Prestashop One Click(Single Click) Checkout – User Manual

Introduction to One Click (Single click) Checkout Addon:

Prestashop One click checkout addon adds a functionality in the PrestaShop’s front end (on Product Page) through which the customer can buy any product instantly, keeping the current cart on hold.

If a customer has some items in their cart already, and come across another product to purchase and likes it so much that the customer wants to buy that product first, The module provides a ‘Buy Now’ button on the product page for this functionality, so that user can buy only a particular product and the current cart products are not included in the order and after completion of order the previous cart items are restored automatically.

Features of Prestashop One Click or Single click Checkout Addon:

1. Prestashop One click (single click) checkout adds a Buy Now button on every product page in the store.

2. Prestashop One click (single click) checkout extension offer the customers a fast and hassle-free direct checkout option.

3. The Quick checkout addon simplifies the checkout process for the online shoppers.

4. Customize the One click checkout(Buy Now) button and match it with your Prestashop theme.

5. Single click checkout way ensures high impact on direct sales.

6. One Click Checkout Addon holds the current cart and checks out the current product only.

7. If the order is not completed through fast cart checkout, then automatically the product is added to the current cart.

8. The Fast checkout addon has a potential to turn your visitors into potential buyers and improves the conversion rates by offering a faster way to checkout.

9. Extremely easy to use backend interface of Prestashop Instant Checkout addon.

10. Prestashop Direct Checkout module is Multi-lingual compatibilty.

11. Prestashop Single Click Checkout addon is Multi-store compatible

12. The Quick checkout addon is compatible with all Prestashop themes and do not conflict with other modules

13. Prestashop Single button checkout addon offers Desktop, Mobile and Tablet responsive design.

14. Prestashop Fast checkout addon is compatible with our One-page checkout module is compatible with our One page checkout module

How Merchant will benefit from Prestashop One Click or Single click Checkout Addon:

1. Prestashop One click(Quick) checkout addon adds a new button to your store, there providing a new feature to your store.

2. Prestashop Fast Cart Checkout Addon increases the conversion rates and increases the rate of returning customers.

3. With the integration of Prestashop Fast Cart Checkout Addon, customer are likely to purchase products in a single click rather than going through multiple checkout steps.

4. Customize the One click checkout (Buy Now) button and match it with your Prestashop theme.

How Customer will benefit from Prestashop One Click or Single click Checkout Addon:

1. Customer will get a Quick and Hassle free way to direct Checkout.

2. Customer can checkout in a single click

Installation Steps for Prestashop Fast Cart Checkout Addon

After purchasing Prestashop One click(Single click) checkout addon, you will get following files as listed below:

1. Compressed File in ZIP format (contains source code of the Prestashop Fast Cart Checkout module)

2. User Manual

Follow the steps to install Prestashop One click checkout addon:

  1. Unzip the compressed file. It would contain files and folders as shown below

  1. Copy all the files and folders of unzipped folder into your store “modules” directory on the path – Root Directory/modules/.
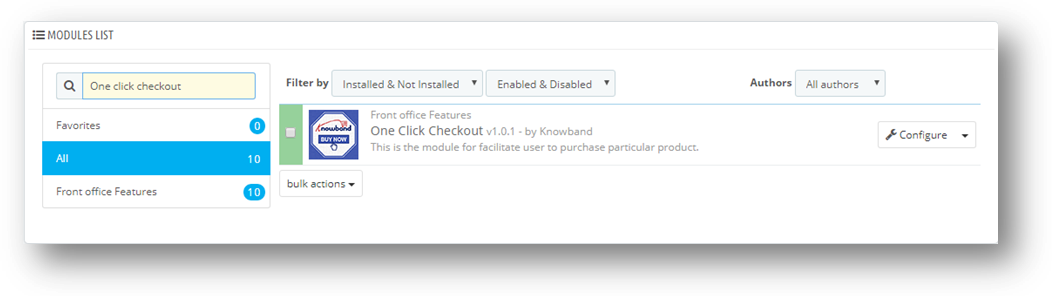
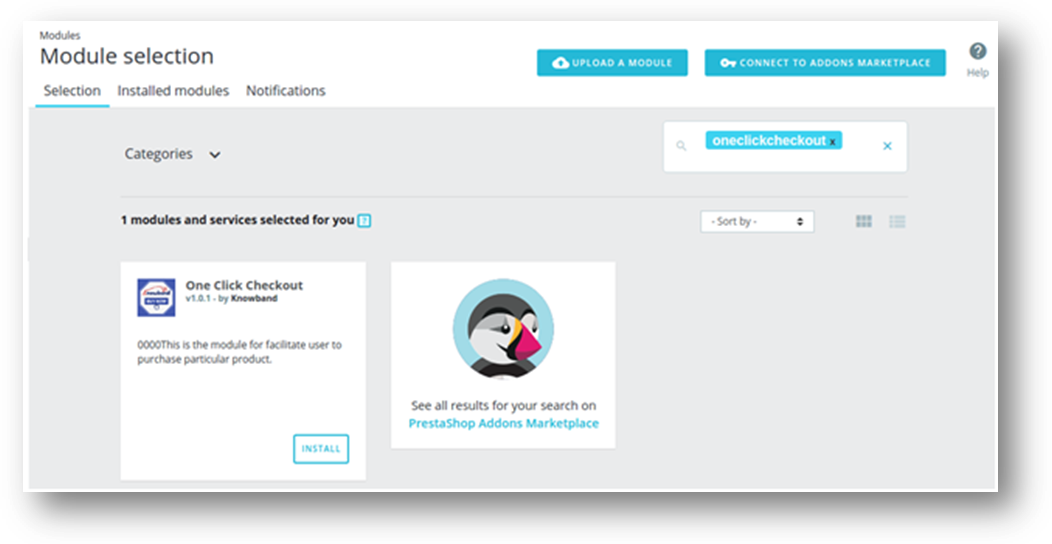
  2. Now the addon is ready to be installed on your Prestashop store and you can find that in Store Admin -> Modules and Services. It is shown below:

PrestaShop 1.6

PrestaShop 1.7

  1. Click on “Install” button to install the addon. It would show a pop-up for your confirmation. Click on “Proceed with the installation” option. This step will install the module and show notification – “Module(s) installed successfully”.

Reference: https://addons.prestashop.com/en/content/13-installing-modules

How to configure Prestashop One Click Checkout or single click checkout addon?

Admin Interface

Following interface is provided to Prestashop store admin :

  1. General Settings

The single page interface of Prestashop Instant Checkout addon has been explained below:

General Settings

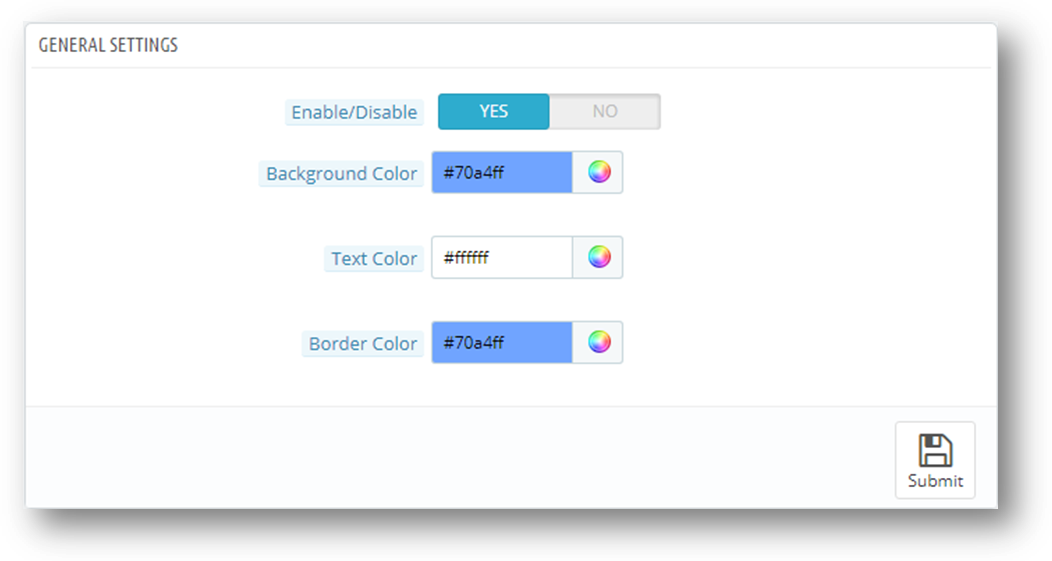
After clicking on configure link of Prestashop One Click(Direct) Checkout module on modules listing page, system will open General Settings tabs by default as shown in screen below:

The configurations will be having respective default values on page load.

  1. Enable/Disable: Initially, this setting will be “OFF”. User can enable/disable the module’s functionality by turning this “ON/OFF”.
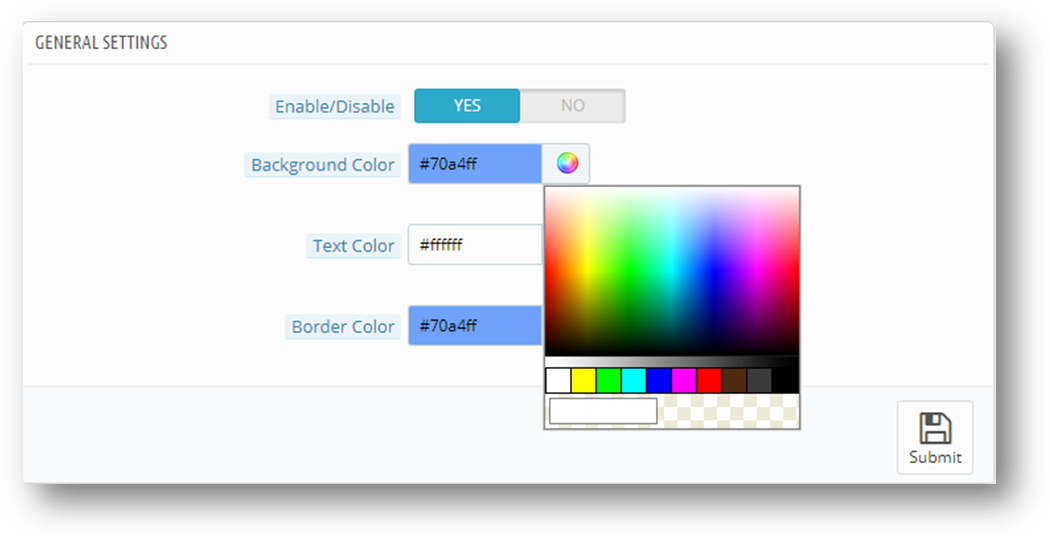
  2. Background Color: Background color for the Buy Now button at the front product page can be changed by picking a color from color picker of this field.

  1. Text Color: Text color for the Buy Now button on product page at the front can be changed from here.
  2. Border Color: Border color of the Buy Now button at the front product page can be selected from here.

Front End of Prestashop One click checkout Addon

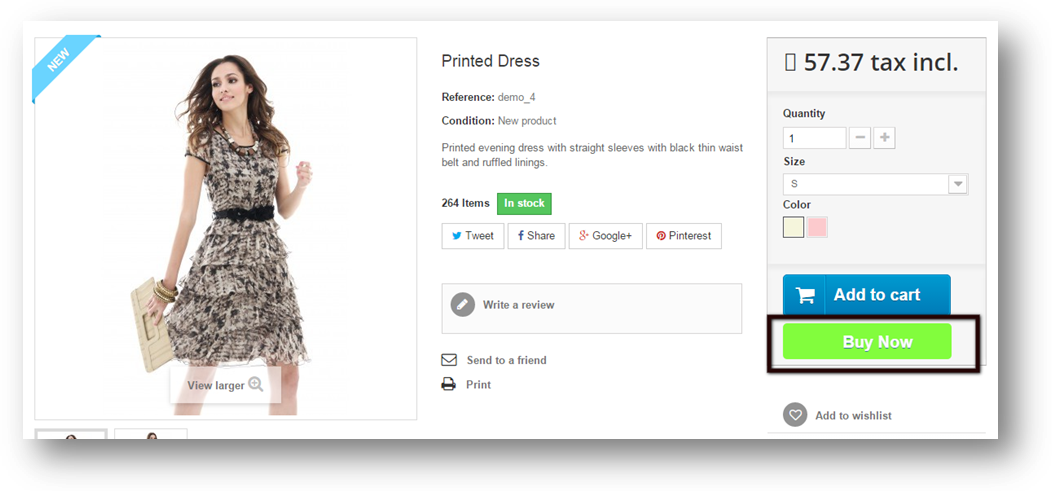
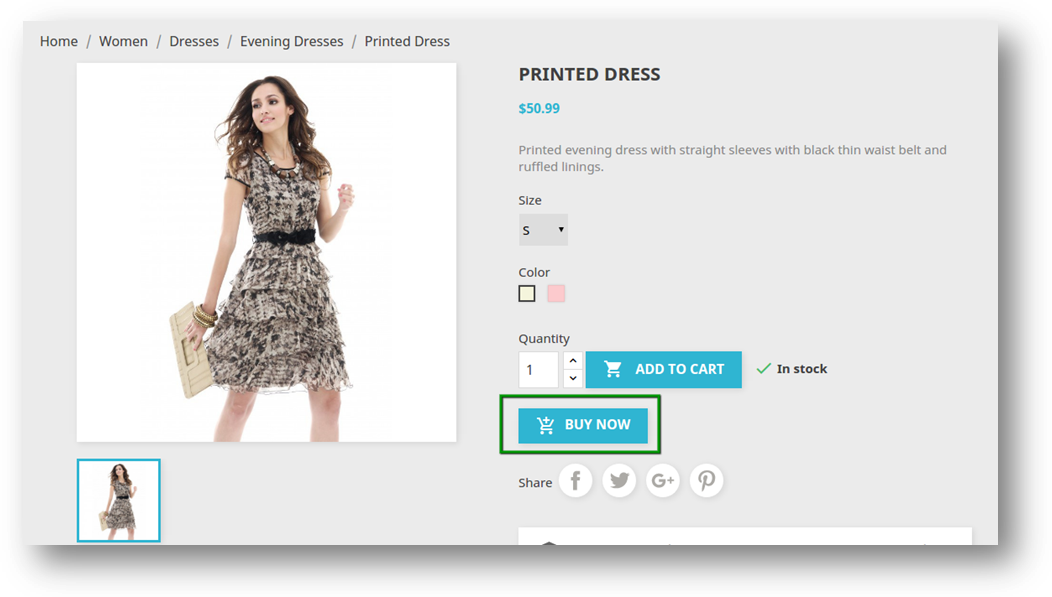
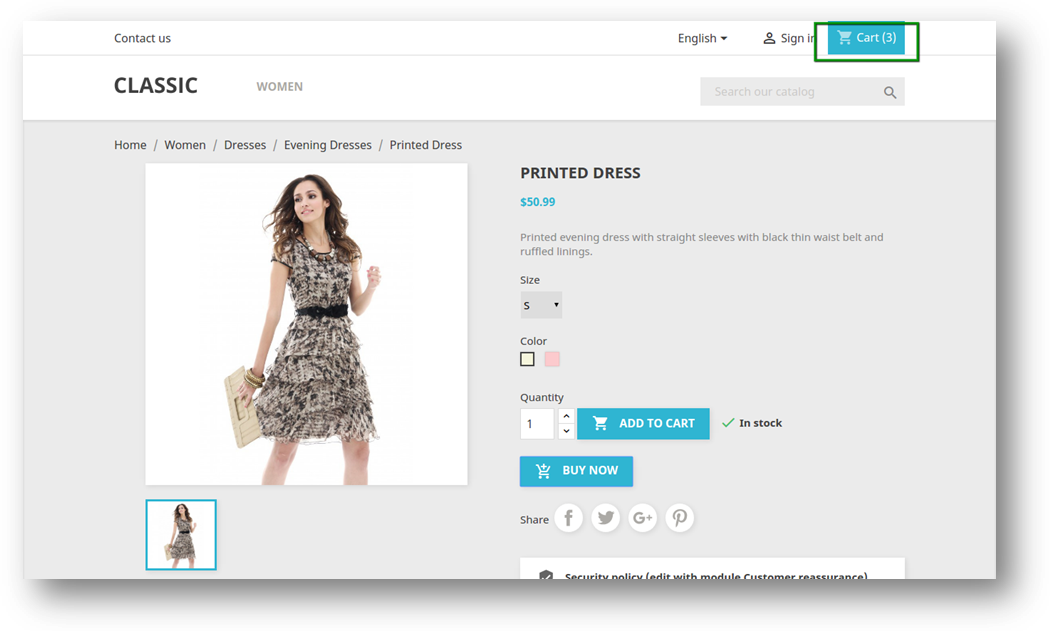
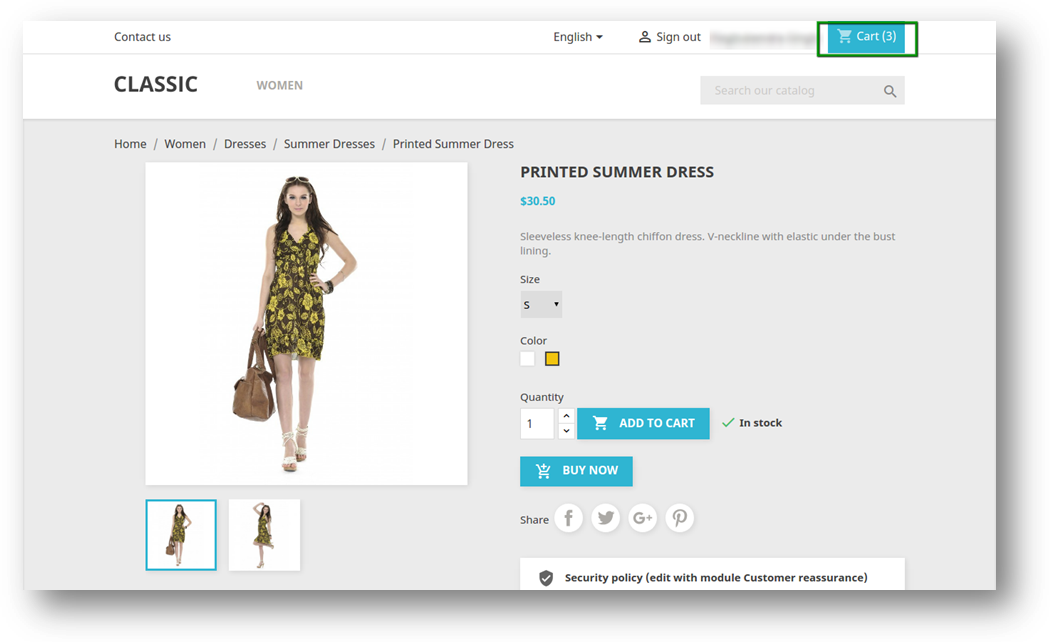
After enabling Prestashop Fast checkout addon the front-end user will see a button (i.e. Buy Now) on the product pages.

The ‘Buy Now’ button at the front-end appears as follows:

PrestaShop 1.6


PrestaShop 1.7

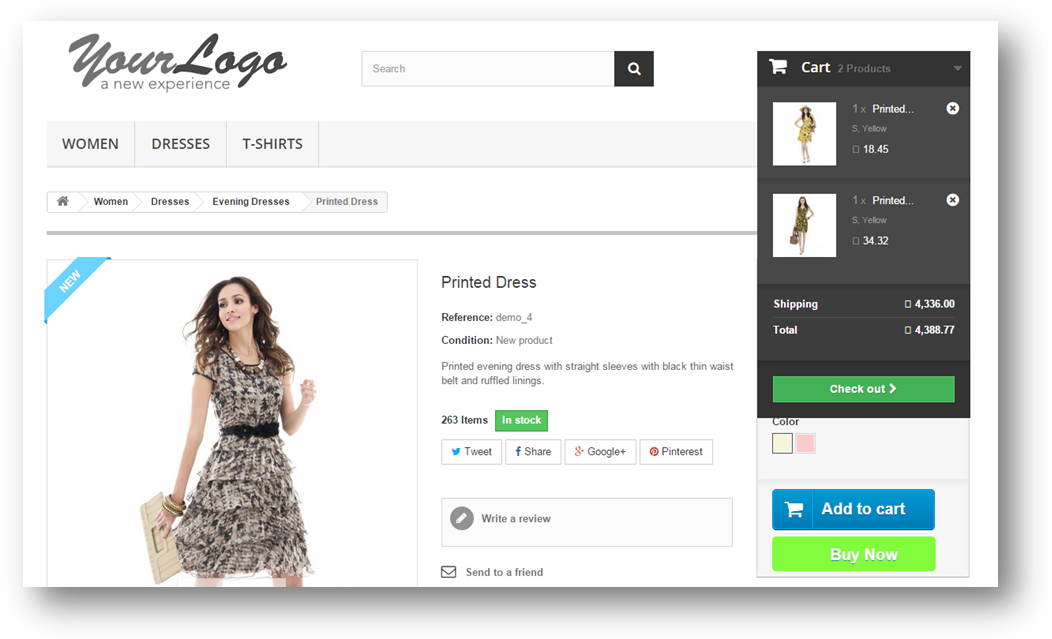
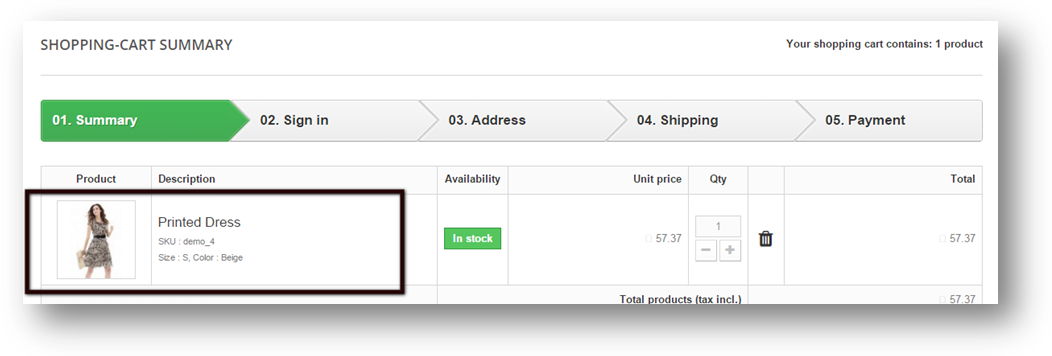
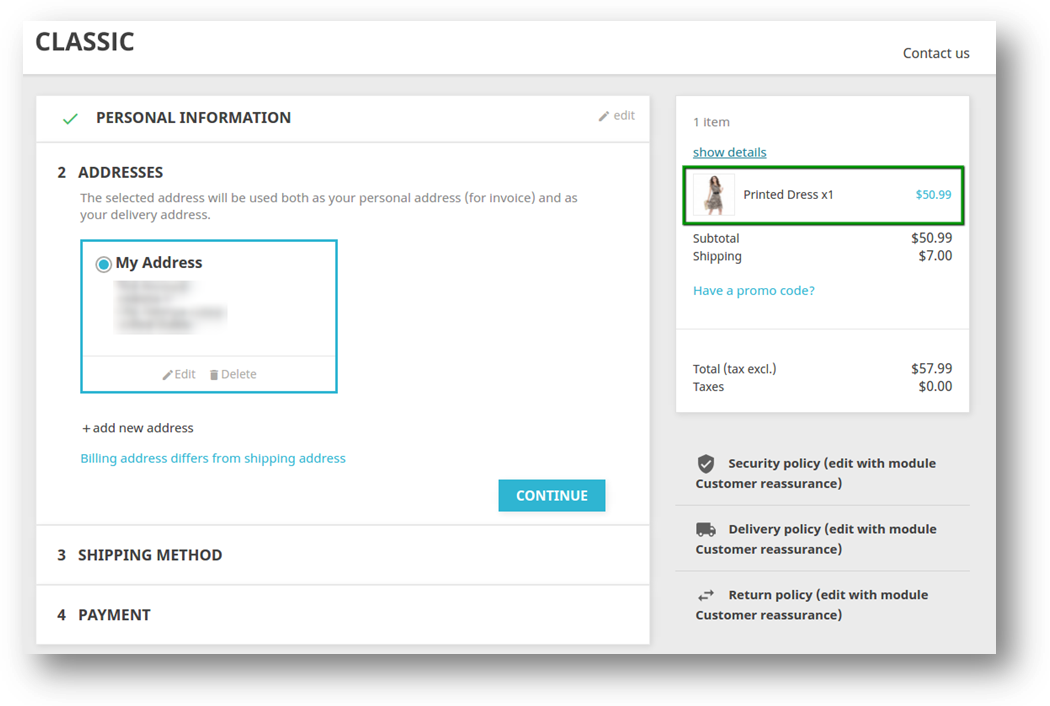
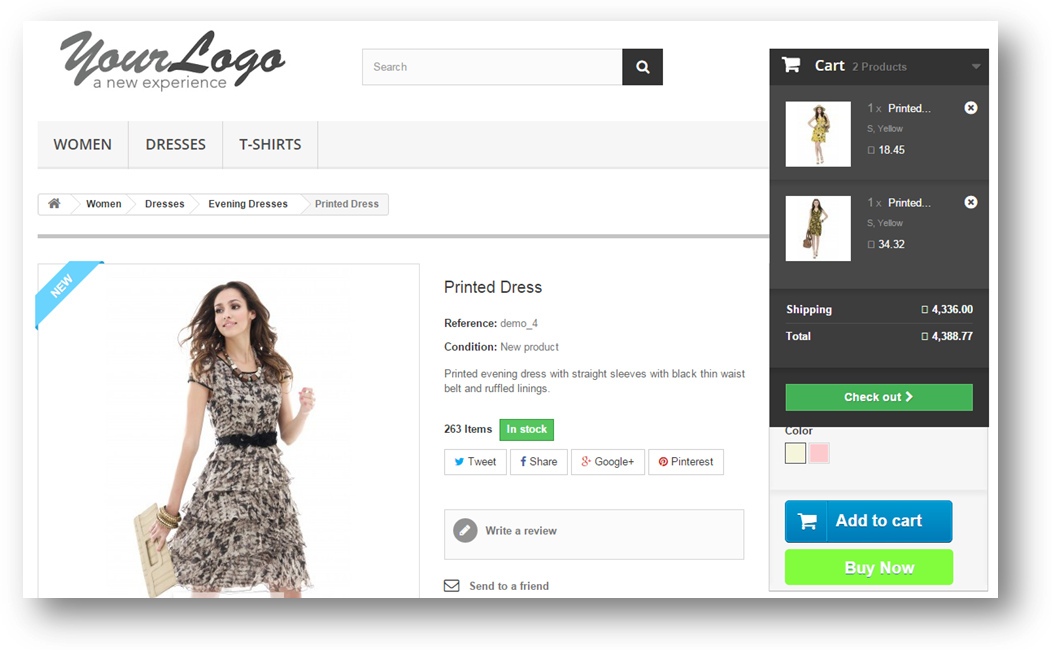
After Clicking on Buy Now button user can directly purchase a product excluding the current cart products. The user will be redirected to order page for that particular product. When clicked on the ‘Buy Now’ button following are the possible cases:

  1. Proceed to the checkout process and confirm order
  2. Did not Proceed to the checkout process and add the item to the cart with other products
  3. Proceed to the checkout process and confirm order

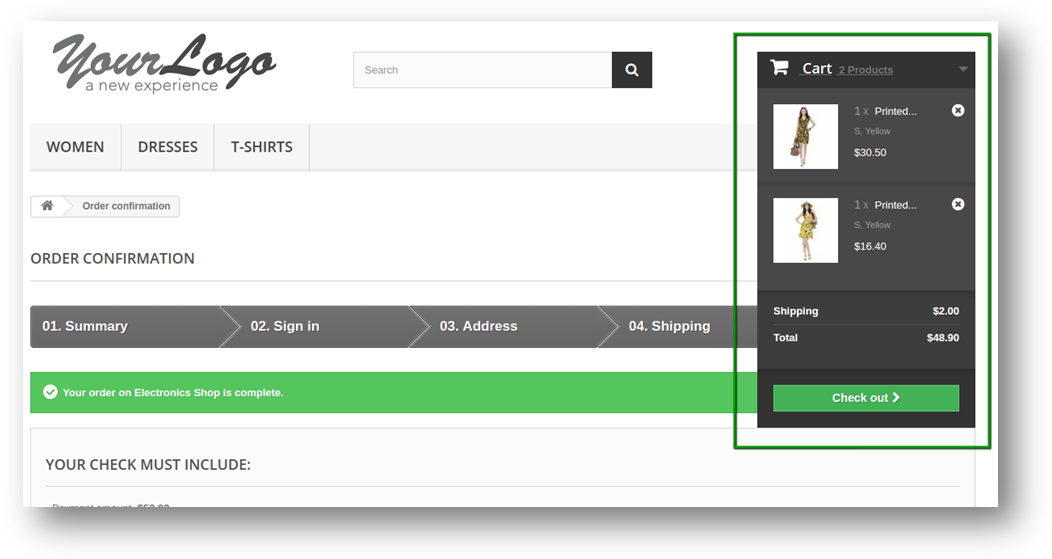
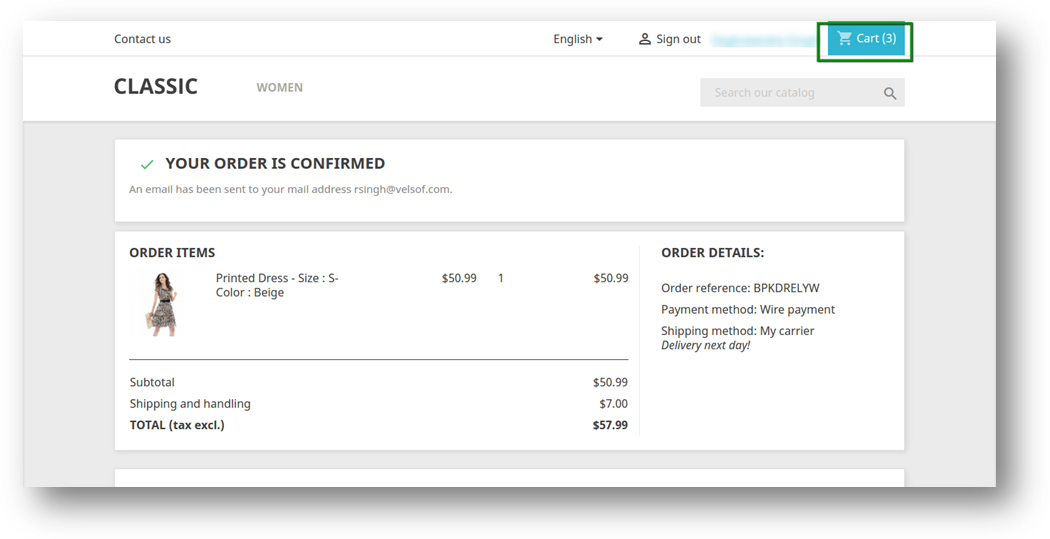
If user shopping cart already has some products and a user clicks on buy now button then the user will be redirected to the order page for that particular product and the user completes the checkout process and confirms the order for that particular product. After confirming the order previous cart of the user will be restored.

PrestaShop 1.6

PrestaShop 1.7

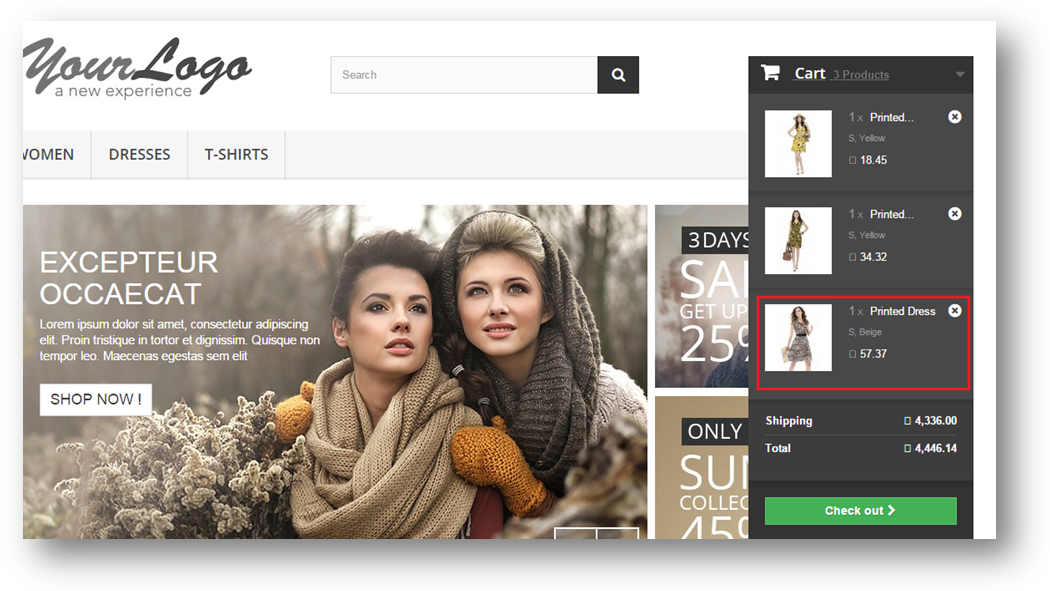
  1. Did not proceed to the checkout process:

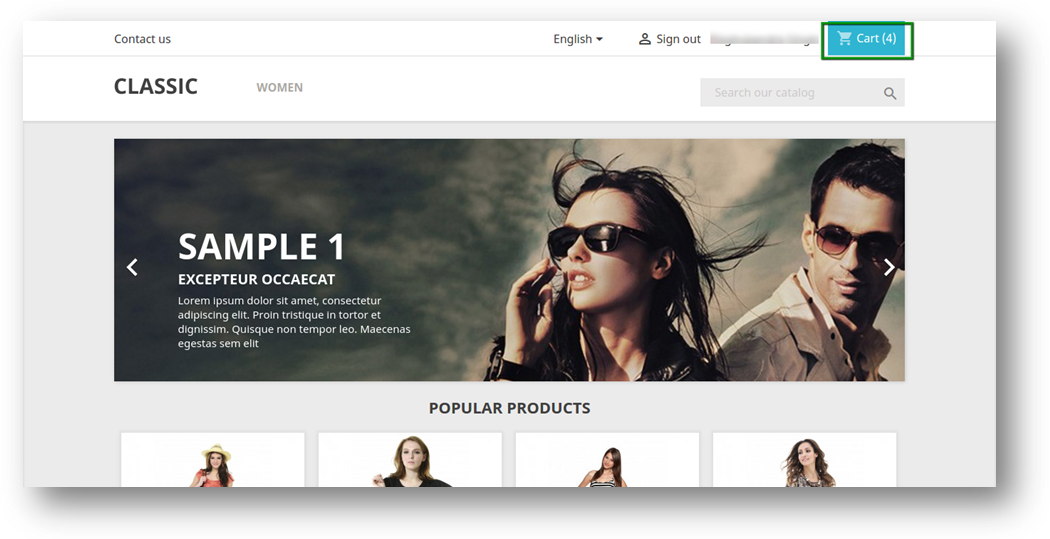
If Prestashop user clicks on Buy Now button and user have some products already in the cart then user will be redirected to the order page but at that time user don’t want to proceed the checkout and user navigates to some other page (e.g. home page), in that condition the particular product is added to the previous cart of the user and the previous cart is restored.

PrestaShop 1.6

PrestaShop 1.7

Recommendations

1. Refresh home page of your store every time you enable/disable the One click(single click) checkout addon. If Fast checkout addon is not working after installation then please check permissions on modules folder. The folder should be writable. Please make the folder permission to 755.


Find more information Prestashop One Click Checkout module

Buy Prestashop Single Click Checkout module

How can you change the currency format in an OpenCart platform?

OpenCart is an engrossing eCommerce platform that is being used on a large scale globally due to the presence of a wide range of features and functionalities. Also, it has emerged as a promising platform for new and experienced site owners equally with its impeccable eCommerce features.

With its multi-currency support feature, brilliant themes, and OpenCart extensions, it has found its clients all across the world that want to carry out their business in their native language. However, I have seen numerous site owners who are unable to implement changes in the currency format on their OpenCart store. Through interaction with those customers, I found the common problem “How to change the currency format in OpenCart as per the Indian currency system?”

Recommended Read: 5 Questions to ask while going for an OpenCart Platform

How to change the currency format in OpenCart as per the Indian currency system?

Understanding the sensibilities and concerns of all those store owners that are facing this issue, here is the solution for you. Before we move ahead in this direction, let us have an insight into the standard currency format in the OpenCart platform.

By default, OpenCart follows a standard currency format that places a comma (,) after every three-digit in a number while displaying the price but this is not the case with the Indian currency format. For example, store owners who are targeting customers residing in India want to change the price format from $ 1,000,000 to INR 10,00,000 which represents the Indian decimal value system.

To carry out this customization, OpenCart store owners need to understand the fact that there is no back-end functionality available in the admin panel to make this change. However, the required changes can be accomplished by making the required changes in the core OpenCart files.

Recommended Read:  Decoding the OpenCart Platform Briefly in eCommerce Scenario

Below are the steps that can guide OpenCart store owners in the right direction.

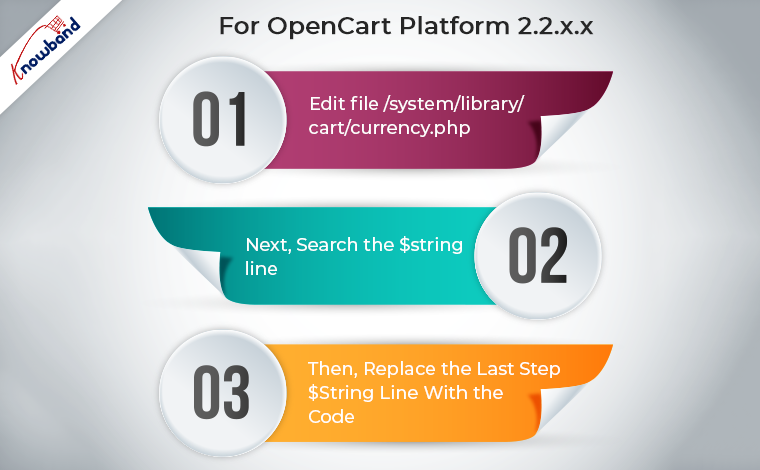
For OpenCart Platform 2.2.x.x and above

  • Edit file /system/library/cart/currency.php. We recommend you create a backup of this file before editing it.
  • You need to search the below line,

$string .= number_format($amount, (int)$decimal_place, $this->language ->get(‘decimal_point’), $this->language->get(‘thousand_point’));

  • Now, you need to replace the above line with the code given below,

$string .= number_format($amount, (int)$decimal_place, $this->language->get(‘decimal_point’), $this->language->get(‘thousand_point’));
$string1=substr($string,0,1);
$string2=substr($string,1);
$string2=str_replace(‘,’,”,$string2);
setlocale(LC_MONETARY,’en_IN’);
$string = $string1.money_format(‘%!i’, $string2);

  • You need to save the file with implemented changes for acquiring the desired currency format.

For all other OpenCart Versions before 2.2.x.x

  • First, edit file /system/library/currency.php. We recommend you create a backup of this file before editing it.
  • Next, you need to search the line given below,

$string .= number_format(round($value, (int)$decimal_place), (int)$decimal_place, $decimal_point, $thousand_point);

  • Then, you need to replace the above line with the code given below,

$string .= number_format(round($value, (int)$decimal_place), (int)$decimal_place, $decimal_point, $thousand_point);
$string1=substr($string,0,1);
$string2=substr($string,1);
$string2=str_replace(‘,’,”,$string2);
setlocale(LC_MONETARY,’en_IN);
$string= $string1.money_format(‘%!i’, $string2);

Finally, you need to save the file with the implemented changes to get the desired currency format.

Recommended Read: What are the merits and demerits of using an OpenCart platform?

These are the simple steps that need to be implemented by OpenCart site owners to achieve the Indian currency format while displaying the product pricing to its customers. In case, you need any other OpenCart extensions to improve the functionality and performance of an OpenCart store, you need to visit the Knowband site. Besides, providing wonderful extensions for Magento 2, OpenCart, WooCoomerce and PrestaShop sites, the company is capable of providing customized plugin development services to its worldwide clients.

For platforms like Magento 2, Prestashop, OpenCart, and WooCommerce, we offer the greatest plugins. Also, for the website and modules, we offer custom module development and modification services. Besides that, we have a dedicated support team that is always available to aid clients when they need any assistance from us in order to deliver the best and most effective post-sale support to our customers. Moreover, on weekends, we continue to fulfil our obligations to customers who need assistance with urgent website problems. Also, in case of doubts or queries related to the OpenCart Module functionality feel free to drop us an email at support@Knowband.com

Additional Alert Email field issue in Opencart v2.3.0.2

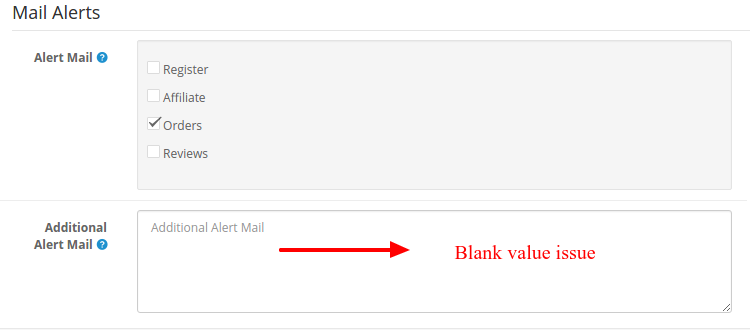
If you are using Opencart v2.3.0.2 and trying to save an additional email address to receive email alerts then you will notice that this version is not saving the value of the “Additional Alert Email” field. After saving its value, when you come back to the store setting page, you will find that the “Additional Alert Email” field is blank, this may cause you to think that you can’t receive email alerts to additional emails because it is not saving additional email address.

After receiving emails from several customers, when we looked into the issue, we found that it is actually saving the additional email address and is also sending email alerts to the additional email address, the only issue is that when you come back to the setting page, it is not showing the saved additional email addresses.

This issue can be solved in the following two ways:

Method #1: Download this free module and install it on your store. Follow the below instructions to install it.

  1. Extract the downloaded zip file.
  2. Upload the XML file from the Admin panel’s Extensions > Extension Installer page.
  3. Now refresh the modifications from the Admin panel’s Extensions > Modifications page.

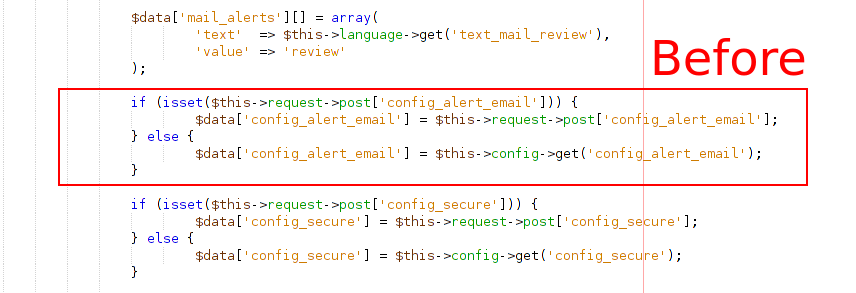
Method #2: Make the required changes manually by following the below instructions. You just need to edit one file.

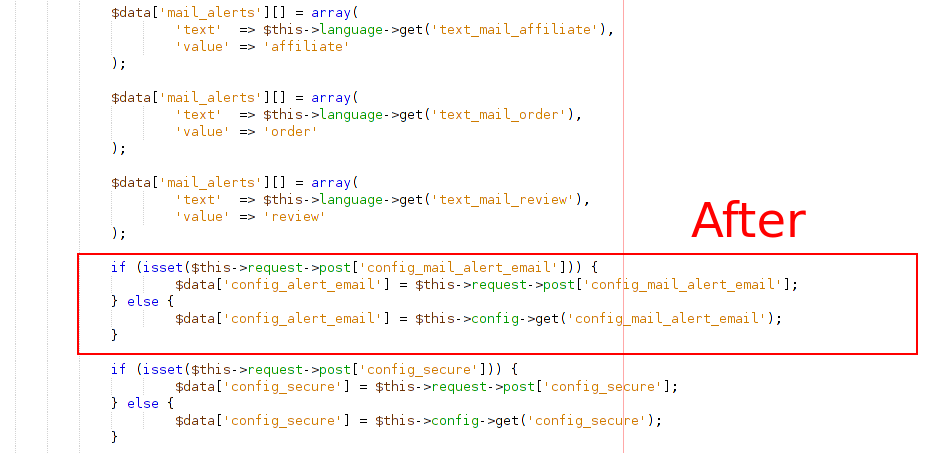
File to edit -> /admin/controller/setting/setting.php

Search for

config_alert_email

and replace it with the following code at 1st, 3rd and 5th position.

config_mail_alert_email

If you face some issue or need some help to fix this bug, feel free to contact us. We will fix it for free.

Related Stories

Zusätzliches Problem mit dem E-Mail-Alarm in OpenCart v2.3.0.2

Wenn Sie OpenCart v2.3.0.2 verwenden und versuchen, eine zusätzliche E-Mail-Adresse zu speichern, um E-Mail-Benachrichtigungen zu erhalten, werden Sie feststellen, dass diese Version nicht gespeichert wird

Nach dem Erhalt von E-Mails von mehreren Kunden, als wir das Problem untersucht haben, haben wir festgestellt, dass es tatsächlich die zusätzliche E-Mail-Adresse speichert und auch E-Mail-Benachrichtigungen an die zusätzliche E-Mail-Adresse sendet. Das einzige Problem ist, dass Sie auf die Einstellungsseite zurückkehren. es zeigt nicht die

Dieses Problem kann auf zwei Arten gelöst werden:

Methode # 1: Herunterladen fehlen uns die Worte.?free module and install it on your store. Follow below instructions to install it.

  1. Entpacken Sie die heruntergeladene Zip-Datei.
  2. Laden Sie die XML-Datei von der Seite Erweiterungen> Erweiterungsinstallation des Admin-Steuerfelds hoch.
  3. Jetzt aktualisieren Sie die Änderungen von

Methode # 2: Nehmen Sie die erforderlichen Änderungen manuell vor, indem Sie die folgenden Anweisungen befolgen. Sie müssen nur eine Datei bearbeiten.

Zu bearbeitende Datei -> /admin/controller/setting/setting.php

Suchen nach

Konfig_alert_email

und ersetzen Sie es durch folgenden Code bei 1st, 3rd

config_mail_alert_email

Wenn Sie ein Problem haben oder Hilfe benötigen, um diesen Fehler zu beheben, kontaktieren Sie uns bitte. Wir werden es kostenlos reparieren.

Ähnliche Beiträge

Problema del campo Ulteriori avvisi via email in Opencart v2.3.0.2

Se stai usando Opencart v2.3.0.2 e stai provando a salvare un indirizzo email aggiuntivo per ricevere avvisi via email, noterai che questa versione non salva il

Dopo aver ricevuto email da diversi clienti, quando abbiamo esaminato il problema, abbiamo rilevato che sta effettivamente salvando l'indirizzo email aggiuntivo e sta anche inviando avvisi e-mail all'indirizzo e-mail aggiuntivo, l'unico problema è che quando torni alla pagina di impostazione, non sta mostrando il

Questo problema può essere risolto in due modi:

Metodo # 1: Scaricare Questo?free module and install it on your store. Follow below instructions to install it.

  1. Estrarre il file di zip scaricato.
  2. Carica il file xml dalla pagina Estensioni> Installazione dell'estensione del pannello di amministrazione.
  3. Ora aggiorna le modifiche da

Metodo # 2: Apporta le modifiche richieste manualmente seguendo le istruzioni di seguito. Hai solo bisogno di modificare un file.

File da modificare -> /admin/controller/setting/setting.php

Cercare

config_alert_email

e sostituirlo con il seguente codice in 1st, 3rd

config_mail_alert_email

Se incontri qualche problema o hai bisogno di aiuto per correggere questo bug, non esitare a contattarci. Lo aggiusteremo gratuitamente.

ARTICOLI cORRELATI

Dodatkowy błąd pola adresu e-mail w OpenCart v2.3.0.2

Jeśli korzystasz z OpenCart v2.3.0.2 i próbujesz zapisać dodatkowy adres e-mail, aby otrzymywać powiadomienia e-mailem, zauważysz, że ta wersja nie zapisuje

Po otrzymaniu e-maili od kilku klientów, gdy analizowaliśmy problem, stwierdziliśmy, że faktycznie zapisuje on dodatkowy adres e-mail, a także wysyła alerty e-mailowe na dodatkowy adres e-mail. Jedynym problemem jest to, że po powrocie do strony ustawień to nie pokazuje

Ten problem można rozwiązać na dwa sposoby:

#1 Metoda: Pobierz to?free module and install it on your store. Follow below instructions to install it.

  1. Wyciągnij pobrany plik zip.
  2. Prześlij plik xml z panelu Rozszerzenia> Strona instalatora rozszerzenia.
  3. Teraz odśwież zmiany

#2 Metoda: Dokonaj wymaganych zmian ręcznie, wykonując poniższe instrukcje. Musisz tylko edytować jeden plik.

Plik do edycji -> /admin/controller/setting/setting.php

w szukaniu

config_alert_email

i zamień go na następujący kod na 1st, 3rd

config_mail_alert_email

Jeśli napotkasz problem lub potrzebujesz pomocy w naprawieniu tego błędu, skontaktuj się z nami. Naprawimy to za darmo.

Related Stories

Problema de campo de email de alerta adicional no Opencart v2.3.0.2

Se você estiver usando o Opencart v2.3.0.2 e tentar salvar um endereço de email adicional para receber alertas de email, você notará que essa versão não está salvando

Depois de receber e-mails de vários clientes, quando analisamos o problema, descobrimos que ele está salvando o endereço de e-mail adicional e também está enviando alertas de e-mail para o endereço de e-mail adicional, o único problema é que quando você volta para a página de configuração não está mostrando o

Esse problema pode ser resolvido de duas maneiras:

Método # 1: Baixar esta?free module and install it on your store. Follow below instructions to install it.

  1. Extraia o arquivo zip baixado.
  2. Faça o upload do arquivo xml na página Extensões> Instalador de extensão do painel do administrador.
  3. Agora atualize as modificações de

Método # 2: Faça as alterações necessárias manualmente seguindo as instruções abaixo. Você só precisa editar um arquivo.

Arquivo para editar -> /admin/controller/setting/setting.php

Procurar por

config_alert_email

e substitua-o pelo seguinte código em 1st, 3rd

config_mail_alert_email

Se você tiver algum problema ou precisar de ajuda para corrigir esse bug, entre em contato conosco. Vamos consertar isso de graça.

Histórias relacionadas

Prestashop Ajax Cart Plus Addon – User Manual

1.0 Introduction

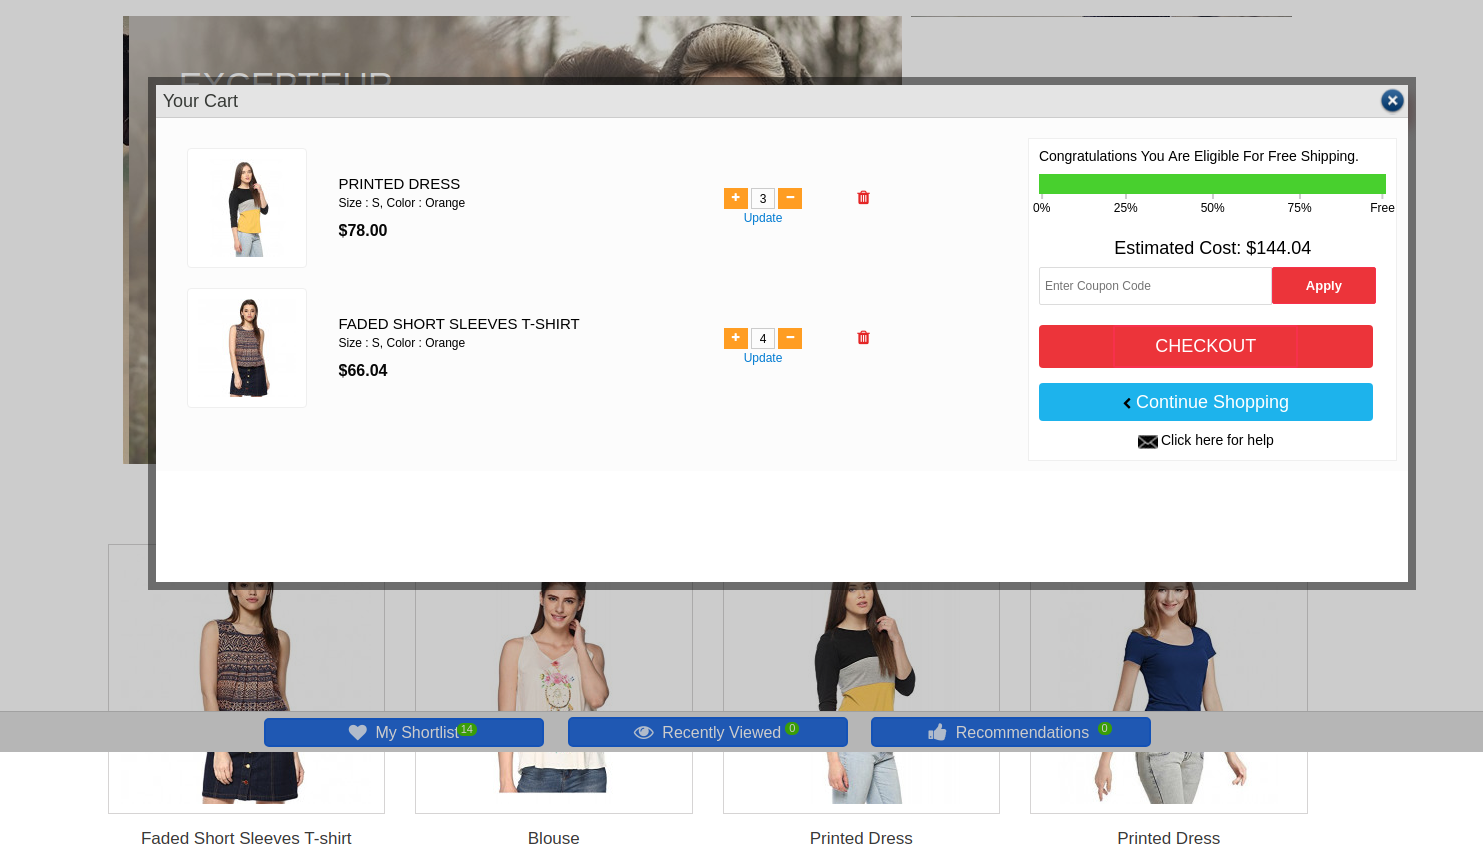
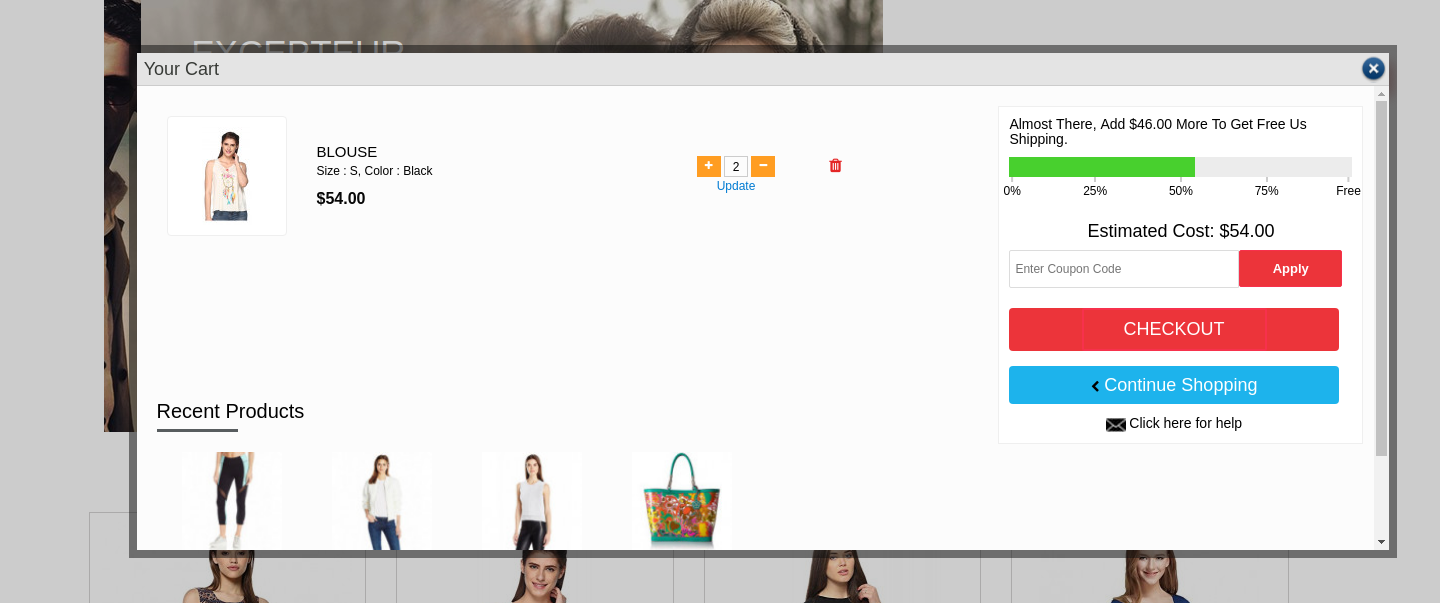
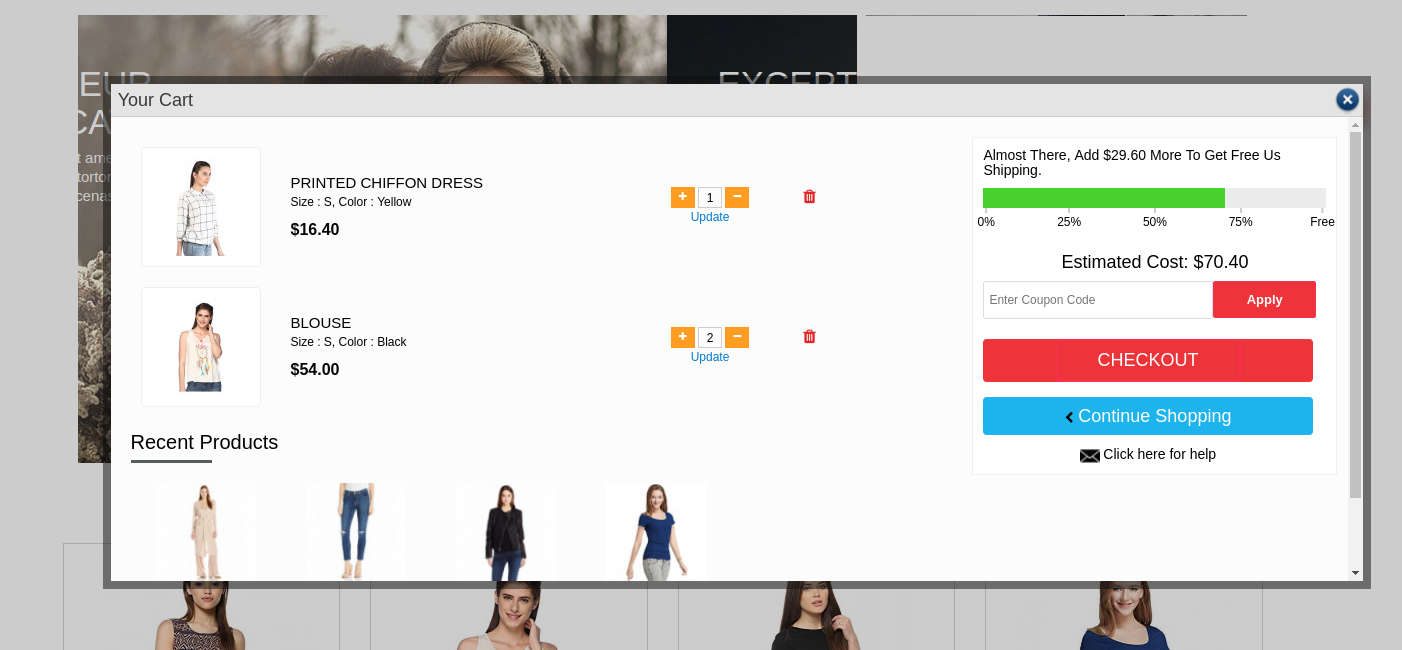
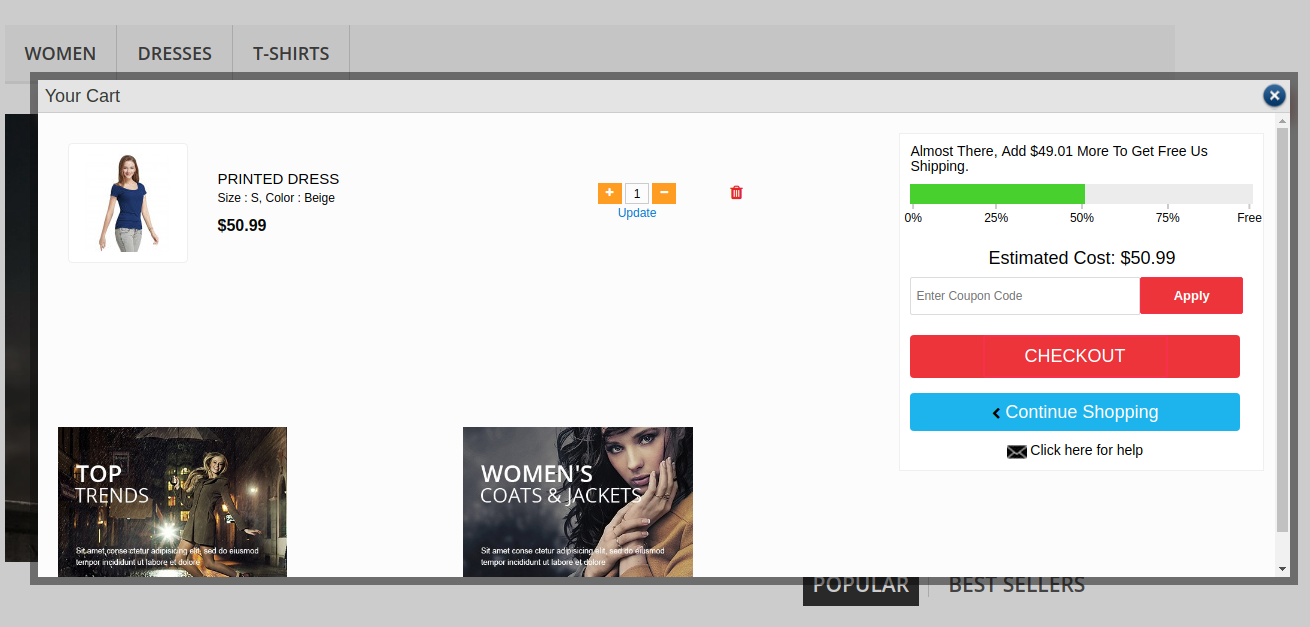
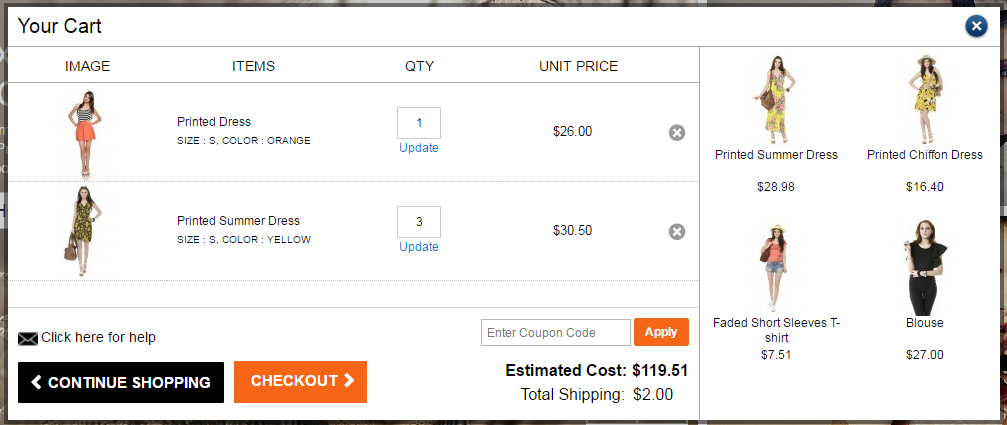
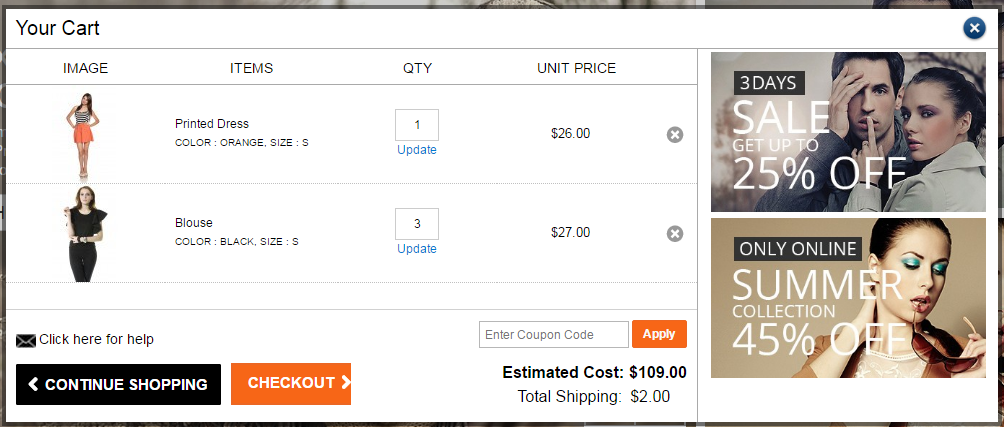
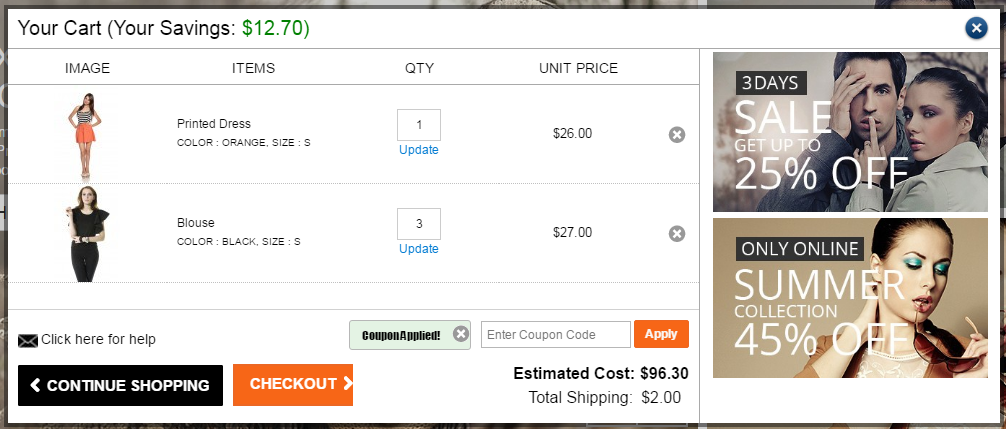
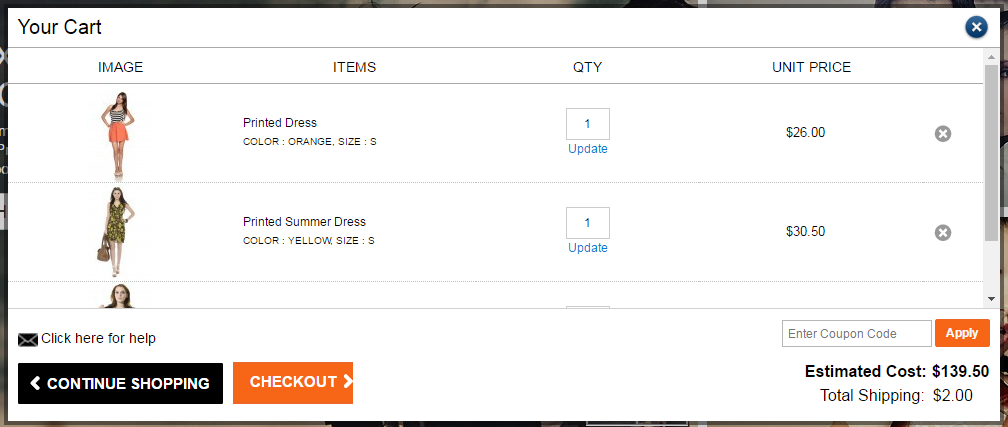
Prestashop Ajax Cart Plus Addon provides an interactive and useful interface/pop-up for Shopping Cart where users will be able to view shopping cart items.along with Related items, New Arrivals, Best Sellers or Promotional banners. Pop-up will also provide the option to apply coupon/gift voucher to check the estimate of the cart. Pop-up will appear when user adds the products into cart from Home Page/Product Page/Category Page etc

Prestashop Ajax cart pop up is fully customizable, the addon offers multiple customization options like look and feel and Custom CSS for advance admin to customize the pop up.

This interactive and informative Ajax cart pop up is a good way to influence the buying impulse of the customers and often leads to conversions.

1.1 Features of Prestashop Ajax Cart+ Addon

  1. Prestashop add to cart popup addon adds a well-organized & optimized Ajax based shopping cart popup on your store.
  2. Very easy to use and intuitive backend: No technical knowledge required
  3. Option to show Related Items, New Arrivals, Best sellers and Promotional banners on the pop up itself
  4. Option for the admin to show the contact information on the Responsive pop up
  5. Prestashop pop up cart Addon provides options for customizing the look and feel of pop up from back-end itself.
  6. Customize the Ajax cart pop up using Custom CSS
  7. Ready Made Ajax Cart Pop up Templates. The admin can select from two templates and set AJAX cart layout.
  8. Option to Enable/Disable the Ajax cart pop up on Mobile Devices.
  9. Option to disable the popup only for mobile devices.
  10. Does not conflict with any other PrestaShop module.
  11. View Cart products, Update cart quantity, Delete cart products, Apply coupon without going to cart page.
  12. Button to visit checkout page directly from the popup.
  13. Ajax enabled cart for effortless interaction.
  14. Prestashop add to cart popup addon provides Multiple Lingual Support.
  15. Prestashop pop up cart Addon is Multi-Store Compatible.
  16. Mobile, Tablet and Desktop responsive design. It adapts to most of the screen sizes and devices.
  17. Prestashop Ajax Cart Addon works with all the PrestaShop themes: do not conflict with any other Prestashop addons

1.2 Benefits of Prestashop Ajax Cart Addon to Merchants

  1. The interactive Ajax based pop up ensures high impact on direct sales.
  2. Fully customizable Ajax cart pop up.
  3. Promote Offers & Banners on Shopping Cart
  4. Show Related Products & Increase Conversion & Average order Size
  5. Increase Customer Trust: Offers them smooth navigation to the checkout page.
  6. Simple & Elegant Admin Panel

1.3 Customer Benefits

  1. View cart products, Update cart quantity, Delete cart products, Apply coupon without going to cart page
  2. View Cart estimated cost and shipping cost before going to the checkout page.
  3. Prestashop Ajax Cart Addon Offers smooth flow to the checkout page
  4. Single Button Click to visit checkout page directly from the popup.
  5. Ajax enabled cart for effortless interaction.
  6. Mobile responsiveness of Prestashop pop up cart Addon makes it usable on mobile devices too.

2.0 Installation Guide for Prestashop add to cart popup addon

After purchasing Prestashop Ajax Cart+ addon, you will get following files as listed below:

1. Compressed File in ZIP format (contains source code of the addon)

2. User Manual

Follow the following steps to install the extension:

  1. Unzip the compressed file. It would contain files and folders as shown below –

  1. Copy all the files and folders of unzipped folder into your store “modules” directory on the path – Root Directory/modules/.
  2. Now this Prestashop add to cart popup addon is ready to be installed on your store and you can find that in Store Admin -> Modules and Services. It would be shown as below –

4. Click on “Install” button to install the addon. It would show a pop-up for your confirmation. Click on “Proceed with the installation” option. This step will install the addon and show notification – “Module(s) installed successfully”.

3.0 How to configure Prestashop Ajax Cart Addon?

This Prestashop pop up cart Addon is configurable and Store Owner or Admin can setup or configure this addon through Admin Panel of store. There are following sections available to configure this addon –

  • General Settings
  • Customizer
  • FAQs
  • Suggestions
  • Other Plugins

Each section is explained below.

3.1 General Settings

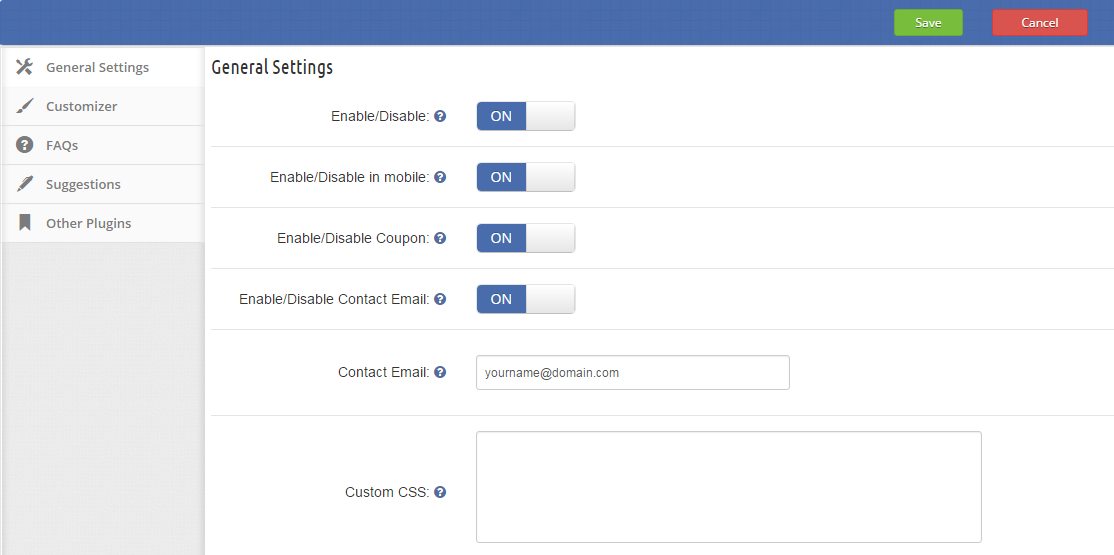
You have to follow steps given below to update general settings of this Prestashop add to cart popup module –

  • Go to the Addon and Services -> Addon and Services
  • It would list all the addons of store. Find ‘Ajax Cart+’ in addons list.
  • Now click on ‘Configure’ button given corresponding to the ‘Ajax Cart+’ addon.
  • It would redirect Store Owner or Admin to a new page as shown below –

  • Update the values of given fields corresponding to ‘General Settings’ as per need.
  • Now click on ‘Save’ and it would validate and save the provided values.
  • That’s it.

This form contains following input fields which Store Owner or Admin can update –

  • Enable/Disable – Initially, this will be “OFF”. Admin can enable/disable addon by turning it ON/OFF
  • Enable/Disable in mobile – Initially, this will be “OFF”. Admin can enable/disable the addon in mobiles by turning it ON/OFF.
  • Enable/Disable Coupon – Coupon input box will be shown on front Ajax Cart pop-up if this is set to ‘ON’.
  • Enable/Disable Contact Email – Contact Email will be shown on Ajax Cart pop-up if this is set to ‘ON’.
  • Contact Email – Input box to provide contact email.
  • Custom CSS – Text area field to add CSS in popup.

3.2 Customizer

You have to follow steps given below to customize Ajax Cart Pop-up appearance on store front –

  • Goto the Addon and Services -> Addon and Services
  • It would list all the addons of store. Find ‘Ajax Cart+’ in addons list.
  • Now click on ‘Configure’ button given corresponding to the ‘Ajax Cart+’ addon.
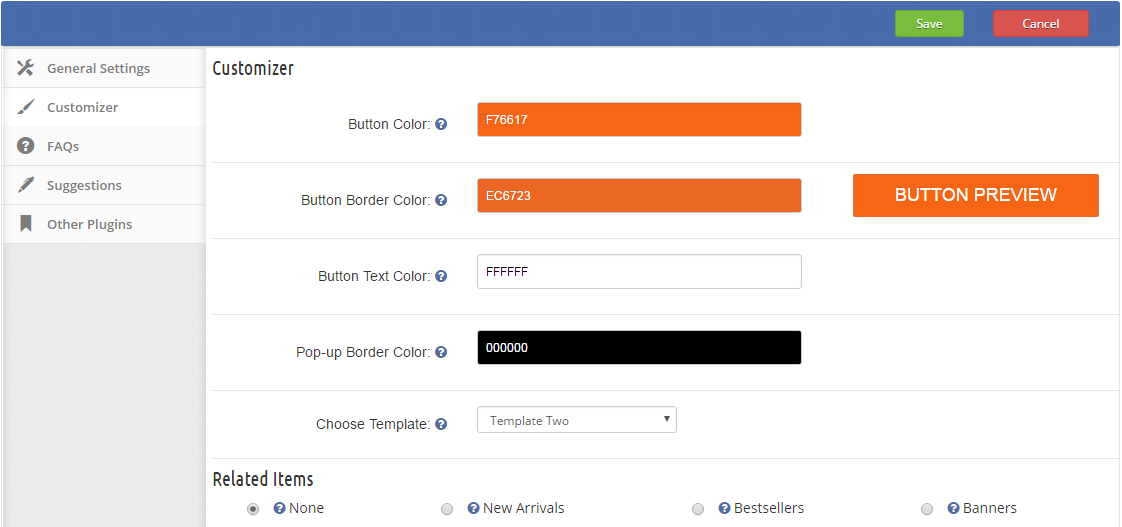
  • It would redirect Store Owner or Admin to a new page as shown below –
  • Update the values of given fields corresponding to ‘Customizer’ section as per need.
  • Now click on ‘Save’ and it would validate and save the provided values.
  • That’s it.

This form contains following input fields which Store Owner or Admin can update –

  • Button Color – Input box to set the pop-up button color. Clicking on the input box will open a color pallet to choose the button color.

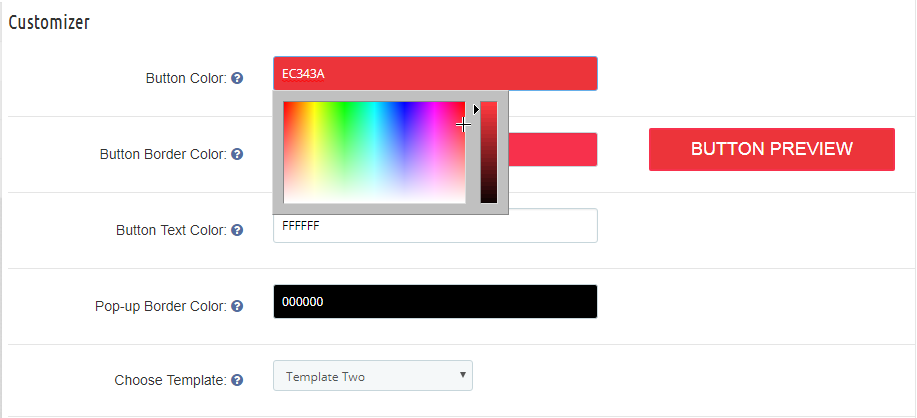
  • Button Border Color – Input box to set the button border color. Clicking on the input box will open a color pallet(shown below) to choose the button border color.

  • Button Text Color – Input box to set the pop-up button text color. Clicking on the input box will open a color pallet to choose the button text color.
  • Pop-up Border Color – Input box to set the pop-up border color. Clicking on the input box will open a color pallet to choose the pop-up border color.
  • Choose Template – There are two templates of the pop up, admin can any one of them.
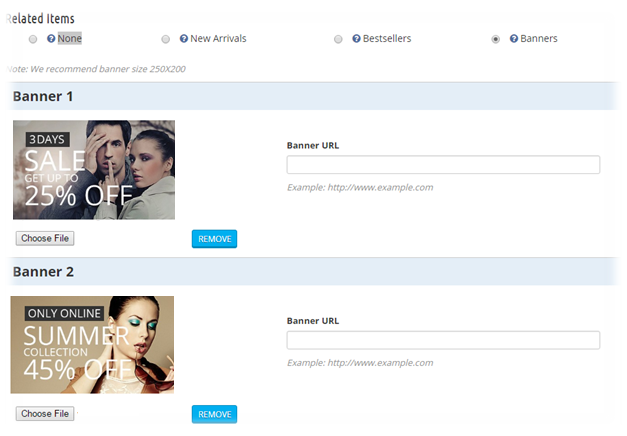
  • Related Items – Admin can select the option which he wants to display in pop-up with cart like Recent Items, New Items OR banners. Addon is having option to display up to two banners.

To add the banner, choose the Banners option. Select the banner which you want to display & provide the URL of the web page where you wish to redirect the user.

4.0 Website Front-end Interface

Template One Without any Suggestion

Template one with New Arrival Suggestions

Template One with Best Seller Items

Template One with banners

Cart with New Products

Cart with Banners

Cart when coupon applied

Cart without Banners & Related Products

For giving an optimized and user-friendly interface to your customers, the store owners can easily implement this Prestashop Ajax Cart to their eCommerce store. With this addon, you can easily trigger the purchase decisions of your customers and hence increase the direct sales of your store. The addon features a direct button to the checkout page from the ajax cart popup which allows the customers to complete their transactions easily and effortlessly. No need to wait anymore, buy this Prestashop Ajax Cart module on the Addon Store
Prestashop Tax Manager Module – User Manual

Introduction

Now the Prestashop eCommerce store admin can offer tax-free products to the selected customers with the help of Prestashop remove tax addon offered by Knowband. The Tax Manager Prestashop Addon allows the e-merchant to remove the tax from some products for selective customer groups or customers. This Tax store manager is highly customizable and easy to implement. The store admin can easily implement the functionality.

Features

  • Easy to install and configure.
  • Highly customizable.
  • No need to change the code on the back-end for implementation.
  • You can apply the functionality even without any technical information.
  • Offers a hassle-free and effortless implementation.
  • The Prestashop tax manager extension is fully customizable.
  • You can remove the tax from product page for selective customers depending on their customer group.
  • One product can be selected for which this rule will not apply. That product will show the included tax.
  • You can select categories for the customers, visitors, and guest users. These customers don’t need to pay tax on selected products.
  • The Prestashop remove tax addon is compatible with all checkout modules.

Steps For Installation of Prestashop Tax Manager Addon

1. The folder structure of the tax manager plugin folder.

2. Copy the whole folder named as tax manager into your modules folder of the root directory of your PrestaShop store through FTP.

3. You can also upload zip folder of the module by clicking on Add New Module button, which should appear just in the top right corner of module listing page.
4. After that, you will be able to find the plug-in ready to be installed in the Modules in your PrestaShop store as shown below.

5. Click on the Install link to install the Prestashop Addon.

Admin Module
Here store owner can change the various settings of this plugin according to the requirements.

After installing the plug-in into the store, the plug-in will provide General Settings tabs in the interface.

General Settings

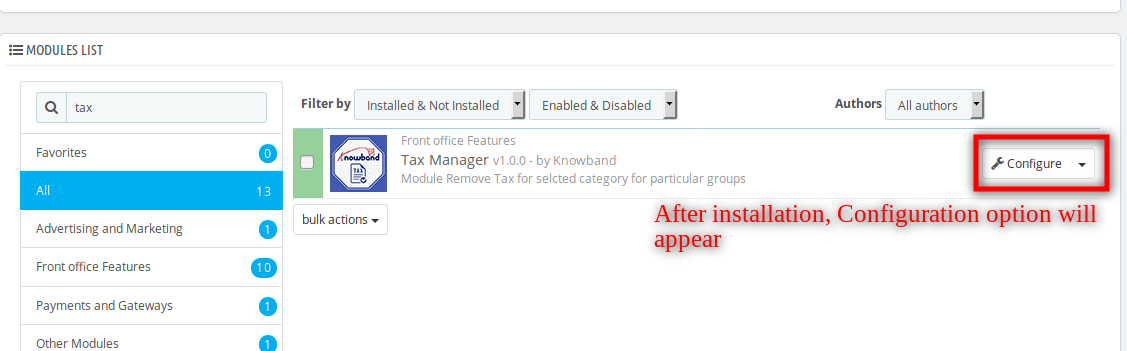
On clicking on configure link on module listing page (configure link will automatically appear once you install the plugin).
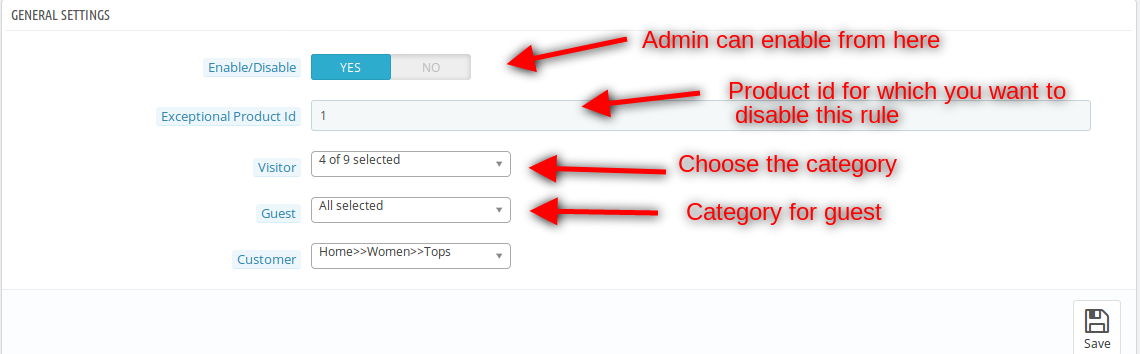
The tab consist following options:

1. Enable/ Disable: To enable the plugin, switch the enable button from OFF to ON. The default value will be OFF.

2. Exceptional Product Id: Enter the product id for which tax manager is not working. Tax manager is also not working on all products if the provided product id is available in the cart.

3. Visitors: The store admin can select the category for visitors.

4. Guest: Here, The store owner can choose the category for guest.

5. Customer: The store admin can select the category for the regular customers for removing the tax.

Front Module
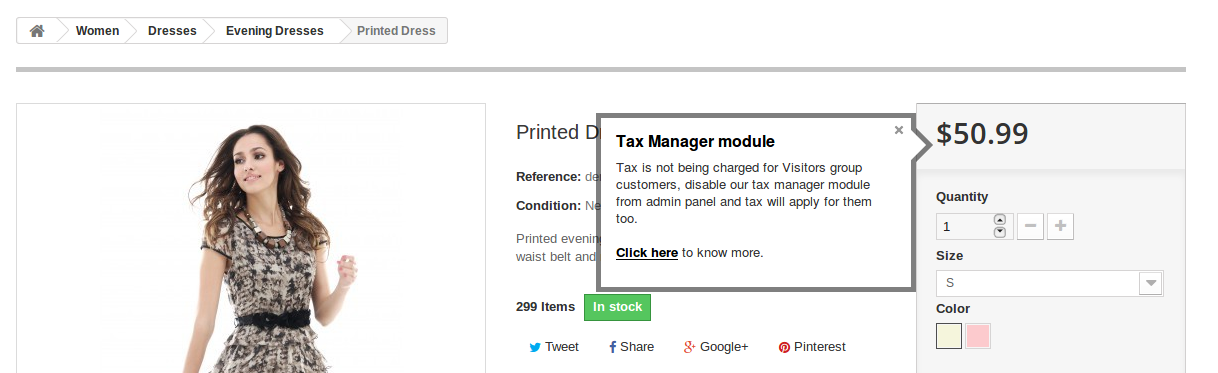
When the admin enables this plugin the products under the selected categories mapped for a particular group are shown without tax and if the provided exceptional product is in the cart or added into the cart the tax manager rule is not available for all the products.
Recommendations

* Always delete the Product.php and Cart.php from rootdirectory/override/classes/ before installing the plugin.

We hope that we have covered all the concerns regarding the installation and product guide of this Prestashop Addon. You should also check more Prestashop traffic and visibility addons that will help you to increase customer engagement on the website.

For more details about this Prestashop module:

Module Link: https://www.knowband.com/prestashop-tax-manager

Admin Demo Link:

https://psmarketplace.knowband.com/admin1/index.php?controller=AdminLogin&token=da86eaf9151622afa37c43b0acc1334c&redirect=AdminModules

Front Demo: https://psmarketplace.knowband.com/en/evening-dresses/4-printed-dress.html

Please contact us at support@knowband.com for any query or custom change request as per your business requirement.

Prestashop Product Jackpot Module by Knowband – User Manual

Introduction of Prestashop Product Jackpot Addon:

Do you want to improve user retention rate of your website? Here is a perfect opportunity for you to grab! Prestashop Product Jackpot addon, a loyalty reward program by Knowband lets the eCommerce store owners engage their audience by offering different free jackpot products. Jackpot modules are highly profitable for strengthening the customer base for your website. Most of the users actually don’t care what all exciting deals and products you bring for them. But finding a jackpot fun, they are encouraged to play and win from your store.

This Prestashop Jackpot Addon by Knowband will help the merchants to attract the customers to their stores by giving them opportunities to get the certain jackpot on whatever page they open first on the shop.

Whenever the customer will win any of the jackpot, a coupon code will be generated as the user enters his name and email id. The generated coupon code with all related information will then be sent to the entered email id. The customer will have to enter the coupon code on the checkout page to get the free gift product which he has won in the jackpot game earlier.

Installation of Prestashop Product Jackpot Addon

To install this Prestashop addon, please follow the following steps:

1. Add addon folder under modules folder of your system.

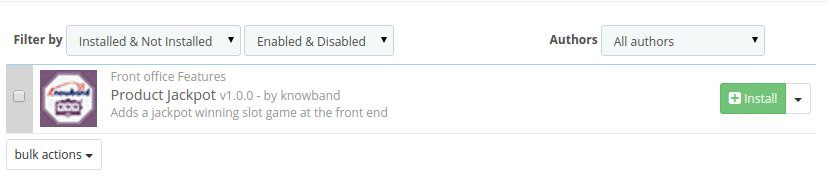
2. After adding this addon folder, the system will list the Prestashop addon on module page under front office feature category as given below:

3. Click ‘install’ to install this Prestashop plugin.

Administration Module

In admin module, there will be following options to configure this Prestashop free gift module. The freebie addon includes 2 tabs and they are as follows.

1. General Settings.
2. Email Settings.

Each section is described in details below.

General Settings of Prestashop Customer Jackpot Addon:

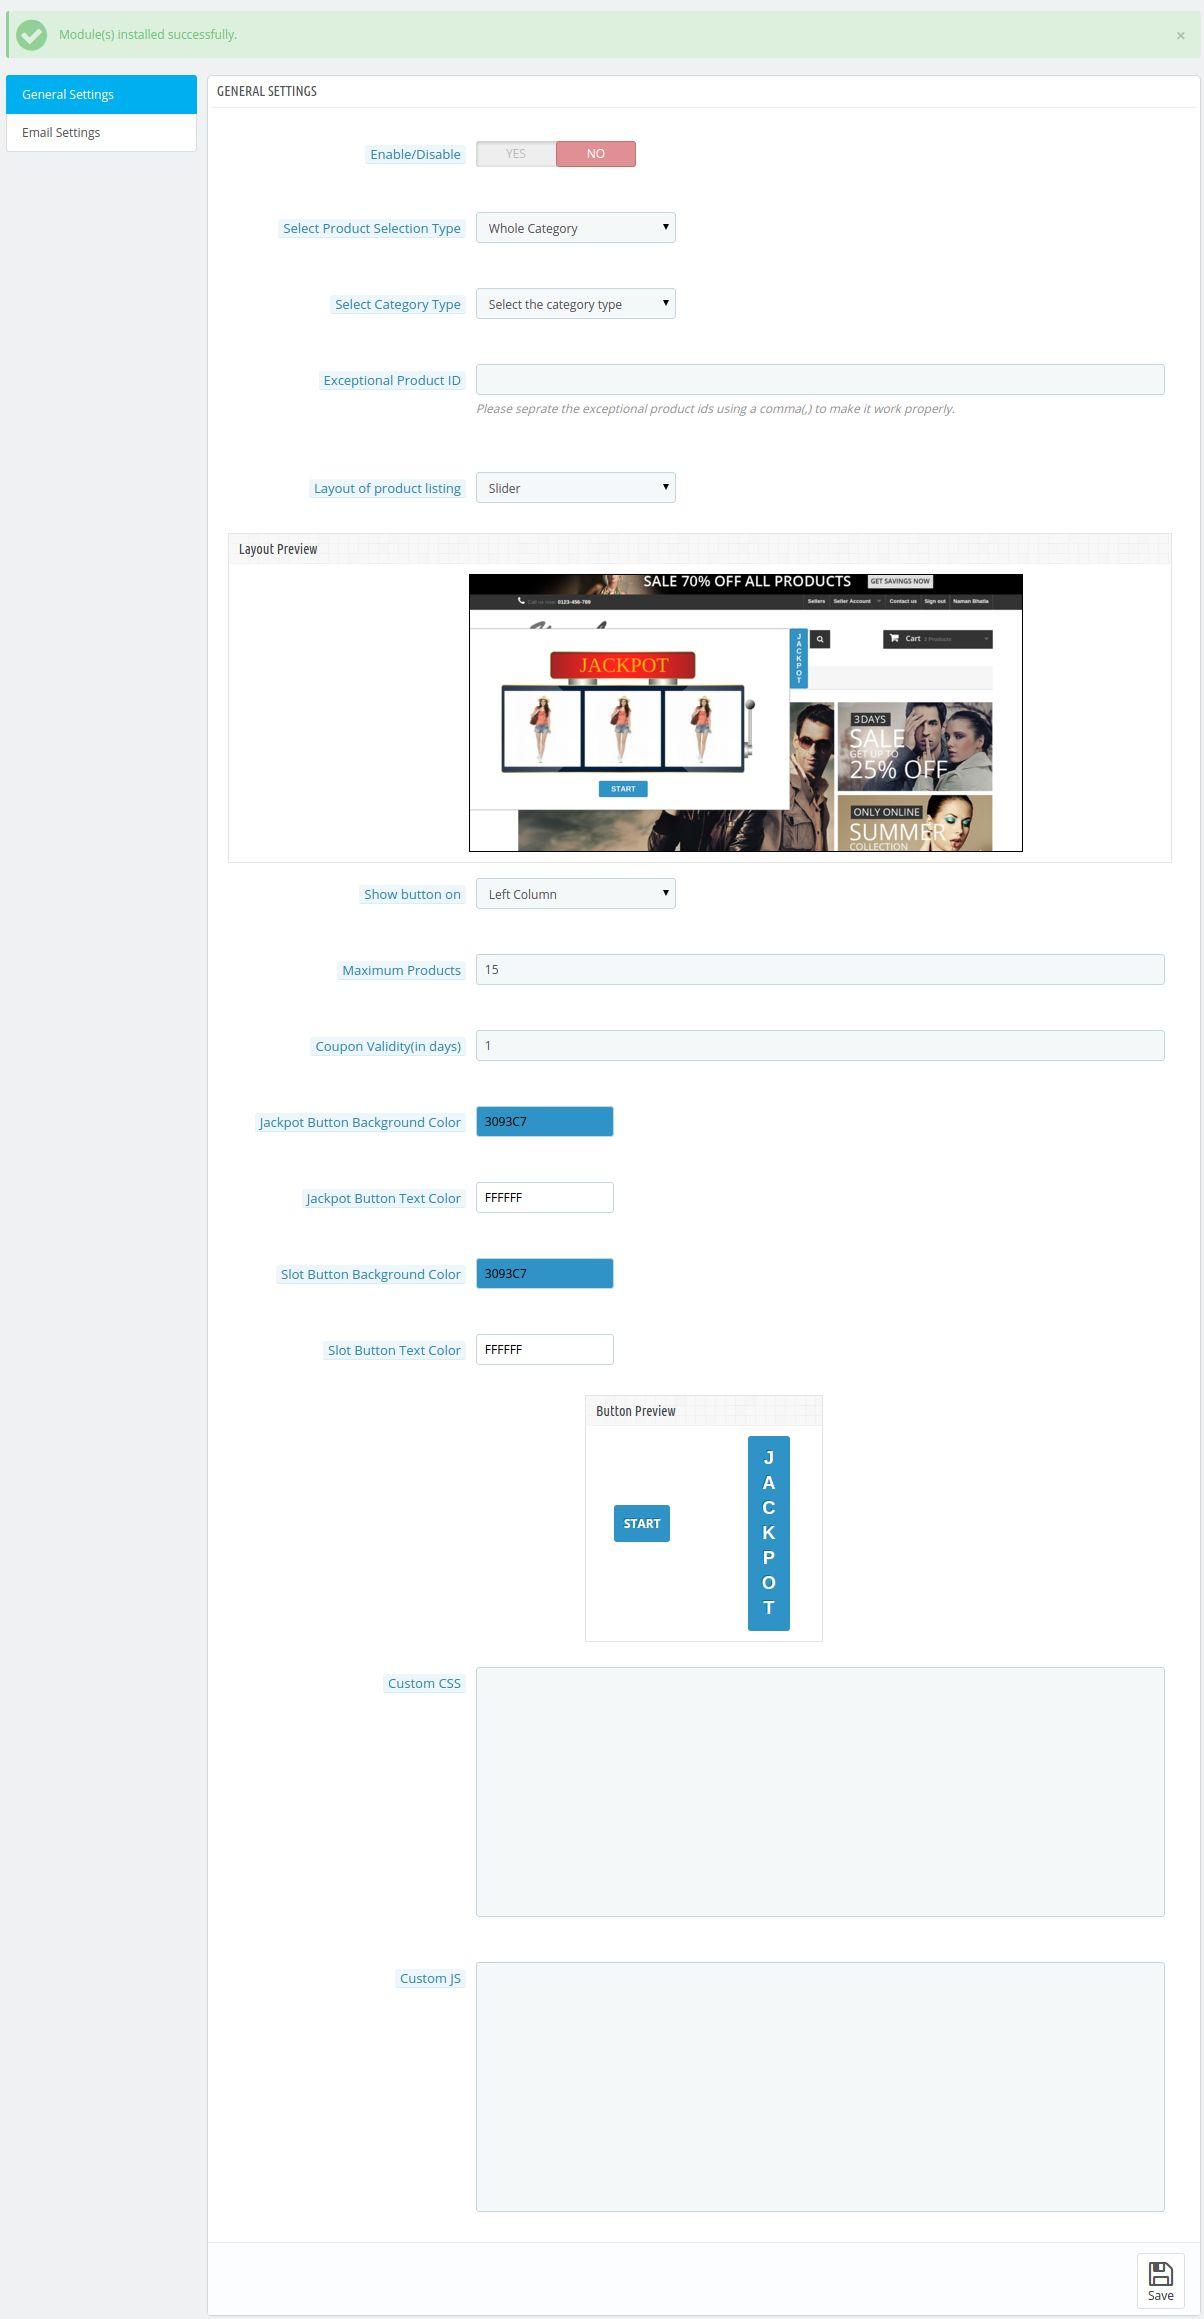
This section will be having the following options to configure the Prestashop jackpot addon:

  • Enable/Disable: This option of the free product module will be having a toggle button with two specific values ON and OFF. This Prestashop module will only work if this is set to ON. If this is set to OFF then none of the features will be working and not even impact any other section of the website. By default, this option will be OFF.
  • Product Selection Type: In this field of the Prestashop gift module, the admin will select that how he is going to define the products which will be appearing in the jackpot game in the front. It will be of two types category and product.

IF ‘CATEGORY’ IS SELECTED-

Select Multiple Category: This field of Prestashop freebie addon only appears when the admin selects category as the product selection type. Here, the admin can select any type of categories whose product will be appearing in the front. This field will be multiple selection types.

Exceptional product Id: This field of Prestashop free gift addon also appears when the category is selected as product selection type. Here, the admin can enter those products id’s separated by the commas which he does not wants to appear in the front.

IF ‘SPECIFIC PRODUCT’ IS SELECTED-

Jackpot Product ID: In this field of the Prestashop customer jackpot addon, the admin has to enter all the products ids which he wants to display on the front. This field will only appear if the admin will select ‘Specific Product’ as product selection type.

  • Select Layout Type: There will be two layout types which will be available in this Prestashop jackpot addon. One layout will be a popup type layout in front and another layout will be a slider layout.
  • Custom CSS and JS: These fields of Prestashop gift module have been provided to let the admin change the look and feel of the front end of this Prestashop module.
  • Show Button On: This field has two option left or right. Here, the admin can select that on which side the admin wants to put the jackpot button.
  • Coupon Validity: Here, the admin can enter the time up to which the coupon code generated by this Prestashop jackpot addon given to the customer will be considered as active.
  • Button Customization Options: The Prestashop freebie addon also has button customization option to change the background color and text color of the buttons which are used in the module in front. These buttons are the jackpot button (Only for slider layout) and Slot game button. The admin can change the background as well as text color above mentioned both buttons just by selecting the desired color from the color picker.

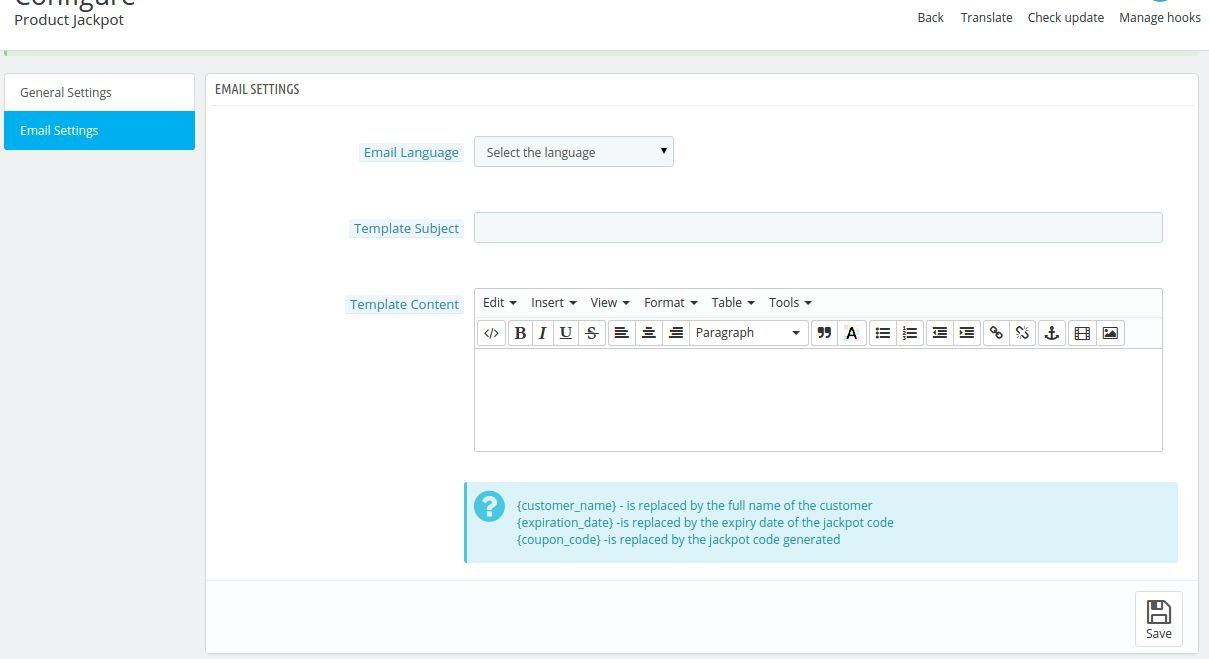
Email Settings of the Prestashop Jackpot Addon:

In this field of Prestashop gift module, the admin will have the following options:

  • Select Email Language: Here, the admin will select the email language using which he will send the email to the customers who have won the jackpot.
  • Template Subject: This field of Prestashop freebie addon allows the admin to enter the email subject. Whatever subject the admin will enter in this email field, it will be used as the subject of the email sent to the customer whenever they will win any jackpot in the front.
  • Template Content: Here, the admin can enter the email content which will be sent to the customers who will win the jackpot in the front.

There are certain constants which have to be used by the admin to let the customers know the discount code and discount validity of the respective code, that will be {{discount_validity}} and {{discount_code}}.

Front End Module of the Prestashop Freebie Addon:

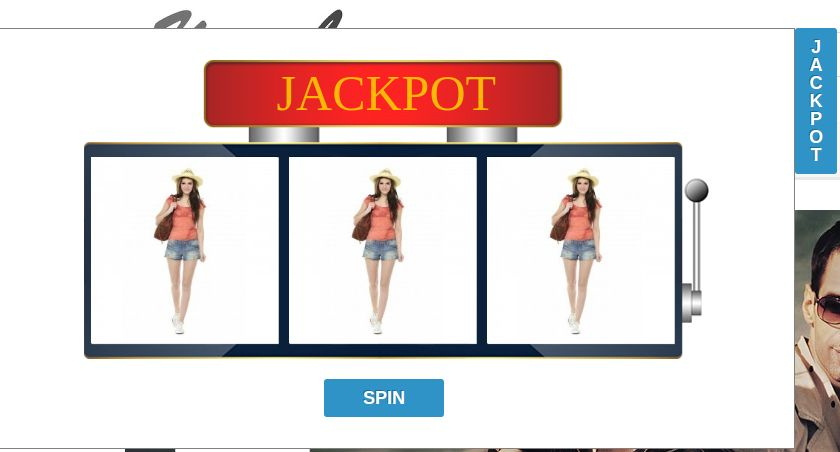
When the Prestashop jackpot addon is enabled from the admin panel then it will appear in the front on the first page where the customer will visit the store. As the settings are given in back end, the module will be having two layouts and when the module will appear in front then it will be according to the layout selected by the admin in the back end.

LAYOUT 1 (SLIDER)

LAYOUT 2 (POP UP)

Watch the video tutorial here:

Click here for Admin Demo and Front Demo.

You can buy Prestashop freebie addon from addon store