

Objectives:
The purpose of this blog is to inform readers on how to save data in Android’s Firebase Realtime database. Simple data kinds, such as strings, can be written to this database, as well as more complicated data types, like Java objects.
Pre-Requisites:
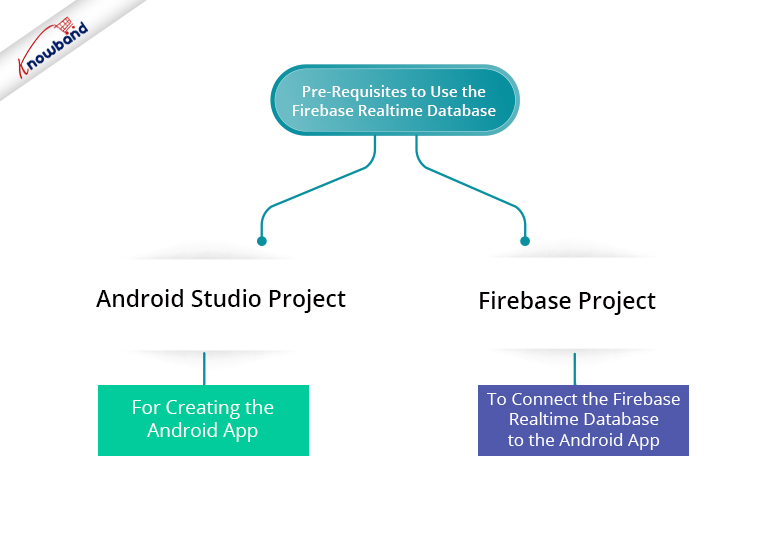 To use the Firebase Realtime Database in Android, we need to have an Android Studio project for creating the android app. Besides that, we need a Firebase project to connect the Firebase real-time database to the Android app.
To create a new Firebase project, follow the below-mentioned steps:-
1. Open the URL – https://console.firebase.google.com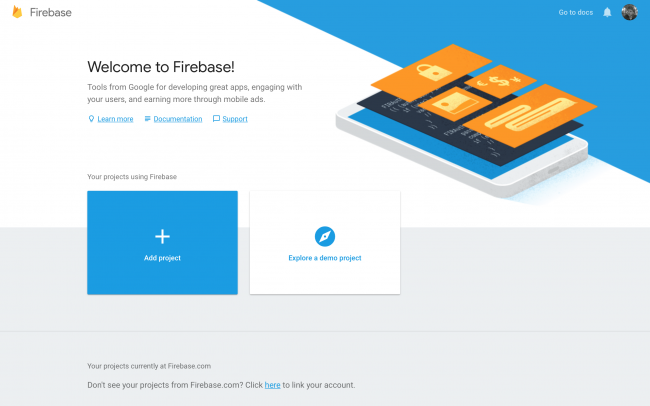
2. Then click on “Add Project”.
3. Next, enter the Firebase Project name and accept the conditions. After that, proceed by clicking on the “Continue” button.
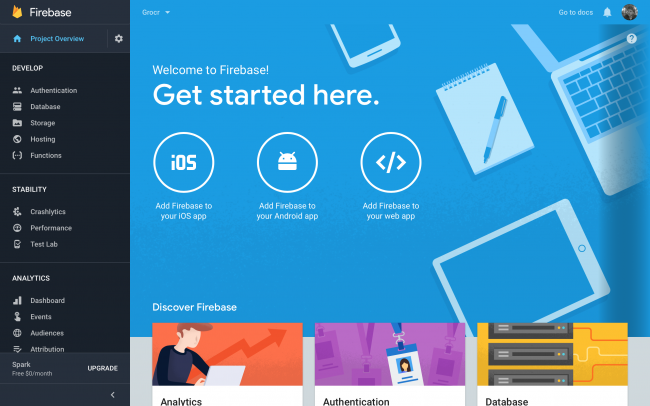
4. Then, on the next Welcome screen, click on “Add Firebase to your Android app“. In the same manner, enter the package name and click on Next.
5. Now, download the google-services.json file to your local system. Then, copy this file to the location in the Android Studio project as specified.
6. Follow the small process in the next step to add 3 lines of code to the build. Gradle files at project-level and app-level.
7. Then, finish adding the Android app to the Firebase project.
8. Open the Database section by clicking on the “Database” option in the left menu. Then, click on the “Create Database” link.
9. Now the process of creating the Firebase project is finished.
Recommended Read: How to fetch data from Firebase in Android?
Add the following line in the app-level build. gradle file to add the library to start using the Firebase Realtime Database.
implementation 'com.google.firebase:firebase-database:16.0.6'
Code Implementation
Before proceeding further, let us understand what is a Firebase reference?
In the Firebase database, the data is stored at a location. Hence, the pointer to that location is known as a Firebase reference. Multiple references point to the same location if they are initiated with the same path.
Create an instance of Firebase Database by writing the following line of code:
private FirebaseDatabase mDatabase = FirebaseDatabase.getInstance();
Now create references of the paths where the data would be stored in the Realtime Database. As the data is stored in the JSON format in the Firebase database, the paths specified in the references are the keys of the JSON object.
Recommended Read: How to fetch data from Firebase in Swift Language (iOS)?
The following line of code has to be added to create a reference to the root node in the database:
private DatabaseReference mDatabaseReference = mDatabase.getReference();
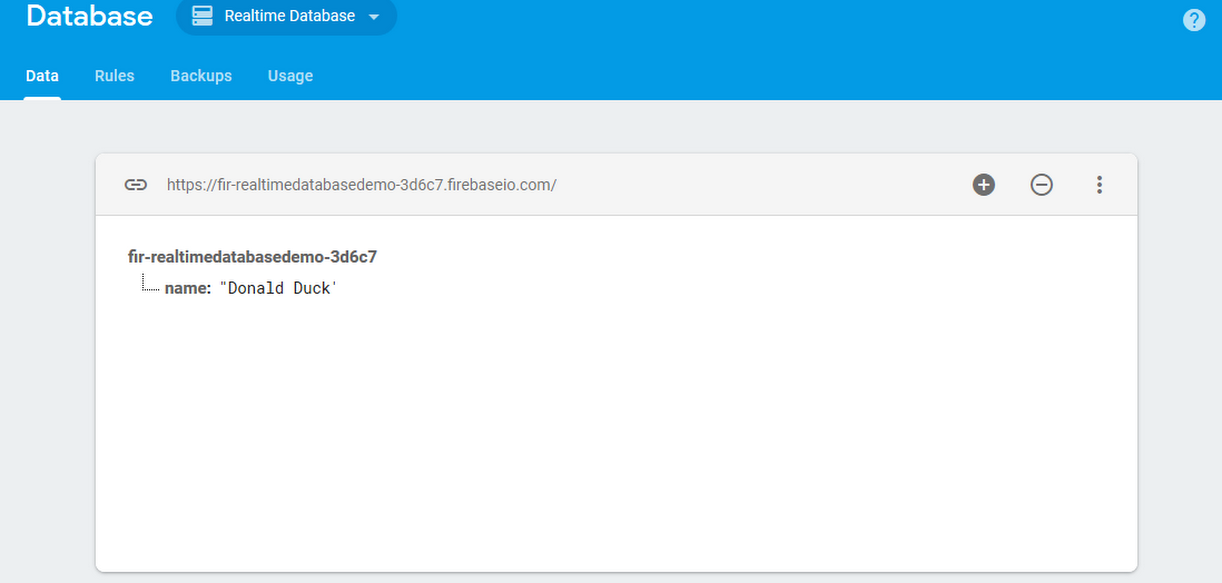
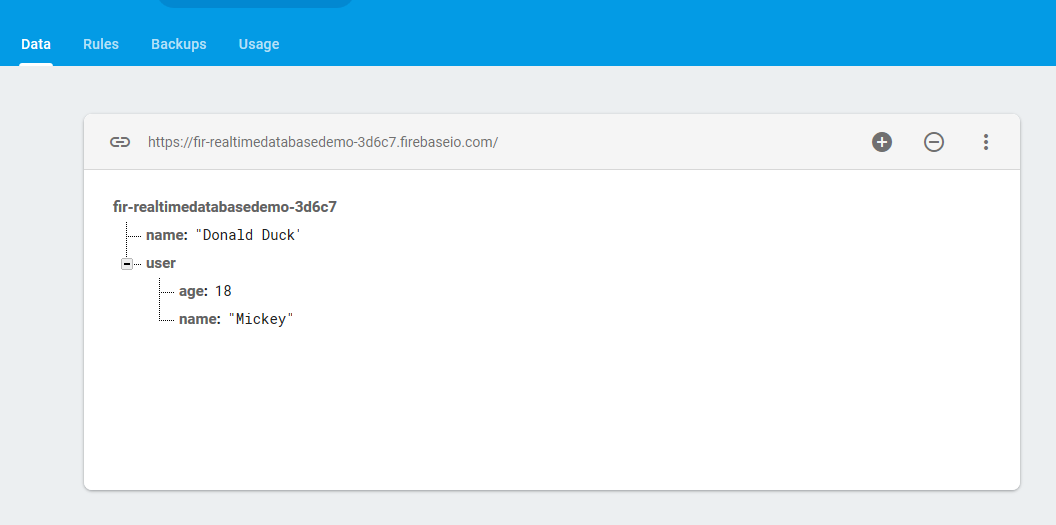
Next, create a child under the root node in the database and use this child key to add the corresponding data. After that, a string can be added to the database by following the below-mentioned lines of code:
mDatabaseReference = mDatabase.getReference().child("name");
mDatabaseReference.setValue("Donald Duck");
The above lines of code would insert the data into the database. The database in the Firebase project will look as follows:
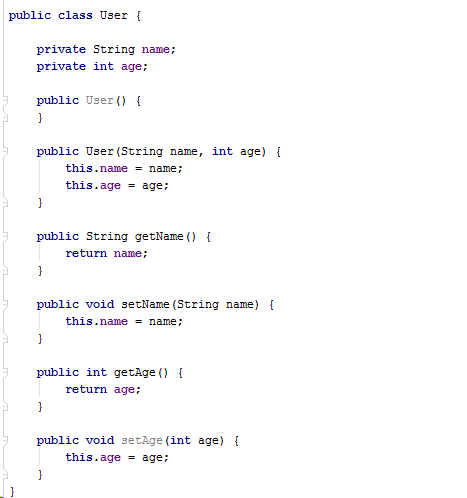
Firebase Realtime database also supports saving complex Java objects. Hence, a model class needs to be created first for saving the Java objects. Also, make sure to add an empty constructor and each attribute’s getters in the class.
Following is the code for a demo model class:
Following is the code to save an object of this class to the Firebase database:
User user = new User("Mickey", 18);
mDatabaseReference = mDatabase.getReference().child("user");
mDatabaseReference.setValue(user);
The above-mentioned code would insert the object data in the Firebase database as follows:
Recommended Read: How to save data to Firebase in Swift Language (iOS)?
Conclusion:
Now you are knowing how to save data into the Firebase Realtime Database. Also, Knowband offers an eCommerce Mobile App Builder module for online Store owners. So, the mobile app Maker plugin is available for platforms like PrestaShop, OpenCart, WooCommerce and Magento 2. Thus, With just a few clicks and no difficulty, you can create your native, responsive app for smartphones and tablets.

