How to Use PrestaShop’s Override System Without Breaking Core

PrestaShop’s override system allows you customize core behavior without touching original files. But used carelessly, it creates fragile stores that break on updates. This guide by Knowband covers how overrides work, when to use them, and three critical gotchas every developer should know.

What Is the Override System?

PrestaShop uses PHP inheritance to let you swap in your own version of any core class without touching the originals. Every core class is named with a Core suffix for example, ProductCore. If you create /override/classes/Product.php with a class called Product that extends ProductCore, PrestaShop loads your version instead. The same applies to controllers.

Only override the specific methods you need to change never copy an entire class file. This keeps your override lean and far less likely to conflict with future updates.

Example, exposing the current controller name to your header template:

Where to Put Your Override Files

Overrides can live in two places. The global /override/ directory at the root of your installation is active immediately after clearing the cache. The better approach is bundling overrides inside a module.

Placing an override inside a module (e.g. /modules/mymodule/override/classes/Product.php) causes PrestaShop to copy it to /override/ on installation and remove it cleanly on uninstall. This is the recommended approach.

A quick example of a class override. Say you want to expose the current controller name to your header template:

// /override/classes/controllers/FrontController.php

class FrontController extends FrontControllerCore {

    public function initHeader() {

        self::$smarty->assign('currentController', get_class($this));

        return parent::initHeader();

    } }

Always call the parent method unless you have a deliberate reason not to. Skipping it will silently break core functionality.

Overriding Module Classes and Controllers

Since PrestaShop 1.6, you can override module classes too. Append “Override” to the class name (e.g. BlockUserInfoOverride extending BlockUserInfo) and place it under /override/modules/. The same pattern applies to module controllers. After any override, clear the cache, specifically delete /cache/class_index.php, or it won’t take effect.

When NOT to Use Overrides

Overrides are exclusive — only one per class can exist. They’re also forbidden in marketplace modules and should be reserved for private store customisations. Before reaching for an override, consider one of these alternatives:

  • Hooks: PrestaShop triggers hook events across every page load — you can tap into them from a module to run custom code or push content into the page without going anywhere near a core class.
  • Symfony Service Overrides: Parts of PrestaShop that have been migrated to Symfony give you a cleaner path through the service container. You decorate or replace a service rather than stomping on the class itself.
  • Custom ObjectModel: Need to add fields to a core entity? Build your own ObjectModel with its own table rather than patching the existing one.

Keeping Overrides Safe Through Updates

PrestaShop updates can silently change method signatures, leaving your override running on stale assumptions. Treat every override as something to revisit after each update. Comment what you changed and why, check the changelog, and keep the override as small as possible. A narrow, well-commented override that calls parent methods properly survives upgrades. A full class copy is a bug waiting to surface.

The “Ghost” Cache: Why Your Override Seems Invisible

The number one reason developers think their override is broken: PrestaShop doesn’t scan /override/ on every request. It compiles a class map into /cache/class_index.php, and until that file is deleted and regenerated, your override is invisible, no matter how correct the code. Clearing the Smarty cache is not enough. Delete class_index.php manually via FTP/SSH, through Advanced Parameters > Performance in the back office, or via the Symfony console.

Figure 1: The PrestaShop override system flow and the role of /cache/class_index.php.


The Symfony Wall: Legacy Overrides Don’t Work for Modern Controllers

This legacy PHP system only works on PrestaShop’s older ObjectModel layer. From PS 1.7 onward, key back office areas, including the new Product Page and Order screens — have been rewritten in Symfony. The PHP override system does not affect these Symfony controllers. For those, use Service Decoration, wrapping or replacing a service via your module’s services.yml file. If an override has no effect even after clearing class_index.php, the controller is likely Symfony-migrated.

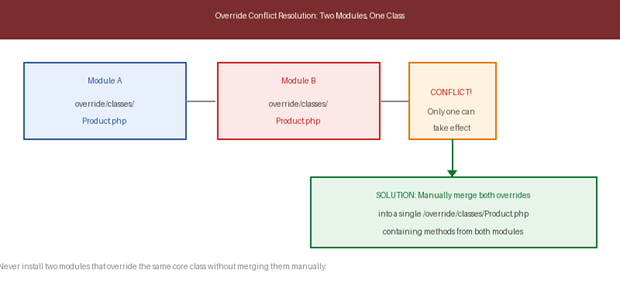
Conflict Resolution: When Two Modules Want the Same Class

When two modules both override the same class, PrestaShop throws an error on the second installation and leaves its override inactive. The fix is manual: open both files, merge all methods into a single /override/ file that extends the Core class, then delete class_index.php. Add comments identifying which module contributed each method. This is why overrides are banned in marketplace modules, conflicts become the merchant’s problem. If building for others, use hooks.

Figure 2: How override conflicts arise when two modules target the same class, and the manual merge resolution.
About Knowband

Knowband is a trusted eCommerce plugin and extension provider with years of experience helping online merchants build faster, smarter, and more feature-rich stores. Whether you run your store on PrestaShop, OpenCart, Shopify, WooCommerce, Magento, or any other major platform, Knowband offers a wide range of ready-to-use plugins and extensions that help you enhance functionality, improve performance, and deliver a better shopping experience, without needing to build from scratch.


Tips To Customize PrestaShop Website For Good Friday & Easter Sale

In most of the holiday seasons, e-shoppers are very active & excited when it comes to online shopping. Irrespective of the religion, online shopping is something every netizen engages in. The upcoming festival is Easter & Good Friday, & we have already started to see some eCommerce websites giving teasers of their holiday season based sale. For all eCommerce website owners, here are some of the PrestaShop website customization that should be tried out for sale boosting strategies in the e-store.

This article is helpful for eCommerce businesses with their website built on PrestaShop. With PrestaShop, it becomes very convenient for e-store admins to customize their website in-line with the theme of Easter / Good-Friday. Some of those useful customizations are mentioned below:

1. PrestaShop Hooks for Easter & Good Friday:

Hooks in PrestaShop are images that can be used just for display or as a hyperlink too. Hooks are something that is primarily utilized to highlight anything. To highlight the offers, new arrivals, Easter goodies, etc. use various hooks on your home-page, footer, sidebar, etc. & keep the user informed.

a) Action Hooks:

These sorts of hooks allow the images to have hyperlinks. So, these hooks are clickable & hence can be used to redirect the site visitor to a relevant page. Use easter images & redirect the user to a specific product/ category page. These kinds of hooks also act like a CTA ( Call to Action ) & must be placed strategically to get better click-through-rate & hence conversions.

b) Display Hooks:

Just as its name suggests, display hooks are merely just plain images. These hooks don’t allow adding of hyperlinks & are simply to display only. For your Easter sale, use the images with some informative & catchy text to let your users know about various ways they would benefit from your Easter Sale. Show your coupon codes, promotional offers & more on these display hooks.

Apart from creating these hooks, a good amount of attention must be given to their placement as well. Some common areas where hooks can be placed are:
a) Multiple areas on the homepage.
c) Left/ Right widget areas.
d) Footer.

2. Top Side Banner Customizations:

PrestaShop has the top banner configured by default which e-store admins can simply enable & disable. You must be having any special discounts or easter coupon codes for sale. Display them to the users on this top banner. This thin banner, on the extreme top of the page, is easily visible to your site visitors.

3. Notify Your Customers:

Using web notifications, push notifications & emails, let your customers know the reasons why they shouldn’t miss out on the Easter / Good Friday Sale. Lure them with promotional offers & referral programs. From the backend of your PrestaShop site, you can create & send these notifications to your existing customers. If you own a PrestaShop Mobile App as well, send in-app Push Notifications to your Mobile App users.

Wondering how to build a PrestaShop App from your website? Try the PrestaShop Mobile App Builder module to launch an eCommerce Mobile App.

4. Offer Limited-Time Discounts As Well:

Keep your easter special discounts & coupons valid only for a limited time duration & keep your site visitors aware of that. This is one of the instances why sales during such festivals go high. You can also design a time-based countdown banner. Seeing the countdown timer running, more e-shoppers are likely to engage with it & the offers mentioned on it.

5. Gamify Some Easter Based CTAs:

Rather than using simple CTA (Call To Action) elements on your page, use a few gamified versions of them. Such as the ‘Spin & Win Discount Wheel’ or an interactive Easter Bunny kind of lottery quiz.

You can also add a PrestaShop Scratch card to your eCommerce store to increase customer engagement. Since Easter is celebrated for the resurrection of Jesus, why not design the scratch card with an Easter theme that attracts visitors.

Another way to show your warmth on the day of Easter is by offering reward points or loyalty points to your PreatShop customer. Customers will relish the opportunity and with the right eligibility rules, this also increases the average cart value and accelerates your business.

Wrap Up

There were some of the PrestaShop Customization tips that, I hope, can help you in preparing your PrestaShop website for the upcoming sale season. With PrestaShop being an open-source module, you can make many more customizations by simply utilizing various of its backend features & 3rd party modules, or even custom-designed codes. Now it’s up to you to make the best out of this festival & to serve your customers in delightful ways this Easter.

Hence, for any such requirement, drop us a message at support@knowband.com or visit KnowBand.

Are Customization On PrestaShop Website Are Really Necessary?

Having a website truly in line with the objectives of the business is what most online store owners want. For that, PrestaShop website customization plays a huge role. For eCommerce websites on PrestaShop, modifications & customizations are necessary to optimally run the website. Although PrestaShop, by default, has almost every possible feature, it still allows unlimited types of customizations in design & functionalities.

Making use of such an open-source platform can prove to be rewarding for businesses in terms of increasing revenue & building a better brand reputation. Hence, this article aims to elaborate on some of such PrestaShop website customizations and why they are necessary for eCommerce businesses. Below are the factors proving why the customizations are a necessity:

1. Improvements In UI & UX:

Making modifications in a PrestaShop site or App helps improve the User Interface & User Experience. For instance, customizing a navigation bar/ menu & making it a sticky menu with all the relevant links can make the navigation process simpler for the site visitors. Many more elements on the website can be customized to make the website more convenient for usage.

2. Additional Functionalities:

Adding customizations is not limited to just adding graphical & aesthetic edits. Many additional functionalities like chatbots, gamified subscriptions, social login & sharing can be introduced into a PrestaShop website. Having such a well-optimized eCommerce website usually gets better responses & reviews from its customers leading to a better online reputation.

3. Payment Gateways:

Based on the needs, an eCommerce business on PrestaShop can set up many different kinds of payment options. Not every potential customer could be using a conventional mode of payment. So, it is good to have multiple options to improve the shopping experience for the users.

4. Checkout Processes:

The lengthy process for checkout can be simplified by introducing simple one page checkout customization. Make your checkout pages having some pre-filled data from the previous purchases. Alternatively, an address book can be added to the user’s account details area. Hence, during checkout, the user will have to simply choose an address from the list, instead of manually typing the entire address.

5. Homepage Customization:

The homepage is the face of a website & it must briefly reflect the contents & objective of the entire website. That’s the reason why most eCommerce giants keep changing the look of their homepage from time to time. Taking the example of an apparels’ e-store, for instance, they keep upgrading their homepage according to the seasonal new arrivals & sale for example- fall collection, spring collection, end-of-season sale, black Friday sale, etc.. This helps the site visitors to be aware of the latest trends & products available on that e-store.

Tip: Utilize the action hooks to set links on the homepage’s images to redirect your customers to relevant products or categories.

6. Footer Customization:

Footer is an element that can mostly be accessed from any page of a website. A majority of the shoppers have the tendency to go bottom in search of useful links. So, be sure to have all the useful information on your website footer. Some of the common links are ‘My Account’ / Sign-In options, sitemap, list of main categories, privacy policy page link, website certification logos, payment options, customer support link, etc.

7. Chat Support Option:

To keep up with all the issues/queries reported of online shoppers & get them resolved using simpler & effective mediums, integrate chat support on your website.  You may choose from any of the popular platforms like Whatsapp, Zopim, & others. More & more netizens are preferring to initially communicate with a business using chatbots before actually making the purchase. So, keeping up with the trend, add a suitable chat channel on your website.

Ending Comments:

A lot more is possible with such customized functionalities. It’s up to businesses to utilize the necessary features & make their website more user-friendly, functional & sales-driving than it used to be. For the above discussed or any other sort of customization functionalities, drop us a message us at support@knowband.com or visit KnowBand.

Best Tips To Customize A PrestaShop Website

Selling products on an eCommerce website rely on the presentation & personalization of the products. In simple words, the functionalities, products, features, etc. should be matching to front-end client requirements. PrestaShop online store customization is all about adding new features and functionalities. While doing so, you must be taking some precautionary measures which will help in branding a unique image to the website without cluttering in any possible way.

The majority of the PrestaShop e-retailers happen to make at least some sort of custom change in their e-store. This is, in fact, a necessity for e-businesses to have a distinctive & unique touch to their eCommerce website. Most businesses opt for this to keep the look & feel of their website in-line with their own unique theme of their business. These customizations not only enhance the graphical design of a website but also contribute to adding more functionalities & improve the shopping experience.

Here are few such factors discussed below that can help you with customizing your eCommerce PrestaShop website.

#1. Customization Using Hooks:

Hooks are basically images that can be used for displaying informative images & also act like CTA sources. We can categorize them into two basic options:

A) Action Hooks:

These hooks are clickable & hence can be used to redirect the site visitor to a relevant page. These kinds of hooks require strategic configuration as their CTR would influence more engagement and sales.

B) Display Hooks:

These hooks are plain images simply for the purpose of displaying various things. Some common areas where hooks are placed:

a) Multiple positions on the homepage.
c) Left/ Right-aligned hooks.
d) Footer’s bottom area.

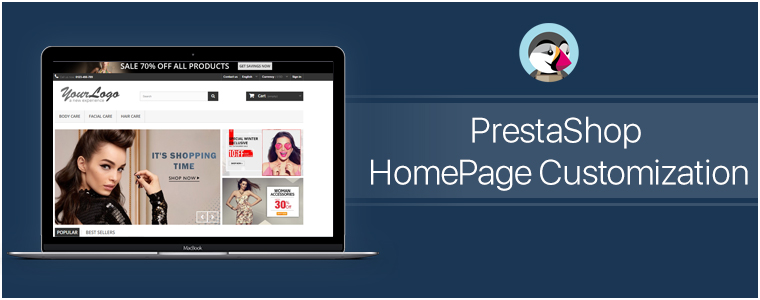
#2. PrestaShop HomePage Customization:

Generally, on the home-page, the area ‘above the fold’ is what gets the first view on a website. Similar to newspapers, websites also have the most important news highlights on the top half of their home page, such an approach to design & customize the PrestaShop homepage helps to engage customers in a more productive way. Some of the home-page designs that can be customized include:

● Sticky Navigation Menu/ Bar with Company Logo, Signup link, search box, etc.
● Slider Images with hyperlinks to relevant topics.
● Banner Images of selected categories of the products being sold on the e-store.
● Hyperlinked Infographic for sale, lotteries, offers, coupons, time-based flash-sale, new arrivals, brand launches.
● Widgets/ add-ons for social accounts like a Facebook block with like/share/follow buttons.
● Static/ dynamic chatbots.
● Gamified CTA (Call to Action) like ‘spin & win’ discount wheels or gamified newsletter/ notification subscriptions.
● Banners for top-seller/ top-brand.
By now, you would have probably realized how these additions would not only make such an e-store stand out for looks & functionalities but also serve the purpose of growing conversions.

A lot of these modifications can be made using the PrestaShop Modules. And because PrestaShop is an open-source eCommerce platform even more edits can be made by manually coding the required functionalities. So the eCommerce businesses on PrestaShop automatically get an additional advantage here to build their site according to their own unique business needs.

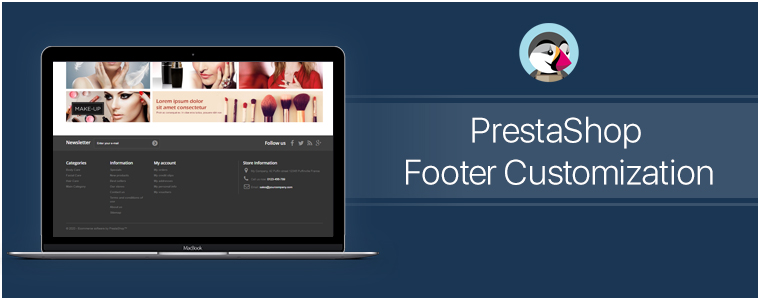
#3. PrestaShop Footer Customization:

The footer of the PrestaShop website enables the e-store admins to showcase various widgets & functionalities. Some can be added via PrestaShop Add-on Modules while some come pre-installed. Even more, can be added via coding or customization.

Footer, for all the webpages, is mostly kept common. So, it is crucial to have all the important things available in it. It offers instant access to your customers for all necessary links & information no matter where they’re displayed on the Prestashop website.

Few common footer customizations are listed below:
● Newsletter Signup Segment
● Social Channel Icons
● Sitemap (HTML Sitemap)
● Company Certifications & Payment Methods
● Quick Navigation Links
● Sign-in /Sign-up Links / ‘My Account’ section
● Contact details of the Company

#4. Other Customizations:

A) CMS Icons:

To display extra information about your PrestaShop store such as payment options, refund policies, etc, admin can use the CMS icons. Clicking them takes the user to the relevant page.

B) Top Side Banner:

This is a default feature that admins can enable/disable. This adds a thin banner on the extreme top of the page with the purpose to show the special offers, discounts, limited-time shipping, etc.

C) Social Sharing Icons/ Links:

With these icons, your e-shoppers can share the link of their choice of products with their friends, family & acquaintances. Prefer to add the links for Facebook, Pinterest, Whatsapp, etc.

Conclusion:

As they say, often little things make the biggest impact. Adding more customized functionalities to your store would help in the growth of the business. These just are a few examples of how PrestaShop Customization can be utilized. Apart from these, there are unlimited numbers of customizations that can be implemented. Feel free to discuss with us on support@knowband.com and get a quote for the required customizations.

Visit KnowBand Plugins to get eCommerce plugins for all platforms.