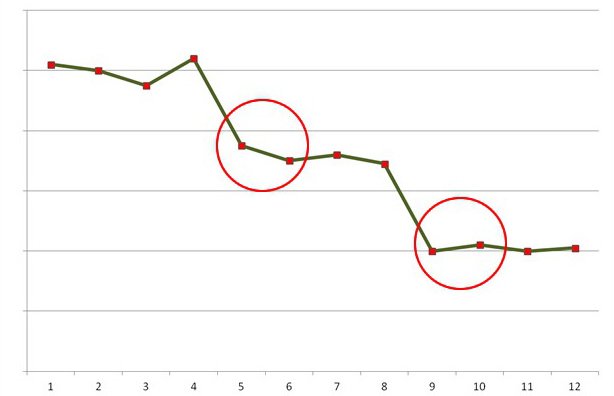
Once the holiday rush is over, the shoppers will enjoy the calm after the storm. However, the month after the holiday season is considered as ‘dark’ for all the eCommerce businesses. The same goes true with the online marketplaces. The post-holiday slumps is something that even the giants in the industry like Amazon, eBay,Walmart and other have to face. It won’t be wrong to state that the small multi-vendor marketplaces will face some major glitches. The key is to keep calm and handle the situation instead of panicking.
Discussed below are some of the tips that can help you deal with these glitches. Check them out.
Extend the offers
Since most of the shopping is done during the holidays, the chances of fall in the conversions are higher post-holidays. However, putting an end to the offers just after the holidays can affect the business even more. The best opportunity to grab the attention of your customer back after the sales season is the commencement of a new year. You can offer promotions for starting a new year. Even though the customer behavior changes drastically once January hits, this is still a great time to roll out New Year themed promotions. Provide compelling reasons to the customers to return back to the store. Try to keep a balance and do not let the sale fall drastically.
Make use of the wishlist and abandoned carts
With so many shopping sites and ample options to choose from, the chances of cart abandonment is high. While the shopping bags may be hitting hard on your business structure, it is actually an opportunity for you. Along with an increase in the website traffic, the number of subscribers is expected to increase. Exploit the opportunity and send them reminders in order to motivate them to complete their transaction. Additionally, the online shoppers are in a habit of comparing the prices. They tend to save the products in the wishlist and wait for the prices to drop down. This is the ideal time to motivate them to place the order. The aim is to clear to the inventory. Send them reminders for the price fall. The store owners can even recommend related products based on the wishlist of the customers. Making efficient use of the abandoned cart and wishlists can help you boost the business.
Liquidate the surplus inventory
This is a usual tendency of the shoppers that they consider the products as left-overs after the sale season. Hence, the best way to liquidate the inventory is to start afresh. Here are few of the tricks to accomplish the goal after the busy holiday season.
Re-structure your marketing campaign and merchandise your online store in order to amp-up the slow-moving stock.
Discount those items that you think are grabbing less attention of the customers. Offer them freebies and incentives when they don’t expect it coming.
Bundling is something that can you can learn from the brick-and-mortar store. This is a standard selling technique for merchants. Not just this, it’s the most popular pricing method for retailers. Bundle the related items together and give an impression as if the customers are striking a deal.
You must have sold a lot of gift cards during the holidays. Send reminders to the card holders and ask them to shop.
Anticipate the slump in the website traffic
After the hectic season, you just can’t expect the website traffic to be the same. Even your loyal customers will take a break from shopping. In addition, the memory of the customers is short. An elongated disconnect with them can affect your business in the future. This is when social media comes into play. Leverage the power of social media and keep interacting with them.
Keep your customers informed about the activities of your store on Facebook, Twitter and other such platforms. Invite them to share their experience. You can even motivate them to participate them photo contest. Provide discount coupons to the winners.
Take their reviews and resolve their issues.
Handle the negative reviews
While the customers may forget to appreciate the positive shopping experience, they will never miss a chance of dropping a negative review. Hence, the real task of the e-marketers will being after the holidays. You may not display the feedback in the front-end, but ignoring them may cost you some conversions in the future. So, make sure that you handle the negativity efficiently. Complete the return/refund request as early as possible. In case, you are not providing the best solution to the queries of the customer, then, provide them with the rightful compensation.
Prepare for the Returns/Exchanges
The holiday sales have been going great so far. By the end of Christmas, most of the marketplace and the individual vendors are expected to reach their target. However, along with the boost the sales, the return/refund request is bound to increase at the same pace. Along with this, since there are multiple vendors operating in your marketplace, the chances of conflicts and disagreement is high. Be prepared to handle the chaos that may follow post-holidays. Incorporate live chat options in your eCommerce sites in order to deal with the complains of the customers then and there. Any negative experience is remembered by the consumers and may affect the reputation of the marketplace in the long run. Improve your customer care and resolve the issues of the customers efficiently. Along with the customers, keep the refund/return policies transparent for the vendors as well operating in your marketplace.
Final Takeaway
eCommerce operations may prosper after the holiday end all you need to do is to take care of these aspects:
The Magento Multi-Vendor Marketplace Extension is a solution that converts your Magento eCommerce store into an online multi-vendor marketplace site. Just like a physical Shopping mall or marketplace where you can invite sellers to open their shop and sell their products. In return to it, you have the option to take commission from the sellers as the rent for the online space you would provide them in your complex (marketplace site).
Marketplace ad-dons on the other hand, are those extensions which add new features and functionalities to the Magento marketplace extension. These features add new opportunities for the marketplace admin and sellers to manage various aspects of the whole marketplace. There are ad-dons for SEO improvement, Conversion Rate Optimization, Product Management, Helpdesk management and much more.
Here in this article, we are going to enlist 3 such marketplace ad-dons that can help you make a strong relationship with your sellers. These extensions provide some extended accessibility options that make the operation of the marketplace shop easier for the sellers. By using these ad-dons, the marketplace admin can create an improved UX for the sellers/merchants/vendors and encourage more sellers to come and register a shop account on the marketplace.
Any seller who wishes to register on a marketplace would first of all want to know if he is doing business with a responsible business on the other side. Not having a seller support system is a clear sign of chances for negligence in seller grievance handling by the marketplace admin. No seller would want to open a shop in a marketplace where they can’t even register their query or complaint if needed.
In this situation a marketplace site can always provide the desired support to its sellers with a seller support system on board. The Marketplace Contact Admin ad-don is one such seller support system that would be liked by your onboard sellers.
It allows a seller to create a query or complaint ticket with the marketplace admin right from the seller dashboard.
Allows admin to check the complaint and queries from all the sellers and reply back repetitively.
The seller or admin might not be logged for the whole time to instantly see the tickets and replies. That’s why, along with the messages on the marketplace interface, the ad-don also sends an email to the seller and admin whenever a new message is received.
This ad-don could be a great extension for the marketplace. With better user experience and seamless seller support, you will have a USP on your marketplace site that will attract more and more Merchants to do business with you.
When we look at the eCommerce competition level in 2017, keeping the sales rate at desired level is a complex task. When everyone in eCommerce market is busy recovering their abandoned carts, new sales generation seems to be a mega task.
However, if you are not able to complete this mega task and keep your marketplace’s conversion rate optimal, you would hardly attract any new seller to your site. Moreover, there are chances that the onboard merchants would also pull their hands back.
In this situation, you need to keep your customers happy by providing every possible facility that can be imagined on an eCommerce store as of now. Happy customers mean more sales, more sales mean happy sellers.
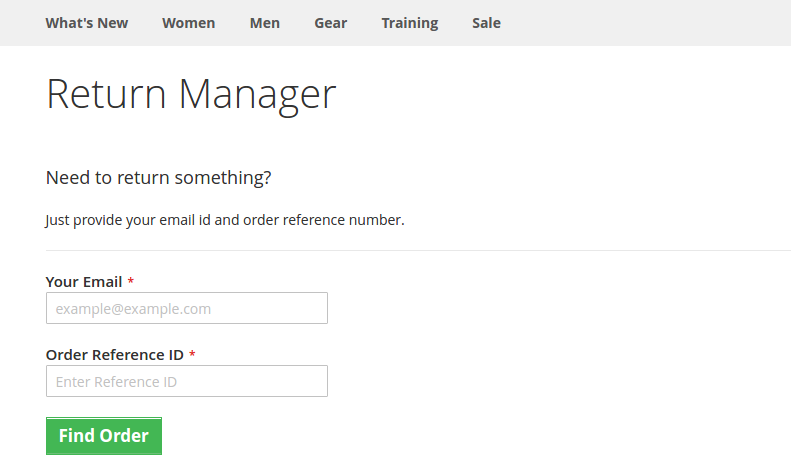
The option for easy returns is one such facility which every eCommerce customer looks out for. You will hardly find an eCommerce customer making a purchase without reading the products return policy of the store. That’s where you need a return management ad-don on your marketplace.
With easy return facility through the ad-don, you can allow your customers to place a return, refund or replacement request directly to the concerned sellers.
The admin and sellers both get notified on a new return request. The sellers can process the return request and can approve/disapprove it based on the marketplace’s return policies.
Now based on your return policies you can use this ad-don to create an ultimate shopping experience on your marketplace. Of course, the customers will like the return and refund facility. Such facilities to the customers can help generate more sells and a good name for your website in the market.
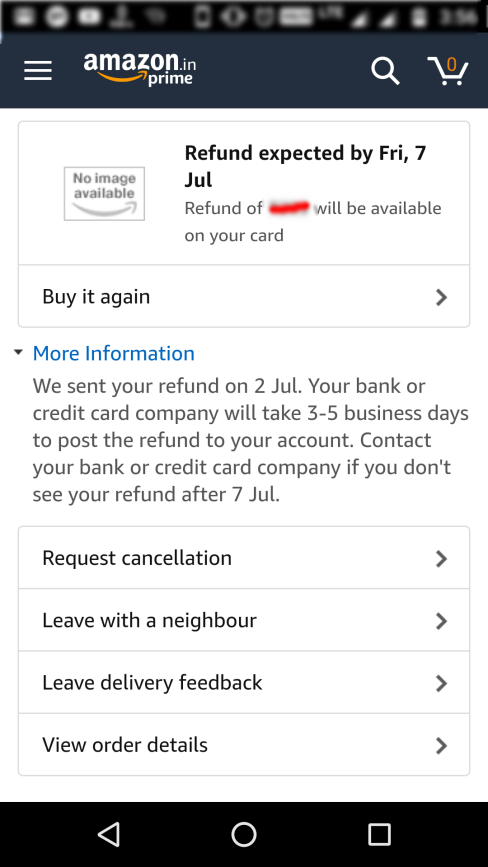
Who doesn’t like the speedy refund management of Amazon on failed for undelivered orders? Despite, I had an undelivered order experience due to courier boy’s mistake, I was happy to place a re-order with Amazon because they refunded me for the undelivered order so fast.
That’s how even a bad shopping experience cannot stop your customers to trust you if you have a recovery plan like easy refund and returns.
Whether you have a run a marketplace site or an inventory based eCommerce store, customer experience is one such thing that will decide the fate of your business. But you cannot expect your website to provide even a decent customer experience when you cannot fulfill the orders on time.
On a marketplace, the failure to fulfill an order on time can happen due to many reasons:
Product was out of stock
Courier service’s mistake
Seller didn’t dispatch the order or time etc.
Whatever be the reason for the failure in product delivery or order fulfillment, the bad name is going to stick on your marketplace; not on the seller. So it’s your job to make sure that sellers are dispatching the orders on time.
Now, that’s a hectic task. Not always but sometimes there might come a situation for a seller when he/she might not be available to fulfill an order received for his product. The reason could be anything:
The seller might have gone on a holiday and he might not have anyone else deployed to manage the marketplace shop till then. The reasons for the holiday could be numerous- recreational or unavoidable circumstances.
In such situation, when the seller would not be available to fulfill the orders, it’s a sure thing that you will lose some happy customers due to this.
How to avoid this?
The Marketplace Seller Vacation Mode Ad-don is the answer. Behind explanation of all these situations, my main aim was to introduce this ad-don as a big problem solver, and it efficiently does that.
This ad-don allows a seller to turn on the vacation mode before going for any such holidays. In this situation:
All the product listing from the particular seller will get hidden from the customers. That is, the customers will not see the products of this seller on the marketplace until he is back from the holiday.
The seller can set an automatic timer to turn off the vacation mode, or can manually do it when he is back from the holiday.
The marketplace admin sees the list of all the sellers who have turned on their vacation mode.
The admin can choose to approve or disapprove a seller’s vacation mode request. That means, the sellers cannot turn on the vacation mode until the admin allows them.
So, admin is still the boss, sellers cannot just go on the vacation every now or then.
Over to you
So, these three features on any marketplace site are definitely the conversion booster and saver as well. The Magento Multi-Vendor Marketplace Extension is backed by many such ad-dons like these. You can have a free demo of both the Admin panel and Front-end interface. Have a tour of the extension as see how it can help you launch a marketplace business of your own.
E-Commerce is a field of huge business opportunities and the success of companies like Amazon, eBay, Alibaba, Flipkart, and others have proved it numerous times. No doubt, it has endless opportunities but with the emergence of other players, competition in the eCommerce field has heated up to a great extent. Most importantly, the worst sufferers are the small and medium companies that don’t have a huge customer base and market reach. To guide those vendors, online marketplaces seem to be the perfect place for grabbing higher conversions and sales among bigger stalwarts.
We are glad to inform you that our company, Knowband has come up with this extraordinary Magento Multi-vendor Marketplace Extensions that has raised new hopes among small and medium vendors in terms of conversions and sales. Let us discuss the various ways which make this Magento extension as the most loved and popular choice among various Magento Marketplace extensions.
Quick registration facility for sellers
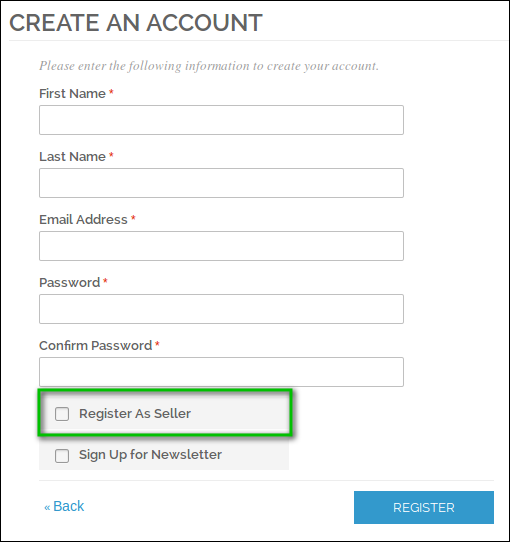
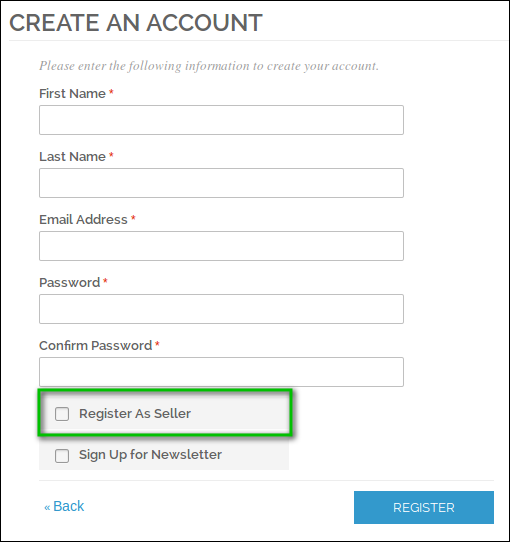
Unlike other available Magento Marketplace Modules, this Magento Marketplace extension has the feature that provides the smooth seller registration from the front end itself. It features a “Register as Seller” option on the registration form that eliminates the hurdles in the seller registration process.
Smooth management and control of the seller account
It is now much easier to manage and control your seller account with the interactive and friendly front end interface of this module. Being a seller, you can manage various seller activities like the addition of a product, quantity, or price. Apart from this, there is no need for any back end login by sellers for accessing their individual account making it as one of the most lucrative Magento Marketplace modules for its targeted customers.
Helps in tracking sales behavior for improving their business in the long run
With the help of this Magento Marketplace extension, the seller can now track the sales information in the form of average revenue per order statistics, items sold by a seller, income, order details, and other such statistics through the help of various graphs, charts, and reports. By having all these relevant data about their seller account, it will be a much-simplified task for individual sellers to boost their conversions and sales.
Magento Marketplace extension provides an easy mechanism to include special prices for products
In order to boost more conversions and sales on your Magento store, you need to run various shopping offers and campaigns from time to time. Furthermore, to create a sense of urgency among your customers, it is important to run campaigns with your attractive offers in the form of special prices. The availability of features like ‘Special Price From’ and ‘Special Price To’ dates in this Magento Marketplace extension can inform customers about the life span of your offers to grab higher conversions and sales in a coherent manner.
Effortless addition of various elements and components
It is now much easier to include a banner, shop logo, custom HTML content, social URLs, and another such element in your Magento site for better performance and productivity. Due to the smooth integration of various elements in this Magento marketplace module, it is now a cakewalk experience to achieve an initial lead among your business rivals. Thus, the easy addition of various site elements makes this Knowband extension as one of the popular choices among numerous Magento Marketplace Modules for providing equal business opportunities to small and medium vendors.
Don’t lose higher conversions and sales even if you are one of those small and medium-size vendors as this Magento Multi-Vendor Marketplace plugin is ready at your service. With the baggage of features and functionalities, it can stand tall among various available Magento Multi-vendor marketplace modules for imparting a unique place to your eCommerce business. Grab this module now by visiting our Knowband store and exploring other ways of getting higher conversions and sales.
Magento multi-vendor Marketplace module by Knowband is one of the easiest ways to transform your eCommerce site into a thriving Multi vendor marketplace. A Multi vendor marketplace is an online space where different sellers and vendors can list their products, manage their inventory and sell at the same platform. The Magento Multi vendor marketplace plugin converts your online shop into a fully functional online marketplace.
1.1 Features offered to the store admin by Magento Multi-vendor Marketplace extension:
The admin can approve/reject the seller’s profile with the help of the Magento marketplace plugin.
The Magento marketplace module makes it easier to set and manage the commission charged to the sellers.
The admin can add/remove the products from the back-end of the Magento marketplace multi-vendor module.
The store admin can create and manage the product categories from the back-end of the Magento marketplace extension.
The Magento store owner can track the transaction and earn at the button click.
The Magento marketplace multivendor is compatible with the latest Magento version and supports all themes.
The admin can approve/reject product and seller reviews from the backend of Magento Multi seller Marketplace plugin.
Email templates offered by the Magento Multi-vendor Marketplace module can be used by the admin to notify the sellers.
Store admin has the access to approve or disapprove the seller vacation request from the backend of Magento Multi seller Marketplace module.
1.2 Features offered to the seller by Magento Multi-vendor marketplace extension:
The Magento Multi-vendor marketplace allows the sellers to register from the front end of the online marketplace.
The sellers can easily map the categories from the seller dashboard.
Also, the sellers can request including a new category to keep the products. The marketplace admin can approve/reject the category request with the help of the Magento multi-vendor marketplace plugin.
The seller’s dashboard makes it easier for them to track and manage their products, profile as well as sales.
Magento multi-vendor marketplace allows the sellers to add sale banners, shop logo and custom HTML content. These banners will be displayed on Seller’s Page with separate product collection.
Sellers can send the payout requests and Vacation request to the admin from the seller dashboard.
Sellers can generate coupons from the seller dashboard to lure the customers and enhances the chances of conversion.
Sellers can display the Upsell and Cross-Sell products at the product page and checkout page to enhances the sale.
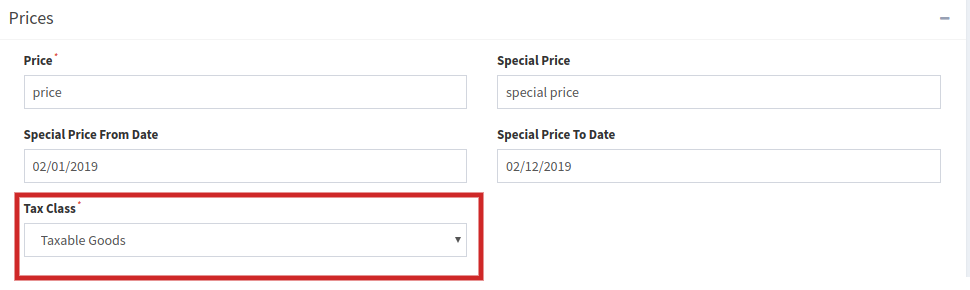
To distinguish taxable and Non- taxable items, sellers can add the products in different tax classes.
1.3 Customer Benefits offered by Magento Multi-vendorMarketplace:
The Magento multi-vendor marketplace extension allows multiple sellers/vendors to sell their products on the same platform. Thus, customers can choose the perfect product from a wide assortment.
Magento marketplace extension allows the customers to shop the products at competitive prices.
The customers can send product reviews. These reviews can be approved/disapproved from the back-end of the Magento marketplace plugin.
Online shoppers can review the sellers. The seller reviews can be monitored from the back-end of the Magento multi-vendor marketplace module.
The Magento multi seller marketplace module even offers an option with the help of which the buyers can become a seller.
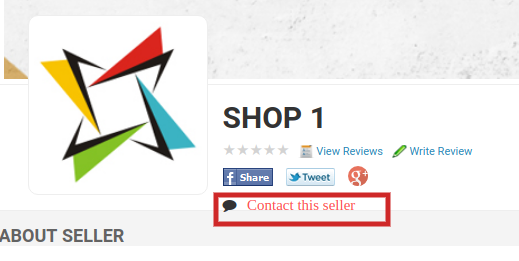
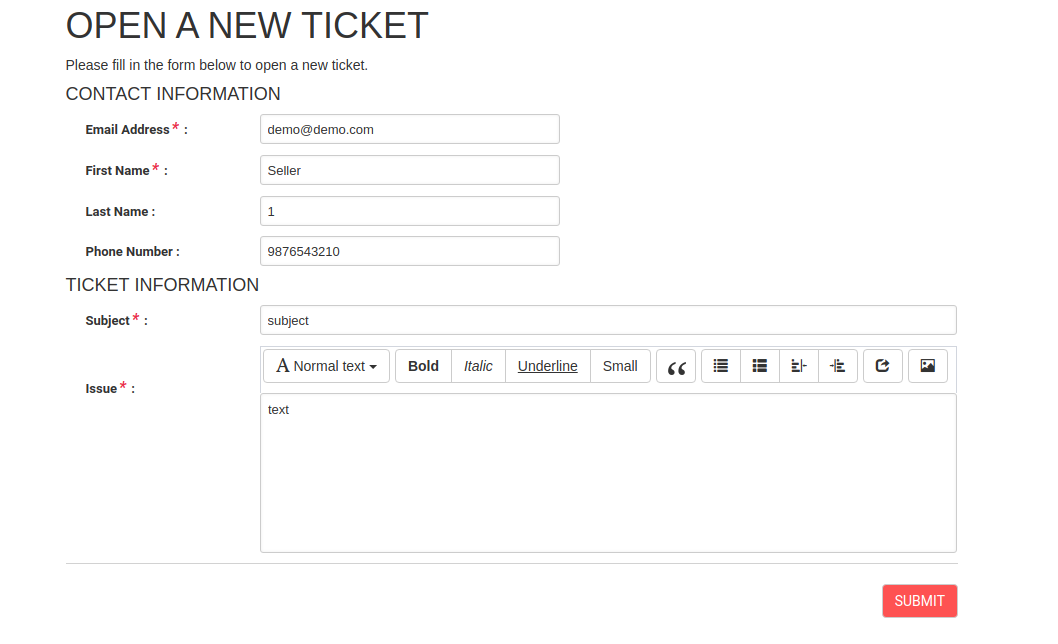
Customers can directly contact the sellers from the frontend of the store. A ticket will be generated every time a customer contacts the seller.
2.0 Steps For Installation of Magento Multi-Vendor Marketplace
Download the Magento Multi-vendor Marketplace extension package.
Unzip the package on your root folder of Magento setup via FTP manager (like Filezilla or WinSCP – download here: https://filezilla-project.org/).
In Admin Panel you will see a new Menu Market Place next to the System menu. In case you are not able to see the link under System, please clear Magento Cache first then check again.
With this, the Magento multi-vendor marketplace extension gets installed on your system.
3.0 Admin Panel
In the admin panel of Magento Multi seller, marketplace extension adds a separate menu (named MarketPlace) right next to the system menu and also adds a new tab to the customer create/edit page.
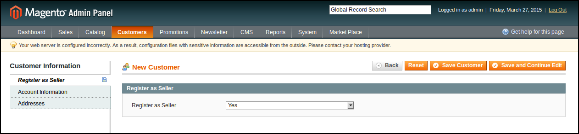
3.1 Register as Seller Option (Add New Customer Page)
If the admin is creating a new Customer from the admin side then a new tab appears on that page asking for the Register as Seller field.
The Path to the Customer page:
Go to Customers -> Manage Customers and Click on Add New Customer on the right side of the page.
The admin can set the field to Yes to register the customer as a seller. By default, the field is set to No.
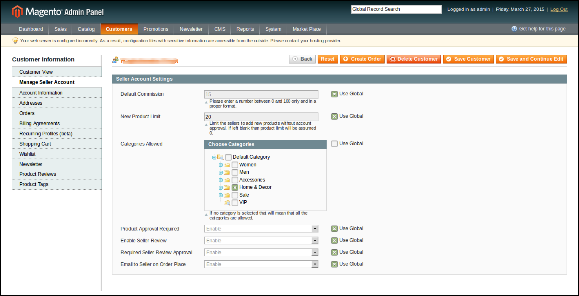
3.2 Manage Seller Settings (Customer Edit Page)
In case of editing a customer if the customer is also a seller than a new tab (named Manage Seller Account) appears to change the seller level settings for the current customer who is a seller as well.
Path to the above page:
Go to Customers -> Manage Customers and click on any customer who is also a seller.
The settings are stored when the admin submits the edit form for the customer.
When this page loads for the first time the fields are filled with the default settings pre-defined for the extension.
4.0 Marketplace Menu
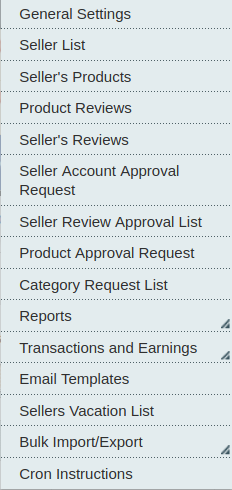
The Magento marketplace extension consists of a total of 15 sub-menu options which redirect to several pages for the Magento multi-vendor marketplace Extension.
Some of the menu options of the Magento multi-vendor marketplace module have further sub-menus to navigate to some of the related pages.
All the 15 configuration options offered by the Magento multi-vendor marketplace plugin are described below in details:
4.1 General Settings
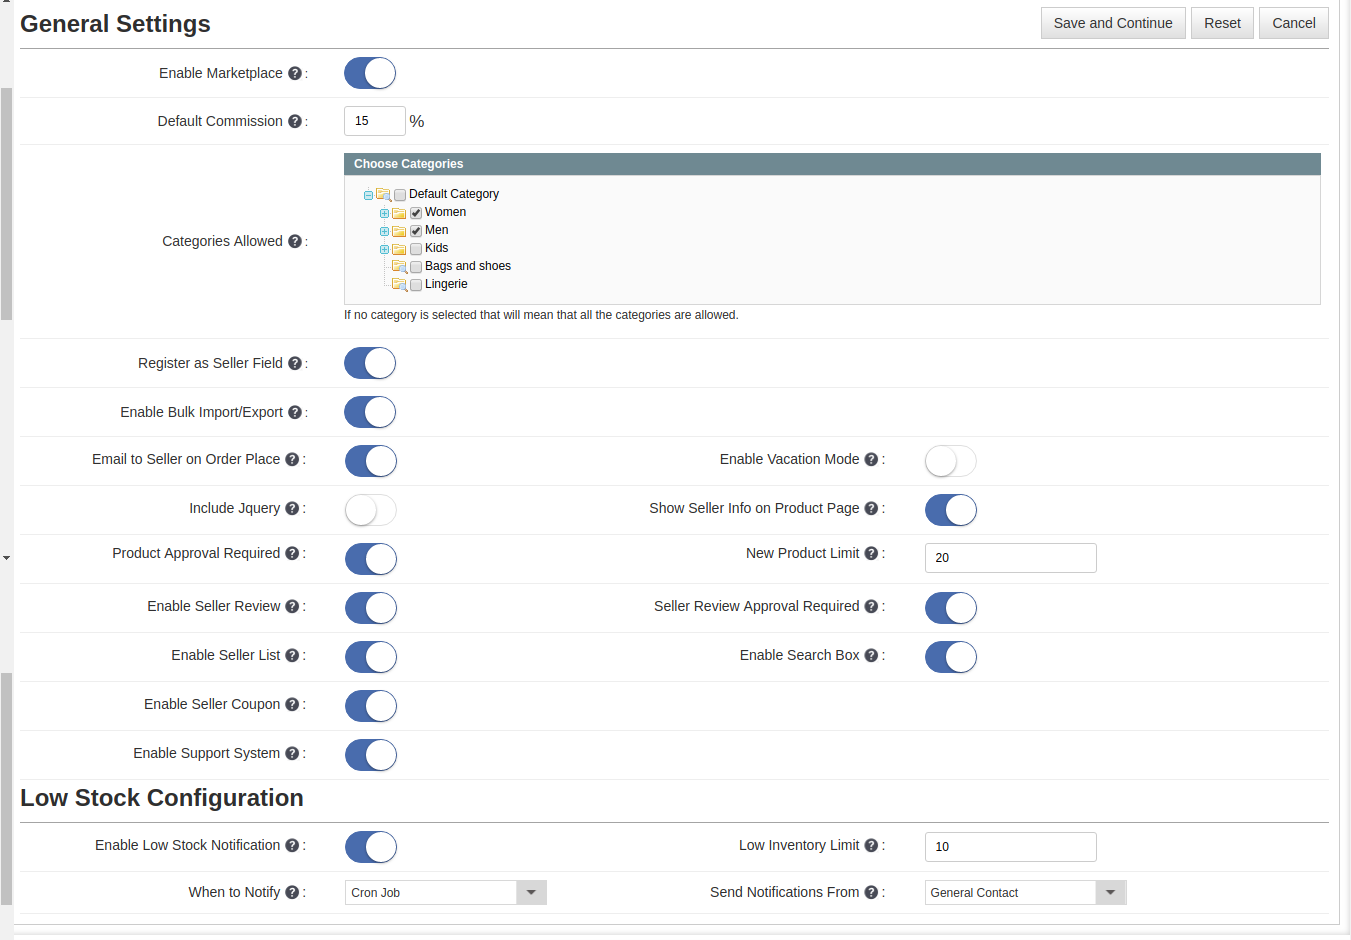
The General settings tab of the Magento multivendor marketplace module is divided into 2 main levels i.e. Seller Level Settings and Global Level Settings. This page only controls the Global level settings for the Magento Marketplace Extension.
This page has all the settings that control the Magento Marketplace plugin and its several features.
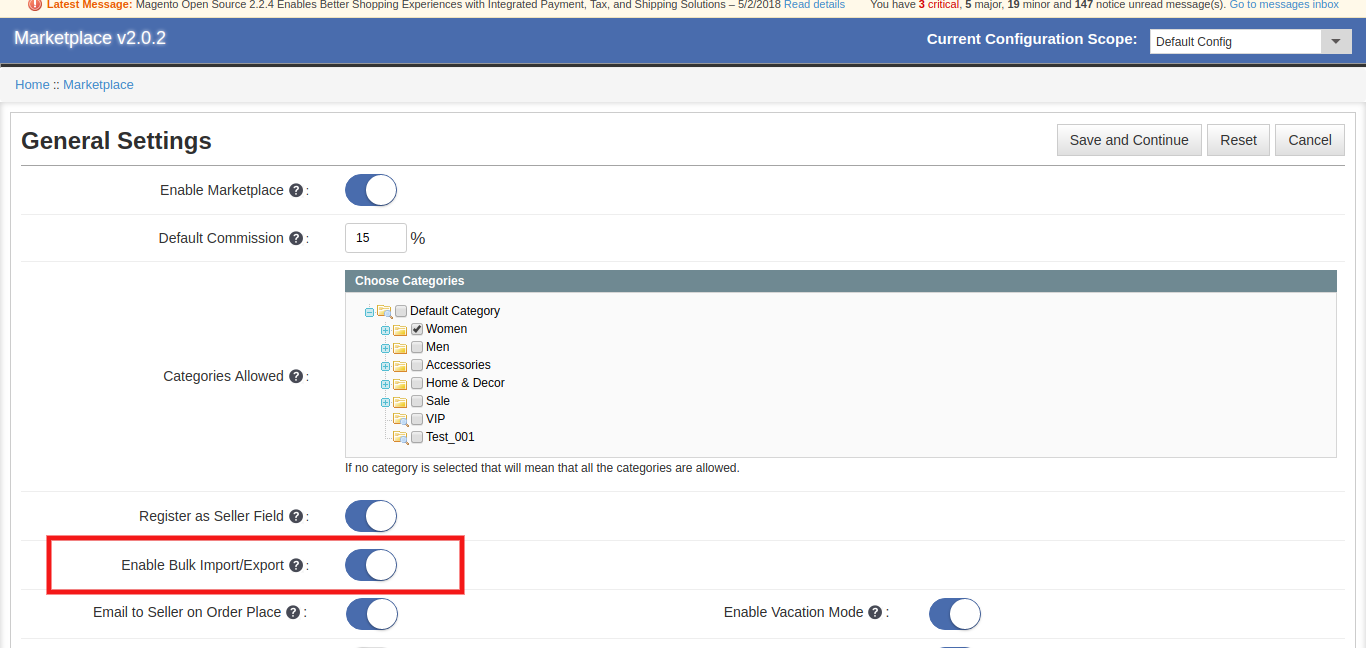
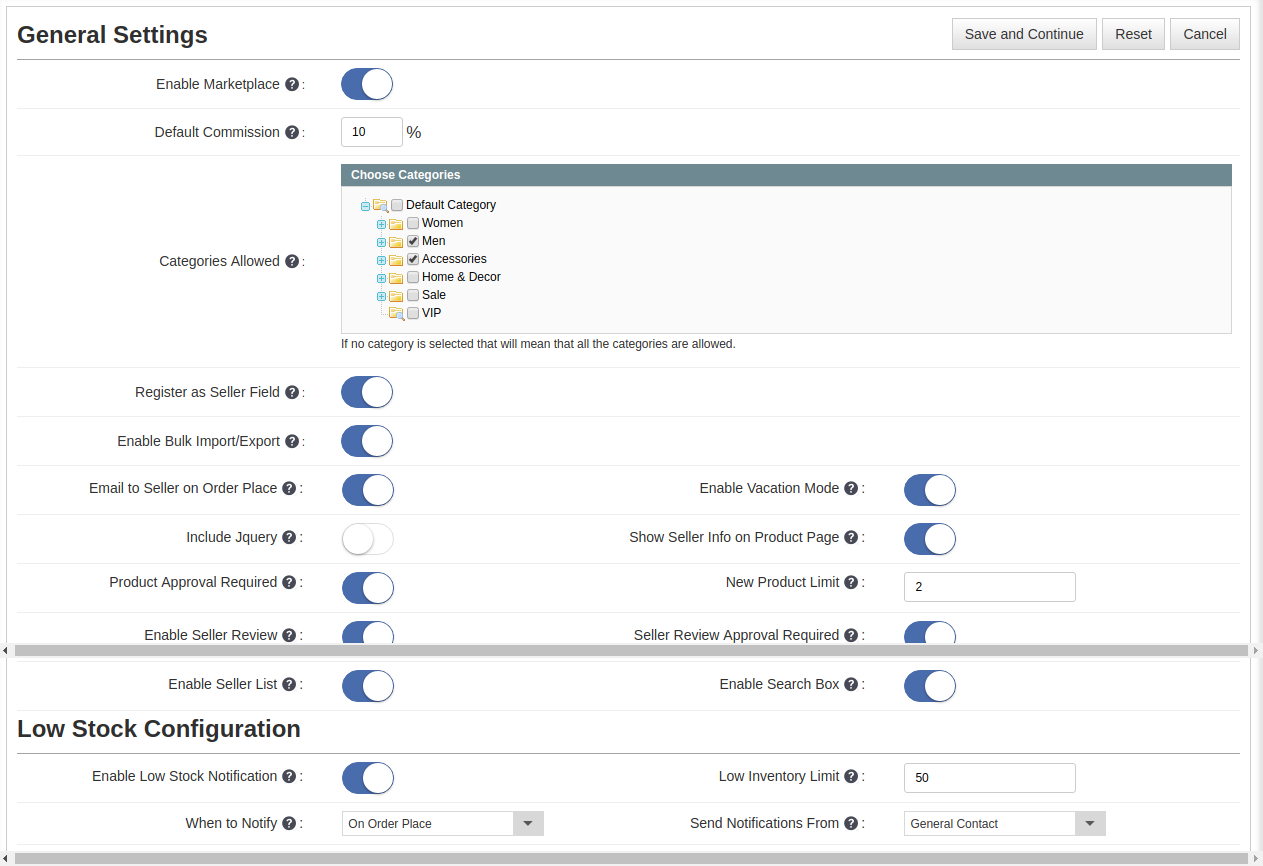
The general settings page of Magento multi-vendor marketplace plugin consists of the following fields:
1. Enable Marketplace: Enables or Disables the Magento Multi-vendor Marketplace extension on the storefront. If disabled, no page or feature of the extension is accessible on the storefront.
2. Default Commission: Sets the default commission percentage that is taken by the store owner from the total sale made by the seller.
3. Categories Allowed: The categories that are allowed for the sellers to add products. If no category is selected then all the categories are allowed and if some of the categories are selected that means that only the selected categories are allowed.
4. Register as Seller Field: Enables or Disables the Register as Seller field on the Create Account page of the storefront.
5. Enable Bulk Import/Export: Enable the button to allows the third-party vendors to use bulk import/export feature.
6. Email to Seller on Order Place: Enable this field to send an email to the seller in case an order is placed for the sellers’ product(s).
7. Include JQuery: Disable this field in case JQuery is already included in the front by another plugin or your theme.
8. Product Approval Required: Enable this field in case approval for the product added by any seller is required before it gets to your store.
9. Enable Seller Review: Enable this field in case you want the customers can review the seller.
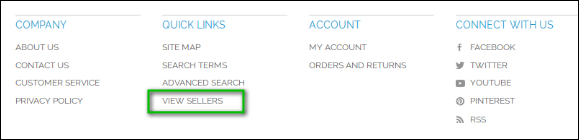
10. Enable Seller List: Enable this field in case you want to show a link in the footer of the storefront to the seller listing page. If this setting is disabled then the seller listing page cannot be accessed anyhow.
11. Enable Vacation Mode: Enable this button to allow the sellers to set the vacation mode for their shop for a particular period.
12. Enable seller Coupon: Enable this feature to allow the sellers to generate coupons for their products.
13. Show Seller Info Product Page: Enable the button to show the seller’s info on the product page.
14. New Product Limit: Enter the maximum number of products that a new seller can add before the seller account is approved.
15. Seller Review Approval Required: Enable this field in case you want the seller review to be approved before it becomes visible in the storefront.
16. Enable Search Box: Enable this field in case you want a search box on the seller listing page to search the sellers.
17. Enable Support System: Once this feature is enabled from the backend of the Magento Multi seller Marketplace module, the customer can directly contact the seller.
Low Stock Configuration
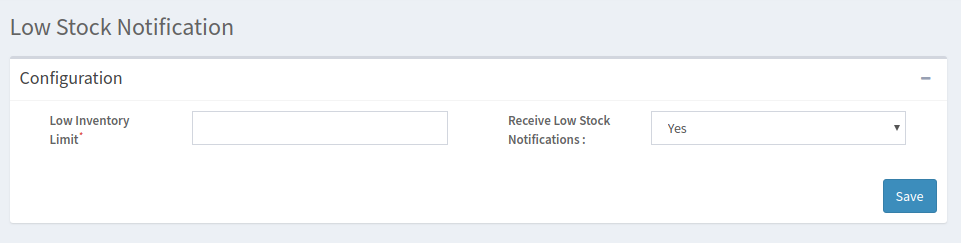
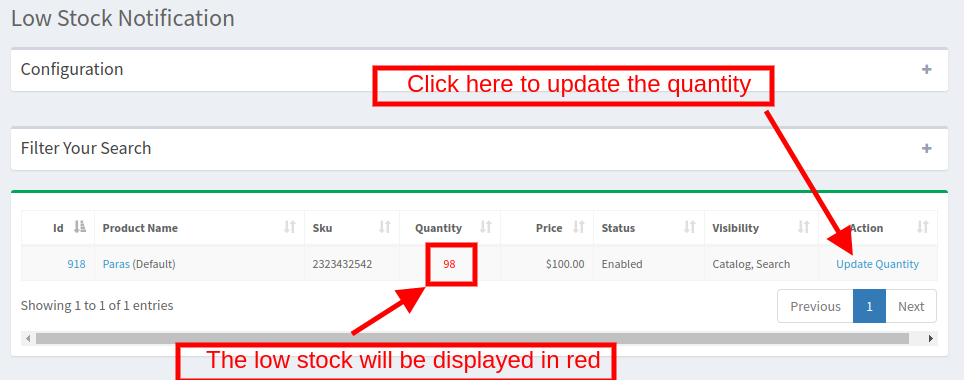
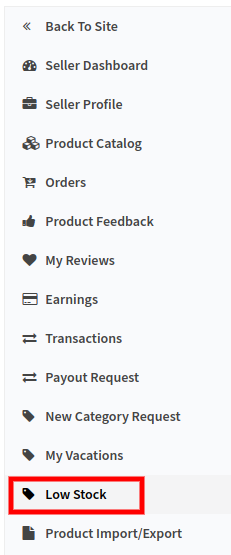
1. Enable Low Stock Notification: Enable the button to notify the sellers regarding the low stock notification. 2. Low Inventory Limit: Enter the stock level below which the seller will be notified regarding low stock. 3. When to Notify: Select when you will send the notification. It may be sent when the order is placed or after executing cron. 4. Send Notification From Select the email ID from which you want to send the notification.
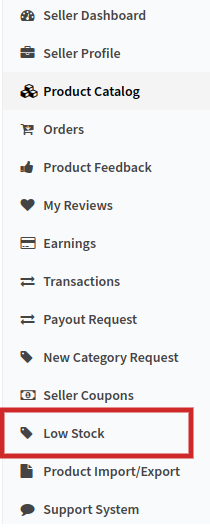
Once this functionality is enabled from the back-end of the Magento Marketplace module, the vendors can configure the low-stock setting from the Low-stock section of their dashboard.
Go to the configuration section of the Low Stock tab of the dashboard.
Low Inventory Limit: The sellers can enter the inventory limit below which they want to get notified. Receive Low Stock Notification: Select whether you want to receive the low stock notification or not.
4.2 Seller List
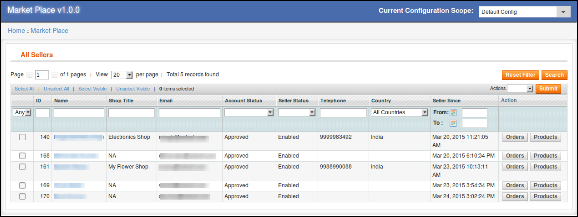
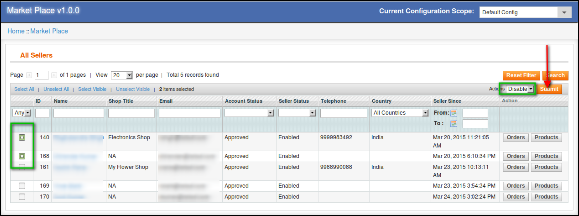
This page of the Magento marketplace extension has a list of all the sellers that are approved by the store owner.
The above list contains a list of all the sellers that are approved. There are buttons to go to the seller’s products and orders in front of each seller.
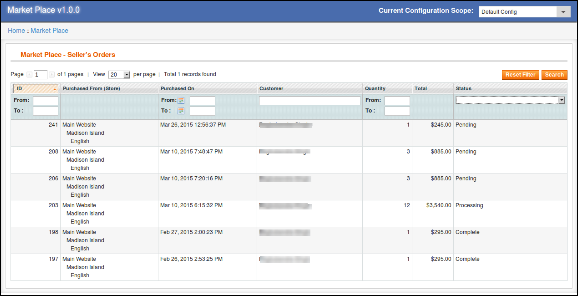
When you click on the Orders button than a new page opens consisting of the list of all the orders for that particular seller opens.
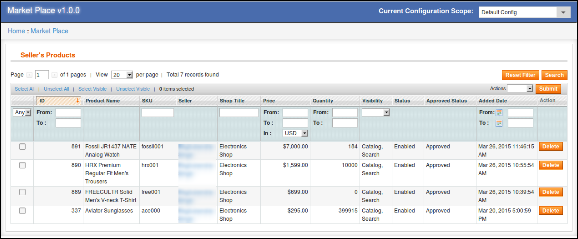
When you click on the Products button than a new page opens consisting of the list of all the products for that particular seller opens.
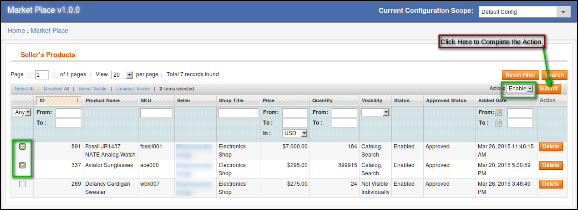
The is also a feature to enable or disable any seller using the Mass Actions feature of the Grid. To enable/disable any seller select the seller(s), choose the action (i.e. Enable or Disable) then click on the submit button to complete the action.
If a seller is disabled then all the products of that seller are also disabled and will not be visible at the storefront.
4.3 Sellers Products
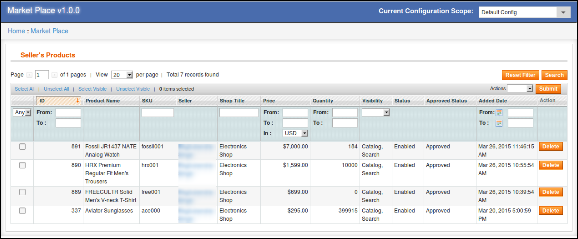
This page of the Magento multi-vendor marketplace extension consists of all the approved products added by the seller(s) to the store.
If the settings (i.e. Product Approval Required) is disabled, then, a product is approved directly when it is added by the seller and appears in this list. Otherwise, the product first appears in the Product Approval list.
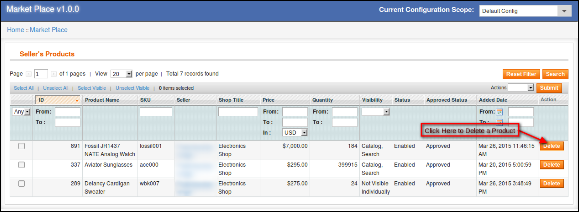
Delete Product: To delete a product, you have to click on the delete button in front of that product.
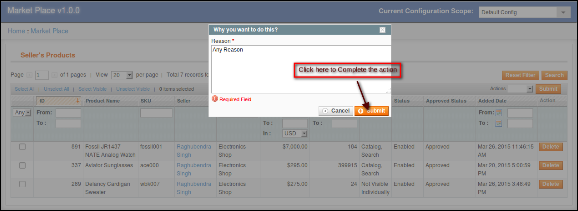
A pop-up will appear asking for the reason for the deletion of the product. To complete the action fill the reason and click submit.
A mail will be sent to the seller to notify the deletion of the product. The mail also contains the reason you provided for the deletion of the product.
Note:- The product delete action cannot be undone. Please use this feature carefully.
Enable/Disable Product: To change the status of any product, you have to use the Mass Action feature of the Grid. To enable/disable any product select the product(s), choose the action (i.e. Enable or Disable), then, click on the submit button to complete the action.
Note:- Once a product is disabled from the back-end of the Magento Multi-vendor Marketplace plugin, it will not be visible at the front. Avoid disabling products, only disable a product if it is very necessary.
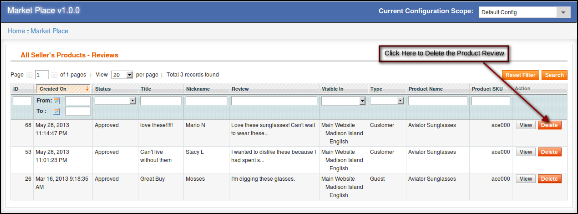
4.4 Product Reviews
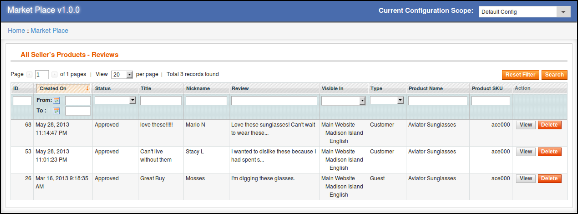
This page of the Magento multi seller marketplace extension contains a list of all the reviews done by customers on the seller’s products.
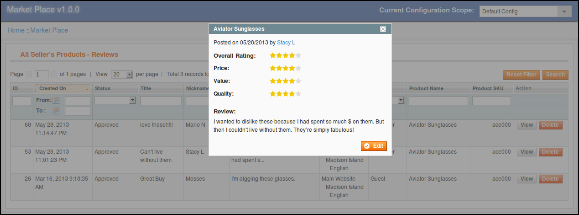
View Product Review: Most of the details of the product review are already mentioned in the grid but some of them are not. To view, all the details of any Product Review click on View Button in front of that review. A pop-up will appear in the back-end of the Magento multi-vendor marketplace plugin having all the details of the product review.
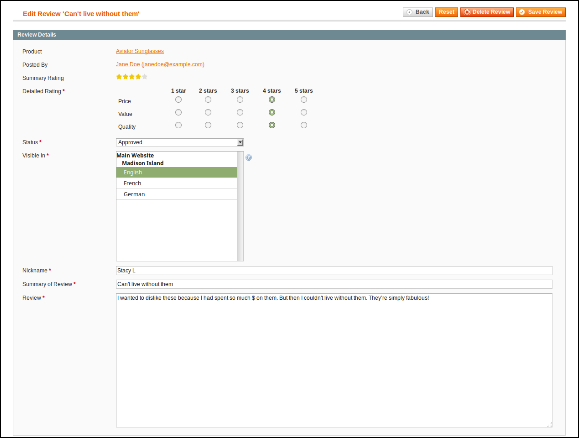
To edit the review you can click on Edit Button on the pop-up that will redirect you to the edit review page.
Delete Product Review: The Magento multi-vendor marketplace extension allows the store admin to delete the product reviews. To delete a product review, you have to click on the delete button in front of that product review on the list.
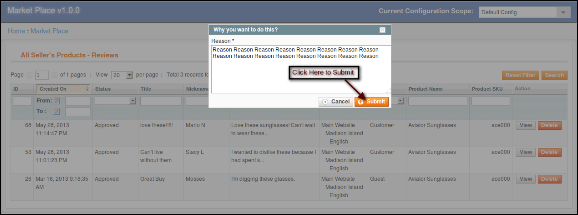
A pop-up will appear asking for the reason for the deletion of the product review. To complete the action fill the reason and click submit.
Note:- The product review delete action cannot be undone. Please use this feature carefully.
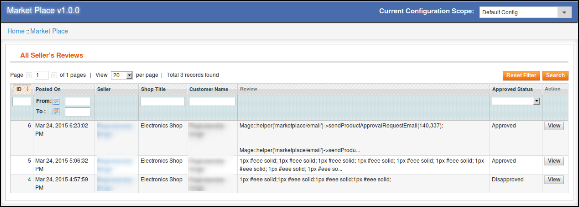
4.5 Sellers Reviews
This list contains a list of all the Sellers Reviews done by customers in the store.
If the settings (i.e. Seller Review Approval Required) is disabled then a seller review is approved directly when it is added by the customer and appears in this list. Otherwise, the review first appears in the Seller Review Approval list.
Note:- The Seller Reviews that are disapproved by the store owner also appear in this list.
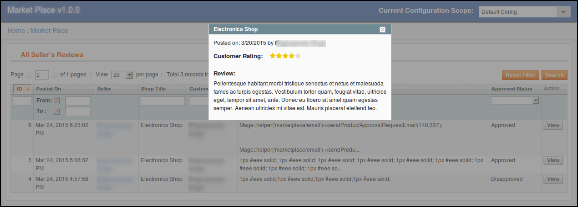
View Seller Review: To view all the details of a seller review you have to click on the View button in front of that review in the list.
On clicking the View button a Pop-up will appear having all the details of the corresponding seller review.
4.6 Seller Account Approval Request
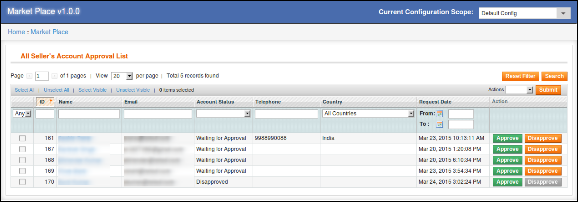
When a seller registers as a seller on your store than it first appears in this list of the Magento multi-vendor marketplace extension as shown in the image below. Then it is up to the store admin to approve or disapprove the seller account request.
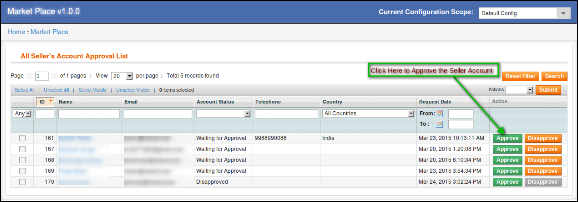
Approve Seller Account: To approve a seller account, you have to click on the Approve button in front of that seller on the list.
Once the Seller account is approved, it directly moves to the Sellers List and all the limits to the seller account are released.
A mail will be sent to the seller to notify the approval of the seller account.
Note:- The Seller Accounts that are approved by the store owner cannot be undone. Please use this feature carefully.
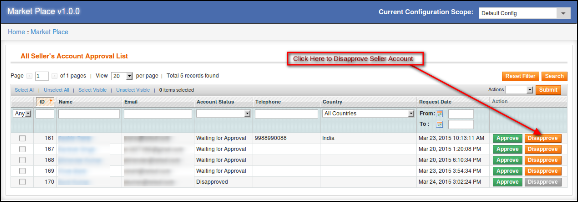
Disapprove Seller Account: To disapprove of a seller account, you have to click on the Disapprove button in front of that seller on the list.
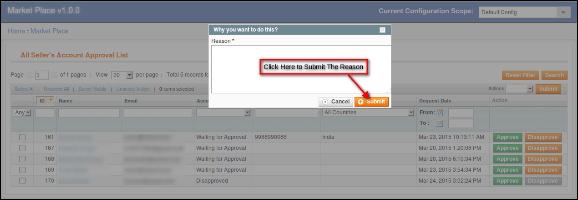
A pop-up will appear asking for the reason for the disapproval of the seller account. Fill the reason and then submit the form to complete the action.
A mail will be sent to the seller notifying the disapproval of the seller account. The reason provided in the pop-up will also be sent in this mail.
Note:- Once a seller is disapproved then he can again apply for the seller account and whenever a seller do this the store owner is notified through a notification email.
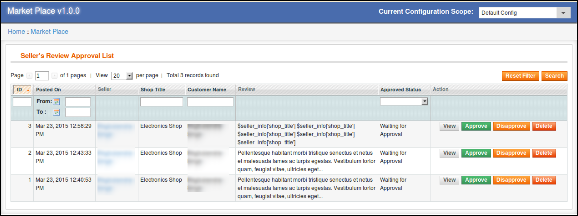
4.7 Seller Review Approval List
This list of Magento multi-vendor marketplace contains all the Seller Reviews that are just posted by the customers and no action is taken on them.
If the settings (i.e. Seller Review Approval Required) is enabled then only any seller review posted by any customer appears in this list otherwise it directly appears in the Seller Reviews list.
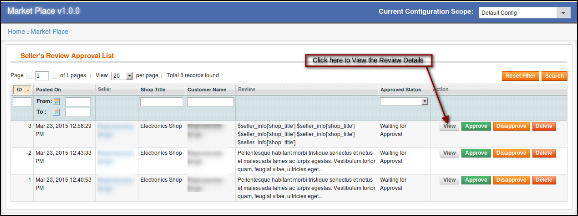
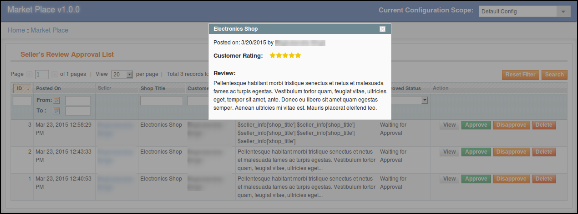
View Seller Review: To view all the details of a seller review you have to click on the View button in front of that review in the list.
On clicking the View button a Pop-up will appear having all the details of the corresponding seller review.
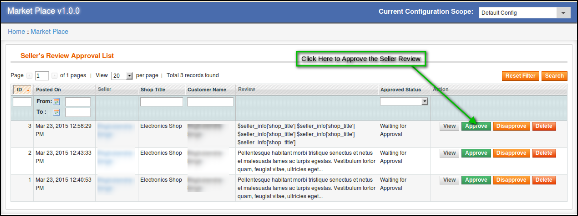
Approve Seller Review: To approve a seller review, you have to click on the Approve button in front of that review on the list.
Once a seller review is approved it becomes visible in the front end and is transferred to the seller review list.
Note:- This action cannot be undone. Please use it carefully.
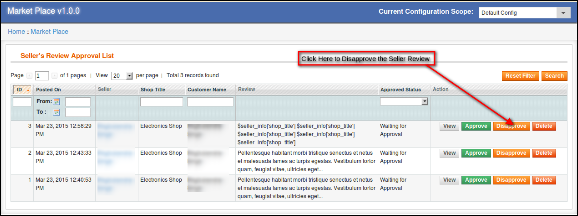
Disapprove Seller Review: To disapprove of a seller review, you have to click on the Disapprove button in front of that review on the list.
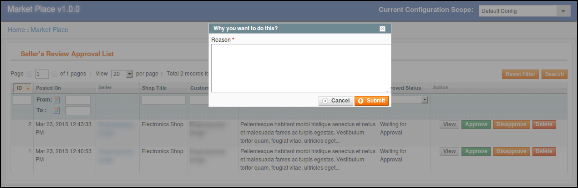
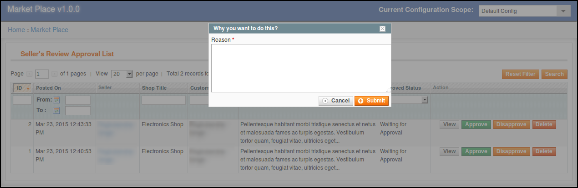
A pop-up will appear asking for the reason for the disapproval of the seller review. Fill the reason and then submit the form to complete the action.
Once a seller review is disapproved it is transferred to the seller reviews list and cannot be found anywhere else.
Note:- This action cannot be undone. Please use it carefully.
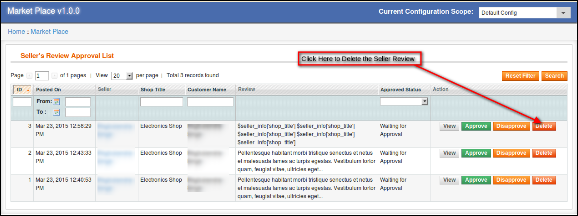
Delete Seller Review: To delete a seller review, you have to click on the Delete button in front of that review on the list.
A pop-up will appear asking for the reason for the deletion of the seller review. Fill the reason and then submit the form to complete the action.
Once a seller review is deleted it is completely removed from everywhere.
Note:- This action cannot be undone. Please use it carefully.
4.8 Product Approval Request
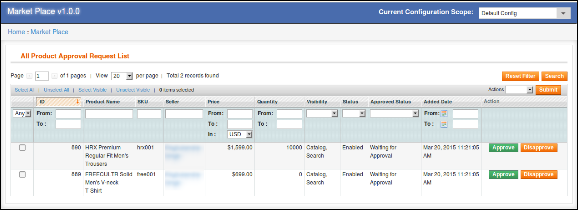
When a seller adds a product then, first of all, it appears here and the store owner is also notified for the same through the mail. Then it is up to the store owner to approve or disapprove the product.
If the setting (i.e. Product Approval Required) is on then only a new product is added appears in this list otherwise it directly appears in the Product List and is automatically approved and enabled.
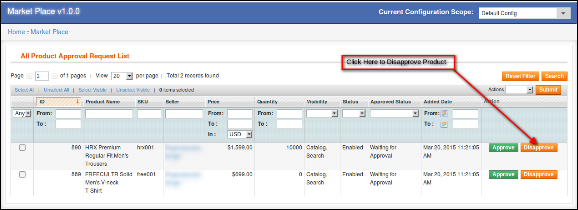
Disapprove Seller Product: To disapprove of a product, you have to click on the Disapprove button in front of that review on the list.
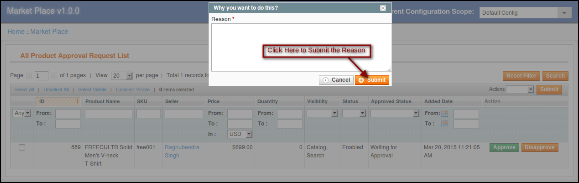
A pop-up will appear asking for the reason for the deletion of the seller review. Fill the reason and then submit the form to complete the action.
Once a product is disapproved a mail will be sent to the seller notifying the disapproval of the product. The disapproved products also appear on the same list. The Store admin can approve them anytime.
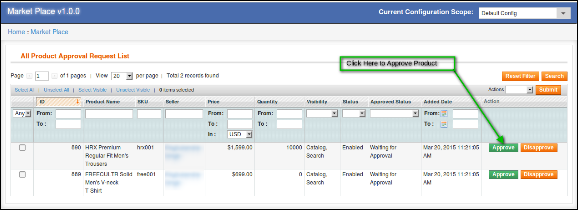
Approve Seller Product: To approve a product, you have to click on the Approve button in front of that review on the list.
Once a product is approved it transfers from this list to the Sellers Products list.
Note:- This action cannot be undone. Please use it carefully.
4.9 Category Request List
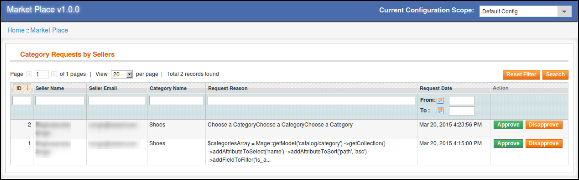
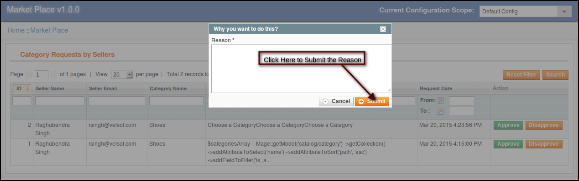
A seller can add the product to categories that are allowed to that seller. In case, the seller needs to add a product to a category that is not allowed, then, the seller can request for the same. All those category requests appear in the Category Request by Seller list of the Magento multivendor marketplace module as shown below. A mail is also sent to the store owner to notify the Request for Category. Then it is up to the store owner to approve or disapprove the request.
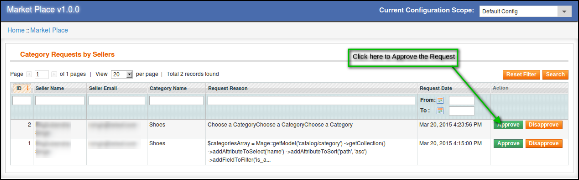
Approve Category Request: To approve a category request, you have to click on the Approve button in front of that category request on the list.
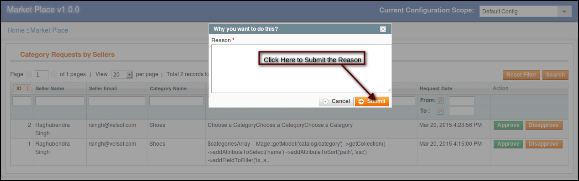
A pop-up will appear in the back-end of the Magento multi-vendor marketplace extension asking for the reason for approving the category request. Fill the reason and then submit the form to complete the action.
Note: This action cannot be undone. Please use it carefully.
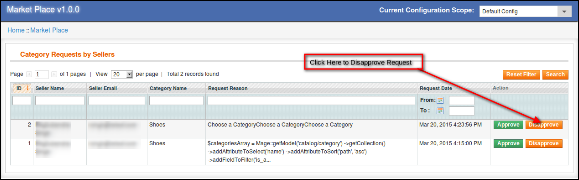
Disapprove Category Request: To disapprove of a category request, you have to click on the Disapprove button in front of that category request on the list.
A pop-up will appear asking for the reason for disapproving the category request. Fill the reason and then submit the form to complete the action.
Note:- This action cannot be undone. Please use it carefully.
4.10 Reports
4.10.1 Reports -> Best Selling Products
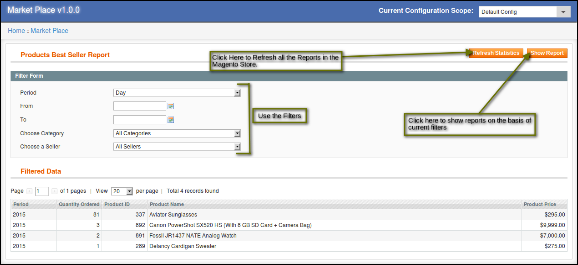
The Report tab of the Magento multi-vendor marketplace helps the store owner to identify the best selling products added by the sellers. The store owner can also use multiple filters for the best selling product reports.
The filters help the store owner identify best selling product :
For a date range.
For a specific category.
For a specific seller.
Note:- Sometimes you may be unable to find any data in this report. In that case, you have to refresh the report statistics and to do that you have to do the following:
Go To Reports -> Refresh Statistics -> Select The Desired Reports to Refresh -> Submit
Or
Click on the Refresh Statistics Button on the top of this page.
4.11 Transactions and Earnings
4.11.1 Transactions and Earnings -> Commissions
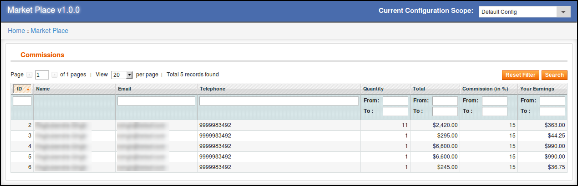
The Commission list of the Magento multi-vendor marketplace extension contains all the commissions earned by the store owner on several orders with commission percentage and total sale of the seller.
4.11.2 Transactions and Earnings -> Category wise commissions
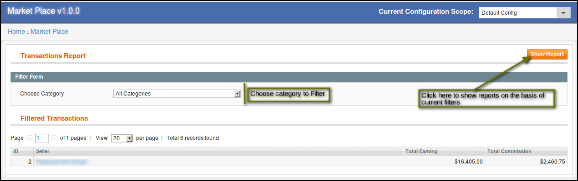
The Transactions and Earnings page of the Magento multivendor marketplace module shows the report for the commissions earned by the store owner. This report shows the total commission earned by the store owner from a seller. The store owner can also use filters to filter the commission reports category wise.
This feature offered by the Magento multi-vendor marketplace extension helps the store owner to identify commissions from different categories and which category has produced how much commission.
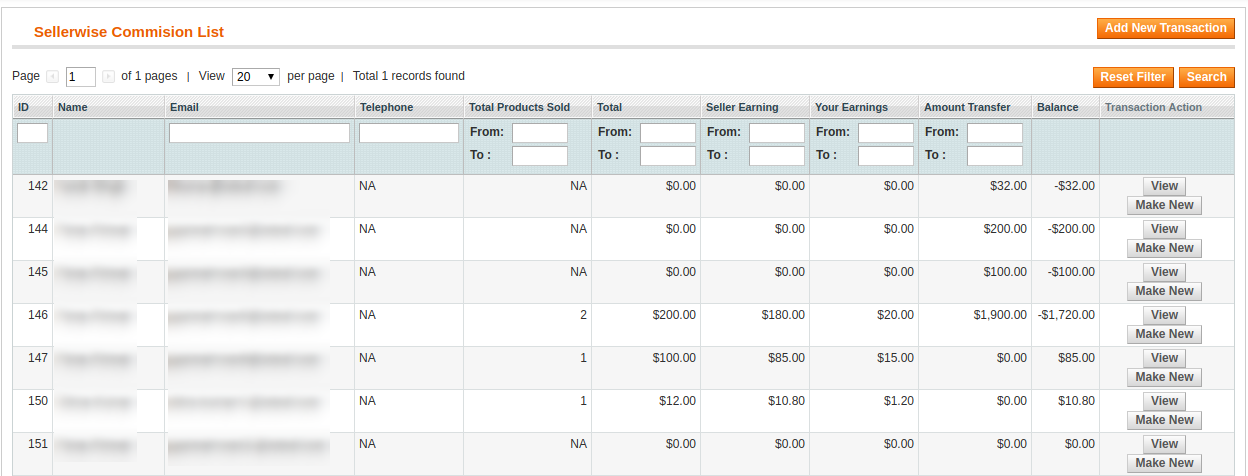
4.11.3 Transactions and Earnings -> Seller wise transaction
The system does not automatically transfer the amount in the seller’s account. Hence the store owner has to keep records of the balance for all the sellers and manually transfer money to the seller and then enter the details of the transaction to keep a record of the same.
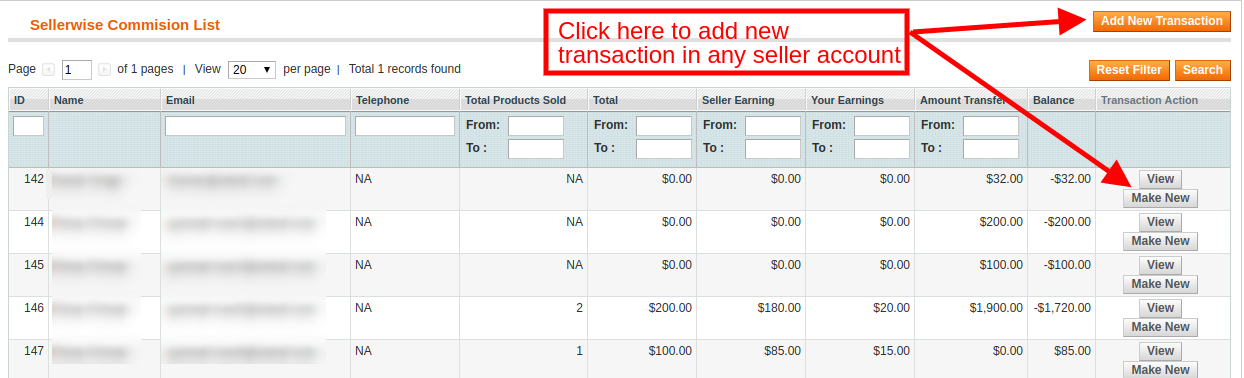
This list contains all the balance variations for all the sellers in the system. The list shows total sales of the seller, seller earning, your commission. This list helps the store owner to identify the earning and categorize them seller wise.
4.11.3.1How to View Transactions Details?
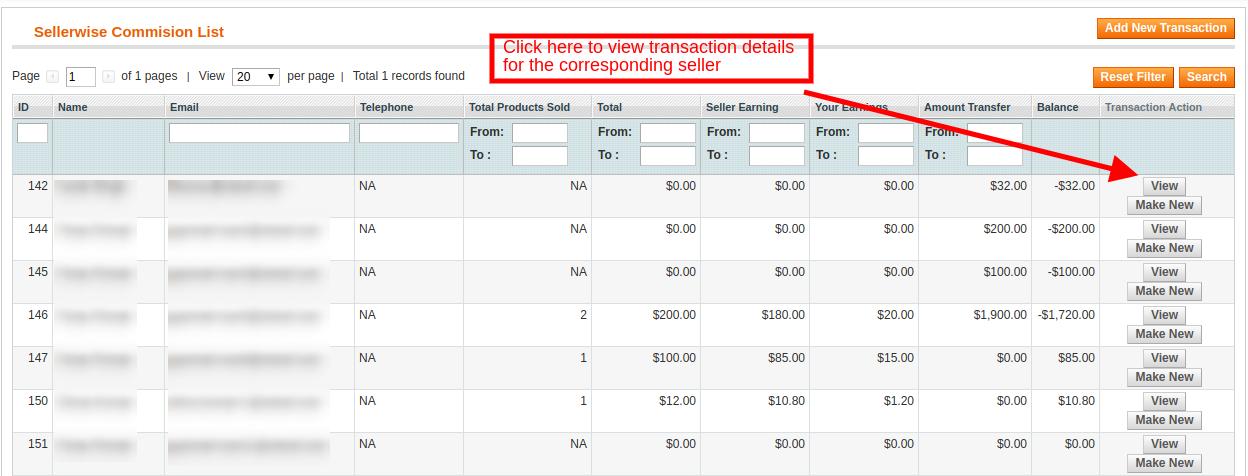
To view the details of the transactions done for a particular seller, you have to click on the View button in front of that seller.
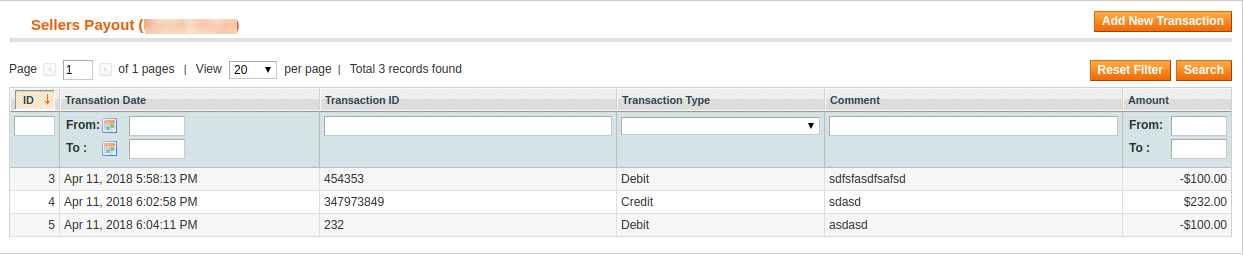
On clicking on the View button in front of any seller a new page will open having a list of all the transactions done for the corresponding seller.
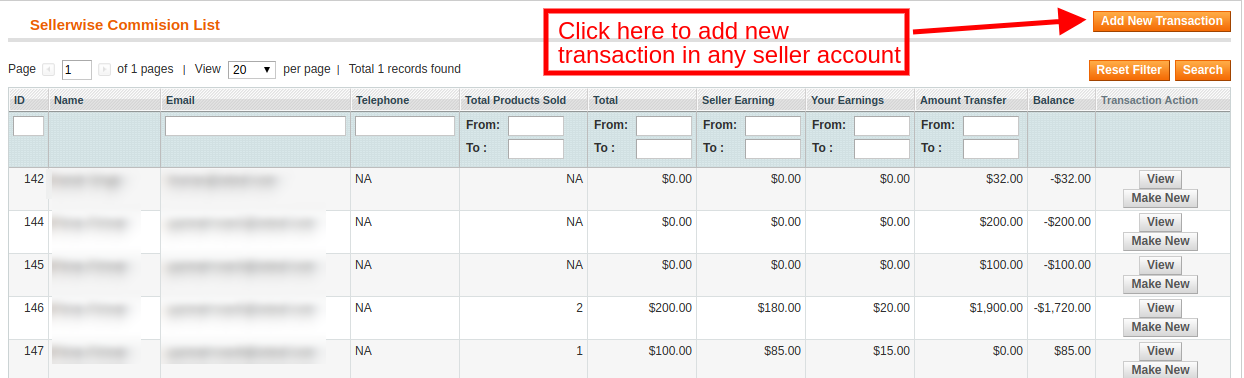
You can also add a new transaction for the current seller by clicking on the Add New Transaction button on the top right portion of the Magento multi-vendor marketplace plugin.
4.11.3.2 How to Add New Transactionin the seller’s payout details?
To add a new transaction detail for any seller, you have to either click on the Add New Transaction button corresponding to respective sellers.
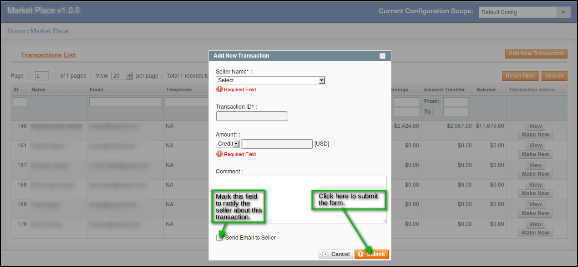
On clicking the button a pop-up appears asking for the details of the transaction. Fill the form and submit the form to complete the action.
The various fields of the pop-up are discussed:
Seller Name: Select the name of the seller from the drop-down list. Transaction ID: Enter the transaction ID here. Amount: Select whether the amount was debited or credited and then enter the amount. Comment: Enter a comment regarding the transaction.
Additionally, the admin can even add a new transaction in the seller’s account by clicking on the Make New button corresponding to each seller account.
Note:- This action cannot be undone. Please use it carefully.
4.11.4 Transactions and Earnings -> Seller Payout
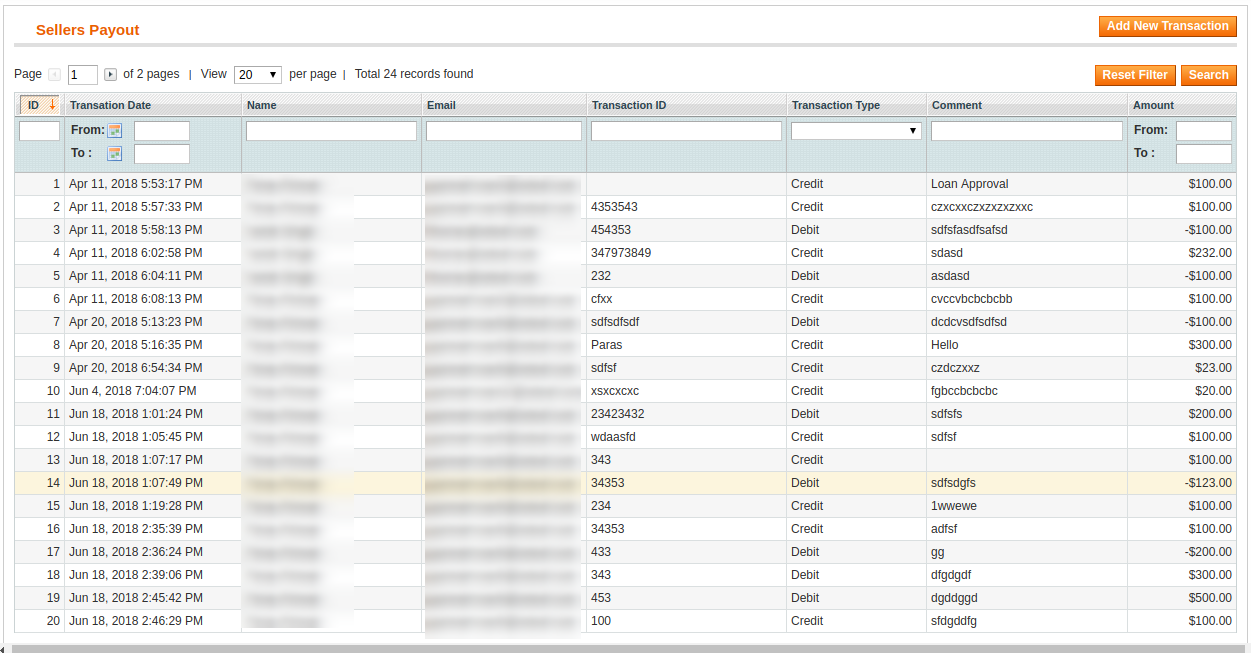
This page contains a list of all the transactions done to date to all the sellers available in the system.
You can also add a new transaction for any seller by clicking in Add New Transaction button on the top right of the above page.
4.11.5 Transactions and Earnings -> Seller Payout Request
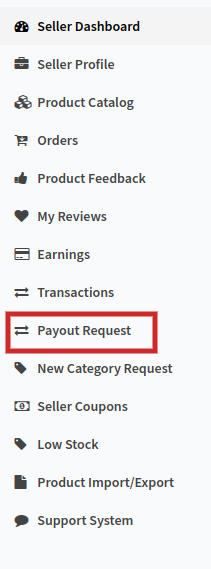
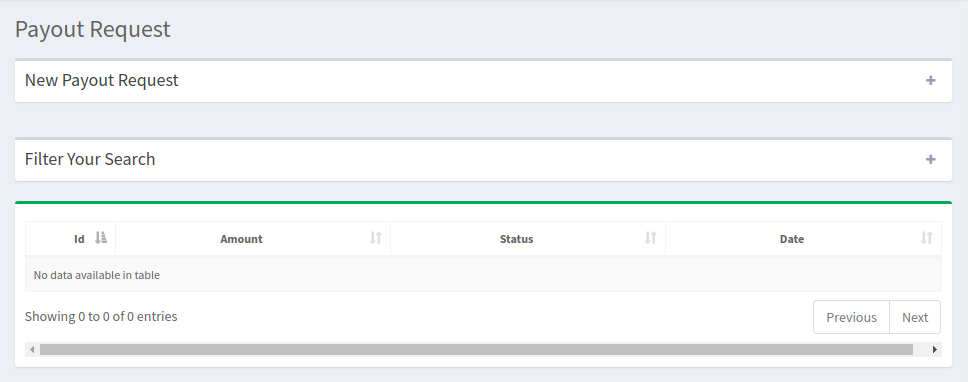
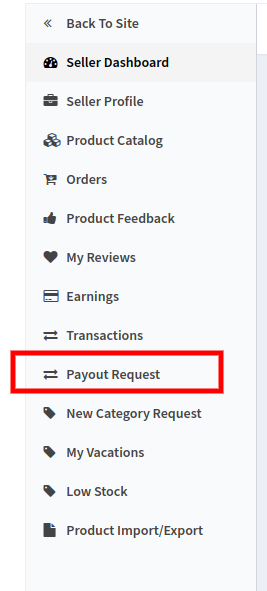
The seller can send a payout request to the store admin from their dashboard. The seller’s request is viewed by the admin from this tab of the Magento Marketplace extension. The Dashboard of the seller includes an option of Payout Request.
On clicking this link, the seller will be redirected on the section of the dashboard as shown in the image below:
4.11.5.1 How can the sellers add a new payout request from their dashboard?
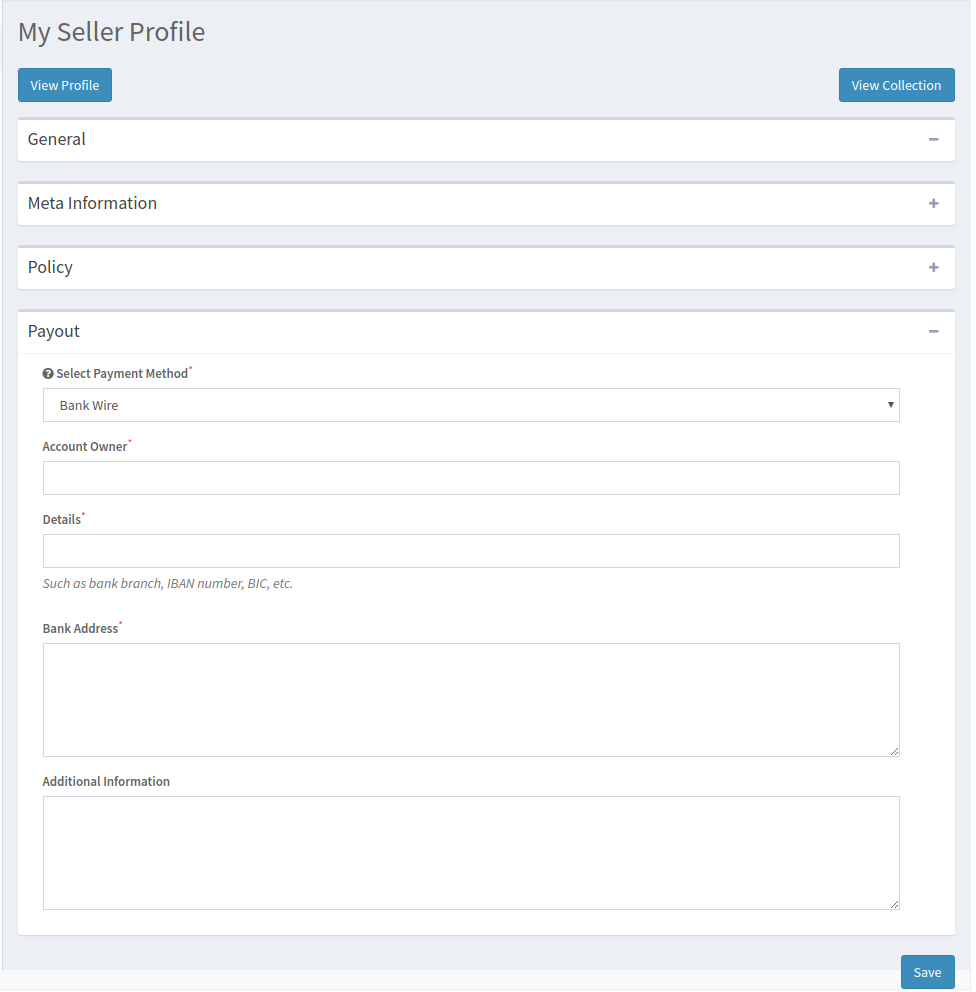
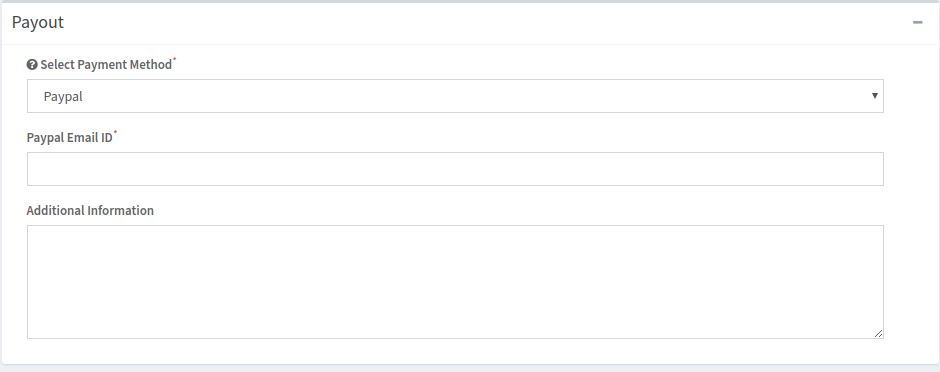
Before the seller can request for the payout, he needs to configure the payout the Profile menu of the Dashboard. The various fields required to be filled in this section are discussed below:
Select Payout Method: The various payout methods in the drop-down menu. Select the method that you want to use for the payout. There are three options available by default:
Bank Wire
Payment By Cheque
PayPal
1. Bank Wire:
On selecting, Bank Wire options, you’ll be required to provide the following information.
Account Owner: Enter the name of the owner of the account in which the amount is to be transferred. Details: This section includes the bank details such as bank branch, IBAN, BIC, etc. Bank Address: Enter the address of the bank. Additional Information: Provide any information that you would like to share with the store admin.
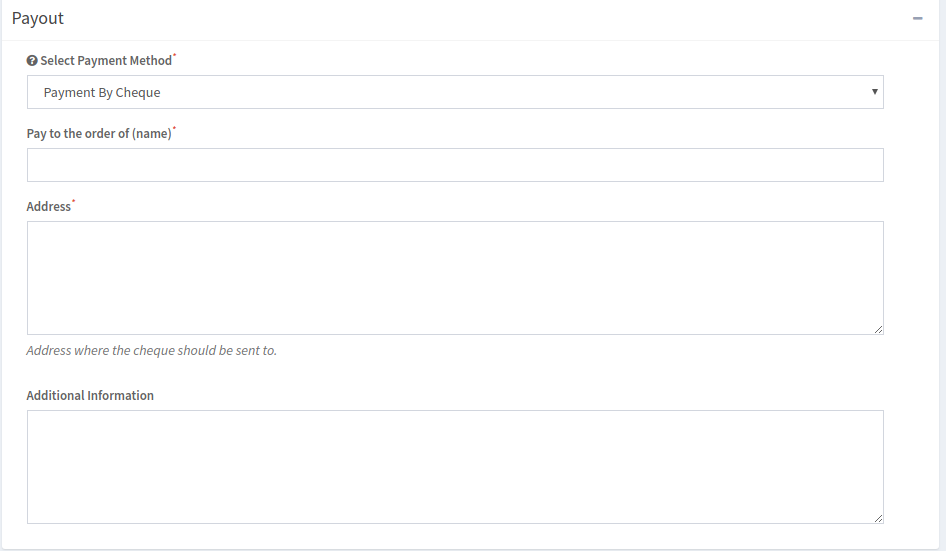
2. Payment By Cheque
Pay to the order of entering the name to which the cheque is to be issued. Address: Provide the address for sending the cheque in this section. Additional Information: Provide any information that you would like to share with the store admin.
3. PayPal
In case you select, PayPal, you will be required to enter your PayPal Email ID. The additional information section allows you to provide any information that you would like to share with the store admin.
Once the payout method is configured in the seller’s profile, the vendor becomes eligible to send the payout requests.
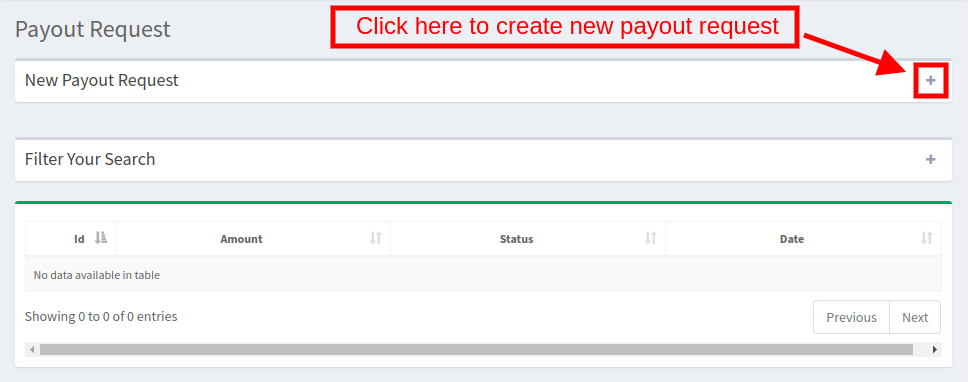
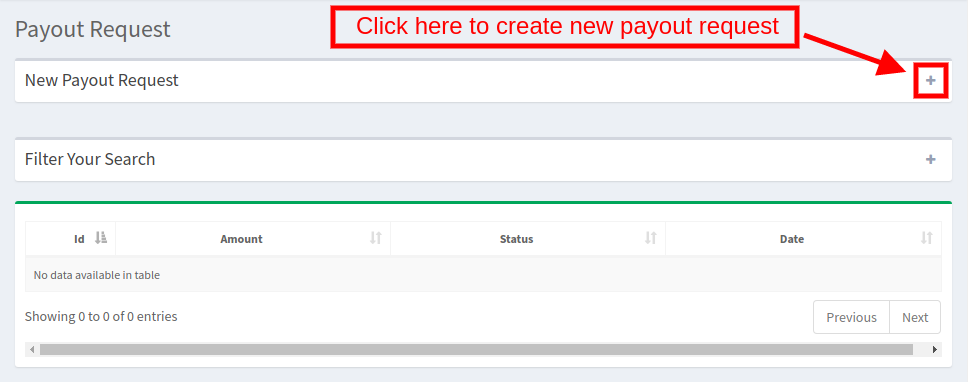
To add new payout request click on the ‘+’ in the New Payout Request section as shown in the image below:
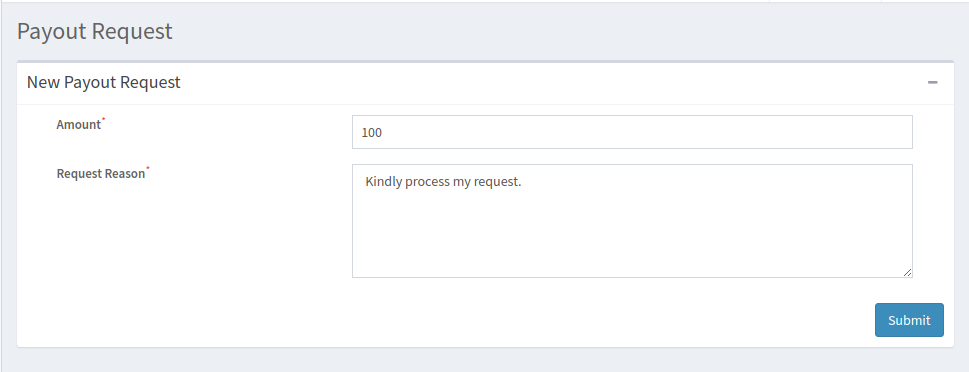
Fill up a small form to send the request.
Amount: Enter the amount of the payout request. Request Reason: Enter the reason for the payout request.
The payout request is, then, send to the admin for approval.
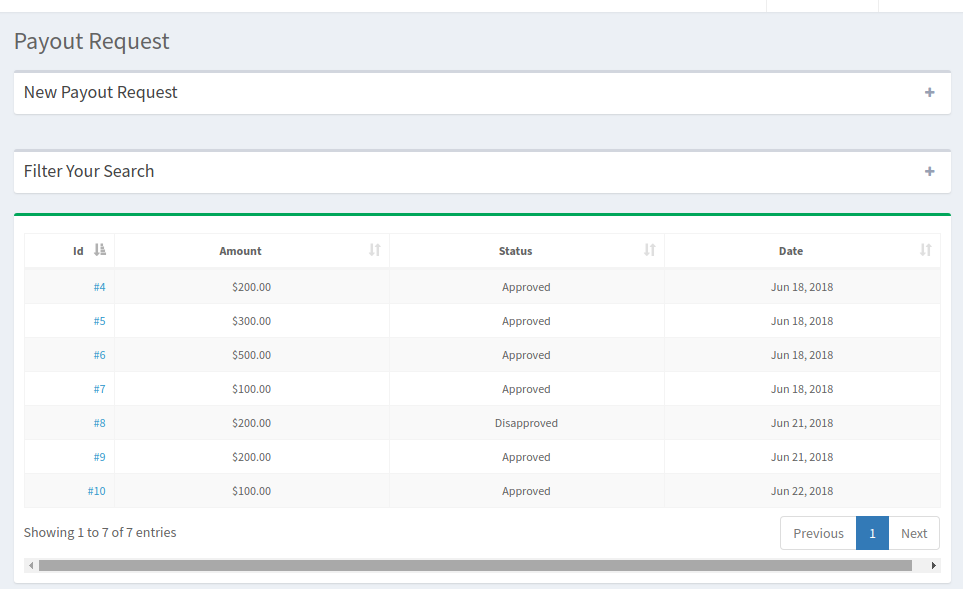
The payout requests that are approved or disapproved or waiting for approval can be viewed in the payout request section as shown below:
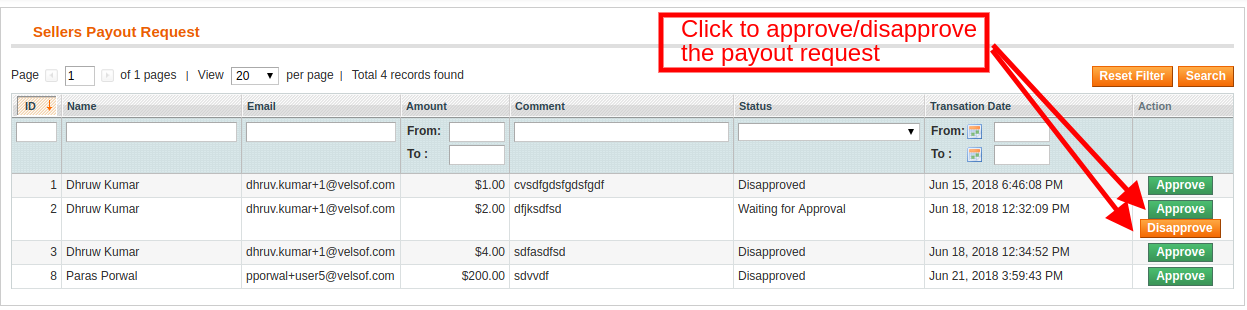
The store admin can view all the payout requests of the sellers of the marketplace in the back-end of the Magento Multi-vendor marketplace extension.
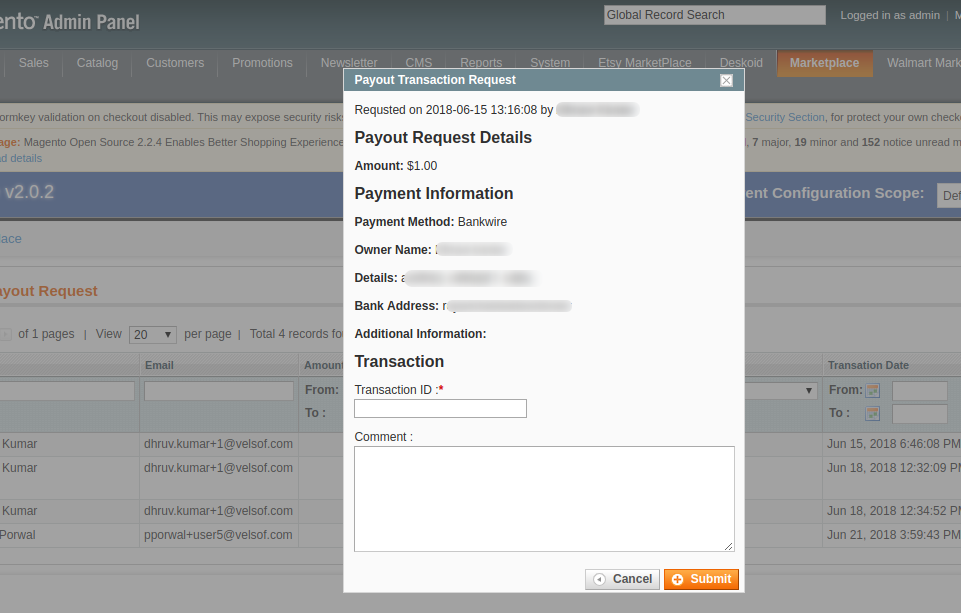
On clicking on the Approve button, a popup will be shown. Enter the transaction ID and comment to approve the request of the seller.
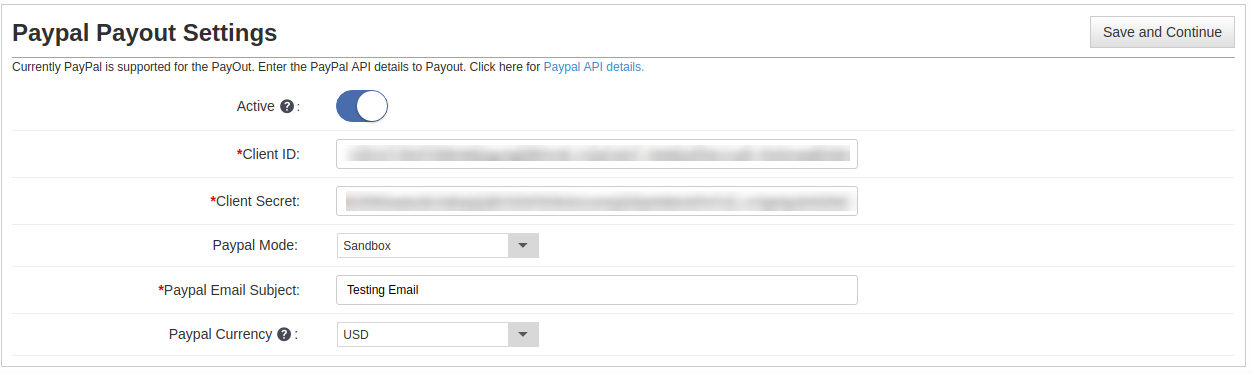
4.11.6 Transactions and Earnings -> PayPal Payout Settings
The PayPal Payout Settings of the Magento Multi seller Marketplace extension allows the store admin to enable the PayPal methods for the payout. Enter the required details as discussed below:
Active: Toggle the button to activate the PayPal payment method. Client ID: Enter the Client ID of your PayPal account. Client Secret: Enter the Client Secret of the PayPal account. PayPal Mode: Select the PayPal mode from the drop-down menu. PayPal Email ID: Enter the email ID used in your account. PayPal currency: Select the default currency for the PayPal transaction.
4.12 Email Templates
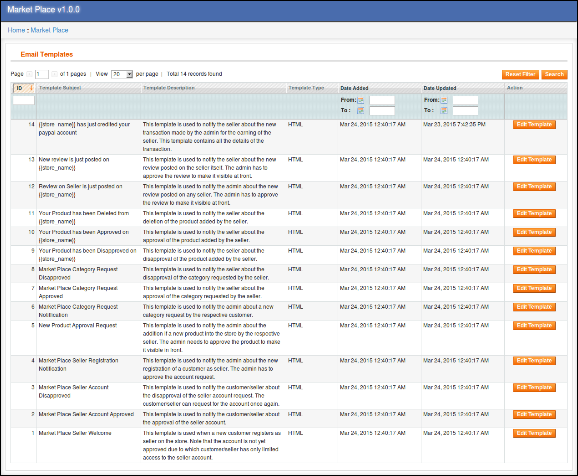
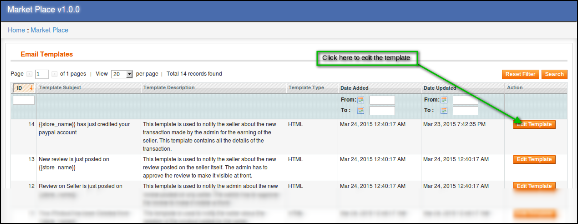
The Email Templates tab of the Magento multi-vendor marketplace module contains a list of all the email templates that are used in the system with all the details of the email templates.
Edit Email Template: To edit an email template click on the Edit Template button in front of any email template.
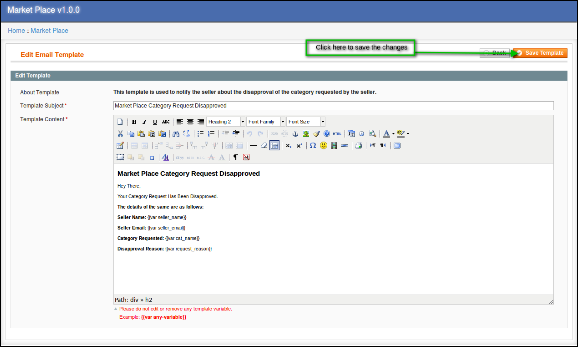
On clicking on the Edit Template button a new page opens having a form for the email template. You can change the email template as desired from the admin interface of the Magento multivendor marketplace.
To save the changes made in the email template click on the Save Template button on the top right of the above page.
Note:- While editing the email template please keep in mind that you don’t edit any text inside the curly brackets (i.e. {{var any_var}}).
4.13. Vacation Mode
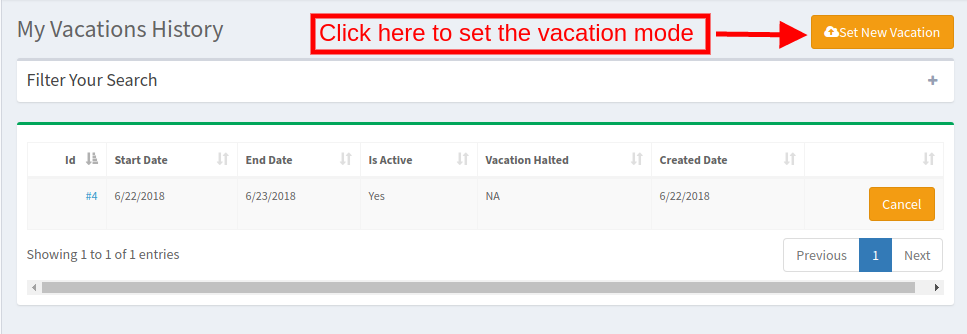
The sellers get an option to disable their shop from the marketplace for a particular period. The request of the sellers to go on vacation mode can be viewed in this section of the Magento Marketplace module.
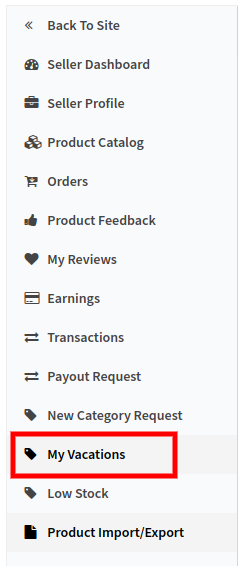
To set the vacation mode, the sellers can go to the Vacation mode tab of their dashboard.
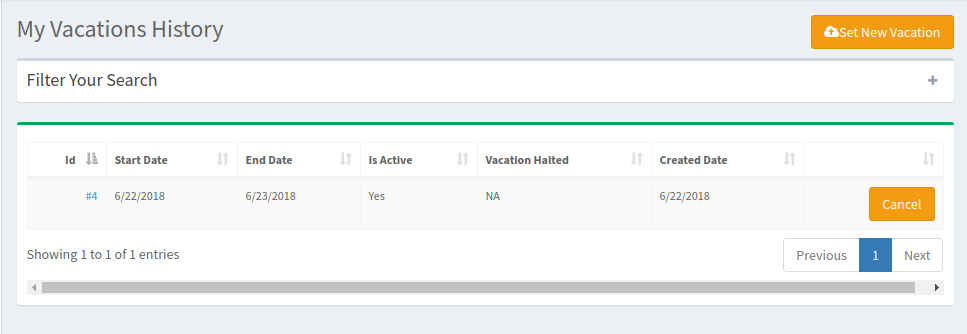
The tab shows the entire vacation history of the seller as shown in the image below:
4.13.1 How to Set the Vacation Mode?
To set the vacation mode, click on the ‘Set New Vacation’ button.
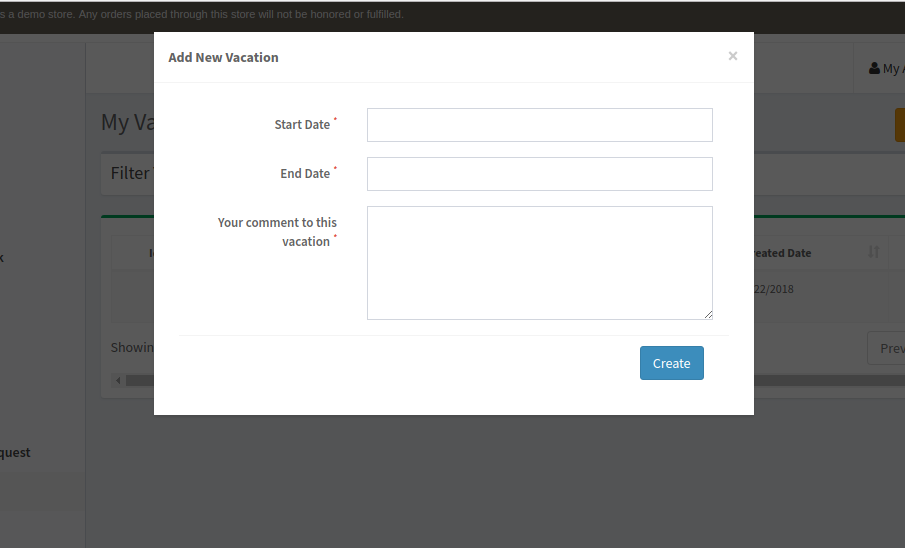
On clicking the button, a popup will appear as shown in the image:
Start and End Date: Enter the start and end date of the vacation. Your comment to this Vacation: Enter a comment for the vacation mode.
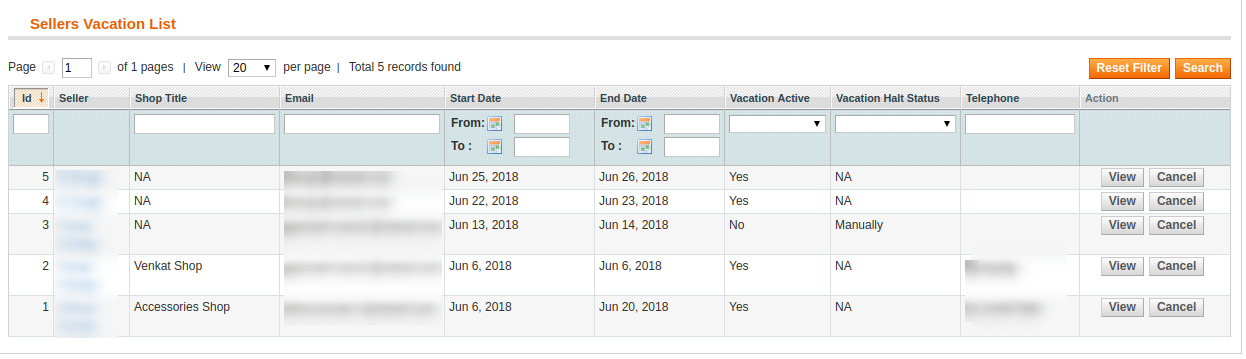
The admin can view the list of the seller who is on vacation in the Vacation tab of the Magento Marketplace plugin.
To see the details of the vacation, click on the View button.
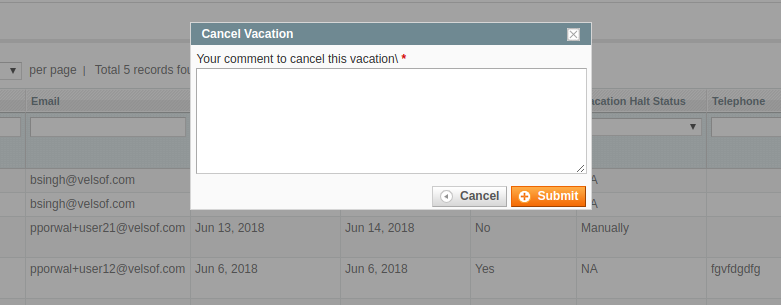
The admin can cancel the request by clicking on the Cancel button.
A popup will be displayed. Enter the reason for canceling the vacation mode and submit.
An email notification is sent to the seller informing them about the cancellation of the vacation.
4.14. Bulk Import/Export
The admin can offer this feature of bulk import and export to the sellers by enabling the same from the back-end.
If enabled the seller can import or export of the products in bulk from their dashboard.
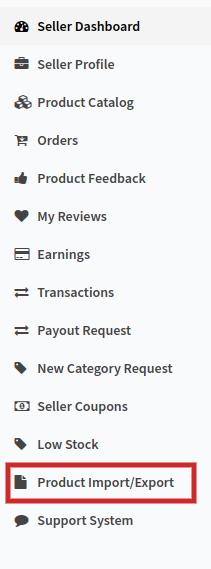
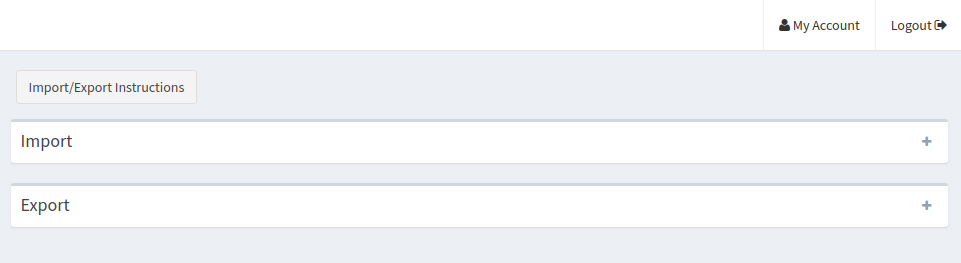
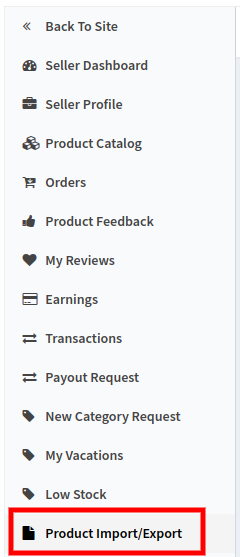
The vendors can import/export the products in bulk from the Product Import/Export tab as shown below:
4.14.1How to Import the products inbulk?
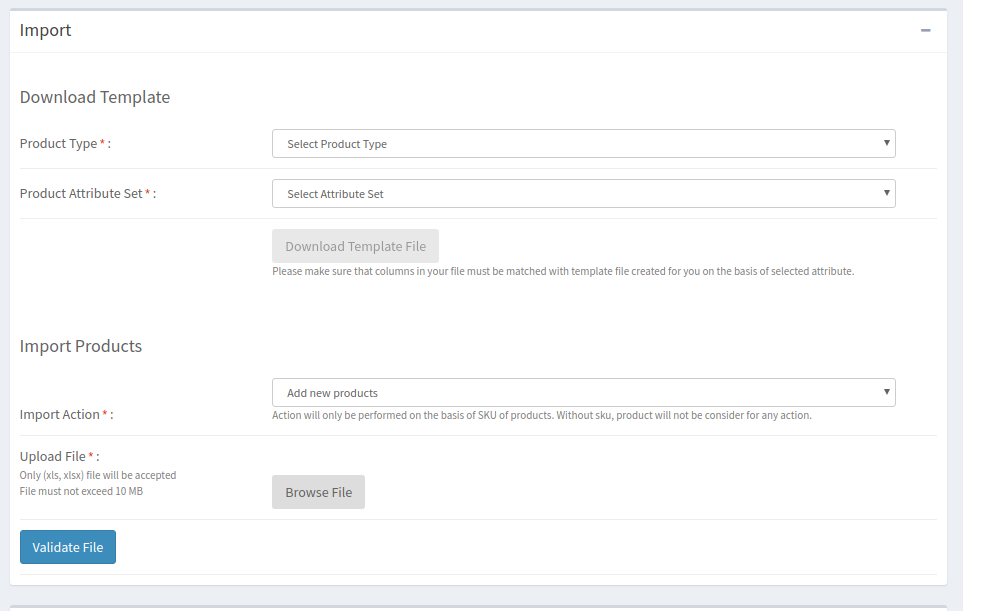
Product Type: Select the type of product that you are uploading. The Magento Multi seller Marketplace Plugin supports all type of products, that is, simple, configurable, virtual and others.
Product Attribute Set: Select the attribute set of the products from the drop-down list.
Download Template File: You can download the template file in an excel sheet for the selected attribute by clicking on this button.
Please make sure that columns in your file must be matched with the template file created for you based on the selected attribute.
Import Action: Select the import action from the drop-down list. Action will only be performed based on the SKU of products. Without SKU, the product will not be considered for any action.
Upload File: Upload the file with the product details here.
Click on the Validate File to complete the import.
4.14.2 How to Export the Products in Bulk?
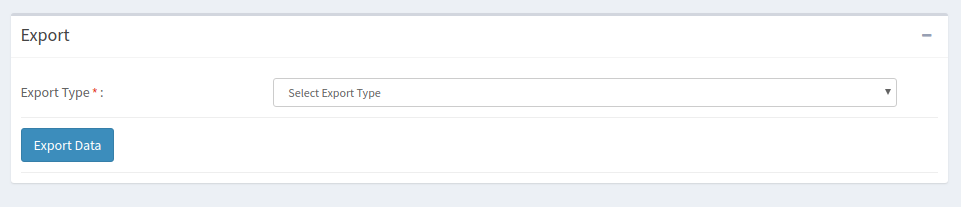
The seller can export the product details listed in the marketplace from this section. Select the Export Type from the drop-down menu and click on Export.
The details will be exported in an excel sheet.
4.15. Cron Instruction
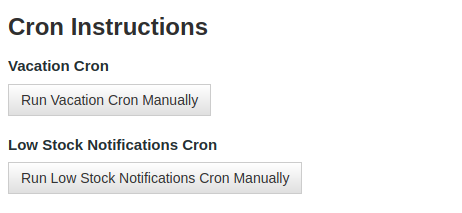
This tab offers two cron options. Execute vacation cron to implement the changes made in the Vacation tab of Magento Multi-vendor Marketplace module in the front-end of the marketplace.
Run Low Stock Notification Cron to send the low stock notifications email to the sellers.
5.0 Register As Seller Field – Register Page
If a new customer is registering in the Magento marketplace store, then, there is an additional field on the Register Page. If the customer wants to Register as Seller than the customer has to mark this field.
Once the account is created, the sellers get access to the dashboard.
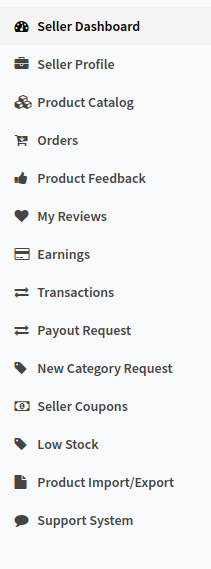
The dashboard of the seller offers several options to the sellers as shown in the image below:
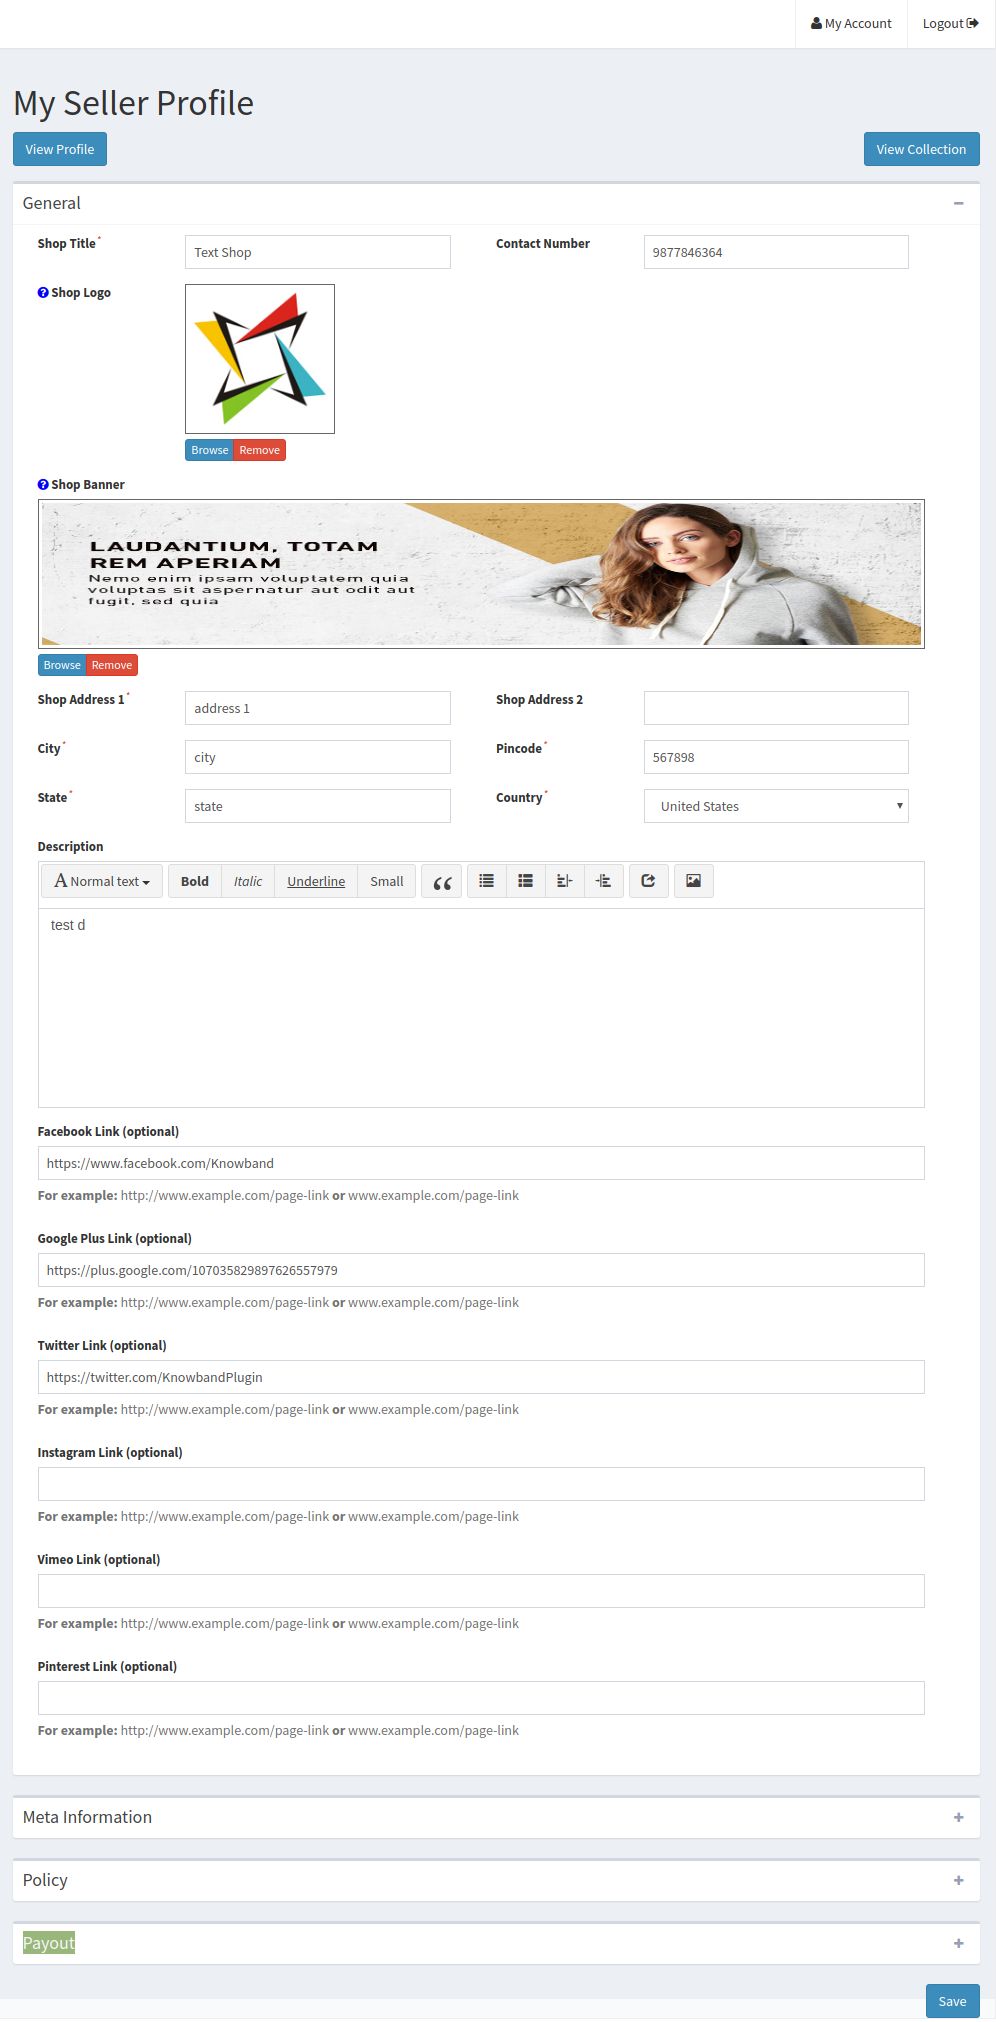
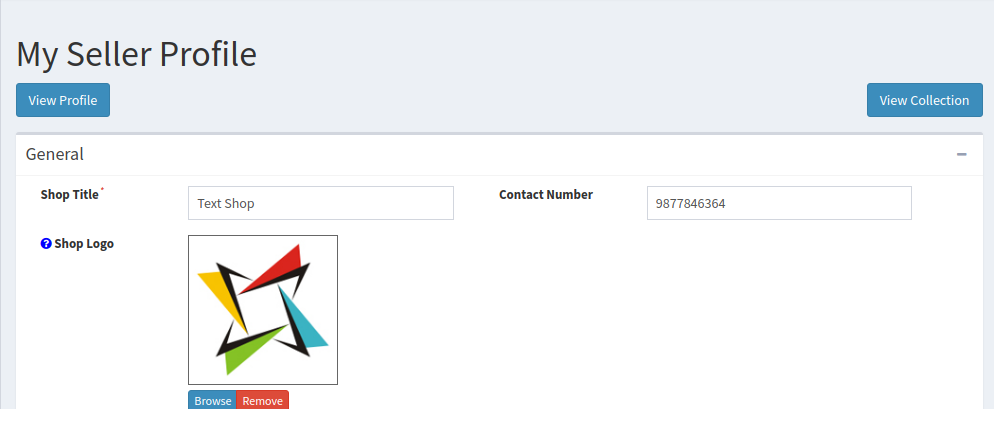
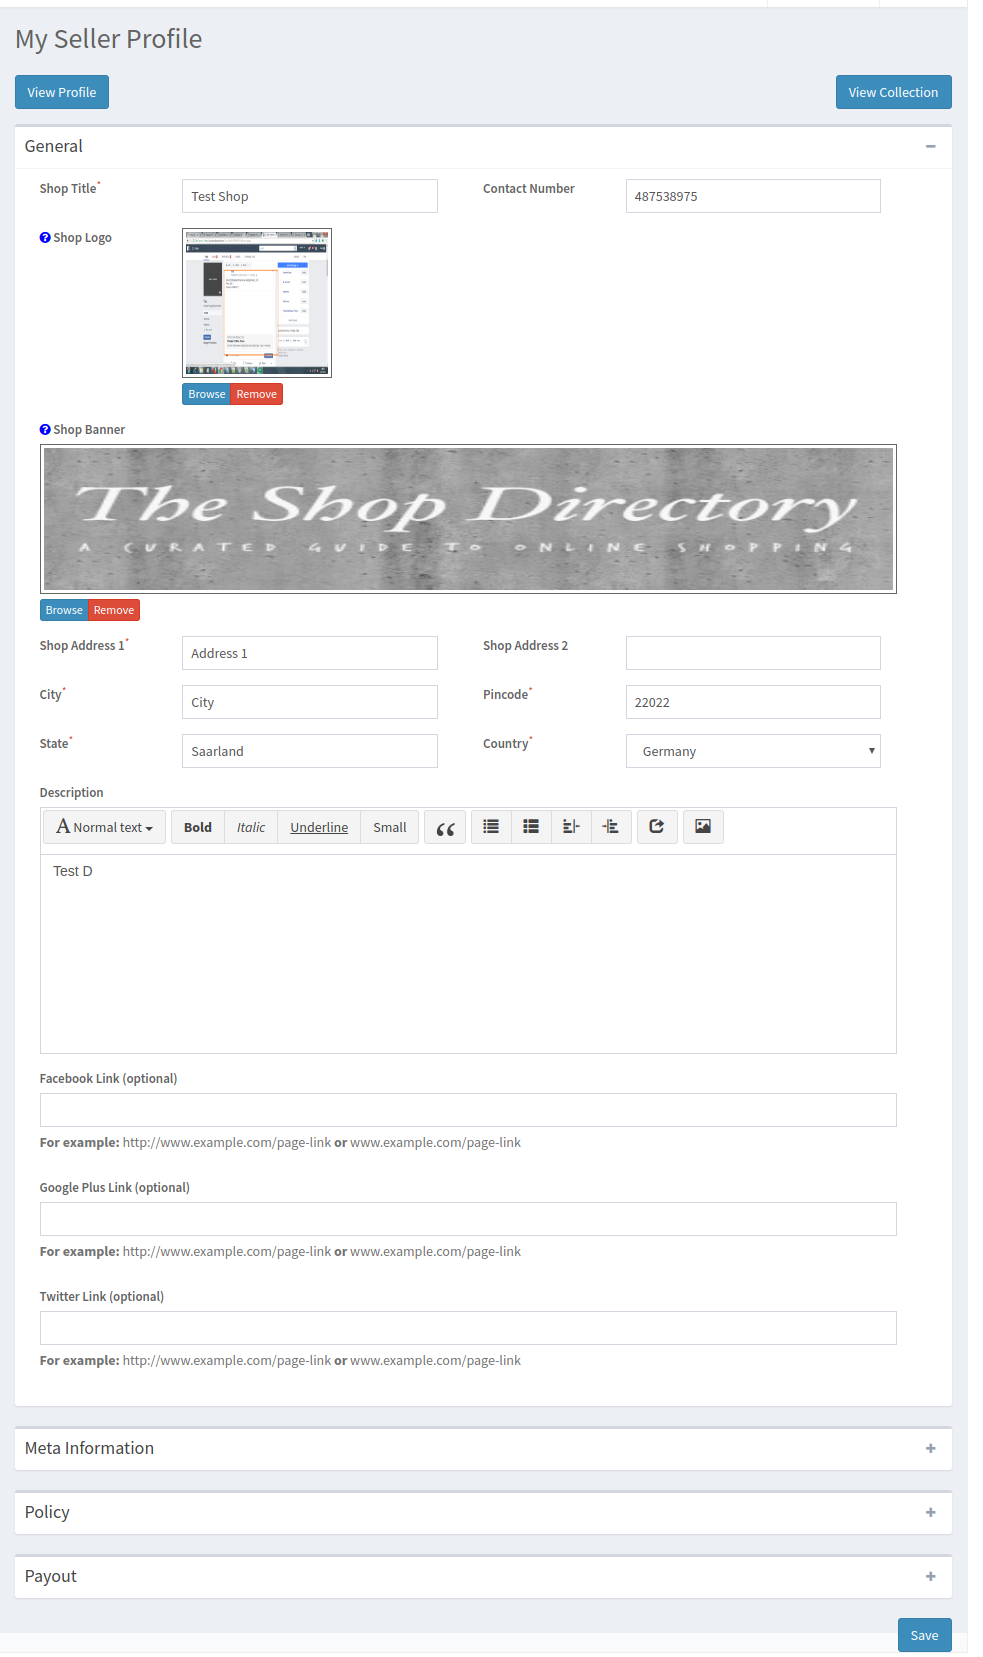
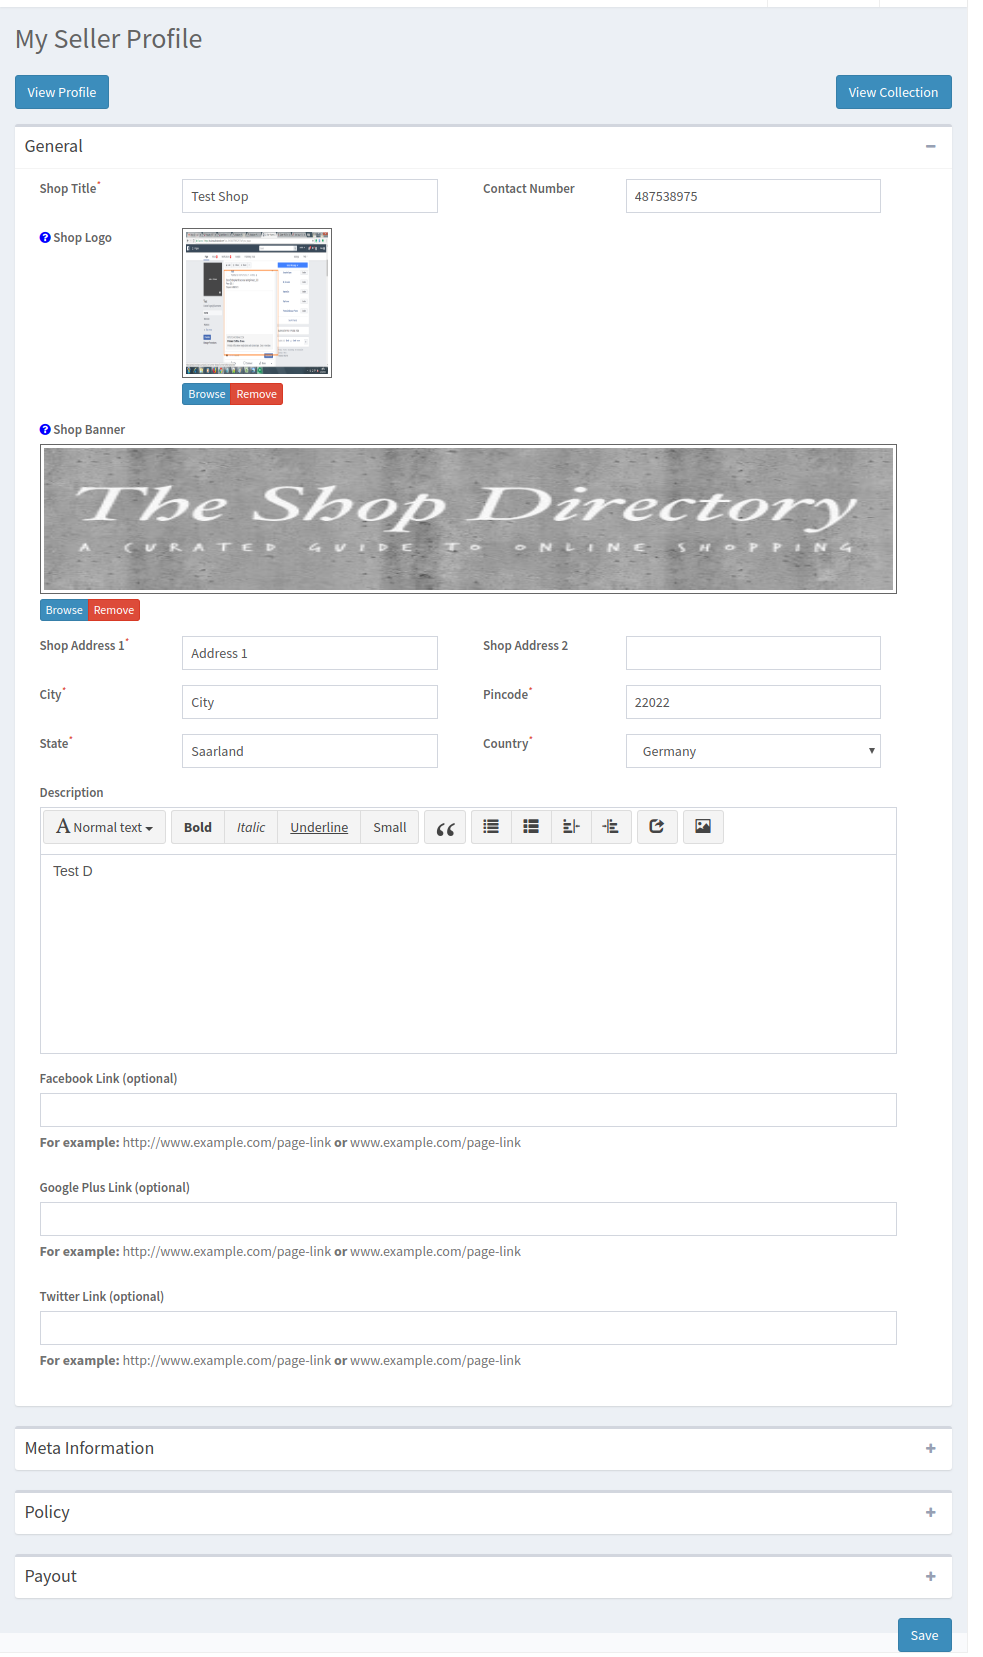
They can configure their profile by clicking on the Seller Profile tab.
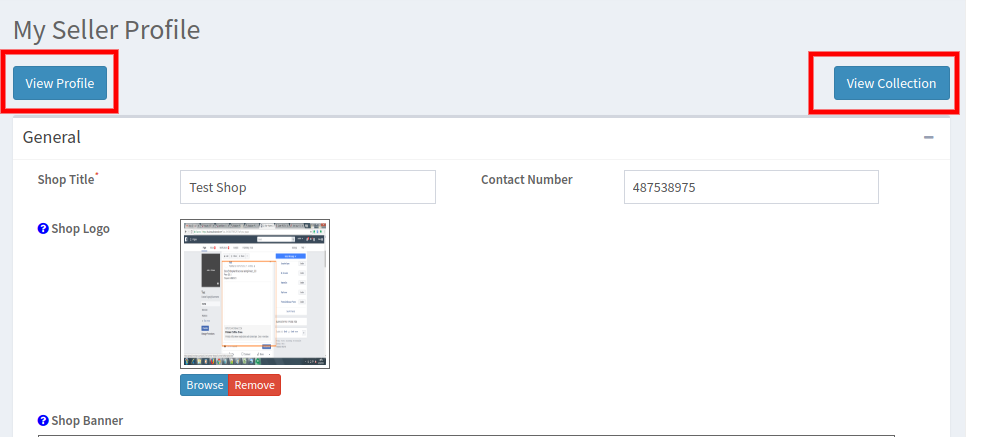
The sellers can view their profile by clicking on the ‘View Profile’ button. Additionally, they can even see their collection by clicking on the ‘View Collection’ Button.
5.1 How sellers can generate a coupon?
Steps to follow to generate a coupon:
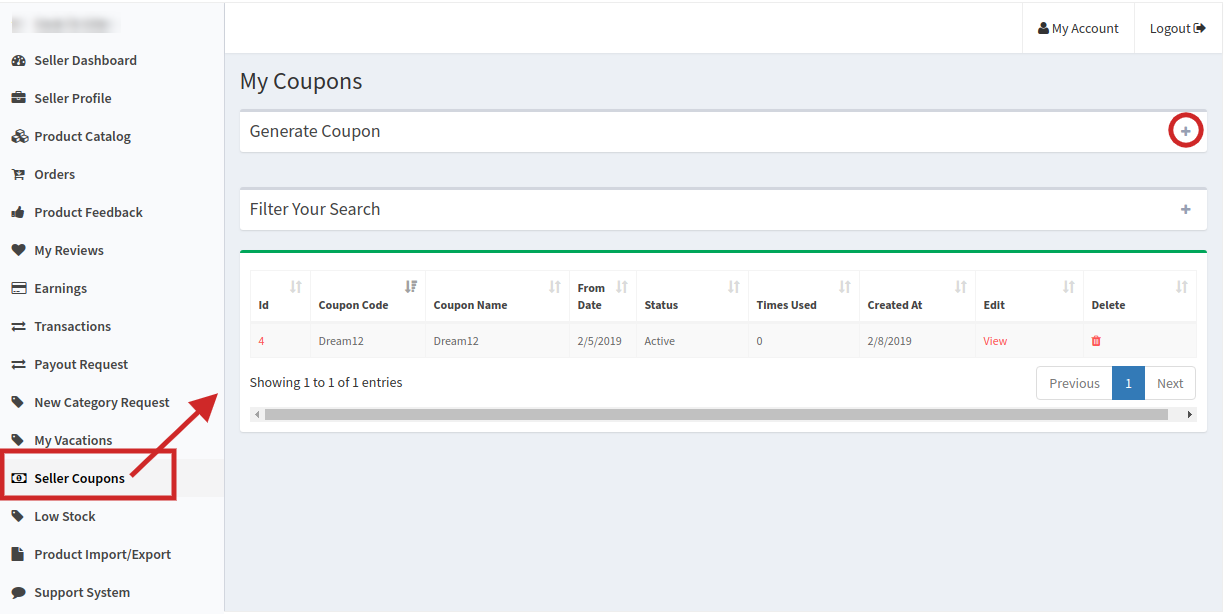
Click on the seller coupon tab available in the seller dashboard.
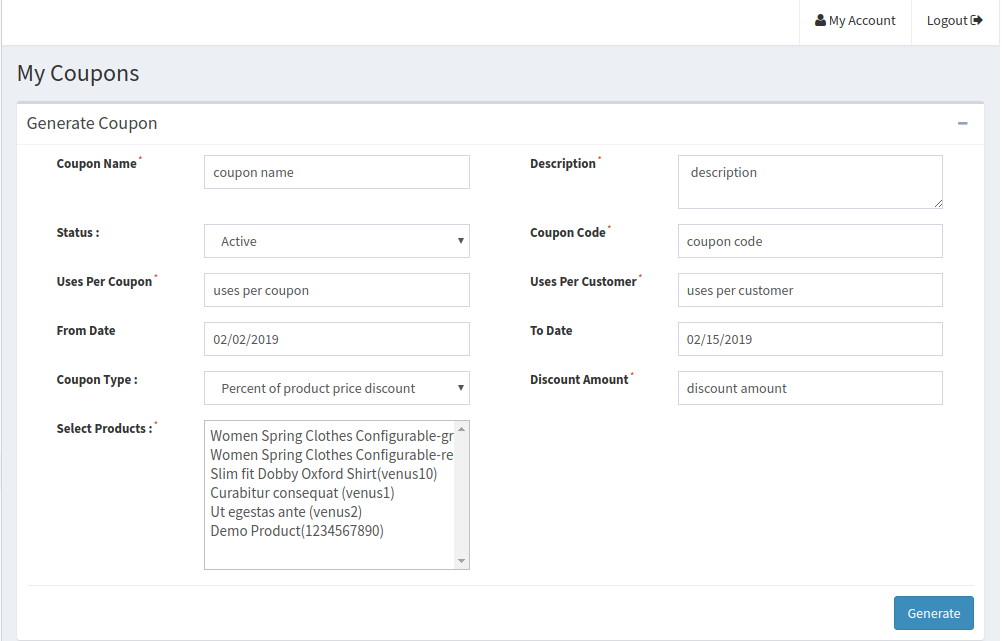
Click on the “+” icon and fill the following fields in the form and following form will appear in front of you:
Coupon Name: Enter the name of Coupon here.
Description: Fill the Coupon description here.
Status: Select the status of coupon here.
Coupon Code: Set the coupon code here. Customers can use this coupon to avail of the discount.
Uses per Coupon: Set the number of times a coupon can be used.
Uses per Customer: Maximum number of times customers can use the coupon.
From Date to To Date: Set the time for which the coupon will be valid.
Coupon Type: Select the type of coupon here. Coupons can be fixed type and percentage type.
Discount Amount: Enter the amount value of the discount here.
Select Products: Select the products on which the seller wants to offer the discount coupon.
Click on the “Generate” button to generate a coupon.
5.2 Tax Class
A tax class is a class assigned to a product by the sellers. Tax class helps in distinguishing between taxable goods and non-taxable goods. In the product Catalog, while filling the product details for a new product, the seller can select the tax class, in price tab of the Product Catalog, that he wants to assign to the items/services.
5.3 Customer Support System
For the seller ticket system, the Marketplace admin needs to enable the seller ticket system feature in the General setting tab in the backend.
Once the feature is enabled at the backend, the customer can directly contact the sellers. Whenever a customer will contact a seller, a ticket will be generated, the seller can view the ticket in the customer support system of the seller dashboard.
5.3.1 How customer can contact a seller?
Click on the seller tab at the frontend of the store.
A seller list will appear before you.
Click on the seller will take the customer to the seller profile page.
The customer needs to click on the contact the seller link and a form will appear before them.
Once the customer will submit the form, the respective seller will receive a ticket.
Watch how Magento Multi seller Marketplace module works?
For further information, refer to the following links:
Magento multi marketplace module by Knowband è uno dei modi più semplici per trasformare il tuo sito eCommerce in un fiorente mercato multi-vendor. Un mercato multi-vendor è uno spazio online in cui venditori e venditori diversi ed elencano i loro prodotti, gestiscono il loro inventario e vendono. Il plug-in per marketplace multi-vendor Magento converte il tuo negozio online in uno di quei marketplace online pienamente funzionanti.
1.1 Funzioni offerte all'amministratore del negozio di Magento Multi estensione del marketplace:
L'amministratore del negozio può creare e gestire le categorie di prodotti dal back-end dell'estensione del marketplace di Magento.
L'amministratore può approvare / rifiutare il profilo dei venditori con l'aiuto del plugin di mercato Magento.
Il modulo del marketplace Magento semplifica l'impostazione e la gestione della commissione addebitata ai venditori.
L'amministratore può aggiungere / rimuovere i prodotti dal back-end del modulo multi-vendor del marketplace di Magento.
Il proprietario del negozio Magento può tracciare la transazione e guadagnare con il clic del pulsante.
Il multi-vendor del marketplace Magento è compatibile con l'ultima versione di Magento e supporta tutti i temi.
L'amministratore può approvare / rifiutare recensioni di prodotti e venditori.
1.2 Funzioni offerte al venditore dall'ampliata del marketplace di Magento Multi:
Il mercato multi vendor Magento consente ai venditori / venditori di registrarsi nel mercato online.
I venditori possono facilmente mappare le categorie e i prodotti con il mercato.
Inoltre, i venditori possono richiedere di includere una nuova categoria. L'amministratore del marketplace può approvare / rifiutare la categoria con l'aiuto del plugin per il marketplace multi-vendor Magento.
La dashboard del venditore facilita il monitoraggio e la gestione dei prodotti, del profilo e della vendita.
Il mercato multi-vendor di Magento consente ai venditori di aggiungere banner di vendita, logo del negozio e contenuti HTML personalizzati. Questi banner verranno visualizzati nella Pagina del venditore con una raccolta di prodotti separata.
1.3 Customer Benefits del mercato di Magento Multivendor:
L'estensione del marketplace multi vendor Magento consente a più venditori / venditori di vendere i loro prodotti su una stessa piattaforma. Pertanto, i clienti possono scegliere il prodotto perfetto da un vasto assortimento.
L'estensione del marketplace Magento consente ai clienti di acquistare i prodotti a prezzi competitivi.
I clienti possono inviare la recensione del prodotto. Queste recensioni possono essere approvate / disapprovate dal back-end del plugin del marketplace Magento.
Gli acquirenti online possono rivedere i venditori. Le recensioni dei venditori possono essere gestite dal back-end del modulo del marketplace di Multi vendor Magento.
Il modulo di mercato multi venditore Magento offre anche un'opzione con l'aiuto di cui gli acquirenti possono diventare venditori.
2.0 Passi per l'installazione di Magento Multi Vendor Marketplace
Scarica il pacchetto di estensione del Marketplace di Magento Multi.
Decomprimere il pacchetto nella cartella principale di Magento setup tramite FTP manager (come Filezilla o WinSCP – scarica qui: https://filezilla-project.org/).
Nel Pannello di amministrazione vedrai un nuovo Menu Market Place accanto al menu Sistema. Nel caso in cui non si riesca a vedere il collegamento sotto Sistema, cancellare prima Magento Cache e poi ricontrollare.
Con questo il Magento
Pannello di amministrazione 3.0
Nel pannello di amministrazione di Magento l'estensione del marketer multi-venditore aggiunge un menu separato (denominato MarketPlace) proprio accanto al menu di sistema e aggiunge anche una nuova scheda alla pagina di creazione / modifica del cliente.
3.1 Registra come opzione venditore (Aggiungi nuova pagina cliente)
Se l'amministratore sta creando un nuovo cliente dal lato amministratore, in quella pagina viene visualizzata una nuova scheda che richiede il campo Registra come venditore.
La pagina Percorso per il cliente:
Vai a Clienti -> Gestisci clienti e clicca su Aggiungi nuovo cliente sul lato destro della pagina.
L'amministratore può impostare il campo su Sì per registrare il cliente come venditore. Per impostazione predefinita, il campo è impostato su No.
3.2 gestisce le impostazioni del venditore (pagina Modifica cliente)
In caso di modifica di un cliente se il cliente è anche un venditore di una nuova scheda (denominato Gestisci account venditore) sembra modificare le impostazioni del livello venditore per il cliente corrente che è un venditore pure.
Percorso della pagina sopra:
Vai a Clienti -> Gestisci clienti e fai clic su qualsiasi cliente che sia anche un venditore.
Le impostazioni vengono memorizzate quando l'amministratore invia il modulo di modifica per il cliente.
Quando questa pagina viene caricata per la prima volta, i campi vengono riempiti con le impostazioni predefinite predefinite per l'estensione.
Menu 4.0 Marketplace
L'estensione del marketplace Magento è composta da opzioni di sottomenu 15 totali che reindirizzano a più pagine per l'estensione del marketplace multi-vendor Magento.
Alcune delle opzioni di menu del modulo del marketplace Multi Vendor Magento hanno ulteriori sottomenu per navigare ad alcune delle pagine correlate.
Tutte le opzioni di configurazione 15 offerte dal plug-in multi-market di Magento sono descritte di seguito in dettaglio:
4.1 Impostazioni generali
La scheda Impostazioni generali del modulo del marketplace multivendor Magento
Questa pagina ha tutte le impostazioni che controllano il plugin di Magento Marketplace
La pagina delle impostazioni generali del plug-in per marketplace di Multi vendor Magento è composta dai seguenti campi:
1. Abilita il mercato: Abilita o disabilita l'estensione del Marketplace di Magento Multivendor sul fronte del negozio. Se disabilitato, nessuna pagina o funzione dell'estensione è accessibile sul fronte negozio.
2. Commissione predefinita: Imposta la percentuale di commissione predefinita che viene presa dal proprietario del negozio dalla vendita totale effettuata dal venditore.
3. Categorie consentite: Le categorie consentite per i venditori di aggiungere prodotti. Se nessuna categoria è selezionata, tutto il
4. Registrati come venditore: Abilita o disabilita il campo Registra come venditore nella pagina Crea account di fronte negozio.
5. Abilita importazione / esportazione collettiva: Abilita il pulsante per consentire ai fornitori di terze parti di utilizzare la funzione di importazione / esportazione di massa.
6. Invia per email al venditore al posto dell'ordine: Abilita questo campo per inviare una email al venditore nel caso in cui venga effettuato un ordine per i prodotti del venditore.
7. Includi JQuery: Disabilita questo campo nel caso in cui JQuery sia già incluso nella parte anteriore da un altro plugin o dal tuo tema.
8. Papprovazione del rodotto richiesta: Abilita questo campo in caso sia richiesta l'approvazione per il prodotto aggiunto da qualsiasi venditore prima che arrivi al tuo negozio.
9. Abilita recensione venditore: Abilita questo campo nel caso in cui desideri che i clienti possano recensire il venditore.
10. Abilita elenco venditori: Abilita questo campo nel caso in cui desideri mostrare un link nel piè di pagina del negozio alla pagina di elenco del venditore. Se questa impostazione è disabilitata, la pagina di elenco del venditore non è accessibile in alcun modo.
11. Abilita modalità vacanza: Abilita questo pulsante per consentire ai venditori di impostare la modalità vacanza per il proprio negozio per un determinato periodo di tempo.
12. Mostra la pagina del prodotto Info del venditore: Abilita il pulsante per mostrare le informazioni del venditore sulla pagina del prodotto. 13. Nuovo limite di prodotto:?Enter the maximum numbers of products that a new seller can add before the seller account is approved.
14. Approvazione recensione del venditore richiesta:Abilita questo campo nel caso in cui desideri che la recensione del venditore sia approvata prima che diventi visibile nella parte anteriore del negozio.
15. Abilita casella di ricerca: Abilita questo campo nel caso in cui desideri una casella di ricerca nella pagina di elenco del venditore per cercare i venditori.
Configurazione scorte limitate
1. Abilita notifica scorte basse: Abilitare il pulsante per informare i venditori in merito alla notifica di scorte basse. 2. Limite di inventario basso: Inserisci il livello delle scorte al di sotto del quale il venditore riceverà una notifica in caso di scorte basse. 3. Quando notificare: Seleziona quando invierai la notifica. Può essere inviato al momento dell'ordine o dopo l'esecuzione di cron. 4. Invia notifica Da: selezionare l'ID e-mail dal quale si desidera inviare la notifica. Una volta abilitata questa funzionalità dal back-end del modulo Magento Marketplace, i fornitori possono configurare l'impostazione low-stock dalla sezione Low-stock del loro dashboard.
Limite di inventario basso: I venditori possono inserire il limite di inventario sotto il quale vogliono essere avvisati. Ricevi notifica scorte basse: Selezionare se si desidera ricevere la notifica di scorte basse o no.
Elenco venditori 4.2
Questa pagina dell'estensione del marketplace Magento ha un elenco di tutti i venditori che sono approvati dal proprietario del negozio.
L'elenco sopra riportato contiene un elenco di tutti i venditori approvati. Ci sono pulsanti per andare ai prodotti e agli ordini del venditore di fronte a ciascun venditore.
Quando fai clic sul pulsante Ordini di una nuova pagina si apre, si apre l'elenco di tutti gli ordini per quel particolare venditore.
Quando fai clic sul pulsante Prodotti, si apre una nuova pagina che consiste nell'apertura dell'elenco di tutti i prodotti per quel particolare venditore.
È anche una funzione per abilitare o disabilitare qualsiasi venditore utilizzando la funzione Azioni di massa della griglia. Per abilitare / disabilitare qualsiasi venditore, selezionare il / i venditore / i, scegliere l'azione (es. Abilita o Disabilita), quindi fare clic sul pulsante Invia per completare l'azione.
Se un venditore è disabilitato, anche tutti i prodotti di quel venditore sono disabilitati e non saranno visibili in negozio.
Prodotti 4.3 per venditori
Questa pagina dell'estensione del marketplace multi vendor Magento è composta da tutti i prodotti approvati aggiunti dal / i venditore / i al negozio.
Se le impostazioni (es. Approvazione prodotto richiesta) sono disabilitate,
Elimina prodotto: Per eliminare un prodotto, devi fare clic sul pulsante Elimina di fronte a quel prodotto.
Apparirà un pop-up che chiederà il motivo della cancellazione del prodotto. Per completare l'azione, inserisci il motivo e fai clic su Invia.
Una mail sarà inviata al venditore per notificare la cancellazione del prodotto. La mail contiene anche il motivo per cui hai fornito la cancellazione del prodotto.
Nota: – L'azione di eliminazione del prodotto non può essere annullata. Si prega di utilizzare questa funzione con attenzione.
Abilita / Disabilita prodotto: Per cambiare lo stato di qualsiasi prodotto, devi usare la funzione Mass Action della Grid. Per abilitare / disabilitare qualsiasi prodotto selezionare i prodotti, scegliere l'azione (es. Abilita o Disabilita), quindi fare clic sul pulsante di invio per completare l'azione.
Nota: – Una volta che un prodotto è disabilitato dal back-end del plugin del Marketplace di Magento Multi, non sarà visibile in primo piano. Evitare di disabilitare i prodotti, disabilitare solo un prodotto se è molto necessario.
Recensioni dei prodotti 4.4
Questa pagina dell'estensione del marketplace multi venditore Magento contiene un elenco di tutte le recensioni fatte dai clienti sui prodotti del venditore.
Visualizza la recensione del prodotto: La maggior parte dei dettagli della recensione del prodotto sono già citati nella griglia, ma alcuni non lo sono. Per visualizzare tutti i dettagli di qualsiasi recensione del prodotto, fare clic sul pulsante Visualizza di fronte a tale revisione. Un pop-up apparirà nel back-end del plug-in multi-market del fornitore Magento con tutti i dettagli della recensione del prodotto.
Per modificare la recensione, puoi fare clic sul pulsante Modifica sul popup che ti reindirizzerà alla pagina di revisione della modifica.
Elimina recensione prodotto:L'estensione del marketplace multi vendor Magento consente all'amministratore del negozio di eliminare le revisioni del prodotto. Per eliminare una recensione di un prodotto devi fare clic sul pulsante Elimina di fronte alla recensione del prodotto nell'elenco.
Apparirà un pop-up che chiederà il motivo della cancellazione della recensione del prodotto. Per completare l'azione, inserisci il motivo e fai clic su Invia.
Nota :- L'azione di eliminazione della recensione del prodotto non può essere annullata. Si prega di utilizzare questa funzione con attenzione.
Recensioni dei venditori 4.5
Questo elenco contiene un elenco di tutte le recensioni dei venditori fatte dai clienti sul negozio.
Se le impostazioni (es. Approvazione recensione venditore richiesta) sono disabilitate, una recensione del venditore viene approvata direttamente quando viene aggiunta dal cliente e appare in questo elenco. In caso contrario, la recensione viene prima visualizzata nell'elenco Approvazione recensione venditore.
Nota: – Anche le recensioni dei venditori che non sono state approvate dal proprietario del negozio vengono visualizzate in questo elenco.
Visualizza la recensione del venditore: Per visualizzare tutti i dettagli di una recensione del venditore devi fare clic sul pulsante Visualizza di fronte a quella recensione nell'elenco.
Facendo clic sul pulsante Visualizza apparirà una finestra popup con tutti i dettagli della recensione del venditore corrispondente.
Richiesta di approvazione dell'account venditore 4.6
Quando un venditore si registra come venditore nel tuo negozio di quanto non appaia prima in questo elenco dell'estensione del marketplace multi-vendor Magento come mostrato nell'immagine qui sotto. Quindi spetta all'amministratore del negozio approvare o disapprovare la richiesta dell'account venditore.
Approva l'account del venditore: Per approvare un account venditore, devi fare clic sul pulsante Approva davanti a quel venditore nell'elenco.
Una volta che l'account venditore è stato approvato, passa direttamente all'elenco dei venditori e vengono rilasciati tutti i limiti all'account venditore.
Una mail verrà inviata al venditore per notificare l'approvazione dell'account venditore.
Nota :- Gli account venditore approvati dal proprietario del negozio non possono essere annullati. Si prega di utilizzare questa funzione con attenzione.
Disapprova l'account del venditore: Per disapprovare un account venditore, devi fare clic sul pulsante Disapprova davanti a quel venditore nell'elenco.
Apparirà un pop-up che chiederà il motivo della mancata approvazione dell'account venditore. Compila il motivo e quindi invia il modulo per completare l'azione.
Una mail sarà inviata al venditore notificando la disapprovazione dell'account venditore. La ragione fornita nel pop-up verrà inviata anche in questa mail.
Nota :- Una volta che un venditore non è stato approvato, può nuovamente richiedere l'account del venditore e ogni volta che un venditore lo fa, il proprietario del negozio viene avvisato tramite un'e-mail di notifica.
Elenco di approvazione per la recensione del venditore 4.7
Questo elenco del marketplace multi vendor di Magento contiene tutte le recensioni dei venditori che sono state appena pubblicate dai clienti e non viene loro intrapresa alcuna azione.
Se le impostazioni (es. Approvazione recensione venditore richiesta) sono abilitate, solo la recensione di qualsiasi venditore pubblicata da qualsiasi cliente viene visualizzata in questo elenco, altrimenti viene visualizzata direttamente nell'elenco Recensioni venditore.
Visualizza la recensione del venditore: Per visualizzare tutti i dettagli di una recensione del venditore devi fare clic sul pulsante Visualizza di fronte a quella recensione nell'elenco.
Facendo clic sul pulsante Visualizza apparirà una finestra popup con tutti i dettagli della recensione del venditore corrispondente.
Approva la recensione del venditore: Per approvare una recensione del venditore, devi fare clic sul pulsante Approva davanti a quella recensione nell'elenco.
Una volta che la recensione di un venditore viene approvata, diventa visibile nel front-end e viene trasferita all'elenco di recensioni del venditore.
Nota: – Questa azione non può essere annullata. Si prega di usare con attenzione.
Disapprova la recensione del venditore: Per disapprovare una recensione del venditore, devi fare clic sul pulsante Disapprova davanti a quella recensione nell'elenco.
Apparirà un pop-up che chiederà il motivo della mancata approvazione della recensione del venditore. Compila il motivo e quindi invia il modulo per completare l'azione.
Una volta che la recensione di un venditore non è stata approvata, viene trasferita nell'elenco di recensioni dei venditori e non può essere trovata da nessun'altra parte.
Nota: – Questa azione non può essere annullata. Si prega di usare con attenzione.
Elimina recensione del venditore: Per eliminare una recensione del venditore, devi fare clic sul pulsante Elimina di fronte a quella recensione nell'elenco.
Apparirà un pop-up che chiederà il motivo della cancellazione della recensione del venditore. Compila il motivo e quindi invia il modulo per completare l'azione.
Una volta che la recensione del venditore viene cancellata, viene completamente rimossa da ogni dove.
Nota: – Questa azione non può essere annullata. Si prega di usare con attenzione.
Richiesta di approvazione del prodotto 4.8
Quando un venditore aggiunge un prodotto, prima di tutto appare qui e anche il proprietario del negozio riceve una notifica per lo stesso tramite la posta. Quindi spetta al proprietario del negozio approvare o disapprovare il prodotto.
Se l'impostazione (vale a dire Approvazione del prodotto richiesta) è attiva, viene aggiunto solo un nuovo prodotto in questo elenco, altrimenti viene visualizzato direttamente nell'elenco dei prodotti e viene automaticamente approvato e abilitato.
Disapprova il prodotto del venditore: Per disapprovare un prodotto, devi fare clic sul pulsante Disapprova davanti a quella recensione nell'elenco.
Apparirà un pop-up che chiederà il motivo della cancellazione della recensione del venditore. Compila il motivo e quindi invia il modulo per completare l'azione.
Una volta che un prodotto non è approvato, verrà inviata una mail al venditore che notifica la disapprovazione del prodotto. I prodotti non approvati appaiono anche nella stessa lista. L'amministratore del negozio può approvarli in qualsiasi momento.
Approva il prodotto del venditore: Per approvare un prodotto, devi fare clic sul pulsante Approva davanti a quella recensione nell'elenco.
Una volta approvato, il prodotto trasferisce da questo elenco all'elenco di prodotti del venditore.
Nota: – Questa azione non può essere annullata. Si prega di usare con attenzione.
Elenco di richieste per la categoria 4.9
Un venditore può aggiungere il prodotto alle categorie consentite al venditore. Nel caso in cui il venditore debba aggiungere un prodotto a una categoria che non è consentita, il venditore può richiedere lo stesso. Tutte le richieste di queste categorie vengono visualizzate nell'elenco Richieste di categoria per venditore del modulo del marketplace multivendor Magento, come mostrato di seguito. Viene inviata anche una mail al proprietario del negozio per notificare la Richiesta di Categoria. Quindi spetta al proprietario del negozio approvare o disapprovare la richiesta.
Approva richiesta di categoria: Per approvare una richiesta di categoria devi fare clic sul pulsante Approva davanti a quella richiesta di categoria nell'elenco.
Un pop-up apparirà nel back-end dell'estensione del marketplace di Multi vendor Magento chiedendo il motivo per l'approvazione della richiesta di categoria. Compila il motivo e quindi invia il modulo per completare l'azione.
Nota:?This action cannot be undone. Please use it carefully.
Disapprova la richiesta di categoria: Per disapprovare una richiesta di categoria, devi fare clic sul pulsante Disapprova davanti a quella richiesta di categoria nell'elenco.
Apparirà un pop-up che chiederà il motivo per cui disapprova la richiesta di categoria. Compila il motivo e quindi invia il modulo per completare l'azione.
Nota: – Questa azione non può essere annullata. Si prega di usare con attenzione.
4.10
Rapporti 4.10.1 -> I prodotti più venduti
La scheda Report del marketplace multi vendor Magento
I filtri aiutano il proprietario del negozio a identificare il prodotto più venduto:
Per un intervallo di date.
Per una categoria specifica.
Per un venditore specifico.
Nota :- A volte è possibile che non si riesca a trovare alcun dato in questo rapporto. In tal caso è necessario aggiornare le statistiche del report e per farlo è necessario effettuare quanto segue:
Vai a Rapporti -> Aggiorna statistiche -> Seleziona i rapporti desiderati da aggiornare -> Invia
Or
Fare clic sul pulsante Aggiorna statistiche nella parte superiore di questa pagina.
Transazioni e guadagni 4.11
Transazioni e guadagni 4.11.1 -> Commissioni
L'elenco della Commissione dell'estensione del marketplace multi vendor Magento contiene tutte le commissioni guadagnate dal proprietario del negozio su più ordini con percentuale di commissione e vendita totale del venditore.
Transazioni e guadagni 4.11.2 -> commissioni per categoria
La pagina Transazioni e guadagni del modulo del marketplace multivendor Magento mostra il report per le commissioni guadagnate dal proprietario del negozio. Questo rapporto mostra la commissione totale guadagnata dal proprietario del negozio da un venditore. Il proprietario del negozio può anche utilizzare i filtri per filtrare la categoria di report delle commissioni.
Questa funzionalità offerta dall'estensione del marketplace multi-vendor di Magento aiuta il proprietario del negozio a identificare commissioni da diverse categorie e quale categoria ha prodotto la commissione.
4. 11.3?Le transazioniSeller?wisetransazione
Il sistema non trasferisce automaticamente l'importo nell'account del venditore. Quindi il proprietario del negozio deve tenere un registro del saldo per tutti i venditori e trasferire manualmente i soldi al venditore e quindi inserire i dettagli della transazione per mantenere un registro dello stesso.
Questo elenco contiene tutte le variazioni di saldo per tutti i venditori nel sistema. L'elenco mostra le vendite totali del venditore, il guadagno del venditore, la commissione. Questo elenco aiuta il proprietario del negozio a identificare il guadagno ea categorizzarlo come venditore saggio.
4. 11.3.1?Comeo?vista?
Per visualizzare i dettagli delle transazioni effettuate per un determinato venditore, è necessario fare clic sul pulsante Visualizza di fronte a quel venditore.
Facendo clic sul pulsante Visualizza di fronte a qualsiasi venditore si aprirà una nuova pagina con un elenco di tutte le transazioni effettuate per il venditore corrispondente.
Puoi anche aggiungere una nuova transazione per il venditore corrente facendo clic sul pulsante Aggiungi nuova transazione nella parte in alto a destra del plug-in del marketplace di Multi vendor Magento.
Per aggiungere un nuovo dettaglio della transazione per qualsiasi venditore, è necessario fare clic su?Add New Transaction?buuton corresponding to respective sellers.
Facendo clic sul pulsante viene visualizzato un popup che richiede i dettagli della transazione. Compila il modulo e invia il modulo per completare l'azione.
Vengono discussi i vari campi del pop-up:
Nome del venditore: Seleziona il nome del venditore dall'elenco a discesa. ID transazione: Inserisci qui l'ID della transazione. Quantità: Seleziona se l'importo è stato addebitato o accreditato e inserisci l'importo. Commento: Inserisci un commento riguardante la transazione. Inoltre, l'amministratore può anche aggiungere nuove transazioni nell'account venditori facendo clic sul pulsante Rendi nuovo corrispondente a ciascun account venditore.
Nota :- Questa azione non può essere annullata. Si prega di usare con attenzione.
4.11.4?Transazioni e guadagni ->Vendereer?Paysu
Questa pagina contiene un elenco di tutte le transazioni effettuate fino alla data a tutti i venditori disponibili nel sistema.
Puoi anche aggiungere una nuova transazione per qualsiasi venditore facendo clic su Aggiungi nuova transazione pulsante in alto a destra nella pagina sopra.
Transazioni e guadagni 4.11.5 -> Richiesta di pagamento del venditore
Il venditore può inviare la richiesta di pagamento all'amministratore del negozio dalla sua bacheca. La richiesta del venditore viene visualizzata dall'amministratore da questa scheda dell'estensione di Magento Marketplace.
Facendo clic su questo link, il venditore verrà reindirizzato nella sezione della dashboard come mostrato nell'immagine seguente:
4.11.5.1 Come possono i venditori aggiungere nuove richieste di pagamento dalla loro bacheca?
Prima che il venditore possa richiedere il pagamento, deve configurare il pagamento nel menu Profilo della Dashboard. I vari campi che devono essere compilati in questa sezione sono discussi di seguito:
Seleziona il metodo di pagamento: I vari metodi di pagamento nel menu a discesa. Seleziona il metodo che desideri utilizzare per il pagamento. Ci sono tre opzioni disponibili per impostazione predefinita:
Bonifico bancario
Pagamento tramite assegno
PayPal
1. Bonifico bancario:
Selezionando, Opzioni bonifico bancario, ti verrà richiesto di fornire le seguenti informazioni.
Titolare dell'account: Immettere il nome del proprietario dell'account in cui deve essere trasferito l'importo. Dettagli: Questa sezione include i dettagli bancari come il ramo bancario, il numero IBAN, il BIC, ecc. Indirizzo della banca: Inserire l'indirizzo della banca. Informazioni aggiuntive: Fornisci tutte le informazioni che desideri condividere con l'amministratore del negozio.
2. Pagamento tramite assegno
Paga all'ordine di: Inserire il nome al quale deve essere emesso il controllo. Indirizzo: Fornire l'indirizzo per l'invio del controllo in questa sezione. Informazioni aggiuntive: Fornisci tutte le informazioni che desideri condividere con l'amministratore del negozio.
3. PayPal
Se selezioni, PayPal, ti verrà richiesto di inserire il tuo ID email PayPal. La sezione delle informazioni aggiuntive ti consente di fornire qualsiasi informazione che desideri condividere con l'amministratore del negozio.
Una volta configurato il metodo di pagamento nel profilo del venditore, il venditore diventa idoneo a inviare le richieste di pagamento. Per aggiungere una nuova richiesta di pagamento, fai clic su "+" nella sezione Nuova richiesta di pagamento, come mostrato nell'immagine seguente:
Riempire
Quantità: Inserisci l'importo della richiesta di pagamento. Motivo della richiesta: Immettere il motivo della richiesta di pagamento. La richiesta di pagamento è, quindi, inviata all'amministratore per l'approvazione. Le richieste di pagamento che sono approvate o non approvate o in attesa di approvazione possono essere visualizzate nella sezione delle richieste di pagamento, come mostrato di seguito:
L'amministratore del negozio può visualizzare tutte le richieste di pagamento dei venditori del mercato nel back-end dell'estensione del marketplace di Magento Multi.
Facendo clic sul pulsante Approva, verrà mostrato un popup. Immettere l'ID della transazione e commentare per approvare la richiesta del venditore.
Transazioni e guadagni 4.11.6 -> Impostazioni pagamento PayPal
Le impostazioni di pagamento PayPal dell'estensione del Marketplace di Magento Multi seller consentono all'amministratore del negozio di abilitare i metodi PayPal per il pagamento. Inserisci i dettagli richiesti come descritto di seguito:
Attivo: Attiva o disattiva il pulsante per attivare il metodo di pagamento PayPal. Identificativo cliente: Inserisci l'ID cliente del tuo account PayPal. Client Secret: Inserisci il segreto del cliente dell'account PayPal. Modalità PayPal: Seleziona la modalità PayPal dal menu a discesa. Email ID PayPal: Inserisci l'ID email utilizzato nel tuo account. Valuta PayPal: Seleziona la valuta predefinita per la transazione PayPal.
4.12
La scheda Modelli di posta elettronica del modulo del marketplace di Multi vendor Magento contiene un elenco di tutti i modelli di email che vengono utilizzati nel sistema con tutti i dettagli dei modelli di email.
Modifica modello email: Per modificare un modello di email, fai clic sul pulsante Modifica modello davanti a qualsiasi modello di email.
Facendo clic sul pulsante Modifica modello si apre una nuova pagina con un modulo per il modello di email. È possibile modificare il modello di posta elettronica desiderato dall'interfaccia di amministrazione del marketplace multivendor Magento.
Per salvare le modifiche apportate nel modello di posta elettronica, fai clic sul pulsante Salva modello in alto a destra nella pagina in alto.
Nota :- Durante la modifica del modello di email, tieni presente che non modifichi alcun testo all'interno delle parentesi graffe (es. {{Var any_var}}).
4.13. Modalità vacanza
I venditori hanno un'opzione per disabilitare il loro negozio dal mercato per un particolare periodo di tempo. La richiesta dei venditori di andare in modalità vacanza può essere visualizzata in questa sezione del modulo Magento Marketplace. Per impostare la modalità vacanza, i venditori possono accedere alla scheda Modalità vacanza della loro dashboard.
La scheda mostra l'intera cronologia delle ferie del venditore, come mostrato nell'immagine qui sotto:
4.13.1 Come impostare la modalità Vacanza?
Per impostare la modalità vacanza, fare clic su 'Imposta una nuova vacanzaPulsante '.
Data di inizio e fine: Inserisci la data di inizio e di fine della vacanza. Il tuo commento a questa vacanza: Inserisci un commento per la modalità vacanza.
L'amministratore può visualizzare l'elenco dei venditori in vacanza nella scheda Vacanze del plug-in Magento Marketplace. Per vedere i dettagli della vacanza, clicca su Vedere ordine pulsante. L'amministratore può annullare la richiesta facendo clic sul Annullare pulsante.
Verrà visualizzato un popup. Immettere il motivo per annullare la modalità vacanza e inviare. Una e-mail di notifica viene inviata al venditore per informarla dell'annullamento della vacanza.
4.14. Importazione / esportazione collettiva
L'amministratore può offrire questa funzionalità di importazione e esportazione di massa ai venditori abilitando la stessa dal back-end.
Se abilitato, il venditore può importare o esportare i prodotti in blocco dalla loro dashboard.
I fornitori possono importare / esportare i prodotti alla rinfusa dalla scheda Importa / Esporta prodotto come mostrato di seguito:
4.14.1?Come?Importae?procondotti?in?bULK?
Tipo di prodotto: Seleziona il tipo di prodotto che stai caricando. Il plug-in Marketplace Magento Multi seller supporta tutti i tipi di prodotti, cioè semplici, configurabili, virtuali e altri.
Set di attributi del prodotto: Seleziona il set di attributi dei prodotti dall'elenco a discesa.
Scarica il file di modello: È possibile scaricare il file modello nel foglio Excel per l'attributo selezionato facendo clic su questo pulsante. Assicurati che le colonne nel tuo file debbano essere abbinate al file modello creato per te sulla base dell'attributo selezionato.
Importa azione: Seleziona l'azione di importazione dall'elenco a discesa. L'azione verrà eseguita solo sulla base di SKU dei prodotti. Senza SKU, il prodotto non sarà considerato per alcuna azione.
Caricare un file: Carica il file con i dettagli del prodotto qui. Clicca sul Convalida file per completare l'importazione.
4.14.2 Come esportare i prodotti alla rinfusa?
Il venditore può esportare i dettagli del prodotto elencati sul mercato da questa sezione. Seleziona il tipo di esportazione dal menu a discesa e fai clic su Esporta. I dettagli saranno esportati in un foglio Excel.
4.15. Istruzione Cron
Questa scheda offre due opzioni di cron. Esegui cron vacanza per implementare le modifiche apportate nella scheda Vacanza del modulo Magento Multi vendor Marketplace nel front-end del marketplace. Esegui la notifica di scorte basse Cron per inviare l'e-mail di notifica di scarsa disponibilità ai venditori.
5.0 Registrati come venditore – Pagina di registrazione
Se un nuovo cliente si registra nel negozio di mercato di Magento, quindi, c'è un campo aggiuntivo nella pagina di registro. Se il cliente desidera registrarsi come venditore, il cliente deve contrassegnare questo campo.
Una volta creato l'account, i venditori ottengono l'accesso al dashboard. La dashboard del venditore offre una serie di opzioni per i venditori, come mostrato nell'immagine qui sotto: