Introduction: One Store, Three Powerful Sales Channels
Research from Shopify’s 2024 Commerce Report confirms that merchants selling on three or more channels generate significantly more revenue than single-channel sellers. The logic is simple that more visibility means more buyers. But managing separate platforms manually leads to stock errors, missed orders, and wasted hours.
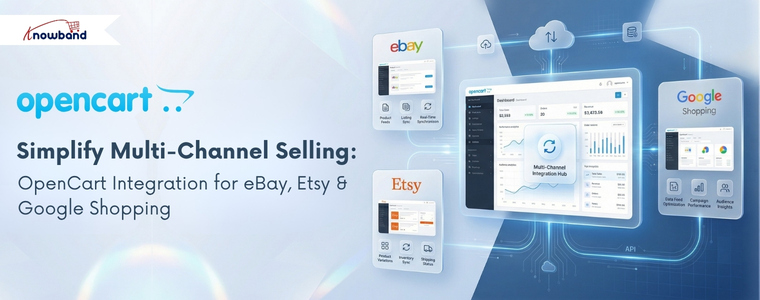
So here is the real question: What if you could manage Google Shopping, Etsy, and eBay all from your OpenCart backend without logging into each platform separately?
That is exactly what the right set of OpenCart integration modules makes possible. Knowband builds each of these connectors specifically for OpenCart merchants who want reliable, low-maintenance multi-channel selling.
Marketplace selling has become an important part of the multichannel ecommerce strategy. According to a 2024 DHL report, 63% of ecommerce businesses sell on at least three online platforms, showing how common it has become for merchants to reach customers through more than one sales channel. In the case of OpenCart, while the opportunity to explore existing marketplaces may help reach a wider discovery of products, it also presents the problem of maintaining consistency in listings, inventory, and orders. This is where selling on the top marketplaces with an OpenCart store can be considered as part of a multichannel selling approach.
The OpenCart Google Shopping Integration module connects your product catalog directly to Google Merchant Center. This module auto-generates a Google-compliant XML feed, maps your categories to Google’s taxonomy, and keeps prices and stock levels updated in real time.
Key Highlights
Automated feed generation: No manual XML exports needed
Real-time price and inventory sync: Supports real-time updates from your store to Google Shopping
GTIN, MPN, and brand field support: improves product eligibility and visibility
Feed scheduling: submit updates hourly, daily, or weekly automatically
Why Google Shopping Matters for your Opencart Store
Google Shopping targets buyers who are already searching for your product. A clean, accurate feed from the OpenCart Google Shopping Module puts your listings in front of high-intent shoppers without requiring a large ad budget. Furthermore, free listings alone can drive consistent, qualified traffic back to your store.
The OpenCart Etsy Marketplace Extension bridges your OpenCart catalogue with Etsy’s marketplace, which attracts over 90 million active buyers looking for unique, handmade, and vintage products. It handles Etsy’s specific listing requirements, custom variations, renewal cycles, and category tags, all managed from OpenCart.
Key Highlights
Product variation sync: Maps OpenCart options like size, color, and material to Etsy listing variants
Listing renewal management: Provides many synchronisation features like relisting, listing, and many more
Tag and category mapping: Pulls relevant keywords from OpenCart to improve Etsy search visibility
Order import: Etsy orders flow directly into your OpenCart dashboard
Why Etsy Marketplace Matters for Your Opencart Stores
Etsy’s audience actively searches for products they cannot find on mainstream platforms. If your store carries handmade, customizable, or niche items, this extension puts them in front of exactly the right buyers. Moreover, centralised order management means you never lose track of an Etsy sale again.
The OpenCart eBay Marketplace Connector, also referred to as the OpenCart eBay Marketplace Extension, links your OpenCart store to eBay’s global marketplace, one of the highest-traffic e-commerce platforms worldwide. Furthermore, automates product listing, bidirectional inventory sync, and order management between both platforms.
Key Highlights
Bulk product listing: List your entire OpenCart catalogue to eBay in one action
Bidirectional inventory sync: A sale on eBay instantly updates stock in OpenCart
Automated order import: Ebay orders appear in your OpenCart backend without manual entry
Pricing rules: Apply platform-specific markups to account for eBay fees automatically
Why eBay Matters for Your Store
eBay draws buyers who compare prices across sellers before purchasing. Getting your products listed there increases competitive visibility significantly. Furthermore, the OpenCart eBay Marketplace Extension ensures your stock numbers stay accurate across both platforms, eliminating the risk of overselling.
Why Running All Three Together Makes Sense
Each platform serves a different buyer intent. Google Shopping captures search-driven traffic. Etsy attracts niche and handmade product seekers. eBay pulls in price-conscious, high-volume shoppers. Together, they cover a wide spectrum of the buying journey.
When all three connect to a single OpenCart store, inventory updates once and syncs everywhere. Orders from all channels land in one dashboard. There is no switching between platforms, no spreadsheet reconciliation, and no overselling risk.
Conclusion
Multi-channel selling is no longer optional for growing OpenCart stores; it is the standard. The OpenCart Google Shopping Integration Extension, the OpenCart Etsy Marketplace Extension, and the OpenCart eBay Marketplace Connector each solve a specific visibility problem. Together, they turn your OpenCart store into a fully connected, automated sales hub.
Start with the channel that fits your product type best. Then expand. The infrastructure is already there
The Prestashop Google Shopping Integrator is a seamless way of displaying your products on Google Shopping. In fact, it helps you connect with the Google Merchant Center effortlessly. Have you ever thought of taking your products to Google Shopping? Do you have a Prestashop store? Well, you can easily do that now with the Prestashop Google Shopping Integration by Knowband.
Integrating your Prestashop store with Google Shopping is extremely easy. However, you can find it intimidating at first. If you are on the road of consideration, this blog will come in handy for you. Going further, in this blog, we will take a look at the whole process of setting up the Prestashop Google Shopping Integration Module.
Let us go forth and check the process out now. I am assuming you have already bought and installed the Prestashop Google Shopping Integrator in your store.
Connection setting of the Prestashop Google Shopping Feed Integration
Under this tab, you will be able to find 4 different connection settings. Further, they are:
Google Application Name: The name of the project will go in here.
Google Client ID: The client ID that you need to set up the connection between the store and Google Merchant.
The Google Client Secret: The client secret for the connection between the store and Google Merchant.
Google Merchant ID: The Google merchant ID goes here.
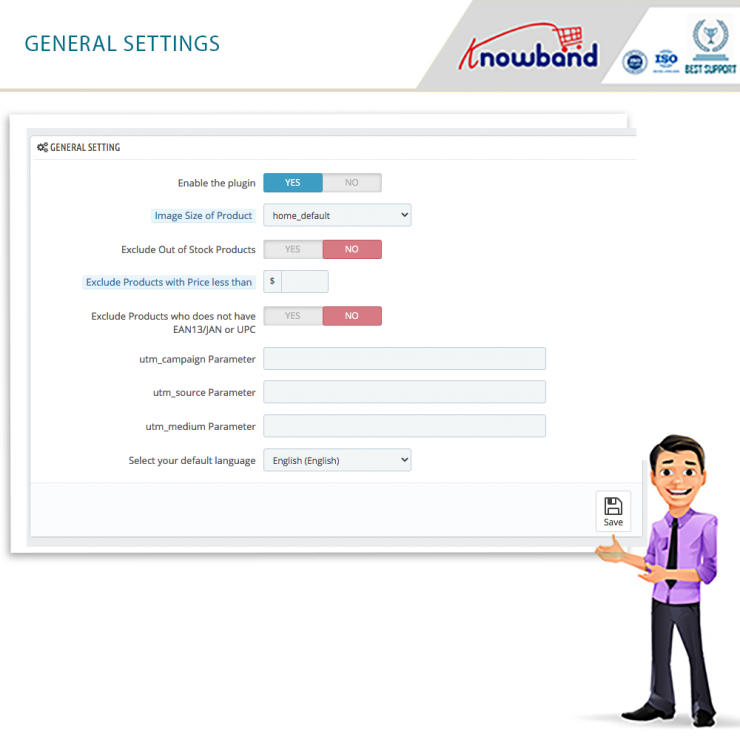
General Settings of the Prestashop Google Shopping Connector
Enable/Disable the plugin
With this functionality, the admin can easily activate or deactivate the functionality of the plugin.
Image Size of the Product
There are two options under this setting by which the admin can decide the size of the product images on Google Shopping. Furthermore, they are Large or Default. Therefore he can choose which size of the product image will display on Google Shopping.
Exclusion of Products
The admin can seamlessly exclude a number of products from listing or displaying on the platform. They include the following:
Out of Stock Products
Products with Price less than
Products who does not have EAN13/JAN or UPC
Moreover, the setting also has the feature of UTM tracking and selecting the Default Language.
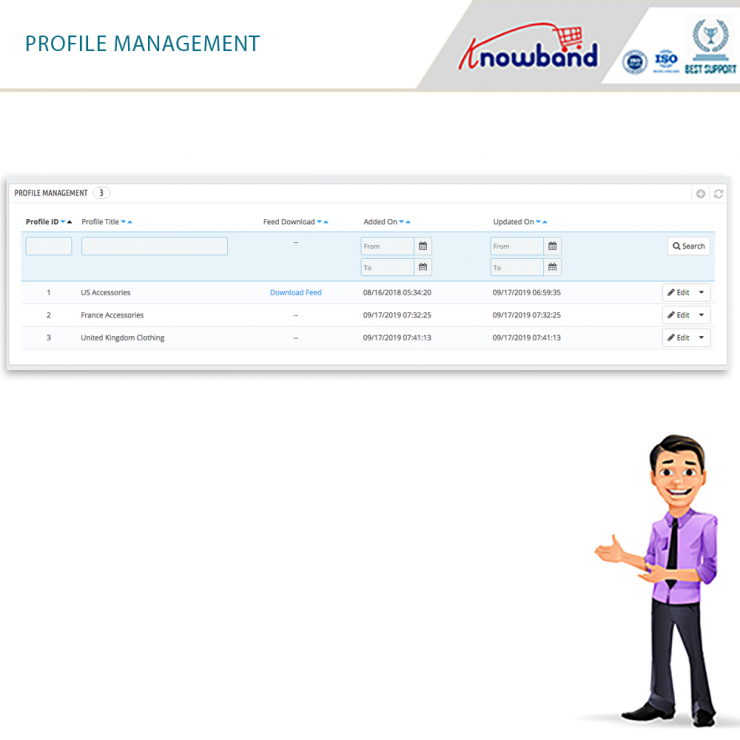
Profile Management settings of the Prestashop Google Shopping API Integration
In one of my blogs earlier, I have detailed the Profile Management tab of the Prestashop Google Shopping Integration Addon. Take a look here to understand it better. It is the tab where you can add the details like country, language, currency, Google Shopping category, store category, and so much more. Moreover, the admin can create as many profiles as he wants to with this setting.
Product Listing settings of the Google Shopping Prestashop Integration
Under this tab of the Google Shopping Prestashop API Integration, the admin will be able to find all the products listed on the platform. Moreover, he will also be able to run the local sync for the products. In addition, there are options like Sync Products and Sync Product Status for syncing the products as well as the product status.
Furthermore, the admin can view all the products listed on Google Shopping. Moreover, with details like the product image, profile with which it was uploaded, and more. In fact, he can choose the products that he wants to disable from displaying on the platform.
Feed Management Settings of the Prestashop Google Shopping Integrator
Under this tab of the Prestashop Google Shopping Integration, the admin can view, edit, or delete the feeds. Moreover, he can even add a new feed by clicking on the Add New button available in the tab. Going further, the Add New tab has a few options that will create a new feed. First, he has to select the profile with which he wants to create the feed. Furthermore, add a label to the feed. Then, the admin can schedule the feed upload from daily, weekly, or monthly. Last, he has to set the hour of the day for the feed.
Synchronization Settings of the Prestashop Google Shopping Integration Addon
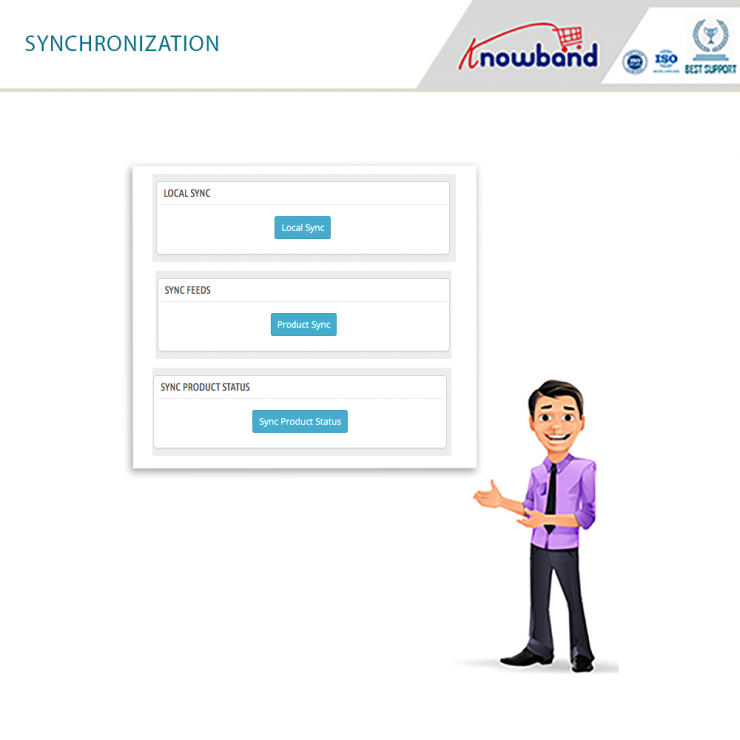
This tab is specifically for the different synchronization settings of the Prestashop Google Shopping Integrator. Furthermore, he will also be able to run the local sync for the products. In addition, there are options like Sync Products and Sync Product Status for syncing the products as well as the product status. Moreover, this tab also has the CRON settings. It helps the automation of the synchronization. When the admin runs the cron, the products, feeds and the product status will sync automatically.
Audit Log of the Prestashop Google Shopping Connector
The admin can keep a watch on the different tasks that were performed using the Prestashop addon.
Therefore, these are the different settings available in the Prestashop Google Shopping Integrator by Knowband. I hope this helped you understand the whole setup process without any trouble. In case you still have a problem or a query, you can get in touch with us at support@knowband.com.
The eCommerce store owners can now submit their products to Google Shopping and bring in new visitors to their site from the search engine with Knowband’s Magento 2 Google Shopping integration extension. The Magento 2 extension is designed to connect the store with the Google Merchant Center.
The Google Shopping Magento 2 integration module creates XML feeds and syncs them with the merchant center with the help of the cron jobs. All you need to do is to have a merchant account in the Google Merchant Center. The connection between the account and the store is done with the help of the API details.
1.1. Admin Features of Magento 2 Google Shopping Integrator:
Here are some of the key highlights of the Google Shopping Magento 2 connector:
The connection between the Magento store and the Google Merchant Center is set up at a few clicks.
The real-time synchronization makes the products listing, feed synchronization, and inventory management effortless.
Once the connection is established, the admin can list the products and related details with the help of a profile-based approach. The Magento 2 Google Shopping connector supports all types of products, simple, configurable, or downloadable.
The profile-based listing enables many-to-one category mapping options. The products of the selected category are synced in bulk with Google Shopping Magento 2 connector.
The attribute mapping becomes effortless with Google Shopping Magento 2 synchronization extension as well.
Additionally, the admin can view the product listing from the back-end of the Magento 2 Google Shopping integrator. The e-merchants can remove the listed products by clicking a button.
The Magento 2 Google Merchant Center connector is designed to achieve an error-free listing. However, in case any product is not listed successfully, you can view the error details at a button click.
The admin can create feeds for the profiles and sync them with the Google Merchant Center by executing cron in the back-end of the Google Shopping Magento 2 integrator. You can even schedule the time for feed synchronization.
The cron options offered by Magento 2 Google Shopping integrator even allow the store admin to sync the status of the products from Google Shopping to the store.
The audit log section of the Google Shopping Magento 2 connector keeps track of the status of the various task running in the back-end.
2.0 Installation
After purchasing Magento 2 Google Shopping Integration extension, the store admin will get the following files:
1. Knowband_Googleshopping.zip which contains the source code of the Google Shopping Integration Magento 2 plugin.
2. User Manual which includes all the details and helps regarding the extension.
Follow the steps mentioned below to install the Magento 2 Google Shopping Integration module at your store:
This extension requires Google Client API, so you need to add the “google/apiclient”: “^2.2” into the composer.json file and update the composer.
Get the Magento 2 Google Shopping Integrator from the Knowband store and download the extension package.
The package has a zipped file. Unzip the package.
Create a folder {Magentoroot}/app/code/Knowband/Google Shopping
Upload the extracted content in the above folder via FTP manager (like Filezilla or WinSCP – download here: https://filezilla-project.org/).
Now run below commands to install the plugin:
php -f bin/magento module:enable –clear-static-content Knowband_Googleshopping
php -f bin/magento setup:upgrade
php -f bin/magento setup:di:compile
php bin/magento setup:static-content:deploy
The extension is now installed and ready for use. In Admin Panel go to “Knowband Extensions >Google Shopping”.
You can now configure and use the Magento 2 Google Shopping Integrator.
3.0 Admin Interface
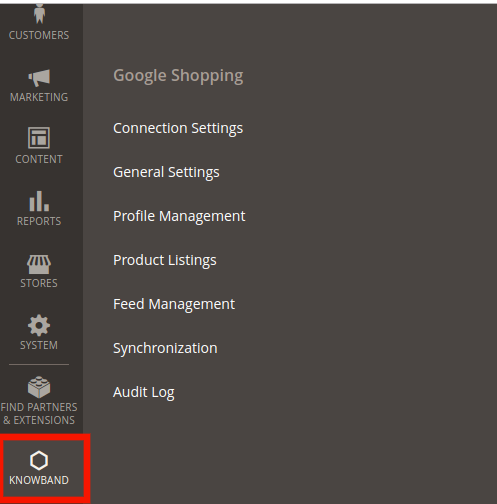
Once the installation is complete, you can find the Magento 2 Google Shopping API integrator in the main menu. Click on Knowband and you’ll find the module as shown in the image below:
3.1. Connection Settings
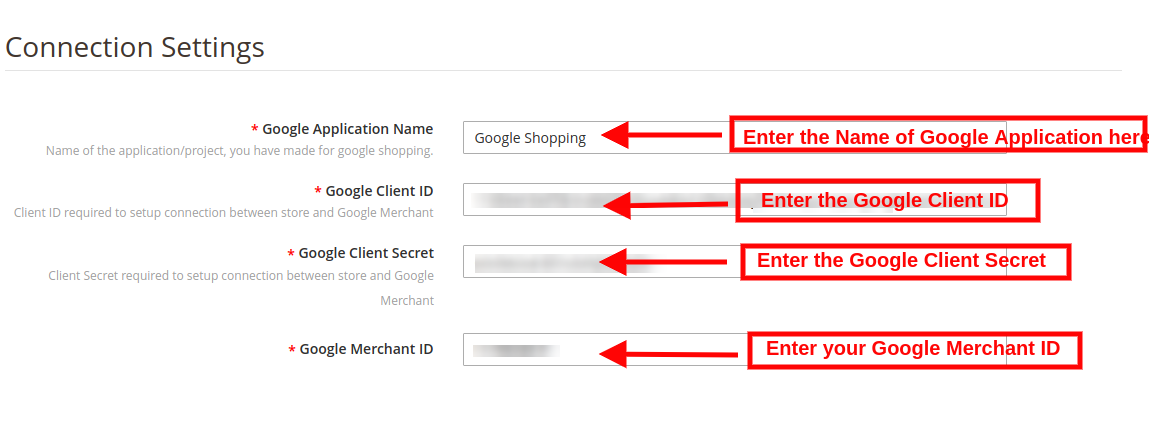
The connection can be set up between the Google Merchant Center and the Magento store from this tab of Google Shopping Magento 2 integration plugin. You need to create an account at Google Merchant Center and obtain the client ID, client Secret and Merchant ID. Refer to Appendix A.
Google Application Name: Enter the name of the project/application that you created for Google Shopping in this section.
Google Client ID: Obtain the Client ID from your Merchant account and enter the same here. This will authenticate the connection between the store and the Google Merchant.
Google Client Secret: Enter the client secret to set up the connection.
Google Merchant ID: Provide the merchant ID of your Google merchant center account here.
3.2. General Settings
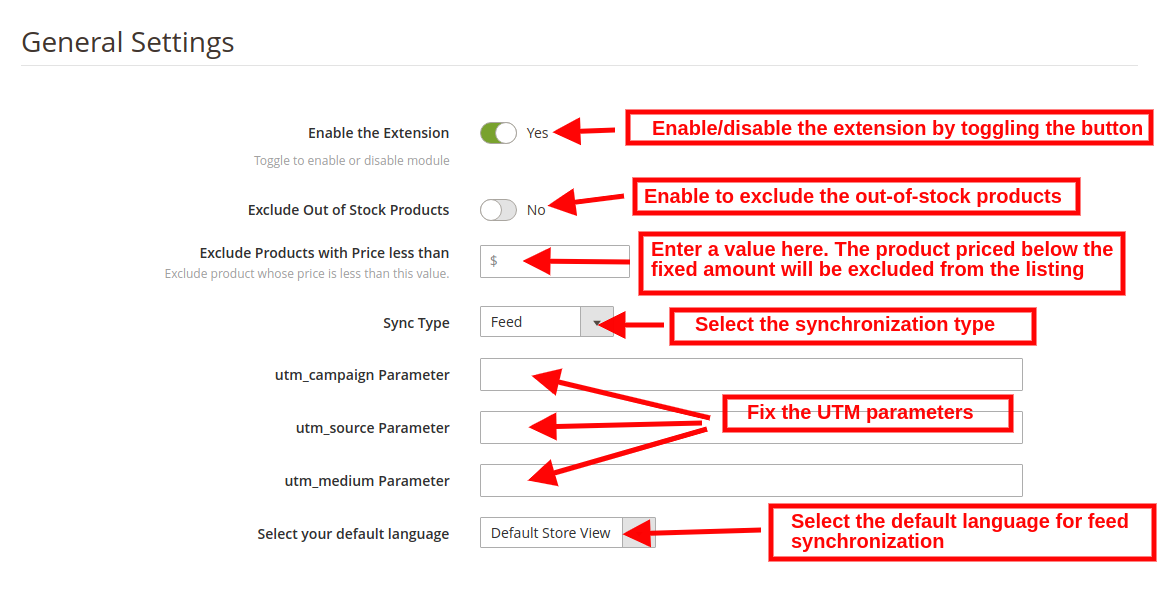
You can do the basic configuration changes in this section of the Magento 2 Google Shopping integrator. The various fields of this tab are discussed below:
Enabled: Toggle this button to activate this Google Shopping Magento 2 API integration plugin.
Exclude Out of Stock Products: The Google Shopping Magento 2 connector allows you to create a profile and list the products in bulk at the Merchant Center. However, some products may go out of stock. The admin can disable out-of-stock products by enabling this button. If enabled, only the in-stock product will be displayed in Google search results.
Exclude Products with Price less than: Enter a fixed amount. Only the products that are priced above the fixed amount will be displayed in the search results.
Sync Type: Select the synchronization type from the drop-down menu. The two options: Content API and Feed.
utm_campaign Parameter, utm_source Parameter, utm_medium Parameter: Enter the UTM for tracking the traffic received via Google Shopping.
Select your default language: The module offers multi-lingual support. Select the default language from this section.
3.3. Profile Management
The admin can create, edit or delete profiles from this tab of the Magento 2 Google Shopping Integration extension.
3.3.1 How to Create New Profiles?
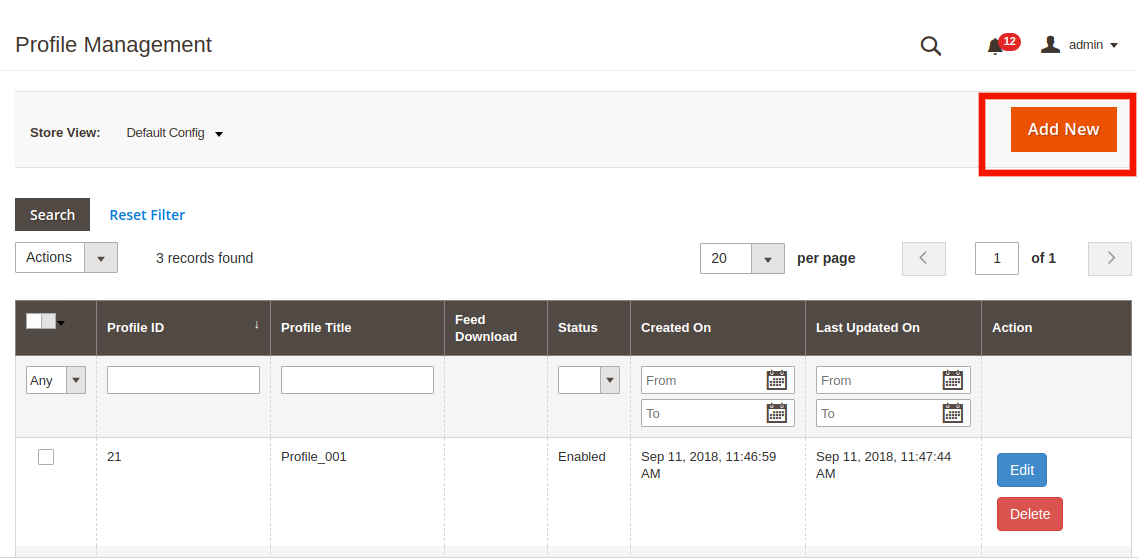
Click on the ‘Add New Profile’ or ‘+’ sign in order to create a new profile.
This will redirect you to the profile management section.
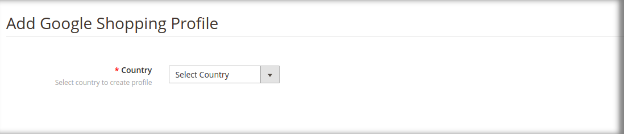
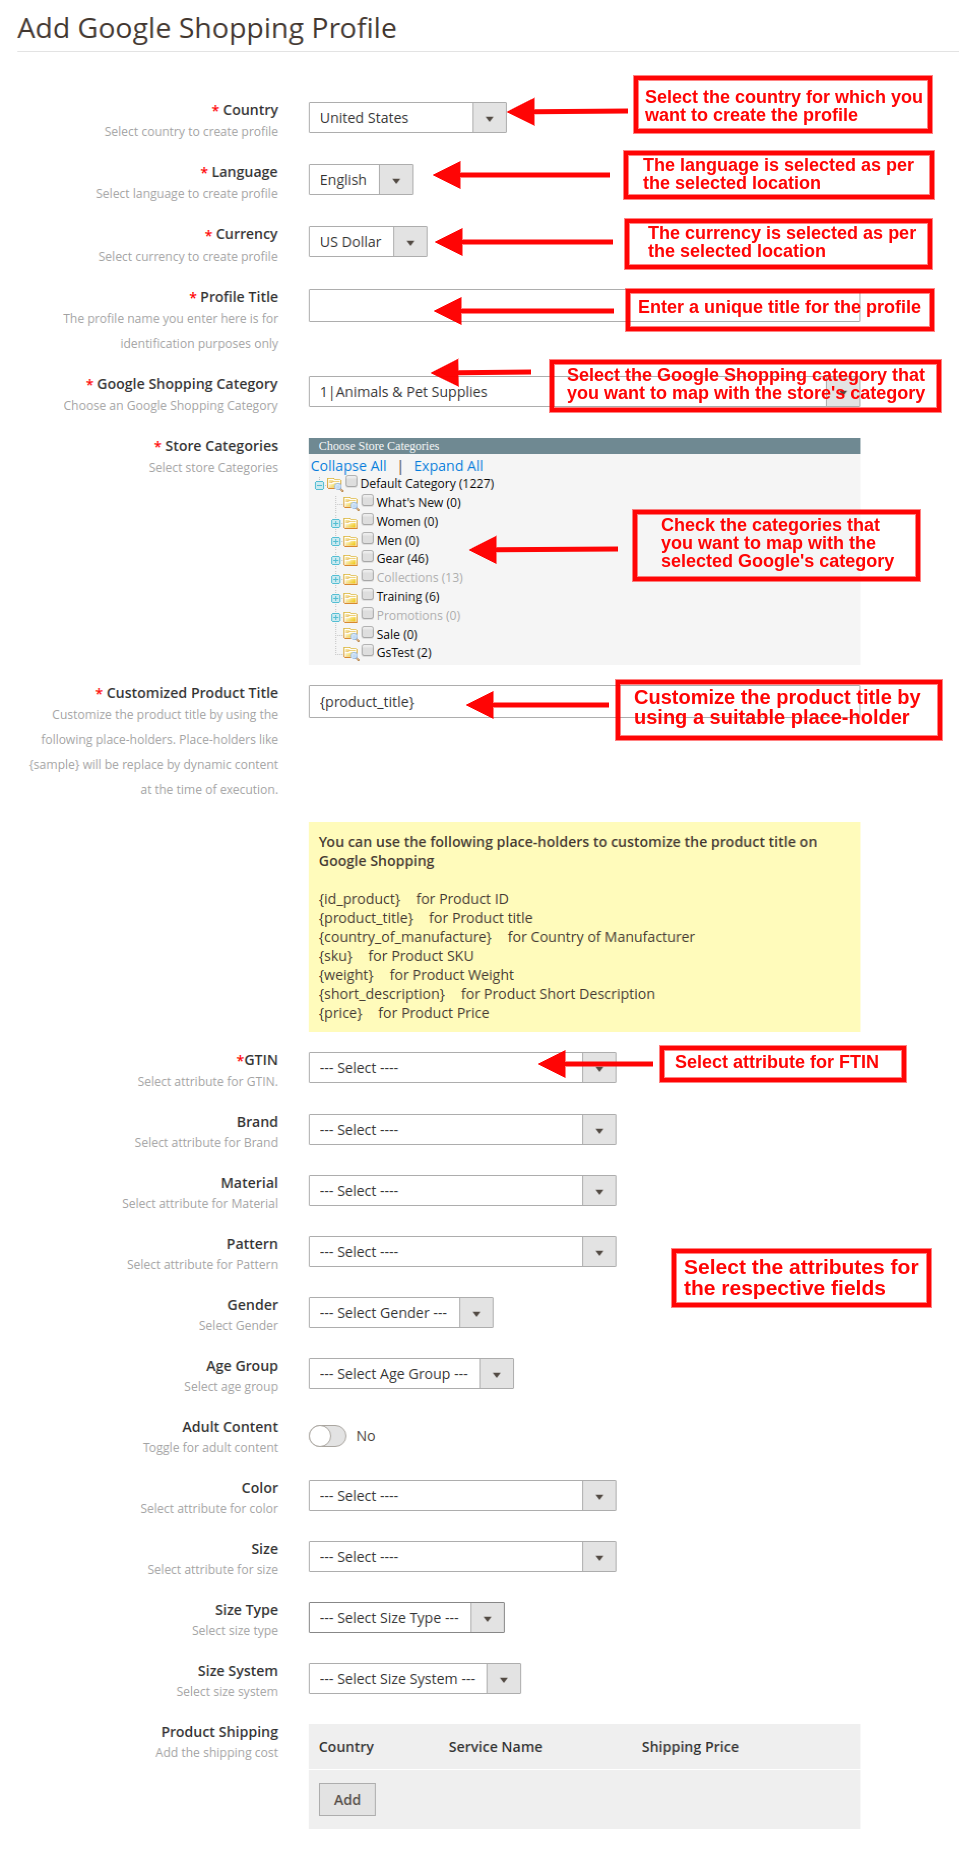
Country: Select the Country from the drop-down list.
Language: The language will be selected by default as per the country selected.
Currency: The currency will be displayed by default according to the country selected.
Profile Title: Enter the name of the profile here.
Google Category: Select the Google category that you want to map the categories of the store.
Store Category: Expand the category and check the categories that you want to map with the selected category of Google.
GTIN: Here, you will map the product unique field so that the Magento 2 Google Shopping Connector can identify products according to the mapped attribute. You must also have to provide unique field mapping for product attributes as well. The various options to choose from include: Reference No., UPC, EAN13. The mapping can then be done based on the selected attribute.
Customize Product Title: Customize the product title by using the following place-holders.
{id_product} for Product ID
{product_title} for Product title
{manufacturer_name} for Manufacturer name
{supplier_name} for Supplier name
{reference} for Product Reference
{ean13} for Product EAN13
{short_description} for Product Short Description
{price} for Product Price
Material: Select the material of the product.
Pattern: Choose the pattern from the drop-down menu.
Gender: Select the Gender for which the product is intended. The options are Male, Female or Unisex.
Age Group: Select the age group that is expected to use the product.
Adult Content: Specify if the product has any adult content or not.
Color: Use the color attribute to describe your product’s color. This information helps create accurate filters, which users can use to narrow search results.
Size: The size attribute describes the standardized size of your product. Your product Ad will appear in the results that are filtered by size.
Size Type: The attribute describes the cut of your product. The supported value for this field includes regular, petite, plus, big, tall and others. This helps create accurate filters.
Size System: With this attribute, you can explain which country’s sizing system your product uses.
Product Shipping: Select the shipping method for the particular product.
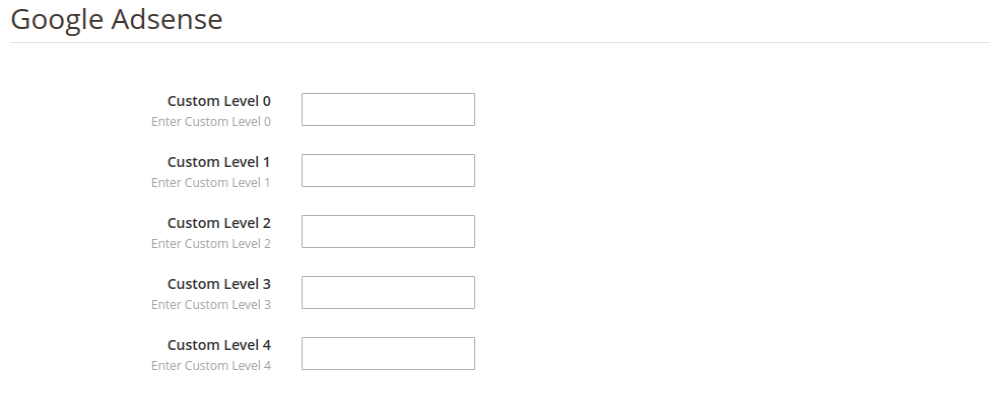
Google Adsense:
Google Adsense refers to the campaign that you’ll run on Google Adwords. Custom labels, Custom Label 0 through Custom Label 4, allow you to create specific filters to use in your Shopping campaigns. Use these filters for reporting and bidding on groups of products. The information you include in these attributes won’t be shown to users.
3.3.2 How to Edit the Existing Profile?
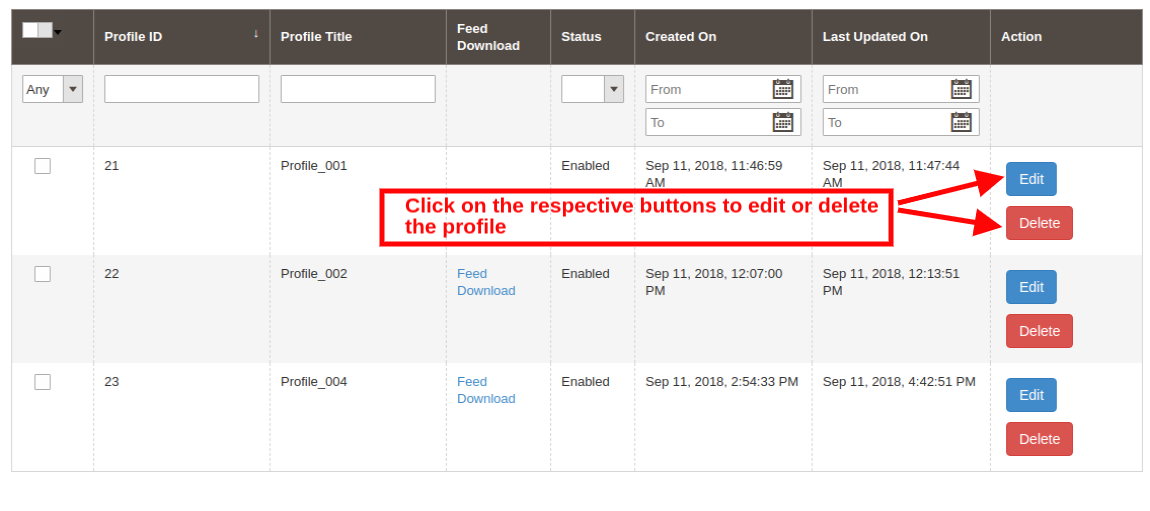
The admin can even edit or delete the profile at a button click.
Click on the Edit or Delete button corresponding to each profile respectively, in order to edit or delete them.
3.4. Feed Management
The feed is created in order to display the products on Google search results. The admin can create N number of feeds and schedule the same for synchronization.
3.4.1 How to create new feeds?
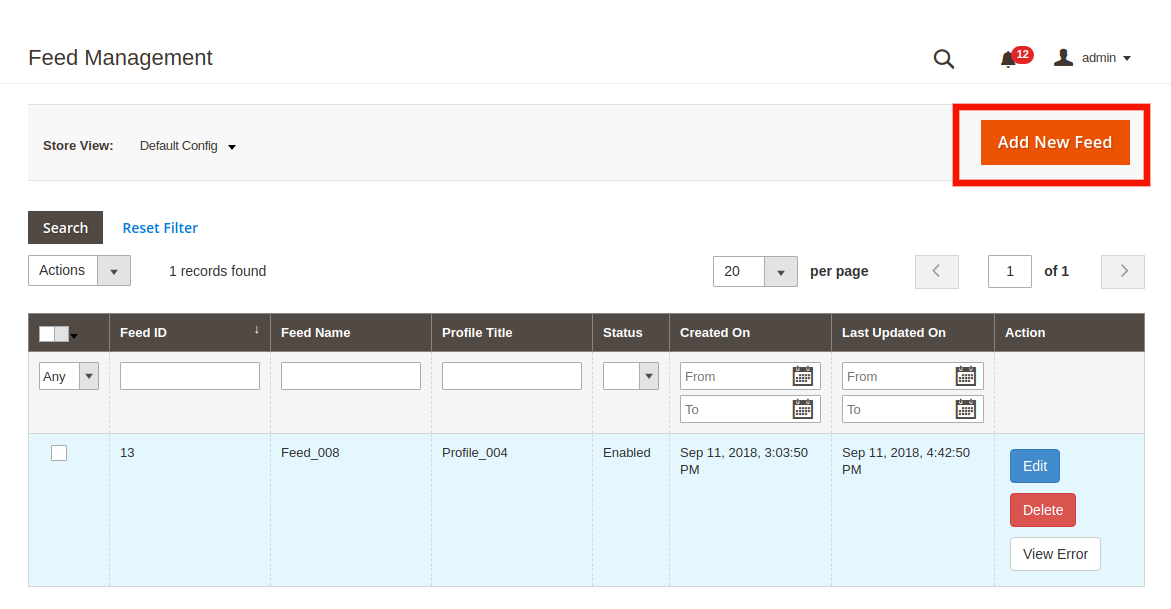
Click on the ‘Add New Feed’ or ‘+’ sign in order to create a new profile.
This will redirect you to the feed creation page of the Magento 2 Google Shopping synchronization extension. The various fields of the interface are discussed below:
Select Profile: The list of the profiles created in the profile management tab of the Magento 2 Google Shopping Integration module will be shown this tab. Select the profile whose product you want to sync with Google Merchant Center.
Feed Label: Enter a unique name for the Feed.
Feed Upload Schedule: Select the schedule of the feed upload.
Set Hour: Select the number of hours in which you want to schedule the feed.
3.4.2 How to download feeds?
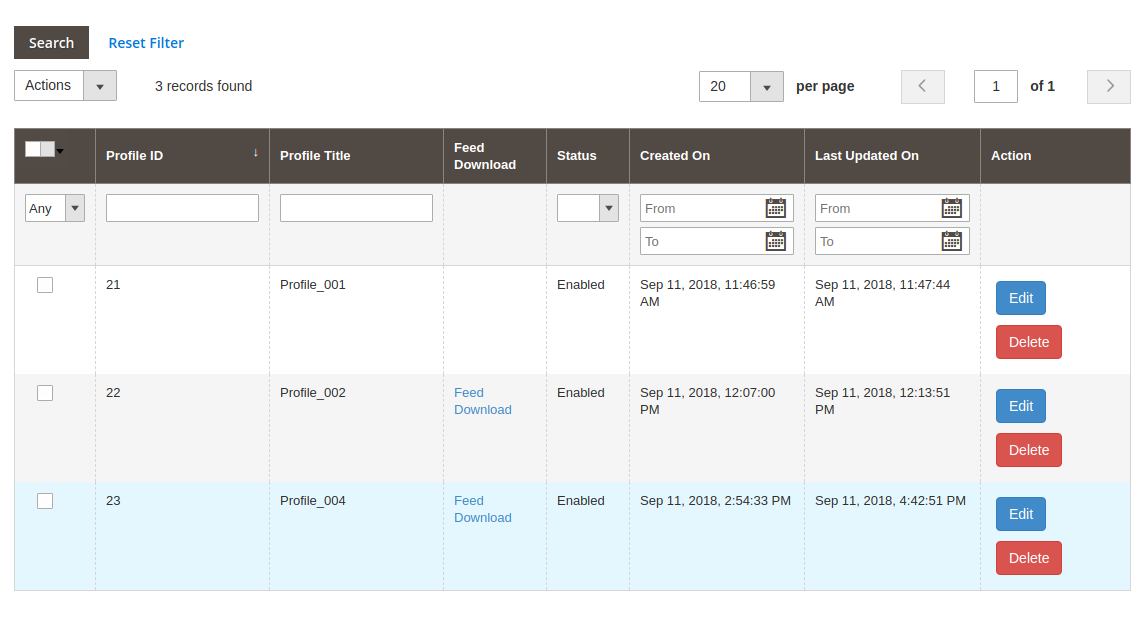
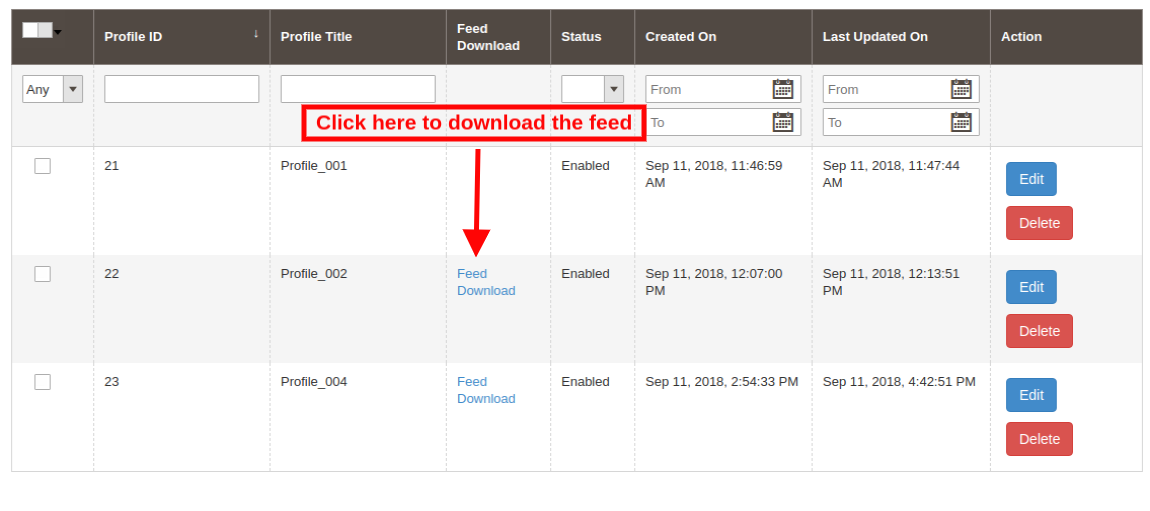
The admin can even download the feed from the respective profile. For this go to the Profile Management tab of Google Shopping Magento 2 integrator. The download option will be shown in the Feed Download section as shown below:
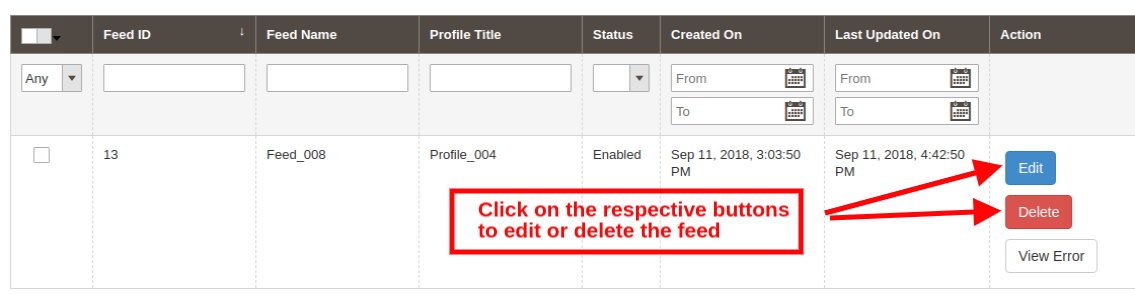
3.4.3 How to Edit/Delete feeds?
In order to edit or delete the feeds, click on the Edit or Delete button corresponding to each feed.
The admin even gets an option to view the report in case any error occurs while feed synchronization. This can be done by clicking on the View Error option as shown in the image below:
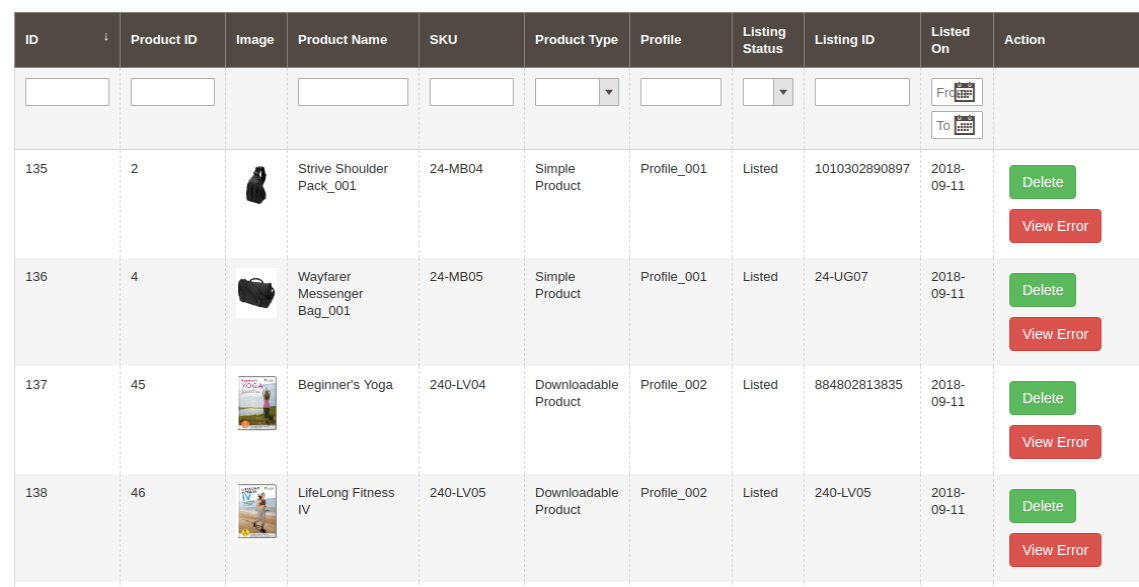
3.5. Product Listing
This section of the Magento 2 Google Shopping integration plugin shows the report of the products listed at the Merchant Center.
The Google Shopping Magento 2 integration module allows the following action to the admin.
Renew: The Renew button can relist the products whose listing has expired. Once this action is executed successfully, the action will be changed to ‘Halt’.
Delete: The admin can remove the product by clicking on ‘Delete’.
View Error: The admin can View Error occurred while listing the product.
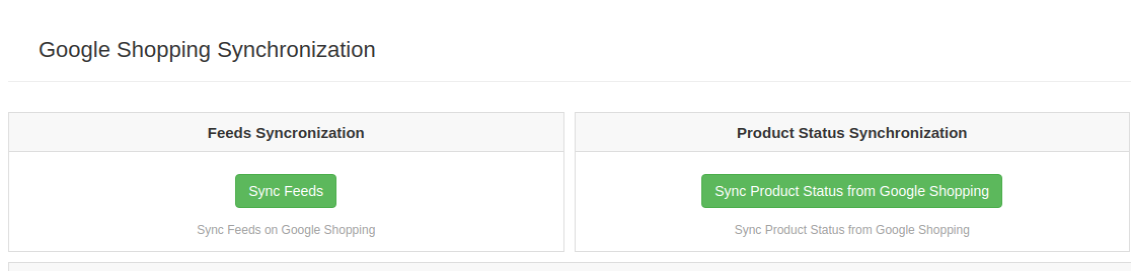
3.6. Synchronization
The Synchronization tab of the Magento 2 Google Shopping Integration module offers a cron option for real-time synchronization. Here are the cron options available.
Sync Feed on Google Shopping: ‘Sync Feed’ cron will synchronize the feed on Google Shopping.
Sync Products Status from Google Shopping: This button can sync the product status from Google shopping to the web store.
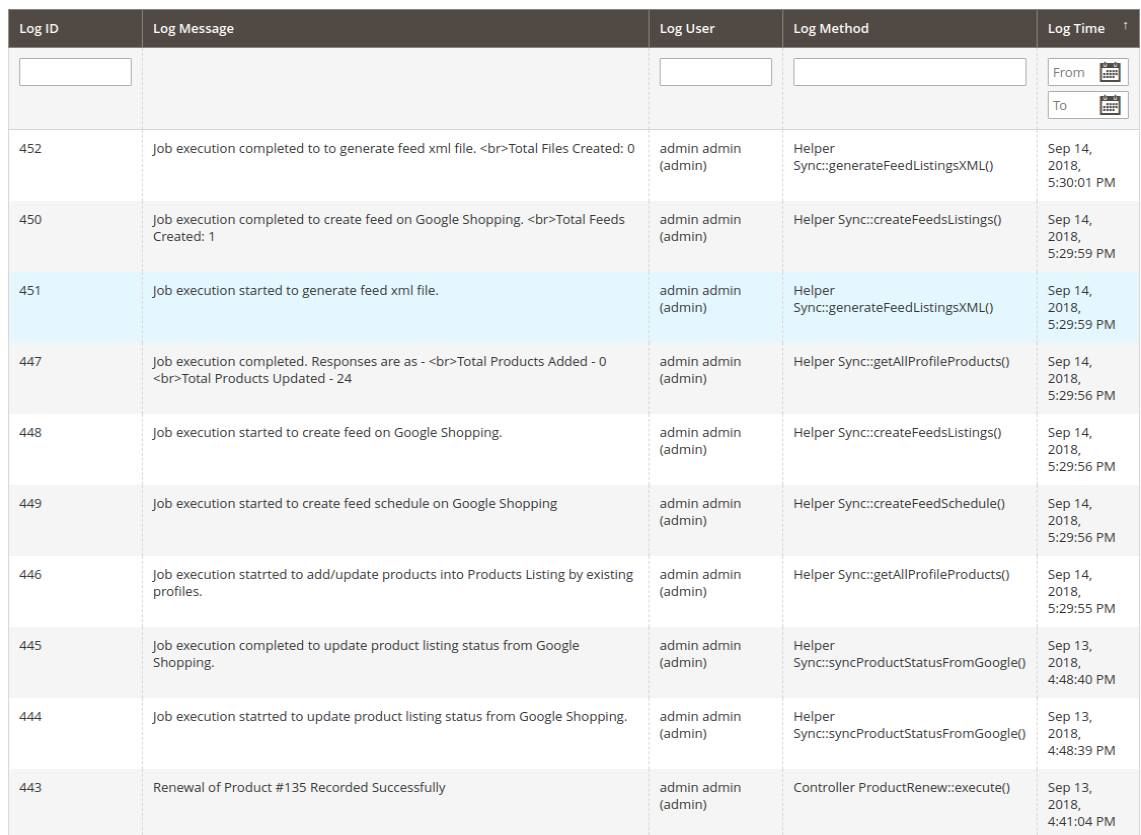
3.7. Audit Log
The admin can view the status of the task running in the back-end in the Audit Log tab of Google Shopping Magento 2 Integration plugin.
4.0. Appendix
How to Create Google Shopping Account?
Before uploading your products on Google shopping, you must have your Google merchant account. If you don’t have then please follow the below URL:
https://merchants.Google.com
Follow the instructions given on the above URL and create your account.
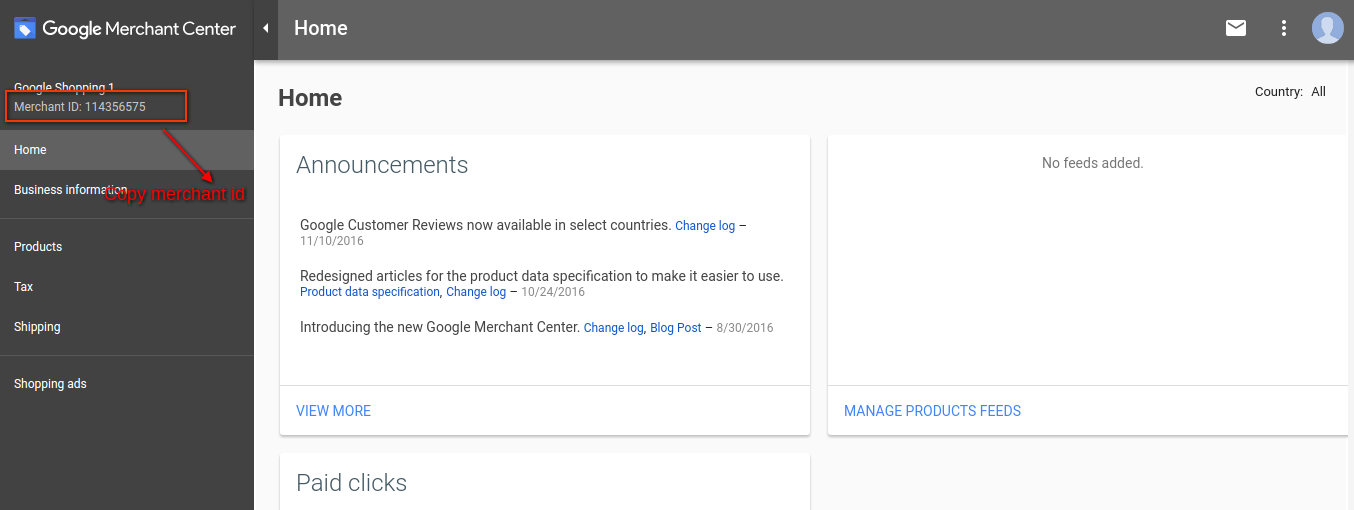
After creating your account, you will be redirected to your merchant center homepage as shown in below screen:
Copy your merchant id highlighted in the above screen and save it in module configurations.
Verify your Website for Google Merchant Account
This verification process is a compulsory process to upload your products to Google Shopping. If you do not verify your site then the module will not be able to upload products and may result in an error.
To verify your website, please follow the below instructions:
Step 1: Go to the “Business Information” tab in your Google Merchant Account.
Step 2: Under “About Your Business” tab, provide the URL of your store. For example, https://www.example.com. Save URL.
Step 3: After saving the website URL, Under the “Website” tab, Click on “Claim Your Website” link. This will show you the link to an HTML file. Download this file and upload it to your root directory of the store.
Step 4: After uploading the HTML file, execute the URL given by Google in step 3.
Step 5: Click on the “Verify & Claim” link.
4.1 How to get a Client ID and Secret?
To get Google client id and secret you need to create a project in Google developer account. Please go to the below URL to sign into the Google developer account.
https://console.developers.Google.com
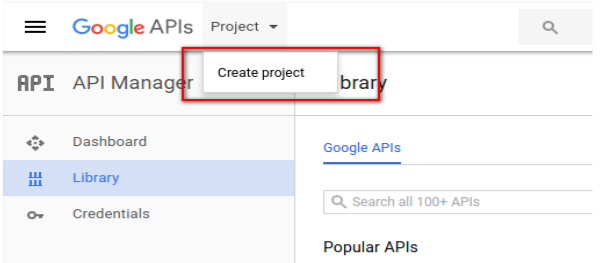
On the above URL, create a project by clicking the link shown in below screen:
Step 1: Name your Project Name and then click on the “Create” link. After creating a project, Google will redirect to the same page and your new project will be selected.
Step 2: Go to the library tab, search for “Content API for Shopping ”. Enable this API for this project.
Step 3: Click on the “Credentials” tab. This tab will show 3 tabs.
Step 4: Set your application name in “OAuth Consent Screen” and save it.
Step 5: Click on the “Credentials” tab and click on the “Create Credentials” button.
Step 6: After clicking the “Create Credentials” button, Google will be shown credentials type options. Choose “Auth client ID”.
Step 7: Set application type as “Web Application”.
Step 8: Set the “Authorized Redirect URIs” field. Your redirect URI is given on the module configuration page. Please copy from there and paste it into this field.
Step 9: Click on the “Create” button. After saving credentials, Google will generate the client id and secret for you. Copy and paste them into the corresponding field in module configuration.
Note: For more details instructions, follow URL https://developers.Google.com/identity/sign-in/web/devconsole-project
Note: If you are getting an error while getting your refresh token. Please also try after “Allowing Less Secure App” in your Google account.
For more values, please follow the below URL and read the documentation:
With the evolution of modern technologies, the trend of online shopping is spreading with a pace and it’s popularity could be witnessed in every corner of the world. As a seller, it is necessary for them to delve into every segment of online trading for a good generation of revenues. The quest to remain ahead in the competition motivates these vendors to come out with some new strategies for good business growth. Selling on an eCommerce platform like Google Shopping provides opportunity even to small business owners and lets them expand their business reach. Before we move further, let’s discuss what exactly is Google Shopping?
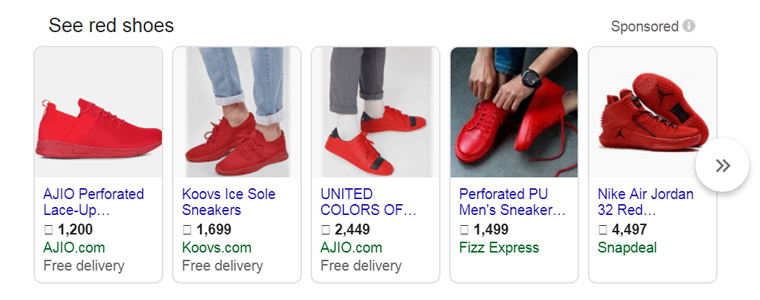
Google shopping is one of the best and most popular eCommerce platforms. It provides sellers an opportunity to access millions of customers around the globe. It is the best thought as an alternative marketplace through which shoppers are directed towards your website. Instead of paying a fixed commission, sellers have to pay an upfront fee to Google i.e., Cost Per Click (CPC) bid. The seller can also direct customers to third-party websites like Etsy, eBay, Walmart, Newegg, and others. If your product’s bid is high, then the Google search algorithm finds your listing relevant for a query given by users and will feature prominently on Google search results.
Becoming a seller on Google shopping is a multifarious entry process. Powered by two different platforms i.e., Google Merchant Center and Google Adwords (formerly Adwords), before selling products on Google shopping, sellers have to activate their accounts on both these platforms. For this, you will be needing a Google login. You can also login by your Gmail account either personal or professional.
Once you have established your account protocols, you can start by optimising your process from the very first step. Sellers must be aware of the Google shopping solutions that allow us to perform various tasks:
To filter the products which can be included in Google feeds.
Create rules for auto-optimisation of PLAs.
Validate feeds before submitting to Google.
Can set up import and feed schedules.
Create an alert whenever an error is rectified.
Can take help from experts of Google feed for fixing errors.
Get started with Google shopping:
Step 1. Feed Set Up on Google Merchant Center:
Mapping of feed and assigning the correct product category for Google Taxonomy could be an intimidating task for sellers. The process of feed mapping can be done manually or by the shopping cart of Google app, but using a trusted Google shopping integration is recommendable.
Documents required for setting up a feed on Google merchant center, Google and Go Data Feed are:
Google Product Feed Specifications
Google Summary of Attribute Requirements
After successfully completing the steps outlined by your Google Shopping feed, Google will take several days to approve it.
In between this time, sellers need to keep a check on the health of your feed. Keep a check that there are no errors or warnings as they would prevent your products from being listed.
If you have submitted the application manually, then you can monitor your feed status via Merchant Center. If you use GoDataFeed’s Google feeds, the app will automatically monitor your feeds and alert you regarding any issue, but still, it’s a good piece of advice to log in occasionally to assess your feed health by yourself.
Step 2. Launch a Shopping Campaign on Google Ads:
Google Shopping uses Product Listing Ads to launch a shopping campaign. Product Listing Ads do not require keywords but do require a connection to your product feed. While you can create Product Listing Ads in any existing campaign, for maximum control on your ad spend, creating a new campaign for your PLAs is recommendable.
Log in to Google Ads. Go to “Campaigns Tab”. This will take you to the “Select campaign settings” page.
After choosing campaign settings, you have to fill some relevant information. You can:
Name your campaign.
Select the linked Merchant Center ID under “Merchant identifier.”
Choose your “Country of sale.”
Set the locations you want to target under “Locations.”
Set your “Default bid,” which can be adjusted later for specific product groups.
Set your campaign budget on daily basis.
Add attributes. You can add up to 7 attribute filters.
Promote and prioritise your campaign (if you are working on multiple campaigns).
Try to use the “inventory filter” for specifying products you want to show in in your campaign.
Choose the method of delivery accordingly.
Schedule ads.
After choosing all these options, save the information and head towards the next page i.e., “Create ad groups.”
3. Create Ad Groups:
Ad groups page comes with the responsibility of notifying people about free shipping, site sales and other marketing campaigns through promotional texting.
After successfully creating a new campaign, you have to connect it to your product feed. This could be accomplished in 3 steps:
Go to Ad Extensions tab.
Then click on the view drop-down menu and select Product Extensions.
Next, click on the new Extensions button where and select your feed file. Also, remember to set the daily budget of your campaign.
Arranging your Ad groups just like grouping your products on your website should be given some thought before starting. It is the best way to start with by arranging them both in the same way. Sellers can also break the ad groups into Age, Gender, Category, and Brands.
Unlike traditional ad groups in Adwords, Product Listing Ads do not use keywords, however, there is a need to set maximum CPC (Cost Per Click) bids. Bidding is been done on products and not on keywords, so it’s better to focus on products more than keywords.
Here are the steps involved in creating an Ad Group:
Name your ad group.
Click on the drop-down menu next to “Subdivide by”.
Choose an attribute you wish to divide your products into multiple groups like Google Product Category, Product Type, Custom Label, Item ID, or Brand.
Click on Save and continue, soon you’ll be redirected to the “Product groups” page where a list of different groups of products according to the attributes you picked can be seen.
Bids would be suggested by Google based on your history or on bids made by other customers.
Step 4: Target Your Ad Groups:
Once you have created Ad groups, sellers need to inform Google about the products you want to associate with each ad group created by you.
You can perform it in the following steps:
Select an ad group and then select the Auto Targets tab.
Now, select the “Add new product target”.
Once you click on “Add product target” a new box will appear on your screen on which you can assign products to each ad group according to the attributes in the feed chosen by you, including product type, brand, condition, ads labels or ads grouping.
You can filter out up to three of the above attributes and Google will validate the filter. Creating a target for each ad group is a necessity.
5.Create Product Ads:
Building a product ad is a hassle-free feature for Product Listing Ads. There is no need to worry about headlines, ad copy or destination URLs as everything Google needs is in your feed. A product ad totally depends on how you created your ad groups.
You can create a new product ad by:
Selecting the Ad tab.
Now selecting the ad drop-down menu and select Product listing ad.
6. Add Promotions:
Last but not least, Google will prompt you to add a promotional message of 45 characters. This is a free service provided to add any message for the marketing of your products. You can promote your product by informing customers about your discounts and offers, free shipping or you can also write your company’s tag line etc. Sellers should take advantage of this valuable ad space! Products with promotional messages increase the trust of customers resulting in more leads.
Over to you:
Selling on a Marketplace like Google shopping is an advantageous choice in today’s eCommerce industry. It’s a great platforms for retailers to earn good chunks of profits, but it’s not a magic wand obviously. Even though sellers are getting good results, regular monitoring of your shopping campaign is a must. If you own multiple ad groups, but only a few are getting good conversions, it’ better to raise the CPC on the better converting ad group rather than spending time on the useless one. At last, I would sum up by the thought – “Never Settle and never stop optimising!!”
Dive into Happiness! Now Integrate your eCommerce with Google Shopping in just few clicks. KnowBand offers Google Shopping Integrators for various CMS platforms like Magento, OpenCart and PrestaShop which allows you to present your products among larger audience and encourage the brand awareness as well.
OpenCart Google Shopping Integration Plugin by Knowband offers an excellent and fully-functional integration solution to the OpenCart store admin. Further, he can list and display their products on Google sponsored ads. In fact, the most advanced OpenCart Google Shopping Integration module offers an easy way to display your products on Google Shopping. Moreover, get thousands of new customers on your online shop.
[Important Update]Google Merchant API Update (July 1, 2026)
The OpenCart Google Shopping module has been updated to use the Google Merchant API for product synchronization and store authentication with Google Merchant Center, replacing the previous integration built on the Content API for Shopping (deprecated).
Improved reliability for Google Shopping feed sync and product data upload
Modern OAuth-based authentication aligned with Google’s current API standards
Required migration – the Content API for Shopping will cease operating on 18 August 2026, making migration essential for any business relying on API-based product management
Continued Google Merchant Centre compatibility, avoiding feed disruption, sync errors, or product listing removal after the shutdown deadline
Access to newer capabilities such as improved product data management for Google Shopping ads and free listings
1.1 Merchant Benefits of Knowband’s OpenCart Google Shopping Integration Plugin:
OpenCart Google Shopping Marketplace Integration allows the store admin to well-rank their products on Google Shopping in the shortest time.
OpenCart Google Shopping Marketplace Integration Module makes it easier for the store admin to connect the store and list the products.
The OpenCart Google Shopping Marketplace Integration Extension makes it easier to set up the connection. Further, this happens in a few simple steps.
OpenCart Google Shopping Marketplace Integration Plugin offers profile-based product upload. Thus, the products can list in bulk and inventory is manageable with ease.
With the help of the Google Shopping OpenCart Integration, the store admin can map the categories of the OpenCart with the category of Google Shopping.
Multiple categories of OpenCart are mappable with a single category of Google Shopping via Google Shopping OpenCart API Integration.
The admin can remove the category at a single click from the back-end of the OpenCart Google Shopping API Integration.
The attributes of the products are mappable with the attribute of Google Shopping with the help of the Google Shopping OpenCart Connector.
OpenCart Google Shopping synchronization module can upload thousands of products in one go. In fact, the products of the mappable category can upload in bulk.
The inventory is manageable from the back-end of the admin interface of the OpenCart Google Shopping Integration plugin. Further, the products can remove easily.
OpenCart Google Shopping Connector allows the merchants to create feeds and schedule their uploads.
The admin can set the country and the corresponding language for feed.
The Google Shopping integration module allows for easy integration. In fact, the admin can download the feed file and upload it to Google Merchant Center.
In case the admin is not comfortable with a cron job, the admin can get manual synchronization. Additionally, the synchronization happens page-wise with the help of Google shopping OpenCart integration.
The audit report offered by the OpenCart Google Shopping feed synchronization extension allows the admin to keep a track of the various task being performed in the back-end.
The admin can see the errors that occurred while product listing with the help of the OpenCart to Google Shopping Synchronization.
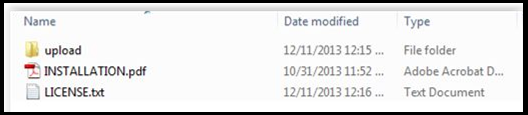
1. Download the zipped file of the OpenCart Google Shopping module from OpenCart & unzip it into a folder. Further, after unzipping the folder structure of the Google Shopping plug-in will be similar to shown in the below screen.
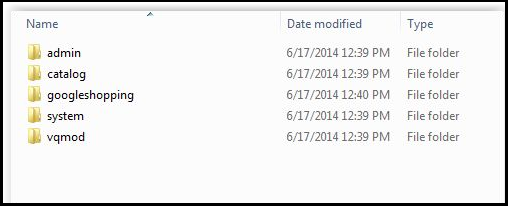
2. Open the upload directory & you will see the following folder structure.
3. Login via FTP & Drag-drop all the folders into your server root directory.
4. Give write permission (775 OR 777) to the google shopping folder and its subsequent folders. the google shopping folder can be one of the locations mentioned below.
system/google shopping
5. The OpenCart Google Shopping extension is now ready to be installed in your OpenCart store.
6. Click on the Install link to install the OpenCart Google Shopping Synchronization plug-in.
7. To access the Google Shopping plugin, Click on the edit button in of OpenCart Google Shopping module as shown below.
8. On clicking, the edit button, the admin interface of the OpenCart Google Shopping module will open. In fact, it contains 7 different tabs as mentioned below:
3.0 Admin Interface
The OpenCart Google Shopping Integration plugin offers several configuration options that allow the store admin to connect their store. Moreover, list their products. Further, the various customization tabs offered by the Google Shopping OpenCart Integration extension includes:
Connection Settings
General Settings
Profile Management
Feed Management
Product Listing
Synchronization
Lets us discuss the various tabs one by one.
3.1 Connection Settings
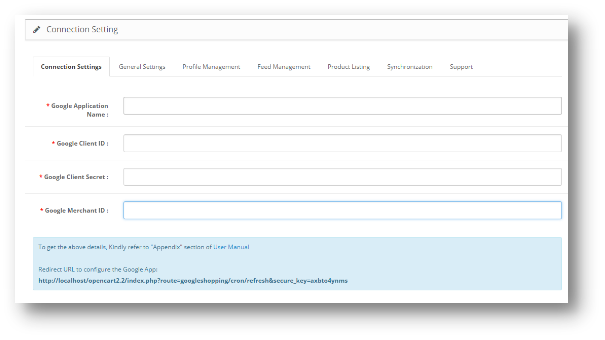
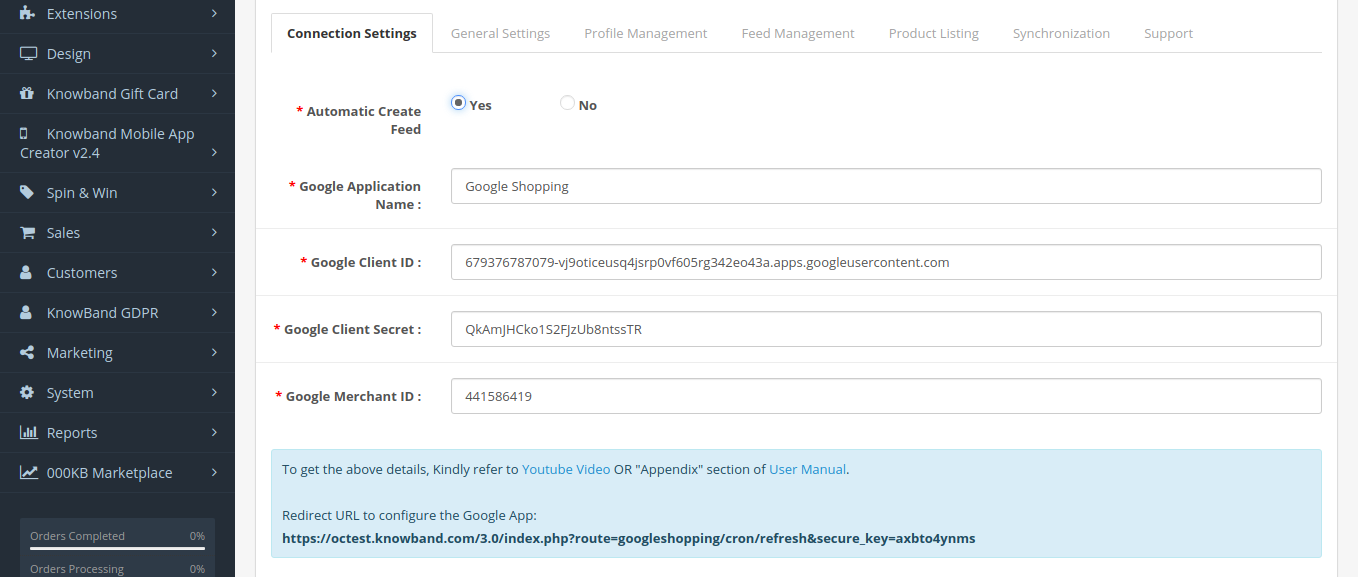
On the connection settings page, there is an option provided “Automatic Create Feed Yes, No.
If it’s set to Yes, then only the connection settings field will display. Moreover, If it’s set to No, Fields will hide there is no need to add the Google Credentials.
Google Application Name: Enter the name of the project/application that you created for Google Shopping. (See Appendix)
Google Client ID: Enter the Client ID that will authenticate the connection between the store and Google Merchant. By default empty but required field. (See Appendix A)
Google Client Secret: Enter the client secret to set up the connection. By default empty but required field. (See Appendix A)
Google Merchant ID: By default empty but required field. Here, you will provide the merchant ID of your Google merchant center account.
3.2 General Settings
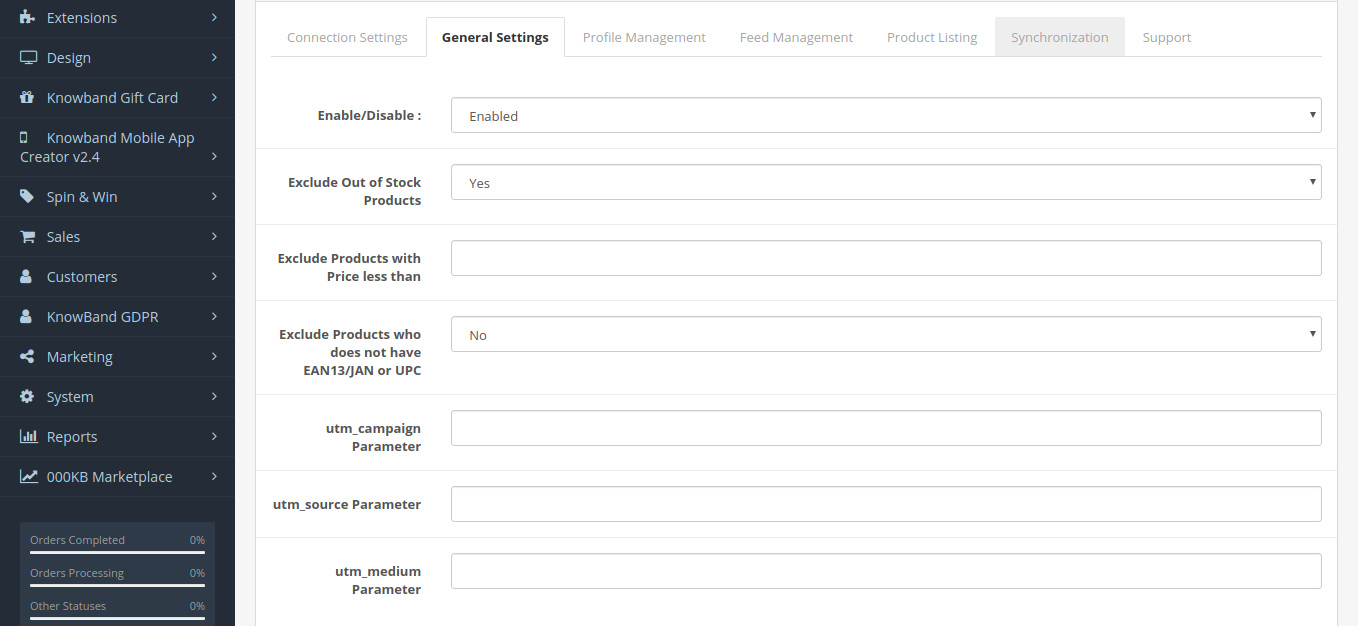
The General Settings tab of the Google Shopping OpenCart Integration plugin allows the admin to make some basic changes and authenticate the OpenCart Google Shopping integration.
Enable/Disable: Enable/disable the OpenCart Google Shopping integration plugin by selecting the options from the drop-down menu.
Image Size of Product: Select the default size of the images from the drop-down menu.
Exclude Out of Stock Products: Select Yes from the drop-down menu if you want to exclude the out-of-stock products. In fact, if yes is selected, then, the products that are not in the inventory will not display in the Google search results.
Exclude Products with Price Less than This field enables you to exclude the products whose price is below a specified limit. For instance, if the admin enters the amount ‘X’ here, then, any product whose price is below ‘X’ will not display in the Google Shopping results.
Exclude Products that do not have EAN13/JAN or UPC: If you want to exclude the products that do not have EAN13/JAN or UPC, then, select Yes.
Sync Type: Select the type of synchronization from the drop-down menu.
Utm_campaign, Utm_source, Utm_medium Parameter: Enter the UTM for tracking the performance.
Select your Default Language: Select the default language that you want to use for feed synchronization. Therefore, the OpenCart Google Shopping Feed synchronization extension offers multi-lingual support.
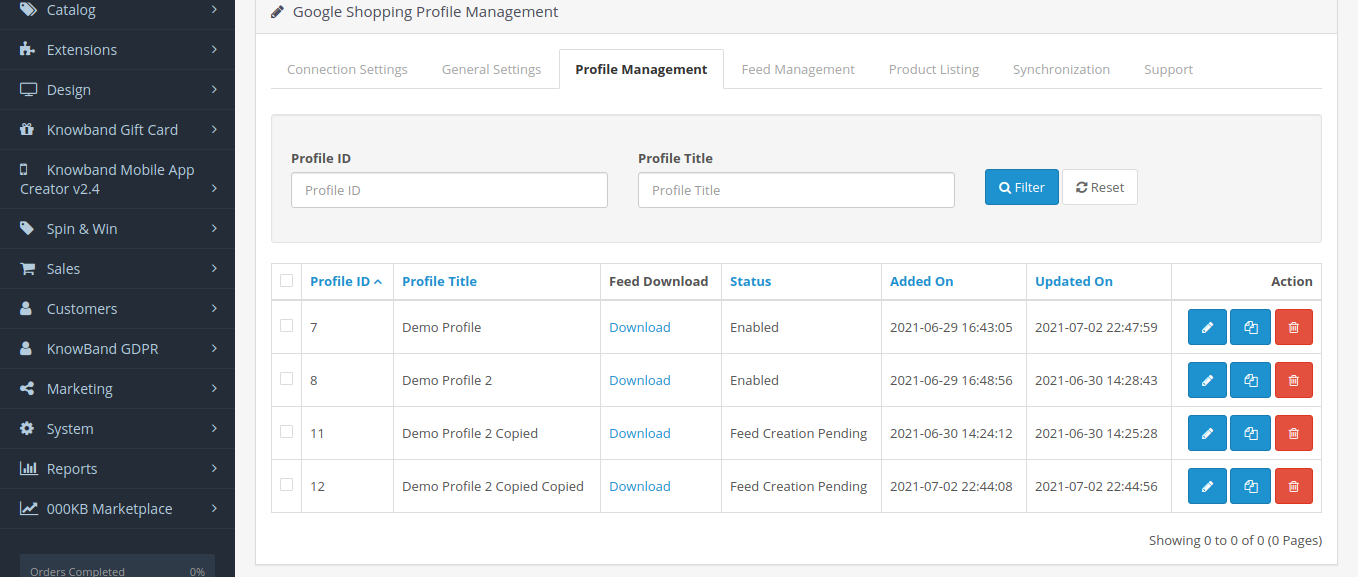
3.3 Profile Management
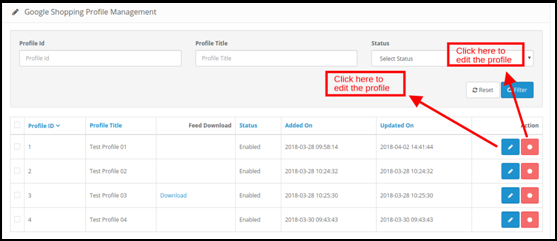
In the “Profile Management” tab clicking on the copy link again, the profile will copy the profile data. However, the profile will be disable. Store category will also not be copied. Further, once the store category will be selected in the copied profile the status will change to enabled.
3.3.1 How to Create New Profiles?
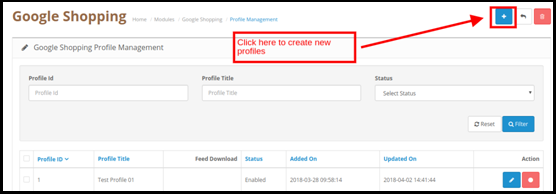
To create a new profile, click on the ‘+’ sign on the top right position of the admin interface of the OpenCart Google Shopping Feed synchronization plugin.
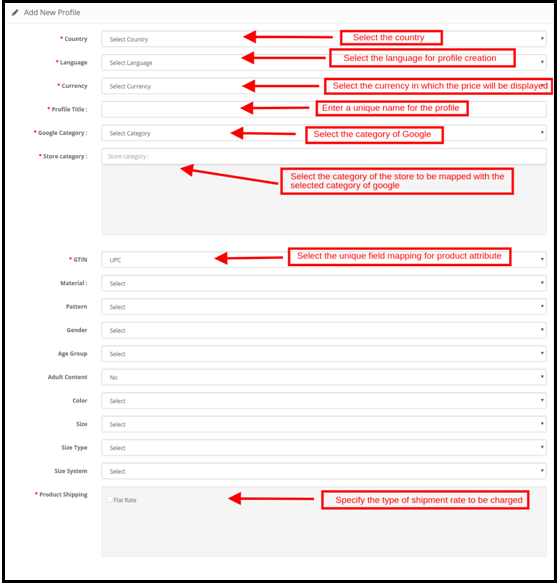
On clicking, you’ll head to the profile creation page. Further, the various fields are discussed in detail below:
Country: Select the country where you want to showcase the products of the profile in the Google Shopping section.
Language: Select the language for profile creation.
Currency: Select the currency in which you want the price of the products to display.
Profile Title: Enter a title for the respective profile.
Google Category: Select the category of Google that is to map with the categories of the OpenCart store.
Store Category: OpenCart Google Shopping connector offers one-to-many category mapping. In fact, select the categories of the store that you want to map with the selected category of Google.
GTIN: Select the unique field mapping for the product attributes. Furthermore, the Google Shopping OpenCart connector will identify the products according to the mappable attribute.
Material: Select the material of the product from the drop-down list.
Pattern: Choose the pattern from the list.
Gender: Select the Gender for which the product is intended. In fact, the various options list in the drop-down list.
Age Group: Select the expected age group of the users of the product.
Adult Content: Specify if the product has any adult content or not.
Color: The color attribute describes the color of the product. Further, these attributes help create accurate filters and narrow down the search results.
Size: The size attribute specifies the standardized size of the product.
Size Type: The attribute describes the cut of your product. In fact, this helps create accurate filters.
Size System: With this attribute, you can explain which country’s sizing system your product uses.
Product Shipping: Select the type of shipping rate that is to be charged.
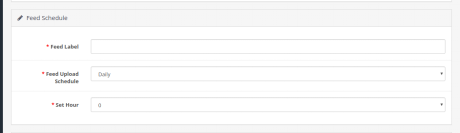
In addition, the Feed Schedule option is now provided under the profile creating a page. Further, no need to create the feed separately under the Feed Management tab.
Feed Label: Enter a unique name for the feed.
Feed Upload Schedule: Select the schedule for the feed synchronization.
Set Hour: Set the Hours of the days for the feed upload schedule.
3.3.2 How to Edit/Delete the Profiles?
The admin can easily edit or delete the profiles from this section of the OpenCart Google Shopping integrator. In fact, to do so, click on the ‘Edit’ or ‘Delete’ button corresponding to each profile.
3.4 Feed Management
The Google Shopping OpenCart integrator offers a user-friendly interface to manage the feeds. Further, the admin can create feeds and sync the same with the Google Merchant Center with the least hassle.
3.4.1 How to Create new Feeds?
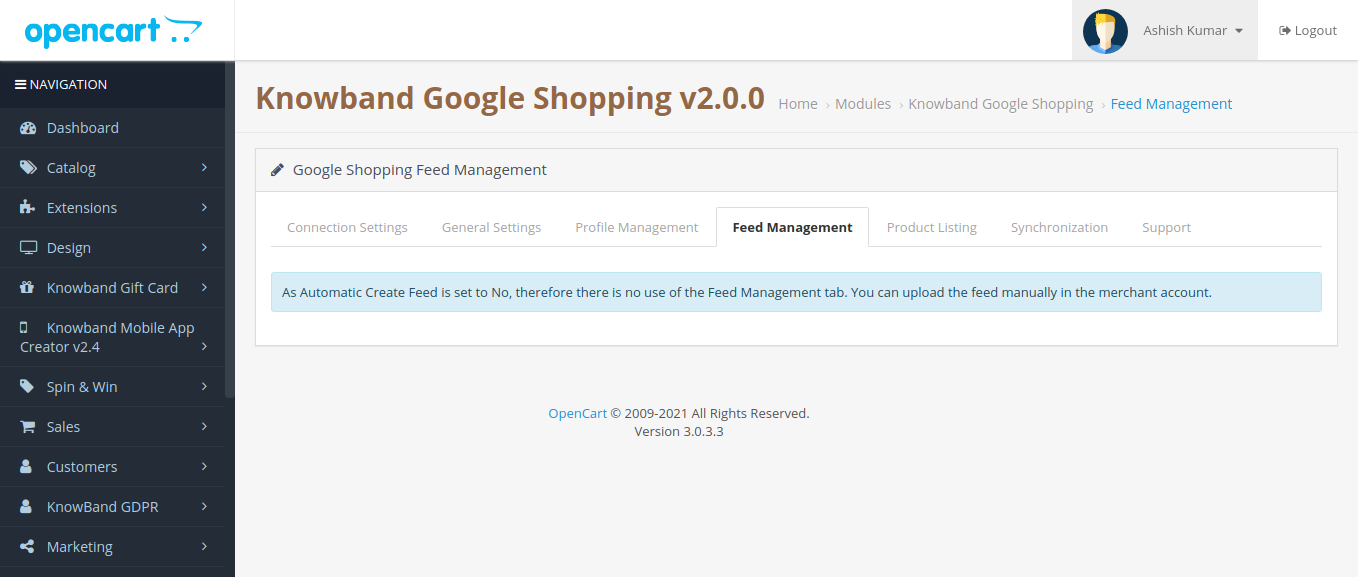
If the Automatic Create Feed is set to No, then in the “Feed Management”, Show the message “As Automatic Create Feed is set to No, therefore there is no use of the Feed Management tab. In fact, you can upload the feed manually in the merchant account”.
If the Automatic Feed is set to No, then the Feed URL will be generated so that customers can copy the feed URL & create the feed in the Google Merchant account manually.
Synchronize the feeds by executing cron in the synchronization section of the OpenCart Google Shopping integration plugin. (See Section 3.)
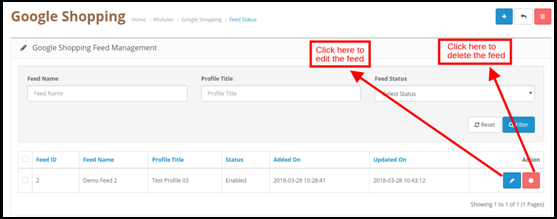
3.4.2 How to Edit/Delete Feeds?
To edit/delete the feeds, click on the Edit or Delete corresponding to each feed as shown in the image below:
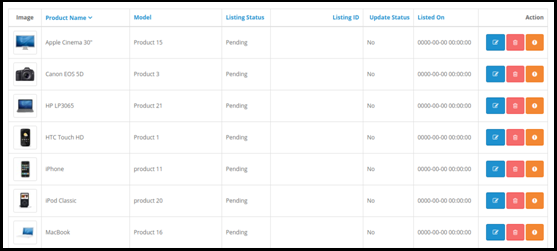
3.4 Product Listing
The product listing is available in this tab of the Google Shopping OpenCart integrator.
You can renew or remove the products by clicking the ‘Relist’ or ‘Remove’ button corresponding to each product.
The admin can even view the errors that occurred while product listing by clicking on the ‘View Error’ button.
The listing status specifies the status of the products. The status of the products can be synced from Google Shopping by executing cron in the Synchronization tab of the Google Shopping OpenCart connector. (See Section 3.5)
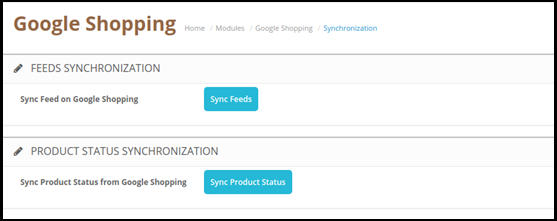
3.5 Synchronization
The cron jobs offered by the OpenCart Google Shopping feed integration module allow the admin to keep everything up-to-date without any manual synchronization.
Feed Synchronization: This cron job allows the admin to sync the feeds on Google Shopping.
Product Status Synchronization: Product Status CRON will also give the message that “This functionality is not available as Automatic Create Feed is selected NO in the Connection Settings Tab”. In case, the Automatic Create Feed is set to Yes, then it will synchronize the Product Status from Google Merchant to the Knowband module.
Appendix
How to Create Google Shopping Account?
Before uploading your products on Google shopping, you must have your Google merchant account. If you don’t have then please follow the below URL:
Follow the instructions given on the above URL and create your account.
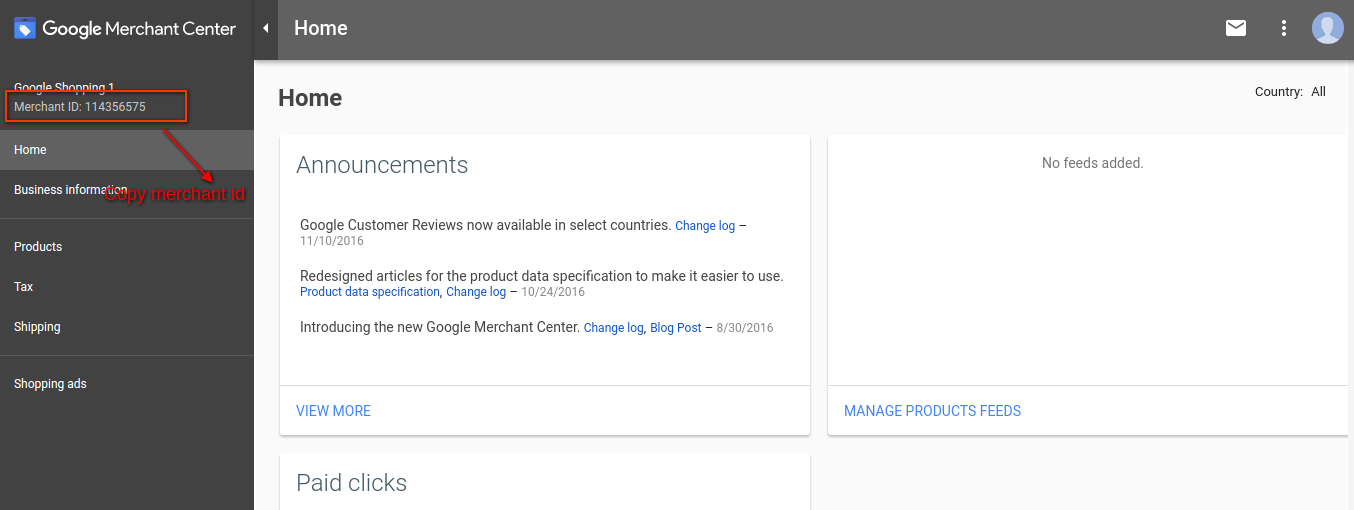
After creating your account, you will head to your merchant center homepage as shown in below screen:
Copy your merchant id highlighted in the above screen and save it in module configurations.
Verify your Website for Google Merchant Account
This verification process is a compulsory process to upload your products to Google Shopping. If you do not verify your site then the module will not be able to upload products and may result in an error.
To verify your website, please follow the below instructions:
Step 1: Go to the “Business Information” tab in your Google Merchant Account.
Step 2:Under the “About Your Business” tab, provide the URL of your store. For example, https://www.example.com. Save URL.
Step 3:After saving a website URL, Under the “Website” tab, click on the “Claim Your Website” link. Furthermore, this will show you the link to an HTML file. Hence, download this file and upload it to your root directory of the store.
Step 4:After uploading the HTML file, execute the URL given by Google in step 3.
Step 5:Click on the “Verify & Claim” link.
How to get Client ID and Secret
To get a Google client id and secret you need to create a project in a Google developer account. Further, please go to the below URL to sign in to the Google developer account.
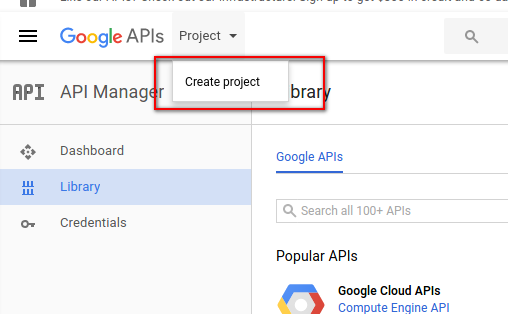
On the above URL, create a project by clicking the link shown in below screen:
Step 1:Name your Project Name. In addition, click on the “Create” link. Furthermore, after creating a project, Google will redirect to the same page and your new project will be selected.
Step 2:Go to the library tab, search for “Content API for Shopping ”. Furthermore, enable this API for this project.
Step 3:Click on the “Credentials” tab. Therefore, this tab will show 3 tabs.
Stage 4:Set your application name in “OAuth Consent Screen” and save it.
Step 5:Click on the “Credentials” tab. Moreover, click on the “Create Credentials” button.
Step 6:After clicking the “Create Credentials” button, Google will be shown credentials type options. In fact, choose “OAuth client ID”.
Step 7: Set application type as “Web Application”.
Step 8: Set the “Authorized Redirect URIs” field. Further, your redirect URI is given on the module configuration page. Additionally, please copy from there and paste it into this field.
Step 9:Click on the “Create” button. After saving credentials, Google will generate the client id and secret for you. Copy and paste them into the corresponding field in module configuration.