An online store always caters for more conversions, higher customer engagement, and zero bounce rates, and achieving this will be a dream come true.
Is your current marketing strategy working? Are you getting enough business from your online store? These are pressing questions and to overcome that you can try something new and in your online store.
How about adding Gamification to the Online store?
Gamification is the hot tactic businesses are using for marketing their products and to increase customer engagement. It allows users to participate in desired activities, shows a road to mastery, and takes advantage of our human psychological proclivity for gaming. But, Gaming and Gamification are not the same. In fact, Gamification involves a specific game element that can keep your user engaged for longer, and to keep them motivated, users are awarded with rewards at the end. It’s a tool that smart marketers use to improve customer engagement and influence user behavior.
Major problems faced by every online business
A number of factors may have a positive or negative effect on a business. Businesses invest thousands of dollars to remove the barriers coming on the way. Major barriers here are the abandoned cart and increased bounce rate.
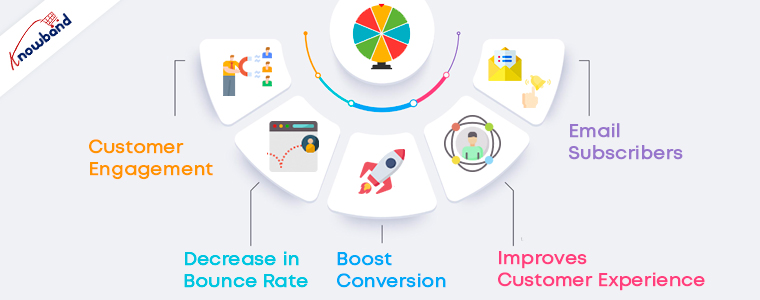
For more conversion, it is needful to focus on customer engagement and eCommerce Gamification can help the businesses achieve that. If you have a PrestaShop store and you are concerned about your business growth then the article is all about what you should do in the coming future for increasing customer engagement to create your brand identity.
How can gamification help to overcome eCommerce issues?
Abandoned Cart
We’ve all had those moments when we impulsively choose a slew of things to purchase from an online shop, and only after we “check out” do we realize what we’ve done. We must get rid of things or move on to something better. As a result, the abandoned cart is born. Cart abandonment is widespread in all industries, but eCommerce fashion businesses suffer the most. Customers do not take any action on the abandoned product unless they find a great deal on their abandoned cart.
Your clients are no exception.
The consumer is unlikely to notice unless the items in the cart are highly priced and come with a slew of other benefits such as free delivery or a heavy discount.
Customer Retention
Another challenge that every eCommerce business faces is customer retention. If you have served your customer well enough then there are chances of their coming back. Customer retention works parallel to customer loyalty. That is hard to achieve just like the pot of gold at the end of the rainbow.
The foundation of any meaningful partnership between two individuals is loyalty. Customer loyalty is a daunting task to acquire and maintain. This is why businesses devote a significant amount of money to achieving these objectives. A system of positive reinforcement, incentives, and expressions of gratitude makes it easier to develop loyalty.
Some fun ways to increases customer engagement in your eCommerce store
1. Spin-and-Win
This is where you can put your daily bonus to good use (and some other style points). This game strategy is fantastic for fans. On every spin, customers can earn rewards, coupons, or anything specified by the store owner. Furthermore, the visitor enters their email address to obtain a discount coupon code, which is then added to their shopping cart. The perceived value of this promotion, as well as its engaging features such as slide-out animations, gradient coloring, and brand recognition, combine to create a seamless eCommerce gamification experience that keeps consumers interested and encourages them to make a purchase.
Spin and win module is considered an advanced eCommerce gamification plugin because of its look and appealing design. It can be customized for various occasions and events like Halloween, Christmas, New Year, Valentine’s day, Diwali, etc. Keep in mind that the text added should be engaging enough to encourage the buyer to take the chance.
You can use the Spin-and-Win on any page of your website. Be it the landing page or the Product Page and this will surely create a positive impact on your customers because everyone loves having fun!
2. Scratch to Win
Consumers enjoy being entertained, and Scratch & Win campaigns have both fun and suspense. Along with customer engagement, this can be used to create a brand identity. Your brand logo, images, and colors can be used on the scratch card.
Scratch-off coupons are an ideal way to improve consumer loyalty and purchase rate. Scratch-offs with coupons and/or prizes are becoming more common in eCommerce stores.
Everyone enjoys the feeling of winning something. Ecommerce businesses may use mobile scratch-off coupons to generate excitement in their stores and on their websites.
Customers know they’ll get something if they play the tempting scratch-off, so the psychological pull of beginning something draws them to the end of the mobile scratch-off card, where they’ll get a reward.
By doing so, you will give your prospect the warm feeling of winning and receiving a reward, as well as gain the customer interaction you were looking for.
3. Loyalty Programs
Loyalty, on the other hand, can be gamified by the use of a point system. To meet your goals, you must have an effective loyalty program. What makes a loyalty program effective?
It improves a customer’s sense of worth. If a customer receives points for doing nothing but spending money, those points feel like they’re a part of their previous purchases. The consumer is attached to them and wants to use them wisely because they have this intrinsic value.
A points system that accumulates over time and can be traded for both virtual and physical goods makes it easy to entice consumers to return for repeat purchases. You can reward loyal customers with discounts and gifts in a similar way. Offering reward points on every purchase will win you the customer as well as their loyalty.
In closing,
Ecommerce gamification has the potential to improve results in many ways. Customer engagement will increase, onboarding will be shortened, and learning interactions will be more effective and meaningful as a result of successful gamification initiatives. Companies benefit greatly from the specific elements of gamification by smoothing out the transition to organizational change.
KnowBand has developed several eCommerce plugins that can help your online business to grow and will take the customer experience to the top tier. Get in touch or write to us at support@knowband.com.
Now the Opencart store merchant can easily get new subscribers for sending newsletters. Opencart Auto Subscribe extension allows the Opencart store admin to add a “subscription form” on the home page of the eCommerce store. This OpenCart Auto Subscribe extension helps the store merchant to design an attractive subscription form, so that, the visitors coming to the website get registered by submitting the required information on it. With a pop-up window, OpenCart email subscription popup allows the Opencart eCommerce store owner to collect the email address of website visitors. The Newsletter Subscribe Extension for OpenCart can automatically subscribe the online store visitors on registration or checkout. This way, the online merchant can get more email id details for sending the newsletter.
The online merchant can show subscription box on website pages and display attractive subscription popup on the website homepage. The online store visitors can enter their email id details and easily subscribe to the website. The Newsletter Subscribe Extension for OpenCart forwards email id details to admin’s MailChimp and Constant Contact account at the same time when users enter their details. The Email Subscriber module for OpenCart is mobile responsive, multi-lingual compatible and offers smooth functioning.
1.1 Features Offered by OpenCart email newsletter addon
The online merchant can subscribe online users automatically while registration, checkout or normally by showing subscription form.
The OpenCart product subscription module allows admin to show subscription box on website pages and subscription popup on the homepage.
The eCommerce store merchant can set the look and feel of subscription box/popup by setting its heading, description and color.
The OpenCart email newsletter addon allows setting the position for showing subscription box and show multiple subscription boxes on the same page by setting sort order.
The OpenCart product subscription module allows the store merchant to set gap for showing subscription popup next time to the same user.
The online store merchant can show a success message after subscription and admin can set the size of subscription popup.
Email Subscriber module for OpenCart allows sending a mail to the subscribers after subscription.
The store merchant can configure MailChimp and Constant Contact settings from the admin interface of the Newsletter Subscription Module.
The OpenCart email newsletter addon is multi-lingual compatible and mobile responsive.
There is no need to change even a single line of codes from the admin interface while using MailChimp Newsletter Subscription module.
Auto Subscribe integration extension helps store admin to gain email subscribers.
Opencart eCommerce store owner can collect mail id from users without any difficulty.
The online customers can get regularly updated the information of the store.
2.0 Auto Subscribe integration Installation Steps
Purchase OpenCart Auto Subscribe extension from the Knowband website.
First, you will get a source code file of the open cart Auto Subscribe extension in zipped file format.
User Manual of this OpenCart Auto Subscribe extension.
Follow below-mentioned steps in order to install OpenCart Auto Subscribe extension:
1. Unzip the received zip file. You will get the folders as shown in the following image:
2. Copy all the folders of the zip file in the Root Directory of OpenCart setup via FTP manager.
So, OpenCart OpenCart Auto Subscribe module is now successfully installed and ready to use at your store.
Now go to the admin menu and click on the extensions and thereby click on configure button next to OpenCart Twitter Login extension.
3.0 Admin Interface
After successful installation, you can configure the OpenCart product subscription module as described in this user manual. There are multiple Configuration tabs as shown below:
Subscriber Box Settings
Popup Setting
Email Setting
Mail Chimp
Constant Contact
Auto Subscribe Events
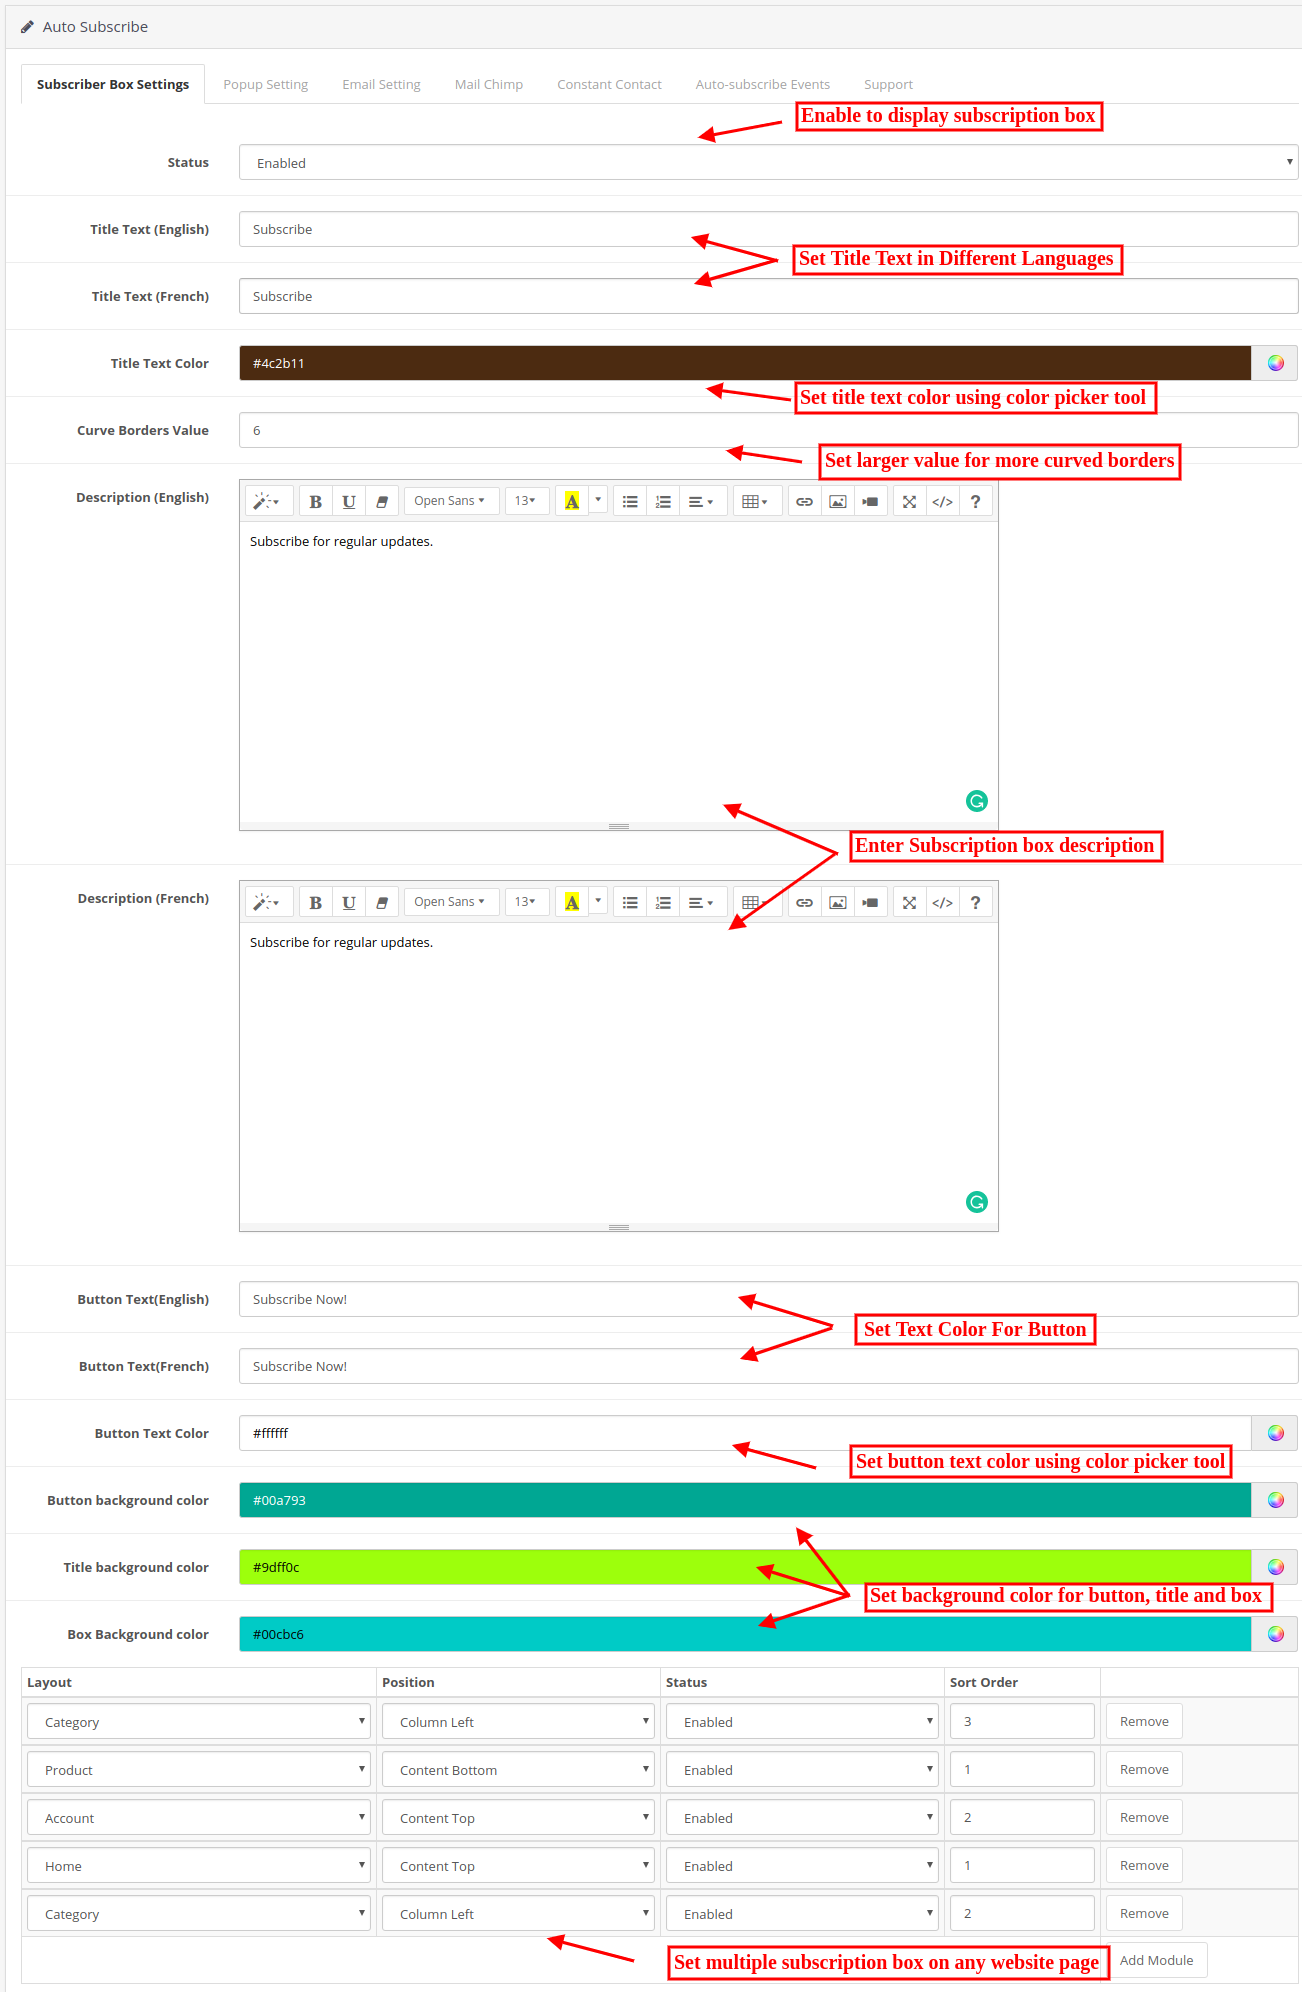
3.1 Subscriber Box Settings
Opencart admin can customize the subscription box to be displayed in the Opencart eCommerce store front by using the following settings option available.
Status: Enable the functionality for showing subscription box on wbesite pages.
Title Text: Enter the title of the subscription box in different languages.
Title Text Color: Select the title text color using color picker tool.
Curve Borders Value: The Opencart store admin can enter the radius of curve borders. This value will be applied to the four corners of the subscription box on front. Higher the value will result more curves.
Description: Enter the text for describing to visitors, the advantages of subscribing to your store. Admin can enter description in different languages.
Button text: Enter the button text here in different languages.
Button text color: Choose button background color using color picker tool.
Button Background Color: Select a color for the background of the button on subscription box.
Title Background Color: Set title background color here.
Box Background color: Choose a background color for the subscription box.
Add Module: Admin can select different pages and set the position of showing subscription box on it. Admin can disable any module if he wants to disable it. Admin can also show multiple subscription boxes on the same website page by selecting its sort order. Any module can be removed from the admin interface of OpenCart MailChimp extension anytime as per the requirement.
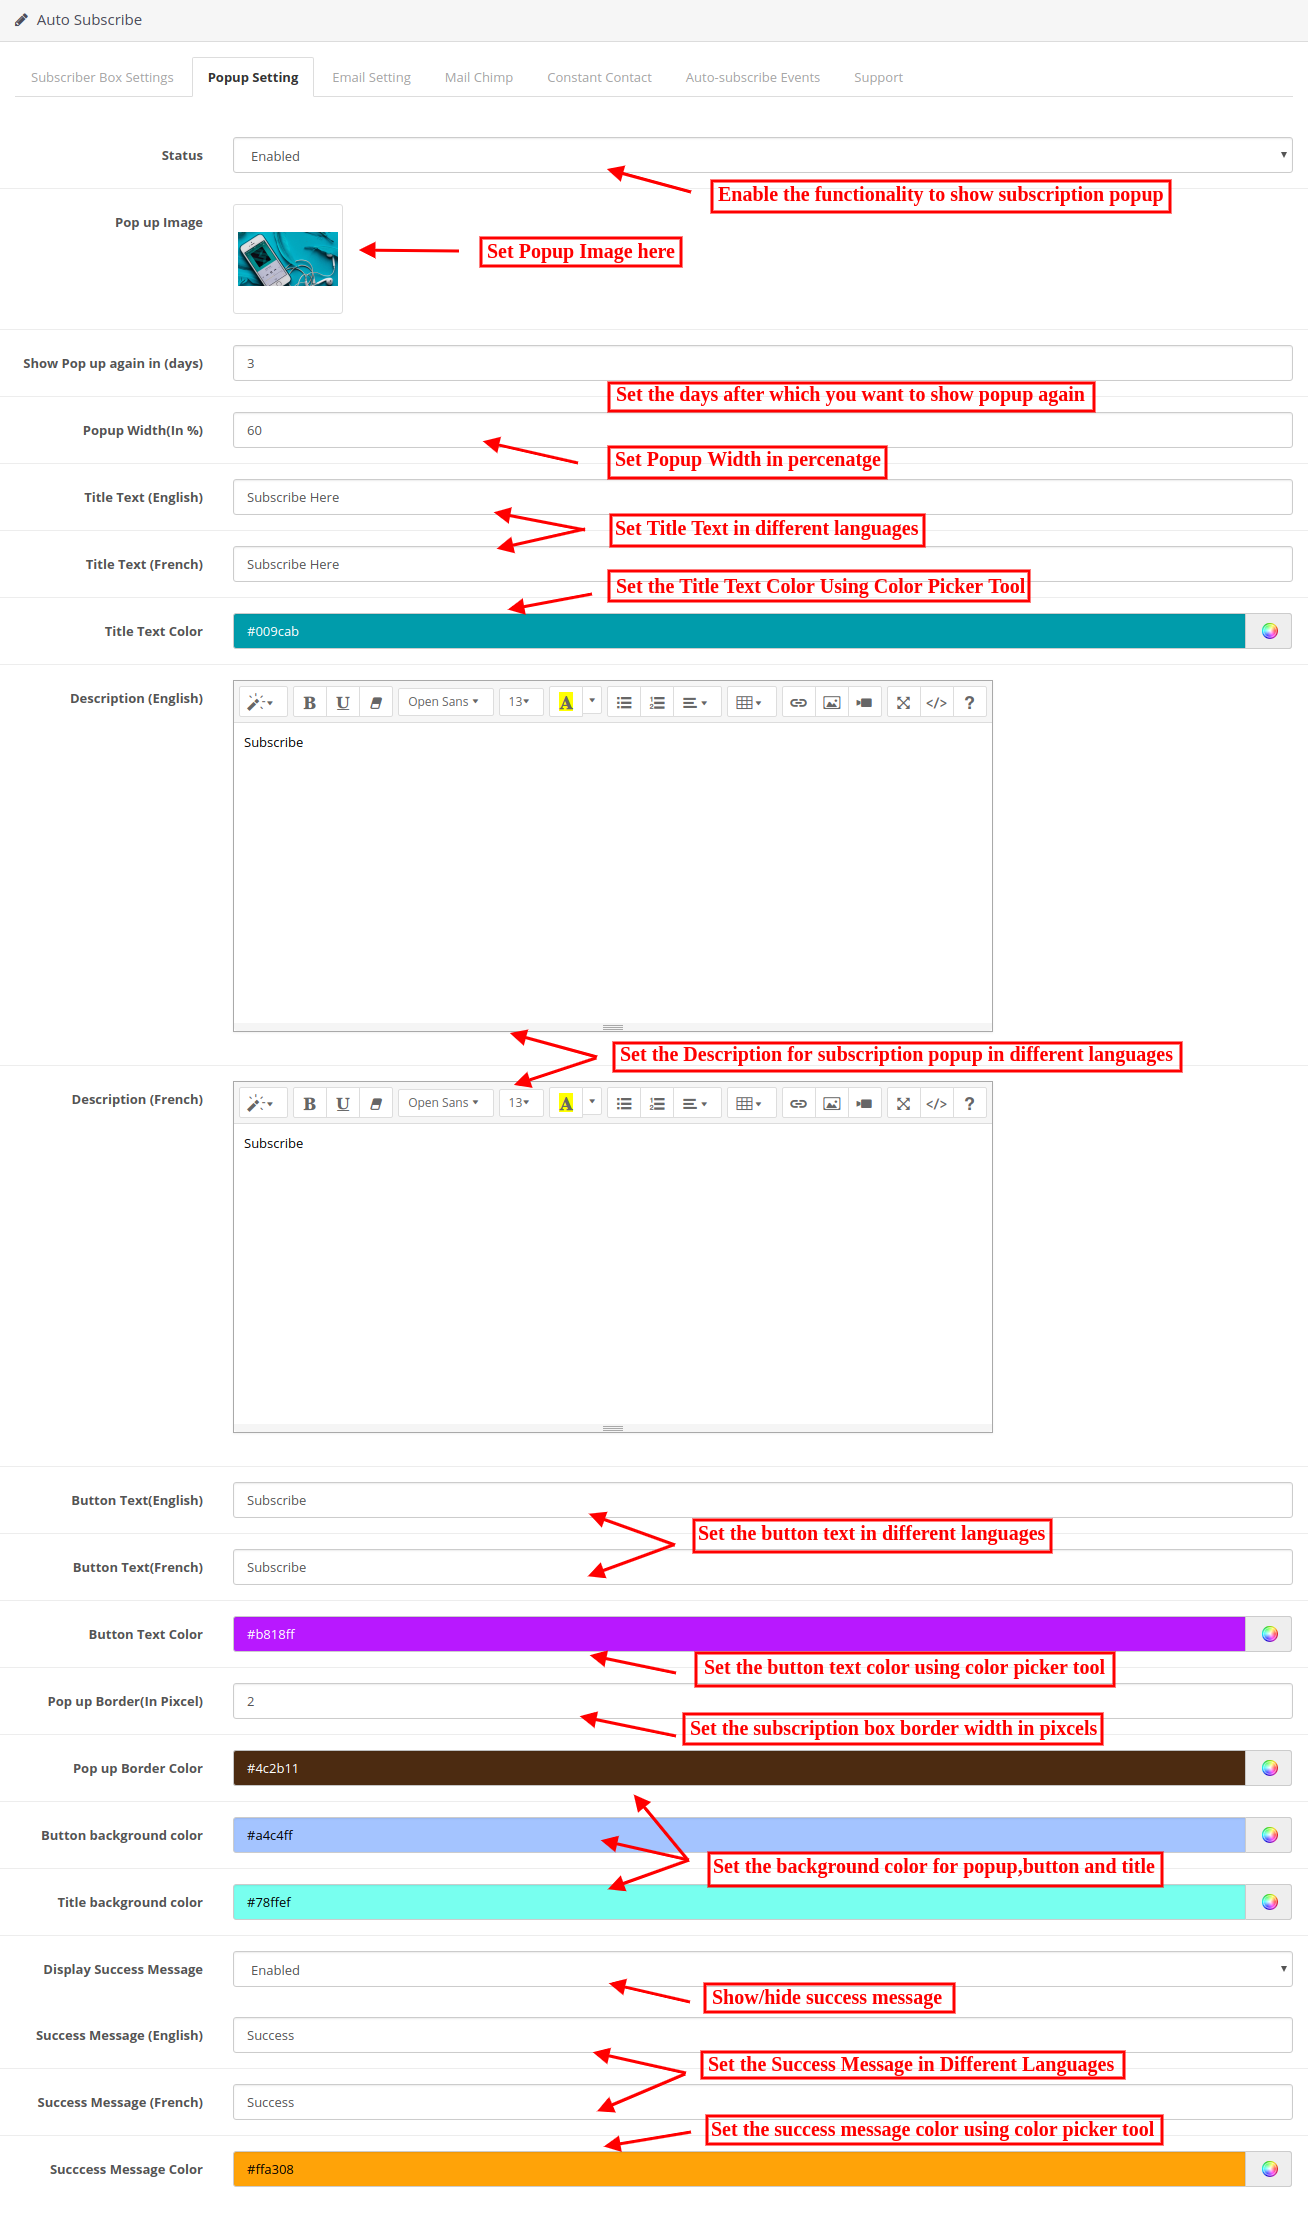
3.2 Pop up Settings tab
The OpenCart MailChimp Integration allows store admin to customize the pop-up box for showing on website homepage using the following setting option available.
Status: Enable or disable the pop-up display on the homepage. One cannot view subscription pop up on the front until this is enabled.
Pop up Image: Select the image for showing with subscription popup.
Show pop up again in (days): You can choose the duration (in days) for which the subscription popup will appear in the front-end. If you want the pop-up to appear only once in a lifetime, type in a number, say 999. If you want it to appear every time a user lands on the home page, type the value 0.
Pop-Up Width: Enter the value in percentage for setting popup width. Higher value will show larger width.
Title Text: Enter the popup title text in different languages.
Title Text Color: Select the title text color using color picker tool.
Description: Enter popup description in multiple languages for describing the store visitors the need of subscribing the store.
Button Text: Enter the button text in multiple languages.
Popup Text color: Set the popup text color using color picker tool.
Pop Up Border: Set the width of pop up border from the admin interface of OpenCart MailChimp Integration module.
Popup Border Color: Set the color of this border using color picker tool.
Button background color: Change the background color of your button as per the website theme.
Title background color: MailChimp Newsletter Subscription module allows setting the background color of the pop-up title.
Display Success Message: Enable to show success message after successful subscription.
Success Message: Set the message which you want to dispaly on website after successful subscription. You can enter success message in multiple languages.
Success Message Color: Choose the desired color for the success message using color picker tool.
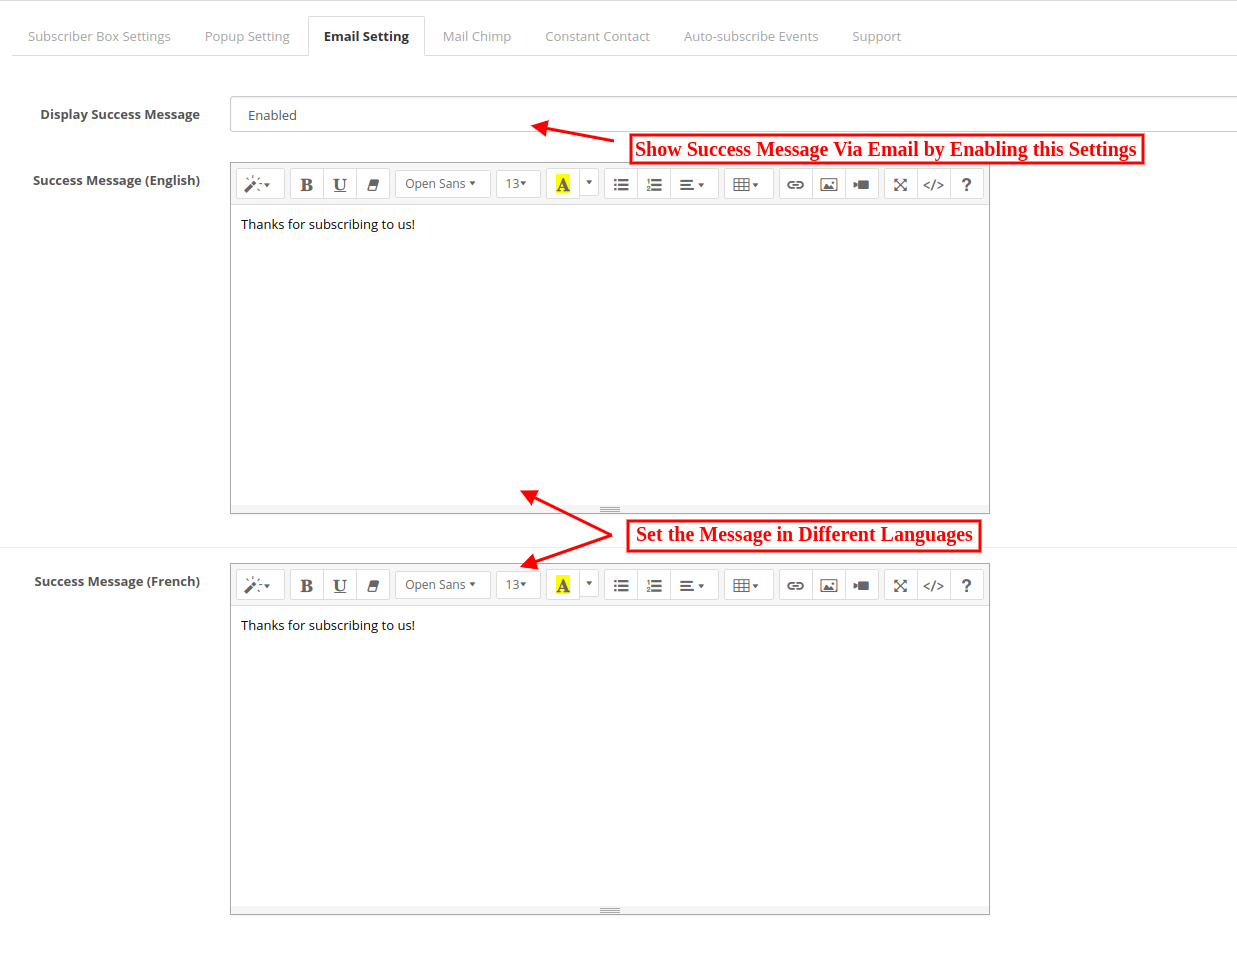
3.3 Email Settings
Admin can show an email to the subscribers.
Display Success Message: Admin can Enable/Disable mail sending after subscription.
Success Message: Opencart store admin can set the mail content. This mail will be sent on subscription. In case of no content, the default mail will be sent to the customer.
3.4 MailChimp Tab
In this tab, OpenCart store admin can choose from the lists in his/her MailChimp account where emails should be added.
Initially, a message will be displayed like No list exists for this API key!
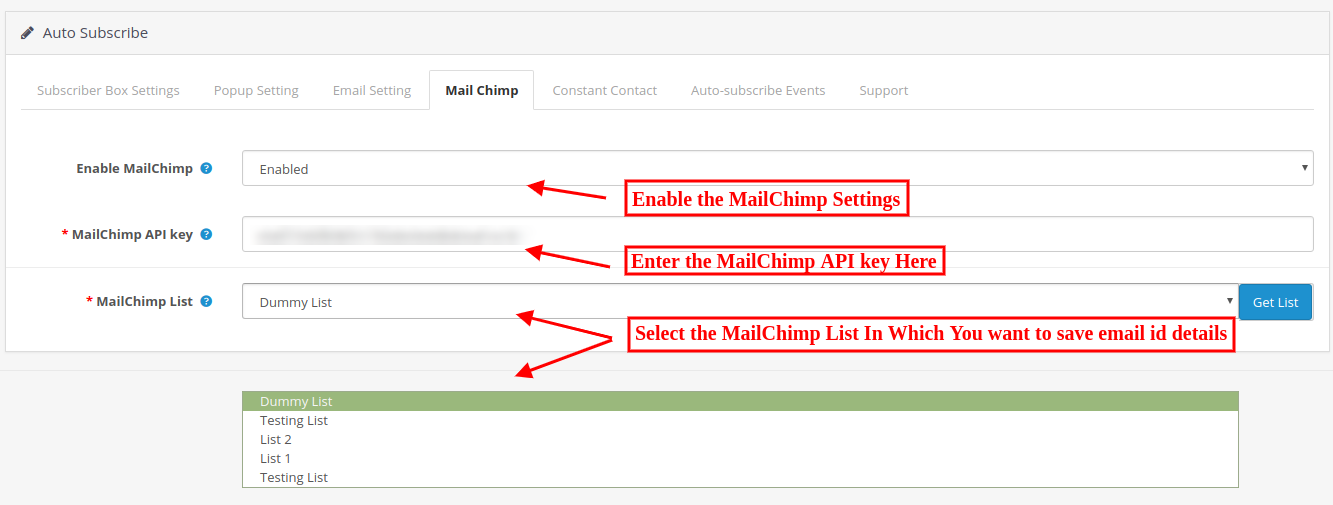
Enable MailChimp: Enable or Disable MailChimp from the admin interface of OpenCart product subscription module.
MailChimp API key: Enter the API key to fetch lists from your account.
MailChimp List: Choose from the lists displayed here. On the selected list, the email id details will be transferred.
3.4.1 Steps to generate Mailchimp API key
Step 1: Click on https://www.mailchimp.com and first of all create a user account in MailChimp, if you don’t have a MailChimp account. Once you create an account, log in to it.
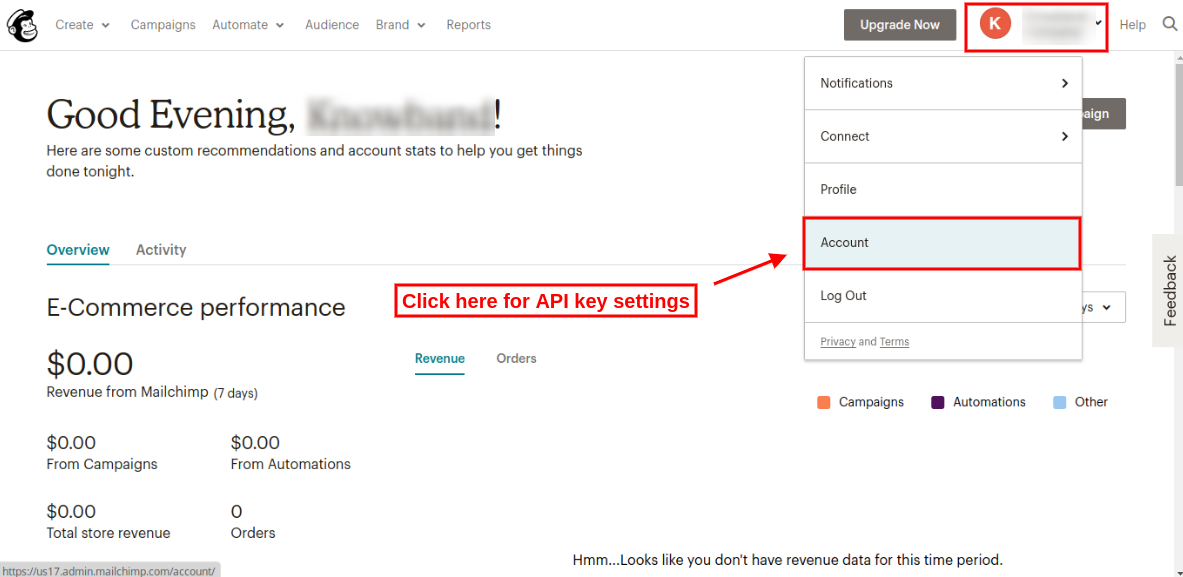
Step 2: On the upper right corner of the dashboard, there will be a drop-down. Select the “Account” option from the list and click on that option.
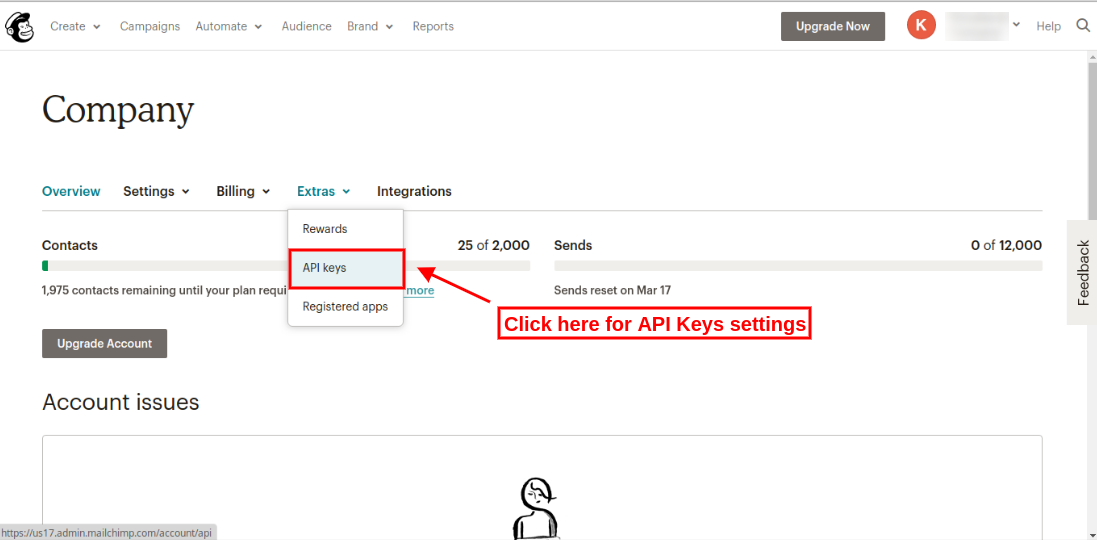
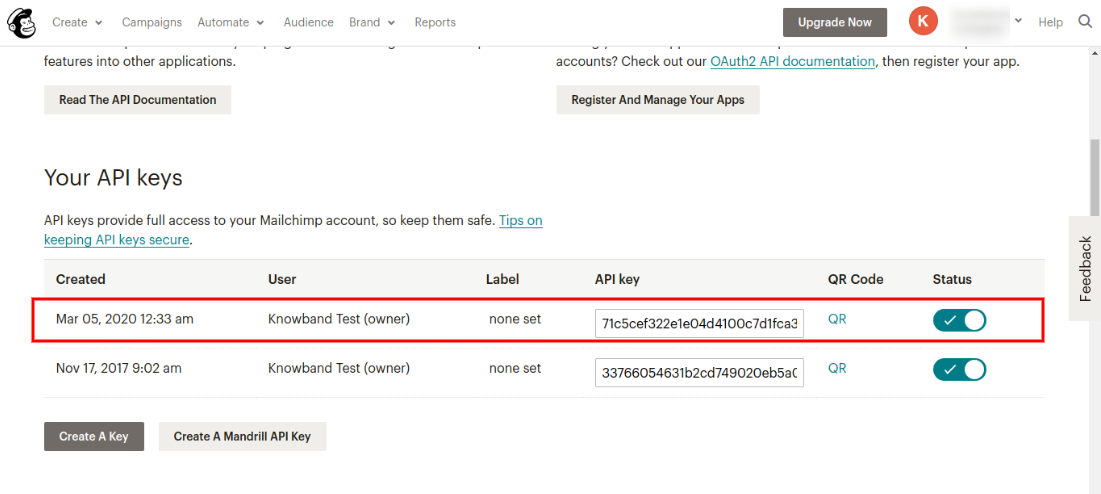
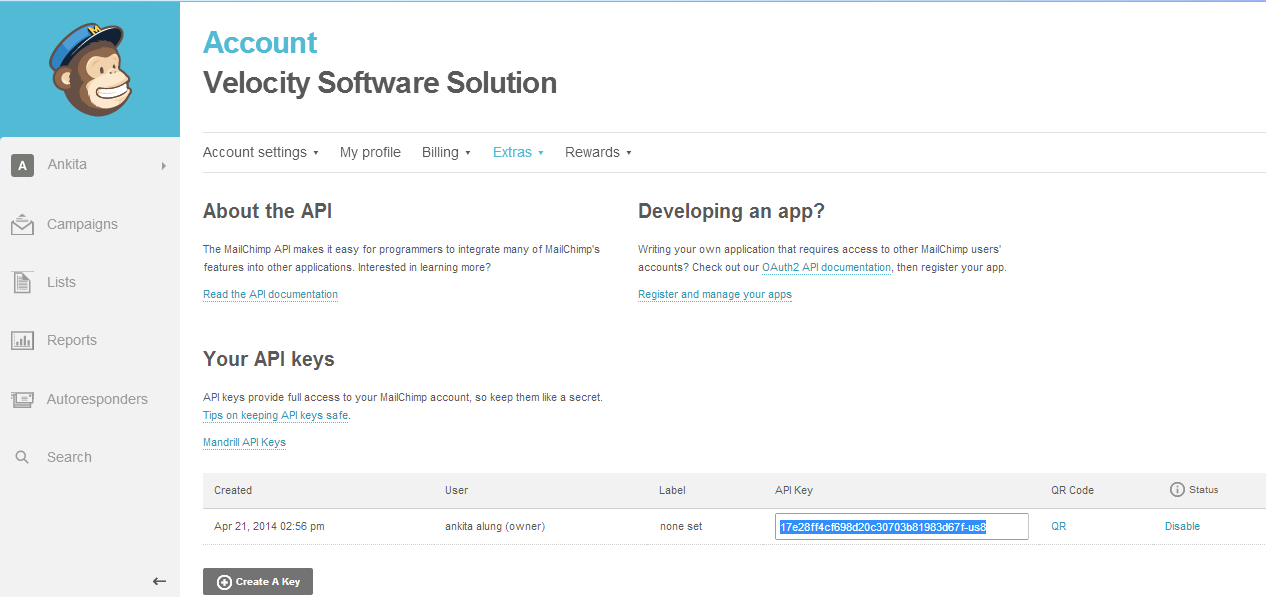
Step 3: After clicking on the “Account” section, there will be some sub-menus. Select the “Extras” submenu. There will be some options, select “API keys” from these options as shown below:
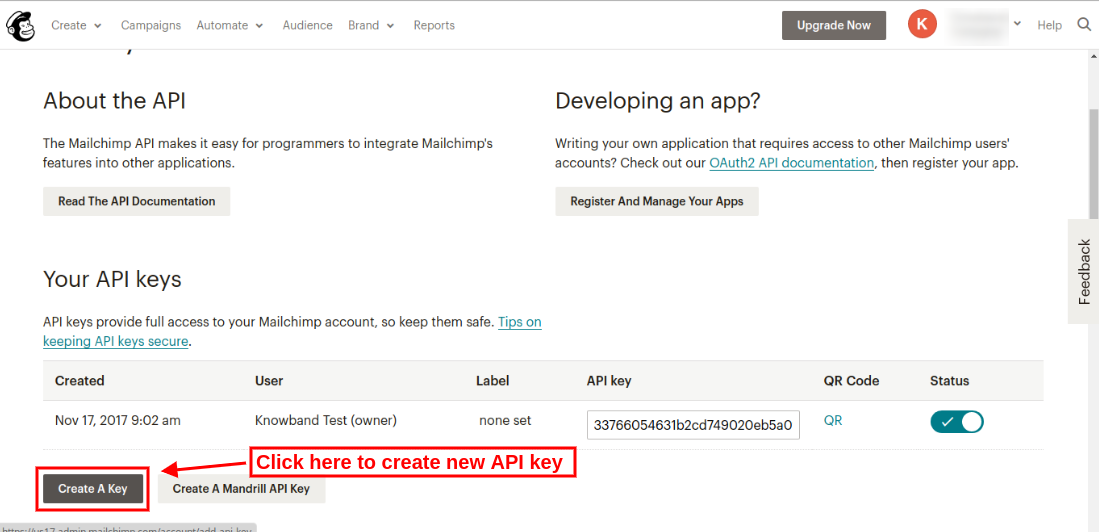
Step 4: On API keys page, click “Create a key” and generate a new API key.
After clicking on Create a Key button, the user can view the newly created API key as shown below:
To create MailChimp Audience
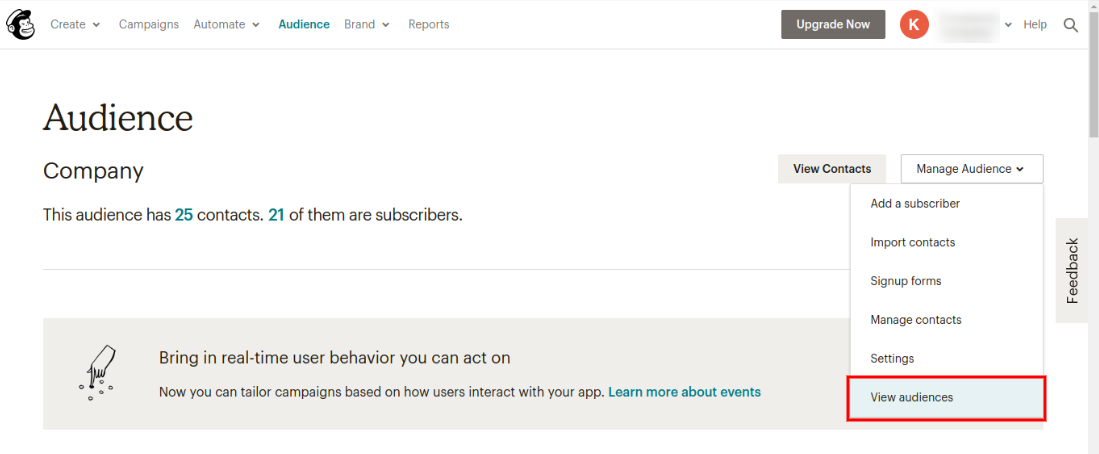
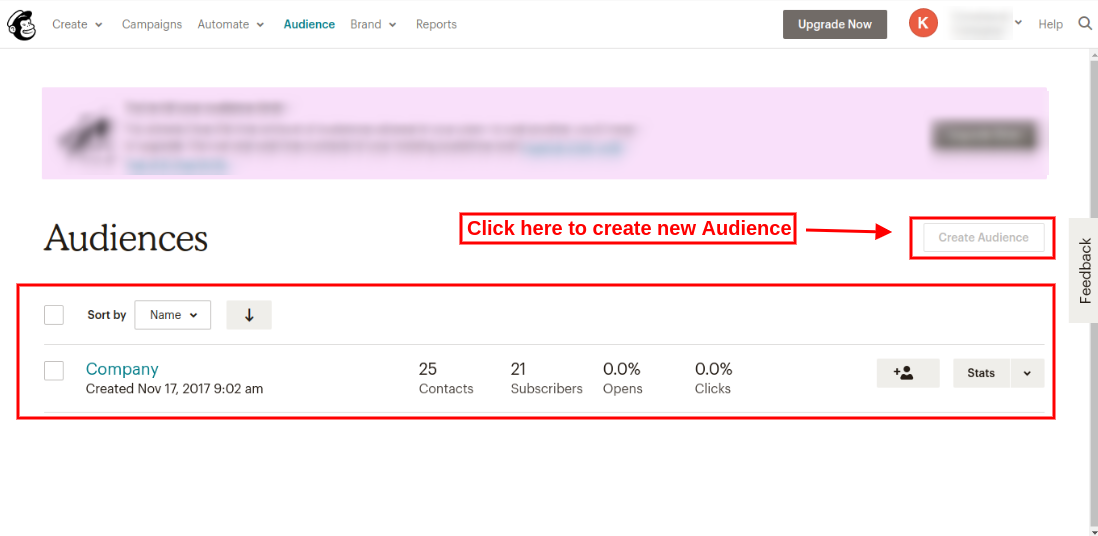
Step 5: Click on the “Audience” tab in the upper menu for rreating new audience. Admin will be redirected to a new page where he/she can view previously created audiences and also create a new audience. The screen is given below:
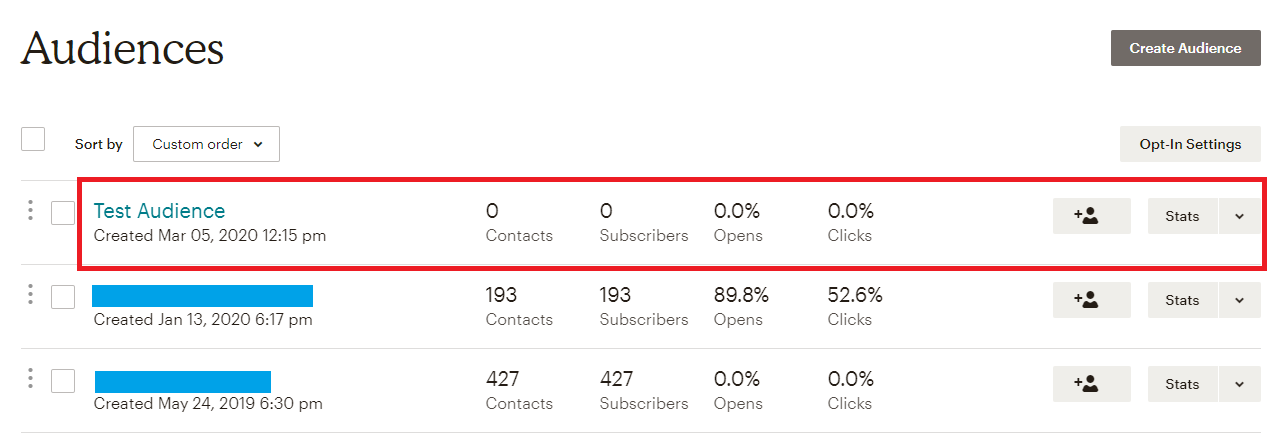
Step 6: On clicking “view audiences” option, admin can view previously created audiences as shown below:
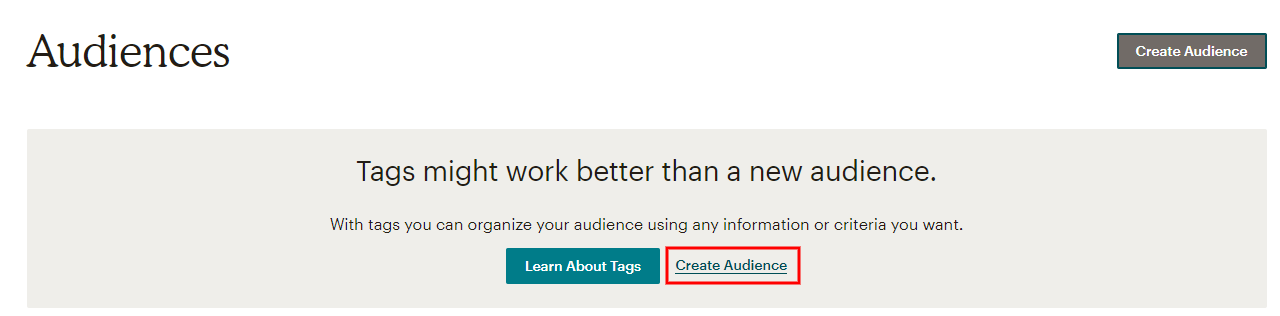
Admin needs to upgrade his/her account for adding more audiences. In the free account, admin can create a single audience only. Admin can upgrade account and then click on “Create Audience” option as shown below:
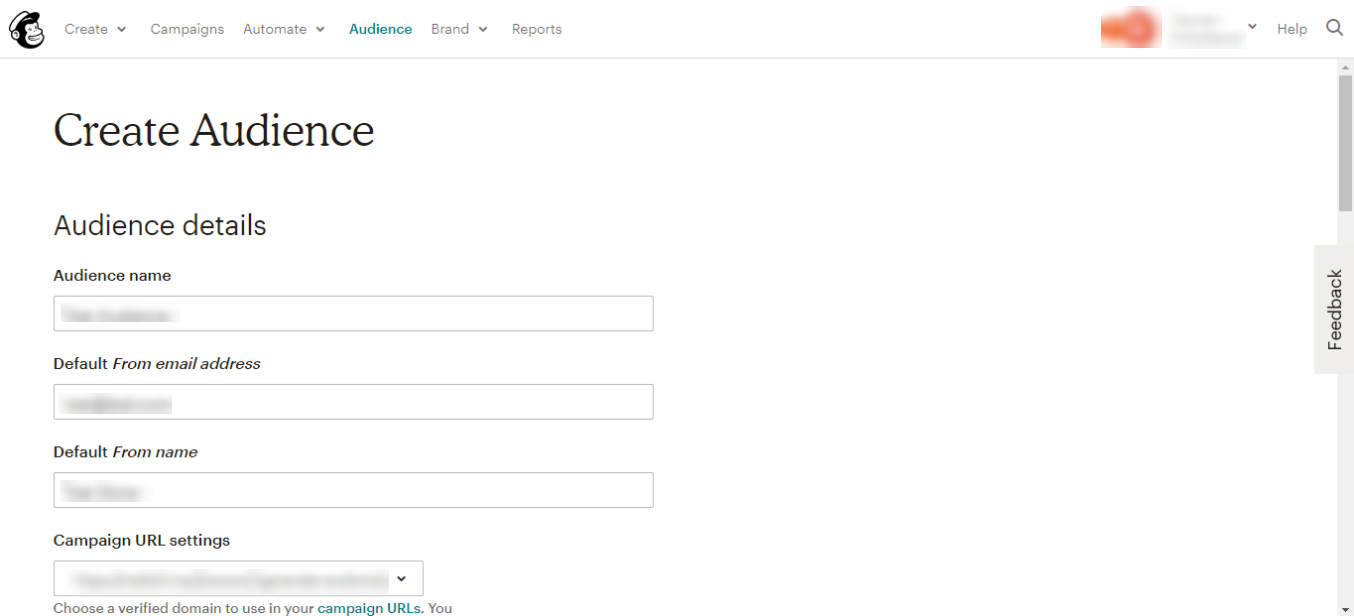
After clicking on “Create audience” option, admin needs to fill the required information:
After saving all the details, the admin needs to save it. This way, admin can create new audience ash shown below:
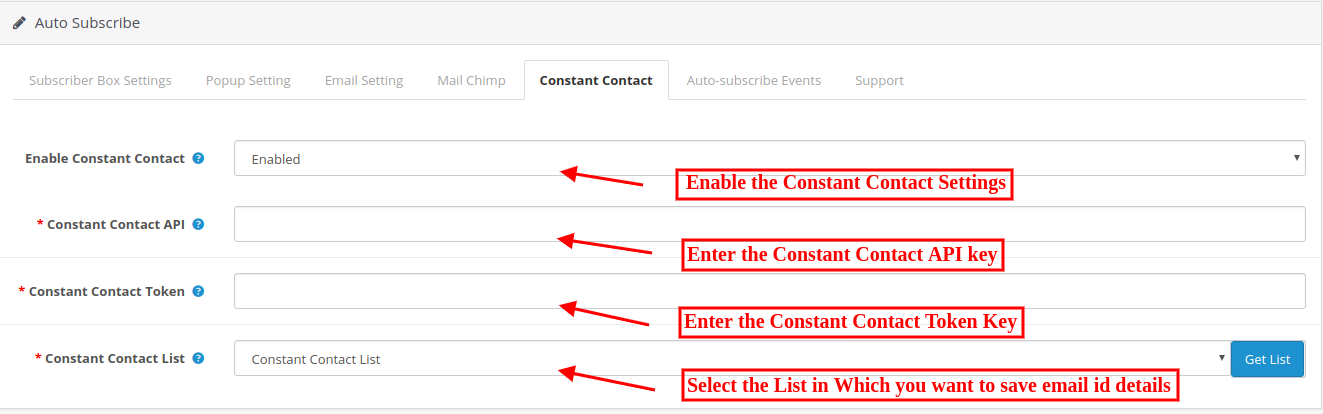
3.5 Constant Contact Tab
In this tab, admin can choose from the lists in his/her Constant Contact account where email id details should be added. Initially, a message will be displayed like No list exists for the combination of Key and Token provided above!
Enable Constant Contact: Enable if you want to save email id details in constant contact account.
Constant Contact API key: The Opencart store admin needs to enter API key. As soon as admin enters the key and clicks on the text box, the request is sent and lists (if any) are fetched and displayed in a drop-down box.
Constant Contact Access Token: The Opencart store admin needs to enter access token along with API Key. As soon as admin enters the token and clicks outside the text box, the request is sent and lists (if any) are fetched and displayed in a drop-down box.
Constant Contact List: Choose from the lists displayed here.
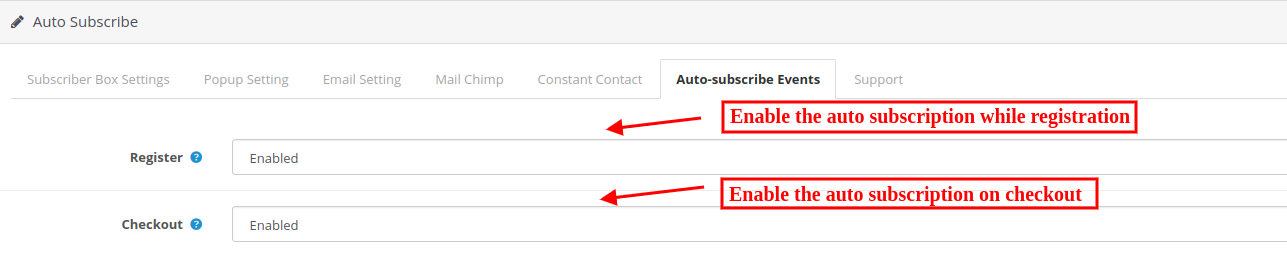
3.6 Auto Subscribe Events
Auto-subscribe events are the events on which the users can be subscribed to the configured lists in admin automatically. On such events, the user will not be notified of being added to the subscription lists you have chosen in admin but they will receive the email for the same if you have turned on the option to send emails (in subscriber box settings tab) on subscription.
Register: Turn on Register, if you want a user to be automatically added to your list on successful registration.
Checkout: Turn on Checkout, if you want a user to be automatically added to your list on successful checkout.
4.0 Requirements
1. Php version 5.3 or greater
To access the API of constant contact, one must use the PHP version equal or higher than 5.3. Unless your server is running the required PHP version, you will not be able to successfully install this plugin.
2. MailChimp
Before using this module, you must have a valid account with MailChimp and one or more lists created in it. Note that, you must also have the access right to alter your email subscribers list. You will need to provide these for this module to work.
API Key: You can obtain your API key from your MailChimp dashboard, or you can create one if you don’t have one already.
3. Constant Contact
You need to have a valid account with constant contact and one or more lists created into it. Note that, you must also have the access right to alter your email subscribers list. You will need to provide these for this module to work.
API Key: You get an API key from constant contact via email as soon as you register your application.
Access Token: In addition to API key, you also needed an access token to grant permission to access API.
Note that, this plug-in works for constant contact API version 2 since version 1 is deprecated and will soon be discontinued.
5.0 Website Front-end Interface
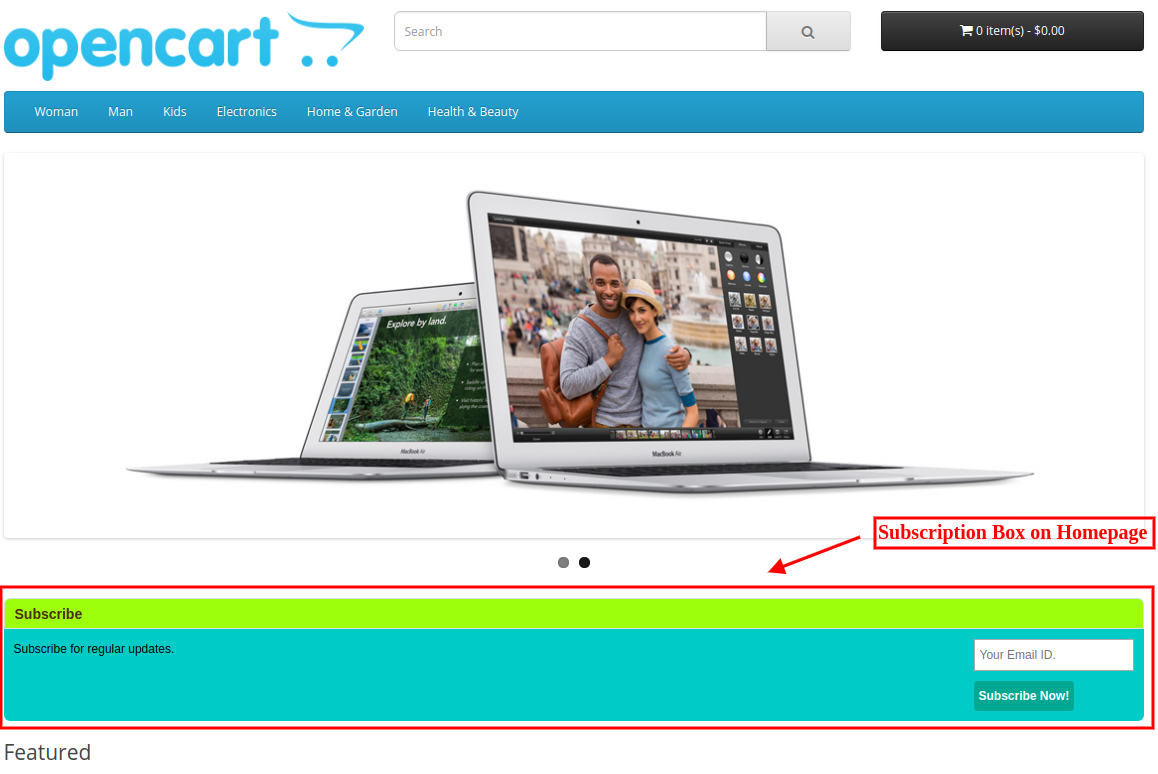
The online store visitors can view the subscription box on the website pages. On the front end, users will have the option to subscribe themselves by clicking on subscribe button. The module will look like the following screen. The visitor can type in email id and click on subscribe button to add itself to the lists configured. A success or an error message will be displayed to notify the user.
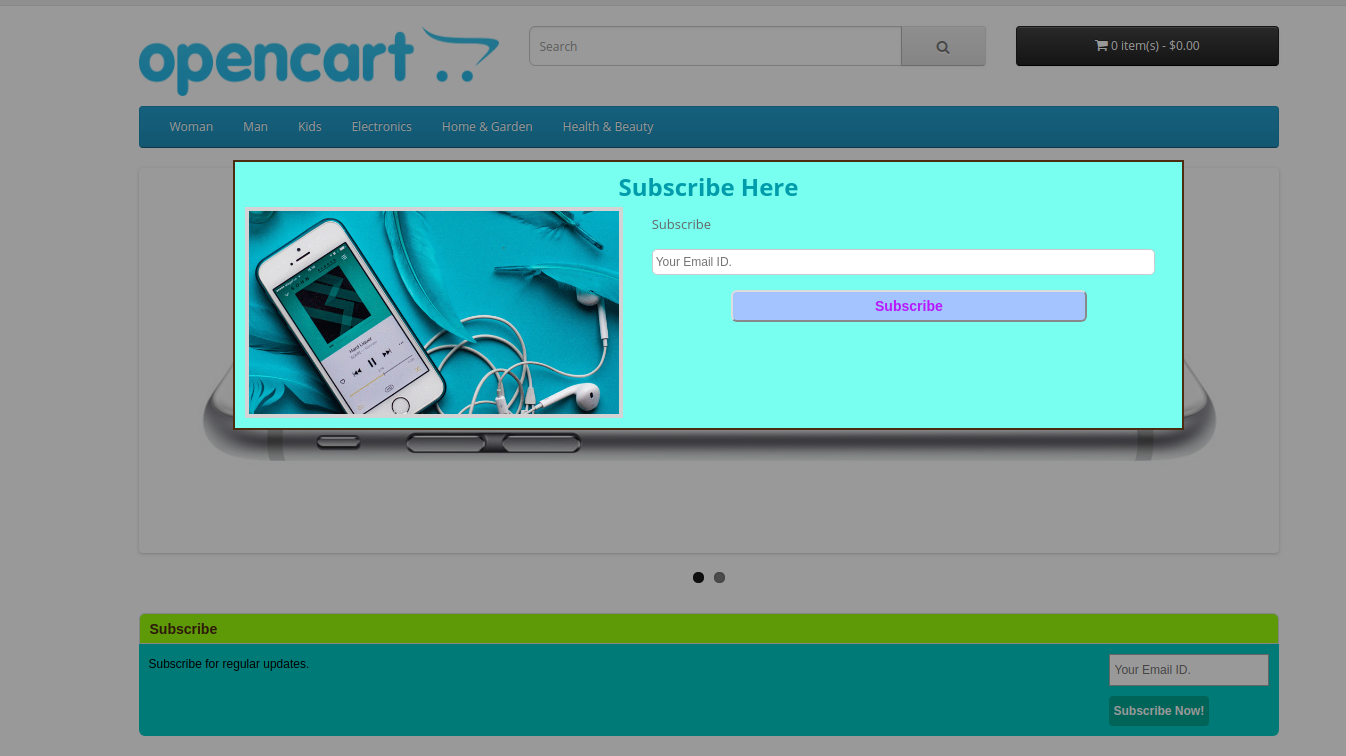
On the user’s end, pop up will appear something like this screen below, depending upon your chosen display settings.
If one chooses an image to be displayed on pop up from admin settings, a pop up like shown above will appear. Admin can also choose to show a pop up without any image, by not choosing any image in the admin panel.
After Successful subscription, the online users can view the success message.