How can you make Blog Integration in Magento a hassle free task?

Blogging holds a key importance in the field of business promotion and marketing as they help in keeping customers engaged to a website. People who visit a particular website like to navigate across some of the common sections of a site like home page, category pages, About Us, blogs and other such areas. It is important to add new updated content from time to time on your site to build a loyal army of readers that are ready to engage with you on a professional business front.

When it comes to blogging, WordPress is one of the most popular CMS platform that was originally developed for the blogging purposes. It is much easier to add a blog, make changes and include special elements like images, links, text formatting on WordPress that makes it all the more important as a blogging environment. Earlier, Magento store owners were in grave trouble as they were unable to acquire the unmatched blogging features of WordPress platform on their Magento site. However, now everything is going to change with the emergence of this Magento Blog extension from Knowband store that allows site owners to integrate WordPress platform into their Magento site.

Before we go further and help you with the integration of WordPress platform into the Magento store, it is important to understand the benefits of this integration for your Magento site.

  • The integration helps in utilizing the features of WordPress platform and Magento functionalities in an eCommerce store.
  • It helps in improving the SEO performance of products on an eCommerce store.
  • This integration allows site owners to make use of the best features of any of the platforms such as static blocks, navigation menus and cart related data.
  • It helps in promoting the products from a Magento site by providing the direct links on the WordPress blogs.
  • The integration offers single login options for avoiding barriers in order completion and optimizing the Magento user experience for better sales.

Steps to be followed during the installation of this Magento blog extension

If you are thinking about adding a blog into your Magento site, I will recommend you to go for Magento Blog extension from Knowband store. This extension can make blog addition on a Magento site a seamless task. In case, you are experiencing any issue about how to utilize the functionalities of this Knowband extension, check out the simple installation steps mentioned below:

1. Ensure that the cache is disabled-
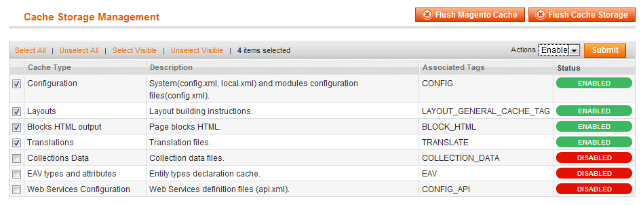
Check out the cache settings of Magento site for the better performance of this Knowband extension.

For a Magento store owner, it is important to disable the caching for improving the user experience of customers. If you are experiencing any problem in the performance of this Magento Blog extension, it is important to check out the cache settings on the Magento site is disabled. In case, the caching is not disabled on a Magento store, here are the simple steps that need to be performed for the same.

– The site admin first needs to log into the back end of the Magento store.
– Now, he/she should navigate the path Systems -> Cache Management.
– The admin needs to select all the cache and then click on the ‘disable’ option drop the drop down menu.
– Finally, it is time to save the changes done on the back end of the site.

2. Check that the Compilation mode on the Magento back end is disabled-
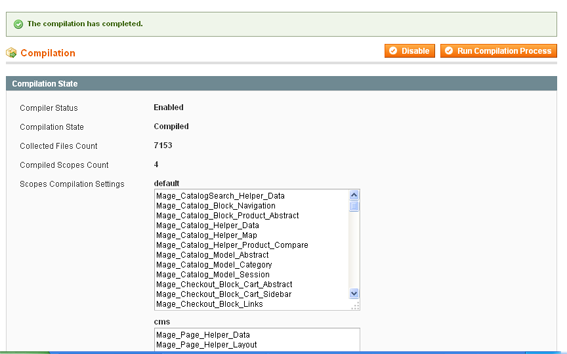
Perform the changes in the compilation settings of the Magento site for ensuring a hassle free installation.

To ensure a flawless working of the Magento Blog extension, it is essential to have a clear view that the compilation mode on the site is disabled. For performing this task on a Magento site, here are the simple steps that needs to be followed.

– First login to the back end of your Magento site through the required credentials.
– Now, follow the path System -> Tools -> Compilation from the admin panel.
– Check that the compiler status is “Disabled” or not.
– If it is not disabled, click on the required “Disable” button located on the right hand side of the screen.

3. Other arbitrary requirements of the installation- Apart from the changes done in the back end of the Magento console, there are other things that can influence the performance of a Magento Blog extension on a site. Here are the certain things to be considered.

– Check all the required files of the extension are present.

– Provide FTP access to your Magento site.

– Although, we can use the Connect Manager tool for the installation of a Magento extension. I would recommend you to go for the manual installation in order to control the entire installation process.

– If the performance of the installed blog extension from Knowband store does not seem appropriate, it is time to take a quick look on the package.xml file in the app- code directory. This particular file is used by the Magento Connect to arrange the files at their proper place. After carefully reviewing the extension files on your Magento store, it is time to use the FTP client for bringing all the required files onto the store root of the Magento instance.

– For ensuring the proper addition of pages on the Magento admin console, ensure that you have clicked on “Flush Cache Storage”. It is also recommended to log in and log out of your site for the better installation and loading of the required extension files. In case, there is some problem that arises during the clearing of the cache through admin console, it is advised to take the help of FTP client .

– With these steps, the required Magento Blog extension will be installed in a seamless manner. Once installed, user can locate the folder named as “knowband_wordpress” and can rename it based on his/her choice.

Once, all these crucial steps are implemented without any problem, Magento site owners are now better prepared to integrate WordPress platform into their site for improved blogging experience. If you are eager to include blogs on your Magento site in a coherent manner, it is time to install this Magento Blog extension at the earnest level. Visit the Knowband site at www.knowband.com and equip yourself with the ability to integrate WordPress blogs on your Magento site.

How to get SQL Server Management Studio 2008 Express installed on a Windows 7?

SQL Server Management Studio (SSMS) is a platform that was launched along side the Microsoft SQL Server 2005 which is meant for configuring, managing and administering all other components present in a Microsoft SQL Server. There are both script editors and graphical tools that are capable to work with different objects and features of the server.

One of the prominent feature of SSMS is the Object Explorer that allows user to browse, select and operate upon the various objects located within the server. As per the version 11 of the SSMS, the entire application has been rewritten in WPF interface which is similar to the one used in Visual Studio 2010. For Windows users who are thinking about utilizing the services of this SQL Server Management Studio 2008 Express can now perform the same in a flawless manner. Here are the installation steps for SSMS on a Windows 7 systems.

Note- Unfortunately, the SQL Server Management Studio (SSMS) is not available on Linux based systems. Certain fixes through platform like Wine are tried but there are still performance issues in this SSMS which makes it ineligible for Linux platform.

You need to first download the Microsoft SQL Server 2008 Management Studio Express and then select either SQLManagementStudio_x64_ENU.exe or SQLManagementStudio_x86_ENU.exe based on the bits supported by a system. This blog explains the installation process for a 64 bit Windows 7 system.

Now, ensure that you are logged into your system as an administrator and not as a secondary user. In order to install the SSMS platform, you need to right click on the exe file and then select on the option “Run as Administrator”. Windows 7 users will get a compatibility issue related warning which needs to be ignored and the installation process should be resumed as it is. Windows users also need to apply latest changes in SQL Server 2008 Service Pack 2.

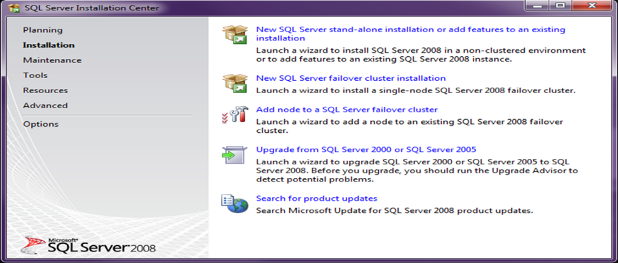
A window screen about the “SQL Server Installation Center” will be displayed as shown below. You need to select the “Installation” tab there.

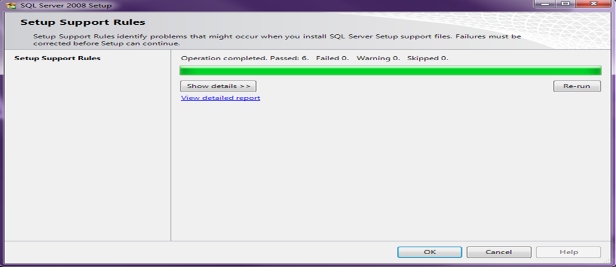
User now needs to select the “New SQL Server stand- alone installation or add features to an existing installation”. The process will initiate the rule check. Ensure that there are no failures in the process and click on the OK button. The window of the process is shown below:

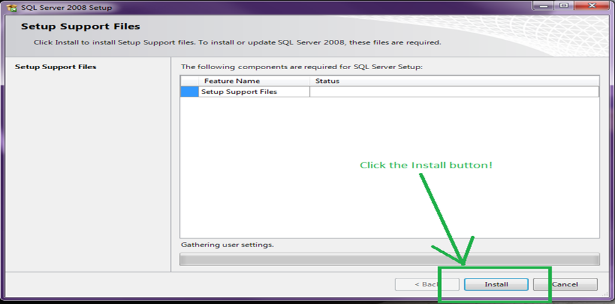
User will now get the screen that says “Gathering user settings” and stays there for a while. After this, the user will get a window screen as shown below where he/she needs to install the Setup Support files.

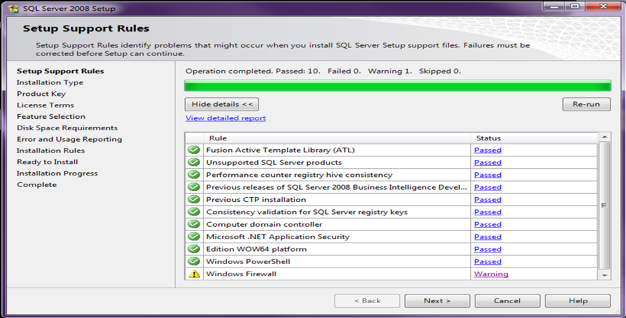
Again, the user will come across a rule check and will have a Firewall warning in the end. In case, the user wishes to enable the remote access to SQL Server, the required Firewall configuration can be done accordingly. Click on the Next button as shown in the window screen below.

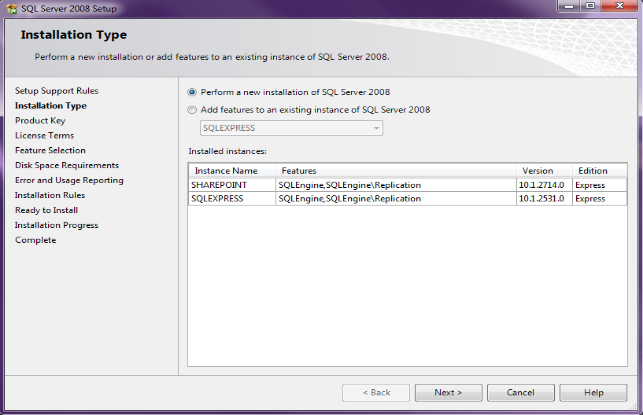
While installing the platform, user will have to make a choice between “Perform a new installation of SQL Server 2008” or “Add features to an existing instance of SQL Server 2008”. Make sure that you are selecting the option “New installation” and not “Add features”. Finally, click on the Next button as shown below.

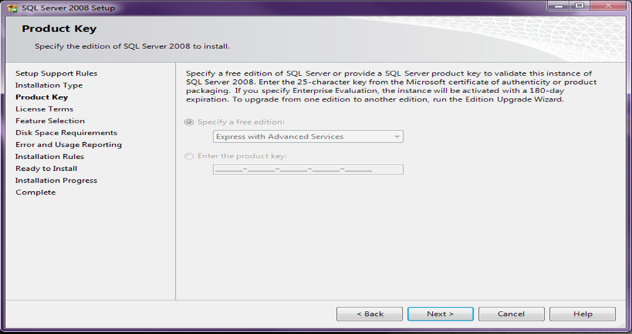
Now, the user would come across a page that asks for Product Key window. As, SQL Server Express is a free product, so you can skip the product key entering field and click on the Next button as shown in the image below.

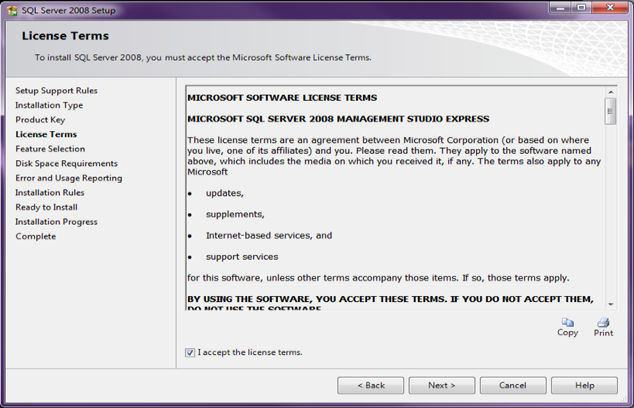
User needs to accept the License Terms and click on the Next button. The window screen is displayed below.

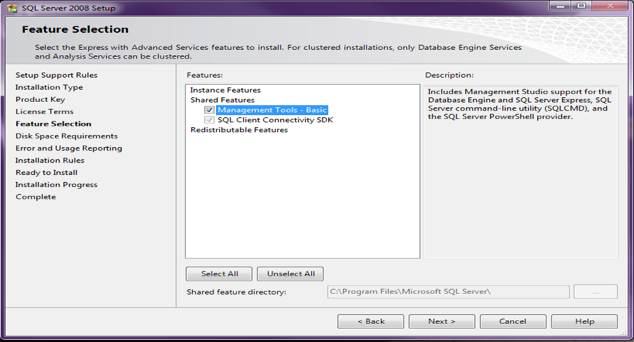
In order to have the desired features in the SSMS platform, it is time for Feature Selection. User needs to check the box as shown in the figure and put a check mark on it that says “Management Tools- Basic”. Click on the Next button in the end.

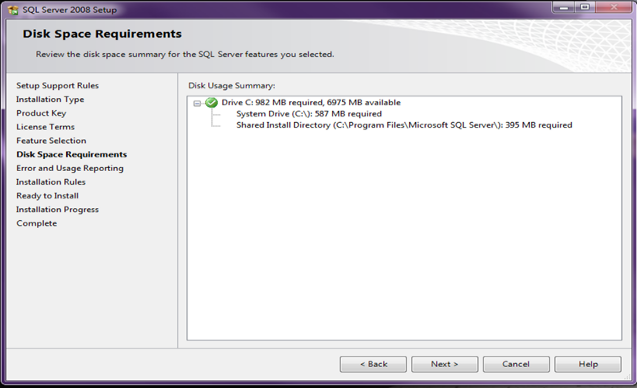
Now, the user needs to verify the disk space requirements and then click on the Next button as shown below.

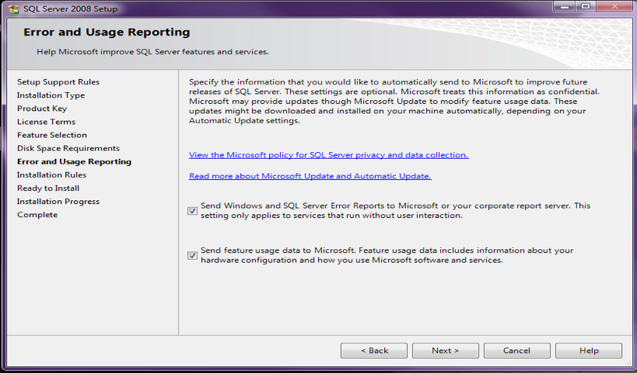
In order to improve the SQL Server features and services by providing the error reporting, you need to put a check mark on the required option and then click on the Next button shown in the image below.

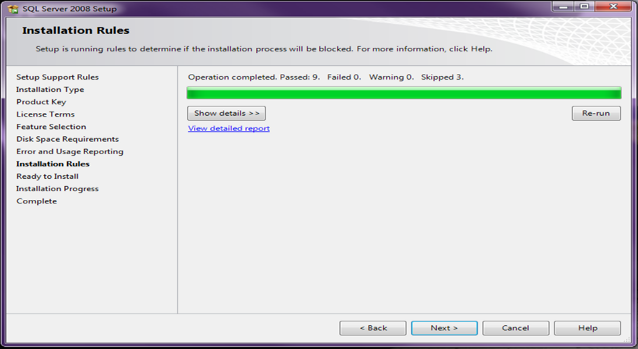
A quick rule check is again started. Now, click on the Next button shown in the window screen displayed below:

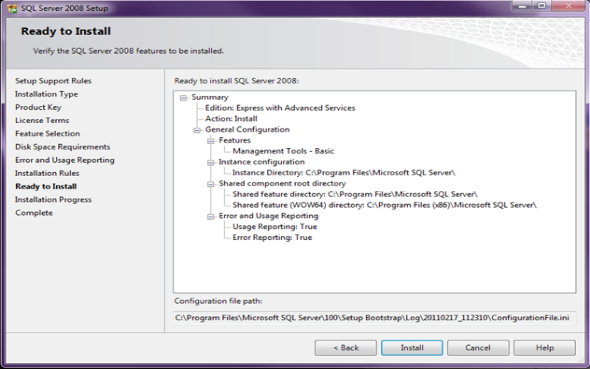
The user will now see a window screen as shown in the figure below that says “Ready to install”. Click on the Install button located on that screen below. The entire installation process will take around 5 minutes for the completion.

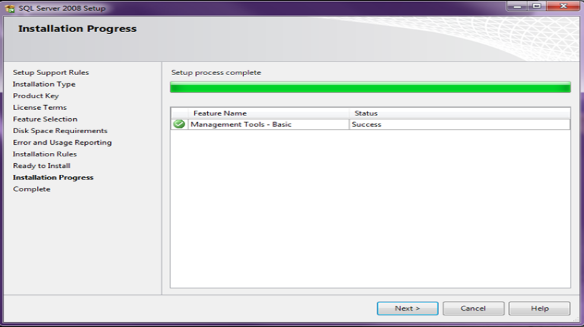
Again, click on the Next button on the “Installation Progress” window as shown below once the installation process is completed.

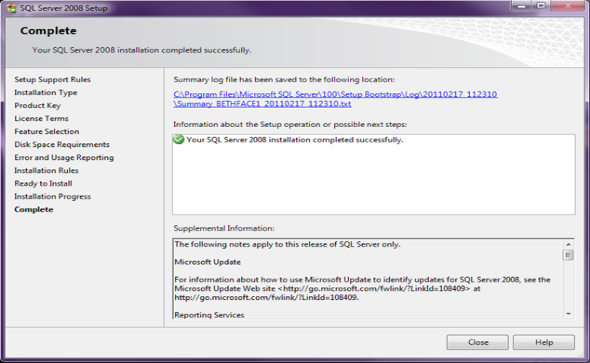
A complete window screen will appear like the one shown below. Users needs to close it and they are all set to use SSMS platform now.

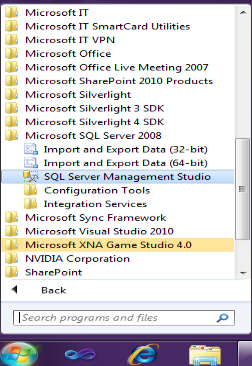
Once the SSMS platform is installed properly, user can now run the SQL Server Management Studio without any problem. The installed platform can be seen in the Programs option as Microsoft SQL Server 2008. You need to ensure that you are running the program as an administrator for accessing all the available features. Here is the image shown below that will provide you a view of the SSMS under Programs.

With these simple steps, it is now easier to install SQL Server Management Studio 2008 Express on Windows 7 systems without any problem. If you are eager to add new functionalities and features in your online store based on eCommerce platforms like Magento, OpenCart and PrestaShop, you can add the customized extensions from Knowband store. Just visit the Knowband store at www.knowband.com and get the various extensions for your online store.

We also provide a No Code Mobile App solution for all the major eCommerce platforms like Prestashop, Opencart, Magento, Magento 2 and Woocommerce. Know more here:

Liked This? You’ll Like These Too

How to install MySQL on Windows and Linux Systems?

MySQL is an open source relational database management system (RDBMS) that is quite popular in various business spheres. The license of this open source project is available for numerous users around the world under the GNU General Public License. It is used by a number of database users around the world due to its OS platform independent feature. This tutorial discusses how to install MySQL on Windows and Linux System.

MySQL open source database system is written in programming languages like C and C++. It can be used with a variety of operating systems like Windows, AIX, FreeBSD, Linux, OS X,  OpenBSD, OpenSolaris and much more. In this blog, we are discussing the installation steps for MySQL on Microsoft Windows and Linux systems. Let us first check out the installation steps for MySQL platform on Windows systems.

Checkpoints to be cleared before the swiftly installing MySQL on Windows and Linux System

If you are one of the Windows users who is looking to install this MySQL, you need to keep in mind certain guidelines for a seamless installation process. Here are the checkpoints for Windows users during the installation process of MySQL.

Keep in mind the size of your database table- In case, the users require a table with a size more than 4GB, it is important to install MySQL platform on a NTFS or new file system. Apart from this, the user needs to use MAX_ROWS and AVG_ROW_LENGTH commands during the creation of a MySQL database table.

Resolve the anti virus scanning issue- There are certain anti virus softwares like Norton/Symantec anti virus that cause problems for directories consisting of MySQL data and temporary tables regarding the performance of MySQL platform. These anti virus softwares read the contents of MySQL files as spam and thus affects the overall performance of the database system.

To handle this situation, it is important to disable the virus scanning feature on the main directory known as datadir which is used to store the MySQL table data. The MySQL users can utilize the inbuilt feature of an anti virus softwares to avoid certain files during the virus scanning process. Apart from this, the temporary files of the MySQL platform can also be exempted from the virus scan program by configuring the separate temporary directory for MySQL temporary files and including this particular directory into the virus scanning exclusion list. For performing this critical task, you need to include a configuration option for the tmpdir parameter in the my.ini configuration file.

How to install MySQL on Windows systems?

If you are a Windows users, it is now easier to download MySQL installer for ensuring a quick installation and configuration of MySQL platform. Here are the simple steps that are involved in the installation process.

  • First, download the MySQL installer from the link and run it on your Windows system.
  • Now, select the appropriate Setup Type for your Windows system. Normally, it is recommended to install MySQL server and other MySQL tools associated with the MySQL development and other helpful tools such as MySQL Workbench by opting for the Developer Default setup method. Otherwise, the user needs to select the Custom setup type for the manual selection of desired MySQL products on their system.
  • It is time to complete the installation process by implementing the various steps mentioned in the MySQL installation wizard. After the completion of the process, all the MySQL products are installed and MySQL server is started.
  • Once, the MySQL platform is installed, it is now easier to configure MySQL to ensure the automatic initialization of MySQL server during the time of system restart.
  • In this way, Windows users can flawlessly install the MySQL installer application on their system. They can use the same application later on to make any configuration or upgradation on the MySQL products.

How to install MySQL on Linux systems?

Being a platform independent database software, MySQL can be easily installed on Linux systems using Ubuntu version. If you are one of the Linux users, you need to perform the following steps for installing MySQL platform on Linux Ubuntu systems.

  • Open the Linux terminal window and run the following command

sudo apt-get install mysql-server

  • During the installation process, Linux users will be asked for the root password.
  • To ensure the proper working and installation of the MySQL server, you need to run the following command

sudo netstat -tap | grep mysql

  • Apart from this, Linux users need to check the lines as mentioned below:

tcp  0     0 localhost.localdo:mysql *:*       LISTEN       13059/mysqld

  • If you are experiencing problems in the working of the SQL server, it is recommended to restart it by executing the following command through Mysql.

sudo /etc/init.d/mysql restart

  • Once, the MySQL is installed, Linux users can start its functioning by running the following command

mysql -u root -p

  • This will change the command prompt to mysql> which will inform the users that they are currently inside the MySQL environment.

Here are the certain set of commands for Linux users in a MySQL environment:

  • For creation of the database, use the following command:

 create database databasename;

  • For accessing the MySQL database, you need to use the following command:

 use databasename;

With the help of the above Linux commands, users can now effortlessly create, insert, update and make other changes in the MySQL database without any assistance.

The above blog is a great help for both Windows and Linux users during the installation of MySQL platform. It will help these operating system users to enjoy the features and functionalities of a MySQL database in a seamless manner. If you are in need to add customized modules or new functionality on your eCommerce store based on Magento, PrestaShop or OpenCart platforms, you need to visit our Knowband store.

Liked This? You’ll Like These Too

How to migrate from MySQL Database to MSSQL Database?

Migration is the crucial and important step in a business environment due to the various restrictions in a platform or a framework and the need to make the data accessible on other required platforms. This migration helps in improving the usability and access to data or content among different available platforms.

Here, we are discussing how to migrate the data of MySQL into Microsoft SQL Server in a flawless manner. There is no “Rocket Science” involved in the entire process and it is as simple as it can be. By performing certain simple steps, it is now much easier to plan the migration from MySQL platform to Microsoft SQL Server environment. Before going further in this direction, let us first discuss the various things that need to be considered while planning a migration process.

Checklists for the data migration from MySQL to MSSQL platform

If you want to perform the data migration task from MySQL to MSSQL platform in a flawless manner, you need to pay attention to various things.

  • It is also important to analyze properly if the SQL Server Management Studio is installed efficiently or not. In the case of the Windows system, you need to perform the certain installation steps for Microsoft SQL Server Management Studio. This platform is restricted to Window users only and is not available for Linux users.

Data Migration Steps from MySQL to MSSQL platform

Here is the step by step instructions for performing the data migration from MySQL platform to MSSQL platform. Take a look below at these simple steps.

  • You need to first download and install the MySQL ODBC Connector, to begin with, the above process. You can also find out the latest release of this extension here.
  • Now, it is time to download and install SQL Server Migration Assistant for MySQL platform. Users can easily download the same from here.
  • On the same page, you need to locate and click on the “Download” button. The action would open up a new page. Once the page is opened, you need to select the file named as “SSMA_MySql\SSMA for MySql.5.3.0.exe”. The user just has to download the required file from there and get it installed on your system.
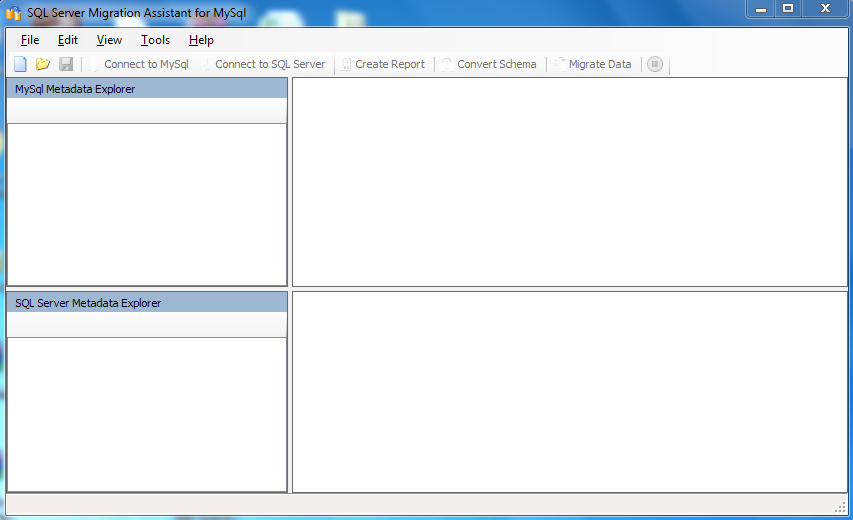
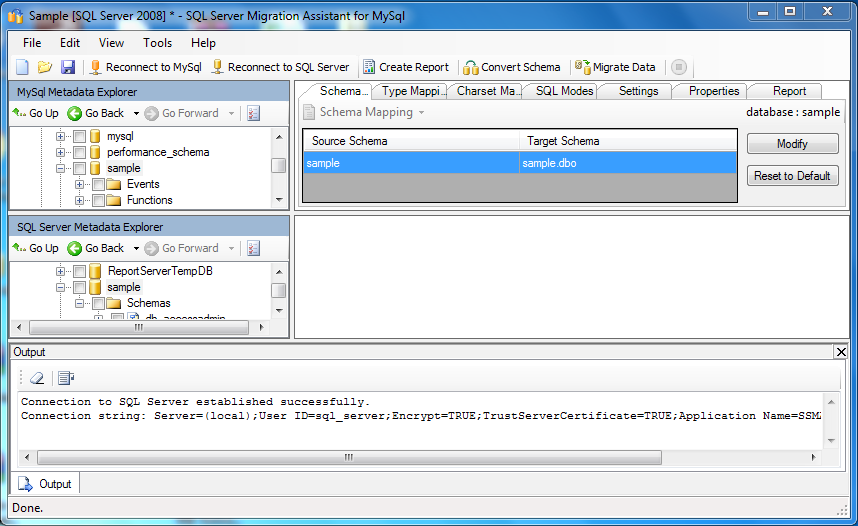
  • The user just has to open the “Microsoft SQL Server Migration Assistant for MySQL” tool that is already installed on your system. In case, the tool is not visible on the desktop, it is time to go to “Start” button and search the same tool over there. You would get the screen as shown below:

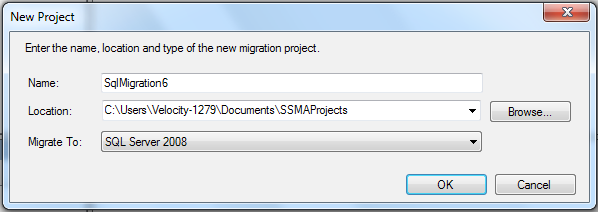
  • To get started with this platform, you need to go to “File -> New Project” and then create a new project for the data migration from MySQL to MSSQL platform. Here is the screenshot of the same process as shown below:

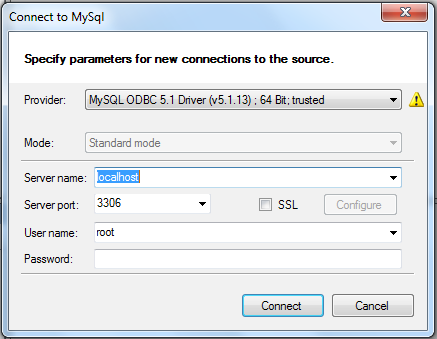
  • Once, the user has created the project successfully, it is time to click on the “Connect to MySQL” option present on the top of the page. A dialog box would be opened known as “Connect to MySQL”. Once, the dialog box is opened, user needs to perform the following functions:
  • First, select the “Provider” as “MySQL ODBC 5.1 Driver”.
  • Now, enter the “Server name” as “localhost”.
  • You need to enter the “Username” and “Password” of localhost which are required for logging into the MySQL.
  • Finally, you need to click on the “Connect” option. This will help in connecting the user to MySQL and contains the list of all the databases that are mapped along with the username that are used for login purposes.

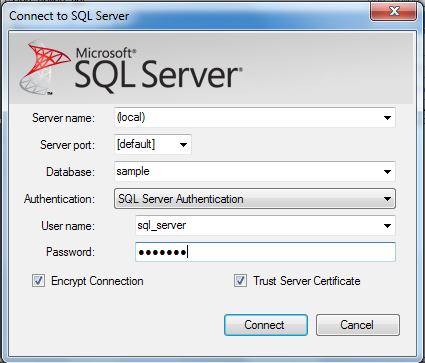
  • After this, you need to click on the “Connect to SQL Server” option provided at the top. This will open up a new dialog box known as “Connect to SQL Server” as shown below. Now, you need to perform the following steps as mentioned below:

  • You need to first select or enter the Server Name.
  • Now, the user needs to select the “Server Port” as “default”.
  • To carry out the data migration of the MySQL platform, it is important to select the right database. This database creation in SQL Server with the help of “SQL Server Management Studio” is an important step before the creation of a database connection.
  • The user needs to select the “Authentication” as Windows or SQL Server.
  • It is required to enter the “Username” and “Password” for connecting the SQL Server.

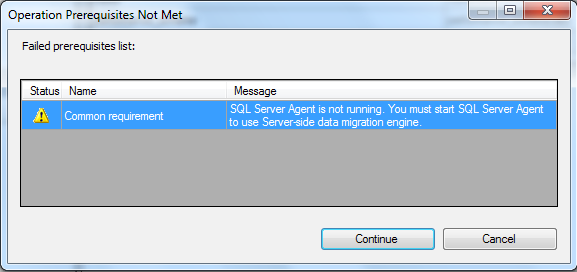
Finally, you need to click on the “Connect” option. It will open up a new dialog box that says “Operation Prerequisite Not Met”, you need to click on “Continue” option. With this step, you would be able to establish a connection with SQL Server along with list of all the databases. Below are the images about the same process.

  • Now, you need to select the database from “MySQL Metadata Explorer” sub- window that needs to be migrated to SQL Server. Once, you have made the selection, a “Convert Schema” option is enabled which needs to be clicked. With this step, you can easily convert the MySQL Database Schema into the SQL Server Database Schema. This process changes the data types of all the columns available in database tables into an applicable data type of the SQL Server.
  • Once, the schema has been converted, you need to select the database from the “SQL Server Metadata Explorer” sub-window. The user just have to right click on that and then select “Save as Script” option to save the required script into the desired location of the system. This is an important step before finally accomplishing the data migration as all the tables of your existing MySQL needs to be created on the target database of the SQL Server.
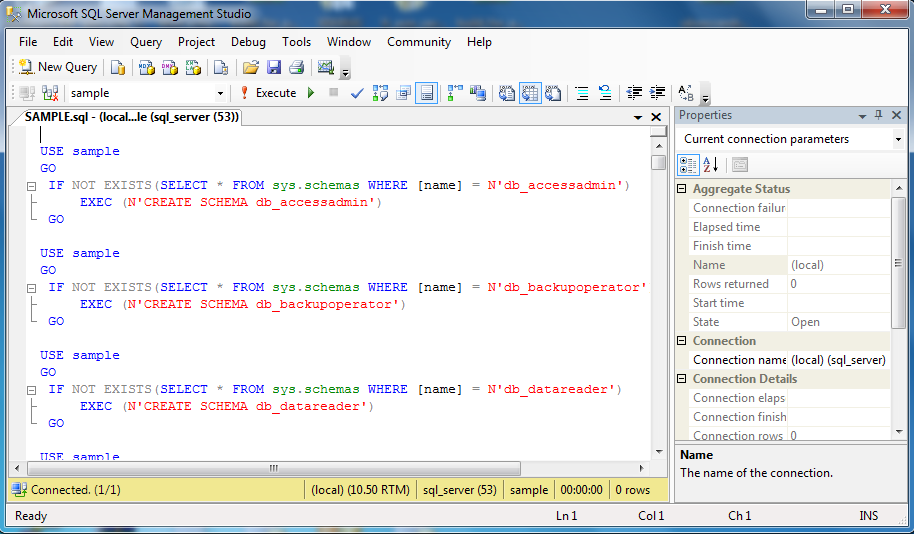
  • Now, it is time to locate the file that you have saved and double click on it. An “SQL Server Management Studio” window will open up asking for the establishment of connection with the SQL Server. You need to enter the required credentials over there and then click on the “Connect” option.
  • Once, the connection has been established, you need to click on the “Execute” option located at the top. This option will help in executing the file and will include all the tables into the selected database as shown in the image below:

  • Now, you need to move towards the “SQL Server Migration Assistant” tool and then select the required database where you want to perform the migration into the SQL Server. This will help in enabling the “Migrate Data” option provided at the top. By clicking on it, a dialog box will open up asking for the establishment of the connection with MySQL and SQL Server one by one. You need to enter the required credentials over there to establish the connection as shown in the image below:

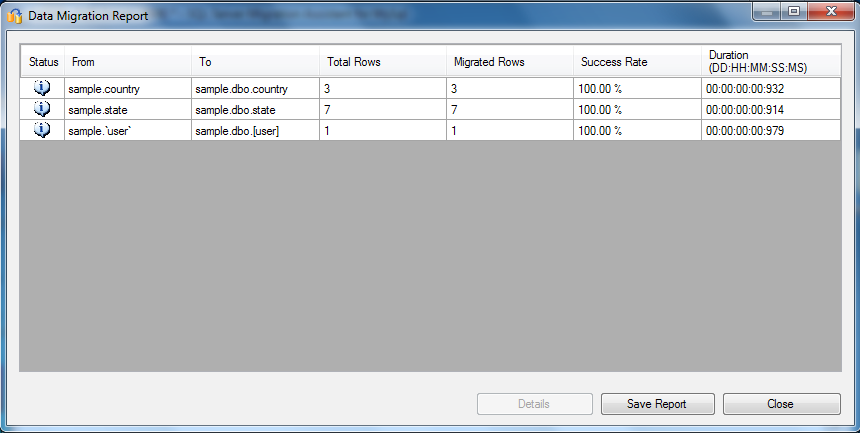
  • Once, you have successfully established the connection, the system would automatically migrate the data into the targeted database of SQL Server and can also be seen in the “SQL Server Management Studio” for refreshing the above database.

With the implementation of these simple steps, it is now easier to migrate the data of MySQL into the MSSQL platform without any trouble. In this way, websites can migrate their existing database from the MySQL platform to MSSQL Server in a quick and efficient manner. For more information about the useful eCommerce extensions that can help in the data migration services, you can visit our website at knowband for availing our expert custom module development services.

Liked This? You’ll Like These Too

Prestashop Custom Maintenance Page – User Manual

1.0 Introduction

The Prestashop Maintenance Page Customizer by Knowband is designed to customize the “Under-Maintenance” page of the Prestashop store. The addon lets the store admin make the changes in the font color, background color, text size and more from the back-end. The store owner can also have a Cron setup to automatically enable Maintenance mode on your store.

2.0 Steps for Installation

The user manual guides you to the easy installation and configuration of the Prestashop Maintenance page customizer by Knowband.

You can follow the steps mentioned below to install the Prestashop addon on your store.

  • Copy custom maintenance page module folder under your root_directory/modules/of your store via FTP or use Prestashop interface to upload the plugin.
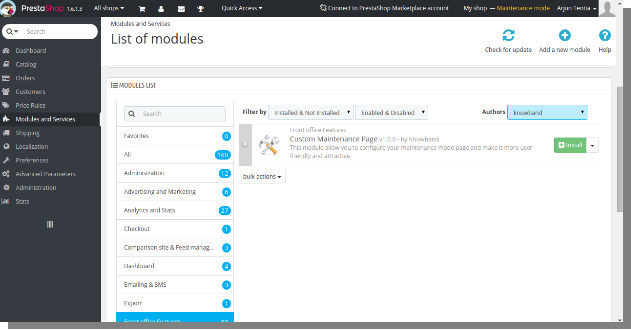
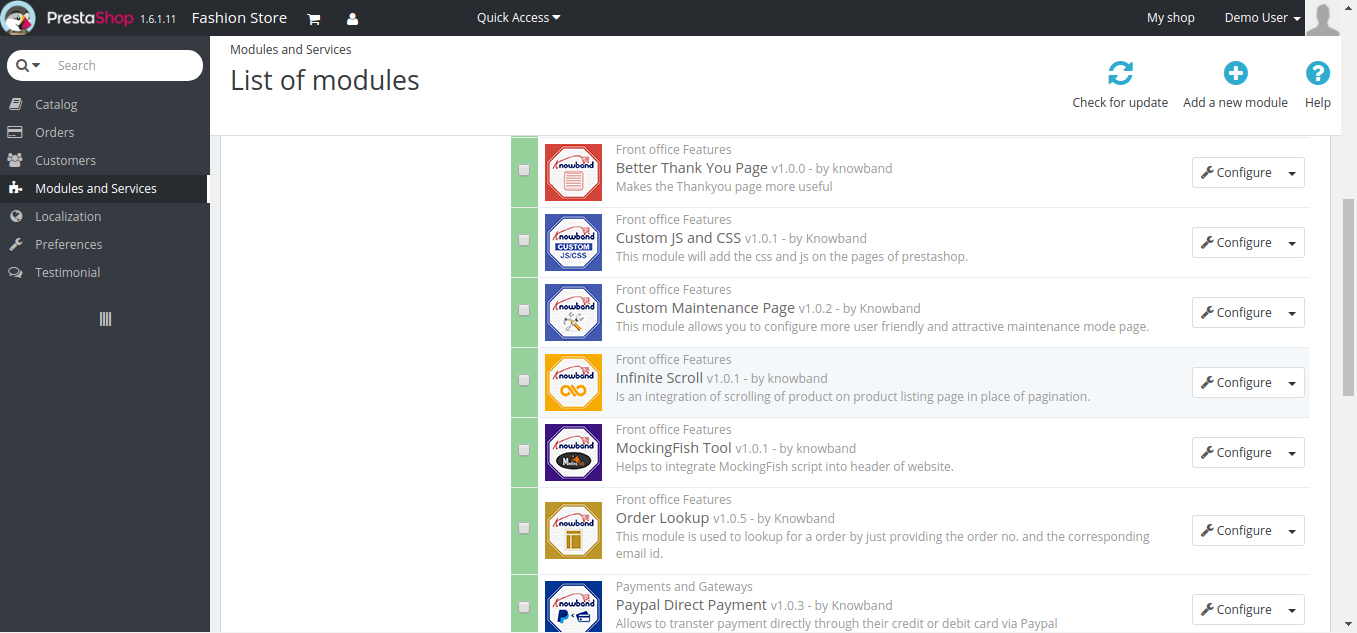
  • After copying, the Prestashop module will be listed on module listing page in admin panel as shown given below screen.

  • If Prestashop maintenance page module is not displaying on your module listing page, search it by filtering module with following details:

Keyword: customamaintenancepage
Author: Knowband
Category: front-office feature
Filter by: Installed & Not Installed/Enabled & Disabled

Note:

  • When you will click on install button, a pop-up box will appear which will display warning messages. You can ignore these messages and move ahead. There will be no negative impact of this warning message on your store.
  • After installing Prestashop modification page customizer module, a configure button will be in front of this plugin on module listing page as shown in the screen below:

3.0 Admin Module

3.0.1 Configuration Settings

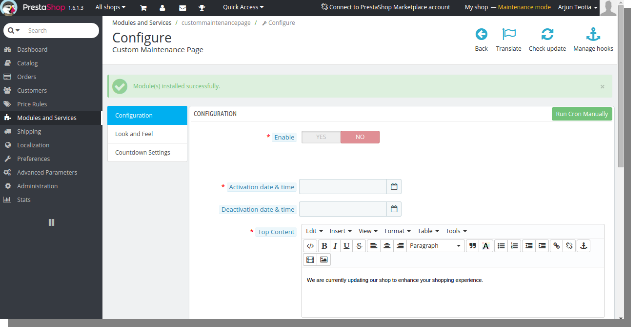
To access this Prestashop error page modification module, Click on configure button of custom maintenance page module. On clicking, module interface will be open and following screen will be displayed as given below:

  • Enable/Disable: To enable the plugin, switch the enable button from OFF to ON. The default value will be OFF.
    Activation date and time: This is the activation date and time when your module will go into maintenance mode. The default value will be Null
  • Deactivation date and time: This is the deactivation date and time when you want your shop to go live and turn off maintenance mode. The default value will be Null.
  • Top Content: This is the main message that will display on your maintenance page after maintenance mode is enabled. We have added a The default text in this field. The default data will be We are currently updating our shop to enhance your shopping experience.
  • Bottom Content: This is another text message that will display on your maintenance page below top content after maintenance mode is enabled.We have added a The default text in this field. The default data will be We apologize for the inconvenience and thank you for your patience.

3.0.2 Look and Feel Tab

This tab basically contains look and feel of maintenance page. These settings are for our user interface on maintenance page.

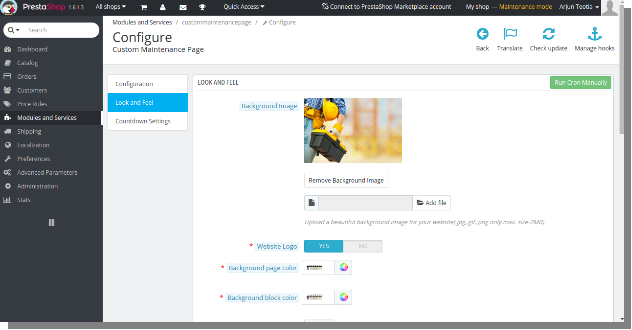
  • Background Image: You can change the background image for your maintenance page here. There is a given The default image for maintenance page background. You can easily upload a beautiful image for your background on maintenance page’s front-end.

  • Website Logo: You can also have an option to show your website logo on maintenance page. The default value of this field will be YES.
  • Background Page Color: This is the background color of maintenance page. The default background color will be white #ffffff.
  • Background Block Color: This is the background color of the rectangular content block on which your message is printed on maintenance page. The default color will be white #ffffff.
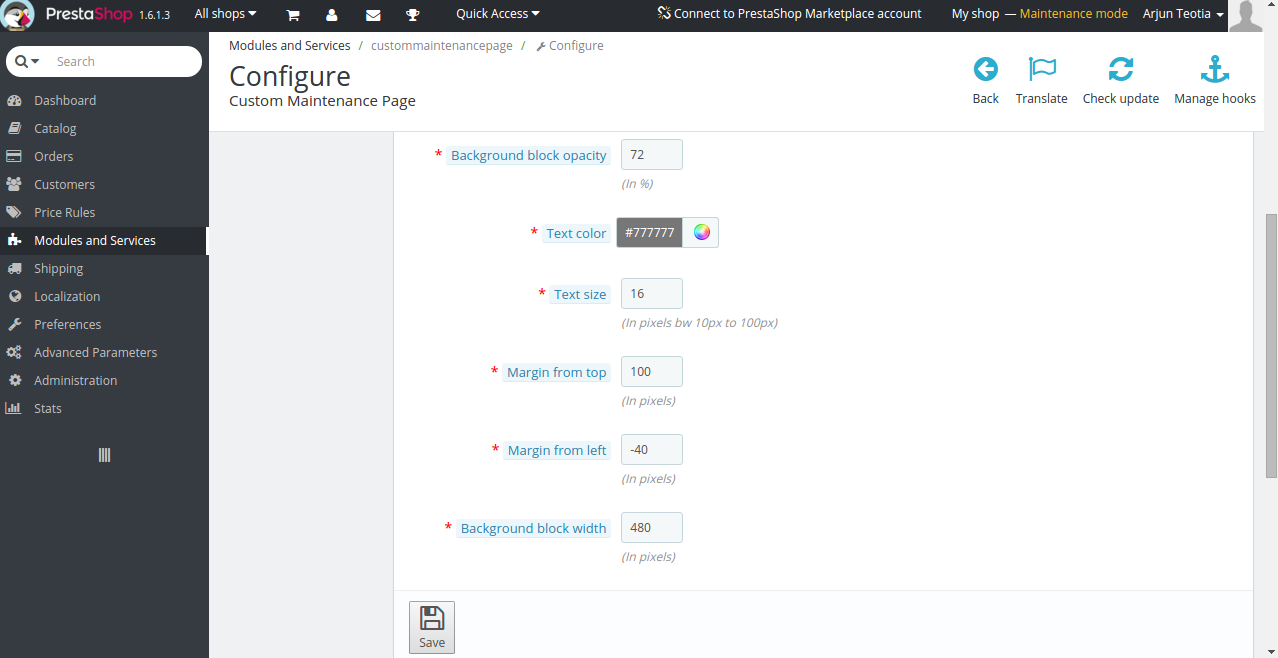
  • Background block opacity: This is the opacity in the percentage of the rectangular content block on your maintenance page. The default value will be 72.
  • Text Color: This is the color of the text message on maintenance page. The default color will be #777777.
  • Text Size: This is the font size of the text message on maintenance page. The default size will be 16pixels.
  • Margin From Top: This is the margin between your content block and top of the window. This helps to move downward or upward your content block on the maintenance page. The default margin will be 100pixels tested well on Prestashop v1.6.1.3.
  • Margin From Left: This is the margin between your content block and left of the window. This helps to move left or right your content block on maintenance page. The default margin will be -40pixels suitable for Prestashop v1.6.1.3. For the different version of Prestashop, you will need to change this setting according to your shop.
  • Background Block width: This is the width of the content block on maintenance page. You can stretch your background block accordingly with ease. The default value will be 480pixels.

3.0.3 Countdown Settings

This tab of the Prestashop error page modification addon is for the configuration setting of the countdown timer on maintenance page. You can change the background color of your timer with the content block and you can even move left, right on the content block. You can also select from 4 different sizes of countdown timer according to your need.

  • Timer Size: You can change the size of your countdown timer which is shown on maintenance page. There are 4 different sizes of countdown timer available Middle size, Small size, Extra small size and Large size. The default value will be Middle Size.

  • Countdown Background Color: This is the background color of the countdown timer. The default data will be white color #ffffff.
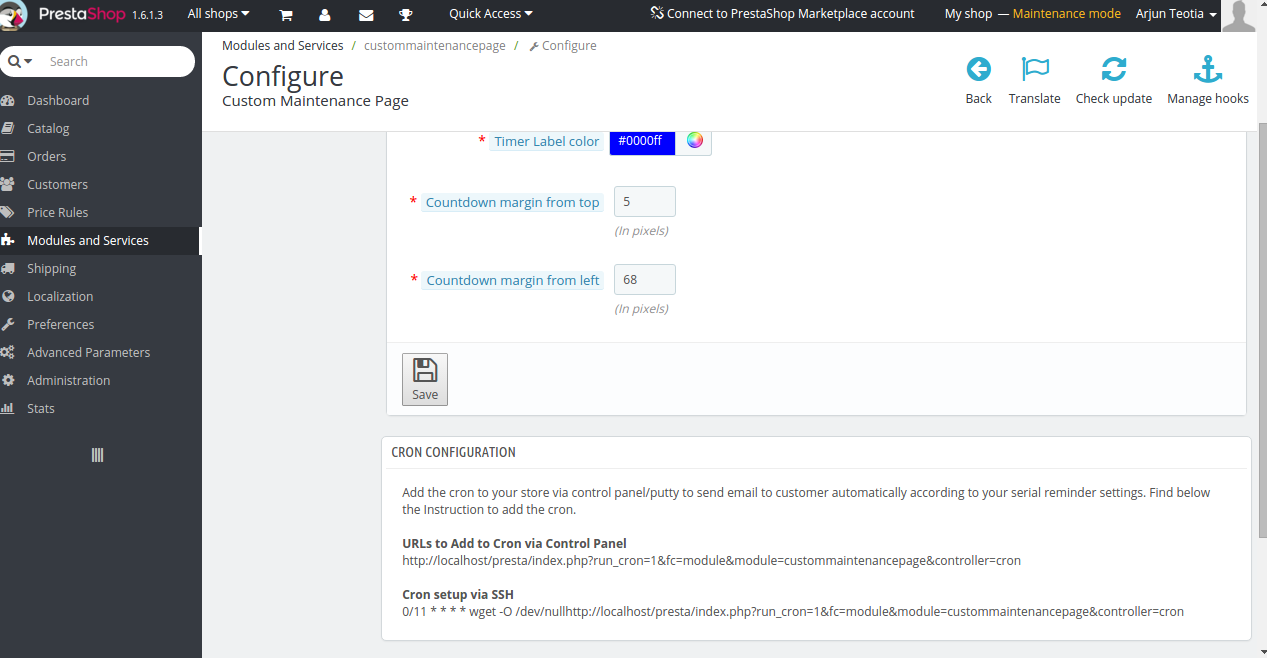
  • Timer Label Color: This is the font color of labels for hours, minutes, seconds. The default color will be blue #0000ff.
    Countdown margin from top: This is the margin of the countdown timer from the top of your text message on the content block on maintenance page. The default value will be 5pixels.
  • Countdown margin from left: This is the margin of the countdown timer from the left of your content block on maintenance page. The default value will be 68pixels.

3.0.3.1 Cron Instructions

This is instruction on how to run your cron function of maintenance tab. There is a button to run cron manually on the left side of module page. You can either click this button to run cron or set an automatic cron on your server following the instructs. The cron URL and how to setup via SSH is given on the below of tabs as shown in the below image –

3.0.3.1.1 The functionality of Cron Function-

These are the requirements when cron function will activate maintenance mode and disable your shop.

  • The module must be installed properly and enabled.
  • The current timestamp must be either greater or equal to Activation time stamp means the current date is same as activation date or ahead of activation date.
  • Deactivation timestamp must be greater than current time stamp means deactivation date must be ahead of the current date.
  • After all above conditions are true. The following message will print on running the cron –
    Maintenance mode has been enabled successfully.

These are the requirements when Cron function will deactivate maintenance mode and re-enable your shop.

  • The module must be installed properly and enabled.
  • All other conditions above must not be true.
  • The current timestamp must be greater than deactivation time stamp means current date must be ahead of deactivation date.
  • After all above conditions are true. The following message will print on running the cron –
    Maintenance mode has been disabled successfully.

In case both these options are incorrect, you will be shown the following message-

The module is not enabled or Activation/Deactivation date for maintenance has not passed yet.

4.0 Front Office Interface

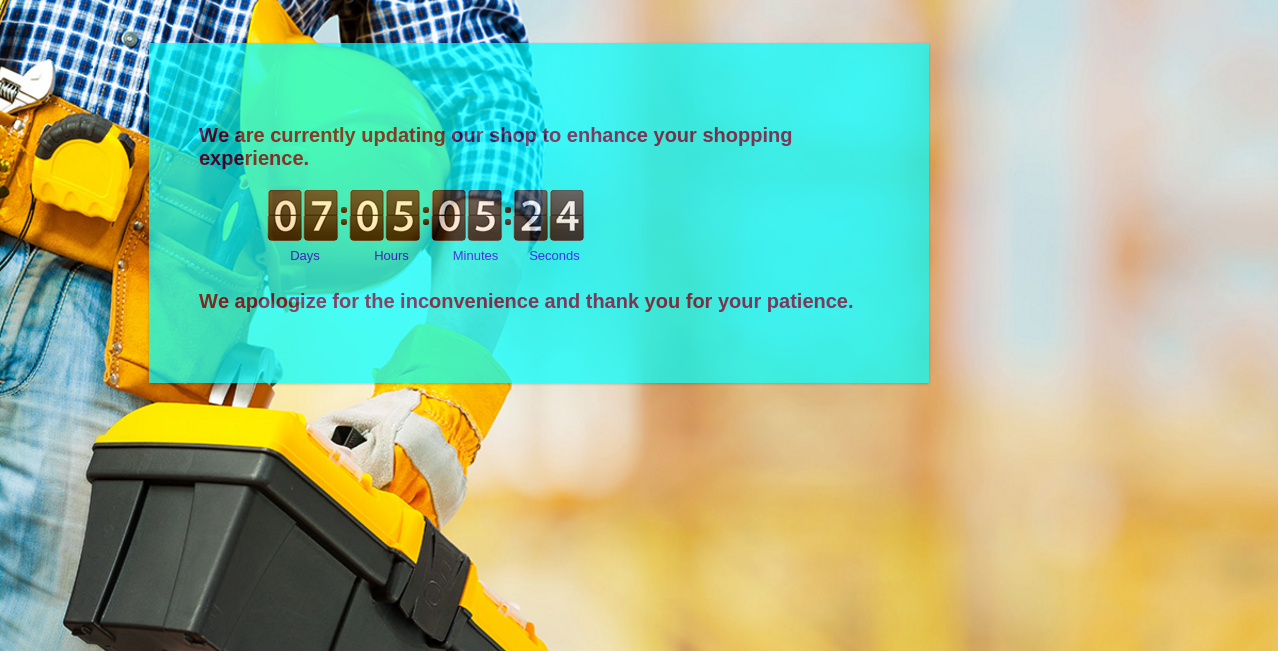
1. Default Settings Interface

2. Without Website Logo

3. The changed Background Color of the content block and countdown timer

4. The maximum opacity of the content block

5. Changed font size and color

6. Changed position of the content block

7. Large Countdown

8. Smaller Countdown

From all of the above images, you can easily make your maintenance page beautiful without making any extra efforts with the help of this module. You can fully customize maintenance page with the Prestashop Maintenance page customizer. So, attract your customers even when your actual shop is disabled.

Liked This? You’ll Like These Too

Prestashop Benutzerdefinierte Wartungsseite – Benutzerhandbuch

1.0 Einführung

Die Prestashop Maintenance Page Customizer by Knowband wurde entwickelt, um die "Unter-Wartung" -Seite des Prestashop-Stores anzupassen. Mit dem Addon kann der Geschäftsadministrator die Änderungen in der Schriftfarbe, Hintergrundfarbe, Textgröße und mehr vom Back-End vornehmen. Der Geschäftsinhaber kann auch ein Cron-Setup einrichten, um den Wartungsmodus in Ihrem Geschäft automatisch zu aktivieren.

2.0 Schritte für die Installation

Das Benutzerhandbuch führt Sie zur einfachen Installation und Konfiguration des Prestashop Maintenance-Seite Customizer von Knowband.

Sie können die folgenden Schritte ausführen, um das Prestashop-Addon in Ihrem Geschäft zu installieren.

  • Kopieren Sie den benutzerdefinierten Wartungsseiten-Modulordner unter Ihrem root_directory / modules / Ihres Speichers per FTP oder verwenden Sie ihn Prestashop Schnittstelle zum Hochladen des Plugins.
  • Nach dem Kopieren wird das Prestashop-Modul auf der Modullistenseite im Admin-Panel aufgelistet, wie unten gezeigt.

  • Wenn das Prestashop-Wartungsseitenmodul nicht auf Ihrer Modullistenseite angezeigt wird, suchen Sie es nach dem Filtermodul mit folgenden Details:

Stichwort:?customamaintenancepage
Autor:?Knowband
Kategorie:?front-office feature
Filtern nach:?Installed & Not Installed/Enabled & Disabled

Hinweis:

  • Wenn Sie auf die Schaltfläche "Installieren" klicken, wird ein Popup-Fenster angezeigt, in dem Warnmeldungen angezeigt werden. Sie können diese Nachrichten ignorieren und fortfahren. Diese Warnmeldung wird in Ihrem Geschäft nicht negativ beeinflusst.
  • Nach der Installation des Anpassungsmoduls für die Modifizierung der Prestashop-Modifizierung befindet sich vor diesem Plugin auf der Modullistenseite eine Konfigurationsschaltfläche, wie im folgenden Bildschirm gezeigt:

3.0 Admin Modul

3.0.1 Konfigurationseinstellungen

Zu

  • Aktivieren deaktivieren:?To enable the plugin, switch the enable button from OFF to ON. The default value will be OFF.
    Activation date and time:?This is the activation date and time when your module will go into maintenance mode. The default value will be Null
  • Deaktivierungsdatum und -uhrzeit:?This is the deactivation date and time when you want your shop to go live and turn off maintenance mode. The default value will be Null.
  • Top Inhalt:?This is the main message that will display on your maintenance page after maintenance mode is enabled. We have added a The default text in this field. The default data will be We are currently updating our shop to enhance your shopping experience.
  • Unterer Inhalt:?This is another text message that will display on your maintenance page below top content after maintenance mode is enabled.We have added a The default text in this field. The default data will be We apologize for the inconvenience and thank you for your patience.

3.0.2-Look-and-Feel-Tab

Diese Registerkarte enthält im Wesentlichen das Erscheinungsbild der Wartungsseite. Diese Einstellungen gelten für unsere Benutzeroberfläche auf der Wartungsseite.

  • Hintergrundbild: Sie können das Hintergrundbild für Ihre Wartungsseite hier ändern. Es gibt ein gegebenes Das Standardbild für den Hintergrund der Wartungsseite. Sie können einfach ein schönes Bild für Ihren Hintergrund auf das Frontend der Wartungsseite hochladen.

  • Website Logo:?You can also have an option to show your website logo on maintenance page. The default value of this field will be YES.
  • Hintergrund Seitenfarbe:?This is the background color of maintenance page. The default background color will be white #ffffff.
  • Hintergrund Blockfarbe:
  • Hintergrundblock-Opazität:?This is the opacity in the percentage of the rectangular content block on your maintenance page. The default value will be 72.
  • Textfarbe:?This is the color of the text message on maintenance page. The default color will be #777777.
  • Textgröße:?This is the font size of the text message on maintenance page. The default size will be 16pixels.
  • Marge von oben:
  • Rand von links:?This is the margin between your content block and left of the window. This helps to move left or right your content block on maintenance page. The default margin will be -40pixels suitable for Prestashop v1.6.1.3. For the different version of Prestashop, you will need to change this setting according to your shop.
  • Hintergrund Blockbreite:?This is the width of the content block on maintenance page. You can stretch your background block accordingly with ease. The default value will be 480pixels.

3.0.3 Countdown-Einstellungen

Diese Registerkarte des Prestashop-Moduls zur Modifikation der Fehlerseite dient zur Konfiguration des Countdown-Timers auf der Wartungsseite. Sie können die Hintergrundfarbe Ihres Timers mit dem Inhaltsblock ändern und Sie können sogar nach links oder rechts im Inhaltsblock gehen. Sie können auch aus 4 verschiedene Größen von Countdown-Timer nach Ihren Bedürfnissen auswählen.

  • Timer Größe:?You can change the size of your countdown timer which is shown on maintenance page. There are 4 different sizes of countdown timer available Middle size, Small size, Extra small size and Large size. The default value will be Middle Size.

  • Countdown-Hintergrundfarbe:?This is the background color of the countdown timer. The default data will be white color #ffffff.
  • Timer Label Farbe:?This is the font color of labels for hours, minutes, seconds. The default color will be blue #0000ff.
    Countdown margin from top:?This is the margin of the countdown timer from the top of your text message on the content block on maintenance page. The default value will be 5pixels.
  • Countdown von links:?This is the margin of the countdown timer from the left of your content block on maintenance page. The default value will be 68pixels.

3.0.3.1 Cron Anweisungen

Dies ist eine Anleitung zum Ausführen Ihrer Cron-Funktion der Registerkarte Wartung. Es gibt eine Schaltfläche, um Cron manuell auf der linken Seite der Modulseite auszuführen. Sie können entweder auf diese Schaltfläche klicken, um Cron auszuführen oder ein automatisches Cron auf Ihrem Server zu setzen, indem Sie den Anweisungen folgen. Die Cron-URL und die Einrichtung über SSH finden Sie auf den folgenden Registerkarten, wie in der folgenden Abbildung dargestellt

3.0.3.1.1 Die Funktionalität von Cron Function-

Dies sind die Anforderungen, wenn die Cron-Funktion den Wartungsmodus aktiviert und Ihren Shop deaktiviert.

  • Das Modul muss ordnungsgemäß installiert und aktiviert sein.
  • Der aktuelle Zeitstempel muss größer oder gleich dem Aktivierungszeitstempel sein. Das aktuelle Datum entspricht dem Aktivierungsdatum oder vor dem Aktivierungsdatum.
  • Der Deaktivierungszeitstempel muss größer sein als der aktuelle Zeitstempel bedeutet, dass das Deaktivierungsdatum dem aktuellen Datum voraus sein muss.
  • Nach alle obigen Bedingungen sind wahr. Die folgende Nachricht wird beim Ausführen des Cron gedruckt:
    Der Wartungsmodus wurde erfolgreich aktiviert.

Dies sind die Voraussetzungen, wenn die Cron-Funktion den Wartungsmodus deaktiviert und Ihren Shop wieder aktiviert.

  • Das Modul muss ordnungsgemäß installiert und aktiviert sein.
  • Alle anderen oben genannten Bedingungen müssen nicht zutreffen.
  • Der aktuelle Zeitstempel muss größer sein als der Deaktivierungszeitstempel bedeutet, dass das aktuelle Datum dem Deaktivierungsdatum voraus sein muss.
  • Nach alle obigen Bedingungen sind wahr. Die folgende Nachricht wird beim Ausführen des Cron gedruckt:
    Der Wartungsmodus wurde erfolgreich deaktiviert.

Falls beide Optionen falsch sind, wird Ihnen folgende Nachricht angezeigt:

Das Modul ist nicht aktiviert oder das Aktivierungs / Deaktivierungsdatum für die Wartung ist noch nicht abgelaufen.

4.0 Front Office-Schnittstelle

1. Standardeinstellungen Schnittstelle

2. Ohne Website-Logo

3. Die geänderte Hintergrundfarbe des Inhaltsblocks und Countdown-Timers

4. Die maximale Deckkraft des Inhaltsblocks

5. Schriftgröße und Farbe geändert

6. Geänderte Position des Inhaltsblocks

7. Großer Countdown

8. Kleinerer Countdown

Aus all den oben genannten Bildern können Sie Ihre Pflegeseite einfach gestalten, ohne dass Sie mit Hilfe dieses Moduls zusätzliche Anstrengungen unternehmen müssen. Sie können die Wartungsseite mit dem Anpassungsdialog für die Prestashop-Wartung vollständig anpassen. Also, locken Sie Ihre Kunden, auch wenn Ihr Laden deaktiviert ist.

Mochte dies? Sie werden diese auch mögen


Prestashop Pagina di manutenzione personalizzata – Manuale dell'utente

1.0 Introduzione

La Prestashop Maintenance Page Customizer by Knowband è progettato per personalizzare la pagina "Under-Maintenance" del negozio Prestashop. L'addon consente all'amministratore del negozio di apportare le modifiche al colore del carattere, al colore di sfondo, alle dimensioni del testo e altro dal back-end. Il proprietario del negozio può anche disporre di un'impostazione Cron per abilitare automaticamente la modalità di manutenzione nel negozio.

2.0 Passi per l'installazione

Il manuale utente ti guida alla facile installazione e configurazione del customizer della pagina Prestashop Maintenance di Knowband.

È possibile seguire i passaggi indicati di seguito per installare l'addon Prestashop nel proprio negozio.

  • Copia la cartella del modulo della pagina di manutenzione personalizzata sotto root_directory / modules / del tuo negozio via FTP o usa Prestashop interfaccia per caricare il plugin.
  • Dopo la copia, il modulo Prestashop sarà elencato nella pagina di elenco dei moduli nel pannello di amministrazione come mostrato sotto la schermata.

  • Se il modulo della pagina di manutenzione di Prestashop non viene visualizzato nella pagina di elenco del modulo, cercarlo dal modulo di filtro con i seguenti dettagli:

Parola chiave:?customamaintenancepage
Autore:?Knowband
Categoria:?front-office feature
Filtra per:?Installed & Not Installed/Enabled & Disabled

Nota:

  • Quando fai clic sul pulsante Installa, verrà visualizzata una finestra popup che visualizzerà i messaggi di avviso. Puoi ignorare questi messaggi e andare avanti. Non ci sarà alcun impatto negativo di questo messaggio di avviso sul tuo negozio.
  • Dopo aver installato il modulo di personalizzazione della pagina di modifica Prestashop, un pulsante di configurazione sarà davanti a questo plug-in nella pagina di elenco dei moduli come mostrato nella schermata seguente:

Modulo di amministrazione 3.0

Impostazioni di configurazione 3.0.1

A

  • Attiva / Disattiva:?To enable the plugin, switch the enable button from OFF to ON. The default value will be OFF.
    Activation date and time:?This is the activation date and time when your module will go into maintenance mode. The default value will be Null
  • Data e ora di disattivazione:?This is the deactivation date and time when you want your shop to go live and turn off maintenance mode. The default value will be Null.
  • Contenuti principali:?This is the main message that will display on your maintenance page after maintenance mode is enabled. We have added a The default text in this field. The default data will be We are currently updating our shop to enhance your shopping experience.
  • Contenuto inferiore:?This is another text message that will display on your maintenance page below top content after maintenance mode is enabled.We have added a The default text in this field. The default data will be We apologize for the inconvenience and thank you for your patience.

Tab 3.0.2 Look and Feel

Questa scheda contiene fondamentalmente aspetto della pagina di manutenzione. Queste impostazioni sono per la nostra interfaccia utente sulla pagina di manutenzione.

  • Immagine di sfondo: È possibile modificare qui l'immagine di sfondo per la pagina di manutenzione. C'è un dato L'immagine predefinita per lo sfondo della pagina di manutenzione. Puoi facilmente caricare una bella immagine per il tuo background sul front-end della pagina di manutenzione.

  • Logo del sito web:?You can also have an option to show your website logo on maintenance page. The default value of this field will be YES.
  • Colore della pagina di sfondo:?This is the background color of maintenance page. The default background color will be white #ffffff.
  • Colore blocco di sfondo:
  • Opacità del blocco di sfondo:?This is the opacity in the percentage of the rectangular content block on your maintenance page. The default value will be 72.
  • Colore del testo:?This is the color of the text message on maintenance page. The default color will be #777777.
  • Dimensione del testo:?This is the font size of the text message on maintenance page. The default size will be 16pixels.
  • Margine dall'alto:
  • Margine da sinistra:?This is the margin between your content block and left of the window. This helps to move left or right your content block on maintenance page. The default margin will be -40pixels suitable for Prestashop v1.6.1.3. For the different version of Prestashop, you will need to change this setting according to your shop.
  • Sfondo Larghezza del blocco:?This is the width of the content block on maintenance page. You can stretch your background block accordingly with ease. The default value will be 480pixels.

Impostazioni conto alla rovescia 3.0.3

Questa scheda del componente aggiuntivo di modifica della pagina degli errori di Prestashop si riferisce alle impostazioni di configurazione del timer per il conto alla rovescia nella pagina di manutenzione. Puoi cambiare il colore di sfondo del tuo timer con il blocco del contenuto e puoi anche spostarti a sinistra, direttamente sul blocco dei contenuti. È inoltre possibile selezionare da 4 diverse dimensioni del timer per il conto alla rovescia in base alle proprie esigenze.

  • Dimensione del timer:?You can change the size of your countdown timer which is shown on maintenance page. There are 4 different sizes of countdown timer available Middle size, Small size, Extra small size and Large size. The default value will be Middle Size.

  • Colore sfondo conto alla rovescia:?This is the background color of the countdown timer. The default data will be white color #ffffff.
  • Colore etichetta timer:?This is the font color of labels for hours, minutes, seconds. The default color will be blue #0000ff.
    Countdown margin from top:?This is the margin of the countdown timer from the top of your text message on the content block on maintenance page. The default value will be 5pixels.
  • Conto alla rovescia da sinistra:?This is the margin of the countdown timer from the left of your content block on maintenance page. The default value will be 68pixels.

3.0.3.1 Cron Istruzioni

Questa è un'istruzione su come eseguire la funzione cron della scheda di manutenzione. C'è un pulsante per eseguire cron manualmente sul lato sinistro della pagina del modulo. Puoi fare clic su questo pulsante per eseguire cron o impostare un cron automatico sul tuo server seguendo le istruzioni. L'URL di cron e le modalità di configurazione tramite SSH sono indicati nel seguito delle schede come mostrato nell'immagine sottostante

3.0.3.1.1 La funzionalità di Cron Function-

Questi sono i requisiti quando la funzione cron attiverà la modalità di manutenzione e disabiliterà il tuo negozio.

  • Il modulo deve essere installato correttamente e abilitato.
  • La data / ora corrente deve essere maggiore o uguale a Data e ora di attivazione significa che la data corrente è uguale alla data di attivazione o prima della data di attivazione.
  • Il timestamp di disattivazione deve essere maggiore della data e ora correnti, la data di disattivazione deve essere precedente alla data corrente.
  • Dopo tutte le condizioni di cui sopra sono vere. Il seguente messaggio verrà stampato sull'esecuzione del cron –
    La modalità di manutenzione è stata abilitata con successo.

Questi sono i requisiti quando la funzione Cron disattiverà la modalità di manutenzione e riabiliterà il tuo negozio.

  • Il modulo deve essere installato correttamente e abilitato.
  • Tutte le altre condizioni di cui sopra non devono essere vere.
  • La data / ora corrente deve essere maggiore della data e ora della disattivazione, la data corrente deve essere precedente alla data di disattivazione.
  • Dopo tutte le condizioni di cui sopra sono vere. Il seguente messaggio verrà stampato sull'esecuzione del cron –
    La modalità di manutenzione è stata disabilitata con successo.

Se entrambe queste opzioni non sono corrette, verrà visualizzato il seguente messaggio:

Il modulo non è abilitato o la data di attivazione / disattivazione per la manutenzione non è ancora passata.

4.0 Front Office Interface

1. Interfaccia impostazioni predefinite

2. Senza logo del sito

3. Il colore di sfondo modificato del blocco del contenuto e del timer per il conto alla rovescia

4. La massima opacità del blocco dei contenuti

5. Dimensione e colore dei caratteri cambiati

6. Posizione modificata del blocco del contenuto

7. Grande conto alla rovescia

8. Conto alla rovescia più piccolo

Da tutte le immagini di cui sopra, puoi facilmente rendere bella la tua pagina di manutenzione senza fare ulteriori sforzi con l'aiuto di questo modulo. È possibile personalizzare completamente la pagina di manutenzione con il customizer della pagina Prestashop Maintenance. Quindi, attira i tuoi clienti anche quando il tuo negozio è disattivato.

Questo mi piaceva? Ti piaceranno anche questi


Prestashop Custom Maintenance Page – Instrukcja użytkownika

1.0 Wprowadzenie

SOCZEWKI Prestashop Maintenance Page Customizer by Knowband został zaprojektowany w celu dostosowania strony "Nie do konserwacji" w sklepie Prestashop. Addon pozwala administratorowi sklepu wprowadzać zmiany koloru czcionki, koloru tła, rozmiaru tekstu i innych elementów z zaplecza. Właściciel sklepu może również mieć konfigurację Cron, aby automatycznie włączyć tryb konserwacji w swoim sklepie.

2.0 Kroki do instalacji

Instrukcja użytkownika prowadzi użytkownika do łatwej instalacji i konfiguracji modułu dostosowywania strony Prestashop Maintenance przez Knowband.

Możesz wykonać kroki wymienione poniżej, aby zainstalować dodatek Prestashop w swoim sklepie.

  • Skopiuj niestandardowy folder modułu stron serwisowych w katalogu root_directory / modules / twojego sklepu przez FTP lub użyj prestashop interfejs do załadowania wtyczki.
  • Po skopiowaniu moduł Prestashop pojawi się na stronie z listą modułów w panelu administracyjnym, jak pokazano poniżej.

  • Jeśli moduł strony konserwacji Prestashop nie wyświetla się na stronie z listą modułów, przeszukaj ją, filtrując moduł z następującymi szczegółami:

słowo kluczowe:?customamaintenancepage
Autor:?Knowband
Kategoria:?front-office feature
Przefiltrować przez:?Installed & Not Installed/Enabled & Disabled

Uwaga:

  • Po kliknięciu przycisku instalacji pojawi się wyskakujące okienko z komunikatami ostrzegawczymi. Możesz zignorować te wiadomości i iść naprzód. Nie będzie negatywnego wpływu tego komunikatu ostrzegawczego na Twój sklep.
  • Po zainstalowaniu modułu modyfikacji strony modyfikacji Prestashop, przycisk konfiguracji będzie znajdował się przed tą wtyczką na stronie z listą modułów, jak pokazano na poniższym ekranie:

Moduł administracyjny 3.0

Ustawienia konfiguracji 3.0.1

To?access?this?Prestashop?error?page?modification?module,?Click?on?configure?button?of?custom?maintenance?page?module.?On?clicking,?module?interface?will?be?open?and?following?screen?will?be?displayed?as?given?below:

  • Włącz / wyłącz:?To enable the plugin, switch the enable button from OFF to ON. The default value will be OFF.
    Activation date and time:?This is the activation date and time when your module will go into maintenance mode. The default value will be Null
  • Data i godzina dezaktywacji:?This is the deactivation date and time when you want your shop to go live and turn off maintenance mode. The default value will be Null.
  • Najlepsza treść:?This is the main message that will display on your maintenance page after maintenance mode is enabled. We have added a The default text in this field. The default data will be We are currently updating our shop to enhance your shopping experience.
  • Bottom Content:?This is another text message that will display on your maintenance page below top content after maintenance mode is enabled.We have added a The default text in this field. The default data will be We apologize for the inconvenience and thank you for your patience.

3.0.2 Look and Feel Tab

Ta zakładka zasadniczo zawiera wygląd strony obsługi. Te ustawienia dotyczą naszego interfejsu użytkownika na stronie konserwacji.

  • Zdjęcie w tle: You can change the background image for your maintenance page here. There is a given The default image for maintenance page background. You can easily upload a beautiful image for your background on maintenance page’s front-end.

  • Website Logo:?You can also have an option to show your website logo on maintenance page. The default value of this field will be YES.
  • Background Page Color:?This is the background color of maintenance page. The default background color will be white #ffffff.
  • Background Block Color:?This is the background color of the rectangular content block on which your message is printed on maintenance page. The default color will be white #ffffff.
  • Background block opacity:?This is the opacity in the percentage of the rectangular content block on your maintenance page. The default value will be 72.
  • Kolor tekstu:?This is the color of the text message on maintenance page. The default color will be #777777.
  • Rozmiar czcionki:?This is the font size of the text message on maintenance page. The default size will be 16pixels.
  • Margin From Top:?This is the margin between your content block and top of the window. This helps to move downward or upward your content block on the maintenance page. The default margin will be 100pixels tested well on Prestashop v1.6.1.3.
  • Margin From Left:?This is the margin between your content block and left of the window. This helps to move left or right your content block on maintenance page. The default margin will be -40pixels suitable for Prestashop v1.6.1.3. For the different version of Prestashop, you will need to change this setting according to your shop.
  • Background Block width:?This is the width of the content block on maintenance page. You can stretch your background block accordingly with ease. The default value will be 480pixels.

3.0.3 Countdown Settings

This tab of the Prestashop error page modification addon is for the configuration setting of the countdown timer on maintenance page. You can change the background color of your timer with the content block and you can even move left, right on the content block. You can also select from 4 different sizes of countdown timer according to your need.

  • Timer Size:?You can change the size of your countdown timer which is shown on maintenance page. There are 4 different sizes of countdown timer available Middle size, Small size, Extra small size and Large size. The default value will be Middle Size.

  • Countdown Background Color:?This is the background color of the countdown timer. The default data will be white color #ffffff.
  • Timer Label Color:?This is the font color of labels for hours, minutes, seconds. The default color will be blue #0000ff.
    Countdown margin from top:?This is the margin of the countdown timer from the top of your text message on the content block on maintenance page. The default value will be 5pixels.
  • Countdown margin from left:?This is the margin of the countdown timer from the left of your content block on maintenance page. The default value will be 68pixels.

3.0.3.1 Cron Instructions

This is instruction on how to run your cron function of maintenance tab. There is a button to run cron manually on the left side of module page. You can either click this button to run cron or set an automatic cron on your server following the instructs. The cron URL and how to setup via SSH is given on the below of tabs as shown in the below image ?

3.0.3.1.1 The functionality of Cron Function-

These are the requirements when cron function will activate maintenance mode and disable your shop.

  • The module must be installed properly and enabled.
  • The current timestamp must be either greater or equal to Activation time stamp means the current date is same as activation date or ahead of activation date.
  • Deactivation timestamp must be greater than current time stamp means deactivation date must be ahead of the current date.
  • After all above conditions are true. The following message will print on running the cron –
    Maintenance mode has been enabled successfully.

These are the requirements when Cron function will deactivate maintenance mode and re-enable your shop.

  • The module must be installed properly and enabled.
  • All other conditions above must not be true.
  • The current timestamp must be greater than deactivation time stamp means current date must be ahead of deactivation date.
  • After all above conditions are true. The following message will print on running the cron –
    Maintenance mode has been disabled successfully.

In case both these options are incorrect, you will be shown the following message-

The module is not enabled or Activation/Deactivation date for maintenance has not passed yet.

4.0 Front Office Interface

1. Domyślny interfejs ustawień

2. Without Website Logo

3. The changed Background Color of the content block and countdown timer

4. The maximum opacity of the content block

5. Changed font size and color

6. Changed position of the content block

7. Large Countdown

8. Smaller Countdown

From all of the above images, you can easily make your maintenance page beautiful without making any extra efforts with the help of this module. You can fully customize maintenance page with the Prestashop Maintenance page customizer. So, attract your customers even when your actual shop is disabled.

Lubiłem to? Spodoba ci się to


Página de Manutenção Personalizada Prestashop – Manual do Usuário

1.0 Introdução

O Personalizador de página de manutenção Prestashop by Banda de conhecimento é projetado para personalizar a página "Under-Maintenance" da loja Prestashop. O addon permite que o administrador da loja faça as alterações na cor da fonte, na cor do plano de fundo, no tamanho do texto e muito mais no back-end. O proprietário da loja também pode ter uma configuração Cron para ativar automaticamente o modo de manutenção em sua loja.

Etapas 2.0 para instalação

O manual do utilizador orienta-o para a fácil instalação e configuração do personalizador da página Prestashop Maintenance da Knowband.

Você pode seguir as etapas mencionadas abaixo para instalar o addon Prestashop em sua loja.

  • Copie a pasta do módulo de página de manutenção personalizada sob seu diretório_raiz / módulos / da sua loja via FTP ou use Prestashop interface para carregar o plugin.
  • Após a cópia, o módulo Prestashop será listado na página de listagem de módulos no painel de administração, conforme mostrado abaixo na tela.

  • Se o módulo de página de manutenção Prestashop não estiver sendo exibido na página de listagem de módulos, pesquise-o por meio do módulo de filtragem com os seguintes detalhes:

Palavra-chave:?customamaintenancepage
Autor:?Knowband
Categoria:?front-office feature
Filtrar por:?Installed & Not Installed/Enabled & Disabled

Nota:

  • Quando você clicar no botão de instalação, aparecerá uma caixa pop-up que exibirá as mensagens de aviso. Você pode ignorar essas mensagens e seguir em frente. Não haverá impacto negativo dessa mensagem de aviso em sua loja.
  • Depois de instalar o módulo personalizador de página de modificação Prestashop, um botão de configuração estará na frente deste plug-in na página de listagem de módulos, conforme mostrado na tela abaixo:

3.0 Admin Module

Configurações de configuração do 3.0.1

To?access?this?Prestashop?error?page?modification?module,?Click?on?configure?button?of?custom?maintenance?page?module.?On?clicking,?module?interface?will?be?open?and?following?screen?will?be?displayed?as?given?below:

  • Habilitar desabilitar:?To enable the plugin, switch the enable button from OFF to ON. The default value will be OFF.
    Activation date and time:?This is the activation date and time when your module will go into maintenance mode. The default value will be Null
  • Data e hora de desativação:?This is the deactivation date and time when you want your shop to go live and turn off maintenance mode. The default value will be Null.
  • Conteúdo principal:?This is the main message that will display on your maintenance page after maintenance mode is enabled. We have added a The default text in this field. The default data will be We are currently updating our shop to enhance your shopping experience.
  • Conteúdo inferior:?This is another text message that will display on your maintenance page below top content after maintenance mode is enabled.We have added a The default text in this field. The default data will be We apologize for the inconvenience and thank you for your patience.

Guia Look and Feel do 3.0.2

Esta aba contém basicamente a aparência da página de manutenção. Essas configurações são para nossa interface do usuário na página de manutenção.

  • Imagem de fundo: Você pode alterar a imagem de plano de fundo da sua página de manutenção aqui. Há uma determinada A imagem padrão para o plano de fundo da página de manutenção. Você pode facilmente fazer upload de uma imagem bonita para seu plano de fundo no front-end da página de manutenção.

  • Logotipo do site:?You can also have an option to show your website logo on maintenance page. The default value of this field will be YES.
  • Cor da página de fundo:?This is the background color of maintenance page. The default background color will be white #ffffff.
  • Cor do bloco de fundo:?This is the background color of the rectangular content block on which your message is printed on maintenance page. The default color will be white #ffffff.
  • Opacidade do bloco de fundo:?This is the opacity in the percentage of the rectangular content block on your maintenance page. The default value will be 72.
  • Cor do texto:?This is the color of the text message on maintenance page. The default color will be #777777.
  • Tamanho do texto:?This is the font size of the text message on maintenance page. The default size will be 16pixels.
  • Margin From Top:?This is the margin between your content block and top of the window. This helps to move downward or upward your content block on the maintenance page. The default margin will be 100pixels tested well on Prestashop v1.6.1.3.
  • Margin From Left:?This is the margin between your content block and left of the window. This helps to move left or right your content block on maintenance page. The default margin will be -40pixels suitable for Prestashop v1.6.1.3. For the different version of Prestashop, you will need to change this setting according to your shop.
  • Background Block width:?This is the width of the content block on maintenance page. You can stretch your background block accordingly with ease. The default value will be 480pixels.

3.0.3 Countdown Settings

This tab of the Prestashop error page modification addon is for the configuration setting of the countdown timer on maintenance page. You can change the background color of your timer with the content block and you can even move left, right on the content block. You can also select from 4 different sizes of countdown timer according to your need.

  • Timer Size:?You can change the size of your countdown timer which is shown on maintenance page. There are 4 different sizes of countdown timer available Middle size, Small size, Extra small size and Large size. The default value will be Middle Size.

  • Countdown Background Color:?This is the background color of the countdown timer. The default data will be white color #ffffff.
  • Timer Label Color:?This is the font color of labels for hours, minutes, seconds. The default color will be blue #0000ff.
    Countdown margin from top:?This is the margin of the countdown timer from the top of your text message on the content block on maintenance page. The default value will be 5pixels.
  • Countdown margin from left:?This is the margin of the countdown timer from the left of your content block on maintenance page. The default value will be 68pixels.

3.0.3.1 Cron Instructions

This is instruction on how to run your cron function of maintenance tab. There is a button to run cron manually on the left side of module page. You can either click this button to run cron or set an automatic cron on your server following the instructs. The cron URL and how to setup via SSH is given on the below of tabs as shown in the below image ?

3.0.3.1.1 The functionality of Cron Function-

These are the requirements when cron function will activate maintenance mode and disable your shop.

  • The module must be installed properly and enabled.
  • The current timestamp must be either greater or equal to Activation time stamp means the current date is same as activation date or ahead of activation date.
  • Deactivation timestamp must be greater than current time stamp means deactivation date must be ahead of the current date.
  • After all above conditions are true. The following message will print on running the cron –
    Maintenance mode has been enabled successfully.

These are the requirements when Cron function will deactivate maintenance mode and re-enable your shop.

  • The module must be installed properly and enabled.
  • All other conditions above must not be true.
  • The current timestamp must be greater than deactivation time stamp means current date must be ahead of deactivation date.
  • After all above conditions are true. The following message will print on running the cron –
    Maintenance mode has been disabled successfully.

In case both these options are incorrect, you will be shown the following message-

The module is not enabled or Activation/Deactivation date for maintenance has not passed yet.

4.0 Front Office Interface

1. Interface de configurações padrão

2. Without Website Logo

3. The changed Background Color of the content block and countdown timer

4. The maximum opacity of the content block

5. Changed font size and color

6. Changed position of the content block

7. Large Countdown

8. Smaller Countdown

From all of the above images, you can easily make your maintenance page beautiful without making any extra efforts with the help of this module. You can fully customize maintenance page with the Prestashop Maintenance page customizer. So, attract your customers even when your actual shop is disabled.

Gostou disso? Você também vai gostar disso


What are the merits and demerits of using a OpenCart platform?

OpenCart is one of the eCommerce platforms that has gained immense popularity and attention which explains its bright future in the years ahead. Although, eCommerce stores have numerous options to choose from but making the right choice will set your online business in the right direction. You may not consider it as an important part in an eCommerce business scenario but a wrong decision regarding eCommerce platform can do a grave injustice to your store in terms of customer engagement, conversion rates and product sales.

If you are unable to arrive at a proper conclusion regarding the selection of OpenCart platform for eCommerce sites, you need to analyze the pros and cons of this widely used eCommerce platform. Here are some of the merits and demerits of this OpenCart platform which is explained as follows:

Merits of OpenCart

The platform is open source and free

The OpenCart platform is an open source platform which means it can be easily modified and customized as per your business requirements. The store owners can avail the wonderful features and functionalities of this eCommerce platform without even spending a single penny as it is available for free of cost.

It consists of a huge active community of OpenCart developers

Having a problem in an eCommerce platform is a simple routine but it often becomes challenging if that problem remains unresolved. Thanks to the huge experienced community of OpenCart developers and programmers that can provide technical support to OpenCart users round the clock.

No Technical Knowledge is required

Store admin can focus more on their business with OpenCart CMS platform. The store admin with little or no technical background can easily add, manage and edit information on their store built using OpenCart platform

The platform has a vast library of themes and modules

This eCommerce platform has a vast range of themes and OpenCart modules that have the potential to improve the performance of any online store. Apart from the built-in modules, users can also avail the amazing third party OpenCart modules from Knowband store which is packed with numerous features and functionalities.

Multi-store management from a single dashboard

The multi-store compatibility is one of the biggest advantages of OpenCart. Having and managing multiple stores can be very complicated and time consuming. However, there are times when having more than one stores becomes inevitable. OpenCart allows you to build multiple eCommerce store and manage them from a single interface. You can evaluate your current orders, track your customers, sales etc. All of this happens from the same section of the website.

Excellent for beginners, small and medium eCommerce businesses

The OpenCart platform is a feature-packed eCommerce package that offers easy store management services to its eCommerce customers. If you are an eCommerce beginner, has small and medium eCommerce stores, this OpenCart platform is definitely the right choice for your online business.

Demerits of Using OpenCart 

Making customization and changes in OpenCart is difficult

It is actually much difficult to make any desired changes in an OpenCart platform due to the absence of an effective Event system. In fact, events have just been incorporated into the OpenCart 2.0 version and are in the early development phase only. vQmod is another alternative to perform the required changes in an OpenCart platform but it often creates a problem in the core files. This critical task needs the assistance of an effective OpenCart expert only.

It is not ideal for supporting multi lingual customers

The OpenCart platform is not meant for catering multi lingual customers due to the problem which is caused in the interpretations. With this feature, it becomes extremely difficult to target multi lingual customers. If you are having an eCommerce store which has customers all around the world with different languages, you need to find out any other alternative apart from this OpenCart platform.

Not optimized for SEO

OpenCart has miles to go when it comes to SEO. This being one of the most important aspects for the success of eCommerce store may lead to some negative impact in the long run. As per experts, there were flaws with SEO in the OpenCart versions 1.5 to version 2.2, and it’s possible that in OpenCart 3.0 will have the same issues.

Owing to all the merits discussed above, it won’t be wrong to state that OpenCart remains one of the most popular eCommerce solutions. In addition to it, there are OpenCart extensions available that can optimize your site in accordance to the latest technologies and as per the expectation of customers. If you already have an OpenCart store or are planning to have one, then, you should simultaneously start thinking of the optimizing the setup.

OpenCart Extensions that can Boost the Functionality of your Store

Take a look at some of these hand-picked plugins that’ll improve the UI and UX of your OpenCart site.
OpenCart Spin and Win

With so many online options to choose, you make the UI of your site attractive enough to keep your customers hooked. OpenCart Spin and Win extension incorporates a gamified spin the wheel interface in the front-end of the site. This roulette-type popup can be placed anywhere on the site and can even be used as an exit popup. The alluring approach is one of the ways to curb the exit-intent of the customers and compel them to spend some more time on your site. So, if you are looking to earn some credits for the look and feel of your site straight-away, this is the smartest solution for you.
OpenCart Social Loginizer


Starting from the time when the customers enter the site to the moment when they check out, the shopping experience has to be flawless. OpenCart social loginizer plugin is one such option that can incorporate the social login options on your site. The online shoppers are mostly not a fan of lengthy registration processes. The quick login options make the sign up a matter of moment.
OpenCart Search More extension


Moving on to the category pages, making the site navigation easier for the store visitors is another important factor. OpenCart Search More plugin makes navigation easier. The customers can view the suggested products right after they type first several letters in the search box. With easy navigation, you can effortlessly boost the user engagement and the session time.

OpenCart Product Video


Product pages are where the actual sales pitch is offered. Hence, it should be readily designed to offer best possible information to the customer. OpenCart product video plugin allows the admin to display the product video and other related videos on the web page without making any code changes in the site. Provide the real-life feel of the product to the customers and enhance the chances of conversions.

OpenCart One Click Checkout (Buy Now)


OpenCart One Click Checkout (Buy Now) plugin adds a buy now button on the products page. The customers can checkout with a single product without removing the products saved in their cart by clicking on this button. The hassle-free checkout triggers the instant purchase decision of the customers.

OpenCart Review Incentive


The reviews and rating of the product pages are another key factors to motivate the customers to place the order. With the help of OpenCart Review Incentive extension, the store admin can offer incentives to the customers in return of their reviews. This is one of the ways to boost the number of reviews on the product page. Enhance the rating of the products and motivate more and more visitors to the checkout page.

OpenCart One page checkout extension


A complicated checkout process can raise the cart abandoned rate of your site. Simplify the checkout process of your site with OpenCart One page checkout plugin. The single page checkout incorporated by the extension offers social login and guest login options as well. Thus, this is one of the ways to optimize the conversion funnel of your site.

OpenCart Price Alert


A high-priced product shouldn’t mean a lost customer. Motivate the store visitors to return back to the site who abandoned the cart because of the product costing with OpenCart Price Alert extension. The OpenCart extension allows the store visitors to subscribe for an alert whenever there is a change in the product. The store admin can send reminders regarding the change in the product pricing. With the automated approach, you can motivate the customers to return back and place the order of the product that they left.

OpenCart Mobile App Builder


The customers these days prefer using mobile apps over the shopping sites. It is high time for the store owners to take a step ahead and stay abreast of the trends and technological advancement. OpenCart Android/iOS Mobile App Builder extensions can help you create a fully-functional mobile store at a few button clicks. The OpenCart store owners can now go mobile and tap a larger audience base with great ease.

OpenCart Multi vendor marketplace plugin

If you already own a eCommerce store based on OpenCart, then, you can even have a marketplace like eBay, Etsy and others. There are no code changes required for it. OpenCart marketplace extension can enable the multi-seller feature in your site without making any changes in the basic code of the site. Along with upgrading the site into a marketplace, the OpenCart multi seller marketplace module even makes the management effortless. The third-party sellers and their products as well as sales can be tracked and managed from a single interface. Not just this, even the vendors get an easy option to manage their shop from the dashboard itself. The profile, product and sales management are done from a single interface. In return of the rented space, the store admin can charge commission from the sellers. This commission is fixed at a button click. The fixed or percentage amount is automatically deducted from the vendors’ revenue.

It is important to have a clear view of all the possibilities and limitations of an eCommerce platform so that you don’t have to regret your choice later on. Don’t make wild guesses while selecting an eCommerce platform for your online store but analyze this eCommerce platform for the right decision. Understand the current eCommerce business scenario and go for this OpenCart platform without any second thought.

This Would Also Interest You: