
1. The First step would be to get the Apple Merchant Id.
a) Login to your Apple Developer Account.
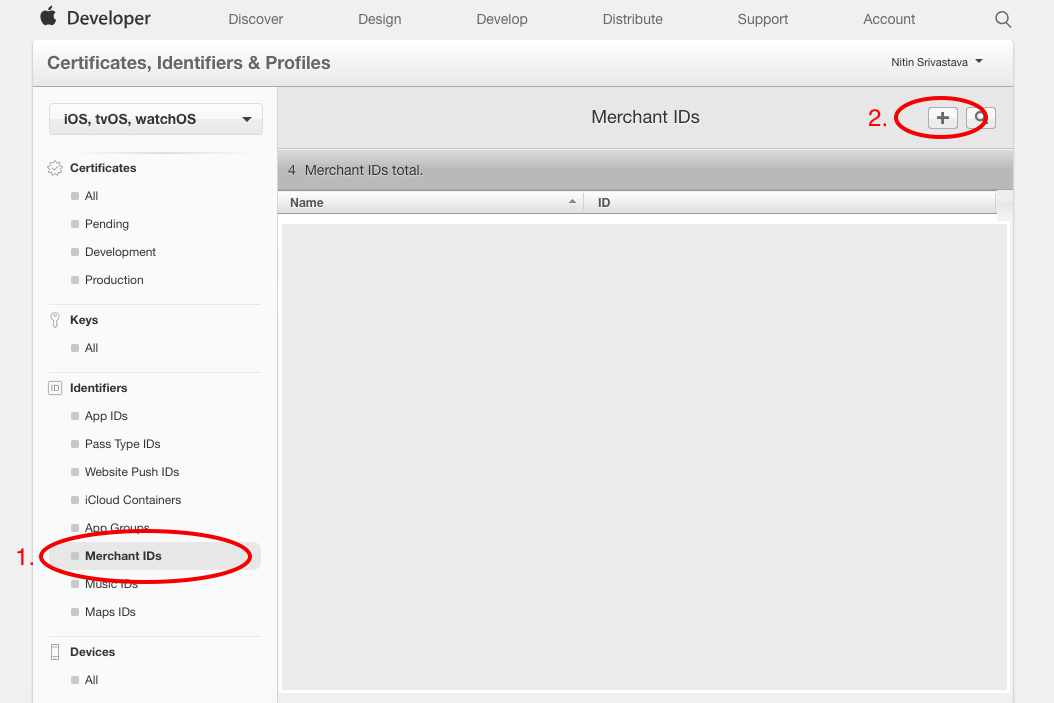
b) Go to “Certificates, Identifiers & Profiles”. Choose iOS, tvOS, and watchOS from the Navigation menu on the left.
- Select the Merchant Id section in the same left menu.
- Click on the “+” button.
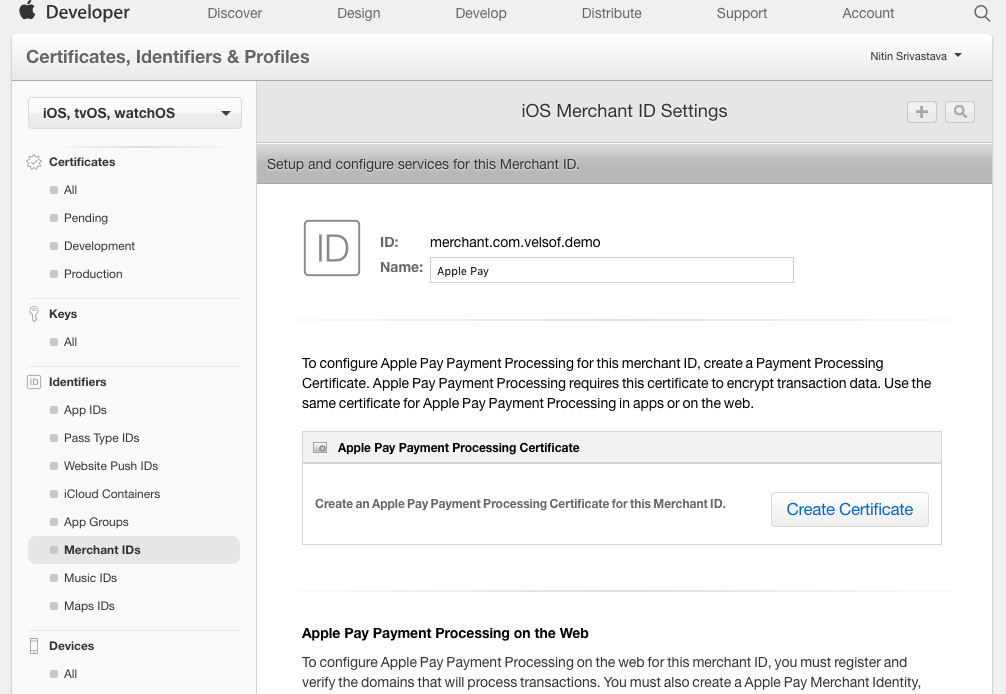
c) A new tab will open. Add Merchant Id description and a Unique Identifier and continue until the same is added. Save the Merchant Id you created.

2. Payment Processing Certificate:
a) Tap on the merchant ID that you created earlier. A tab will open up, and select the “Edit” option.
b) A new tab will open. Tap on Create Certificate.
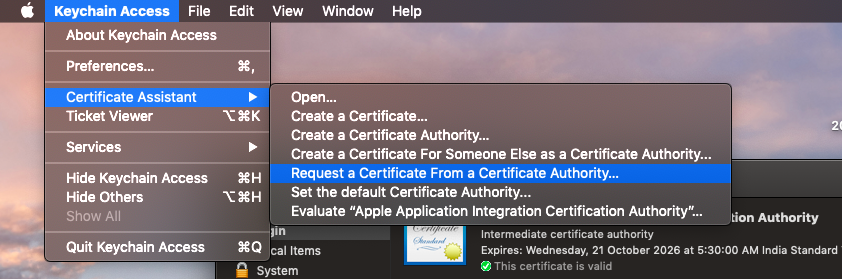
c) Open Keychain Access on your Mac using “cmd + Space”.
d) Request a new certificate from the authority.
e) Fill in the Email and Common Name fields. Check “Save to disk” and “Let me specify Key Pair Information”. Click continue.

f) Select Algorithm to “ECC” and Key Size to “256 bits”. Click Continue.
g) Continue with step 2. Upload the certificate that you have created.
h) After the upload is complete, please download the Apple-generated certificate.

Recommended Read: How to fetch data from Firebase in Swift Language (iOS)?
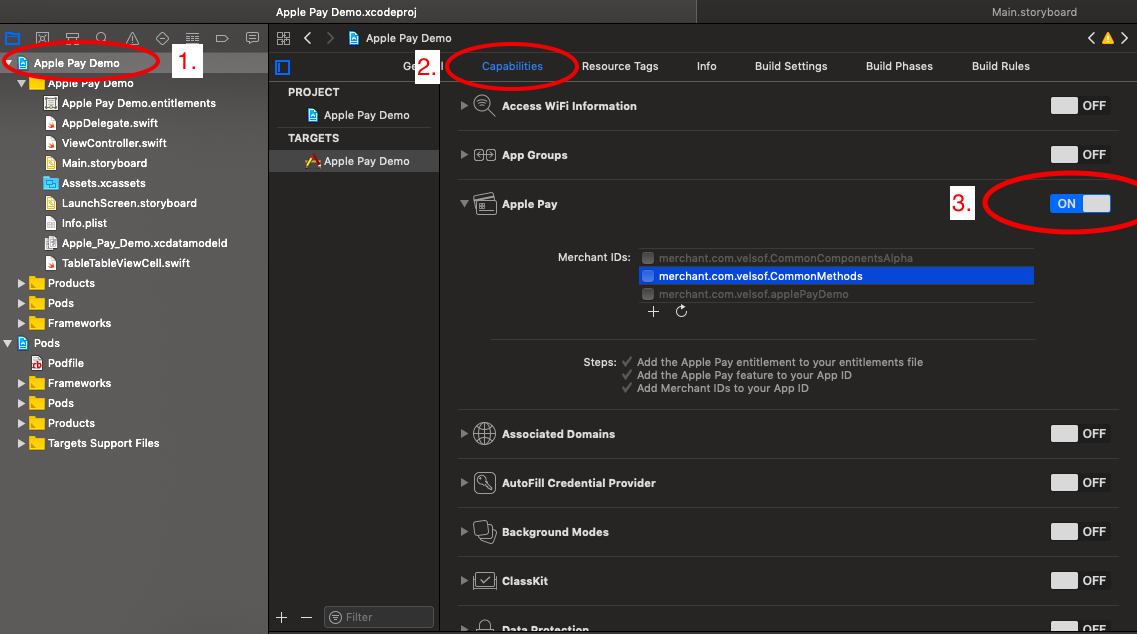
3. Configure Apple Pay :
a) Setup Apple pay in the Xcode project.
4. Add the below line into the podfile and install pods.
# Pods for Apple Pay Demo
pod ‘Stripe/ApplePay’
5. After pod installation, make sure that you are using “project. xcworkspace”.
Note: Please don’t use “project.xcodeproj”
6. Add the below code at the top of your Controller class to import pod libraries. There are chances that you don’t find these SDKs in the suggestion. Don’t worry it will take some time. Or you can type the code manually.
import Stripe
import PassKit
7. Extend your view controller class with the “PKPaymentAuthorizationViewControllerDelegate” class.
class ViewController: UIViewController, PKPaymentAuthorizationViewControllerDelegate
8. Add the below code in your controller class.
var paymentRequest: PKPaymentRequest!
var transactionId = “”
var status = “”
var amount = 100/**
* This function is called on tap of the ApplePay Payment option on Payment Page.* **Author:** Asharma
* **Date:** 01-Oct-2018
*/
func setupApplePay()
{
paymentRequest = PKPaymentRequest()
paymentRequest.currencyCode = “USD”
paymentRequest.countryCode = “US”
paymentRequest.merchantIdentifier = “Your Merchant Id”// Payment networks array
let paymentNetworks = [PKPaymentNetwork.amex, .visa, .masterCard, .discover]
if PKPaymentAuthorizationViewController.canMakePayments(usingNetworks: paymentNetworks)
{
paymentRequest.supportedNetworks = paymentNetworks
paymentRequest.merchantCapabilities = .capability3DSlet item = PKPaymentSummaryItem(label: “Order Total”, amount: NSDecimalNumber(string: “\(amount)”))
paymentRequest.paymentSummaryItems = [item]
let applePayVC = PKPaymentAuthorizationViewController(paymentRequest: paymentRequest)
applePayVC.delegate = self
self.present(applePayVC, animated: true, completion: nil)
}
else
{
// Notify the user that he/she needs to set up Apple Pay on the device
// Below code calls a common function to display an alert message. You can either create an alert or can just print something on console.
CommonMethods.displayAlert(message: “Apple Pay is not available on this device.”, viewController: self)
print(“Apple Pay is not available on this device”)
}
}/**
* This function is called when Apple Pay payment will be authorized.* **Author:** Asharma
* **Date:** 01-Oct-2018
*/
func paymentAuthorizationViewController(_ controller: PKPaymentAuthorizationViewController, didAuthorizePayment payment: PKPayment, completion: @escaping (PKPaymentAuthorizationStatus) -> Void){
// Payment token can be found like this
print(payment.token)
// Get response from the server and set the PKPaymentAuthorizationStatus
let status = PKPaymentAuthorizationStatus(rawValue: 0)!self.transactionId = payment.token.transactionIdentifier
switch status.rawValue {
case 0:
self.status = “approved”
// perform Functionality on Apple Pay Successfull Payment
default:
self.status = “failed”
}}
/**
* This function is called when Apple Pay payment authorization is finished.* **Author:** Asharma
* **Date:** 01-Oct-2018
*/
func paymentAuthorizationViewControllerDidFinish(_ controller: PKPaymentAuthorizationViewController){
self.dismiss(animated: true, completion: nil)
}

9. You can call the function setup apple pay() whenever you want to start an Apple Pay transaction. Either you can call the same function in viewDidLoad() or you can call this function with the tap of a button.
Example: In the case of a button tap, you need to add a button in UI, and draw the IBAction of the button. IBAction is a function that will be called on a tap of the button from which is referenced. In this action, you can call this function.
@IBAction func onTapBtnPay(_ sender: Any) {
setupApplePay()}
Recommended Read: PayU Integration in iOS using Swift
Apple Pay Sandbox Testing
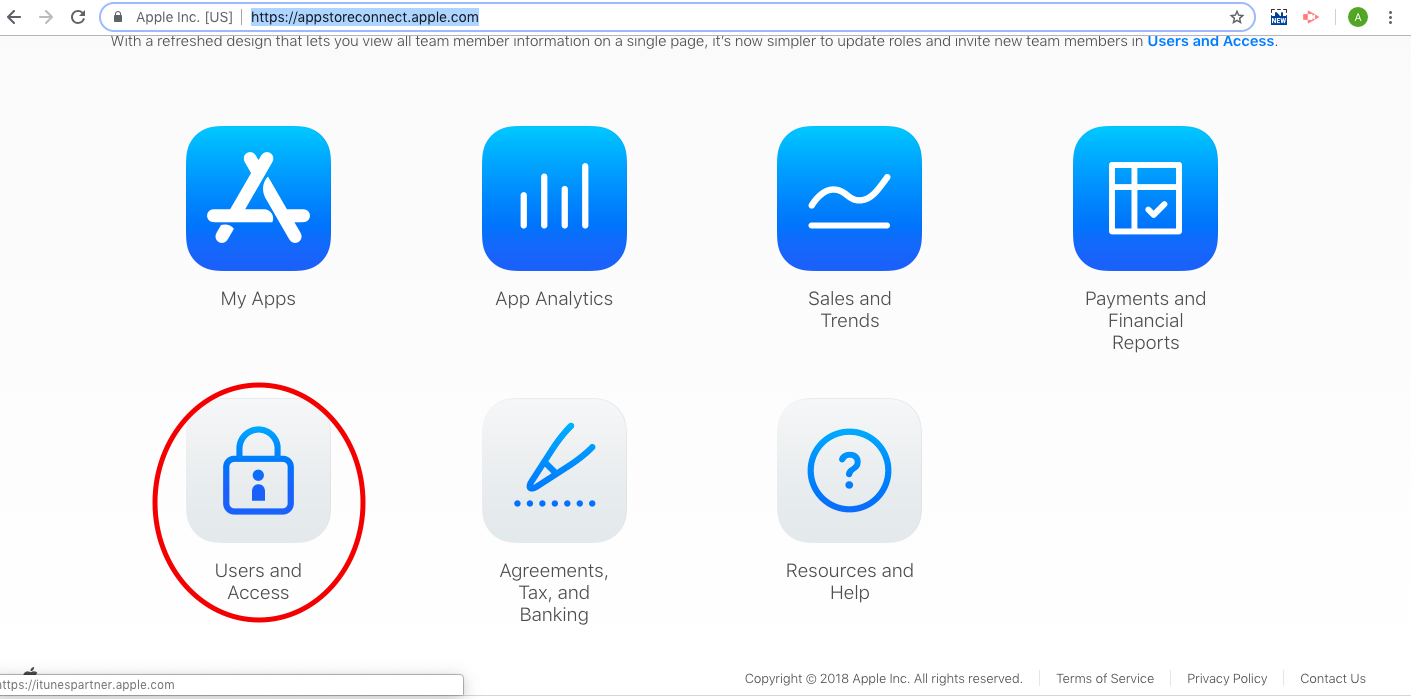
1. Create a Sandbox Tester Account.
a) Login to https://appstoreconnect.apple.com/
b) Select Users and Access.
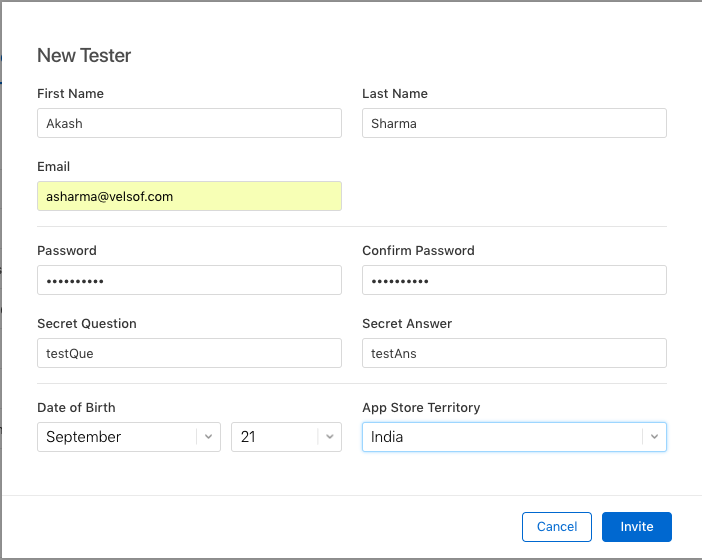
c) Go to the testers section in the left navigation menu. Then click on the “+” button.

d) A popup will appear. Please fill out that form.
Note: Please use mail that is not registered with Apple.
f) Sign out of your Apple ID on all testing devices and sign back in with your new sandbox tester account.
2. Adding a test card number :
a) Make sure you have logged out from iCloud and iTunes.
b) Sign into your test device using the sandbox tester account you created.
c) Add a sandbox card.
Example :
FPAN: 4761 1200 1000 0492
Expiration Date: 11/2022
CVV: 533
You can find more cards here.
Note: The issue you might face is that the card will not be added. It will show some errors. Possible resolution maybe – you might have not logged out of the device completely. Please log out from iCloud and iTunes.
d) After adding the card, you can proceed with the Apple Pay transaction.
Wrap UP
Create your eCommerce mobile app with Knowband’s mobile app builder and integrate PayU just by following these simple steps. You can develop and publish a pair of entirely native Android and iOS apps for your eCommerce website with KnowBand’s eCommerce Mobile App Builder.
With the aid of our feature-rich eCommerce Mobile App Builder solution, you can start selling on mobile devices and attract customers from all over the world to your store. Knowband is a well-known brand that creates eCommerce mobile apps. Our main objective is to create robust yet user-friendly eCommerce mobile apps that may provide any eCommerce business with a competitive edge. You can create a user-friendly environment and make it easier for e-merchants to reach their customer base using Knowband’s eCommerce Mobile App Builder.

