
Step1: Setup Instructions for Repositories in SVN
Goto Redmine > Administration > Settings > Repositories and make sure the settings are as shown below:
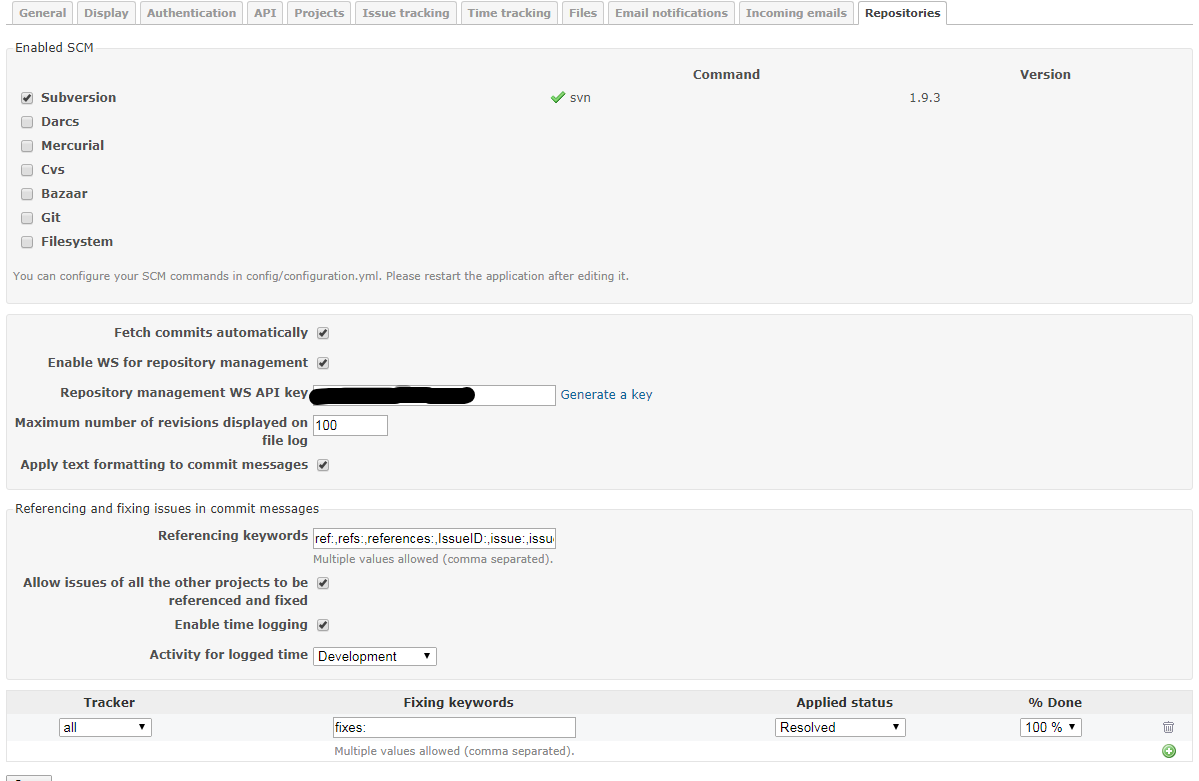
Fetch commits automatically
When you enable this option the applicatiojn automatically starts retrieving the revisions when the user tries to access the repository page
Default value is: Yes
You can disable this option and automate the call to Repository#fetch_changesets using cron to regularly retrieve the revisions for all of the repositories in the background.
For Velocity: We have not disabled it and at the same time put up an automatic fetch whenever a new commit is made. To know how the same has bene done, please read further.
Example:
ruby script/runner “Repository.fetch_changesets” -e production
For Redmine 2.x:
ruby script/rails runner “Repository.fetch_changesets” -e production
For Redmine 3.x:
bin/rails runner “Repository.fetch_changesets” -e production
You can setup the automatic call from post-commit (for SVN) and post-receive (for GIT) hook and make the changesets being fetched after each commit. Please note that running the above statement would fetch details for each reporsitory added in any project in Redmine so in case you have large number of such repositories added in the projects then it becomes a time consuming process. For me it was around 10 seconds for 1 repository. I have more than 100 repositoties for various projects so unnecessarily waiting for each fetch everytime a commit is made in any repo does not make sense
You can fetch all the repositories via browser using the following URL:
To fetch only one repository via browser use the following URL: (Fetching only the repository for which the commit was made is far more efficient and less time consuming.
Project identifier can either be the number of the project, e.g. id=1 or the identifier name that you gave the project, e.g., id=mobileapp
Example: https://www.myredmineurl.com/sys/fetch_changesets?id=mypid&&key=djdj57FGDJmkj67
Read more about post-commit scripts: https://www.redmine.org/projects/redmine/wiki/HowTo_setup_automatic_refresh_of_repositories_in_Redmine_on_commit
Enable WS for repository management
This option should be activated only if you installed the script for automatic SVN repository creation. Default: No. But in order to autofetch each repository on commit, please enable this even if you do not want to create SVN repo automatically.
Repository management WS API key
A secret key for repository management WS. This will be used in fetching each repository secretly.
Maximum number of revisions displayed on file log
It provides a way to limit the amount of revisions which are retrieved from the SCM for a certain, browsed path.
Referencing issues in commit messages
When fetched from the repositories, commit messages are scanned for referenced or fixed issue IDs.
These options lets you define keywords that can be used in commit message to reference or fix issues automatically, and the status to apply to fixed issues.
Default keywords are:
- for referencing issues: refs:, references:, IssueID: (capital and small matters)
- for fixing issues: fixes:, closes:
There’s no default status defined for fixed issue. You’ll have to specify it if you want to enable auto closure of issues.
If you want to reference issues without using keywords, enter a single star: * in the Referencing keywords (Administration/Repository) setting. In this case, any issue ID found in the message will be linked to the changeset.
Example of a working commit message using default keywords:
This commit refs #1, #2 and fixes #3This message would reference issues 1 and 2 and automatically fix issue 3.
After a keyword issue IDs can be separated with a space, a comma or &.
The keywords are caseinsensitive and at least one blankspace or colon is needed between the keyword and the first hash to produce
a match. More examples that will produce the same result as the example above:
This commit refs:#1, #2 and fixes #3
This commit Refs  #1, #2 and fixes #3
This commit REFS: #1, #2 and fixes #3
Enable time logging
Allows time logging directly from commit messages. This only makes sense if you activated the “Time tracking” module in said project. In this case, you can add special words in your commit message to indicate the time you spent on an issue.
The basic syntax for doing that is : @<time>, where time consists in a number of hours or minutes.
Here’s a list of many valid commit messages that would work if you want to say you spent N hours on issue 1234:
Implement feature #1234 @2

Implement feature #1234 @2h
Implement feature #1234 @2hours
Implement feature #1234 @15m
Implement feature #1234 @15min
Implement feature #1234 @3h15
Implement feature #1234 @3h15m
Implement feature #1234 @3:15
Implement feature #1234 @3.25
Implement feature #1234 @3.25h
Implement feature #1234 @3,25
Implement feature #1234 @3,25h
Activity for logged time
This is the type of activity that should be used when detecting there’s a log time in a commit message (see above).
Step2: Making changes in the Project
2. Ensure that you are able to commit and update the Project Repository which you intend to access from the server where Redmine is installed.
For Velocity: For Velocity there is a generic user: velsofsvn which is added to all the repositories and this is the user used on Redmine server to refresh the repository listings when commits happen. So check if this user has access to the repository being setup for auto closure of issues via SVN. In case facing issues with access check if the IP restrictions are there in the repository on Assembla/SVN host.
2. Goto your Project as a system admin and there goto Settings > Modules. Enable Repository Module.
3. Fill in the below shown form in the Repository module for that project:
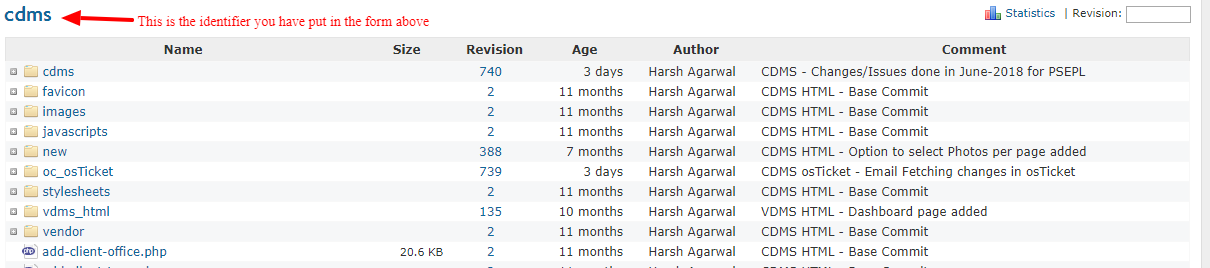
Identifier: Any name you wish
URL: URL of the Assembla repository. Example: https://subversion.assembla.com/svn/protocol.cdms/trunk
Login: Username which has access to the above repository. For Velocity: velsofsvn
Password: Password which has access to the above repository. For Velocity: Password here: https://docs.google.com/spreadsheets/d/1DuvyfZgCx125Mv04mhCgXqrOcTW7BQPtSGPbvO9pu-g/
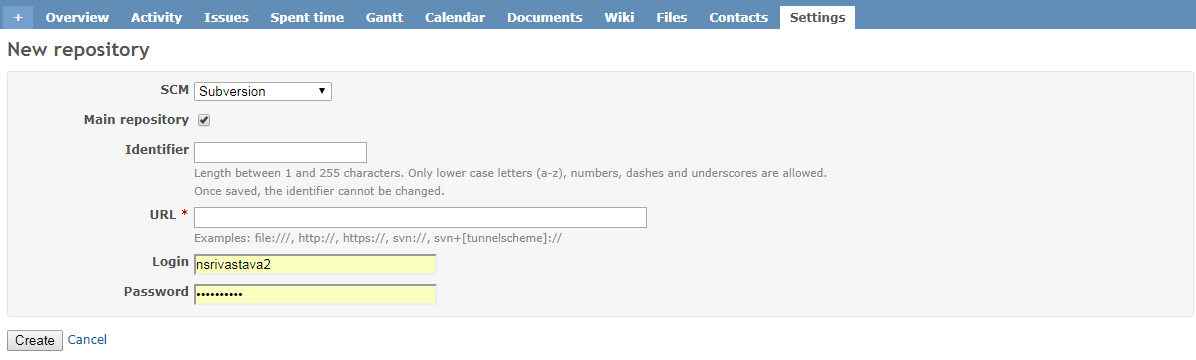
4. Once you have completed Step #3, the Repository will start showing like the way shown below:
Step3: Making changes in Assembla SVN
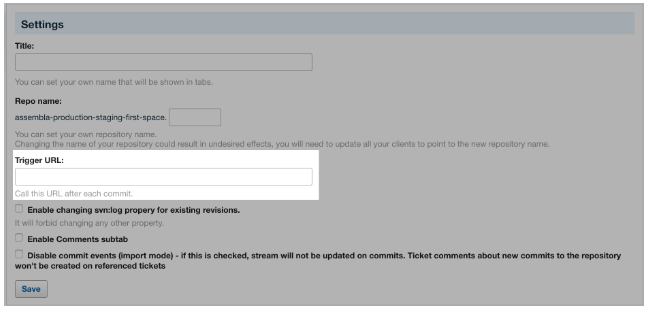
5. To access to this page, you must be an owner or a member with ALL permissions (learn more about roles and permissions). To get here, go to your Assembla SVN repository > Settings > General Settings.
Trigger URL:
This feature calls a specific URL after each commit. Our server sends a request to the remote service specified in the URL. The result will depend on what a user sets this service to do under this specific URL. GET URL after each commit can be used to trigger a build for example.
Here in Trigger URL you have to put in the url dicussed above for Auto Fetching a particular Repository:
Example: https://www.myredmineurl.com/sys/fetch_changesets?id=mypid&&key=djdj57FGDJmkj67
That is it. You should be up and running.

