Elevate your online store with the WooCommerce VideoMate Plugin—a powerful, all-in-one solution designed to seamlessly integrate eye-catching video content throughout your e-commerce experience. Whether you want to enhance product pages, create immersive landing sections, or boost buyer engagement, this Video Manager for WooCommerce helps you tell your brand story in the most captivating way. From increasing dwell time to converting views into sales, it’s the ultimate plugin for visual-driven growth.
You can easily showcase promotional clips, product tutorials, reviews, or user-generated content. Add videos to any part of your site—homepages, product listings, or category pages—without compromising your theme or layout. The plugin’s intuitive interface gives you full control over video placement and presentation, helping you align visuals perfectly with your branding strategy.
Moreover, this WooCommerce Video Manager plugin supports popular formats like Instagram reels, YouTube shorts, and TikTok clips, making it simple to upload downloaded trending social media video content that resonates with today’s shoppers. With built-in upload validation, your files are checked for compatibility and size before processing, ensuring smoother performance and a hassle-free experience. Best of all, everything is managed directly from your WordPress dashboard—no coding is needed.
In short, whether you’re running product launches, educational campaigns, or testimonial-driven marketing, the WooCommerce product video Manager extension makes it easy to turn video content into a sales-driving force. Fully responsive and customizable, it’s the perfect tool to craft a visually rich shopping journey that not only grabs attention but keeps customers coming back. Let your videos do the talking and elevate your brand with one smart plugin.
1.0 Transform Your Store with Dynamic, Customizable Video Features
Transform Your WooCommerce Store with Dynamic Video Content: Start by energising your storefront with the WooCommerce VideoMate Plugin—a powerful video manager for integrating engaging, conversion-ready video content. Moreover, this all-in-one WooCommerce video plugin helps present products, share brand stories, and drive sales with ease.
Streamlined Video Uploads and Management: Upload and organize reels, clips, and video assets directly from your WordPress dashboard. The built-in video uploader WooCommerce Plugin offers simple, drag-and-drop management with no technical skills required.
Strategic Placement Across Store Pages: Map videos to specific product pages, categories or home pages. Whether using the WooCommerce product video Extension, you can tailor content placement for maximum visibility.
Responsive, Interactive Displays: After that, showcase content using the WooCommerce video carousel Extension or the sleek WooCommerce floating video widget Plugin. These responsive elements make it easy to highlight tutorials, promos, or featured products in an engaging layout.
Full Customisation and Mobile Optimisation: Moreover, customise autoplay, headers, video counts, and layout styles to match your store’s branding. The entire WooCommerce VideoMate Extension is mobile-optimised and built to deliver a smooth, consistent experience on all devices.
Make Your Homepage Work Harder: In addition, grab attention from the start with the WooCommerce homepage video Extension. Use it to introduce your brand, showcase promos, and product reviews or tell your story right on your storefront’s first impression.
Bring in Social Proof with Ease: Further, integrate trending formats like reels and shorts using the WooCommerce Instagram Video Manager Plugin or embed content from platforms like TikTok and Twitter. Boost credibility with real-time customer engagement without redirecting visitors offsite.
Centralised Admin Control: Lastly, streamline your workflow with one unified dashboard. Whether you’re adjusting a single clip or managing a full library, the WooCommerce Video Manager Plugin simplifies your video strategy
2.0 Installation Guide for WooCommerce VideoMate Plugin
Step 1: Download the Plugin
After purchase completion, download the wcvideomate.zip file, which contains the complete video manager plugin for WooCommerce.
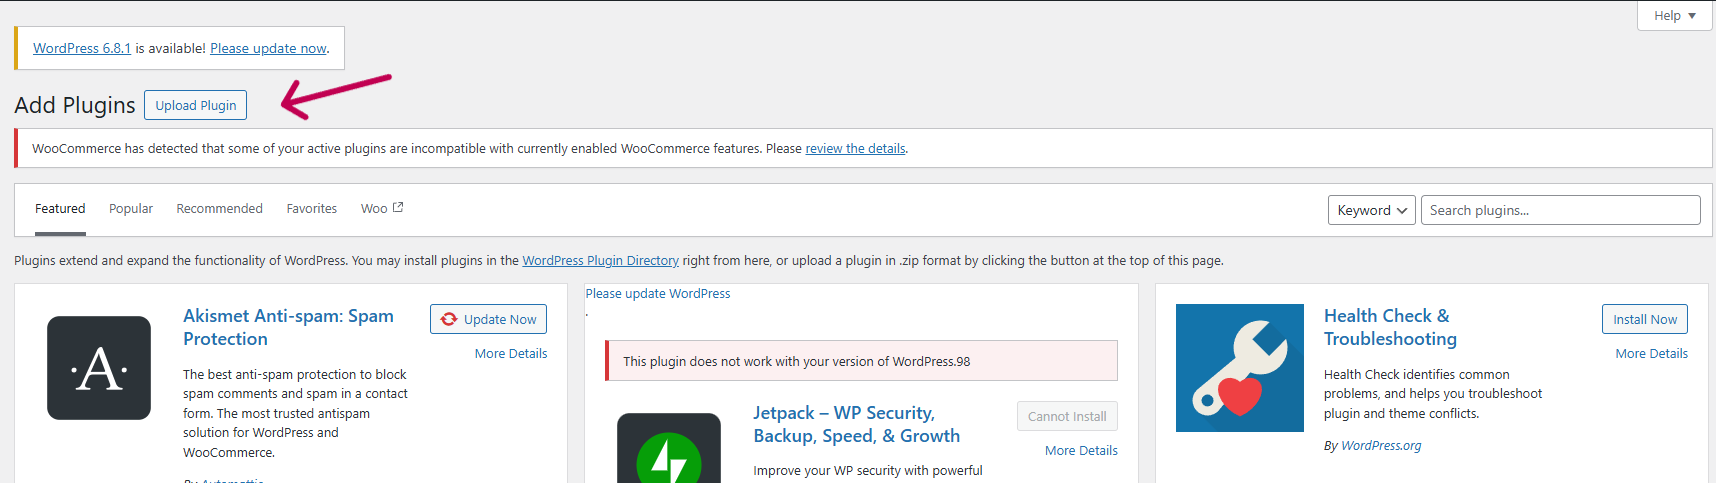
Step 2: Upload via WordPress Plugin Installer
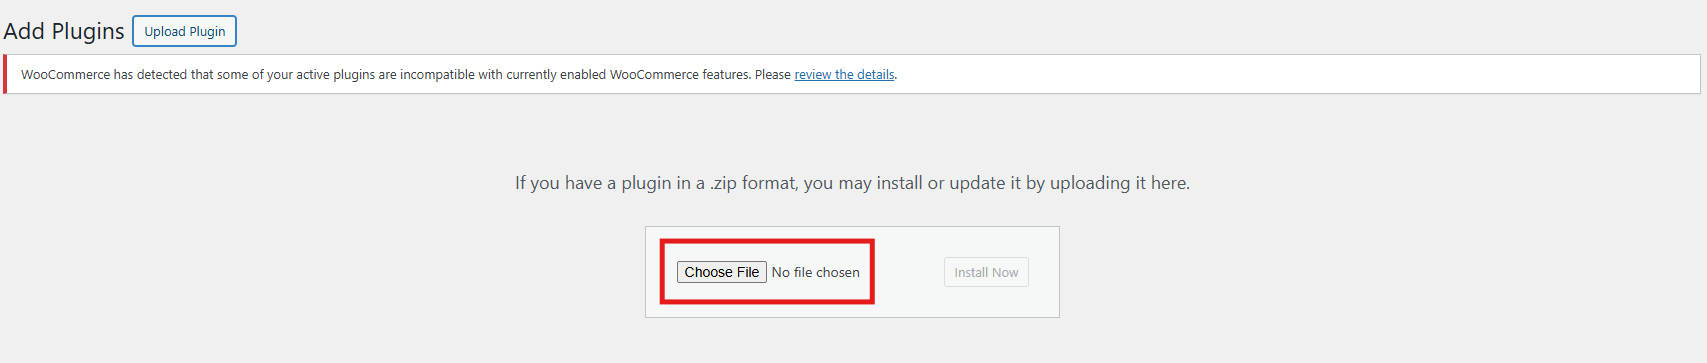
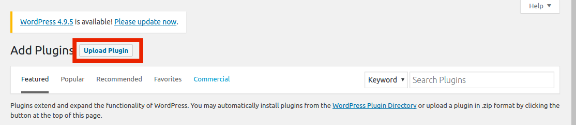
Click on “Upload Plugin” and select the wcvideomate.zip file from your device.
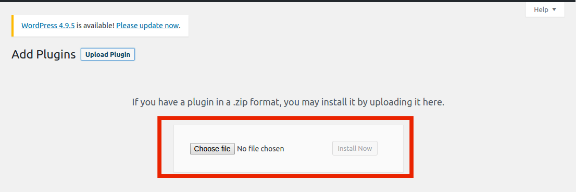
Upload the zipped file and click “Install Now” to begin the installation process.
After the installation is complete, click “Activate Plugin” to start using it on your WooCommerce store.
Step 3: Access the Plugin
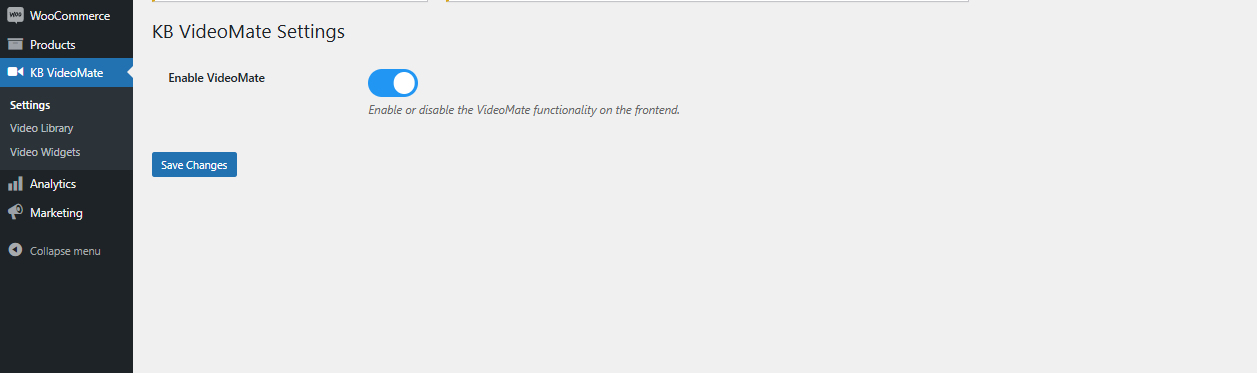
Navigate to WooCommerce > VideoMate in your WordPress admin dashboard to begin configuration.
Enable/Disable Plugin: Easily turn the WooCommerce video plugin on or off with a single toggle—no complicated setup needed.
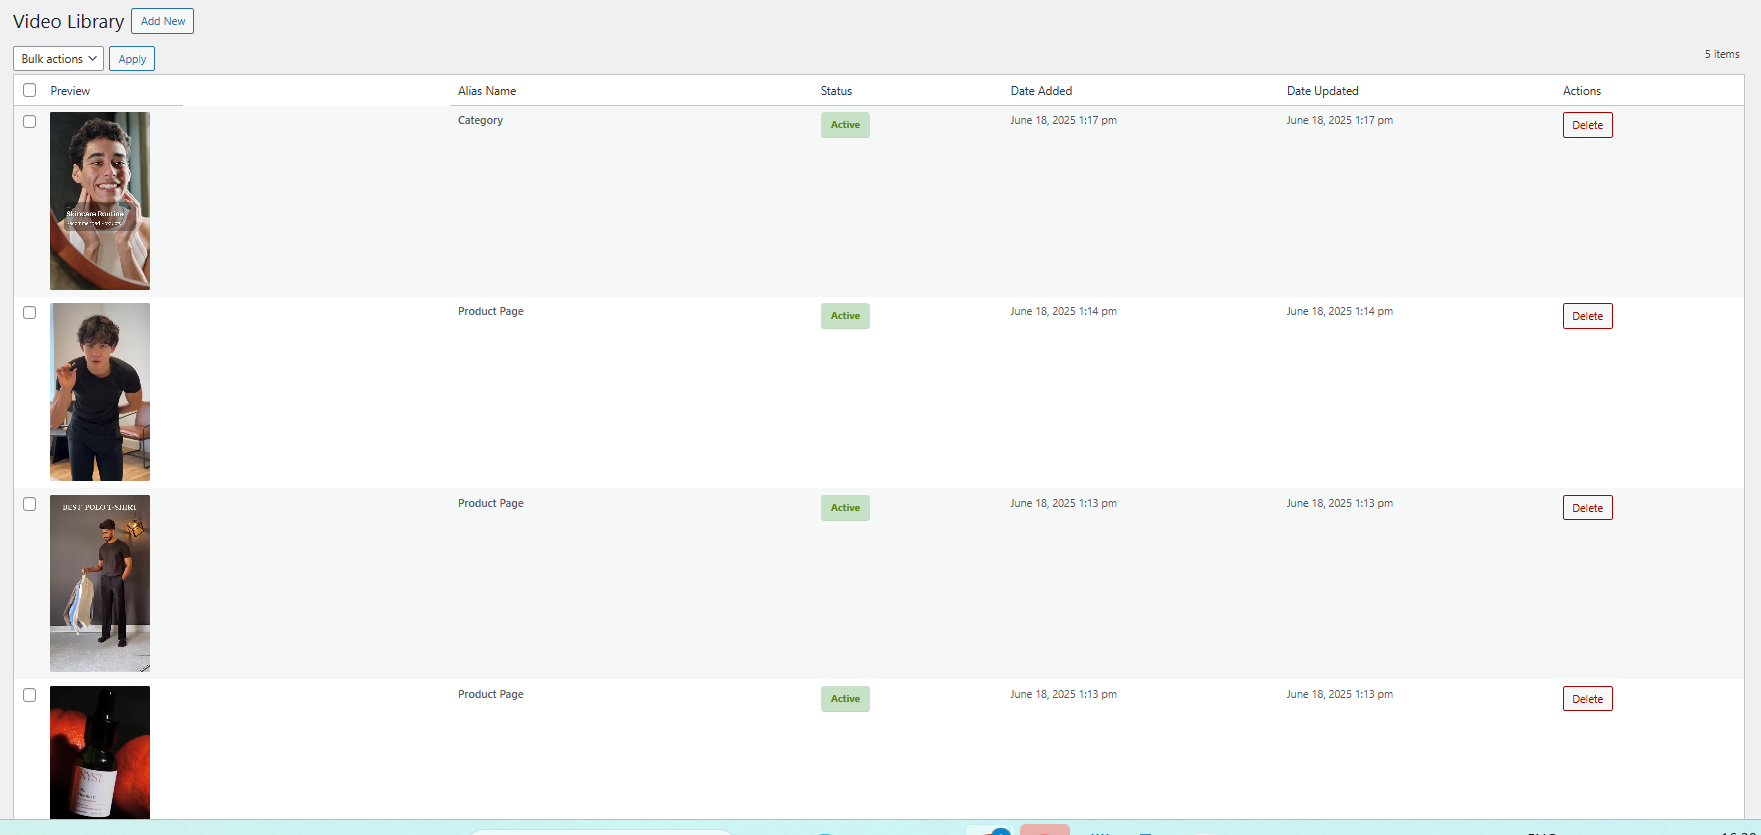
3.2 Video Library Management
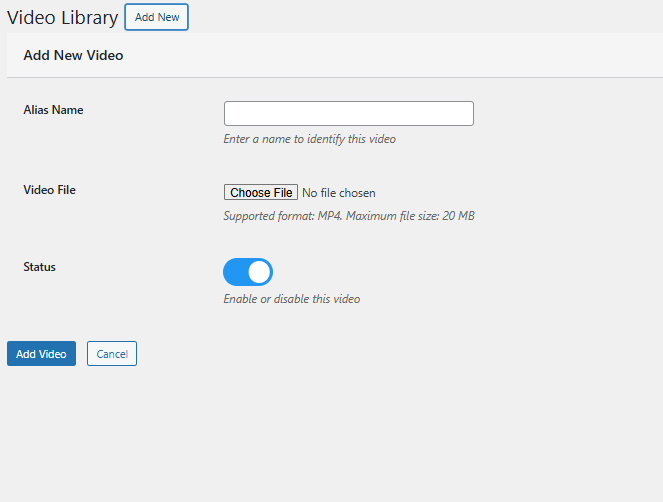
Add New Video: Upload files and assign descriptive names. Furthermore, store administrators can preview videos before configuring widgets using the WooCommerce Video Integration Plugin.
Alias Name: Add the alias name corresponding to the video for identification.
Status Management: Effortlessly enable or disable any video, reel, or clip within the Video Library using the edit option.
Upload: Seamlessly upload saved Instagram or TikTok reels and clips to showcase them on your store using the Social Media Video Plugin for WooCommerce.
Content Removal: Delete any videos you no longer require with a single click—quick and efficient.
3.3 Video Widget Configuration
Widget Title: Set a custom title for your video widget to align with your store’s theme and engage your visitors effectively.
For example, use titles like “Customer Favourites”, “Product Showcases”, or “Tutorial Videos” to guide your customers and create a more personalised experience.
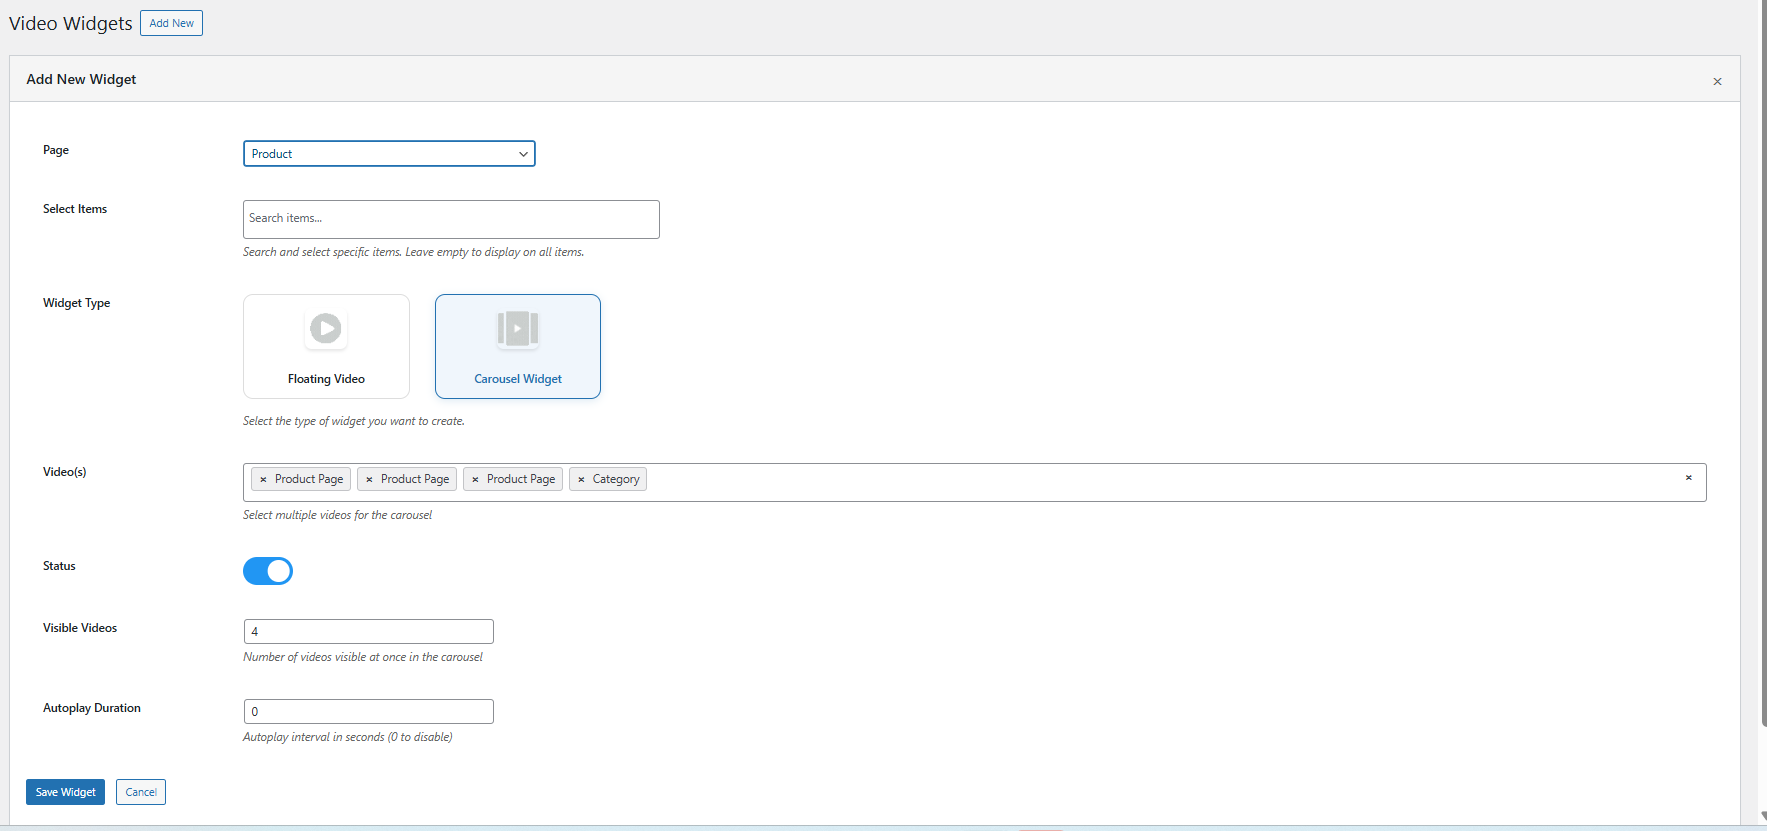
Create a New Widget: Easily configure a new video widget to showcase content on product pages, category listings, or the homepage.
Select Page Type: Choose where the widget will appear—whether on the homepage, specific product pages, or category sections.
Map to Products or Categories: Assign your videos or clips to selected products or categories for targeted and relevant video placement.
Widget Type: Select either a carousel or a floating video widget, depending on your store’s layout, customer browsing habits, or visual design preferences.
Carousel Display: Create engaging multi-video sliders effortlessly with the WooCommerce Video Manager Extension. Use the video carousel feature to showcase several videos in a sleek, scrollable layout. Simply choose the clips you want to feature—ideal for promoting products, highlighting offers, or sharing brand stories in a single interactive view.
Floating: Add a floating widgets for video via the WooCommerce floating video widget extension.
Autoplay Configuration: Adjust how long each video plays automatically by setting a specific timer value in seconds for every widget. This feature ensures videos begin automatically after a specified delay, helping to capture attention without user interaction.
Display Positioning: Customize the exact placement of your floating video to align perfectly with your store’s layout and visual design.
Maximum Video Limit: Limit the video count in the carousel to keep your storefront organized and visually appealing.
Widget Visibility Control: Effortlessly enable or disable individual widgets with a simple toggle. This flexibility is ideal for seasonal campaigns, limited-time offers, or experimenting with different layouts
4.0 Benefits of Using WooCommerce VideoMate Plugin
Keep Customer Hooked with Engaging Videos
To begin with, using video through the WooCommerce product video Extension or product video WooCommerce Extension encourages shoppers to stay longer, explore deeper, and make better-informed buying decisions. As a result, it enhances user experience and reduces bounce rates significantly.
Turn Views into Sales with Video Conversions
Additionally, the WooCommerce VideoMate Plugin is a powerful solution for implementing effective video marketing on WooCommerce stores. By demonstrating product value through in-store video content, you can create emotional connections, build trust, and ultimately drive higher conversion rates.
Place Videos Where They Convert Best
In addition, with the WooCommerce Video Manager Plugin, you can position content exactly where it matters most. Whether it’s on your homepage, product pages or in collections via the WooCommerce video Plugin, your videos remain both strategic and impactful. Plus, display content elegantly using the WooCommerce video carousel Extension for an engaging visual layout.
Plug in Social Proof with TikTok & Reels
Furthermore, enhance your storefront with dynamic, real-time video content using the WooCommerce VideoMate Extension. Easily upload trending TikTok videos and embed clips using the Instagram video on WooCommerce Plugin. Moreover, this is perfect for influencer campaigns, customer testimonials, and user-generated content.
Manage Videos with Ease—No Code Needed
With the intuitive design of the WooCommerce Video Manager Plugin, you can add videos to WooCommerce Plugin-based stores without touching a single line of code. With plugins like the video uploader WooCommerce Plugin by KnowBand, managing your media becomes quick, centralized, and seamless
5.0 Support & Assistance
If you face any issues during installation or while using the plugin, feel free to reach out to our support team:
The Knowband WooCommerce Google Tag Manager Plugin is a robust solution that streamlines the integration of Google Tag Manager (GTM) with your WooCommerce store. Designed with ease of use in mind, this plugin allows store owners to effortlessly implement and manage various Google tags—no technical knowledge is required.
Moreover, with the WooCommerce GTM Plugin, you can accurately track key customer interactions, including product views, category views, add-to-cart and remove-from-cart actions, checkout steps, payment processes, shipping details, and order confirmations. As a result, these insights help you better understand customer behaviour and optimize the user journey.
In addition, the Google Tag Manager for WooCommerce also captures UTM parameters, giving you a clearer picture of how your marketing campaigns are performing. By doing so, it allows store owners to identify which campaigns generate the most traffic and conversions. Consequently, this enables smarter budget allocation and an improved return on investment (ROI).
Ultimately, this plugin is ideal for businesses aiming to enhance their analytics, boost conversions, and elevate the overall shopping experience. The Knowband WooCommerce Google Tag Manager Extension supports Google Analytics, GA4, and other Google marketing tools—thereby empowering data-driven decision-making with precision and ease
Key Features of WooCommerce Google Tag Manager Plugin
Effortless Google Tag Manager Integration Knowband’s WooCommerce Google Marketing Integration user-friendly integration tool makes it easy to connect Google Analytics 4 to your WooCommerce store with no technical skills or coding experience needed.
Moreover, this plugin allows the store admins to track key e-commerce metrics like product views, add-to-cart events, purchases, and more in real-time. Make data-driven decisions to boost conversions and grow your business, all from an intuitive dashboard.
Real-Time Event Tracking for Actionable Insights WooCommerce Google Marketing Integration Plugin allows store owners to track critical customer interactions as they happen, including product views, add-to-cart actions, checkout steps, coupon usage, and selected payment and shipping methods, giving you immediate visibility into user behaviour.
Campaign Tracking with UTM Parameter Support Furthermore, Custom Event Tracking WooCommerce Plugin automatically capture UTM parameters to evaluate your marketing campaign performance and identify the channels driving the highest traffic and conversions.
Enhanced eCommerce Tracking for Smarter Decisions GTM WooCommerce Plugin allows the store owners to gain deeper insights into your store’s performance with advanced tracking of product engagement, cart activity, and completed purchases—perfect for data-driven strategy optimization.
Fast and Simple Setup – No Technical Knowledge Needed The WooCommerce Google Event Tracker Plugin features an intuitive interface that enables a smooth, hassle-free setup—allowing users to manage tracking tags effortlessly, with no coding required.
Powerful Admin Dashboard for Complete Control Moreover, you can manage all your tracking tags and events directly from your WooCommerce admin panel using a streamlined and user-friendly dashboard.
Multi-Language Compatibility for Global Reach Knowband’s WooCommerce Google Analytics Integration is designed for international stores, the extension supports multiple languages to help you deliver a consistent, localized shopping experience across different regions.
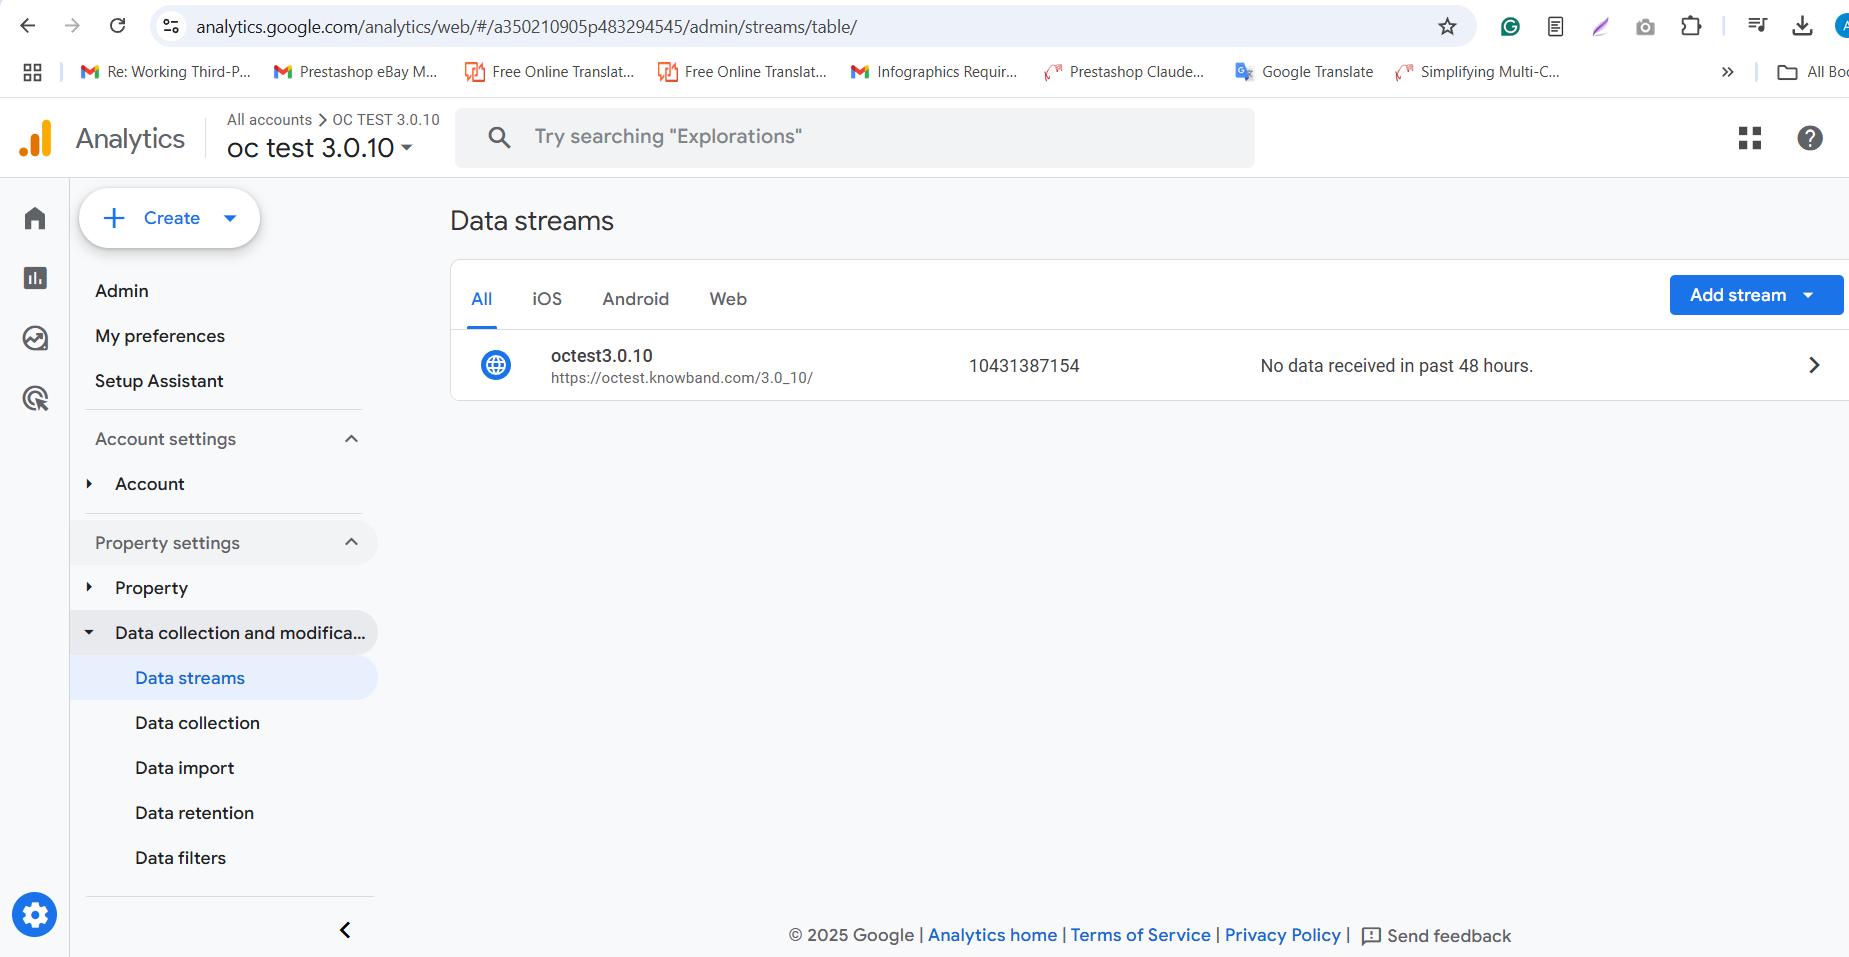
2.1 Steps to Get the Google Tag Manager ID and Google Analytics Measurement ID
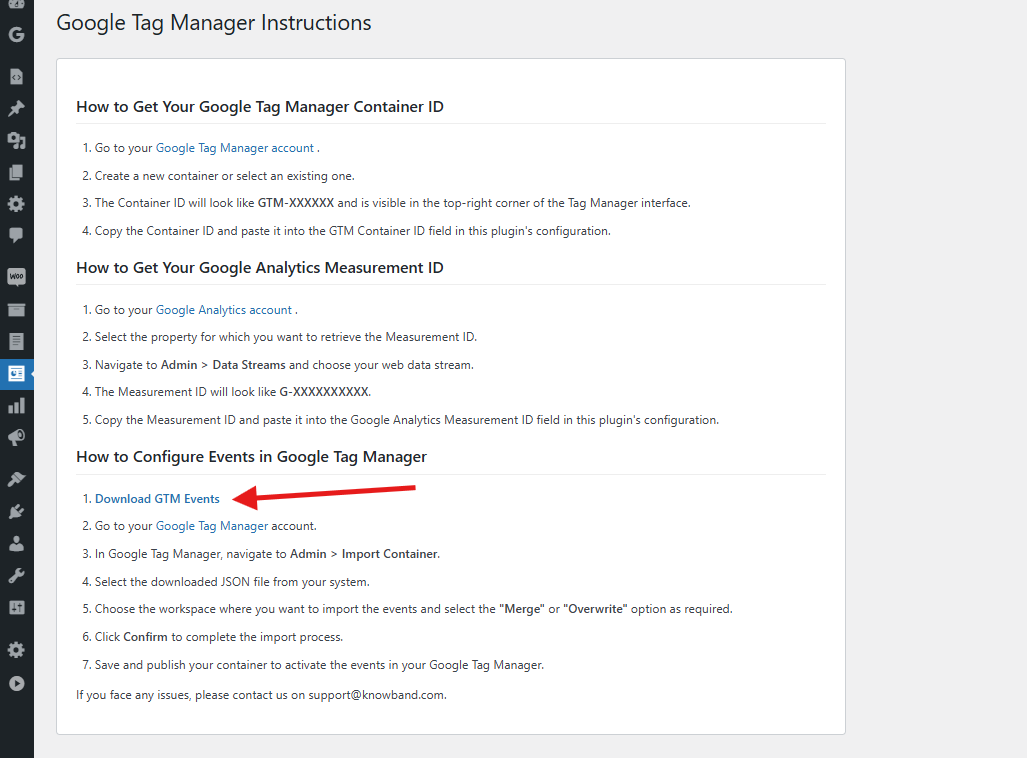
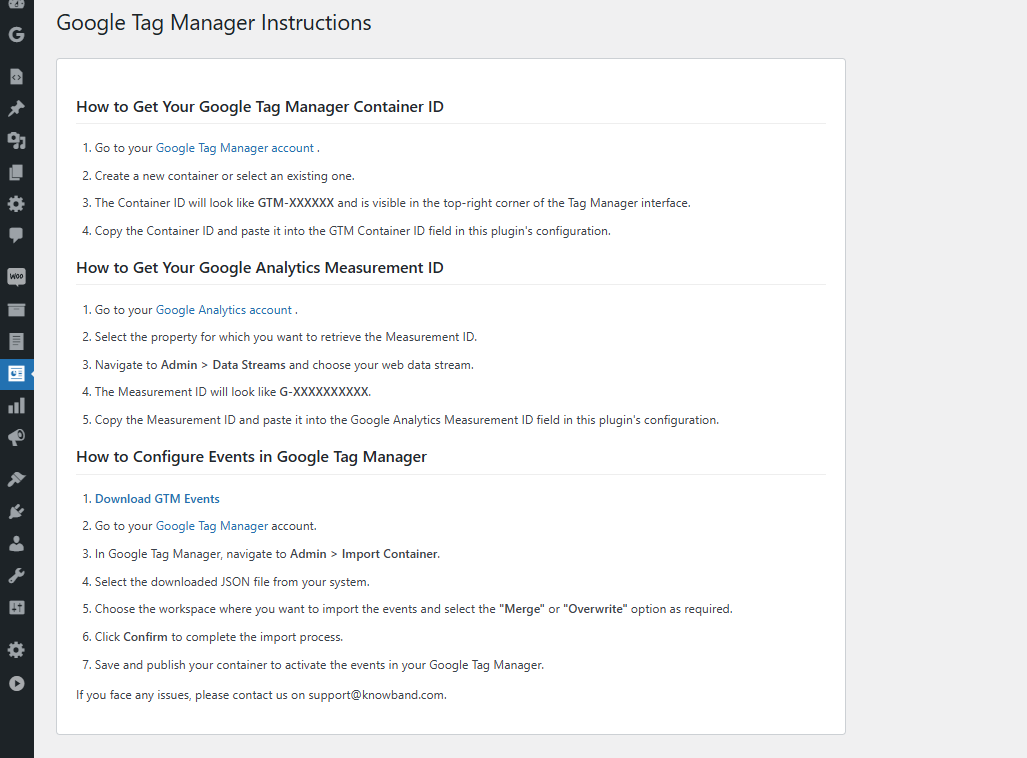
Step 1: Download the GTM Events File Navigate to the WooCommerce gtag Integration Plugin’s configuration panel and go to the Instructions tab. There you’ll find a direct link to download the GTM events JSON File.
Step 2: Log into Google Tag Manager Access your Google Tag Manager account.
Step 3: Import the Events Container Go to Admin > Import Container in your GTM dashboard.
Step 4: Upload the JSON File Select the downloaded JSON file from your computer.
Step 5: Choose the Workspace and Import Option Pick the GTM workspace where you’d like to import the events. Then choose either Merge (to combine with existing settings) or Overwrite (to replace them entirely), based on your preference.
Step 6: Confirm the Import Click Confirm to complete the import process.
Step 7: Publish the Container Save and publish the updated container to activate the new events in your GTM account
By following the above steps, you can successfully configure the WooCommerce gtag Integration Extension. However, if you face any issues, please feel free to contact us at support@knowband.com.
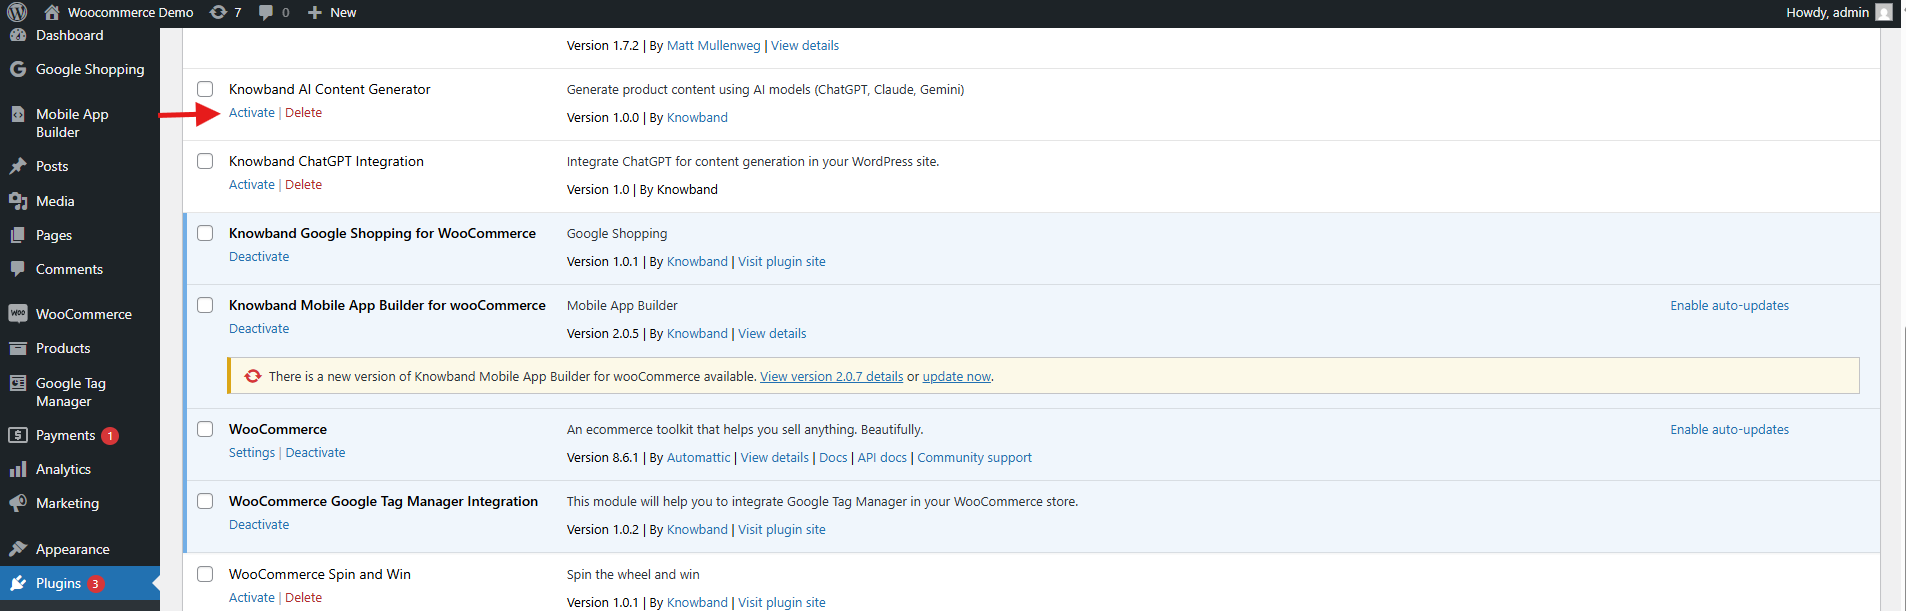
Upload the zipped file provided with the WooCommerce GA4 Integration purchase.
Click Install Now next to the plugin, then click Activate once installed.
5.0. Admin Panel Overview of WooCommerce eCommerce Measure Extension
The Google Tag Manager for WooCommerce extension includes a user-friendly admin dashboard that allows store owners to easily configure and manage tracking tags directly from the WooCommerce backend—no technical expertise required.
Core Features of the Admin Panel
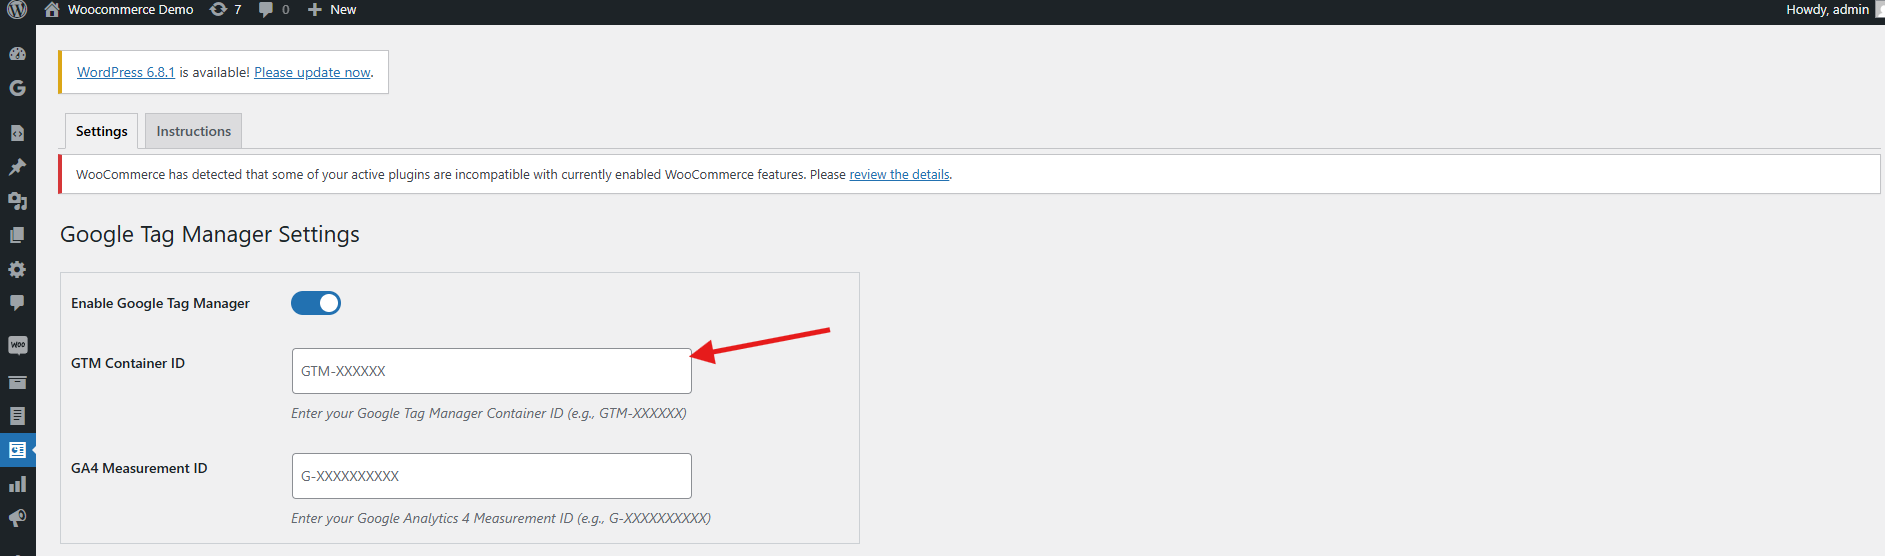
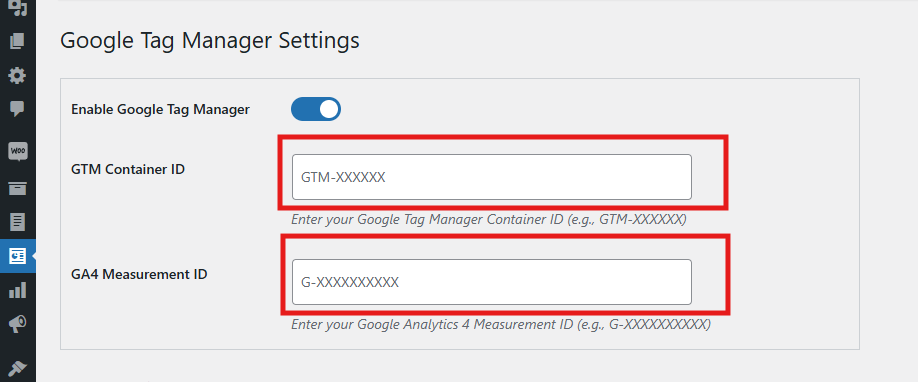
Enable or Disable Extension Instantly activate or deactivate the module as needed with a simple toggle.
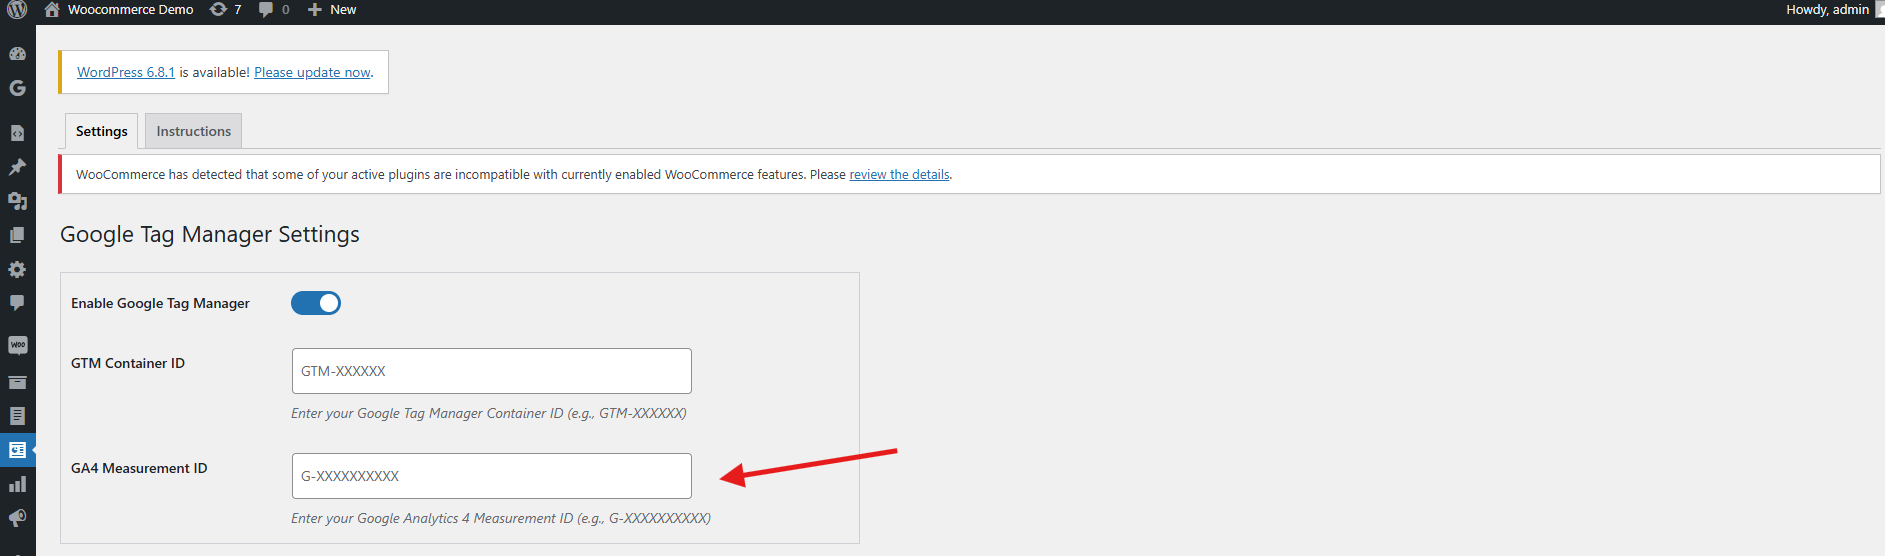
GTM Container ID Please enter your Google Tag Manager Container ID in this field to seamlessly connect your WooCommerce store with GTM.
Refer to section 1.1 for guidance on locating this ID.
Google Analytics ID Input your Google Analytics Measurement ID to link Google Analytics with GTM and start tracking store performance.
Event-Based Tag Management
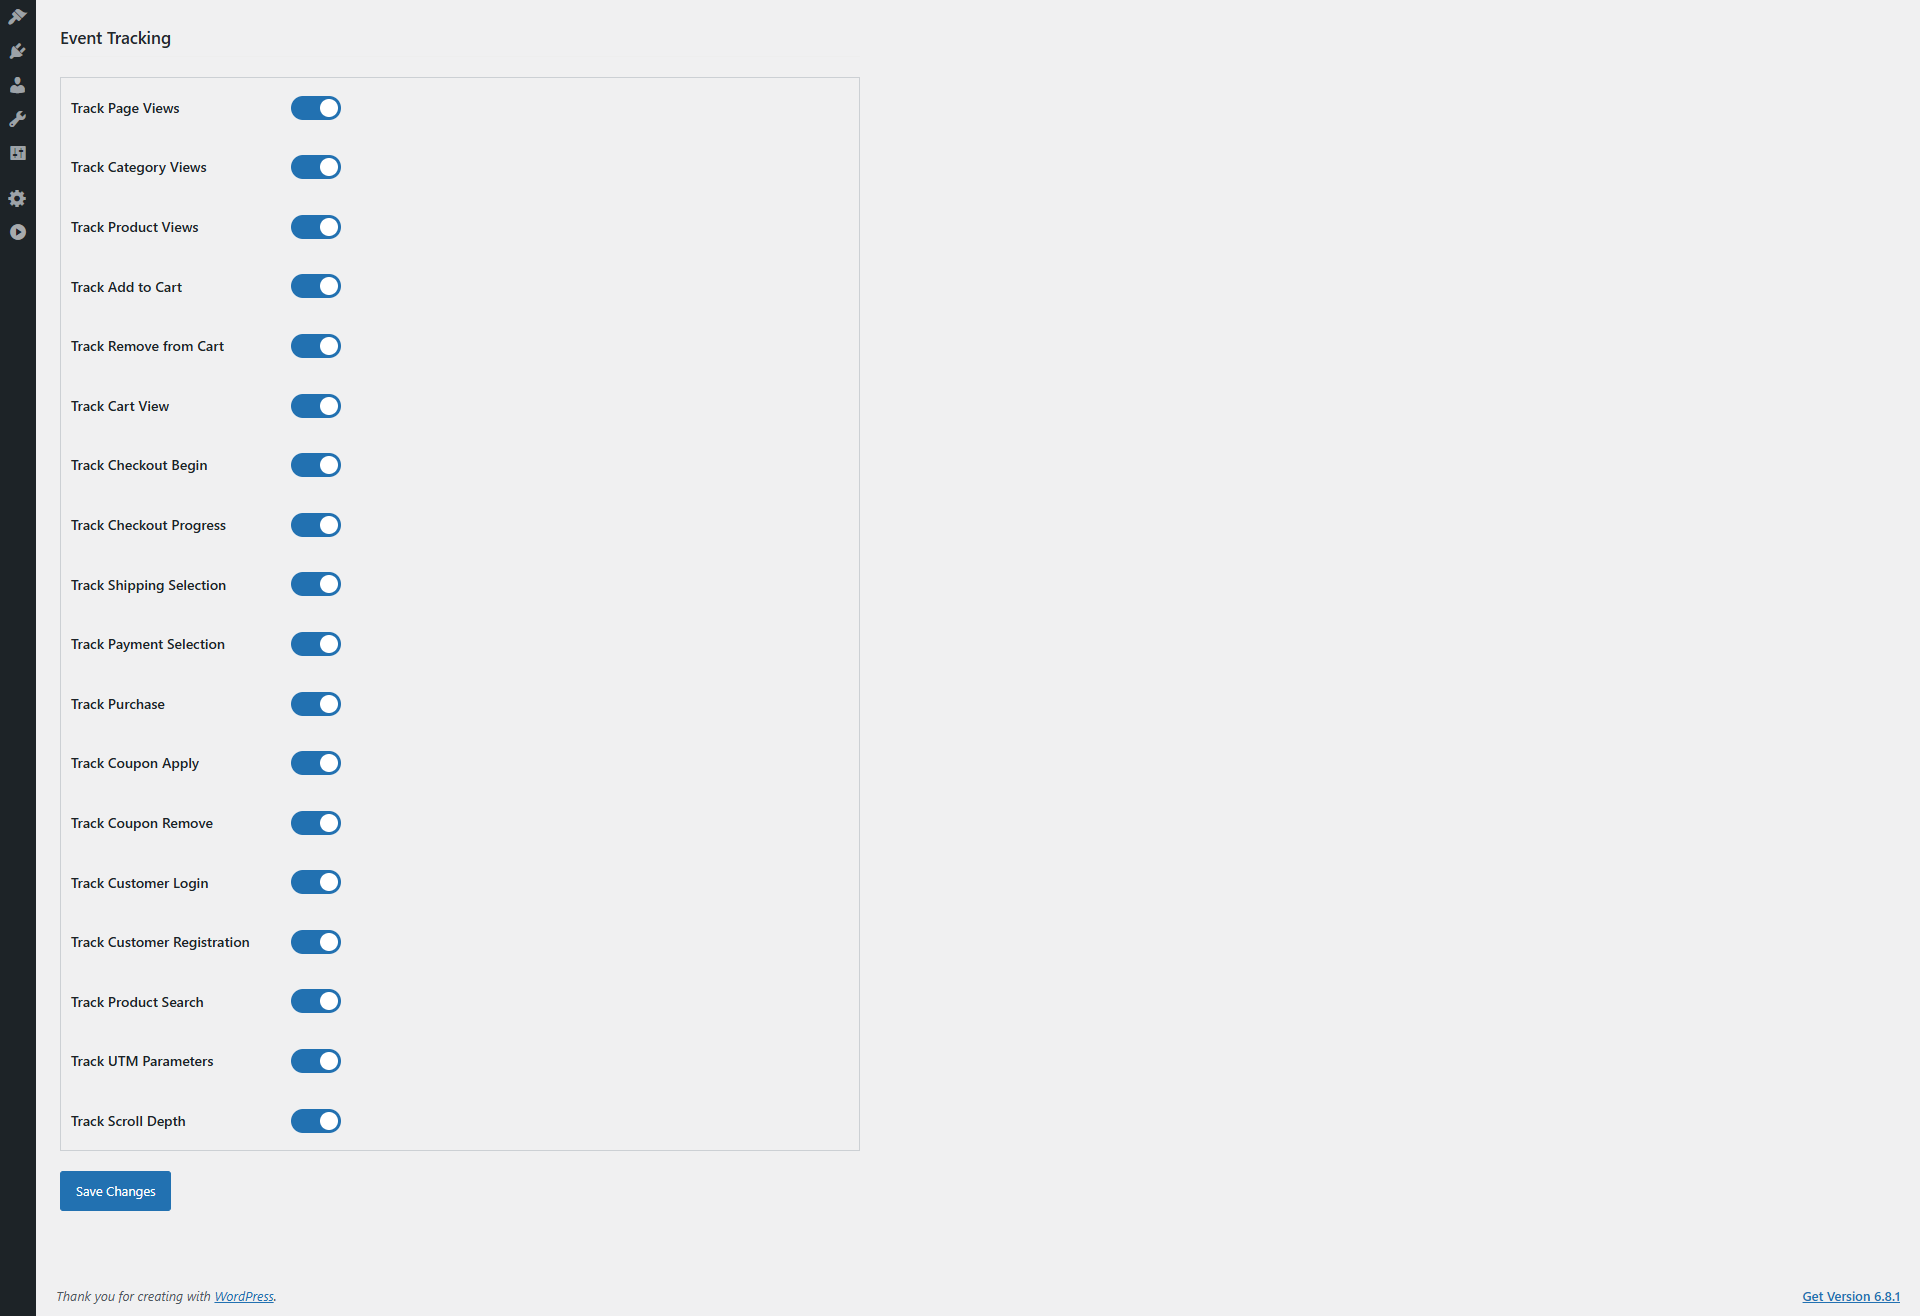
Each event listed below can be individually enabled or disabled based on your store’s specific tracking requirements in the WooCommerce GA4 Integration Plugin. Consequently, this flexibility allows you to tailor the data collection, enabling Google Analytics to provide more relevant insights and helping you make smarter business decisions.
Track Page Views You can enable or disable the event as per your need. This event tracks every page visit, which helps GA analyze overall site traffic and user navigation patterns. Therefore, it is crucial to understand customer behaviour and optimise your site structure.
Category Views Enable or disable as needed. Moreover, this tracks visits to product categories, allowing GA to identify popular sections. As a result, you can focus your marketing efforts and manage inventory more effectively.
Product Details Page Furthermore, you can enable or disable the event as needed. This event in WooCommerce GA4 Integration Extension monitors engagement with individual product pages, providing valuable insights into which products attract the most attention. Thus, it aids in product promotion and stock management.
Add to Cart Enable or disable as needed. This event in WooCommerce GA4 eCommerce Events tracks when customers add products to their shopping cart, giving GA critical data on purchase intent. Consequently, you can optimize your sales funnel and remarketing strategies.
Cart Removal Enable or disable as needed. It detects when items are removed from the cart, which helps identify potential obstacles in the purchasing process. Hence, you can improve the user experience to reduce cart abandonment.
Cart Views Enable or disable as needed. This monitors how often customers view their cart, providing insight into shopper engagement and possible bottlenecks before checkout.
Checkout Start Enable or disable as needed. It captures when a user begins the checkout process, allowing GA to track funnel progression. Therefore, you can improve the checkout experience to minimize drop-offs.
Checkout Page Enable or disable as needed. This tracks detailed interactions on checkout pages, offering valuable data for optimizing conversions at this critical step.
Address Selection Enable or disable as needed. It monitors when customers add or select shipping addresses, helping identify preferences or issues during checkout.
Shipping Method Choice Enable or disable as needed. This tracks which shipping options customers select, providing insights into customer preferences and aiding logistics and marketing planning.
Order Confirmation Enable or disable as needed. The WooCommerce eCommerce Measure Extension’s order confirmation captures successful order completions, the primary conversion event for GA. Consequently, it is essential for accurate revenue tracking and ROI measurement.
Customer Login Enable or disable as needed. This tracks when users log in to their accounts, offering insights into returning customer behaviour and loyalty program effectiveness.
Customer Registration Enable or disable as needed. It monitors new account creations, useful for tracking customer acquisition and growth trends.
Discount Code Use Enable or disable as needed. This monitors the usage of promotional or discount codes, helping assess the effectiveness of marketing campaigns and incentives.
Discount Code Removal Enable or disable as needed. It tracks when discount codes are removed during checkout, highlighting friction points that may cause cart abandonment.
Search Product Tracking Enable or disable as needed. This captures the search terms customers enter, offering valuable data to optimize product offerings and merchandising.
Capture UTM Parameters Enable or disable as needed. It automatically collects UTM parameters from URLs, allowing GA to accurately attribute traffic and conversions to specific marketing campaigns. Consequently, this is essential for boosting your campaign’s ROI.
5.0 Configuration Instructions:
The WooCommerce No-Code Google Tag Manager Integrationprovides straightforward, beginner-friendly setup instructions—no technical knowledge required. Store admins can easily access the Google Tag Manager and Google Analytics Consoles and follow simple steps to retrieve the necessary credentials for integration.
Moreover, these clear instructions are designed to guide you through the entire WooCommerce gtag Integrator Plugin configuration process with ease.
If you encounter any issues during setup or while using the extension, our support team is here to help. You can contact us by:
The WooCommerce AI Content Generator Plugin is a powerful plugin designed to help WooCommerce store owners effortlessly create high-quality product content. By integrating the advanced capabilities of Claude AI, ChatGPT API, Gemini API, and DeepSeek, the plugin enables the generation of SEO-optimized product, category and CMS page descriptions, meta titles, and meta descriptions, all while maintaining a natural and authentic brand voice.
Moreover, the AI Content Generator for WooCommerce also functions as a robust, AI-powered plugin for seamless content creation across multiple languages. As a result, your store can connect with global customers and expand its reach without compromising quality or consistency.
Furthermore, Knowband’s WooCommerce AI Generator Plugin offers a variety of AI Models for content generation. Store owners can select from ChatGPT options like GPT-3.5 and GPT-4.0; Claude models such as Haiku 3, Haiku 3.5, Sonnet 3.5 (Old), and Sonnet 3.5 (New); along with Gemini variants, including Gemini 1.5 Pro, 1.5 Flash, 1.5 Flash-8b, 2.0 Flash, and 2.0 Flash – Lite Preview. In addition, DeepSeek offers both chat and coder reasoner models.
With support for bulk content generation, the plugin dramatically reduces the time and effort required for manual writing. Whether you’re creating content from scratch or updating existing product information, the WooCommerce AI Content Generator ensures accuracy, consistency, and speed.
Additionally, the WooCommerce SEO AI Content Generator plugin supports content generation for category pages and CMS pages, including About Us, FAQs, Shipping Policy, and more. This means you can create a fully optimized, content-rich WooCommerce store without needing to write manually. Whether launching a new store or updating an existing one, users can apply AI assistance to all key areas of their website.
1.0 Key Features of the WooCommerce AI Content Creation Extension
AI-Powered Content Generation The WooCommerce Claude AI Content Generator Extension automatically creates high-quality product and category descriptions, meta titles, meta descriptions, and CMS page content by leveraging advanced AI technologies—including ChatGPT, Claude, Gemini, and DeepSeek. This ensures your entire store’s content is professional, engaging, and SEO-optimized.
Enhanced SEO Performance All generated content follows best SEO practices, thereby improving your store’s search engine rankings and boosting visibility through strategic keyword placement and well-structured metadata.
Flexible AI Model Selection The AI Content Generator for WooCommerce offers a wide variety of AI models for content creation. Store owners can choose from ChatGPT options like GPT-3.5 and GPT-4.0; Claude models including Haiku 3, Haiku 3.5, Sonnet 3.5 (Old), and Sonnet 3.5 (New); Gemini variants such as Gemini 1.5 Pro, 1.5 Flash, 1.5 Flash-8b, 2.0 Flash, and 2.0 Flash – Lite Preview; as well as DeepSeek Chat and Coder Reasoner.
User-Friendly Interface Designed for ease of use, the extension provides an intuitive interface that allows store owners, regardless of technical experience, to generate professional, high-quality content quickly and effortlessly.
Bulk Processing Capabilities
Ideal for stores with large product catalogues, the WooCommerce DeepSeek AI Content Generator enables bulk content generation for multiple products simultaneously—saving both time and effort.
Additionally, it supports bulk CSV import, allowing users to upload files and select specific entries for AI-generated content creation or updating, which offers flexible and efficient content management.
Comprehensive Activity Tracking The plugin keeps a detailed log of all actions taken, including timestamps and summaries of changes. As a result, store owners benefit from transparency and easy tracking of content updates and modifications.
2.0 Benefits of WooCommerce AI Content Generator Plugin for E-Merchants
Time Savings AI Product Description Generator WooCommerce quickly generates high-quality content in minutes, reducing manual writing efforts and freeing you to focus on your core business.
Improved SEO Performance Create AI-optimized product content that follows SEO best practices to boost search engine rankings and organic traffic.
Superior Content Quality Generate professional, engaging, and brand-consistent product descriptions that enhance your store’s credibility.
Cost Efficiency Save on copywriting expenses by automating content creation with advanced AI technology.
Competitive Edge Stay ahead by providing better, faster, and more accurate product information than your competitors.
Enhanced Customer Experience Deliver clear, detailed content that helps customers make informed decisions and increases conversions.
Performance Monitoring Track all AI-generated content changes with an activity log to review and improve your content strategy over time.
3.0. Installation Steps of the AI CMS Page Content Generator WooCommerce
Step 1: Purchase the Plugin Buy the WooCommerce AI Content Generator plugin from the Knowband store. After purchase, you will receive a zipped file containing the plugin’s source code.
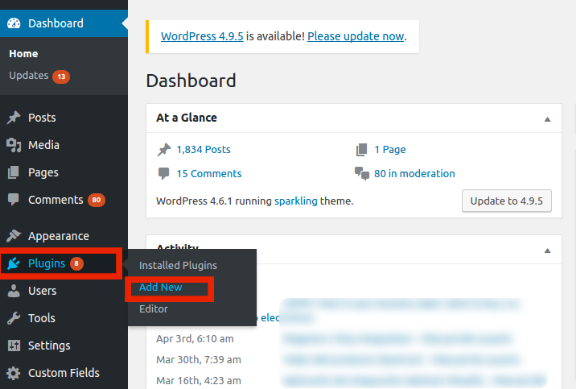
Step 2: Access the WordPress Dashboard Access your WordPress admin dashboard, then navigate to Plugins → Add New.
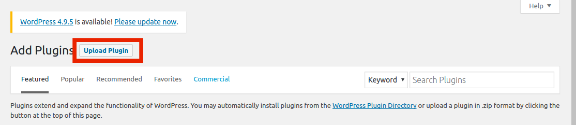
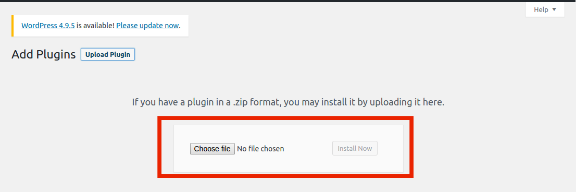
Step 3: Upload the Plugin On the “Add Plugins” page, click the Upload Plugin button.
Step 4: Upload the File Click Choose File, select the zipped plugin file you downloaded, and upload it.
After the upload completes, click Activate Plugin.
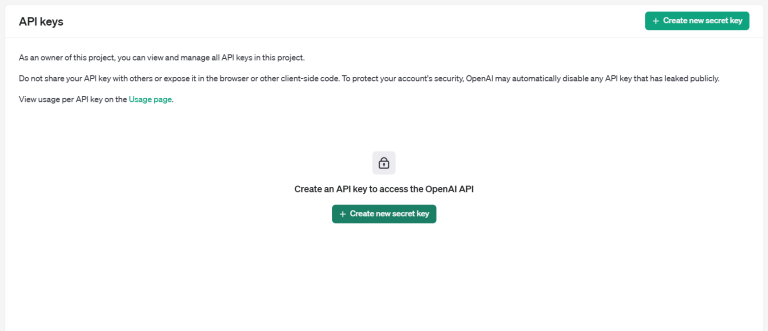
3. Make sure to copy the key immediately and store it safely.
DeepSeek API Content Generation Steps
Follow these steps to generate content using the DeepSeek API within the WooCommerce AI Content Generator plugin:
Step 1: Get Your DeepSeek API Key
Register or log in to your DeepSeek account at their official website.
Navigate to the API section and create or copy your unique API key.
3. Copy the API key to enable the functionality of DeepSeek AI Engine in WooCommerce AI Content Generator Plugin
4. Copy the DeepSeek API key for the OpenCart AI Content Generator Extension
4.0.0 Admin Interface of Knowband’s WooCommerce AI Content Generator Plugin
4.0.1 General Settings of WooCommerce Claude AI Content Generator
The WooCommerce Bulk AI Content Generator Extension allows store admins to customize AI settings and efficiently handle large-scale content generation tasks.
Configuration Options:
Enable/Disable- Enable or disable the module as per your need.
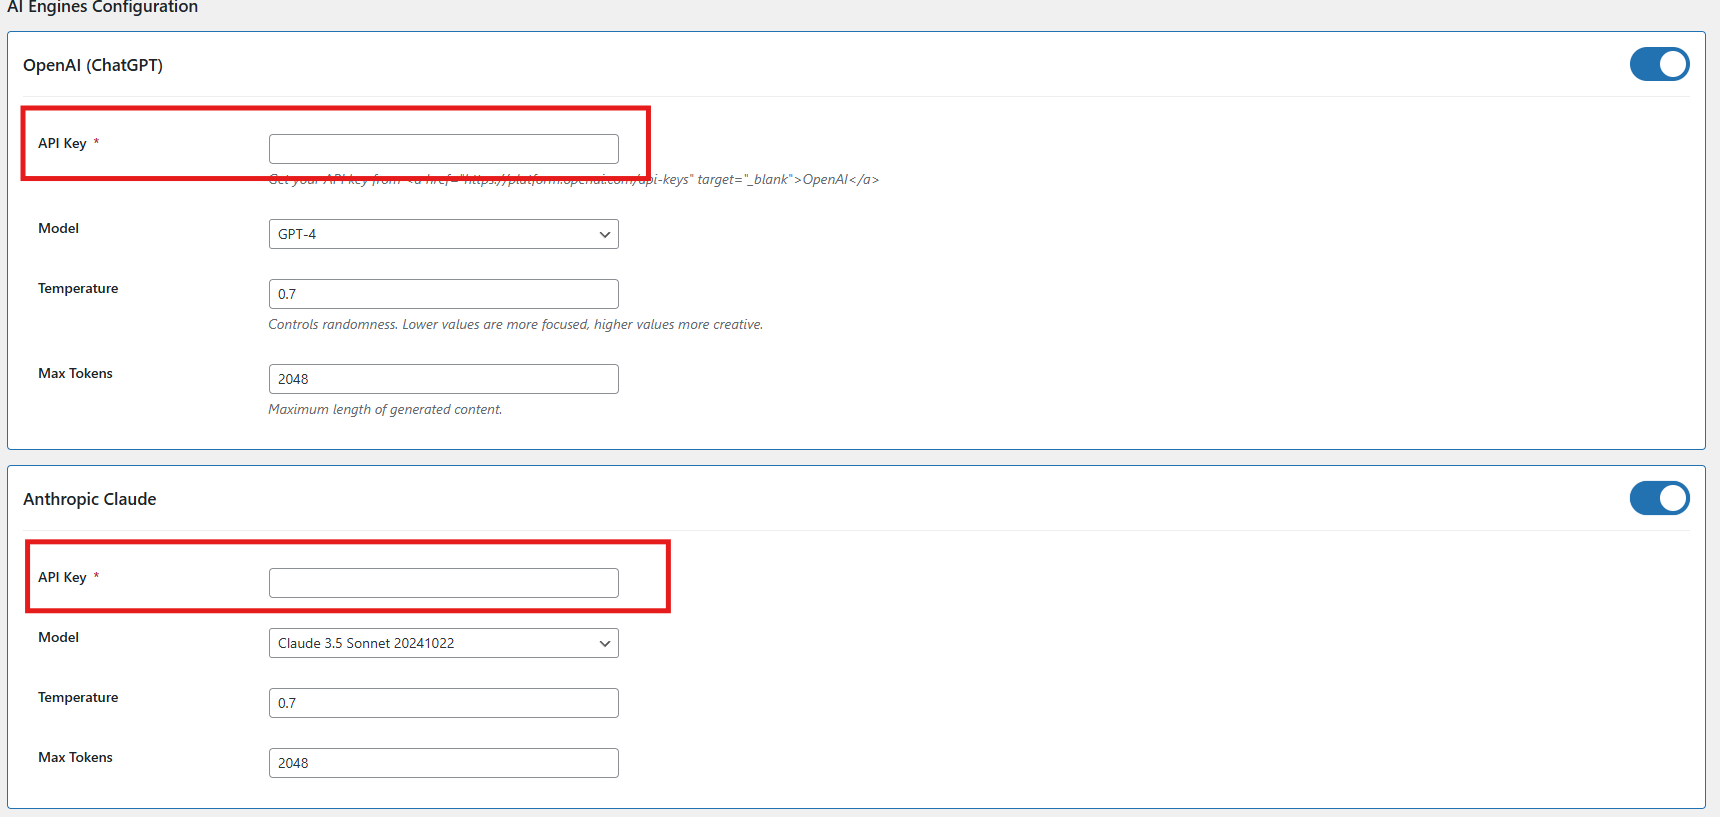
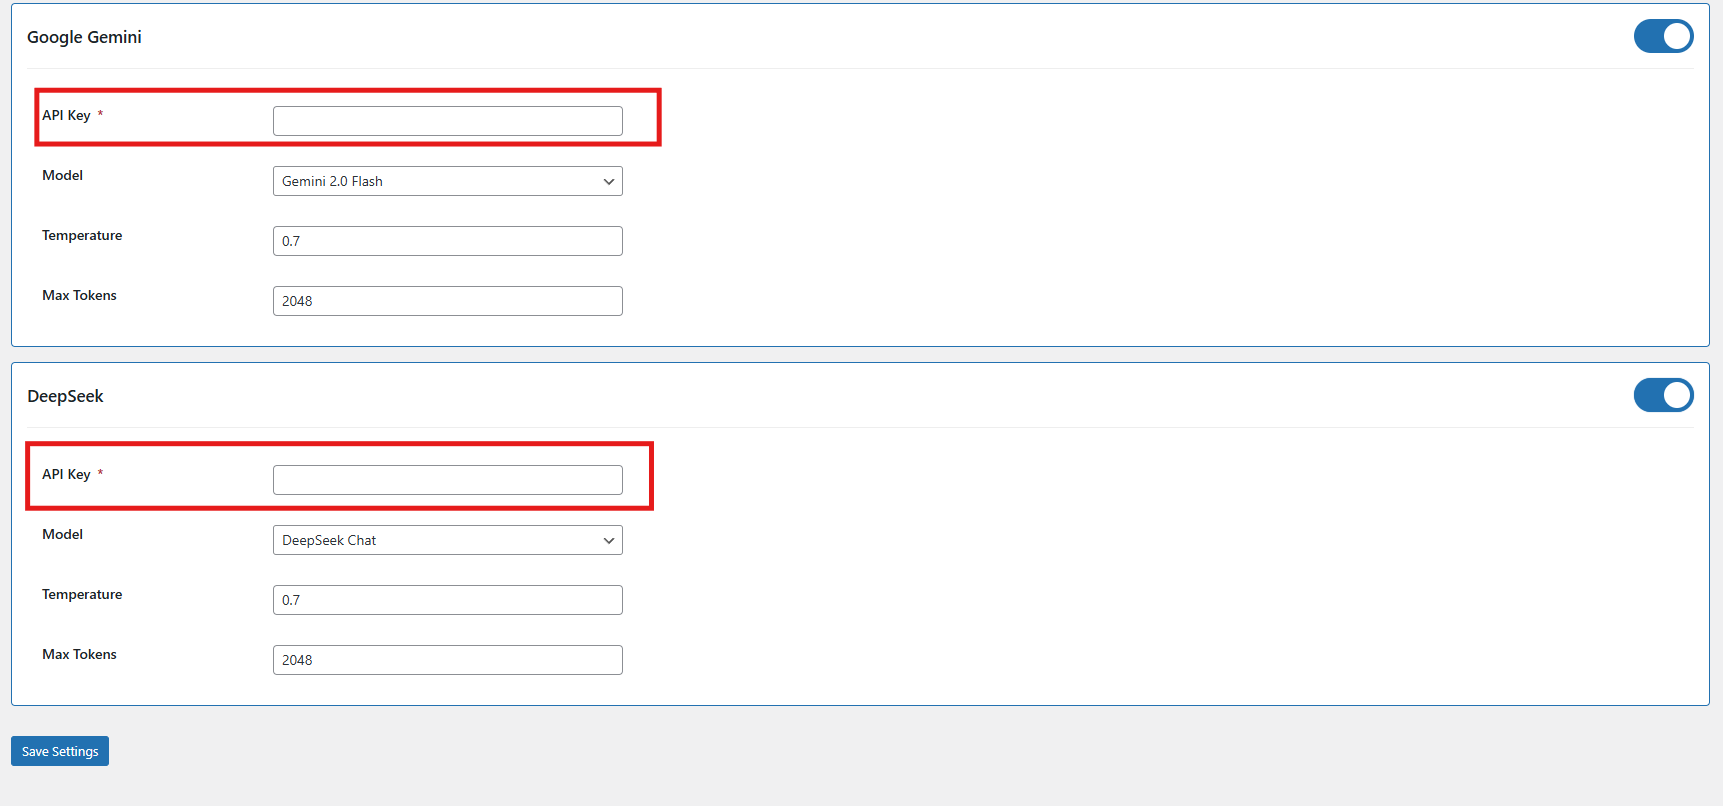
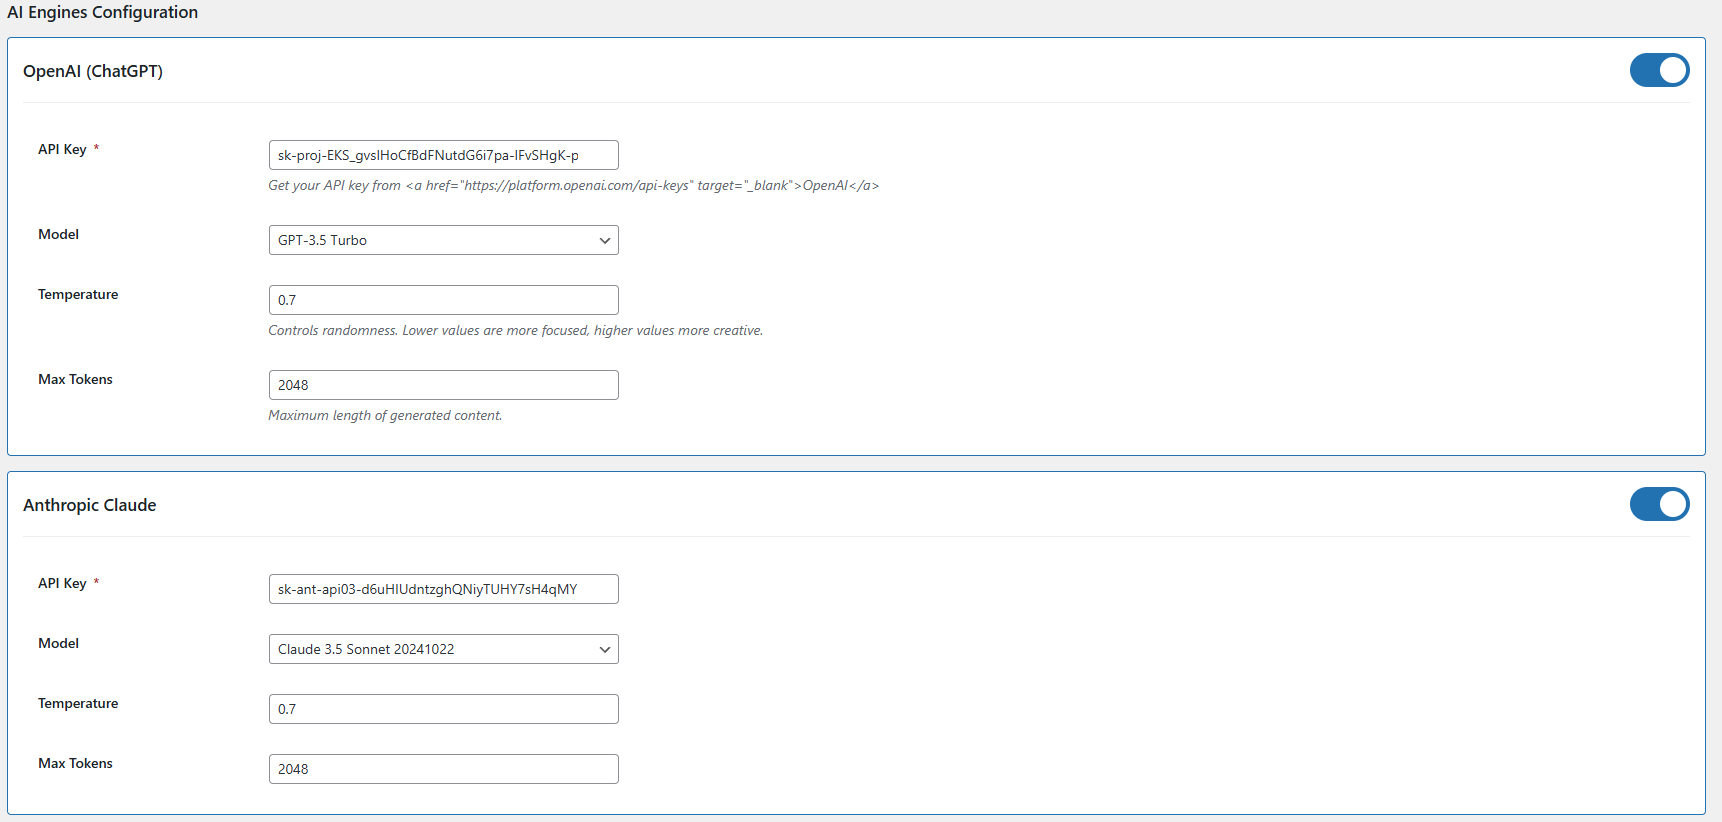
API Key Configuration – Add API keys for all supported AI models, including Claude, ChatGPT, Gemini, and DeepSeek, to ensure seamless integration and functionality.
Claude Engine Toggle – Quickly enable or disable the Claude AI engine with a single click based on your content generation needs.
API Key for Claude – Enter the necessary API key to activate Claude AI’s features for content generation and language.
Claude Model Selection – Select from a range of Claude AI models, such as Haiku 3, Haiku 3.5, Sonnet 3.5 and Sonnet 3.5, to power your content creation tasks.
Token- Add the token limit for the content generator default 2048, you can add up to 32000 as a token limit which will apply to all AI models
Enable/Disable ChatGPT – Turn the ChatGPT AI engine on or off to control its role in generating content for your store.
API Key for ChatGPT – Enter your ChatGPT API key to activate content generation capabilities.
Select ChatGPT Model – Choose between ChatGPT 3.5 and ChatGPT 4.0 for generating high-quality, SEO-friendly content.
Enable/Disable Gemini AI – Easily activate or deactivate the Gemini AI engine to manage content creation workflows.
API Key for Gemini – Provide your Gemini API key to enable its integration with the content generator.
Select Gemini Model – Choose from Gemini models like 1.5 Pro, 1.5 Flash, 1.5 Flash-8b, 2.0 Flash, or 2.0 Flash–Lite Preview based on your performance and output needs.
DeepSeek Model – Enable the DeepSeek engine by selecting the preferred mode for content generation.
Select DeepSeek Model Type – Choose between the Chat or Coder model based on the type of content you need to generate.
Temperature Setting – Adjust the creativity level of AI-generated content (range: 0.0 to 1.0). Lower values offer more consistency, while higher values produce more creative outputs.
4.0.2 Content Generation Prompts for WooCommerce Gemini AI Content Generator Plugin
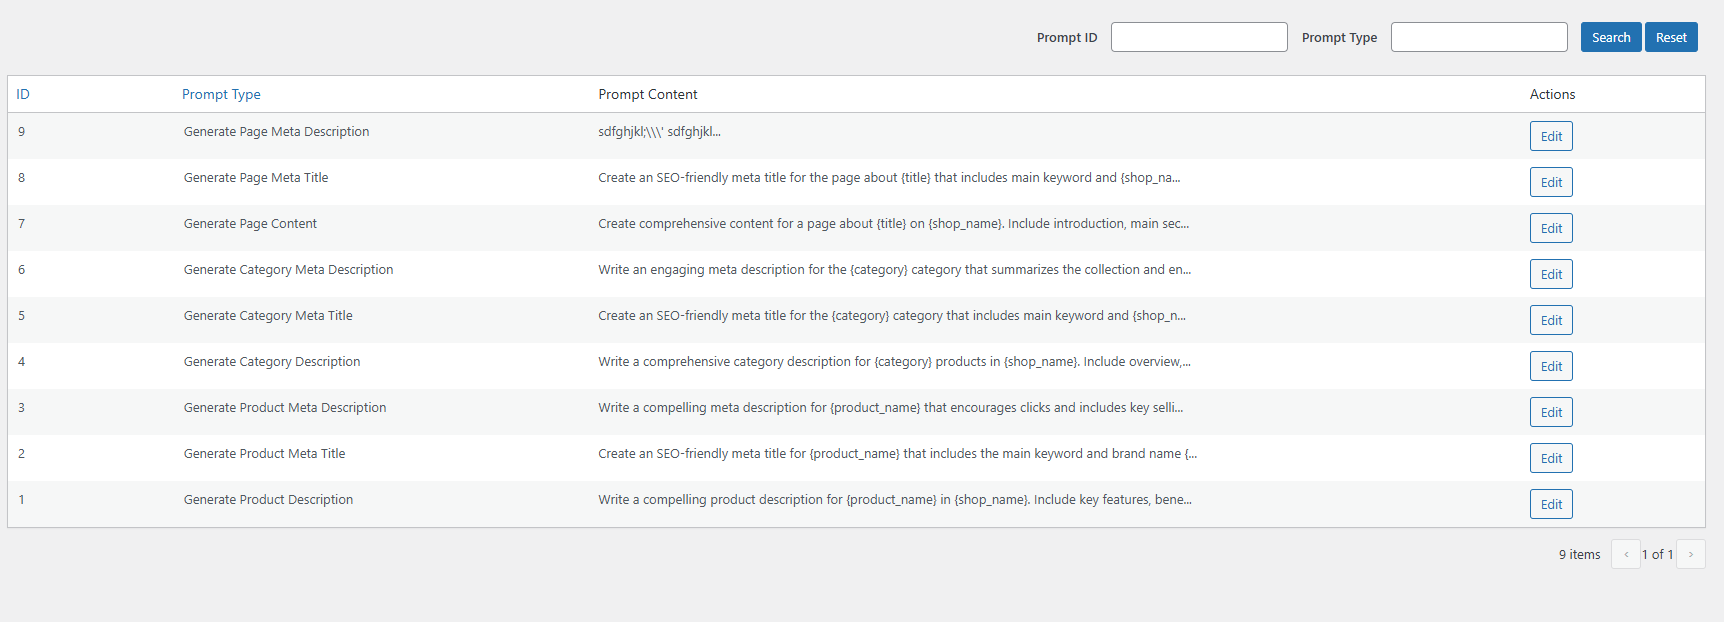
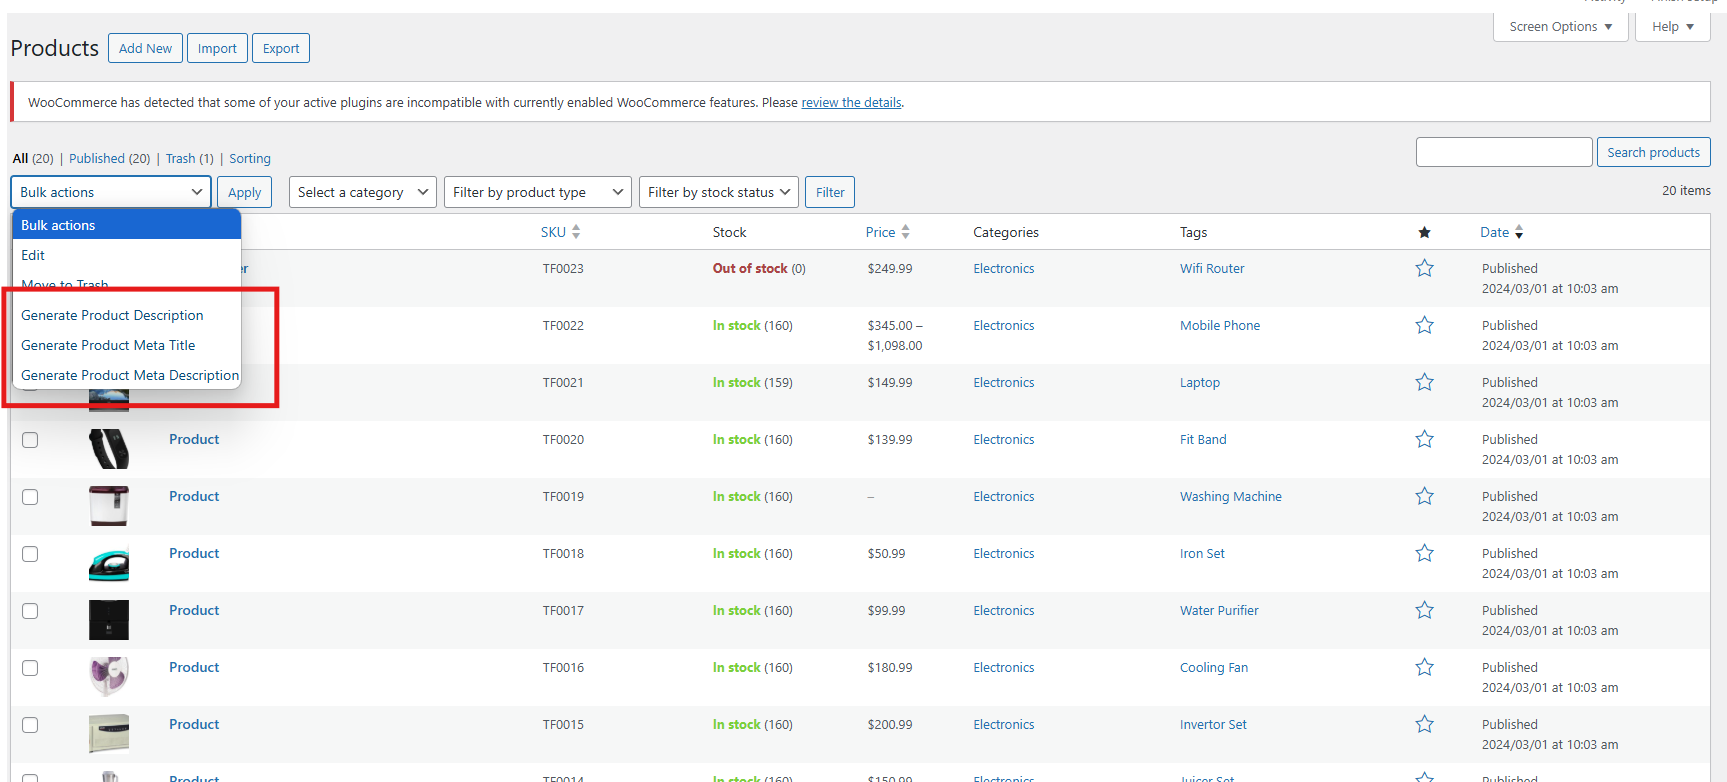
Generate Product Description- Creates SEO-optimized and well-structured product descriptions that emphasize key features and benefits.
Generate Product Meta Title- Generates concise, keyword-rich meta titles under 60 characters to improve search visibility.
Generate Product Meta Description- Crafts engaging meta descriptions within 140 characters designed to attract clicks.
Category Content Generation:
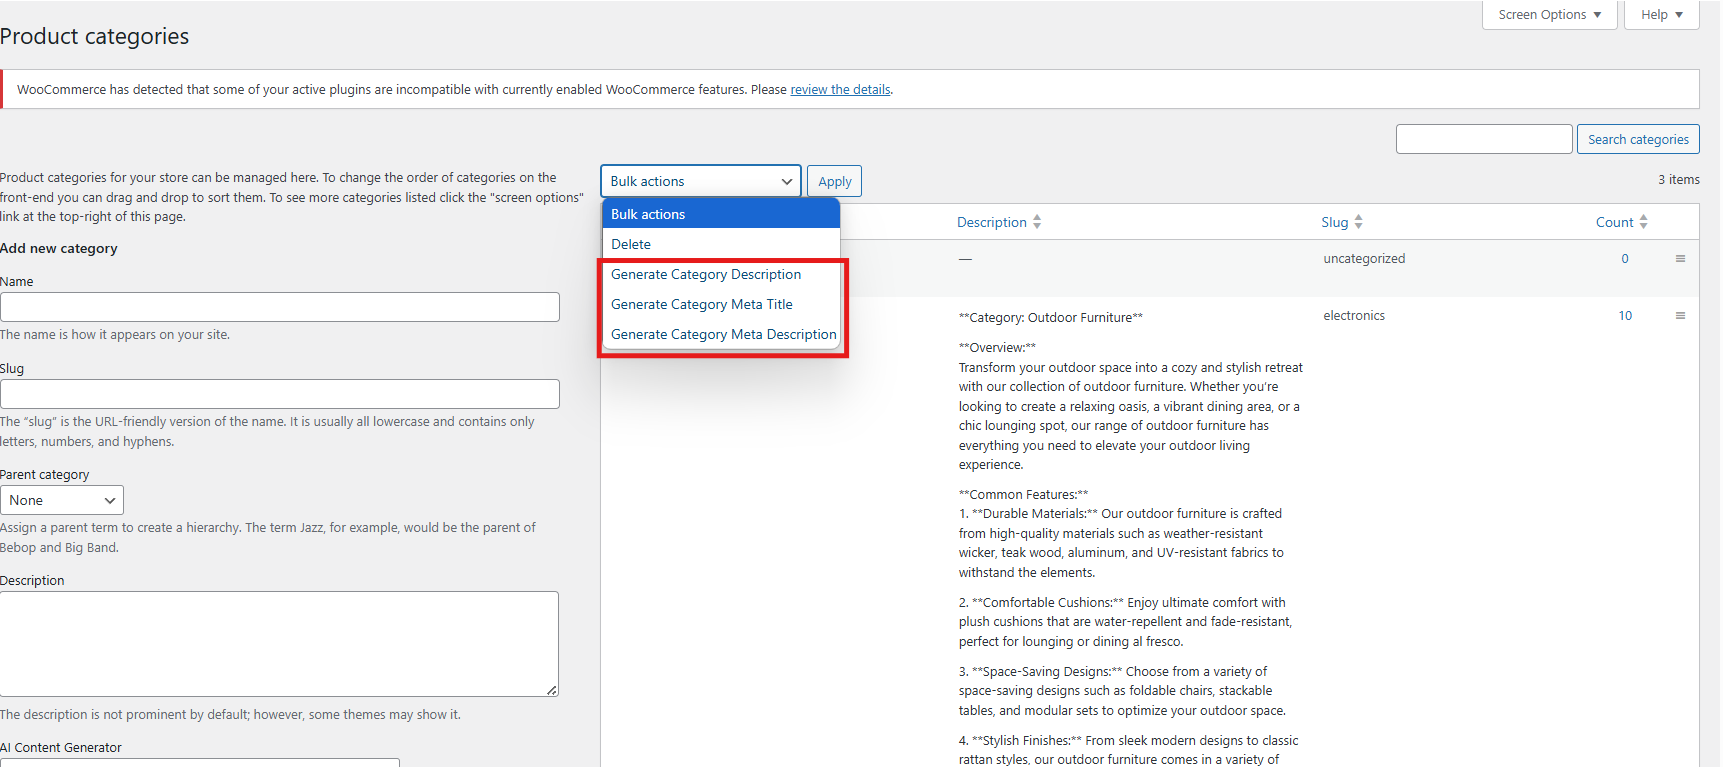
Generate Category Description- Develop detailed category content with proper HTML formatting for better presentation.
Generate Category Meta Title- Produces keyword-focused category titles under 60 characters to boost SEO.
Generate Category Meta Description- Creates clear and concise category descriptions within 140 characters for search engines.
Page Content Generator for Multi-engine AI Content Generator for CMS and Products
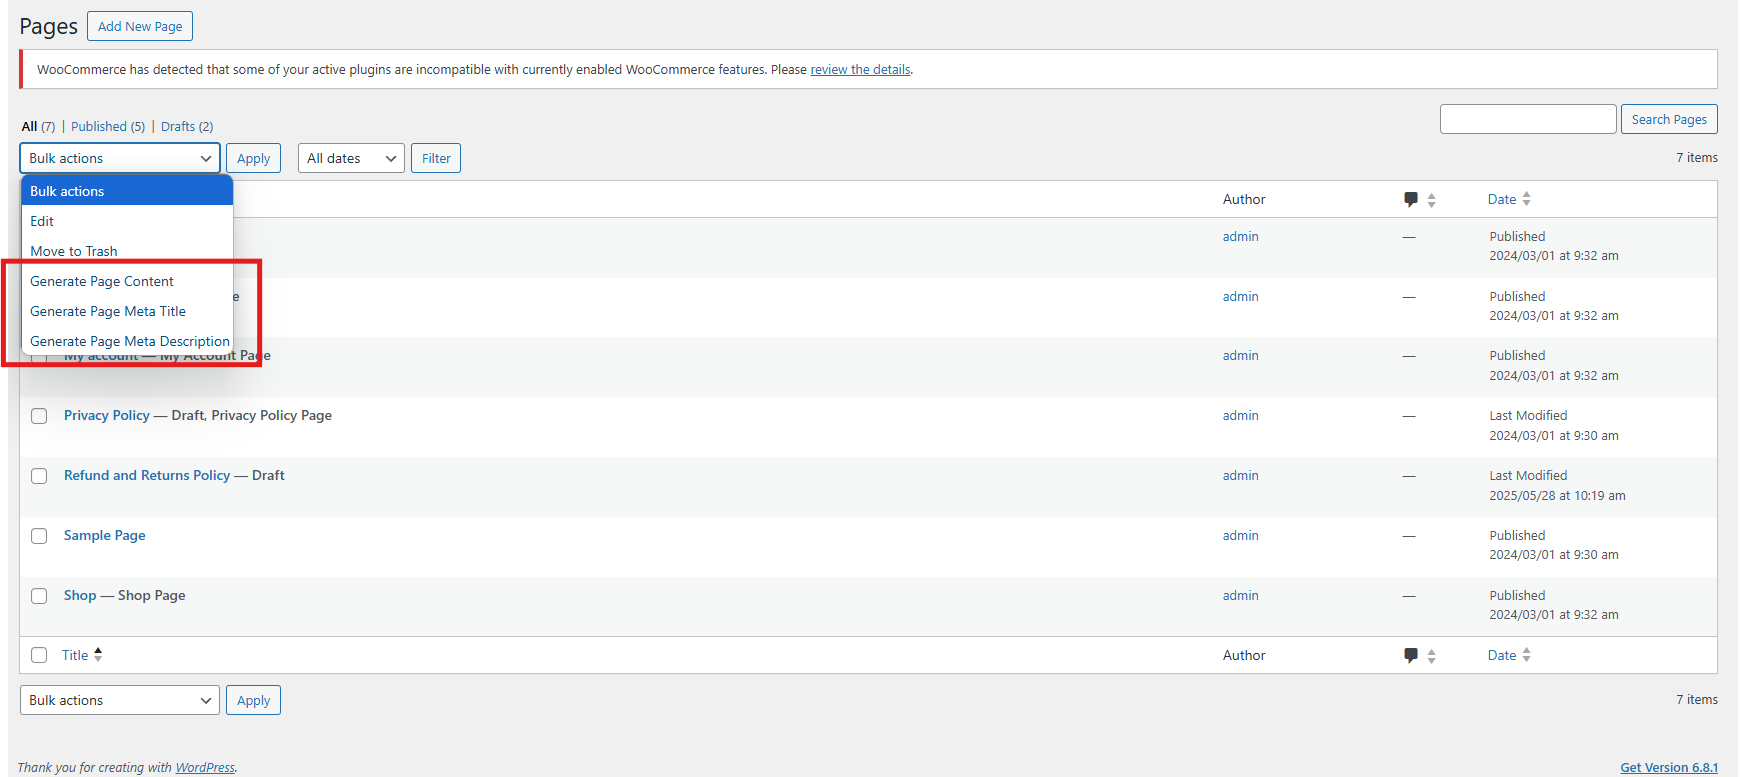
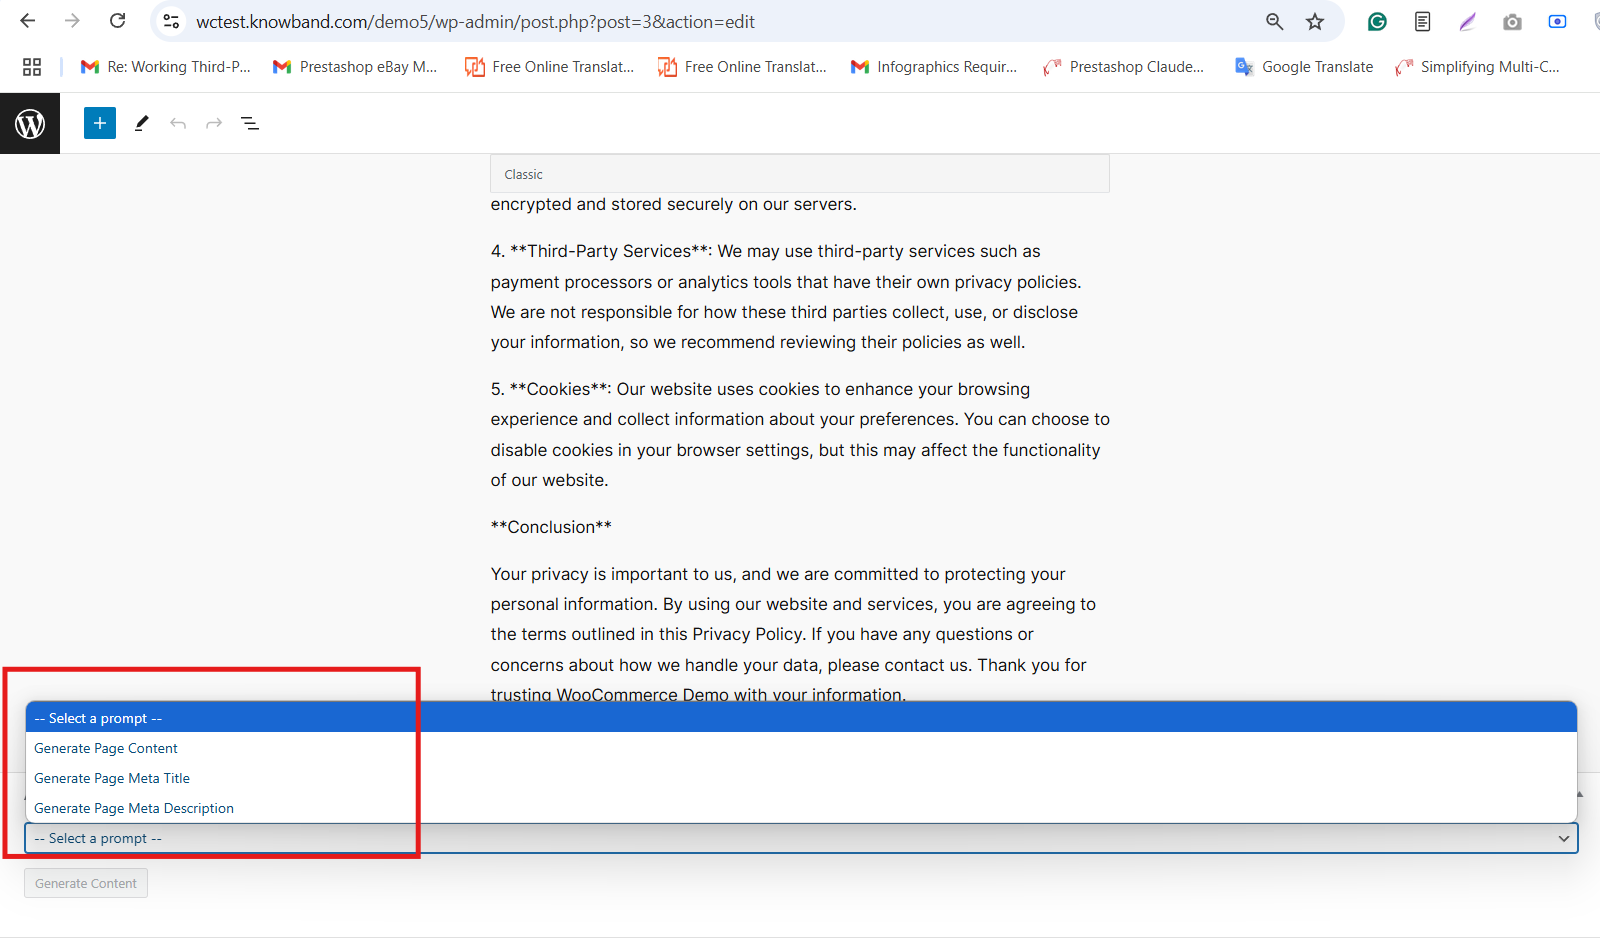
Generate Page Meta Description: Create an SEO-friendly meta description that summarizes the CMS page content clearly and effectively.
Generate Page Meta Title: Generate a concise meta title including main keywords and your store’s name for better search ranking.
Generate Page Content: Produce well-structured, engaging content for CMS pages to inform and attract your visitors.
5.0. Bulk Product Content Generation
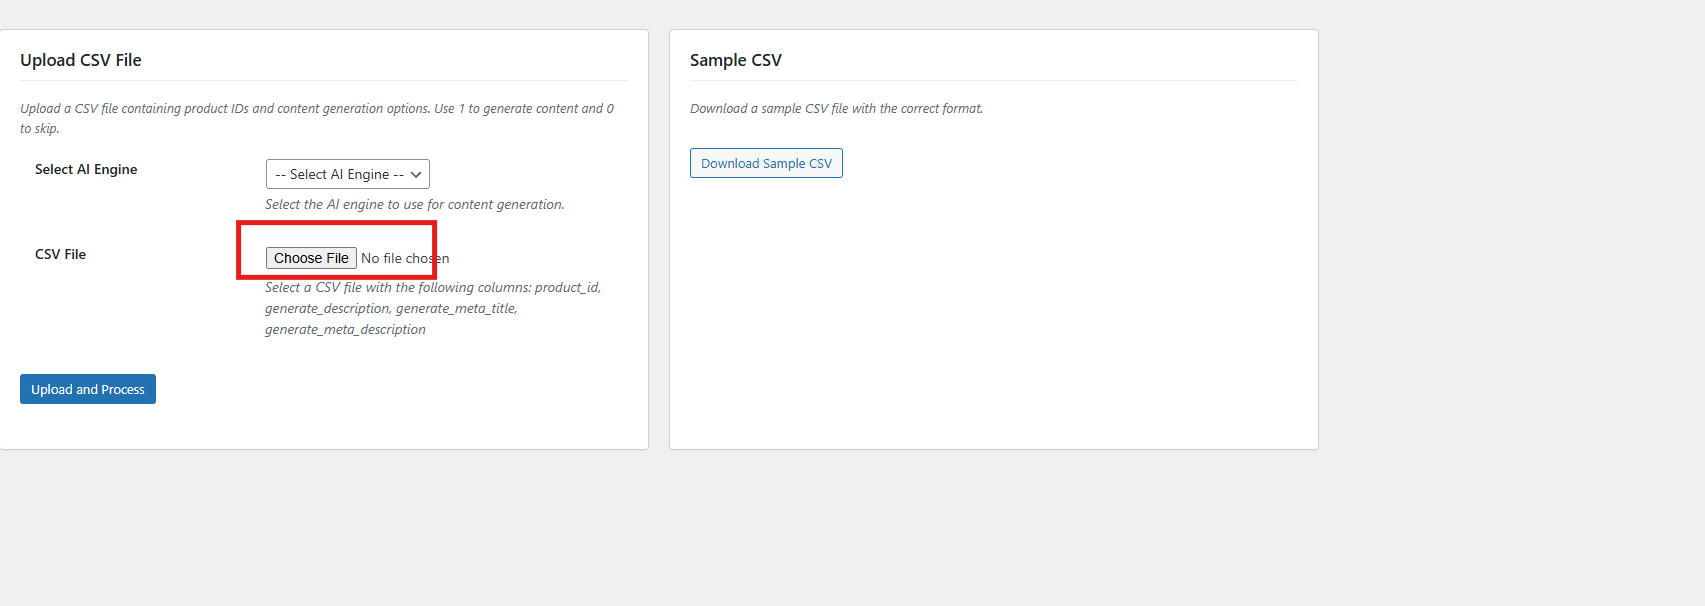
The SEO Meta Content Generator WooCommerce exhibit the feature that allows you to generate product content for multiple products at once by uploading a CSV file. This saves time and effort when managing large product catalogues.
Steps To Generate Bulk Product Content
1. Upload CSV File
Upload the CSV file by clicking Choose File and selecting your file.
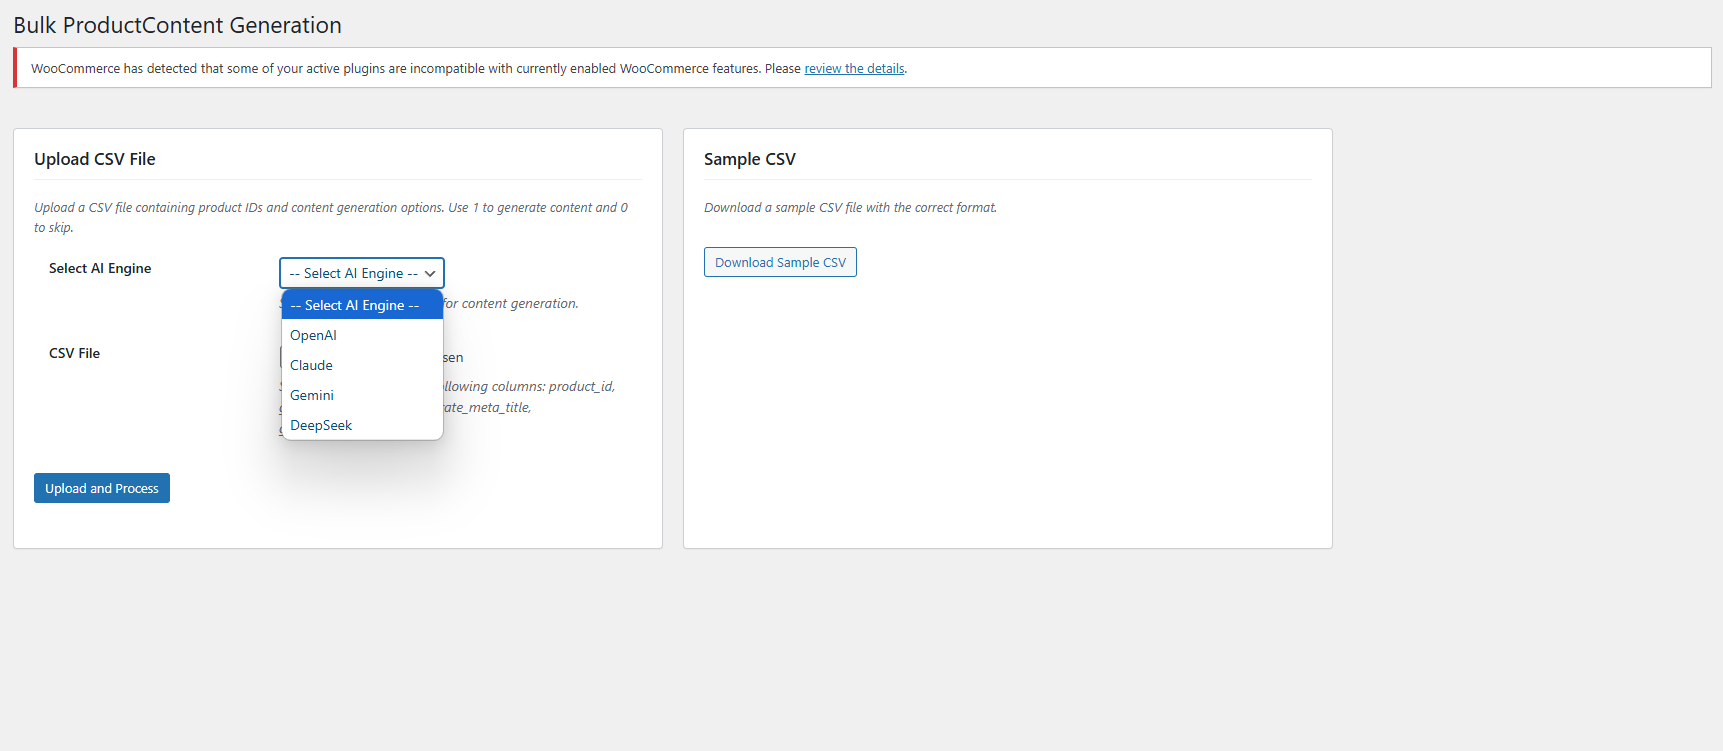
2. Select AI Engine Choose your preferred AI engine from the dropdown menu.
3. Upload and Process After selecting your file and AI engine, click the Upload and Process button to start generating content for the products listed in your CSV. The plugin will process the file and create the requested content accordingly.
6.0. Task Logs In WooCommerce AI Content Extension
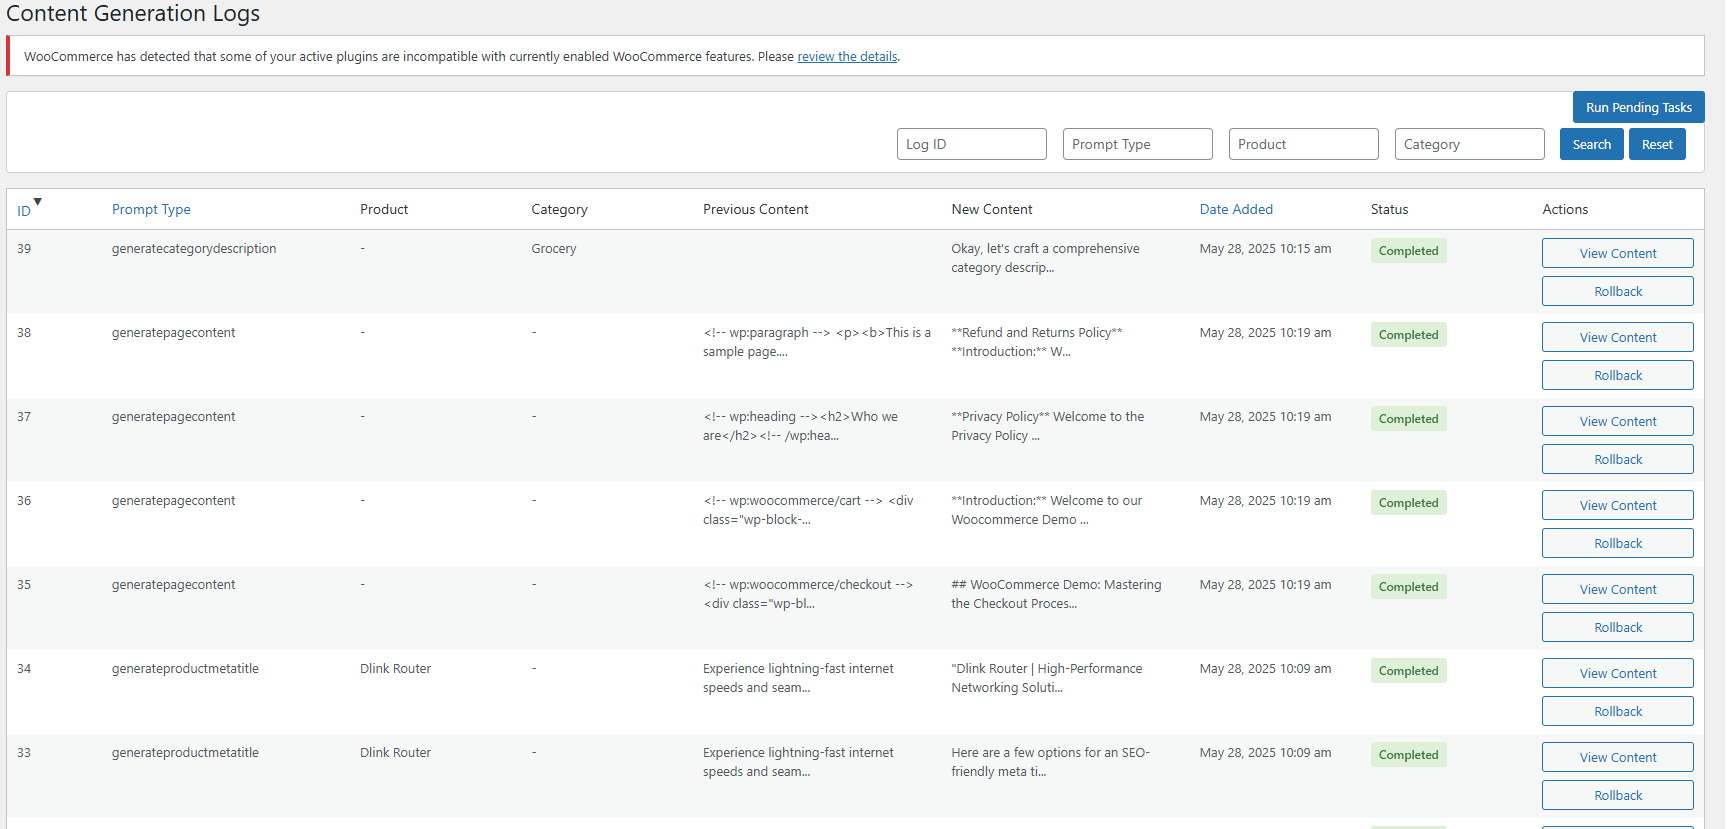
The WooCommerce AI Content Generator Plugin keeps a detailed log of all AI-generated content. This log includes information such as the type of prompt used, language, product or category involved, timestamp, status, previous content, and the newly generated content. Moreover, this helps you track changes, review past updates, and monitor the evolution of your content.
6.0 Steps to Execute the Prompts in AI Meta Description Generator for Woocommerce
Use the WooCommerce AI Content Generator plugin to create content easily for products, categories, and CMS pages such as descriptions, meta titles, and meta descriptions.
Follow these steps to execute the prompts–
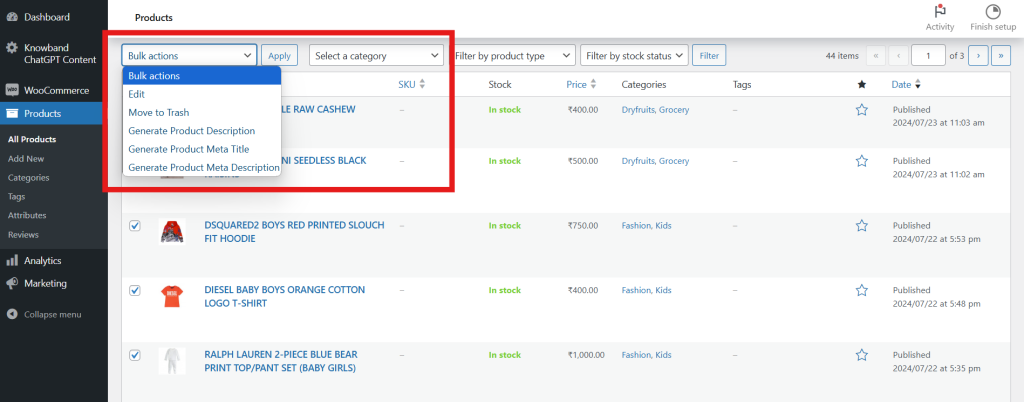
Step 1: Navigate to Products, Categories, or CMS Pages in your WordPress admin panel.
Step 2: Select the specific items or pages you want to generate content for. You can work on individual items or select multiple for bulk processing.
Step 3: Click the Bulk Actions dropdown menu (for bulk) or use individual action buttons (for single items). Step 4: Choose the AI operation you want to perform options include generating descriptions, meta titles, and meta descriptions.
Step 5: Select the AI engine you want to use for the content creation tasks.
Step 6: Review the AI-generated content carefully and approve it before publishing to ensure accuracy and brand consistency.
If you have any questions, need further assistance, or want to provide feedback about the WooCommerce AI Content Generator, please don’t hesitate to reach out to our support team. We’re here to help you make the most of the plugin and ensure a smooth content generation experience. Contact us anytime at:support@knowband.com
The WooCommerce ChatGPT Content Generator Plugin is an advanced AI-based tool designed to simplify content management for your WooCommerce store. Powered by advanced OpenAI’s ChatGPT technology, this innovative plugin makes bulk content creation effortless, making it an essential resource for modern eCommerce businesses. With this tool, you can quickly craft engaging product and category descriptions, compelling titles, and SEO-optimized content to improve your store’s visibility and enhance customer satisfaction.
Designed to seamlessly integrate with WooCommerce, the plugin streamlines content generation, saving time and effort for merchants. Thus, utilizing the capabilities of ChatGPT Engines 3.5 and 4.0, helps you deliver high-quality content that not only helps you grow your online store’s performance but also saves time in manual content writing.
Effortless Content Creation: Easily generate high-quality product titles, detailed descriptions, and optimized meta tags, ensuring consistent and professional content across your store while saving valuable time.
4 AI Engine Support: Powered by advanced ChatGPT models GPT-4.0, GPT-4-turbo, GPT-4, and GPT-3.5-turbo, the WooCommerce ChatGPT Plugin caters to diverse content generation needs, making it ideal for businesses of all sizes.
SEO-Optimized Output: Create SEO-friendly content effortlessly to enhance your store’s search engine rankings and drive more organic traffic.
User-Friendly Interface: Designed with simplicity in mind, the plugin offers an intuitive setup process, making it accessible for store admins without technical expertise.
Category and Meta Tags Management: Quickly generate category names and meta descriptions for a polished and organized presentation.
Bulk Content Generation: Streamline operations by processing multiple products at once, perfect for stores with extensive catalogs.
Enhanced Store Operations: Simplify content-related tasks to ensure smooth and efficient product updates, optimizing your store’s overall performance.
Global Flexibility: With support for various languages, including RTL scripts, the plugin accommodates businesses targeting diverse markets.
This streamlined tool empowers WooCommerce store owners to create and manage content effectively, enhancing productivity and boosting online presence.Top of Form
Setting Up the ChatGPT Key for Your Plugin
Follow these simple steps to enable ChatGPT functionalities in your WooCommerce plugin:
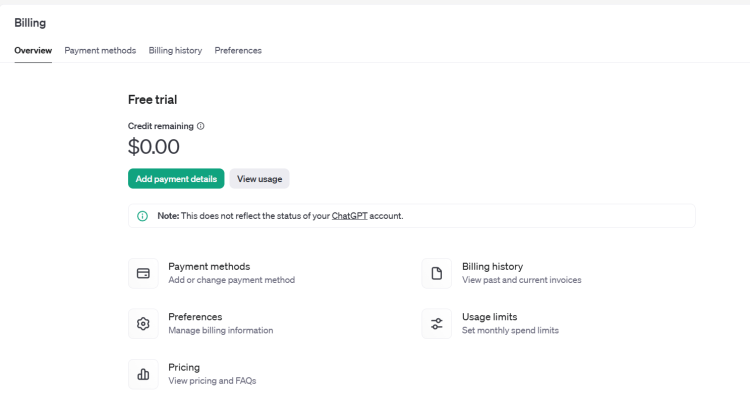
Add funds if necessary to prevent API request failures.
Once you’ve set up your API key and verified your billing, your WooCommerce ChatGPT plugin will be fully operational, ready to streamline content generation for your store.
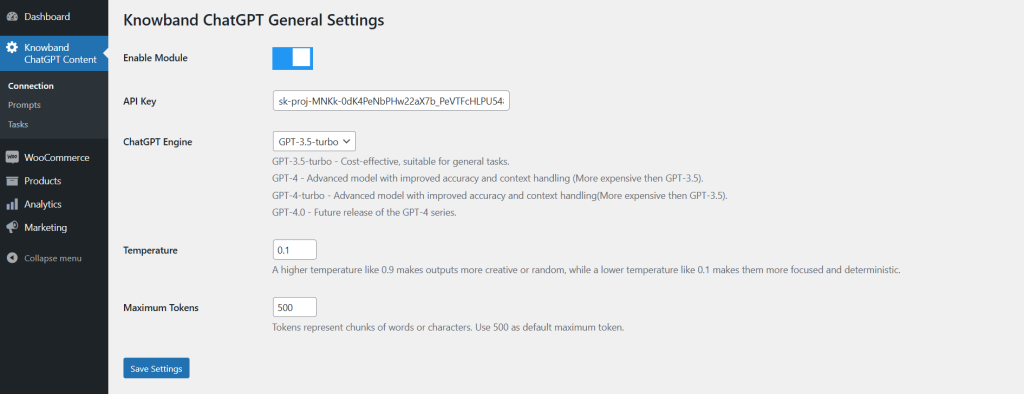
Enable Module: The store admin can activate/deactivate the extension using the following button.
API Key: Insert the obtained ChatGPT API key in this section. Please follow the steps mentioned above to get the ChatGPT API key for your module.
ChatGPT Engine: The plugin comes with 4 powerful ChatGPT engines to streamline the content management on your store.
GPT-3.5-turbo – Cost-effective, suitable for general tasks.
GPT-4 – Advanced model with improved accuracy and context handling (More expensive than GPT-3.5).
GPT-4-turbo – Advanced model with improved accuracy and context handling(More expensive than GPT-3.5).
GPT-4.0 – Future release of the GPT-4 series.
Select the one that suits your needs the best.
Temperature: The following text field accepts values between 0.1 and 0.9. Whereas, the lowest value 0.1 generates more focused and simple content. On the other hand, the highest value 0.9 generates more creative and refined content.
Maximum Tokens: Tokens represent chunks of words or characters. Use 500 as the default maximum token.
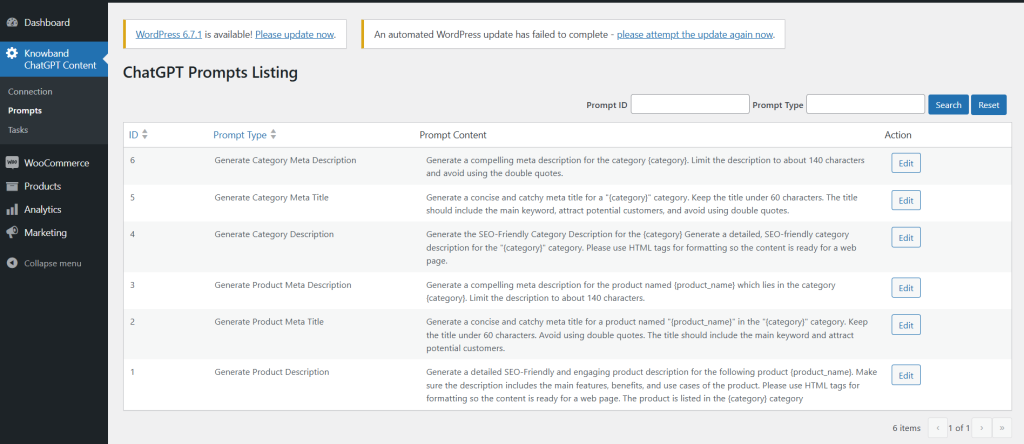
Generate Category Meta Description: Generate a compelling meta description for the category {category}. Limit the description to about 140 characters and avoid using the double quotes.
Generate Category Meta Title: Generate a concise and catchy meta title for a “{category}” category. Keep the title under 60 characters. The title should include the main keyword, attract potential customers, and avoid using double quotes.
Generate Category Description: Generate the SEO-Friendly Category Description for the {category} Generate a detailed, SEO-friendly category description for the “{category}” category. Please use HTML tags for formatting so the content is ready for a web page.
Generate Product Meta Description: Generate a compelling meta description for the product named {product_name} which lies in the category {category}. Limit the description to about 140 characters.
Generate Product Meta Title: Generate a concise and catchy meta title for a product named “{product_name}” in the “{category}” category. Keep the title under 60 characters. Avoid using double quotes. The title should include the main keyword and attract potential customers.
Generate Product Description: Generate a detailed SEO-Friendly and engaging product description for the following product {product_name}. Make sure the description includes the main features, benefits, and use cases of the product. Please use HTML tags for formatting so the content is ready for a web page. The product is listed in the {category} category.
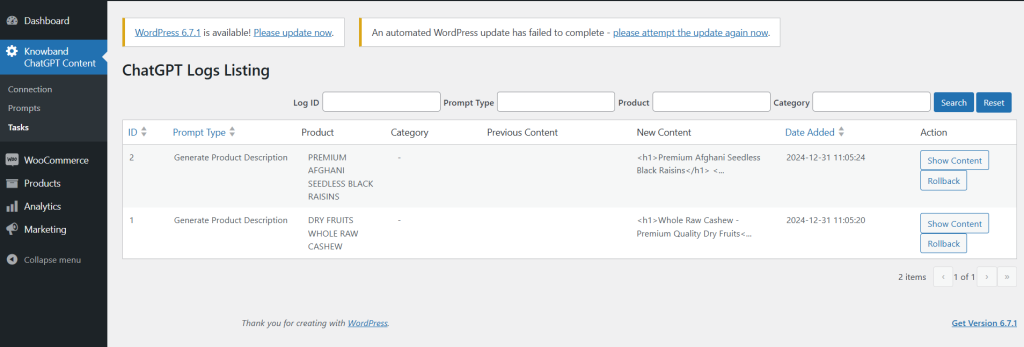
3. ChatGPT Logs Listing
This tab provides the admin with a comprehensive overview of completed tasks. It displays details such as the executed prompt type, product name, product category, previous content, and the newly generated content.
Additionally, the store admin can filter the data using criteria like Filter ID, Prompt Type, and Product Name for easy navigation and organization.
How to Use ChatGPT Prompts
Store administrators can easily utilize ChatGPT prompts by following these steps:
Navigate to Catalog → Products in the admin panel.
Select the desired products from the list.
Access the Bulk Actions tab.
Choose the appropriate prompts to perform actions on the selected products.
This streamlined process enables admins to efficiently generate content for multiple products at once, saving time and effort.
eBay WooCommerce Integrator plugin is the modern solution if you are planning to sell on eBay Marketplace. In fact, eBay is one of the major marketplaces that rule over the entire online business industry. Moreover, not only eBay is known for Business-to-Business Market but also these days eBay is a great platform for individuals for shopping. On top of that, eBay has its wings spread over 30+ countries. Furthermore, merchants around the globe gather on eBay to present their inventory to a huge eBay audience base. Likewise, for making eBay selling easy, the Knowband WooCommerce eBay Integration Module module allows WooCommerce shop owners to sell their products on eBay Marketplace. Therefore, in other simple words, the WooCommerce eBay Marketplace Integration Extension allows the WooCommerce admins to set up a connection between WooCommerce and eBay Marketplace.
1.0 Features offered to WooCommerce Online Retailers:
Moreover, WooCommerce online sellers can list their shop inventory in bulk on the eBay Marketplace. In fact, all thanks to the Profile based listing offered by Knowband eBay WooCommerce Integrator.
The WooCommerce store admins will get an option to add, remove and re-list their eBay listings from their WooCommerce shop backend.
eBay WooCommerce Connector offers an Inventory Management feature to the WooCommerce shop admins.
In other words, WooCommerce online retailers can sell their WooCommerce shop products even with the same stock as they are having on their shop.
eBay WooCommerce API Integrator offers a Log reporting option to the sellers. Further, the same feature will show a detailed activity log to the online sellers.
WooCommerce eBay Integrator allows the WooCommerce admins to manage their eBay orders right from their WooCommerce shop back end.
WooCommerce eBay Integration Plugin allows the WooCommerce merchants to validate order hooks to hook product inventory data on both eBay and WooCommerce.
If you are planning to sell on eBay and are just hesitating about the commission charges, we got you.
KnowbandWooCommerce eBay Integration Extension offers a unique feature of price variation. In fact, by using the same, WooCommerce online sellers can sell their shop products on eBay at an increased price.
2.0 Installation Guide:
After completing the purchase, all the WooCommerce admins will have to install and connect the Knowband WooCommerce eBay Integration Plugin with eBay Marketplace.
In the downloadable package, the store admins will get 2 files.
Zip File (Containing Source Code of WooCommerce eBay Marketplace Integration).
User Guide.
Here are the steps to install the eBay WooCommerce Integrator.
Unzip the zip file containing Files and Folders related to the source code of the module.
Copy the same into the root directory of your WooCommerce back end.
And that’s all. The WooCommerce store admins can find the Knowband eBay WooCommerce Connector at their shop back-end just by following the above-mentioned steps.
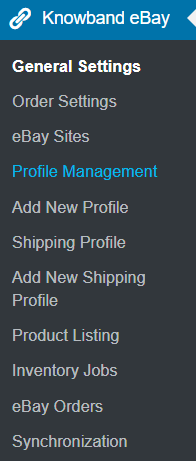
After Installing the eBay WooCommerce API Integrator, the admins can find the module in the side menu of their WooCommerce online shop as mentioned in the below image.
3.0 Connection Guide:
It is required to set up the connection between eBay Marketplace and WooCommerce shop before starting to sell on the Marketplace. In fact, now, WooCommerce online sellers will have to follow some steps by step guidelines.
Here is a detailed description of them.
3.1 eBay Seller Account Set Up:
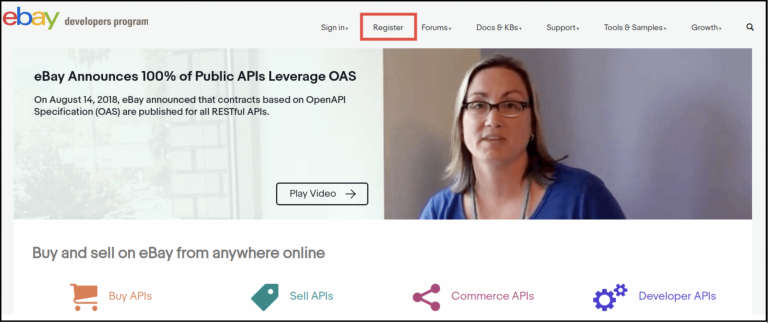
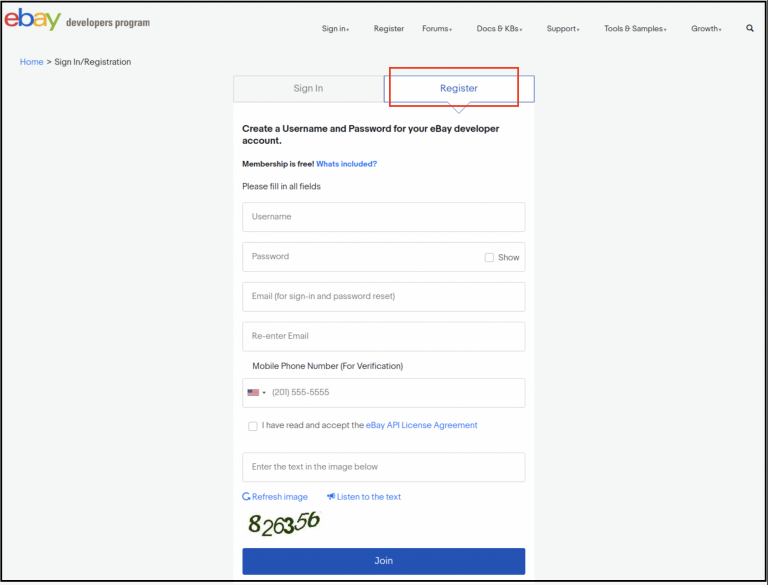
Before putting selling on eBay on the list, it will require an eBay seller account. Moreover, individuals can create their eBay seller account by following the steps mentioned here.
After entering all the valid data, you will be headed to the join option.
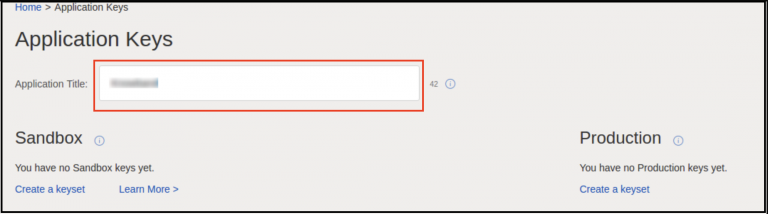
In this very next step, eBay will redirect you to the application creation page.
In the newly opened form, enter the application name and click on create a key set.
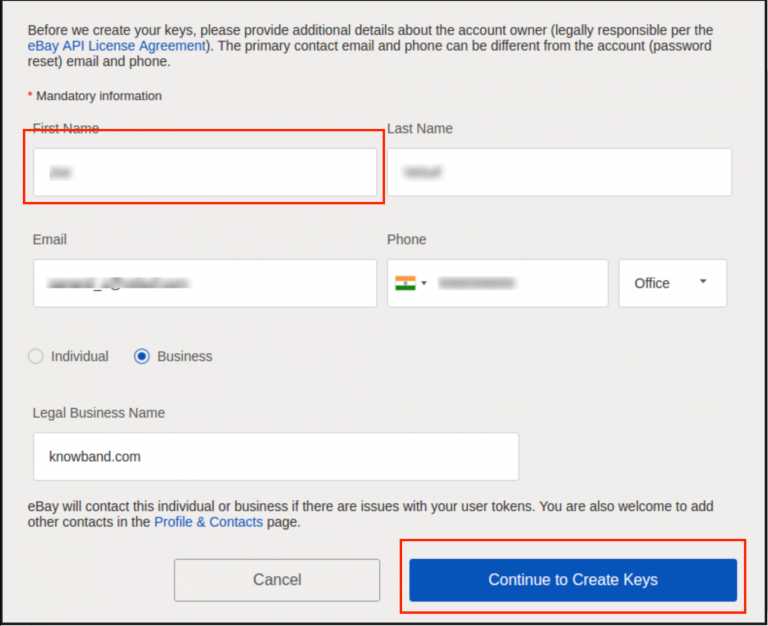
Fill out the appeared form and click on continue to create keys.
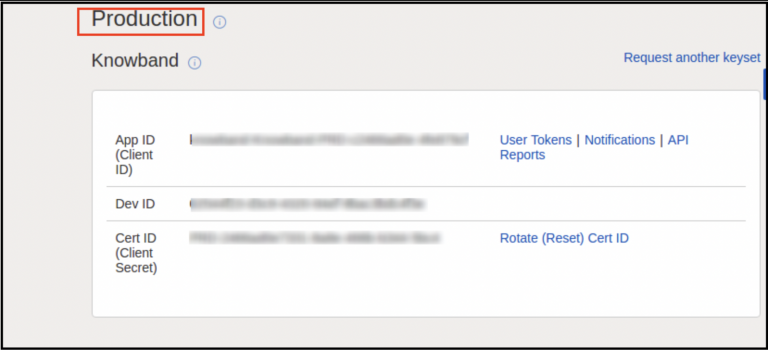
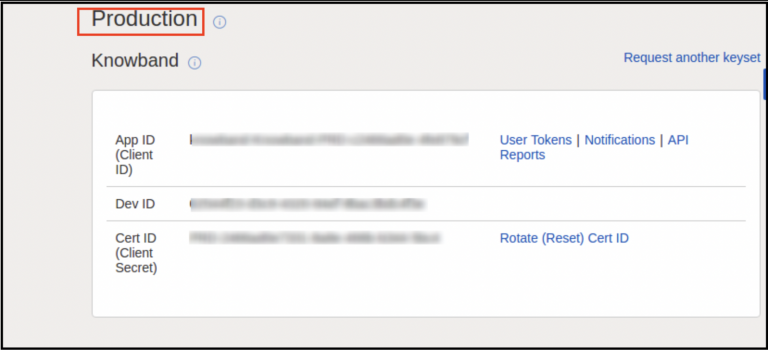
You can find the Application ID, Developer ID, and Client Secret on this page.
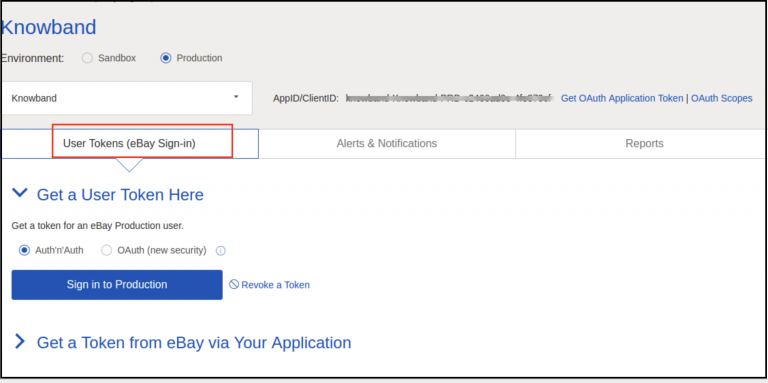
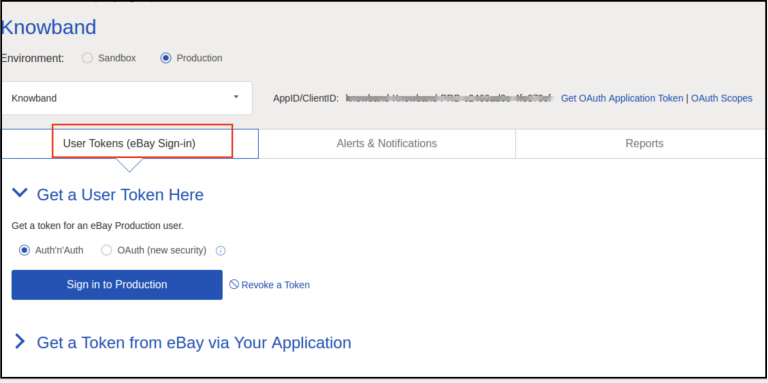
For the further step, you will require to generate the user token. Click on the button mentioned in the below image.
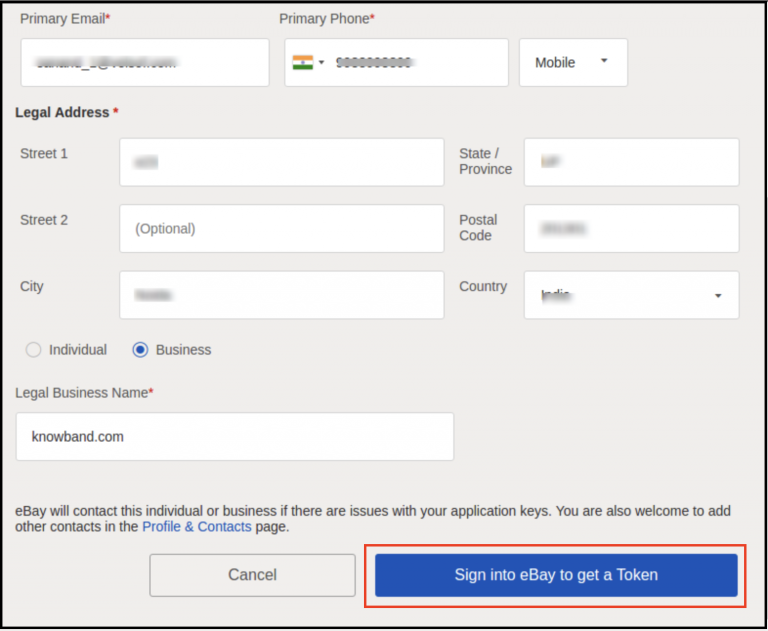
Click on sign-in to production for getting the token.
Fill in all the validated data, and click on sign-in to get a token.
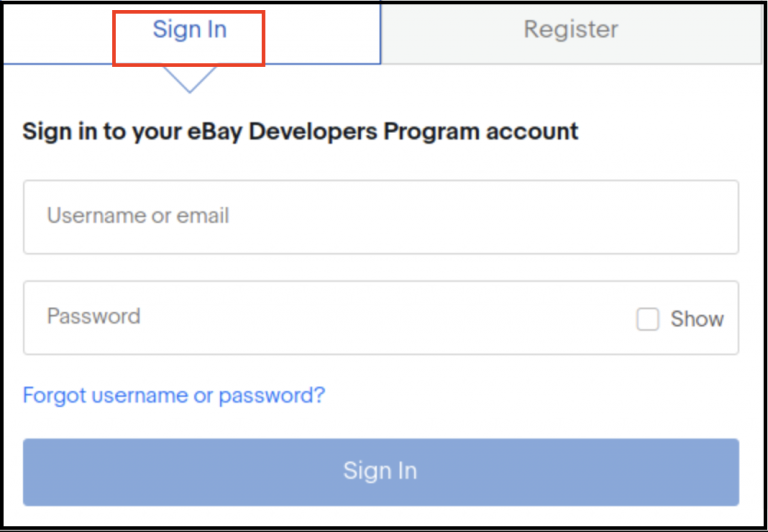
After clicking on the above-mentioned option, the users will redirect to eBay sign-in. Further, if you are already having an account, log in with the same, or you can always register a new one.
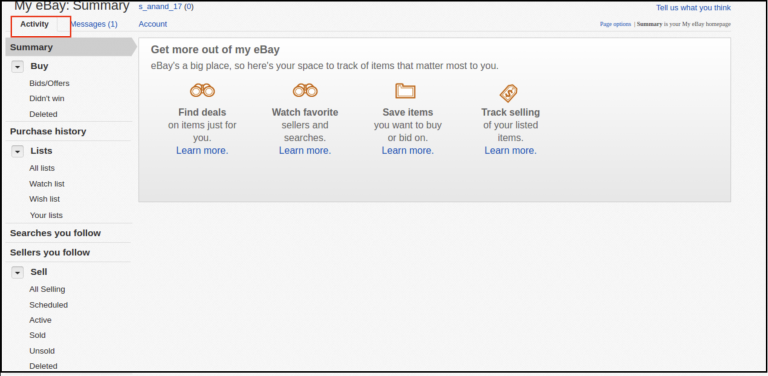
All done. If everything went nice and perfect, you will be headed to eBay.
4.0 Token generation via Your Application:
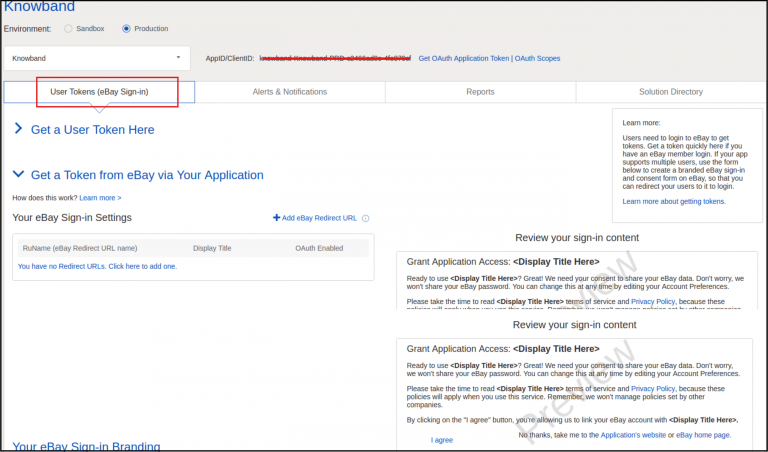
For this option, you will have to click on the user token in the below image.
On the appeared page, click on Get a token from eBay via your Application.
You will find here the option for adding an eBay redirect URL. Further, click on the same, fill out the form and save.
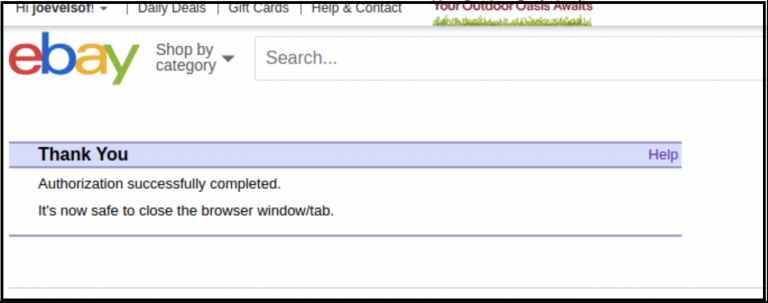
Done. All you need to do now is click on I agree from the right side of the form. Moreover, if you have followed the process completely, you will receive a successful authentication message.
5.0 Default Settings:
In the initial phase, all the products will have default categories while listed on eBay.
2. By default, the online sellers will get a free shipping option with the following detail.
Shipping Service: UPS Ground.
Shipping Type: Flat.
Later the sellers can also change the same from eBay Account.
3. The sellers will find the return policy added by default.
Refund Option: Money Back.
Days: 30 days.
Description: If you are not satisfied, return the item for a refund.
Shipping Cost Paid By: Buyer
Note: The online sellers can also change the same later from their eBay Accounts.
6.0 Admin End of Knowband WooCommerce eBay API Integration Module:
WooCommerce online sellers will have options to manage their eBay business with the following options offered by WooCommerce eBay Integrator Extension.
General Setting.
Order Setting.
eBay Sites.
Profile Management.
Add a new Profile.
Shipping Profile.
Add a new Shipping Profile.
Product Listing.
Inventory Jobs.
eBay Orders.
Synchronization
Not only the WooCommerce online vendors can manage their eBay shop with the help of these tabs but also they can do many more.
Let’s find out, what these tabs are designed for.
6.1 General Settings:
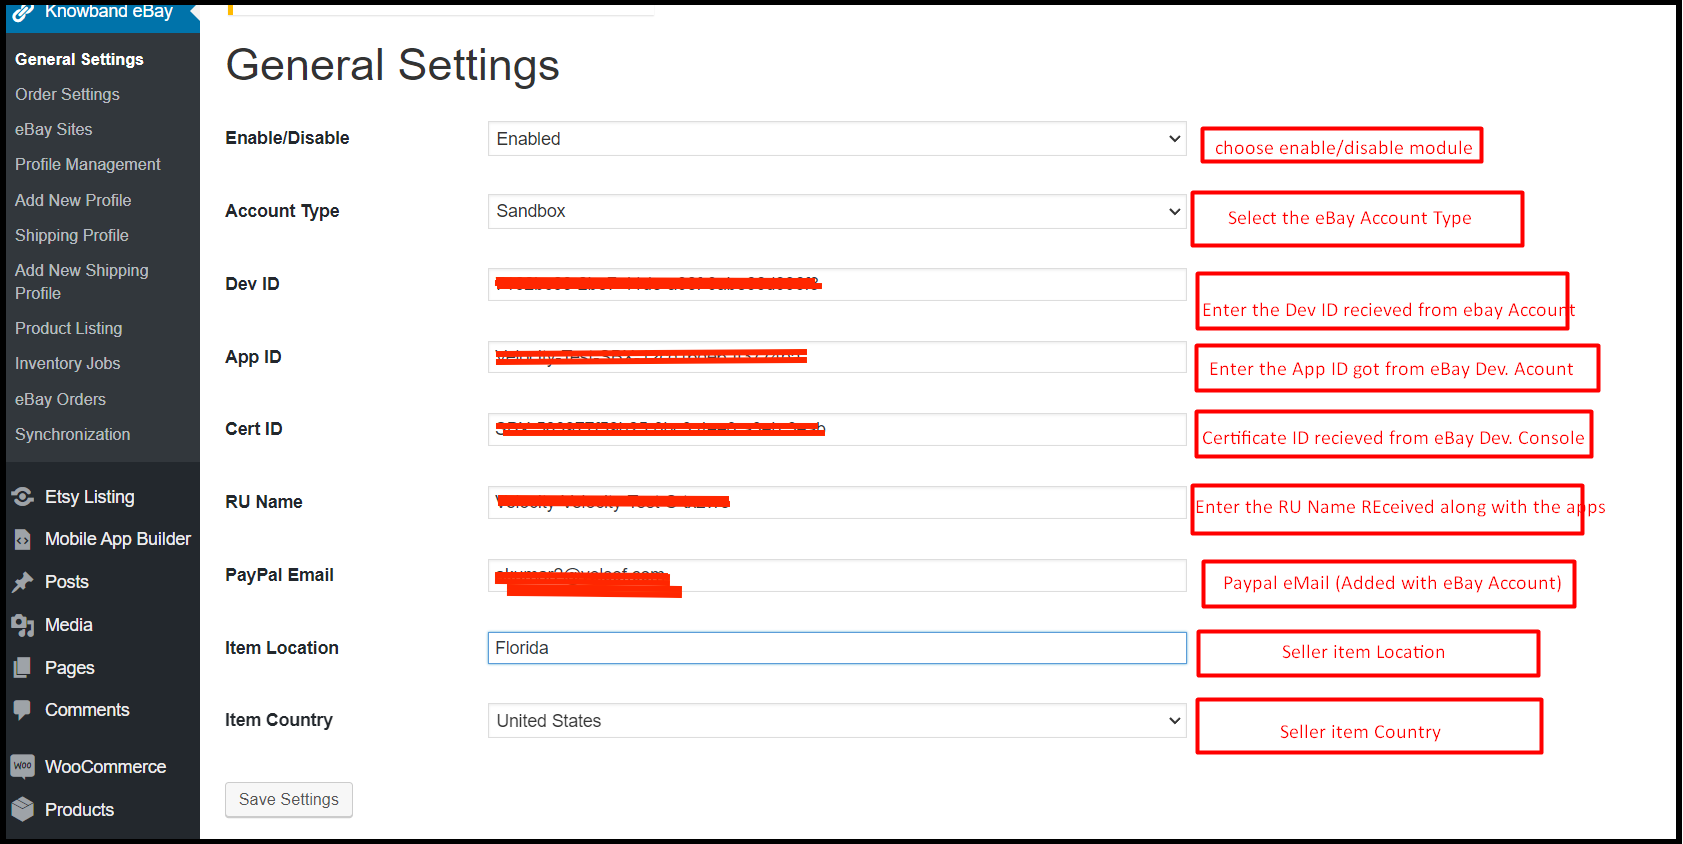
In this section, the WooCommerce admins will get options for entering the essential details for the connection. Further, you will find the General setting tab of the Knowband WooCommerce eBay Integration Module as mentioned in the below image. In fact, to set up the connection between eBay and WooCommerce shop, the admins will have to fill in the data in all of the mentioned fields.
Enable/Disable: By turning on this option the online WooCommerce sellers will be able to connect or disconnect their shop from eBay.
Account Type: This option is provided for choosing the account type. In case you want to test the module first, you can always choose the option of a sandbox. However, choose the production option from the dropdown list.
ID: In this field, enter the dev ID. Generated on the eBay developer console (Follow the steps mentioned above to get the Dev. ID).
Cert ID: Enter the cert. ID. In this field, that was generated while generating the token.
RU Name: Likewise, for App ID and Cert ID, the sellers can find their RU name also on the eBay Developer Console.
PayPal Email: In this field, enter the PayPal email which you are using on your eBay seller account.
Item Location: This field was designed for choosing the item location. Furthermore, enter the location from where you will be managing to ship for eBay orders.
Item Country: For item location, enter the item country you want to choose for shipping handling.
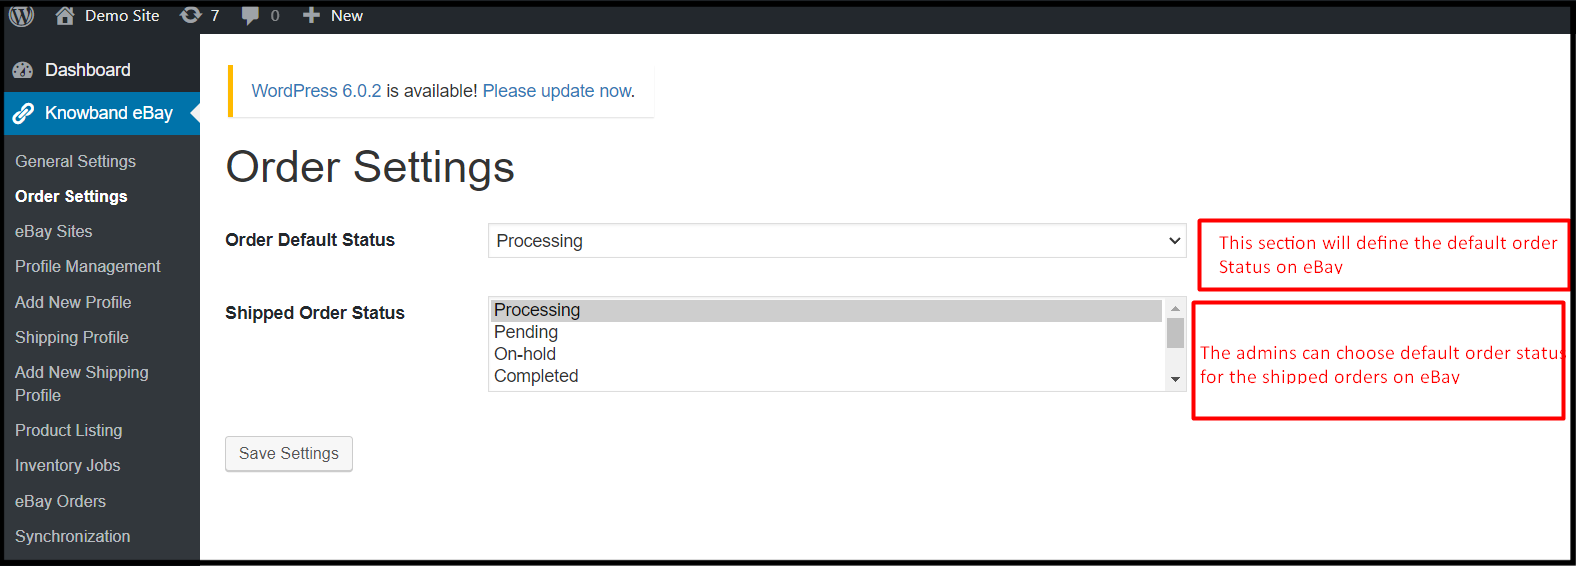
6.2. Order Setting:
Knowband WooCommerce eBay Marketplace Integration Extension offers a separate tab for order management. Further, in this tab, the WooCommerce store admins can select the default order status for the default orders and shipped orders.
Order Default Status: The default order status stands for the first order status the online sellers want to show on eBay as soon as they get an order.
Shipped Order Status: The WooCommerce shop admins can select the order statuses for the shipped products.
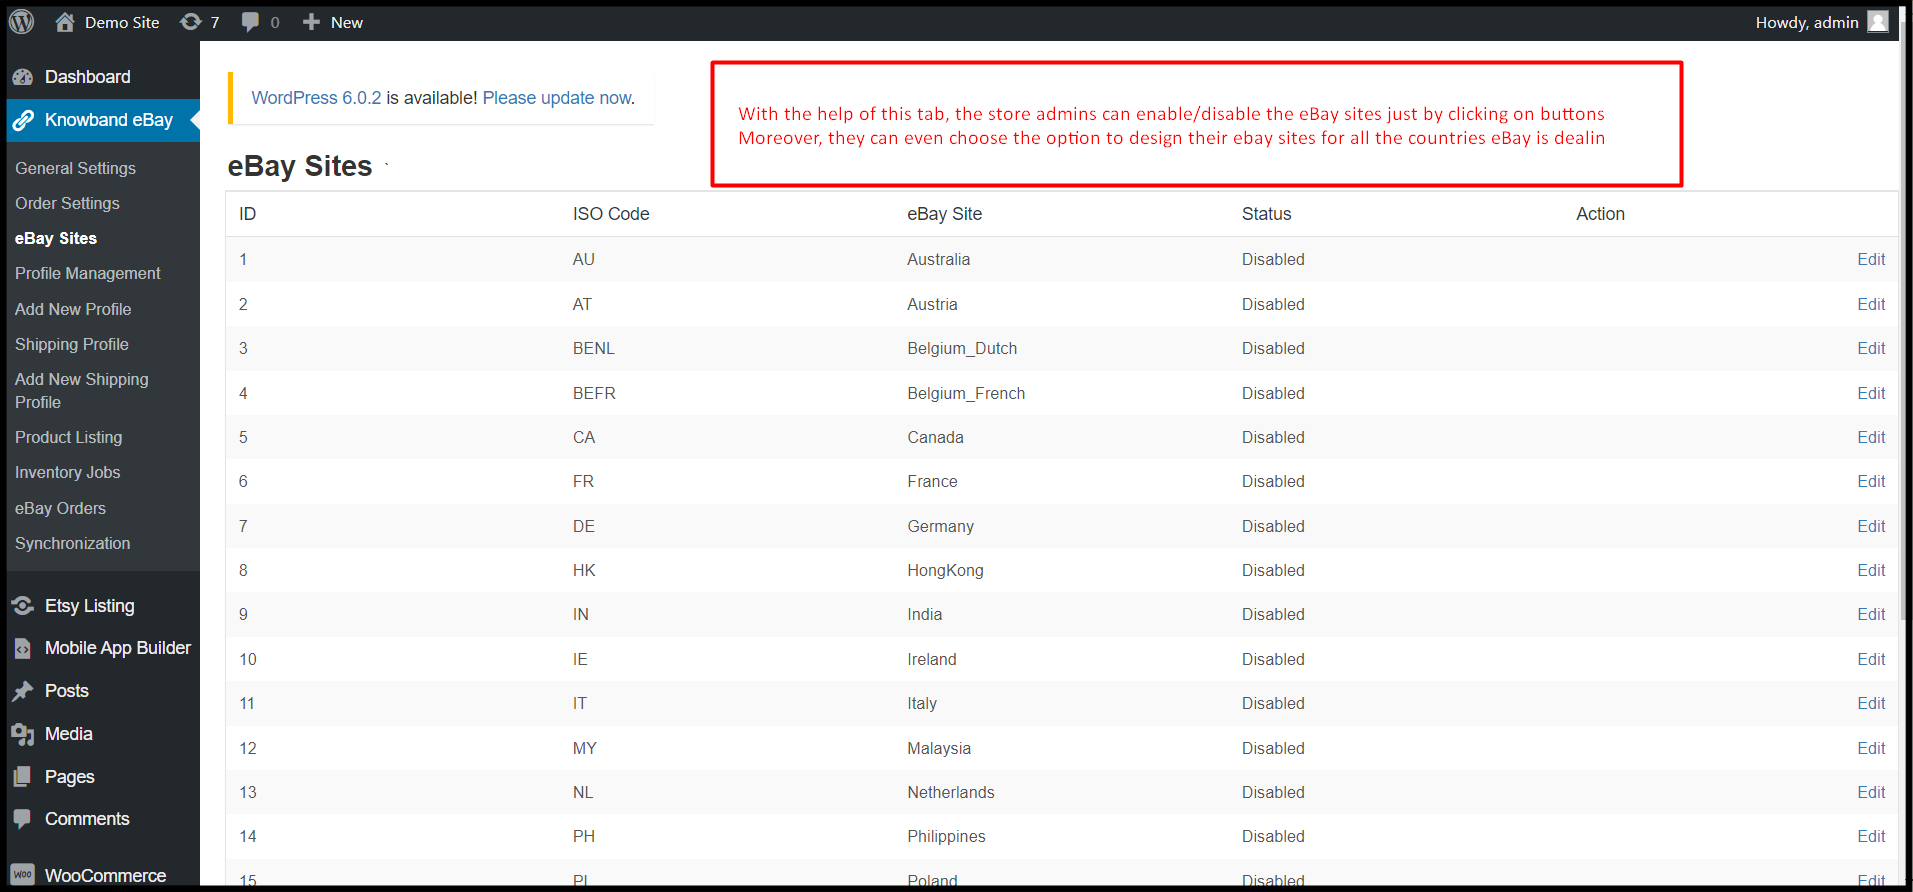
6.3 eBay sites:
Not only the WooCommerce eBay Integration Plugin allows the sellers to list their products on eBay. However, also they can create various eBay sites from the module backend. In fact, as shown in the below-described image, the WooCommerce store admins can enable as many eBay sites as they want for selling their products in multiple countries.
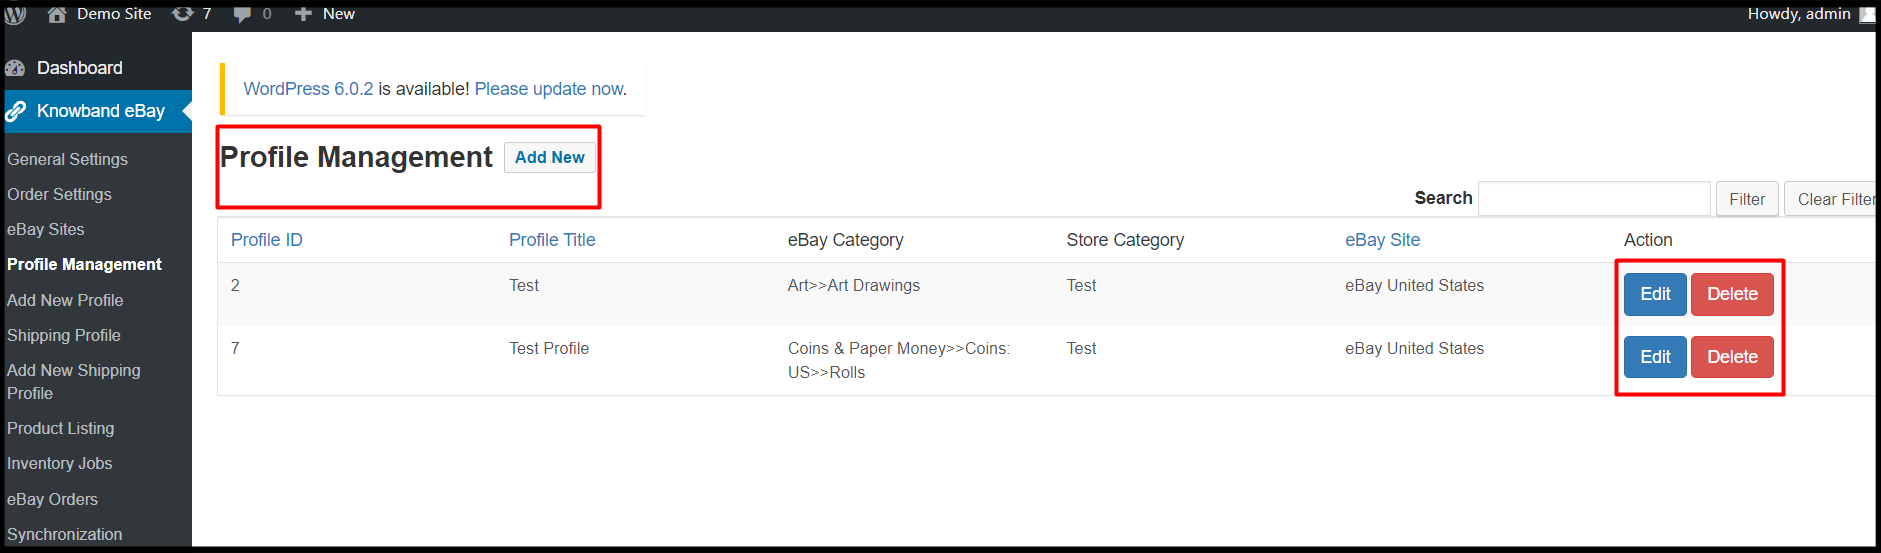
6.4 Profile Management:
The WooCommerce online vendors can design their eBay profiles right from their WooCommerce back-end. Moreover, Knowband eBay WooCommerce Integrator allows the admin to edit and delete the created profiles even after profile creation.
Edit: Choosing the following option will allow online sellers to edit their already created profiles.
Delete: If you want to delete the eBay profile, just a single click on this button will erase all the data from that particular profile.
6.5 Add New Profile:
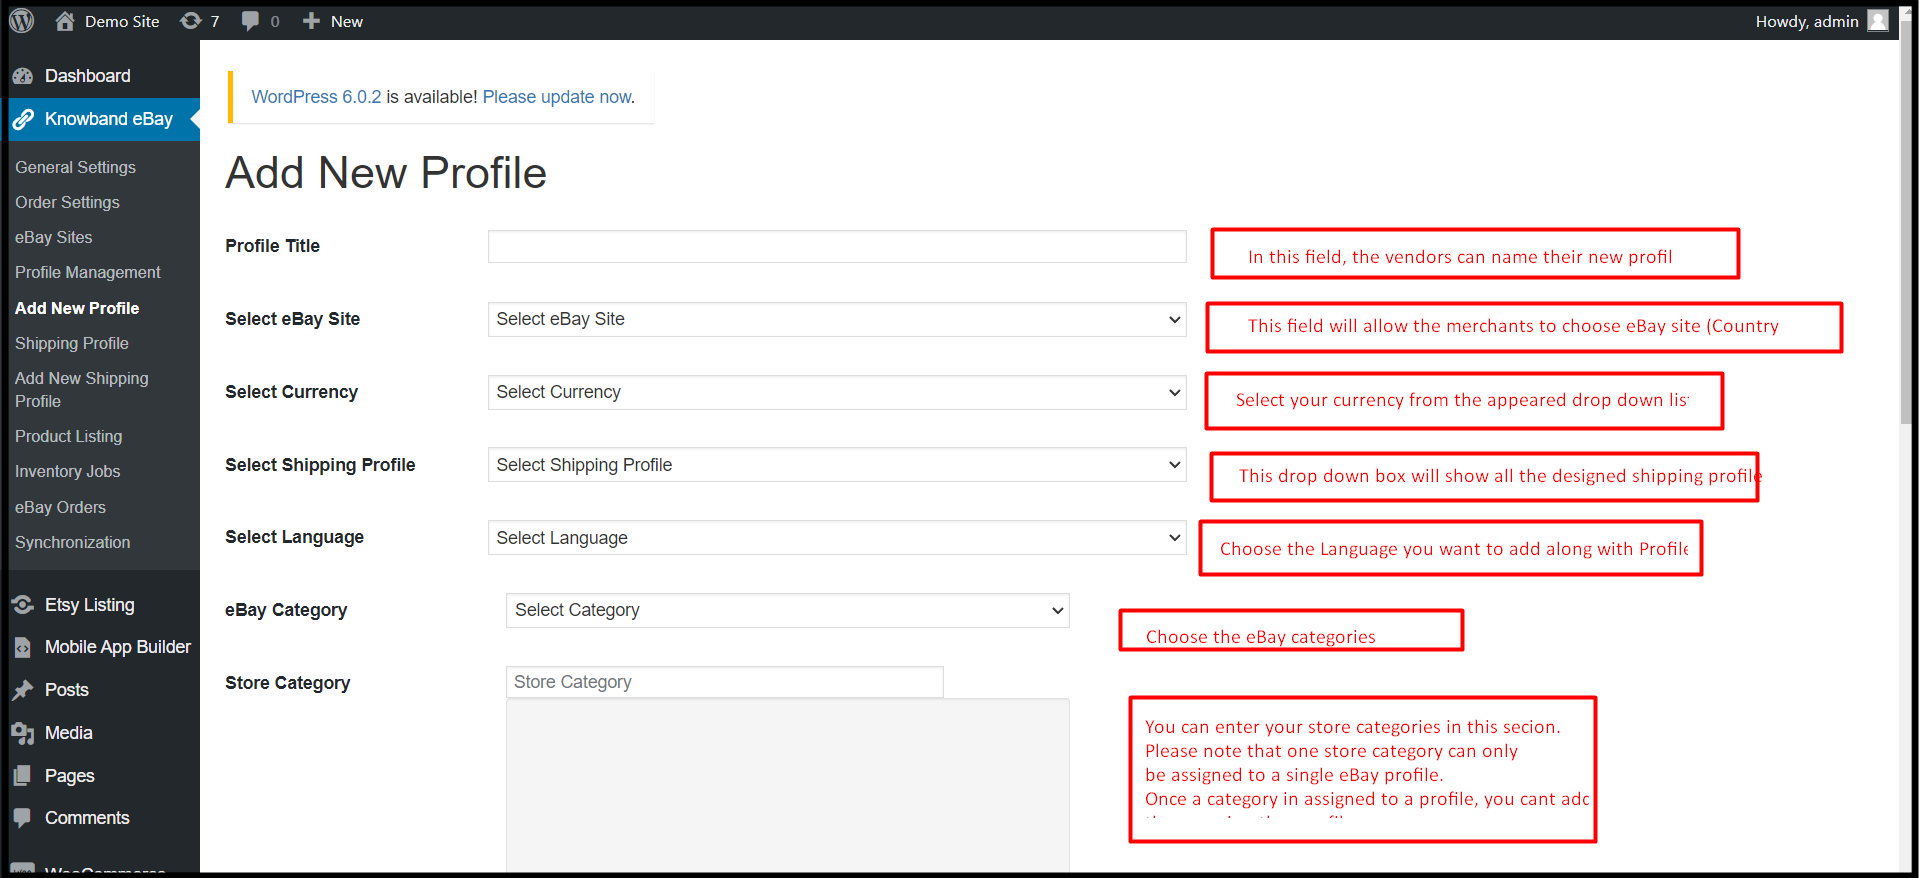
In this very section, the WooCommerce eBay Integrator module offers admins to create their eBay profiles. In fact, not only the store admin can create their eBay profiles but also if they want to, they can also add modifications in the same at a later time.
Profile Title: Enter the most suitable eBay profile title in the following field.
Select eBay Sites: WooCommerce store admins can add eBay sites in this field.
eBay Category: Admins can choose the eBay categories from the appearing drop-down. In simple words, they can map for which eBay category, their profile will appear.
Select Currency: Choose the currency you want to deal in on the eBay Marketplace.
Select Shipping Profile: In this drop-down field, all the created shipping profiles will appear. Moreover, the admins can choose any of the shipping profiles for their eBay profile.
Select Languages: The WooCommerce store admins can choose the languages they want to go on eBay with. Moreover, for every eBay Profile, they can choose a different language.
Store Category: The WooCommerce store admins can choose their store categories for the profile. Moreover, they can add as many store categories as they want into a single profile. Furthermore, once a category will be assigned to a profile, admins cannot use the same in other profiles.
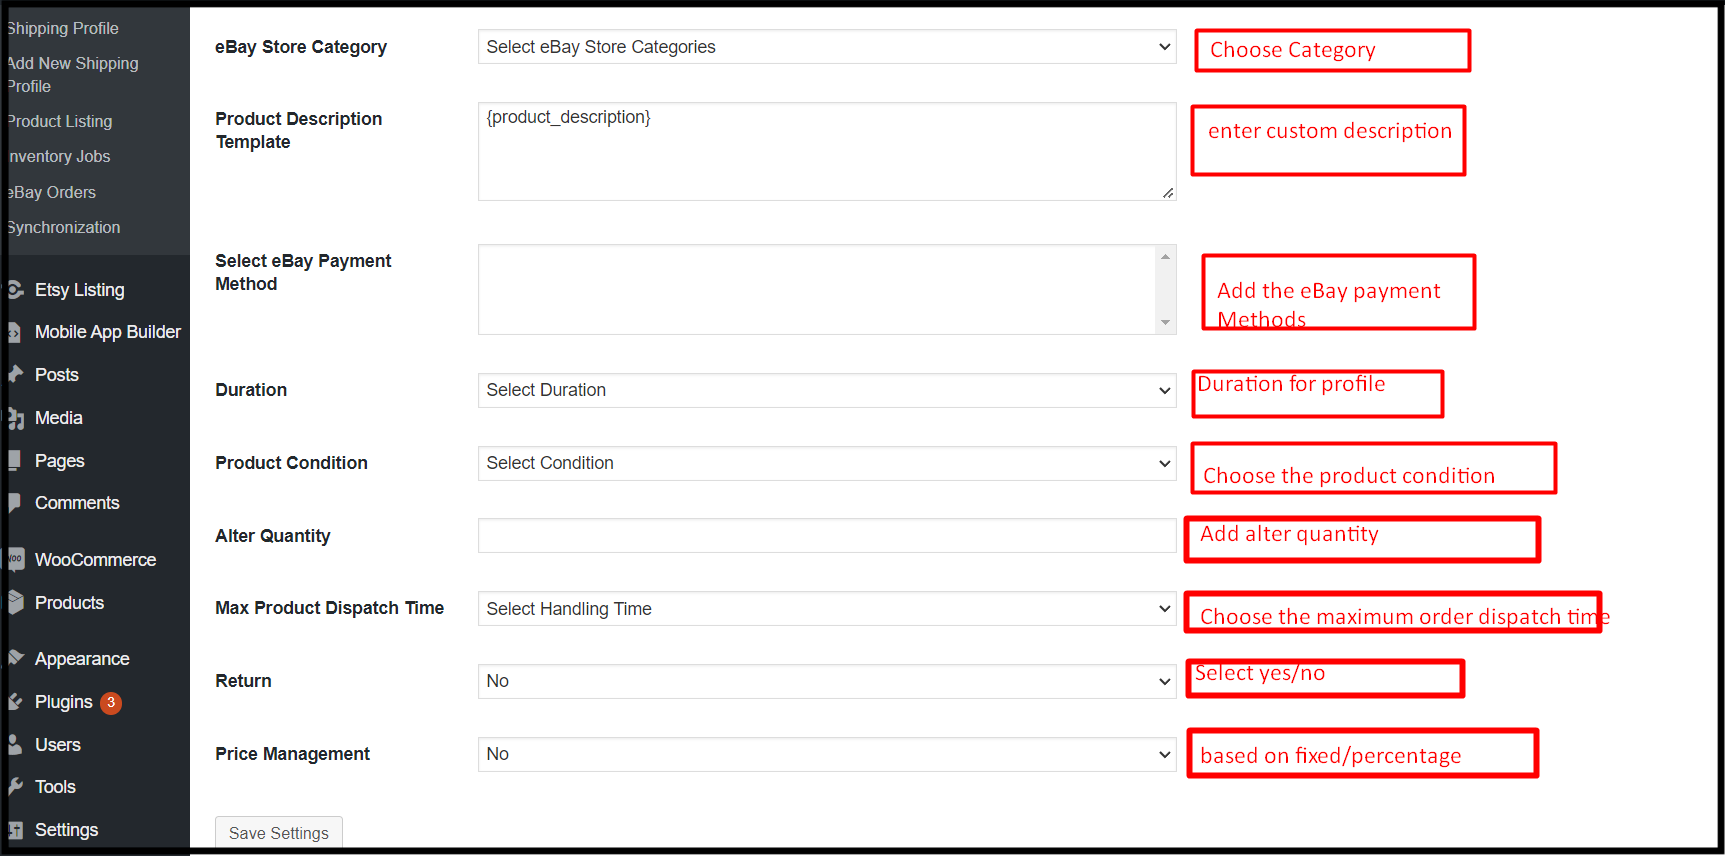
eBay store Category: Admins can choose eBay store categories from this option.
Product Description Template: The admins can design custom product description templates for their eBay listings.
Select eBay Payment Method: Choose the eBay Payment Method from the help of this option.
Duration: The store merchants can choose the duration for the profiles with the help of the following option.
Product Condition: From the appeared dropdown, like eBay, the vendors can choose the product condition. For instance, they can select the options such as used, new, old, etc.
Alter Quantity: Using the following option, WooCommerce online sellers can list their WooCommerce inventory with altered quantity on eBay Marketplace.
Maximum Product Dispatch Time: Enter the maximum product dispatch time on eBay in the following text field.
Return: This option will allow the sellers to enable/disable return management. Moreover, if the sellers want to enable returns on their listings, the eBay WooCommerce Connector allows vast options for return management.
Price Management: This feature helps the admins to stand against the eBay commission. Furthermore, not only the WooCommerce sellers can increase their listing price based on percentage but also can increase with a fixed value amount.
6.6. Shipping Profile:
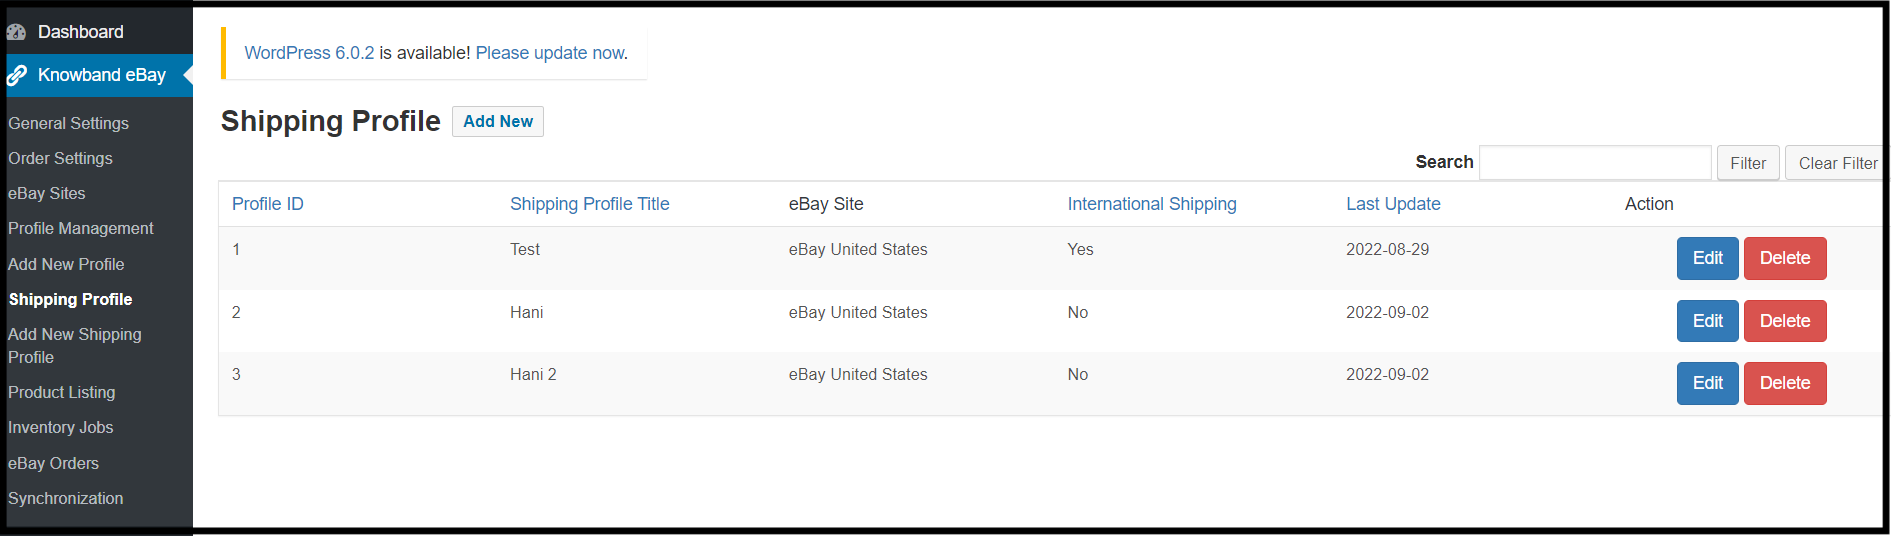
The next tab Knowband WooCommerce eBay Connector addon offers shipping profiles. Moreover, WooCommerce online sellers can choose the shipping profile they want to assign to the eBay Profiles. Also, they can even edit or delete the already-added shipping profiles.
6.7. Add a New Shipping Profile:
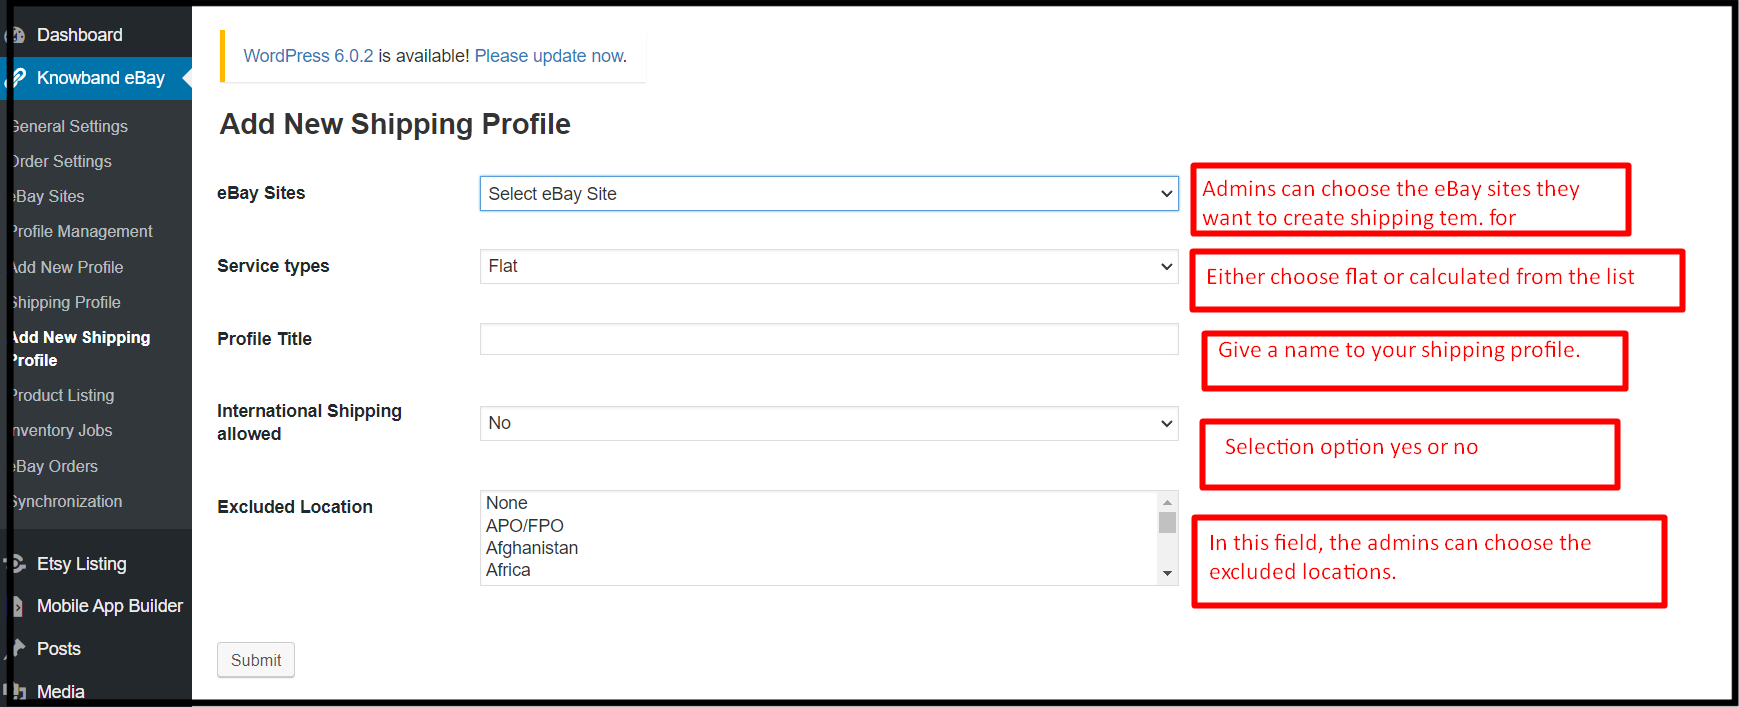
In add new shipping profile tab the WooCommerce online vendors will get an option for adding new shipping profiles. These shipping profiles can later be used for eBay order management.
eBay Sites: The WooCommerce store admins can choose eBay sites from the appearing dropdown.
Service Type: In this option,eBay WooCommerce API Integrator offers 2 options, flat and calculated. If you want to charge a flat fee from the customers you can choose the flat. Moreover, if you are planning to charge according to the locations of customers, you will also have the option for the same.
Profile Name: The store retailers can give a reasonable name to their shipping profile by entering values in this field.
International Shipping Allowed: This is a Boolean button that allows WooCommerce sellers to choose the yes and no options. The admins can allow/disallow international buyers from completing purchases.
Excluded Locations: The admins can prohibit the users for special locations from orderings the products. All they need to do is to enter the locations they want to exclude from their selling list.
6.8. Product Listings:
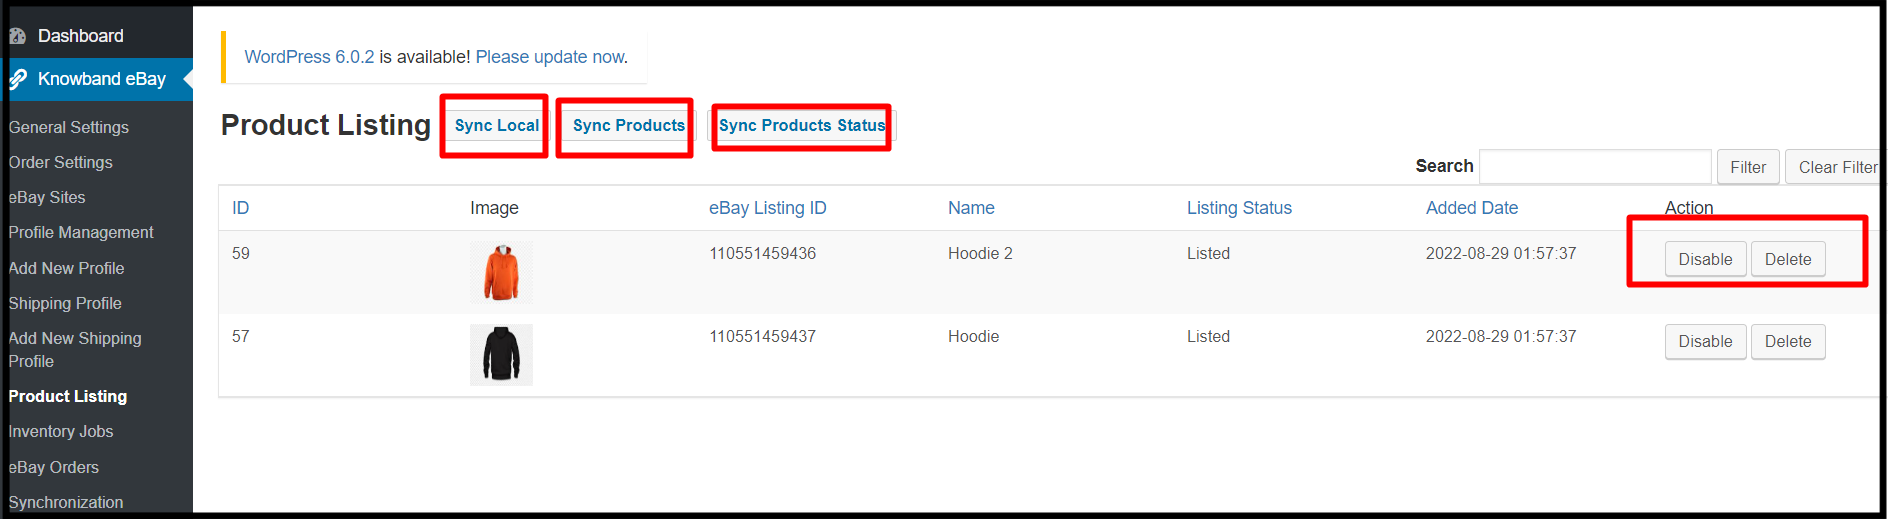
Knowband WooCommerce eBay API Integration Module offers a different tab for managing product listings. In this tab, the store admins can keep track of all of their eBay listings and can manage the same easily.
Sync Local: The admins can locally synchronize by hitting the same button.
Products Sync: Online WooCommerce sellers can synchronize products with the help of the sync product button.
Sync Product Status: In case you have added or removed a new product on eBay Marketplace, you can check the same here if that is listed or not.
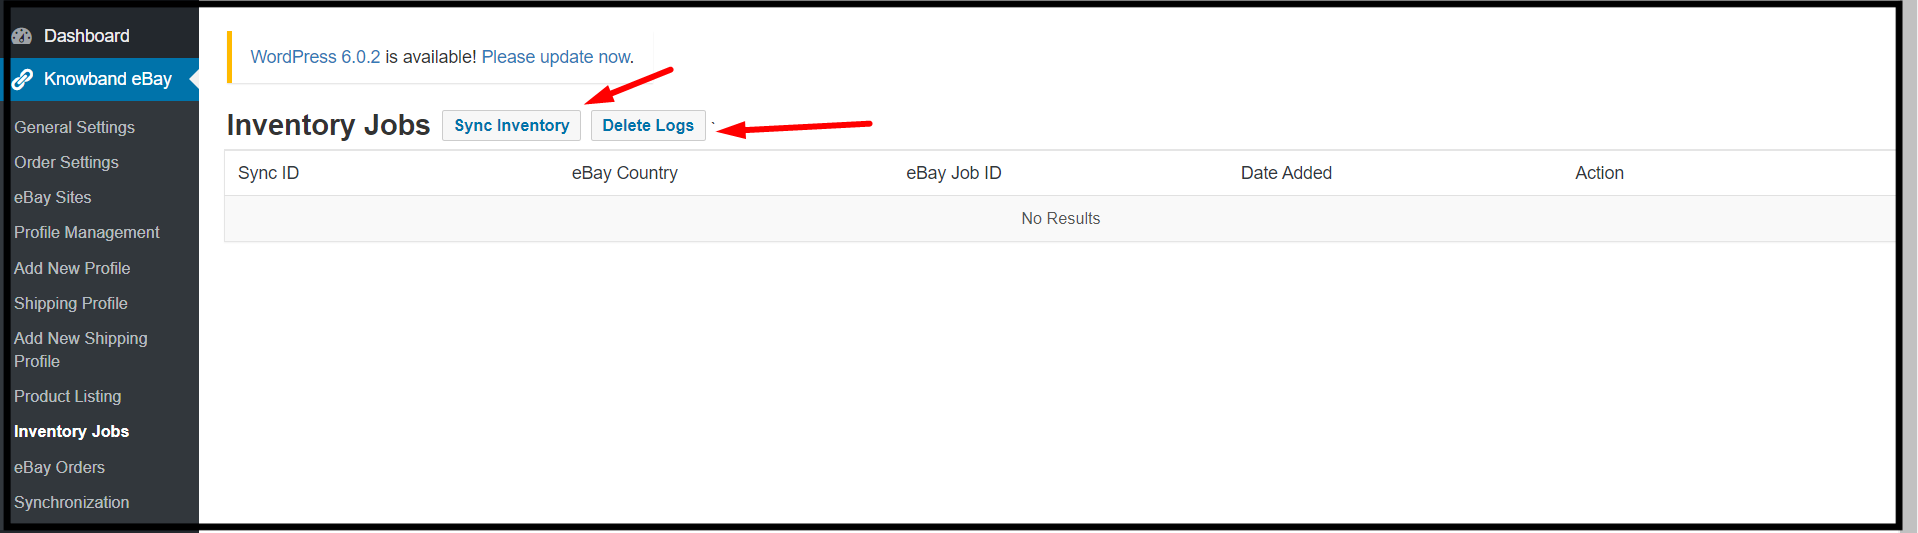
6.9. Inventory Jobs:
In this tab offered by the Knowband WooCommerce eBay Marketplace Integrator addon, the admins can keep track of their data. Moreover, they can check eBay inventory and logs. Further, in simple words, the back store admins can have a look at all of the activities in the inventory jobs table.
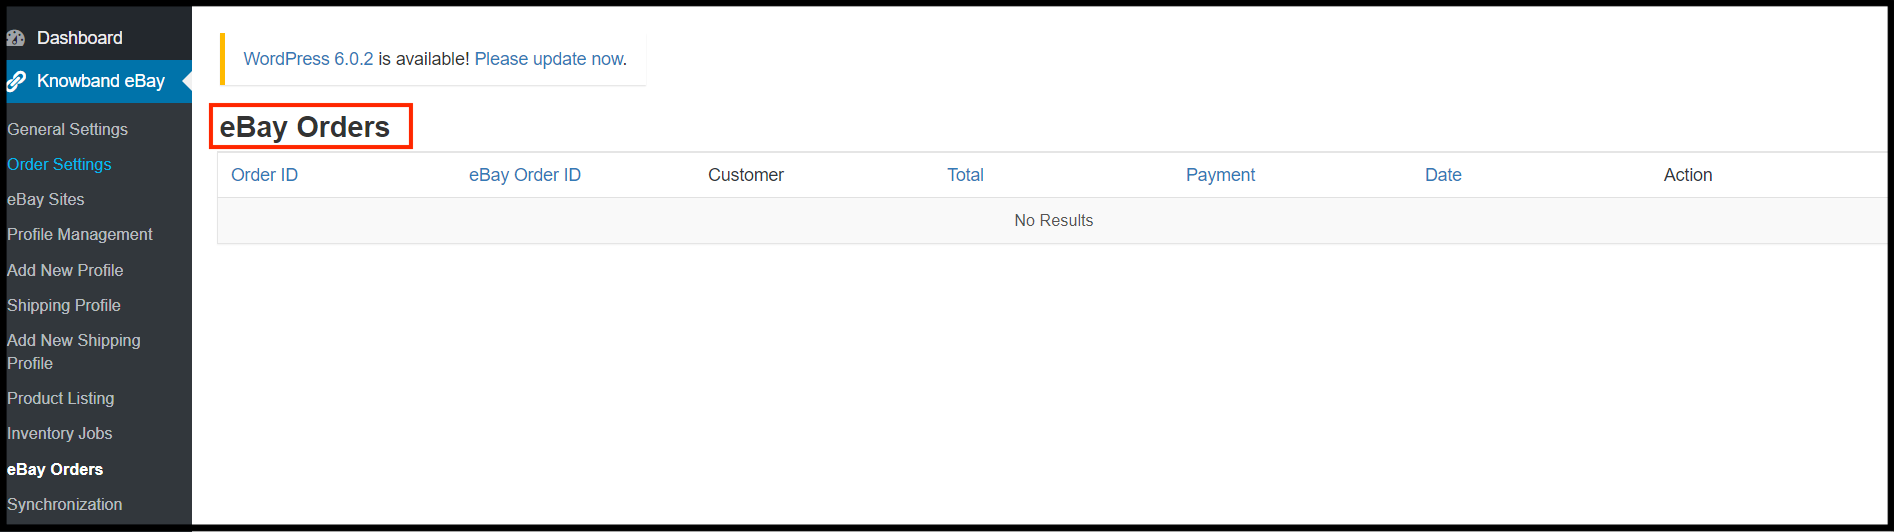
6.10. eBay Orders:
This particular tab is specially designed for keeping up track of eBay Orders. In fact, not only the WooCommerce admins can keep the track of their eBay orders from this tab but also, they can even update the same.
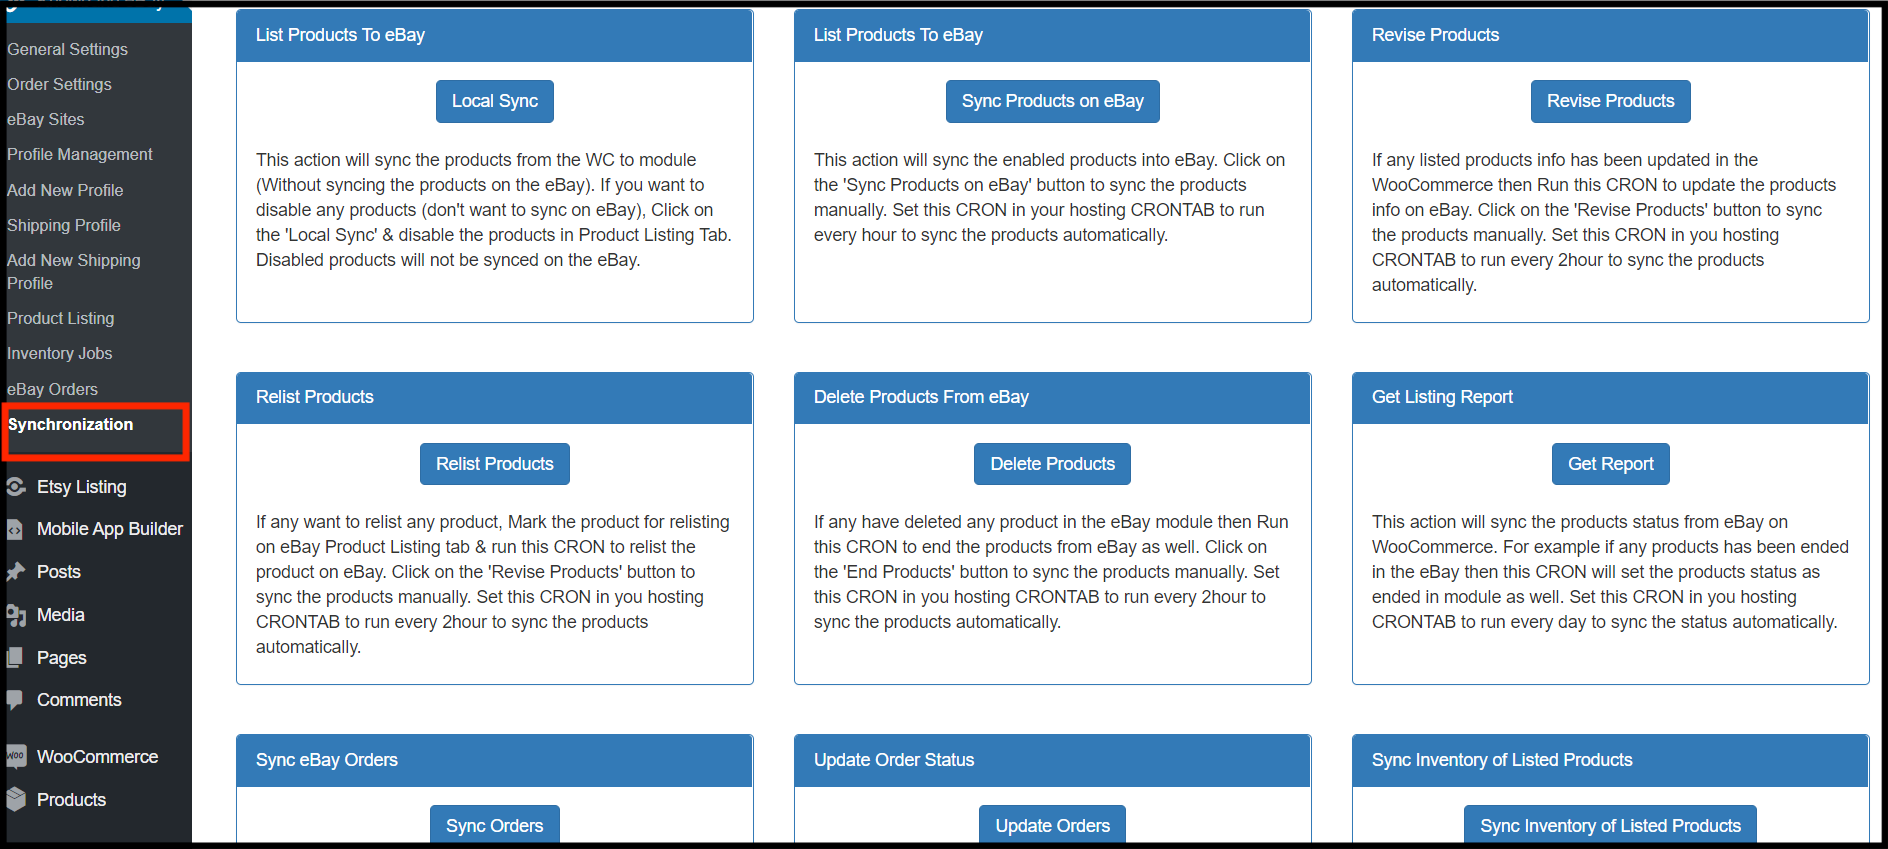
6.11. Synchronization:
The following tab is loaded with one-tap cron buttons. Knowband WooCommerce eBay Integrator offers the following tab to take care of all of the manual selling essentials in automated ways. Further, not only the sellers can use this cron with a single click but also the same works on most advanced API-based technologies.
Local Sync: This cron button will load the module with all of the products from the WooCommerce shop. Furthermore, this button could come in handy for you if you want to edit a profile before publishing it to eBay.
Sync Products on eBay: The following cron button will synchronize the store products on the eBay Marketplace.
Revise Products: Do you have recently updated any product information on your WooCommerce store and want to update the same on eBay? In fact, the revise products button simply updates the details of the product on eBay Marketplace within no time.
Relist Products: When you wish to relist a product on the eBay Marketplace, you can use the Relist Products cron.
Delete Products: This feature is useful if you want to remove a product from eBay Marketplace after removing it from the module.
Get Listing Report: The listing Report cron will load all the listing reports and will show them in the admin panel.
Sync Orders: Synchronize Orders button will help the admins to get all the eBay orders on the WooCommerce shop back end.
Update Order: Synchronize Order Status cron button will update the modified order status on the eBay Marketplace.
Sync Inventory of the Listed Products: The stock levels of all the items posted on the eBay Marketplace will be updated by this cron. In fact, running this cron will automatically adjust the stock to 99 on both eBay and WooCommerce if you have 100 on both sites and one product sells through either one.
In the End,
Since more than ten years ago, Knowband has been offering services to its cherished community of internet sellers. Further, all we have accomplished in this lovely trip is a family of more than 80,000 content online retailers. In fact, a smooth connection between an online seller’s business and the eBay Marketplace is also made possible by our most sophisticated WooCommerce eBay Integration module.
Get fully Flutter Android & iOS apps for your WooCommerce website & start selling your products on Mobile Apps!
1.0 Introduction
This is the user manual for WooCommerce Mobile App Builder’s cutting-edge and ready-made Flutter mobile app solution. This eCommerce website plugin was created and expertly crafted to help you create flawless and feature-rich Android and iOS shopping apps.
1.1 Introduction to WooCommerce Mobile App Builder
The most sophisticated and automated way to expand your online business to mobile platforms is with the WooCommerce Mobile App Builder. It turns your entire website into a mobile app with features and enables you to sell products on mobile devices in addition to the traditional website. The app’s features and operation perfectly mirror those of the website and are compatible with both Android and iPhone devices.
The pre-configured framework used by our WooCommerce Mobile App Builder was created by experts and professionals to create two Flutter eCommerce apps (Android and iOS). The apps can bring every item in your store to the user’s fingertips and increase sales and revenue. Therefore, this is your best opportunity if you are a WooCommerce store merchant looking for a complete mobile app solution. To get complete information on WooCommerce Mobile App Development, read the article in its entirety.
Additionally, the Multi-vendor Marketplace plugin is fully compatible with our WooCommerce Mobile App Builder extension. The same Mobile Apps can be used to access the entire marketplace listing. Even better, we provide a bundle that includes both WooCommerce Advanced Marketplace With Mobile App and WooCommerce Multi-Vendor Marketplace.
Moreover, You would be persuaded to choose this Flutter app solution if you considered the following advantages of WooCommerce Mobile App Maker:
A mobile app solution with no coding.
A welcoming administrative panel with full access.
Free assistance for three months
Completely Flutter remedies (Android & iOS)
Synchronization of your apps and website at all times
Extremely flexible in terms of design and operation.
Uses practical marketing tools to boost user engagement.
Increases your store’s revenue and traffic.
Top Qualities of the WooCommerce Mobile App Builder:
The following is a list of some of the major features that your apps with WooCommerce Mobile App Builder will include:
The layout of the home screen can be changed (Complete Flexibility)
Store Identities
(24/7) WhatsApp Chat Support
OTP and fingerprint login for both tablets and smartphones with Google and Facebook
Support iOS 9 and subsequent iOS versions, as well as Android 4.2, and up versions support.
automatic inventory updates.
Numerous Font & Color Options
bilingual and RTL (Right To Left)
Support All Product Types
Support Multi-currency
Support Website Shipping Method Supported on Apps
Support Website Payment Method
Push Notifications indefinite
Options for Product Social Sharing
Numerous options for sorting and filtering
Wishlist Functionality
Internet coupons or vouchers backed by apps.
Checkout Screen with Fewer Details
Live Order Monitoring
Unbroken Accordion Menu
Clear-cut Category & Product Screen
Latest Version Updates in WooCommerce Mobile Apps:
With an integrated “Add To Cart” button for products on the Home & Category screen, the WooCommerce Mobile App has been made more usable for online shoppers. By simply tapping the cart button, users can quickly add products to the cart.
The category screen of mobile apps also features an Add To Cart button. Users only need to scroll to the bottom of the page to browse the products and keep adding items to their shopping cart by tapping the Add To Cart button.
A) App Reviews for Products
Our WooCommerce Mobile App is currently compatible with WooCommerce’s built-in Product Comments module. The user can now post product reviews on the website, and those reviews will also show up on the app. The user has access to both read and write reviews on the app.
b) Related App Store Products
The Automatic Related Products module is now compatible with the WooCommerce Mobile App Builder. On the product page of the website and mobile app, related products can be shown. This compatibility can be a wonderful tool for your company to increase cross-selling.
C) Deep Linking: A deep linking feature is built into the WooCommerce Mobile App. Now, when a link is shared, the user will be taken to the application rather than the website. Installing the app on the mobile device is the only requirement. The user will even be directed to the appropriate app screen by the shared link.
D) Accessibility in Offline Mode: With this extension, eCommerce mobile apps will now function even when there is no internet connection. Users are able to browse any time the pages that were loaded while the internet was active. Products, categories, the cart screen, etc.
The WooCommerce Spin & Win extension is also compatible with the WooCommerce Mobile App Creator. On the web store, a spin-wheel interactive pop-up that can be scheduled for entry or exit display is provided by the gamified email subscription pop-up. The same pop-up will now be automatically displayed on the apps thanks to this integration. The extension only needs to be installed on your website.
F) Video Banner Elements: Knowband’s WooCommerce Mobile App Builder now supports video banners on the home page. Store admins can upload videos directly or embed YouTube videos, making the home page more visually appealing and improving the user experience.
G) List/Grid View: Knowband’s WooCommerce 2 Native Mobile App Builder for Android and iOS allows app users to easily switch between list and grid views while browsing products. This feature improves the shopping experience by providing a flexible and attractive way to explore products. Users can toggle between views using the list/grid button on the product listing pages.
H) Automated Banner Sliders: The latest Knowband Magento 2 Mobile App Builder includes an automated banner slider feature. Store admins can easily set the sliding interval from the module’s backend. This is especially helpful for “Banner Horizontal Sliders” on the home page, allowing admins to add both video and image banners for a more dynamic and engaging display.
I) Enhanced Review Section: The Knowband mobile app features an improved review section. Approved reviews are displayed with a better user interface, offering a more visually appealing and seamless experience for both Android and iOS users.
This is not the end of the list. Learn more about the features in-depth from this page.
2.0 Demo of the WooCommerce mobile app
KnowBand is aware of your hesitation to use the solution and has provided all owners of eCommerce stores with a free demo in order to allay your worries. The merchants can see their store operating on our demo apps as well as our demo store operating on mobile devices.
2.1 Check Out Our Demo Store for Apps
Want to see the features of the eCommerce app? In order for you to explore the app and see all of its features, we have integrated our demo store with it. Just adhere to the guidelines below:
Step 1: Your mobile device can be used to download and install the Nautica WooCommerce Mobile App. The following are links to download trial versions of the following apps:
Secondly, the Click the view demo button after launching the Nautica WooCommerce App.
I’m done now! On the demo app, you will see our demo store operating. You can browse it, test out every feature, place orders, etc.
Note: Click here to access the KnowBand Mobile App Builder Admin Panel on our demo store.
2.2 Watch Your Store Operate with Demo Apps
Not content? Do you wish to test the demo apps on your store? We have everything covered for you, though. On our demo app, you can also experience your store, and at no cost. You only need to follow these 3 steps to achieve the same results:
Install the Demo Apps on your mobile device in step 2 (links are in the previous section). Open the app and type in the store URL.
Click “View Your Store” to begin using demo apps to explore your store.
Type your store’s URL into the box that appears.
For instance, see https://www.example.com/
Note: No APK or IPA files will be provided with this module; this Free version of Mobile App Builder is only for demonstration purposes. You must buy the WooCommerce Mobile App Builder’s paid version in order to obtain your own APK/IPA files.
3.0 Create a mobile WooCommerce app in 3 easy steps
We hope you enjoyed the WooCommerce Mobile Apps demo and discovered what you were looking for. So now is the perfect time to add a pair of Flutter apps to your store. An eCommerce mobile app can be created in the most straightforward manner possible. Your app will be ready in just 3 easy steps and 1-2 working days.
First, add the module to your website.
Install WooCommerce Mobile App Builder on your store after downloading it.
Step 2: Share the details of your application
Use our prerequisites form to share your app’s specifications.
Step 3: In 1-2 days, receive your apps
Our knowledgeable and experienced developers create your apps precisely in accordance with the shared details. In 1-2 days, we would reply with APK/IPA files.
Note: These APK/IPA files can be published on the appropriate app stores.
Still a problem? Tell us, and we’ll help you publish the apps. Furthermore, you can contact us at support@knowband.com if you have any questions or suggestions.
4. Installation of Module
You will receive the files listed below once you have purchased the WooCommerce Mobile App Builder module:
1. ZIP-formatted compressed file (contains the source code of the addon)
2. User Guide
You can now continue the installation process in one of the two ways listed below:
Details of module installation via FTP
Installing a module using admin details
5.0 Screens for the admin panel
It’s time to set up the WooCommerce Mobile App Creator’s Admin Panel after it has been successfully installed on your website. You will see the following tab with user-friendly interfaces as soon as you select the “Configure” option on the KnowBand Mobile App Builder. Let’s eliminate each one individually.
5.1 General settings:
The settings needed for users’ devices to run your mobile app are all covered under the General Setting tab. This tab has every generalized option required to sync the app.
A) Enable Plugin: To make your mobile app functional on users’ devices, enable the WooCommerce Mobile App Creator plugin.
B) Enable Spin and Win: When any user opens the app, enable the display of a gamified spin-wheel pop-up on the home screen. It can be used to provide discounts and deals in exchange for their email addresses, which are then used for marketing. The Spin and Win module from Knowband must be installed on your website in order for this functionality to function.
The Spin and Win Module will only function if the plugin has been installed in your store end.
C) Redirect on Cart Page when Add To Cart: This feature enables you to manage the “Add To Cart” button’s navigation. When a user taps the Add To Cart button, you have the option of sending them to the shopping cart or keeping them on the product page. This increases the likelihood of making additional purchases.
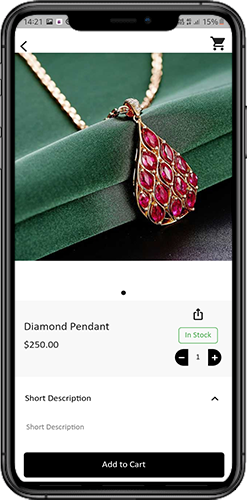
D) Display Short Description: Allow the short description of the product to appear on the product screen alongside the full description and other information.
E) Choose Layout: Pick the Home Page Layout you want for your WooCommerce app. According to different holidays and themes, you can create a variety of home screen layouts in the backend and use them as needed for your store.
Choose the preferred button color for your WooCommerce Mobile App under Option
F) App Theme Color: Pick your WooCommerce Mobile App’s preferred theme color.
G) Logo image: Put your store’s logo on the app’s top header by uploading it. This helped your brand gain recognition among global mobile customer s.
H) Disabled Shipping Methods: Select the shipping options you want to be hidden from the WooCommerce Mobile App.
I) Enabled CMS Pages: Select the CMS pages you want to appear on mobile apps.
J) Enable Request Log Reporting: Enable the log feature on mobile apps to learn more about any unusual behavior exhibited by your app.
K) Enable WhatsApp Chat Support: On your WooCommerce Mobile Apps, enable the WhatsApp chat option. Your WhatsApp number entered in the backend can be used by users to get in touch with you directly.
L) Enable/disable Phone Number Registration: In your WooCommerce Mobile App, enable the Phone Number login option and enable OTP authentication for your users.
M) Enable URL encoding for Image Links: Turn on this feature to allow the app to support characters other than ASCII.
N) Show Add to Cart Button on Product Block: The admin can show/hide the “add to cart” button for the product listing pages with the help of this button.
O) Enable Notification List Feature: The button allows the admin to enable the notification listing features for the app users. If this option is disabled, the notification tab will not appear in the app.
P) Enable Sign In Login Popup: The admin can enable or disable the login/sign-up pop-up for the new customers with this option.
5.2 Settings for Push Notifications
The Google Primary Services for the Push Notification to Mobile Devices are used by the WooCommerce Mobile App Creator for Android and iOS to harness the power of push notifications. It provides this practical marketing tool to increase sales by grabbing users’ attention right away. With the help of your WooCommerce Mobile App, you can easily highlight your current specials and offers. WooCommerce Mobile App Maker offers both automated and customized notifications.
A) Service Account JSON: With the deprecation of the traditional Firebase push messaging API, it has been replaced by a Service Account JSON file. In this section, admins can configure the JSON file from their Firebase account. You can either set it up yourself, or we can provide the Service Account JSON file during the app creation process for your convenience.
B) Order Creation Notification Enable/Disable: Enable/Disable automated Push Notification sent to app users upon successful order creation.
–> Title and Message for Push Notification: To create an order successfully, enter the title and message in the push notification setting.
C) Order Status Changed Notification: Users of the app can choose whether to receive automated Push Notifications when their previous order’s delivery status changes.
-> Title and Message for Push Notification: Enter the title and message whenever the delivery status of an earlier order is updated on the push notification setting.
D) Enable/Disable Abandoned Cart Notification: Enable/Disable automated push notifications that are sent to users whose carts have been abandoned but no successful purchase has been made.
Enter the title and message for the push notification sent to app users who have abandoned their carts.
E) Time Interval: The amount of time (in hours) between which app users who have abandoned their carts without making a purchase will receive Push Notifications.
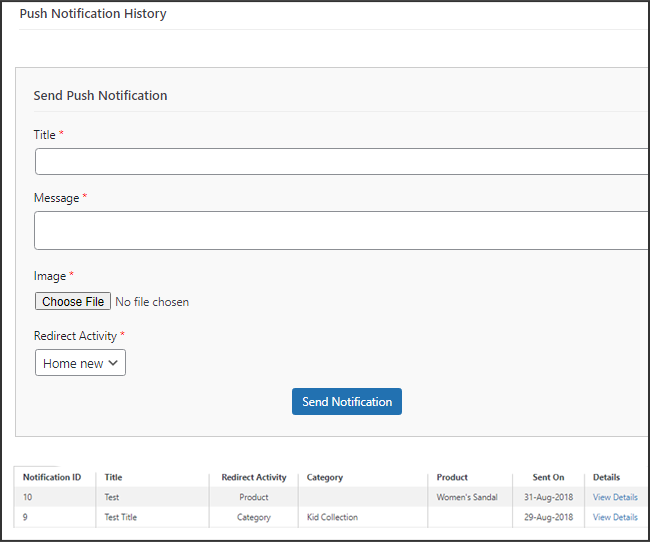
5.3 History of Push Notifications
This tab includes a history of each type of push notification that was sent to a user with relevant information. The retailer has access to all previously sent notifications. Additionally, a custom notification created in the backend can be sent to the users using this tab. Through manually sent notifications, you can easily inform customers about any information or discounts pertaining to the store.
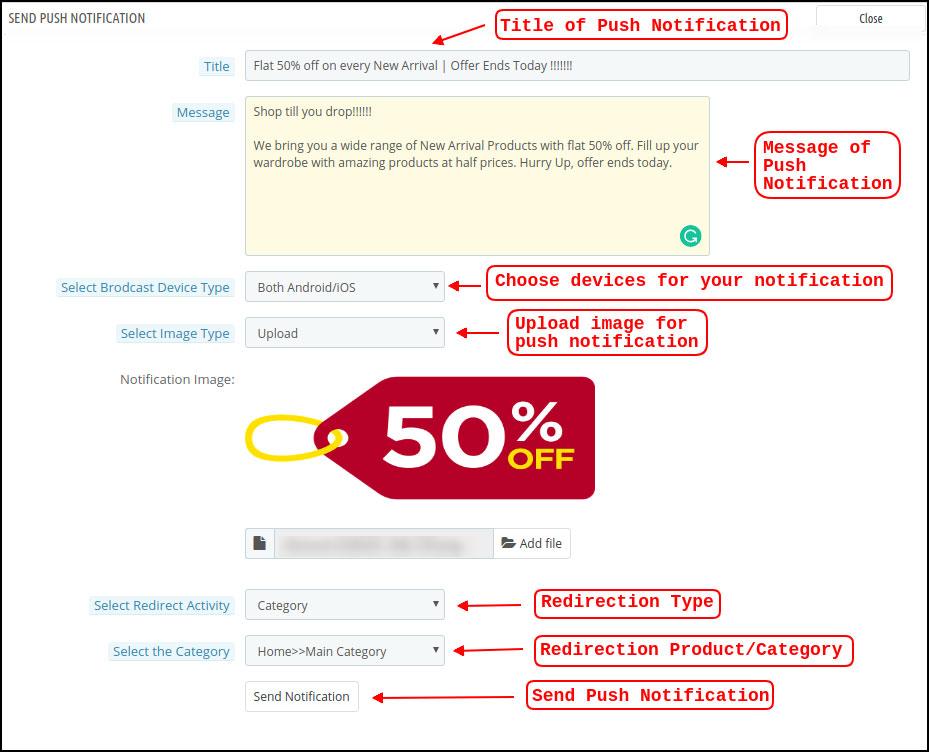
Send Notification: You can choose to manually send a notification to app users using this option. According to the screenshot below, you can customize the notification’s title, message, landing page, image, etc.
a) Push Notification Title: This is the name of the manual Push Notification you will be sending to app users.
b) Push Notification Message: The text of your manual notification that needs to be sent to app users.
c) Device Type: You can specify which users on Android, iOS, or both platforms you want to receive your manual push notification.
d) Image Type: You are able to upload the banner or image you want to use to support your notification. The banner image can be used directly through a URL or uploaded.
e) Notification Image: The store administrator is given the opportunity to preview the notification image and assess how it will appear on users’ apps.
The actual URL of the notification image that will be sent to app users is listed under item f.
f) Redirection Activity: Here, you can select from the Home Screen, Any Category, or Any Product to redirect your notification. Your users will be directed to whatever you specify when they tap the push notification.
g) Choose the Category/Product: For your notification, you can select any relevant category/product screen.
h) Send Notification: After creating and previewing your notification, it’s time to send it to your apps.
5.4 Payment Procedures
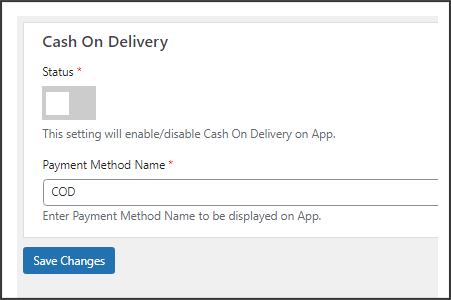
All types of website payment methods are supported by the WooCommerce Mobile App Creator for Android & iOS apps. It also includes the option for COD payments and the flexibility to include additional Web-View payment methods.
In our mobile app, the only available payment option is cash on delivery by default. Disable the COD method from the module’s back end, though, if you want to add the same payment methods as on your WooCommerce store. All of the payment options that are available on your website will work as intended in your mobile apps after the COD method is disabled.
.
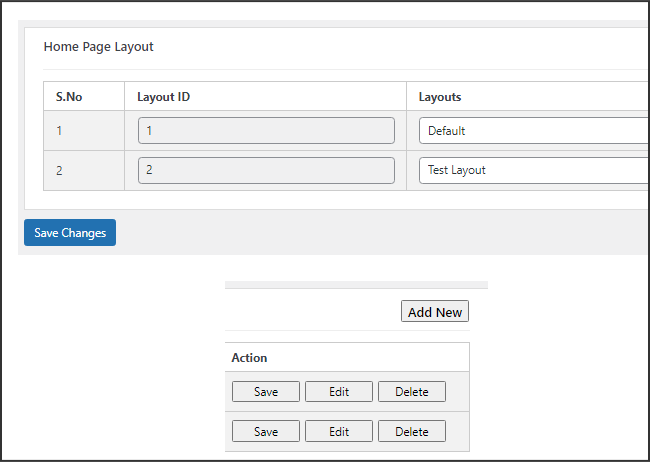
5.5.1 Home Page Design
The WooCommerce Mobile App Builder plugin’s ability to design and create multiple home screen layouts using different designing attributes and elements is one of its most amazing features. As can be seen in the screenshot below, this tab contains a list of home screen layout that has been previously configured using different themes & fonts:
The following elements are available in the back-end to configure the home page layouts:
Top categories
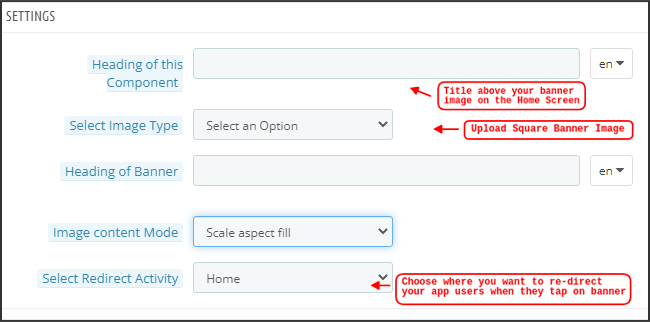
Square Banner
Horizontal Sliding Banner
Grid Banners
Countdown Banner
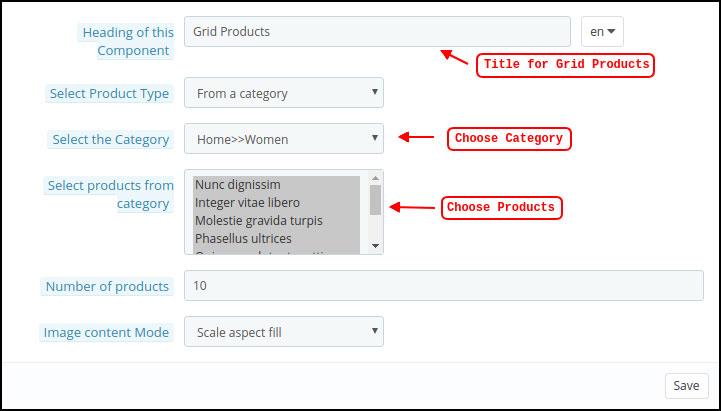
Grid Products
Horizontal Sliding Products
Recently Accessed Products
Add YouTube videos/upload videos on the home page layout.
Login/sign-up pop-up for the non-logged-in users.
Add custom banners with custom dimensions.
Any of these attributes can be set up by the store merchant and used to create and save multiple layouts. These layouts can be utilized based on the theme and specifications. Additionally, using just a drag and drop functionality, different elements’ positions can be changed.
Top Categories:
Top categories can be configured, including their image and landing categories or products, and are shown as small squares on the home screen. Maximum categories available through the WooCommerce Mobile App Maker are 8, with a minimum of 4 required.
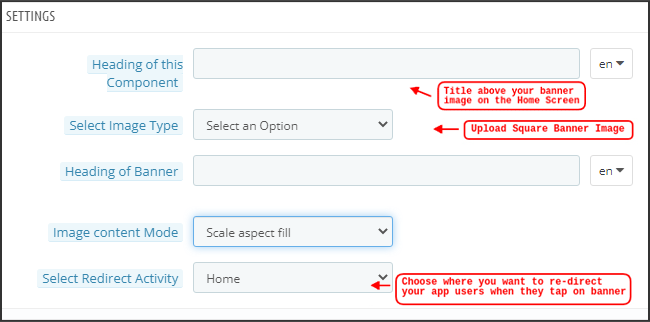
Square Banner:
Top categories can be configured, including their image and landing categories or products, and are shown as small squares on the home screen. Maximum categories available through the WooCommerce Mobile App Maker are 8, with a minimum of 4 required.
In the recent updates, we have also provided the option to showcase different videos with the YouTube Video/Video Upload section added in the “Select Image Type” section.
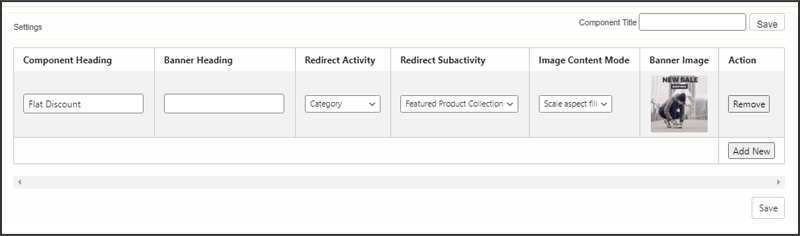
Horizontal Sliding Banner:
These rectangular sliding doors are available and fully customizable from the backend. Like banner squares, the admin can also highlight the banner sliders by adding video elements. Furthermore, now the admin can get the option to enter the time that he wants to set for the automated banner sliding.
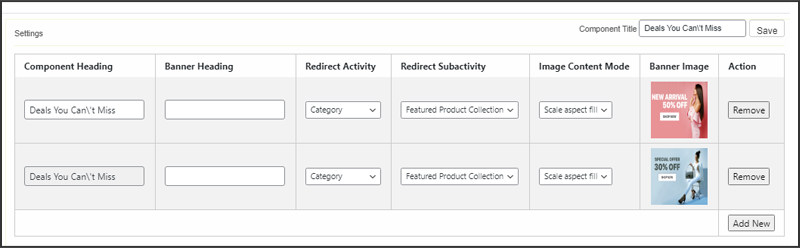
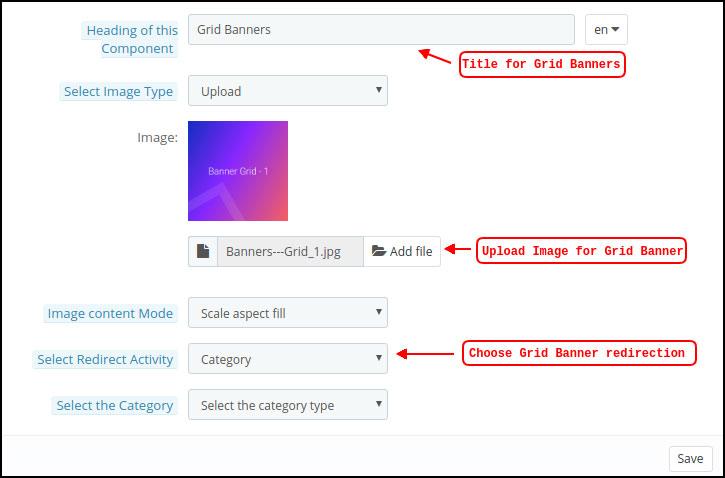
Grid Banners:
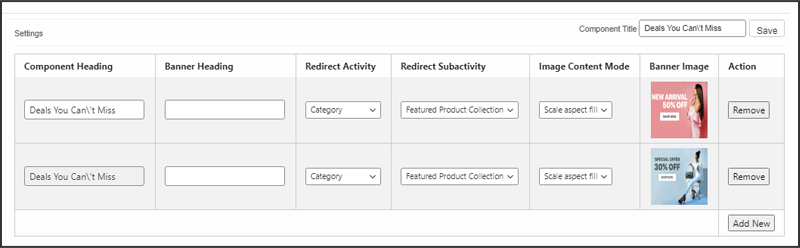
These are square-shaped banners that are listed in a grid format on the home screen. On the home screen, you can place as many banners as you like. You can also change the landing page’s image as needed.
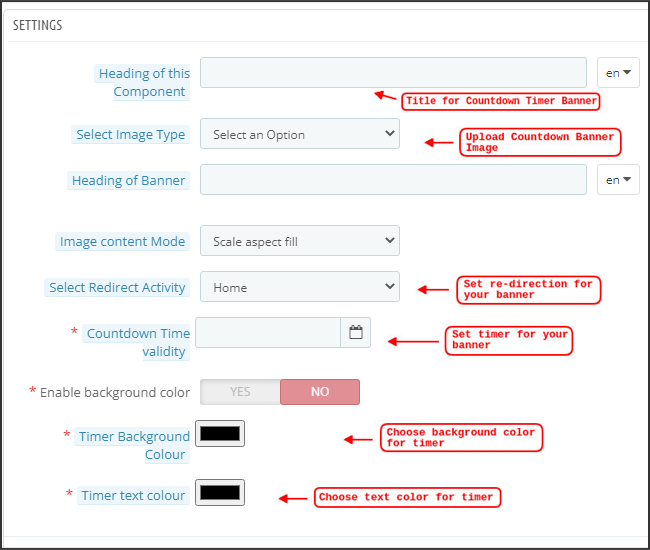
Countdown Timer Banner:
A countdown timer is available on the banner provided by the WooCommerce Mobile App Builder. You can choose the landing page and banner image, as well as set a timer for when you want to display the banner. The banner will automatically disappear when the timer expires.
Square Products:
Regarding banners, the WooCommerce Mobile App Creator provides products to show as square listings on the home screen.
Horizontal Sliding Products
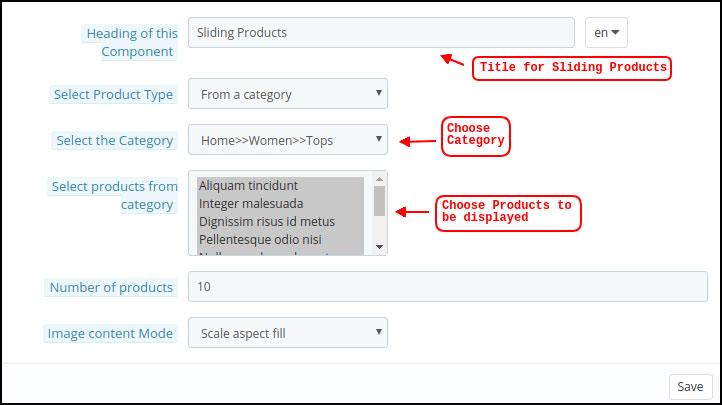
The products can be added as horizontal sliders. The products chosen may fall under any one particular category or may be highlighted as Best Sellers, Featured Products, etc.
Grid Products:
Grid listings of the products can also be added to the home screen. Any category can be used to select the goods.
Products Recently Viewed: The WooCommerce Mobile App Creator offers the recent tab element, which shows the most recent products the user has viewed. To display the element on your home screen, simply include it in your layout.
Sign-Up Pop-Up: Capturing visitors’ emails is a major challenge in eCommerce. To simplify this, the latest version of the Magento 2 Mobile App Builder includes a login/sign-up pop-up feature. Store admins can add a pop-up that appears for non-logged-in customers, making it easier to collect emails by offering simple login options and increasing the chances of email opt-ins.
Note: When designing a layout in the backend panel, the store administrator can add up to 20 elements.
6.0 Screens for Mobile Apps
6.1 Home Screen
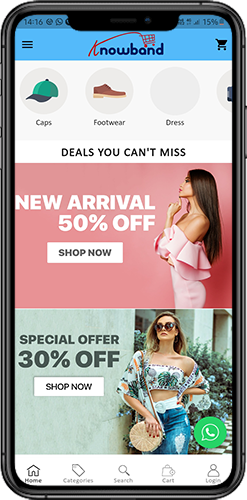
Your WooCommerce Mobile App’s Home screen will be exactly how you want it to be. You have complete creative control over how to design and create a home screen with the WooCommerce Mobile App Maker. You can create user-friendly home screen layouts using a variety of banners (Square, Grid, Sliding), products (Square, Grid, Sliding), countdown timer banners, and recent products tabs in the backend.
Additionally, different design elements’ placements can be changed based on the situation.
1. Dynamic Layouts: You can create and save different layouts in the backend and reuse them for different events and festivals by using a variety of elements. Your app’s home screen can be created and customized dynamically.
2. Brand Logo: The WooCommerce Mobile App’s top header’s left-middle section displays your store’s logo. The logo can be enabled or disabled, as well as having its image changed, from the module backend.
3. Search: The search feature enables mobile app users to find what they’re looking for quickly and easily. The WooCommerce Mobile App offers two ways to search for products: On the WooCommerce Mobile App’s bottom tab bar layout, there is a search option.
–> Text: Users of your app can search for desired products by entering a few relevant keywords. The WooCommerce Mobile App will display results for that keyword that are pertinent.
4. Wishlist Bag: The wishlist bag, which contains all bookmarked products, is visible on the top header of your WooCommerce Mobile App. Users of the app can store their wishlist items in a bag for potential future purchases.
5. Shopping Cart: The Shopping Cart can be found on the app’s home screen in the top-right corner.
The users can get to know about the products added to their cart right from there.
6. WhatsApp:
A live seller-buyer chat option can be found at the bottom right of the home screen. Customers who use your mobile app can easily and directly message you with any questions, and you can answer them right away.
6.2.1 An Accordion Menu (Navigation Bar)
On the website, there are WooCommerce Mobile Apps for Android & iOS that have been developed with accurate product categorization. Mobile shoppers can browse a variety of products with ease. The Accordion Menu is also available for all CMS pages. It offers the following alternatives:
1. My Account
All user data, including personal details, shipping addresses, and order details, can be found on the My Account screen. The customers have access to all of their information and can update both their login credentials and personal information.
2. Categories
These categories match those on your website exactly. For easy browsing, you can map them appropriately and provide a 3-level categorization to app users.
3. CMS Pages
Here, a variety of CMS pages from your website, including About Us, Contact Us, Terms & Conditions, etc., are displayed. From the WooCommerce Mobile App Builder backend, you can select the one you want to be shown on the mobile app.
4. Language
Your users can view the WooCommerce Mobile app in their native language using the language selection option.
5. Currencies(s)
The WooCommerce Mobile App also shows all currencies that are offered on your e-commerce website. Customers can view and buy products for the price in the currency of their choice.
6. Sign in/Sign out
This option makes it simple for your users to log in and out of the WooCommerce Mobile App.
6.3 Category Screen:
Your WooCommerce Mobile App includes all of the associated categories, parent categories, and subcategories. The category screen is created with minimal clutter in
1.Two fundamental views:
Grid and List. In every listing, the product name, image, price, and discount are shown along with a button to add them to your wishlist bag. Layered navigation on mobile apps created with the WooCommerce Mobile App Builder makes finding products much easier. The category screens offer the following choices:
2. Sort:
Customers can choose the preferred order for sorting the category product pricing using this option. Your apps have two sorting options: Price: Low to High and Price: High to Low.
3. Filter:
The users can filter out the products using various selection options provided under the filter tab.
6.4 Product Screen:
Your WooCommerce Mobile App’s product screen is straightforward and interesting. Along with the name and price, various images of the same item are displayed. Depending on inventory status, the product availability is also indicated as “In Stock” or “Out Of Stock”. It includes the next additional items.
1. Options
Product Options: This screen shows all available options for the product, including size, color, and so forth. The product choices here match those on the website.
2. Brief Description
Users can quickly decide after reading the brief description of your product.
3. Product Details and Care
This page displays all of the product information that is listed on the website. Users of the app can access this page for detailed product information.
4. Add To Wishlist: By tapping “Add To Wishlist” on the left bottom of the product screen, users of the mobile app can directly bookmark the product.
5. Add To Cart: As the name implies, clicking the “Add To Cart” button adds the product directly to the shopping cart, allowing users to continue with the transaction.
6. Product Social Sharing
On this screen, you have the option to share your product on various social networks, including Bluetooth and email. Users of the app can invite many users to your app by sharing the products with their friends and family on various social media platforms.
6.6 Login Screen
The WooCommerce Mobile App Creator streamlines the sign-in/registration process and provides a variety of one-tap login options:
1. Login
Using their email addresses as sign-in credentials, app users can authenticate and access apps.
2. Register
The mobile app allows all new app users to register and create an account on the store. Only pertinent information is requested on the WooCommerce Mobile App sign-up form.
3. Use Phone Number to Log In
The easier and more reliable phone number login option that your mobile app offers makes it simpler for users to login and verify their OTP.
4. Use your fingerprint to log in
Additionally, your users have the option of using fingerprint authentication to sign in. Users can now quickly access apps thanks to this.
5. Login with Facebook
Users can access the app by logging in with their Facebook credentials.
6. Login with Google
The users can log in to the app using their GoogleAccount within no time.
7. Shopping Cart Screen:
All of the items in your shopping cart are displayed on the WooCommerce Mobile App’s shopping cart screen. The product’s name, quantity, total price, and shipping cost are all visible to app users.
1.Use Voucher
By entering active coupons and vouchers that are currently active on your website, this option enables users to receive discounts and offers.
2. The full product cost
Users can access this page to view the full cost of their shopping bag. It is automatically updated whenever there is a change in the quantity of a product or an addition.
3. Revision of Product Quantity
With the “Update Quantity” option, app users can even change the product quantity.
4. Remove the item
Users of the app can easily remove a product from their cart by selecting “Remove” from the menu.
6. Continue To Checkout
By selecting “Continue To Checkout,” front-end mobile app users can continue to the checkout & payment screens. On the checkout screen, they will receive a redirect.
6.8 Checkout Process
The checkout process in the WooCommerce mobile app Builder is made simple. In the mobile app’s checkout process, front-end users have the option to choose the shipping details, billing details, order numbers, order comments, and so forth.
Orders can be placed using just a few easy steps on the Android and iOS apps.
1. Customers can choose and add the desired item to their shopping carts. When the shopping bag is clicked, the user can also choose the desired product quantity. Users of the mobile front-end app can also view the total number of products and shipping costs.
At the bottom of the same page, the customer can also choose to use any coupon or coupon code.
2. The user can review the order and see several details after selecting the Continue to Checkout option. such as the cost of the product, the cost of shipping, the shipping address (which can be changed on the same page), the order summary (the number of products), the total cost, and so forth.
On the same page, the customer can also choose their preferred method of shipping. The order comment option that appears at the bottom of the screen allows the user to also include any special requests or requirements.
3. After selecting the option to “continue to checkout,” the user will be taken to the screen that asks for their payment method.
Users can choose from all of the website’s payment options on this screen. The shopping app includes a cash-on-delivery option as a standard form of payment.
The user will be taken to the order summary screen after completing the payment activity. where the customer can view the status, cost, and other information regarding their orders. Users of the front-end mobile apps will receive the order confirmation popup messages on their mobile phone screens as well.
6.9 My Account Screen
Users of the Android/iOS eCommerce app can view all account information, including a history of previous orders, on the My Account screen. The following options are available on the My Account screen:
Order History
The users learn all the details of the earlier-placed order. The date the order was submitted, the order number, the price, and the delivery status are all visible to the users screen.
2. Update Profile:
Users can also update their previously saved profile information, such as their first or last name, phone number, and password.
3. Delivery Address (s)
Users of the app have access to the full list of saved shipping addresses. From here, you can also add a new shipping address.
4. Order Details:
The complete list of previously placed app orders is available to app users.
5. Reorder function
By selecting the “Reorder” button, you can directly reorder a product. By pressing a single button, all previous orders will be added to the cart.
6.10 Order Detail Screen
The WooCommerce eCommerce App’s order details screen shows every aspect of the order, including the shipping address, a summary of the products, the shipping and payment options, and the total cost. From this screen, users can even follow the delivery of previously placed orders.
WooCommerce Spin and Win plugin by Knowband is one of the most innovative ways to boost the user engagement and conversions of the eCommerce site. The WooCommerce spin and win exit popup offered by Knowband displays an attractive roulette-type spin the wheel interface in the front-end. The gamified and animated approach motivates the customers to enter their email ID and spin the wheel. Once the wheel rotates, the customers can win enticing discounts.
In addition to enhancing the user engagement, the WooCommerce spin and win module can even optimize the UI of the site. The alluring interface can be designed to match the theme of the site. The wheelio can even be used as an exit popup. Thus, WooCommerce spin and win exit-intent popup can help you get rid of the annoying subscription popup and still manage to increase the subscription base.
1.1 Admin Benefits of WooCommerce Spin and Win plugin:
1. The 3-in-1 WooCommerce spin and win plugin can be used at the entry or exit of the store visitors.
2. The WooCommerce email subscription popup extension can curb the exit intent of the visitors and increase their stay at the site.
3. The admin gets easy interface to customize the look and feel of the WooCommerce spin and win extension.
4. The admin interface of WooCommerce spin and win exit intent popup allows the store owners to set the frequency of wheel display.
5. The admin can even select the theme and wheel design from the back-end of the WooCommerce spin and win extension.
6. The gamified approach of WooCommerce subscription popup extension allows the admin to boost the subscriber base of the site.
7. The WooCommerce email subscription pop up integrator sync the data automatically with the MailChimp and Klaviyo account of the store admin.
8. The custom CSS option in the admin interface of WooCommerce Spin and Win module allows the merchants to change the look and feel of the wheel design accordingly.
9. The WooCommerce interactive popup extension comes with number of pre-designed email templates to choose from.
10. The Online merchant gets full access to manage the discounts being offered. The admin can customize the slices of the spin wheel from the back-end of the WooCommerce entry pop up extension.
11. Even the possibility of a slice appearing once the wheel is rotated can be fixed from the admin interface of WooCommerce Spin and Win extension.
12. Offers various themes for spin and win popup to attract wide number of customers to the store. The themes can be implemented in accordance with the occasion like Christmas, Easter etc.
2.0 Installation
In order to install the WooCommerce intercative pop up plugin in your WooCommerce site follow the below-mentioned steps:
Step 1: Buy the WooCommerce plugin from the Knowband store. Youâll get the zipped file with the source code of the WooCommerce Wheelio and User manual.
Step 2: Go to the Dashboad of WordPress -> Plugin -> Add New
Step 3: You’ll be redirected to an interface. Click on Upload Plugin.
Step 4: Click on Choose File and upload the zipped file.
3.0 Admin Interface
WooCommerce spin and win extension offers an easy to use admin interface. The store admin can easily customize the Wheelio in a few button clicks.
The admin interface of WooCommerce email subscription pop up Module offers 8 setting tabs. They are listed below:
General Settings
Display Settings
Look and Feel Settings
Text Settings
Slice Settings
Email Marketing
Email Setting
Statistics
Let us discuss the various setting tabs offered by WooCommerce exit popup extension in detail.
3.1 General Settings
The general settings of WooCommerce Spin and Win extension offers basic customization option. The various fields in this tab is discussed below.
1. Enable the extension
Toggle this button to enable the WooCommerce exit intent popup extension. Once enabled, the spin wheel will be shown in the front-end of the site.
2. Show Pull-out tab
In case the store visitors are not willing to spin the wheel, they can remove the interface form the front-end by clicking on No, I do not feel lucky link. The pull-out tab brings the wheel back on the screen.
Enable this functionality to display the pull-out tab on the front-end of the site. The pull-out link will be displayed as shown below:
3. Email Recheck
WooCommerce spin and win email subscription pop-up module can boost the subscriber base of the site in a fun way. Enabling this feature allows the admin to reduce email duplicity. If this is enabled, the store visitors will be allowed to spin the wheel only once with a single email ID. The customers will not allow to avail the discounts twice with a single email address.
4. Wheel Display Interval
Enter the display interval of the wheel. The wheel will be displayed after the specified time interval. If 0 is selected, then, the spin wheel will be displayed every time a user visits the site.
5. Custom CSS
Enter the custom CSS code to change the look and feel of the interface.
6. Custom JS
The admin can enter custom JavaScript in this section.
3.2 Display Setting
The display setting tab of WooCommerce Spin and Win intercative popup mosule offers easy means to manage the display options of Wheelio. The various options offered are discussed below:
1. Minimum Screen Size
Select the minimum standard size of the screen for wheel compatibility. The WooCommerce spin wheel will work on all the screen size larger than the selected one.
2. Maximum Display Frequency
Select the display frequency of wheelio from the drop-down list in this section. For example, if Every Visiter is selected, the store visitors will be able to see the spin wheel at every visit.
3. Hide Spin Wheel After
You can even hide the spin wheel when desired. Select when you want to hide the same from the dropdown menu.
4. Set Time Interval
WooCommerce spin and win extension allow the admin to set the display interval of the wheel. In order to set the interval, enable the button. The admin will be asked the select the Active Date and Inactive Date. The wheelio will be shown only in between the selected interval.
5. Where to Display
Select the webpages of the site where you want to display the spin wheel from the drop-down list.
6. Who to Show
Select the customer group to whom you want to show the wheel.
7. When to Show
Choose the time which you think is feasible for displaying the wheel once a visitor visits the site.
8. GEO Location
Select the GEO location where you want to display the WooCommerce interactive popup module.
3.3 Look and Feel Settings
WooCommerce spin and win plugin allows the store admin to customize the appearance of the subscription popup.
The various customization options of the WooCommerce spin and win extension are discussed below.
Theme
The WooCommerce entry pop up extension comes with a number of default themes. The store owner can select the desired one that matches the website theme from the drop-down list. The e-merchants can easily appeal their customers with the help of new themes for different occasions like Christmas, Thanksgiving, Easter etc.
Wheel Design
WooCommerce exit intent popup mosule even allows the admin to select the wheel design to be displayed in the front-end.
Wheel Preview
The admin can even preview the selected wheel design.
Wheel Background Color
Select the background color of the wheel from the color chart.
Font Color
The color of the texts written on the wheel slices can be changed from here.
Button Background Color
The admin can select the background color of the buttons displayed on the spin wheel.
‘No, I do not Feel Lucky text color
The font color of this link can be changed from here.
Display Logo
Enable this button in case you want to display any image on the wheel. The admin can choose the image from their local drive and upload the same.
3.4 Text Setting
The various text displayed on the wheel can be changed from this tab of the WooCommerce spin and win extension. The admin can change the Title Text, Subtitle Text and Rules Text.
The text entered in this section of the WooCommerce exit popup module will be displayed as shown in the image below:
3.5 Slice Setting
The wheel displayed by the WooCommerce spin and win email subscription shows 12 slices with different offers, free gifts and discounts. The admin can customize all the 12 slices of the wheel from this tab of WooCommerce email subscription popup.
The slice setting tab of WooCommerce spin and win extension consists of 4 sections.
Slice Label: Enter the name of the slice here. The text will be displayed in the front-end.
Coupon Type: Select the type of discount that you want to offer to the customers. You can either select fixed discount or percentage discount type.
Coupon Value: Enter the discount value here.
Gravity: This section specifies the possibility of a particular slice being selected after the spin. Enter the desired value in the Gravity column accordingly. This value cannot be greater than 100 or less than 1. Moreover, the sum of the value of all the 12 slices should not exceed 100.
3.6 Email Marketing
The WooCommerce spin and win email integration extension offers inbuilt email MailChimp and Klaviyo integrator. WooCommerce email subscription popup module captures the email ids of the store visitors and automatically sync the data to the MailChimp and Klaviyo accounts of the store owner.
In order to setup the integration, enable the respective functionality. Enter the API Key of your account and select the list of the email ids. The WooCommerce MailChimp Integrator and WooCommerce Klaviyo Integrator will sync the email details of the customers in the respective account of the store admin.
3.7 Email Template Settings
The coupons received by the visitors after spinning the wheel can be offered in three ways. The admin can either display the coupon on the wheel or send the same via mail or both.
Coupon Display Options: The admin can select the display options from the section of the WooCommerce Spin and Win extension.
Email Templates: WooCommerce Spin and Win plugin offers a number of default email templates. The admin can select the desired theme from the drop-down menu.
Email Subject: Enter the subject line of the email to be send to the customers.
Email Content: Enter the email content in this section.
Test Email: Enter an email address in the box to test the email functionality before sending it to the customer.
3.8 Statistics
The WooCommerce Spin and Win extension offer the statistical report of the number of coupons that are generated along with the number of coupons that were used and the ones that were left unused.
The same report is generated in tabular as well as in the graphical format. The report can be filtered by selecting the dates.
4.0 Store Front-end
Once the customization changes are done and the WooCommerce Spin and Win extension is enabled, the wheel will displayed as shown in the image below.
Once the customer wins a discount, the coupon will be generated. This coupon can be used to get the offered discount in the checkout page.
The customers can paste the copied coupon code on the checkout page and get the discount.
Once the coupon is applied the discount amount will be deducted from the total order value.
Disclaimer: In case the “Spin and Win” wheel popup does not display at the front, kindly clear the cache or delete the cookies. Sometimes cookies prevent the popup from displaying at front.