The General Data Protection Regulation (GDPR) is a replacement for the European Union Data Protection Directive which will be enforced on May 25, 2018. The new directives have been passed, as per the new technologies and business advances; a new approach to protection of the personal data has been introduced.
GDPR provides more control to the customers to control their personal data. Customers have the right to request for the deletion of the data. It is mandatory for the store admin to honor the customer request within 30 days. The Prestashop GDPR addon – Data deletion and data anonymization allows the store admin to provide an interface to the customer so that they can request for the deletion of the data under the GDPR directives.
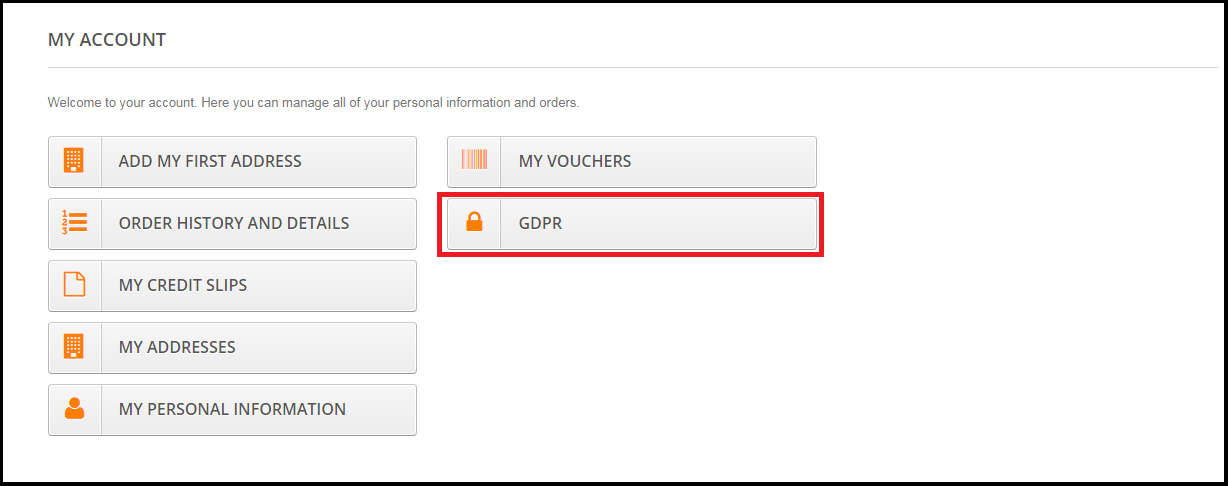
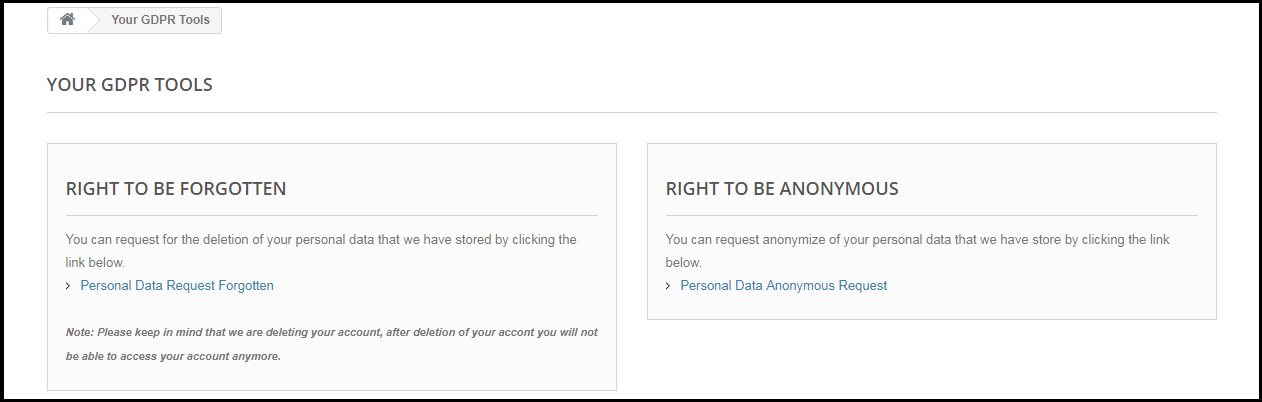
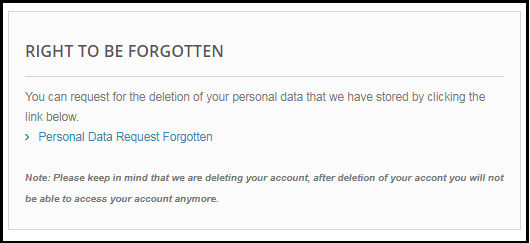
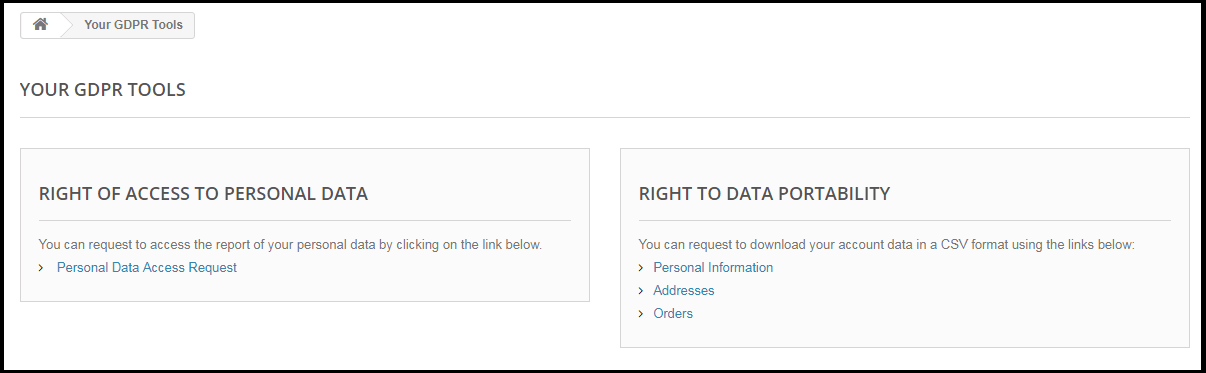
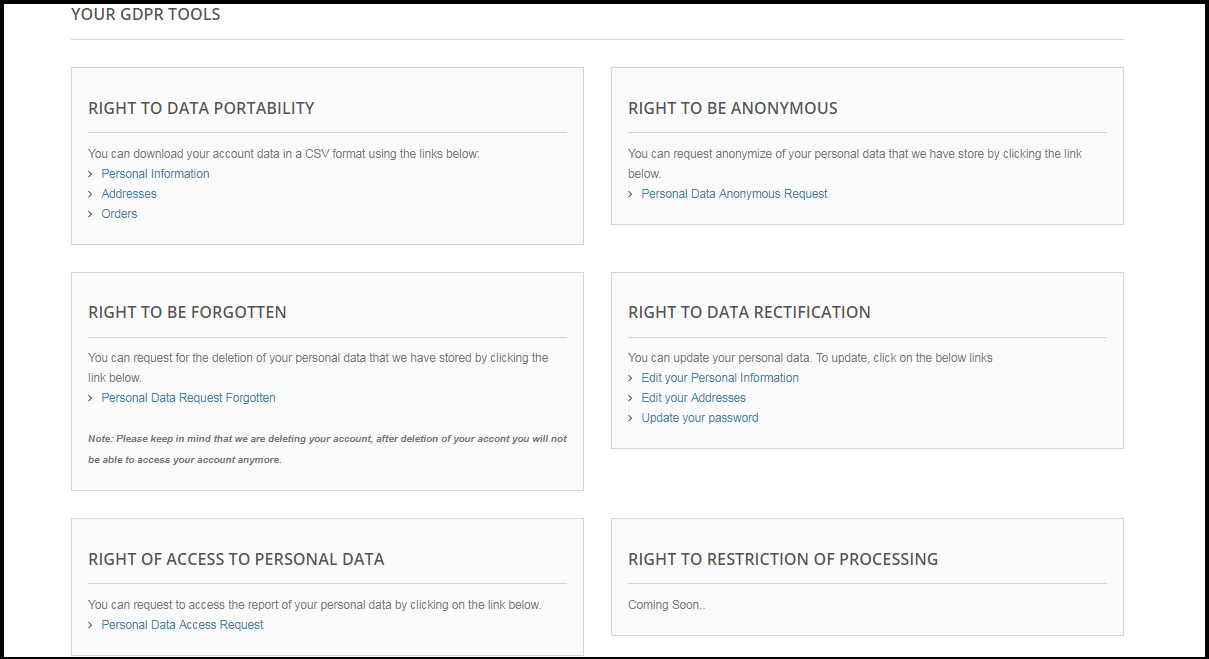
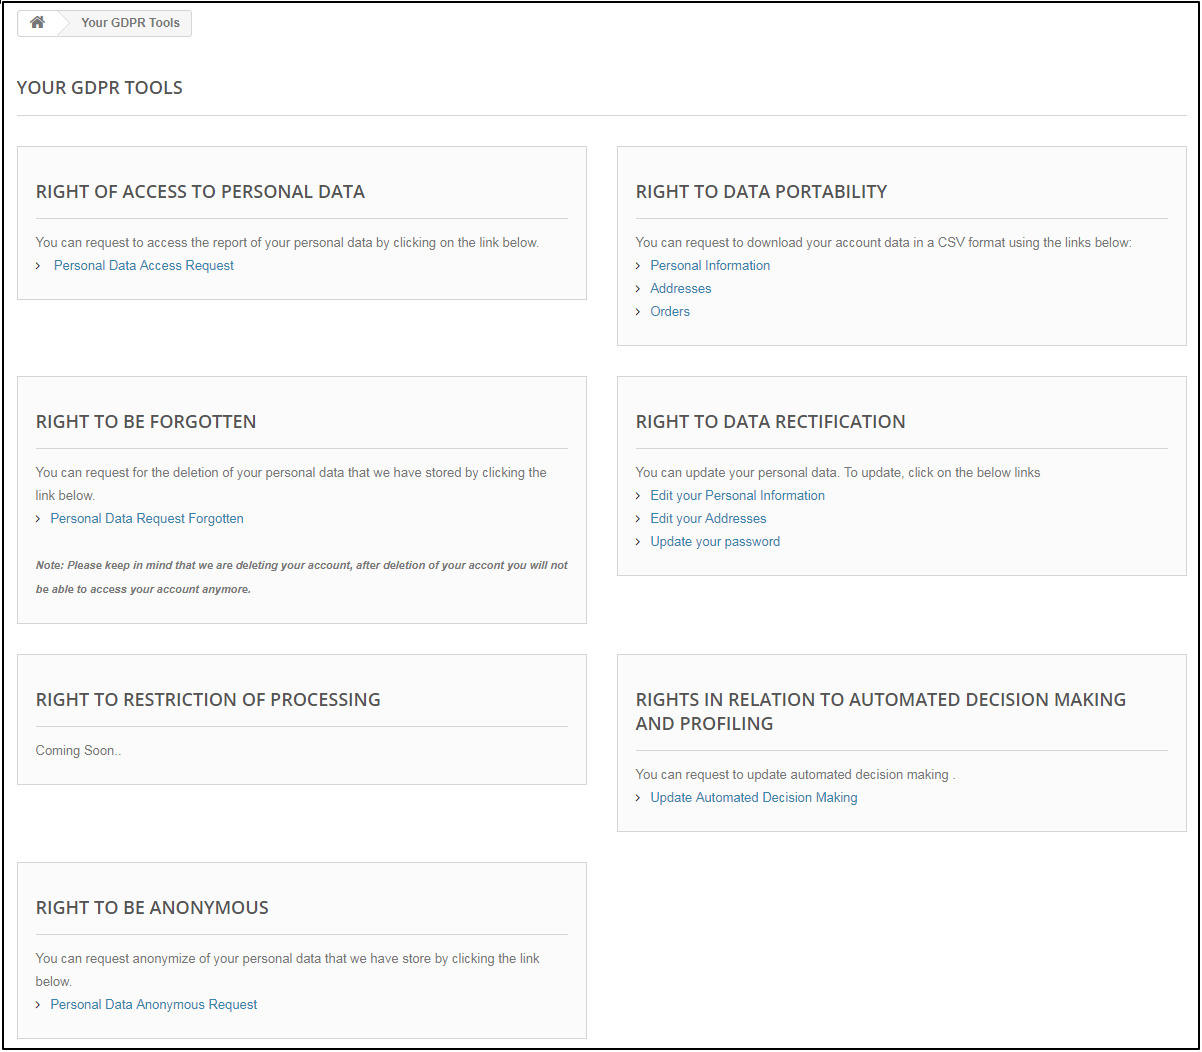
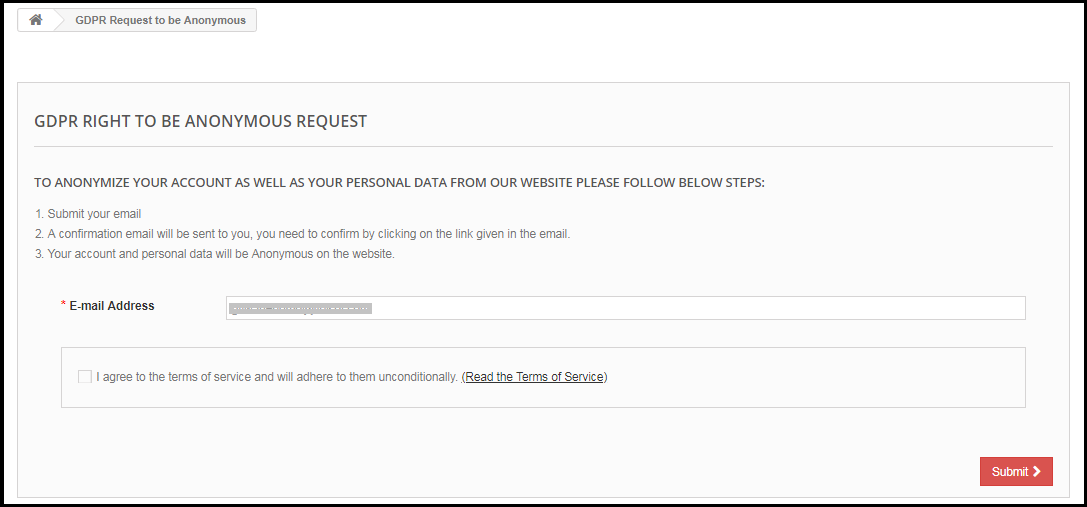
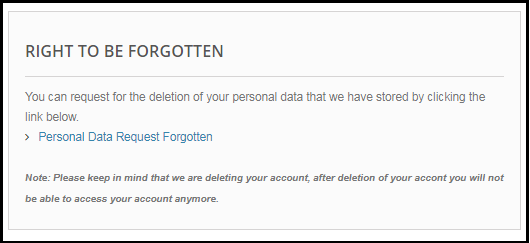
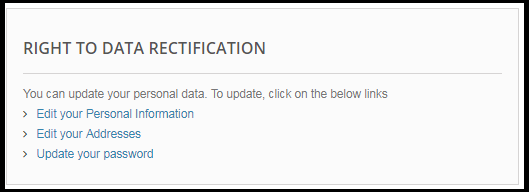
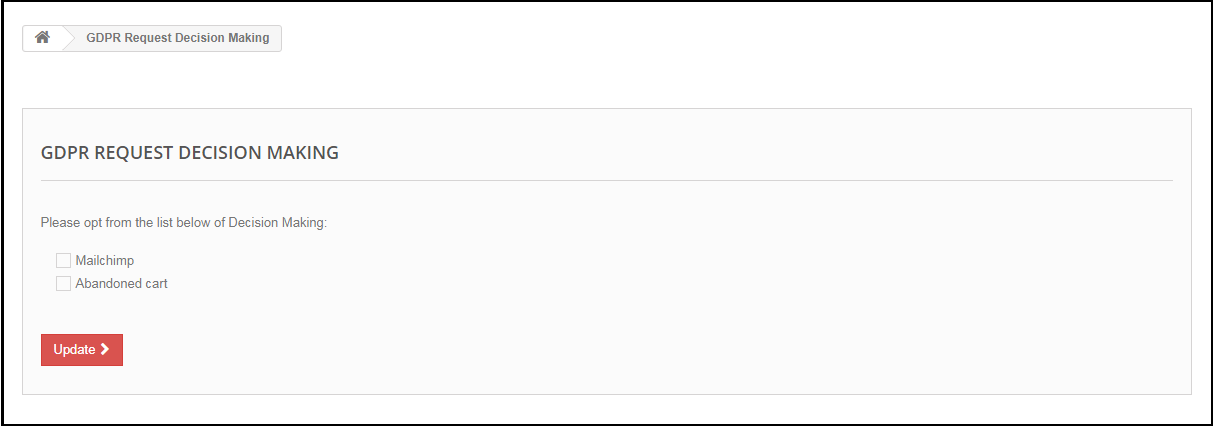
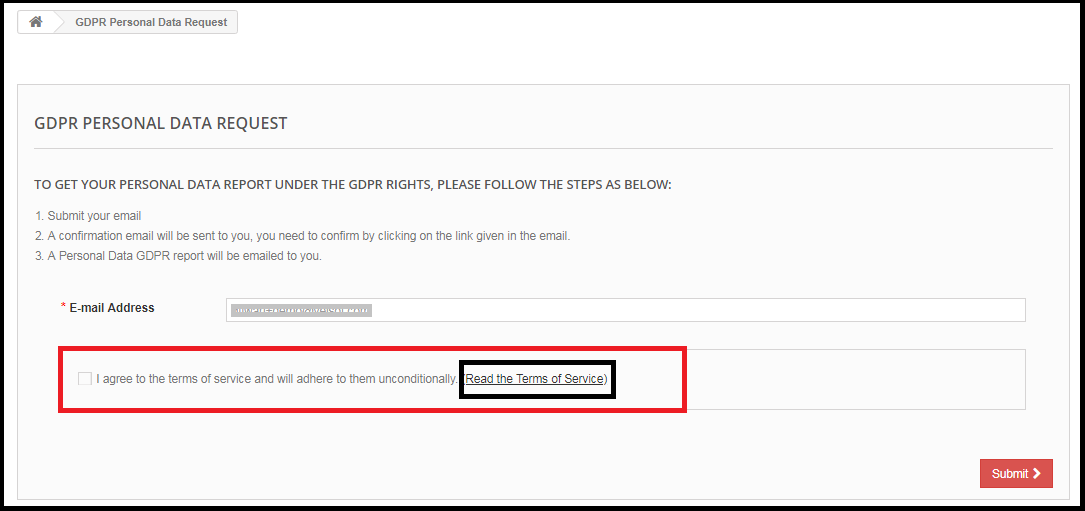
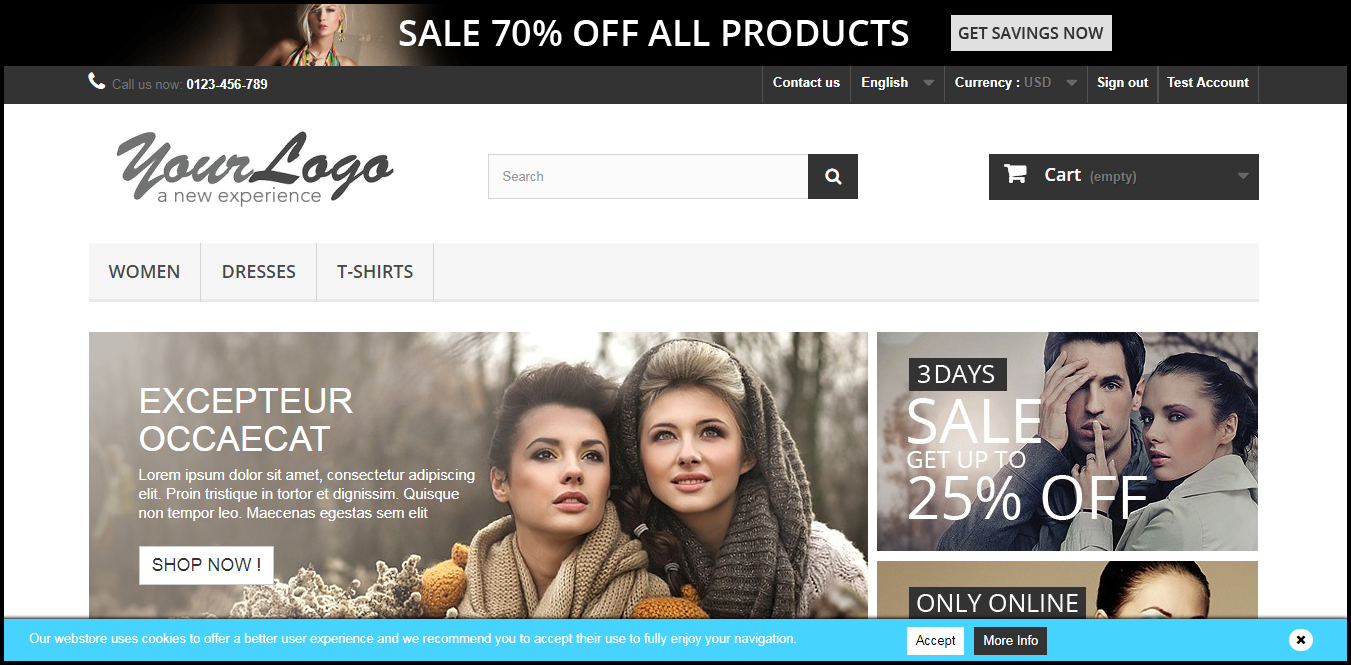
The customer-end interface of the Prestashop GDPR Module –
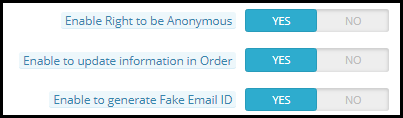
As per the requirement, the admin has the choice to enable/disable any of these rights.
Installation of Prestashop GDPR Module
After placing your order for the Prestashop GDPR module you can download the zip file of the module. This zip file contains:
1) GDPR.zip (source code of the module)
2) User Manual
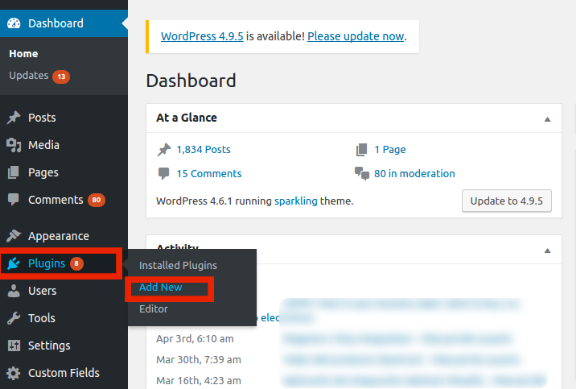
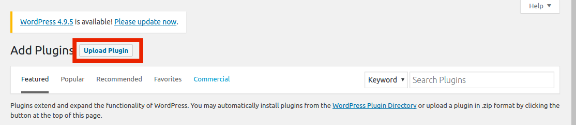
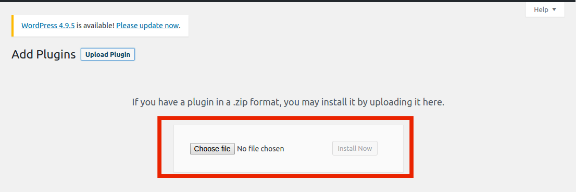
In order to install the extension in your Prestashop store follow the below-mentioned steps:
1) Unzip the gdpr.zip file.
2) Copy the entire content, that is, the files and folders of the unzipped folder. Paste the same into the “Modules” folder of your store’s directory. Follow the below-mentioned address path – Root Directory/modules/.
3) The Prestashop GDPR plugin is all set to be installed in the store. Go to the Store Admin and then to ‘Modules and Services’.
4) Click on the “Install” button just next to your module. It would show a pop-up for your confirmation. Click on “Proceed with the installation” option. This step will install the module and show notification – “Module(s) installed successfully”.
5) Once the installation is complete, you will get the access to the admin interface of the module by clicking on the “Configure” button.
Admin Interface of Prestashop GDPR Addon
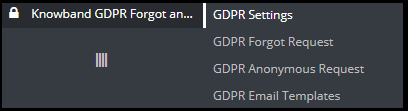
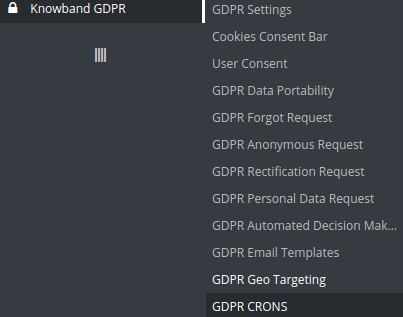
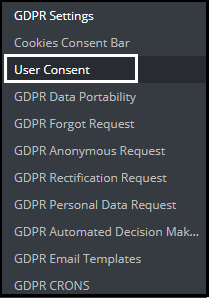
In the admin section of the Prestashop GDPR Customer rights module following options are available:
1) GDPR Settings
2) GDPR Forgot Request
3) GDPR Anonymous Request
4) GDPR Email Templates
GDPR Settings
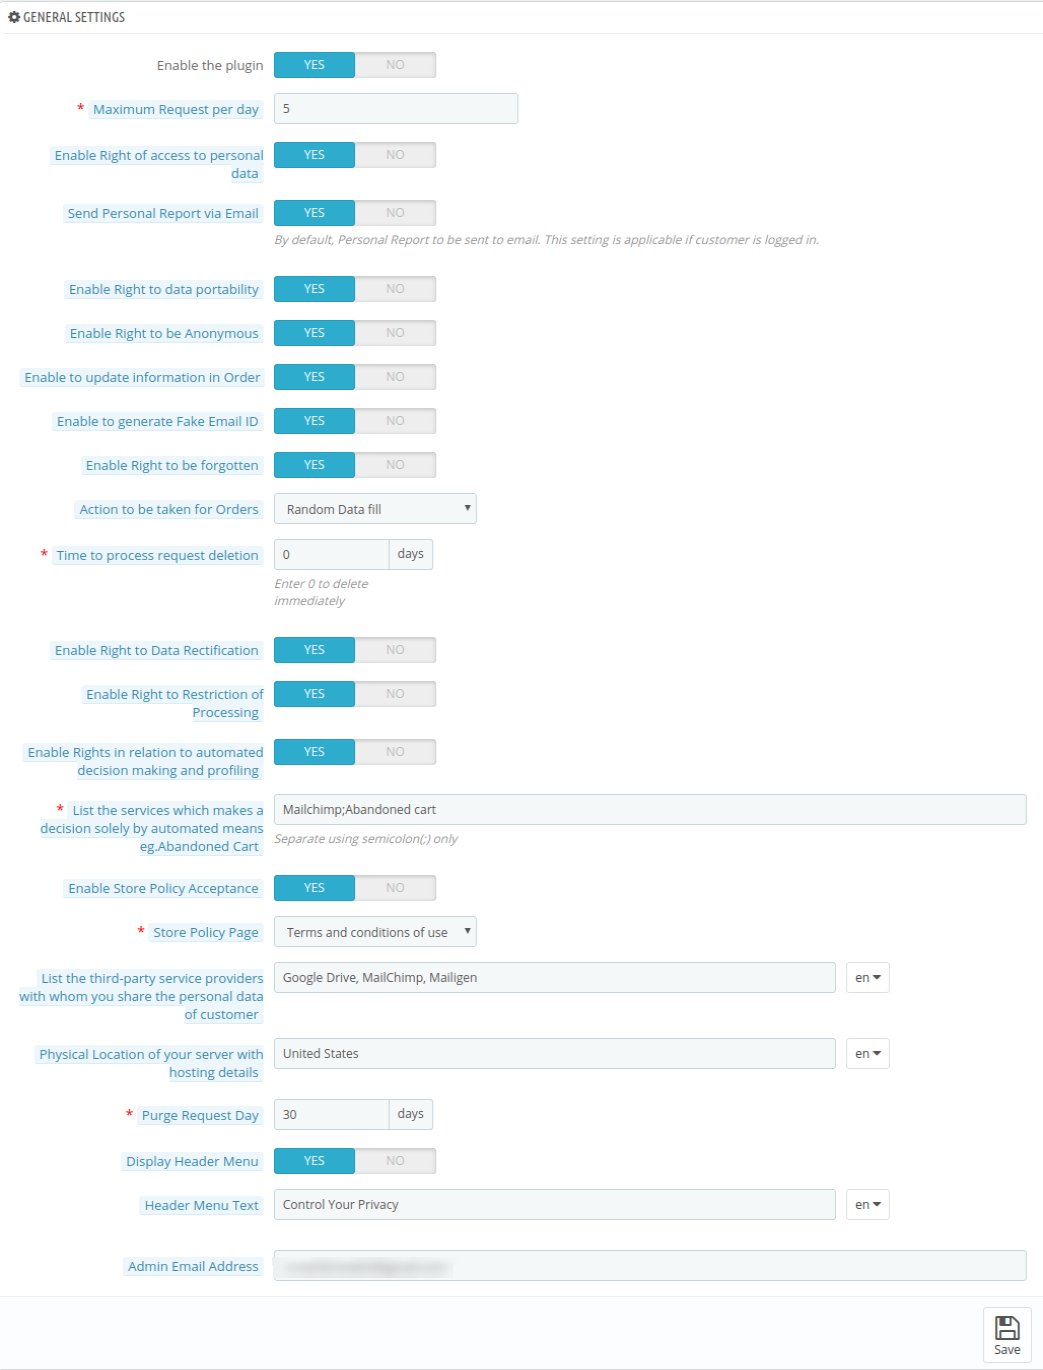
The GDPR Settings tab of the Prestashop GDPR Addon allows the store admin to enable the rights of the customer. The Settings tab of the Prestashop GDPR module has the following options:
1) Enable the Plugin:
As per the requirement, admin can Enable/Disable the data deletion and data anonymization option for the customer.
2) Maximum request per day:
The customer can request for the deletion of the data, the admin can set the limit for the requests by each user on daily basis. It will be recommended to set the maximum requests per day to a minimum number to avoid the spam requests.
3) Data anonymization request:
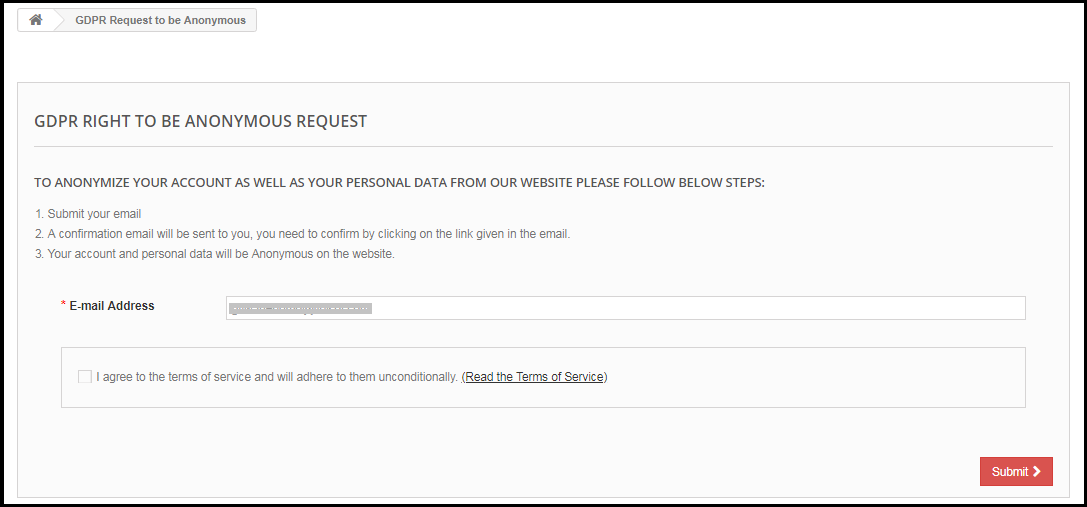
If the setting for the Right to be Anonymous is enabled from the admin panel of the Prestashop GDPR addon – data deletion and data anonymization, then the customer will be able to make a request for data anonymization. As soon as the customer will request for the data anonymization a confirmation email will be sent to the customer. As per the customer’s confirmation, customer details will be anonymized. Admin has the choice to anonymize the personal details of the customer like Name and email-id. The admin has the option to override the changes to the previous orders.
Enable the Data anonymization settings:
If the data anonymization settings are enabled from the admin interface of the Prestashop GDPR module then the customer will be able to request for the data anonymization and in this case, only customer name will be replaced by the random name.
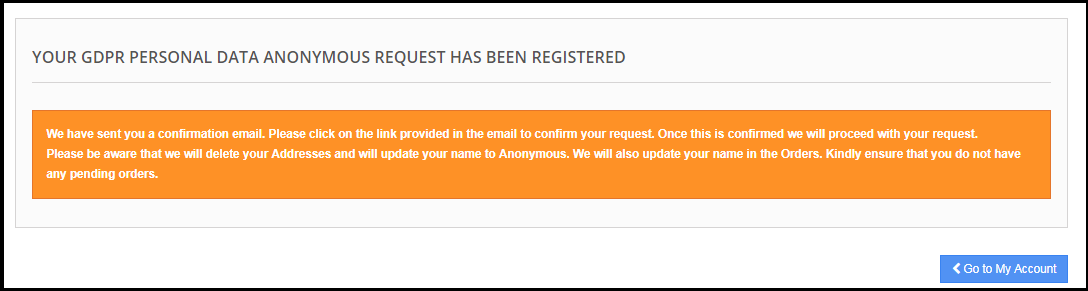
If a customer request for the Data anonymization, then a confirmation email will be sent to the registered email address and the customer will be requested to confirm the request.
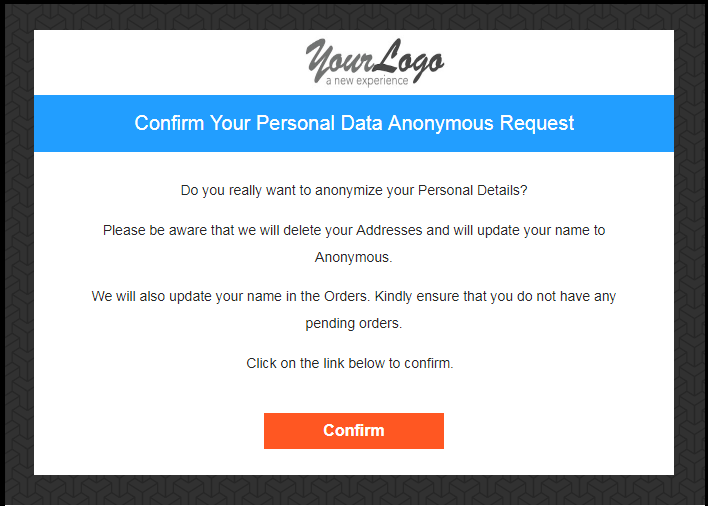
Email confirmation:
After requesting for the data anonymization customer will receive an email with a request to confirm the data anonymization request.
Note:
In case you are using the third-party services and sharing the customer data with third-party, then you need to make the required changes as per the procedure followed by the service provider. This GDPR module will anonymize the data which you have stored in your database only. The data anonymization process is just like the data deletion request.
4) Enable to update information in Order:
If a customer requests to make his/her information anonymous then admin can select the option to enable/disable the changes to the previous orders. If this setting is enabled from the admin interface of the Prestashop GDPR addon then the previous order details will be overridden.
5) Enable to generate Fake Email ID:
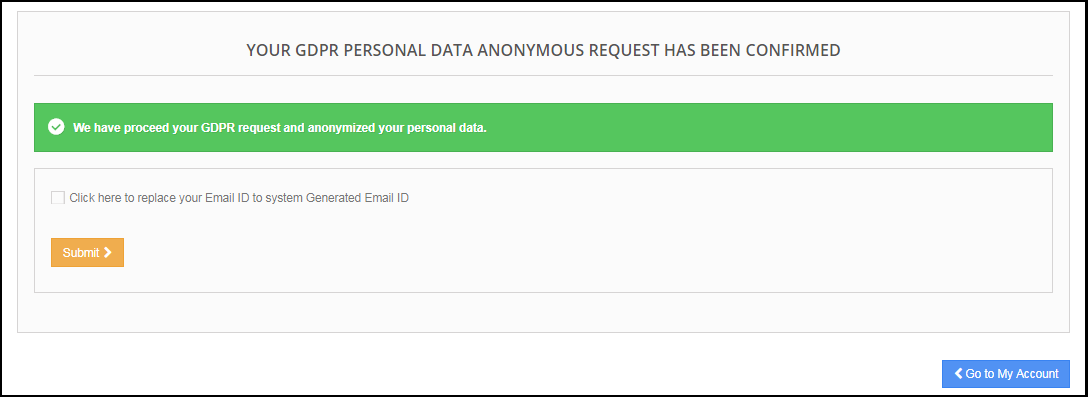
Admin has the choice to enable the settings to replace the customer’s email id by the system generated email-id. If the customer would like to anonymize his/her email id then they can submit the request for email id anonymization.
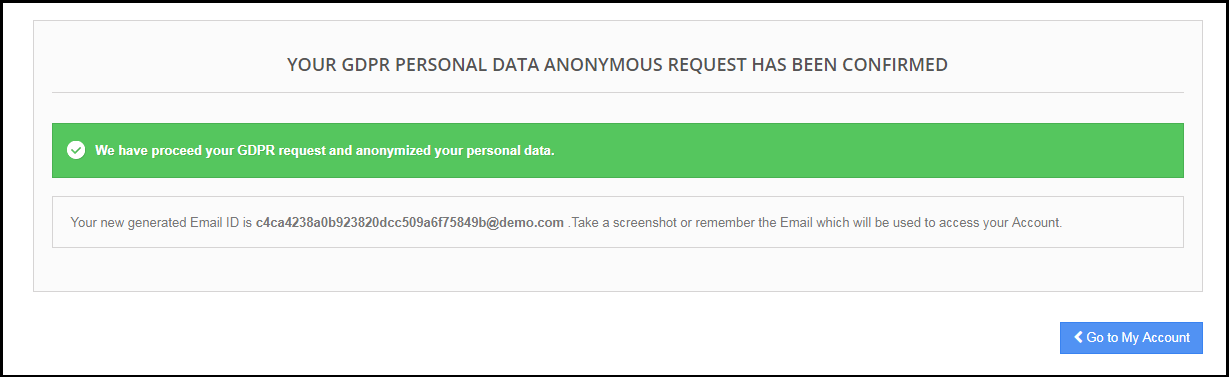
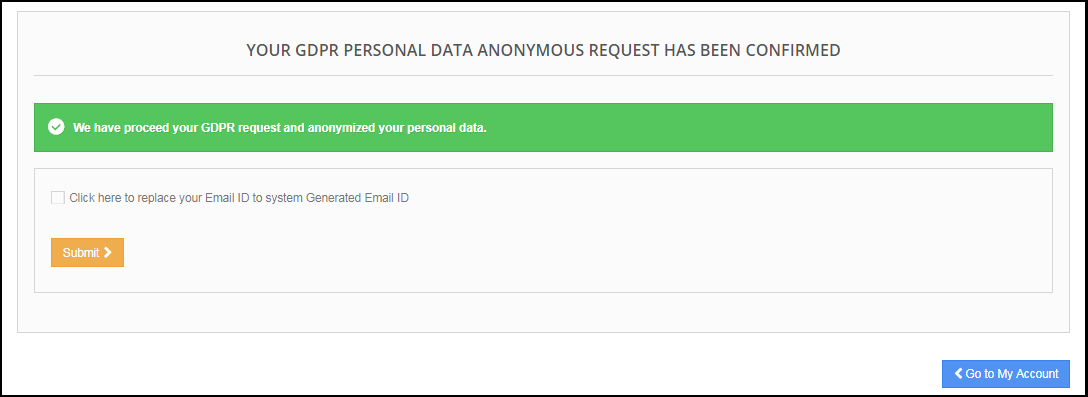
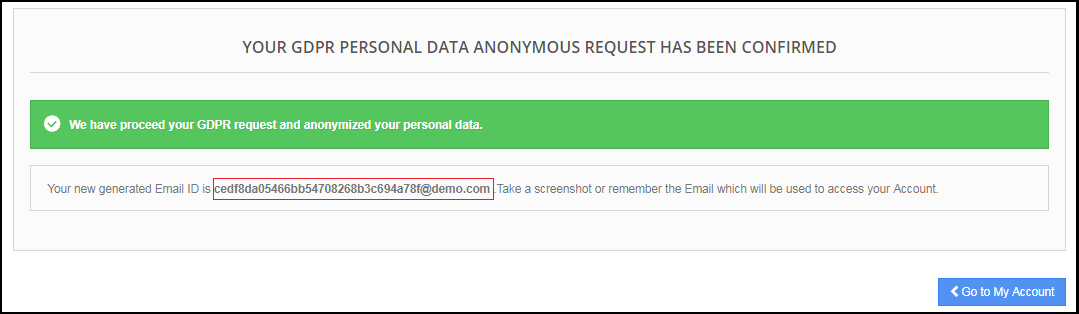
If the customer submits the request to anonymize the email id also. Then the customer email id will be replaced by a system generated an email.
The customer can save the system generated email id to access his/her account.
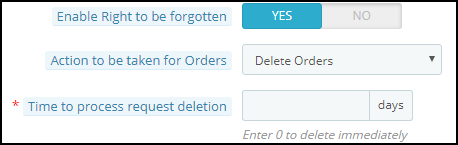
6) Enable right to be Forgotten:
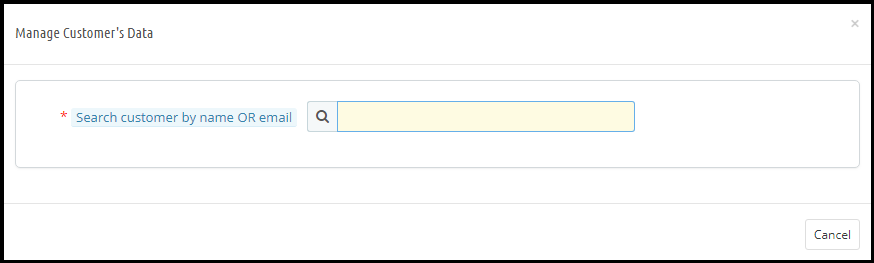
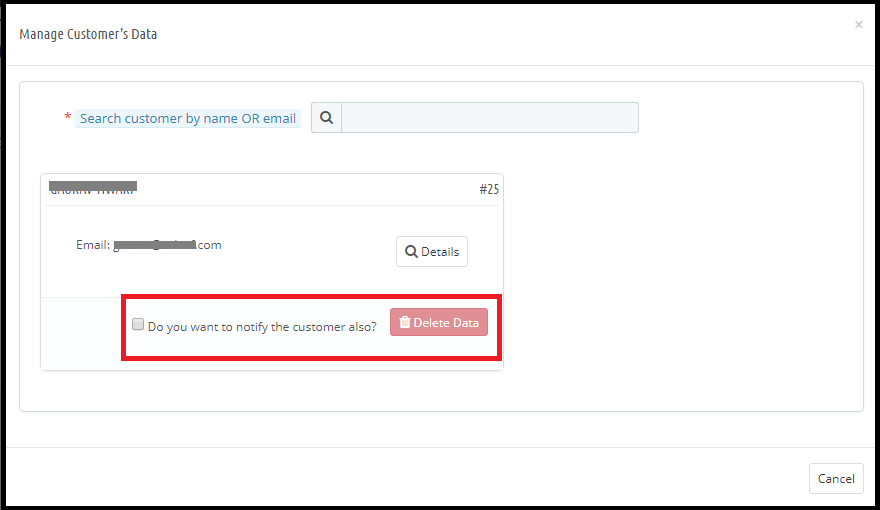
The new GDPR Directives allow the customer to erase their personal data. By using the Prestashop GDPR Addon module by Knowband, the admin can provide an interface to the customers to raise requests for the data deletion.
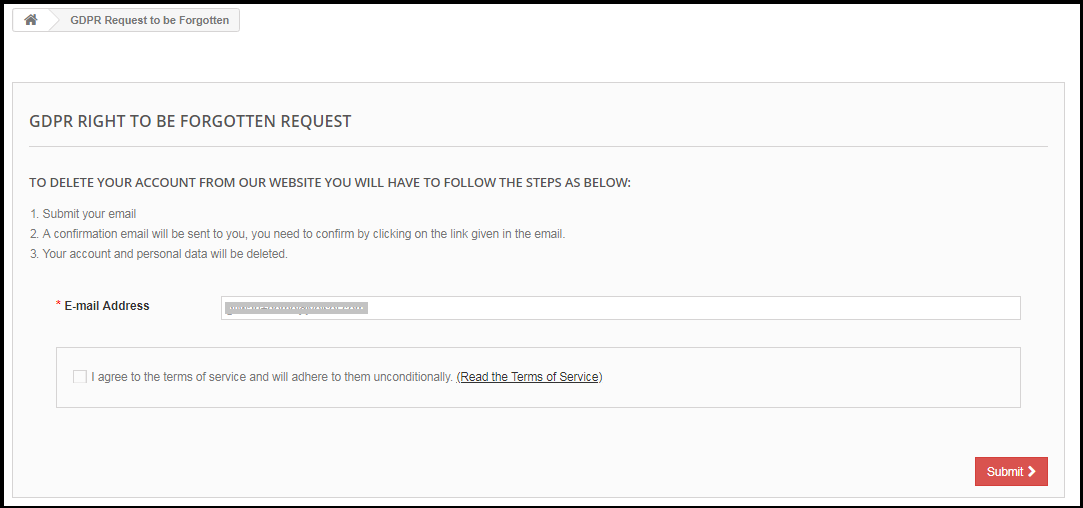
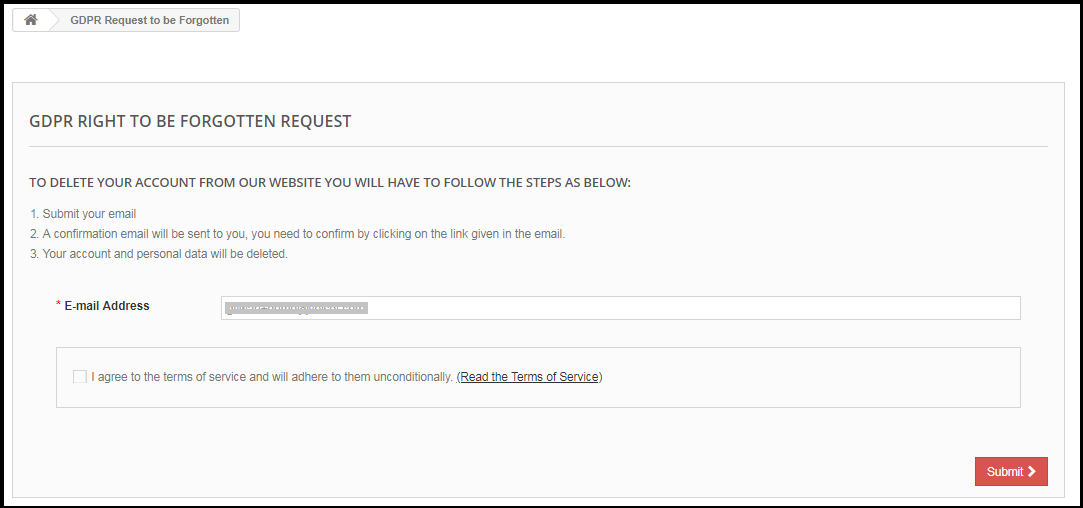
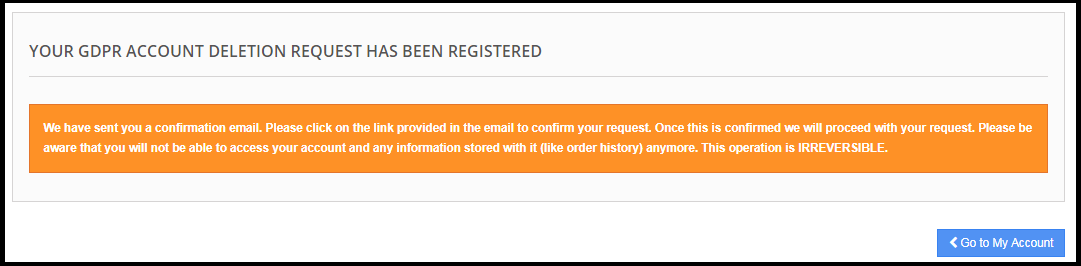
The data deletion report request interface for the customer will be as below:
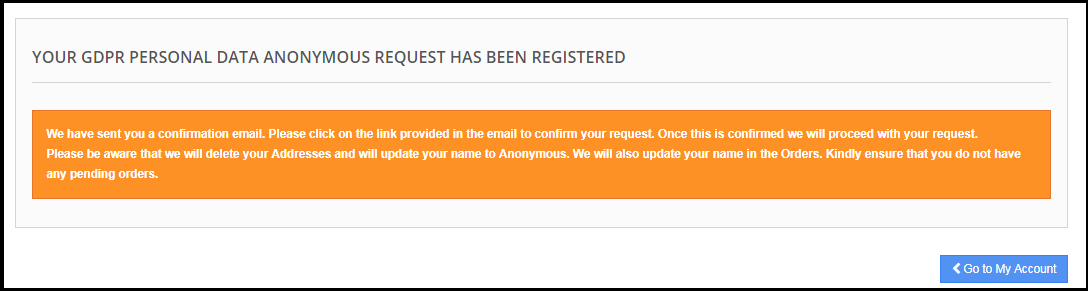
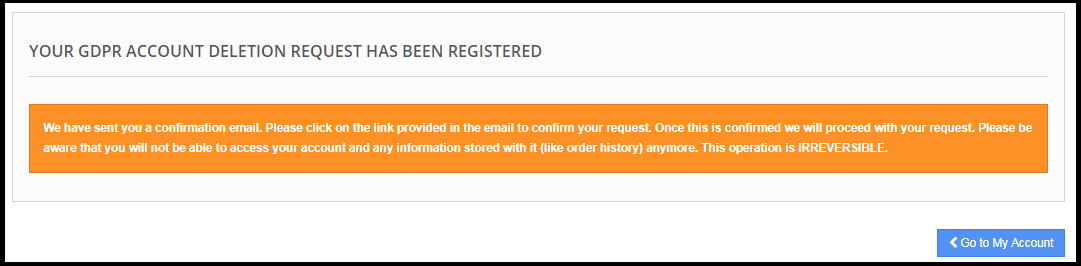
After requesting for the Account deletion the customer will be notified that an email with the confirmation request has been sent to the registered email id.
Note:
1) It is recommended to consult with your legal team before enabling this setting. After deleting the customer’s personal data it cannot be retrieved. Admin has the option to enable the delete order setting which has been explained in the next topic.
2) In case you are sharing the customer data with third-party service providers then you need to delete the customer data manually. As of now, this module does not support the feature to delete the data shared with the third-party service providers.
Example: If you are using MailChimp for sending promotional emails then you have to delete the customer details from MailChimp list manually.
9) Enable to Delete Orders:
If a customer has requested for the data deletion request under the GDPR, then the admin has the choice to delete the personal data of the customer along with the previous order details. If this setting is not enabled from the admin interface of the GDPR module then only personal data will be deleted and order information will remain as it is.
Note:
It is recommended to consult with your legal team before enabling the order deletion settings. The order details deleted from the system cannot be retrieved.
8) Enable Store Policy Acceptance:
If a customer would like to raise a request under GDPR rights then admin can add the condition to accept the Privacy Policy link before requesting for the Account Deletion or Data Anonymization. The admin interface of the Prestashop General data Protection Regulation addon allows the store admin to enable the setting so that for each request customer need to accept the terms and policy.
9) Store Policy Page:
Admin can add the URL of the page on which all the Terms and Conditions are listed. The customer can check the Terms and Conditions by clicking the link available with the message at the time of raising the request.
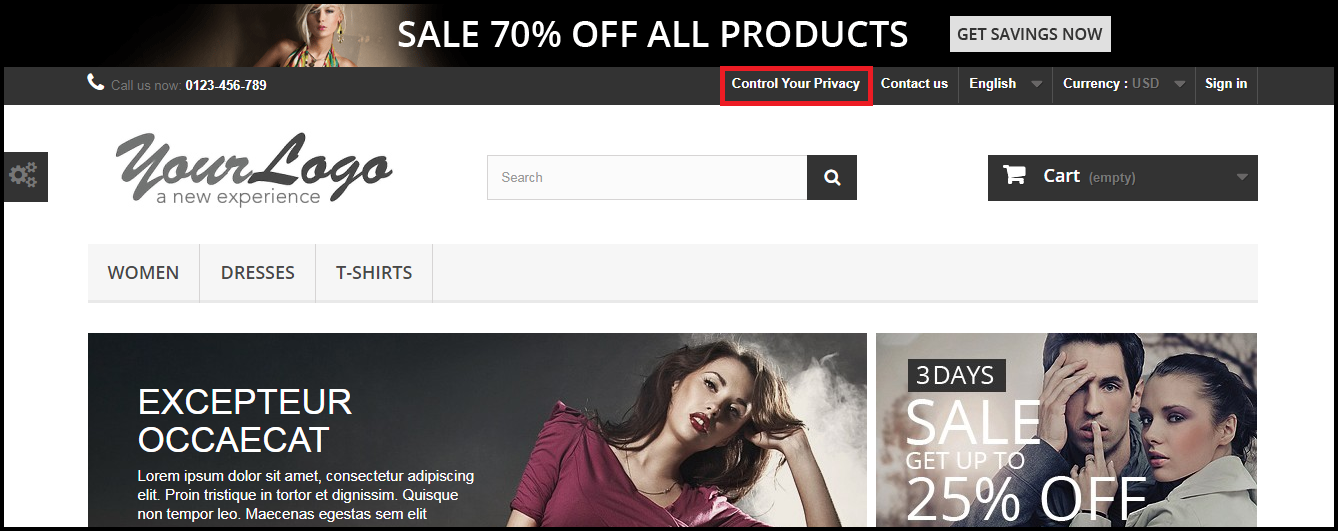
10) Display Header Menu
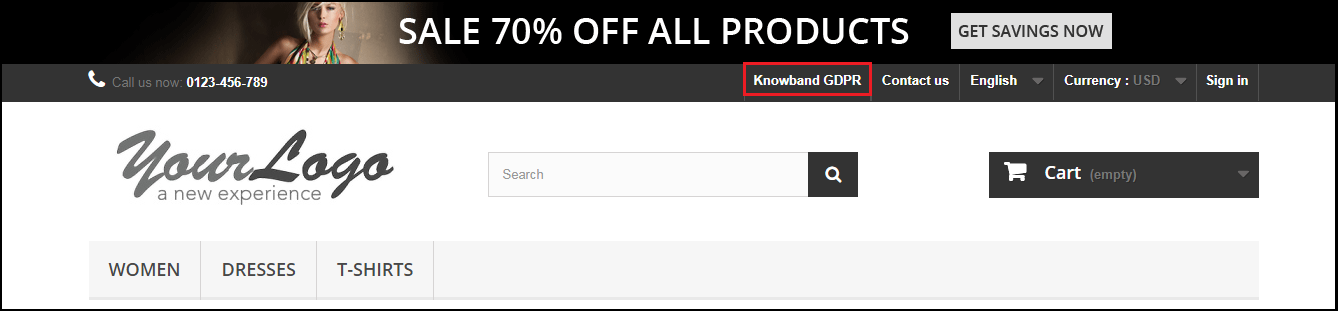
Display Header Menu option of the Prestashop GDPR compliance addon allows the store admin to display the GDPR option in the header section of the website. By enabling “Display Header Menu” setting of the Prestashop GDPR addon, store admin can allow the guest users to access the GDPR rights.
11) Header Menu Text
Admin can define the text for the Header Menu.
GDPR Forgot Request
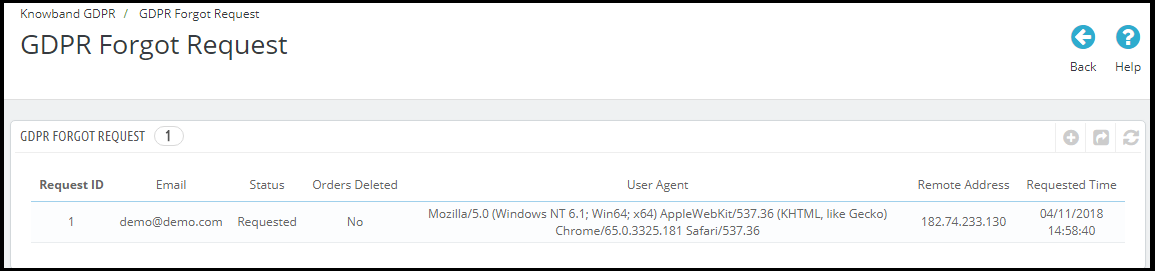
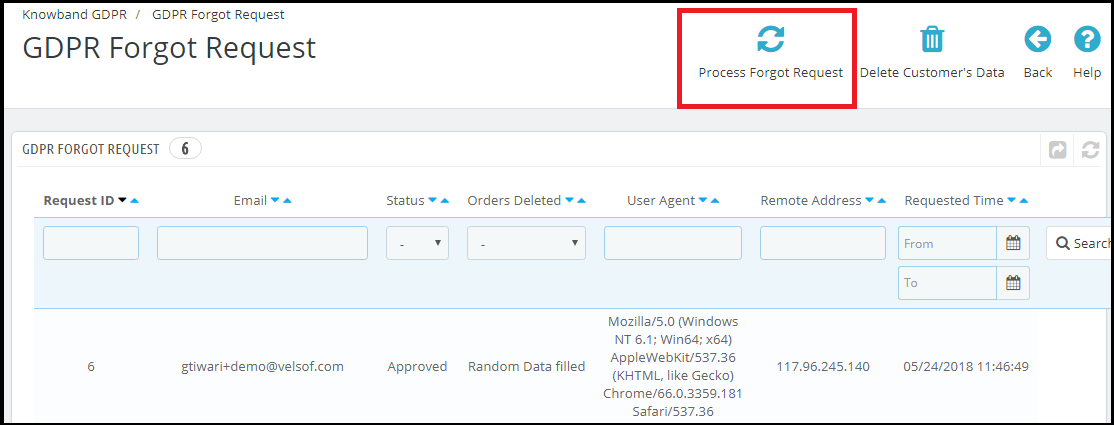
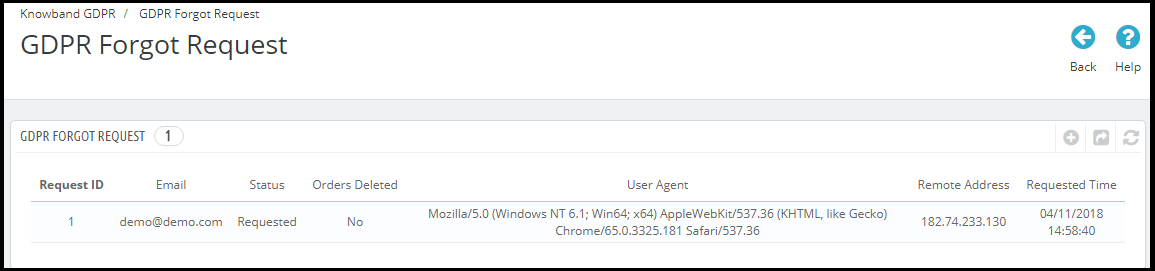
The Prestashop GDPR Addon keeps the log of all the data deletion requests. This log is helpful for the admin to verify that the customer details have been deleted or not. Admin can also use this log to remove the customer data from the third-party service providers.
Note:
As soon as a customer request for the deletion of his/her details a confirmation email will be sent to the customer. As per the customer’s confirmation, the details of the customer will be deleted from the system.
The Prestashop GDPR Module allows the admin to exclude the previous orders so that only the personal details of the customer will be deleted but order details will be saved for the future reference. Please use this setting carefully because the data deleted once cannot be retrieved. It is strongly recommended to consult with your legal team to make sure how to use this setting.
The Prestashop GDPR Module only deletes the customer data from the store database. If you share the customer data with the third-party service providers (eg. MailChimp) or store it on the third-party platform (eg. Google Drive) then you need to delete the customer data from these platforms manually.
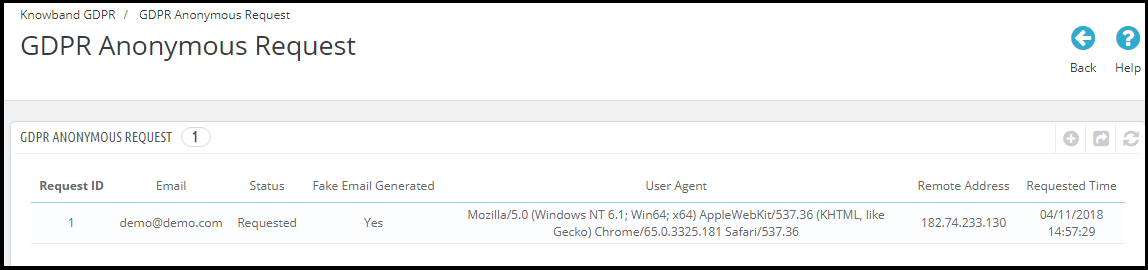
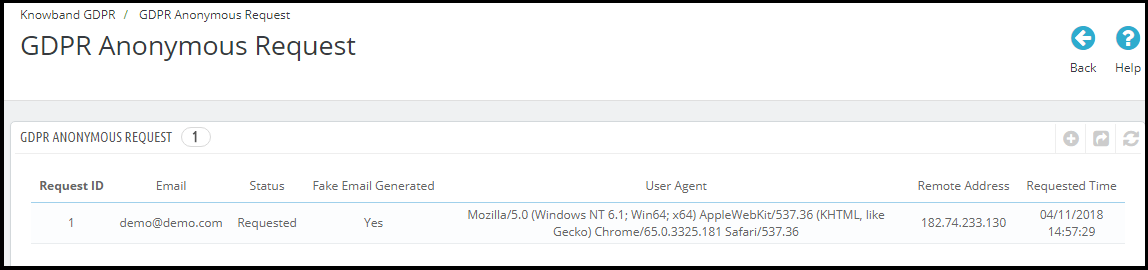
GDPR Anonymous Request
The Prestashop GDPR Addon keeps the log of the Data Anonymization requests. Admin can use this log to verify the status of the data anonymization requests.
GDPR Email Templates
The Prestashop GDPR Addon by Knowband allows the admin to send following emails to the customer on raising a request under the GDPR.
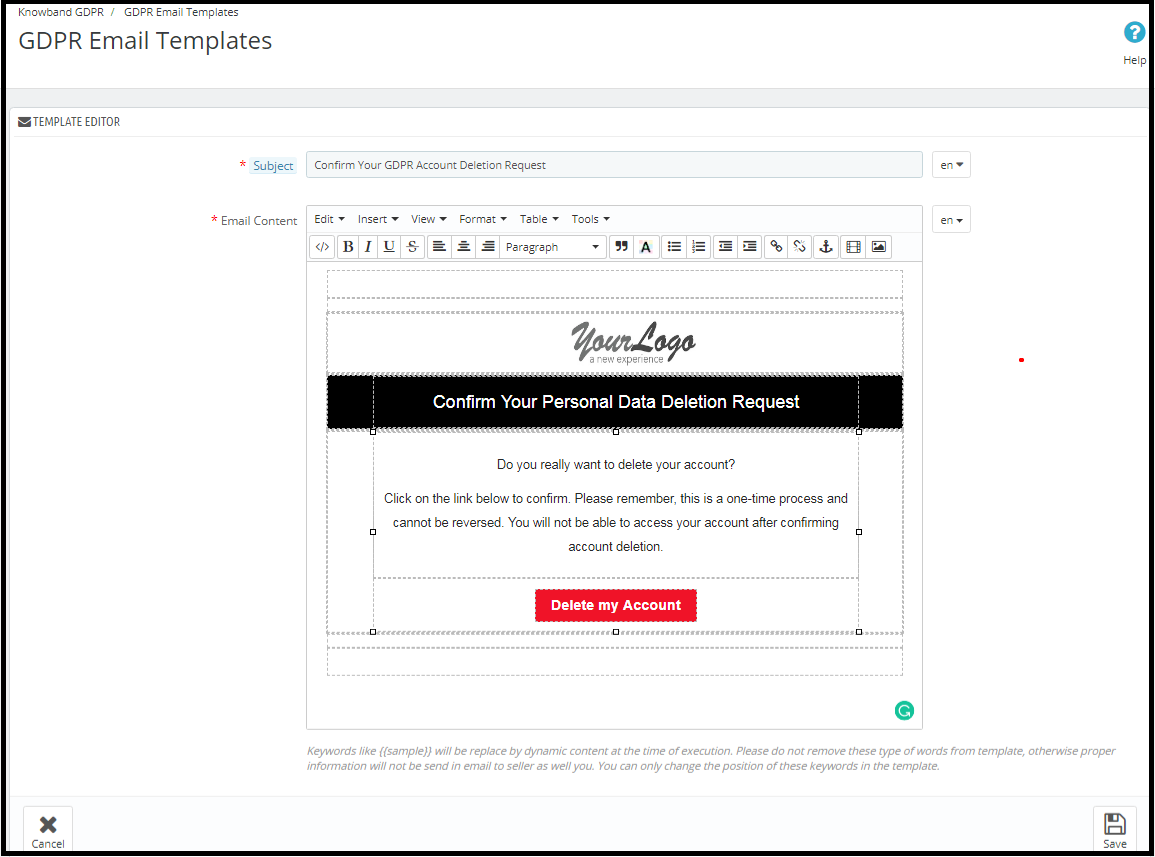
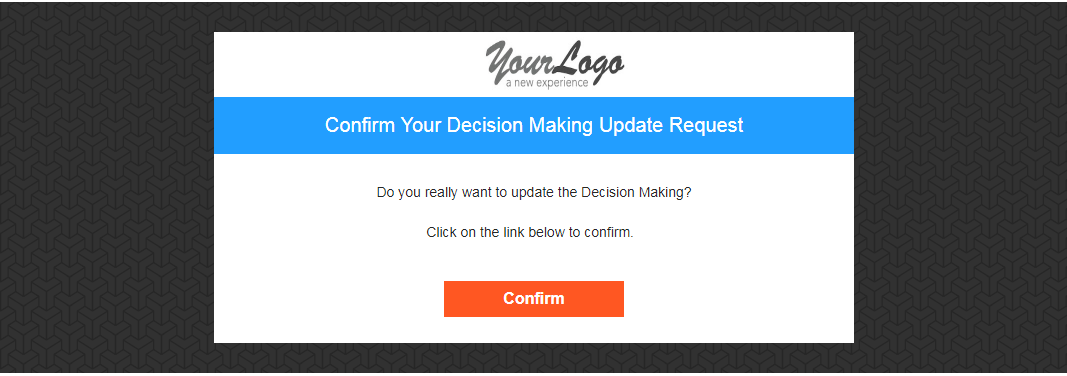
Confirm Your GDPR Account Deletion Request
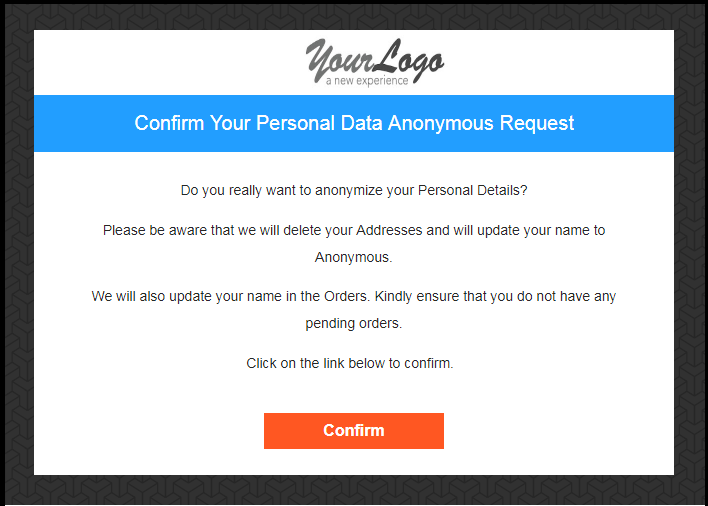
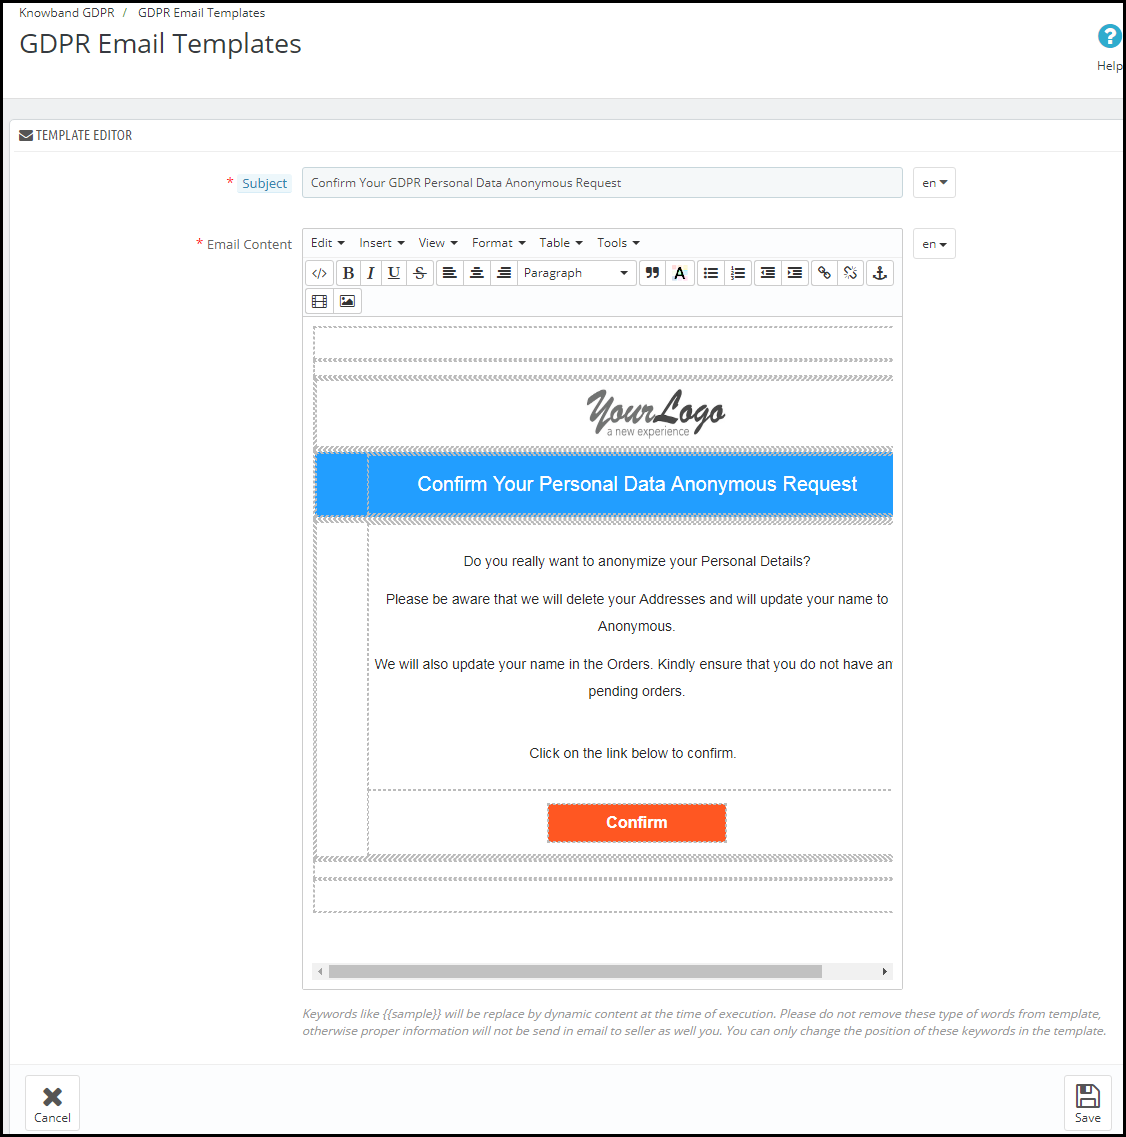
Confirm Your GDPR Personal Data Anonymous Request
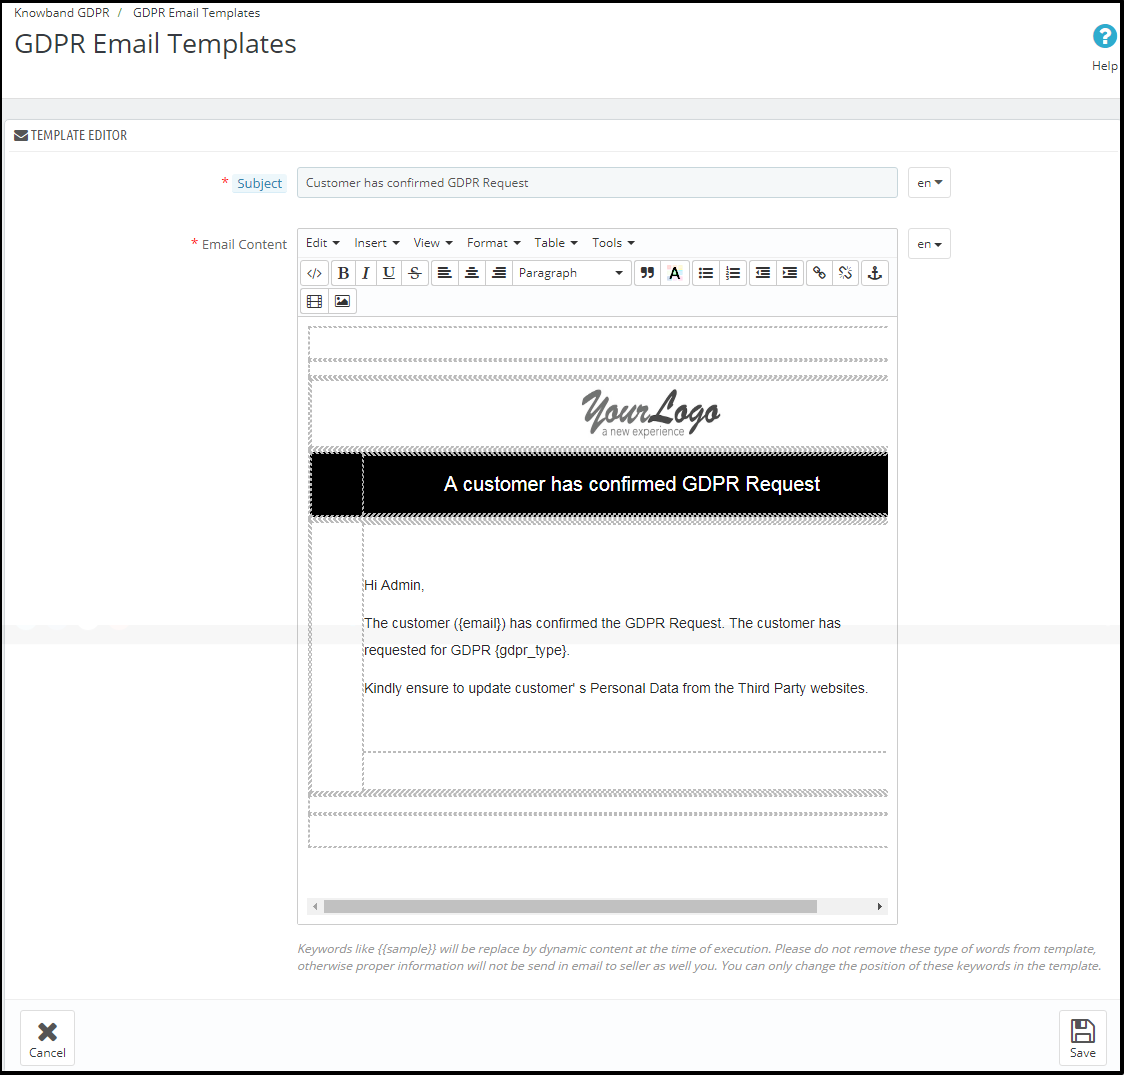
Customer has confirmed GDPR Request
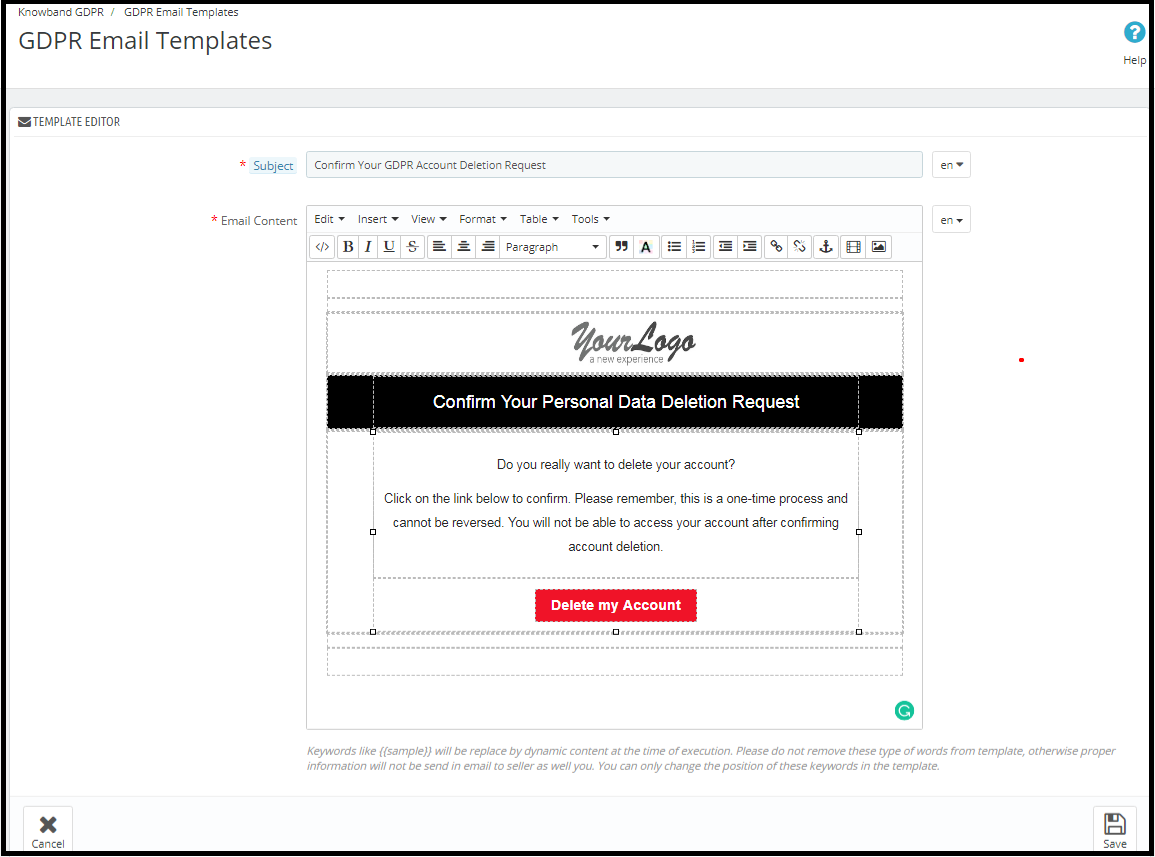
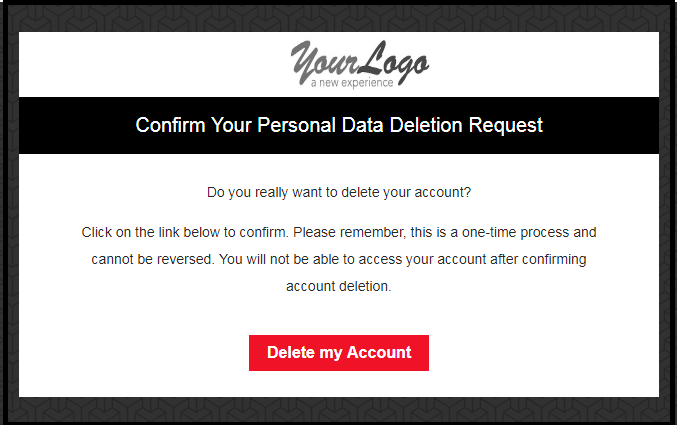
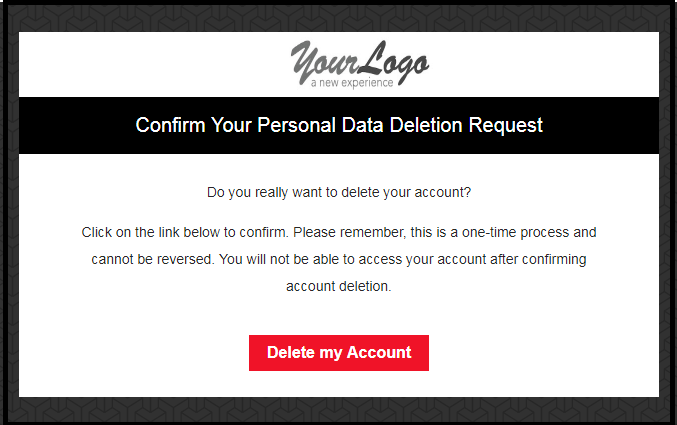
Confirm Your GDPR Account Deletion Request
Admin can update the Subject line and the email text by using the GDPR Email Template Settings.
The default format of the email template is as below:
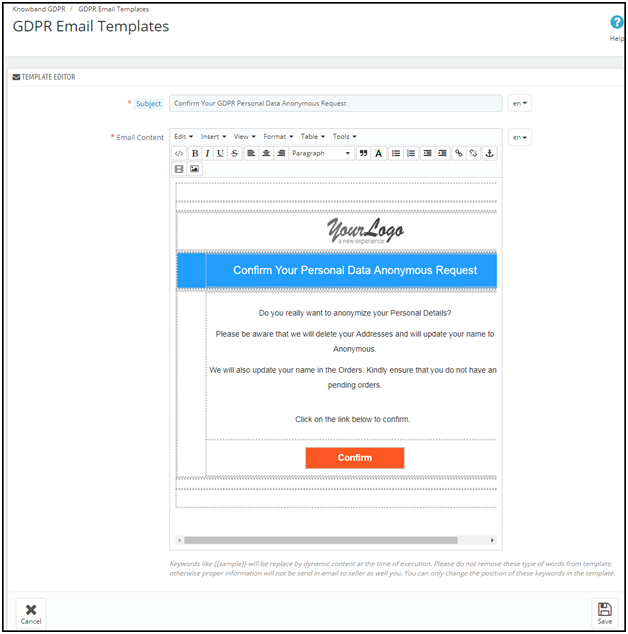
Confirm Your GDPR Personal Data Anonymous Request
Admin can update the Subject line and the email text by using the GDPR Email Template Settings.
the default format of the email template is as below:
Customer has confirmed GDPR Request
Note: The purpose of these features is to help you to meet with the GDPR requirements. Installing this module only does not guarantee merchant sites’ compliance with the new obligations imposed by the GDPR. It is your responsibility to put in place all the necessary measures to ensure you comply.
The General Data Protection Regulation (GDPR) is a replacement for the European Union Data Protection Directive which will be enforced on May 25, 2018. The new directives have been passed, as per the new technologies and business advances; a new approach to protection of the personal data has been introduced.
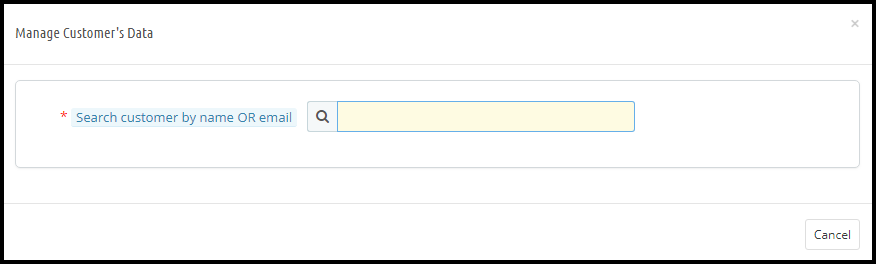
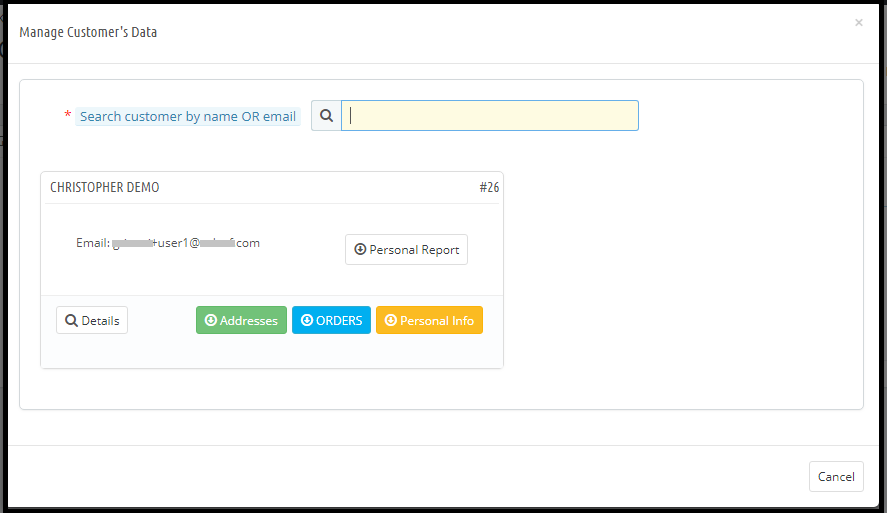
The Prestashop GDPR Module – Right to access and data portability helps the store admin to manage the data access and data portability requests of the customers. By using the Prestashop GDPR Module by Knowband admin can provide an interface to the customers so that they can request for their personal information and if the required customer can also download the data as a CSV file.
To enable the GDPR Rights for the customers, download the zip file of the module from the Downloads section of your Knowband account.
1) GDPR.zip (source code of the module)
2) User Manual
In order to install the extension in your Prestashop store follow the below-mentioned steps:
1) Unzip the gdpr.zip file.
2) Copy the entire content, that is, the files and folders of the unzipped folder. Paste the same into the “Modules” folder of your store’s directory. Follow the below-mentioned address path – Root Directory/modules/.
3) The Prestashop GDPR plugin is all set to be installed in the store. Go to the Store Admin and then to ‘Modules and Services’.
4) Click on the “Install” button just next to your module. It would show a pop-up for your confirmation. Click on “Proceed with the installation” option. This step will install the module and show notification – “Module(s) installed successfully”.
5) Once the installation is complete, you will get the access to the admin interface of the module by clicking on the “Configure” button.
1.2.0 Front-end interface of the Prestashop GDPR Module:
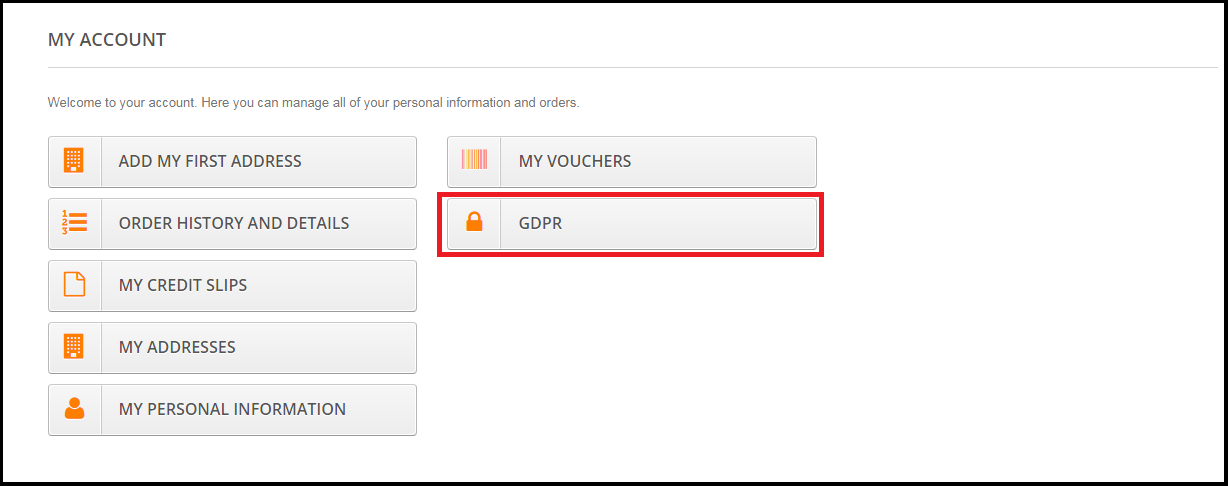
Customers will be able to access the GDPR rights by navigating to the My account section. Here, a separate tab GDPR will be visible to the customers. By using the GDPR tab customers can access their GDPR rights – Right to access and Right to data portability.
On clicking the GDPR tab the customer will be redirected to the GDPR tools page, from here customer can request for their personal data and also download their personal details like personal information, addresses and orders.
The Prestashop GDPR Module – Right of access and data portability, allows the store admin to enable the GDPR settings for the guest users so that guest users can also request for the details of their personal data. If the GDPR rights are enabled for the guest user then it will appear in the header section. Please refer to the attached screenshot.
1.3.0 Admin Interface of Prestashop GDPR Addon – Right to access and data portability:
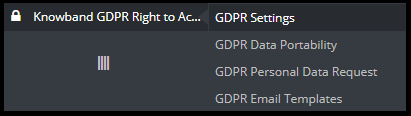
The admin section of the Prestashop GDPR addon has the following options:
1) GDPR Settings
2) GDPR Data Portability
3) GDPR Personal Data Request
4) GDPR Email Templates
1.3.1 GDPR Settings:
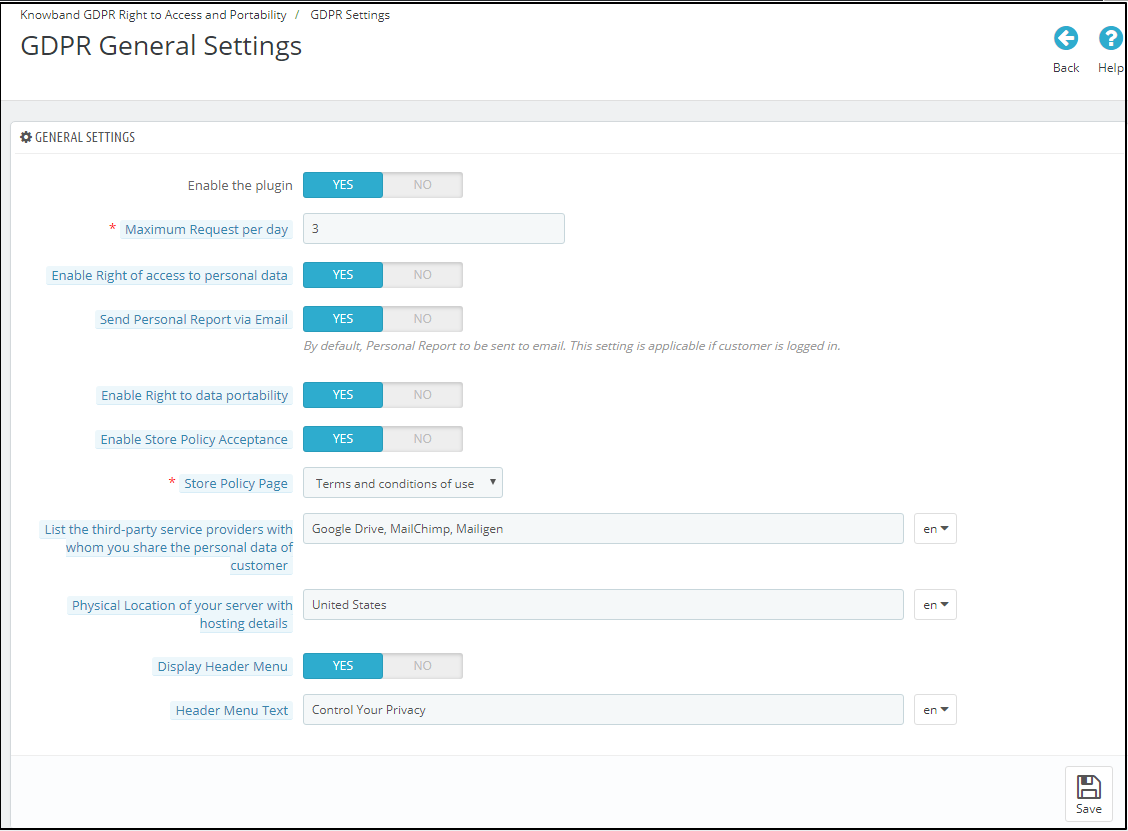
The GDPR Settings tab of the Prestashop GDPR Addon – Rights to access and data portability has the following options. Please refer to the attached screenshot below:
a)Enable the Plugin:
Admin can enable the customer rights by using the Enable the plugin toggle button.
b) Maximum request per day:
Admin has the options to set the max limit for the Personal data request.
c) Enable Right of access to personal data:
The right of access to personal data allows the customers to request for the personal data. Admin has the option to display the report immediately or admin can enable the setting to send the GDPR Personal data report over email.
d) Send Personal report via email:
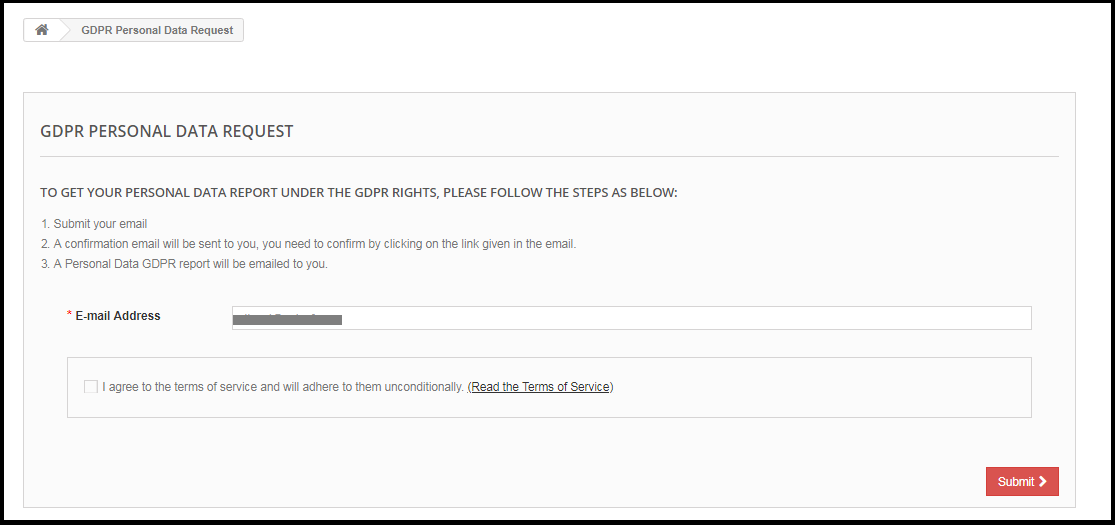
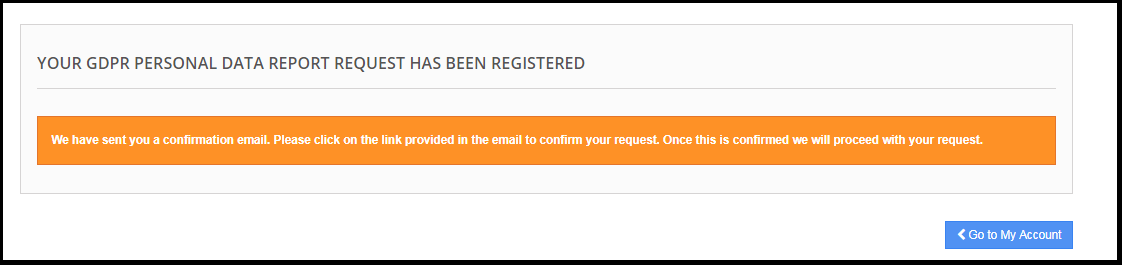
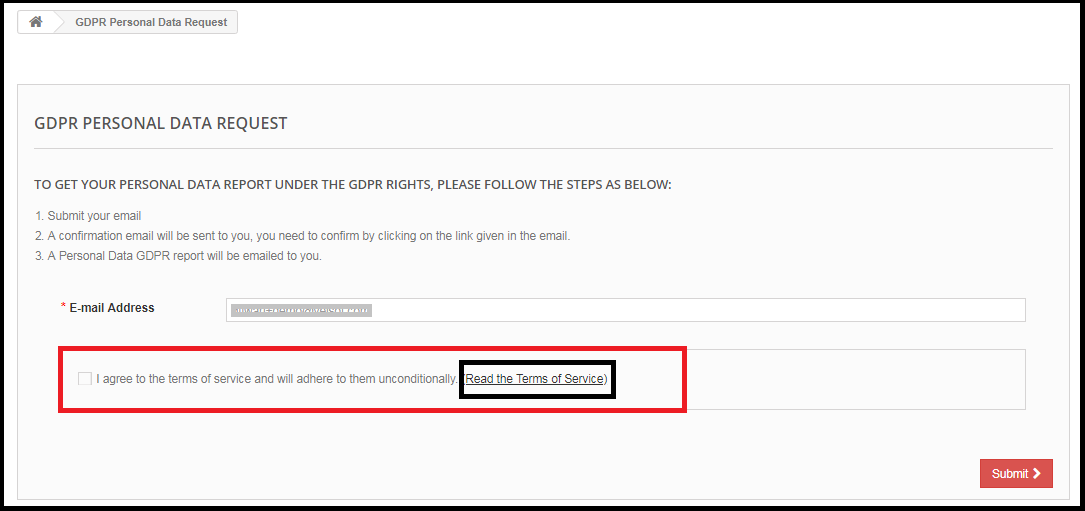
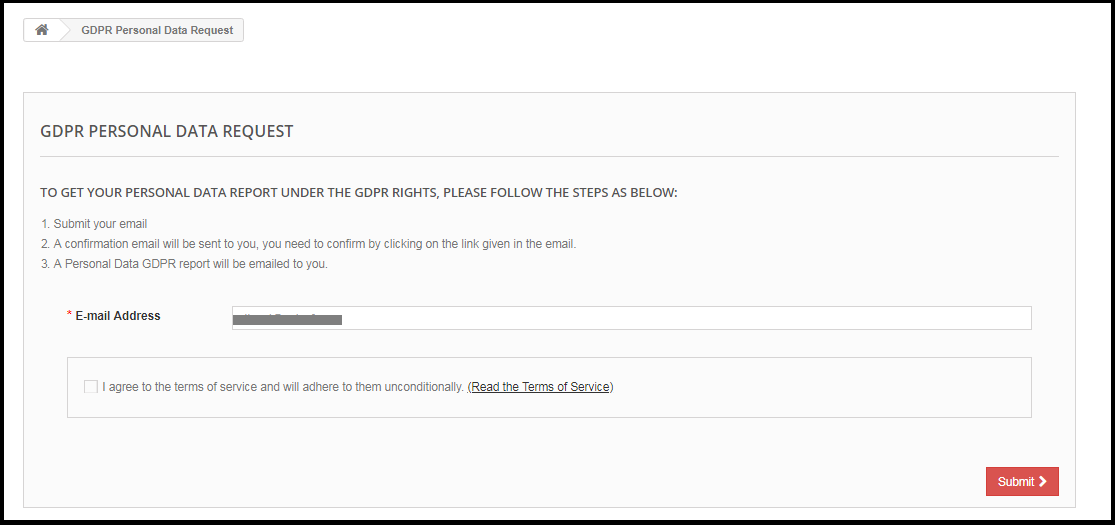
If this setting is enabled then the Personal data report will be sent via the email. Steps for the request for the personal data are listed below:
Step-1:
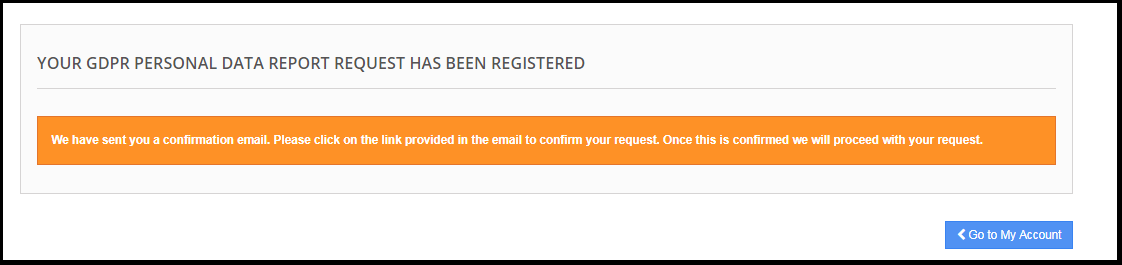
Request for the GDPR Personal Data report – Prestashop GDPR Addon
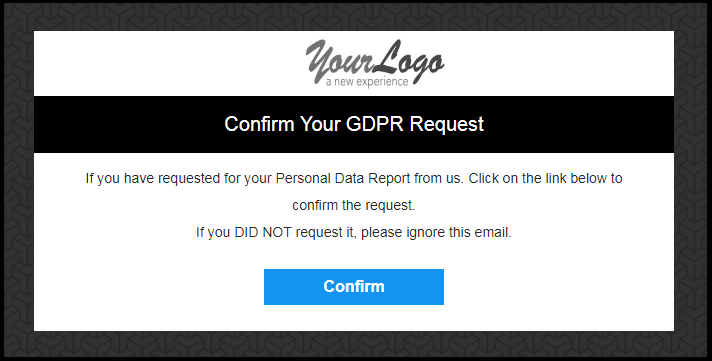
Step: 2
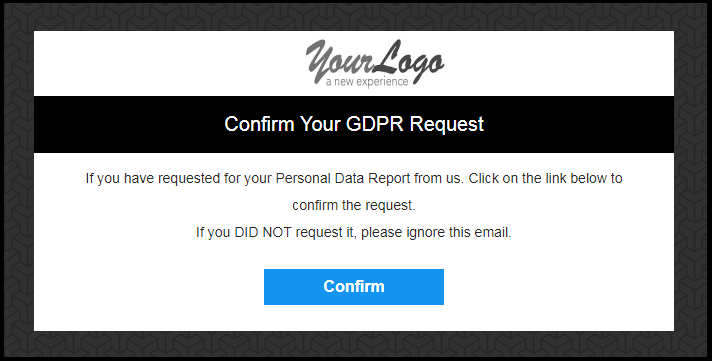
Confirm the GDPR Request.
Step: 3
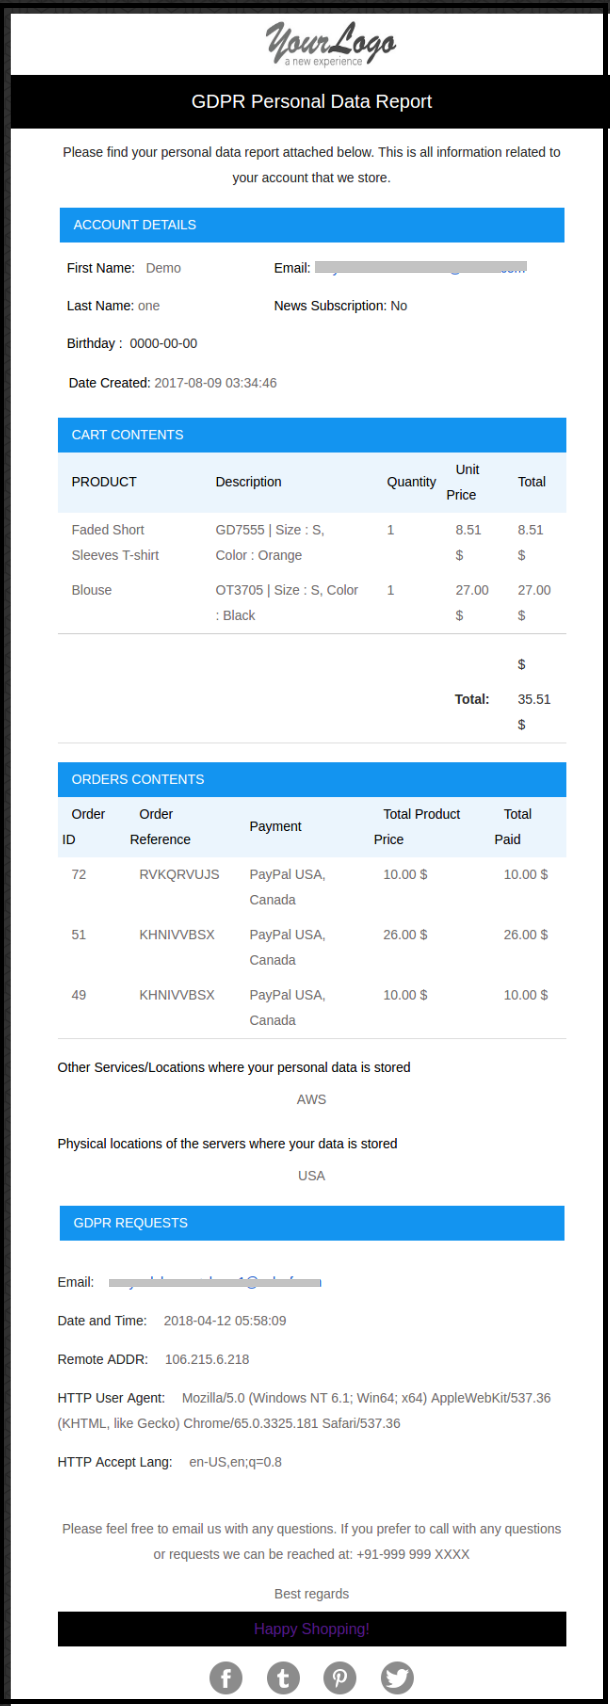
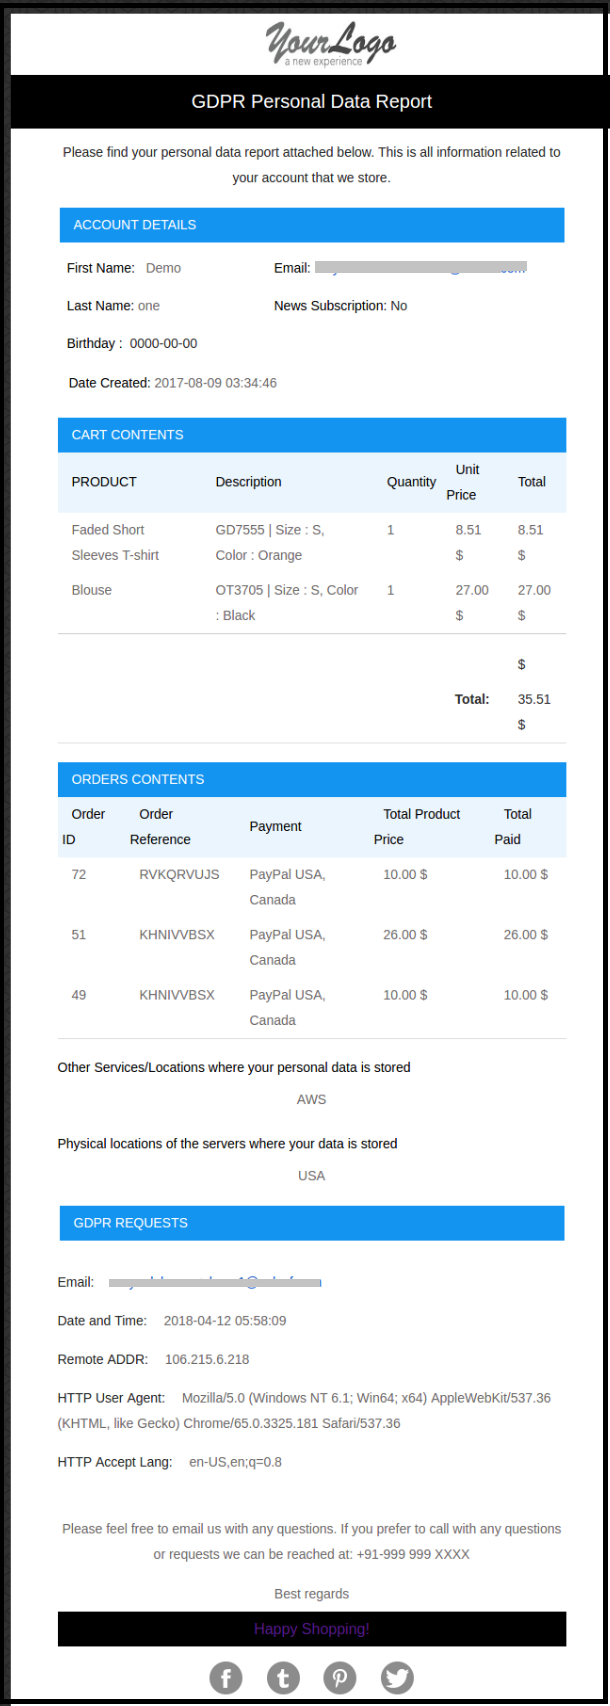
As soon as the customer will confirm the GDPR Personal Data Request, an email with the customer details will be sent to the customer.
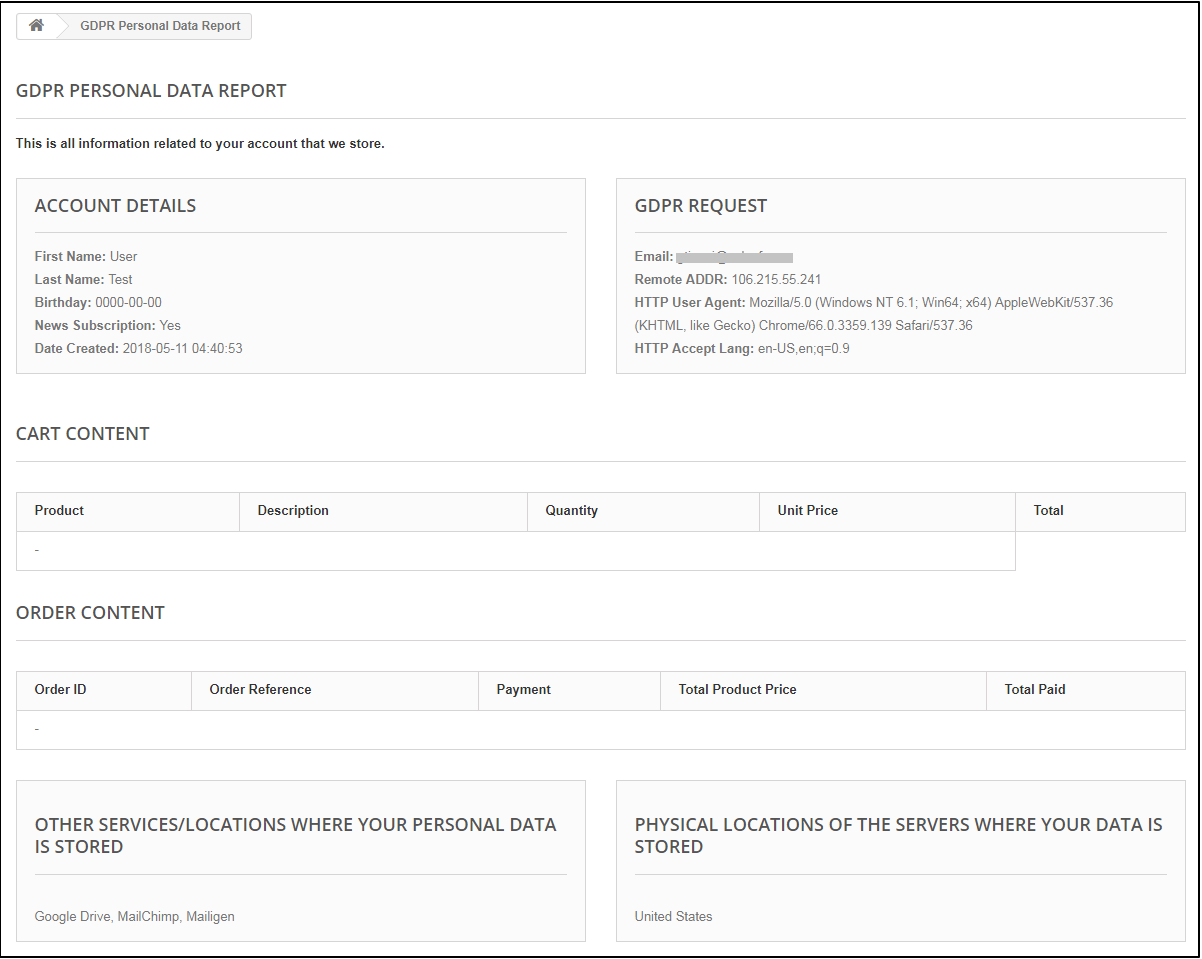
If the Send Personal Report via Email setting is disabled then the personal data report will be displayed immediately. Please refer to the attached screenshot.
e) Enable Right to Data Portability:
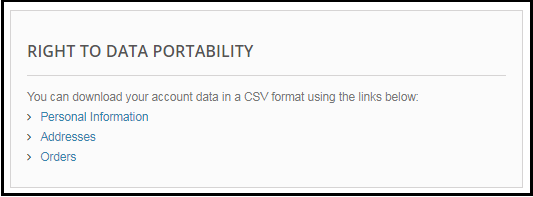
Right to data portability allows the customers to download their personal information which they have provided to the data controller.
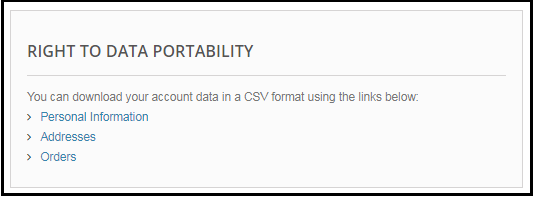
The Prestashop GDPR addon – Right to access and data portability allows the store admin to provide an interface to the customers so that they can easily download their data like personal details, addresses and orders.
In case the customer is logged in then he/she can directly download the report. For the guest users, it is mandatory to verify the data download request only after successful verification the guest user will be able to download the data.
Personal Information Report example:
f) Enable Store Policy Acceptance:
If a customer would like to raise a request under GDPR rights then admin can add the condition to accept the Terms and Conditions before requesting for the GDPR request for the Personal Data. The admin interface of the Prestashop GDPR addon allows the store admin to enable the setting so that for each request customer need to accept the terms and policy.
g) Store Policy Page:
Admin can add the URL of the page on which all the Terms and Conditions are listed.
h) Services/ Other locations where you store customer data:
Admin can list all the third-party service providers’ details to share the details with the customer.
i) Physical locations of servers where you host your website and other data:
Admin can define the physical server location of the server where the data has been stored.
j) Display Header Menu:
If the admin would like to enable the GDPR rights for the guest users then admin can enable the Display Header Menu setting. Admin has the choice to update the text for the GDPR rights, this text will be visible in the header section of the website and customers can access their rights by using this interface.
k) Header Menu Text:
Admin can define the text for the Header Menu.
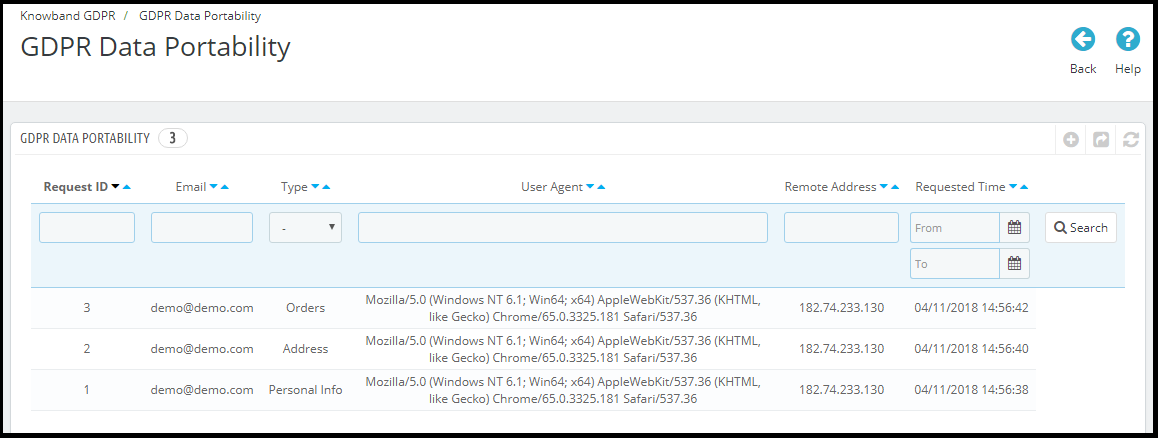
1.3.2 GDPR Data Portability
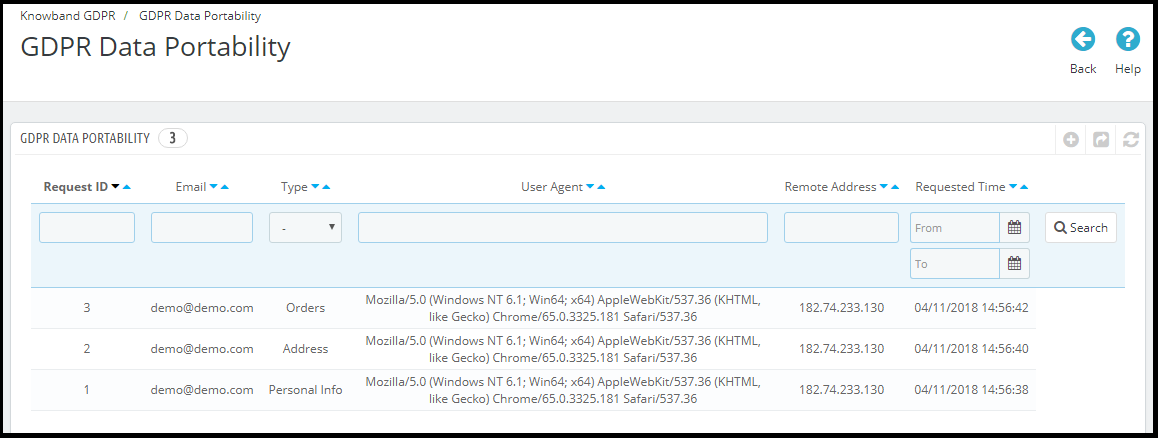
The Prestashop GDPR Module – Right to access and data portability, keeps the log of all the GDPR data portability requests processed.
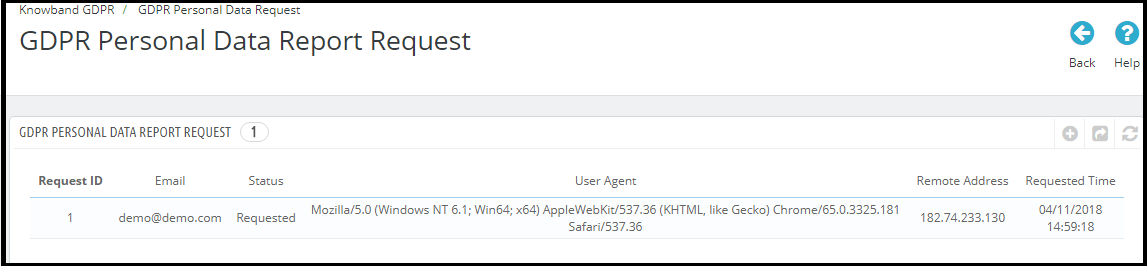
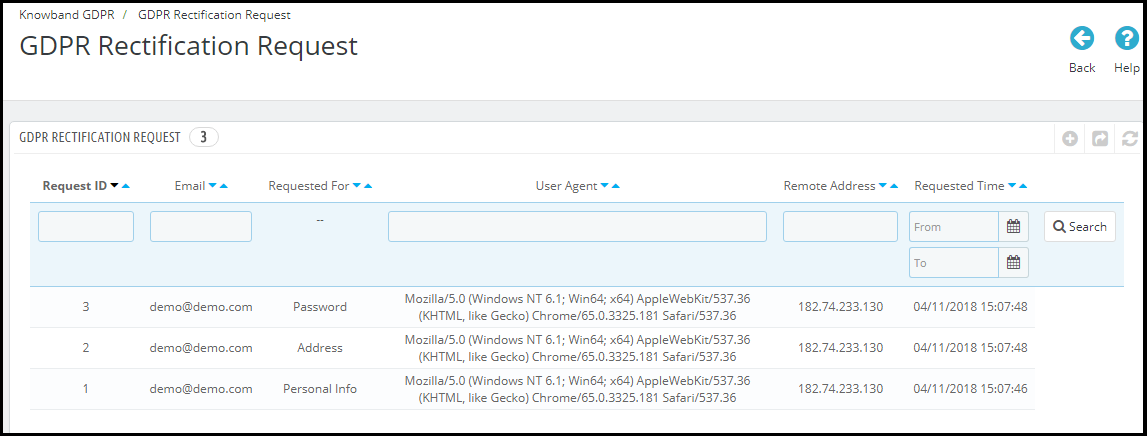
1.3.3 GDPR Personal Data Report Request
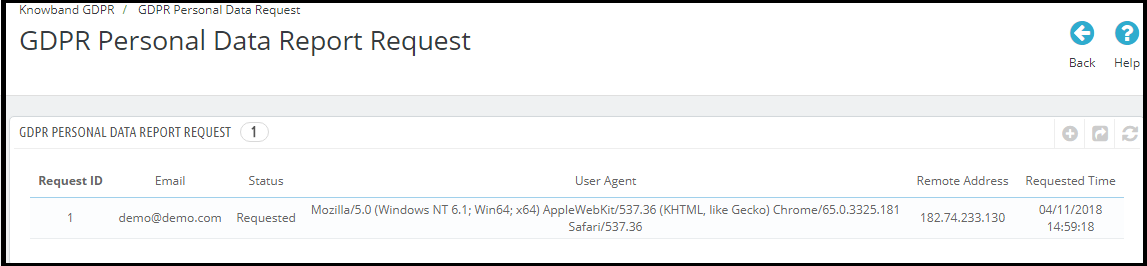
The Prestashop GDPR Addon – Right to access and data portability, keeps a log of all the personal data requests processed.
1.3.4 GDPR Email Templates
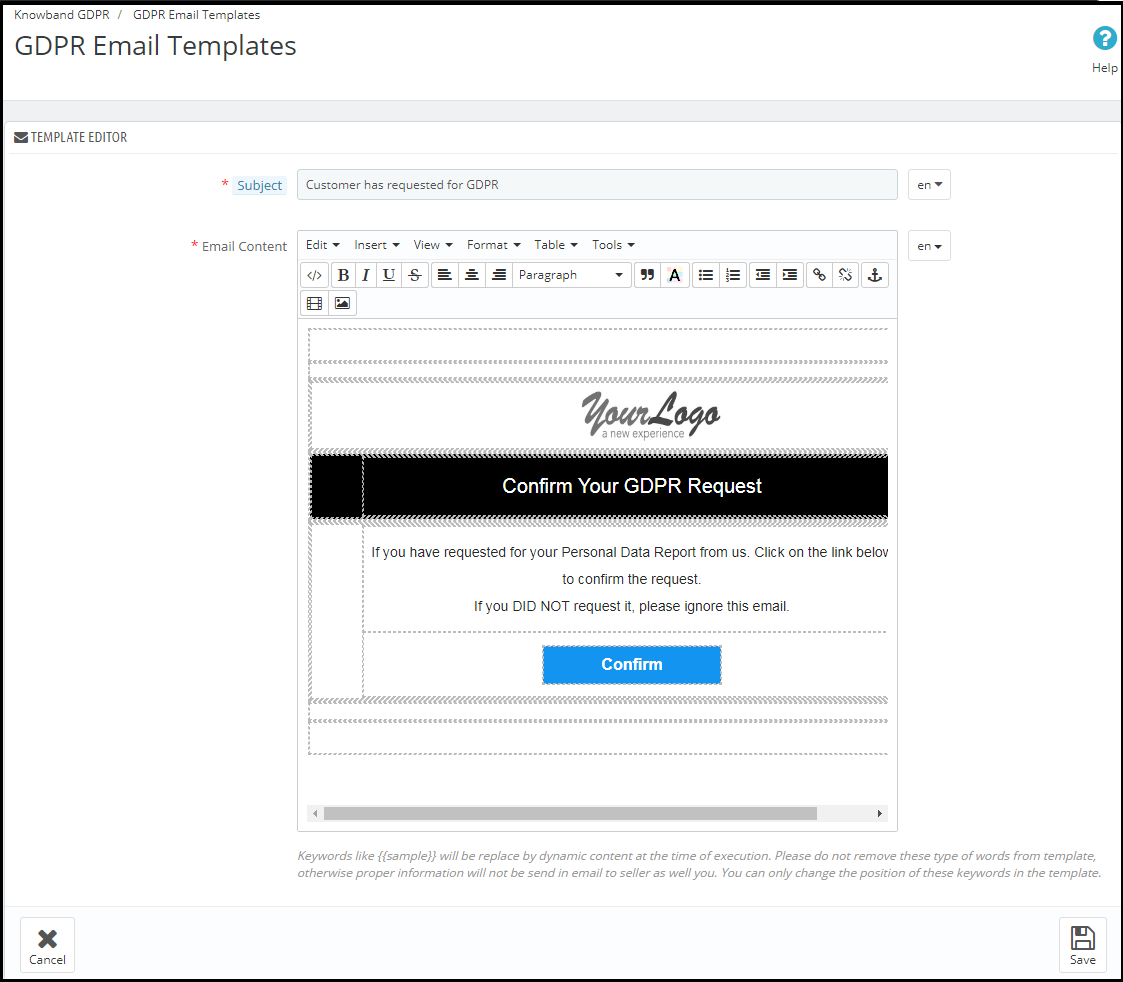
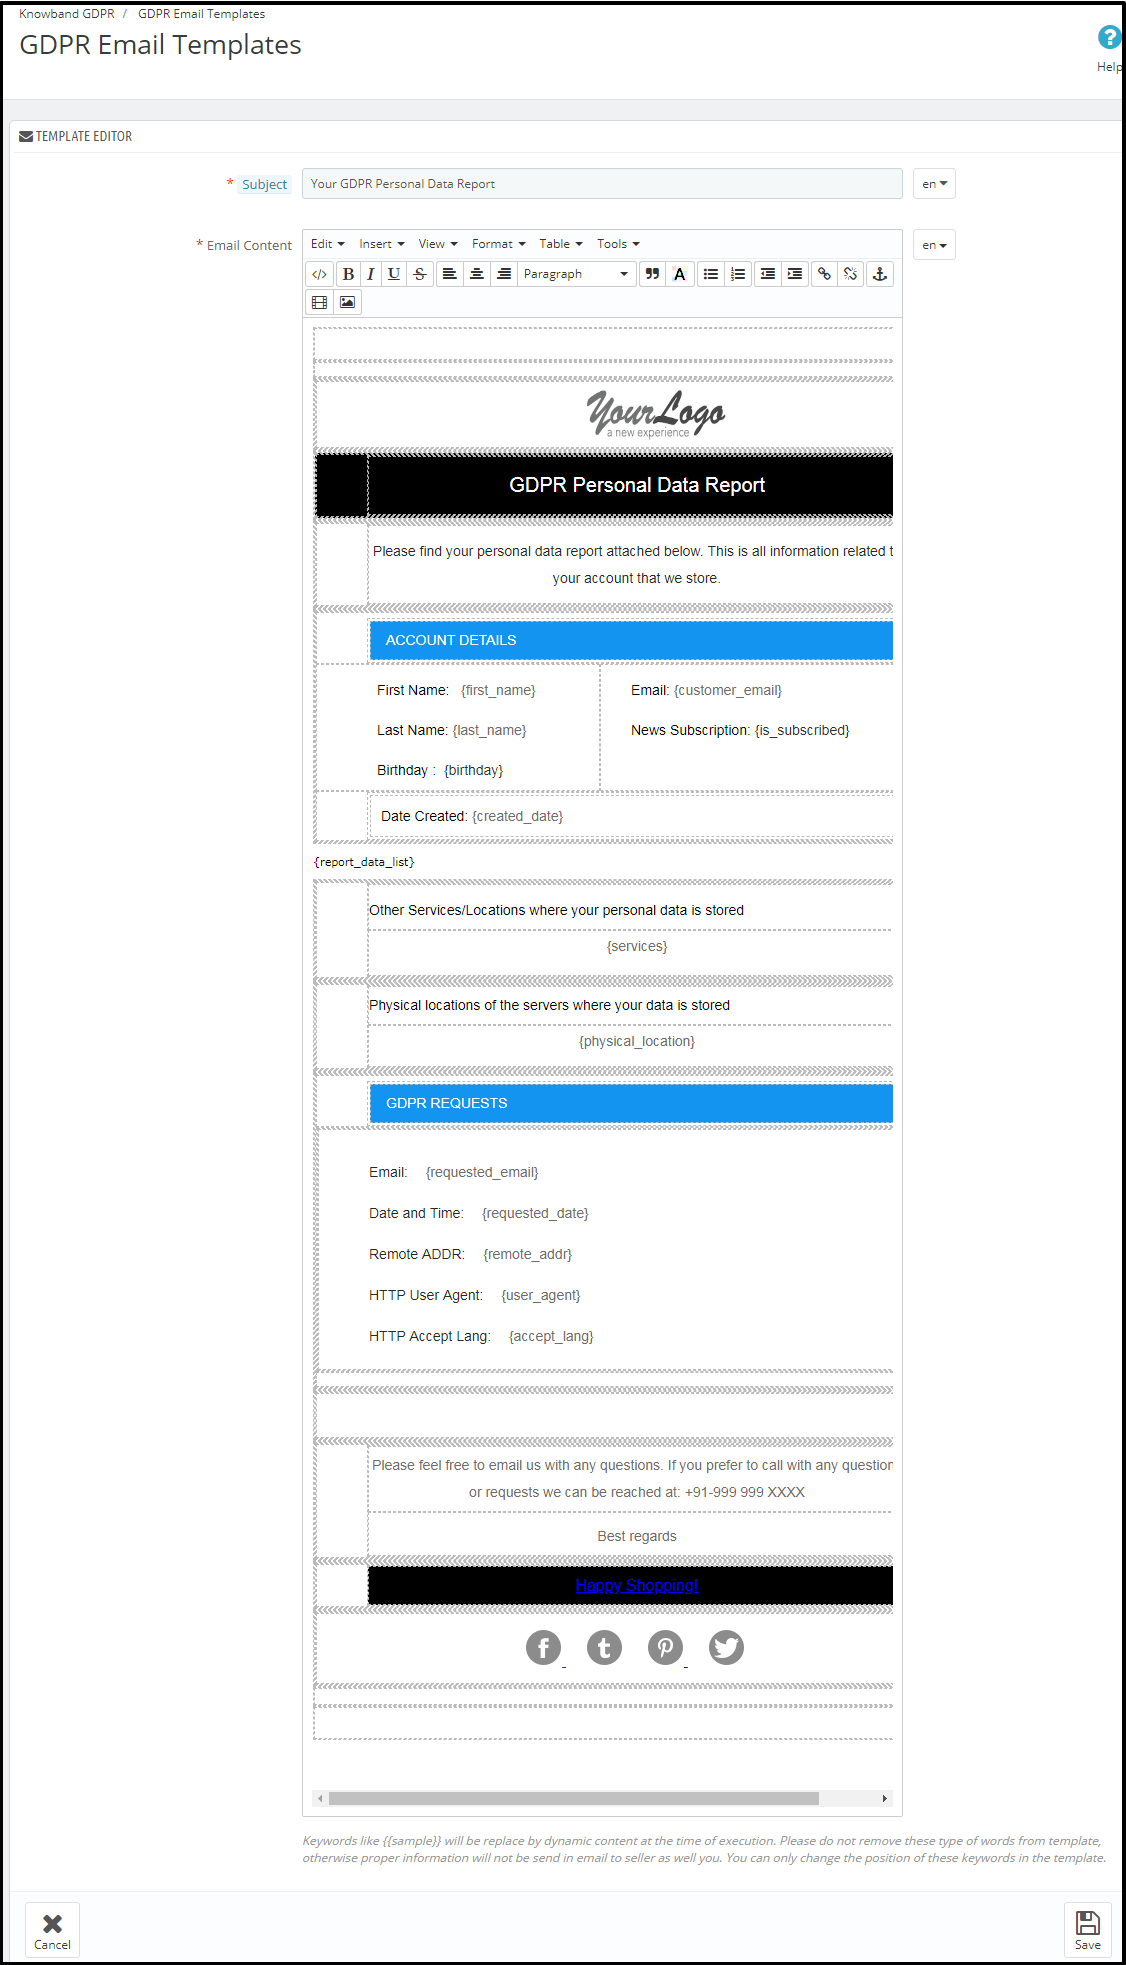
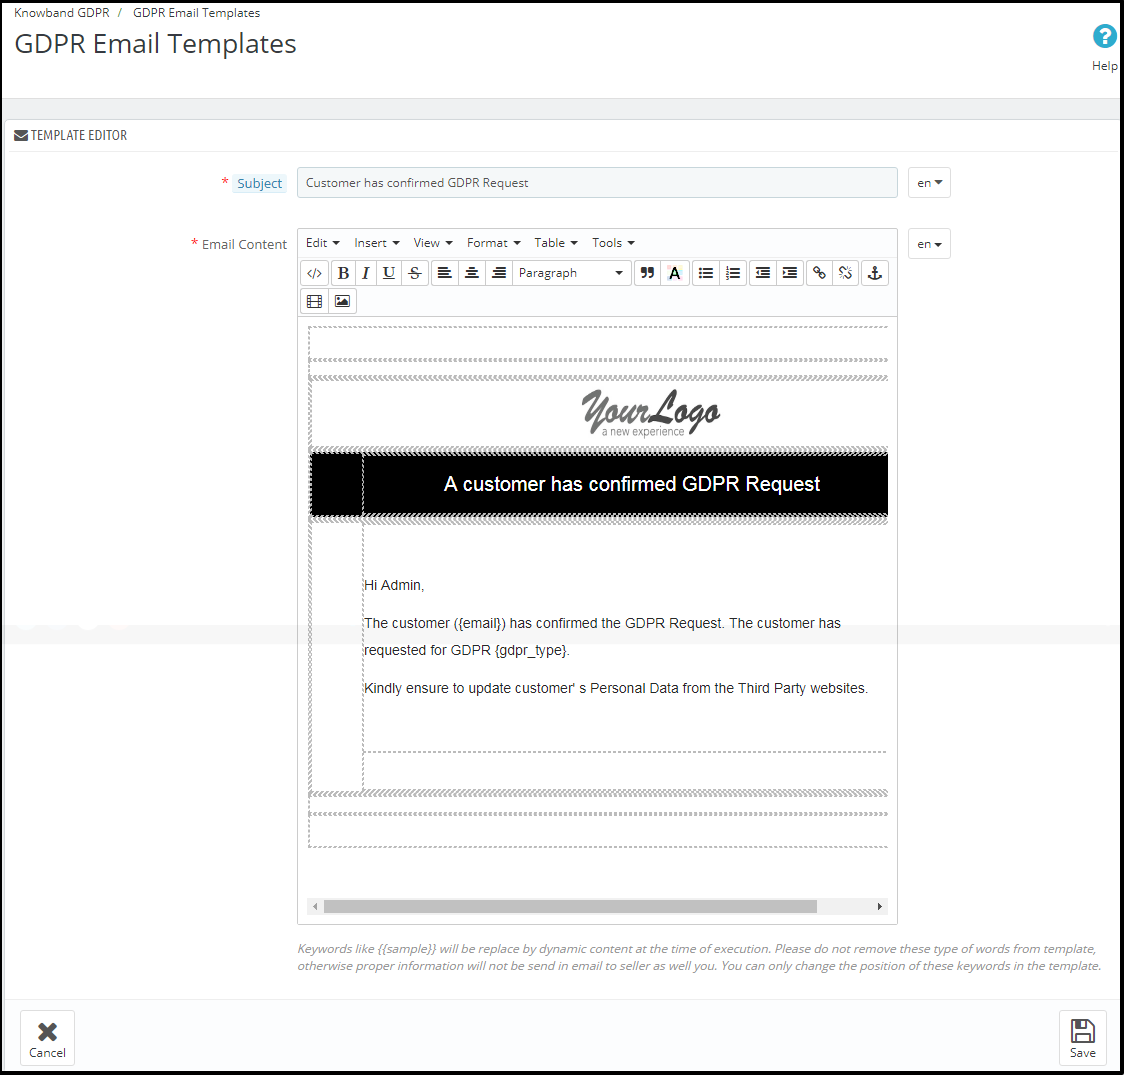
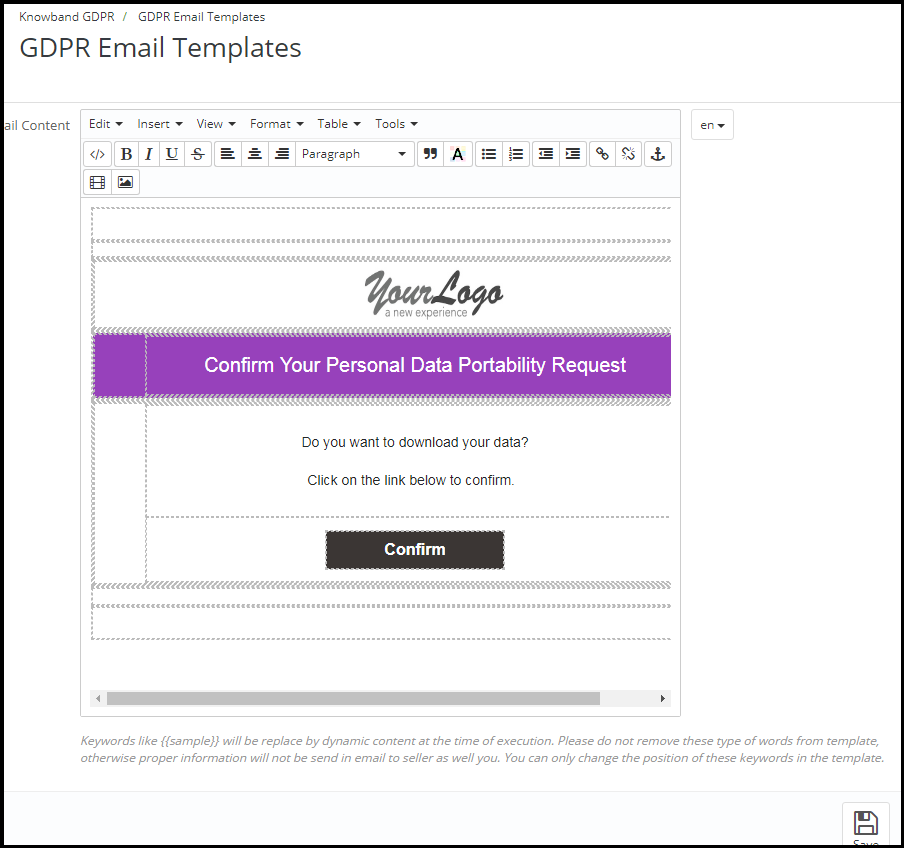
The Prestashop GDPR Addon by Knowband allows the admin to send following emails to the customer on raising a request under the GDPR.
Customer has requested for GDPR
Your GDPR Personal Data Report
Confirm Your GDPR Personal Data Portability Request
Customer has confirmed GDPR Request
Note: The purpose of these features is to help you to meet the GDPR requirements. Installing this module only does not guarantee merchant sites’ compliance with the new obligations imposed by the GDPR. It is your responsibility to put in place all the necessary measures to ensure you comply.
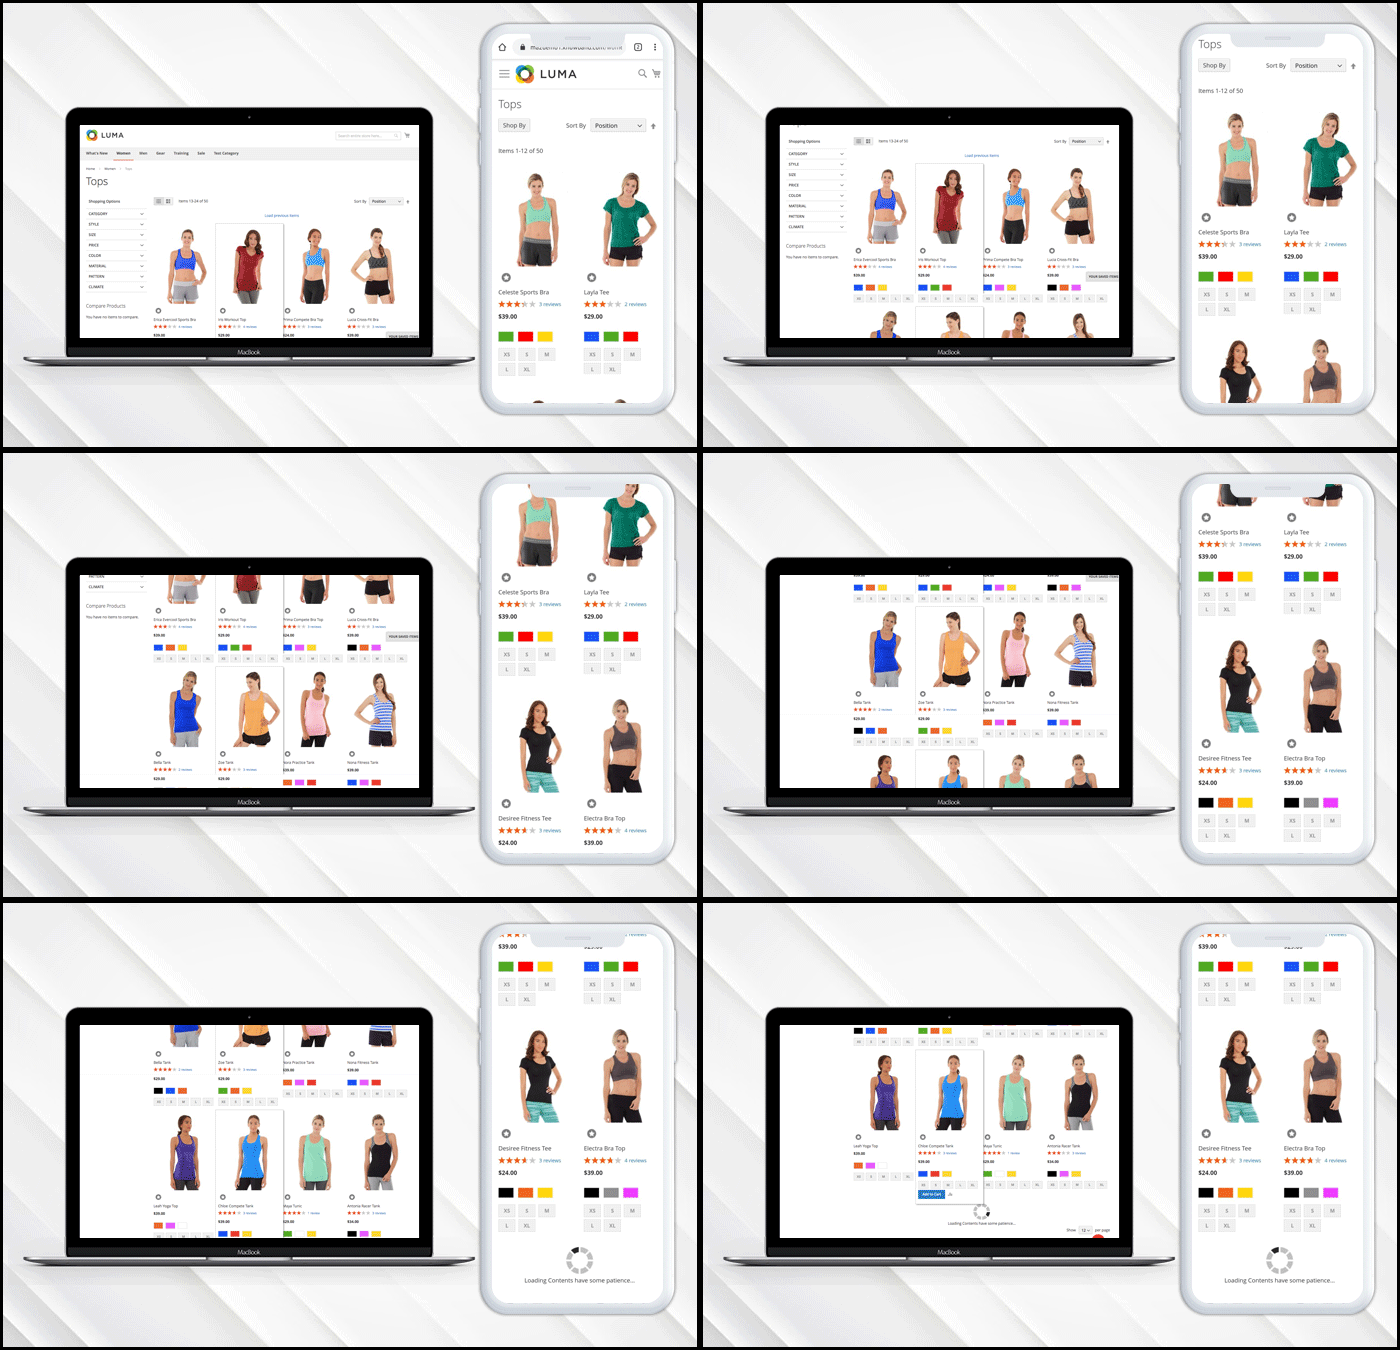
Infinite scrolling loads web page content continuously as the user scrolls down the web page. Basically, infinite scrolling is the technique of web design to eliminates pagination from the website. Magento 2 Infinite Scroll Extension by Knowband does the same. It removes the pagination and page reload functionality from the website and make navigation easier for your Magento store visitors to view the next set of products without reloading the web page.
1.1 Features of Magento 2 quick scroll extension:
Magento 2 Infinite Scroll extension replaces the pagination system from the website.
Magento 2 fast scroll extension reduces the load time of the website.
Store admin can enable or disable the Magento 2 infinite scroll module in a single button click.
Magento 2 quick scroll extension offers sandbox testing option to the admin. After enabling this store admin needs to enter the specific IP address to test the module.
Infinite scroll for Magento 2 extension serves better user experience.
Magento 2 fast scroll module optimizes the navigation of the site.
The admin can specify the number of pages after which, “Load More” will be shown. Store admin can also adjust the loader speed.
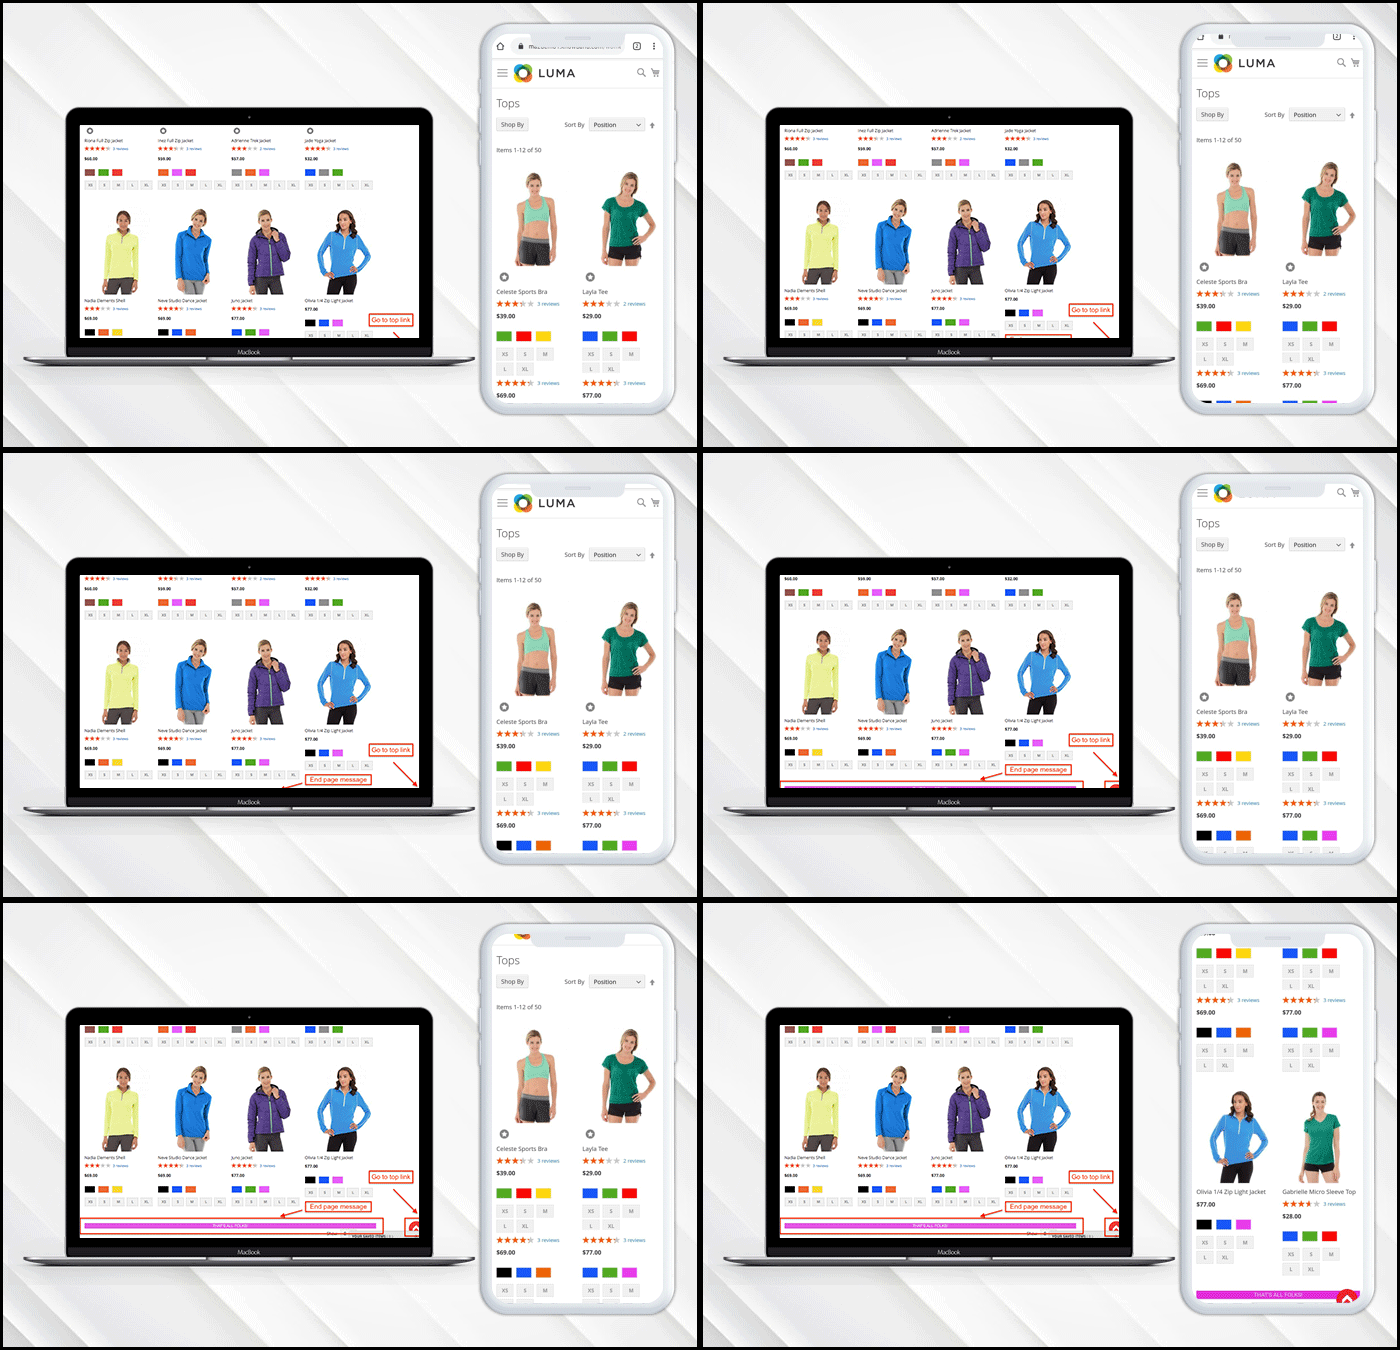
Store admin can display end page message after the completion of the product listing.
Magento 2 endless scroll extension works smoothly with list views as well as the grid view.
Store admin can set the background color and text color of the end page message and go to the top link.
Magento2 infinite scroll module offers the store admin to add the selector setting.
Magento 2 infinite scroll module is mobile responsive.
2.0 Installation Steps of Infinite scroll for Magento 2 Extension:
The steps to install the Magento 2 quick scroll extension are mentioned below:
1. Buy the Infinite scroll for Magento 2 extension from Knowband. You can download the extension package.
2. The package has a zipped file that contains the user manual and the source code of Magento 2 Infinite Scroll Extension. Unzip the package.
3. Create a folder {Magento root}/app/code/Knowband/Infinitescroll
4. Upload the extracted content in the above folder via FTP manager (like Filezilla or WinSCP – download here: https://filezilla-project.org/).
5. Now run below commands to install the Magento 2 Infinite Scroll Extension:
6. The extension is now installed and ready for use. In Admin Panel go to “Knowband Extensions > Infinite Scroll”.
You can now configure and use the Magento 2 Infinite Scroll extension.
3.0 Admin Interface
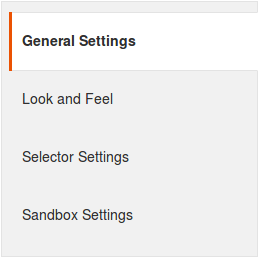
Magento 2 fast scroll extension offers following interfaces to be configured:
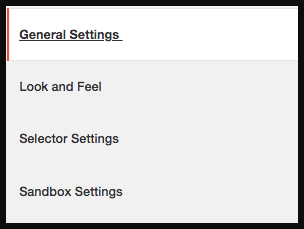
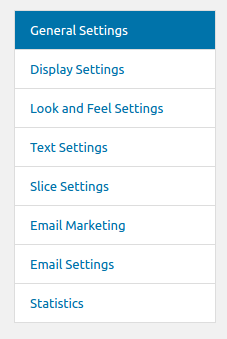
General Settings
Look and Feel Settings
Selector Settings
Sandbox Settings
Below is the detailed description of every setting:
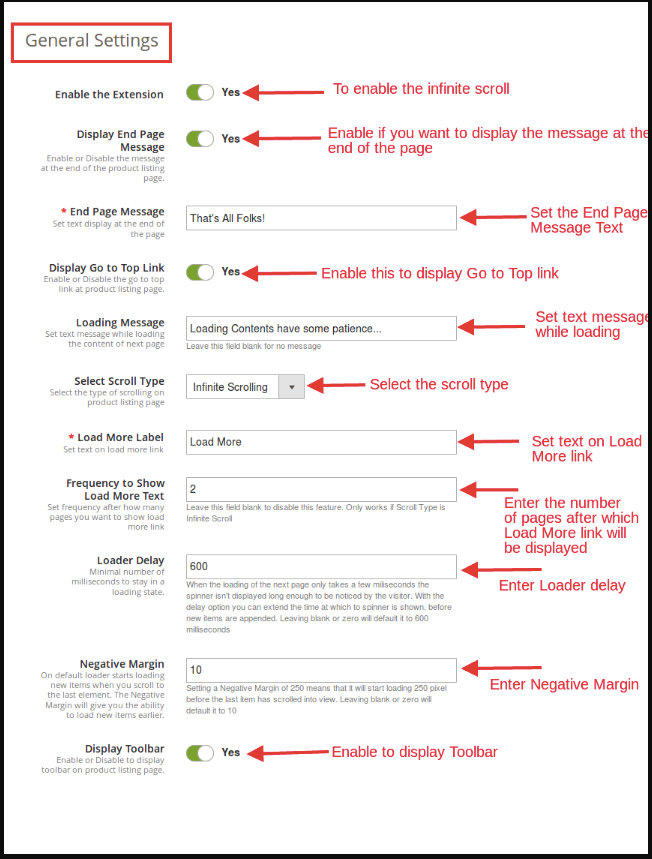
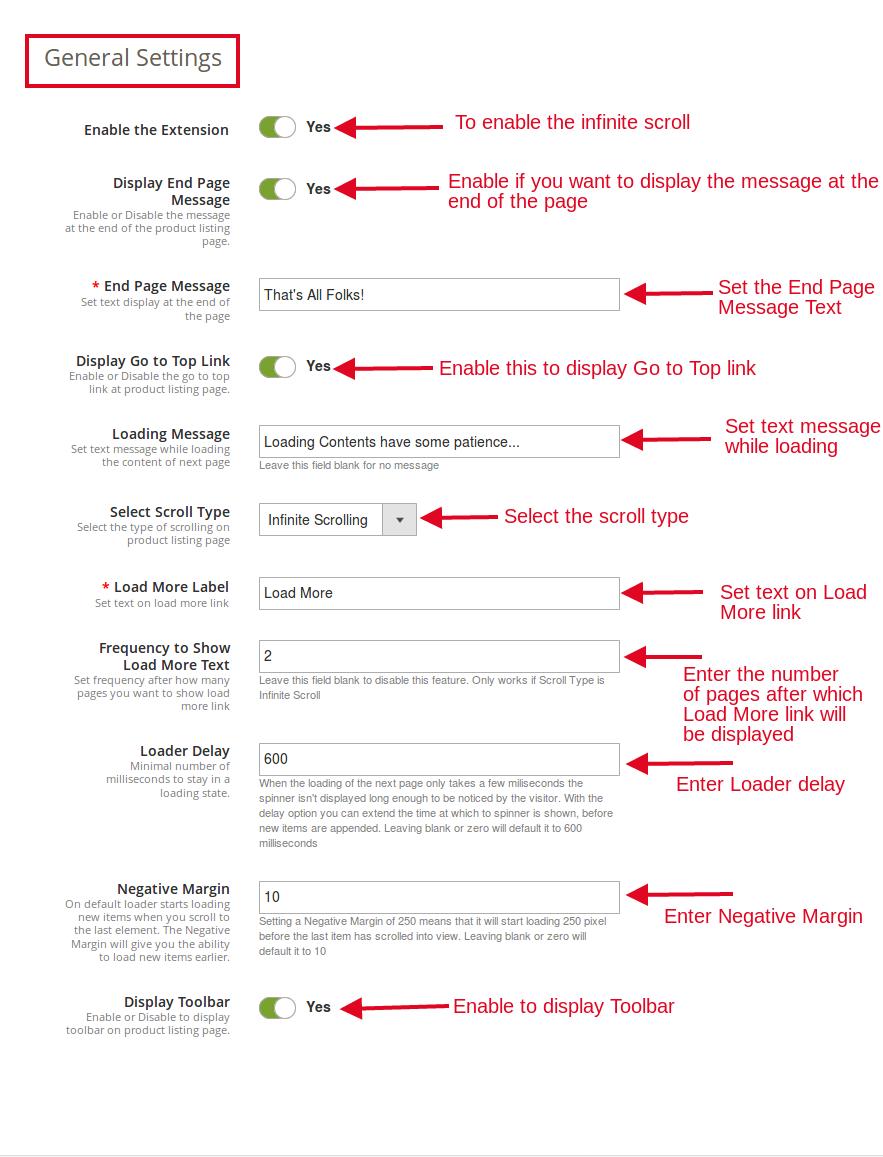
3.1 General Settings
From this tab, store admin can adjust the general settings of the Magento 2 infinite scroll module.
Enable the extension: This tab of Magento 2 fast scroll will enable the infinite scroll option. The admin can enable/disable this Magento extension whenever needed.
Display End Page Message: This field of Magento 2 quick scroll extension allows the admin to enable/disable the message that would be displayed at the end of the product listing page.
End Page Message: This field of Magento 2 endless scroll extension allows the admin to set the text of the end page message that would be displayed at the end of the product listing page.
Display Go To Top Link: The Magento 2 infinite scroll module allows the admin to display the “Go To Top Link” option that helps the users to jump to the top of the product listing page.
Loading Message: This section of Magento 2 fast scroll extension offers the admin to set the text while loading the content of the web page.
Select Scroll Type: The Magento 2 quick scroll extension provides the admin to select the type of scrolling on product listing page. Following options are given in scroll type:
a. Infinite Scrolling
b. Load More Link
Load More Label: When “Load More Link” option is selected, this field will be shown. This field of Magento 2 infinite scroll extension let the admin to set the text on Load More link.
Frequency to show Load More text: This field of Magento 2 fast scroll extension will work only when “Scroll Type” is “Infinite Scroll”. This field allows the admin to set the frequency of load more link to be shown in the front-end.
Loader Delay: This field of Magento 2 infinite scroll module allows the admin to set the minimal number of milliseconds to stay in a loading state.
Negative Margin: This field of Magento 2 quick scroll extension will give you the ability to load the new items earlier before you reach to last item of the page. By default, the loader starts loading new items when the user scrolls to the last element of the page. The admin can set the number of products here. For instance, if the number ‘X’ is entered here, then, the loader will start loading before there are X number of products left in the web page.
Display Toolbar: This field of Magento 2 endless scroll extension will allow the admin whether to display the Toolbar on product listing page or not.
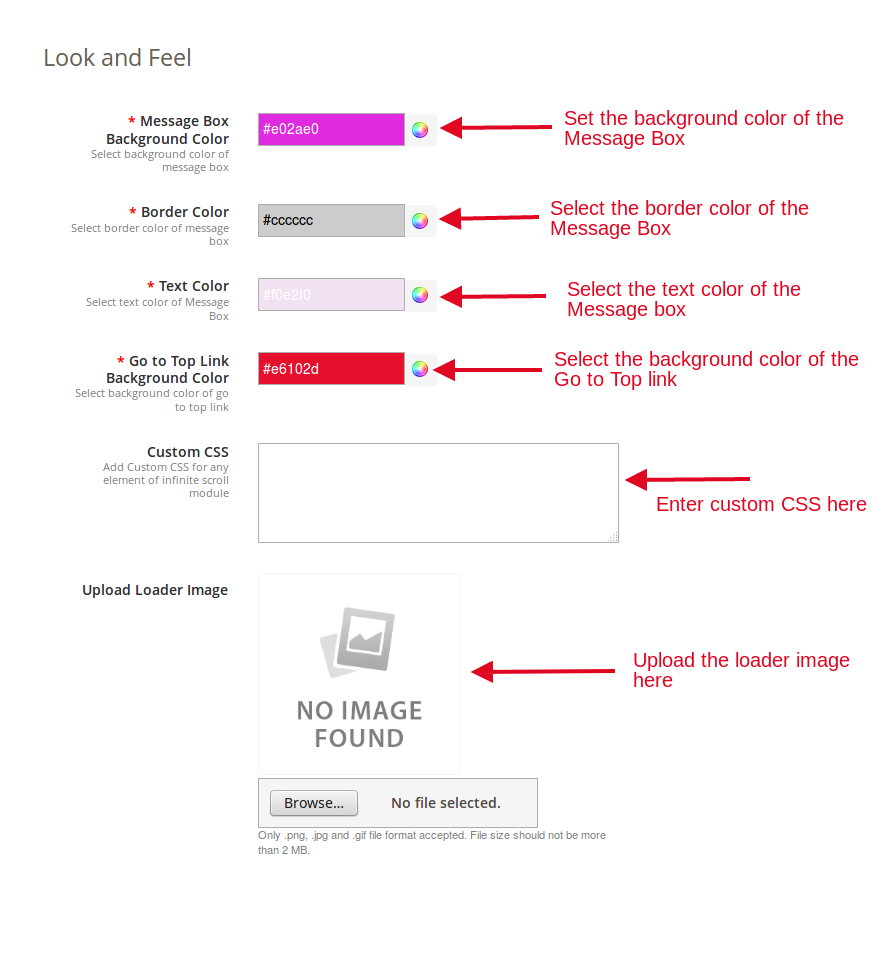
3.2 Look and Feel Settings
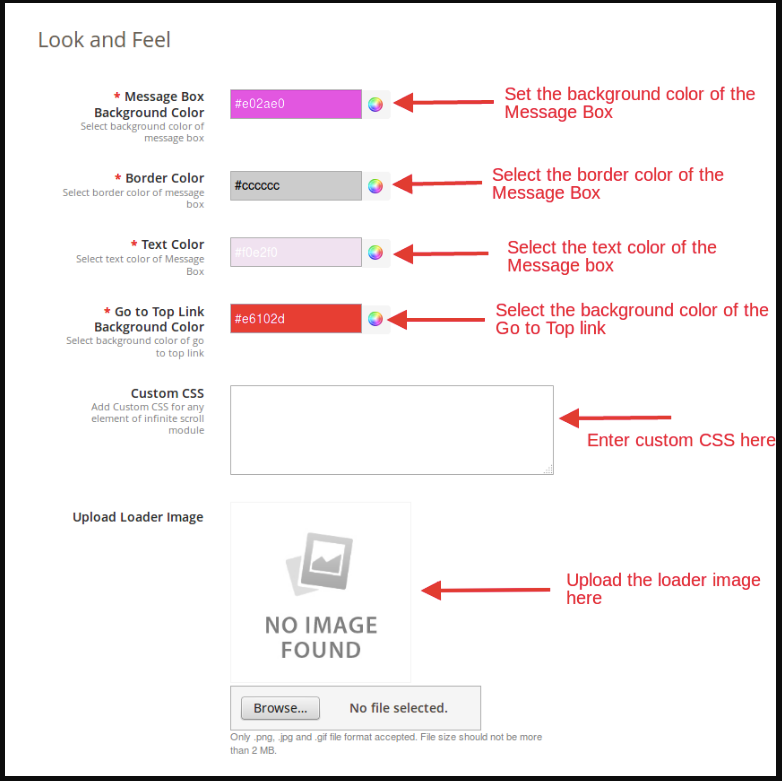
From this tab, the store admin can adjust the background and text color of the message box and go to top link.
Message Box Background Color: This tab of Magento 2 endless scroll extension offers the admin to set the background color of the message box.
Border Color: The Magento 2 Infinite Scroll extension allows the admin to customize the border color of the message box as per his preferences.
Text Color: The admin can customize the text color of the message box as per his choice. He can do the same just by selecting the color from the color picker.
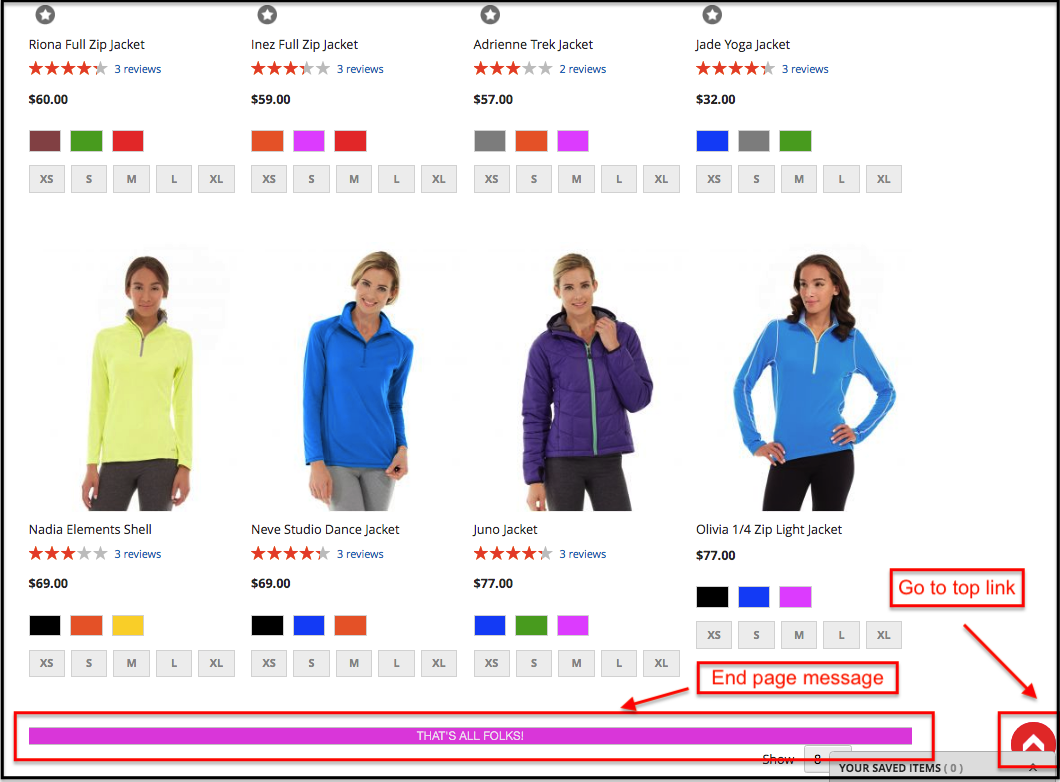
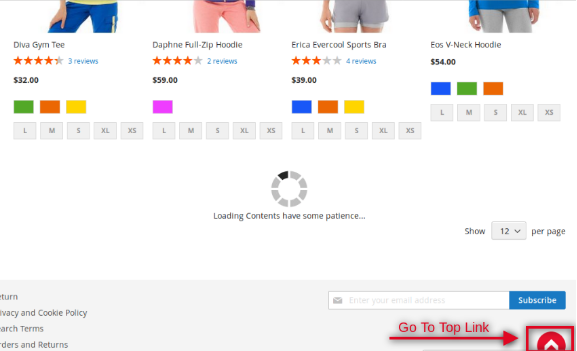
Go To Top Link Background Color: This field of Magento 2 fast scroll extension allows the admin to set the background color of the “Go To Top Link”. Below is the screenshot of the Go To Top Link:
Custom CSS: If the admin wants to add the custom CSS for any element of Infinite scroll for Magento 2 extension, then, he can do the same by adding CSS in this field.
Upload Loader Image: This tab of Magento 2 endless scroll extension allows the admin to upload the loader image of his choice. The admin can upload .jpg, .png and .gif format images only. Image size should not be more than 2 MB.
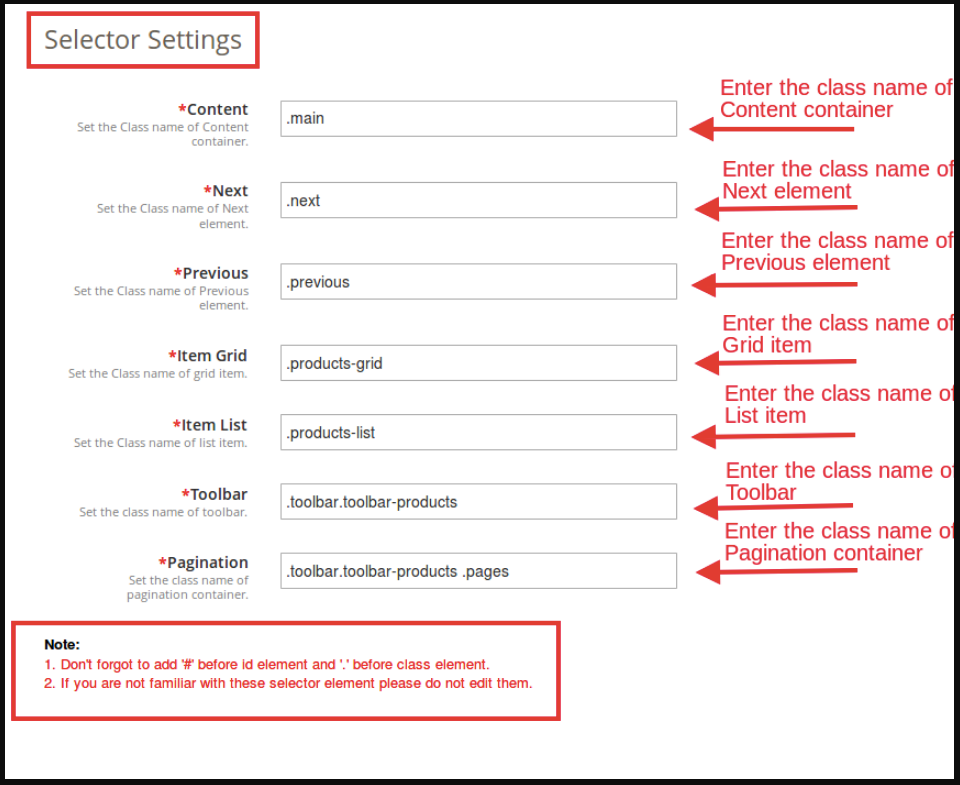
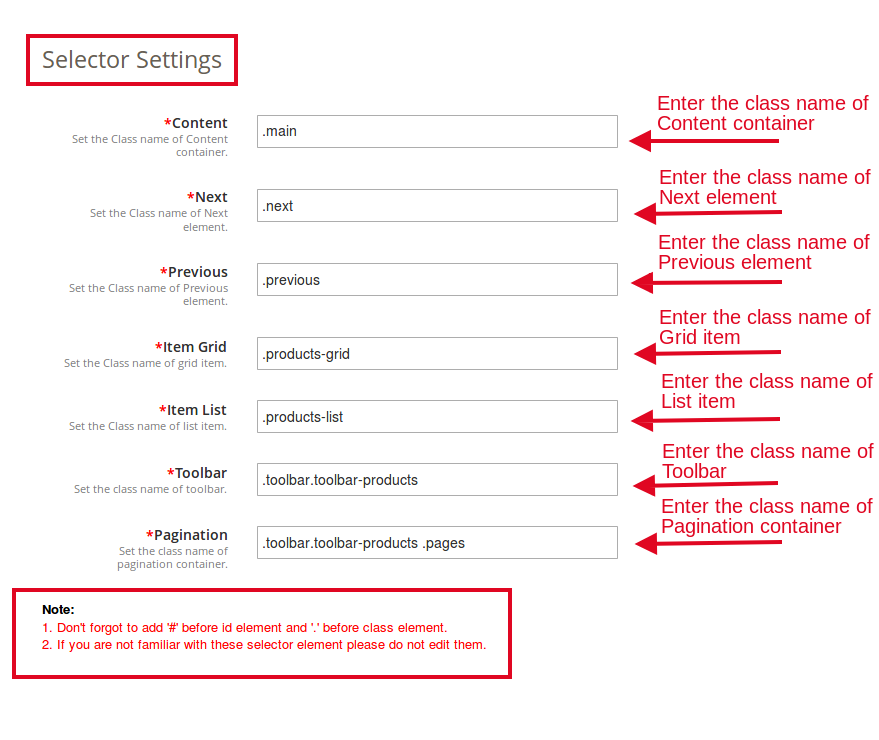
3.3 Selector Settings:
Content: This tab of Magento 2 Infinite Scroll extension allows the admin to set the Class name of the Content container.
Next: This tab of Magento 2 fast scroll extension offers the admin to set the Class name of Next element.
Previous: This tab of Magento 2 quick scroll extension allows the admin to set the Class name of the Previous element.
Item Grid: This field of Magento 2 endless scroll extension allows the admin to set the Class name of Grid item.
Item List: This field of Magento 2 endless scroll extension allows the admin to set the class name of the list item.
Toolbar: In this field of Magento 2 infinite scroll module, the admin will have to set the Class name of the Toolbar.
Pagination: This tab of Magento 2 quick scroll extension allows the admin to set the Class name of the pagination container.
NOTE:
1. Don’t forget to add ‘#’ before id element and ‘.’ before the class element. 2. If you are not familiar with these selector elements please do not edit them.
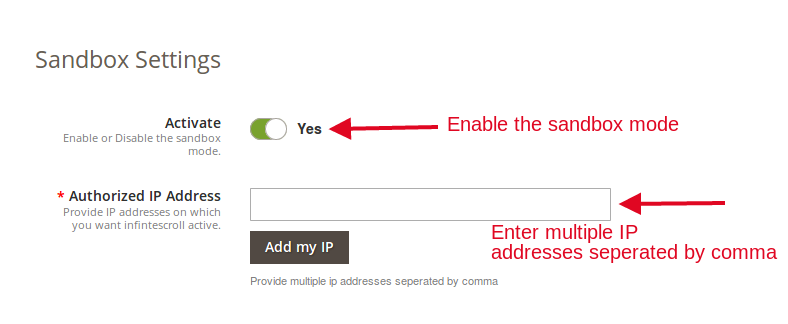
3.4 Sandbox Settings:
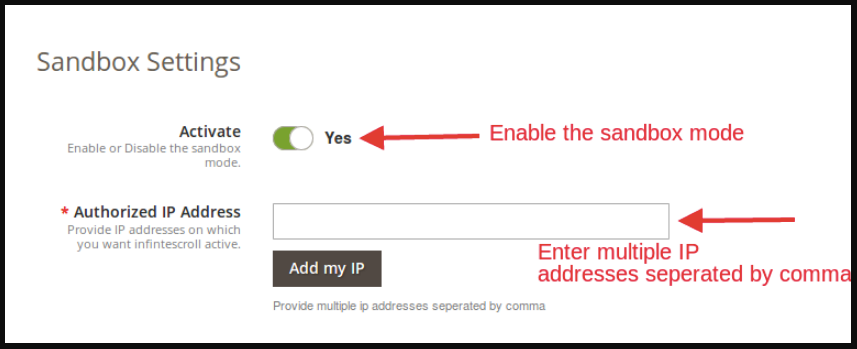
The Sandbox Settings tab of the Magento 2 infinite scroll extension offers the admin to test the extension before implementing it on the site.
Activate: Enable this field of Magento 2 fast scroll extension to test the extension.
Authorized IP Address: In this field of Magento 2 quick scroll extension, enter the IP addresses on which you want infinite scroll active. Make sure that the entered IP addresses are separated by a comma. You can add the IP by clicking on “Add my IP” option.
4.0 Store Front-end
The Magento 2 endless scroll extension will be enabled on the whole website where pagination occurs. The Infinite scroll for Magento 2 extension would appear at the front as follows:
End page message and top link:
Find more details about this Infinite scroll for Magento 2 below:
1. Introduction of Magento 2 Advance Wishlist Extension
In the eCommerce industry, most of the time online buyers visit the store just for viewing the product price, quality and comparing the products with other stores. If your store has a wishlist option, then, the store visitors can shortlist their favorite product and save them in their wishlist for future purchase. Knowband provides Magento 2 advanced wishlist extension to your Magento 2 store.
This Magento 2 save for later extension adds the Wishlist functionality to your eCommerce store. This Magento 2 Save for later module allows the shoppers to save their favorite products in the wishlist. So that, they can view or purchase it later.
Allows the Shoppers to Add products in the wishlist– This Magento 2 wishlist extension allows the customers to add the products they are interested into their Wishlist. The wishlist option improves their shopping experience. At the same time, the site owners can increase the customer retention.
Easy to manage to Save for later block– With the help of Knowband Magento 2 Save for Later extension, the customers can manage their wishlists. They can edit items, remove products or add new products in their Save for later block.
Admin can view and manage customer’s wishlist – Products saved in the Wishlists can easily be tracked by admin from the back-end of the Magento 2 wishlist extension. Apart from this, the store admin can view the most demanded or save the product from the admin dashboard.
1.1 Admin Benefit of the Knowband Magento 2 Advanced Wishlist module:
1. The Magento 2 advanced wishlist extension by Knowband allows the customers to save their favorite product to their wishlist with the intention of future purchase.
2. The admin can allow the Guest Customer save the favorite product to their Wishlist and they can also set the expiry time of the saved products.
3. This Magento 2 wishlist extension shows a ‘My Wishlist’ block. The look and feel of the wishlist block can be controlled by the store owner. They can change the block color, button color and text color etc. Save for later interface the products shortlisted by the customer.
4. This Magento 2 wishlist extension enables the admin to track the product details from the admin panel. They can also track the product which product is high on demand or which product is added in the wishlist the most.
5. The Magento 2 advanced wishlist extension by Knowband provides an option to the store admin to do the product and category analysis. That is, the admin can view the category which is browsed most and the product that is becoming popular.
6. The online merchant increases the user experience of the site.
7. The Magento 2 Save for Later extension’s back-end interface extremely easy to use.
8. This Magento 2 wishlist extension increases the conversion rate of the website.
9. The Magento 2 favorite product list extension helps the admin to reduce the abandoned cart of the website by using this Magento 2 wishlist extension.
1.2 Major key feature of Knowband Magento 2 Wishlist Extension:
1. The Magento 2 wishlist extension allows the customer can add the products to their wishlist.
2. The Customers can also create, modify and delete the products saved in the wishlists from front-end.
3. This Magento 2 Save for Later extension by Knowband shows the Save For Later block popup in front-end.
4. Knowband’s Magento wishlist extension is easy to install & manage.
5. Magento Save for Later module can be enabled/disabled from the back-end.
6. Magento favorite product list extension is compatible with all Magento 2 store themes.
7. The Magento 2 wishlist extension is fully mobile responsive.
2.0 Installation
The steps to install the Magento 2 Save for Later extension are mentioned below:
1. Buy the Magento 2 Save for Later extension from Knowband. You can download the extension package.
2. The package has a zipped file that contains the user manual and the source code of Magento 2 advanced wishlist extension. Unzip the package.
3. Create a folder{Magentoroot}/app/code/Knowband/Saveforlater
4. Upload the extracted content in the above folder via FTP manager (like Filezilla or WinSCP – download here: https://filezilla-project.org/).
6. The Magento wishlist extension is now installed and ready for use. In Admin Panel go to “Knowband Extensions > Save For Later”.
You can now configure and use the Knowband Magento 2 wishlist extension.
3.0 Admin Panel
After installing Magento 2 advanced wishlist extension in the Magento 2 store, the store owner can make the changes without any hassles. There are following sections available to admin interface: –
Let us discuss the various customization options of Magento 2 Save for Later extension.
3.1 General Settings
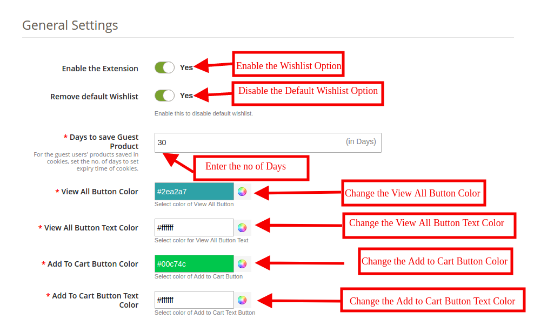
The General settings tab of Magento 2 wishlist module by Knowband offers the basic configuration options to the Store admin. The General settings tab is discussed below.
Enable Save For Later Settings: This field will enable the save for later option. If enabled, the Magento 2 favorite product list module will allow the customer to save the favorite product to their wishlist.
Remove Default Wishlist: Enable this field to remove the default wishlist option from the Magento 2 site. If this button is enabled, then, the Magento 2 Save for Later extension will automatically remove the default wishlist option in the front-end.
Days to Save Guest Product: After enabling this option, you can allow the Guest users to save the interesting product to their Wishlist for a certain time period. You can set the expiry days for cookies. Default cookies will be stored for 30 days.
View All Button Color: You can change the “VIEW ALL” button color in this section of Knowband Magento 2 advanced wishlist extension.
View All Button Text Color: You can change the text color of “VIEW ALL” button text color in this section of Knowband Magento 2 Save for Later extension
Add to Cart Button Color: You can change the “ADD TO CART” button color in this section of Knowband Magento 2 favorite product list extension.
Add to Cart Button Text Color: You can change the “ADD TO CART” button text color in this section of Knowband Magento 2 wishlist extension.
3.2 Category Analysis
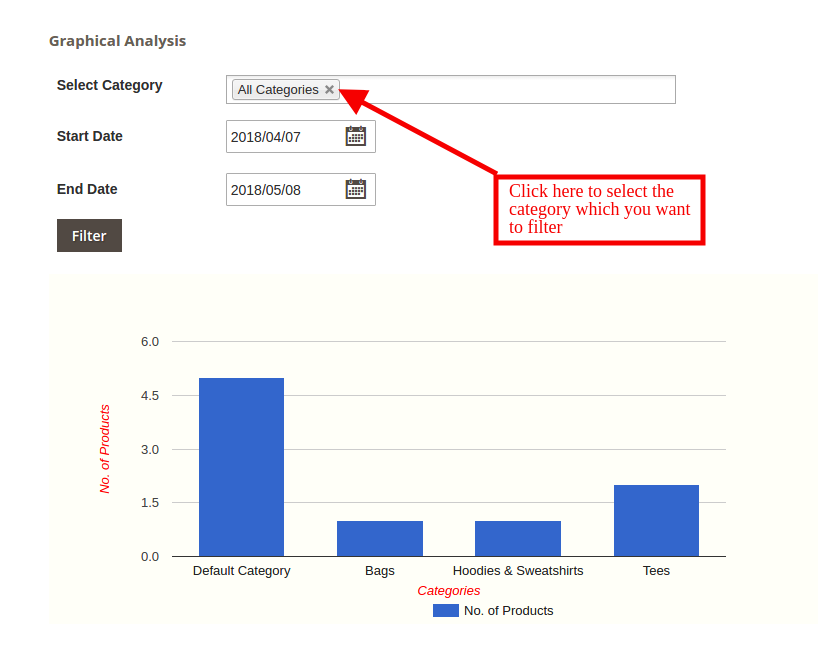
The category analysis is done in this section of the Magento 2 Save for Later extension. The graphical report shows the complete information about the categories that are being browsed the most. The report showcases the categories whose products are being saved the most. This Magento 2 wishlist extension tab will display the category reports in the form of graphs and list.
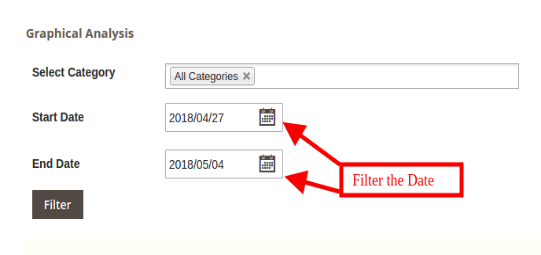
This Category Analysis tab shows Report in tabular and chart form. Admin can set the filter to fetch report for the specific period of time or for a particular category.
Admin can fetch report based on category, From Date and To Date.
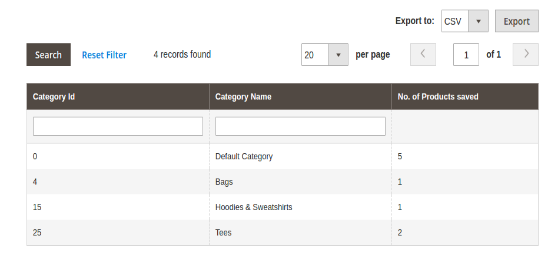
By clicking on any category admin can view the list of all saved products of the categories.
By clicking on the category name a new report Category(s) Save for Later Product(s) is shown.
3.3 Product Analysis
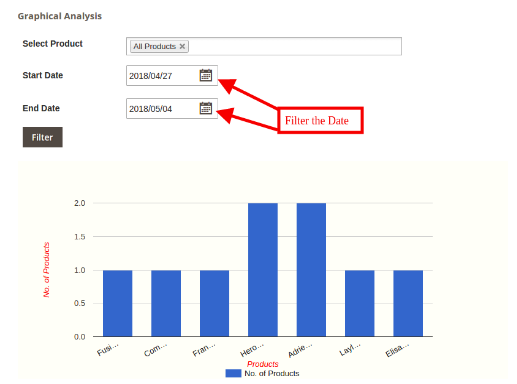
This tab shows Product Analysis Report in tabular and chart form. Admin can set filter to fetch report of the performance of the products for specific period of time or for a particular category.
3.4 Customer Analysis
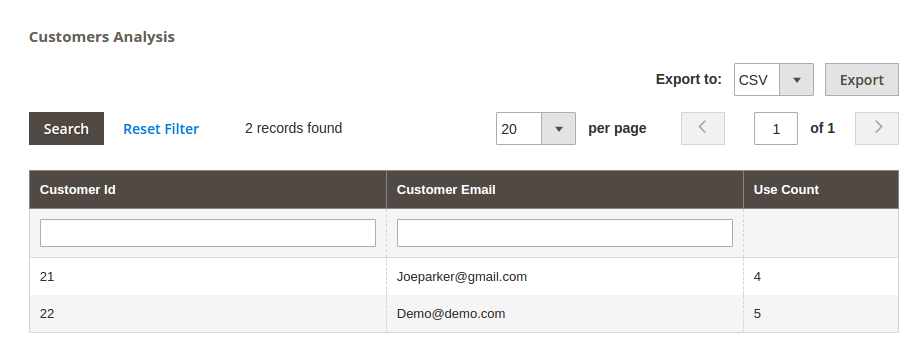
This Magento 2 favorite product list allows the Magento store owners to fetch the entire report of their store visitors and customers. They can find the relevant report by applying filters on the top of the grid there is an export button, that will export the grid data into CSV file. You can find a particular record for Customer by using its id and search button available on the top left of the grid.
4.0 Front End Module
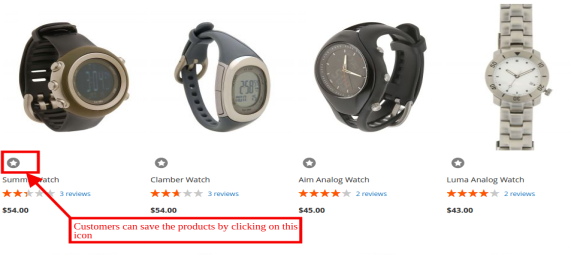
With Knowband’s Magento 2 Wishlist extension shows the Save for Later popup. the customers can save the products in their wishlist by hitting on the icon as shown in the image below.
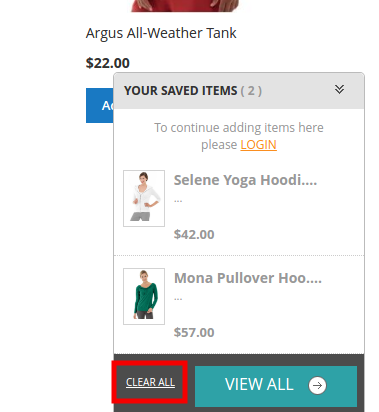
1. By Clicking on Save icon customer can save the product in the wishlist. The saved products by the customer can be seen in the Save For Later popup.
2. The customer can delete a single product or all product by clicking on CLEAR ALL link.
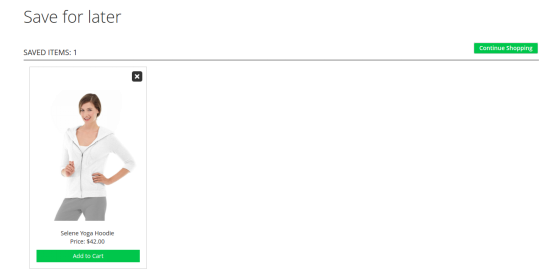
3. The Online seller can see his products by clicking on VIEW ALL link. On clicking the link, the customer will be redirected to the page as shown below:
The customers can move the products saved in the wishlist to their shopping cart by hitting the ‘Add to Cart’ button.
4. By clicking on the cross icon customer can delete his products from the list.
For more information about the Magento 2 wishlist extension visit here:
Managing the customer return request is not an easy task. It takes a lot of time and effort. The RMA system plays an important role in an eCommerce store. Without the RMA system, the store owner enables to manage of the customer request with ease and customer are also enabled to return and refund the product. Worry no more! The Prestashop Return Manager Addon adds the functionality to manage return requests for any order placed by a customer as well as a guest customer. The Prestashop return manager addon allows admin to adds a return manager button link to the front-end through which any customer/guest customer can apply for the return of any product contained in an order placed earlier.
IT is very easy to use and the customer can return any product in order completely or partially, which means the customer can also return half or less quantity of any product in the order.
How can Prestashop return manager work:
The first process this, the customer can initiate the product return request from their account page, after initiating the request the Store admin receives the return request.
When a user requests a product return, the admin can verify the return request genuine or not. If the request is genuine then they can approve the return request. The admin change return product status form the back end interface.
This Prestashop Return Manager addon offer two functionality:
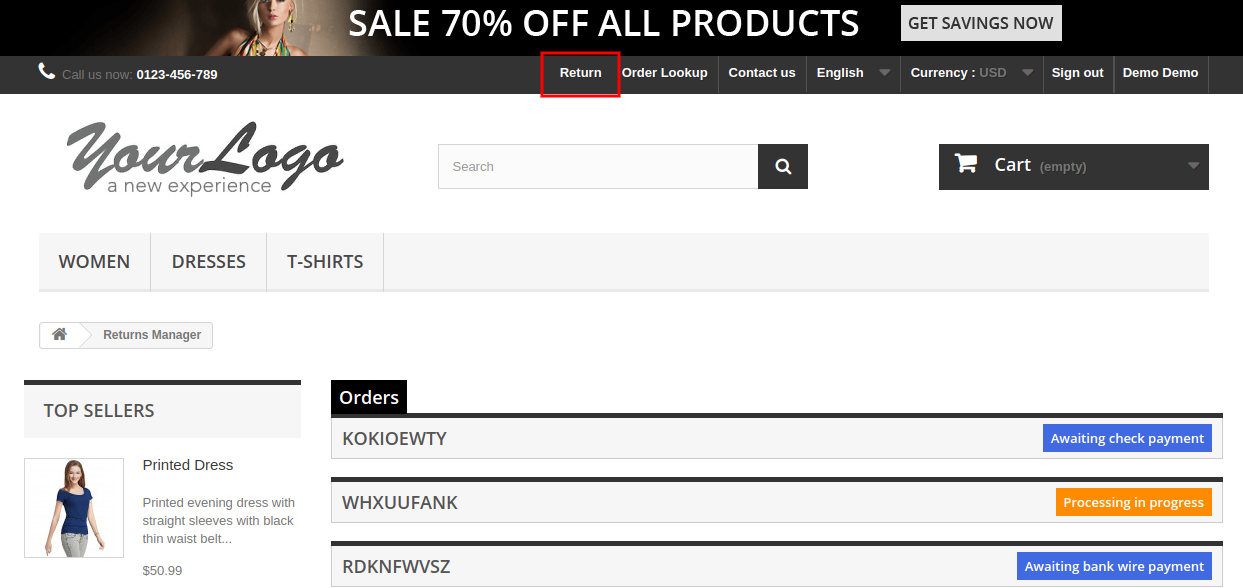
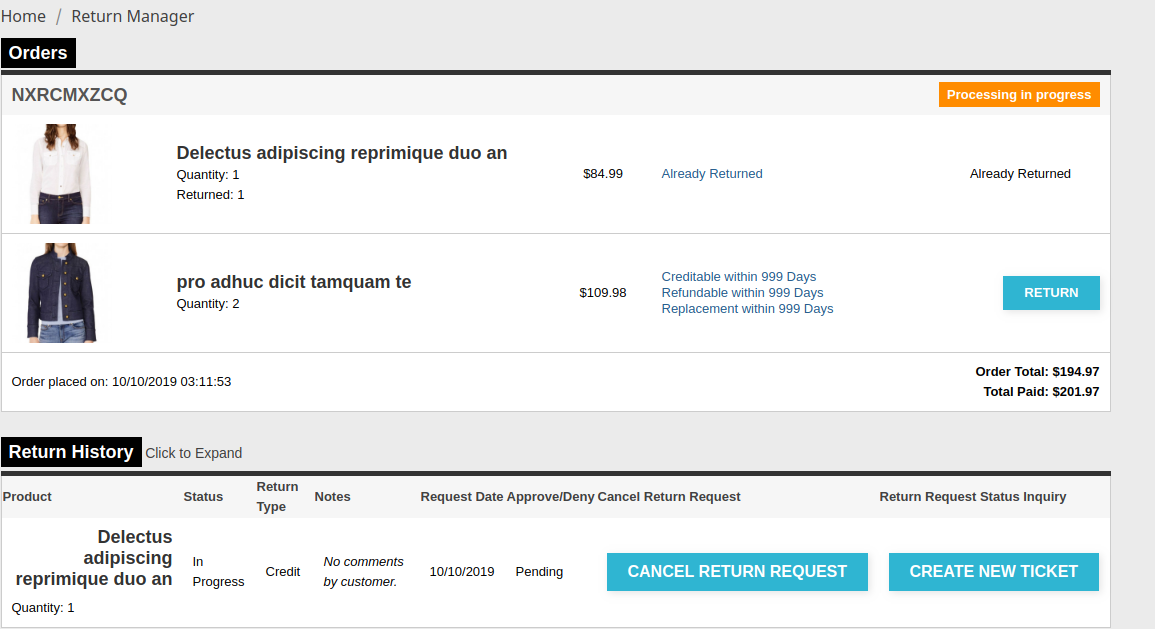
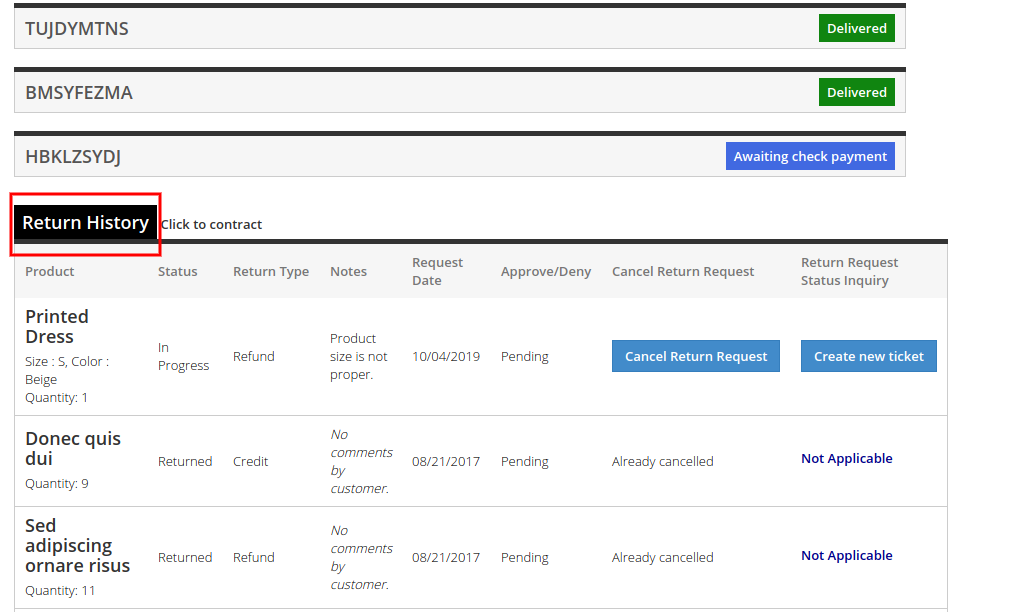
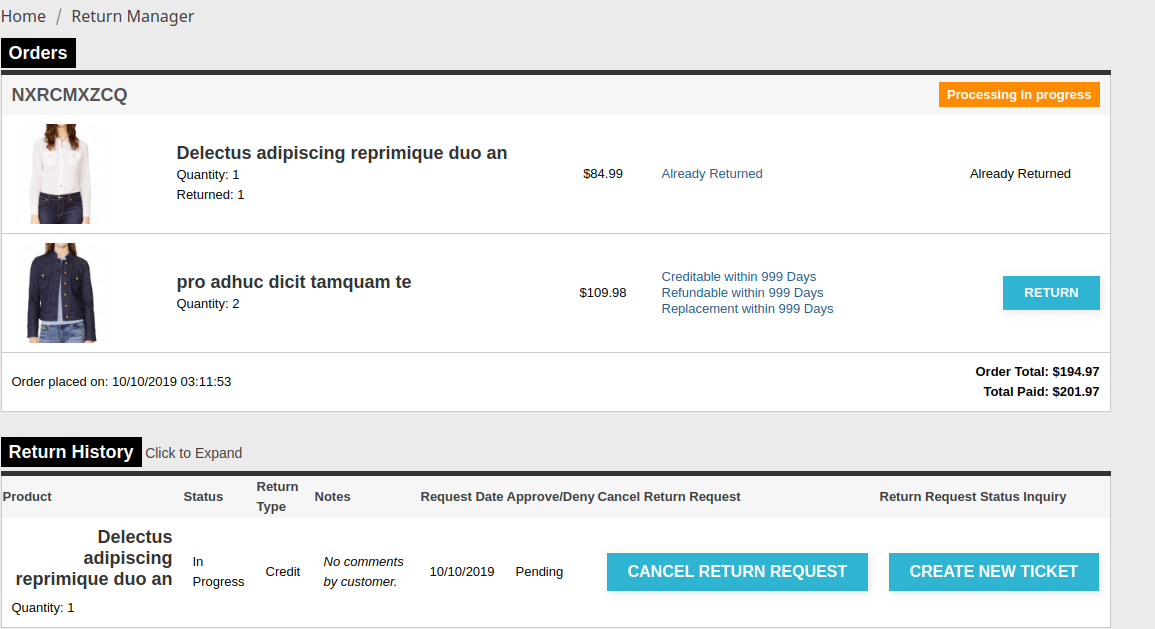
For the login users- The Prestashop order refund addon shows the return manager link appears in the header as well as the ‘My Account’ page. When the logged-in customer opens a My Account page this page containing the list of all the orders that he/she placed and the products that are eligible for return have a link to apply for a return. This page also contains the history of returns applied by the logged-in customer.
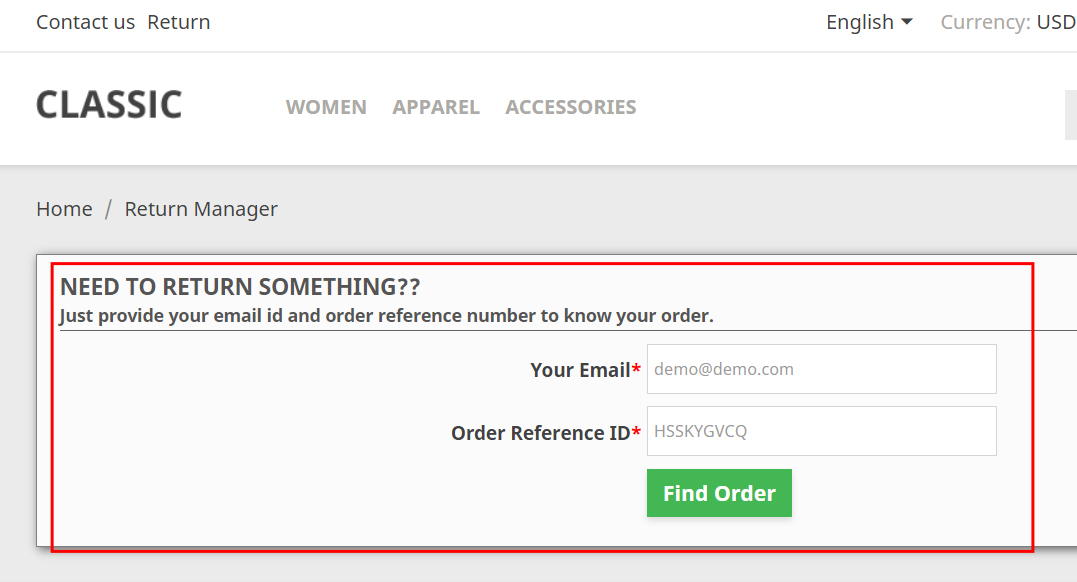
For the Guest users- In case the user is not logged-in the website then the return manager link opens a page containing a form to find any order. After finding an order using the form the order detail appears and the products from that particular order that is eligible for return have a link to apply for a return. This page also contains the history of returns applied by the guest customer who has placed this particular order.
In the updated version of this Prestashop Order refund manager module, the online users can also cancel their order for a limited period. The online merchant can apply the related settings from the admin interface.
What is new in the version v3.0.8:
In the updated version,
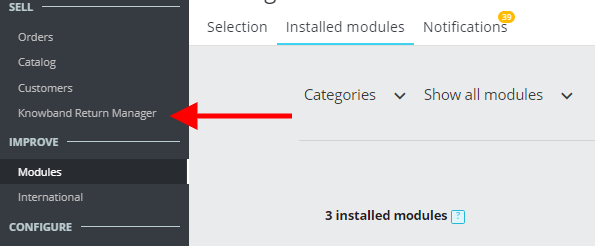
The Return Manager module allows the admin to use the module form the left menu of the Prestashop backend.
The admin can check the status of returns & cancellations at one place.
The admin can also a custom text explaining the order status or any other details in the return status email template.
The admin gets an option to select the order status from which he wants the return policy to apply for customers.
Return Manager module allows admin to send the test email before making the email live.
the Return Manager module allows the admin use the module form the left menu of the Prestashop backend.
The admin can check the status of returns & cancellations at one place.
The admin can also a custom text explaining the order status or any other details in the return status email template.
The admin gets an option to select the order status from which he wants the return policy to apply for customers.
Return Manager module allows admin to send the test email before making the email live.
1.1 Benefit of Merchant
This Prestashop return manager addon allows the admin to enable/disable the functionality as per the desires.
This Prestashop return manager Extension enables the admin to select the return method i.e. Credit, Refund, and Replacement.
The Admin can manage or change the credit return message, refund return message, and replacement return message from the admin interface of the Prestashop return manager Module.
ThisPrestashop order return manager Extension allows admin to customize the look and feel of the Return Manager link that shows the Front End.
Prestashop order return manager plugin gives the freedom to the merchant to manage the return slip settings. The store admin sets the return address or adds the return address and they can also change return guidelines that print on the return slip.
This Prestashop RMA enables admin to select the default return and refund policy and they can also add the new return policy.
This PrestaShop return product addon allows admin to set the return reason on the back-end and he/she also adds the new return reason.
The Store admin can change the return status of the online customer from the back-end.
It generates a return request from the back-end and the admin can find any order by simply providing the reference number and the corresponding email and then apply for a return accordingly.
The Prestashop store admin can customize the email templates accordingly with the help of the Prestashop order refund addon.
Prestashop order return manager Addon allows the merchant to view all the pending returns and refunds of the buyers.
The Prestashop Return Manager plugin enables the admin to view the active return list.
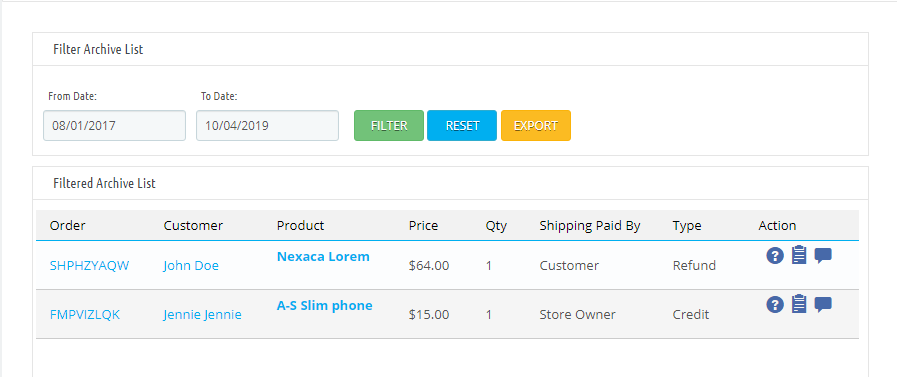
The Admin can set filter the archives list and view all return requests that are complete.
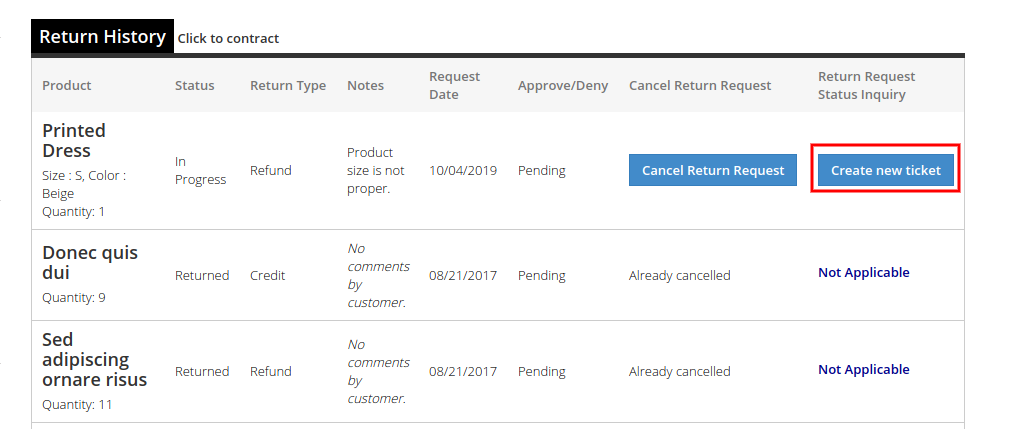
Customers can inquire about the status of their actions return requests. They also get an option to cancel that request.
Prestashop order return manager Addon allows customers to return their order for the selected order status.
Prestashop return manager extension allows you to set minimum and maximum days for each type “Credit/Refund/Replacement” within a return policy.
It is easy to update the pending and active return requests list by clicking the Refresh button provided at the Prestashop refund order Extension admin interface.
When the active return requests are marked completed, the inventory is automatically completed.
You can generate and send the discount voucher to the customers for submitting a refund request.
Admin can also include custom CSS and JS code from the admin interface of Return Manager for Prestashop.
The online store merchant can allow the online users to select the products which he/she wants in replacement.
The online merchant can allow the users to return the whole order by selecting products.
This Prestashop return manager module allows the store merchant to set custom fields from the admin interface.
Admin can now allow the online users to send order cancellation requests from the website front-end interface.
The Prestashop Return Manager Module allows the admin to set up the order status on which the users can cancel their orders.
Note: Prestashop Return Manager Addon is now compliant with the GDPR. We have integrated the GDPR hooks on our return manager module. Please refer to the General Settings to know more about the GDPR.
2.0 Installation Guide
To install this Prestashop Return Manager Addon, please follow the following steps:
1. Copy the whole folder named as “return manager” into your modules folder of the root directory of your PrestaShop store through FTP.
2. You will be able to find the Prestashop return manager extension ready to be installed in the “Modules” in your PrestaShop store as shown below.
For version 1.6 – For version 1.7 –
Click on the Install link to install the Prestashop return manager addon.
2.1 Module Implementation
The Prestashop Return Manager Addon implementation will have two sections:
1- Admin Module 2- Front-End Module
3.0 Admin Module
In the admin module, there will be the following options to configure this Prestashop replacement manager Addon. The Prestashop replacement manager Module includes 18 tabs and they are as follows.
Return Manager Prestashop extension allows admin to check the status of all return and cancellation requests at a single click.
Easy Navigation: The admin can access the module from the left menu of the Prestashop backend easily.
The Prestashop return manager addon will provide the following interface:
General Settings
Custom CSS/JS
Return Slip Settings
Return Policies
Return Reasons
Cancel Reasons
Return Statuses
Return Address
Create a Return
Email Templates
Pending Order Cancel List
Complete Order Cancel
Pending Return List
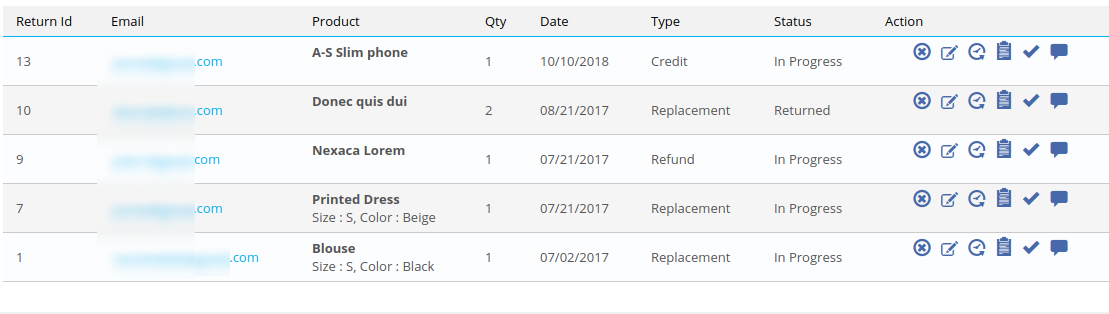
Active Returns List
Canceled Returns List
Archives List
Custom Fields
Other Plugins
Each tab contains some specific settings/functionality that can be changed according to the need. Each tab of this Prestashop Return Manager Addon explained below.
3.1 General Settings
After clicking on the configure link on the Prestashop replacement manager Module listing page (configure link will automatically appear once you install the plugin), the system will open general settings tabs by default.
This tab will be having the following options to configure the Prestashop replacement manager Module.
Initially, fields in the above form will be already filled with their default values.
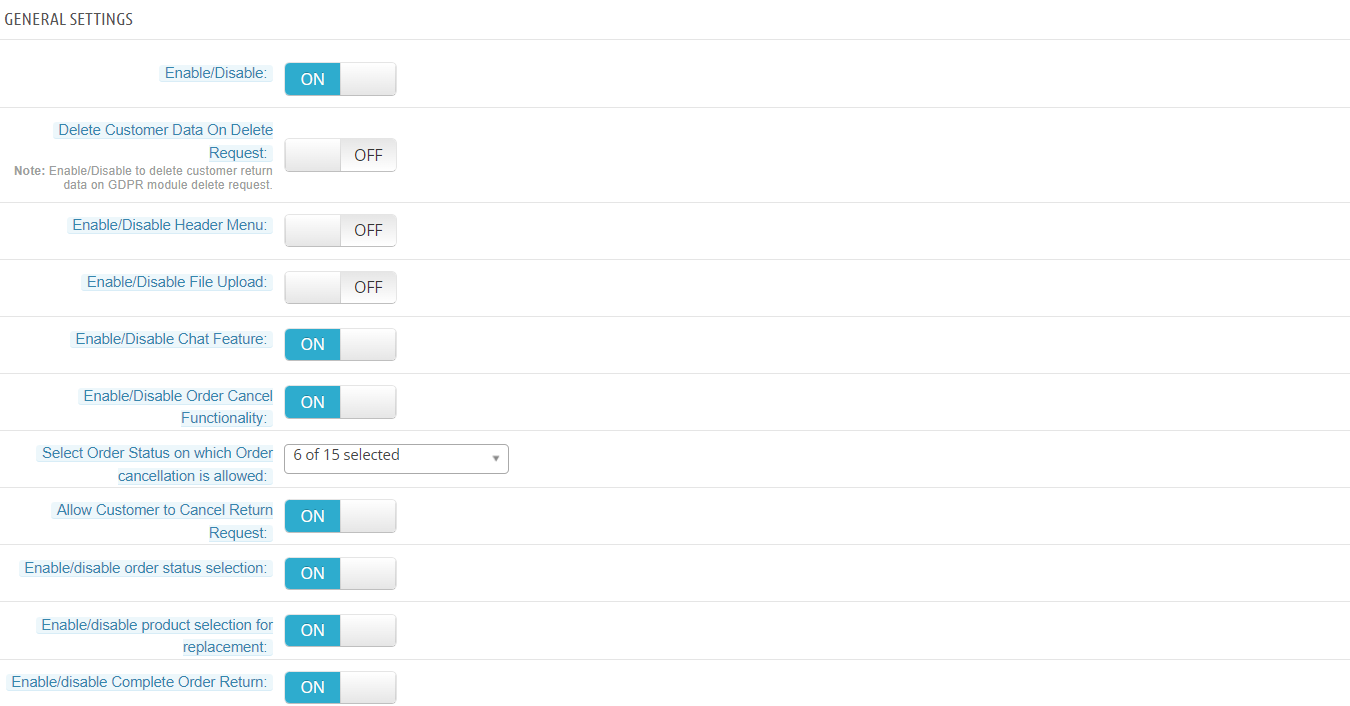
Enable/Disable: Initially, this Prestashop order return addon general settings will be “OFF”. The Online store admin can enable/disable this Prestashop order refund extension by turning ON/OFF in this setting.
Delete Customer Data on Delete Request: This feature allows the store admin to delete the customer data from the back-office. The module deletes the subscriber details automatically. If you are using the official GDPR module then you must need to enable this setting. The main purpose of this feature is to export and deletes user data on the PrestaShop GDPR module request. The Customer Data will be deleted on if this setting is ON. Note: It is also compatible with our Prestashop GDPR Module.
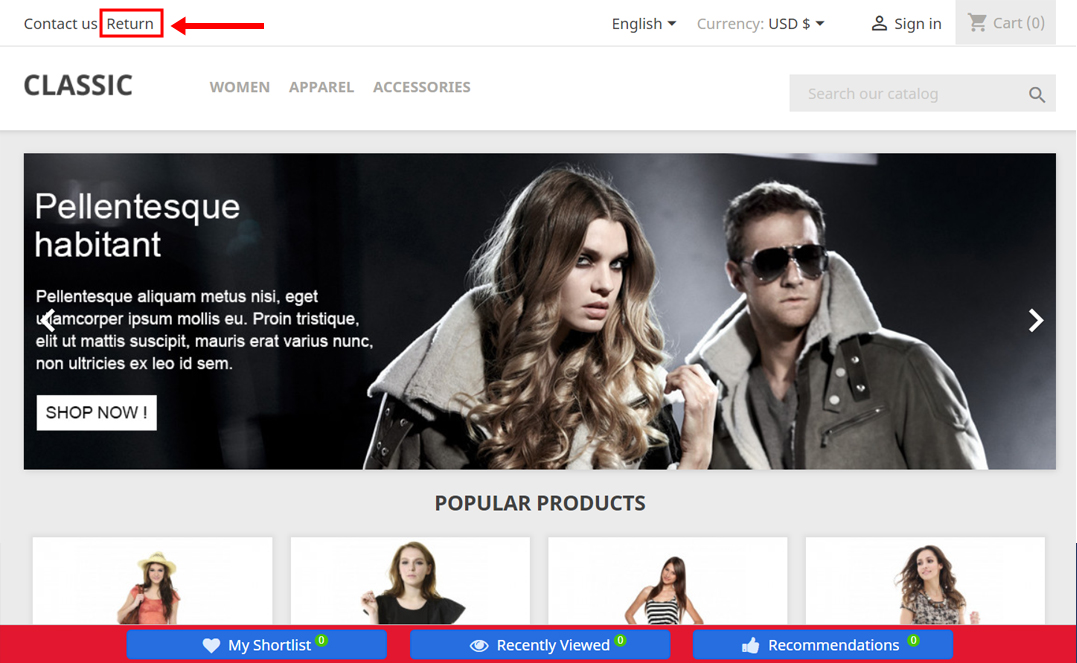
Enable / Disable Header Menu: When the field is enabled, the Return tab will be available in the store’s header through which placed orders can be returned.
Enable/Disable File Upload: In this tab, the admin can enable/disable the File Upload option button. This option allows the customer to upload the return product image.
Enable/Disable Chat Feature: This option enables or disables the ticket system for your store. If this feature is enabled, customers can raise a ticket and chat regarding their return requests.
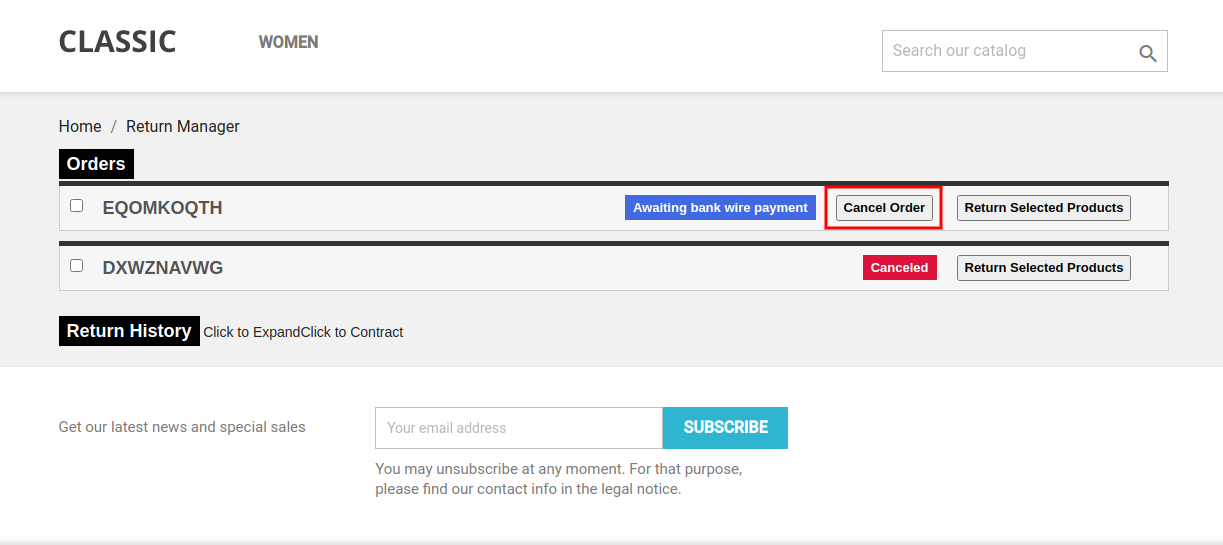
Enable/disable Order Cancel Functionality: Activate or deactivate the functionality of order cancellation.
Select Order Status on which Order cancellation is allowed: Select the order status on which you want to allow order cancellation.
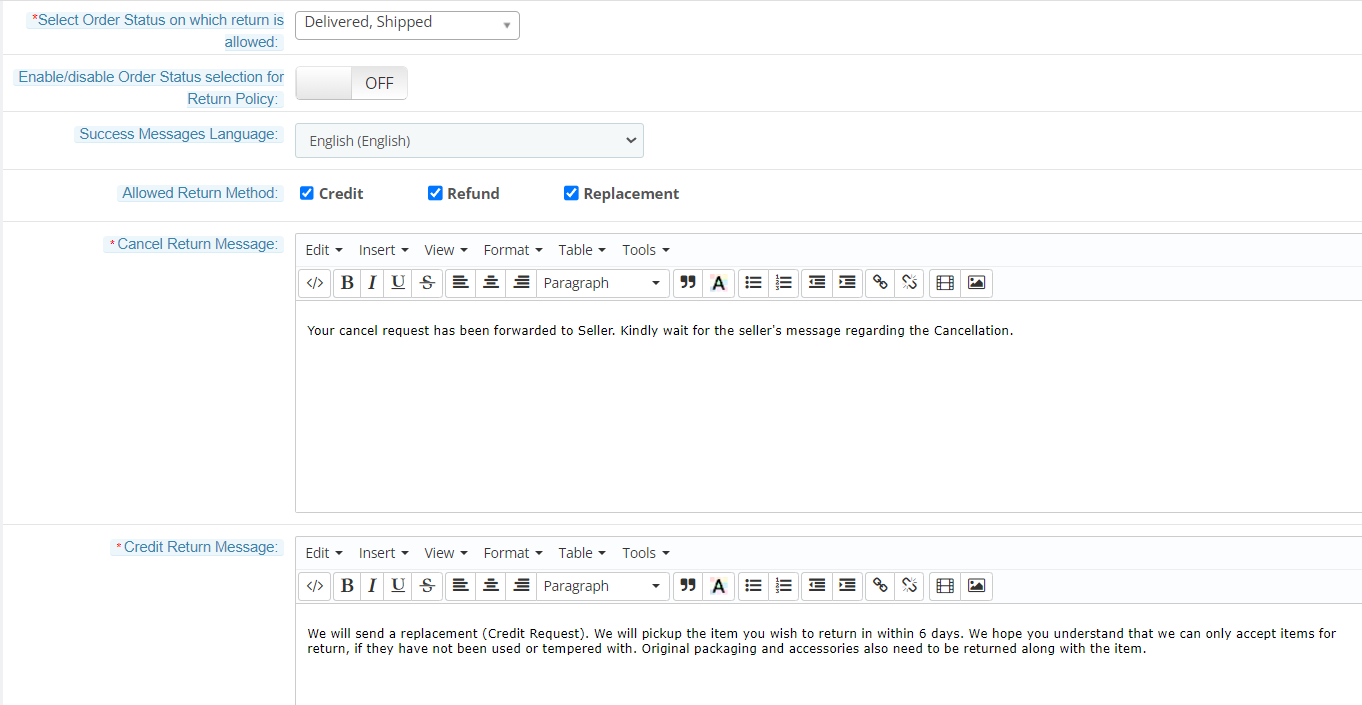
Enable/disable Order Status selection for Return Policy: Return Manager module Admin can set order status after reaching which the return policy will be considered. Once this feature is enabled then the admin can select the Order Status from which Return policies are applicable.
Allow Customer to Cancel Return Request: This option allows or disallows the customer to cancel their return request. if this option is enabled, the customer can cancel their return request.
Enable/Disable Order Status Selection: This functionality lets you enable or disable product returns on selected order status.
Enable disable product selection for replacement: The merchant can allow the online users to select the products which they want in replacement.
Enable Disable complete order return: Customers can return the whole order if they wish to do so. Admin can activate or deactivate the complete order return facility from the admin interface of the Prestashop order return manager Module. Users can select the products which he wants to return.
Select Order Status on which Order Return is Allowed: With this option, admin can set the specific order status on which they want to allow returns on the store.
Enable/disable Order Status selection for the Return Policy: When the field is enabled the user can select the order status on which the Return Policy will be applicable.
Success Messages Language: This drop-down contains all the languages available and enabled in the system, to save the success messages in a different language you have to choose the desired language from this dropdown. The success messages will be saved for the selected language when you submit the form.
Allowed Return Method: This option allows the admin to select the return method which they want to offer.
Order Cancellation Message: Here, the admin can set the message for display to the users after creating order cancel request.
Credit Return Message: It allows the admin to change the text as well as the format (HTML Design) of the text that will be displayed on the successful submission of a return request (Credit Type) by any customer.
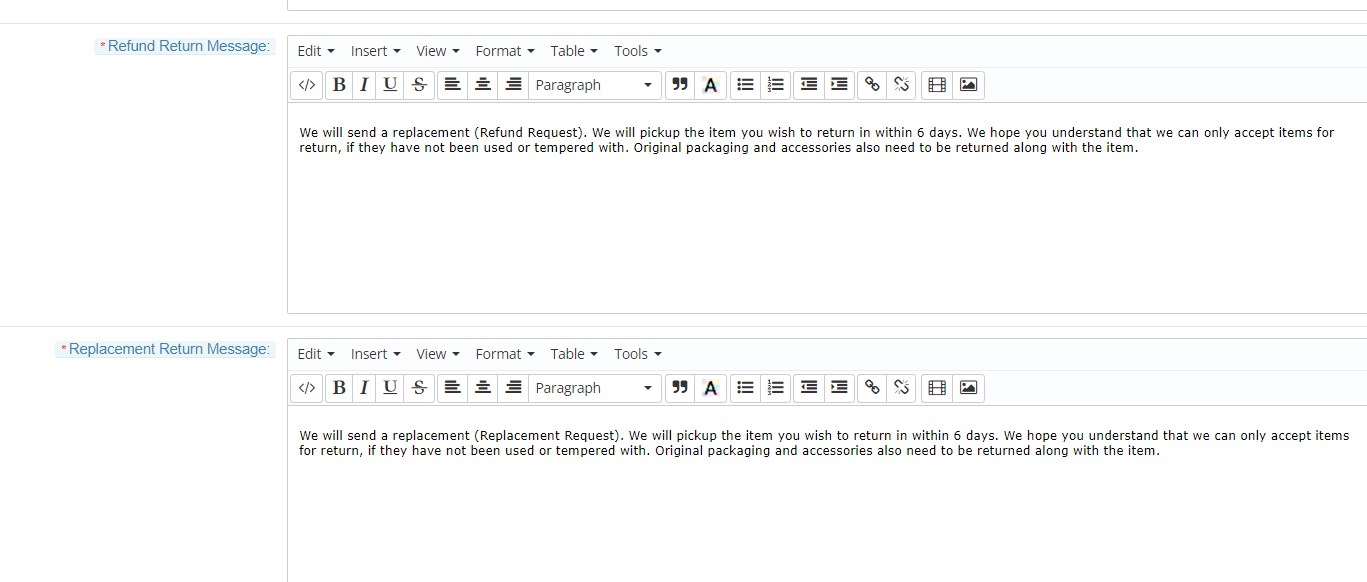
Refund Return Message: This option enables the admin to change the text as well as the format (HTML Design) of the text that will be displayed on the successful submission of a return request (Refund Type) by any customer.
Replacement Return Message: This Prestashop return manager addon enables the admin to change the text as well as the format (HTML Design) of the text that will be displayed on the successful submission of a return request (Replacement Type) by any customer.
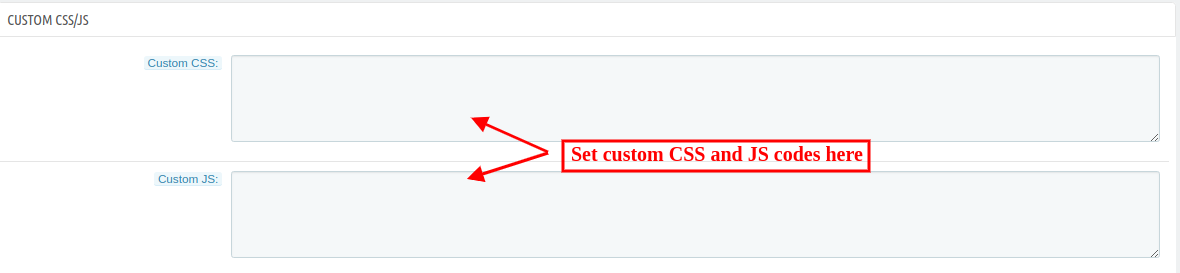
3.2 Custom CSS and JS
Add CSS Code: With this option, you can add additional CSS code.
Add JS Code: With this option, you can add additional JS code.
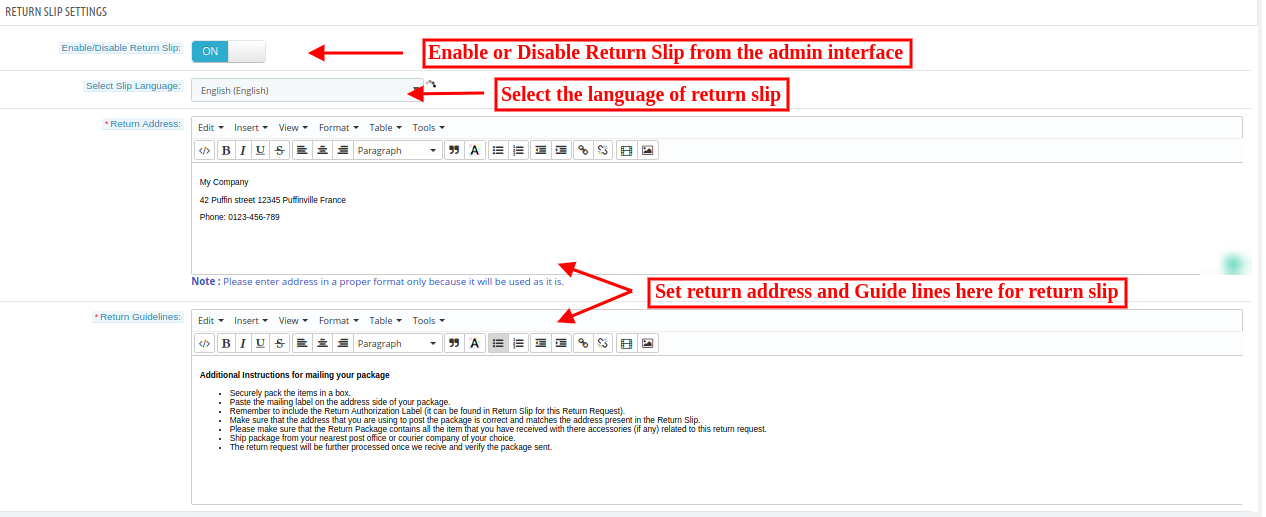
3.3 Return Slip Settings
In this tab, the merchant can alter the settings and content of the Return Slip. This return slip is generated automatically when the admin approves any return request (if the feature is enabled). The return slip is generated in the ‘PDF’ format and is mailed to the customer in the mail for Return Request Approval Notification.
The Prestashop store admin needs to implement these settings:
Enable/Disable Return Slip: Initially, this will be “OFF”. Admin can enable/disable the Return Slip feature by turning ON/OFF in this setting. Return slips are only generated when the feature is turned ON.
Select Slip Language: This drop-down contains all the languages available and enabled in the system, to save the Return Slip content in a different language you have to choose the desired language from this dropdown. The content will be saved for the selected language when you submit the form.
Return Address: This address will be printed on the return slip and will also be displayed on the return request form.
Return Guidelines: These guidelines will be printed on the return slip.
3.4 Return Policies
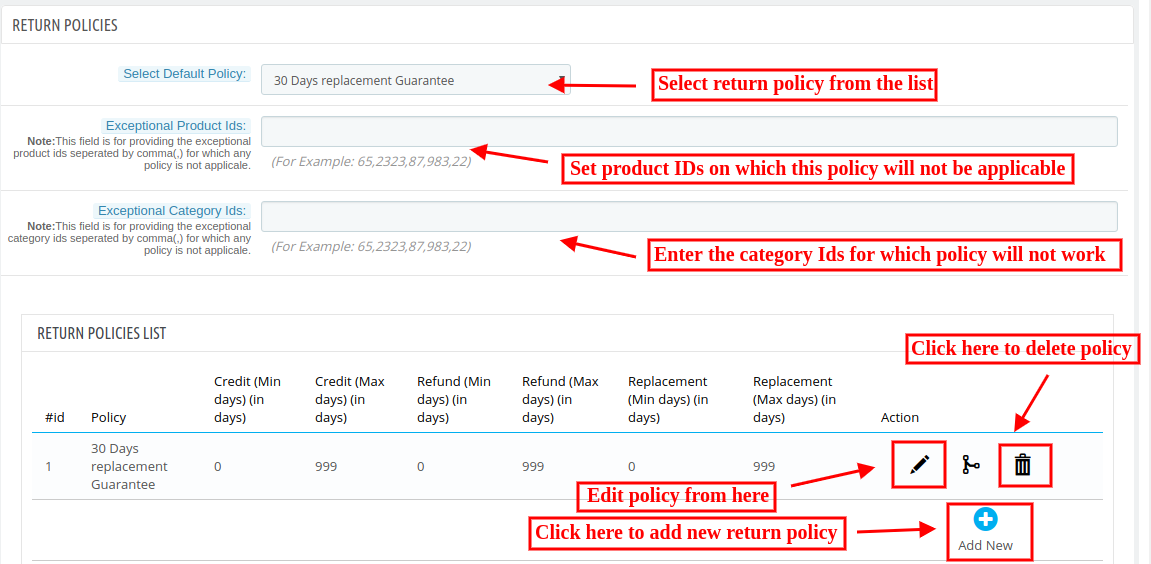
In this tab, the admin can add new return policies and can also edit or delete an existing return policy for the PrestaShop product return extension.
There is also an option to map the return policies to categories. A product is eligible for return only if it’s Default Category is mapped to a policy.
3.4.1 How to find the Default Policy of a product?
It allows the store admin to find the default policy. Following are the steps to find default policy of a product –
1. Go to Catalog > Products 2. Click on the “Edit” button of the desired product. 3. Click on the “Associations” tab.
The “Default Category” of the desired product will be displayed.
Note: One category can only be mapped with at-most one policy. But one policy can be mapped with more than one category.
This PS module provides an option to map the return policies to products.
This tab contains a list of existing return policies for the Prestashop replacement manager Module. The admin can also create a new return policy using the Add New button at the bottom of the policies tab. After clicking on the add new button a pop-up appears containing the form to create the return policy.
3.4.2 How to add a new policy?
The Prestashop refund order Extension provides the store admin option to add the new return policy. Following are the steps to add a new policy –
1. Go to Module and Services > Search module “Return Manager” > Click on the “Configure” button. > “General Setting” tab will display.
2. Click on the “Return Policies” tab.
3. Click on the “Add New” button. A pop-up will display to add a new policy.
4. Fill all the mandatory fields and click on the “Save” button.
5. After the successful validation, the new policy would be added to the “Return Policies List” table.
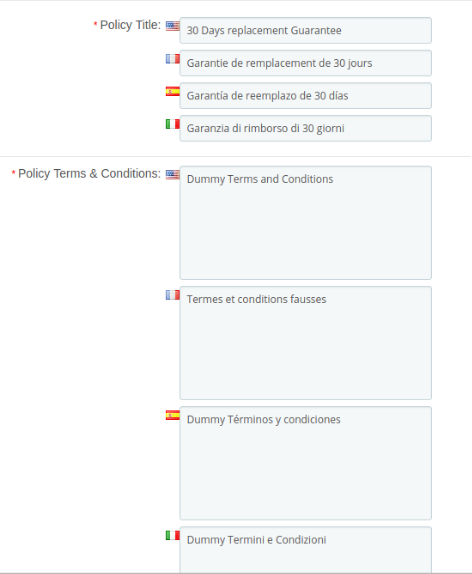
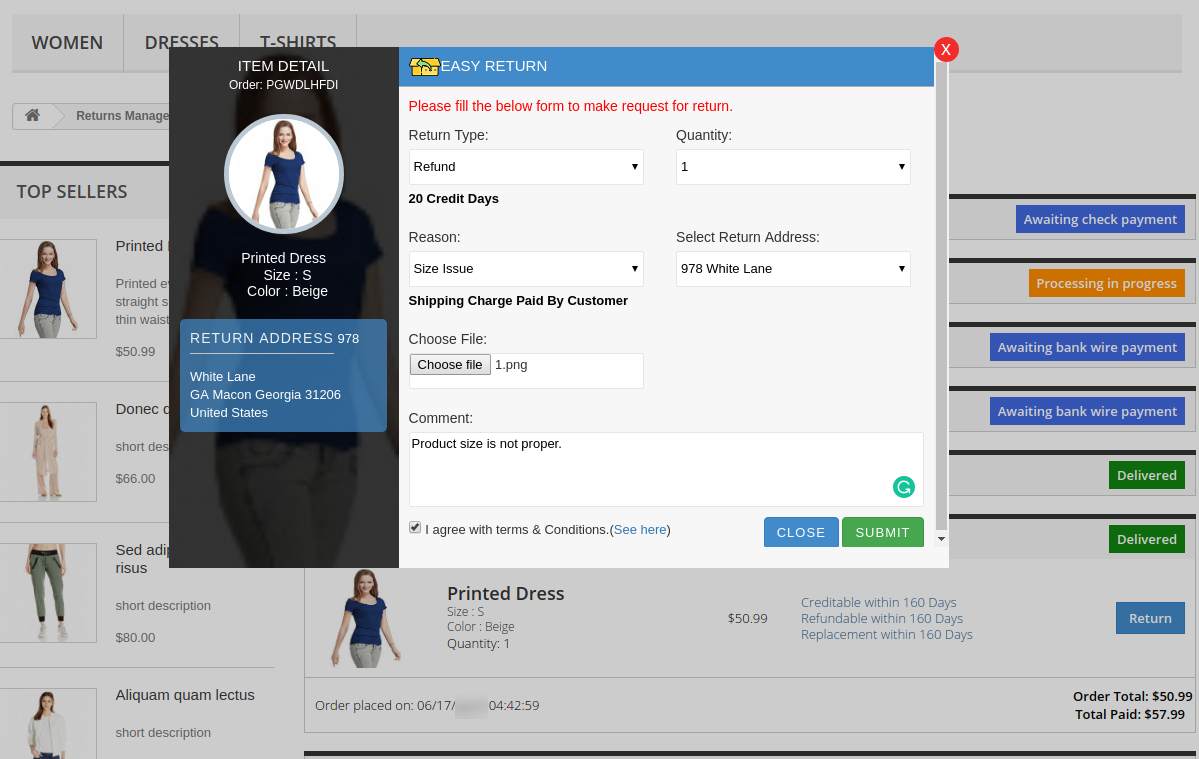
The form contains several input fields to enter the data of the policy like the name of the policy, validity, terms and condition of the policy and the option to choose the parameters i.e. Credit, Return and Replacement.
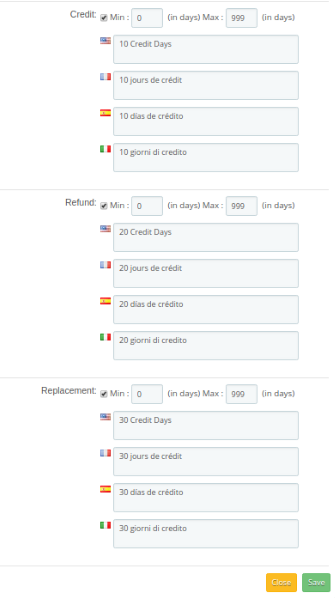
The admin can also enter the minimum and maximum days applicable to this return policy for different options as shown in the form below.
3.4.3 How to apply on policy for any product/category?
The Prestashop RMA extension allows the seller to apply policy for any product/category. Following are the steps to apply no policy for some product/category –
1. Go to Module and Services > Search module “Return Manager” > Click on the “Configure” button. > “General Setting” tab will display.
2. Click on the “Return Policies” tab.
3. Enter Product Id / Category Id at the field Exceptional Product Ids / Exceptional Category Ids respectively for which no policy would be applicable.
4. Click on the “Save” button.
3.4.4 How to edit a policy?
The Prestashop refund order Extension allows the eCommerce merchant to edit the already added policy. Following are the steps to edit a policy –
1. Go to Module and Services > Search module “Return Manager” > Click on the “Configure” button. > “General Setting” tab will display.
2. Click on the “Return Policies” tab.
3. Click on the “Edit” icon of the desired policy.
4. A pop-up will open with all the data already persist on the field as shown below.
5. Fill all the mandatory fields and click on the “Save” button.
Actions
1. The admin can edit any policy using the first link in the Action column from the policy listing table. On clicking this link a modal containing the form for the policy will appear and the data for that policy is already filled in the fields. The admin can edit any data and can save the changes made.
2. The second link in the actions column is for mapping categories to the policy. On clicking this link a modal will appear containing the options to map the categories to that particular policy.
3.4.5 How to map policy with categories?
The Prestashop RMA extension allows the admin to map. Following are the steps to map policy with categories –
1. Go to Module and Services > Search module “Return Manager” > Click on the “Configure” button. > “General Setting” tab will display.
2. Click on the “Return Policies” tab.
3. Click on the “map” icon of a particular policy.
4. A pop will display with a drop-down field to map this policy with the categories as shown below.
5. Click on the “Save” button.
Note: The policy for a particular product would be decided based on the “Default Category” of the product.
3. The third link in the Action column is for deleting any particular policy.
3.4.6 How to delete a policy?
The Prestashop product return manager module allows the eCommerce store merchant to delete the pre-defined. Following are the steps to delete a policy –
1. Go to Module and Services > Search module “Return Manager” > Click on the “Configure” button. > “General Setting” tab will display.
2. Click on the “Return Policies” tab.
3. Click on the “Delete” icon for the policy you want to delete.
4. Confirm by clicking on the “OK” button.
3.5 Return Reasons
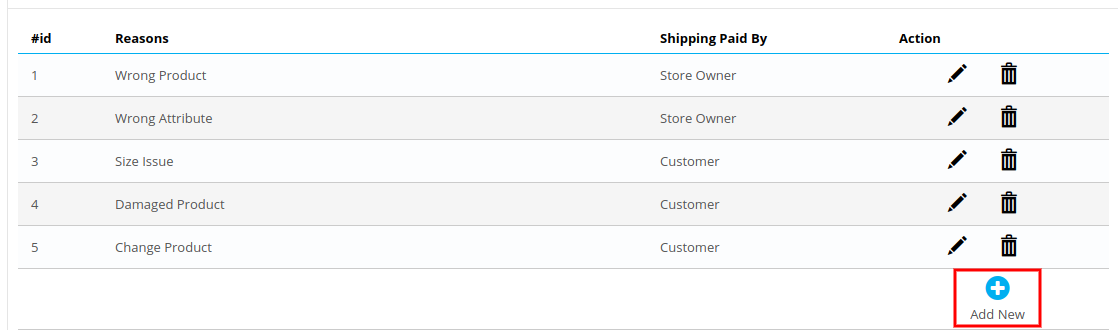
In this tab, a list of return reasons will appear in the form of a table. By default, there are 5 reasons already added into the Prestashop RMA and they are non-editable. The admin can further add any numbers of reasons into the Prestashop return manager addon.
The two links below the action column in the reasons list are for editing and deleting the existing return reasons.
3.5.1 How to add a new Return Reason?
The Prestashop return manager addon allows the store admin to add and edit the new return reason. Following are the steps to add a return reason –
1. Go to Module and Services > Search module “Return Manager” > Click on the “Configure” button. > “General Setting” tab will display.
2. Click on the “Return Reasons” tab.
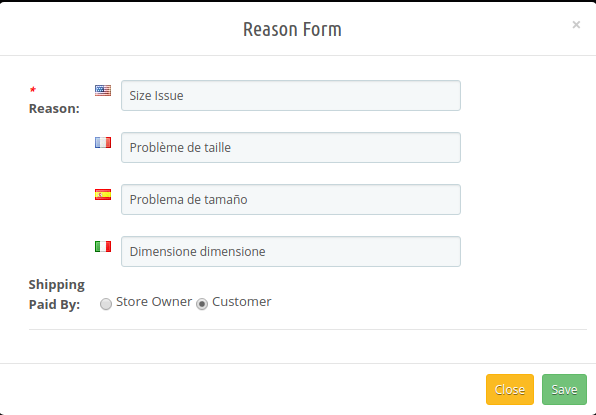
3. Click on the “Add New” button. A pop-up will display to add a new Return Reason.
4. Fill all the mandatory fields and click on the “Save” button.
5. After the successful validation, the new return reason would be added to the “Return Reasons List” table.
The admin can add as many reasons as required to the system using the ‘Add New’ link at the bottom of the listing tab. On clicking on the link a form will appear to add new Return Reason into the Prestashop Order Refund Extension. The form is shown below:
3.5.2 How to edit a Return Reason?
The Prestashop return manager addon allows the store admin to edit the return reason. Following are the steps to edit a return reason –
1. Go to Module and Services > Search module “Return Manager” > Click on the “Configure” button. > “General Setting” tab will display.
2. Click on the “Return Reasons” tab.
3. Click on the “Edit” icon of the desired reason.
4. A pop-up will open with data already persist in the field.
5. Fill the mandatory fields and click on the “Save” button.
3.5.3 How to delete a Return Reason?
The Prestashop return manager module allows the store admin to delete the already added return reason. Following are the steps to delete a return reason –
1. Go to Module and Services > Search module “Return Manager” > Click on the “Configure” button. > “General Setting” tab will display.
2. Click on the “Return Reasons” tab.
3. Click on the “Delete” icon of the return reason you want to delete.
4. Confirm by clicking on the “OK” button.
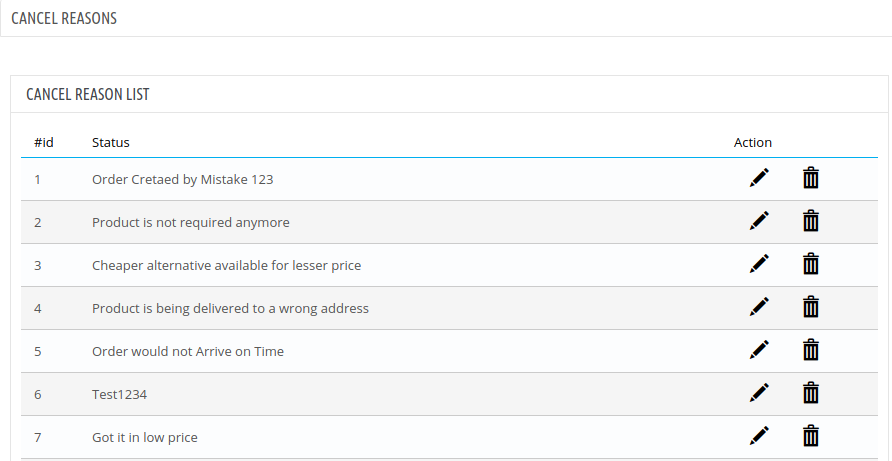
3.6 Cancel Reasons
The online merchant can list the reasons for order cancellation. The online users can choose from these listed reasons while creating an order cancellation request.
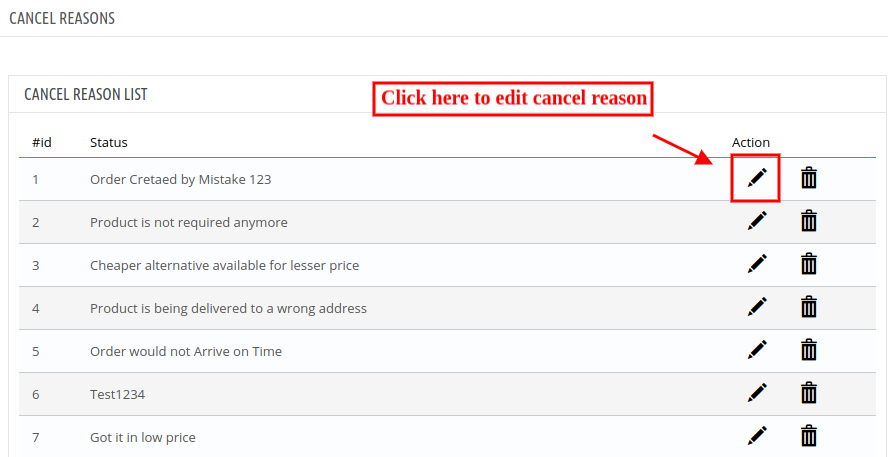
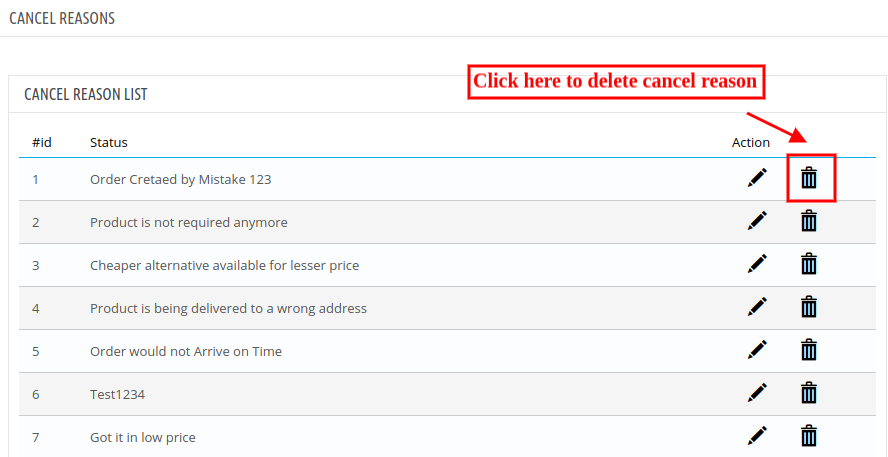
Admin can add, delete and edit any cancel reason from the admin interface of this Prestashop Return Manager Module.
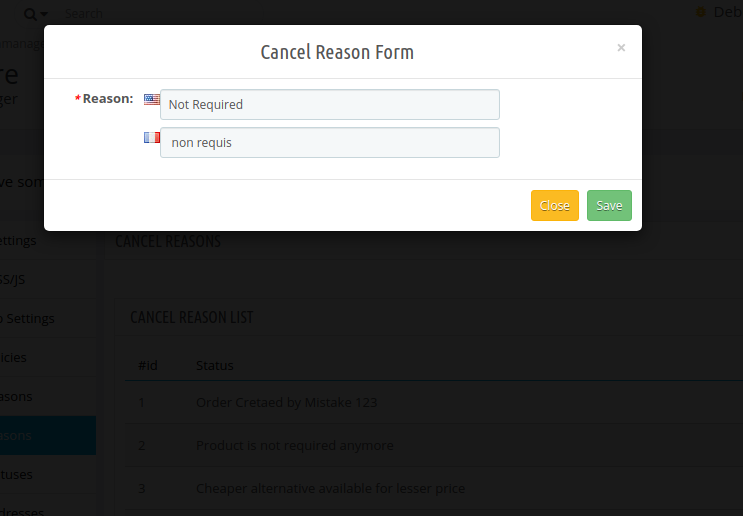
3.6.1 Steps for adding new cancel reasons:
Admin needs to click on add new button and enter the reasons in different languages. Please check the below screenshot:
3.6.2 Steps for editing any cancel reason:
Admin needs to click on edit option and change the reason. After that, he can save it. Check the screenshot:
3.6.3 Steps for Deleting cancel reason:
Admin needs to click on the delete icon and in the message box click on ok button. Check the below screenshot:
3.7 Return Statuses
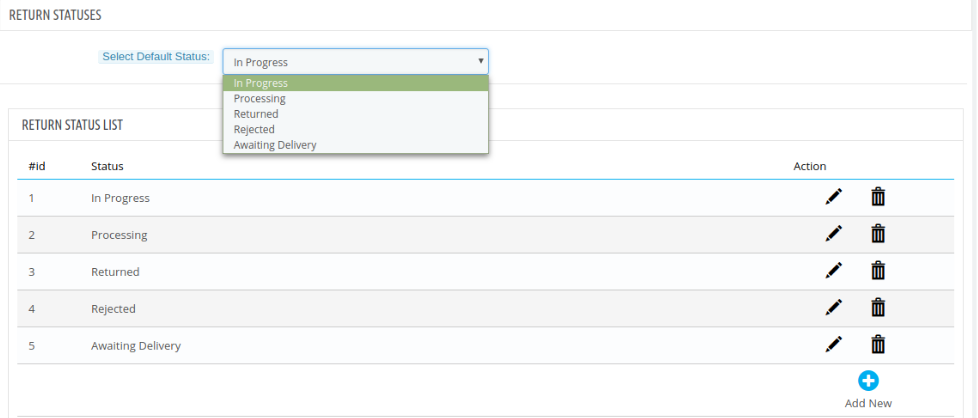
This tab contains a list of return statuses in the form of a table. By default, there are 5 statuses already added to the Prestashop return manager addon and they are non-editable. The admin can further add any numbers of statuses into the system. The tab also contains an option to choose default and the final status of any return request.
The two links below the action column in the statuses list are for editing and deleting the existing return statuses.
The admin can also change the default return status and final return status from the drop-downs in this tab.
3.7.1 How to add a new Return Status?
The Prestashop return manager addon allows the store admin to add the new return status. Following are the steps to add new return status –
1. Go to Module and Services > Search module “Return Manager” > Click on the “Configure” button. > “General Setting” tab will display.
2. Click on the “Return Statuses” tab.
3. Click on the “Add New” button. A pop-up will display to add a new Return Status.
4. Fill all the mandatory fields and click on the “Save” button.
5. After the successful validation, the new return status would be added to the “Return Reasons List” table.
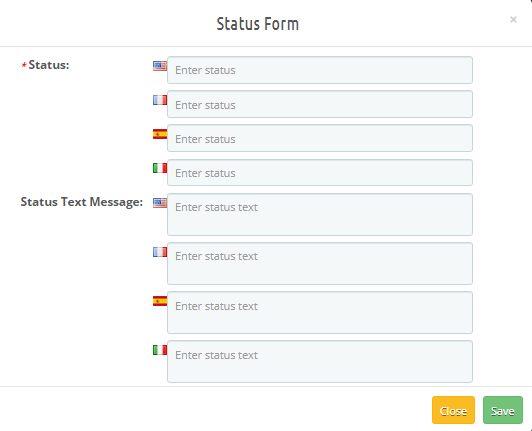
The admin can add as many statuses as required to the system using the ‘Add New’ link at the bottom of the listing tab. On clicking on the link a form will appear in a modal to add new Return Reason into the system. The form is shown below:
6.While adding the new return status admin can also add a status message explaining the meaning of that particular return status which he can highlight in the return status email as a Custom Text using placeholders.
3.7.2 How to edit a Return Status?
The Prestashop product return manager addon allows the store admin to edit the return status. Following are the steps to edit return status –
1. Go to Module and Services > Search module “Return Manager” > Click on the “Configure” button. > “General Setting” tab will display.
2. Click on the “Return Statuses” tab.
3. Click on the “Edit” icon of the desired return status.
4. A pop-up will open with data already persist in the field.
5. Fill the mandatory fields and click on the “Save” button.
3.7.3 How to delete a Return Reason?
The Prestashop RMA module allows the store admin to delete the return reason. Following are the steps to delete return status –
1. Go to Module and Services > Search module “Return Manager” > Click on the “Configure” button. > “General Setting” tab will display.
2. Click on the “Return Statuses” tab.
3. Click on the “Delete” icon of the return status you want to delete.
4. Confirm by clicking on the “OK” button
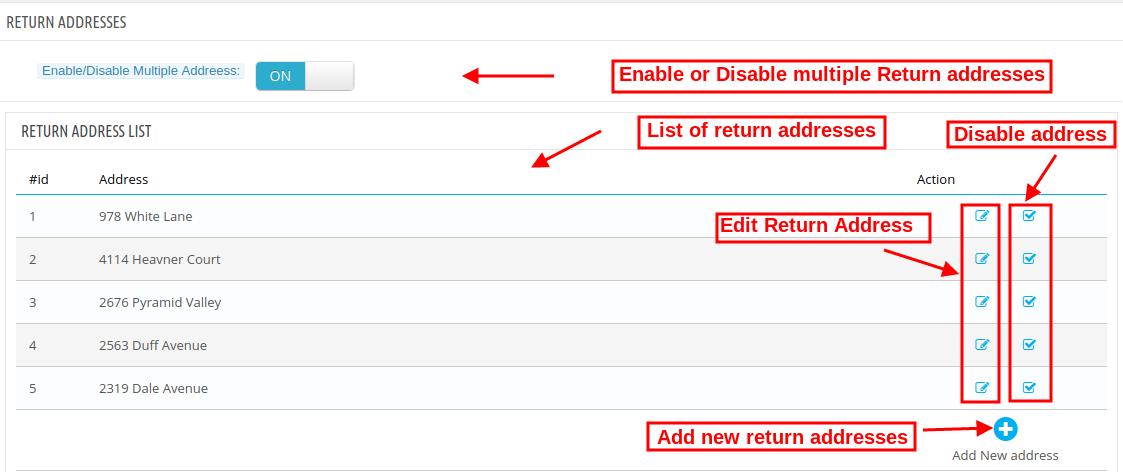
3.8 Return Addresses
The online merchant can add, delete and modify return address from the admin interface of this Return manager module. The admin can view a list of added addresses and also modify it or disable it anytime.
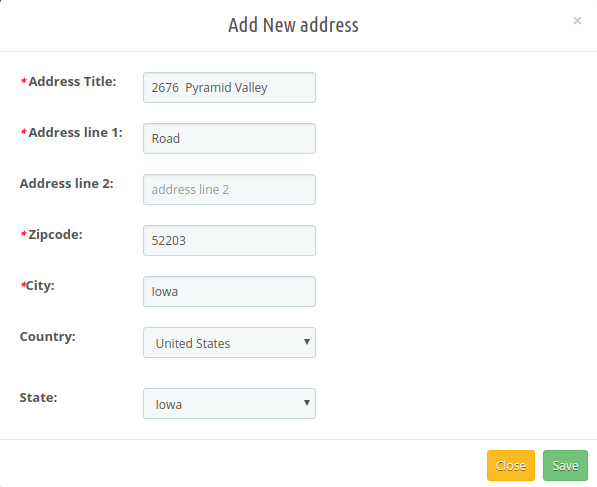
Admin can add a new address by clicking on the “+” sign. After that, the admin needs to add address details like area, zip code, city, country and state.
The online merchant can easily edit and disable the generated address without any hassle.
3.9 Create a Return
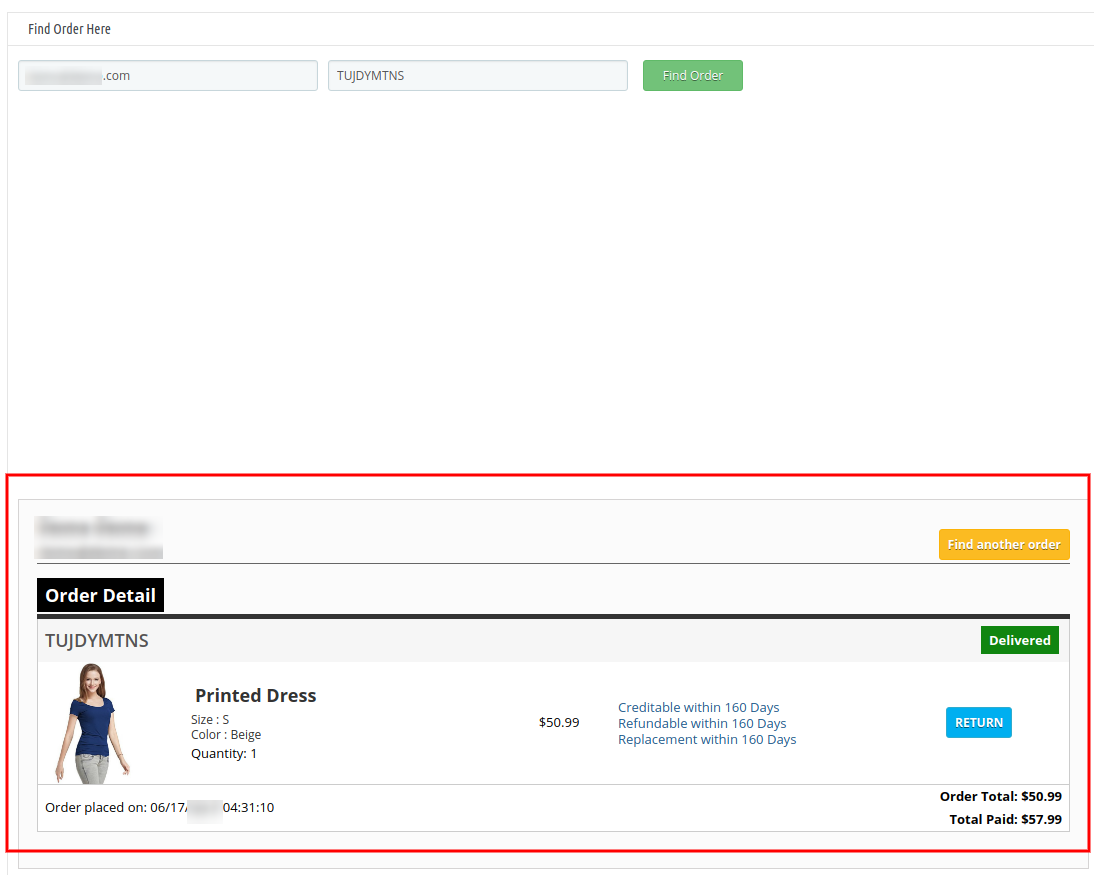
This tab is used to generate a return request from the admin panel itself. The tab contains a form through which the admin can find any order by simply providing the reference number and the corresponding e-mail and then apply for return accordingly.
3.9.1 How to Create a Return?
The Prestashop product return manager addon allows the store admin to create the return. Following are the steps to create a return –
Go to Module and Services > Search module “Return Manager” > Click on the “Configure” button. > “General Setting” tab will display.
Click on the“Create a Return” tab.
Enter Email Id of the customer and the Reference Id of the order.
Order Details will be displayed in that particular order as shown below.
Click on “Return Button” for the desired product. A pop up will be displayed to completed the return process.
Filled all the mandatory fields and agree to Terms and Conditions.
Click on the “Submit” button. The return request would be sent and order details would be added in “Pending Returns List” tab
Note:
Any return request whether it is created by admin or customer is moved to the pending returns and the admin has to approve it first to further change the status of the return request or to take any further action.
The orders that are delivered are only eligible for return.
By default, the status of the return request is set to default return status set by the admin in the ‘Return Statuses’ tab.
When the admin finds an order using the find order form then the order detail for the respective order will appear containing the list of products and a return button in front of products eligible for return. When the admin clicks on the return button a pop-up will appear containing the return form and enter specific data for the return request. Admin can fill the form for generating a return request on behalf of users.
3.10 Email Templates
This tab contains an interface through which the admin can edit or translate (to any language) any email template that is used in this system.
3.10.1 How to edit an Email Template?
The Prestashop order return manager Addon allows the store admin to edit the email template. Following are the steps to edit an email template –
1. Go to Module and Services > Search module “Return Manager” > Click on the “Configure” button. > “General Setting” tab will display.
2. Click on the “Email Templates” tab.
3. Select the desired template you want to edit.
4. Fill all the mandatory fields, apply the desired change and click on the Save button at the bottom of the form.
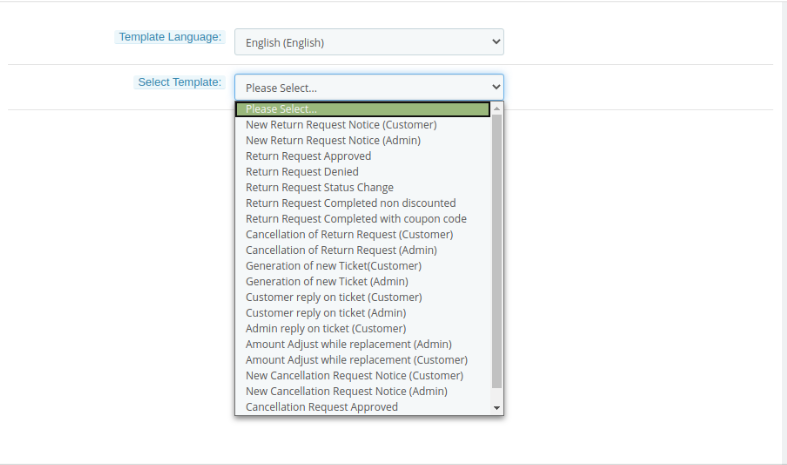
There are 20 email templates available that are used by this Prestashop return manager Addon:
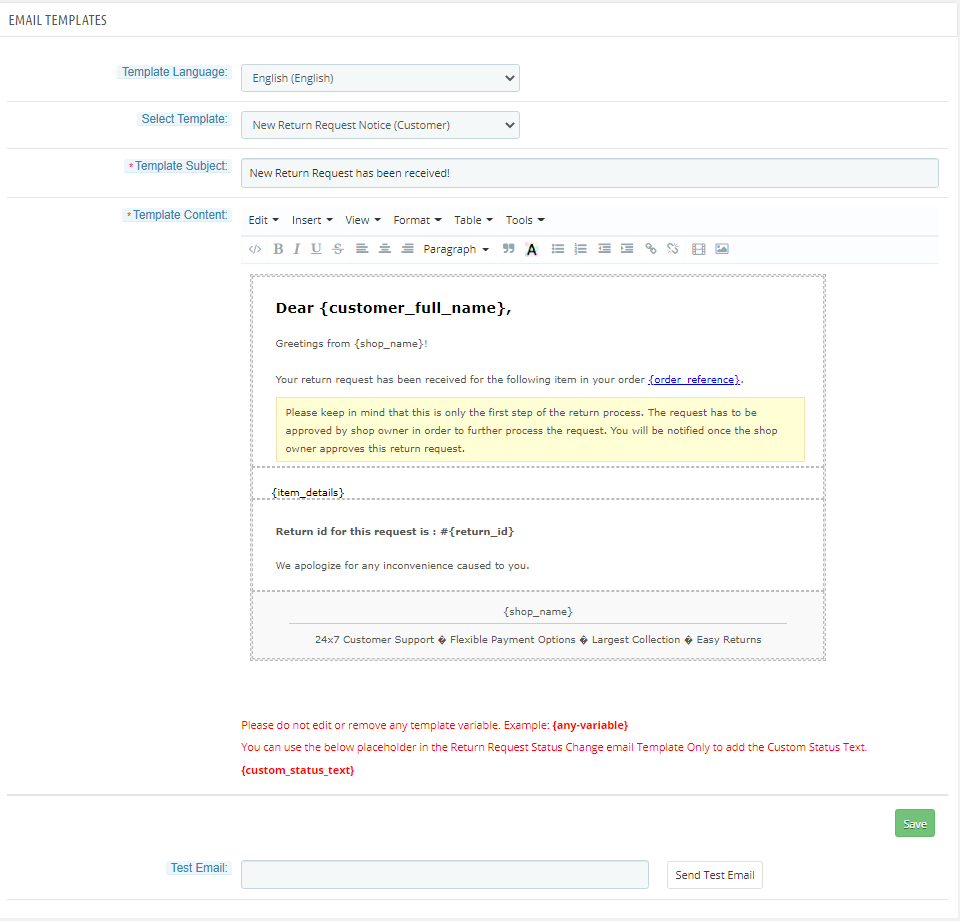
New Return Request Notice (Customer): This mail template is used to notify the customer regarding the new Return Request generated by the customer itself. The customer who has created the return request will only receive this mail.
New Return Request Notice (Admin): This mail template is used to notify the Store Owner regarding the new Return Request generated by any customer.
Return Request Approved: This mail template is used to notify the customer regarding the Approval of the Return Request that is created by the customer earlier.
Return Request Denied: This mail template is used to notify the customer regarding the Dis-Approval of the Return Request that is created by the customer earlier.
Return Request Status Change: This mail template is used to notify the customer regarding the update in the status of the Return Request that is created by the customer earlier.
Return Request Completed non-discounted: This mail template is used to notify the customer regarding the completion of the Return Request that is created by the customer earlier.
Return Request Completed with coupon code: In this mail template, the customers will get return request completion information along with the coupon code.
Cancellation of return request(Customer): This email template will be used to notify customers regarding return request cancellation done by them.
Cancellation of return request(Admin): This email template will notify the store admin regarding return request cancellation.
Generation of New Ticket(Customer): When the customer generates any new ticket, this email template will be used for sending emails regarding this ticket generation.
Generation of New Ticket(Admin): Whenever customers generate a new ticket, this email template will be used to notify the store admin regarding ticket generation.
Customer Reply on Ticket(Customer): Customers will get an email notification when they reply on any ticket.
Customer Reply on Ticket(Admin): Admin will get the notification on customers to reply to the ticket.
Admin Reply on Ticket(Customer): Customers will get a notification on the admin’s reply on tickets.
Amount Adjust while replacement(Admin): Admin will get notification regarding Amount Adjust while replacement.
Amount Adjust while replacement(Customer): Customers will get notification regarding Amount Adjust while replacement.
New Cancellation Request Notice(Customer): Customers will get notification regarding their cancellation request.
New Cancellation Request Notice(Admin): Admin will get notification regarding the new cancellation request.
Cancellation Request Approved: Notification regarding approval of cancellation request.
Cancellation Request Declined: Notification regarding rejection of cancellation request.
To edit or translate any email template the admin has to choose the desired email template and language. On doing the same the email template data will appear in a form below, to save the changes made the admin has to click on the ‘Save’ button at the bottom.
Admin can send the test email while setting up the template before making it live.
Admin can add a custom text using placeholders in the return status emails.
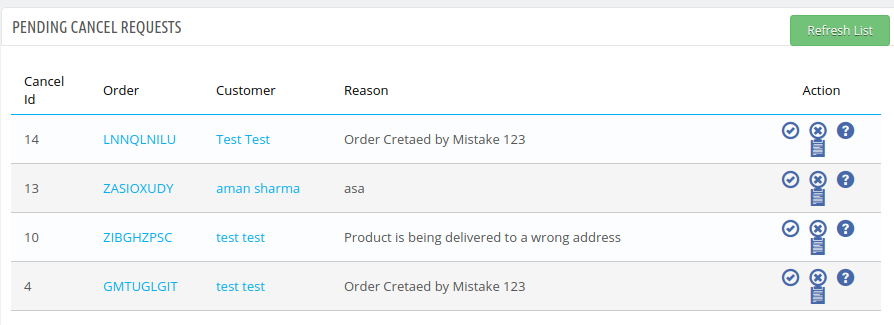
3.11 Pending Order Cancel List
Admin can view the order cancellation requests which are pending. Admin can approve or decline the request from here. Admin can also refresh the list and check new cancellation requests.
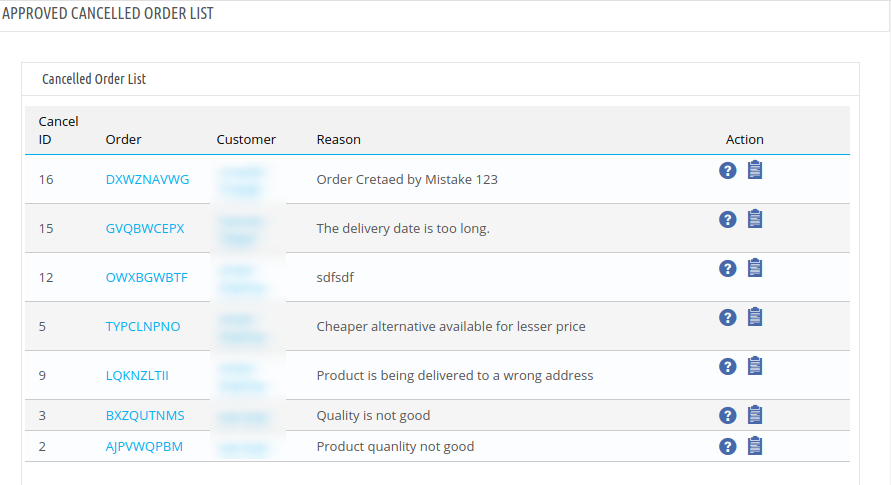
3.12 Complete Order Cancel
Here, the admin can view the approved canceller orders and also check the customer notes if available.
3.13 Pending Returns List
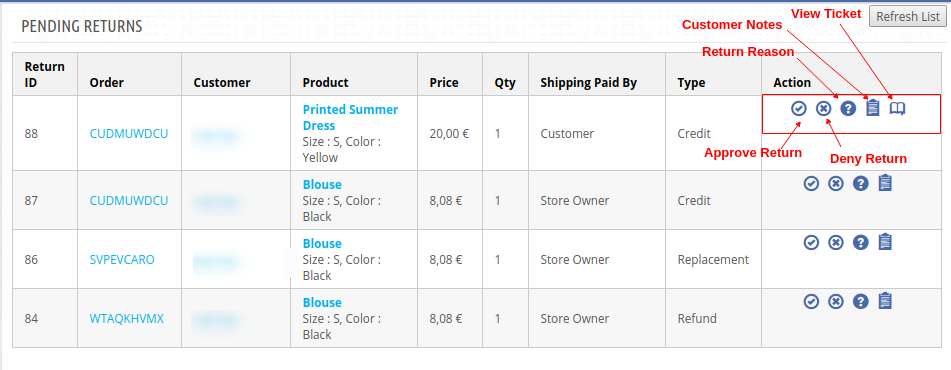
This tab contains a list of all the returns that are pending i.e. are not approved by the admin. The admin has to approve a return request to perform several operations on the return request like changing the status and completing the return process.
3.13.1 How to approve a return request?
The Prestashop product return manager addon allows the store admin to edit the return request. Following are the steps to approve a return request –
1. Go to Module andServices > Search module “Return Manager” > Click on the “Configure” button. > “General Setting” tab will display.
2. Click on the “Pending Returns List” tab.
3. Click on the tick button.
3.13.2 How to deny a return request?
The Prestashop RMA manager module allows the Prestashop store merchant to deny the return request. Following are the steps to deny a return request –
1. Go to Module and Services > Search module “Return Manager” > Click on the “Configure” button. > “General Setting” tab will display.
2. Click on the “Pending Returns List” tab.
3. Click on the cross button.
You will find the “Refresh List” button which fetches and updates all the pending return requests.
The admin can approve or deny a return request using the actions available in front of the list.
Once the admin approves a return request then it is moved to the Active Returns List.
On the other hand, if the admin denies a return request that it is removed from the list and this action can not be undone.
The admin can view the detail of the product, the details of the order and also the details of the customer by clicking on the respective links from the list of the pending return.
Admin can view the reason corresponding to a return request.
They can view extra product return notes if provided by the customer.
If the ticket system is enabled, customers can raise a ticket from the return section of their account. Corresponding to the order return request, admin can view the ticket as shown below:
3.14 Active Returns List
This tab contains a list of all the returns that are approved by the admin. The admin can proceed with the return process after approving the return request using this tab. The admin can view the return status history, change the status of the return request, and can also deny a request from this tab as well.
You will find the “Refresh List” button which fetches and updates all the active return requests.
The actions that can be performed from this tab for the active returns are:
Deny the return request.
Change the status of the return request.
View history of the return request.
View customer comments.
Mark the return request as complete.
View the ticket information
When the admin marks a return request as complete then it is moved to the archives list.
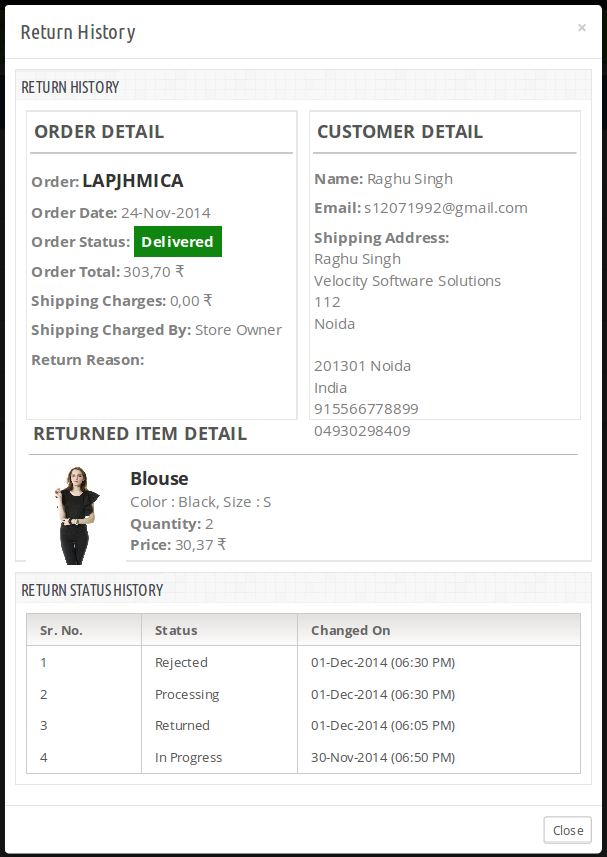
When the admin clicks on the view history link in front of the return from the active returns list then a modal will appear containing the details of the order and the return status history for that return request. The modal is as follows:
3.14.1 How to change return status?
The Prestashop return manager extension allows the store admin to change the return status. Following are the steps to change return status –
1. Go to Module and Services > Search module “Return Manager” > Click on the “Configure” button. > “General Setting” tab will display.
2. Click on the “Active Returns List” tab. A pop up will display with the field to change the status.
3. Change the status and click on the “Save” button
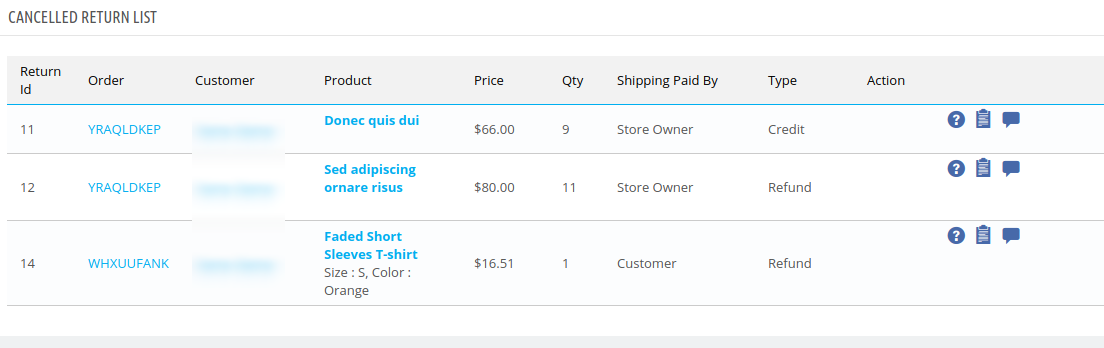
3.15 Canceled Return List
Customers can cancel their placed return requests from their account section. The information about those canceled requests can be checked under this section.
3.16 Archives List
This tab contains all the return requests that are complete. The tab also contains a form through which the admin can filter the archives list and can also export the list of completed return requests based on certain filters to a CSV file.
3.17 Custom Field
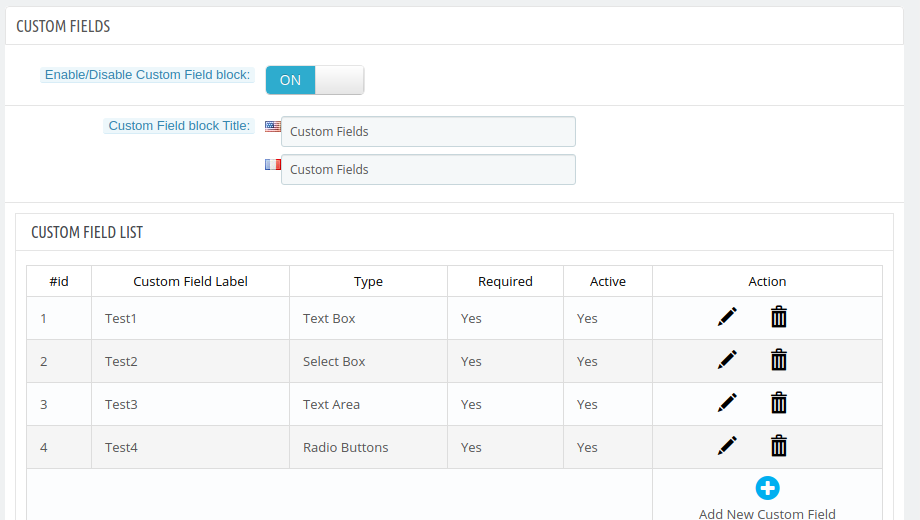
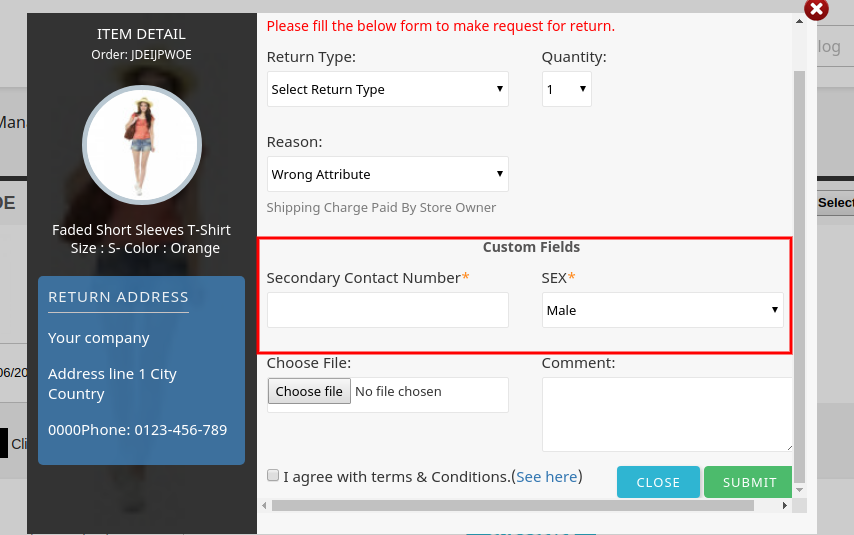
In the updated version, the online store merchant can also create custom fields from the admin interface. They can add, update and delete custom fields.
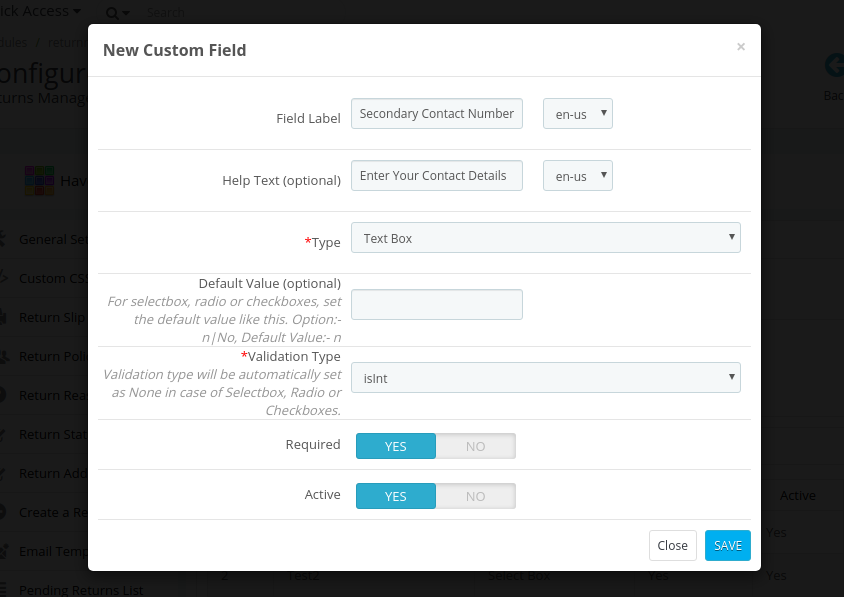
The online merchant can click on add new custom fields for creating new custom fields. After clicking on this, the admin will get these options as shown below:
The online merchant can enter these details and create a field as shown below:
Field Label: Enter Field Label in multiple languages.
Help Text: Set Help text in various languages.
Type: Select from available field type. Admin can select from the text box, select box, text area, radio buttons and checkboxes.
Default Value: Enter the default value here.
Validation Type: Select from available validation type. Admin can set none validation type, isint, isname and isemail validation type.
Required: Admin can set any field as required field.
Active: Admin can enable or disable any field.
3.18 Other Plugins
As the admin clicks on this “Other Plugins” tab, they will be redirected to the Addon store where they can buy other plugins for their Prestashop store.
4.0 Front End Module
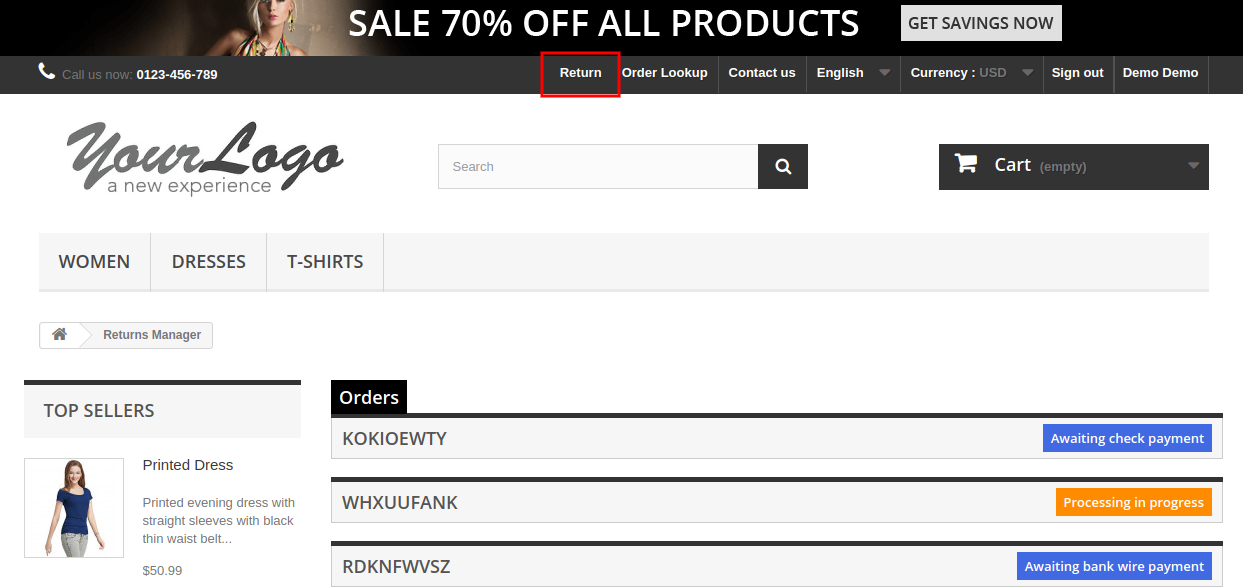
After enabling the Prestashop Reward Point module the front-end user will see a link in the header of the front-end through which the user can navigate to a new page.
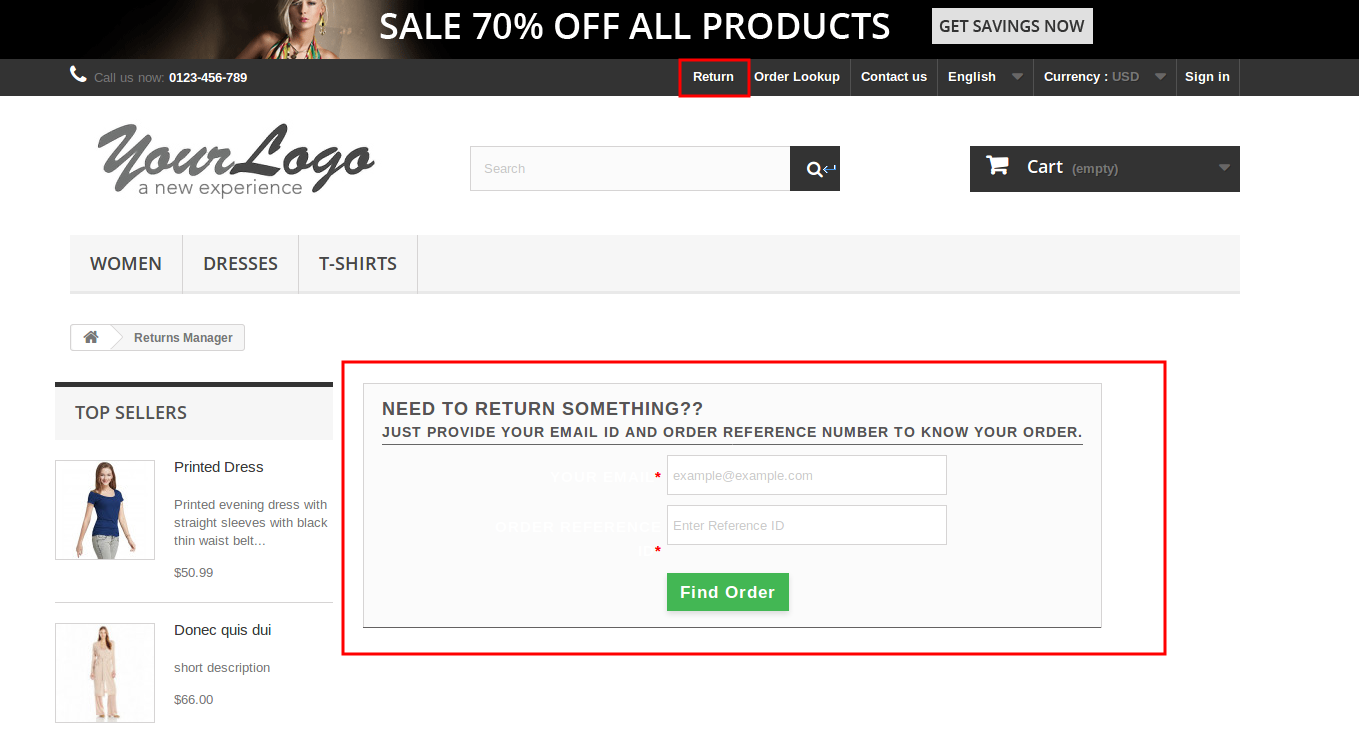
The link in the header of the front-end will appear as follows:
For Version 1.6-
For Version 1.7-
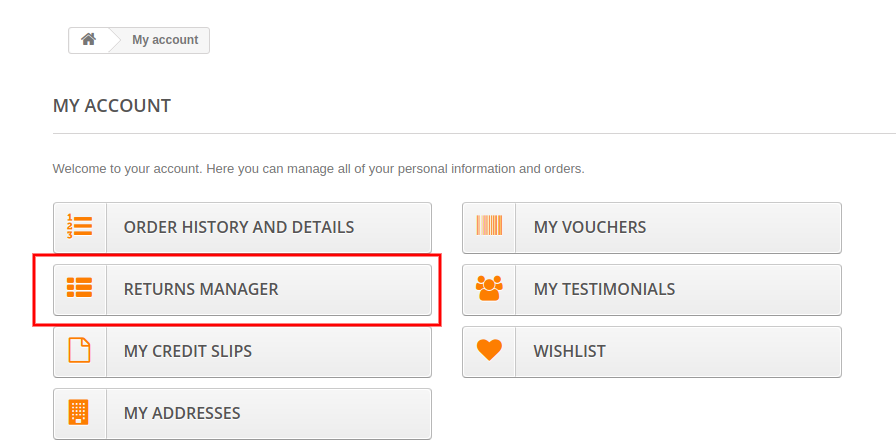
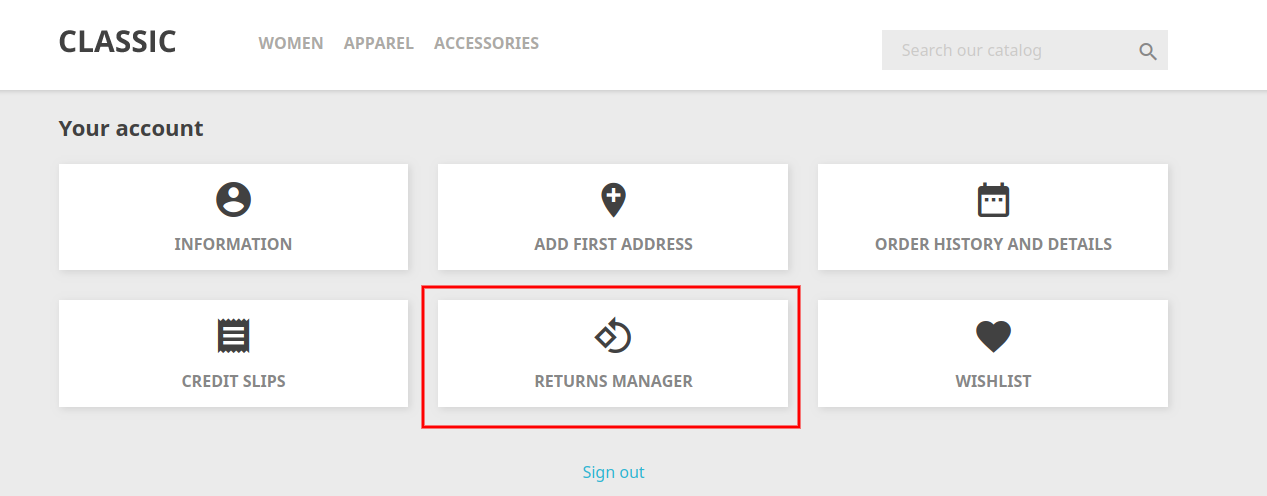
The link for the Returns Manager page will also appear on the ‘My Account’ page of any customer. This link only appears to a logged-in customer on the ‘My Account’ page.
For Version 1.6- For Version 1.7-
When the customer clicks on this link then a new page will open based on the logged-in status of the customer.
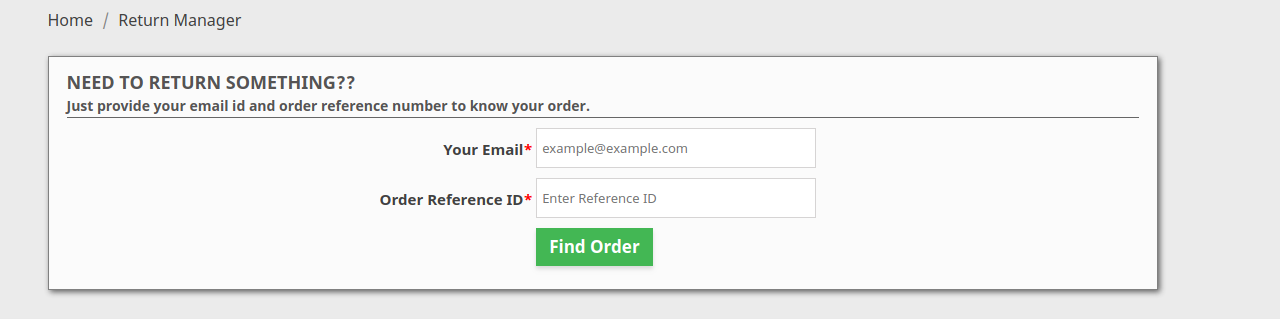
In case the user is a guest and is not logged into the website then the page will contain a form to find the order as follows:
For Version 1.6-
For Version 1.7-
After proving the order reference number and the respective email the details of that order will appear including the return history based on the email provided by the customer. The order details will appear as follows:
For Version 1.6-
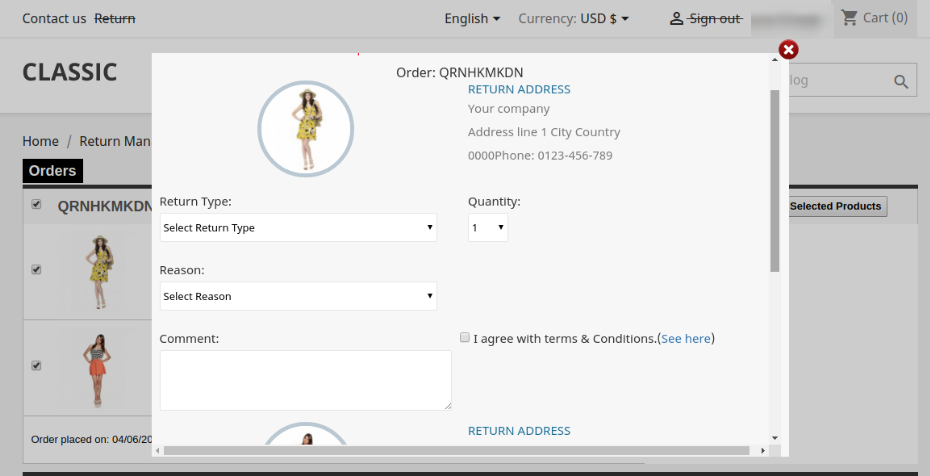
There will be a popup on which customers can add details for generating the return request. For Version 1.7-
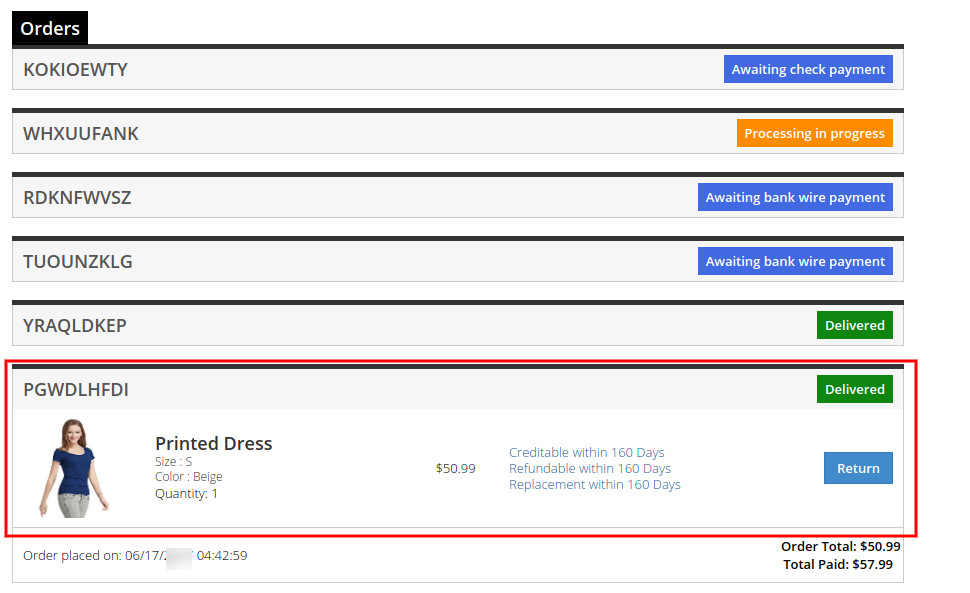
The products that are eligible for return in that particular order will have a return button. Through this button, the customer can apply for the return of that particular product.
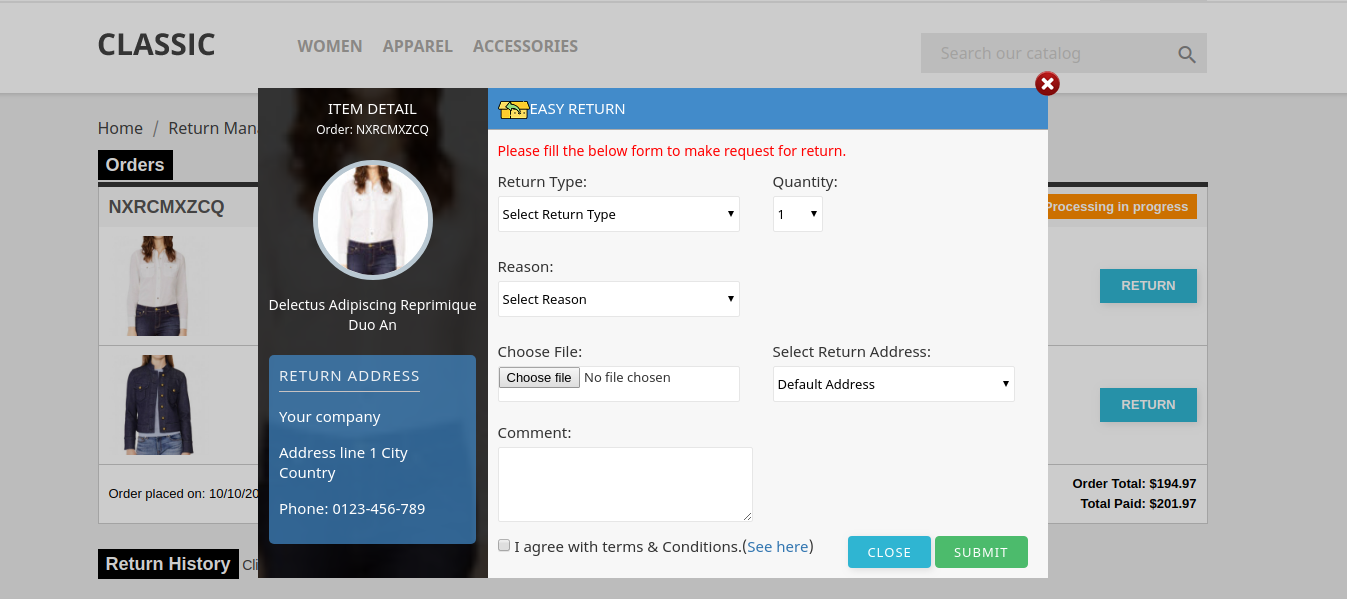
On clicking on the Return button a pop-up will appear containing the form for return of that particular order. The form will appear as follows:
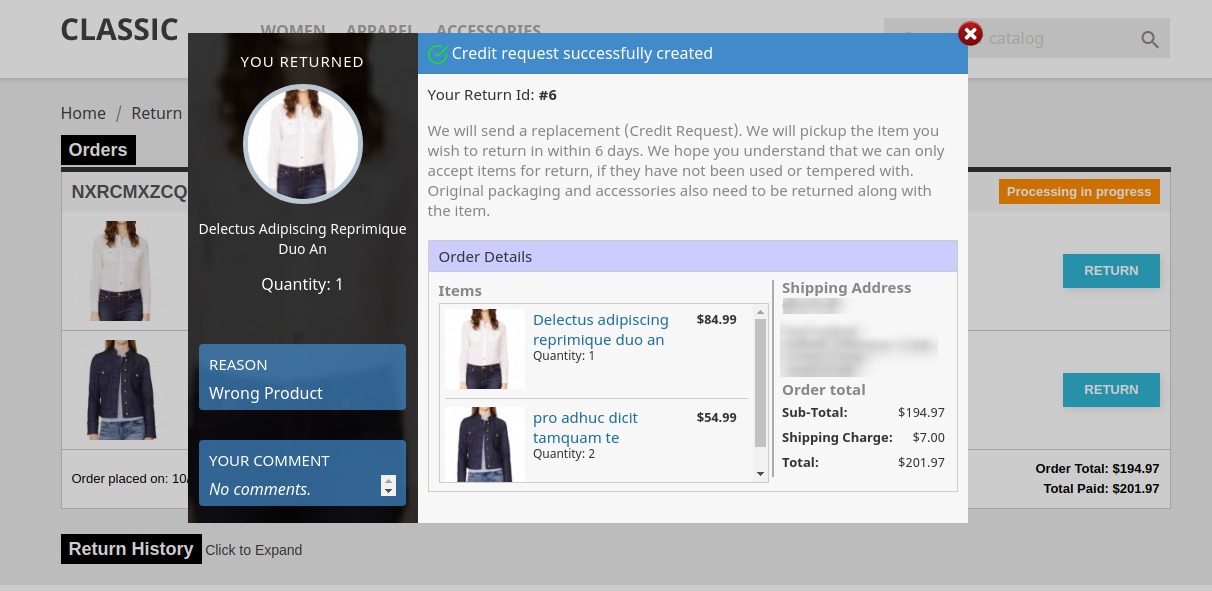
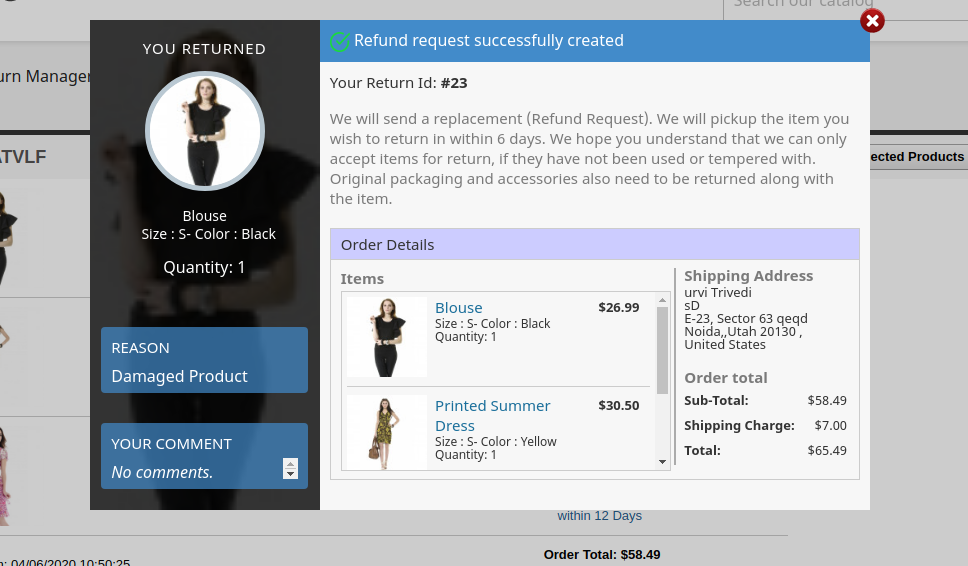
This PrestaShop Return Manager addon allows the customer has to fill the above form and then click on submit then a success form will appear showing the successful submission of the return request as shown below :
– In case the user is a registered customer and is logged into the website then the page will contain a list of all the orders placed by the customer. The page will appear as follows:
For Version 1.6- For Version 1.7-
Customers can also generate a ticket for return related information.
For Version 1.6-
For Version 1.7-
In the updated version, the online users can select the product for return and also enter the details in custom fields s shown below:
While selecting the replacement option, the online users can get an option to select the products which he wants in return.
The online users can return overall order or return only selected product which he wants to return.
The online users can also return the whole order if he wishes to do so.
Order Cancellation:
The online users gets an option to cancel the order for a short period. The customers need to go to the My Account >> Return Manager section to cancel the order as shown below:
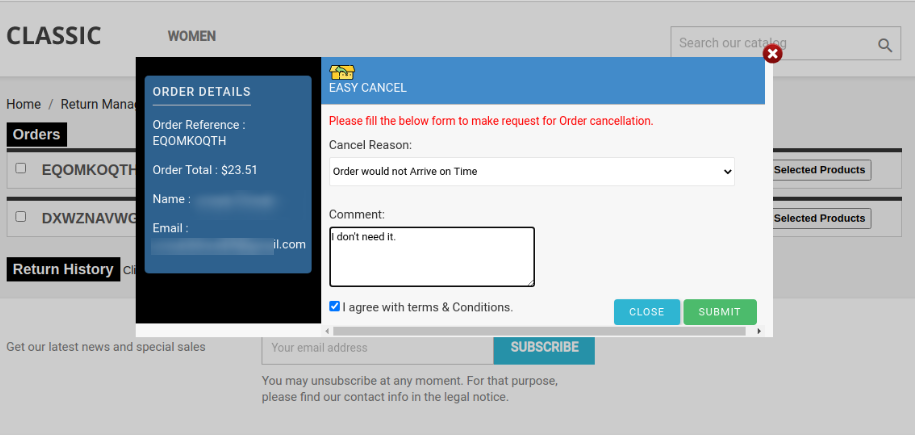
The online users can select from the listed reasons and also write their comment for order cancellation.
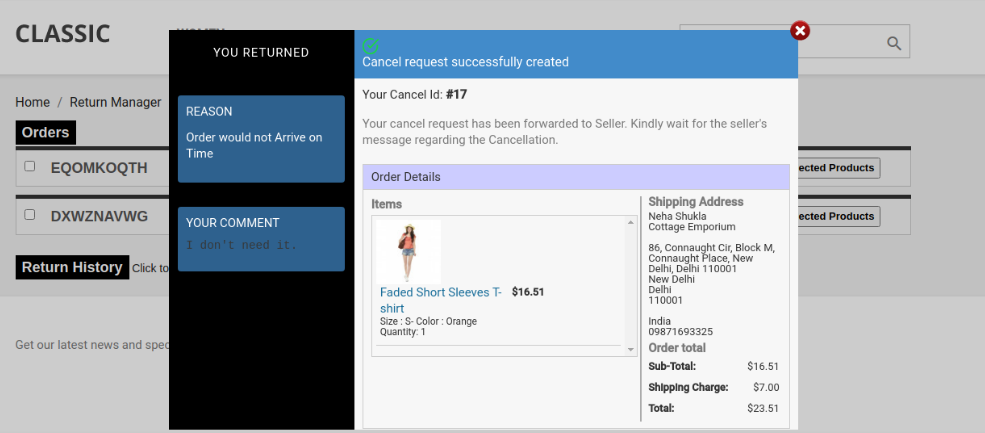
After submitting the request, users can view this message:
Once the online merchant approves the request, the user will view the status as canceled and also get an email notification while requesting the order cancellation and approval/decline.
5.0 Tutorial: Watch the YouTube Video Guide
To help you set up and use the Knowband PrestaShop Return Manager (RMA) Module, we have prepared a detailed YouTube tutorial video. This video walks you through the installation, configuration, and usage of the module, making returns, refunds, and order cancellations easy to manage.
In This Tutorial Video, You Will Learn:
How to install and activate the Return Manager module in your PrestaShop store
How to configure return policies, reasons, and order status conditions
How customers can raise return and cancellation requests from their account
How the admin can approve or manage requests efficiently
Watch the tutorial here:
For any questions, assistance, or custom modifications related to the Return Manager module, contact our support team:
support@knowband.com
6.0 Recommendations
1. Refresh the home-page of your store every time you enable/disable plugin.
2. If the Prestashop product return manager is not working after installation then please check permissions on the modules folder. The folder should be writable. Please make the folder permission to 755.
This way, Knowband’s Prestashop return manager module makes return management simple and hassle-free for the online store admin. This feature-rich Prestashop addon offers a simple and user-friendly platform for handling return requests. At the same time, it makes the overall return process simple for online users. The online users can easily create return requests and also generate tickets for followup. This PrestaShop Return manager module is mobile responsive and offers smooth functioning.
You can try Prestashop addon for on your Prestashop website. Prestashop Return Product extension helps you increase customer engagement to your store & increase brand awareness.
For more details about Prestashop return manager Module, please visit here:
Magento 2 Auto Switch Language and Currency extension by Knowband offered helps you localize your eCommerce site. The store admin can fix the default language and currency to be used in a particular location from the backend of the Magento 2 Auto switch currency and language extension. The Magento 2 Auto change language and currency extension detects the IP of the site visitors. The visitors can view the contents and product prices in the specified language and currency. In short, the Magento 2 Auto switch currency and language module changes the language and currency being used on the site automatically based on the IP of the store visitor.
The Magento 2 store owners can now localize their business and cater overseas customers without making any changes in the site for the various locations.
1.1 Admin Benefits of Magento 2 Auto Switch Language and Currency Extension:
With Magento 2 automatic language and currency change module, the admin can tap the global audience with least hassle.
The Magento 2 auto switch language extension automatically changes the language of the site based on the location of the store visitor. The store owner need not make any changes in the back-end of the site.
The Knowband Magento 2 auto switch currency module changes the currency of the eCommerce site automatically based on the location of the customers.
The Online retailer can enable or disable the functionality just by clicking a button from the back-end of the Magento 2 auto change language and currency extension.
The Magento 2 automatic change language and currency module allows the admin to upload the geolocation file with ease.
The mapping of the language and currency for the various locations can be done at a few button clicks from the admin interface of the Magento 2 auto switch language and currency plugin.
This Magento 2 Automatic language and currency converter plugin offers multi-lingual support.
The Magento 2 language and currency auto-switcher is SSL compatible also.
The Magento 2 language and currency switcher module is compatible with the other themes.
The store admin can offer a better store experience to the customers by showing the information in their preferred language and currency.
This Magento 2 Auto change language and currency extension offers hassle-free and smooth functioning.
2.0 Installation
The steps to install the Magento 2 Auto Switch Language and Currency Module are mentioned below:
1. Buy the Magento 2 Auto Switch Language and Currency extension from Knowband. You can download the extension package.
2. The package has a zipped file that contains the user manual and the source code of Magento 2 Auto Switch Language and Currency plugin. Unzip the package.
3. Create a folder {Magento root}/app/code/Knowband/Autoswitchlangcurrency
4. Upload the extracted content in the above folder via FTP manager (like Filezilla or WinSCP – download here: https://filezilla-project.org/).
6. The extension is now installed and ready for use. In Admin Panel go to “Knowband Extensions > Auto Switch Language and Currency”.
You can now configure and use the Knowband Magento 2 Auto Switch Language and Currency extension.
3.0 Admin Interface
Magento 2 language and currency switch extension automatically changes the language and currency of the Magento 2 site by detecting the IP of the user. The user need not change the same manually. The admin interface of the Magento 2 currency and language switch plugin offers two tabs. They are mentioned below:
General Settings
Mapping
Let us discuss the various customization options of Magento 2 automatic language and currency switch module.
3.1 General Settings
The General settings tab of Magento 2 Auto Language and Currency Switch module by Knowband offers basic configuration options. The various fields in this tab is discussed below.
Enable Language Settings: This field will enable the auto-language switch option. If enabled, the Magento 2 auto language switch extension will convert the language of site to one fixed in the back-end.
Enable Currency Settings: Enable this field to change the currency being used in the transaction of the eCommerce site. If this button is enabled, then, the Magento 2 auto currency switch plugin will automatically change the currency being used in the front-end.
Upload Geolocation File: You can upload the Geolocation file in this section of Magento 2 Auto language and currency change module. Only .mmdb file format is accepted.
You can upload the file here or copy the file in the location ‘app/code/Knowband/Autoswitchlangcurrency/view/frontend/web‘, using FTP.
3.2 Mapping
The mapping section of the Magento 2 auto currency and language change extension is where you map the language and currency to the relevant location. The geolocations uploaded in the general setting tab can be viewed here as shown in the image below:
You can apply filter and find a particular location. In case, you want to change the language and currency fixed for a particular location, click on the ‘Edit’ icon as shown below.
For instance, we select India. As you click on the edit icon, a popup will appear in the front-end to edit your store mapping.
Country: This section specifies the selected location.
Language: Select the language from the drop-down list. For instance, we change the language of India from English to French. The Magento 2 auto change language and currency plugin will detect the IP of the user. If the user is browsing the site in India, then, the language used in the site will be automatically changed to French and the user will view the entire content in French.
Currency: You can change the default currency of the site from this section. For instance, if you change the currency from INR to Euro, then, the users of the selected location will by default view the prices in Euro.
4.0 Store Front-end
The default language and currency of the site is shown in the front-end.
With Magento 2 auto change language and currency module, the IP of the user will be detected and the default language and currency is changed automatically as shown in the image below. The changes will be based on the configuration of done in the back-end of the Magento 2 auto switch language and currency plugin.
For more information about the Knowband Magento 2 Auto Switch Language and Currency:
The General Data Protection Regulation (GDPR) is a replacement for the European Union Data Protection Directive which will be enforced on May 25, 2018. The new directives have been passed, as per the new technologies and business advances; a new approach to protection of the personal data has been introduced.
1.1 New Data Protection Rights under GDPR
1) Transparent information, communication, and modalities for the exercise of the rights of the data subject
2) Information to be provided where personal data are collected from the data subject
3) The right of access by the data subject
4) Right to rectification
5) Right to erasure (‘right to be forgotten’)
6) Right to restriction of processing
7) Notification obligation regarding rectification or erasure of personal data or restriction of processing
8) Right to data portability
9) Right to object
10) Automated individual decision-making, including profiling
Under GDPR it is mandatory for the store owners to provide with thorough information about how the personal data of the customers will be processed. This information can be mentioned on the Privacy Policy page. The information given on the Privacy page should be concise, transparent, intelligible, and easily accessible, in clear and plain language, free of charge.
1.2 How Prestashop GDPR module by Knowband helps the sellers to comply with GDPR?
The PrestaShop GDPR Module by Knowband helps the sellers to comply with the GDPR directives without putting any extra efforts. By installing the GDPR module admin can display the GDPR Tools option on the account details page at the front-end of the customer. The GDPR module handles the following requests:
1) Cookies Consent Bar
2) Right of access to the personal data
3) Right to data portability
4) Right to be anonymous
5) Right to be forgotten
6) Right to data rectification
7) Right to restriction of processing (coming soon)
8) Rights related to the automated decision making
Additional features offered by Prestashop GDPR Module:
Cookie consent bar: Admin can display the cookie consent bar on the website. The Cookie option also blocks the cookies used by the third party modules.
Checkboxes for the user consent on the registration and contact form: The Prestashop GDPR Addon allows the store admin to display the additional checkboxes on the Registration and Contact form.
Data download from the admin: Admin can download the personal data of the customer in CSV format so that it can be shared with the customer.
Data Deletion option: Admin can delete the customer data from the back-office.
GDPR Request Log: The Prestashop GDPR Module keeps the log of GDPR requests, as a proof of the processing of the requests.
GDPR request retention period: Admin can set the retention period for the GDPR requests received. After the set duration, the GDPR request data will be deleted.
Email templates: Prestashop GDPR Module offers so many email templates that help to automate the process.
Guest User: Guest users can also request for their personal details with ease.
Geo Location Targeting: The online merchant can set IP address and select country/regions for showing specific GDPR functionalities like cookie consent bar, user consent check-box, GDPR links in my account page and GDPR header menu link.
Customer Interface of the Prestashop GDPR Module
A logged in customer can access the GDPR rights from My Account section. Here a separate tab, GDPR will be visible to the user by accessing this GDPR tan the logged in user can access the GDPR rights. Please refer to the attached screenshot:
On clicking the GDPR tab a new page will get opened. Here all the GDPR rights of the customer (enabled by the admin) will be listed and customer can access any of these rights with ease.
As per the requirement, the admin has the choice to enable/disable any of these rights.
2.0 Installation of Prestashop GDPR Module
After placing your order for the Prestashop GDPR module you can download the zip file of the module. This zip file contains:
1) GDPR.zip (source code of the module)
2) User Manual
In order to install the extension in your Prestashop store follow the below-mentioned steps:
1) Unzip the gdpr.zip file.
2) Copy the entire content, that is, the files and folders of the unzipped folder. Paste the same into the “Modules” folder of your store’s directory. Follow the below-mentioned address path – Root Directory/modules/.
3) The Prestashop GDPR plugin is all set to be installed in the store. Go to the Store Admin and then to ‘Modules and Services’.
4) Click on the “Install” button just next to your module. It would show a pop-up for your confirmation. Click on “Proceed with the installation” option. This step will install the module and show notification – “Module(s) installed successfully”.
3.0 Admin Interface of Prestashop GDPR Addon
In the admin section of the Prestashop GDPR Customer rights module following options are available:
1) GDPR Settings
2) EU Cookie Law
3) User Consent
4) GDPR Data Portability
5) GDPR Forgot Request
6) GDPR Anonymous Request
7) GDPR Rectification Request
8) GDPR Personal Data Request
9) GDPR Automated Decision Making
10) GDPR Email Templates
11) GDPR Geo Targeting
12) GDPR Crons
3.1 GDPR Settings
The GDPR Settings tab of the Prestashop GDPR Customer Rights module allows the store admin to enable/disable the customer’s rights. As per the settings enabled by the admin, the customer will be able to access the rights from his/her account. Please refer to the attached screenshot below:
The Settings tab of the GDPR module has following options:
3.1.1 Enable the Plugin
As per the requirement, admin can Enable/Disable the Prestashop GDPR Compliance Plugin. If the setting of the Enable the Plugin is yes, only then this module will work.
3.1.2 Maximum request per day
Customers have the right to request the personal data. Admin can set the limit for the requests on daily basis. It will be recommended to set the maximum requests per day to a minimum number to avoid the spam requests.
3.1.3 Enable Right of access to personal data
The right of access to personal data allows the customers to check their personal details which they have shared with the data controller.
If this setting is enabled from the admin interface of the Prestashop GDPR addon only then customers will be able to able to check their personal details by logging into their account. The screenshot of customer end has been attached below:
Step-1:
Request for the GDPR Personal Data report – Prestashop GDPR Addon
As soon as the customer request for the GDPR personal data report, the customer will be notified that an email with the confirmation link has been sent to the entered email address.
Step: 2
Confirm the GDPR Request.
Step: 3
As soon as the customer will confirm the GDPR Personal Data Request, an email with the customer details will be sent to the customer.
3.1.4 Enable Right to Data Portability
Right to data portability allows the customer to download his/her personal data so that he/she can share this data with other data controller with ease.
If this setting is enabled from the admin interface of the Prestashop GDPR Module only then the customer will be able to download their personal data in CSV format. As of now, the Prestashop GDPR Module allows the customers to download their personal data like – Account information, Address details, Order details. The screenshot of the interface at the customer end has been attached below:
Personal Information Report:
3.1.5 Enable Right to be Anonymous
If the setting for the Right to be Anonymous is enabled from the admin panel of the Prestashop GDPR addon then the customer will be able to make a request for data anonymization. As soon as the customer will request for the data anonymization a confirmation email will be sent to the customer. If the customer confirms the data anonymization request, as per the settings enabled by the admin personal details like Name, Email Id will be replaced by random details. To process the data anonymization request the Prestashop admin has the following option:
• Enable Right to be Anonymous: If this setting is enabled from the admin then the customer will be able to request for the data anonymization but in this case, only the name of the customer will be anonymized.
As soon as a customer registers the Data anonymization request customer will be notified to confirm the data anonymization request over email.
Email confirmation:
On request for the data anonymization customer will receive the email at the entered email address with a request to confirm the data anonymization request.
Note:
In case you are using the third-party services and sharing the customer data with third-party, then you need to make the required changes as per the procedure followed by the service provider. This GDPR module will anonymize the data which you have stored in your database only.
3.1.6 Enable to update information in Order
If customer requests to make his/her information anonymous then admin can select the option to enable/disable the changes to the previous orders. If this setting is enabled from the admin interface of the Prestashop GDPR addon then the previous order details will also be replaced.
3.1.7 Enable to generate Fake Email ID
If a customer raises a request for the data anonymization then admin can select the option to replace the email id of the customer by fake email id. Please refer to the attached screenshot:
If the customer submits the request to anonymize the email id also. Then the customer email id will be replaced by a system generated email-id.
The customer can use the system generated email id for accessing the account.
3.1.8 Enable right to be Forgotten
As per the new GDPR Directives customer has the right to be forgotten. If this setting is enabled from the admin interface of the Prestashop GDPR Compliance Module then the customer can request for the deletion of his/her data by accessing his/her account. After receiving the request of the customer a confirmation email will be sent to the customer and as per customer’s approval, entire details of the customer will be deleted from the database.
The forgotten request interface for the customer will be as below:
Customer will be notified that an email with the confirmation request has been sent to the registered email id.
To handle the data deletion option admin has the following options from the back-office:
Enable right to be forgotten: Admin can enable the Right for the customers. If enabled only then customers will be able to request for the data deletion.
Action to be taken for orders: In order to process the data deletion requests, the admin has the options to select the action for the previous orders. Admin can select the options like Delete orders, Random data fill or No Action for orders. If the Delete Order option has been selected then the order will be deleted, in case of random fill the personal details of the customer will be replaced by the random data but the order and product details will remain as it is. This will help the admin to maintain the statistics of the orders and product sale. In case of No Action, the previous order details will remain as it is.
Time to process request deletion: Admin can set the option to delete the customer data immediately or after some time. The Prestashop GDPR Addon allows the delete the customer data after a fix time interval and admin can setup the cron to automate the process.
In order to complete the data deletion request go to the Data Forgot tab of the Prestashop GDPR Addon module and click on the “Process Forgot Request”.
Admin can also set up the cron job to automate the process.
Note:
1) It is recommended to consult with your legal team before enabling data deletion settings. After deleting the customer’s personal data it cannot be retrieved. Admin has the option to enable the delete order setting which has been explained in the next topic.
2) In case you are sharing the customer data with third-party service providers then you need to delete the customer data manually. As of now, this module does not support the feature to delete the data shared with the third-party service providers.
Example: If you are using MailChimp for sending promotional emails then you have to delete the customer details from MailChimp list manually.
3.1.9 Enable the right to data rectification
A customer has the right to update the incorrect personal data. The Prestashop GDPR Customer Rights Module allows the store admin to let the customer modify the personal data like personal details, address etc.
3.1.10 Enable Right to Restriction of Processing
This feature will be updated soon.
3.1.11 Enable Rights in relation to automated decision making and profiling
If this setting is enabled from the admin panel of the Prestashop GDPR compliance module then store admin will be able to list the services which make a decision by automated means. If a customer requests for the services which make a decision by automated means then the customer will get an email to confirm the request. As soon as the user will confirm the request, the user will be redirected to a new link. Here all the services with the automated decision making will be listed and the user can select the one which he/she would like to continue.
3.1.12 Enable Store Policy Acceptance
If a customer would like to raise a request under GDPR rights then admin can add the condition to accept the Terms and Conditions before requesting for the GDPR request for the Personal Data, Account Deletion or Data Anonymization.
3.1.13 Store Policy Page
Admin can add the URL of the page on which all the Terms and Conditions are listed. The customer can check the Terms and Conditions by clicking the link available with the message at the time of raising the request.
3.1.14 Services/ Other locations where you store customer data
If you use the third-party services and share the customer data with them, then list down all the third-party service providers here. This information will be sent to the customer if he/she request for the Personal Data.
3.1.15 Physical locations of servers where you host your website and other data
You can mention the server location here, where you store the customer data.
3.1.16 Purge Request Day
This option allows the store admin to set the retention period for the GDPR requests. As per the number of days entered by the store admin the GDPR request data will be deleted from the database. Cron setup is available for automating the process.
3.1.17 Display Header Menu
Display Header Menu option of the Prestashop GDPR compliance addon allows the store admin to display the GDPR option in the header section of the website. By enabling “Display Header Menu” setting of the Prestashop GDPR addon, store admin can allow the guest users to access the GDPR rights.
3.1.18 Header Menu Text
Admin can define the text for the Header Menu.
3.1.19 Admin Email Address
The online store admin can enter his email address for getting GDPR related e-mail notifications. Prestashop GDPR Module provided an option to add admin email in the General setting tab to receive/send the mail using that email address instead of default shop email address.
3.2 Cookie Consent Bar
It is mandatory for the online store owners to display the message that website uses the cookies (if you use cookies for the better customer experience) with the option to accept or discard the cookie acceptance. The Prestashop GDPR Module allows the store admin to display the Cookie Consent Bar at the front end with the option to accept the cookie or discard the message. Admin can easily customize the appearance settings as well as the message on the cookie bar.
The Cookie Consent Bar tab has following settings:
In the new version of the Prestashop GDPR Module, the option to block cookies from the third party module has been added the new admin interface of the module has the option to setup the Cookie Bar Settings and Cookie Blocker option. Please refer to the attached screenshot:
3.2.1 Cookie Bar Settings
The cookie bar setting tab has the 2 options Configuration and Appearance.
3.2.1.1 Configuration
Admin has following options to set-up the Cookie Consent Bar.
Enable the Cookies Consent Bar: The Admin can enable or disable the cookie message on the website.
Cookie Name: In this section define the name of the cookie to get the user consent. Please do not use the space to the cookie name.
Cookie Lifetime: Cookie Lifetime allows the store admin to set up the cookie duration that how long the cookie will be stored on the user’s device.
Terms and Condition of use: The admin can list the cookies details on a Cookie Policy page and add the link to the page on the message displayed to the user.
Display Close Button: Admin has the option to remove the Close button from the Cookie Consent Bar.
3.2.1.2 Appearance Settings
Admin can easily control the following options for the Cookie Consent Bar.
Notification Position: Admin can select the position of the Cookie Notice on the Bottom of the page or Top.
Effect when hiding the notification: Admin can select the options like Fade, Hide or Slide from the drop-down list.
Notification Message: Admin can easily update the notification message as per the requirement.
Background Color: Admin can customize the background color of the cookie bar.
Background Opacity: Admin can set the opacity of the cookie consent bar.
Notification Message Font Color: Admin can set the notification message font color.
Background Color of Accept Button: Admin can set the background color for the Accept Button.
Font Color of Accept Button: Admin can set the font color of the Accept button.
Background Color of More Information Button: The background color of more information button can be changed to match it with the website theme.
Font Color of More Information Button: Admin can select the font color to match with the website theme.
3.2.2 Cookie Blocker
The Cookie Blocker interface will consist of the Details of the Cookies. Admin will have the option to add the Module category. For example, Strictly Necessary Cookies – Admin can map all the third party modules under this category which are required for the proper functioning of the features of the website. To map the modules under the category admin need to click the drop down option as highlighted in the screenshot below.
How to map the modules with the Module Category?
In order to map the third party modules which use the cookies admin need to click the drop down option and then click on the Add Modules. This will open a new page with the option to select the modules. Please refer to the screenshot.
Now find the module which you would like to map with the Module Category and click on the Module Name. On clicking the Module name option to enter details regarding the Cookie will appear. Please refer to the attached screenshot:
Admin can add the multiple module categories and map the modules to these categories with ease. At the front-end, if the user clicks on the Cookie Settings option then he will be able to activate the cookies of his choice. Please refer to the attached screenshot:
Note: Strictly Necessary Cookies will be enabled by default. All other module cookies can be controlled by the customer.
3.3 User Consent
The user consent option allows the store admin to display the checkboxes on the Signup and Contact form. In order to add the checkboxes on the Registration and Contact form admin need to click on the User consent option. Please refer to the attached screenshot:
Clicking on the User Consent option will open a new window with the option to add the checkboxes on the Registration and Contact form. Please refer to the attached screenshot:
In order to add a new checkbox admin need to click on the + icon as highlighted in the screenshot above. Clicking on the + icon will open a new form to fill the details. Please refer to the attached screenshot:
Title: This is for the internal use. The title of the consent box will appear in the back-office details.
Content: The text entered here will be displayed to the user at the front-end.
Form Type: Admin can select the Registration Form or the Contact form to display the additional information.
Consent URL: Admin can add the link to the Privacy Page or Terms and Conditions page.
Required: Admin has the choice to make the field a mandatory filed.
At the front-end the checkbox will appear like below:
The Prestashop GDPR Addon by Knowband also records the user consent. To verify the customer consent admin need to navigate to the Customers section. Please refer to the attached screenshot:
3.4 GDPR Data Portability
In the GDPR data portability section of Prestashop GDPR Module, admin can check the status of the data portability requests raised by the customers. Customers can download the personal data like Personal Info, Addresses and Orders in the CSV format. Admin can check the reports of the downloaded data in this section.
New Feature:
The new version of the Prestashop GDPR Module allows the store admin to download the customer data from the back-office. This feature will help the store admin to share the customer data if data has been requested from some other communication channel like email instead of using the website. To download the customer data follow steps mentioned below:
Go to the GDPR Data Portability Tab
Click on the Download Customer Data option as highlighted in the screenshot
On clicking the Download Customer Data a new tab will open. Please refer to the attached screenshot.
On searching for the customer details by Customer Name or Customer email-id the details of the customer with the options to download the details of the customer will appear. Please refer to the attached screenshot:
From here admin can download the customer details. The downloaded data will be in CSV format.
3.5 GDPR Forgot Request
According to the right to be forgotten of GDPR, the customer can request for the deletion of his/her personal details. All the requests registered under “Right to Forgotten” will be listed under the GDPR Forgot Request tab. As per the settings enabled/disabled for the order deletion, order details will be stored or deleted. Admin can easily check the status of the GDPR Forgot requests from the admin interface of the Prestashop GDPR module under the “GDPR Forgot Request” tab.
Note:
As soon as a customer request for the deletion of his/her details a confirmation email will be sent to the customer. As per the customer’s confirmation, the details of the customer will be deleted from the system.
The Prestashop GDPR Module only deletes the customer data from the store database. If you share the customer data with the third-party service providers (eg. MailChimp) or store it on the third-party platform (eg. Google Drive) then you need to delete the customer data from these platforms manually.
New Feature:
The new version of the Prestashop GDPR Module allows the store admin to delete the customer data from the back-office. This feature will help the store admin to delete the customer data if the data deletion request has been generated from some other communication channel like email instead of using the website. To delete the customer data follow the steps mentioned below:
Go to the GDPR Forgot Request Tab
Click on the Delete Customer’s Data option as highlighted in the screenshot
On clicking the Delete Customer’s Data a new tab will open. Please refer to the attached screenshot.
Admin needs to enter the customer name or the email id to find the customer details. The details will appear like.
From here, admin can check the customer details and also select the option to delete the customer data. Admin can also notify the customer regarding the data deletion through email. As per the settings enabled from the General Settings for the data deletion requests order details will be handled in a similar manner.
Note:
1) If any third party module uses the Prestashop hooks (as per the guidelines of the Prestashop to make the Prestashop modules GDPR Compliant) then the Prestashop GDPR Module by Knowband will allow the store admin to delete the customer data from that module as well.
2) As of now, the Prestashop GDPR Compliance Module by Knowband does not keep the record of the data deletion requests processed from the back-office.
3.6 GDPR Anonymous Request
If the customer would like to make his/her information anonymous so that no one can identify the user from the personal details then the customer can request to anonymize the data. In this case, the customer personal data will be replaced by fake details and as per the settings enabled under the GDPR Settings tab of the Prestashop GDPR Compliance Module; a fake email id can also be generated. If the customer wishes he/she can continue to use the services by using the fake email id to access his account details. Admin can check the details of the Data Anonymous Request under the GDPR Anonymous Request tab of the Prestashop GDPR Compliance Module.
3.7 GDPR Rectification Request
The customer has the right to modify the inaccurate information. The Prestashop GDPR Module allows the customer to modify the details like Personal Information, Address, and Password etc. Admin can check the status of the status of the modification made by the customers under the GDPR Rectification Request.
3.8 GDPR Personal Data Report Request
As per the GDPR Rights customer can request for the details of the personal data which has been collected by the store admin along with the details that how the personal data has been used and which other services are using the data of the customer. At the front-end customer gets an interface to request for the personal data under the My Account section. As soon as the user request for the Personal Data an email for the confirmation will be sent to the user to the registered email address. As per the confirmation from the user personal data details will be sent to the user. Admin can check the status and details of the Personal Data Request status under the GDPR Personal Data Report Request.
Note:
As of now the Prestashop GDPR Module by Knowband allows the store admin to share the details like Personal Information, Address Details, Newsletter Subscription, D.O.B, Shopping Cart Contents, Order Details, Admin can also list all the third-party service providers details and the physical location of the server along with the details of the hosting company.
3.9 GDPR Email Templates
The GDPR Module by Knowband allows the admin to sending following emails to the customer on raising a request under the GDPR.
Confirm Your GDPR Account Deletion Request
Confirm Your GDPR Personal Data Anonymous Request
Customer has requested for GDPR
Your GDPR Personal Data Report
Customer has confirmed GDPR Request
Confirm Your GDPR Decision Making Request
Confirm Your GDPR Personal Data Portability Request
3.9.1 Confirm Your GDPR Account Deletion Request
Admin can update the Subject line and the email text by using the GDPR Email Template Settings.
The default format of the email template is as below:
3.9.2 Confirm Your GDPR Personal Data Anonymous Request
Admin can update the Subject line and the email text by using the GDPR Email Template Settings.
The default format of the email template is as below:
3.9.3 Customer has requested for GDPR
This Email template is used to send a confirmation mail to the customer when a customer has requested for Personal Data Report.
The email at the customer end will be like below:
3.9.4 Your GDPR Personal Data Report
This email template will be used to send the Personal Data of the customer requested under the GDPR Right to the access to the Personal Data.
At the customer end the email design will be as below:
3.9.5 Customer has confirmed GDPR Request
3.9.6 Confirm Your GDPR Decision Making Request
This email template will be used to request the customer for the confirmation of the automated decision-making requests.
Email at the Customer end.
3.10 GDPR GEO Targeting
The online store admin can also select any IP address and country/region for showing selected GDPR functionalities. Thus the admin can hide the GDPR functionalities from the countries where these rules are not compulsory.
3.10.1 GEO Targeting using IP address
Enable/Disable: The store owner can easily activate this functionality.
Enter the IP address: The online store admin can enter the IP address here. The store admin can enter multiple IP addresses by separating them using this |(pipe) character.
Select the GDPR functionality to display: Admin can select the functionalities ie cookie consent bar, user consent check-box, GDPR links in my account page and GDPR header menu link. The selected IP address will be able to view the chosen functionalities.
3.10.2 GEO Targeting using Country
Enable/Disable: The online store owner can enable or disable the functionality easily.
Select Country/Region: Admin can select the country from the drop-down list. Admin can select only region or countries.
Select the GDPR functionality to display: Admin can select the functionalities ie cookie consent bar, user consent check-box, GDPR links in my account page and GDPR header menu link. The selected functionalities will display in those specific countries.
3.11 GDPR CRONS
In order to help the store admin to automate the Data deletion and Purge Request, cron settings are available in the Prestashop GDPR Module. Please refer to the attached screenshot.
Admin can complete the data deletion and Purge Requests by Clicking the “Forgot Request” and “Purge Requests” button or set up the cron to automate the process.
Note: The purpose of these features is to help you to meet the GDPR requirements. Installing this module only does not guarantee merchant sites’ compliance with the new obligations imposed by the GDPR. It is your responsibility to put in place all the necessary measures to ensure you comply.
Thus with the help of this Prestashop GDPR plugin, the admin can easily handle the GDPR requests and allows the customers to update, delete, download their individual details. The General Data Protection Regulation module offers a user-friendly interface and effortless working. The GDPR module for Prestashop addon is highly customizable. There are email templates available for sending the e-mail. There is a choice to opt-in for cookies.
For more information about this Prestashop addon please visit:
WooCommerce Spin and Win plugin by Knowband is one of the most innovative ways to boost the user engagement and conversions of the eCommerce site. The WooCommerce spin and win exit popup offered by Knowband displays an attractive roulette-type spin the wheel interface in the front-end. The gamified and animated approach motivates the customers to enter their email ID and spin the wheel. Once the wheel rotates, the customers can win enticing discounts.
In addition to enhancing the user engagement, the WooCommerce spin and win module can even optimize the UI of the site. The alluring interface can be designed to match the theme of the site. The wheelio can even be used as an exit popup. Thus, WooCommerce spin and win exit-intent popup can help you get rid of the annoying subscription popup and still manage to increase the subscription base.
1.1 Admin Benefits of WooCommerce Spin and Win plugin:
1. The 3-in-1 WooCommerce spin and win plugin can be used at the entry or exit of the store visitors.
2. The WooCommerce email subscription popup extension can curb the exit intent of the visitors and increase their stay at the site.
3. The admin gets easy interface to customize the look and feel of the WooCommerce spin and win extension.
4. The admin interface of WooCommerce spin and win exit intent popup allows the store owners to set the frequency of wheel display.
5. The admin can even select the theme and wheel design from the back-end of the WooCommerce spin and win extension.
6. The gamified approach of WooCommerce subscription popup extension allows the admin to boost the subscriber base of the site.
7. The WooCommerce email subscription pop up integrator sync the data automatically with the MailChimp and Klaviyo account of the store admin.
8. The custom CSS option in the admin interface of WooCommerce Spin and Win module allows the merchants to change the look and feel of the wheel design accordingly.
9. The WooCommerce interactive popup extension comes with number of pre-designed email templates to choose from.
10. The Online merchant gets full access to manage the discounts being offered. The admin can customize the slices of the spin wheel from the back-end of the WooCommerce entry pop up extension.
11. Even the possibility of a slice appearing once the wheel is rotated can be fixed from the admin interface of WooCommerce Spin and Win extension.
12. Offers various themes for spin and win popup to attract wide number of customers to the store. The themes can be implemented in accordance with the occasion like Christmas, Easter etc.
2.0 Installation
In order to install the WooCommerce intercative pop up plugin in your WooCommerce site follow the below-mentioned steps:
Step 1: Buy the WooCommerce plugin from the Knowband store. Youâll get the zipped file with the source code of the WooCommerce Wheelio and User manual.
Step 2: Go to the Dashboad of WordPress -> Plugin -> Add New
Step 3: You’ll be redirected to an interface. Click on Upload Plugin.
Step 4: Click on Choose File and upload the zipped file.
3.0 Admin Interface
WooCommerce spin and win extension offers an easy to use admin interface. The store admin can easily customize the Wheelio in a few button clicks.
The admin interface of WooCommerce email subscription pop up Module offers 8 setting tabs. They are listed below:
General Settings
Display Settings
Look and Feel Settings
Text Settings
Slice Settings
Email Marketing
Email Setting
Statistics
Let us discuss the various setting tabs offered by WooCommerce exit popup extension in detail.
3.1 General Settings
The general settings of WooCommerce Spin and Win extension offers basic customization option. The various fields in this tab is discussed below.
1. Enable the extension
Toggle this button to enable the WooCommerce exit intent popup extension. Once enabled, the spin wheel will be shown in the front-end of the site.
2. Show Pull-out tab
In case the store visitors are not willing to spin the wheel, they can remove the interface form the front-end by clicking on No, I do not feel lucky link. The pull-out tab brings the wheel back on the screen.
Enable this functionality to display the pull-out tab on the front-end of the site. The pull-out link will be displayed as shown below:
3. Email Recheck
WooCommerce spin and win email subscription pop-up module can boost the subscriber base of the site in a fun way. Enabling this feature allows the admin to reduce email duplicity. If this is enabled, the store visitors will be allowed to spin the wheel only once with a single email ID. The customers will not allow to avail the discounts twice with a single email address.
4. Wheel Display Interval
Enter the display interval of the wheel. The wheel will be displayed after the specified time interval. If 0 is selected, then, the spin wheel will be displayed every time a user visits the site.
5. Custom CSS
Enter the custom CSS code to change the look and feel of the interface.
6. Custom JS
The admin can enter custom JavaScript in this section.
3.2 Display Setting
The display setting tab of WooCommerce Spin and Win intercative popup mosule offers easy means to manage the display options of Wheelio. The various options offered are discussed below:
1. Minimum Screen Size
Select the minimum standard size of the screen for wheel compatibility. The WooCommerce spin wheel will work on all the screen size larger than the selected one.
2. Maximum Display Frequency
Select the display frequency of wheelio from the drop-down list in this section. For example, if Every Visiter is selected, the store visitors will be able to see the spin wheel at every visit.
3. Hide Spin Wheel After
You can even hide the spin wheel when desired. Select when you want to hide the same from the dropdown menu.
4. Set Time Interval
WooCommerce spin and win extension allow the admin to set the display interval of the wheel. In order to set the interval, enable the button. The admin will be asked the select the Active Date and Inactive Date. The wheelio will be shown only in between the selected interval.
5. Where to Display
Select the webpages of the site where you want to display the spin wheel from the drop-down list.
6. Who to Show
Select the customer group to whom you want to show the wheel.
7. When to Show
Choose the time which you think is feasible for displaying the wheel once a visitor visits the site.
8. GEO Location
Select the GEO location where you want to display the WooCommerce interactive popup module.
3.3 Look and Feel Settings
WooCommerce spin and win plugin allows the store admin to customize the appearance of the subscription popup.
The various customization options of the WooCommerce spin and win extension are discussed below.
Theme
The WooCommerce entry pop up extension comes with a number of default themes. The store owner can select the desired one that matches the website theme from the drop-down list. The e-merchants can easily appeal their customers with the help of new themes for different occasions like Christmas, Thanksgiving, Easter etc.
Wheel Design
WooCommerce exit intent popup mosule even allows the admin to select the wheel design to be displayed in the front-end.
Wheel Preview
The admin can even preview the selected wheel design.
Wheel Background Color
Select the background color of the wheel from the color chart.
Font Color
The color of the texts written on the wheel slices can be changed from here.
Button Background Color
The admin can select the background color of the buttons displayed on the spin wheel.
‘No, I do not Feel Lucky text color
The font color of this link can be changed from here.
Display Logo
Enable this button in case you want to display any image on the wheel. The admin can choose the image from their local drive and upload the same.
3.4 Text Setting
The various text displayed on the wheel can be changed from this tab of the WooCommerce spin and win extension. The admin can change the Title Text, Subtitle Text and Rules Text.
The text entered in this section of the WooCommerce exit popup module will be displayed as shown in the image below:
3.5 Slice Setting
The wheel displayed by the WooCommerce spin and win email subscription shows 12 slices with different offers, free gifts and discounts. The admin can customize all the 12 slices of the wheel from this tab of WooCommerce email subscription popup.
The slice setting tab of WooCommerce spin and win extension consists of 4 sections.
Slice Label: Enter the name of the slice here. The text will be displayed in the front-end.
Coupon Type: Select the type of discount that you want to offer to the customers. You can either select fixed discount or percentage discount type.
Coupon Value: Enter the discount value here.
Gravity: This section specifies the possibility of a particular slice being selected after the spin. Enter the desired value in the Gravity column accordingly. This value cannot be greater than 100 or less than 1. Moreover, the sum of the value of all the 12 slices should not exceed 100.
3.6 Email Marketing
The WooCommerce spin and win email integration extension offers inbuilt email MailChimp and Klaviyo integrator. WooCommerce email subscription popup module captures the email ids of the store visitors and automatically sync the data to the MailChimp and Klaviyo accounts of the store owner.
In order to setup the integration, enable the respective functionality. Enter the API Key of your account and select the list of the email ids. The WooCommerce MailChimp Integrator and WooCommerce Klaviyo Integrator will sync the email details of the customers in the respective account of the store admin.
3.7 Email Template Settings
The coupons received by the visitors after spinning the wheel can be offered in three ways. The admin can either display the coupon on the wheel or send the same via mail or both.
Coupon Display Options: The admin can select the display options from the section of the WooCommerce Spin and Win extension.
Email Templates: WooCommerce Spin and Win plugin offers a number of default email templates. The admin can select the desired theme from the drop-down menu.
Email Subject: Enter the subject line of the email to be send to the customers.
Email Content: Enter the email content in this section.
Test Email: Enter an email address in the box to test the email functionality before sending it to the customer.
3.8 Statistics
The WooCommerce Spin and Win extension offer the statistical report of the number of coupons that are generated along with the number of coupons that were used and the ones that were left unused.
The same report is generated in tabular as well as in the graphical format. The report can be filtered by selecting the dates.
4.0 Store Front-end
Once the customization changes are done and the WooCommerce Spin and Win extension is enabled, the wheel will displayed as shown in the image below.
Once the customer wins a discount, the coupon will be generated. This coupon can be used to get the offered discount in the checkout page.
The customers can paste the copied coupon code on the checkout page and get the discount.
Once the coupon is applied the discount amount will be deducted from the total order value.
Disclaimer: In case the “Spin and Win” wheel popup does not display at the front, kindly clear the cache or delete the cookies. Sometimes cookies prevent the popup from displaying at front.
Magento 2 Scratch coupon extension by Knowband allows the store admin to display a scratch coupon block on the front-end of the website. The e-merchant can make the process of offering discount fun, so that, even a small discount amount is appreciated by the store visitors with the help of Magento2 scratch coupon extension. This email subscription popup plugin is highly customizable, user-friendly and mobile responsive also. The store admin can apply this unique functionality without any complex process. There is no need to change even a single line of code for implementation.
The Magento 2 extension displays a scratch coupon block on the eCommerce site. The store visitors can scratch the same and avail the discount by entering their personal detail. In addition to this, the Magento 2 subscription popup module can increase the customer base of the site. Thus Magento 2 subscription module helps the eCommerce store admin to subscribe the store visitors easily without any hassle. The store visitors can enjoy the discount and the e-merchant can get the email subscribers without any extra efforts.
1.1 Features offered by Magento2 Scratch Coupon Extension:
The admin can easily enable/disable the Magento 2 scratch coupon plugin.
The admin can select the webpages of the site where they want to display the interface with the help of Magento 2 scratch coupon module.
The Magento 2 scratch coupon module allows the admin to customize the look and feel of the front-end UI.
The Magento 2 email subscription pop-up plugin helps the e-merchant in getting customer’s mail id.
The admin gets an option to enter the expiry duration of the discount coupon from the back-end of the Magento 2 interactive popup module.
The Magento 2 responsive popup extension even allows the admin to exclude the category and product from the scratch coupon block.
The Magento 2 scratch coupon extension can offer fixed discount or percentage amount. The admin can even enter the percentage range.
The store admin can customize the front-end UI to match it with the theme of the site.
The Magento2 email subscription popup extension allows the admin to send the coupon code via email.
The Magento 2 scratch coupon plugin offers a complete statistical report of the coupons generated and used.
2.0 Installation
The steps to install the Magento 2 Scratch Coupon Module are mentioned below:
1.Purchase the Magento 2 Scratch coupon extension from the Knowband store and download the extension package.
2.You’ll receive a zipped file containing the user manual and the source code of Magento 2 Scratch Coupon Integration plugin. Unzip the package.
3.Create a folder {Magento root}/app/code/Knowband/Scratchcoupon
4.Upload the extracted content in the above folder via FTP manager (like Filezilla or WinSCP – download here: https://filezilla-project.org/).
5.Now run below commands to install the plugin:
php -f bin/magento module:enable –clear-static-content Knowband_ Scratchcoupon
php -f bin/magento setup:upgrade
php -f bin/magento setup:di:compile
php bin/magento setup:static-content:deploy
6.The extension is now installed and ready for use. In Admin Panel go to “Knowband Extensions > Scratch Coupon”.
You can now configure and use the Magento 2 Scratch Coupon extension.
3.0 Admin Interface
The admin interface of Magento 2 interactive popup allows the merchants to display a playful scratch coupon on the front-end of the site. The admin can easily customize the interface from the back-end of the Magento 2 Scratch coupon. Magento 2 extension offers 4 tabs. They are mentioned below:
General Settings
Look and Feel
Email Setting
Statistics
Let us discuss the various customization options are discussed in detail.
3.1 General Settings
The General settings of Magento 2 Scratch coupon block module offers configuration settings. The various fields in this tab is discussed below.
Enable the Extension: Toggle the button to enable the Magento 2 responsive discount popup module. If enabled, the scratch coupon will be displayed as shown in the image below:
Coupon Expire: Enter the number of days after which the discount coupon code will expire.
Coupon Code Length: Enter the length or the character limit for the coupon code to be displayed on the scratch coupon block.
Dash Every X Characters: Enter the number of characters after which you want to put a dash in the coupon code.
Scratch Box Display Interval: Enter the display interval of the scratch box. If the admin enters ‘X’ days, then, the next scratch block will be displayed after X days.
Show Scratch Box On: Select the web page of the site from the drop-down menu where you want to display the scratch coupon interface.
Exceptional Category IDs: Enter the category ID that you want to exclude. The customers will not be allowed to use the discount coupon on the selected categories.
Exceptional Product IDs: Enter the product ID that you want to exclude from the scratch coupon. The customers will not be allowed to avail the discount on the selected products.
Discount Type: Select the discount type that you want to offer to the customers. The admin can following discount type:
Fix Discount: Select this option and enter the fixed discount amount. The customers will be offered the specified discount amount while shopping.
Fix Percentage: Enter the percentage discount amount.
Percentage Range: Enter the desired range of percentage discount. The store visitors may get any discount amount in between the specified range.
Stop Further Discount: If enabled, the customers will not be allowed to avail any further discount on their cart other than the discount amount offered by the scratch coupon.
Allow Free Shipping: Enable this button to allow free shipping to the customers.
3.2 Display Setting
This section of Magento2 scratch coupon extension allows the admin to control and change the look and feel of the front-end UI.
The various customization options offered by this tab of the Magento 2 Subscription popup extension are discussed below:
Background Color3.2 Display Setting
Select the background color of the scratch coupon interface from the color chart.
Text Color
Select the color of the fonts to be displayed on the website from the color chart.
Theme
The color refers to the color of the scratch coupon block. Select the same from the color chart. The selected colors will be displayed in the front-end as shown in the image below:
Main Title
Main title refers to the text that will be displayed at the top of the scratch coupon block.
Email Title: Enter the text to be displayed corresponding to the email address textbox.
Name Title: Enter the text to be displayed corresponding to the customer’s name textbox.
Scratch Box Title: Enter the text that you want to display as scratch box title. The entered text will be displayed in the front-end.
Form Heading: Enter the heading of the form that will be displayed after the coupon is scratched.
Sub-form Heading: Enter the sub-heading of the form that will be displayed after the coupon is scratched.
Button Text: Enter the text to be displayed on the button.
Success Message: Enter the message that you want to display after the customers successfully gets a discount coupon.
3.3 Email Settings
The Magento 2 email subscription extension is an easy way to boost the subscriber base of the eCommerce site. The admin can send the coupon code via email. This tab of the Magento 2 Scratch coupon plugin allows the admin to customize the email settings with ease.
Email Subject: Enter the subject line of the email as per your wish.
Email Content: Enter the content of the email that will be send to the customers.
Test Email: Enter an email ID in order to test email before it is send to the customers.
Send Email to Admin: Enable if you want to send the email to the store admin.
3.4 Statistics
The Magento 2 scratch coupon module offers a complete statistical report of the coupons generated and used by the store visitors. The store admin can view 4 type of statistic report.
Discount Statistics: It refers to number of times the coupons of different discount types were generated.
Generated Vs Used: It represents a statistical report of the coupons generated and used.
Coupon Used within Days: It offers a complete report of the coupons that were used for placing the order within specified days.
Coupon Status: The admin can check the coupon status, that is, whether it’s used or unused from this tab of Magento 2 scratch coupon extension.
4.0 Store Front-end
If the Magento 2 scratch coupon subscription pop is enabled, the block will be displayed as shown in the image below:
The store visitor can scratch the coupon by moving their mouse on the same.
The store visitors will be required to enter their name and email address in order to get the coupon code. Once the process is complete, a success message will be displayed.
They can use the coupon code received via email at the checkout page and get the offered discount as shown in the image below:
So this way the store admin can easily attract the customers, improve their store experience and also gain more profit. The Magento 2 email subscription module is capable to subscribe the store visitors also. With the help of this Magento 2 email subscription pop-up plugin the store admin can get the email id of the customers which can be used for email marketing.
For more details about this Magento 2 module please visit:
Etsy Magento 2 Integrator offered by Knowband is the fastest means to integrate the store with the marketplace. The Etsy Magento 2 Integration extension offers a bi-direction synchronization between the store and the marketplace.
If you own a Magento 2 eCommerce site and are looking to expand the reach of your business that listing your products on popular marketplaces is inevitable. The Magento 2 Etsy marketplace Integrator extension automates the process of store integration. The admin can easily list the products along with their details and make changes in the same from the back-end of the Magento 2 Etsy Connector module. The orders received from the marketplace syncs with the orders of the store by executing cron in the admin interface of the Magento 2 Etsy integrator by Knowband.
Note: “The term ‘Etsy‘ is a trademark of Etsy, Inc. This application uses the Etsy API but is not endorsed or certified by Etsy, Inc.”
1.1 Merchant Benefits of Magento 2 Etsy Connector:
The profile-based listing of the Etsy Magento 2 integrator module allows the admin to list the products in bulk.
The Magento 2 Etsy connector offers an option of the second language to the admin. The multi-lingual compatibility adds to the ease of trading.
The Magento2 Etsy Connector extension offers multi-currency compatibility as well.
The admin can add shipping methods as per their convenience and sync the same with the marketplace with the help of the Magento 2 Etsy API integration plugin.
The Etsy Magento 2 API integration extension even allows the admin to add N number of shipping entries with each shipping template.
Profile-based listing of Etsy Magento 2 connector plugin allows the admin to upload and then edit the products in bulk.
The real-time synchronization of the Etsy Magento 2 Integrator allows the admin to manage the inventory with ease.
The admin can easily upload the product variation, renew, edit or remove the products with the help of the Etsy Magento 2 integration extension.
The Magento 2 Etsy integrator module creates orders in the store as per the orders received from the marketplace. The orders can be processed from a single interface.
Even the order status is changeable. Moreover, syncs with Magento 2 Etsy integrator.
The error occurred while product listing or cron execution can be easily tracked from the back-end of the Magento 2 Etsy integration module.
1.2 Installation
Follow the following steps to install the Magento 2 Etsy integrator extension in your store:
1. Download the Magento 2 Etsy Connector module package from the Knowband store.
2. You’ll receive a zipped file containing the user manual and the source code of the Magento 2 Etsy Integration plugin. Further, unzip the package.
3. Create a folder {Magento root}/app/code/Knowband/Etsy
4. Upload the extracted content in the above folder via FTP manager (like Filezilla or WinSCP – download here: https://filezilla-project.org/).
5. Now run the below commands to install the plugin:
6. In Admin Panel go to the main menu -> Knowband -> Etsy.
7.The Magento 2 Etsy Marketplace integrator extension is now ready for use.
At last, this User Manual will guide the users through the Etsy Magento2 Integrator extension configuration and settings.
To start selling on Etsy Marketplace you need to have a seller account on Etsy. In fact, in this section, we are listing all the steps to create a seller account on Etsy. Further, please find them below –
Further, click on the “Open your Etsy Shop” button on the page you are visiting now by following the link given in the first step above or you can refer to the screenshot given below.
It would open a pop-up as shown below. Furthermore, click on the “Register” tab.
After filling up the registration form, click on the “Register” button. In fact, it would create your seller account and send a verification email to the provided email address. Further, it would also redirect you to another page as shown below.
Now, it is asking for the setup of your shop preferences. Furthermore, complete all the highlighted sections. For instance, Shop Preferences and Name your shop, Stock your shop, How you will get paid, and Set up Billing.
That is it.
2.2.1 Etsy Marketplace Integration- Setup an App
To start communication between Magento Store and Etsy Seller Account, you need to create an App on Etsy Marketplace. Further, following are the steps to create an App on Etsy –
It would open a page where a form will be shown with a few input fields as shown below.
Fill up the form and click on “Read Terms and Create App”. Furthermore, please make sure that you left the “Inventory Management Compatibility” checkbox is checked.
It would ask to accept “terms and conditions”. In fact, accept and click on the “Create App” button.
At last, it would register your App on Etsy Marketplace and provide API details as shown below.
3.0 Admin Interface
The admin panel of the Magento 2 Etsy Connector module contains the 9 tabs for settings.
General Settings
Shipping Templates
Shipping Templates Entries
Profile Management
Product Listing
Order Setting
Order Listing
Synchronization
Audit Log
3.1. General Settings
The connection between the Etsy marketplace and the Magento 2 store is established in the General Settings tab of the Magento 2 Etsy API integration extension. Further, the various input fields are below:
1. Enable the Extension
Toggle this button to enable the Etsy Magento 2 API integration extension. In fact, if enabled, the module and all its settings will be working on the store.
2. Etsy API Key
Enter the obtained Etsy API Key in this section. Further, this will authenticate the connection between the Magento 2 store and Etsy Marketplace.
3. Etsy API Secret
Enter Etsy API Secret Key here. Further, it is mandatory for authenticating the integration between the site and the marketplace.
4. Etsy Default Language
Select the default language from the drop-down menu. In fact, to retrieve the language in this section execute the ‘Language Synchronization’ cron. (See Section 3.8)
5. Languages to Sync
Magento 2 Etsy Integrator extension is multi-lingual compatible and offers an option to choose the secondary language. Further, choose the language used for synchronizing the product. In fact, the selected language should be anything other than the default language.
Once you have filled all the required fields, click on the ‘Save Settings’. Furthermore, a ‘Connect’ button will appear once the changes are saved. In fact, to establish the connection between the site and the marketplace, click on the “Connect” button. Further, it would redirect admin to Etsy Marketplace to allow the App Access to the store. At last, click on the “Allow Access” button as shown below.
Follow the above-mentioned steps and the connection will be established between the store and the Etsy Marketplace.
The user will then be redirected to the admin interface of the Magento 2 Etsy Marketplace Connector module. In fact, the ‘Connect’ button will replace with the “Disconnect” button.
Note: Once the connection is set up, execute the Country/Region cron in the synchronization tab of the Magento 2 Etsy Integrator. Further, the cron job will sync the country list in the database. (See section 3.8.)
3.2 Shipping Template Settings
Magento 2 Etsy Connector allows the sellers to add shipping templates as per their requirements. Likewise, the admin can manage, edit or add new shipping options in the Shipping Templates tab of the Magento 2 Etsy Synchronization extension.
3.2.1 How to add Shipping Templates?
Here, click on ‘Add New’ to create new shipping templates as shown below:
The shipping template creation page of Magento 2 Etsy integration includes the following input fields:
Shipping Template Title: Here, enter a unique name or title for the Shipping Template.
Origin Country: Choose a country from the list that you want to set as the origin country of the shipment.
Primary Cost: Here, enter the primary cost for the order shipment. Further, you can set it only once.
Secondary Cost: Secondary cost will change on every additional item that is to be shipped. In fact, enter the shipping cost for each additional item. Thus, you can set it only once.
Minimum Processing Days: Here, enter the minimum number of days after the order places when the shipment will be initiated.
Maximum Processing Days: Here, enter the maximum number of days after the order places when the shipment will be initiated.
3.2.2 How to Edit/Delete the existing Shipping Templates?
The admin can edit or delete the shipping templates from this tab of the Magento 2 Etsy Integrator module. Further, the created shipping templates will list as shown below. Here, click on the Edit or Delete button corresponding to each shipping template for performing the respective action.
3.2.3 How to Add the Shipping Entries?
Each shipping template can have multiple shipping entries. Further, to see the shipping entries in a particular shipping template, click on the ‘View Shipping Entries’ button.
This will redirect you to the shipping entries page as shown below.
The admin can even add new shipping template entries by clicking on the ‘Add Shipping Template Entry’ button.
Here, click on the Add New Entries button to create new entries.
This will redirect you to the shipping entry creation page of the Magento 2 Etsy Connector module.
Shipping Template Title: The template title in which you want to add the entries will display in this section.
Origin Country: It will remain the same as selected in the shipping template.
Destination Type: Select the destination type of the shipment. In fact, it can be a Country or a Region.
Destination Country: Select the destination place of the shipment here.
Primary Cost: Enter the primary cost of the shipment.
Secondary Cost: Enter the secondary cost that will be charged for each additional item.
3.3 Shipping Template Entry
Here, the admin gets an option to see all the shipping entries in the shipping templates in this tab of the Etsy Magento 2 Connector extension.
To edit or delete the shipping entries, click on the Edit or Delete button respectively corresponding to each shipping template.
3.4 Profile Management
Magento 2 Etsy integrator allows the admin to list the products in bulk with the help of profiles. Thus, the admin can create profiles in this tab of the Magento 2 Etsy connector. Further, the profile-based listing allows easy attribute and category mapping.
3.4.1 How to add a new profile?
To add new profiles, click on the ‘Add New’ link as shown in the image below.
The link will redirect you to the profile creation page. Thus, the various fields are below:
Profile Title: Enter a unique name for the profile.
Etsy Category: Here, select an Etsy Marketplace Category to list the attributes. Furthermore, the Magento 2 Etsy Marketplace connector allows the admin to map a single category of Etsy with multiple categories of the store.
Attribute Mapping: Here, map the selected Etsy Marketplace attributes to the store’s attributes to list the variations on the marketplace.
Store Categories: Check the category of the store that you want to map with the selected category of the Etsy Marketplace.
Shipping Template: Choose a Shipping Template from the drop-down list. Furthermore, the customer can avail of the selected shipping options. In fact, to list the shipping templates execute the cron job in the Synchronization tab of the Etsy Magento 2 Integrator extension.
Select Shop Section: The store admin can choose the shop section from the list of added shop sections.
Enable Custom Pricing: Here, toggle this button to set a custom price for products at the Etsy store.
Custom Price: Store owners can set different values of the product available at the Etsy shop. Further, the admin has the flexibility to increase or decrease the custom price of Etsy Products. In fact, the changes can be set either as fixed or a percentage value.
Etsy Currency: This currency should be the same as the currency of your Etsy Admin panel, you can check the Etsy currency in Finances -> Payment Settings -> Currency.
Customized Product Title: Here, you can customize the product title by using the following place-holders. Further, place-holders like {sample} will replace by dynamic content at the time of execution.
{id_product} for Product ID
{product_title} for Product title
{country_of_manufacture} for Country of Manufacturer
{sku} for Product SKU
{weight} for Product Weight
{short_description} for Product Short Description
{price} for Product Price
Sync Property: Here, select the properties to sync with the Etsy Marketplace. Thus, this will work while updating the product and its variations.
Enable to enter a minimum quantity: If enabled, the item will not list if the quantity is below the specified limit.
Enable to enter a maximum quantity: If enabled, the quantity of the item will display as the specified limit even if it’s higher.
Is the product customizable?: Enable if the product is customizable.
Who Made: Here, specify who made the products. The options list in the drop-down list.
When Made: Here, select when this product was made.
Is Supply?: Here, specify if the product is the product is supply product or not.
Recipient: Here, select the Recipient of the product
Occasion: Here, specify the Occasion (if any) for which the product is intended.
3.4.2 How to Edit/delete a new profile?
Here, the admin can edit or delete the profile from this section of the Magento 2 Etsy Integration module by clicking on the Edit or Delete button respectively.
3.5 Product Listing
This section of the Magento 2 Etsy Integration plugin shows the list of all the products available on Etsy Marketplace with their statuses. Hence, to sync the product in the Etsy Marketplace, execute the Product Synchronization Cron in the Synchronization tab (See section 3.8.). Further, the variations of the products sync with the marketplace by executing Product variations Synchronization.
Along with the listed product, this section offers several other options to the store admin. They are below:
Renew the Products
Here, the admin can renew the expired products by clicking on the “Renew” action corresponding to each product.
After setting up a product for renewal, the action “Renew” will replace with the “Halt” action. Thus, this action is used to stop product renewal in case needed.
Delete the Products
Here, click on the “Delete” action given corresponding to each product listing to remove the product from the listing. In fact, after setting up a product for deletion, the action “Delete” will replace with the “Relist” action.
View Error
The admin can view the error that occurred in listing the product. Further, for this, click on the ‘View Error’ action. In fact, if any error is encountered while product listing, then, the same is shown in the popup. Otherwise, the message, ‘No Listing Error Found’ will be flashed.
3.6 Order Settings
Order Settings tab of the Etsy Magento 2 Integration extension allows the admin to map the order statuses with Etsy Marketplace order statuses. Further, the admin can select the order statuses and sync the same with the marketplace by executing the Order Status cron in the Synchronization tab. (See section 3.8)
The various fields are below:
Order Default State: Choose an order default status from the drop-down menu. Order Paid State: Choose the order state for the paid orders placed on the Etsy marketplace. In fact, the selected option will display in the marketplace as well. Order Shipped Status: Choose an ordered state for the shipped orders on the Etsy marketplace.
Note –
The default status is the first status of the order when it is placed in the store.
Paid status means that payment for the order has been made and accepted.
Shipped status means that ordered items have been shipped.
Map Etsy Orders with Store Carrier: Now store admin can map the Etsy orders with the Magento 2 store carrier. Select Shipping Methods for Etsy Orders: Now map the imported order from Etsy with the selected carrier. Etsy Carrier Name for Tracking Url: Store owners can choose the carrier used for tracking Etsy orders on orders received at Etsy. Show Tax Breakup in Etsy Orders: The store admin can display the tax breakups for orders received at Etsy.
3.7 Order Listing
The order listing tab of Magento 2 Etsy displays the list of orders placed received from the marketplace. Further, to obtain the list of the order, execute the Order Synchronization cron. (See Section 3.8)
To check the order, click on ‘View Order’.
The admin gets to see the following details of each order.
It offers basic information. For instance, the order date, status, billing and shipping address, payment information, gift options, item ordered, comment history.
The default order view page is shown below:
Invoice: The admin can generate the invoice for the orders received from here. Thus, this will initiate the processing of the order. Further, execute the Update Order Status on Etsy cron. Moreover, the status of that order will be updated in the Etsy Marketplace.
Credit Memos: Change the status of the credit here.
Shipments: The admin can update the shipment details. For instance, the name of the shipment, date, and the quantity of Shipment.
3.8 Synchronization
Magento 2 Etsy Synchronization extension offers a bi-directional connection between the store and the marketplace. Further, the products, shipping options, and their details can list on the marketplace. Thus, the admin can sync the order from the marketplace to Magento 2 eCommerce site.
This section of the Magento 2 Etsy API integration module offers various cron options. In fact, store synchronization can be carried out by executing cron.
At last, the various jobs to synchronize content between Store and Etsy Marketplace are shown below –
3.8.1 How to sync Countries/Region?
Follow the steps below to synchronize Countries/Region on Etsy Marketplace –
Goto the Etsy Marketplace -> Synchronization tab (Main Menu)
Further, click on the “Sync Countries/Region” button shown below.
It would perform the following actions –
The cron will get all the countries with their country ID and ISO code and save them into the database.
Once the cron executes, the countries and regions in the database. In addition, the admin can select the countries accordingly.
3.8.2 How to sync Shipping Template on Etsy Marketplace?
Follow the steps mentioned below to synchronize Shipping Templates on Etsy Marketplace –
Goto the Etsy Marketplace ->Synchronization tab (Main Menu)
Further, click on the “Shipping Template Synchronization” button shown below.
It would perform the following actions –
It will sync new shipping templates along with their Entries on Etsy.
The plugin will update the modifications made in the Shipping Templates and their entries on Etsy
It will remove the deleted shipping templates and their entries from Etsy.
3.8.3 How to sync Products on Etsy Marketplace?
Following are the steps to synchronize Products on Etsy Marketplace –
Goto the Etsy Marketplace ->Synchronization tab (Main Menu)
Further, click on the “Sync Products” button shown below.
It would perform the following actions –
The cron will update the profile-based product listing.
It will add products on the Etsy Marketplace with the respective product details (e.g. Price, Quantity, Image, etc.).
Next, it will update the changes made in the products that are already available on the Etsy marketplace.
It will renew the expired products on Etsy Marketplace for the items in which the ‘Renew’ action is initiated.
Likewise, it will remove the products from Etsy Marketplace which mark as deleted on Store.
At last, it updates the Listing Status of each product available on Etsy Marketplace.
3.8.4 How to sync Products Variation on Etsy Marketplace?
Following are the steps to synchronize Products Variation on Etsy Marketplace –
Goto the Etsy Marketplace ->Synchronization tab (Main Menu)
Further, click on the “Sync Products Variation Listing” button shown below.
It would perform the following actions –
The cron execution will add Products Variations on Etsy Marketplace.
Second, it will update Products Variations that are already listed on Etsy Marketplace.
Next, it will remove the Products Variations on Etsy Marketplace that mark as deleted on the Store.
3.8.5 How to sync Orders received from Etsy Marketplace?
Follow the steps below to synchronize Orders from Etsy Marketplace –
Goto the Etsy Marketplace ->Synchronization tab (Main Menu)
Further, click on the “Sync Orders” button shown below.
It would perform the following actions –
The orders and their details received from the marketplace sync with the Magento 2 store by executing this cron.
It creates Shipping Carrier options into the store as per the details of the order coming from Etsy Marketplace.
In fact, it creates Orders into the store as per the details coming from the Etsy Marketplace.
In addition, it sets the order status as per the configuration settings updated in the “Order Settings” tab of this Magento 2 Etsy Marketplace Integrator module.
3.8.6 How to sync Order Status with Etsy Marketplace?
To sync the order status, follow the steps below:
Goto the Etsy Marketplace ->Synchronization tab (Main Menu)
Further, click on the “Update Order Status on Etsy” button shown below.
It would perform the following actions –
Here, the action syncs the order statuses as specified by the admin with the marketplace.
Here, the cron checks if there is any status update recorded by the Etsy Marketplace Connector for any Etsy Order. Thus, the updates are then synchronized accordingly.
3.8.7 How to sync Language on Etsy Marketplace?
Following are the steps to synchronize Language to Etsy Marketplace:
Go to the Etsy Marketplace ->Synchronization tab (Main Menu)
Further, click on the “Sync Translations” button shown below.
It would perform the following actions:
In case there are any product or category details in different languages, then, the same will be synchronized in the Etsy marketplace. Hence, the Magento 2 Etsy Marketplace Connector offers multi-lingual support.
Note:
Once the synchronization completes successfully, then, a message will display – “Synchronization completed” else “Synchronization failed” will be flashed.
3.9 Audit Log
The Audit Log section of the Magento 2 Etsy connector extension contains the list of the tasks. Further, the status of the same can be viewed here. Thus, the errors (if any) that occurred while executing the jobs can be checked here.