Magento 2 Affiliate and Referral Program Extension- User Manual

1.0 Introduction

The online store admin can now implement a multi-level marketing strategy for increasing website sales, conversion rate and custom domain. Knowband offers Magento 2 Affiliate and Referral Program Module which allows the online store owner to provide an option to become an affiliate customer and earn the profit. The customers can register as an affiliate and get an exciting commission on every referral. The store admin can show multiple ways to refer the website, affiliates can share the referral code, referral link or voucher. Affiliates can redeem their commission amount by generating a payout request.

The online store admin can manage the overall Affiliate and Referral Program from the Magento 2 Affiliate and Referral Extension admin interface. The e-merchant can remove the affiliate registration option anytime by disabling the “affiliate registration” option. The admin can accept or reject any referral and payout request. This way, the store owner can boost sales, conversion rate and website revenue.

1.1 Features of Magento 2 Affiliate and Referral Extension

  1. The online store owner can allow the customers to become an affiliate and earn a commission on every referral.
  2. The online seller can enable or disable affiliate registration anytime from the admin interface of the Magento 2 Affiliate and Referral Module.
  3. The Magento 2 Affiliate and Referral Extension provides multiple referral methods. Affiliate can share referral links, referral code and voucher code to their acquaintances.
  4. The Magento 2 Affiliate and Referral Program Module allows sharing referral links via multiple social media options like Facebook, Twitter and Pinterest.
  5. Admin can offer different commission amounts on new registration and placed the order. Admin can offer a percentage-based amount on order and fixed amount on new registration.
  6. The store owner can also enable the settings to generate a voucher automatically on new registration. The newly registered affiliate can share this coupon code for the referral.
  7. This is up to store admin that he wants to offer a commission on new user registration or first order of the referred customer.
  8. The Social Affiliate plugin for Magento 2 shows affiliate customers list in which admin can set the affiliate status, affiliate details and earned commission.
  9. Admin can also generate specific vouchers for affiliate customers and also set the expiry date for the same.
  10. In the referral list, the e-merchant can view the referred customer’s details, customers referral status and referral amount.
  11. The store admin can view the list of all the generated vouchers. Admin can also apply new rules and conditions for those vouchers.
  12. The affiliates can generate voucher or request payout of the earned commission.
  13. The customers can also view the functionality on their mobile devices. The Magento 2 Affiliate and Referral Program Module is mobile responsive.

1.2 Admin Benefits of Magento 2 Affiliate and Referral Program Extension

  1. Magento 2 Affiliate and Referral Program Extension makes it simple to implement a multi-level marketing strategy.
  2. Magento 2 Affiliate and Referral Program Module is simple to implement and easily activated on the website.
  3. Magento 2 Customer Referral Module allows multiple users to become an affiliate and earn money just by referring their know persons.
  4. Magento 2 Affiliate Extension helps to increase website revenue, sales, conversion rate and custom domain.
  5. Affiliate multi-level marketing system offers multiple referral commission to the affiliates.
  6. An affiliate marketing program for Magento 2 provides various methods of referral.
  7. Admin can accept or decline the payout request as per his wish.
  8. Social Affiliate plugin for Magento 2 is multi-lingual compatible.
  9. Admin doesn’t need to change even a single line of codes to implement the affiliate program.

2.0 Installation

After purchasing Magento 2 affiliate and referral extension, the store admin will get the following files:

  1. shareandwin.zip which has the source code of this Magento 2 affiliate and referral program plugin.
  2. User Manual, with all the basic details and information.

The steps to install the Magento 2 Affiliate and Referral Program Extension are mentioned below:

  • Buy the Magento 2 Affiliate and Referral Program module from Knowband. You can download the extension package.
  • The package has a zipped file that contains the user manual and the source code of the Magento 2 Affiliate and Referral Program module. Now, Unzip this package.
  • Create a folder {Magentoroot}/app/code/Knowband/Affiliateandreferral
  • Upload the extracted content in the above folder via FTP manager (like Filezilla or WinSCP – download here: https://filezilla-project.org/).
  • Now run below commands to install the plugin:
  1. php bin/magento module:enable Knowband_Affiliateandreferral
  2.  php bin/magento setup:upgrade
  3.  php bin/magento setup:di:compile
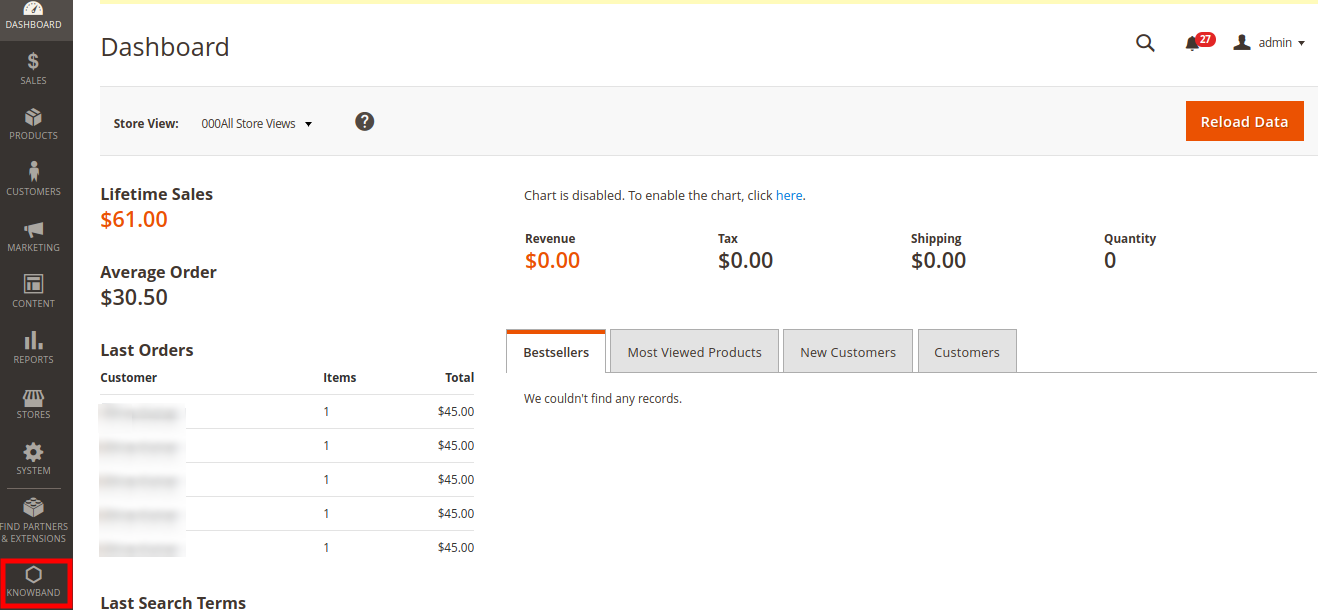
  • The extension is now installed and ready for use. In Admin Panel go to “Knowband Extensions >affiliate and referral”.
    You can now configure and use the Knowband affiliate and referral plugin.

3.0 Admin Interface

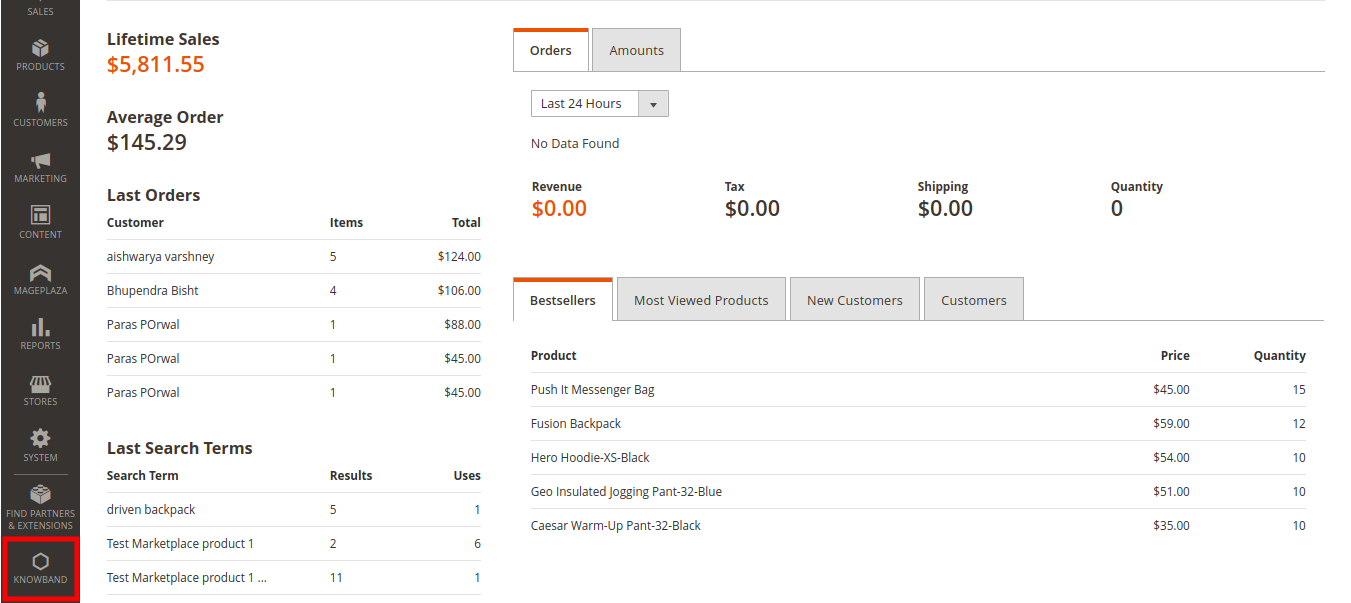
After a successful installation, you can configure this Magento affiliate and referral module. Go to Knowband>affiliate and referral, you will get some customization options as shown below:
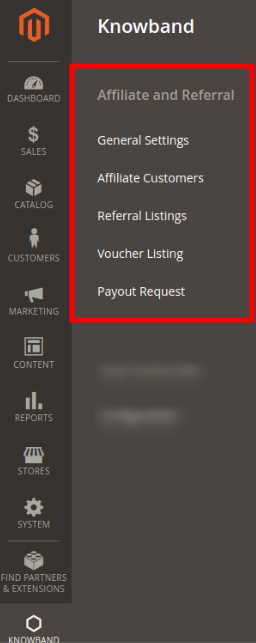
Configureation options : affiliate and referral

The store owner can apply the settings as per the requirements and offer multi-level marketing on the website.

3.1 General Settings

In general settings, the online store admin can apply the configuration for showing the affiliate registration options and managing the referral system setting.

Please check the configuration options below:  

In Magento 2 affiliate and referral extension general settings, you will get these configuration options as shown in the image:
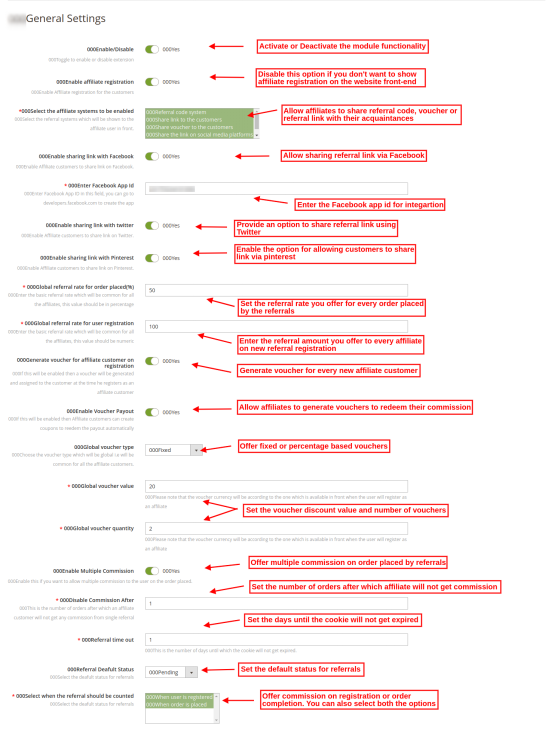
  • Enable/ Disable: Activate or deactivate the Magento 2 affiliate extension functionality just by a button toggle.
  • Enable affiliate registration: Enable to show affiliate registration on the website front-end interface. If you do not want to allow new affiliate registration then disable this option.
  • Select the affiliate systems to be enabled: Magento 2 affiliate and referral extension provides multiple referral options. Admin can allow affiliates to share referral code, share referral link, share voucher, share the link on a social media platform and also share the link via email.
  • Enable sharing the link with Facebook: Allow sharing the referral link via Facebook. Affiliates can also share the link as a Facebook private message.

*Enter Facebook App Id: Enter the Facebook app id here, to incorporate Facebook(Find out the steps to generate Facebook App id in Section 3.1.1)

  • Enable sharing the link with twitter: Enable the option to allow affiliates to share referral link from Twitter account.
  • Enable sharing the link with Pinterest: Activate this configuration option for allowing share the referral link via Pinterest.
  • Global referral rate for orders placed: Set the referral rate which you want to offer on referral order placement. This will be a percentage-based value.
  • Global referral rate for user registration: Here, you need to set the fixed amount referral rate on new registration.
  • Generate voucher for affiliate customers on registration: Enable the settings if you want to offer a voucher to the newly registered affiliate customer. They can share this voucher with their friends and refer to the website.
  • Enable Voucher Payout: Activate this option to allow affiliates to generate vouchers to redeem their commission amount.
  • Global voucher type: You can create common vouchers for all the affiliate customers. The Magento 2 affiliate and referral extension allow for offering fixed or percentage-based vouchers.

  • Global voucher value: Enter the value of the voucher. The customers can get a discount of that value when they apply this voucher.
  • Global voucher quantity: Enter the voucher quantity ie the number of time a voucher can be applied. In that case, 2 customers can apply this coupon code single time.
  • Enable Multiple Commission: As an eCommerce store admin, you can offer a commission to the affiliate on multiple orders placed by the single referred customers.

*Disable Commission After: You can also enter the number of ordered after which affiliate will not get the commission.

  • Referral time out: Enter the number of days until which cookies will not expire. Enter the days till which the referral code, referral link will be active.
  • Referral Default Status: Enter the default status for the referrals. If admin sets default status as “pending” then the initial status of the referred customer will be pending. The affiliate customer will get the referral commission when admin set the status as “accepted” the referral.
  • Select when the referral should be counted: You can count referral on new user registration or new order placement. You can also select both the conditions if he wishes to.

3.1.1 Facebook app ID Generation Steps

In order to generate the Facebook app ID, you need to follow these steps:

  • First of all log-in into your Facebook account.
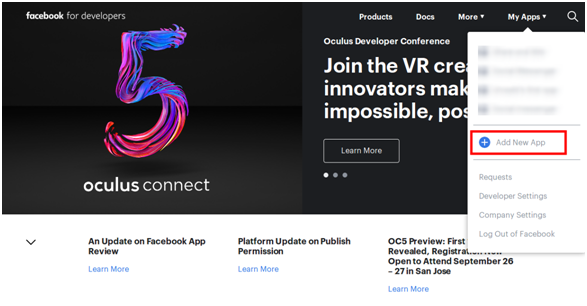
  • Now go to the “MY APPS” and click on ”ADD NEW APP”.
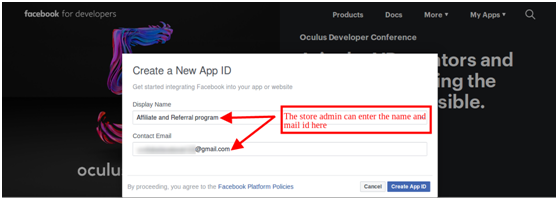
  • Enter the “Display Name” information and “contact email ID” details. After that, click on the “Create App ID” button.
  • After that go to “Settings” and select the “Basic” option.
  • You will get the APP ID here. Insert app domains, category, privacy policy URL here.
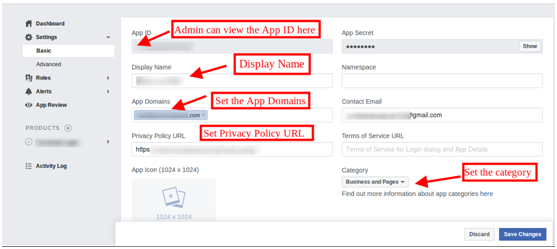
This way, you can get the Facebook app ID.

3.2 Affiliate Customers

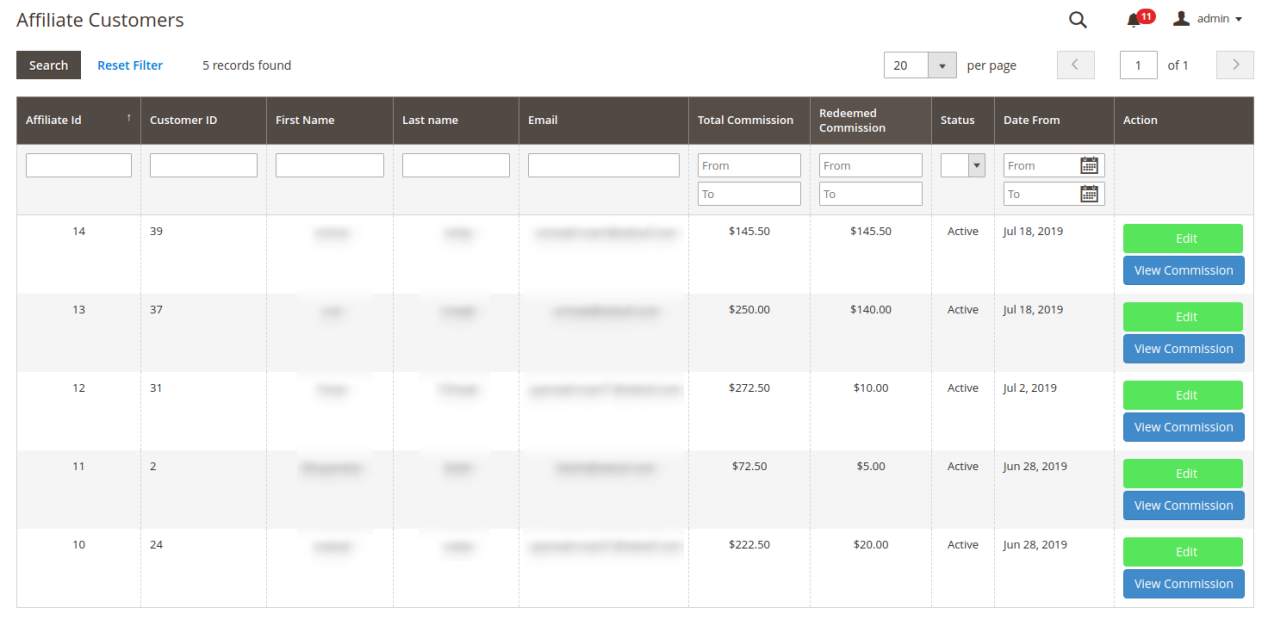
Admin can view the list of affiliate customers and manage affiliates. The recently registers affiliate will be shown on the top of the list. Admin can view the commission and edit the customer details.  Affiliate customers list as shown below:
3.2.1 View Commission

You can click on the “view commission” and check the list of commission type and value. Admin can also edit the referral status if he wishes to do the same.
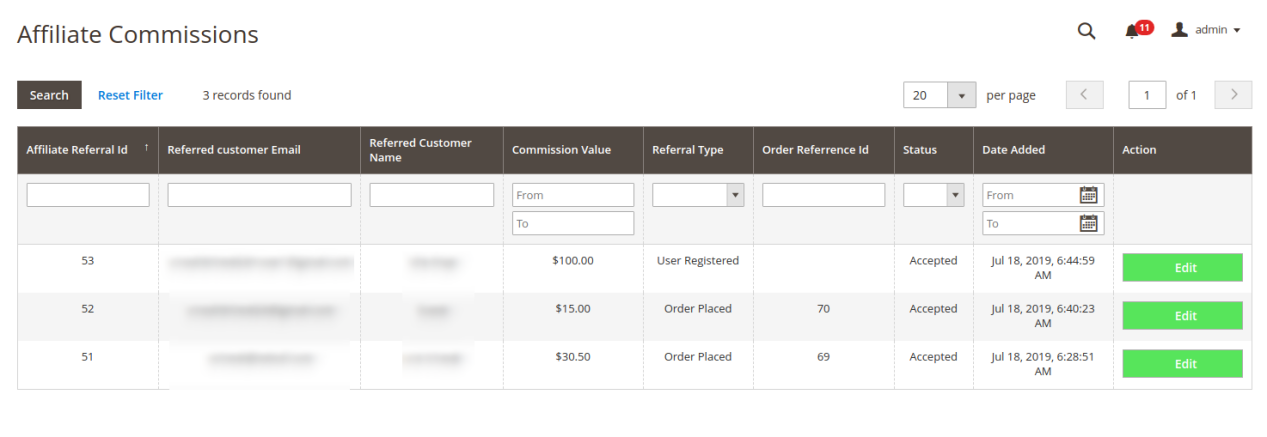
Admin can click on the “Edit” button and update the referral status if it is pending.
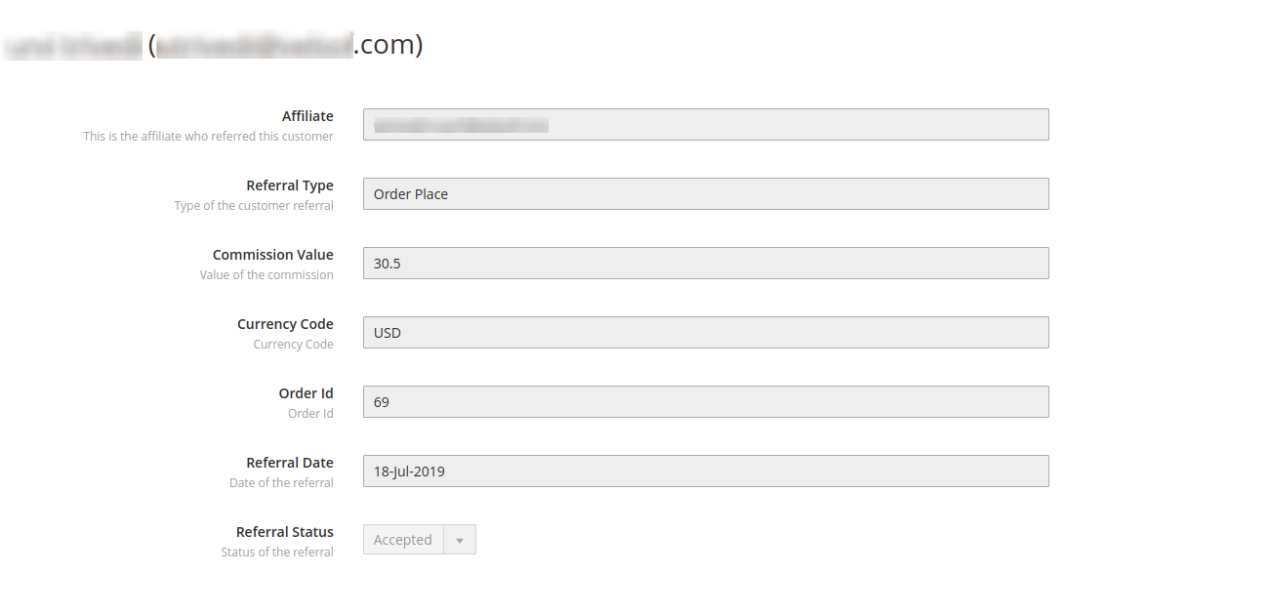
3.2.2 Edit Affiliate customer details

After clicking on the “Edit” button on the affiliate Customers page, this page will open:
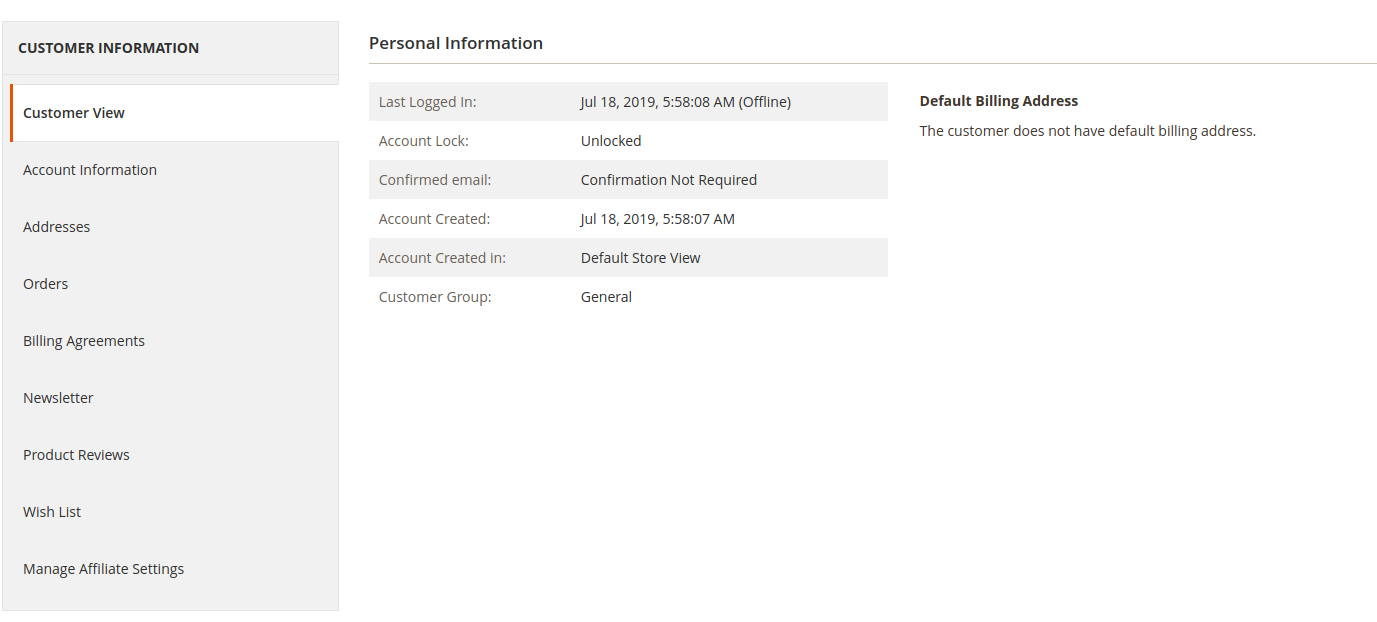
From the last option ie ”Manage Affiliate Settings”, you will get this page:
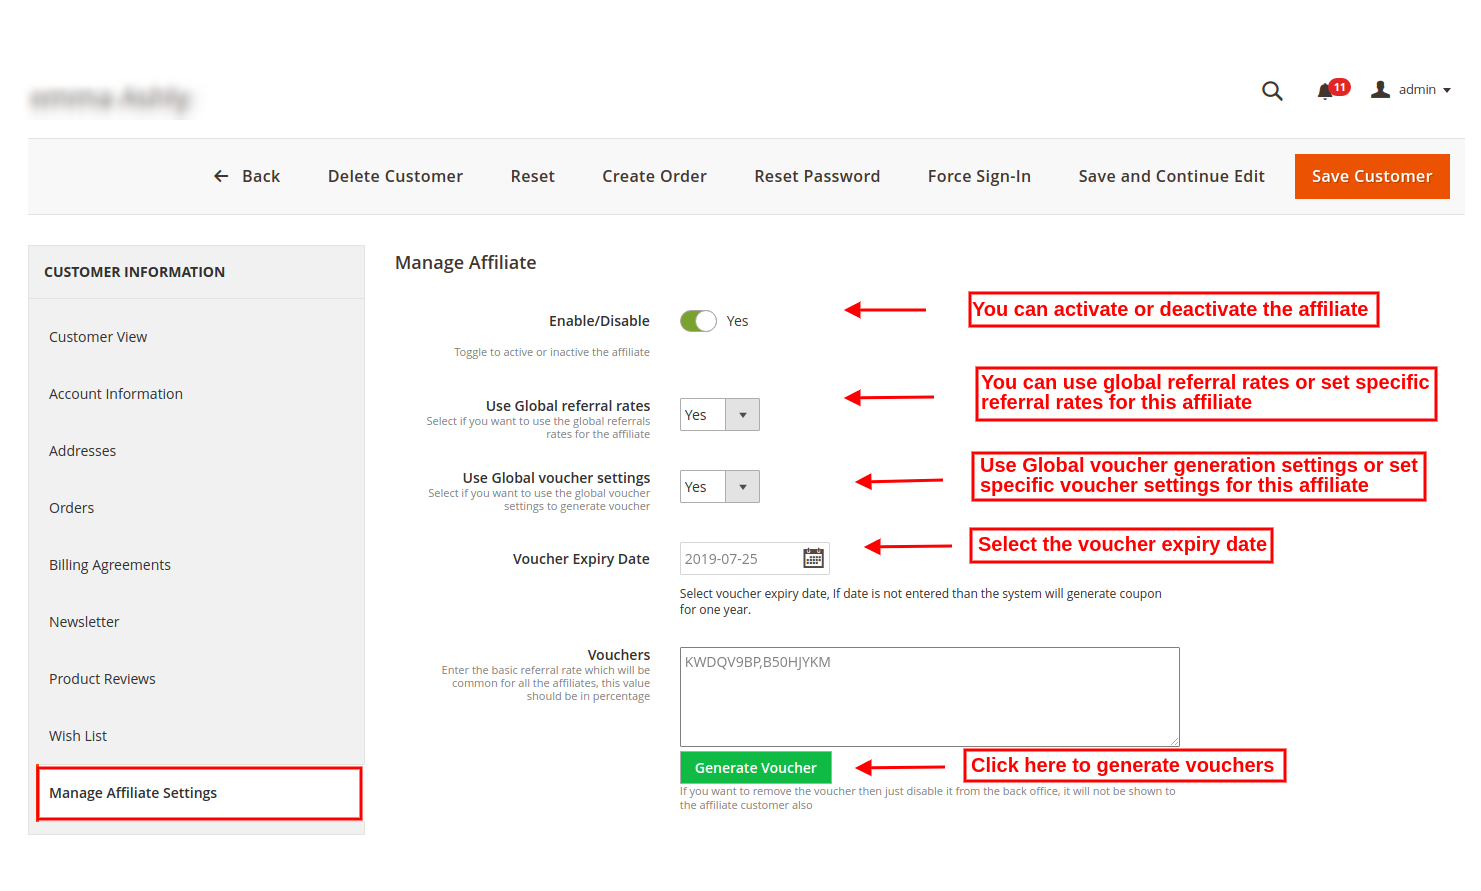
  • Enable/Disable: The Magento 2 customer referral module allows to enable or disable any affiliate customer anytime.
  • Use Global Referral Rates: You can use the global referral rate or set specific referral rate for that customer. If you want to apply specific setting then select “no”:

*Referral rate for order placed: Enter the percentage-based value for referral order completion.

*Referral rate for User registration: Set the fixed value referral rate for user registration.

  • Use Global voucher settings: Admin can use Global voucher settings or go for specific settings for that customer.

*Voucher Type: Set the voucher type ie fixed or percentage-based voucher.

*Voucher Value: set the value which you want to offer as a discount.

*Total voucher quantity: Set the number of vouchers ie number of times for which this voucher can be used.

  • Voucher Expiry Date: Admin can set the voucher expiry date. By default, the system generates a voucher with one-year validity.
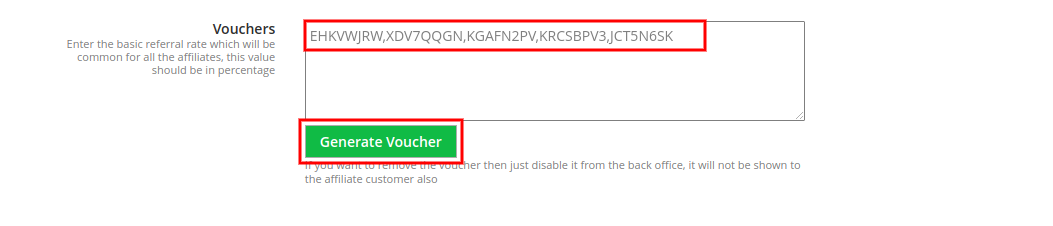
  • Vouchers: Admin can click on generate voucher settings for generating vouchers.
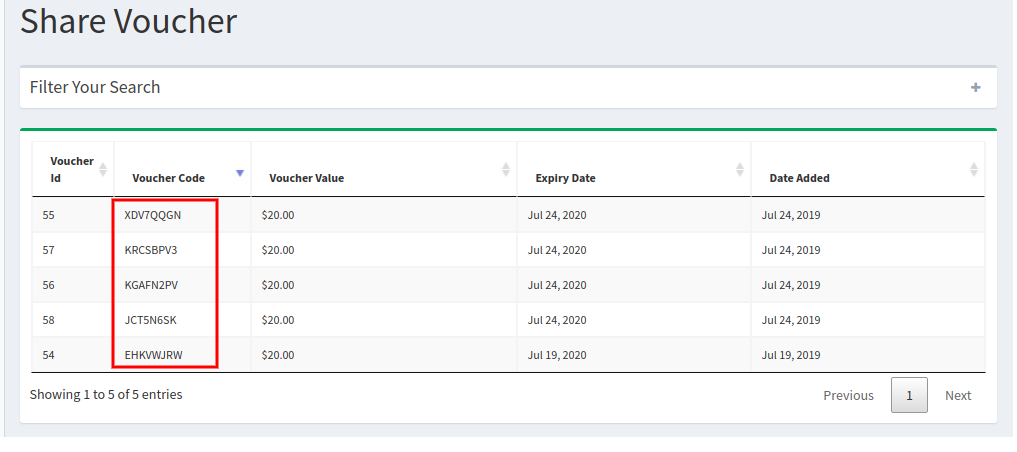
In front-end interface, there will be a list of vouchers in affiliate method section:
3.3 Referral Settings

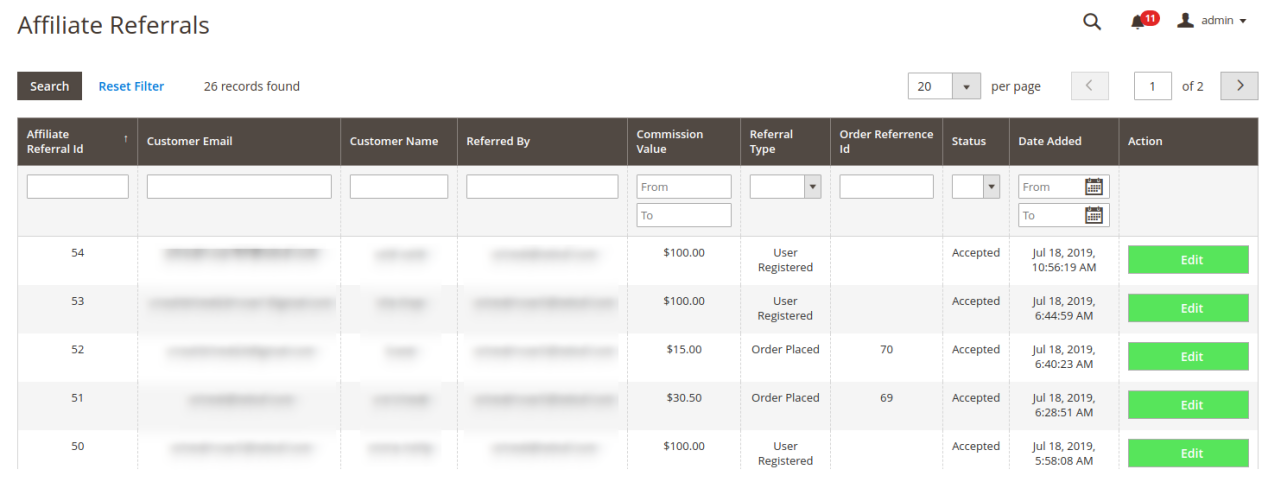
Here the store admin can view the list of referrals. The online merchant can also accept the referral. You can select the entries per page and also apply filters to check any specific affiliate referral.
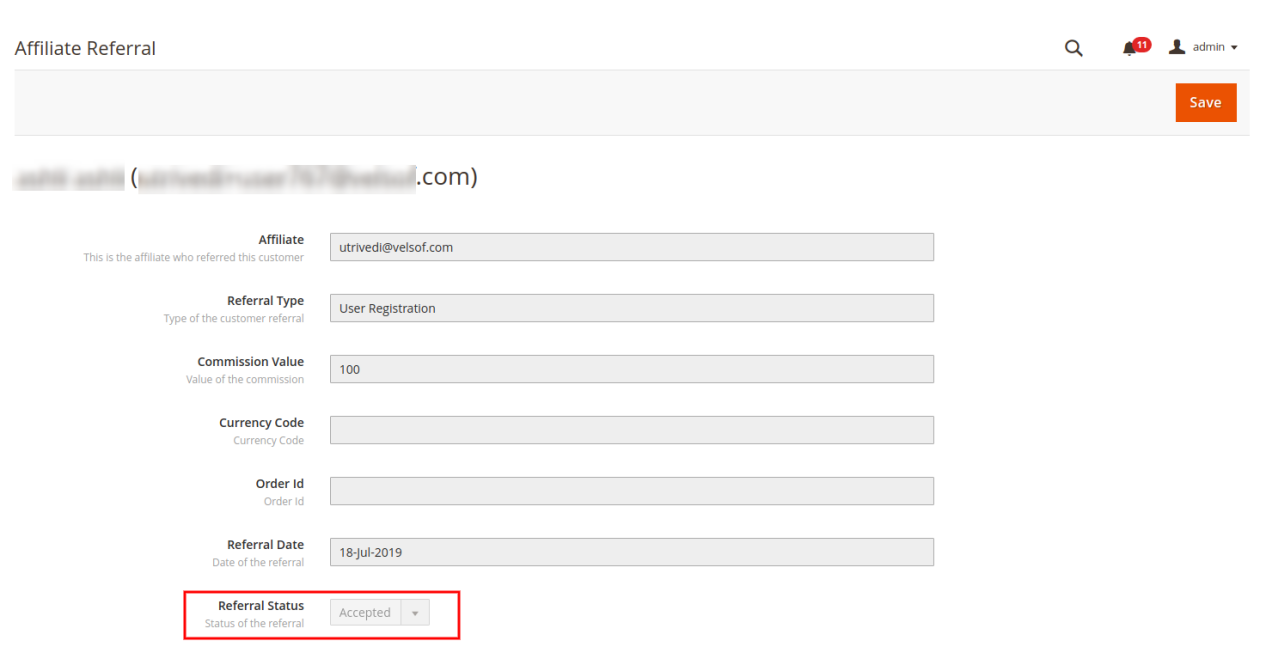
Admin can click on the edit button and change the referral status from the admin interface of this Referral and affiliate marketing module for Magento 2.
3.4 Affiliate Voucher Listing

In affiliate voucher listing page, the store owner can view the list of all the generated vouchers and also change the conditions/rules for every coupon.
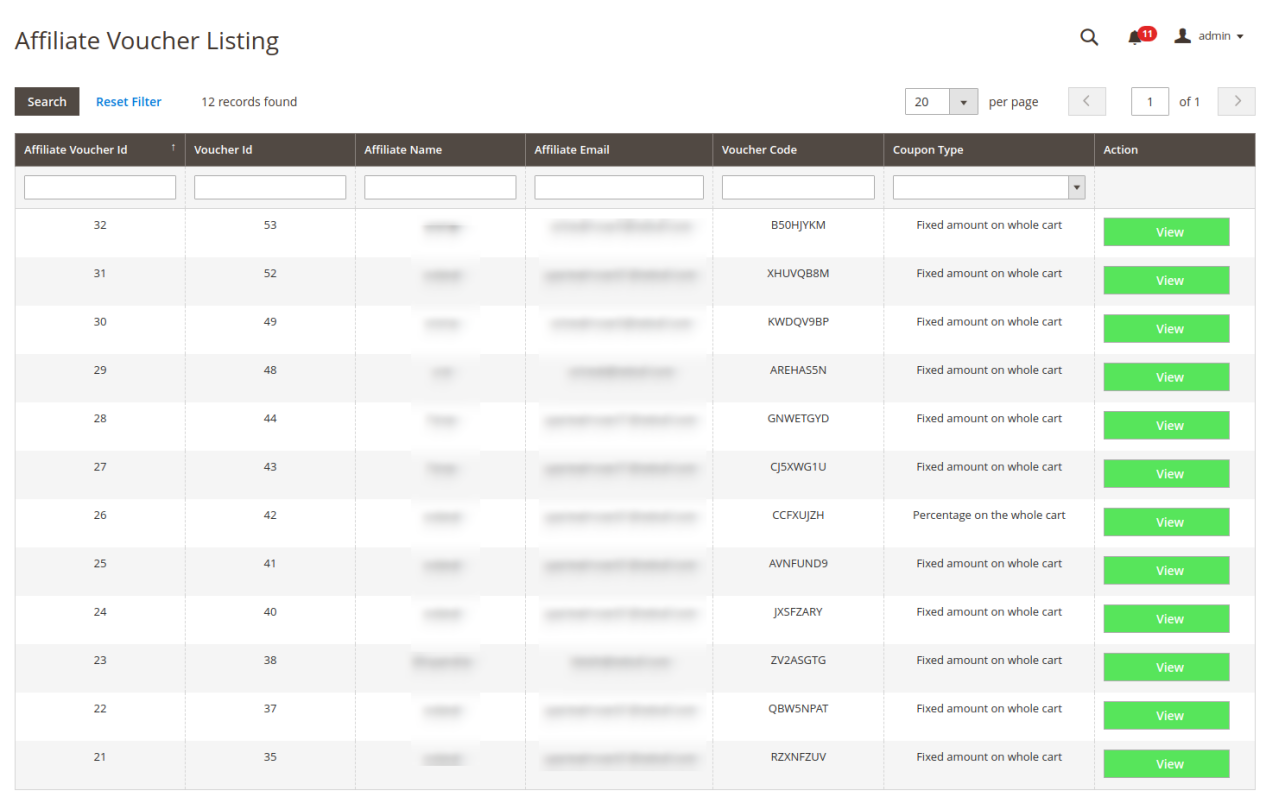
After clicking “view” button, admin can change the voucher conditions and other related settings.

3.5 Affiliate Payout requests

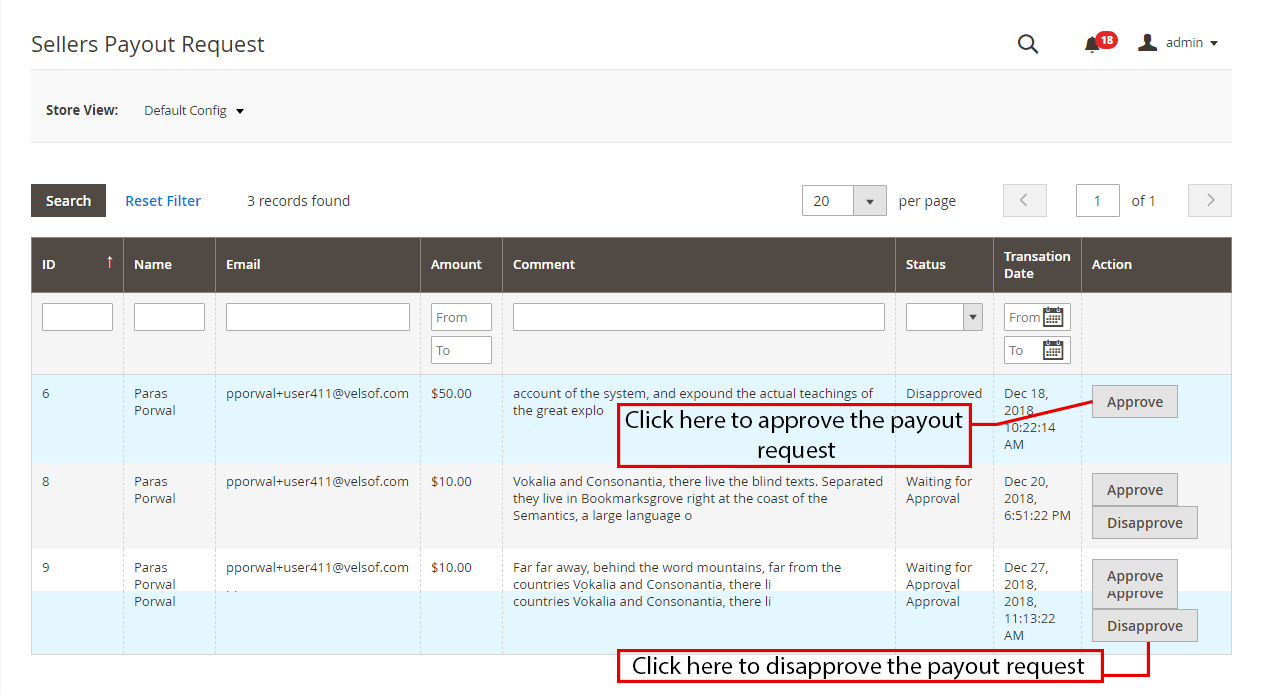
As a store admin, you can view the payment requests generated by affiliates. Admin can also view the payout request status. You can approve or deny the payout request.

The payout list will look like a below-mentioned image:
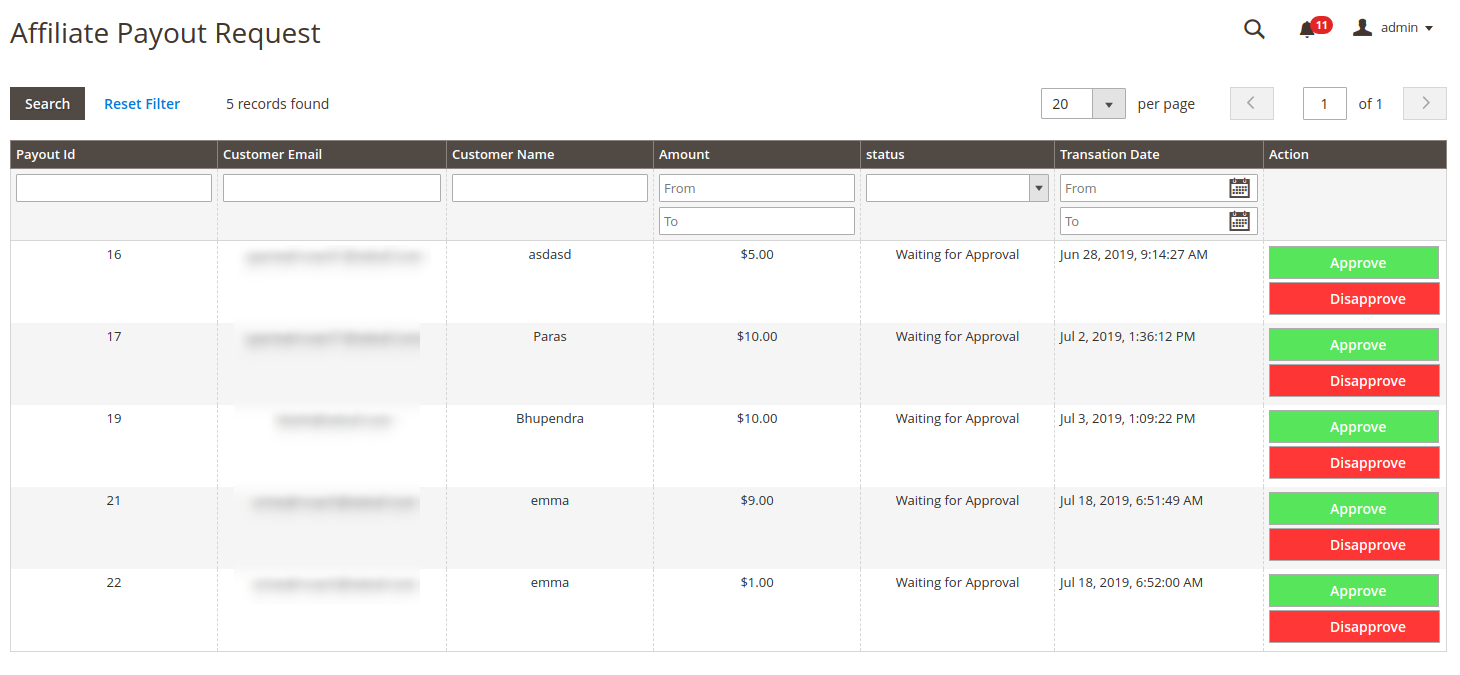
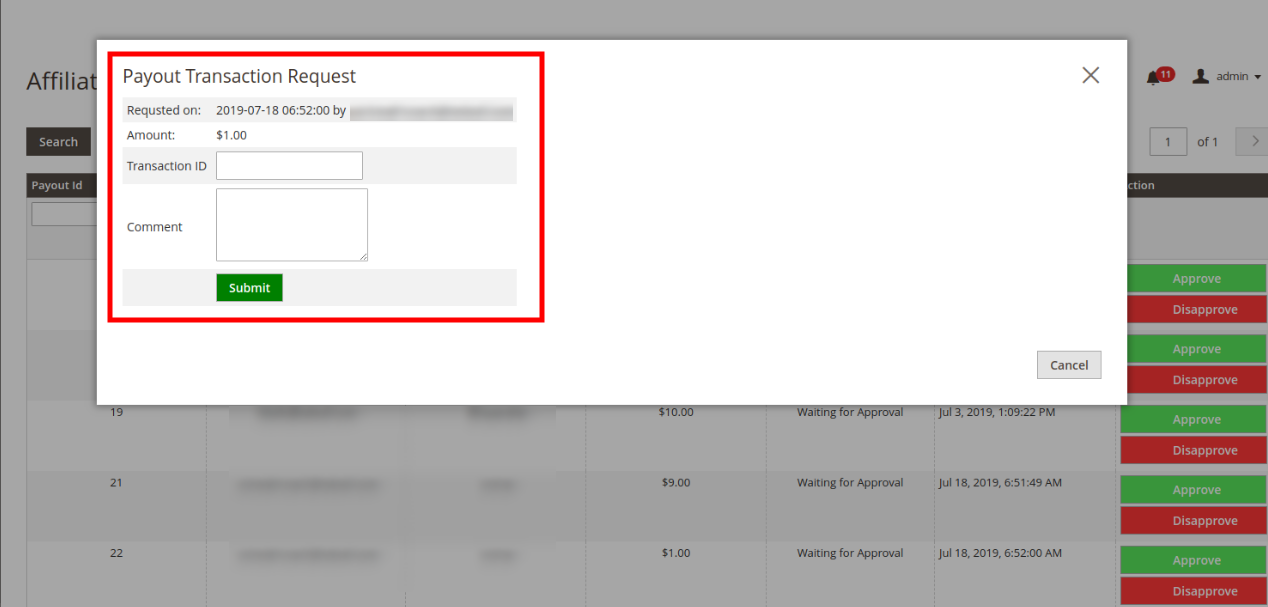
Admin can click on approve or disapprove button.

A popup will come while approving the request as shown below:
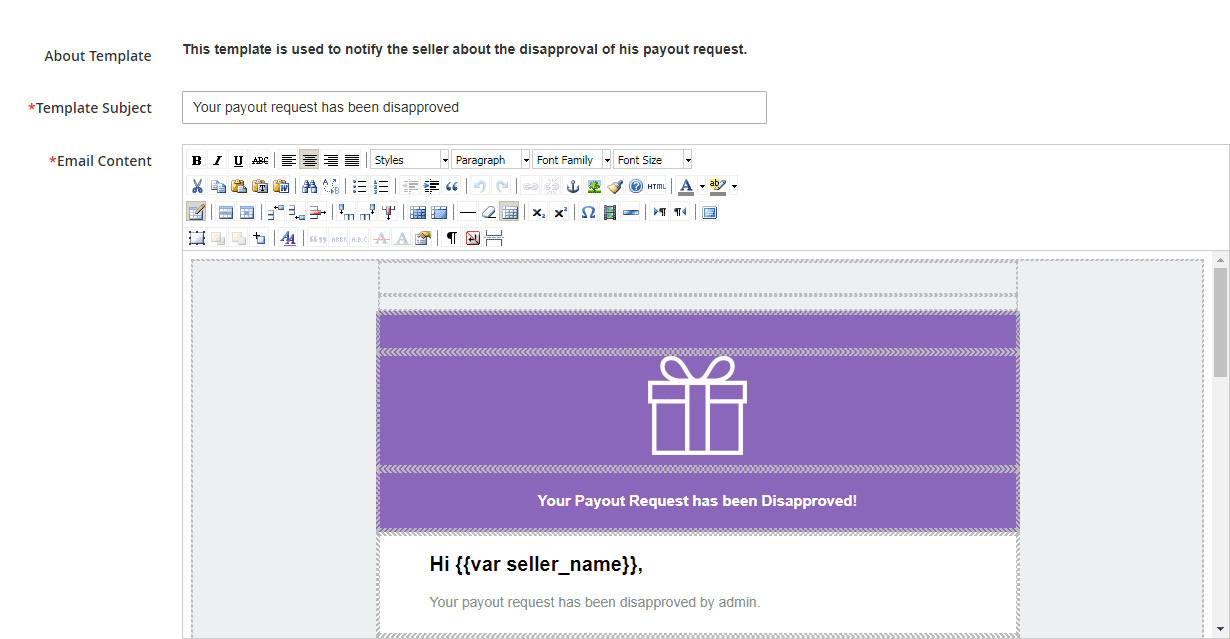
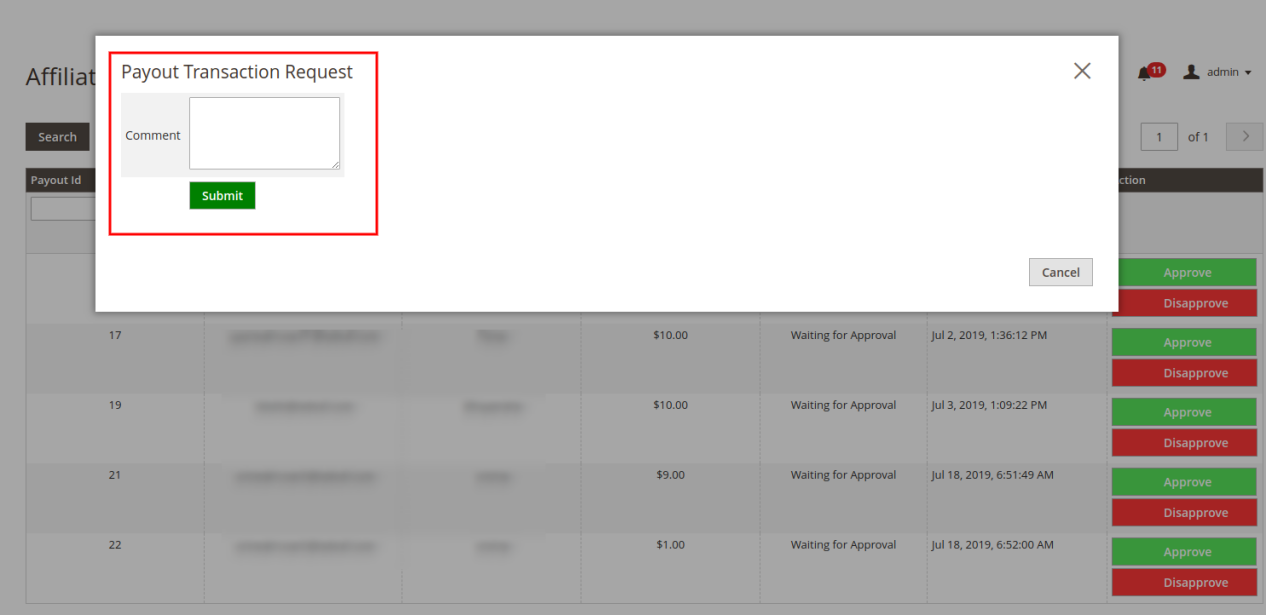
A popup will come while disapproving the request as shown below:
4.0 Front-end Interface

Online customers can register as an affiliate customer and earn commission on every referral:
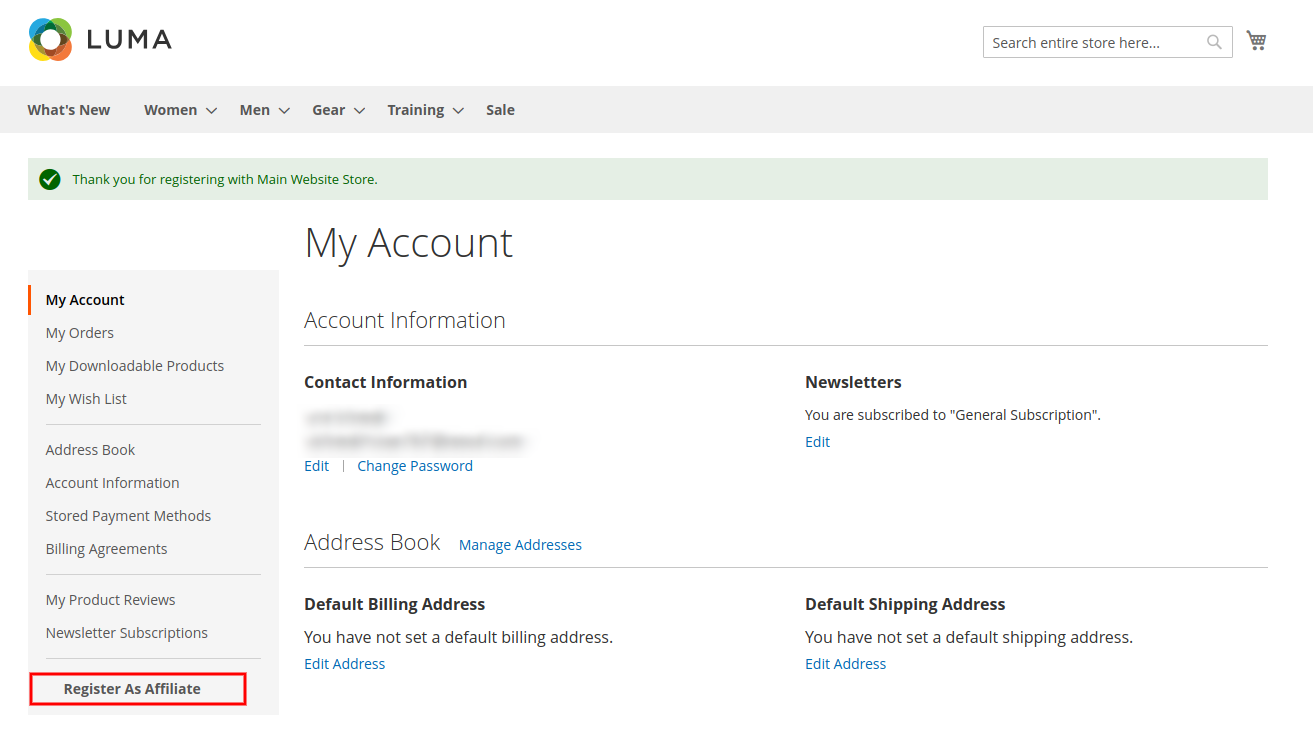
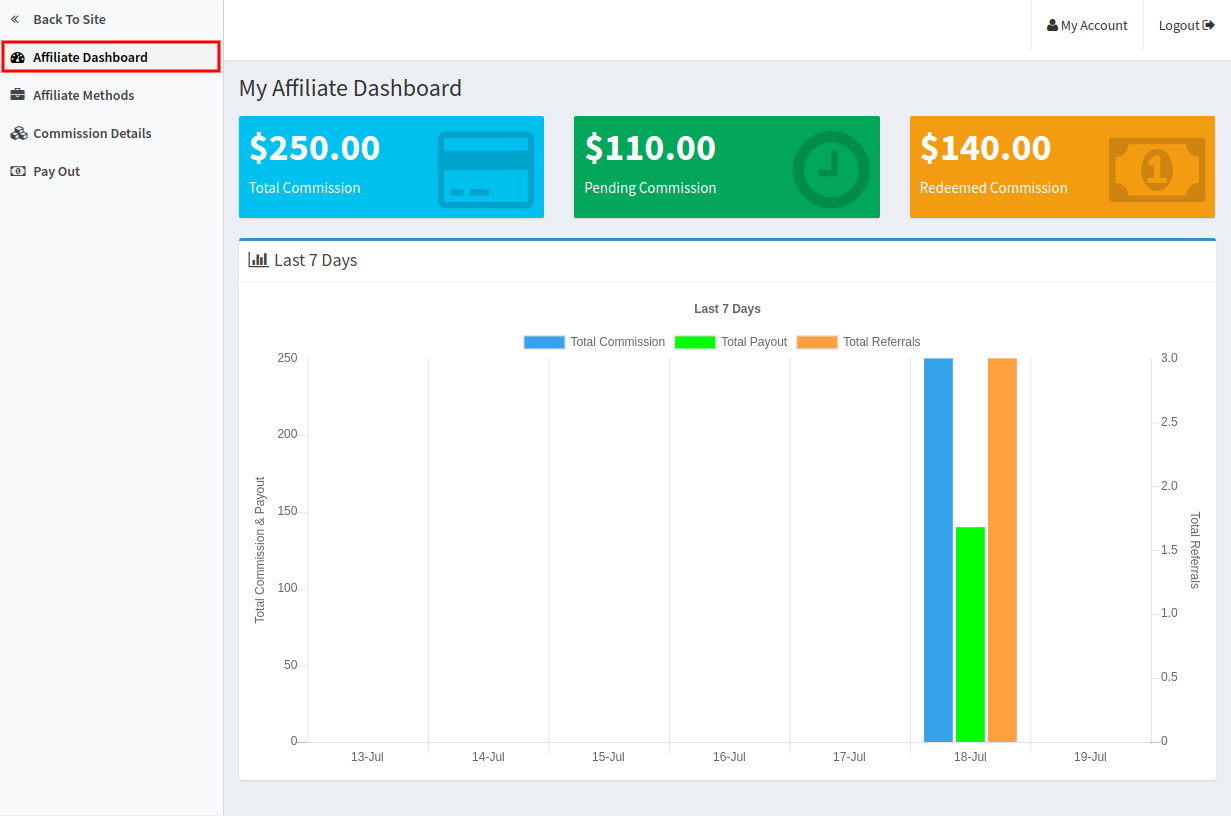
Affiliates can view an interface where they can view affiliate dashboard, available affiliate methods, commission details and payout section.

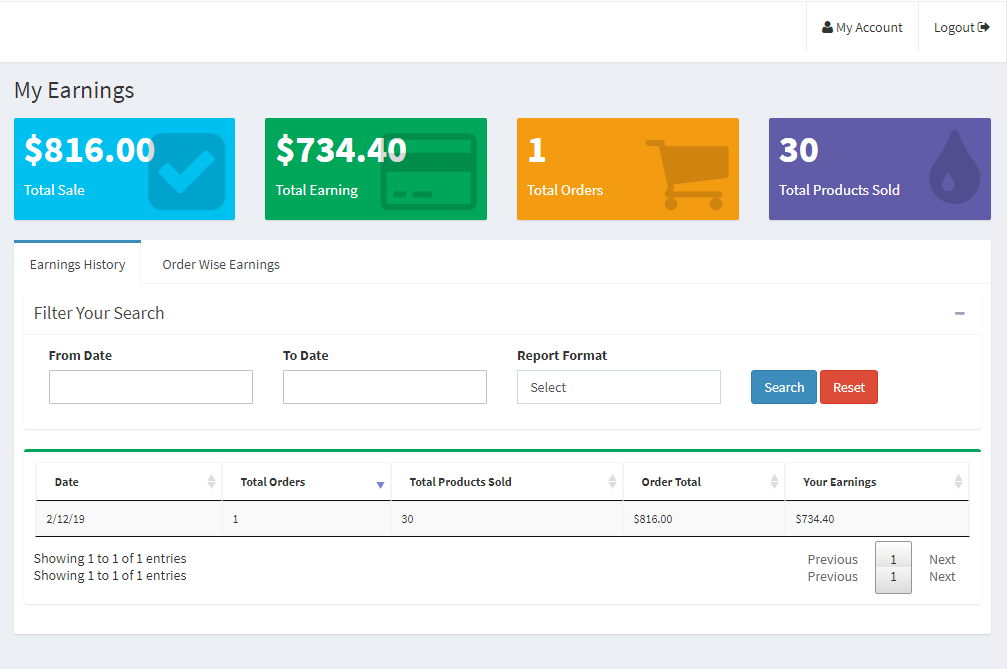
In the dashboard, affiliates can view total commission, redeemed commission and pending commission along with the graphical representation.
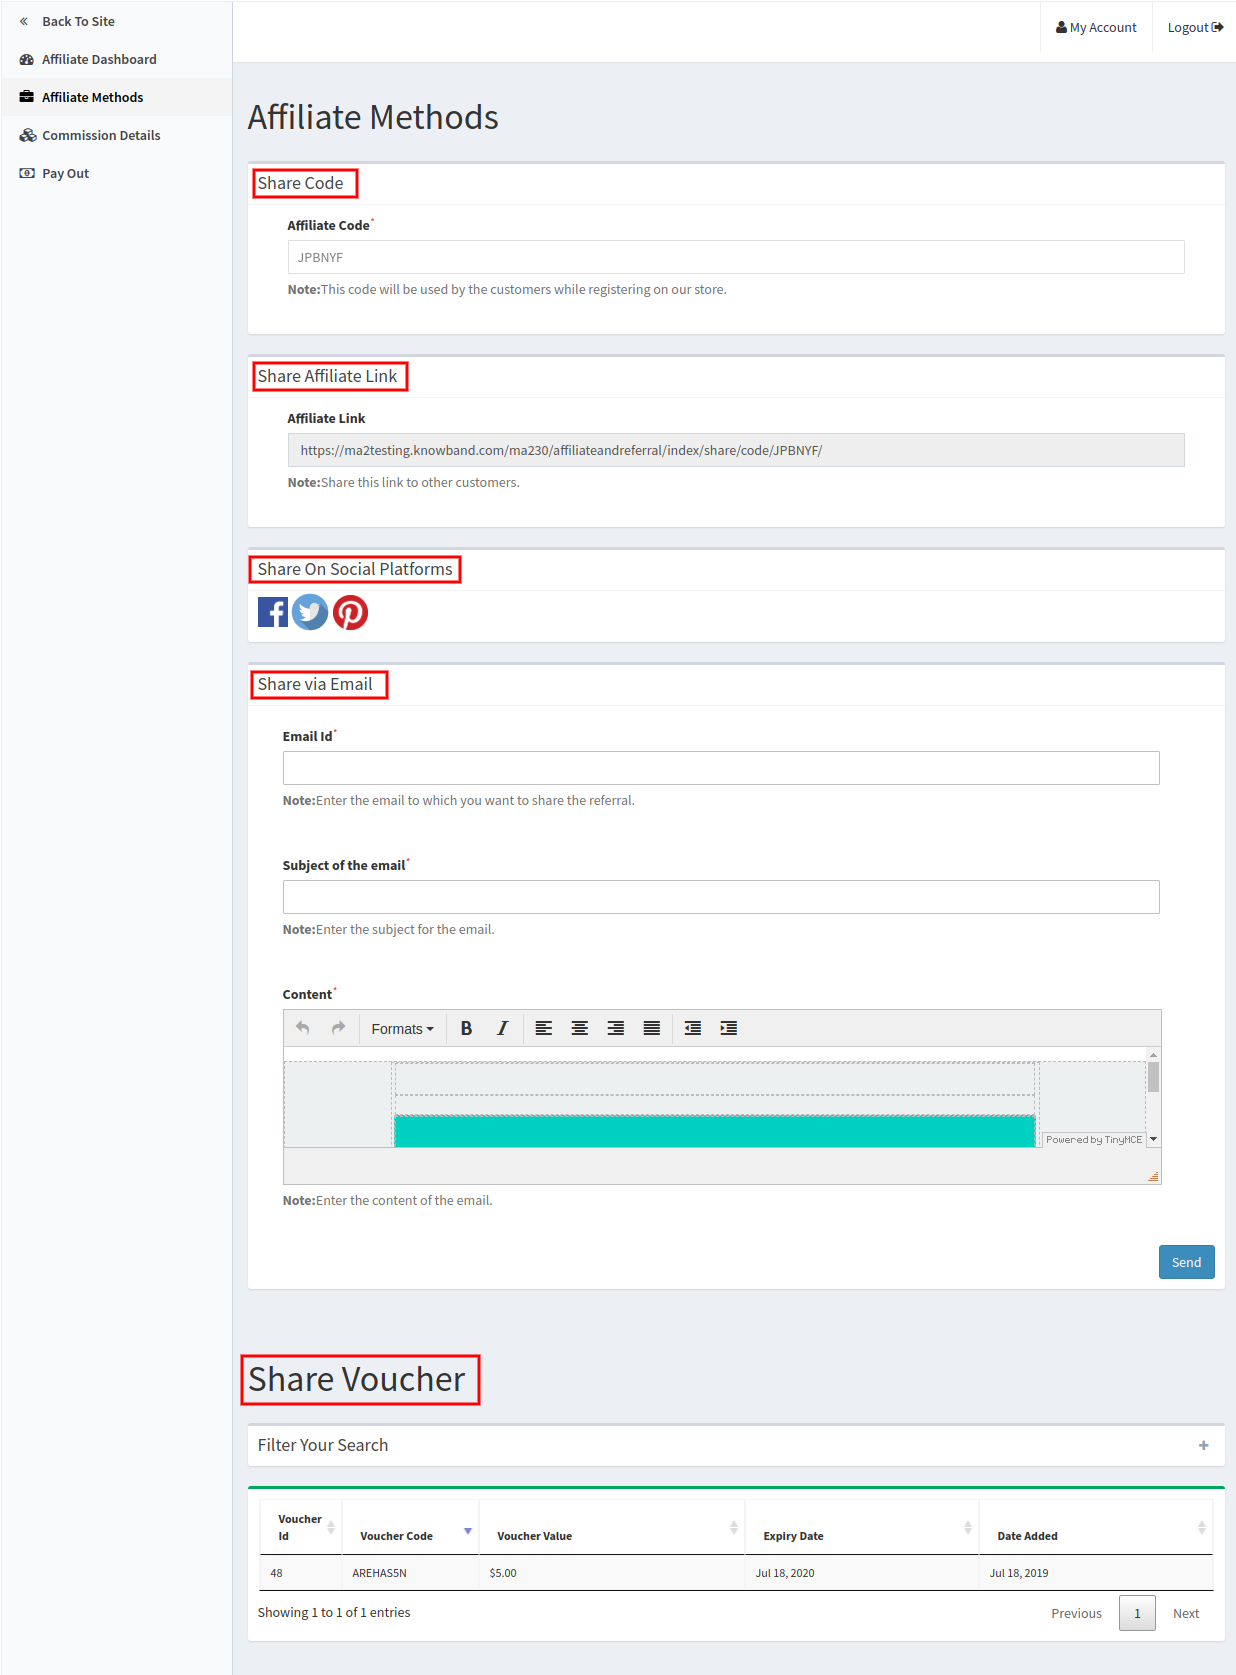
In affiliate methods, affiliate customer can check the available methods for referring to the website.

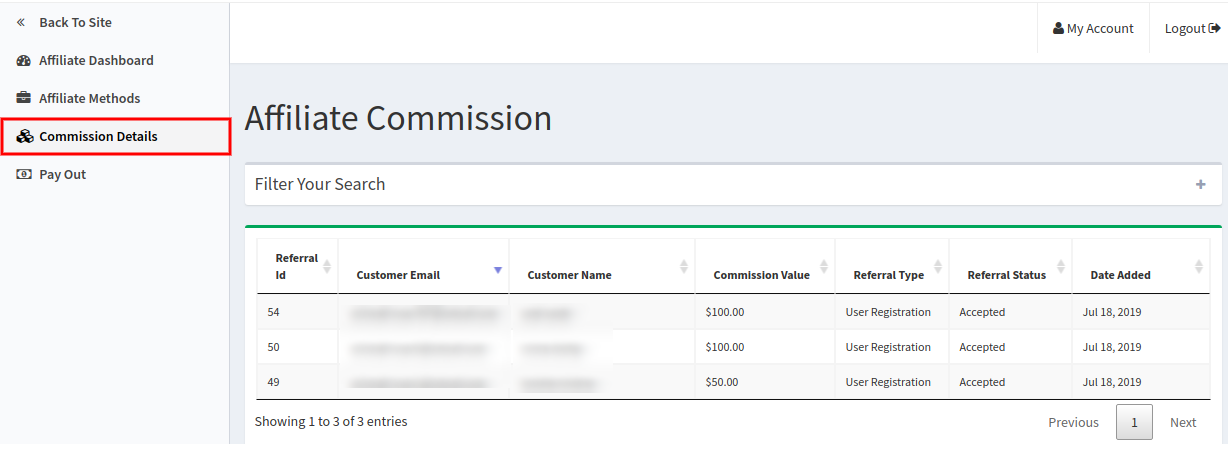
The affiliate customer can view commission details in which he can check the referral amount which he got from each referral. The affiliate customer can also view the referral status in the list.

  • Share Code: Admin can share the affiliate code with relatives and friends. They can enter this code while registration which is counted as a referral.
  • Share affiliate link: In this method, the affiliate customer can share the affiliate link. When an online user visits the store using this link and register/place order then is counted as a referral.
  • Share via Social Platform: Affiliate customers can also share the referral link using social media platforms like Facebook, Twitter and Pinterest.
  • Share via Email: Affiliates can send an email along with the affiliate link. Affiliates just need to enter the email id and subject line for sending an email.
  • Share voucher: Affiliates can also share the vouchers for referring the website. When any online user will apply the voucher code, this will be counted as a referral.
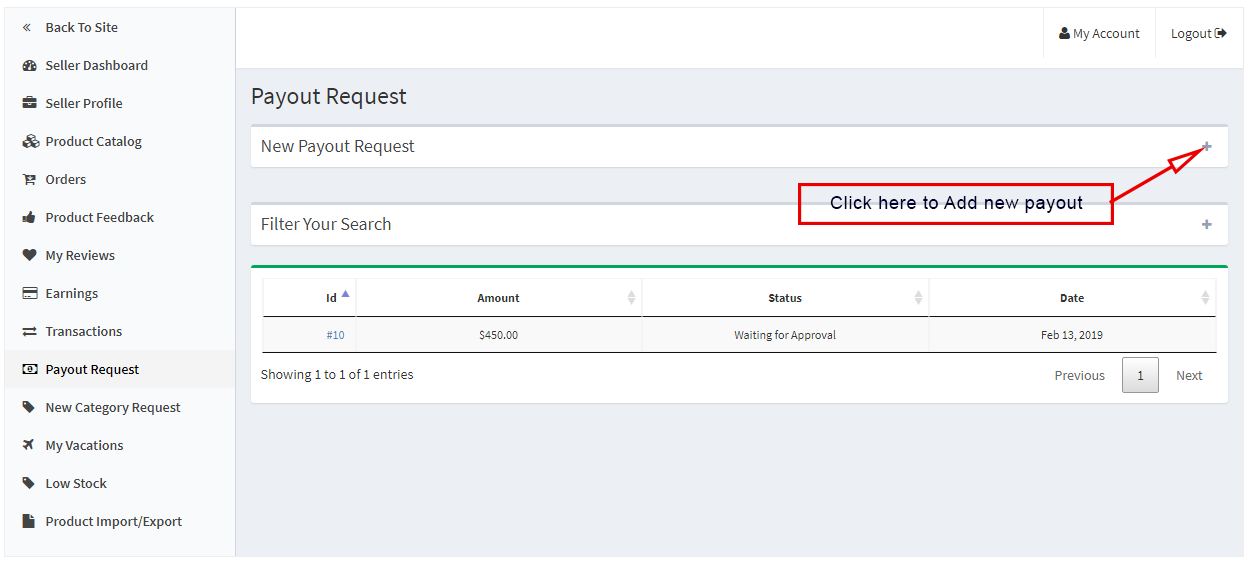
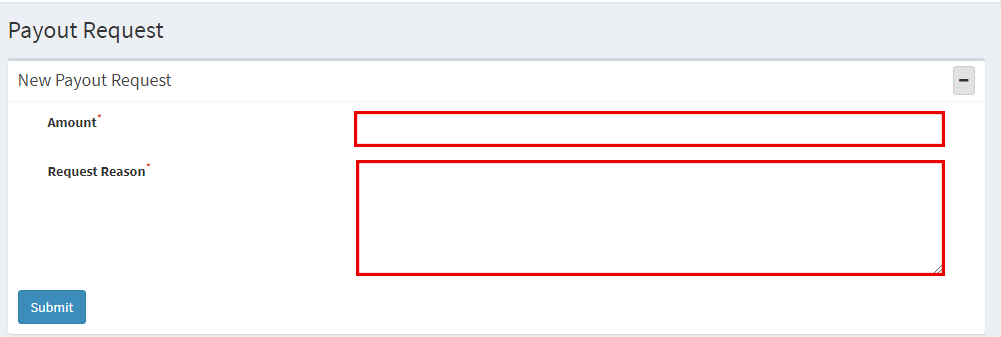
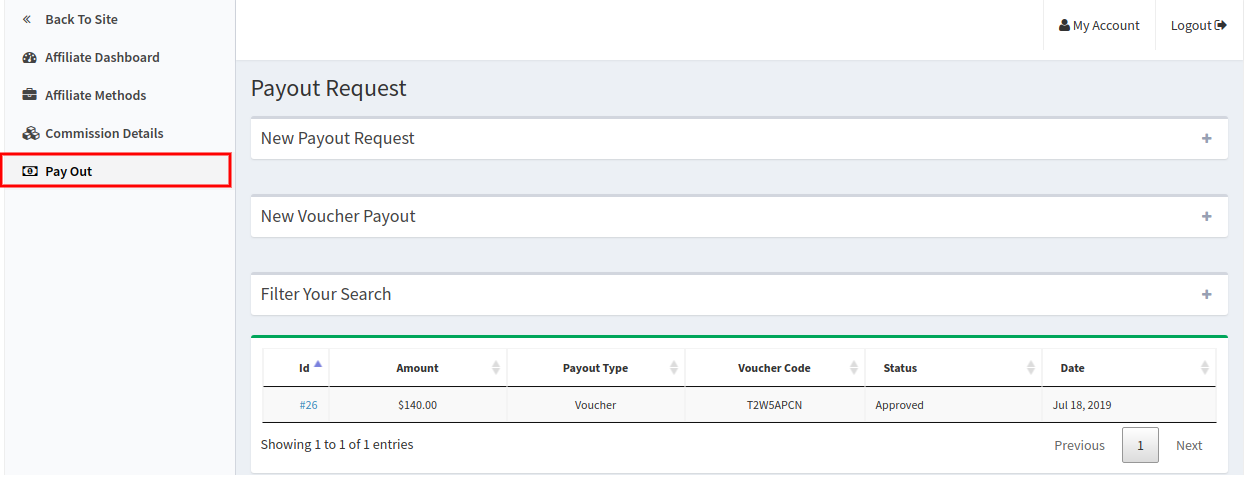
In payout Section, the affiliate customers can send a request for payment. There is no minimum amount of restriction on payouts. Affiliates can also generate voucher and shop the products from the website.
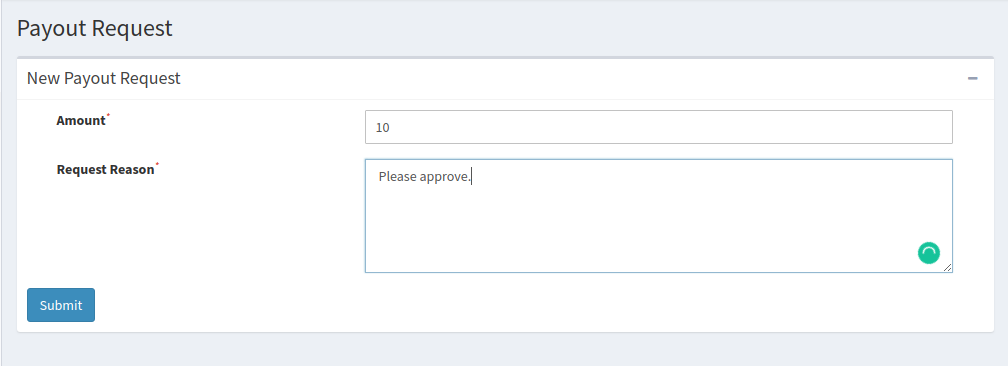
The affiliate customer can click on “+” and send payout request. After admin approval, the affiliate can get their payment.
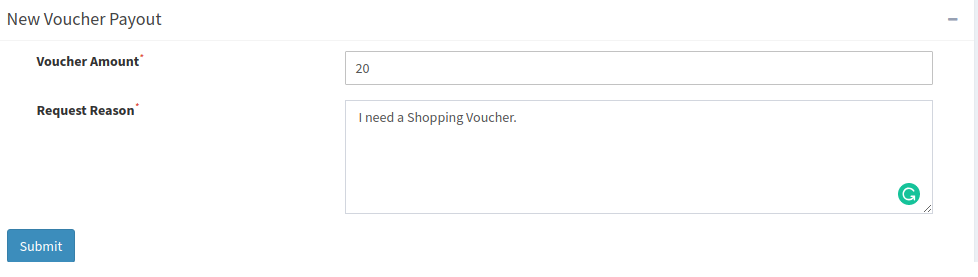
Affiliates can click on submit button and get the voucher code immediately.
This way Referral and affiliate marketing module for Magento 2 implements multi-level marketing functionality on the website. The customers can become an affiliate and earn a commission. On the other hand, the online store owner can increase website conversion rate, boost sales and improve customer domain with the help of affiliate users. The admin doesn’t need to implement any lengthy and complex process.

Steps to apply Referral code on Registration and place order:

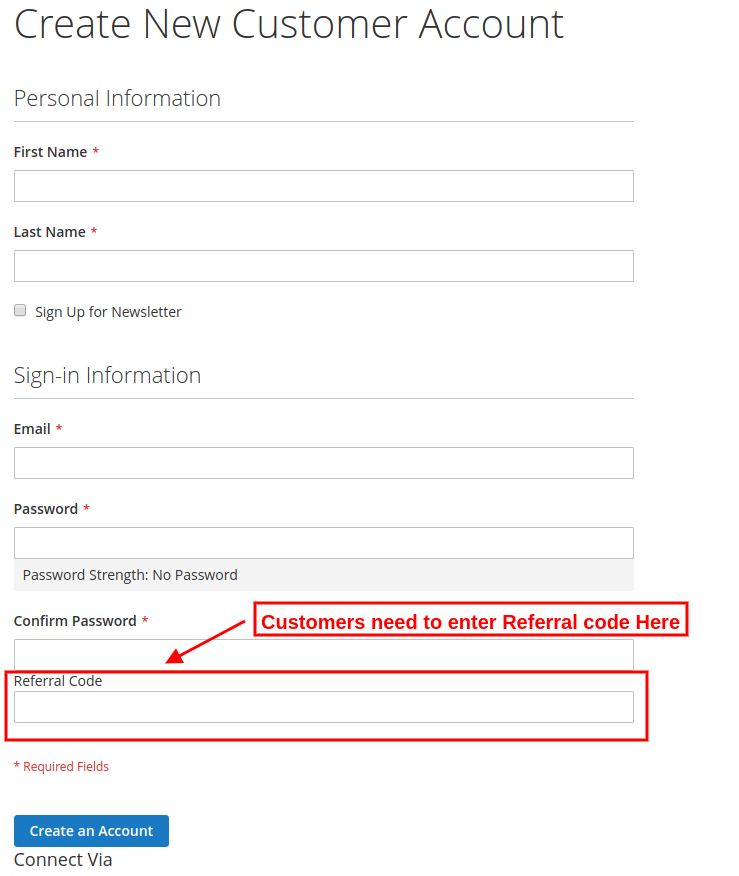
Once affiliate customer shares referral code, online users can enter this referral code at registration page as shown below:
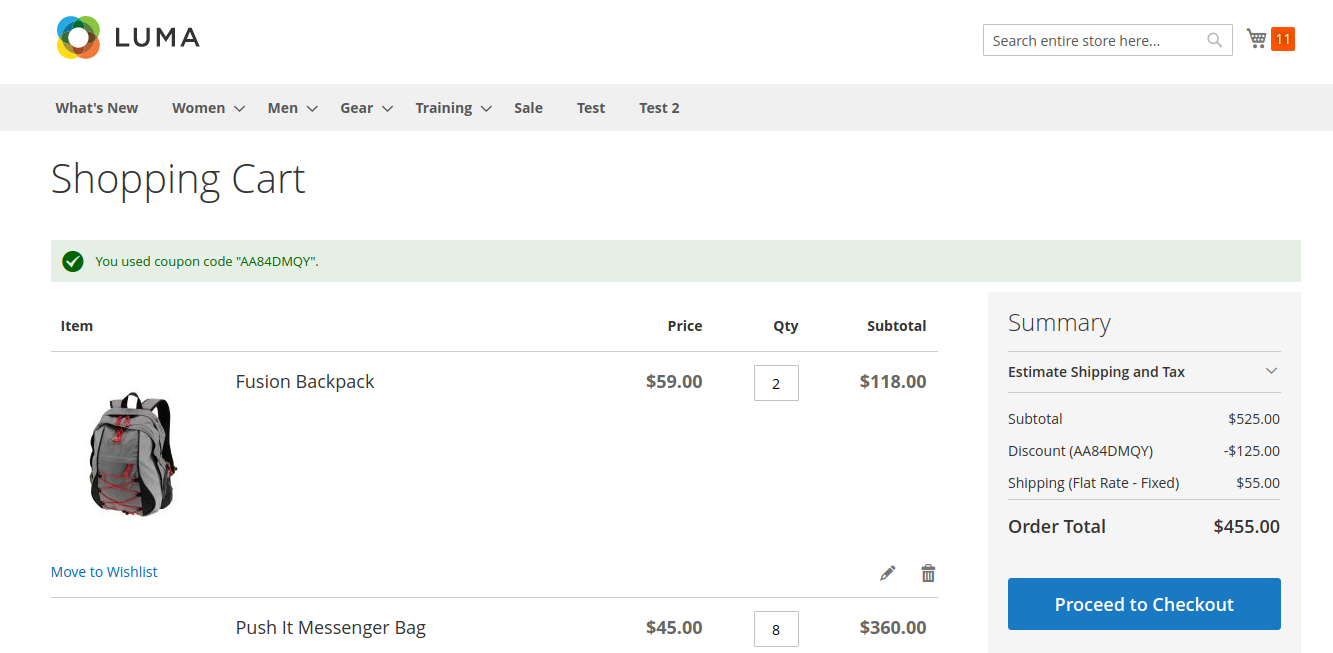
Online users can Place an order by applying the voucher code. The affiliate customer shares voucher and gets referral amount when an online user places an order using the shared voucher code.

Online users can apply this coupon which will be considered and the affiliate customer will get a referral bonus for this.
This way, the online store merchant can use this Magento 2 affiliate extension ane increase the number of users easily by implementing an affiliate system. The online users can share the referral code from various methods and ask their friends to register and shop from the website. The Magento 2 Refer to friend plugin allows offering multiple commissions to the users. Admin can offer commissions on every new signup and order places by the referrals. The Magento 2 customer referral module is highly customizable and provides a specific list of referrals and affiliate customers. Admin can easily view and take action without any hassle. The online users can send requests for payout or generate vouchers of their earned commission. This Social affiliate plugin for Magento 2 makes the overall process very easy for the customers and users.

For more details, please visit here:

Magento 2 Affiliate and Referral program extension Module Link

Magento 2 Affiliate Program extension Admin Demo Link

Magento 2 Referrals module Front Demo Link

For more support and information, feel free to contact us via email at support@knowband.com anytime.
Magento Instagram Shop Gallery Extension – User Manual

1.0 Introduction

Create a beautiful Instagram Gallery for your eCommerce store with Knowband’s Magento Instagram Shop Gallery Extension and boost the visitor engagement with your store. This Magento Instagram Shop Extension is an effective method to market your store products and thereby improving your site sales. With the highest user engagement, Instagram is been popularly used for branding business products and services. Likewise, you can also give the Instagram look and feel to your website to appeal the new and returning visitors at your online shop. This Instagram module for Magento builds your Instagram business profile and improves the user experience at your store.

1.1 Striking Features of Magento Instagram Shop Gallery Extension

This Instagram Shop Gallery Extension from Knowband is feature-rich extension offering you customizable features that can be configured without any technical knowledge. Let us quickly check the complete features of this Magento Instagram product tag feed module.
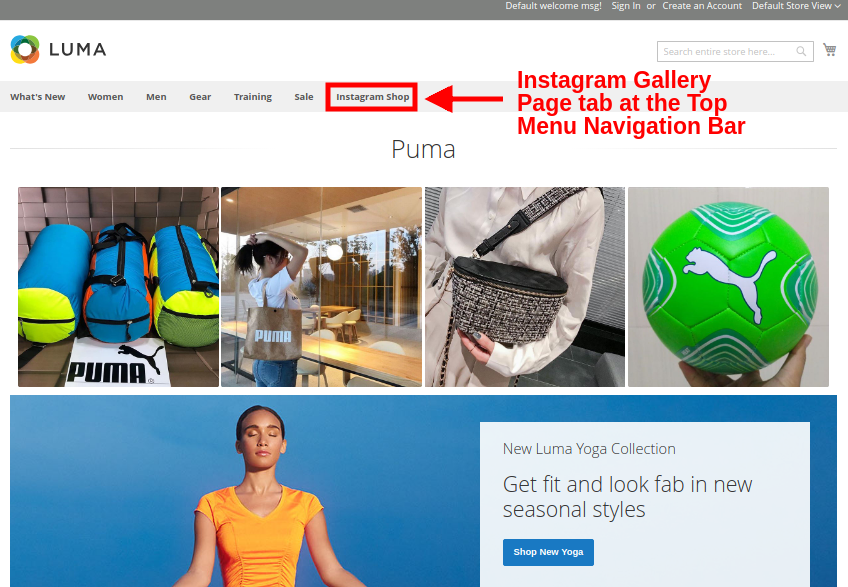
1. Magento Instagram Shop Gallery Extension incorporates an Instagram Shop Gallery at your eCommerce store.
2. With Magento Instagram Shop Extension, you can specify the particular tags to fetch the Instagram images and display them sorted into Instagram Gallery.
3. With Magento Instagram Integration Extension, you can filter fetched images by total images, approved images or images with shop products. The filtered results are shown on the website front.
4. The complete Instagram Image Gallery can be enabled or disabled from the back-office.
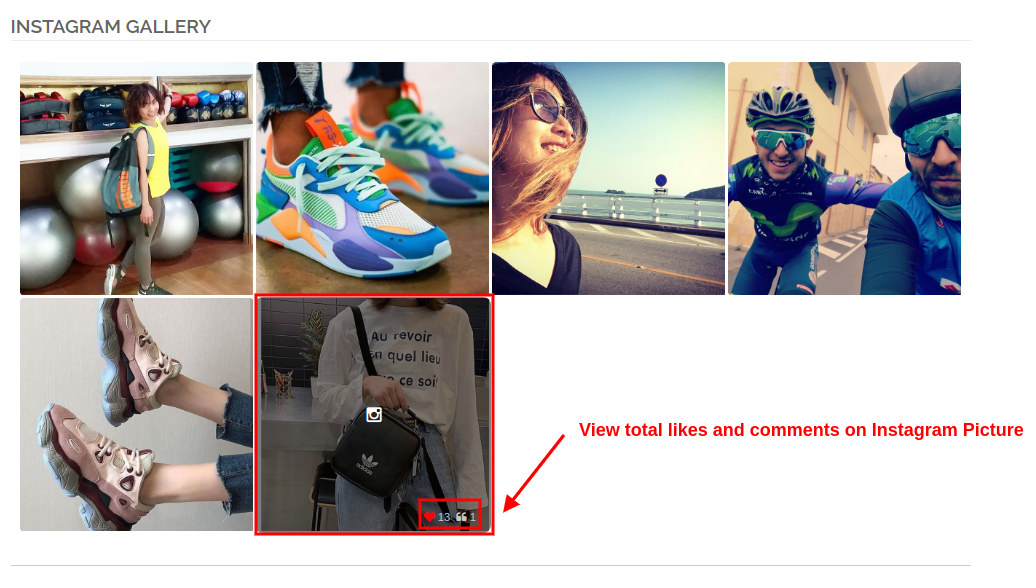
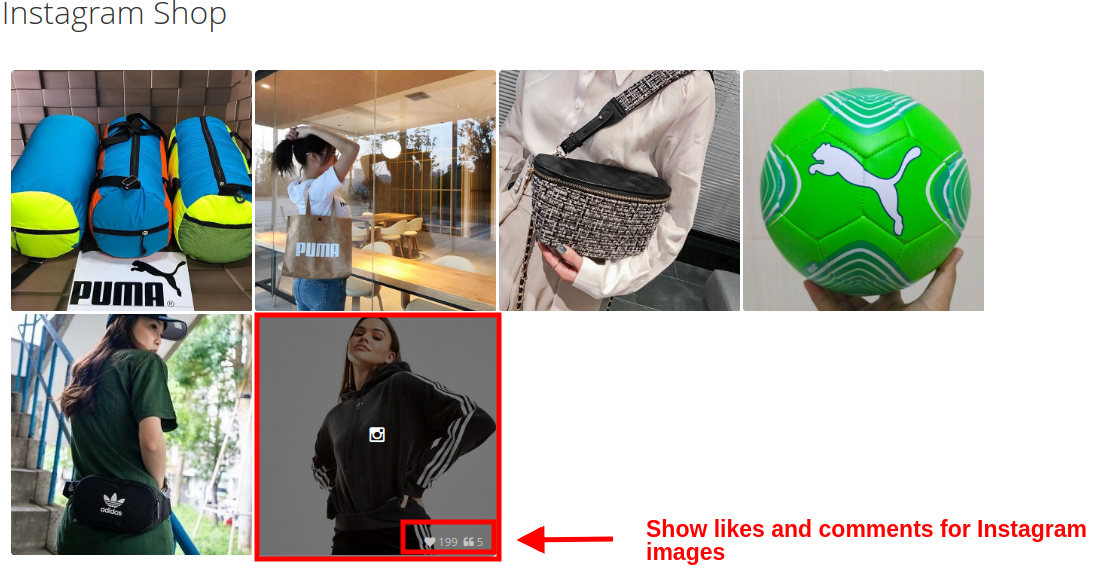
5. With Magento Instagram Shop Gallery Extension, you can show the likes and comments as the customer points over any of the Instagram Image
6. You can show or hide the main Instagram Gallery page from the backend of this Magento Instagram extension.
7. You can show or hide the Instagram Shop Gallery link in the footer section of the eCommerce website.
8. Instagram Gallery extension for Magento gives an option to set the title for Instagram Shop Gallery Page.
9. With Magento Instagram Module, you can show selected images on the main Instagram page which can be total photos, approved ones, having related images or having both approved and related images.
10. With Magento Instagram Shop Extension, you have the option to limit the number of images that can be shown on the Instagram Shop page.
11. You can even set a desired URL page key for this main Instagram Shop page.
12. You can create unlimited Instagram galleries with Magento Instagram product tag feed module which can be modified and deleted as required.
13. With Magento Instagram Shop Gallery Extension, you can set title, image limit and image visibility for the particular Instagram gallery.
14. You have the option to show or hide the selected image gallery on the main Instagram Shop page.
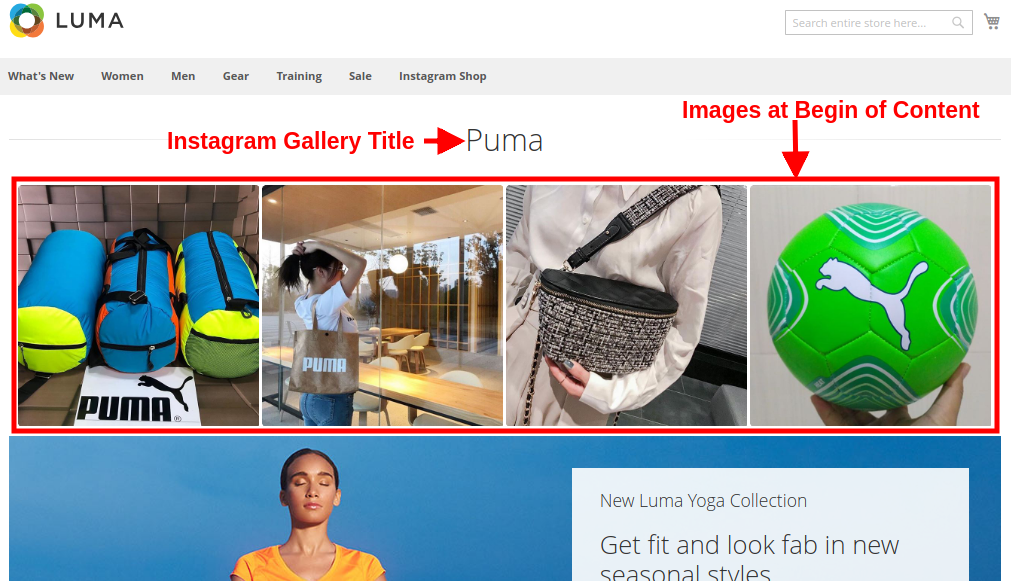
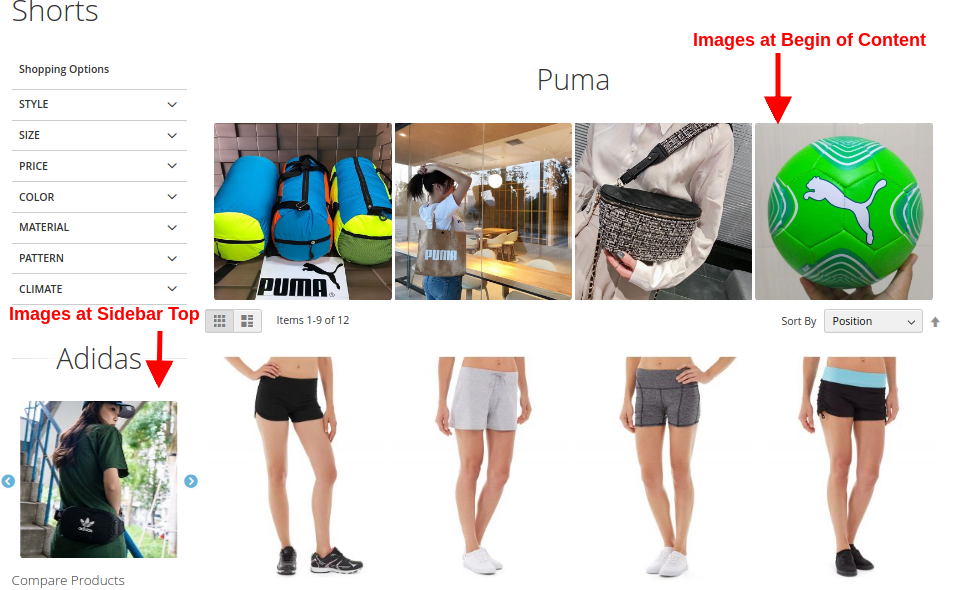
15. Magento Instagram product tag feed module allows you to set Instagram gallery visibility at different locations of different site pages.
16. You can add ‘N’ images to an Instagram gallery which can be edited or deleted anytime from the back-office of this Magento Instagram Integration Extension.
17. With Magento Instagram Shop Extension, you can set a sort order for the images in a Instagram Gallery.
18. Magento Instagram module allows you map and pin any site products with the Instagram image.

1.2 Technology for Development

Language: PHP
Frame Work: Magento

2.0 Installation Guide for Magento Instagram Shop Gallery

1. Once after purchasing Magento Instagram Shop Gallery Extension from the Knowband store, you will get the following files on your registered email.

  • Source code file of Magento Instagram Shop Extension in zipped file format.
  • User Manual of Instagram Shop Gallery Extension.
    Download the files.

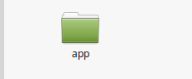
2. Unzip the package in the root folder of your Magento setup via FTP manager (like Filezilla or WinSCP – download here: https://filezilla-project.org/). You’ll find the files and folders as shown in the image below:

The Magento Instagram Shop Gallery Extension is now installed for your store and is ready to configure without any coding hassles.

3.0 Admin Interface of Magento Instagram Shop Gallery Extension

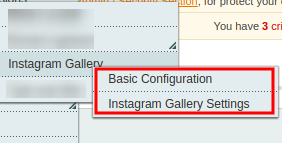
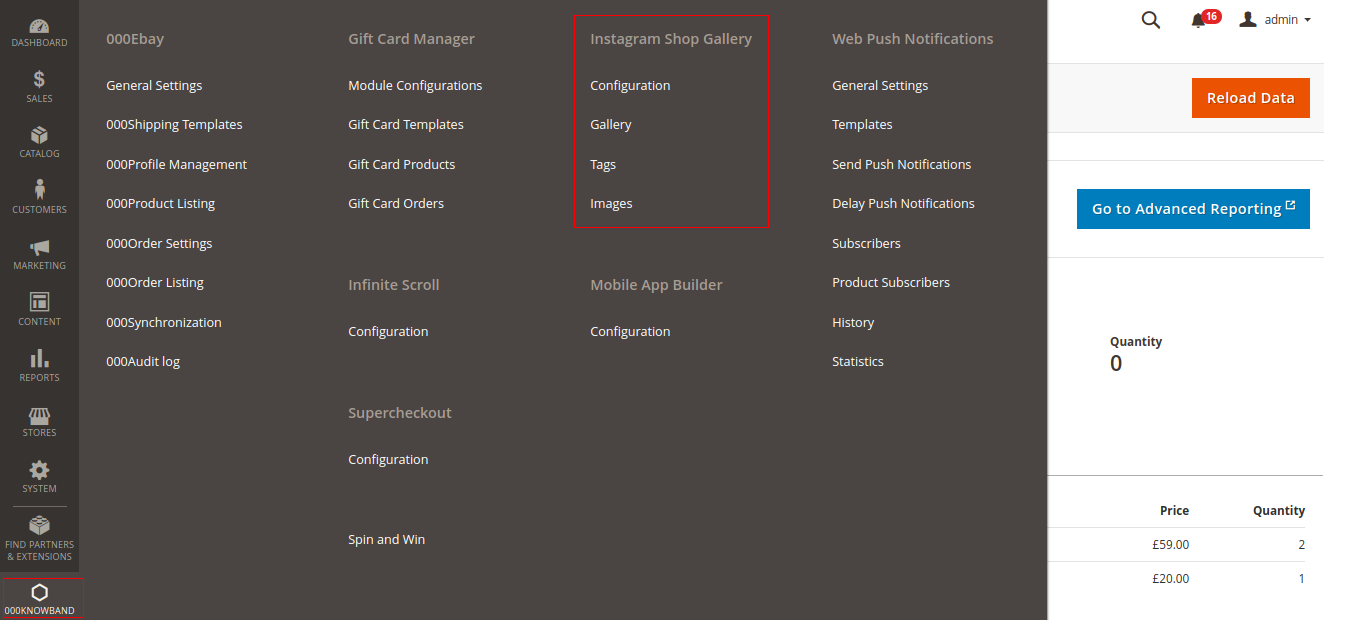
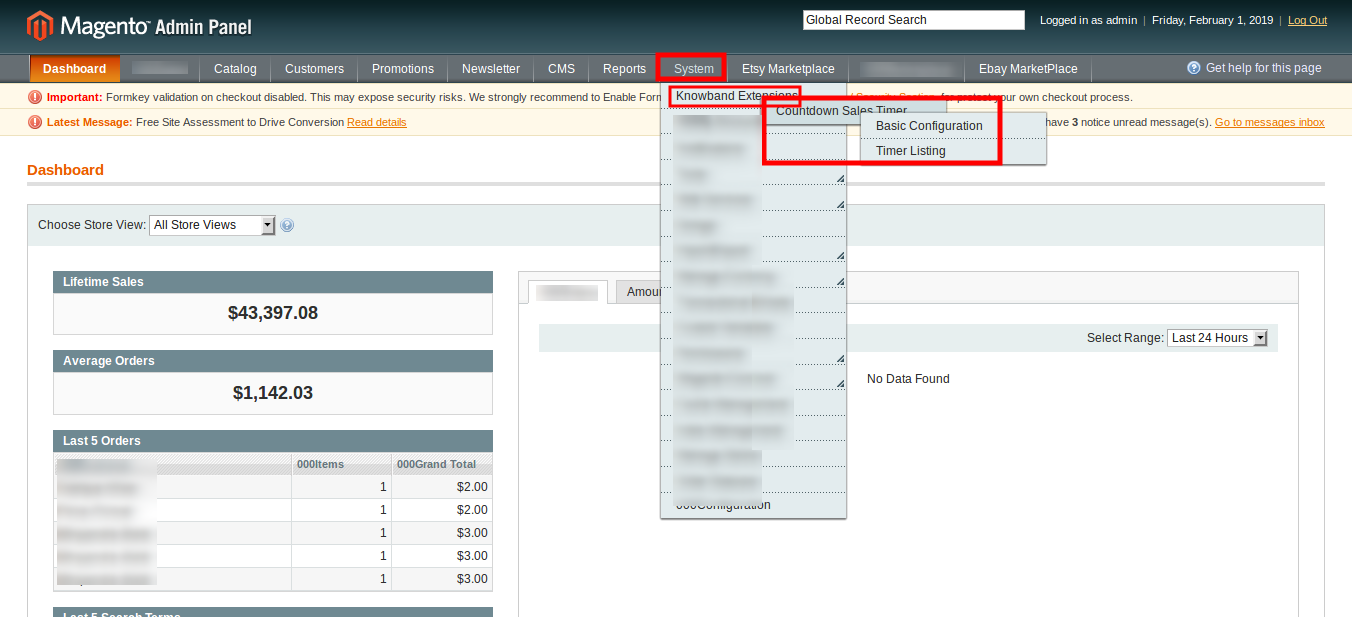
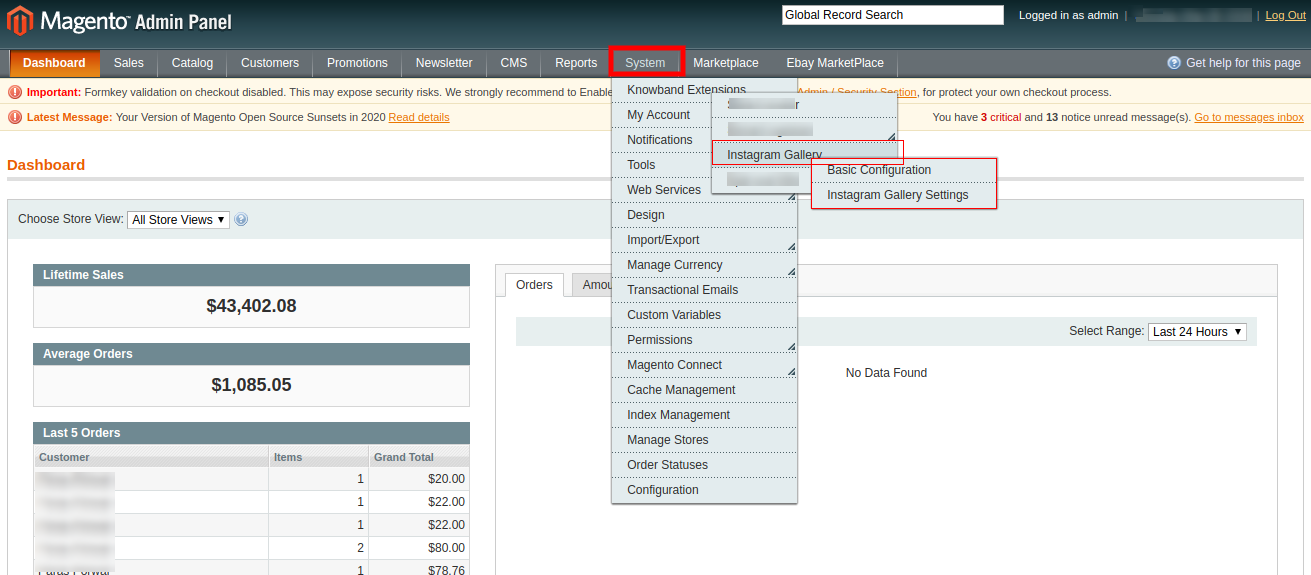
Once you have successfully installed Magento Instagram Gallery Module on your website, you can display unlimited Instagram image posts at different pages of your store as required. Further, to configure this Magento Instagram module, navigate the module settings in the given order: Admin Panel > System> Knowband Extensions > Instagram Gallery

The easy to understand admin interface of Magento Instagram product tag feed plugin has been divided into two broad sections as:

1.Basic Configuration
2.Instagram Gallery Settings

Each of these sections has been discussed in detail below.

3.1 Basic Configuration Settings

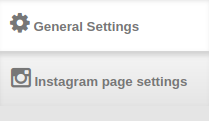
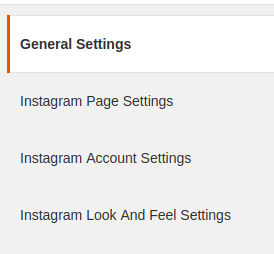
The configuration settings of this Magento Instagram Shop Extension is sub-divided into two sections as:
1.General Settings
2.Instagram Page Settings

Each of this sub-section has been discussed in the next section 3.1.1 and 3.1.2

3.1.1 General Settings

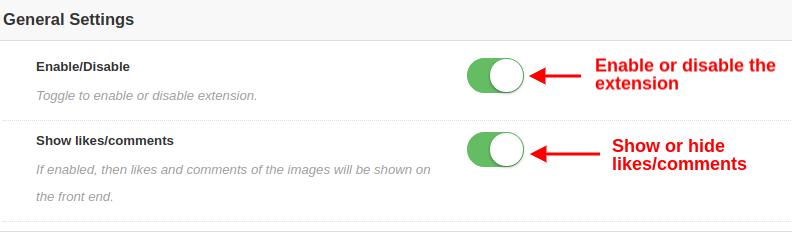
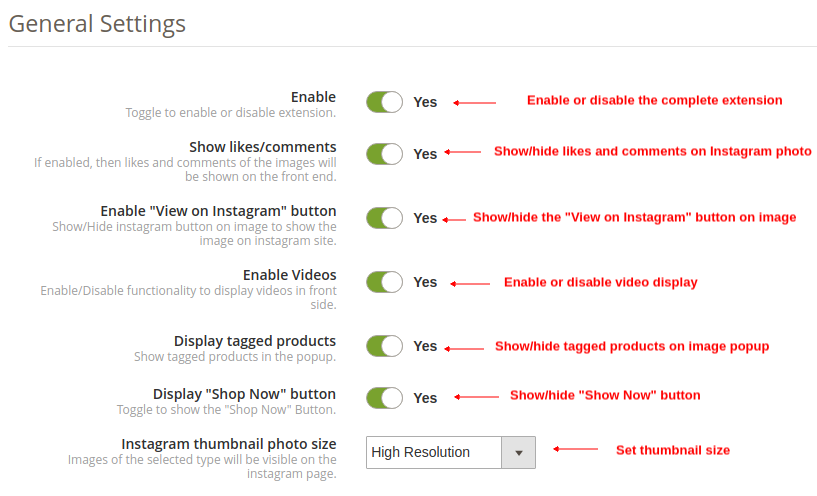
In the general settings of the Instagram Shop Gallery for Magento, you will get the following configuration options as given below:

  • Enable/Disable: With this button, you can easily enable or disable the whole functionality of Magento Instagram Integration Module for your eCommerce store.
  • Show Likes/Comments: Using this option, you can enable or disable the likes and comments for any Instagram feed. If enabled, the likes and comments for the particular post will be visible on the frontend to the customers.

3.1.2 Instagram Page Settings

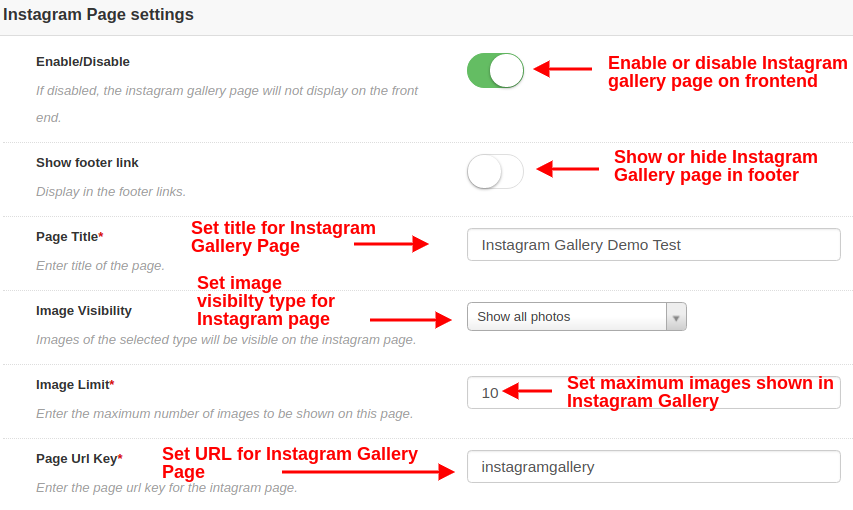
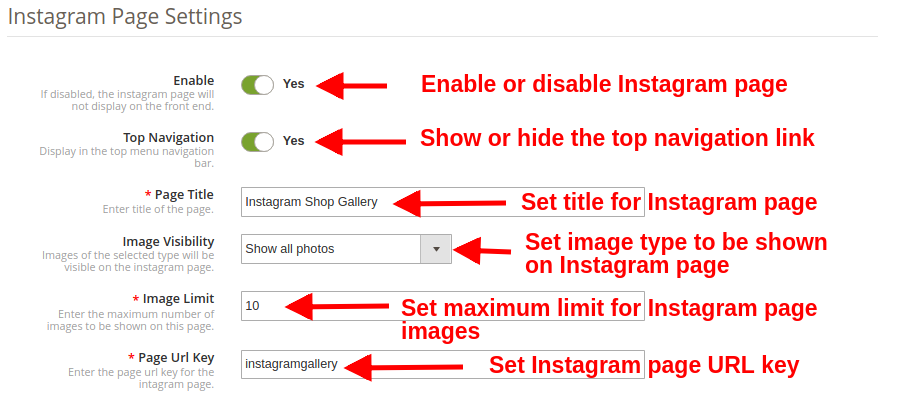
Under this section of Magento Instagram Integration Extension, you can configure the settings of main Instagram Page which will display all the fetched Instagram images at your store.

  • Enable/Disable: This option will enable or disable the main Instagram Gallery Page shown at the frontend of the website.
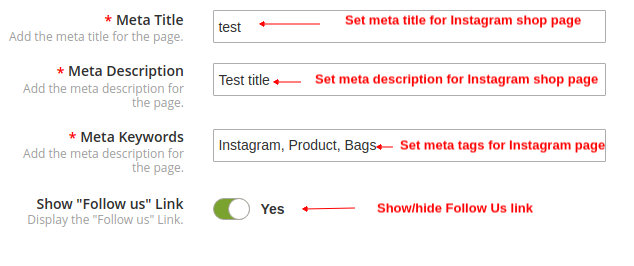
  • Show Footer Link: With this option, you can show or hide the Instagram page link in the footer section of website. If enabled, the Instagram gallery link is shown in the footer section of website.
  • Page Title: This option will allow you to set a desired title for the Instagram Shop Gallery Page.
  • Image Visibility: This option decides which category of images will be shown on the main Instagram page. You can set any image type out of these four options:
    a. Show all photos
    b. Only approved
    c. Have related product
    d. Approved and related product

Note: The total images can be managed from the “Gallery Settings” discussed in next section 3.2

  • Image Limit: With this option, you can set the maximum number of images which will be shown on the Instagram Gallery page.
  • Page Url Key: Using this option, you can set a custom URL key for the Instagram Shop Gallery Page.

3.2 Gallery Settings

The total Instagram images which are displayed at the front of the website can be configured and managed from this section of Magento Instagram Module. You can fetch as many images using different tags and create different Instagram Galleries. You also have the option to edit the settings of the Instagram gallery. You can manage the related products which will be shown with each of the Instagram Images.

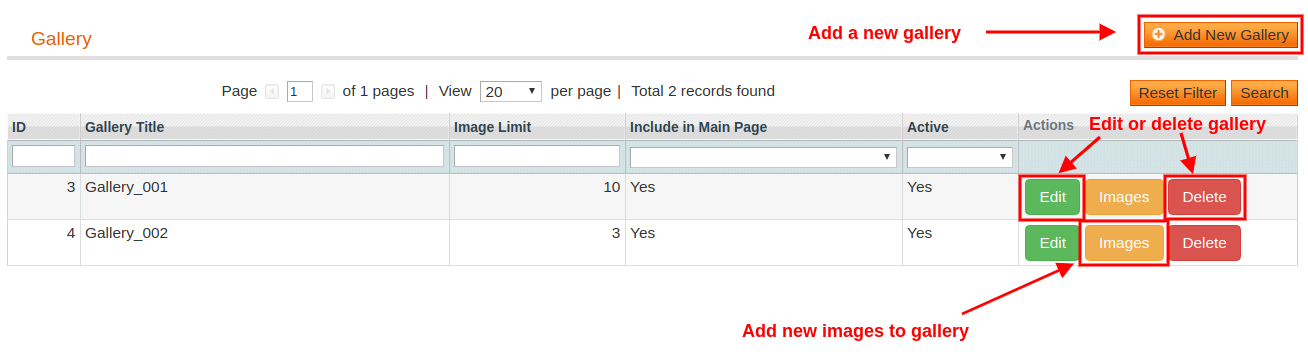
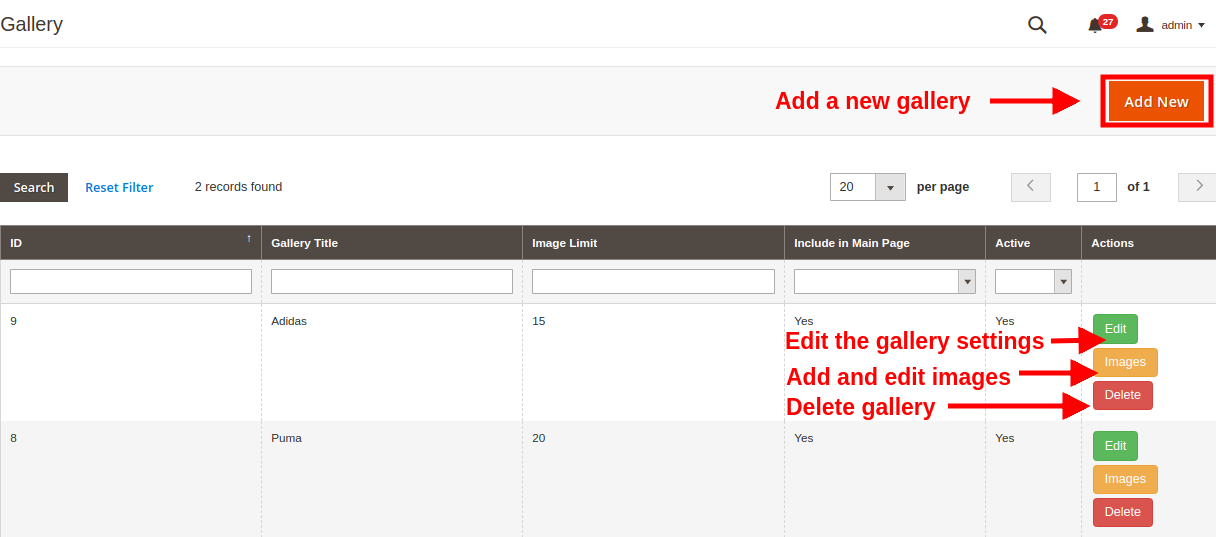
The below interface gives you a list of existing Instagram Gallery which can be edited or deleted. You can edit the existing images or you can add new images to the Instagram gallery.

From this interface, you can perform the following set of actions:

3.2.1 Add a New Gallery

To add a new gallery, click on “Add New” button at the top right corner of the screen.

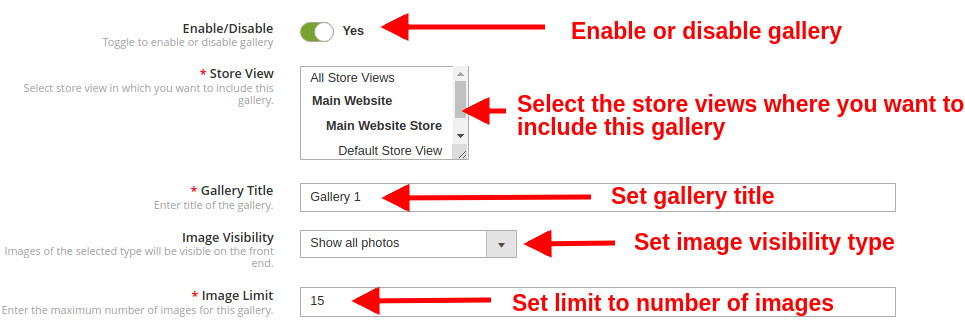
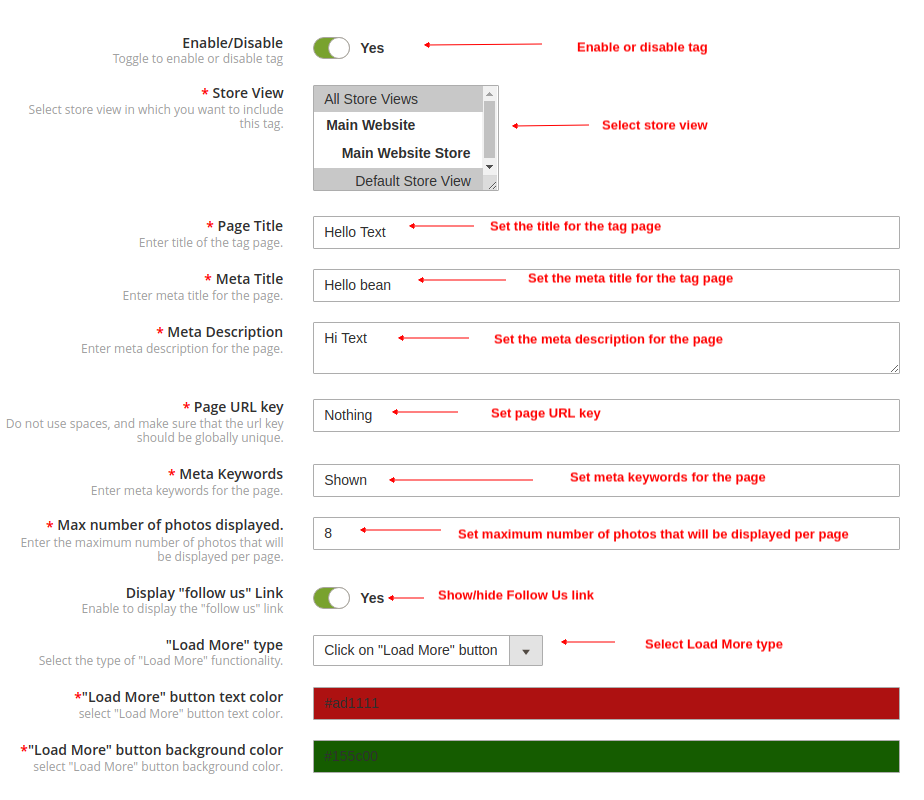
  • Enable/Disable: This option will enable or disable the selected Instagram gallery.
  • Gallery Title: With this option, you can set the desired title for the gallery.
  • Image Visibility: With this option, the images of the selected type will be shown on the frontend of the website.
  • Image Limit: Using this option, you can set a maximum number of image limit which will be shown in the gallery.
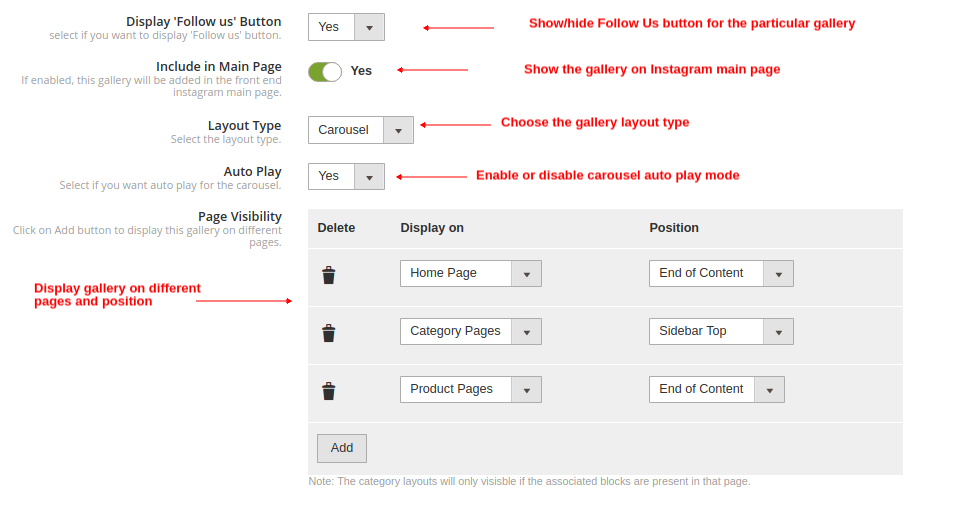
  • Include in Main Page: You can enable this toggle field if you want this gallery to be shown at the main Instagram page on the front.
  • Page Visibility: This option helps you can set visibility of Instagram gallery on various pages at different locations. Simply Click on Add button to display this gallery on different pages.

3.2.2 Edit the Existing Gallery Settings

Now if you want to edit the existing settings of the gallery, click the “Edit” button corresponding to the gallery you want to configure.

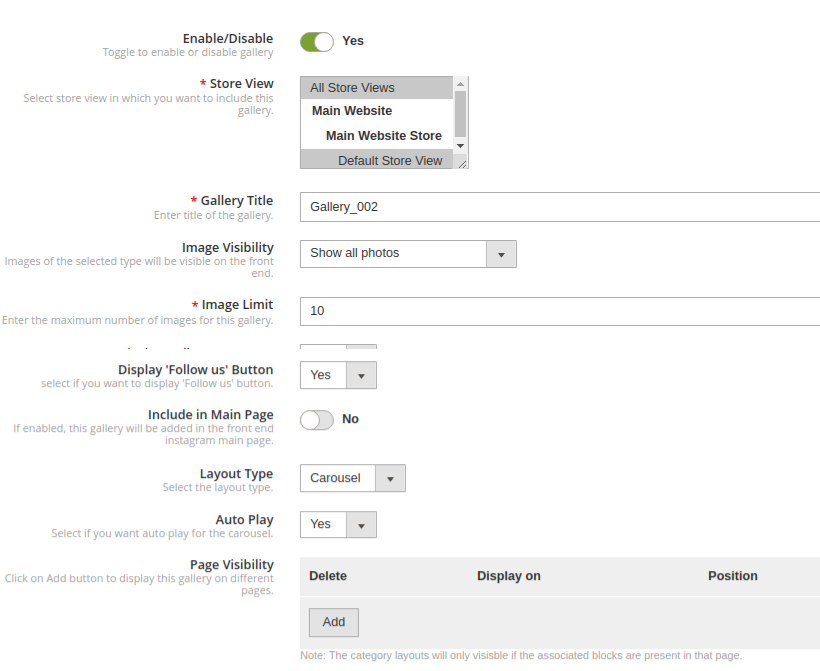
  • Enable/Disable: You can toggle this button to enable or disable the Instagram gallery.
  • Gallery Title: This option allows you to set a custom title for the Instagram gallery.
  • Image Visibility: With this option, you can select the visibility type for the images shown on the frontend.
  • Image Limit: Using this option, you can set the maximum number limit of images for this gallery.
  • Include in Main Page: By enabling this toggle field, you can add this gallery on the main Instagram page at front.
  • Page Visibility: With this option, you can set visibility of Instagram gallery on various pages and on different locations. Simply Click on Add button to display this gallery on different pages.

3.2.3 Add and Edit Images

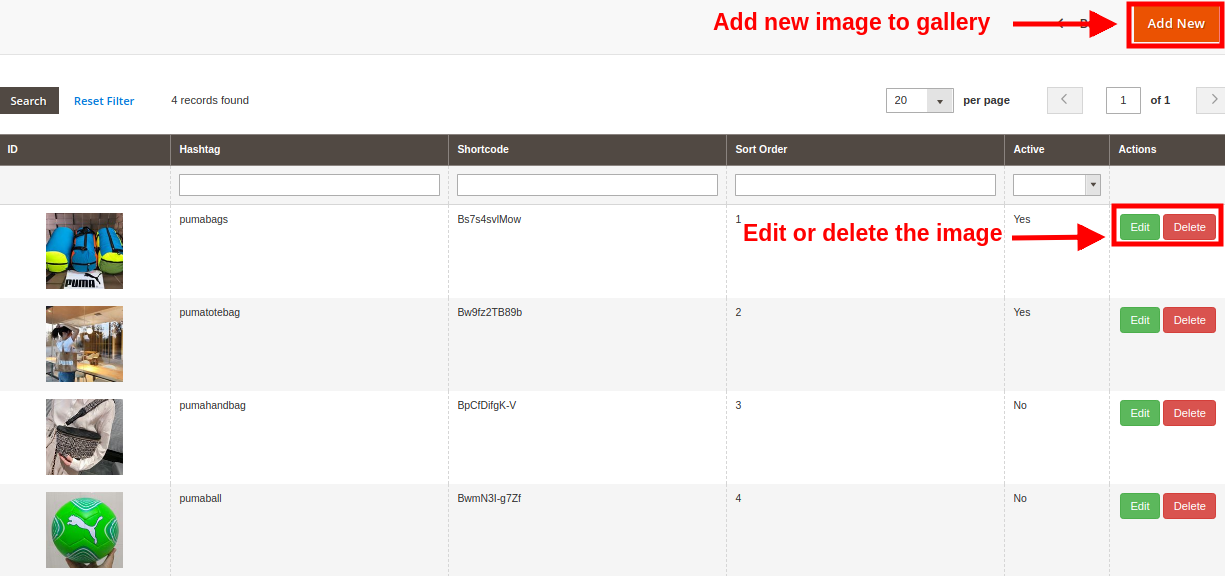
You can add as many Instagram images to a gallery by clicking on the “Images” button corresponding to the gallery.

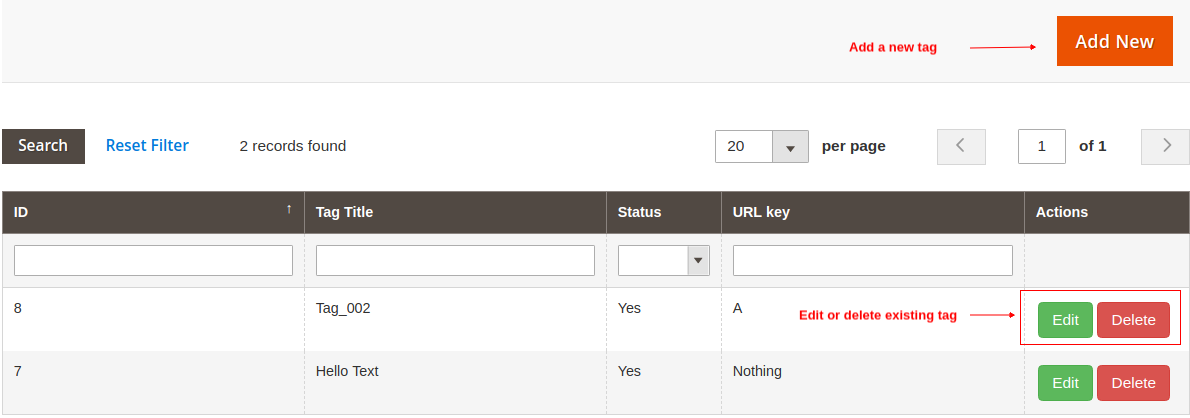
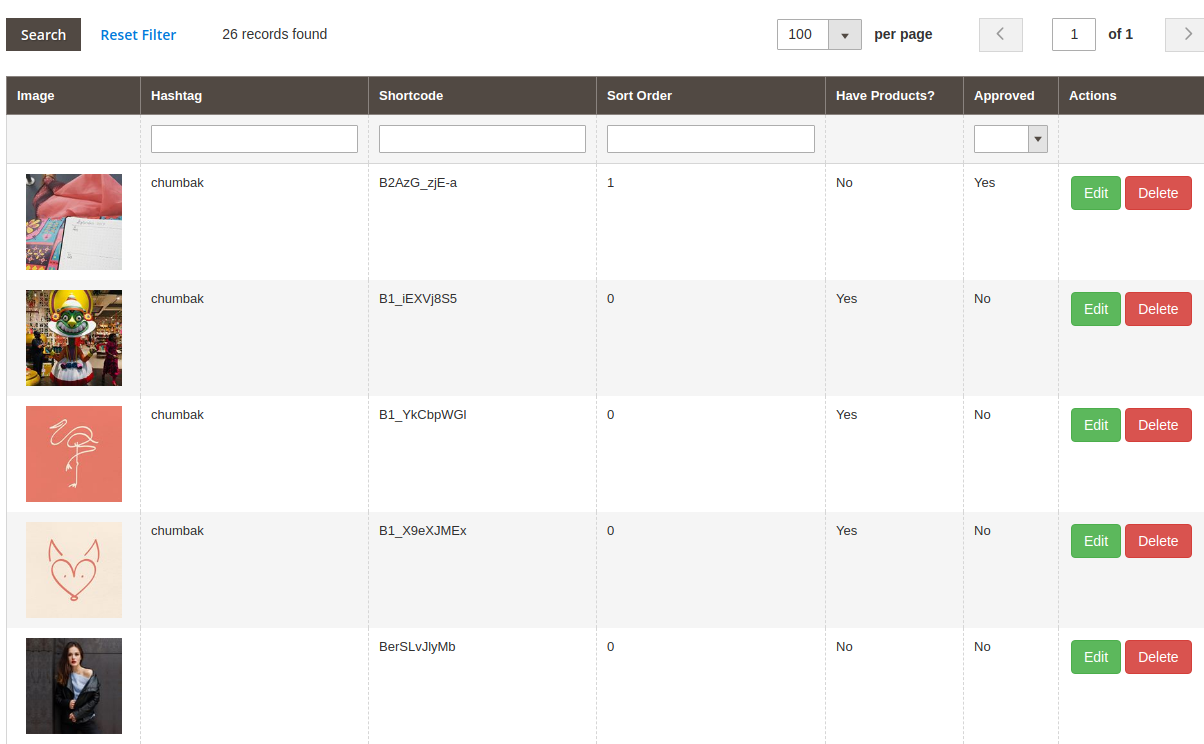
The above screen shows you a list of existing Instagram gallery images. You can add new images, modify or delete the existing images.
Note: Deleting an image is easy, you just have to click the “Delete” button corresponding to the image.

3.2.3.1 Add New Image

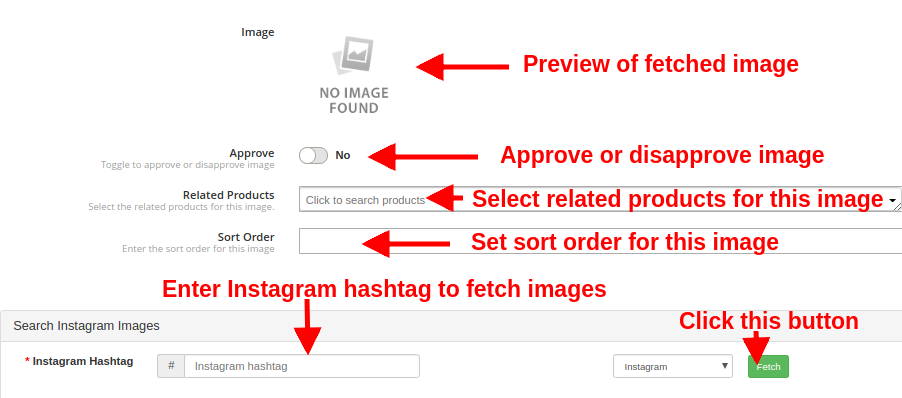
To add a new image to the Instagram Gallery, click on “Add New Image” button at the top right side of admin panel and fill the following fields:

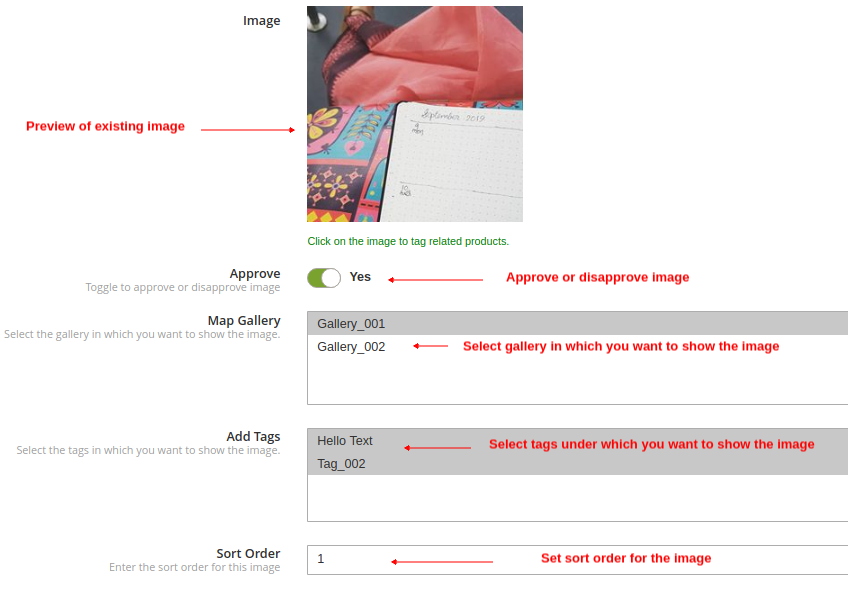
  • Image: This option will allow you to check the preview of the fetched Instagram image.
  • Approve: With this option, you can approve or disapprove the selected Instagram image.
  • Related Products: With this option. You can select the related site products that you want to pin with that Instagram image.
  • Sort Order: This option lets you set the sort order of image on the Instagram gallery page.
  • Instagram Hashtag: Enter the Instagram hashtag to find or fetch the relevant images and then click on “Fetch” button.
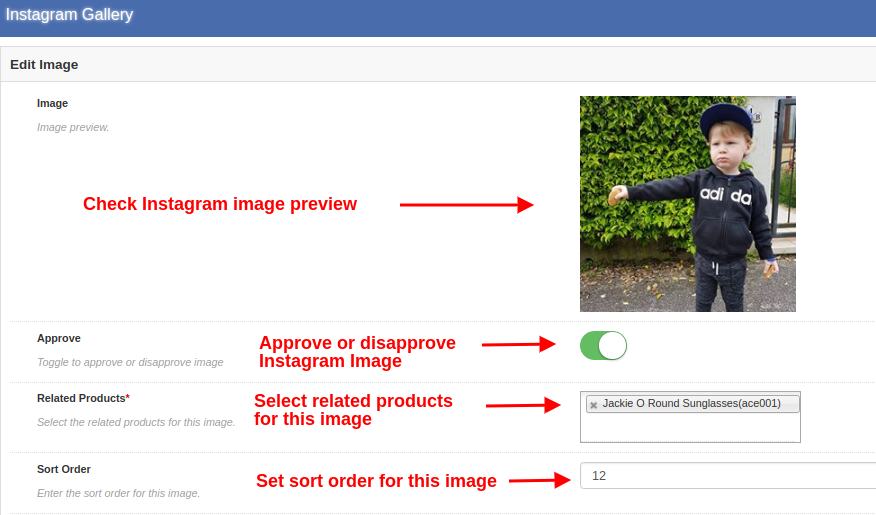
3.2.3.2 Edit an existing image

  • Image: This option lets you check the preview for the fetched Instagram image.Approve: With this option, you can approve or disapprove the image.
    Related Products: This option allows you to select the related products that you want to show for that image.
    Sort Order: This option lets you set the sort order of image.

3.2.4 Delete the Existing Gallery

Deleting a gallery is simple, you just have to click the “Delete” button corresponding to the desired Instagram gallery as shown in the image below:

4.0 Front Interface of Instagram Gallery Module for Magento

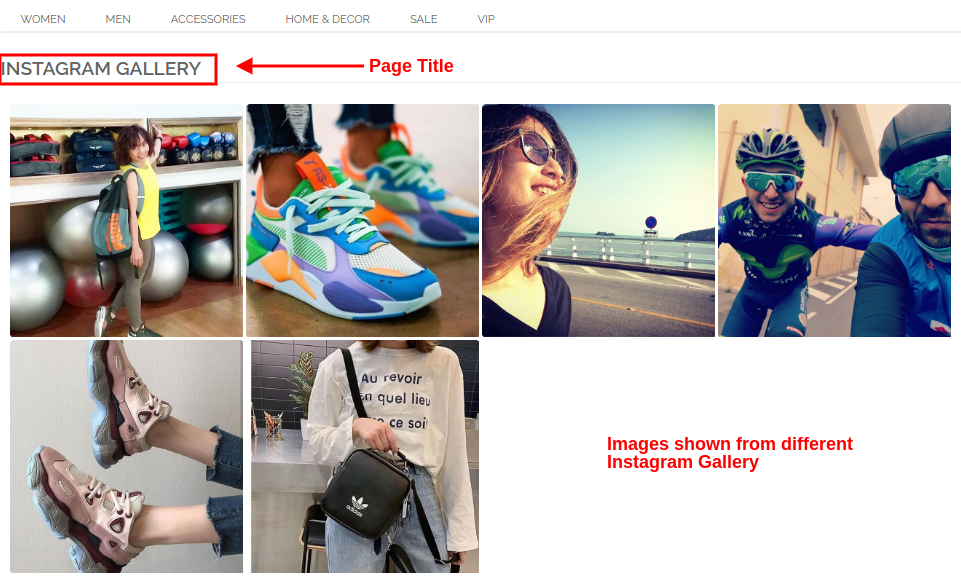
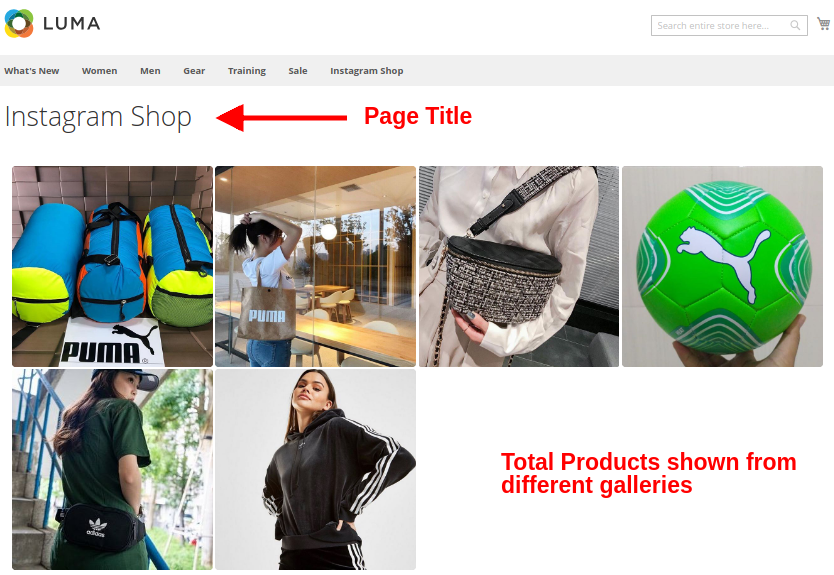
A) Instagram Shop Page

Customers will see this Instagram Gallery option in the footer section of the website.

Upon clicking the tab, they will be redirected to the Instagram Shop Page with URL key as:
“https://yourstore.com/mage1934/index.php/instagramgallery/”
This URL can be defined as per your own site needs. The Instagram Shop Gallery looks like in the image below:

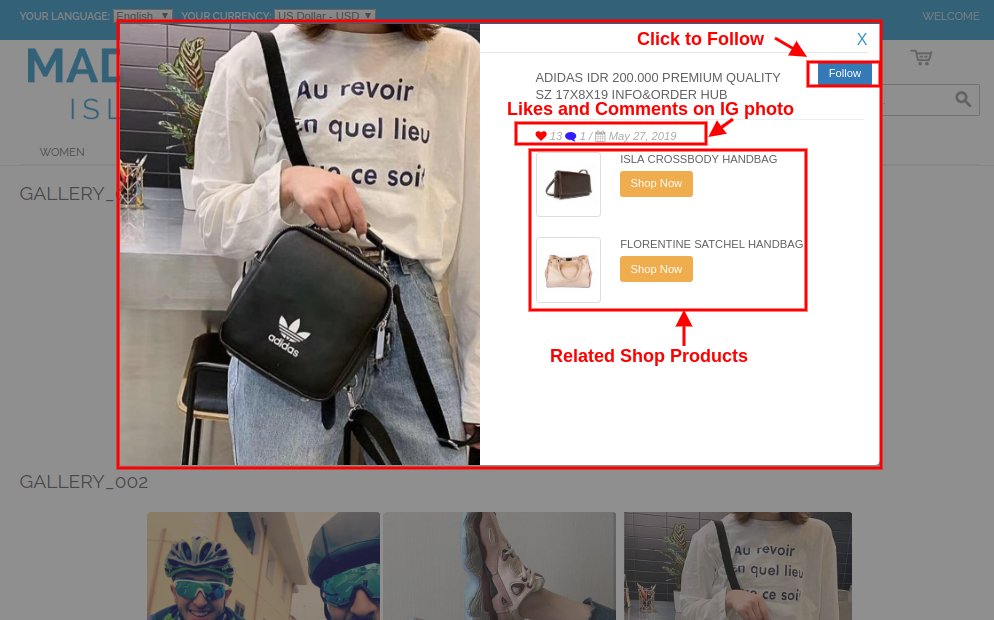
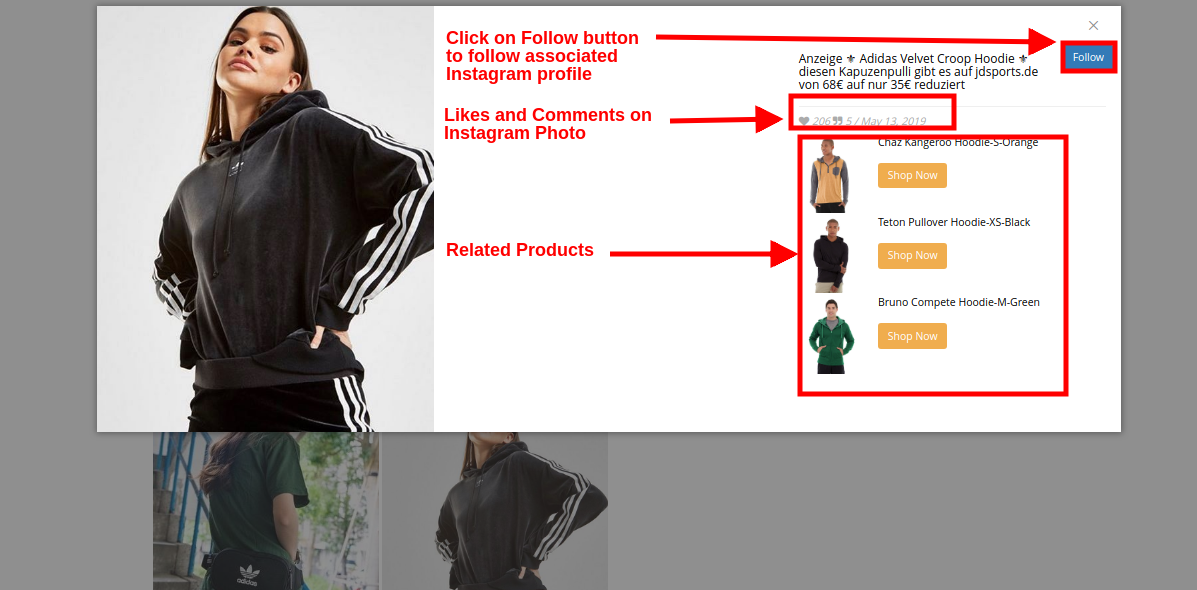
B) Likes and Comments for Instagram Image

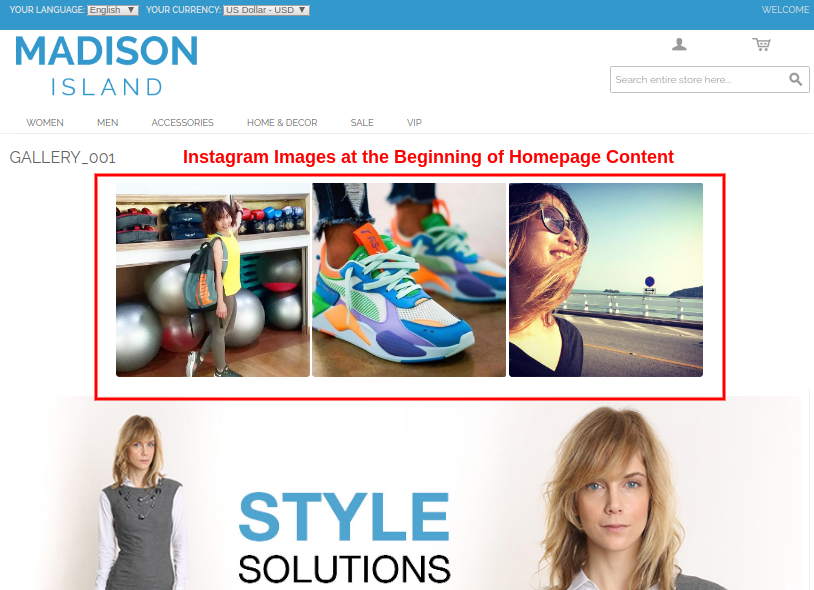
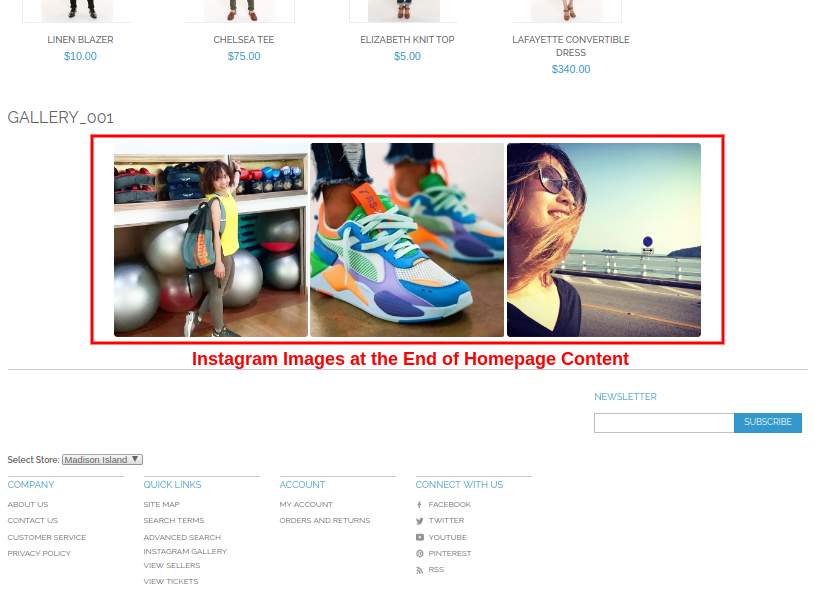
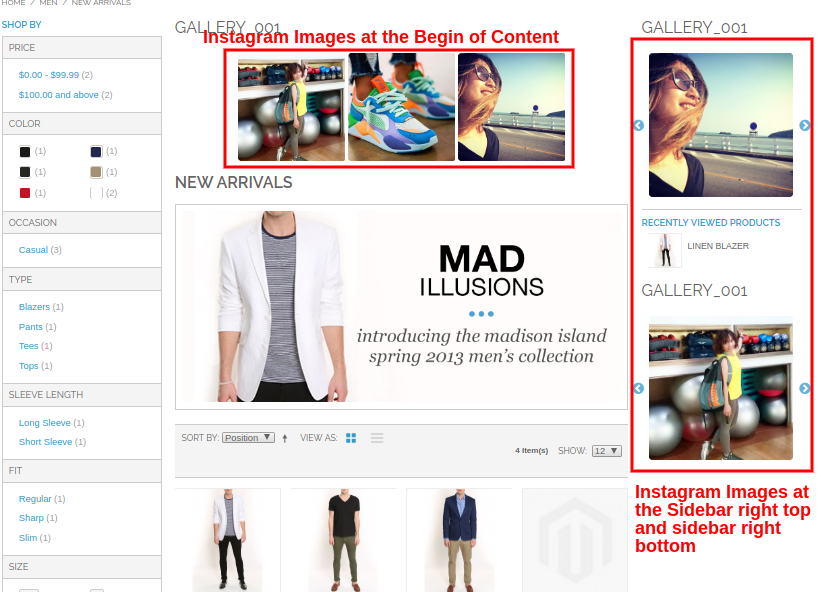
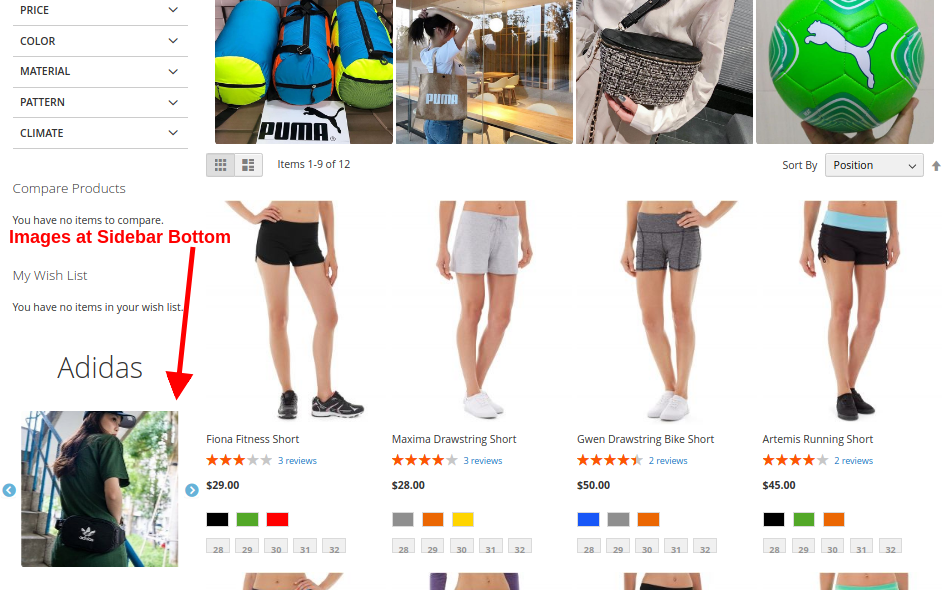
C) Show Instagram Gallery on Homepage

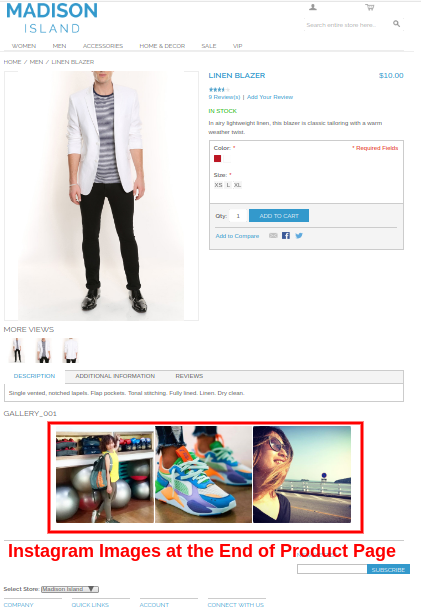
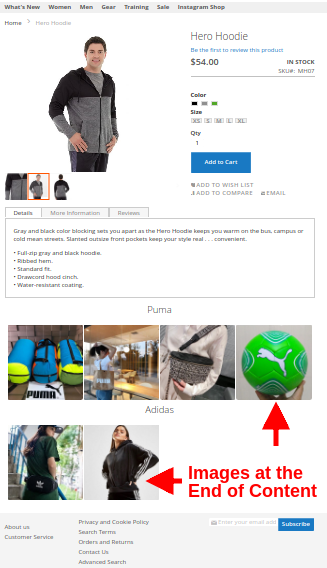
D) Show Instagram Gallery on Product Pages

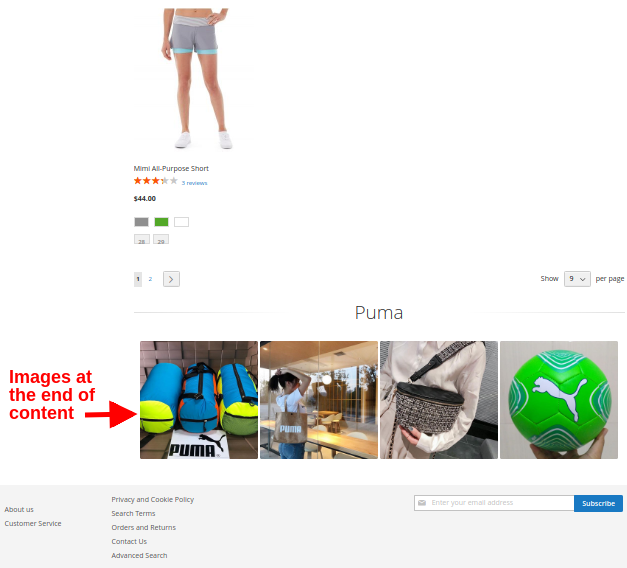
E) Show Instagram Gallery on Category Pages

On clicking any of the images, customers will see the following image popup.

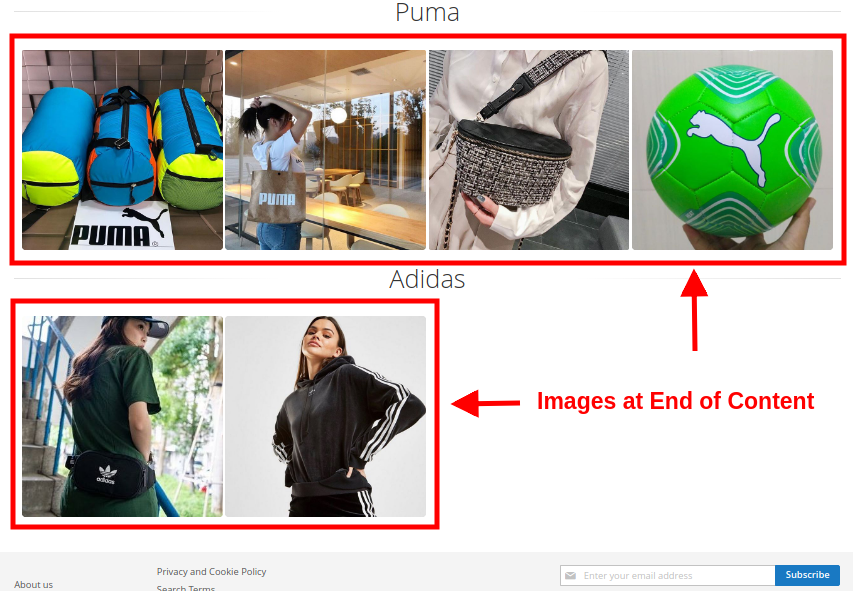
This way, the online store admin can show Instagram images on website pages without any hassle. The eCommerce store merchant can attract online users by showing eye-catchy Instagram photos. The online merchant can easily implement Magento Instagram Shop Extension and showcase Instagram images on website. The Shop on your Instagram gallery module shows a specific Instagram gallery page on the website. The online users can click on footer link and visit the Instagram gallery page. This way, the online merchant can reduce bounce rate easily. The Magento Instagram product tag feed module is highly customizable and allows the online users to view related products on clicking any specific page. The online merchant can add and showcase unlimited Instagram images.

The eCommerce store admin can show Instagram image on different website pages at desired position. The Magento Instagram Shop Gallery Extension is mobile responsive and offers smooth functioning. The online users can click on any Instagram image and view likes, comments and posting date details easily. The online merchant can also promote products by mapping the products as related products. This way admin can also increase website sales easily using this Magento Instagram module.

Knowband is one of the most reputed names in the field of plugin development. We provide best plugins for platforms like – Magento, Prestashop,  OpenCart and

Shopify.

Magento Instagram Shop Gallery Module Link

Magento Shoppable Instagram Module Admin Demo Link

Magento Instagram module Front Demo Link

Insta Shoppable Gallery Module for Magento Video Tutorial

Magento Instagram Integration Extension Marketplace Link

For more support and information, feel free to contact us via email at support@knowband.com anytime.
Magento 2 Web Push Notification Extension – User Manual

1.0 Introduction

For online store owners, it is important to attract new visitor’s attention to their website and also engaging those who already visited it. One great tactic that look promising is web push notifications. Being a store owner, if you have not implemented push notifications for your website, then you are missing some great business opportunities. In order to integrate web push notifications for your site, Knowband offers Magento 2 Web Push Notification Module that will allow admin to send real-time push notifications to their existing and new customers. Web Push Notification module gives you constant power to engage your audience via different kind of push alerts like back in stock alert, price alert, order status alert, abandoned cart alert, etc.

Magento 2 Push Notification for web browsers like Chrome and Firefox displays welcome popup on the user’s device asking for their consent to send alerts on various events. Push notifications are delivered instantly to the users which build up their constant engagement on the store. Magento 2 Browser Notification extension allows admin to send personalized push messages. With this extension, the admin can create and send personalized product recommendations to their customers based on their individual browsing and purchase history. Push notifications are highly responsive over mobile and tablet devices so you can achieve easy interaction with your customers. Web push notifications implemented using Magento 2 Browser Notification extension helps you in delivering various alert messages in real time which has a higher response rate compared to an email which subsequently leads to higher marketing ROI.

1.1 Striking Features of Magento 2 Cart Reminder Push Notification Module

No hassles and coding efforts are involved in the integration of web push notifications to the website. Before that, quickly take an insight into the highlights offered by this Magento 2 Web Push Notifications extension.

1. Magento 2 Web Push Notification Module offers a direct, real-time marketing technique for sending tailored push notifications to dormant users like breaking news updates, notifying customers when items are back in stock or drop price alerts. No matter whether are accessing the site or not, the subscribers will receive timely alerts triggered by the admin.

2. Magento 2 Order Status Update Push Notification triggers a welcome notification popup on the site frontend as the user visits the site. This is a permission popup asking the user to allow or deny automatic updates.

3. Magento 2 Browser Notification extension sends automated notifications for different events like when a user places an order, order status is changed, product price is updated, product stock is updated, or the cart is abandoned.

4. The template and message can be personalized for price alert notifications, stock alert push notifications, abandoned cart alerts or other kinds of custom notifications with the help of this Magento 2 Website Push Notification extension.

5. The notification title, action buttons, popup image shown over the welcome notification popup can be configured from the back-office of this Magento 2 Cart Reminder Push Notification Module.

6. With Magento 2 Browser Notification extension, admin can test web push notifications right after sending them by registering with the send test feature. Push notifications can be tested immediately or at some scheduled time.

7. To integrate push notification service to the website, the admin needs to configure firebase settings from the backend of Magento 2 Web Push Notification Module.

8. Magento 2 Browser Notification extension offers five default push notification templates which can be customized or deleted from back-office. Admin can create multiple custom notification template if they require for their business for announcing offers and new arrivals.

9. Web push notifications are perfectly compatible with browsers like Google Chrome, Firefox, and other browsers as well.

10. Magento 2 Cart Reminder Push Notification Module allows admin to create any type of push notifications with a custom message, title, URL and images. The link can be added to the complete notification popup or to the popup button specifically.

11. Admin can view the list of notification subscribers and product subscribers from the backend of Magento 2 Web Push Notifications extension.

12. Magento 2 Web Push Notification Module allows admin to send the notifications immediately or on a particular time. This functionality can be handled using the cron job. Admin can run the cron job in order to send all scheduled notifications instantly.

13. Magento 2 Web Push Notifications extension lets admin test the promotional alerts before sending it to the actual subscriber base.

14. Web Push Notification For Magento 2 offers a responsive UI for desktop and mobile devices.

15. Magento 2 Order Status Update Push Notification plugin works on multiple store views.

16. Magento 2 Browser Notification extension provides a simple backend interface which can be effortlessly configured by the store admin.

2.0 Installation Guide of Magento 2 Browser Notification Extension

1. Once after purchasing Magento 2 Web Push Notification Module from the Knowband store, you will get the following files on your registered email:

  • Source code file of Magento 2 Web Push Notification Module in zipped file format.
  • User Manual of Magento 2 Website Push Notification Extension.

2. Unzip the extension package.

3. Create a folder{Magentoroot}/app/code/Knowband/Webpushnotification

4. Upload the extracted content in the above folder via FTP manager (like Filezilla or WinSCP – download here: https://filezilla-project.org/).

5. Add the following dependencies in the Magento root composer.json file:
“mobiledetect/mobiledetectlib”: “^2.8”,
“geoip2/geoip2”: “^2.9.0”
And below command to install the above dependencies:
composer update

6. Now run below commands to install the plugin:
php -f bin/magento module:enable –clear-static-content Knowband_Webpushnotification
php -f bin/magento setup:upgrade
php -f bin/magento setup:di:compile
php bin/magento setup:static-content:deploy

The Magento 2 Web Push Notifications extension is now installed and ready to use.

3.0 Admin Interface of Magento 2 Web Push Notifications Extension

Just after successful installation of Magento 2 Web Push Notification extension on your website, you can create and activate web push notifications for your store in accordance with business requirements. Navigate the settings in the given order: Admin Panel > Knowband > Web Push Notifications

The simple to understand admin interface of Magento 2 Browser Notification extension is divided into eight main sections namely:

1.General Settings
2.Templates
3. Send Push Notifications
4.Delay Push Notifications
5.Subscribers
6.Product Subscribers
7.History
8.Statistics

Each of these sections has been discussed in detail below.

3.1 General Settings

The general settings of Magento 2 Web Push Notification extension is further sub-divided into four sections namely:

1.Configurations
2.Firebase Settings
3.Product Sign Up Box Settings
4.Welcome Notifications Settings

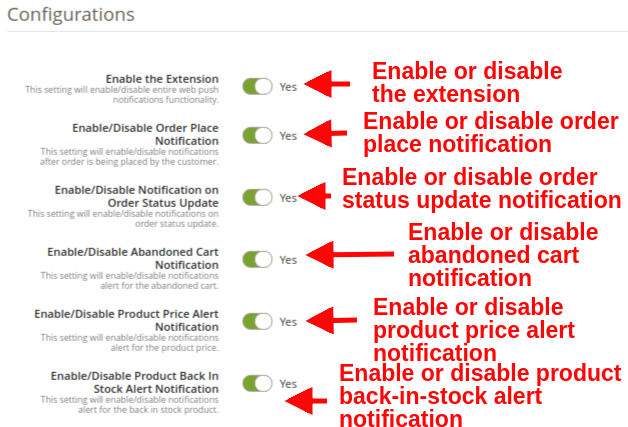
3.1.1 Configurations

  • Enable the Extension: This option enables or disables the whole functionality of Magento 2 Web Push Notification Module with the help of toggle button. On enabling this, customer will see a push notification request popup box on their screen.
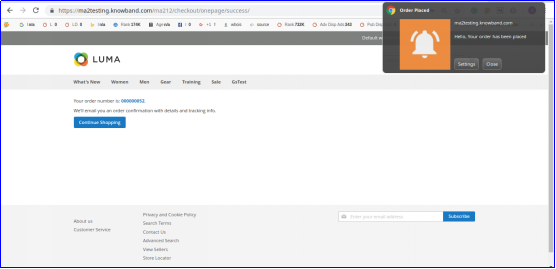
  • Enable/Disable Order Place Notification: This setting enables or disables the notifications after the customer places an order. Admin can send order status notification to the customer after enabling this option.

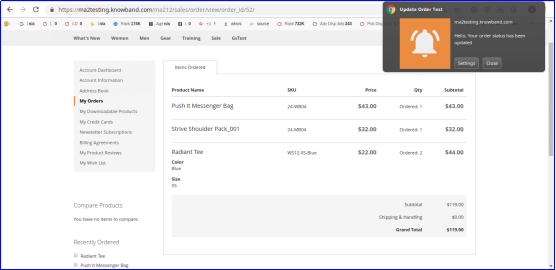
  • Enable/Disable Notification on Order Status Update: This setting will enable or disable the notifications on order status update.
  • Enable/Disable Abandoned Cart Notification: This setting will enable or disable the notifications when the customer abandons their cart. This notification only triggers if the customer has abandoned the cart.
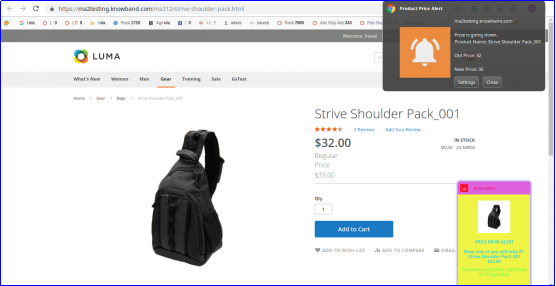
  • Enable/Disable Product Price Alert Notification: This setting will enable or disable the notification alert for the product price. As there is a drop in product price, product subscribers will receive a notification alert.
    Note: These settings are only applicable when the users subscribe for the product notification.
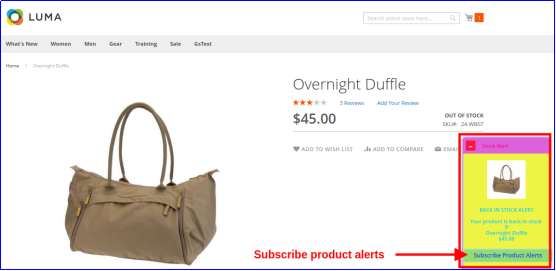
  • Enable/Disable Product Back In Stock Alert Notification: This setting will enable or disable the notification alert for the product stock. When the out-stock product comes back in stock, product subscribers will be notified.
    Note: These settings are only applicable when the user subscribes for the product notification.

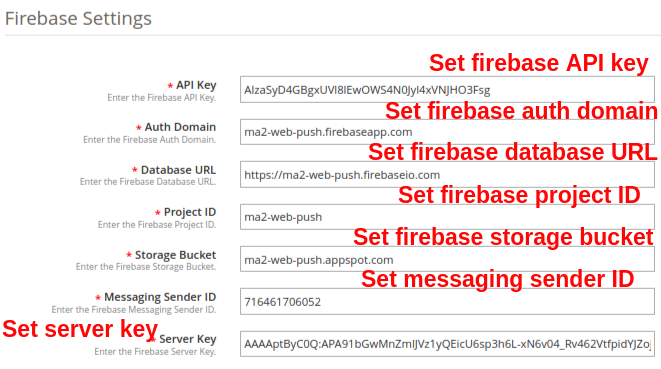
3.1.2 Firebase Settings

Firebase works in the backend as a service responsible to push mobile and desktop notifications to users while they are accessing a particular website. These settings are usually set one time during initial module setup.

  • API Key: This option allows you to specify the Firebase API key.
  • Auth Domain: This option allows you to set Firebase auth domain value.
  • Database URL: Using this option you can set the Firebase database URL.
  • Project ID: This option lets you set the Firebase project ID.
  • Storage Bucket: With this option you can specify Firebase storage bucket.
  • Messaging Sender ID: This option sets the Firebase messaging sender ID.
  • Server Key: This option will set the Firebase server key.

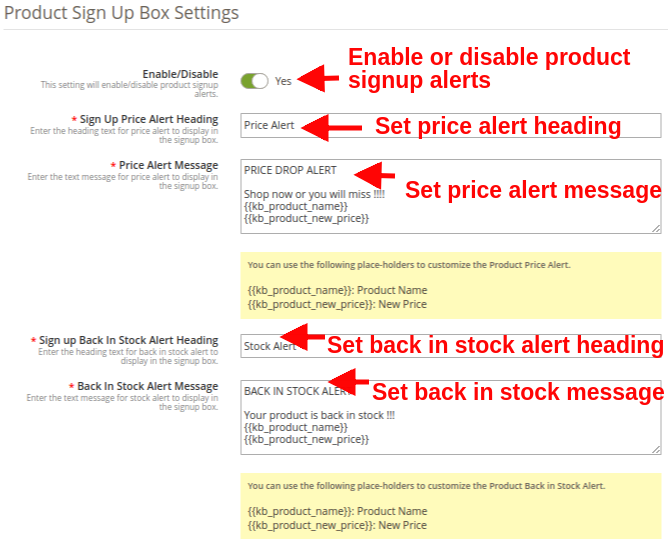
3.1.3 Product Sign Up Box Settings

In this tab of the Magento 2 Cart Reminder Push Notification Module, the admin can edit the sign-up box settings for the product. Customers who will subscribe to the product will receive its price and stock related alerts. Under this tab, you will get the following options:

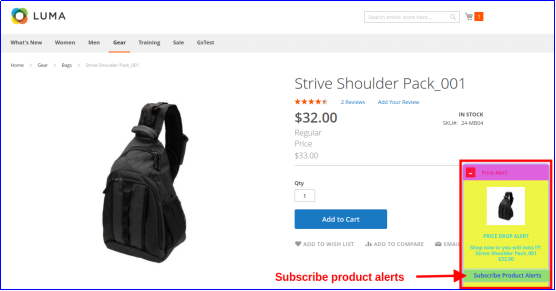
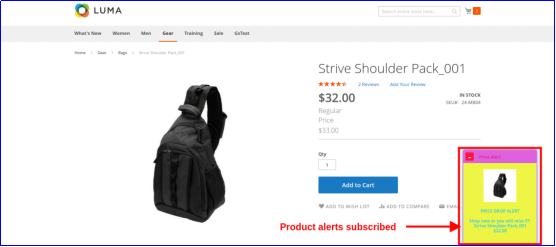
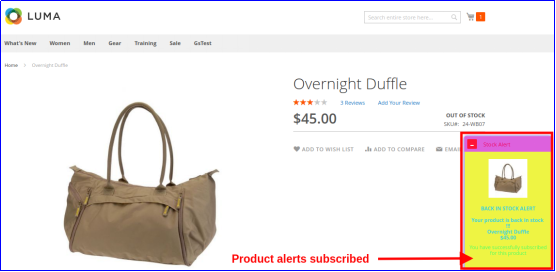
  • Enable/Disable: This option enables or disables the product signup alerts. If enabled, module will show the Subscription box in the front-end of the store where the customer can subscribe for product price alert or back in stock product alert.
  • Sign Up Price Alert Heading: This field allows you to set a heading for the price alert notification box.
  • Price Alert Message: You can set a desired push notification message flashed on Price alert subscription box.
  • Sign Up Back In Stock Alert Heading: This field allows you to set a custom heading for the back-in-stock notification box.
  • Back In Stock Alert Message: You can set a desired push notification message flashed on Back-in-stock alert box.

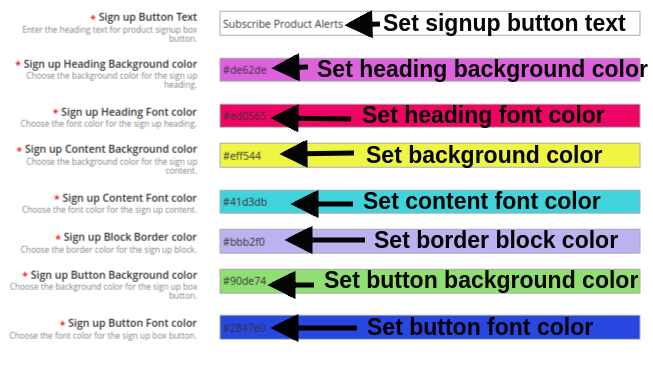
  • Sign Up Button text: You can modify the text shown on the product subscription or signup popup.
  • Sign up Heading Background color: You can change the background color for the sign up box heading.
  • Sign up Heading Font color: This option allows you to change the subscription box heading font color as per requirement using color picker tool.
  • Sign up Content Background color: You can change the Subscription box background color using this option.
  • Sign up Content Font color: The admin can change the font color of subscription box text with this option.
  • Sign up Block Border color: This field of Web Push Notification module allows you to set the border color for the signup notification box.
  • Sign up Button Background color: This option lets you set the background color for the product subscription button shown in sign-up box.
  • Sign up Button Font color: This option lets you set the font color for the product subscription button text.

3.1.4 Welcome Notification Settings

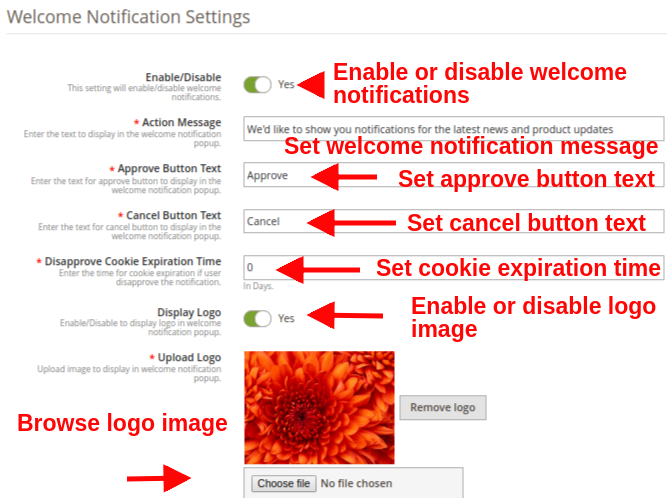
Under this section of Magento 2 Web Push Notification module, the admin can customize the look and feel of the Welcome notification box. This Welcome Notification box will be shown in the front-end of the store when the customer enters the store. The users can click on approve button for getting the site notifications or can cancel the option. This section contains the following options:

  • Enable/Disable: Admin can enable/disable this Permission Box on the frontend. If enabled, the permission box will be shown in the front-end of the store.
  • Action Message: This option sets the display text for the welcome notification popup.
  • Approve Button Text: You can enter the display text for the Approve button shown over welcome notification popup box.
  • Cancel Button Text: You can enter the display text for the Cancel button shown over welcome notification popup box.
  • Disapprove Cookie Expiration Time: This option sets the time for cookie expiration if user disapprove the notification. Like if this value is set to 2, and the user clicks on Cancel/Disapprove button then the welcome notification permission box will be shown to that user after two days.
  • Display Logo: This option allows you show/hide the display logo for the welcome notification popup.
  • Upload Logo: Using this option, you can browse and upload a desired logo image for the welcome notification popup.
    Note: Web push notification module allows the admin to run cron to send the push notification immediately or after a fixed time.

3.2 Templates

Web Push Notification For Magento 2 offers five default ready-made templates which are fully-customizable and gives flexibility to create new templates as per business needs. Under this section, you can customize or add a new Web Push notification template. The five default notification templates offered include:
1. Order Place Notification Alert
2. Product Back In Stock Alert
3. Product Price Alert
4. Abandoned Cart Alert
5. Order Status Update Alert


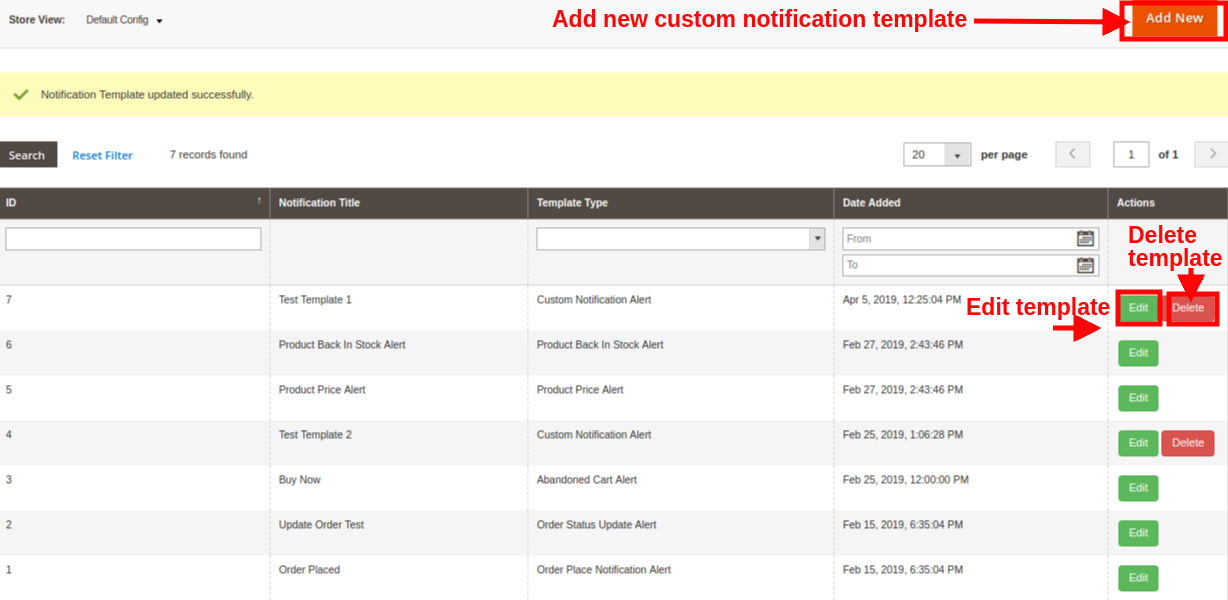
Note: The default notification templates can be modified but cant be deleted by the admin. While the new created templates can be modified or deleted from this section.

3.2.1 How to add Custom Notification Template?

An option to add templates of Push Notification for web browsers is provided at the back-office. Simply click on “Add New” button for creating a custom notification template. Fill the following fields in order to create a new notification template for the store.

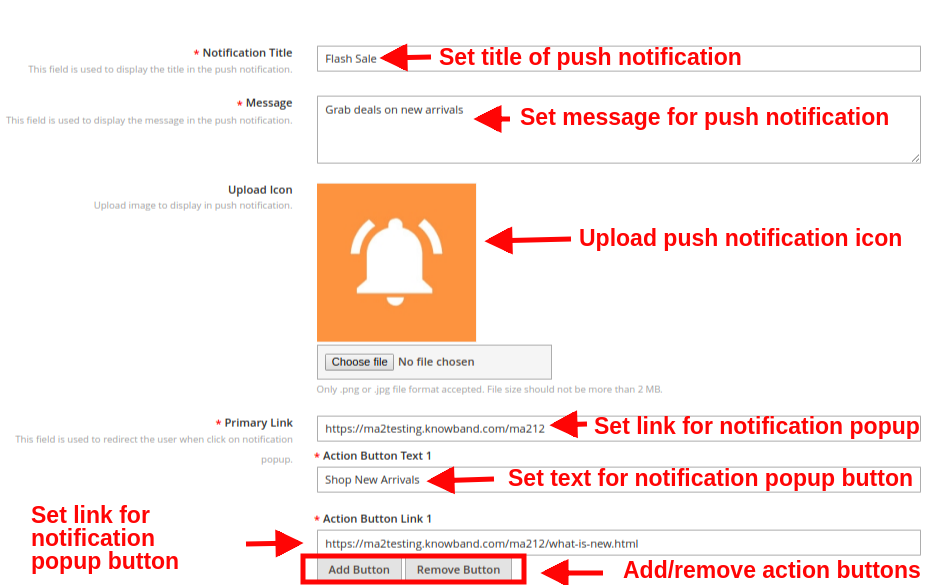
  • Notification Title: With this option, admin can set a title for web push notification.
  • Message: Using this option, you can set a custom message for the web push notification.
  • Upload Icon: This field allows you to choose a desired icon for the custom push notification.
  • Primary Link: With this option, you can set a primary link for the push notification. When the user clicks on the notification popup, they are redirected to this specific link.
  • Action Button: You can add as multiple action buttons to display on the push notification popup box. These buttons can be set with different text and action button link.
  • After the successful entry of details, the new custom template would be added in the “Push Notification Template” table.
    Note: The Admin can add the N no of Custom template for a various promotional offer like Flash Sale, Buy 2 Get 1, Happy hours and more.
    The other default notification template include:
  • Product Back In Stock Alert: When the admin changes the status of the Product quantity to in-stock from the back-end of the module, back in stock push alerts are sent to the customer.
  • Product Price Alert: When the admin changes the product price and they offer a discount price then the price alert push notification is sent to the customer.
  • Abandoned Cart Alert: This Magento 2 Browser Push Notification module sends an abandoned cart notification to the customer when they leave their cart.
  • Order Status Update Alert: When the admin changes the status of the order, this order status push notification is sent to the customer.
  • Order Place Notification Alert: As the customer will place an order, this alert is automatically sent to them.

3.3 Send Push Notifications

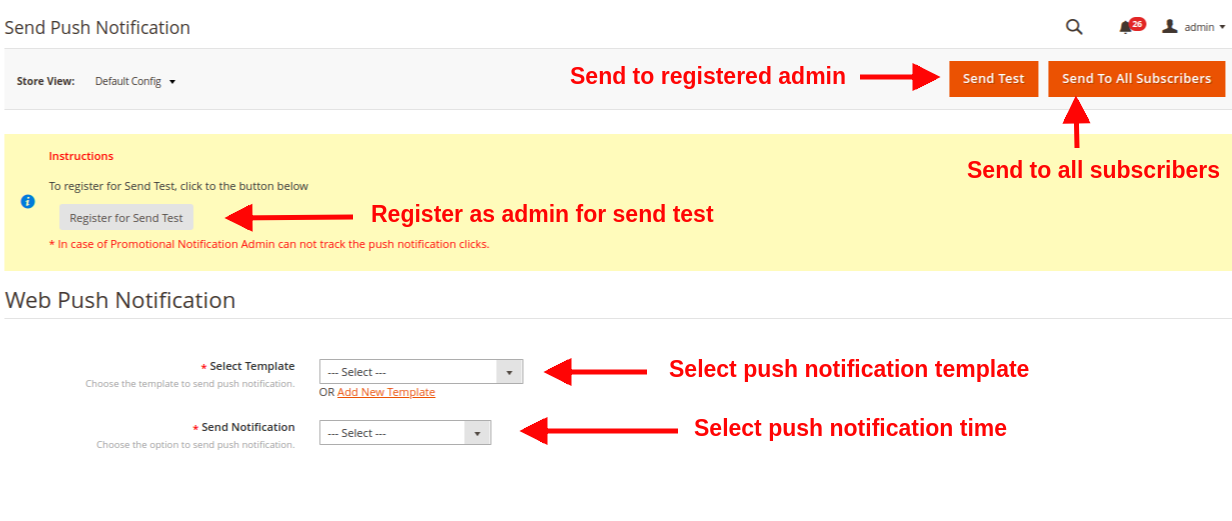
Magento 2 Cart Reminder Push Notification Module allows admin to send push notifications manually. For this, you have they have to select the template and send time for the push notification. Once the notification is set, you can test it in two ways:

1.Admin can register as admin and then test the push notification. This notification alert is only send to the registered admin not the subscribers.
2.If the admin finds no issue in the push notification, they can send push notification directly to all the subscribers.

  • Select Template: This option allows admin to choose the template for notification from the existing ones.
  • Send Notification: Admin can send the notification immediately or on a scheduled time.

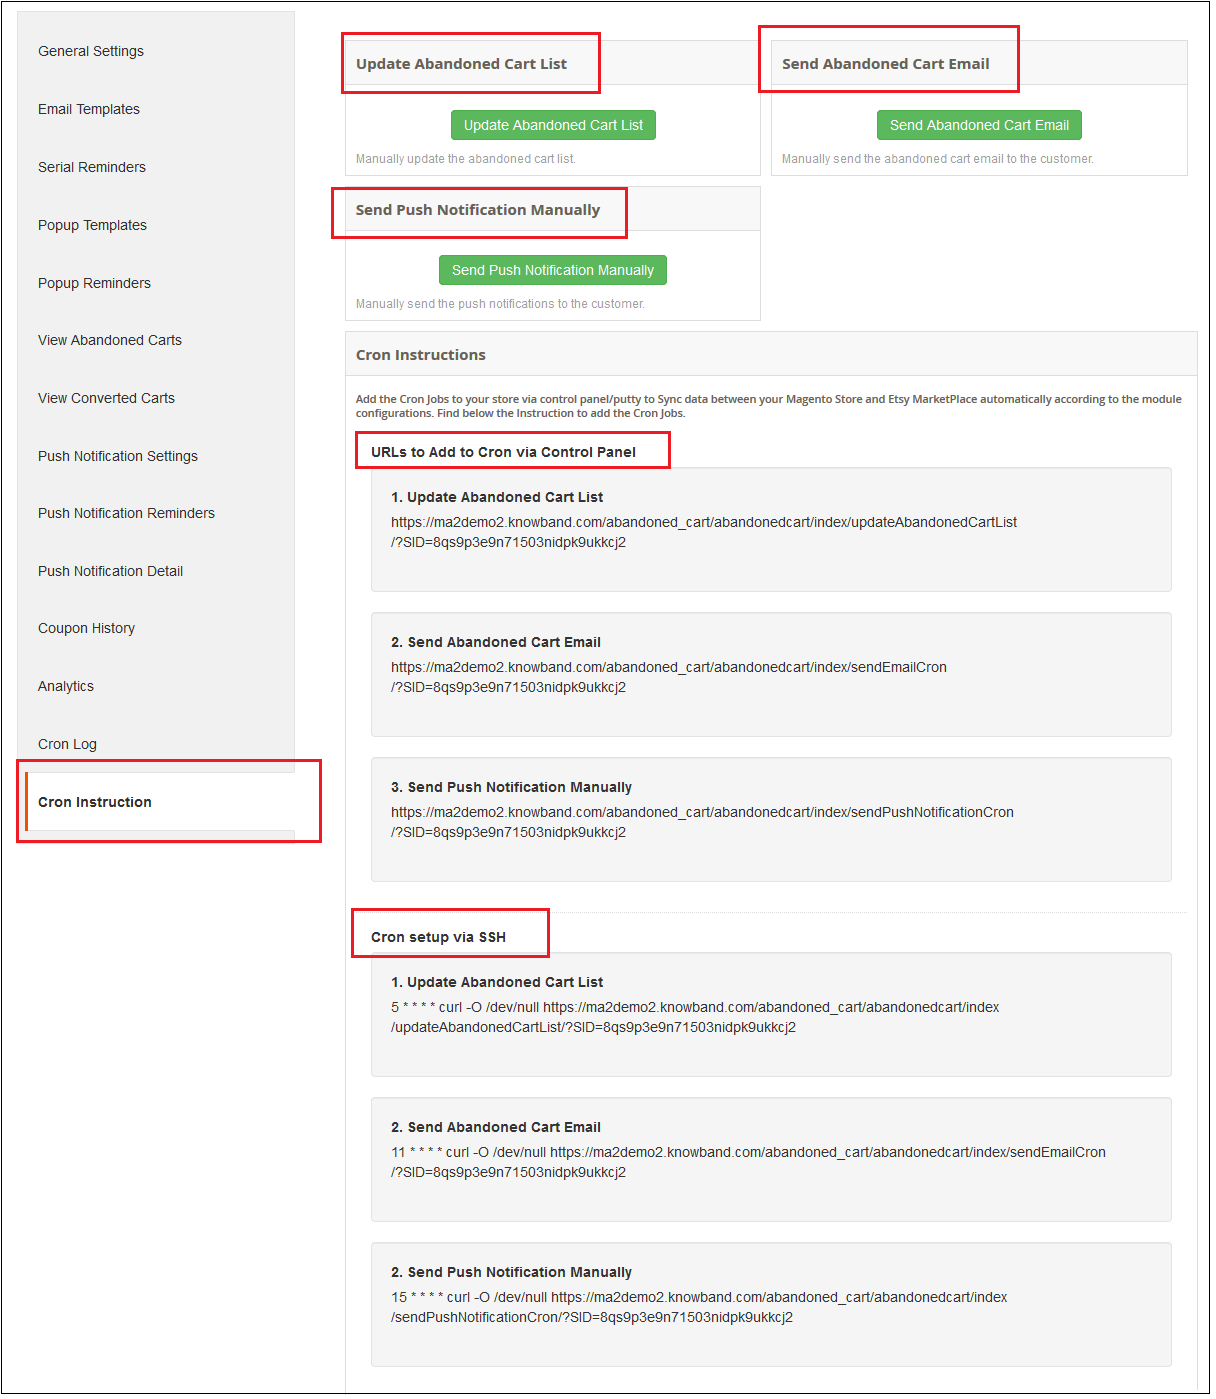
When the admin sends push notification at a particular time, then the cron has to run manually. Here are the cron instructions:

1. Delay Push Notification CRON
https://www.example.com/ma212/kbwebpush/index/delayPushCron/?SID=dgaqkeauhluhn4cmtaug3gahl2
2. Abandoned Cart Notification CRON
https://www.example.com/ma212/kbwebpush/index/abandonedCartCron/?SID=dgaqkeauhluhn4cmtaug3gahl2

3.4 Delay Push Notifications

Web Push Notification for Magento 2 allows the admin to schedule the notification for a particular time. All the scheduled notification will be displayed in the Push Delay Notification tab along with their status.


3.5 Subscribers

Under this section of Magento 2 Web Push Notifications extension, admin can view the total list of subscribers who have allowed the push notifications. Records of users who deny the push notification are not shown in this panel.

The admin can keep a track on the subscribers along with their details like browser name, browser version, platform, device type, country, subscription time and user type.

3.6 Product Subscribers

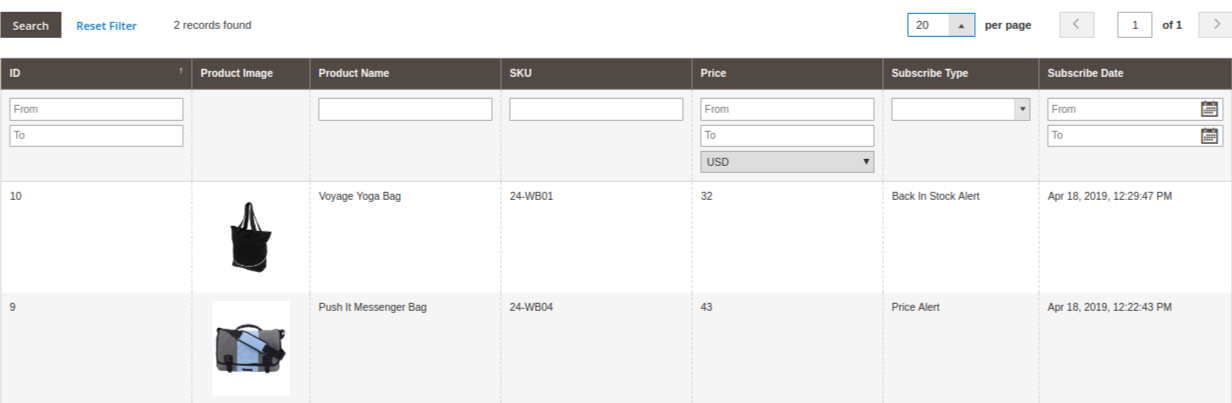
Web Push Notification For Magento 2 also gives a detailed view to the product subscribers along with their subscription type detail. Admin can see which product is subscribed along with its name, product image, product SKU, Price, Subscription type and subscription date.


3.7 History

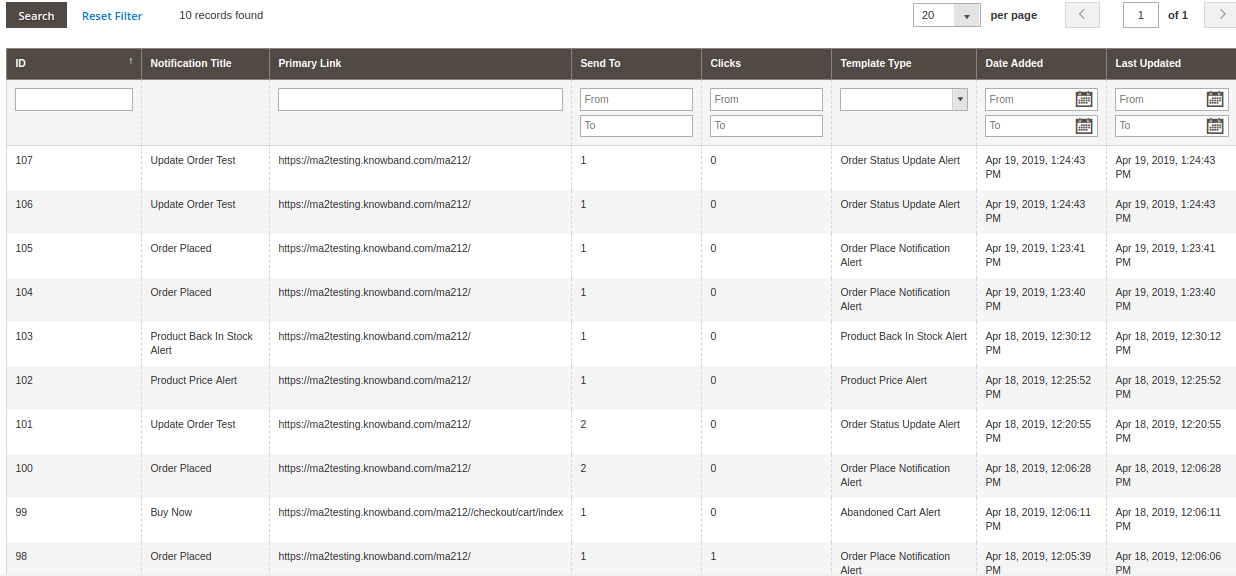
Magento 2 Web Push Notification Module allows the store admin to view the overall history of web push notifications generated for different events like order place, order status update, price alert, abandoned cart and others. Admin can filter the results based on push notification type or date created. From this section, they can even view the total customers who received a particular push notification.

3.8 Statistics

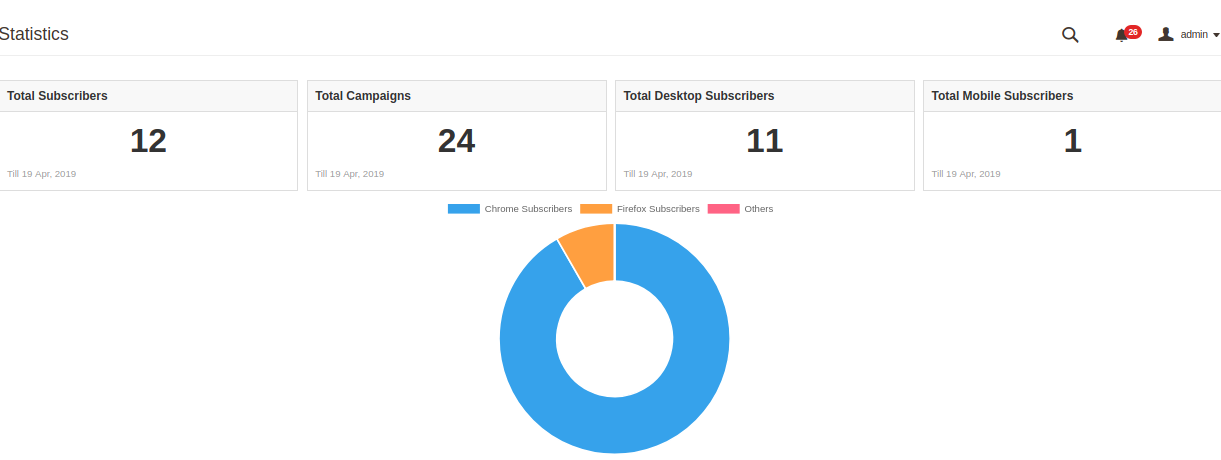
Magento 2 Website Push Notification extension provides a simple interface to understand the subscription analytics. Admin can easily view the number of desktop subscribers and mobile subscribers. Additionally, you can view particular subscribers coming through Chrome and Firefox browsers.

Note:

  • Total Subscribers are the users who have approved the push notifications for their system or device. This includes both desktop and mobile subscribers.
  • Total Campaigns are the total push notifications sent for different events.

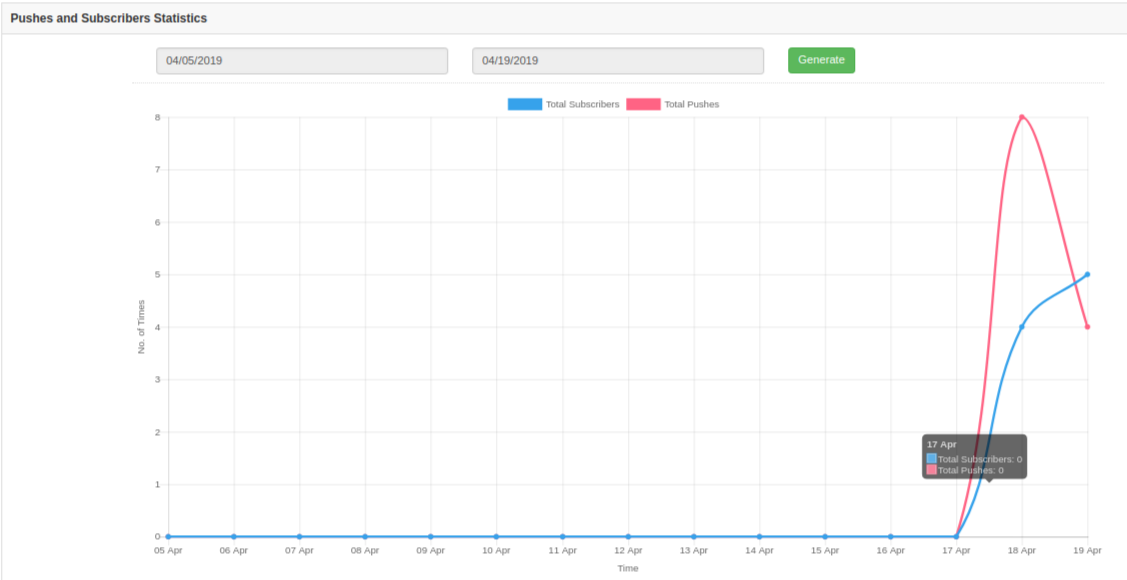
Report analysis can also be done using graphical statistics as shown in the below image with the help of filter option.

These graphical stats provide information about the total number of subscribers and the total number of push notifications sent to those subscribers.

4.0 Front Interface of Magento 2 Browser Notification extension

A)Welcome Notification Box
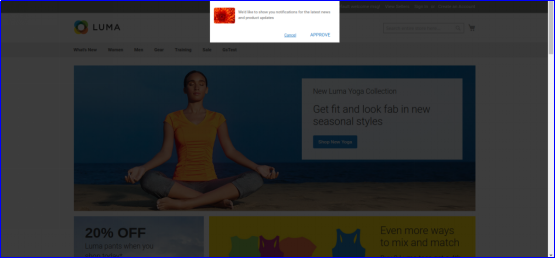
This welcome notification box contain buttons to approve or disapprove the alert subscriptions. As the user visits the site, this subscription popup is shown on their front, which they have to either approve or deny. If they “Deny” they will not get any site or product related notifications. If they “Approve”, they will receive sale alerts, offers information and product related updates like back in stock, price drops and abandoned cart.


B)Order Place Notification Alert


C)Order Status Update Alert

D)Product Price Alert


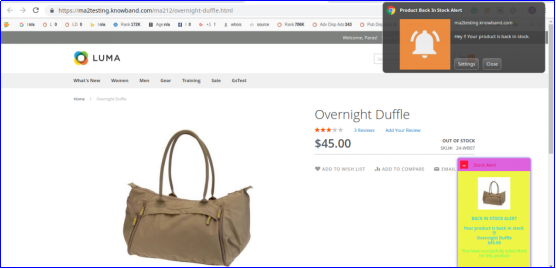
E)Product Back In Stock Alert


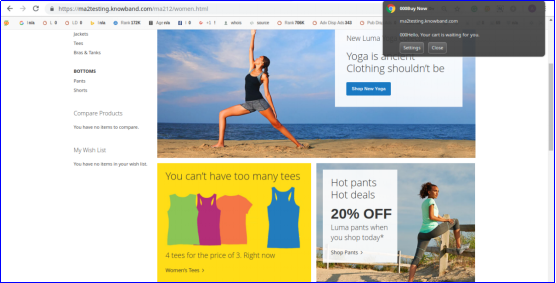
F)Abandoned Cart Notification Alert

Magento 2 Store Locator and Pickup Extension – User Manual

1.0 Introduction

Eliminate unnecessary shipping costs and let customers buy the products conveniently and independently from physical stores using Magento 2 store locator and pickup extension. This module adds an unlimited number of pickup locations for the online business which is shown to the customers based on their country or postal codes. Pickup services added using Magento 2 store pickup module are helpful for the customers as they benefit in saving their shipping time and money. Choosing this shipping option during checkout helps customers in finding the nearest location, where they can pick up the order easily.

Magento 2 in-store pickup extension offers a seamless offline experience to the customers that ultimately reflects the sales process of your business. Magento 2 Google Maps Store Locator plugin uplifts the traffic volumes at your physical stores and improves the shopping experience of customers with DIY order pick up functionality. With Magento 2 Store locator module, you can show store locations in a nice and neat user interface which effectively aids customers in checking store availability and interacting with those physically before purchasing any product.

1.1 Striking Features of Google Maps Store Locator Plugin for Magento 2

To enable the self-service deliveries of products at different physical outlets of your eCommerce brand, quickly take an insight into the functionality of Magento 2 in-store pickup extension.

1. Magento 2 store locator and pickup extension integrate a fast and optimized in-store pickup functionality at your eCommerce store catering to various products need through offline stores. During checkout, customers can search the nearest available store for order pickup.

2. Magento 2 store pickup module allows admin to create and customize an unlimited number of pickup stores for their business.

3. Magento 2 Google Maps Store Locator plugin adds up a new shipping method on the site checkout easing customers in opting for the convenient find and pickup service.

4. With Magento 2 in-store pickup extension, admin can effortlessly configure the existing physical stores from the back-office without using any coding skills.

5. Magento 2 store locator and pickup extension require the integration of Google Map API Key for displaying the available stores for different country users.

6. Admin can add offline shop details like store name, address, zip code, country, latitude, longitude and shop image from the backend of Magento 2 Store locator module.

7. Magento 2 store pick up plugin allows you to show store location on the Google Map marked with a pin icon. To locate the physical store, the admin has to move the pointer over the map using a zooming function.

8. If required, admin can show the offline shop contact details including website, contact number, fax and business email.

9. Magento 2 Google Maps Store Locator plugin suggests the most relevant and nearby store suggestions to the customer based on their provided address.

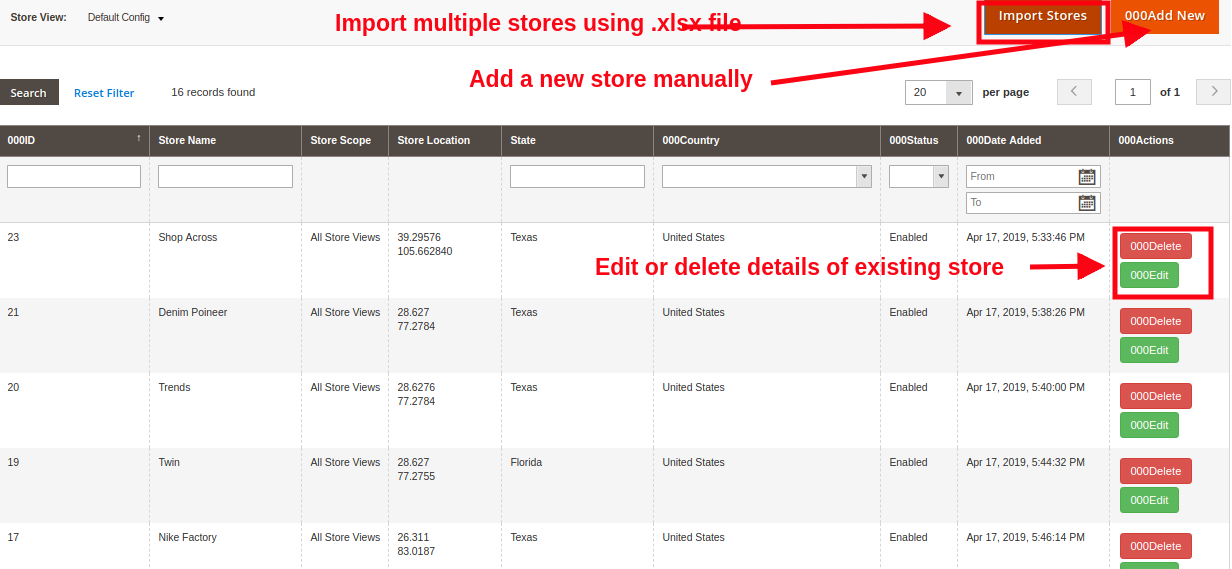
10. Magento 2 store locator and pickup extension give two methods to add new stores for the brand. One is to add stores manually or adding bulk stores in a single go by uploading a .xlsx file from the back-office.

11. The whole functionality of store locator and pickup can be enabled or disabled from the backend.

12. Each of the physical stores can be enabled or disabled separately using this Magento 2 in-store pickup extension.

13. You can set an image for the Google Map pointer using this Magento 2 store pickup module.

14. Magento 2 Store locator module allows you to set a default zoom level for the Google Map integrated on the store locator page on the frontend.

15. With Magento 2 store locator and pickup module, the store owner can display physical distances of the store from the customer’s location in miles or in kilometers.

16. The store locator and pickup section can be shown on the homepage and in the site footer also.

17. Admin gets an option to set a custom URL for the store locator page using this Magento 2 pick-up module.

18. To make it look appealing, admin can set a landing page image for the store locator page with Magento 2 in-store pickup extension.

19. Admin can give store pickup options for selected countries only.

20. Magento 2 Google Maps Store Locator plugin allows admin to set the handling fee type and pickup amount.

21. Magento 2 store locator and pickup extension support multi-lingual and multi-store compatibility.

2.0 Installation Guide of Magento 2 store locator and pickup extension

1. Once after purchasing Magento 2 Store locator module from the Knowband store, you will get the following files on your registered email:

  • Source code file of Magento 2 store locator and pickup extension in zipped file format.
  • User Manual of Magento 2 store locator and pickup extension

2. Unzip the extension package.

3. Create a folder{Magentoroot}/app/code/Knowband/Storelocator

4. Upload the extracted content in the above folder via FTP manager (like Filezilla or WinSCP – download here: https://filezilla-project.org/).

5. Now run below commands to install the plugin:

php -f bin/magento module:enable –clear-static-content Knowband_Storelocator
php -f bin/magento setup:upgrade
php -f bin/magento setup:di:compile
php bin/magento setup:static-content:deploy

The Magento 2 Store Locator extension is now installed and ready to use.

3.0 Admin Interface of Magento 2 In-Store Pickup Extension

Just after the successful installation of Magento 2 store locator and pickup extension on your website, you can add and configure physical stores in accordance with business requirements. Navigate the settings in the given order: Admin Panel > Knowband > Store Locator and Pickup

The simple to understand admin interface of Magento 2 Store Locator module is divided into two broad sections namely:

1.General Settings
2.Manage Stores

Each of these sections has been discussed in detail below.

3.1 General Settings

The general settings of Magento 2 store locator and pickup extension offers you the following basic configurations:

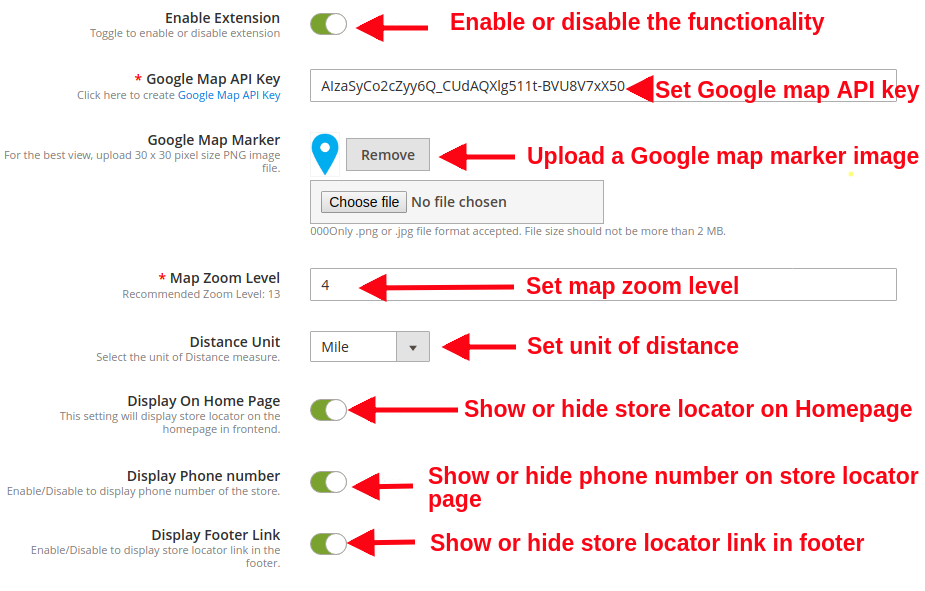
  • Enable/Disable: The store admin can enable or disable the functionality of Magento 2 Google Maps Store Locator plugin just by toggling this button.
  • Google Map API Key: Set the Google map API key in this field. The process to generate an API key has been discussed in section 3.1.1.
  • Google Map Marker: Admin can choose the desired image as Google Map marker.
  • Map Zoom Level: Admin can set the default zoom level for the location map.
  • Distance Unit: Admin can set the unit of distance in kilometers or miles. This distance depicts the reach to offline store from the customer’s exact location.
  • Display on Homepage: Admin can decide whether they want to show or hide the store locator option on the Homepage.
  • Display Phone Number: Enable or disable this option to show or hide the contact details for the store.
  • Display Footer Link: Enabling or disabling this option will show or hide the store locator link in the footer section.

  • Footer Link Text: This option sets the text for the store locator link shown in footer section of the website.
  • Store Locator Page URL Key: This option sets a custom page URL for the store locator page.

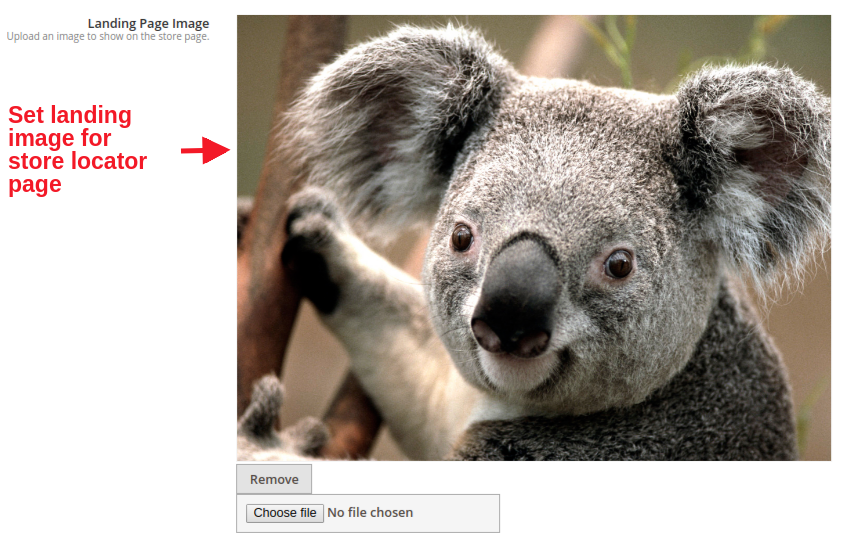
  • Landing Page Image: This option set the landing page image for the store locator page. Simply browse and choose any file of your choice.

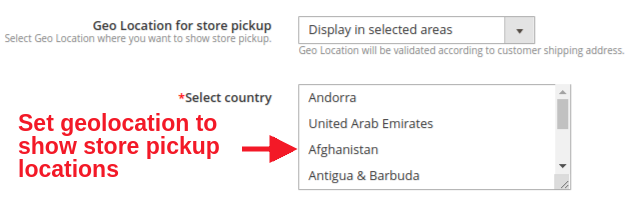
  • Geo Location for Store Pickup: Admin can set the option whether they want to display store locator functionality in selected areas or worldwide.
  • Select Country: This option allows you to set multiple countries where the store pickup options will be provided to the customers.

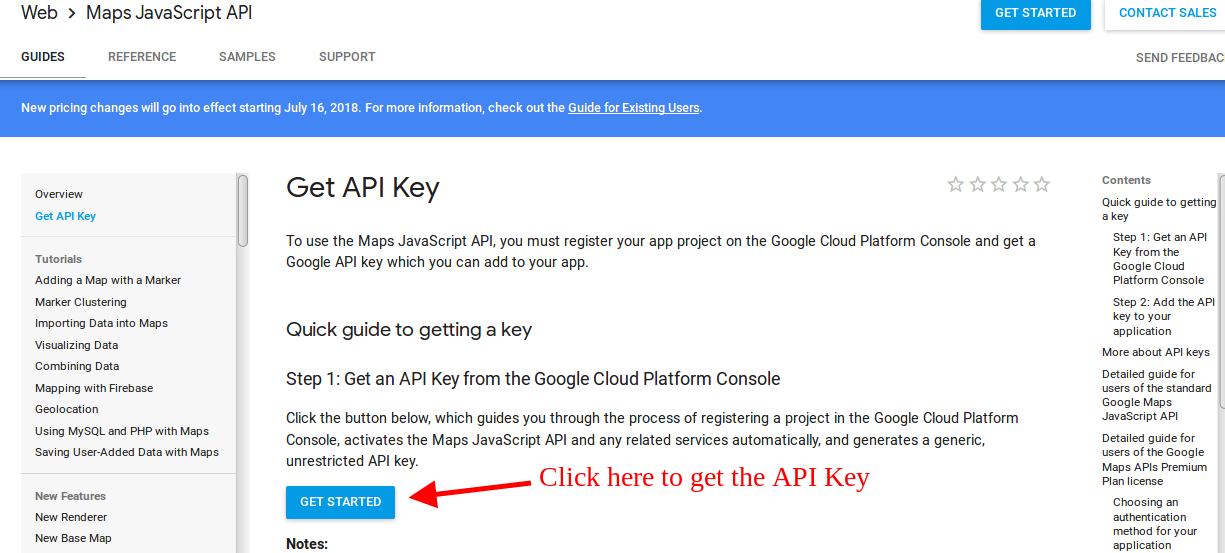
3.1.1 How to generate the Google Map API key

The eCommerce store admin can generate the Google API key by following these steps:

  • Click on the “Get Started” button: The admin can click on this button to get the Google map API key.

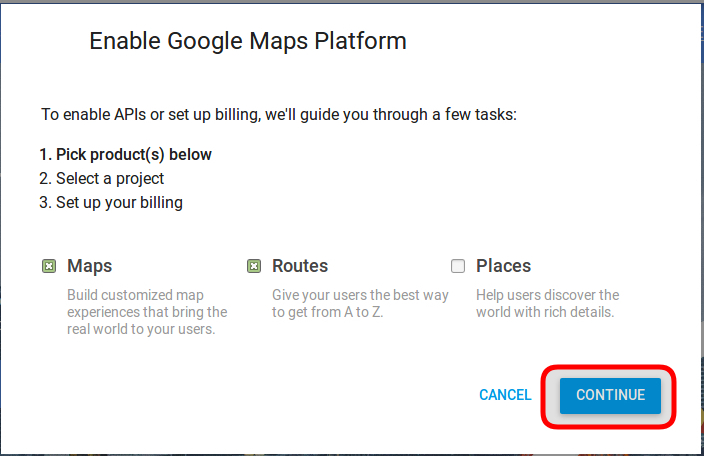
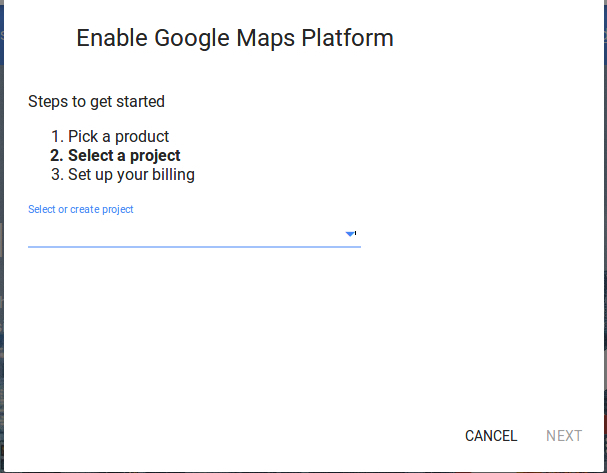
Pickup the products: When the admin will click the “Get Started” button this pop-up will be displayed.


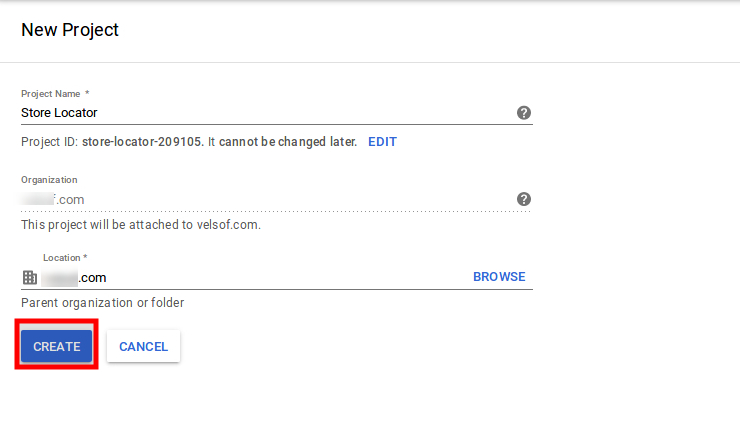
Project selection: The eCommerce store admin can select or create a project.

1. Select a project:

2. Create a new project:


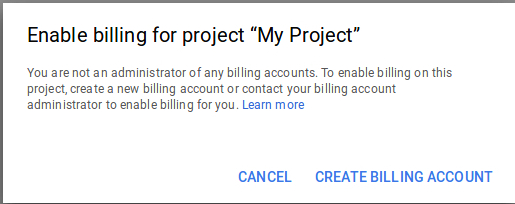
Setup the billing: The eCommerce store admin can now set up the billing.


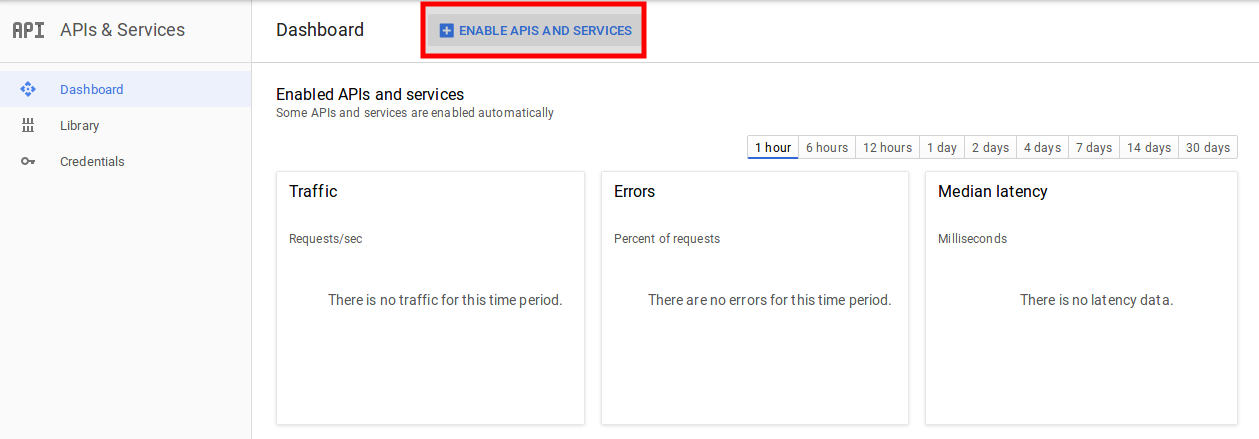
After billing the store admin can get their Google map API key.
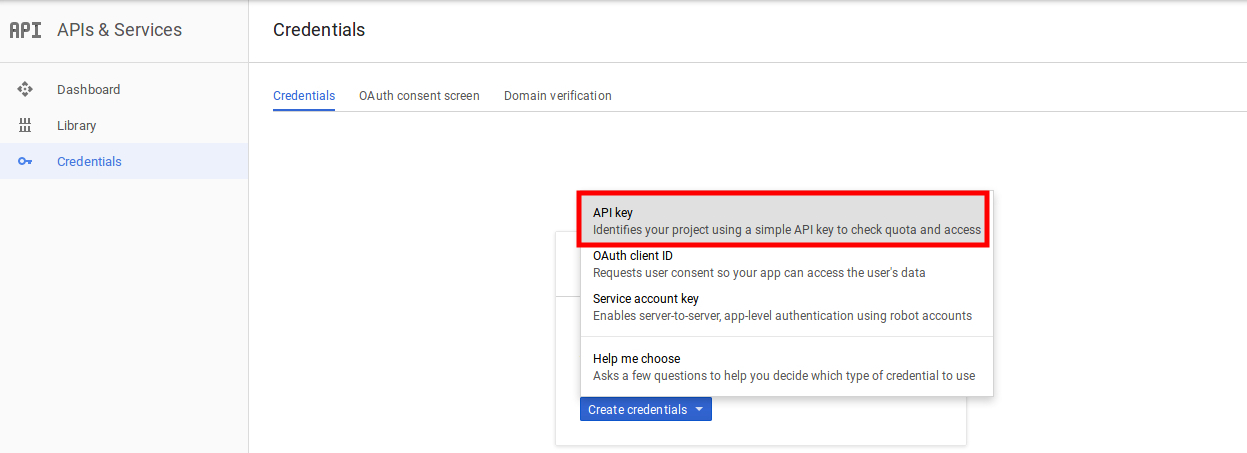
On the Credentials page, get an API key:


The store admin can select the API key option:


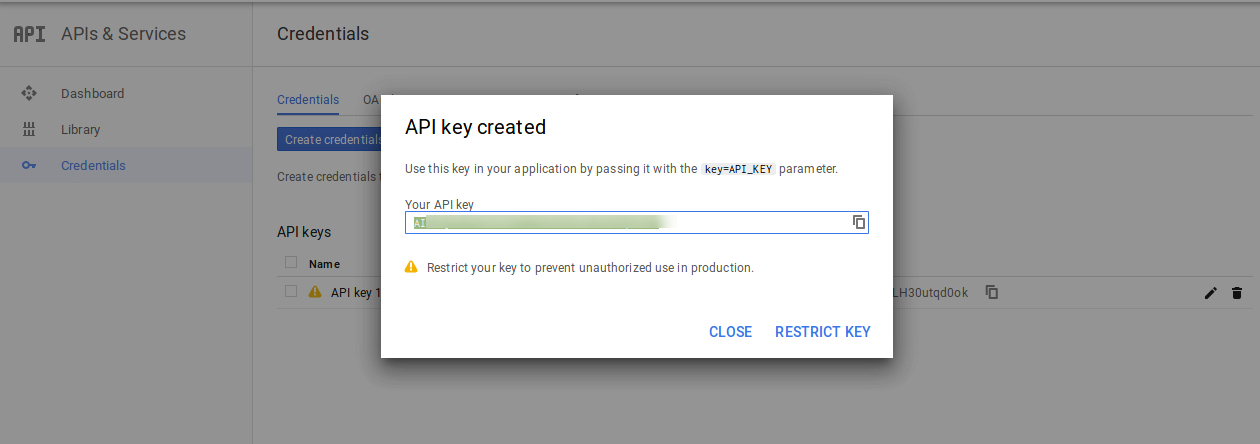
The admin can select the restrict key option from the dialog box to set a browser restriction on the API key.

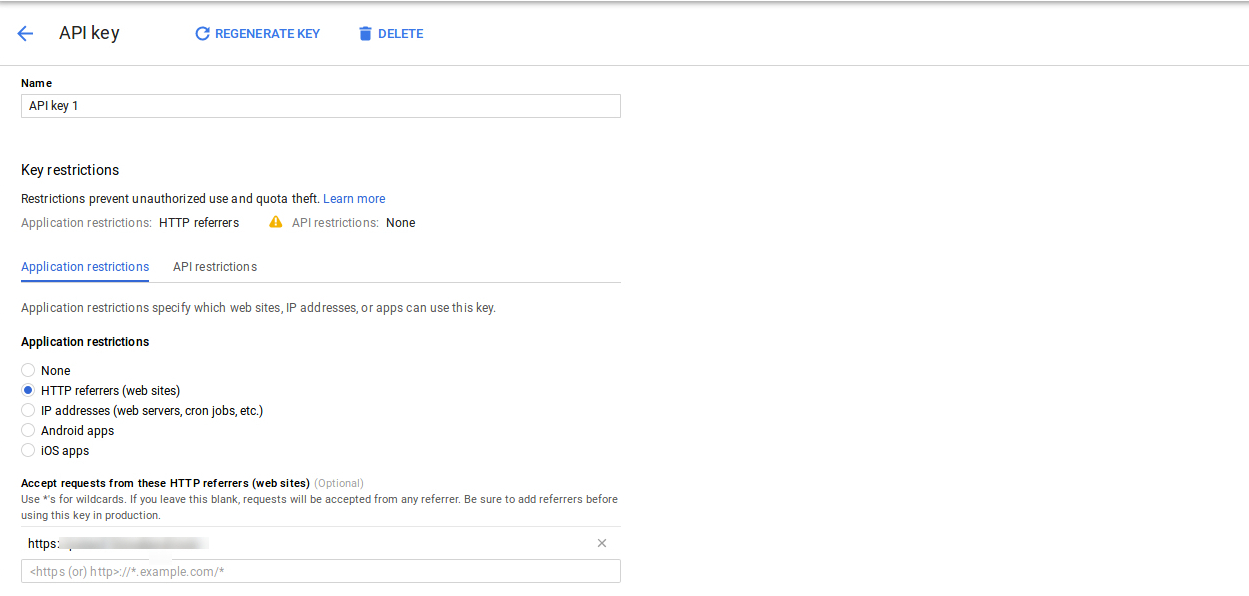
In the Key restriction section, the store admin can select HTTP referrers (web sites), then follow the on-screen instructions to set referrers.


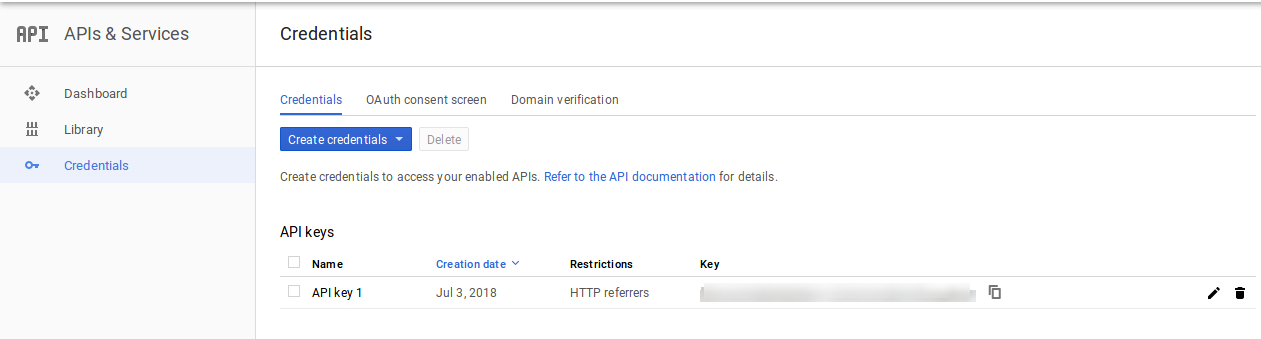
This way the admin can set the Google map API key.

3.2 Manage Stores

The owner of eCommerce stores can add new physical stores for their brand under this admin section. They can configure the details of the existing stores or can delete them directly from this place. This way, the Prestashop Store locator addon allows the admin to add, delete and edit the store related details.

Also, this admin interface gives you a complete view of the list of existing offline stores.

The store admin can easily add a store from the admin panel. After clicking on the “add new store” button, a screen will be shown like below:

New physical stores can be added in two ways:
1. Adding stores manually
2. Importing stores using .xlsx file

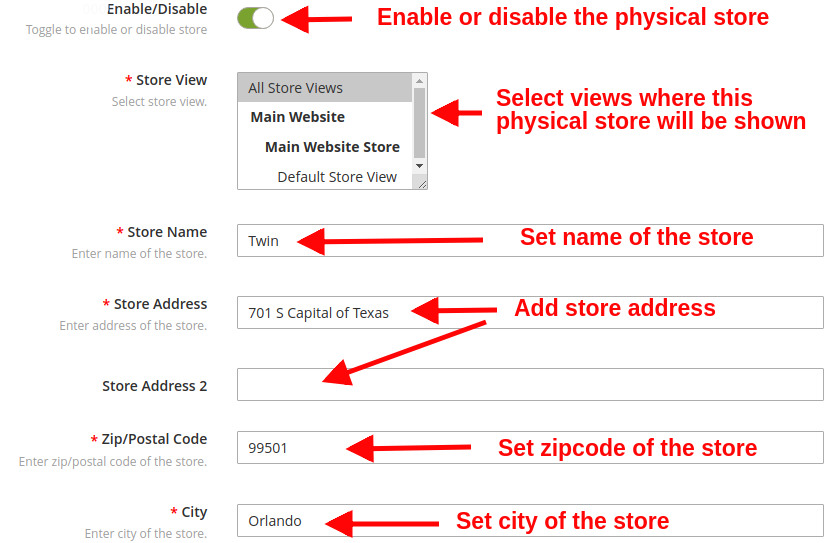
1) Adding Stores Manually

  • Enable/disable: This option shows or hides the particular physical store.
  • Store View: This option lets you select all store views for which this physical store is visible.
  • Store Name: You can set the name of your store using this option.
  • Store Address: You can set the address of the store.
  • Zip/Postal Code: This option lets you set the zip or postal code for the store.
  • City: This option lets you set the city of the store.

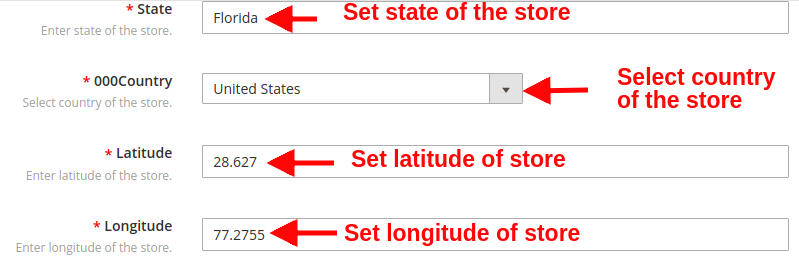
  • State: This option will set the state of the store.
  • Country: This option sets the country of the store.
  • Latitude: This option sets the latitude value of the store.
  • Longitude: This option sets the longitude value of the store.

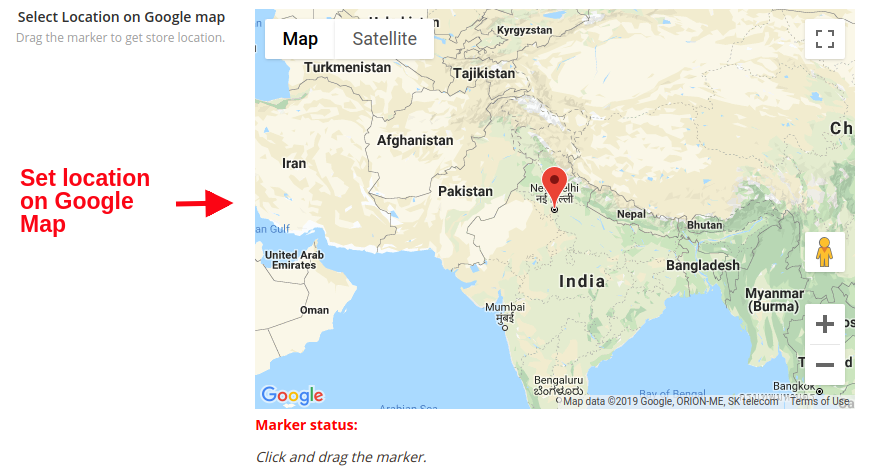
  • Google Map Location: This option allows you to point the address of the store on Google Map using locator icon.

  • Website: This option sets the link to the official website of the store.
  • Contact Number: This option sets the contact number of the store.
  • Fax: You can set the fax detail of the physical store.
  • Email: This option allows you to set the contact email address of the store.
  • Store Image: Using this option, you can upload a desired image for the store.

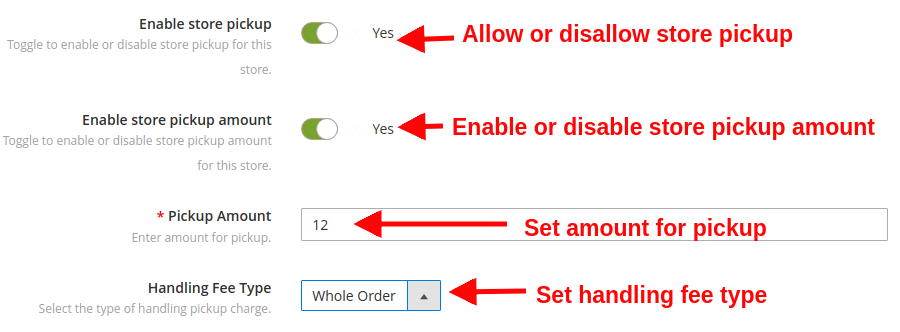
  • Enable Store Pickup: This option will enable or disable the store pickup functionality. This can be used when the product stock runs out.
  • Enable Store Pickup Amount: This option lets you enable or disable the store pickup amount if applicable as per the business needs.
  • Pickup Amount: This option lets you set the pickup amount for the order by the customer.
  • Handling Fee Type: With this option, you can select the type of handling pickup charge. Three options are offered under this category: per product, per quantity and whole order.

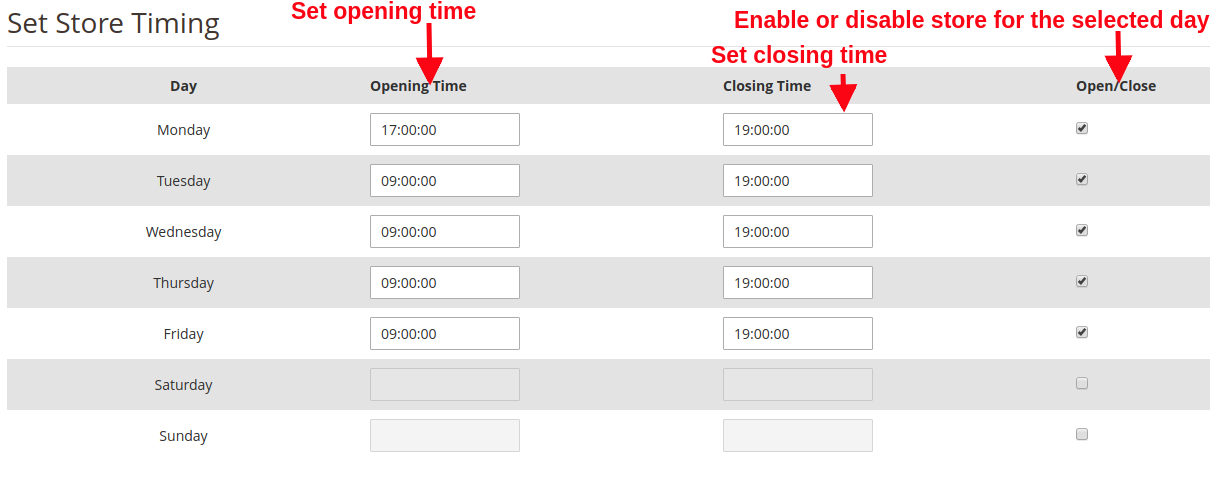
  • Store Timing: With this option, you can select the opening and closing time for the store on all days within a week. To keep the store pickup off for a particular day, you can simply un-tick the Open/Close check box.

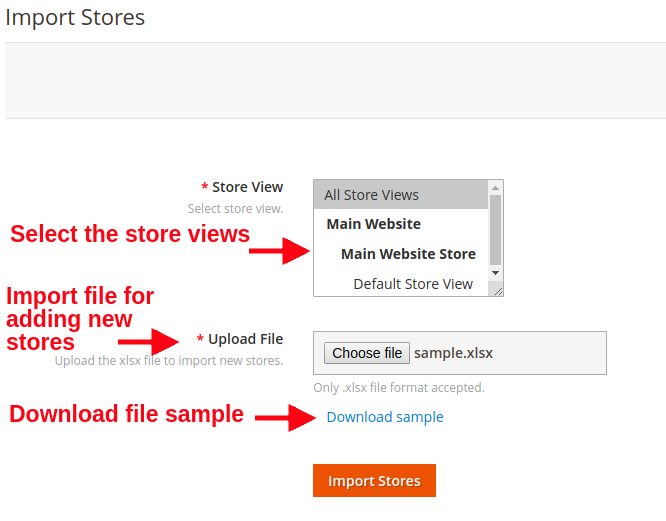
2) Importing Stores Using .xlsx File

  • Store Views: Select the store views where the imported stores will be visible.
  • Upload File: Using this option, you can upload the .xlsx file in order to import new physical stores.
  • Download File Sample: Download a sample file to check the way of listing store information in a .xlsx file format.

4.0 Front Interface of Magento 2 Google Maps Store Locator plugin

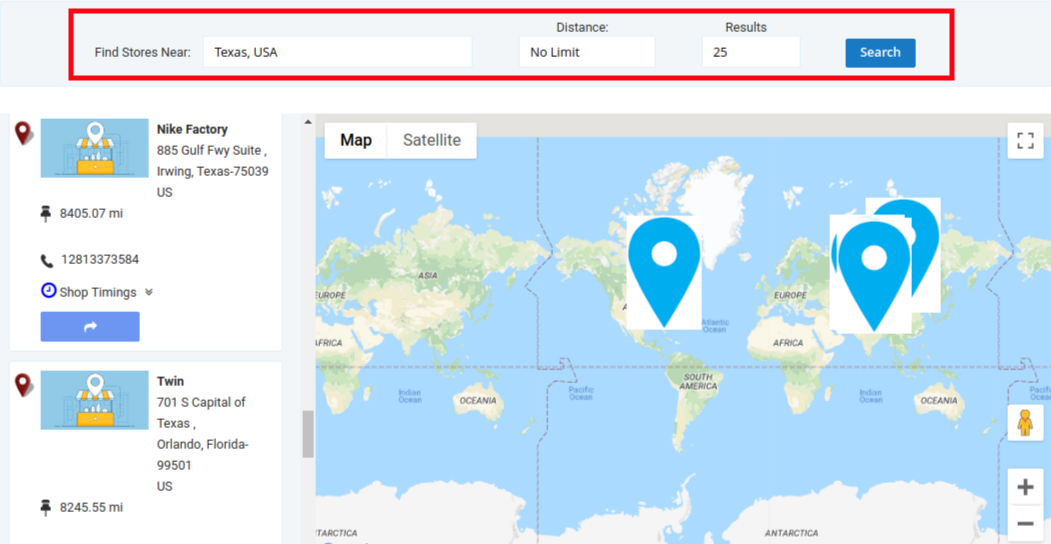
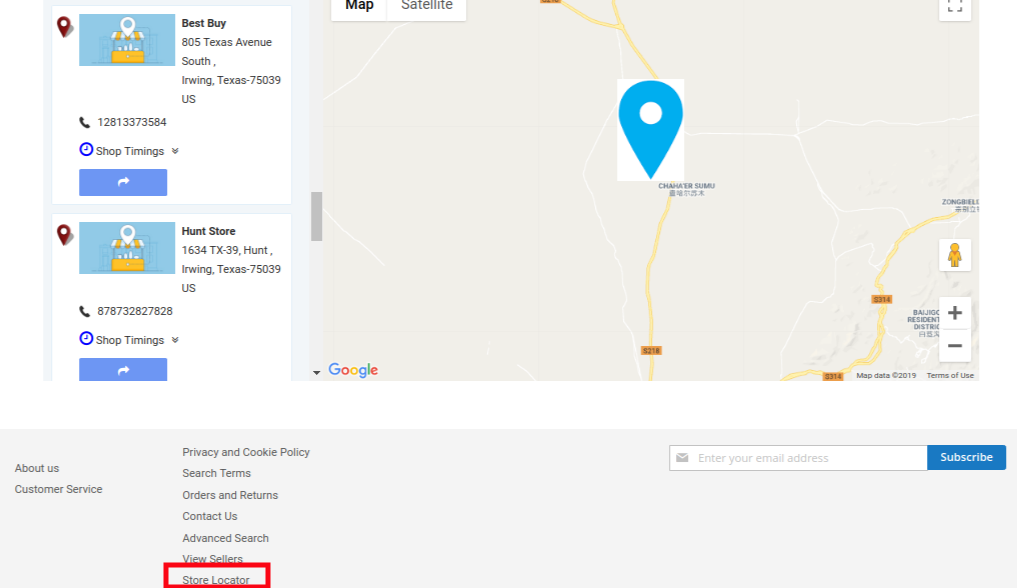
A) In the front, the customers can find the nearby stores directly from the Homepage.

They can locate the nearest store by entering a landmark address that is conveniently reachable from their actual location. For the provided address/city/state, a list of store recommendations is shown to the customer. Customers can view the details for any of these physical shops and can pick up their products.

Moreover, they can check the contact details, name, distance and opening timings for the shop. Hence, this way the customers get their product faster, conveniently and without paying extra shipping charges.

B) Store Location link in the footer section

C) Store Location options on the Checkout page
Here, the customer can select the pickup option for their product. Note that other shipping methods are also available here.


The customers can view the store on the front-end like this:

The customers can place their pickup orders easily by selecting the date and time as desired.

Note that the option of “Search Store Pickup” is also provided. Customers can click this option when they want to see the complete details for the listed stores. On clicking the button, a popup will be shown in the image below.

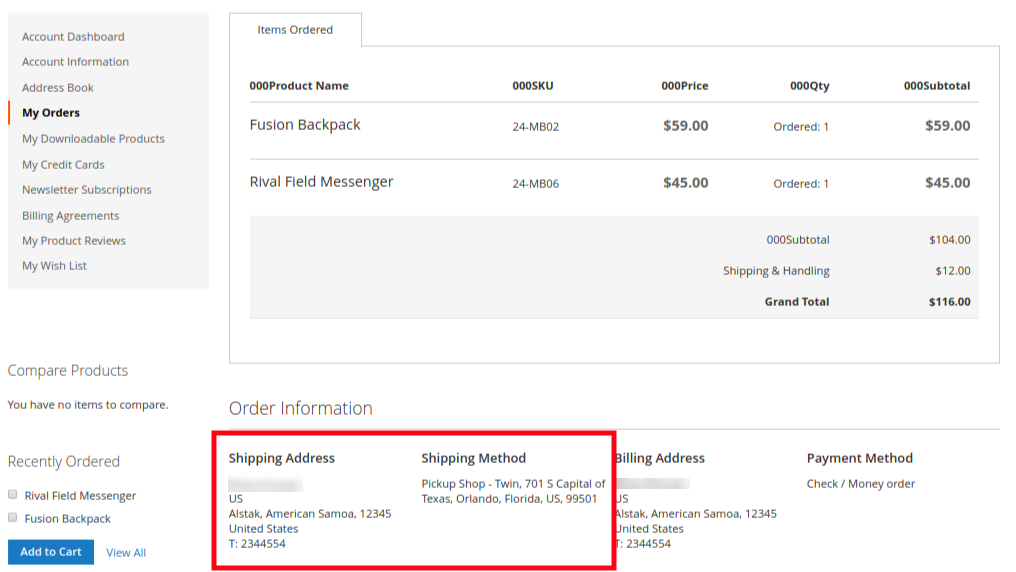
D) Pickup details after successful order completion


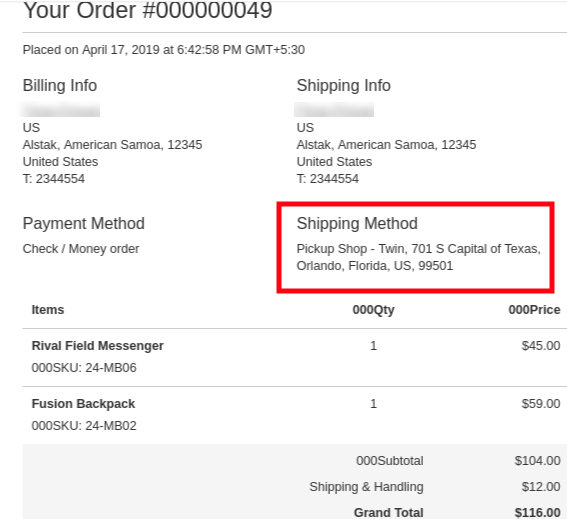
E) After placing an order, customer will receive an email confirming the order pickup details.


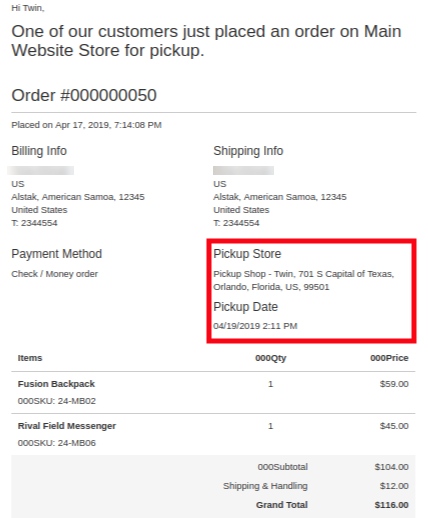
F) The owner of the physical shop also receives an email confirming the pickup order placed by the customer.

This way, the online store merchant can show multiple physical stores on the website using Google Maps and allow the online users to pick up the order from the store itself. The Magento 2 store locator and pickup module is highly customizable and allows showing multiple stores without any restriction. The e-merchant can show a store pickup option on the checkout page. The online users can select the nearest store and pick up their orders as per their preferences. They don’t need to pay delivery charges for the ordered product. The Magento 2 Store locator extension offers easy store management, admin can show store name, address, working days, contact information and store image easily for a better understanding of the customers. By offering the store locators and pickup facilities, admin can get more orders.

For more details about this Magento 2 store locator and pickup extension, please visit:

Magento 2 store locator and pickup module link

Magento 2 store locator and pickup module Admin Demo

Magento 2 Store locator module Front-end Demo

Magento 2 Review Reminder and Incentives Extension – User Manual

1.0 Introduction

In this growing eCommerce scenario, there are several strategies to improve the business connect with the customers. One such strategy is review booster and incentive system which helps in creating a better product image while gaining customer loyalty by offering enticing incentives. Product reviews create a first and long-lasting impression while the customer is about to purchase from an online shop. Before finalizing their purchase from the store, they believe in what buyers of the same product have experienced on the store.

Knowband’s Magento 2 Review Reminder and Incentives extension is one eCommerce business module which encourages customers to leave business reviews regarding their purchase. Magento 2 Review Booster module facilitates a way to collect product reviews from all kind of users and incentivize in exchange for the product reviews. Moreover, the Review Booster and Incentives extension for Magento 2 helps store owners to send personalized follow-up reminder emails to set up communication with your buyers and ask for reviews.

1.1 Striking Features of Magento 2 Review Reminder and Incentives plugin

The Magento 2 Review Reminder and Incentives Extension offers you multiple customizable features which are easy to implement for your eCommerce website. Admin can implement and configure any feature for their store without using any coding knowledge. Let us quickly take an overview of striking features by Magento 2 product reviewing and incentives module.

1. The Magento 2 Review Reminder and Incentives extension provides a means to collect product reviews from visitors and buyers who purchased an order from the store.

2. With Magento 2 review booster extension, admin can create and keep a track on reminder triggers as well as the incentives offered. The admin can schedule the follow-up reminders and fix the incentive criteria from the back-end.

3. Magento 2 Review Reminder and Incentives plugin lets you evaluate product reviews before making them live on the product pages under the review section. If you select automatic then reviews will be automatically approved and get live on the website and if you select manual then admin has to approve or disapprove it.

4. Magento 2 product reviewing and incentives module allows site admin to offer incentives and reminders to selected group i.e customer or buyer or both.

5. WIth Magento 2 Product Review Reminder module, store admin can even set the title and template for review reminder email sent to the customer or admin. The email also states whether the review includes an incentive or without incentive.

6. Magento 2 Review Reminder and Incentives block can be shown on the complete site or for different pages like Homepage, Product page, Category page, etc.

7. This Review Booster and Incentives extension for Magento 2 provides SSL compatibility and device responsive UI.

8. Magento 2 review booster extension supports and works flawlessly with multiple languages.

9. With Review Reminder and Incentives extension for Magento 2, admin can change the color of background color, border color and font color of review button.

10. The Magento 2 Review Reminder and Incentives extension provides an option to exclude products and categories from the review booster system.

11. Magento 2 review booster extension gives a detailed view to check the products that have been reviewed and the customers who have reviewed those products from the backend.

2.0 Installation Guide of Review Reminder and Incentives extension for Magento 2

1. Once after purchasing Magento 2 Review Reminder and Incentives extension from the Knowband store, you will get the following files on your registered email:

  • Source code file of Magento 2 Review Booster module in zipped file format
  • User Manual of Magento 2 Review Booster module

2. Unzip the extension package.

3. Create a folder{Magentoroot}/app/code/Knowband/Reviewbooster.

4. Upload the extracted content in the above folder via FTP manager (like Filezilla or WinSCP – download here: https://filezilla-project.org/).

5. Now run below commands to install the plugin:

php -f bin/magento module:enable –clear-static-content Knowband_Reviewbooster
php -f bin/magento setup:upgrade
php -f bin/magento setup:di:compile
php bin/magento setup:static-content:deploy

The Magento 2 Review Booster and Incentives module is now installed and ready to use.

3.0 Admin Interface of Magento 2 Review Reminder and Incentives Extension

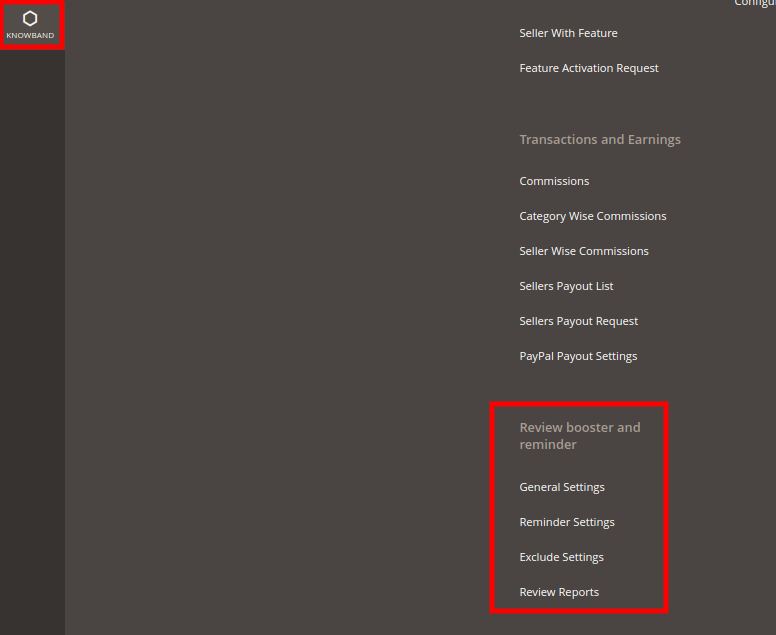
Just after successful installation of Magento 2 Review Booster and Incentives module on your website, you can collect and display as many reviews on your store as per business requirements. In order to configure this Magento 2 Review Booster module, navigate the settings in the given order: Admin Panel > Knowband > Review Booster and Reminder

The simple to understand admin interface of Magento 2 Review Reminder and Incentives plugin contains the following four sections namely:

1.General Settings
2.Reminder Settings
3.Exclude Settings
4.Review Reports

Each of these sections has been discussed in detail below.

3.1 General Settings

The general settings of Magento 2 Review Booster module are further divided into two sections as:
1.General Settings
2.Review Booster Settings

3.1.1 General Settings

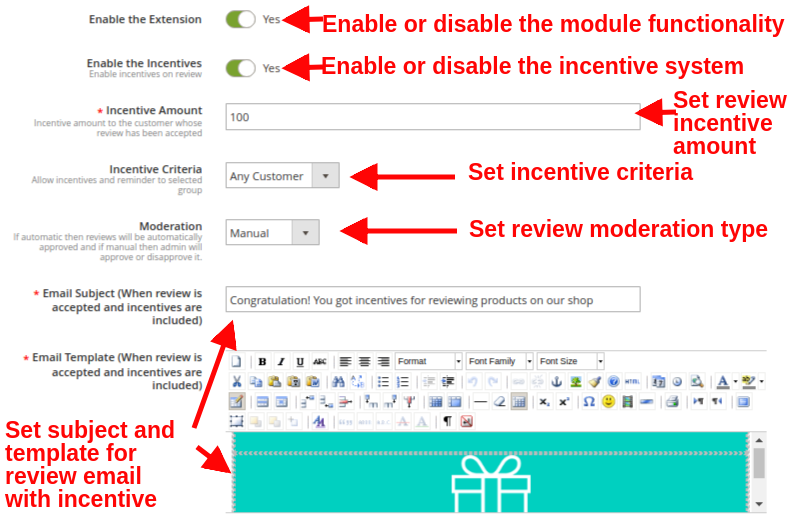
The general settings of this Review Booster and Incentives extension for Magento 2 contains the following basic configuration settings:

  • Enable the Extension: This option enables or disables the review booster and reminder functionality at your commerce store.
  • Enable the Incentives: With this option, you can allow or disallow incentives on customer reviews.
  • Incentive Amount: This sets the incentive amount you want to offer to your customers for writing a review. This amount is only provided to the customers whose review is accepted by the admin.
  • Incentive Criteria: With this option, you can provide incentives and reminder to selected groups which includes buyer or any customer. When selected as “Buyer”, shoppers will see the review block on the selected pages. While if this option is set to “Any Customer”, then any user can review the product from the product page itself, while it will not show on other pages.
  • Moderation: This will select the moderation type for product reviews. If automatic is set then the reviews given by customers will be automatically approved without manual changes. If this option is set as manual, admin has to approve or disapprove the product review.
  • Email Subject (When review is accepted and incentives are included): This option sets the subject line for the email sent to customer whose review is approved and provided incentive.
  • Email Template (When review is accepted and incentives are included): This option sets the template content for the email sent to customer whose review is approved and provided incentive.

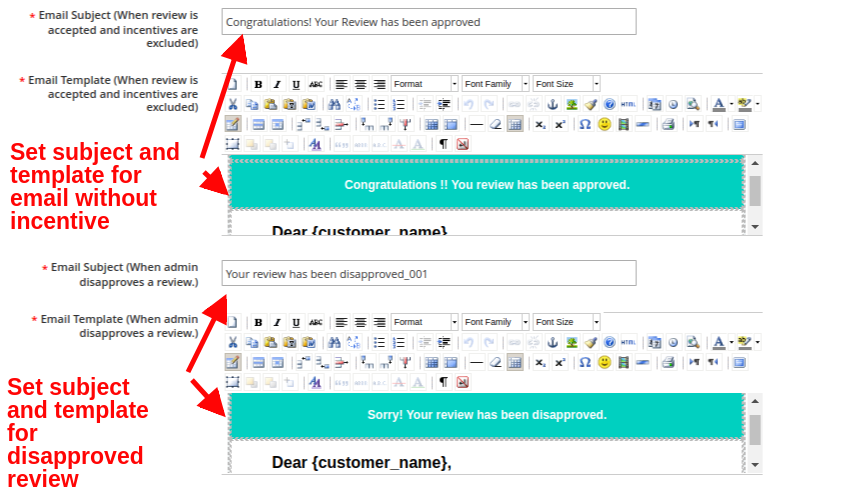
  • Email Subject (When review is accepted and incentives are excluded): This option sets the subject line for the email sent to customer whose review is approved without including any incentive.
  • Email Template (When review is accepted and incentives are excluded): This option sets the template content for the email sent to customer whose review is approved without including any incentive.
  • Email Subject (When admin disapproves a review): This option sets the subject line for the email sent to customer when their review is disapproved.
  • Email Template (When admin disapproves a review): This option sets the template content for the email sent to customer when their review is disapproved.

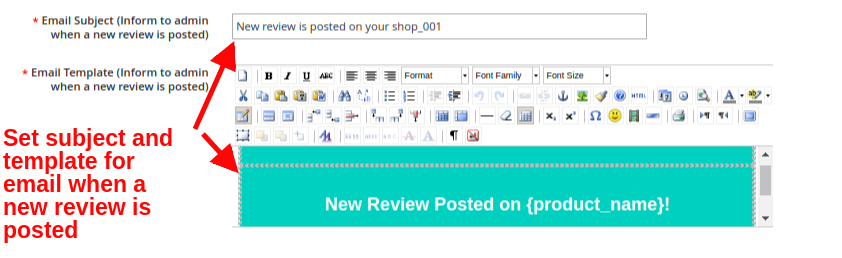
  • Email Subject (Inform to admin when a new review is posted): This option sets the subject for the email sent to the admin informing them about the posted review.
  • Email Template (Inform to admin when a new review is posted): This option sets the template for the email sent to the admin informing them about the posted review.

3.1.2 Review Booster Settings

The review booster settings of Magento 2 Review Reminder and Incentives plugin have been discussed below.

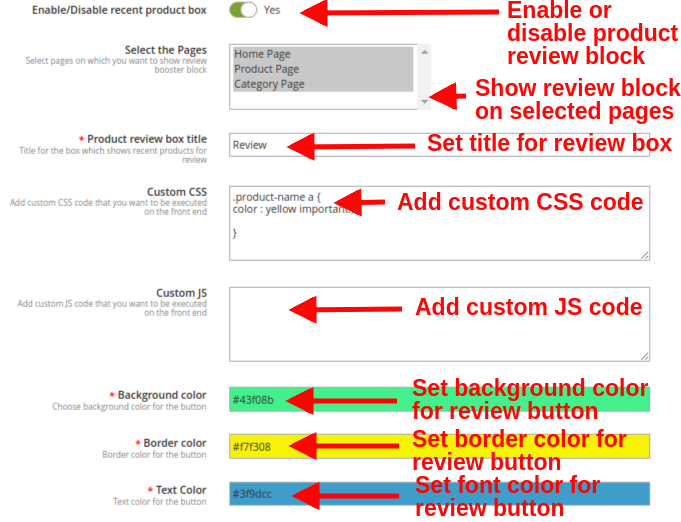
  • Enable/Disable recent product box: This option will enable or disable the recent purchase review block visible to the customers who purchased an order on the store. If this is disabled, the standard review block is still visible on all product pages to every visitor.
  • Select the Pages: This option allows you to select all the pages where you want to show review booster block to the buyers.

Note: Review booster block is visible to buyers on all site pages allowed by admin, while a user/visitor can only see and provide reviews from the product page.

  • Product review box title: This option sets a custom title for the product review block for recent product purchases.
  • Custom CSS: With this option, you can add CSS code that you want to execute on the frontend.
  • Custom JS: With this option, you can add JS code that you want to execute on the frontend.
  • Background color: This option sets the background color for the review button.
  • Border color: This option set the border color for the review button.
  • Text Color: This option sets the font color for the text shown on the review button.

3.2 Reminder Settings

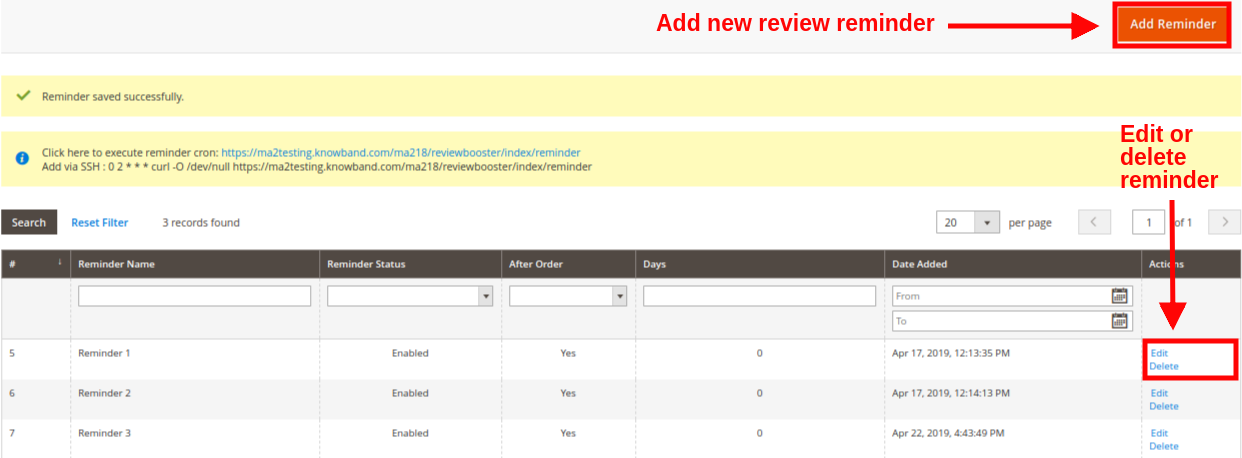
The reminder settings of this Magento 2 Review Booster and Incentives module gives a detailed view to the list of existing follow-up reminders at the backend.


You can see the email reminder along with their sent status and delivery date. Each of these review reminder can be edited or deleted by clicking on the “Edit/Delete” button corresponding to the reminder listing.

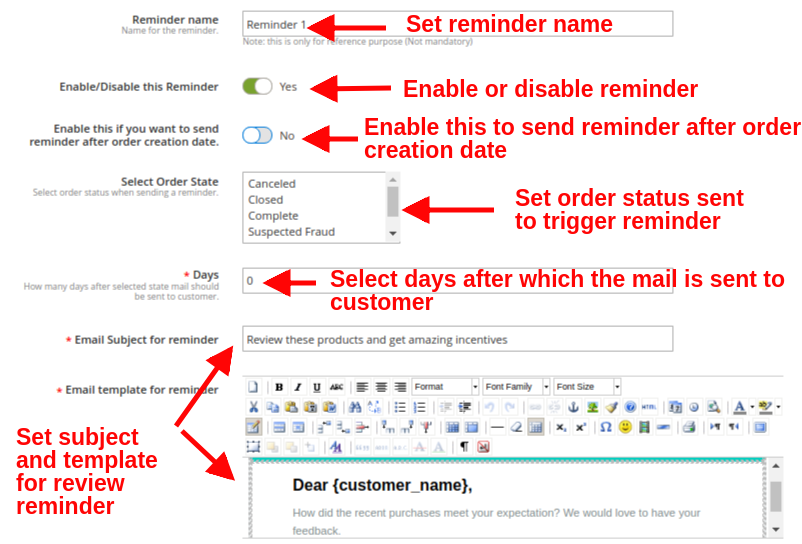
To add a new email follow-up reminder, click on “Add Reminder” button at the top right place of Reminder Settings section. You will see the following configuration options:

  • Reminder name: This option sets the name for the review reminder.
  • Enable/Disable this Reminder: Enable or disable the review reminder email using this option.
  • Enable this if you want to send reminder after order creation date: By enabling this option, the review reminder or follow-up email will be sent after order creation date. If this option is enabled, the next option “Select Order State” will get automatically disabled.
  • Select Order State: Select the order state when you want to send a reminder to the customer. As the order reaches to that state, the reminder is automatically triggered.
  • Days: This option specifies the number of days after which the selected state mail should be sent to the customer.
  • Email Subject for reminder: This option helps you to set the subject for the review reminder email.
  • Email template for reminder: This option helps you to set the template for the review reminder email

To send scheduled reminders to customers, cron job has to be executed manually by executing the following instructions:

Click here to execute reminder
cron: {Your store base URL}/reviewbooster/index/reminder
Add via SSH : 0 2 * * * curl -O /dev/null {Your store base URL}/reviewbooster/index/reminder

3.3 Exclude Products and Categories

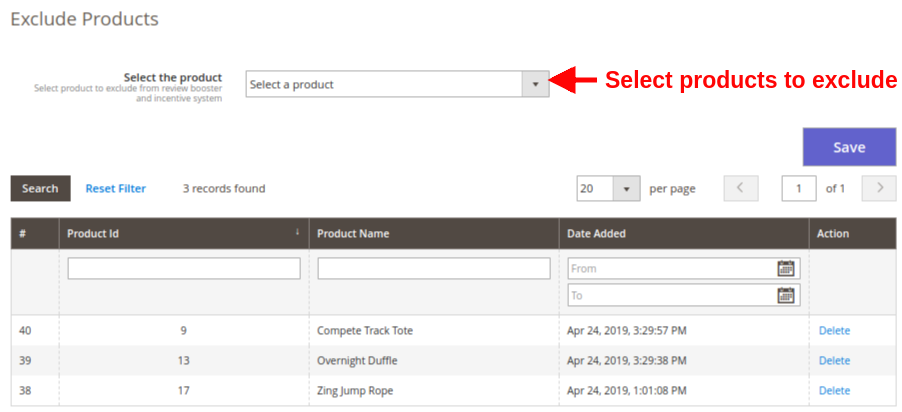
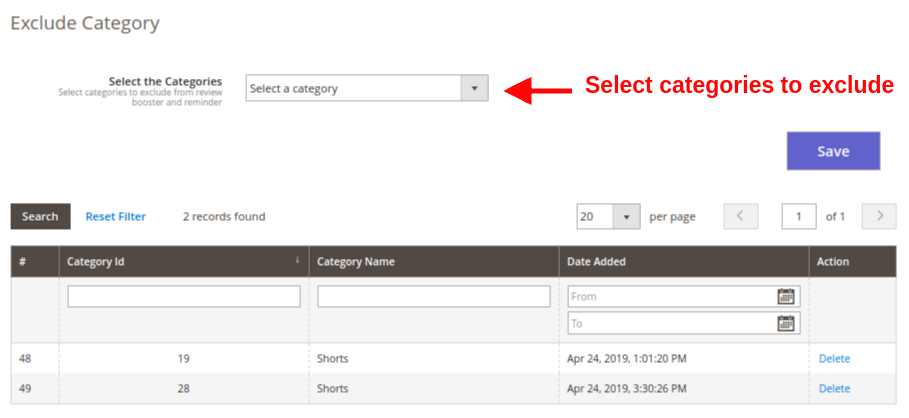
With this Magento 2 Review Booster module, you have the flexibility to disable review booster and reminder block for selected products and categories. From this section of this Magento 2 module, you can mark desired products and categories where you want to hide/disable this Review Booster block for the users.

  • Select the Product: Select the products you want to exclude from review booster and incentive system. You can also view the list of excluded products where this review block is hidden.

  • Select the Category: Select the categories you want to exclude from review booster and incentive system. You can also view the list of excluded categories where this review block is hidden.

After making the changes, click on “Save” button to execute the settings.

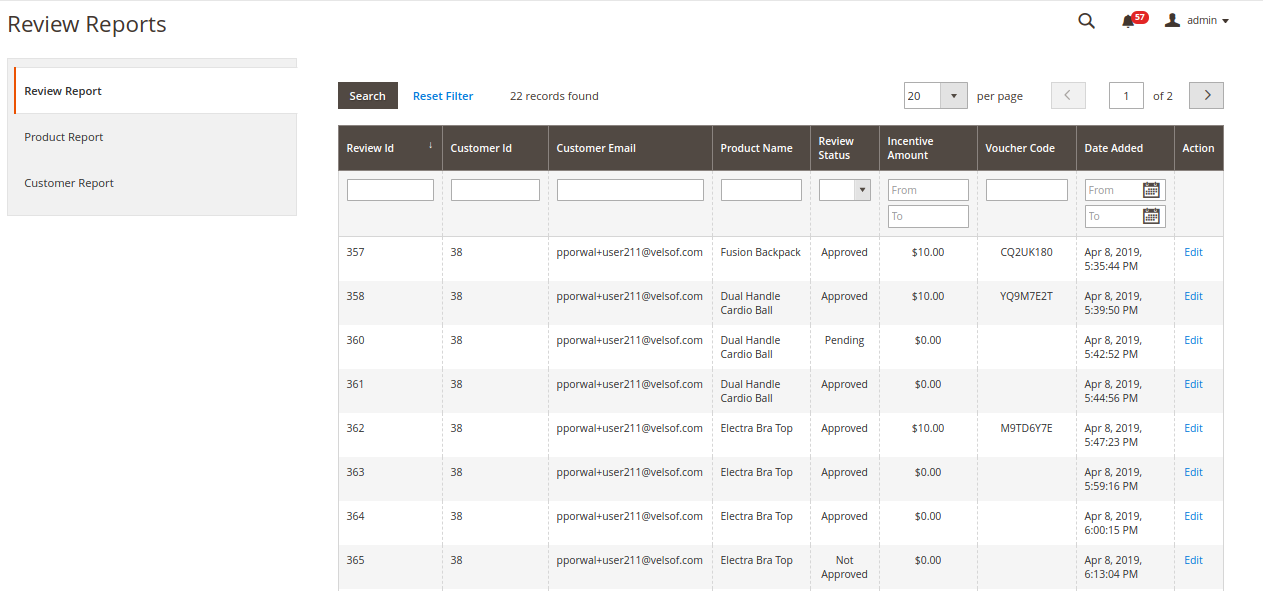
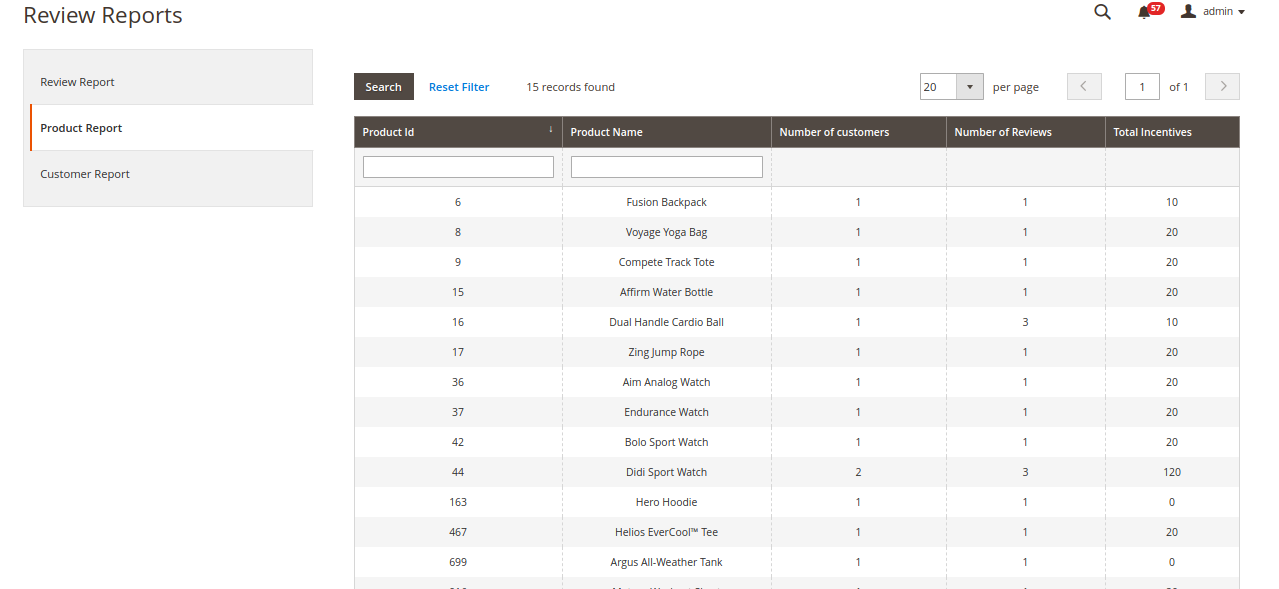
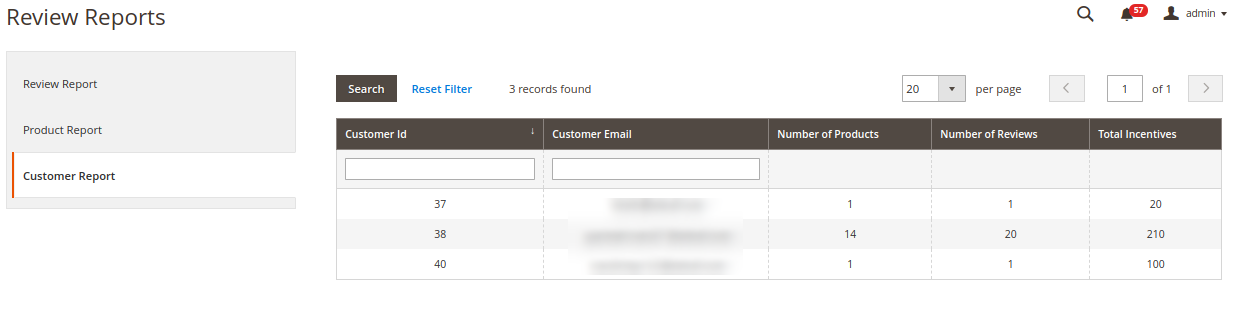
3.4 Review Report

Under the Review Report section of Magento 2 Review Reminder and Incentives plugin, you can view the complete site statistics regarding the customer reviews, reminders sent and incentives earned by the customer.
The complete report system is divided into three subsections namely:

3.4.1 Review Report

3.4.2 Product Report

3.4.3 Customer Report

4.0 Front Interface of Magento 2 Review Reminder and Incentives Extension

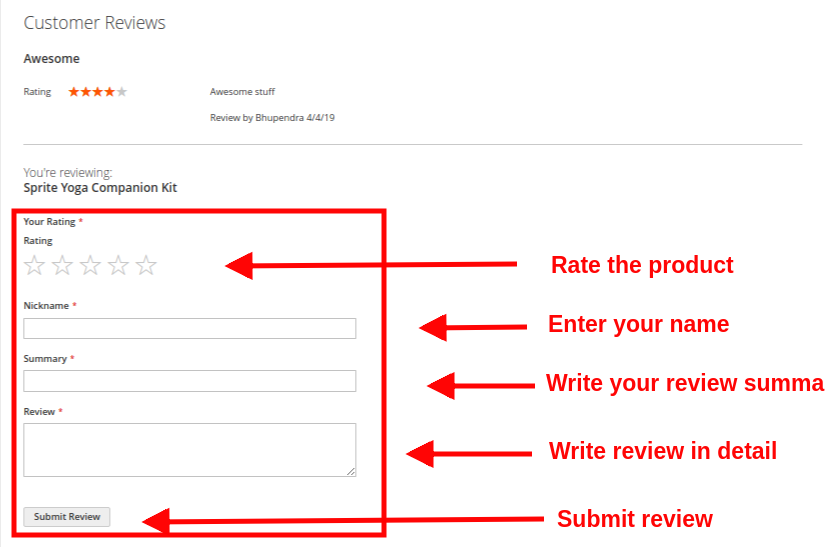
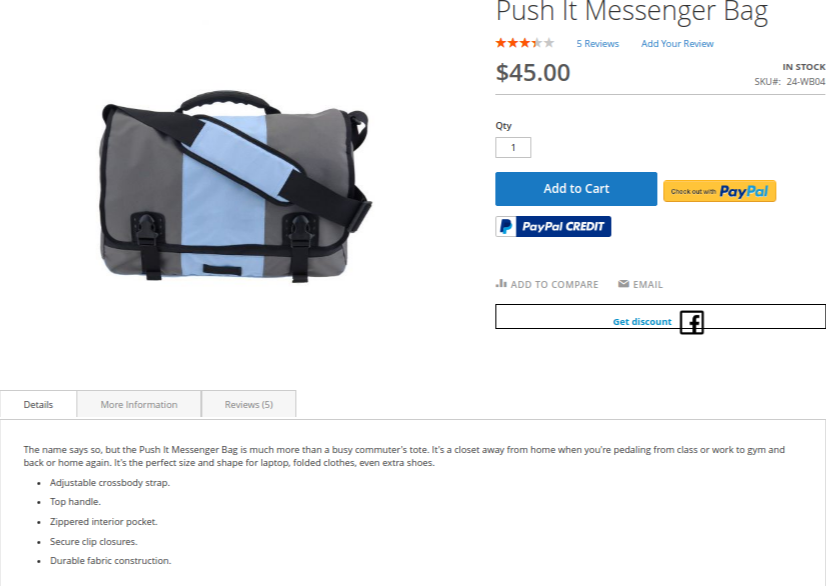
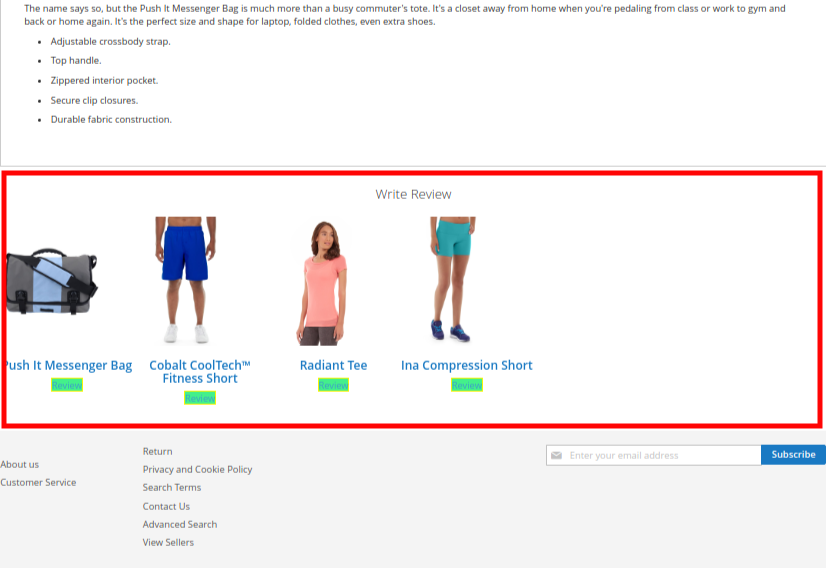
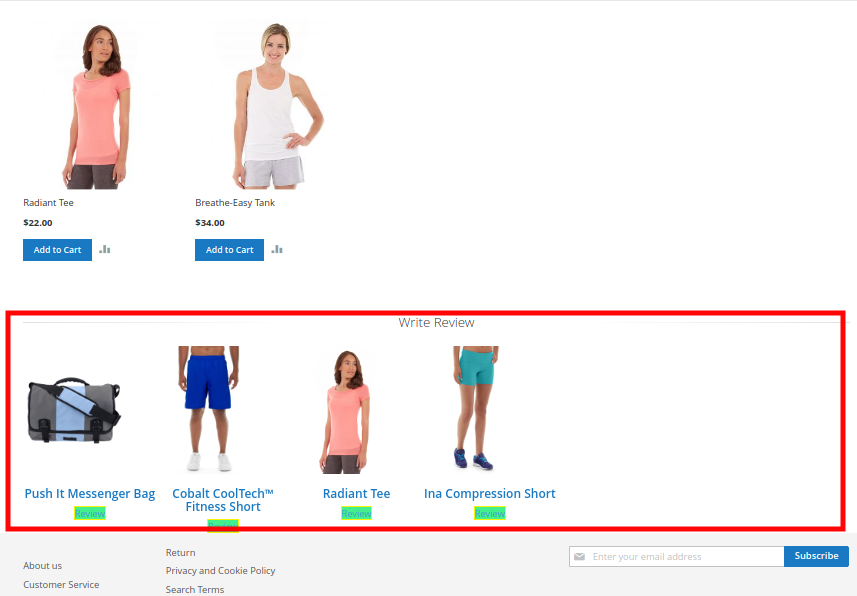
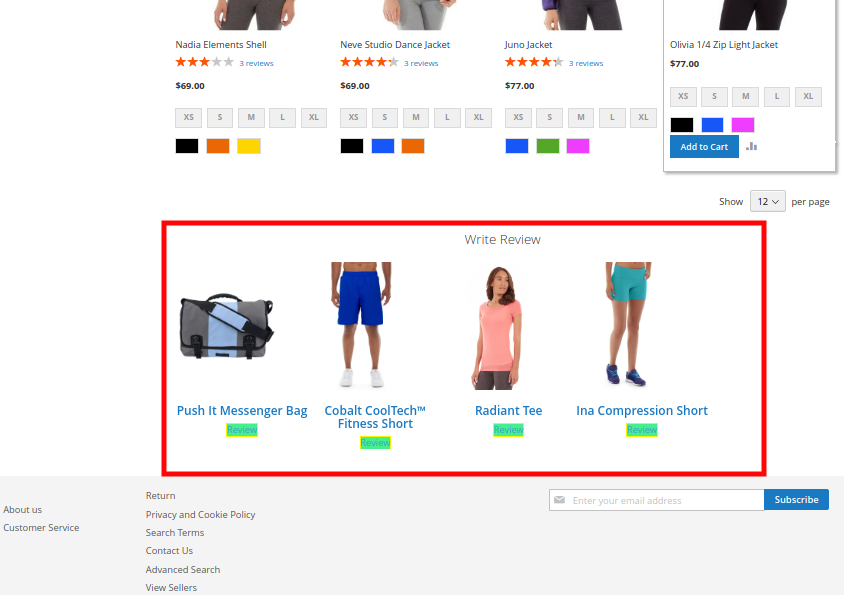
1. Product Review Block on Product Page
A) Review Write Block shown on product page to all Non-Buyers or Visitors of website.


B) Review Write Block shown on product page to Buyers of the website for their purchased products. The block shows all the purchased products of a customer on which the customer has not reviewed yet.


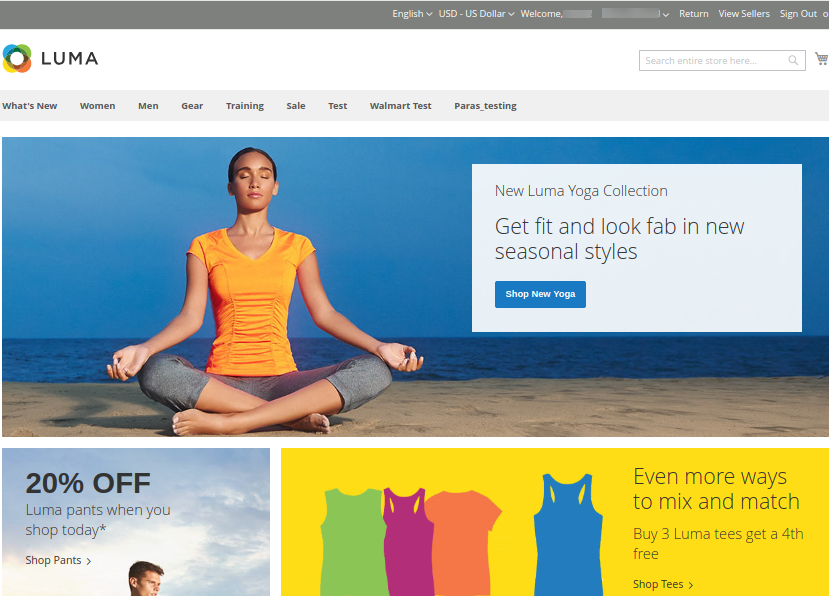
2. Product Review Block on Homepage
This Review Write Block is shown on Homepage to Buyers of the website for their purchased products.


3. Product Review Block on Category Page
This Review Write Block is shown on Category Page to Buyers of the website for their purchased products.

Magento 2 Instagram Shop Gallery Extension – User Manual

1.0 Introduction

Embed Instagram image galleries anywhere on your eCommerce store and showcase a list of mapped site products with those images using Knowband’s Magento 2 Instagram Shop Gallery Extension. This is one best way to increase conversion rates directly by integrating Instagram tagged images. Instagram Shop module adds a well-known interface for the visitors which compels them to buy the related products immediately.

1.1 Striking Features of Magento 2 Instagram Shop Gallery Extension

The Magento 2 Instagram Shop Gallery Extension offers you multiple customizable features which are easy to implement for your eCommerce website. Admin can implement and configure any feature for their store without using any coding knowledge. Let us quickly take an overview of striking features by this Magento 2 Instagram product tag feed module.

1. Magento 2 Instagram Shop Gallery Extension helps e-merchants to embed Instagram gallery to their website front.

2. Magento 2 Instagram Shop Extension fetches and displays Instagram photos based on the tags specified by the admin at the backend.

3. Magento 2 Instagram Integration Extension lets admin integrate Instagram Shop gallery page to the website showing all the fetched Instagram images under different Instagram galleries.

4. Admin can enable or disable the complete working of Magento 2 Shoppable Instagram Module for their store.

5. With Magento 2 Instagram Shop Gallery Extension, admin can show the likes and comments for the fetched Instagram image.

6. The main Instagram page can be enabled or disabled from the backend of this Magento 2 extension.

7. Using Magento 2 Instagram Shop Gallery Extension, Admin can show or hide the Instagram Page link in the top menu navigation bar of the website.

8. Insta Shoppable Gallery Module for Magento 2 allows admin to set the title for the Instagram Shop Gallery Page.

9. Using Magento 2 Shoppable Instagram Module, admin can show the images of the selected type on the main Instagram page. They can show all the photos, approved ones, having related images or having both approved and related images.

10. Magento 2 Instagram Shop Extension allows admin to set a limit on the maximum number of images that can be shown on this Instagram Shop page.

11. Admin can set a URL page key for this Instagram Shop page.

12. Magento 2 Instagram product tag feed module gives the flexibility to create as many Instagram gallery for the website which can be edited or deleted as per needs. They can be separately enabled or disabled if required.

13. Magento 2 Instagram Shop Extension allows admin to select the store view in which they want to include this gallery.

14. With Magento 2 Instagram Shop Gallery Extension, the store merchant can set the gallery title, image limit and image visibility for the particular gallery.

15. Admin gets an option to show or hide the selected image gallery on the main Instagram Shop page.

16. Using Magento 2 Instagram product tag feed module, admin can set the gallery visibility on different pages of the website at different positions.

17. The eCommerce store admin can add as many images for a particular gallery which can be edited or deleted anytime.
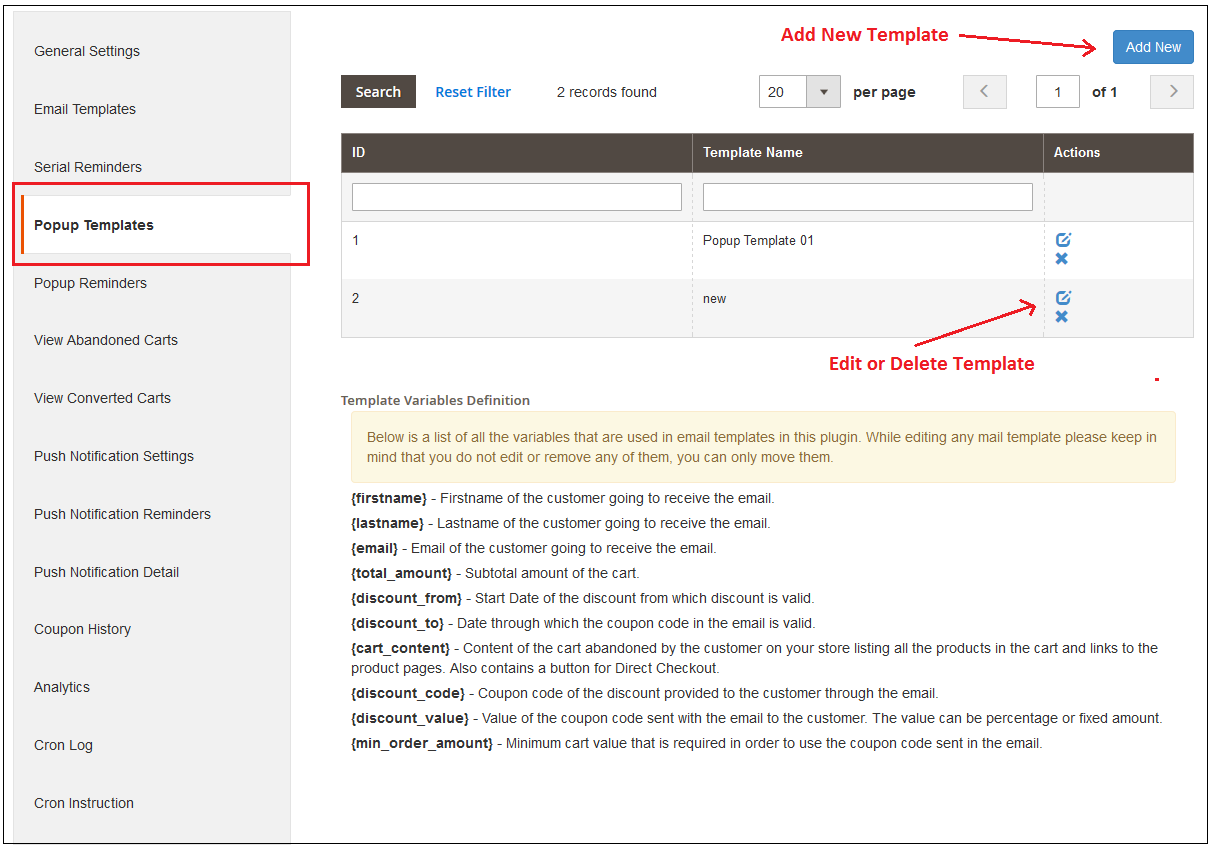
18. Admin has to specify Instagram Hashtag in order to fetch a new image. They can select any of the images out from the fetched images whose preview is available on the same interface.

19. Admin can use the toggle button to enable or disable a particular image.

20. Insta Shoppable Gallery Module for Magento 2 also allows admin to set a sort order for the images in a category.

21. Magento 2 Shoppable Instagram Module gives an option to map desired products for the Instagram image.

2.0 Installation Guide of Magento 2 Shoppable Instagram Module

1. Once after purchasing Magento 2 Instagram Shop Gallery Extension from the Knowband store, you will get the following files on your registered email:

  • Source code file of Magento 2 Instagram Shop Extension in zipped file format.
  • User Manual of Instagram Shop Gallery Extension

2. Unzip the extension package.

3. Create folder{Magentoroot}/app/code/Knowband/Instagramshopgallery

4. Upload the extracted content in the above folder via FTP manager (like Filezilla or WinSCP – download here: https://filezilla-project.org/).

5. Now run below commands to install the plugin:

php -f bin/magento module:enable –clear-static-content Knowband_Instagramshopgallery
php -f bin/magento setup:upgrade
php -f bin/magento setup:di:compile
php bin/magento setup:static-content:deploy

The Magento 2 Instagram Shop Gallery Extension is now installed and ready to use.

3.0 Admin Interface of Insta Shoppable Gallery Module for Magento 2

Just after successful installation of Magento 2 Shoppable Instagram Module on your website, you can display as many Instagram feeds on different pages of your store as per business requirements. In order to configure this Magento 2 Instagram module, navigate the settings in the given order: Admin Panel > Knowband > Instagram Shop Gallery

The simple to understand admin interface of Magento 2 Instagram product tag feed plugin has been divided into two broad sections:

1. Configuration

2. Gallery

3. Tags

4. Images

Each of these sections of Magento 2 Instagram Shop Gallery Extension has been discussed in detail below.

3.1 Configuration Settings

The configuration settings of Magento 2 Instagram Shop Extension is further divided into two sections as:

1. General Settings

2. Instagram Page Settings

3. Instagram Account Settings

4. Instagram Look and Feel Settings

Each of these settings has been discussed in the next section.

3.1.1 General Settings

Under the general settings of Instagram Shop Gallery for Magento 2, you have the following configuration options:

  • Enable: On toggling this button, you can enable or disable the complete functionality of this Magento 2 Shoppable Instagram Module for your store.
  • Show Likes/Comments: Enable or disable this option to show likes and comments on the Instagram feed. If enabled, the likes and comments for the particular post will be shown on the frontend to the customers.
  • Enable View on the Instagram button: With the help of this option, you can enable or disable the “View on Instagram” button on the Instagram image popup.
  • Enable Videos: This option allows you to enable or disable Instagram videos on the frontend.
  • Display Tagged Products: With this option, you can show/hide the tagged products alongside Instagram photo.
  • Display Shop Now Button: By enabling this option, you can display the Shop Now button with every Instagram photo.
  • Instagram Thumbnail Photo Size: Using this option, you can set the size or resolution for Instagram photos.

3.1.2 Instagram Page Settings

Under this section of Magento 2 Instagram Integration Extension, you can make various settings for the Instagram Page.

  • Enable: This option allows you to enable or disable the complete Instagram feed page whose link is shown on the menu bar of the website.
  • Top Navigation: You can show or hide the Instagram page link in the top navigation menu of the website. If enabled, the Insta shoppable gallery link is shown at the menu navigation bar.
  • Page Title: This option lets you set a custom title for the Instagram Shop Gallery Page.
  • Image Visibility: This option decides which category of images will be shown on the Instagram page. You can set any image type out of these four options:
    a. Show all photos
    b. Only approved
    c. Have related product
    d. Approved and related product
    Note: The total images can be managed from the “Gallery Settings” discussed in the next section 3.2
  • Image Limit: This option will set the maximum number of images to be shown on this Instagram Gallery page.
  • Page Url Key: Using this option, you can set a desired URL key for the Instagram Shop Gallery Page.

  • Meta Title: This option allows you to set your own meta title for Instagram shop page.
  • Meta Description: This option allows you to set the desired meta description for Instagram shop page.
  • Meta Keywords: This option allows you to set your meta keywords for Instagram shop page.
  • Show Follow Us Link: Using this option, you can show/hide a Follow Us link on the image popup.

3.1.3 Instagram Account Settings

  • Enable Search from Account: This option will enable or disable the Instagram image search using the account.
  • Access Token: Set the generated access token using this option.
  • Instagram Display Name: With this option, you can set the display name for the Instagram page.
  • Instagram Profile URL: With this option, you can set the desired Instagram profile URL.

3.1.4 Instagram Look and Feel Settings

  • Set “Follow” button title: This option helps you to set the title for the Follow button.
  • Set “Follow” button text color: This option sets the font color for the Follow button.
  • Set “Follow” button background color: This option sets the background color for the Follow button.
  • Set “Follow” button border color: This option sets the border color for the Follow button.
  • Set “Follow” button text hover color: This option sets the text hover color for the Follow button.
  • Set “Follow” button hover color: This option sets the hover color for the Follow button.
  • Set “Follow” button hover border color: Using this option, you can set the hover border color of Follow button.

3.2 Gallery Settings

The Instagram images that will be fetched and shown on the website can be configured under this section of back-office. You can create multiple Instagram Shop galleries for your website and can even edit the settings of the existing gallery. You can show as many images in each of the Instagram gallery using relevant hashtags and show related products for those images.
The below interface shows a list of existing Instagram Gallery which can be edited or deleted. You can edit the existing images or you can add new images to the Instagram gallery.

From this interface, you can perform the following sequence of actions:

3.2.1 Add a New Gallery

To add a new gallery, click on “Add New” button at the top right corner of the screen.

  • Enable/Disable: Toggle this button to enable or disable the Instagram gallery.
  • Store View: With this option, select the store views where you want to include this gallery.
  • Gallery Title: This option allows you to set a title for the gallery.
  • Image Visibility: With this option, the images of the selected type will be shown on the frontend.
  • Image Limit: Using this option, set the maximum number of images for this gallery.

  • Display Follow Us button: This option allows you to show Follow Us button for the selected gallery.
  • Include in Main Page: You can enable this toggle field if you want this gallery to be added on the Instagram main page at the front.
  • Layout Type: With this option, you can set the gallery layout type as a carousel or grid view type.
  • Auto Play: Enable this option if you want auto play for the carousel.
  • Page Visibility: With this option, you can set visibility of Instagram gallery on various pages. Simply Click on Add button to display this gallery on different pages.

3.2.2 Edit the Existing Gallery Settings

You can easily edit the existing settings of the gallery by clicking on the “Edit” button corresponding to the gallery you want to configure.

  • Enable/Disable: Toggle this button to enable or disable the Instagram gallery.
  • Store View: With this option, select the store views where you want to include this gallery.
  • Gallery Title: This option allows you to set a title for the gallery.
  • Image Visibility: With this option, the images of the selected type will be shown on the frontend.
  • Image Limit: Using this option, set the maximum number of images for this gallery.
  • Include in Main Page: You can enable this toggle field if you want this gallery to be added on the Instagram main page at the front.
  • Page Visibility: With this option, you can set visibility of Instagram gallery on various pages. Simply Click on Add button to display this gallery on different pages.

3.2.3 Add and Edit Images

Now once you have created a gallery, you can add multiple images to it by clicking on the “Images” button corresponding to the gallery.

The above screen shows you a list of existing Instagram gallery. You can add new images, modify or delete the existing images.
Note: Deleting an image is easy, you just have to click the “Delete” button corresponding to the image.

3.2.3.1 Add New Image

In order to fetch and add images to a particular Instagram gallery, there are three ways you can prefer. 

  1. Enter the relevant tag of your choice and search those tagged photos from the whole of Instagram. Select “Instagram” and click on “Fetch” button.
  2. The other option is that you can select “Saved Photos” option. This will fetch all the images that have been already added to any Instagram Gallery.
  3. The option “From Account” fetches images and videos from a particular Instagram profile or account which you have set from backend.
3.2.3.2 Edit an existing image

  • Image: This option lets you check the preview for the fetched Instagram image.
  • Approve: With this option, you can approve or disapprove the image.
  • Map Gallery: This option allows you to select the gallery in which you want to show that particular image.
  • Add Tags: Using this option, you can select the tag or category under which the image will be shown.
  • Sort Order: This option lets you set the sort order of image.
  • Related Products: This option allows you to select the related products that you want to show for that image. For this, you have to click on “Click on the image to tag related products” text shown in green color. This will allow you to pin unlimited site products to that image.

3.2.4 Delete the Existing Gallery

Deleting a gallery is simple, you just have to click the “Delete” button corresponding to the desired Instagram gallery.

3.3 Tags Settings

From this interface, you can perform 3 actions as:

  1. Add a new tag

  • Enable/Disable: This option allows you to enable or disable the selected tag.
  • Store View: Using this option, select the store view in which you want to include the tag.
  • Page Title: This option allows you to set the title for the tag page.
  • Meta Title: This option allows you to set the meta title for the tag page.
  • Meta Description: This option allows you to set the meta description for the tag page.
  • Page URL Key: This option sets a unique page URL.
  • Meta Keywords: With this option, you can set the meta keywords for the tag page.
  • Max Number of Photos Displayed: This option sets the maximum photo limit for a particular tag.
  • Display Follow Us Link: This option allows you to show/hide Follow Us link on tag page.
  • Load More Type: Using this option, select the Load More type as:
    • Click on Load More button
    • Auto (when scroll down)
  • Load More Button Text Color: This option lets you set the text color for the Load More button.
  • Load More Button Background Color:  This option lets you set the background color for the Load More button.

2. Edit existing tag

You will see the same configuration options when you edit the existing tag.

3. Delete existing tag

You can simply click on the Delete button corresponding to a particular tag.

3.4 Images Settings

From this interface, you can easily manage the total images fetched and added for various Instagram Gallery. You can add a new image, edit the existing one or delete them.

4.0 Front Interface of Insta Shoppable Gallery Module for Magento 2

A) Instagram Shop Page

Customers will see this Instagram Gallery option on the top menu bar.

Upon clicking the tab, they will be redirected to the Instagram Shop Page with URL key as “https://ma2testing.knowband.com/ma215/instagramgallery/”. This URL can be defined as per your own site needs. The Instagram Shop Gallery looks like in the image below:

B) Likes and Comments for Instagram Image


C) Show Instagram Gallery on Homepage


D) Show Instagram Gallery on Product Pages


E) Show Instagram Gallery on Category Pages

On clicking any of the images, customers will see the following image popup.

Magento Walmart Canada Integrator-User Manual

1.0 Introduction

Magento Walmart Canada Integrator offered by Knowband is an interface to synchronize the Walmart Marketplace with the Magento store. By using the Walmart API Key(Walmart Consumer ID, Walmart Private Key and Consumer Channel Type) the eCommerce store admin can connect the Walmart Marketplace with Magento store. With the help of Magento Walmart Canada Integration Module, the store admin can upload the products. Inventories, orders and shipping method from the backend of store.
Walmart is one of the largest profit generating company and has shown remarkable growth in few years. With the help of Magento Walmart Canada Integration Extension, the online merchant can easily list the products at the Marketplace and sync the orders from the Walmart Marketplace by running Cron jobs from the admin panel. Selling products at the Walmart Marketplace will enhance the popularity of the seller products on a large scale.

1.1 Features of Walmart Canada Magento API Integrator.

Walmart Canada Magento Integrator can be effortlessly installed by the eCommerce store admin.Technical Knowledge of the admin is not required to configure the Walmart Canada Magento Connector as no source code modification is required from the admin end. The various features offered by the Magento Walmart Canada API Integrator are:

  1. Walmart Canada Integrator offers a real time synchronization.No manual synchronization is required by the admin to sync the details from the Marketplace with eCommerce store and vice-versa.
  2. Even a non-technical store owner can set up the connection between Walmart Marketplace and Magento store. Connection can be established within few clicks.
  3. N number of profiles can be created in the backend of Walmart Canada Magento API integrator.
  4. Profile based listing helps in bulk product upload.
  5. Magento Walmart Canada Integrator allows the admin to map the categories and attributes of the eCommerce store with the Walmart Marketplace.
  6. The store admin can make changes in the inventories by editing the profile from the backend of Magento Walmart Canada Integration Module.
  7. Product listed at the Marketplace can be monitored from the backend of Magento Walmart Canada Integration Extension.
  8. Products can be renewed and deleted by the admin as per his choice from the admin panel of Walmart Canada Magento Integrator.
  9. With the help of Walmart Canada Magento Connector, the online merchant can even add shipping methods at the Marketplace.
  10. Magento Walmart Canada API Integrator offers admin the chance to win the BuyBox. The online merchant can reprice the products to win the BuyBox.
  11. Orders received at the Walmart Marketplace gets listed in the backend of Magento Walmart Canada API Integrator. Order status can be updated by the admin can by synced at the Marketplace by running the Cron job.
  12. The Online Merchant can monitor the error occurred while listing the product from the backend of the Magento Walmfrom the Marketplace with eCommerce store and vice-versa.
  13. The sellers can easily manage the lag time from the backend of Magento Walmart Canada Integration Extension.

2.0 Installation

Follow the following steps for installing Magento Walmart Canada Integrator:

  • Download the Walmart Canada Magento Connector package from Knowband store.
  • Unzip the package in the root folder of Magento setup via FTP panel.
  • In the admin panel go to the Walmart CA Marketplace.
  • The Magento Walmart Canada Integration Module is now ready to use.

2.1 How to connect the Walmart Marketplace with the Magento store using Magento Walmart Canada Integration Extension

To configure the Walmart Canada Magento Integrator, store admin needs the Walmart API key. In order to obtain the Walmart Consumer ID, Walmart Private Key and Consumer Channel Type, the admin needs to follow the following steps:

2.2 Walmart Canada Magento Connector API Activation

The store admin can obtain the Walmart Consumer ID, Walmart Private Key, Consumer Channel Type and other related details by following these steps:

  1. Login to your Walmart Seller Account.
  2. Click on the setting icon and then click on the API option at the bottom of the dropdown.
  3. Click on the Consumer Id and Copy the ID for future use.
  4. Click on the Regenerate Key to generate the Secret Key. A popup will appear in front of you.
  5. Click on the “Yes,Regenerate Key” on the Popup.
  6. Copy Consumer ID, Walmart Private Key, Consumer Channel Type and paste them in the respective options in the General setting tab of the Magento Walmart Canada API Integrator.

3.0 Admin Interface of Magento Walmart Canada Integrator

Magento Walmart Canada Integrator offers a User-friendly interface. After installation, the Magento CA Marketplace will be visible at the top of the admin panel. Magento Walmart Canada Integrator offers 14 tabs in admin panel for setting purpose.

  • General Settings
  • Profile Management
  • Shipping Carrier Mapping
  • Promotions
  • Shipping Override
  • Product Listing
  • Attribute Mapping
  • Order Setting
  • Order listing
  • Feed Status
  • BuyBox Report
  • Manage Lag Time
  • Tax Report
  • Sales Report
  • Product Sales Report
  • Synchronization
  • Audit Log

3.1 General Settings

In order to connect the ecommerce store with the Walmart Marketplace, the admin needs to fill all the mandatory fields in the general setting tab of Magento Walmart Canada Integrator. The input fields are described below:

1.Enable/Disable
The online Merchant can enable/disable the Walmart Canada Magento API integrator with a single click.
2.Walmart Consumer ID
Paste here the Consumer Id copied while login in Walmart Seller Account.
3.Walmart Private Key
Enter the private Key obtained while login in Walmart Seller Account.
4.Consumer Channel Type
Enter the consumer Channel to authenticate the integration between the Magento store and the Walmart Marketplace.
Click on the “Save Configuration” button at the top right side to complete the connection process.

3.2 Shipping Override

Walmart Canada Magento API integrator offers admin the acess to manage the shipping options at the Walmart Marketplace from the backend of the store. In the section, admin can create, edit and delete the shipping override as per his choice.

3.2.1 How to add a Shipping Template

Click on the “Add New” button at the top right of the Shipping override section.
A new page will appear in front of you. Fill all the mandatory fields to create the the a shipping template:

Shipping Override Title: Enter the shipping Override Title in this field.
Shipping Allowed: Admin can enable/ disable a shipping method with the click of a button.
Shipping Method: As per the requirement, admin can easily configure the shipping methods from the backend of Walmart Canada Magento API integrator. Shipping methods offered by the Walmart Canada Integrator are STANDARD and EXPRESS.

For further information on this, please refer to the following links:
https://marketplace.walmart.com/knowledgebase/articles/Article/Shipping-Standards-For-Marketplace-Sellers

Shipping Region: The online merchant can select the shipping region from the available choices.
Shipping Price: With Walmart Canada Magento API integrator the online merchant can set shipping price for various shipping regions and methods.

3.2.2 How to Edit and Delete the existing Shipping Override

Shipping overrides will get listed in the Shipping Override section of the Walmart Canada Magento API integrator. Click on the delete/edit buttons on the right side of the existing entries to delete and edit respectively.

3.3 Attribute Mapping

Attribute Mapping involves the mapping of the attributes of the eCommerce store with the attributes of the Marketplace. Attribute mapping helps in syncing the products from the store with the Marketplace. Attribute Mapping of the Walmart Canada Integrator helps in listing the products in an effortless way.

3.3.1 How to map the Attributes

The Store admin has the access to add and delete attributes from the backend of Magento Walmart Canada API Integrator. Click on the “Add New” button the top right of the section and fill all the mandatory fields to successfully map the attributes of the eCommerce store with the Marketplace.

3.3.2 How to delete the mapped Attributes

With Walmart Canada Magento Connector, the store admin can delete the mapped attribute with few clicks. The store admin can delete the mapped attribute by clicking the “Delete” button along the right side of the existing mapped attribute.

3.4 Profile Management

Unlimited profiles can be created, edited and deleted by the admin from the Walmart profile section of the Walmart Canada Magento Integrator. Profile based listing helps in bulk uploading of the products. Profile management section consists of two tabs: General settings and Profile Fields.


3.4.1 General Settings

With Magento Walmart Canada Integration Extension the store admin can map multiple categories of the eCommerce store with the categories of Magento Walmart. The store admin needs to fill all the mandatory details in the form to successfully submit the form. After filling all the details, the store admin needs to click on the “Submit Profile” at the top right side of the General setting section.

Profile Title: Enter a relevant name for the profile.
Store Language: The store admin needs to select the language available in the dropdown.
Walmart Category: The store admin needs to select the category type that he wants to map with the store category.
Store categories: With Magento Walmart Canada Integration Module, the store admin can select multiple categories for mapping with the category of the Walmart.
Custom Pricing: Custom pricing feature of the Magento Walmart Canada Integrator enables the admin to increase or decrease the product price at the Walmart with a fixed amount or percentage amount. Amount of price that admin wants to add or decrease is also set by the admin.
Barcode Identifier: With Walmart Canada Magento API integrator, the store admin can select the unique product field for the product. Barcode identifier will help to identify the product .
Product Brand Identifier: In this tab the admin needs to select the field having the value of product brand in your system.

Product Manufacturer Identifier: With Magento Walmart Canada Integration Extension, the admin can select the field with value equal to the product manufacturer in your system.
Customized Product Title: The store admin has the access to customize the product title from the list of place holders available. Selected placeholder will replaced by the dynamic value at the time of execution. The various placeholders available are:
{id_product} for Product ID
{product_title}for product title
{country_of_manufacture} for Country of Manufacturer
{sku} for Product SKU
{weight} for Product Weight
{short_description}for Product Short Description
{price} for Product Price
Shipping Override: This field helps the admin to select the shipping overrides for products from the list of options available.
Product Tax Code: With Product Tax Code field, the admin can provide the sales tax code for the products of the current profile.

3.4.2 Profile Fields

On the basis of the selected Walmart category, the admin can provide the additional information and values of the products while submitting the profile from the backend of Walmart Canada Magento Integrator.
Admin needs to click the “Submit Profile” button to save all the product information.

3.5 Products Listing

In Walmart Products listing tab, the admin can view the listed products at the Walmart Marketplace. Moreover Walmart Canada Magento Connector allows the admin to view the status of each product. In order to sync the products at the backend of the store, the admin needs to run the Cron job.

3.5.1 Renew a product

In case the product listing gets expired, the store admin can renew the product back at the Walmart Marketplace by clicking the “Renew” button next to the product. As soon as the product gets renewed, the button will be replaced by a “Halt” button.

3.5.2 Relist or Delete a product

If the admin wants to delete the product listed at the Walmart Marketplace, the store admin just needs to click the “Delete” button next to the product. At this time, Delete button will get replaced by the “Relist” button. The admin can relist the product back at the Walmart Marketplace by clicking the “Relist” button at the backend of the Walmart Canada Magento Integrator.

3.5.3 View Error

With Magento Walmart Canada API Integrator, the store admin can view the error occurred while listing the product. The store admin needs to click the “View Error” button to view the error.

3.6 Promotions

Various Promotional deals and offers can be run at the Walmart Marketplace from the backend of Magento Walmart Canada API Integrator. With the help of Walmart Canada Integrator, the store admin can run clearance and reduced price deals at the Walmart Marketplace.

3.6.1 How to create a New Promotion

The eCommerce store owner needs to click on the “Add New” button at the right side of the Walmart Promotions Listing section. As the admin clicks on the button, a new page will open in front of them. Fill all the mandatory fields in the displayed page.

Promotion Detail: Here enter the promotion details.
Price Type: The store admin can select the promotion type here. Admin can run a clearance and reduced promotion at the Walmart.
Discount Price: Here admin is supposed to enter the discount amount on the deals.
Start Date and End Date(UTC Timezone): Here enter the time duration during which the promotion will run at the Walmart Marketplace.
Product Selection: Admin can select the products or profiles on which he wants to offer the promotion.

3.6.2 How to Edit or Delete a Promotion

The store admin can edit and delete any existing promotion from the backend. Click the “Edit” and “Delete” button to perform the respective function.“Sync” button next to the promotion is used to sync the promotion at the Marketplace.

3.7 Manage Lag Time

The store admin can update the Lag time from the backend of the Magento Walmart Canada API Integrator. Lag time is used to avoid any shipping delay. Click on the “Update Shipping Lag Time” button to update the Lag Time.

A new popup dialog will appear in front you. Enter the Lag time in days and click on the “Update” button. This will update the Shipping Lag Time at the Walmart Marketplace.

3.8 Order Settings

In Magento Walmart Canada API Integrator, order setting tab can be used to map the order status at the store with the Walmart Marketplace. Cron jobs can be used to sync the order status at the Walmart Marketplace.

The various fields available at the Order Settings are:

Order Current State: Admin can Choose order Current Status here.
Order Shipped State: Admin can choose the order status for the shipped Orders placed at Walmart.
Order Acknowledge State: This field allows the admin to select the order state for the Acknowledge orders at Walmart store.
Order Cancel State: Select the order state for cancelled order at Walmart store.

3.9 Orders Listing

Order received at the Walmart gets listed at the backend of Walmart Canada Magento Connector.Admin needs to run the “Sync Order” tab to sync the orders from Walmart. To process the order, click on the “View” button next to the order received.

3.10 Feed Status

Multiple Cron Jobs can be run from the admin panel of the Walmart Canada Integrator. Every time a Cron is run, a feed gets created in the Walmart Feeds section. Complete detail of the feed can be viewed by clicking the “View” button next to the respective feed.

3.11 BuyBox Reports

Multiple Cron Jobs can be run from the admin panel of the
By clicking the “Sync Walmart BuyBox” button, cron job will be run to fetch the BuyBox report from the Walmart Marketplace. It might be possible that multiple competitors will be selling the same product at different price value. BuyBox report obtained will help the admin to compare the price of a product with the competitors product price.

With Multiple Cron Jobs can be run from the admin panel of the, admin can reprice the product value to win the BuyBox. Updated price can be synced at the Walmart by clicking the “Sync Repricing” in the Walmart synchronization section of Walmart Canada Magento Connector.

3.12 Synchronization

Walmart Synchronization section plays an important role in establishing the connection between the Walmart Marketplace and the store. Multiple cron jobs can be run to sync all the settings and changes from the Walmart store with the eCommerce store.


The various Cron jobs run to synchronize the settings and changes are as under:

Sync Products: This button helps the admin to sync all the product listed at the backend of Walmart Canada Magento API integrator to sync at the Walmart Marketplace. The cron job will add products with their mandatory product details at the Walmart Marketplace.

Sync Product Inventory: The following cron job is run to sync the quantity of the product at the Walmart Marketplace.

Sync Product Price: The following button will sync the updated product price at the Walmart.

Sync Orders: The following cron job will be used to sync orders from the Walmart Marketplace with the eCommerce store.

Sync Order Status: Updated order status can be synced at the Walmart Marketplace by running the Sync Order Status from the backend of Magento Walmart Canada Integration Extension.

Sync Feed Status: Feed status can be synced at the Magento store by running the following cron job.

Sync Shipping Lag Time: Lag time in days on shipping orders can be synced at the Walmart Marketplace by running the Cron Jobs.

Sync Walmart BuyBox: BuyBox report can be downloadable from the Walmart store by running the following Cron job. BuyBox report will help the admin to compare product price of various competitors.

Sync Repricing: Repriced value of products to win the BuyBox can be synced at the Walmart Marketplace by running the following Cron job.


3.13 Tax Code

Tax code section of Walmart Canada Magento Integrator enables the admin to view the tax code of the products in bulk. The online merchant can easily view the tax code of the inventories.

3.14 Audit Log

Tax code section of Walmart Canada Magento Integrator enables the admin to view the tax code of the products in bulk. The online merchant can easily view the tax code of the inventories.
All the Cron jobs executed can be viewed from the Audit Log section of the Magento Walmart Canada Integration Extension. Admin can easily view the status of each Cron job from the Walmart Audit Log section.

For further information, refer to the following links:

 Magento Walmart Canada Integration

Walmart Canada Magento API integrator Admin Demo


Magento 2 Multi vendor Marketplace-User Manual

The 1.0 Introduction

Magneto 2 Multi vendor Marketplace allows the admin to uplift the revenue by selling the goods of third-party vendors at the same platforms. Etsy, eBay, etc, are among the best eCommerce stores, successful in keeping their customers engaged by providing services and products of different sellers at the same platform. Nowadays getting customers’ attention and keeping them busy in your store is not an easy task.

Knowband has come with Magento 2 Multi seller Marketplace module to help the admin to build their Marketplace. With the help of Magento 2, multi-vendor Marketplace extension store admins can build a Marketplace like Walmart, Etsy, and eBay and allow multiple vendors to easily register and list their products on the site. Store admin just needs to install the Magento 2 Marketplace plugin and manage everything from the backend of the store.

1.1 Admin Benefits of Magento 2 Marketplace Extension

The various admin benefits offered by Knowband’s Magento 2 Multi vendor marketplace plugin are below:

  • The store admin can simply upgrade their eCommerce store into a fully-featured Marketplace with the help of the Magento 2 Multi seller Marketplace module.
  • All types of products including Simple, configurable, and bundled are supported by Magento 2 Marketplace Module.
  • With the help of the Magneto 2 Multi vendor Marketplace, the store admin can set the global commission as well as a category-based commission to be charged to the sellers. Admin can add category-wise commission as well.
  • Seller’s profile and products at the Marketplace can be easily viewed by the store admin from the admin panel of Magento 2 Marketplace Extension.
  • The store admin has the access to approve or disapprove the seller account request. Moreover, do the same for the product listings.
  • Categories for keeping the products are assigned to the admin from the Magento 2 Multi-vendor Marketplace Module. Sellers can add their products only to the assigned categories.
  • The store admin has the chance to enable/disable the seller reviews and seller products reviews from the backend of the Magento 2 Multi vendor Marketplace Extension.
  • Magento 2 Marketplace Module offers the admin access to track the sales report and overall transaction of the site.
  • Default email templates for notifying the sellers are offered to the store admin by the Magento 2 Multi seller Marketplace module.

1.2 Seller Benefits offered by Magneto 2 Multi vendor Marketplace

  • The third-party vendors can easily register as a seller at the site just by filling a form.
  • Multiple sellers can register themselves at the Marketplace by filling few details in the form.
  • Once the admin approves their account, the sellers can easily list their products at the Marketplace from the seller dashboard.
  • Sellers can add their banners, shop logo, and metadata from their seller dashboard.
  • Sellers can effortlessly monitor the overall transaction and sales report from the seller dashboard.
  • New category requests can be forwarded by the sellers to the admin. In fact, the admin can approve or disapprove the category request from the back-end of the Magento 2 Multi vendor Marketplace module.
  • Sellers can add coupons for their store to give a discount to their customers and attract them with different offers.

1.3 Customer Benefits of Magento 2 Marketplace Extension

  • The customer is given a wider range of options to choose products from.
  • Seller’s profile can be easily viewed by the visitors on the product page.
  • Customers can send their valuable feedbacks for products as well as the seller.
  • Customers has also an option to register themselves as a seller on Magento2 Marketplace.

2.0 Installation

Buy the Magento 2 Multi vendor Marketplace extension from the KnowBand store. You’ll get the following files:

  • Zipped File containing the source code of the module
  • User Manual

Follow the steps mentioned below in order to install the Magento 2 Multi seller Marketplace extension in your store:

  1. Unzip the zipped file. Create a folder (Magento root)/app/code/Knowband/Marketplace
  2. Upload the extracted content in the above folder via FTP manager (like Filezilla or WinSCP – download here: https://filezilla-project.org/).
  3. Run below commands via SSH on root Magento directory:
    a) composer require phpoffice/phpexcel:1.8.1
    b) composer require paypal/rest-api-sdk-php: 1.13.0
  4. Now run the below commands to install the plugin:
    php -f bin/magento module:enable –clear-static-content Knowband_Marketplace
    Then, php bin/magento setup:upgrade
    php bin/magento setup:di:compile
    php bin/magento setup:static-content:deploy
  5. In Admin Panel go to the main menu -> Knowband -> Marketplace.
  6. The Magento 2 Marketplace extension is now ready for use.

This User Manual will guide the users through the Magento 2 Multi seller Marketplace module configuration and settings.

3.0 Admin Panel

The Magento 2 Marketplace plugin offers multiple options for configuration and management of the online marketplace.
All the tabs are below in detail.

3.1 General Settings

General settings of Magento 2 Multi seller Marketplace is divided into two main types:
the General Settings and Low Stock Configuration

3.1.1 General Settings

The various fields of this General setting of the Magneto 2 Multi vendor Marketplace plugin are below:

    • Enable Marketplace: Toggle this button to Enable/ Disable the Magento 2 Multi seller Marketplace module.
    • Default Commission: Admin can enter the commission to be charged to the sellers here. The percentage amount set by the admin applies to all the Marketplace sellers by default.
    • Categories Allowable: Admin can select the categories he wants to assign the sellers. If he selects no category here, the seller can keep the products in all the categories.
    • Register as Seller Field: If the admin enables then the seller can register their store at the Marketplace.
    • Show different registration page for Seller: If the admin enables then sellers can register themselves using a separate registration form in the front end of Magento2 Marketplace. 
    • Enable Bulk Import/Export: Admin can allow the sellers to upload the products in bulk with a toggle of this button.
    • Email to seller on order place: If the admin enables this button, the seller will be notified about the orders via email.
    • Enable Vacation Mode: When the admin enables, this feature allows the 3.7 Sellers Reviews
      All the seller reviews along with their allowable status will list in this section. Sellers to send the vacation request to the admin.
    • Show Seller information on Product Page: Customers can view the seller information on the product page if the admin enables this button.
    • Product Approval Required: If he selects ‘Yes’, then, admin approval will be required to list the product at the site.
    • New Product Limit: Enter the product limit here that you want the sellers to list at the Marketplace. If the field is left blank, no product will list.
    • Enable Seller Review: Select he selects ‘Yes’, the customers will be able to send their feedback for the sellers here.
    • Seller Review Approval: If the admin enables this feature, then, the review sent by the customers will be forwarded to the admin for approval. Only after the approval of the store admin, the review will be visible to the customers.
    • Enable Seller List: Enable this button to display the list of the sellers in the front-end of the site
    • Activate search box: Enable this feature to allow the customers to search sellers on the seller listing page.
    • Enable Seller Coupon: If the admin enables this feature, then the sellers can add coupons for their stores.
    • Enable Seller Customer Support: Enable this feature to allow the sellers to view and solve the queries of their customers.

3.1.2 Low Stock Configuration

  • Enable Low Stock Notification:  If he selects ‘Yes’ then, the sellers will be notified about the low stock via email.
  • Low Inventory Limit: This is a mandatory field where the admin is needed to add the limit below which the products are considered low stock.
  • When to Notify: Admin has the choice to select the condition when he wants to send the mail to sellers.
  • Send Notifications from: Select the emails which you want to send as notifications.

3.2 Custom Fields:

The admin can add different custom fields for the seller’s profile. Admin can align these custom fields under a different section of the seller’s profile. Admin has a variety of choices to select custom fields like text, radio, check-box, etc. And admin can make these custom fields required also.

3.3 Seller List

The admin can monitor the list of the sellers selling their goods at the Marketplace from the backend of the Magento 2 Multi seller Marketplace extension. Admin can view the list of orders and the seller’s products with a click on the right side of each seller.

3.3.1 How to Edit Seller’s Account

The admin even gets an option to edit the profile of the sellers. Click on the name of the seller and a new page will open in front of you. Admin can here view and edit seller account details, orders, product reviews, Customer view, etc.

3.3.2 Seller Account Settings

The following tabs are available in the Seller Account Settings:

  • Default Commission: Admin has the choice to set a different commission amount of the seller in comparison with the global commission.
  • New Product Limit: The product limit set in the General setting tab is changeable for a particular seller. Admin can set the new product limit for a particular seller here.
  • Categories Allowable: Categories other than the global categories can be assigned to a particular seller here.
  • Product Approval Required: Product approval settings are changeable in this tab.
  • Enable Seller Review: Admin can change the settings for seller review here.
  • Required seller Review Approval: The admin can change the seller review approval settings for a particular seller in this field.
  • Email to seller on Order Place: If the admin wants to notify a particular seller or not on orders placed then the admin can enable or disable the settings here.

3.4 Seller Account Approval Request

The third-party vendors can fill up the form in order to register their seller account at the site. The seller list along with their account status can be viewed by the admin in this tab of the Magento 2 Multi vendor Marketplace extension.

3.4.1 How to Approve and Disapprove the Seller’s Account

The admin can approve the seller’s account at a button click from the back-end of the Magento 2 Marketplace module.

Just click on the approve or disapprove button corresponding to each seller account as shown below:

If the admin clicks on the Approve button, a pop-up will display asking for permission to approve or disapprove the seller account.

Once the admin approves the seller’s profile, the seller will list it in the ‘Seller List’ tab of the Magento 2 Multi vendor Marketplace module. If the admin clicks on the Disapprove button, a pop-up box asking for the reason for the disapproval will appear.

3.5 Sellers Product List

The admin approves the products from the back-end of the Magento 2 Multi vendor Marketplace extension will list in the Sellers Products tab.

3.5.1 How to edit and remove the details of the products

The store owner can edit or delete the product details of the products list by the sellers if required. Click on the ‘Edit’ or ‘Delete’ button respectively.

3.6 Product Approval List

The third-party sellers can list their products from the seller dashboard of their profile. The products added from the dashboard list in this tab of the Magento 2 Marketplace module for approval. Admin approval is required only if the admin enables this feature. The store admin can approve or disapprove the product at a button click.

Only the products that the admin approves get listed in the Product Approval List tab of the Magento 2 Marketplace module as shown in the figure:

If the admin clicks on the Approve button a pop-up will display with the message “Do you want to approve product?”. Click ‘Ok’ if you want to go ahead with the action.

3.7 Seller Membership Configuration

This page contains all the basic settings which the Store admin needs to control the membership plans.

Enable Seller Membership: Toggle this button to enable the membership plan functionality.

The number of days left to upgrade plan when warning message will display: Enter the number of days after which a warning message will display to the sellers to upgrade plan.

Notification when the number of products left to upgrade the plan: Enter the number of products left after which a warning notification will display to the sellers to upgrade the plan.

Select order state after which the membership plan will activate: Admin can select the order state on which membership plan orders will activate.

Show custom Memerbship plan page: Using this tab admin can enable a custom membership plan page for the sellers.

Add URL for the custom page for membership plan: Enter the link of the custom membership plan page using this tab.

Provide rebate to the current sellers for the first time: If the store admin enables this button then the seller’s products remain active until this period.

Rebate Duration: Enter the Rebate duration using this button.

3.8 Membership Plan

Store admin can add new membership plans, edit and disable them from this page.

Enable Plan: Toggle this button to enable the membership plan.

Plan Name: Enter the membership plan name using this button.

The Plan Price: Enter the membership plan price.

Plan Duration: Enter the duration of the plan until it remains active.

Number of Products: Enter the number of products that a seller can upload to the membership plan.

Plan Image: Upload the image of the membership plan.

3.9 Seller Membership Plans

From the seller membership plan page, the store admin can view the assigned membership plans for the sellers. Store admin can view membership plan Id, order Id, seller Id, Plan duration, status, etc.

3.10 Seller Membership Reminder

Store admin can send reminder messages to the sellers whose membership plan is about to expire.

Reminder Name: Enter the name of the reminder from this tab.

Enable/Disable this reminder: Toggle this button to enable or disable the reminder.

The number of days left to upgrade plan, when notification will be sent: Enter the number of days after which warning reminder will be sent to the sellers.

Email subject of reminder: Enter the email subject of the reminder from this button.

Email template for a reminder: Customize the email template of the reminder message from this tab.

3.11 Assign Membership Plan

Store admin can assign a membership plan to the sellers by just selecting the plan and sellers.

3.12 Product Reviews

The customers can give ratings and write reviews for the products if this feature that the admin enables from the back-end of the Magento 2 Marketplace plugin. If the admin enables this, the customers can leave their reviews by clicking on ‘Write a Review’.

The reviews written in the front-end will list in the back-end of the Magento 2 Multi vendor Marketplace plugin as shown in the image below:

Admin can click on the ‘Edit’ button to edit or approve the product reviews. This will redirect you to the review edition page of the Magento 2 Multi vendor Marketplace module.

The various fields of this interface are below:

    1. Product: The name of the product for which the review is posted will be shown here.
    2. Author: The name of the customer sending the review will be shown here. The admin can change the name if required.
    3. Summary Rating: This section will by default show the rating given by the customer.
    4. Detailed Rating: The admin can even change the rating in this field.
    5. Status: Admin has the access to update the status of the Review here.
    6. Summary of Review: In this field, a summary of the review will be available.
    7. Review: The review entered by the customer will be shown here. The store owner can edit the review if required.

To get the changes reflected, the admin needs to click on the “Save Review” button at the top right side of the page.

3.13 Sellers Reviews

All the seller reviews along with their allowable status will list in this section.

The admin can view the detailed information by clicking on the “View” button on the right side of each review. Once the view button is clicked, a pop up will appear in front of you.

3.14 Sellers Review Approval List

The customers can even give reviews to the sellers if the admin enables this feature from the back-end of the Magento 2 Multi seller Marketplace module. In order to leave the review, the customers can click on the ‘Write Review’ link on the product page of the website. Refer to the image below:

This will redirect them to an interface where they give ratings and reviews to the sellers. The seller’s reviews entered here will list in the Sellers Reviews Approval Request tab of the Magento 2 Multi seller Marketplace Module.

The admin can view, Approve, Disapprove and Delete the reviews by clicking on the “View”,” Approve”, “Disapprove” and “Delete” buttons respectively for respective functions.

3.15 Category Request List

The admin assigns the category to the third-party seller for listing the products. The sellers can even request the admin to add a new category from their Dashboard. The category requests sent by the sellers will list in the Seller Category Request List tab of the Magento 2 Marketplace extension as shown in the image below:


Only after the admin approves the new category request, only then the seller will be allowable to list their product in the assigned category. Admin can approve or disapprove the new category request by clicking on the “Approve” or “Disapprove” button respectively.

3.16 Sellers Vacation Request

The Magento 2 Marketplace extension comes with a feature that allows the sellers to go on vacation. If he enables this feature from the Settings Tab of Magento 2 Multi vendor Marketplace module, only then the sellers can request for the same. Admin can view the list of sellers on vacation from this tab

3.17 Best Selling Products

The admin can view the list of best-selling products of a particular seller. The list of best-selling products can be filtered on the basis of the time period, category, and seller.

3.18 Email Templates

The Magento 2 Multi seller marketplace plugin offers various pre-designed email templates for various scenarios. The store admin can even customize the email templates as required by clicking on the “Edit Template” button.

On clicking the “Edit Template” button, the admin can modify the subject and the content of the email at his convenience.

3.19 Cron Instructions

The admin can run the Cron jobs to sync the changes from the backend of the Magento 2 Multi seller Marketplace module with the frontend of the store. Further, he can run Cron jobs from the backend are below:

  • Vacation Cron: Vacation Cron job runs to disable the seller’s products from the front end of the store when the sellers go on vacation.
  • Low stock Notification Cron: Cron jobs run to alert the seller about the low stock products.

3.20 Seller with Import and Export feature

A list of sellers that can upload products in bulk from the seller dashboard can be viewed by the admin from this section. Admin can disable the feature by clicking on the “Disable” button on the right side of the seller.

3.21 Admin Shipping

With the help of this feature, the admin can add their shipping prices based on the weight and price range of the products. This feature will allow them to fix a shipping price for a particular weight range or price range. Admins can use this feature while adding a new shipping method.

3.22 Transaction and Earnings

3.22.1 Commission

The store admin even gets an option to monitor the total transaction, seller earnings, and admin earnings. The name of the seller, along with its Email-id is also there.

3.22.2 Category Wise Commission

With Magento 2 Marketplace module, the store admin gets access to filter the commission category-wise. Admin can easily view the total earning, total commission for a particular category in Category Wise Commission.

3.22.3 Seller Wise Commission

The admin can view the list of total products sold, total earning, seller earning and admin earnings from the backend of the Magento 2 Marketplace plugin. To view the detailed transaction action, the admin needs to click on the “View” button.

Moreover, Magento 2 Multi seller Marketplace extension allows the admin to add a new transaction detail from the admin panel of the store. As soon as the admin will click on the “Make New” button a pop-up will appear in front of him. Admin needs to fill in all the details in the popup and click on the submit button to submit the new transaction entry.

3.22.4 Seller Payout

The sellers can view the payout requests that the admin approves from the Sellers Payout section.

3.22.5 Seller Payout Request

Payout Request sent by the sellers can be viewed by the admin from the backend of the Sellers Payout Request. Admin can approve/ disapprove the payout request with a few clicks. Once the admin clicks on the “Approve” button a pop window as shown in the figure will appear.

When the admin will click on the “Disapprove” button, a dialogue box with a comment field will appear. Once the admin clicks the submit button after filling the comment fields, the request will not approve.

3.22.6 PayPal Payout Request

Magento 2 Multi seller plugin offers admin the access to set the PayPal Payout Settings from the backend of the store. Admin needs to fill the Client ID, Client Secret key, Paypal Mode, Paypal Email Subject, and Paypal Currency in the backend of the store.

4.0 Front-end UI

Once the Magento 2 Marketplace extension is successfully installed at the Magento 2 store, the third-party sellers can register by filling a simple form from the front end of the store. For easy management of the shop, the seller gets access to their dashboard.

4.1 Seller Registration

Sellers can register their accounts by filling out the registration form from the front end of the store. The registration form format is the same for both the sellers and customers. To register as Sellers, the seller needs to select an additional checkbox in the form.

4.2 Seller Dashboard

Once the account registration procedure is completed from the back-end of the Magento 2 Marketplace plugin, the seller will get access to the Dashboard. Sellers can view the entire sales report, product list, and order details from the seller dashboard. New Category requests, Payout requests, and vacation requests can be sent by the sellers from the dashboard.

4.2.1 Seller’s Profile

The sellers can edit their profile and personalize their shop from this Seller profile tab of the dashboard. Sellers can add and edit Shop Title, Address, and Social account links in this tab.

4.2.2 Product Catalog

The sellers can follow the path mentioned below in order to add a new product. As soon as the seller will click on the Product Catalog, the following page will display. The seller can view the list of products listed at the Marketplace from the Product Catalog.3.15.6 PayPal Payout Request.

In order to add a new product to the list, click on the “New Product” button

Go to My Account -> Dashboard -> Products Catalog.

4.2.2.1 How to add a new product

Products already listed by the sellers get listed in the Seller dashboard tab. Once the admin clicks on the “New Product” button, a popup menu with attribute fields and product type field display.
Select the attribute fields and product type field and click on the “Continue” button.

This will redirect you to the ‘New Product’ page. Fill up the mandatory field details in order to add the product.

4.2.3 Orders

The list of orders and their related details can be viewed by the seller on this tab of the Seller Dashboard.

4.2.4 Product Feedback

The sellers can view the Review received on the products in the Product Review Tab of their Dashboard. All the reviews received will list as shown in the image below:

4.2.5 My Reviews

My Reviews tab in the seller’s dashboard lists out the seller reviews received on their profile.

4.2.6 Earnings

Sellers can view the total sale, total earning, total order, and total product sold in this tab. The vendors can even apply a filter to the earning results as per their requirements. The total earning history will display as shown below:

4.2.7 Transaction History

The seller can view their entire transaction history in the transaction tab.

4.2.8 Payout Request

Sellers can view the list of payout requests sent to the admin from the Payout Request tab. Payout Request status can be also be monitored by the seller they can even send category requests to the store admin. Moreover, sellers can generate a new payout request by following the steps:

Go to the Dashboard -> Payout Request

Click on the “+” icon on the right side of the New Payout Request. Once the “+” is clicked, a new dropdown will appear.

  • Amount: Enter the amount value here.
  • Request Reason: Enter the reason for Payout Reason in this field.

Click the “Submit” button at the button of the page to submit the payout entry.

4.2.9 New Category Request

Sellers can view the categories assigned by the admin to them. Additionally, a seller can send a new category request to the store admin by following these simple steps.

In order to send a category request, go to the Dashboard -> New Category Request, a page will open in front of him.

  • Choose a Category: Select a category you want to request.
  • Reason: Give an appropriate reason for requesting that category.

4.2.10 My Vacations

My Vacation tab displays the list of vacation requests already submitted by the sellers to the admin.

4.2.10.1 How to set a new Vacation entry

Once the seller is on the My Vacation section, click on the “Set New Vacation” button, a popup window will open in front of them with the following fields:

  • Start date: Enter the start date of the vacation here.
  • End Date: Enter the last date of vacation here.
  • Your comment on the vacation: Enter details related to the vacation here.

Click on the “Create” button here and the request will be sent to the admin for approval then.

4.2.11 Seller Coupons

Using this feature sellers can generate coupons for their customers. Sellers can use different variations for creating their coupons like users per coupon, coupon type, etc.

4.2.12 Low Stock

The low stock tab displays the list of products that are low in stock. The seller can set the Low stock Configuration setting from this section. Click on the “+” sign on the right side of the configuration and fill the following field there.

  • Low Inventory limit: Enter the threshold limit below which you want to get notified.
  • Receive Low Stock Notification: Enable/ disable the Low stock Notification from this field.

4.2.13 Product Import and Export

In order to upload the products in bulk, sellers need to generate a sent product import/ export request to the admin. Enter the comment in the box, and submit the request to the admin. Once the admin approves the request, only then the seller can upload the products in bulk.

4.2.14 Support System

This feature allows the sellers to view the queries of their customers in the form of tickets. When the seller clicks on the Ticket ID they are able to see the full detail about the query and even reply and change the status of the query.

4.2.15 Seller Shipping

By using this feature sellers can add their shipping prices based on the weight and price range of the products. This will allow them to fix a shipping price for a particular weight range or price range. They can use this feature while adding a new shipping method.

4.2.16 Seller Membership Plan

Sellers can check their membership plan history by applying filters. Under the filters, sellers have to fill in the plan name and the order ID of the membership plan for checking the history of the membership plans.

To add a new membership plan sellers have to click on the “Membership List” button.

For further information, refer to the following links:

Magento Countdown Sales Timer Extension – User Manual

1.0 Introduction

Do you know an effective way to drive sales and engagements for the website? The instant process to boost conversions is to provide compelling reasons to BUY NOW for your visitors. Sales Countdown Timer campaigns seamlessly convert your hesitant buyers into leads for your store. Magento Countdown Sales Timer Extension from Knowband helps e-merchants in convincing their visitors by displaying a Countdown Timer bar on the frontend. Finding the countdown timers, customers will either act fast or will miss the deal forever.
This Countdown Timer extension for Magento is a multi-purpose module offering flexible settings to catch the attention of the customers via attractive sales countdown timers. Being a store owner, you can create unlimited custom looking timers for your store and can display them as per some fixed schedules. Magento Countdown Sales Timer extension not just stimulates purchase levels but also offers an intuitive way to promote products and categories of the store. Hence, Sales Countdown Timer Bar for Magento is an advanced promotion tool to run occasional sales, timed discount deals, boost new arrivals and launches on the store.

1.1 Striking Features of Sales Countdown Extension for Magento

Installing and configuring Magento Countdown Sales Timer extension doesn’t involve any technicalities nor it includes any source code modifications. The in-built features of this Magento module can be effortlessly modified without any assistance. The various features offered by countdown timer campaigns module have been listed below:

  • Magento Countdown Sales Timer extension is a quick and easy way to add real-time sale countdown timers to create urgency among store visitors.
  • This Sales Countdown Timer Bar for Magento is designed to match up with your store theme and requirements.
  • Magento sale countdown module lets you set up and schedules sales campaign between two fixed dates and time.
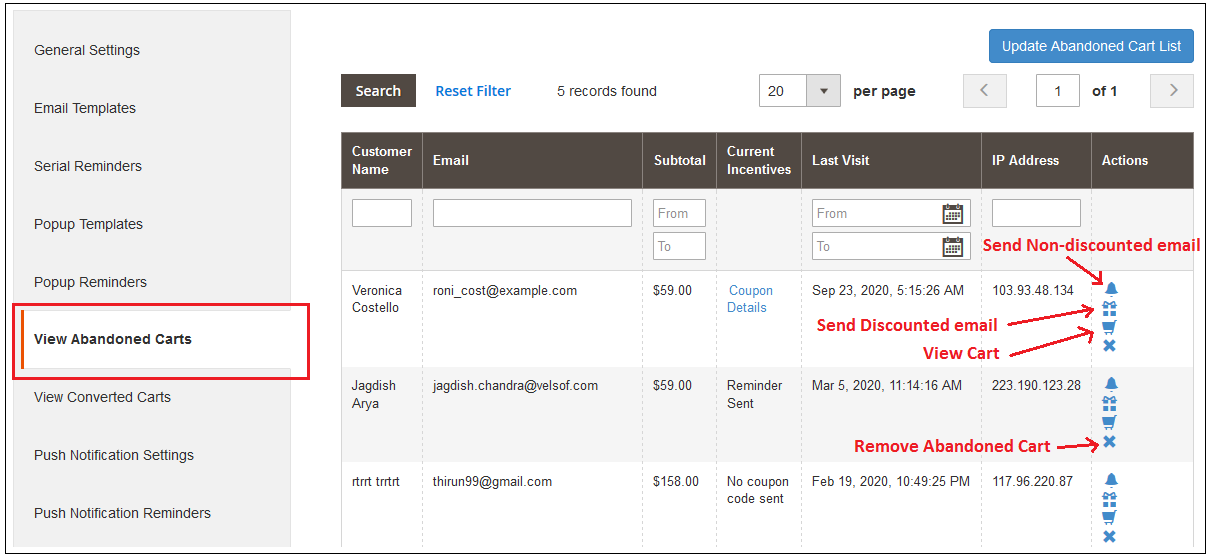
  • Create any number of countdown timers for different store products and categories without any coding efforts.
  • Magento Countdown Timer extension allows admin to set the desired name, description for each countdown timer.
  • The Countdown Timer extension for Magento allows e-merchants to set the unique priority order for each of the reminders.
  • Admin can show a customized button on the Sales Countdown Timer Bar for Magento website. They can set a link on that timer button as per their site requirements.
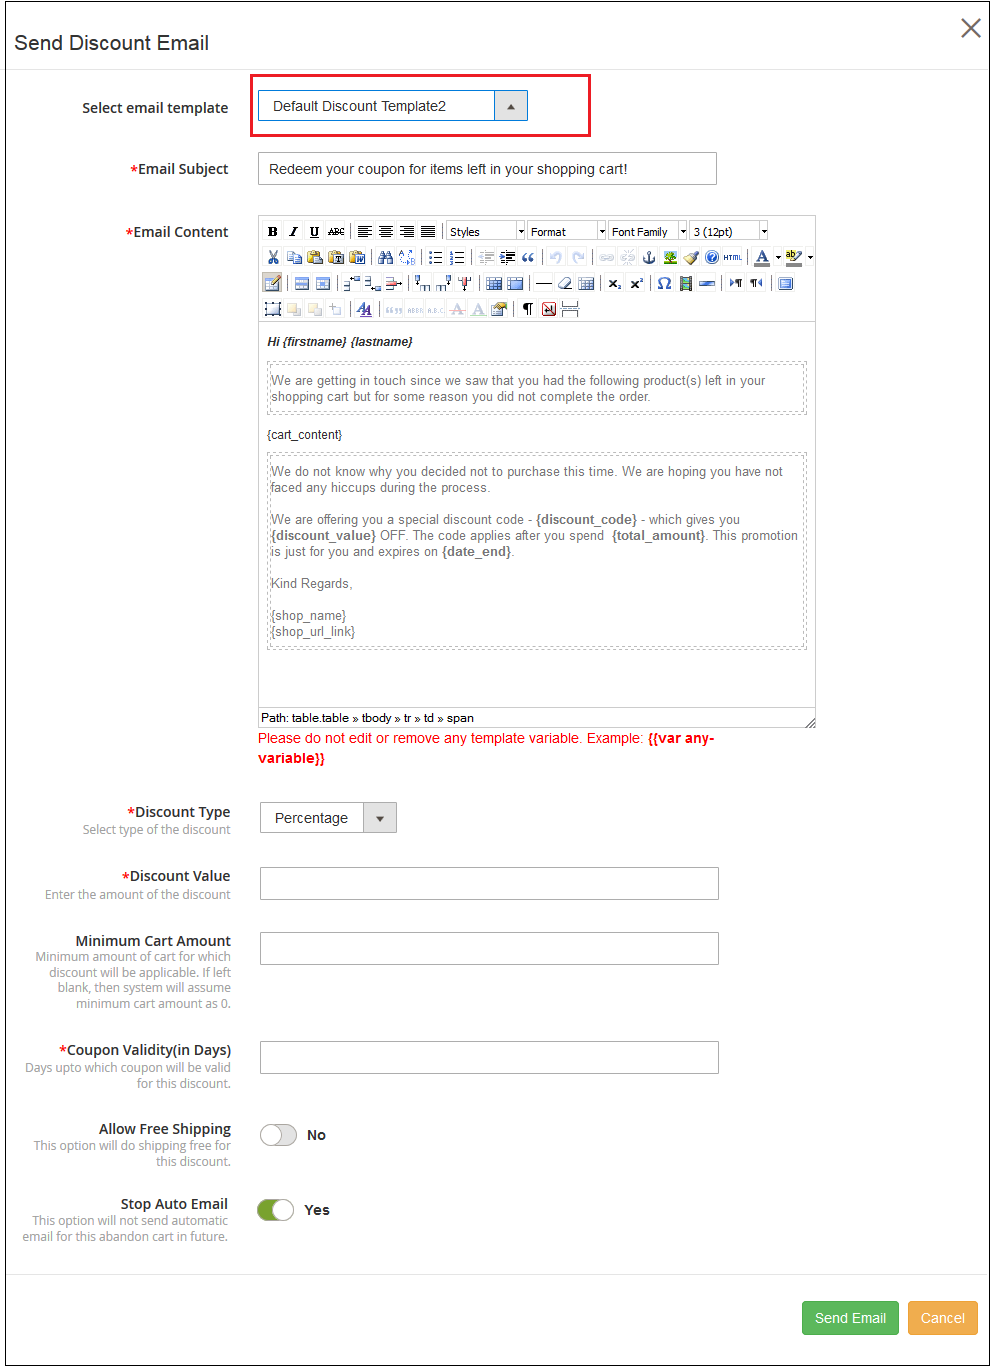
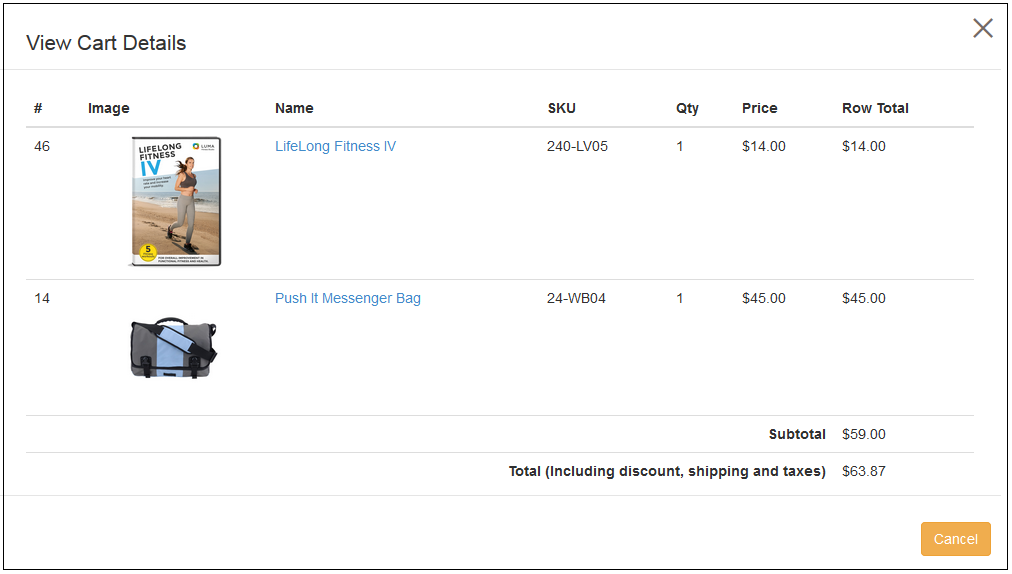
  • Magento Countdown Timer supports compatibility with multiple languages and site themes.
  • With Magento sale countdown module, admin can display a custom countdown timer expiration message on the frontend. This information is useful for the visitors to know that the prevailing deal or offer has been expired.
  • Using color picker tool, store merchants can also set appealing colors and predefined themes for Sales Countdown Timer Bar for Magento site.
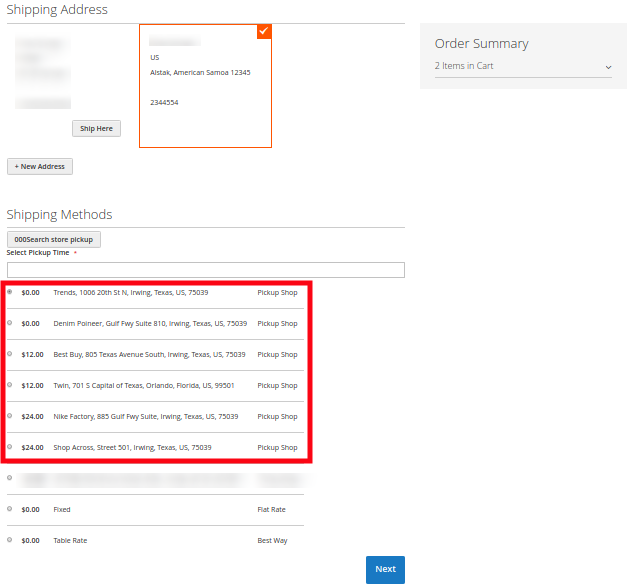
1.2 Magento Countdown Sales Timer Benefits to Customer

  • With Magento Countdown Timer, customers are updated with the trending rush alerts and active campaigns on the store.
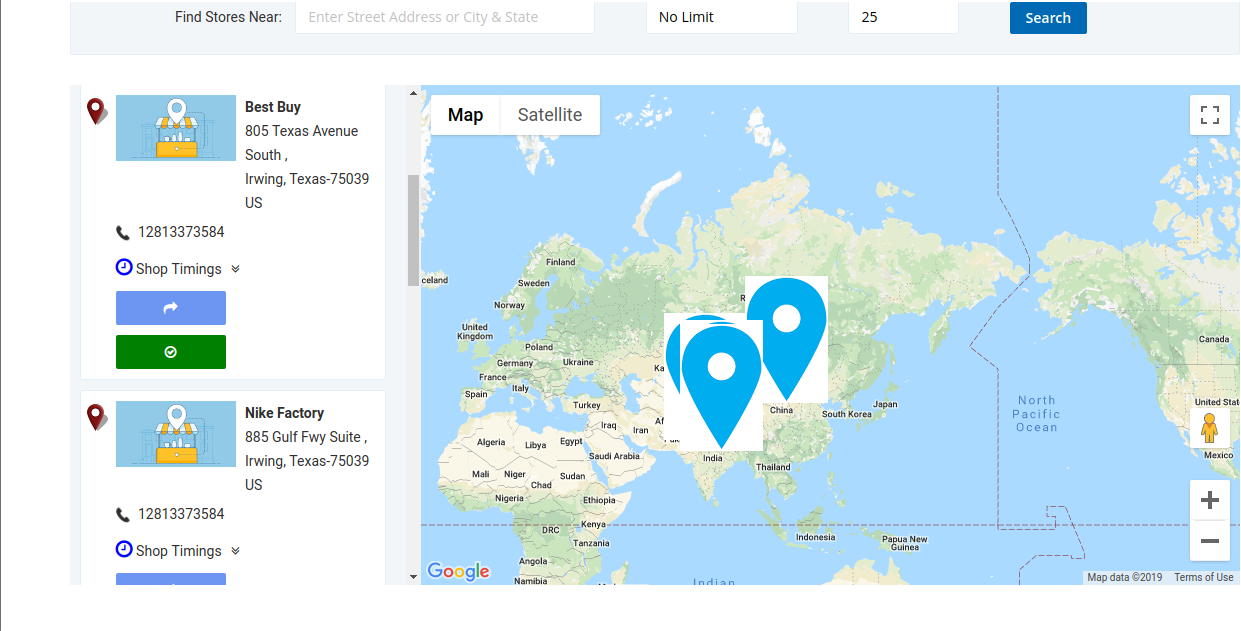
  • Magento sale countdown module features a landing page link which redirects the customer to the main page containing new launches or promotional offers.

1.3 Technology for Development

Language: PHP
Frame Work: Magento

2.0 Installation Guide

The store admin can follow these simple steps for installing the Magento Countdown Sales Timer extension:

1. First of all download the extension package from the Knowband store.
2. You will get a zipped file containing the source code and user manual. Unzip the package on the root folder of your Magento setup via FTP manager (like Filezilla or WinSCP – download here: https://filezilla-project.org/). You’ll find the files and folders as shown in the image below:

The extension is now installed and ready for use. Now the store admin can now use and configure the Sales Countdown Timer Bar for Magento.

3.0 Admin Interface of Sale Countdown Magento Extension

Once after you have successfully installed Magento Countdown Sales Timer extension from Knowband Store, you can now easily configure its different settings and make it ready for your Magento website. To configure the various settings of this module. Open the admin panel, go to System > Knowband Extensions > Countdown Sales Timer

The complete settings of this Countdown Timer extension for Magento is divided into two parts:

1. Basic Configuration
2. Timer Listing

Basic Configuration

The admin interface showing the basic configuration settings of this Magento module is as given below.

1. Enable the Extension: The functionality of Magento Countdown Sales Timer extension can be enabled or disabled using the provided toggle switch.
2. Include jQuery: Admin can include the jQuery library on the store’s front if the library was not present on the client store.

Timer Listing

The admin interface of Magento Countdown Timer consist of a list of timer records along with filter option. The settings for each of the existing timer can be separately deleted or configured.

Add New Timer: Use this option if the admin wants to create a new coundown reminder for their store. To modify the settings for any existing reminder, click on Edit button corresponding to a particlar reminder record. The configuration settings for a particular countdown reminder is divided into three major sections as:

1. General Settings
2. Display Settings
3. Look and Feel Settings

Each Tab under Timer Settings of Magento Countdown Timer module has been discussed below.

3.1 General Settings

On clicking on the General Settings tab, you will see the following options as given below:

Initially the above fields are set to their default values.

1. Enable the Timer: Admin can enable or disable a selected timer using this toggle switch.
2. Name: Set a custom name for the countdown timer which will be displayed before Timer.
3. Message: Set a desired message which will be displayed after Timer.
4. Button Label: Admin can set a custom label for the button on countdown timer block.
5. Button Link: Admin can set a desired URL on button click. When the user clicks the button, they are redirected to this specific link.
6. Sort Order: Admin can set the sort order or priority value for each of the reminders created for the Magento site. Remember, this priority value should be unique.
7.Show Custom CSS: Admin can add custom CSS code to enhance the frontend functionality of the website.

After this, click on the “Save” button shown at the top right corner of admin panel to save the module settings.

3.2 Display Settings

The display settings of this Magento module control where and how the Magento Countdown Timer will be displayed to the visitors. The various configuration options under this section include:

1. Start Date: Admin can set a start date and time(GMT date and time) for the counterdown timer.
2. End Date: Similarly, they can set a end date and time for the counterdown timer.
3. Minimum Screen Size: Admin can select a particular display configuration using this option.
4. Expiration Type: This option allows you to set the countdown timer expiration type.
5. Expiration Message: If the expiration type has been selected as Auto then no message is displayed after the deal expires. But if you have selected Show Message option, then set a custom expiration message in this field.
6. Where to Display: Admin can choose where they want to display the countdown timer block on their website.
7. Select Pages: If the admin wants to display the timer block on selected pages, then they can select the pages here.
8. Display Position: Site admin can fix the display position for the countdown timer block over the website. The three display options include:

Top of the store

Fixed to top of window

Bottom of the store

9. Enter Time: Admin can enter time (in seconds)after which they want to show the timer Block on the frontend. Set 0 if you want to display it immediately to the visitors.
10. Geolocation: This option lets you select the geolocation for the display of sales timer block.

After this, click on the “Save” button shown at the top right corner of admin panel to save the module settings.

3.3 Look and Feel Settings

The look and feel settings of countdown magento extension control the frontend appearance of the countdown timer block. The various configuration options offered are:

1. Theme: Admin can set a particular theme for the sales timer block from the themes offered by countdown timer campaigns module.
2. Theme Preview: This option allows the admin to preview the theme before the apply the changes to their website.
3. Background Color: Using this option admin can set the background color for the sales countdown timer block.
4. Text Color: The font color of the text shown on countdown timer block can be set using this option.
5. Button text Color: Admin can change the text color on the timer button.
6. Button background color: Admin can set a desired background color for the timer button.
7. Timer Text color: Select text color for the timer text shown in sales countdown block.

After this, click on the “Save” button shown at the top right corner of admin panel to save the module settings.

4.0 Front Interface of Magento Countdown Sales Timer extension

After you have successfully configured the settings of magento sale countdown module, you can see Sales Countdown Timer Bar for Magento store in accordance with the selected priority values and time schedule.

Sales Countdown Timer on Category Page


Sales Countdown Timer on Product Page


Sales Countdown Timer on Home Page


Expiration Message after the Sale Ends