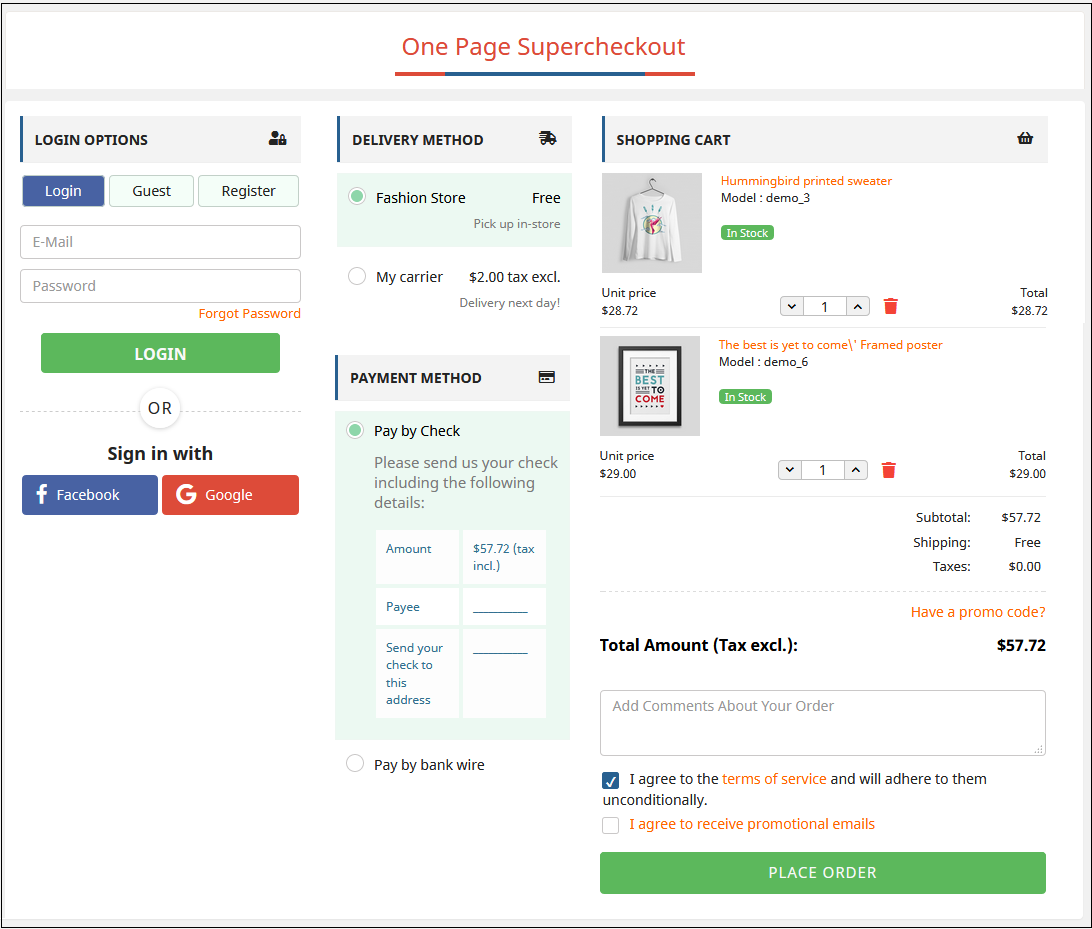
Cart abandonment is one of the biggest challenges faced by eCommerce stores today, and Prestashop merchants are no exception. With consumers becoming more impatient and expecting seamless online shopping experiences, a complicated checkout process can lead to high cart abandonment rates. This is where the Prestashop One Page Supercheckout comes into play, offering a streamlined solution that can drastically reduce cart abandonment on your Prestashop store.
Also known as the Prestashop One Step Checkout Addon, Prestashop Quick Checkout Addon, and Prestashop Fast Checkout Addon, this solution is designed to simplify the buying journey and improve conversion rates.
In this article, we will explore how the Prestashop One Page Checkout addon can simplify the checkout process and help you retain more customers by reducing friction.
The Problem with Traditional Checkouts:
A complicated, multi-step checkout process is one of the main reasons for cart abandonment. Many traditional checkouts require users to fill out multiple forms, navigate through different pages, and endure long loading times before completing a purchase. This leads to frustration and eventually pushes the customer to abandon their cart.
On the other hand, the Prestashop merchants who are looking to fix this issue need a Prestashop fast checkout addon that simplifies the entire process for their customers, providing a seamless and responsive experience that encourages them to complete their purchase in just a few clicks.
How the Prestashop One Page Supercheckout Solves This Problem!
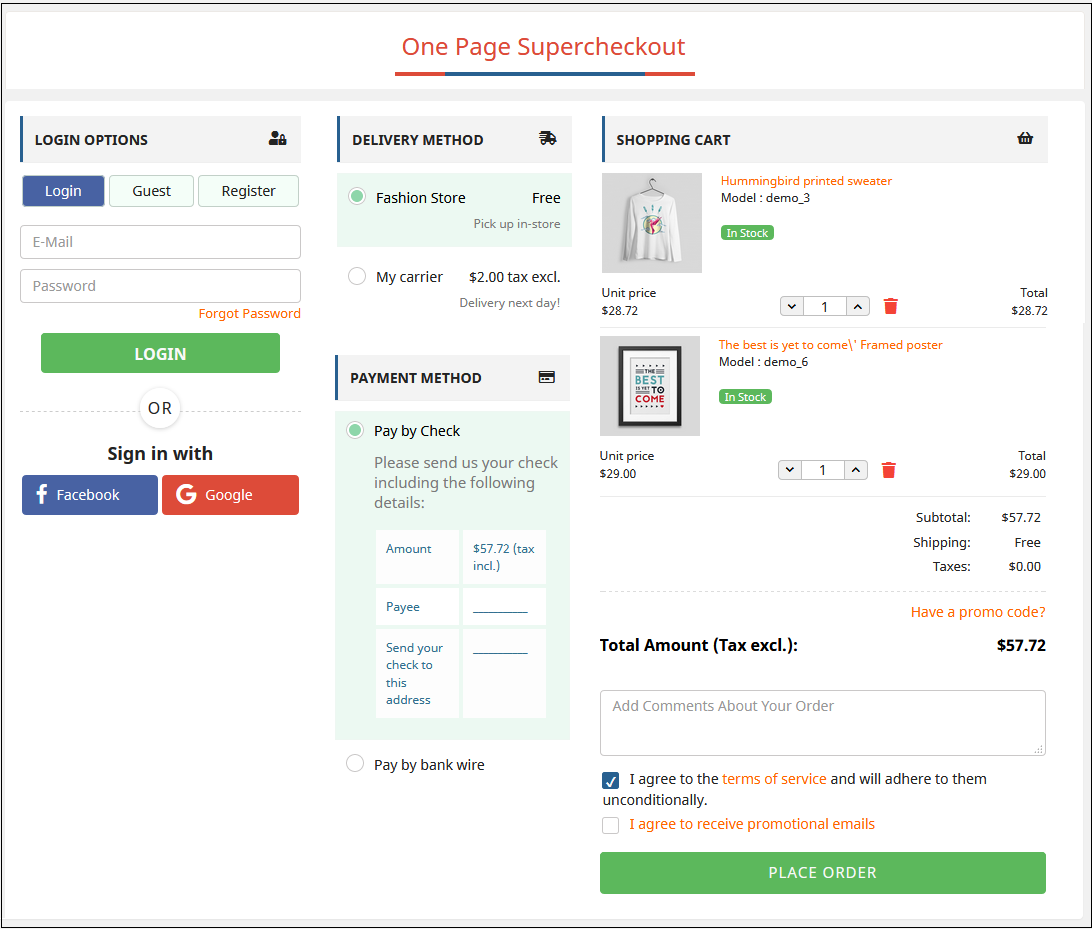
The Prestashop One Page Supercheckout is designed to address all the pain points associated with a complex checkout process. Furthermore, the Prestashop One Page Checkout Extension consolidates all checkout steps—billing, shipping, payment methods, and order summary—into a single, easy-to-navigate page. This means no more multiple clicks and loading screens, reducing the time and effort required from customers to complete their orders.
This makes it one of the most reliable Prestashop Simplified Checkout Addons available for merchants looking to enhance user experience and reduce drop-offs.
Key Features of One-Page Supercheckout for Prestashop:
1. Single-page Checkout:
Unlike traditional checkouts, this quick checkout extension for Prestashop simplifies the entire process by placing all required fields on a single page. Moreover, it removes unnecessary steps and speeds up the checkout, significantly improving the customer experience.
2. Guest Checkout Option:
One common reason for cart abandonment is the forced account creation process. The Prestashop One Step Checkout addon provides a guest checkout option, allowing customers to complete their purchases without the hassle of creating an account. This feature alone can reduce cart abandonment rates by making the purchase process more accessible.
3. Responsive and Mobile-Friendly Design:
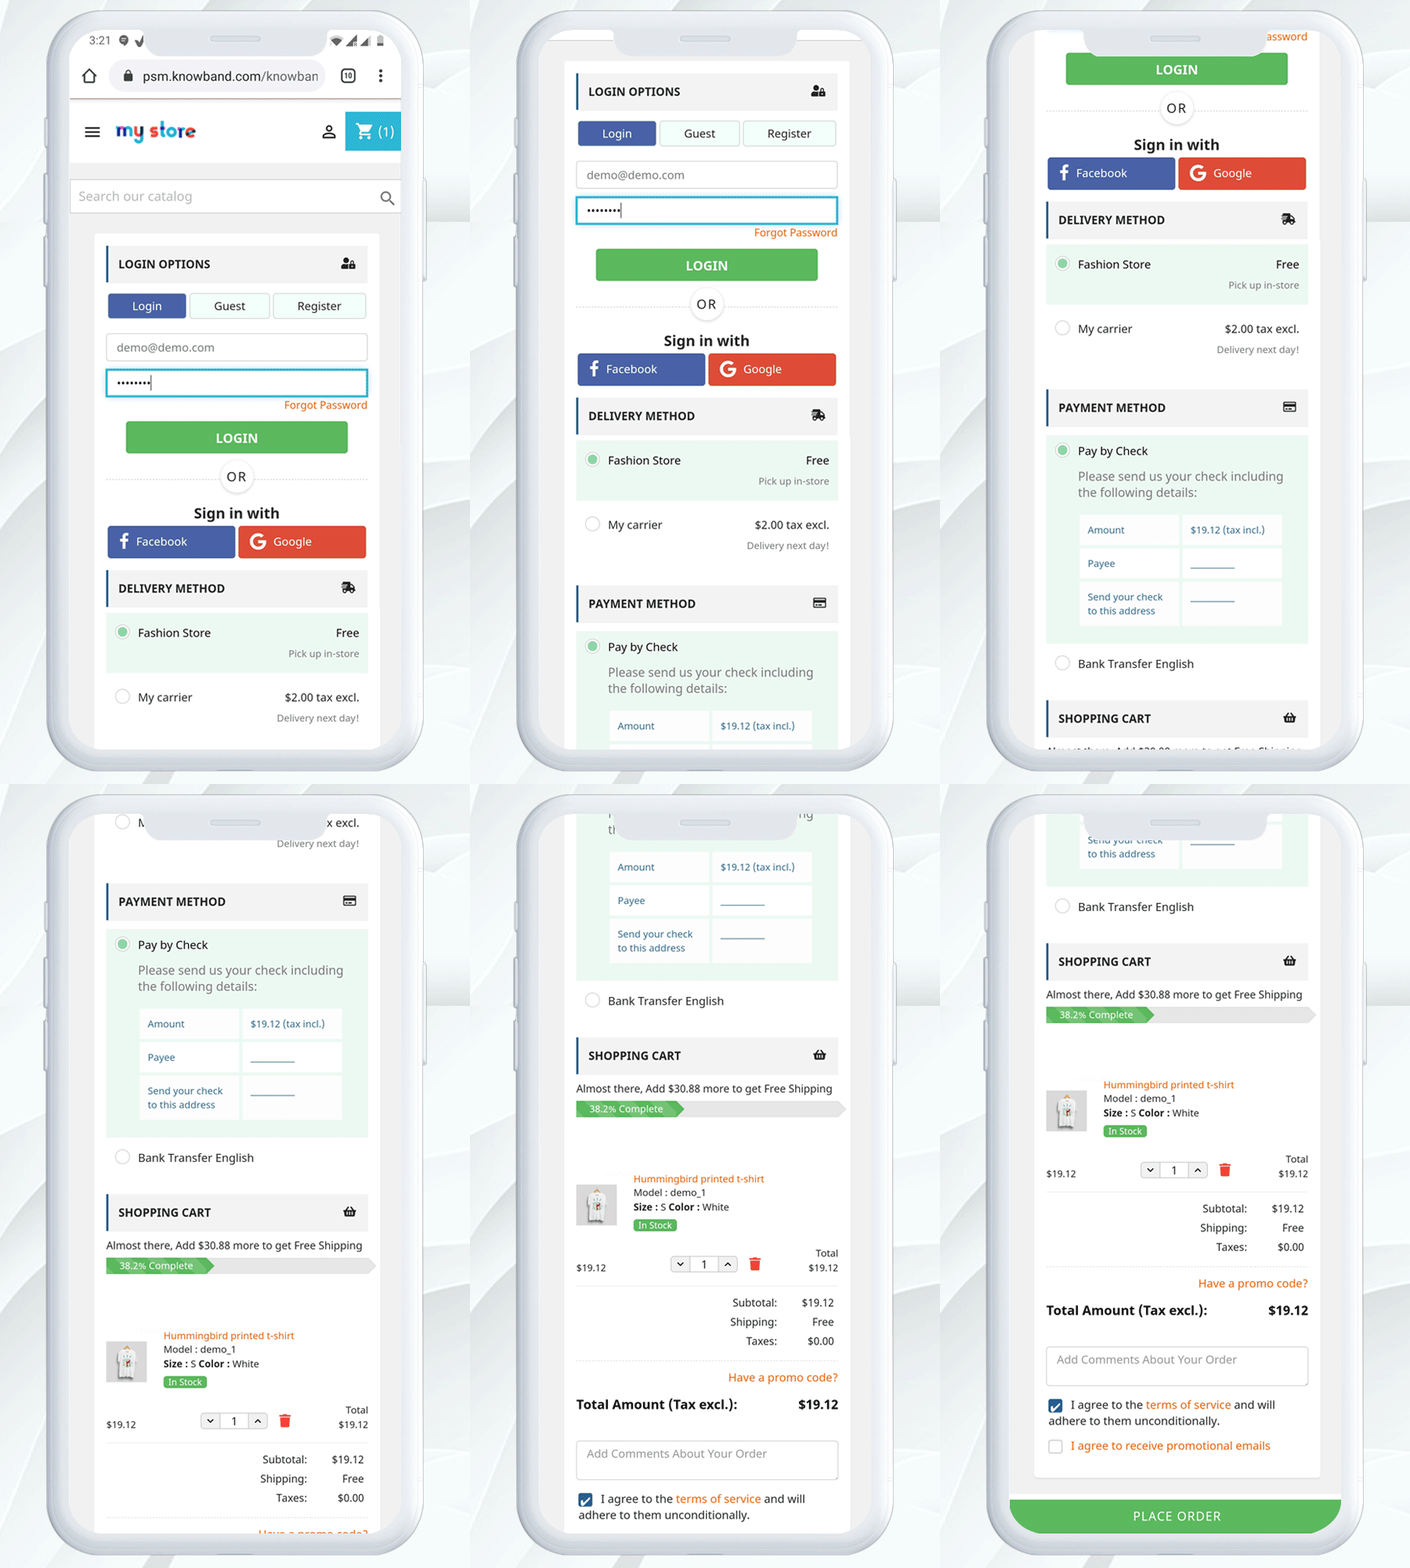
With mobile commerce on the rise, having a checkout page that works smoothly on all devices is crucial. Therefore, the Prestashop responsive one-step checkout addon by Knowband ensures that the checkout process is fully optimized for all screen sizes, providing a seamless experience whether your customers are shopping from their phones, tablets, or desktops.
This responsive one page checkout Prestashop solution helps capture mobile users who are more likely to abandon slow or cluttered checkouts.
4. Multiple Payment and Shipping Options:
Customers appreciate having choices when it comes to payments and shipping. Knowband’s One Step Checkout Prestashop extension integrates multiple payment gateways and shipping methods, ensuring that customers can select their preferred option without leaving the checkout page.
5. Customizable Design:
You can easily customize the look and feel of the One Page Checkout Prestashop to match your store’s branding. Whether it’s adding logos, changing colors, or reordering fields, this quick checkout addon for Prestashop is fully adaptable to your store’s needs.
6. Compatibility with Popular Prestashop Modules:
The Prestashop One Page Supercheckout is designed to work flawlessly with other popular Prestashop modules, including loyalty programs, discount systems, and more. This ensures that you don’t lose out on any additional features while benefiting from a simplified checkout process.
How One Page Supercheckout Reduces Cart Abandonment?
By reducing the number of steps involved in the checkout process, the Prestashop quick checkout addon makes it easier and faster for customers to complete their purchase. Furthermore, when the customers can complete an order in under a minute, they’re far less likely to abandon their cart.
Guest Checkout:
The guest checkout feature is especially important for first-time visitors. Many shoppers are reluctant to create an account on a site they haven’t shopped on before. Therefore, Knowband’s Prestashop One Step Checkout addon eliminates this hurdle, allowing customers to make a purchase as guests, which significantly improves conversion rates.
Optimized for Mobile:
Mobile shopping is becoming the norm, and the responsive one page checkout Prestashop ensures that your store’s checkout process is optimized for mobile devices. A mobile-friendly checkout process reduces frustration and cart abandonment from mobile shoppers.
Trust and Transparency:
The One Page Checkout Prestashop provides a clear, upfront summary of the order, including shipping costs and taxes. By offering this transparency, customers are less likely to feel overwhelmed or surprised by additional charges at the last step, which often leads to cart abandonment.
Knowband’s Prestashop One Page Checkout Addon
Streamline your checkout process with PrestaShop One Page SuperCheckout, reducing cart abandonment and boosting conversions with a fast, single-page checkout.
If you’re a small business or just starting out, you might be interested in the Prestashop One Page Supercheckout free version. While it offers fewer features than the premium version, it still provides many of the essential tools you need to streamline your checkout process and reduce cart abandonment.
For those looking to upgrade, the paid version offers even more customization options, integrations, and additional payment methods, making it an all-in-one solution for larger stores.
Conclusion!
If you’re a Prestashop merchant struggling with cart abandonment, the Prestashop One Page Supercheckout is the perfect solution to simplify your checkout process and retain more customers. With features like single-page checkout, guest checkout, mobile optimization, and multiple payment and shipping options, this quick checkout addon Prestashop is designed to help you minimize cart abandonment and boost your conversions.
Whether you opt for the Prestashop One Page Supercheckout free version or the paid one, this extension will undoubtedly make a positive impact on your store’s performance. Simplify your checkout today and watch your sales grow with this powerful Prestashop One Step Checkout addon!
Cart abandonment is one of the critical challenges that impacts sales directly. There can be various reasons behind the cart or order abandonment. For the same reason, it becomes crucial to take every necessary step to provide a smooth and hassle-free checkout experience to the customers.
On the other hand, a cumbersome checkout process can also lead to cart abandonment. Thus, recognizing the need for a quick and efficient checkout process, we at Knowband have developed the One Page Supercheckout for Prestashop. With over 13,000 downloads on the official addon store and more than 20,000 downloads on our website, it is one of our top-selling Prestashop modules. We are excited to introduce a free version of this highly acclaimed add-on that will allow you to experience its efficiency firsthand.
The Need for a Streamlined Checkout Process!
An efficient checkout process is essential for several reasons:
Payment method Integrations:
A One Step Checkout Prestashop Extension is essential for stores that want to deliver a consistent checkout experience across all devices. The Responsive one-page checkout Prestashop design automatically adapts to mobile phones, tablets, and desktops, ensuring easy navigation and fast order placement regardless of screen size.
To support mobile shoppers, the extension works seamlessly with trusted payment gateways such as PayPal, Stripe, Authorize.Net, Amazon Pay, Apple Pay, Google Pay, Mollie, PayU, Razorpay, Boleto, ccAvenue, Sage Pay, MobilPay, and Pago Fácil. This combination of responsiveness and payment flexibility significantly enhances customer satisfaction.
Reduced Cart Abandonment: A lengthy and complicated checkout process is one of the primary reasons for cart abandonment. Therefore, simplifying the checkout process for visitors can significantly reduce this issue.
Improved Customer Experience: A quick and hassle-free checkout process enhances the overall shopping experience, leading to higher customer satisfaction and repeat purchases. Furthermore, happy customers mean more referrals which leads to an enhanced brand name.
Increased Conversion Rates: By making the checkout process more efficient, you can increase the likelihood of customers completing their purchases. Furthermore, it also helps in boosting the conversation rates by turning visitors into customers.
In the competitive landscape of e-commerce, having a streamlined checkout process is no longer a luxury but a necessity. This is where our Prestashop One Page Supercheckout addon comes into play.
Introducing the Free Version of One Page Supercheckout:
We understand that investing in a new addon can be a significant decision for any online retailer. To make this decision easier, we have introduced a free version of our One Page Supercheckout. This version comes with certain restrictions but is perfect for demo purposes, allowing you to test the functionalities and experience the efficiency of our addon before making a purchase.
A quick checkout addon for Prestashop, plays a crucial role in improving user experience and reducing abandoned carts. The Prestashop fast checkout addon removes unnecessary page reloads and allows customers to enter their details, select shipping, and make payments without delays. This streamlined checkout flow keeps customers engaged and makes the buying process more intuitive.
This Prestashop responsive one-step checkout addon integrates seamlessly with popular payment solutions including PayPal, Advanced PayPal, Stripe, Authorize.Net, Amazon Pay, Apple Pay, Google Pay, Square, Klarna, Skrill, Neteller, Worldpay, Mollie, PayU, Razorpay, Boleto, ccAvenue, Sage Pay, MobilPay, Ogone, Pago Fácil, Paytm, Payoneer, and 2Checkout. Such extensive gateway support ensures convenience, trust, and flexibility for customers worldwide.
Key Features of the Free Version:
The free version of our Prestashop One Page Supercheckout offers several features designed to streamline the checkout process:
Single Page Checkout: All necessary checkout information is consolidated onto a single page, it also reduces the number of steps required to complete a purchase.
Responsive Design:Our addon is fully responsive, ensuring that the checkout process is smooth and user-friendly on all devices, including desktops, tablets, and smartphones. Furthermore, the module comes with inline validations to provide customers with a neat and clean checkout journey.
Guest Checkout Option: Allows customers to check out as guests, without the need to create an account, further simplifying the process.
By offering these features in the free version, we aim to provide you with a glimpse of the full potential of our Prestashop One Step Checkout Addon.
Why Choose One Page Supercheckout?
Our Prestashop One Page Supercheckout is designed to address the common pain points associated with the checkout process. Here are some reasons why you should consider using our addon:
Efficiency:
The primary advantage of our One Page Checkout Prestashop addon is efficiency. By consolidating the entire checkout process onto a single page, it eliminates unnecessary steps and reduces the time taken to complete a purchase.
User-Friendly Interface:
The intuitive and user-friendly interface of Knowband’s quick checkout extension Prestashop ensures that customers can easily navigate through the checkout process. This ease of use is crucial for enhancing the overall shopping experience.
Increased Conversion Rates:
By simplifying the checkout process, our Prestashop quick checkout addon can help increase conversion rates. Moreover, a smoother checkout process means fewer abandoned carts and more completed purchases.
Enhanced Customer Satisfaction:
A quick and hassle-free checkout process leads to higher customer satisfaction. Therefore, satisfied customers are more likely to return for future purchases and recommend your store to others.
Knowband’s Prestashop Free One Page Checkout Addon
Discover Knowband’s Prestashop Free one page checkout addon for optimizing checkout processes into a single page, enhancing user convenience and conversion rates.
Getting started with the free version of our Prestashop fast checkout addon is easy. Simply visit our website, download the addon, and install it on your Prestashop store. Once installed, you can start experiencing the efficiency and benefits of our Prestashop responsive one-step checkout addon.
Once you have experienced the benefits of our One Step Checkout Prestashop Extension with the free version, we are confident that you will want to upgrade to the full version. The full version unlocks additional features and capabilities, providing even greater value for your Prestashop store.
Conclusion!
In conclusion, a streamlined checkout process is essential for the success of any online store. Furthermore, with our Prestashop One Page Supercheckout, you can significantly improve the efficiency of your checkout process, leading to higher conversion rates and enhanced customer satisfaction. We invite you to try the free version of our addon to experience its benefits firsthand. Download the free version today and take the first step towards a more efficient and user-friendly checkout process for your Prestashop store. Also, you can watch our videos here for Free Prestashop Modules:
Checkout is one of the most important aspects of the order process. It not only defines the hassle-free process for the customers but also impacts the bounce order rate by a huge margin. For the same reason, in today’s fast-paced e-commerce environment, optimizing the checkout process is crucial for eCommerce websites. Not only does an enhanced checkout process maximize conversions but also it enhances the customer experience. Thus, in today’s article, we have the Prestashop One Page Checkout by Knowband to streamline the checkout experience on your website. Let’s delve deep and have a quick overview of all the amazing features.
Where the Default Five-Step Checkout Loses Orders – Update (September 29, 2026)
PrestaShop’s default checkout runs five steps, and each page load is a chance to leave. Forced account creation is usually the biggest drop-off, followed by shipping costs appearing on a separate page. A one-page checkout with guest and social login fixes both.
It also supports popular payment gateways such as PayPal, Stripe, Klarna, Amazon Pay and Mollie, and carriers such as DHL, UPS, FedEx, DPD and GLS. With Ship2Pay, you can show only the payment methods that suit the delivery option the customer picks. The quick checkout addon to reduce checkout steps article explains the fix and how to test it in preview mode before going live.
Streamline Your Checkout with the PrestaShop One-Page Checkout Addon
Single-page checkout, social login, customizable layout, and MailChimp integration at no cost. A solid starting point before moving to the full premium version.
The Prestashop One Page Checkout Extension by Knowband revolutionizes the typical multi-page checkout process by consolidating all crucial elements into a single page. Furthermore, this approach not only speeds up the checkout flow but also makes it more user-friendly. Thus, with the One-page checkout installed on the website, customers can now view the cart, edit quantities, and enter shipping and payment details all on one page. This factor significantly reduces the time and hassle involved in navigating through multiple pages. As a result, the customers can complete the checkout easily and the bounce rate can be reduced immensely.
Enhanced User Experience:
While designing the supercheckout extension for Prestashop, we have focused on user experience. Moreover, its responsive design ensures that the checkout page looks great and functions smoothly across all devices, including smartphones and tablets. This is particularly important as mobile commerce continues to grow. The Prestashop responsive one-step checkout addon adapts to any screen size, providing a seamless experience for mobile users. Therefore, the following factor not only enhances the user experience but also ensures cross-platform usability for your customers.
Increased Conversion Rates:
The confusing checkout process is one of the most sounding reasons for checkout abandonment. Customers usually get frustrated by filling in different order information on different pages. On the other hand, the One Step Checkout Prestashop Extension effectively reduces cart abandonment by minimizing the steps required to complete a purchase. The quicker and simpler process encourages customers to complete their purchases, leading to higher conversion rates for businesses. On top of that, the intuitive layout of the Prestashop fast checkout addon, where all elements are visible at once, also helps in reducing customer confusion and decision fatigue.
Customizable and Flexible:
The Prestashop Quick Checkout Addon offers extensive customization options to fit the unique needs of your business. You can adjust the layout, fields, and even the colors to match your store’s branding. This level of customization ensures that the checkout experience not only feels integrated but also emphasizes your brand identity.
Improved Trust and Security:
The Prestashop One Page Checkout makes security a priority. Therefore, it integrates seamlessly with various secure payment methods, ensuring that customer payment information is handled safely. This security aspect is vital in building trust with your customers, encouraging repeat business, and enhancing the reputation of your store.
Features and Benefits:
Consolidates the checkout into a single page, reducing clicks and page loads, which streamlines shopping and lowers cart abandonment rates.
Responsive design ensures a smooth checkout on any device, which is crucial for capturing the growing mobile shopper demographic.
Simplifies the buying process, reducing friction and decision fatigue, which can lead to higher sales conversions.
We provide numerous options to tailor the checkout to your brand, improving the aesthetic and functional alignment with your business needs.
The one-page supercheckout module supports secure payment integrations to safeguard customer information, fostering trust and encouraging repeat business.
The module comes with social login, guest checkout, and auto-address fill to enhance user convenience and transaction speed.
In the END!
By incorporating these advanced features, the Prestashop One Page Checkout Module by Knowband not only simplifies the checkout experience but also transforms it into a competitive advantage for your e-commerce store, driving both customer satisfaction and business growth.
It is evident that for any e-commerce website, the checkout process stands as the final phase of order completion. It is the last interaction a customer has with your online store before becoming a paying customer, making it a crucial aspect of any e-commerce business. Further, streamlining this process can significantly impact sales and conversions, as idro-web discovered when they integrated Knowband One Page Checkout for Prestashop into their website.
Challenges of the Traditional Checkout Faced by idro-web
The idro-web, an online store specializing in various products related to water treatment and purification, was no stranger to the challenges of the traditional multi-step checkout process. Despite offering a wide range of high-quality products, their conversion rate at the checkout stage was lower than expected. Also, at some point, this rate started following the negative slope. Moreover, customers were often abandoning their shopping carts during the checkout process. The main reason for this was the lengthy, time-consuming process, and unnecessary steps in the checkout.
Recognizing the need for a solution to boost their conversions, the team at idro-web began their search for a Prestashop module that could address these issues. Therefore, after extensive research, they stumbled upon the Knowband Prestashop One Step Checkout Addon.
Knowband Prestashop Fast Checkout Addon
Prestashop Quick checkout addon is a powerful module designed to simplify the checkout process. Additionally, it helps in enhancing user experience and boosting conversions. It condenses the multi-step checkout into a single, user-friendly page, making it faster and easier for customers to complete their purchases.
After discovering this module, idro-web was joyous with its potential to resolve the issues they were experiencing with their checkout process. The team decided to give it a try, and the journey to transform their checkout experience began.
The Implementation: Streamlining the Checkout Process
The implementation of the Knowband Prestashop simplified checkout addon was a straightforward process. Further, the idro-web team integrated the module seamlessly into their Prestashop-based website. Therefore, the module’s user-friendly interface allowed them to customize the checkout page to match their brand’s needs. Also, it helped maintain a cohesive look and feel throughout the entire shopping process.
By having the checkout on a single page, the module eliminates unnecessary steps and the amount of time and effort to complete a purchase. Further, this simplicity was a game-changer for idro-web, and they were excited to see the impact on their customer’s shopping experience.
The Results: A Remarkable Transformation
The result of integrating the quick checkout addon Prestashop was nothing short of remarkable. As soon as Knowband One Page Supercheckout was implemented, idro-web witnessed a drastic change in their checkout conversion rates. Customers now find it easier to navigate the checkout process. Additionally, the store’s abandoned cart rate dropped significantly.
1. Improved User Experience:
The streamlined, one-page checkout process made it effortless for customers to complete their purchases. Customers appreciated the simplicity and convenience, which helped achieve a higher satisfaction level.
2. Faster Checkout:
With reduced steps and less time required to complete the purchase, customers were more likely to proceed to the checkout and complete their transactions.
3. Reduced Abandoned Carts:
The most crucial improvement was the significant reduction in abandoned shopping carts. The idro-web business saw a remarkable drop in the number of customers leaving their site during the checkout process. Therefore, this was ultimately helpful in boosting their sales and revenue.
4. Increased Conversions:
The combined effects of improved user experience, faster checkout, and reduced abandoned carts led to a remarkable increase in conversions. As a result, the business can turn more visitors into paying customers now.
Customer Feedback: A Glowing Testimonial
One of the most compelling aspects of the idro-web success story is the feedback from its customers. The store received numerous positive reviews regarding the improved checkout experience. Customers were not only completing their purchases but also taking the time to express their satisfaction with the changes.
After using the Prestashop fast checkout addon, the business started to experience exponential growth and decided to take some customizations too. The Knowband’s team of experts assisted the idro-web in the implementation of custom features as per their business requirements.
The Ongoing Benefits: Sustainable Growth
The implementation of Knowband One Page Supercheckout brought more than just short-term success. Now, the idro-web is on the path of continuous growth:
1. Increased Repeat Business:
Satisfied customers were more likely to return for future purchases, leading to a growth in the number of loyal customers.
2. Enhanced SEO and Ranking:
With improved user experience and reduced bounce rates, the business website experienced better SEO rankings and visibility in search results.
3. Competitive Advantage:
The streamlined checkout process gave idro-web a competitive edge over other e-commerce stores in their domain.
4. Continued Support:
Knowband modules are known for their continuous updates and support, ensuring that idro-web would always have access to the latest features and optimizations.
Conclusion:
The journey of idro-web with Knowband One Page Checkout Prestashop is proof of the transformative power of simplifying the checkout process. By streamlining its checkout, idro-web improved its business drastically. Their customers’ satisfaction levels and the store’s reputation were significantly enhanced.
If you’re facing similar challenges with your e-commerce checkout process, consider the journey of idro-web and the impact of Knowband One Page Supercheckout. Streamlining your checkout experience could be the key to unlocking higher conversions, customer satisfaction, and long-term success for your online business. Please do not hesitate to connect with the Knowband team. Further, we will be happy to assist you in finding the most suitable extensions for your website.
This comes as no secret that the Prestashop One Page Checkout is highly popular. In fact, the One Page Checkout Prestashop by Knowband is celebrated for more than 10K installations. Isn’t that an achievement?
What does the Prestashop One Page checkout do?
The Prestashop One Step Checkout Addon by Knowband helps the admin optimize the checkout page. Moreover, the idea of using one page checkout is to ensure a quick and easy way to complete the purchase. Therefore, that’s exactly what the One Step Checkout Prestashop Module does. Furthermore, the admin can add or delete custom fields as per the need to make sure the customer does not feel bothered in completing the purchase. Hence, results in increased sales and revenues for the store.
In this blog, we will take a look at the different settings available in the Responsive one page checkout Prestashop. Let’s go check them out.
Various Settings of the Prestashop responsive one step checkout addon
General Settings
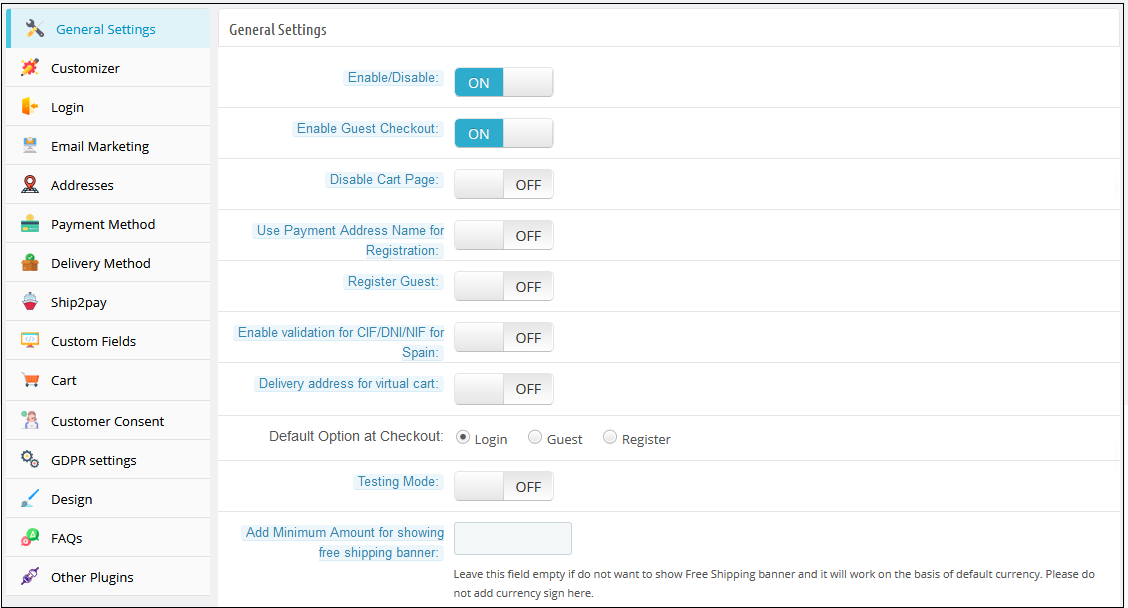
Under the General Settings tab, you will be able to find the most basic settings of the Prestashop addon. For instance, enabling/disabling the plugin, guest checkout, minimum amount for showing free shipping banner, and more. Using these settings, you can set the basic tone of the module.
Customizer
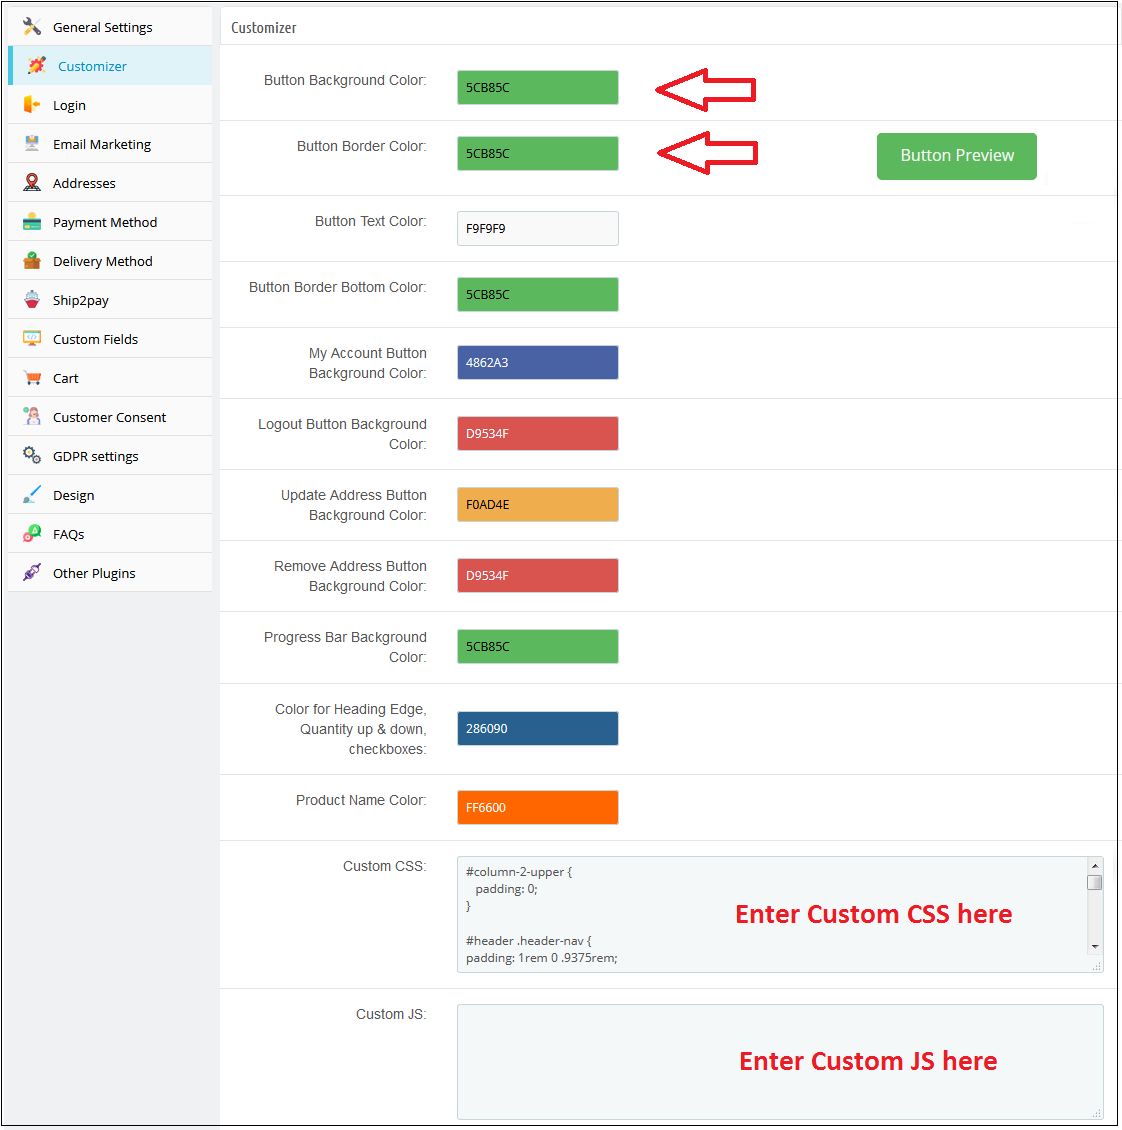
The Customizer tab has all the customization settings of the checkout page. In fact, the different colors of the buttons available on the checkout page. For instance, the admin can customize the logout button color, ‘my account’ button color, product name color, and so many others. This way, the admin will be able to customize the entire look & feel as per his need using the Single Page checkout. Furthermore, he can also add Custom CSS and Custom JS if need be.
Login
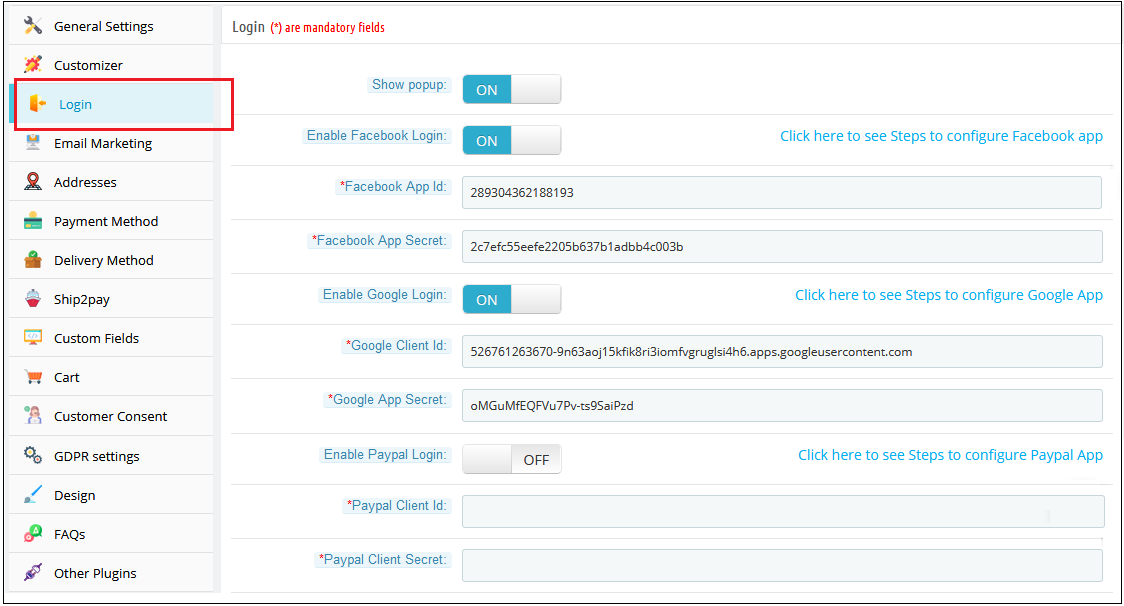
We already know how important login and registration on a website are. Therefore, the Login tab of the Prestashop One Page Checkout is very crucial. Here, you will be able to find settings related to login functionality. Further, you can configure the Facebook login, Google login, and PayPal login. In fact, customers can easily click on any of these social login options and come aboard. Moreover, you also have the option to add more social login options as well.
Email Marketing
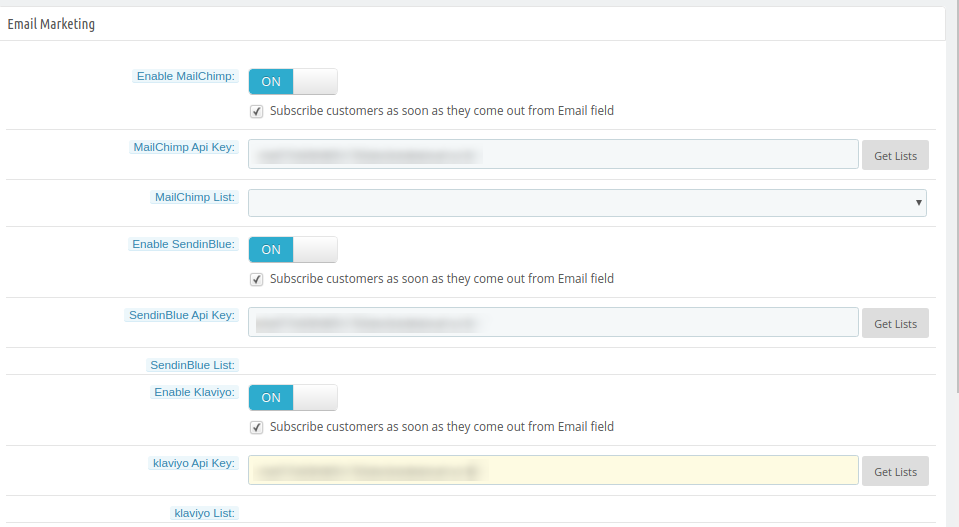
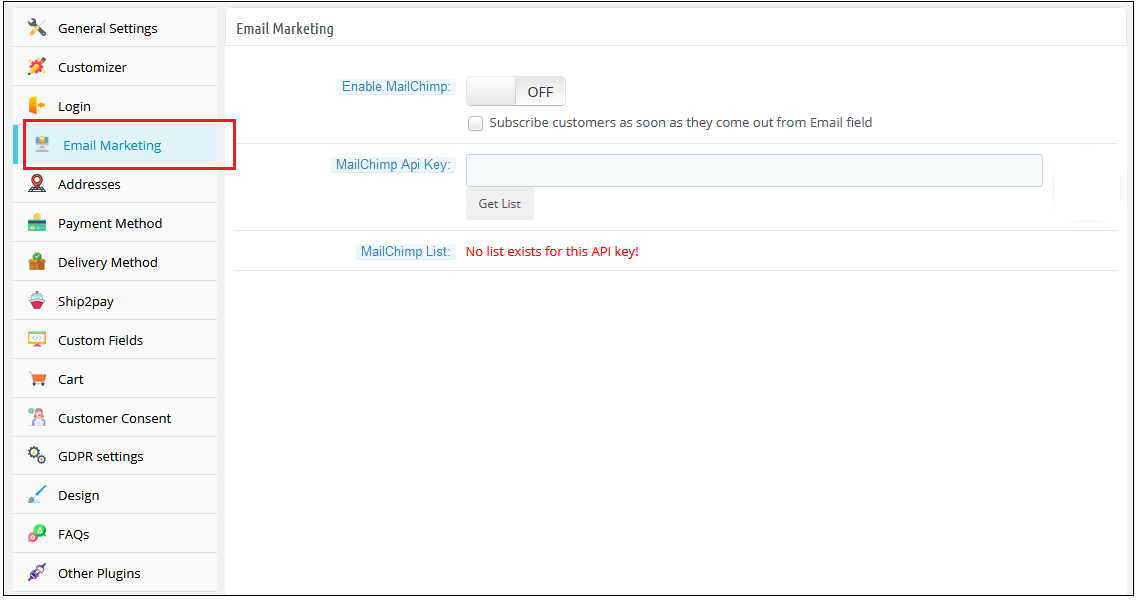
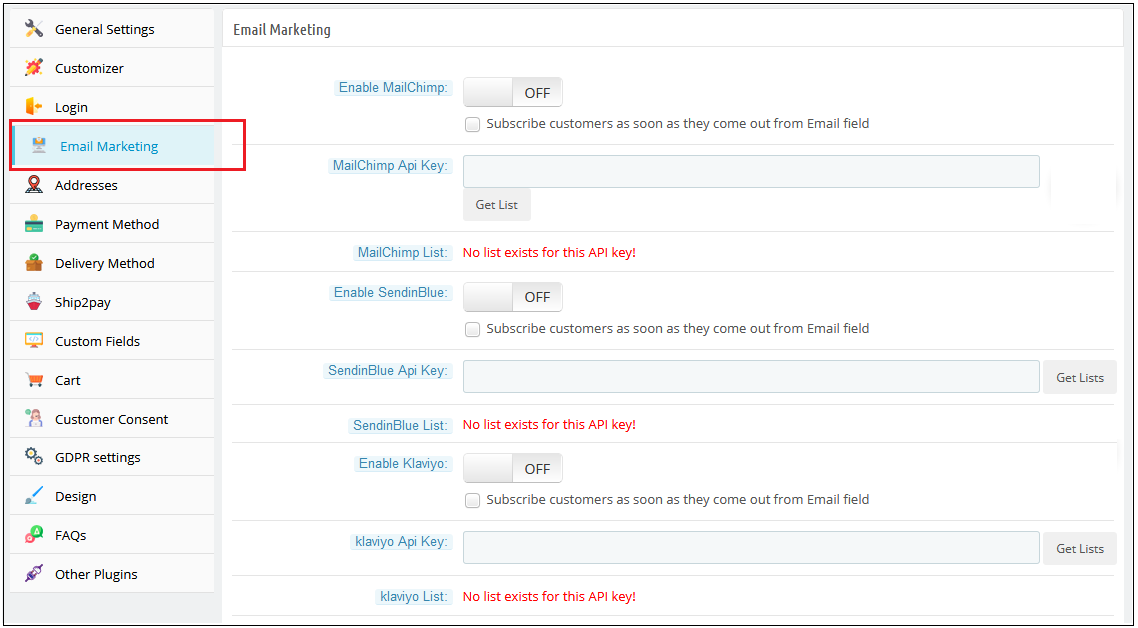
In the Email Marketing tab of One Page Checkout Prestashop, the admin can enable the integrators. Further, Prestashop One Page Supercheckout features 3 email marketing integrators. They are MailChimp, SendInBlue, and Klaviyo. The admin can simply enable the integrators to catch all the email addresses that come to the checkout page. Moreover, use them for email marketing in the future.
Addresses
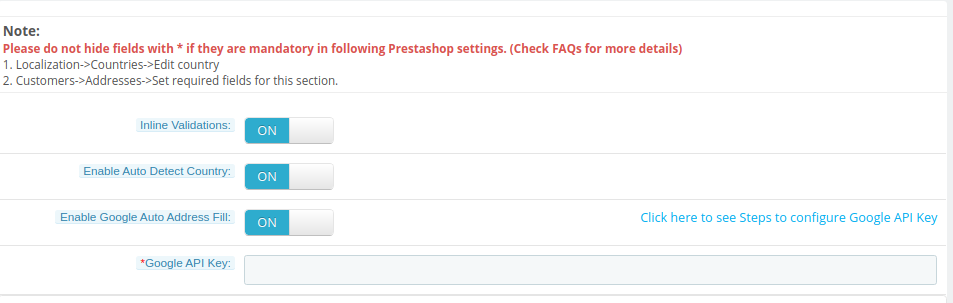
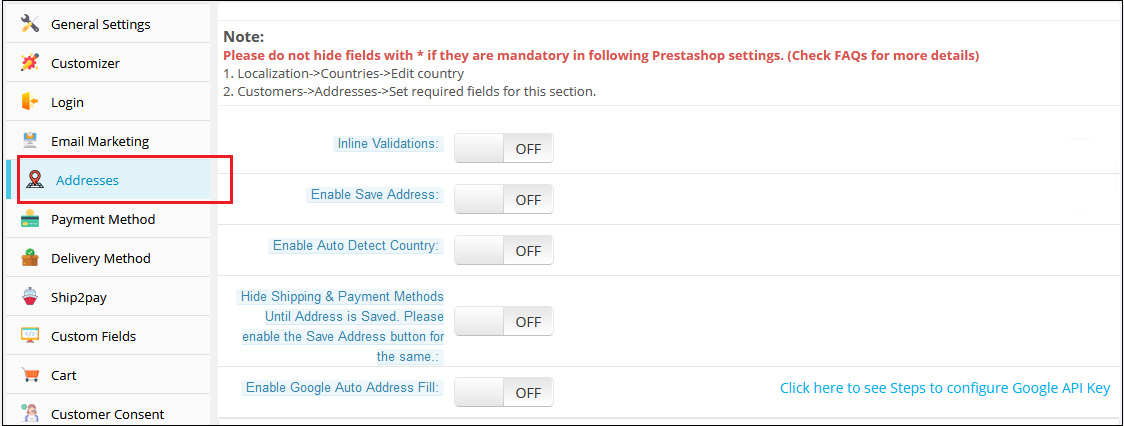
Under this tab of Prestashop One Page Checkout by Knowband, the admin will be able to customize the different checkboxes. The admin can enable inline validation, enable save address, Auto Detect Country, Enable Google Auto Address Fill, and more. In addition, the tab looks like the image below. It will help you with a better understanding.
Payment Method
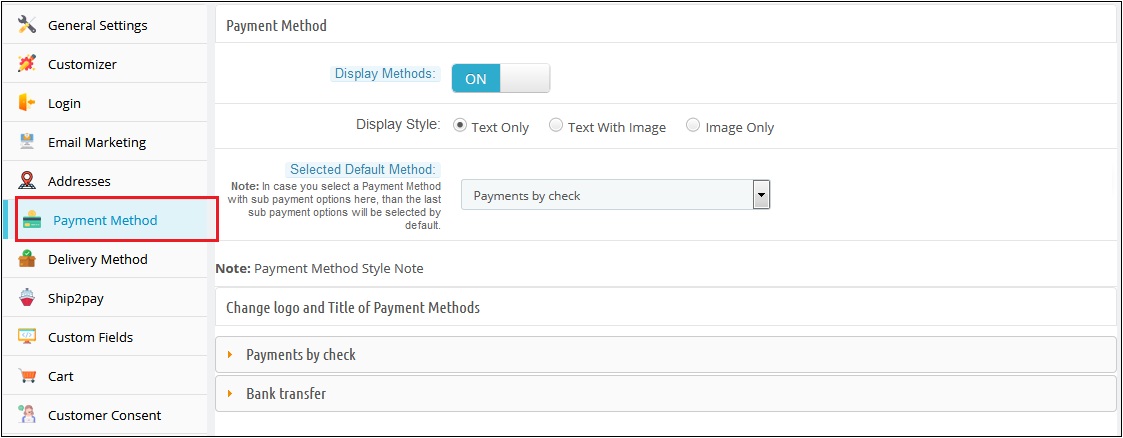
The Prestashop one page checkout supports multiple payment methods. In fact, under this setting, the admin can set a default payment method.
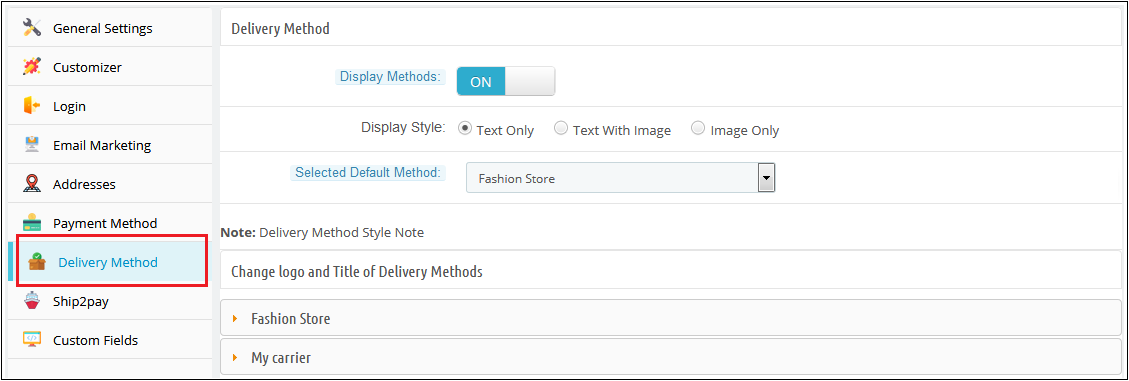
Delivery Method
The Responsive one page checkout Prestashop supports multiple shipping methods. In fact, under this setting, the admin can set a default shipping method.
Ship2pay
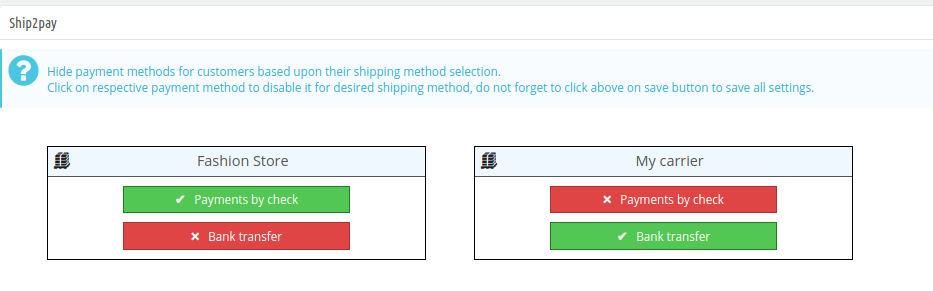
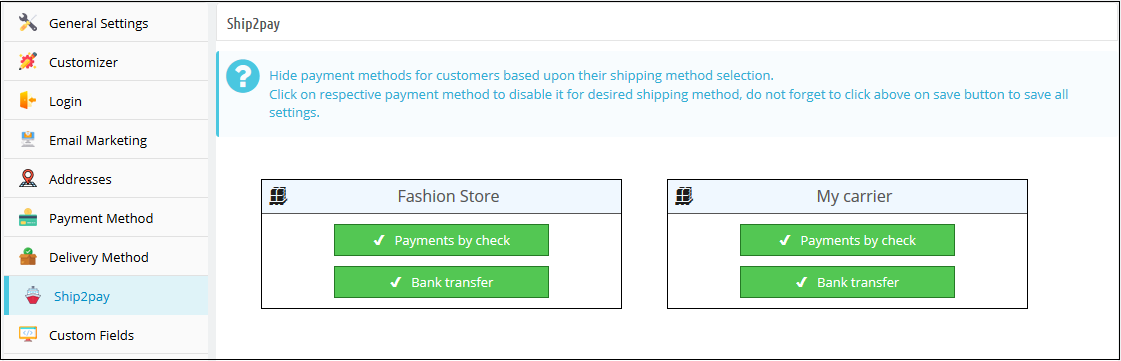
The manager can prohibit payment systems depending on the shipping method selected by the consumer using this feature of the Prestashop module. That is, the administrator can associate certain payment types with specific shipping alternatives in the shop.
Custom Fields
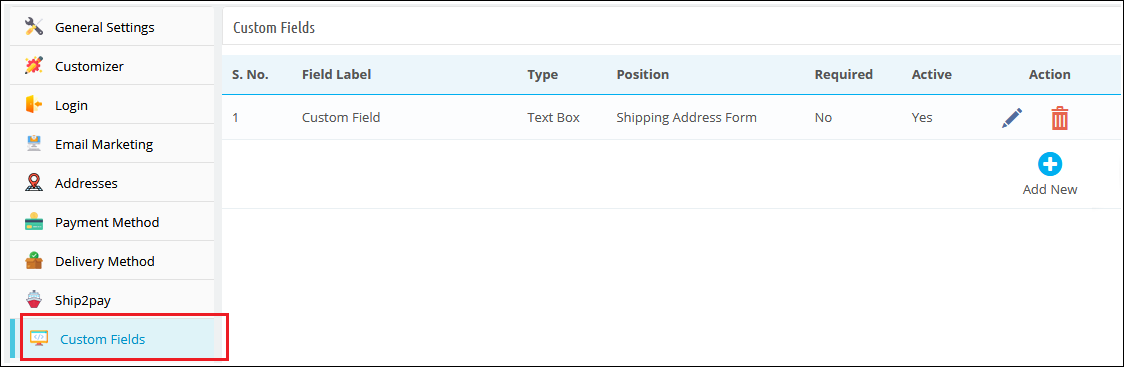
The Prestashop responsive one step checkout addon features a Custom Fields tab. Further, the admin can easily add, edit, and delete the custom fields as per the need. Moreover, add the title, type, position, and other settings as per the need.
Cart
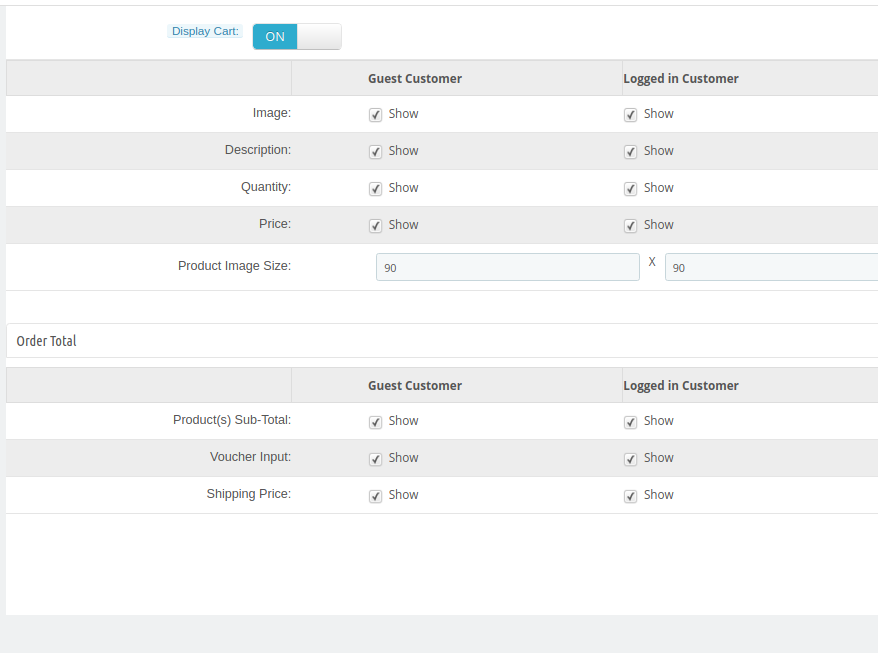
Under this tab of the addon, the admin can choose to show or hide the cart on the checkout page. Furthermore, customize the order total settings and confirm settings for both guests and logged-in customers.
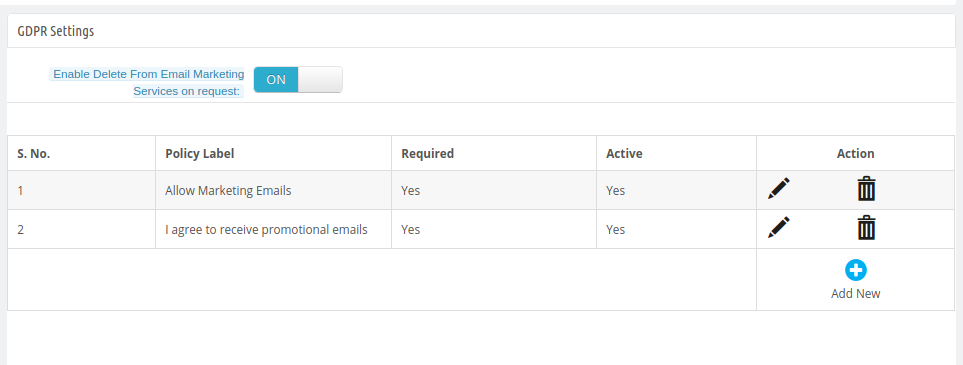
GDPR Settings
The Single Page checkout is GDPR compliant. Furthermore, add, edit, or delete the GDPR settings under various options. For instance, the policy label, and other options.
Design
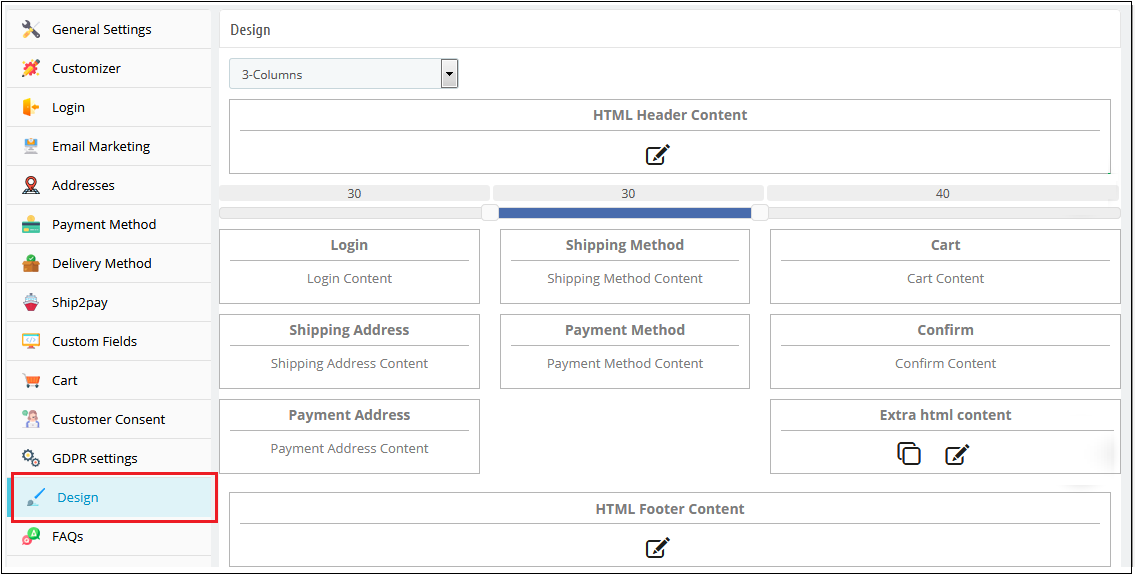
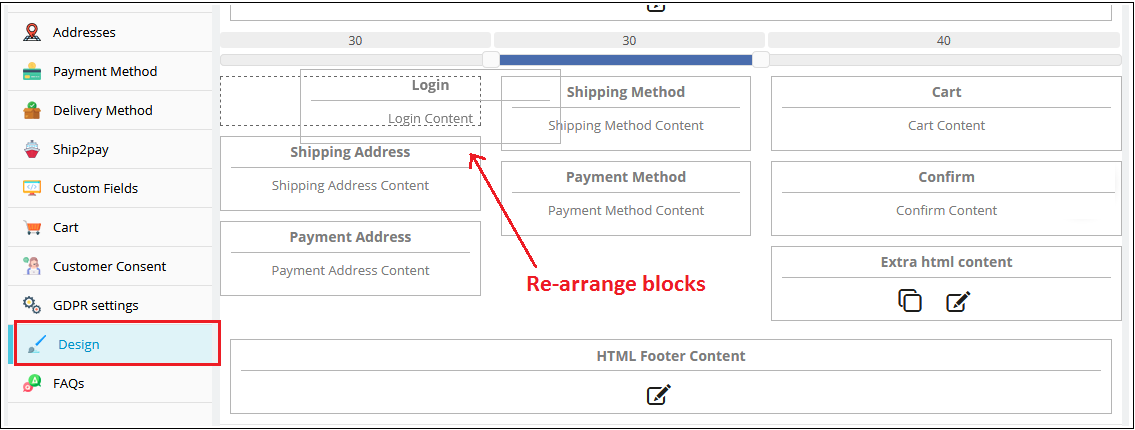
The Prestashop One Page Checkout by Knowband features 3 layout options. 1-section, 2-sections, and 3-section layouts. Furthermore, the admin can choose the layout that best suits your website. The first section is where all the custom fields are laid out in one column. Secondly, the 2-sections option is where the fields are divided into two columns in a pleasing way. Likewise, the last one has 3 columns. However, all the custom fields are still on the single page and the customer can fill in the details without any obstruction.
Customer Profile
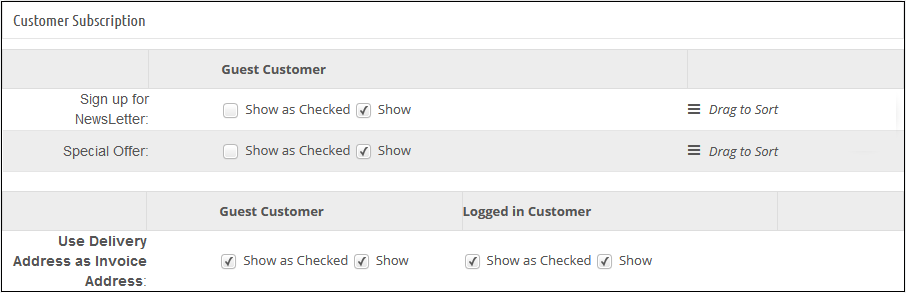
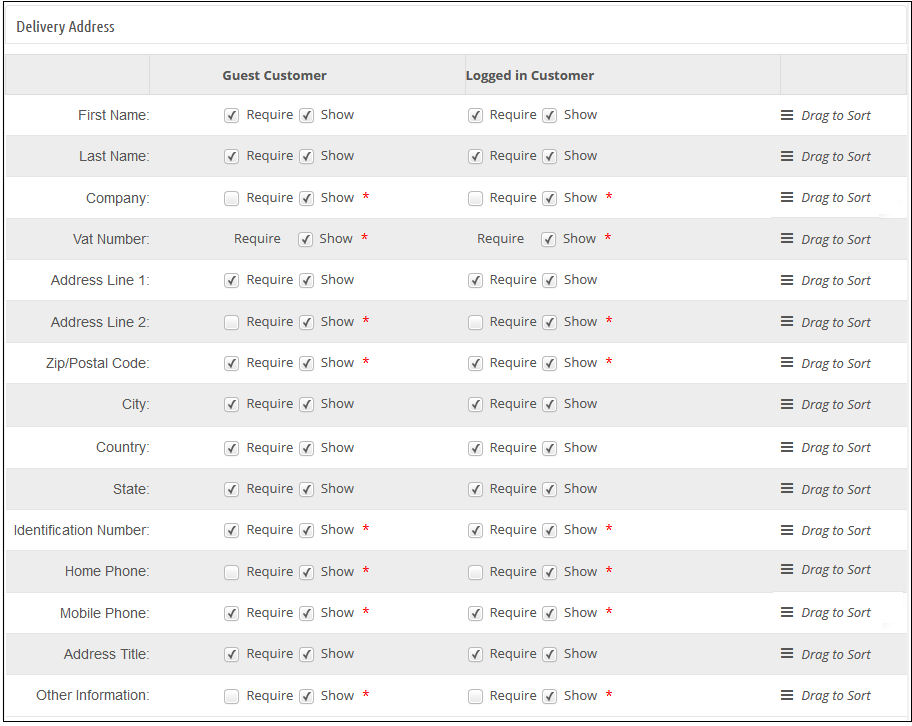
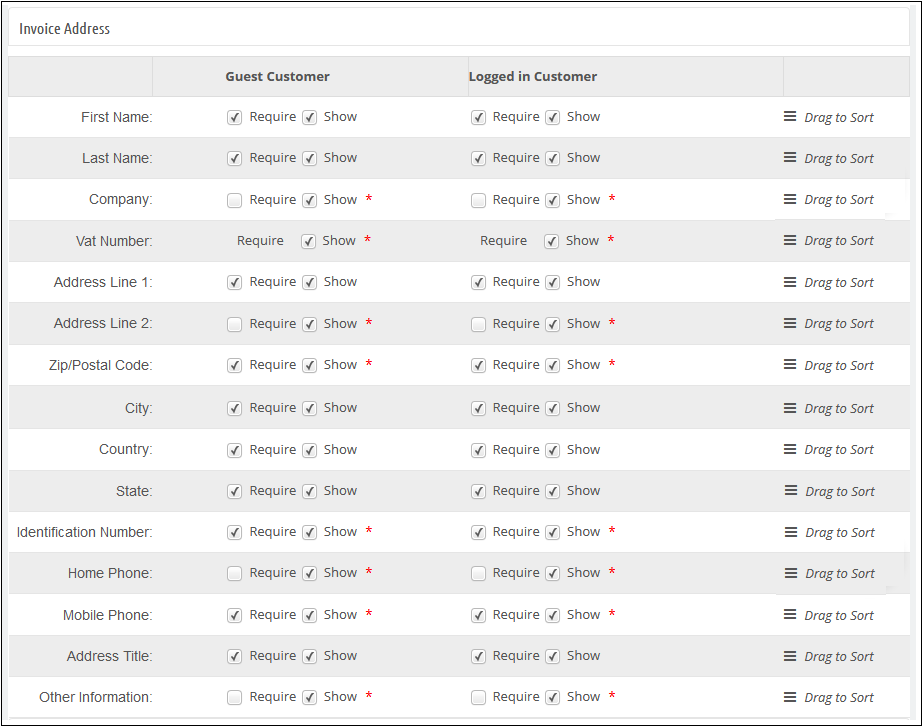
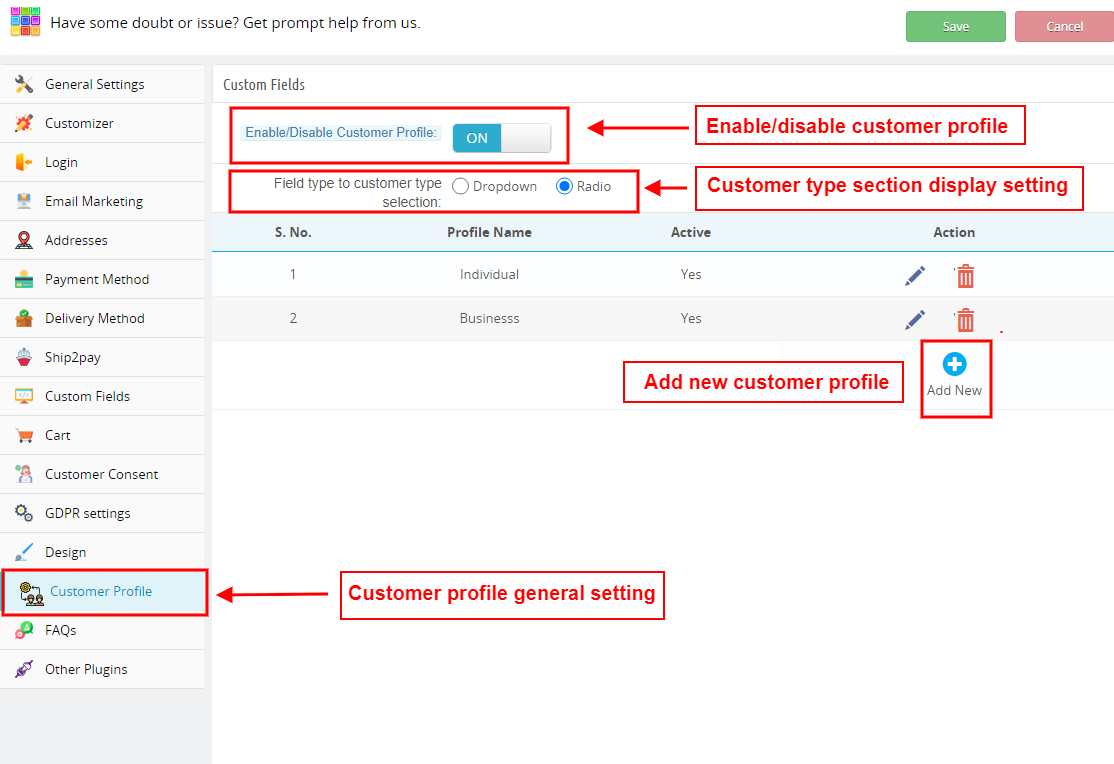
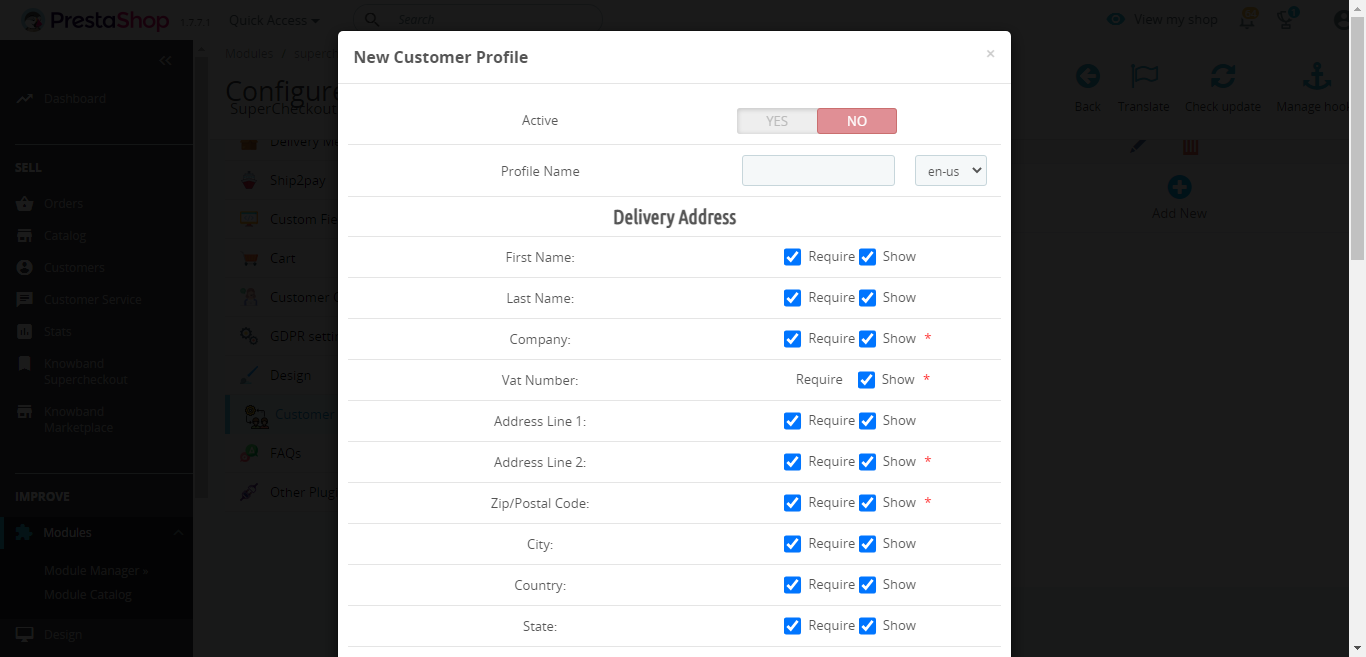
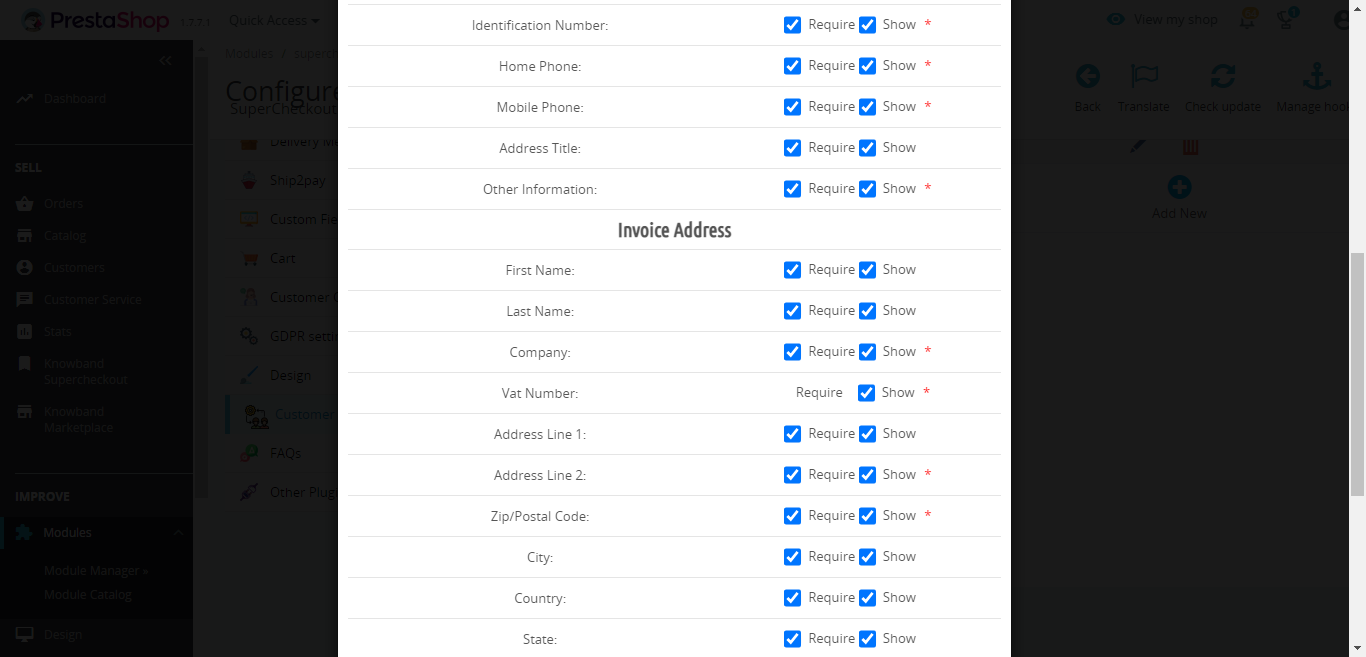
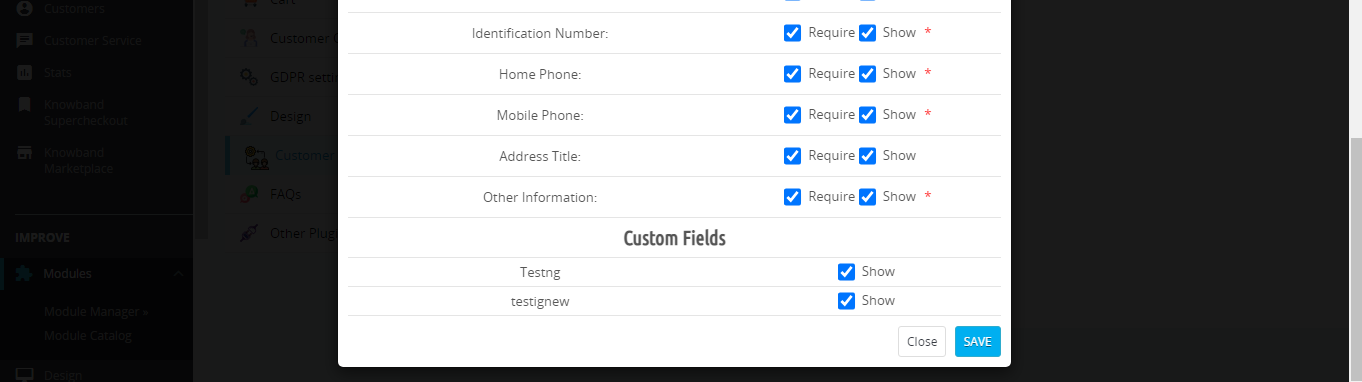
This is one of the latest features of the Prestashop One Page Supercheckout. Further, the admin can create as many customer profiles as he wants to. Moreover, he can configure the settings or checkboxes under the settings like Invoice Address, Delivery Address, and Custom Fields.
Let us Wind up!
The Prestashop One Page Checkout is one of the best options. In fact, it is certainly feature-loaded. You can easily check them out on the Knowband store. Moreover, you will be able to check the User Manual and the Demo version(Admin demo and Front demo). With them, you can get your hands on the settings of the plugin. In case you want to know more about the addon, let us know at support@knowband.com.
PrestaShop One Page SuperCheckout is known as one of the best PrestaShop addons which simplify and fastens the checkout process of your eCommerce store and helps you improve the conversion rate of your business. With the Prestashop Fast Checkout addon, you can eliminate the risk of cart abandonment on the checkout page and can get more successful orders on your store in comparison to the multi-page checkout. Since the users don’t have to go to multiple pages to fill in the checkout details, the addon makes it easy and convenient for your online customers to easily and quickly complete the checkout and place their orders.
Knowband’s PrestaShop One Page Supercheckout addon is one of the best-selling addon with around 8000+ downloads on the Knowband store and 9000+ downloads on the PrestaShop Addon store. The addon has over 500+ 5* reviews on both the stores. Recently, there are some new features have been added to the addon in the new v6.0.9 version. In this article, we will be discussing all these newly added features in the module in brief.
Newly Added Features to the PrestaShop One Page SuperCheckout addon:
1. Select Methods to Display Total Price of the Product:
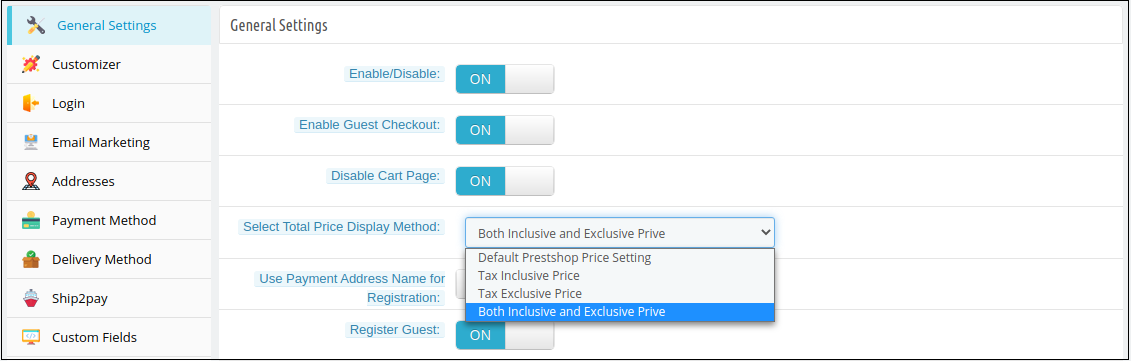
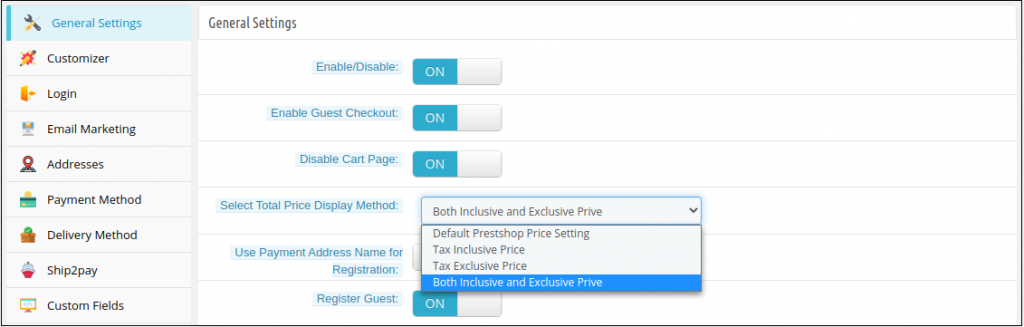
In the latest version of the PrestaShop Quick Checkout addon, the e-merchant can now choose to display the total price of the product in various ways. The store owner can choose to display the PrestaShop default price, the total price of the product inclusive tax or exclusive tax, or both i.e., inclusive and exclusive tax. The store owner can select these display options from the ‘Select Total Price Display Method’ section in the General Settings tab in the back office.
Whichever method is selected by the store owner, will be displayed in the Shopping Cart section on the checkout page.
2. Show Custom Field in the Invoice:
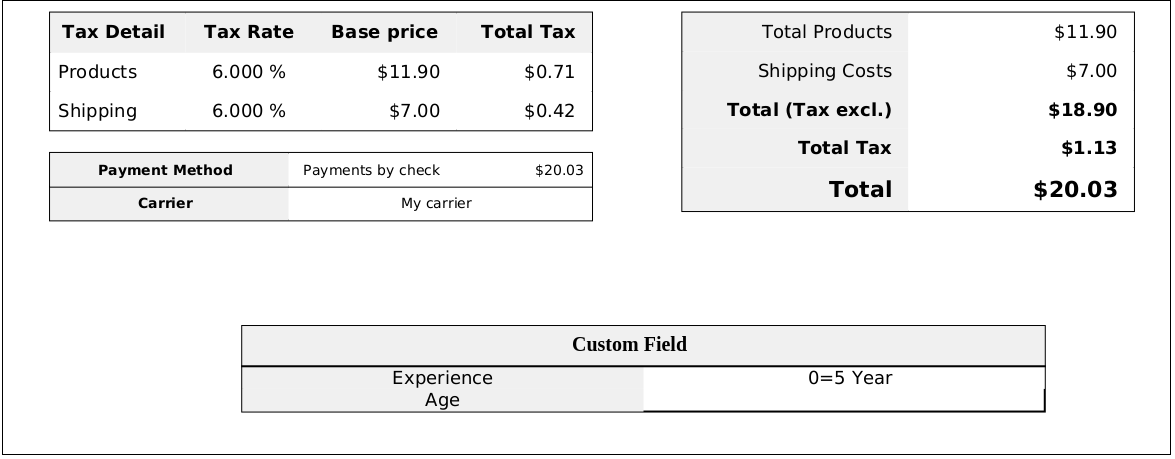
With this feature, the store owner can enable displaying the information filled in the custom field on the invoice of the placed order. The store owner can enable or disable this ‘Display Custom Field in Invoice’ feature from any or all the custom fields in the back office of the PrestaShop Simplified Checkout addon. The customers can view the custom field details in the received invoice of the placed order.
3. Compatibility with PrestaShop v1.7.7.1:
PrestaShop recently released its latest version PS v1.7.7.1 with some new features and fixes. With the latest update in the PrestaShop One Step Checkout Addon, we have made the addon fully compatible with the latest PrestaShop version v1.7.7.1.
4. Compatibility with Zasielkovna and gmparcellocker modules:
The module is now completely compatible with the gmparcellocker and Zasielkovna modules.
5. Fixed Compatibility Issue with Mollie Payment Method:
In the newly released version of the module, all the issues with the compatibility of the module with the Mollie Payment Method have been fixed.
Other Important Features of the PrestaShop Responsive One Step Checkout addon:
1. Social Login feature:
The addon allows the online shoppers to easily and quickly sign-in with popular social media accounts like Google, Facebook, and Paypal. Login with social accounts not only reduces the manual efforts of the online buyers but also saves them from creating a new account to place their orders.
2. Guest Checkout functionality:
As many online shoppers don’t like to get registered and share details on a new unknown eCommerce website, this Guest checkout feature in the PrestaShop One Page SuperCheckout helps them place their online orders without registering themselves on the website. The online users can place their orders as guest customers or can also create a new account or sign-in to their existing accounts right from the checkout page without any hassle.
3. Integration with MailChimp, SendinBlue, and Klaviyo:
The Prestashop One Page Checkout offers integration with popular email service providers such as MailChimp, Klaviyo, and SendinBlue. After the integration of these accounts with the module, the collected database of the online users will automatically be synced to these accounts.
4. Easy Look and Feel Checkout Page Customizations:
The e-merchant can easily customize the look and feel of the checkout page including change the color of text, button background, button border, etc.
5. Manage Checkout Fields:
The store owner can easily manage the fields of the page from the back office of the Prestashop One Page SuperCheckout. From showing or hiding the fields or making the fields mandatory or optional, the store admin can do everything easily from the admin interface. He can also re-arrange the steps with drag and drop functionality.
Now make the overall process of checkout easy and faster by implementing one-page checkout. Knowband offers Prestashop Smart One Page Checkout Addon which replaces the default checkout process with one-page advance checkout. The online merchant can make the overall process easy and convenient for online users
The online buyers can view a one-page checkout popup at the same time when they click on the “Add to Cart” button. The Prestashop simplified checkout addon makes the checkout process very simple and effective for online users. There is no need to follow the lengthy process of checkout while shopping online. The store admin can enable testing mode before implementing it. Admin can set the look and feel of checkout buttons. By making the process of checkout simpler, the online merchant can increase sales and profit.
1.1 Features offered by PrestaShop Smart One Page Checkout Addon
The online users can view the checkout popup at the same time when they click on the “Add to cart” button on the product page. This module offers AJAX-based popup.
The online merchant can allow guests and registered customers to checkout easily.
Admin can enable test mode and check it before implementing it.
Admin can add specific IP addresses if he doesn’t want to offer smart one-page checkout to all the customers.
Prestashop Smart One Page Checkout Addon allows the online merchant to set the look and feel of the checkout button. Admin can preview the button color easily from the admin interface. The online merchant can enter custom CSS and JS codes also.
Admin can offer Facebook login and Google login option on the checkout page. From the admin interface, admin can get the configuration steps of the Google app and Facebook app.
Admin can setup Klaviyo, MailChimp and Sendinblue email integrator sites and save email id details of subscribers.
This Prestashop Quick checkout addon offers auto address filling functionality.
Admin can select from available payment methods and delivery methods easily from the admin interface of this Prestashop One Page Advanced Checkout.
Admin can also hide payment methods from shipping methods.
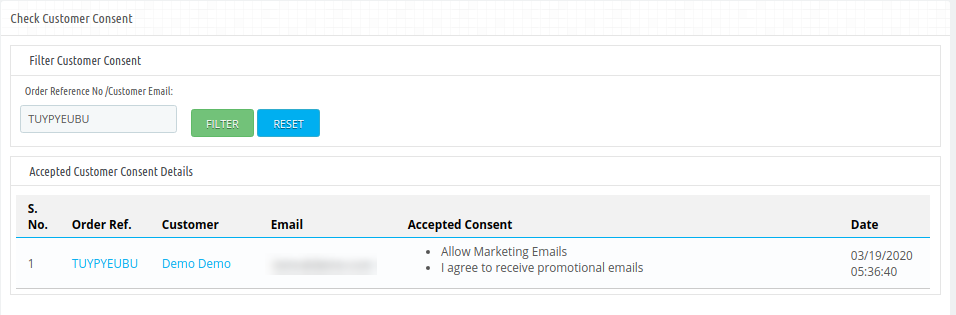
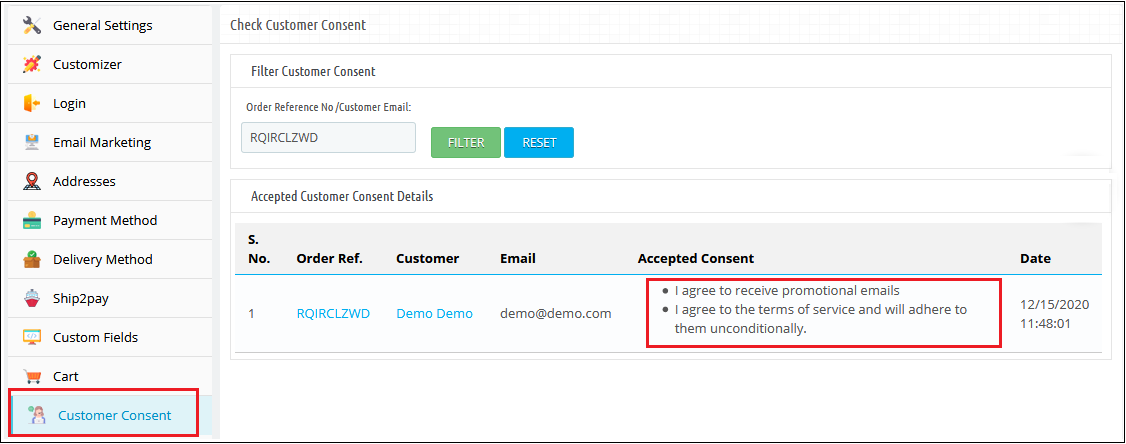
Admin can also check the customer’s consent by entering the email ID/order reference number.
The Prestashop Smart One Page Checkout addon offers GDPR compliance.
The Prestashop Smart One Page Checkout addon is multi-lingual compatible, multi-store compatible and offers smooth functioning.
2.0 Installation
First of all, purchase the Prestashop Smart One Page Checkout Addon and download the zip file from the Downloads section of your Knowband account.
You will get smartonepagecheckout.zip (source code of the module) and User Manual after downloading the zip file.
To install the module in the store follow the below-mentioned steps:
1) Unzip the smartonepagecheckout.zip file.
2) Copy the entire content, that is, the files and folders of the unzipped folder. Paste the same into the “Modules” folder of your store’s directory. Follow the below-mentioned address path – Root Directory/modules/.
3) The Prestashop simplified checkout addon is all set to be installed in the store. Go to the Store Admin and then to ‘Modules and Services’.
4) Now click on the “Install” button just next to your module. There will be a pop-up for your confirmation. Click on “Proceed with the installation” option. This step will install the Prestashop simplified checkout addon and show notification – “Module(s) installed successfully”.
5) Once the installation is complete, you will get access to the admin interface of the module by clicking on the “Configure” button.
3.0 Admin Settings
The online store admin can easily apply the settings from the admin interface and implement smart one page checkout functionality. These are the configuration options as shown below:
General Settings
Customizer
Login
Email Marketing
Addresses
Payment method
Delivery Method
Ship2pay
custom Fields
cart
customer consent
GDPR Settings
3.1 General Settings
In General settings, the online merchant can apply these settings as described below:
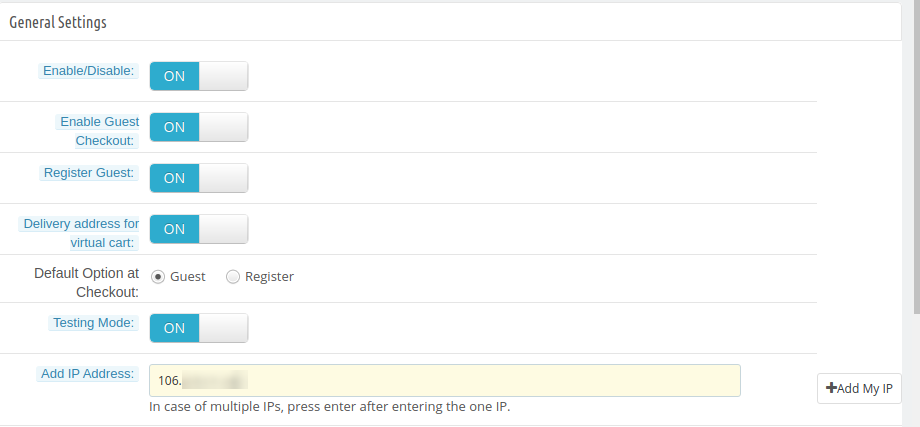
Enable/disable: Activate or deactivate the module functionality.
Enable Guest Checkout: Activate the Guest checkout option by toggling the button.
Register Guest: Allow guest registration option.
Delivery address for Virtual cart: Enable this option for showing delivery address. While deactivating this option, it will show the invoice address and hide the delivery address for virtual products.
Delivery Option at Checkout: Admin can select guests or register as a default option at the checkout page.
Testing Mode:
Testing Mode: Enable the option if you want to test the module before implementation.
Add IP address: Enter the IP addresses if you want to show smart one-page checkout on specific IP addresses. Separate every IP address with a comma.
3.2 Customizer
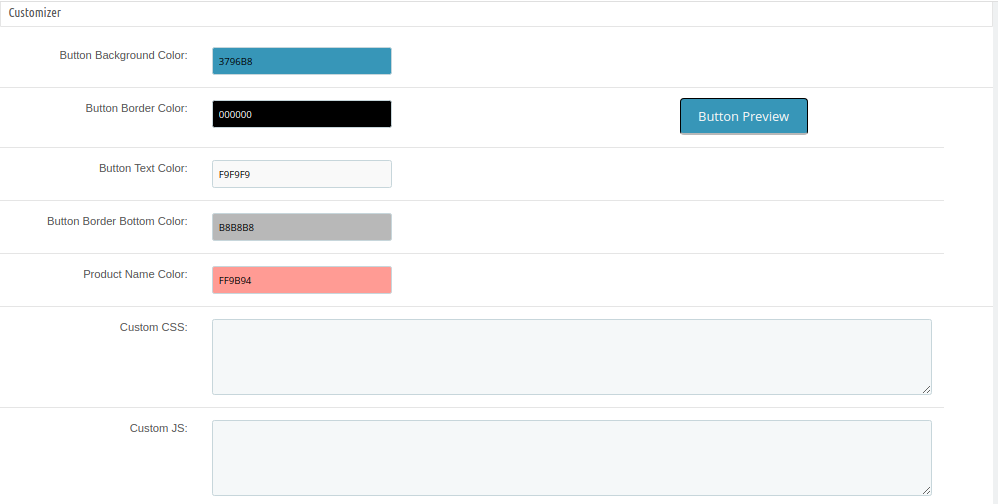
In Customizer settings, admin can set the look and feel of smart one-page checkout button and also apply advance appearance settings as shown below:
Button Background Color: Set the background color for the button.
Button Border Color: Set the button border color from the admin interface.
Button Text Color: Set the button text color from here.
Button Border Bottom Color: Set button border-bottom-color from here.
Product Name Color: Here, set the product name color.
Custom CSS: Enter custom CSS code for the advance look and feel settings.
Custom JS: Enter JS codes for more appearance settings.
3.3 Login
In login settings, admin can offer social login options to online users like Facebook and Google login options:
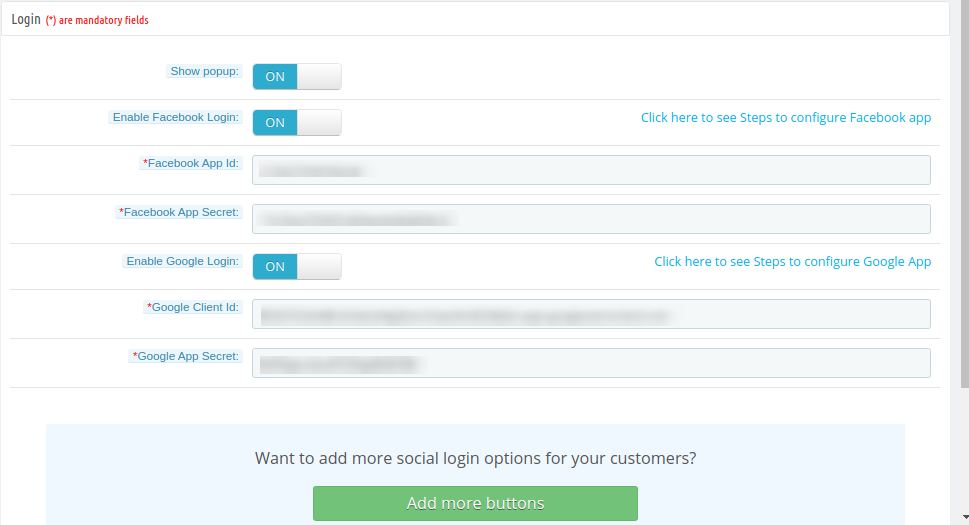
Show popup: If this setting is enabled then Facebook or Google Login Page will be open in a pop up after clicking on the login options.
Enable Facebook Login: Enable this option for showing the Facebook login button.
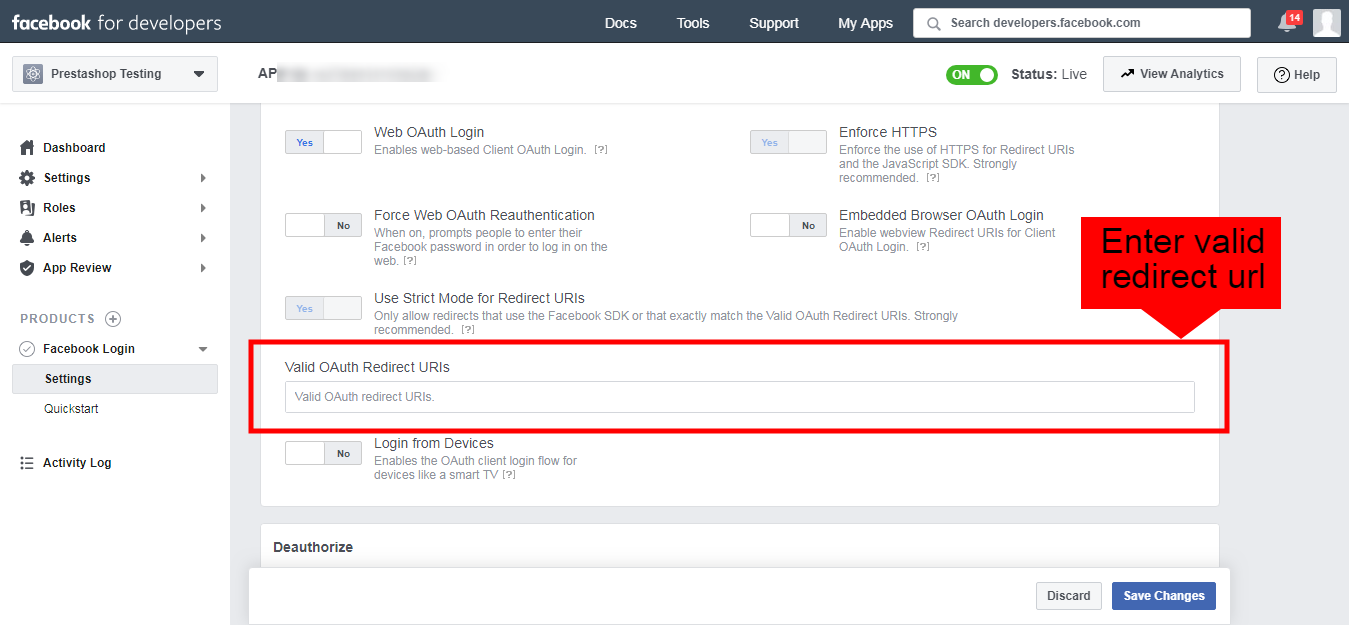
Facebook App Id: Admin can check the configure steps for Facebook app ID generation and enter the Facebook app id here. Visit 3.3.1 Section for getting steps to generate Facebook app id and app secret.
Facebook App Secret: Here, Enter Facebook App Secret.
Enable Google Login: Activate if you want to show Google login option on the checkout page.
Google Client Id: Admin can check the steps to configure Google App and enter Google client Id here.
Google App Secret: Enter Google app secret here. Visit 3.3.2 Section for getting steps to generate Google app id and client id.
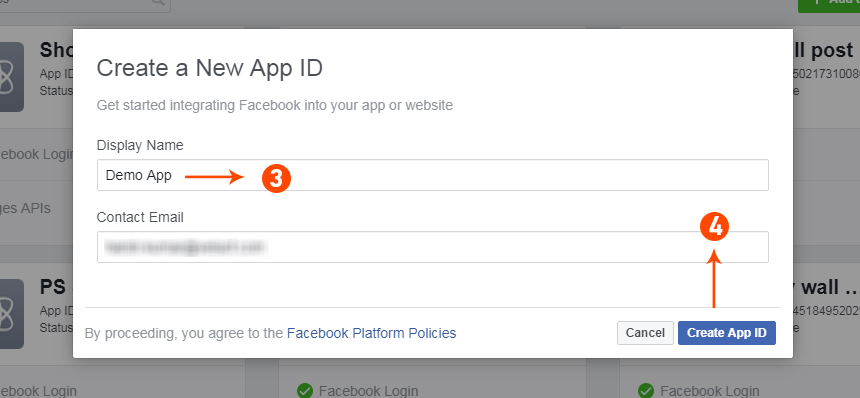
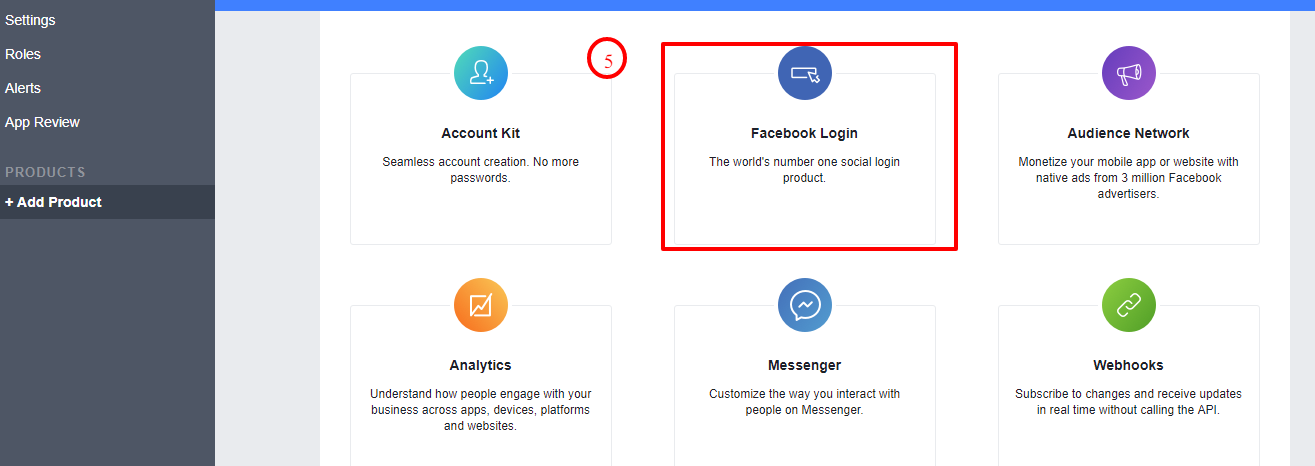
3.3.1 How to setup Facebook Login
For Generating Facebook App id and app secret follow these steps:-
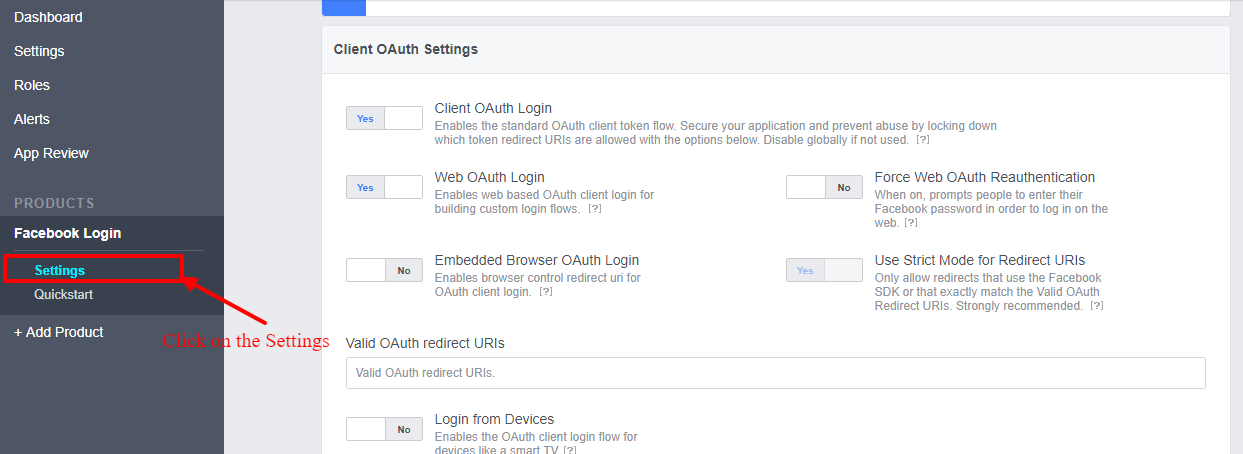
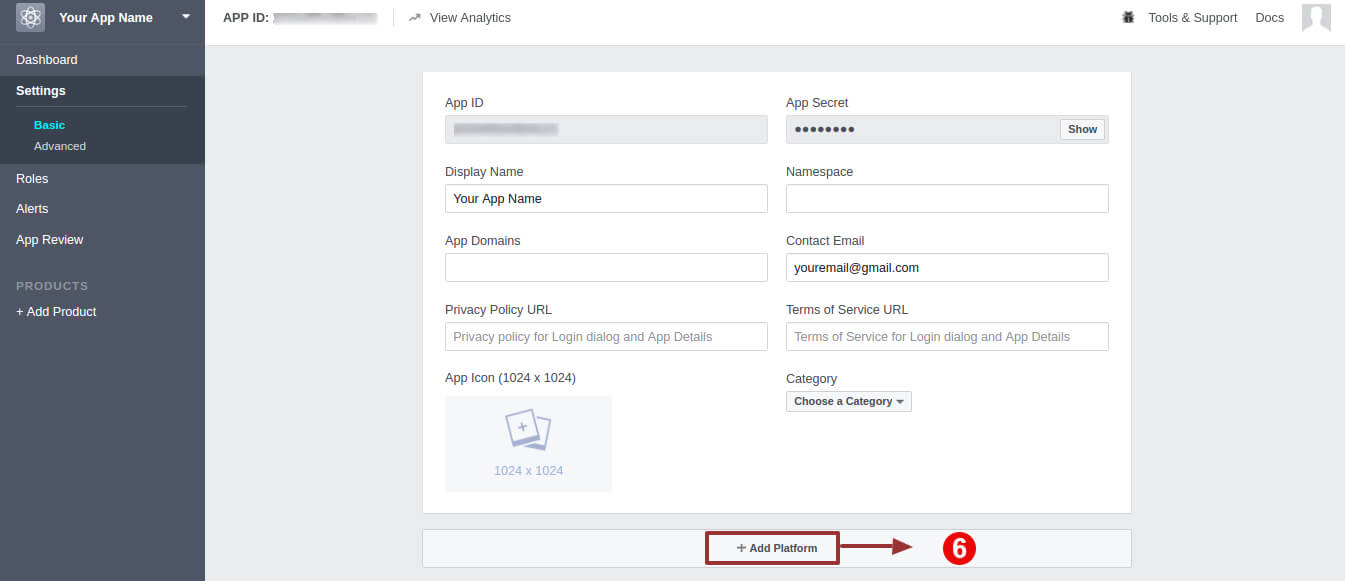
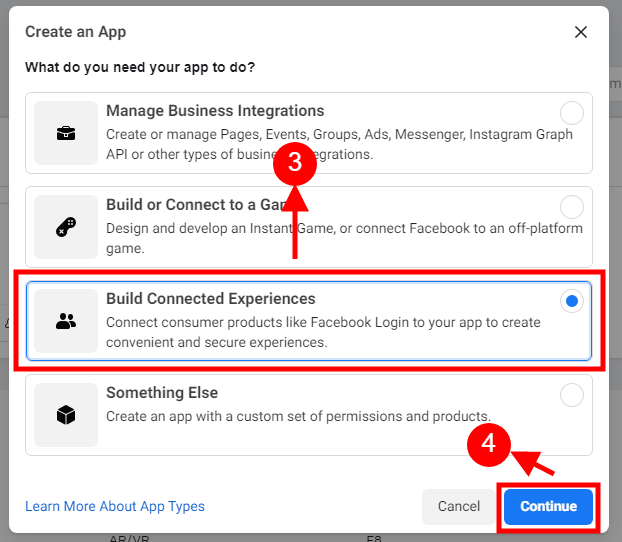
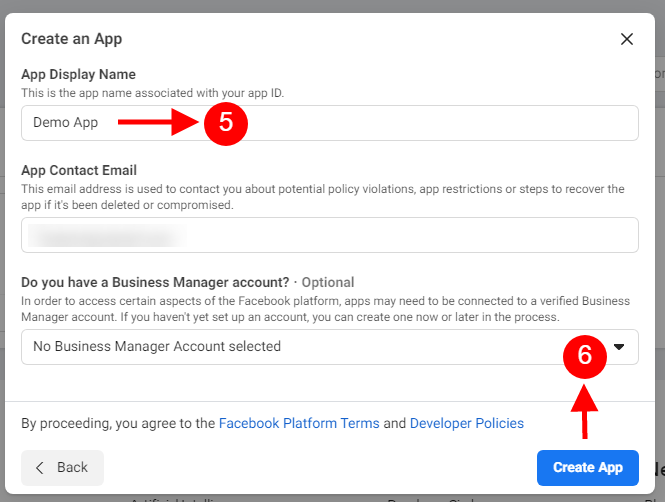
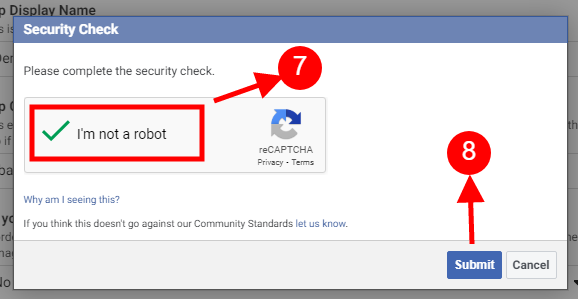
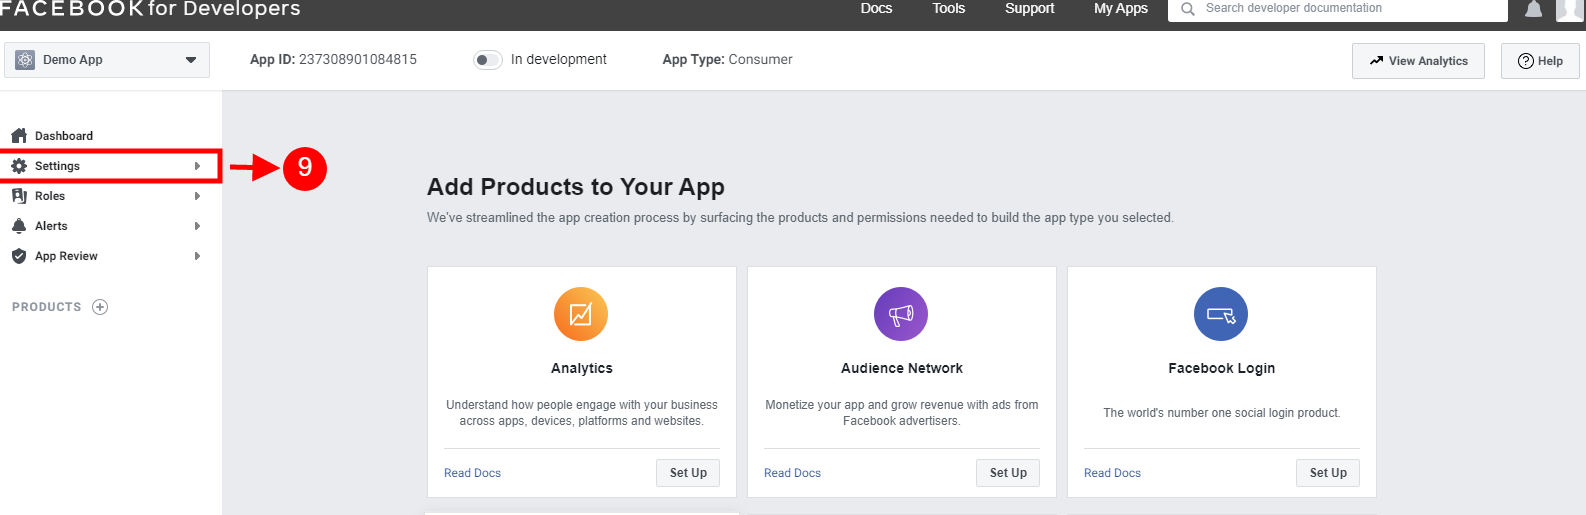
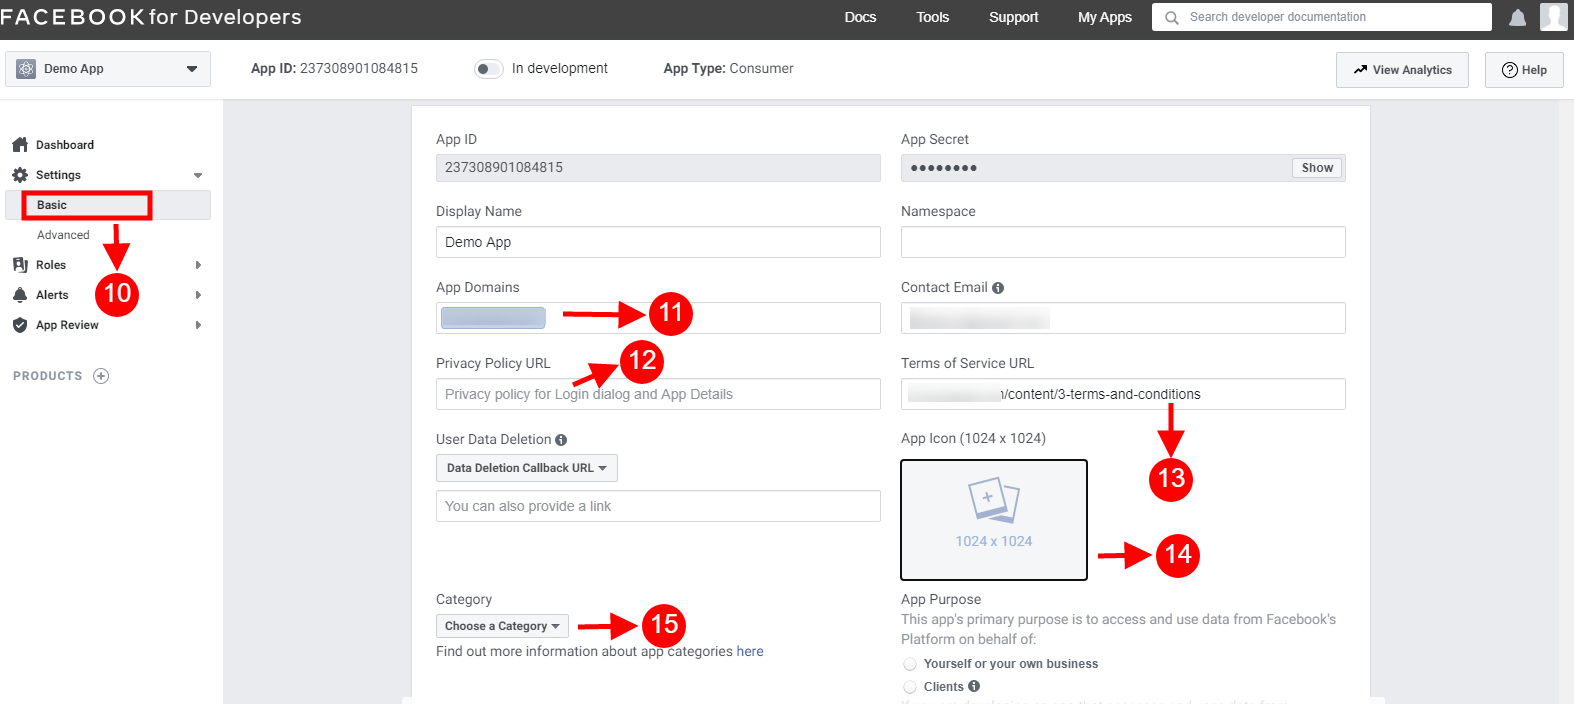
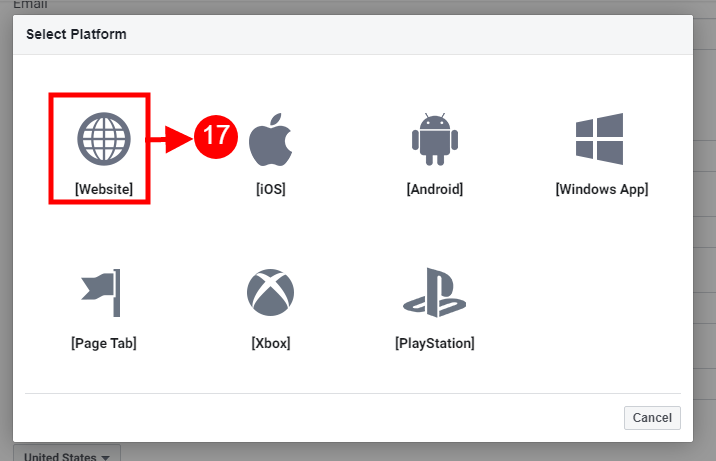
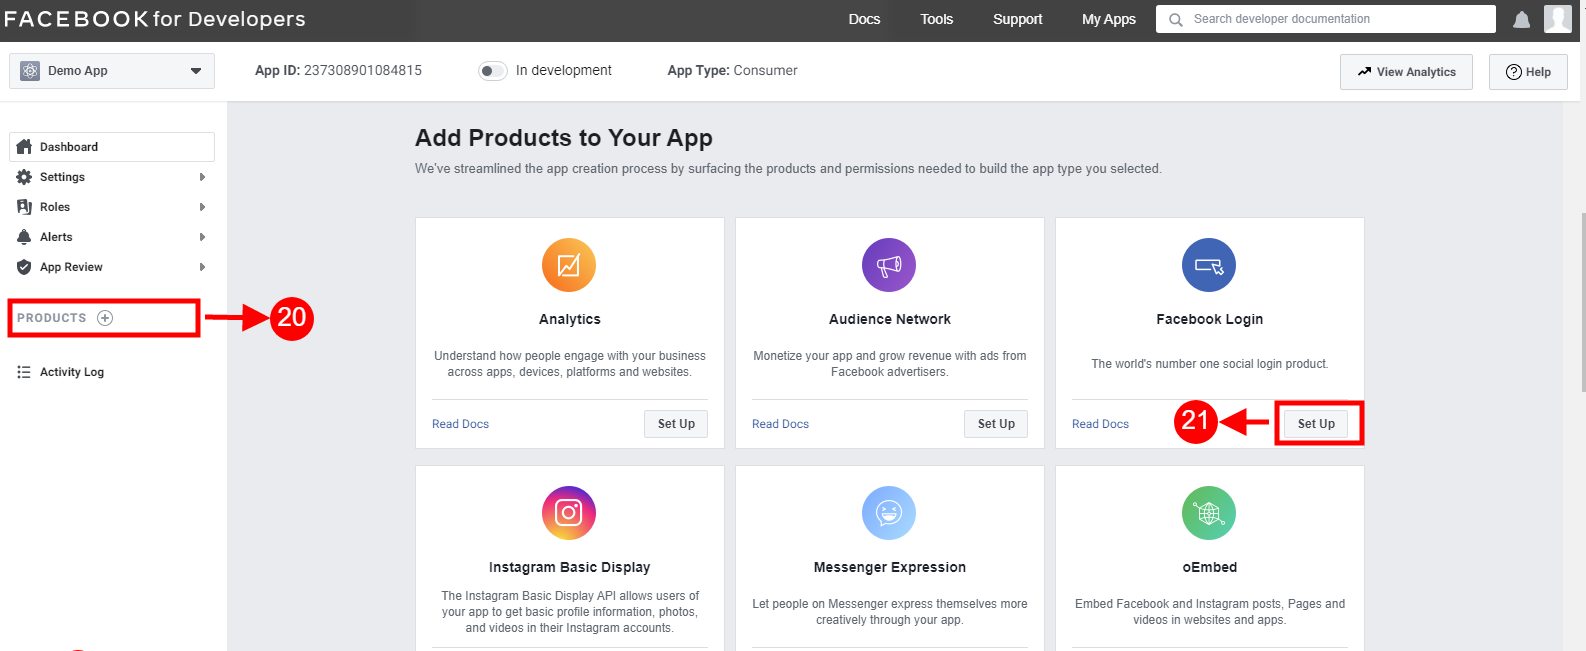
Step 6: Now in the settings section, there will be two options available in the dropdown list, Basic and Advanced. You need to click on “Basic” settings and click on the “+Add Platform” button.
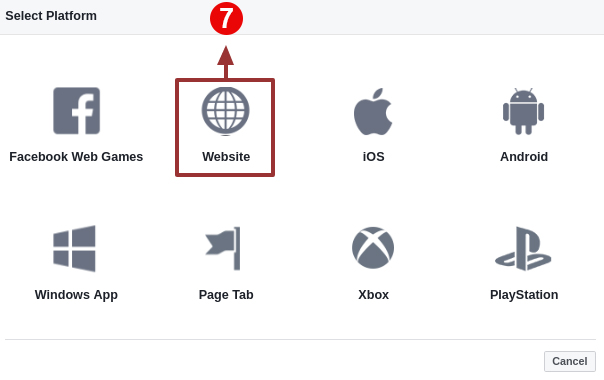
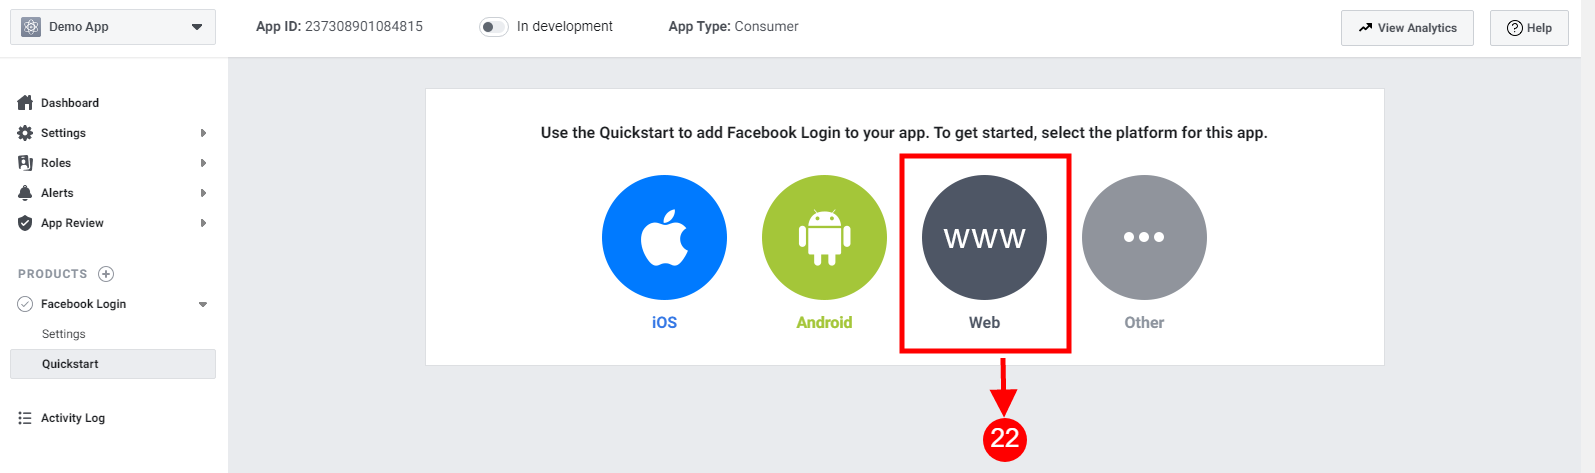
Step 7: Now select the website as your platform.
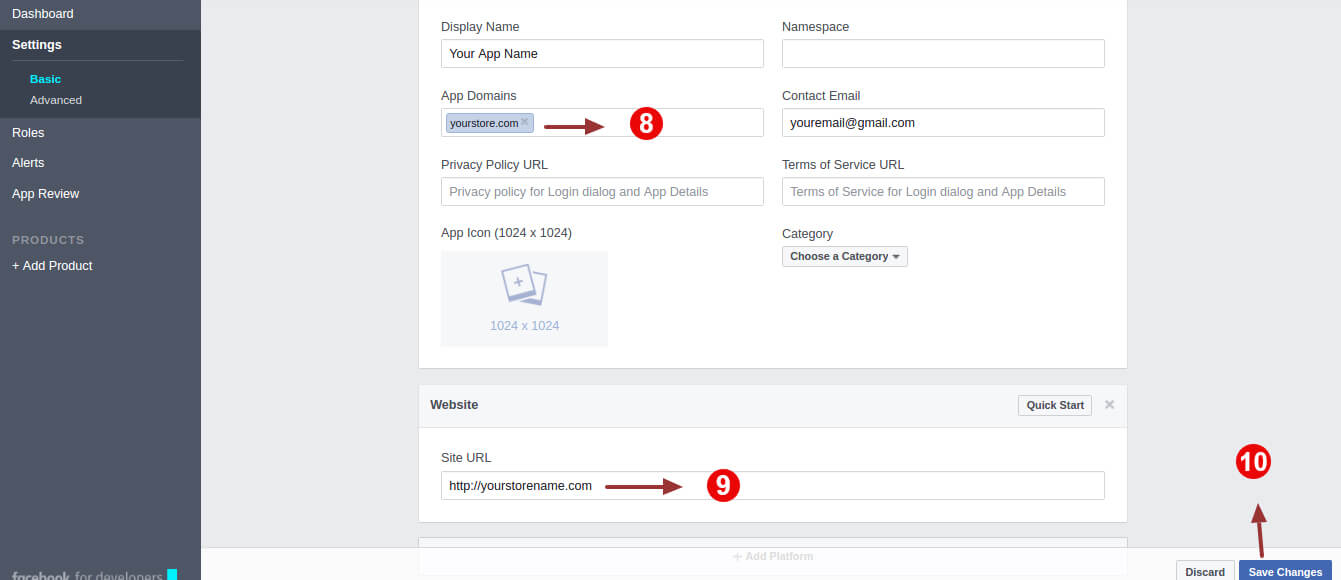
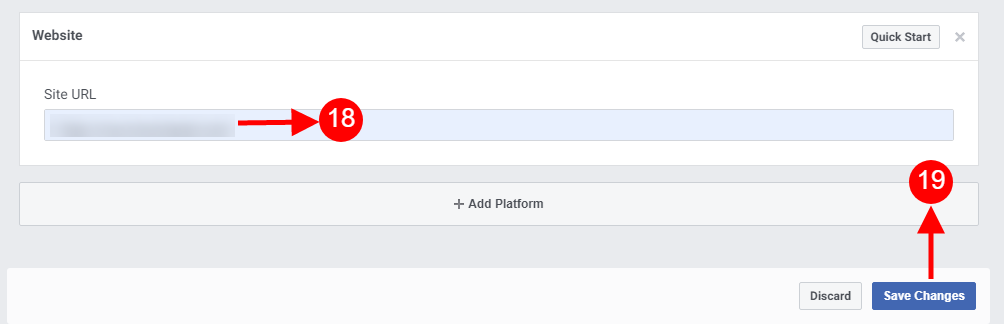
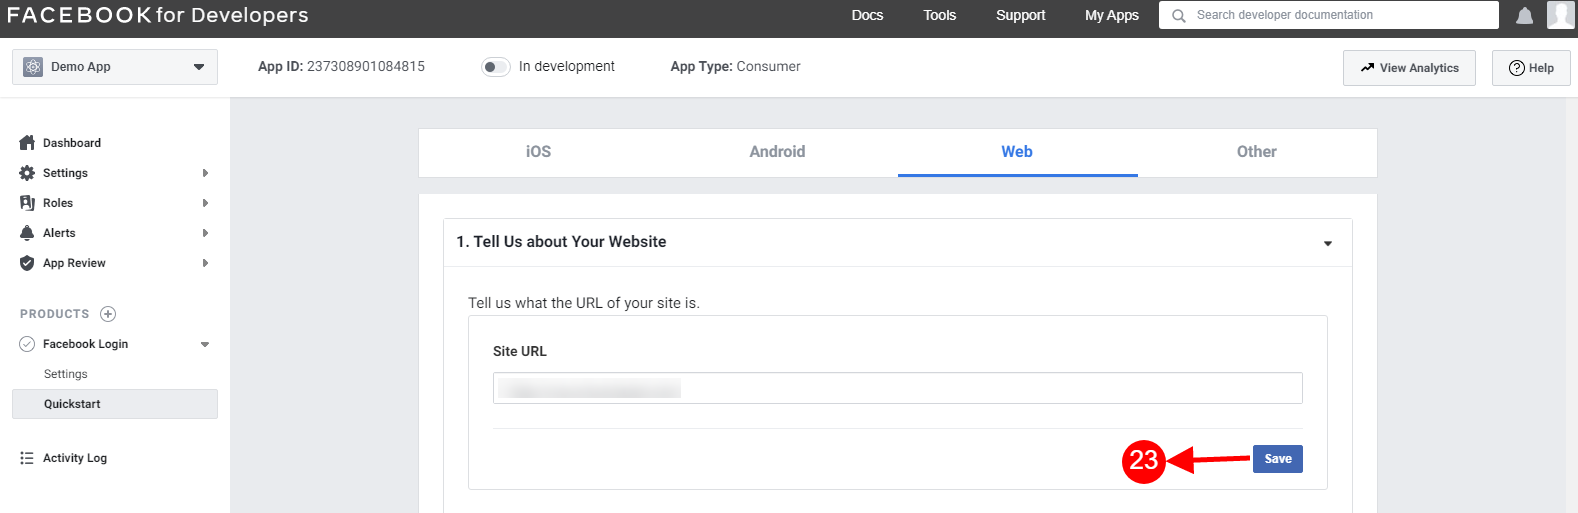
Step 8,9,10: In the basic settings enter these details:
In step 8, enter App Domain:www.example.com
For Step 9 use Site Url: https://www.example.com/
After that save the changes.
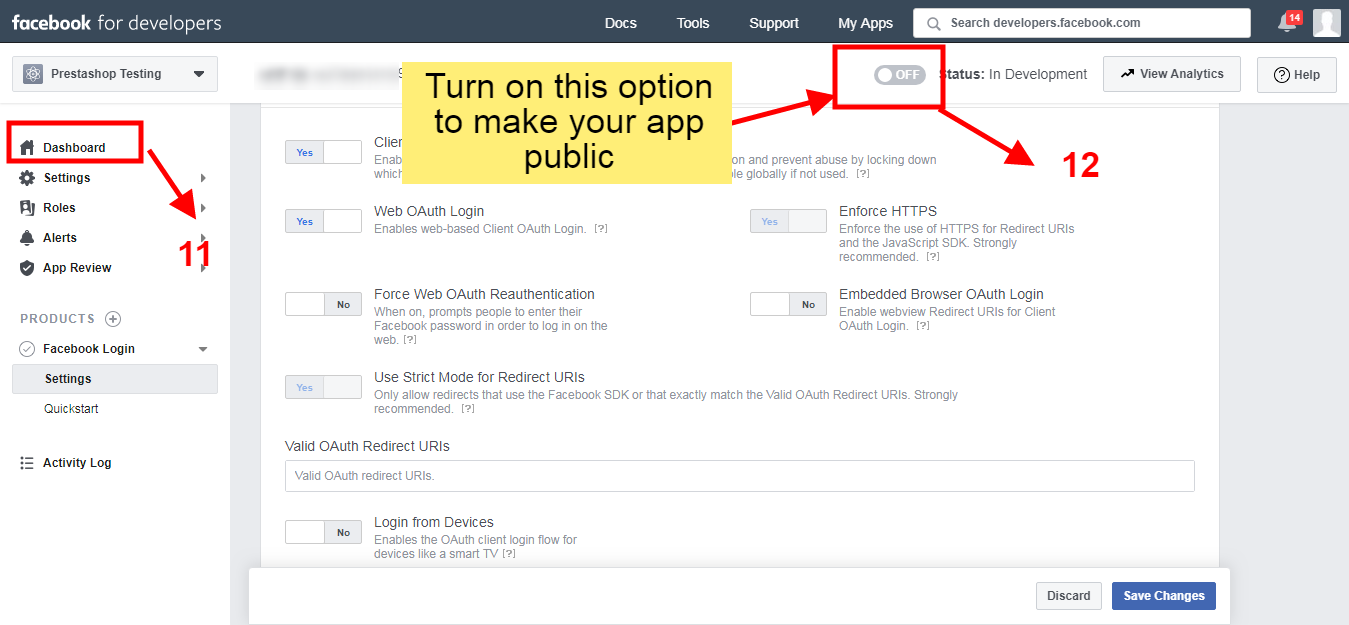
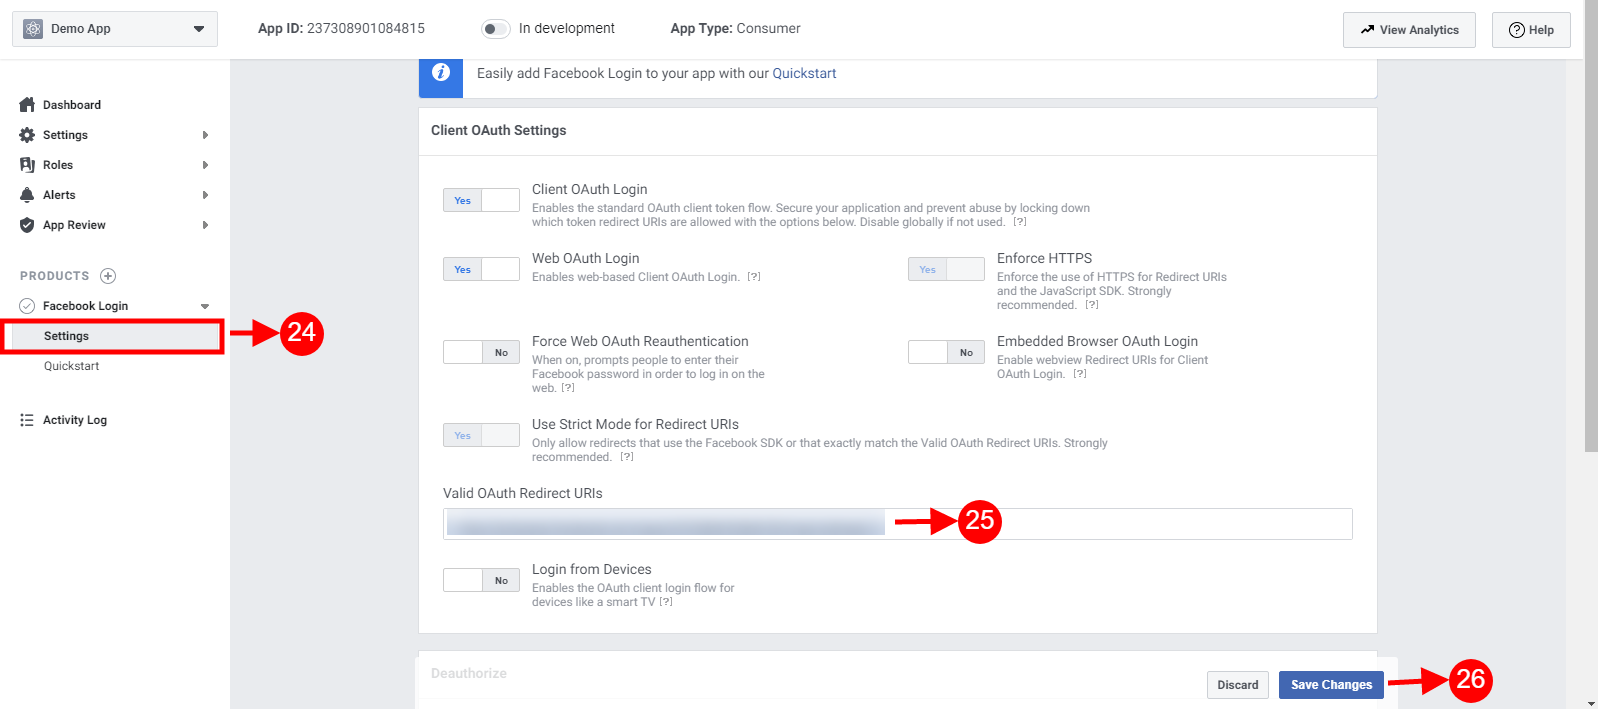
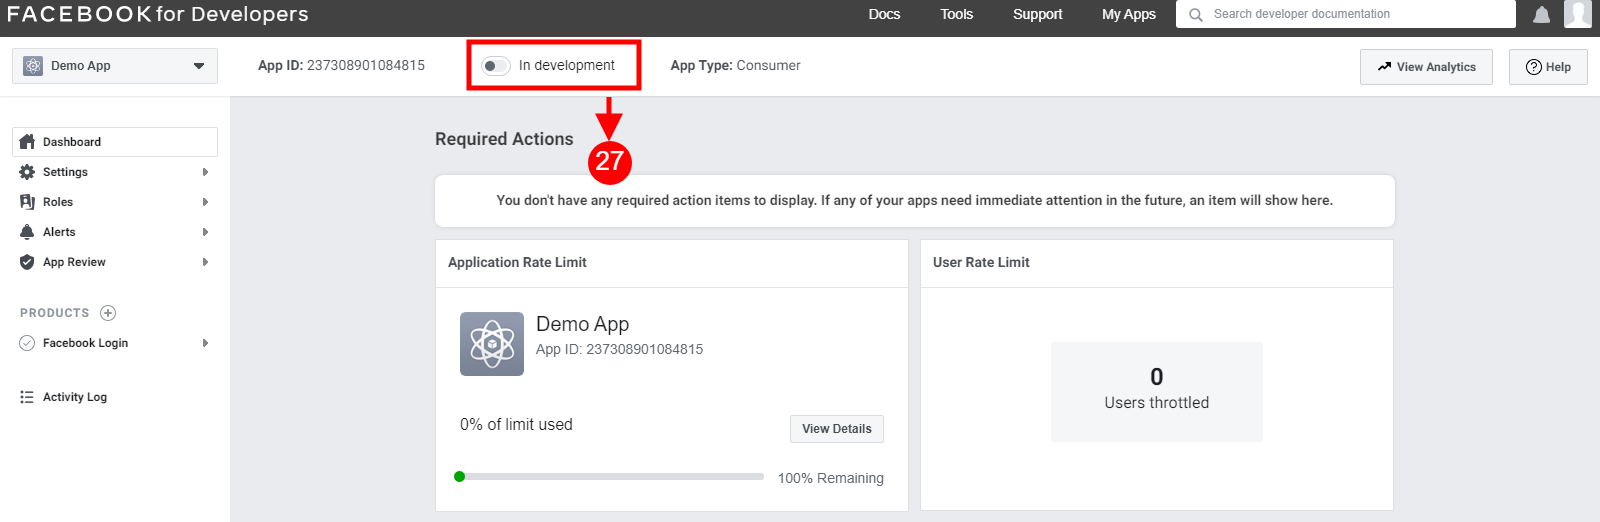
Step 11 and 12: Go to the dashboard and turn on the option for making the app public:
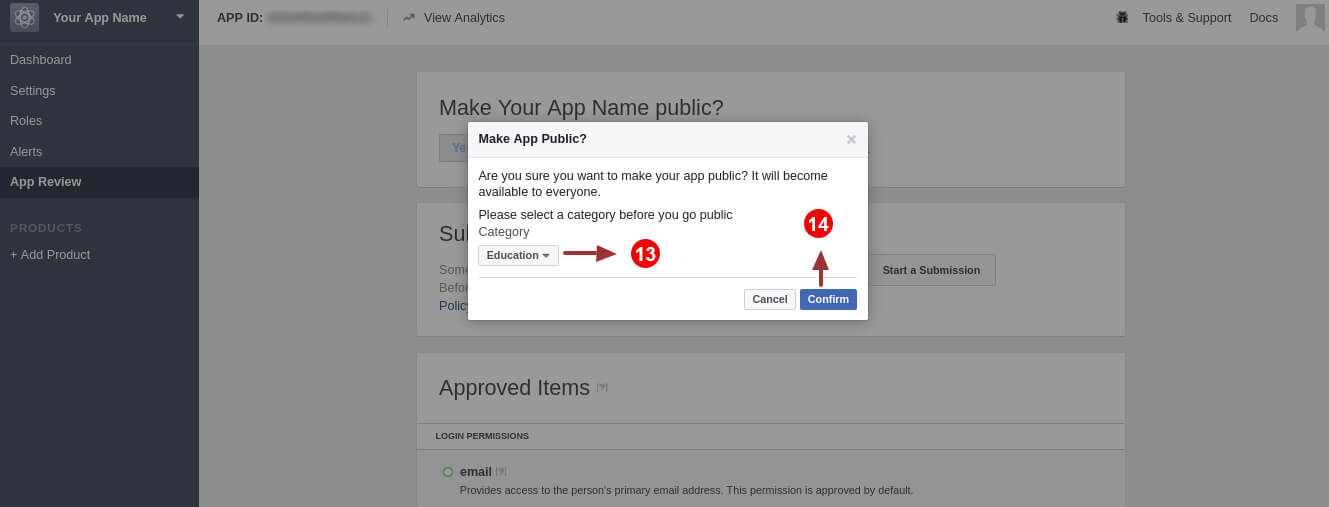
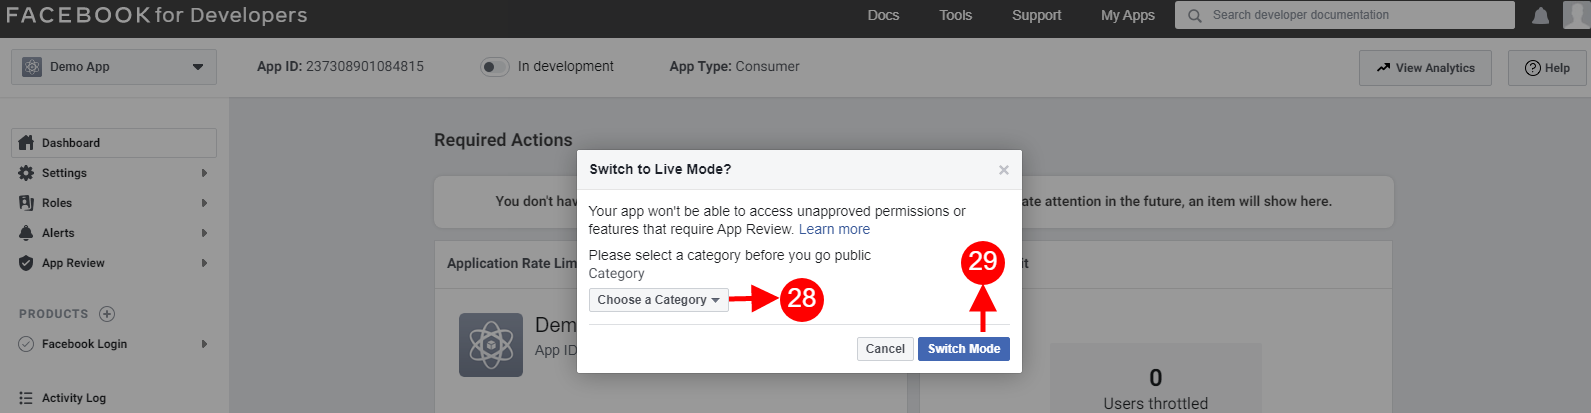
Step 13,14: Select the category and click on the Confirm button.
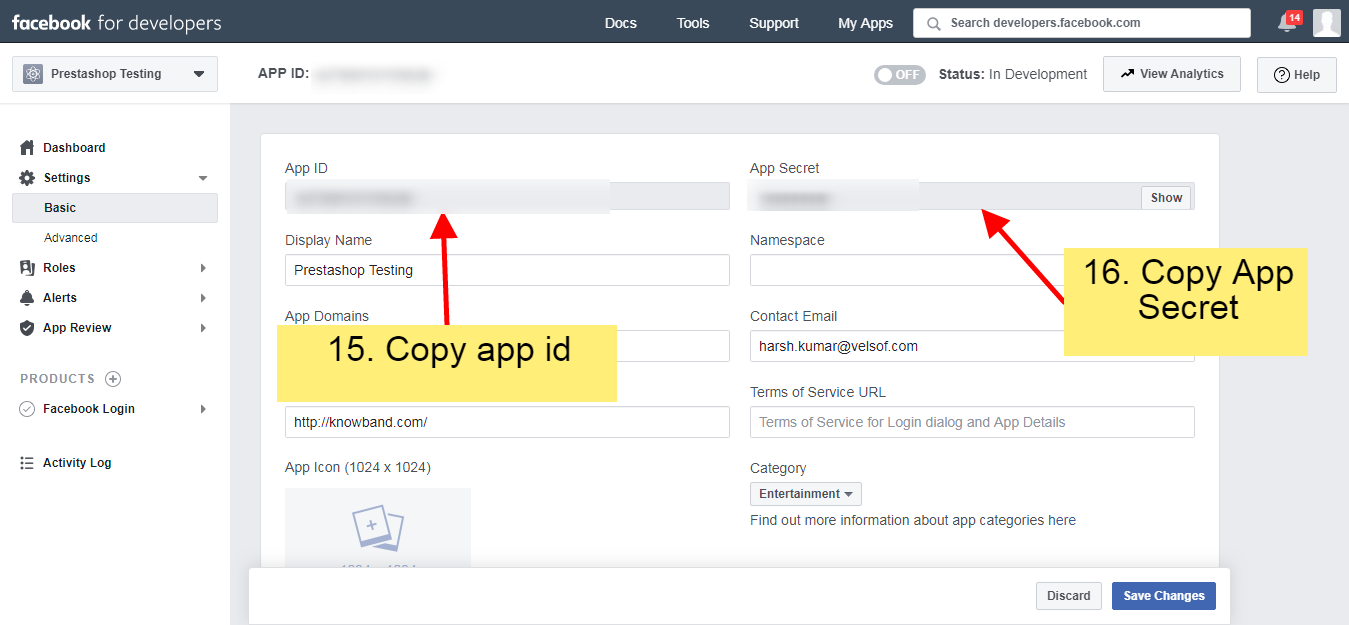
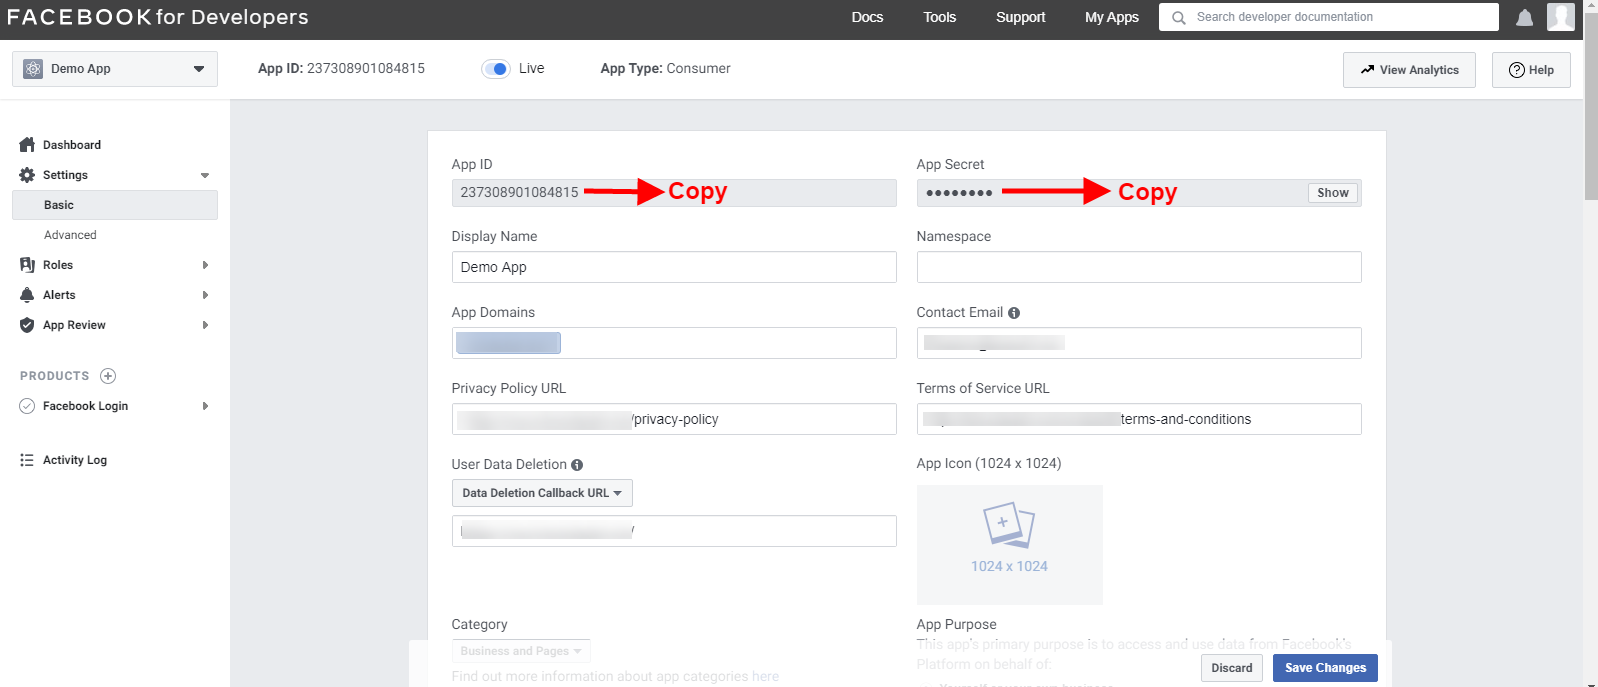
Step 15,16: Copy the App ID and App Secret from here:
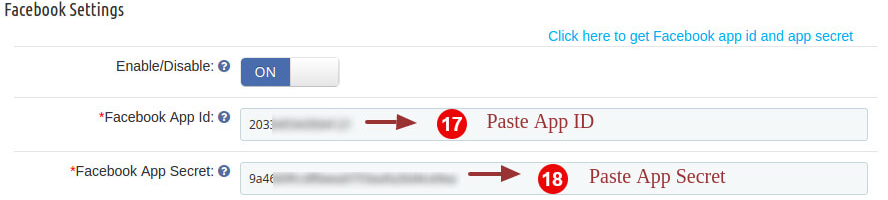
Step 17, 18: Enter app id and app secret into the fields provided in the module.
3.3.2 How to setup Google Login
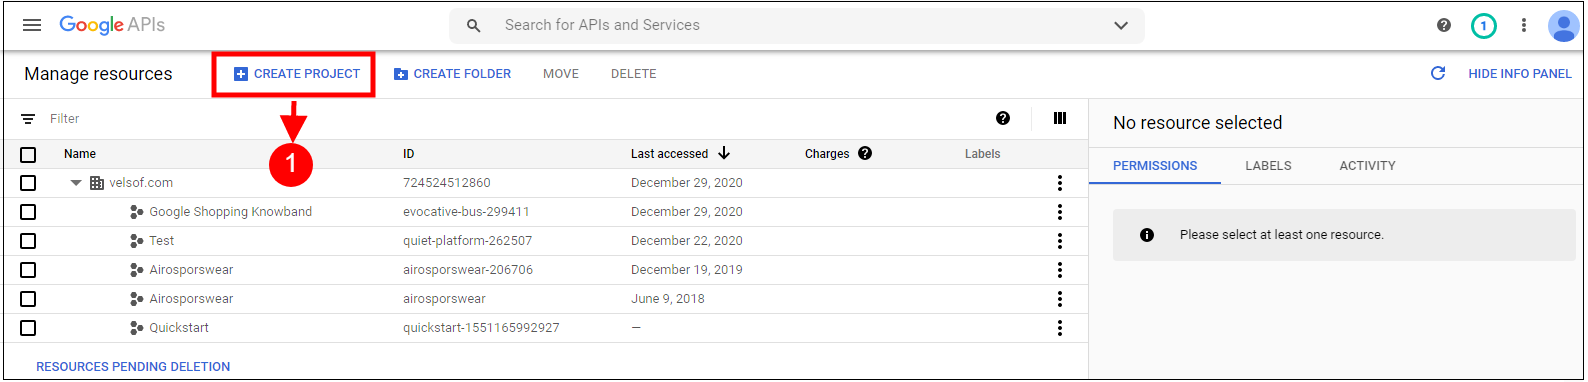
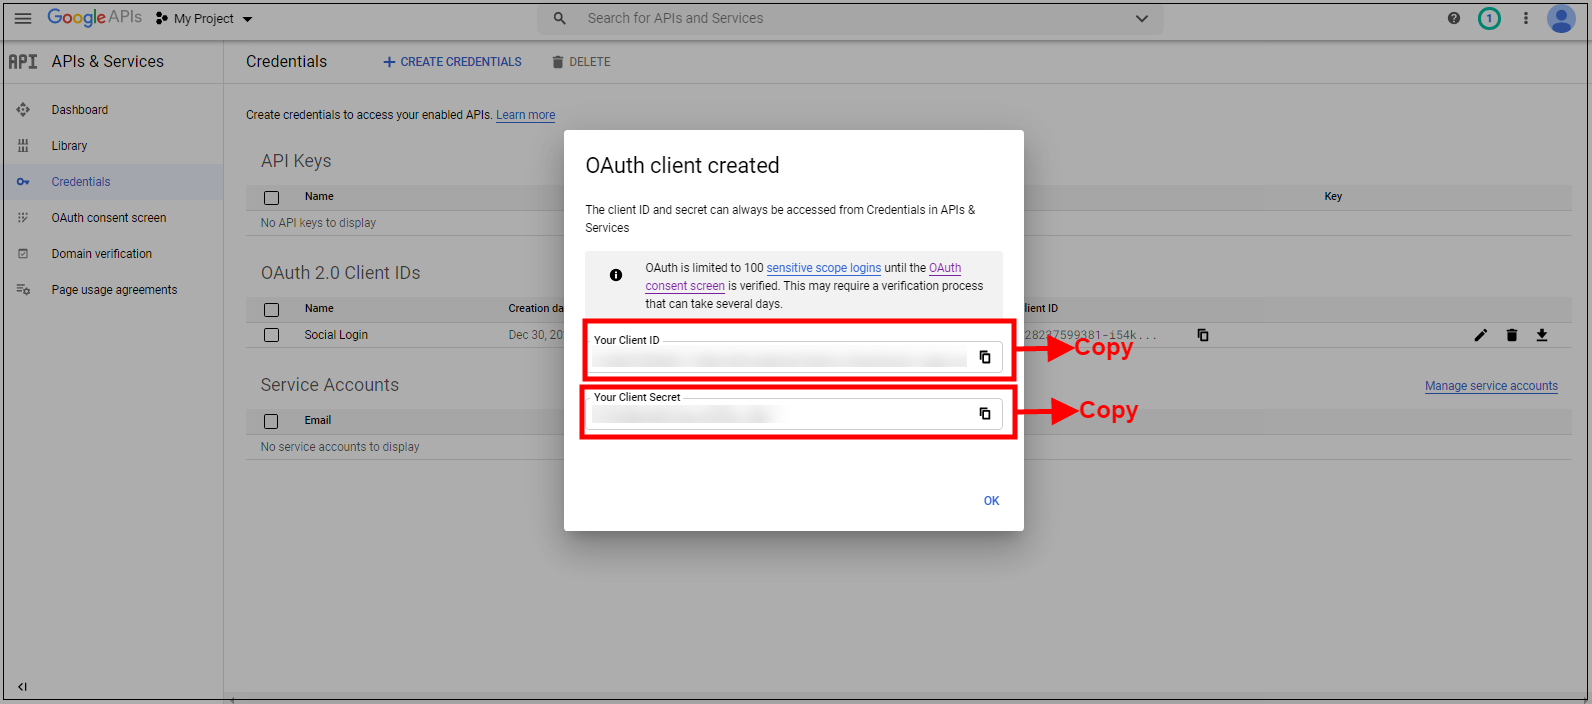
Follow the below steps to get a client id and client secret.
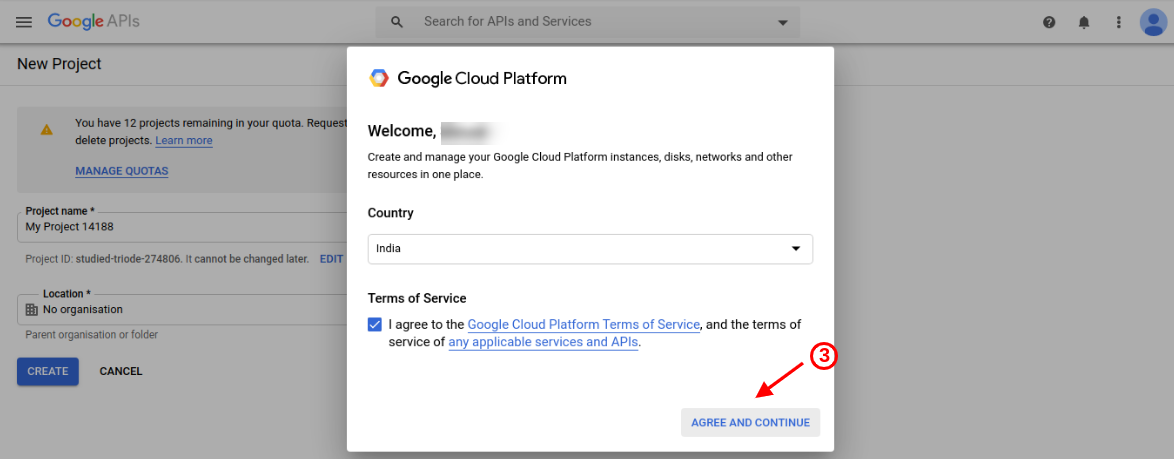
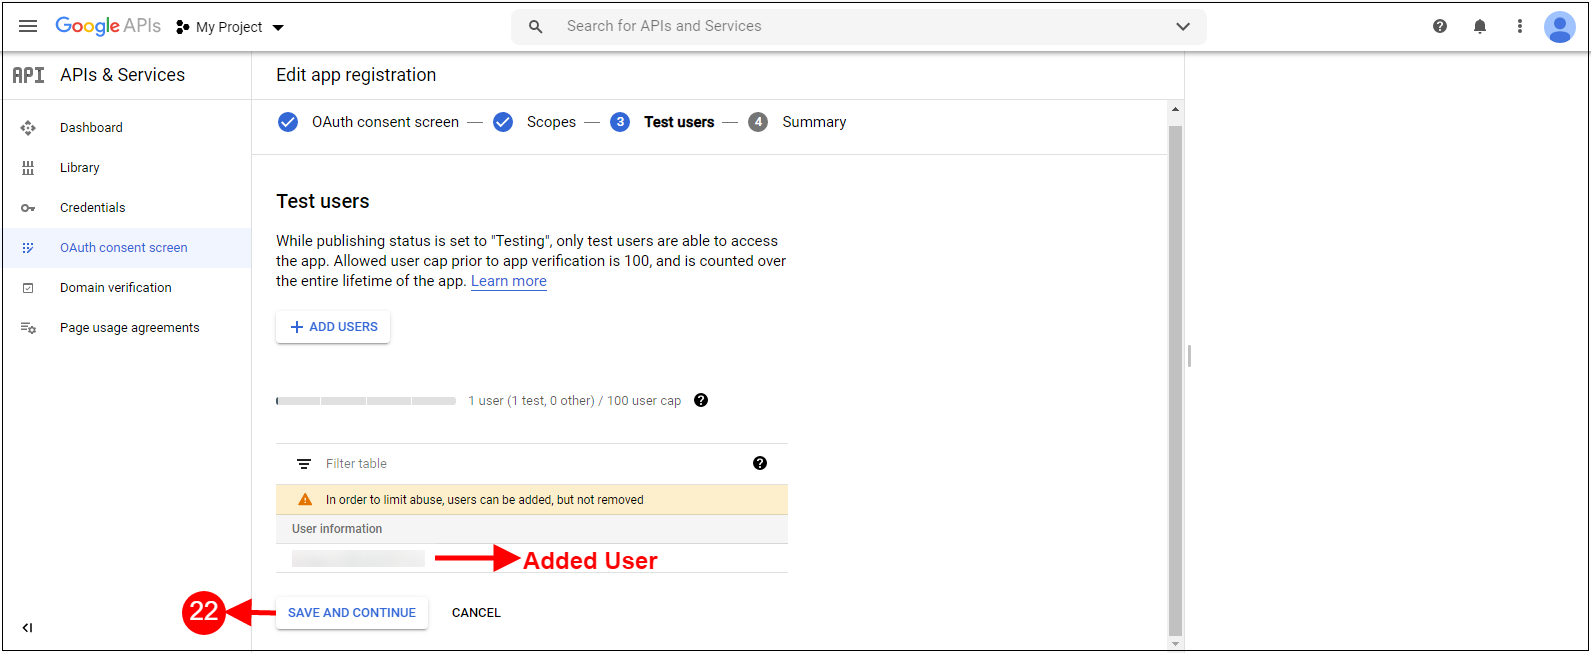
Step 3: Select the country and check on agree with terms and conditions. After that click on the continue button.
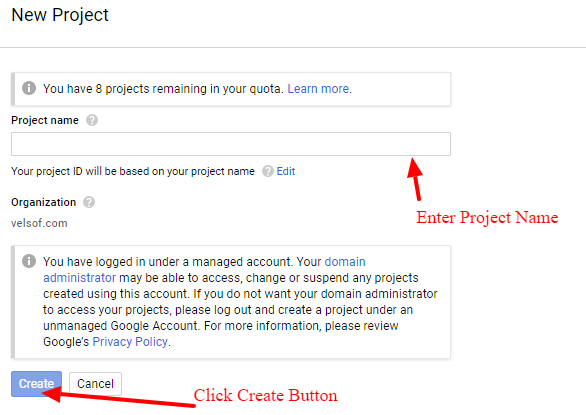
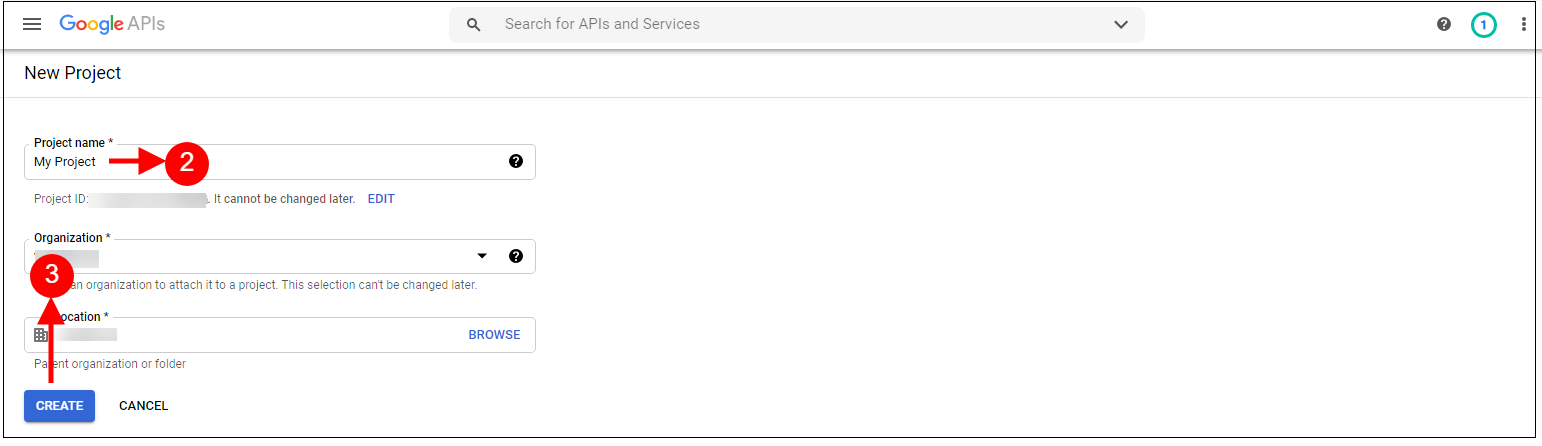
Step 4, 5: Enter your desired Project Name and click on the “Create” option.
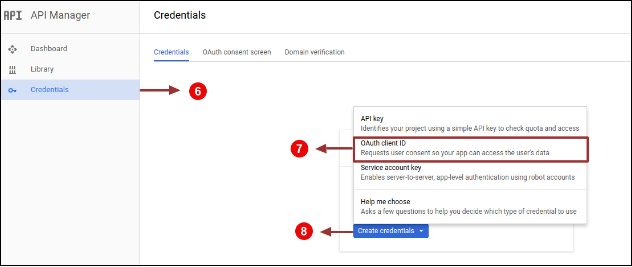
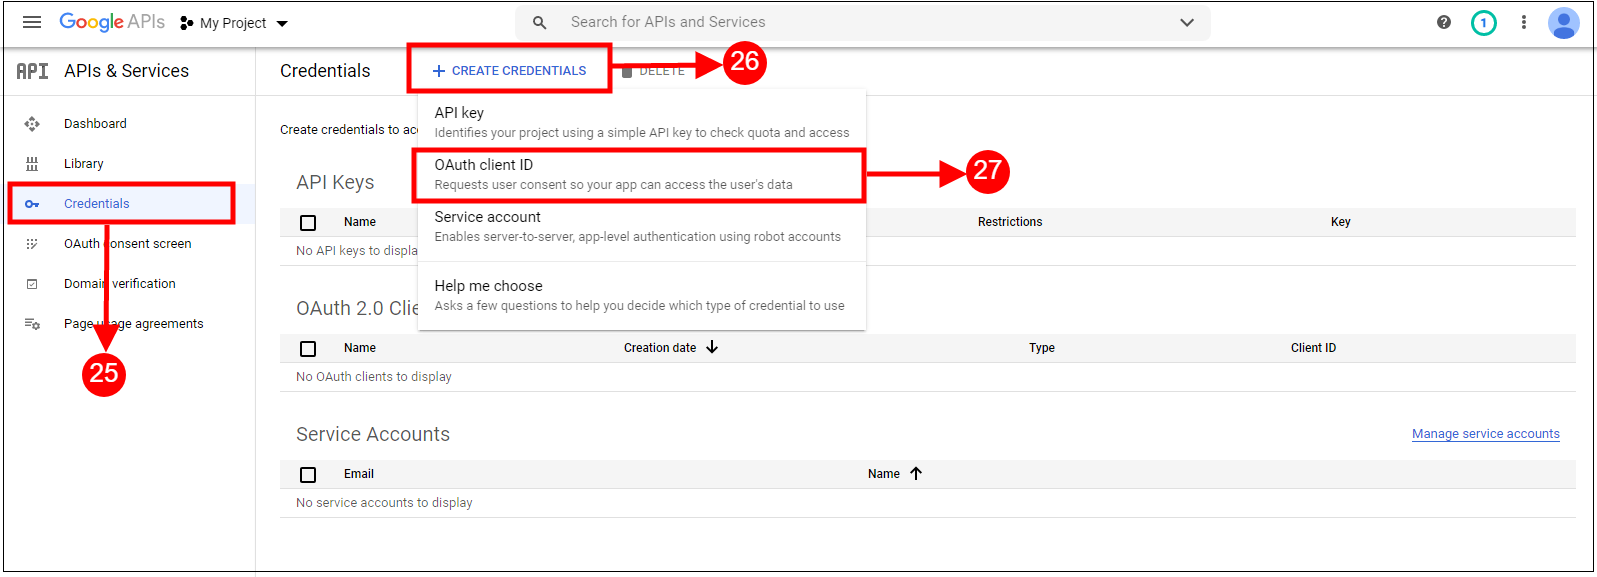
Step 6,7 & 8: Go to API Manager, click on Create Credentials and select the OAuth client ID option.
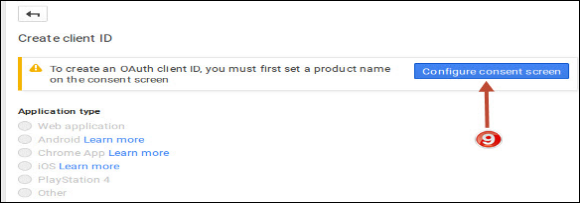
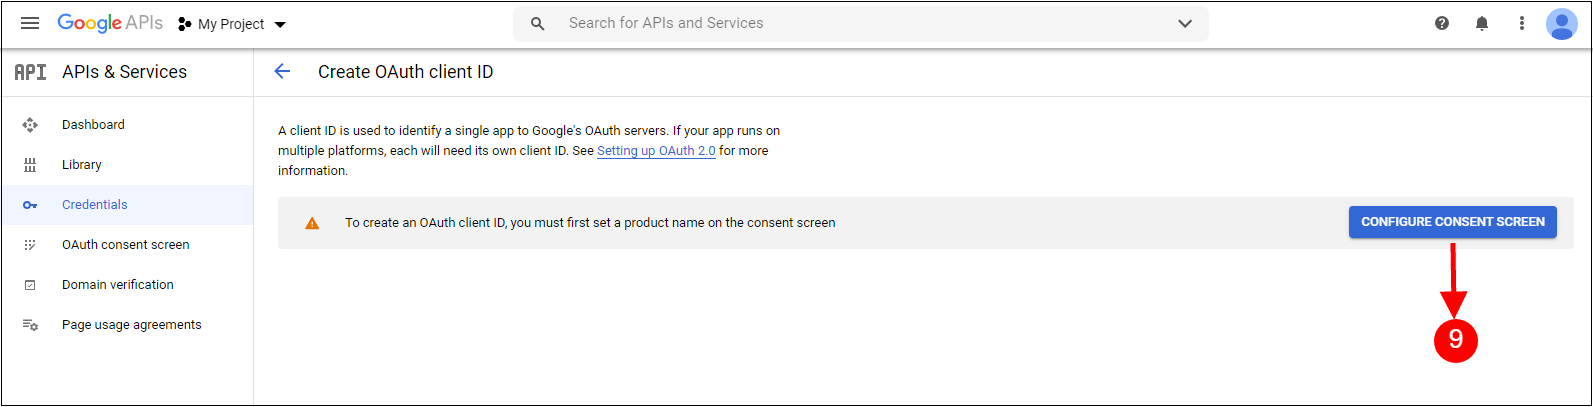
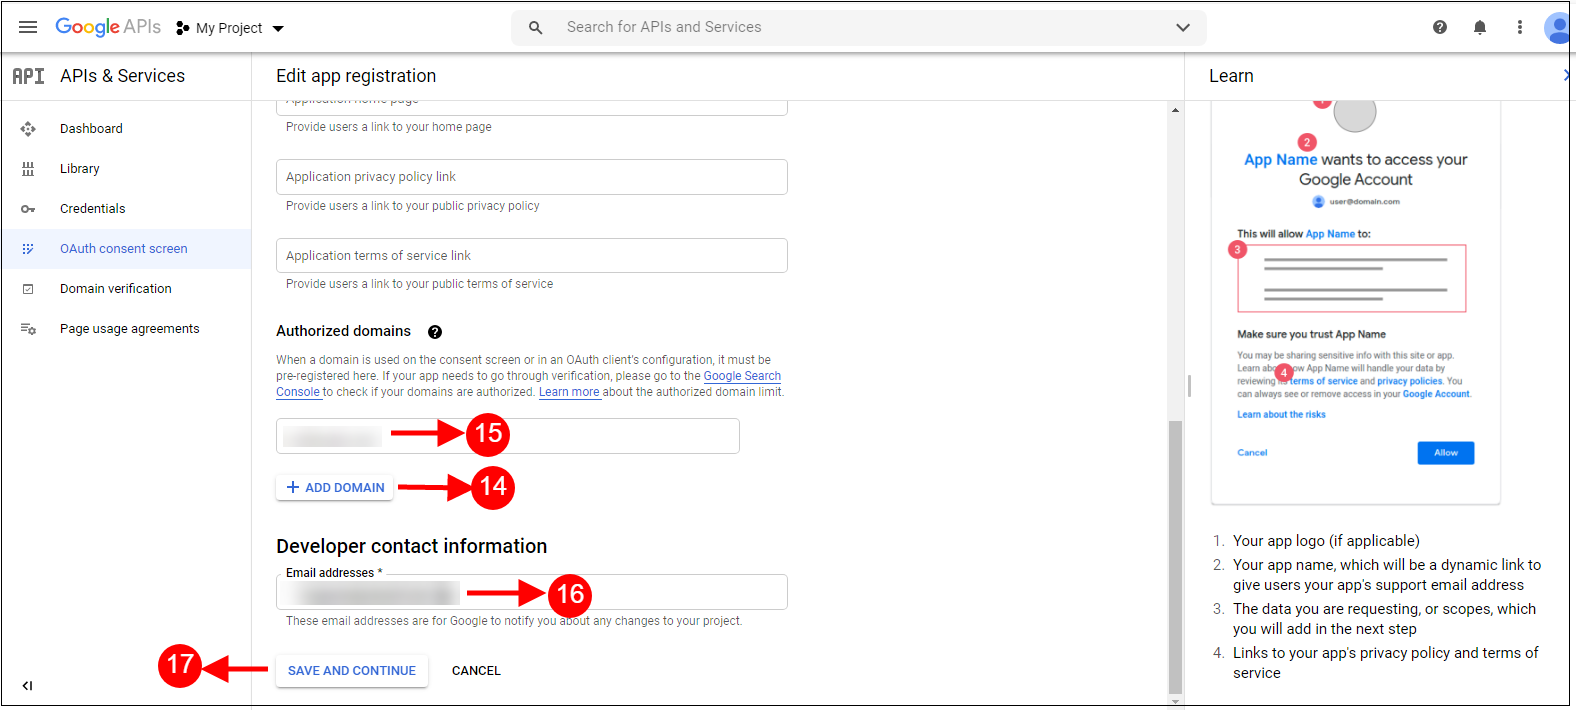
Step 9: Click on the “Configure consent screen” button.
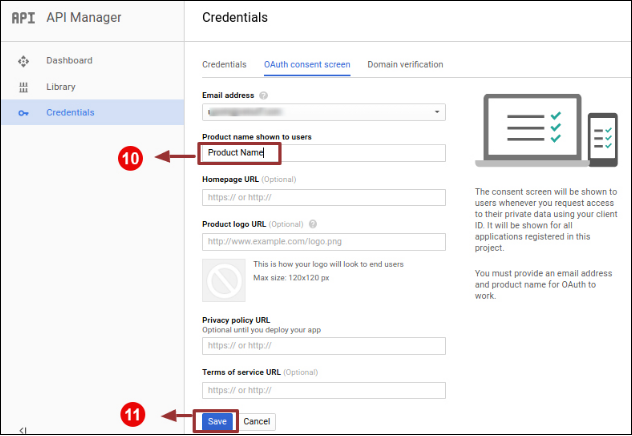
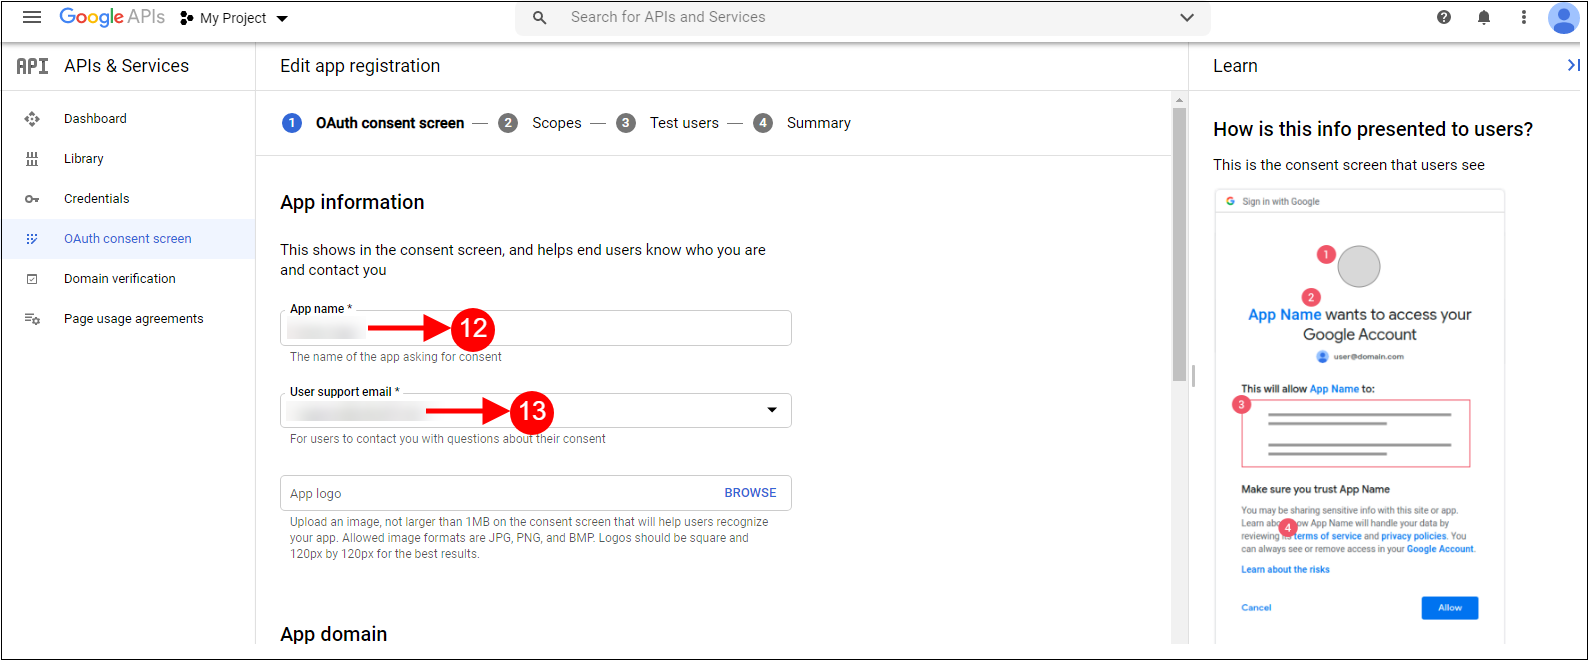
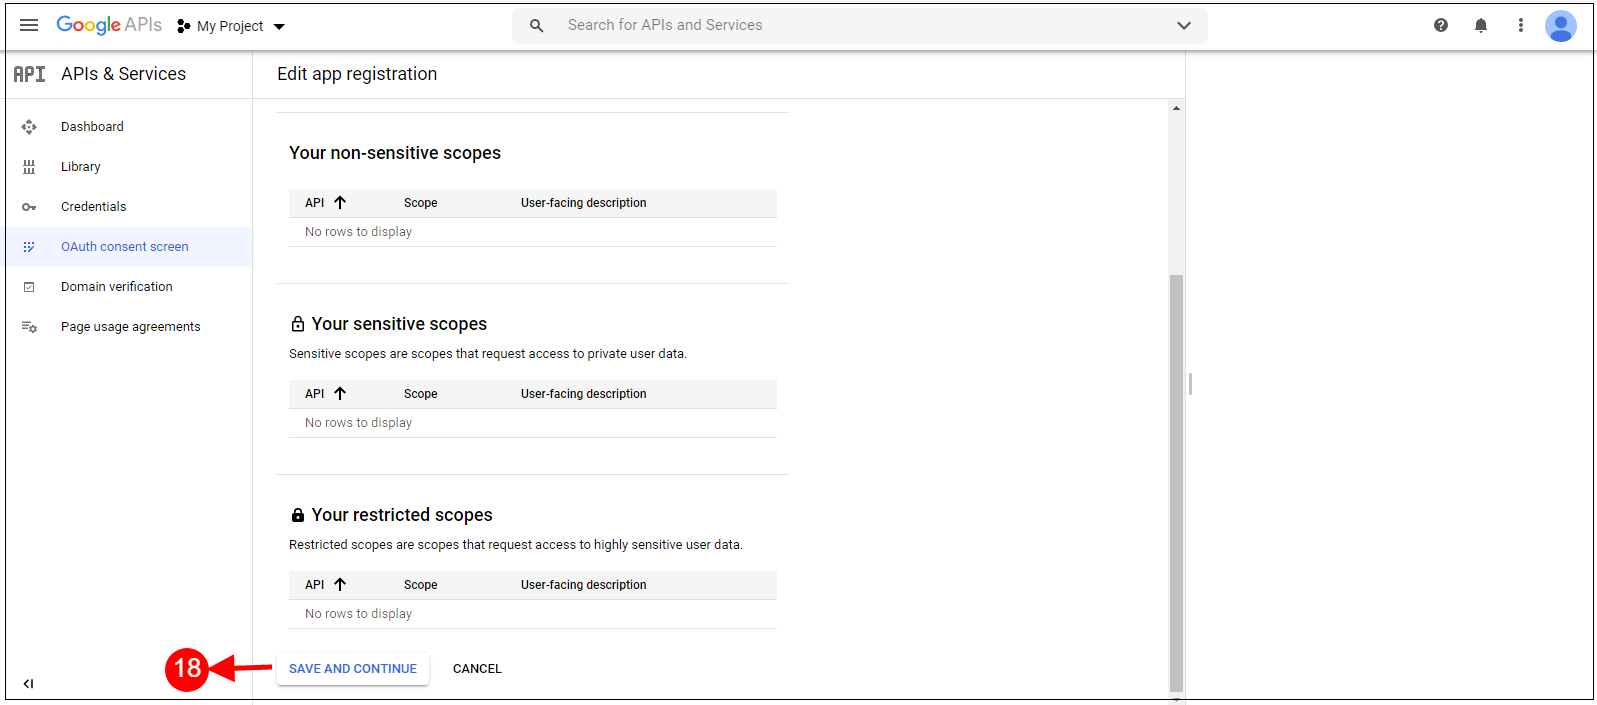
Step 10, 11: Enter “Email Id”,“Product Name” and then click on “Save” button.
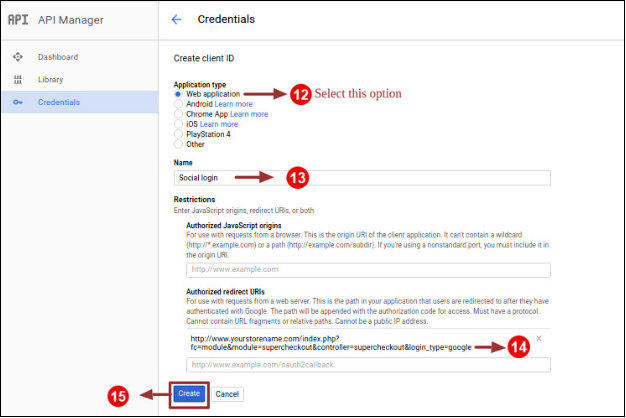
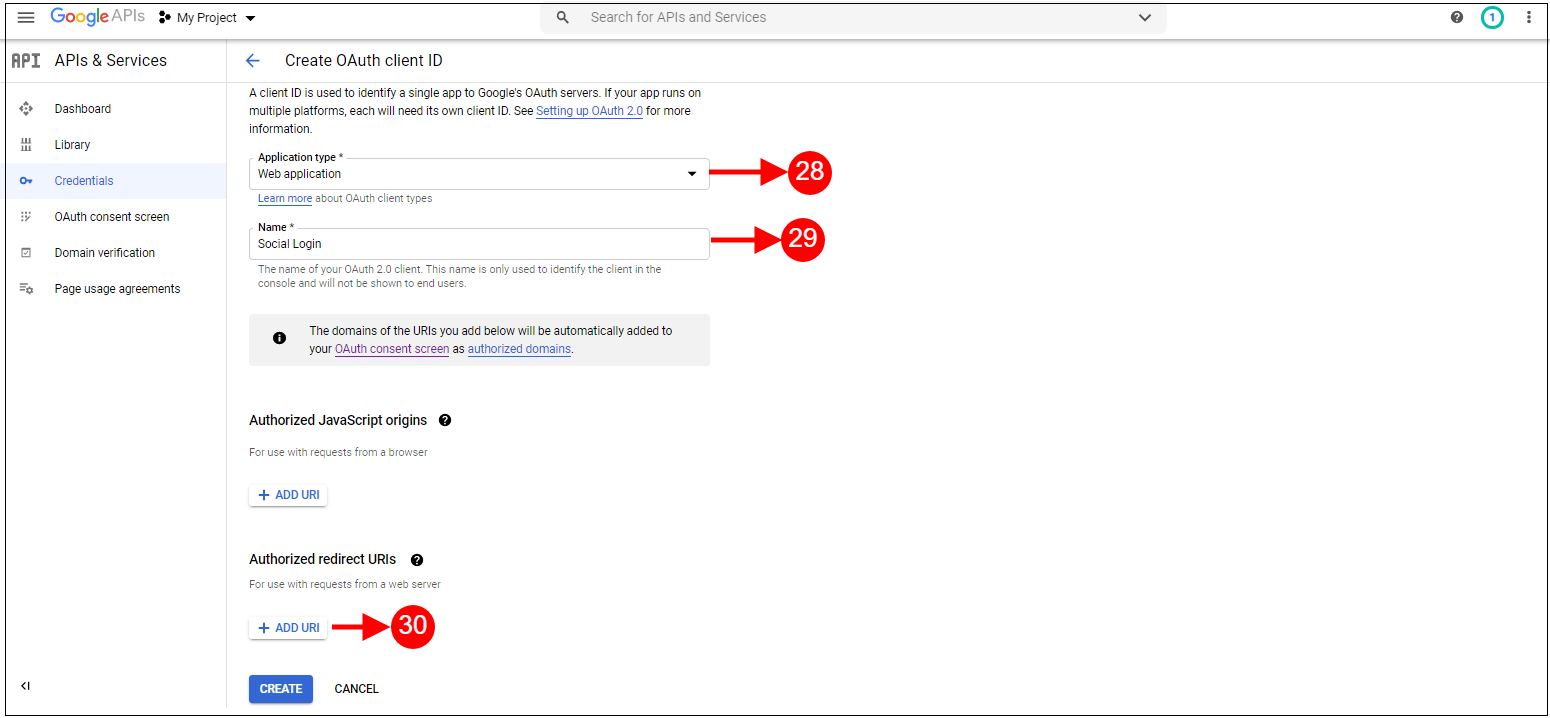
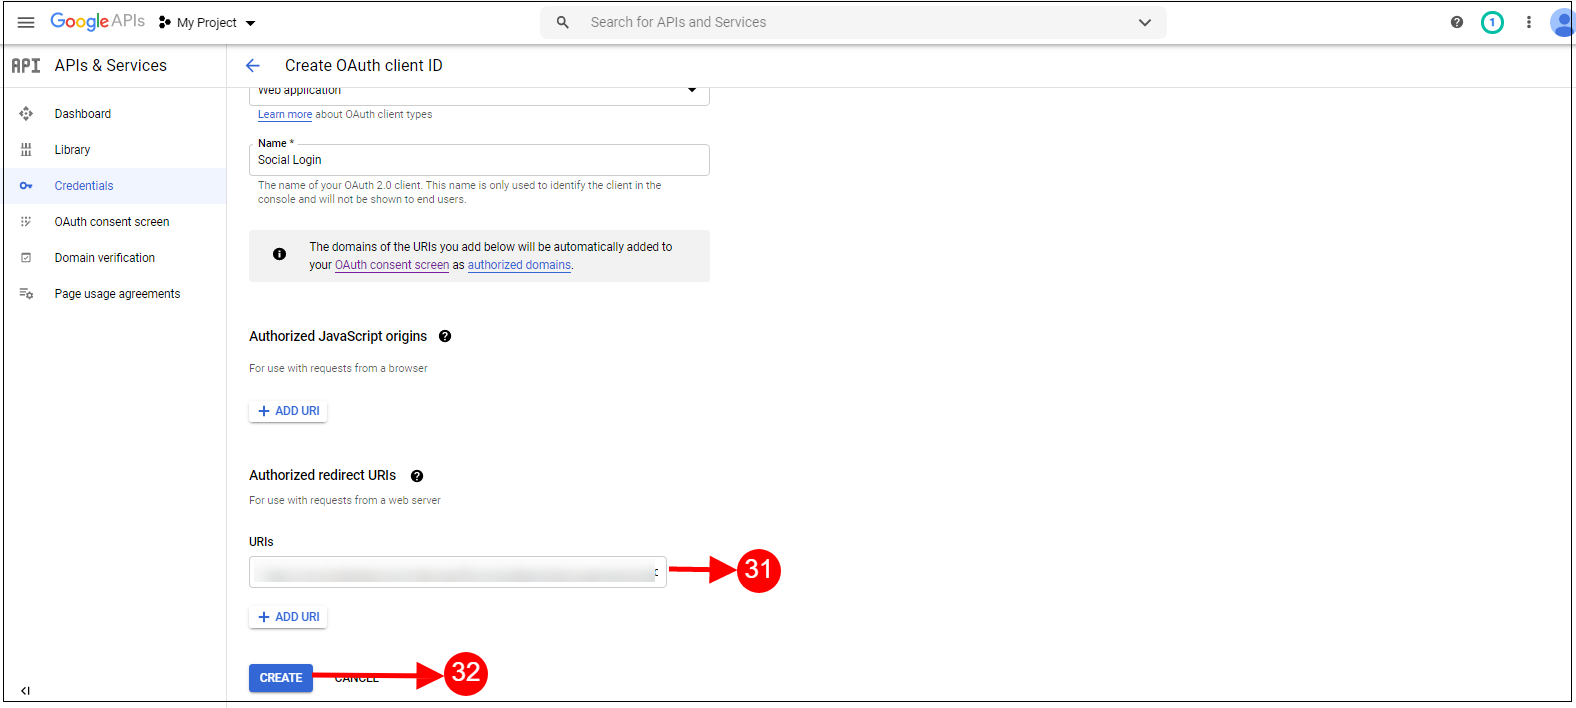
Step 12,13 & 14,15: Select “Web application”, Enter “Name “, “Authorized Redirected URIs“ as mentioned below and click on “Create” Button.
Use Authorized javascript origins: https://www.example.com/
Use Authorized Redirect Url: https://www.example.com/index.php?fc=module&module=kbstepcheckout&controller=kbstepcheckout&login_type=google
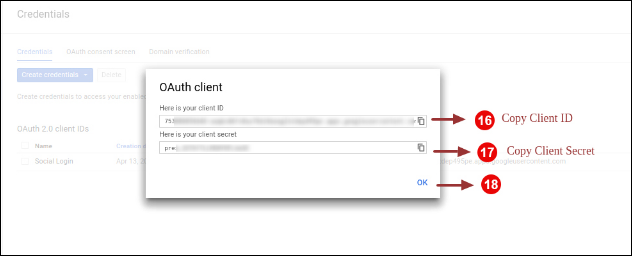
Step 16, 17, 18: Copy Client ID and Client Secret.
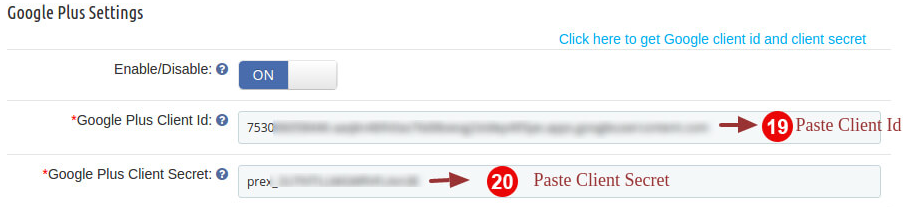
Step 18, 19: Paste Client ID and Client Secret in the Text Field shown below:
3.4 Email Marketing
The online merchant can setup Klaviyo, MailChimp and Sendinblue email integrator sites and save email id details of subscribers. The store admin can save the user’s email ID details easily.
Enable MailChimp: Activate this option for saving email id details in MailChimp.
MailChimp API key: Enter API key here.
MailChimp List: Choose the list in which you want to save the email id details.
Enable SendinBlue: The online merchant can also configure Sendinblue.
SendinBlue API key: Enter SendinBlue API key here.
SendinBlue list: Select the list from available options.
Enable Klaviyo: Enable Klaviyo option for saving email id.
Klaviyo API Key: The online merchant can enter Klaviyo API Key here.
Klaviyo list: Select the list from here.
3.5 Addresses
In address settings, admin can configure auto address filling options as shown below:
Inline Validations: Admin can activate or deactivate inline validators.
Enable Auto Detect Country: Activate country auto-detect functionality.
Enable Google Auto Address Fill: Activate for automatically address filling functionality.
Google API Key: Admin can check the Steps to configure Google API Key and enter it here.
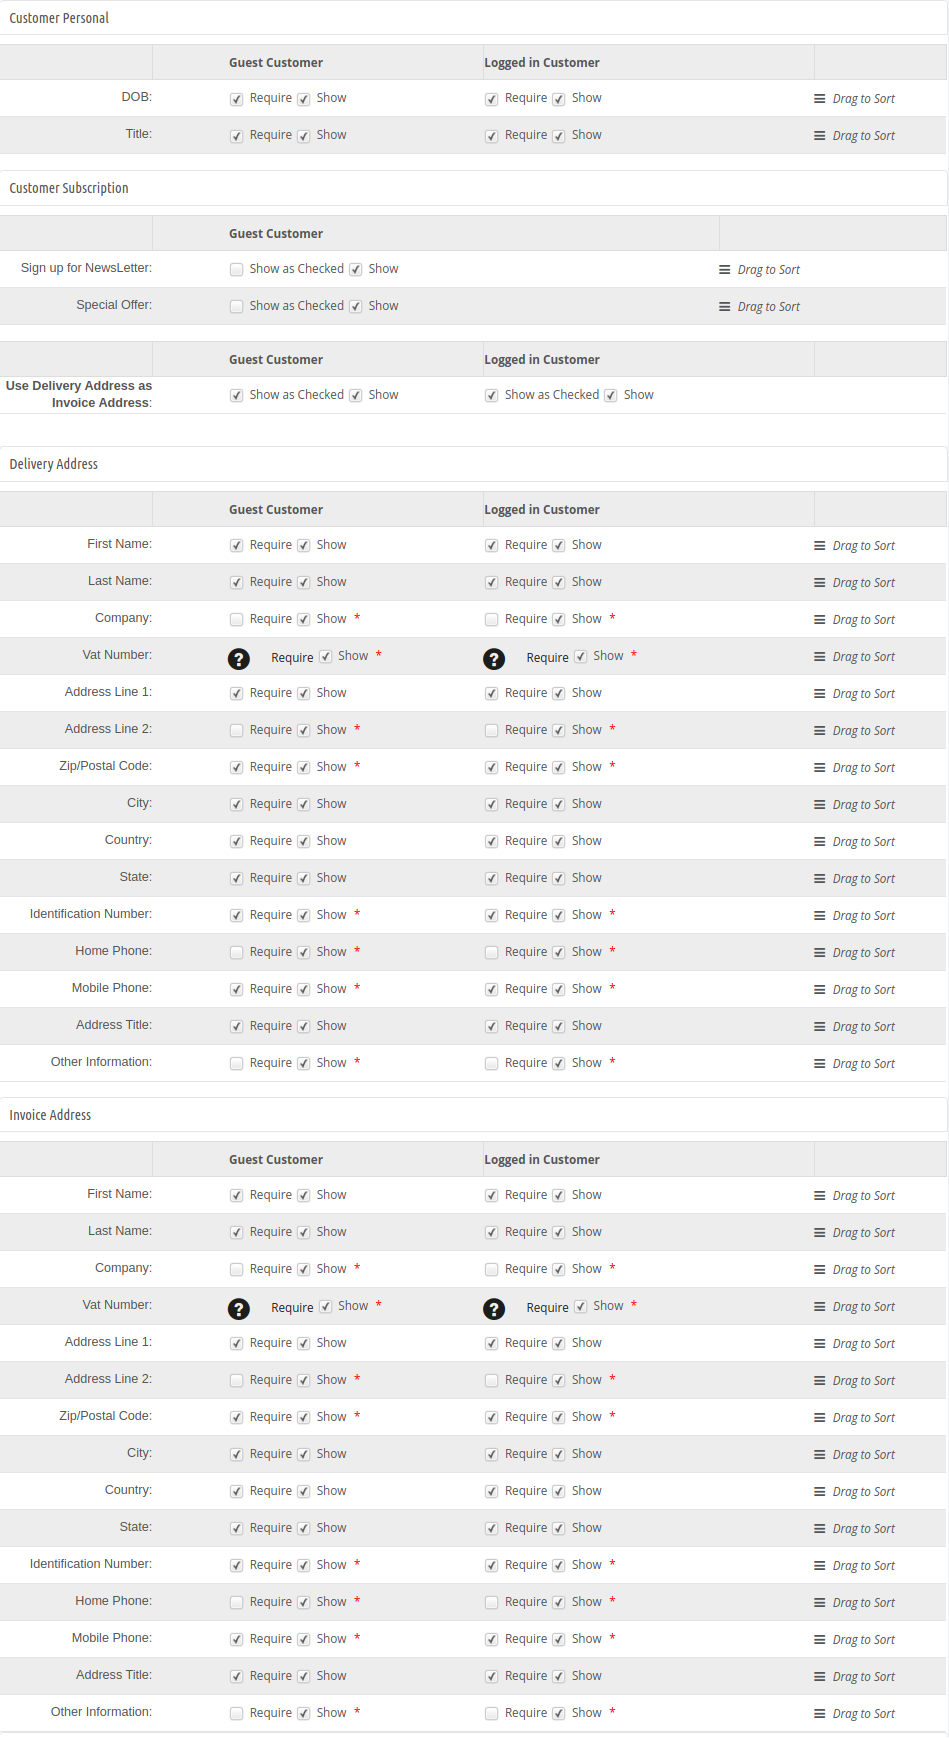
Admin can also view field details of guest and registered customers:
Important points:
To make a field show/hide in the Prestashop Smart one page checkout page, check the checkbox just to the left of Show label.
To make a field of this Smart checkout Prestashop checkout addon as mandatory (required field), check the checkbox just to the left of Require Label.
The fields of the Prestashop Smart One Page Checkout Extension can also be rearranged according to the requirement. To rearrange just hold Drag to sort and drag & drop the field vertically, wherever it is required.
On saving, the fields will be rearranged as per the changes.
3.6 Payment method
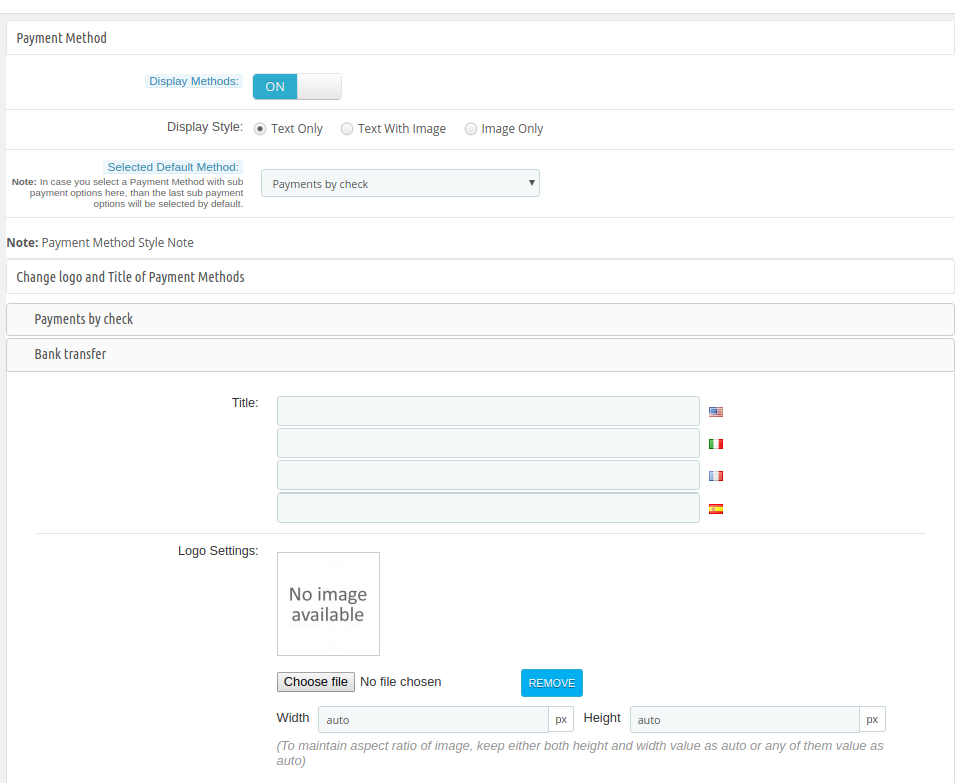
In the payment method section, admin can set payment method related conditions as shown below:
Display Methods: To Enable/Disable the payment methods on the Smart checkout page, switch the button from ON to OFF or vice-versa. This will disable the payment method block from the checkout page. By default, this option of the
Prestashop Smart checkout addon will be enabled.
Display style: There are 3 options in this field of the Prestashop Smart One Step Checkout Addon to display how your payment methods will be displayed on the checkout page.
Selected Default method: Choose the default payment method from the list which will be displayed as selected at the time, when the customer comes on the checkout page.
Admin can change the logo and title of available payment methods.
3.7 Delivery method
In this section of Prestashop Quick checkout addon, admin can apply delivery methods related settings:
Display Methods: To Enable/Disable the delivery methods on the checkout page switch the button from ON to OFF or vice-versa. This will disable the delivery method block from the checkout page. By default, this will be enabled.
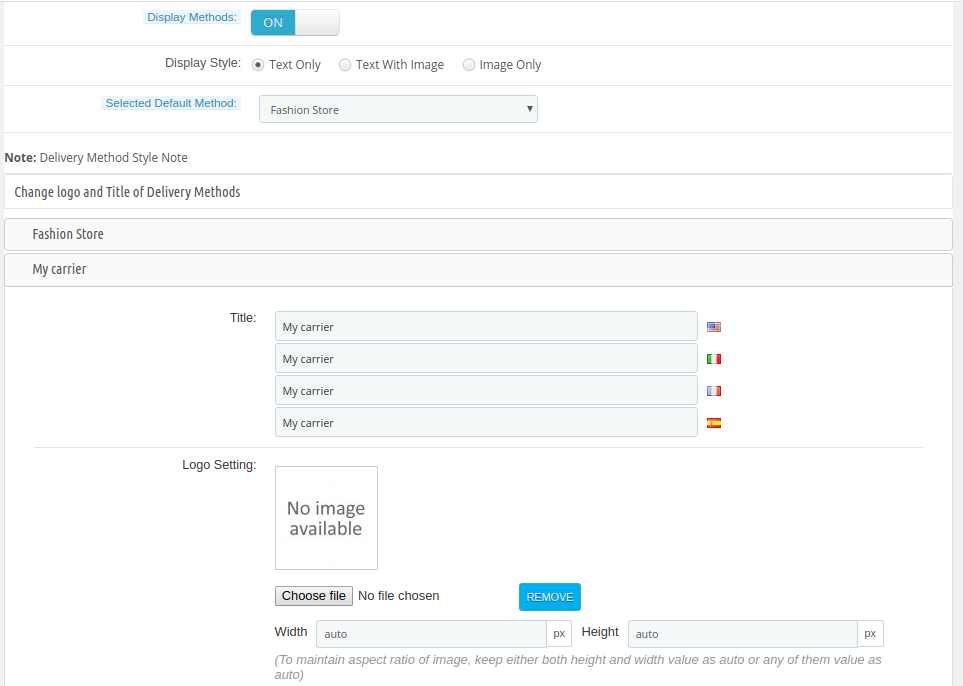
Display style: There are 3 options in this field of the Prestashop fast checkout addon to display how your delivery methods will be displayed on the checkout page.
Selected Default method: Choose the default delivery method from the available list which will be displayed as selected at the time, when the customer comes on the checkout page.
Admin can change the logo and title of available payment methods.
3.8 Ship2pay
From here, admin can hide the payment methods for all the available shipping methods. Admin just needs to click on the payment method for showing or hiding it.
3.9 Custom Fields
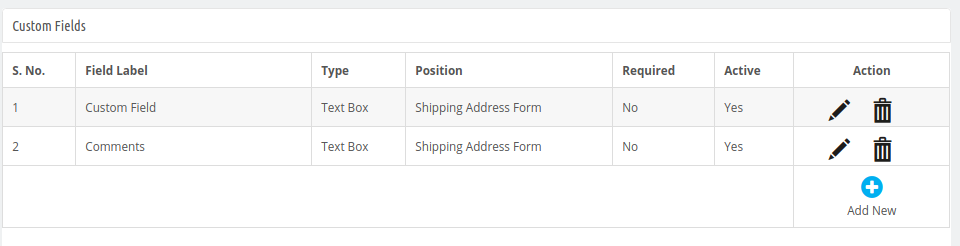
Admin can also create custom fields as per the requirements. In the Custom fields section, admin can view the list of all the created custom fields. Admin can edit, delete and make new custom fields easily.
How to Create new Custom Fields:
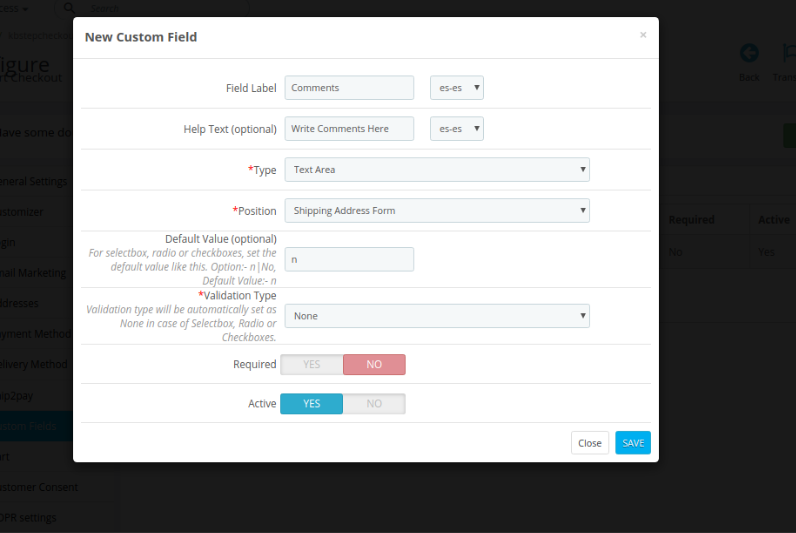
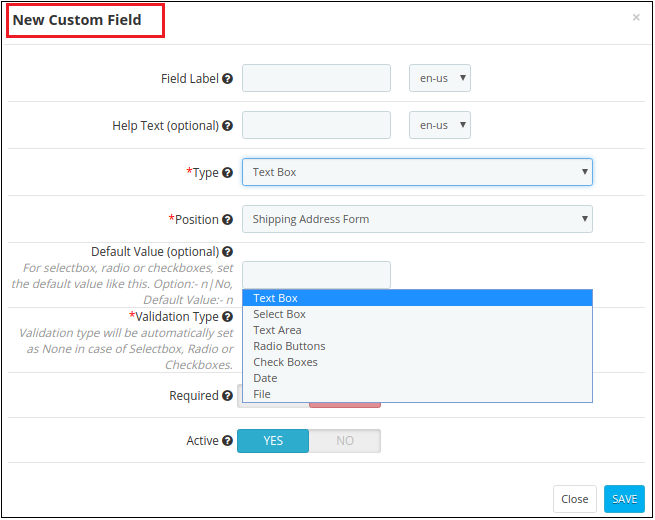
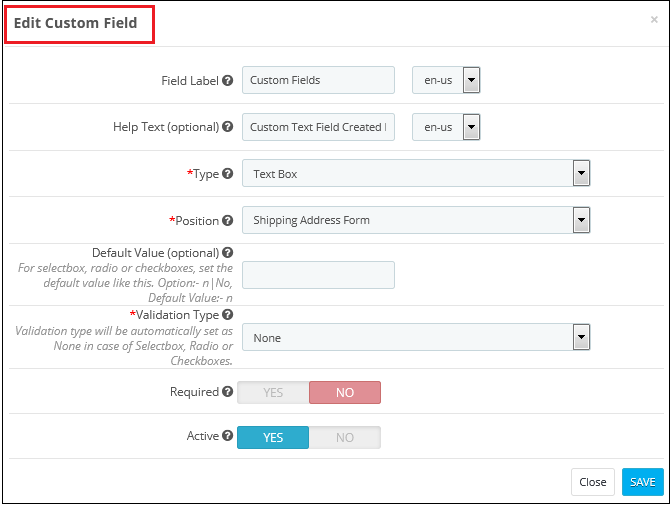
For adding a new custom field, the admin needs to click on the “+” button and enter these details as shown below:
Field Label: Enter the label for the new custom field.
Help Text: Enter help text for this new custom field.
Type: Select type of custom input field like text box, select box, text area, radio button, checkboxes and date.
Position: Select the position where you want to show this custom field.
Default value: For select box, radio or checkboxes admin needs to set value. By default, this value will be n.
Validation Type: Set validation type from the available options like int, URL, name, email and date.
Required: Make this field as a required field.
Active: Activate the field by enabling this option.
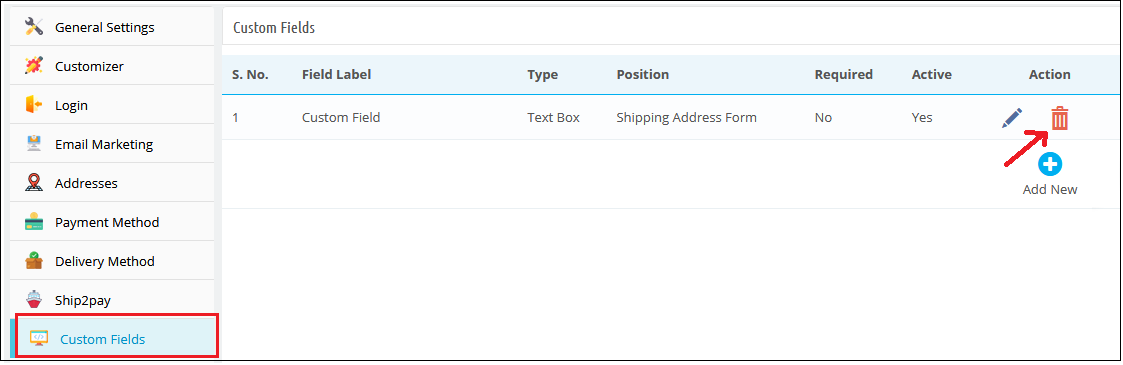
Admin can click on the bin button for deleting the custom fields and click on the edit button for changing the custom field settings.
3.10 Cart
Admin can enable the “Display Cart” option for showing cart. Admin can select the fields which he wants to show to the guest and logged in customers.
3.11 Customer Consent
Enter the Order Reference number or customer email id from the filter customer consent section.
3.12 GDPR Settings
Enabling Delete from Email Marketing Services on Request: Activate or deactivate the settings as per the requirements. By enabling the option, admin can delete customer details from email marketing services on their request.
Admin can view a list of policies and also add new GDPR policies, delete and edit any policy.
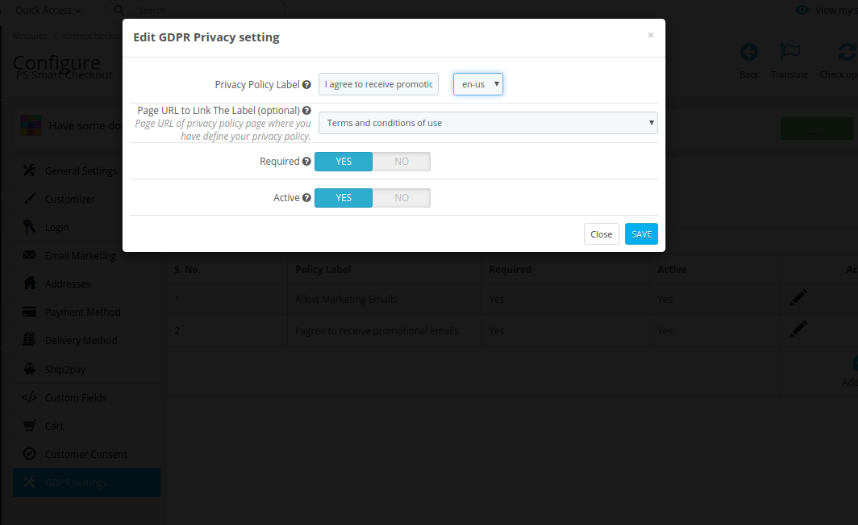
Privacy Policy Label: Admin can set the label for privacy policy in different languages.
Page URL to link the label: Admin can select the page to link the label.
Required: Make this policy mandatory.
Active: Enable the option for activating this privacy policy.
4.0 Front-end Interface
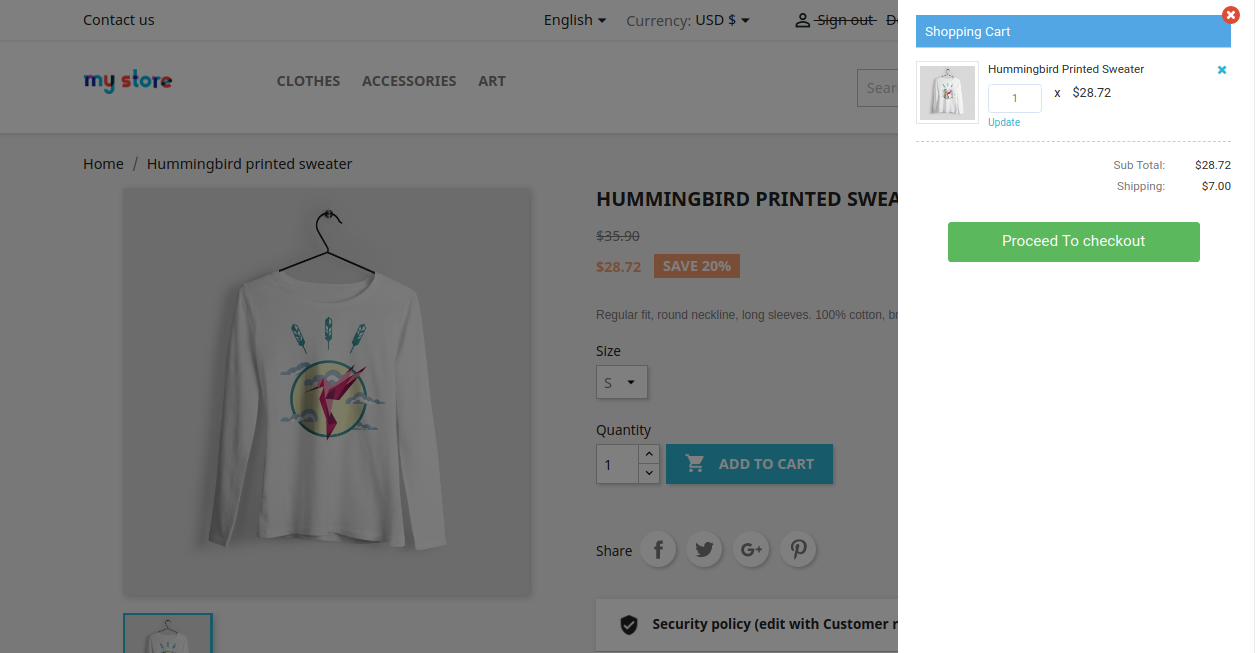
After a successful configuration, the admin can offer a simple and hassle-free checkout option. The online users will get smart one-page checkout popup as soon they click on “add to cart option”. Please check the below Screenshot for better details:
After that, online users need to click on “proceed to checkout” for further process.
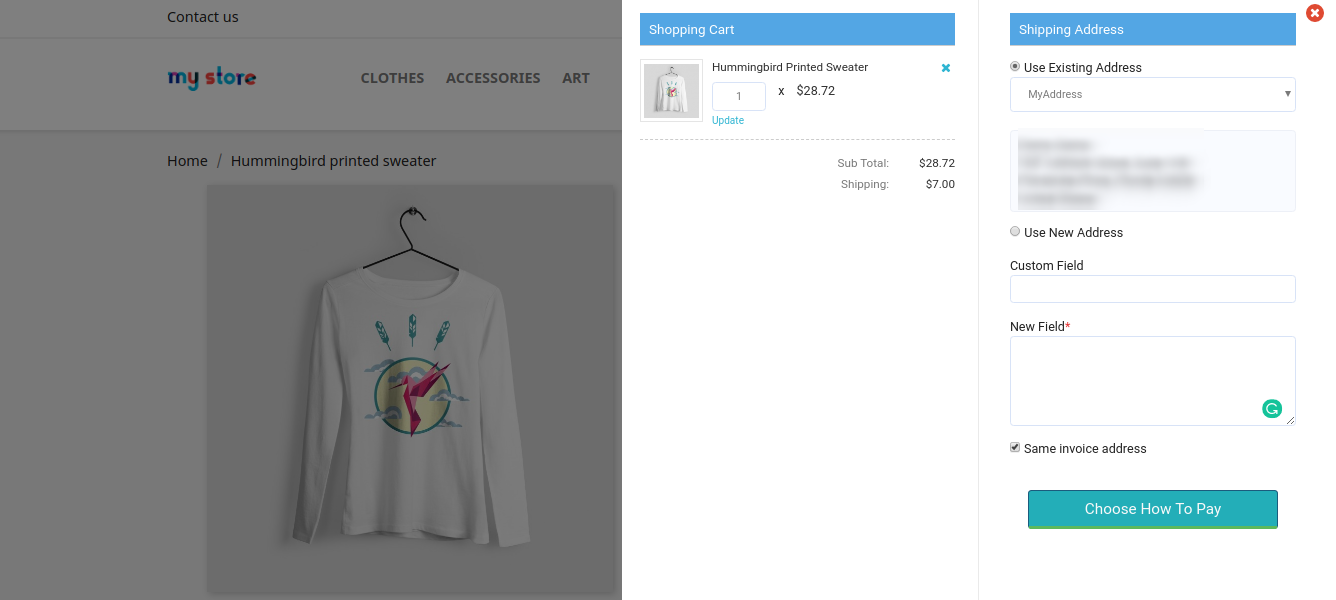
Here, online users need to select a shipping address or add a new address.
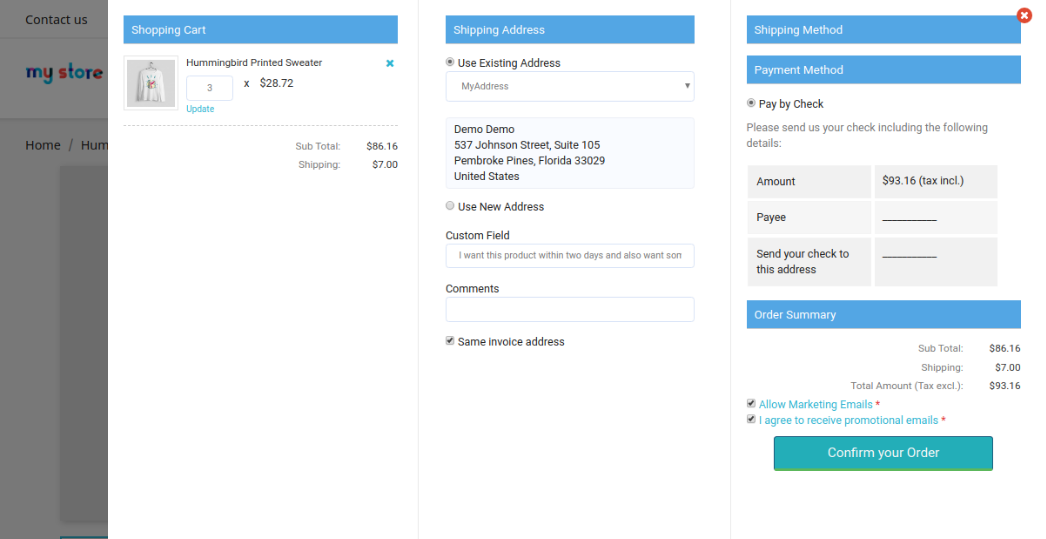
After that, online users can select the shipping method and payment method. After that, they can confirm the order easily.
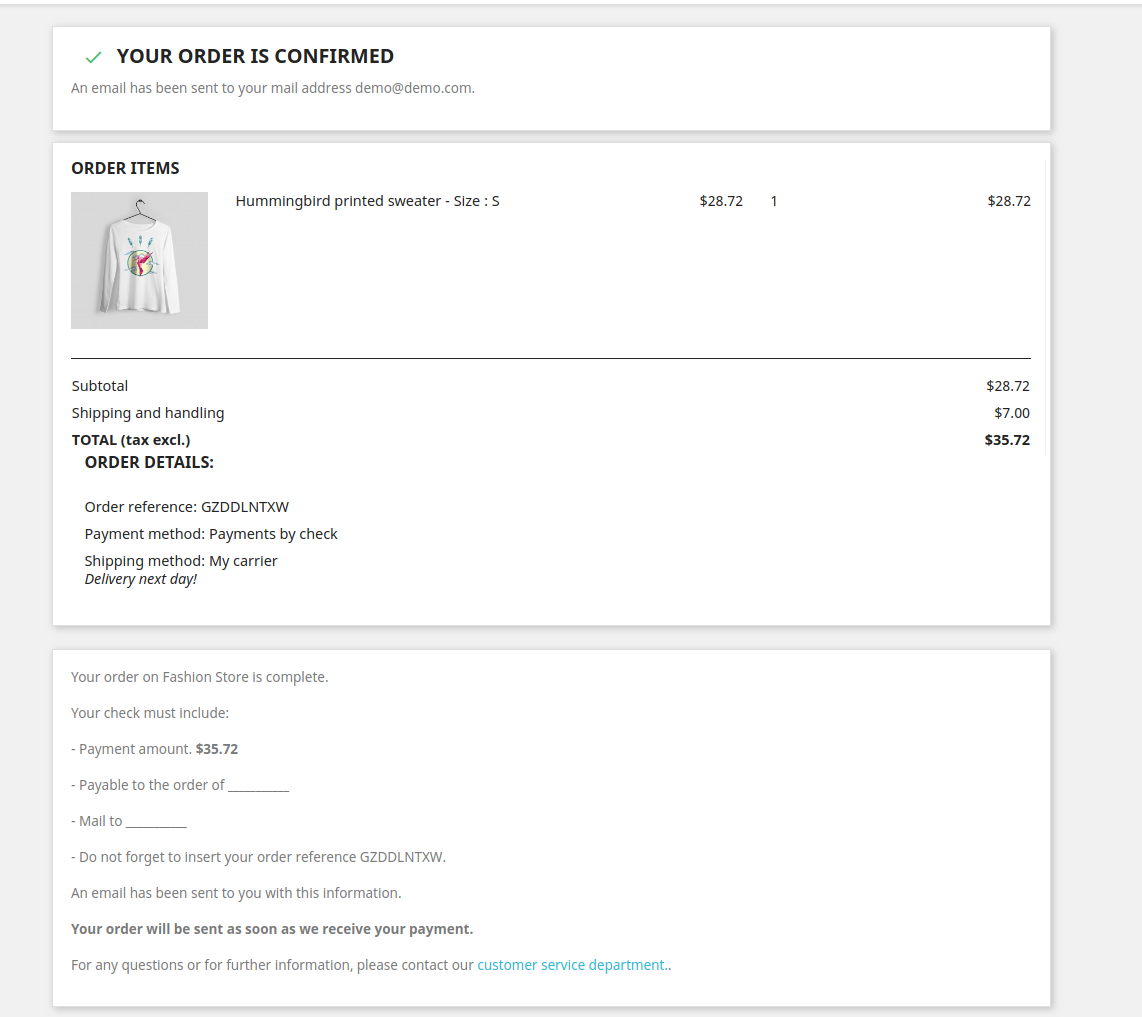
Online users can check the order summary from this page easily.
Prestashop is one of the widely used eCommerce platforms because of the awesome themes, features, and extensions available for the store owners. Every store owner wants to provide a smooth and fast shopping experience to their customers to make their business more successful. The checkout process became the key point of this process. Hence, Prestashop One Page Checkout Addon is a solution to this issue.
The One Page Checkout options reduce the additional efforts of the customers. It allows them to complete the checkout process on a single page hence reducing the abandoned cart. The best part that comes with Prestashop one checkout module is Social login. With this feature, users can log in with Google and Facebook login.
Mobile View:
Note: The Prestashop one step checkout Module by Knowband is GDPR compliant.
What’s New in PrestaShop One Page Checkout:
There are some newly added features in the PrestaShop One Page Supercheckout:
1) Choose Total Price Display Methods for the Checkout Page: Now the e-merchant can choose different methods to display the total price of the products on the checkout page. The store admin can choose default PrestaShop price, price inclusive tax, price exclusive tax, or both inclusive and exclusive price from the back office of the PrestaShop One Page SuperCheckout addon.
2) Option to Show the Custom Field in the Invoice: The store owner can now show the custom field’s data in the Invoice of the orders placed. The customers can check the custom field they added on the checkout page in their invoices.
3) Compatibility with Zasielkovna and gmparcellocker addons: Knowband’s PrestaShop One Page SuperCheckout addon is now fully compatible with the gmparcellocker and Zasielkovna addons.
4) Fixed Compatibility with Mollie Payment Method: In the latest update, the issues with the compatibility with the Mollie Payment Method have been fixed.
5) Compatible with PS v1.7.7.1: The PrestaShop One Page Checkout module is now compatible with the latest PrestaShop version v1.7.7.1.
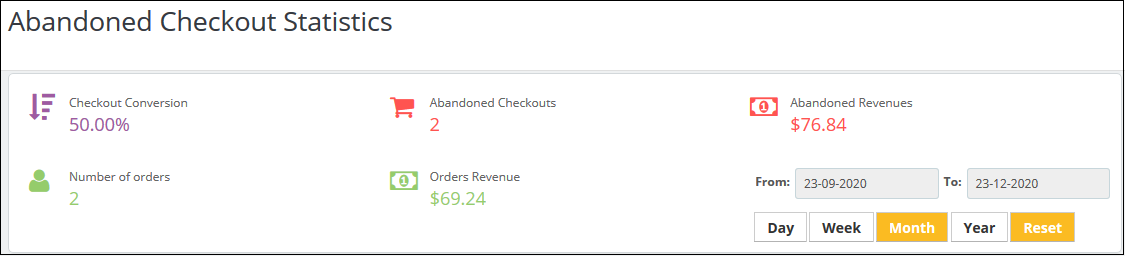
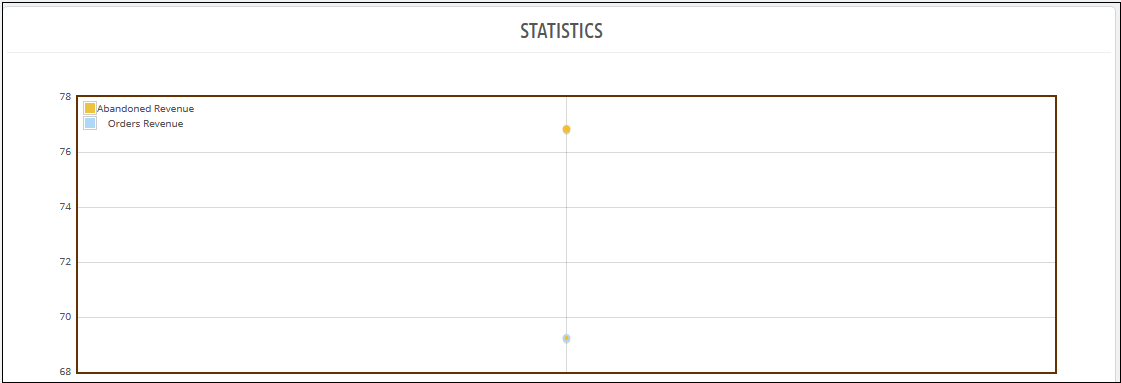
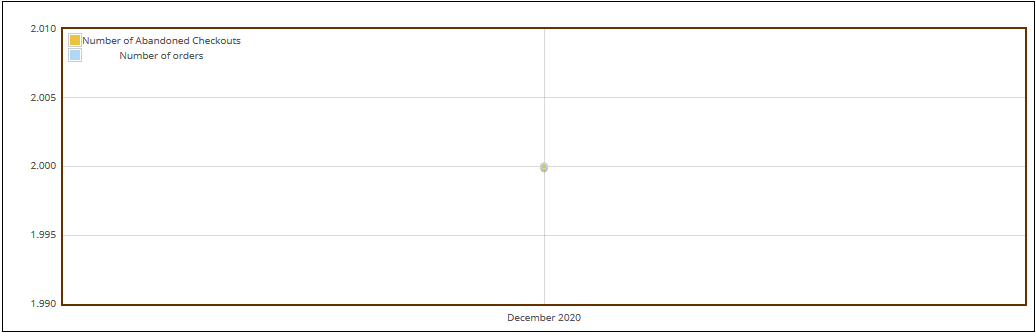
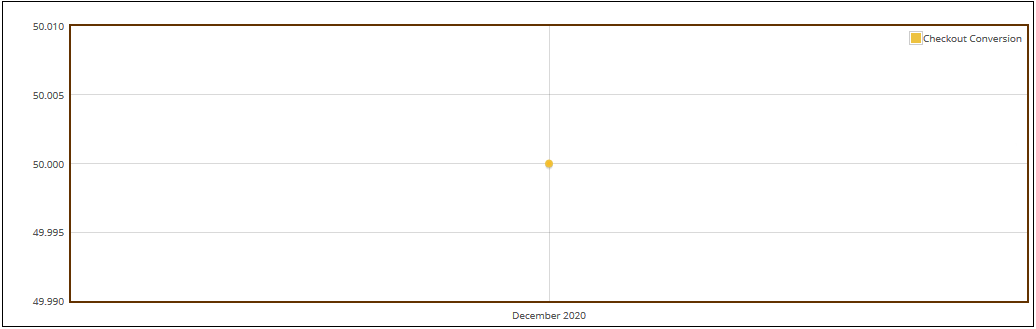
6) The admin can make a detailed comparison between the order revenue earned and the revenue lost in abandoned carts in the form of a graphical data. They can filter analysis results in days, weeks, months and year to get a precise data.
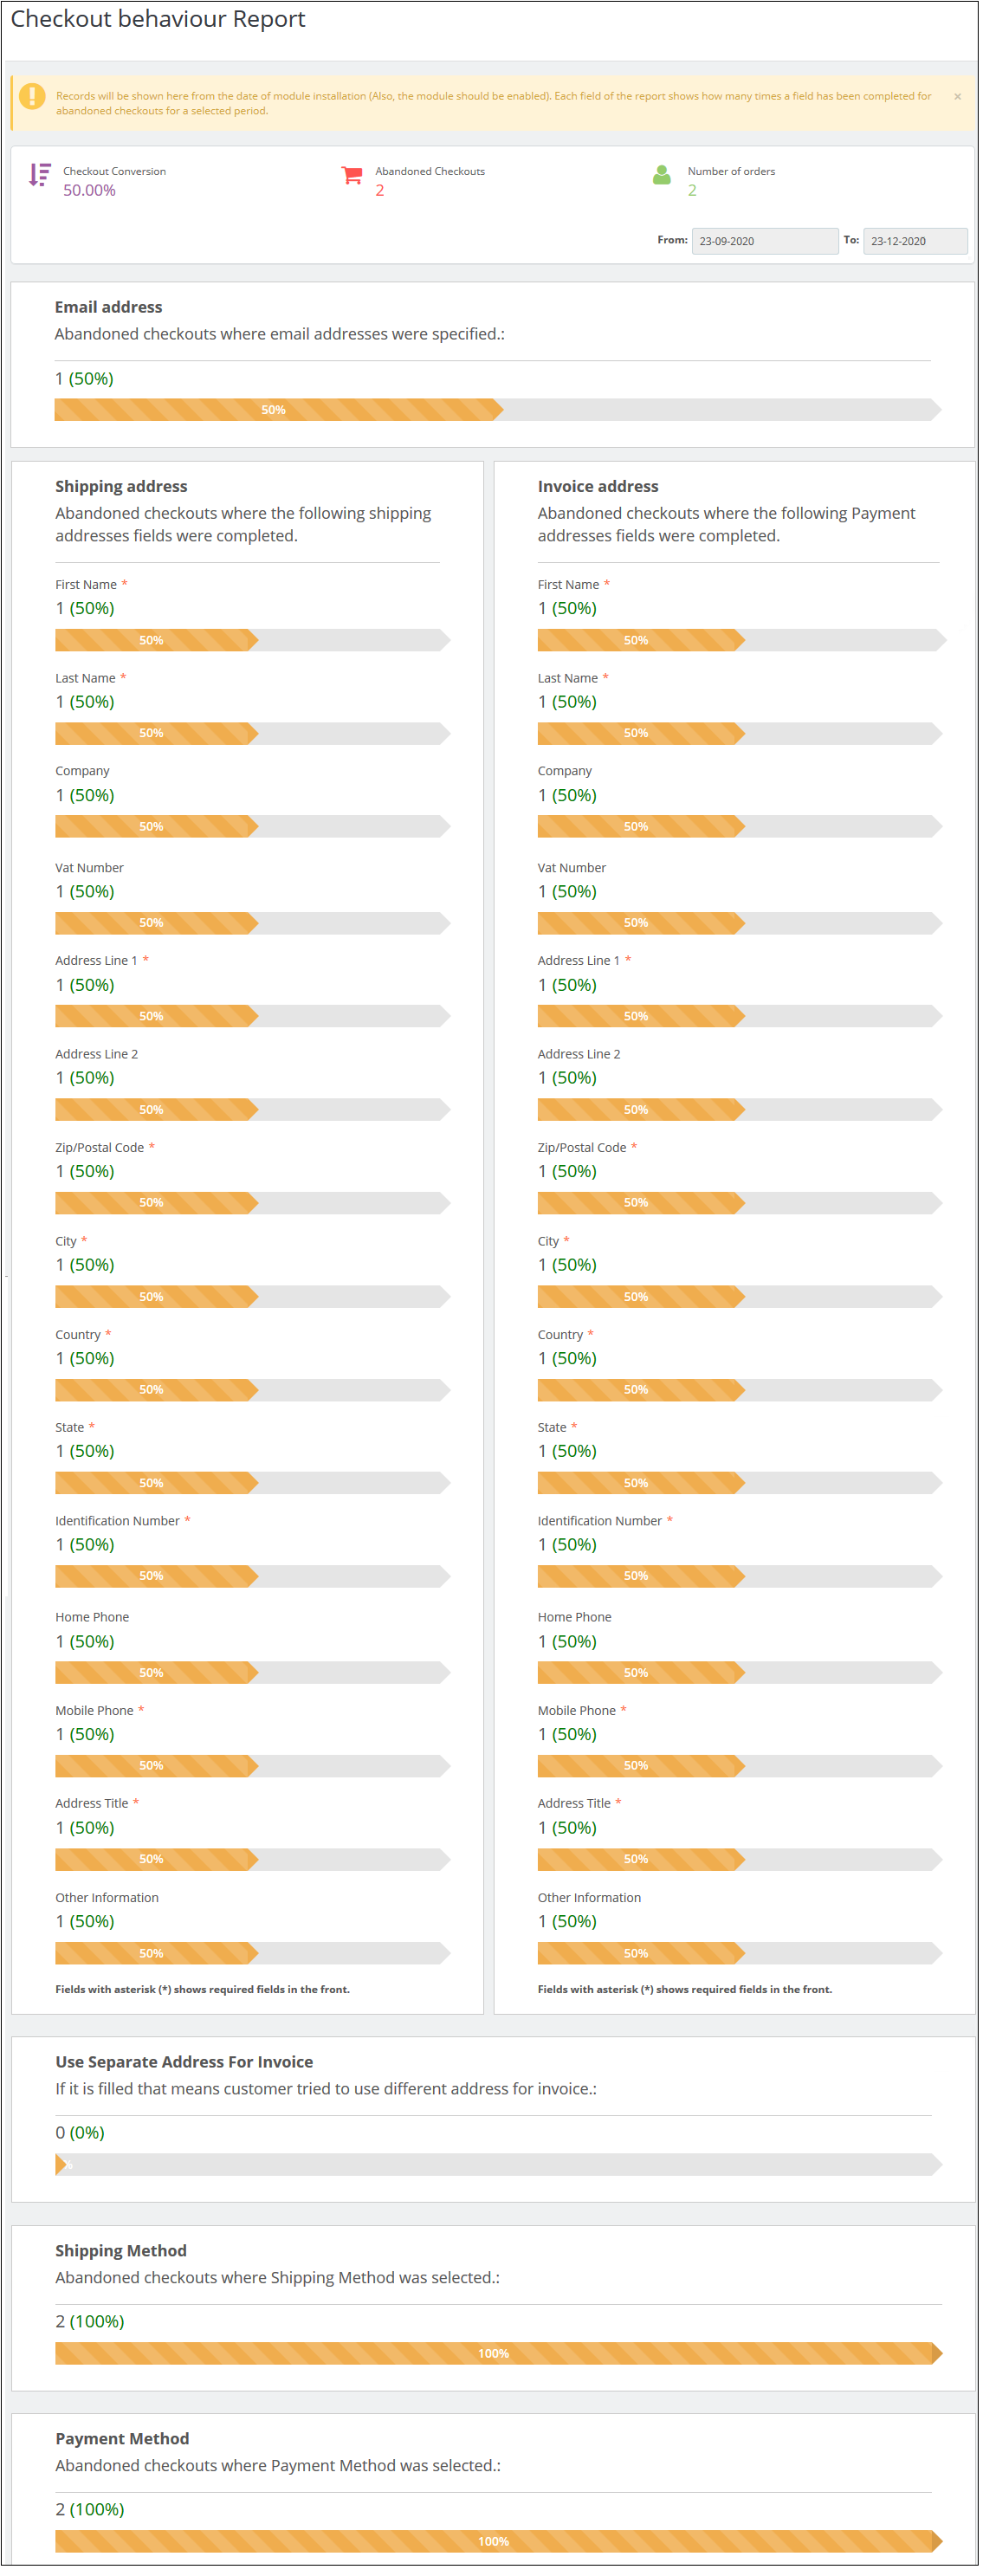
7) There is a new added functionality to track the checkout behaviour. The admin can check the percentage of data filled or skipped by the online users who left their cart abandoned so that the admin can remove the unnecessary steps which are bothering the customers.
8) There is an option to verify whether the identification number CFI/DNI/NIF entered by the customers of Spain is correct or not.
1.1 Admin-Benefits of One Page Checkout Prestashop Addon
Let’s take a quick look at the benefits of having a Prestashop One step checkout module on your Prestashop store:
Prestashop Quick checkout addon allows the store owners can design their own one page checkout page as per the website theme.
Prestashop simplified checkout addon is compatible with multiple stores and devices.
This quick checkout extension Prestashop Targets multi-lingual customers.
The Prestashop fast checkout addon offers less and relevant checkout steps.
This quick checkout add-on Prestashop serves a better customer experience.
Prestashop One Page Checkout addon eliminates page reload time and keeps checkout information at a single page.
With the help of this Prestashop One Page Checkout Extension, custom fields can be added as desired.
Prestashop One Step Checkout Addon allows the admin to get a thorough statistical report about the rate of abandoned checkouts and the completed orders.
The new checkout behavior report helps the eCommerce merchant to analyze the behavior of the customers who abandoned their carts during the checkout process.
1.2 Features of Prestashop One Step Checkout Addon
One Page Checkout Prestashop offers easy customization.
With the addon, you can offer Guest checkout functionality to your customers.
Prestashop One Page Supercheckout provides simple & quick Login.
Social login options are offered in this one page checkout Prestashop addon.
Prestashop One Step Checkout Addon has an inline validation feature that shows an error to customers if any wrong value is entered.
One Step Checkout Prestashop Extension is compatible with multiple payment and shipping methods.
Responsive one page checkout Prestashop is mobile and tablet responsive.
This one page checkout module is GDPR compatible.
The responsive one page checkout Prestashop module allows the admin to create as many privacy policies as per the requirement.
The one step checkout Prestashop addon offers the admin to make any of the privacy policies mandatory or optional.
The admin can view the customer consent along with all the details including order id, email id, customer name, accepted consent, time, and date as well.
Prestashop responsive one step checkout addon is compatible with free and virtual/digital products.
Cart Customization on Prestashop One Page Checkout Page.
Prestashop one page checkout addon offers an option to add custom fields as well.
MailChimp Integration is provided in this Prestashop Quick checkout addon. Other integrators SendInBlue and Klaviyo are also supported.
Offers Ship2Pay feature which allows the store owner to map payment methods with the selected delivery methods.
Supercheckout provides an option to update or delete the saved address.
You also get an option to create ‘Date’ and ‘File’ type custom fields.
One Page Checkout displays shipping and payment methods only when the customer saves the address.
Admin can test the one page checkout on a specific URL that is provided at the backend.
Provides compatibility with various payment methods like Amazon Pay(only 1.7 version), a4paypalpro, and Play plug.
Prestashop simplified checkout addon allows the admin to add custom CSS and JS.
This quick checkout extension Prestashop SEO Friendly.
The Prestashop fast checkout addon offers multilingual Support.
Prestashop One Page Checkout module allows the admin to show/hide any fields.
Prestashop One Page Checkout Extension offers automatic customer registration.
More attractive feature
Country Autofill: The autofill feature of this Supercheckout module helps in auto-selecting the country for the customers based on their IP.
Google Address Autofill: The auto-fill feature automatically fills up the address fields at the Supercheckout page. The auto-fillup functionality uses Google Places Integration services for which Google API Key has to be configured from the backend.
Gift message: Allow your customers to add a gift message with the order. Admin can check this message on the order details page from the backend interface.
Show/Hide total tax field: Admin can show/hide the total tax field in the cart summary section of one page checkout.
Address Fields Layout Changes: Admin can change the address fields layout from 1-column to 2 columns. Example: User detail fields like First name & last name can be shown in a single row.
One Page Checkout is now compatible with Stripe Official and PayPal Plus payment methods.
Set Condition for Free Shipping: Prestashop Supercheckout gives an option to set a minimum amount for showing a free shipping banner at the checkout page.
Enable validation for CIF/DNI/NIF: Prestashop fast checkout addon offers validation for CIF/DNI/NIF for Spain.
Abandoned Checkout Statistics: Prestashop Quick checkout addon offers a graphical analysis of the abandoned cart details and completed order details.
Checkout Behaviour Report: The admin can track the checkout behavior in a precise graphical format.
With the addon, the store owner can now allow customers to log in with their Paypal ID.
The e-merchant can now redirect the customers directly to the checkout page after clicking on the Checkout button. If the admin disables this feature, then the users will be redirected to the cart page.
The store owner can now allow the customers to register themselves with their Payment address name. Earlier the users had the option to register with the delivery address but now they can use their Payment address as well.
2. One Page Checkout Prestashop Module Installation Guide
2.1 Copy the “SuperCheckout” module folder under your root_directory/modules/of your store via FTP or use the Prestashop interface to upload the plugin.
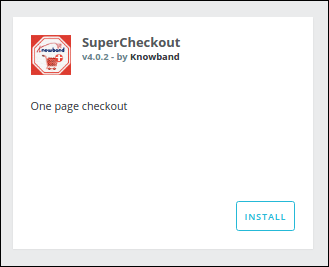
2.2 After copy, Prestashop one page checkout module will be listed on the module listing page in the admin panel as shown given below screen
2.3 If Prestashop one page checkout module is not displaying on your module listing page, search it by filtering the module with the following details.
Filter by: Installed & Not Installed/Enabled & Disabled
Note:
When you will click on the install button, a pop-up box will appear which will display warning messages. You can ignore these messages and move ahead. There will be no negative impact of this warning message on your store.
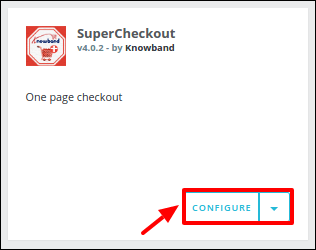
After installing Prestashop Supercheckout addon, a “configure” button will be in front of this one page checkout plugin on the module listing page as shown on the screen below:
3. User Manual
To access this Prestashop one page checkout addon, Click on the configure button of the Supercheckout module. On clicking, One Page Checkout Prestashop module interface will be open and the following screen will display as given below:
3.1 General Settings
3.1.1 General Settings of Prestashop Fast Checkout Addon
Enable/Disable: To enable the Prestashop one-page checkout plugin, switch the enable button from OFF to ON. The default value will be OFF.
Enable Guest Checkout: By enabling this option of the Prestashop quick checkout module, the store will allow the customer to checkout as a guest. The default value will be OFF
Register Guest: By enabling this option of the simplified checkout Prestashop module, the store will register guests automatically and send a registration email to the corresponding customer. The default value of this field of Prestashop One Step Checkout Addon will be OFF.
Enable validation for CIF/DNI/NIF for Spain: The admin can check and verify if the identification number CIF/DNI/NIF entered by the customers of Spain is valid or not.
Delivery Address for Virtual Cart: Admin can enable or disable this option to show/hide delivery addresses for the virtual or downloadable products.
Disable Cart page: With the module, the store admin can disable the cart page from the General Settings. If it is disabled, then the customer will be redirected directly to the Checkout page after clicking on the “Process to Checkout” button.
Select Total Price Display Method: With the addon, the store owner can select from various methods to display the product’s total price format on the checkout page. The admin can display the default PrestaShop price, price inclusive tax, exclusive tax, or both inclusive and exclusive tax.
Use Payment Address Name for Registration: The PrestaShop One Page Checkout module allows the customers to use the name mentioned in the Payment Address for registration.
Default Checkout Option: There are 3 options in this field of the One Step Checkout Prestashop Extension, which will display at the front end. With these options of the fast checkout Prestashop module, the admin can set which option will display to customers on the one page checkout. These options are:
1. Login: If this option of the Responsive one page checkout Prestashop addon is selected, the customer will see the login form in the login section.
2. Guest: If this option of the Prestashop responsive one step checkout addon is selected, the customer will see only the email field in the login section.
3. Register: If this option of the one page checkout Prestashop module is selected, the customer will see the registration form in the login section.
On the front, the customer can also change the checkout option. By default, the login option will be selected
Testing Mode: If you want to test the Prestashop one page checkout addon before making it live on your store then you can enable this option. While this option of the One Step Checkout Prestashop Extension is enabled your customers are redirected to the normal checkout page but you can open the SuperCheckout page directly through the URL. The URL for the same appears below this option once you enable it.
Add Minimum Amount for Showing Free Shipping Banner: Using this option, you can set a minimum amount for showing a free shipping banner at the checkout page.
3.1.2 Customizer settings of Prestashop fast checkout module
This tab in Prestashop one page checkout addon has the features using which the admin can modify the checkout front end by adding some CSS or JS in its fields. This tab of Prestashop fast checkout addon already has the feature to change the colors of buttons that appear in the checkout. Whatever CSS will be placed in the custom CSS field that CSS will appear in the front of the store and the same is the case with the custom JS field.
3.1.3 Login Tab
This tab of Prestashop fast checkout addon contains a setting to enable /disable Facebook and Google registration & login as shown below.
Enable Facebook Login: To enable Facebook Registration & Login, switch the button from OFF to ON. But before you do that do get Facebook APP ID and APP SECRET from https://developers.facebook.com without these keys, this functionality of the Prestashop single step checkout addon will not work. By default, this functionality of the one page checkout Prestashop addon will be disabled.
Enable Google Login: To enable Google Registration & Login, switch the button from OFF to ON. But before you do that do get Google APP ID, CLIENT ID, and APP SECRET from https://code.google.com/apis/console without these keys, this functionality of the quick checkout addon Prestashop will not work. By default, this field of the Prestashop One Step Checkout Addon will be disabled.
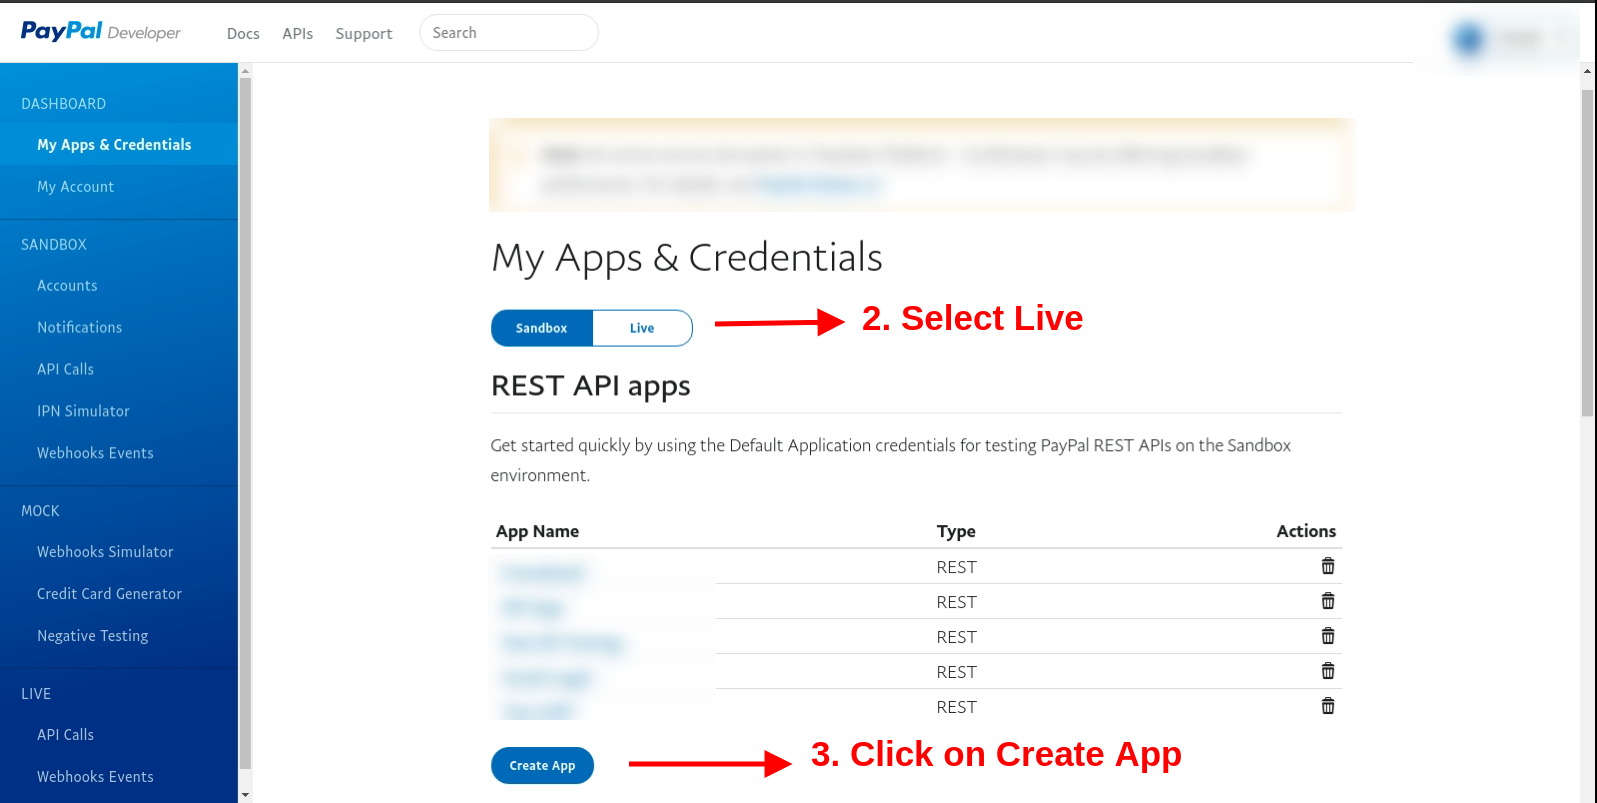
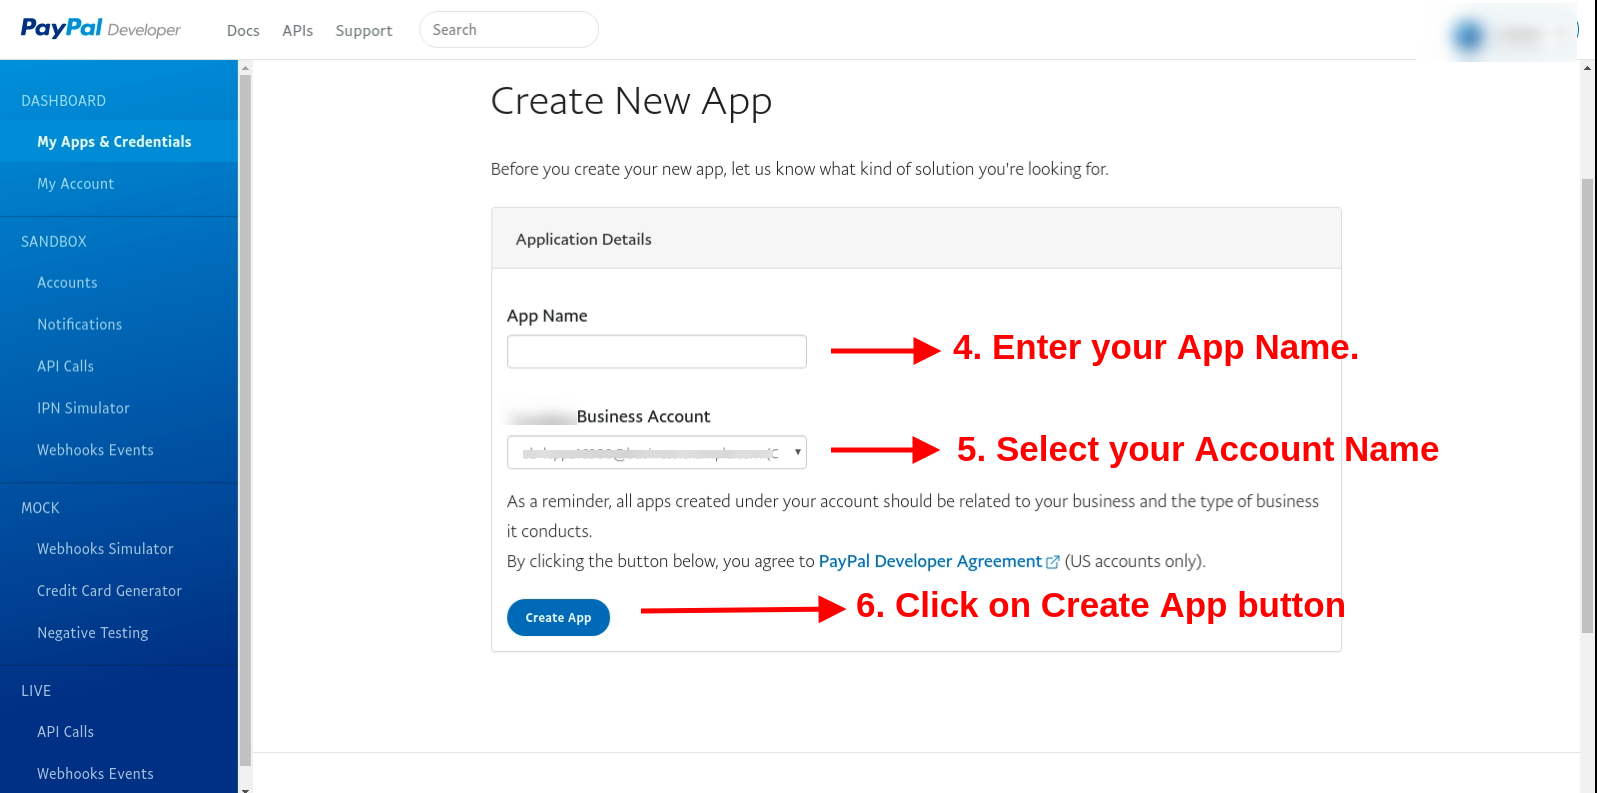
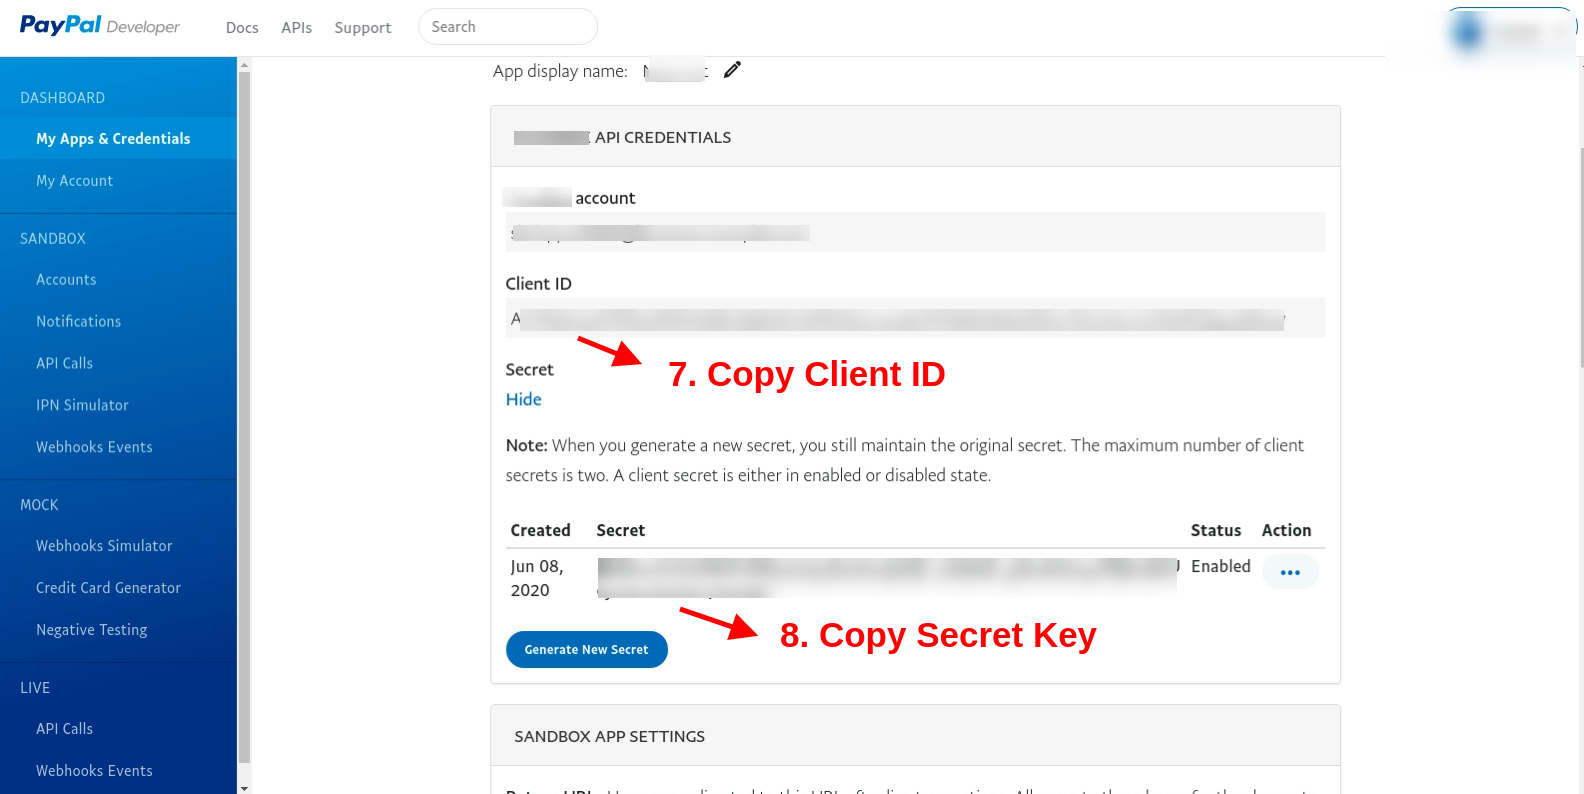
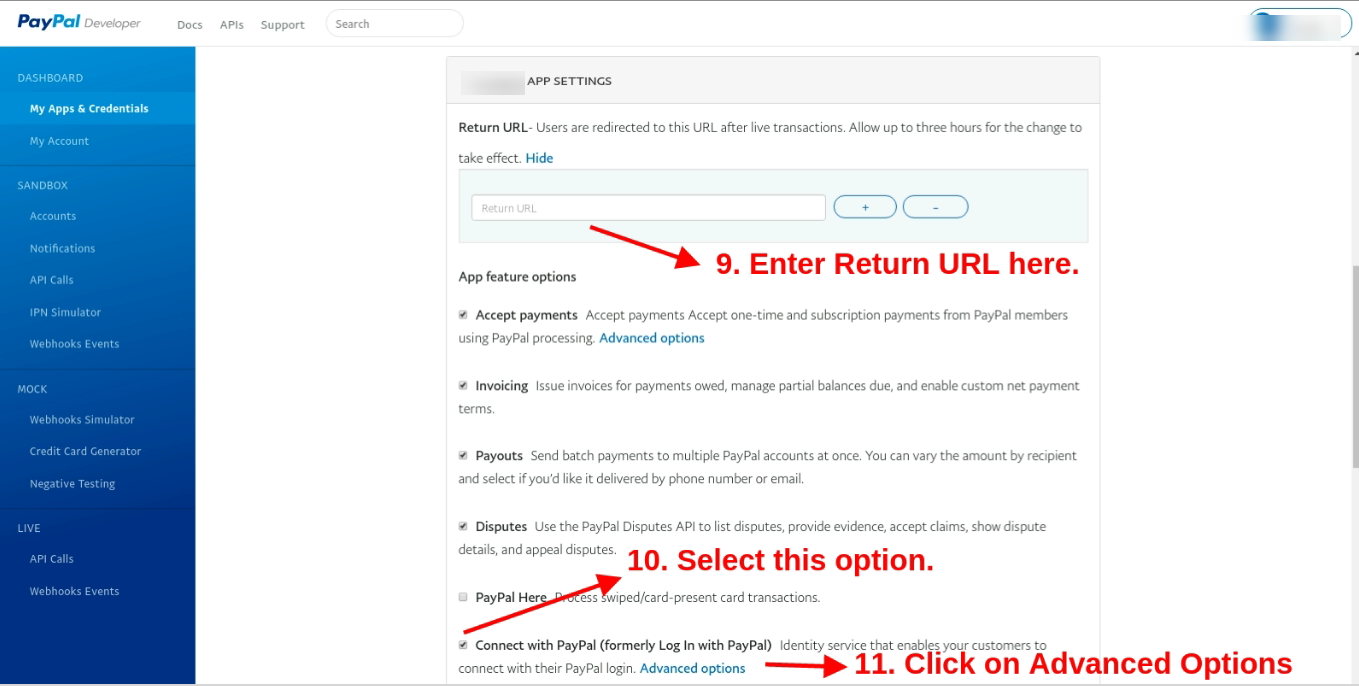
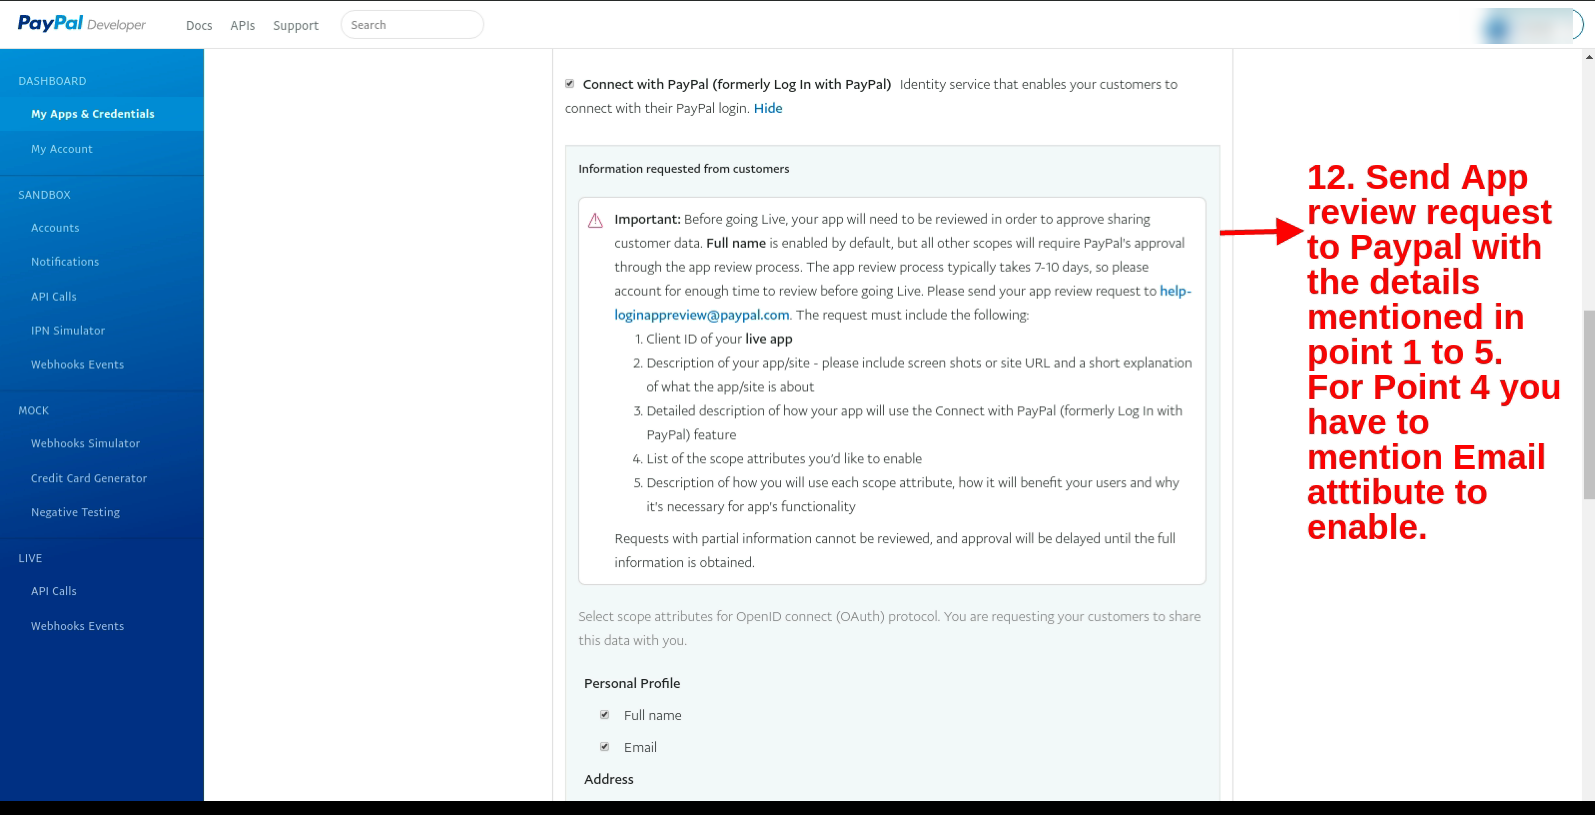
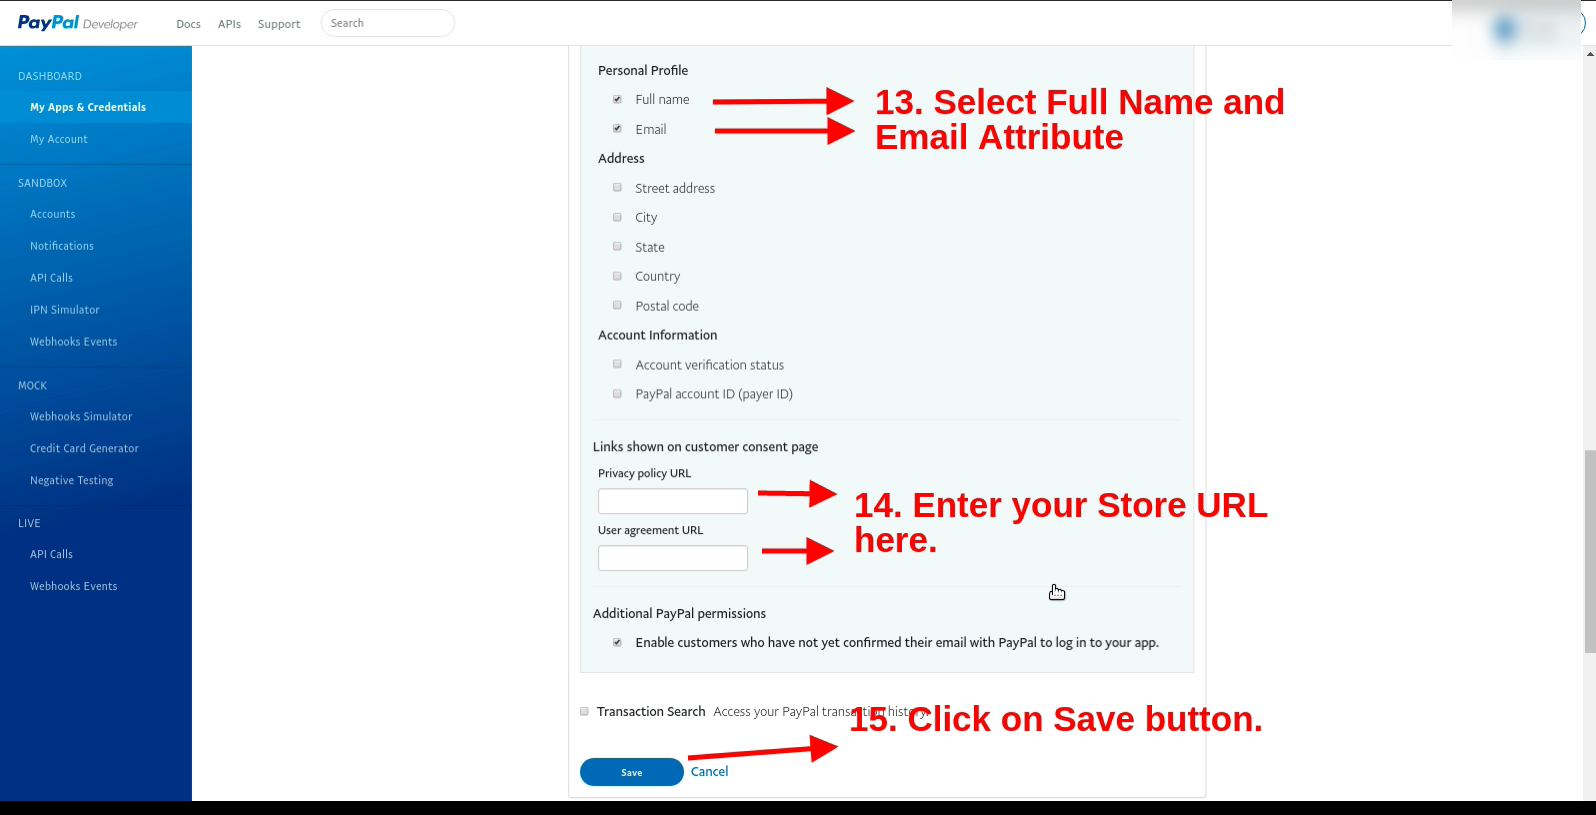
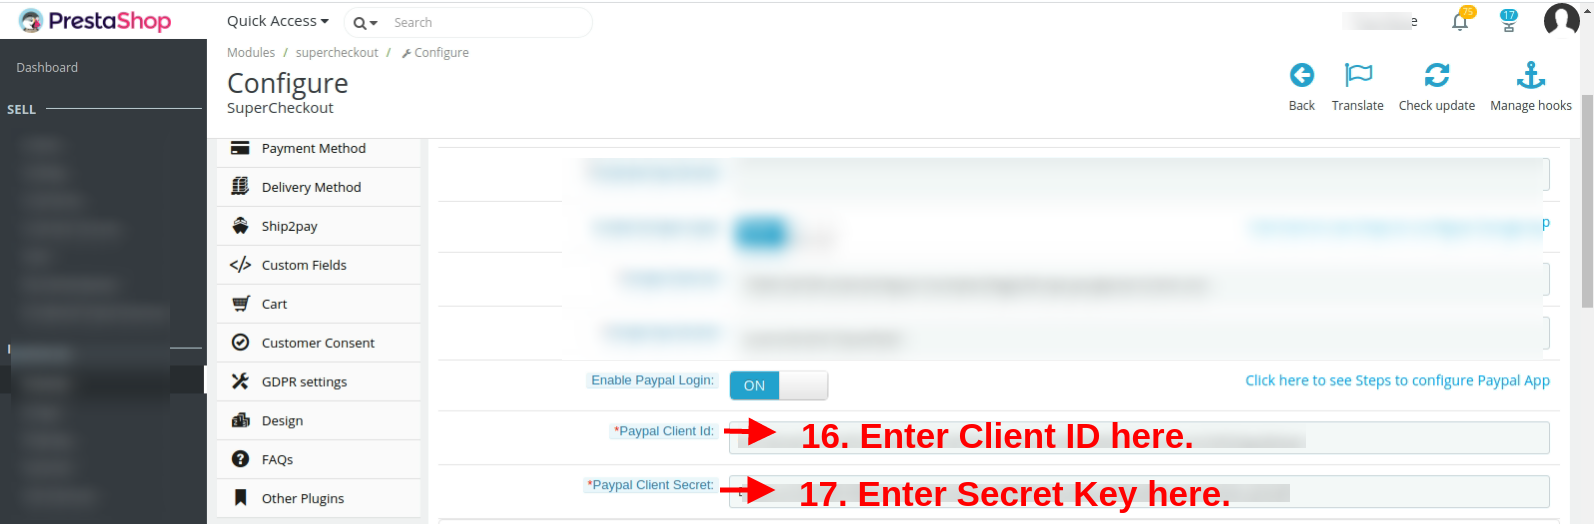
Enable Paypal Login: Activate or deactivate the login options from the admin interface. Enter PayPal client id and client secret from https://developer.paypal.com/developer/accounts/ and save the settings.
Please read Annexure A to set up Google, Facebook, and PayPal login.
3.1.4 Email Marketing Tab of the One Step Checkout Prestashop Extension
Mail Chimp is an email marketing service by which you can send bulk newsletters/offer emails to your customers. Mail Chimp also provides many attractive Templates and many more features. Our Prestashop one page checkout module allows you to add custom email directly to mail chimp list as soon as they register using our Prestashop one page checkout addon.
For using Mail Chimp you need to have an API Key.
A) How to configure Mail Chimp?
Login to your Mail Chimp account.
Click on the right corner tab > Choose Profile > Extras > API Keys.
Here Admin Can Create an API key by clicking on the “Create a Key” button.
Copy the API key.
Admin can also make a Different list for Each Social login customer by clicking on “List” in the Top Menu Bar.
Now Paste the API Key in the Provided Mail chimp API Key section and click on the “Get List” Button.
Select the list from the Dropdown menu.
B) Mail Chimp Settings:
Enable/Disable: To enable the Mail chimp, switch the enable button from OFF to ON. The default value will be “OFF”.
Subscribe Customer Checkbox: Check this option of the Responsive one page checkout Prestashop module, if you want to subscribe customers to mail chimp as soon as he comes out from the email field. Please note that this function will not subscribe them to the Prestashop list. Our mail chimp integration is responsible to subscribe only to the Mailchimp list.
Mail Chimp API Key: Enter Your Mail Chimp API Key and Click on the “Get List” button.
Mail Chimp List: Select your desired list and save settings.
Similarly, you can configure the other two email marketing integrators including Klaviyo and SendinBlue.
3.1.5 Addresses Tab
This tab in Prestashop one page checkout addon contains a setting for the fields which are to be shown in the customer registration, delivery address, and invoice address section on the front.
The Addresses Tab of the Prestashop Quick checkout addon consists of two sections. The one on the left is for Guest Customers and the right one for Registered Customers.
To make a field show/hide in the Prestashop one page checkout page, check the checkbox just to the left of the Show label.
To make a field of this fast checkout Prestashop checkout addon as mandatory (required field), check the checkbox just to the left of Require Label.
The fields of the Prestashop One Page Checkout Extension can also be rearranged according to the requirement. To rearrange just hold icon () and drag & drop the field vertically, wherever it is required.
On saving, the fields will be rearranged as per the changes.
This tab of the One Page Checkout Prestashop addon also has more features named inline validation and enables the save address feature. If inline validation is enabled then the fields like first name, last name, zip code are validated as soon as they are filled which lets the customer know that he/she is entering the wrong value. If the save address feature is enabled then a button with the text “SAVE” appears just below the address field of the Prestashop one page checkout addon and using that button the customer can save his/her address before placing the order.
Enable Auto Detect Country: If this option is enabled, then the country of the customer is automatically detected and filled into the provided country field on the Supercheckout page.
Enable Google Auto Address Fill: Using this option, the admin can enable auto-fillup of address with Google Places Integration.
Google API Key:For the above feature to work, the admin needs to set the Google API key through this configuration option.
3.1.6 Payment Method Tab of the Prestashop One Page Checkout Module
1. In Prestashop one page checkout addon, this tab contains settings for payment methods shown in one page checkout page like enabling/disabling, or selecting a default method.
2. Display Method: To Enable/Disable the payment methods on the checkout page, switch the button from ON to OFF or vice-versa. This will disable the payment method block from the checkout page. By default, this option of the Prestashop fast checkout addon will be enabled.
3. Display Style: There are 3 options in this field of the Prestashop One Step Checkout Addon to display how your payment methods will be displayed on the checkout page. By default, payment methods will be displayed with its name. If you select the style with the image, then please upload the image of size (95 X 20) for the corresponding payment method under the appropriate payment module directory.
4. Selected Default Method: This option of the One Step Checkout Prestashop module, will be a drop-down list of all installed payment modules. Here you can select the payment method, which will be displayed as selected at the time when a customer comes on the checkout page.
Ship2Pay: With the Ship2Pay feature, the store admin can map the payment methods with the selected delivery methods. If the admin has mapped some payment methods with a particular delivery method then other payment methods will be disabled for the customers on selecting this particular delivery method.
3.1.7 Delivery Method Tab of the Prestashop One Page Checkout Module
In one page checkout Prestashop, this tab contains settings for delivery methods shown on the checkout page like enabling/disabling, or selecting a default method
2. Display Method: To Enable/Disable the delivery methods on the checkout page switch the button from ON to OFF or vice-versa. This will disable the delivery method block from the checkout page. By default, this will enable.
3. Display Style: There are 3 options in this field of the Prestashop fast checkout addon to display how your delivery methods will display on the checkout page. By default, delivery methods will display with their name. If you select a style with an image, then please upload an image of size (95 X 20) for the corresponding delivery method.
4. Selected Default Method: This option of the Prestashop One Page Checkout addon will be a drop-down list of all active delivery methods. Here you can select the delivery method, which will be displayed as selected at the time when a customer comes on the checkout page. The selection will differ according to customer location. If your selected method maps with customer location, then the method will show as selected at the time of checkout page loading.
3.1.8 Custom Fields Tab of the Prestashop fast checkout module
In Prestashop one page checkout module, this tab is used to add custom fields on the front checkout page. This tab of the Prestashop simplified checkout addon contains a list of custom fields and options to Add, Edit, or Delete any field.
These custom fields of the Prestashop fast checkout addon can be used to get some additional data from the customer and display it in different positions i.e. Shipping Address Form, Payment Address Form, Cart Block, or Customer Registration Block.
A) How to add a custom field?
Following are the steps to add a custom field on the checkout page:
Click on the “Add New” button.
A pop-up will display, fill all the required fields and add your desired features.
Click on the “Save” button.
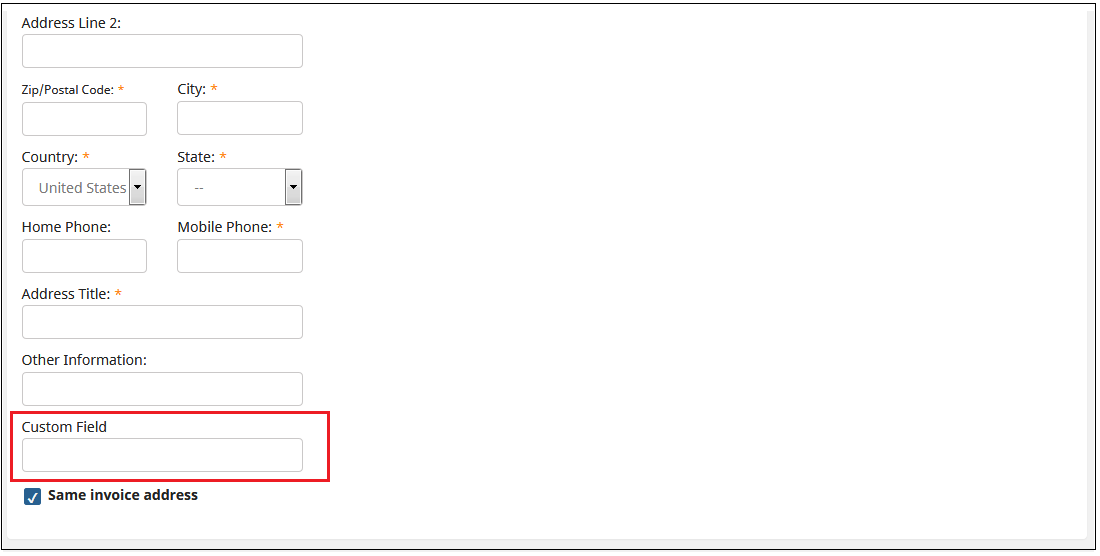
Example 1 – If the admin wants to add a drop-down with the label “Want to become Member ?”
Following are the steps to be followed –
1. Add a new custom field as shown below.
Configure its position as “Shipping Address Form”.
2. Go to Front End, add the product to the cart and proceed to “Checkout”. On the Checkout page, the custom field will be displayed as shown below.
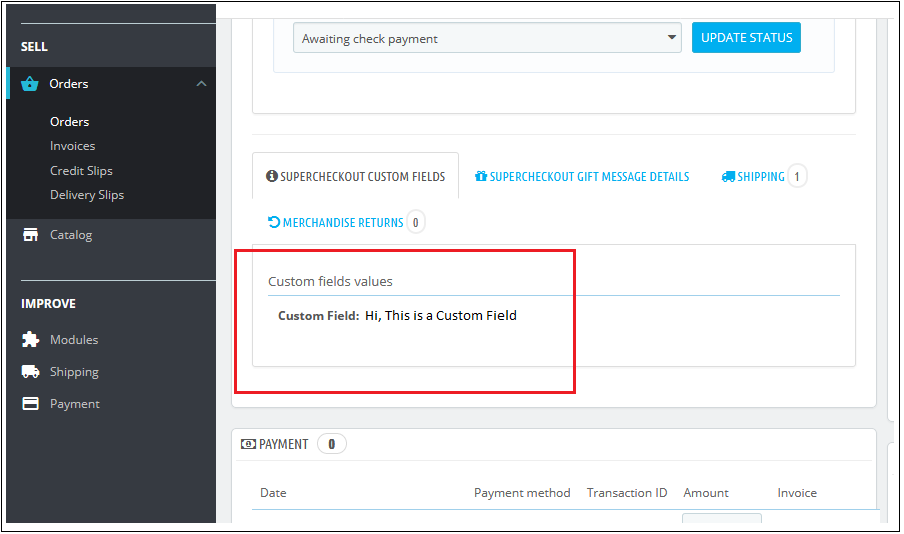
3. Admin can check the data fetched from the customer by following steps –
(a) Go to the “Orders” tab. (b) Click on the “View” button for a particular order you want to check. (c) The Customer’s information will be displayed in the “SUPERCHECKOUT CUSTOM FIELDS” tab as shown below.
4. Customer can also check the Custom field by following steps-
(a) Go to the “My Account” page. (b) Click on “Order History and Details” (c) Click on the “Details” button (d) Image shown below will display.
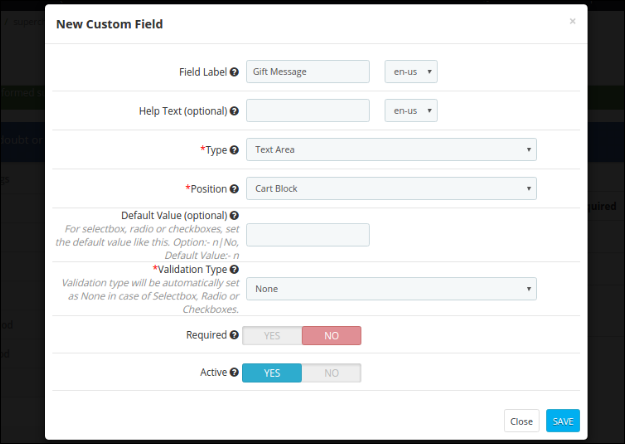
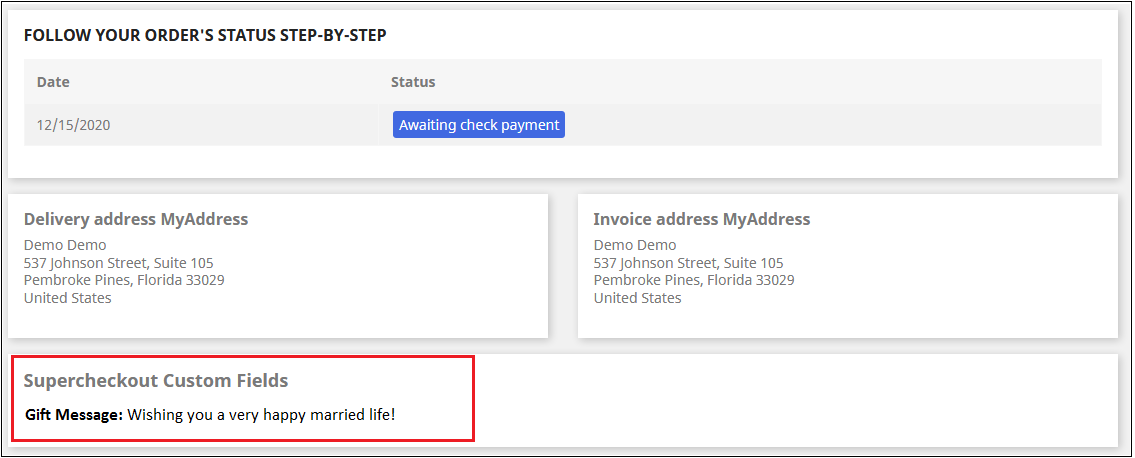
Example 2 – If the admin wants to add a text area with the label “Gift Message”. Following are the steps to be followed –
1. Add a new custom field as shown below.
Configure its position as “Shipping Address Form”.
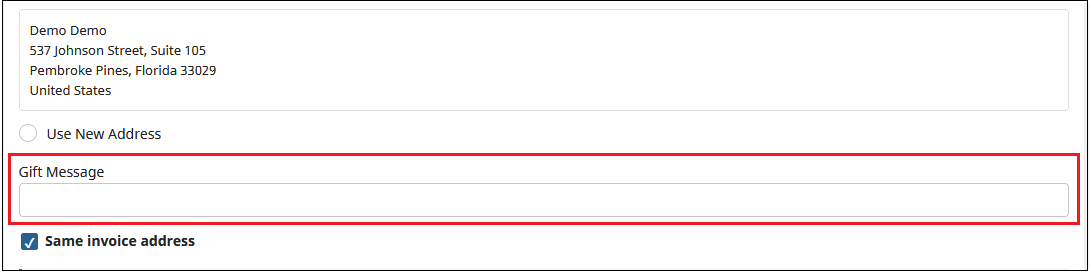
2. Go to Front End, add the product to the cart and proceed to “Checkout”. On the Checkout page, the custom field will be displayed as shown below.
3. Admin can check the data fetched from the customer by following steps –
(a) Go to the “Orders” tab. (b) Click on the “View” button for a particular order you want to check. (c) The Customer’s information will be displayed in the “SUPERCHECKOUT CUSTOM FIELDS” tab as shown below.
5. Customer can also check the Custom field by following steps-
(a) Go to the “My Account” page. (b) Click on “Order History and Details” (c) Click on the “Details” button (d) Image shown below will display.
B) How to edit a custom field?
To edit a custom field, click on the ‘Edit’ icon shown in front of any row of this Prestashop quick checkout module. It will open a form shown below. Values of the form in this Prestashop quick checkout module will be filled already.
Admin will have to click on the ‘Save’ button to save the edited details.
C) How to delete a custom field?
To delete a custom field of the Responsive one page checkout Prestashop module, the admin will have to click on the delete icon shown next to every table row. It asks for confirmation to delete a row.
3.1.9 Cart Tab of the Prestashop responsive one step checkout addon
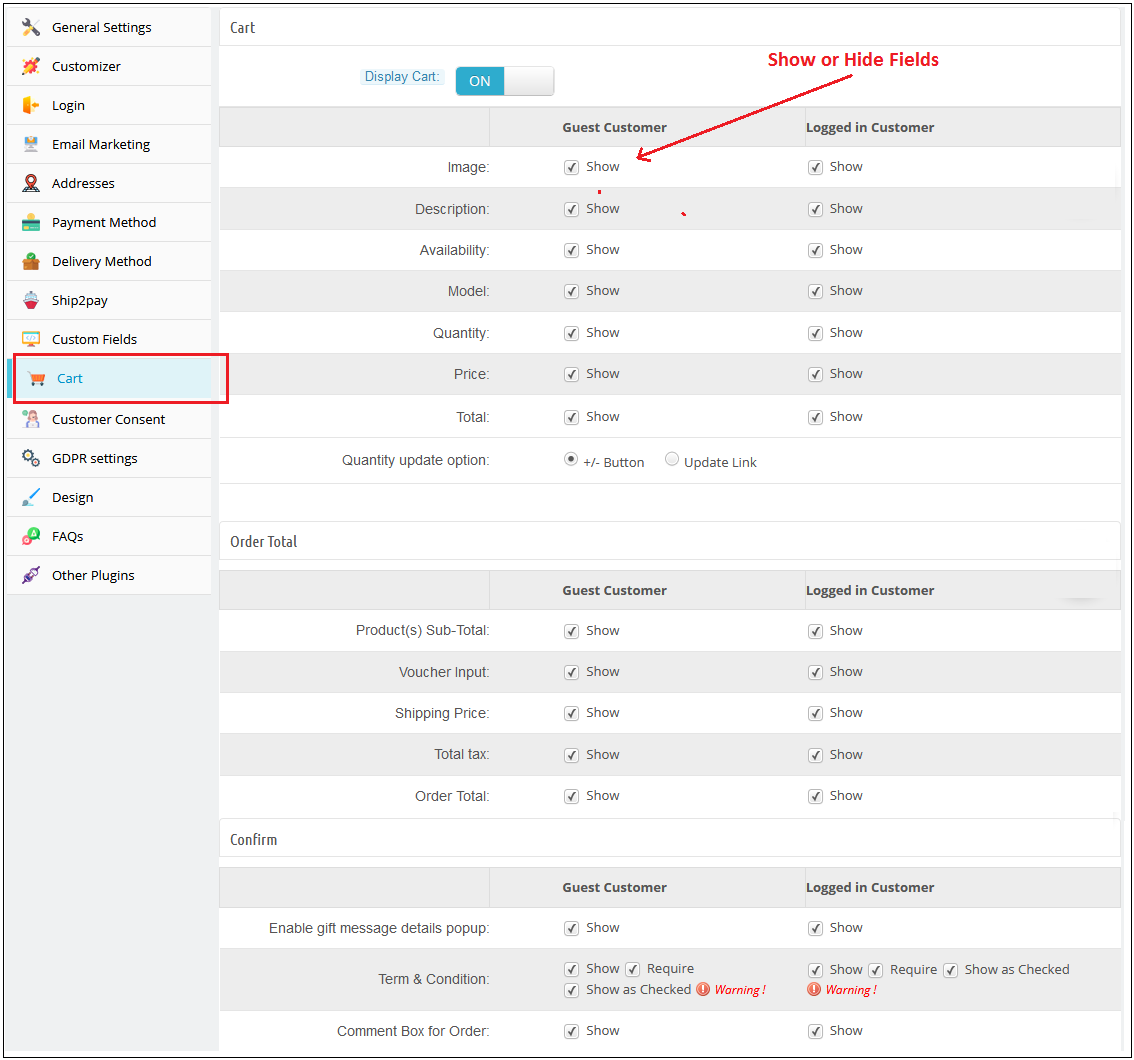
This tab One Step Checkout Prestashop module contains setting for the cart, order total, and confirming the order as shown below :
Its divides into three sections :
Cart
Order Total
Confirm
A) Cart
1. Display Cart: By default, cart display will enable.
2. To Show/Hide cart summary options from the checkout page, check to uncheck the checkbox present in front of the Cart Summary Option label.
3. Product Image Size: This option of the one step checkout Prestashop module will show which size of the product image will be displayed on the One checkout page. By default, this field of the Prestashop quick checkout addon will be shown with their default values.
B) Order Total
To Show/Hide cart summary options from the checkout page check uncheck the checkbox present in front of the Cart Summary Option label.
C) Confirm
To Show/Hide cart summary options from the checkout page check uncheck the checkbox present in front of the Cart Summary Option label. Admin can provide an option to add a gift message along with their product order. Admin will have the option to check this message on the order details page from the backend.
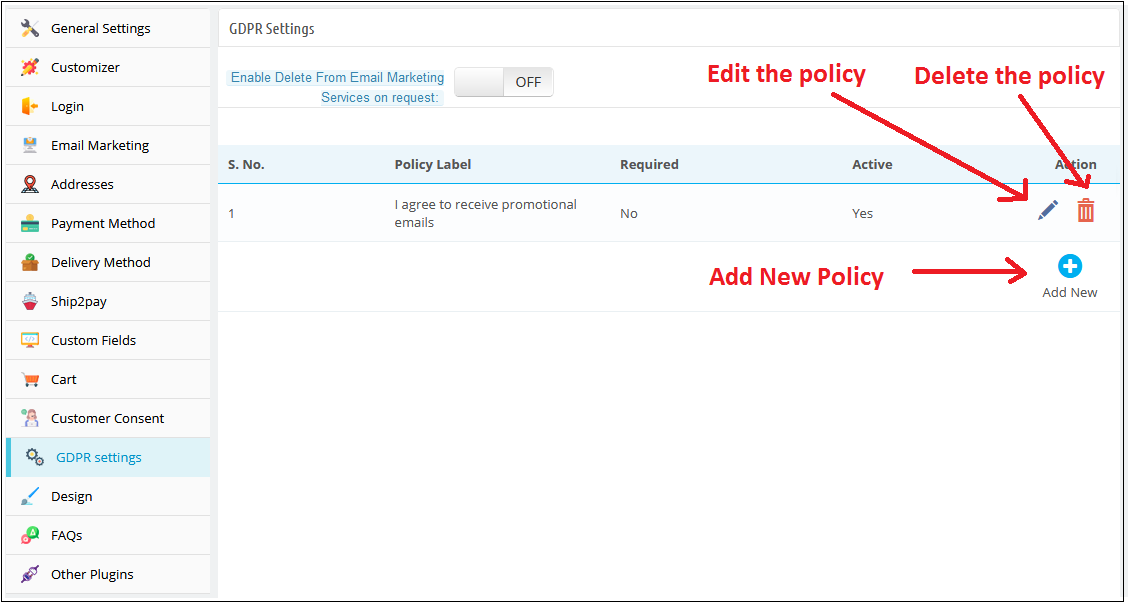
3.1.10 GDPR Setting Tab of the One Page Checkout Prestashop Addon:
This field of the Prestashop one page checkout module allows the admin to add the opt-in boxes (checkbox) on the checkout page to meet the GDPR requirements. Admin can add the multiple opt-in boxes at the checkout page. As per the GDPR directives “The GDPR is clearer that an indication of consent must be unambiguous and involve a clear affirmative action (an opt-in). It specifically bans pre-ticked opt-in boxes. It also requires distinct (‘granular’) consent options for distinct processing operations. Consent should be separate from other terms and conditions and should not generally be a precondition of signing up to a service. You must keep clear records to demonstrate consent”.
Let’s take a look at the screenshot below:
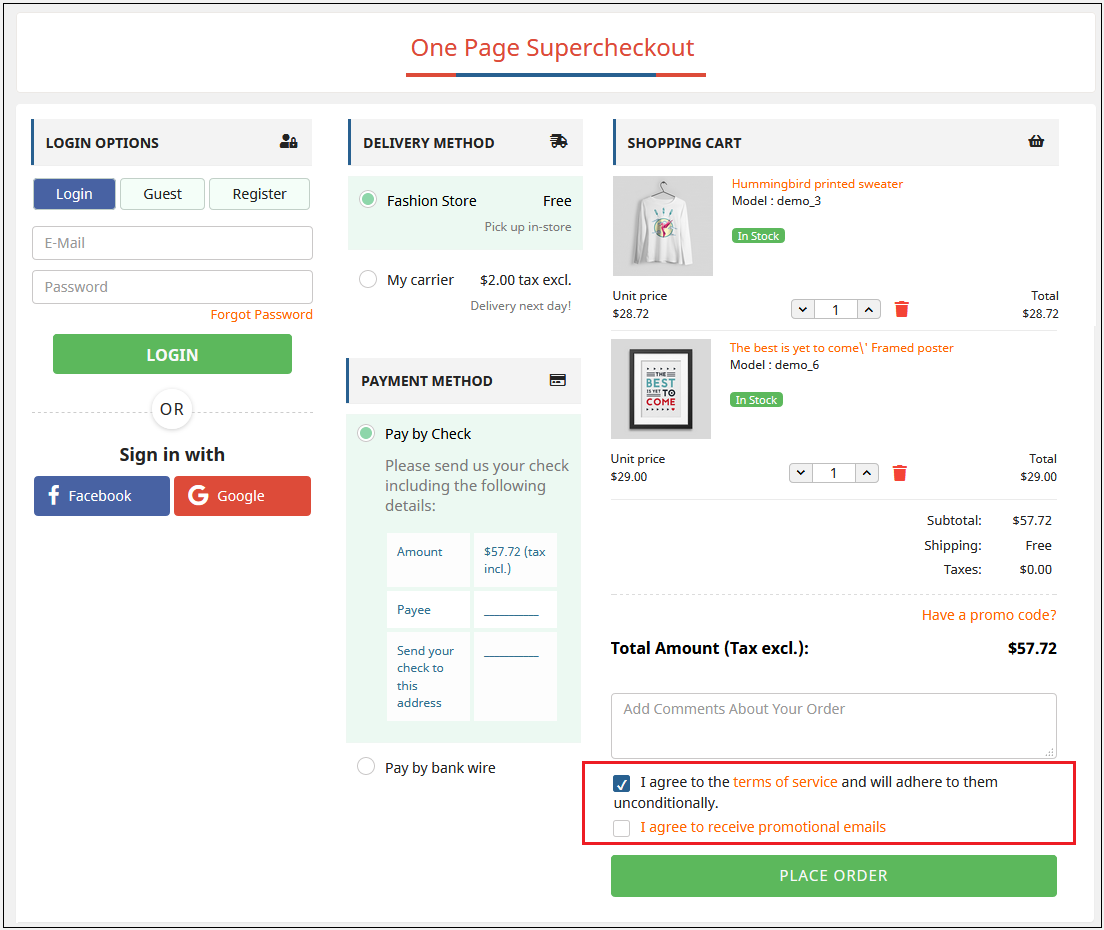
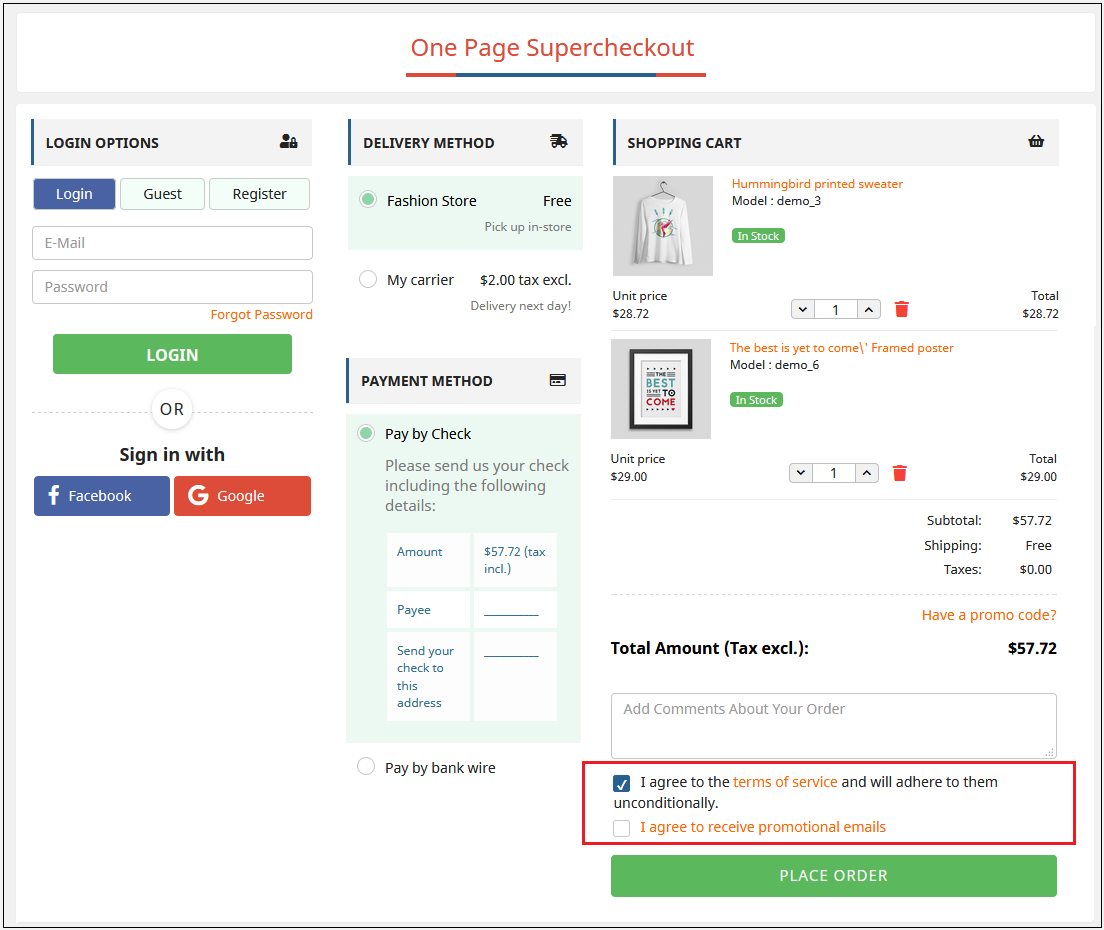
Please refer to the attached screenshot of the front end:
3.1.10.1 Adding New Policy:
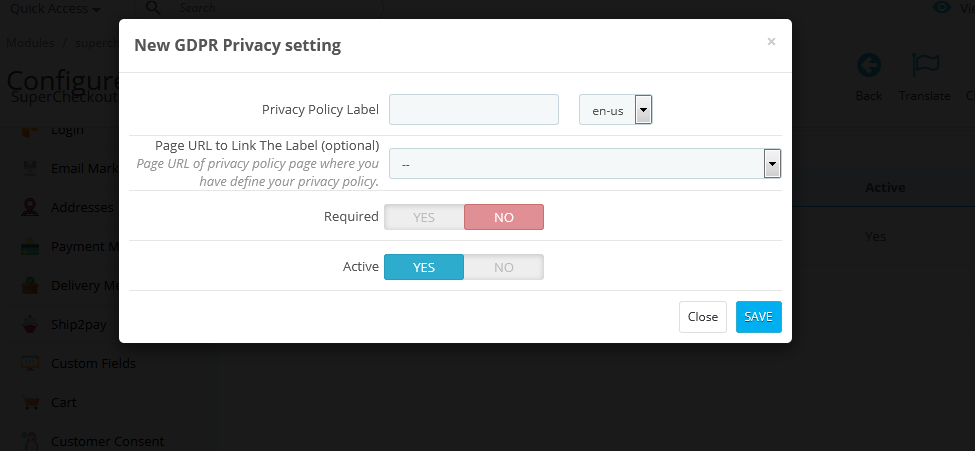
The one page checkout Prestashop addon allows the admin to add as many policies. To add a new policy, the admin will just need to click on the “Add New” option. After doing so, a popup will appear, where the admin will ask to fill in the details of the policy.
Privacy Policy Label: In this field, enter the privacy policy label. The text entered here will be visible to the user on the front end. Page URL to Link the Label: This field is not mandatory. But if you have any URL to link the label where you have defined your privacy policy, then enter the same here.
Required: This option is to make the policy field required or optional. If you make this field optional then the customers can continue to place his order without providing consent. Otherwise, only after providing consent, the user will be able to place the order.
Active: This field of the GDPR setting is to make the opt-in option enable or disable at the front end.
Let’s take a look at the screenshot below:
3.1.11 Customer Consent Tab of the one step checkout Prestashop module
This field of the Prestashop one step checkout displays the data of all the customers who have agreed to any privacy policy(s) defined by the admin. The data will also display the date, time, and order reference number as well. To view the list, the admin must have to enter the email id or order reference number and click on the Filter button. The accepted customer consent details will be displayed along with the order reference number, customer name, email id, accepted consent, date, and time as well. Let’s take a look at the screenshot below:
3.1.12 Design Tab of the Responsive one page checkout Prestashop module
This tab of the Prestashop one step checkout module contains the settings for the design of the checkout page in the catalog as shown below:
2. To change the width of any column adjust the slider present at the top as shown below :
3. Block of different steps of the simplified checkout Prestashop module can also be rearranged from one column to the other or in the same column as shown below:
4. On saving, the block will be rearranged in the checkout page as per the changes
3.1.13 Add Customer profile type as a custom field in PrestaShop Supercheckout
This tab of One Page Checkout allows the seller to add a custom field to select the customer type for the users. Admin can add various profile type options.
Enable/Disable Customer Profile: Admin can show or remove the customer type custom field by choosing the Yes and No option
Field type to customer type selection: Admin can decide if this field will be displayed as a dropdown menu or with radio buttons.
How to add a new customer type?
The administrator can build separate profiles for different categories of clients, such as business customers and personal orders, and display different fields for checkout for each type of profile, as well as decide whether or not the information is mandatory.
Click on the ‘Add New’ button on the customer profile page.
You will be redirected to a new page with the title ‘New Customer Profile’
Active: Enable or disable the profile from here.
Profile Name: Add or update the profile name
Delivery address: You will find various address field options like name, company, VAT number, address, city, country, contact number, etc. in this tab.
Make sure to select the ‘require’ checkbox if you want to make any field mandatory.
Display Address on Invoice: You will find various address field options like name, company, VAT number, address, city, country, contact number, etc. in this tab. The selected fields will be displayed on the invoice.
Make sure to select the ‘require’ checkbox if you want to make any field mandatory.
Enable/Disable Custom fields: You can show or hide the custom fields from this tab.
3.1.14 FAQ Tab of the Prestashop responsive one step checkout addon
This tab of the one page checkout Prestashop module contains several questions (with answers to them) that are asked by our customers. We recommend you go through the questions before raising any ticket for this Prestashop fast checkout addon.
3.1.15 Other Plug-ins Tab
This tab of the Prestashop fast checkout addon redirects to our developer page having a list of other plug-ins developed by us. If you like this Prestashop Quick checkout addon then you can try our other plug-ins also.
3.2 Abandoned Checkout Statistics
Here, the admin can look for the number of orders they have received, checkout conversion rate, abandoned checkouts, order revenue generated and revenues lost in abandoned carts.
Prestashop simplified checkout addon offers a comparison report between the completed orders and abandoned cart orders. The admin can analyze reports for a specified day, week, month, and year. This PrestaShop\ module offers a total of 3 graphical reports. Those are:
Prestashop simplified checkout addon offers a comparison report between the completed orders and abandoned cart orders. The admin can analyze reports for the specified day, week, month, and year. This PrestaShop module offers a total of 3 graphical reports. Those are:
Abandoned Revenues v/s Order Revenues
Number of Abandoned Checkouts v/s Number of orders
Checkout conversion
The data will appear in tabular format. The table includes the number of orders received, number of abandoned checkouts, revenue earned from orders, revenue lost due to abandoned carts, and checkout conversion rate.
The admin can check the data for a specified day, week, month, and year.
3.3 Checkout Behaviour Report
This feature offers a detailed report of the customers who abandoned their carts. It gives the data if they left the checkout process. The online store merchant can check the filled information percentage provided by the users who left the cart abandoned. They can check reports for any specific day, just by filtering out these dates.
4. Annexure A
4.1 How to Set up Facebook Login?
Follow the steps below to create Facebook App:-
1: Go to the given URL: https://developers.facebook.com/apps/
2: Click on the “Create App” button.
Step 3&4: Select the “Build Connected Experiences” option and click on the ‘Continue’ button.
5&6: Add “App Display Name”, “App Contact Email”, and choose from the “Do you have a Business Manager Account?” and then click on the “Create App” button.
7&8: After clicking on Create App ID you will have to go through a security check as shown:
10-15: Two options will be available in the dropdown, Basic and Advanced, click on “Basic”. And then enter your “App Domain”, ”Privacy URL”, ”Terms of Service URL”, ”Add Icon”, ”Select Category” and click on the “Save Changes” button.
App Domains:
yourdomain.com is correct
yourdomain.com/store is incorrect
www.domain.com is incorrect
16: Now click on “+Add Platform”.
17: And select Website as Platform.
18&19: Now Enter your site URL.
20&21: Click on “Products+” and click on the Setup button from the Facebook login tab.
22: Select the web as the platform for the app.
23: Add Site URL and click on save.
24-26: Click on Settings and add a Valid OAuth Redirect URIs.
Select Live from the “My apps and credentials” section. After that click on Create App button.
Now enter the app name, select the account name and click on create app button.
Copy client Id and secret key from here:
Here, enter the return URL ie. https://psm.knowband.com/supercheckout_demo/17/index.php?fc=module&module=supercheckout&controller=supercheckout&login_type=paypal after that select the “Connect with PayPal” option and click on “Advance options”
Send an App review request to Paypal with the details mentioned in points 1 to 5 (present in the screenshot). For Point 4 you have to mention the Email attribute to enable.
In the personal profile, section select the full name and email option. After that enter the store URL (https://psm.knowband.com/supercheckout_demo/17/) and click on the Save button.
Now enter the client ID and secret key after enabling the PayPal login page option.
5.0 Front-end Interface
After successful installation, the Checkout page will look like this. The admin can add or remove fields from the checkout page and thus can display all the checkout steps in one place.
In the updated version, there is a Paypal login option for the users.
Watch how this Prestashop One Page Checkout Plugin works:
Find more details about this Prestashop Simplified Checkout Addon below:
Prestashop One Page Checkout Module Product Link:Click Here One Page Checkout Prestashop Addon Admin Demo: Click Here Responsive one page checkout Prestashop Addon Front Demo: Click Here
Find this Prestashop One Page Checkout Module on Addon Store as well.Visit: Click Here


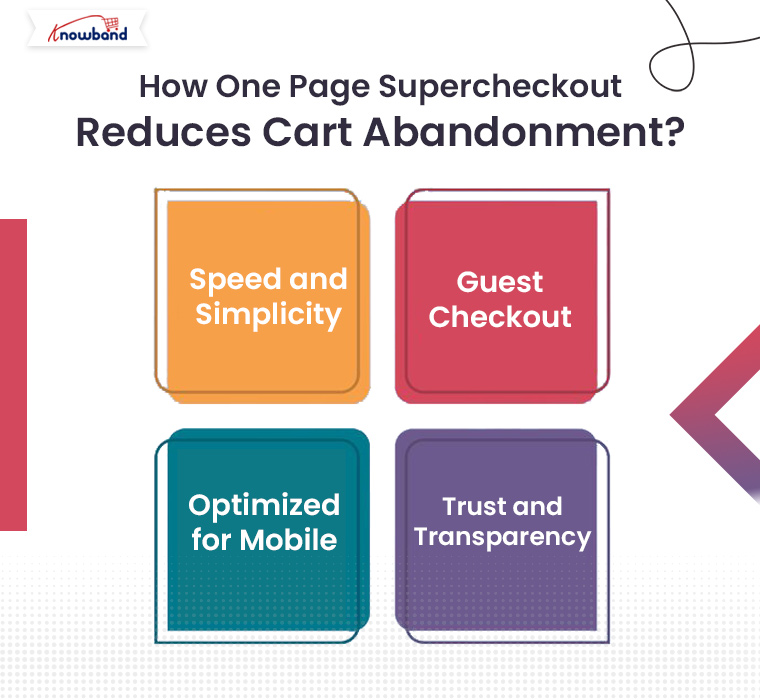








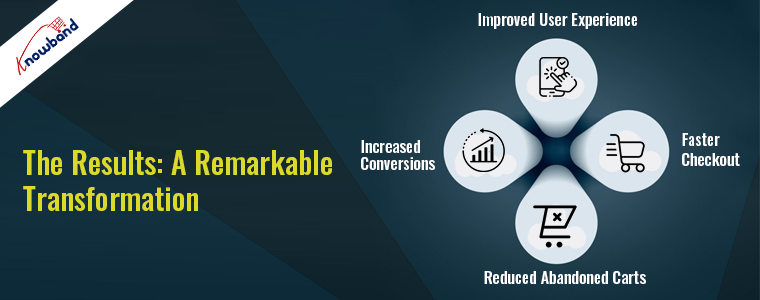
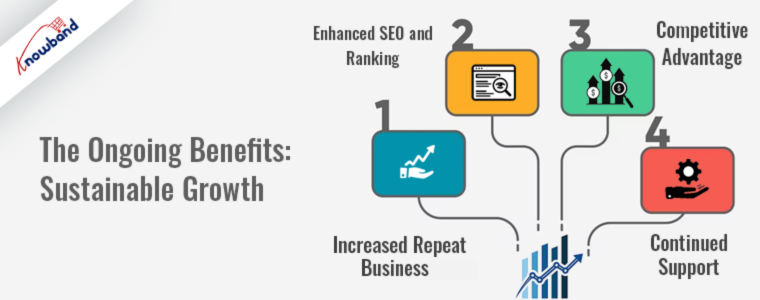
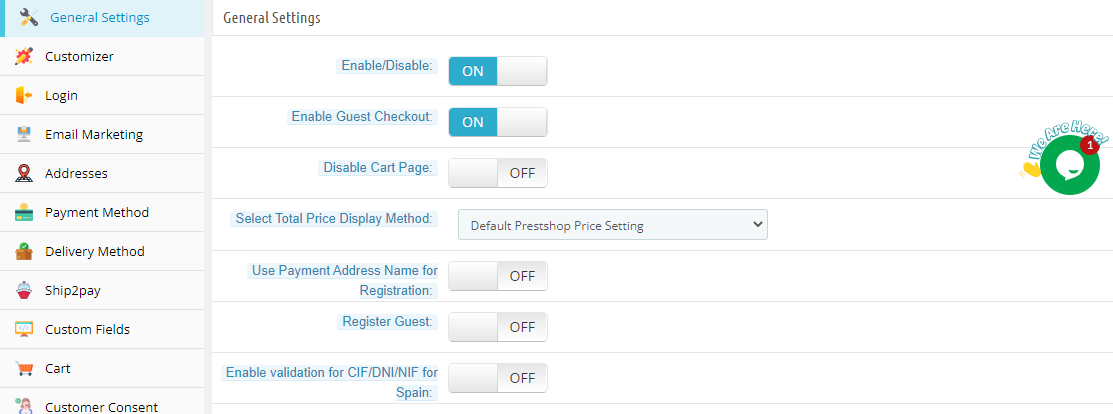
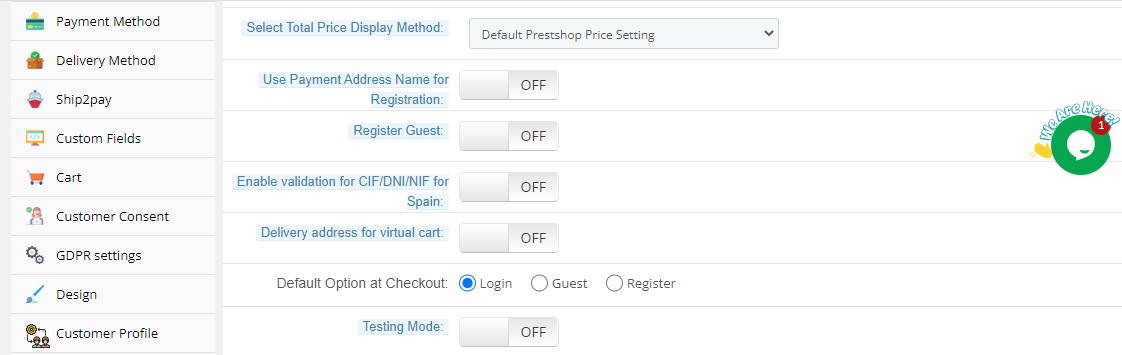
![[Version 6.0.9 Released] New Features Added to PrestaShop One Page SuperCheckout Addon](https://www.knowband.com/blog/wp-content/uploads/2021/03/Version-6.0.9-Released-New-Features-Added-to-PrestaShop-One-Page-SuperCheckout-Addon.png)