Ecommerce companies always look for options that can bring more and more sales. Store optimization for speed, engagement, customer acquisition, and retention rates are on the top of the list. To add to this, KnowBand launched a super easy-to-handle OpenCart plugin for Back-in-stock alerts and low stock notifications. The Back in Stock alerts notify customers about the subscribed products when they are available in stock and increase customer retention rate.
OpenCart Back-in-Stock plugin- Unique way to Capture Lost Sales
Does every customer like to receive emails from the eCommerce website? Is it worth sending alerts to all the customers visiting your store? Are your ongoing campaigns working well?
If your answer is ‘No’ for any of the questions asked, you must stick to this article and read further. Let me give you a brief about the plugin and how you can boost sales with this tool
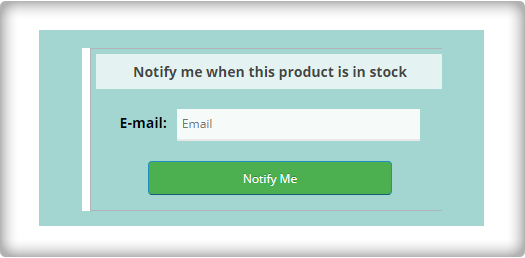
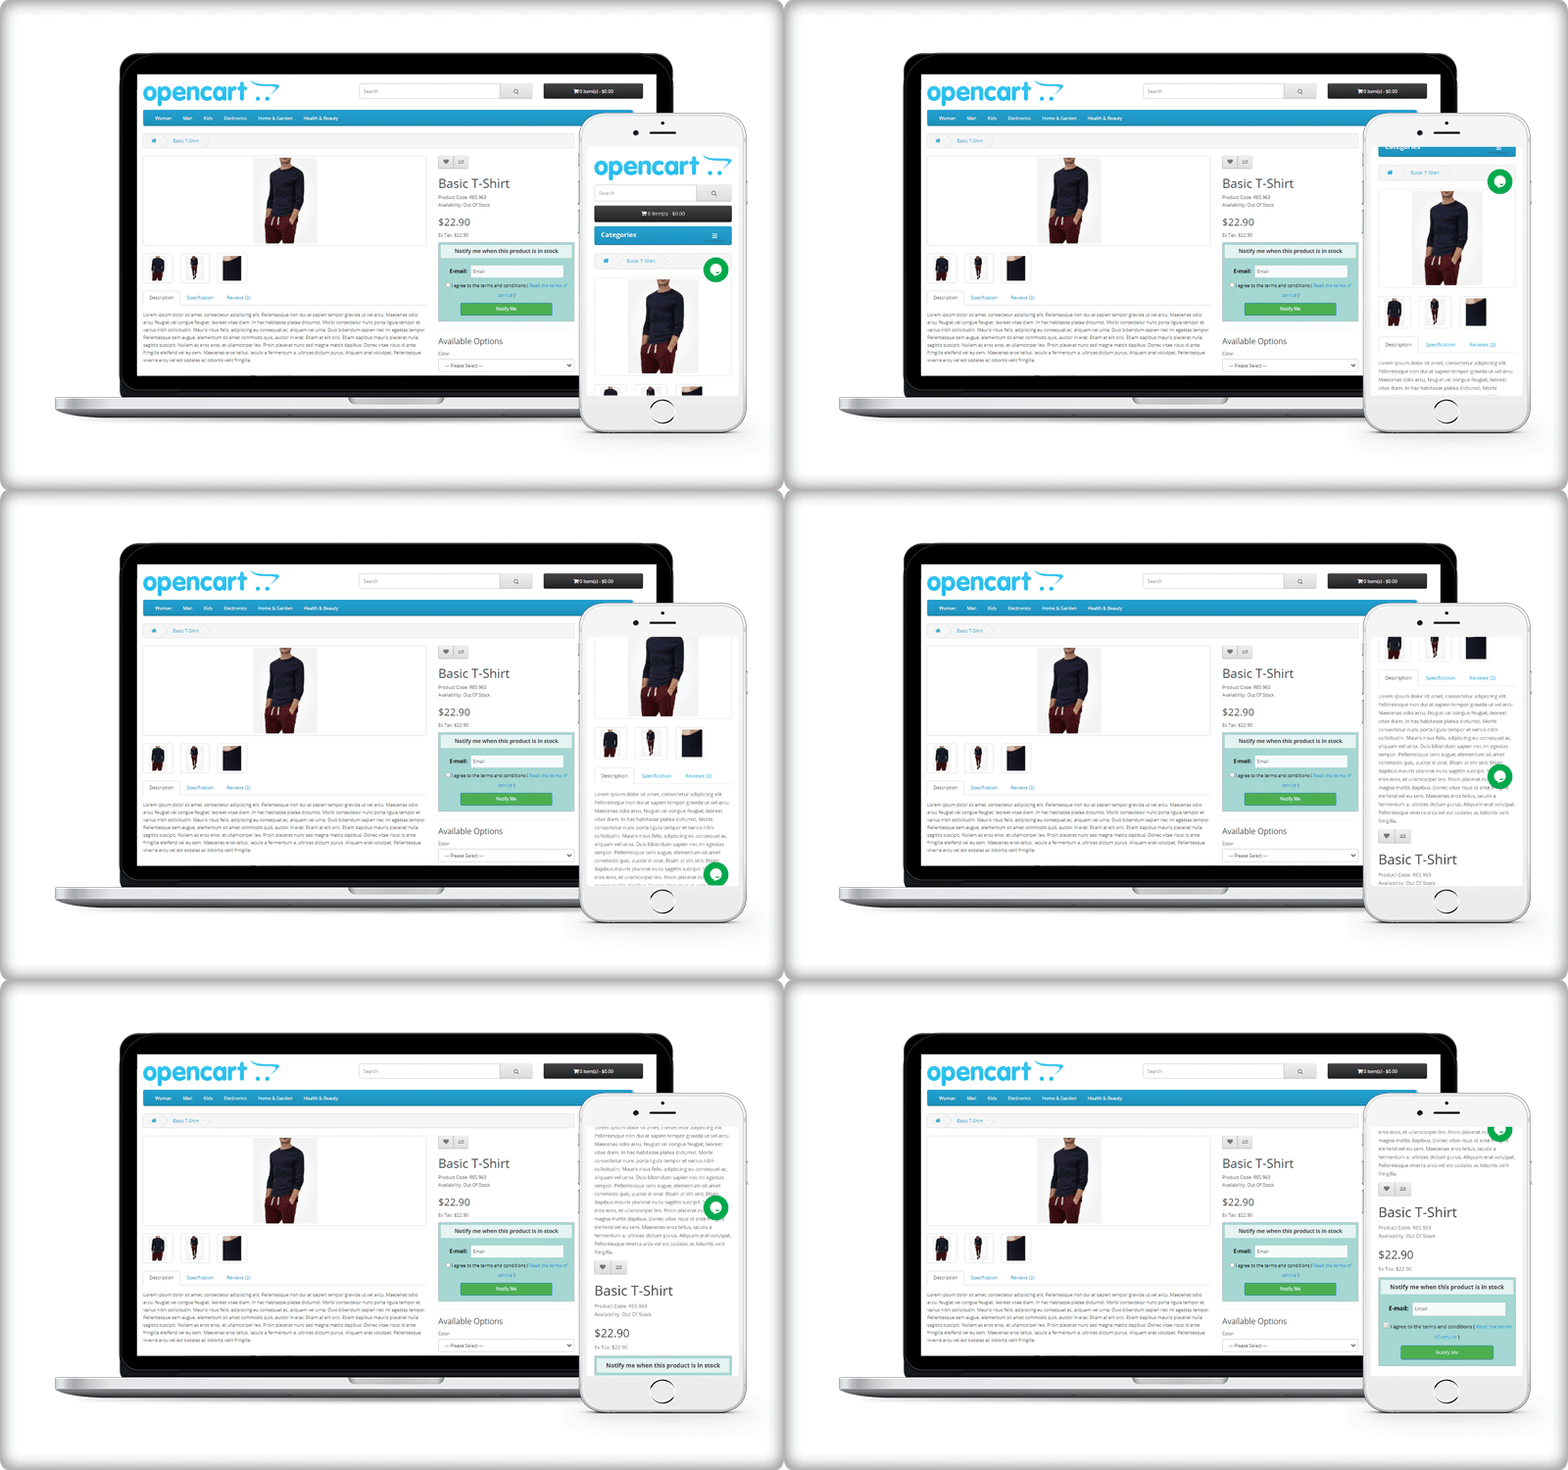
Display a subscription box on the product page
On your website, you must have added pop-ups for email subscriptions to grow your email list. But, it won’t tell you if the customer is interested in any particular product. For this, you can use the OpenCart Back-in-Stock plugin. With this, a customer can subscribe for back-in-stock alerts for a specific product on your OpenCart store.
OpenCart Back-in-stock alert is a 3-in-1 extension. It allows you to send alerts at three different points in time
Send initial subscription email: As the customer subscribes to your custom alerts, you can send a customized welcome email with a text that states about the subscribed product.
Notify customer with a low-stock alert: If the subscribed product is low in quantity, a low-stock notification will be sent automatically with the OpenCart Back-in-stock plugin.
Send an email with ‘Back-in-stock’ custom text: The third email category is Back-in-stock. Make the best use of the OpenCart back-in-stock plugin when the product is again available in your store.
Auto-trigger Low stock and Back-in-stock alerts
Every time you send an email, there are chances that you miss out on some of the other details.
The OpenCart extension for low stock or back-in-stock allows the sender to save the default email templates. The template options are available for all three, the initial email, low-stock email, and the back-in-stock email.
In addition, it has cron functionality that sends your email alerts automatically to subscribers. For instance, set the low-stock alert quantity to 4, it will auto-trigger an email as the quantity reaches 4.
Real-time Analytics for Opencart
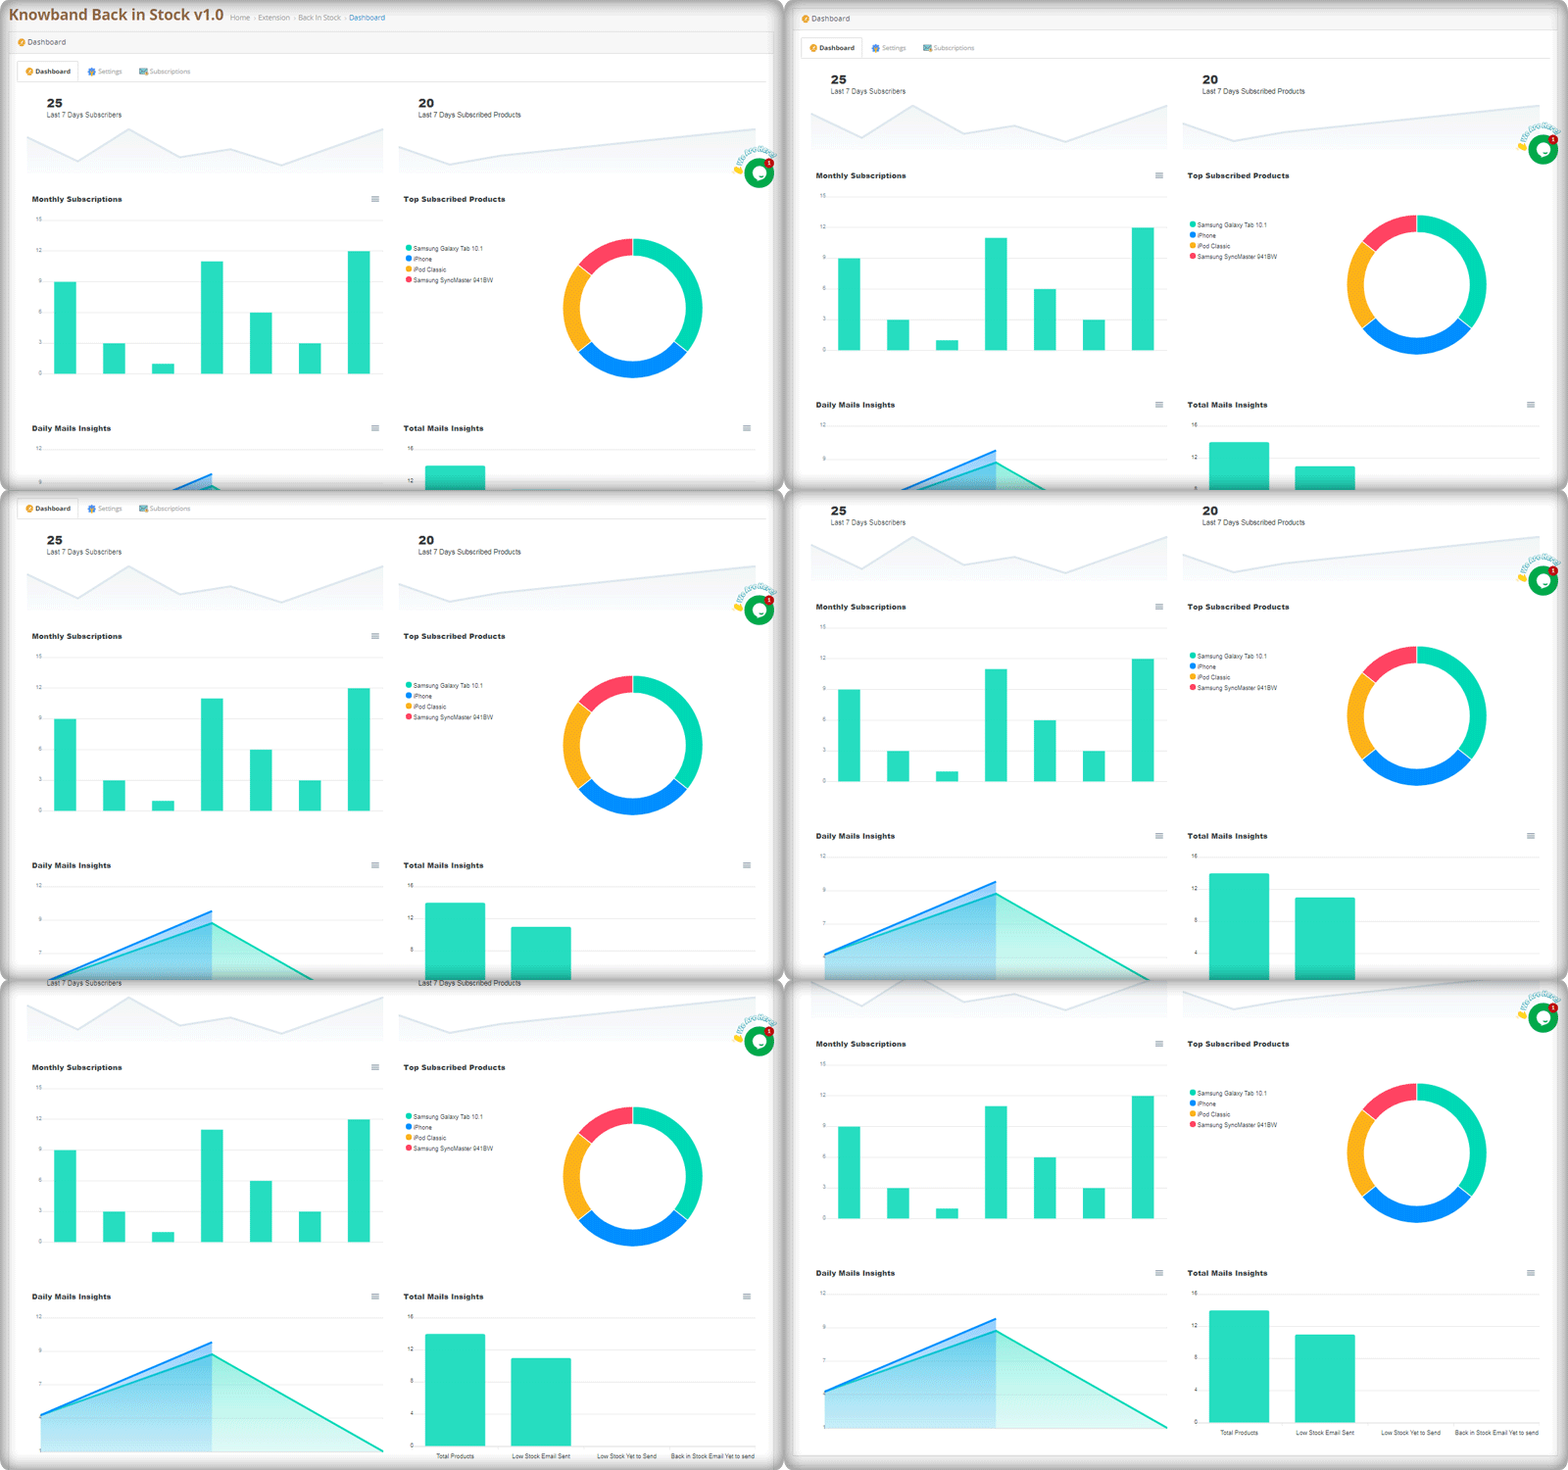
The best part of this extension is its analytical reports. Data gives you an insight into everything.
The graphical reports with pie diagrams display the number of subscribers (weekly), monthly subscription data, number of products subscribed, top subscribed products, and daily reports of the subscriptions.
The OpenCart Back-in-stock plugin gives well-analyzed reports. Anyone with or without an analytics degree can depict the results by looking at those colorful graphs.
Send alerts via your email provider like Mailchimp
Use this as an opportunity to run your email marketing campaign. The MailChimp synchronization with the module will build up your email list. Use this data for every other marketing campaign you run by email. Why just the stock alerts, but you can send welcome emails, discounted emails, abandoned cart alerts, and a lot more. If you haven’t started with email marketing, it’s time to buckle down.
This all-in-one email subscription and back-in-stock alert extension is a must-have for every OpenCart eCommerce store. You can send as many alerts as you want! Create customized templates for email and the product page subscription block. Customers won’t miss out on their favorite products and the merchant won’t lose any sales.
If there’s a feature you desire on your OpenCart site, there’s a good chance an Opencart plugin will let you achieve it; if you can’t find one, you can always contact us for custom plugin creation.
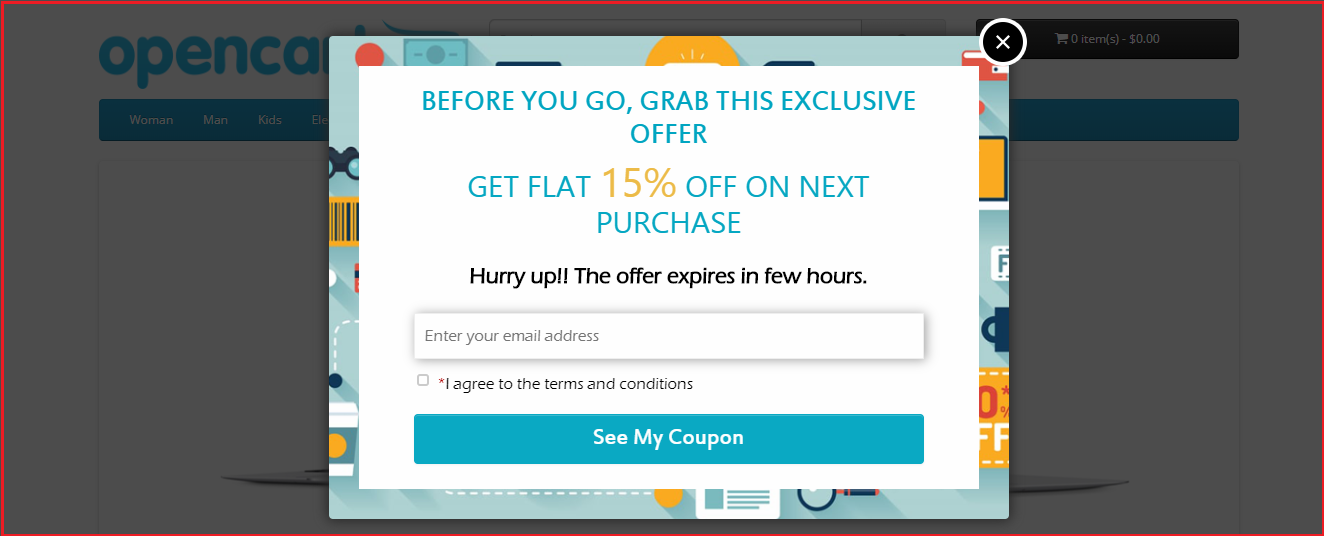
OpenCart Exit Pop up also known as OpenCart Exit Intent Pop up is a powerful extension that helps you draw visitors’ attention when they are about to leave your website.
A pop up appears promptly as soon as it is noticed that the visitor is trying to take an exit. The extension provides you with an opportunity to stop your visitors at the very last moment from leaving your website. It is up to you how you make the best use of the pop up to make visitors stay on your website.
Overview
1. Works as both Entry and Exit Pop up
2. Design Popup | Adjust the look and feel
3. Multiple Popup themes
4. Customize the Popup Display Settings
5. Set up discount coupon value
6. Email Recheck
7. Email Synchronization through MailChimp and Constant Contact
8. Multi-lingual Support
Description
1. OpenCart Exit Intent Pop up offers pre-existing appealing popup themes. You can choose the desired one from the drop-down list.
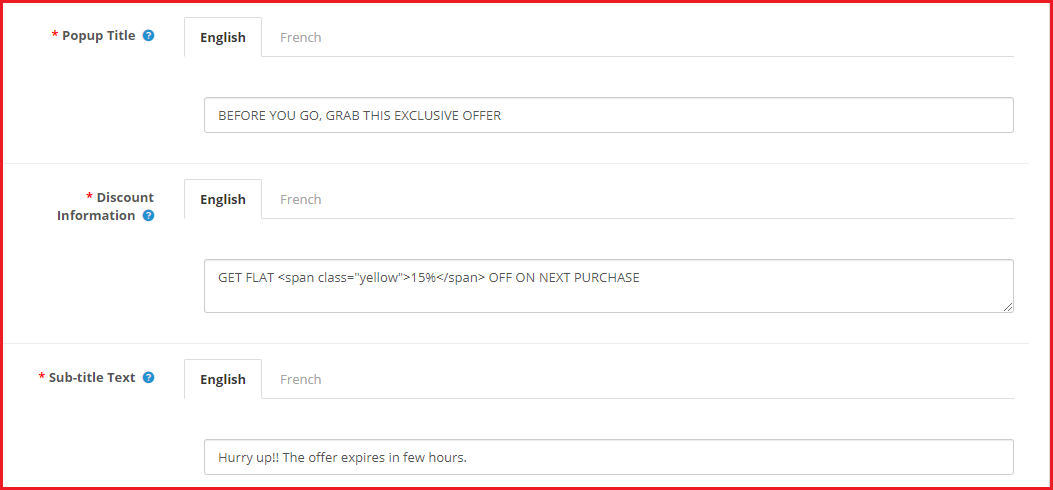
2. OpenCart Exit Pop up allows admin to modify the popup content according to the goals they want to achieve through that popup. The extension offers three sections to specify the popup content.
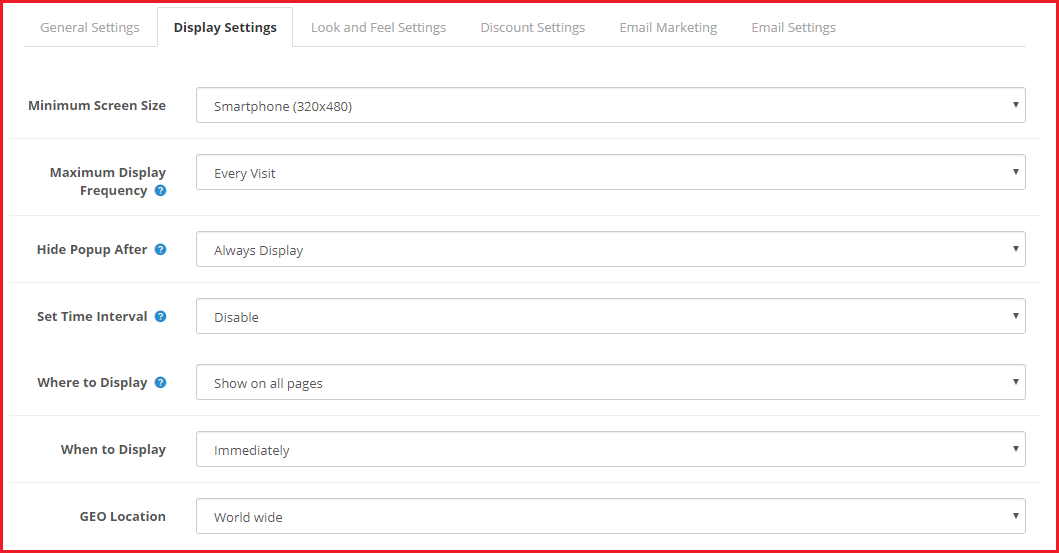
OpenCart Exit Popup comes up with various options to configure the popup display settings.
3. The extension lets you specify the minimum screen size on which the popup will be displayed.
4. You can set the display frequency of the popup which can be: on every visit, one visit per hour, one visit per day, one visit per week or one visit per month.
5. You can set a duration (in seconds) after which the popup disappears automatically. The duration can be 10 seconds, 20 seconds, 30 seconds or 40 seconds.
6. The exit pop up extension also lets you enable the popup functionality for a certain time period only. For example, if you are running any campaign or providing a limited time offer and want to promote it through the popup, you can set the start and end date of the exit popup accordingly.
7. With OpenCart Exit Popup Email Subscription extension, you can select the pages where you want to display or where you do not want to display the popup.
8. OpenCart Exit-Intent Pop up extension also provides you with the option to display the pop up immediately, after a few seconds, after a visitor has scrolled down to some percentage or when the user is trying to exit.
9. You can also limit the popup display for selected countries. You can either show to visitors coming from worldwide or select the countries where you want to display or hide the popup.
10. OpenCart Exit Pop up extension has the email recheck functionality which, if enabled, would not allow a user to claim the coupon code twice. It simply means that a single email address cannot be used again.
11. You can set the pop-up display interval (in days). The defined period will be the number of days after which the pop up will be displayed to the same user again.
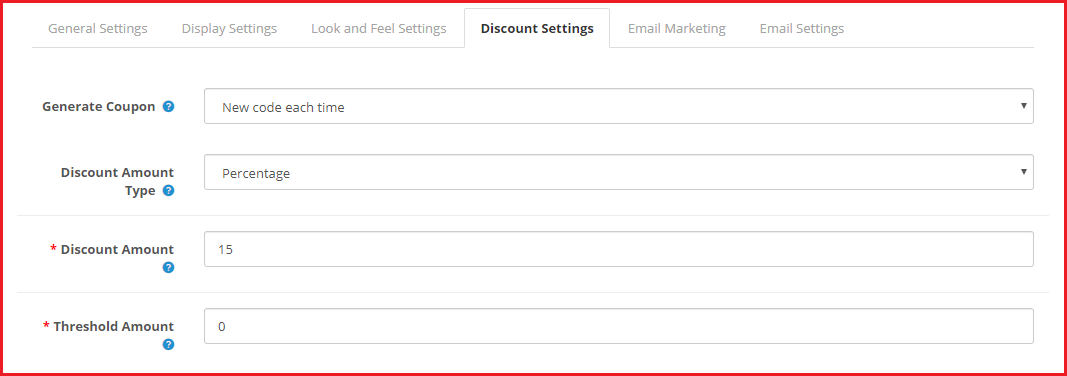
12. You can set the popup functionality to either generate a fixed coupon code or generate a new coupon code every time.
13. The coupon code can be set to provide a flat discount value or a percentage discount. You can also set a threshold cart amount to redeem the coupon code at the checkout.
14. OpenCart Exit Popup also offers MailChimp and Constant Contact Integrator, enabling which the email address of the visitor would be captured in the respective amount.
15. With OpenCart Exit-intent Popup, the admin can customize the email that would be sent to the user when they submit their email address. You can also test the email to check how it will deliver to the users.
16. The extension also displays the coupon statistics in the form of line graphs. The email address of the user, coupon code and the status of the coupon code is displayed inside the statistics section.
17. The module provides multi-lingual support.
Benefits of OpenCart Exit Pop up Extension
1. Make a last-minute effort to convince users to stay on your website.
Now the Opencart store merchant can easily get new subscribers for sending newsletters. Opencart Auto Subscribe extension allows the Opencart store admin to add a “subscription form” on the home page of the eCommerce store. This OpenCart Auto Subscribe extension helps the store merchant to design an attractive subscription form, so that, the visitors coming to the website get registered by submitting the required information on it. With a pop-up window, OpenCart email subscription popup allows the Opencart eCommerce store owner to collect the email address of website visitors. The Newsletter Subscribe Extension for OpenCart can automatically subscribe the online store visitors on registration or checkout. This way, the online merchant can get more email id details for sending the newsletter.
The online merchant can show subscription box on website pages and display attractive subscription popup on the website homepage. The online store visitors can enter their email id details and easily subscribe to the website. The Newsletter Subscribe Extension for OpenCart forwards email id details to admin’s MailChimp and Constant Contact account at the same time when users enter their details. The Email Subscriber module for OpenCart is mobile responsive, multi-lingual compatible and offers smooth functioning.
1.1 Features Offered by OpenCart email newsletter addon
The online merchant can subscribe online users automatically while registration, checkout or normally by showing subscription form.
The OpenCart product subscription module allows admin to show subscription box on website pages and subscription popup on the homepage.
The eCommerce store merchant can set the look and feel of subscription box/popup by setting its heading, description and color.
The OpenCart email newsletter addon allows setting the position for showing subscription box and show multiple subscription boxes on the same page by setting sort order.
The OpenCart product subscription module allows the store merchant to set gap for showing subscription popup next time to the same user.
The online store merchant can show a success message after subscription and admin can set the size of subscription popup.
Email Subscriber module for OpenCart allows sending a mail to the subscribers after subscription.
The store merchant can configure MailChimp and Constant Contact settings from the admin interface of the Newsletter Subscription Module.
The OpenCart email newsletter addon is multi-lingual compatible and mobile responsive.
There is no need to change even a single line of codes from the admin interface while using MailChimp Newsletter Subscription module.
Auto Subscribe integration extension helps store admin to gain email subscribers.
Opencart eCommerce store owner can collect mail id from users without any difficulty.
The online customers can get regularly updated the information of the store.
2.0 Auto Subscribe integration Installation Steps
Purchase OpenCart Auto Subscribe extension from the Knowband website.
First, you will get a source code file of the open cart Auto Subscribe extension in zipped file format.
User Manual of this OpenCart Auto Subscribe extension.
Follow below-mentioned steps in order to install OpenCart Auto Subscribe extension:
1. Unzip the received zip file. You will get the folders as shown in the following image:
2. Copy all the folders of the zip file in the Root Directory of OpenCart setup via FTP manager.
So, OpenCart OpenCart Auto Subscribe module is now successfully installed and ready to use at your store.
Now go to the admin menu and click on the extensions and thereby click on configure button next to OpenCart Twitter Login extension.
3.0 Admin Interface
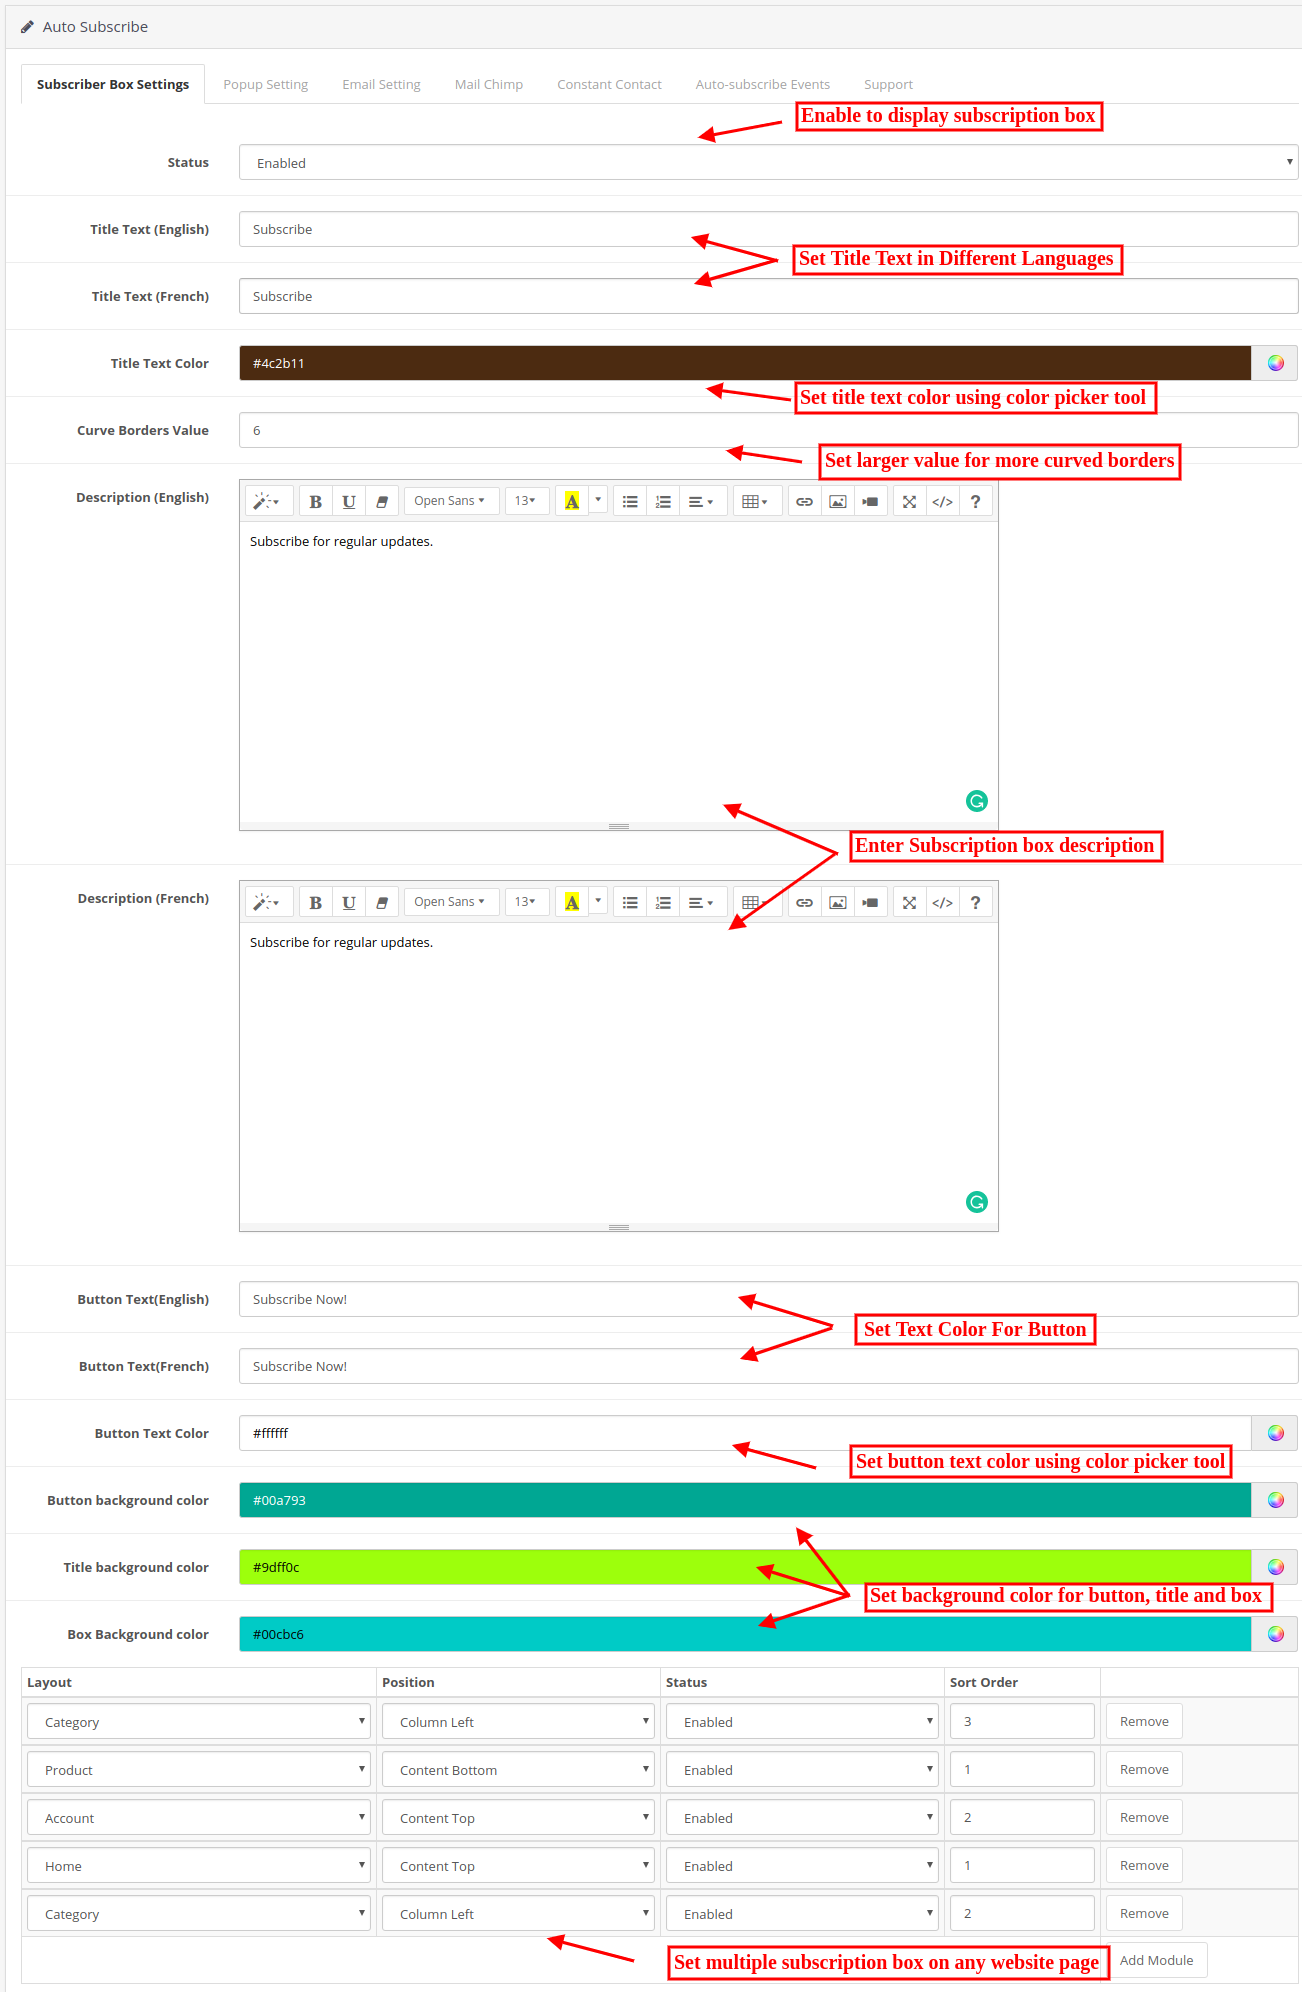
After successful installation, you can configure the OpenCart product subscription module as described in this user manual. There are multiple Configuration tabs as shown below:
Subscriber Box Settings
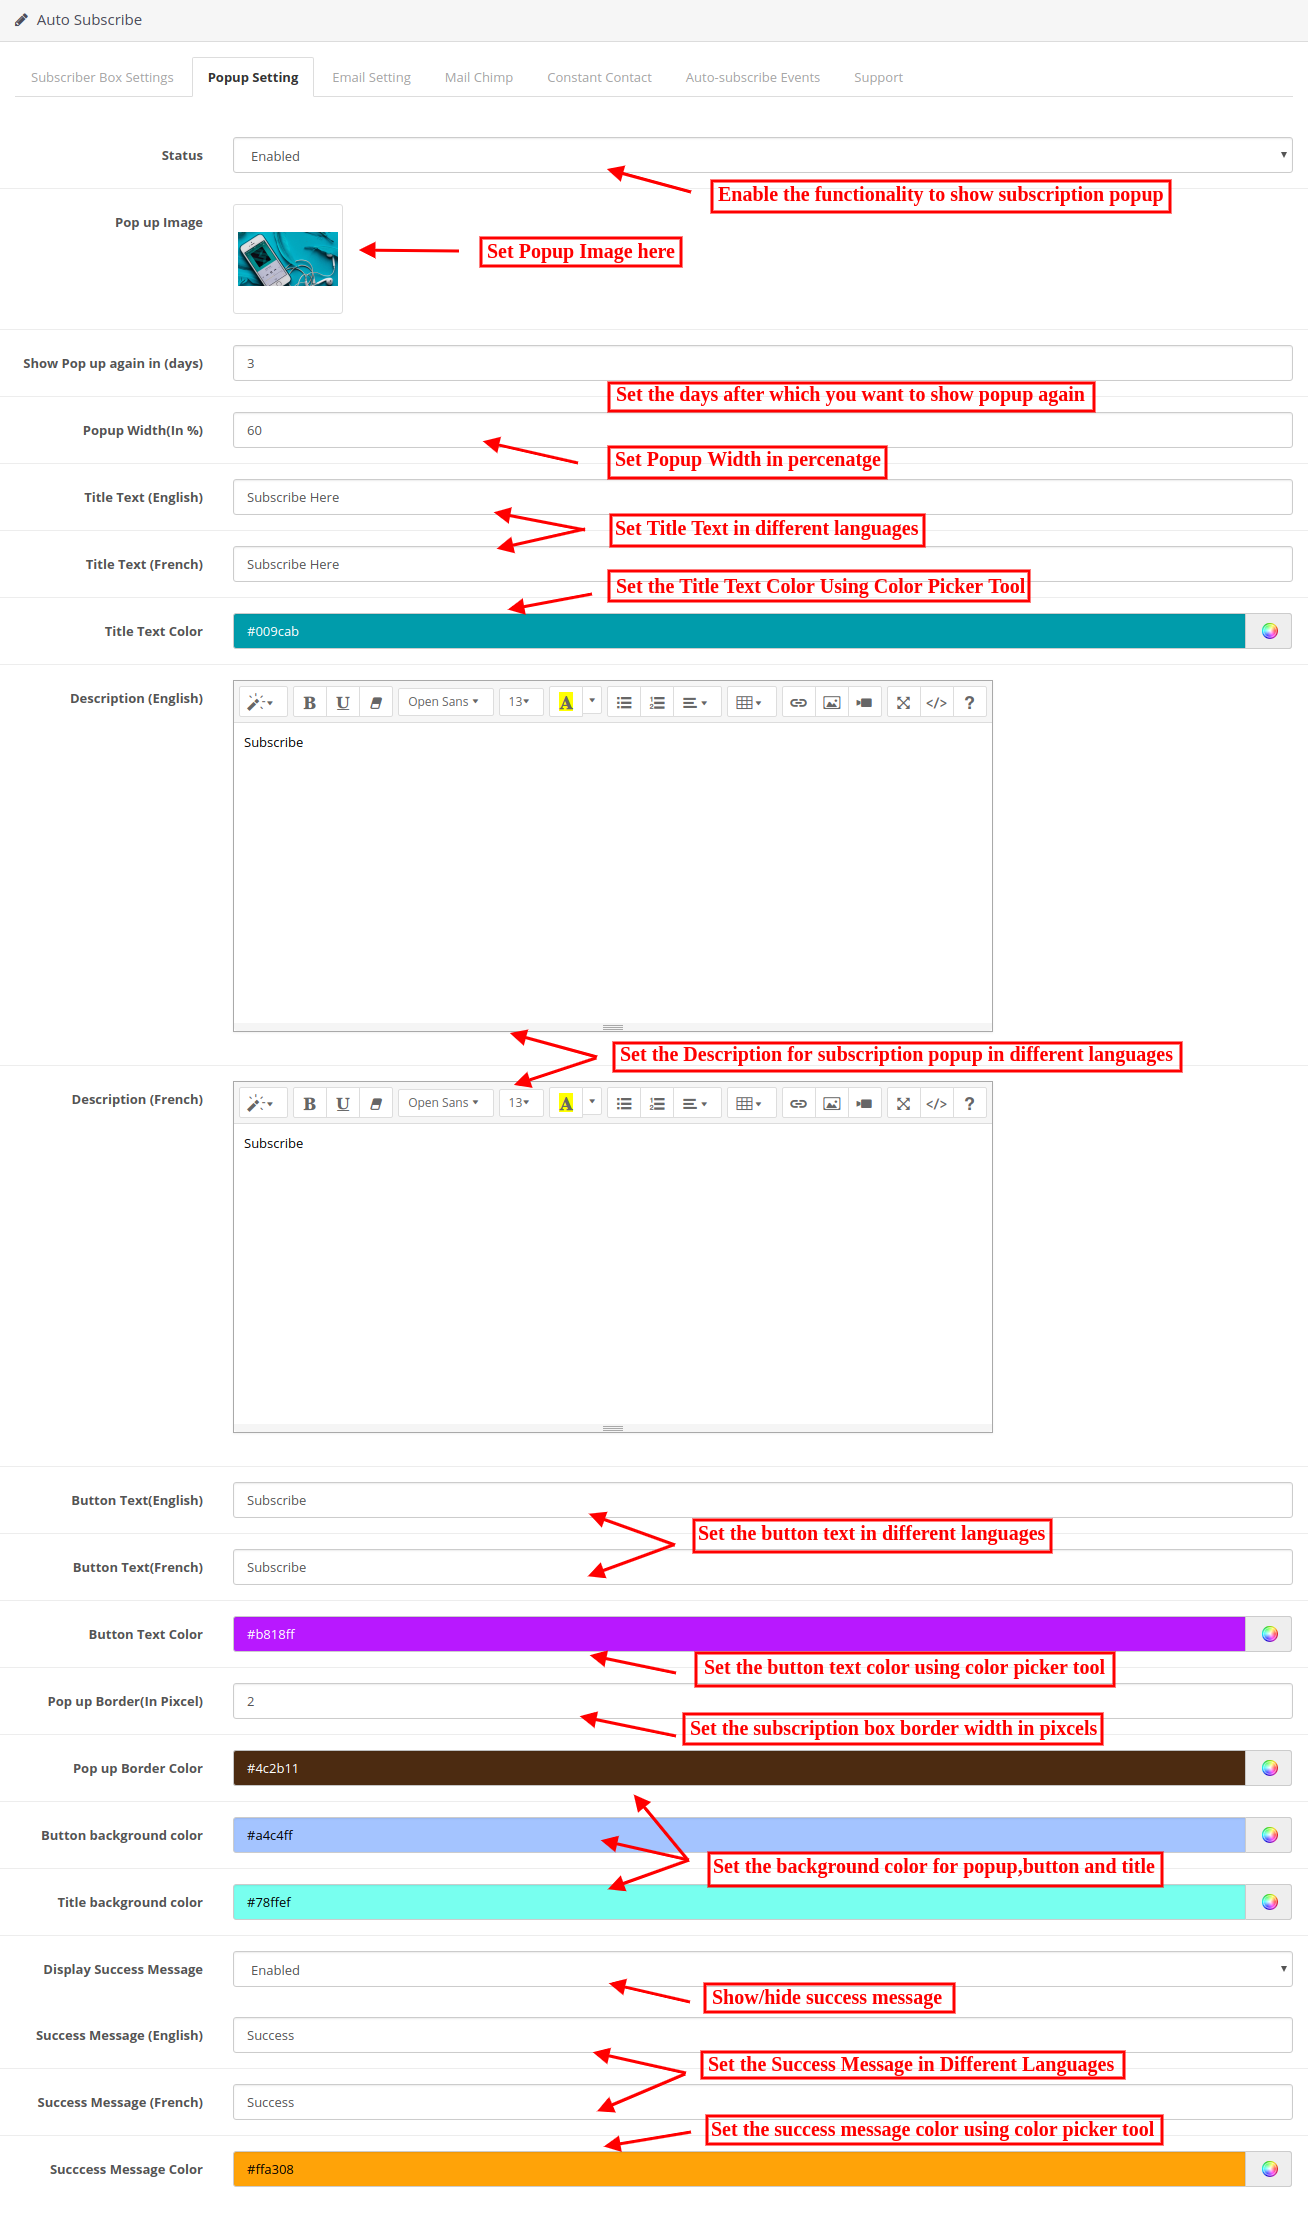
Popup Setting
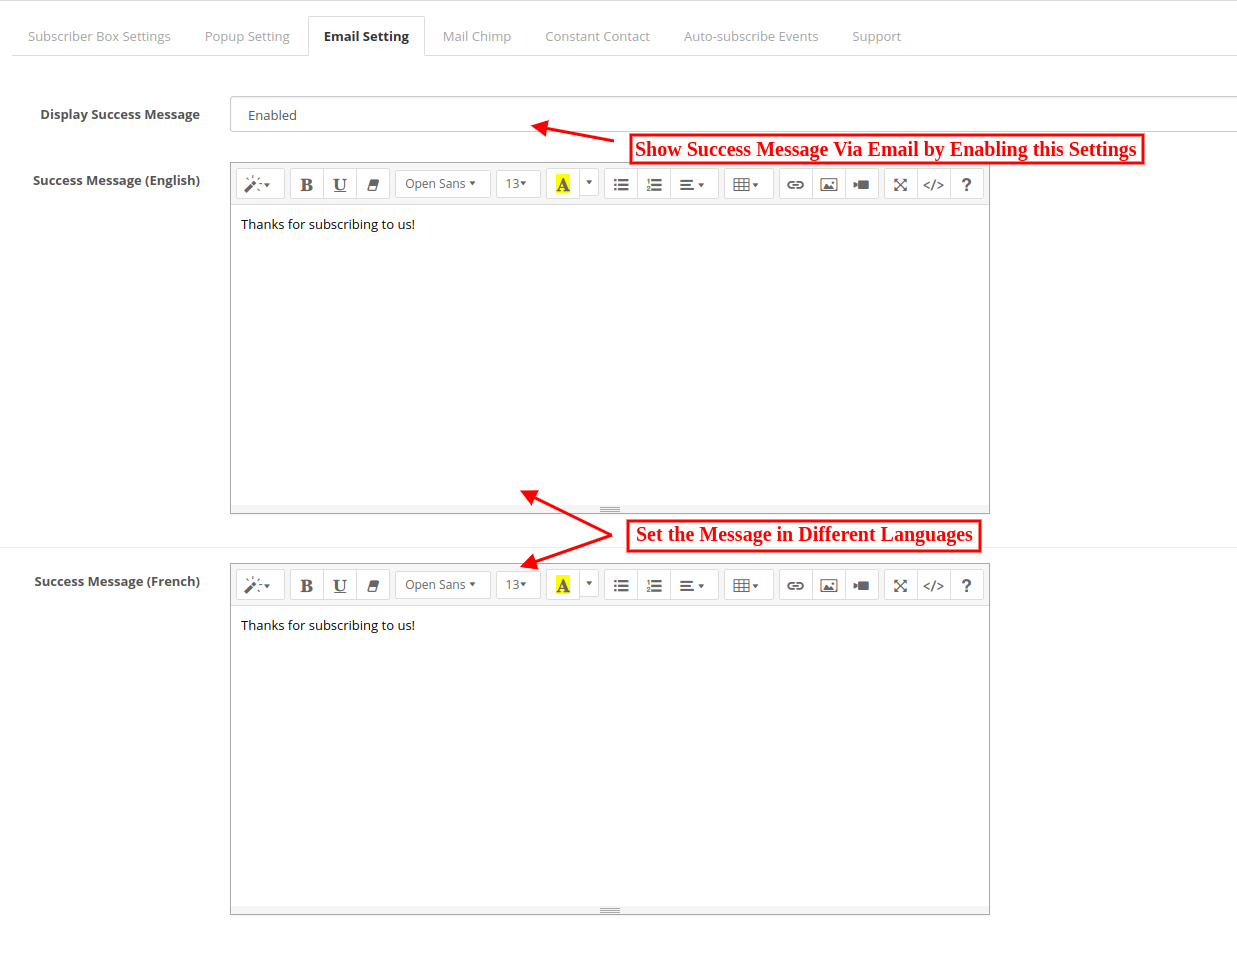
Email Setting
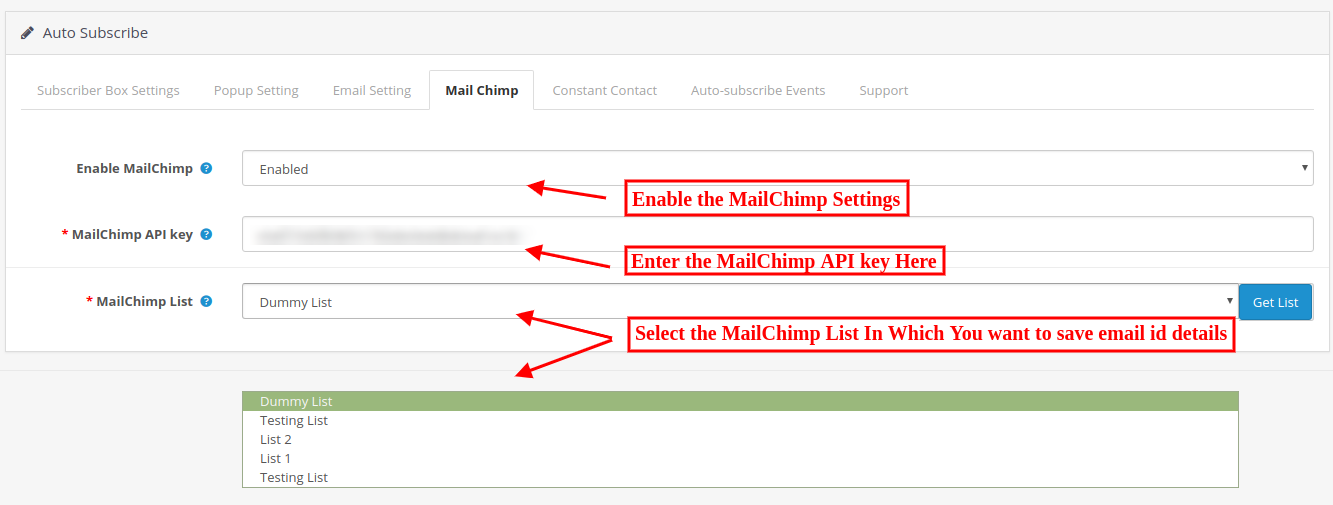
Mail Chimp
Constant Contact
Auto Subscribe Events
3.1 Subscriber Box Settings
Opencart admin can customize the subscription box to be displayed in the Opencart eCommerce store front by using the following settings option available.
Status: Enable the functionality for showing subscription box on wbesite pages.
Title Text: Enter the title of the subscription box in different languages.
Title Text Color: Select the title text color using color picker tool.
Curve Borders Value: The Opencart store admin can enter the radius of curve borders. This value will be applied to the four corners of the subscription box on front. Higher the value will result more curves.
Description: Enter the text for describing to visitors, the advantages of subscribing to your store. Admin can enter description in different languages.
Button text: Enter the button text here in different languages.
Button text color: Choose button background color using color picker tool.
Button Background Color: Select a color for the background of the button on subscription box.
Title Background Color: Set title background color here.
Box Background color: Choose a background color for the subscription box.
Add Module: Admin can select different pages and set the position of showing subscription box on it. Admin can disable any module if he wants to disable it. Admin can also show multiple subscription boxes on the same website page by selecting its sort order. Any module can be removed from the admin interface of OpenCart MailChimp extension anytime as per the requirement.
3.2 Pop up Settings tab
The OpenCart MailChimp Integration allows store admin to customize the pop-up box for showing on website homepage using the following setting option available.
Status: Enable or disable the pop-up display on the homepage. One cannot view subscription pop up on the front until this is enabled.
Pop up Image: Select the image for showing with subscription popup.
Show pop up again in (days): You can choose the duration (in days) for which the subscription popup will appear in the front-end. If you want the pop-up to appear only once in a lifetime, type in a number, say 999. If you want it to appear every time a user lands on the home page, type the value 0.
Pop-Up Width: Enter the value in percentage for setting popup width. Higher value will show larger width.
Title Text: Enter the popup title text in different languages.
Title Text Color: Select the title text color using color picker tool.
Description: Enter popup description in multiple languages for describing the store visitors the need of subscribing the store.
Button Text: Enter the button text in multiple languages.
Popup Text color: Set the popup text color using color picker tool.
Pop Up Border: Set the width of pop up border from the admin interface of OpenCart MailChimp Integration module.
Popup Border Color: Set the color of this border using color picker tool.
Button background color: Change the background color of your button as per the website theme.
Title background color: MailChimp Newsletter Subscription module allows setting the background color of the pop-up title.
Display Success Message: Enable to show success message after successful subscription.
Success Message: Set the message which you want to dispaly on website after successful subscription. You can enter success message in multiple languages.
Success Message Color: Choose the desired color for the success message using color picker tool.
3.3 Email Settings
Admin can show an email to the subscribers.
Display Success Message: Admin can Enable/Disable mail sending after subscription.
Success Message: Opencart store admin can set the mail content. This mail will be sent on subscription. In case of no content, the default mail will be sent to the customer.
3.4 MailChimp Tab
In this tab, OpenCart store admin can choose from the lists in his/her MailChimp account where emails should be added.
Initially, a message will be displayed like No list exists for this API key!
Enable MailChimp: Enable or Disable MailChimp from the admin interface of OpenCart product subscription module.
MailChimp API key: Enter the API key to fetch lists from your account.
MailChimp List: Choose from the lists displayed here. On the selected list, the email id details will be transferred.
3.4.1 Steps to generate Mailchimp API key
Step 1: Click on https://www.mailchimp.com and first of all create a user account in MailChimp, if you don’t have a MailChimp account. Once you create an account, log in to it.
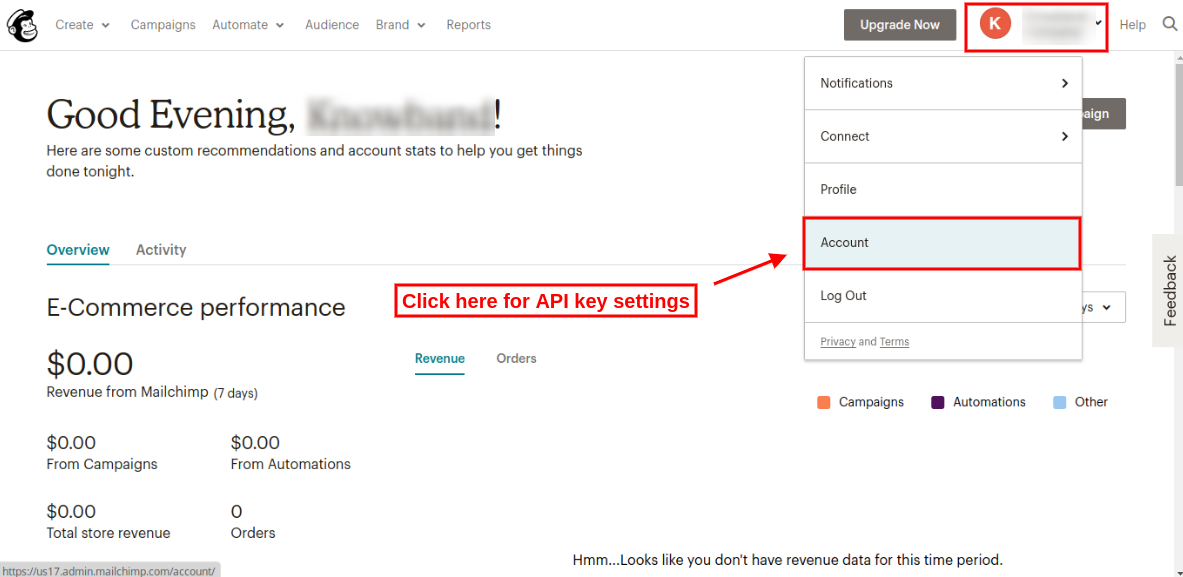
Step 2: On the upper right corner of the dashboard, there will be a drop-down. Select the “Account” option from the list and click on that option.
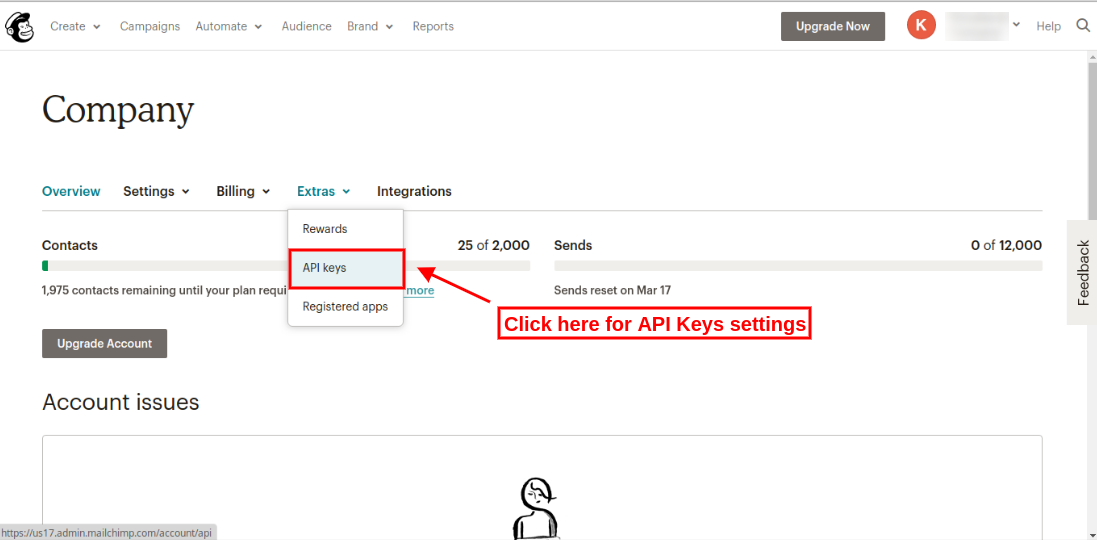
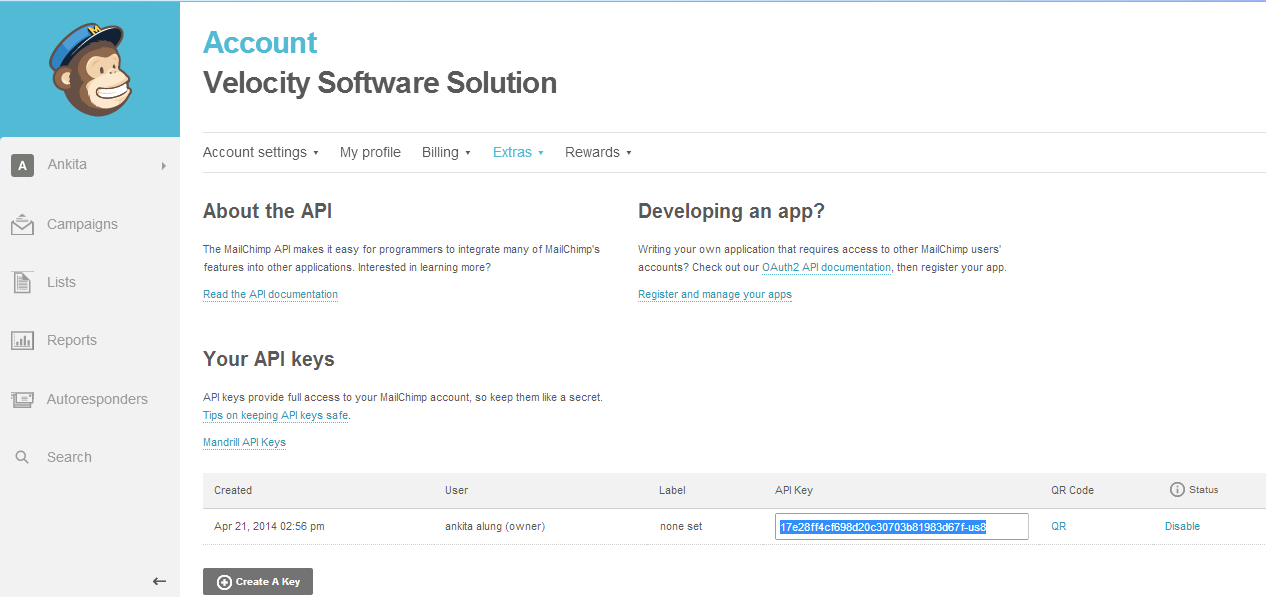
Step 3: After clicking on the “Account” section, there will be some sub-menus. Select the “Extras” submenu. There will be some options, select “API keys” from these options as shown below:
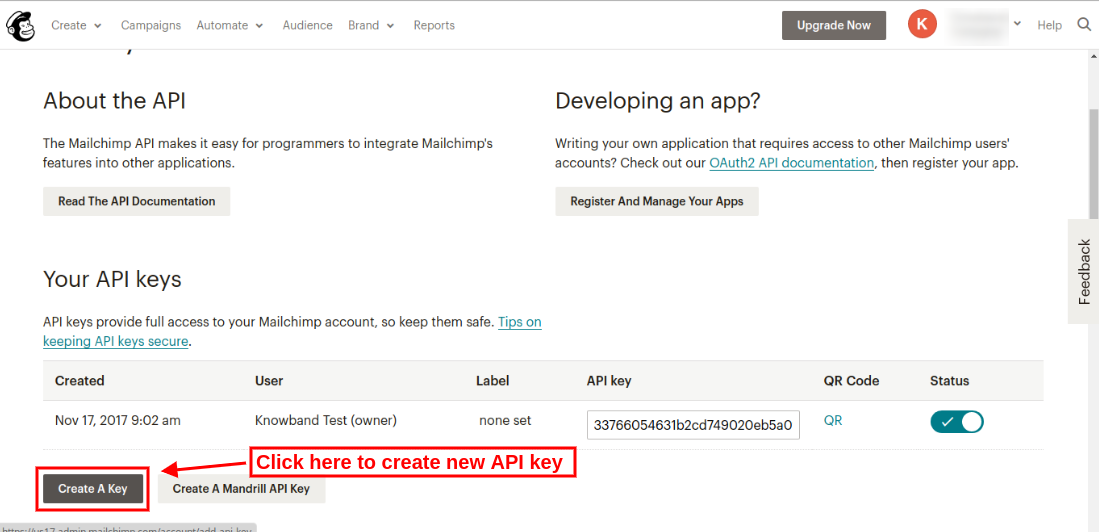
Step 4: On API keys page, click “Create a key” and generate a new API key.
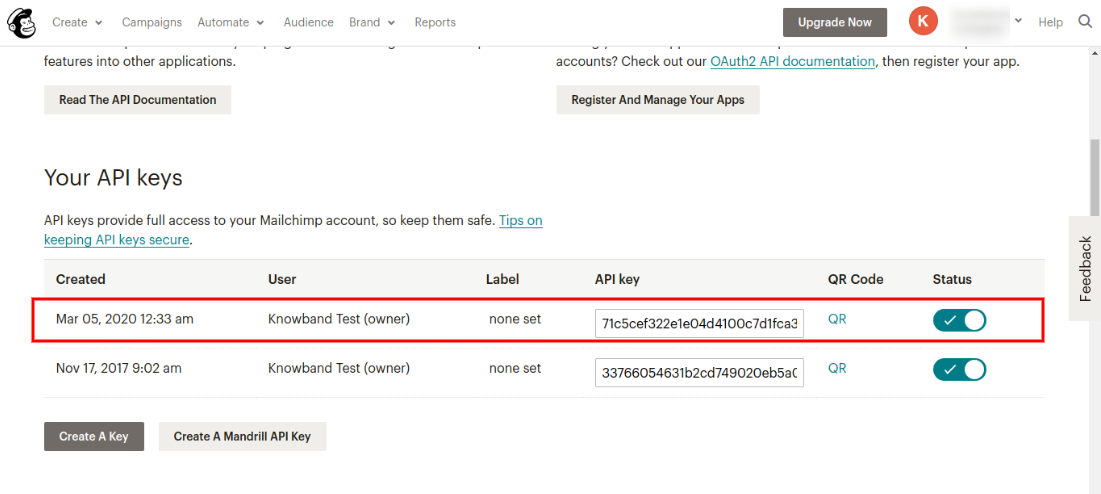
After clicking on Create a Key button, the user can view the newly created API key as shown below:
To create MailChimp Audience
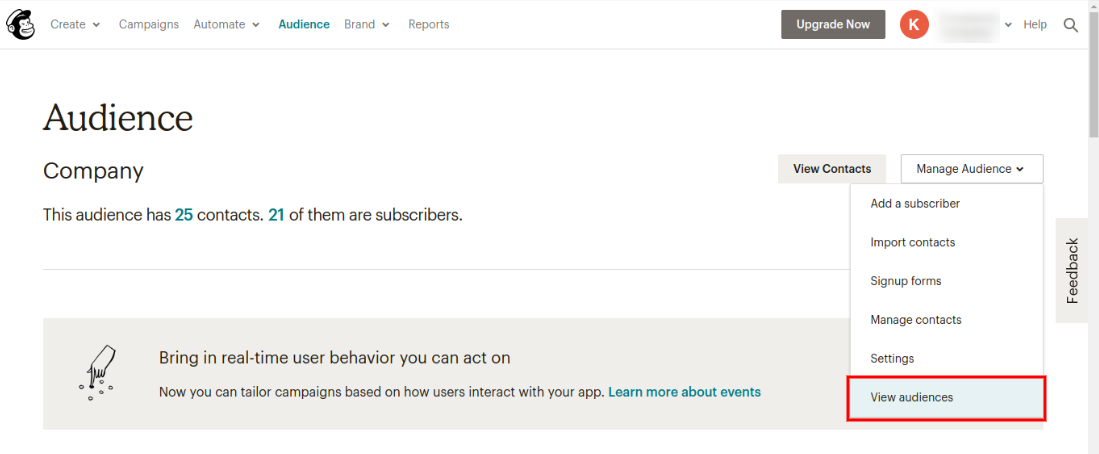
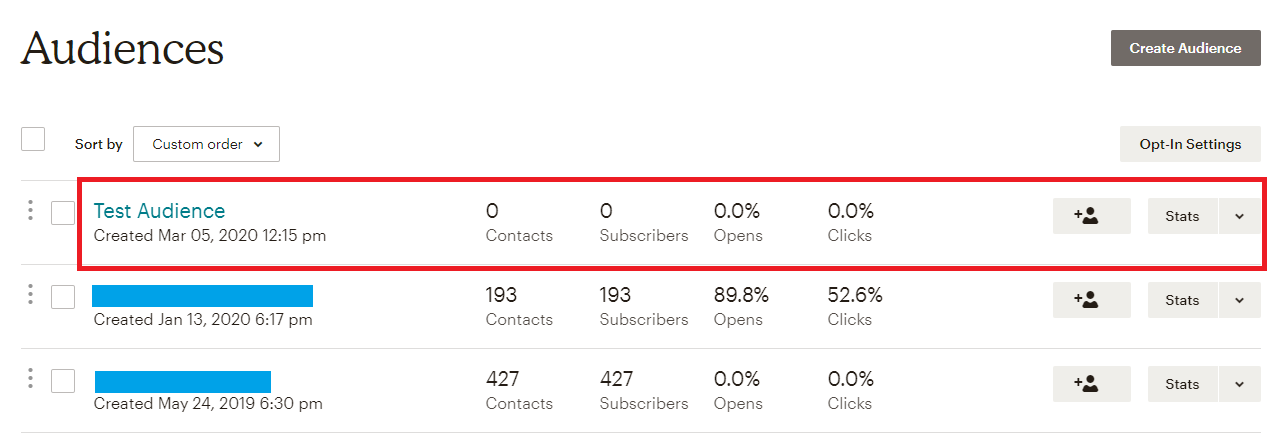
Step 5: Click on the “Audience” tab in the upper menu for rreating new audience. Admin will be redirected to a new page where he/she can view previously created audiences and also create a new audience. The screen is given below:
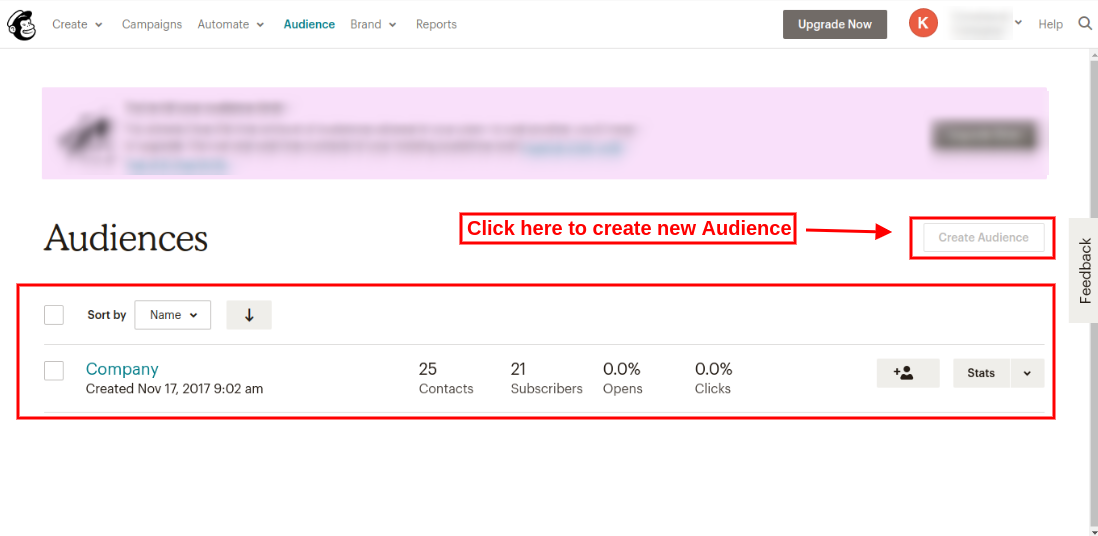
Step 6: On clicking “view audiences” option, admin can view previously created audiences as shown below:
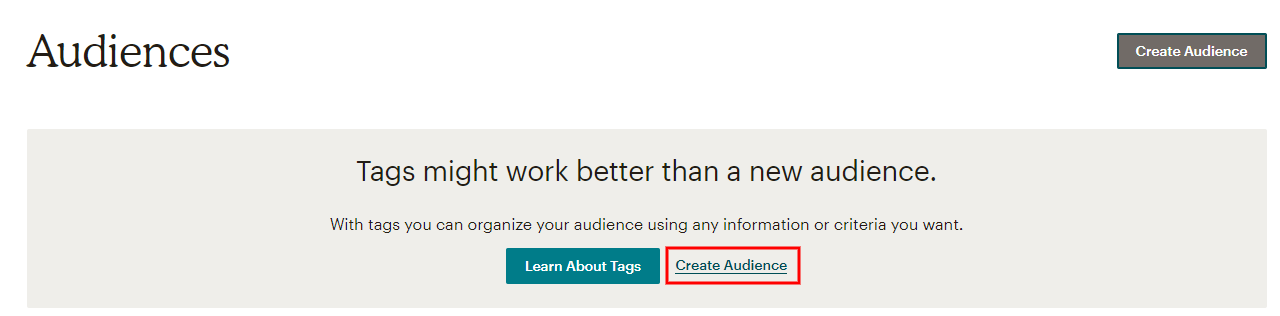
Admin needs to upgrade his/her account for adding more audiences. In the free account, admin can create a single audience only. Admin can upgrade account and then click on “Create Audience” option as shown below:
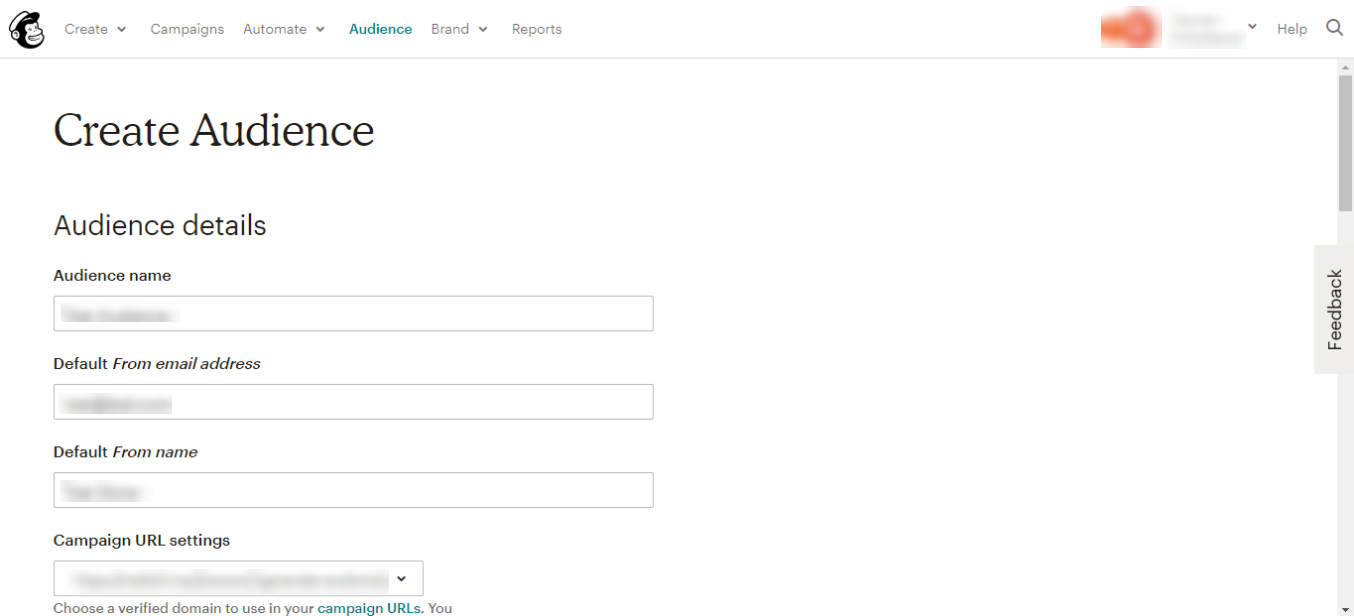
After clicking on “Create audience” option, admin needs to fill the required information:
After saving all the details, the admin needs to save it. This way, admin can create new audience ash shown below:
3.5 Constant Contact Tab
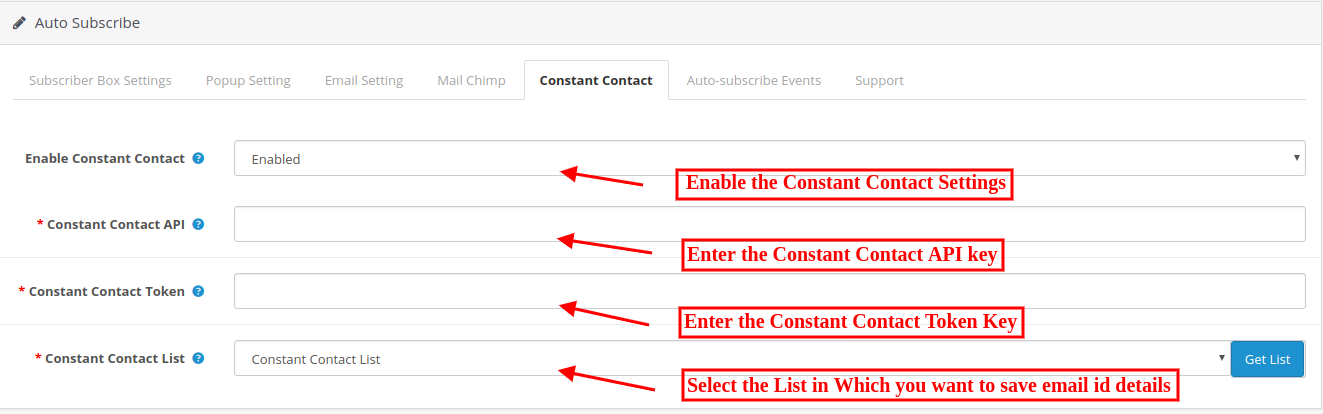
In this tab, admin can choose from the lists in his/her Constant Contact account where email id details should be added. Initially, a message will be displayed like No list exists for the combination of Key and Token provided above!
Enable Constant Contact: Enable if you want to save email id details in constant contact account.
Constant Contact API key: The Opencart store admin needs to enter API key. As soon as admin enters the key and clicks on the text box, the request is sent and lists (if any) are fetched and displayed in a drop-down box.
Constant Contact Access Token: The Opencart store admin needs to enter access token along with API Key. As soon as admin enters the token and clicks outside the text box, the request is sent and lists (if any) are fetched and displayed in a drop-down box.
Constant Contact List: Choose from the lists displayed here.
3.6 Auto Subscribe Events
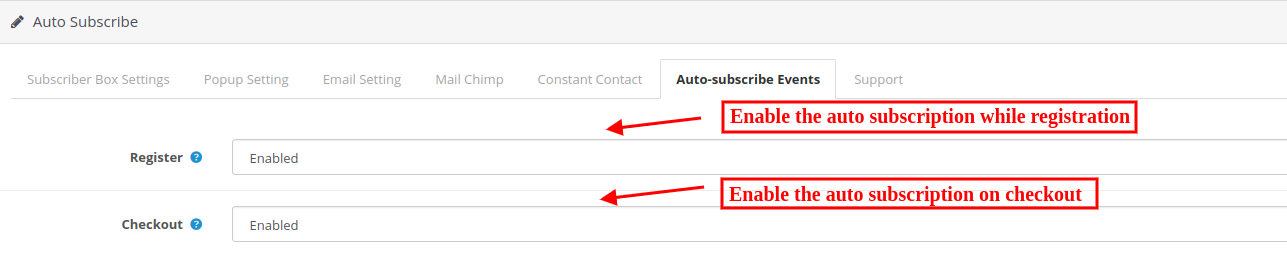
Auto-subscribe events are the events on which the users can be subscribed to the configured lists in admin automatically. On such events, the user will not be notified of being added to the subscription lists you have chosen in admin but they will receive the email for the same if you have turned on the option to send emails (in subscriber box settings tab) on subscription.
Register: Turn on Register, if you want a user to be automatically added to your list on successful registration.
Checkout: Turn on Checkout, if you want a user to be automatically added to your list on successful checkout.
4.0 Requirements
1. Php version 5.3 or greater
To access the API of constant contact, one must use the PHP version equal or higher than 5.3. Unless your server is running the required PHP version, you will not be able to successfully install this plugin.
2. MailChimp
Before using this module, you must have a valid account with MailChimp and one or more lists created in it. Note that, you must also have the access right to alter your email subscribers list. You will need to provide these for this module to work.
API Key: You can obtain your API key from your MailChimp dashboard, or you can create one if you don’t have one already.
3. Constant Contact
You need to have a valid account with constant contact and one or more lists created into it. Note that, you must also have the access right to alter your email subscribers list. You will need to provide these for this module to work.
API Key: You get an API key from constant contact via email as soon as you register your application.
Access Token: In addition to API key, you also needed an access token to grant permission to access API.
Note that, this plug-in works for constant contact API version 2 since version 1 is deprecated and will soon be discontinued.
5.0 Website Front-end Interface
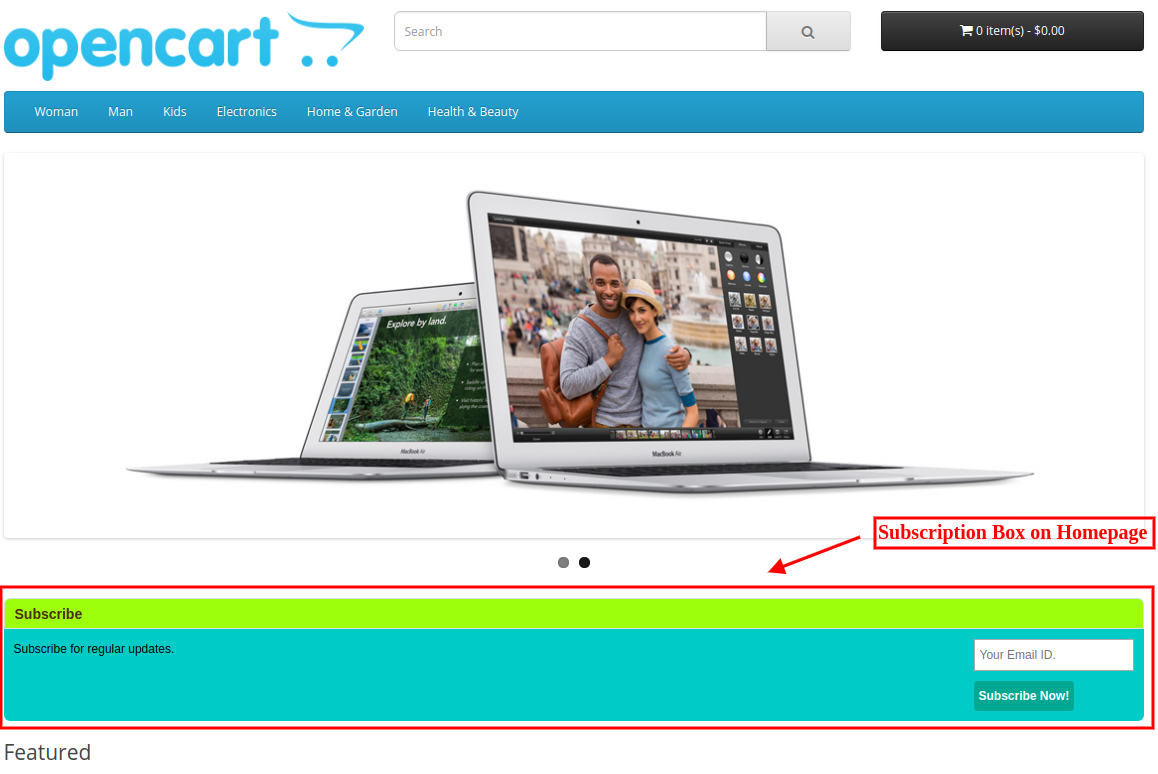
The online store visitors can view the subscription box on the website pages. On the front end, users will have the option to subscribe themselves by clicking on subscribe button. The module will look like the following screen. The visitor can type in email id and click on subscribe button to add itself to the lists configured. A success or an error message will be displayed to notify the user.
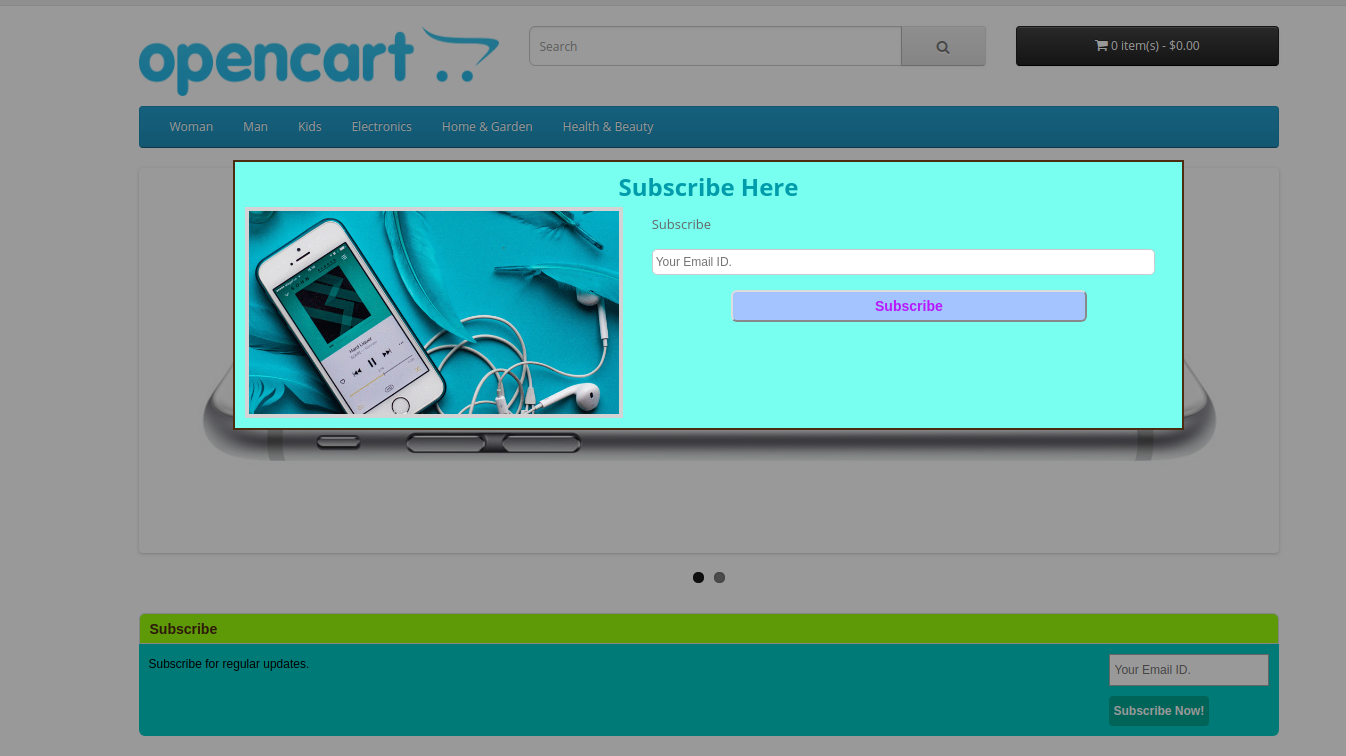
On the user’s end, pop up will appear something like this screen below, depending upon your chosen display settings.
If one chooses an image to be displayed on pop up from admin settings, a pop up like shown above will appear. Admin can also choose to show a pop up without any image, by not choosing any image in the admin panel.
After Successful subscription, the online users can view the success message.