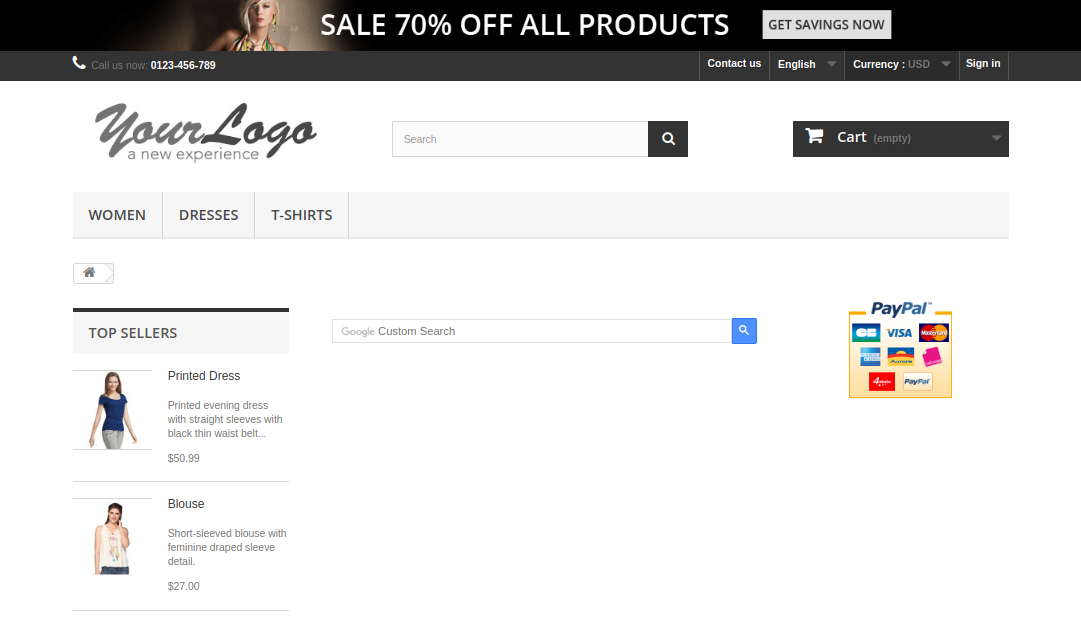
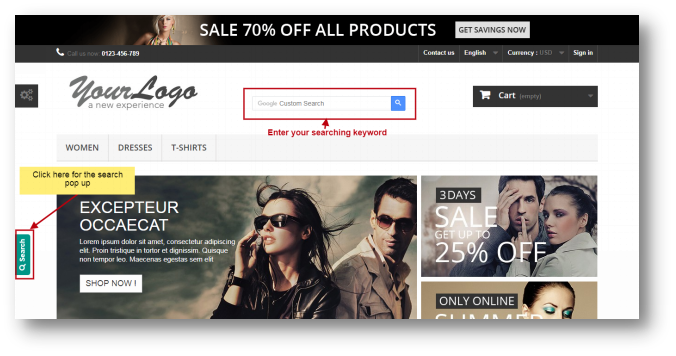
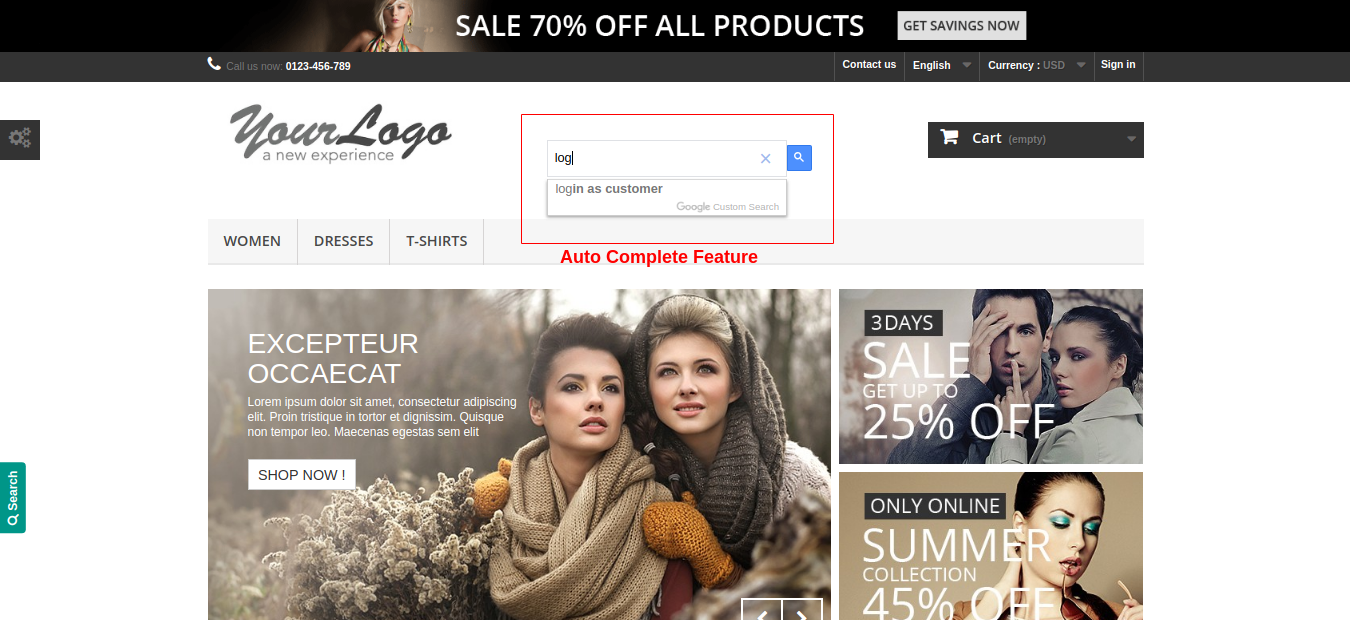
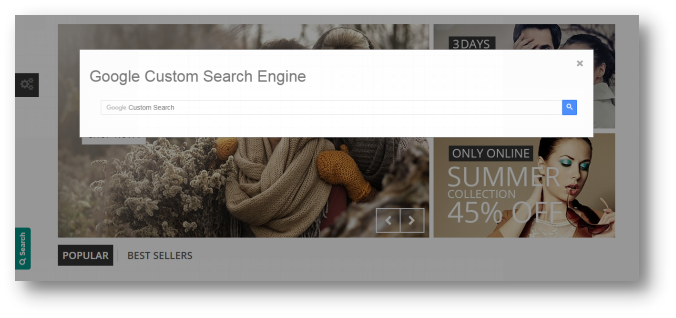
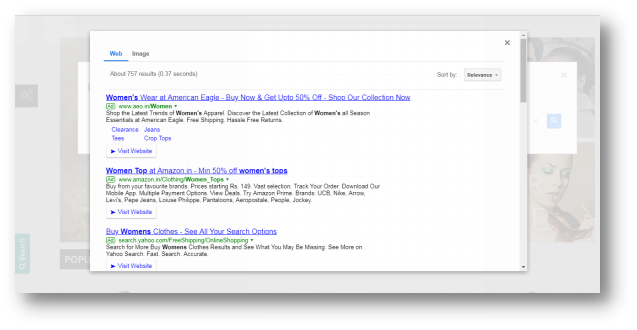
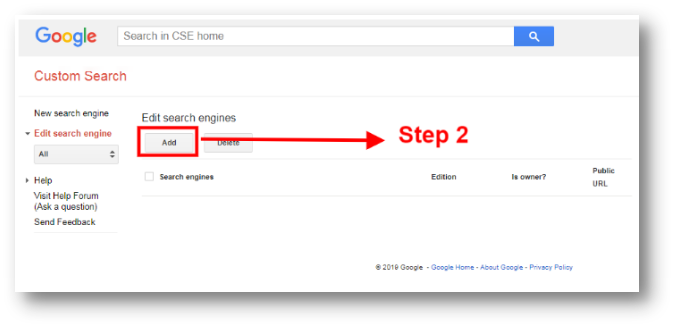
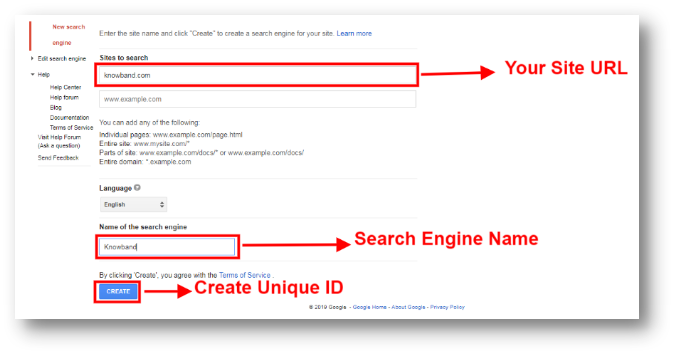
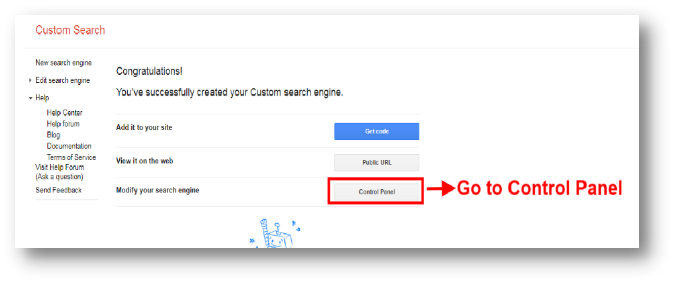
Ever searched for something on a site and thought it should also have a Google search Feature? Well you can do it now by Prestashop Google Custom Search Addon by Knowband. Through the Prestashop Custom Google Search Module, you can add a custom Google search feature on Web Store. It means that whenever a customer will search something on your website, it will show the search result from Google. As a Web store owner, you can also set the Websites from only which the search will be shown to your customers from the backend.
PS Google Custom Search easily incorporates your web store search with your Prestashop Web store search.
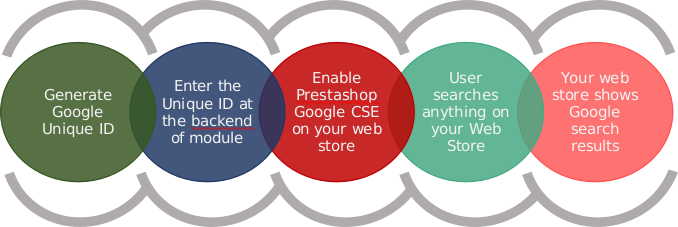
How it works?
2.0 Features of Prestashop Custom Google Search Module
3.0 Installation Guide for PS Google Custom Search
The store admin can follow these simple steps for installing the Prestashop Custom Google Search Module on their eCommerce store:
1. Firstly, download the addon package from the Knowband store.
2. You will get a zipped file containing the source code and user manual. Unzip the complete package in the root directory of your Prestashop store through FTP manager (like Filezilla or WinSCP – download here: https://filezilla-project.org/). You’ll find the files and folders as shown in the image below:
The Prestashop Custom Google Search addon is now installed and ready for use. Now the admin can configure the various configuration settings in accordance with their Prestashop site.
4.0 Admin Interface of Prestashop Google Custom Search Plugin
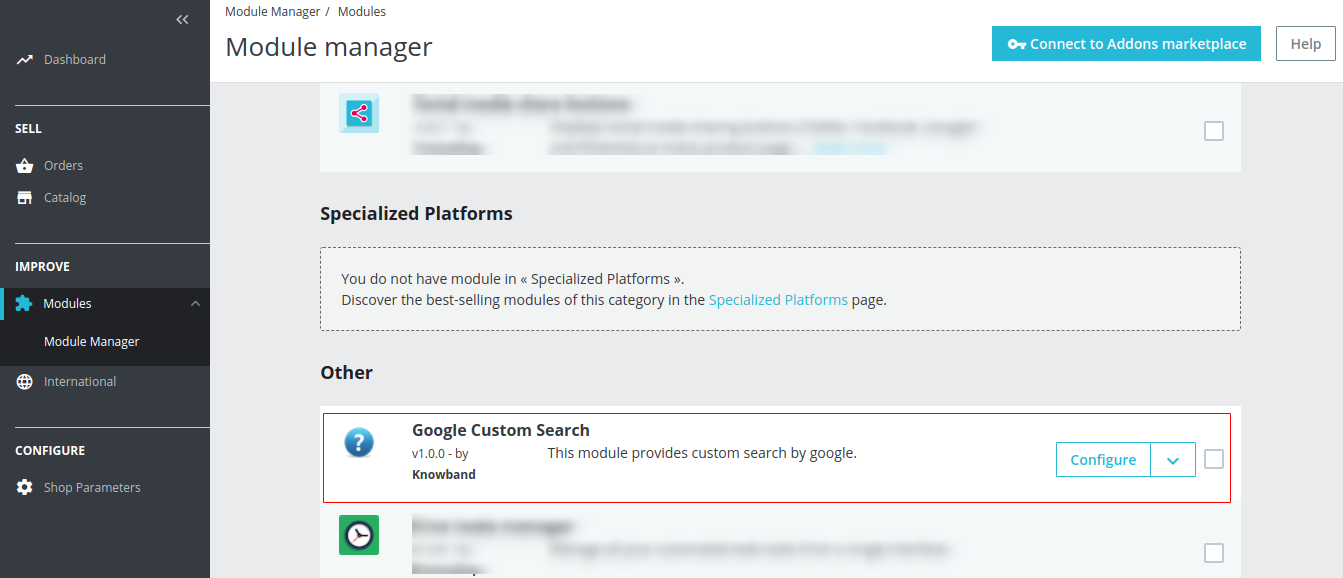
Just after successful installation of Prestashop Custom Google Search Module at your website, you can configure Custom Google Search settings as per your needs. In the admin panel or dashboard, Click on “Modules and Services” and then on “Configure” button provided next to Google Custom Search Module.
Once Clicked on Configure, the following page will open Up:
4.0.1 General Settings
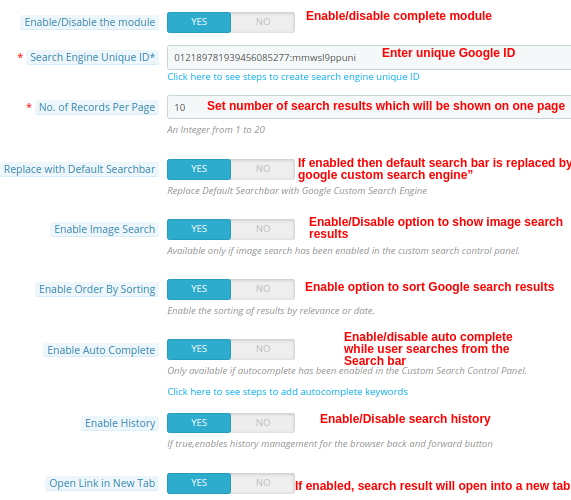
From this setting of the Prestashop Google Custom Search module, Store owner can enable/disable the complete module and do much more. The following screen will be shown to the Admin:
As a shopper, you’ve probably abandoned plenty of carts yourself. As a retailer, you often wish that more people would actually complete a purchase instead of leaving their carts behind. But can you do anything about eCommerce cart abandonment, and win back some of those lost sales?
You certainly can, but there are a lot of different areas to navigate and improve.
What is cart abandonment?
Cart abandonment is when an online shopper adds at least one product to their cart and then exits without making a purchase. Abandonment rates are staggeringly high — demonstrating the huge revenue opportunity to win back these shoppers and make a sale.
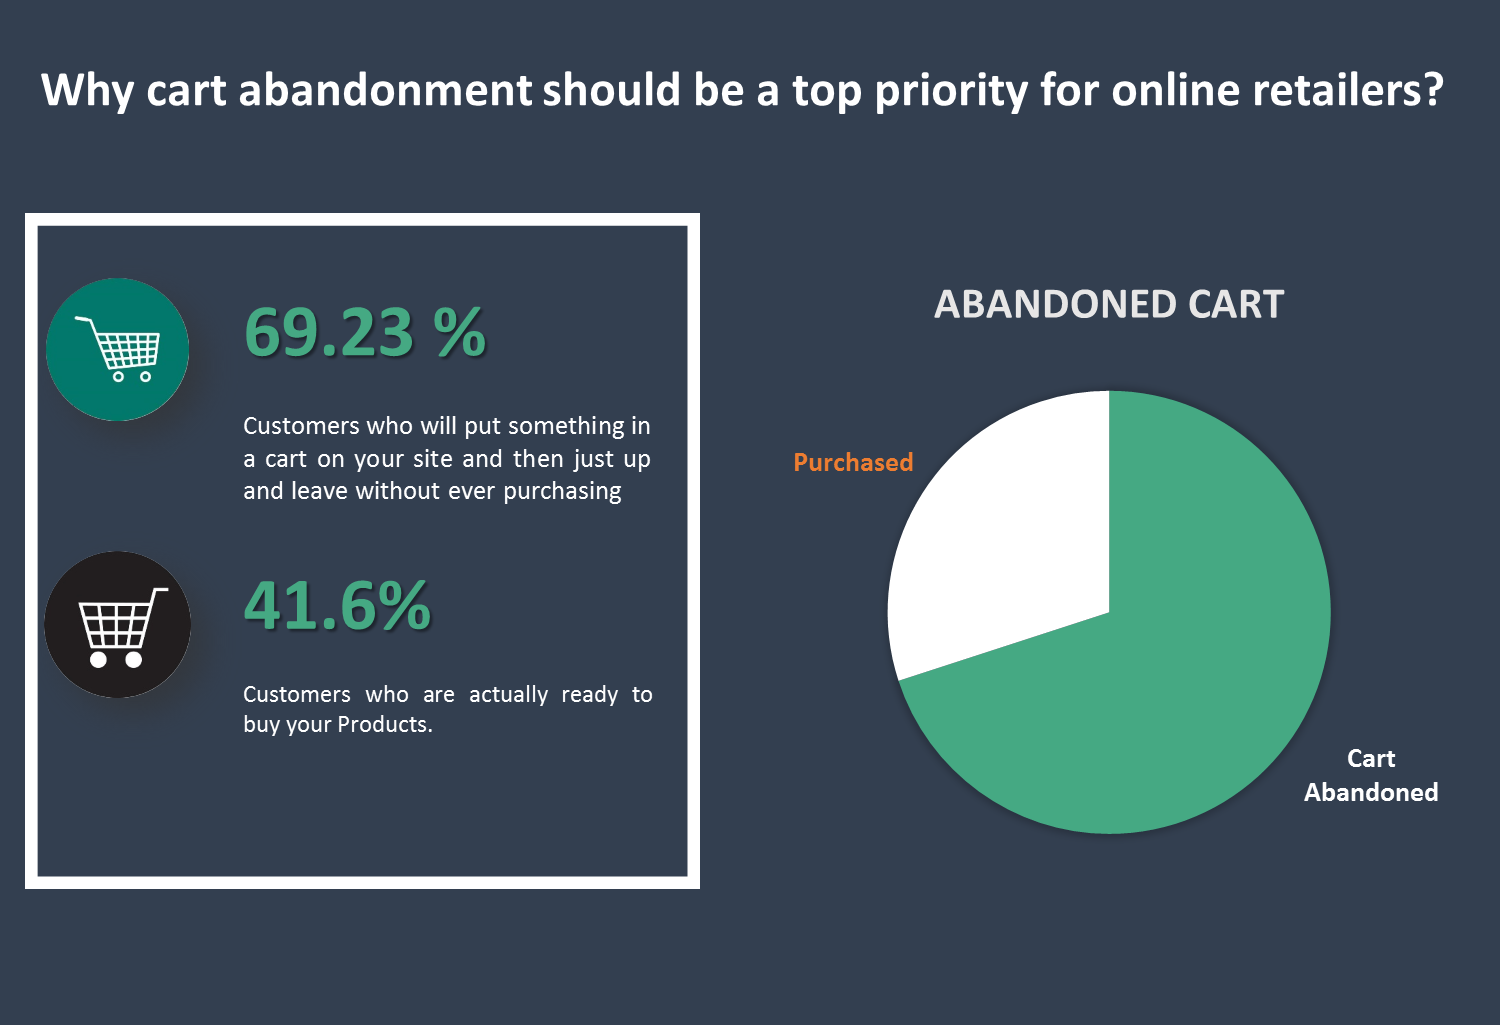
Why cart abandonment should be a top priority for online retailers? 69.23% –– that’s the average percentage of the customers who will put something in a cart on your site and then just up and leave without ever purchasing. 58.6% –– that’s the percentage of people who say they’ve abandoned a cart within the last 3 months because “I was just browsing / not ready to but”. These people likely won’t ever even initiate your checkout flow.
But for the 41.6% of other abandoned carts, many people will begin your checkout flow. Why does this matter? Because when a customer begins the checkout flow, they must first enter their email. And, when you have their email, you can trigger an abandoned cart series to bring that customer back and earn their sale.
To convert the abandoned cart into purchases is a difficult task and requires a lot of efforts.
Here by Opencart Abandoned cart module we simplify this process for you. This module allows the Admin to view all the abandoned carts and take actions accordingly. Admin can create their own e-mail template, be it a discounted e-mail or non-discounted e-mail and send it to the customer automatically through this module.
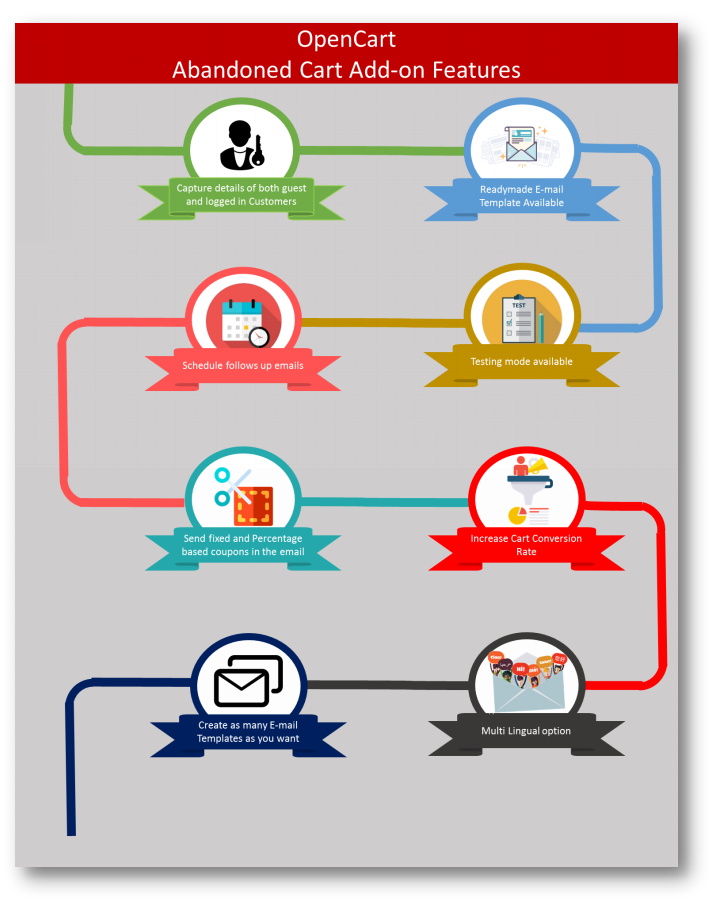
Salient Features of the OpenCart Abandoned Cart extension:
The extension analyzes the behavior of the online shoppers and tracks and marks the abandoned carts on the online store.
With the extension, the store admin can modify the follow-up email templates and can make as many new templates as he wants from the admin interface.
The extension offers discounted and non-discounted email templates. The admin can highlight an attractive discount and a coupon code in the email to convince buyers to purchase the products.
The store admin has to set a time-delay after which the extension automatically sends the follow-up email to the customers. The store admin doesn’t have to send the reminder emails manually.
The e-merchant can check and see all the captured abandoned carts and the converted carts through sending emails in the back-end of the extension.
With the awesome Analytics tab, the store owner can compare the total abandoned carts with the total converted carts and can make new strategies to increase the converted carts.
The extension offers a Test mode option by which the store admin can test and review the reminder emails by sending them to a given test email address.
The extension is mobile responsive and offers multi-language support.
The e-merchant can also view and check all the coupons which are generated by the extension. The admin can check how many coupons have been used by the customers and how many are still unused.
2.0 Installation Guide
Before starting the installation process, you have to buy the Abandoned Cart Serial Reminders by the Knowband store. Once purchased, you will receive the following files on your registered email.
Source code of Opencart Abandoned cart extension in zipped file format.
User Manual of Opencart Abandoned cart extension.
Now in order to install this on your online shop, follow the given steps:
Step 1: Unzip the zip file. You will get the folders as shown in the image below
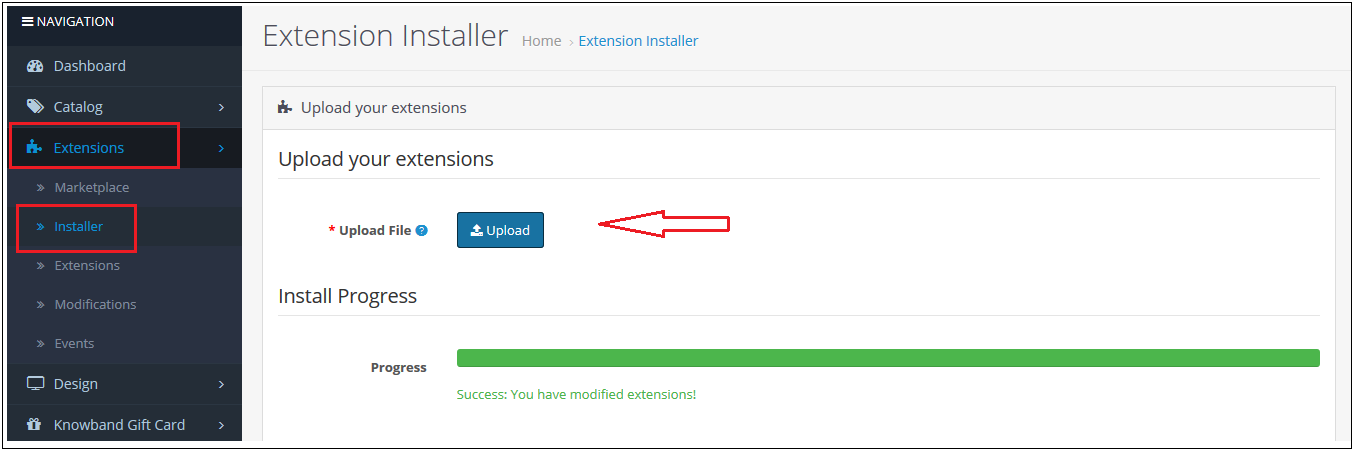
Step 2: Go to Extensions and then Installer. From here, you can upload the “kbabandoned_cart.ocmod” file and install the extension.
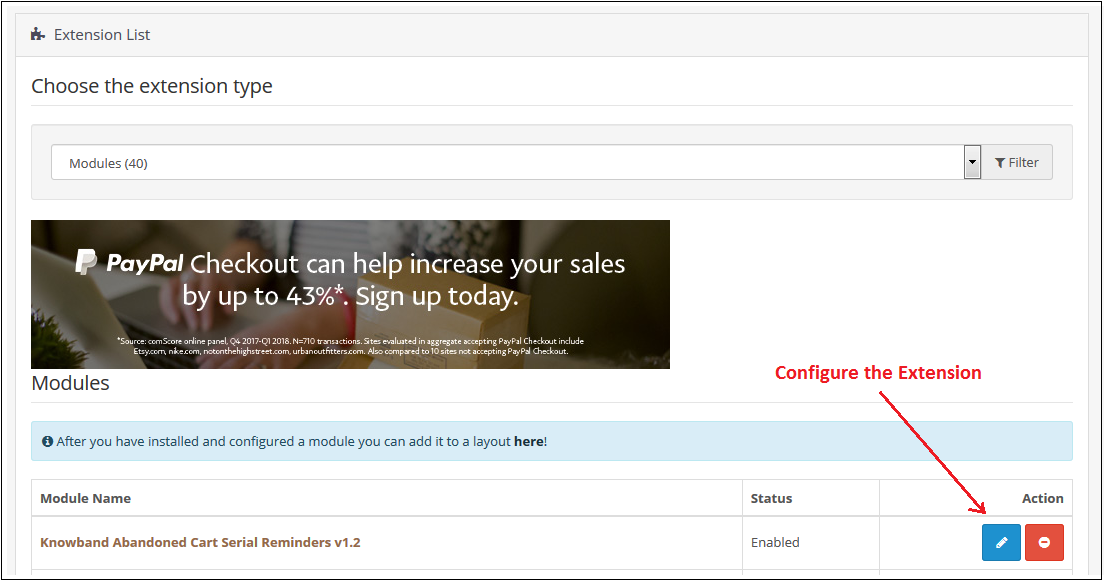
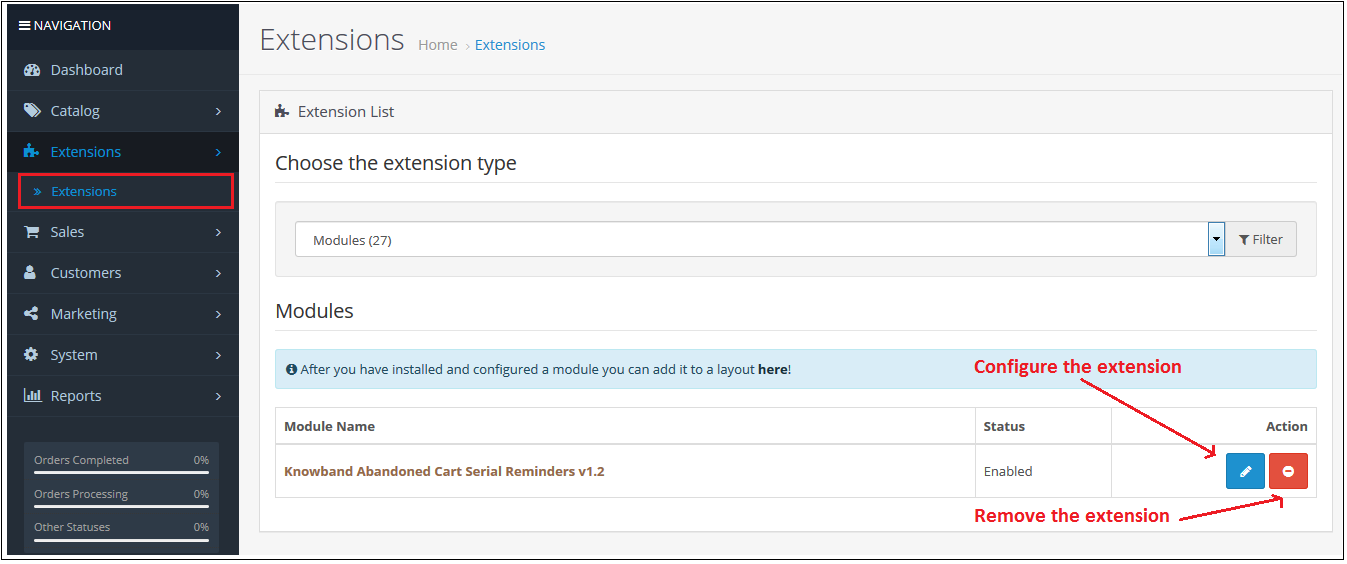
So Opencart Abandoned cart Module, is now successfully installed and is ready to use at your store. Go to the admin menu and click on the extensions. Choose the Extension Type as Modules. You will find a list of modules. Select the Knowband Abandoned Cart Serial Reminders.
3.0 Useful Cron Instructions
3.1 Reasons/Cases when the email is not sent to the customers
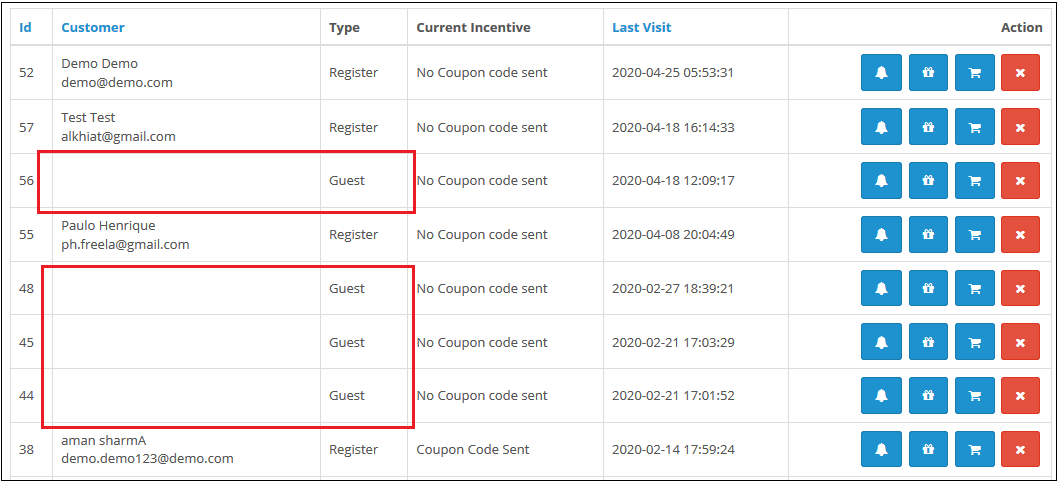
A. Email Id is not available (Guest customer)
B. If the cart does not satisfy the condition of serial reminders
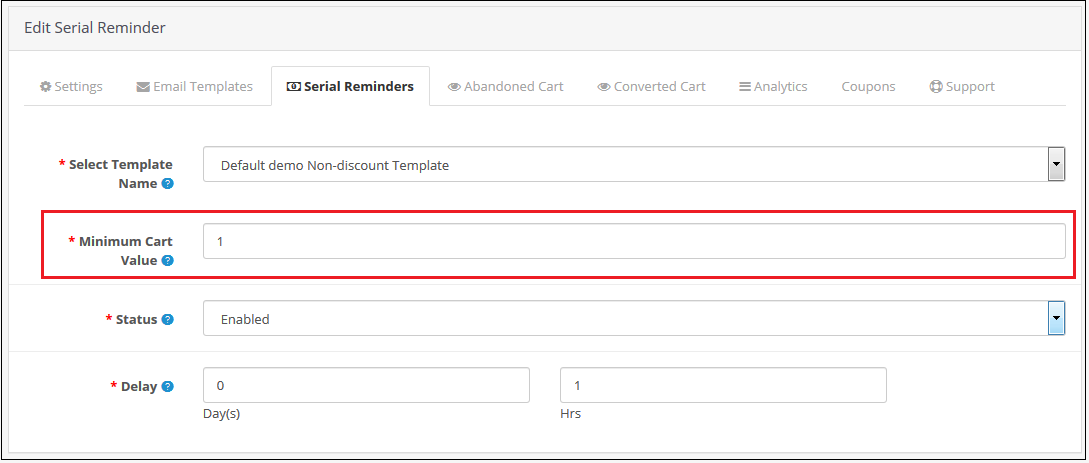
If the minimum cart value is greater than the abandoned cart value. For example, the minimum cart amount is $50 and the abandoned cart amount is $45. It will not send a reminder in this case.
If the delay is set to one day, so the reminders will not be sent to the customers whose carts are abandoned for less than a day. C. If you have not setup the Cron properly or if the Cron is not working.
3.2 Types of Crons
There are two types of cron that run every hour.
1. Cron to update the Abandoned cart: This cron runs every hour.
For example, suppose if the cron runs at 11:05, 12:05…..and so on and you have set “Mark Abandoned Cart” as 1 hour. When cron runs at 11:05 it will add all the abandoned cart created between 9:05 to 10:05. If you have set “Mark Abandoned Cart” as 0 hours then it will add all the abandoned cart created between 10:05 to 11:05.
2. Cron to send a reminder email: This cron also runs after every hour.
For example, suppose the cron runs at 11:11, 12:11…..and so on and you have set the Reminder for 1 day and ‘Mark Abandoned Cart’ as 1 Hour. When cron runs at 11:11 then the emails will be sent to all the abandoned carts between 9:11 to 10:11 of the previous day. If you have set Reminder for 2 days and ‘Mark Abandoned Cart’ as 0 hour then the emails will be sent to all the abandoned cart between 10:11 to 11:11 of the day before yesterday.
3.3 Procedure to configure CRON job
3.3.1 What is a cron?
A cron is a service that allows a user to automatically execute a script at a specific time.
For example, you can set a particular PHP script to be automatically executed every day at midnight.
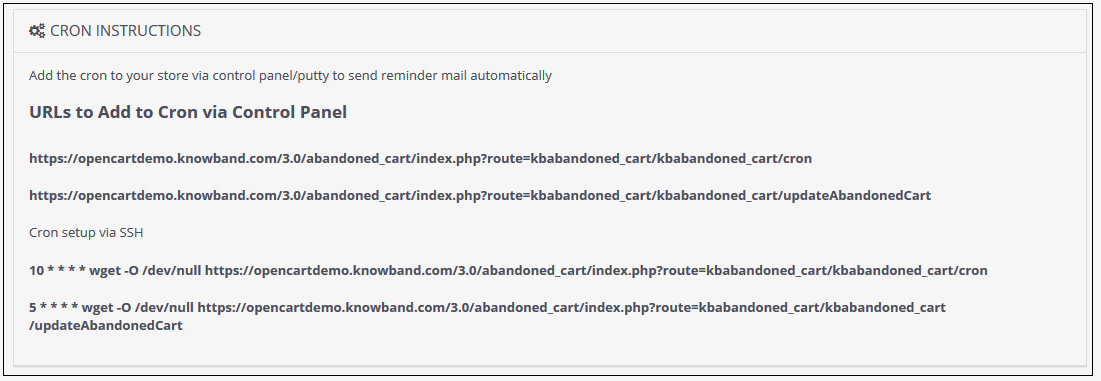
Add the cron to your store via control panel/putty to send reminder mail automatically Example URLs to Add the Cron via Control Panel
4.0 Admin Interface of OpenCart Abandoned cart extension
To configure the Abandoned cart email follow-up extension for OpenCart, Navigate the settings in the following order:
Admin Panel > Extensions >Modules> Abandoned Cart Serial Reminders
The Admin Interface of OpenCart Abandoned cart recovery email extension includes the following main settings:
General Settings
E-mail Templates
Serial Reminders
View Abandoned Cart
View Converted Cart
Analytics
Coupons
Support
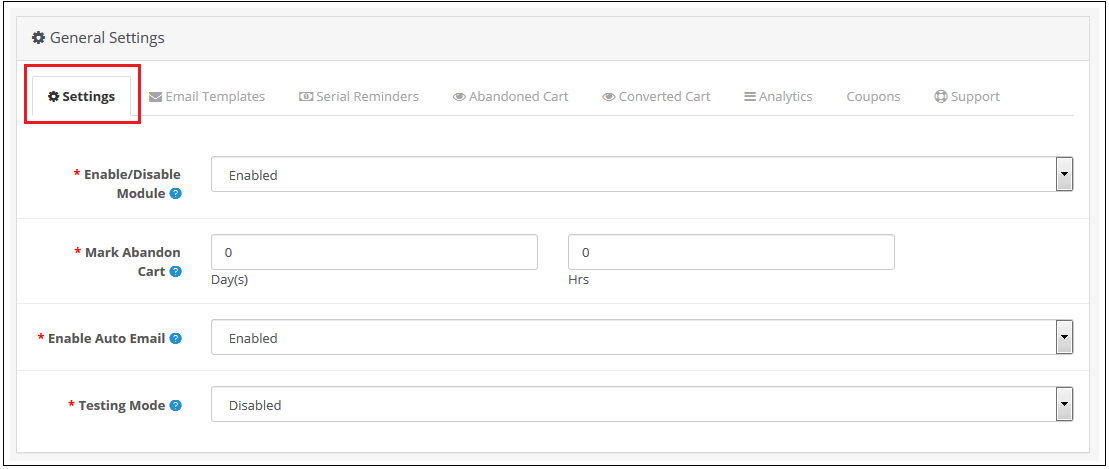
4.0.1 General Settings
Through this setting of OpenCart Abandoned Cart Serial Reminder, you can enable/disable the whole module by just one click. The screen will look like as shown below:
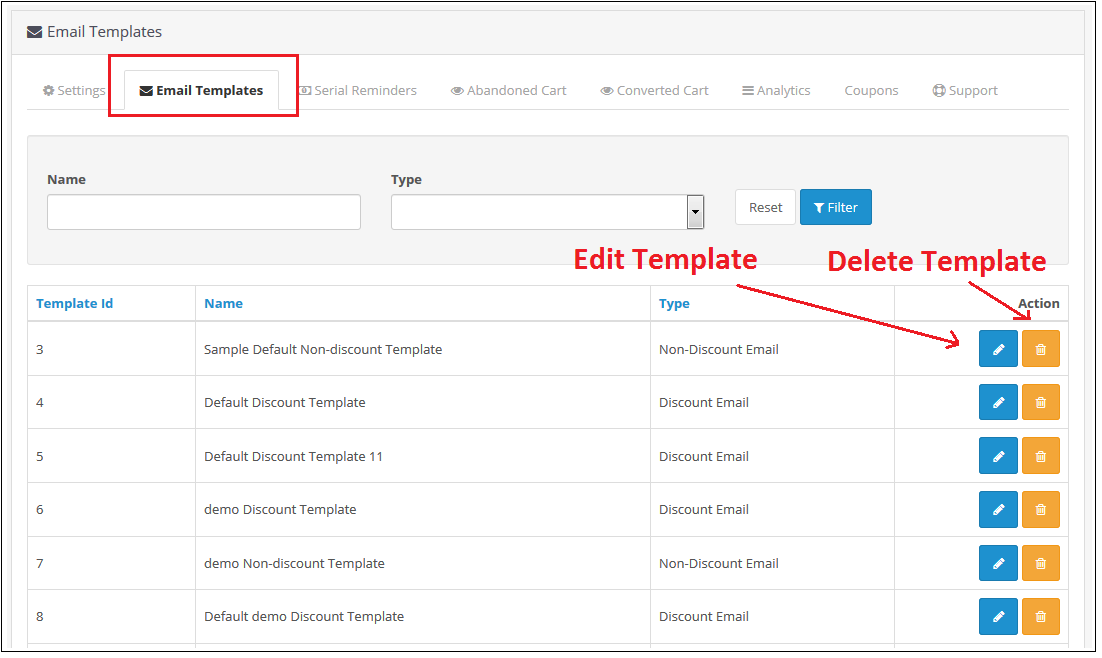
4.0.2 E-mail Templates
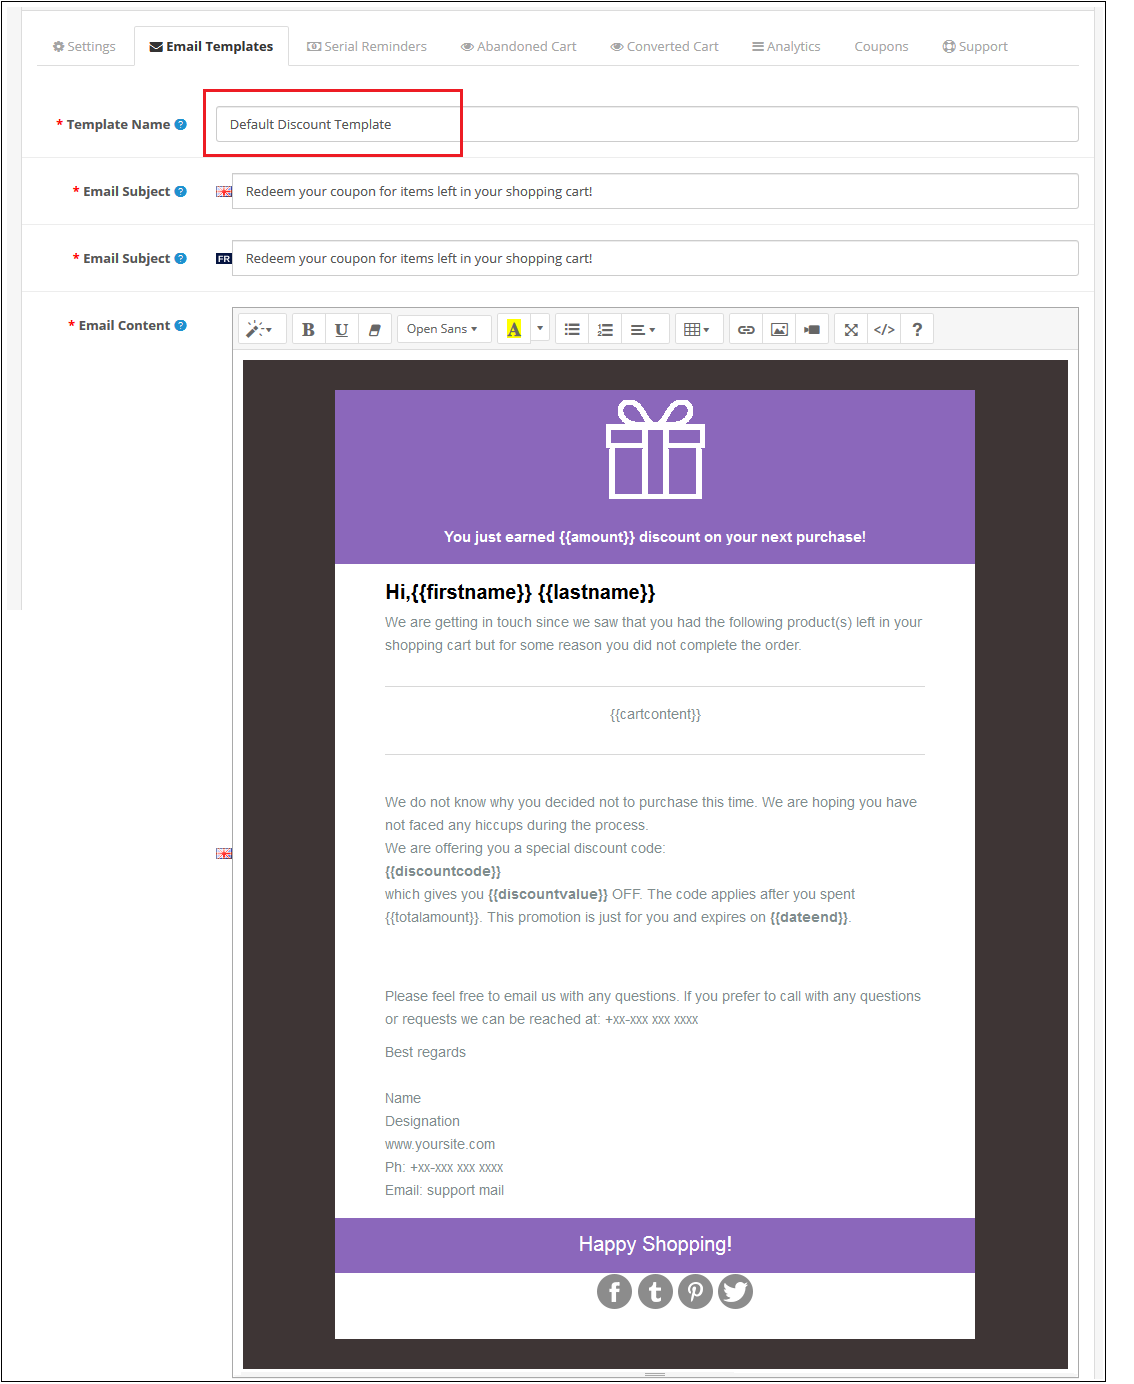
Through this setting of OpenCart Abandoned Cart Serial Reminder, you can add an e-mail Template in the module which will be used when you sent an e-mail reminder to your customers. The screen will look like as shown below:
Edit an E-mail Template: You can Edit an existing E-mail Template using the Edit option. The screens for Editing E-mail Template will be same as Adding an E-mail Template. The only difference will be that Edit will have the fields already filled. Delete an E-mail Template: You can delete an E-mail Template by clicking on the ‘Trash’ Icon. A pop up will show up asking for the Confirmation. You can click yes and the E-mail Template will be deleted. Add an E-mail Template: You can add an E-mail Template by Clicking on the option provided on the Top of the Page. The following screen will show up:
4.0.3 Serial Reminders
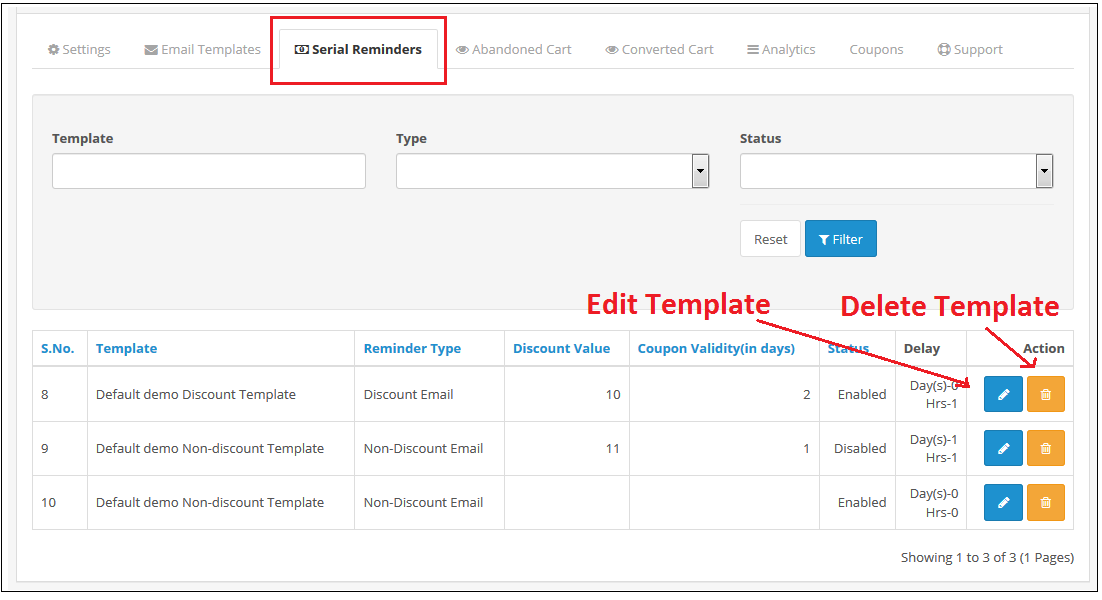
This setting of OpenCart Abandoned Cart Serial Reminder allows you to send e-mail reminders to your customers after a specific time (which will be set by you) of their Cart Abandonment.
The screen will look like as shown below:
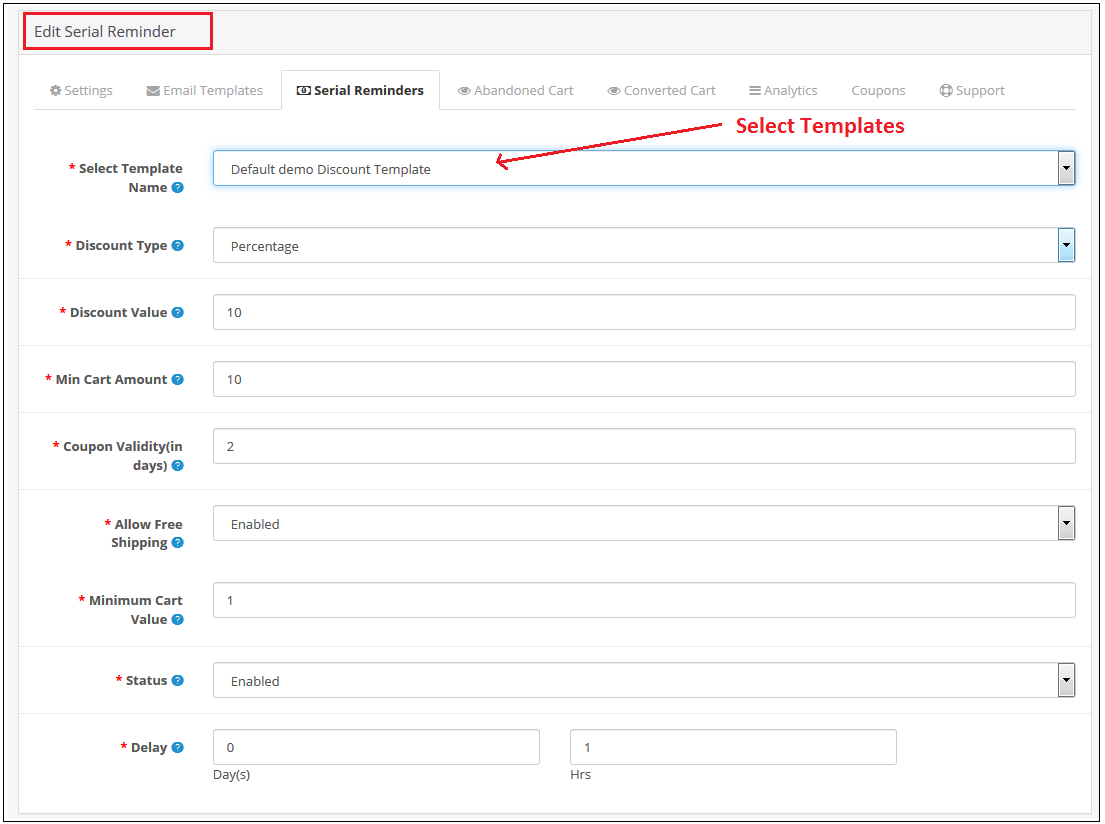
Edit a Serial Reminder: You can Edit an existing Serial Reminder using the Edit option. The screens for Editing Serial Reminder will be same as Adding a Serial Reminder. The only difference will be that Edit will have the fields already filled. Delete a Serial Reminder: You can delete a Serial Reminder by clicking on the ‘Trash’ Icon. A pop up will show up asking for the Confirmation. You can click yes and the Serial Reminder will be deleted. Add a Serial Reminder: You can add a Serial Reminder by Clicking on the option provided on the Top of the Page. The following screen will show up if the E-mail Type is Discount:
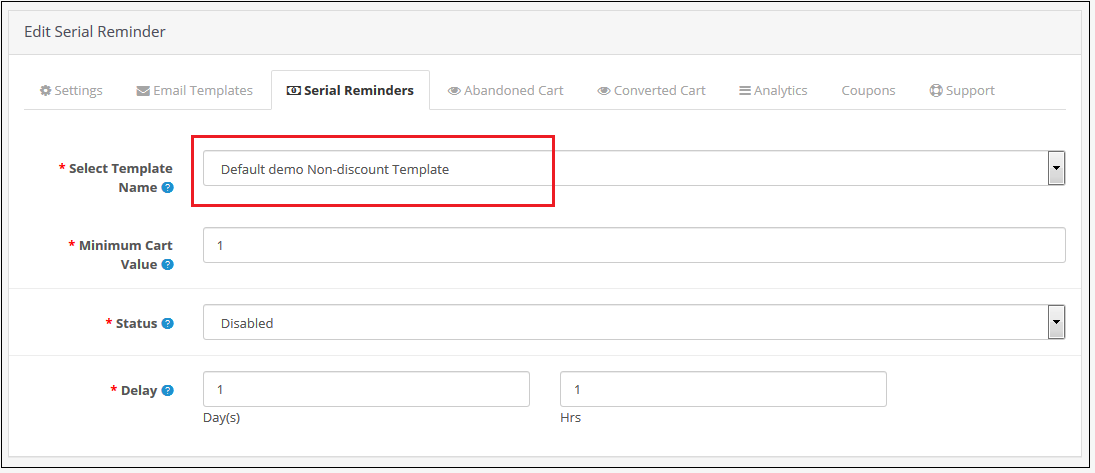
The following screen will show up to Add a Serial Reminder in Opencart Abandoned cart email follow-up extension if the E-mail Template type is Non-Discount:
4.0.4 Abandoned Cart
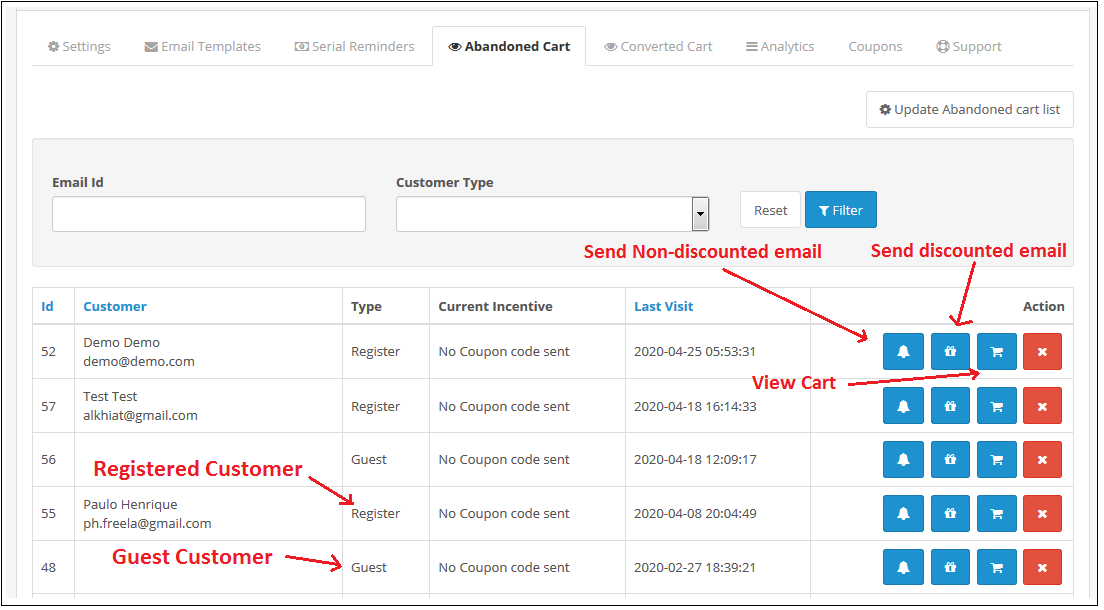
Through this setting of OpenCart Abandoned cart recovery email extension, you can send e-mails to the customers who have left their cart abandoned. You can view the list of all the abandoned cart customers in this setting and send them Discounted/ Non-Discounted E-mails. The screen will look like as shown below:
Update Abandoned Cart: This button is given at the Top of the Settings. You can click on this button to run Cron and the number of Products in abandoned cart will be shown to you. This number will be the updated number since you last updated the Abandoned Cart List.
After clicking on the Button you need to refresh the Page and the updated list will be shown to you.
Send Non-Discounted E-mail: When you will click on the bell Icon, then a pop up will show on the screen from where you can send a Non-Discounted e-mail to the customer. This e-mail will act as a reminder to the customer reminding them of the products they have left in their cart. The following screen will show up when you will click on the Icon:
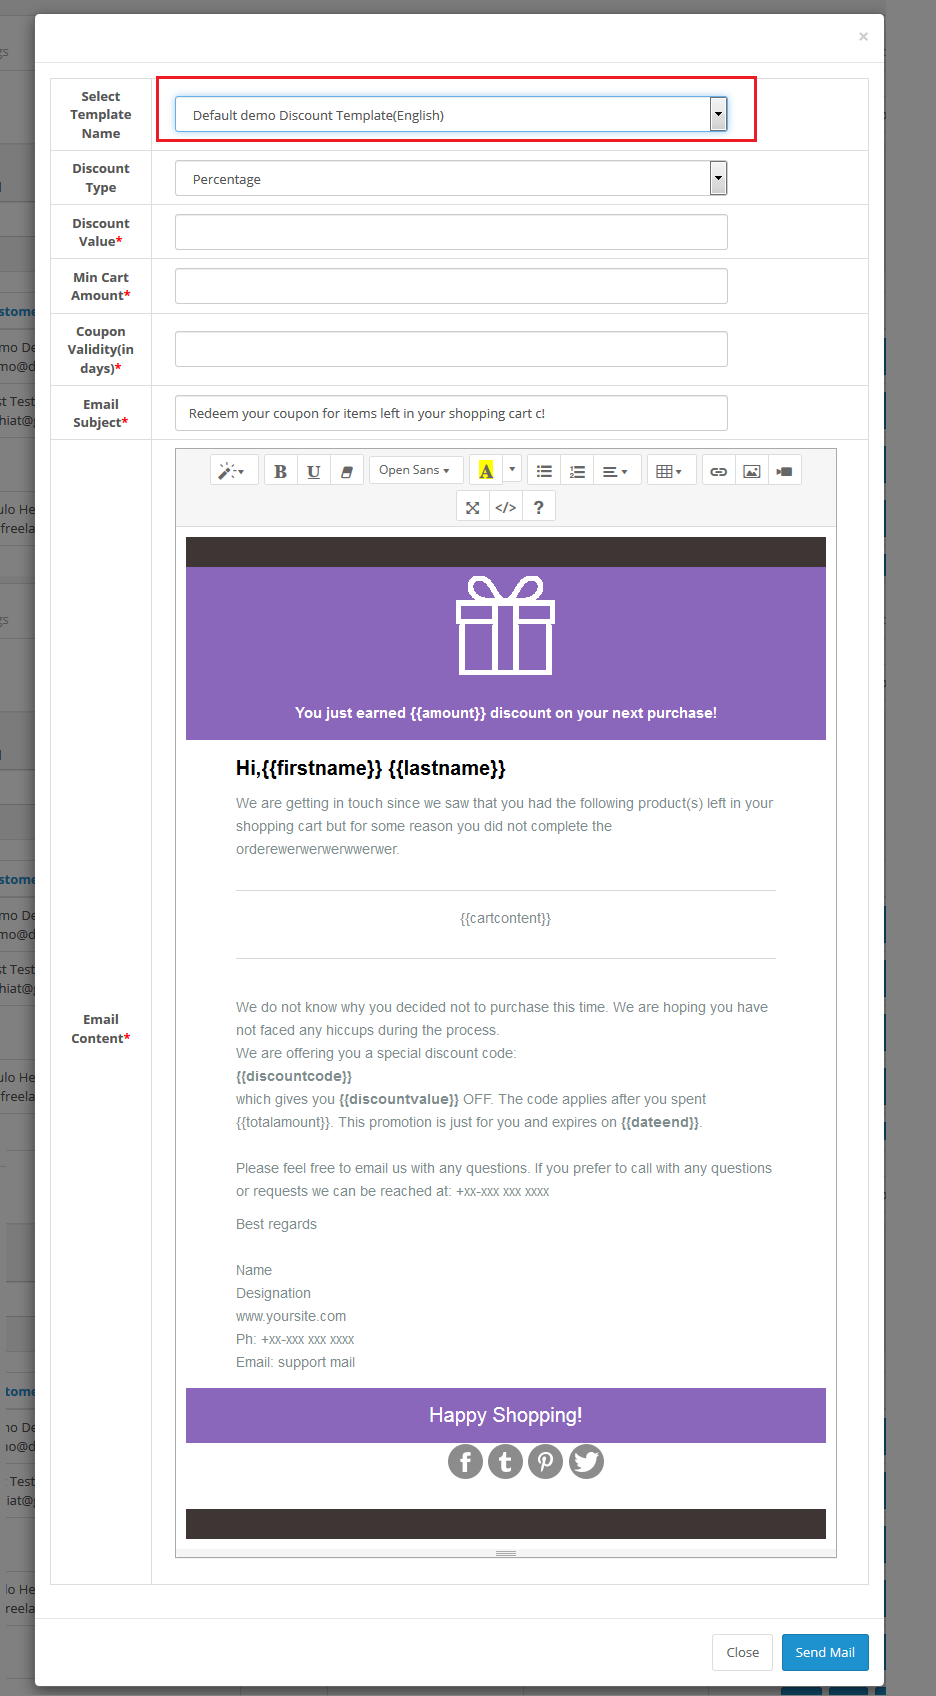
Send Discounted E-mail: When you will click on the Gift Icon, then a pop up will show on the screen from where you can send a Discounted e-mail to the customer. The following screen will show up when you will click on the Icon:
View Customer’s Cart: When you will click on the cart Icon of OC Abandoned Cart Serial Reminder, then a pop up will show on the screen from where you can view the products in the customer’s Cart. The following screen will show up when you will click on the Icon:
Delete an Abandoned Cart: You can delete an Abandoned Cart by clicking on the ‘Cross’ Icon. A pop up will show up asking for the Confirmation. You can click yes and the Abandoned Cart will be deleted.
4.0.5 Converted Carts
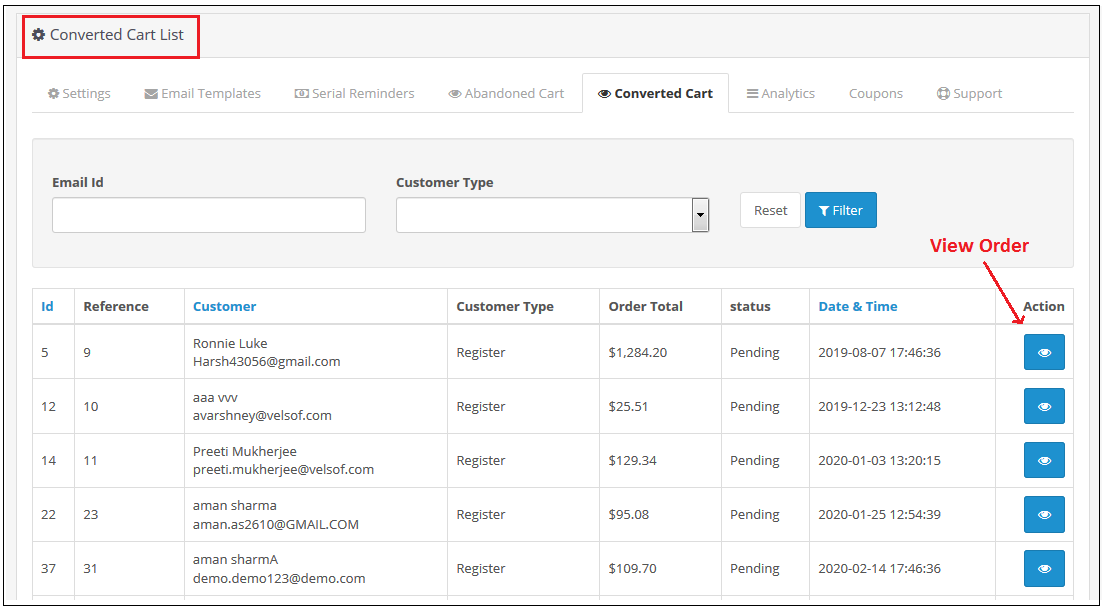
The Converted Cart tab of Opencart Cart Abandoned extension by Knowband, enlists all converted orders for registered customers or we can say that the abandoned carts for whom order has been placed after the reminder mail are sent. The screen will look like as shown below:
You can also view the details of the order that is placed using the abandoned cart by clicking on the “Action Button” in front of the desired converted cart.
4.0.6 Analytics
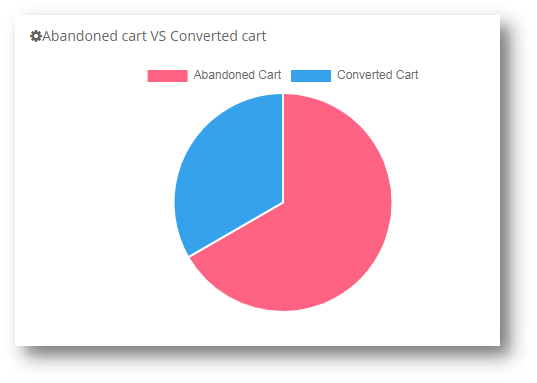
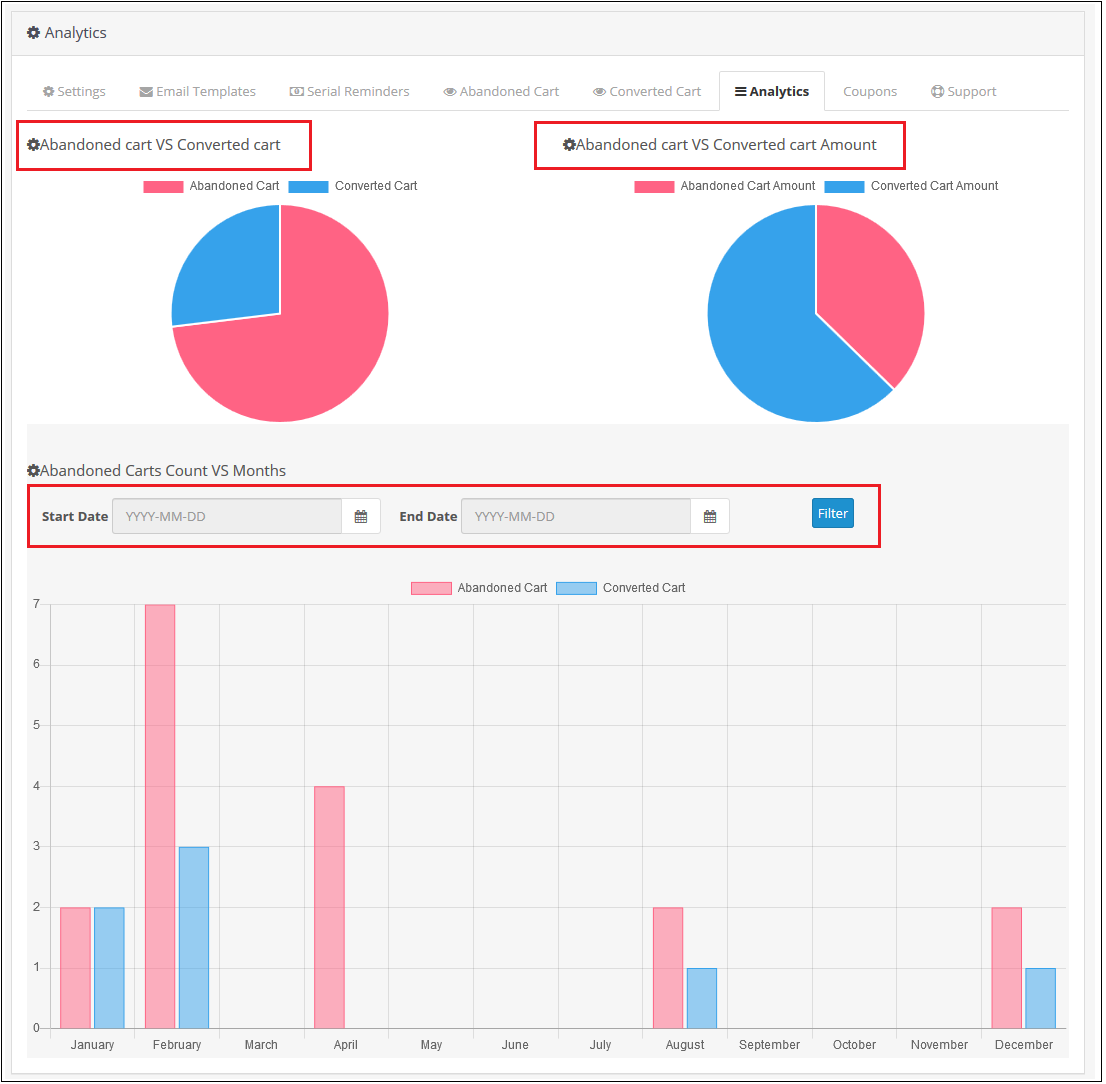
Analytics setting of OpenCart Abandoned cart recovery email extension will show the graphical representation of comparison for Abandoned Vs Converted Cart. Through this setting, you will not have to calculate anything, you can view the comparison in easy graphical format. The following graphs will be show to you:
Number of Abandoned Cart Vs Converted Carts:
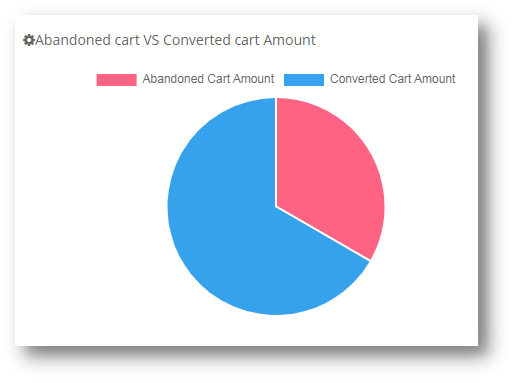
Abandoned Cart Amount Vs Converted Cart Amount:
Abandoned Cart Count Vs Converted Cart Count Monthwise:
4.0.7 Coupons
Through this setting of Opencart Abandoned cart email follow-up extension, you can view the list of all the coupons which are sent to the customers in the E-mail.
You can filter out the Coupons on the basis of Used and Unused. The screen will look like as shown below:
4.0.8 Support
In case of any issue, drop an email to support@knowband.com OR click here to raise the ticket.
Tutorial: Watch the Video Guide
To help you set up and use the Opencart Abandoned Cart Extension, we have prepared a detailed tutorial video. This video walks you through the installation, configuration, and usage of the extension step by step.
Improve the conversion rates of your store with the help of customer reward system. Integrate Knowband’s Prestashop Loyalty Points addon at your store that grants loyalty points to your customer upon creating a new account on the store, placing an order for a particular product or a specific product in the category and other events. The loyalty points can be converted to loyalty discount coupons by the customers during their next purchase from the store. This Prestashop Loyalty points and discount addon helps in increasing customer retention and reorders letting customers to collect more & more reward points which they can redeem during future orders. Thus Prestashop Loyalty points system implements a customizable reward and discount scheme at your store to encourage customer orders and signups.
1.1 Striking Features of Prestashop Loyalty Points Module
Prestashop Loyalty Points addon is highly customizable plugin with no core changes required. You can define as many loyalty points rule for your eCommerce store and award loyalty based discount vouchers to your customer. Lets quickly check different features offered by this Prestashop Loyalty points and discount addon.
Prestashop Loyalty points system grants loyalty points to your customers for placing an order with specific cart value, creating an account , ordering a certain product etc. The loyalty points are defined specific for different rules.
Prestashop Loyalty reward points can be offered manually or automatically to the customers based on their cart value, product selection or site activity.
Prestashop purchase points addon allows an option to set order status when the loyalty points are added to the customer account.
With Prestashop Loyalty points and discount addon, you can set the order status when the loyalty points assigned to any customer are automatically cancelled.
With this Loyalty points module, you can set the discount equivalent to a single loyalty point. This discount value can be set in any desired currency.
Prestashop Loyalty points addon gives an option to set minimum cart amount to be eligible to apply loyalty discount coupon.
The tax over Prestashop loyalty discount coupons can be enabled or disabled from the backend.
Loyalty points module for Prestashop allows you to set various progression names in multiple languages.
Prestashop Loyalty Points addon lets you create unlimited loyalty points rules based on customer’s Cart, Product or Behavior.
With this loyalty point module, you can set the title, description, number of loyalty points, start date, end date and validity for each rule.
You can modify, enable, disable or delete the existing rules from the back-office of Reward points module.
The status and detailed history for Prestashop loyalty discount coupons can be viewed at the backend.
With Prestashop customer loyalty system, you can easily get into the details of loyalty points earned by the customers of store.
The different email sent for points credit, points cancellation and points redemption can be modified from the back-office of this Prestashop Loyalty reward points module.
Prestashop Loyalty points system is simple to enable or disable from back-office interface.
Prestashop loyalty discount module is multi-lingual compatible.
1.2 Technology for Development
Language: PHP Frame Work: PrestaShop
2.0 Installation Guide for Prestashop Loyalty Points and Discount Addon
You can follow these simple steps for installing the Prestashop Loyalty Points addon on your eCommerce store:
1. Firstly, download the addon package from the Knowband store.
2. You will get a zipped file containing the source code and user manual. Unzip the complete package in the root directory of your Prestashop store through FTP manager (like Filezilla or WinSCP – download here: https://filezilla-project.org/). You’ll find the files and folders as shown in the image below:
3. The Prestashop Loyalty Point plugin is all set to be installed in the store. Go to the Store Admin and then to ‘Modules and Services’.
4. Click on the “Install” button just next to your module. It would show a pop-up for your confirmation. Click on “Proceed with the installation” option. This step will install the module and show notification – “Module(s) installed successfully”.
3.0 Admin Interface of PrestaShop Purchase Points Addon
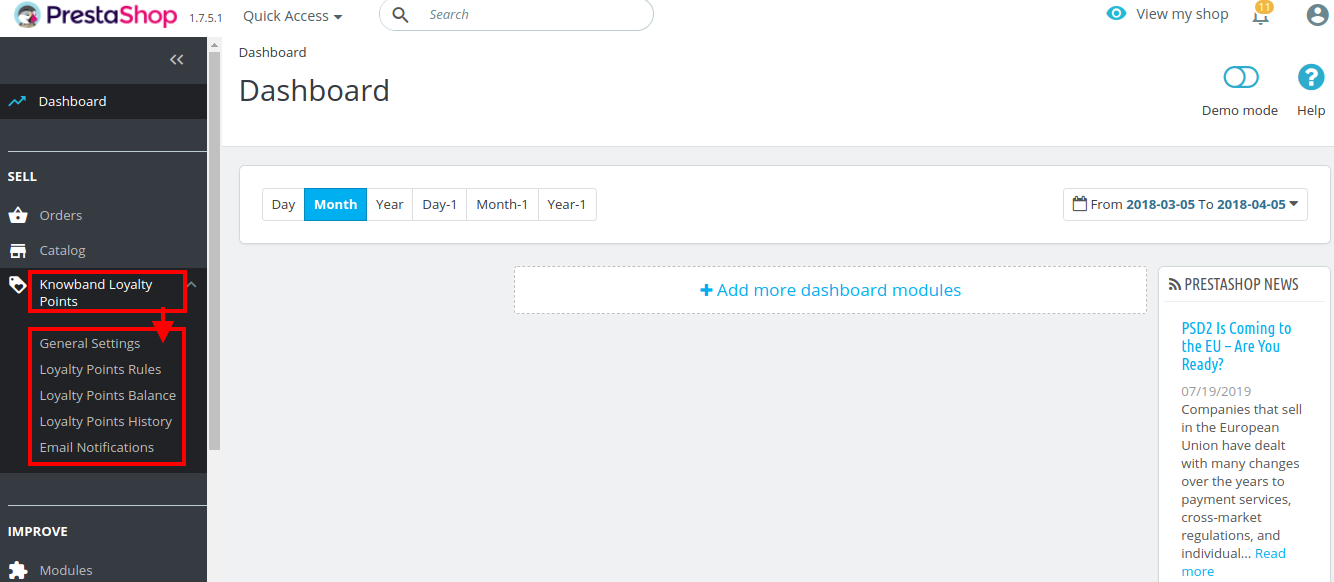
Just after successful installation of Prestashop Loyalty Points addon at your website, you can create and apply as many loyalty points rules for your store. You can grant loyalty points to your customers manually or automatically based on various criteria. In the admin panel or dashboard, click on “Knowband Loyalty Points”. It will list you various configuration tabs as shown in the given screenshot.
Here, in this interface of Prestashop Loyalty points system, you will see five sub sections under Loyalty Points module.
General Settings
Loyalty Points Rules
Loyalty Points Balance
Loyalty Points History
Email Notifications
Each section of this Prestashop Loyalty points and discount addon has been discussed below.
3.1 General Settings
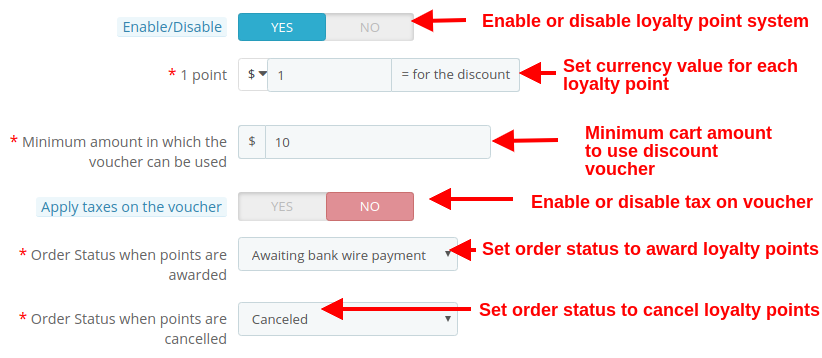
Under the general settings of Loyalty points module for Prestashop, you can perform the basic settings for the reward points system.
Enable/Disable: This option fully enables or disables the loyalty point system for the store.
1 Point: This option sets the currency value equivalent to each loyalty point. You can set this amount in any selected currency.
Minimum amount in which the voucher can be used: This option sets the minimum cart amount over which the coupon can be applied.
Apply taxes on the voucher: This option will enable or disable the taxes over the discount voucher.
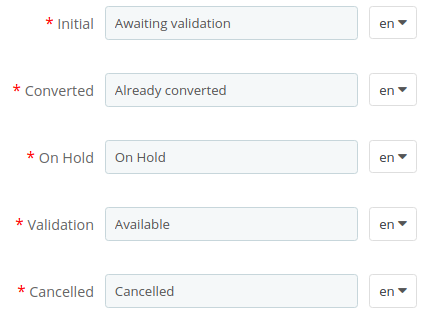
Order status when points are awarded: This option sets the order status when the loyalty points are awarded.
Order status when points are cancelled: This option sets the order status when these loyalty points are cancelled.
As shown in the below screenshot, you can set the names for various loyalty points progression. Theses names are applicable to complete module settings.
3.2 Loyalty Points Rule
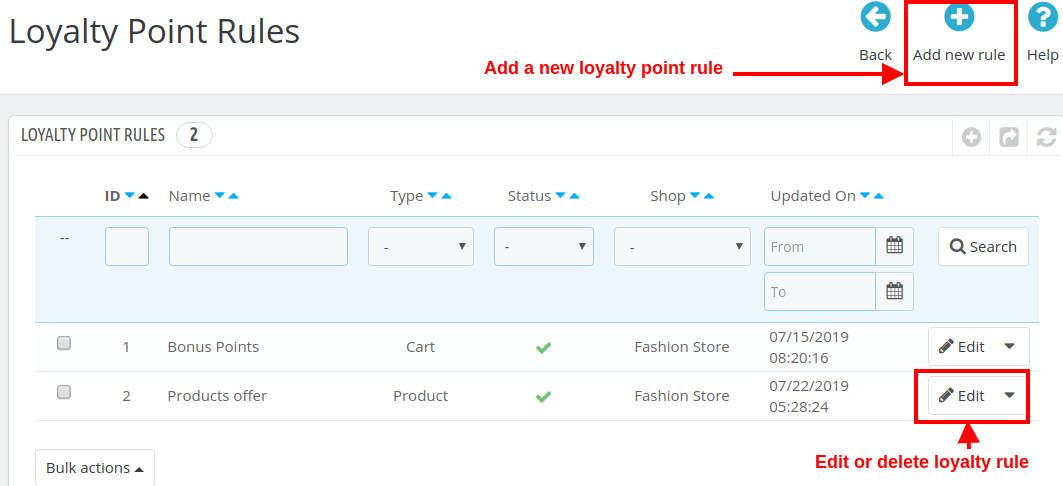
Under this section of Prestashop purchase points addon, you can create multiple loyalty points rule based on various customer activity. Each rule can be modified, enabled, disabled or deleted as per site requirements.
The above screen shows the list of existing loyalty point rules at your store. These can be modified, deleted or you can create a new rule as discussed below.
To create a new loyalty point rule for your store, click on the “Add new Rule” button at the top right screen. Initially, it will only show you the “Configuration” tab. Once you will save the Configuration options, it will show you the next two tabs: “Conditions” and “Notifications”.
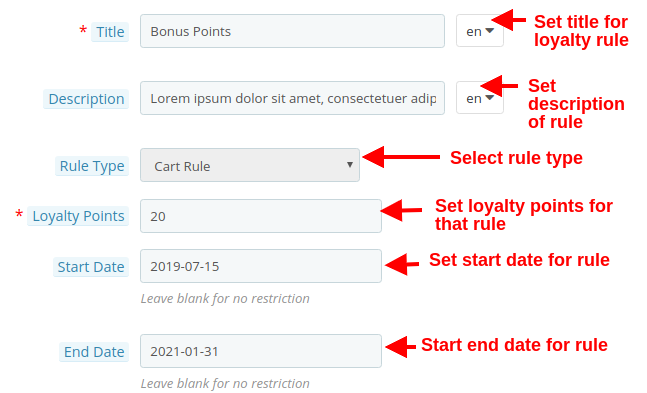
Following options are listed under the “Configuration” tab of new rule.
1. Configuration
Title: This option sets the title for the loyalty point rule.
Description: This option allows you to set a small description of the rule.
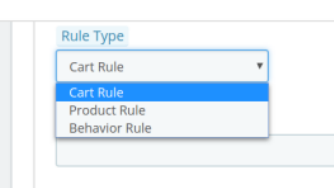
Rule Type: Using this option, you can set the rule type out of three options as Cart Rule, Product Rule, or Behavior Rule as shown below.
Loyalty Points: Using this option, you can set the number of loyalty points for this selected rule.
Start Date: This option defines the start date for the rule.
End Date: This option defines the end date for the rule.
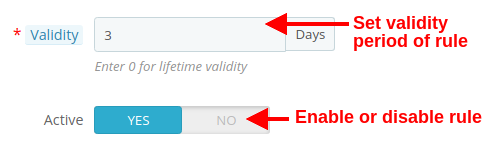
Validity: This option will set the validity period of the loyalty points (in days). If set to 0, the loyalty points has lifetime validity.
Active: Enable or disable the rule using this option.
2. Conditions
For the selected rule type, you can select the rule conditions as shown below.
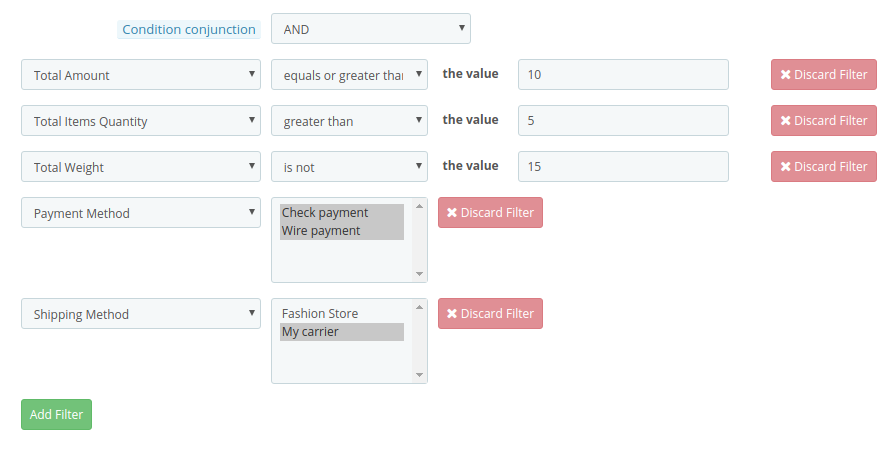
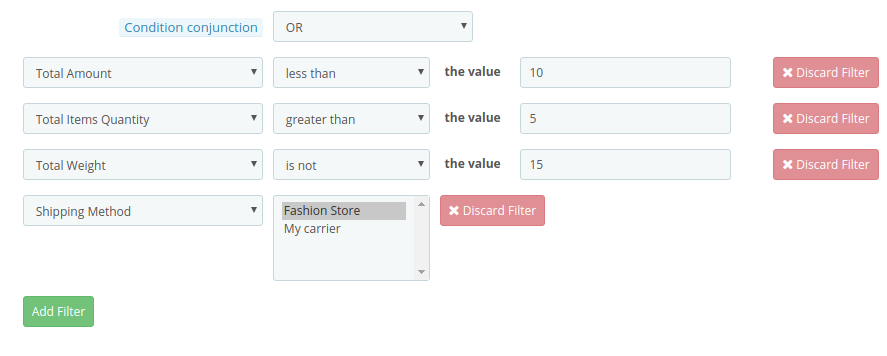
Condition Conjunction: This option will select the conjunction type as “OR” or “AND”.
A) Conditions for Cart Rule
You can create any type of rule using conjunctions: “AND” & “OR”
Admin can apply conditions on the basis of Total Amount, Total Items quantity, Total weight, Payment Method, Shipping Method.
Below are the examples of the rules that can be created using these conditions:
1.This rule works when (total amount >= 10) and (total items quantity > 5) and (total weight ≠ 15) and (payment method = check/wire) and (shipping method = my carrier) are all applicable to customer’s cart. To get specific points, all conditions should be TRUE. (Refer below screenshot)
2.This rule works when (total amount < 10) or (total items quantity > 5) or (total weight ≠ 15) or (shipping method = Fashion store/my carrier) is applicable to customer’s cart. To get specific points, any one condition should be TRUE. (Refer below screenshot)
Similarly, you can create other rules as well with different filters and values.
B) Conditions for Product Rule
You can create any type of rule using conjunctions: “AND” & “OR”
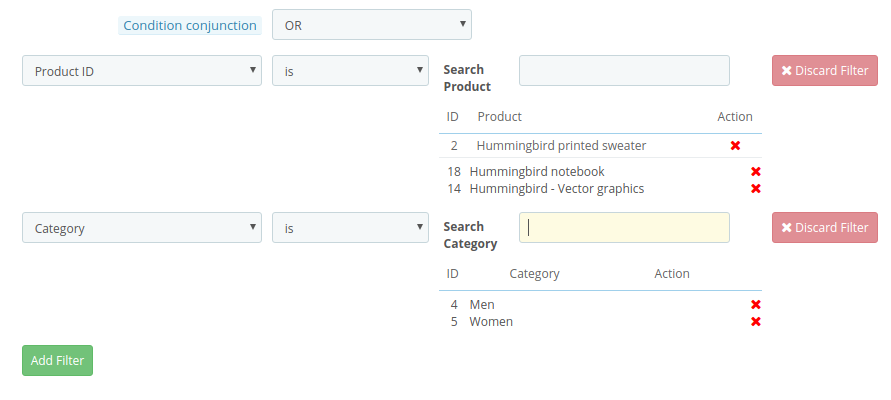
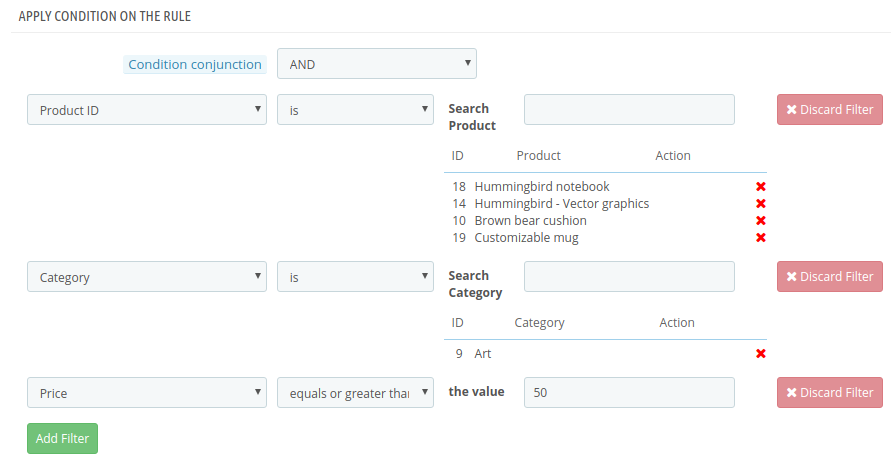
Admin can apply conditions on the basis of Product ID, Category, Price.
Below are the examples of the rules that can be created using these conditions:
1.This rule works when (product ID is 2/18/14) or (category is 4/5) is TRUE. To get specific points, any one condition should be TRUE. (Refer below screenshot)
2.This rule works when (product ID is 2/18/14) and (category is 4/5) and (price >= 50) is TRUE. To get specific points, all the conditions should be TRUE. (Refer below screenshot)
Similarly, you can create other rules as well with different filters and values.
C) Conditions for Behavior Rule
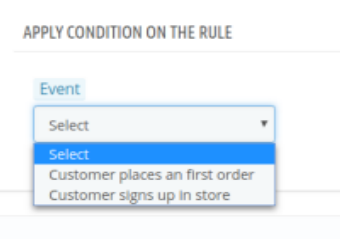
Admin can apply condition on the basis of customer’s sign up and customer’s first order.
1. First Order – The Loyalty points will be granted to the customers when they place their first order on the store.
2. Sign Up – The Loyalty points will be granted to the customers when they will create an account on the store.
3. Notifications
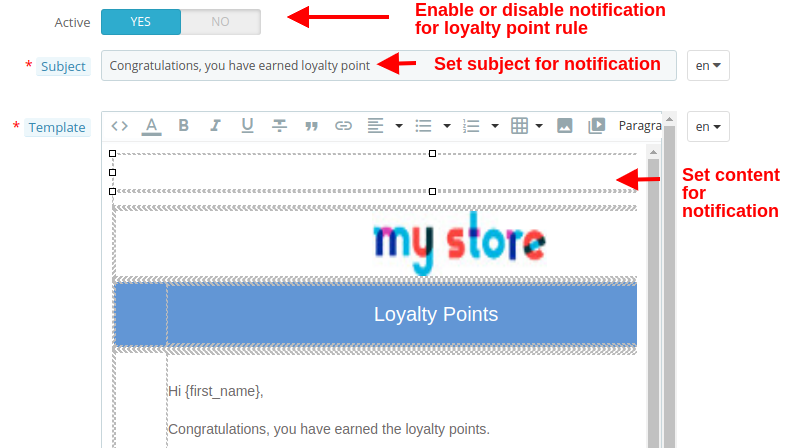
The Notification tab shows the configuration options for email sent to the customers when they earn loyalty points through the selected rule. The options include:
Active: This option enables or disables the notification for the selected loyalty point rule.
Subject: This option sets the subject for the email sent to customers upon winning loyalty points at the store.
Template: This option sets the email content or body which details about the loyalty points they have earned on the store.
3.3 Loyalty Points Balance
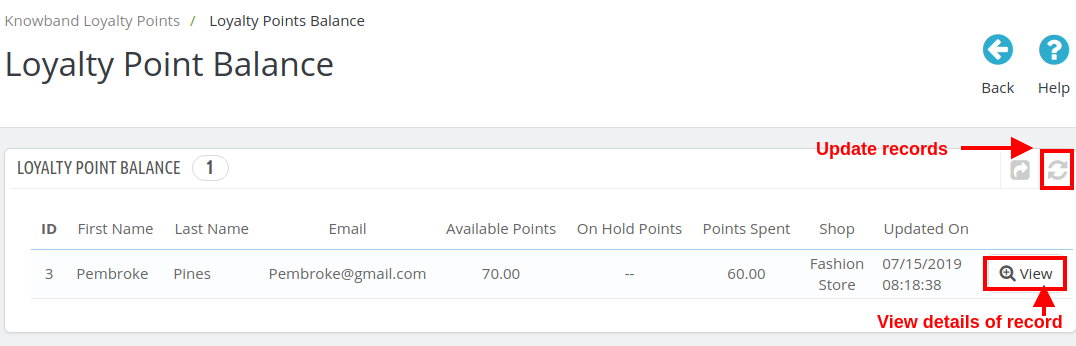
Here in this section of Prestashop Loyalty points and discount addon, you can check the status of loyalty points granted to various customers of the store. You can view the details of each of the customer who have been granted the loyalty and discount points.
You can click the “Refresh” button in order to update the loyalty points records for store customers. Click on “View” button to check the details of a particular record (all records of the same customer) like shown in the image below.
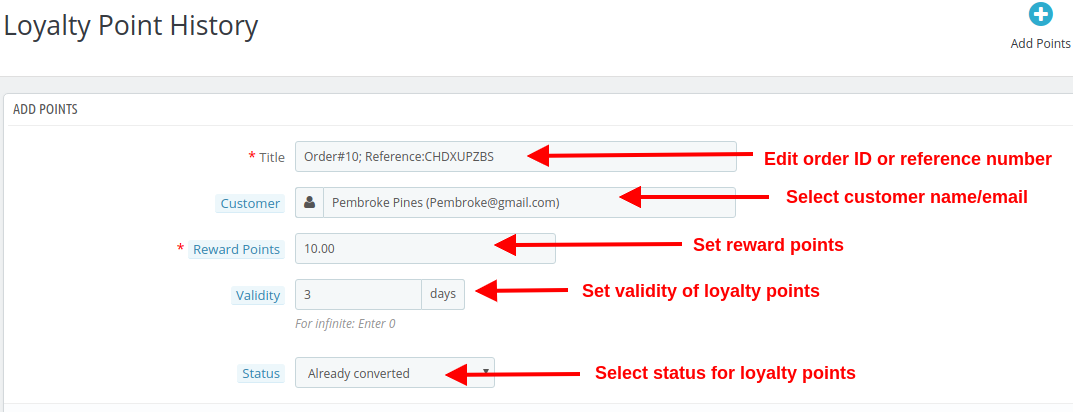
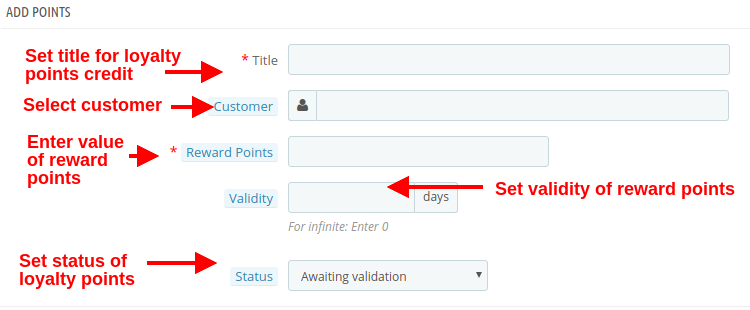
You can edit the various order records of a same customer by clicking on the “Edit” button. To assign the loyalty points manually, click on “Add Points” button as shown in the image above. When you add points manually, you will see the following configuration options.
Title: The option sets the order or reference number for crediting loyalty points to the customer’s account.
Customer: With this option, select the name or email of the customer to whom you want to reward loyalty points.
Reward Points: Set the number of loyalty points you want to offer to the customer.
Validity: Set the validity of loyalty points using this option. Set this as 0 for infinite days validity.
Status: This option sets the status of the loyalty points granted to the customer.
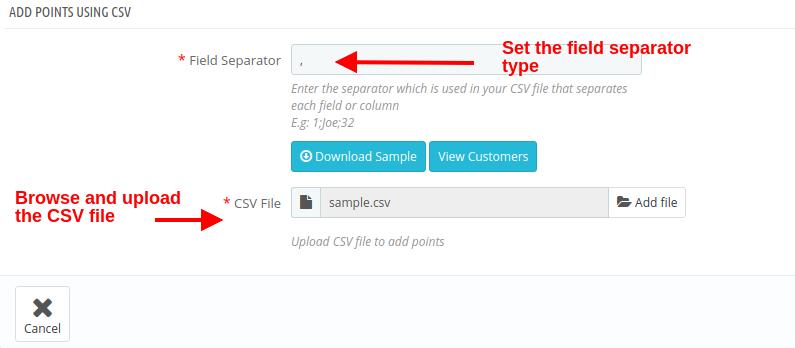
If you want to add loyalty points manually for bulk customers, you can simple upload a .csv file as shown below.
Field Separator: This field allows you to specify the type of field separator you have used in your CSV file for separating various records.
CSV File: This option allows you to browse and upload the .csv file saved at your local space.
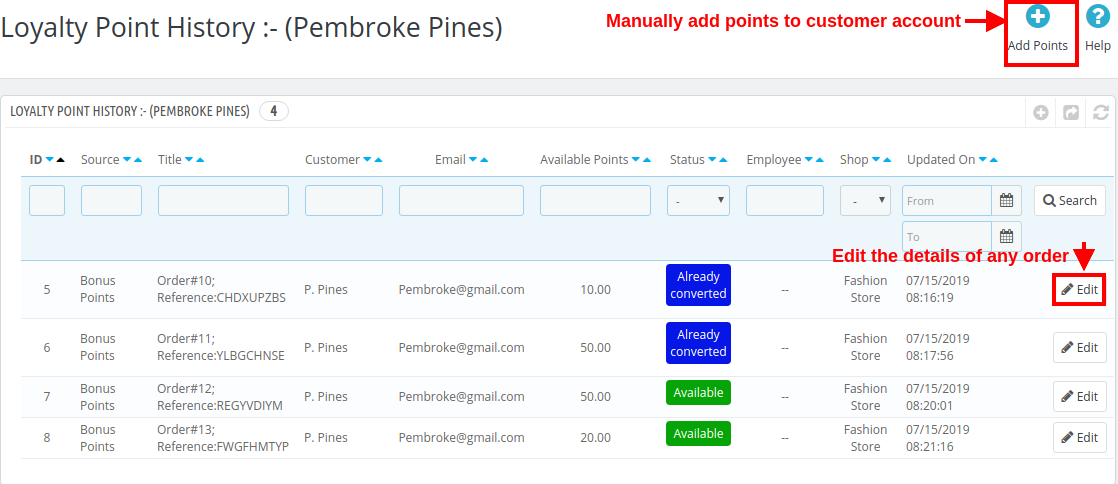
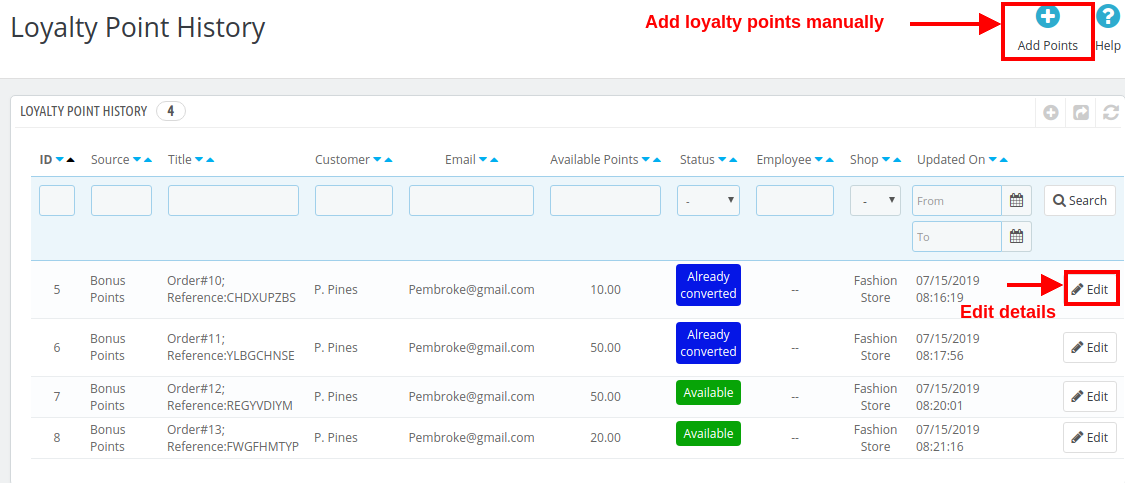
3.4 Loyalty Points History
With Prestashop Loyalty points system, you can view the loyalty points history along with the customer details. From this panel, you can manually grant loyalty points to the customers.
By clicking on Add Points button, you will be shown the below screen. (already discussed in 3.3 section)
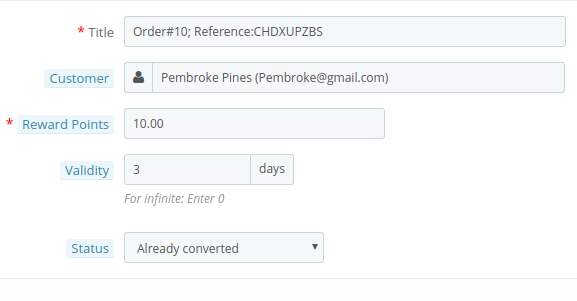
On clicking the “Edit” button corresponding to any record, you will be shown the below screen.
Title: This option will allow you to modify the reference title or order title.
Customer: This option allows you to change the customer name or email who are assigned these loyalty points.
Reward Points: This option lets you set the loyalty points.
Validity: With this option, you can change the validity period for the rewarded loyalty points.
Status: This option lets you change the status of those loyalty points. The status of these points can be checked from the customer’s “Account Dashboard”.
3.5 Email Notifications
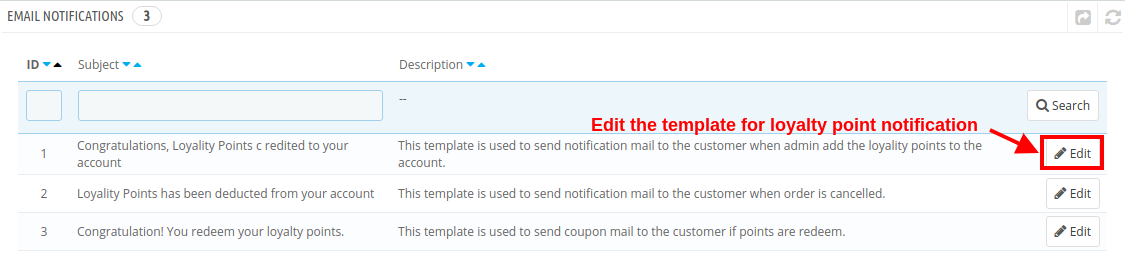
Prestashop purchase points addon gives you flexibility to modify/edit the email templates when loyalty points are credited to customer account, loyalty points are deducted and when loyalty points are redeemed into discount coupons.
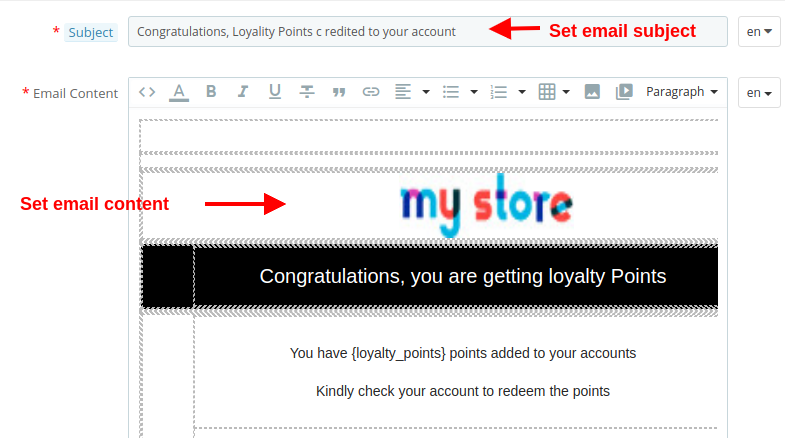
Click on the “Edit” button to configure the email template with the given options:
Subject: This option allows you to set a subject for the email sent to the customer for credited points, deducted points or redeemed points.
Email Content: This option allows you to set the content for the email sent to the customer for credited points, deducted points or redeemed points.
4.0 Front Interface of PrestaShop Loyalty Points System
As soon as the customer redeems the loyalty points, a discount voucher is generated and all Available Points are turned into Converted Points.
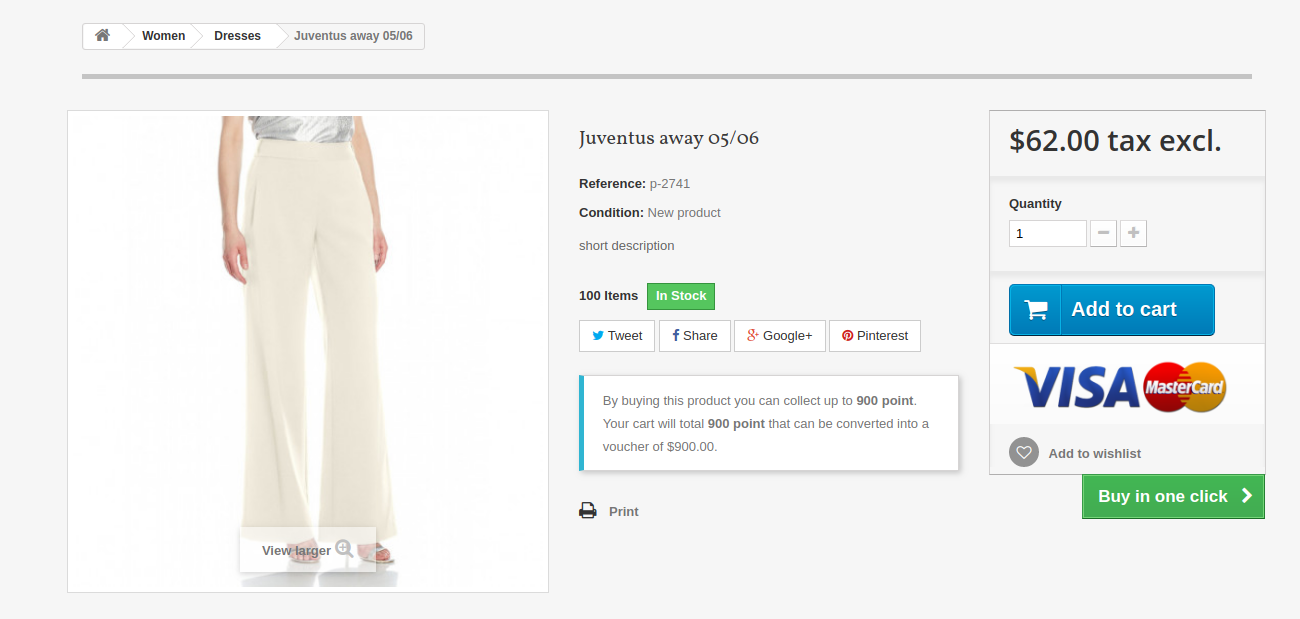
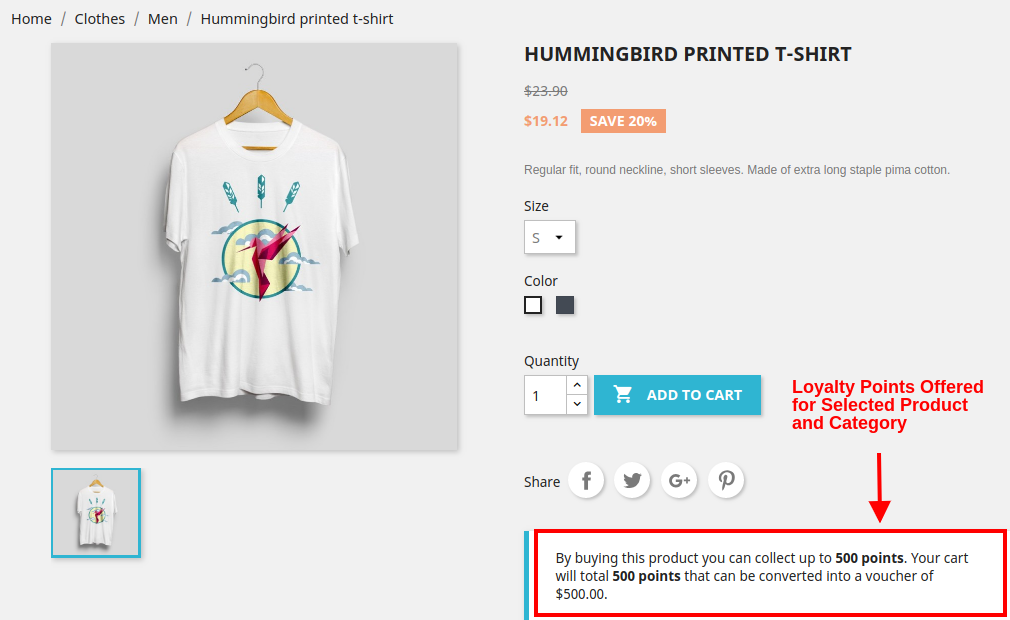
A) When Product Rule is set for specific product and categories, you will see the following screen.
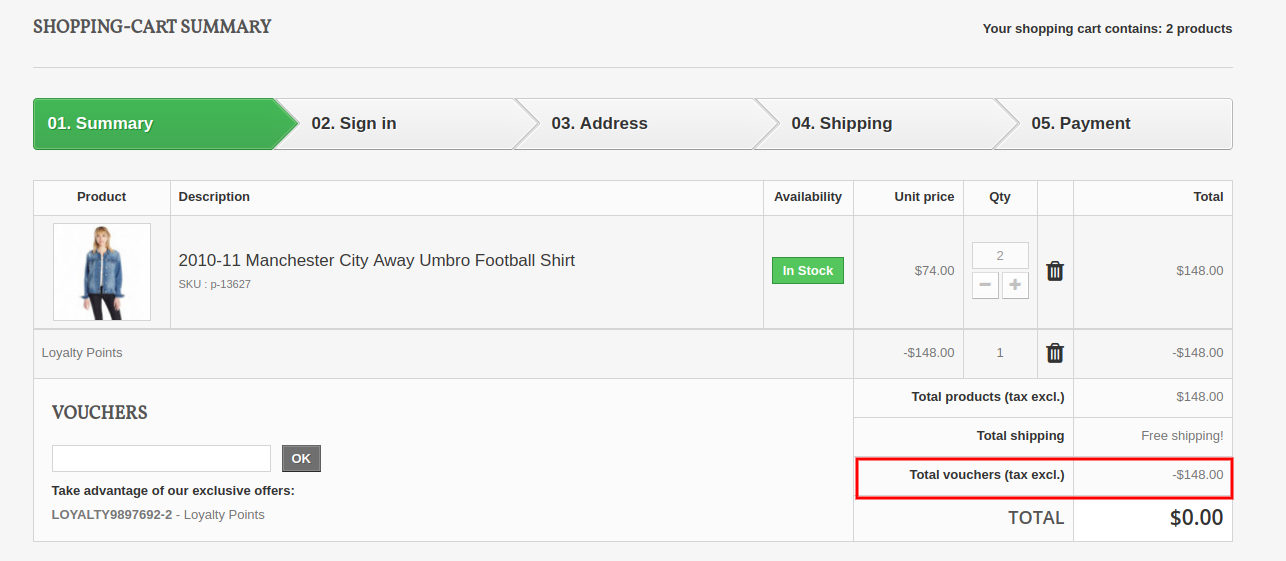
1.6 Version:
1.7 Version:
B) When Behavior rule is set. Like when customer sign-ups on the store or place their first order. The below screenshot shows how the customer gets loyalty points for signing up on the store.
1.6 Version:
1.7 Version:
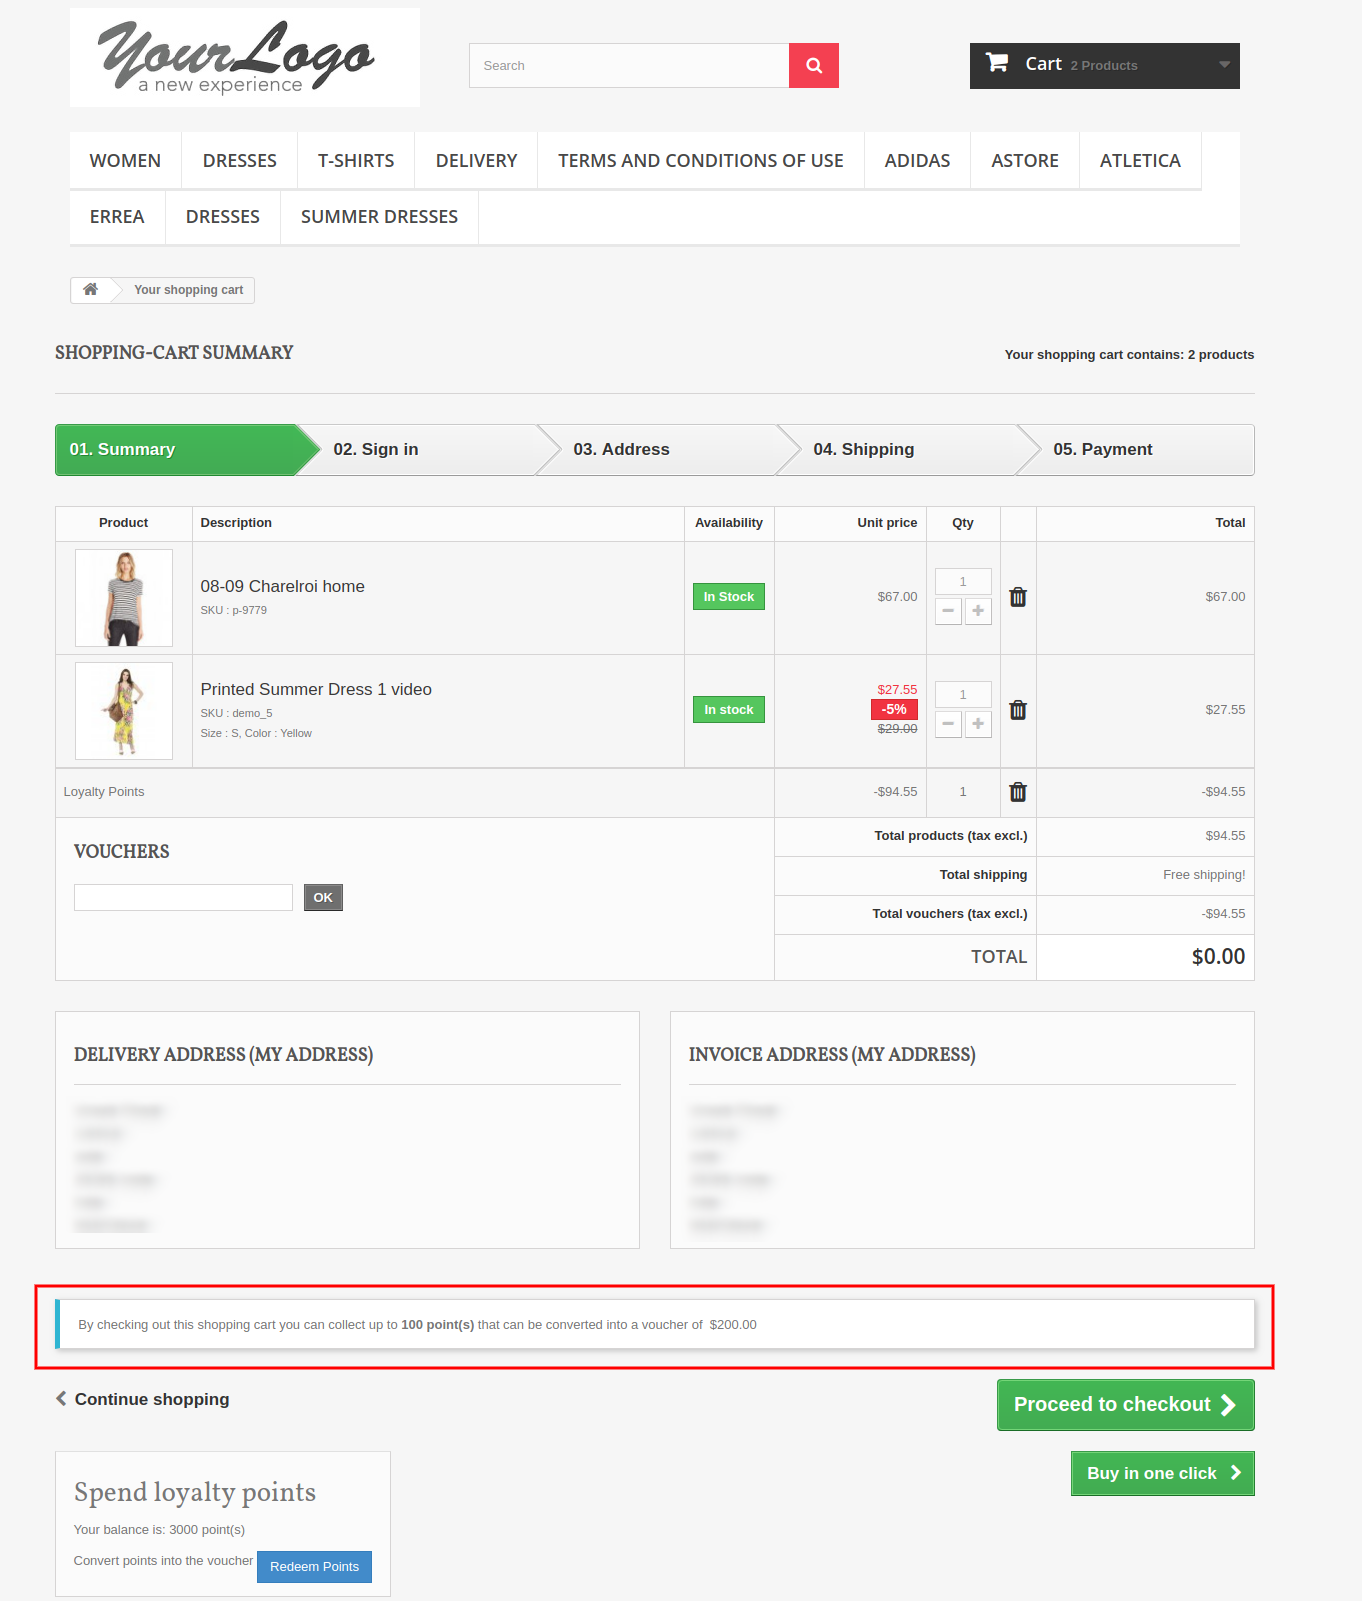
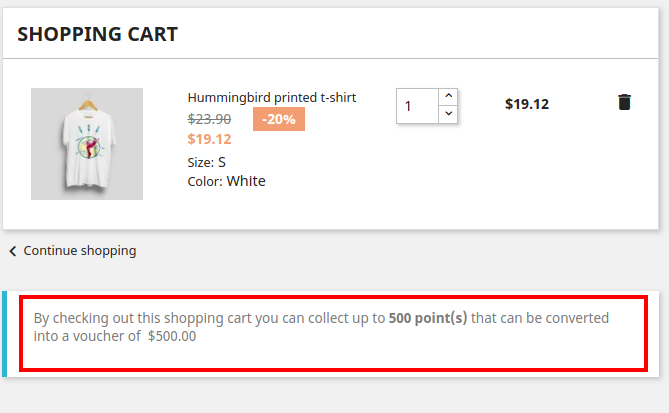
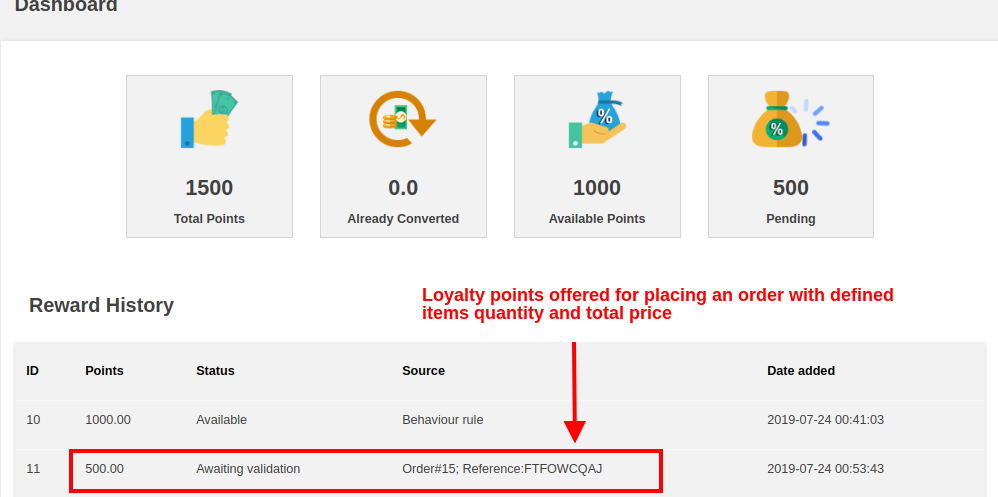
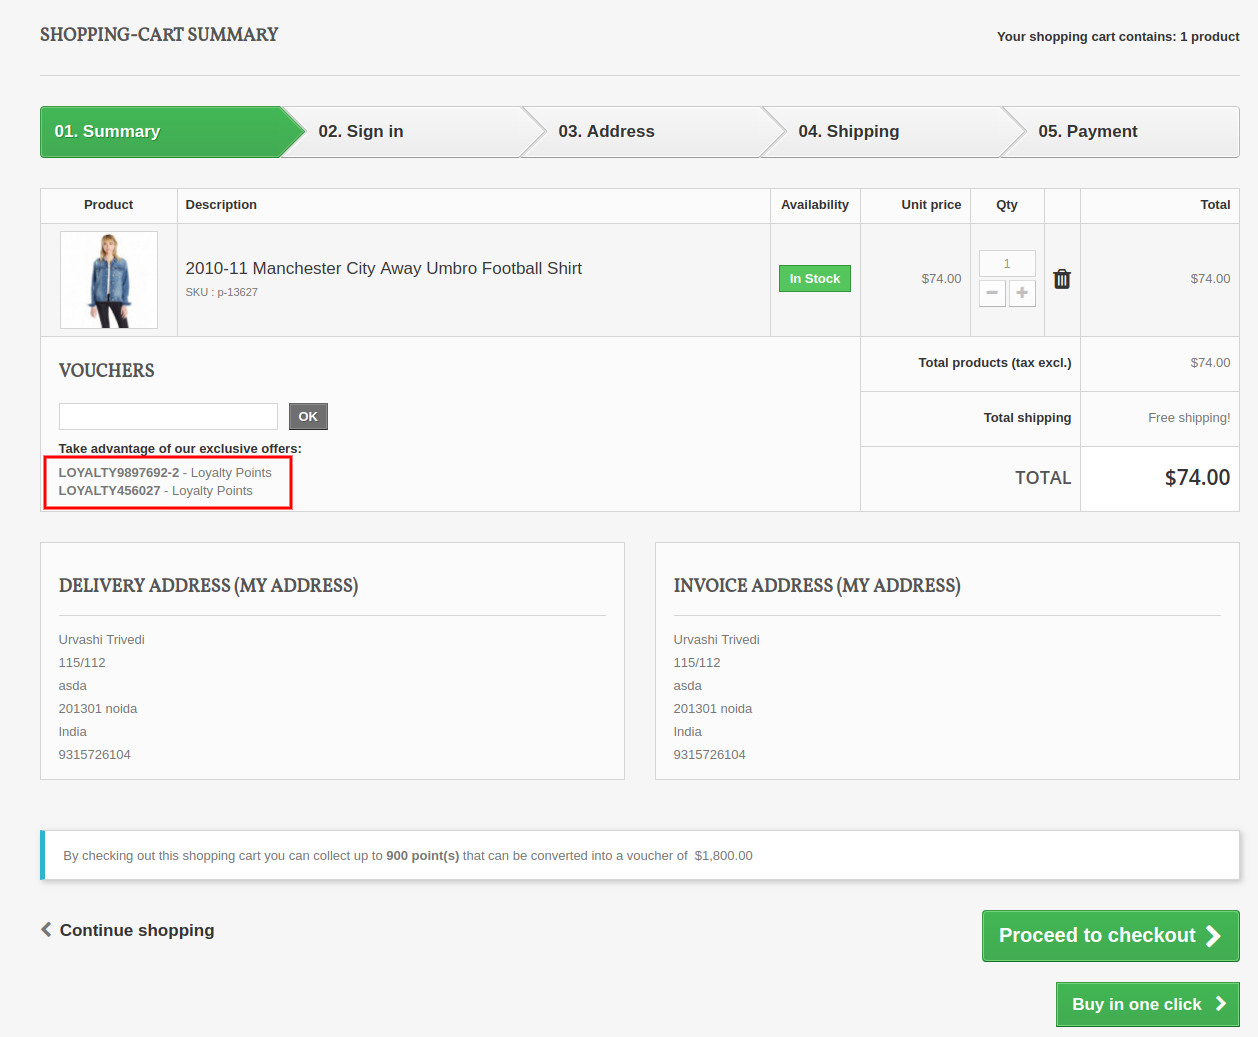
C) When customer’s cart follows some criteria based on total amount, total items quantity, total weight, payment method or shipping method. The below screenshot shows how the customer gets loyalty points for placing an order as per defined cart rule.
1.6 Version:
1.7 Version:
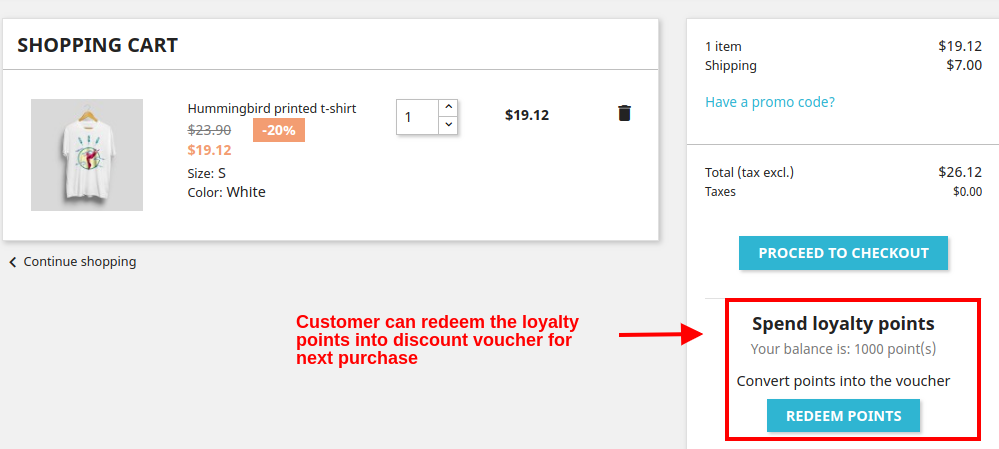
D) Customer can convert their available points into a discount amount. The loyalty points are redeemed into a discount voucher which can be applied for next purchase.
1.6 Version:
Customers can use the loyalty points and generate the vouchers.
1.7 Version:
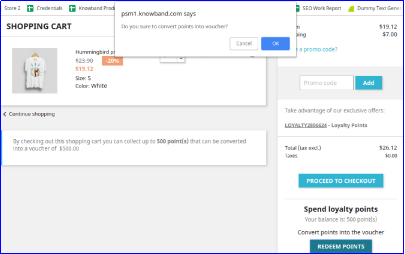
On clicking the Redeem Points button, you will see the following popup box on the screen.
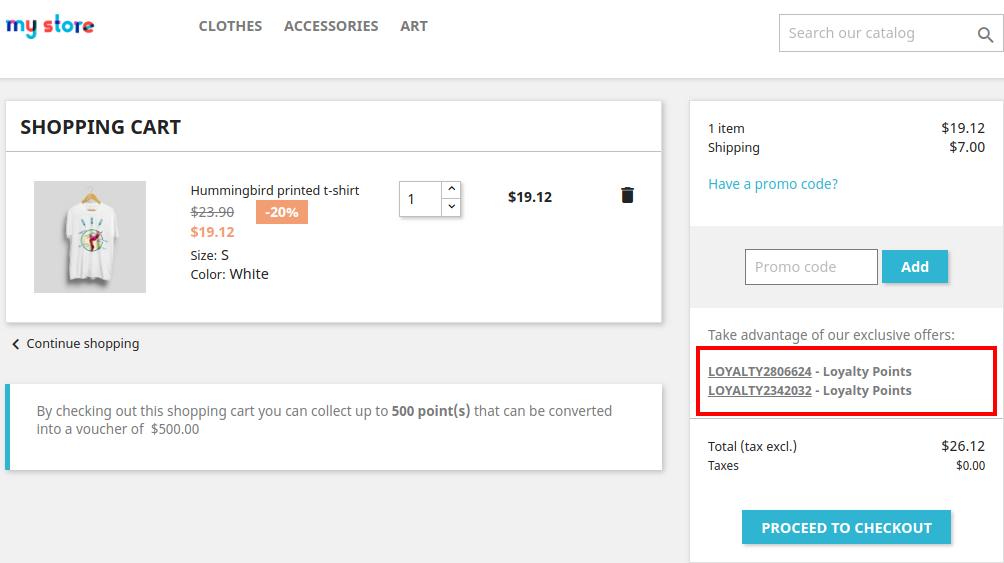
As the customer clicks on OK button their available loyalty points are converted into a discount coupon code as shown below.
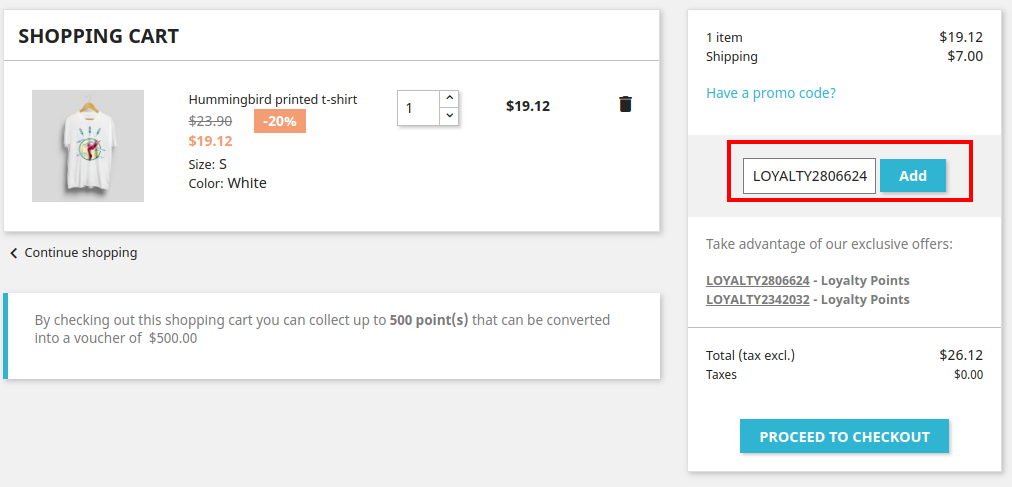
By clicking the desired discount code, it automatically gets copied into the Promo Code box as shown.
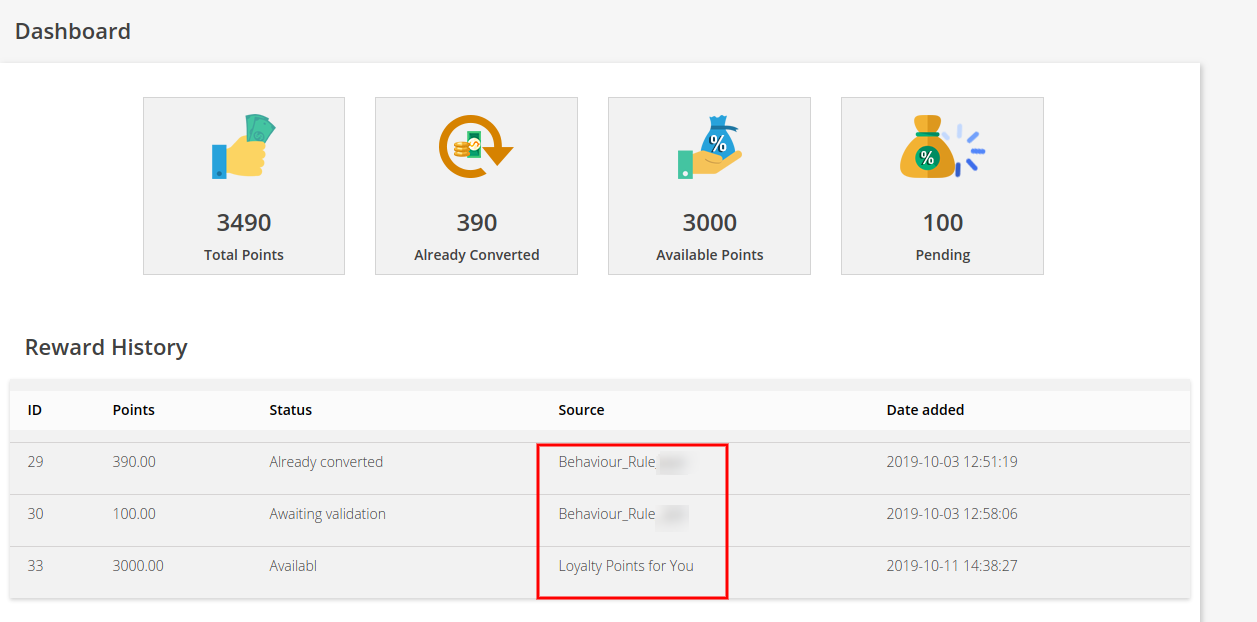
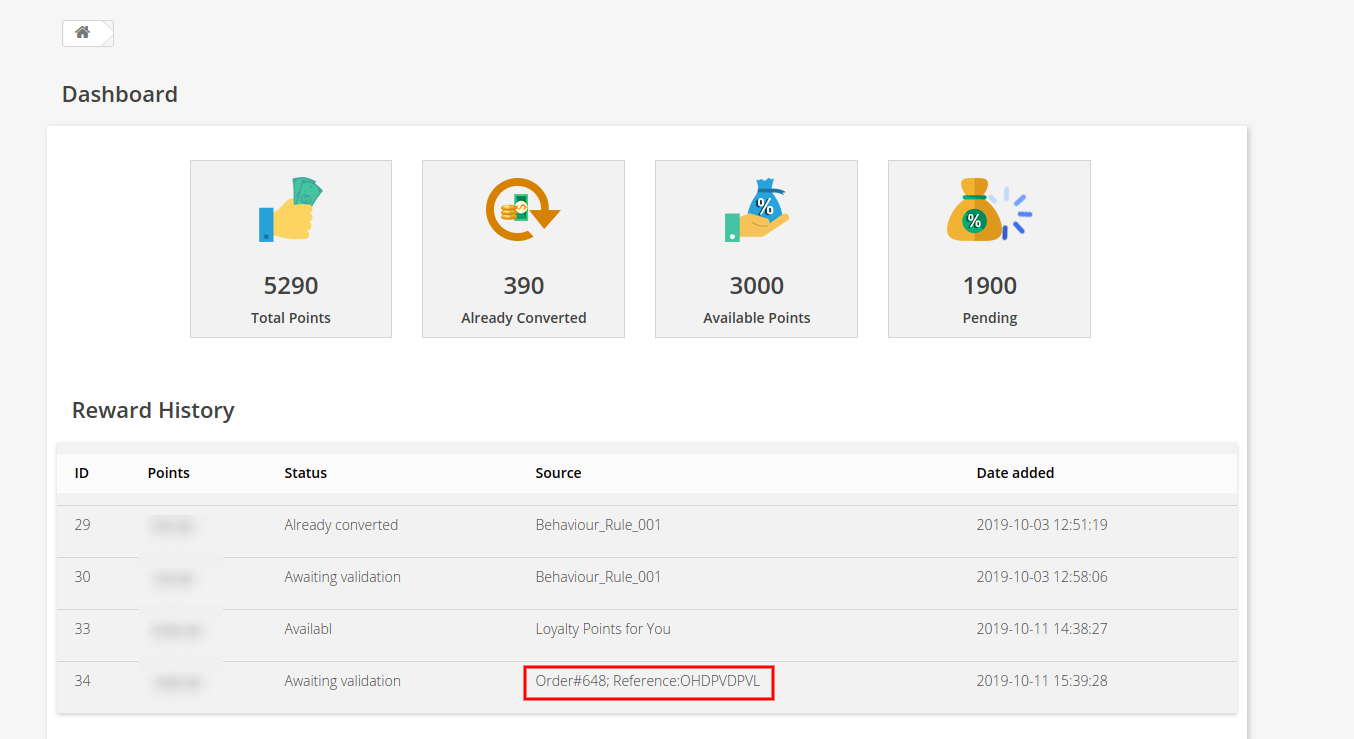
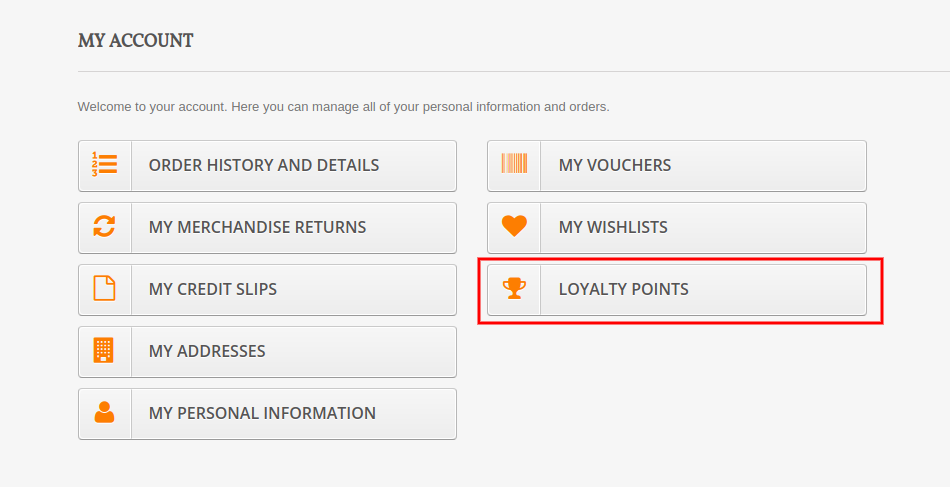
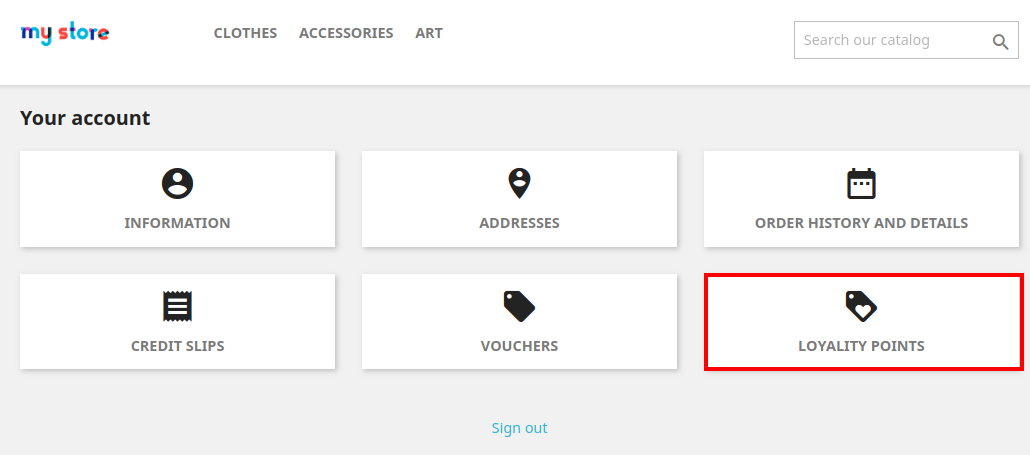
E) Customer can check the complete status of their loyalty points from their Dashboard.
1.6 Version:
1.7 Version:
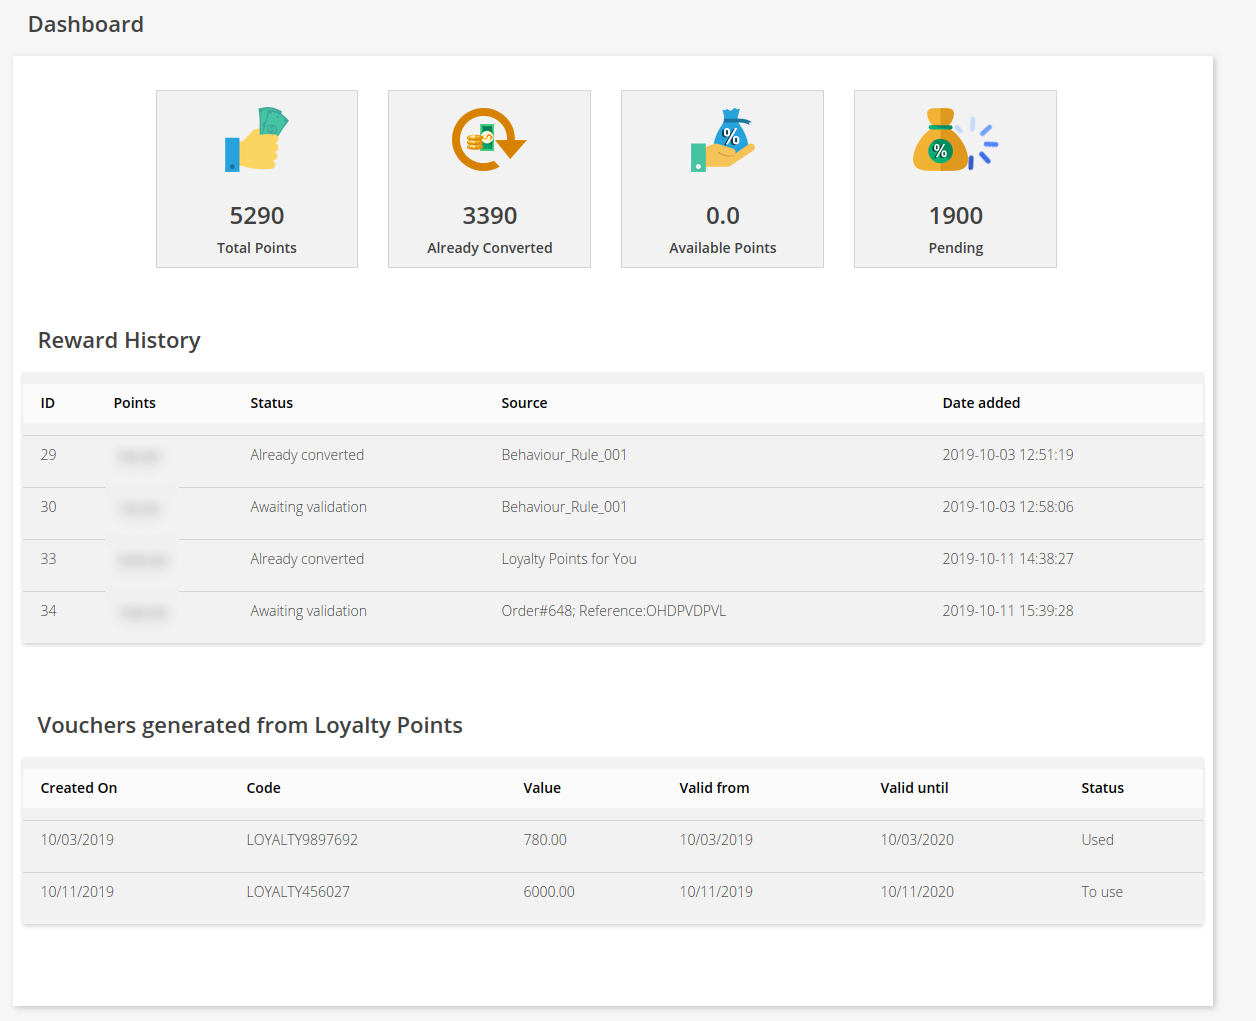
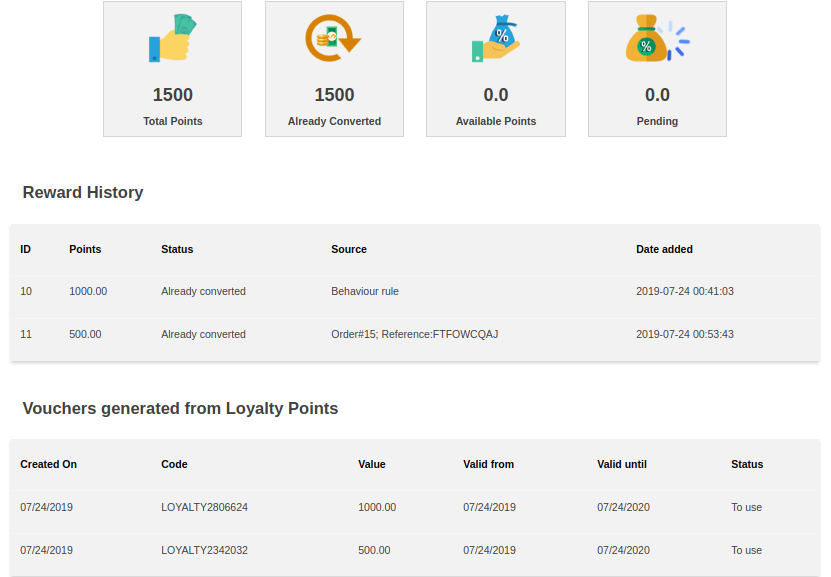
On clicking the Loyalty Points option, customer will jump to the below screen. Here they can check the complete status of their loyalty points, their reward history, discount vouchers generated from points etc.
Version 1.6:
Version 1.7:
5.0.0 Tutorial Video of Prestashop Loyalty Points Module
Checkout our complete tutorial videos, which cover all the features from Installation to the complete frontend working.
Instagram is undoubtedly one of the fastest ways to reach a huge number of specific users and have them familiarize with a brand. Opencart Instagram Shop Gallery Extension by Knowband lets your customers shop what they see in your Instagram Account. You can showcase your Opencart Shoppable Instagram Feed on to your eCommerce website. More and more businesses want to advertise on Instagram because of its incredible audience. As technology evolves toward a visual-centric approach, users wanting to obtain as much information as possible but in less time are shifting from editorial to mainly visual content. You can give your customers a visual approach for them to view the products on your eCommerce store as Opencart Shoppable Instagram Feed and buy tagged products as if they are shopping on Instagram.
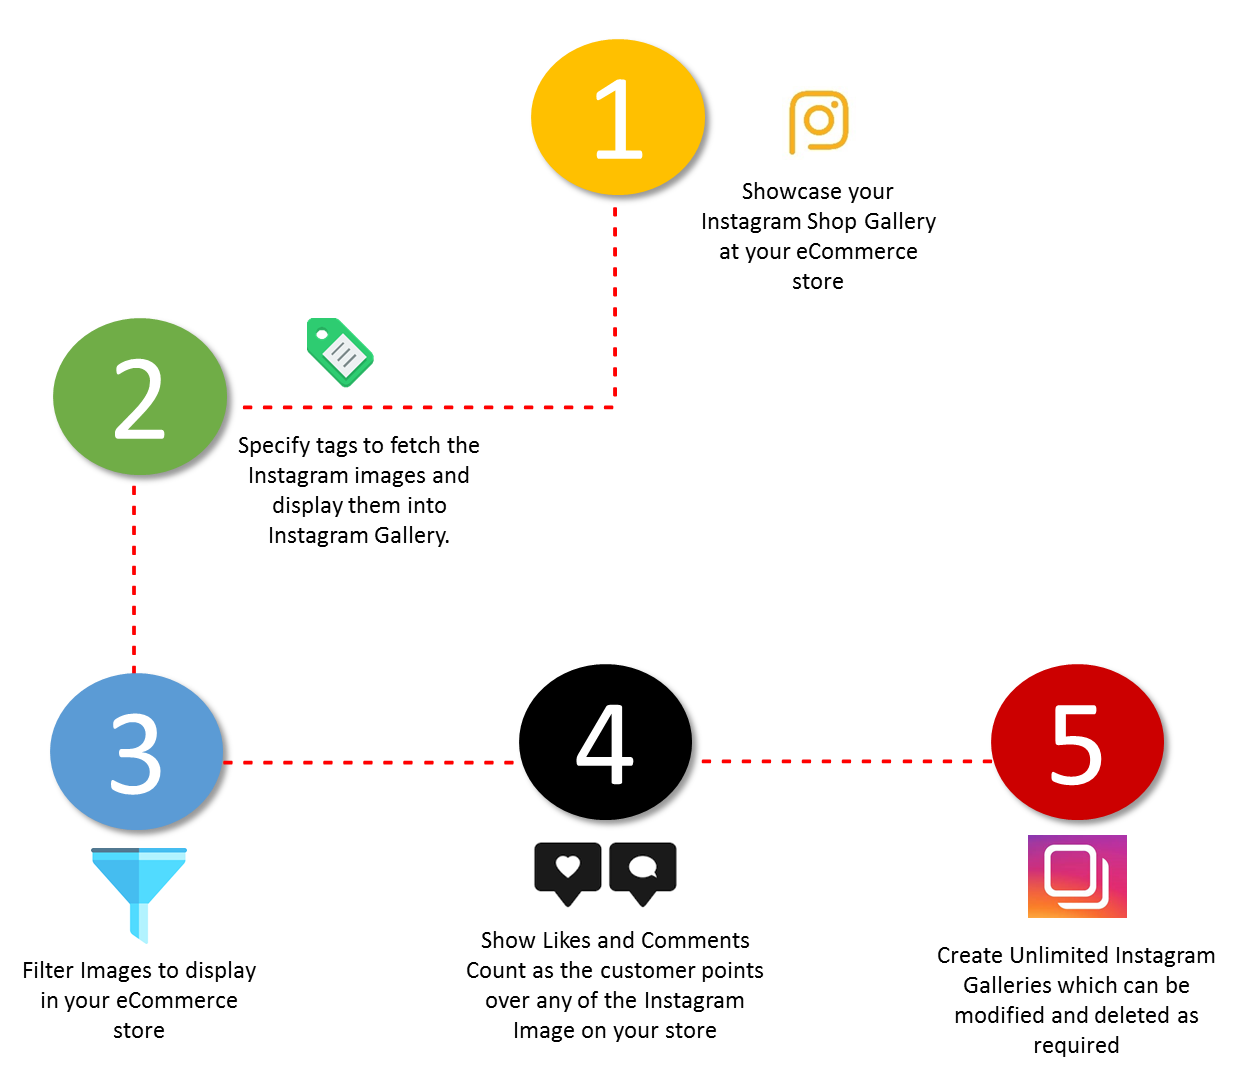
2.0 Features
3.0 Installation Guide
Before starting the installation process, you have to buy the Opencart Instagram Shop Gallery Extension from the Knowband store. Once purchased, you will receive the following files on your registered email.
Source code of Opencart Instagram Shop Gallery Extension module in zipped file format.
User Manual of Opencart Instagram Shop Gallery Extension module.
Now in order to install this Opencart Instagram Shop Gallery Extension module on your online shop, follow the given steps:
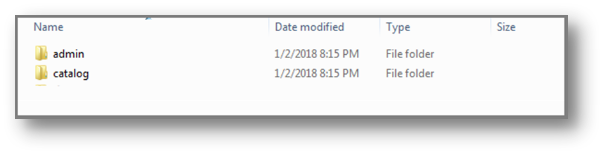
Step 1: Unzip the zip file. You will get the folders as shown in the image below
Step 2: Copy all the folders of the zip file in the Root Directory of OpenCart setup via FTP manager.
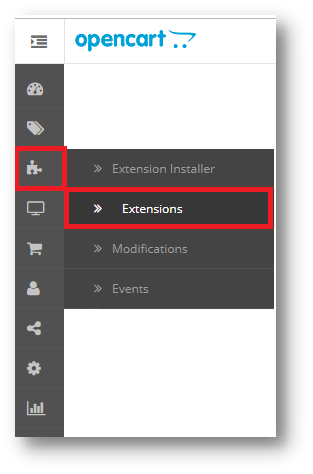
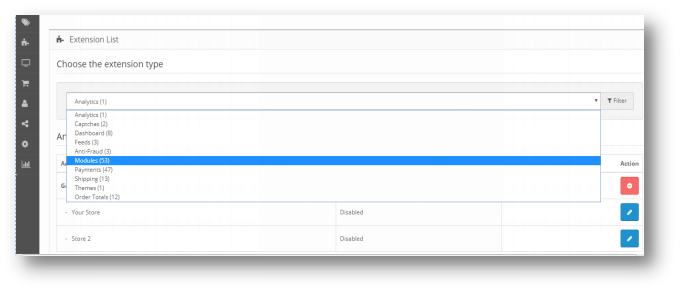
So, Opencart Instagram Shop Gallery Extension plugin is now successfully installed and is ready to use at your store. Go to the admin menu and click on the extensions. Choose the Extension Type as Modules. You will find a list of modules. Select the Opencart Instagram Shop Gallery Extension.
4.0 Admin Interface of OpenCart Instagram Shop Gallery Extension
To configure the Opencart Instagram Shop Gallery Extension, Navigate the settings in the following order: Admin Panel > Extensions > Modules > Instagram Shop
The Admin Interface of Opencart Instagram Integration Extension is divided into 6 Tabs:
Instagram Account
Photos and Videos
Tags
Layouts
Settings
Help
4.0.1 Instagram Account
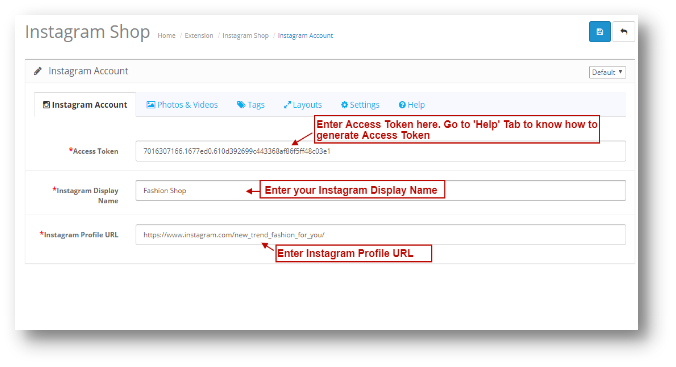
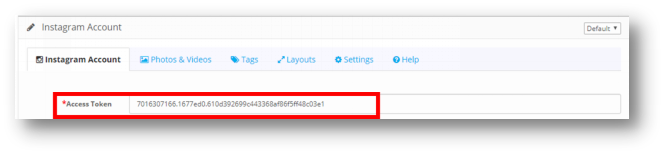
Under the Instagram Account of the Opencart Instagram Integration Extension, You will have the following configuration option:
Know how to generate Access Token: Annexure 1: How to generate Access Token?
4.0.2 Photos & Videos
Under the Photos & Videos of the Opencart Instagram Integration Extension, You will have the following configuration option:
1.All
2.Featured
3.Tagged with Products
4.0.2.1 All
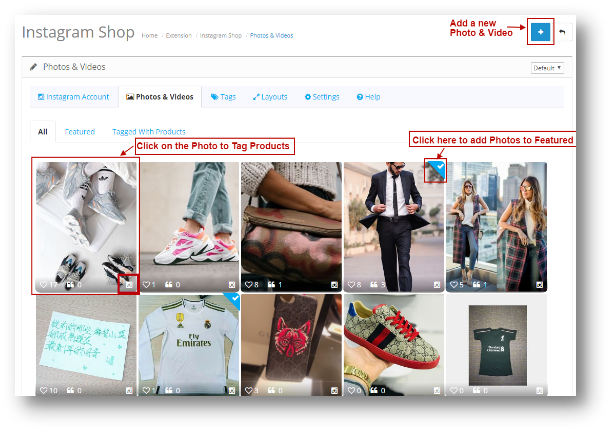
Here all the Photos added on your eCommerce store will be shown. The page will look like the following as shown below:
Instagram Icon: Click on the Icon to view the Photo on Instagram Profile.
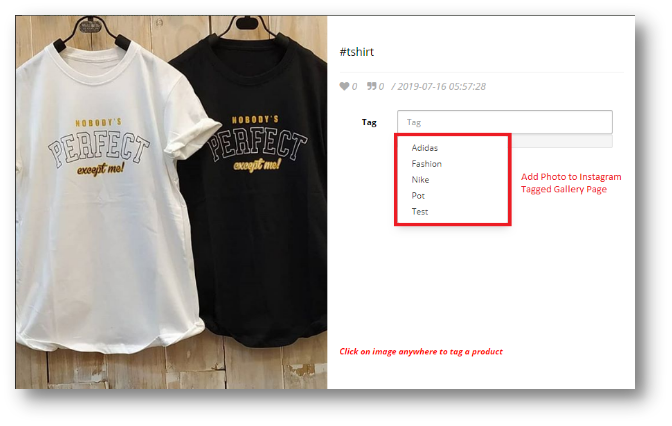
When you will click on the Photo, the following pop up will be appear to them as shown below:
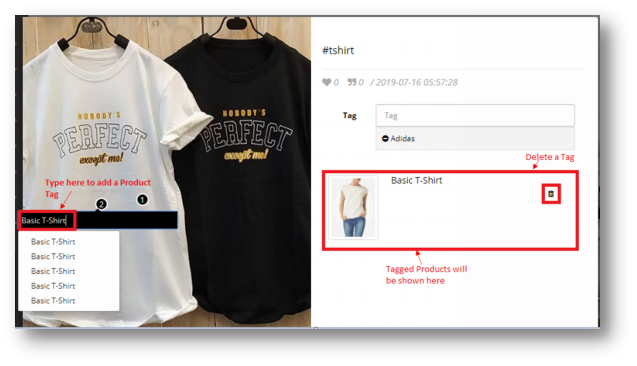
You can add an Image or Video to a Tagged Gallery Page as follows:
You can Tag as many Products as you want with this Photo.
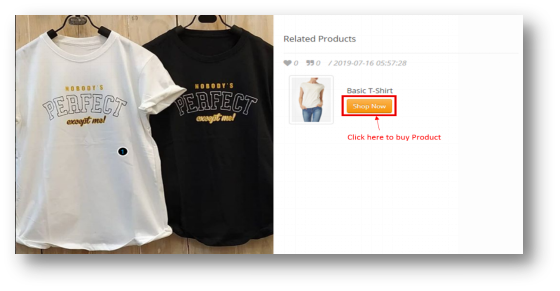
Tagged products will be shown in your eCommerce store as below:
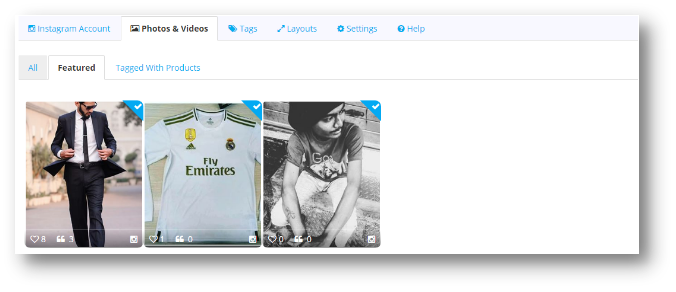
4.0.2.2 Featured
All the Photos and videos marked as Featured in ‘All’ Tab will be shown here. The page will look like as the one shown below:
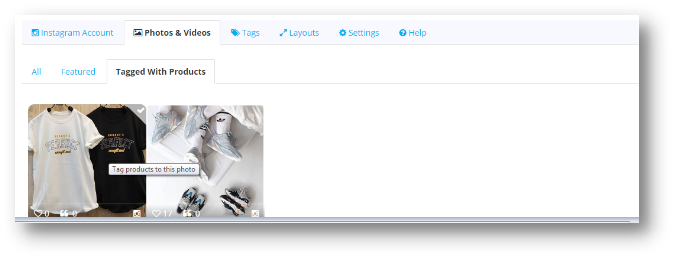
4.0.2.3 Tagged with Products
All the Photos and Videos which are tagged with products will be listed here. You can click on the image to Tag photo with products. The screen will be shown as below.
4.0.2.4 Add Photos & Videos
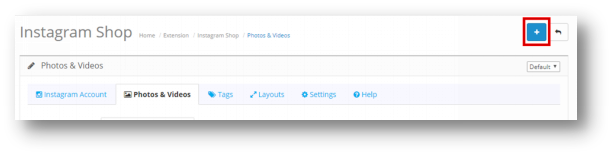
Follow these simple steps to add a Photo and Video. Click on the Add Icon which is highlighted on the screenshot below:
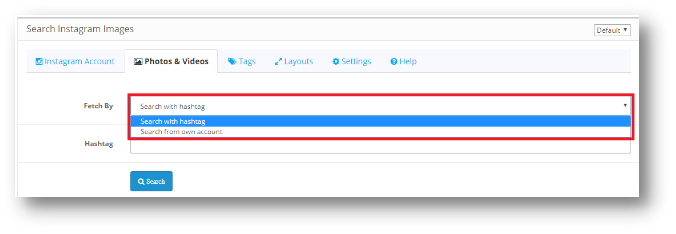
The following screen will appear:
Users will have 2 options to add a screen:
Search with Hashtag
Search from own Account
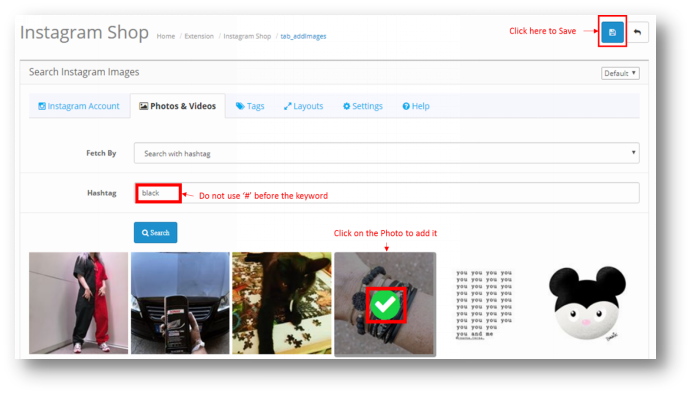
Search with Hashtag
You can search a Photo using Hashtags and all the photos listed under that Hashtag will appear on the screen. You can select a Photo and click on Save and the Photo will be saved under ‘All’ Tab.
*Note – Do not use ‘#’ before the keyword to search a Photo.
You can only add a Photo using the Hashtag. To add a Video, you need to search it from your own account.
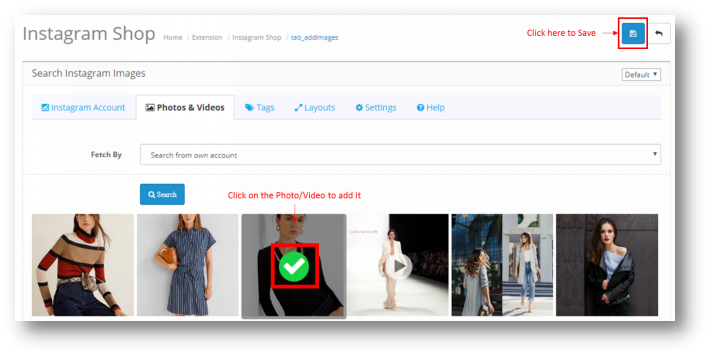
Search from own Account
When you click on Search from own account, the following page will be shown below. All the Photos and Videos uploaded on your Opencart Shoppable Instagram Feed will be shown.
Once the Photo or video is added, it will be shown on the ‘All’ Tab of the Photos & Videos setting page of Opencart Instagram Integration Extension.
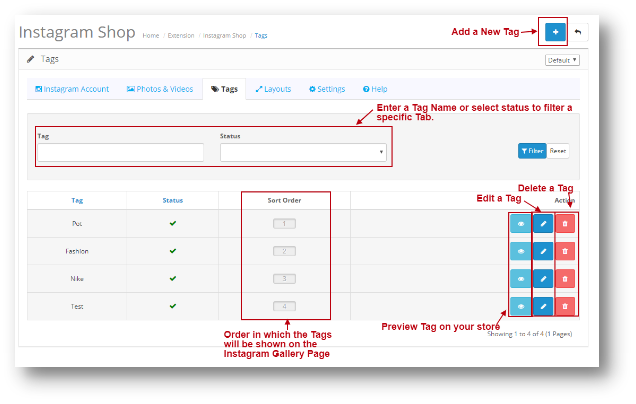
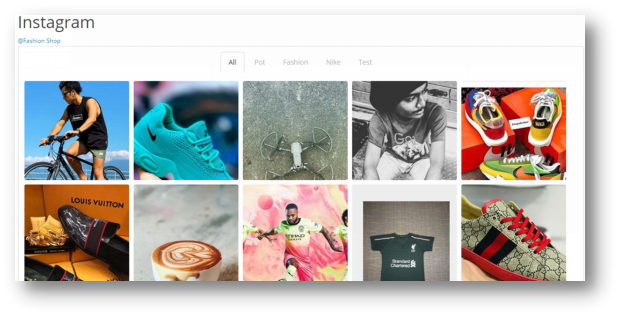
4.0.3 Tags
Using Tags, you can add a page in your store and show specific Products under that Tag. The Tag page will look like as shown below:
Preview Tag: If you click on this option then it will redirect you to the Store where you can view the Tag Page.
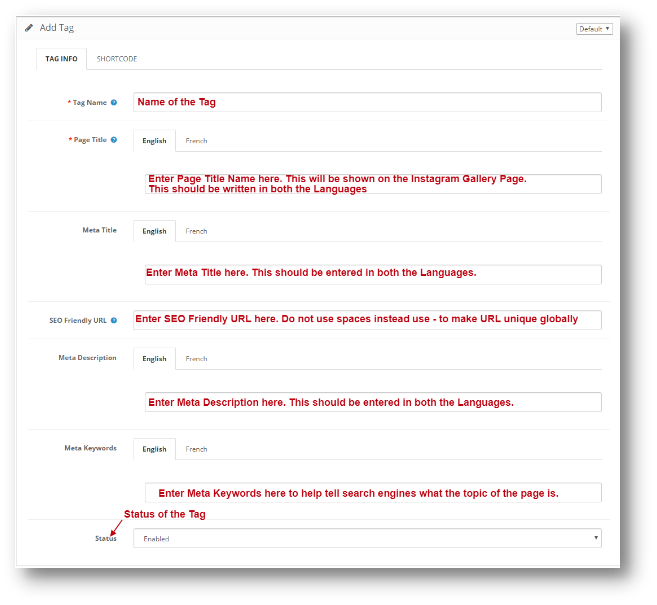
4.0.3.1 Add a Tag
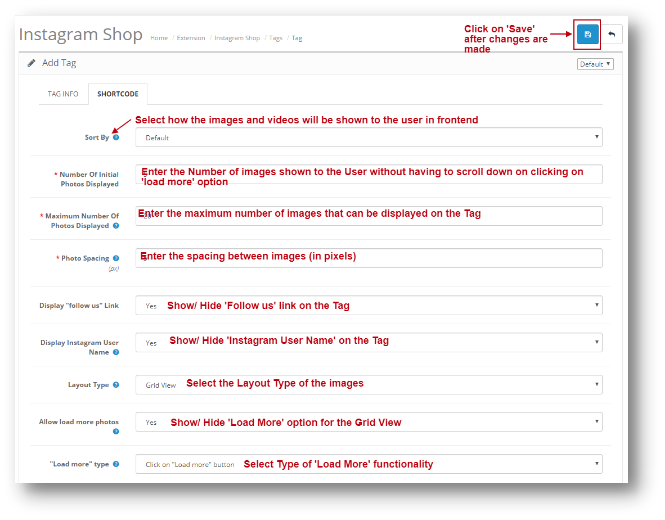
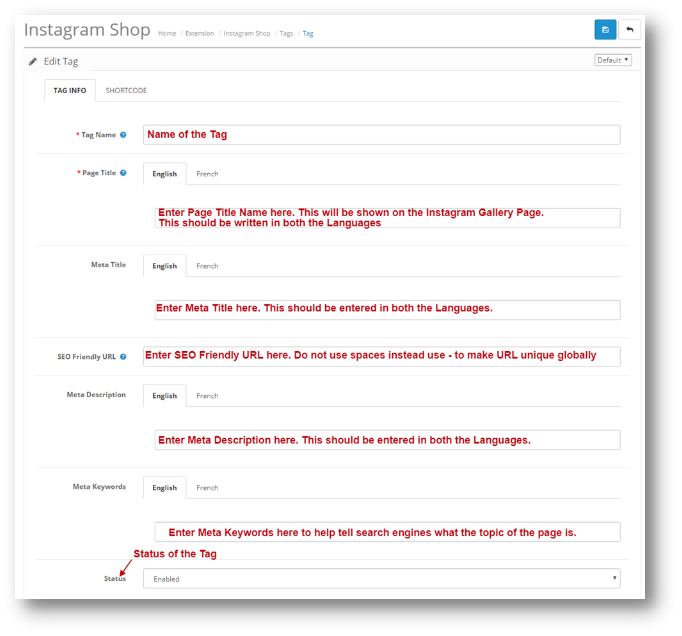
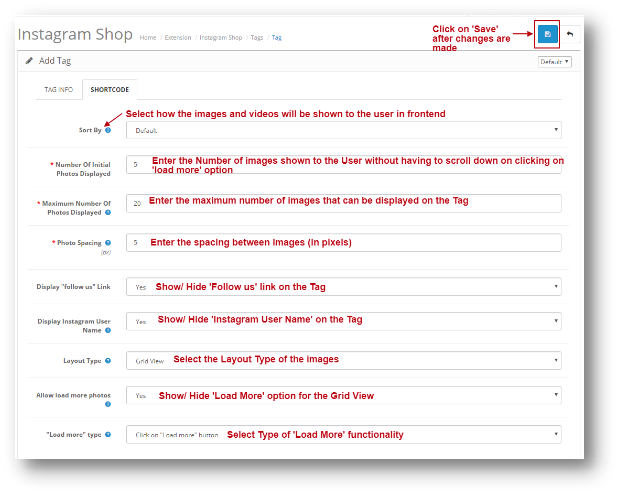
Under the Add Tag of Opencart Instagram Integration Extension, Admin will have the following configuration options:
Tag Info
Short code
After the information is saved on both the Tabs of Add Tag. You can click on Save and the Tag will be added.
Layouts:
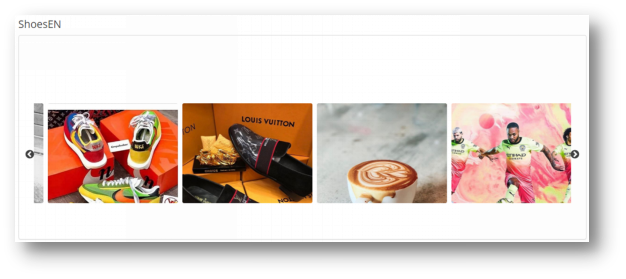
The following two types of layout options are present in Opencart Instagram Shop Gallery Extension:
Carousel Slider
Grid View
4.0.3.2 Edit a Tag
Under the Edit Tag of Opencart Instagram Integration Extension, You will have the following configuration options. It will be same as Add Tag, the only difference is that data will be pre-filled.
Tag Info
Short code
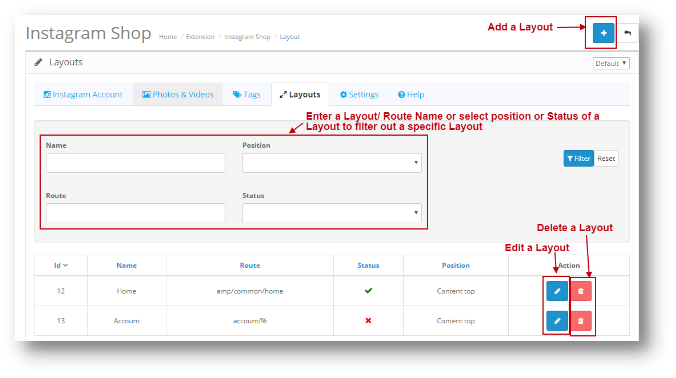
4.0.4 Layouts
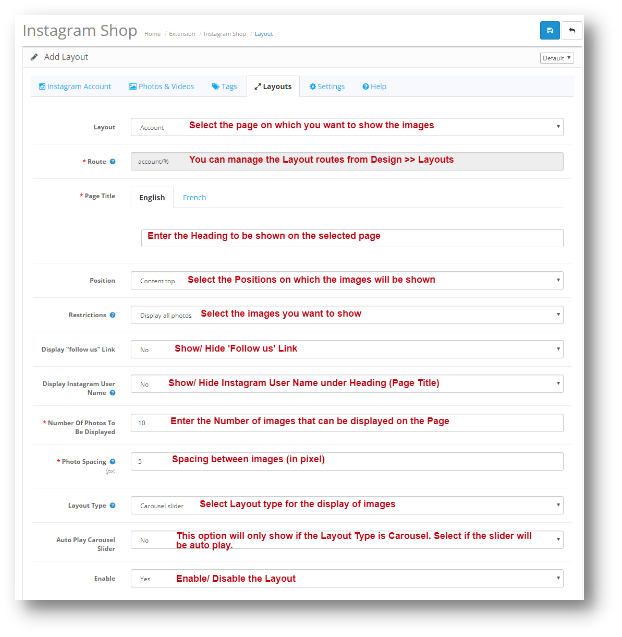
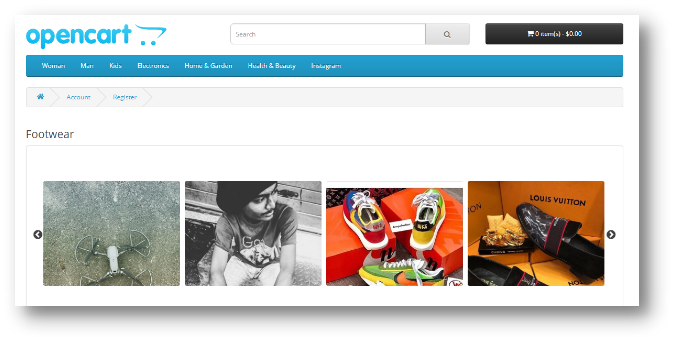
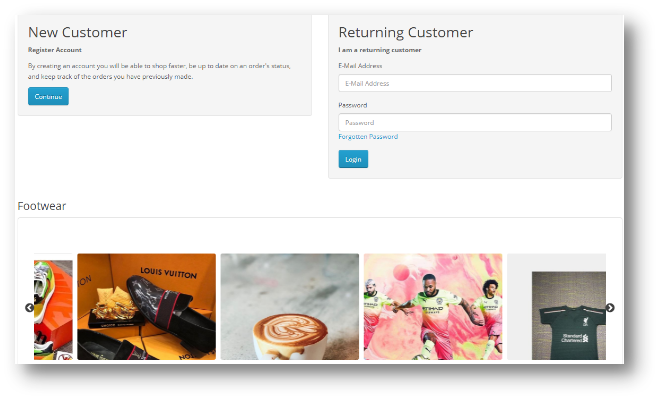
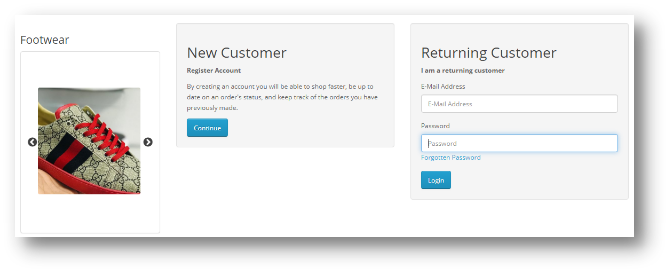
You can add your Instagram images on any page of your webstore from this option. Under the Layouts of the Opencart Instagram Integration Extension, You will have the following configuration option:
Edit Layout: Edit Layout Page will be same as Add a Layout Page. The only difference is that in edit page all the field will be pre-filled. Delete Layout: When you click on Delete Layout, the page will give a Pop up to confirm. Once you confirm it, the Layout will be deleted.
4.0.4.1 Add Layout
You can add images from your Instagram feed on any page of your Webstore from this option. Add Layout of Opencart Instagram Shop Gallery Extension will have the following configuration option:
Position of Layouts:
Content Top
Content Bottom
Column Left
Column Right
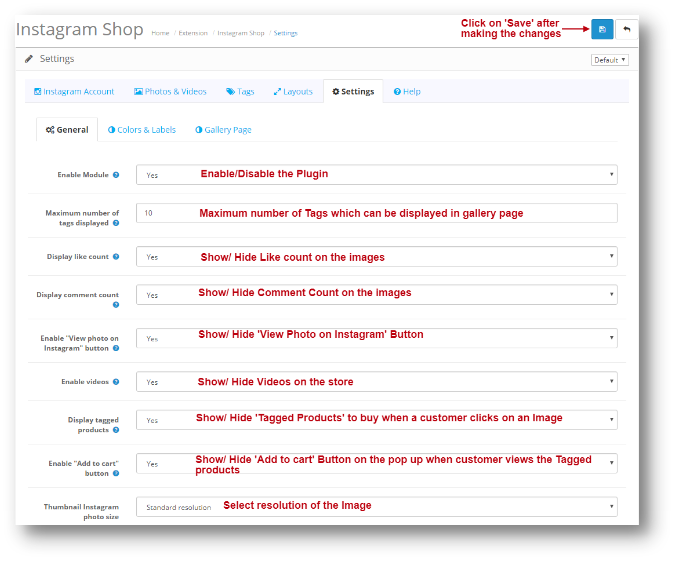
4.0.5 Settings
Settings page will have the following configuration options:
4.0.5.1 General
Under the General Settings of the Opencart Instagram Integration Extension, You will have the following configuration option:
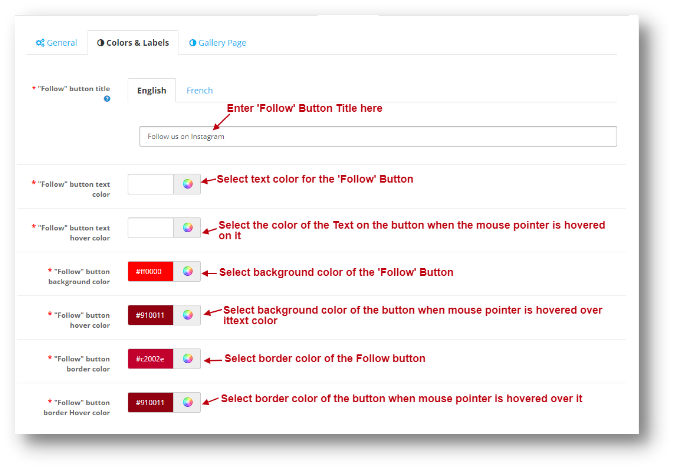
4.0.5.2 Colors and Labels
You can change the Look and feel of ‘Follow’ Button from this setting. The same is shown on the screenshot below:
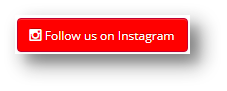
Follow button will look like as shown below:
4.0.5.3 Gallery Page
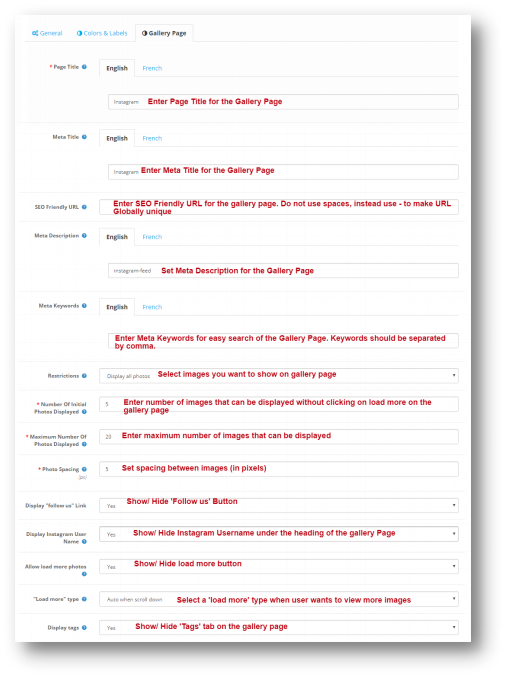
You can change the main gallery page settings from this option. Under the Gallery Page Settings of the Opencart Instagram Integration Extension, You will have the following configuration option:
4.0.6 Help
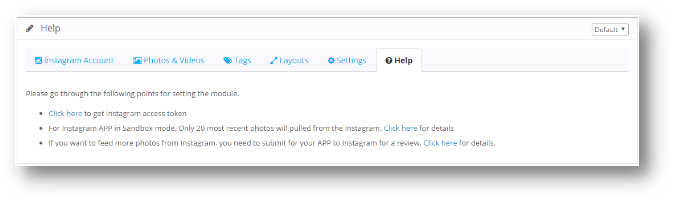
Under the Help Tab of the Opencart Instagram Integration Extension, You can see on how to get the access Token for your Instagram account. You can follow the listed steps to generate Access Token. The page will look like following:
Annexure 1: How to generate Access Token?
Click here to go to Instagram Account
Step 1:
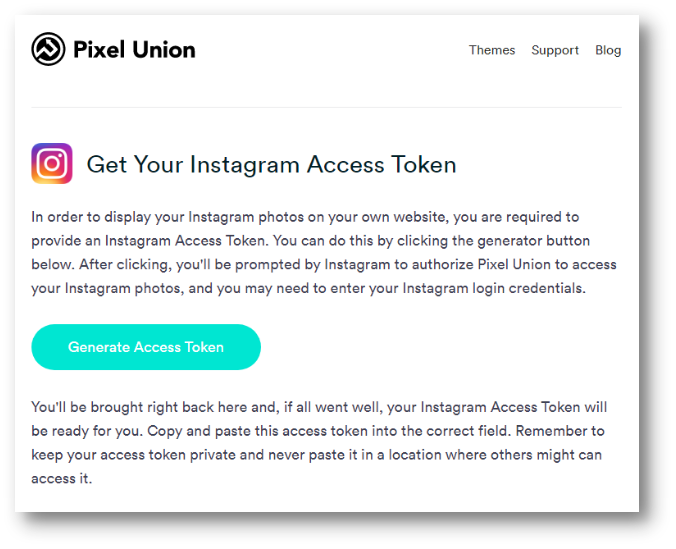
Go to https://instagram.pixelunion.net/ and click on Generate Access Token
Step 2:
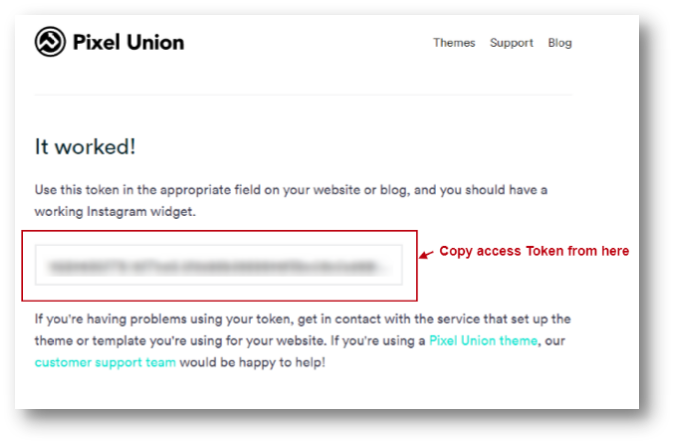
Copy Access Token
Step 3:
Paste it in the Access Token field under Instagram account settings.
Social media integration is the essential functionality for most of the eCommerce sites today. Social media platforms like Facebook and Instagram provide you the only space to grab lots of traffic as well as sales. Magento Social Wall Post Extension helps you showcase the new arrivals and limited stock products of your store among a wide range of audience. This way Social feed integration is the best means to engage your social media audience on your main website. The social feeds sent on Facebook and Instagram help to gain customer trust which certainly leads to higher conversion levels.
Knowband’s Magento Social Wall Post module allows you to display product related posts on your official pages at Facebook and Instagram. Moreover, Magento Social Feed extension serves as the best tool to announce promotions and discounts with limited product stocks.
1.1 Striking Features of Social Wall Post Extension for Magento
This Magento Social Wall Post module provides you various customizable features to display feeds from your website at any Facebook page or Instagram page. In order to integrate Magento Social Feed extension, you have to configure various functionality without any source code modifications. But first, lets take a quick overview into the features of Instagram Wall Post for Magento.
1. Magento Facebook Wall Post Extension publishes feeds on your Facebook and Instagram pages based on product, category, new arrival or limited stock product.
2. The various product feeds sent using Magento Social Wall Post module are compatible with mobile and tablet devices.
3. With Magento Instagram Post module, you can create manual or automatic posts for social media pages.
4. With the help of Social Wall Post Extension for Magento, you can share selected product and category feeds without any hassles.
5. Using Magento Social Feed extension, create as many posts with custom title, description, images, and product link. These posts or feeds can be scheduled for a particular date and time.
6. Magento social media integration module allows easy integration of your Facebook and Instagram account. You just have to follow the configure the configuration steps for connecting your social accounts.
7. For each product related or category related posts, Magento Social Wall Post module allows you set a custom text and social network to send any post.
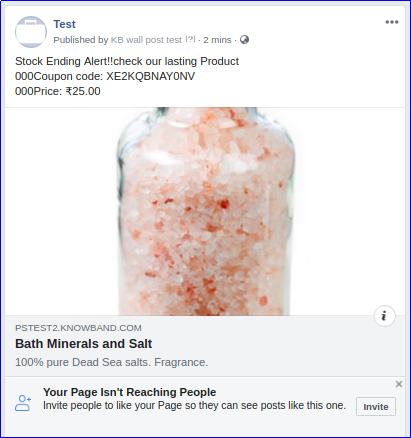
8. With Magento Social Feed extension, you can send limited stock alerts to your Facebook and Instagram wall.
9. Magento Social Wall Post module gives an option to set the product quantity below which the stock alert feed is automatically sent to Facebook and Instagram users.
10. Magento Instagram Post module provides an option to set a desired message for the stock alert wall post.
11. Magento Facebook Wall Post Extension helps you to offer discount coupon along with limited stock alerts sent to social media walls. For each discount coupon, you can set a fixed discount type, value, validity and quantity which can be modified from backend.
12. Magento Facebook Wall Post Extension executes cron jobs to publish scheduled posts, send new product posts & limited stock alerts on social wall.
13. Magento Facebook Post module allows you to set a description and image size for the product feeds shown on Facebook and Instagram page.
14. Magento Social Feed extension allows you to display product price in selected currency.
15. This Instagram Wall Post for Magento shares new products feed on social network wall along with a custom description.
16. Magento Facebook Post module is multi-store and multi-lingual compatible.
17. The functionality of Social Wall Post Extension for Magento doesn’t conflicts with other installed modules on the store.
1.2 Technology for Development
Language: PHP
Frame Work: Magento
2.0 Installation Guide of Social Wall Post Extension for Magento
1. Once after you purchase Magento Social Wall Post module from the Knowband store, you will get the following files on your registered email.
Source code file of Magento Social Wall Post extension in zipped file format.
User Manual of Magento Social Wall Post module.2. Download the files.
2. Unzip the package in the root folder of your Magento setup via FTP manager (like Filezilla or WinSCP – download here: https://filezilla-project.org/). You’ll find the files and folders as shown in the image below:
The Magento social media integration module is now installed for your store and is ready to configure without any coding hassles.
3.0 Admin Interface of Magento Facebook Wall Post Extension
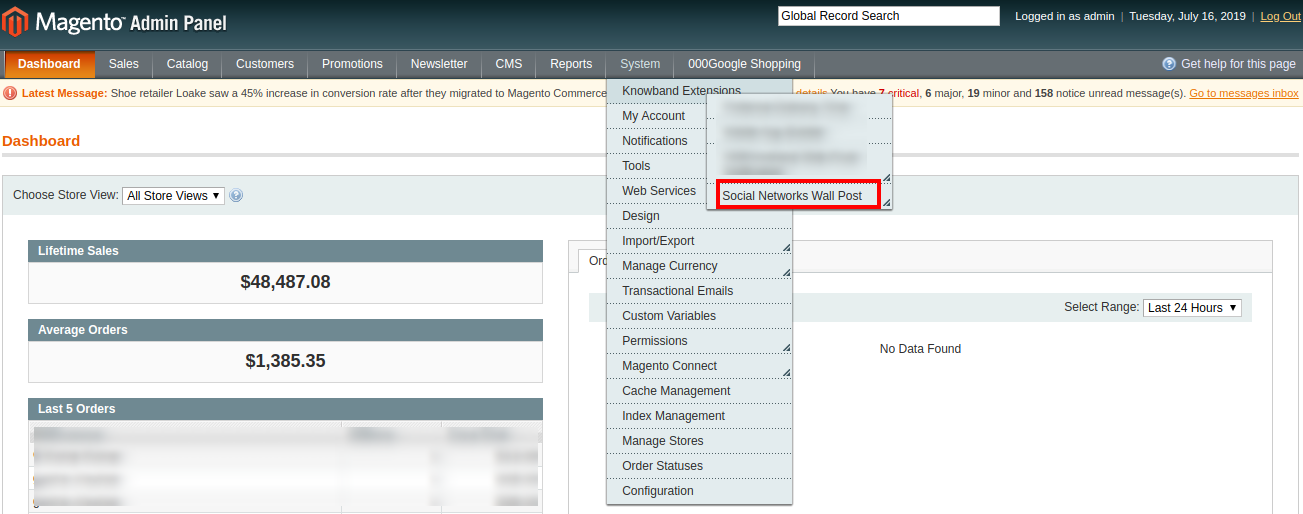
Once you have successfully installed Magento Social Wall Post module on your website, you can send or share unlimited product feeds on Facebook and Instagram. Whether there is any new product arrival or limited product stock alert, you have to configure the Magento social media integration module settings as per your business needs. Navigate to the module settings in the given order: Admin Panel >> System >> Knowband Extensions >> Social Network Wall Post
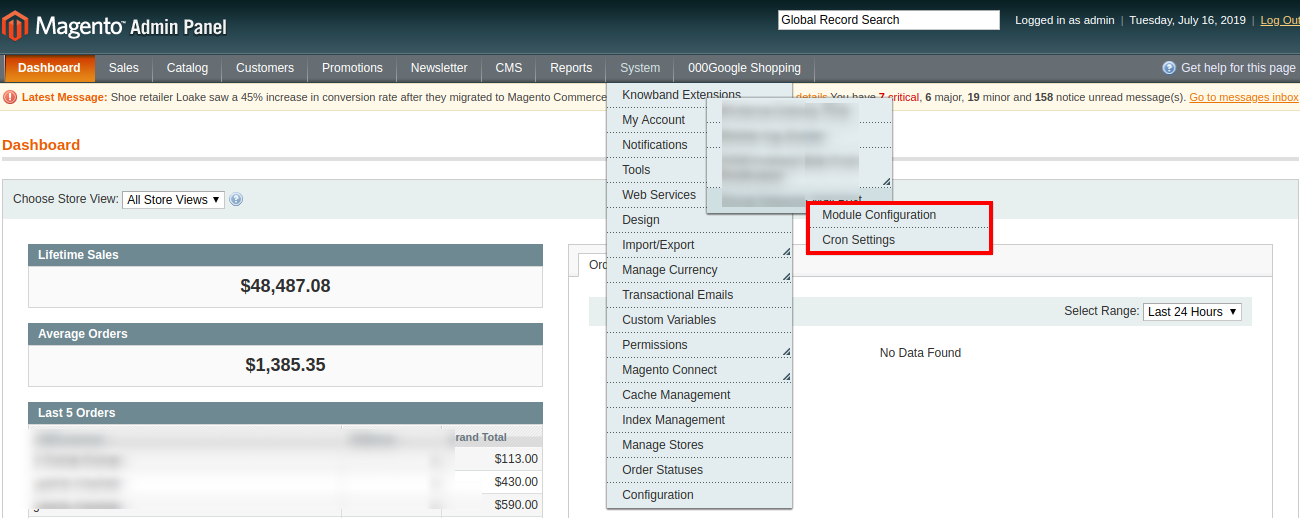
The easy to understand admin interface of Social Wall Post Extension for Magento has been divided into two broad sections as:
1.Module Configuration
2.Cron Settings
Each of these sections have been discussed in detail below.
3.1 Module Configuration
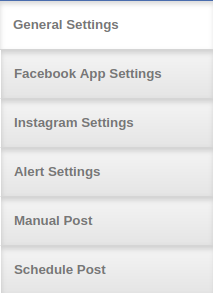
The configuration settings of this Magento Facebook Wall Post Extension is sub-divided into six sections as:
1. General Settings
2. Facebook App Settings
3. Instagram Settings
4. Alert Settings
5. Manual Post Settings
6. Schedule Post Settings
Each of these sub-section have been discussed in the next section.
3.1.1 General Settings
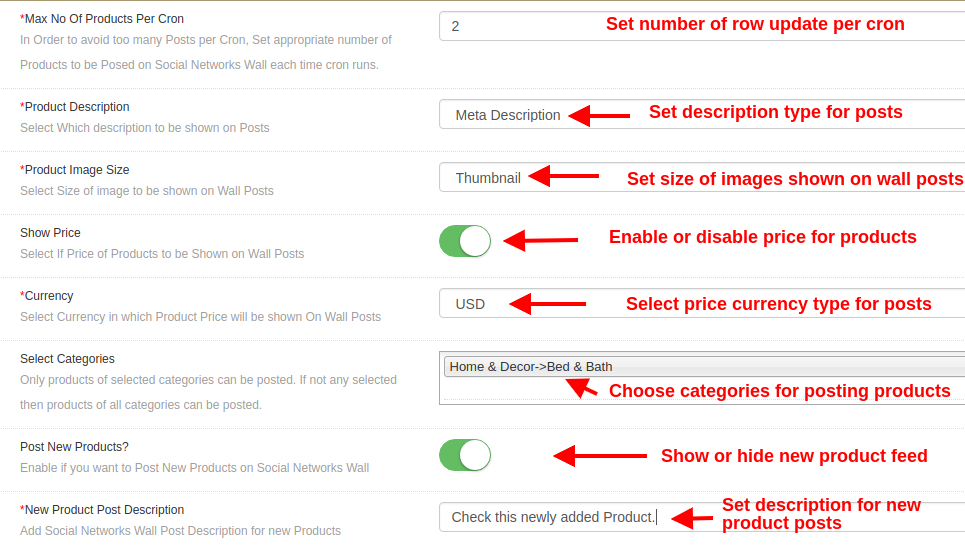
Max no of Products per Cron: This option will set the number of products which will be posted on social network wall per cron. Like, if the value is set to 2, then only two posts will be published on executing a single cron instruction.
Product Description: This option sets the product description type which is shown on the social media post. The options include Meta description, short description and long description.
Product Image Size: This option sets the image size for the products shown in feeds. This options include Thumbnail, base image, and small image.
Show Price: Enable or disable this option to show product price on wall posts.
Currency: This option allows you to select currency of product price Indian rupee or US dollar.
Select Categories: This option helps you to select the categories from which the products will be posted on social wall. If no category is selected then products from all category will be posted.
Post New Products: Enable or disable new product posts on social wall (Facebook and Instagram).
New Product Post Description: With this option, you can set a desired post description for new products.
3.1.2 Facebook App Settings
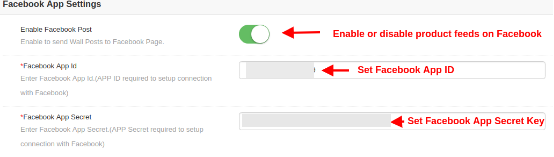
Enable Facebook Post: This option allows you to enable or disable wall posts on Facebook page.
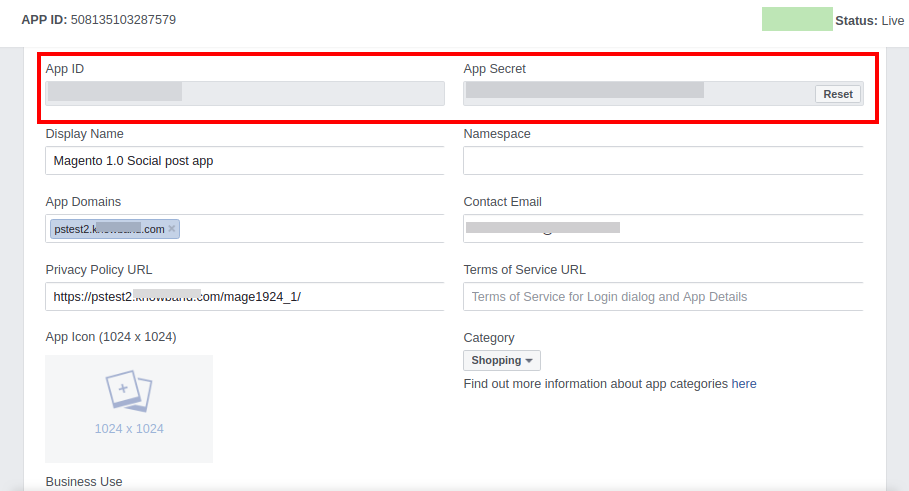
Facebook App ID: This option will set app ID required to setup connection with Facebook.
Facebook App Secret: This option will set the Facebook App Secret key to setup connection with Facebook.
Facebook Access Token: This option sets the Facebook Access Token for setting up connection with Facebook.
Choose Page: Once the various keys are set, it will show you all the pages for which the app permission is granted.
3.1.2.1 Steps for Facebook Configuration
The steps for Facebook configuration are:
Login to your account at https://developers.facebook.com. If you dont have a account, create one.
Click on the “My Apps” dropdown menu, click on “Create App” option.
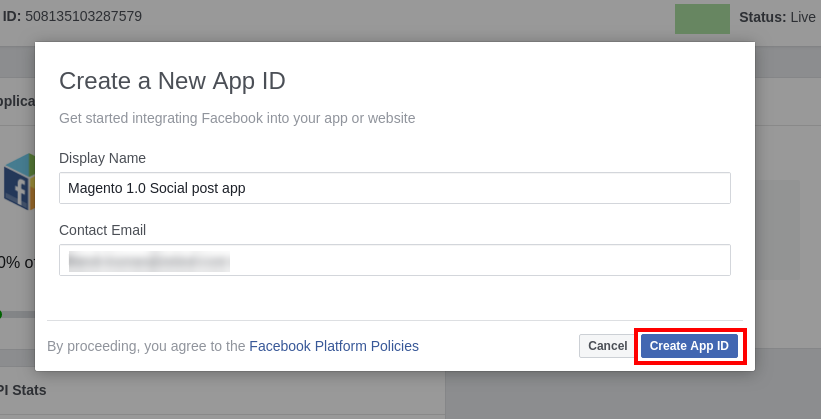
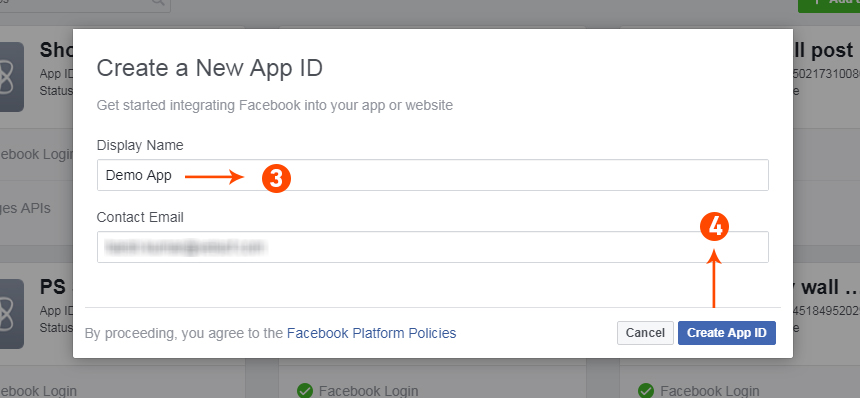
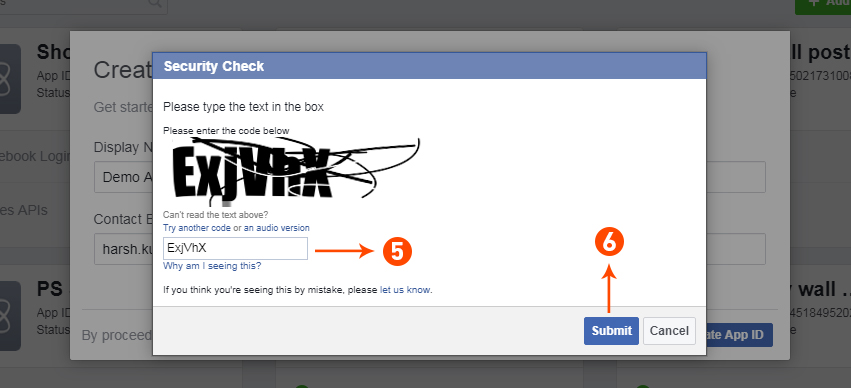
Now, set the “Display Name” for your app and then click on “Create App ID” button.
Your App is now created. It will be now listed under “My Apps” dropdown section.
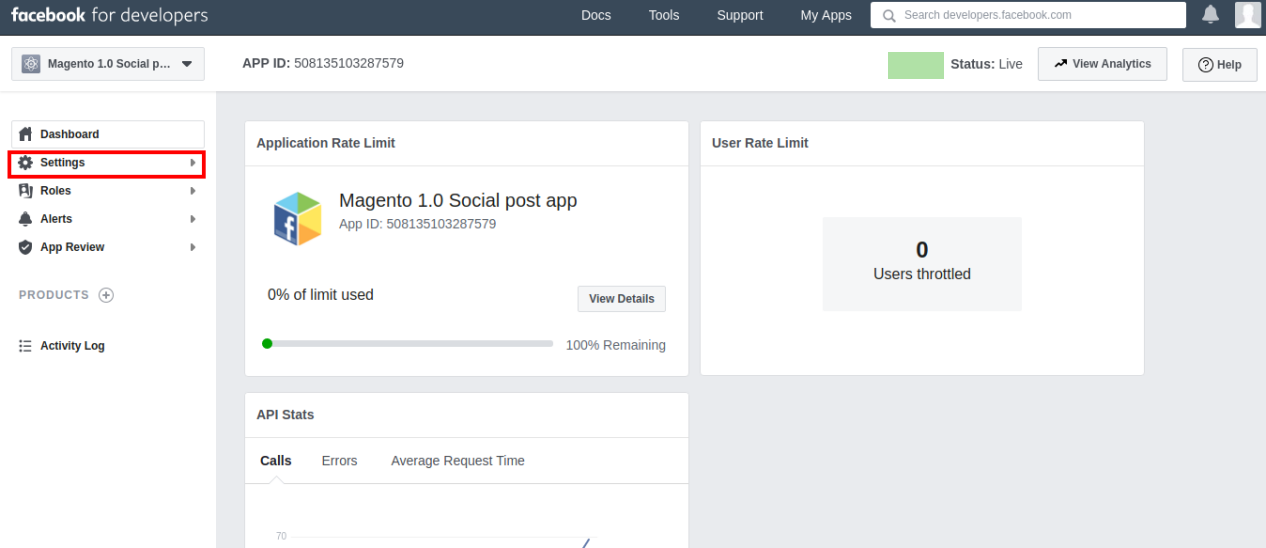
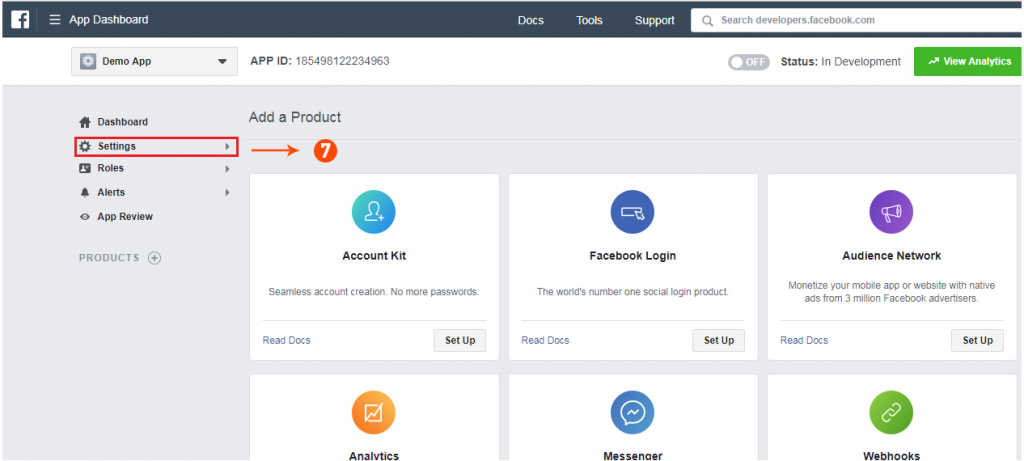
Click on the App you created. It will show you the dashboard.
Click on the Settings option.
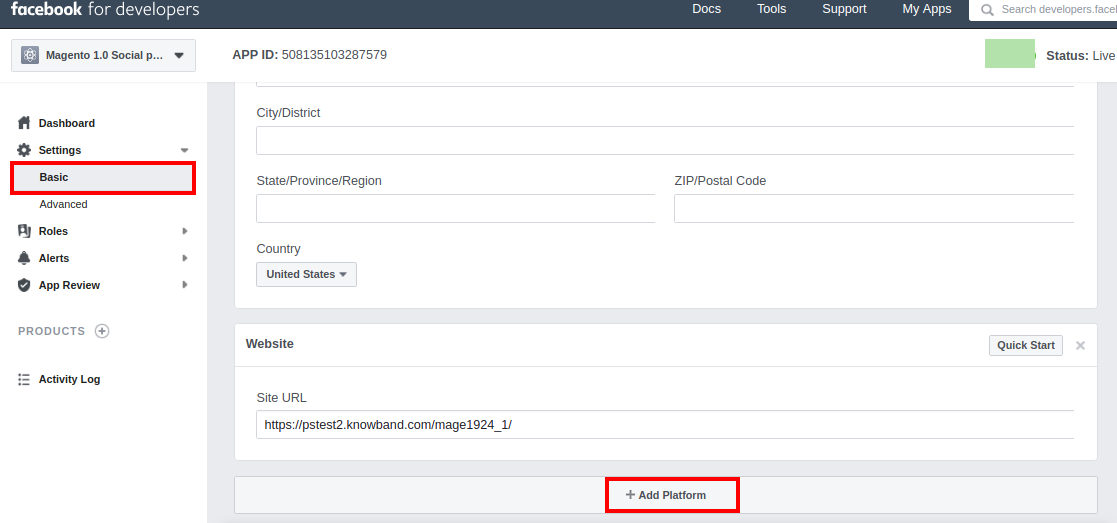
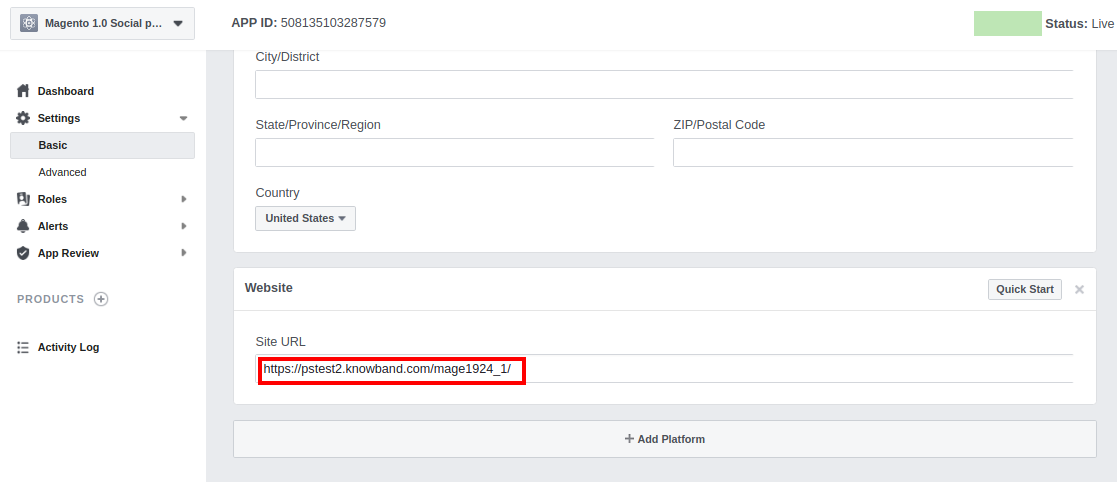
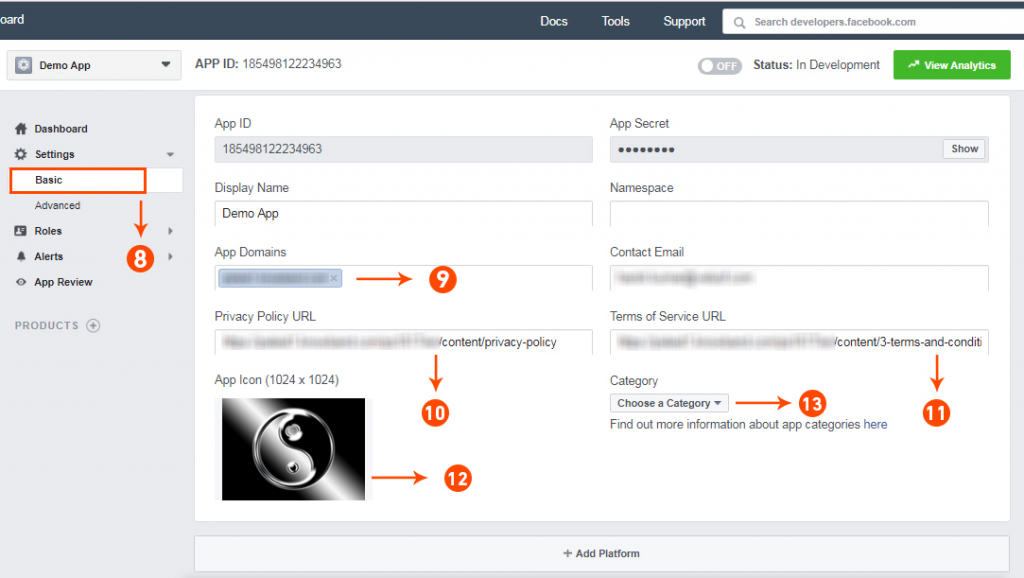
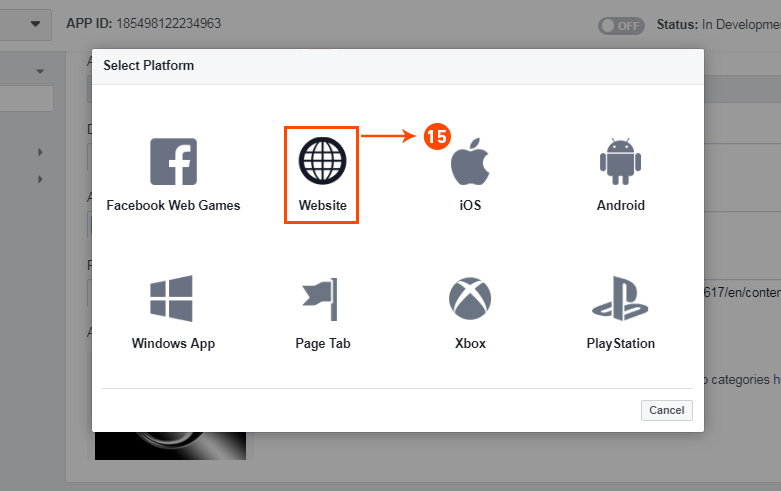
Under Basic tab, click on “Add Platform” option at bottom of the screen.
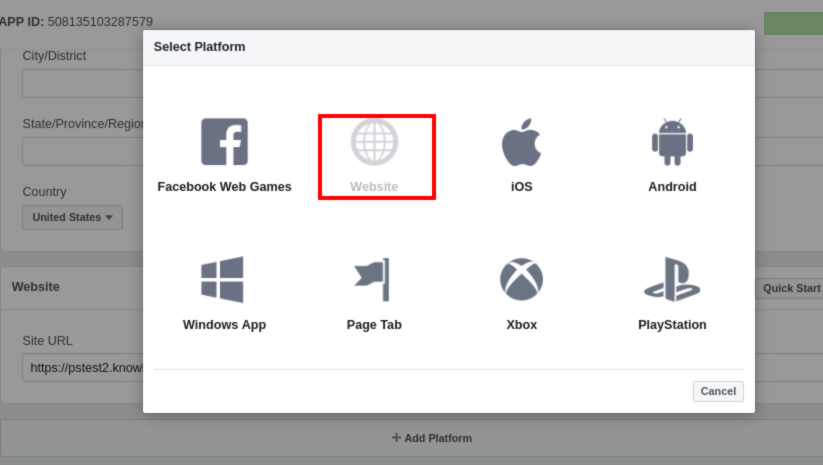
Choose Website option.
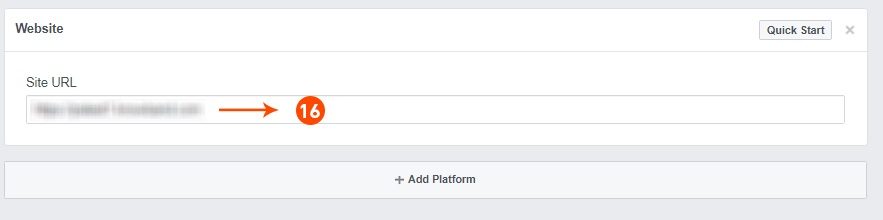
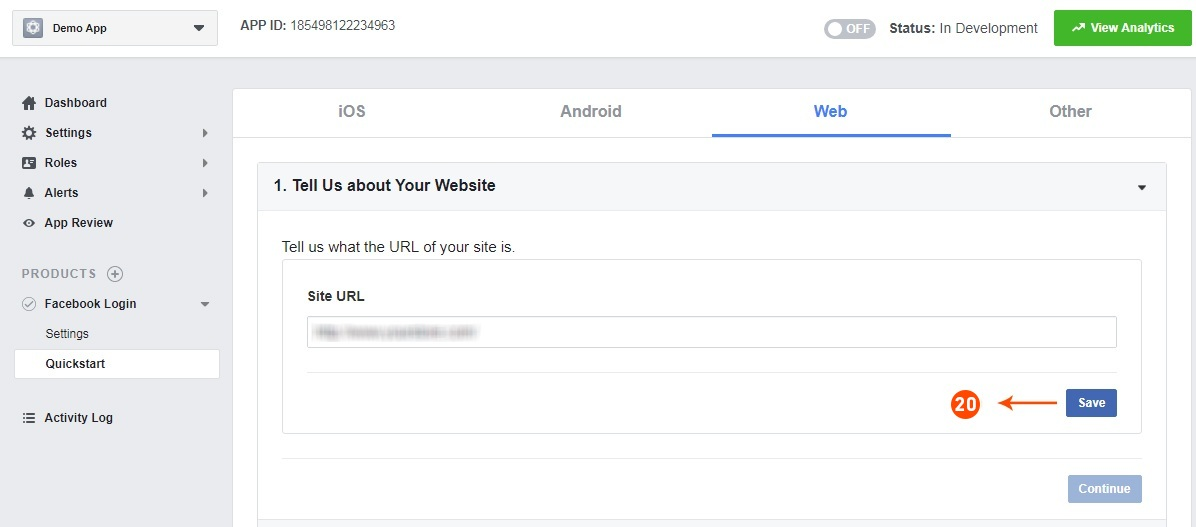
Enter the URL of your website under “Site URL” field.
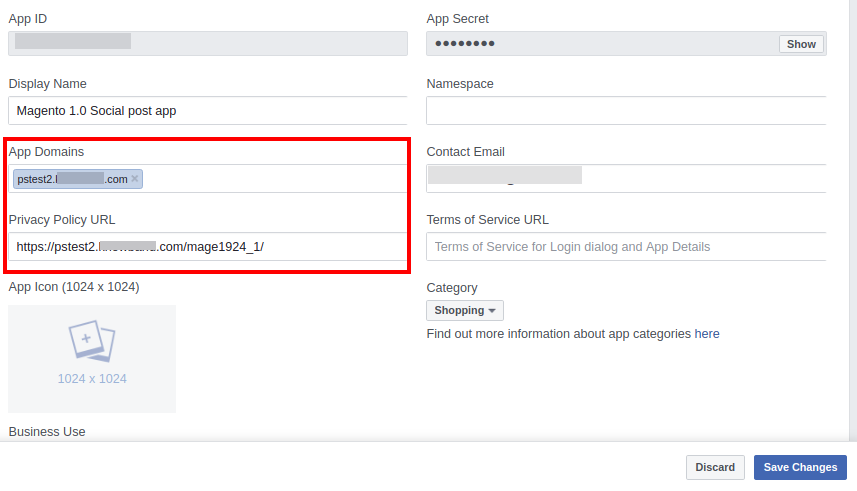
Enter the site URL into “App Domains” and site privacy policy URL into “Privacy Policy URL”.
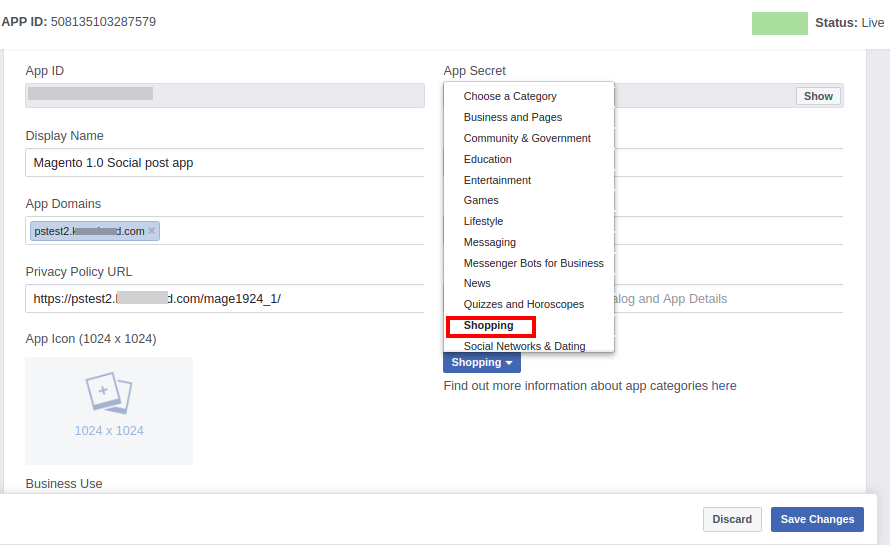
Select “Shop Category” suitable for your site. Suppose, you have selected as Shopping.
Now go to “Facebook App Settings” in your module settings.
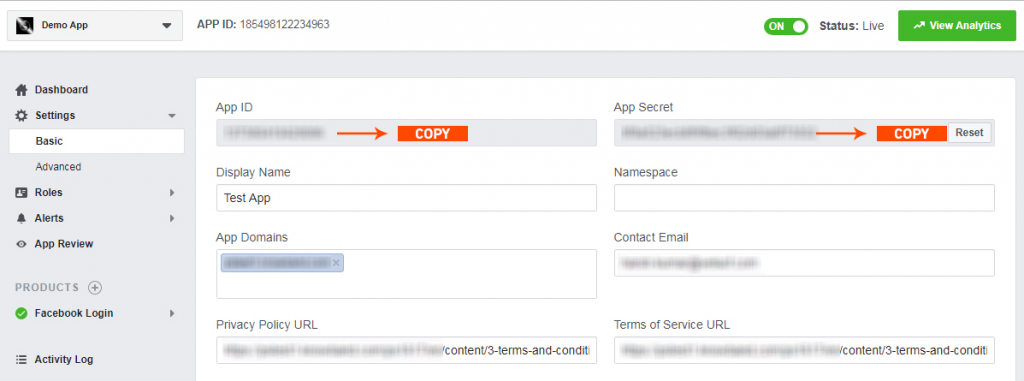
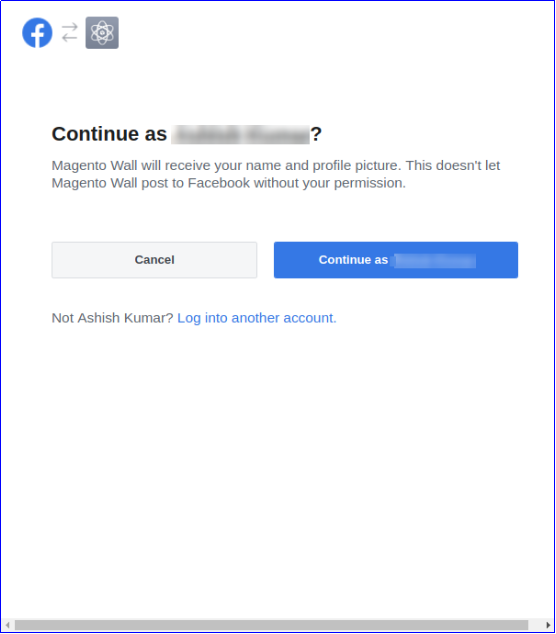
Copy the “App ID” and “App Secret” data from Facebook developer UI to your admin interface of your module as shown below:
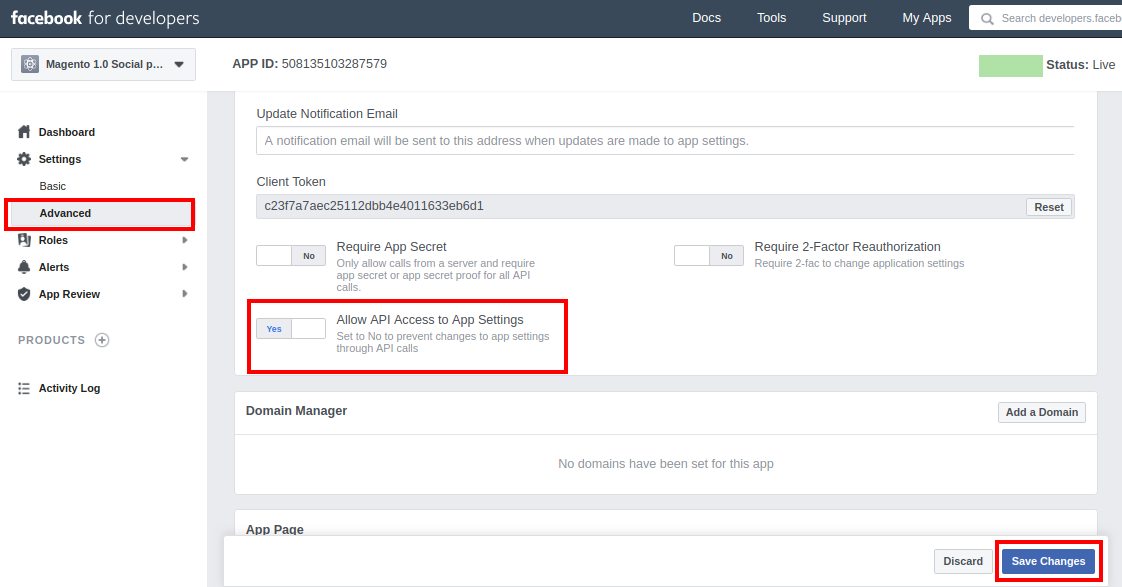
Now, enable the “Allow API Access to App Settings” option under Advanced tab. Then, click on “Save Changes” button.
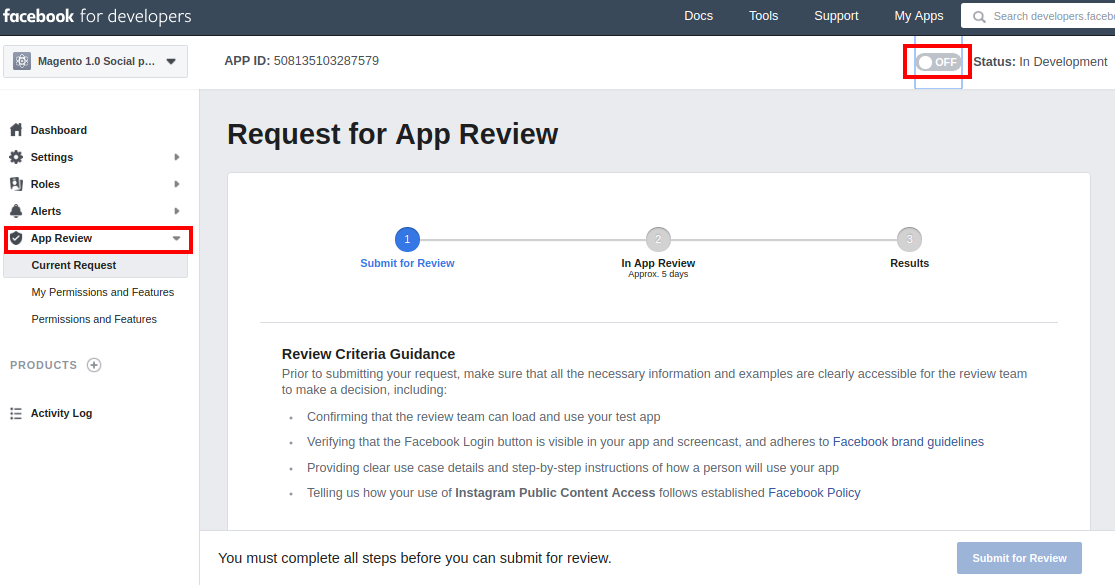
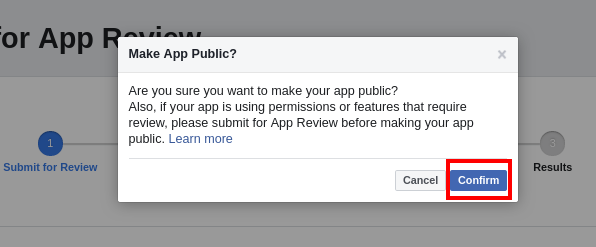
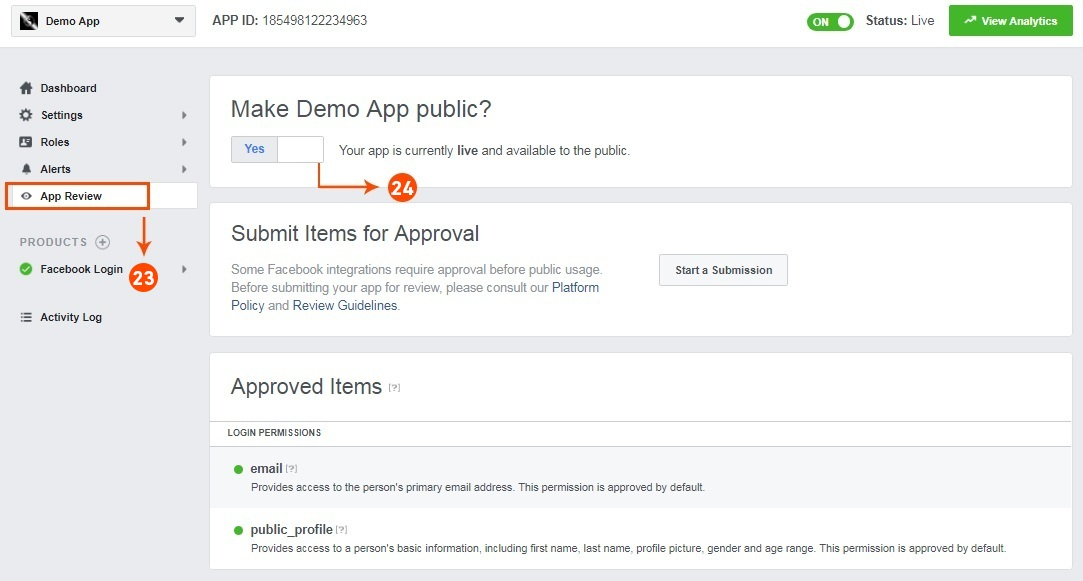
Under App Review tab, enable the toggle button shown at the top side of screen.
It will show the following confirmation screen. Click on “Confirm” button.
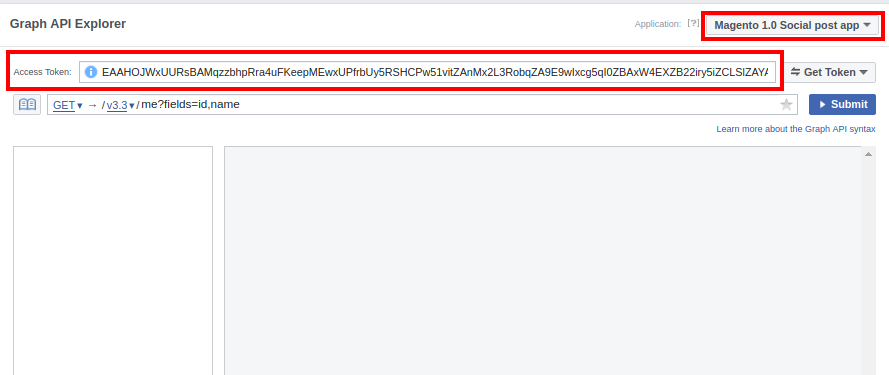
Go to Graph API Explorer at https://developers.facebook.com/tools/explorer in a new tab. Select your App and it will show you an Access Token for it.
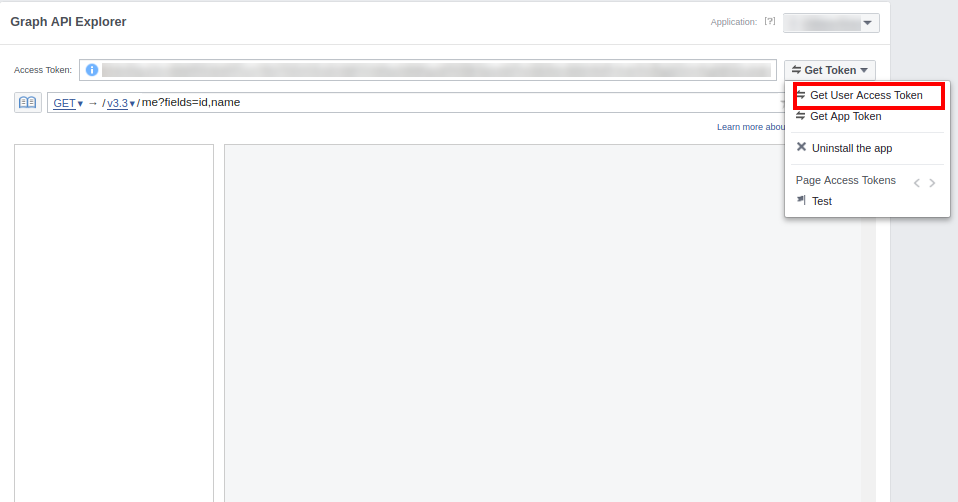
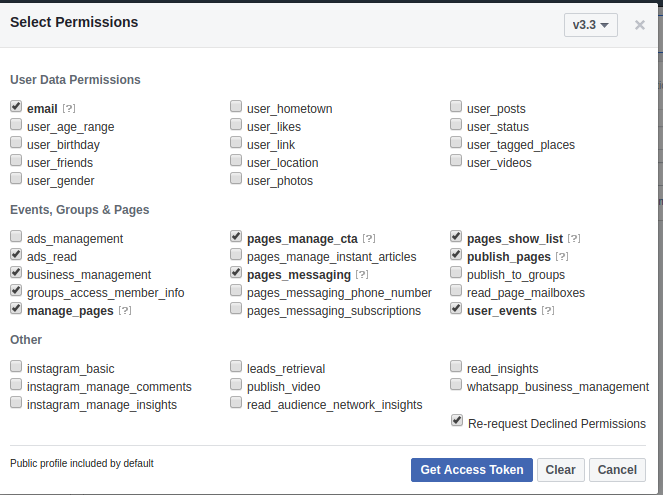
Click on “Get User Access Token” and select the permissions.
Select publish_actions, manage_pages, user_photos, pages_show_list, publish_pages and user_managed_groups options and click Get Access Token. Click “OK” when asked permission.
Click on “Get Access Token” button.
Click OK to finish.
Copy the Facebook Access Token and paste it in the Facebook App Settings of your module. The Facebook App configuration is successfully done.
Under the Facebook App Settings, there is an option to select the Facebook Pages. All the pages for which app permissions is given will be listed in its dropdown. Select any page.
3.1.3 Instagram Settings
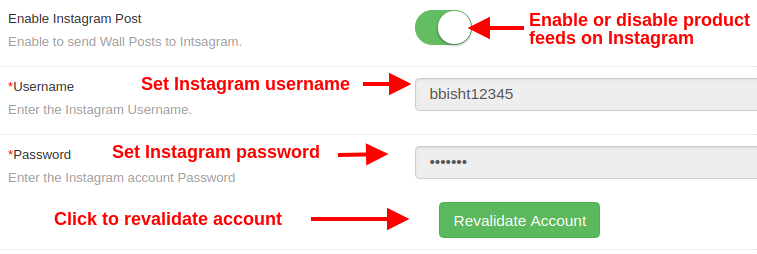
Enable Instagram Post: This option will enable or disable posts or feeds on Instagram wall.
Username: This option allows you to specify the Instagram username.
Password: This option allows you to enter Instagram account password.
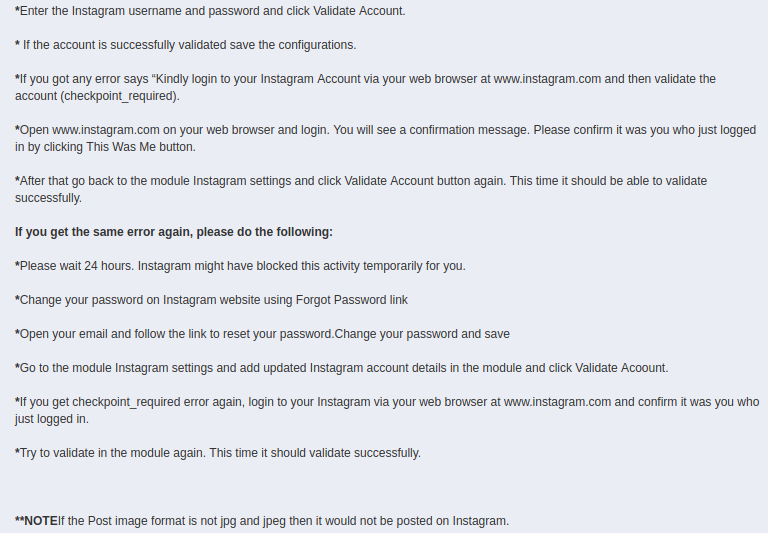
3.1.3.1 Steps for Instagram Configuration
The steps for Instagram configuration are provided inside the module settings as shown in the screenshot below.
3.1.4 Alert Settings
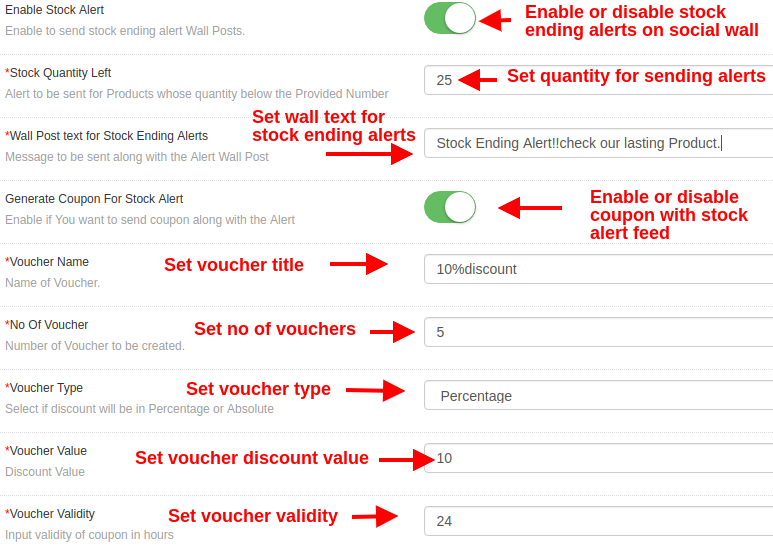
Enable Stock Alert: Enable or disable product stock alerts on connected social walls.
Stock Quantity Left: This option sets product quantity below which limited stock feeds are sent to Facebook and Instagram wall.
Wall Post Text for Stock Ending Alerts: This option allows you to set text for stock ending alert posts.
Generate Coupon for Stock Alerts: This option enables or disables discount voucher with stock alerts.
Voucher Name: With this option, you can set a name or title of the discount voucher.
No of Vouchers: This option specifies the quantity of discount vouchers available for customer use.
Voucher Type: This option specifies the type of discount voucher as fixed or percentage.
Voucher Value: This option sets the discount value offered using discount voucher.
Voucher Validity: This option sets the validity of discount voucher (in hours).
3.1.5 Manual Post Settings
You can manually post the selected products and categories of the website under this section.
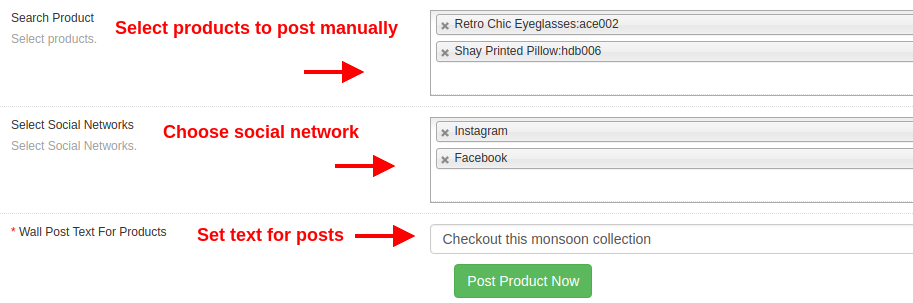
Search Product: This option allows you to select products that you want to manually post on Facebook and Instagram page.
Select Social Networks: This option lets you select the social network where you want to send the post or feed. You can select it as Facebook or Instagram.
Wall Post Text for Products: With this option, you can set the desired text for the manual posts.
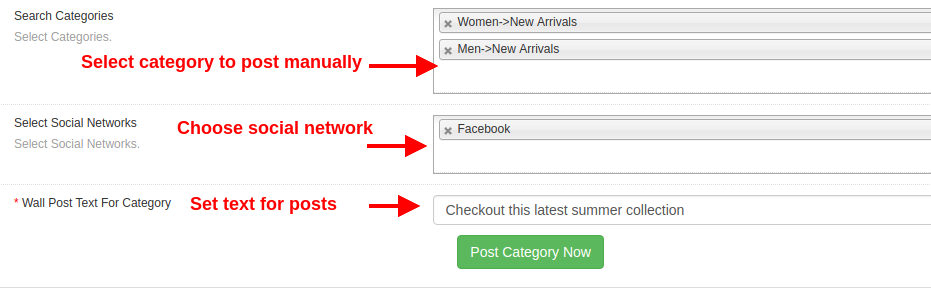
Search Categories: This option allows you to select categories that you want to manually post on Facebook page.
Select Social Networks: This option lets you select the social network where you want to send the post or feed. You can select this option as Facebook as Category posts are not supported with Instagram.
Wall Post Text for Categories: With this option, you can set the desired text for the manual posts.
3.1.6 Schedule Post Settings
Under the Schedule Post Settings of this Magento module, you can view the list of all scheduled posts. You can edit them or delete them only if they are unpublished. Once they are published or posted on connected social media pages, you cannot edit those posts. Such posts can be viewed only.
The published posts are marked as “Posted” while the unpublished posts are marked as “Pending”.
Note: A scheduled post will be marked as “Posted” only if the post is published on both the social streams, Facebook and Instagram. If any error occurs while posting the feed on Facebook or Instagram, then status will be shown as “Pending”. Even if the product is posted only on Facebook or Instagram, then also the status is shown as “Pending”.
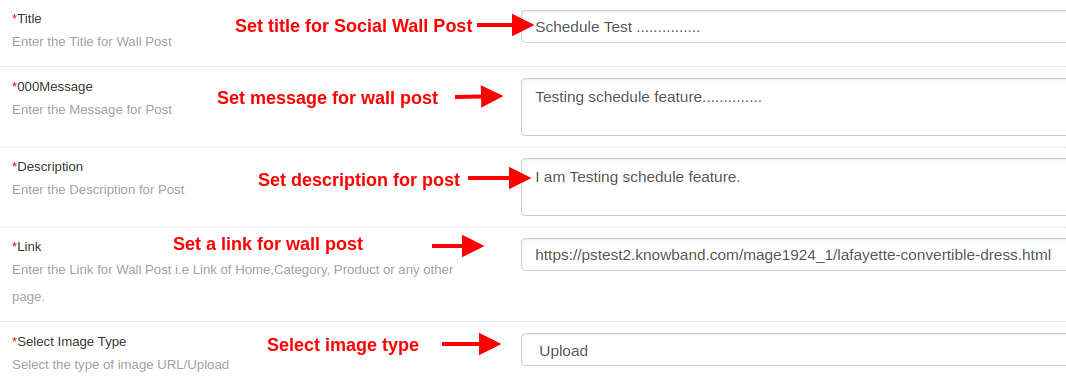
To create a new scheduled post, fill up the following configuration options:
Title: This option will set the title for the scheduled wall post.
Messages: This option sets the message for the social wall post.
Description: This option sets the description of the social wall post.
Link: With this option, you can set a link for the scheduled wall post. The link can be targeted for a selected product, category, or any other page.
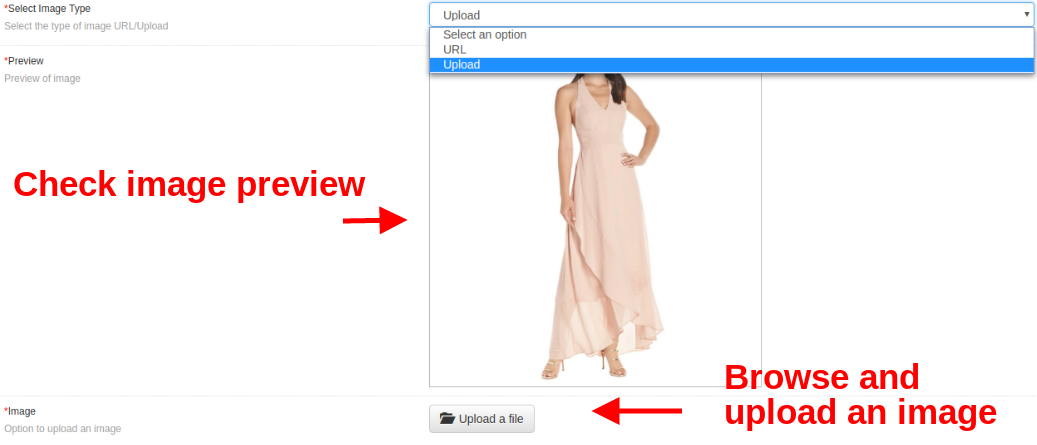
Select Image Type: You can select the image type. You can either upload an image from the local system or set the image via link.
Preview: With this option, you can preview the uploaded image or fetched image from specific URL.
Image: If the Image Type is selected as Upload, this option allows you to browse and upload a desired image.
Post Date: This option lets you specify the date and time for scheduling the specific social wall post.
3.2 Cron Settings
Under this Cron Settings tab of Magento Social Wall Post Extension, you can manually run cron commands for performing various actions such as:
Send Scheduled Post Manually: Hit this cron to send all the post which are scheduled before current time will be posted.
Sync Products Manually: Hit this cron to sync limited stock alert feeds in the table.
Send Posts Manually: Hit this cron to manually send posts for stock ending products and new products of the store.
Under this tab, you can check/view records for new product feeds and limited stock alert feeds.
Note: New Product Feeds are automatically added/updated to this table as soon as new product is added to the store from backend. While the stock alert feeds are only updated in this table once you run the cron “Sync Products Manually”.
Note: Make sure that all the product details are correctly entered while you add any new product in the catalog. If you further modify any product detail after saving the product, that product wont be counted as a new product.
4.0 Front Interface of Magento Social Wall Post module
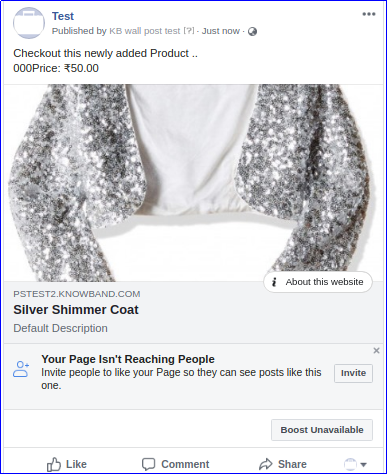
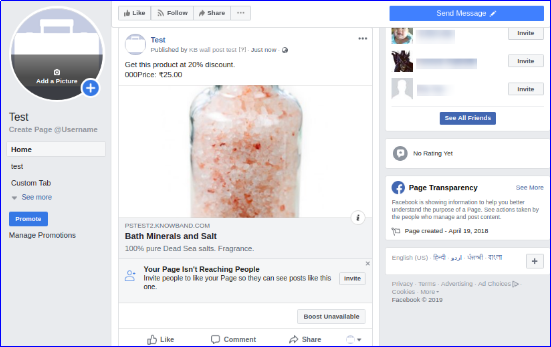
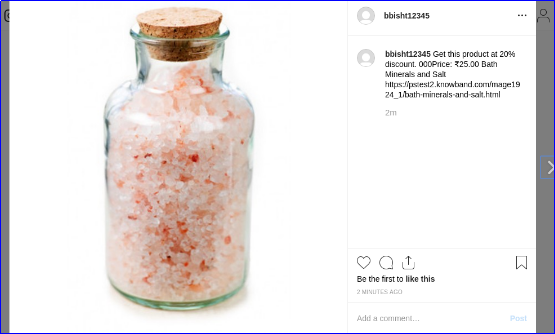
The front UI for this module can be checked from Facebook and Instagram account which are configured with this Social Wall Post module.
The online store admin can now implement a multi-level marketing strategy for increasing website sales, conversion rate and custom domain. Knowband offers Magento 2 Affiliate and Referral Program Module which allows the online store owner to provide an option to become an affiliate customer and earn the profit. The customers can register as an affiliate and get an exciting commission on every referral. The store admin can show multiple ways to refer the website, affiliates can share the referral code, referral link or voucher. Affiliates can redeem their commission amount by generating a payout request.
The online store admin can manage the overall Affiliate and Referral Program from the Magento 2 Affiliate and Referral Extension admin interface. The e-merchant can remove the affiliate registration option anytime by disabling the “affiliate registration” option. The admin can accept or reject any referral and payout request. This way, the store owner can boost sales, conversion rate and website revenue.
1.1 Features of Magento 2 Affiliate and Referral Extension
The online store owner can allow the customers to become an affiliate and earn a commission on every referral.
The online seller can enable or disable affiliate registration anytime from the admin interface of the Magento 2 Affiliate and Referral Module.
The Magento 2 Affiliate and Referral Extension provides multiple referral methods. Affiliate can share referral links, referral code and voucher code to their acquaintances.
The Magento 2 Affiliate and Referral Program Module allows sharing referral links via multiple social media options like Facebook, Twitter and Pinterest.
Admin can offer different commission amounts on new registration and placed the order. Admin can offer a percentage-based amount on order and fixed amount on new registration.
The store owner can also enable the settings to generate a voucher automatically on new registration. The newly registered affiliate can share this coupon code for the referral.
This is up to store admin that he wants to offer a commission on new user registration or first order of the referred customer.
The Social Affiliate plugin for Magento 2 shows affiliate customers list in which admin can set the affiliate status, affiliate details and earned commission.
Admin can also generate specific vouchers for affiliate customers and also set the expiry date for the same.
In the referral list, the e-merchant can view the referred customer’s details, customers referral status and referral amount.
The store admin can view the list of all the generated vouchers. Admin can also apply new rules and conditions for those vouchers.
The affiliates can generate voucher or request payout of the earned commission.
The customers can also view the functionality on their mobile devices. The Magento 2 Affiliate and Referral Program Module is mobile responsive.
1.2 Admin Benefits of Magento 2 Affiliate and Referral Program Extension
Magento 2 Affiliate and Referral Program Extension makes it simple to implement a multi-level marketing strategy.
Magento 2 Affiliate and Referral Program Module is simple to implement and easily activated on the website.
Magento 2 Customer Referral Module allows multiple users to become an affiliate and earn money just by referring their know persons.
Magento 2 Affiliate Extension helps to increase website revenue, sales, conversion rate and custom domain.
Affiliate multi-level marketing system offers multiple referral commission to the affiliates.
An affiliate marketing program for Magento 2 provides various methods of referral.
Admin can accept or decline the payout request as per his wish.
Social Affiliate plugin for Magento 2 is multi-lingual compatible.
Admin doesn’t need to change even a single line of codes to implement the affiliate program.
2.0 Installation
After purchasing Magento 2 affiliate and referral extension, the store admin will get the following files:
shareandwin.zip which has the source code of this Magento 2 affiliate and referral program plugin.
User Manual, with all the basic details and information.
The steps to install the Magento 2 Affiliate and Referral Program Extension are mentioned below:
Buy the Magento 2 Affiliate and Referral Program module from Knowband. You can download the extension package.
The package has a zipped file that contains the user manual and the source code of the Magento 2 Affiliate and Referral Program module. Now, Unzip this package.
Create a folder {Magentoroot}/app/code/Knowband/Affiliateandreferral
Upload the extracted content in the above folder via FTP manager (like Filezilla or WinSCP – download here: https://filezilla-project.org/).
The extension is now installed and ready for use. In Admin Panel go to “Knowband Extensions >affiliate and referral”.
You can now configure and use the Knowband affiliate and referral plugin.
3.0 Admin Interface
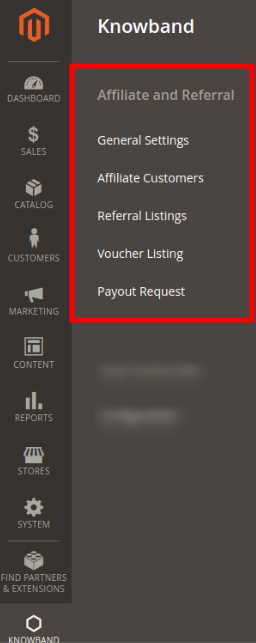
After a successful installation, you can configure this Magento affiliate and referral module. Go to Knowband>affiliate and referral, you will get some customization options as shown below:
The store owner can apply the settings as per the requirements and offer multi-level marketing on the website.
3.1 General Settings
In general settings, the online store admin can apply the configuration for showing the affiliate registration options and managing the referral system setting.
Please check the configuration options below:
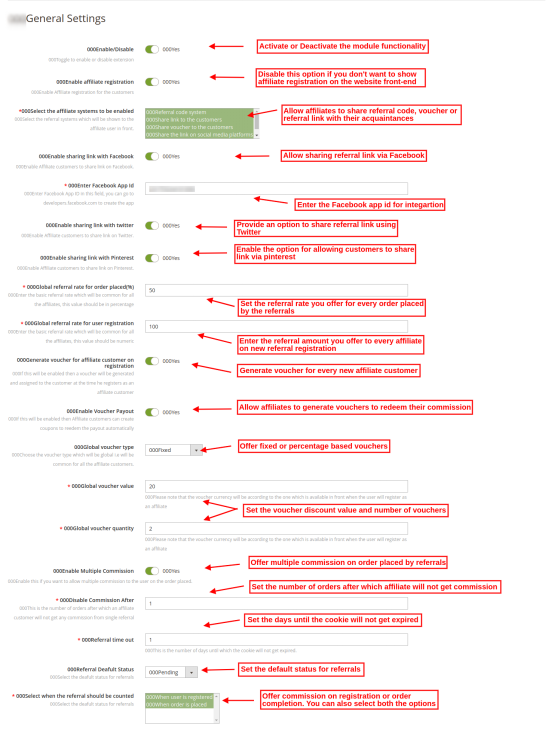
In Magento 2 affiliate and referral extension general settings, you will get these configuration options as shown in the image:
Enable/ Disable: Activate or deactivate the Magento 2 affiliate extension functionality just by a button toggle.
Enable affiliate registration: Enable to show affiliate registration on the website front-end interface. If you do not want to allow new affiliate registration then disable this option.
Select the affiliate systems to be enabled: Magento 2 affiliate and referral extension provides multiple referral options. Admin can allow affiliates to share referral code, share referral link, share voucher, share the link on a social media platform and also share the link via email.
Enable sharing the link with Facebook: Allow sharing the referral link via Facebook. Affiliates can also share the link as a Facebook private message.
*Enter Facebook App Id: Enter the Facebook app id here, to incorporate Facebook(Find out the steps to generate Facebook App id in Section 3.1.1)
Enable sharing the link with twitter: Enable the option to allow affiliates to share referral link from Twitter account.
Enable sharing the link with Pinterest: Activate this configuration option for allowing share the referral link via Pinterest.
Global referral rate for orders placed: Set the referral rate which you want to offer on referral order placement. This will be a percentage-based value.
Global referral rate for user registration: Here, you need to set the fixed amount referral rate on new registration.
Generate voucher for affiliate customers on registration: Enable the settings if you want to offer a voucher to the newly registered affiliate customer. They can share this voucher with their friends and refer to the website.
Enable Voucher Payout: Activate this option to allow affiliates to generate vouchers to redeem their commission amount.
Global voucher type: You can create common vouchers for all the affiliate customers. The Magento 2 affiliate and referral extension allow for offering fixed or percentage-based vouchers.
Global voucher value: Enter the value of the voucher. The customers can get a discount of that value when they apply this voucher.
Global voucher quantity: Enter the voucher quantity ie the number of time a voucher can be applied. In that case, 2 customers can apply this coupon code single time.
Enable Multiple Commission: As an eCommerce store admin, you can offer a commission to the affiliate on multiple orders placed by the single referred customers.
*Disable Commission After: You can also enter the number of ordered after which affiliate will not get the commission.
Referral time out: Enter the number of days until which cookies will not expire. Enter the days till which the referral code, referral link will be active.
Referral Default Status: Enter the default status for the referrals. If admin sets default status as “pending” then the initial status of the referred customer will be pending. The affiliate customer will get the referral commission when admin set the status as “accepted” the referral.
Select when the referral should be counted: You can count referral on new user registration or new order placement. You can also select both the conditions if he wishes to.
3.1.1 Facebook app ID Generation Steps
In order to generate the Facebook app ID, you need to follow these steps:
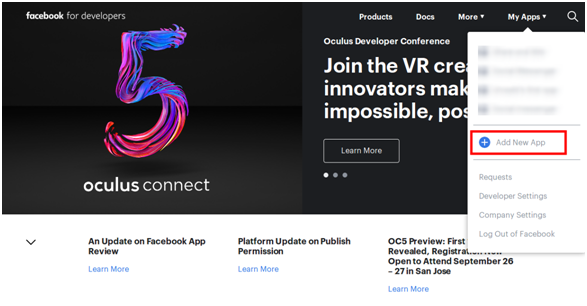
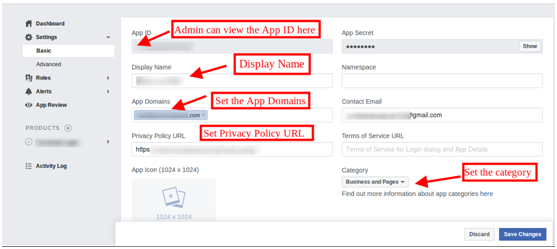
Now go to the “MY APPS” and click on ”ADD NEW APP”.
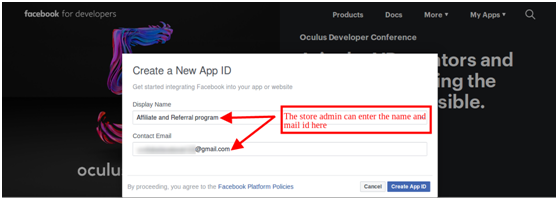
Enter the “Display Name” information and “contact email ID” details. After that, click on the “Create App ID” button.
After that go to “Settings” and select the “Basic” option.
You will get the APP ID here. Insert app domains, category, privacy policy URL here.
This way, you can get the Facebook app ID.
3.2 Affiliate Customers
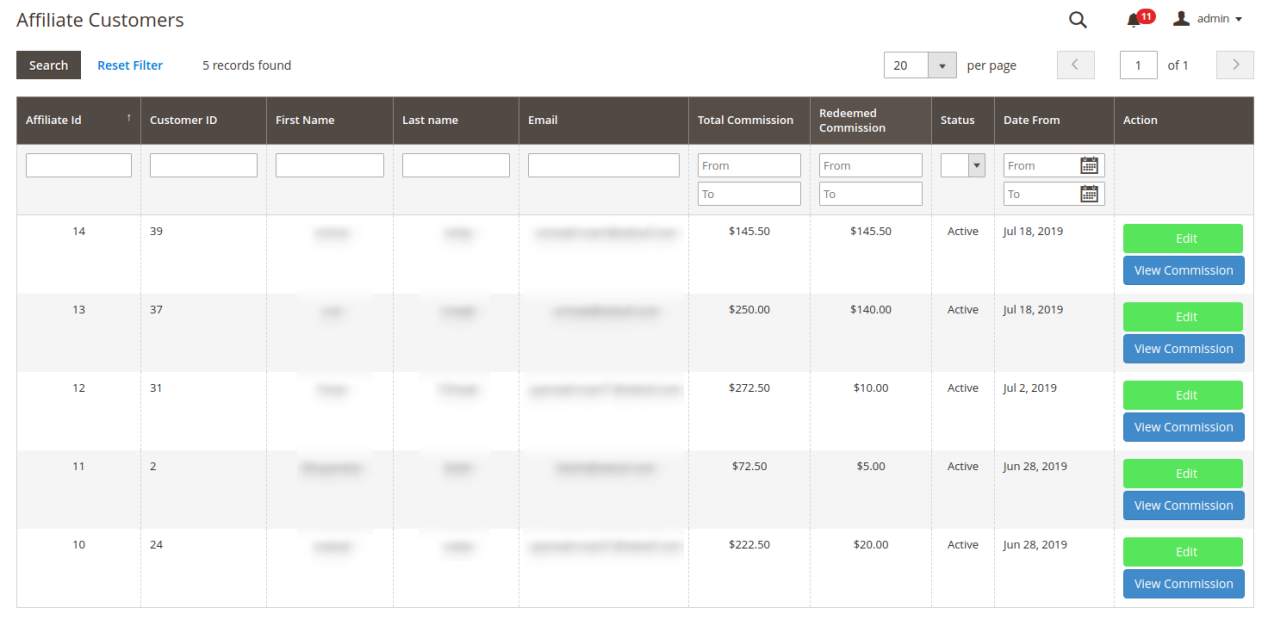
Admin can view the list of affiliate customers and manage affiliates. The recently registers affiliate will be shown on the top of the list. Admin can view the commission and edit the customer details. Affiliate customers list as shown below:
3.2.1 View Commission
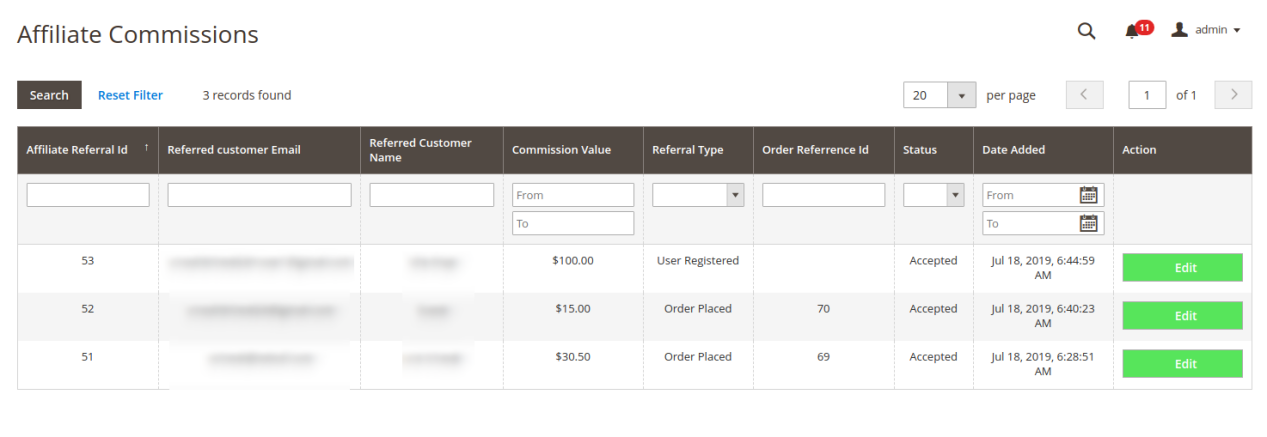
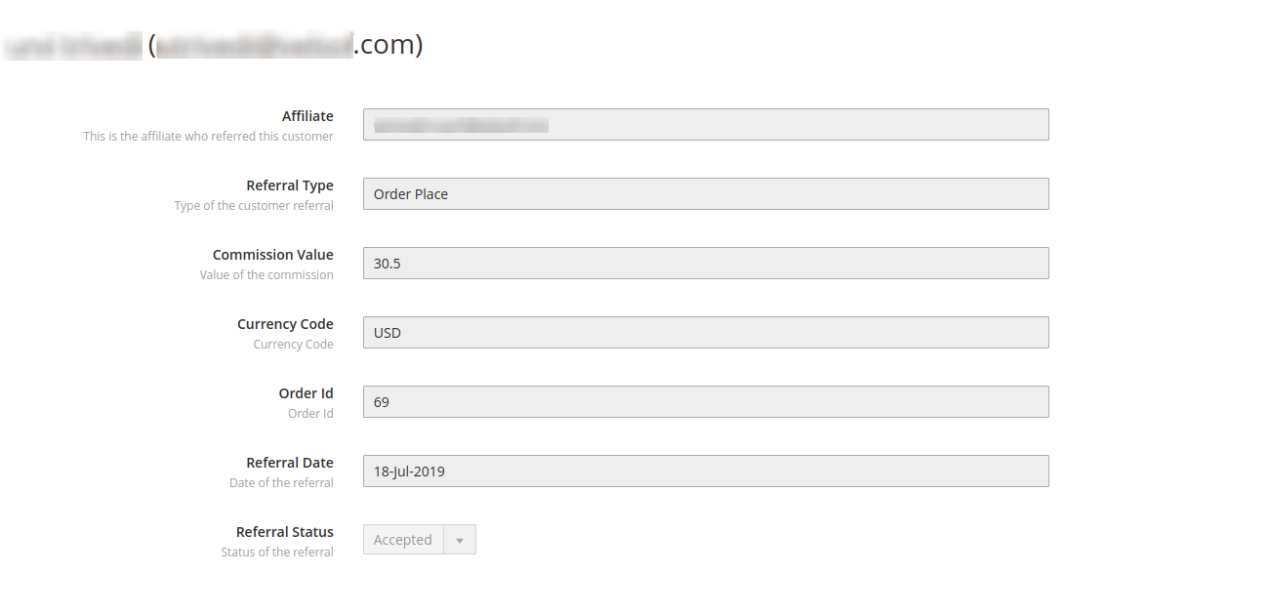
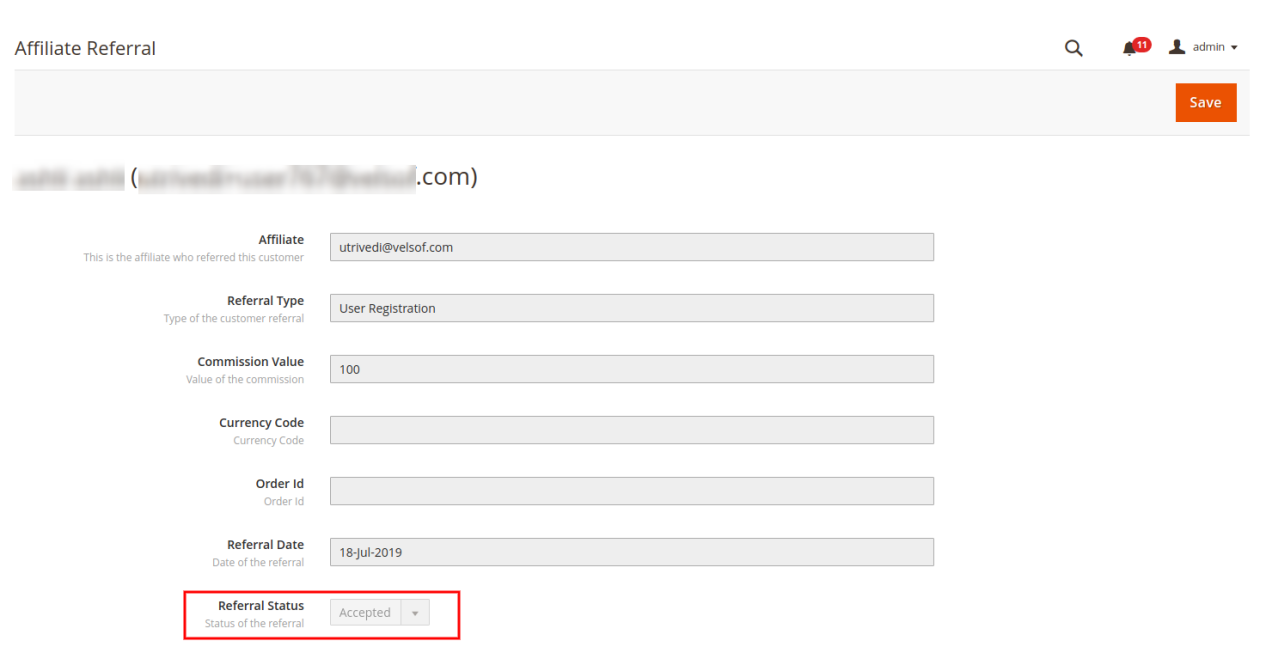
You can click on the “view commission” and check the list of commission type and value. Admin can also edit the referral status if he wishes to do the same.
Admin can click on the “Edit” button and update the referral status if it is pending.
3.2.2 Edit Affiliate customer details
After clicking on the “Edit” button on the affiliate Customers page, this page will open:
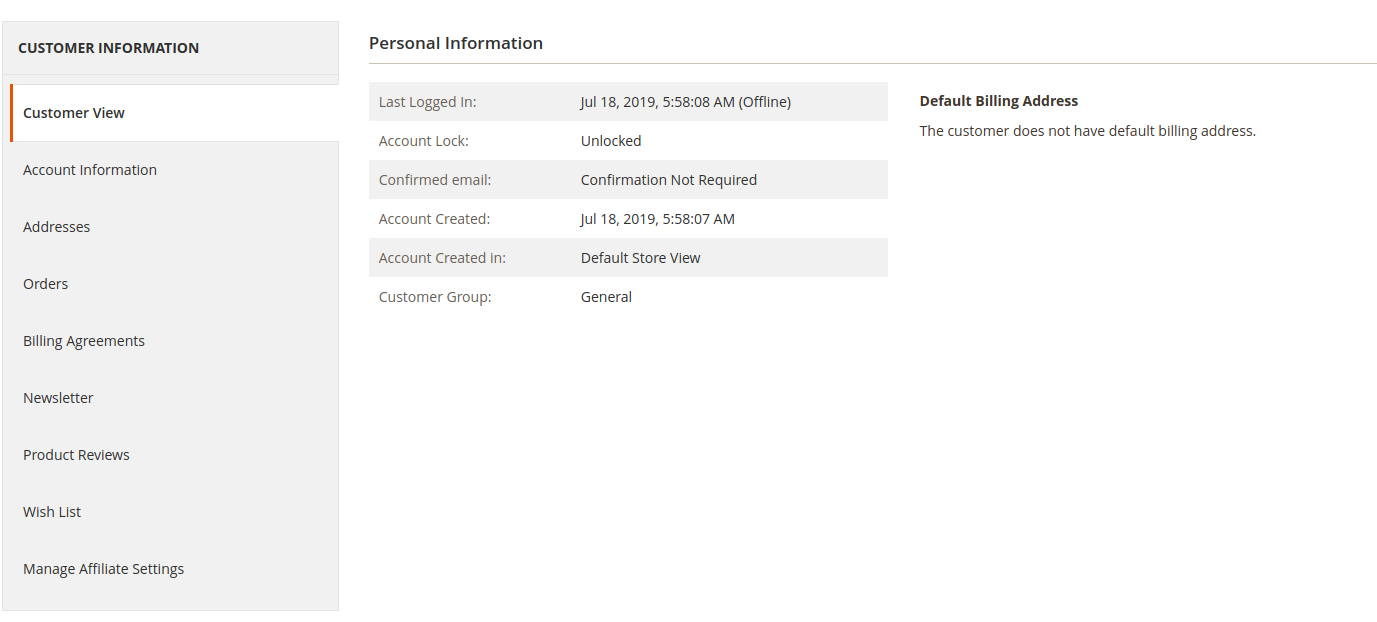
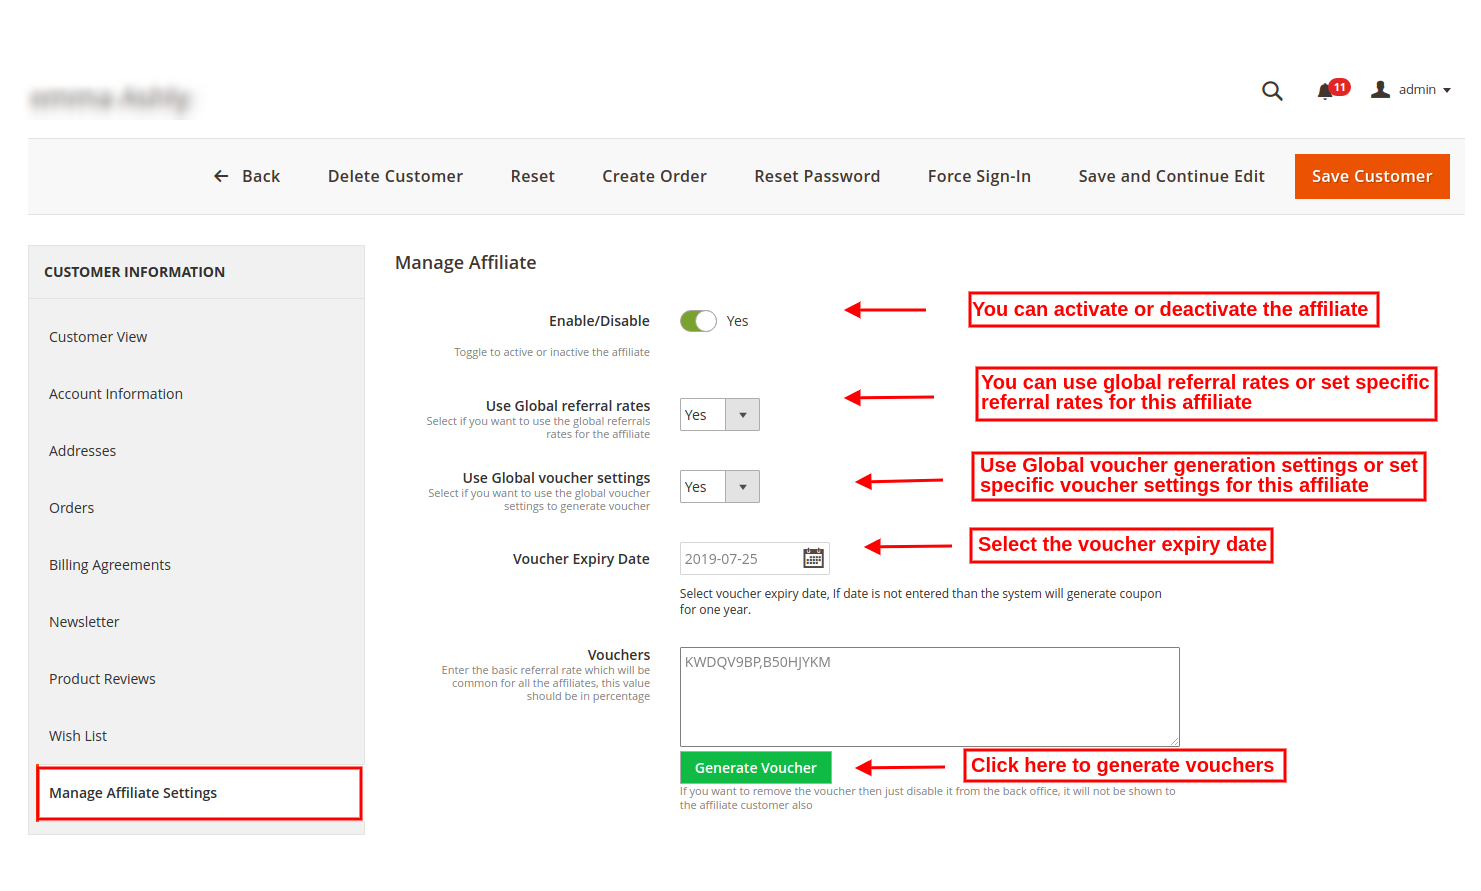
From the last option ie ”Manage Affiliate Settings”, you will get this page:
Enable/Disable: The Magento 2 customer referral module allows to enable or disable any affiliate customer anytime.
Use Global Referral Rates: You can use the global referral rate or set specific referral rate for that customer. If you want to apply specific setting then select “no”:
*Referral rate for order placed: Enter the percentage-based value for referral order completion.
*Referral rate for User registration: Set the fixed value referral rate for user registration.
Use Global voucher settings: Admin can use Global voucher settings or go for specific settings for that customer.
*Voucher Type: Set the voucher type ie fixed or percentage-based voucher.
*Voucher Value: set the value which you want to offer as a discount.
*Total voucher quantity: Set the number of vouchers ie number of times for which this voucher can be used.
Voucher Expiry Date: Admin can set the voucher expiry date. By default, the system generates a voucher with one-year validity.
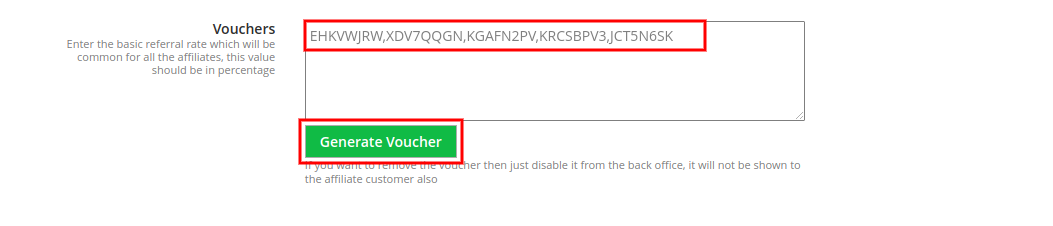
Vouchers: Admin can click on generate voucher settings for generating vouchers.
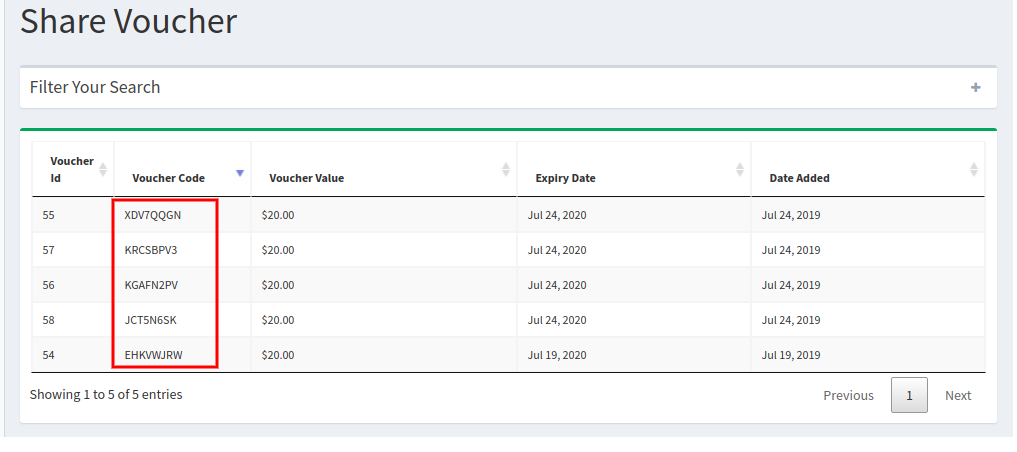
In front-end interface, there will be a list of vouchers in affiliate method section:
3.3 Referral Settings
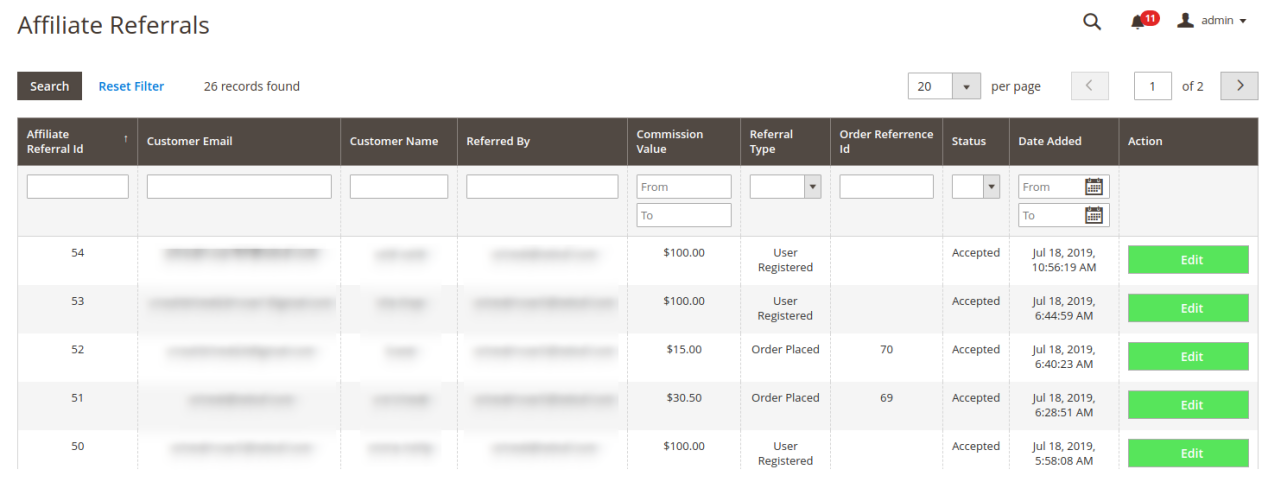
Here the store admin can view the list of referrals. The online merchant can also accept the referral. You can select the entries per page and also apply filters to check any specific affiliate referral.
Admin can click on the edit button and change the referral status from the admin interface of this Referral and affiliate marketing module for Magento 2.
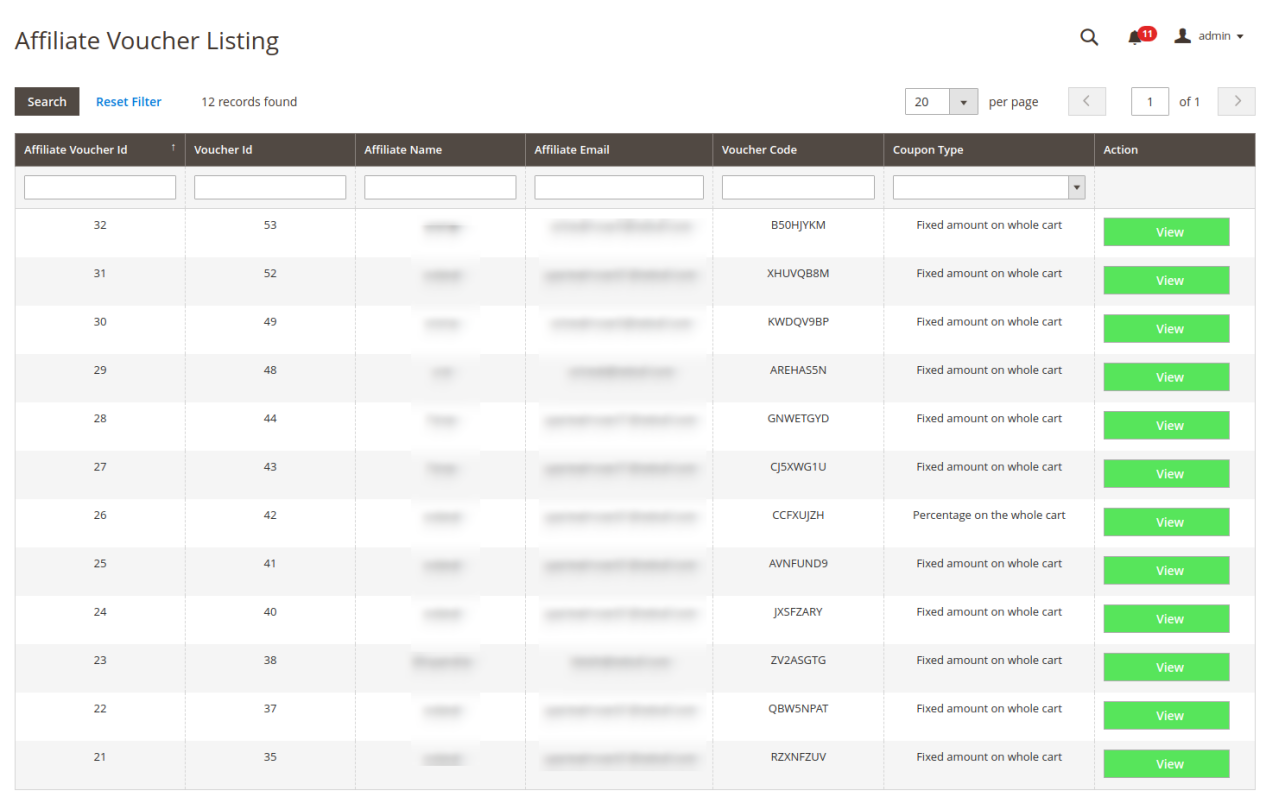
3.4 Affiliate Voucher Listing
In affiliate voucher listing page, the store owner can view the list of all the generated vouchers and also change the conditions/rules for every coupon.
After clicking “view” button, admin can change the voucher conditions and other related settings.
3.5 Affiliate Payout requests
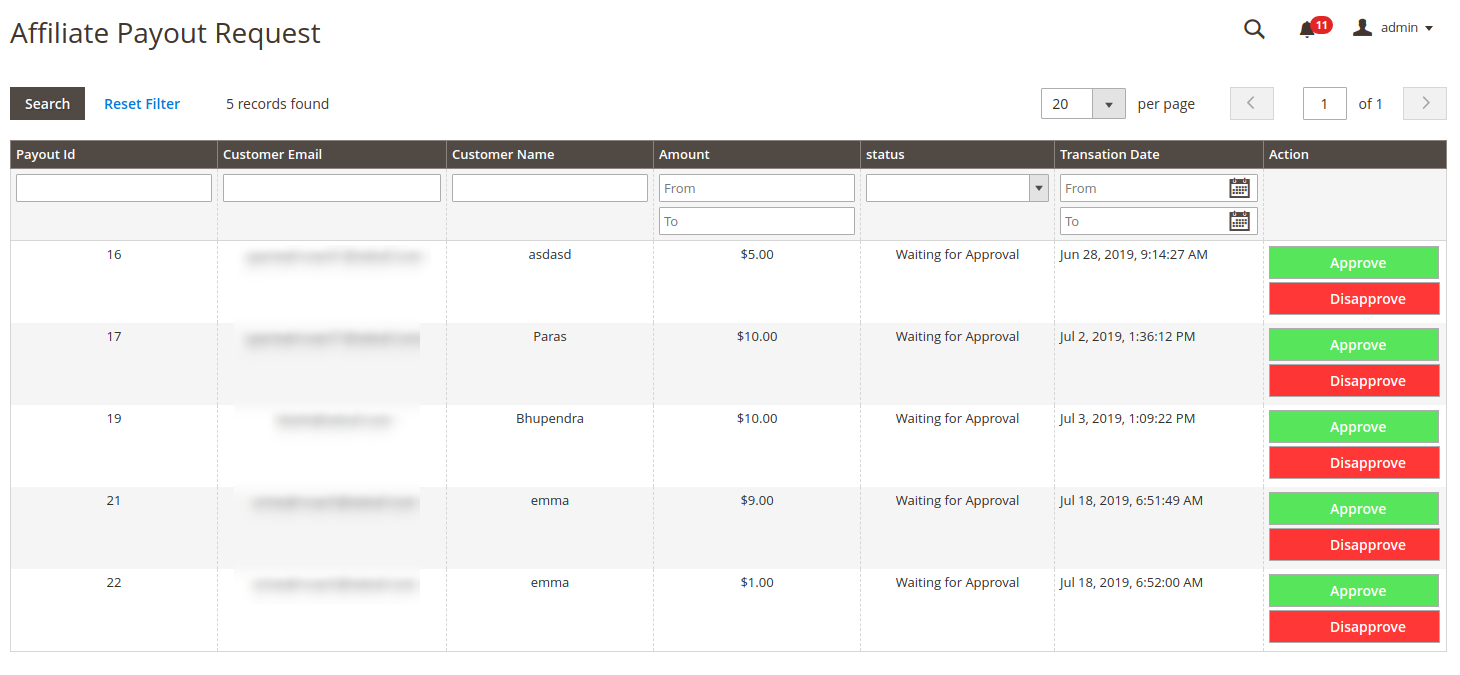
As a store admin, you can view the payment requests generated by affiliates. Admin can also view the payout request status. You can approve or deny the payout request.
The payout list will look like a below-mentioned image:
Admin can click on approve or disapprove button.
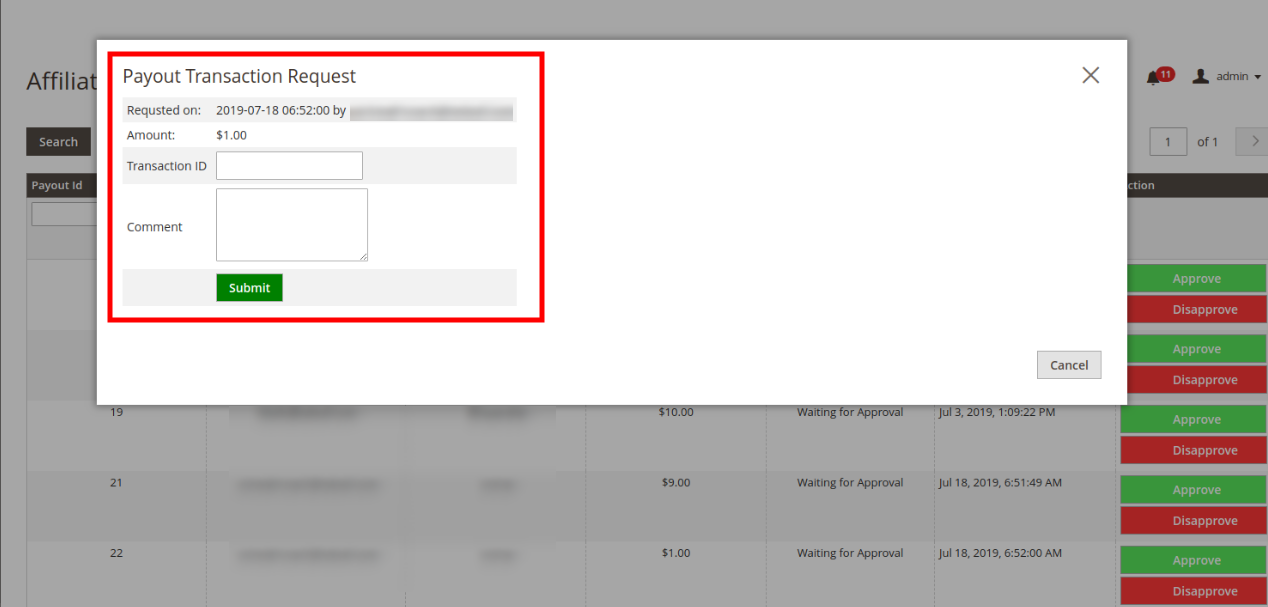
A popup will come while approving the request as shown below:
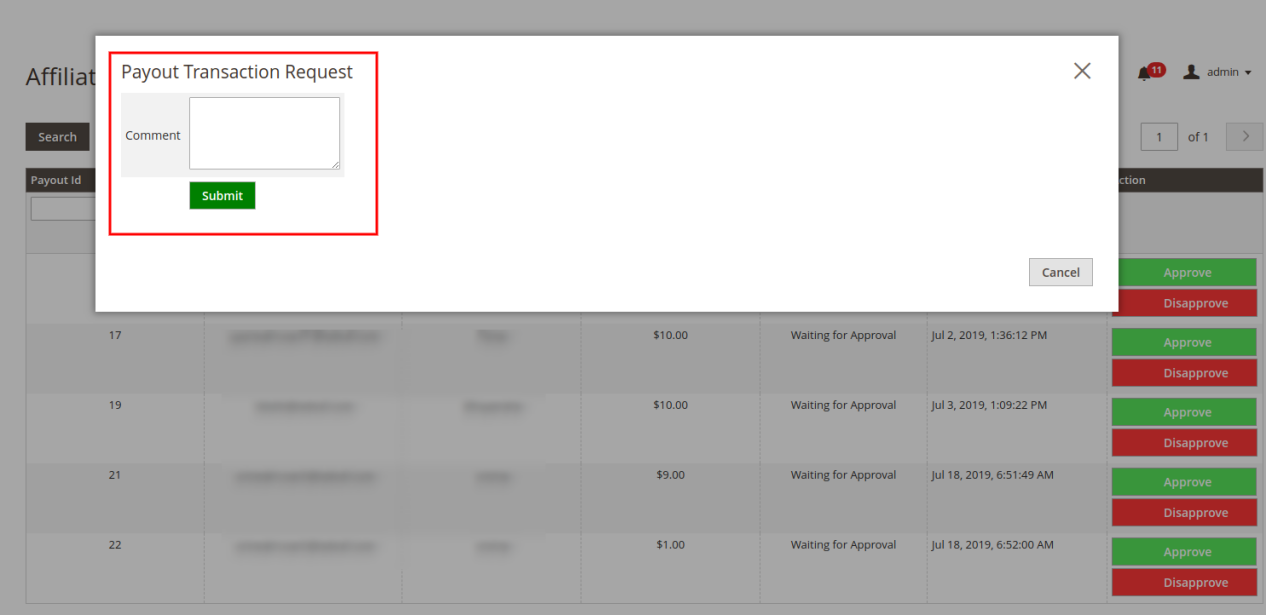
A popup will come while disapproving the request as shown below:
4.0 Front-end Interface
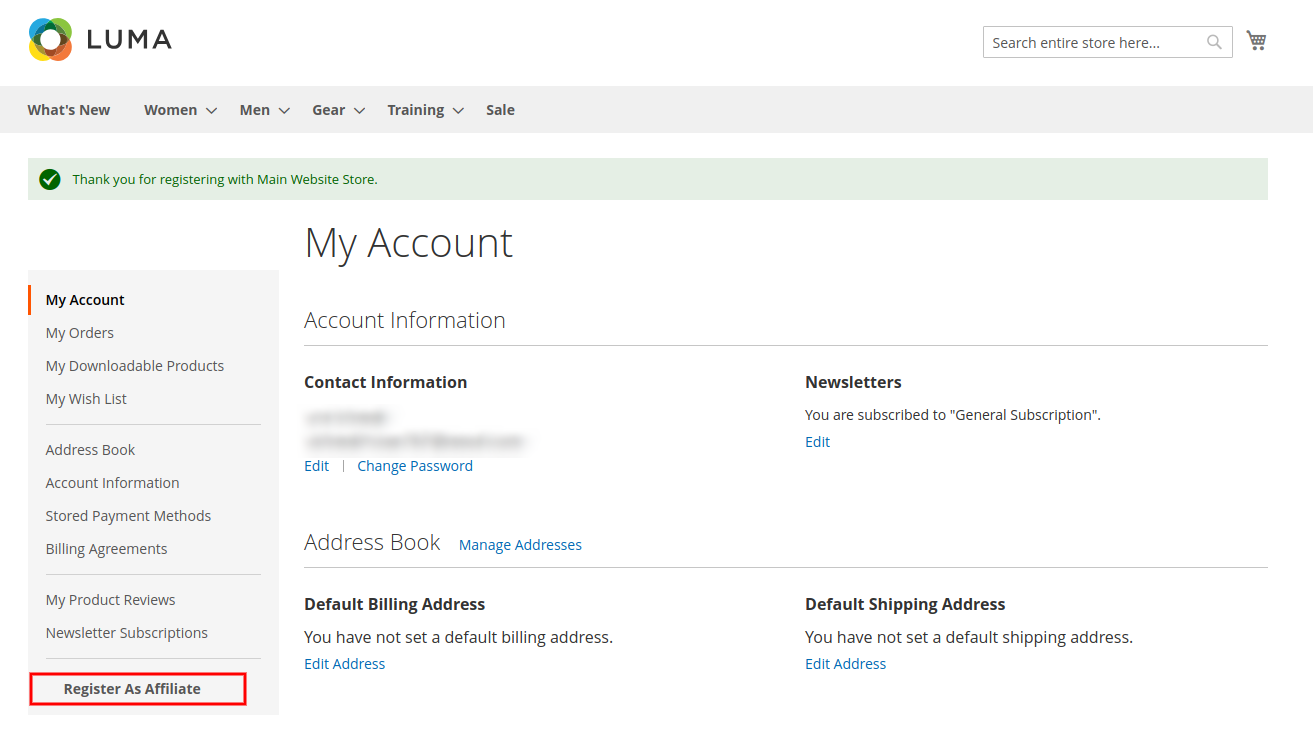
Online customers can register as an affiliate customer and earn commission on every referral:
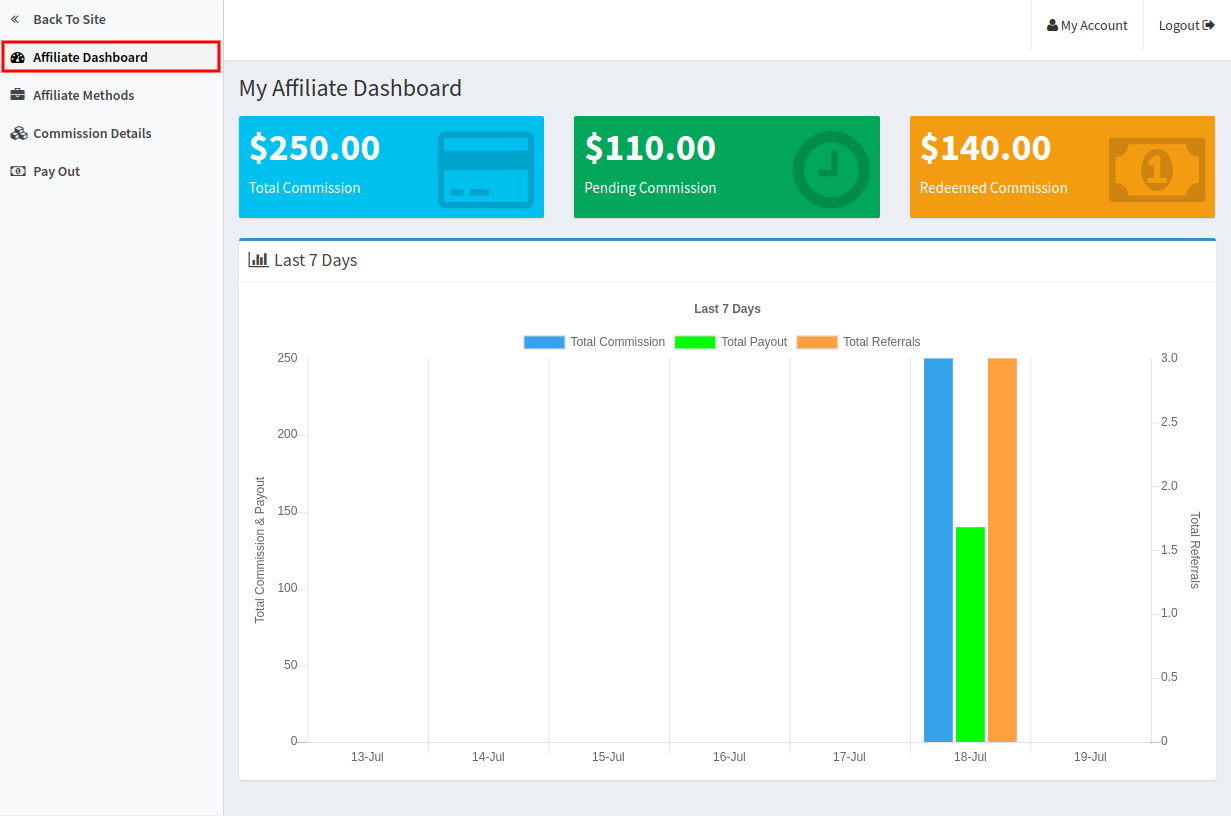
Affiliates can view an interface where they can view affiliate dashboard, available affiliate methods, commission details and payout section.
In the dashboard, affiliates can view total commission, redeemed commission and pending commission along with the graphical representation.
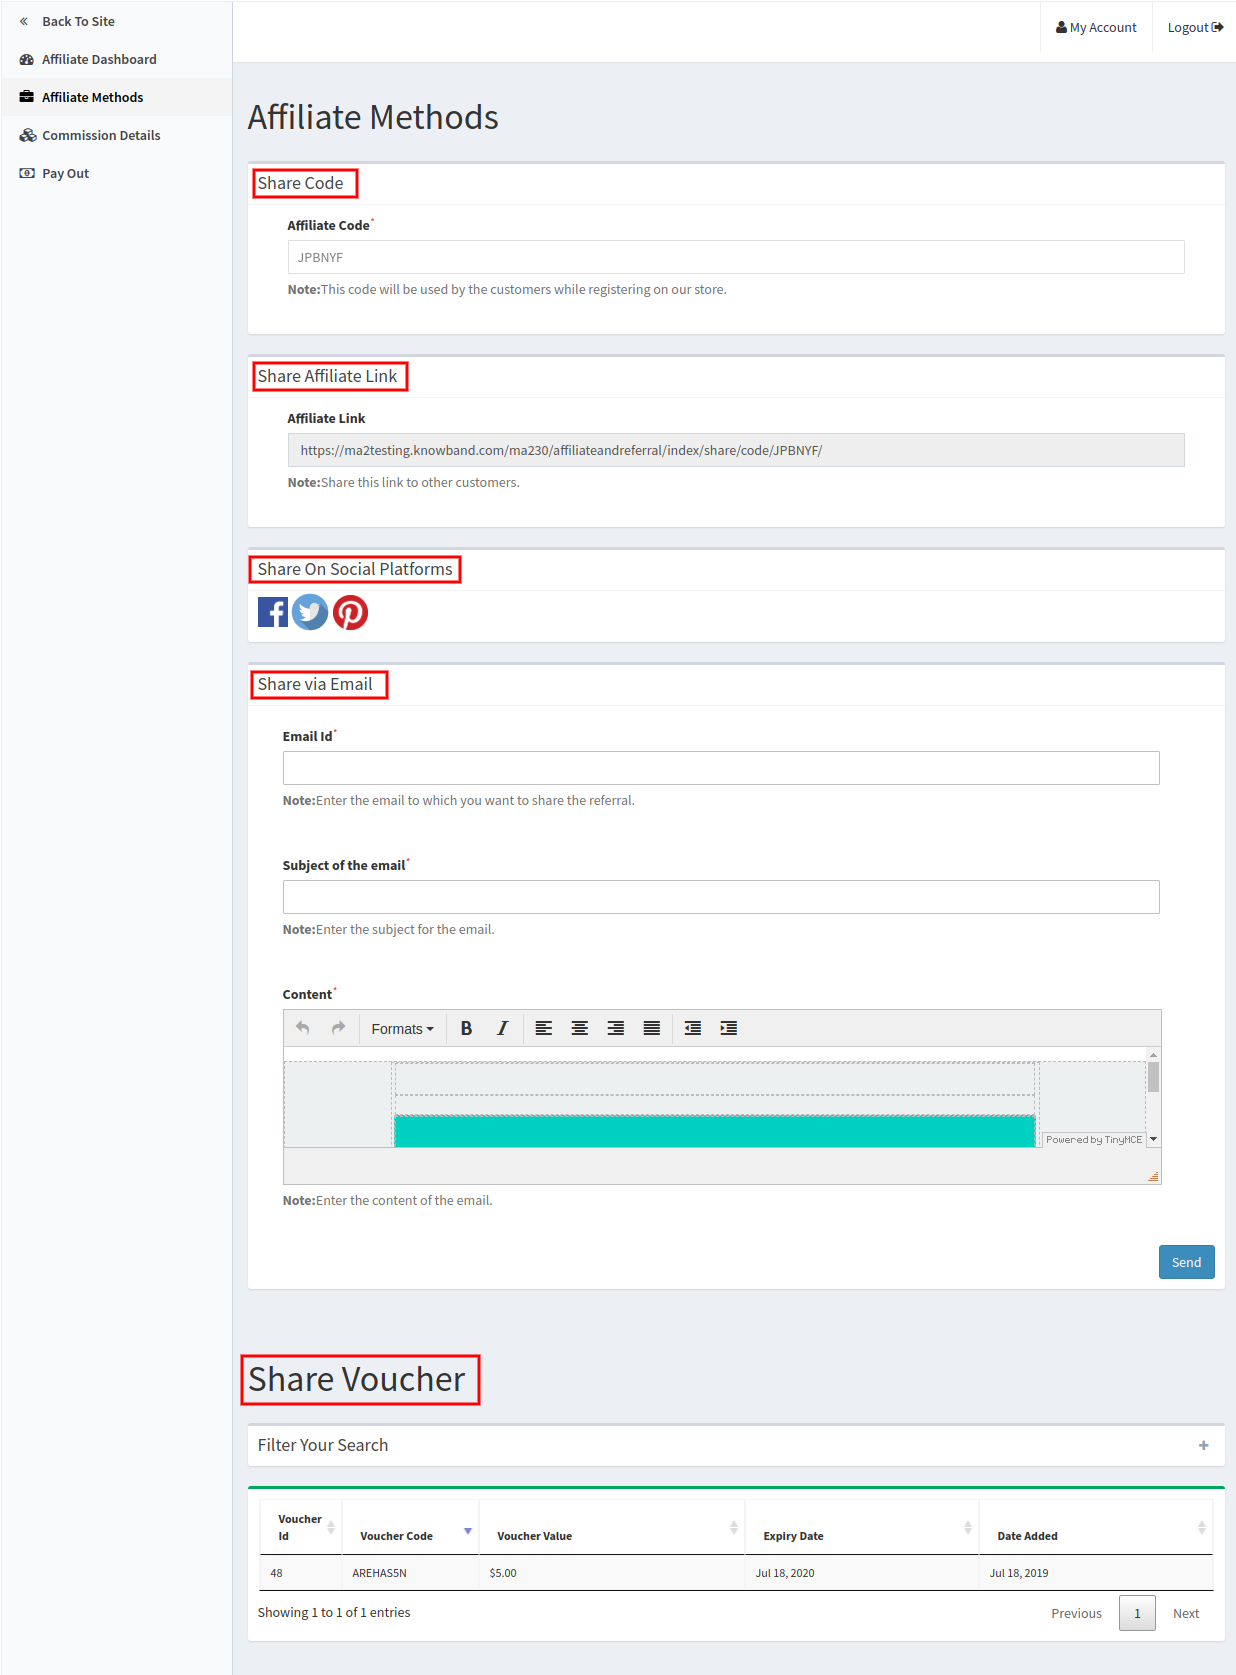
In affiliate methods, affiliate customer can check the available methods for referring to the website.
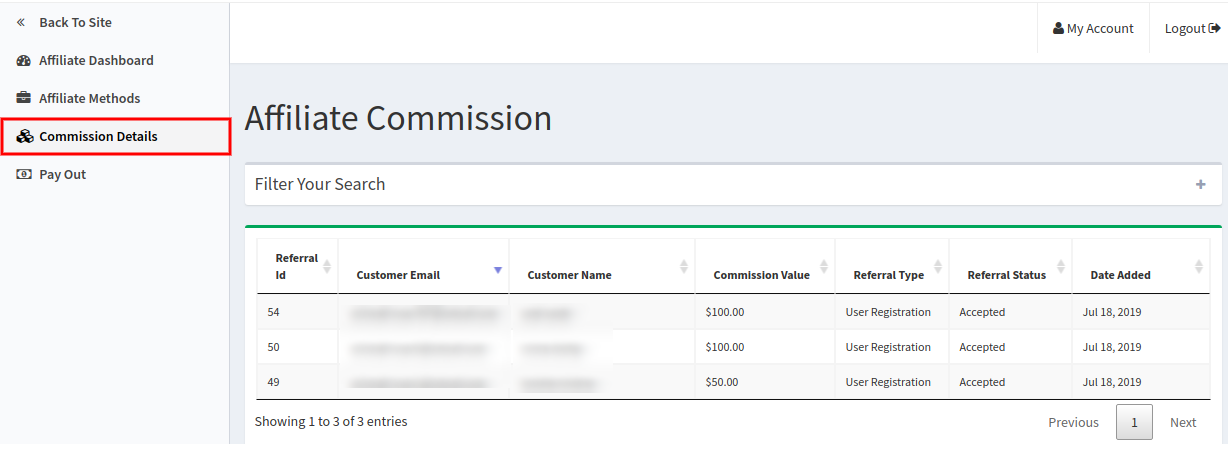
The affiliate customer can view commission details in which he can check the referral amount which he got from each referral. The affiliate customer can also view the referral status in the list.
Share Code: Admin can share the affiliate code with relatives and friends. They can enter this code while registration which is counted as a referral.
Share affiliate link: In this method, the affiliate customer can share the affiliate link. When an online user visits the store using this link and register/place order then is counted as a referral.
Share via Social Platform: Affiliate customers can also share the referral link using social media platforms like Facebook, Twitter and Pinterest.
Share via Email: Affiliates can send an email along with the affiliate link. Affiliates just need to enter the email id and subject line for sending an email.
Share voucher: Affiliates can also share the vouchers for referring the website. When any online user will apply the voucher code, this will be counted as a referral.
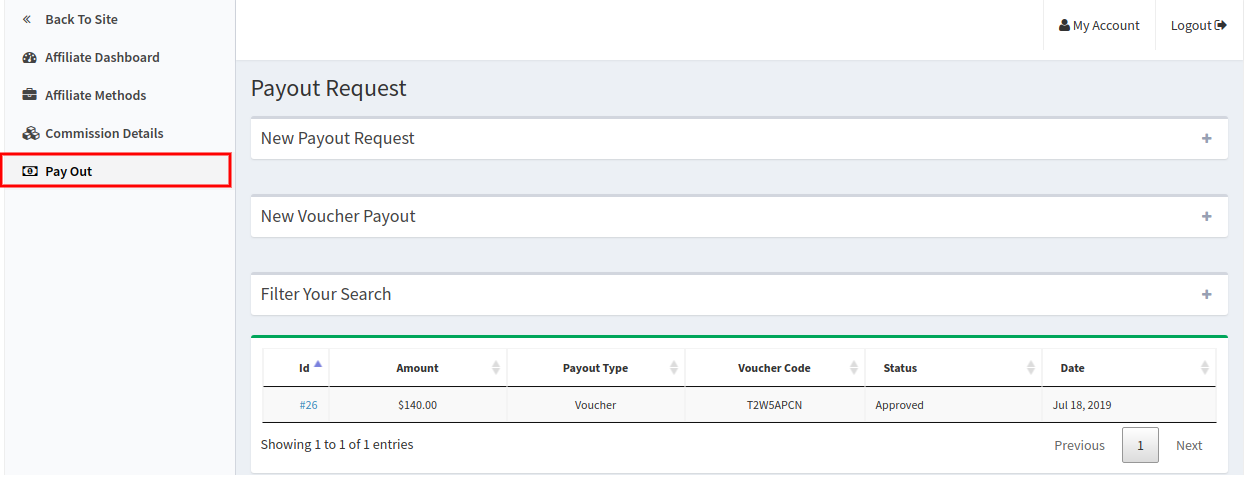
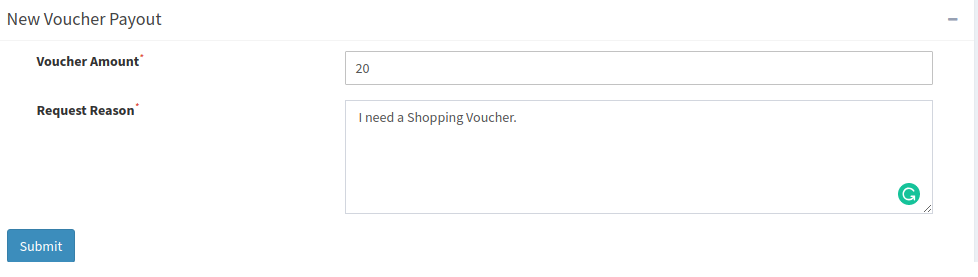
In payout Section, the affiliate customers can send a request for payment. There is no minimum amount of restriction on payouts. Affiliates can also generate voucher and shop the products from the website.
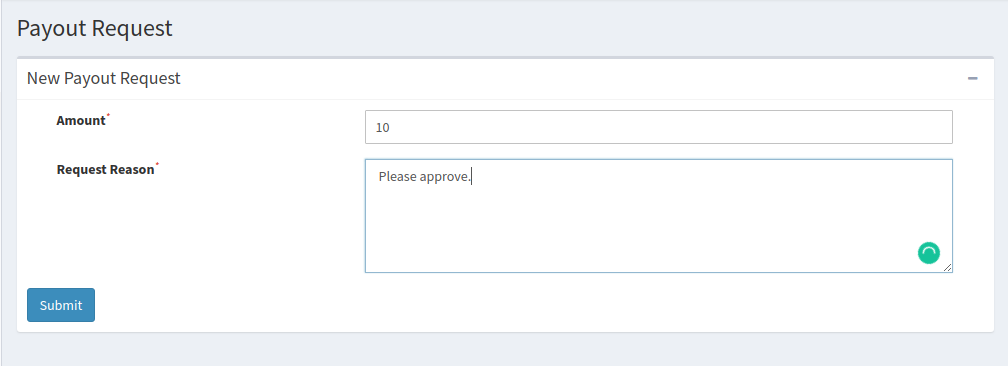
The affiliate customer can click on “+” and send payout request. After admin approval, the affiliate can get their payment.
Affiliates can click on submit button and get the voucher code immediately.
This way Referral and affiliate marketing module for Magento 2 implements multi-level marketing functionality on the website. The customers can become an affiliate and earn a commission. On the other hand, the online store owner can increase website conversion rate, boost sales and improve customer domain with the help of affiliate users. The admin doesn’t need to implement any lengthy and complex process.
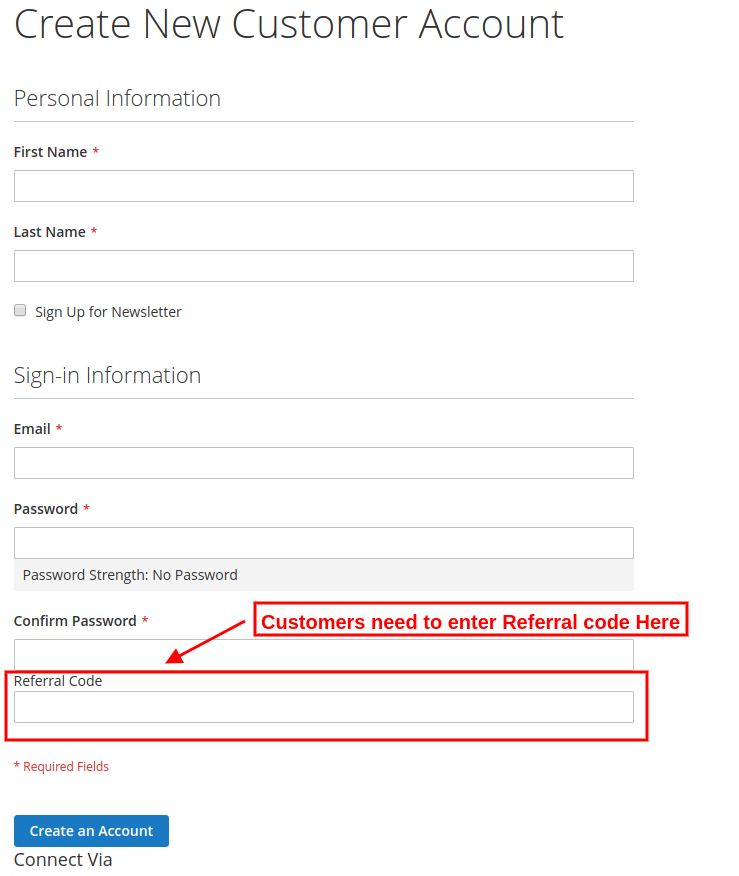
Steps to apply Referral code on Registration and place order:
Once affiliate customer shares referral code, online users can enter this referral code at registration page as shown below:
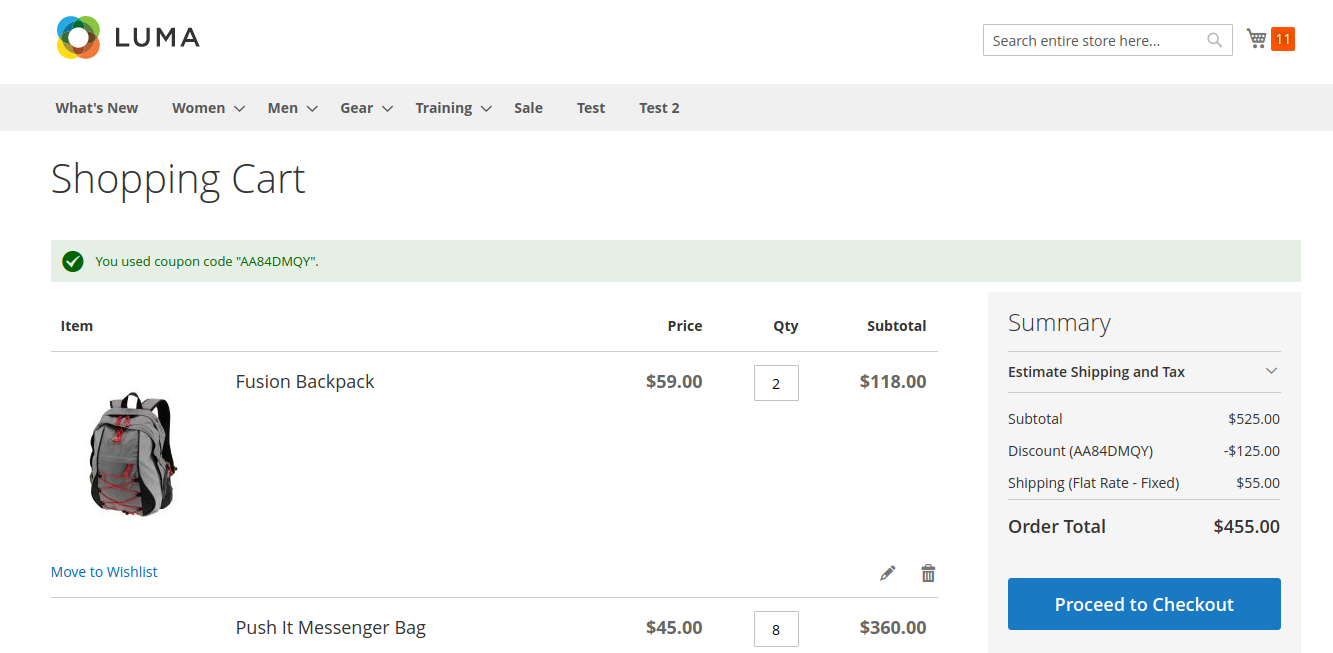
Online users can Place an order by applying the voucher code. The affiliate customer shares voucher and gets referral amount when an online user places an order using the shared voucher code.
Online users can apply this coupon which will be considered and the affiliate customer will get a referral bonus for this.
This way, the online store merchant can use this Magento 2 affiliate extension ane increase the number of users easily by implementing an affiliate system. The online users can share the referral code from various methods and ask their friends to register and shop from the website. The Magento 2 Refer to friend plugin allows offering multiple commissions to the users. Admin can offer commissions on every new signup and order places by the referrals. The Magento 2 customer referral module is highly customizable and provides a specific list of referrals and affiliate customers. Admin can easily view and take action without any hassle. The online users can send requests for payout or generate vouchers of their earned commission. This Social affiliate plugin for Magento 2 makes the overall process very easy for the customers and users.
Managing an ecommerce website isn’t easy. Competition is fierce, technology is ever-changing, and there’s no other position in the company that gets as much advice from well-meaning peer ‘experts’ (anyone who’s watched a webinar on conversion optimization) or gets as much daily scrutiny as the ecommerce manager.
Every part of the site must be consistently tested and optimized. Every word of copy must do the job it’s there to do. And something as simple as the configuration of an online sizing chart can either pull customers in or drive them away.
The ecommerce manager must balance all of it.
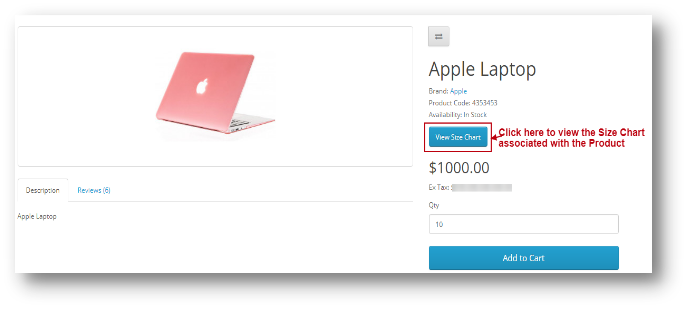
The OpenCart Product size chart Module by Knowband is a Size Chart creating module for OpenCart. Using this extension, the merchant can show the different types of size charts for each category, product, and manufacturers available on his/her store.
The eCommerce store admin can assign the chart to a particular product or products of a particular category or products of a particular manufacturer. Thus with the help of this OpenCart Product Size chart Extension, the eCommerce store owner can easily resolve the size-related issues of the store customers.
Why is the online sizing chart so important?
The majority of returns for ecommerce apparel items are due to the customer not being satisfied with the fit.
This article isn’t for online clothing store managers only, though. Many items require a fit of one type or another – sleeping bags, fishing rods, furniture… all need to fit the buyer.
We’ve already mentioned that high return rates can often be traced directly to sizing issues. Uncertainty about the fit is why many would-be online customers opt to drive to the store and try an item on before purchasing.
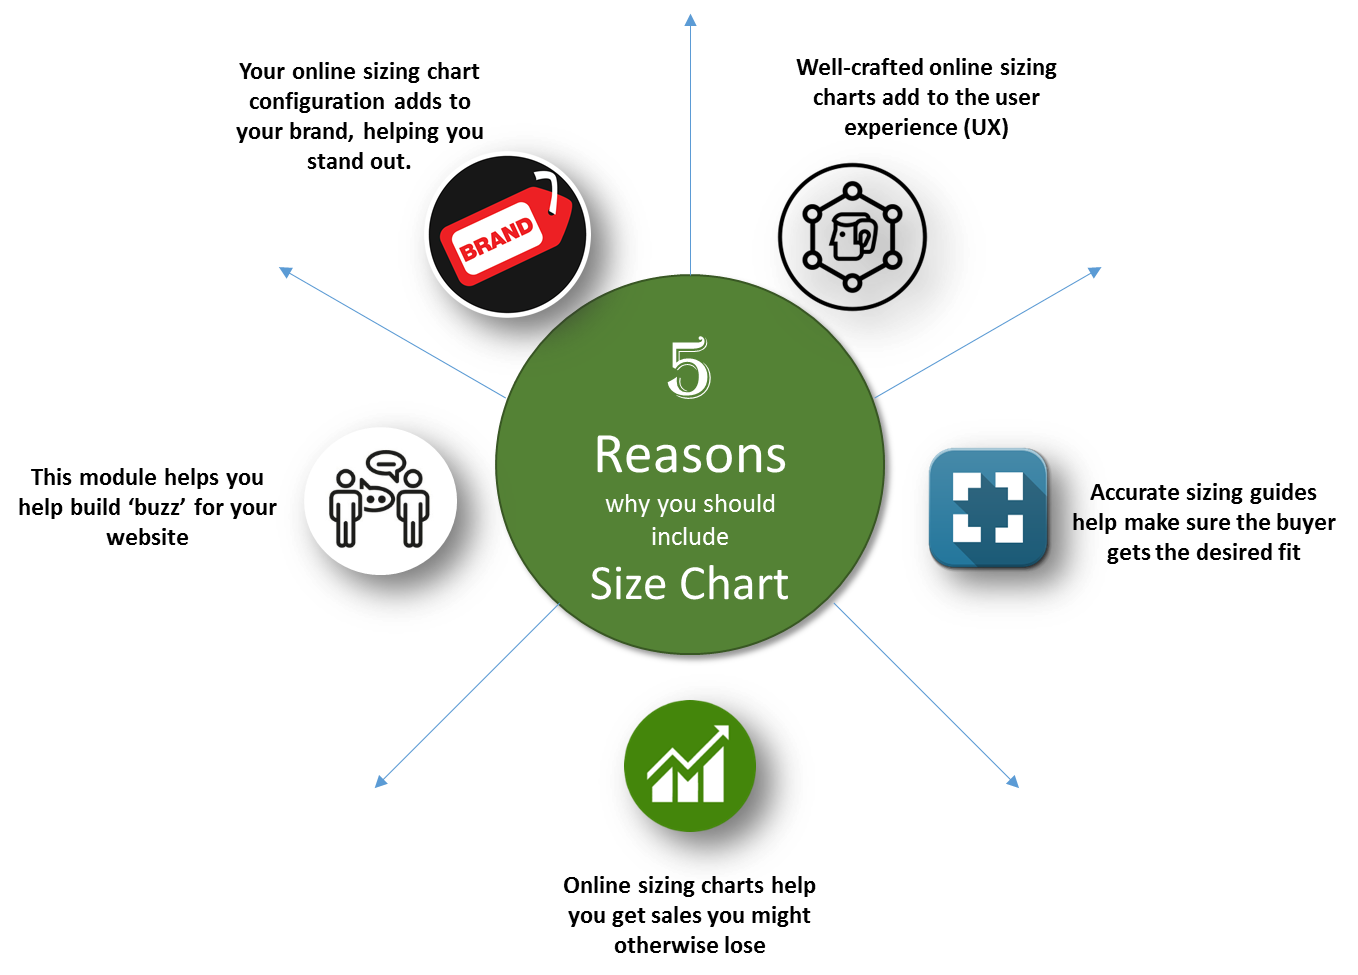
Here are our top five reasons why ecommerce managers should pay close attention to how their sizing information is presented:
1.1 Features
2.0 Installation Guide
Before starting the installation process, you have to buy the OpenCart Product size chart Extension by the Knowband store. Once purchased, you will receive the following files on your registered email.
Source code of OpenCart Product size chart Extensionmodule in zipped file format.
User Manual of OpenCart Product size chart Extensionmodule.
Now in order to install this OpenCart Product size chart Extensionmodule on your online shop, follow the given steps:
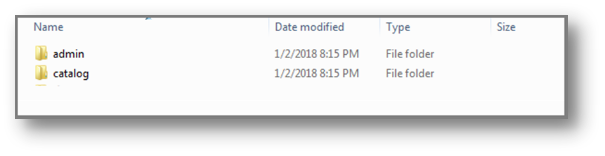
Step 1: Unzip the zip file. You will get the folders as shown in the image below:
Step 2: Copy all the folders of the zip file in the Root Directory of OpenCart setup via FTP manager.
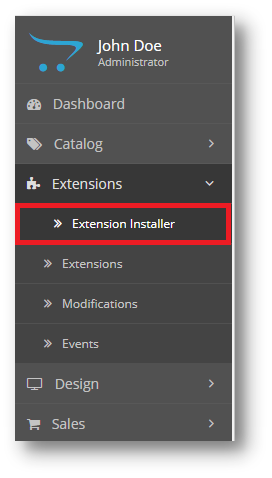
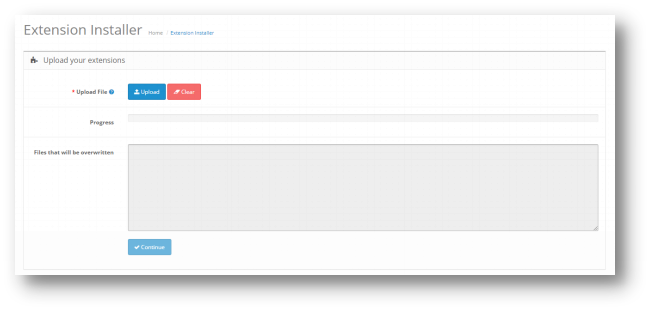
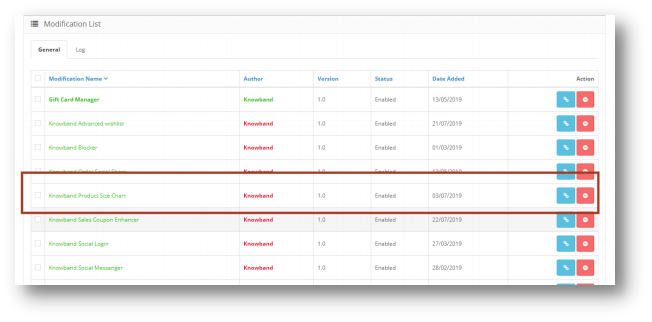
Step 3: There is a file name kbproductsizechart.ocmod.zip (for OC>=3.0) or kbproductsizechart.ocmod.xml (for OC < 3.0). You need to install this file in the following Location:
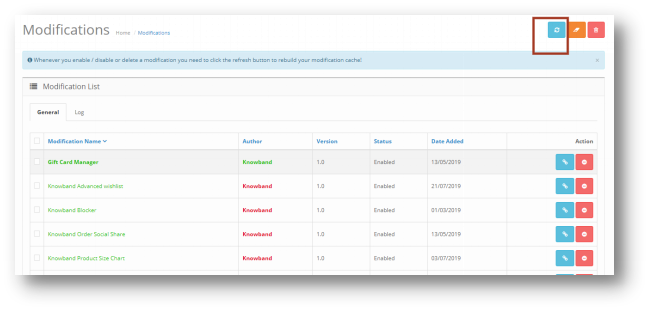
Step 4: After Installation you need to select this file and refresh Modifications:
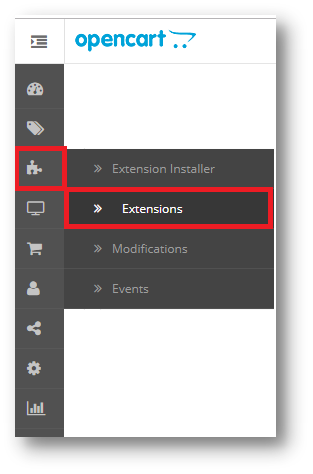
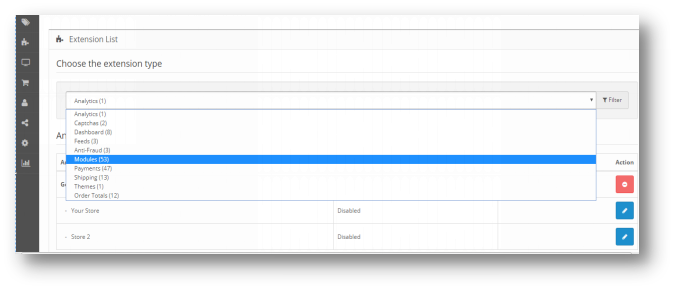
So, OpenCart Product size chart Extension plugin is now successfully installed and is ready to use at your store. Go to the admin menu and click on the extensions. Choose the Extension Type as Modules. You will find a list of modules. Select the OpenCart Product size chart Extension
3.0 Admin Interface of OpenCart Product size chart Module
To configure the Size guide module for OpenCart, Navigate the settings in the following order:
The Admin Interface of OpenCart size catalog Extensionis divided into 6 Tabs:
General Settings
Attribute Sets
Charts
Manufacturer Chart
Product Chart
Support
3.0.1 General Settings
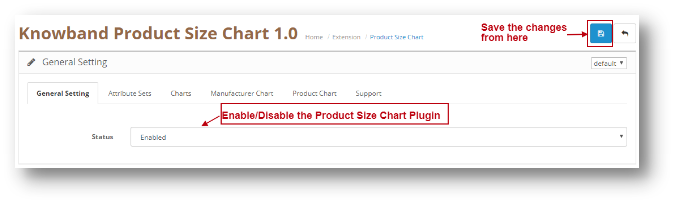
This setting will have an Option to enable/disable the plugin. The page will look like as shown below:
3.0.2 Attribute Sets
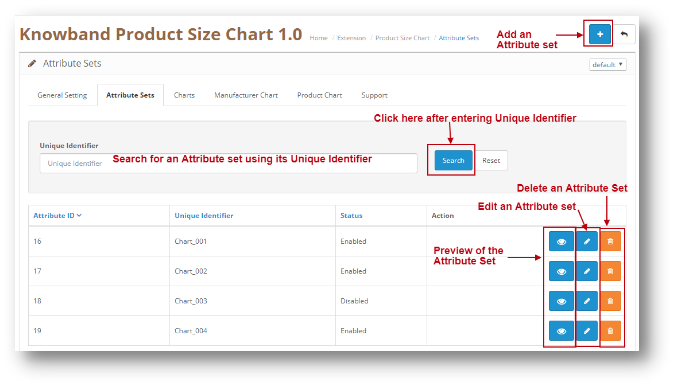
Through this setting of OpenCart Size chart table extension, you can add a New Attribute Set or make changes in the Existing Attribute Set’s Columns and Rows. The screen will look like as shown below:
Edit an Attribute set: You can Edit an existing Attribute set using the Edit option. The screens for Editing Attribute Set will be same as Adding an Attribute Set. The only difference will be that Edit will have the fields already filled.
Delete an Attribute Set: You can delete an Attribute Set by clicking on the ‘Trash’ Icon. A pop up will show up asking for the Confirmation. You can click yes and the Attribute will be deleted.
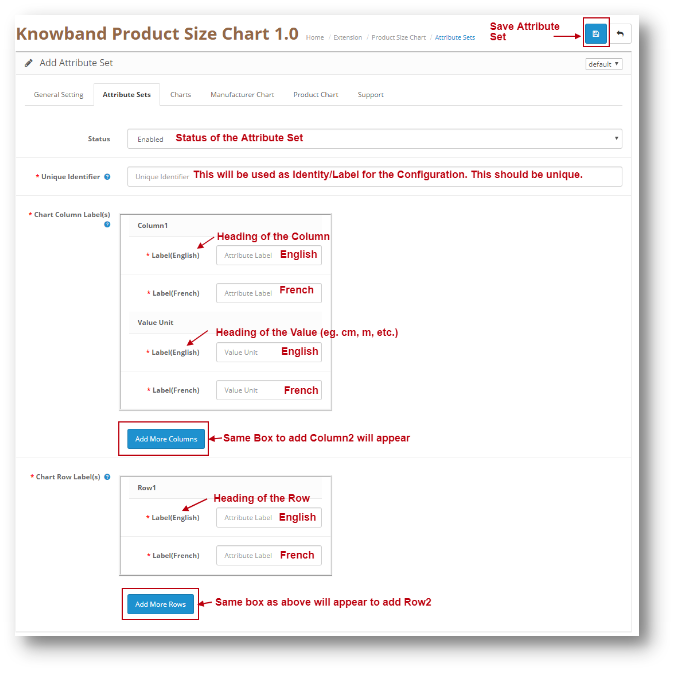
Add an Attribute Set: You can add an Attribute Set by Clicking on the option provided on the Top of the Page. The following screen will show up:
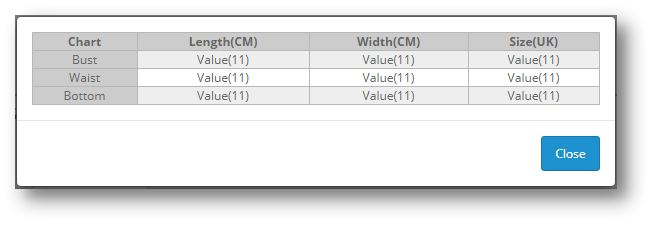
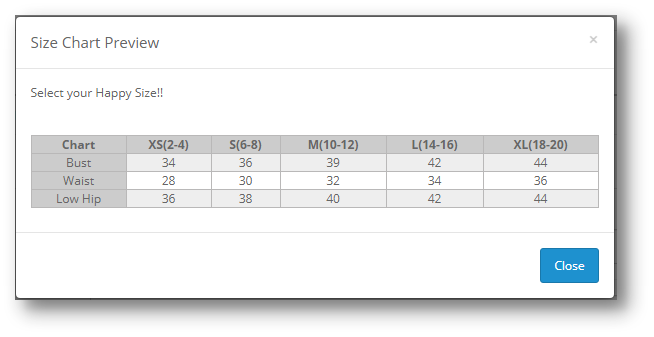
Preview of the Attribute Set: When clicking on the ‘Eye’ (Preview) Icon, the preview of the Attribute Set will be shown as a Pop Up. The Pop up will look like as shown below:
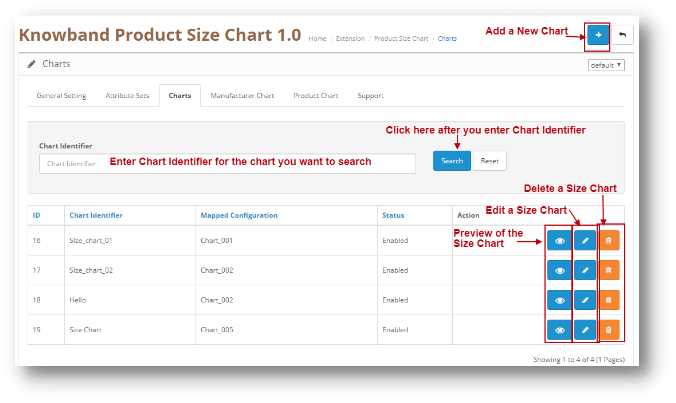
3.0.3 Charts
Through this setting of OpenCart Size chart table extension, you can add a New Size Chart or make changes in the Existing Size chart Columns and Rows Values. The screen will look like as shown below:
Edit a Chart: You can Edit an existing Chart using the Edit option. The screens for Editing Chart will be same as Adding a New Chart. The only difference will be that Edit will have the fields already filled.
Delete a Chart: You can delete a Chart by clicking on the ‘Trash’ Icon. A pop up will show up asking for the Confirmation. You can click yes and the Chart will be deleted.
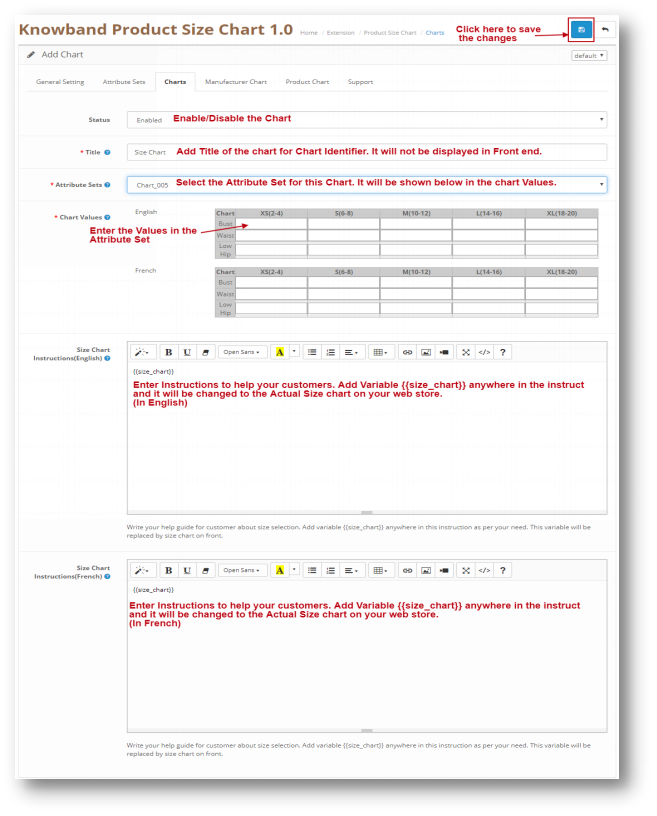
Add a Size Chart: You can add a Size Chart by Clicking on the option provided on the Top of the Page. The following screen will show up:
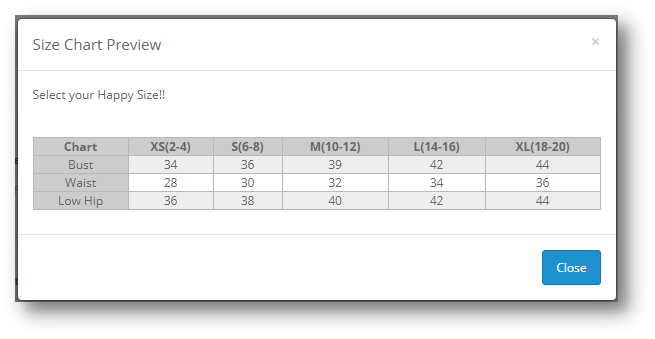
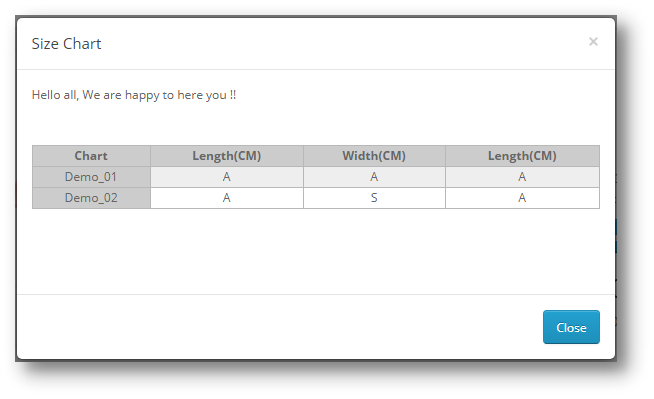
Preview of the Size Chart: When clicking on the ‘Eye’ (Preview) Icon, the preview of the Size Chart will be shown as a Pop Up. The Pop up will look like as shown below:
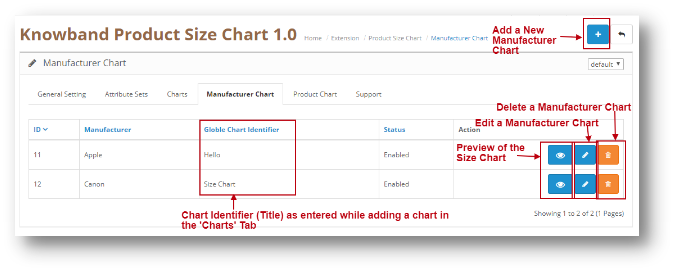
3.0.4 Manufacturer Chart
This setting of OpenCart Size chart table extension shows the charts which are mapped to different manufacturers. To add a new entry, the admin can click on the add icon appearing on the right side of the table. The Manufacturer Tab will look like as shown below:
Edit a Manufacturer Chart: You can Edit an existing ManufacturerChart using the Edit option. The screens for Editing ManufacturerChart will be same as Adding a New ManufacturerChart. The only difference will be that Edit will have the fields already filled.
Delete a Manufacturer Chart: You can delete a ManufacturerChart by clicking on the ‘Trash’ Icon. A pop up will show up asking for the Confirmation. You can click yes and the ManufacturerChart will be deleted.
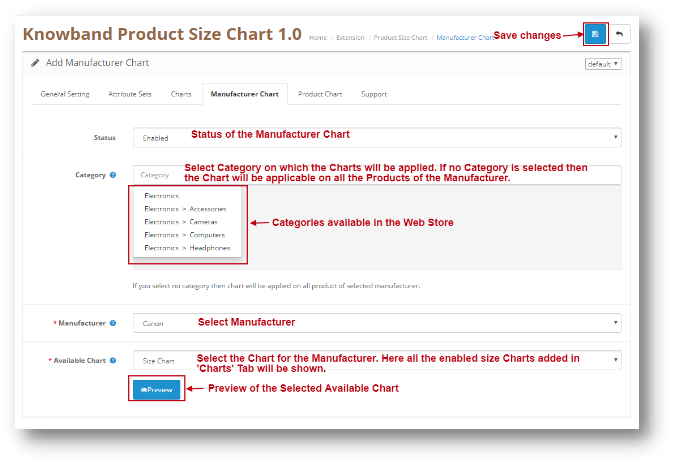
Add a Manufacturer Chart: You can add a ManufacturerChart by Clicking on the option provided on the Top of the Page. The following screen will show up:
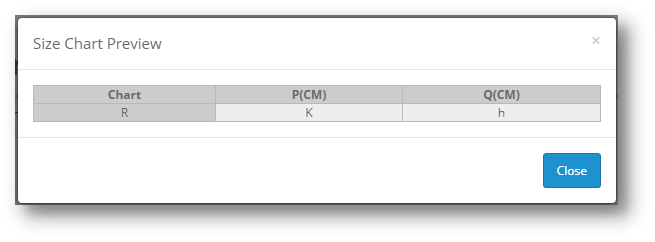
Preview of the Manufacturer Chart: When clicking on the ‘Eye’ (Preview) Icon, the preview of the Manufacturer Chart will be shown as a Pop Up. The Pop up will look like as shown below:
**Note – If a Product has a Manufacturer Chart mapped with them and the Store Admin also mapped a Product Chart with it, then the Product chart will be given highest Priority. Thus Product Chart mapped with the Product will be shown in the Web store to the User.
3.0.5 Product Chart
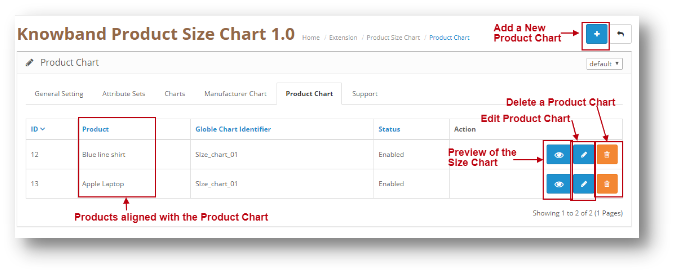
This setting of OpenCart Size chart table extension shows the charts which are mapped to different Products. To add a new entry, the admin can click on the add icon appearing on the right side of the table. The Product Chart Tab will look like as shown below:
Edit a Product Chart: You can Edit an existing ProductChart using the Edit option. The screens for Editing ProductChart will be same as Adding a New ProductChart. The only difference will be that Edit will have the fields already filled.
Delete a Product Chart: You can delete a ProductChart by clicking on the ‘Trash’ Icon. A pop up will show up asking for the Confirmation. You can click yes and the ProductChart will be deleted.
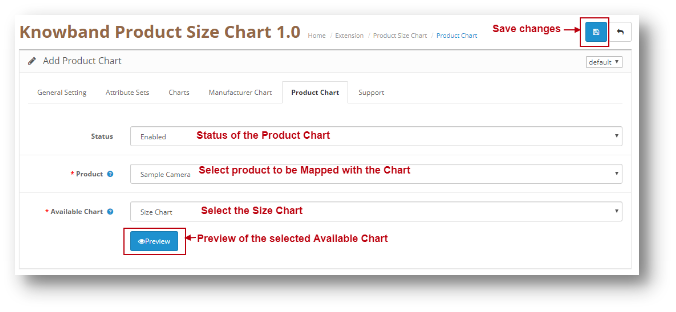
Add a Product Chart: You can add a ProductChart by Clicking on the option provided on the Top of the Page. The following screen will show up:
Preview of the Manufacturer Chart: When clicking on the ‘Eye’ (Preview) Icon, the preview of the ManufacturerChart will be shown as a Pop Up. The Pop up will look like as shown below:
**Note – If a Product has a Manufacturer Chart mapped with them and the Store Admin also mapped a Product Chart with it, then the Product chart will be given highest Priority. Thus Product Chart mapped with the Product will be shown in the Web store to the User.
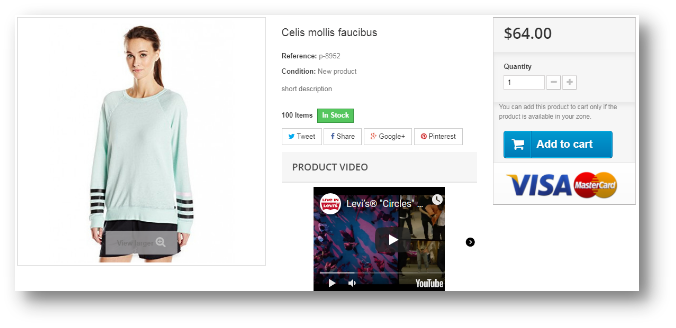
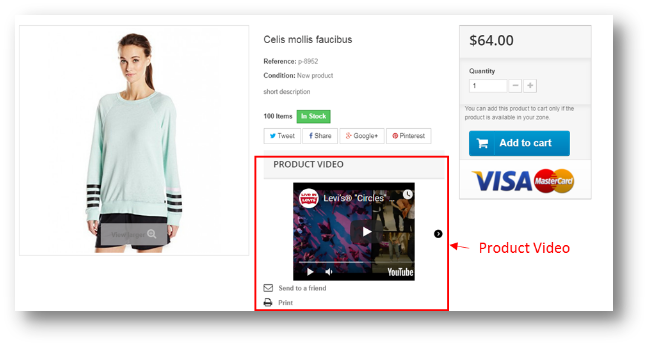
A product video is an explainer video that effectively demonstrates the benefits of a product. A demo video increases conversion rates by providing a creative and engaging story that demonstrates how your product functions in the real world, and what kind of impact it has. By using narrative and metaphor, a product video can create a better lasting impression in the consumer’s mind, leaving the product features to be experienced rather than explained.
People are more likely to retain information received through video because the information is presented through audio and visual channels. Therefore, if you need to express something about a product quickly and memorably, video is the best way to do it. Knowband offers Prestashop Product Video module for the Prestashop store admin that allows him/her to add the product videos on their store’s product pages. This Prestashop extension allows the sellers to present their products confidently that make the customers sure about their products.
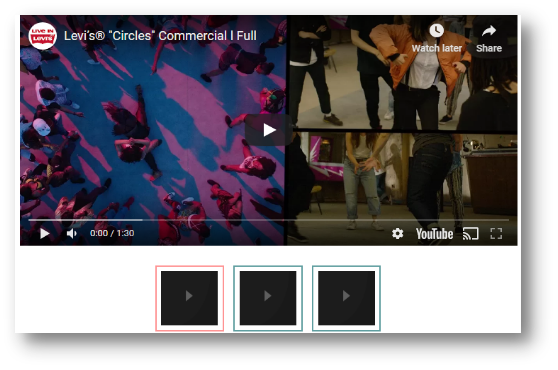
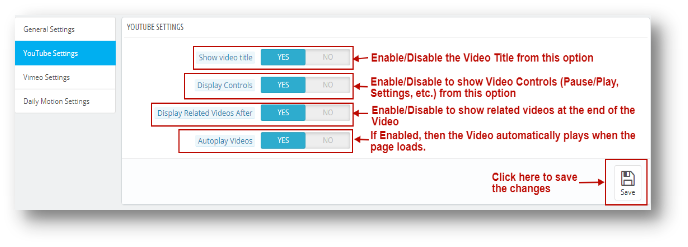
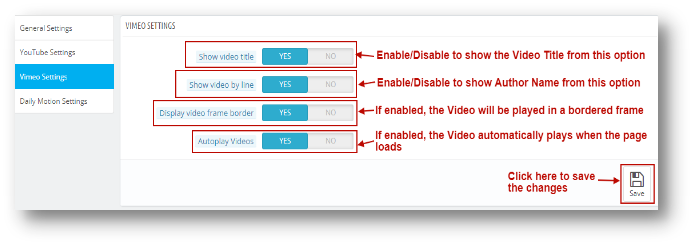
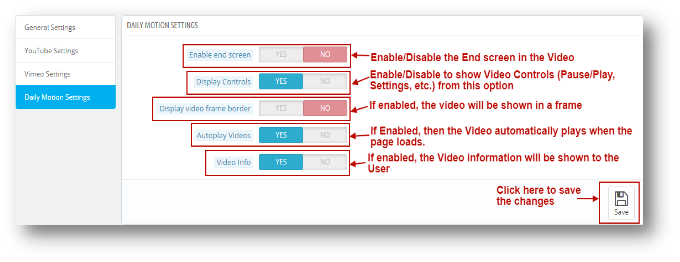
This Prestashop Product Video addon will provide an interface and functionality to the Prestashop eCommerce website admin to show their product pages with high-quality product videos from YouTube, Vimeo, and Daily Motion.
1.1 Benefits
1.2 Features
2.0 Admin Interface
Admin will have 4 settings available which are described below.
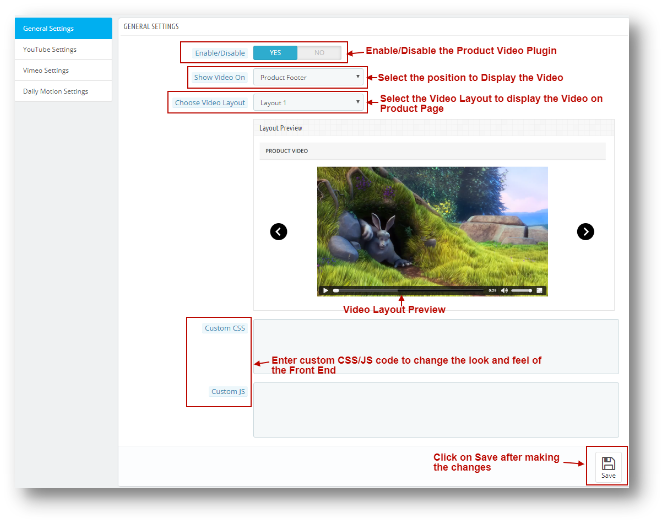
2.0.1 General Settings
General Settings will have simple customization functionalities options like deciding the position and Layout of the Video. The page will look like as shown below:
Positions to Show Video:
Product Footer (Bottom of the Page)
Product Right Column
Video Layouts:
Layout 1
Layout 2
2.0.2 YouTube Settings
Admin can change YouTube video Settings from this Option. YouTube Settings Tab page will look like as the one below.
2.0.3 Vimeo Settings
Admin can change Vimeo video Settings from this Option. Vimeo Settings Tab page will look like as the one below.
2.0.4 Daily Motion Settings
Admin can change Daily Motion video Settings from this Option. Daily Motion Settings Tab page will look like as the one below.
3.0 How to Add a New video to a Product?
To add a New Video to a Product, Follow these simple steps:
4.0 User Interface
The Front end will look like as shown below to the customers.
Product reviews are an important way to know the perspective of the customers who have purchased the products at your store. But sometimes, it might get difficult to compel users to leave a review for their purchase or ask new visitors to rate the product. In order to incorporate a review and rating system on the store, Knowband has offered OpenCart review incentive module which motivates buyer and customers to write a review in exchange of appealing incentives. This OpenCart review reminder and incentive module reminds the user about reviewing their purchase on the store. Using OpenCart product review reminder module, you can easily create and schedule unlimited review reminder emails for asking bulk product reviews and rating from the customers. Only approved reviews are provided with the discount incentive which increase the number of returning customers on your eCommerce store.
1.1 Striking Features of OpenCart Review Reminder and Incentive Module
Product review and rating is all about building brand reputation in eCommerce markets. With OpenCart review incentive module, you can easily control the review content visibility on your website. Moreover, you don’t require to code anything for the implementation of this review and incentive system at your store. Everything is simple and can be managed from the backend without modifying any existing code.
Before that, let us take a quick outlook of the features offered by this OpenCart review reminder module.
1. Compel your visitors and customers to write a product review in exchange of incentive by incorporating OpenCart review manager plugin at your store.
2. Enable or disable the functionality of OpenCart product review reminder module using the toggle switch provided at back-office.
3. The incentive system of this OpenCart review incentive module can be separately enabled or disabled as per business needs.
4. You can moderate product reviews before making them live on the product pages. You can either accept the product reviews or reject them.
5. OpenCart review and rating manager allows you to ask product reviews from all customers or buyers only.
6. With OpenCart customer Ratings and Reviews system, you can offer a fixed or percentage type incentive value to your customers.
7. The review incentive amount can be set from the backend of this OpenCart review and rating manager plugin.
8. OpenCart review incentive module automatically sends an approval or rejection email to the customer depending upon the moderation result.
9. You will receive an alert notification email as any user will post a review on your website.
10. OpenCart review reminder and incentive module lets you configure the reminder email sent to the customer for asking reviews and when once after they have reviewed the product.
11. OpenCart product review reminder and incentive is mobile responsive and device compatible.
12. OpenCart review manager plugin supports multi-store and multi-lingual compatibility.
13. You can view the complete report for the product reviews, offered incentives and list of reviewed products from the back-office of this OpenCart review incentive module.
14. Create unlimited Smart review reminder and send them to buyers as soon as they complete their purchase from the store.
15. OpenCart review reminder extension allow excluding products and categories for which no reviews are required.
2.0 Installation Guide of OpenCart Product Review Reminder Module
Before starting the installation process, you have to buy the OpenCart review incentive extension from the Knowband store. Once purchased, you will receive the following files on your registered email.
Source code of OpenCart Review Incentive module in zipped file format.
User Manual of OpenCart review reminder and incentive plugin.
Now in order to install this OpenCart review reminder module on your online shop, follow the given steps:
1. Unzip the zip file. You will get the folders as shown in the image below.
2. Copy all the folders of the zip file in the Root Directory of OpenCart setup via FTP manager.
So, OpenCart review and incentive module is now successfully installed and is ready to use at your store. Go to the admin menu and click on the extensions. Choose the Extension Type as Modules. You will find a list of modules. Select the Review Incentive module.
3.0 Admin Interface of OpenCart Review Reminder and Incentive Module
Just after successful installation of OpenCart review and incentive modulee, you can create and schedule unlimited review reminder for the store customers. Navigate the settings in the given order: Admin Panel > Extensions > Modules > Review Incentive
The simple to understand admin interface of OpenCart review and rating manager plugin has been divided into two broad sections namely:
Each of these sections has been discussed in detail below.
3.1 General Settings
Under the general settings of OpenCart product review reminder and incentive plugin, you will get the following configuration options:
Enable/Disable: This option will enable or disable the complete functionality of OpenCart Review Option module.
Incentive Criteria: With this option, you can decide whether you want to offer incentive to all customers or buyers only.
Enable Incentives: The incentive system incorporated using OpenCart review incentive module can be enabled or disabled using this option.
Incentive Amount type: This option sets the incentive type as fixed or percentage.
Incentive Amount: This option will set the incentive amount or value which is offered to customer in exchange of product reviews.
Moderation: With the help of this option, you can evaluate the product reviews before making them live on product page. OpenCart Review Option module allows checking and modifying the review before posting it on the website.
Review Description: This option will set the content or description which is shown in the left side of the Write Review page.
Email Subject (When review is accepted and incentives are included): This option will set the subject of the email sent to customers when their review is accepted and incentives are included.
Email Template (When review is accepted and incentives are included): This option will set the content of the email sent to customers when their review is accepted and incentives are included.
Email Subject (When review is accepted and incentives are excluded): This option will set the subject of the email sent to customers when their review is accepted but incentives are excluded.
Email Template (When review is accepted and incentives are excluded): This option will set the content of the email sent to customers when their review is accepted but incentives are excluded.
Email Subject (When admin disapproves a review): This option will set the subject of the email sent to customers when their review is rejected or disapproved.
Email Template (When admin disapproves a review): This option will set the content of the email sent to customers when their review is rejected or disapproved.
Email Subject (Inform to admin when a new review is posted): This option will set the subject of the email sent to store admin or owner when any new review is posted on the website.
Email Template (Inform to admin when a new review is posted): This option will set the content of the email sent to store admin or owner when any new review is posted on the website.
3.2 Reminder Settings
Under the reminder settings of OpenCart product review reminder module, you can create multiple review reminders for your eCommerce store with custom values. These reminders can be sent to different customers who have purchased items from the store. OpenCart review request plugin asks the buyers to review and rate their order on the store. The screenshot shown below gives a list of existing review reminders which can be modified or deleted as per store requirements. You can even create a new reminder and schedule it from this section.
3.2.1 How to create a new reminder
Automatic Invite Email: This option enables or disables the reminder or automatic email notification sent to buyers to review their purchase.
Enable this if you want to send reminder after order creation date: The value of this setting decides when to send the reminder email to the customer. If this is enabled, then reminder will be sent to the customer after the specified number of days (this is selected in the next field) from the date of order creation. If this is disabled, then number of days after selected order status, reminder will be sent to customer. Order status set from here will be checked.
Automatic email if order status: You have to set this option only if the above option is disabled. With this, you can set the order status after which the automatic email will be sent to the customer.
Days: This option will set the number of days after which the reminder email is sent to the customer.
Email Subject: This option allows you to set a subject for the reminder email sent to the customers.
Email Content: This option sets the content for the reminder email which specifies the product they have purchased from the store and has to be reviewed, rated.
3.2.2 How to run cron to send automatic reminders
In order to send all the scheduled reminder emails all at once, you have to manually hit the cron command each time.
For this, you have to run the URL:
All the site products and categories for which you don’t want to get review & rating from the customer, you can exclude them from this section.
Excluding Products
Select the specific product to exclude, which can be further modified or deleted.
Excluding Categories
Select the specific category to exclude.
3.4 Reviews
Under the Reviews tab of OpenCart review incentive module, you can check all the product reviews along with the details of associated customer. You can check filtered product reviews for a specific time interval. Each of the product review can be examined and then accepted/rejected from this section.
If the moderation for product reviews is set as automatic, all the product reviews are approved by default. Else, if moderation is set to manual, you can accept or reject the review.
Additionally, you also get the option to modify the following details of a product review.
Product: This field shows the name of the reviewed product.
Title: This field shows the review title given by the customer/buyer.
Review Description: This field shows the description for the product as given by the customer.
Rating: This shows the product rating given by the customer on that particular product.
Total Helpful Votes: This is a count of readers who found that review useful or helpful.
Total Not Helpful Votes: This is a count of readers who don’t found that review useful or helpful.
Author: This field specifies the name of the product reviewer.
Email: This field specifies the email information of the reviewer.
Incentive Amount Type: This field specifies the type of incentive amount if applicable.
Incentive: This field shows the inventive value or amount.
Total Amount: Using this option, you can set the cart amount which is required to apply the incentive code.
End Date: This field specifies the expiry date of the incentive coupon.
Certified Buyer: You can mark the customer as a certified buyer with the help of this option.
Status: This option simply enables or disables the particular product review on frontend.
3.5 Reports
The report system of OpenCart review and incentive module offers you detailed statistics based on different criteria such as:
1. Reports based on Products
2. Reports based on Category
3. Reports based on Manufacturer
4. Reports based on Customers
These reports can be filtered for different time periods using the filter option present at the admin screen.
4.0 Front Interface of OpenCart Review Incentive Module
A) Link to “Write a Product Review block” on product page
B) “Write a Review” block on front-end
C) Message after submitting a product review
This way, the OpenCart Product Review Reminder and Incentive module easily implements the functionality of reminding customers to write a product review. The online users can get incentives on writing product reviews. The online merchant can offer an incentive for all the customers or only buyers as per the requirements. OpenCart Product Review Reminder and Incentive module allows offering fixed or Percentage based incentive. The OpenCart Product Reviews module provides an option to check the reviews before posting it or post it automatically. Multiple email templates are available for sending email to the customers regarding review approval or disapproval. OpenCart Product Review Reminder and Incentive extension also provides an option to include an incentive or exclude incentive and send mail accordingly.
The store admin can configure the OpenCart Review extension for sending review reminder to the customers after order creation date or as per the order status. The OpenCart Review extension sends automatic review reminder emails to the customers, admin can customize the mail templates as per the requirements. Opencart Review Manager module is multi-lingual compatible and offers smooth functioning. OpenCart enhance Review extension implements the review incentive functionality without implementing any code changes. OpenCart Review Option extension allows excluding any product/category if he doesn’t want to implement the functionality for this particular product. Admin can view the list of all the reviews from the admin interface of this OpenCart Auto Review Option module and approve or disapprove it. OpenCart Product review plugin is mobile responsive and offers a hassle-free implementation. Admin can view the report for checking the total reviews and incentive details from the admin interface of OpenCart star rating extension.
Knowband is one of the most reputed names in the field of plugin development. We provide best plugins for platforms like – Magento,Prestashop, OpenCart and
Every 1 out of 10 online users compel to abandon their cart just because of the long and complicated checkout. Further, you can optimize your site checkout to an interesting one by incorporating OpenCart One Page Advanced Checkout Extension from Knowband. In fact, the OpenCart responsive checkout popup module turns up the entire checkout process to a single ajax based popup. Furthermore, which triggers over the screen as the customer opts to purchase a product from the store. Thus, this One Page Checkout for OpenCart reduces cart abandonment by offering the entire purchase process on a single popup, without loading the next page.
1.1 Features of One Page Checkout for OpenCart
Incorporating One Page Checkout for the OpenCart store is no big deal as it offers simple customization without involving any technical skills or existing code modifications. So, quickly allow your customers to purchase the product through a single popup, giving them faster checkout. Moreover, a less interruption experience. Thus, below listed are the striking highlights of this OpenCart One Page Checkout extension.
1. OpenCart One Page Checkout module displays the total checkout fields in the form of a responsive ajax based checkout popup on the frontend. Further, of the website without redirecting to another URL.
2. This One Page Checkout for OpenCart provides a seamless way to boost the newsletter subscriptions for the online business.
3. The responsive checkout popup incorporated using the OpenCart simplified checkout module can be easily enabled or disabled using the toggle button given at the backend.
4. The guest registration feature of the OpenCart responsive checkout popup automatically registers the customer with the site. In addition, send them the login password on their email.
5. You have the flexibility to enable or disable the guest checkout functionality of the OpenCart One Page Checkout module.
6. Using this OpenCart Single Page checkout extension, you can add CSS code to the advanced checkout page.
7. OpenCart Single Page checkout module offers a testing mode feature that lets you test the advanced checkout page functionality on a specific IP.
8. With OpenCart simplified checkout module, give customers the benefit of social login options. For instance, Google and Facebook over the checkout page.
9. OpenCart fast checkout extension allows you to show/hide payment and shipping address fields differently for logged-in and guest customers of the store.
10. The custom address field marks are needful or optional with the help of this OpenCart One Page Supercheckout module.
11. Using One Page Checkout for the OpenCart site, you can provide multiple shipping and payment methods to the customers which are configurable from the backend.
12. OpenCart responsive checkout popup module eases you in setting a desired logo image and title for each of the payment and shipping methods displayed on the supercheckout page.
13. The ship2pay feature of OpenCart quick checkout extension automatically selects the payment method corresponding to each shipping method selected by the customer.
14. OpenCart responsive checkout popup extension offers a configurable cart whose fields can be fixed as per business needs.
15. OpenCart One Page Checkout module is multi-store and multi-lingual compatible.
16. OpenCart quick checkout extension offers a mobile responsive layout to the customers.
17. The MailChimp Integrator feature of OpenCart Single Page checkout automatically syncs the customer data with the connected MailChimp account of the seller.
1.2 Front Interface of OpenCart Responsive Checkout Popup Module
When the user clicks on the “Add to Cart” button corresponding to a product, they will see the following responsive checkout slider on their screen.
Cart Summary Section of OpenCart One Page Advanced Checkout
Further, as they click on the “Checkout” button, they can view and complete the complete advanced checkout form in a single go as shown in the images below:
Account Login Section
If the customer unchecks the “Ship to same address” checkbox, then they will see the shipping address section as shown below:
Shipping and Payment Method Section
2.0 Installation Guide of OpenCart One Page Advanced Checkout Extension
Before starting the installation process, you have to buy the OpenCart One Page Checkout module from the Knowband store. Further, once purchased, you will receive the following files in your registered email.
Source code of OpenCart One Page Advanced Checkout Extension in zipped file format.
User Manual of OpenCart One Page Checkout extension.
Now, to install this OpenCart Advanced Checkout on your online shop, follow the given steps:
1. Unzip the zip file. You will get the folders as shown in the image below
2. Copy all the folders of the zip file in the Root Directory of OpenCart setup via FTP manager.
So, OpenCart One Page Advanced Checkout is now successfully installed. In addition, is ready to use at your store. Further, go to the admin menu. Moreover, click on the extensions and thereby click on configure button next to One Page Advanced Checkout.
3.0 Admin Interface of OpenCart Responsive Checkout Popup
Just after successful installation of One Page Checkout for OpenCart the website, you can configure the checkout form fields as per your requirements. Furthermore, you have to navigate the settings in the given order: Admin Panel > Extensions > Modules > One Page Advanced Checkout
The simple to understand admin interface of OpenCart fast checkout extension is divided into nine sections namely:
General Settings
Login Settings
Payment Address
Shipping Address
Shipping Method
Ship2Pay
Payment Method
Cart
Newsletter
3.1 General Settings
Enable/Disable: This option lets you enable or disable the complete functionality of One Page Checkout for Opencart the website. If disabled, the standard Opencart checkout is shown to the customers.
Enable Newsletter Option: Using this option, you can show or hide the newsletter subscription box for your site. If the customer checks the newsletter option, they will subscribe to site updates(newsletter).
Register Guest Automatically: You can enable automatic registration for your guest customers (users who perform guest checkout). This option will automatically send a password to the customer for further use of the account.
Register Account: By enabling this option, you can give password fields on single page checkout where the user can enter their password to register.
Display Guest: This option will show or hide the guest option in the login section of checkout. Using this option, users can perform guest checkout for their items.
Add Custom Style: This option allows you to include additional custom style (CSS code), displayed on the front of their website.
Testing Mode: You can enable this option to test the one page checkout module functionality before making it live for the customers.
Add IP: This option allows you to enter the specific IP address where you want to test the advanced supercheckout features.
3.2 Login Settings
Enable Facebook Login: This option will enable or disable the Facebook login option displayed on the front of one page checkout form.
Facebook App ID: This option allows you to set the Facebook App ID required to connect with your Facebook account.
Facebook App Secret: This option will set the Facebook App Secret Key.
Note: You can get the Facebook app ID and secret key from https://developers.facebook.com/ which has been discussed in section 3.2.1
Enable Google Login: This option will enable or disable the Google login option displayed on the front of one page checkout form.
Google App ID: This option allows you to set the Google App ID required to connect with your Google account.
Google Client ID: This option allows you to set the Google client ID.
At last, Google App Secret: This option will set the Google App Secret Key.
Note: You can get the Google app ID, client ID, and secret key from https://code.google.com/apis/console which has been discussed in section 3.2.2
3.2.1 How to setup Facebook Login
Facebook App can be created by below-mentioned steps:-
1: Go to the given URL: https://developers.facebook.com/apps/
2: Click on the “Add a New App” button.
3&4: Enter your App name and email id, then click on the “Create App ID” button.
5&6: After clicking on Create App ID you will have to go through a security check as shown:
7: Click on the “Setting” tab.
8-13: Two options will be available in the dropdown, Basic and Advanced, click on “Basic”. And then enter your “App Domain”, “Contact Email”, ”Privacy URL”, ”Terms and Conditions URL”, ”Add Logo”, ”Select Category” and click on the “Save Changes” button.
App Domains:
yourdomain.com is correct
yourdomain.com/store is incorrect
www.domain.com is incorrect
14: Now click on “+Add Platform”.
15: And select Website as Platform
16: Now Enter your site URL.
17&18: Click on “Products+” and select Facebook login.
19: Select web as the platform for the app.
20: Now click on save.
21&22: Click on Settings and add a Valid OAuth Redirect URIs.
Valid OAuth Redirect URIs:
https://your_store_url/index.php?route=kbstepcheckout/kbstepcheckout&fblogin=1
23&24: Click on “App review”. And mark “Make ‘your app name’ Public” to Yes.
Final Step: Copy the App ID and App Secret and paste it into the fields provided in the module.
3.2.2 How to setup Google Login
Follow the below steps to get the client id and client secret.
1. Go to the link “ https://console.developers.google.com/project ”.
2. Click on the drop-down option highlighted in button “ 2 ” and then click on “Create a project”.
3. Enter your desired Project Name and click on “Create”.
4. Go to API Manager, click on Create Credentials and select the OAuth client ID option.
5. Click on the “Configure consent screen” button.
6. Enter “Email Id”, “Product Name” and then click on the “Save” button.
7. Select “Web application”, Enter “Name “, “Authorized Redirected URIs“ as mentioned below and click on the “Create” Button,
9. Paste Client ID and Client Secret in the Text Field shown below in the Prestashop one-page checkout module’s admin panel.
How to Generate the Google API key:
1) Go to API Manager, click on the left menu, click on API & Services, and then click on Credentials.
2) Click on Create Credentials & then select the API key.
3)Copy the API key and enter the same into the Google App Id field of the admin end module’s login page
3.3 Payment Address
OpenCart One Page Checkout allows you to show or hide any field for payment address. The fields can be separately enabled or disabled for logged-in and logged-out customers. You can mark any field as required, differently for logged-in and logged-out customers of the store. Additionally, you can reorder the address fields using a simple drag and drop action.
3.4 Shipping Address
OpenCart responsive checkout popup module allows you to show or hide any field for the shipping address. The fields can be separately enabled or disabled for logged-in and logged-out customers. Using OpenCart One Page Advanced Checkout, you can mark any field as required, differently for logged-in and logged-out customers of the store. Additionally, you can reorder the address fields using a simple drag and drop action.
Note: To include and show more custom fields in the Payment Address, Shipping Address, cart section, or account section of the checkout, you can refer to section 3.10
3.5 Shipping Method
Display Shipping Methods: This option will show/hide the complete list of shipping methods provided on the advanced checkout page.
Display Style: With this option, you can select the display style for the shipping methods. It can be only logo image, only text, or both.
Display Shipping Method Title: This option will enable or disable the title for the particular shipping method.
Select Default Shipping Method: With this option, you can select any shipping method as the default method.
Title: This option sets the desired title for the shipping method.
Logo: This option sets the logo image for the shipping method.
Likewise, you can modify the title and logo image for all the shipping methods using this OpenCart One Page Advanced Checkout module.
3.6 Ship2Pay
3.7 Payment Method
Display Payment Methods: This option will show/hide the complete list of payment methods provided on the advanced checkout page.
Display Style: With this option, you can select the display style for the payment methods. It can be only logo image, only text, or both.
Select Default Payment Method: With this option, you can select any payment method as the default method.
Title: This option sets the desired title for the payment method.
Logo: This option sets the logo image for the payment method.
Likewise, you can modify the title and logo image for all the payment methods with the help of one page supercheckout.
3.8 Cart
Under this section of OpenCart One Page Supercheckout, you can customize the cart and display it the way you want at your store. The image size of cart items can be easily modified by setting the image height and width.
Product Image Size: This option allows you to set the image size for the products shown in the cart section of the one page checkout.
Moreover, you can show or hide the various cart fields to log in and log out customers of the store. Fields like “Agree to the Conditions”. Moreover, order comments marked as optional or optional as per your site requirements.
3.9 Newsletter
Enable MailChimp: This option of Opencart one page supercheckout, allows you to enable or disable the MailChimp Integration functionality for your store.
MailChimp API Key: With this option, you can set the MailChimp API key which will connect your site to the MailChimp account of the seller.
MailChimp List: Using this option, you can fetch and select the particular list connected to the MailChimp account.
3.9.1 How to configure MailChimp
Login to your Mail Chimp account.
Click on the right corner tab > Choose Profile > Extras > API Keys.
Here Admin Can Create an API key by clicking on the “Create a Key” button.
Copy the API key.
Admin can also make a Different list for Each Social login customer by clicking on “List” in the Top Menu Bar.
Now Paste the API Key in the Provided Mail chimp API Key section and click on the “Get List” Button.
Select the list from the Dropdown menu.
3.10 How to add edit or delete custom fields to the Supercheckout page
In order to add custom fields to any section of One Page Checkout, you can go to the “Custom Fields” option under the “Customers” tab at the left side section of the admin interface.