
1.0 Introduction
Every 1 out of 10 online users compel to abandon their cart just because of the long and complicated checkout. Further, you can optimize your site checkout to an interesting one by incorporating OpenCart One Page Advanced Checkout Extension from Knowband. In fact, the OpenCart responsive checkout popup module turns up the entire checkout process to a single ajax based popup. Furthermore, which triggers over the screen as the customer opts to purchase a product from the store. Thus, this One Page Checkout for OpenCart reduces cart abandonment by offering the entire purchase process on a single popup, without loading the next page.
1.1 Features of One Page Checkout for OpenCart
Incorporating One Page Checkout for the OpenCart store is no big deal as it offers simple customization without involving any technical skills or existing code modifications. So, quickly allow your customers to purchase the product through a single popup, giving them faster checkout. Moreover, a less interruption experience. Thus, below listed are the striking highlights of this OpenCart One Page Checkout extension.
1. OpenCart One Page Checkout module displays the total checkout fields in the form of a responsive ajax based checkout popup on the frontend. Further, of the website without redirecting to another URL.
2. This One Page Checkout for OpenCart provides a seamless way to boost the newsletter subscriptions for the online business.
3. The responsive checkout popup incorporated using the OpenCart simplified checkout module can be easily enabled or disabled using the toggle button given at the backend.
4. The guest registration feature of the OpenCart responsive checkout popup automatically registers the customer with the site. In addition, send them the login password on their email.
5. You have the flexibility to enable or disable the guest checkout functionality of the OpenCart One Page Checkout module.
6. Using this OpenCart Single Page checkout extension, you can add CSS code to the advanced checkout page.
7. OpenCart Single Page checkout module offers a testing mode feature that lets you test the advanced checkout page functionality on a specific IP.
8. With OpenCart simplified checkout module, give customers the benefit of social login options. For instance, Google and Facebook over the checkout page.
9. OpenCart fast checkout extension allows you to show/hide payment and shipping address fields differently for logged-in and guest customers of the store.
10. The custom address field marks are needful or optional with the help of this OpenCart One Page Supercheckout module.
11. Using One Page Checkout for the OpenCart site, you can provide multiple shipping and payment methods to the customers which are configurable from the backend.
12. OpenCart responsive checkout popup module eases you in setting a desired logo image and title for each of the payment and shipping methods displayed on the supercheckout page.
13. The ship2pay feature of OpenCart quick checkout extension automatically selects the payment method corresponding to each shipping method selected by the customer.
14. OpenCart responsive checkout popup extension offers a configurable cart whose fields can be fixed as per business needs.
15. OpenCart One Page Checkout module is multi-store and multi-lingual compatible.
16. OpenCart quick checkout extension offers a mobile responsive layout to the customers.
17. The MailChimp Integrator feature of OpenCart Single Page checkout automatically syncs the customer data with the connected MailChimp account of the seller.
1.2 Front Interface of OpenCart Responsive Checkout Popup Module
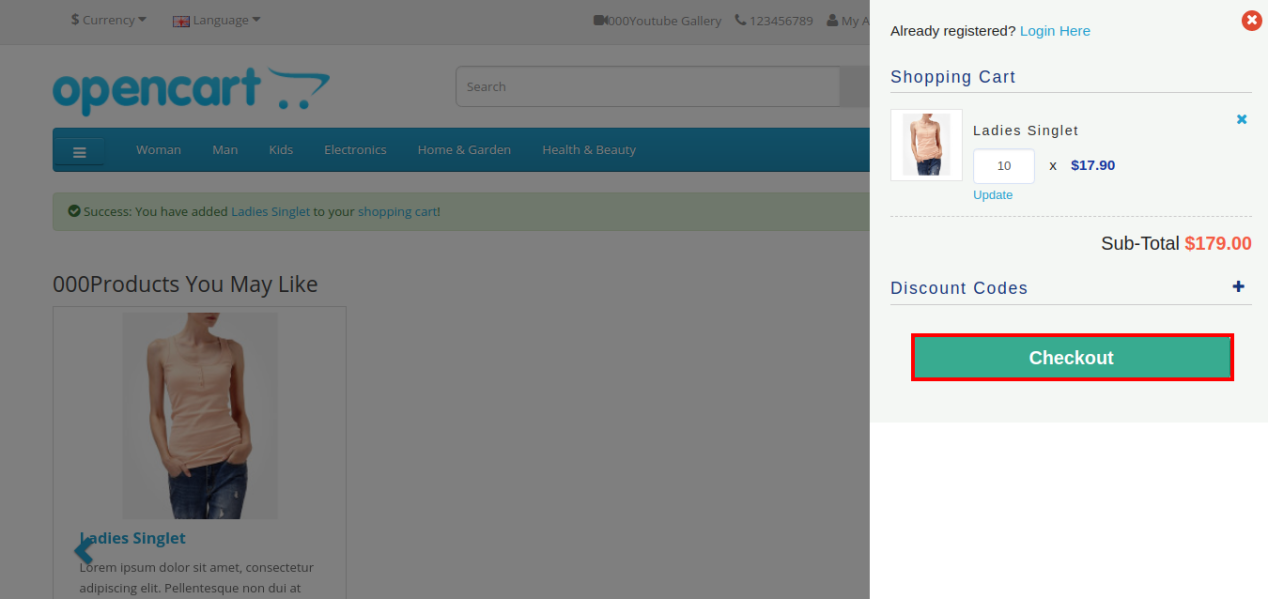
When the user clicks on the “Add to Cart” button corresponding to a product, they will see the following responsive checkout slider on their screen.
Cart Summary Section of OpenCart One Page Advanced Checkout

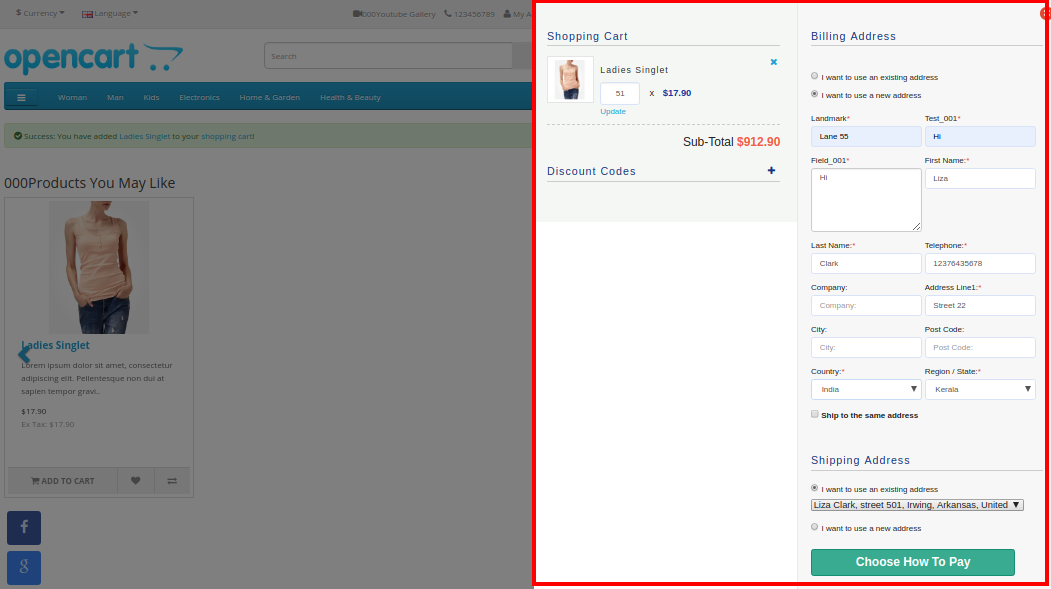
Further, as they click on the “Checkout” button, they can view and complete the complete advanced checkout form in a single go as shown in the images below:
Account Login Section


If the customer unchecks the “Ship to same address” checkbox, then they will see the shipping address section as shown below:
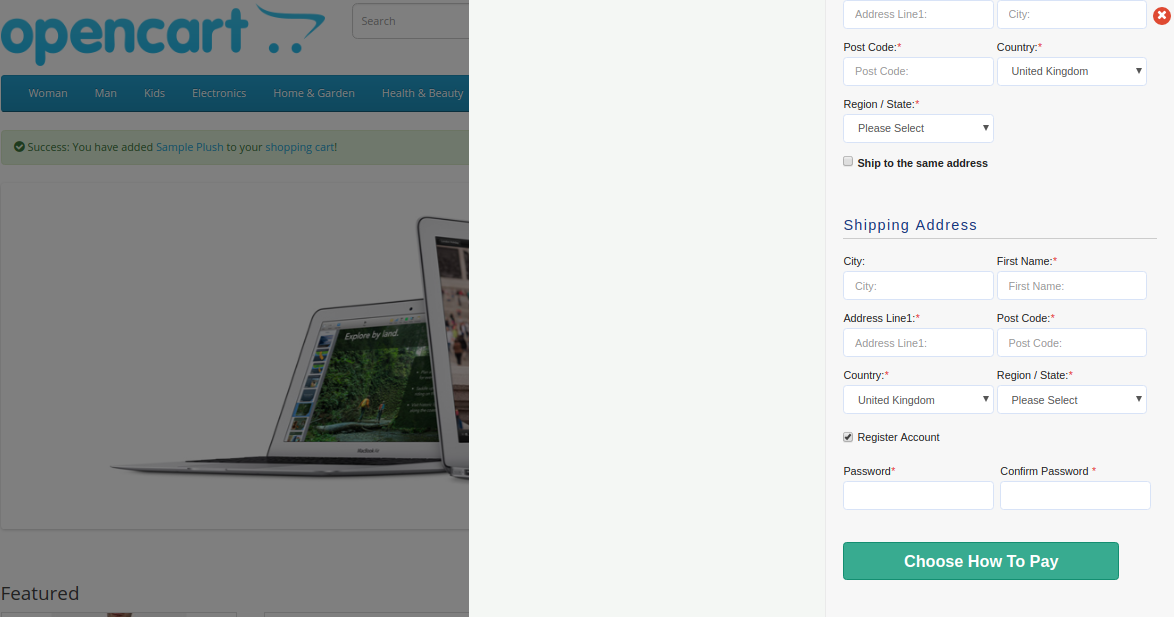
Shipping and Payment Method Section

2.0 Installation Guide of OpenCart One Page Advanced Checkout Extension
Before starting the installation process, you have to buy the OpenCart One Page Checkout module from the Knowband store. Further, once purchased, you will receive the following files in your registered email.
- Source code of OpenCart One Page Advanced Checkout Extension in zipped file format.
- User Manual of OpenCart One Page Checkout extension.
Now, to install this OpenCart Advanced Checkout on your online shop, follow the given steps:
1. Unzip the zip file. You will get the folders as shown in the image below

2. Copy all the folders of the zip file in the Root Directory of OpenCart setup via FTP manager.
So, OpenCart One Page Advanced Checkout is now successfully installed. In addition, is ready to use at your store. Further, go to the admin menu. Moreover, click on the extensions and thereby click on configure button next to One Page Advanced Checkout.
3.0 Admin Interface of OpenCart Responsive Checkout Popup
Just after successful installation of One Page Checkout for OpenCart the website, you can configure the checkout form fields as per your requirements. Furthermore, you have to navigate the settings in the given order: Admin Panel > Extensions > Modules > One Page Advanced Checkout


The simple to understand admin interface of OpenCart fast checkout extension is divided into nine sections namely:
- General Settings
- Login Settings
- Payment Address
- Shipping Address
- Shipping Method
- Ship2Pay
- Payment Method
- Cart
- Newsletter
3.1 General Settings

- Enable/Disable: This option lets you enable or disable the complete functionality of One Page Checkout for Opencart the website. If disabled, the standard Opencart checkout is shown to the customers.
- Enable Newsletter Option: Using this option, you can show or hide the newsletter subscription box for your site. If the customer checks the newsletter option, they will subscribe to site updates(newsletter).
- Register Guest Automatically: You can enable automatic registration for your guest customers (users who perform guest checkout). This option will automatically send a password to the customer for further use of the account.
- Register Account: By enabling this option, you can give password fields on single page checkout where the user can enter their password to register.
- Display Guest: This option will show or hide the guest option in the login section of checkout. Using this option, users can perform guest checkout for their items.
- Add Custom Style: This option allows you to include additional custom style (CSS code), displayed on the front of their website.
- Testing Mode: You can enable this option to test the one page checkout module functionality before making it live for the customers.
- Add IP: This option allows you to enter the specific IP address where you want to test the advanced supercheckout features.
3.2 Login Settings

- Enable Facebook Login: This option will enable or disable the Facebook login option displayed on the front of one page checkout form.
- Facebook App ID: This option allows you to set the Facebook App ID required to connect with your Facebook account.
- Facebook App Secret: This option will set the Facebook App Secret Key.
Note: You can get the Facebook app ID and secret key from https://developers.facebook.com/ which has been discussed in section 3.2.1 - Enable Google Login: This option will enable or disable the Google login option displayed on the front of one page checkout form.
- Google App ID: This option allows you to set the Google App ID required to connect with your Google account.
- Google Client ID: This option allows you to set the Google client ID.
- At last, Google App Secret: This option will set the Google App Secret Key.
Note: You can get the Google app ID, client ID, and secret key from https://code.google.com/apis/console which has been discussed in section 3.2.2
3.2.1 How to setup Facebook Login
Facebook App can be created by below-mentioned steps:-
1: Go to the given URL: https://developers.facebook.com/apps/
2: Click on the “Add a New App” button.
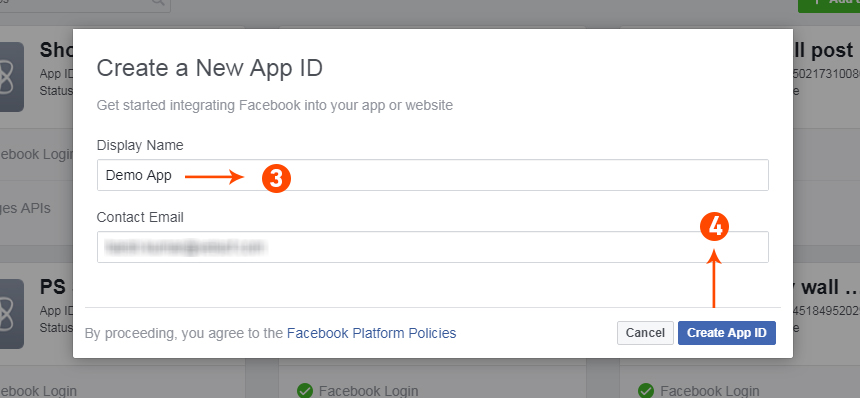
3&4: Enter your App name and email id, then click on the “Create App ID” button.
5&6: After clicking on Create App ID you will have to go through a security check as shown:

7: Click on the “Setting” tab.

8-13: Two options will be available in the dropdown, Basic and Advanced, click on “Basic”. And then enter your “App Domain”, “Contact Email”, ”Privacy URL”, ”Terms and Conditions URL”, ”Add Logo”, ”Select Category” and click on the “Save Changes” button.
App Domains:
yourdomain.com is correct
yourdomain.com/store is incorrect
www.domain.com is incorrect

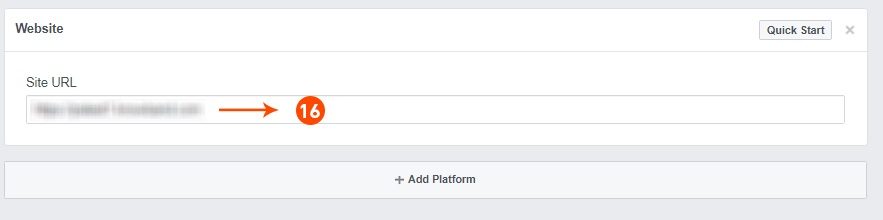
14: Now click on “+Add Platform”.

15: And select Website as Platform

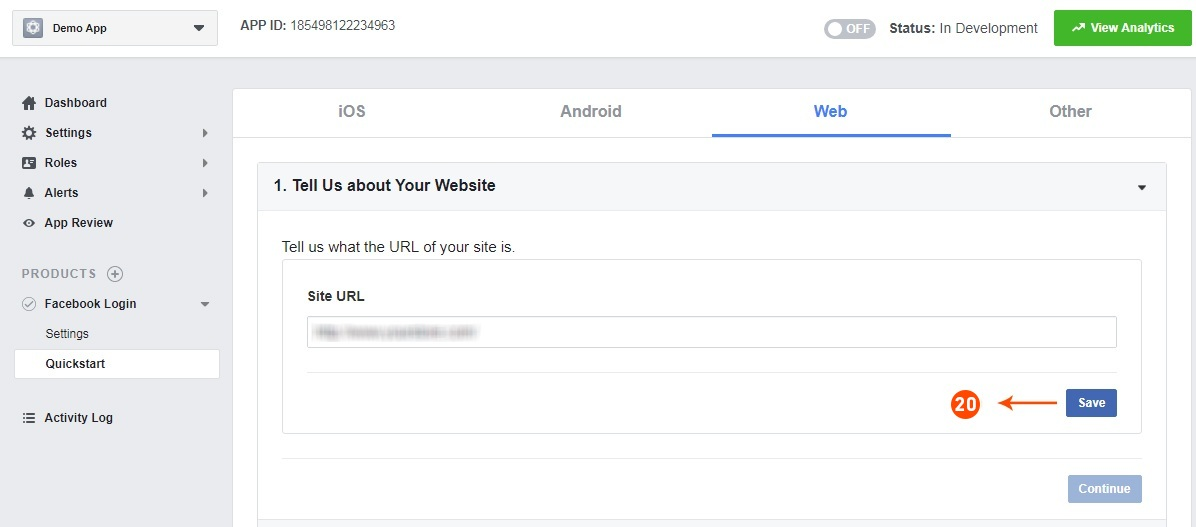
16: Now Enter your site URL.
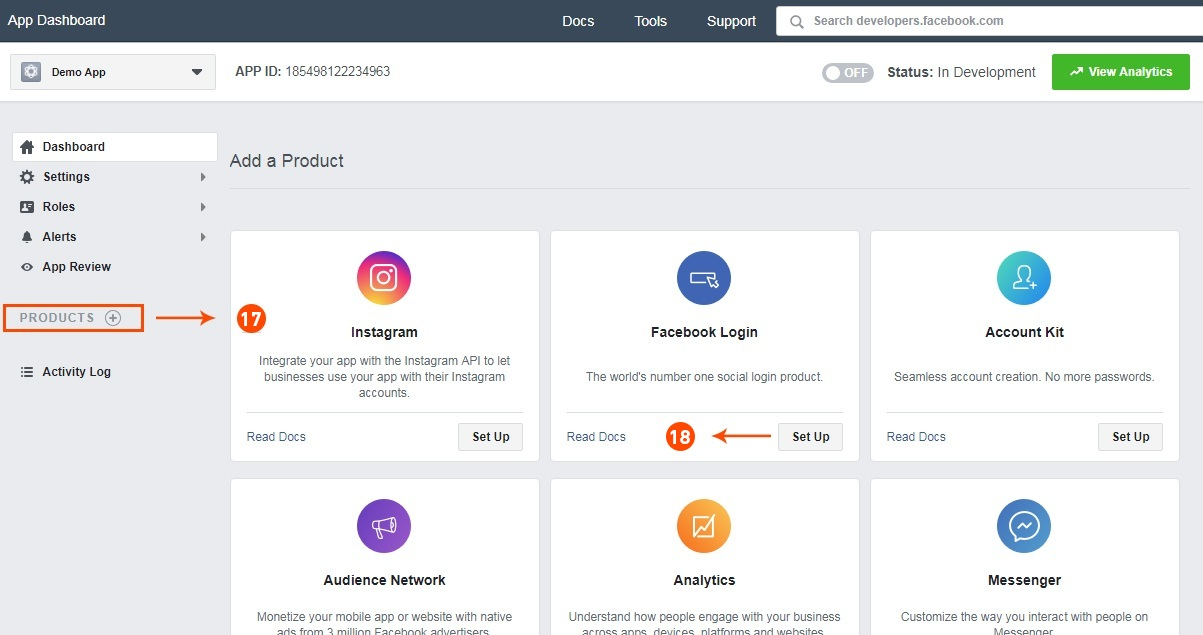
17&18: Click on “Products+” and select Facebook login.
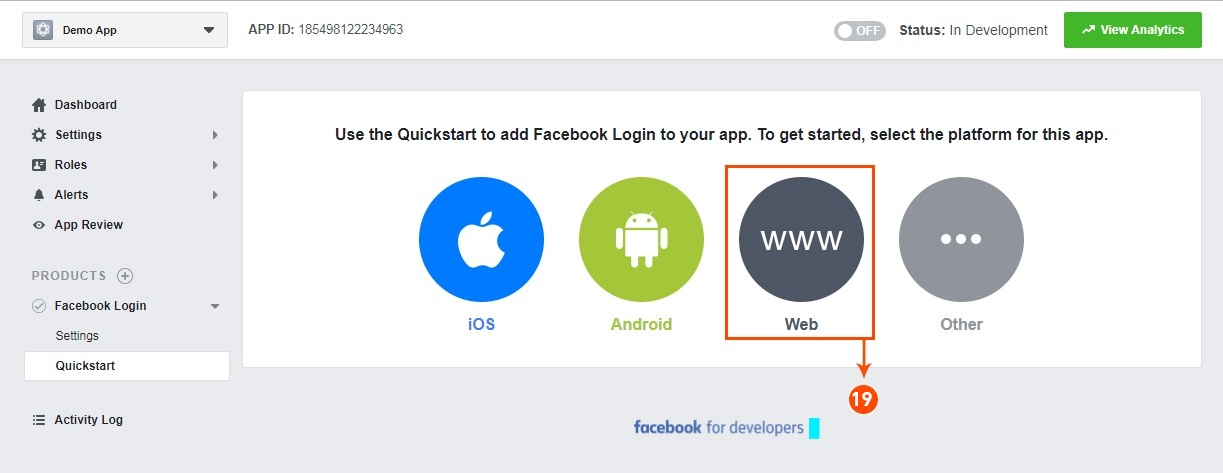
19: Select web as the platform for the app.
20: Now click on save.
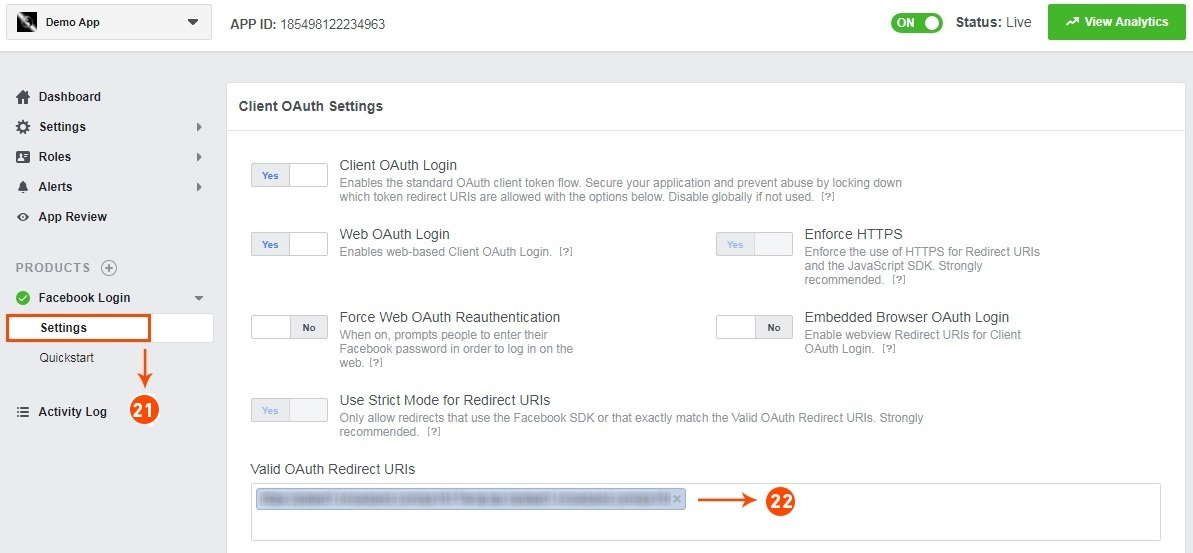
21&22: Click on Settings and add a Valid OAuth Redirect URIs.
Valid OAuth Redirect URIs:
https://your_store_url/index.php?route=kbstepcheckout/kbstepcheckout&fblogin=1
23&24: Click on “App review”. And mark “Make ‘your app name’ Public” to Yes.
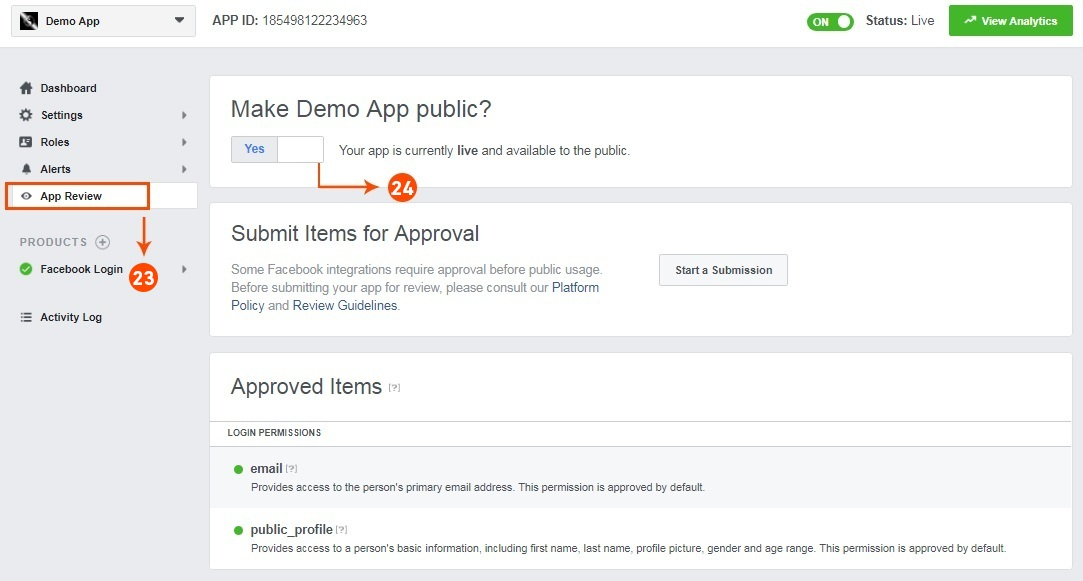
Final Step: Copy the App ID and App Secret and paste it into the fields provided in the module.

3.2.2 How to setup Google Login
Follow the below steps to get the client id and client secret.
1. Go to the link “ https://console.developers.google.com/project ”.
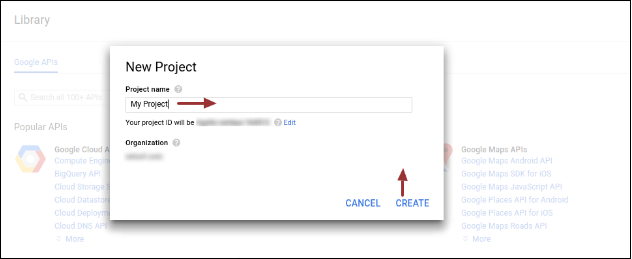
2. Click on the drop-down option highlighted in button “ 2 ” and then click on “Create a project”.

3. Enter your desired Project Name and click on “Create”.
4. Go to API Manager, click on Create Credentials and select the OAuth client ID option.

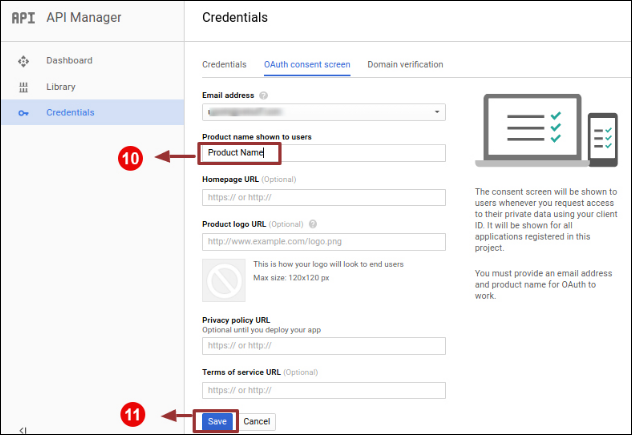
5. Click on the “Configure consent screen” button.

6. Enter “Email Id”, “Product Name” and then click on the “Save” button.
7. Select “Web application”, Enter “Name “, “Authorized Redirected URIs“ as mentioned below and click on the “Create” Button,
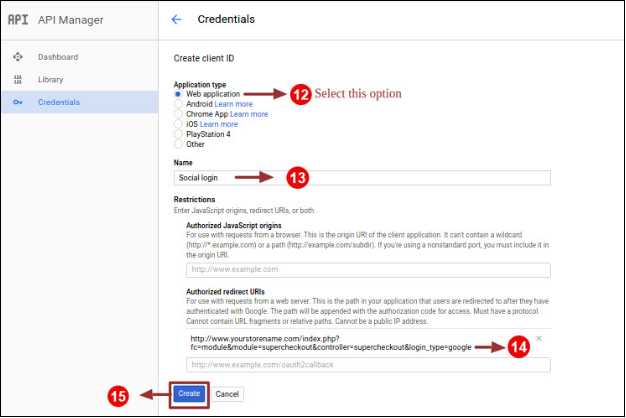
Use the Following Redirect URL
https://your_store_url/index.php?route=kbstepcheckout/kbstepcheckout
8. Copy Client ID and Client Secret.
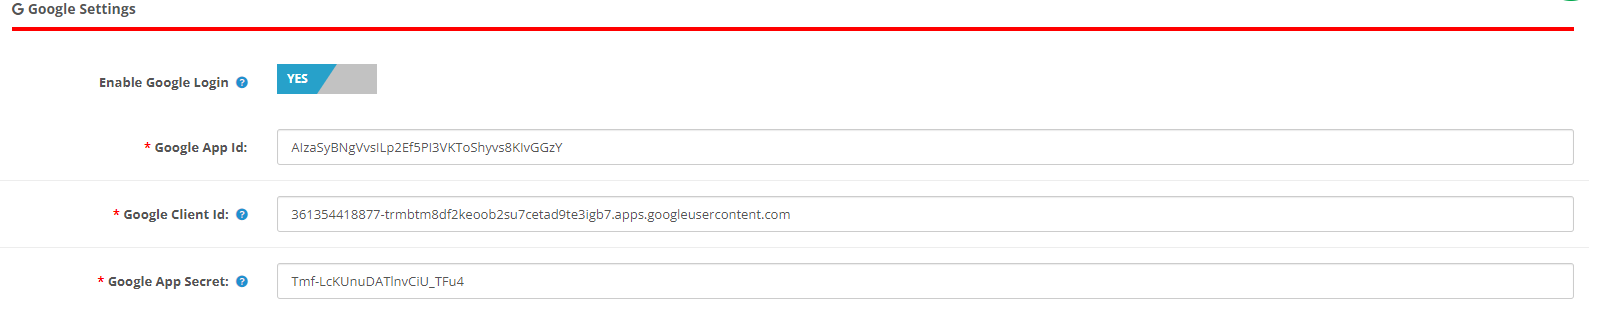
9. Paste Client ID and Client Secret in the Text Field shown below in the Prestashop one-page checkout module’s admin panel.
How to Generate the Google API key:
1) Go to API Manager, click on the left menu, click on API & Services, and then click on Credentials.
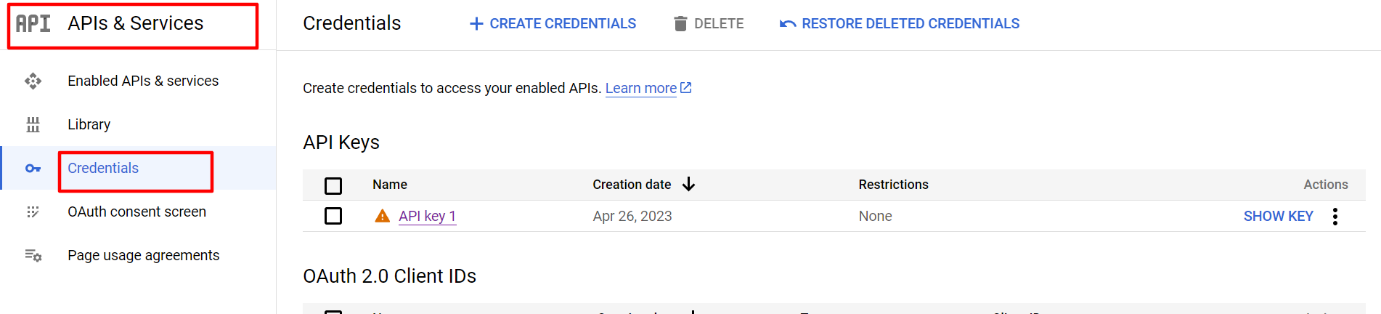
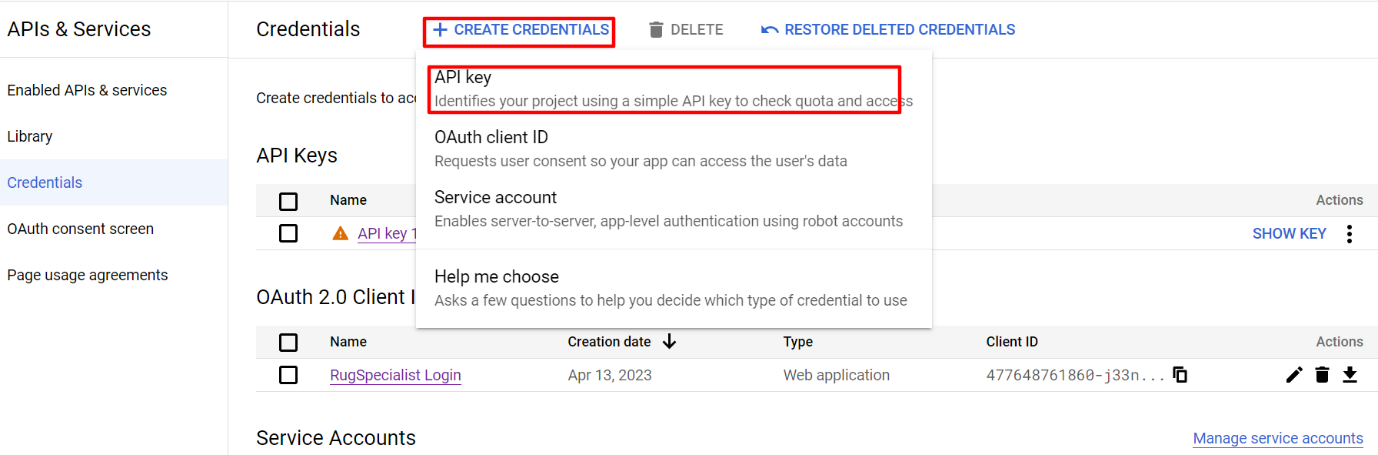
2) Click on Create Credentials & then select the API key.
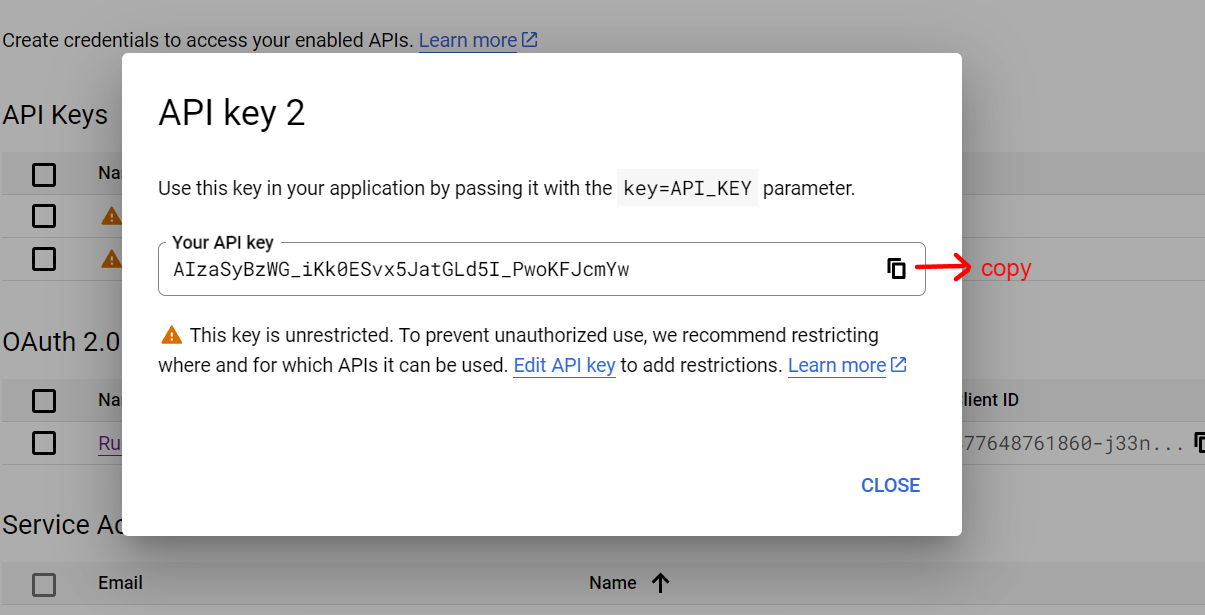
3)Copy the API key and enter the same into the Google App Id field of the admin end module’s login page
3.3 Payment Address

OpenCart One Page Checkout allows you to show or hide any field for payment address. The fields can be separately enabled or disabled for logged-in and logged-out customers. You can mark any field as required, differently for logged-in and logged-out customers of the store. Additionally, you can reorder the address fields using a simple drag and drop action.
3.4 Shipping Address

OpenCart responsive checkout popup module allows you to show or hide any field for the shipping address. The fields can be separately enabled or disabled for logged-in and logged-out customers. Using OpenCart One Page Advanced Checkout, you can mark any field as required, differently for logged-in and logged-out customers of the store. Additionally, you can reorder the address fields using a simple drag and drop action.
Note: To include and show more custom fields in the Payment Address, Shipping Address, cart section, or account section of the checkout, you can refer to section 3.10
3.5 Shipping Method

- Display Shipping Methods: This option will show/hide the complete list of shipping methods provided on the advanced checkout page.
- Display Style: With this option, you can select the display style for the shipping methods. It can be only logo image, only text, or both.
- Display Shipping Method Title: This option will enable or disable the title for the particular shipping method.
- Select Default Shipping Method: With this option, you can select any shipping method as the default method.
- Title: This option sets the desired title for the shipping method.
- Logo: This option sets the logo image for the shipping method.
Likewise, you can modify the title and logo image for all the shipping methods using this OpenCart One Page Advanced Checkout module.
3.6 Ship2Pay

3.7 Payment Method

- Display Payment Methods: This option will show/hide the complete list of payment methods provided on the advanced checkout page.
- Display Style: With this option, you can select the display style for the payment methods. It can be only logo image, only text, or both.
- Select Default Payment Method: With this option, you can select any payment method as the default method.
- Title: This option sets the desired title for the payment method.
- Logo: This option sets the logo image for the payment method.
Likewise, you can modify the title and logo image for all the payment methods with the help of one page supercheckout.
3.8 Cart
Under this section of OpenCart One Page Supercheckout, you can customize the cart and display it the way you want at your store. The image size of cart items can be easily modified by setting the image height and width.

- Product Image Size: This option allows you to set the image size for the products shown in the cart section of the one page checkout.
Moreover, you can show or hide the various cart fields to log in and log out customers of the store. Fields like “Agree to the Conditions”. Moreover, order comments marked as optional or optional as per your site requirements.
3.9 Newsletter

- Enable MailChimp: This option of Opencart one page supercheckout, allows you to enable or disable the MailChimp Integration functionality for your store.
- MailChimp API Key: With this option, you can set the MailChimp API key which will connect your site to the MailChimp account of the seller.
- MailChimp List: Using this option, you can fetch and select the particular list connected to the MailChimp account.
3.9.1 How to configure MailChimp
- Login to your Mail Chimp account.
- Click on the right corner tab > Choose Profile > Extras > API Keys.
- Here Admin Can Create an API key by clicking on the “Create a Key” button.
- Copy the API key.
- Admin can also make a Different list for Each Social login customer by clicking on “List” in the Top Menu Bar.
- Now Paste the API Key in the Provided Mail chimp API Key section and click on the “Get List” Button.
- Select the list from the Dropdown menu.
3.10 How to add edit or delete custom fields to the Supercheckout page
In order to add custom fields to any section of One Page Checkout, you can go to the “Custom Fields” option under the “Customers” tab at the left side section of the admin interface.

