1.0 Introduction
Improve the conversion rates of your store with the help of customer reward system. Integrate Knowband’s Prestashop Loyalty Points addon at your store that grants loyalty points to your customer upon creating a new account on the store, placing an order for a particular product or a specific product in the category and other events. The loyalty points can be converted to loyalty discount coupons by the customers during their next purchase from the store. This Prestashop Loyalty points and discount addon helps in increasing customer retention and reorders letting customers to collect more & more reward points which they can redeem during future orders. Thus Prestashop Loyalty points system implements a customizable reward and discount scheme at your store to encourage customer orders and signups.
1.1 Striking Features of Prestashop Loyalty Points Module
Prestashop Loyalty Points addon is highly customizable plugin with no core changes required. You can define as many loyalty points rule for your eCommerce store and award loyalty based discount vouchers to your customer. Lets quickly check different features offered by this Prestashop Loyalty points and discount addon.
- Prestashop Loyalty points system grants loyalty points to your customers for placing an order with specific cart value, creating an account , ordering a certain product etc. The loyalty points are defined specific for different rules.
- Prestashop Loyalty reward points can be offered manually or automatically to the customers based on their cart value, product selection or site activity.
- Prestashop purchase points addon allows an option to set order status when the loyalty points are added to the customer account.
- With Prestashop Loyalty points and discount addon, you can set the order status when the loyalty points assigned to any customer are automatically cancelled.
- With this Loyalty points module, you can set the discount equivalent to a single loyalty point. This discount value can be set in any desired currency.
- Prestashop Loyalty points addon gives an option to set minimum cart amount to be eligible to apply loyalty discount coupon.
- The tax over Prestashop loyalty discount coupons can be enabled or disabled from the backend.
- Loyalty points module for Prestashop allows you to set various progression names in multiple languages.
- Prestashop Loyalty Points addon lets you create unlimited loyalty points rules based on customer’s Cart, Product or Behavior.
- With this loyalty point module, you can set the title, description, number of loyalty points, start date, end date and validity for each rule.
- You can modify, enable, disable or delete the existing rules from the back-office of Reward points module.
- The status and detailed history for Prestashop loyalty discount coupons can be viewed at the backend.
- With Prestashop customer loyalty system, you can easily get into the details of loyalty points earned by the customers of store.
- The different email sent for points credit, points cancellation and points redemption can be modified from the back-office of this Prestashop Loyalty reward points module.
- Prestashop Loyalty points system is simple to enable or disable from back-office interface.
- Prestashop loyalty discount module is multi-lingual compatible.
1.2 Technology for Development
Language: PHP
Frame Work: PrestaShop
2.0 Installation Guide for Prestashop Loyalty Points and Discount Addon
You can follow these simple steps for installing the Prestashop Loyalty Points addon on your eCommerce store:
1. Firstly, download the addon package from the Knowband store.
2. You will get a zipped file containing the source code and user manual. Unzip the complete package in the root directory of your Prestashop store through FTP manager (like Filezilla or WinSCP – download here: https://filezilla-project.org/). You’ll find the files and folders as shown in the image below:

3. The Prestashop Loyalty Point plugin is all set to be installed in the store. Go to the Store Admin and then to ‘Modules and Services’.
4. Click on the “Install” button just next to your module. It would show a pop-up for your confirmation. Click on “Proceed with the installation” option. This step will install the module and show notification – “Module(s) installed successfully”.
3.0 Admin Interface of PrestaShop Purchase Points Addon
Just after successful installation of Prestashop Loyalty Points addon at your website, you can create and apply as many loyalty points rules for your store. You can grant loyalty points to your customers manually or automatically based on various criteria. In the admin panel or dashboard, click on “Knowband Loyalty Points”. It will list you various configuration tabs as shown in the given screenshot.
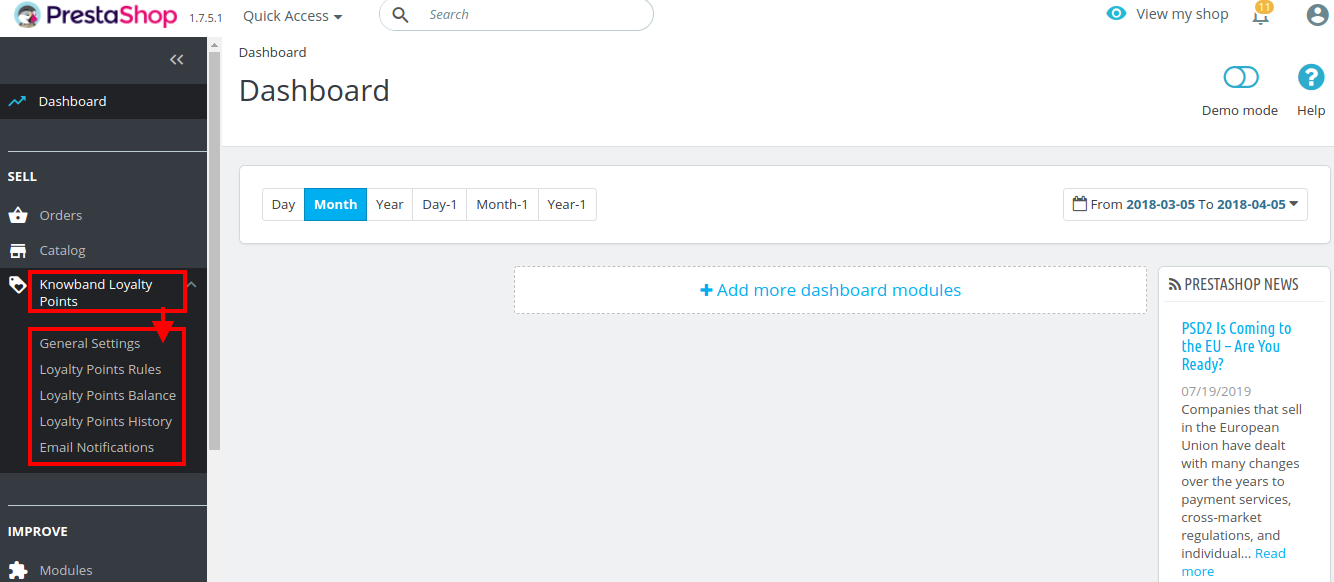
Here, in this interface of Prestashop Loyalty points system, you will see five sub sections under Loyalty Points module.
- General Settings
- Loyalty Points Rules
- Loyalty Points Balance
- Loyalty Points History
- Email Notifications
Each section of this Prestashop Loyalty points and discount addon has been discussed below.
3.1 General Settings
Under the general settings of Loyalty points module for Prestashop, you can perform the basic settings for the reward points system.
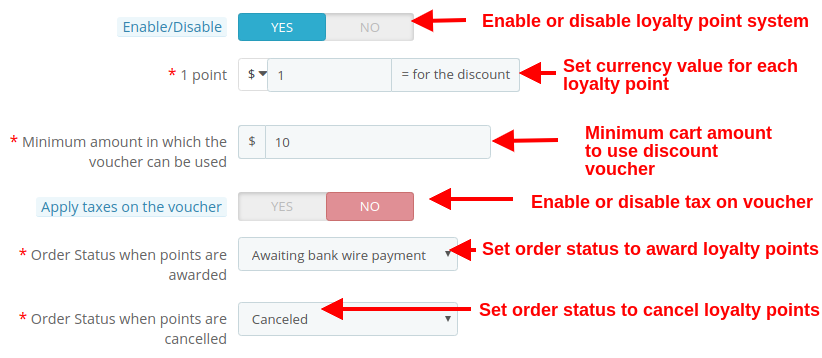
- Enable/Disable: This option fully enables or disables the loyalty point system for the store.
- 1 Point: This option sets the currency value equivalent to each loyalty point. You can set this amount in any selected currency.
- Minimum amount in which the voucher can be used: This option sets the minimum cart amount over which the coupon can be applied.
- Apply taxes on the voucher: This option will enable or disable the taxes over the discount voucher.
- Order status when points are awarded: This option sets the order status when the loyalty points are awarded.
- Order status when points are cancelled: This option sets the order status when these loyalty points are cancelled.
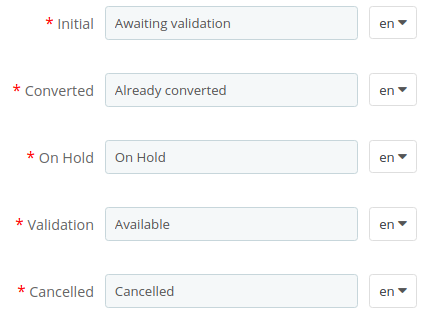
As shown in the below screenshot, you can set the names for various loyalty points progression. Theses names are applicable to complete module settings.
3.2 Loyalty Points Rule
Under this section of Prestashop purchase points addon, you can create multiple loyalty points rule based on various customer activity. Each rule can be modified, enabled, disabled or deleted as per site requirements.
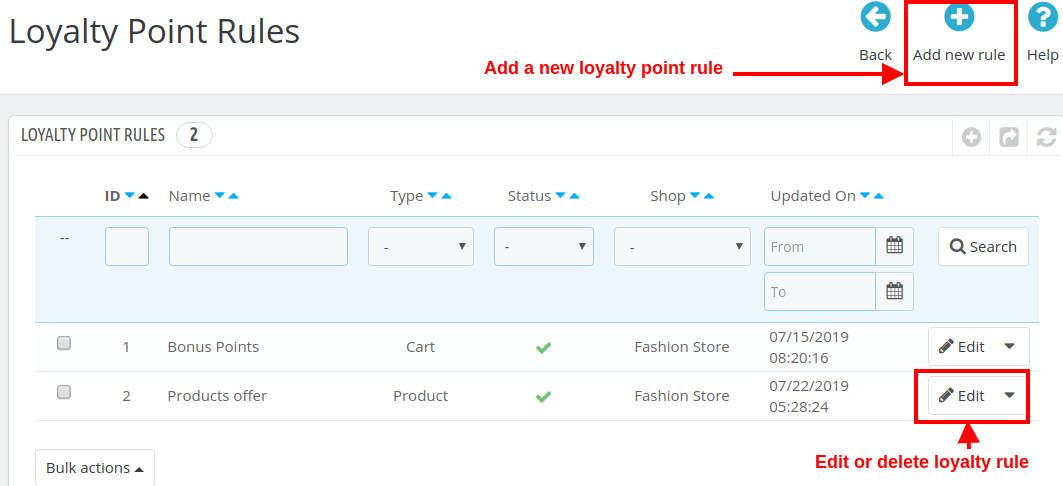
The above screen shows the list of existing loyalty point rules at your store. These can be modified, deleted or you can create a new rule as discussed below.
To create a new loyalty point rule for your store, click on the “Add new Rule” button at the top right screen. Initially, it will only show you the “Configuration” tab. Once you will save the Configuration options, it will show you the next two tabs: “Conditions” and “Notifications”.
Following options are listed under the “Configuration” tab of new rule.
1. Configuration
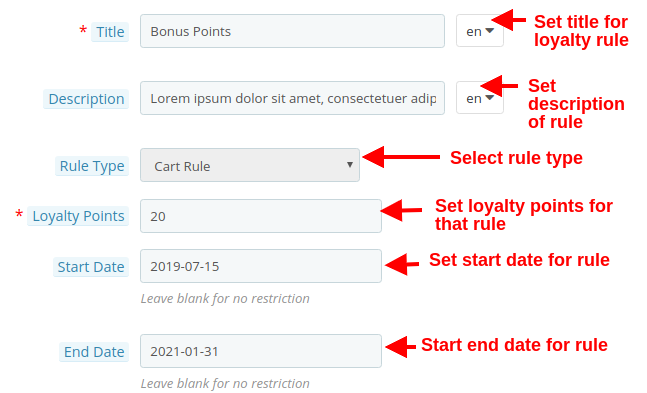
- Title: This option sets the title for the loyalty point rule.
- Description: This option allows you to set a small description of the rule.
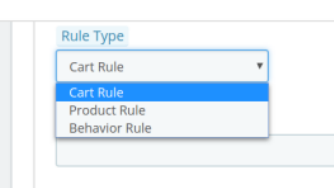
- Rule Type: Using this option, you can set the rule type out of three options as Cart Rule, Product Rule, or Behavior Rule as shown below.
- Loyalty Points: Using this option, you can set the number of loyalty points for this selected rule.
- Start Date: This option defines the start date for the rule.
- End Date: This option defines the end date for the rule.
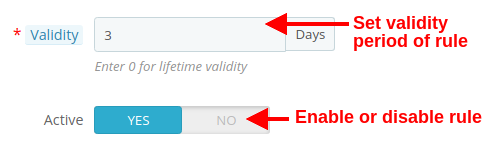
- Validity: This option will set the validity period of the loyalty points (in days). If set to 0, the loyalty points has lifetime validity.
- Active: Enable or disable the rule using this option.
2. Conditions
For the selected rule type, you can select the rule conditions as shown below.
- Condition Conjunction: This option will select the conjunction type as “OR” or “AND”.
A) Conditions for Cart Rule
- You can create any type of rule using conjunctions: “AND” & “OR”
- Admin can apply conditions on the basis of Total Amount, Total Items quantity, Total weight, Payment Method, Shipping Method.
- Below are the examples of the rules that can be created using these conditions:
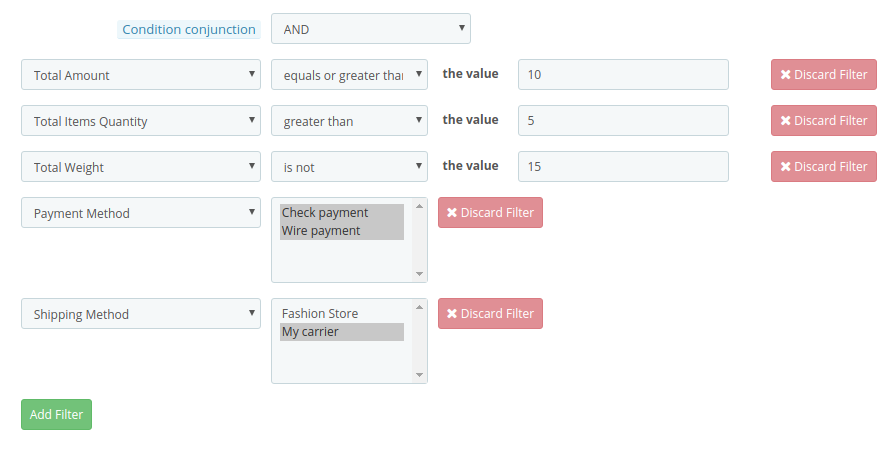
1.This rule works when (total amount >= 10) and (total items quantity > 5) and (total weight ≠ 15) and (payment method = check/wire) and (shipping method = my carrier) are all applicable to customer’s cart. To get specific points, all conditions should be TRUE. (Refer below screenshot)
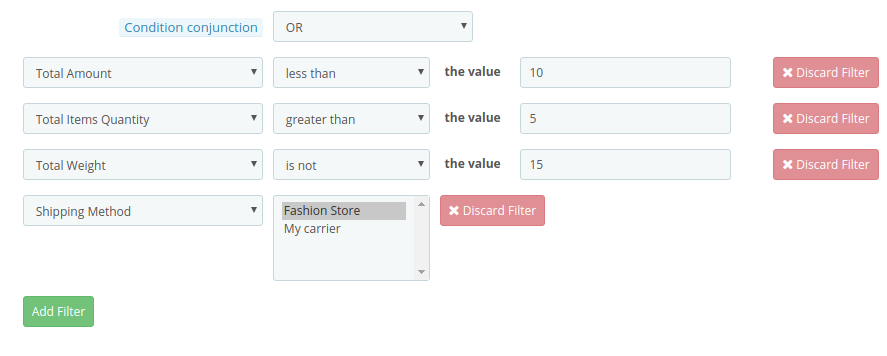
2.This rule works when (total amount < 10) or (total items quantity > 5) or (total weight ≠ 15) or (shipping method = Fashion store/my carrier) is applicable to customer’s cart. To get specific points, any one condition should be TRUE. (Refer below screenshot)
Similarly, you can create other rules as well with different filters and values.
B) Conditions for Product Rule
- You can create any type of rule using conjunctions: “AND” & “OR”
- Admin can apply conditions on the basis of Product ID, Category, Price.
- Below are the examples of the rules that can be created using these conditions:
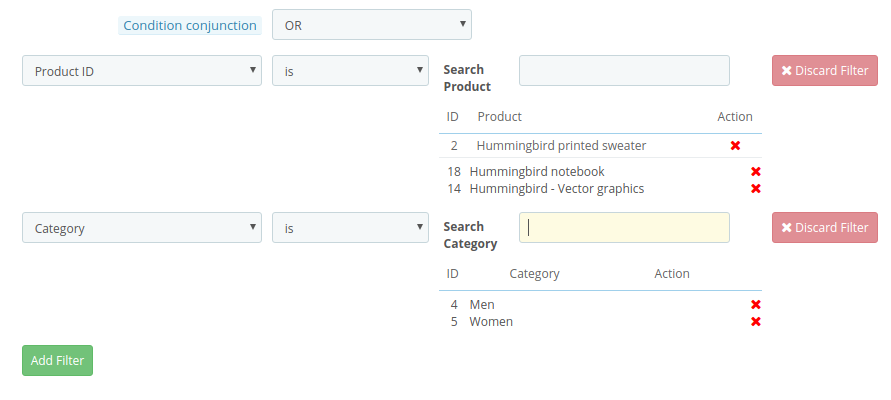
1.This rule works when (product ID is 2/18/14) or (category is 4/5) is TRUE. To get specific points, any one condition should be TRUE. (Refer below screenshot)
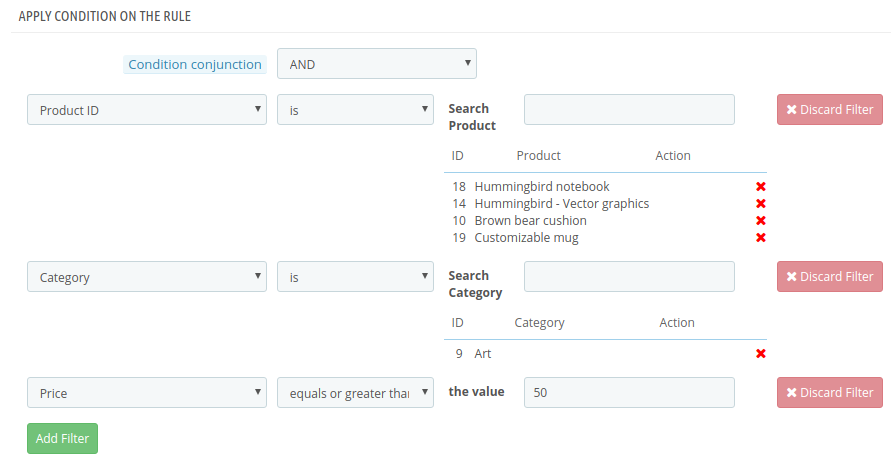
2.This rule works when (product ID is 2/18/14) and (category is 4/5) and (price >= 50) is TRUE. To get specific points, all the conditions should be TRUE. (Refer below screenshot)
Similarly, you can create other rules as well with different filters and values.
C) Conditions for Behavior Rule

Admin can apply condition on the basis of customer’s sign up and customer’s first order.
1. First Order – The Loyalty points will be granted to the customers when they place their first order on the store.
2. Sign Up – The Loyalty points will be granted to the customers when they will create an account on the store.
3. Notifications
The Notification tab shows the configuration options for email sent to the customers when they earn loyalty points through the selected rule. The options include:
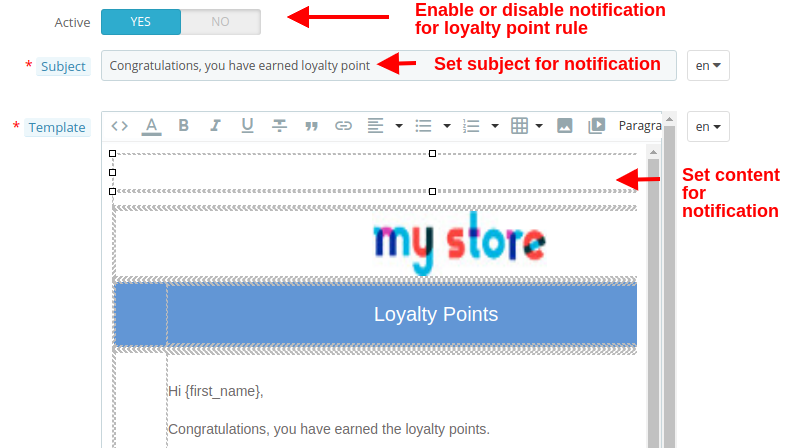
- Active: This option enables or disables the notification for the selected loyalty point rule.
- Subject: This option sets the subject for the email sent to customers upon winning loyalty points at the store.
- Template: This option sets the email content or body which details about the loyalty points they have earned on the store.
3.3 Loyalty Points Balance
Here in this section of Prestashop Loyalty points and discount addon, you can check the status of loyalty points granted to various customers of the store. You can view the details of each of the customer who have been granted the loyalty and discount points.
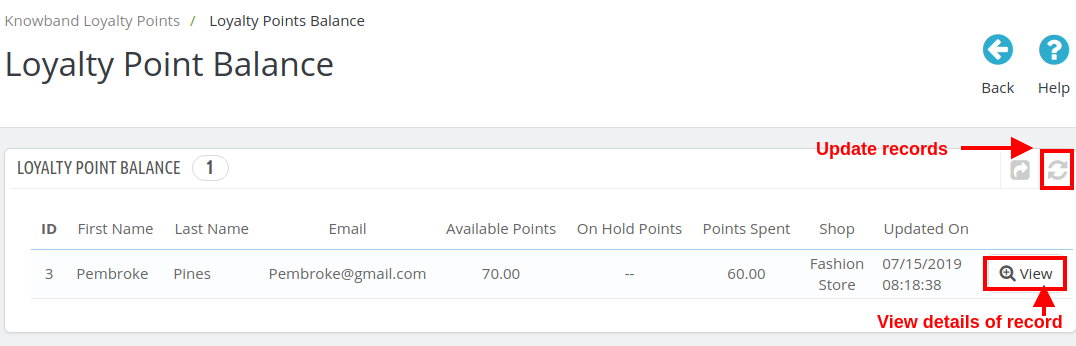
You can click the “Refresh” button in order to update the loyalty points records for store customers. Click on “View” button to check the details of a particular record (all records of the same customer) like shown in the image below.
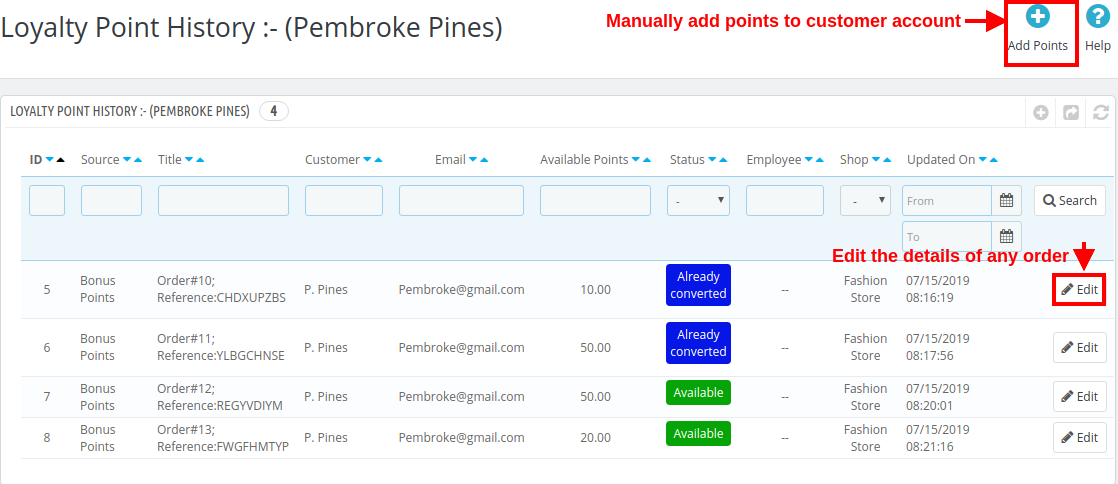
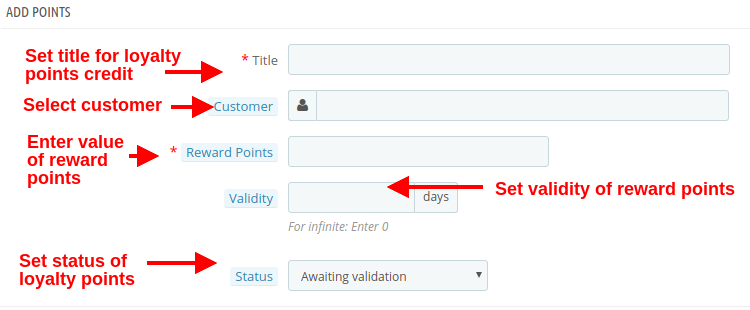
You can edit the various order records of a same customer by clicking on the “Edit” button. To assign the loyalty points manually, click on “Add Points” button as shown in the image above. When you add points manually, you will see the following configuration options.
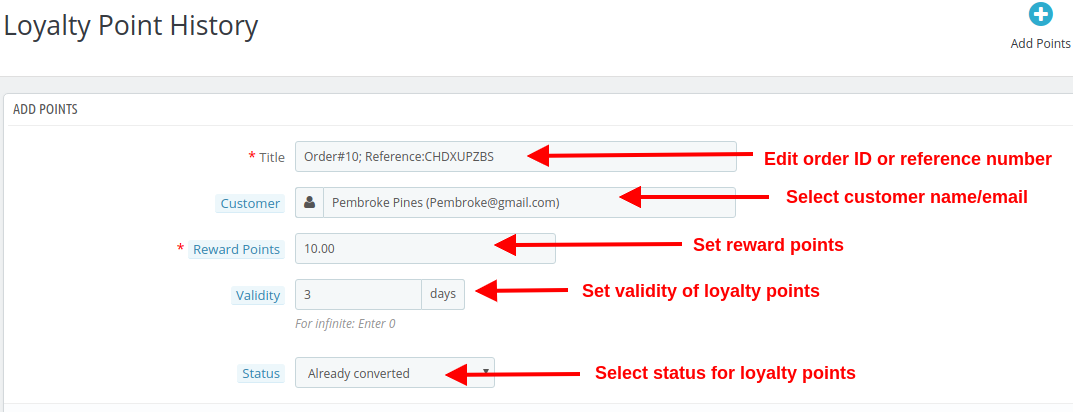
- Title: The option sets the order or reference number for crediting loyalty points to the customer’s account.
- Customer: With this option, select the name or email of the customer to whom you want to reward loyalty points.
- Reward Points: Set the number of loyalty points you want to offer to the customer.
- Validity: Set the validity of loyalty points using this option. Set this as 0 for infinite days validity.
- Status: This option sets the status of the loyalty points granted to the customer.
If you want to add loyalty points manually for bulk customers, you can simple upload a .csv file as shown below.
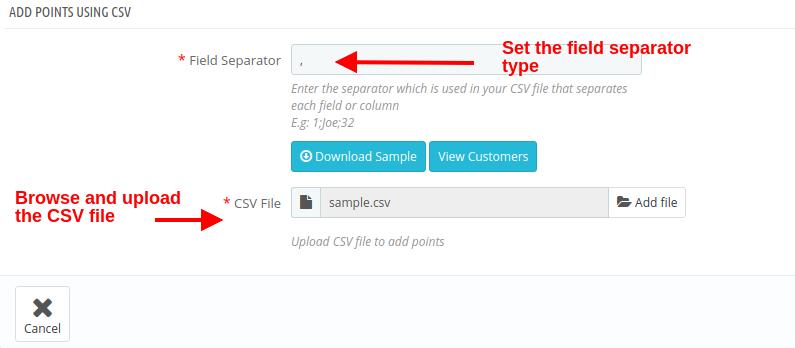
- Field Separator: This field allows you to specify the type of field separator you have used in your CSV file for separating various records.
- CSV File: This option allows you to browse and upload the .csv file saved at your local space.
3.4 Loyalty Points History
With Prestashop Loyalty points system, you can view the loyalty points history along with the customer details. From this panel, you can manually grant loyalty points to the customers.
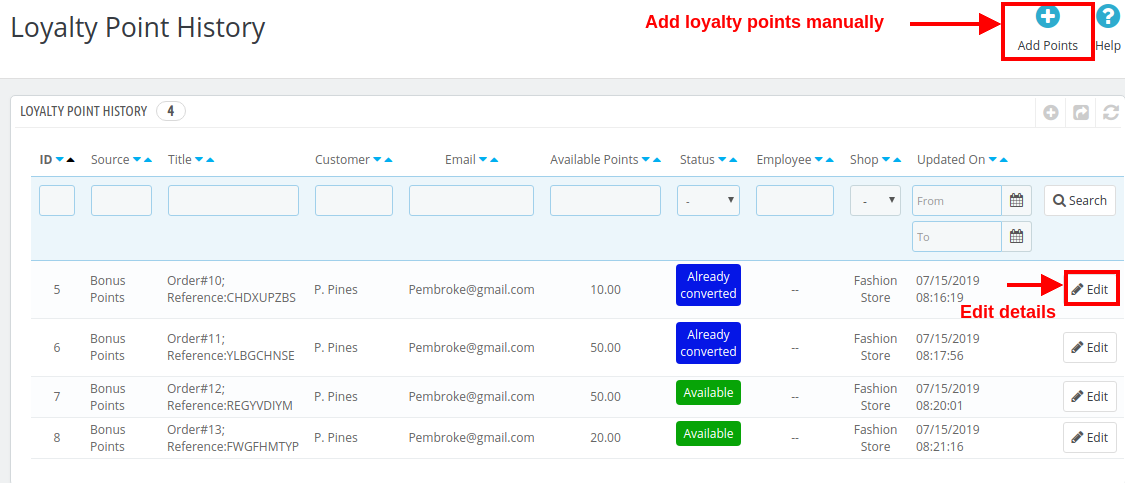
By clicking on Add Points button, you will be shown the below screen. (already discussed in 3.3 section)
On clicking the “Edit” button corresponding to any record, you will be shown the below screen.
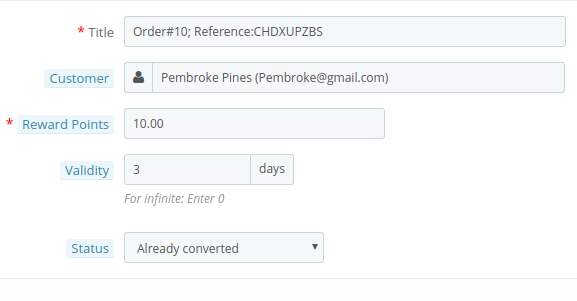
- Title: This option will allow you to modify the reference title or order title.
- Customer: This option allows you to change the customer name or email who are assigned these loyalty points.
- Reward Points: This option lets you set the loyalty points.
- Validity: With this option, you can change the validity period for the rewarded loyalty points.
- Status: This option lets you change the status of those loyalty points. The status of these points can be checked from the customer’s “Account Dashboard”.
3.5 Email Notifications
Prestashop purchase points addon gives you flexibility to modify/edit the email templates when loyalty points are credited to customer account, loyalty points are deducted and when loyalty points are redeemed into discount coupons.
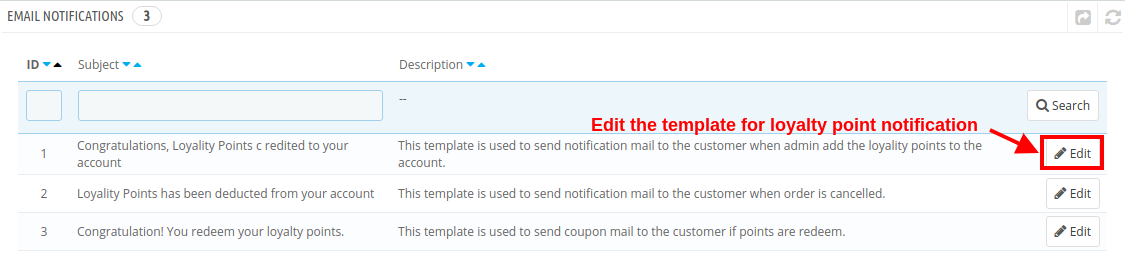
Click on the “Edit” button to configure the email template with the given options:
- Subject: This option allows you to set a subject for the email sent to the customer for credited points, deducted points or redeemed points.
- Email Content: This option allows you to set the content for the email sent to the customer for credited points, deducted points or redeemed points.

4.0 Front Interface of PrestaShop Loyalty Points System
As soon as the customer redeems the loyalty points, a discount voucher is generated and all Available Points are turned into Converted Points.
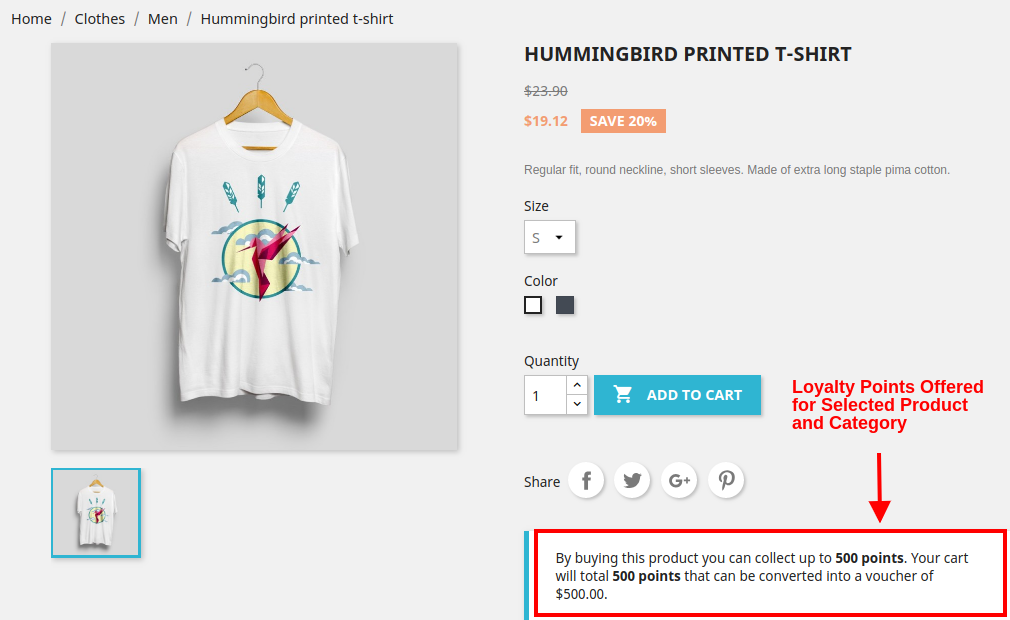
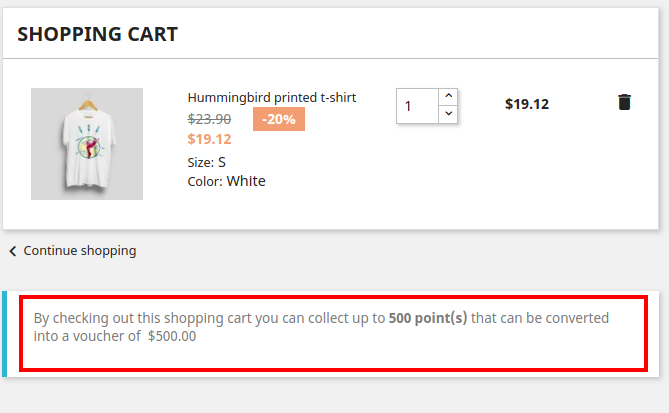
A) When Product Rule is set for specific product and categories, you will see the following screen.
1.6 Version:
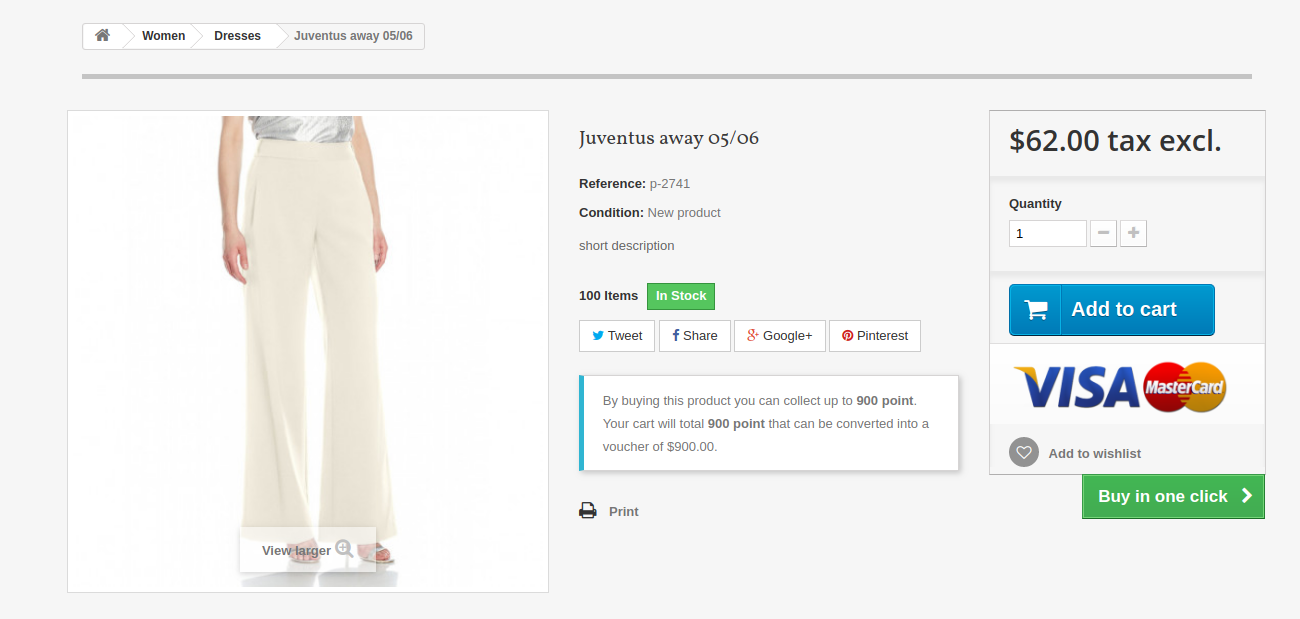
1.7 Version:
B) When Behavior rule is set. Like when customer sign-ups on the store or place their first order. The below screenshot shows how the customer gets loyalty points for signing up on the store.
1.6 Version:
1.7 Version:

C) When customer’s cart follows some criteria based on total amount, total items quantity, total weight, payment method or shipping method. The below screenshot shows how the customer gets loyalty points for placing an order as per defined cart rule.
1.6 Version:
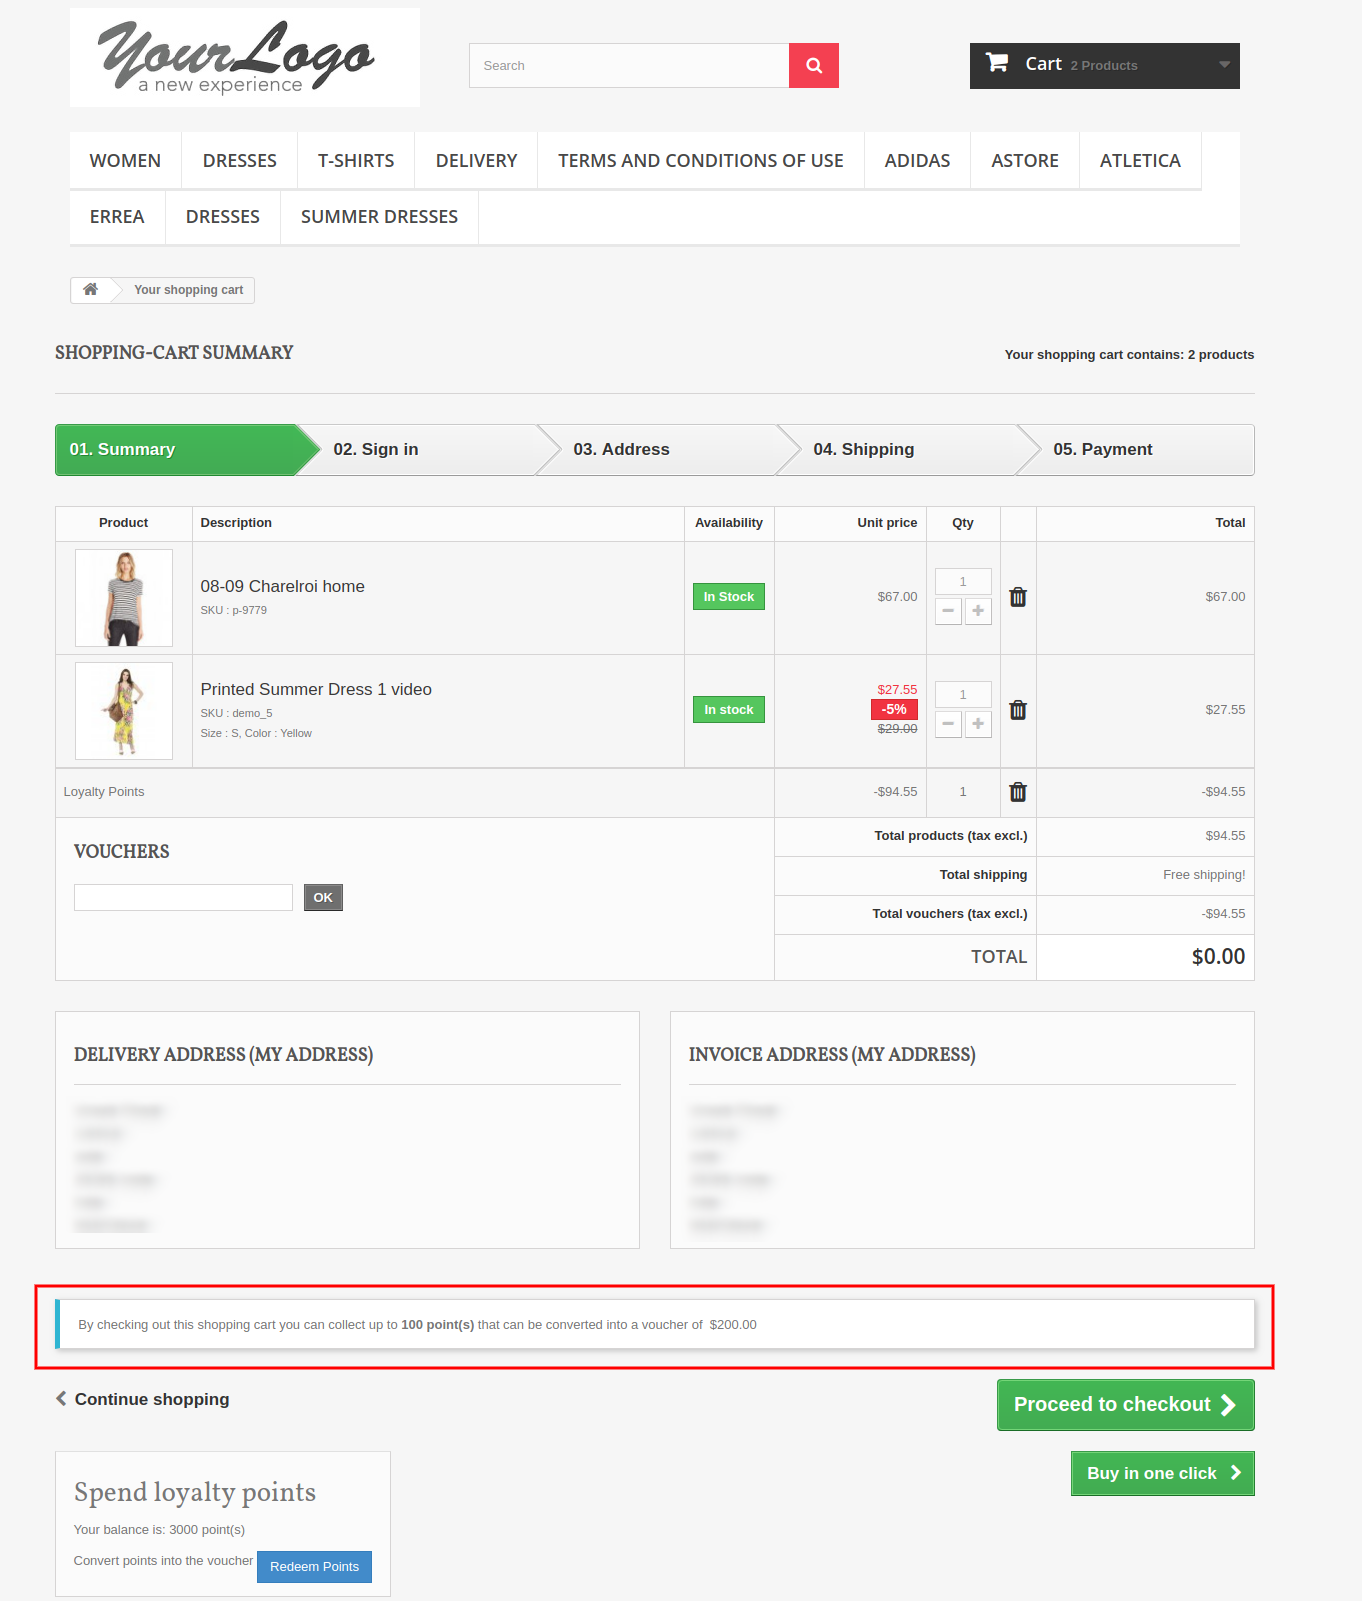
1.7 Version:

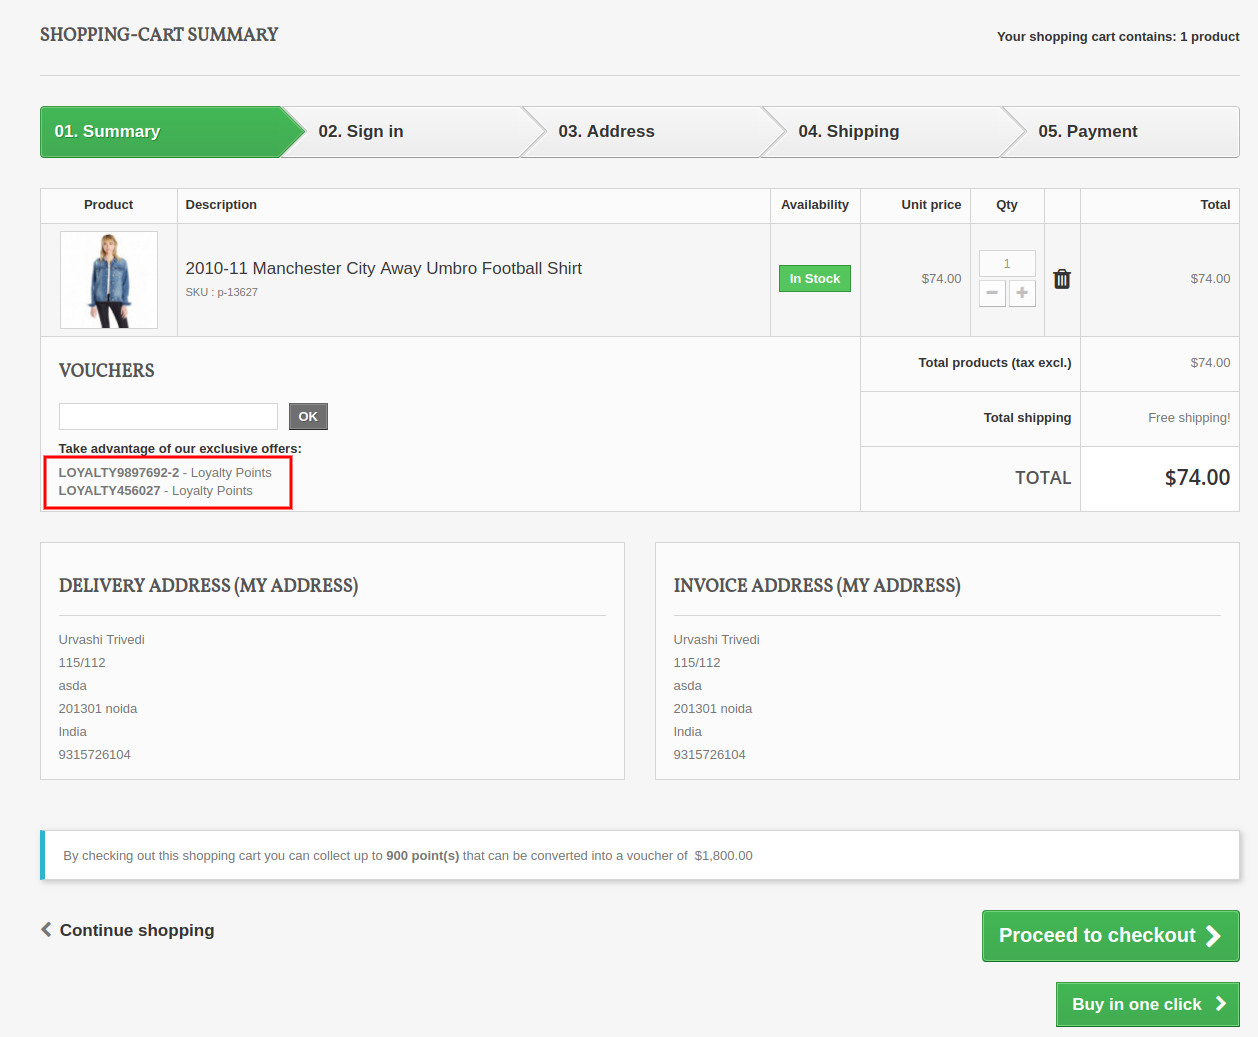
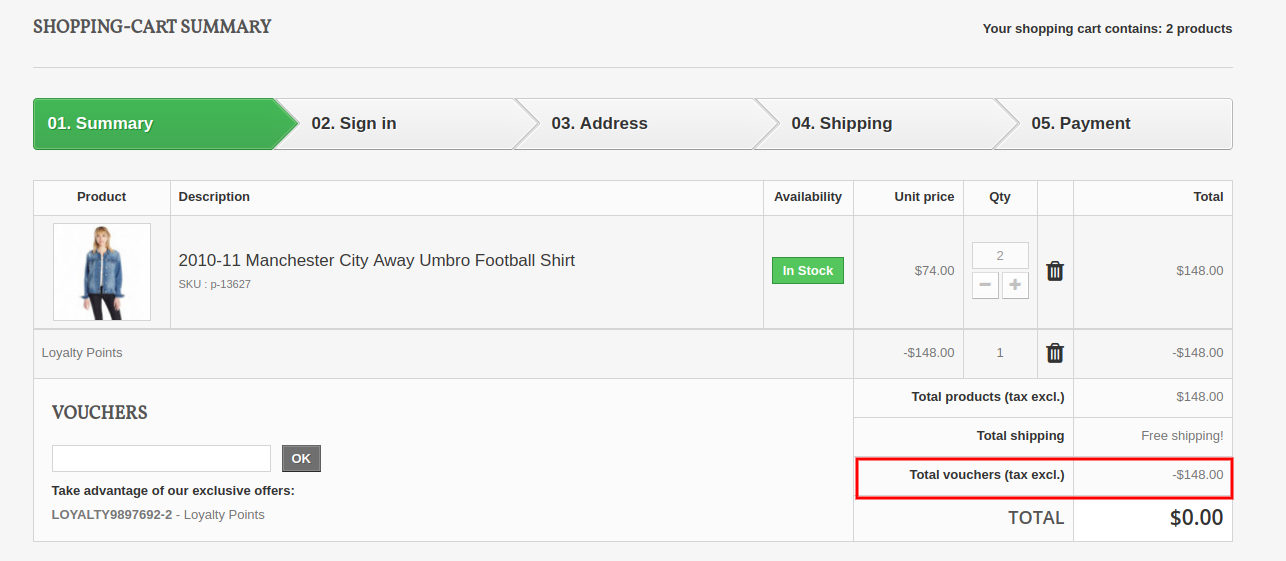
D) Customer can convert their available points into a discount amount. The loyalty points are redeemed into a discount voucher which can be applied for next purchase.
1.6 Version:
Customers can use the loyalty points and generate the vouchers.
1.7 Version:

On clicking the Redeem Points button, you will see the following popup box on the screen.
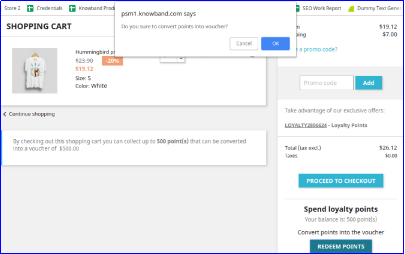
As the customer clicks on OK button their available loyalty points are converted into a discount coupon code as shown below.
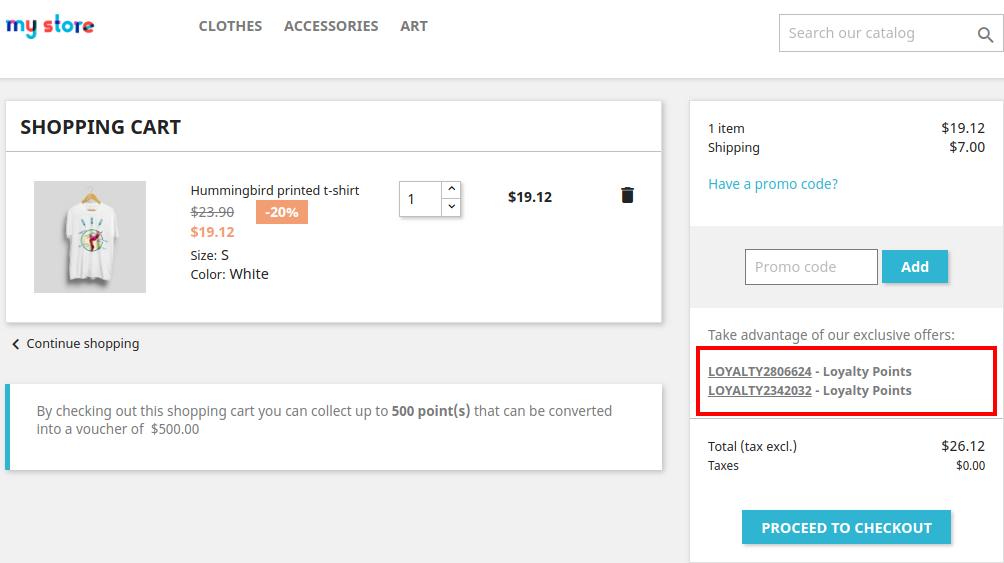
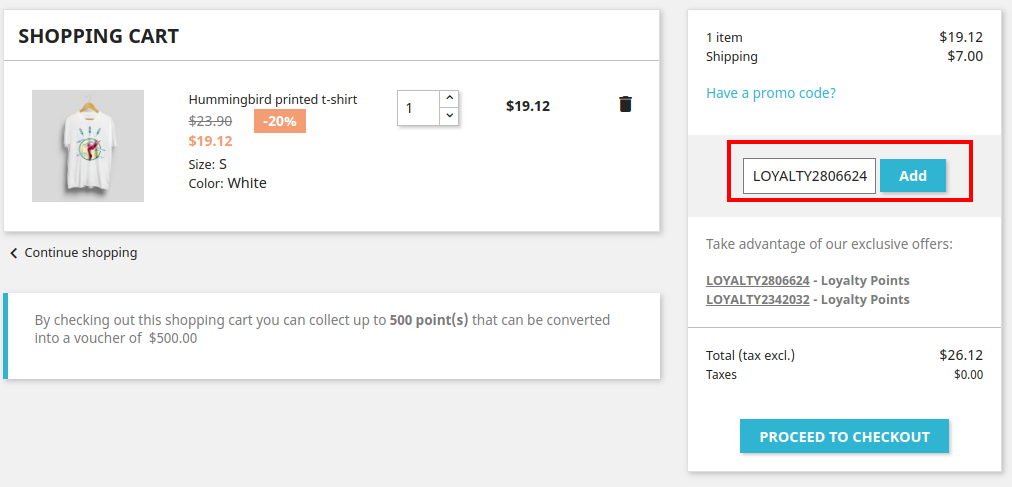
By clicking the desired discount code, it automatically gets copied into the Promo Code box as shown.
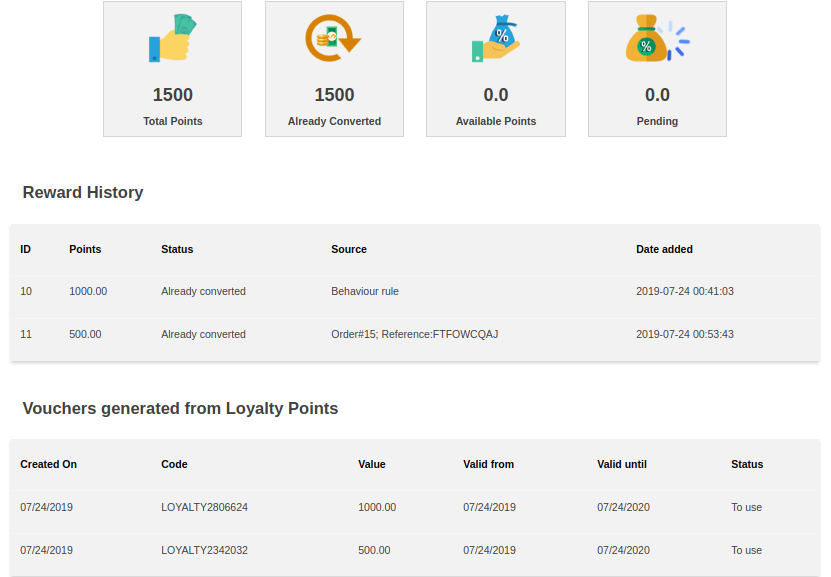
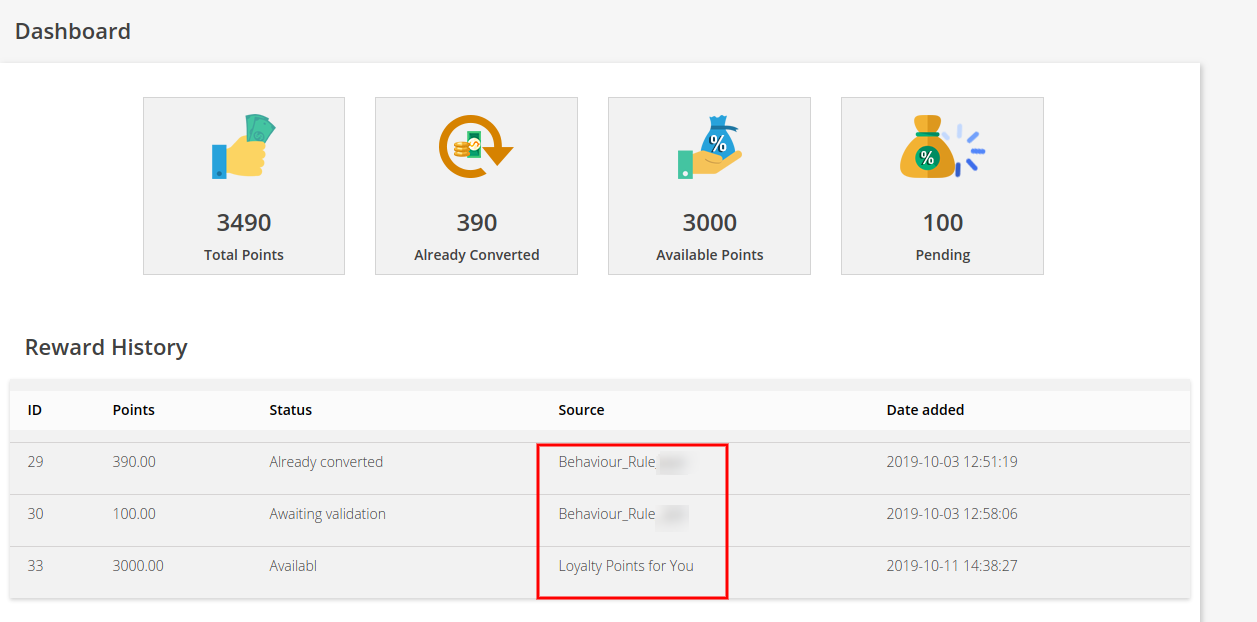
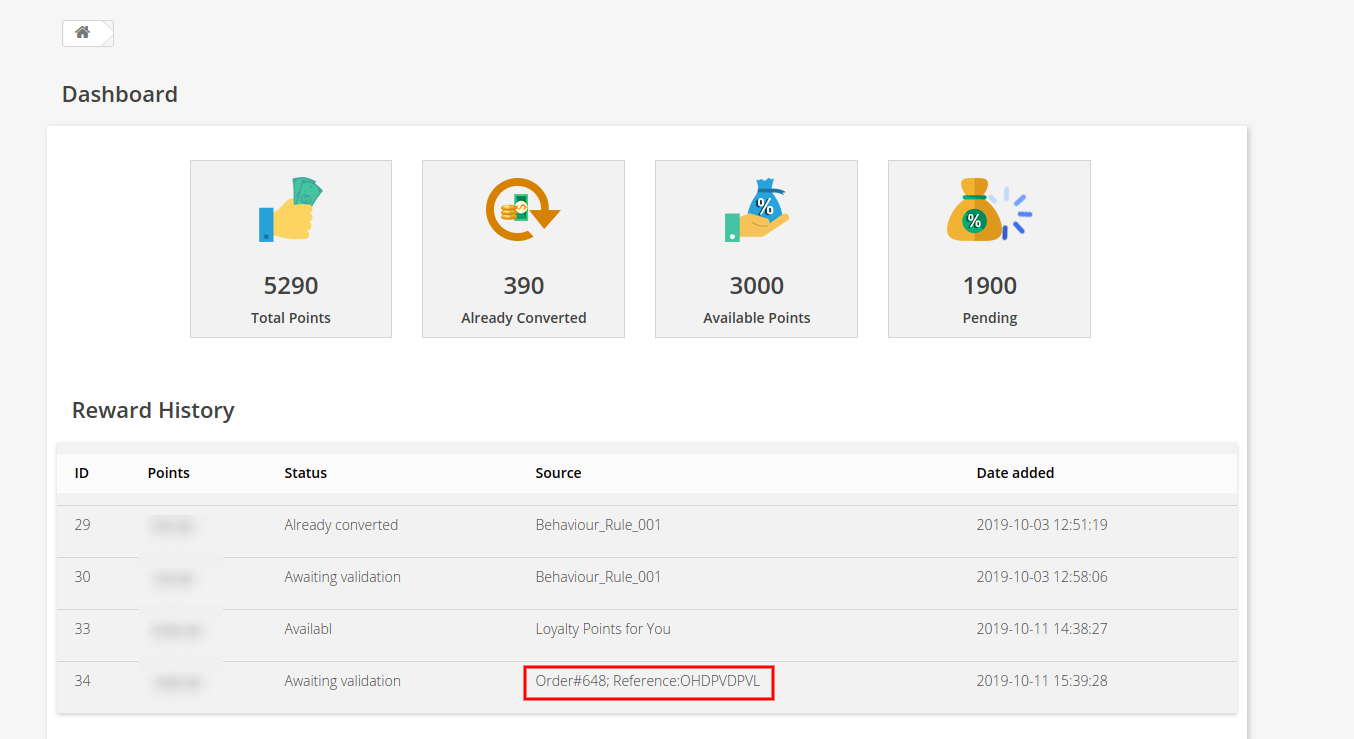
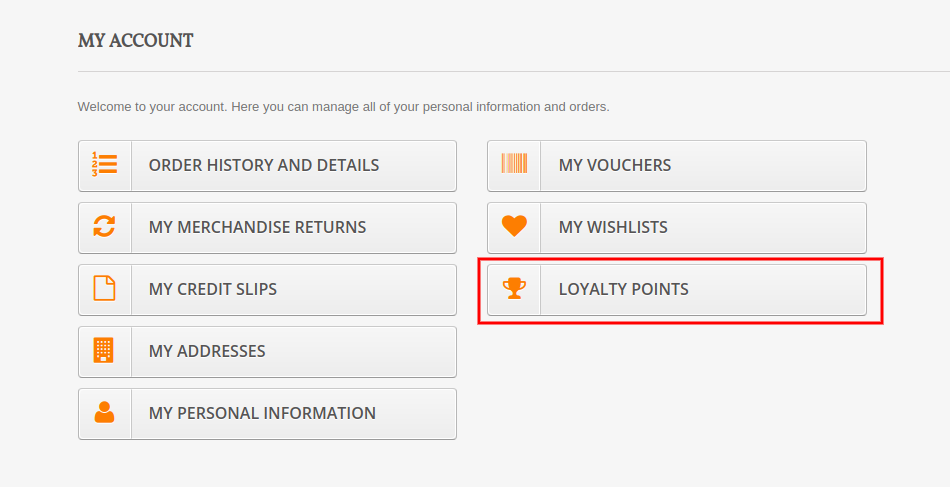
E) Customer can check the complete status of their loyalty points from their Dashboard.
1.6 Version:
1.7 Version:
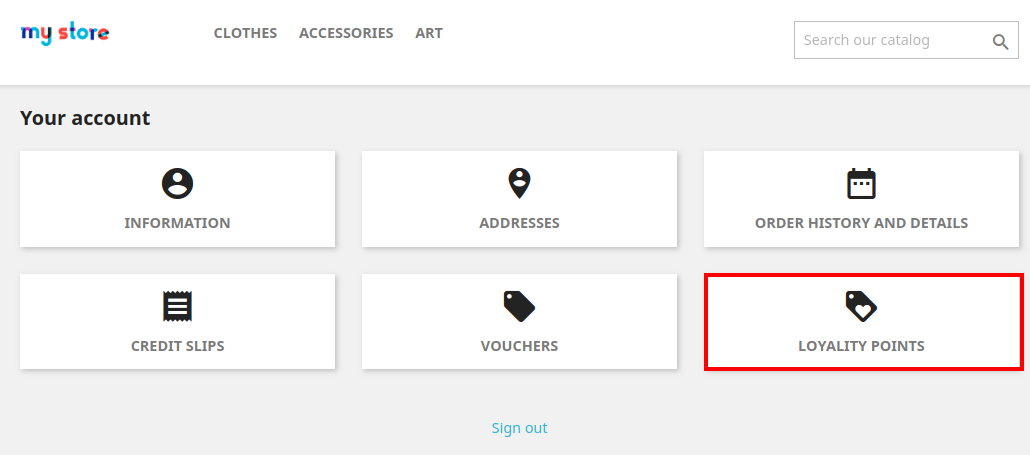
On clicking the Loyalty Points option, customer will jump to the below screen. Here they can check the complete status of their loyalty points, their reward history, discount vouchers generated from points etc.
Version 1.6:
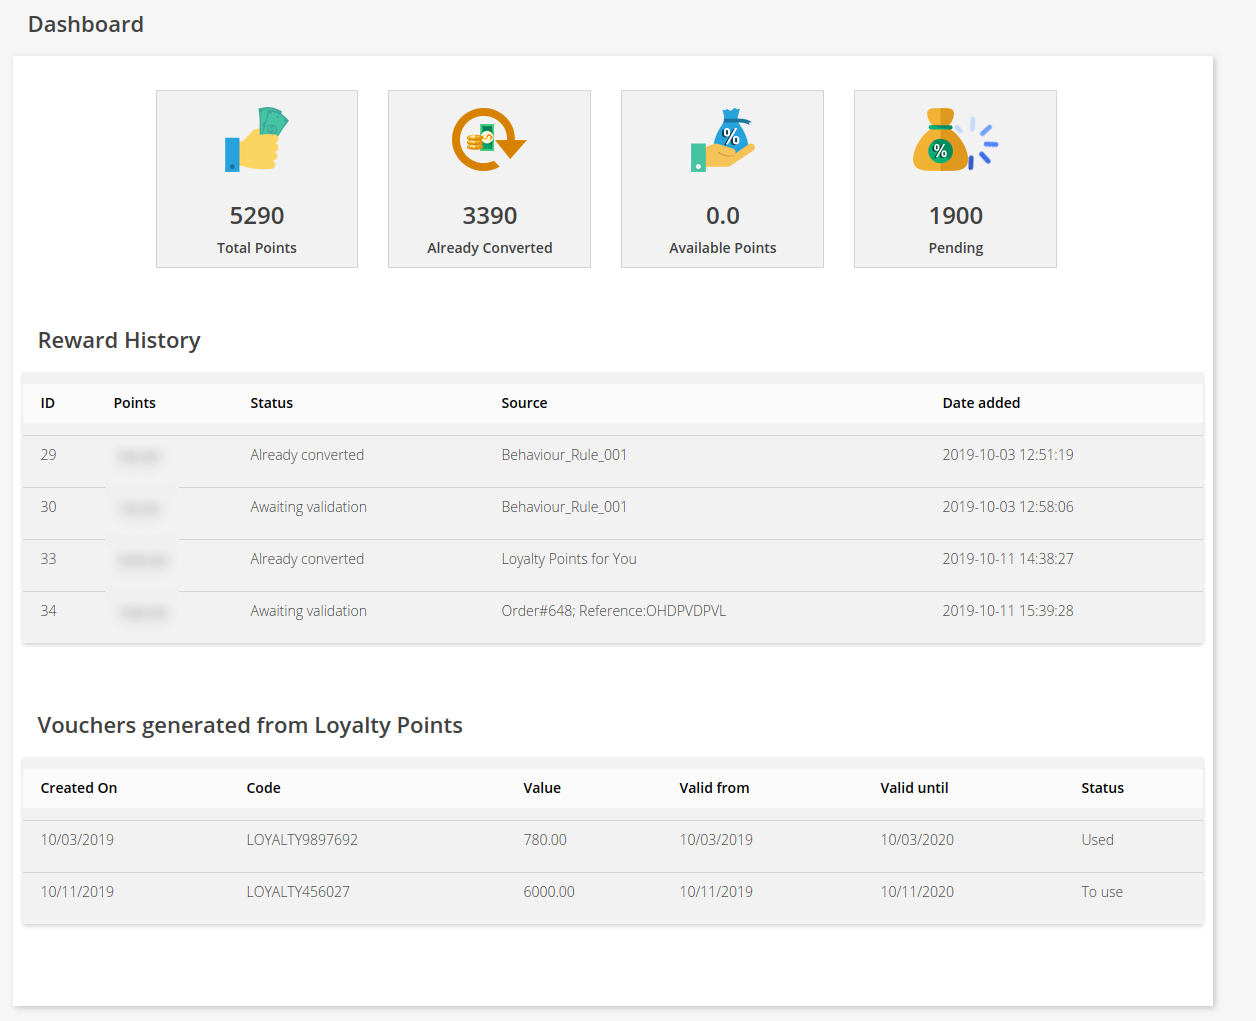
Version 1.7: