OpenCart Make An Offer – User Manual

Admin Panel of OpenCart Make An Offer Extension

The admin panel has 6 tabs for configuring this plug-in, as listed below:

  • General Settings
  • Products Settings
  • Email Settings
  • Pending Requests
  • Processed Requests
  • Statistics

General Settings

General Settings tab has following options:
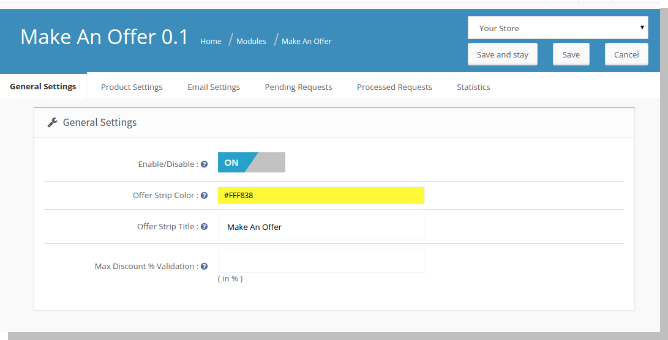
Picture1

Enable/Disable (On/Off switch) :

This is the main switch to enable/disable the entire Module.

Offer Strip Colour :

You can change the colour of the strip that appears on the front end by clicking on this field and choosing the desired colour to suit your theme.

Offer Strip Title :

You can change the text on the strip that appears on the front end.

Maximum discount % validation :

The discount % you enter here decides the validating amount a customer can enter on front end and make request for a negotiable amount. This option minimizes the admins effort to review requests with absurdly low prices for each product.

Product Settings

This tab has following options:

All Products:

Admin can add the products that shall come under this scheme. Admin can either select all product to come under this scheme or only selected products.
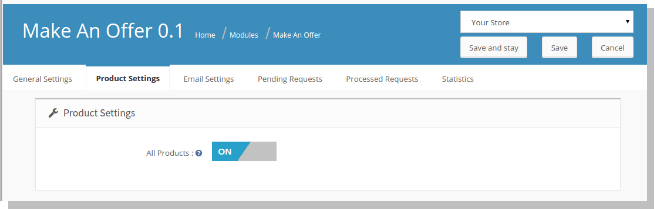
Disabling this switch adds a row below this option where you can add the products that shall come under this scheme.

Add Products:

If admin chooses to enable on only selected products, following fields will show up on page.
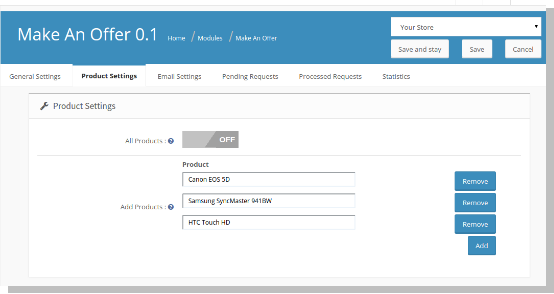
  • Name : This will be an auto-suggest box
  • Add: Button to add more similar rows for more products.
  • Remove: Button to remove row.

Email Settings

This tab will help admin create mail bodies for different actions he/she might take for each request.

Rejecting Offer :

If all the products within a customer request are rejected, an email informing the same will be sent in response to the customers automatically, provided mail settings in admin have been configured properly. The subject and Email body for this email can be configured here.

Common Response :

If one or more product offers are accepted or negotiated, this email will be sent to the customers automatically which can be configured.

Pending Requests

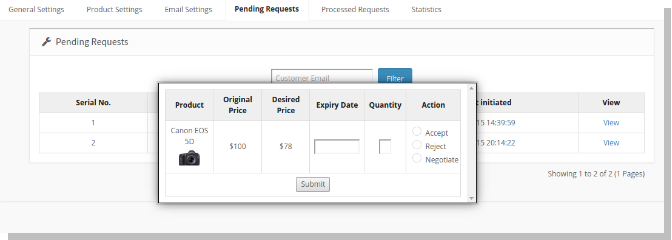
This is the place where admin can view all requests that have been made by each customer. Also he/she can take actions as to whether accept/reject an offer, or to negotiate price with customer.

Admin can filter these requests based on the customers email ID.

After, you have decided to take actions on each product offer, you can submit the response. As soon as you submit the response, an email will be sent informing the status of all the product requests made.
Processed Requests

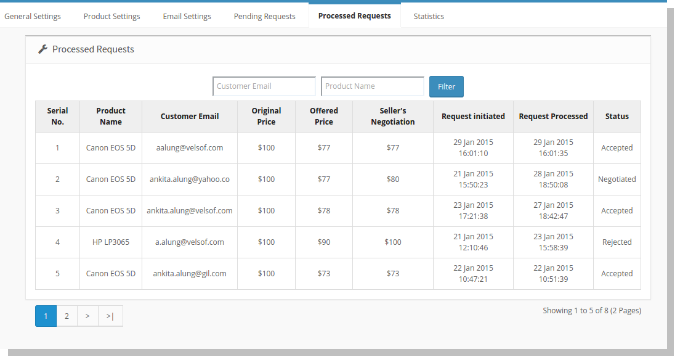
This is the place where admin can view all requests that he/she has taken action on. Admin can view all these requests with filter options for customer email and product name.
Statistics

This is the place where admin can view the counts of requests made by each customer and corresponding responses to their requests made by the admin. There is also option to filter these statistics based on customer email. Here admin can also view the total sum of all the requests sent and responses taken by the admin as highlighted on the top.

Front End

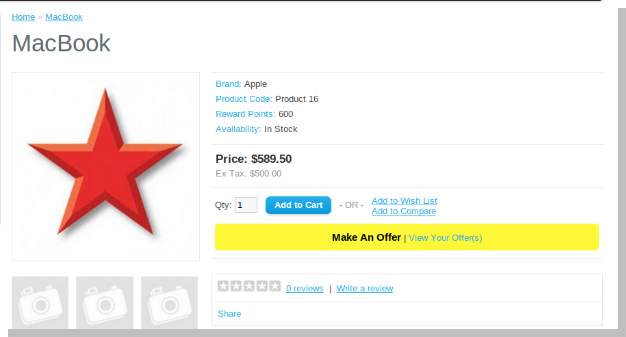
On the front end, the product layout will have a button to make an offer besides the add to cart button, if the product is added on admin panel to come under this scheme.
Clicking on make an offer opens up a pop up asking for an offer price you want to make. Once after entering that price and email ID, you may submit the request.
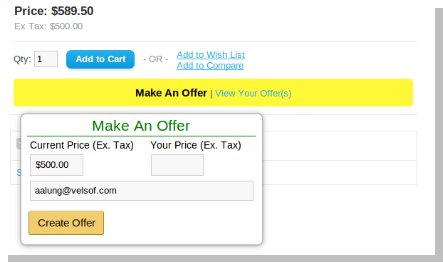
After submitting request, you can view page which shows all the products for which you have made offer. The link for the page is provided next to the option where one can create offers.
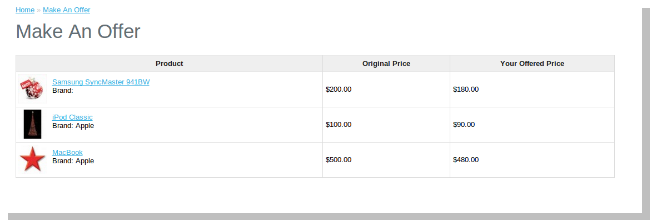
After submitting the request for all products, you will have to wait for response from admin via email on your submitted email ID.
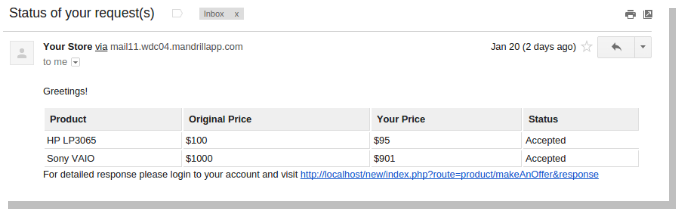
After the customer receives the response via email, clicking on the link provided in email will land user to the page where all requested products can be seen with status.

You can avail the discounted prices by visiting the product page via link with each product. On the product layout page, you can add a product to cart just the same way as before, that is, by clicking on add to cart button after selecting desired options.
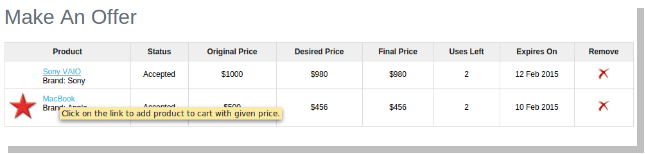
This page gives the detailed response to all your requests which can be used by you to avail discounted price.

After you use up this offered price, respective quantity of uses left will be subtracted. You can purchase product at the offered price until uses are exhausted or offer surpasses the expiry date.

We hope that we have covered all the concerns regarding the installation and product guide of this OpenCart Extension. If you are new to OpenCart you should check the Merits and Demerits of OpenCart.
OpenCart One Page Checkout Pro – User Manual

How to install OpenCart One Page Checkout Pro plugin on your server

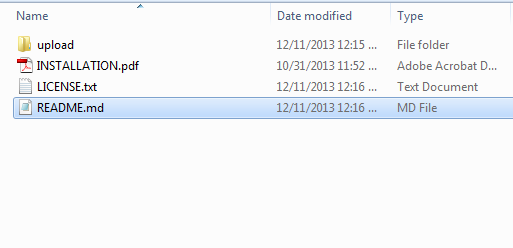
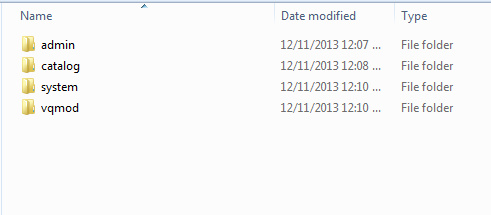
1. Download the zip from OpenCart & unzip into a folder. After unzip folder structure of Supercheckout Pro plugin will be similar as shown in below screen

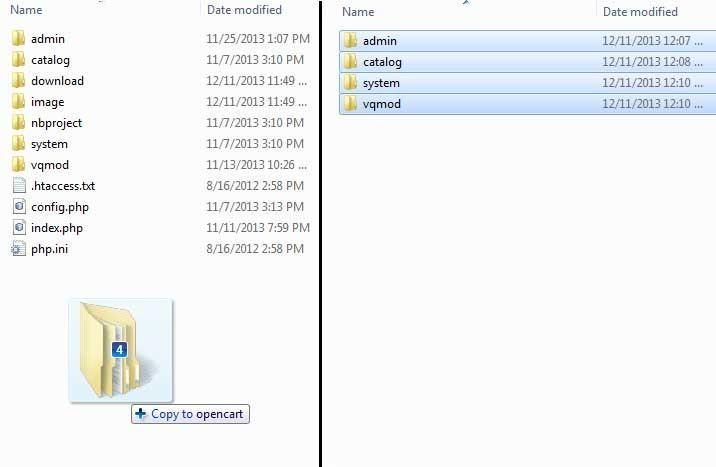
2. Open the upload directory & you will see following folder structure.

3. Login via FTP & Drag drop all the folders into your server root directory. You dont have the change the default theme folder name to your theme folder name.

You must have VQMOD installed for this plug-in to work. If VQMOD is not installed please download and install fromthe URL below:
https://code.google.com/p/vqmod/

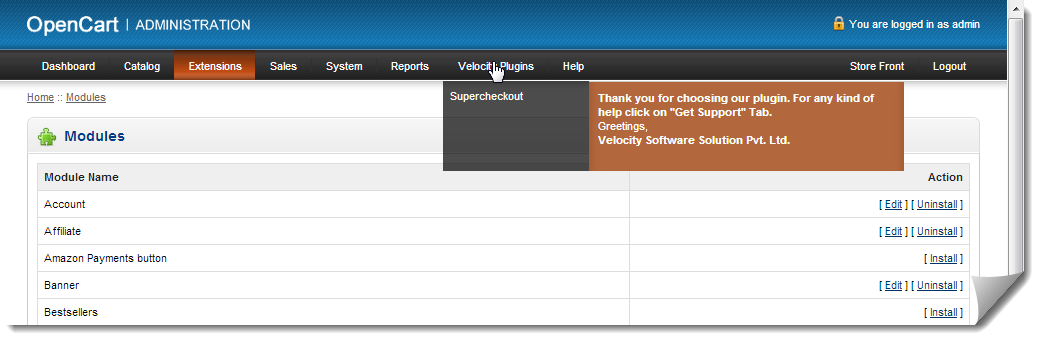
4. You will find the plugin ready to be installed in the Modules of your opencart.


5. Click on Install link to install the plugin. This will also add a dropdown option in your menu bar which will list all plugins by Velocity installed on your store for fast navigation. This dropdown also has a message box, using which we can inform you about new launched plugin or new update.

6. Delete the Vqcache files from the vqmod/vqcache folder.

7. To access Super Checkout plugin, Click on edit button which is just to the right of Supercheckout Pro module as shown below.

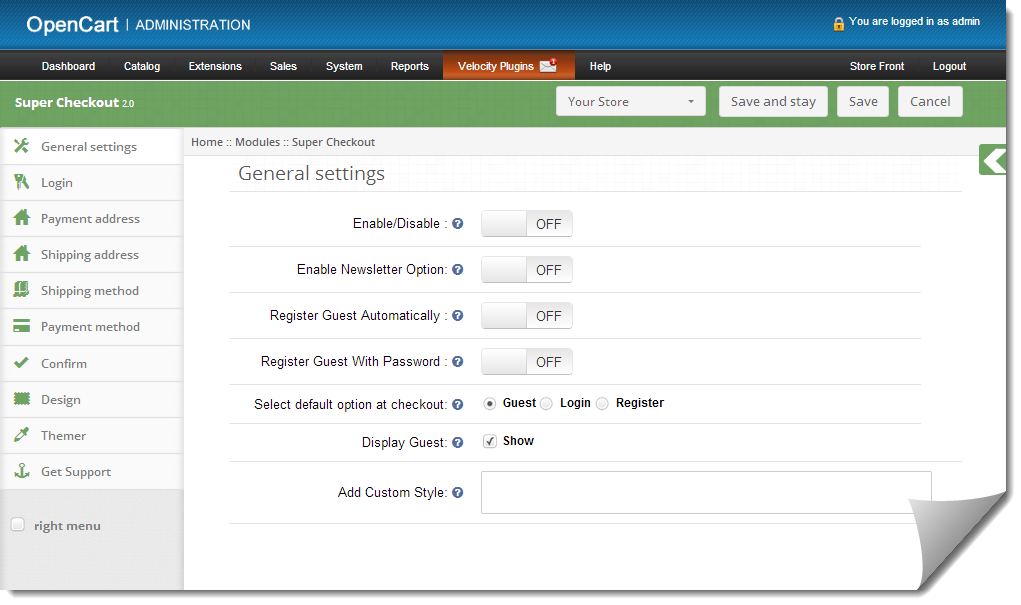
8. On clicking edit button the module for plugin will open. It contains navigational bar at the top, menu at the left and main content in the center as shown below.

1. General Settings tab

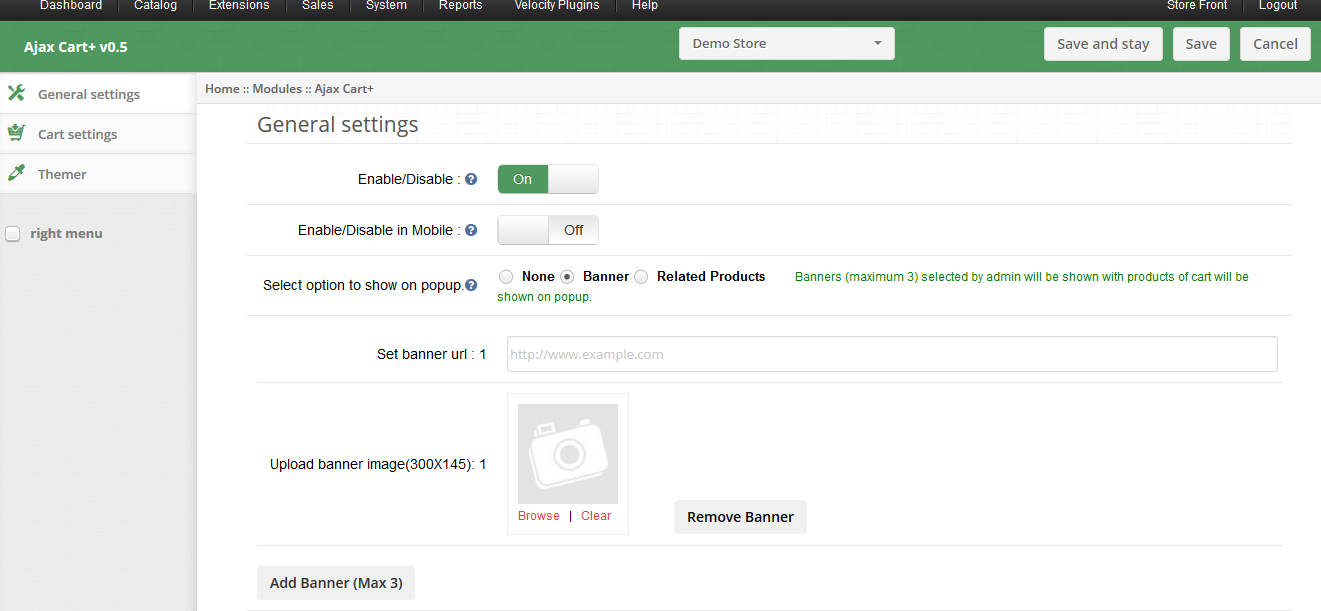
1. To enable/disable plug-in, Switch the enable button OFF to ON / ON to OFF this is just to the right of Enable/Disable label. Refresh home page of your store every time you change enable/disable setting.

2. To change the default view from None to Banner or Related Product or vice-versa in pop-up dialog select an option from given radio button.

3. When you select banner radio button, a button Add Banner (Max 3) will appear on screen.

4. Click Add Banner button to add a banner, on clicking this button you will be asked to enter banner URL and select banner image.


5. Write the complete URL of your web page where you wish to redirect user on clicking the banner.

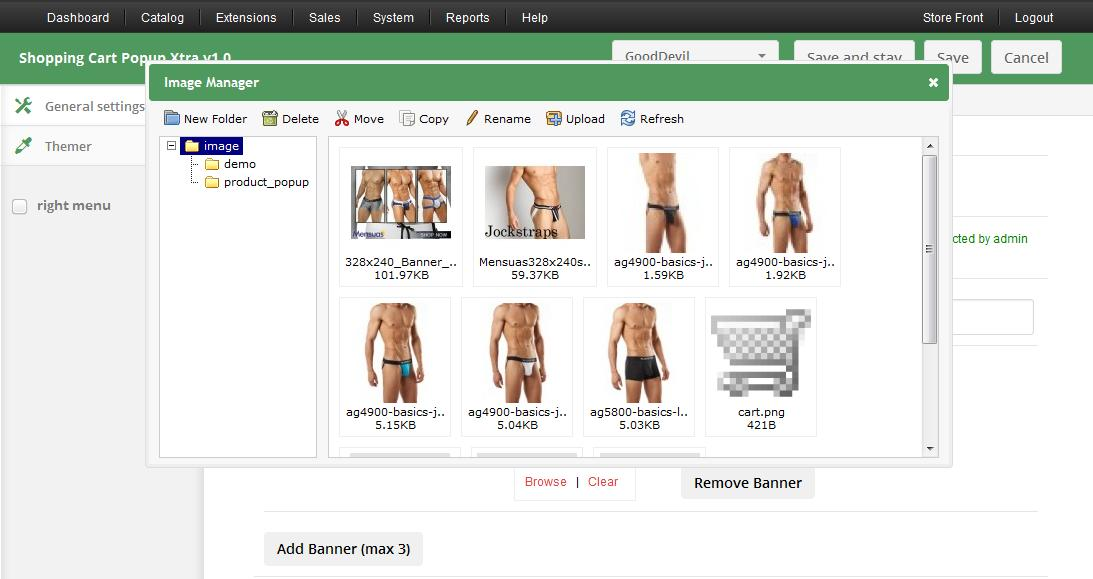
6. Select an image for banner to be shown on pop-up dialog from Image Manager as shown below. Click Browse to open Image Manager.

7. You can remove a banner by clicking Remove Banner button.

2. Login Tab

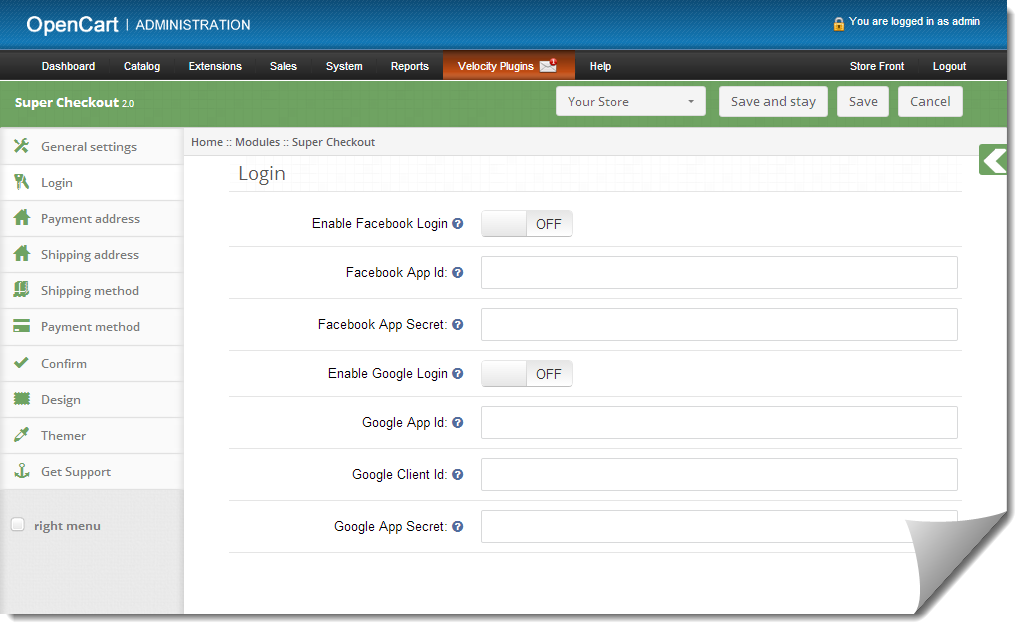
  1. This tab basically contains setting to enable /disable Facebook and Google registration & login as shown below.
  2. To enable Facebook Registration & Login switch the button from OFF to ON which is just to the right of Enable Facebook Login label. But before you do that do get Facebook APP ID and APP SECRET from www.developers.facebook.com.
  3. Enter the APP ID and APP SECRET in their respective fields and save. You will find Facebook login button on your checkout page.
  4. To enable Google Registration & Login switch the button from OFF to ON which is just to the right of Enable Google Login label. But before you do that do get Google APP ID, CLIENT ID and APP SECRET from https://code.google.com/apis/console. For detailed instructions to get the APP ID, download the Facebook & Google Setup guide from OpenCart account.
  5. Enter the APP ID, CLIENT ID and APP SECRET in their respective fields and save. You will find Google login button on your checkout page.

3. Payment Address Tab

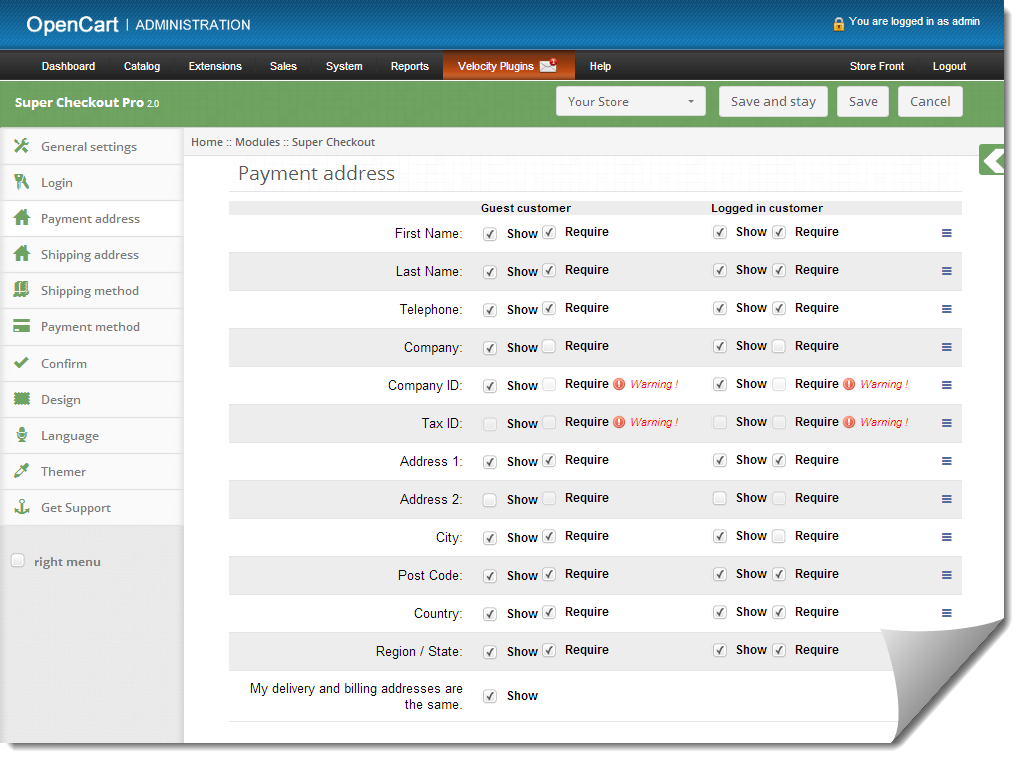
  1. This tab contains setting for the fields which is to be shown in Payment or Billing Address section in checkout page as shown below.
  2. It consists of two sections. The one in the left if for Guest Customers and the right one for registered customers.
  3. To make a field display/hide in the checkout page check the checkbox just to the left of Show label.
  4. To make a field as mandatory (required field) check the checkbox just to the left of Require Label.
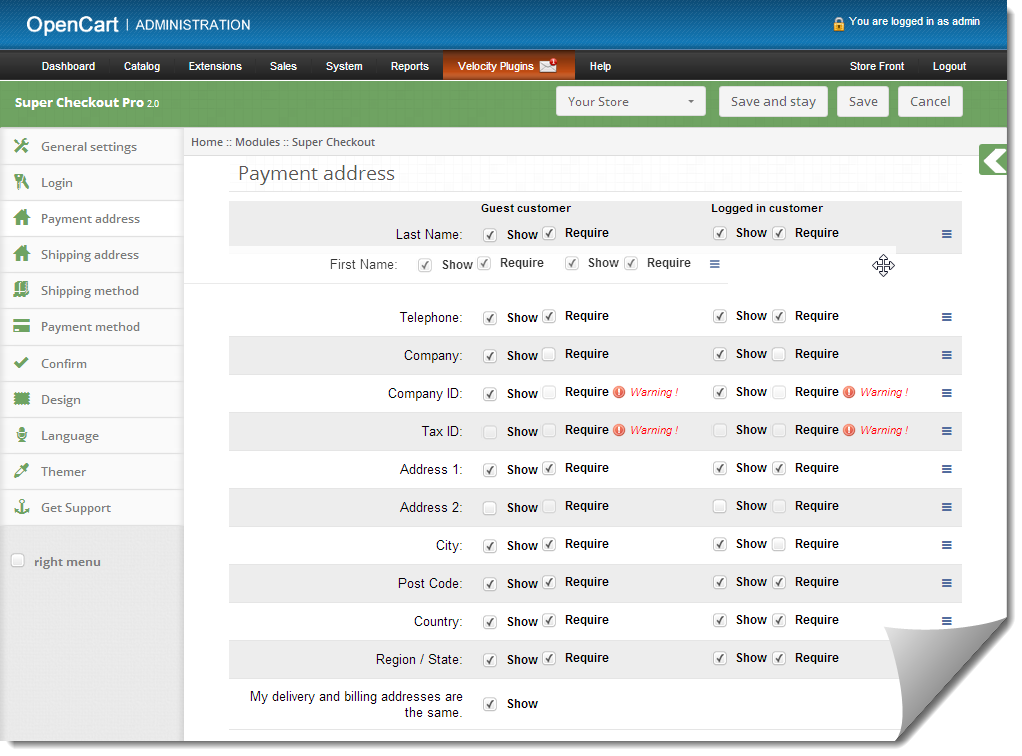
  5. The fields can also be rearranged according to the requirement. To rearrange just move the cursor to the drag icon and drag & drop the field wherever it is required as shown below.
  6. On saving, the fields will be rearranged as per the changes.

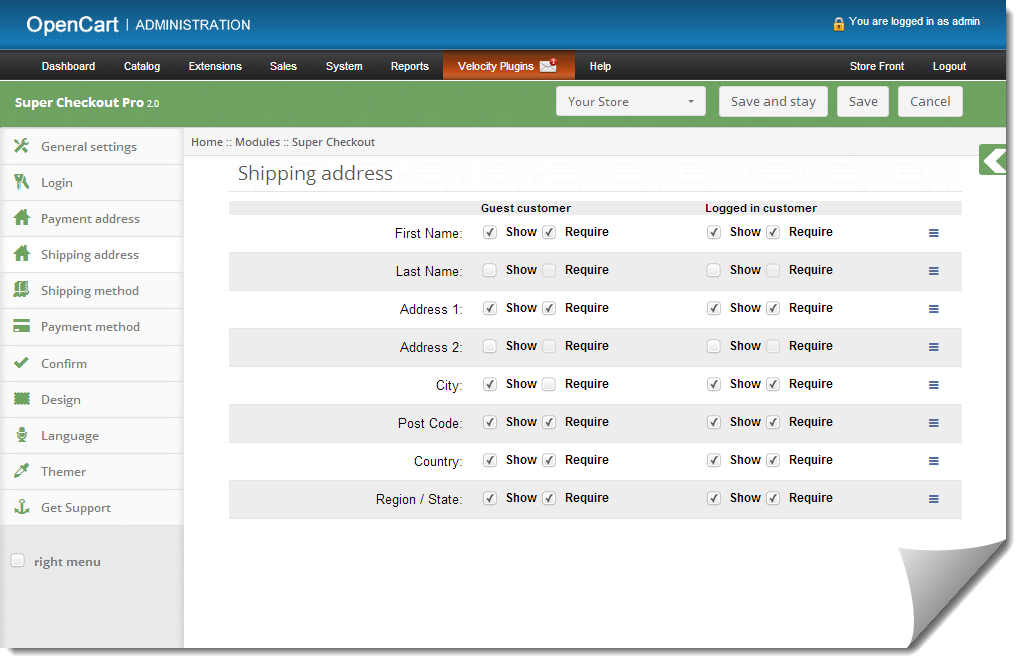
4. Shipping Address Tab

  1. This tab contains setting for the fields which is to be shown in Shipping Address section in checkout page as shown below.
  2. It consists of two sections. The one in the left if for Guest Customers and the right one for registered customers.
  3. To make a field display/hide in the checkout page check the checkbox just to the left of Show label.
  4. To make a field as mandatory (required field) check the checkbox just to the left of Require Label.
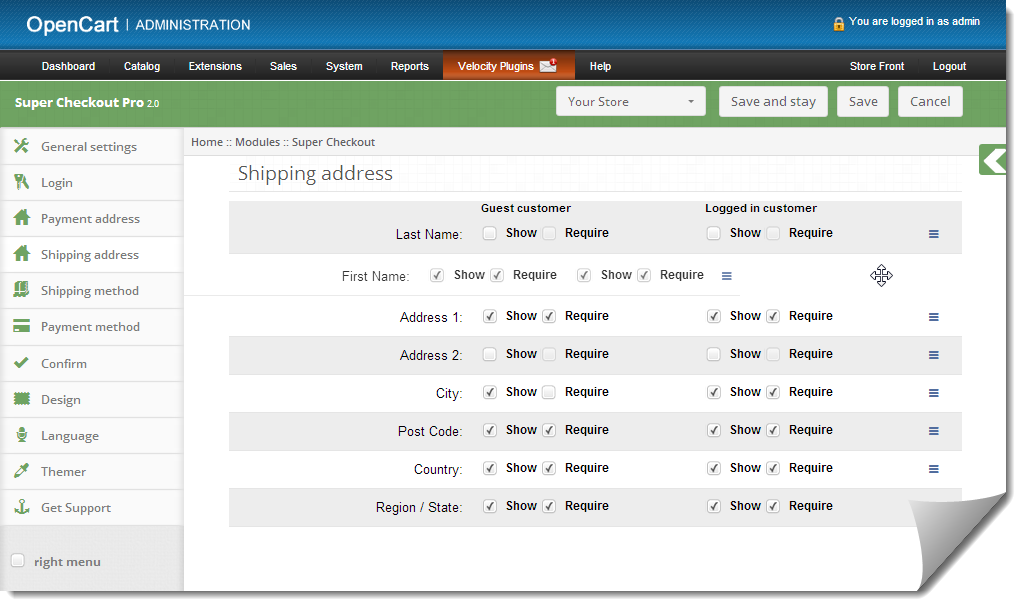
  5. The fields can also be rearranged according to the requirement. To rearrange just move the cursor to the drag icon and drag & drop the field wherever it is required as shown below.
  6. On saving, the fields will be rearranged as per the changes.

5. Shipping Method Tab

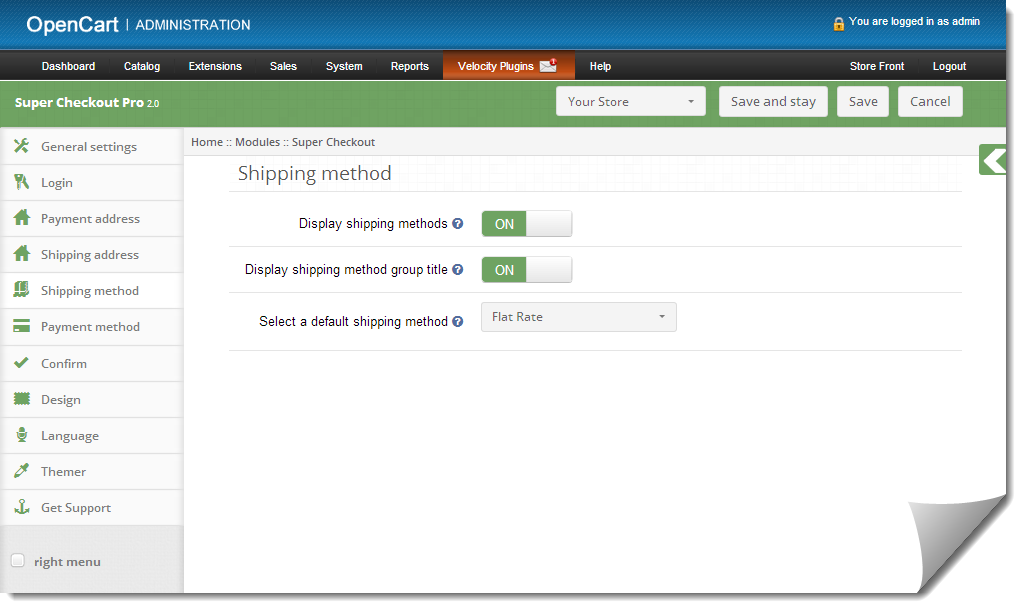
  1. This tab contains settings for shipping method which is shown in checkout page. It basically contains settings for enabling/disabling and setting the default shipping method as shown below:
  2. To Enable/Disable the shipping methods from the checkout page switch the button from ON to OFF or vice-versa. This will disable the shipping method block from checkout page. But you should select a default shipping method (if any installed) to apply shipping charges to the order.
  3. To Enable/Disable Shipping Method title switch the button from ON to OFF or vice-versa. This will cause the title to of shipping to enable or disable from checkout page.
  4. To get a default shipping method selected in the checkout page select the default shipping method from the dropdown. If the selected shipping method is not installed it will automatically select from installed shipping method.

6. Payment Method tab

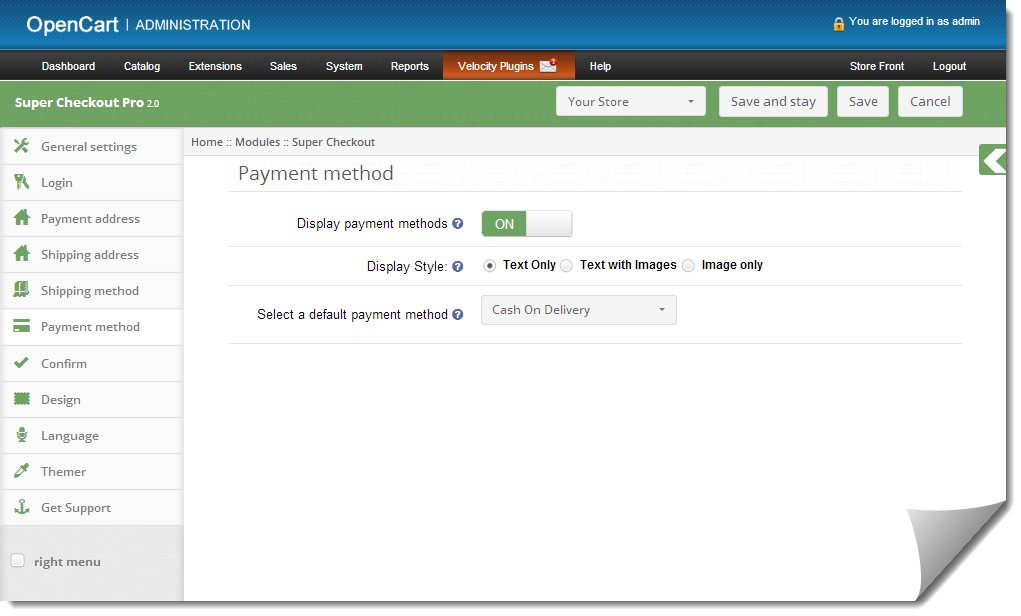
  1. This tab contains settings for payment methods shown in checkout page like enabling/disabling or selecting a default method.
  2. To Enable/Disable the payment methods on the checkout page switch the button from ON to OFF or vice-versa. This will disable the payment method block from checkout page. But you should select a default payment method (if any installed) to get a payment method in the checkout
    page.
  3. Supercheckout also enables you to display payment method name with or without their logo. You can also set it to display Payment method image only. Select desired radio button which is just right of Display style label.

7. Confirm Tab

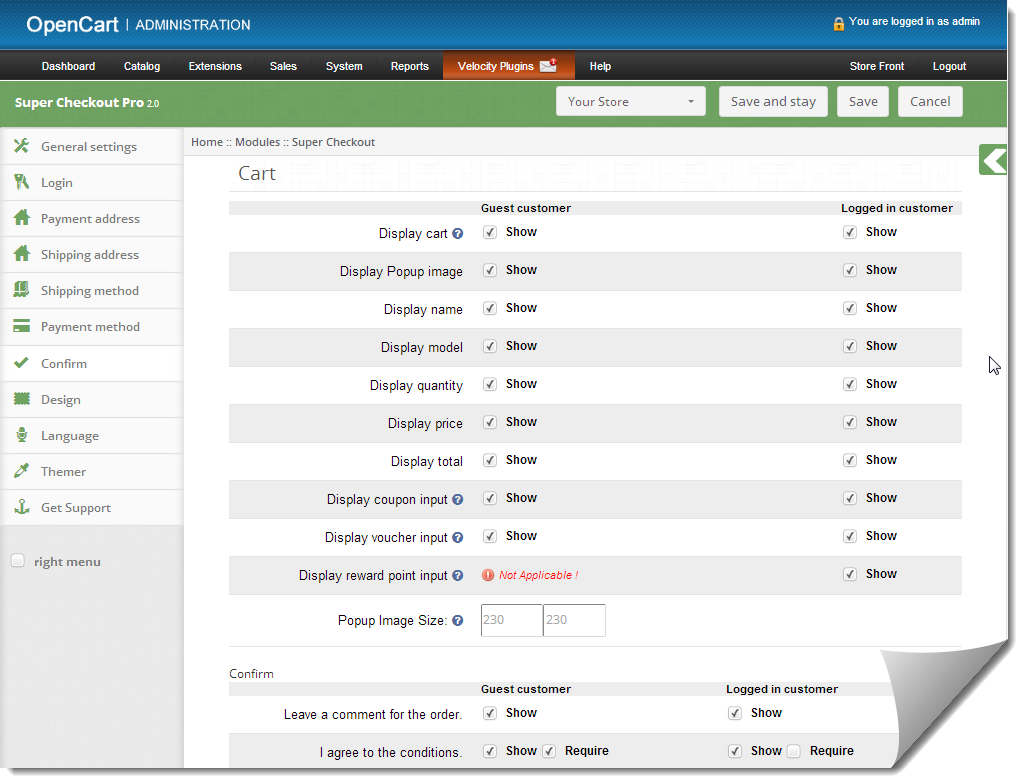
  1. This tab contains setting for the cart and confirming the order as shown below:
  2. Its divide in two section
    a. Cart
    b. Confirm

Cart:

  1. This tab is again divided into two sections, the left one is for Guest Customers and Right one for Registered or Logged in customers.
  2. To Display/Hide cart from the checkout page check uncheck the checkbox present in front of Display Cart label.
  3. To enable/ disable any column in the cart check/uncheck the checkbox in front of that respective column.
  4. To enable/disable the popup images for the product check/uncheck the checkbox in front of that respective column.
  5. To change the size of popup for images Enter the width and height of the popup in textbox in front of Pop Image Size label.
  6. Coupon , Reward Points and Voucher options can also be disabled or enable by checking/unchecking the checkbox in front of that respective field. Kindly note that rewards point text box will only be visible on Supercheckout page once following three conditions are fulfilled.
    a.) Customer must be logged in.
    b.) He must have at-least 1 reward point in his account.
    c.) He must have a product in the cart which can be purchased with reward points.

Confirm:

  1. This tab is again divided into two sections, the left one is for Guest Customers and Right one for Registered or Logged in customers.
  2. To enable the comment box for the order by customer check the checkbox in front of that Leave a comment for the order label & to disable uncheck the same checkbox.
  3. To enable agree to the term or any other information saved in the admin for the store check/uncheck the checkbox in front of I agree to the conditions label.

8.  Design Tab

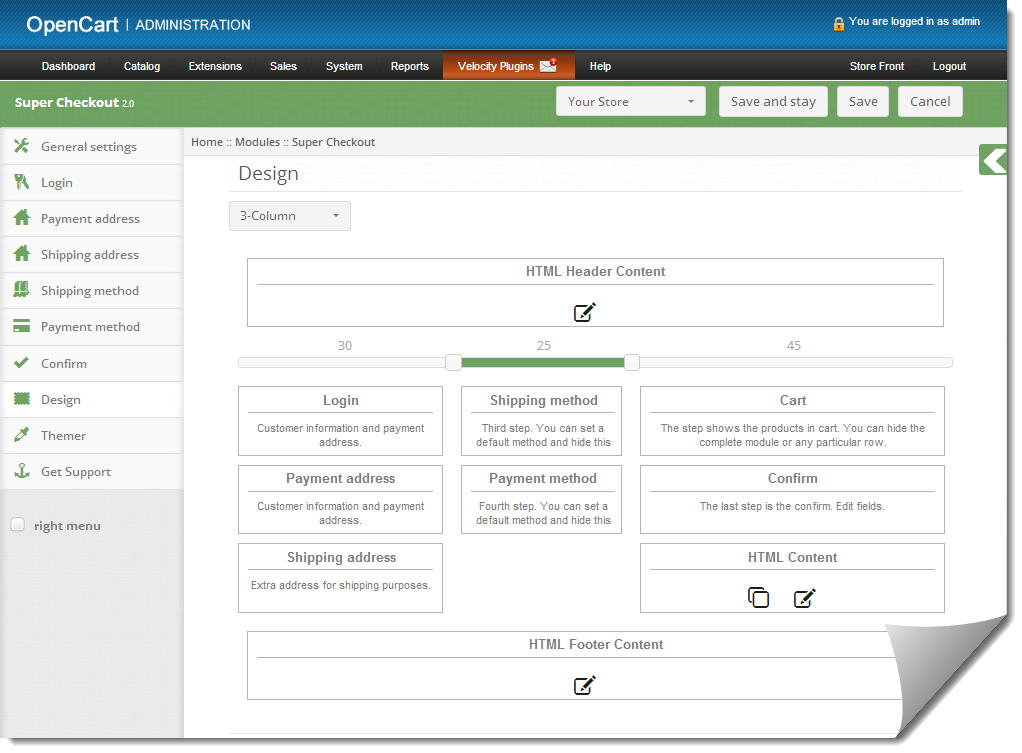
  1. This tab contains the settings for the design of checkout page in the catalog as shown below:
  2. To change the width of any column adjust the slider present at the top as shown below
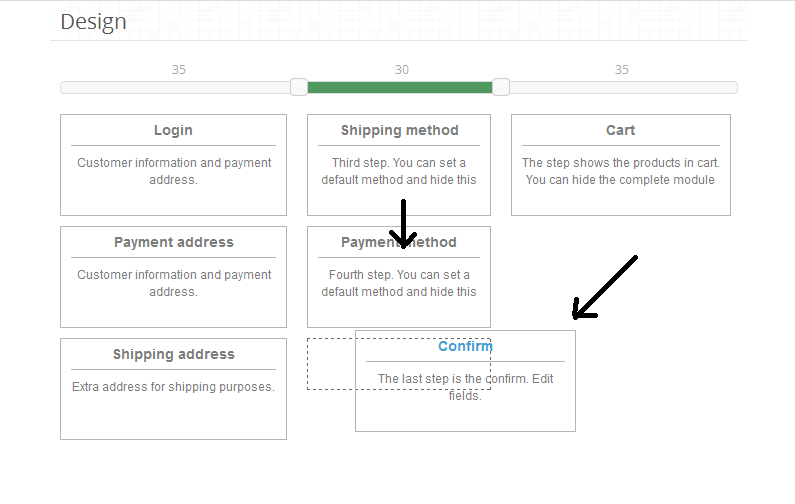
  3. Block of different steps can also be rearranged from one column to the other or in the same column as shown below:
  4. On saving, the block will be rearranged in the checkout page as per the changes

9. Language tab

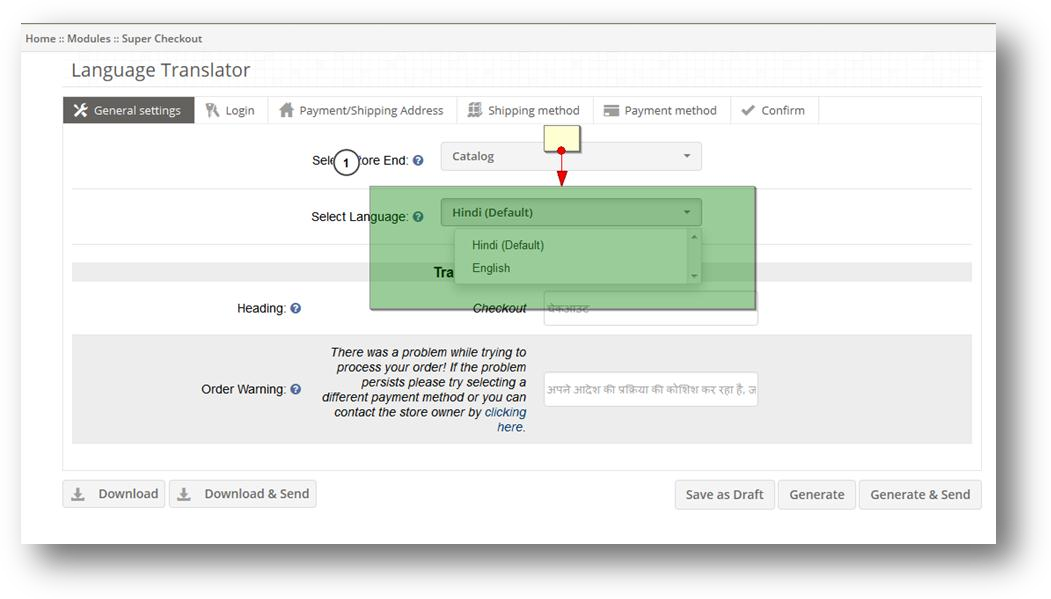
Using language tab, you can generate language translation of the supcheckout language file.

1. First you need to add a language in your OpenCart store. To add the new language to go System -> Localization -> Language & add now language.

2. Added language will be displayed in supercheckout module as displayed below.

3. Choose the language in which you need to translate & choose the website i.e. Front End/Admin End which you need to translate.

4. Based on the selection, Various fields in Various tabs will be populated like in General Settings,Login, Payment/Shipping Address Setting etc.

5. By default it will display the English translation. Add translation of various texts.

6. After adding translation of text, you can perform following action using the buttons below.

a. Download: Download button will download the translated language file. You need to upload the file into your supercheckout language directory.

1.1: If case of front end, you need to upload the language file in catalog/language/[[YOUR_LANG]] /supercheckoutPro folder

2.1: In case of admin, you need to upload the downloaded language file in
admin/language//[[YOUR_LANG]] /module folder

b. Download & Share: Download & Share button will download the language file & a copy
of the language file will be shared with Velocity.

c. Save as Draft: Save as Draft button will save the translation for future use.

d. Generate: Generate button will try to upload the language file in desired directory if server permissions allow saving of the files.

e. Generate & Send: Generate button will try to upload the language file in desired directory if server permissions allow saving of the files & a copy of the files will be shared with Velocity

10. Themer tab

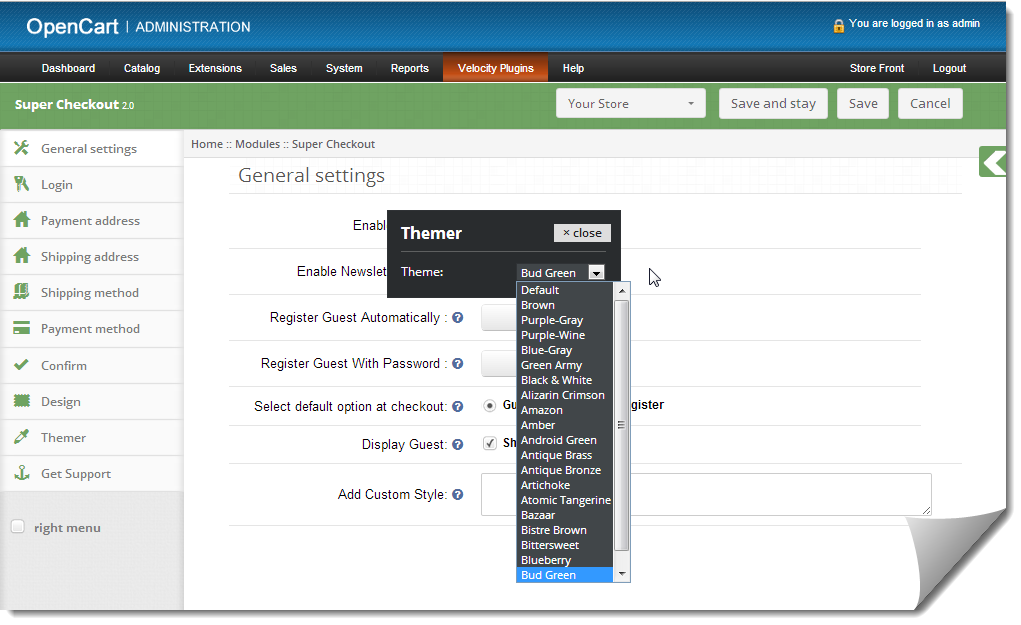
By clicking on themer tab, you will have an option to change the theme of Supercheckout admin panel.

11. Get Support tab

By clicking on Get Support tab, you will be redirected to our support website, where you can contact our support for help. Use this tab in case you have any query/issue or found some bug.

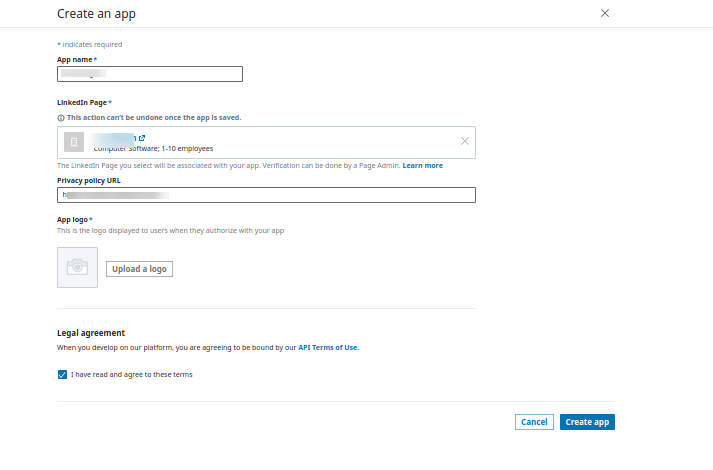
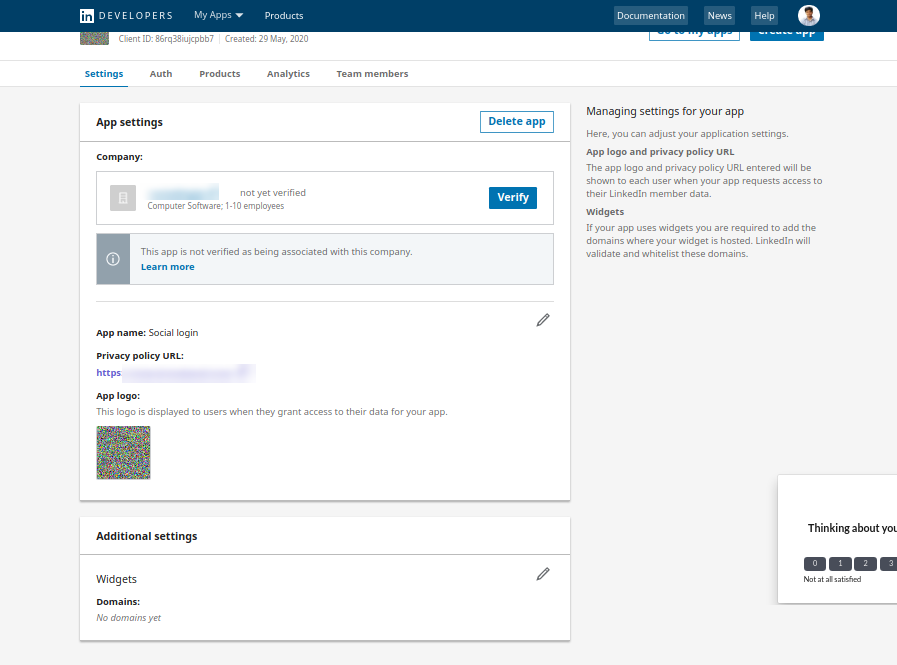
How to get Facebook API details?

Steps:

    • Go to https://developers.facebook.com/
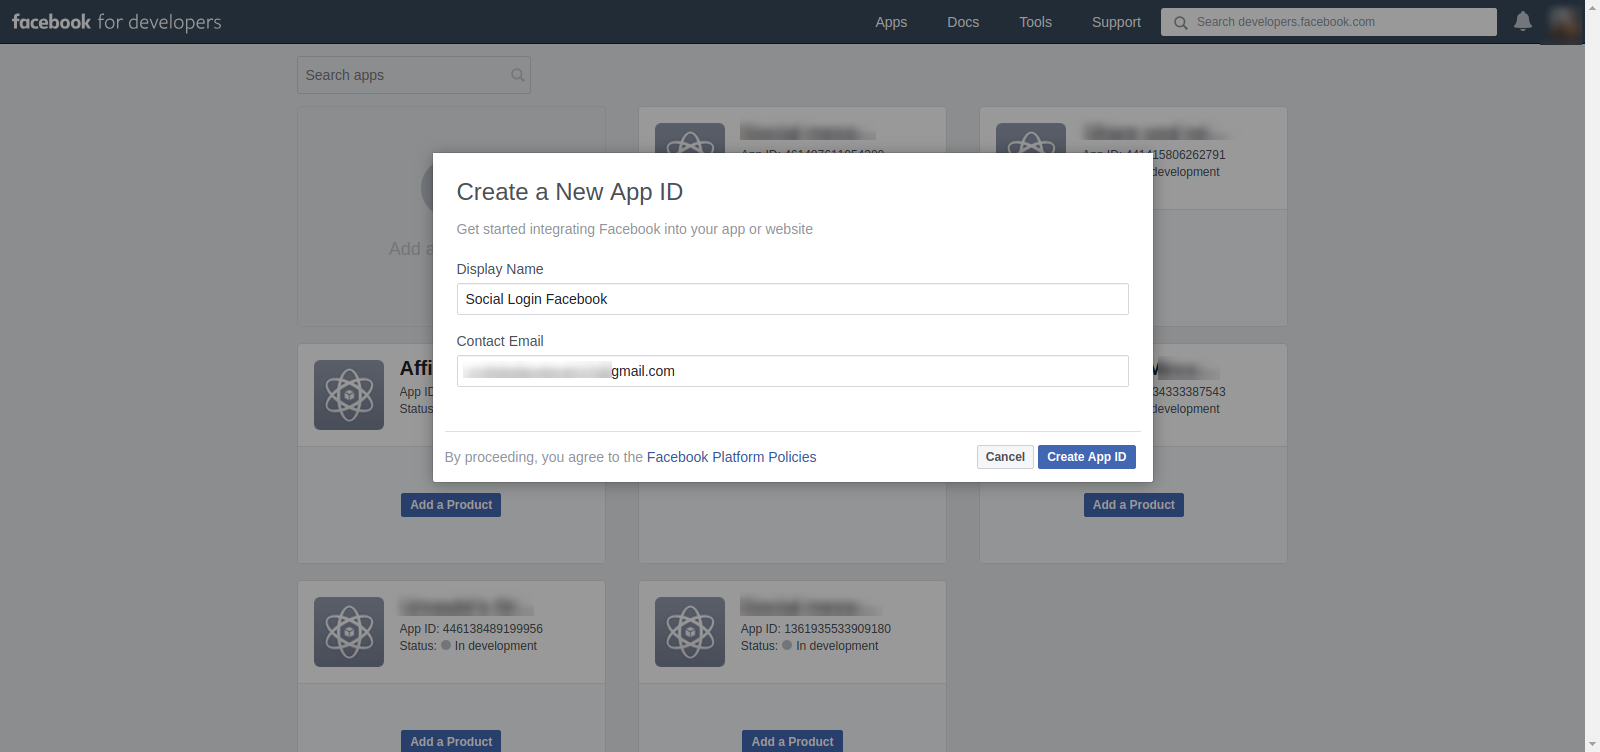
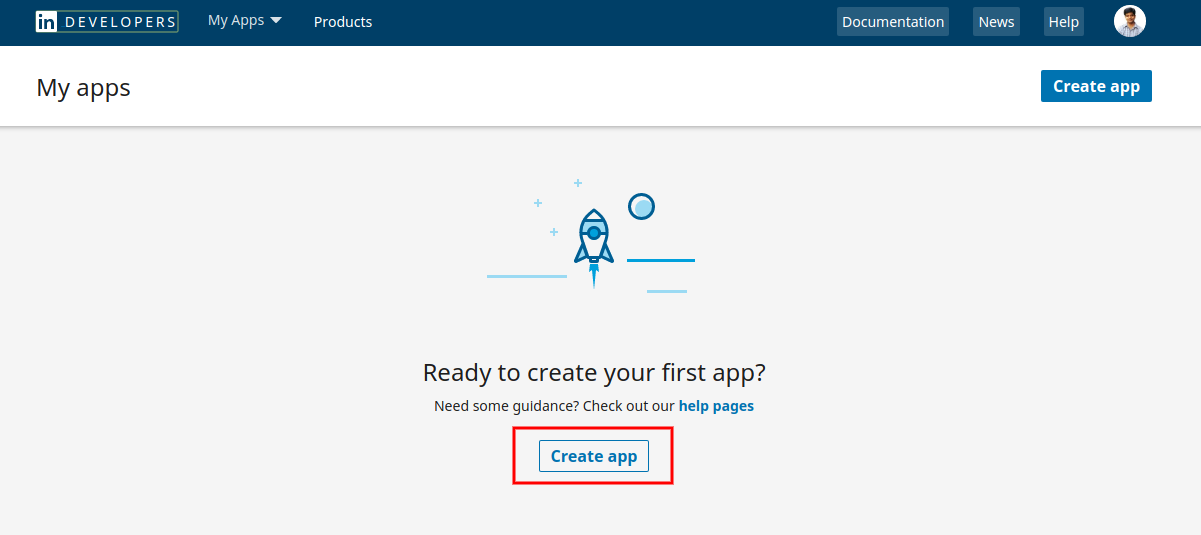
    • Click on Apps -> Create a new app.
    • Follow the instructions on the screen.
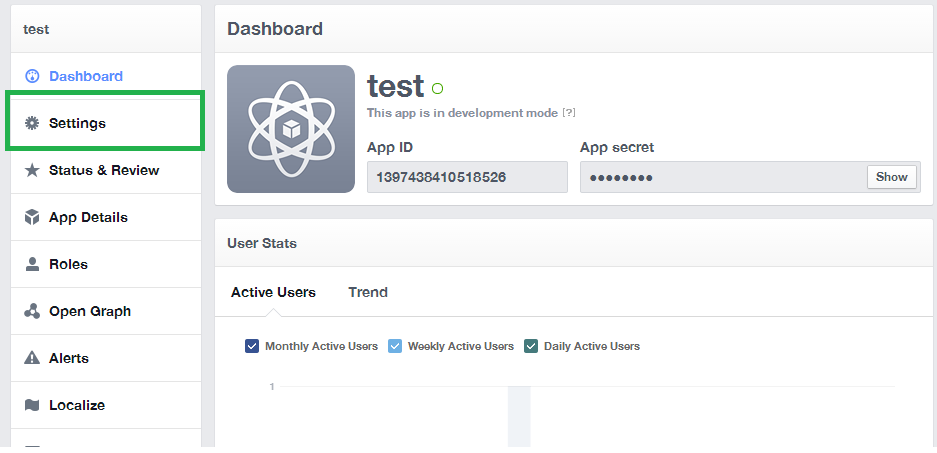
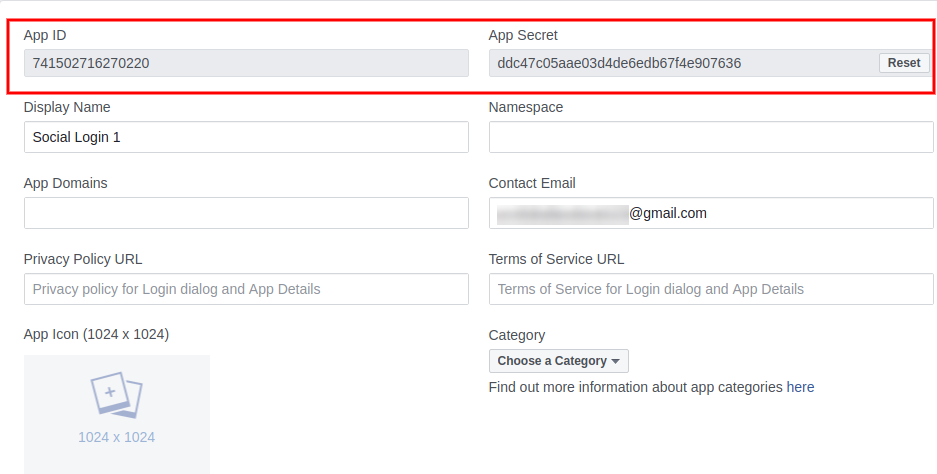
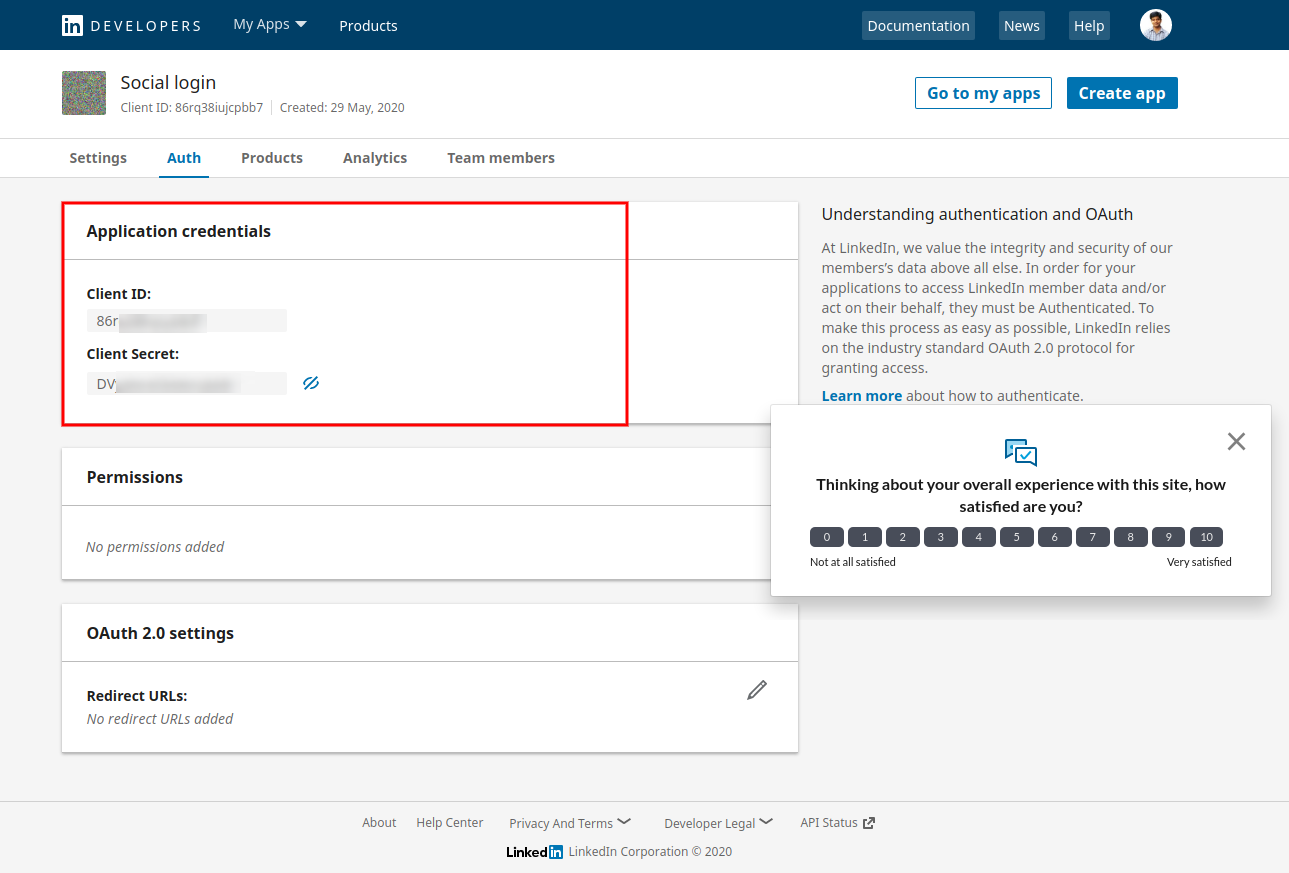
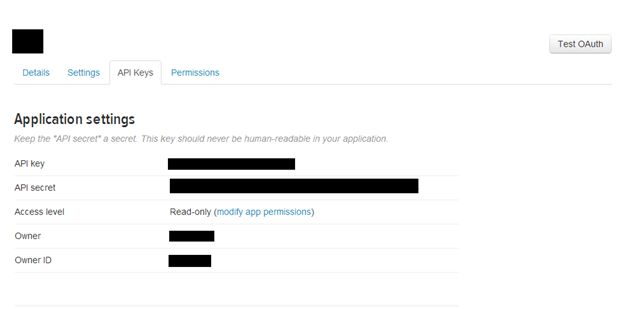
    • You will get the API ID & App secret (Click show button)
    • Now Go to Settings from the Left Menu

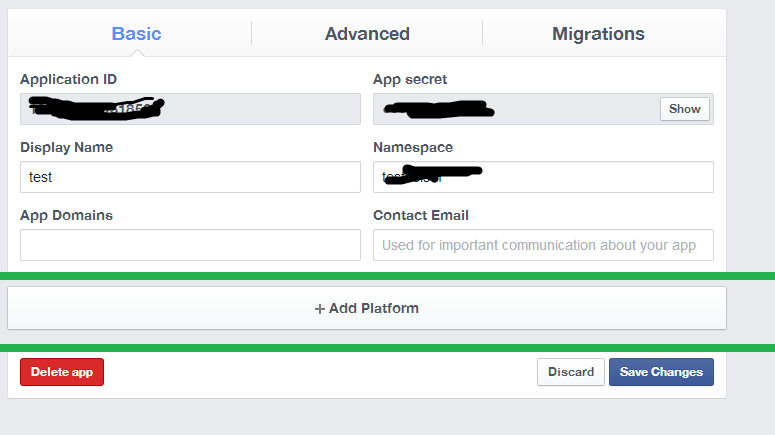
    • Click on Add Plateform link as shown below

    • Select Website.
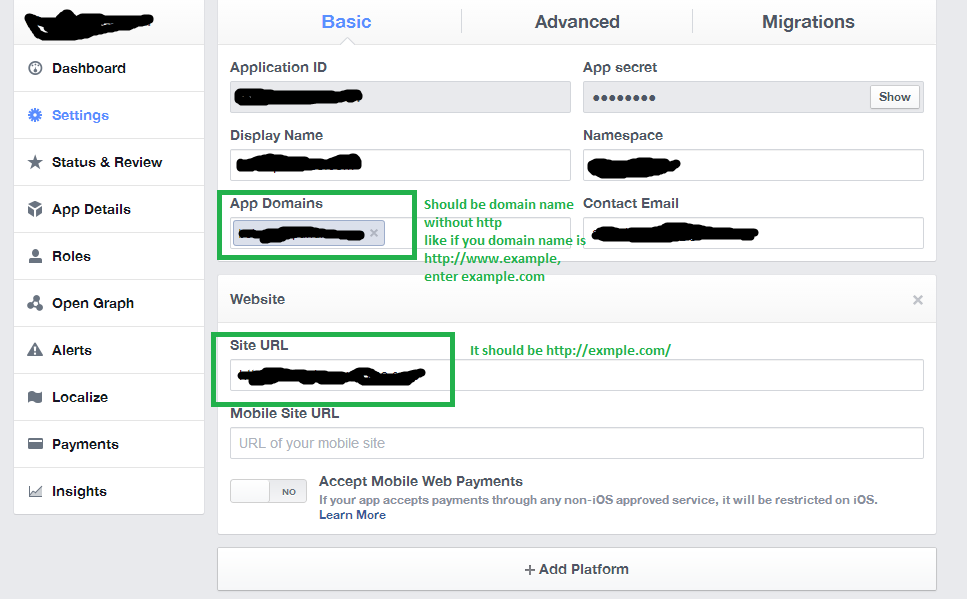
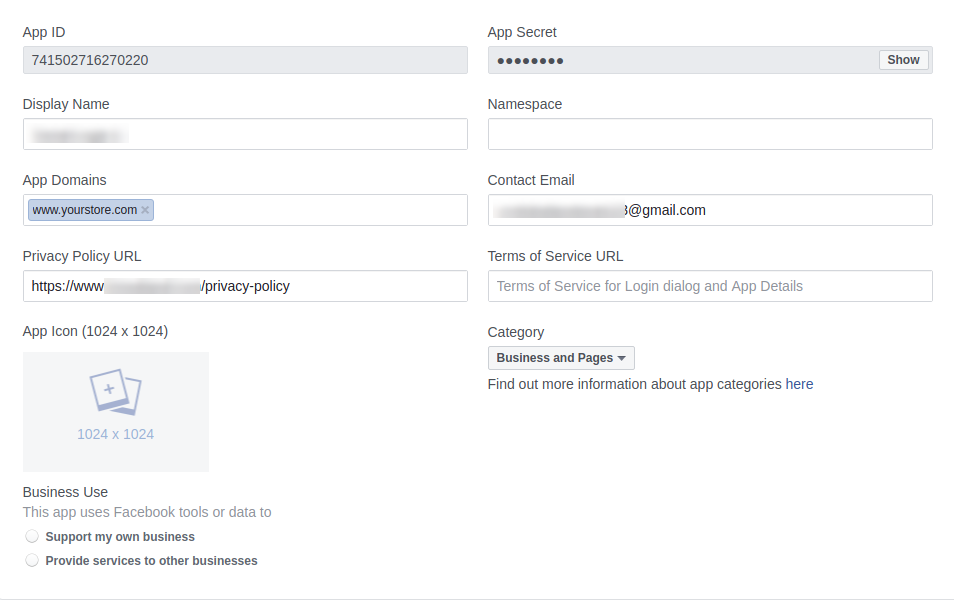
    • Enter App Domain & Site URL as shown in below screen.

  • Click Save Changes button.
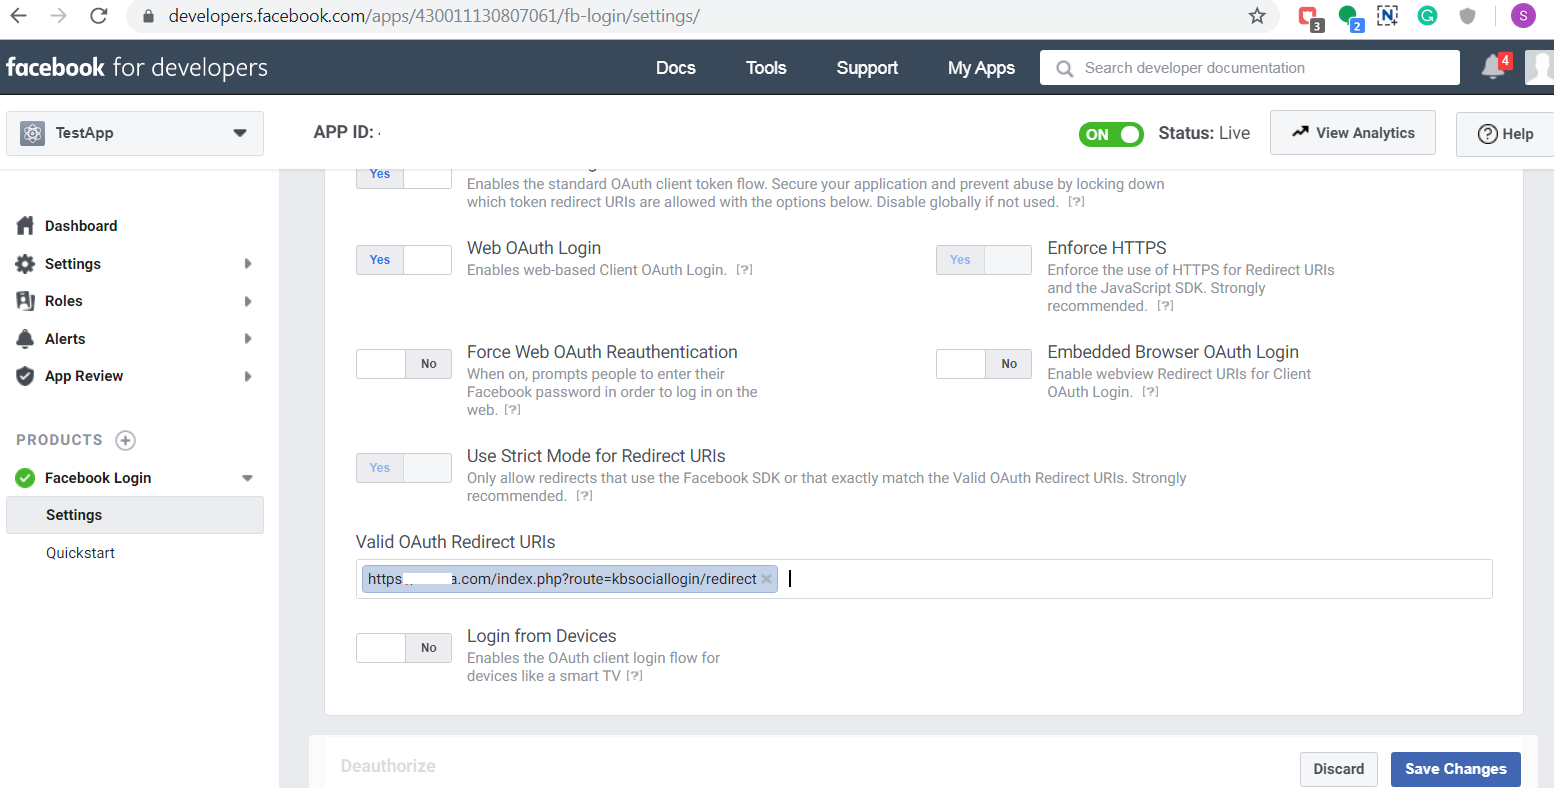
  • After that Go to Status & Review tab & make the application Live.

How to get Google API details?


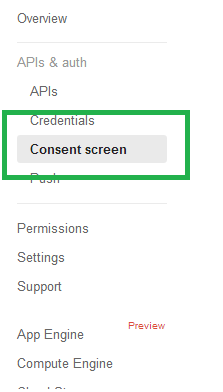
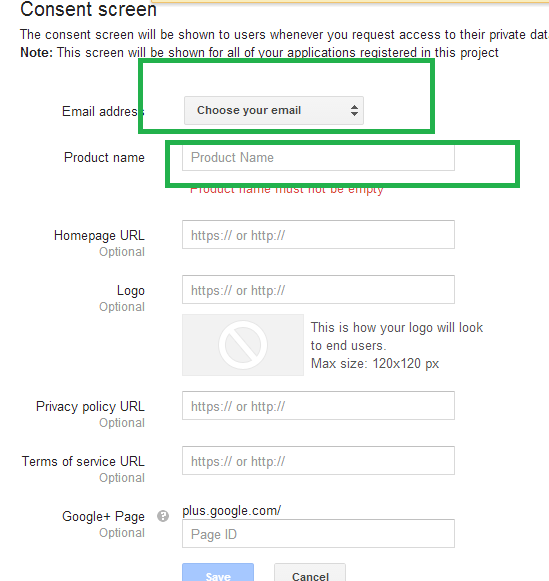
  • On the Consent screen, Select Email Address, Enter Any Project Name & Press Save Button.

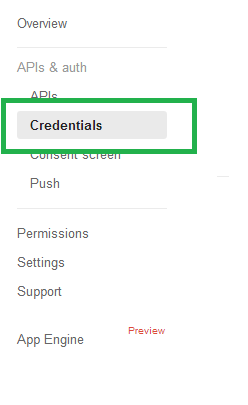
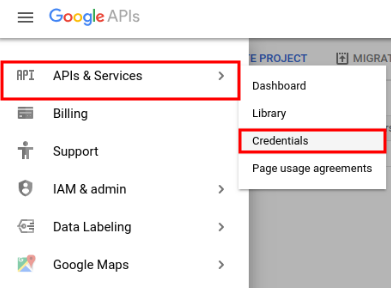
  • Then click App & Auth -> Credentials from left column.

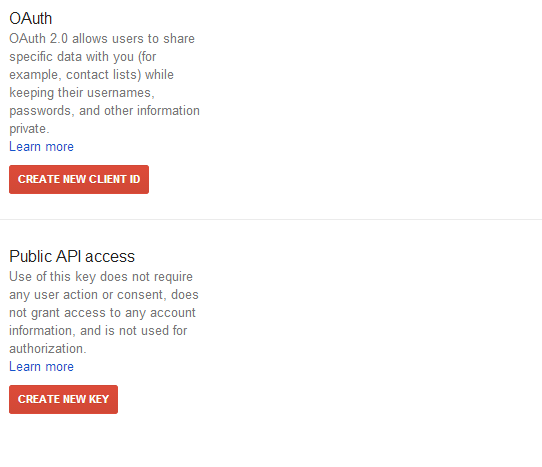
  • A screen as below will appear.

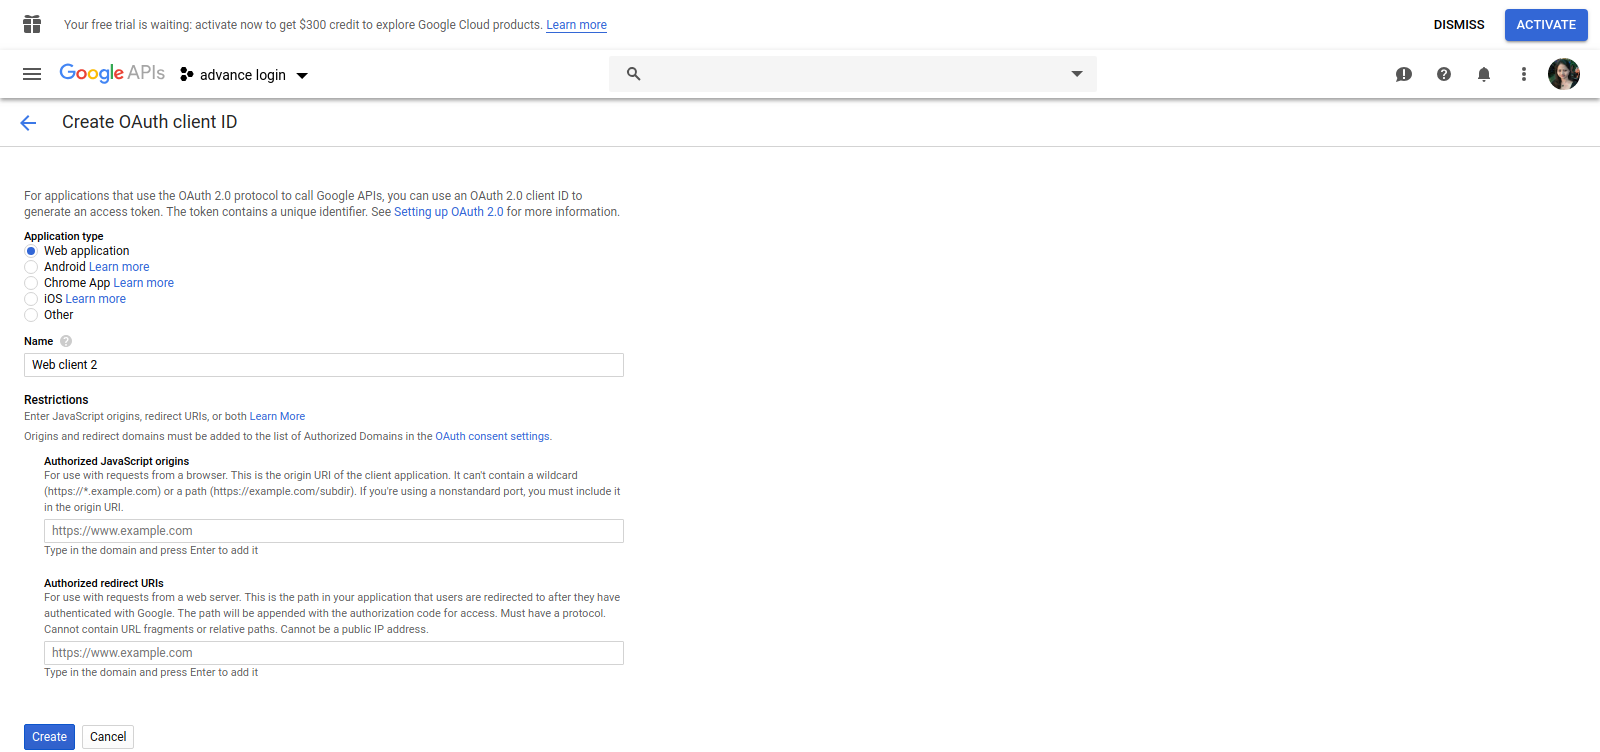
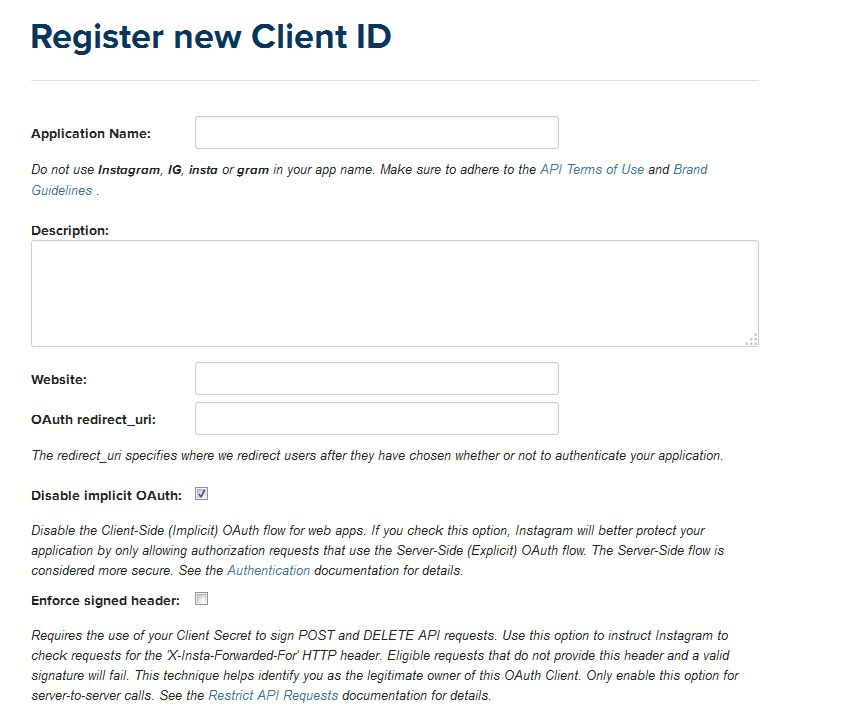
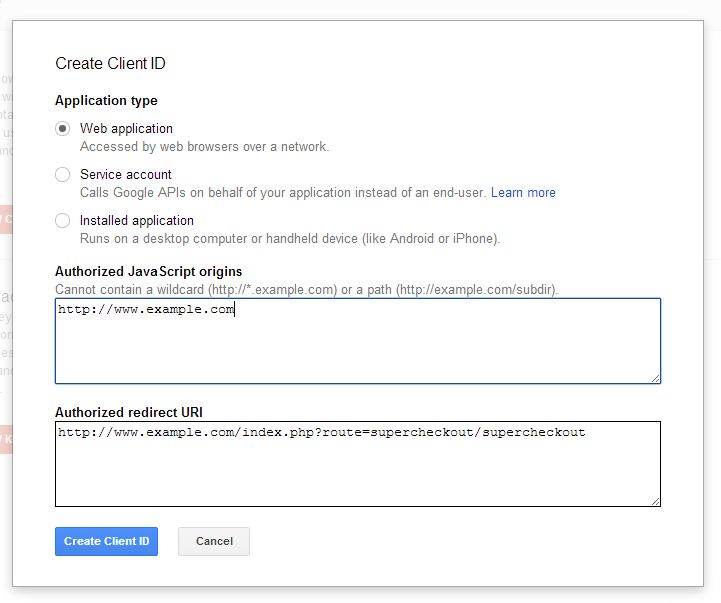
  • Click on CREATE NEW CLIENT ID. A popup as below will appear.

  • Enter the details as shown in above screen.
    1. Application Type: Web Application
    2. Authorized JavaScript origins: Your domain name i.e. https://www.example.com
    3. Authorized redirect URI: Path of super checkout page

https://www.example.com/index.php?route=supercheckout/supercheckout

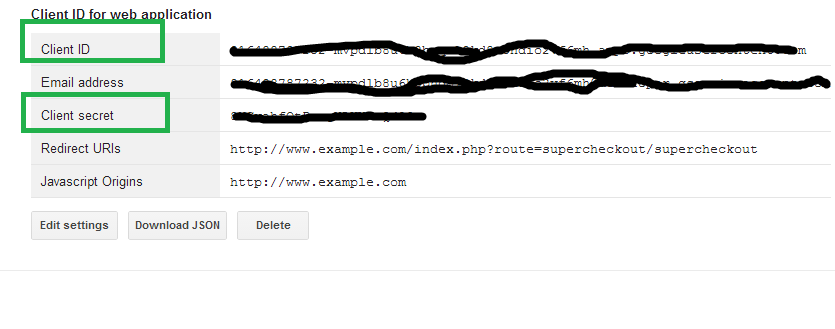
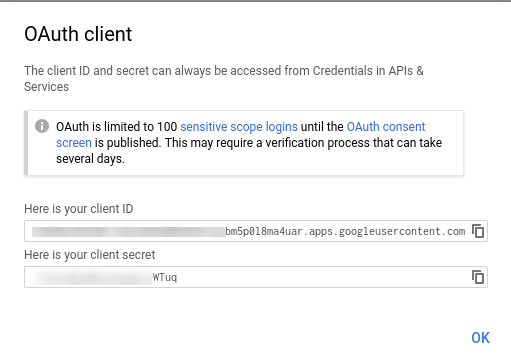
  • Click Create Client ID. As screen as below will appear. Copy the Client ID, Client secret from the below screen.

  • Click CREATE NEW KEY from public API access section. A popup will appear. Click on server key button then click on Create button without adding anything in input box.
  • Above step will generate the API key.

This Would Also Interest You:

Opencart Amazon Payment – User Manual

How to install Opencart Amazon Payment plugin on your server

Follow the following steps for installung Amazon Payment Method:

1. Install VQmod (if not yet installed, visit
https://code.google.com/p/vqmod/wiki/Install_OpenCart).

2. Unzip the archive and find Upload folder.

3. via FTP manager (like Filezilla or WinSCP – download here: https://filezilla-project.org/)
upload to you main directory the files and folders in the Upload folder.

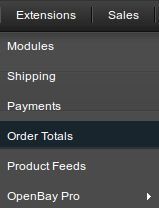
4. In Admin Panel go to Menu > Extensions > Payments > Amazon Payments v1.0.

5. Install Abandoned Cart.

6.That is all – Your system is ready. Click on Edit and configure it.

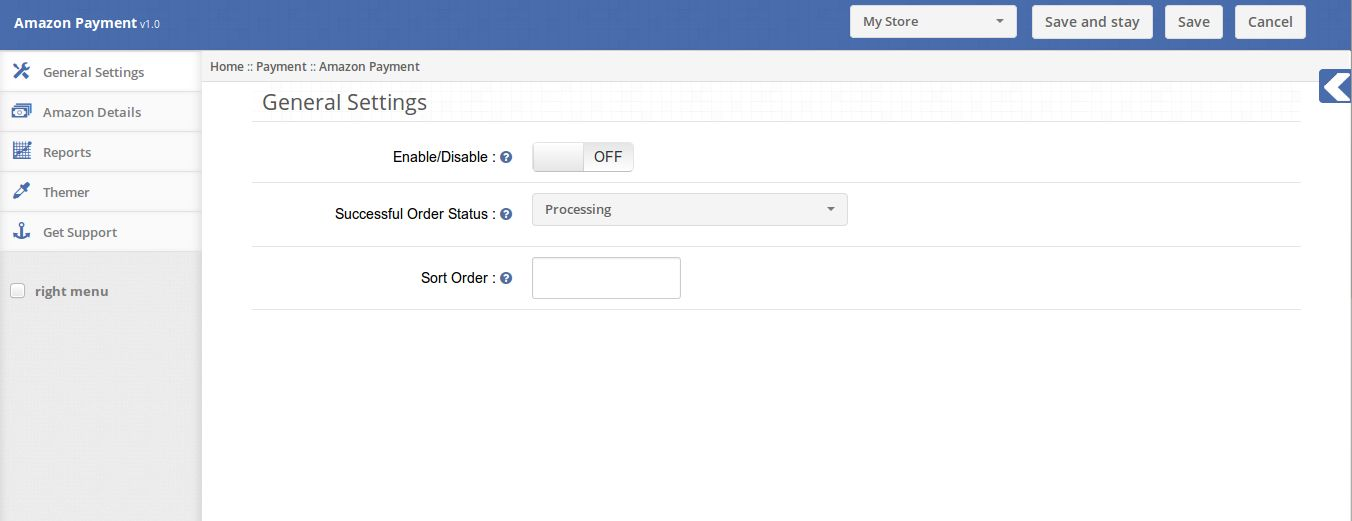
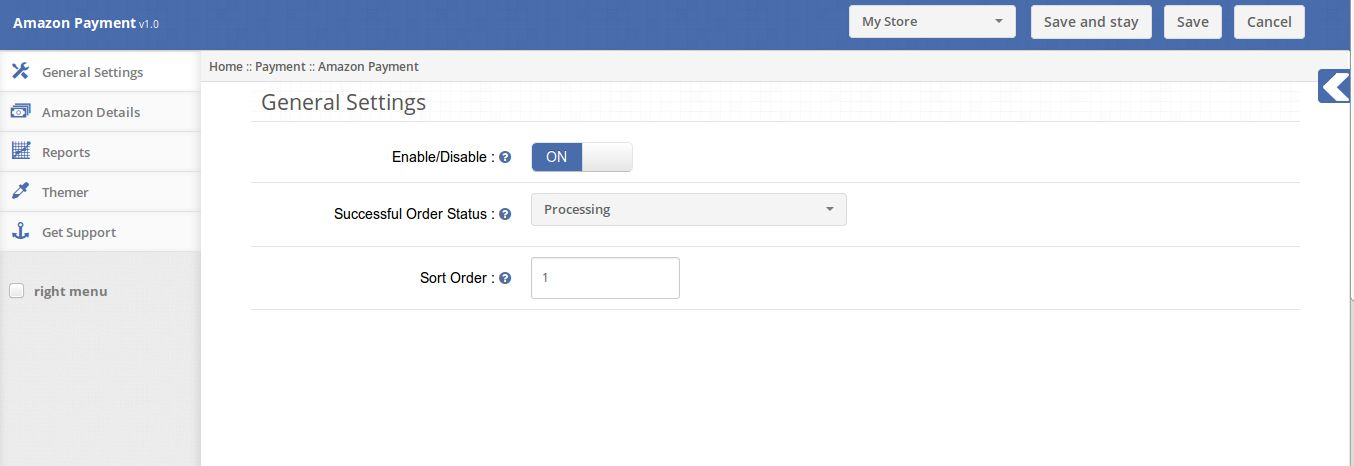
1. General Settings tab

The General Settings tab has following options:

1. Enable/Disable: Enables or Disables the plugin on the store front. If disabled, Pay viaAmazon will not be listed in Payment Methods on checkout page.

2. Successful Order Status: The successful order status will be the status of the order onsuccessful payment from Amazon.

3. Sort Order: The Sort Order is the position on which the Pay via Amazon will be listed inPayment Methods list on checkout page.

2. Amazon Details tab

The Amazon Details Tab lets the Admin to provide their Amazon Payment Credentials.

For registering, new Amazon Payment Account click on the Click here to create your AmazonPayments account link and create your Amazon Payment Account.

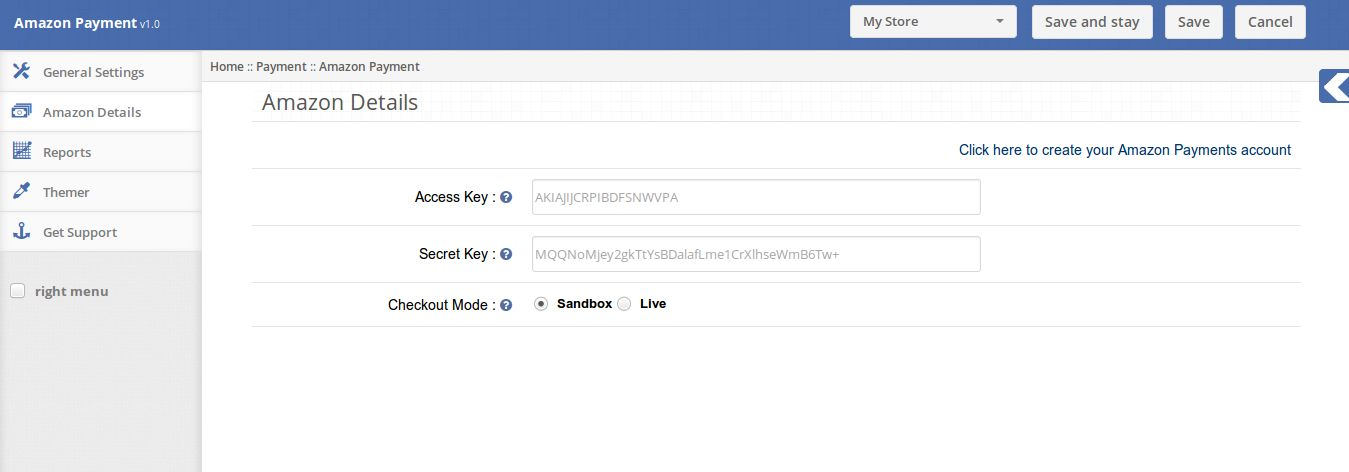
1. Access Key: The Access Key is provided by the Amazon Payments.

2. Secret Key: The Secret Key is also provided by the Amazon Payments.

3. Checkout Mode: The Checkout will set whether the Amazon Payment acccount which isbeing used is in Sandbox mode or in Live mode.

3. Reports tab

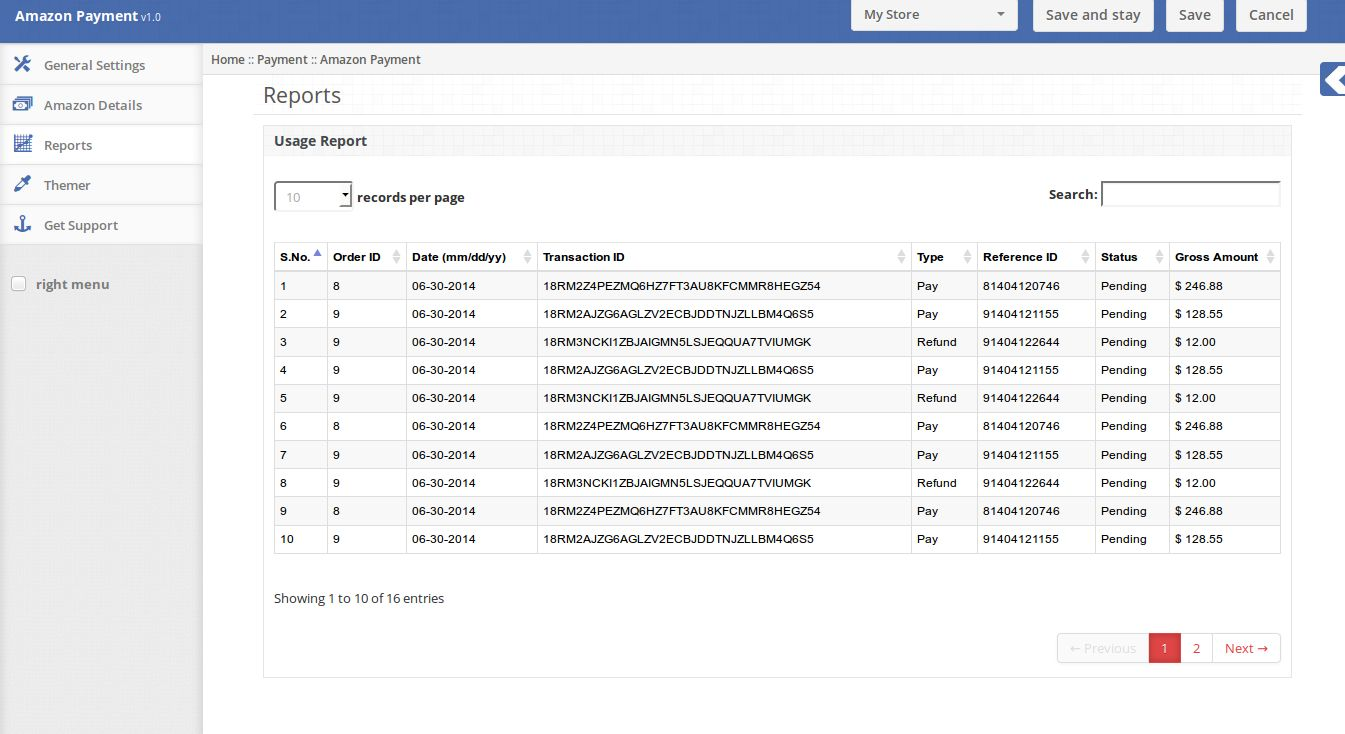
The Report section of the Admin Module shows the list of the orders placed using AmazonPayment Method.

4. Refund Option

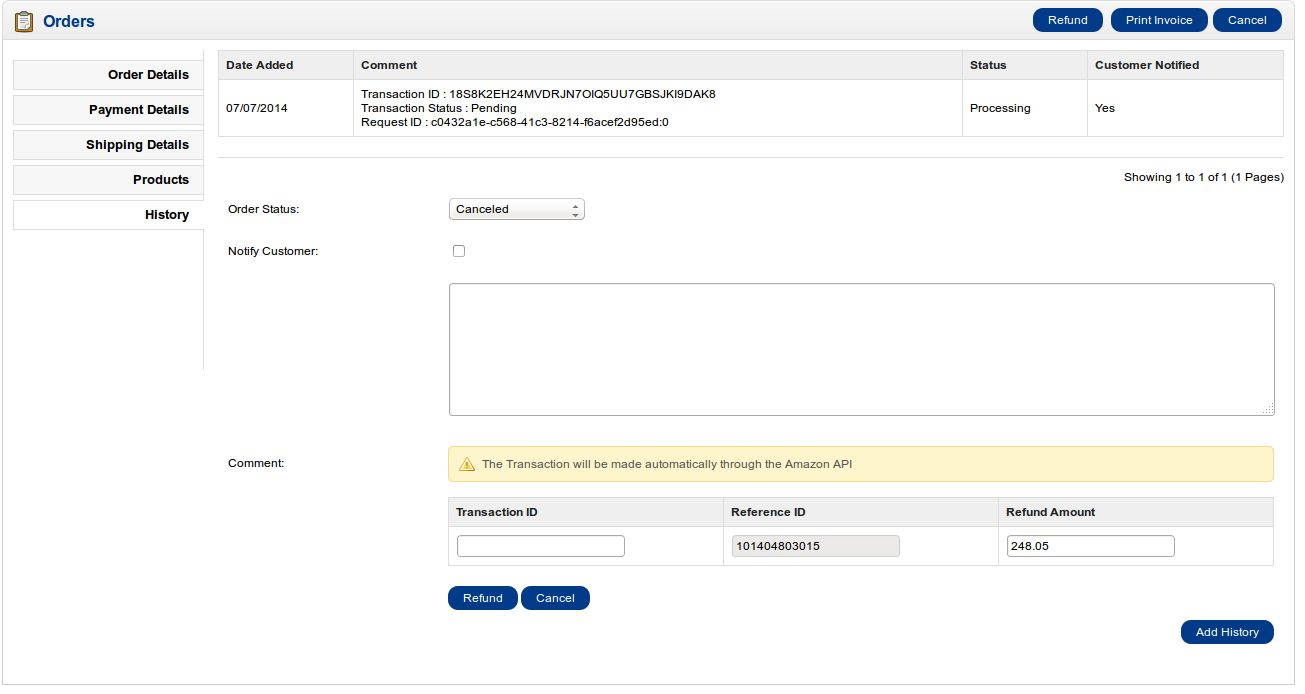
On View Order page in Admin Section of the module the Admin is also able to refund thepayment if the payment is made through Amazon Payment method.

On clicking the Refund button the refund form is visible in which the Admin has to copy pastethe Transaction ID from the order comment table placed above the Refund Form.

Description

Store Front

In the Store Front End the Pay via Amazon method is listed in the Payment Methods list onthe checkout page. When users clicks on Confirm the user will be redirected to AmazonPayments for making payments.

This Would Also Interest You:

Opencart Slideup Promotion – User Manual

How to install Opencart Slideup Promotion plugin on your server

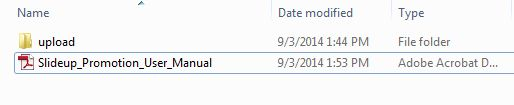
1. Folder structure of the Slideup Promotion plug-in folder.

2. Open the upload folder and you will find the following folder structure:

You must have VQMOD installed for this plug-in to work. If VQMOD is not installed please download and install from the URL below:
https://code.google.com/p/vqmod/

3. Select all the folder and drag and drop them to the root directory of your OpenCart store throughFTP.

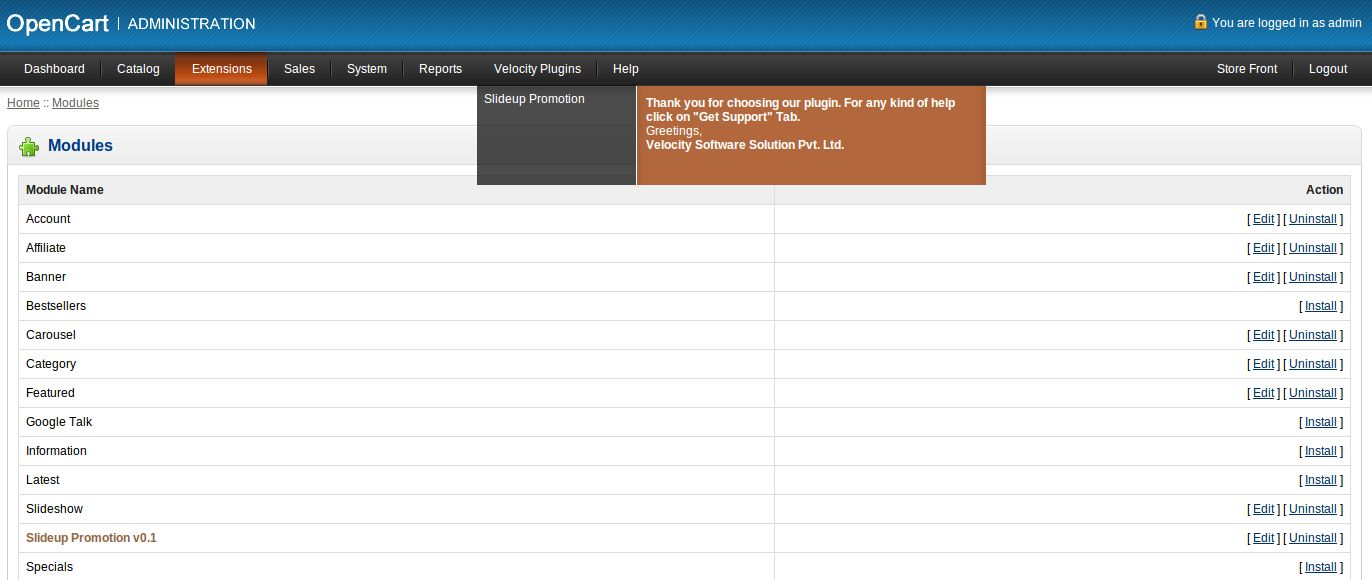
4. You will be able find the plug-in ready to be installed in the Modules in your OpenCart storeas shown below.

5. Click on the Install link to install the plug-in. This will also add a dropdown option in your menu bar which will list all plug-ins by Velocity installed on your store for fast navigation. Thisdropdown also has a message box, using which we can inform you about new launched plug-in ornew update.

6. Delete the Vqcache files from the vqmod/vqcache folder.

7. To access Slideup Promotion plug-in click on edit button in module section as shown below:

8. On clicking edit button the module for plug-in will open. It contains navigational bar at top, menu at left and main content at center as shown below.

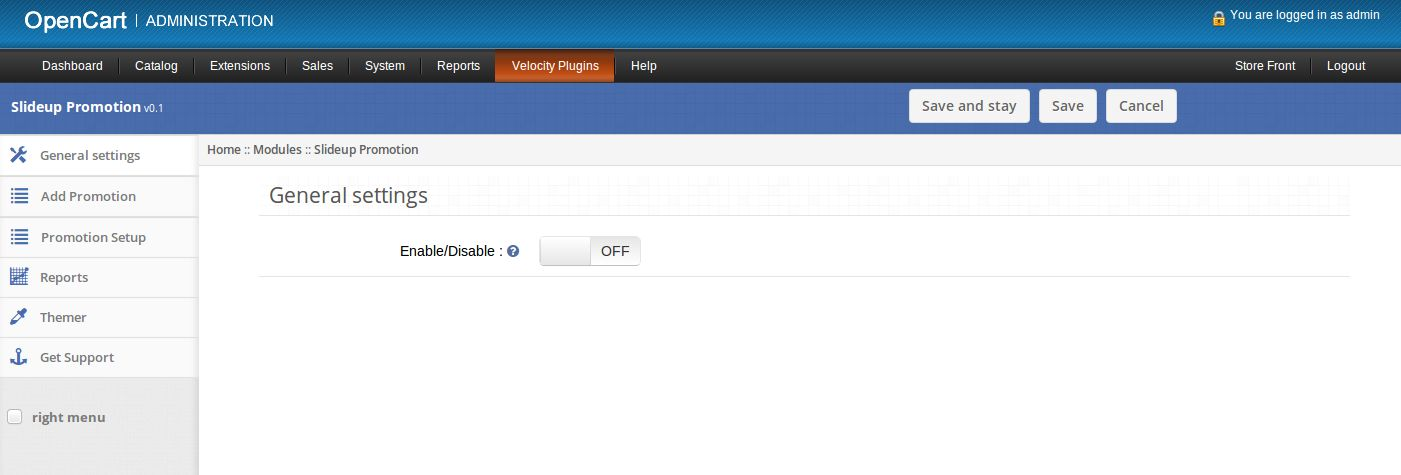
1. General Settings tab

Enable/Disable: Enable or disable plug-in as shown below.

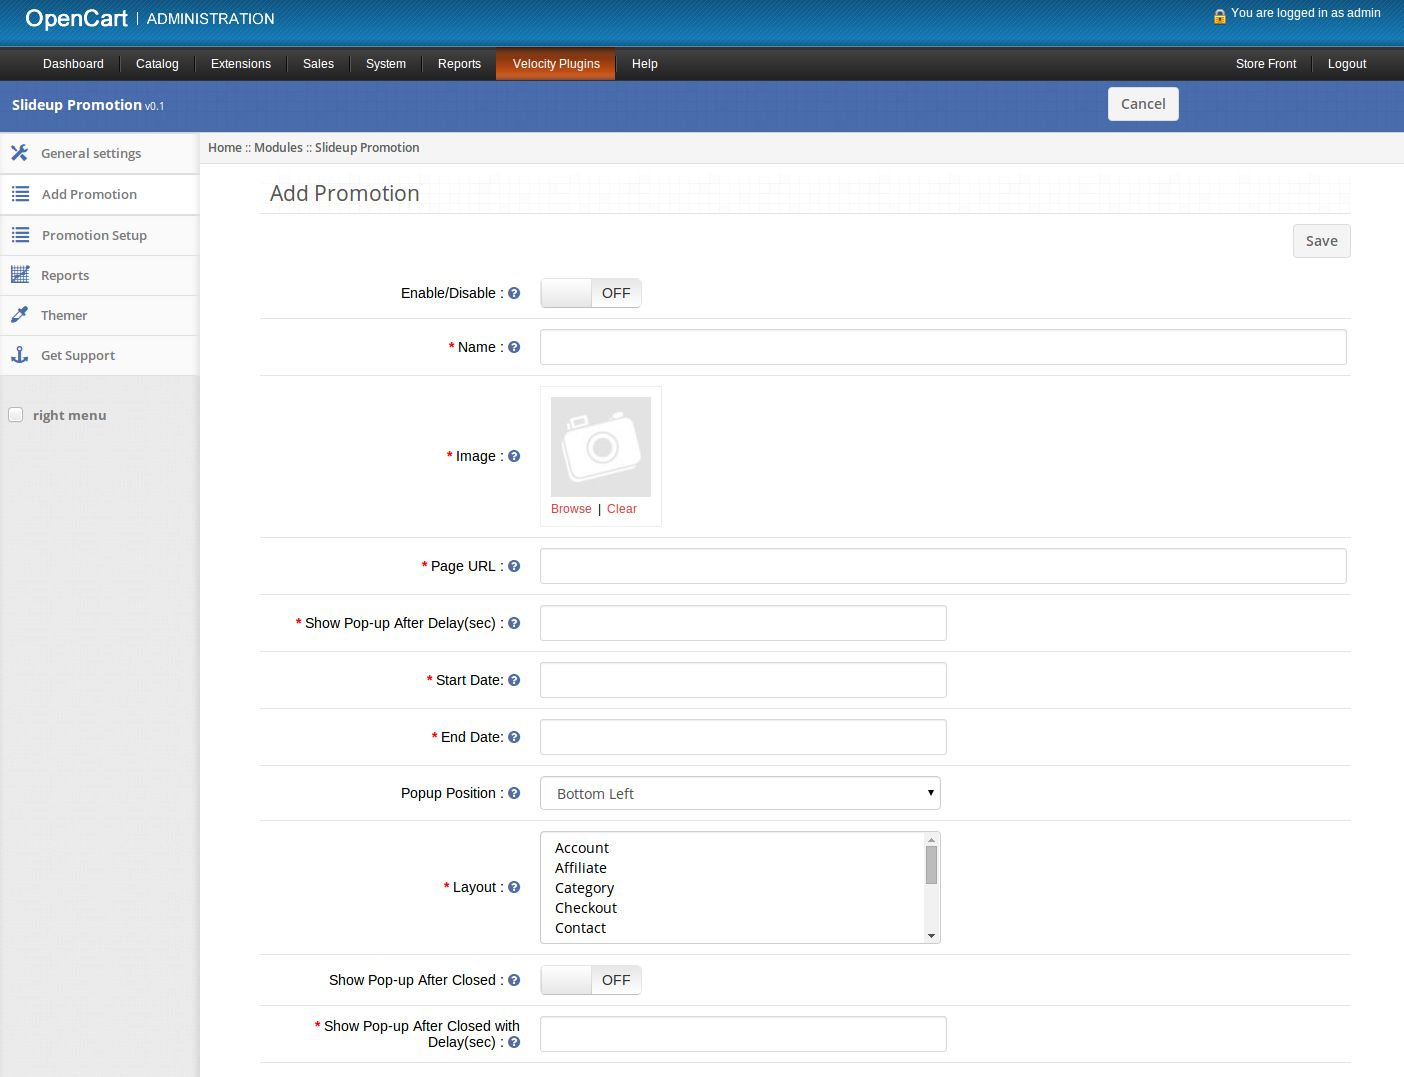
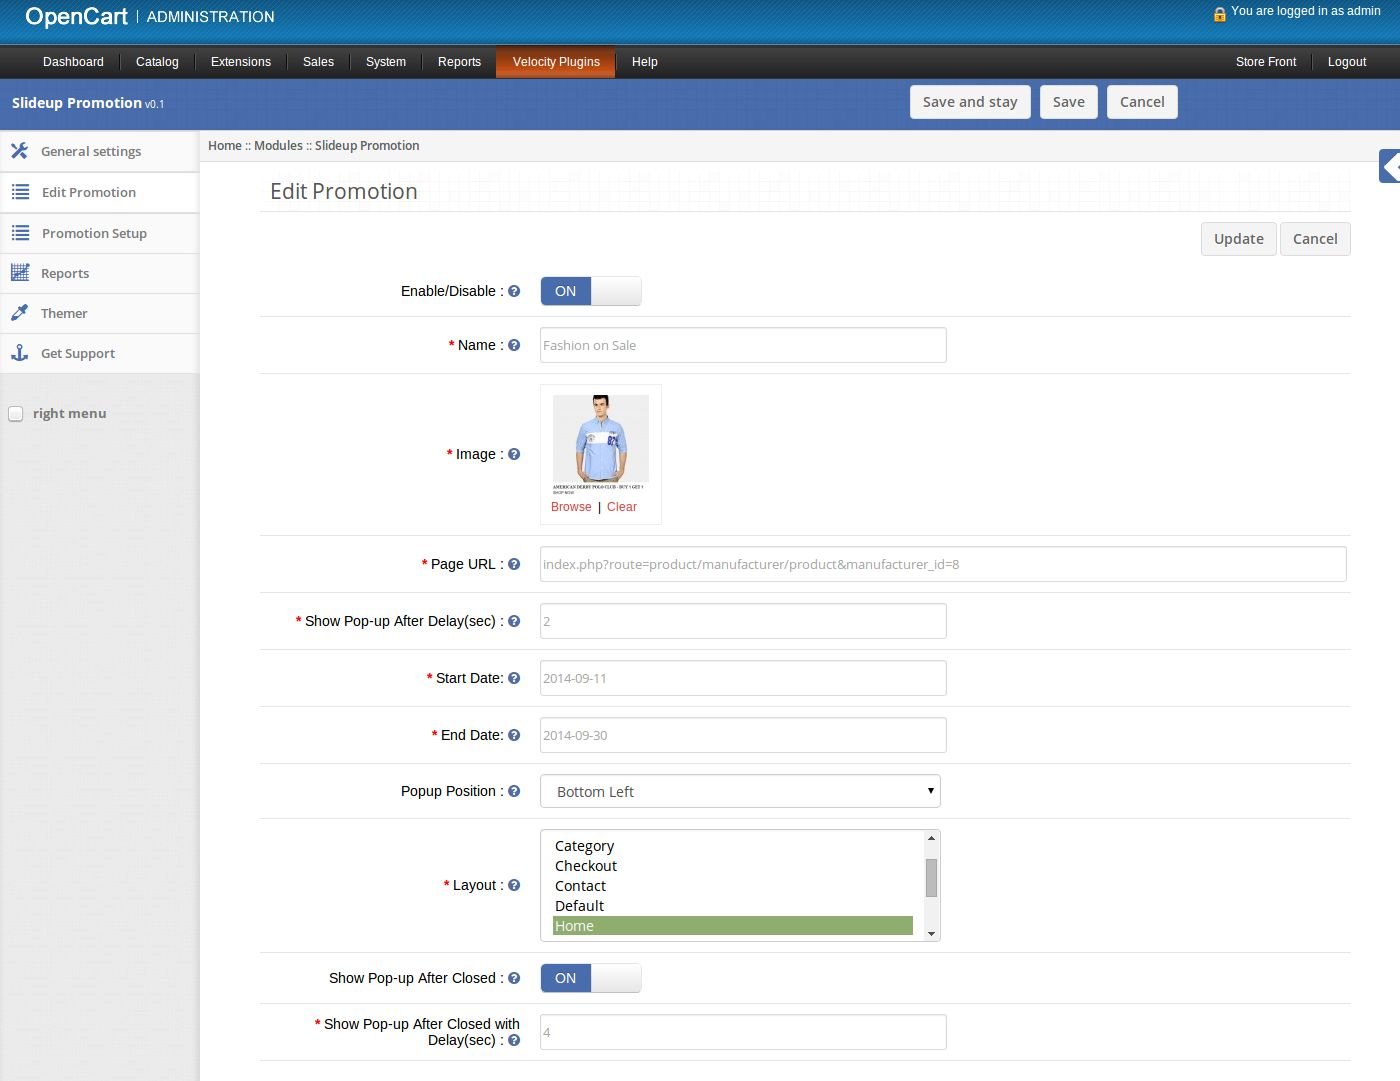
2. Add Promotion tab

1. Here admin can create a new promotion.

2. Enable/Disable: Enable or disable promotion.

3. Name: Set name of promotion.

4. Image: Set image to show on front end in the promotion popup.

5. Page URL: Set url of webpage which should be opened on clicking the promotion popup.

6. Show Pop-up After Delay: Set the delay time in seconds for the popup to appear after page load in
front end.

7. Start Date: Set start date for promotion.

8. End Date: Set end date for promotion.

9. Popup Position: Set the position of promotion popup to appear on front end.

10. Layout: Select one or multiple layouts on which you wish to show the promotion popup.

11. Show Popup after closed: Set on to show promotion popup again after closing the popup in front end.

12. Show popup after closed with delay: Set the time in seconds for promotion popup to appear again
after being closed by customer.

3. Promotion Setup tab

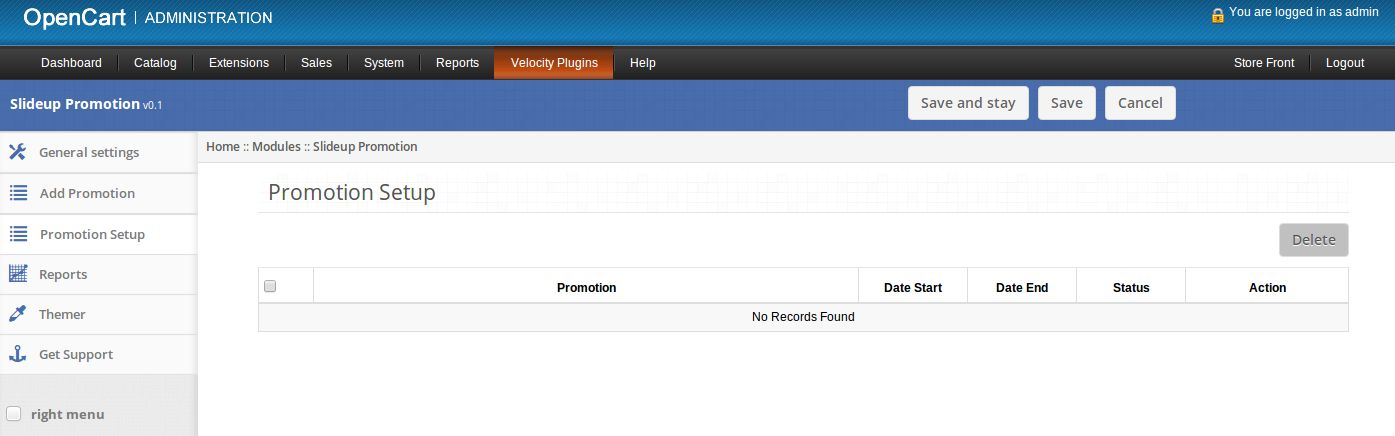
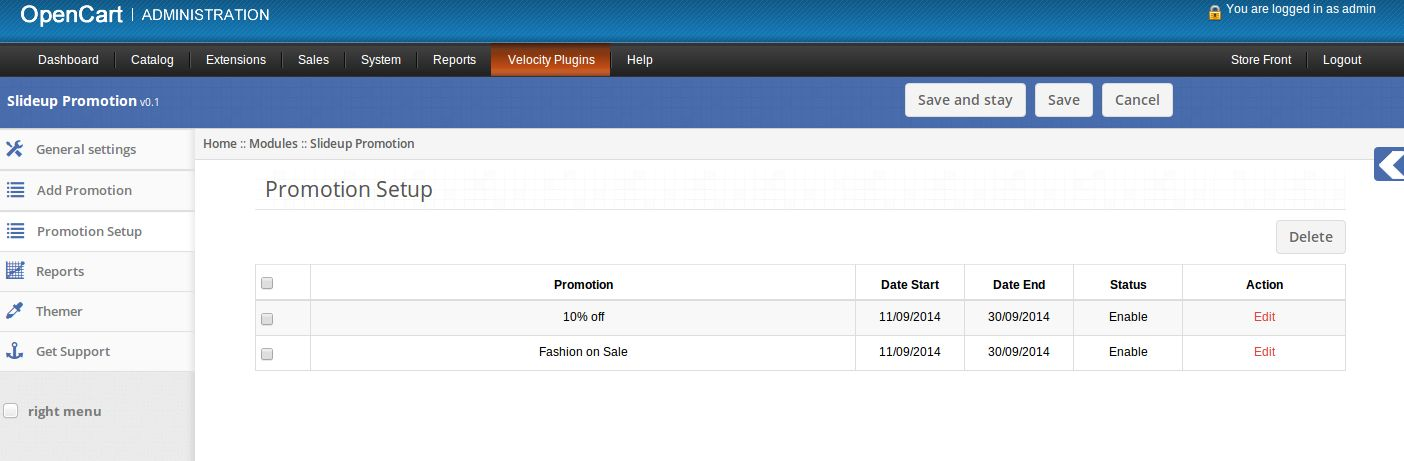
1. Here admin can see list of saved promotions.

2. If their are no saved promotions then this tab will look as follows:

3. If their are some saved promotions then this tab will look as follows:

4. Click on Edit link provided in front of every promotion to edit that promotion.

5. Click on Delete button to delete selected promotions.

6. On clicking the edit link a form will appear to edit the promotion.

7. Enable/Disable: Enable or disable promotion.

8. Name: Set name of promotion.

9. Image: Set image to show on front end in the promotion popup.

10. Page URL: Set url of webpage which should be opened on clicking the promotion popup.

11. Show Pop-up After Delay: Set the delay time in seconds for the popup to appear after page load in
front end.

12. Start Date: Set start date for promotion.

13. End Date: Set end date for promotion.

14. Popup Position: Set the position of promotion popup to appear on front end.

15. Layout: Select one or multiple layouts on which you wish to show the promotion popup.

16. Show Popup after closed: Set on to show promotion popup again after closing the popup in front end.

17. Show popup after closed with delay: Set the time in seconds for promotion popup to appear again
after being closed by customer.

4. Reports tab

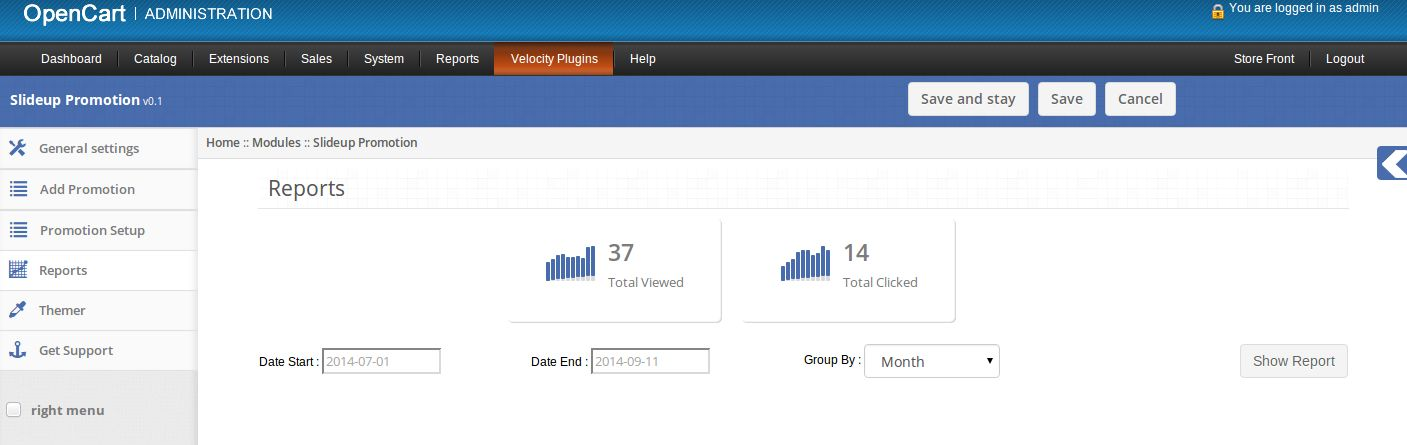
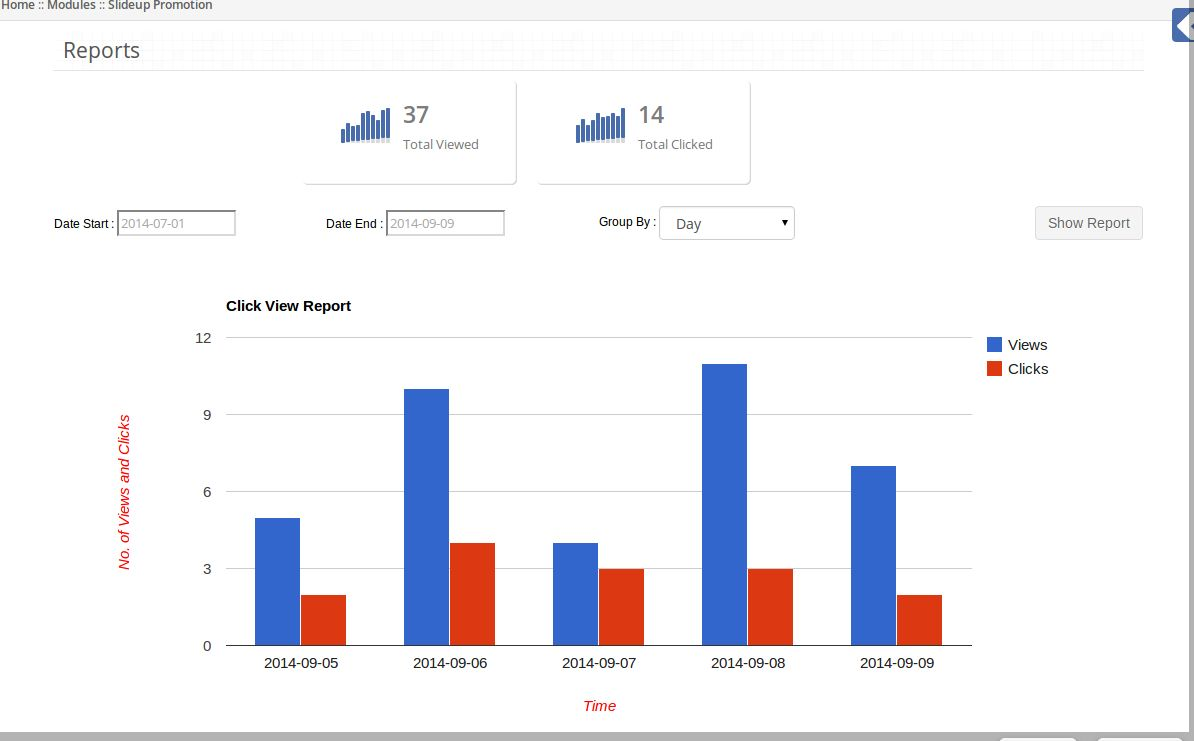
1. Here admin can see reports related to promotions.

2. On the top of this tab total number of promotion viewed and total number of promotions clicked by
customers is displayed.

3. On clicking Show Report button graphical report will appear as per values of filter.

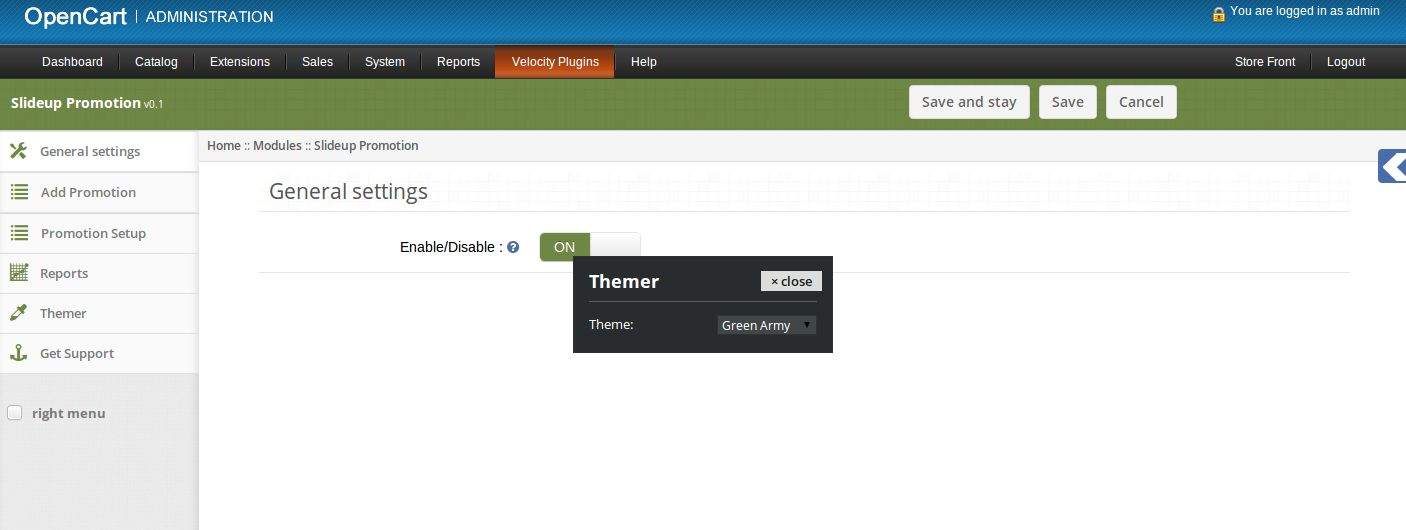
5. Themer tab

By clicking on themer tab, you will have an option to change the theme of Slideup Promotion admin
panel.

6. Get Support tab

By clicking on Get Support tab, you will be redirected to our support website, where you can contact
our support for help. Use this tab in case you some query/issue or found some bug.

Screenshots

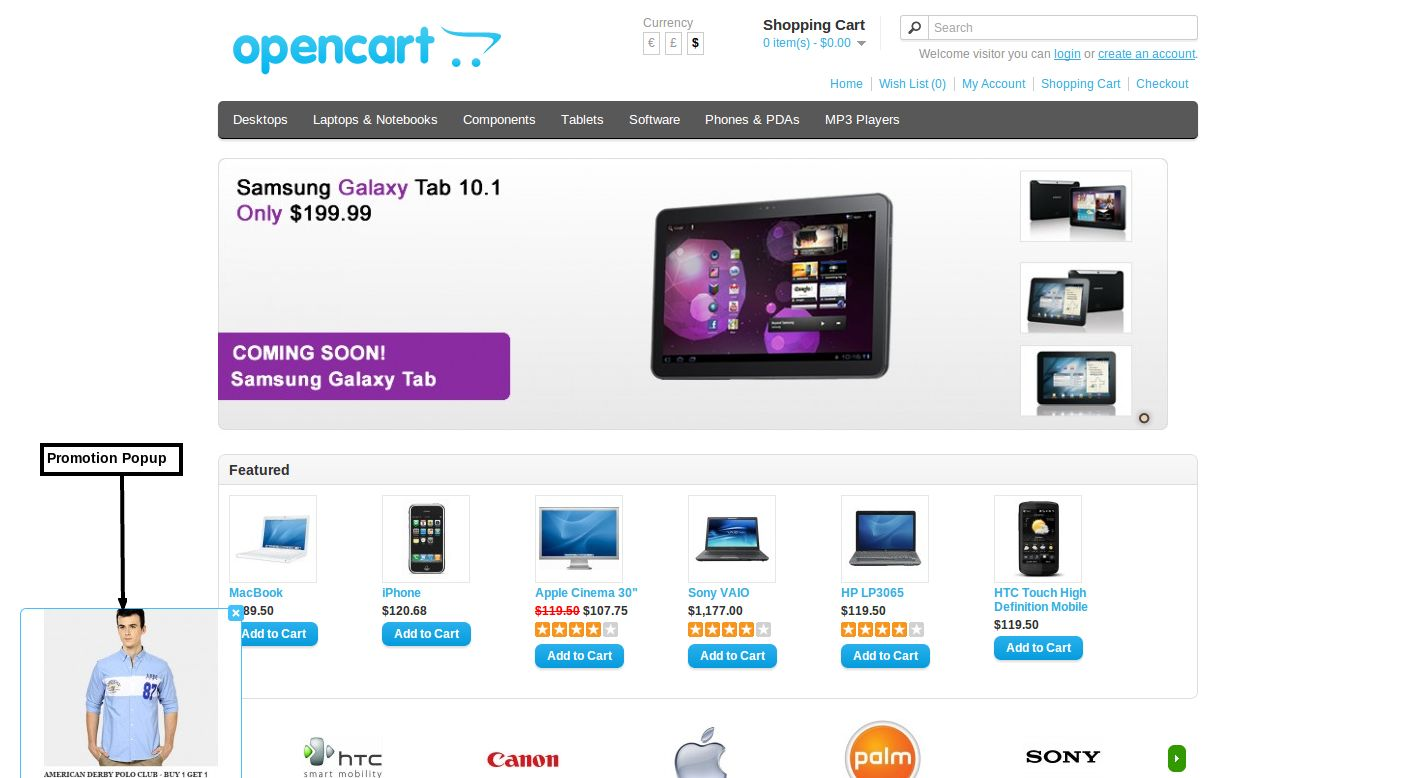
Promotion Popup at bottom-left position.

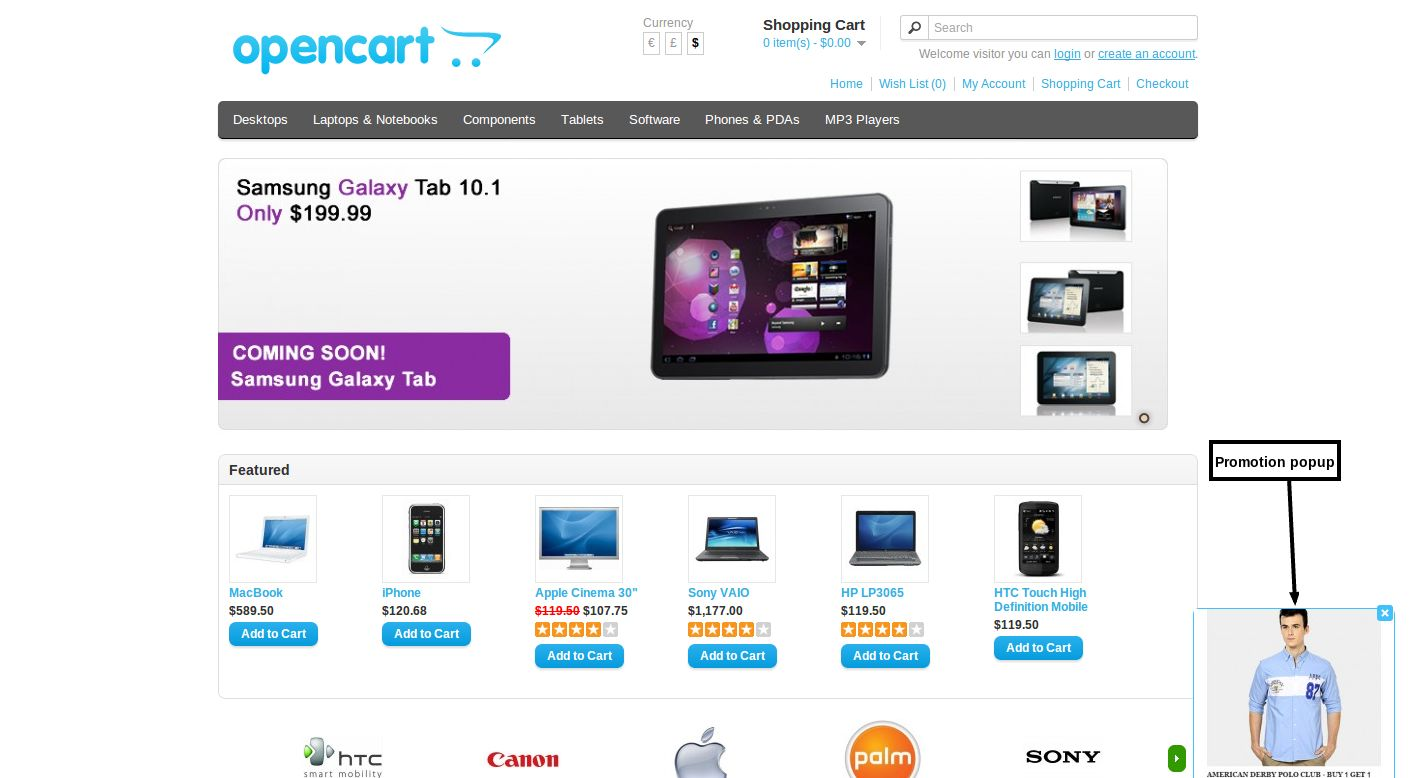
Promotion Popup at bottom-right position.

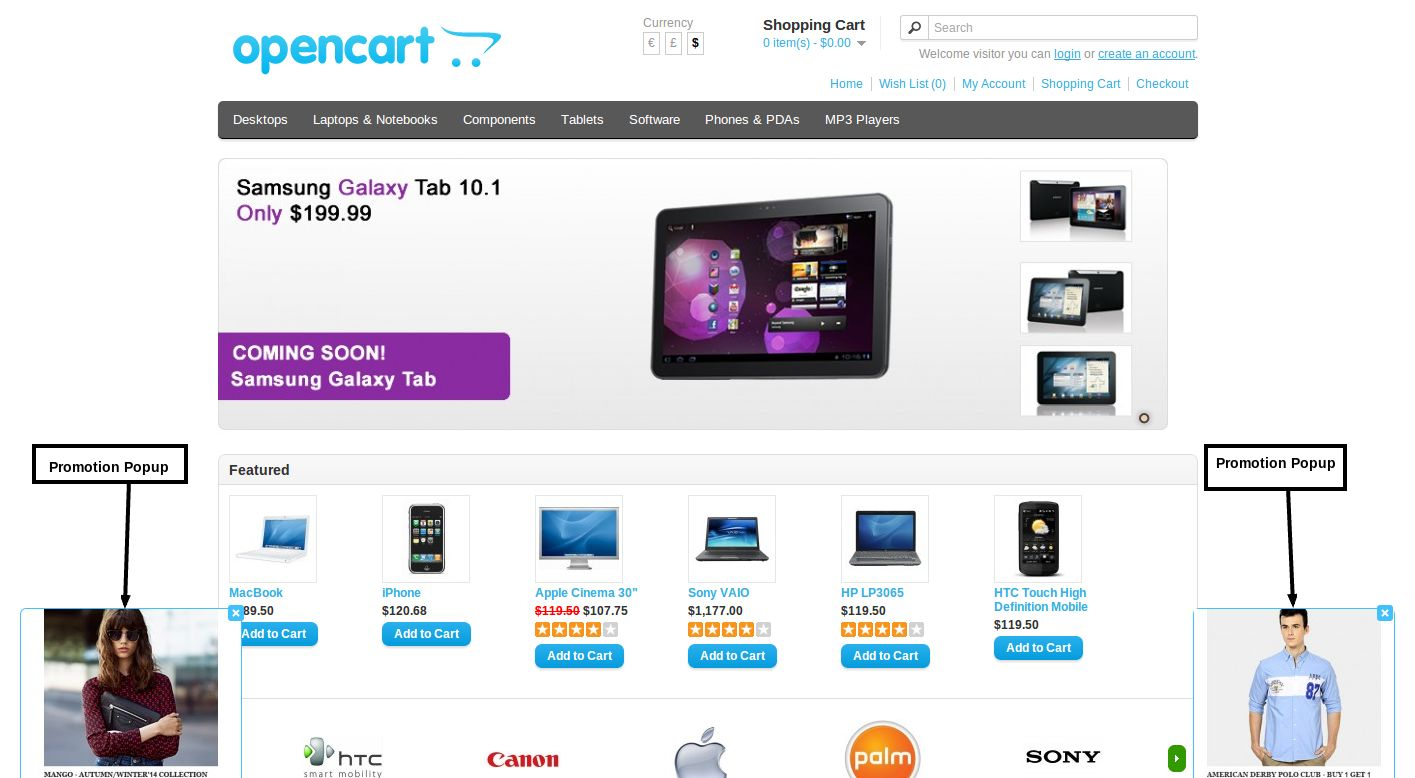
Multiple Promotion Popup on same page.

OpenCart Follow Up Email – User Manual

How to install OpenCart Follow Up Email plugin on your server

1. Folder structure of the Follow Up Email plug-in folder.

2. Open the upload folder and you will find the following folder structure:

You must have VQMOD installed for this plug-in to work. If VQMOD is not installed please download and install from the URL below:
https://code.google.com/p/vqmod/

3. Select all the folder and drag and drop them to the root directory of your OpenCart store throughFTP.

4. You will be able find the plug-in ready to be installed in the Modules in your OpenCart store as shown below.

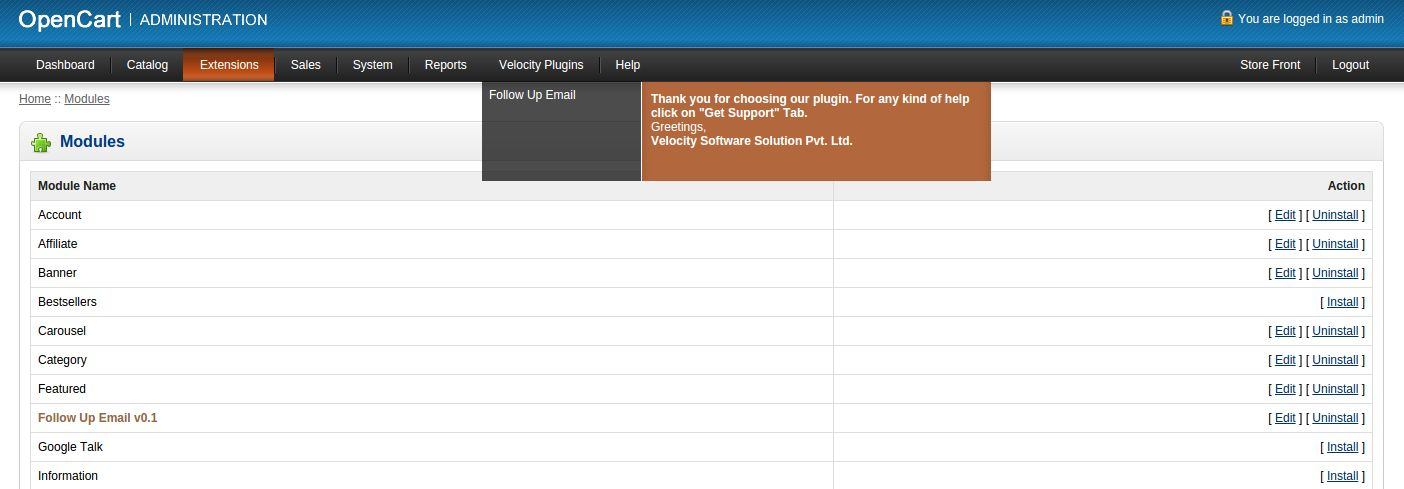
5. Click on the Install link to install the plug-in. This will also add a dropdown option in your menubar which will list all plug-ins by Velocity installed on your store for fast navigation. Thisdropdown also has a message box, using which we can inform you about new launched plugin or new update.

6. Delete the Vqcache files from the vqmod/vqcache folder.

7. To access Follow Up Email plug-in click on edit button in module section as shown below:

8. On clicking edit button the module for plug-in will open. It contains navigational bar at top, menu at left and main content at center as shown below.

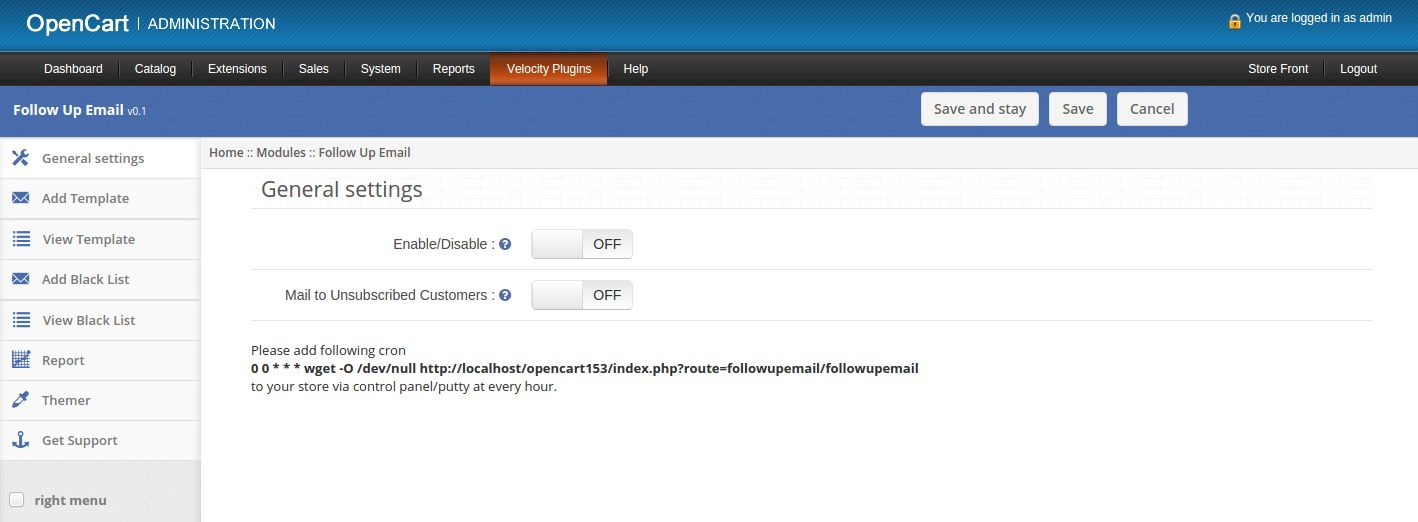
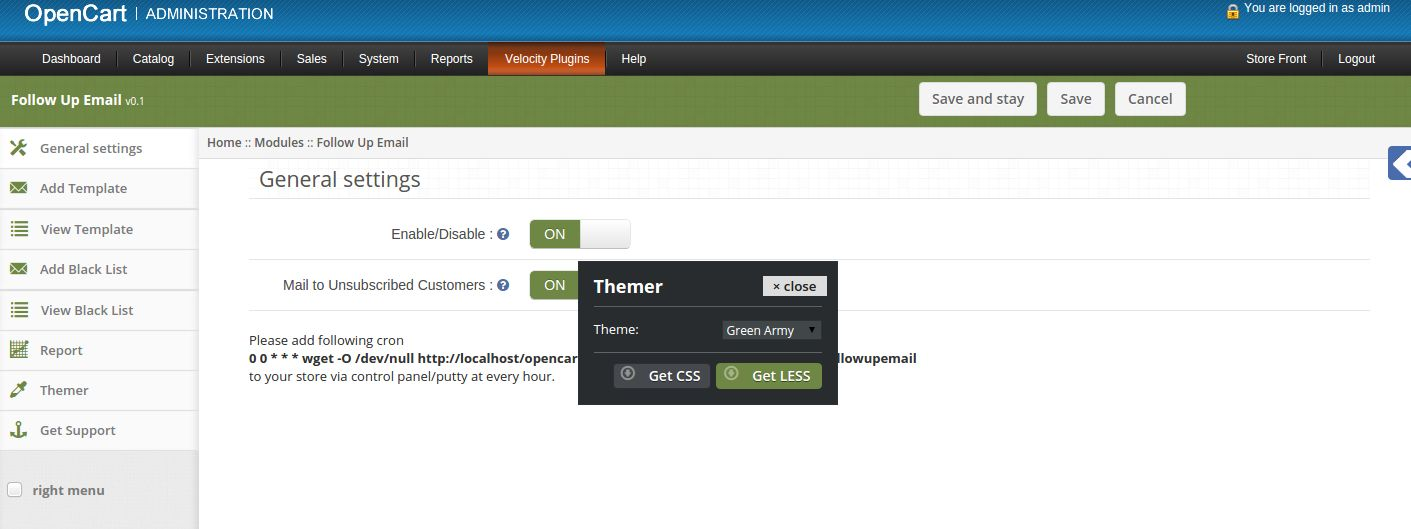
1. General Settings tab

1. Enable/Disable: Enable or disable plug-in.
2. Mail to Unsubscribed Customers: Enable or Disable sending mails to unsubscribed customers.

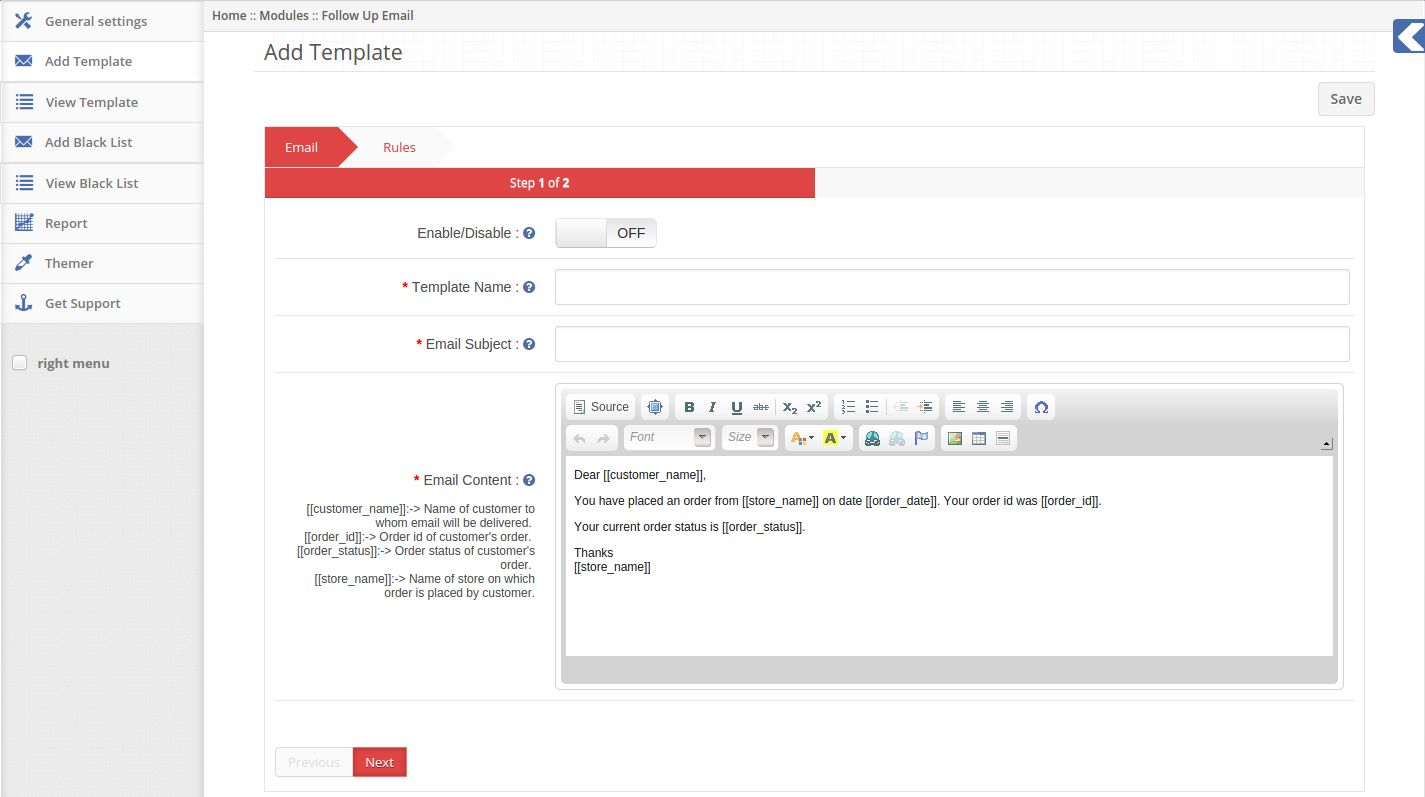
2. Add Template tab

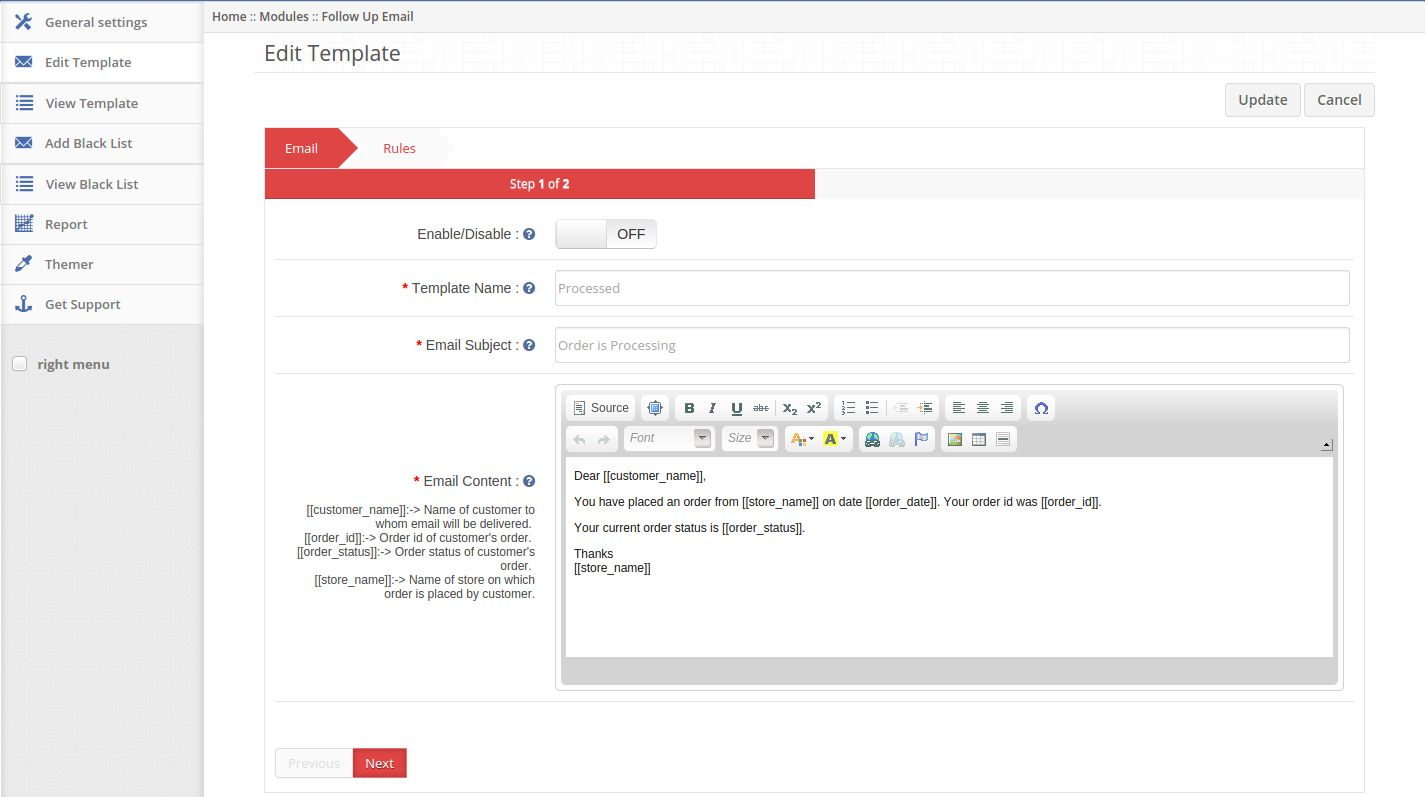
1. Here admin can create a new template.

2. Enable/Disable: Enable or disable template.

3. Template Name: Set name of template.

4. Email Subject: Set subject of email to be sent.

5. Email Content: Set content of email to be sent.

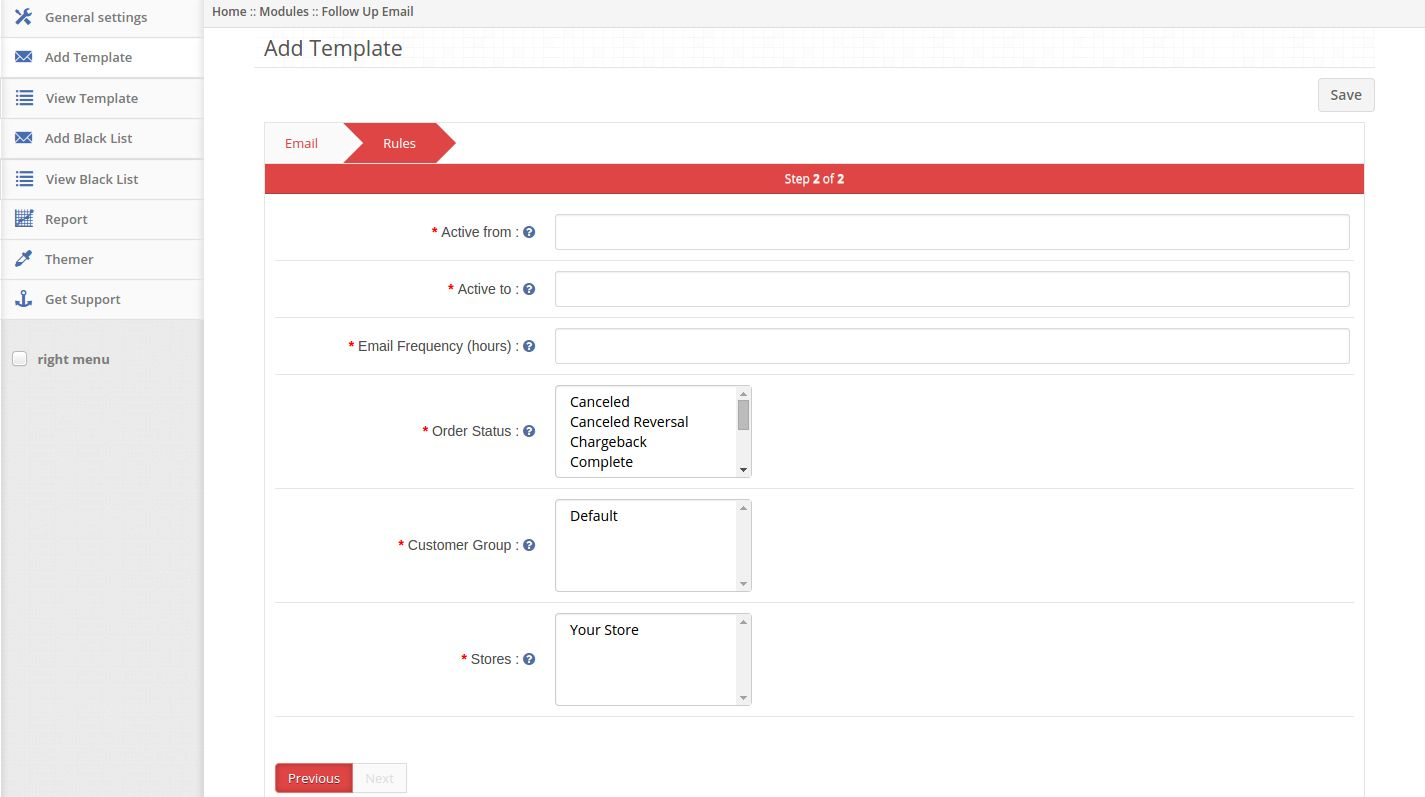
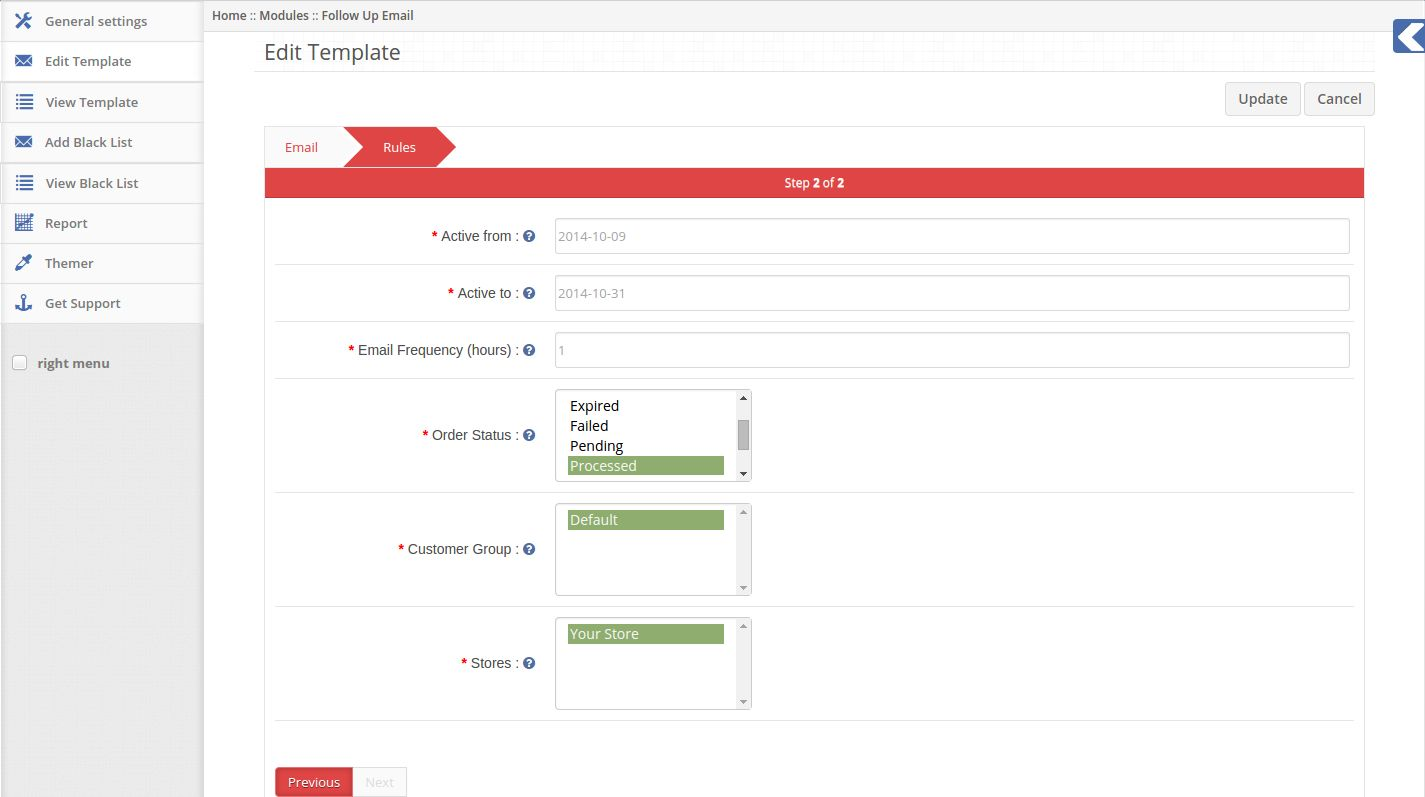
6. Active from: Set start date of sending emails of this template.

7. Active to: Set end date of sending emails of this template.

8. Email Frequency: Set delay time (in hours) for sending emails.

9. Order Status: Select one or multiple order statuses after which you wish to send emails.

10. Customer Group: Select one or multiple customer groups. Email will be sent to customers belonging
to selected customer groups.

11. Stores: Select one or multiple stores. Email will be sent to customers who placed orders from
selected stores.

12. Email will be sent to customers belonging to any of the selected customer groups who placed order
from any of the selected stores, after selected (email frequency) hours of their order reaching any of
the selected order statuses.

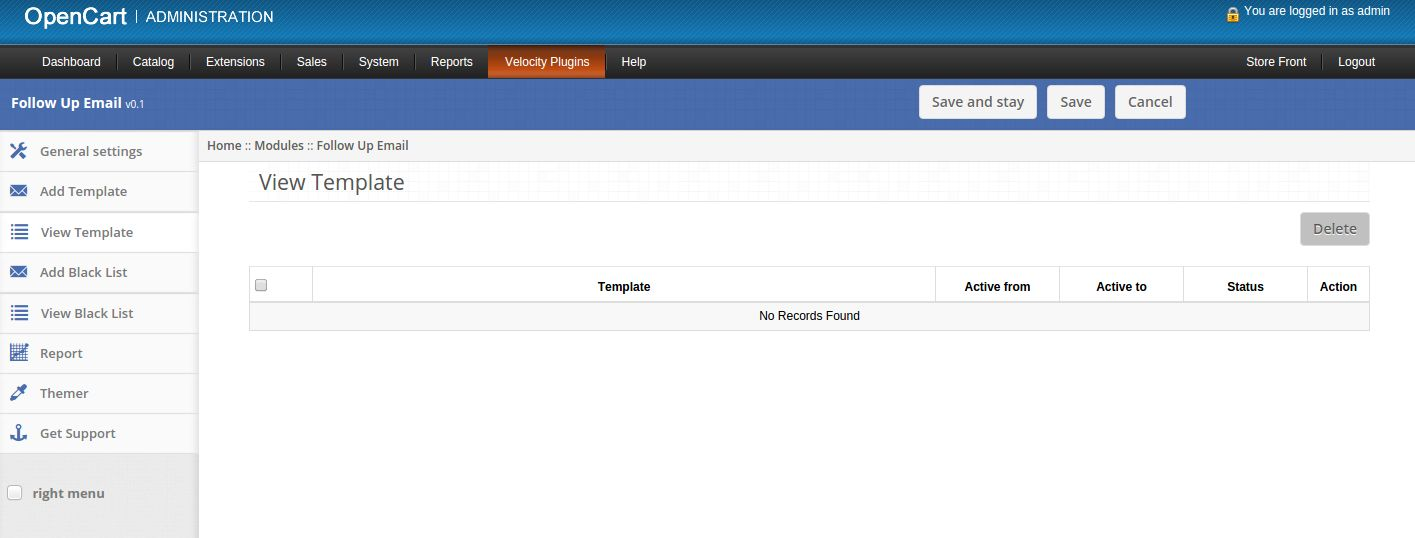
3. View Template tab

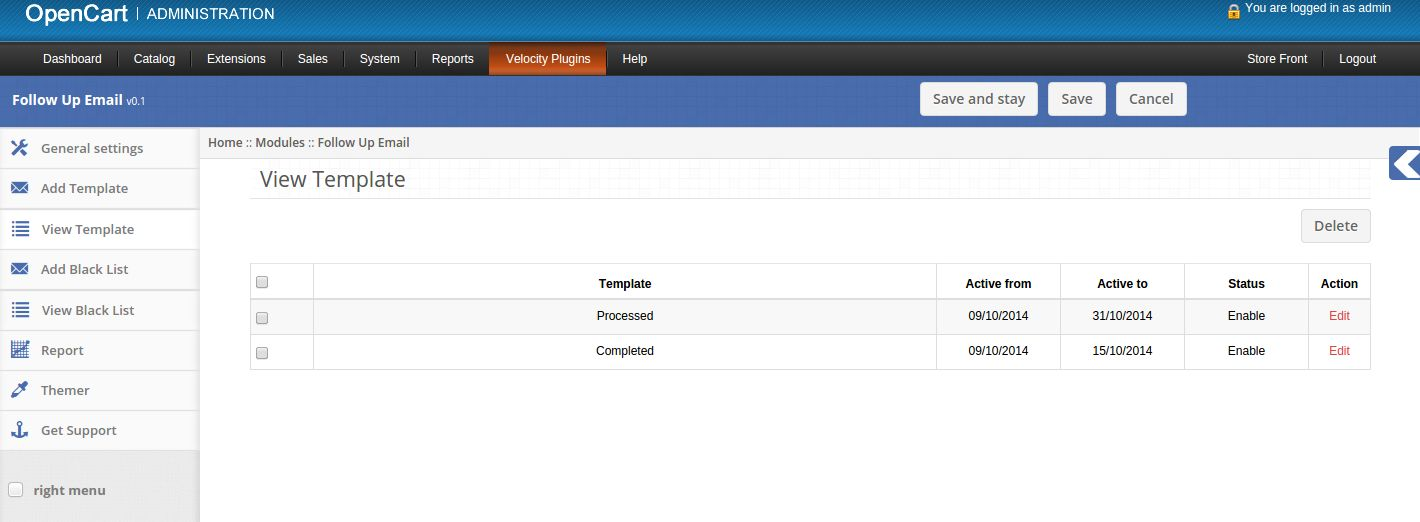
1. Here admin can see list of saved templates.

2. If their are no saved templates then this tab will look as follows:

3. If their are some saved templates then this tab will look as follows:

4. Click on Edit link provided in front of every template to edit that template.

5. Click on Delete button to delete selected templates.

6. On clicking the edit link a form will appear to edit the promotion.

7. Enable/Disable: Enable or disable template.

8. Template Name: Set name of template.

9. Email Subject: Set subject of email to be sent.

10. Email Content: Set content of email to be sent.

11. Active from: Set start date of sending emails of this template.

12. Active to: Set end date of sending emails of this template.

13. Email Frequency: Set delay time (in hours) for sending email.

14. Order Status: Select one or multiple order statuses after which you wish to send emails.

15. Customer Group: Select one or multiple customer groups. Email will be sent to customers belonging
to selected customer groups.

16. Stores: Select one or multiple stores. Email will be sent to customers who placed orders from
selected store.

4. Add Black List tab

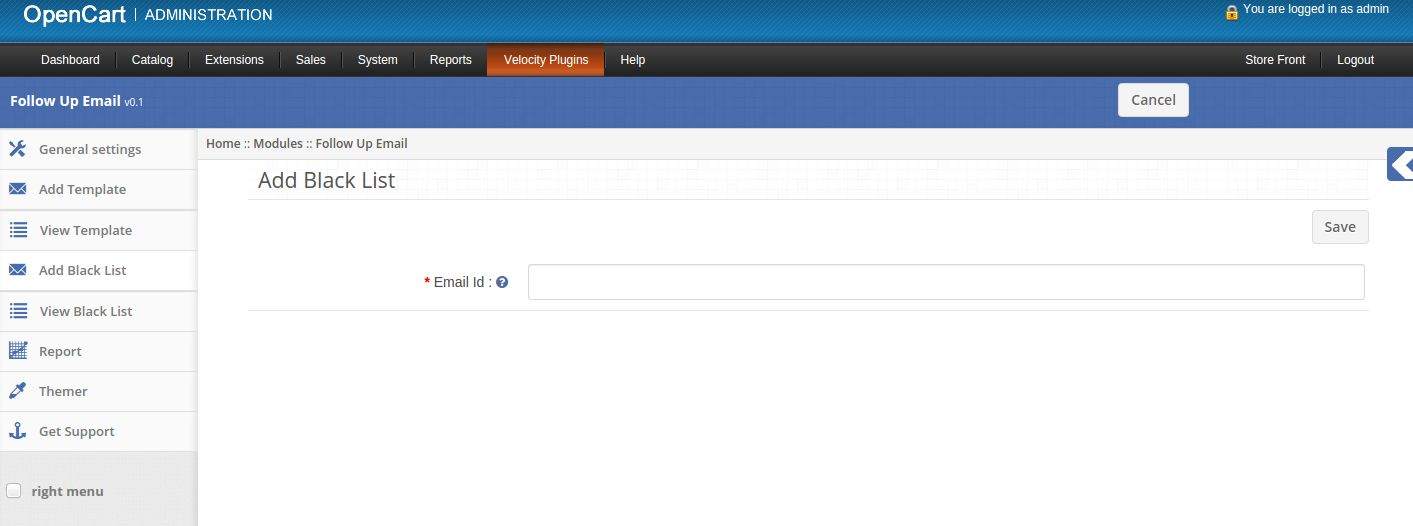
1. Here admin can add email id in black list.

2. Email Id: Enter email id to which you do not wish to send emails.

3. No email will be sent to email ids listed in black list.

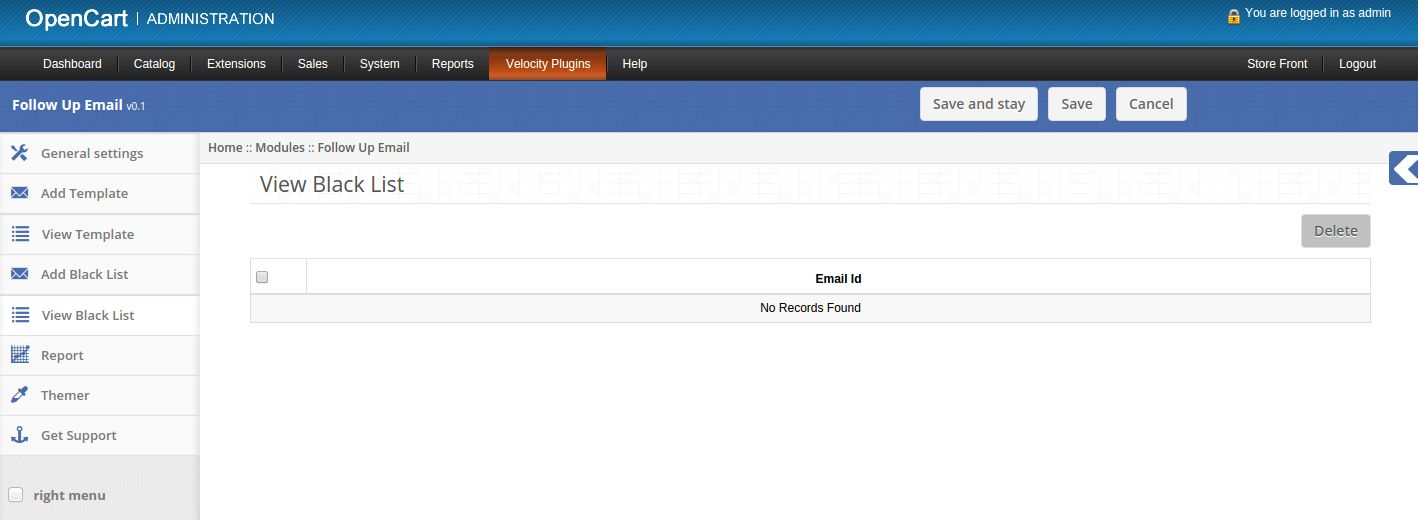
5. View Black List tab

1. Here admin can see black listed email ids.

2. If there are no saved black listed email id then this tab will look as follows:

3. If their are some saved black listed emails then this tab will look as follows:

4. Click on Delete button to delete selected email ids from black list.

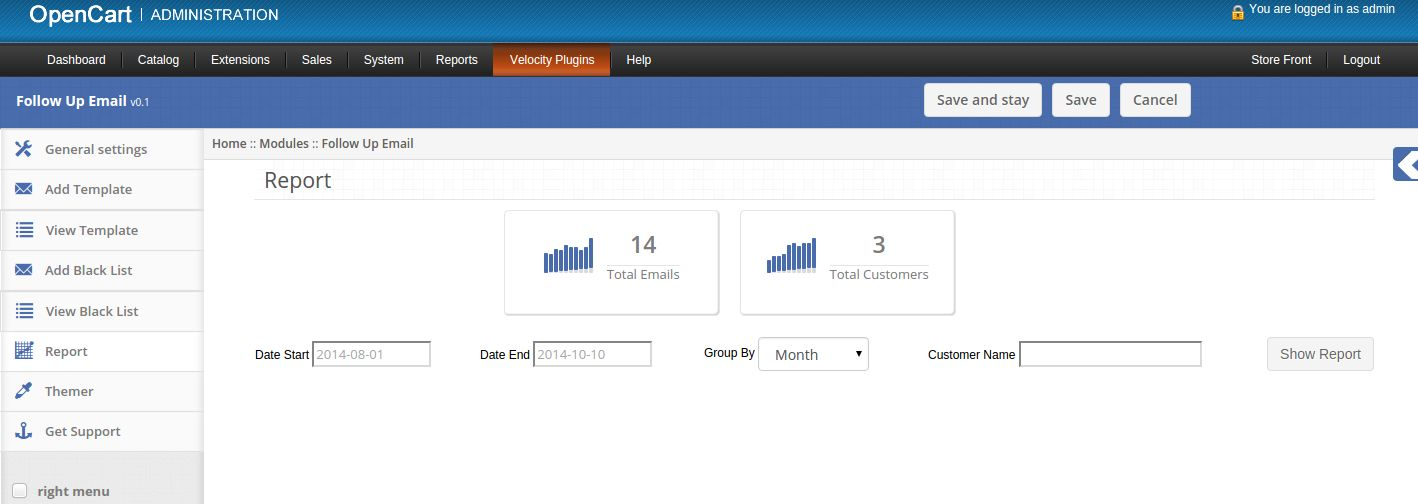
6. Reports tab

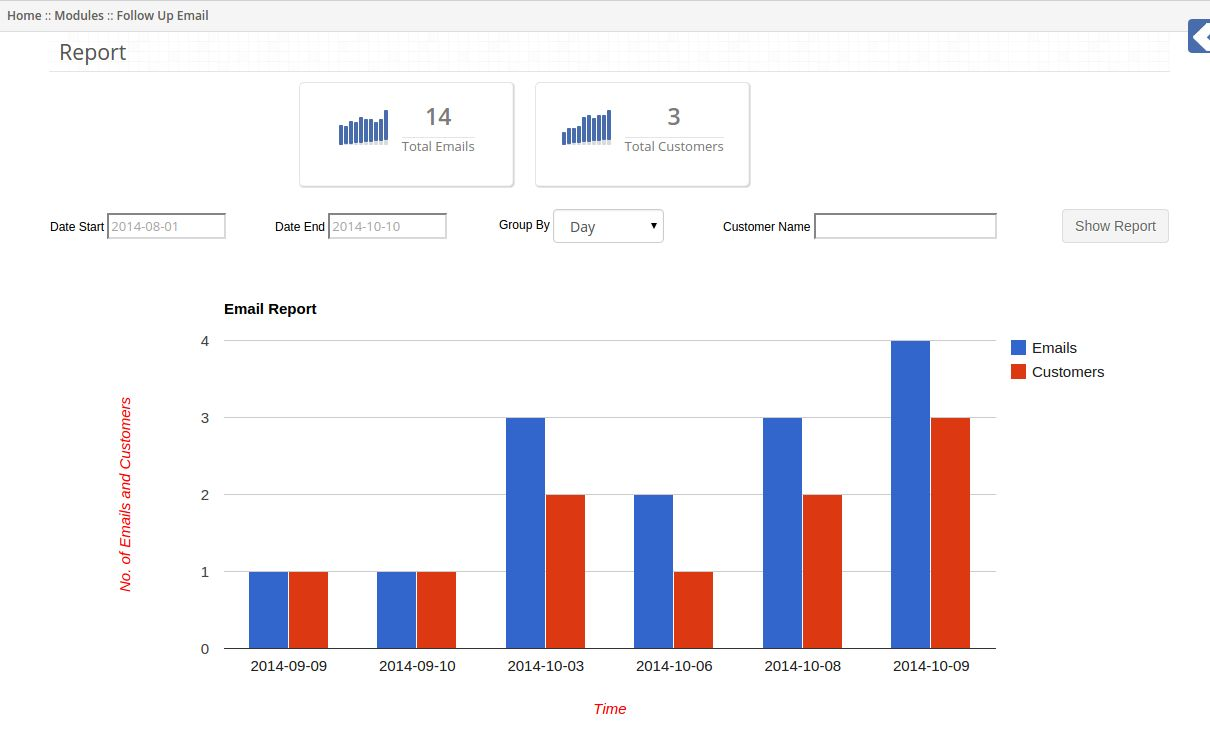
1. Here admin can see reports of emails sent to customers.

2. On the top of this tab total number of emails sent and total number of customers received email is
displayed.

3. On clicking Show Report button graphical report will appear as per values of filter.

4. You can also see report of email sent to particular customer by writing his name in filter.

7. Themer tab

By clicking on themer tab, you will have an option to change the theme of Follow Up Email admin
panel.

8. Get Support tab

By clicking on Get Support tab, you will be redirected to our support website, where you can contact
our support for help. Use this tab in case you some query/issue or found some bug.

Cron Setup

After installation of plug-in please add following cron to your store via control panel/putty. This cron should run once in every hour.
0 0 * * * wget -O /dev/null https://yourstore.com/index.php?route=followupemail/followupemail
Replace yourstore.com with url of your default store.

Recommendations

Set cron file to run once in every hour.

Opencart Shipworks – User Manual

Demo to Setup OpenCart Shipworks Plugin Instructions

1. Download & Install the shipworks from https://www.shipworks.com/shipworks/download.php

2. After completion of installation of Shipworks, login into shipworks.

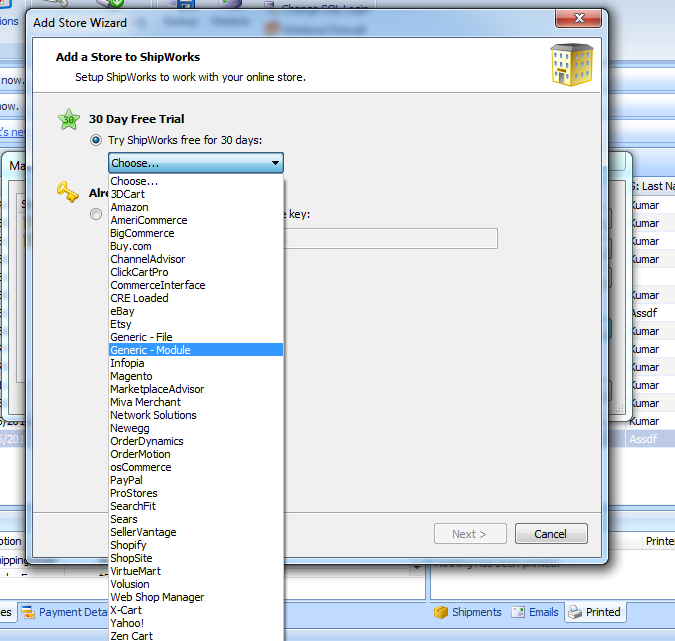
3. Go to Manage -> Stores & Add New Store to add new store if you have added any store in shipworks else shipworks automatically open the Add New Store screen.

4. Select Generic Module from the cart list as shown below & click Next.


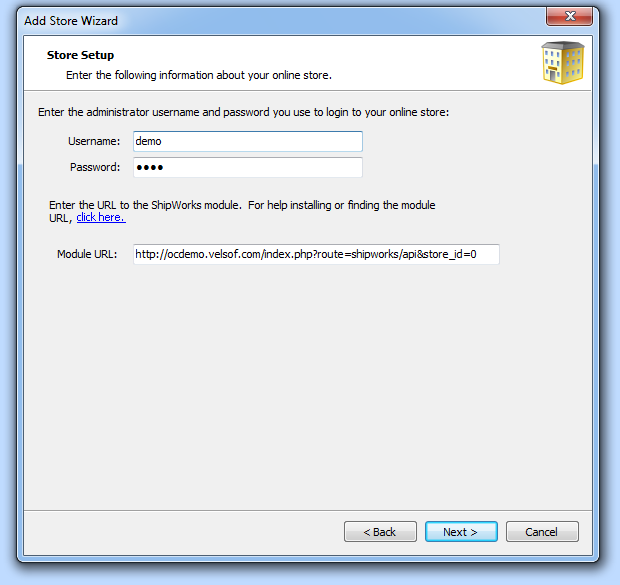
5. On the next screen, enter the following details.
Username: demo
Password: demo
Module URL: https://ocdemo.knowband.com/index.php?route=shipworks/api&store_id=0


6. After adding the Module URL, Click on the Next button & follow the instructions on Shipworks
screen.

7. When Shipworks ask for license key, provide the following license key & click next.

FZQ5K-EGRA2-ENMFT-55XKB-GENERIC-NSRIVASTAVA2@VELSOF.COM

8. After that click Finish button. Now shipworks is ready to download the orders from the server.

9. Click on the Download button to download the orders. System will download the orders into
shipworks from the server.

10. You can test by creating new order on the site i.e. https://ocdemo.knowband.com

Knowband OpenCart Filter Pro Extension – User Manual

Introduction:

Knowband offers OpenCart Filter Pro extension which simplifies the product searching for your store customers. With the help of this improve filter module the e-merchant can showcase various filtering options on the website store. Thus customers can easily find the required product just by selecting the appropriate filter options.

Features:

  • The Opencart product filter module is very easy to install and configure.
  • The store admin can activate/deactivate the search filter plugin anytime.
  • The Opencart filter by price module offers a simple and hassle-free implementation.
  • You don’t need to change codes for implementation.
  • No technical help required for applying this functionality.
  • The store owner can allow the users to minimize/maximize the filter options.
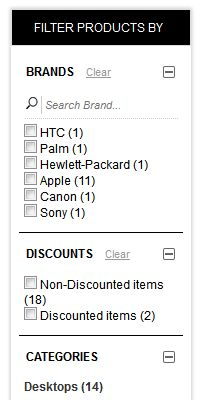
  • AJAX-based navigation makes product searching faster.
  • You can show/hide the available products count.
  • Provide filtering based upon many options like attribute, brands, categories, discount etc.
  • The Opencart filter extensions allow the store owner to select the suitable location for showing filter options.
  • OpenCart custom filter extension allows setting sort order for filter options.
  • OpenCart attribute filter plugin Doesn’t conflict with any other module.
  • Checkbox layered navigation module offers free installation support.
  • Free support and future updates.

How to install OpenCart Filter Pro plugin on your server

1. Download the zip from OpenCart & unzip into a folder.

2. Open the upload directory & you will see following folder structure.

3. Login via FTP & Drag drop all the folders into your server root directory. You dont have to changet he default theme folder name to your theme folder name.

4. You will find the plug-in ready to be installed in the Modules of your OpenCart.
You must have VQMOD installed for this plug-in to work. If VQMOD is not installed please download and install from the URL below:
https://code.google.com/p/vqmod/

5. Click on Install link to install the plug-in.

6. Delete the vqcache files from the vqmod/vqcache folder.

7. To access settings of Filter Pro plug-in, click on the edit button for filter Pro in the list of modules as shown below.

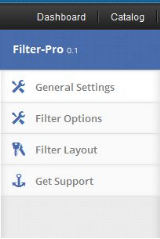
8. Store admin will have various settings options categorized in the left column as shown:

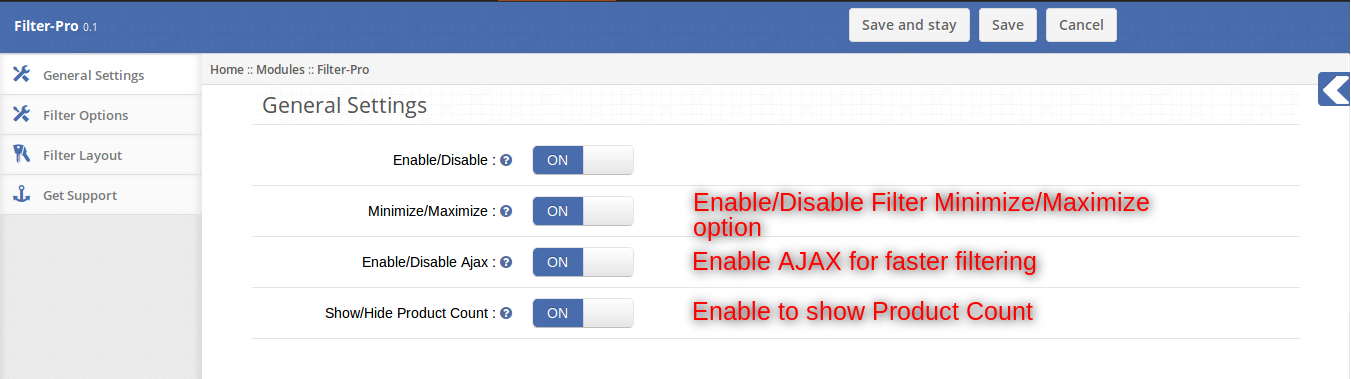
1. General Settings tab

Admin can play with various settings to customize the module according to him/her. Settings provided under this tab are applicable to the entire module be it on any layout. Following settings options are available for it:
1. Enable/Disable: This is the global enable/disable switch for module. Enabling/Disabling this switch will enable/disable the entire module wherever applied.
2. Minimize/Maximize: Enabling this will give user the option to minimize and maximize each filter onstore front.
Clicking on the + icon will maximize the filter data and the +icon will change to a – icon.

3. Enable/Disable Ajax: If you switch it on, filtering would be done via Ajax otherwise on page refresh.

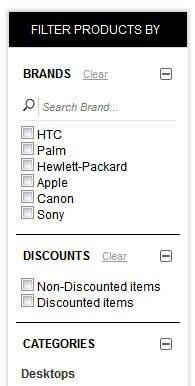
4. Show/Hide Product count: If you switch on this button, store front users will be able to see the products count with each filter.

If you switch this button off, you will not be able to see any product count with any filter.

2. Filter Options tab

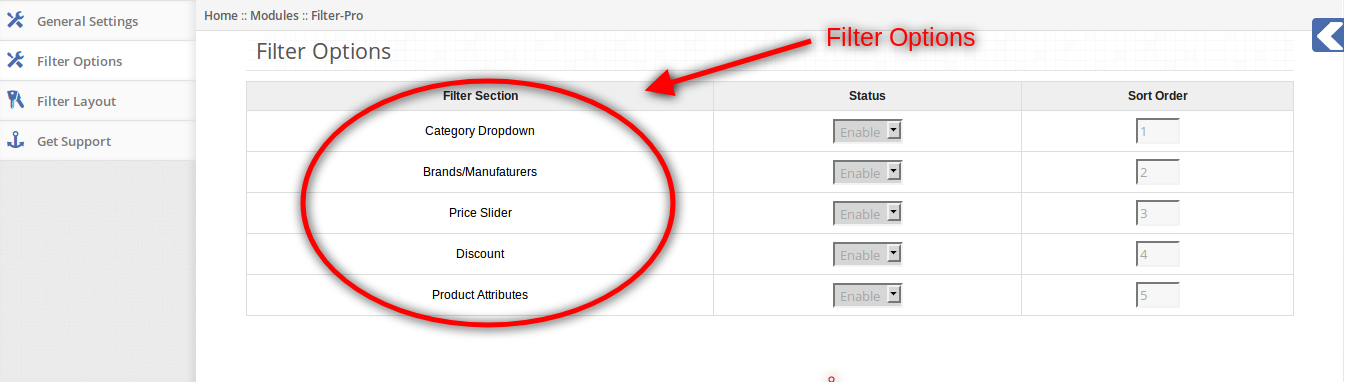
Under this setting option, admin can choose which filters should be enabled for all layouts. Also, sort order for each filter can be put in here. Options are described as following:

1. Status for each category: Each filter namely category, Brands, Price, Discount and Product Attributes have option to be either enabled or disabled globally. If any of these filters are disabled,they will not appear on any module whether they are enabled on a layout or not.

2. Sort Order for each category: Each filter has a text box for entering a sort order. This sort order decides which filter may appear above another filter in the module.
Filter with smallest sort order will appear at the top of the module, largest at the bottom-most part of the module.

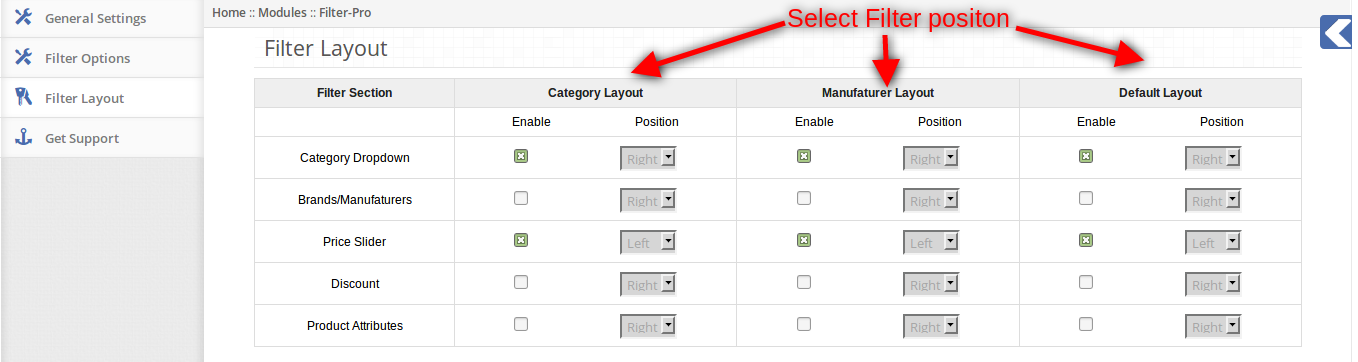
3. Filter Layout tab

Under this setting option, admin can choose to show specific filters for specific layouts on left or right positions.

In the filter option table, each filter has corresponding options for each layout.

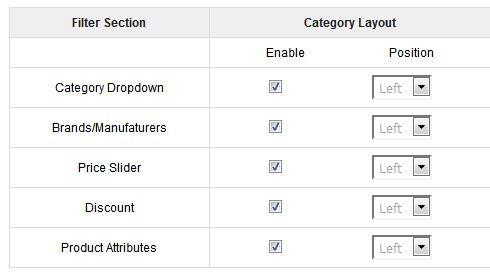
1. Enable: To enable a filter, you must check enable the checkbox for that layout corresponding to the filter you want to enable. For example, if you want to enable Product attributes for the category layout, you will have to check enable checkbox under category layout corresponding to Product Attributes.

2. Position: You can choose to show an enabled filter on either left-hand side or right-hand side of the layout by selecting the position from the drop down in front of each filter.

Store Front

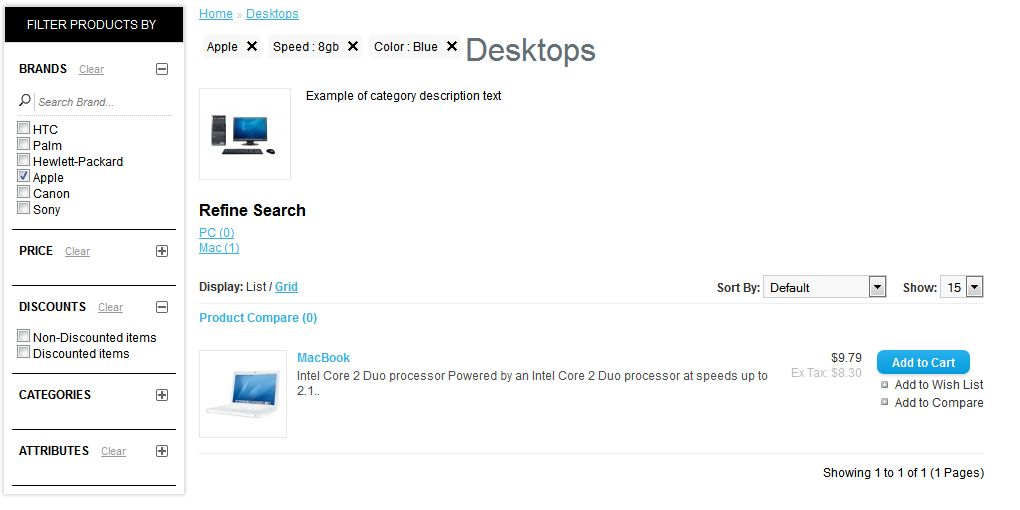
On the front- end, users will be able to view all enabled filters on the respective layouts on the respective positions (left, right).

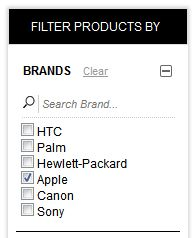
  • On checking any of the check-boxes, product listing will happen according to the options chosen,also the chosen options will be displayed on top.

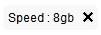
  • Clicking on close icon (as highlighted below) of any of these will remove that filter immediately and make a new product listing.

Each filter also has the option for clearing all the chosen options within a filter, clicking on the link
Clear will remove all filtering options, uncheck all the options for that filter and create a new product listing.

For more details please visit: 

Module Link: https://www.knowband.com/opencart-filter-pro

Admin Demo Link:

https://ocdemo.knowband.com/1.5/admin/index.php?route=module/filterPro&token=c4f245743f23ccbf154ba1ec9a69e002

Front Demo:  https://ocdemo.knowband.com/1.5/index.php?route=product/category

Please contact us at support@knowband.com for any query or custom change request as per your business requirement.

Opencart Birds View – User Manual

How to install OpenCart Birds View Plugin on your server

1. Folder structure of BirdView plugin.

2. Open the upload folder and you will find the following folder structure:

You must have VQMOD installed for this plug-in to work. IfVQMOD is not installed please download and install from the URL below:
https://code.google.com/p/vqmod/

3. Select all the folder and drag and drop them to the root directory of your OpenCart storet hrough FTP.

4. You will be able find the plug-in ready to be installed in the Modules (Extensions -> Modules)in your OpenCart store as shown below.

5. Click on the Install link to install the plugin.

6. To enable the plugin, Go to Extension -> Module & edit the Birdview plugin.

7. Click on edit button in module section as shown below:

8. On clicking edit button, A module page will be displayed.

Features

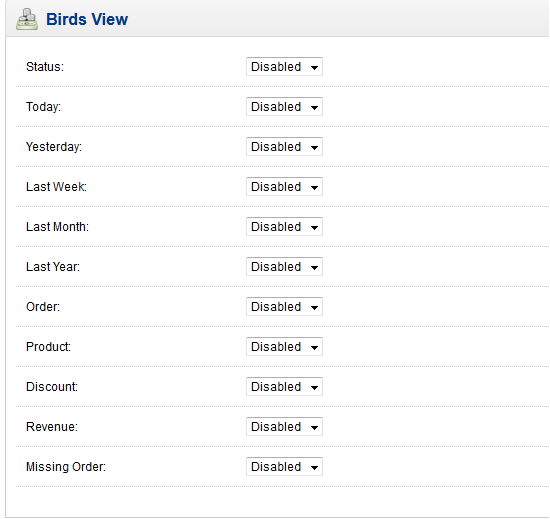
1. Select enable for status field to enable the plugin.

2. Enable the chart to display the chart on admin.

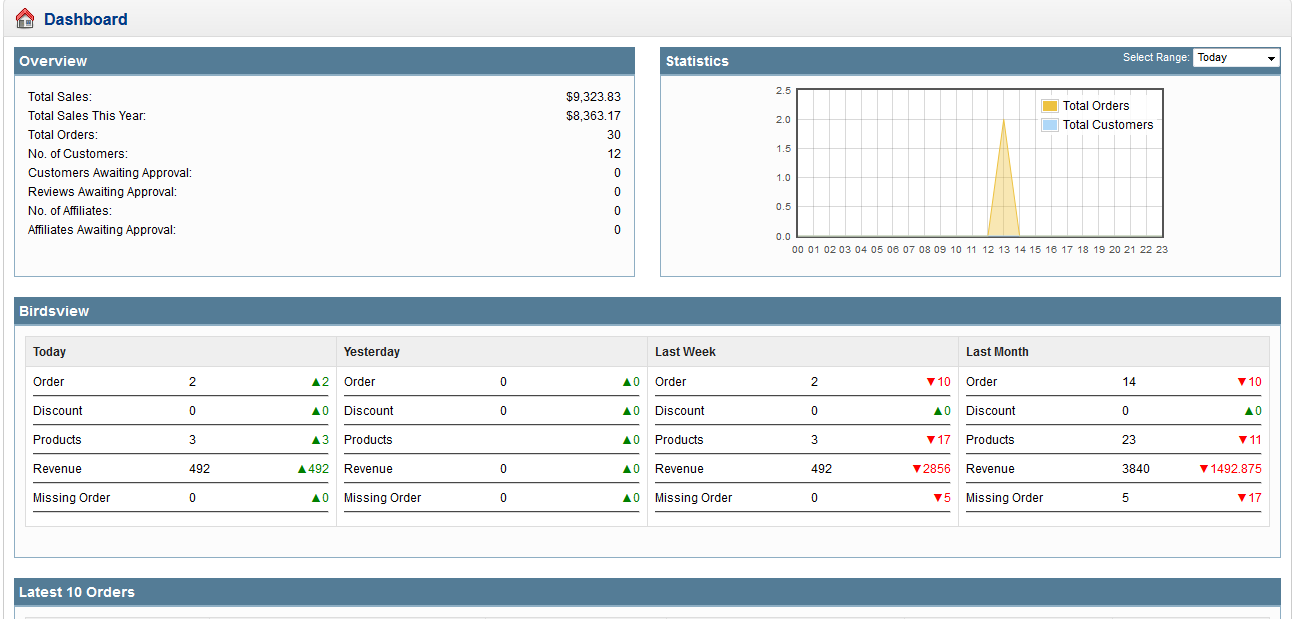
3. Select enable for Today, Yesterday, Last Week, Last Month, Last Year option to enable to boxes
in the Admin Dashboard. If you want to disable any of the boxes, then select disabled option for
the particular boxes.

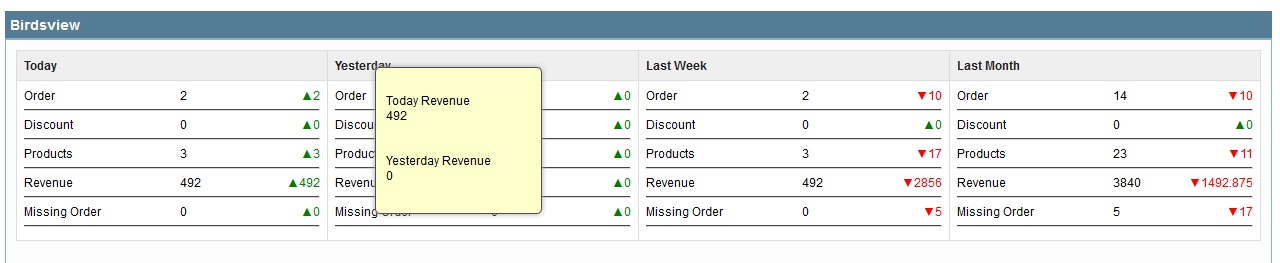
4. Each box i.e. Today, Yesterday, Last Week, Last Month, Last Years having type of data i.e.Order, Product, Discount, Revenue, Missing order.

  • Order: No of orders received
  • Product: No of products sold
  • Discount: Coupon/Voucher discount on sold product
  • Revenue: Total amount of sold products
  • Missing Order: Received missing orders.

5. Disable any columns to remove the data from boxes.

Screen shots