Nowadays everyone wants to get rid of spam on their website whether it is spam comments or spam messages or spam traffic on your site. To protect your website from spam, one of the best and easiest ways is to use Google reCAPTCHA.
In earlier days, people used to put some random number or string on the screen and verify it on the server-side. But this method is the old-day method and it is also time taking for many users whereas Google’s reCAPTCHA method is easy to use and takes less time resulting in a better user experience. They just need a single click to prove that they are humans and not a robot. Google reCAPTCHA is very easy to implement in a PHP script.
In this blog, you will learn how to Integrate Google reCaptcha with PHP in our step by step guide.
Step 1: To fetch the Google reCAPTCHA API key
To get an API key to use reCAPTCHA with PHP, you need to register your website at – https://www.google.com/recaptcha/admin. The screenshots are given below for your help:
Label: Use a label of your own choice, so that it is easy to recognize the site in the future. You can add your brand name of website URL in this field to enhance the readability of the project name.
reCAPTCHA type: Choose any one type of reCAPTCHA you prefer for your site. There are two types available currently i.e., reCAPTCHA v3 and reCAPTCHA v2. We have used reCAPTCHA v2 in the sample project.
Domains: Here you need to enter your website name for which you will be implementing the reCAPTCHA functionality. It applies to the domains you enter here, and also to its subdomains. For example, a registration for abc.com also registers xyz.abc.com.
Now just check the checkbox of Accept the reCAPTCHA Terms of Service and click on Submit button.
Now you have the site key and secret key for your website.
Step 2: To Implement the Google reCaptcha with PHP the second step comes as Implementing reCAPTHA functionality to your site:
To add reCAPTCHA in PHP first you need to include the reCAPTCHA JavaScript library in your HTML.
Knowband offers Google ReCaptcha Addon for various platforms including PrestaShop, andOpenCart. The Google ReCaptcha module is a powerful security tool that guards your website against spam entries while facilitating easy access for actual users.
The Google ReCaptcha plugin can be used for sign-in, registration, password reset, well-known contact forms, and other things. Images are shown in the Google ReCaptcha addon as part of their standard validation processes to help identify humans.
This Google reCaptcha module offers excellent performance and is extremely customizable. From the back end of Knowband modules, the e-merchant may quickly adjust the Google reCaptcha addon.
Prestashop Google ReCaptcha Addon
PrestaShop Google reCaptcha by Knowband enhances your store’s security by integrating Google reCaptcha, preventing spam and automated bots.
Implementing Google reCAPTCHA on websites is essential for security. It helps tell real users from bots, preventing spam and automated attacks. This keeps user data safe and ensures the website runs smoothly. By blocking harmful traffic, reCAPTCHA improves the user experience, making online interactions safer and more reliable.
Recommended read –Empower Your PrestaShop Store Security with Knowband’s Top PrestaShop Modules
Along with this, the Google reCaptcha is also compatible with Knowband’s One Page Checkout, protecting you against transaction fraud. It is the best way to guard your store against transaction fraud. To view the admin demo and front-end demo of the Google reCaptcha Module, visit our store.
The relational database management system MySQL is free and open-source. The word “My” is a combination of “SQL,” the acronym for a structured query language, and “My,” the name of co-founder Michael Widenius’s daughter.
A relational database arranges data into one or more tables where it is possible for the data to be related to one another. The relational database’s data can be created, modified, and extracted using the SQL programming language, which is also used to manage user access to the database. An RDBMS, such as MySQL, works with an operating system to implement a relational database in a computer’s storage system, manages users, permits network access, and makes it easier to test database integrity and create backups.
Under the terms of the GNU General Public License, MySQL is free and open-source software. It is also accessible under a number of proprietary licences. Sun Microsystems acquired the Swedish company MySQL AB, which owned and sponsored MySQL (now Oracle Corporation).
Objectives of the blog
To learn how to fix the issue “The user specified as a definer (‘xyz’@’localhost’) does not exist” in MySQL. It can be any value in place of ‘xyz’.
This error has occurred because you have defined different users in Definer and using other accounts in MySQL.
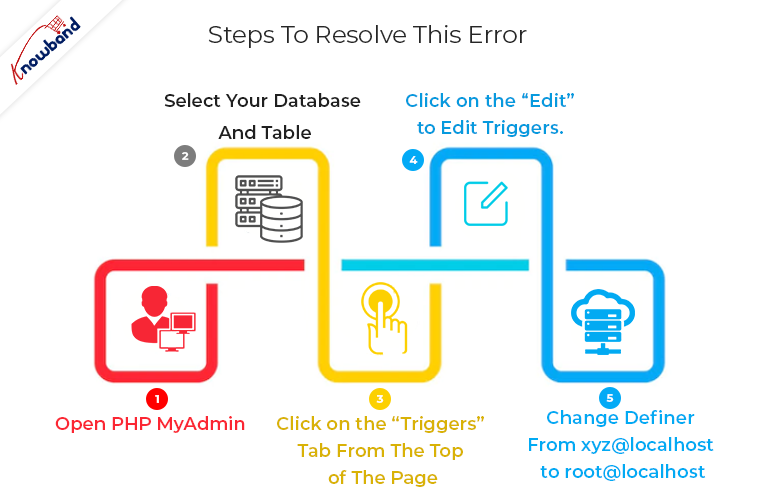
So while creating Triggers, you should use the “root@localhost” in the Definer. Follow the below steps to resolve this error:
Step 1: Open phpMyAdmin
Step 2: Select your database and table
Step 3: Click on the “Triggers” tab from the top of the page
Step 4: Click on the “Edit” to edit triggers.
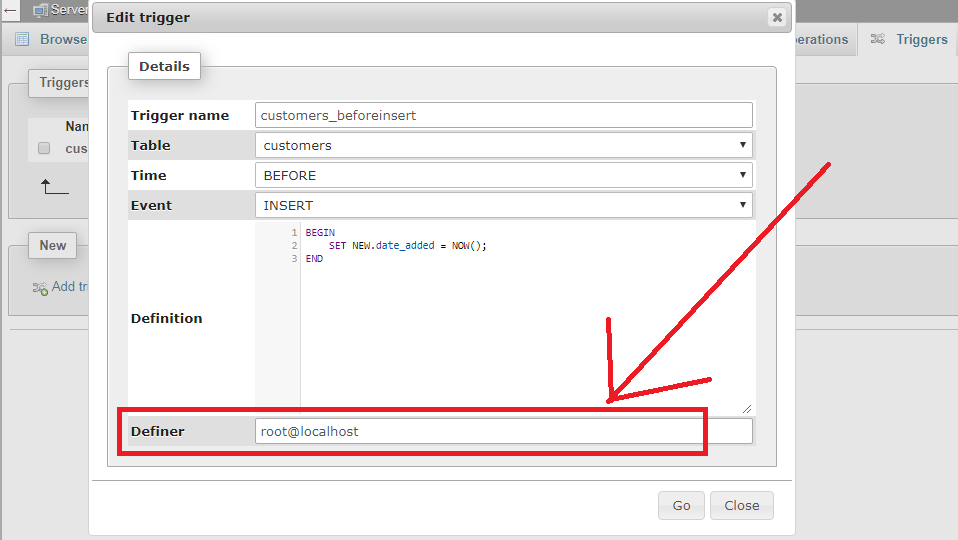
Step 5: Change Definer from xyz@localhost to root@localhost
For more details check this screenshot:
You can contact us at support@knowband.com if you have any questions. Best-in-class solutions for all things eCommerce are offered by Knowband. Additionally, we offer custom development services for a variety of platforms like Prestashop, Opencart, Magento 2, and Magento 2.
First, we should know about the term “bounce rate”
In easy words we can say, bounce rate is the ratio between the number of visitors comes on our site and the number of visitors leaves our site from the landing page without navigating to another page.
When visitors or customers land on our website from any other external link for example advertisement, search result, shared link, etc but if they do not visit internal links of the site. This will increase the bounce rate as the server of Google Analytics will not be triggered due to no engagement.
So this will lower our ranking in Search Engine Results which is definitely a great loss for the growth of our website.
When the bounce rate matter
We should keep in mind that if the objective of our website is to share information then bounce does not matter for us. Let us take an example if our webpage gives any text-based information and if visitors came and read the articles and leave our sites. Here the job is done as the visitor got the information.
But the bounce rate really matters if we are looking forward to getting more and more active visitors engaged on our sites.
The major reason for the bounce rate
The website is taking more time to load.
Bad user interface and content management.
The UI of the landing page is complex which not easily understandable for every type of user.
Visitors didn’t get the information in the smart way which they looked for.
Internal links of our website are not clearly highlighted for the visitors.
Unwanted popup on the landing pages.
How to measure the bounce rate
Google provides many useful services for our website. To measure the bounce rate we can use Google Analytics which tracks and monitor the traffics coming on our websites. It calculates the total behavior on our website. So it is a great tool to measure the bounce rate of our website.
To use these tools we just need a Google account and link our website with Google Analytics. Note: If you need any help to use this tool please write the query in the comment box given at the bottom of the page.
According to Google
The bounce rate is a single-page session divided by all the sessions or the percentage of all sessions on your site in which users viewed only a single page and triggered only a single request to the Analytics server.
How To Minimize The Bounce Rate Of Our Website?
A Good Landing Page
A landing page is the first page where our visitors enter in our website by clicking on the links of search engine results. The first impression is the last impressions so landing page must have a clear and user-friendly interface.
The landing page plays an important role in the good conversions rate. A good landing page should an attractive offer and able to explain why it is valuable for money in concise terms. There should be an “About” section on the landing page and also navigation links should be clearly visible.
The landing page of Knowband is a good example of the landing page.
Reduce Page Load Time
As a user, we can know how irritating to browse the slow pages. Visitors simply press the back button if a page takes more than 5 seconds to load. Unwanted third party scripts on our website also increase the page load time. If we are showing an unoptimized image it also takes more time to load.
Tips:According to Google, a good score for page speed is 85 or above. We can know about the speed of our pages using the Google Analytics tool.
Remove Unwanted Pop-Ups
Unwanted pop-ups and ads on the pages are also responsible to increase the bounce rate.
AB Testing
AB Testing is a useful experiment where two or more designs of the same page will show randomly to the visitors. By seeing the report of the AB Testing we can analyze which design had performed better and given more conversion.
CTA: Call To Action
CTA is just like a hidden trap or baits on our landing page. Newsletter subscription, download button, internal links are some good examples of CTA. These things should be clearly visible on our pages.
Thanks for reading this blog. Hope all five mentioned tips will help you to reduce the bounce rate of your website. You can consider these points according to your business need.
To learn how to select modified files to deploy on the server using GitAhead.
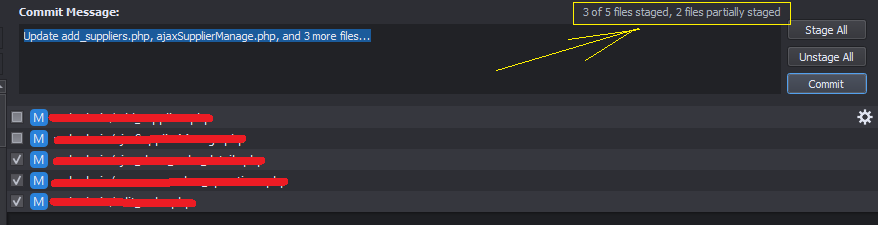
Generally, by clicking on the “Select All” button all the modified files selected and the “Select All” button disabled automatically.
But for some file, it will not select and if you try to do it manually it will not let you do. And it will also show those files as “partially staged”. You can see in the below screenshot:
To fix this issue you need to follow below steps:
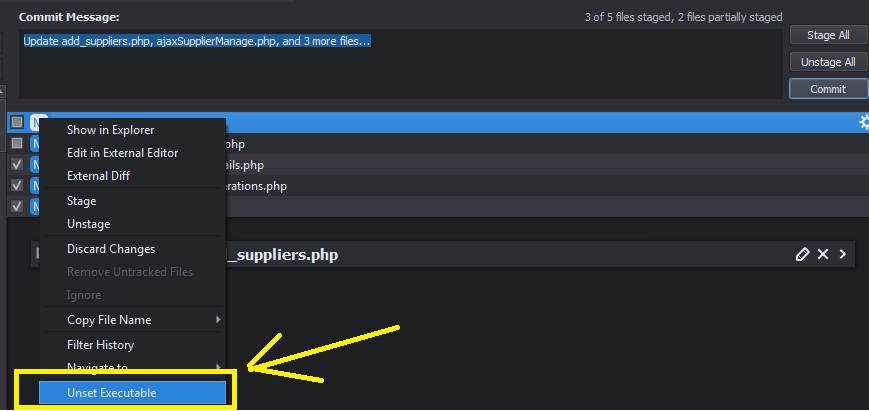
Step 1: Right-click on all that file and click on “Unset Executable” as shown in below screenshot:
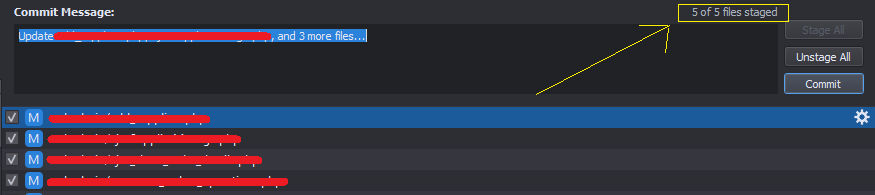
Step 2: Now click on the “Stage All” button, and now it will stage all the files. Now you will able to commit on server successfully.
In this encryption, we are going to use a secret key for encrypting the string. The algorithm used will be AES with CBC (Cipher Block Chaining) mode.
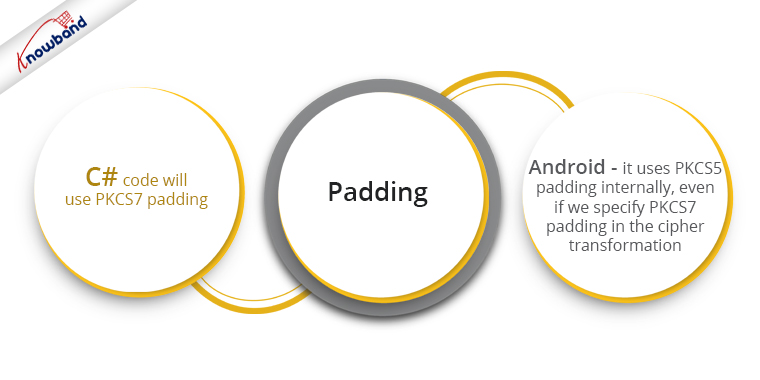
The C# code will use PKCS7 padding, as PKCS5 is not available there. In Android, it uses PKCS5 padding internally, even if we specify PKCS7 padding in the cipher transformation. So, we’re also specifying the PKCS5 padding mode. When tested, they both produce the same correct results.
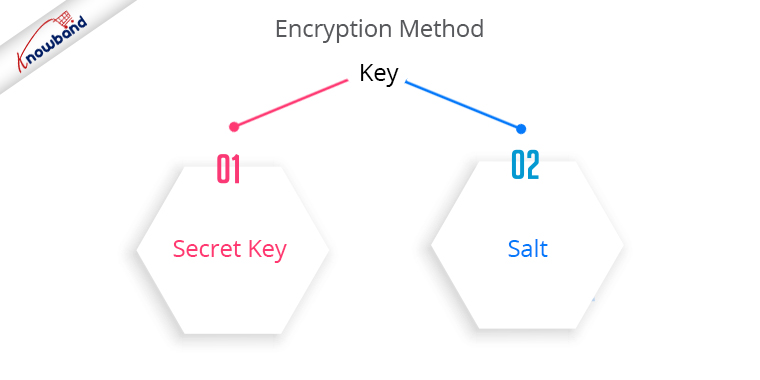
In this encryption method, a single key is used for both the secret key and the salt.
When using different keys for the secret key and salt, there was some difference between the Base64 encoded versions of the salt (or Initialization Vector). The Base64 encoded versions were created by Android and C# codes, and they were different from one another.
To overcome this, we’ve used a single key that will serve as both the secret key and the salt.
It is time to shower your social media posts with hashtags. If you are an active social media user, you would have probably seen users and businesses put a number of hashtags on their posts. And the usage goes extreme during the holiday season.
If you have an online business, you may be searching and digging the social media platforms to find the relevant and trending hashtags that could give a boost to your posts and provide them with a higher reach.
While hashtags can be used across multiple platforms, they are not as effective on other platforms as they are on Instagram and Twitter, and somewhat LinkedIn. Instagram rules the hashtag game. Though people also use hashtags on Facebook, they are the least impactful.
Using hashtags, on the right platforms, can create huge brand exposure, especially during the holiday season and increase your follower base widely.
They give you organic reach, and with higher reach come higher engagement.
In this article, I have compiled a list of the most popular Instagram hashtags that you can use in this Holiday season which includes Thanksgiving, Black Friday, Cyber Monday, Christmas and New Year.
The hashtags that I have mentioned are not niche-specific. You can filter out the relevant hashtags and use them accordingly. You can use a maximum of 30 Instagram hashtags with one post so, choose them wisely. Let’s start with the general holiday season hashtags.
Hashtags for Holiday Season
Some of the most popular Twitter and Instagram hashtags for the holiday season are-
#holiday
#holidaydecor
#holidayseason
#holidayparty
#holidayfun
#holidaygifts
#holidayoutfit
#holidaygiftguide
#holidayweekend
#holidaymood
#holidayshopping
#holidaycollection
#holidayfashion
#holidayspirit
#holidaysale
#holidaysarecoming
#holidaydeals
#holidayvibes
#holidayspecial
#holidaygiveaway
#holidaygiveaway2021
#holidaycontest
Now, let’s find out the popular Twitter, Facebook, and Instagram hashtags for individual holidays.
Hashtags for Thanksgiving
#thanksgiving
#thanksgivingclapback
#thanksgivingdecor
#thanksgivingcookies
#thanksgivingdinner
#thanksgivingtable
#thanksgivings
#thanksgivingoutfit
#thanksgiving2021
#thanksgivingday
#thanksgivingeve
#thanksgivingprep
#thanksgivingservice
#thanksgivingweekend
#thanksgivingturkey
#thanksgivingtreats
#thanksgivingdecorations
#thanksgivingdeals
#thanksgivingsale
#thanksgivinggiveaway
#thanksgivinggift
Social Media Hashtags for Black Friday
#blackfriday
#blackfriday2021
#blackfridaysale
#blackfridayweek
#blackfridaydeals
#blackfridayshopping
#blackfridayweekend
#blackfridayspecial
#blackfridayoffer
Instagram Hashtags for Cyber Monday
#cybermonday
#cybermonday2021
#cybermondaysale
#cybermondaydeals
Instagram Hashtags for Christmas
#christmas
#christmastree
#christmasday
#christmasdecor
#christmascookies
#christmasgifts
#christmasdecorations
#christmasparty
#christmasshopping
#christmastime
#christmaspresents
#christmascountdown
#christmasspirit
#christmascards
#christmasdeals
#christmassale
#christmasgiftideas
#christmascontest
#christmasgiveaway
#merrychristmas
#merryxmas
#santaclaus
#xmas
#xmastime
#xmasgifts
#xmasdeals
Social Media Hashtags for New Year
#happynewyear
#happynewyear2021
#newyear
#newyearsresolution
#newyearsale
#newyeardecoration
Final Word
People would be performing searches on social media using hashtags to find out some exciting deals and offers that brands are offering. And you never know when a user finds your post in the search results and lands on your Brand page.
Hashtags have the potential to turn prospects into potential customers. It kind of does free marketing for your Brand. Use them smartly but do not overuse them (Instagram hashtags max limit is 30). Your posts shouldn’t look clunky.
Do you know you can utilize the power of hashtags to increase your sales? No, I ain’t kidding. This is possible with Knowband’s Instagram Shop Gallery module.
The Instagram Shop Gallery module adds an attractive Instagram Gallery interface to your website. Using this module, you can fetch images from Instagram using any hashtag and map your products on those images. Check out the modules for your relevant platform to know their complete features and benefits.
QR code is a type of two dimensional barcode which is abbreviated from Quick Response Code . It is an optical label which contains information about the item. It is simply attached to the item. It contains black squares which are arranged in a squares grid with white background.
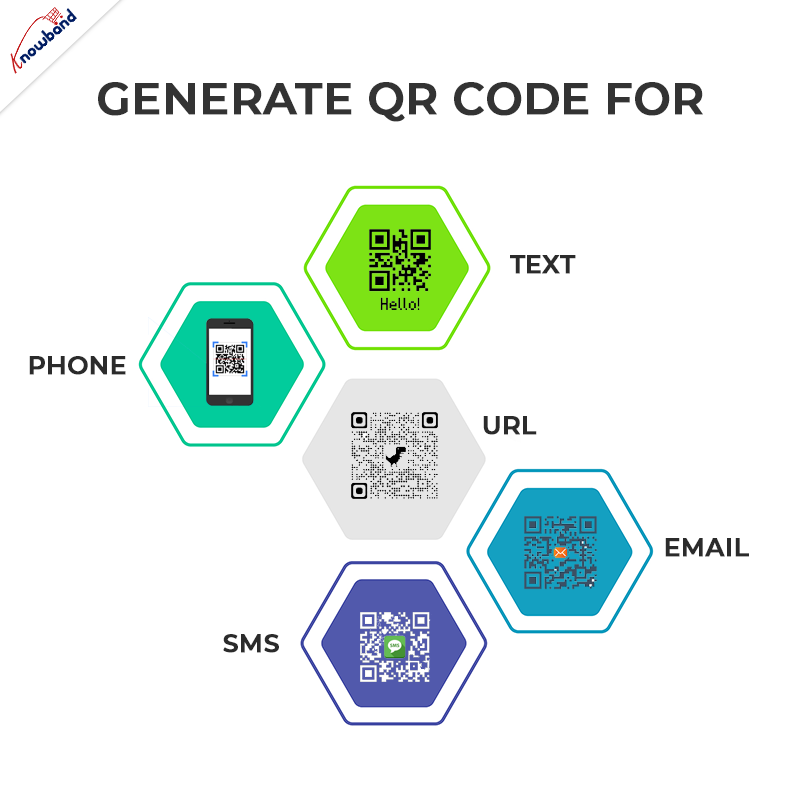
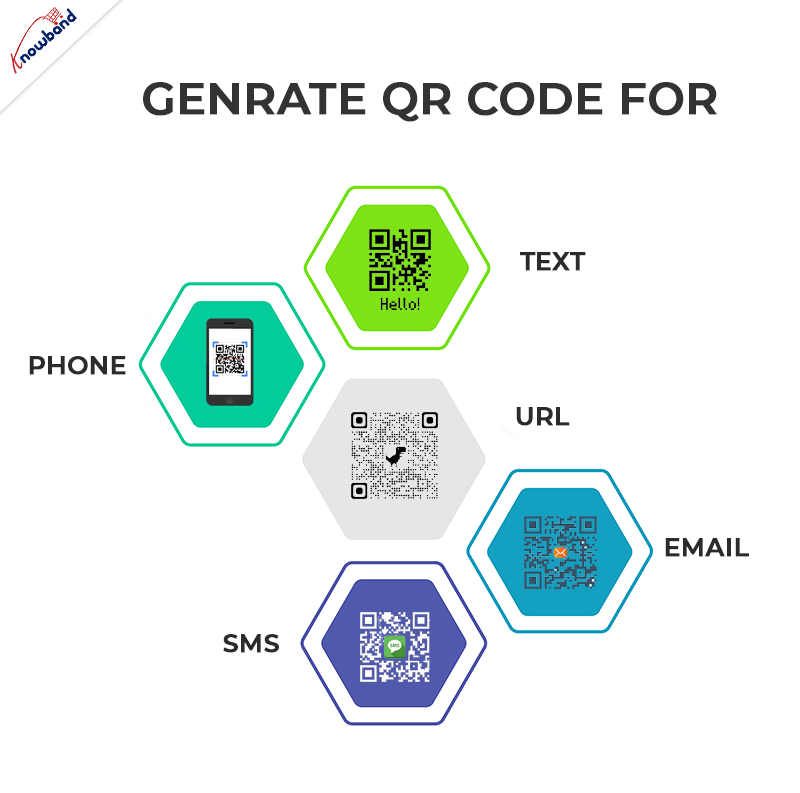
In this blog we will learn how to generate QR code using PHP step by step. With the help of simple PHP script you can generate QR code for Text, Phone, URL, Email and SMS.
In this project you need to create two files:
qrcode.php
index.php
STEP 1: Define class QrCode in qrcode.php:
1. Create a class QrCode. In this class, we will define the URL for GOOGLE CHART API and functions to generate the QR code for Text, Phone, URL, Email and SMS.
STEP 2: Define URL of Google chart API in QrCode Class:
1. We create variables to store the URL of Google chart API and data which is used to create the QR code.
<span style="vertical-align: inherit;"><span style="vertical-align: inherit;">class QrCode {</span></span><span style="vertical-align: inherit;"><span style="vertical-align: inherit;">
//URL OF GOOGLE CHART API</span></span><span style="vertical-align: inherit;"><span style="vertical-align: inherit;">
private $apiUrl = 'https://chart.apis.google.com/chart';</span></span><span style="vertical-align: inherit;"><span style="vertical-align: inherit;">
// DATA TO CREATE QR CODE</span></span><span style="vertical-align: inherit;"><span style="vertical-align: inherit;">
private $data;</span></span><span style="vertical-align: inherit;"><span style="vertical-align: inherit;">
}</span></span>
STEP 3: Define Functions to generate QR code of different types in QrCode Class:
We have the following types and functions for the same in which we can generate the QR Code:
1.URL
<span style="vertical-align: inherit;"><span style="vertical-align: inherit;">// Function which is used to generate the URL type of QR Code.</span></span><span style="vertical-align: inherit;"><span style="vertical-align: inherit;">
public function URL($url = null) {</span></span><span style="vertical-align: inherit;"><span style="vertical-align: inherit;">
$this->data = preg_match("#^https?\:\/\/#", $url) ? </span><span style="vertical-align: inherit;">$url : "https://{$url}";</span></span><span style="vertical-align: inherit;"><span style="vertical-align: inherit;">
}</span></span>
2.Text
<span style="vertical-align: inherit;"><span style="vertical-align: inherit;">// Function which is used to generate the TEXT type of QR Code.</span></span><span style="vertical-align: inherit;"><span style="vertical-align: inherit;">
public function TEXT($text) {</span></span><span style="vertical-align: inherit;"><span style="vertical-align: inherit;">
$this->data = $text;</span></span><span style="vertical-align: inherit;"><span style="vertical-align: inherit;">
}</span></span>
3. EMAIL
<span style="vertical-align: inherit;"><span style="vertical-align: inherit;">// Function which is used to generate the EMAIL type of QR Code.</span></span><span style="vertical-align: inherit;"><span style="vertical-align: inherit;">
public function EMAIL($email = null, $subject = null, $message = null) {</span></span><span style="vertical-align: inherit;"><span style="vertical-align: inherit;">
$this->data = "MATMSG:TO:{$email};SUB:{$subject};BODY:{$message};;";</span></span><span style="vertical-align: inherit;"><span style="vertical-align: inherit;">
}</span></span>
4.PHONE
<span style="vertical-align: inherit;"><span style="vertical-align: inherit;">// Function which is used to generate the PHONE type of QR Code.</span></span><span style="vertical-align: inherit;"><span style="vertical-align: inherit;">
public function PHONE($phone) {</span></span><span style="vertical-align: inherit;"><span style="vertical-align: inherit;">
$this->data = "TEL:{$phone}";</span></span><span style="vertical-align: inherit;"><span style="vertical-align: inherit;">
}</span></span>
5.SMS
<span style="vertical-align: inherit;"><span style="vertical-align: inherit;">// Function which is used to generate the SMS type of QR Code.</span></span><span style="vertical-align: inherit;"><span style="vertical-align: inherit;">
public function SMS($phone = null, $msg = null) {</span></span><span style="vertical-align: inherit;"><span style="vertical-align: inherit;">
$this->data = "SMSTO:{$phone}:{$msg}";</span></span><span style="vertical-align: inherit;"><span style="vertical-align: inherit;">
}</span></span>
6. CONTACT
Prestashop AI Chatbot Addon
Create and launch a perfect AI Chatbot created using PHP for prestashop store.
<span style="vertical-align: inherit;"><span style="vertical-align: inherit;">// Function which is used to generate the CONTACT type of QR Code.</span></span><span style="vertical-align: inherit;"><span style="vertical-align: inherit;">
public function CONTACT($name = null, $address = null, $phone = null, $email = null) {</span></span><span style="vertical-align: inherit;"><span style="vertical-align: inherit;">
$this->data = "MECARD:N:{$name};ADR:{$address};TEL:{$phone};EMAIL:{$email};;";</span></span><span style="vertical-align: inherit;"><span style="vertical-align: inherit;">
}</span></span>
STEP 4: Define Functions to save the QR Code image in QrCode Class:
With 13+ years of excellence in information technology, we provide web and app development technologies on various frameworks. You can also explore a wide range of Prestashop, Opencart, WooCommerce, Shopify, and Magento 2 ready-to-use eCommerce extensions.
In case you have queries/suggestions, you can reach out to our technical support portal at our email address support@knowband.com.
The Prestashop One Page Checkout by Knowband simplifies the checkout process, enhancing user experience and boosting conversions for your online store.
NetBeans is one of the best and powerful IDE for any WebDevelopment specially best for PHP frameworks such as ZenCart, OpenCart, CakePhp etc.
CakePhp use their own custom file extension for its View files i.e. *.ctp. NetBeans doesn’t know about this file by default. So there are no color coding will be shown when these types of files are opened in the NetBeans. We have to manually enable these features.
Below are the steps to enable highlighting for CakePHP .ctpfiles.
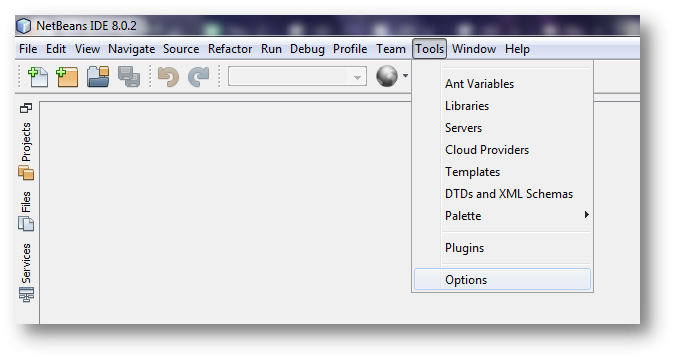
1. Go to Tools => Options
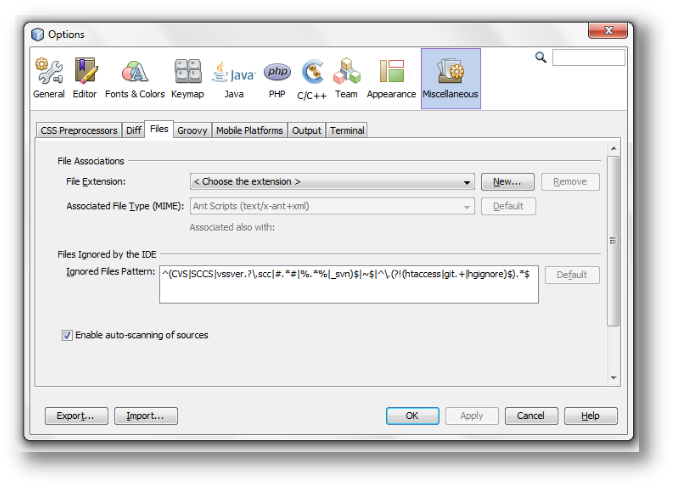
2. Click on Miscellaneous => Files
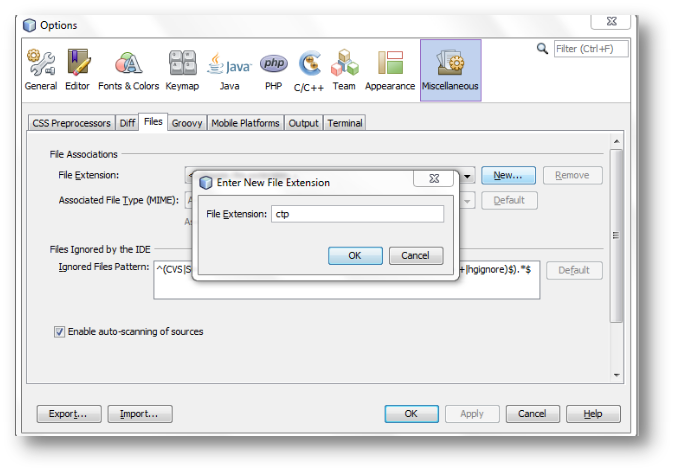
3. Click on New button and type ctp. Then click on Ok.
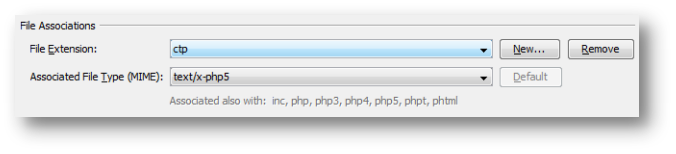
4. From Associated File Type (MIMI): Choose: text/x-php5.
5. Click on OK.
Note: Restart the IDE if changes don’t reflected after doing the above steps.
You can create straightforward applications that only retrieve the order information you require using the Orders API section of the Amazon Marketplace Web Service (Amazon MWS). This makes it possible for you to create unique applications quickly, easily, and adaptably in fields like demand-based decision support tools, order synchronisation, and order research.
Important: The role Amazon assigns you after you submit the Developer Registration and Assessment form determines your access to Amazon MWS data. See Registering to Use Amazon MWS for more details.
Objective of the blog
After reading this blog, you will be able to understand how sellers can get the Amazon orders using API.
Let’s know about the order’s API
Amazon orders API helps the sellers to get the order’s details and synchronized the Amazon orders on their custom application. This is very helpful for retrieving order updates in real-time and the sellers can also get the order status (shipped or unshipped) information easily for all orders by using API.
How to synchronized Amazon orders on custom application
First of all, you need the credential of Amazon MWS (Market Place Web Service) API. If you still don’t have, you can get the help from this blog
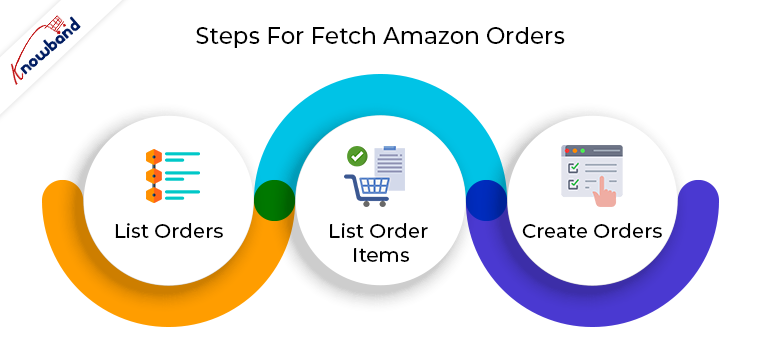
To fetch Amazon orders on your end, you need to follow the below steps:
1. List Orders – In this step, you need to send a request to Amazon to get the orders from Amazon for a particular time interval.
You need to send the following data given below in the request:
mws.amazonservices.co.uk/Orders/2013-09-01
?AWSAccessKeyId=XXXXXXXXXXXXXXX
&Action=ListOrders
&SellerId= XXXXXXXXXXXXXX                                // Here write your merchant id
&SignatureVersion=2                                             // Here write your signature version
&Timestamp= gmdate("Y-m-d\TH:i:s\Z", time())     // Write the time stamp &Version=2013-09-01
&Signature=1234Knowband1234example1234                              // Here you need to write the signature
&SignatureMethod=HmacSHA256                     // Here write your signature method
&LastUpdatedAfter=date("Y-m-d\TH:i:s\Z", strtotime('-24 hour'));  //request to get orders for last 24 hours only from Amazon
&OrderStatus.Status.1=Unshipped                // Here you need to add the status for which you want to fetch the orders
&OrderStatus.Status.2=PartiallyShipped
&OrderStatus.Status.3=Shipped
&MarketplaceId.Id.1= XXXXXXXXXXXXX
AWSAccessKeyId=XXXXXXXXXXXXXXXXXXXX
In the response, you will get an order feed file which will contain the list of orders which are placed on Amazon in the last 24 hours and have the requested order status.
Here is the sample order feed file.
2. List Order Items – From the first step, you will only get order details (like Amazon orders id, purchase date, etc) not order item details (ordered product detail). To get the order’s item details, you will need to send a separate request to Amazon. You need to send request corresponding to each order. If you need details for 5 Amazon orders then you will need to send 5 requests.
The request is given below:
e.g $Amazon_order_id = 112-5028700-7051869
mws.amazonservices.co.uk/Orders/2013-09-01
?AWSAccessKeyId=XXXXXXXXXXXXXXXXXXXX
&Action= ListOrderItems
&SellerId=‘XXXXXXXXXXXXXX’;           // Here write your merchant id,
&'AmazonOrderId'=$Amazon_order_id       // Here write the order id for which you want to get detail
// Here you need to write the signature, when you send HTTP requests to AWS, you need to sign the requests so that AWS can identify who sent the request
&Signature=1234Knowband1234example1234
&SignatureVersion=2                                 // Here write your signature version
&SignatureMethod=HmacSHA256               // Here write your signature method
&Timestamp=gmdate("Y-m-d\TH:i:s\Z", time())      // Write the time stamp
&Version=2013-09-01
In response of the request, you will get the descriptive detail of the order. The sample is given below:
3. Create Orders – This step is the final step and from step 1 & 2, you got all the details of the Amazon orders which you need to create orders on your application. By parsing the above XML feeds (list order and list order item), you can create orders on your application.
If an Amazon order is already created on your application then you can use the step 1 to update the order status of that order.
If you require any assistance or custom development, please feel free to reach us at support@knowband.com.
You can also check out marketplaces integration modules for Prestashop, Opencart, Magento, and Magento 2 here.
Convert your store into a native Android and iOS app with our No Code Mobile App Builder solution. Know more here:
Sometimes, while developing an e-commerce website, you’ll need to automatically check the payment status and mark the order status as “Completed”, “Pending” or as per your requirement. A default order status is set on the basis of payment done. The Front-end users can check their order’s status in their Account History page. In this blog we will learn how to change the default order status on Woo Commerce as “Invoice to be printed” step by step.
Step 1: Create a custom plugin
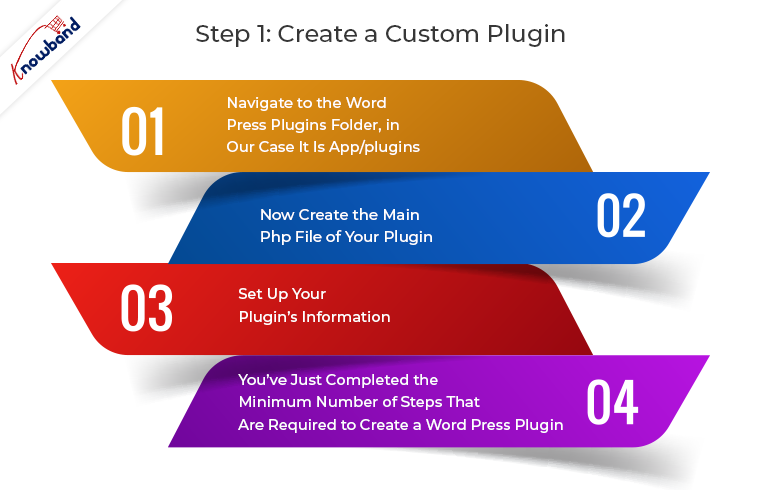
To create a custom plugin on your website follow the following steps:
1. Navigate to the Word Press plugins folder, in our case it is app/plugins. Create a folder as “customstatus”.
Important Note: Give your folder a unique name (Word press default plugins name should not conflict with your plugin name) using lowercase letters and dashes.
2. Now create the main PHP file of your plugin. To do so, create a PHP file within your plugin folder and give it the same name as the folder name. In our case, the folder name is “customstatus” so the file name will be customstatus.php.
3. Set up your plugin’s information. Just copy paste the below code in customstatus.php file.
/** * Plugin Name: My First Plugin * Plugin URI: https://www.mywebsite.com/my-first-plugin * Description: The very first plugin that I have ever created. * Version: 1.0 * Author: Your Name * Author URI: https://www.mywebsite.com */
Note: Edit the details such as Author Name, Plugin Name, Description, etc. as per your requirement.
4. That’s it! You’ve just completed the minimum number of steps that are required to create a Word Press plugin. You can now activate it from the Plugins tab in Word Press admin.
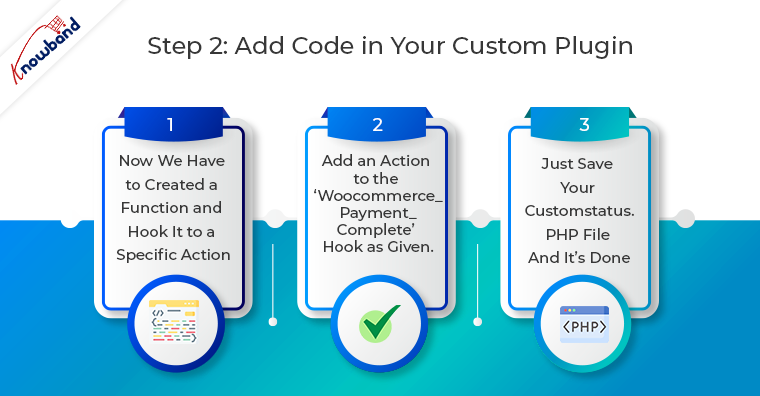
Step 2: Add Code in your custom plugin
1. Now we have to create a function and hook it to a specific Action. Simply copy the below function in your customstatus.php.
2. Since we want to update the order status on complete payment, add an action to the ‘woocommerce_payment_complete’ hook as given below in the highlighted code.
//COPY THE WHOLE CODE IN customstatus.php FILE.
#<editor-fold defaultstate="collapsed" desc="Default Status as Invoice To Be Printed">
function action_woocommerce_payment_complete( $order_id ) {
      if( ! $order_id ) return;
        $order = wc_get_order( $order_id );
        $order->update_status( 'wc-print-invoice' ); //Order status will be updated to “Invoice To Be Printed”.
};

// add the action
add_action( 'woocommerce_payment_complete', 'action_woocommerce_payment_complete', 10, 3 );
#</editor-fold>
3. Just Save your customstatus.php file and it’s done. From now on, the order status will be updated to “Invoice to Be Printed” when the payment is complete.
USEFUL NOTE: If you want to update the order status when “Thank You” or “Checkout Success” page is loaded you can add the action on “woocommerce_thankyou” hook. In customstatus.php replace
add_action( ‘woocommerce_payment_complete’, ‘action_woocommerce_payment_complete’, 10, 3 ); with add_action( ‘woocommerce_thankyou’, ‘ggb_custom_change_order_status’ ,10,3);
You can reach us at support@knowband.com for any queries regarding Woocommerce. We provide customized changes on Woocommerce and also specific modules to help you sell better.
One of the most popular module for Woocomerce is Spin And Win. This module has a proven record of generating sales and boosting conversion rate. See what client’s are saying about this module: