How to Track Visitor’s Data on Magento?

Magento is one of the most powerful open source e-commerce platform based on PHP. One of its powerful features is user activity logging system. By using user’s data we can analyze the customers/visitors behaviour which ultimately helps in business. For example, if we know that the customers are frequently visiting a particular section of a category then you can run the campaign to increase the conversion rate in terms of an order placed on your Magento store.

Magento has a dedicated module Mage_Log to store the log of the customer/visitor.

It mainly stores the following data

1.Customers who logged in
2.Current Visitors
3.Past Visitors
4.Details like IP, First visit, Last visit etc

Two main tables in which data is stored are

1.log_customer
2.log_visitor

Every time a user visits the store the Magento generates a visitor_id and store it in a log_visitor table. When a registered customer visits the store using their credentials then a log_customer table is updated.

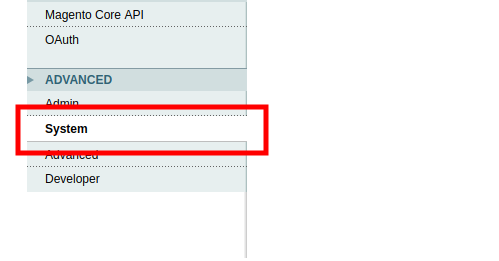
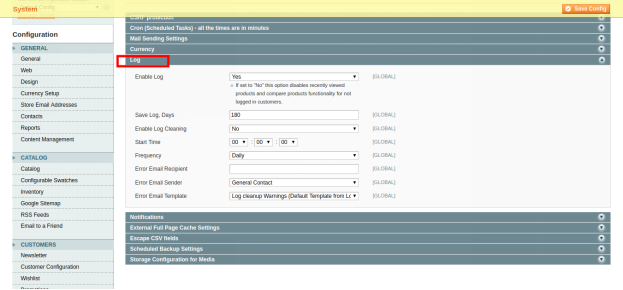
One can enable or disable logging option from Magento admin panel. Steps to do so are

Go to

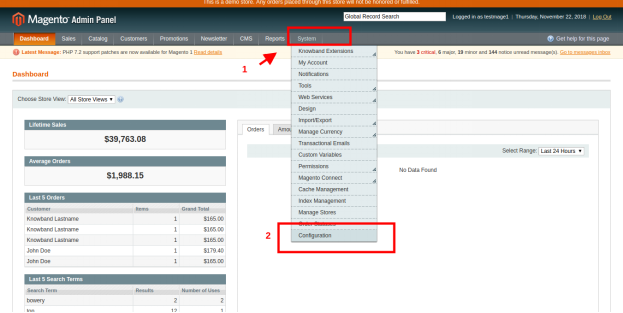
System -> Configuration -> System -> Log
We can get visitor’s data using the following code

$visitor_data = Mage::getSingleton(‘core/session’)->getVisitorData();

Here $visitor_data will return an array of the customer/visitor information which is stored in the session

Array
(
[] =>
[server_addr] => 197777237
[remote_addr] => 197777237
[http_secure] =>
[http_host] => www.testmage1.com
[http_user_agent] => Mozilla/5.0 (X11; Linux x86_64) AppleWebKit/537.36 (KHTML, like Gecko) Chrome/68.0.3440.84 Safari/537.36
[http_accept_language] => en-US,en;q=0.9
[http_accept_charset] =>
[request_uri] => /test
[session_id] => njt3e2cc4g5c85o8gccnjs1ep3
[http_referer] =>
[first_visit_at] => 2018-11-22 14:42:15
[is_new_visitor] =>
[last_visit_at] => 2018-11-22 14:42:20
[visitor_id] => 19
)

If you need some specific data like the first visitor last visit time then you can use its model too

echo $firstVisitAt = Mage::getModel('log/visitor')->getFirstVisitAt();
echo $lastVisitAt = Mage::getModel('log/visitor')->getLastVisitAt();

Hope this will help you in tracking visitor’s data on your Magento store. Happy Coding:)
How to programmatically create customer in Magento?

Magento is one of the most flexible and widely used e-commerce platforms nowadays. Many times during our development we need to create customers via our code. For example, if we are developing a Magento plugin to connect our Magento store to marketplaces like Walmart, Etsy etc then we create an order for the customer via our code. But to create an order we need to create customer if that customer does not exist on our Magento store. We can create customer in Magento simply by using the following code.

Code for creating a customer in Magento:

$_website = Mage::app()->getWebsite()-->getId();
        $store = Mage::app()->getStore();       
        $_firstName = 'Jhon';
        $_lastName = 'Doe';
        $_customerEmail = 'demo@demo.com';
        $_customerPassword = '#KnowbandPlugins';
        
        $_newCustomer = Mage::getModel("customer/customer");
        $_newCustomer->setWebsiteId($_website)
                     ->setStore($store)
                     ->setFirstname($_firstName)
                     ->setLastname($_lastName)
                     ->setEmail($_customerEmail)
                     ->setPassword($_customerPassword);
        try{
            $_newCustomer->save();
        }
        catch (Exception $e) {
            Mage::getSingleton('customer/session')->addException($e, $this->__('Error in creating customer'));
            Mage::logException($e);
        }
<a href="https://www.knowband.com/blog/wp-content/uploads/2018/10/untitled-26.png"><img class="alignnone size-medium wp-image-22306" src="https://www.knowband.com/blog/wp-content/uploads/2018/10/untitled-26-300x48.png" alt="creating-customer-in-magento" width="300" height="48" /></a>

But this customer only has very basic information like first name, last name, email etc. It does not have shipping or billing address. We can save complete address information of the customer via the following code.

Code for saving the address of the customer:

$_website = Mage::app();getWebsite();
$_customerEmail = 'demo@demo.com'; //Customer Email
$_countryId = 'IN';
        $_postCode = '201301';
        $_city = 'Noida';
        $_telephone = '1111111111';
        $_fax= '';
        $_company = 'Velocity Software Solutions';
        $_street = '';
        
        $_customer = Mage::getModel('customer/customer')
                ->setWebsiteId($_website->;getId())
                ->loadByEmail($_customerEmail);
        $_customerAddress = Mage::getModel("customer/address");
        $_customerAddress->setCustomerId($_customer->getId())
                ->setFirstname($_customer->getFirstname())
                ->setMiddleName($_customer->getMiddlename())
                ->setLastname($_customer->getLastname())
                ->setCountryId($_countryId)
                ->setPostcode($_postCode)
                ->setCity($_city)
                ->setTelephone($_telephone)
                ->setFax($_fax)
                ->setCompany($_company)
                ->setStreet($_street)
                ->setIsDefaultBilling('1')
                ->setIsDefaultShipping('1')
                ->setSaveInAddressBook('1');

        try{
            $_customerAddress->save();
        }
        catch (Exception $e) {
            Mage::getSingleton('customer/session')->addException($e, $this->__('Error in saving customer address.'));
            Mage::logException($e);
        }
<a href="https://www.knowband.com/blog/wp-content/uploads/2018/10/untitled-27.png"><img class="alignnone size-medium wp-image-22308" src="https://www.knowband.com/blog/wp-content/uploads/2018/10/untitled-27-300x133.png" alt="saving-address-of-customer" width="300" height="133" /></a>

Now the customer address information is complete. Hope the above-mentioned code will help you in adding a new customer to your Magento store.

How to install Magento using command line?

Magento is one of the best e-commerce based open-source platform which is written in PHP. Magento provides three different platforms:

  1. Magento Community Edition
  2. Magento Enterprise Edition
  3. Magento Enterprise Cloud Edition

Here we will be learning how to install Magento using the command line(CLI). Command line installation of Magento is one of the most efficient ways of installing if we are installing it on servers.

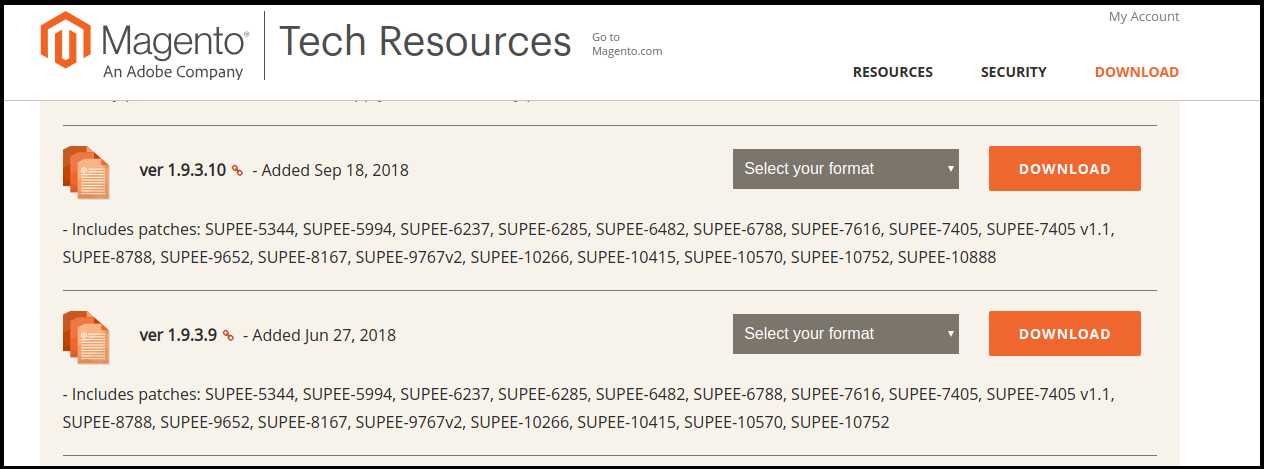
Download Magento Community Edition 1.X

One can download the required version of the Magento from the official website of the magneto. Use below link to download your package.

https://magento.com/tech-resources/download

It will ask to login. If you do not have an account then create an account and proceed further.

Uncompressing the downloaded file

Move the file to a directory where you want to install it and uncompress it.

a) If it is a zip file then using following way:

Syntax:- unzip file_name

e.g –

unzip magento-1.9.3.10-2018-09-18-03-21-10.zip

b) If it is a tar file then use the following way:

Syntax:- tar xf file_name

e.g –

tar xf magento-1.9.3.10-2018-09-18-03-21-10.tar.bz2

Prerequisite for Magento installation:

For the installation of the Magento, you will need to meet the standard system requirements. As per the documentation of Magento you need to meet the following requirement for the installation of the Magento.

a) Environment:

LAMP (Linux, Apache, MySQL, and PHP) or LNMP stack

b) Operating System:

Linux x 86, x86-64

c) Web Server:

  • Apache 2.x
  • Nginx 1.7.x

d) Server Hosting:

  • Ability to run scheduled jobs (crontab) with PHP 5.
  • Ability to override options in .htaccess files.

e) PHP:

  • PHP 5.6
  • PHP 5.5
  • PHP 5.4

f) Required extensions:

  • PDO_MySQL
  • Simplexml
  • Mcrypt
  • Hash
  • GD
  • DOM
  • Iconv
  • Curl
  • SOAP (for Webservices API)

g) Additional configuration:

  • safe_mode off
  • memory_limit no less than 256 MB (512 MB recommended)

h) Database:

  • MySQL 5.6 (Oracle or Percona)

For detailed information please check:

https://docs.magento.com/m1/ce/user_guide/magento/system-requirements.html

Setup Database

Now we will set up the database for our Magento. For setting up database one must have following things

  1. DB Host
  2. DB Name
  3. DB Username
  4. DB Password

Steps for creating a database:

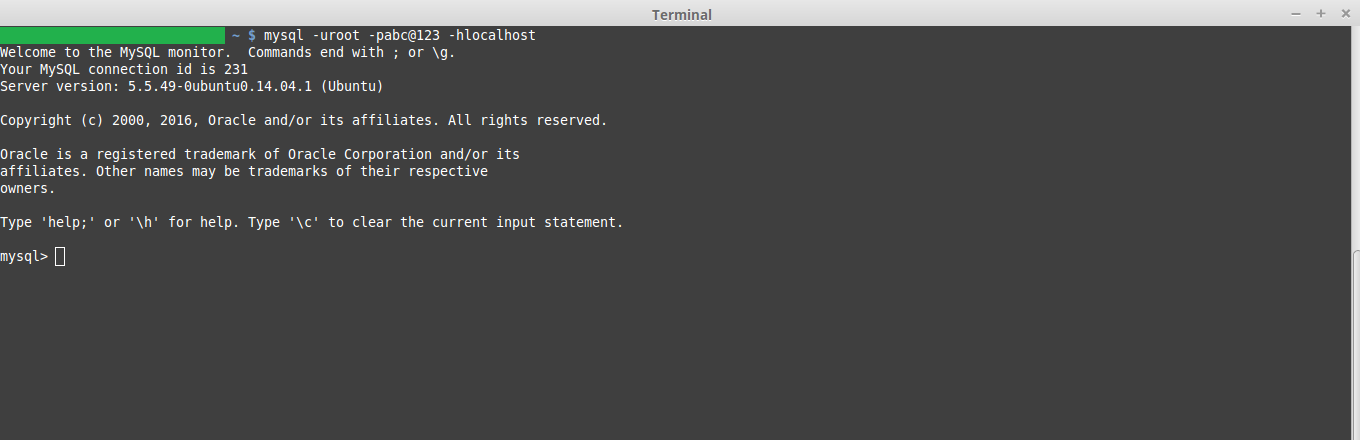
Step 1. Login to your MySQL:

MySQL -uDB_User -pDB_Password -hDB_Host

a) DB_User:- Username of the MySQL

b) DB_Password:- Password of the MySQL

c) DB_Host:- Hostname of the MySQL

Step 2. Create a database:

Syntax:- create database DB_NAME

E.g

create database kb_mage_db;

Here kb_mage_db is the name of the database which we are creating.

Step 3. Check the newly created database using below command

Show databases;

This will show the list of all the created database in your system. Here the name of the database which you created should show.

Step 3. Exit from your MySQL server using the following command

exit;

Installation of Magento

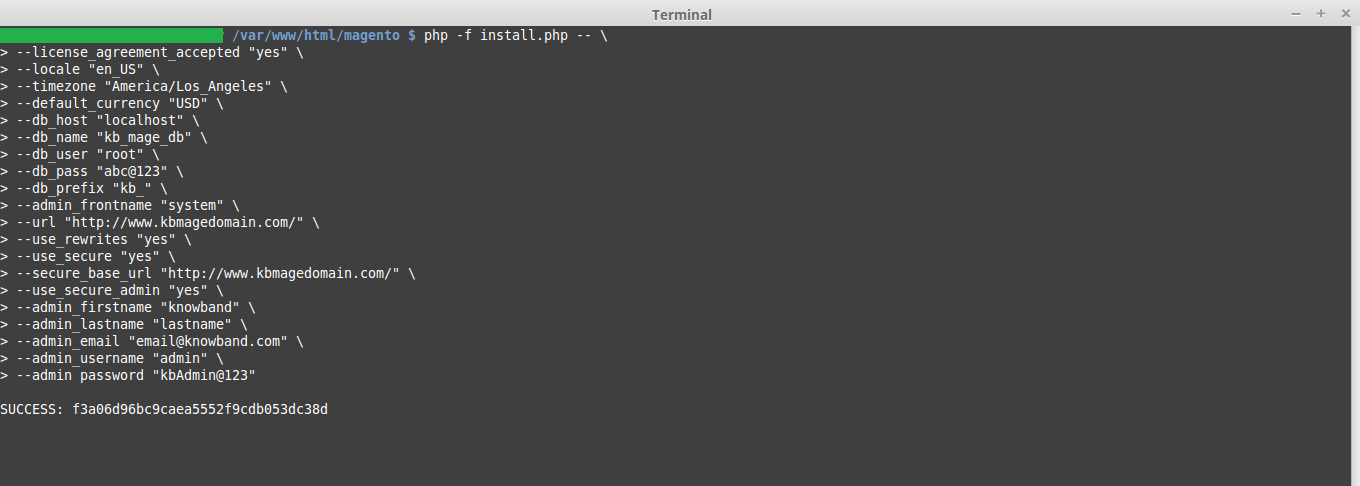
For CLI installation, we need to run the following command:

php -f install.php -- \
--license_agreement_accepted "yes" \
--locale "en_US" \
--timezone "America/Los_Angeles" \
--default_currency "USD" \
--db_host "DB_HOST" \
--db_name "DB_NAME" \
--db_user "DB_USER" \
--db_pass "DB_PASS" \
--db_prefix "DB_PREFIX" \
--admin_frontname "ADMIN_FRONT_NAME" \
--url "SITE_URL" \
--use_rewrites "yes" \
--use_secure "yes" \
--secure_base_url "SITE_URL" \
--use_secure_admin "yes" \
--admin_firstname "ADMIN_FIRST_NAME" \
--admin_lastname "ADMIN_FIRST_LAST_NAME" \
--admin_email "EMAIL" \
--admin_username "USERNAME" \
--admin_password "PASSWORD"

Explanation of the keywords used in the CLI command.

  1. Locale: Place language code like “en_US” which want to use in Magento.
  2. Timezone: Place timezone which wants to use in Magento. In this case, we have used “America/Los_Angeles”.
  3. Default_currency: Place currency which wants to use in Magento.
  4. DB_HOST – Database hostname, in case of a local system put localhost
  5. DB_NAME – The name of your database e.g. kb_mage_db
  6. DB_USER – The username with access rights to the database
  7. DB_PASS – The password for the database user
  8. SITE_URL – The path where Magento is installed, e.g. https://www.kbmagedomain.com/
  9. ADMIN_FIRST_NAME – First name of the admin
  10. ADMIN_LAST_NAME – Last name of the admin
  11. EMAIL – The store owner’s email address, e.g. email@knowband.com
  12. USERNAME – The administrator’s username. This will be used to login on magneto backend.
  13. PASSWORD – The administrator’s password. This will be used to login on magneto backend.

After the installation of the Magento, success message will show with the encryption id.

Now open your favorite browser and check you installed Magento using the URL you used.

How to programmatically create orders in Magento?

Sometimes we need to programmatically create orders in Magento. Suppose you are creating a Magento plugin for your store to connect it to the marketplace like Walmart or Etsy. In these cases, we need to create order on our Magneto store whenever a customer places an order on the marketplace. To do so we fetch the details of the item ordered and the customer details like shipping and billing details and create order on our Magento store programmatically.

So in today’s article, we will be learning how we can programmatically create an order for a customer for any particular item. We will follow the following steps for creating an order on the Magento store.

Steps involved in creating order:

  • We will define customer data like first name, last name, email.
  • Define Shipping and Billing address of the customer.
  • Define Shipping and Payment method of the customer.
  • Define product and the quantity which needs to be ordered on our Magento store.
  • Create a customer if the customer does not exist our Magento store. It’s an optional step.
  • Add product to the quote of the customer.
  • Add Shipping and Billing address to the quote of the customer.
  • Prepare and save quote of the customer.
  • The order is created on your Magento store.

Use the below code to create order in Magneto 1.x –

         $_store = Mage::app()->getStore();
         $_website = Mage::app()->getWebsite();
         $_firstName = John';
         $_lastName = 'doe;
         $_email = 'demo@demo.com';
        /*
         * Custom billing address
         */
        $billingAddress = array(
            'customer_address_id' => '',
                         'prefix' => '',
            'firstname' => $_firstName,
            'middlename' => '',
             'lastname' => $_lastName,
            'suffix' => '',
            'company' => '',
            'street' => array(
                 '0' => 'Sector 63', // Required
                '1' => 'Noida, UP' 
            ),
             'city' => 'Noida',
            'country_id' => 'IN', // Country code
            'region' => 'UP', 
            'region_id' => '',
            'postcode' => '201301',
            'telephone' => '888-888-8888',
            'fax' => '',
            'save_in_address_book' => 1
        );
 
        /*
         * Custom shipping address
         */
        $shippingAddress = array(
            'customer_address_id' => '',
            'prefix' => '',
            'firstname' => $_firstName,
            'middlename' => '',
            'lastname' => $_lastName,
            'suffix' => '',
            'company' => '',
            'street' => array(
                '0' => 'Sector 63', // Required
                '1' => 'Noida, UP' 
            ),
            'city' => 'Noida',
            'country_id' => 'IN', // Country code
            'region' => 'UP',
            'region_id' => '',
            'postcode' => '201301',
            'telephone' => '888-888-8888',
            'fax' => '',
            'save_in_address_book' => 1
        );
 
        /**
         * Enter the shipping method you want to use. Some of the other shipping
         * methods are tablerate_tablerate, freeshipping_freeshipping etc.
         * Here we are using flatrate_flatrate
         */
        $_shippingMethod = 'flatrate_flatrate';
 
        /**
         * Enter the payment method you want to use. Some of the order payment  
   	*methods are checkmo, free, banktransfer, ccsave, purchaseorder etc.
         */
        $_paymentMethod = 'cashondelivery';
 
        /**
         * Provide array of product and their qty.
         * $array = array(product_id => qty)
         */
        $productIds = array(905 => 1);
        $quote = Mage::getModel('sales/quote')
                ->setStoreId($_store->getId());
 
        $quote->setCurrency(Mage::app()->getStore()->getBaseCurrencyCode());
 
        $customer = Mage::getModel('customer/customer')
                ->setWebsiteId($_website->getId())
                ->loadByEmail($_email);
 
        /**
         * Preparing customer for the quote 
         * if the customer is not registered then we will create a new customer. This is  	*an optional process.
         */
        if (!$customer->getId()) {
            $customer = Mage::getModel('customer/customer');
 
            $customer->setWebsiteId($_website->getId())
                    ->setStore($_store)
                    ->setFirstname($_firstName)
                    ->setLastname($_lastName)
                    ->setEmail($_email);
 
            /**
             * Creating new customer
             * Skip try-catch if you don't want to create a new customer.
             */
            try {
                // Generating password for customer. You can also use any custom  // password for it.
                $password = $customer->generatePassword();
                $customer->setPassword($password);
                $customer->setForceConfirmed(true);
                $customer->save();
 
                $customer->setConfirmation(null);
                $customer->save();
                $customerId = $customer->getId();
                $customAddress = Mage::getModel('customer/address');
                $customAddress->setData($billingAddress)
                        ->setCustomerId($customerId)
                        ->setIsDefaultBilling('1')
                        ->setIsDefaultShipping('1')
                        ->setSaveInAddressBook('1');
                $customAddress->save();
 
            } catch (Mage_Core_Exception $e) {
                Mage::getSingleton('customer/session')->addException($e, $this- >__('Error in creating customer'));
                Mage::logException($e);
            } catch (Exception $e) {
                Mage::getSingleton('customer/session')->addException($e, $this- >__('Error in creating customer'));
                Mage::logException($e);
            }
        }
 
        // Assign customer to quote
        $quote->assignCustomer($customer);
 
        // Add products to quote
        foreach ($productIds as $productId => $qty) {
            $product = Mage::getModel('catalog/product')->load($productId);
            $quote->addProduct($product, $qty);
        }
 
        // Add billing address to quote
        $_billingAddressData = $quote->getBillingAddress()- >addData($billingAddress);
 
        // Add shipping address to quote
        $_shippingAddressData = $quote->getShippingAddress()- >addData($shippingAddress);
 
        /**
         * If the customer is a registered customer then you can fetch their billing or  *shipping address as below
         * 
         * $_customerBillingAddress = $customer->getPrimaryBillingAddress();
         * $_customerShippingAddress = $customer->getPrimaryShippingAddress();
         * 
         * $_billingAddressData = $quote->getBillingAddress()- >addData($_customerBillingAddress);
         * $_shippingAddressData = $quote->getShippingAddress()- >addData($_customerShippingAddress);
         */
 
        // Collect shipping rates on quote shipping address data
        $_shippingAddressData->setCollectShippingRates(true)
                ->collectShippingRates();
 
        // Set shipping and payment method on quote shipping address data
        $_shippingAddressData->setShippingMethod($_shippingMethod)
                ->setPaymentMethod($_paymentMethod);
 
        // Set payment method for the quote
        $quote->getPayment()->importData(array('method' => $_paymentMethod));
 
        try {
            $quote->collectTotals();
            $quote->save();
 
            // Preparing Order From Quote
            $service = Mage::getModel('sales/service_quote', $quote);
            $service->submitAll();
            
            // $incrementId is the increment id of the order created.
            $incrementId = $service->getOrder()->getRealOrderId();
 
            Mage::getSingleton('checkout/session')
                    ->setLastQuoteId($quote->getId())
                    ->setLastSuccessQuoteId($quote->getId())
                    ->clearHelperData();
 
           /*
           * $response is the Array of the response with the status of the order  creation.
           */
            $response['success'] = true;
            $response['error'] = false;
        $response['messages'] = 'Order number '.$incrementId.' created  successfully.';
        } catch (Mage_Core_Exception $e) {
            $response['success'] = false;
            $response['error'] = true;
            $response['messages'] = $e->getMessage();
            Mage::logException($e);
        } catch (Exception $e) {
            $response['success'] = false;
            $response['error'] = true;
            $response['messages'] = $this->__('Error in processing order. Please try  again later.');
 
            Mage::logException($e);
        }
        
        Mage::app()->getResponse()->setBody(Mage::helper('core')- >jsonEncode($response));

Please go through the above-mentioned code to create order on your store.  In the above example, we have placed an order of one simple item with quantity 1. We have used “cash on delivery” as the payment method and “flatrate_flatrate” as the shipping method. You can make any combination as per your requirement and your Magento store configuration. Hope this will help you in understanding the mechanism of creating order.

How to run Direct SQL Queries in Magento?

Today we will learn how to run direct SQL queries in the Magento 1.x. By default Magento usages data model to access and modify the database. The data model provides good abstraction which hides the tricky queries but they also make the operation slow. Direct SQL queries come very handily whenever we need to update/insert a large number of data. For example, you have to update the price of all the products of a manufacturer and there are 15k products in that manufacturer. Doing this via loading product model in Magento will take a lot of time.

We can also use Magento resource to directly run our SQL queries without loading the whole collection.

Get the core resource model –

$resource = Mage::getSingleton('core/resource');

After this we need to create read or write connection as per our need.

/**

* Retrieve the read connection

*/

$readConnection = $resource->getConnection('core_read');

/**

* Retrieve the write connection

*/

$writeConnection = $resource->getConnection('core_write');

Fetching the correct Table name –

In case you are unaware of the prefix of the table then you can use below code to fetch the correct table name.

$_tableName = $resource->getTableName('catalog_product_entity');

If the prefix is mage_ then the table name it will return will be mage_catalog_product_entity

Reading Data –

To read data from the table use the following code

$query = “select * from {$_tableName}”;

$query_result = $readConnection->fetchAll($query);

Here, $query_result will return the result of select query. In our case it will return the array of all the product. In case you need data of only product then use following command.

$query = “select * from {$_tableName} where entity_id={$_productId}”;

$query_result = $readConnection->fetchAll($query);

Here $_productId is the id of the product whose data we need.

Writing Data –

For inserting data into the table use the following code.

$insert_query = “INSERT INTO {$_tableName} (‘COL_NAME1’,’COL_NAME2’) VALUES                                                                 (‘COL_VALUE1’,’COL_VALUE2’)”;

$writeConnection->query($insert_query);

Updated Data –

If we have to update the type_id of a product to “configurable” then we can use following code. Here $_productId is the product id.

$update_query = “UPDATE {$_tableName} SET type_id=”configurable” WHERE 						entity_id={$_productId}”;
$writeConnection->query($update_query);

But Magento has provided the concept of the model for database connection as they provide abstraction and they are more secure that the direct SQL queries.

How to Create a Custom Layout for CMS Pages in Magento 2?

Computer software called a content management system (CMS) is used to control the creation and modification of digital content (content management). Enterprise content management (ECM) and web content management (WCM) are typical applications for a CMS.

ECM typically integrates document management, digital asset management, and record retention to support multiple users in a collaborative setting.

In contrast, WCM is a collaborative process for creating websites that allows for the inclusion of text as well as embedded graphics, photos, video, audio, maps, and program code that interacts with users and displays content.

In this article, we’ll learn about how to create custom CMS pages layout for our cms pages.

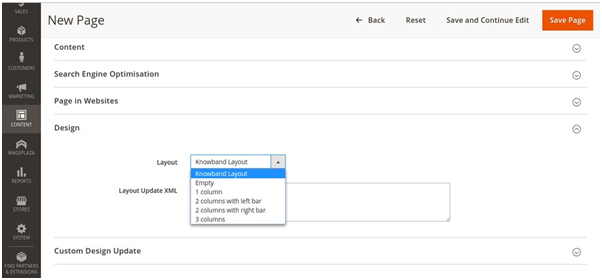
We’ll create a custom layout named Knowband Layout.

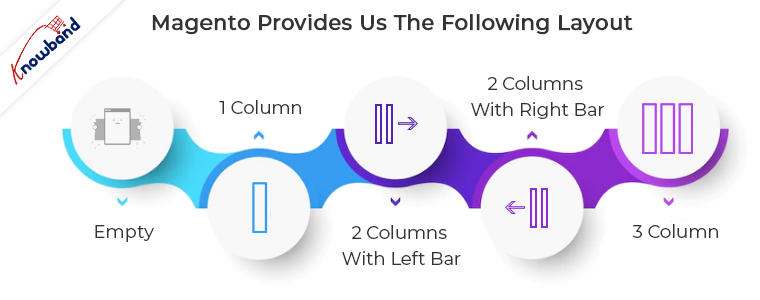
Magento provides us with the following layout:

-> Empty

-> 1 column

-> 2 columns with left bar

-> 2 columns with right bar

-> 3 columns

If you want to create your own customized layout for the cms pages or some specific pages then you need to focus on the following steps:

Step 1:

Create <Vendor_Name>/<Module_Name>/view/frontend/page_layout/kb_layout.xml file. This file will define the design of your custom layout.


<?xml version="1.0" encoding="UTF-8"?>

<layout xmlns:xsi="https://www.w3.org/2001/XMLSchema-instance" xsi:noNamespaceSchemaLocation="urn:magento:framework:View/Layout/etc/page_layout.xsd">

<update handle="empty"/><!-- you can change the handle like 2columns-left or 3columns etc-->

<referenceContainer name="page.wrapper">

<container name="header.container" as="header_container" label="Page Header Container"  htmlTag="header" htmlClass="page-header" before="main.content"/>

<container name="page.top" as="page_top" label="After Page Header" after="header.container"/>

<container name="footer-container" as="footer" after="-" label="Page Footer Container" htmlTag="footer" htmlClass="page-footer" />

</referenceContainer>

</layout>

Step 2:


Create <Vendor_Name>/<Module_Name>/view/frontend/layouts.xml. This file will register the custom layout.

<?xml version="1.0" encoding="UTF-8"?>

<page_layouts xmlns:xsi="https://www.w3.org/2001/XMLSchema-instance" xsi:noNamespaceSchemaLocation="urn:magento:framework:View/PageLayout/etc/layouts.xsd">

<layout id="kb_layout">

<label translate="true">Knowband Layout</label>

</layout>

</page_layouts>

After creating these two files, clear the cache and your custom layout will be added to the layout list.

You can check your custom layout in the admin side at Content-> Pages -> Add New Page -> Design

Thanks for reading this. Please feel free to reach us at support@knowband.com for any issues.

Knowband also provides many great extensions for major CMS platforms like Prestashop, Opencart, Magento, Magento 2, and Woocommerce.

Take a look at our No Code Mobile App solution for all major CMS platforms here.

Know more:

How to Update Magento 2 to the latest version using Composer?

Magento 2 is the latest major release of the Magento eCommerce platform which is available in both the community and enterprise editions. Magento keeps releasing the updates to keep the platform secure and up-to-date with latest new requirements.

This article provides a complete guide for upgrading a Magento 2 store using the composer. Magento 2 with its command line interface saves a lot of time for the developers in module management, cache management, updates and lot more. That’s why we are going to use the Command Line Interface to update the Magento 2 here.

Why should you update your Magento 2 store?

Here are the following reasons for why you should update Magento 2:

  • For keeping your website secure with latest Security Patches
  • For getting new UI Updates For Functionality Improvement
  • For Bug Fixes For support of Latest Features
  • For Website Speed and Performance Improvement
  • For New Payment Methods Support For improved integration with 3 party Magento 2 extensions, Google Analytics, Shipping Methods, Payment Gateways etc.

Important Note:

You can use the Magento 2 Command Line Interface (CLI) upgrade only when you have installed your Magento 2 by using the Composer or the Zip file from the official Magento website. CLI upgrade won’t work if you have cloned your Magento 2 store from GIT repository.

Update Magento 2 using Composer

Follow these steps and commands to upgrade your Magento 2:

1. You will need the full file system access to do this upgrade. If you have the full file system ownership, then, first of all, connect to your web server via SSH.

2. Now login to your Magento 2 server using any SSH client. You can use the Putty SSH client here.

3. After establishing the SSH connection, Navigate to your Magento 2 root directory.

4. Now, run the following command:

composer require magento/product-community-edition 2.1.3 –no-update

NOTE: Here you can change the version number accordingly. For example, if you want to upgrade the Magento 2.0.x version, then change the edition accordingly.

5. Now, run this command:

composer update

NOTE: If you are prompted for authentication then you need to enter your magento.repo authentication keys after running the above command.

6. Now, run these three commands in the same order:

rm -rf var/di/* var/generation/* var/cache/* var/log/* var/page_cache/*

php bin/magento cache:clean

php bin/magento cache:flush

NOTE: If you are using the Magento file system Cache storage then go to the next step. Otherwise, if you are using other Cache storage like Memcached, Varnish, and Redis then you will need to clear the cache manually for them.

7. Now, Run the following commands:

php bin/magento setup:upgrade

php bin/magento setup:di:compile

php bin/magento indexer:reindex

8. Check the new version number using the following command:

php bin/magento –version

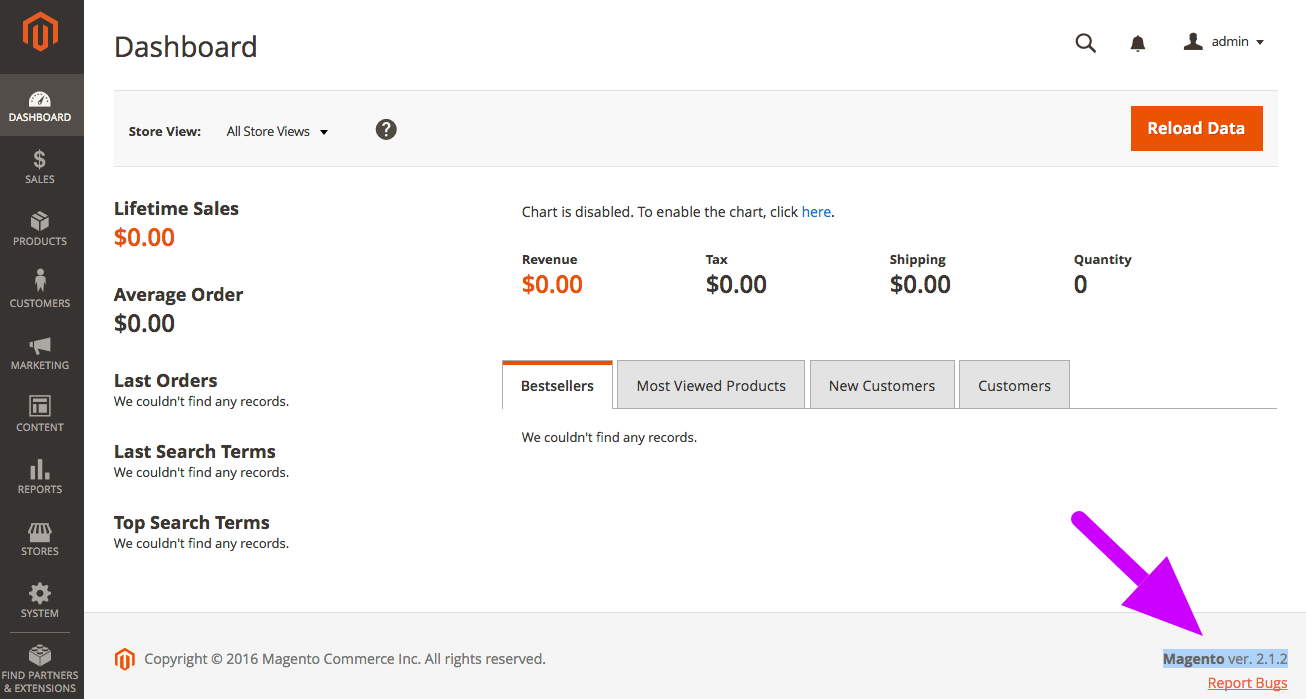
9. You can also verify the version number by going to your Magento 2 Admin Panel and refreshing the window. To check if you have successfully completed the update, see the Magento 2 version number at bottom right corner of the page. If there is any error, try clearing the cache again after resetting the file permission.

Finally

We have completed the Magento 2 update here. There are various other methods to update your Magento 2 store as well. However, this method is one of the quickest ones and saves a lot of time. Do let us know if you need any assistance in the update or searching for Magento and Magento 2 extensions. We have a pretty good collection of that.

You Might Also Like:

How to upgrade Magento version on LINUX

This tutorial discusses how you can upgrade Magento community version to upper/latest version. There are number of new features in upper/latest version which can help you out in your management system.

Upgrade Magento tutorial will tell you to upgrade without loosing any data.

Prerequisites

It is highly recommended to install Magento on VPS with at least 2GB of RAM, if you have less then 2GB of RAM, we recommend you to create a swap file.

Step 1: Pre-Upgrade Magento Tasks

Complete the tasks discussed in the following sections in the order shown:

  • Enabling Exception Logging
  • Disabling cron jobs (EE 1.13.0.2 or later)
  • Flushing the Cache
  • Backing Up the Database
  • Archiving Customizations and Extensions
  • Restoring Configuration Settings

Enabling Exception Logging

Before you start upgrading, we recommend to enable exception logging. With exception logging enabled, it will be easier to diagnose errors during upgrade. After up-gradation you can disable the same.

To enable exception logging, you need to follow these steps-

  • Log in to the Admin Panel as an administrator.
  • Click System > Configuration.
  • In the ADVANCED group, click Developer.
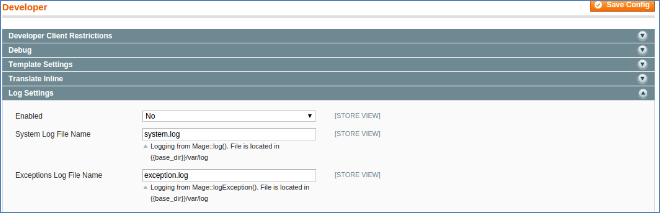
  • In the right pane, click Log Settings to expand it.

The following figure shows an example.

  • From the Enabled list, click Yes.
  • Optionally change the names of the log files.
  • Click Save Config button(right top).

Disabling cron jobs (EE 1.13.0.2 or later)

  • Disable all running cron jobs,
  • Enter the following commands in terminal

Ubuntu:

CentOS:

Flushing the Cache

Clear the Magento Cache with following steps-

  • Log in to your admin panel.
  • System > Cache Management
  • Click Flush Magento Cache.

Backing Up the Database

You need to back up your database, you can use mysqldump or any other tool.

Mysql dump command are are as follows

Archiving Customizations and Extensions

You can archive all your customized themes and extensions

  • Archive the Magento media and all sub-directories.

  • Archive any custom themes in the following directories:

  • Archive any customizations or extensions in the following directories:

  • Transfer the archives you just created to the development environment.
  • Copy [your Magento install directory]/app/etc/local.xml to your development environment.

Restoring Configuration Settings

After you have exported the magento database and extensions, you can roll back all the configuration settings which you changed earlier.

Step 2: Replace setup files

  • You need to replace all the current version setup files with latest version setup files.
  • Download latest version setup (.zip)file, extract all the files and replace them with current magento setup files in root directory.
  • We recommend you not run back-end or front-end while the files are copying.
  • Run back-end and front-end after completion of copying of files, magento will automatically update the system.
  • If there is no up-gradation observed,

Clear the Magento Cache with following steps-

  • Log in to your admin panel.
  • System > Cache Management
  • Click Flush Magento Cache.
  • Click Flush Cache Storage

How to Upgrade Magento

Upgrading Magento

This tutorial will guide you how to upgrade magento using the Connect Manager. Always create a back-up of magento files and of the database used by the application.

Things to do before you upgrade magento

  • Create a back-up of magento files (mandatory).
  • Create a back-up of the database used by the application (mandatory).
  • Flush the cache (mandatory).
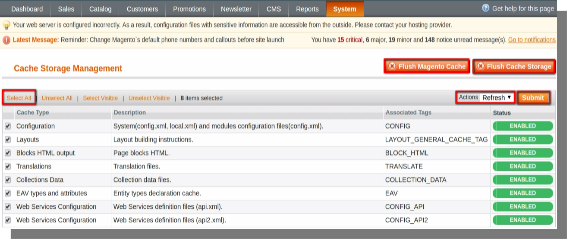
  • Open the back-end of your store and hover your cursor on the System menu and click on cache management option.

System Menu(menu bar)>>Cache Management Option

  • Select cache types using Select all option and opt Refresh option on the Action drop-down and click on submit.
  • After refreshing, again select cache types using select all option and opt for Disable option on the Action drop-down and click on submit.

Upgrade Magento

To upgrade magento follow the below mentioned steps:

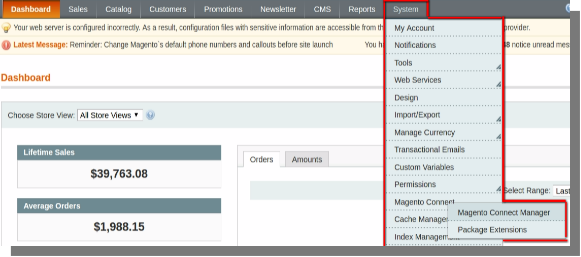
  • Open the back-end of your store and hover your cursor on the System menu and then on Magento Connect option and then click on the Magento Connect Manager option.

System Menu(menu bar)>>Magento Connect>>Magento Connect Manager.

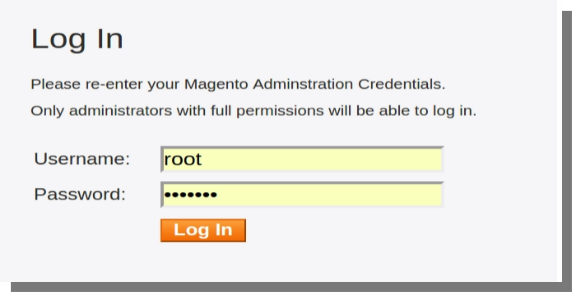
  • On the page that opens type your admin Username and Password and click on login to access the Connect Manager.

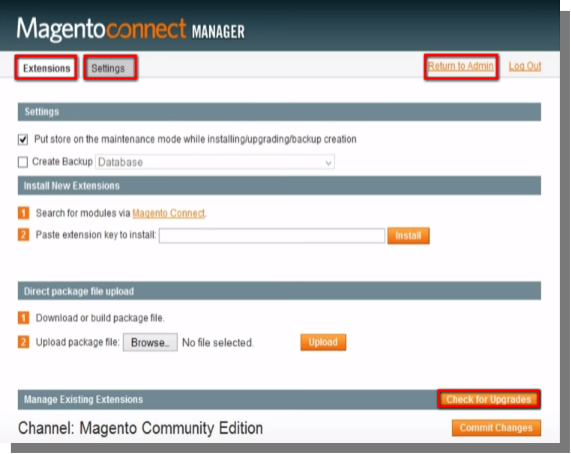
  • After logging-in you will see two tabs Extensions and Settings tab.

Under Extensions Tab

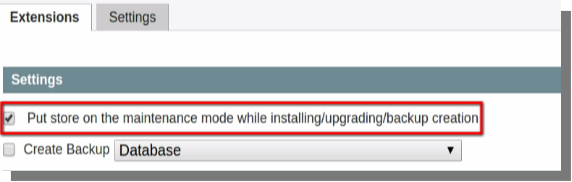
  • Make sure that the check-box for “put store on the maintenance mode while installing/upgrading” is marked.
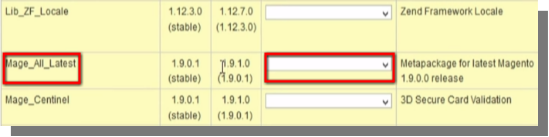
  • Next, click on the “Check for Upgrades” option, the extensions list will be updated and those who have the latest version will be colored in yellow.
  • In the list find Maze_All_Latest and from its drop-down select the latest stable version.

  • Click on the Commit Changes button at the bottom of the page.
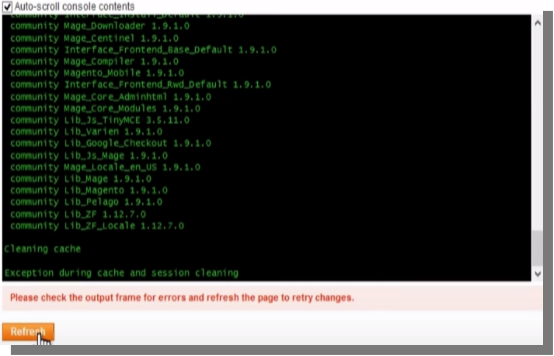
  • Wait until the Upgrade is complete, when this happens click on the Refresh button below the command window at the bottom of the page.

  • Then click on Return to admin at the top of the page.
  • After Performing the above steps magento will be upgraded.

You Might Also Like:

How to Upgrade Extension of Magento

Upgrade Extension

Follow the below mentioned steps for upgrade extension:

  • Open the back-end of your store and hover your cursor on the System menu and then on Magento Connect option and then click on the Magento Connect Manager option.

System Menu(menu bar)>>Magento Connect>>Magento Connect Manager.

Under Extensions Tab:

  • Make sure that the check-box for “put store on the maintenance mode while installing/upgrading” is marked.

  • Next, click on the “Check for Upgrades” option, the extensions list will be updated and those who have the latest version will be colored in yellow.

  • In the list find the extension which you wish to update and from its drop-down select the latest extension.
  • Click on the Commit Changes button at the bottom of the page.
  • Wait until the Upgrade is complete, when this happens click on the Refresh button below the command window at the bottom of the page.
  • The Extension will be upgraded after completion of the above mentioned steps.

You Might Also Like: