How Knowband is Transforming eCommerce with AI?

The eCommerce is evolving rapidly, and artificial intelligence (AI) is at playing a crucial role in store management. From content management to customer handling, AI is helping and handling manual tasks in automated ways.

Therefore, businesses need smarter tools to create content, translate efficiently, and provide exceptional customer support. Knowband is revolutionizing the industry with its AI-powered modules for Prestashop, OpenCart, WooCommerce, and Magento 2.

In this article, we will explore how Knowband’s AI-driven solutions, including content generators, translation tools, and an upcoming chatbot, are making online store management easier and more efficient.

The Growing Role of AI in eCommerce!

Managing a large product catalog requires huge manual efforts. Furthermore, content generation for products in bulk is a huge task and requires manual content generation. This leads to hiring content writers to meet the requirements. The expenses are even higher if you are handling a multi-lingual website. Not only do you need to generate the content, but it is also mandatory to translate the content efficiently and up to market standards for all the available languages.

On the other hand, AI is changing the way online businesses operate. From automating repetitive tasks to improving customer engagement, AI-driven solutions are helping merchants save time and enhance user experience.

Benefits of AI in eCommerce:

Automated Content Creation – AI can generate product descriptions, blogs, and marketing content instantly.

Accurate Translations – AI-powered tools provide high-quality translations, helping stores expand globally.

Improved Customer Support – AI chatbots respond to customer queries in real time, enhancing user satisfaction.

Better SEO Performance – AI-generated content is automatically optimized for search engines, increasing store visibility.

Knowband has embraced these AI advancements to develop powerful modules that simplify online store management.

AI-Powered Content Generation and Translation Addons:

Creating content manually can be time-consuming and challenging. However, Knowband’s AI-based content generator and translator addons automate this process, ensuring high-quality and engaging content for eCommerce stores.

1. Prestashop Claude Content Generator & Translator Addon:

Claude AI is known for its human-like responses and deep understanding of language. With Knowband’s newly launched Claude Content Generator and Translator for Prestashop, the eCommerce merchants can:

  • Generate product descriptions, meta tags, and blog content effortlessly.
  • Translate content into multiple languages for global reach.
  • Improve customer engagement with well-structured and SEO-friendly text.

On top of that, Claude provides very affordable services for the APIs. Thus, if you are planning to introduce an AI content generator module on your Prestashop store, Knowband’s got the right one for you.

2. Prestashop ChatGPT Content Generator & Translator Addon:

ChatGPT is the most popular AI-based online platform helping people with daily life and informational queries. Furthermore, OpenAI’s ChatGPT has a variety of engines that allow you to get specific response tones for your unique needs.

Therefore, AI has driven writing for Prestashop eCommerce. Knowband’s Prestashop ChatGPT Content Generator add-on offers:

  • AI-generated descriptions, category texts, and marketing copies.
  • Real-time content translation for multilingual stores.
  • Optimized content that boosts search rankings and conversion rates.

Moreover, the store admin gets advanced engine options to choose from for content translations and generation on Prestashop.  

3. Prestashop Gemini Content Generator & Translator Addon:

Gemini is one of the most powerful AI-based search engines available in the market. Furthermore, Google’s Gemini AI is another game-changer in AI-powered content.

The Prestashop Gemini Content Creator and Translator addon provides:

  • Quick and accurate content generation tailored to store needs.
  • High-quality translations for global expansion.
  • AI-driven suggestions to improve readability and engagement.

4. Prestashop DeeSeek Content Generator & Translator Addon:

DeepSeek is a newly introduced AI-based search engine that has captured the market attention within very little time. The reason behind its popularity is affordable premium services and accurate information. Moreover, the DeeSeek AI is designed for precision and efficiency. This Knowband addon enables:

  • Automatic generation of high-quality product content.
  • Instant translations with minimal manual effort.
  • SEO-optimized text that enhances search visibility.

These AI-powered modules save time, reduce workload, and improve the overall efficiency of an eCommerce business.

Coming Soon: Knowband’s AI Chatbot for Prestashop!

Customer support is one of the biggest challenges for eCommerce businesses. Furthermore, slow response time can lead to lost sales and dissatisfied customers. Therefore, to take care of customer handling on Prestashop automatically, Knowband is soon launching an AI-powered chatbot for Prestashop.

Why an AI Chatbot?

  • 24/7 Instant Support – The chatbot will provide real-time responses to customer inquiries.
  • Personalized Interactions – AI-driven chatbots can recommend products based on user preferences.
  • Order Assistance – Customers can check order status, shipping details, and return policies effortlessly.
  • Reduced Workload – Automating FAQs and customer queries frees up time for store owners.

Moreover, with the AI chatbot for Prestashop, online store owners can provide seamless support without needing a dedicated customer service team.

How Knowband’s AI Solutions Benefit eCommerce Merchants!

By integrating AI-based modules into their Prestashop, OpenCart, WooCommerce, or Magento 2 stores, merchants can:

  •   Save Time & Effort – Automating content creation and translations reduces manual workload.
  •   Expand Global Reach – AI-powered translations make it easier to target international customers.
  •   Boost Sales & Engagement – Well-structured and optimized content enhances user experience.
  •   Enhance Customer Support – AI chatbots ensure fast and accurate responses, increasing customer satisfaction.

Final Thoughts!

AI is the present. Knowband is at the forefront of this transformation, offering eCommerce merchants cutting-edge AI-powered tools to streamline operations, improve content quality, and enhance customer interactions.

With AI-based content generators, seamless translation add-ons, and an upcoming intelligent chatbot, Knowband is making eCommerce smarter, faster, and more efficient.

Explore Knowband’s AI-powered solutions today and stay ahead of the competition!
Prestashop Gemini AI Content Generator/Translator Addon – User Manual

The Prestashop Gemini Content Generator/Translator Addon is a cutting-edge tool designed to transform content management for Prestashop store owners. This advanced module harnesses the power of AI to simplify content creation and translation, making it a must-have for modern eCommerce businesses. Moreover, with the Prestashop Gemini Content Generator Module, you can quickly generate engaging product descriptions, attention-grabbing product titles, and SEO-friendly content. As a result, your store’s online presence improves, attracting more visitors and enhancing the overall customer experience.

In addition to content generation, the AI Content Generator for Prestashop seamlessly integrates with Prestashop Gemini, ensuring smooth and efficient operation. Furthermore, its SEO Content Generator feature guarantees that all content is not only original but also fully optimized for search engines. On top of that, the module comes with the Prestashop Gemini Content Translator, an AI-driven translation addon that enables store owners to expand their business into international markets with precise and context-aware translations.

Whether you’re handling multilingual content or aiming to enhance the efficiency of your content strategy, the Prestashop Gemini Content Generator Addon simplifies the entire process. Additionally, the Prestashop Gemini Content Translator Module combines state-of-the-art AI with user-friendly features, allowing merchants to save time while enhancing their stores with high-quality, multilingual content.

1.0. Key Features of Prestashop Google AI Gemini Content Generator/Translator Addon:

Seamless Content Creation – Easily generate high-quality product titles, detailed descriptions, and well-optimized meta tags with the Prestashop Gemini Content Generator Module. This saves time while ensuring uniform and engaging content across your store.

Advanced AI Engines – The Prestashop Gemini Content Generator and Translator addon is powered by multiple AI models, including Gemini 1.5 Flash, Gemini 1.5 Pro, Gemini 1.5 Flash -8b, Gemini 2.0 Flash, and Gemini 2.0 Flash – Lite Preview. Therefore, with these cutting-edge AI engines, you can create highly creative content and translate it with precision to meet diverse store requirements.

Optimized for SEO – Improve your store’s search rankings effortlessly with Knowband’s AI Content Generator. The Gemini content translator for Prestashop helps generate SEO-friendly content that drives more traffic to your website.

Effortless AI-Powered Translation – Expand your business globally by translating your store’s content into multiple languages with ease. The AI Translation Addon for Prestashop ensures accurate and context-aware translations with minimal effort.

Easy to Set Up and Use – Designed with a user-friendly interface, the Prestashop AI Content Creator is simple to install and operate, even for store admins without technical expertise. Furthermore, this ensures a smooth and hassle-free onboarding experience.

Category and Meta Tag Automation – Quickly generate and translate category names and meta descriptions with precision. This feature ensures professional and consistent content throughout your store with just a few clicks.

Bulk Content Generation – Ideal for stores with large product catalogs, the module supports batch content creation. Thus, this allows you to process multiple items simultaneously, significantly increasing efficiency.

Improved Store Management – Streamline content management tasks, making product updates quicker and boosting overall operational efficiency. This feature benefits both small and large-scale businesses.

Multi-Language Compatibility – The module supports all languages, including right-to-left (RTL) scripts, ensuring flexibility for global businesses. Additionally, it is compatible with multiple Prestashop versions, making it a reliable solution for a wide range of stores.

2.0 How to Generate the Gemini Key for Module Configurations?

To enable Gemini functionality in your PrestaShop module, you must configure an API Key.

To use Gemini features, you need to set up an API Key. Please follow these steps:

Step 1: Obtain an API Key:

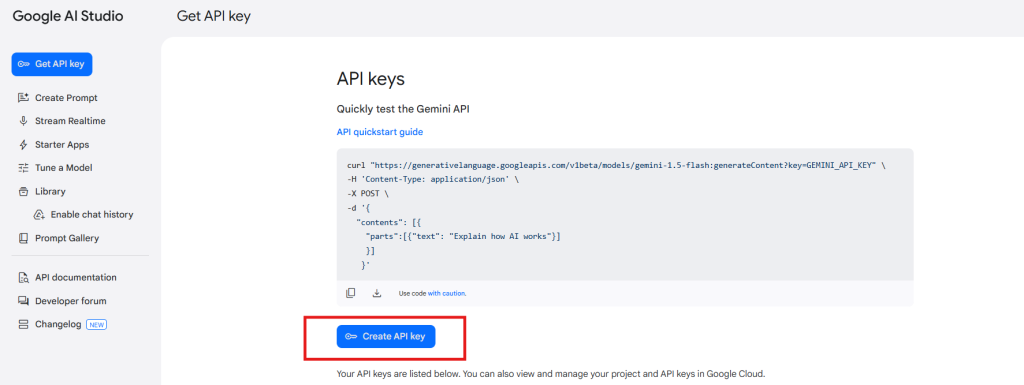
  • Go to the Gemini API Key generation page at https://aistudio.google.com/app/apikey and log in or create an account if you haven’t already.
  • Click on “Create new secret key”. Copy this key for the next step.

Step 2: Enter the API Key in Your PrestaShop Module:

Step 3: Save the Settings:

After entering the API Key, click “Save” to store your settings. The Gemini module will now use this key to interact with the Gemini API.

Important:

Billing Requirement: Ensure that you have a sufficient credit balance in your Gemini account for the API to function. If your credit balance is depleted, the API requests will not work. You can check your balance and add funds by visiting the billing overview page at https://aistudio.google.com/app/apikey.

Keep your API Key secure and do not share it publicly, as it is linked to your Gemini account usage and billing.

3.0 Installation Guide for Prestashop AI Content Creator Addon:

Once you purchase the addon, follow the below steps:

  • Go to the Store Admin -> Modules and Services.

  • Click on “Upload a module”. You can drag or drop the file or can simply select the file from the system.

4.0 Admin Interface Overview:

4.0.1 General Setting:

The Google AI Content Generator for Prestashop allows the admin to configure the module and handle bulk content operations within just a few clicks.

Here is a Brief Overview:

Enable/Disable: Enable/Disable the Prestashop Gemini Content Generator.

API Key for Gemini: Paste the API Key into the provided “API Key for Gemini” field.

Gemini Engine for Content Generation: This module utilizes a range of advanced AI models, including Gemini 1.5 Flash, Gemini 1.5 Pro, Gemini 1.5 Flash -8b, Gemini 2.0 Flash, and Gemini 2.0 Flash – Lite Preview. With these state-of-the-art AI engines, you can effortlessly generate compelling content and translate it accurately to meet the unique needs of your store.

Temperature: Enter the temperature here. A higher temperature value leads to a more creative content tone. Whereas, a lower temperature shares more focused and relevant content.

Maximum Tokens: Enter the number of maximum tokens here. The term “tokens” stand for the chunks of words of characters. Keep the default value as 500.

Gemini Engine for Translations: Select the Google Gemini AI engine for your content translation.

Primary Language for Translation/Content Generation: Select the default language to be used for generating and translating content.

Languages to Translate Content: Select the different multiple languages for content translation.

4.0.2. Gemini Prompts:

The module includes 14 built-in Gemini prompts, designed to assist with a variety of tasks. Below is a list of these prompts along with their functionalities:

Generate Product Description: Generate a detailed SEO-Friendly and engaging product description for the following product {product_name}. Make sure the description includes the main features, benefits, and use cases of the product. Please use HTML tags for formatting so the content is ready for a web page. The product is listed in the {category} category

Generate Product Meta Title: Generate a concise and catchy meta title for a product named “{product_name}” in the “{category}” category. Keep the title under 60 characters. Avoid using double quotes. The title should include the main keyword and attract potential customers.

Generate Product Meta Description: Generate a compelling meta description for the product named {product_name} which lies in the category {category}. Limit the description to about 140 characters.

Translate Product Title: Translate the following product title and make sure to give translated content only

Translate Product Description: Translate the following product description and preserve the HTML structure and tags, and only translate the visible text content and make sure to give translated content only.

Translate Product Meta Title: Translate the following product Meta Title and make sure to give translated content only.

Translate Product Meta Description: Translate the following product Meta Description and make sure to give translated content only.

Generate Category Description: Generate the SEO-Friendly Category Description for the {category} Generate a detailed, SEO-friendly category description for the “{category}” category. Please use HTML tags for formatting so the content is ready for a web page.

Generate Category Meta Title: Generate a concise and catchy meta title for a “{category}” category. Keep the title under 60 characters. The title should include the main keyword, attract potential customers, and avoid using double quotes.

Generate Category Meta Description: Generate a compelling meta description for the category {category}. Limit the description to about 140 characters and avoid using double quotes.

Translate Category Title: Translate the following category title and make sure to give translated content only.

Translate Category Description: Translate the following Category description and preserve the HTML structure and tags, and only translate the visible text content and make sure to give translated content only

Translate Category Meta Title: Translate the following Category Meta Title and make sure to give translated content only.

Translate Category Meta Description: Translate the following category meta description and make sure to give translated content only.

4.0.3. Gemini Prompts Task Log:

This tab displays comprehensive information about all executed prompts. It includes key details such as Prompt Type, Product, Category, Language, Previous Content, New Content, and Date, allowing for easy tracking and management.

 5.0. How to Execute Gemini Prompts?

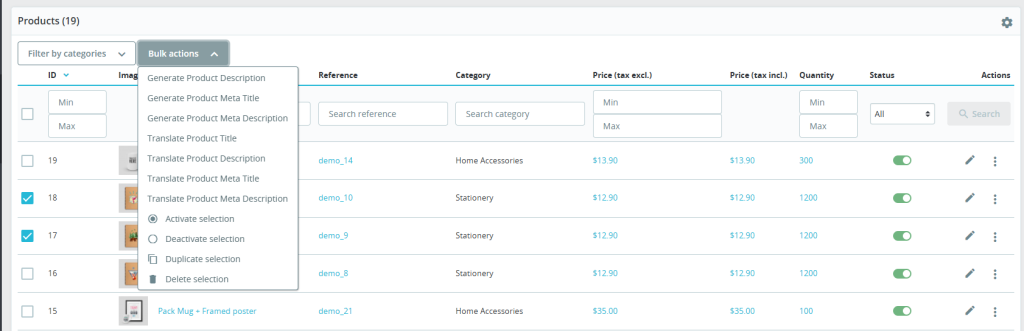
The Prestashop store retailer can generate and translate the content within a few taps from the Prestashop Backend>>Products tab.

Choose the desired products and navigate to the Bulk Actions tab, as shown in the screenshot above. From there, you can select various prompts to perform different actions efficiently with the help of Prestashop AI Content Generator and Translator Module.

  • Generate Product Description: Select multiple products and click on the “generate product description” button.
  • Generate Product Meta Title: Generate the meta titles of products from here.
  • Generate Product Meta Description: Select the products and click on the “generate product meta description” prompt shown under the bulk actions section.
  • Translate Product Title: Translate the product titles from here.
  • Translate Product Description: This prompt helps the store admin translate the product description into multiple different languages.
  • Translate Product Meta Title: Translate the product meta title from here.
  • Translate Product Meta Description: Select multiple products and hit the following prompt for product meta description translations in bulk.

Boost Valentine’s Sales: Add Love-Themed Stickers and Labels to Your Prestashop Store

Valentine’s Day is a special occasion when shoppers look for romantic gifts and special deals. Thus, it becomes crucial to make your store ready for the Valentine’s season sales to make the most out of out.

As an eCommerce store owner, you must grab their attention and encourage them to buy. One of the easiest and most effective ways to do this is by using love-themed product stickers and labels on your Prestashop store.

With the Prestashop Product Sticker Module by Knowband, you can highlight discounts, promotions, and best-selling items in an eye-catching way. Furthermore, this helps in improving product visibility and boosting conversions.

Why Use Stickers and Labels for Valentine’s Day Sales?

Adding Valentine’s Day-themed stickers and labels to your store can make a big difference in customer engagement.
Here’s why the eye-catching stickers work:

  • Grab Customer Attention – Eye-catching stickers help products stand out and increase the chances of your products being noticed.
  • Highlight Special Offers – With the Prestashop Product Sticker and Label Addon, the store admin can promote discounts, bundle deals, and limited-time offers with attractive labels.
  • Create Urgency – Prestashop retailers can also use stickers like “Limited Offer,” “Valentine’s Special,” or “Only a Few Left” to encourage quick purchases.
  • Enhance Store Aesthetics – Love-themed stickers make your store look festive and appealing and create a better shopping experience for your customers.

How the Prestashop Product Sticker Module Can Help:

The Prestashop sticker module is a powerful tool that allows store owners to add custom labels and stickers to their products. Furthermore, it provides an easy way to promote Valentine’s Day offers and grab shoppers’ attention.

Key Features of the Prestashop Sticker and Label Module!

  • Customizable Stickers & Labels – Add Valentine ’s-themed stickers like hearts, discount tags, and best-seller labels.
  • Automated Sticker Placement – The module applies stickers automatically to selected products based on the rules configurations added from the module backend.
  • Multiple Sticker Positions – Place labels on different parts of the product image.
  • Schedule Stickers in Advance – The admin can set a prior start and end date for Valentine’s promotions.
  • User-Friendly Interface – Easy to install and manage without technical knowledge.

Ideas to Use the Prestashop Sticker and Label Plugin for Valentine’s Day!

1. Highlight Discounts & Special Offers:

Shoppers love discounts, especially during special occasions. Thus, the Prestashop admins can use the Prestashop product label plugin to add stickers like:

  • “Valentine’s Day Sale – 20% Off”
  • “Buy 1 Get 1 Free – Limited Time”
  • “Special Gift for Your Loved One”

These labels instantly attract attention and drive sales.

2. Showcase Best-Selling and Trending Products:

Valentine’s shoppers often look for popular gift options. Use the Prestashop Sticker Extension to add badges like:

  • “Best Seller”
  • “Most Loved Product”
  • “Valentine’s Top Pick”

Moreover, using this kind of product visuals on the product images builds trust and helps customers make quicker purchase decisions.

3. Create Urgency with Countdown Stickers:

Fear of missing out (FOMO) is a great sales strategy. Therefore, the Prestashop product badge plugin lets you create urgency with labels such as:

  • “Only a Few Left!”
  • “Limited Stock Available”
  • “Offer Ends Soon”

Shoppers are more likely to buy when they feel an offer is time-sensitive.

4. Add Festive Elements with Custom Stickers:

Make your store visually appealing by adding love-themed stickers with the Prestashop sticker maker module. Some ideas include:

  • Heart-shaped stickers
  • Valentine’s Day gift tags
  • “Gift Wrapped with Love” labels

These elements enhance the shopping experience and create a romantic theme in your store.

Integrate Product Stickers on Opencart

No Coding Skills Required

SHOP NOW

How to Install and Use the Prestashop Product Label and Stickers Module?

Install the Module – Download and install the Prestashop product label and sticker module from Knowband.

Customize Stickers – Choose from pre-designed Valentine’s Day stickers or upload your own.

Set Display Rules – The module provides options to apply the product stickers based on categories, discounts, or stock availability.

Schedule Stickers – Set start and end dates for automatic removal after Valentine’s Day.

Save and Apply – Once settings are done, apply stickers to your product images instantly.

Benefits of Using the Prestashop Label and Badge Module:

Increases Product Visibility – Helps customers find special deals quickly.

Boosts Conversions – Attracts more clicks and encourages purchases.

Enhances Store Appearance – Makes the store festive and engaging.

Saves Time – Automates sticker placement and scheduling.

Conclusion!

Adding Valentine’s Day-themed product labels and stickers to your Prestashop store is a simple yet powerful way to boost sales. Therefore, with the Prestashop Product Sticker Addon, you can highlight offers, create urgency, and enhance the overall shopping experience.

Don’t miss out on increased conversions this Valentine’s Day! Install the Prestashop product label addon today and make your store visually appealing and sales-ready.


Boost Your Sales with OpenCart Google Merchant Feeds Integration

Are you struggling to increase the visibility of your OpenCart store? Want to attract more customers and boost your sales? The solution lies in listing your products on Google Merchant Console.

By integrating your store with Google Merchant Center, you can display your products on Google Shopping, reaching millions of potential buyers.

Therefore, we’ll explore how Knowband’s OpenCart Google Shopping Integration Module can help you grow your business its features and benefits, and why it’s a must-have tool for every OpenCart store owner.

Introducing Google Shopping for eCommerce?

Google Shopping is a platform where users can search for products and compare prices from different online stores. Furthermore, when you list your products on Google Shopping, they appear in Google search results and in the Shopping tab. This not only increases your store’s visibility but also drives more potential customers to your website.

To display your products on Google Shopping, you need to create a product feed and submit it to Google Merchant Center. This is where the OpenCart Google Shopping Integration Extension helps by automating the process for the Opencart eCommerce merchants.

Why Do You Need OpenCart Google Shopping Integration?

Manually adding and updating product feeds in Google Merchant Center can be time-consuming and complex. However, the OpenCart Google Shopping Integration Plugin simplifies this by automatically syncing your store’s products with Google Shopping.

Here’s why you need the OpenCart Google Shopping Feed Integration Extension:

  • Automated Feed Submission: No need to manually upload product details. The extension syncs your product feed with Google Merchant Center.
  • Increased Sales & Traffic: Your products get listed on Google Shopping, bringing more traffic and potential buyers.
  • Error-Free Listings: The module ensures that product data is submitted in the correct format, reducing errors and feed rejection.
  • Real-Time Synchronization: Any changes you make in your store (price, stock, descriptions) are automatically updated in Google Shopping.

Key Features of OpenCart Google Shopping Integration Module

The OpenCart Google Shopping Module comes with powerful features that make selling on Google Shopping easier.

1. Easy Product Feed Generation: The Knowband module generates Google Shopping Feeds for OpenCart, which includes all product details like title, description, price, and images.

2. Automatic & Manual Sync Options: With the OpenCart Google Shopping Connector, you can schedule automatic feed updates or manually sync whenever needed.

3. Advanced Filtering Options: The OpenCart Google Shopping Synchronizer allows you to select specific products, categories, or brands to include in the feed.

4. Multi-Language & Multi-Currency Support: Sell internationally? No problem! The extension supports multiple languages and currencies.

5. Feed Optimization: The module ensures your product feed follows Google’s guidelines, improving your chances of getting approved.

How to Use OpenCart Google Shopping Integration Plugin?

Setting up OpenCart Google Shopping Feed Integration Extension is easy. Follow these steps:

Step 1: Install the Extension

First, install the Free or Paid Google Shopping OpenCart Integration Module on your OpenCart store.

Step 2: Connect with Google Merchant Center

Link your store with Google Merchant Center by entering the connection details.

Step 3: Configure the Settings

Customize the feed settings under profile configurations, select products to include, and set the sync frequency.

Step 4: Generate & Submit the Feed

Generate the Google Shopping Feed for OpenCart and submit it to Google Merchant Center.

Step 5: Monitor and Optimize

Check for errors, update missing attributes, and optimize your product titles and descriptions for better visibility.

Benefits of Using OpenCart Google Shopping Module!

Using the Free Google Shopping Integration Module for OpenCart offers several advantages:

Saves Time & Effort: Automates feed submission, reducing manual work.

Increases Product Visibility: Your products appear in Google search results and Google Shopping.

Boosts Sales & Conversions: More exposure leads to higher sales.

Improves Marketing Performance: Helps with Google Ads campaigns by providing high-quality product feeds.

Integrate Your Opencart Shop with Etsy Marketplace

No Coding Skills Required

SHOP NOW

Free vs. Paid Google Shopping Integration Modules:

If you are looking for a Free Google Shopping Opencart Synchronization Module, we have got you covered at Knowband. While our free Opencart Google Shopping Connector module offers basic functionality, premium OpenCart Google Shopping Merchant Free Extensions come with advanced unlocked features.

Furthermore, the paid OpenCart Google Shopping Integration Extension is a better investment if you want seamless integration and long-term benefits.

Conclusion!

Integrating your OpenCart store with Google Shopping is one of the best ways to boost sales and reach more customers. Moreover, the OpenCart Google Shopping Integration Module simplifies the process by automating product feed submissions and ensuring real-time updates.

If you haven’t started using the Opencart Free Google Shopping Synchronization Module, now is the time! Enhance your store’s visibility, drive more traffic, and increase your sales with the OpenCart Google Shopping Module.

Would you like to see a demo of the Opencart Google Merchant Centre Connector in action? Get started today and grow your online business!

Boost Your Sales: Connect Your OpenCart Store to Etsy with Knowband

If you run an OpenCart store and want to expand your reach, selling on Etsy is a great opportunity. Etsy is one of the most popular marketplaces for handmade, vintage, and unique products. Thus, if you deal in similar product categories, integrating your OpenCart store with Etsy, can boost sales, increase visibility, and reach a wider audience for your eCommerce business.

However, managing two platforms separately can be time-consuming and challenging. This is where Knowband’s OpenCart Etsy Connector comes in handy. With the help of the Opencart Etsy Integration Extension, you can easily sync your store with Etsy and automate your selling process.

Important Updates for Opencrat Etsy Seller (January 3, 2026)

Knowband’s Etsy Connector for OpenCart has been upgraded to include OpenAPI authorization, ensuring secure and uninterrupted integration with Etsy’s updated API standards.

It is crucial for sellers to update the extension to v2.0.4 by January 18, 2026, as older versions may lose connection, which can disrupt product listings and inventory synchronisation.

This update also allows sellers to manage return policies directly from the store dashboard and automatically sync them to Etsy, making store operations more efficient.

In this article, we will explain how the Etsy OpenCart Integration module can help you streamline your business and increase revenue effortlessly.

Why Sell on Etsy from OpenCart?

Etsy is a well-known global marketplace with millions of active buyers. Thus, if you are already selling on OpenCart, integrating your store with Etsy can provide you with multiple benefits:

  • Expand your customer base by reaching Etsy shoppers.
  • Increase revenue by selling on multiple platforms simultaneously.
  • Automate product listing and updates with an easy synchronization process.
  • Save time by managing everything from your OpenCart dashboard.

Furthermore, by using the OpenCart Etsy integrator, you can avoid the hassle of manually uploading products and managing orders on two different platforms.

Introducing Knowband’s OpenCart Etsy Connector?

The Etsy OpenCart Marketplace Integration module by Knowband is a powerful plugin that helps OpenCart store owners connect their store to Etsy with ease. With this module, you can:

  • Sync products, categories, and pricing automatically.
  • Manage orders from Etsy within your OpenCart admin panel.
  • Update inventory and product information effortlessly.
  • Automate product listing and avoid manual work.

This OpenCart Etsy Marketplace Integration Extension is designed to simplify your workflow and maximize your productivity.

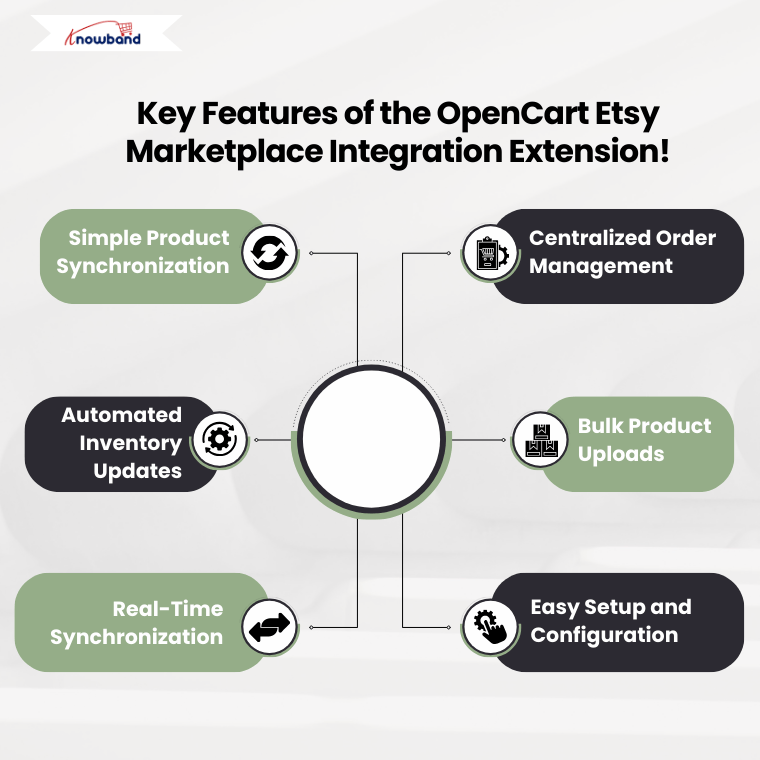
Key Features of the Etsy Opencart Synchronization Extension!

1. Simple Product Synchronization:

With the Opencart Etsy Synchronization Extension, you can sync your OpenCart products with Etsy in just a few clicks. Moreover, the extension allows you to map product categories, pricing, and inventory details effortlessly.

2. Centralized Order Management:

No need to switch between platforms! The Etsy OpenCart API Integrator lets you manage Etsy orders directly from your OpenCart dashboard. This feature ensures that your order processing is fast and efficient.

3. Automated Inventory Updates:

The Etsy Opencart API Integrator Extension ensures that any inventory updates in OpenCart are automatically reflected on Etsy. Therefore, this prevents overselling and inventory mismatches.

4. Bulk Product Uploads:

The Opencart Etsy Integration Extension allows you to bulk upload products to Etsy. This not only saves time and effort but also helps you manage a large product catalog.

5. Real-Time Synchronization:

The Etsy Opencart Synchronization Extension provides real-time data syncing, ensuring that your store and Etsy marketplace remain up-to-date with the latest product changes.

Integrate Your Opencart Shop with Etsy Marketplace

No Coding Skills Required

SHOP NOW

6. Easy Setup and Configuration:

The OpenCart Etsy Marketplace Integration Extension is user-friendly and requires no coding skills. Furthermore, you can easily set up and configure the module using the step-by-step guide provided by Knowband.

How to Use the OpenCart Etsy Integrator?

Using the Etsy OpenCart Marketplace Integration module is simple. Here’s how you can get started:

  • Install the Module – Download and install the Opencart Etsy Integration Plugin from Knowband.
  • Connect Your Etsy Store – Use the Opencart Etsy API Integrator to authenticate and link your OpenCart store with Etsy.
  • Configure Settings – Customize settings such as product mapping, pricing, and inventory rules.
  • Sync Products and Orders – Start syncing your OpenCart products with Etsy and manage orders seamlessly.
  • Monitor Performance – Track sales and optimize your product listings for better results.

Why Choose Knowband’s OpenCart Etsy Connector?

Knowband is a trusted name in eCommerce extensions and plugins. Furthermore, the free Knowband OpenCart Etsy Integration extension offers a seamless way to connect OpenCart with Etsy without technical hassles.

Benefits of Choosing Knowband:

  • User-Friendly Interface – The module is easy to install and use.
  • Regular Updates – Get the latest features and improvements.
  • 24/7 Customer Support – Dedicated support for hassle-free integration.
  • Free OpenCart Etsy Marketplace Integration Extension Available – A free version is available for testing before upgrading.

Conclusion!

Expanding your online business by selling on Etsy from OpenCart is a great strategy to increase sales. Furthermore, with the Etsy OpenCart Integration plugin, you can automate product listings, manage orders efficiently, and synchronize inventory without hassle.

Knowband’s OpenCart Etsy Connector simplifies the integration process, making it easy, fast, and effective. Whether you are a small business or an established brand, using the OpenCart Etsy integrator can help you reach more customers and grow your business.

Get started today with the Free OpenCart Etsy Marketplace Integration Extension and take your eCommerce business to the next level!

You may also like to read:
Discover how integrating your PrestaShop store with Etsy can save time and maximize sales. Read More

Magento 2 ® Google Tag Manager (gtag, GA4, GTM Events) – User Manual

The Magento 2 Google Tag Manager Plugin by Knowband offers a simple and efficient way to connect Google Tag Manager (GTM) to your Magento 2 store. With this easy-to-use module, store owners can manage and integrate multiple Google tags without requiring technical expertise. Furthermore, the Magento 2 gtag Manager Plugin enables tracking of essential events like Add to Cart, Product Views, Checkout Initiation, Order Completion, and more, providing valuable insights into customer interactions.

The Magento 2 Google Analytics Integration Plugin also supports capturing UTM parameters, allowing you to analyze the performance of your marketing campaigns. Thus, by understanding which campaigns drive traffic and conversions, you can refine your strategies, allocate ad budgets effectively, and boost your ROI.

Designed to enhance tracking and optimize conversions, the Magento 2 GTM Extension is ideal for improving user experience and achieving better results. Whether you rely on GA4 or GTM, this module simplifies the integration process, so you can focus on growing your business.

1. Key Features Offered by Magento 2 GA4 Integration Plugin:

Effortless Google Tag Integration: Add Google Analytics, Google Ads, and GA4 to your Magento 2 store without any coding skills.

Instant Event Tracking: With the Magento 2 Gtag Integration Plugin, the store admin can monitor user activities in real-time, such as Add to Cart, Product Views, and Checkout Initiation, to gain immediate insights into customer behavior.

Track UTM Parameters: Easily capture UTM parameters to measure the success of your marketing campaigns and identify the most effective channels.

Advanced eCommerce Tracking: Google Analytics for Magento 2 helps the admin gain detailed insights into sales performance with enhanced tracking of events like Product Detail Views, Add to Cart, and Order Confirmations.

Simple Setup and Configuration: Enjoy a hassle-free experience with a user-friendly interface that makes setting up and managing tags quick and easy—no technical knowledge required!

Intuitive Dashboard: The module provides ease of all tags and events management directly from your Magento 2 admin panel with a simple and organized dashboard.

Multi-Language Support: The Magento 2 GTM module supports multiple languages, making it ideal for stores that cater to diverse audiences.

1.1. How to Find Your Google Tag Manager Container ID?

Step 1: Log in to your Google Tag Manager account.

Step 2: Either create a new container or choose an existing one.

Step 3: Locate the Container ID, which appears in the format GTM-XXXXXX, in the top-right corner of the Google Tag Manager dashboard.

Step 4: Copy the Container ID and paste it into the GTM Container ID field within this module’s configuration settings.

You can also refer to the module’s functionality overview video for more information about the Container ID generation steps.

1.2. How to Locate Your Google Analytics Measurement ID?

Step 1: Log in to your Google Analytics Account.

Step 2: Choose the property for which you need the Measurement ID.

Step 3: Go to Admin > Data Streams and select your web data stream.

Step 4: Find the Measurement ID, which appears in the format G-XXXXXXXXXX.

Step 5: Copy the Measurement ID and enter it in the Google Analytics Measurement ID field in the module’s configuration.

Integrate GA4 on Your Prestashop Store

No Coding Skills Required

SHOP NOW

1.3. How to Set Up Events in Google Tag Manager?

Step 1: Download the GTM Events file. You can find the download link in the module’s configuration section under the Instructions tab.

Step 2: Log in to your Google Tag Manager account.

Step 3: In Google Tag Manager, go to Admin > Import Container.

Step 4: Upload the downloaded JSON file from your computer.

Step 5: Select the workspace where you want to add the events and choose either the Merge or Overwrite option based on your requirements.

Step 6: Click Confirm to finalize the import process.

Step 7: Save and publish your container to enable the events in Google Tag Manager.

If you encounter any issues during the setup, feel free to reach out to us at support@knowband.com for assistance.

Admin Panel Overview:

The Magento 2 Google Analytics Integration Extension comes with an intuitive and easy-to-manage admin dashboard that allows the store admin to configure and manage the plugin without even any technical expertise.

2.1 General Settings:

  • Enable the Extension: Enable/Disable the GA4 tracking on your Magento 2 store with this button.
  • GTM Container ID: Insert the “Google Tag Manager Container ID” in the following text field. Please follow the steps mentioned above to extract the GTM Container ID from the GTM console.
  • Google Analytics Measurement ID: Add the “Google Analytics Measurement ID” here.

2.1 GTM Events Configurations:

This tab provided under the Magento 2 Google Analytics Module lists all the Google Analytics Events in a single interface. Further, the store admin can easily enable/disable the analytics events with the Enable/Disable “Toggle” button.

  • Page View: Enable the “Page View” analytics event from this button.
  • View Product: Get the data insights when a customer views a product on your store.
  • View Category: Manage the “View Category” tag from here.
  • Add to Cart: Get insights when a customer adds products to the cart with the “Add to Cart” event.
  • Remove from Cart: Capture the analytics when the customers remove items from the cart.
  • Checkout Begins: Gather the insights as soon as the customer opts in for the checkout process on your Magento 2 store.
  • Checkout Page: Enable/Disable the “Checkout Page” Google Tag Manager event from here.
  • Add/Update Address: Track when the customers add or update their addresses.
  • Shipping Details: Get the insights when the customers fill in the shipping details during the checkout.
  • Order Success Page: Track the real-time insights from the order success page.
  • Apply Discount: Enable/Disable the “Apply Discount” tracking event with the “Apply Discount” tag.
  • View Cart: Capture the insights when a customer views the cart.
  • Customer Registration: Gather the data during customer registration on your eCommerce store.
  • Customer Login: Manage the “Customer Login” tracking insights from here.
  • Add to Wishlist: This tag provides the analytics data when the customers add something to the Wishlist.
  • Search: Check what your customers are looking for and implement the strategies with better insights.
  • Track UTM Parameters: Enable/Disable the UTM parameters tracking from here.

2.2. Configuration Steps:

The Magento 2 no-code Google Tag Manager integration provides easy-to-follow instructions, removing the need for technical skills to set up the module. The store admin can quickly access the required credentials by following the simple steps outlined below:

These steps will guide the store admin through the module setup. However, if you encounter any issues during the connection process or with the module, feel free to contact us at support@knowband.com or submit a ticket on knowband.com/helpdesk.

Tired of Manual Listings on eBay? Here’s How Knowband’s Connector Can Help

Managing an eCommerce store is no easy task, and selling on multiple platforms like eBay can quickly become overwhelming. Furthermore, if you’ve been manually listing products, updating inventory, and managing orders on eBay, you know how time-consuming and error-prone the process can be. That’s where Knowband’s eBay Marketplace Connector comes in to simplify the job.

[New Features Alert] Prestashop eBay Marketplace Connector v2.2.1 is here 

Knowband has the Prestashop eBay Integration Addon v2.2.1 with enhanced features, Rate Limit API Monitoring and Inventory Comparison.

  • Avoid downtime: Check API usage before listing with the Prestashop eBay Integration Module

  • Stay in sync: Automatically update stock across your store and eBay using the eBay Prestashop Connector.

  • Seamless automation: Reduce manual work and prevent overselling with the dedicated inventory sync feature in the Prestashop eBay Marketplace Integration Module.

Upgrade your Prestashop eBay Integration Plugin with version 2.2.1 today to keep your listings accurate and your store running smoothly!

This powerful extension is designed for major platforms like Prestashop, Opencart, WooCommerce, and Magento 2. By automating eBay integration, it saves you time and effort while helping you expand your reach to millions of eBay customers.
Let’s explore how Knowband’s eBay Connector can transform your multichannel selling experience.


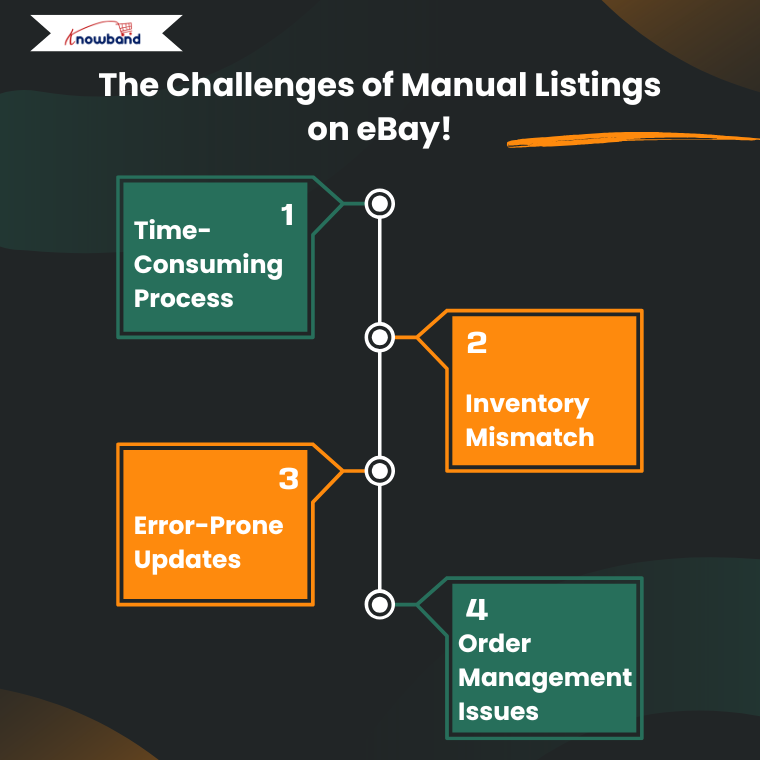
The Challenges of Manual Listings on eBay!

Manually managing eBay listings comes with several challenges:

Time-Consuming Process: Creating product listings individually takes hours, especially if you have a large catalog.

Inventory Mismatch: Keeping inventory levels consistent across your eCommerce store and eBay can lead to overselling or underselling.

Error-Prone Updates: Manual updates to pricing, descriptions, or stock are susceptible to errors, affecting customer satisfaction and overall purchase journey.

Order Management Issues: Handling eBay orders separately from your store can disrupt workflow and cause delays.

These challenges not only hinder your productivity but also limit your ability to scale your business effectively.

How Knowband’s eBay Marketplace Connector Simplifies the Process:

Knowband’s eBay Marketplace Connector addresses all these pain points by offering seamless integration between your eCommerce store and eBay. Here’s how it helps across different platforms:

1. For Prestashop Stores:

If you run your store on Prestashop, Knowband’s eBay Connector Module for Prestashop ensures that you can:

  • Sync your product catalog with eBay in a few clicks.
  • Automate updates for prices, stock levels, and product descriptions.
  • Map product attributes from your Prestashop store to eBay categories for accurate listings.
  • Manage orders from eBay directly within your Prestashop dashboard.

Moreover, with these features, Prestashop merchants can focus more on growing their business rather than spending hours managing listings.

2. For Opencart Stores:

For Opencart users, the Opencart eBay Connector brings unmatched ease of use:

  • Quickly map your Opencart categories to eBay categories for faster product uploads.
  • Keep your inventory and pricing synchronized in real-time to avoid discrepancies.
  • Handle eBay orders alongside your Opencart orders, streamlining the fulfillment process.
  • Automate repetitive tasks like bulk product uploads, saving valuable time.

Therefore, Opencart merchants can rely on the eBay Connector to handle their multichannel selling needs effortlessly.

3. For WooCommerce Stores:

WooCommerce, being a flexible and widely used platform, works seamlessly with Knowband’s eBay Connector. Here’s what it offers:

  • Bulk-upload WooCommerce products to eBay with just a few clicks.
  • Automatically update product information like titles, descriptions, and images.
  • Synchronize stock levels between your WooCommerce store and eBay to avoid overselling.
  • Manage returns and order statuses directly within WooCommerce.

Integrate Your WooCommerce Shop with eBay Marketplace

No Coding Skills Required

SHOP NOW

Furthermore, WooCommerce sellers can use the connector to streamline their workflow and focus on boosting sales.

4. For Magento 2 Stores:

Magento 2, known for its scalability, becomes even more powerful with the Magento 2 eBay Marketplace Connector Plugin:

  • Effortlessly list Magento 2 products on eBay while mapping custom attributes.
  • Ensure real-time synchronization of inventory, prices, and product details.
  • Automate order imports from eBay to your Magento 2 store for simplified management.
  • Gain insights into your eBay sales performance through detailed analytics.

Therefore, Magento 2 merchants can leverage this integration to manage their operations efficiently and scale their eBay presence.

Key Benefits of Knowband’s eBay Marketplace Connector!

No matter which platform you use, the Knowband eBay Connector offers a host of benefits:

Time Savings: Automate tasks like product uploads and updates to free up your time.

Error Reduction: Minimize manual errors by synchronizing data automatically.

Improved Efficiency: Manage orders, inventory, and listings from one central dashboard.

Multichannel Growth: Expand your sales reach by tapping into eBay’s vast customer base.

User-Friendly Interface: The connector is designed to be easy to use, even for non-technical users.

Why Choose Knowband?

Knowband has established itself as a trusted name in the eCommerce industry, offering high-quality extensions that cater to merchants’ unique needs. Therefore, the eBay Marketplace Connector is no exception. With features tailored for Prestashop, Opencart, WooCommerce, and Magento 2 eCommerce platforms, it ensures a smooth integration process and long-term support.

Moreover, Knowband provides excellent customer service to help you set up and configure the extension, ensuring you get the most out of it.

Conclusion!

Managing eBay listings manually is a thing of the past. However, with Knowband’s eBay Marketplace Connector, you can automate and simplify your eBay integration, no matter which platform your store is built on—Prestashop, Opencart, WooCommerce, or Magento 2.

Thus, by streamlining your workflow, reducing errors, and saving time, this extension allows you to focus on growing your business and reaching more customers. So, if you’re tired of manual listings on eBay, it’s time to upgrade to Knowband’s eBay Connector and transform the way you sell online.

How to Send the Webservice Key of PrestaShop in the Authorization Header Instead of the URL

PrestaShop provides a comprehensive webservice API that enables developers to programmatically manage critical aspects of an eCommerce store, including products, orders, customers, and more.

Traditionally, accessing the PrestaShop API involves appending the webservice key as a query parameter in the URL. While this method is functional, it poses significant security concerns due to the potential exposure of sensitive information.

A more secure and professional approach is to transmit the webservice key through the Authorization header. In this blog, we delve into the reasons for adopting this approach, its technical advantages, and a step-by-step guide to implementing it in your PrestaShop integration.

Why Use the Authorization Header?

Transmitting sensitive information like the webservice key via the Authorization header offers several technical benefits over embedding it in the URL:

Mitigation of Security Risks:

Sensitive information included in URLs is often logged in browser history, server logs, and monitoring tools.
This increases the risk of unauthorized access and data exposure. It compromises the overall security of sensitive information.. By using the Authorization header, you ensure that the key remains hidden from such logs.

Adherence to Security Standards:

Modern security guidelines and compliance frameworks discourage placing sensitive data in query strings.
Employing the Authorization header aligns with these standards and enhances the overall security posture of your API integrations.

Improved URL Readability:

Embedding the webservice key in the URL results in cluttered and hard-to-read query strings.
By using the Authorization header, you maintain clean and professional URLs, simplifying troubleshooting and debugging.

Scalability and Interoperability:

The Authorization header is widely adopted across APIs and platforms, ensuring compatibility and future-proofing your implementation. 

Build Android and iOS App for Your Prestashop Store

No Coding Skills Required

SHOP NOW

Steps to Send the Webservice Key in the Authorization Header

Implementing the Authorization header for your PrestaShop webservice requests involves a series of technical configurations. Below are the detailed steps:

Step 1: Enable the PrestaShop Webservice

To begin, ensure that the webservice functionality is enabled in your PrestaShop store:

  1. Log in to your PrestaShop store Back Office.
  2. Navigate to Advanced Parameters > Webservice.
  3. Toggle the switch to enable the webservice functionality.

This step ensures that your store can handle API requests.

Step 2: Generate a Webservice Key

Next, create a unique webservice key with the required permissions:

  1. In the Webservice section, click Add New Key.
  2. Define the key permissions, such as GET, POST, PUT, and DELETE, based on your integration requirements.
  3. Save the key and securely store it, as it will be required for authorization.

Step 3: Update Your Code to Use the Authorization Header

Modify your API integration code to include the webservice key in the Authorization header instead of the URL.

Step 4: Test Your Implementation

After integrating the Authorization header, verify its functionality by testing API requests. Key points to validate include:

  1. The server accepts the Authorization header.
  2. The response contains the expected data.
  3. Error handling works as intended for invalid or missing keys.

Testing ensures seamless integration and reliability in production environments.

Step 5: Update Server Configurations (Optional)

In some instances, your PrestaShop server may explicitly check for the webservice key in the URL. To enable the use of the Authorization header, adjust the server configurations as follows:

  1. Modify the .htaccess file to bypass checks for keys in query strings.
  2. Adjust the API controller settings in PrestaShop to prioritize Authorization headers.

These configurations ensure backward compatibility and prevent disruptions.

Advanced Considerations

For developers handling large-scale integrations, consider the following enhancements:

  • Token-Based Authentication: Replace static webservice keys with dynamically generated tokens for improved security and control.
  • Rate Limiting: Implement request throttling to prevent abuse and ensure optimal API performance.
  • HTTPS Enforcement: Always use HTTPS to encrypt API communication, safeguarding sensitive data during transmission.
  • Error Logging: Maintain comprehensive logs for API requests and responses to facilitate debugging and auditing.

These measures fortify your API ecosystem and prepare it for future scalability.

Add Clean URLs & 301/302/303 redirection on Your Prestashop Store

SHOP NOW

Conclusion

Sending the webservice key in the Authorization header is a significant upgrade to your PrestaShop API integration. By adopting this approach, you mitigate security risks, adhere to best practices, and future-proof your eCommerce store’s infrastructure.

To implement this enhancement, follow the outlined steps meticulously, test rigorously, and update configurations as needed. Complement this practice with additional security measures, such as HTTPS enforcement and token-based authentication, for a robust API integration.

If you have any questions or insights then feel free to share them in the comments section. Together, we can build secure and efficient eCommerce solutions.

Happy coding!

Prestashop Google Merchants Feeds Addon: The Smart Way to Manage Google Shopping Feeds

In today’s highly competitive eCommerce landscape, gaining visibility on Google Shopping can significantly boost your sales. Furthermore, Google Shopping serves as a vital platform for businesses to showcase their products to a wider audience. Thus, if you are a Prestashop store owner, integrating your store with Google Shopping becomes seamless with Knowband’s Prestashop Google Merchants Feeds Addon. This article will explore how this smart tool simplifies feed management while ensuring your products shine on Google Shopping.

Why Google Shopping Matters for Your Business?

Google Shopping is an effective platform for eCommerce businesses to reach potential customers searching for products. Furthermore, it provides users with a streamlined shopping experience by displaying product details like images, prices, and reviews directly on Google’s search results.

For Prestashop store owners, leveraging Google Shopping can lead to increased traffic, better visibility, and higher sales. However, managing Google Shopping feeds manually can be time-consuming and error-prone. This is where the Prestashop Google Shopping Integration Addon comes into play, offering a smarter and more efficient way to handle your product feeds.

What Is the Prestashop Google Merchants Feeds Addon?

The Prestashop Google Merchants Feeds Addon is a comprehensive solution designed to connect your Prestashop store with Google Merchant Center. It allows you to automate the process of syncing your product data with Google Shopping, ensuring your store’s inventory is always up to date.

Therefore, this powerful tool acts as a Prestashop Google Shopping Connector, bridging the gap between your store and Google Merchant Center. Whether you are looking for a Prestashop Free Google Marketplace Integration Module or a premium solution, this addon offers unmatched efficiency and ease of use.

Key Features of the Prestashop Google Merchants Feeds Addon!

Seamless Integration with Google Merchant Center:

The addon provides flawless Google Shopping Prestashop Integration, making it easy to synchronize your product data. Furthermore, with a few simple steps, you can set up the connection and start uploading your product feeds automatically.

Support for Multiple Languages and Currencies:

If your store caters to international customers, this addon ensures your feeds are optimized for various regions. Moreover, it supports multiple languages and currencies, ensuring global compatibility.

Automated Feed Updates:

Forget about manual updates! The addon automates the process of updating your product information, including pricing, stock levels, and descriptions, directly in Google Merchant Center.

Customizable Feed Options:

Tailor your Google Shopping feeds according to your requirements. Moreover, this Prestashop Google Shopping Integration Plugin allows you to include or exclude specific products and categories, ensuring only the relevant items are displayed.

Error-Free Synchronization:

With its reliable features, the addon eliminates common errors in product feeds. It leverages Prestashop Google Shopping API Integration to ensure smooth and accurate synchronization.

List Your Products on Google Merchant Console Effrotlessly

SHOP NOW

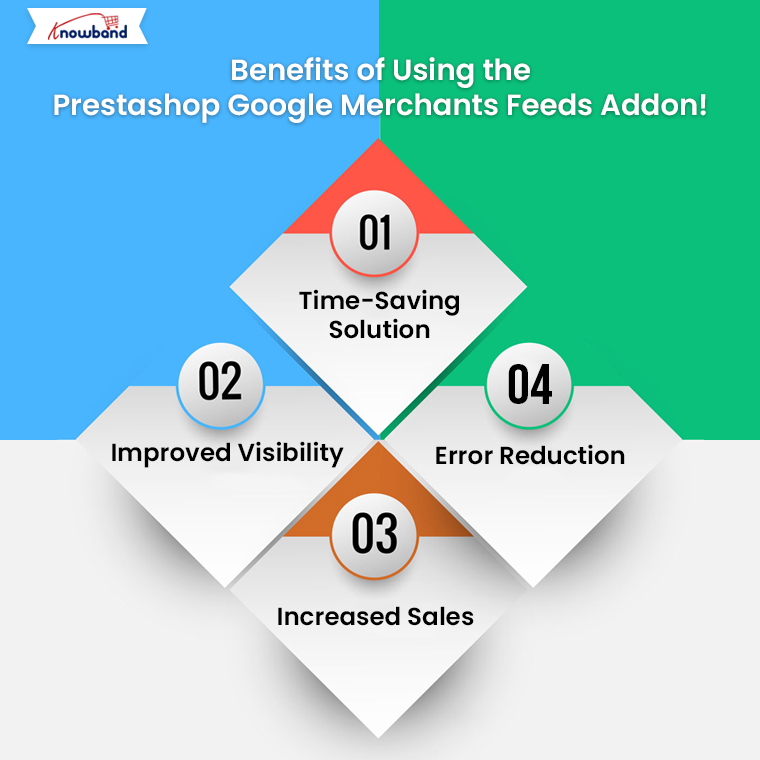
Benefits of Using the Prestashop Google Merchants Feeds Addon!

Time-Saving Solution: Managing Google Shopping feeds manually can be overwhelming. Furthermore, the Free Google Shopping Prestashop Integration Module automates this process, saving you valuable time.

Improved Visibility: By using this addon, you enhance your chances of ranking higher in Google Shopping results. Thus, the Prestashop Google Shopping Feed Integration ensures your product data is optimized for better visibility.

Increased Sales: A well-managed Google Shopping feed can attract more customers, ultimately driving higher sales. Therefore, this tool acts as a Prestashop Google Shopping Integrator, making your products more accessible to a larger audience.

Error Reduction: Manual feed management often leads to errors that can impact your visibility. With the Google Shopping Prestashop API Integration, you can ensure error-free and accurate data transfer.

How to Get Started with the Addon?

Setting up the Prestashop Google Shopping Integration Module is simple. Follow these steps to get started:

Install the Addon: Download and install the module from Knowband. If you are looking for a Free Google Shopping Integration Module for Prestashop, some basic versions might meet your needs.

Connect to Google Merchant Center: Log in to your Google Merchant Center account and use the addon’s built-in features to establish a connection.

Configure Feed Settings: Customize your feed settings by selecting which products or categories to include. You can also schedule automated feed updates.

Sync Your Products: Once the setup is complete, sync your product data. The addon will handle the rest, ensuring your feeds are always updated.

Why Choose the Prestashop Google Merchants Feeds Addon?

There are several Prestashop Google Shopping Integration Extensions available, but Knowband’s addon stands out for its user-friendly interface, robust features, and unmatched reliability. Moreover, it caters to businesses of all sizes, offering a solution that is both effective and easy to use.

Additionally, for those looking for a Free Google Shopping Synchronization Module, this addon offers value that goes beyond its cost. It simplifies complex tasks, making it the go-to choice for Prestashop store owners.

Conclusion!

The Prestashop Google Merchants Feeds Addon is a smart and efficient way to manage your Google Shopping feeds. From seamless integration to automated updates, it covers all the essential aspects needed to boost your store’s visibility and sales on Google Shopping.

Whether you are new to Google Shopping or looking to streamline your current setup, this Prestashop Google Shopping Integration Addon by Knowband is the ultimate tool. Take advantage of this addon today and unlock the true potential of your Prestashop store!

Related Read:
Simplify your Google Shopping feed management and reach more customers effortlessly. Read More