How to remove extra space between the Navigation Bar and the Scroll View?

Objectives of the blog

After reading this blog we will be able to understand the reason for the extra space between top Navigation Bar and Scroll View in iOS app in versions iOS 7 to iOS 10.

Problem Statement

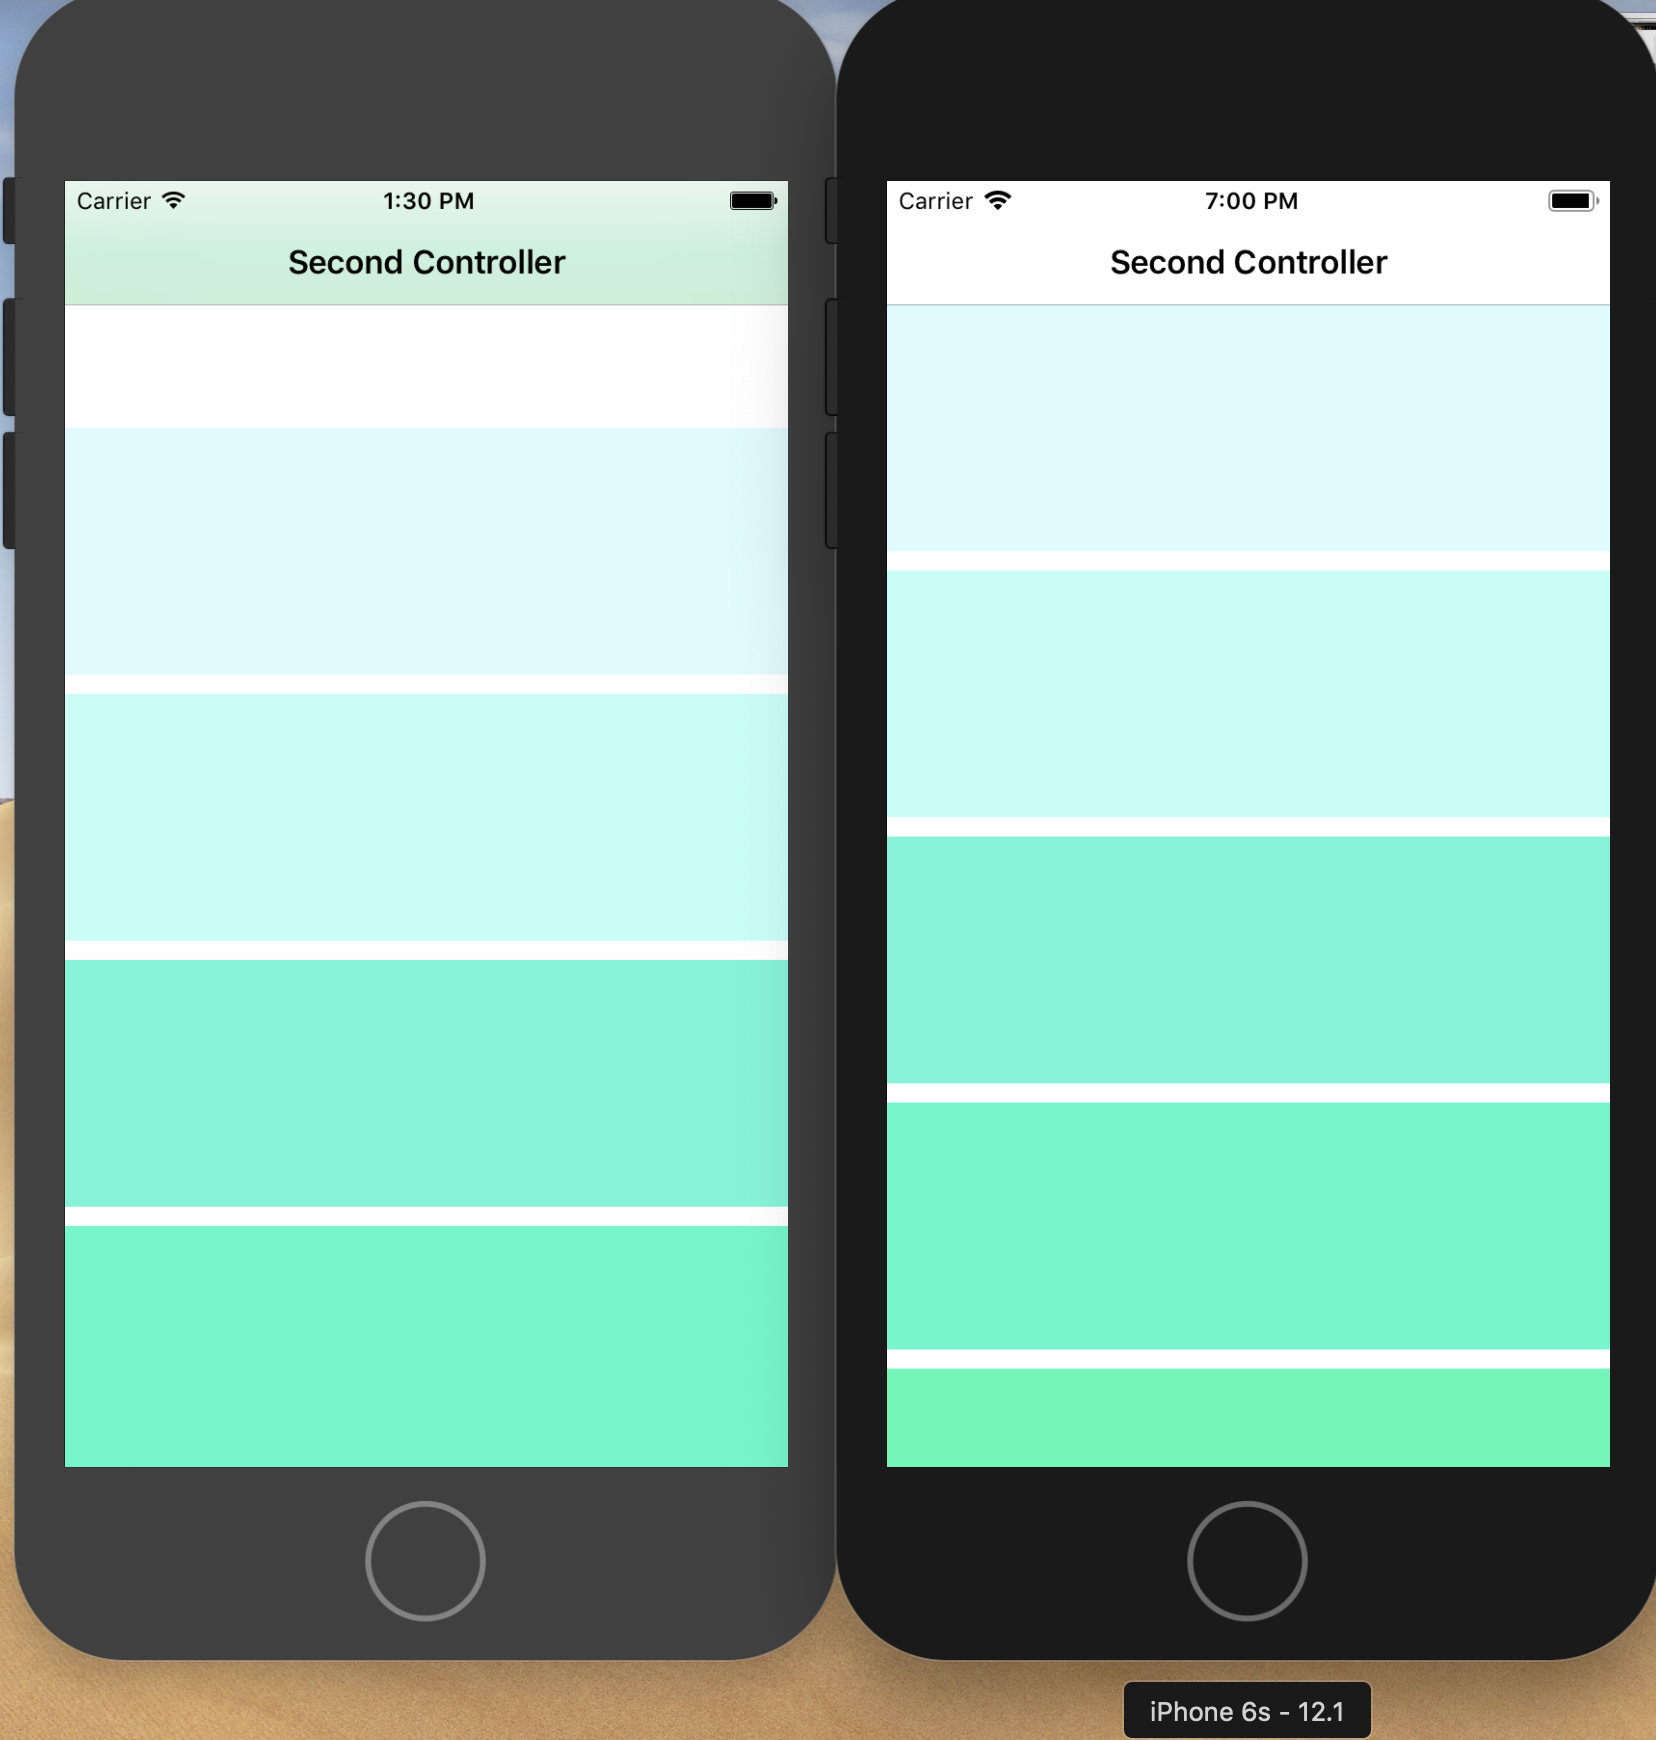
When we add a scroll view or table view (any scrollable view) in a view controller that contains a Navigation Bar at top, we face a common issue that were is some extra space between the top Navigation Bar and the Scroll View.


Why the current issue is there

From iOS 7 to iOS 10, when we add a Navigation Bar on top of any ViewController, then Xcode provides us an option to make the Navigation bar translucent. So that we can see through the Navigation Bar and the scrolling of the page can be seen through the navigation bar.

Now the reason for the issue is that when a Scroll View is added in the ViewController and Navigation Bar is set and translucent, the ScrollView leaves a margin from the main view for navigation bar. But the navigation bar added on the run time and it moves the main view downed so that Navigation Bar can fit on the top. So in that case, the view is shifted downward by Navigation bar and scroll view leaves margin for Navigation bar. Here we observe that the extra spacing added two times.

This was the only reason that we see extra space between the Navigation Bar and the Scroll view.

Procedure to Solve the issue-

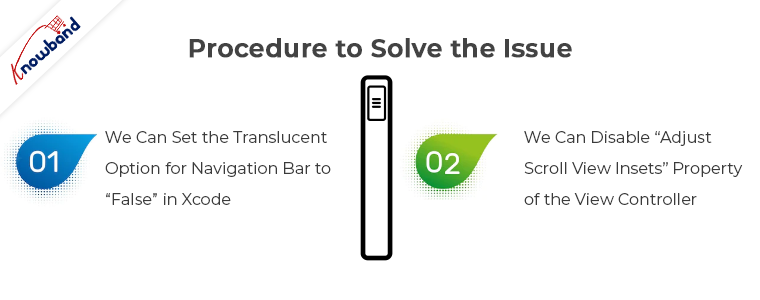
There are two ways to resolve the issue. In both the cases we restrict the scroll view to leave extra margin for the Navigation Bar.

1. We can set the Translucent option for Navigation Bar to “False” in Xcode

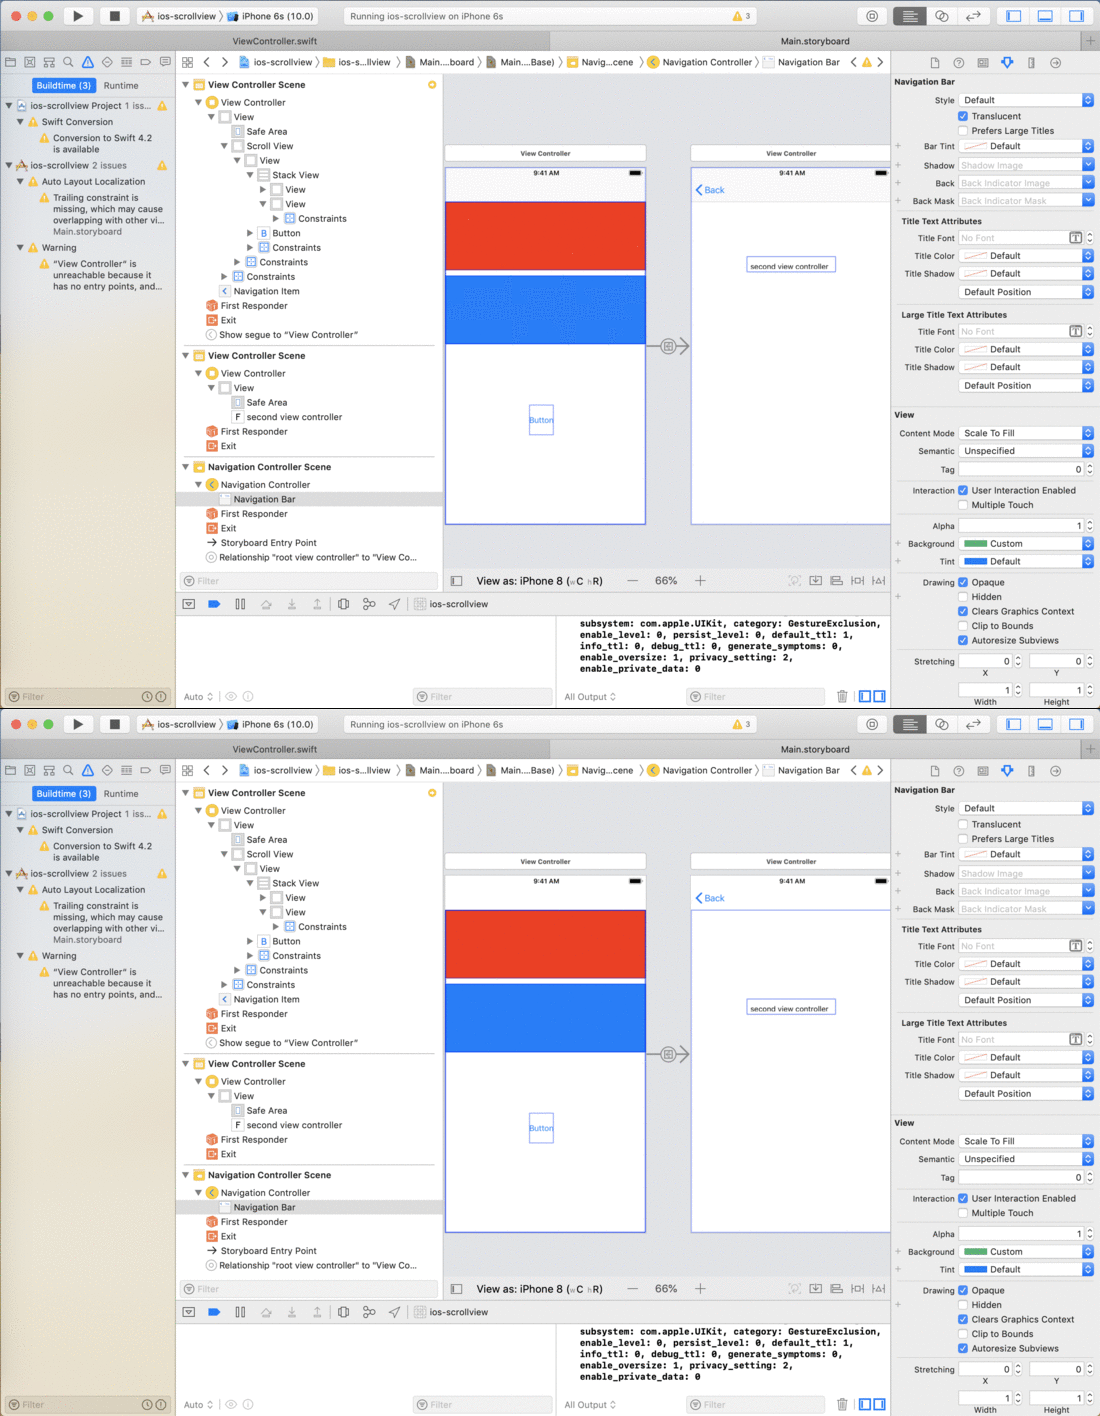
— This will make the navigation bar Opaque and then the scroll view is not required to scroll under the Navigation Bar. So that Scroll View will leave no space for Navigation Bar.

In the below Gif you can see that the view’s layout constraint changes when we enable/disable the “Translucent” property of the navigation Bar.


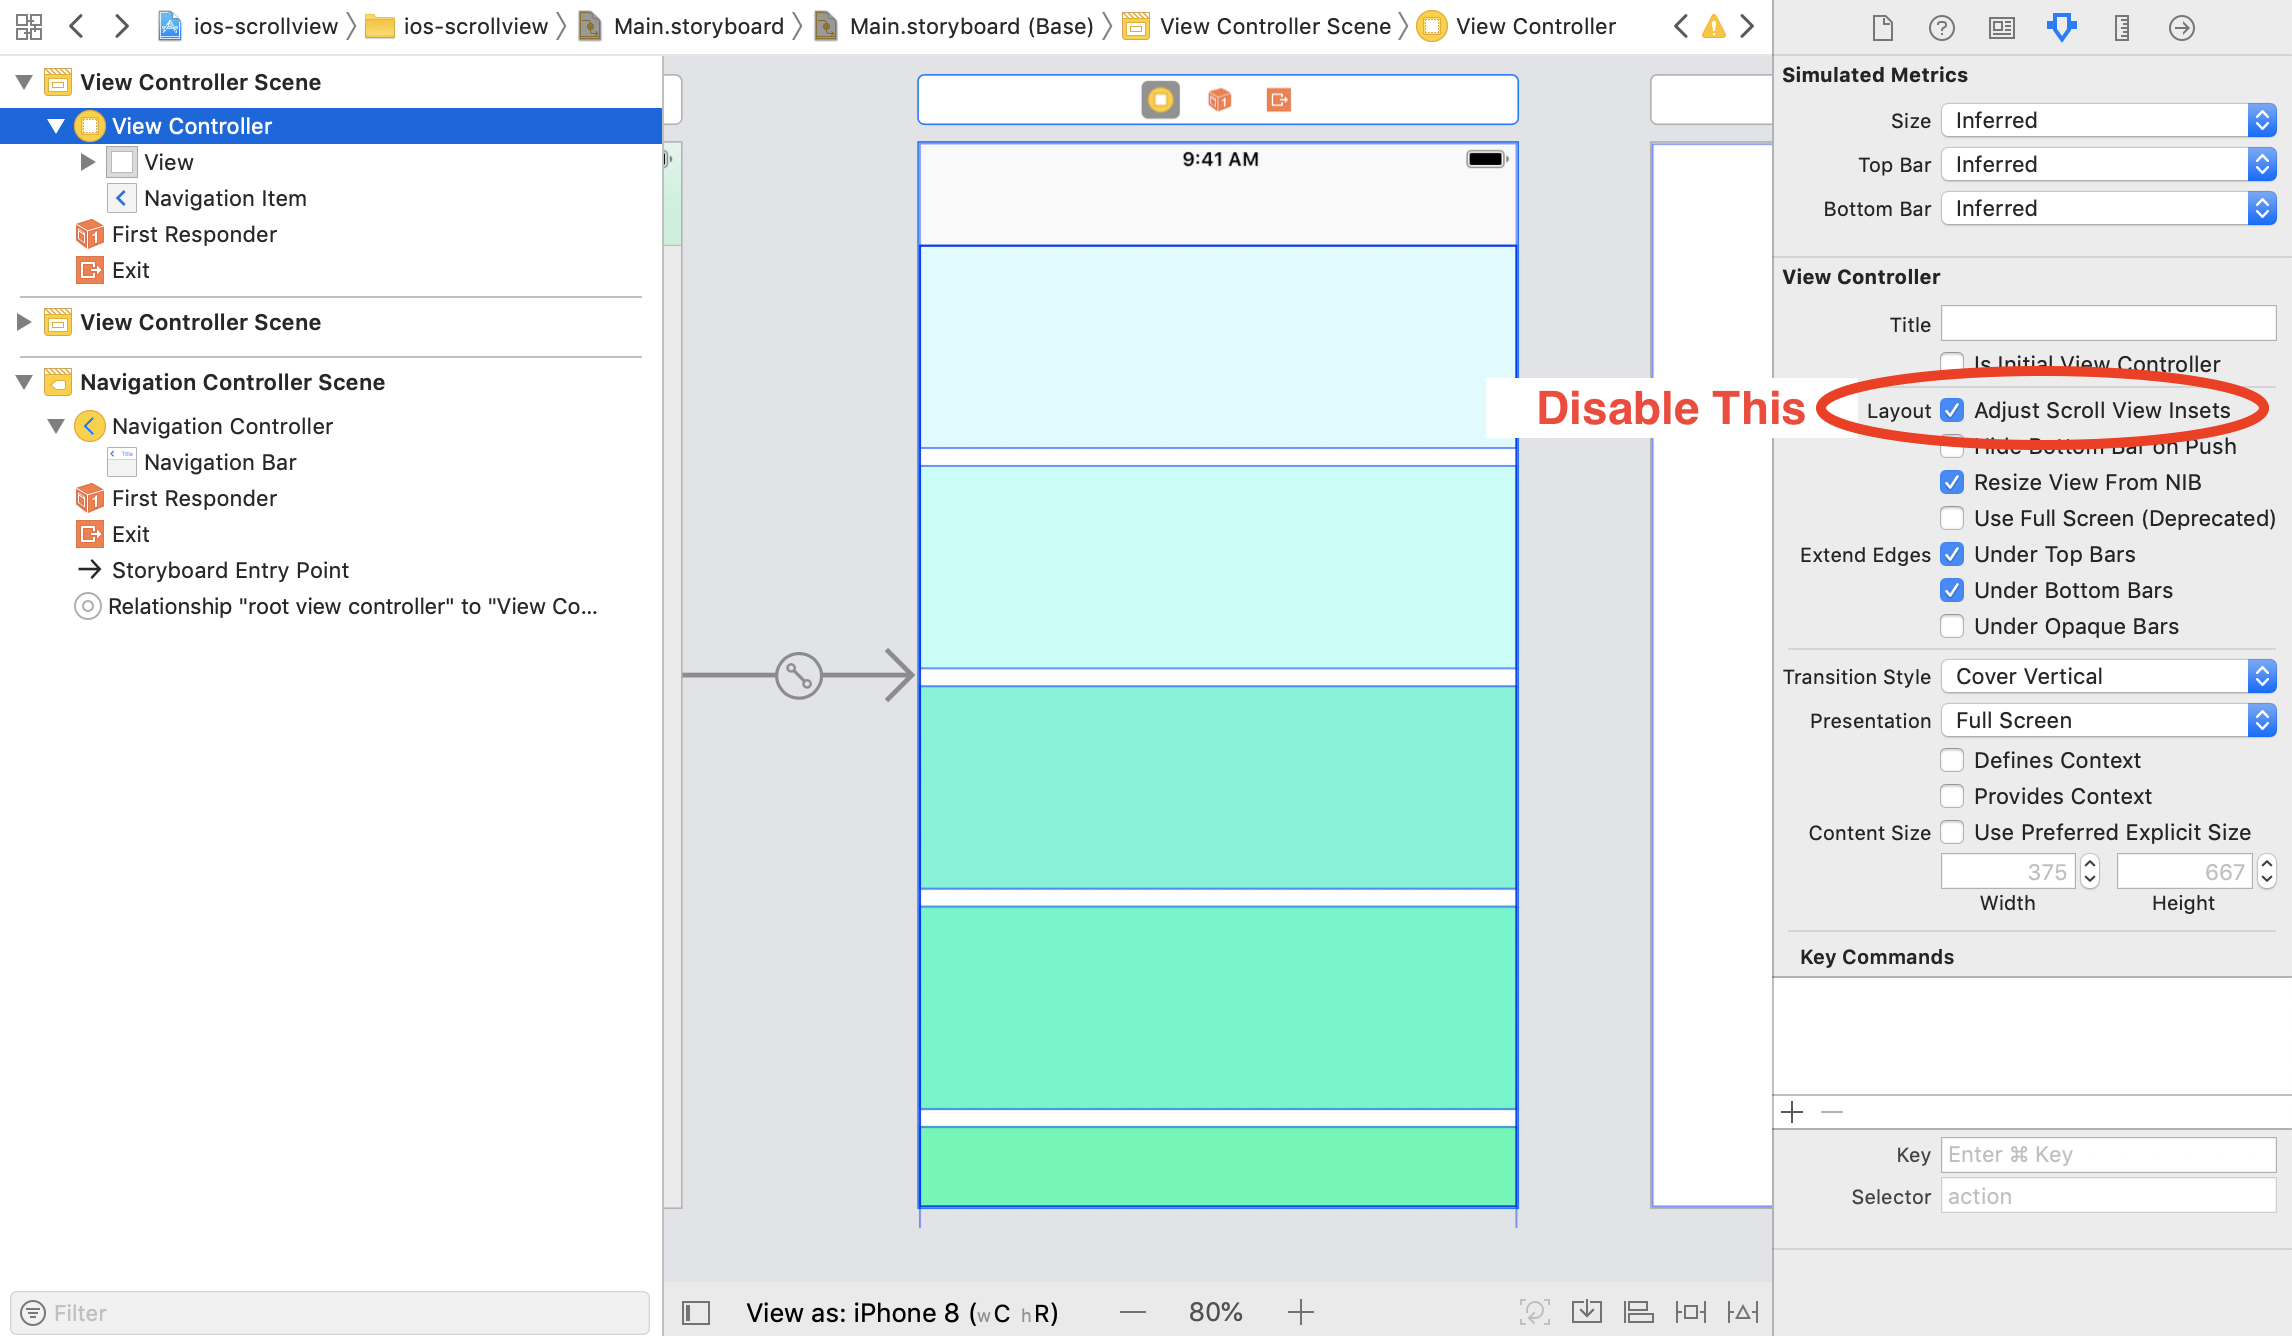
2. We can disable “Adjust Scroll View Insets” property of the ViewController.

— This will restrict the Scroll View to leave extra space for the Navigation bar on top.


Summary

After following the above procedure, you will be able to remove the extra space between the Navigation Bar and Scroll View.

If you face any issues, please feel free to reach us at support@knowband.com. We also provide No Code Mobile App Builder for Prestashop, Opencart, Magento 2 and Woocommerce. Know more here:


How to Get PayPal Client ID and Secret Key?

In order to integrate Express Checkout with the REST API, a PayPal client ID that authenticates a merchant’s account with PayPal is necessary. A client ID can only be created by the account holder.

Ask the merchant to share their client ID with you if you’re a developer integrating Express Checkout on the client’s behalf. If the merchant hasn’t already done so, they must create a client ID.

Steps to find the PayPal ID and PayPal Client Secret Key:

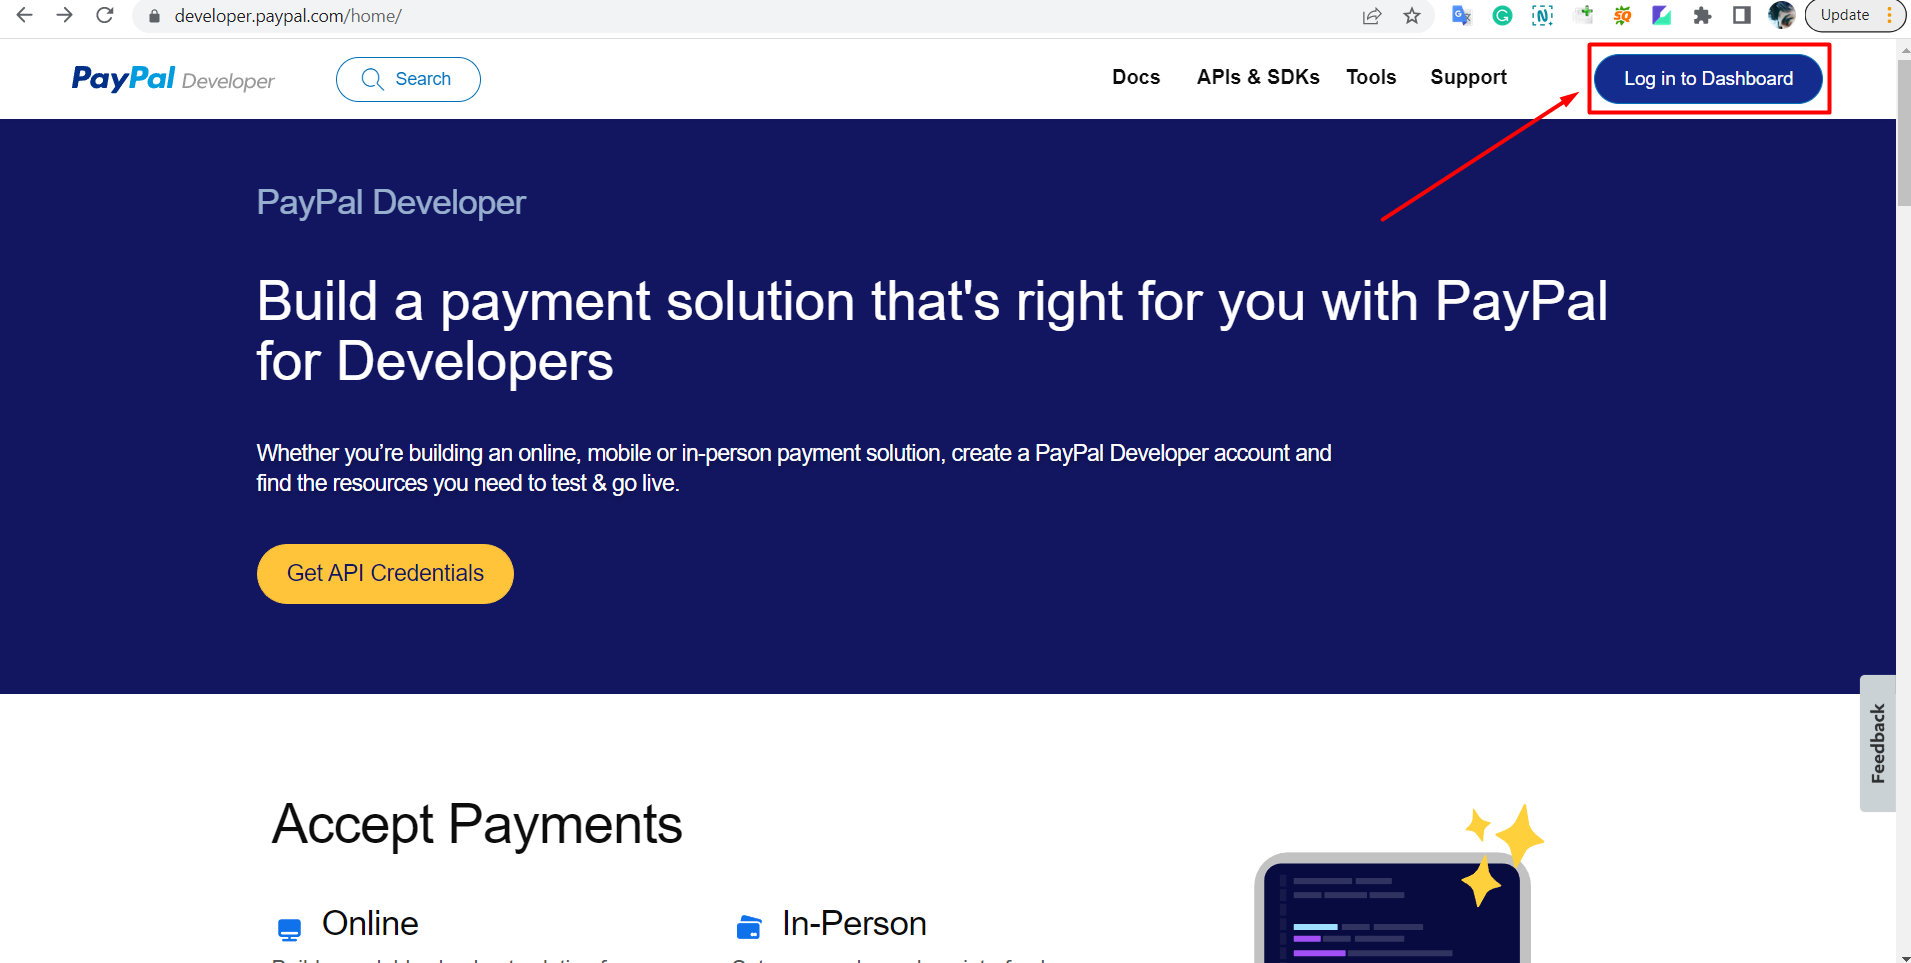
1. Go to PayPal Developers Website home page.

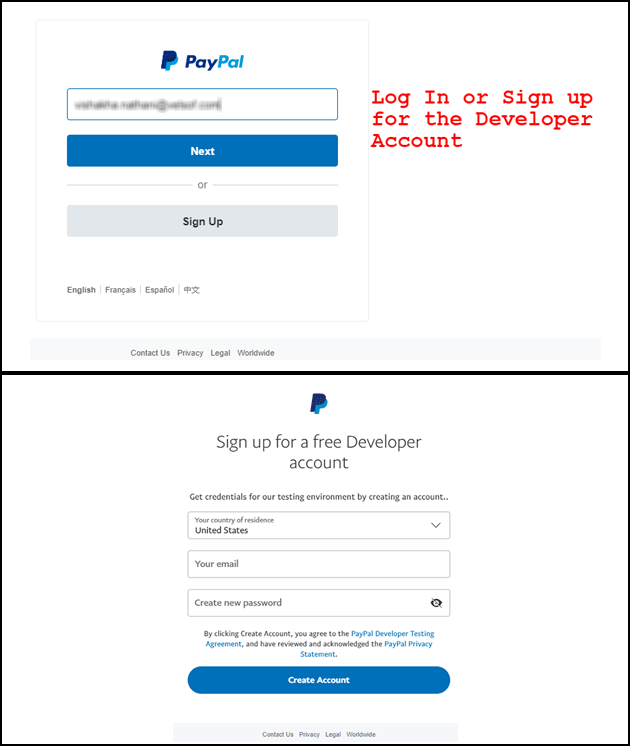
2. Then Login to the dashboard.

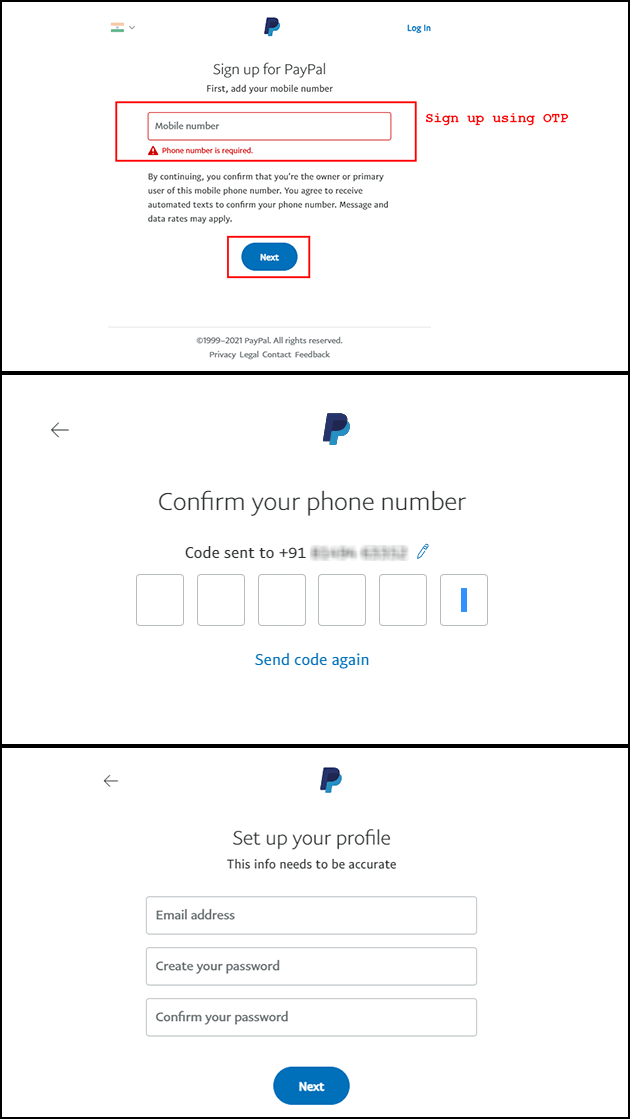
You can log in with your mobile number using OTP and set up your profile by adding basic details.

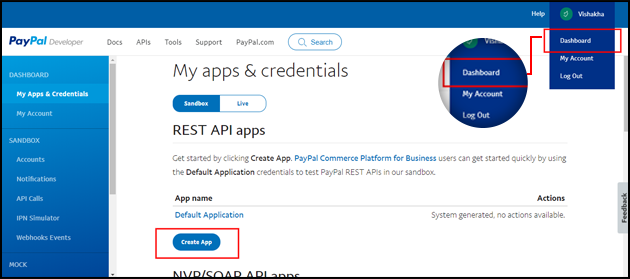
3. Go to “[Your Name]“, then go to “Dashboard” in the top right corner. You will get an option to “Create App“. Create your new app.

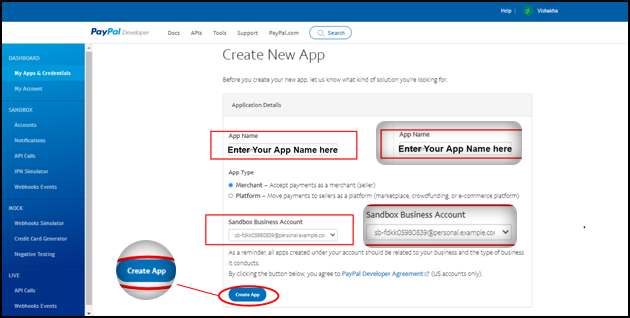
4. Fill in the details for the new app and create a new app. A new screen will open.


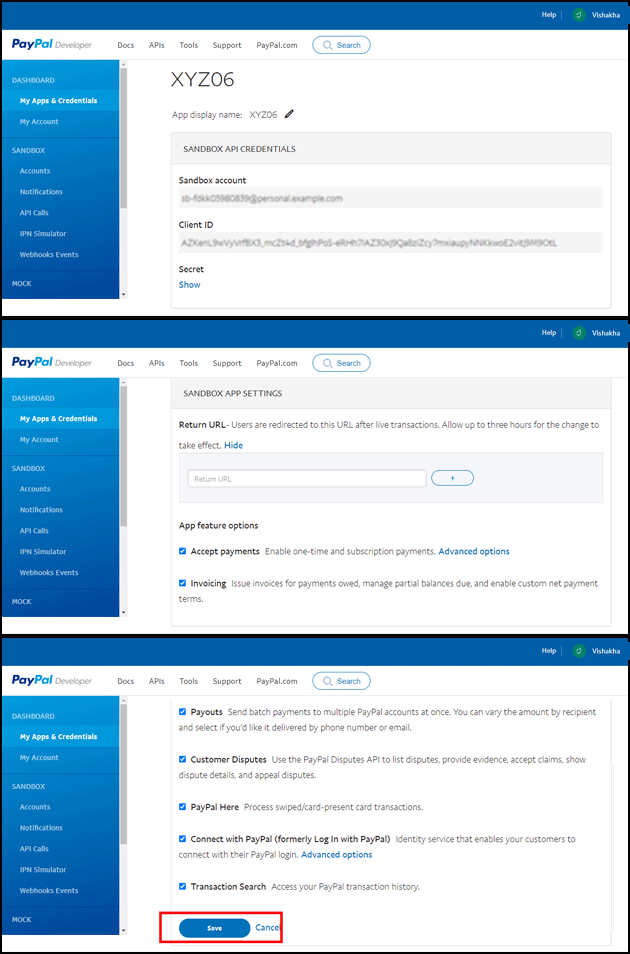
5. On the next page, you will be able to see your PayPal Client ID and PayPal Client secret.

Note: You will find Sandbox App settings and credentials on the same page.


6. You have the PayPal Client ID and secret.

You need a developer, personal, or business account to access the Developer Dashboard, get credentials, and create sandbox accounts. Different levels of access to PayPal functionality are available with each account. On the My Account page in the Developer Dashboard, you can upgrade your account if you need access to a feature you don’t currently have.

Capabilities Developer Account Personal Account Business Account
Access sandbox x x x
Send and receive money x x
Go live x

You can use the Paypal Client ID with our One Page supercheckout Prestashop module and integrate the Paypal payment gateway and transform the standard checkout into an optimized, seamless, and feature-rich One page express checkout.

Prestashop One Page Supercheckout Addon

The Prestashop One Page Supercheckout addon by Knowband makes checkout faster and easier by putting everything on one page, helping to reduce cart abandonment.

SHOP NOW

Apart from it, along with Prestashop we offer One Page checkout modules for Opencart and Magento 2 eCommerce platforms. The One Page SuperCheckout Addon has over 15,000 downloads on the official addon store and is one of the top-selling extensions. On top of that, the module supports all the popular payment gateways and shipping methods, opening the door for endless customizations for eCommerce store admin. 

Having queries about PayPal payment gateway integration, get in touch with our support team at our email address support@knowband.com. 

You can also check out our top selling Module – Mobile App for PrestaShop

How to send push notification from server?

What are push notifications?

Push notifications are the messages that are pushed to mobile from another platform than the receiving device. Let us consider any mobile app either closed or open. We get some notification from server irrespective of the app is open/closed/minimised. The only condition is that the app should be installed. In such case, we trigger notifications from web server say Firebase. We are pushing the notifications to mobile app from server. Hence these are called push notification.

Firebase provides us API(s) that can be triggered to send the push notification to any device.

Sending Push Notification using Firebase

We can trigger below API provided by the Firebase to send a push notification to any device.

API URL :

https://fcm.googleapis.com/fcm/send

Headers :

Content-Type:application/json

Authorization:key=AAAAR8kVIU:APA91bGaZe_uSKd2EtATPVoIUFGW6E3EwzcfsurUtjMIMIsxdTICC2Wl4BDtiWVupueBaJoQbb1JjAjDDEhDEWXWf3Cp_WXBAO1LkOUwtYPnj7XjeEFW1jqhzW8J1g1IwLinL42t8u

Body :

{
"to":"fqU6X2UAdiI:APA91bEHIZ2MwdsTdIW3_Sk_hvH9ZHbbbzJln4A8n6gYyYH71V5dlxazxWWejcafEOEIHc1mvwxauVodIOgdXrSiaxU0mfyPTKWr47k-8SwlyY30_Mxh8NTA2winTE16JO-KbajD",
"priority":"high",
"mutable_content":true,
"content_available":true,
"notification":{
"title":"Sample title",
"body":"Sample Body Sample Body"
},
"data":{
"title":"Title Title",
"body":"Sample body Sample Body",
"image":"Image Link",
"description":"Sample Description"
}
}

PayU Integration in iOS using Swift

What is PayU?

PayU is an online payment method that is highly popular in the eCommerce industry. The rise in popularity of PayU money is the main reason why every eCommerce store merchant is looking to integrate this payment mode into their store. Thus, PayU is one of the fast & secure payment gateways.

The users can easily complete their transaction process with the PayU payment method. So, Let’s find out the advantages of the PayU payment mode.

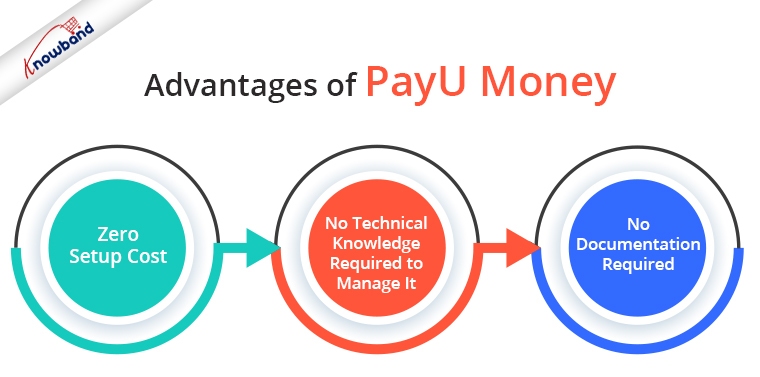
Advantages of PayU Money

  1. Zero Setup Cost.
  2. No technical knowledge is required to manage it.
  3. No documentation is required to use PayU money as a payment gateway.

Recommended Read: How to download the Android/iOS app from the Diawi link?

Here is the complete process to integrate PayU in iOS using Swift:

1. SignUp with Payu money here.

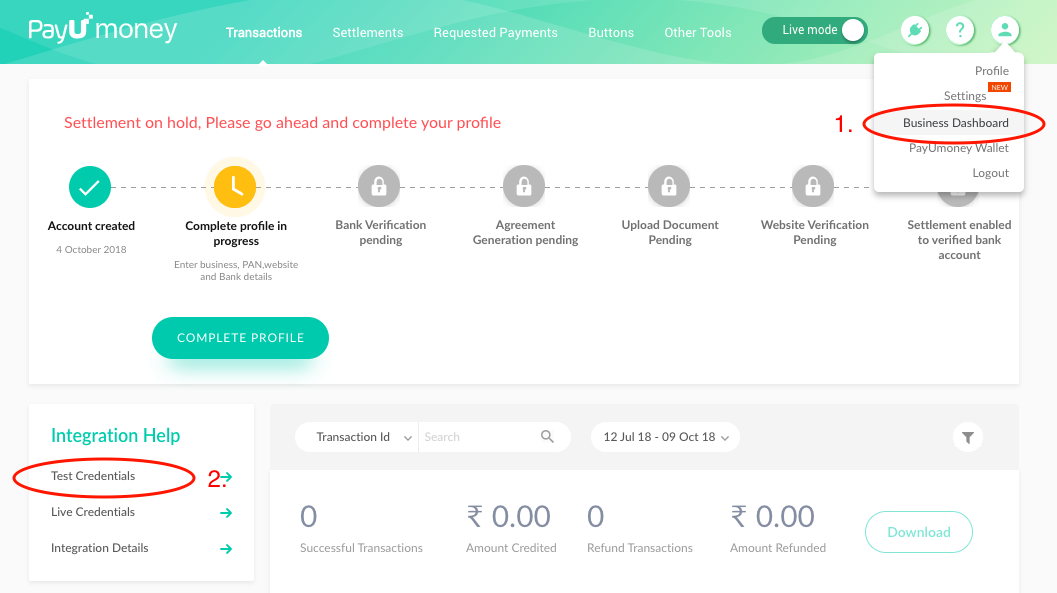
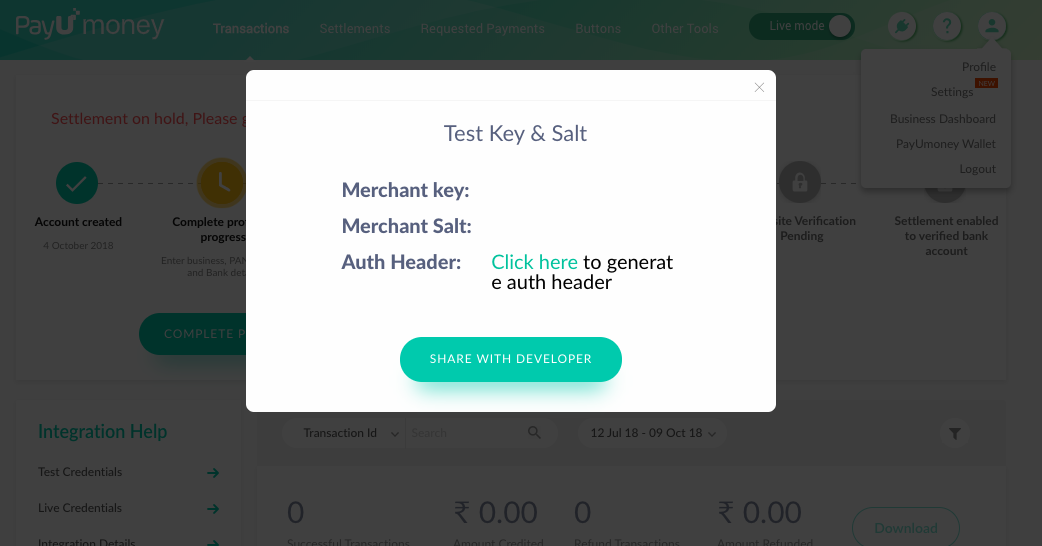
2. You can find your PayU Test Key & Salt in Business Dashboard. Check the below screenshots reference.


3. You have to download Payu SDK by using the command “$ git clone –recursive https://github.com/payu-intrepos/PayUMoney-IOS-SDK.git” in the terminal. We need Payu Frameworks from this SDK. However, it may fail sometime but it will work. For instance, for me, it failed 8-9 times.

The general error that you can face :

MacBook-Air:desktop mac$ git clone –recursive https://github.com/payu-intrepos/PayUMoney-IOS-SDK.git

Cloning into ‘PayUMoney-IOS-SDK’…

remote: Enumerating objects: 4, done.

remote: Counting objects: 100% (4/4), done.

remote: Compressing objects: 100% (4/4), done.

remote: Total 2146 (delta 0), reused 0 (delta 0), pack-reused 2142

Receiving objects: 100% (2146/2146), 50.17 MiB | 958.00 KiB/s, done.

Resolving deltas: 100% (892/892), done.

Submodule ‘Dependencies/CitrusGraphics’ (https://github.com/citruspay/citruspay-ios-sdk.git) registered for path ‘Dependencies/CitrusGraphics’

Cloning into ‘/Users/mac/Desktop/PayUMoney-IOS-SDK/Dependencies/CitrusGraphics’…

remote: Enumerating objects: 6013, done.

remote: Counting objects: 100% (6013/6013), done.

remote: Compressing objects: 100% (2573/2573), done.

error: RPC failed; curl 18 transfer closed with outstanding read data remaining

fatal: The remote end hung up unexpectedly

fatal: early EOF

fatal: index-pack failed

fatal: clone of ‘https://github.com/citruspay/citruspay-ios-sdk.git’ into submodule path ‘/Users/mac/Desktop/PayUMoney-IOS-SDK/Dependencies/CitrusGraphics’ failed

Failed to clone ‘Dependencies/CitrusGraphics’. Retry scheduled

Cloning into ‘/Users/mac/Desktop/PayUMoney-IOS-SDK/Dependencies/CitrusGraphics’…

remote: Enumerating objects: 6013, done.

remote: Counting objects: 100% (6013/6013), done.

remote: Compressing objects: 100% (2573/2573), done.

error: RPC failed; curl 18 transfer closed with outstanding read data remaining

fatal: The remote end hung up unexpectedly

fatal: early EOF

fatal: index-pack failed

fatal: clone of ‘https://github.com/citruspay/citruspay-ios-sdk.git’ into submodule path ‘/Users/mac/Desktop/PayUMoney-IOS-SDK/Dependencies/CitrusGraphics’ failed

Failed to clone ‘Dependencies/CitrusGraphics’ a second time, aborting

OR
Also, You can download the required frameworks from this link.

4. Open your Xcode project. Move PayUMoney-IOS-SDK/Dependencies/CitrusGraphics/Framework/graphics-sdk/CitrusGraphics.framework into your project. Then, remember to select Add to Targets when moving into the Xcode project.
Next, move ⁨PayUMoney-IOS-SDK/CoreSDK/PayUMoneyCoreSDK.framework into your project. After that, add to Targets when moving into the Xcode project.
Then, move ⁨⁨PayUMoney-IOS-SDK/PlugNPlay/PlugNPlay.framework into your project. Next, add to Targets when moving into the Xcode project.


5. Note:

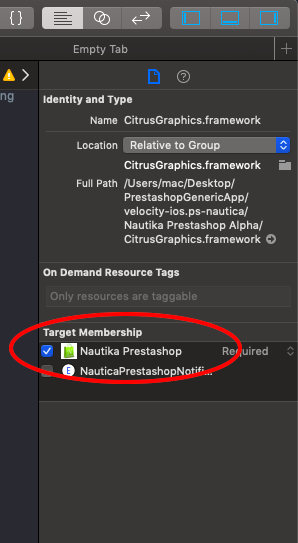
If you missed to add targets or you are getting an error that these files are missing or in case you get an Apple o linker error for these files then adds “Target Memberships” to these frameworks.

6. Add the below line in the podfile –

# For payu integration
pod ‘PayUmoney_PnP’

# For hash creation
pod ‘CryptoSwift’

7. Run command – pod install

8. After pod installation is complete make sure that you are using “project.xcworkspace” Xcode project.

Note: Please don’t use “project.xcodeproj” Xcode project.

9. To use Objective C code in Swift we need to create a Bridging header. First, you can create a new Bridging header manually and add it to Build settings > Objective -C Bridging Header.
OR
Also, you can create a new C file ( .m file or .h file). It will automatically create a new bridging header.

10. Generally Bridging Header file will be empty. You can add the below code in Bridging Header either at the bottom or at the top of the file –

#import <PlugNPlay/PlugNPlay.h>

11. Import the CryptoSwift library into your controller.
import CryptoSwift

Note: There are chances that you don’t get “CryptoSwift” in the import suggestion. Don’t worry, you can manually type the same code shown above.

12. The function below in your ViewController class where from which you will initiate the PayU transaction.

func setupPayu()

{

var kMerchantSalt = “your salt”

var txnParam = PUMTxnParam()

PlugNPlay.setDisableCompletionScreen(true)

//Set the parameters

txnParam.phone = “8802444107”

txnParam.email = “asharma@velsof.com”

txnParam.amount = “500”

txnParam.environment = PUMEnvironment.test

txnParam.firstname = “Akash”

txnParam.key = “Your Key”

txnParam.merchantid = “Your Merchant id”

txnParam.txnID = “1234567890”

txnParam.surl = “https://www.payumoney.com/mobileapp/payumoney/success.php”

txnParam.furl = “https://www.payumoney.com/mobileapp/payumoney/failure.php”

txnParam.productInfo = “iPhone7”

txnParam.udf1 = “ud1”

txnParam.udf2 = “ud2”

txnParam.udf3 = “ud3”

txnParam.udf4 = “ud4”

txnParam.udf5 = “ud5”

txnParam.udf6 = “”

txnParam.udf7 = “”

txnParam.udf8 = “”

txnParam.udf9 = “”

txnParam.udf10 = “”

/*

* Below code is used to create a formatted hashString from the Payu Transaction parameters

* **Author:** Asharma

* **Date:** 09-Oct-2018

*/

let hashString = “\(txnParam.key!)|\(txnParam.txnID!)|\(txnParam.amount!)|\(txnParam.productInfo!)|\(txnParam.firstname!)|\(txnParam.email!)|\(txnParam.udf1!)|\(txnParam.udf2!)|\(txnParam.udf3!)|\(txnParam.udf4!)|\(txnParam.udf5!)||||||\(kMerchantSalt)”

/*

* Below code is used to create dynamic hash from hashString

* **Author:** Asharma

* **Date:** 09-Oct-2018

*/

let data = hashString.data(using: .utf8)

txnParam.hashValue = data?.sha512().toHexString()
PlugNPlay.presentPaymentViewController(withTxnParams: txnParam, on: self) { (response, error, extraParam) in

print(“response”)

print(error)

}

}

13. When you want to start a PayU transaction, you can call the setupPayu() function. Then, either on the tap of a button or inside another function.
Example: I have created a button on my project. Created an IBAction of the button. This IBAction is a function that will be called on the tap or button that I created.

@IBAction func onTapBtnPay(_ sender: Any) {

setupPayu()

}

14. You have completed the integration part of PayU integration.

Recommended Read: How to save data to Firebase in swift language?

Create your eCommerce mobile app with Knowband’s mobile app builder and integrate PayU just by following these below simple steps. With KnowBand’s eCommerce Mobile App Builder, you can create and release a pair of fully native Android and iOS apps for your eCommerce website.

You may start selling on mobile devices and draw a global audience to your store with the help of our feature-rich eCommerce Mobile App Builder solution. As a producer of eCommerce mobile apps, Knowband is a well-known brand. Our major goal is to build strong, yet simple to use, eCommerce mobile apps that may provide any eCommerce enterprise with a competitive edge. The eCommerce Mobile App Builder from Knowband enables you to design a user-friendly environment and makes it simpler for e-merchants to reach their consumer base. Every handheld device is totally compatible with the lightweight, straightforward applications offered by the eCommerce mobile app provider.

Suggested Articles:

Apple Pay Integration in iOS using swift

1. The First step would be to get the Apple Merchant Id.

a) Login to your Apple Developer Account.

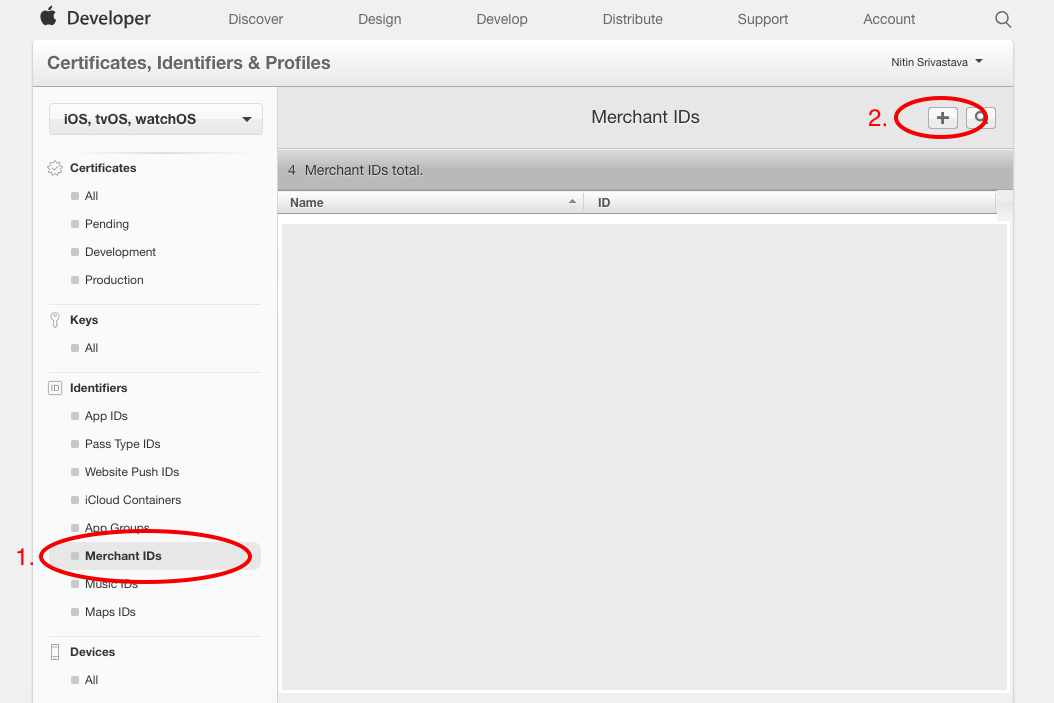
b) Go to “Certificates, Identifiers & Profiles”. Choose iOS, tvOS, and watchOS from the Navigation menu on the left.

  • Select the Merchant Id section in the same left menu.
  • Click on the “+” button.

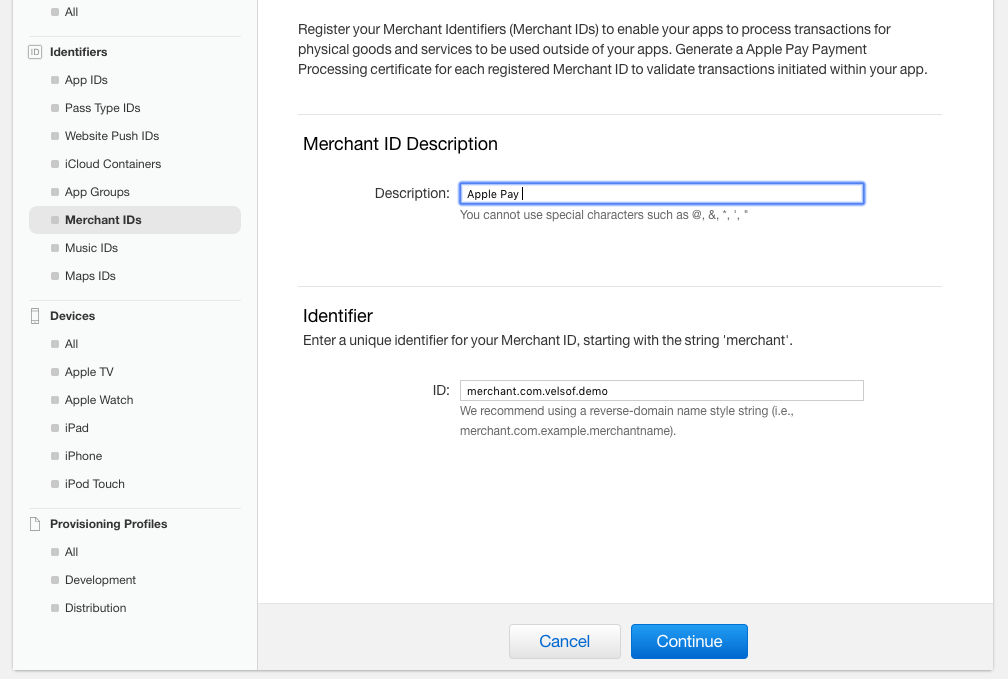
c) A new tab will open. Add Merchant Id description and a Unique Identifier and continue until the same is added. Save the Merchant Id you created.

2. Payment Processing Certificate:

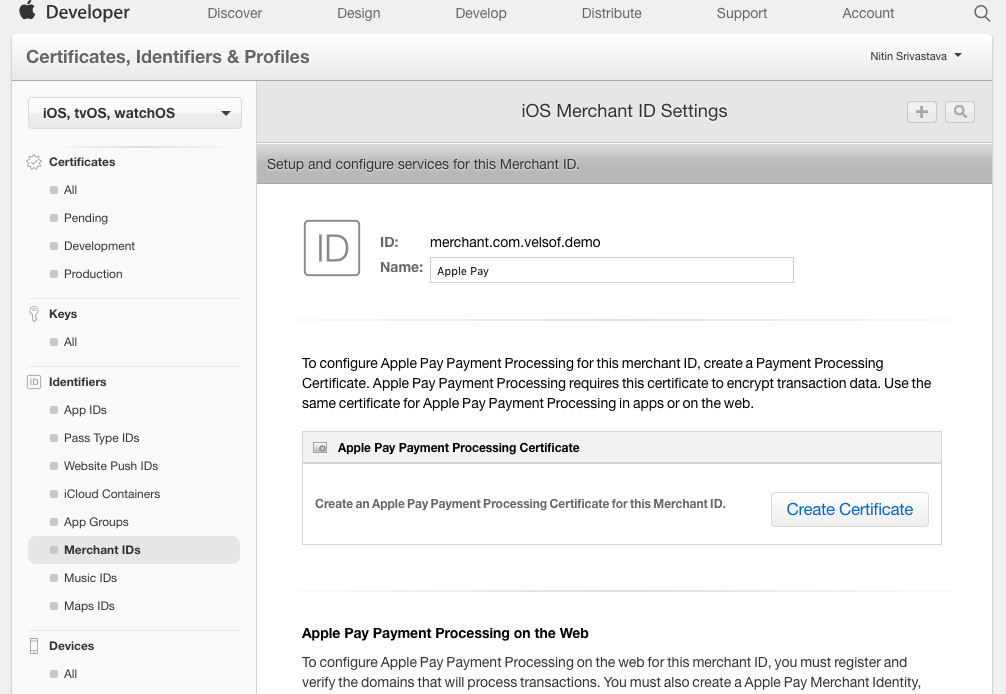
a) Tap on the merchant ID that you created earlier. A tab will open up, and select the “Edit” option.

b) A new tab will open. Tap on Create Certificate.


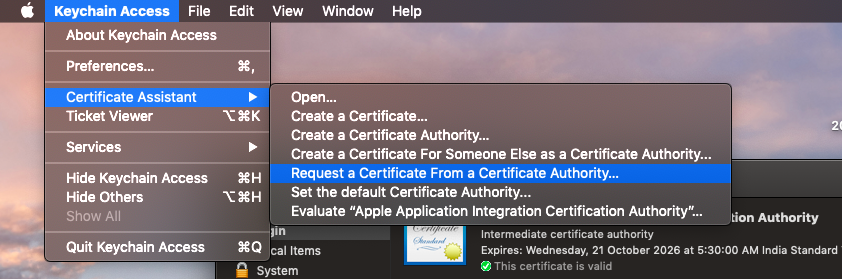
c) Open Keychain Access on your Mac using “cmd + Space”.
d) Request a new certificate from the authority.

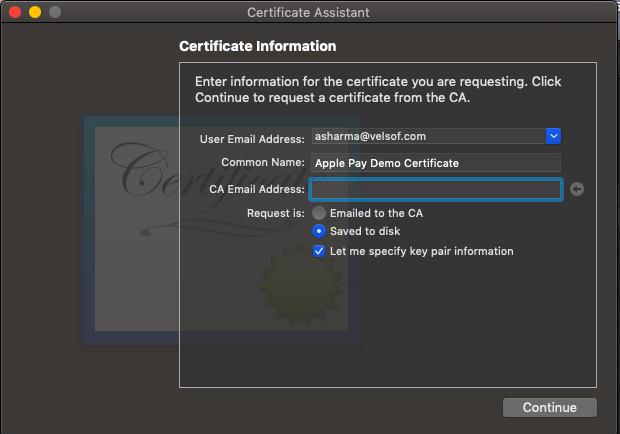
e) Fill in the Email and Common Name fields. Check “Save to disk” and “Let me specify Key Pair Information”. Click continue.

f) Select Algorithm to “ECC” and Key Size to “256 bits”. Click Continue.

g) Continue with step 2. Upload the certificate that you have created.

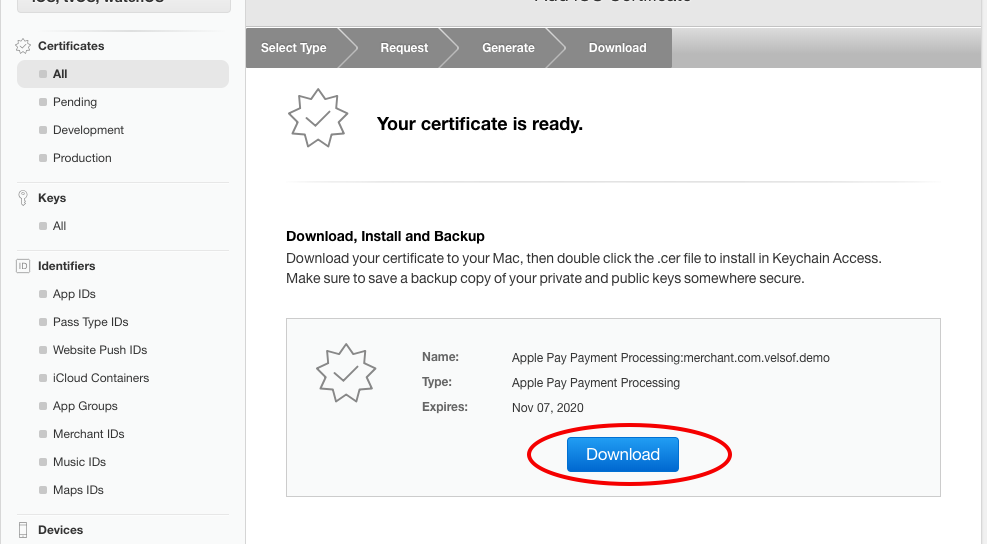
h) After the upload is complete, please download the Apple-generated certificate.

Recommended Read: How to fetch data from Firebase in Swift Language (iOS)?

3. Configure Apple Pay :

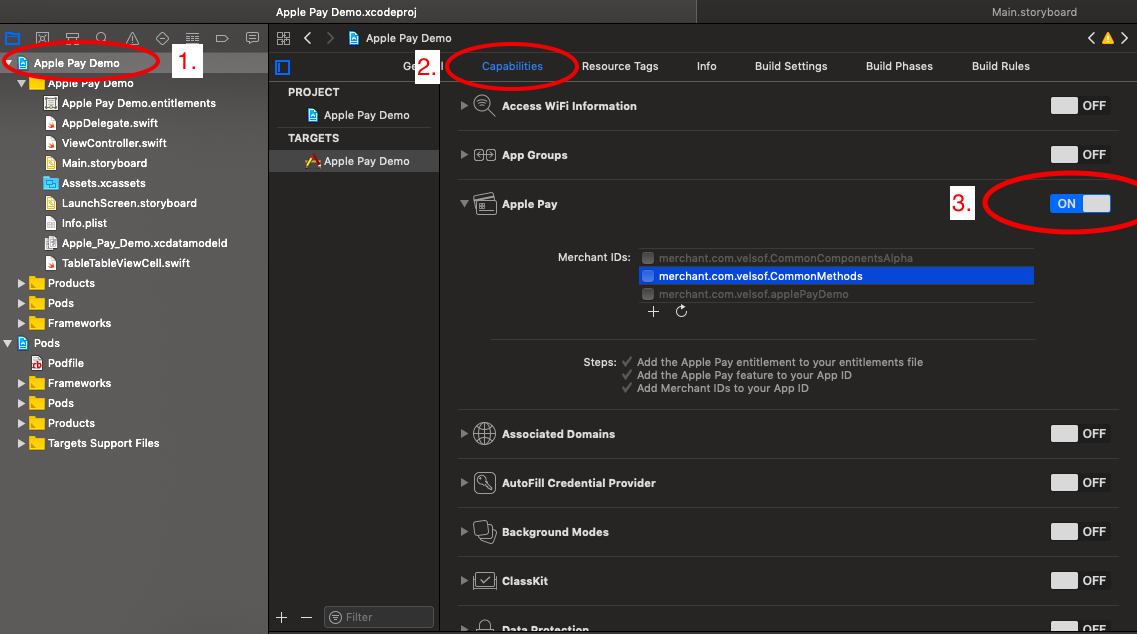
a) Setup Apple pay in the Xcode project.

4. Add the below line into the podfile and install pods.

# Pods for Apple Pay Demo
pod ‘Stripe/ApplePay’

5. After pod installation, make sure that you are using “project. xcworkspace”.

Note: Please don’t use “project.xcodeproj”

6. Add the below code at the top of your Controller class to import pod libraries. There are chances that you don’t find these SDKs in the suggestion. Don’t worry it will take some time. Or you can type the code manually.

import Stripe
import PassKit

7. Extend your view controller class with the “PKPaymentAuthorizationViewControllerDelegate” class.

class ViewController: UIViewController, PKPaymentAuthorizationViewControllerDelegate

8. Add the below code in your controller class.

var paymentRequest: PKPaymentRequest!
var transactionId = “”
var status = “”
var amount = 100

/**
* This function is called on tap of the ApplePay Payment option on Payment Page.

* **Author:** Asharma

* **Date:** 01-Oct-2018
*/
func setupApplePay()
{
paymentRequest = PKPaymentRequest()
paymentRequest.currencyCode = “USD”
paymentRequest.countryCode = “US”
paymentRequest.merchantIdentifier = “Your Merchant Id”

// Payment networks array
let paymentNetworks = [PKPaymentNetwork.amex, .visa, .masterCard, .discover]
if PKPaymentAuthorizationViewController.canMakePayments(usingNetworks:        paymentNetworks)
{
paymentRequest.supportedNetworks = paymentNetworks
paymentRequest.merchantCapabilities = .capability3DS

let item = PKPaymentSummaryItem(label: “Order Total”, amount: NSDecimalNumber(string: “\(amount)”))

paymentRequest.paymentSummaryItems = [item]

let applePayVC = PKPaymentAuthorizationViewController(paymentRequest: paymentRequest)
applePayVC.delegate = self
self.present(applePayVC, animated: true, completion: nil)
}
else
{
// Notify the user that he/she needs to set up Apple Pay on the device
// Below code calls a common function to display an alert message. You can either create an alert or  can just print something on console.
CommonMethods.displayAlert(message: “Apple Pay is not available on this device.”, viewController: self)
print(“Apple Pay is not available on this device”)
}
}

/**
* This function is called when Apple Pay payment will be authorized.

* **Author:** Asharma

* **Date:** 01-Oct-2018
*/
func paymentAuthorizationViewController(_ controller: PKPaymentAuthorizationViewController, didAuthorizePayment payment: PKPayment, completion: @escaping (PKPaymentAuthorizationStatus) -> Void)

{
// Payment token can be found like this
print(payment.token)
// Get response from the server and set the PKPaymentAuthorizationStatus
let status = PKPaymentAuthorizationStatus(rawValue: 0)!

self.transactionId = payment.token.transactionIdentifier

switch status.rawValue {
case 0:
self.status = “approved”
// perform Functionality on Apple Pay Successfull Payment
default:
self.status = “failed”
}

}
/**
* This function is called when Apple Pay payment authorization is finished.

* **Author:** Asharma

* **Date:** 01-Oct-2018
*/
func paymentAuthorizationViewControllerDidFinish(_ controller: PKPaymentAuthorizationViewController)

{
self.dismiss(animated: true, completion: nil)
}


9. You can call the function setup apple pay() whenever you want to start an Apple Pay transaction. Either you can call the same function in viewDidLoad() or you can call this function with the tap of a button.

Example: In the case of a button tap, you need to add a button in UI, and draw the IBAction of the button. IBAction is a function that will be called on a tap of the button from which is referenced. In this action, you can call this function.

@IBAction func onTapBtnPay(_ sender: Any) {
setupApplePay()

}

Recommended Read: PayU Integration in iOS using Swift

Apple Pay Sandbox Testing

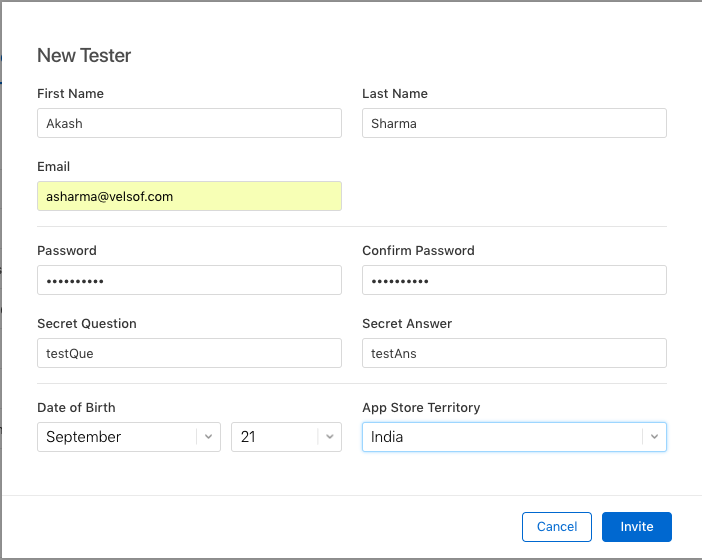
1. Create a Sandbox Tester Account.

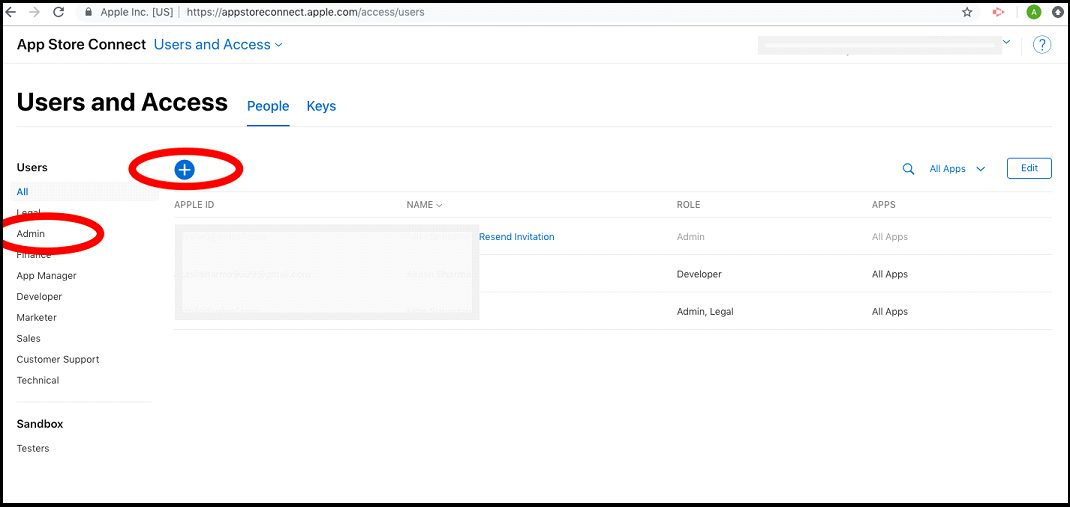
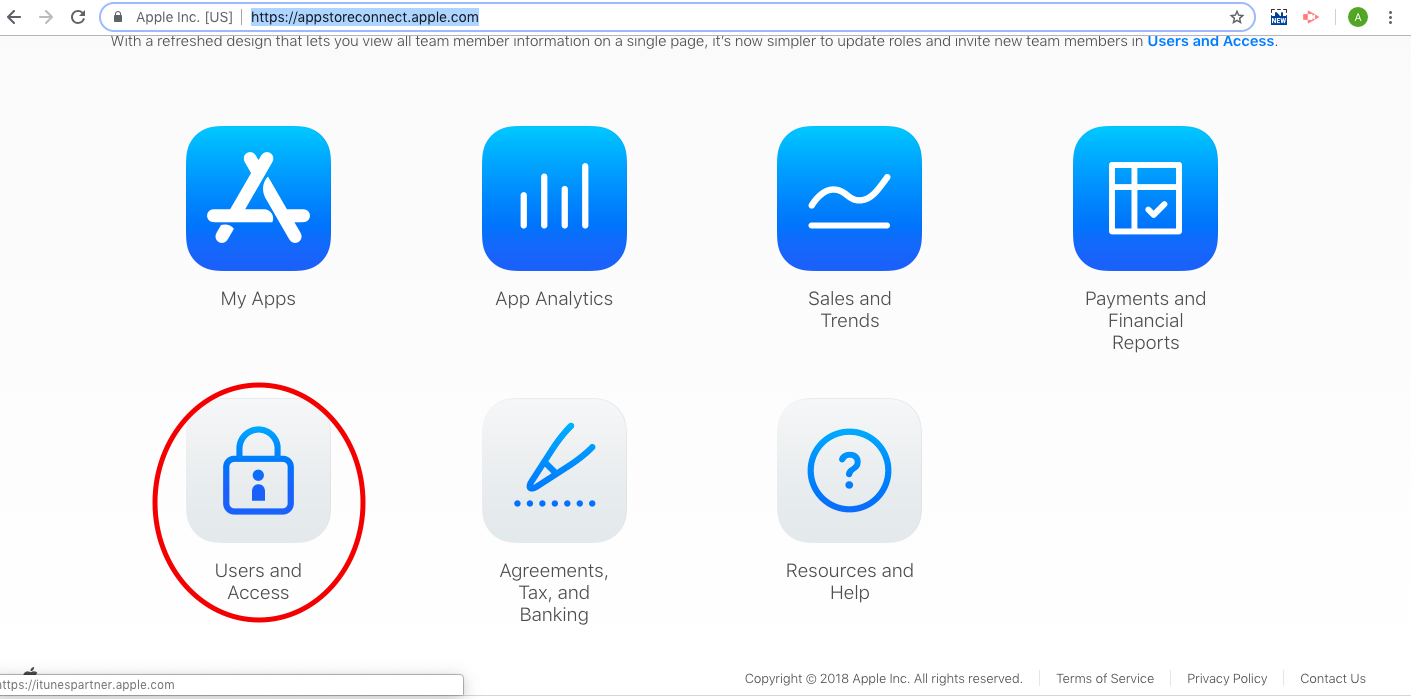
a) Login to https://appstoreconnect.apple.com/
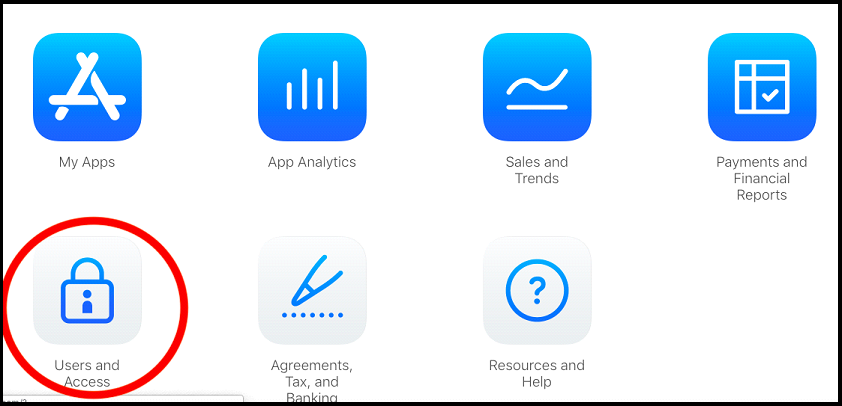
b) Select Users and Access.

c) Go to the testers section in the left navigation menu. Then click on the “+” button.

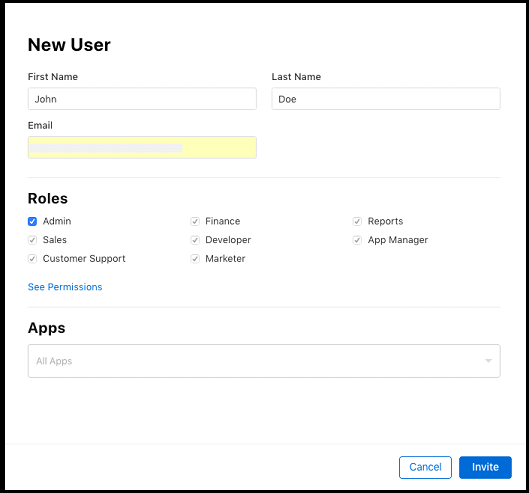
d) A popup will appear. Please fill out that form.
Note: Please use mail that is not registered with Apple.

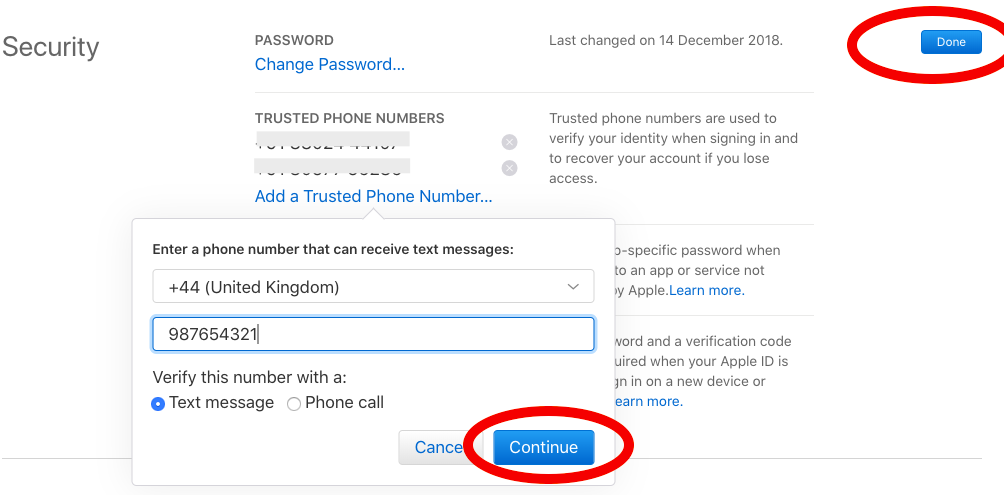
f) Sign out of your Apple ID on all testing devices and sign back in with your new sandbox tester account.

2. Adding a test card number :

a) Make sure you have logged out from iCloud and iTunes.
b) Sign into your test device using the sandbox tester account you created.
c) Add a sandbox card.
Example :
FPAN: 4761 1200 1000 0492
Expiration Date: 11/2022
CVV: 533

You can find more cards here.

Note: The issue you might face is that the card will not be added. It will show some errors. Possible resolution maybe – you might have not logged out of the device completely. Please log out from iCloud and iTunes.

d) After adding the card, you can proceed with the Apple Pay transaction.

Wrap UP

Create your eCommerce mobile app with Knowband’s mobile app builder and integrate PayU just by following these simple steps. You can develop and publish a pair of entirely native Android and iOS apps for your eCommerce website with KnowBand’s eCommerce Mobile App Builder.

With the aid of our feature-rich eCommerce Mobile App Builder solution, you can start selling on mobile devices and attract customers from all over the world to your store. Knowband is a well-known brand that creates eCommerce mobile apps. Our main objective is to create robust yet user-friendly eCommerce mobile apps that may provide any eCommerce business with a competitive edge. You can create a user-friendly environment and make it easier for e-merchants to reach their customer base using Knowband’s eCommerce Mobile App Builder.