

PrestaShop Order, Customer and Address Import Export Addon – Complete User Guide
Learn how to use the PrestaShop Bulk Migration Module to import, export, and migrate orders, customers, and addresses with automated transfers, FTP/SFTP support, and detailed transfer logs.
1.0 Introduction
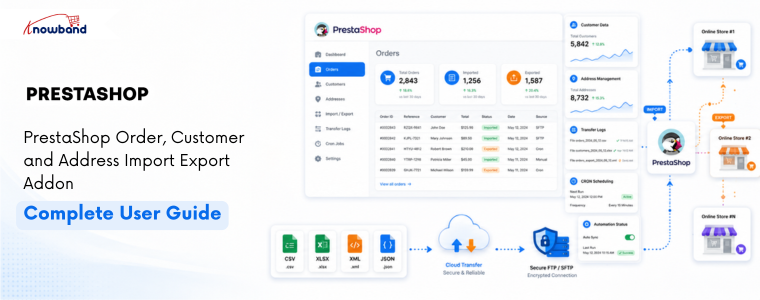
Managing order data across stores and partner systems is one of the most time-consuming tasks a PrestaShop admin faces. Migrating to a new store means recreating order history by hand. Sending daily order files to a warehouse or finance team means logging in, exporting, and sending on a schedule that someone has to maintain. Fixing corrupted records after a failed transfer means hours of cleanup with no clear record of what went wrong. The Knowband PrestaShop Order, Customer and Address Import Export Addon serves as a powerful PrestaShop Bulk Migration Module, handling all three challenges with ease. It transfers orders, customers, and addresses between PrestaShop stores and external systems in CSV, XLSX, JSON, and XML, with cross-store identity resolution, FTP/SFTP delivery, scheduled automation, and a full audit log. No developer is needed at any step.
This guide covers every tab, wizard step, and setting so you can configure the PrestaShop Order, Customer and Address Import Export Addon and start transferring order data on day one. Compatible with PrestaShop 1.7.x through 9.x.
1.1 Who Is The PrestaShop Bulk Migration Module For
The Knowband PrestaShop Order, Customer and Address Import Export Addon is built for:
- Store owners migrating from an existing PrestaShop installation who need to bring the full order history across.
- Operations teams that rely on a PrestaShop scheduled order export to send regular files to warehouses, fulfilment partners, or accounting systems.
- Admins who need PrestaShop bulk order management for correcting records, exporting a set, editing in Excel, and re-importing the corrected file.
- Any organisation that needs a verifiable record of every order data movement for audit or compliance purposes.
2.0 Installation Guide
System Requirements
- PrestaShop 1.7.x, 8.x, or 9.x
- PHP 7.2 or higher
Installing the Module
Head to your PrestaShop back office and go to Modules, then Module Manager. Find the upload option at the top right of the screen. Select the ZIP file from your account and confirm. PrestaShop processes the upload on its own.
Once the upload finishes, hit Install on the prompt that follows. The module configuration screen opens right after. If the module does not appear, type Order Import Export into the Module Manager search and click Configure.
Common Installation Issues
- Upload fails: The server is rejecting the file size. Ask your host to raise upload_max_filesize and post_max_size to at least 32 MB.
- Module not visible after install: Clear the PrestaShop cache under Advanced Parameters, then Performance and search again.
- Configuration page looks broken: Clear your browser cache and the PrestaShop theme cache under Design, then Theme and Logo, then Advanced Settings.
3.0 Admin Panel Overview
The Knowband PrestaShop Order, Customer and Address Import Export Addon adds four main tabs to the back office:
- General Settings: Module preferences, sample template downloads, performance limits, and CRON configuration.
- Export: Create and run export profiles using the three-step wizard.
- Import: Create and run import profiles using the three-step wizard.
- Transfer Logs: A full history of every import and export run with status, record counts, and row-level error detail.
4.0 General Settings Tab
The General Settings tab has four sub-tabs: Preferences, Template Files, Limits and Speed, and Scheduled Cleanup.
4.1 Preferences
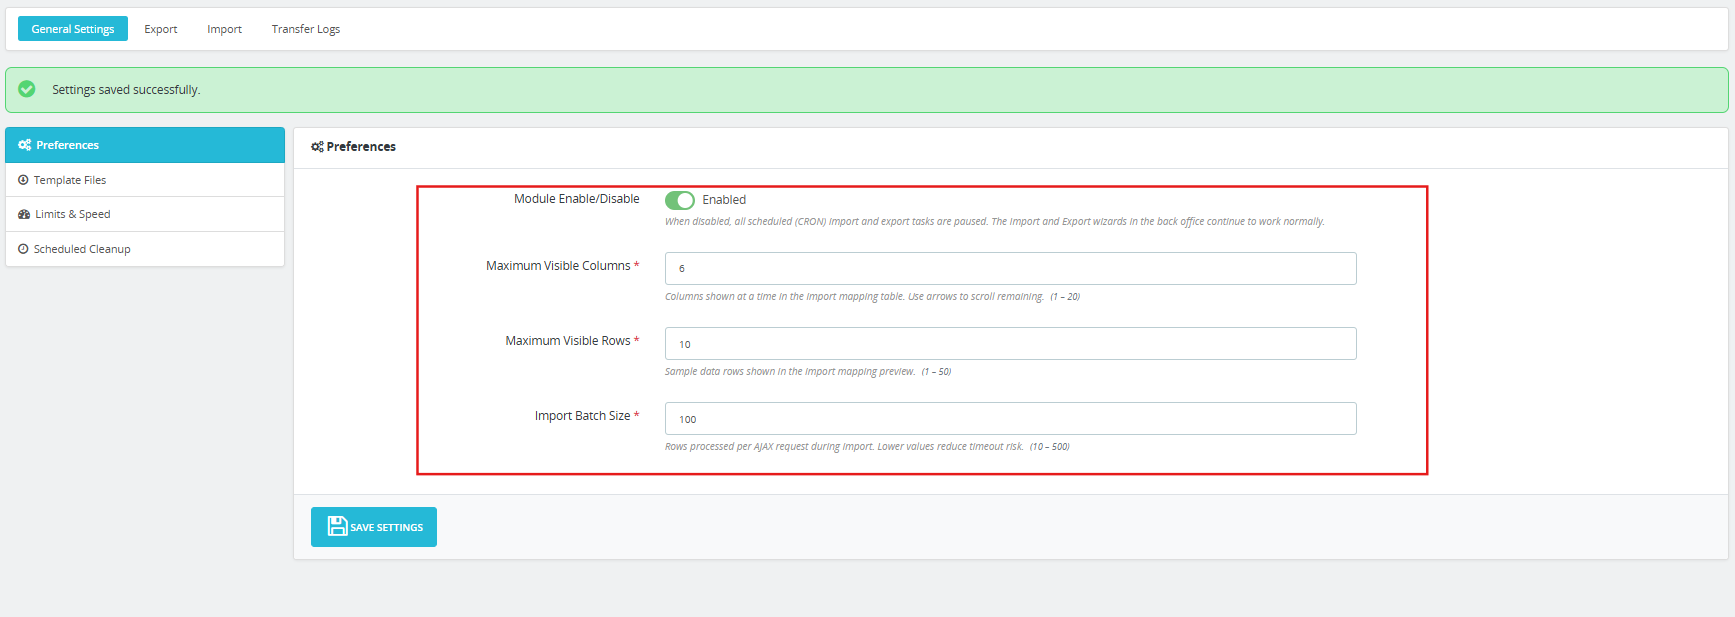
Module Enable/Disable: The main toggle for the entire PrestaShop Bulk Migration Module. When set to Disabled, all scheduled CRON import and export tasks pause automatically. The manual Export and Import wizards in the back office continue to work normally regardless of this setting.
Maximum Visible Columns: Sets how many columns appear at one time in the import mapping table. Range is 1 to 20. Use the arrow controls in the mapping interface to scroll through the remaining columns.
Maximum Visible Rows: Controls how many sample data rows appear in the import mapping preview. Range is 1 to 50.
Import Batch Size: The number of rows the module processes per AJAX request during an import run. Range is 10 to 500. Lower values reduce timeout risk on shared hosting environments where large imports hit PHP execution limits.
Click Save Settings to apply.
4.2 Template Files
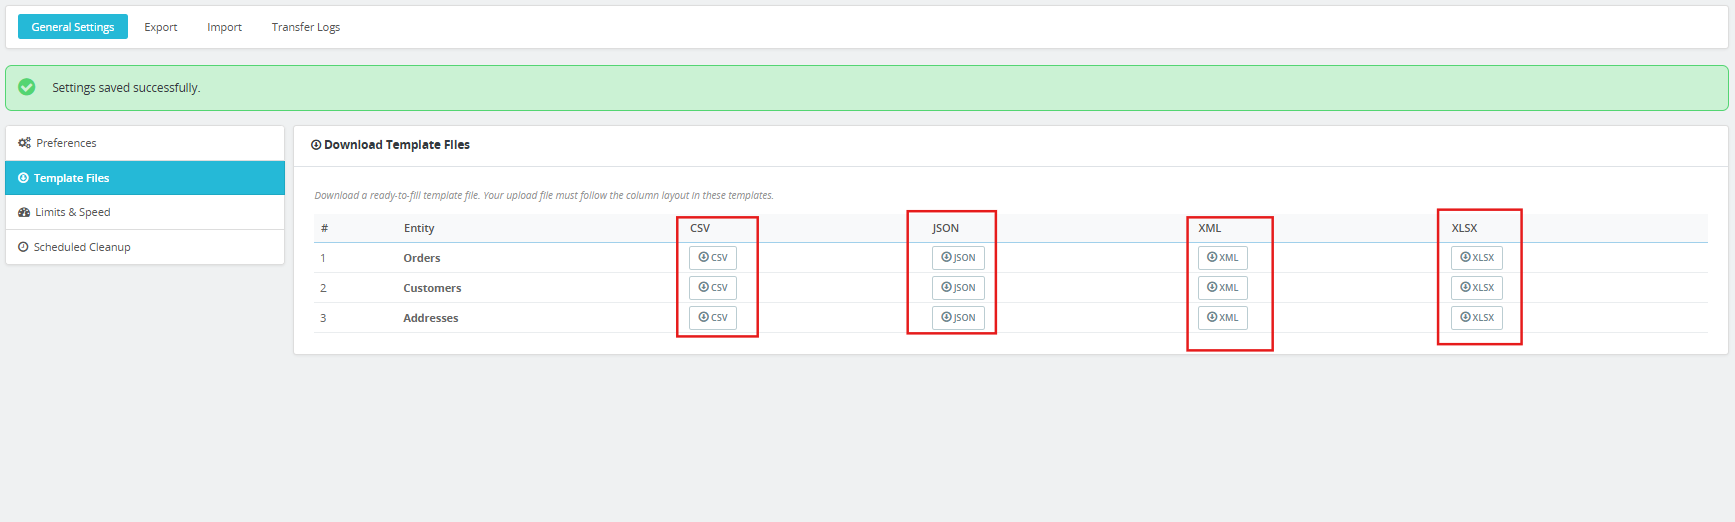
The Template Files sub-tab provides ready-to-fill sample files for each supported entity in all four formats. Download a template before building your first import file to confirm the column layout.
Three entities are available:
- Orders: CSV, JSON, XML, XLSX
- Customers: CSV, JSON, XML, XLSX
- Addresses: CSV, JSON, XML, XLSX
Each sample contains realistic, fully populated data across every supported column. Templates are generated from the live column catalogue and stay updated with any schema updates.
4.3 Limits and Speed
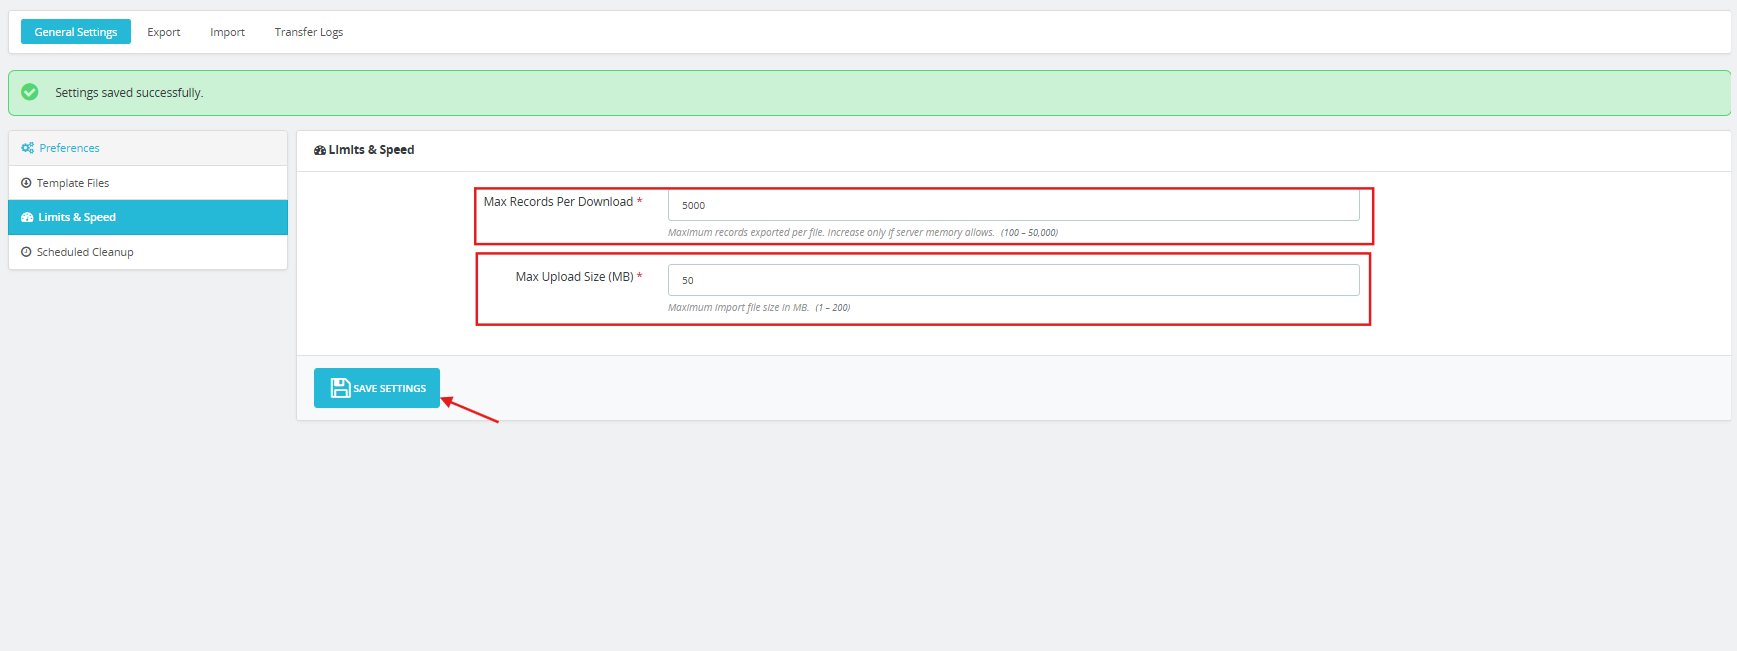
Max Records Per Download: The maximum number of records exported per file. Range is 100 to 50,000. Increase only when server memory allows.
Max Upload Size (MB): The maximum import file size the module accepts. Range is 1 to 200 MB.
Click Save Settings to apply.
4.4 Scheduled Cleanup
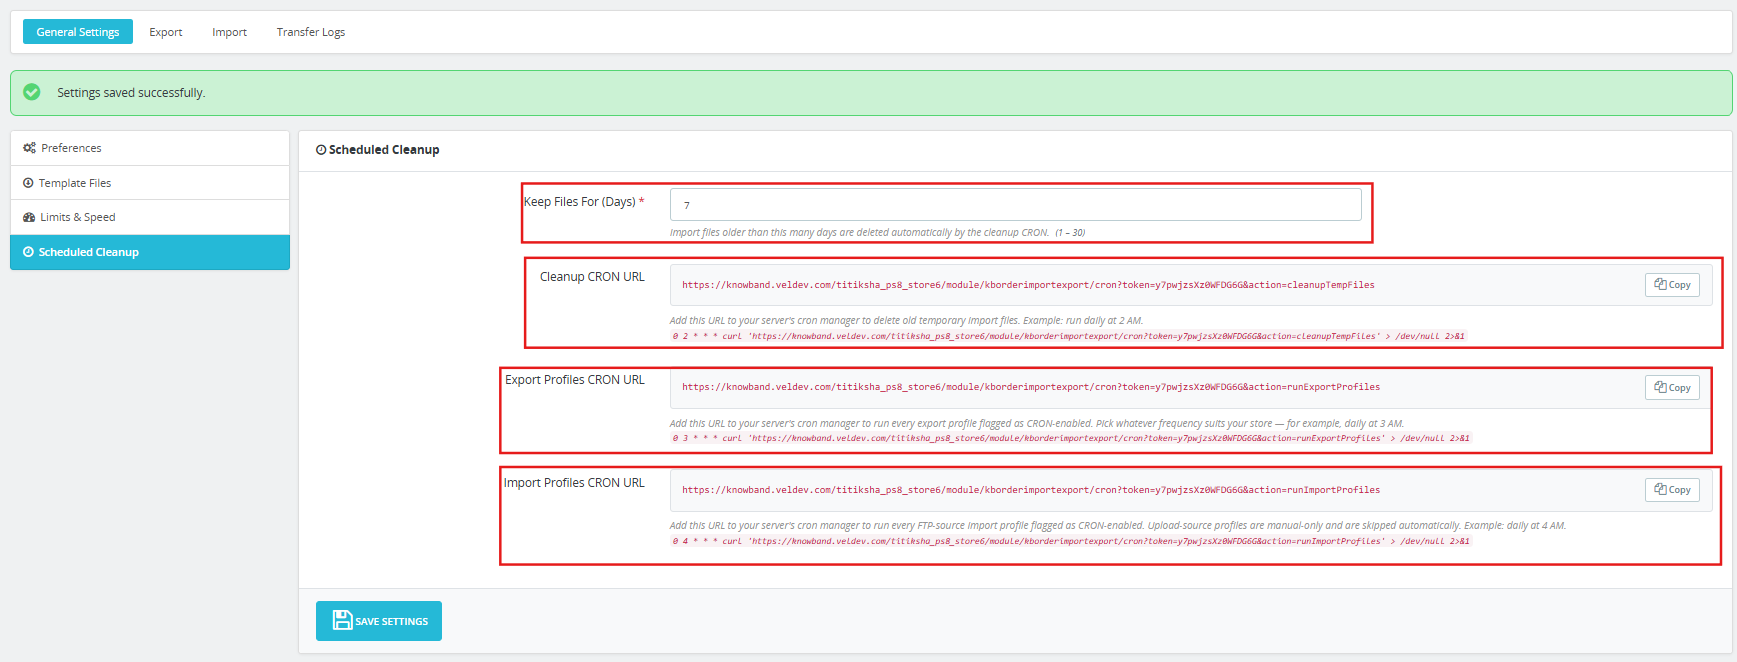
Keep Files For (Days): Import files older than this number of days are deleted automatically by the cleanup CRON. Range is 1 to 30 days.
Cleanup CRON URL: Paste this URL into your server’s cron manager to delete old temporary import files on a schedule. The example runs daily at 2 AM.
Export Profiles CRON URL: Paste this URL into your server’s cron manager to run every export profile flagged as CRON-enabled. Pick any frequency that suits your PrestaShop scheduled order export needs, for example, daily at 3 AM.
Import Profiles CRON URL: Paste this URL into your server’s cron manager to run every FTP-source import profile flagged as CRON-enabled. Upload-source profiles are manual-only and are skipped automatically when this URL runs. Example: daily at 4 AM.
All three URLs are token-secured. Only requests carrying the correct token trigger the operation.
5.0 Export Tab: Three-Step Wizard
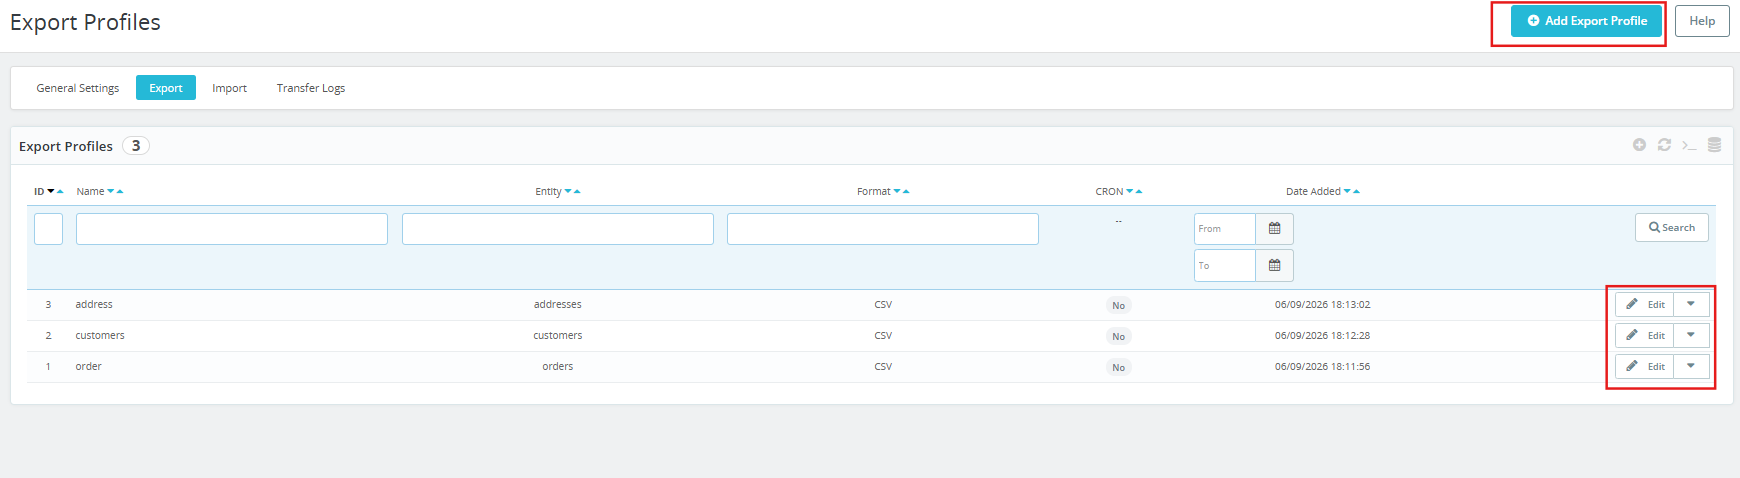
The Export tab lists all saved export profiles and provides the wizard for creating new ones. Each row in the list shows the profile name, data type, file format, and last run status. Click the run button to execute a profile immediately. Click Edit to change its settings.
Step 1: Transfer Settings
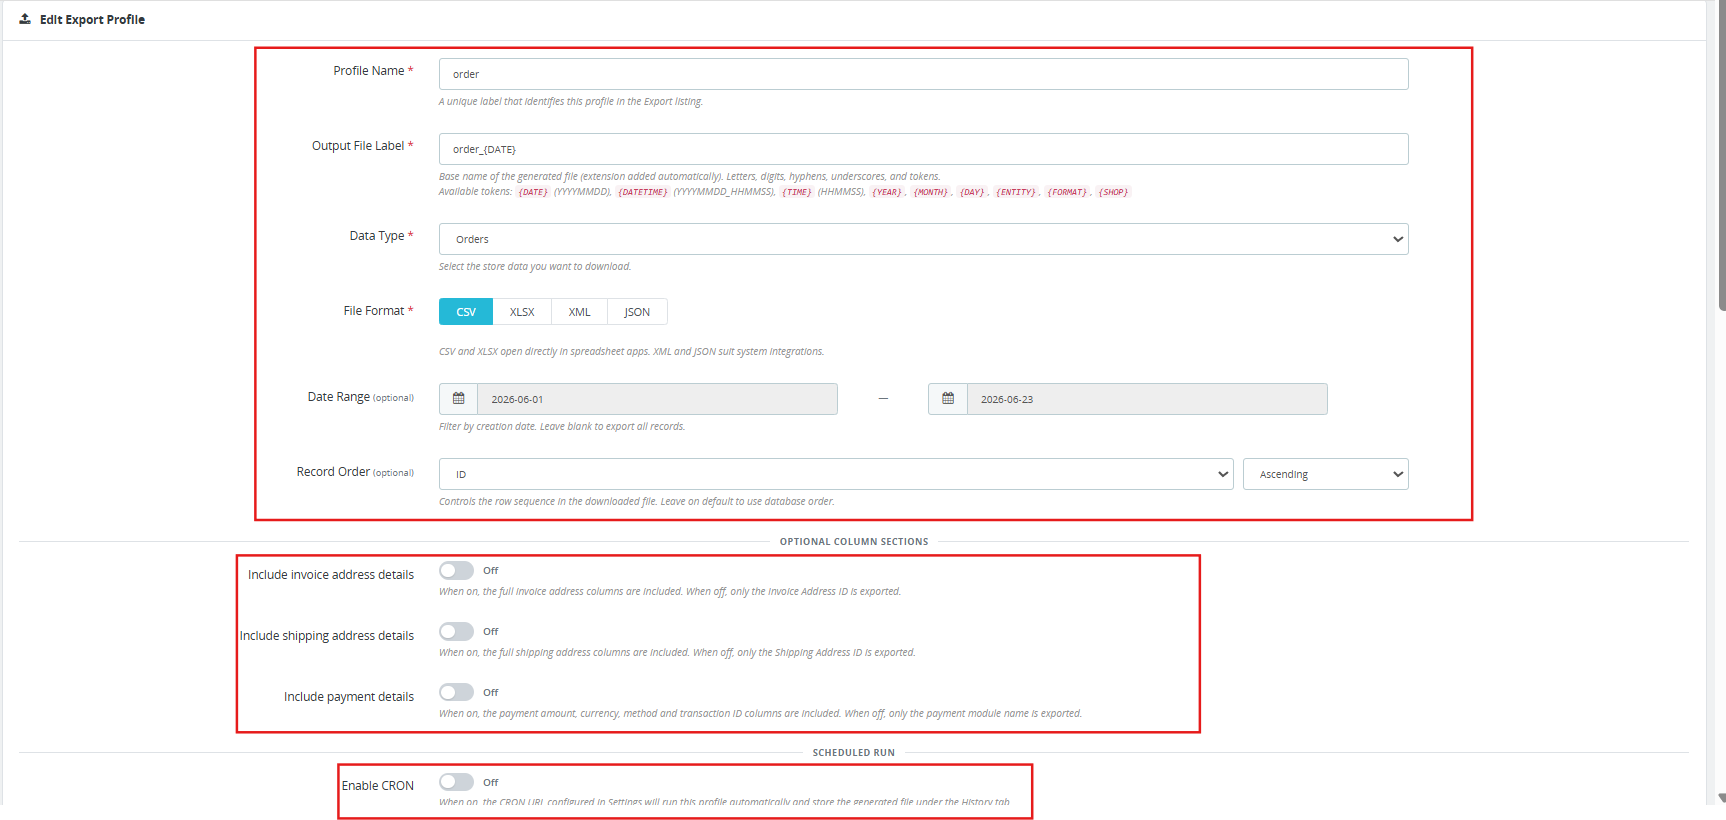
Profile Name: A unique label that identifies this profile in the Export listing.
Output File Label: The base name of the generated file. The extension is added automatically. Supports dynamic tokens (see Section 10).
Data Type: Choose what to export: Orders, Customers, or Addresses.
File Format: CSV, XLSX, XML, or JSON. CSV and XLSX open directly in any spreadsheet application. XML and JSON suit system integrations.
Shop: Limits the export to records belonging to the selected shop in a multi-shop setup.
Date Range (optional): Filter by order creation date. Leave blank to export all records.
Record Order (optional): Control the row sequence in the output file. Sort by ID, Reference, Date Created, Date Updated, Total Paid, or State, ascending or descending. Leave on default to use database order.
Optional Column Sections: Three independent toggles control whether full column blocks are included in the export.
- Include invoice address details: When off, only the Invoice Address ID is exported. When on, all invoice address columns are included.
- Include shipping address details: When off, only the Shipping Address ID is exported. When on, all shipping address columns are included.
- Include payment details: When off, only the payment module name is exported. When on, the payment amount, currency, method, and transaction ID columns are included.
Scheduled Run (Enable CRON): When on, the Export Profiles CRON URL runs this profile automatically and stores the generated file under the Transfer Logs tab.
Export Destination: Choose File System to save the file locally for download from the Transfer Logs page. Choose FTP/SFTP to push the file to a remote server after each run. A local copy is also kept as a fallback download when FTP/SFTP is selected.
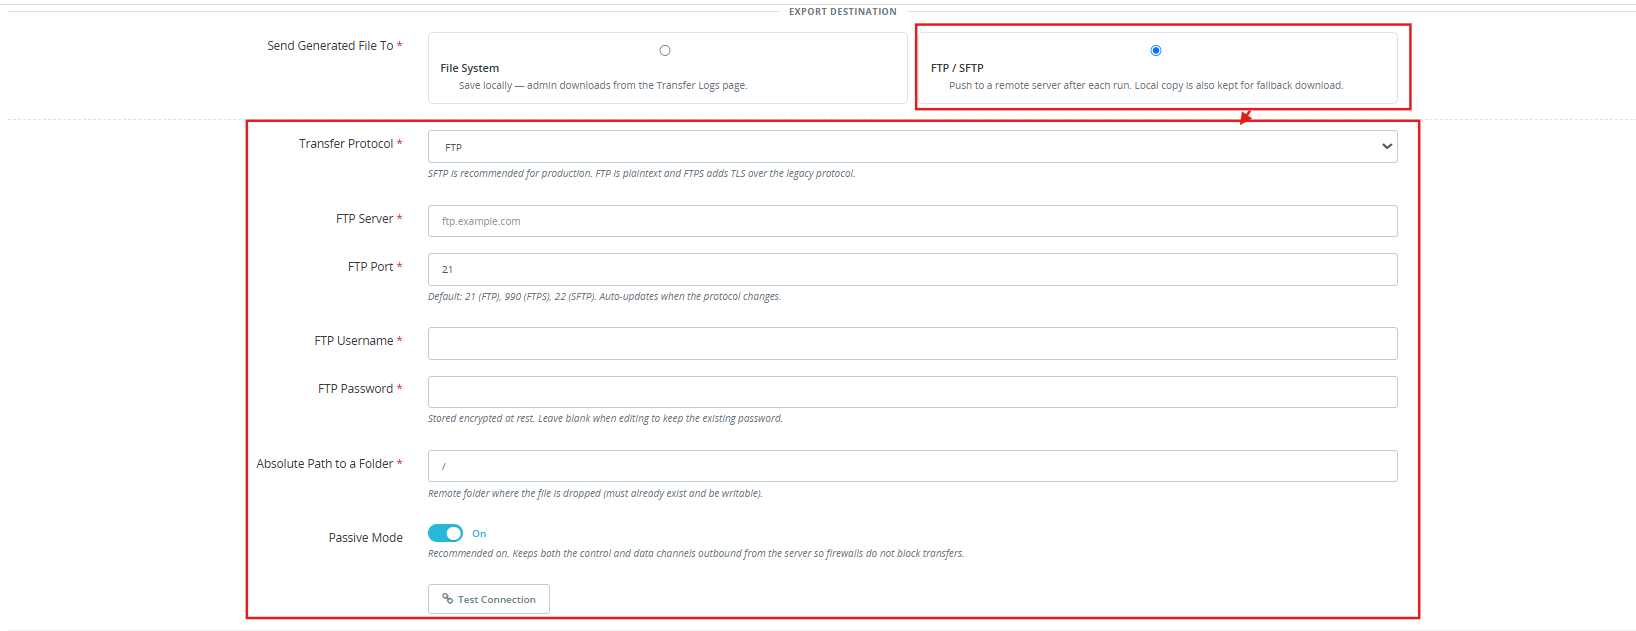
FTP/SFTP Settings (when FTP/SFTP destination is selected):
- Transfer Protocol: FTP, FTPS (FTP over TLS), or SFTP (SSH). SFTP is recommended for production environments.
- Server, Port (auto-updates when the protocol changes: 21 for FTP, 990 for FTPS, 22 for SFTP).
- Username and Password (stored encrypted at rest).
- Absolute Path to Folder on the remote server. The folder must exist and be writable.
- Passive Mode: On by default. Recommended to keep on so firewalls do not block transfers.
- Test Connection button: validates credentials against the live server before the profile is saved.
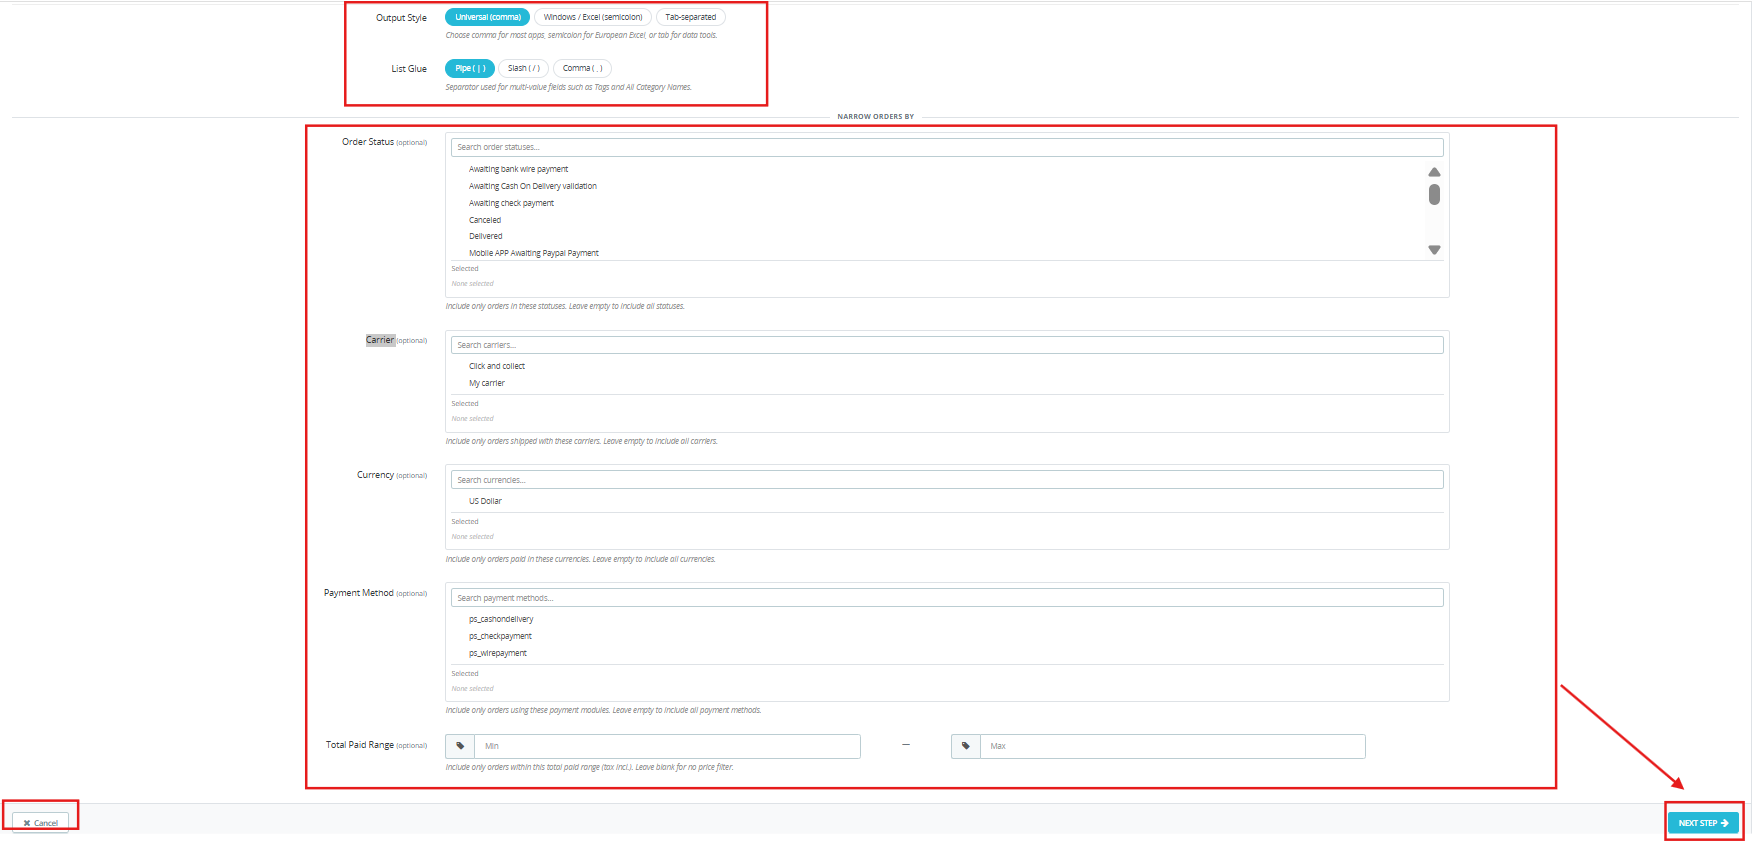
Output Style: Universal comma for most applications, semicolon for European Excel, or tab-separated for data tools.
List Glue: The separator used for multi-value fields. Pipe, Slash, or Comma.
Narrow Orders By (optional filters):
- Order Status: filter by one or more statuses.
- Carrier: filter by one or more carriers.
- Currency: filter by one or more currencies.
- Payment Method: filter by one or more payment modules.
- Total Paid Range: include only orders within a minimum and maximum total paid value (tax included).
Leave any filter empty to include all records for that dimension.
Click Next Step to proceed.
Step 2: Choose Fields

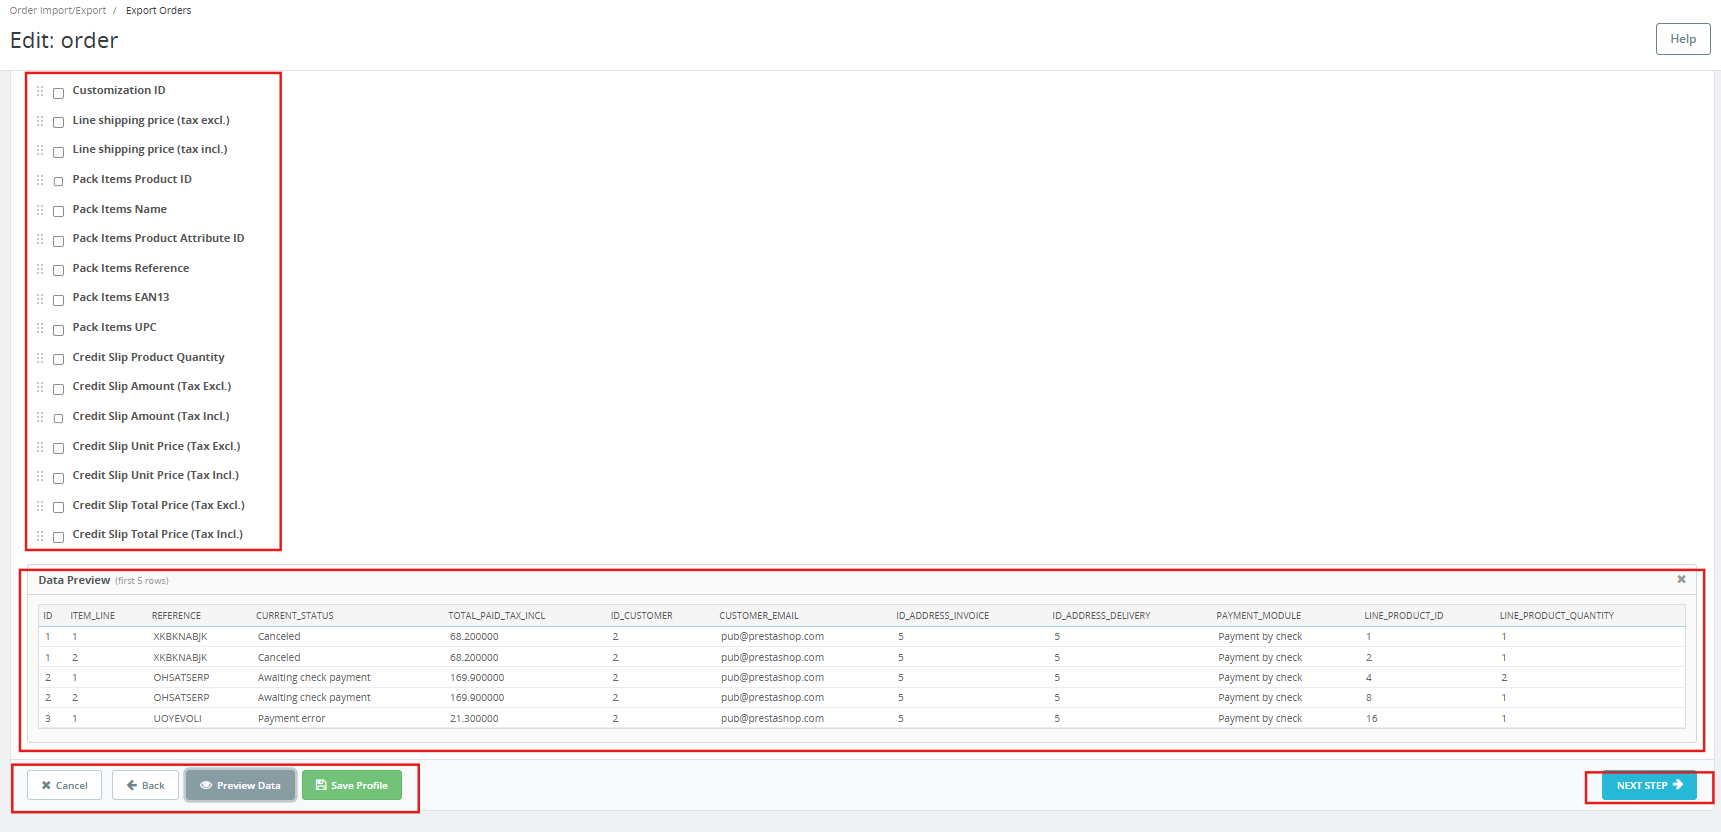
Select the fields to include in the export from 155 available columns. Use Select All, Deselect All, or Reset to Defaults as needed. Required fields cannot be deselected. Drag rows to reorder the columns in the output file.
The 155 available fields span six sections: order data, customer data, address data, payment data, and product line data.
Step 3: Generate File
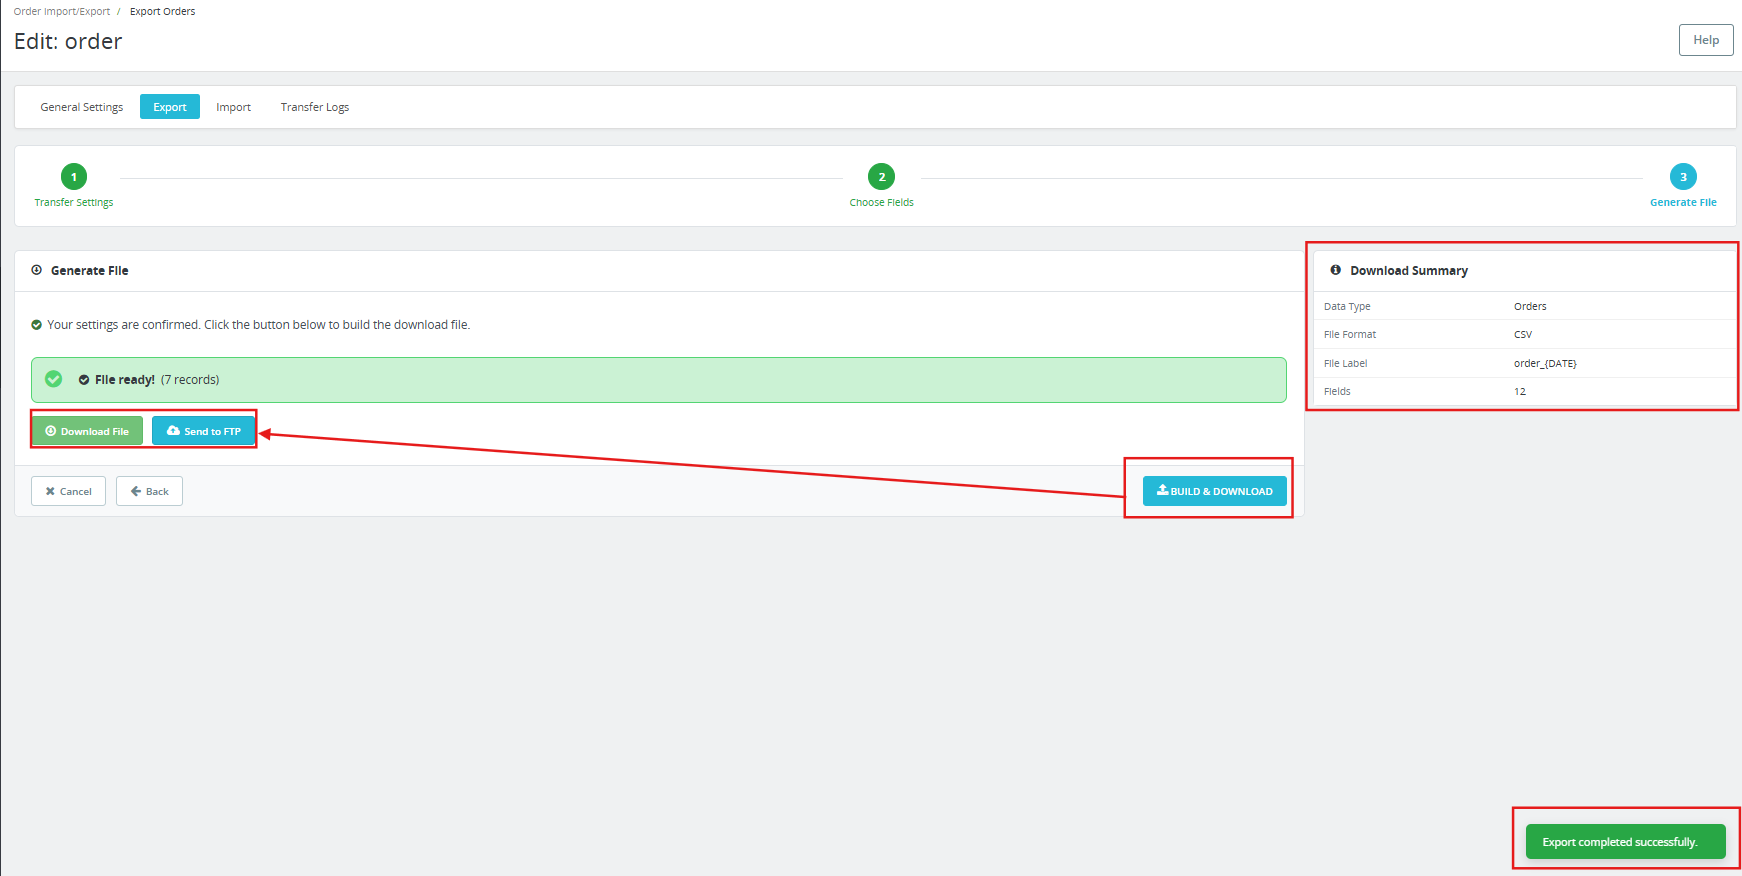
Review the export summary, data type, file format, file label, and field count. Click Build and Download to generate the file immediately, or save the profile and let the CRON run handle it on schedule.
6.0 Import Tab: Three-Step Wizard
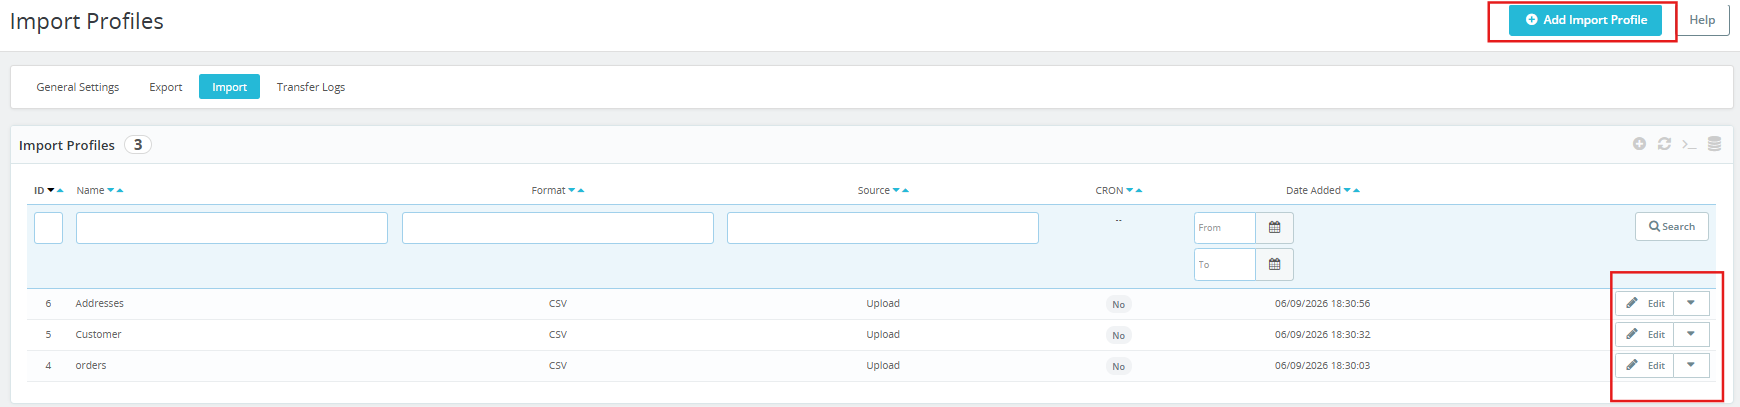
The Import tab lists all saved import profiles and provides the wizard for creating new ones.
Step 1: Source Settings
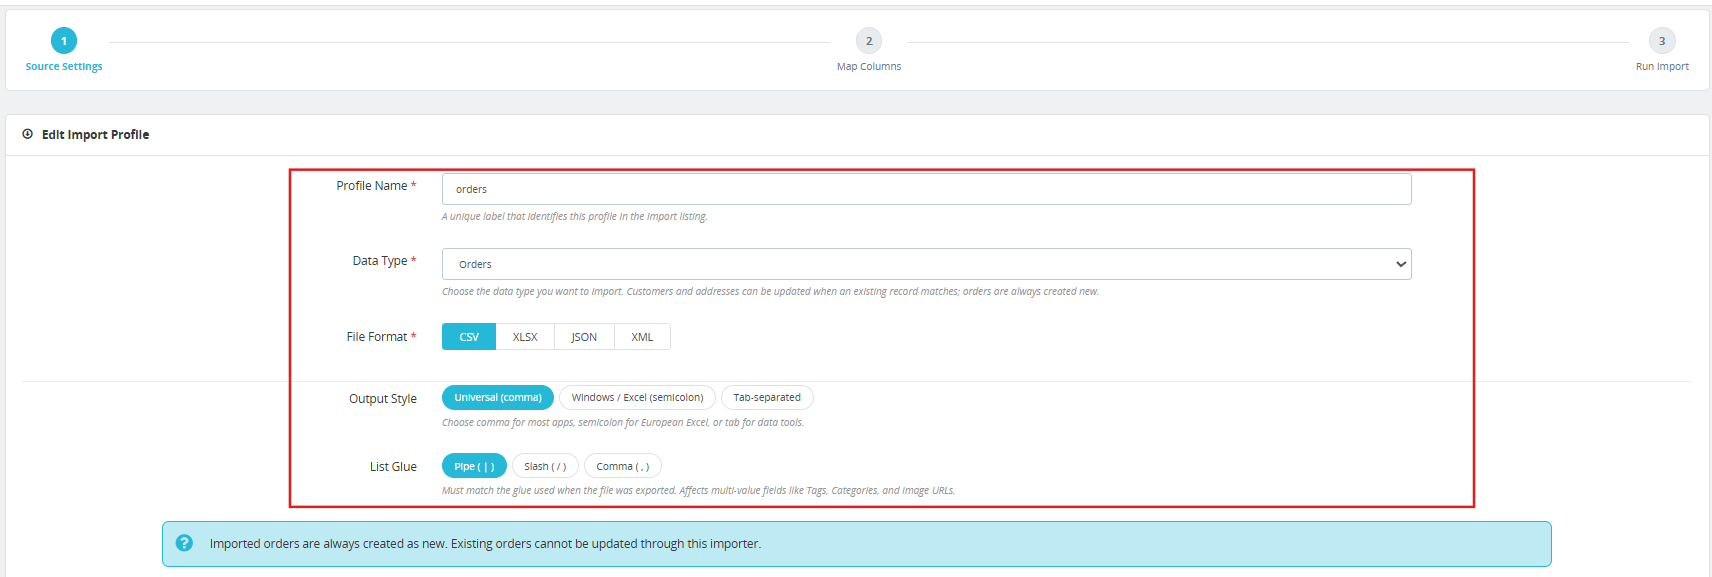
Profile Name: A unique label for this profile in the Import listing.
Data Type: Orders, Customers, or Addresses. Customers and addresses update existing records on match. Orders are always created anew; existing orders cannot be updated through this module.
File Format: CSV, XLSX, JSON, or XML.
Output Style and List Glue: Must match the settings used when the file was exported.
Shop: Imported orders are always created under the selected shop.
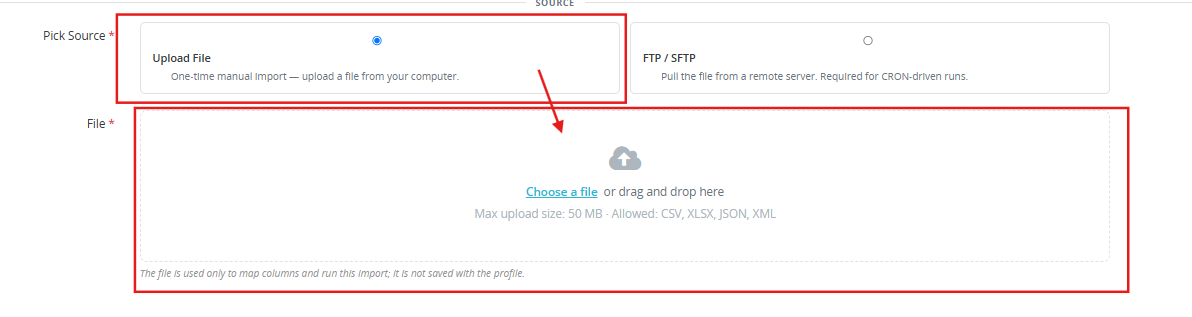
Source: Upload File for a one-time manual import from a local file. FTP/SFTP to pull the file from a remote server. FTP/SFTP source is required for CRON-driven import runs.
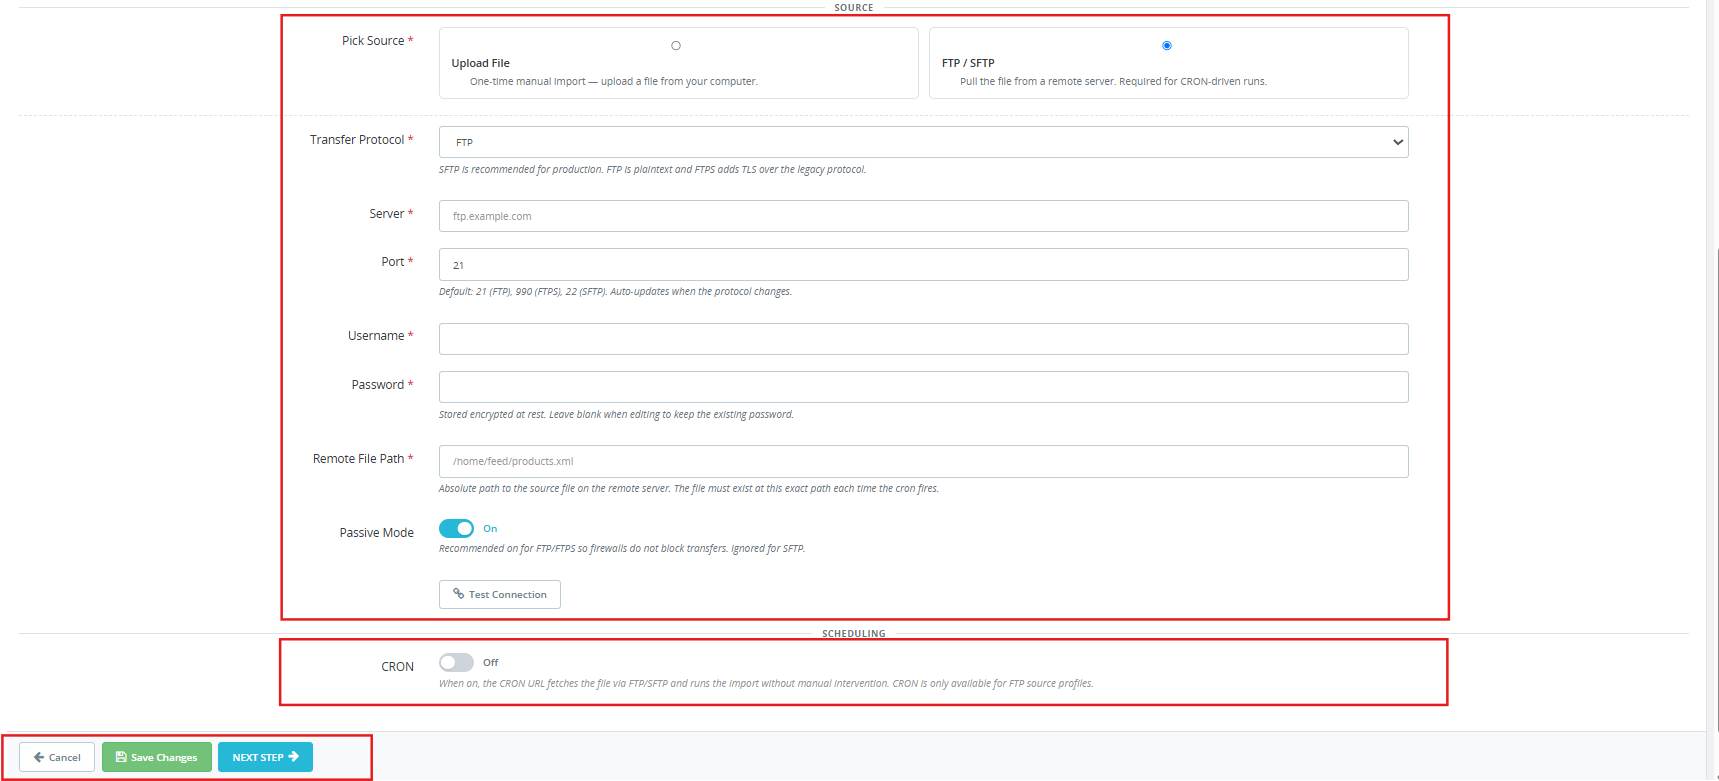
FTP/SFTP settings: Same fields as the export wizard, protocol, server, port, username, password, remote file path, passive mode, and test connection.
CRON: Only available for FTP source profiles. When on, the Import Profiles CRON URL fetches the file from the remote path and runs the import automatically without manual intervention.
Click Save Profile to save without running, or Next Step to proceed to mapping.
Step 2: Map Columns
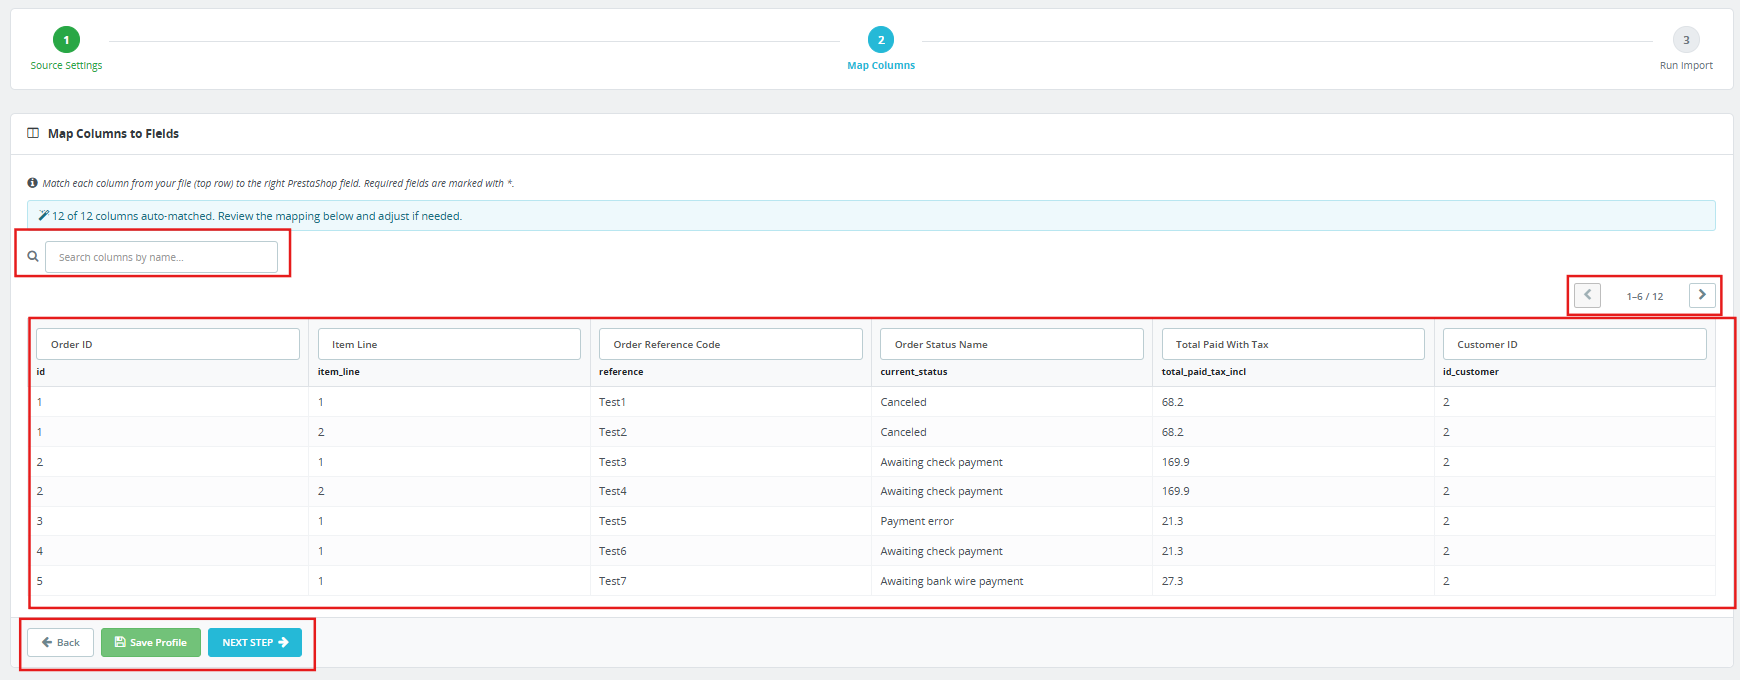
The PrestaShop Bulk Migration Module reads the uploaded file and auto-matches column headers to PrestaShop fields. From the live module, 154 of 155 columns are matched automatically from recognised header names.
The mapping screen shows the first rows of the file as a live preview so the admin can verify data before committing. Required fields are marked with an asterisk. Search columns by name using the search field above the table.
Review the auto-matched assignments and adjust any that need correcting. Common naming variants from external systems are recognised automatically in most cases.
Step 3: Run Import

Mapping confirmed. Click Start Import to begin. The module processes the file in batches based on the Import Batch Size setting in Preferences. A progress indicator shows the current status.
Click Save Profile before starting to preserve the column mapping for future runs of the same file structure.
7.0 Cross-Store Identity Resolution
Migrating orders between PrestaShop installations is the most complex use case for any PrestaShop store migration module. Raw database IDs for customers, addresses, and products differ between stores and cannot be used as transfer identifiers.
The PrestaShop order migration addon resolves all three entity types using identifiers that remain stable across installations:
Customers are matched by email address. No match creates a new account using the name, email, and a system-generated password. The customer resets credentials and accesses their account on the new store immediately.
Addresses are matched by a composite hash built from first name, last name, address line one, postcode, city, and phone. No match creates a new address record from the imported data.
Products and combinations are matched by product reference and combination reference. An unresolvable reference rejects the entire order, no partial writes, no line items pointing at missing products.
A full export from one store imports cleanly using this PrestaShop store migration module into a separate installation without any manual remapping of accounts, addresses, or product IDs.
8.0 Data Integrity and Validation
The importer enforces order-level atomicity. If any line item within an order fails validation, the entire order is excluded from the batch. No partial order record is written to the database.
Every rejection produces a precise log entry:
Row 23: column “currency_iso” contains “USDD”, expected a 3-letter ISO 4217 code (e.g. USD, EUR, GBP). Row 41: column “customer_email” contains “not-an-email”; a valid email address is required.
Fix only the affected rows in the source file and re-import them. The rest of the batch is unaffected.
9.0 Transfer Logs Tab
Every import and export operation writes a log entry to the Transfer Logs tab. Each row shows:
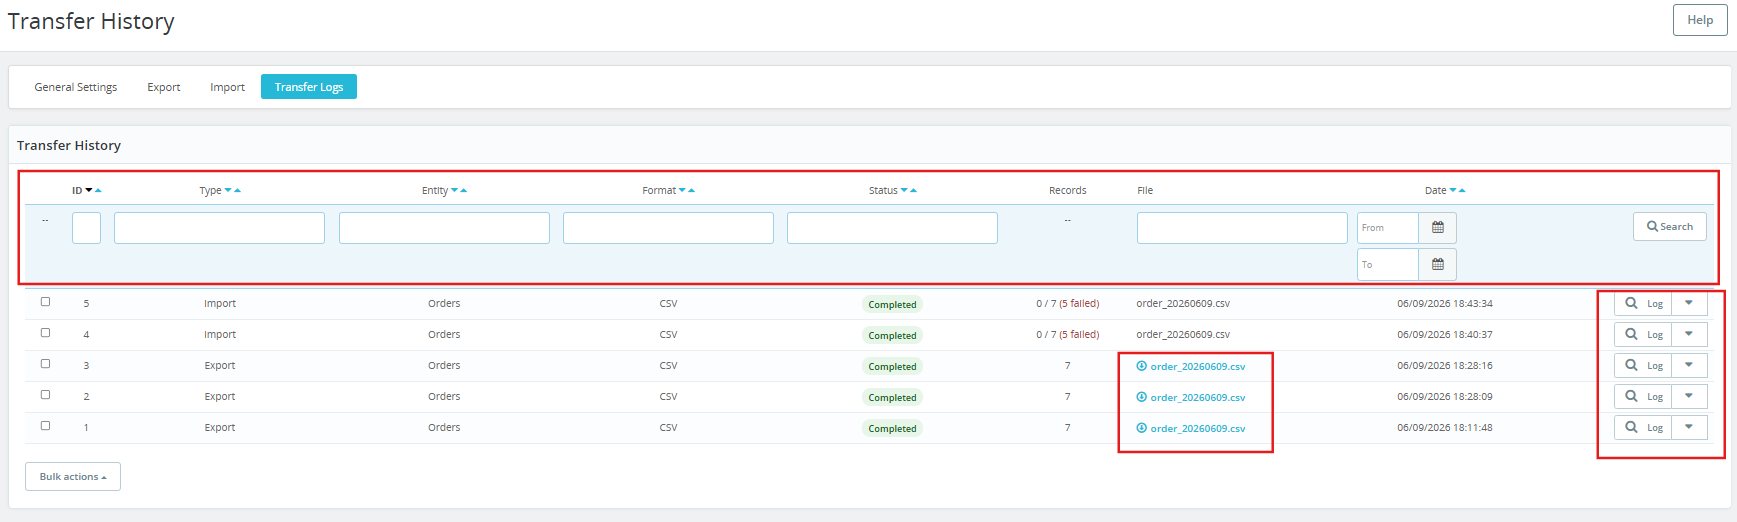
- ID: Sequential run number.
- Type: Export or Import.
- Entity: Orders, Customers, or Addresses.
- Format: CSV, XLSX, JSON, or XML.
- Status: Completed or Failed.
- Records: How many records the run processed.
- File: The filename, with a download link for export files.
- Date: When the run started.
Filter the log by ID, type, entity, format, status, or date range using the controls at the top of the table.
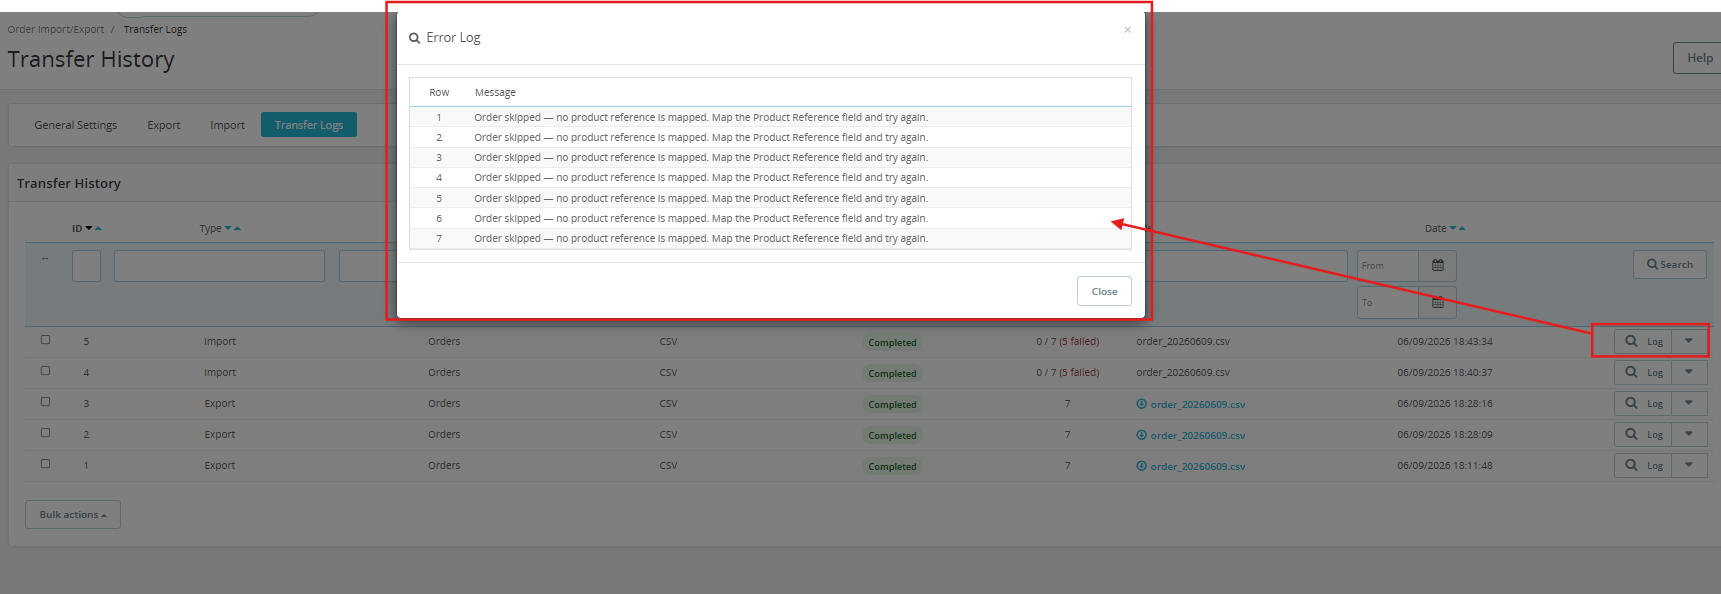
Past export files can be re-downloaded directly from the log without re-running the export. Row-level error detail is accessible for any run that produced failures.
10.0 Dynamic Filename Tokens
Output file labels support nine runtime tokens that expand at the point of generation:
- orders_{DATE}.xlsx produces orders_20260608.xlsx
- {SHOP}orders{DATETIME}.csv produces mystore_orders_20260608_143215.csv
Available tokens: {DATE}, {DATETIME}, {TIME}, {YEAR}, {MONTH}, {DAY}, {ENTITY}, {FORMAT}, {SHOP}.
11.0 Frequently Asked Questions
Q: What is the Knowband PrestaShop Order, Customer and Address Import Export Addon, and what does it do?
The Knowband PrestaShop Bulk Migration Module is a bulk order data transfer tool that imports and exports PrestaShop orders, customers, and addresses in CSV, XLSX, JSON, and XML. It handles cross-store identity resolution, reusable transfer profiles with saved column mapping, FTP and SFTP file delivery, CRON-based scheduled automation, 155 exportable fields, email notifications, and a full transfer log with row-level error detail. Compatible with PrestaShop 1.7.x through 9.x.
Q: How do I migrate orders from one PrestaShop store to another?
Create an export profile on the source store and download the orders file. On the destination store, create an import profile, upload the file, confirm the column mapping, and run the import. The PrestaShop order migration add-on resolves customers by email, addresses by composite hash, and products by reference. No manual remapping of accounts, addresses, or product IDs is needed between the two stores.
Q: What happens if a product reference in the import file does not exist in the destination store?
The entire order containing that line item is excluded from the import. No partial order record is written. The Transfer Logs tab records the row number, column name, and the specific value that could not be resolved. Fix only the affected rows and re-import them.
Q: What file formats does the PrestaShop Bulk Migration Module support?
CSV, XLSX, JSON, and XML, all four in both import and export directions. CSV and XLSX open in any spreadsheet application. JSON and XML suit system integrations and API-based partners.
Q: How does the scheduled PrestaShop order export work via CRON?
Enable CRON on any export profile, set the destination to FTP/SFTP, and copy the Export Profiles CRON URL from General Settings into your server’s cron manager with the required interval. Every CRON-enabled PrestaShop bulk order management profile runs automatically on that schedule, pushes the file to the configured server, and sends a completion notification. Upload-source import profiles are manual-only and are skipped automatically when the Import Profiles CRON URL fires.
Q: Can I filter which orders get exported?
Yes. The export wizard includes filters for order status, carrier, currency, payment method, and total paid range. A date range filter narrows exports to a specific creation window. Apply any combination of filters and leave the rest blank to include all records for those dimensions.
Q: How does FTP and SFTP file delivery work?
Export profiles push files to FTP (port 21), FTPS (FTP over TLS, port 990), or SFTP (SSH, port 22). Import profiles pull files from FTP or SFTP on a schedule. Credentials are stored encrypted. A test connection button validates the connection before the profile is saved. If a push fails, the file saves locally, and a notification email explains the failure.
Q: What is the PrestaShop order backup module feature?
Every import and export run writes a log entry to the Transfer Logs tab with date, filename, entity type, status, and record counts. Past export files re-download from the log without re-running the export. This gives organisations with audit or compliance requirements a complete, timestamped record of all order data movements.
Q: How many fields can be exported per order using the PrestaShop Bulk Migration Module?
155 fields are available across order data, customer data, product line data, address data, and payment data. Per-section toggles let admins include or exclude the full invoice address block, the shipping address block, and the payment detail block independently to keep files lean when full columns are not needed.
Q: Is the PrestaShop Order, Customer and Address Import Export Addon compatible with PrestaShop 9?
Yes. The PrestaShop Order, Customer and Address Import Export Addon works with PrestaShop 1.7.x through 9.x. Check the product page for the most current compatibility details.
12.0 Conclusion
This addon covers every order data transfer need from one back-office panel. Export any combination of orders, customers, and addresses to the format each receiving system needs. Import complete order history into a new store without manual account remapping. Schedule everything via CRON and push files automatically via FTP or SFTP.
Every run is logged with the PrestaShop order backup module, keeping every entry timestamped. Every failure gives a precise, fixable error message. Every export file stays available for re-download. For support, custom development requirements, or PrestaShop addon services, reach out to the Knowband support team or visit the Knowband product page directly.
Also available on Prestashop Addons – https://addons.prestashop.com/en/data-transfer-backup/98144-advanced-order-customer-address-data-migration.html