PrestaShop Fb Wall Post User Manual provides an easy to use and configure feature to the Prestashop store owners to automatically post your products, categories and brands on your official Facebook page. The innovative and easy to understand and configure module helps in boosting the customer engagement on the social media platform in just a few button click.
1.1. Project Objectives
The module can be used by the store owner to achieve following things:
It allows the admin to post product, category and brand automatically on your Facebook store.
The Module even allows the admin to post the new products on the Facebook page of the store
The admin can hide or display the price of the product.
You can even get the Low Stock post with the help of this module.
The admin can even post the discount coupons.
2.0 Installation
Follow the following steps to install the extension:
Unzip the Facebookwallpost.zip file. It would contain files and folders.
Copy all the files and folders of unzipped folder into your store “modules” directory on the path – Root Directory/modules/.
The module is now ready to be installed in your store. You can find it in Store Admin -> Modules and Services.
Click on “Install” button to install the module. It would show a pop-up for your confirmation. Click on “Proceed with the installation” option. This step will install the module and show notification – “Module(s) installed successfully”.
3.0 System Setup
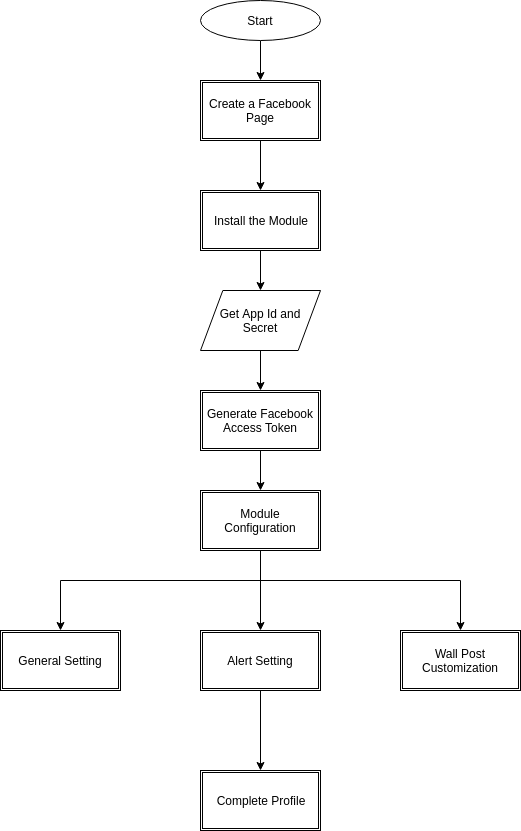
Before proceeding ahead, it is important to know that what is the correct flow of actions to setup this system as there are several things which are dependent on other things and if we do not take care of them then it would become difficult to process smoothly or may be error prone.
4.0 Admin Interface
The admin interface of the module is completely configurable. Click on the ‘Configure’ next to the module in the admin panel.
4.1 How To Start configuration process?
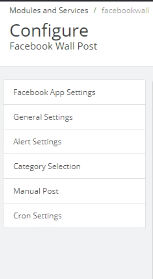
After clicking the “Configure” button, the admin will be redirected to the Configuration page of the module. It offers the below-listed configuration options:
Facebook App Setting
General Setting
Alert Setting
Category Setting
Manual Post
Cron Setting
Let us discuss each options one-by-one.
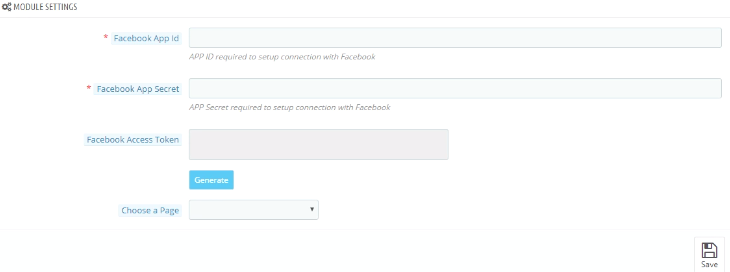
Facebook App Setting:- The Facebook App Setting includes the process to the sync the Facebook profile of the store owner. Follow the below-mentioned steps:-
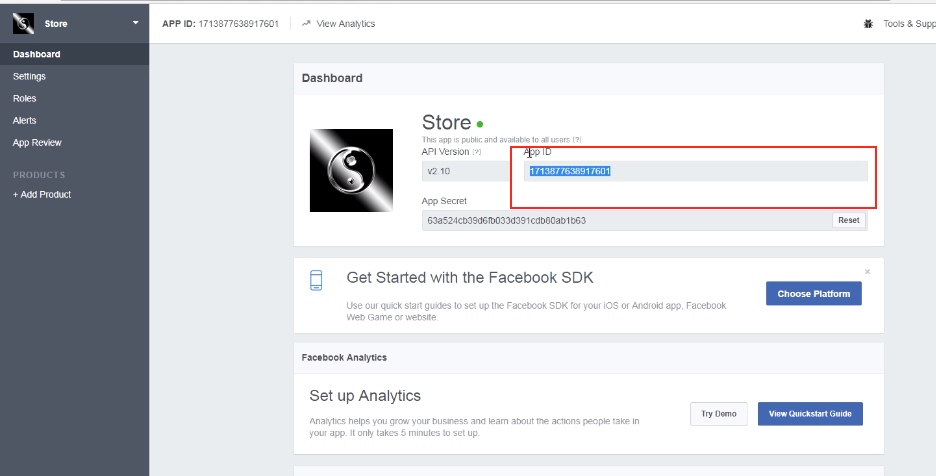
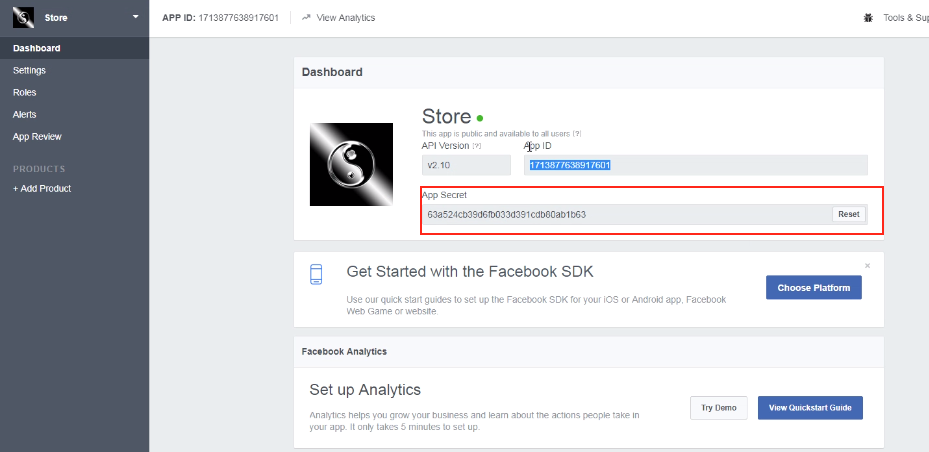
Facebook App Id:- This field is for Facebook App Id created for this module. Enter the Facebook App Id in the first column. In order to find the App id, go to the dashboard of your Facebook App. Copy the app id from the column shown in the image below and paste it in the setup page of the module.
Facebook App Secret:- This field is for Facebook App Secret created for this module. Copy the App Secret from the next column as shown in the image below.
‘Save’ the changes made in the configuration setting.
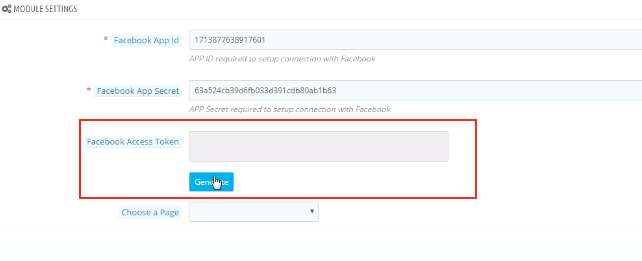
Facebook Access Token: The next thing you need to do is generate the ‘Facebook Access Token’. Once the changes are saved, click on the ‘Generate’ button. This button will be disabled by default. It will be enabled only when the App Id and App Secret is entered and the changes have been saved.
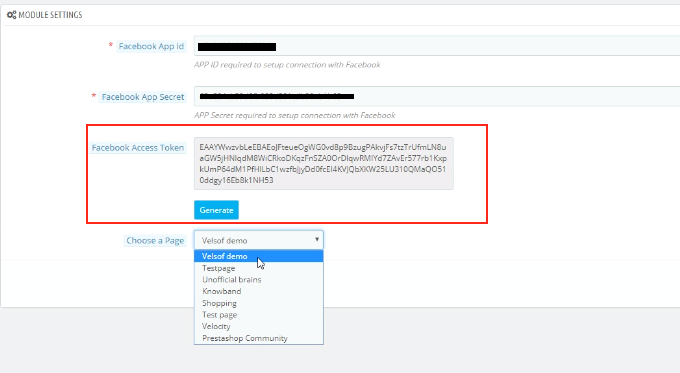
As you click on the button, you will get a pop-up for Facebook Login. Log in your Facebook store and the access token will be generated.
The module is now synced with your Facebook store and is ready for use.
‘Choose the Page’ from the options given in the dropdown list and save the changes. The posts will be displayed on the page selected by you.
4.2 General Settings
The module is now successfully synced with the Facebook Page of the admin.
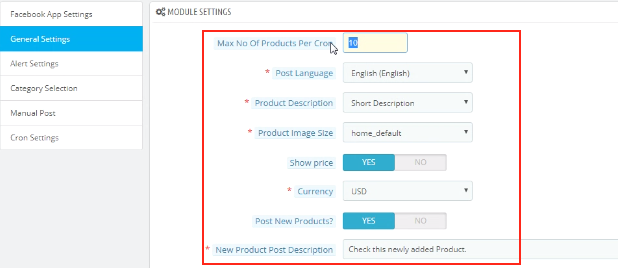
The General Setting allows to make the necessary changes in the look and feel of the FB Wall Post module. Here are some of the options offered.
You can change the ‘Maximum number of Products Per Cron’.
You can select the ‘Post Language’.
The admin can set the ‘Product Description’.
Select the ‘Product Image Size’ from the options offered in the dropdown list.
The ‘Show Price’ option enables you to either display or hide the price of the products.
The admin can select the desired ‘Currency’ from the option available.
‘Post New Products?’ option asks you if you want to Post New products on the Facebook Wall or not.
In case you are posting the new product, then, you can even set the description for the same in the ‘New Product Post Description’.
Click on the ‘Save’ button in order to save the changes made by you.
4.3 Alert Setting
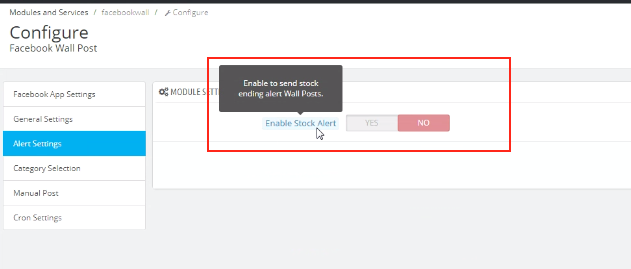
Here, you can enable/disable the option to send Stock Ending Alert Wall Posts.
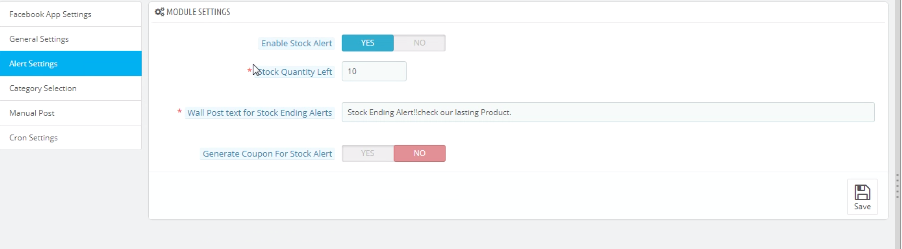
In case, you enable this option, then, you’ll be asked a series of question which includes the following.
Stock Quantity Left: You can enter the quantity of the stock below which the alert will be send on the wall post.
Wall Post Text for Stock Ending Alert: You can enter the text that you want to be displayed when the inventory falls below a certain limit.
Generate Coupon For Stock Alert: You can enable it if you want to send coupon along with the Alert. In case you enable the coupon code option, the module provides an option to customize the vouchers as well.
Voucher Name: The name of the voucher can be entered in the first column. You can even choose from the different language options available and select the one as per your requirement.
No. Of Vouchers: Allow you to select the number of vouchers you want to send.
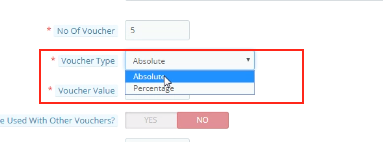
Voucher Type: You can select the type of voucher you want to send. It can ‘Absolute’ or ‘Percentage’.
Can be used with Other Vouchers: You can enable this option if the voucher can be send with other vouchers as well.
Voucher Validity: Set the duration for which the voucher is valid is here.
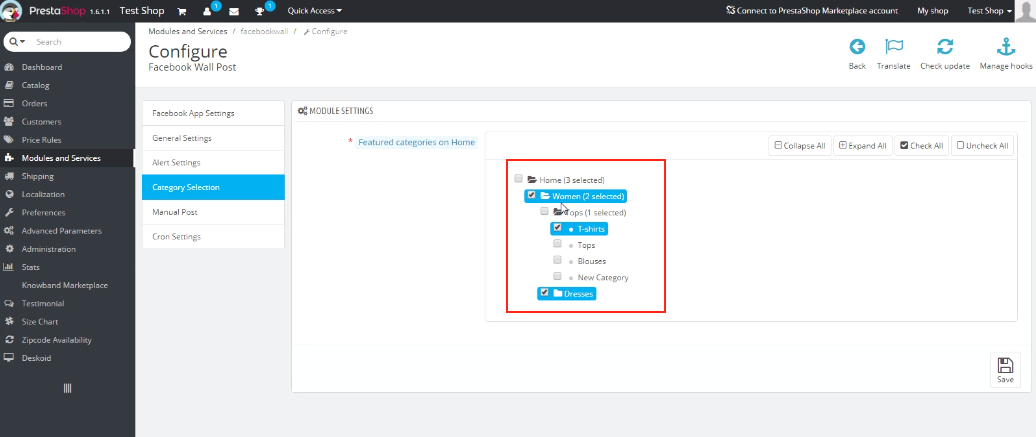
4.4 Category Selection
You can select the categories you want to display on the Facebook wall post here. Check the options that you want to display. Only those products whose default category is selected in this section will be posted on the Facebook Wall.
4.5 Manual Post
This option allows you to customize the wall post manually.
Search Product: It will show the dropdown of various product options. You can select the one as per your wish.
Wall Post Text For Products: Set the text that you want to display on the wall post. Click on ‘Post Product Now’ button and the products will be posted.
Search Category: It will show the dropdown of various category options. You can select the one as per your wish.
Wall Post Text For Categories: Set the text that you want to display on the wall post. Click on ‘Post Category Now’ button and the products will be posted.
Search Brand: It will show the dropdown of various brands options. You can select the one as per your wish.
Wall Post Text For Brands: Set the text that you want to display on the wall post. Click on ‘Post Brand Now’ button and the products will be posted.
4.6 Cron Selection
Add the cron configuration to your store in order to sync the products and send Facebook wall posts to your customers automatically according to your setting.
‘Sync Product Manually’ will allow you to sync the products. The products will then get listed below. The admin can even delete the listed products from the table by clicking on the ‘Delete’ icon.
On clicking the ‘Send Post Manually’, the products will get posted on the Facebook Wall of the admin.
5.0 Facebook Tab UI
Once you have already configured Prestashop Facebook Wall Post module and synced with the Facebook profile, the changes will be shown in the front end.
5.1 Home Page
Home page will have the UI similar to mentioned below.
5.2. Selected Page
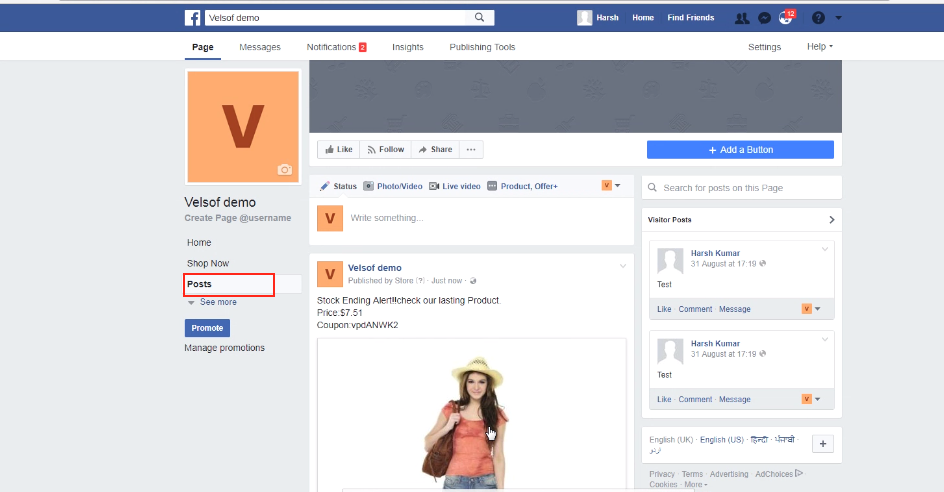
Go to the page which you selected earlier in the admin interface. The products posted will be shown on the wall post of the page.
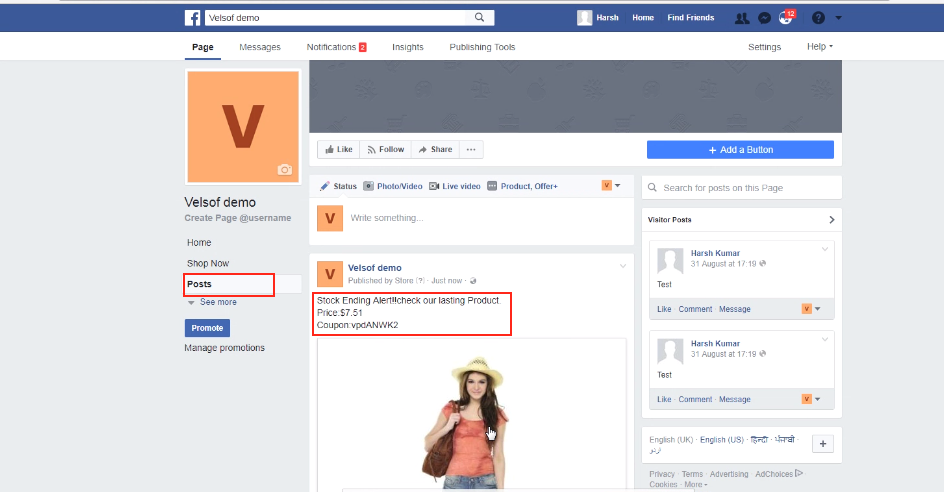
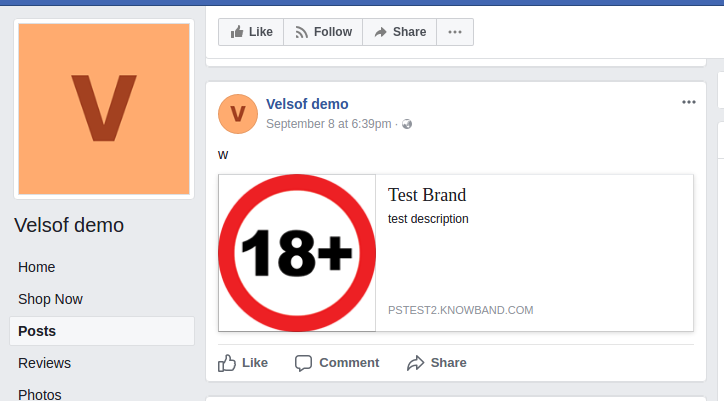
As you can see in the image below, the Stock ending alter has been posted on the wall along with the Product Price and the Coupon Code.
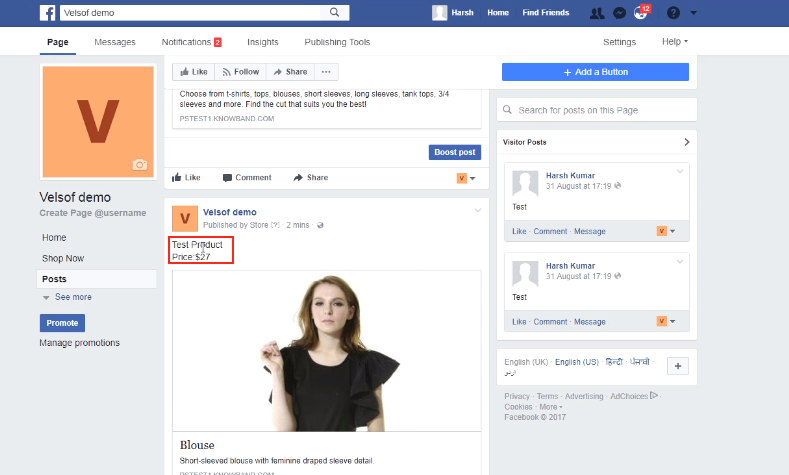
The Product along with the price can be seen on the wall of the Facebook.
This is how the brand posted on the wall will look like.
The category to be displayed on the Facebook will be seen like this in the front end.
Opencart do not assign unique SKU to each option of a product. For example, if one product has multiple options (sizes & color), then you cannot update the inventory of each option directly. You have to enter/scan product SKU, then select one option from option list. To remove this option selection step, we have developed a module (Opencart Option SKU Manager) to assign unique SKU to each option of product. After installing this module, you can directly enter/scan the SKU of option of SKU and update the quantity.
Functionality and working
How to install plugin
Follow the steps explained below to install the module.
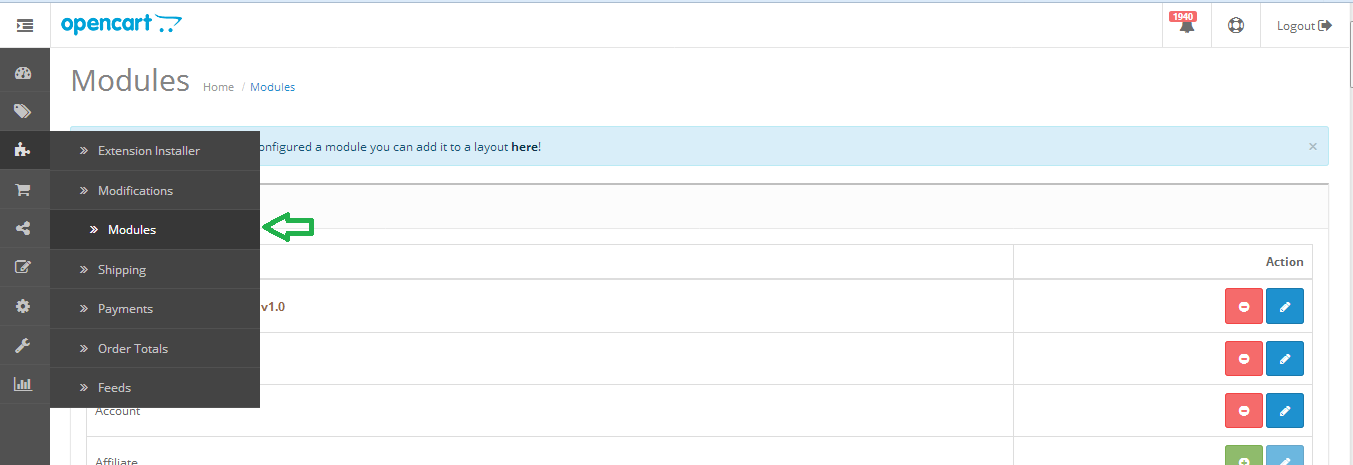
Step 1: Open the modules list from menu as shown below.
Step 2: Click on install button against “Option SKU Manager ” plugin as shown below. Plugin will be installed successfully and read to use.
How to enable plugin
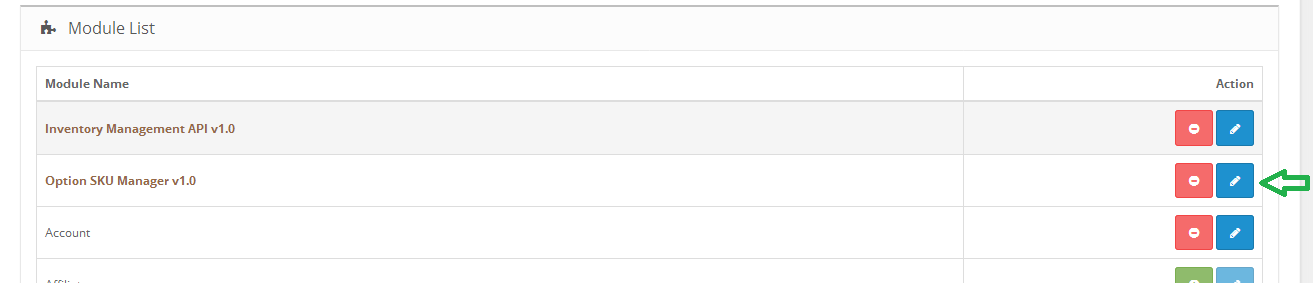
Step 1: Click on edit button against “Option SKU Manager ” plugin as shown below.
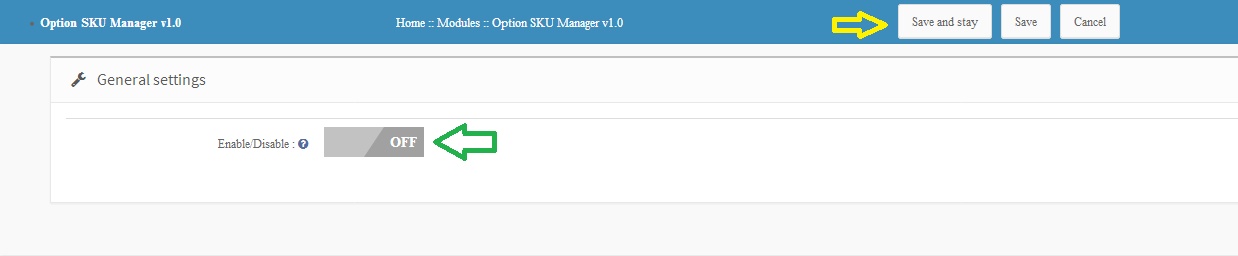
Step 2: Enable the module and click on either “Save and Stay” or “Save” button. Module will be successfully enabled.
How to assign unique SKU to variations
Once you have installed and enabled the module, you can assign unique SKU to each product variations. Follow the steps below to assign unique SKU.
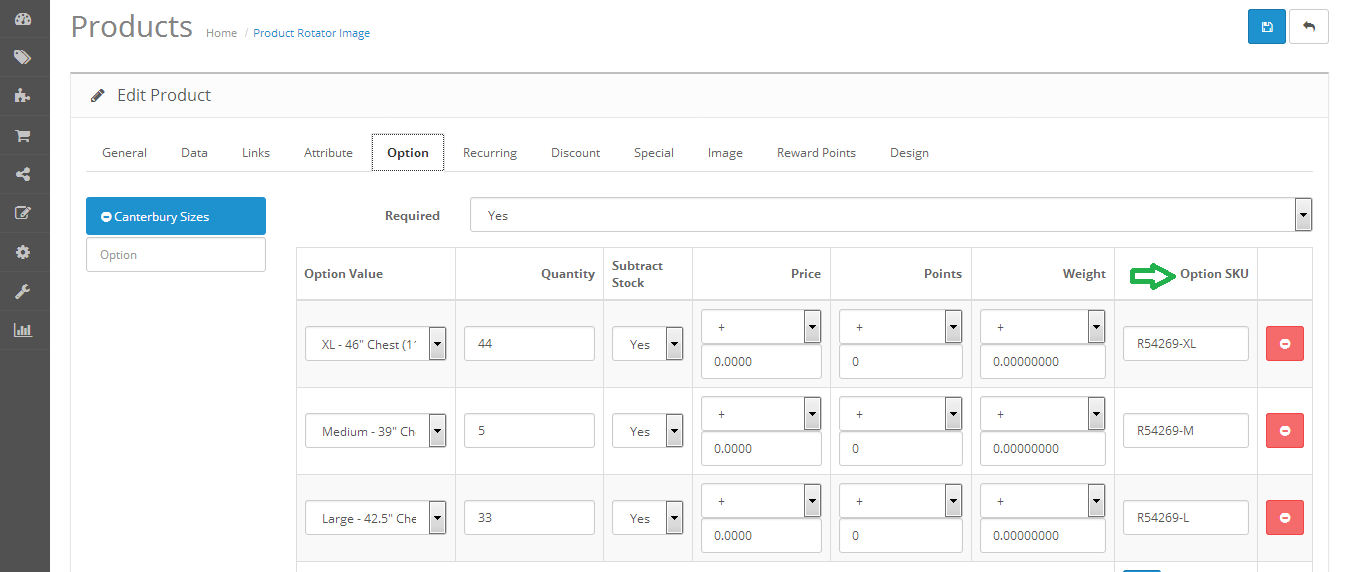
Step 1: Edit any product and click on options tab. Enter unique SKU for each variations and save the product.
A Mobile App is definitely one such solution that can take your eCommerce business to far off places. With the support of the Magento Mobile App Builder for Android/iOS, you can seamlessly target your multi-platform customers and grab maximum sales as well as customer engagement. The mobile apps with Magento eCommerce Mobile App Builder can make your eCommerce business accessible to the worldwide mobile-based consumers. The store owners can now improve the chances of their business growth and expansion. This Mobile App Maker for Magento allows the store owners to get their customized mobile app as per their business requirements and needs.
Whether your eCommerce site is recording a consistent sale volume or if it’s on the verge of finding your niche market, nowadays mobile apps have the potential to drive quality traffic as well as conversions. Mobile applications have become the flavor of the current time and the idea of taking your business on the mobile platform sounds quite perplexing.
To ease the task for all the Magento store owners out there, KnowBand has brought its readymade framework Magento Mobile App Builder. This pre-designed mobile app solution builds full-fledged Android & iOS apps for your eCommerce website.
1.1 Salient Feature of Magento Mobile App Builder
The Magento Mobile App Builder comes with some of the major sale pushing features:
–> Customizable Home Screen Layout (Complete Flexibility)
–> Store Branding
–> Zopim & WhatsApp Chat Support (24*7)
–> Google & Facebook Login
–> OTP & Fingerprint Login
–> Both Tablet & Mobile Support
–> Android 4.2 to Android 8.0 (Oreo) Support
–> iOS 9 to iOS 11 Support
–> Automatic Inventory Update
–> Multiple Color & Font Choices
–> Multi-lingual & RTL (Right To Left) Support
–> Multi-currency Support
–> All Product Type Support
–> Website Payment Method Supported on Apps
–> Website Shipping Method Supported on Apps
–> Custom Payment Method Integration
–> Unlimited Push Notifications
–> Product Social Sharing Options
–> Multiple Filtering & Sorting Options
–> Advanced Voice Search (Android Only)
–> Wishlist Functionality
–> Website Coupon/Vouchers Supported on Apps.
–> Simplified Checkout Screen
–> Real-time Order Tracking
2.0 Magento Mobile App Demo
KnowBand offers a FREE Magento Mobile Apps demo for you before making the actual purchase. The store admin can experience the apps functioning on your testing devices.
2.1 View Our Demo Store working on Apps
We have set up a free Demo store just to test the Magento Mobile App functionalities. Install the application on your device & explore its flawless working.
Step 1: Download and install the Nautica Magento Mobile App on your mobile device. Here, are the links to the apps: Apple App Store Google Play Store
Step 2: Once the apps are successfully installed, open & tap “View Demo” option on the splash screen. Start testing the apps working with ease.
Note: You can access the admin panel of Magento Mobile App Builder from here.
2.2 View Your Store working on Demo Apps
Still not convinced? Want to test your own website on the demo apps. We got you covered with that as well in just 3 simple steps:
Step 2: Install the demo Magento Apps on the testing devices & enter the store URL in View Your Store option.
Step 3: Tap “View Your Store” and start experiencing your own website on Magento Android & iOS Apps.
Note: This Free version of Mobile App Builder is just for the demo purpose & no APK/IPA files will be provided with this module. In order to get your own APK/IPA files, you need to purchase the paid version of the Magento Mobile App Builder.
3.0 Process to build Magento Mobile Apps
Satisfied with our demo apps & want a pair for yourself? Build Magento Mobile Apps in just 3 simple steps:
Step 1: Purchase & Install Module on your website.
Get paid version of Magento Mobile App Builder from KnowBand & install the same on your website.
Step 2: Share some App-related Specifications
We would require some app-related specifications & requirements from your end. For this, we would send a pre-requisites to form with you.
Step 3: Get Your Android & iOS Apps in 1-2 days
Our developers & technical team will develop the apps & get back to you in 1-2 days.
Note: You can publish these APK/IPA files on respective app stores. Refer following links for the same:
If there is any issue while publishing app on respective stores, we would get it done for you.
4.0 Admin Panel Screens
After successful purchase & install of Magento Mobile App Builder, the store admin can configure the backend panel. Go to System>>KnowBand Extensions>>Mobile App Builder & you would find the following tabs in the module backend:
4.1 General Settings:
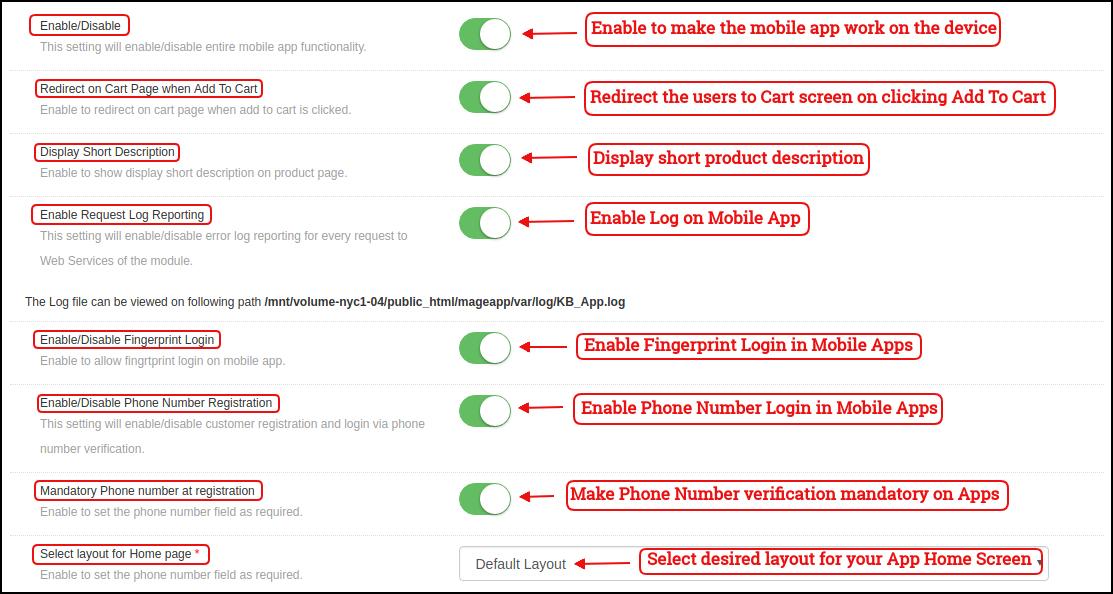
a) Enable/Disable: Enable/disable the Magento Mobile App Builder module to make the apps work on the smartphone. b) Redirect on Cart Page when Add To Cart: Redirect the mobile app users to the cart screen whenever any user tap Add To Cart button. c) Display Short Description: Enable to display the short product description on the mobile apps. d) Enable Request Log Reporting: This functionality enables the error log on the mobile devices. This error log file is used to rectify any error or abnormal behavior of App. e) Enable Fingerprint Login: Enable the fingerprint login option in the mobile apps. f) Enable Phone Number Registration: Enable Phone Number login/registration in the mobile apps. g) Select Layout for Home Page: Choose the desired layout for your app home screen. You can create multiple layouts under Home Page Layout tab which will be displayed here in the drop-down menu.
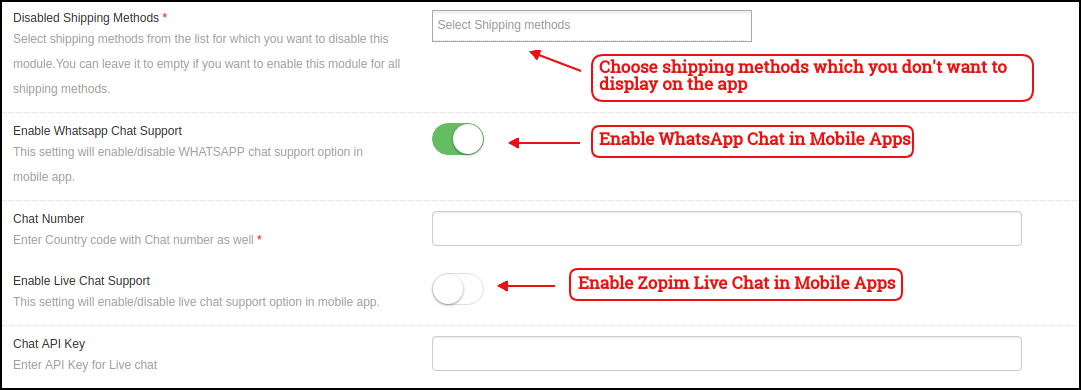
h) Disabled Shipping Methods: Choose shipping methods which you don’t want to display on the Mobile Apps. i) Enable WhatsApp Chat Support: Enable/disable the WhatsApp chat option on mobile apps. J) Enable Live Chat Support: Enable/disable Zopim chat options in mobile apps.
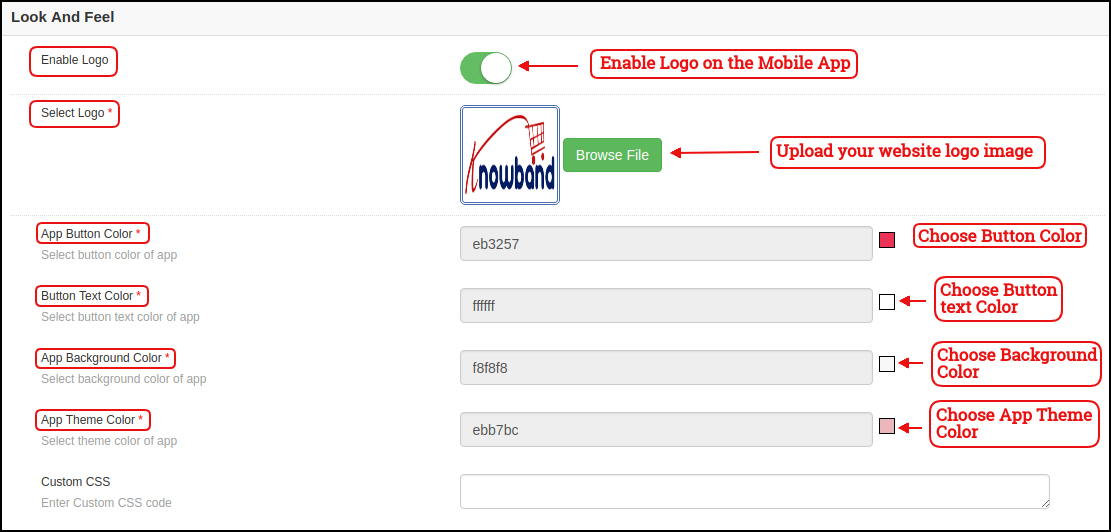
k) Enable Logo: Enable logo in your mobile apps. You can upload the logo image which will be displayed on the header of the mobile apps. l) App Button Color: Choose the button color for your apps. m) App Button Text Color: Choose the button-text color for your apps. n) App Background Color: Choose the background color for your apps. o) App Theme Color: Choose the theme color for your apps.
4.2 Mobile Menu Settings
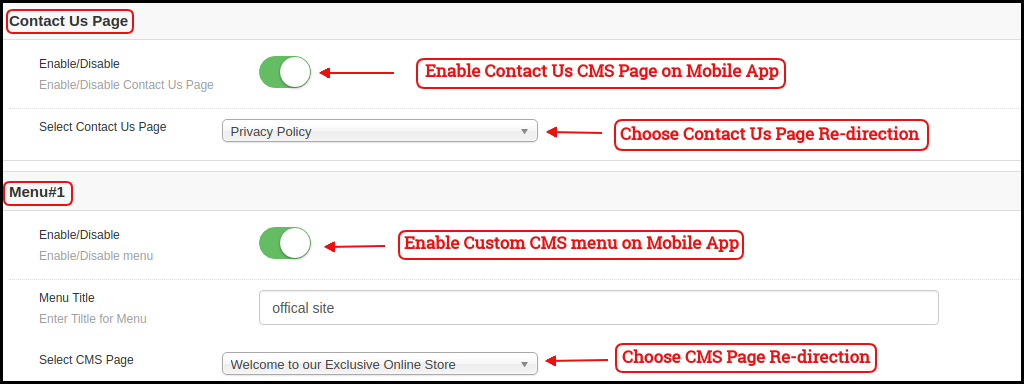
This tab of the Magento Mobile App Maker allows the store admin to display various website CMS pages on the Mobile Apps. You can add as many custom CMS pages as you want. The Mobile App Maker for Magento allows you to bring all the website CMS pages on the app.
4.3 Payment Methods:
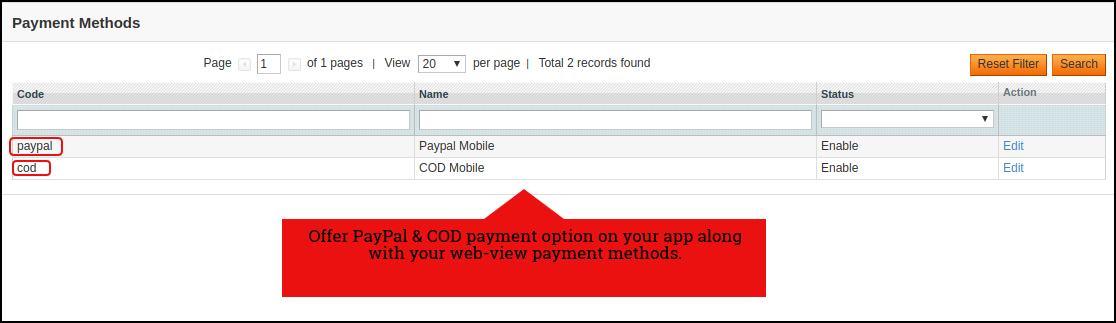
The Magento Mobile App Creator offers additional PayPal & COD payment options to make the payments easier in the apps. The mobile apps with this extension already support web-view payment options in mobile apps.
4.4 Push Notifications:
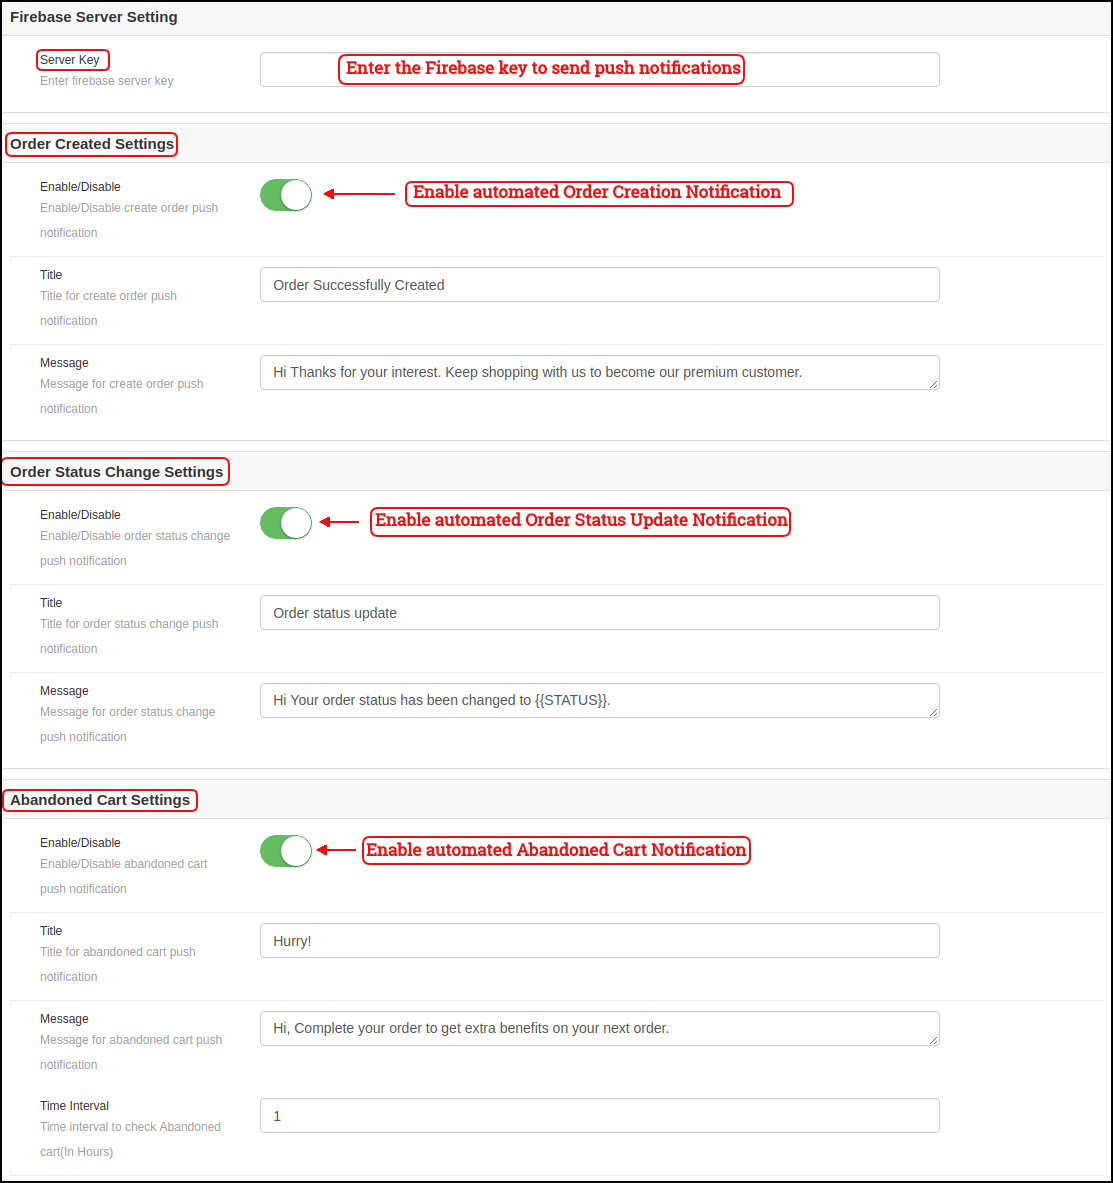
a) Firebase Key: Enter the Google Firebase key to send push notifications on your Magento Apps. You can skip this setting for the Free version. We would set up the same with the paid version of the module.
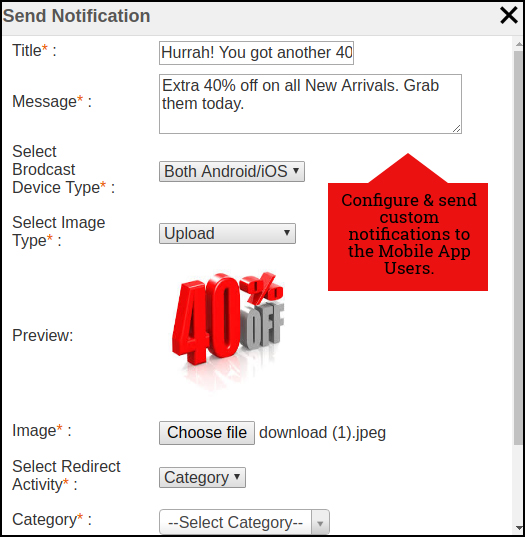
b) Order Success Notification: Configure automated Order Creation Push notification which would be sent automatically to the user’s who successfully creates an order. c) Order Status Update Notification: Configure automated Order Status Update notification which would be sent automatically to the users whenever there is an update in order delivery status. d) Abandoned Cart Notification: Configure automated Abandoned Cart notification which would be sent automatically to the users who left their products in the cart. This notification is sent repeatedly to the users after a fixed time duration. e) Send Notification:
If the store admin feels like there is a need to highlight any daily deals or discounts, custom notifications can also be sent to the app users. These notifications can be configured from the backend panel & will be broadcasted to all app users.
4.5 Home Page Layout
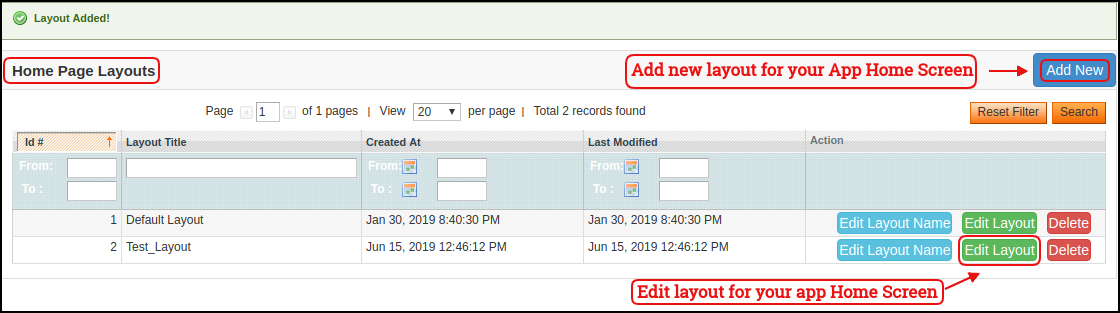
The Magento Mobile App Builder offers customizable Home Screen in your apps whose layout can be configured by you. You can create & save multiple layouts based on various themes, festivals or events & select them for your app as per the requirement.
The module offers the flexibility to add as many layouts as needed along with the options to edit previous layouts.
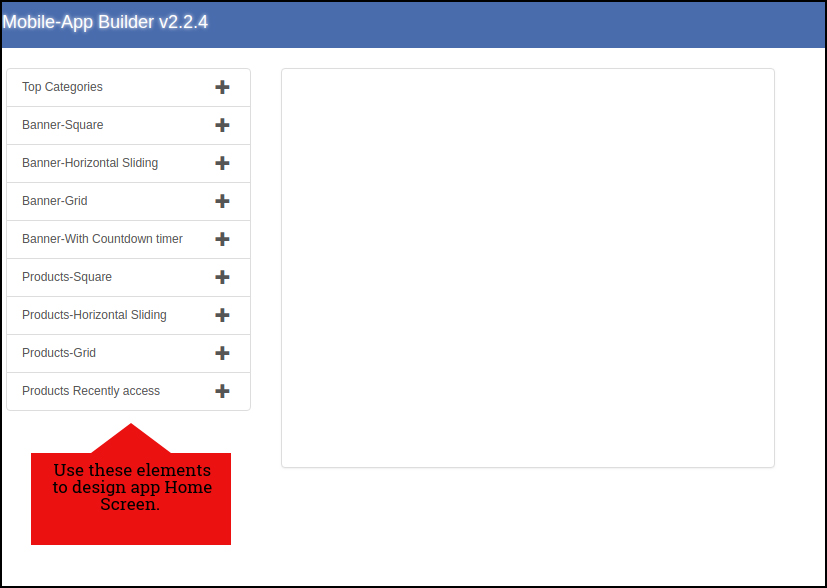
In the Home Page Layout of Magento Mobile App Creator, the store admin gets to edit & customize the following designing elements:
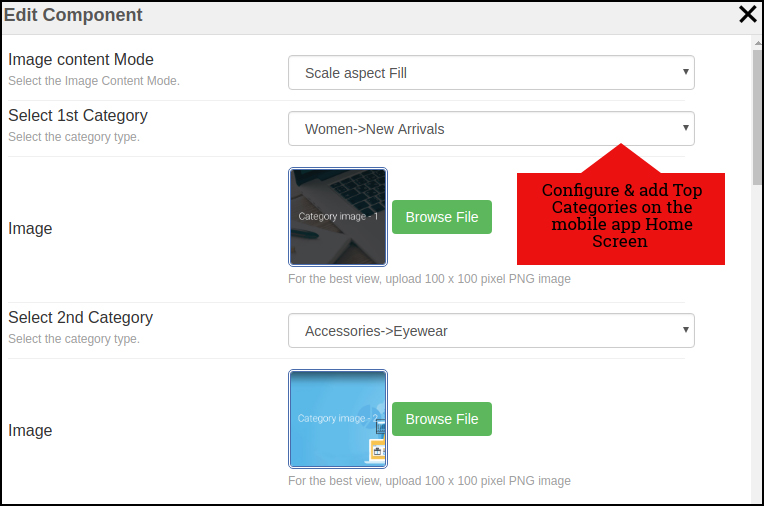
Top Categories:
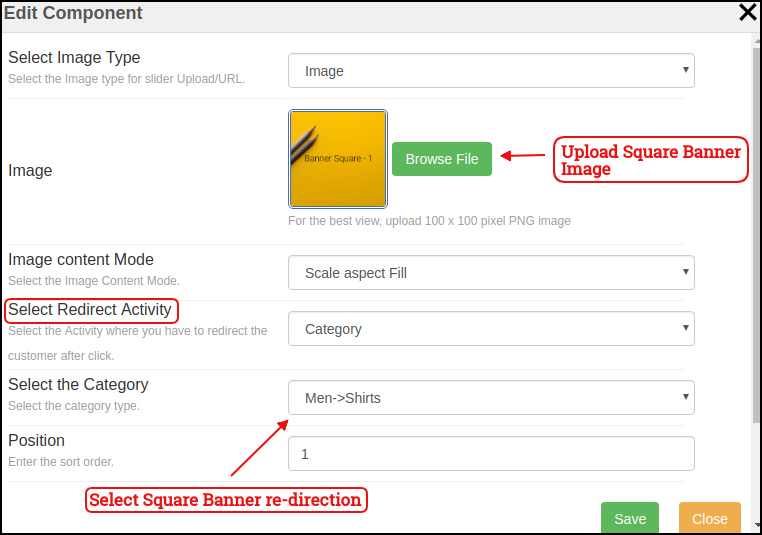
Top categories are displayed in the form of small squares on the Home Screen which can be configured from the backend using images & landing pages.
Square Banner:
Square Banner is a configurable square shaped listing on the Home Screen whose image & landing pages can be configured from module backend.
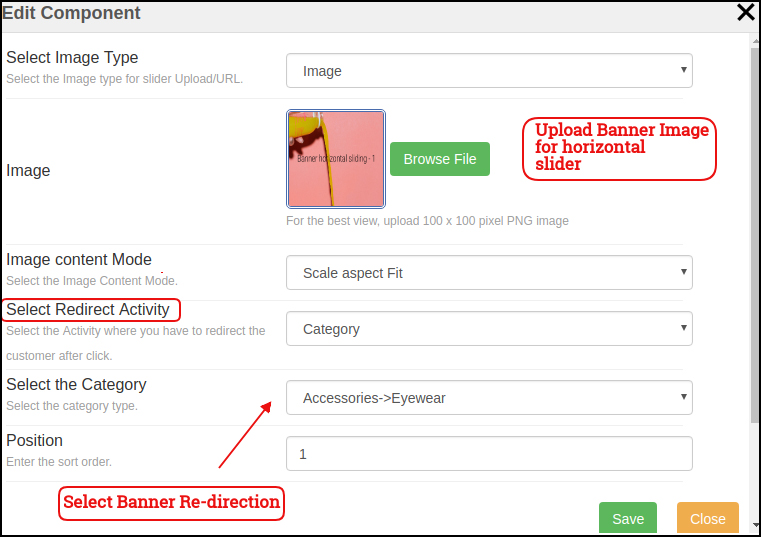
Sliding Banner:
The Banners can also be displayed in horizontal sliding & their image/landing page can be configured from the backend interface.
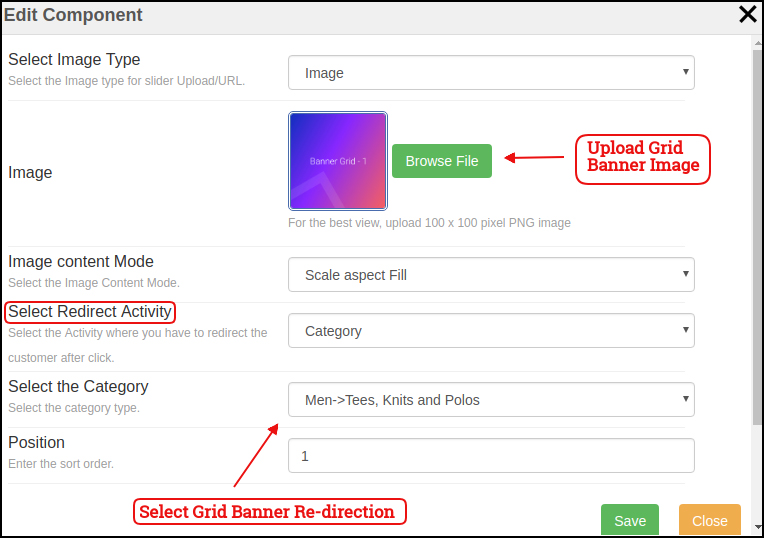
Grid Banner:
The Banners can also be displayed in the form of grid listing on mobile app Home Screen. These banner images & landing pages can be customized easily from the backend interface.
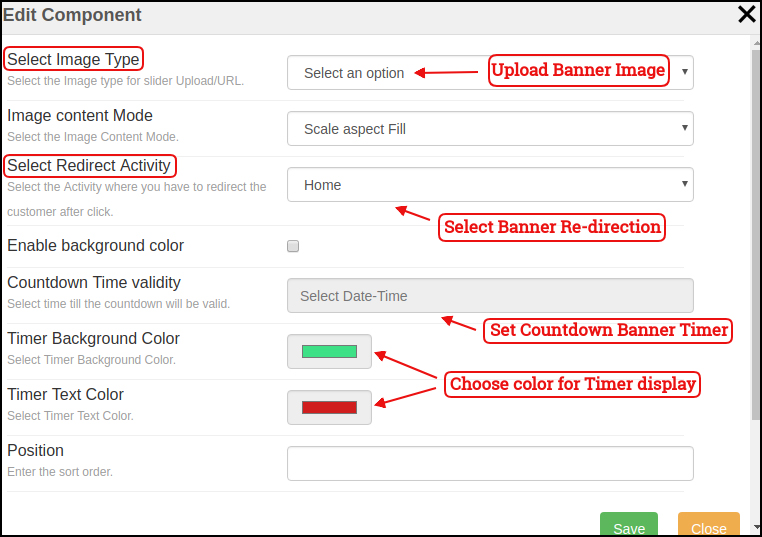
Countdown Banner:
The Magento eCommerce Mobile App Maker offers a count-down timer banner on your home screen in order to offer a time-based sale (Flash Sale). The banner timer, image, landing page can be configured from backend panel.
Square Products:
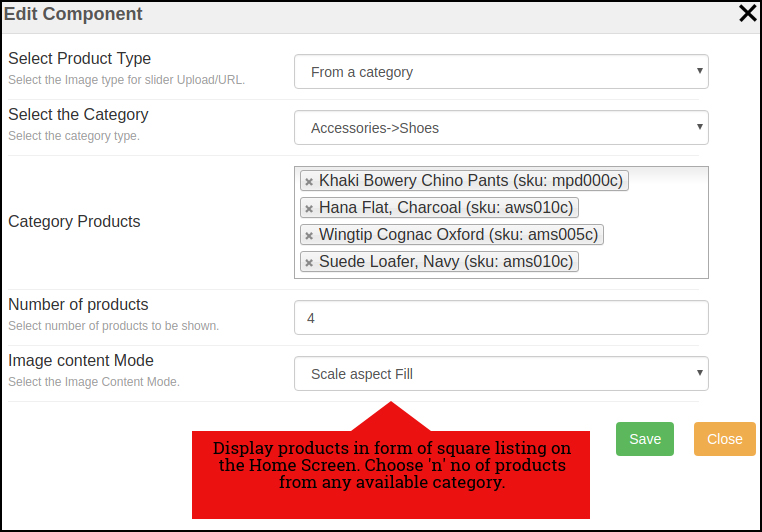
The products on your store can be listed on the Home Screen of the app in the square listing.
Sliding Products
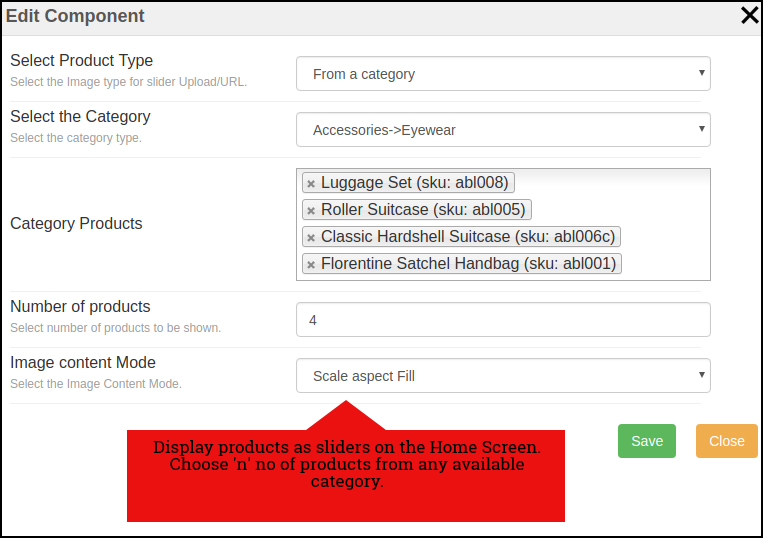
The products can be displayed in the sliding view on the mobile app Home Screen & can be configured from backend panel.
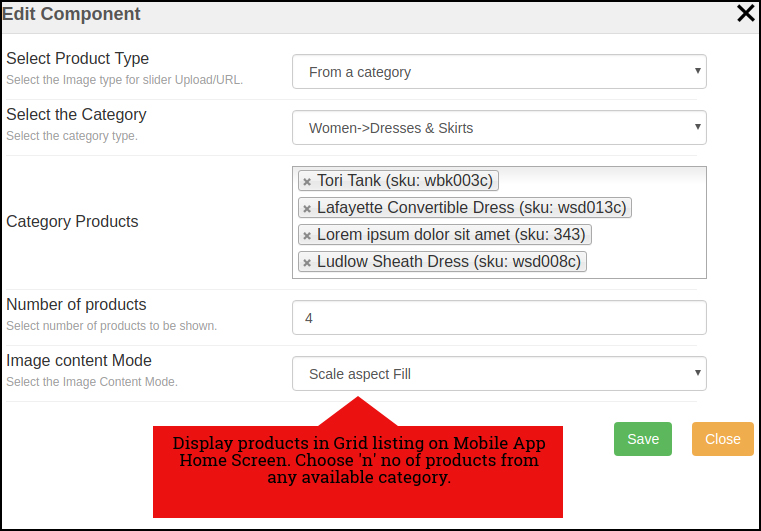
Grid Products:
The products can also be displayed in the grid view on Mobile App Home Screen. These listing can be configured as shown in the snapshot below:
Products Recently Accessed:
The Magento Mobile App Creator brings one more element of Recently Viewed Products. This attribute displays those products in the sliding view which were being visited recently by the user.
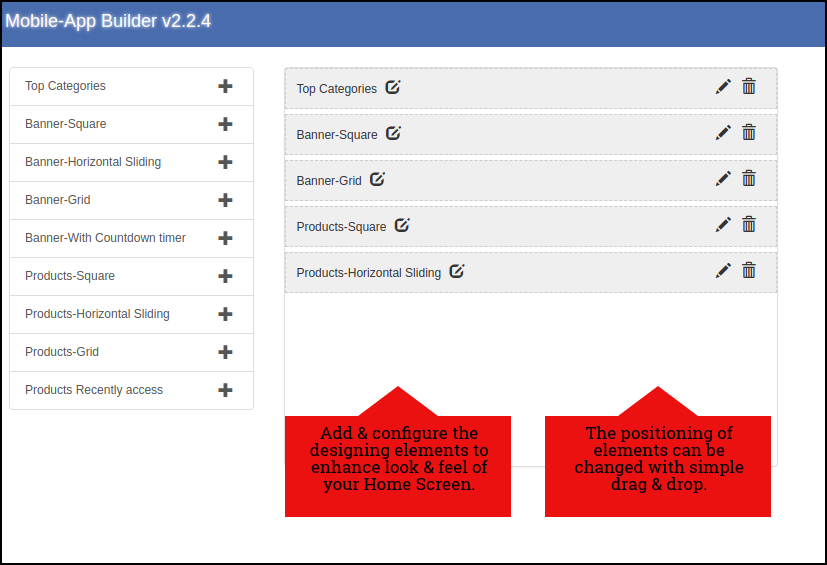
Note: The store admin can add up to 20 elements while designing layout in the backend panel.
5.0 Mobile App Screens:
5.1 Home Screen:
The Magento Mobile App Builder offers a dynamic home screen in the mobile apps which can be easily designed from the backend panel. The store admin gets the complete flexibility to design & craft the home screen as per his/her choice. The Magento Mobile App Builder offers the following designing elements:
The positioning of these attributes can also be changed as well just with simple drag & drop.
a) Dynamic Layouts: Craft alluring home screen layouts on your own which connect with the users & compel them to make the purchase.
b) Website Logo: Add your store logo in the module backend & display the same on the header of the app.
c) Search: The search option in Magento Mobile App allows the users to search for products without any hassle. Both keyword & voice search makes it easier for the buyers to get the right product in the least time.
d) Wishlist: Wishlist option in the Magento Mobile App lets you bookmark the products regarding future purchase.
e) Shopping Cart: The users can access the shopping cart from the top-right corner of the home screen.
f) WhatsApp/Zopim Chat: Your Magento Mobile App users can directly contact you regarding any query or concern through WhatsApp & Zopim chat option on the home screen.
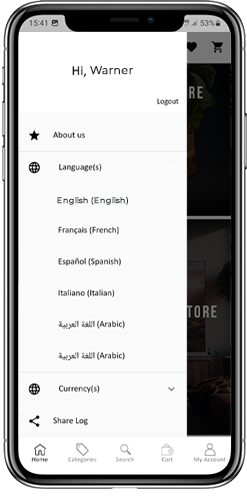
5.2 Accordion Menu (Navigation Bar)
The Magento Mobile Apps for Android & iOS come up with easy to use categorization of your store products. The online shoppers get to browse all the categories in the navigation bar along with all CMS pages. The Accordion menu categories are the same as of your store & it provides the following options:
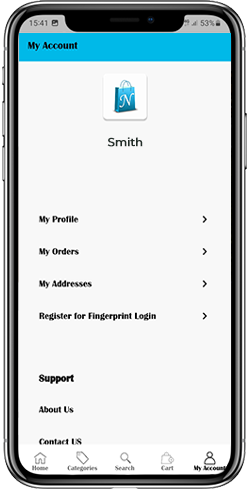
My Account:
The My Account screen of Magento Mobile App contains all the user information like Personal Details, Shipping Address(s) & Order Details. There is even an option for the users to register their fingerprint. The online shoppers get to view complete personal details from here & update the password as well.
Categories:
All your store categories are fetched on the mobile apps as well. Offer a multi-level categorization to your app users & let them browse products with ease.
CMS Pages:
All of your website CMS pages like About Us, Contact Us, Terms & Conditions, etc will be displayed here.
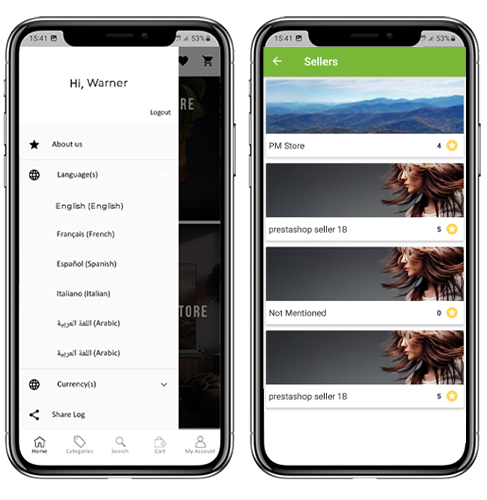
Language(s):
The Magento Mobile Apps are both multi-lingual & RTL supported. The users can choose the desired language & all the app contents will be translated accordingly. Every language available on the store is displayed here.
Currency(s):
Just like languages all sorts of currencies available on your website will be displayed in Magento Mobile Apps. This allows the users to make the payments with the desired currency option.
5.3 Category Screen:
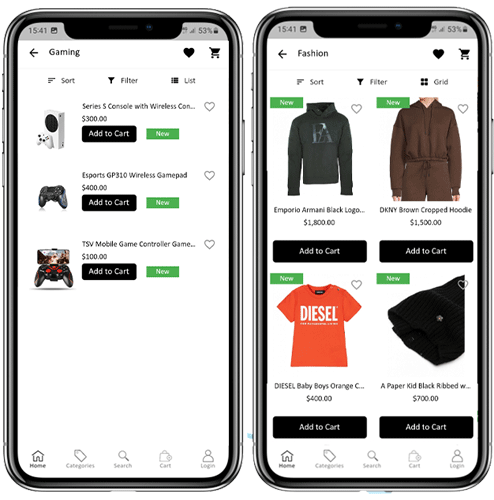
All sorts of categorization available on your Magento stores will be displayed in the mobile apps as well. The category screen has two views: Grid & List view. The product image, name, price is displayed for all product listings. The mobile apps with Magento Mobile App Maker have multiple filter & sorting options which simplify product search for the users.
Grid & List View:
The products can be displayed in both grid & list view.
Sort:
Sort option in Magento Mobile Apps allows the users to view products in Low to High or High to Low category.
Filter:
Filter down the category products with various attributes like price, cost, etc. & search desired products without any efforts.
5.4 Product Screen:
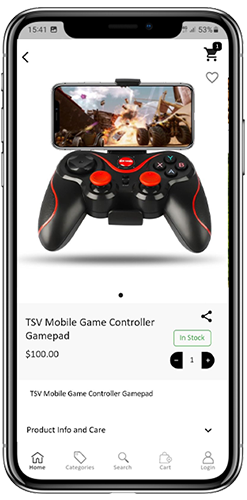
The product screen of Magento Mobile App is as simple & easy-to-use as it could get. Every product has multiple images displayed along with name & price. The product availability is also displayed as “In Stock” or “Out Of Stock”. The product screen has the following other options:
Product Options:
Various options related to the product like size, color, etc. are displayed on the product screen. These options are the same as available on your website.
Short Description:
Users get to read the short description of your product to quickly make up their mind. The Magento Mobile App displays both short & full description of the products.
Product Info & Care:
All the information related to the specific product is displayed under this section. This is the same information as of website.
Add To Wishlist:
The users can even add the products into the wishlist bag from here. The products added in wishlist are bookmarked for the future purchase.
Add To Cart:
The Add To Cart button allows you to add product in the cart which can be processed further in successful order creation.
Product Social Sharing:
The Magento Mobile App has the option to share the products on different social platforms, Bluetooth & e-mail. The users can share the products with their friends & relatives & bring potential users to your store.
5.5 Wishlist Screen:
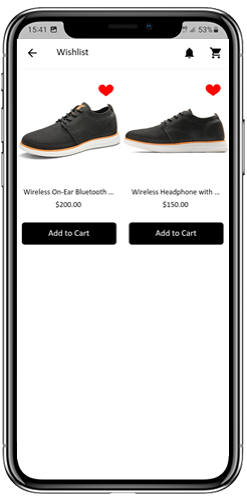
The Magento Mobile App Builder has a wishlist bag allowing the users to bookmark products for future purchase. The users can view the list of all wishlist products from this screen. It has the following options:
Add To Cart:
The app users can add the wishlist product directly into the shopping cart with Add To Cart option.
Remove From Wishlist:
The users can even remove any wishlist product with remove option if required.
5.6 Login Screen
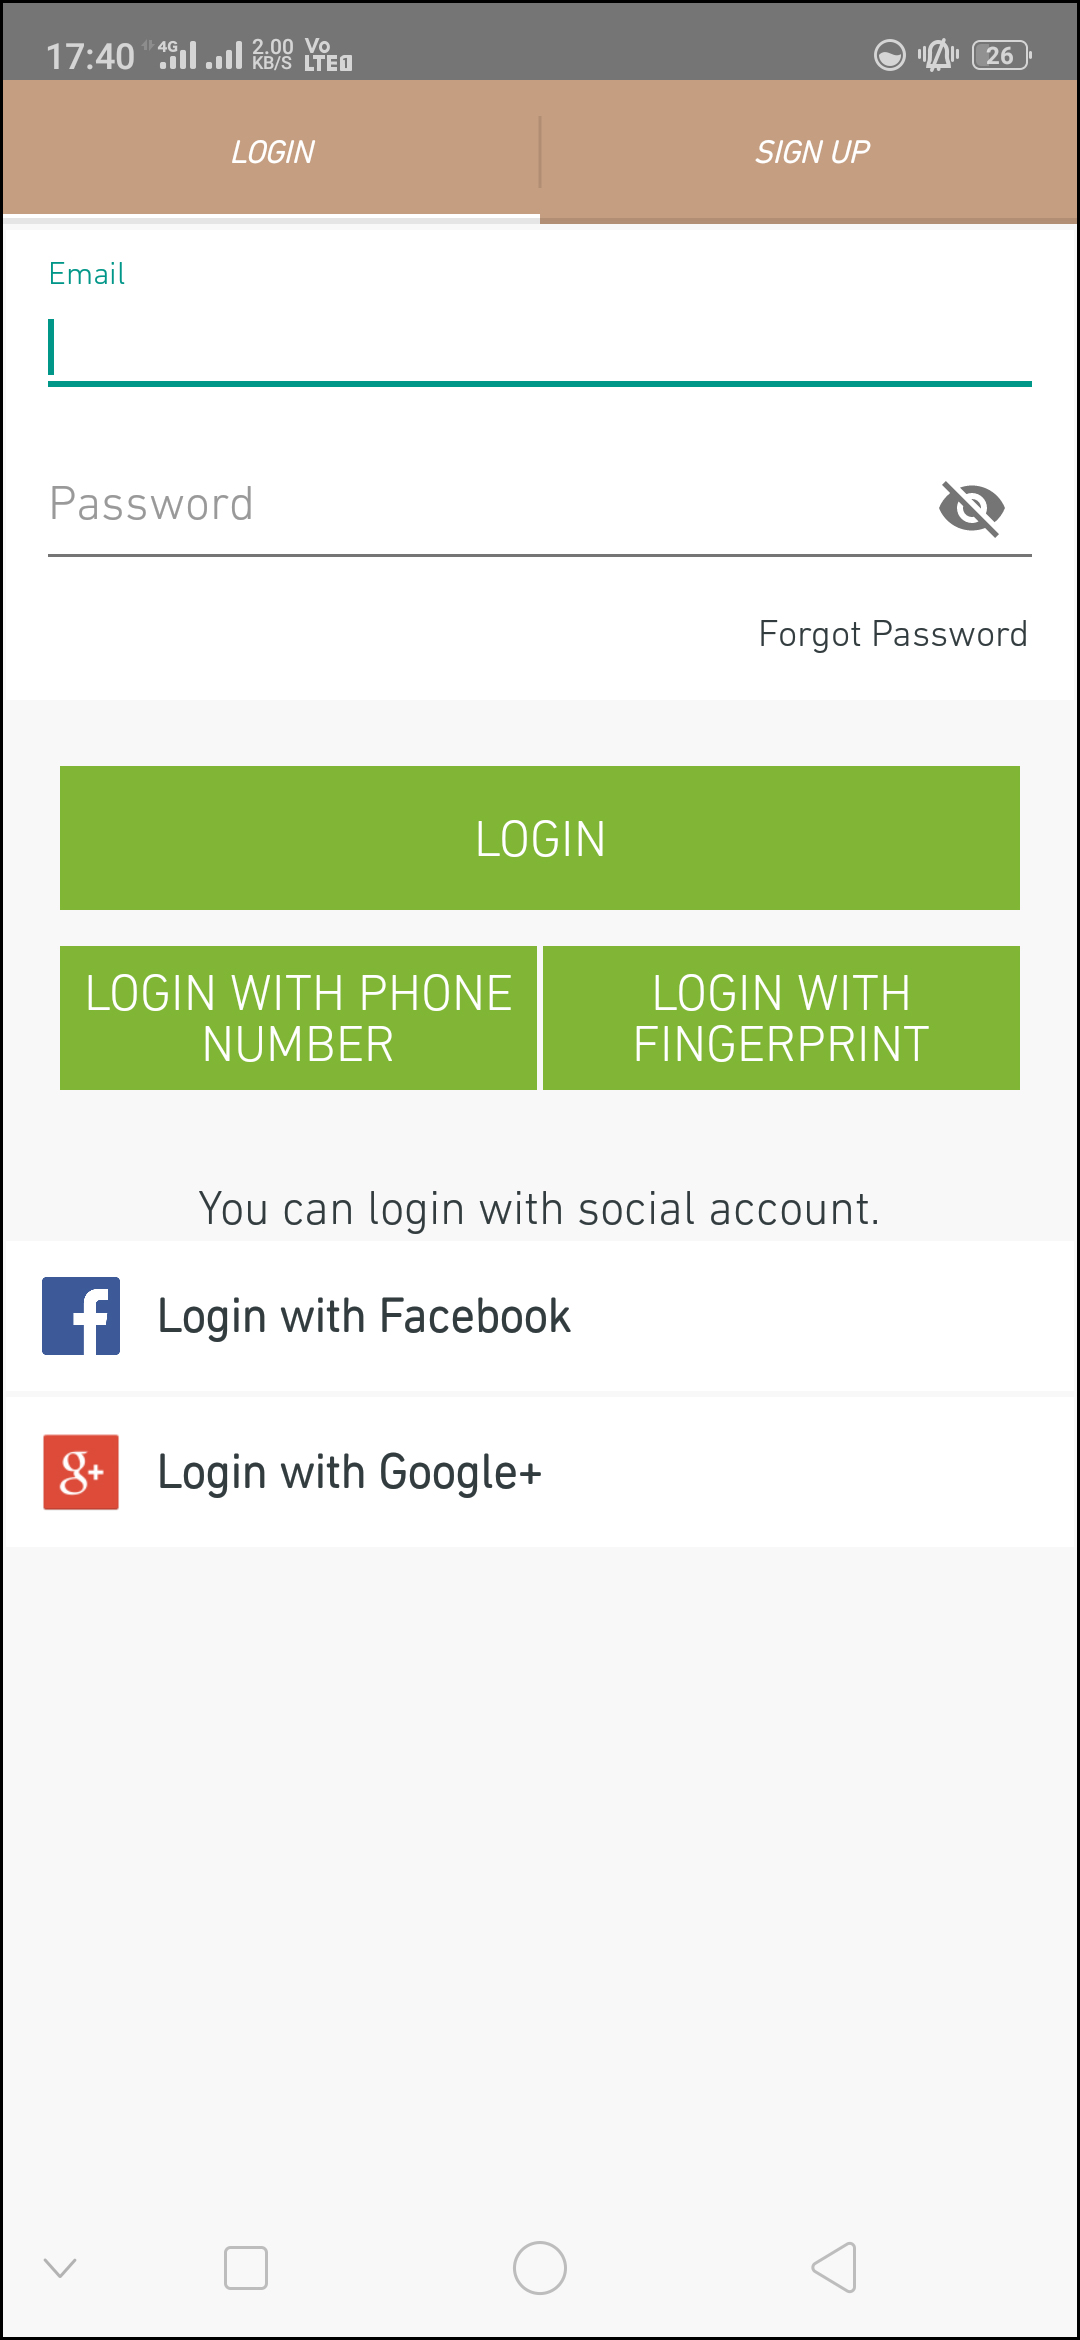
The Magento Mobile App Creator offers various one-tap login options & make sign-in/registration process more seamless:
Login:
The app users can authenticate & access to Magento Mobile Apps using e-mail sign-in credentials.
Sign Up:
All the new users can sign-up & create their account on the store from mobile App. The sign-up form of Magento Mobile App is fully uncluttered.
Login with Phone Number:
Your Magento Mobile App comes up with phone number login option as well which allows users to verify OTP & login without any hassle.
Login with Fingerprint:
Your app users also get an option to log in with a fingerprint. This biometric authentication allows the users to login apps in seconds.
Login with Facebook:
The users can log in into mobile apps using their Facebook Account Credentials.
Login with Google+:
The users can log in into app using their Google+ Account Credentials.
5.7 Shopping Cart Screen:
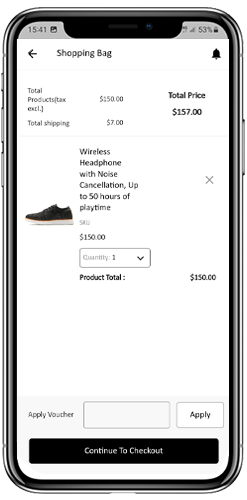
The Shopping Cart screen of your Magento Mobile App will display all products added into shopping cart. The app user’s can view Product name, quantity, total price & shipping cost. This screen has the following options:
1. Apply Voucher:
This option allows the users to get discounts & offers by entering valid coupon & voucher running on your website.
2. Total Product Price:
The users can view the complete cost of their shopping bag which is automatically updated as per any addition in the cart.
3. Update Product Quantity:
The users can even update the specific product quantity.
4. Remove Product:
The app users can simply remove the product from the cart.
5. Continue Shopping:
The app users can leave the cart to browse more products on your app. The shoppers will be re-directed to the home screen on tapping Continue Shopping option.
6. Continue To Checkout
The app users can proceed further to the checkout & payment screens just by tapping the “Continue To Checkout” option. It will re-direct users on the checkout screen.
5.8 Checkout Screen
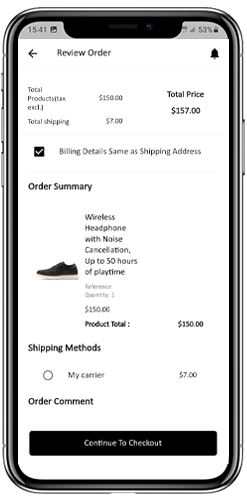
The mobile apps built with Magento Mobile App Maker has a simplified checkout approach on a single-screen. The users can review complete order details like shipping details, billing details, order summary, order comment, payment summary before making the actual order.
Shipping Address:
The checkout screen of Magento Mobile Apps screen provides details of all addresses saved by the user. If required, the user can also edit/save new shipping address. The total checkout cost is also displayed on this screen.
Billing Details:
The users can even enter billing details along with shipping details for their purchase. They can also choose the shipping address to be same as the billing address.
Order Summary:
The app users get to view purchased product details along with the quantity before making the final purchase.
Shipping Methods:
Every shipping methods running on your website are displayed on the checkout screen as well. The users can choose the desired one from here.
Order Comment:
The app users can also add any comment related to their order which will be visible to the store admin in the backend.
5.9 Payment Screen:
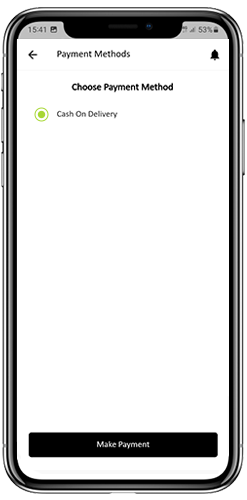
The payment screen on the Magento Mobile App displays both web-view & native app payment methods. The Magento Mobile Apps supports all sorts of website payment options along with PayPal & COD payment methods. Moreover, various other native payment options like PayU, Apple Pay, Amazon Pay, Braintree, Stripe etc. can also be added in your mobile app over a fair price.
5.10 My Account Screen
My Account screen of the Magento Android/iOS App allows the users to view the complete account details including list of all previous orders. My Account screen has the following other options:
Order History:
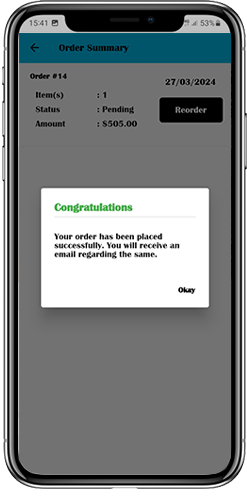
The users get to know about complete order details created on the app. The order creation date, reference, price & delivery status is available on this screen.
Update Profile:
Users can also update their pre-saved profile details like First or last name, phone number & password.
Shipping Address(s):
The app users can see the complete list of saved Shipping Addresses. New Shipping address can also be added from here.
Order Details:
The app users can view the complete list of the previously placed orders from the app.
Re-order feature:
There is a direct re-order functionality allowing the users to repeat the order just by clicking “Re-order” button.
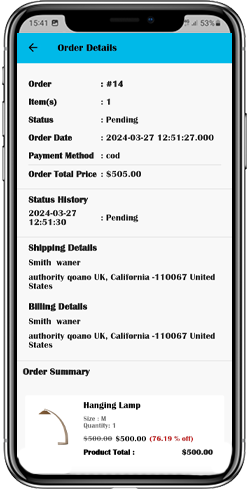
5.11 Order Detail Screen
Order details screen of Magento Android & iOS App provides complete order detail such as shipping address, product summary, shipping and payment method and total cost summary. This order detail is of the previous order placed by you. The users can even track the delivery of previously placed orders directly from this screen.
6.0 Advanced Magento Marketplace with Mobile App
KnowBand’s Magento Marketplace converts your online website into a fully fledged marketplace. The Magento Mobile App Builder is fully compatible with Magento Marketplace extension. This means you can bring the entire marketplace listing on the same Magento Mobile Apps. Thus, launch a pair of Marketplace compatible Mobile Apps with KnowBand & attract a large base of sellers & customers to your store.
–> As the user clicks on the Seller option, he/she is redirected to the Seller page of the mobile store. The user can view the list of the sellers of the marketplace along with their rating.
–> The customers can click on the name of the seller in order to see his profile and product being offered. The sellers can log in with their username and password. They are then redirected to the dashboard.
Get to know more about the Magento Mobile App Builder plugin with:
In the Present time, customers are demanding more details and specific information about the product that they want to purchase. Showing more and more details is also used as the selling point of view. This is one of the most important factors to provide the look and feel of the product to the customers. Knowband offers Prestashop Product Video module for the Prestashop store admin that allows him/her to add the product videos on their store’s product pages. This PrestaShop extension allows the sellers to present their products confidently that make the customers sure about their products.
This PrestaShop addon will provide an interface and functionality to the Prestashop eCommerce website admin to show their product pages with high-quality product videos from YouTube, Vimeo, and Daily Motion. The Prestashop Product Video addon is basically an plugin for PrestaShop eCommerce sites. As we know that, Product details are the very crucial part of any product page on the eCommerce stores. Products details significantly affect the sales of any items on an eCommerce store. That is why we have implemented this Product Video addon for PrestaShop sites where the site admins can add product videos on their product pages. This Prestashop extension will provide an interface and functionality to the site admins to embed their product pages with high-quality product videos from YouTube, Vimeo, and Daily Motion.
Here are some basic features of the Prestashop product video module:
It is very simple to install and configure this PrestaShop addon.
The eCommerce store admin can easily enable/disable this Prestashop product video addon.
The Prestashop youtube addon offers a simple and user-friendly interface.
No coding is required for uploading product videos.
The Prestashop product video upload module offers a hassle-free implementation.
This adding video extension is highly customizable.
The Prestashop Dailymotion addon offers multiple layouts and positions for showing product videos.
The e-merchant can add custom CSS and JS codes to customize the look and feel.
The Prestashop product video upload addon allows adding multiple videos on the product page.
The e-merchant can add videos from multiple platforms like YouTube, DailyMotion, and Vimeo.
This Prestashop Vimeo addon module is multi-store compatible.
The Prestashop video upload addon is compatible with SSL enabled stores.
The eCommerce store owner can show display controls also.
The Prestashop adding video plugin allows showing related videos also.
The admin can enable/disable auto-play video option anytime.
The store admin can insert the video link for showing the product video.
This Prestashop product video addon is mobile responsive also.
Here are some of the benefits which need to be highlighted:
Easy to implement: The best part of Prestashop product video addon is that it has simple and easy-to-use admin interface.
Confidence building: Product video creates more confidence about store’s products in the buyers.
Detailed Information: Customer gets specified information about that particular product.
Product reviews videos: eCommerce store admin can also include product review videos to provide product description details.
Customer engagement: With the help of product videos store admin can enhance customer engagement on the store.
Multiple Layouts: This Prestashop Product Video addon has a variety of layouts to select for the video.
Position Selection: Admin can select the position where he/she wants to show video. The position can be product footer or in product right column.
Auto-play option: Admin can Select whether to auto-play video on page load or not.
Real life view: Customer gets a real-life view and it clear all the confusion of customer about the product.
Steps for Installation
To install this Prestashop product video addon, please follow the following steps:
Add the Prestashop adding video folder under modules folder of your system.
After adding this addon folder, system will list the addon on module page under “front office feature”category as given below:
After installation of the Prestashop youtube addon, you need to configure it for the first use on your site.
Find out the Prestashop vimeo addon in the list of modules installed on your site.
Select “Configure” option given on the right side of the extension list.
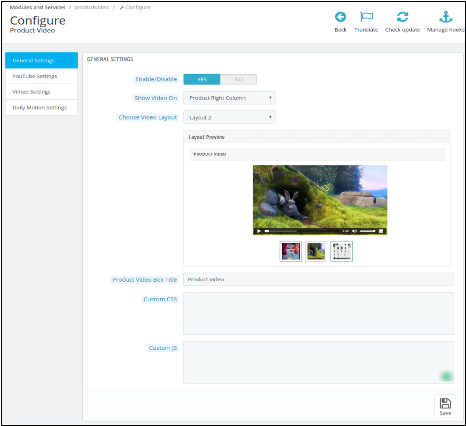
After clicking the Configure option you will see a window like the one mentioned below:
Enable/Disable: Click “Enable” to use the Prestashop Dailymotion addon on your site.
Show Video on: You can Select the position of the video.
Product Footer: Select this option if you want to show your product video in the footer of your product(s) page.
Product Right Column: Select this option if you want to show your product video in the Right Column of the product(s) page.
Choose Video Layout: Select the type of the layout or interface you want to show for your product video. Once you select any of the layout options, you will be able to see the preview of the layout.
Product Video Box Title: Give a title for your product video box.
Custom CSS and Custom JS: Modify the Look and feel of the product video on the product page by giving your custom CSS and custom JavaScript.
You can do further configurations of the three video sharing platforms that are implemented on this module.
YouTube Settings:
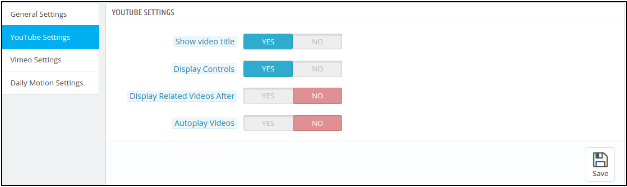
Click on the YouTube Setting. You will be able to see a window like the image below:
Show Video Title: You can show the video title on the product page by clicking yes.
Display Controls: Choose yes, if you want to show the playback controls on the product video.
Display Related videos: Admin can control whether to show related videos on product page after one video or not.
Auto-play Videos: Select yes to auto-play the video once the product page is visited by a customer.
Vimeo Settings:
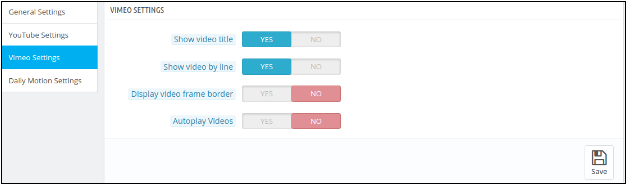
Click on Vimeo Setting. You will be able to see a window like the image below:
Show Video Title: You can show the video title on the product page by clicking yes.
Show Video By Line: Choose yes, if you want to show all your videos from the particular product line by line.
Display Video Frame Border: Select yes in order to show the border of the video frame.
Auto-play Videos: Select yes to auto-play the video once the product page is visited by a customer.
Configure Daily Motion:
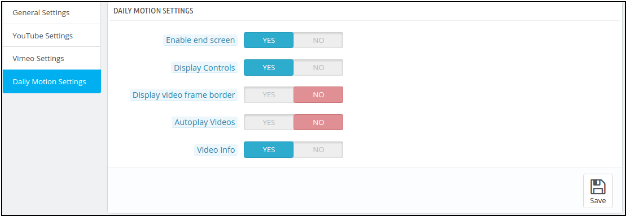
Click on Daily Motion Setting. You will be able to see a window like the image below:
Enable end screen: Select yes to enable the end screen option.
Display Controls: Choose yes to show the playback controls on the video.
Display Video Frame Border: Choose yes, if you want to show the border of the video frame.
Auto-play Videos: Select yes to auto-play the video once the product page is visited by a customer.
Video Info: Choose yes to show the video information on the product video.
What will be the changes on Product Menu?
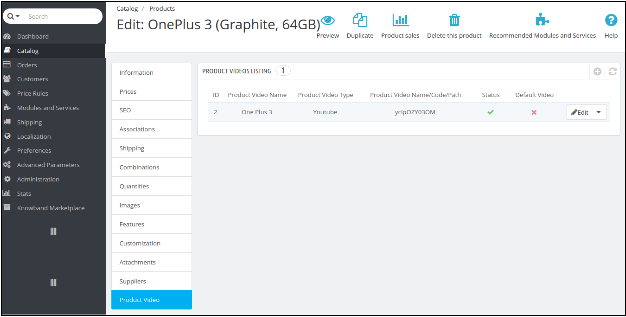
After the addon installation, a sub menu for the Product Video will be displayed in each product upload or product edit page as shown in the image below:
When the admin will go to the “catalog”, select “the products” option on Prestashop admin side and click “Edit” on any product listed there, then the system will open this window. Here the admin can:
1. Edit the already Added product Video(s).
OR
2. Add a video to a new product.
1. When Admin wants to Edit the already Added product Video(s):
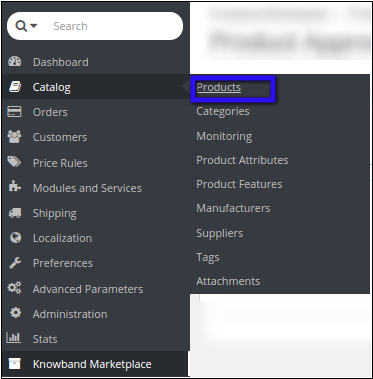
Go to the “Catalog”, then select “Products” using the PrestaShop menu tab.
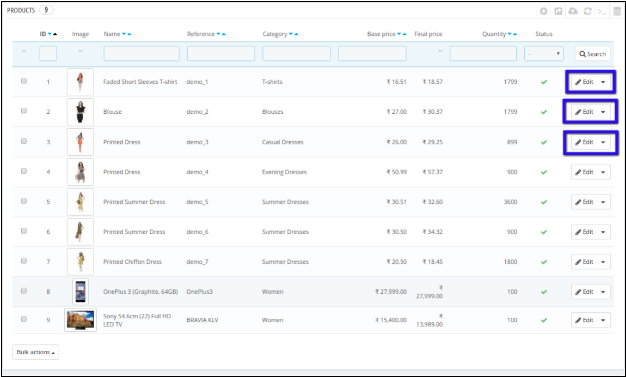
When you click the Products, a new window will open with the list of products.
Select the product in which you want to update or add a new video.
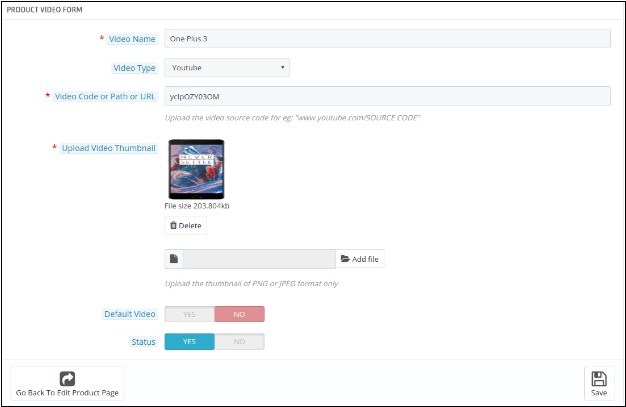
Select the Edit option and click on Product Video option given at the bottom of the menu. A list of products will appear. Here, you have to click on the “edit” option to get to the product video upload page.
Video Name: Give a name to your product video.
Video Type: Select the type of video you want to attach. (YouTube, Vimeo, or Daily Motion)
Video Code or Path or URL: Give the URL of the video. You can give the YouTube, Vimeo, or Daily Motion link of the video.
Upload Video Thumbnail: Upload a thumbnail that will be shown on the video link on the product page.
Default: You can select the particular by default video which you want to show in case of more than one product videos.
Status: Here, you can enable or disable the video respectively.
NOTE: THIS MODULE IS ALSO COMPATIBLE WITH KNOWEBAND MARKETPLACE MODULE (v1.0.4) TO EDIT OR ADD NEW VIDEOS OF SELLER ADMIN CAN FOLLOW THE FOLLOEING STEPS.
1. Edit the already Added product Video(s).
OR
2. Add a video to a new product.
1. When Admin wants to add a new Video to a new product:
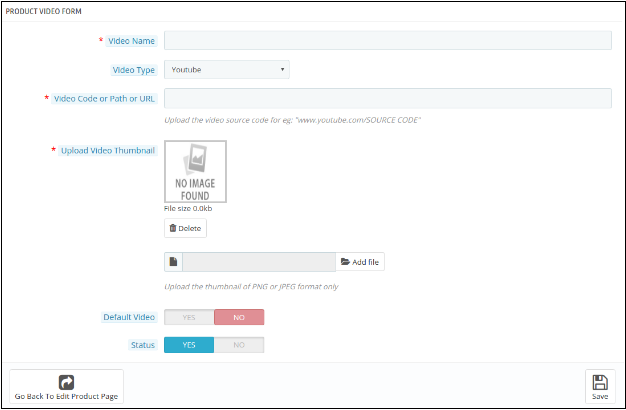
Follow all the steps as in the above section except in Step IV, you have to click on the Add new icon as given below in this screenshot below.
The similar window appears as in Step IV. Fill all the details as specified in the previous section. Refer to the screenshot below for better understanding.
Fill all the details and click Save to save your settings.
2. When Admin wants to Edit the already Added product Video(s):
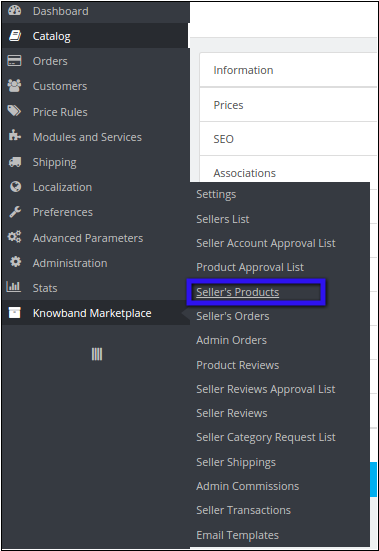
I. Navigate to Sellers products using the Knowband menu tab
II. After clicking Sellers Products, a new window appears with the list of sellers products.
III. Select the product in which you want to update or add a new video. Click on View menu on the right side of the product listing.
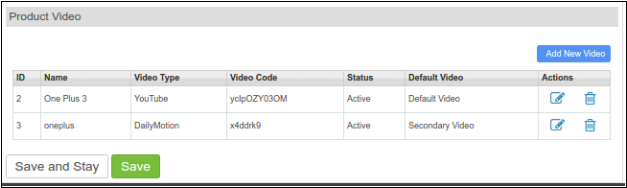
IV. A new window appears where you have to click on Product Video option given at the bottom of the menu. A list of products appears. Here you have to click on “edit” option to get to the product video upload page.
Menu Location
After installation, a menu will be displayed to the seller in the product upload or product edit page as shown in below screen:
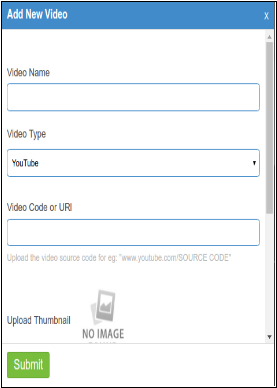
To add a new video the seller has to click on “Add New Video” option. A new Pop-up window appears as given below.
Video Name: The seller needs to give a name to the Product Video.
Video Type: Select the type of video is YouTube, Vimeo, or Daily Motion.
Video Code or URL: Give the link of the product video.
Upload Thumbnail: Upload Thumbnail image to show on the product page.
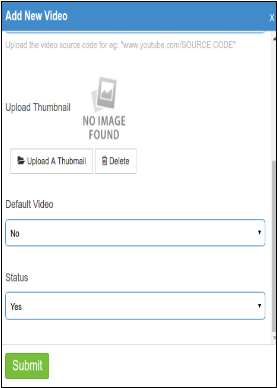
Default Video: If you are giving multiple Videos on a product, then you need to specify if your current video is to be shown as default video on the product page.
Status: Select the status as YES or NO to enable or disable the video.
Submit: Click submit to save your settings.
Front End Module
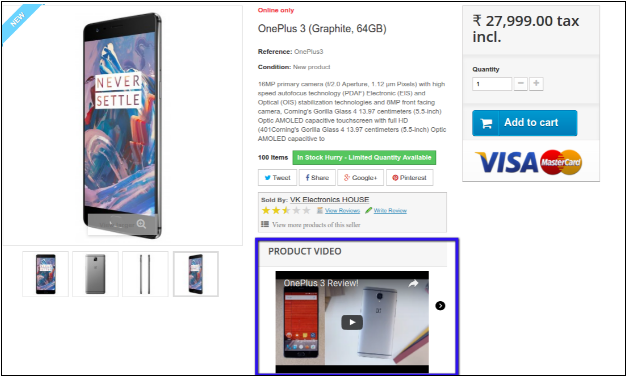
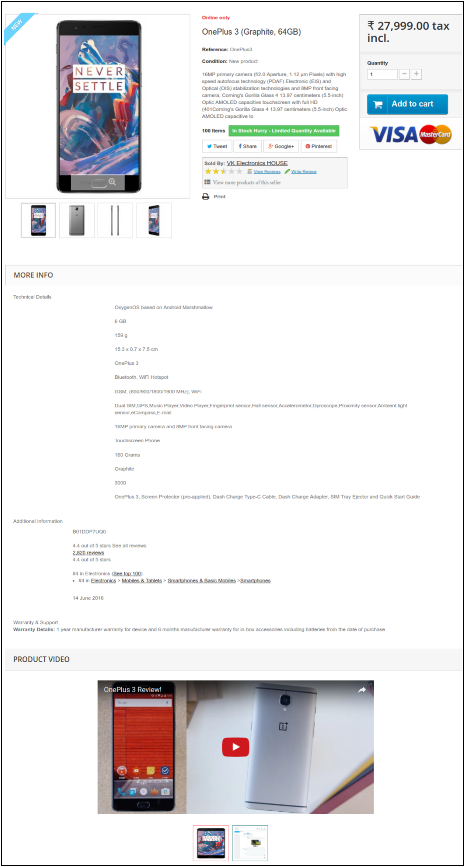
The Product video is shown to customer on a product page in two ways:
1. At the Footer, as shown in the screenshot below.
2. At the Right column of the product page as shown in the screenshot below: