Setting up an online grocery marketplace is a fantastic way to tap into the growing demand for online shopping. With the help of Knowband’s Multi-Vendor Marketplace Module for Prestashop, you can easily transform your existing Prestashop store into a fully functional multi-seller platform. Or, if you are planning to launch a multi-seller grocery marketplace from scratch, this guide will walk you through the process, highlighting why Knowband’s solution is the ideal choice for your marketplace.
Why Choose Knowband’s Multi-Vendor Marketplace for Prestashop?
When it comes to creating a multi-vendor marketplace, choosing the right tool is crucial. Knowband’s Prestashop Multi-Vendor Marketplace Addon offers a comprehensive solution that makes the entire process smooth and efficient. Furthermore, this module is packed with features that make managing a multi-seller marketplace straightforward, even if you’re just starting out.
One of the biggest advantages of using Knowband’s Prestashop Marketplace Module is its user-friendly design. It allows you to manage multiple vendors with ease, giving each vendor access to their own dashboard where they can manage their products, orders, and inventory. Moreover, this setup not only simplifies the process for you but also for the vendors, making your marketplace an attractive option for them to join.
Moreover, the module is highly customizable. You can set different commission rates for different vendors or product categories, allowing you to tailor the marketplace to fit your specific business model. This flexibility is a key feature of the Prestashop Multi-vendor Marketplace Extension, ensuring that it can grow with your business.
Getting Started with Knowband’s Multi-Vendor Marketplace!
The first step in setting up your grocery marketplace is to install the Prestashop Multi-seller Marketplace Module. If you’re unsure about purchasing the module right away, Knowband provides a Prestashop Free Marketplace Module that allows you to test out the basic functionalities. Once you’re comfortable, you can upgrade to the full version to unlock all the advanced features.
Installing the Module:
To install the module, you need to download it from the Knowband website. After downloading, log in to your Prestashop admin panel and navigate to the “Modules and Services” section. Here, you can upload the module and click the install button. Once the installation is complete, the module will be ready to configure.
Configuring the Marketplace:
After installation, the next step is to configure the module to suit your marketplace’s needs. The Prestashop Multi-vendor Marketplace Plugin is highly customizable, allowing you to set up the marketplace exactly how you want it. In the general settings, you can name your marketplace, upload a logo, and adjust other basic settings. You can also enable vendor registration, allowing sellers to sign up and start listing their products. The registration process is simple and can be customized to gather all the necessary information from vendors.
Therefore, one of the key aspects of managing a multi-vendor marketplace is setting up a fair and effective commission structure. The Prestashop Marketplace Plugin allows you to set different commission rates for different vendors or product categories. This means you can charge a higher commission for premium product categories or offer discounts to attract more vendors to your platform.
Another essential feature of the Prestashop Multi-vendor Marketplace Addon is the ability to manage payments and shipping methods. You can configure various payment gateways and shipping options, which vendors can then use to manage their transactions. This level of control is vital for ensuring that the marketplace operates smoothly.
Turn your PrestaShop store into a fully functional marketplace! Easily manage sellers, products, and commissions with this powerful PrestaShop Marketplace module.
Once the marketplace is set up, you can start inviting vendors to join. The Multi-Vendor Marketplace for Prestashop makes it easy for vendors to register and start selling. Furthermore, each vendor will have access to a personal dashboard where they can add and manage their products, track orders, and handle inventory. This autonomy makes the platform attractive to sellers, as they have control over their own stores within your marketplace.
As the marketplace admin, you have the option to approve or disapprove vendors before they start selling. This feature ensures that only high-quality sellers join your platform, maintaining the overall quality of your marketplace.
Product management is another crucial aspect of running a successful grocery marketplace. With Knowband’s Multi-Vendor Marketplace for Prestashop, you can create product categories that are specific to your marketplace. For a grocery marketplace, this might include categories like fruits, vegetables, dairy, and snacks. Vendors can then add their products to these categories, making it easy for shoppers to find what they need.
Launching and Promoting Your Marketplace:
After setting up your marketplace, it’s time to launch and start attracting customers. Promoting your marketplace is crucial to its success, and there are several strategies you can use to get the word out.
Search Engine Optimization (SEO) is a great place to start. By optimizing your marketplace with SEO-friendly URLs, meta tags, and product descriptions, you can improve your site’s visibility on search engines like Google. This will help attract more organic traffic to your marketplace.
Social media is another powerful tool for promotion. Creating social media accounts for your marketplace on platforms like Facebook, Instagram, and Twitter can help you reach a broader audience. Regularly posting about new products, special offers, and other updates will keep your audience engaged and encourage them to shop on your marketplace.
Conclusion!
Setting up a grocery marketplace with Knowband’s Prestashop Multi-Vendor Marketplace Plugin is a straightforward process that offers a wide range of benefits. Whether you’re just starting out or looking to expand an existing business, this module provides all the tools you need to create a successful and thriving online marketplace. By following the steps outlined above, you can set up your marketplace, manage vendors and products efficiently, and start attracting customers in no time.
Managing a multi-vendor marketplace can be a rewarding yet challenging endeavor. The concept of having multiple sellers on a single platform offers immense potential for growth, as it attracts a broader customer base and provides diverse product offerings. However, this model also comes with its set of unique challenges. Thankfully, with the right tools, such as Knowband’s Prestashop Multi-vendor Marketplace Module, these challenges can be effectively managed. Thus, in this article, we will explore five common challenges faced by marketplace owners and how our Prestashop Marketplace Addon can solve them.
Vendor Management:
One of the most significant challenges in managing a multi-vendor marketplace is keeping track of multiple vendors, their products, and their activities. Therefore, ensuring that all vendors adhere to marketplace guidelines, manage their inventories effectively, and deliver quality products can be a daunting task.
On the other hand, Knowband’s Prestashop Multi-vendor Marketplace Plugin simplifies vendor management by offering a comprehensive vendor dashboard. This dashboard provides vendors with an intuitive interface to manage their products, track orders, and handle returns. Furthermore, the marketplace admin can monitor vendor activities, approve or reject products, and set commission rates, all from a centralized platform. This not only streamlines vendor management but also ensures that the marketplace maintains a high standard of quality.
2. Commission Management:
Another common challenge is managing commissions. Different vendors might have different commission structures based on the products they sell, their sales volume, or their agreement with the marketplace. Thus, without a robust system, keeping track of these commissions and ensuring accurate payouts can become complex.
Therefore, our Prestashop Multi-vendor Marketplace Extension offers a flexible commission management system that allows marketplace admins to set different commission rates for different vendors or product categories. Moreover, the system automatically calculates the commission for each sale and provides detailed reports, making it easier to manage payments. This feature ensures transparency and accuracy in financial transactions, fostering trust between the marketplace and its vendors.
3. Product Approval and Quality Control:
Maintaining the quality of products listed on the marketplace is crucial for its success. However, when dealing with multiple vendors, it can be challenging to ensure that all products meet the required standards before they are listed.
The Prestashop Multi-seller Marketplace Module by Knowband addresses this issue by incorporating a product approval system. Before a product goes live on the marketplace, it must be approved by the admin. This allows the admin to review product descriptions, images, and pricing to ensure they meet the marketplace’s standards. Moreover, this feature helps in maintaining the overall quality and reputation of the marketplace.
4. Order Management and Fulfillment:
Order management becomes increasingly complex in a multi-vendor marketplace. Each vendor is responsible for fulfilling their orders, but customers may place orders from multiple vendors in a single transaction. Coordinating these orders, ensuring timely delivery, and managing returns can be a significant challenge.
Our Prestashop Marketplace Module offers a robust order management system that simplifies this process. It allows vendors to manage their orders independently while providing the marketplace admin with a global view of all orders. Moreover, the system also supports partial order fulfillment, where different parts of an order can be fulfilled by different vendors. This feature ensures a smooth and seamless shopping experience for customers, which is crucial for the success of any marketplace.
5. Customer Support and Dispute Resolution:
In a multi-vendor marketplace, customer support can become complicated. Issues such as product quality, shipping delays, or miscommunication between the vendor and the customer can lead to disputes. Managing these disputes effectively is essential to maintain customer trust and satisfaction.
The Prestashop Multi-vendor Marketplace Addon includes a built-in dispute management system. Customers can raise concerns directly through the platform, and the admin can mediate between the vendor and the customer to resolve issues. Additionally, the module supports vendor ratings and reviews, providing customers with valuable insights into the reliability of each vendor. This not only helps in resolving disputes but also enhances the overall customer experience.
Prestashop Multi-vendor Marketplace Module
Transform your PrestaShop store into a dynamic marketplace with ease! Enable multiple vendors, manage commissions, and grow your business with this comprehensive marketplace solution.
Managing a multi-vendor marketplace comes with its share of challenges, but with the right tools, these challenges can be easily overcome. Our Prestashop Marketplace Addon is designed to address the most common issues faced by marketplace owners, from vendor management and commission handling to product approval and customer support. By leveraging this powerful Prestashop Marketplace Extension, you can focus on growing your marketplace, knowing that the complexities of management are well taken care of.
Whether you’re running a large-scale marketplace or just starting, our Prestashop Multi-vendor Marketplace Plugin offers the flexibility, functionality, and ease of use you need to succeed. And if you’re looking to get started without an upfront investment, we also offer a FREE Prestashop Marketplace addon that allows you to explore the capabilities of our module before committing to a purchase. With our Prestashop Free Marketplace Module, you can experience firsthand how it simplifies marketplace management and drives growth.
A multi-vendor marketplace allows multiple sellers to list and sell their products on a single platform. This model not only diversifies the product range but also increases the potential customer base, as more vendors bring in their following. Therefore, Knowband’s Prestashop Multi-vendor Marketplace Module is designed to facilitate this transformation seamlessly.
On the other hand, creating a multi-vendor marketplace with Knowband can significantly boost your online store’s growth and revenue. With Prestashop’s versatile platform, you can easily transform your store into a thriving multi-vendor marketplace. This guide will walk you through the steps to achieve this using the Prestashop Marketplace Addon, ensuring your marketplace is set up for success.
Choosing the Right Prestashop Marketplace Module:
The first step to creating a successful multi-vendor marketplace is selecting the right module. The Prestashop Multi-vendor Marketplace Addon by Knowband is a popular choice due to its robust functionality and ease of use.
Furthermore, the marketplace addon for Prestashop offers a comprehensive set of features for managing vendors, products, orders, and commissions efficiently. Moreover, it ensures that the module you choose supports all the necessary functionalities to manage multiple vendors smoothly.
Installing and Configuring the Prestashop Marketplace Addon!
Download the Module: Purchase and download the Prestashop Marketplace Addon from Knowband.com.
Install the Module: Navigate to your Prestashop admin panel, go to Modules and Services, and click on “Upload a module”. Upload the downloaded file and install it.
Configure the Module:After installation, configure the settings to match your marketplace needs. This includes setting up vendor registration, commission rates, product approval processes, payment gateways, and others.
By configuring these settings carefully, you ensure that the marketplace operates smoothly and vendors can easily manage their stores within your platform.
Setting Up Vendor Registration and Management!
A crucial aspect of Knwoband’s multi-vendor marketplace is vendor management. The Prestashop Multi-seller Marketplace Module simplifies this process. Here’s how to set it up:
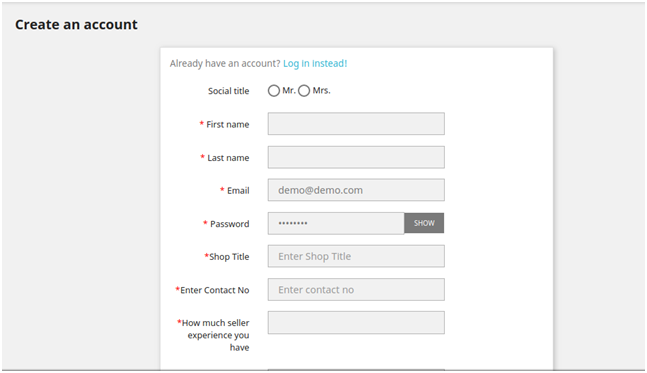
Vendor Registration: As a Prestashop admin, you can enable a straightforward registration process for vendors and ensure that your registration form collects all necessary information and is easy to navigate.
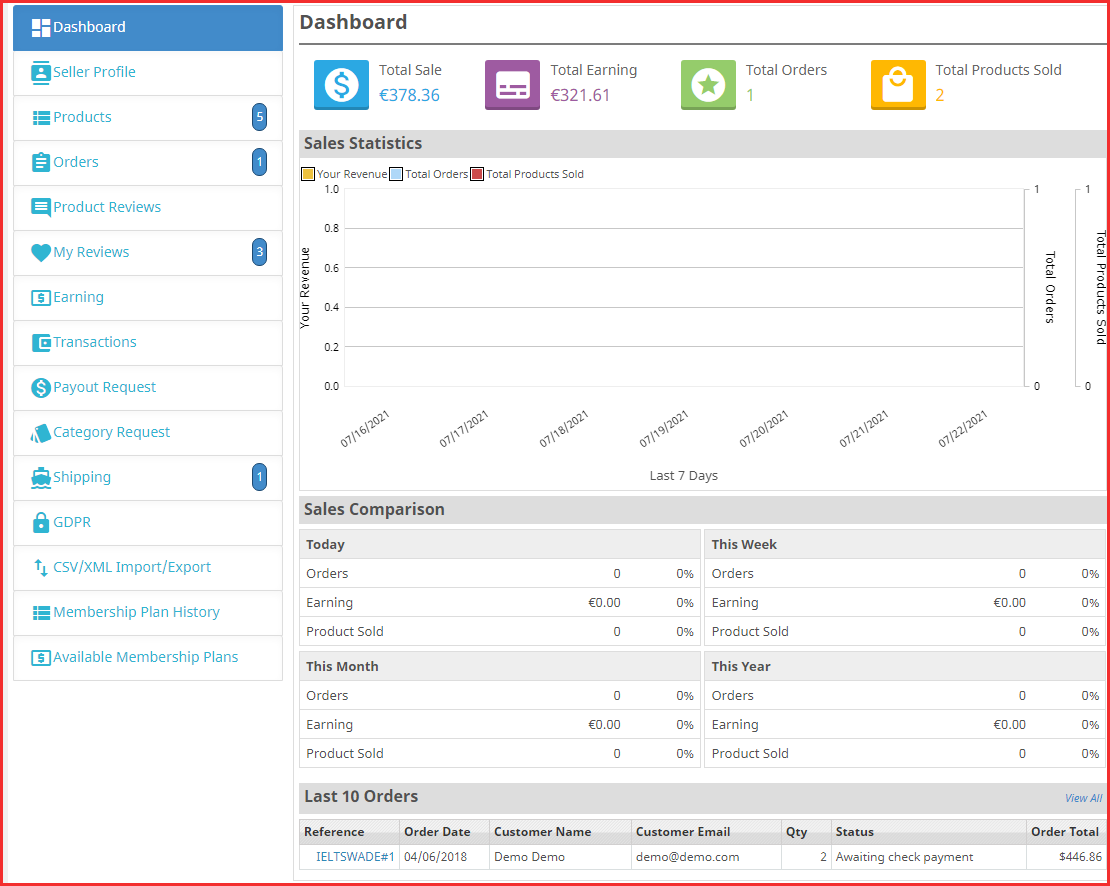
Vendor Dashboard: The Prestashop multi-seller marketplace provides vendors with a comprehensive dashboard where they can manage their products, view sales reports, and track orders.
Approval System:The store admin gets a separate tab to approve vendors and their products before they go live on the marketplace. Therefore, this ensures quality control and maintains the marketplace’s standards.
By providing vendors with the tools they need to succeed, you create a supportive environment that encourages more sellers to join your platform.
Prestashop Multi-vendor Marketplace Module
Transform your PrestaShop store into a fully functional marketplace with the PrestaShop Marketplace Addon by Knowband. Easily manage multiple vendors, products, and orders from a single platform.
Effective management of products, orders, and commissions is vital for a successful marketplace. Thus, the Prestashop Marketplace Extension offers various features to help with this:
Product Management: Allows vendors to add, edit, and manage their products easily and sets up guidelines for product listings to maintain consistency and quality across the marketplace.
Order Management: Knowband’s Prestashop multi-seller marketplace plugin provides vendors with a streamlined order management system where vendors can process orders, update statuses, and handle customer inquiries efficiently.
Commission Management: The store admin can define and manage commission rates for different vendors. The addon should support flexible commission structures to cater to various vendor agreements.
These features ensure that both vendors and marketplace administrators can manage their tasks efficiently, leading to a smoother operation.
Enhancing the Customer Experience!
A successful multi-vendor marketplace is not just about managing vendors; it’s also about providing an excellent shopping experience for customers. Here’s how you can enhance the customer experience:
User-Friendly Interface:Our marketplace module for PrestaShop ensures that your marketplace has an intuitive and easy-to-navigate interface. Because a clean and organized layout helps customers find what they are looking for quickly.
Search and Filter Options: Implement advanced search and filtering options to help customers easily locate products.
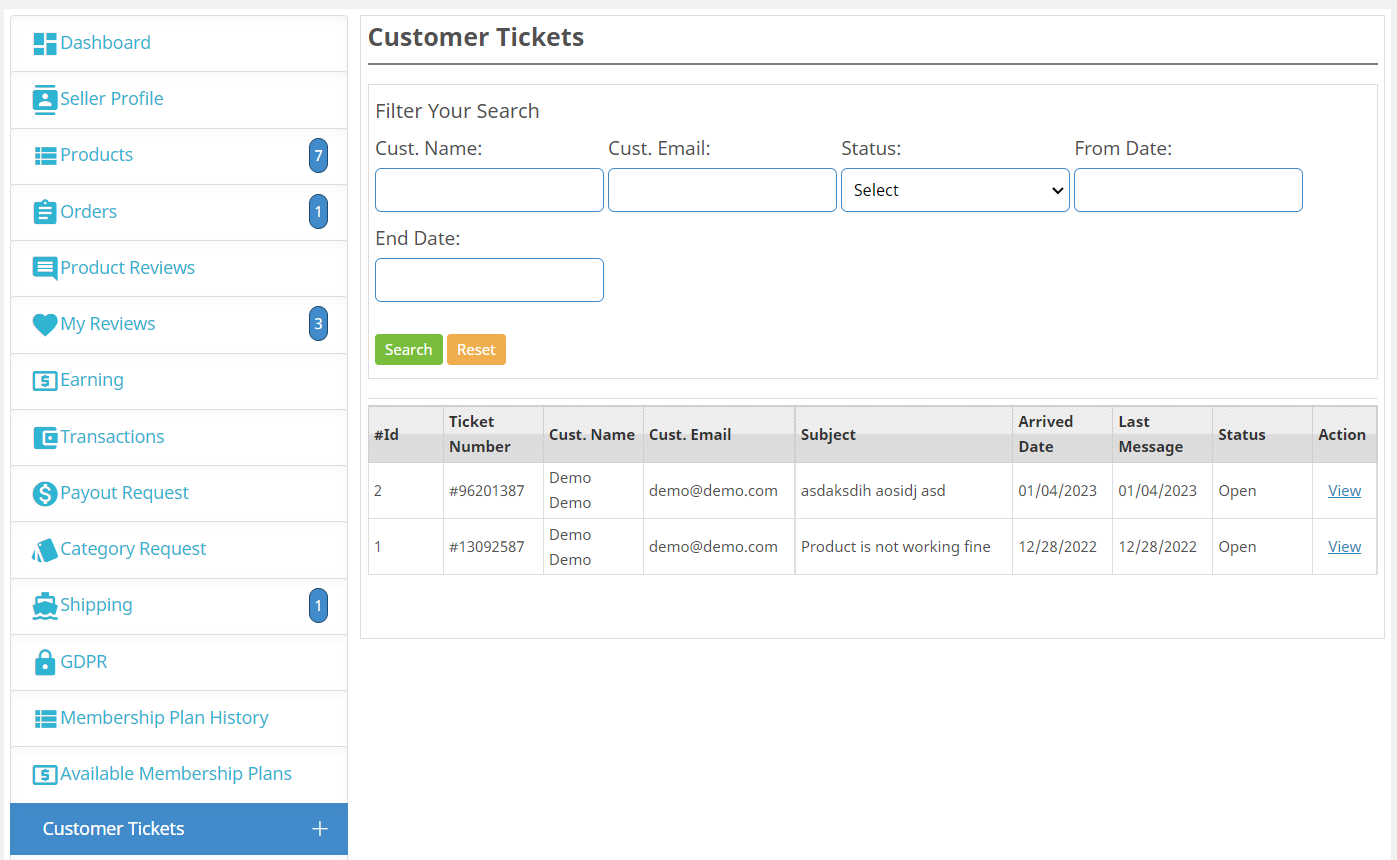
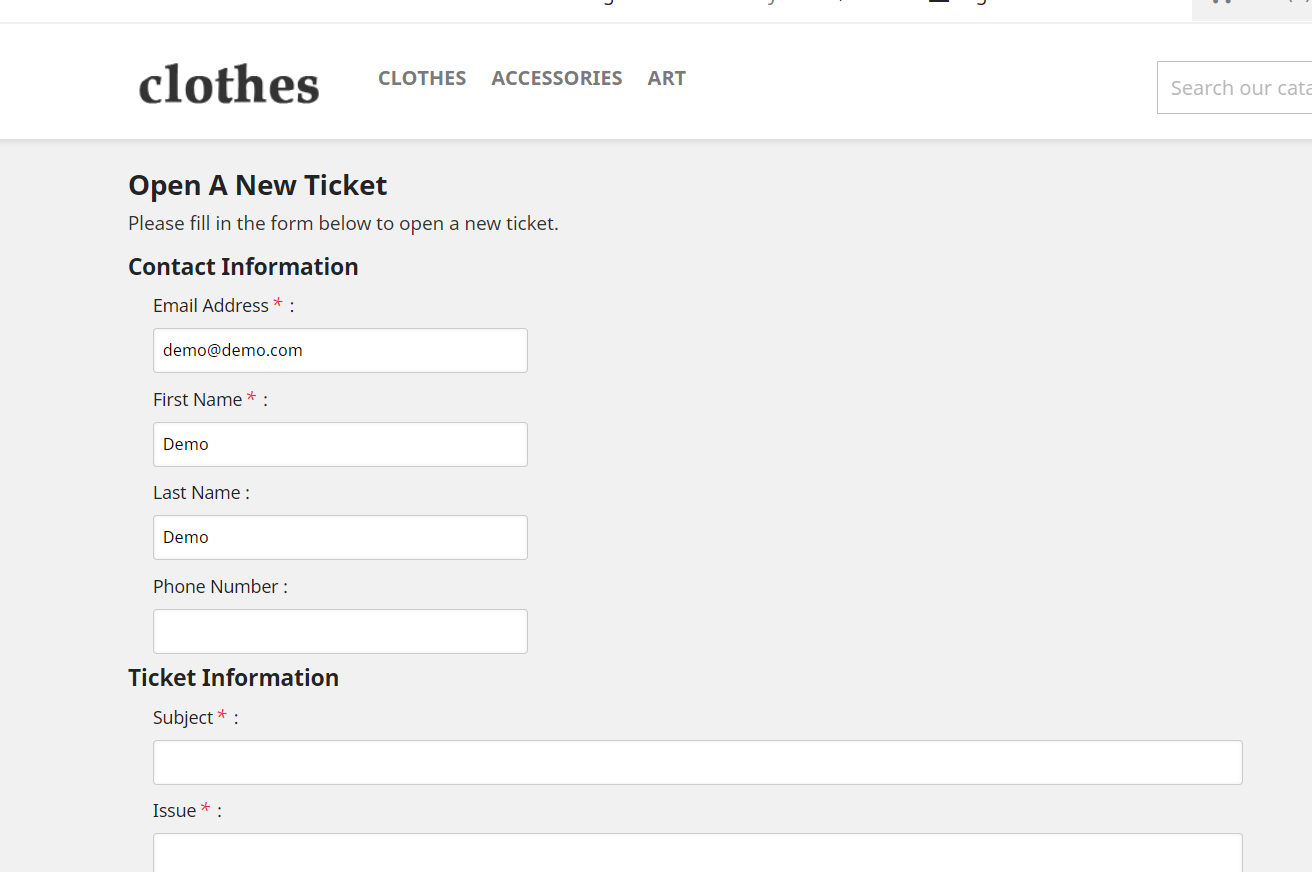
Customer Support: The marketplace module allows the customers to raise tickets directly to the third-party sellers and communicate their queries most easily. Thus, with the intuitive customer support system, the admin can offer robust customer support to handle queries and issues promptly. Furthermore, by focusing on the customer experience, you increase the likelihood of repeat purchases and positive reviews, which are crucial for the growth of your marketplace.
Conclusion!
Creating a successful multi-vendor marketplace on Prestashop involves careful planning and execution. By choosing the right Prestashop Marketplace Addon, setting up efficient vendor management, and ensuring a great customer experience, you can build a thriving marketplace. Therefore, you can utilize Knowband’s Prestashop Multi-vendor Marketplace Plugin to streamline operations and foster a vibrant community of sellers and buyers. With the right strategies in place, your Prestashop marketplace can achieve significant growth and success.
In the ever-evolving world of e-commerce, staying ahead of the curve is paramount for online store owners. Prestashop, a popular e-commerce platform, has consistently delivered robust solutions to help businesses thrive in the digital marketplace. Now, with the imminent release of Prestashop v8.1, we are excited to announce our latest offering: the Prestashop Marketplace Addon. An all-in-one solution to transform your online store into a thriving multi-vendor marketplace.
Empowering Your Prestashop Store with the Marketplace Module!
Unveiling Prestashop v8.1 Compatibility:
As the e-commerce landscape continues to evolve, Prestashop remains committed to providing cutting-edge tools to empower online businesses. The upcoming release of Knowband’s Prestashop v8.1 compatible marketplace addon represents a significant milestone in the journey. Not only we are promising enhanced features and improved performance but also an even more user-friendly interface. And, to complement this exciting update, we are thrilled to introduce the Prestashop Marketplace Module, fully compatible with Prestashop v8.1 soon.
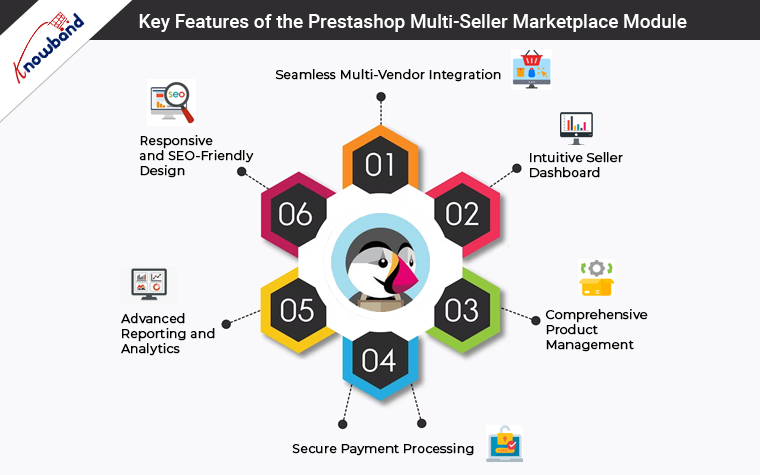
Key Features of the Prestashop Multi-Seller Marketplace Module:
1. Seamless Multi-Vendor Integration:
With Knowband’s Prestashop Multi-Vendor Marketplace Plugin, you can seamlessly transform your single-vendor store into a dynamic multi-vendor marketplace. Furthermore, you can also empower multiple sellers to list their products on your platform, expanding your product catalog and increasing your revenue potential.
2. Intuitive Seller Dashboard:
The Prestashop Marketplace Extension offers an intuitive seller dashboard, making it easy for vendors to manage their products, orders, and customer interactions. Moreover, this user-friendly interface streamlines the vendor experience, fostering collaboration and growth.
3. Comprehensive Product Management:
The Prestashop Multi-vendor Marketplace addon provides robust product management features, enabling vendors to add, edit, and manage their product listings effortlessly. Therefore, it also supports multiple product types, ensuring compatibility with a wide range of products.
4. Secure Payment Processing:
We understand the importance of secure transactions in the world of e-commerce. Our Prestashop Multi-seller Marketplace Module comes with secure payment processing options, guaranteeing smooth financial transactions between vendors and customers. Moreover, we have provided a tailored process to handle seller-admin and seller-customer payment processes.
5. Advanced Reporting and Analytics:
To help you make informed decisions, Knowband’s Marketplace Addon for Prestashop offers advanced reporting and analytics tools. Thus, the store admin can monitor the performance of vendors, track sales, and gain valuable insights into your marketplace’s growth.
6. Responsive and SEO-Friendly Design:
The Prestashop Multi-vendor Marketplace Extension boasts a responsive and SEO-friendly design, ensuring that your marketplace looks great on any device and is easily discoverable by search engines. Moreover, it also contributes to higher visibility and increased organic traffic.
Benefits of Using the Knowband’s Prestashop Marketplace Plugin!
1. Revenue Diversification:
By allowing multiple sellers to join your marketplace, you can diversify your product offerings and increase your revenue potential. Moreover, the store admin can earn commissions on each sale made by vendors, creating a sustainable income stream.
2. Enhanced User Experience:
The intuitive seller dashboard and user-friendly design of our Marketplace Module ensure a positive experience for both vendors and customers.
3. Scalability and Growth:
As your marketplace grows, so does your business. Thus, with the Prestashop Marketplace Addon, you can easily scale your operations and add more vendors, products, and categories to meet the demands of your expanding customer base.
4. Competitive Edge:
In a competitive e-commerce landscape, offering a multi-vendor marketplace sets you apart from the competition. Furthermore, it provides customers with a wider selection of products and encourages repeat visits to your platform.
5. Data-Driven Decision Making:
With advanced reporting and analytics, you can make data-driven decisions to optimize your marketplace’s performance, identify trends, and tailor your strategy for success.
Conclusion!
With Prestashop v8.1 compatibility, a plethora of features, and numerous benefits, the marketplace module for Prestashop is the perfect solution to take your online business to the next level.
Stay tuned for the release of our Prestashop v8.1-Compatible Prestashop Multi-Vendor Marketplace Addon and unlock the full potential of your e-commerce store. Don’t miss out on the opportunity to boost your revenue, enhance your user experience, and stay competitive in the ever-expanding world of online retail.
In the rapidly evolving world of e-commerce, establishing your marketplace can be a game-changer for entrepreneurs looking to expand their business horizons. At Knowband, we offer a powerful solution for creating a marketplace through Prestashop Marketplace Addon. This comprehensive module Prestashop Marketplace Extension, empowers users to transform their online store into a thriving multi-vendor marketplace. Furthermore, it helps in including an additional income source into your business. But also enhances brand recognition for the Presta store retailers.
Understanding the Prestashop Marketplace Ecosystem!
Knowband’s Prestashop Multi-Seller Marketplace Addon is designed to facilitate the seamless integration of a multi-vendor marketplace within the Prestashop framework. Moreover, this extension enables online store owners to invite multiple sellers to showcase and sell their products on a shared platform.
Thus, along with selling your products via your Presta store, you can also allow other vendors to list the products in your store as a third-party seller. Later, you can earn commission and various other margins by allowing sellers to do so.
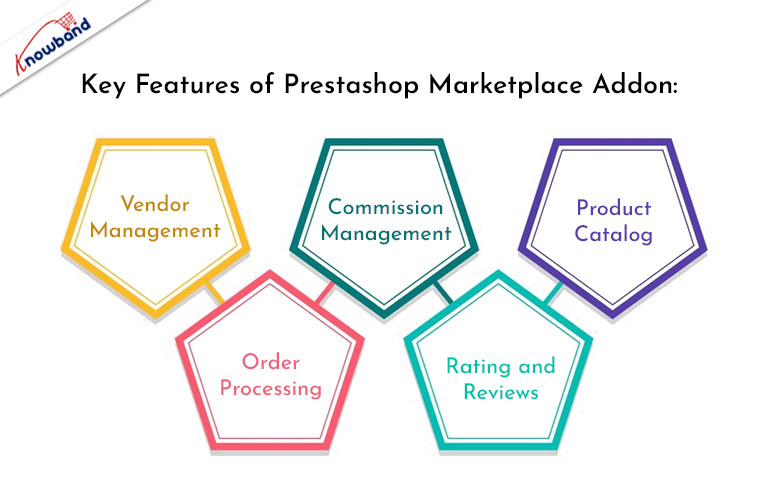
Key Features of Prestashop Marketplace Addon:
Vendor Management:
The Prestashop Multi-Vendor Marketplace empowers administrators to efficiently manage multiple vendors. Through a user-friendly interface, vendors can register, list products, and manage orders, while administrators can easily oversee and moderate vendor activities. Moreover, the Prestashop admin has complete owner control over all the seller activities.
Commission Management:
Knowband’s Multi-Seller marketplace for Prestashop module offers a flexible commission management system, allowing administrators to set commission rates based on product categories or individual vendors. Thus, the following feature ensures a fair and transparent revenue-sharing model between the marketplace owner and vendors.
Product Catalog:
Vendors can effortlessly create and manage their product catalog within the Prestashop Marketplace. The centralized product catalog enhances user experience by providing customers with a diverse range of products from various sellers.
Order Processing:
The Prestashop Marketplace Addon streamlines order processing by providing a centralized dashboard for managing orders. Furthermore, it simplifies the fulfillment process for both administrators and vendors.
Rating and Reviews:
Customer feedback is crucial in any marketplace. The module includes a robust rating and review system, allowing buyers to share their experiences and helping build trust among potential customers. Furthermore, the sellers as well as store admin can manage the review at their convenience right from their dashboards.
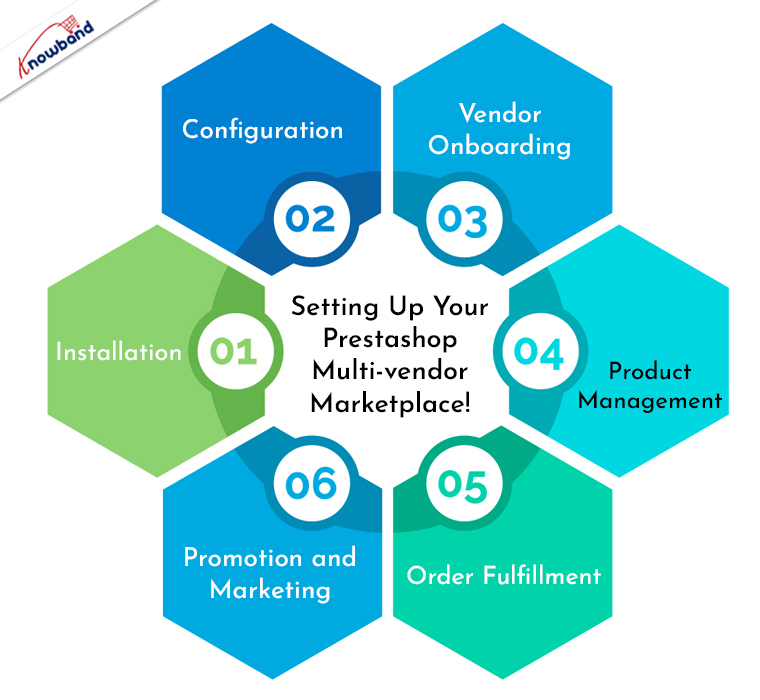
Setting Up Your Prestashop Multi-vendor Marketplace!
Creating your own marketplace using Knowband Prestashop Marketplace Extension is a straightforward process. Follow these steps to get started:
Installation:
Begin by installing the Prestashop Marketplace Addon on your Prestashop store. This can be done through the Prestashop admin panel by uploading the module. Or, you can also insert the module files via cPanel/FTP details into your store directory.
Configuration:
Define commission rates, shipping options, and other essential parameters. Furthermore, you can also check out the module’s user manual for more information about marketplace configurations.
Vendor Onboarding:
Invite vendors to join your marketplace by allowing them to register through a dedicated vendor registration page. Vendors can create accounts, upload product listings, and manage their store settings.
Product Management:
Vendors can easily add, edit, and remove products from their catalog. Therefore, it ensures that product information is accurate and meets your marketplace standards.
Order Fulfillment:
Manage orders efficiently by monitoring the order dashboard. Both administrators and vendors can track order statuses, process shipments, and handle customer inquiries.
Promotion and Marketing:
The Prestashop store admin can encourage vendors to promote their products and drive traffic to the marketplace. Moreover, you can also leverage marketing tools within Prestashop to enhance the visibility of your multi-vendor marketplace.
Conclusion!
In conclusion, the Prestashop Marketplace Addon provides a comprehensive solution for entrepreneurs looking to venture into the world of multi-vendor e-commerce. Moreover, this addon empowers you to create a dynamic and lucrative online marketplace. By following the steps outlined above, you can seamlessly integrate the Prestashop Marketplace Addon and embark on the journey of building and managing your very own Prestashop Marketplace.
In the world of e-commerce, owning a Prestashop store provides an excellent platform to showcase and sell your products. However, if you’re looking to take your business to the next level and enable multiple vendors to sell their products on your platform, Knowband’s Prestashop Marketplace Addon is the solution you need. With the Prestashop multi-seller module by Knowband, you can transform your Prestashop store into a thriving multi-vendor marketplace.
Why Choose Prestashop Marketplace Addon?
Prestashop is renowned for its flexibility and scalability, making it a popular choice for e-commerce entrepreneurs. While it provides a robust foundation for running a single-vendor store, the true power of Prestashop is unleashed when you turn it into a multi-vendor marketplace. Therefore, the Prestashop Multi-Vendor Marketplace Addon is designed for this very purpose. Moreover, with this addon, you can enable multiple sellers to list their products and manage their businesses within your marketplace.
Getting Started: Installation Guide.
To create your own marketplace using the Knowband’s multi-seller marketplace addon for Prestashop, follow these key steps:
Install the Addon:
Install the module on your Prestashop store like any other module or extension.
Configuration:
Once the addon is installed, you can configure it according to your specific requirements. Furthermore, it includes setting commission rates, defining accepted payment methods, implementing vendor verification processes, and more. The configuration options provided by the Prestashop Marketplace Module are highly flexible, allowing you to tailor your marketplace to your business model.
Invite Vendors:
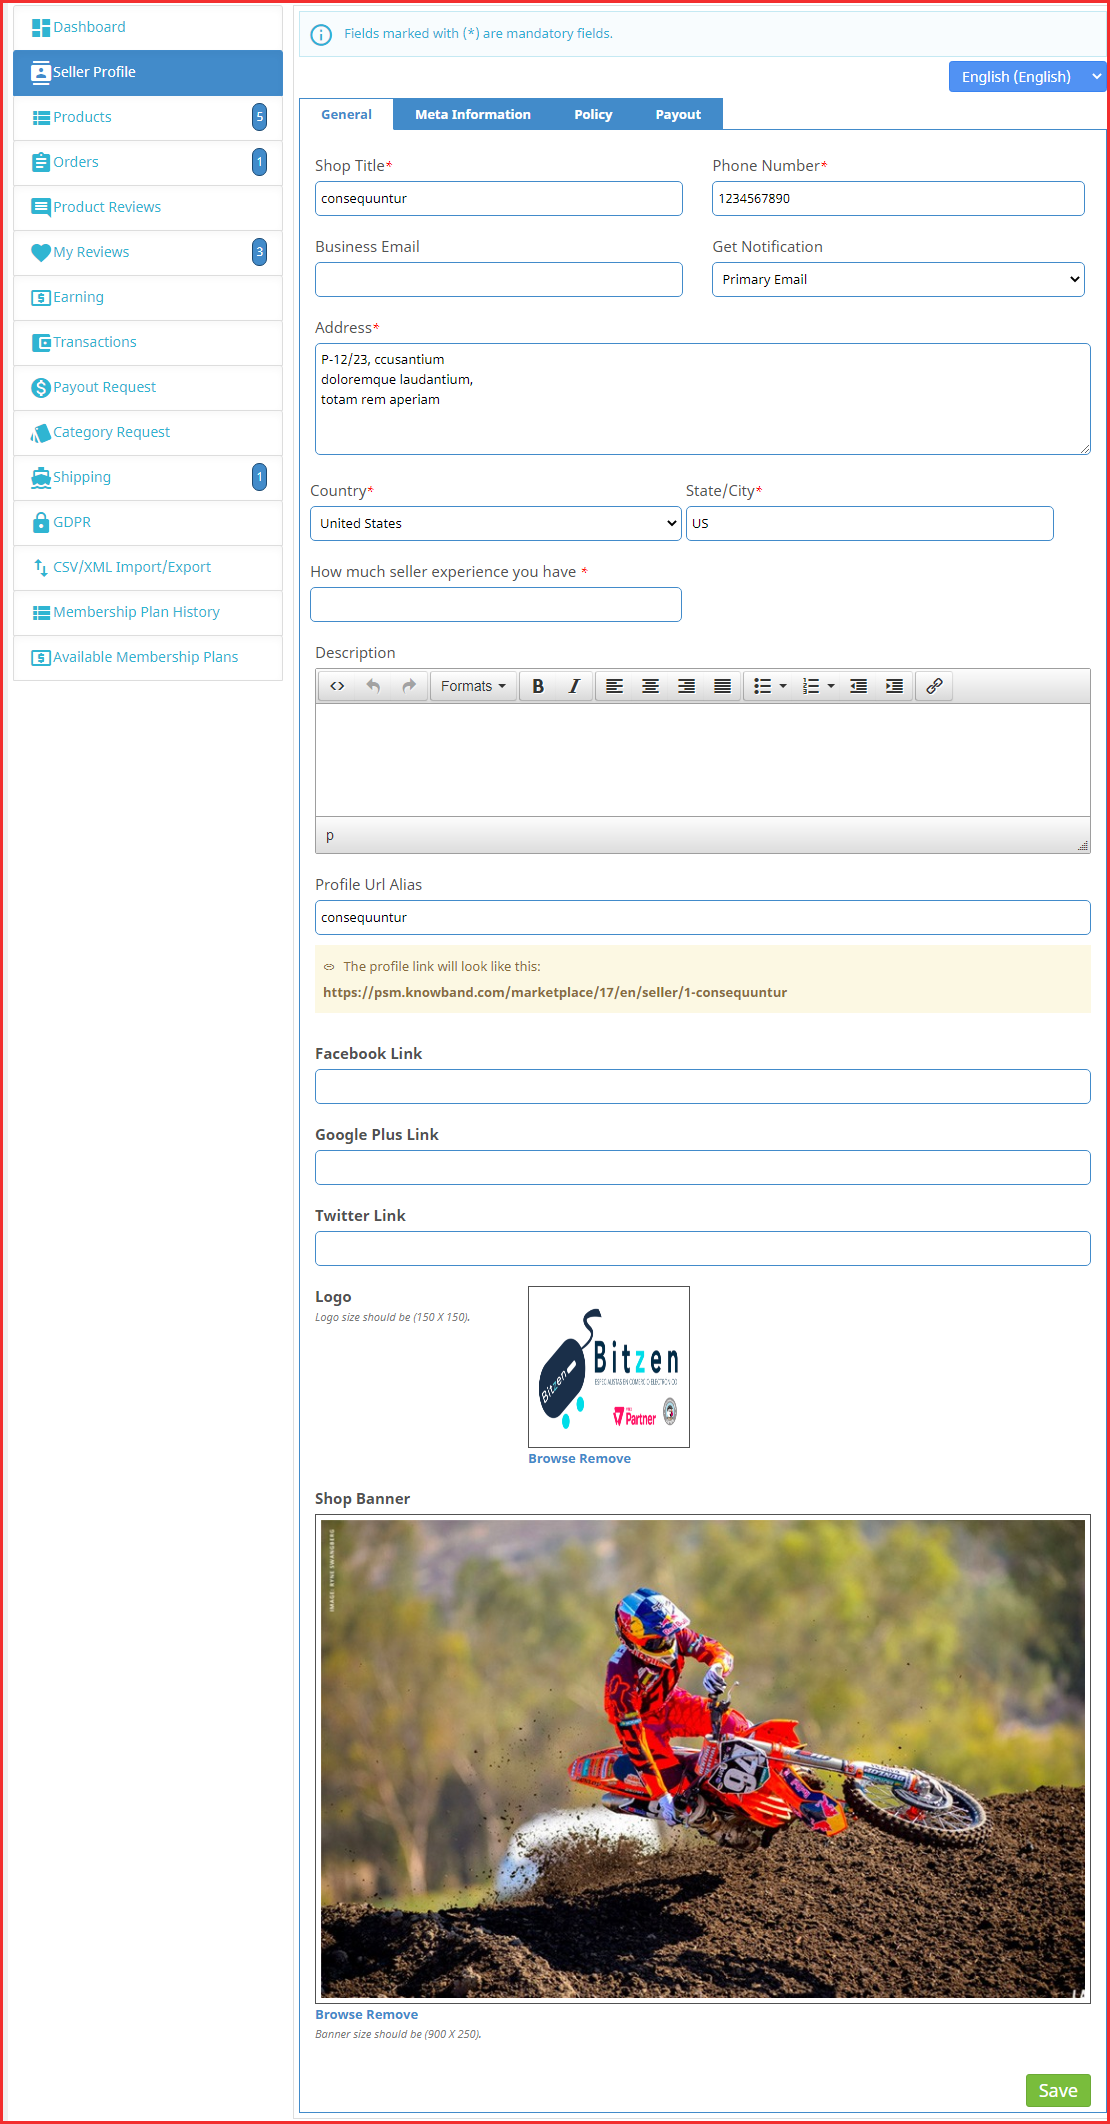
After the configuration is complete, you can start inviting vendors to join your marketplace. Vendors can sign up on your platform, create their vendor profiles, and begin listing their products for sale. Moreover, they will have their own dedicated vendor dashboards to manage their stores and products efficiently.
Manage and Monitor:
As the owner of the marketplace, you’ll have access to a comprehensive dashboard that allows you to manage vendor activities, track sales, and ensure the smooth operation of your marketplace. Thus, you can approve, disapprove, or even remove vendors as necessary, ensuring the quality and reliability of your marketplace.
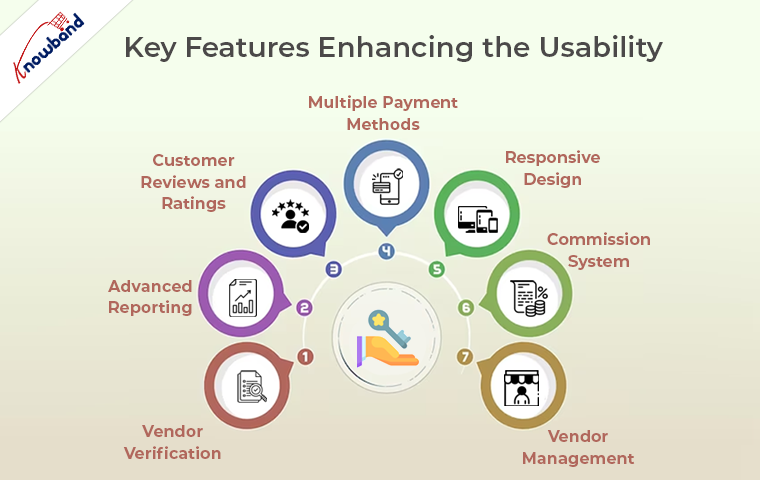
Key Features: Enhancing the Usability
Knowband’s Prestashop Multi-Seller Marketplace module offers a wide range of features and functionalities to ensure the smooth operation of your multi-vendor marketplace. Here are some of the key features:
Vendor Management:
The Prestashop Marketplace Plugin provides efficient tools for vendor management. You can approve or disapprove vendor registrations and, if necessary, remove vendors from your marketplace.
Commission System:
The addon offers a flexible commission system, allowing you to earn a percentage from each vendor’s sale. This revenue-sharing model is a core element of the marketplace business model.
Multiple Payment Methods:
The Prestashop marketplace supports various payment methods, ensuring a seamless transaction experience for both vendors and customers.
Advanced Reporting:
Access to detailed reports and analytics is vital for monitoring the performance of your marketplace. Furthermore, the addon provides you with insights into sales, vendor activities, and other essential metrics.
Responsive Design:
Your marketplace needs to be accessible and user-friendly on all devices. The Prestashop Marketplace Extension ensures that your marketplace is responsive and mobile-friendly, providing an excellent shopping experience for your customers.
Vendor Verification:
To maintain the quality and reputation of your marketplace, you can implement vendor verification processes. This can include identity verification, business verification, or other relevant checks.
Customer Reviews and Ratings:
Customer feedback is crucial in building trust. The Prestashop Marketplace Addon allows customers to leave reviews and ratings for vendors, creating a trustworthy environment for shopping.
Benefits of Using Prestashop Marketplace Addon:
Now that we’ve explored how to create your own marketplace with the Prestashop Marketplace Addon and its key features, let’s delve into the benefits of using this powerful tool:
Scalability:
The Prestashop Multi-vendor Marketplace addon enables you to expand your e-commerce business without significant investments in infrastructure. As you onboard more vendors, your marketplace naturally scales, offering a wider range of products to your customers.
Diverse Product Catalog:
One of the most significant advantages of a multi-vendor marketplace is the diverse product catalog it offers. Furthermore, multiple sellers can list their products, providing a wide selection for your customers. This diversity attracts a broader customer base, increasing your reach and potential sales.
Income Generation:
Through the flexible commission system provided by the Prestashop Marketplace Plugin, you can generate revenue every time a sale occurs on your platform. As more vendors join and more products are sold, your income potential increases.
Reduced Risk:
Sharing responsibilities with vendors, such as product listings, order processing, and customer service, reduces your business risk. Thus, you no longer carry the entire burden of running a successful e-commerce store.
Improved Customer Experience:
A rich and diverse product selection, along with multiple sellers to choose from, enhances the customer experience. Customers can explore a wide array of products and brands, making their shopping experience more engaging and satisfying.
In the END:
In conclusion, Knowband’s Prestashop Marketplace modules are the ultimate tool to create your own marketplace. Furthermore, it empowers you to expand your e-commerce business, offer a diverse product catalog, generate income, reduce risk, and provide an improved customer experience.
Furthermore, if you have queries regarding module features or workflow, please feel free to drop us an email at support@knowband.com for more information.
Marketplaces are seen as the new medium of business engagement among numerous buyers and sellers community around the world. They are one place where people can simultaneously purchase as well as sell their products online. It is a wonderful platform to boost online business in a smooth manner without any hurdle. Apart from this, marketplaces are a wonderful option for small and medium eCommerce store owners for improving their sales among numerous competitors.
If you have not seen significant growth in your sales and conversions for a long time, it is time to avail of the expertise of various PrestaShop Marketplace extensions for a quick business makeover. These extensions are built on responsive web design that makes them suitable to be used on various devices like desktops, laptops, smartphones and tablets for targeting a large groups of users. Let us discuss various features and functionalities of these Knowband extensions that make them the perfect choice for numerous eCommerce store owners.
This PrestaShop module is meant for supporting various small and medium eCommerce store owners to boost their sales to a great extent. With the help of this marketplace extension, it is now possible to connect directly with the seller and buyer community without any middlemen involved. Although, there are multiple marketplace stores to explore it has carved out a niche place for itself among various available PrestaShop Marketplace extensions. Here are some of the various features that make this PrestaShop extension for conversions as the best choice for eCommerce stores.
Supports various themes, stores, and browsers for maximum customer attention.
Offers easy seller registration facility for buyers for a quick selling opportunity.
Provides detailed information about seller list, seller reviews, and seller profile for quick decision making.
Ensures various facilities like commission customization, seller profile setting, the inclusion of social URLs, and other such components for increasing sales.
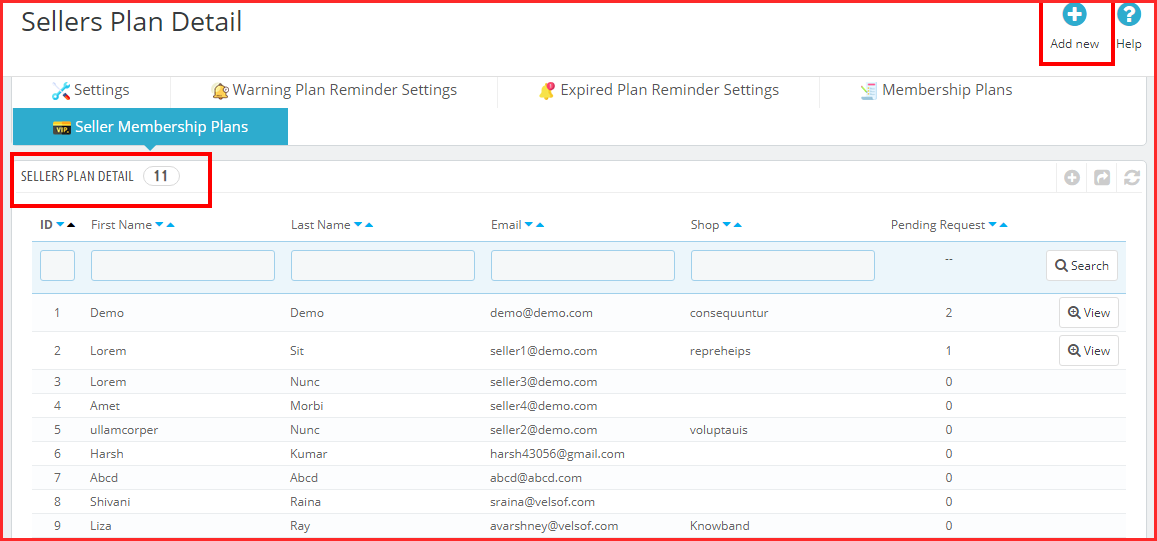
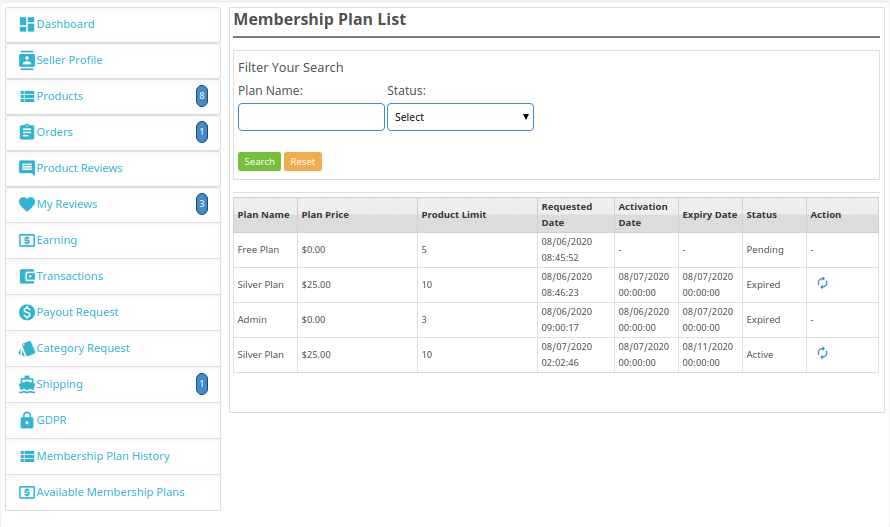
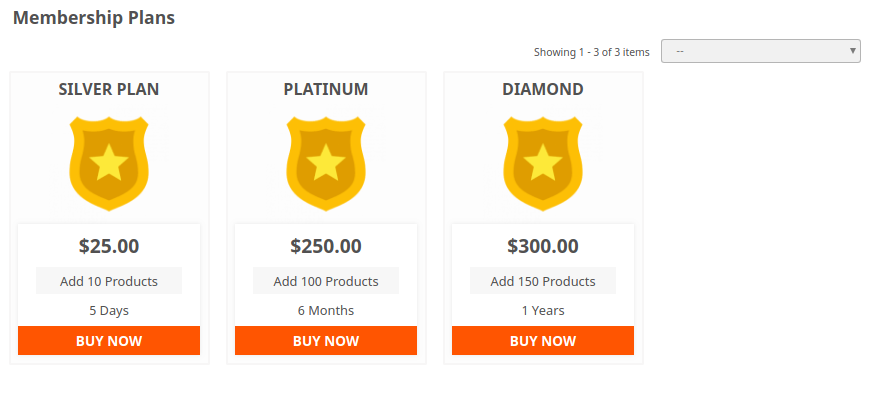
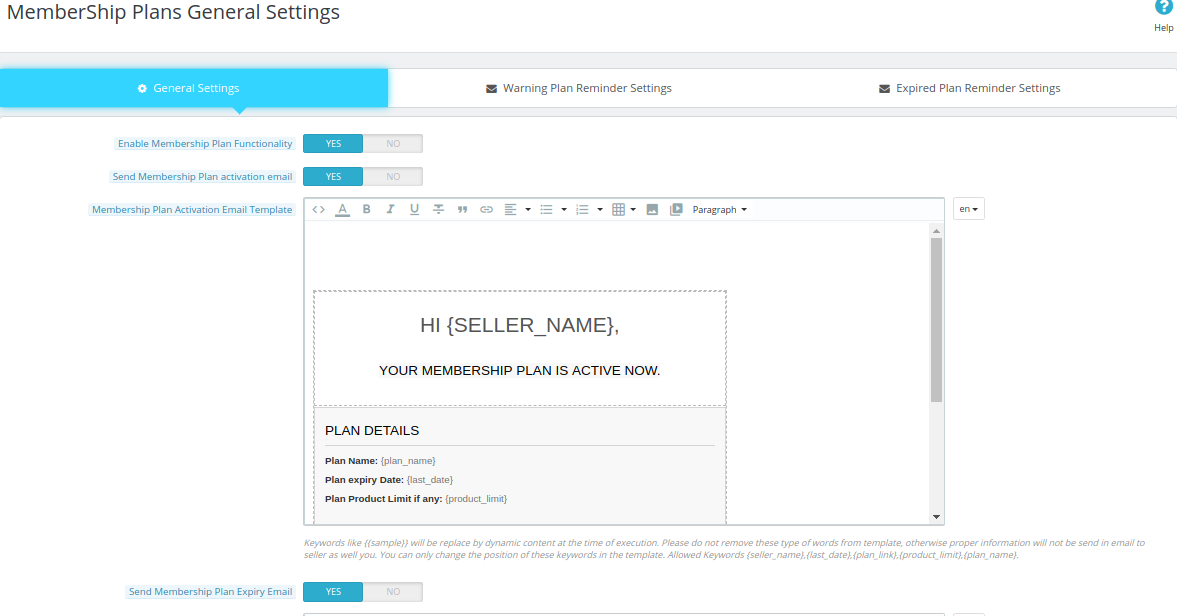
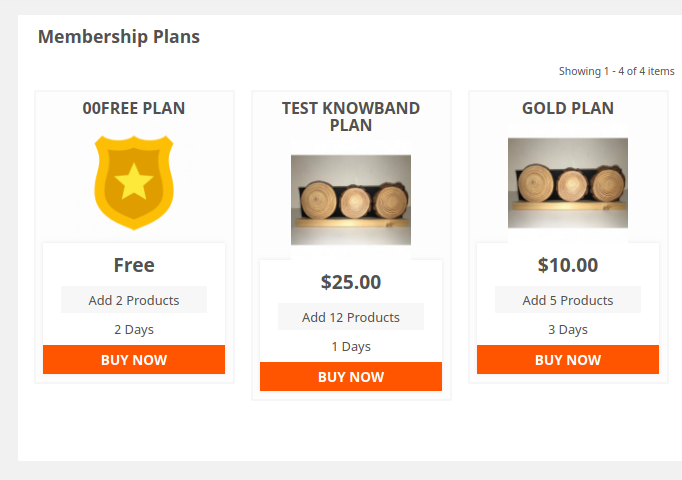
Store admin can create various membership plans for the sellers as per their requirements.
It is now easier to keep track of the product quantity and get a timely alert regarding a low quantity on the marketplace store with the help of this PrestaShop Marketplace Addons. Some of the features of this PrestaShop Marketplace plugin are as explained below:
Provides facility to enable/disable low stock product notification.
Supports easy installation and configuration.
Compatible with multiple languages, SSL and other eCommerce stores.
Option to change product quantity for receiving low stock notification.
Now, customers on marketplace stores are now able to download invoice for their orders with seller information in a quick and flawless manner. By installing this PrestaShop Marketplace Seller Invoice Addon, you can get invoice quickly. Here are the few features that makes them as one of the best PrestaShop Marketplace extensions without any second opinion.
Option to choose multiple invoice layout.
Functionality to disable module for selected sellers.
Provide customization facility to change invoice prefix, hide store name or logo and other such functions.
Works with multi stores, SSL and multiple languages.
Easy installation and configuration facility.
If you are having a PrestaShop Marketplace store, these Knowband extensions are the perfect complement for a promising online business future. With the assistance of these PrestaShop Marketplace extensions, it is now an easy task to increase the performance and popularity of your marketplace store. Visit this Knowband store and embrace these PrestaShop extensions for marketplace stores to get the required site traffic, conversions and sales in a simple manner.
Prestashop Multi-vendor Marketplace addon by Knowband is an effective way to convert your PrestaShop eCommerce store into a fully functional online marketplace. PrestaShop Marketplace Module provides store admin with the opportunity to enhance the reach of their store and offer a variety of items and services to customers. The PrestaShop Multi-Seller Marketplace module can turn your eCommerce site into a complete marketplace. The store admin can manage the inventories, orders, products, and shipping methods at the Marketplace from the backend of the PrestaShop Multi-seller Marketplace Module. The PrestaShop marketplace owner can charge a commission to the sellers/vendors on the products they sell. Sellers will get the chance to promote their brand and serve the audience of Marketplace in return for the commission they are paying to the admin.
Prestashop Multi-Seller Marketplace is now GDPR compliant.
1.1 Admin Benefits of Prestashop Multi-vendor Marketplace Module:
The store admin can convert their eCommerce store into a marketplace with a few button clicks.
The store admin can now make their marketplace compliant with the GDPR EU laws. The compliance enables by toggling a button in the admin interface of the Etsy clone for PrestaShop.
Admin can add custom fields for the seller’s profile. moreover, the admin can add new custom fields or remove already added fields.
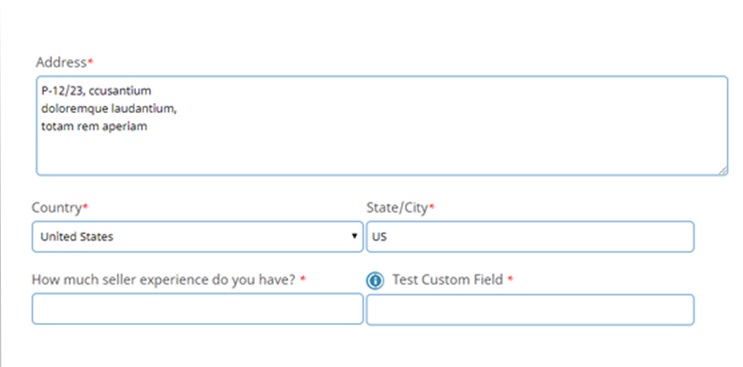
Admin can show custom fields in the seller’s front profile page using Multivendor Marketplace Module.
The admin can also add a separate seller registration form under the general settings tab.
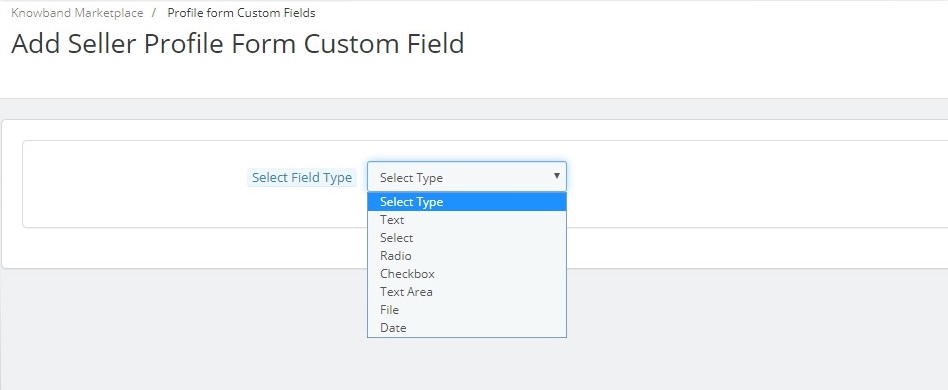
Admin can select the custom field type which he wants to add like a radio button, checkbox, etc.
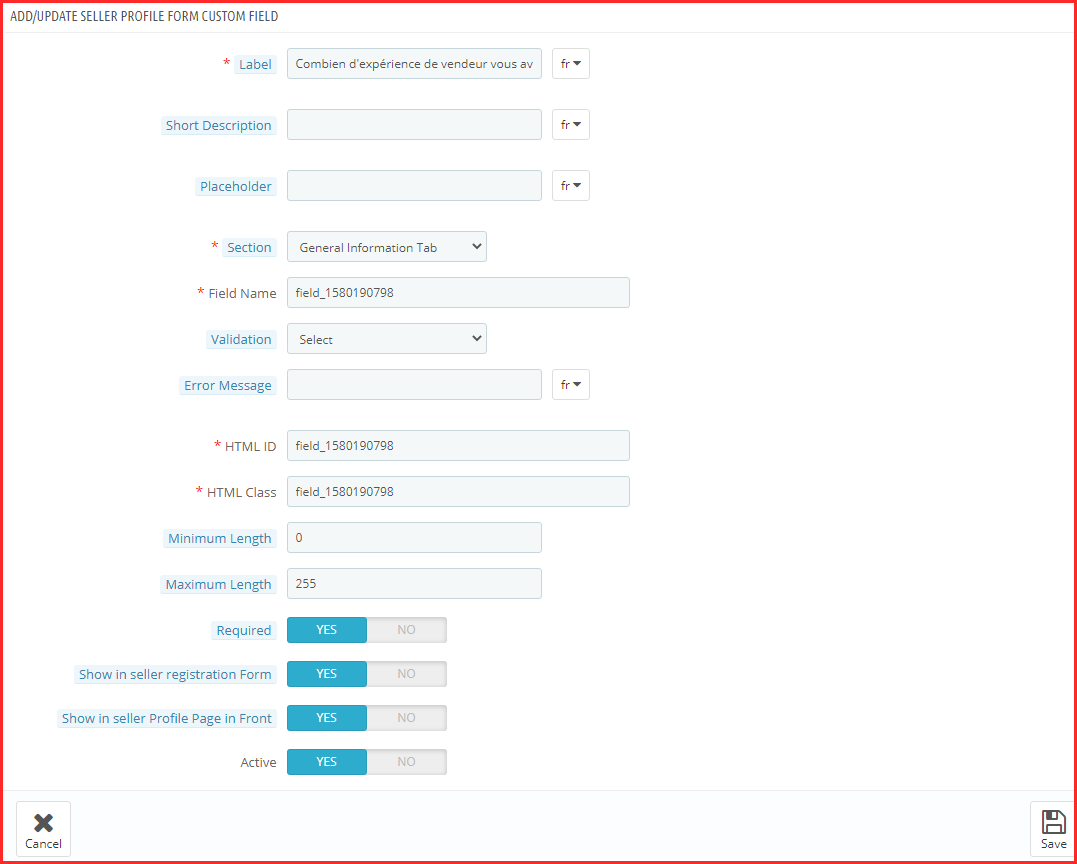
Admin can make these custom fields required using the “Required” tab button.
The store owner can map any custom field under a particular section in which he wants to show that custom field.
The admin can even disallow the seller to view the email ID of the customers. If the admin enables it, the sellers can request to close their shop from the marketplace.
Also, the admin can fix the commission that he wants to charge to the sellers from the back-end of the PrestaShop Multi-vendor Marketplace extension.
The admin gets complete access to approve/disapprove the products available on the marketplace. Moreover, can even fix the quantity of the new products that a seller can add to the marketplace with the help of this PrestaShop Marketplace plugin.
The admin can even auto-approve functionality just at a button toggle from the back-end of the PrestaShop Seller Marketplace extension.
Admin gets an option to approve/disapprove the seller’s profile at a button click.
The PrestaShop Multi-seller Marketplace add-on allows the store admin to track and manage the sellers operating in the marketplace easily.
The PrestaShop admin can add/remove the product or category as per the requirement from the admin interface of the PrestaShop Multi-vendor Marketplace extension.
When sellers request to add a new category to the front-end of the marketplace, the admin can view and accept/reject them accordingly.
The admin can see the seller transaction from a single tab of the PrestaShop Seller Marketplace addon. Thus, the performance of the sellers are traceable.
Store admin can view the report of the commission earned from the PrestaShop marketplace plugin.
The admin can accept/reject the reviews on the products or sellers with the help of the PrestaShop Marketplace extension.
Additionally, the PrestaShop marketplace module offers an option to create custom shipping methods.
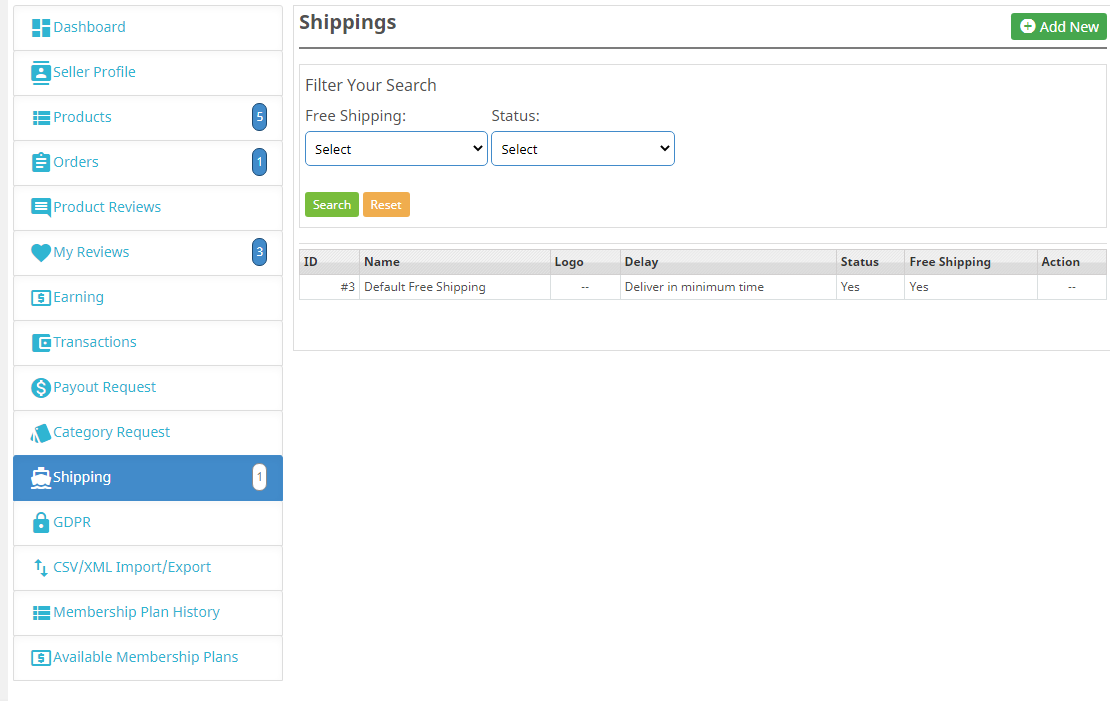
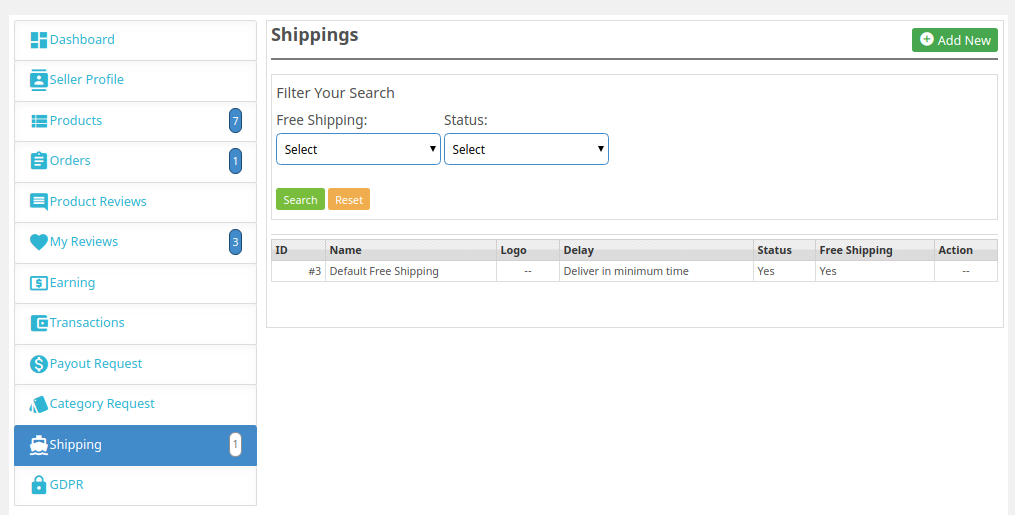
The seller can either select the default shipping method or create custom methods from their dashboard.
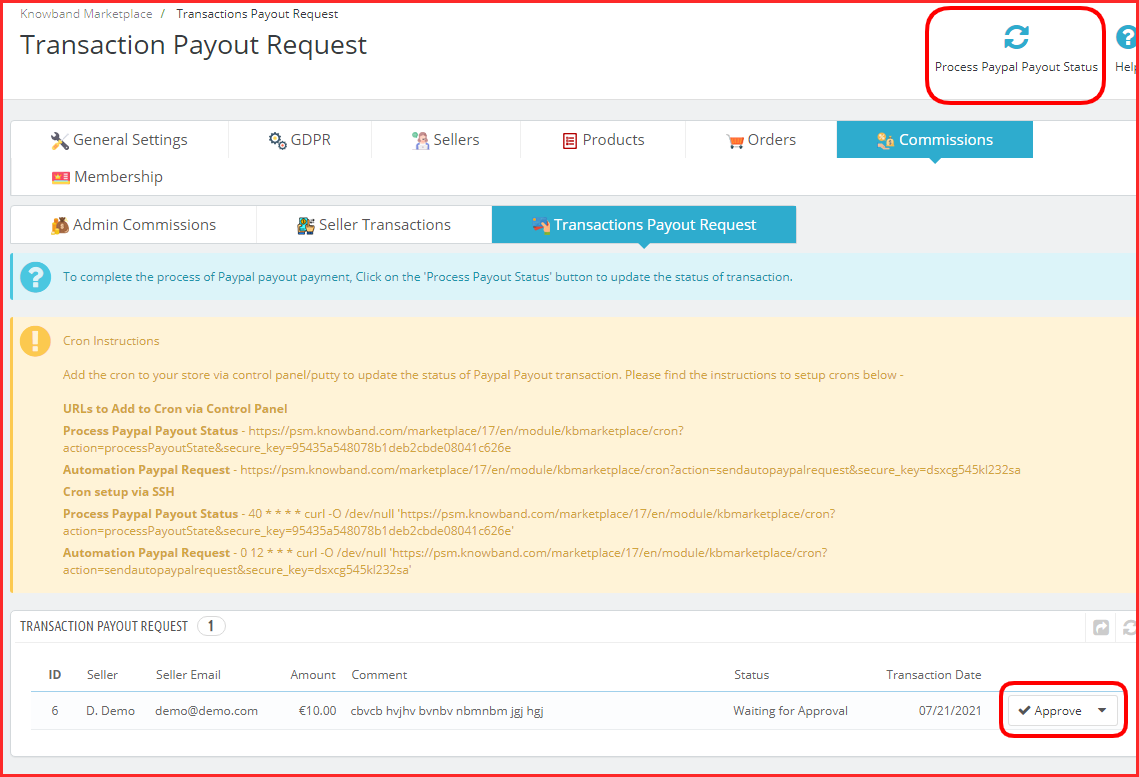
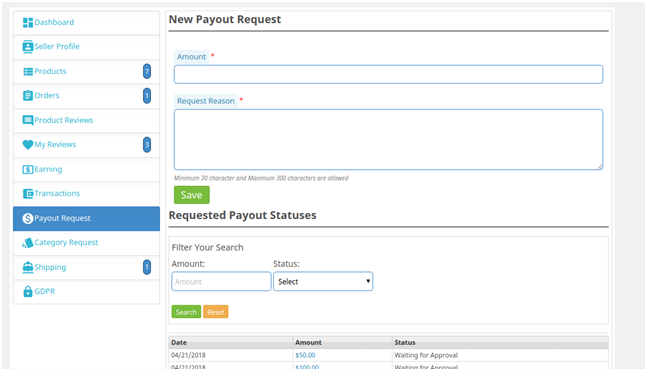
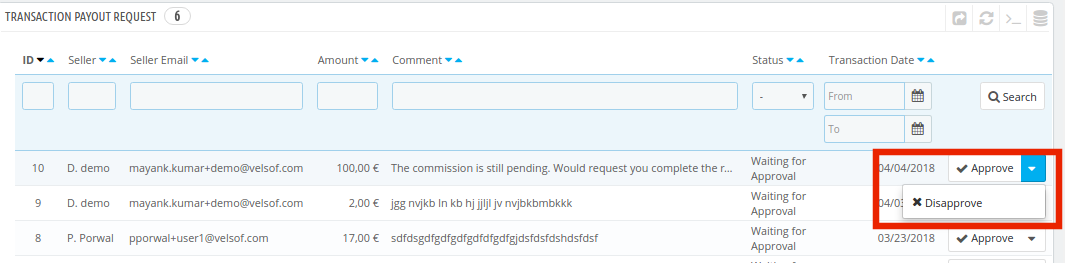
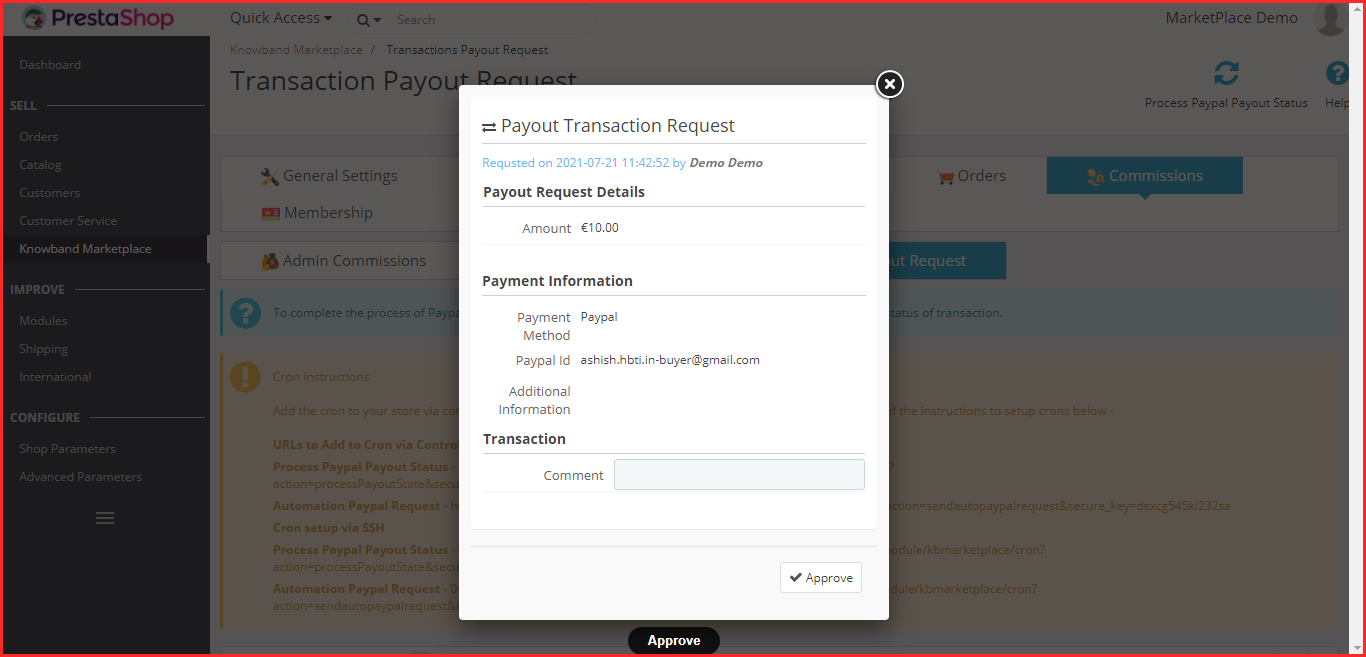
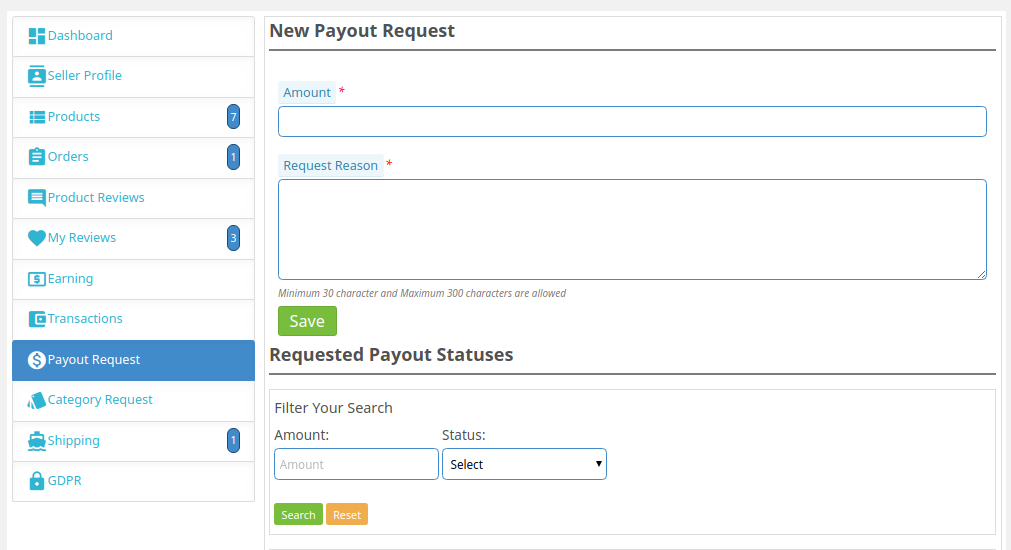
The PrestaShop multi-seller marketplace addon allows the sellers to initiate payout requests from their dashboard. The admin can approve or disapprove the payout request from the back-end of the PrestaShop addon.
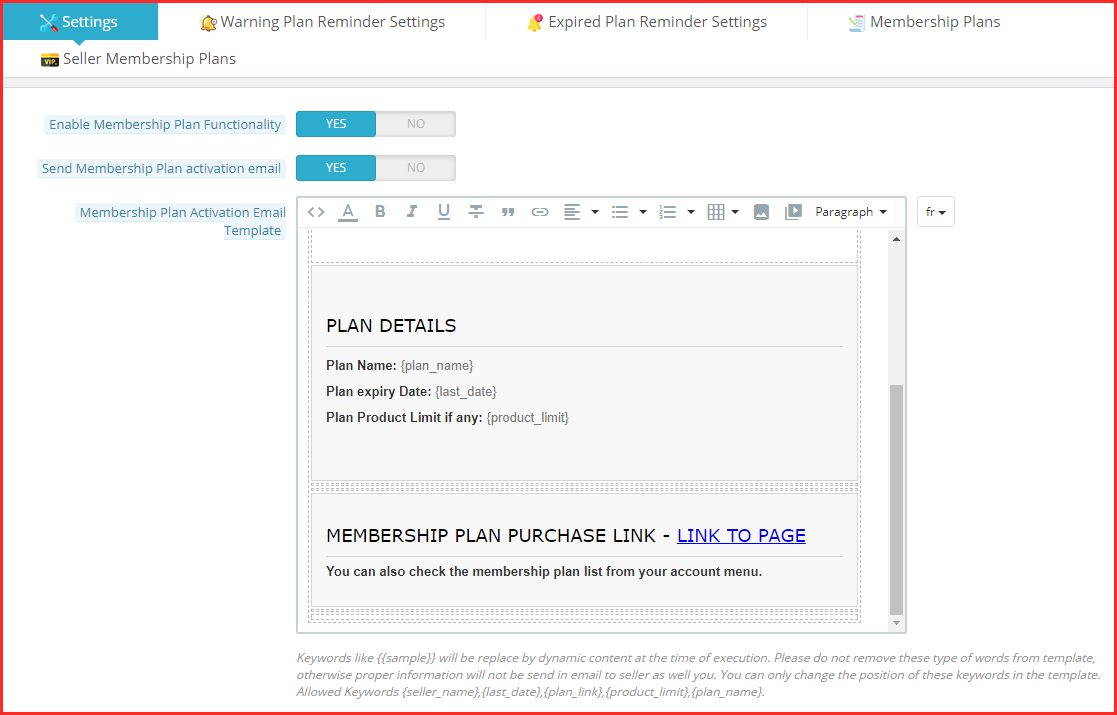
Admin can create various membership plans for the sellers.
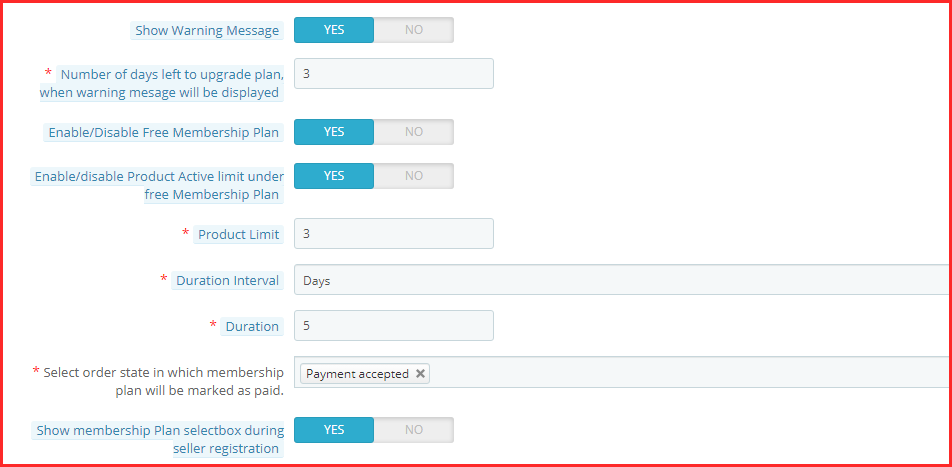
Admin can also enable a free membership plan feature for the sellers for one-time use.
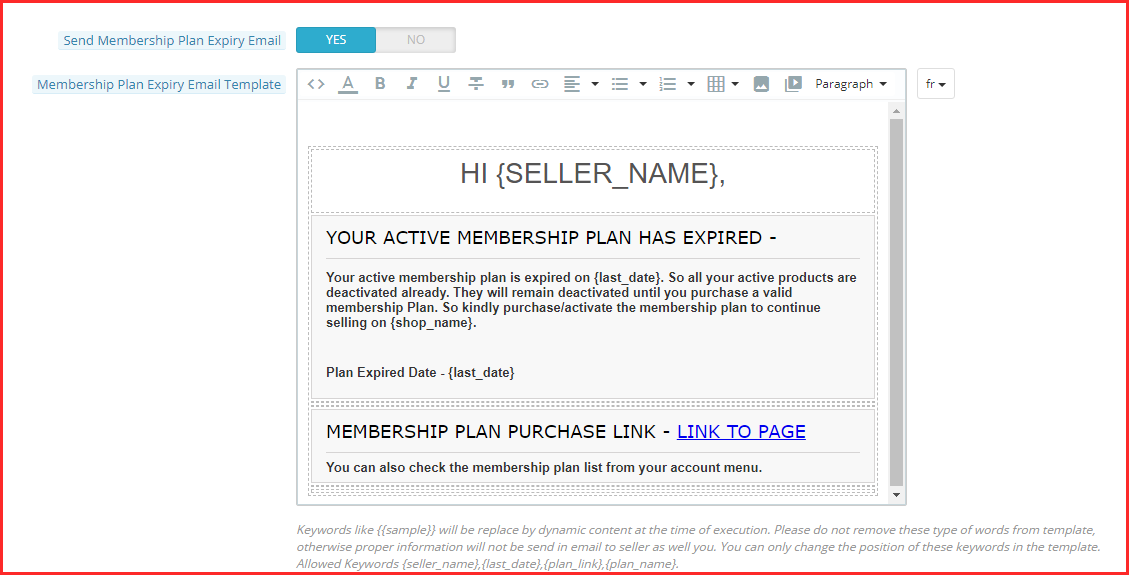
Store admin can send warning emails to the sellers from upgrading their membership plans.
The GDPR requests raised by the sellers are available from the back-end of the PrestaShop Multi-Seller marketplace addon.
The shop closure request of the sellers is approvable/disapproval from the admin interface of the PrestaShop marketplace extension.
Admin gets an option to automate the transaction payout request process which helps the admin to automate all the payment requests of the sellers.
Admin can add a particular amount from the panel which will always be kept on hold for the sellers.
Now, the Knowband Customer seller Ticketing System module is by default available in the PrestaShop Multi-Vendor Marketplace module.
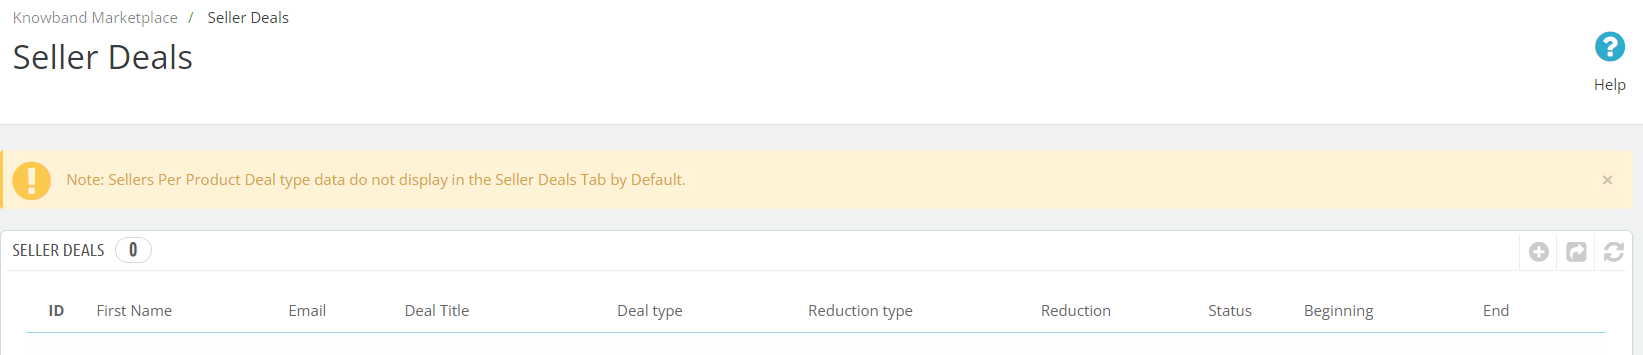
Seller Deal Management at ease with Knowband Deal Manager Addon (available by default in PrestaShop Multi-Seller Marketplace).
The admin can choose whether free shipping is created at the time of seller registration or any other admin carrier clone is created.
1.2 Seller Benefits of the Prestashop Multi-Seller Marketplace Module:
Sellers can add any type of product to the marketplace. PrestaShop Multi-seller Marketplace extension supports all types of products, right from the simple, configurable to the virtual and bundled products.
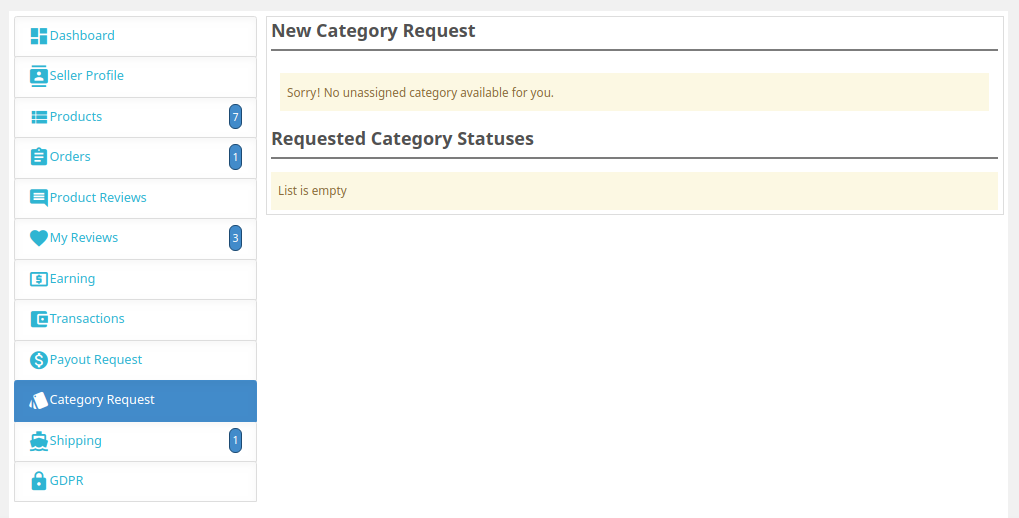
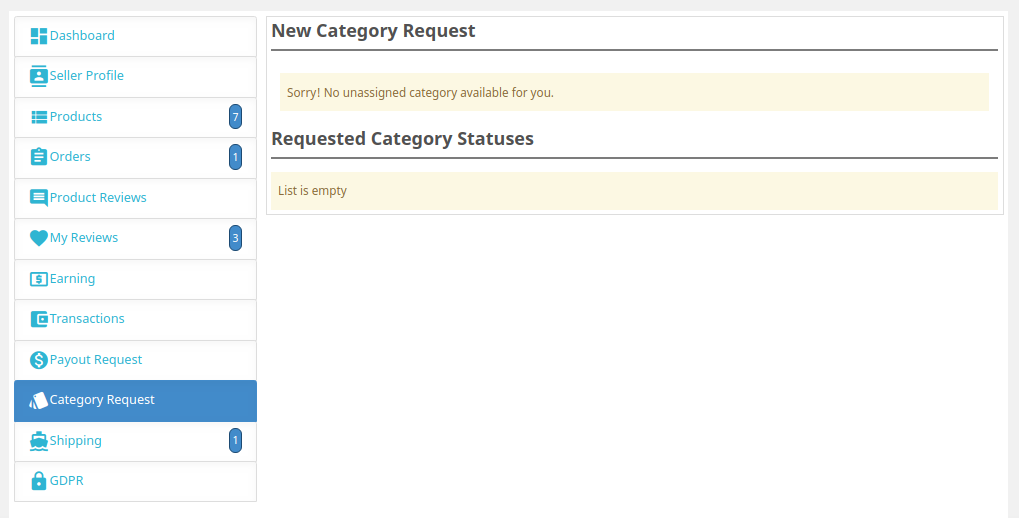
The sellers can even request the admin to add new categories.
Also, the commission charges are fixed, so, the entire transaction is transparent.
The PrestaShop Multi-Vendor Marketplace module makes it easier for sellers to sell their products to a larger customer base.
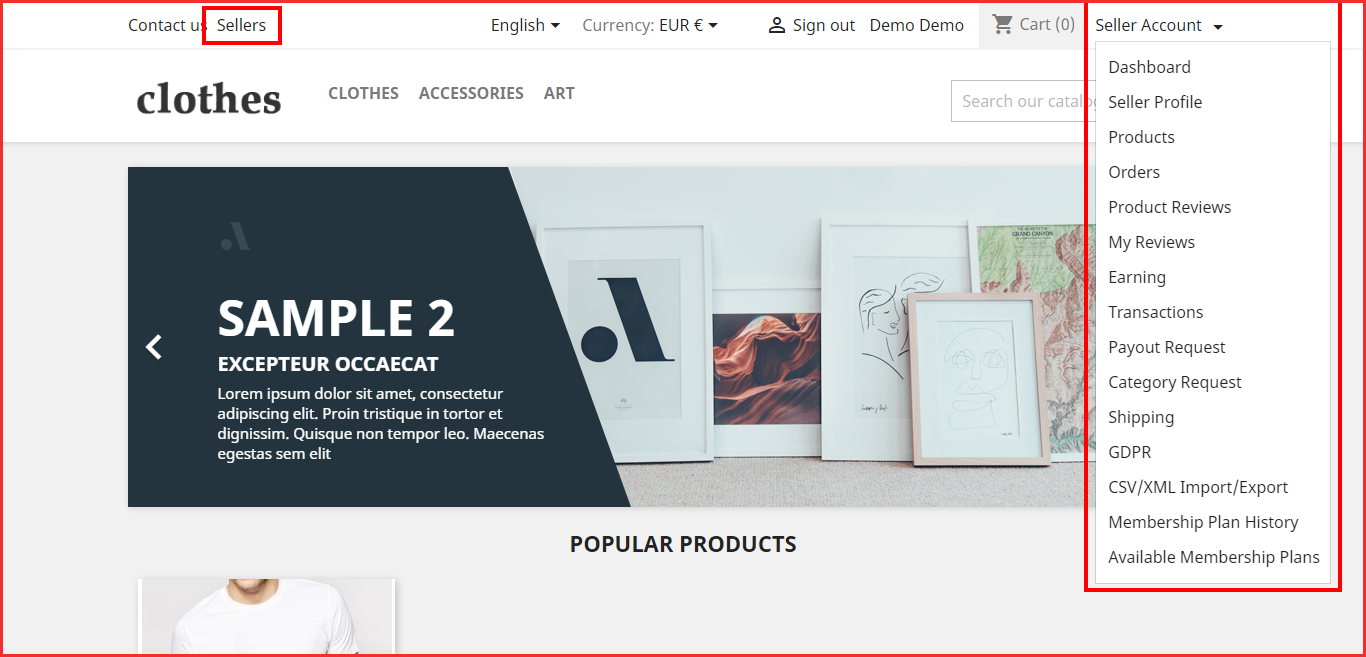
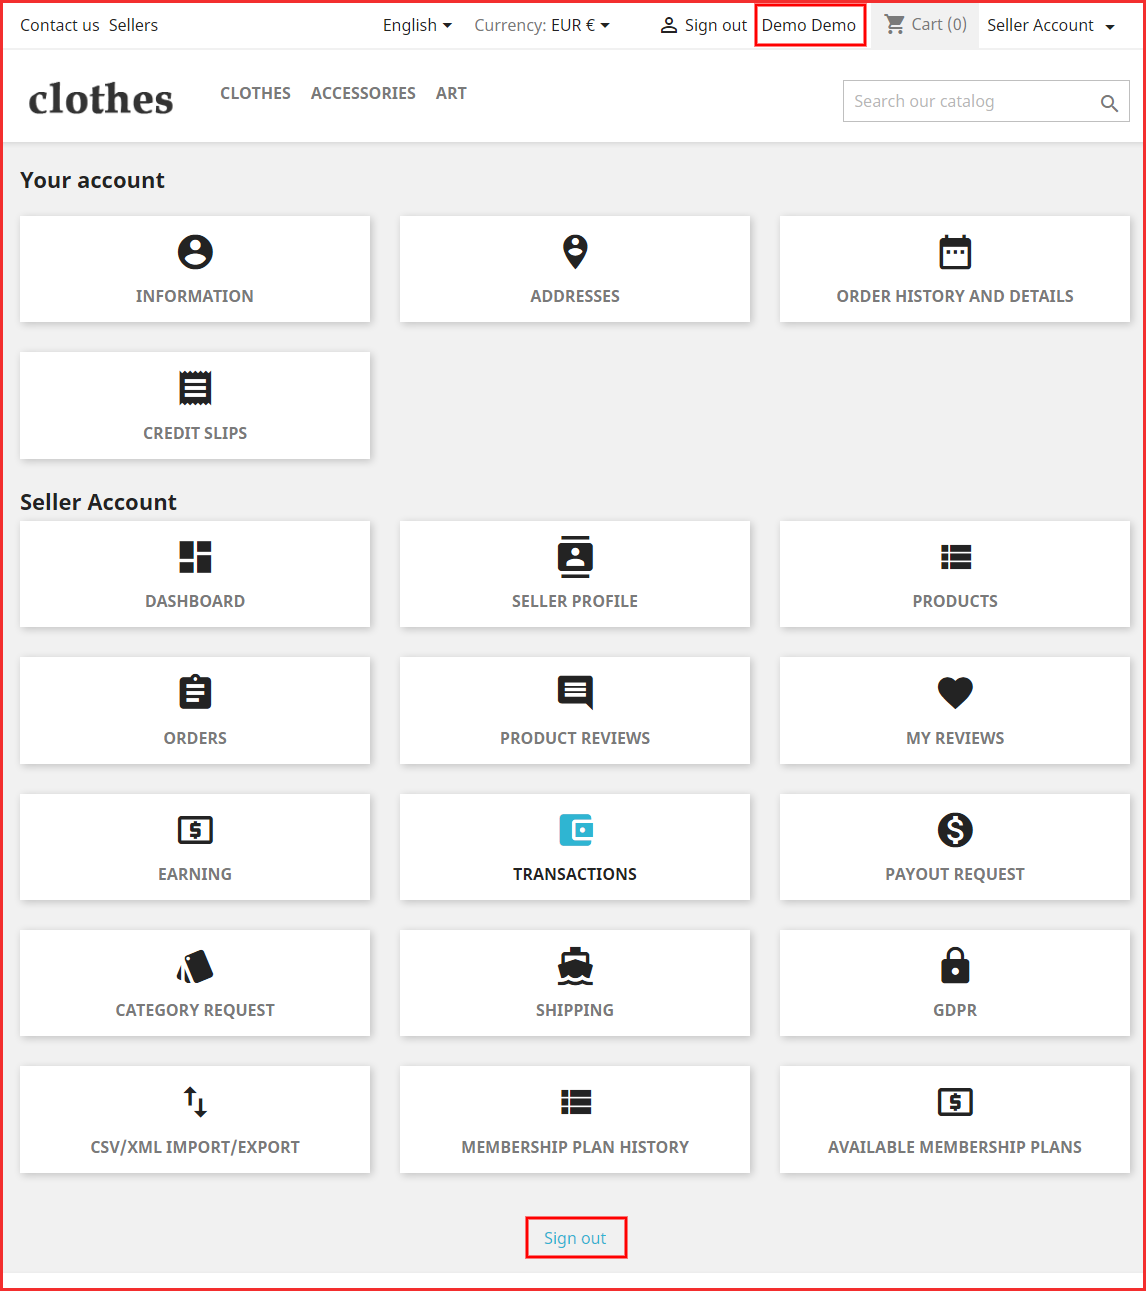
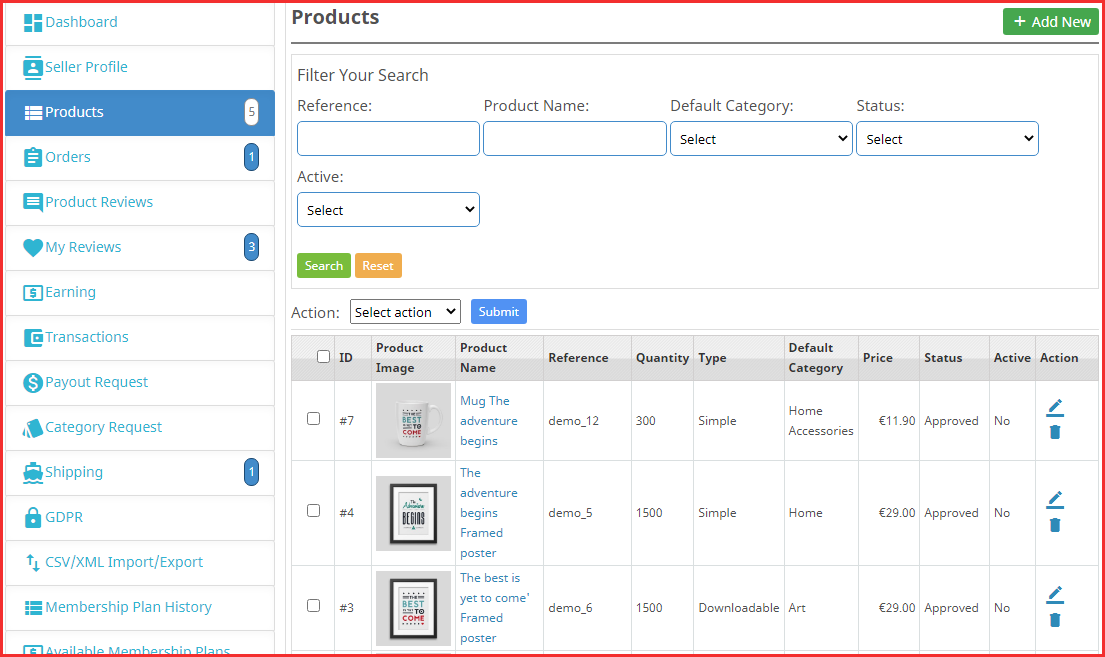
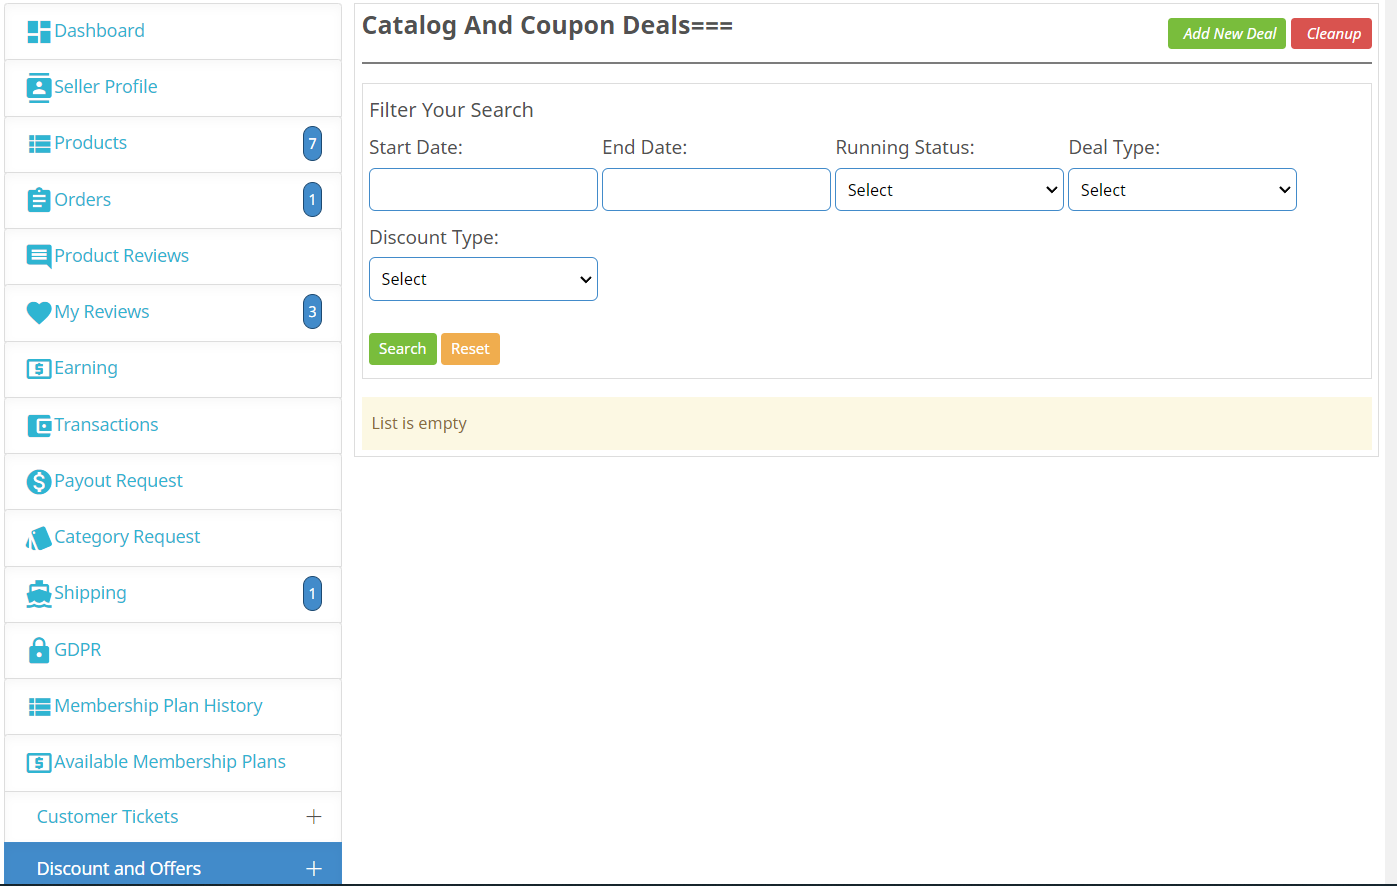
The dashboard allows the vendors to view their profiles, products, and orders.
A separate seller’s page makes it easier for the vendors to promote their business.
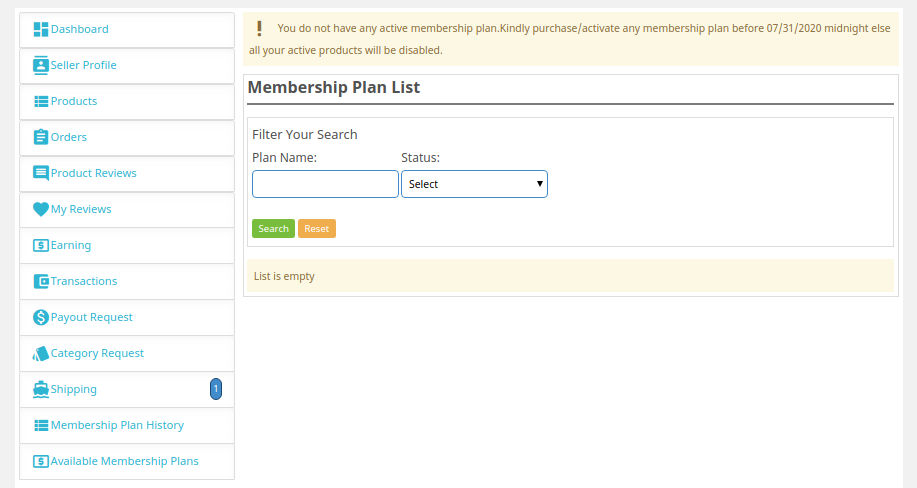
Sellers can choose from various membership plans as per the requirements.
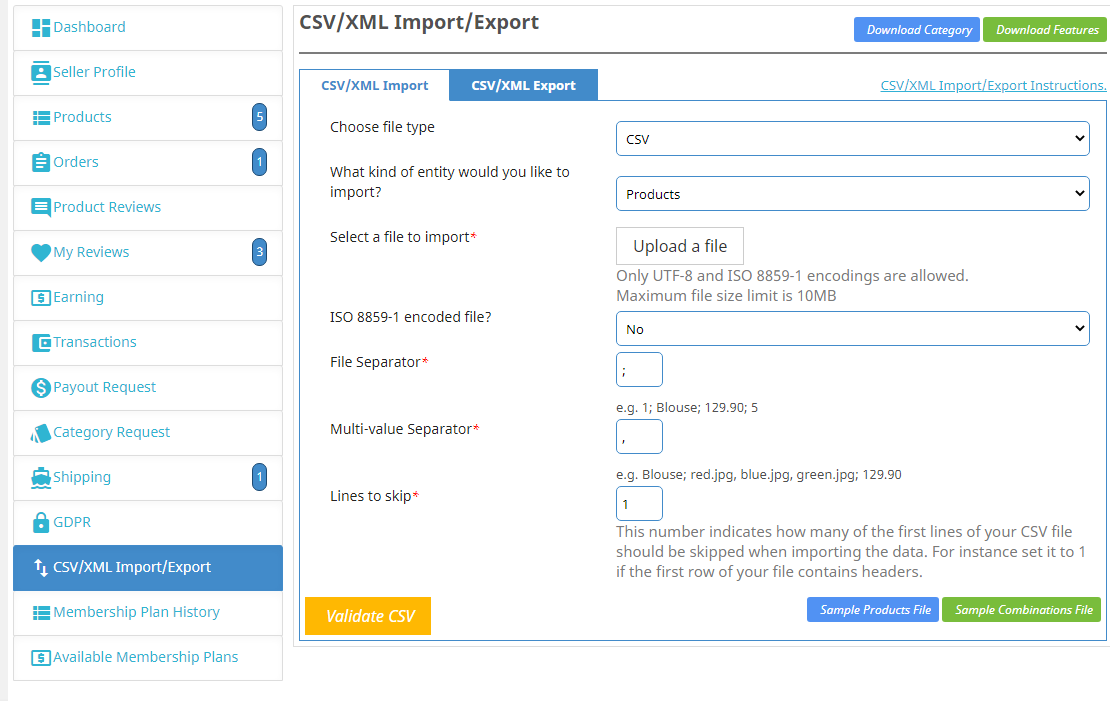
The seller can import the CSV file for products and inventory from the seller interface
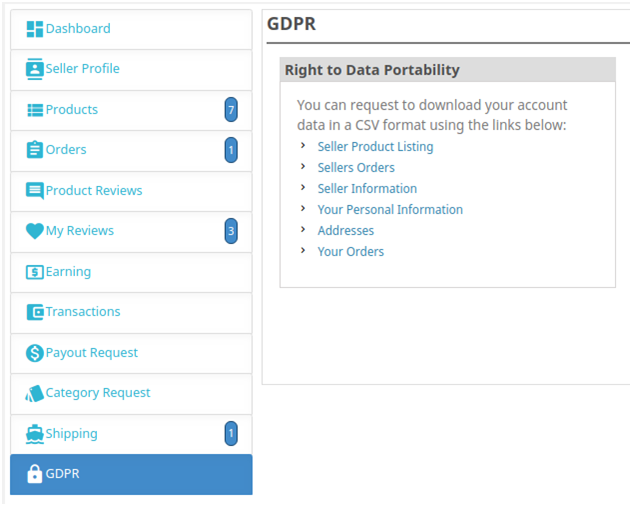
Under GDPR compliance, the sellers get an option to download their details in CSV format by clicking a button.
The sellers can even request the admin to remove their shop from the marketplace. This request is processed from the back-end of the PrestaShop marketplace addon.
Now the sellers can save the images while adding the products to their shops.
1.3 Buyer Benefits
The store visitors can now choose the ideal products from a wider range of product options.
Customers get an option to review the sellers. Customers can also review the products by using our Product Review Reminder or Default Product Comment Addon.
The seller reviews aid them in their purchase decision.
Online shoppers can select the product by visiting the seller’s page.
Buyers can also become a seller in PrestaShop Multi-Seller Marketplace. They can also register as sellers.
2.0 Installation
Follow the following steps for installing the Prestashop Marketplace module:
1. Download the Prestashop Multi-vendor Marketplace add-on package.
2. Unzip the package in /modules directory of your Prestashop store via FTP manager (like Filezilla or WinSCP – download here: https://filezilla-project.org/). The folder structure for the Prestashop Marketplace addon is shown in the image below:
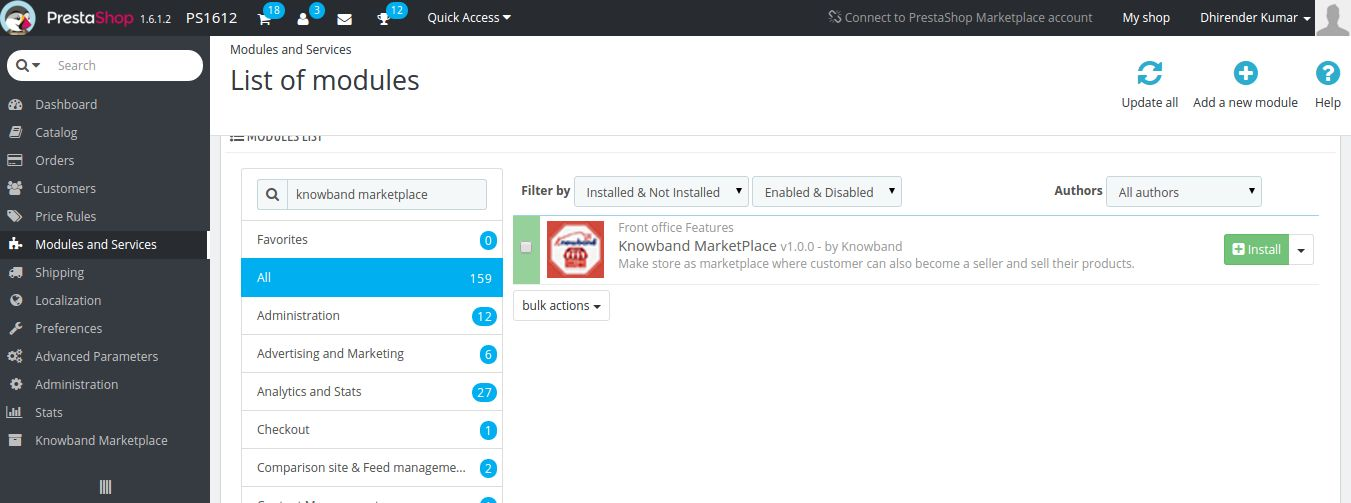
3. You will be able to find the Prestashop Marketplace addon, which is, ready to be installed in the Modules List in your PrestaShop store as shown below.
4. Click on the Install link to install. Once the Prestashop Multi-Seller Marketplace module is set up properly the Install button will convert to Configure.
3.0 Module Configuration of Admin Interface
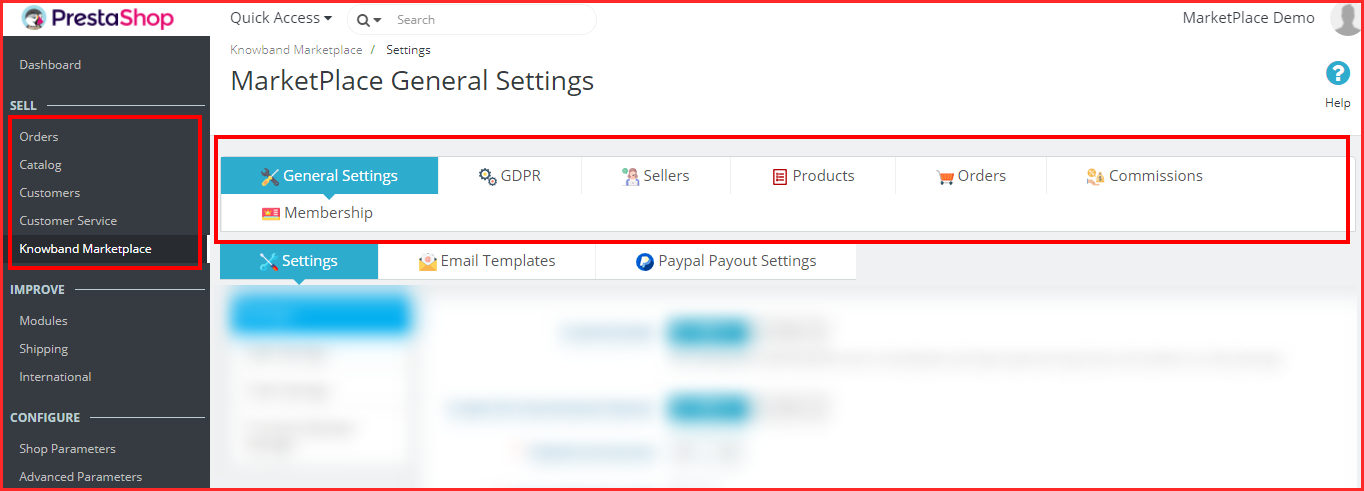
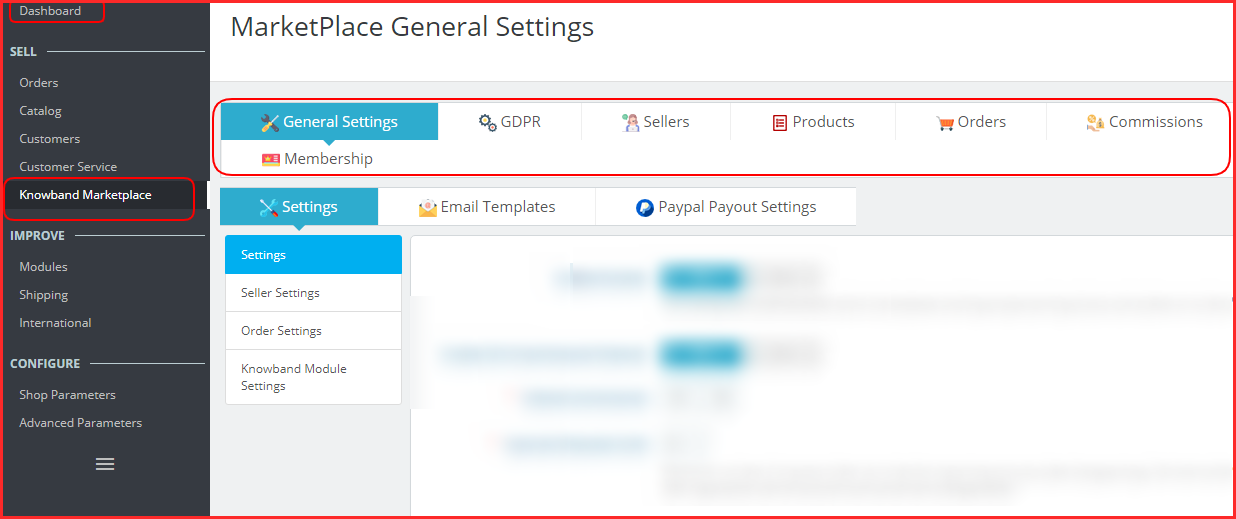
In the admin panel of the PrestaShop Marketplace module, you’ll find a separate menu (named Knowband Marketplace) at the end of the menu as shown below.
3.1 How to Add Seller from the back-end of the Prestashop Marketplace?
The PrestaShop store admin can even add new sellers from the back end just by following these simple steps:
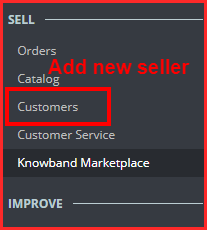
In the Main Menu of the PrestaShop store
Go to Customers -> Go to Add New Customer on the right side of the page or click on the ‘+’ sign on the top right side of the page as shown below.
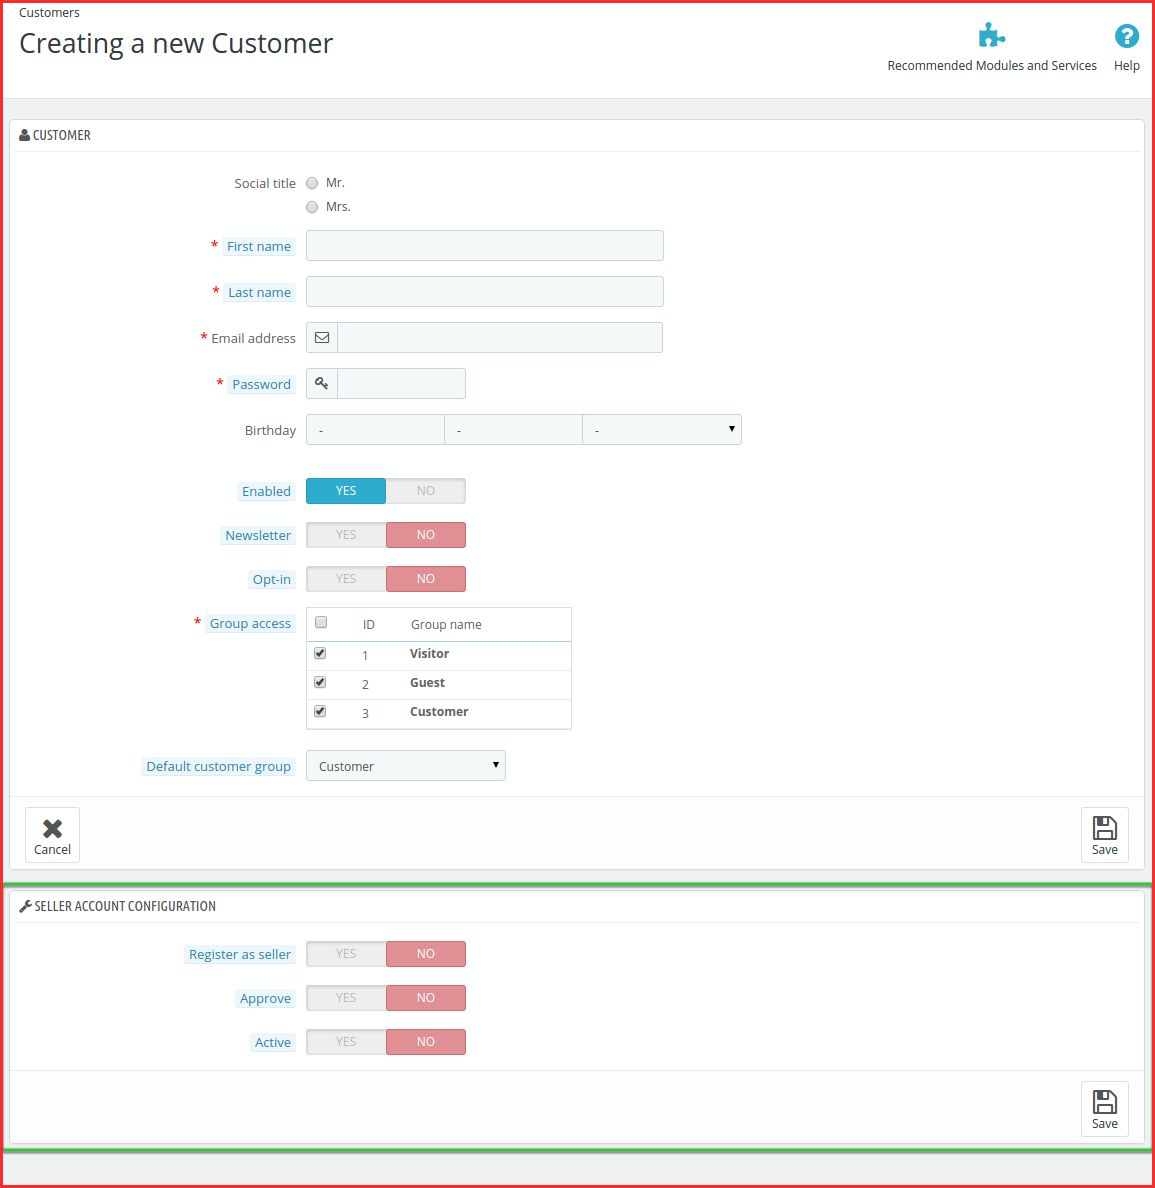
You’ll go to the Customer creation page. A new block will appear at the bottom asking for the Seller Account Configuration.
The admin can add a new seller by filling up the form and a new information block that appears right below. From here a new customer can register as a seller as shown in the image below.
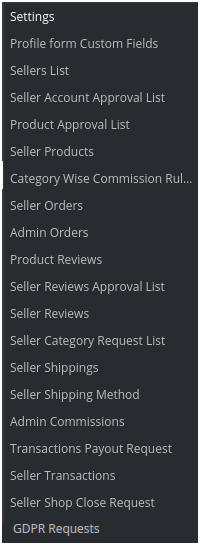
Prestashop Marketplace Menu
The PrestaShop Multi-vendor Marketplace Menu consists of several sub-menu options that direct the users to several pages in the PrestaShopMulti-Seller Marketplace Addon. Here is the list of sub-menus options shown in the image below: All the configuration options are available below in detail:
Marketplace Dashboard:
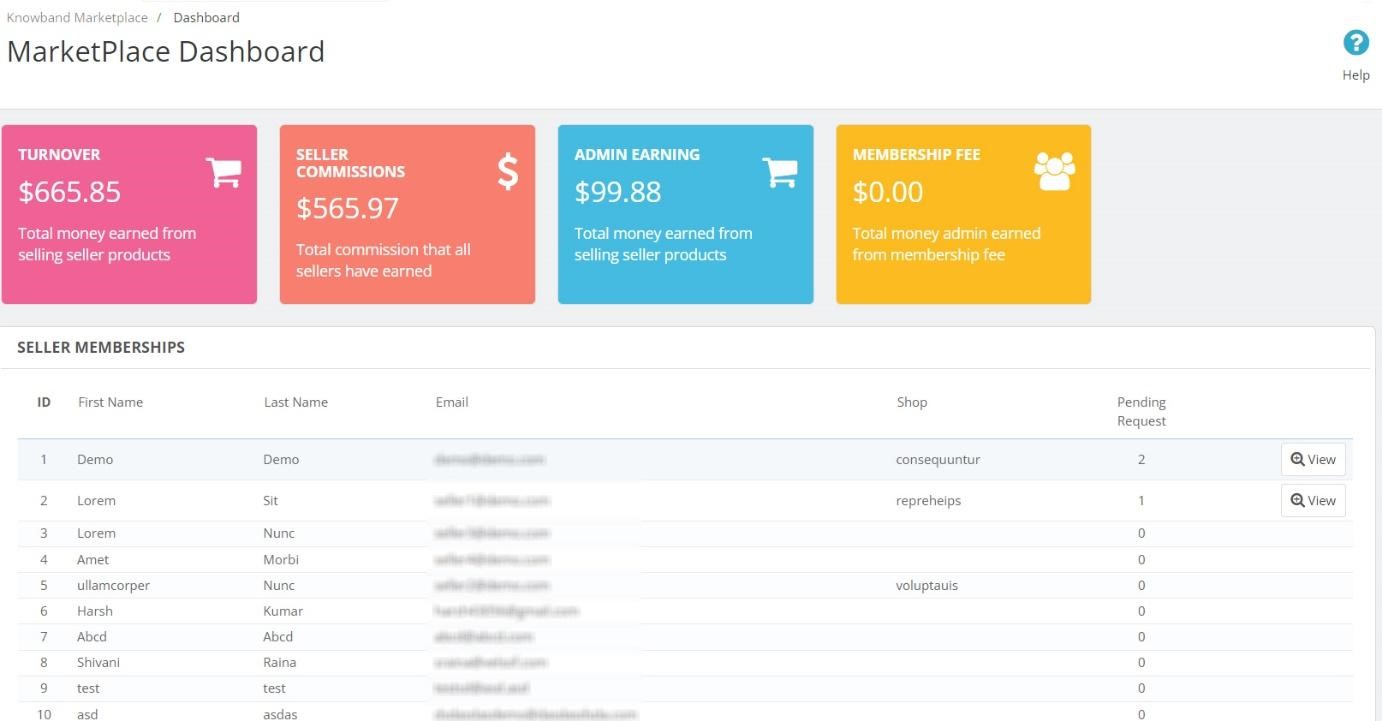
We have recently added the dashboard section in the PrestaShop Multi-Seller Marketplace addon. In the following section, the PrestaShop admins can track all sales, orders, commissions, and much more.
Instance, the PrestaShop store admins can have a glance at total sellers’ earnings, admin commissions, and other details.
4.0 General Settings
The PrestaShop Multi-seller Marketplace Module’s Settings tab divides into 2 levels i.e. Seller Level Settings and Global Level Settings. This page below only controls the Global level settings for the PrestaShop Marketplace Module.
4.1Settings
This page has all the common settings that control the PrestaShop Multi-seller Marketplace extension and its several other features.
4.1.1 Settings
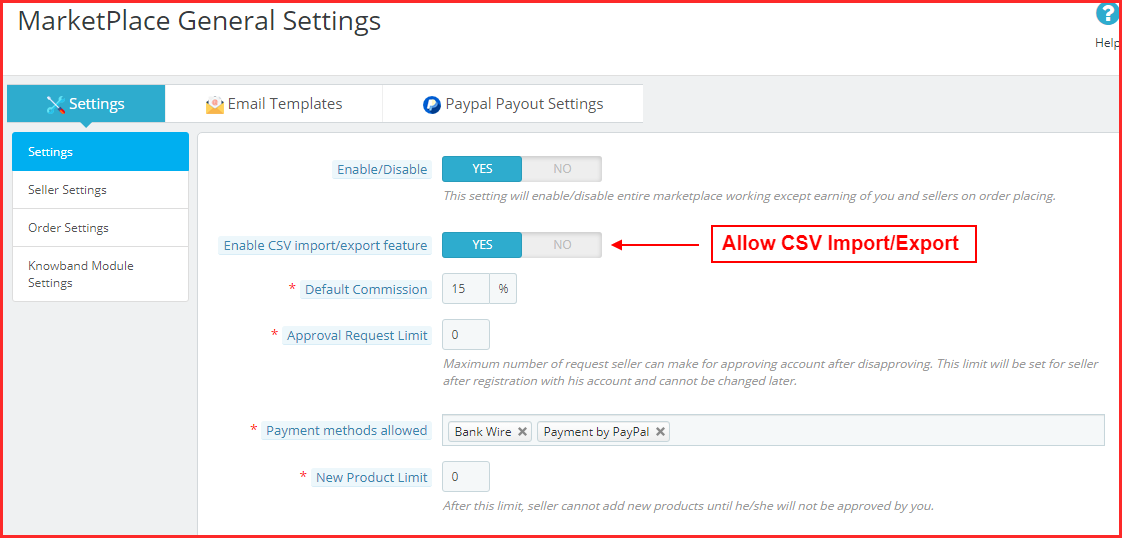
The general settings page consists of the following fields:
Firstly, the admin can Enable/Disable the module.
Enable CSV Import/Export– Allow sellers to import/export the CSV files for the products and combination.
Default Commission: The PrestaShop Multi-vendor Marketplace Extension allows the admin to fix and change the commission being charged to the sellers. This section sets the default commission percentage that will charge from the sellers from the total sales made by them.
Enable/Disable Seller Registration Message: The following setting will enable/disable the seller registration message (welcome message at the time of registration).
Approval Request Limit: It is the maximum number of requests that a seller can make to get a new seller account. This limit will be set for each seller after registration with his account and cannot be changed later.
Payment Methods Available: Select the payment methods you want to allow for transactions.
New Product Limit: Here admin can enter the maximum number of new products that a seller can add. After this limit, the seller cannot add any new product without the approval of the admin.
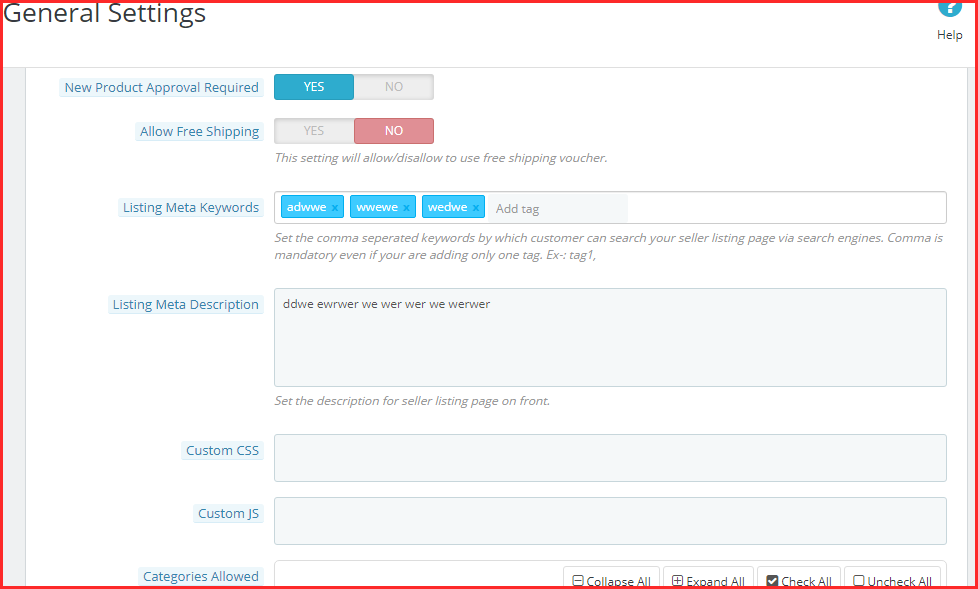
Allow Free Shipping: This setting will allow/disallow to use of a free shipping voucher.
Listing Meta Keywords: Add all the meta tags (separated by comma) by which your customers can search the Seller Listing Page via Search Engines.
Listing Meta Description: Add the description to the meta tags added in the above field.
Custom CSS:
In the following text field, the admins can add the customized CSS they want to show on the front end.
Custom JS:
The Custom JS text field offers the admin to add Java Script Manually for the front end.
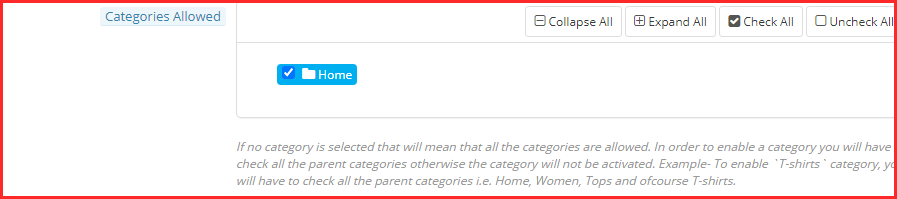
Categories Available: This option shows the categories that the admin allows for the sellers to add products. If the admin selects no category, all the categories are there. In addition, if he selects some of the categories, it means that only those categories are there.
4.1.2 Seller Settings
Admin can control many features for the seller profile.
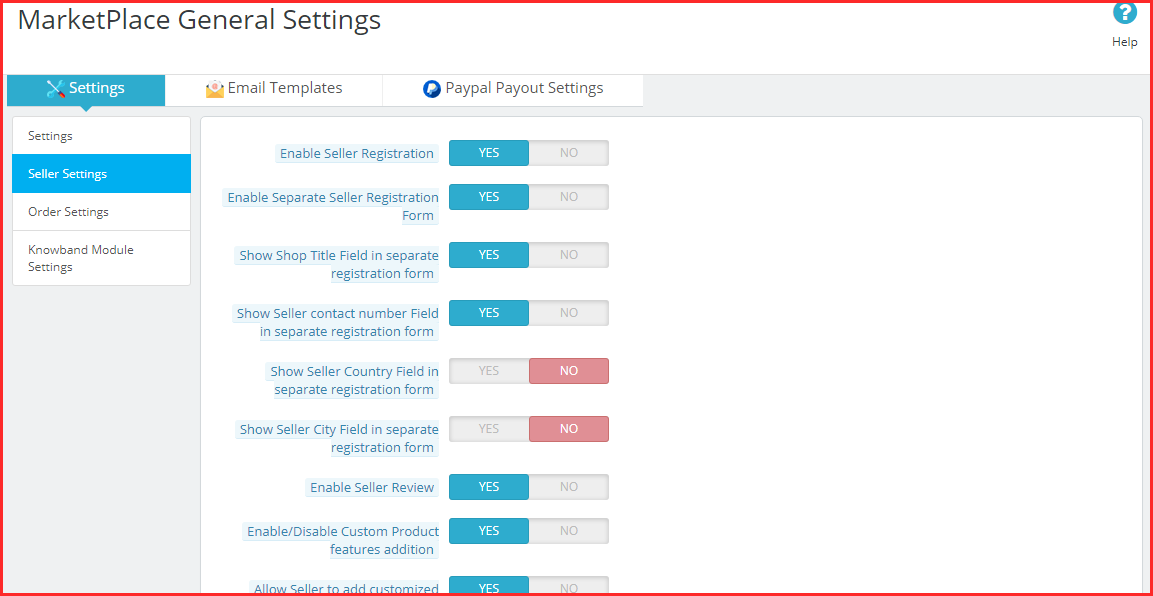
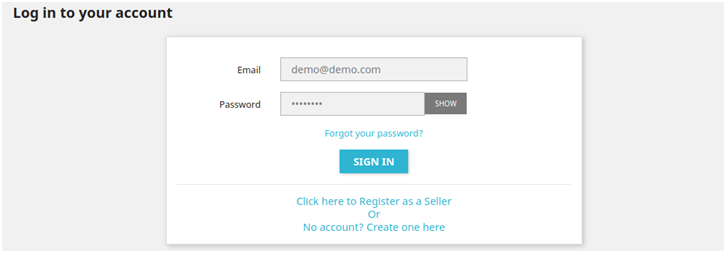
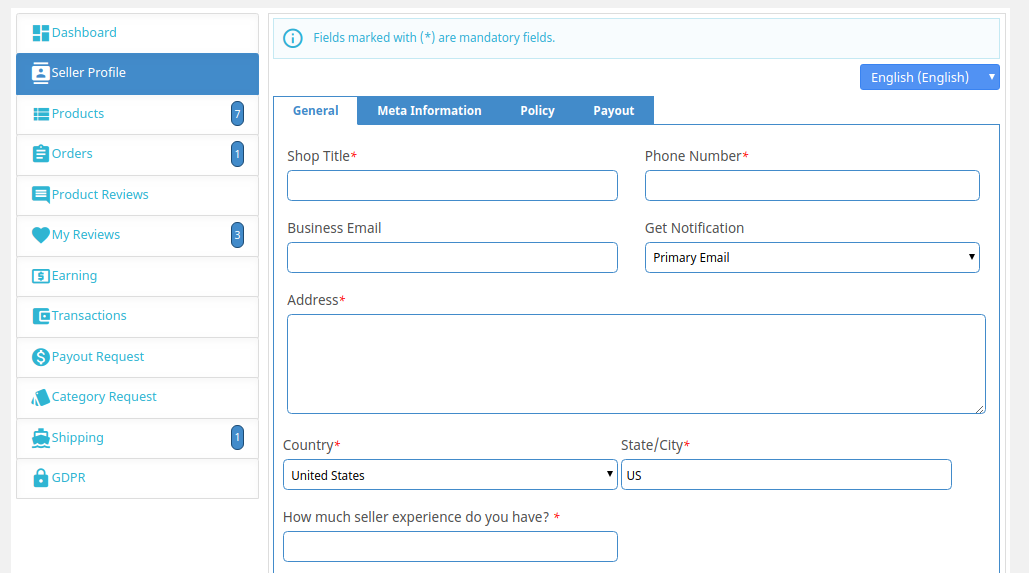
Enable Seller Registration: By enabling this button, the admin can allow the new or existing customer who is not a seller to register as a seller. The same ‘Register as Seller’ option is available in the Customer Tab of the PrestaShop store as well as in the front-end of the marketplace.
Separate Seller Registration Form:
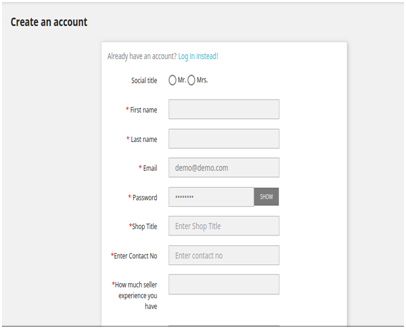
Admin can add a separate seller registration form under the “General Setting” tab of the PrestaShop Multivendor Marketplace. By allowing this functionality admin is also able to add more custom fields in the seller registration form like shop title, seller contact details, seller country, etc.
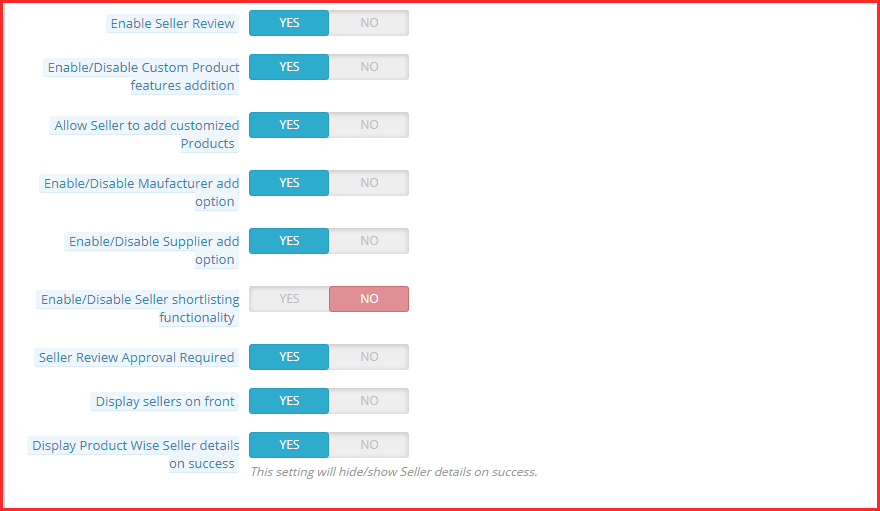
Enable Seller Review: Enable this field, in case you want the customers to review the seller.
Enable/Disable Custom Product features addition: Enable this field, in case you want to add custom product features.
Allow Seller to add customized Products: Enable this field, in case you want to allow sellers to add customized products.
Enable/Disable Manufacturer add option: Enable this field, in case you want to add the manufacturer option.
Activate/Disable Supplier add option: Enable this field, in case you want to add the supplier option.
Enable/Disable Seller shortlisting functionality: Enable this field, in case you want to add seller shortlisting functionality.
Seller Review Approval Required: Enable this field in case you want the seller review to approve before it becomes visible on the storefront.
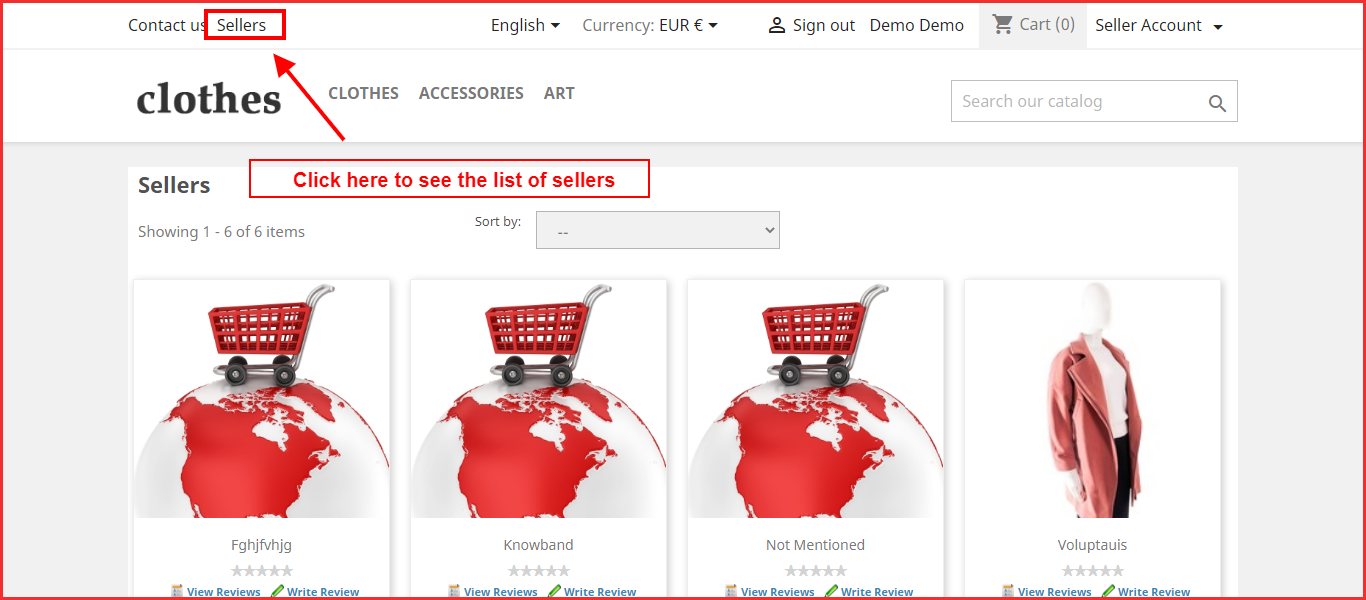
Display sellers on the front: Enable this field in case you want to show a link in the header of the PrestaShop marketplace front-end about the seller’s listing page. If this setting is on disable then the seller listing page. In fact, the Sellers listing options will display in the front-end as below:
Display Product Wise Seller Details on Success: If the admin enables this feature, the seller details will be shown on the order confirmation page.
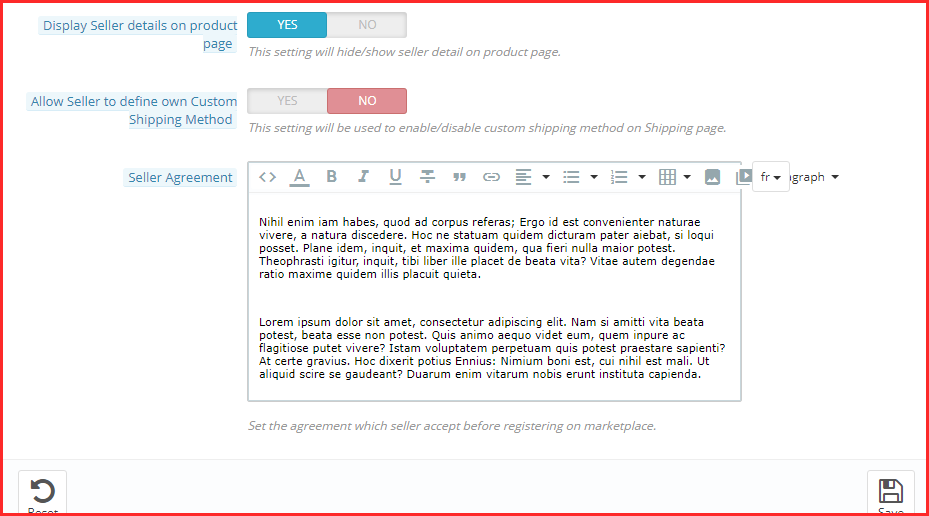
Display Seller Details on Product Page: When the option is on enable, the seller’s detail displays on the product page.
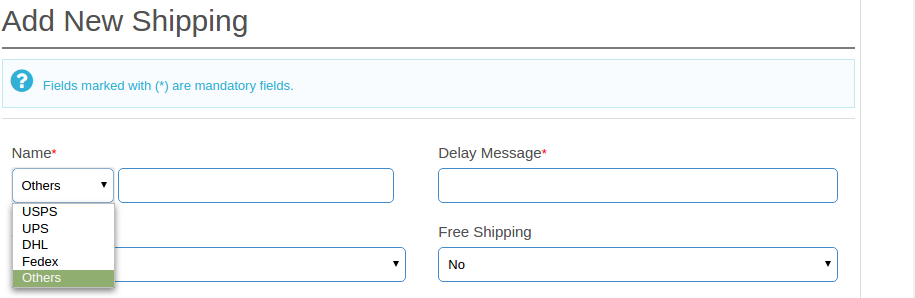
Allow Seller to define own Custom Shipping Method: Enable this functionality to allow the sellers to define their shipping methods. In case, this feature is off, then, only the default shipping methods defined by the admin be shown in the Shipping tab of the seller’s dashboard.
In case, this feature is on, then, the seller will get an ‘Others’ option in the front-end as shown in the image below:
The seller can select ‘Others’ to add his custom shipping methods.
Seller Agreement: The seller agreement is customizable from this section of the PrestaShop Multi-vendor Marketplace plugin. The same agreement is visible to the sellers once they register themselves in the PrestaShopMulti-Seller Marketplace.
Enable/Disable Product Type Selection:
This setting will allow the admin to enable/disable the product type selection functionality for seller on the front.
Use Admin Career as Seller Default Career:
This setting will allow using the admin carrier as the seller’s default carrier which was automatically created for the seller.
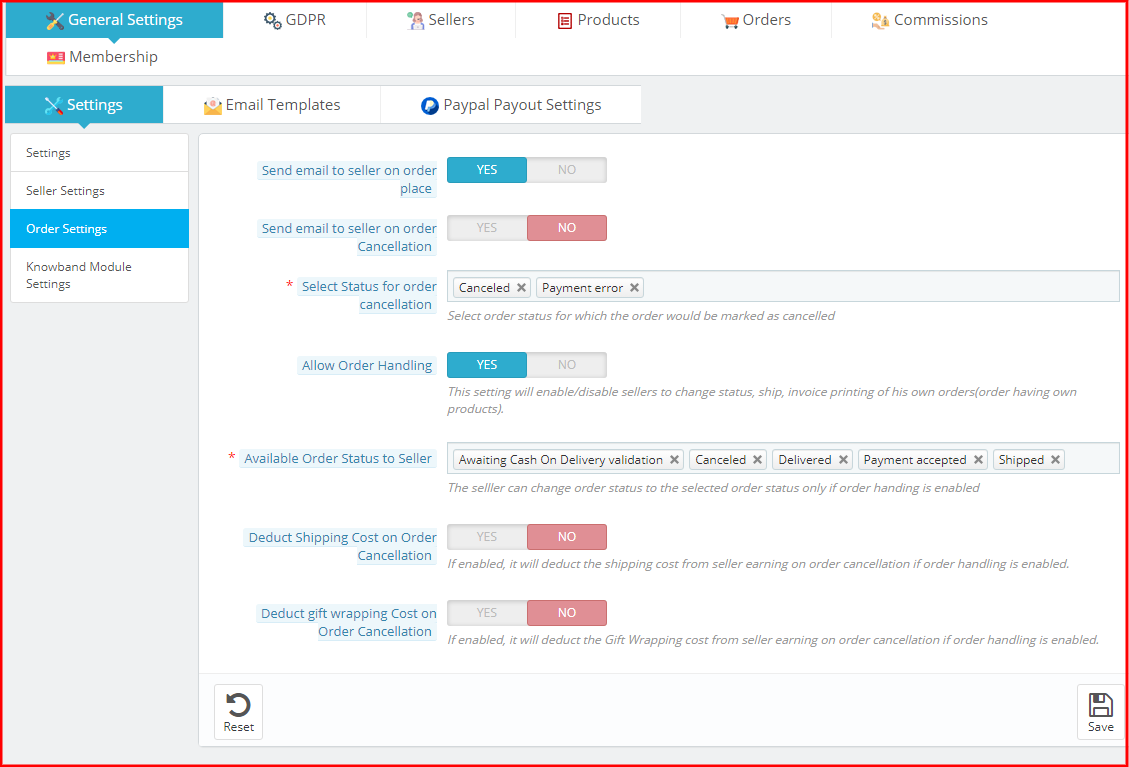
4.1.3 Order Settings
Admin can configure the order setting, email alert options for orders, and many more.
Send Email to Seller on Order Place: Enable this field to send an email to the seller in case an order comes for the seller’s product(s).
Send Email to Seller on Order Cancellation: Enable this field to send an email to the seller in case an order cancels for the seller’s product(s).
Select Status for order cancellation: Select the order status for which the order marks as canceled.
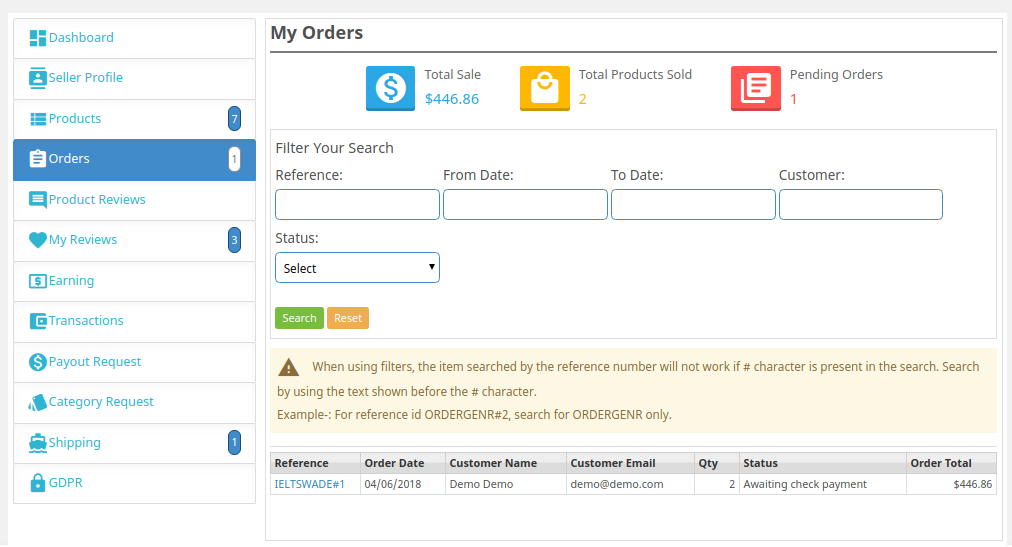
Allow Order Handling: This setting will enable/disable the sellers to manage and change the order status, manage the shipment of the orders and generate the invoice for their products.
Available Order Status to Seller: The seller can change the order status to the selected order status only if order handling enables.
Deduct Shipping Cost on Order Cancellation: If the admin enables this feature, it will deduct the shipping cost from the seller earnings on order cancellation if order handling enables.
Deduct gift wrapping Cost on Order Cancellation: If the admin enables this feature, it will deduct the Gift Wrapping cost from the seller’s earnings on order cancellation if order handling enables.
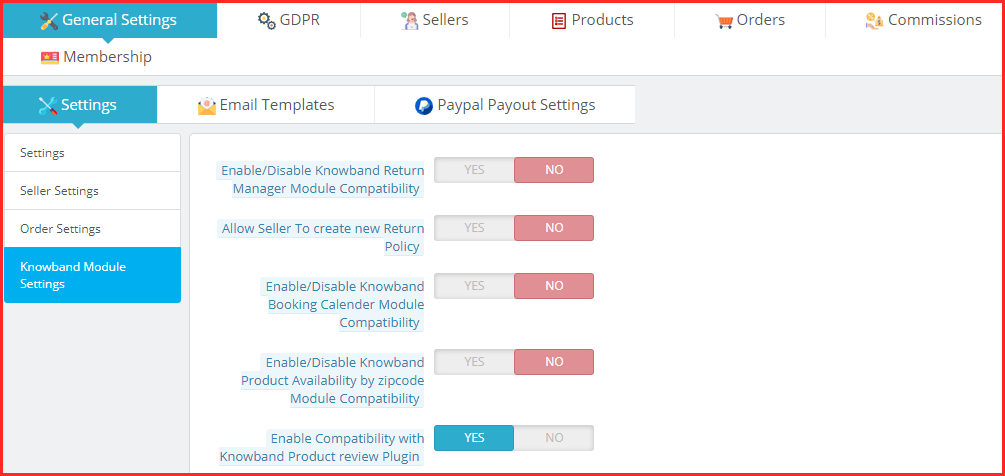
4.1.4 KnowBand Module Settings
Here, the admin can enable/disable the Knowband modules.
Enable/Disable Knowband Return Manager Module Compatibility: Enable this field, in case you want to add Knowband Return Manager Module Compatibility.
Allow Seller to create a new Return Policy: Enable this field, in case you want to allow the seller to create a new return policy.
Enable/Disable Knowband Booking Calendar Module Compatibility: Enable this field, in case you want to add Knowband Booking Calendar Module Compatibility.
Enable/Disable Knowband Product Availability by zipcode Module Compatibility: Enable this field, in case you want to allow zipcode module compatibility.
Enable Compatibility with Knowband Product review Plugin: Enable this field, in case you want to allow compatibility with the product review plugin.
Enable Seller Ticket System: Knowband Multi-vendor marketplace now have an option for enabling/disabling the seller customer ticketing system. You can turn on the module by choosing the yes or no option.
Enable Deal Manager: Likewise, seller ticketing system, we have also added Knowband Deal Manager Module with the Knowband Multi-Vendor Marketplace module. You can enable/disable the same from the yes/no buttons provided in the general setting panel.
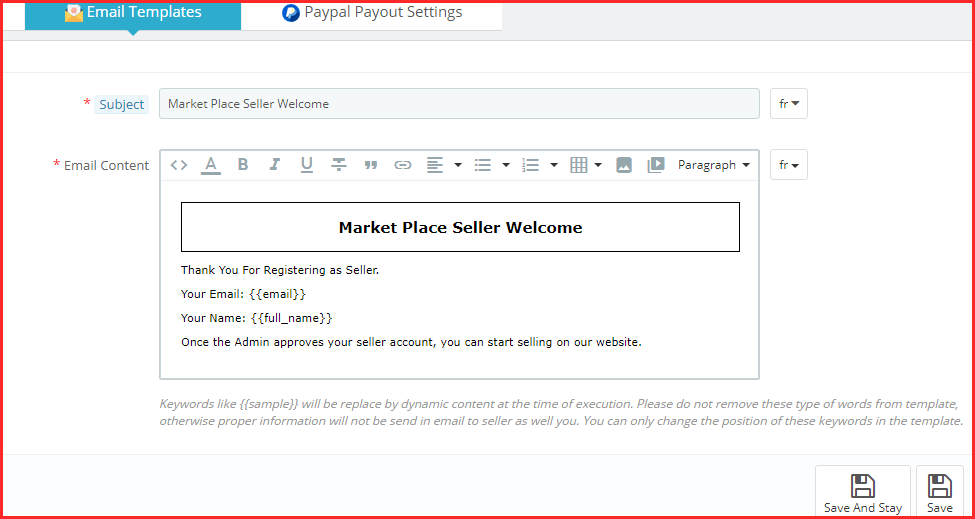
4.2 Email Templates
Various email templates are available for multiple actions. There is a total of 30+ default email templates which include subjects like welcome email, seller account approval, approval notifications, transaction emails, order status templates, etc.
Edit the email template
Admin can edit the default email templates.
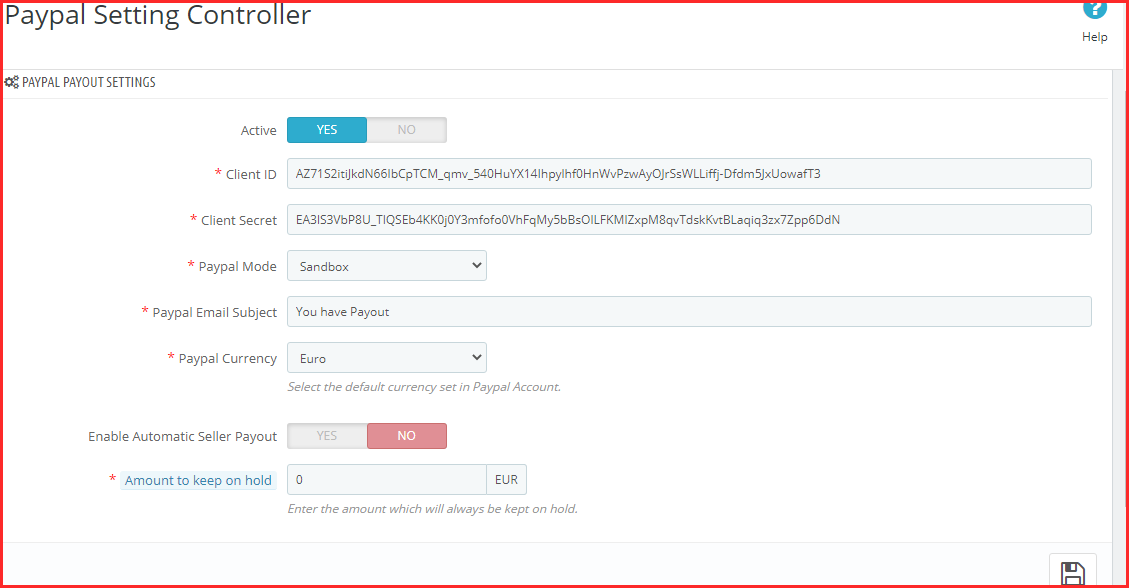
4.3 PayPal Payout settings
The admin can use PayPal if sellers opt for this payment method.
Admin has to add the PayPal details in PayPal Payout Settings.
Enter the API details of the PayPal details as shown in the image below:
Active: Toggle the button to activate the PayPal payout settings.
Client ID: Enter the Client ID of your PayPal account here.
Client Secret: Enter the secret key here.
PayPal Mode: Select the mode, that is, Sandbox or Live from the options drop-down menu.
The PayPal Email Subject: Enter the email subject for PayPal here.
PayPal Currency: Select the default currency set in your PayPal account.
Enable Automatic Seller Payout: Toggle the button to activate automatic seller payout.
Amount to keep on hold: Enter the amount which will always be kept on hold for sellers.
5.0 GDPR
Since GDPR is mandatory in many countries, the admin can configure the PrestaShop marketplace module with GDPR.
5.1 GDPR Settings
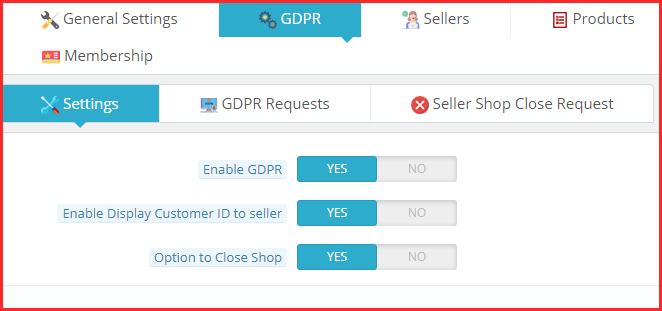
The store admin can enable the GDPR settings by clicking a few buttons in this section of the Prestashop marketplace addon. The various fields are visible below:
Enable GDPR: Toggle this button enables GDPR compliance.
Enable Display Customer ID to seller: Enable this feature if you want to display the customers’ ID to the third-party sellers.
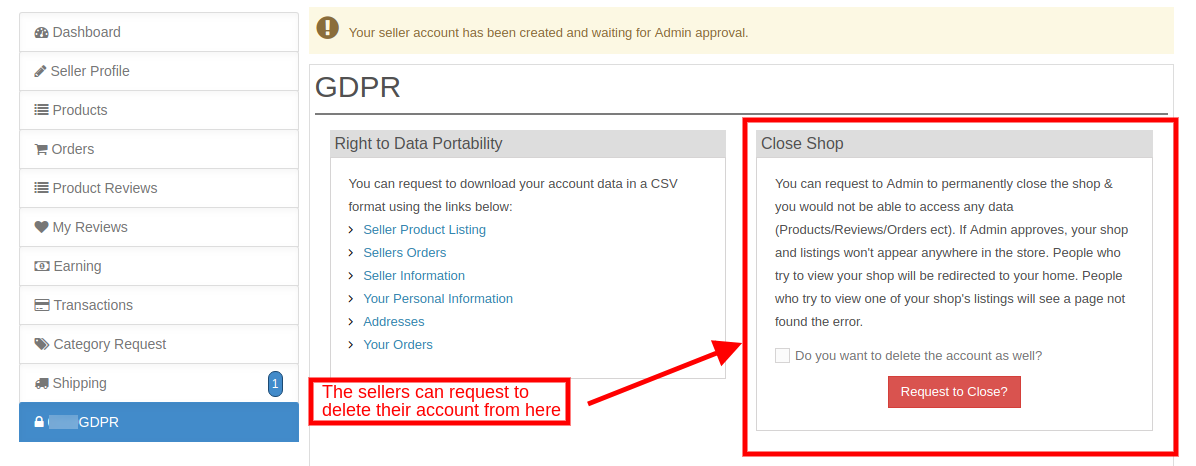
Option to close Shop: If this feature enables, then, the sellers will get options to request for the shop closure. It displays a section in the tab in the dashboard of the sellers from where the request raises.
5.2 GDPR Requests
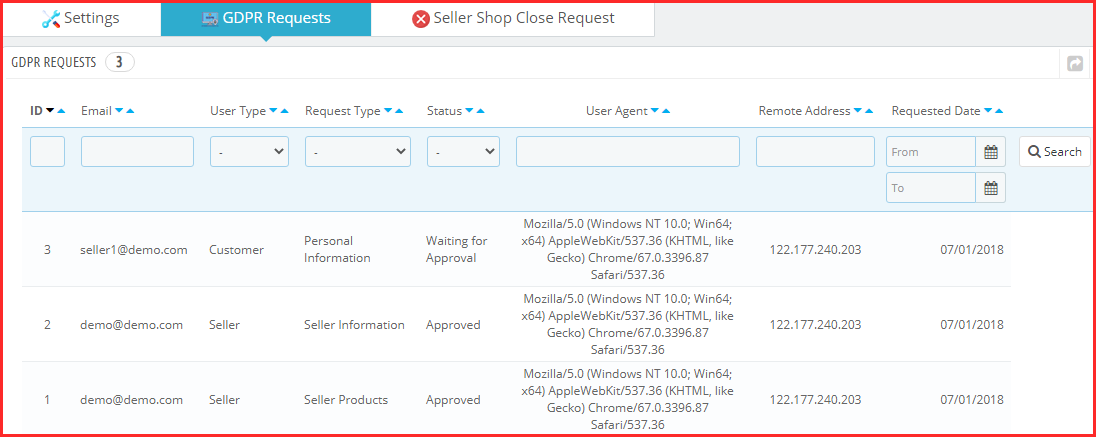
The sellers can download their data in CSV format just by clicking the links provided in the GDPR section of the dashboard.
The admin can view the GDPR requests initiated from this section in the back-end of the Prestashop multi-vendor marketplace module as shown in the image below:
5.3 Seller Shop Close request
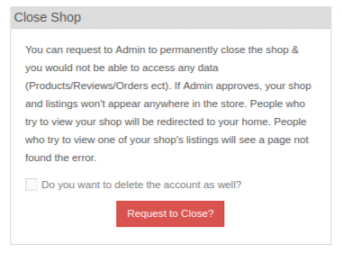
Ifthe admin enables this feature from the back-end of the Prestashop multi-vendor Marketplace plugin, the sellers can request the admin to close their shop.
The request to delete the sellers’ account initiates by just clicking a couple of buttons from the dashboard. The image of the front-end interface is shown below:
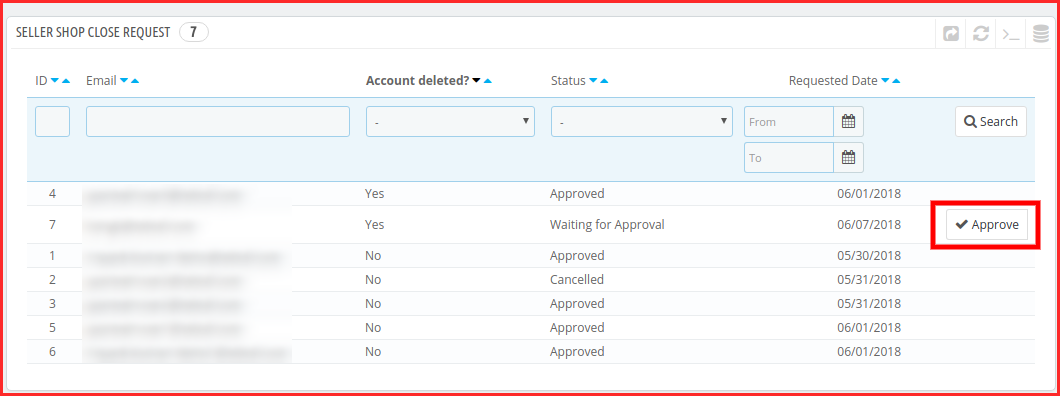
Once the request is sent, the admin can view the same from the Seller Shop CloseRequest tab of the Prestashop multi-seller marketplace extension.
The confirmation mail is sent to the seller. Once the sellers provide the confirmation, an ‘Approve’ button displays corresponding to the request. The admin can click the same and complete the request.
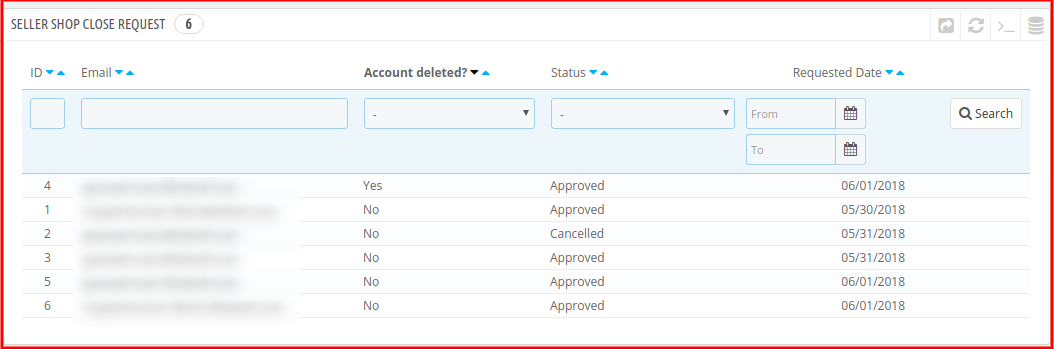
The entire list of the shop closure request and their status is displayed in this section of the Prestashop multi-seller marketplace plugin as shown in the image below:
6.0 Sellers
6.1 List of Sellers
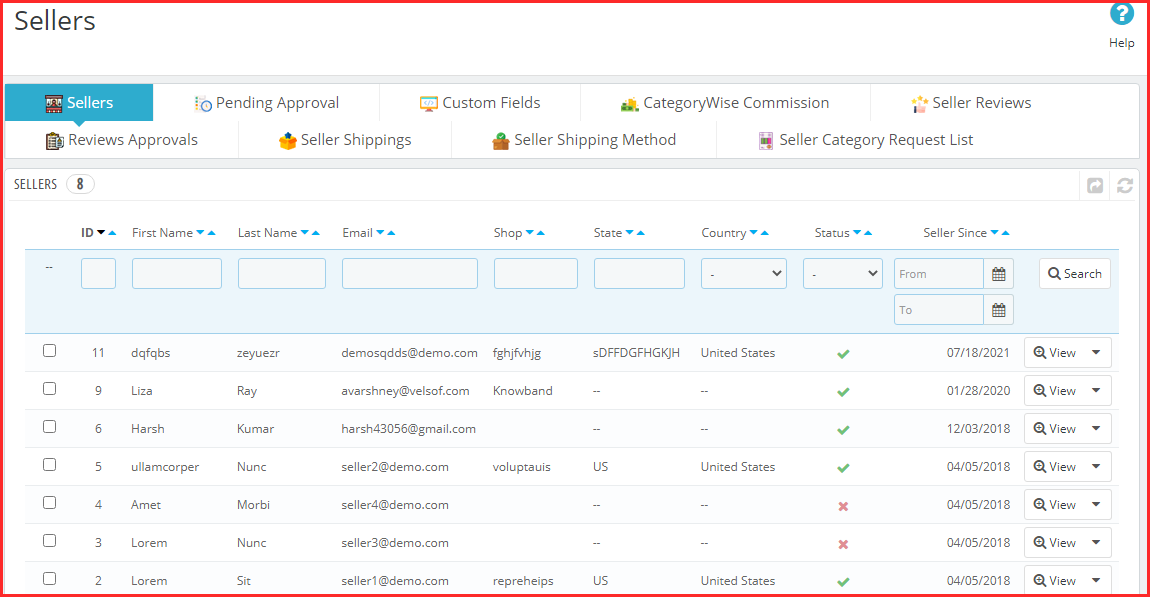
This page of the Prestashop Multi-seller Marketplace extension has a list of all the sellers that the store owner approves.
There are several filters as well to filter the list of sellers as shown in the above screenshot.
The above figure consists of a list of all the sellers that clear the approval.
The admin can also enable or disable a seller in this list using the bulk actions of the grid.
If a seller disables, then, all the products of that seller also disable. Moreover, will not be visible on the storefront.
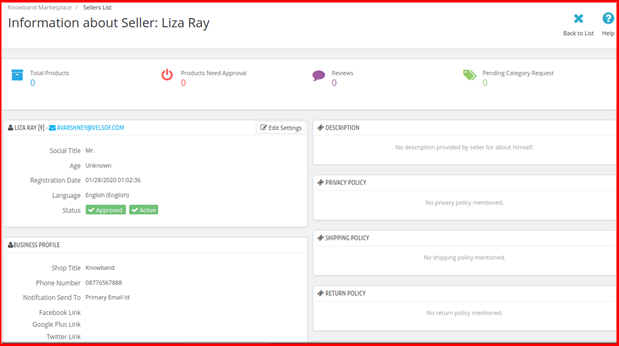
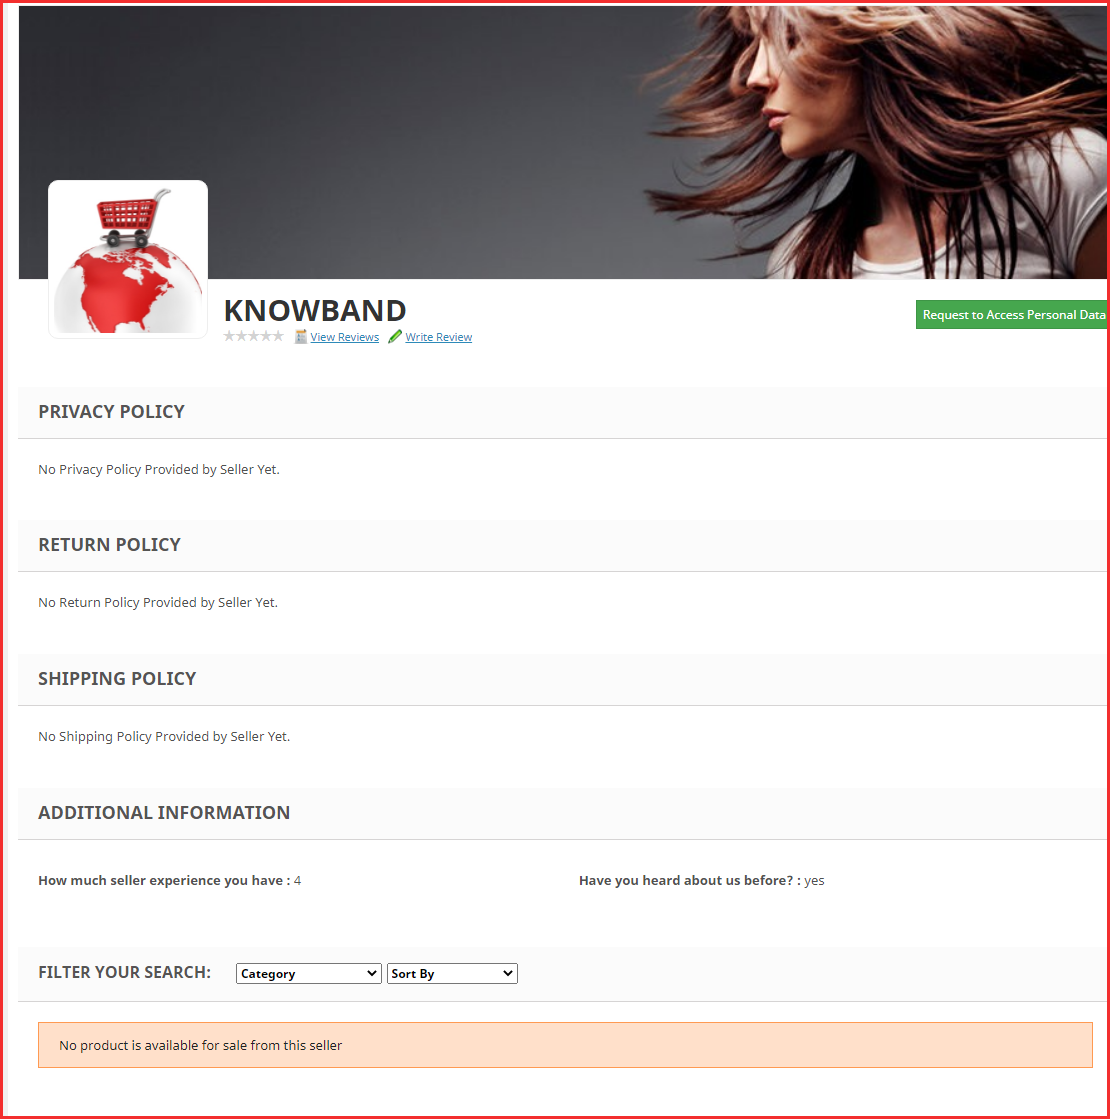
When you click on the view button, a new page opens up consisting of information about the seller.
6.1.1 How can the admin edit the Sellers Profile from the backend?
To edit the seller’s profile, follow the below-mentioned profile:
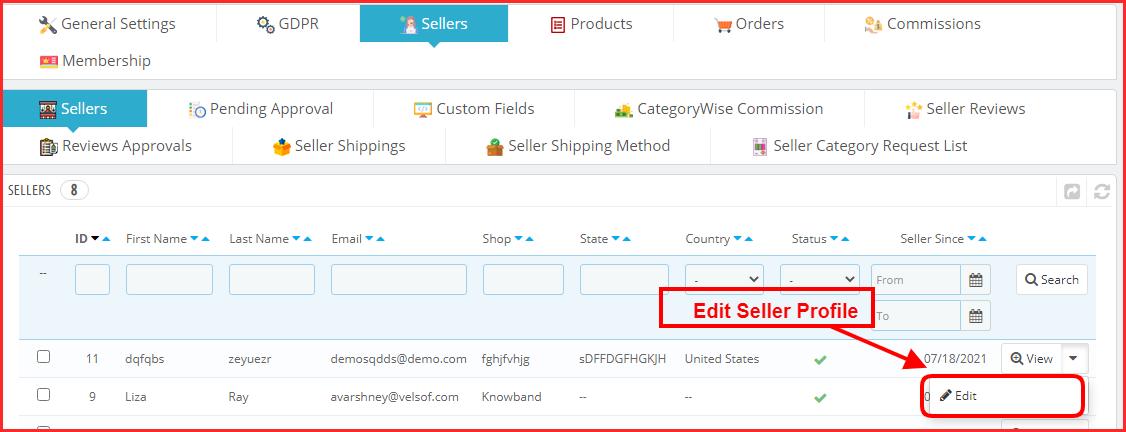
Go to Customers -> Select a Customer who is also a seller -> Click on Edit link on the Customer Information Page
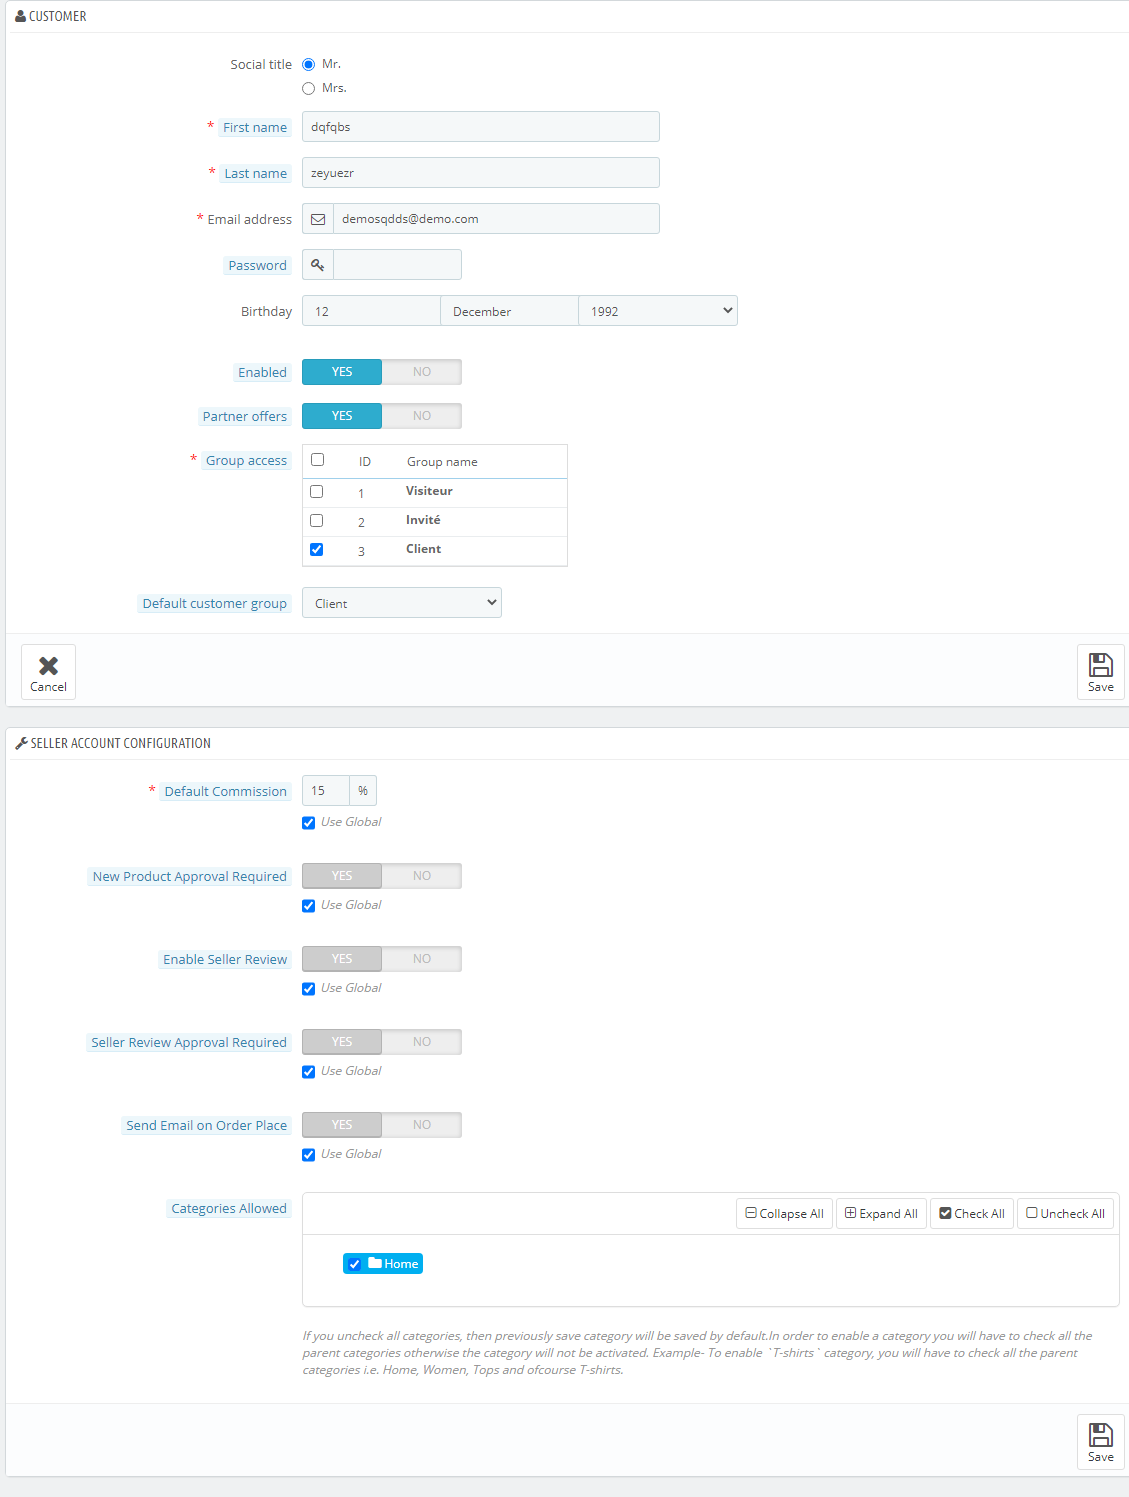
In case, the store admin can edit a seller’s profile just by clicking on the Edit button corresponding to the profile. The admin can edit the profile just as they edit the customer’s profile.
When this page loads for the first time the fields have the default settings that are pre-defined for the addon.
6.2 Pending Seller Approval
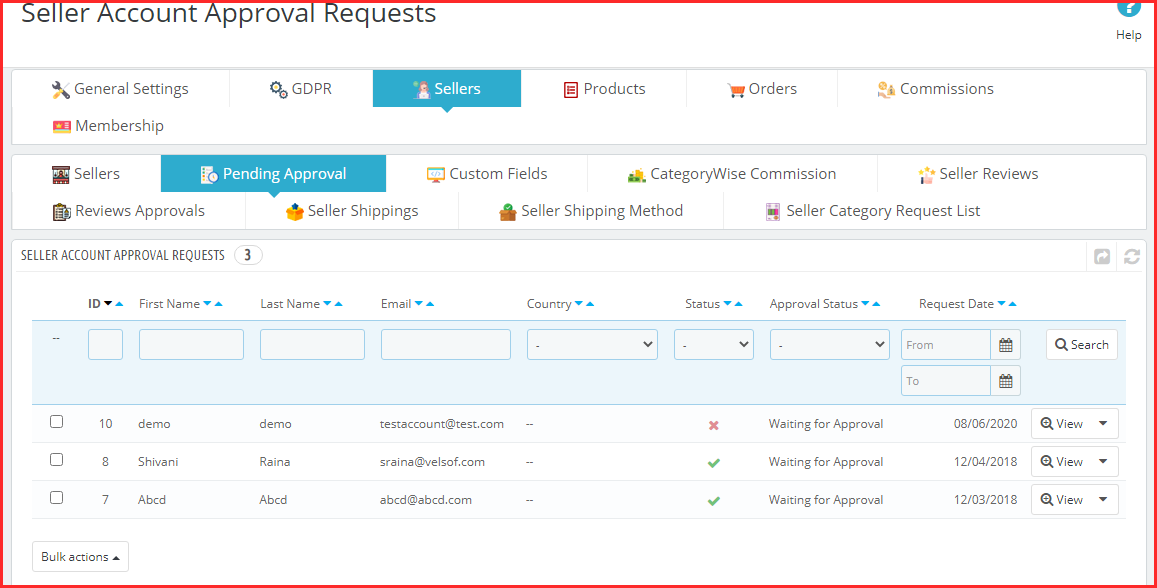
Seller Account Approval Request
When a seller registers or any customer registers as a seller on the Prestashop marketplace, then, it first appears in this tab of the Prestashop Multi seller Marketplace module. The store admin can approve or disapprove of the seller account request.
Approve Seller Account: To approve a seller’s account, you have to click on the “Cross” button corresponding to that seller on the list from the backend.
Once the Seller account approves it directly moves to the Sellers List. Moreover, all the limits to the seller account release.
A mail will be sent to the seller to notify him about the approval of the seller account.
Note:- The Seller Accounts that the store owner approves cannot be undone. Please use this feature carefully.
Disapprove Seller Account: To disapprove of a seller account, you have to click on the “tick” button in front of that seller on the list.
A pop-up will appear asking for the reason for disapproval of the seller account. Fill out the reason and then submit the form to complete the action.
A mail will be sent to the seller notifying the disapproval of the seller’s account. The reason provided in the pop-up will also be sent in this mail.
Note:- Once a seller request disapproval then he can again apply for the seller account. In addition, whenever a seller does this the store owner gets a notification email.
6.3 Custom Fields
Now admin can add custom fields for the seller profile page and even make them required for the sellers to fill out.
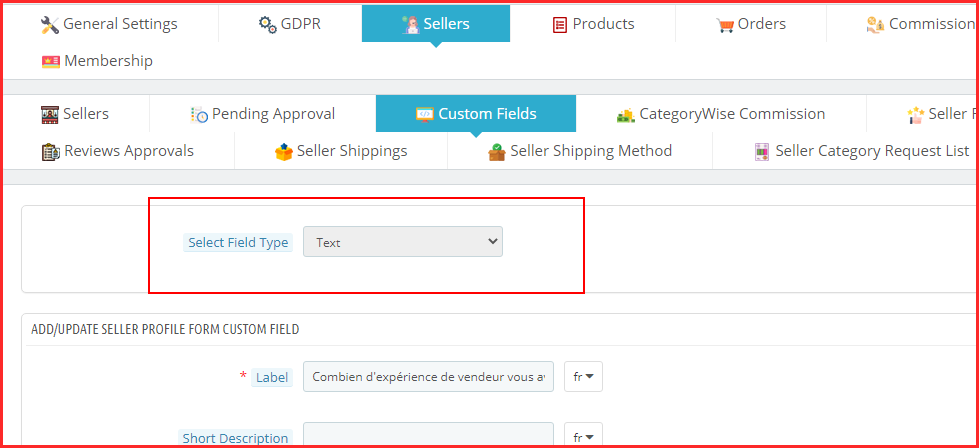
Custom Fields Type Selection:
Admin can select the custom field type that he wants to add on the seller profile page. Further, the admin gets lots of options. For instance, checkbox, radio button, text box, etc.
6.3.1 How to Add New Custom Fields for Seller Profile in PrestaShop Multi-vendor marketplace?
Custom Fields for Seller Profile:
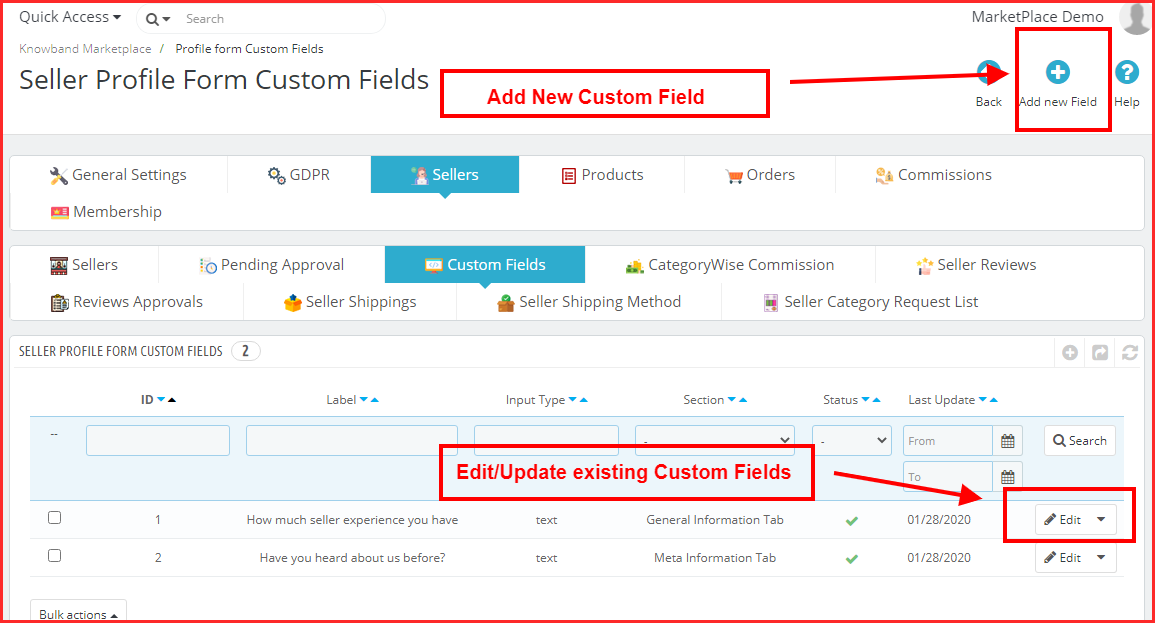
Admin can add new custom fields for the seller’s profile under the “Profile Form Custom Fields” tab. In fact, with the help of this tab, the admin can add new custom fields or delete already added custom fields for sellers’ profiles using PrestaShop Multivendor Marketplace.
Custom Fields Type Selection:
Admin can select the custom fields type which he wants to add on the seller profile page. Further, the admin gets lots of options. For instance, checkbox, radio button, text box, etc.
Category-wise Custom Fields:
Admin can map the custom fields in a particular category using the “Section” tab under Profile Form Custom Fields. Thus, with the help of this admin can map the custom fields category-wise.
Make Custom Fields Required:
Admin can make these custom fields required using the “Required” tab.
Show Custom Fields on Seller Front Page:
With the help of the PrestaShop Multivendor Marketplace, the admin can show the custom fields on the seller’s profile page. Further, the admin can allow this functionality under the “Profile Form Custom Fields” tab.
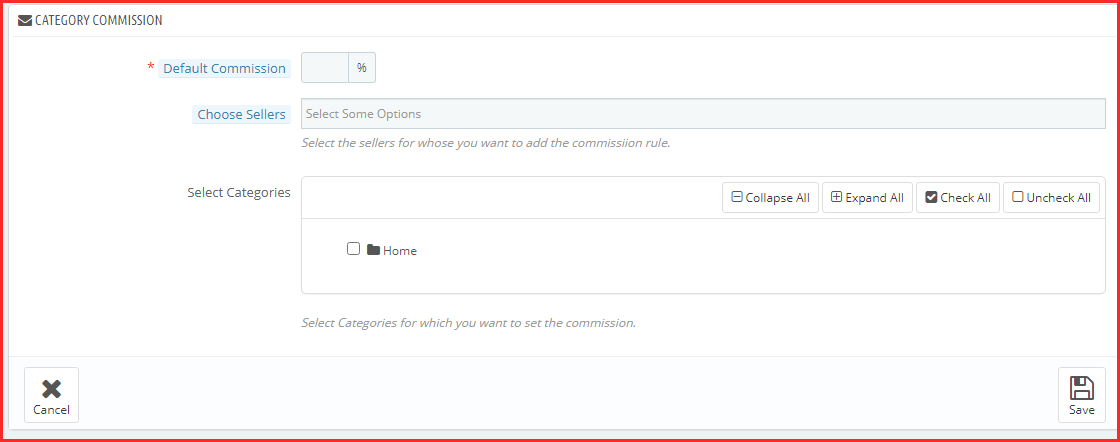
6.4 Category Wise Commission
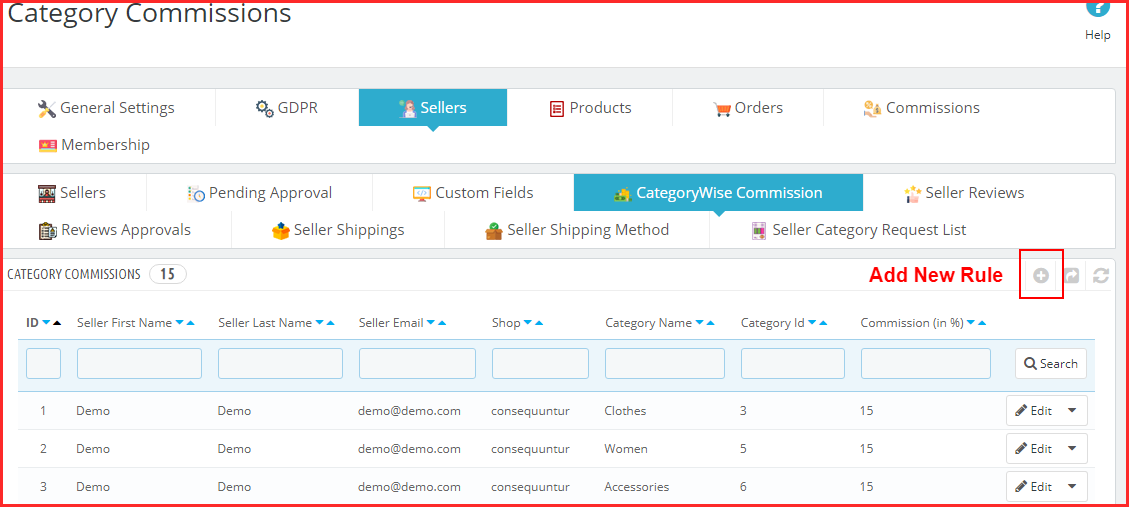
Now, the admin can easily divide the commission according to the product category. Thus, the admin can make new categories too accordingly.
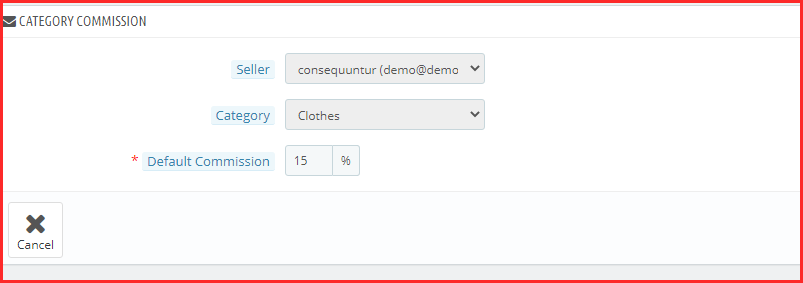
In the above screenshot, the admin can set a new category by entering a default commission. In fact, this enables the admin to charge different commission rates for different product categories.
Admin can edit the commission rule by clicking the edit option at any point in time.
6.5 Seller Review
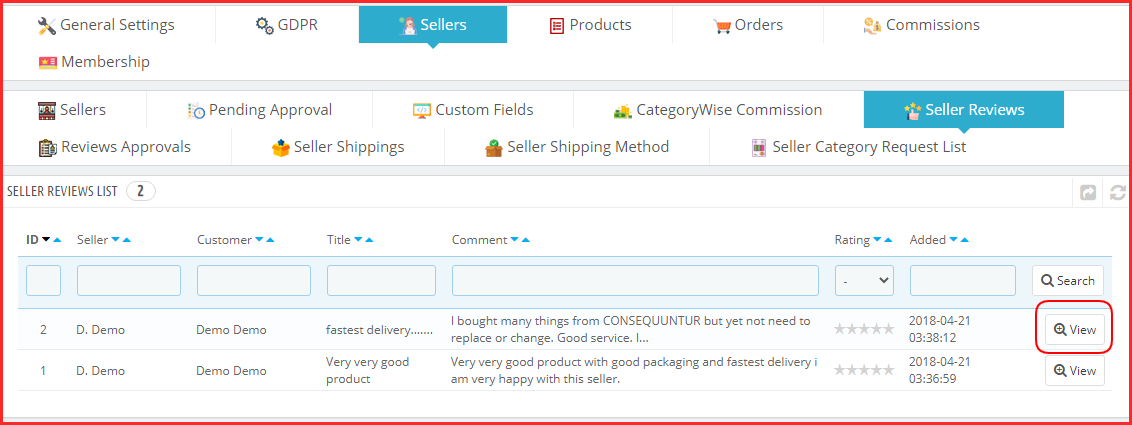
This seller Reviews tab of the Prestashop Multi-seller Marketplace extension contains a list of all the Sellers Reviews done by customers in the store.
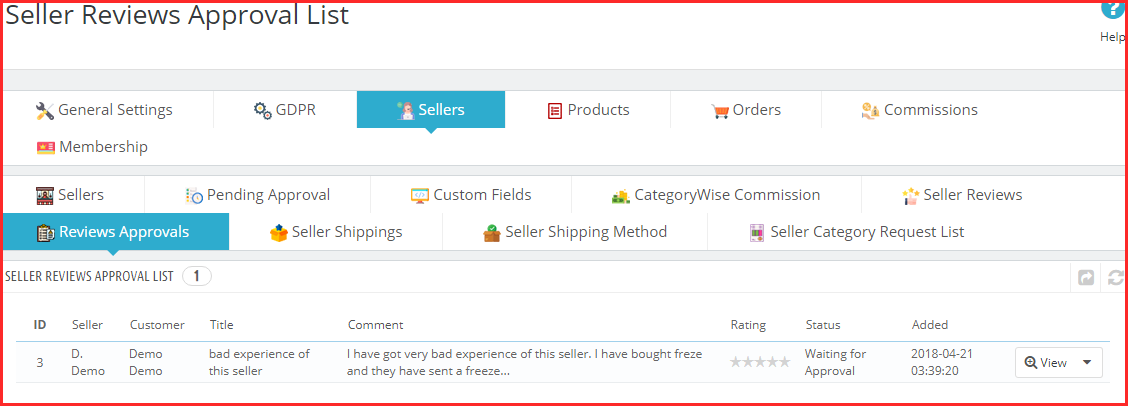
If the admin disables the setting (i.e. Seller Review Approval Required), then a seller review approves directly. Further, when the customer adds. In addition, appears on this list. Otherwise, the review first appears in the Seller Review Approval list.
Note:- The Seller Reviews that the store owner disapproves of also appear in this list.
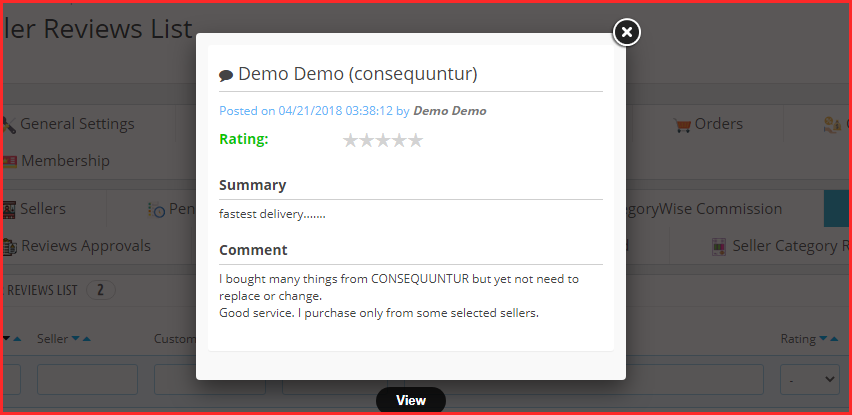
View Seller Review: To view all the details of a seller review you have to click on the View button in front of that review in the list.
On clicking the View button, a Pop-up will appear having all the details of the corresponding seller review.
6.6 Seller Reviews Approval
This tab of the Prestashop Multi-vendor Marketplace extension contains all the Seller Reviews. Furthermore, the ones that the customers post. In addition, no action is happening about them.
If the admin enables these settings (i.e. Seller Review Approval Required), then, only any seller review posted by any customer appears in this list otherwise, it directly appears in the Seller Reviews list.
The reviews that are pending approval are showcased as in the image below:
View Seller Review: To view all the details of a seller review you have to click on the View button in front of that review in the list.
On clicking the View button, a Pop-up will appear having all the details of the corresponding seller review.
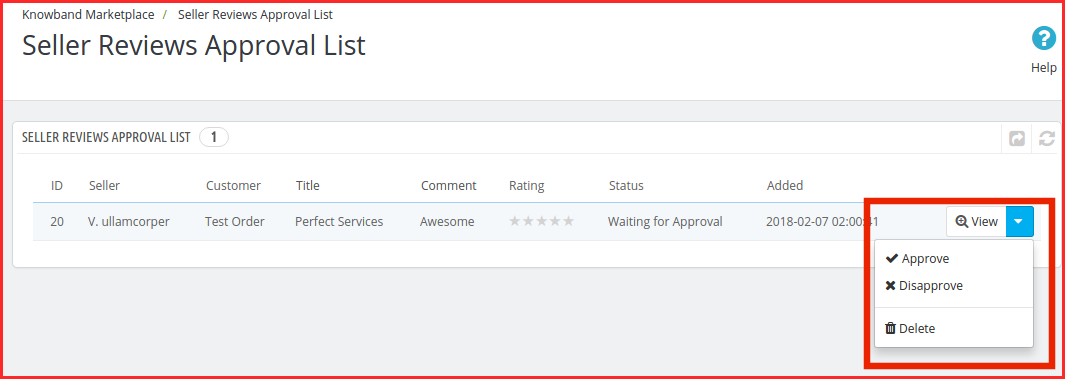
Approve Seller Review: To approve a seller review, you have to click on the Approve button in front of that review on the list.
Once a seller review approves from the backend, it becomes visible on the front end. In addition, is transferrable to the seller review list.
Note:- This action cannot be undone. Please use it carefully.
Disapprove Seller Review: To disapprove a seller review, you have to click on the Disapprove button in front of that review on the list.
A pop-up will appear asking for the reason for disapproval of the seller’s review. Fill in the reason and then submit the form to complete the action.
Once a seller review disapproves, it is transferable to the seller reviews list and cannot be found anywhere else.
Note:- This action cannot be undone. Please use it carefully.
Delete Seller Review: To delete a seller review, you have to click on the Delete button in front of that review on the list.
A pop-up will appear asking for the reason for the deletion of the seller review. Fill the reason and then submit the form to complete the action.
Once a seller review deletes, it is completely removed from everywhere.
Note:- This action cannot be undone. Please use it carefully.
All this can happen with a button click with the help of the Prestashop Marketplace extension.
6.7 Seller Shipping
Whenever a new seller adds to the system, a default shipping method is also available that applies to all the products by default. Moreover, it is free as well.
The seller can add a new shipping policy and can map products to it as well, but until then, all the products are mappable to the default shipping policy only.
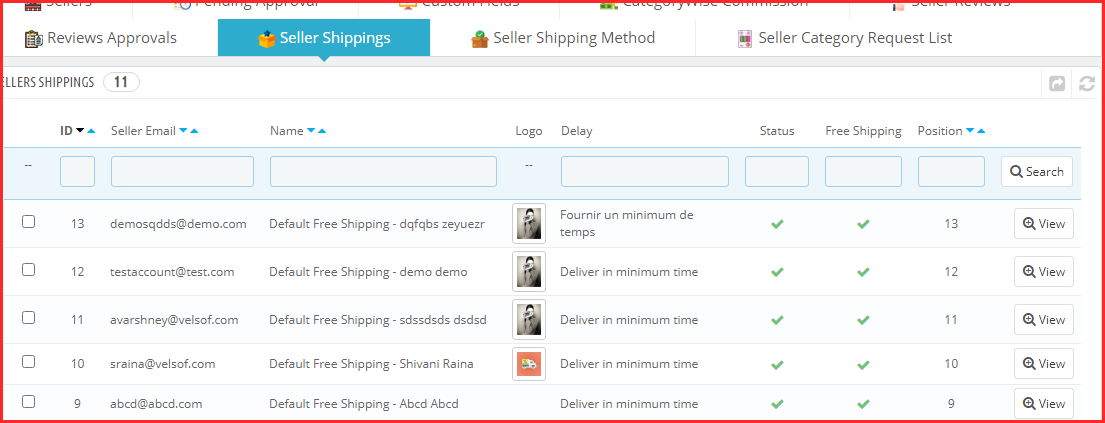
The Seller Shipping tab of the Prestashop Multi-vendor Marketplace addon page contains a list of all the shipping methods. Furthermore, the ones that the admin creates for the sellers are present in the system.
View Shipping: To view the details of a seller shipping, you have to click on the View button in front of that entry.
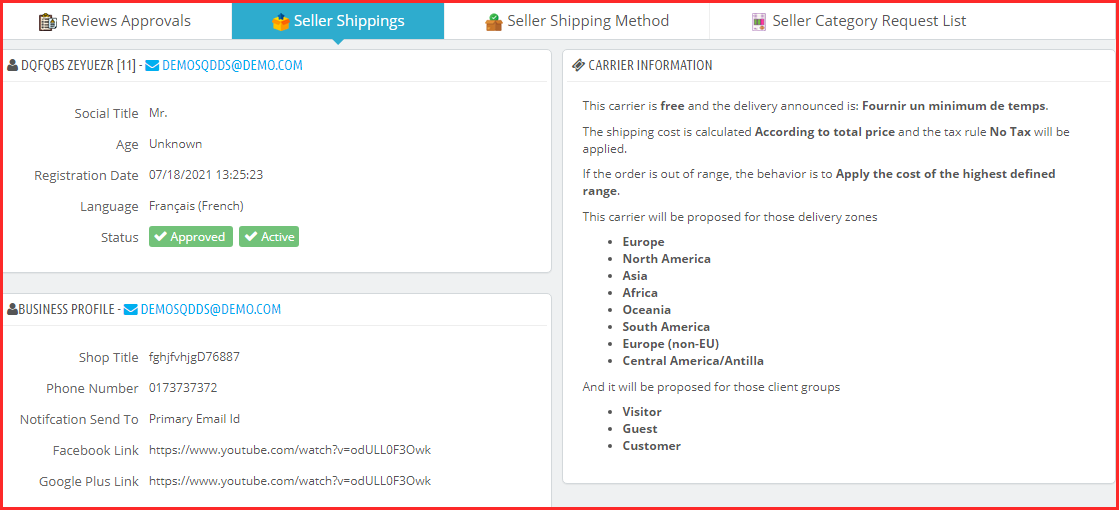
On clicking the button, a new page opens up having details of the respective shipping method.
The page will display Profile Status, Business Profile, Carrier Information and payment information (bank wire details)
Note:-
The admin will not be able to delete or edit any shipping method for any seller. In fact, if tries he/she will redirect to the Carrier Listing page with the corresponding error.
By default, all the products for a seller will be mappable to the Default shipping method for the respective seller. Thus, the default shipping methods are identifiable with the name Default Free Shipping – Seller Name.
6.8 Seller Shipping Method
Prestashop multivendor marketplace extension allows the sellers to define their shipping methods. For this, the ‘Allow Seller to define own Custom Shipping Method’ feature enables from the Setting tab of the Prestashop marketplace module.
6.8.1 How can the admin add Shipping Methods?
The admin can add custom shipping methods in this tab. To add custom shipping methods, click on the ‘Add New Shipping Methods’ link or the ‘+’ sign in the top-right position.
This will redirect you to the shipping methods creation page of the Prestashop marketplace addon.
Shipping Method Name: Enter the name of the shipping methods.
Active: Toggle the button to activate or deactivate the shipping method.
The shipping methods will be available as shown below. The admin can edit or remove them by clicking on the Edit or Delete button corresponding to each shipping method.
6.8.2 How can the Seller add custom Shipping Methods that they want to allow the customers to select?
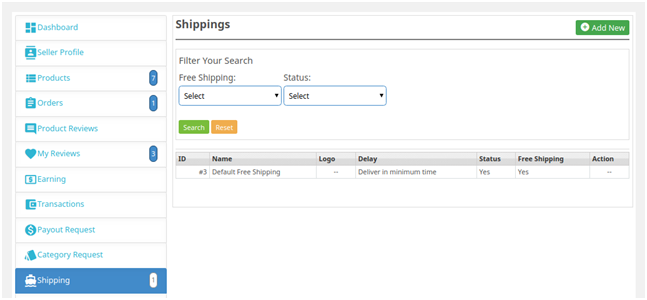
The seller can create their shipping methods from their dashboard. Go to the Dashboard -> Shipping tab.
The various shipping methods that the seller creates are available in this tab.
To add new methods, click on the ‘Add New’ link as shown in the image below:
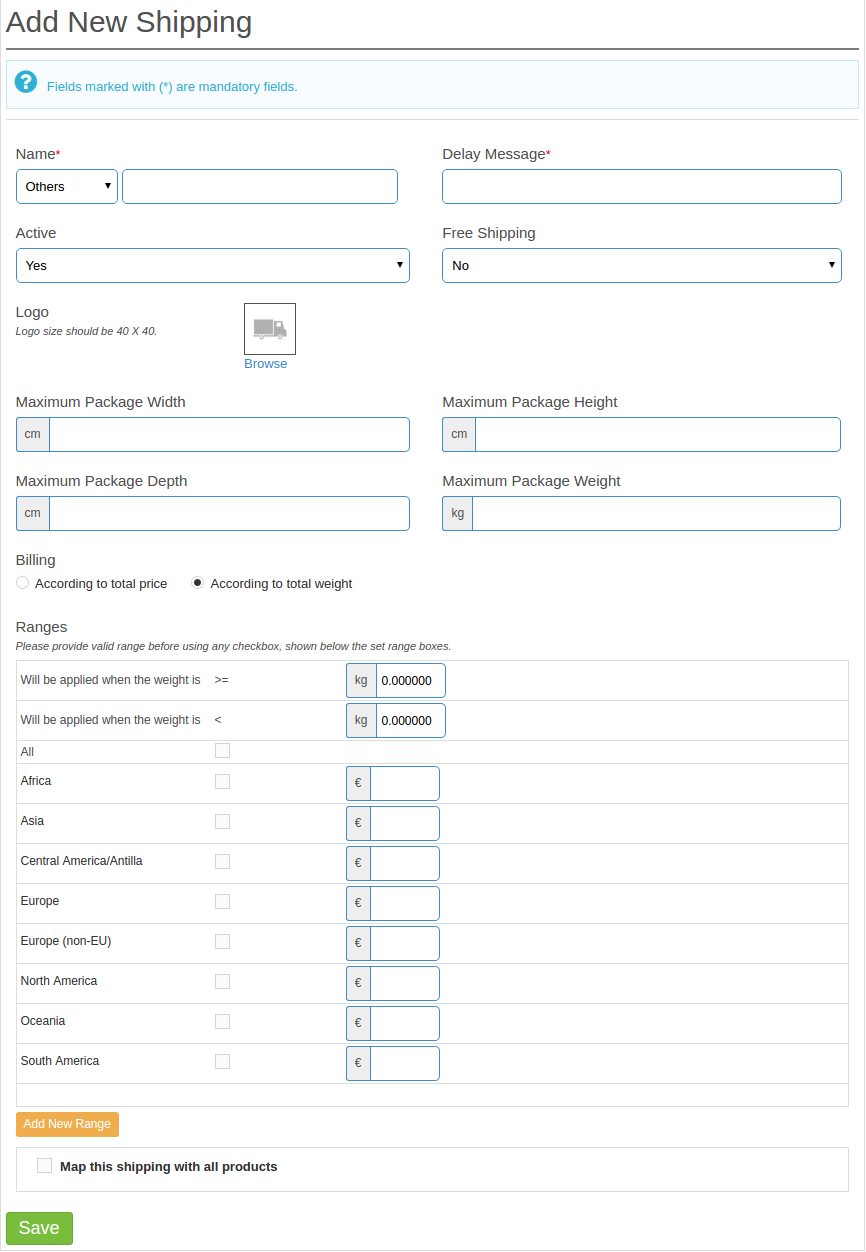
You’ll redirect to the shipping methods creation page. Further, the various field required to be filled are shown below:
The various shipping methods will list in the drop-down menu. To create a new one, select ‘Others‘. Enter the name of the shipping method.
The sellers can create the shipping methods by entering the required fields as shown in the image below.
6.9 Seller category Request list
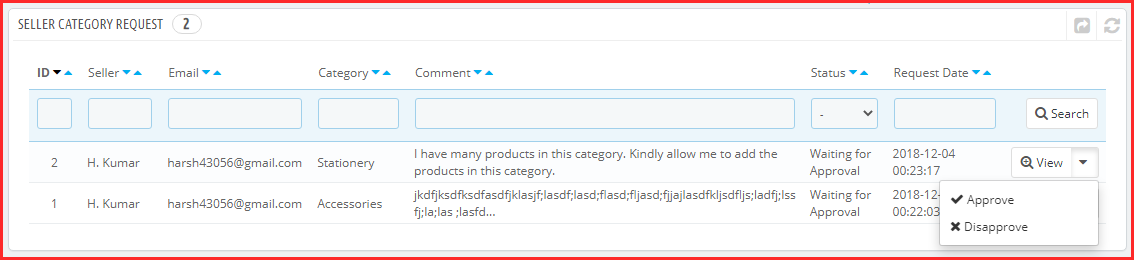
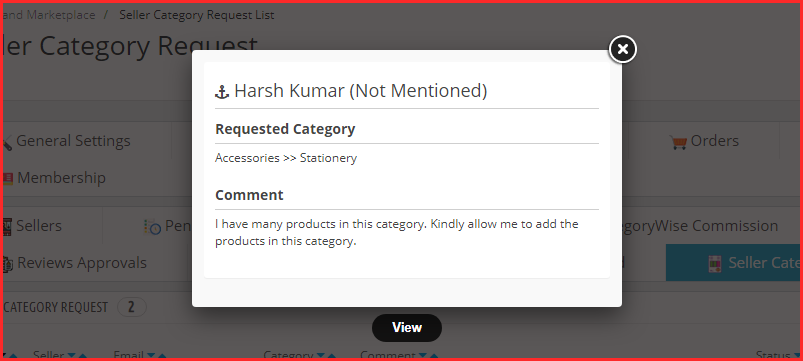
A seller can add products only to those categories that the admin allows to him/her. However, if the seller needs to add a product to a category that is not he does not allow, then the seller can request for the category. All those category requests appear on this list. A mail is also sent to the store owner to notify them about the Request for Category. Then, it is up to the store owner to approve or disapprove the request.
View Category Request: To view the details of a category request, you have to click on the View button in front of that category request on the list.
On clicking the View button a Pop-up will appear having all the details of the corresponding category request.
Approve Category Request: To approve a category request, you have to click on the Approve button in front of that category request on the list.
Note:- This action cannot be undone. Please use it carefully.
Disapprove Category Request: To disapprove of a category request, you have to click on the Disapprove button in front of that category request on the list.
A pop-up will appear asking for the reason for disapproving the category request. Fill out the reason and then submit the form to complete the action.
Note:- This action cannot be undone. Please use it carefully.
7.0 Products
Product setting includes the seller product configuration, product approval list, and product review.
7.1 Seller Products
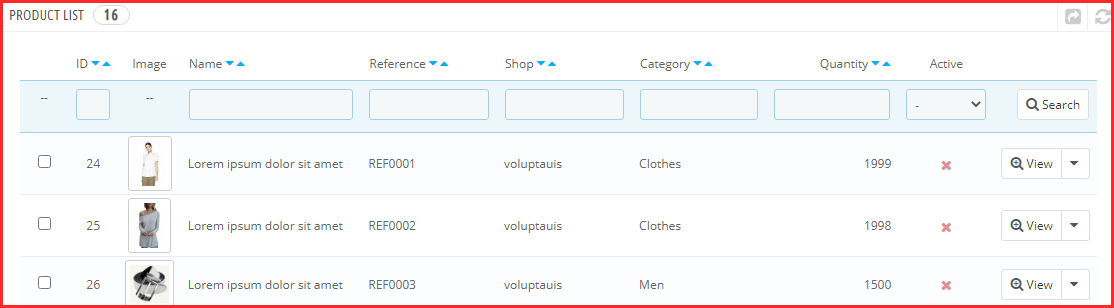
The Seller Products page of the Prestashop Multi-vendor Marketplace add-on consists of all the approved products added by the seller(s) on the store.
If the admin disables the settings (i.e. New Product Approval Required) in the Setting tab of the Prestashop Marketplace module, then a product approves directly when it is added by the seller and appears in this list. Otherwise, the product first appears in the Product Approval list.
Delete Product: To delete a product, you have to click on the Delete button corresponding to each product as shown in the image below.
A pop-up will appear asking for the reason for the deletion of the product. To complete the action, fill in the reason. Further, click on the submit button.
A mail will be sent to the seller to notify the deletion of the product. The mail also contains the reason you have provided for the deletion of the product.
Note: The product delete action cannot be undone. Please use this feature carefully.
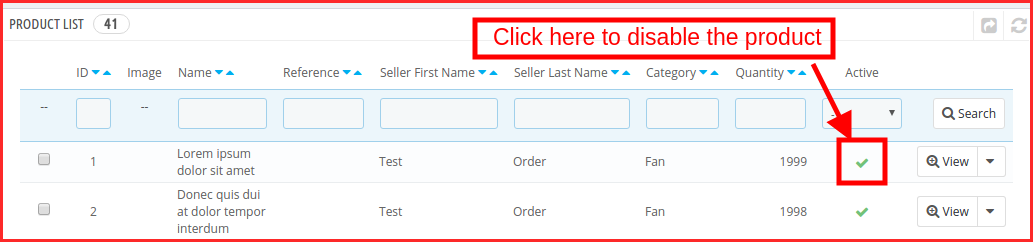
Enable/Disable Product: To change the status of any product, you have to use the Bulk Action feature of the Grid. To enable/disable any product, select the product(s) and choose the action (i.e. Enable or Disable) to complete the action.
Note: Once a product is disabled, it will not be visible at the front. To avoid disabling products and only disable a product if it is very necessary.
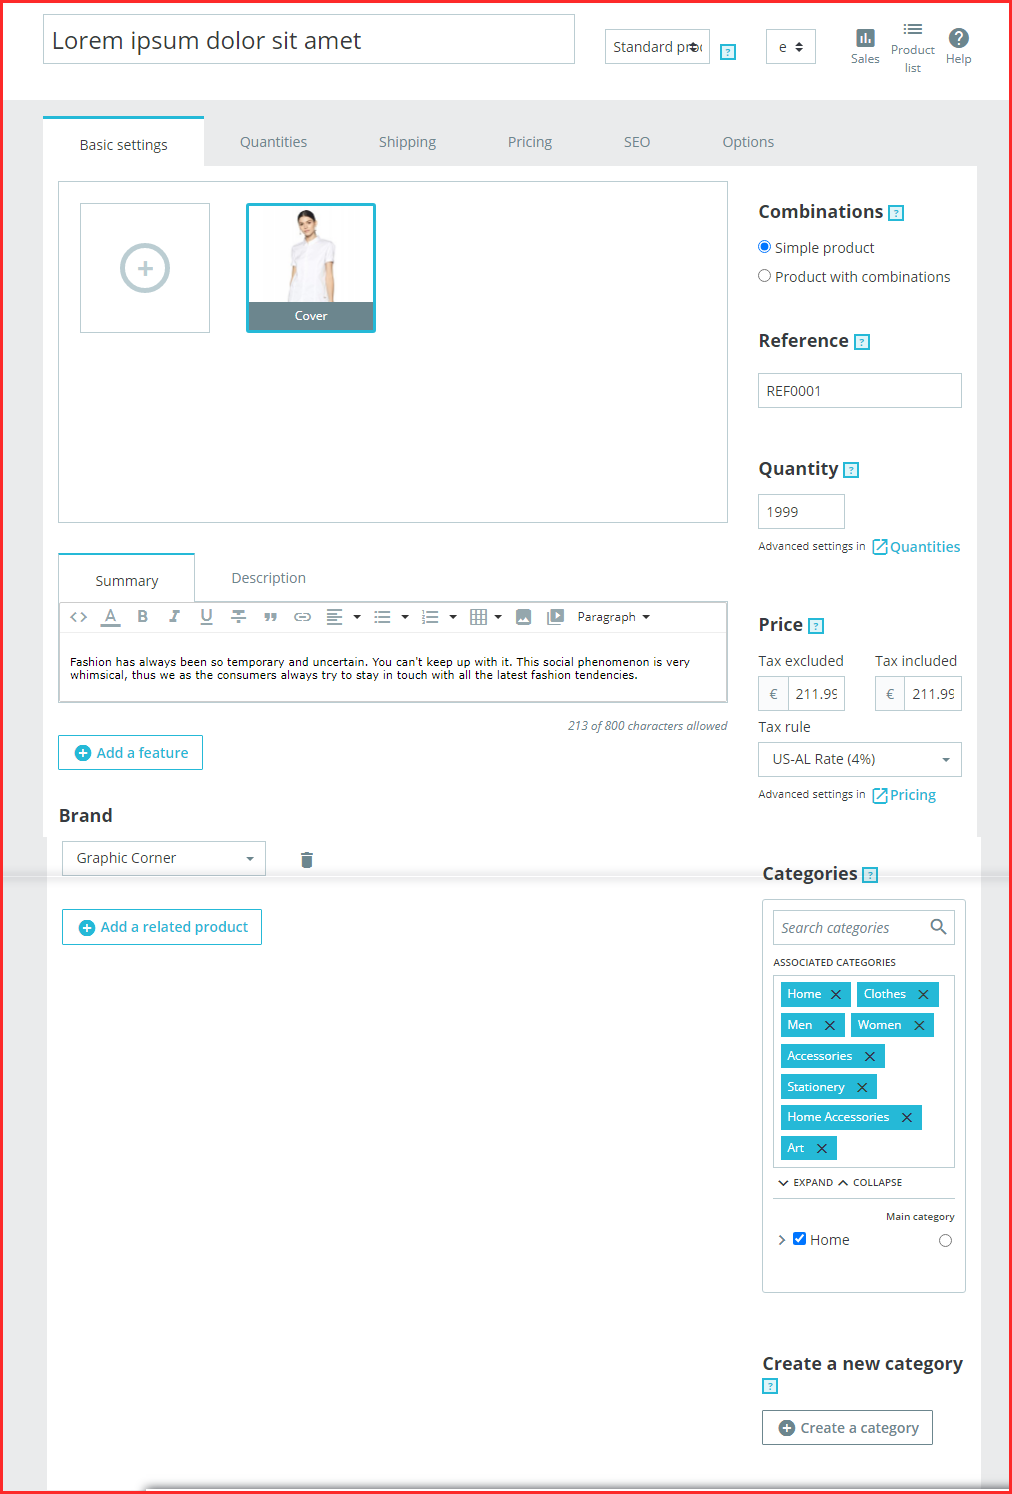
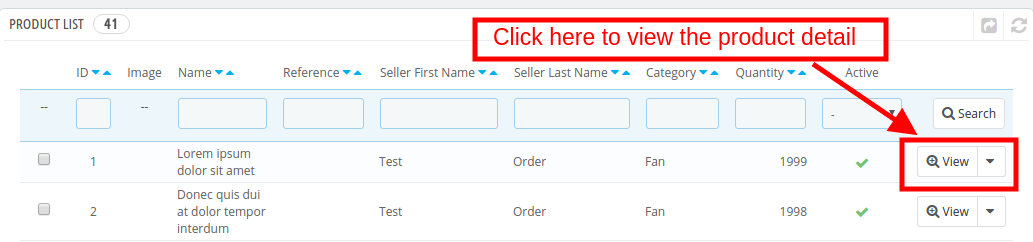
View or Edit Product: There is also an option to view the details of any product on the list. To do that you have to click on the View button in front of that product and it will take you to the edit page of the respective product. Further, on clicking the view button, you’ll redirect to the products detail page as shown below:
Admin can update the product settings. Knowband’s PrestaShop Marketplace Module provides options for updating the quantity, and shipping options like delivery time, date, shipping fees, etc. Moreover, the admin can update the pricing of the product.
For Google rankings, the product SEO can be updated.
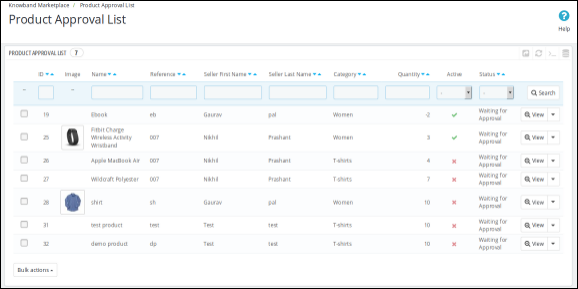
7.2 Products Approval List
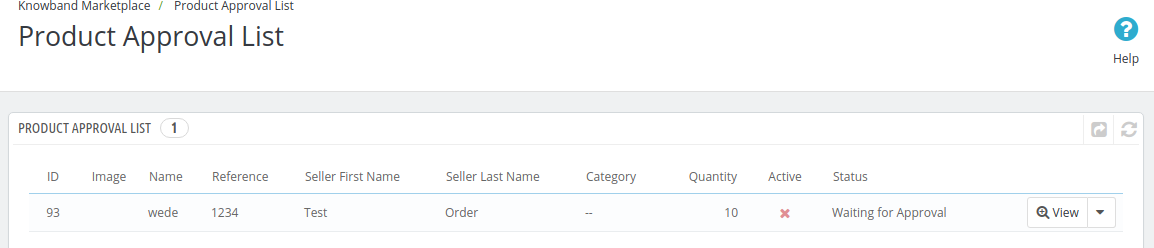
When a seller adds a product, then, first of all, it appears in this tab of the Prestashop Multi-vendor Marketplace extension. The store owner is also notified of the same through the mail. Then, it is up to the store owner to approve or disapprove of the product.
If the setting (i.e. New Product Approval Required) enables only then, a new product appears on this list. Otherwise, it directly appears in the Product List and approves automatically and is visible.
Disapprove Seller Product: To disapprove of a product, you have to click on the Disapprove button corresponding to that product on the list.
A pop-up will appear asking for the reason for the disapproval of the product. Fill out the reason and then submit the form to complete the action.
Once a product disapproves, a mail will be sent to the seller notifying disapproval of the product with the reason provided in the above form. The products that don’t get approval also appear on the same list. The Store admin can approve them at any point in time.
Approve Seller Product: To approve a product, you have to click on the Approve button in front of that product in the Product Approval list.
After approval, the product is moved from the Product Approval list to the Sellers Products list.
Note:- This action cannot be undone. Please use it carefully.
7.3 Product Reviews
The Product Reviews page of the Prestashop Marketplace plugin consists of a list of all the product reviews sent by customers on the seller’s products.
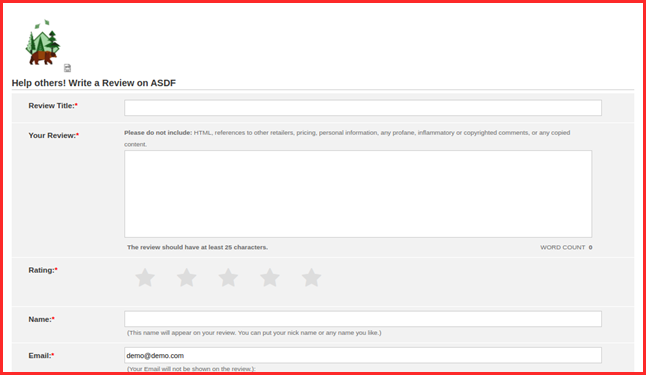
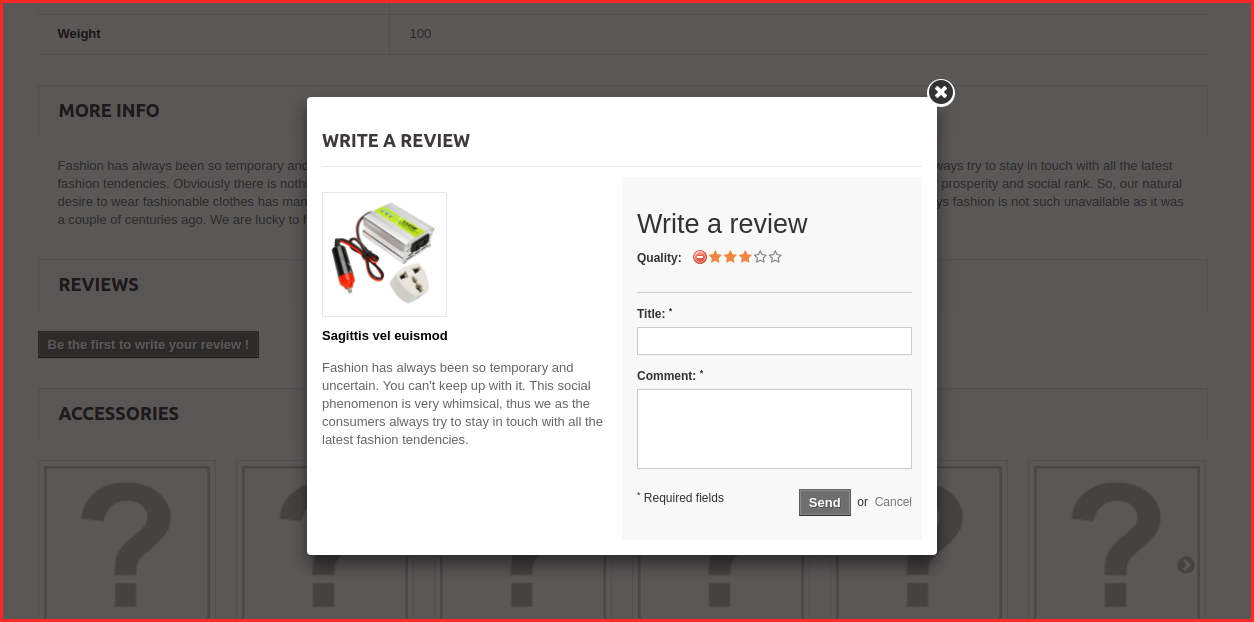
The online buyers can add a review on any of the seller’s products as shown below:
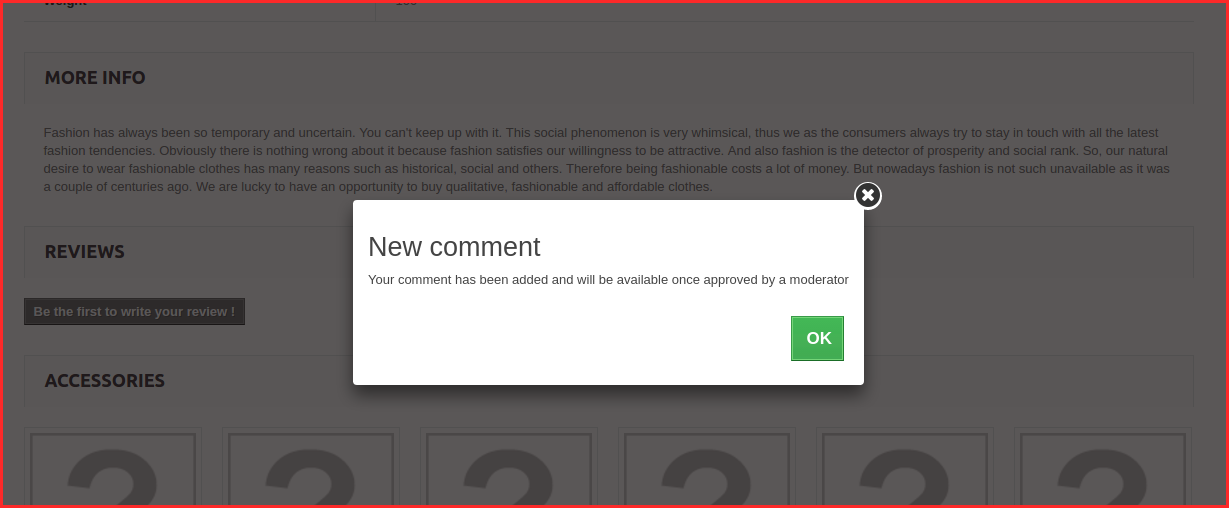
Once the review is posted by the customer, he’ll get a message saying that “Your comment has been added and will be available once the moderator approves them.”
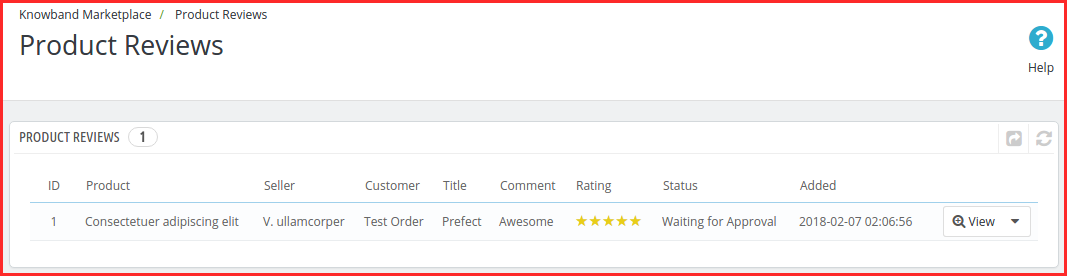
These reviews are then listed in the Product Review tab of the Prestashop Multi seller Marketplace plugin.
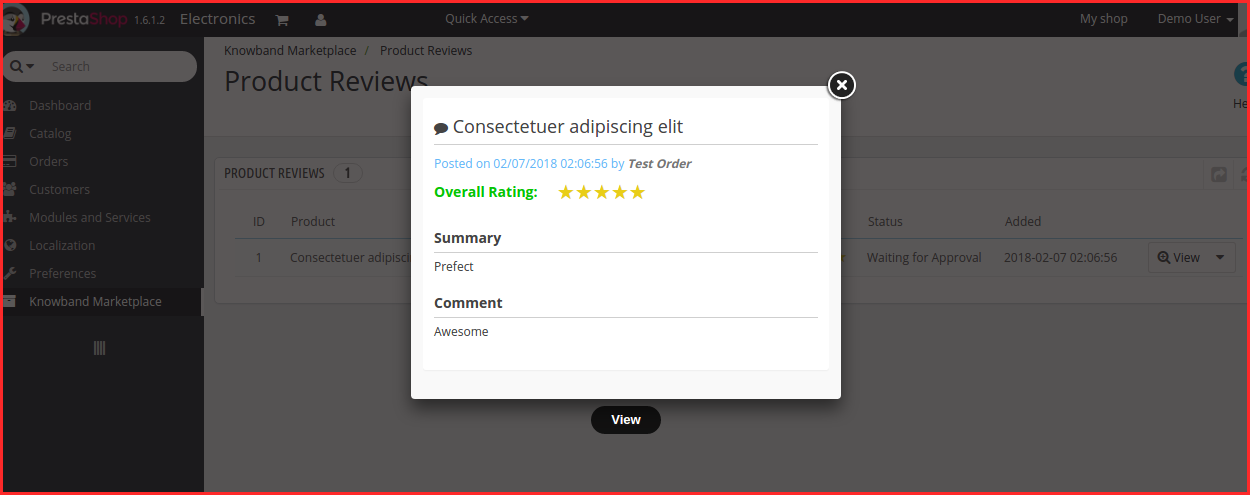
View Product Review: Most of the details of the product reviews are already mentioned in the grid but some of them are not. To view all the details of any Product Review, click on View Button in front of that review. A pop-up will appear having all the details of the product review.
As you click, you can see the complete review as shown in the image below:
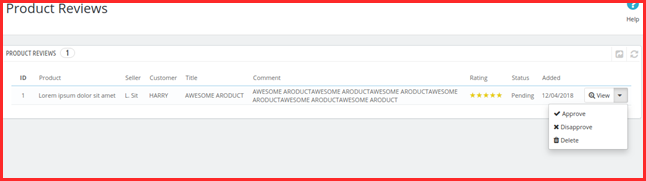
Delete Product Review: To delete a product review, you have to click on the delete button in front of that product review on the list.
Note:- The product review deletes action cannot be undone. Please use this feature carefully.
Approve Product Review: The product reviews that are added by the customers for the seller’s products will appear in the list here with the status Waiting for Approval and it will not be shown on the storefront to other customers until the approval. To approve it, you have to click on the Approve button in front of the product review.
8.0 Orders
Admin can view, edit and update the order status for both seller and admin orders.
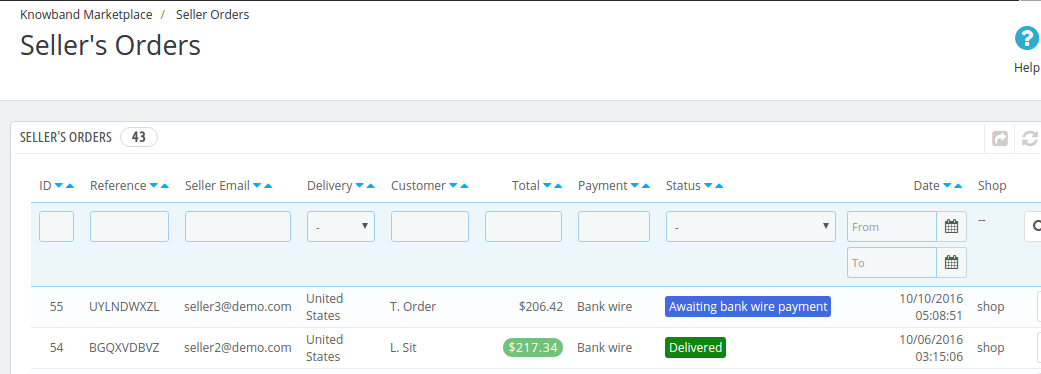
8.1 Sellers Orders
The Seller Order Tab of the Prestashop Multi-vendor Marketplace Addon consists of all the orders that are placed by customers for products added by sellers in the store. The orders shown in this list are split based on sellers which means, if there are products by different sellers in the same order then they will appear separately in this list.
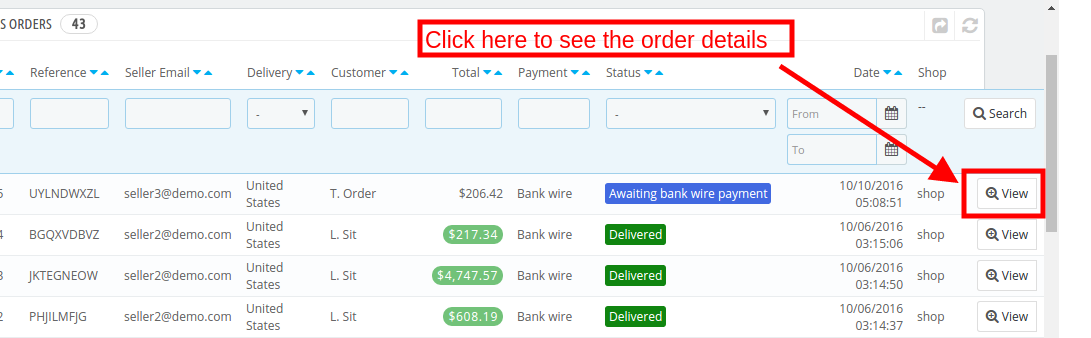
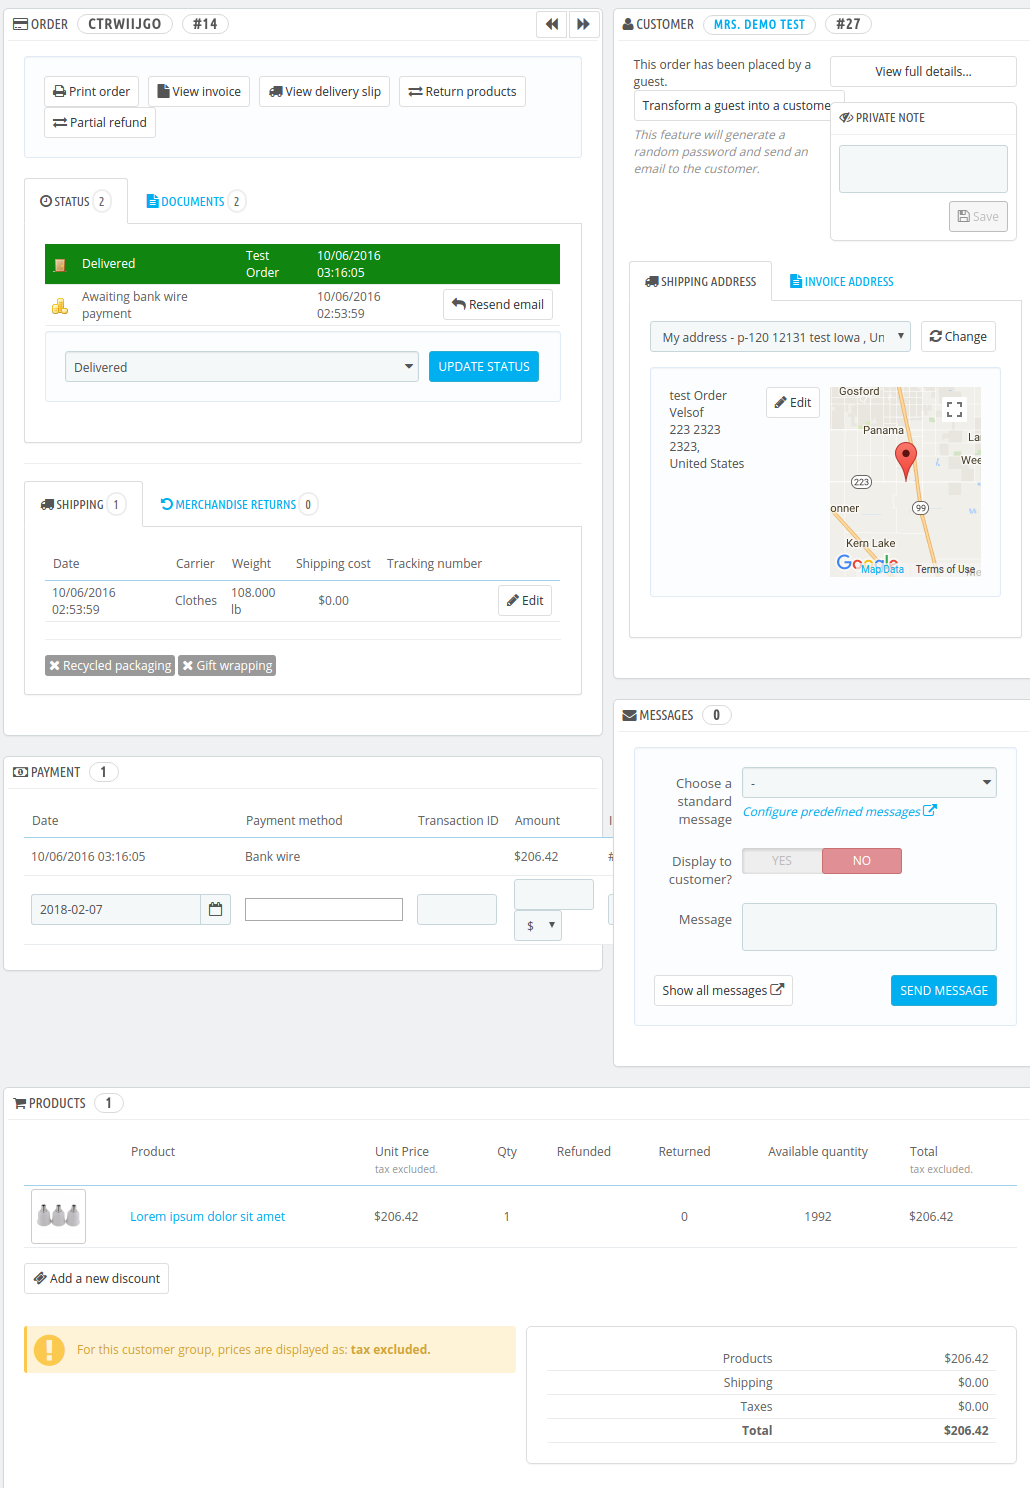
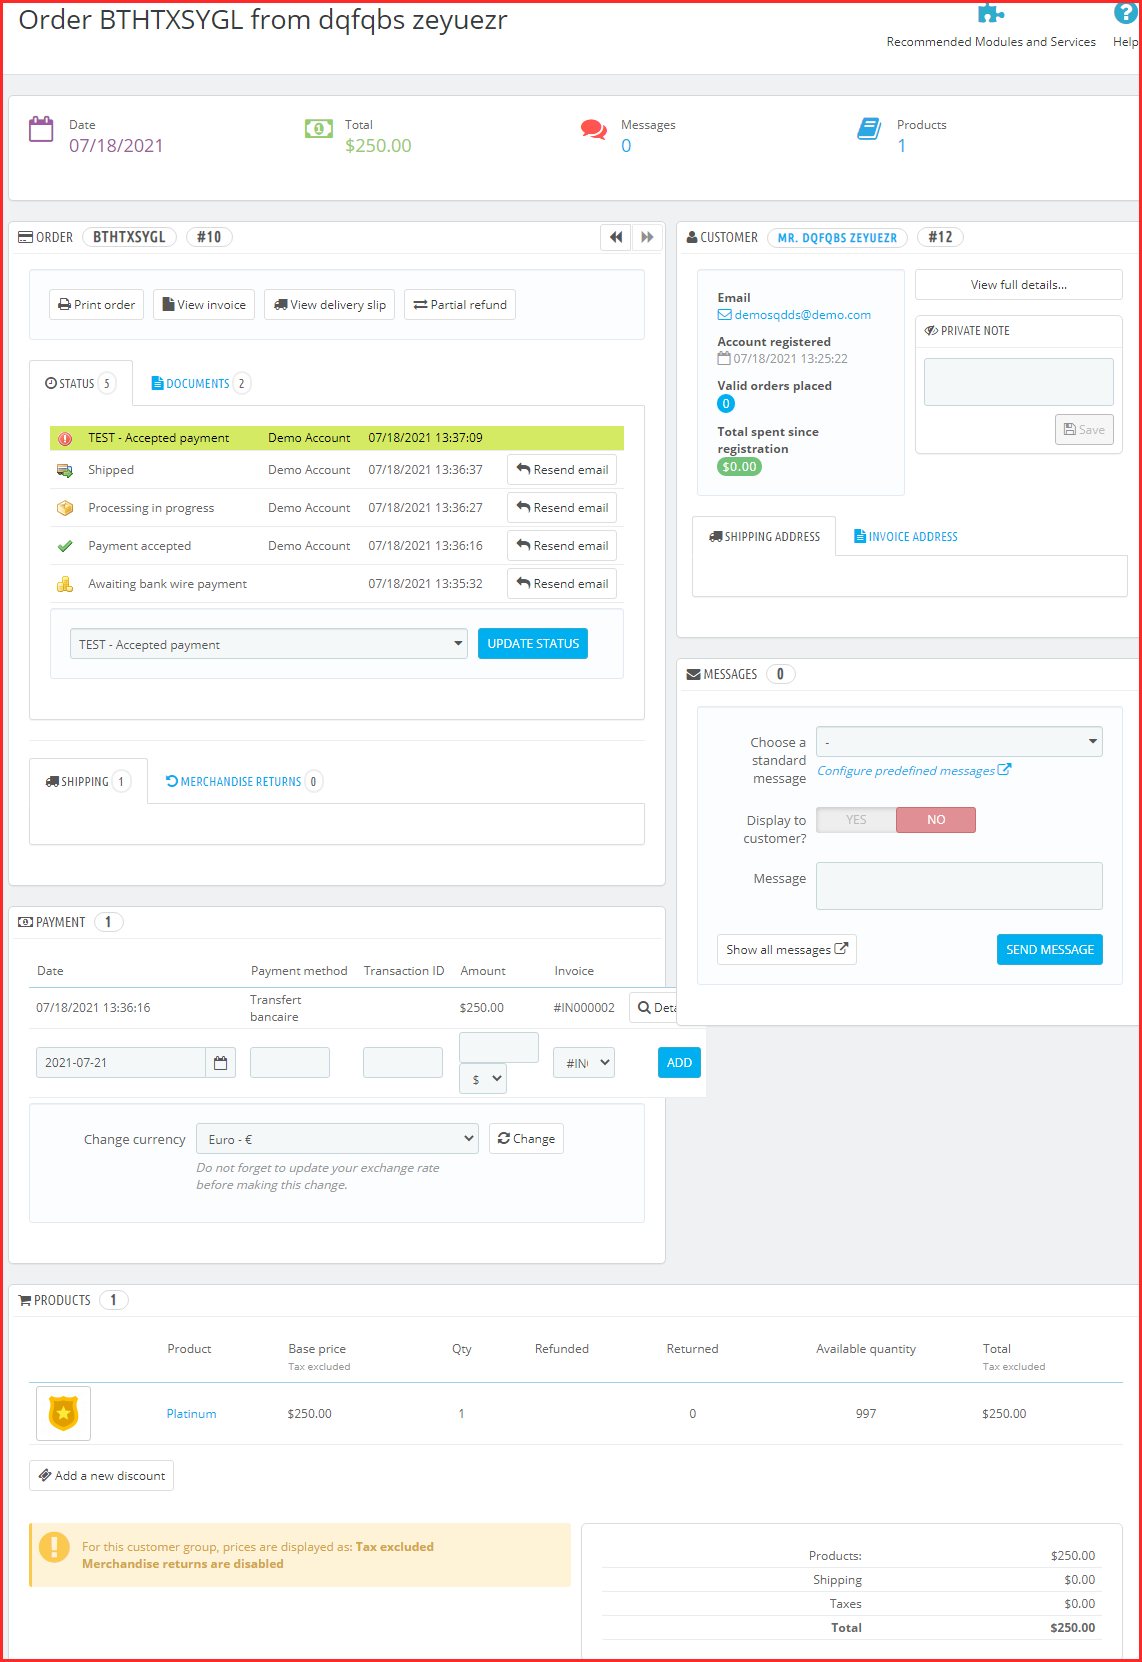
View Order: There is also an option to view the details of any order on the list. To do that, you have to click on the View button in front of that order, it will take you to the order details page of the respective order. This view page is the same as when you edit any order.
As you click on the View button, you’ll redirect to the order page as shown below:
8.2 Admin Order
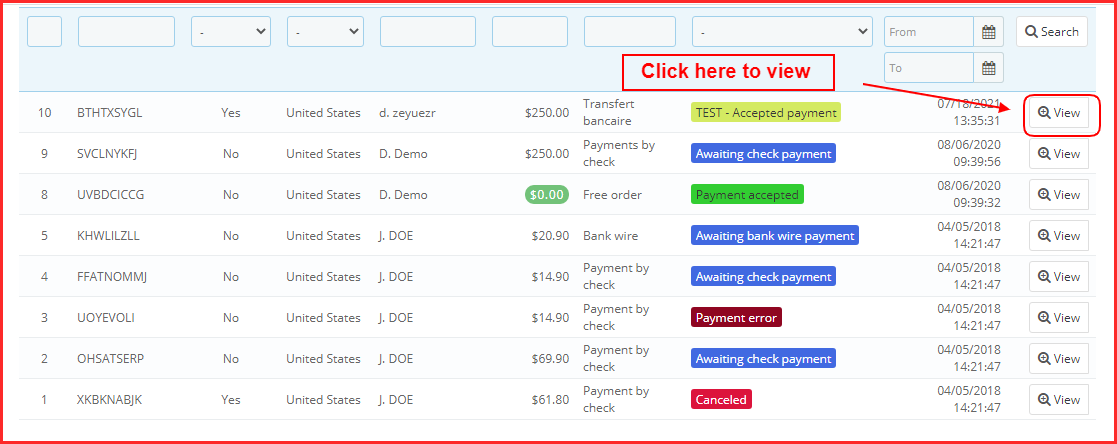
The Prestashop Marketplace module allows the store admin to sell more and more products without maintaining their inventory. However, the admin can even sell their products in the marketplace. The orders received for the products of the admin can be viewed in the Admin Order tab of the Prestashop Multi-seller Marketplace addon. The orders will be displayed as shown below. To see the details of the order, click on the View button corresponding to each order.
The order details page is shown in the image below:
9.0 Commissions
The PrestaShop Multi-seller Marketplace module makes it easier for the store admin to manage the commission structure of the marketplace.
9.1 Admin Commission
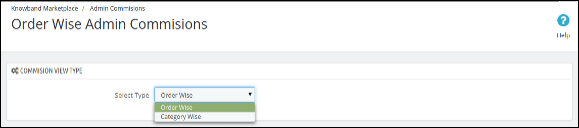
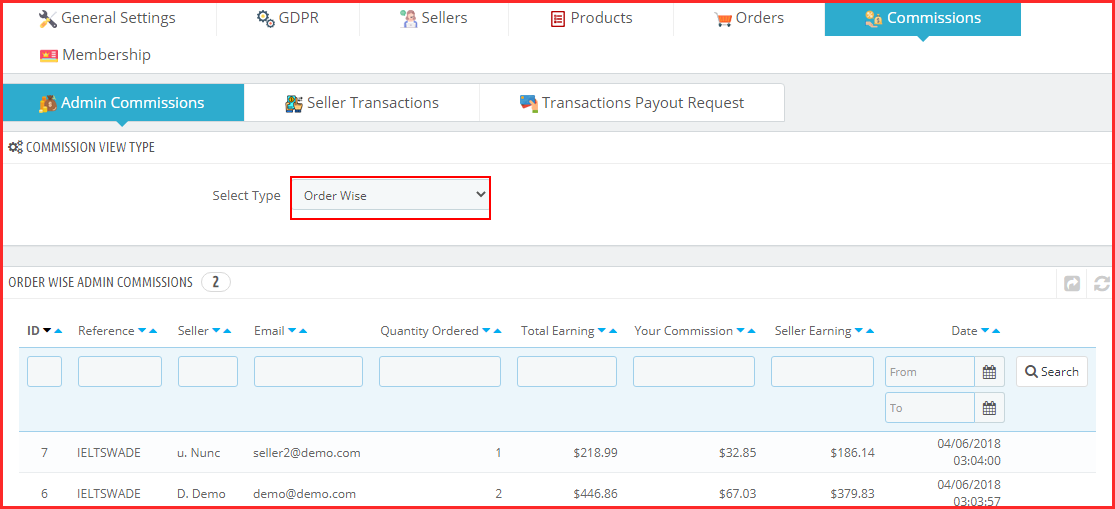
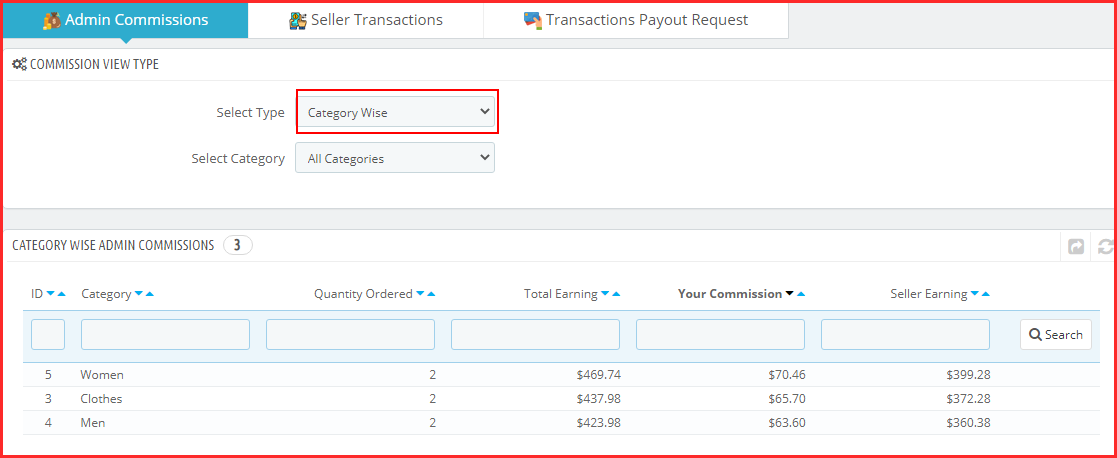
The Admin Commissions tab of the PrestaShop Multi seller Marketplace extension contains a filter through which the admin can filter the commissions earned in the form of Order Wise or Category Wise selection. By default, the page shows Order Wise Admin Commissions.
9.1.1 Order Wise Admin Commissions
This list contains all the commissions earned by the store owner on every order placed for any seller’s product. This list is split based on orders placed for selling products.
9.1.2 Category wise commissions
This list shows the total commission earned by the store owner from a seller. The store owner can also use filters to filter the commission reports category-wise.
It helps the store owner to identify commissions from different categories and which category has produced how much commission.
9.2 Seller Transaction
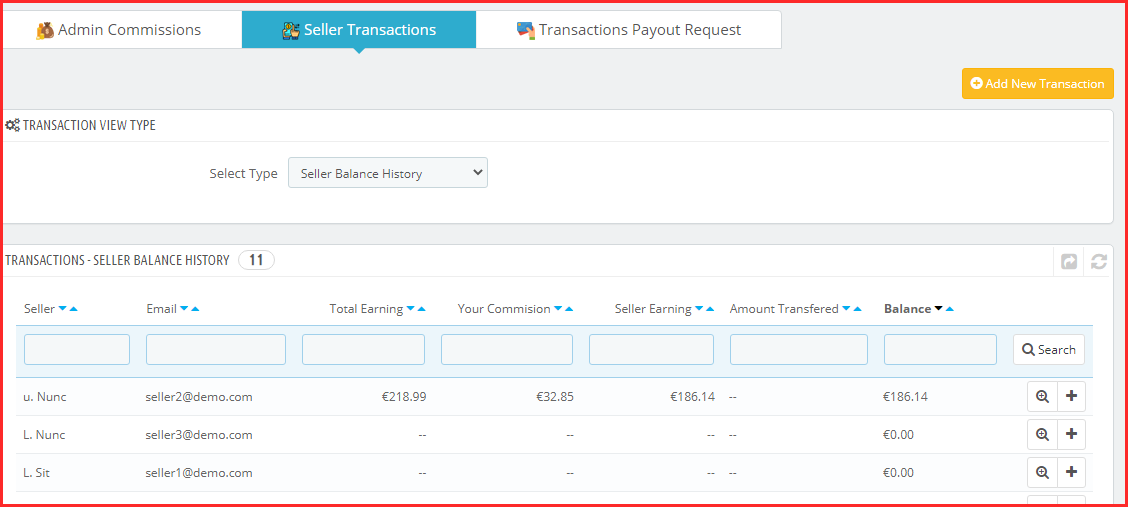
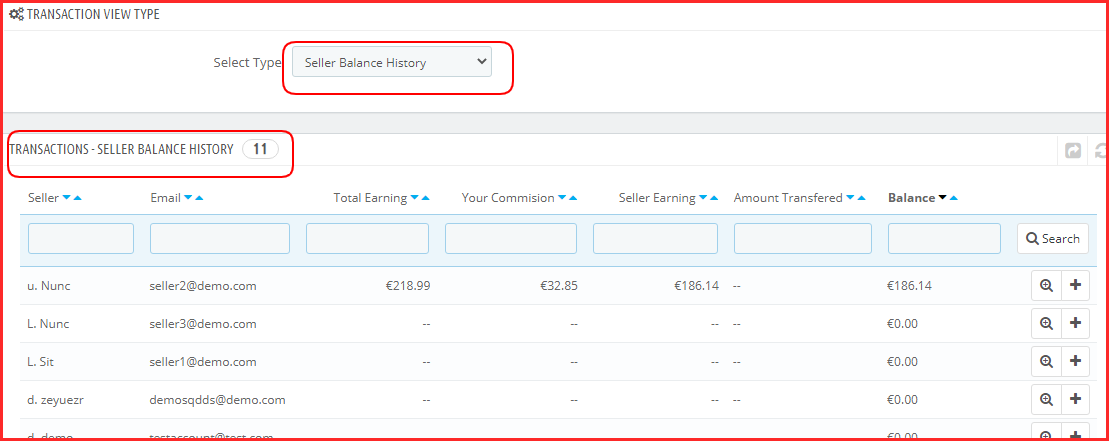
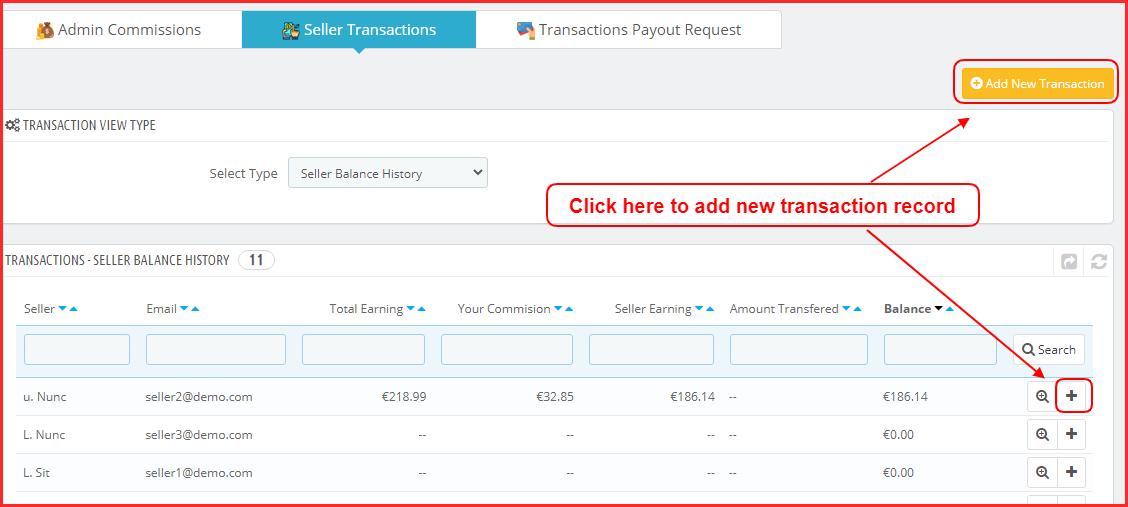
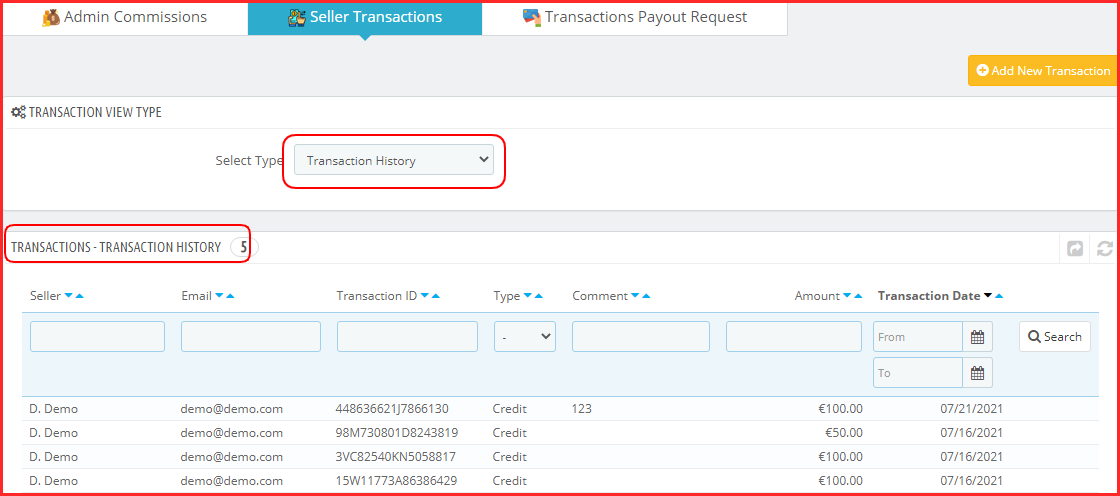
The system does not automatically transfer the amount in the seller’s account, hence the store owner has to keep records of the balance for all the sellers and manually transfer money to the seller and later on, enter the details of the transaction to keep a record of the same.
The Prestashop Marketplace module allows the admin to view two types of transactions of the sellers, that is, Seller Balance History and Transaction History.
The Seller Transactions page of the Prestashop Multi-vendor Marketplace plugin keeps the track of the seller transactions and the remaining balance of sellers.
9.2.1 Seller Balance History
This list of the Prestashop Multi-seller Marketplace plugin contains all the balance variations for all the sellers in the system. The list shows the total sales of the seller, seller’s earnings, and your commission. This list helps the store owner to identify the earnings and categorize them seller-wise.
View Transactions Details
To view the details of the transactions done for a particular seller, you have to click on the View button in front of that seller.
On clicking on the View button in front of any seller, a new page will open up having a list of all the transactions done for the corresponding seller.
You can also add a new transaction for the current seller by clicking on the Add New Transaction button on the top right-hand side of the below page.
9.2.2 Create New Transaction from the back-end of the Prestashop Multi-vendor Marketplace Module
To add a new transaction detail for any seller, you have to either click on the Make New button in front of the seller or you can also click on the Make New Transaction button on the top right-hand side of the page.
9.2.3 Transactions History
This page contains a list of all the transactions done to date to all the sellers available in the system.
You can also add a new transaction for any seller by clicking on the Add New Transaction button on the top right-hand side of the above page.
9.3 Transaction Payout Request
With this additional feature, the sellers can request the store admin for any payout. Earlier, the admin was in charge of any of the payment that was to be made to the sellers. However, the sellers can now initiate a payout request from their dashboard. The admin can approve or deny the payout request of the sellers from this tab of the PrestaShop multi-vendor marketplace addon.
Three payment methods are provided, that is, Bank Wire, Pay by Check, and PayPal.
The admin can use PayPal if this payment method is opted by the sellers.
Admin can enable automatic seller payout which helps the admin to automate the payout request process. Further, the admin can either use cron URL’s for this setup or use the “Process Paypal Payout Status” cron directly.
Admin can also add a particular amount which will always be kept on hold for sellers.
Note: Refer General Settings section for PayPal Payout Settings
How can the seller create a Transaction Payout Request?
To create the payout request, the seller is required to click on the Payout Request tab of the dashboard of their account.
The various fields required to be filled by the seller are discussed below:
Amount: Enter the amount that you are requesting for the payout.
Request Reason: Specify the reason for which the payout request has been initiated.
As the Save button is clicked, the payout request will list as shown in the image below:
The same payout request will list in the admin interface of the Prestashop multi-seller marketplace extension.
9.3.1 How can the admin approve/disapprove the Transaction Payout Request?
The admin can approve or reject the payout request by clicking on the Approve or Disapprove button corresponding to each request.
In case, the admin approves the payout, then, a popup will be displayed as shown in the image below:
If the payment methods are Bank wire or Pay by Check, then, the admin will have to enter the Transaction ID.
Once the request is successfully approved, the transaction will be saved in the Transaction Table.
In the case of the PayPal payment method, a request will be sent to PayPal and based on the response, success or error message will be displayed. If the request is successfully approved, it is added to the Transaction table.
10.0 Membership
Prestashop multi-vendor marketplace admin can create and update multiple membership plans for the sellers.
10.1 Settings
This page contains all the settings which the Store admin needs to control the membership plans. Enable membership plan functionality: By enabling this button store admin allows all the new and existing sellers to purchase a membership plan.
Send membership plan activation email: If the admin enables this feature, an email is sent to those sellers whose membership plan is activated.
Membership plan activation email template: Update the email template as required.
Send membership plan expiry email: If the admin enables this feature, an email is sent to those sellers whose membership plan is expired.
Membership Plan Expiry Email Template: Update the email template as required.
Show warning message: Store admin can use this feature to show a warning message to those sellers whose membership plan is about to expire.
Number of days left to upgrade plan: Store admin can also adjust the number of days to upgrade the membership plan. A warning message will be shown to the sellers during this time period for upgrading their plans.
Enable disable free membership plan: If the admin enables this feature, a free membership plan will be added to the seller’s membership plans.
Enable disable product active limit under the free membership plan: Store admin can enable and disable the product listing limit under the free membership plan
Product limit: Store admin can adjust the product listing limit using this tab.
Duration interval: The admin can adjust the duration interval of the free membership plan. For example: days, months, and years.
Duration: The admin can set the duration of the free membership plan after which this plan is deactivated.
Select the order state in which the membership plan will be marked as paid: Admin can select the order state on which free membership plan orders will be marked as paid.
Show membership plans select box during seller registration: If the admin enables this feature then sellers can select the membership plan at the time of registration.
10.2 Warning Plan Reminder settings
Admin can enable this functionality to send a warning email to the sellers whose plan is about to expire. Admin can set the number of days before plan expiry warning mail should be sent to the seller.
10.3 Expired Plan Reminder Settings
Admin can enable this functionality to send an email to those sellers whose membership plan
Admin can also set the number of days after the plan expiry warning email should be sent to the seller.
Moreover, the admin can customize the reminder email template.
10.4 Membership Plans
Store admin can create a new membership plan under the membership plans tab. After clicking on the add new button, a new membership plan form will be open with the following fields:
Plan name: Admin can set the Plan name which is displayed to the sellers.
Plan price: Admin can set the plan price using this tab.
Enable/disable product active limit: Using this feature admin can enable the product listing limit for that particular membership plan.
Plan duration interval: Store admin can set the plan duration interval using this tab.
Duration: The admin can set the duration for which the plan remained active.
Enable: Using this tab admin can enable or disable the membership plan.
Plan image: Admin can choose the plan image that he wants to show to the sellers.
10.5 Seller Membership Plans
From this tab, the admin can check the seller’s plan details like their first name, last name, email, shop name etc.
From the add new option, the store admin can add new seller plan details by filling in the following details:
Choose sellers: Admin can choose the seller for which the admin wants to add plan details.
Add customized plan: Admin can also customize the plan details by filing the plan name, product active limit, duration interval, and duration details.
Mark plan as approved: If the admin enables this feature then the seller plan will approve.
Activate plan: The store admin can activate the seller’s plan by enabling this button.
Seller Deals: In the following tab, the PrestaShop store admins can keep the track of the seller’s deals. Moreover, here we have provided various details such as deal type, reduction type, reduction, starting date, and deal ending date.
11.0 Seller Interface of PrestaShop Marketplace Module
Any seller has access to several pages that are designed for handling the functionality of a seller account. The link for all these pages is there on the My Account page of a customer who is also a seller.
Another way sellers can access the dashboard is displayed in the image below:
11.1 Seller Dashboard
The seller dashboard displays the analytics data of the sales, earnings, and total orders along with the number of products sold.
The seller can see the sales statistics, compare the sales data and check out the last order details as well.
Register As Seller Field (Register Page)
If a new customer is registering on the Store then simply enter your mail id according to the screenshot given below.
After clicking on “Create an Account”, you have to enter your information as given in the screenshot below.
Once the merchant becomes a seller of the marketplace, he can avail of all the functionality of the module and boost his sales effortlessly.
The Dashboard of the sellers includes a GDPR section. The customers can download their data and can even delete their accounts with ease.
11.2 Seller Profile
The sellers can edit their profile and personalize their shop from this tab of the dashboard.
From the seller profile section, a seller can update the general setting for their seller page view, add meta descriptions, create policies, and request payouts to the store admin.
11.2.1 How does Seller Profile Appears to customers?
Customers can visit the seller profile and shop from a particular seller too.
11.2.2 Customer can buy products from an individual seller
For visiting the seller page, the customer has to click on the seller’s profile then they will redirect to the seller’s shop.
11.3 Seller’s Product
The sellers can follow the path mentioned below in order to add a new product.
Go to My Account -> Dashboard -> Products
The already listed products are displayed in this tab of the seller’s Dashboard.
In order to add a new product click on the ‘+’ sign at the top right portion.
This will redirect you to the ‘Add New Product’ page. Fill up the required detail in order to add the product.
11.4 Order
The sellers can view their orders and related details in this tab of the Dashboard.
11.5 Product Reviews
The sellers can view the review received on their product in the Product Review Tab of their Dashboard. All the reviews received will be listed as shown in the image below:
11.6 My Reviews
The tab of the seller’s dashboard lists the reviews received on their profile.
11.7 Earnings
The total earnings of the seller are visible in this tab. The vendors can filter the results as per requirement.
The total earning history is visible as shown below:
11.8 Transactions
The seller can view their entire transaction history in this tab. The amount debits or credits in their account are visible here.
11.9 Payout Request
Sellers can view the list of payout requests sent to the admin from the Payout Request tab. For a new payout request, sellers need to fill in the payout amount and reason and send it to the admin for approval.
11.10 Category Request
The sellers can view the categories assigned to them. Additionally, they can even send a category request to the store admin. In order to send a category request, go to the Dashboard -> Category Request
11.11 Shipping
The sellers can view the shipping process as in the screenshot below:
11.12 CSV and XML
Also, the admin can import/export the products and combinations in CSV and XML formats.
11.13Membership plan history
Sellers can check their membership plan history by applying filters. Under the filters, sellers have to fill in the plan name and the status of the membership plan for checking the history of the membership plans.
11.14Available membership plans
Using this tab sellers can buy membership plans by checking the plan details.
Seller Customer Ticket System:
Knowband PrestaShop multi-seller marketplace provides a separate tab for managing tickets between customers and sellers. In the following tab, the sellers can find all the ticket details such as customer email address, last updated date, ticket number, etc. Moreover, we have also provided an option to search the tickets based on the filter options (customer name, customer email, status, from date, end date).
Seller-Customer-Ticket System: Front End Preview:
The customers will get an option on the seller’s products pages for “contact the seller”. After clicking on the same, they will be redirected to the above-mentioned page.
Here, the customers can fill out the details such as email, name, phone number, ticket subject, and issues regarding the tickets.
After submitting the details, the sellers can check the tickets on their personalized dashboard.
Discounts and Offers:
In the discount and offers tab, the sellers can create their own coupons and offers (applicable only to the seller’s products).
Here, we have provided the options for choosing a start date, offer end date, running status, deal type, and discount type (percentage/fix).
For more information on the Prestashop Multi seller Marketplace extension, refer to the following links:



-300x300.webp)




-300x300.jpg)