Introduction of Magento One Click Checkout (Buy Now) Extension
1.0 Introduction
The Knowband Magento one click checkout (Single Checkout) extension is a module which when enabled allows the online shoppers to buy product instantly without modifying their exiting cart. A new button “Buy Now” will be shown at product detail page. On clicking this button, the old cart will be hidden and the new product will be added to the cart for instant checkout.
On successful order confirmation, old cart will be resumed.
Old cart can also be resumed along with the new product, if after clicking on “Buy Now” button customer navigates to any other page.
This Magento Quick checkout extension will also provide an option to track the number of times the users clicked and bought from the “Buy Now” button.
Also, the Google analytic code can be inserted through this Magento single click checkout extension which will be helpful in Google tracking on click of “Buy Now” button.
1.1 How Merchant will benefit from Magento One Click (Single click) Checkout Extension?
The Magento quick checkout extension allows the store admin to adds a ‘Buy Now’ button on Product pages, clicking on which will directly take the user to the checkout page with only the current product in the cart.
The Magento one click checkout extension enables the store admin to customize the One click checkout (Buy Now) button if they require.
The Magento instant checkout extension allows the e-merchant to include the jQuery if required.
The Store admin can track the One click checkout (Buy Now) button clicks by adding the Google analytics script code.
With the help of the Statistics tab, the admin can view the visited product page and also the conversion mapping of those who clicked on “Buy Now” button and placed a successful order.
The Magento single button checkout extension boosts the direct sales.
The Online retailers have a chance to increase the conversion rate of the website.
With the use of this Magento one click checkout (Buy now) extension, the store admin can make the UI and UX of the site appealing and responsive.
This Magento instant checkout extension is easy to use.
This Magento single click checkout extension reduces the cart abandoned rate of the website.
1.2 How Customer will benefit from Magento One Click (Single click) Checkout Extension?
The Customer can easily make the checkout process without editing the old shopping cart.
The Online consumers will get a quick and hassle-free way to directly checkout.
The Online shoppers can checkout in a single click.
The Buyers always love the easy and fast checkout process.
2.0 Installation
After purchasing the Magento single click checkout extension, you will get the following files as listed below:
1. magentocustommaintenancepage.zip (contains source code of the extension)
2. User Manual
Follow the following steps for installing Magento One Click Checkout Module:
Download the Magento extension package.
1.Unzip the package on your root folder of Magento setup via FTP manager (like Filezilla or WinSCP – download here: https://filezilla-project.org/).
2. Copy all the files and folders of unzipped folder into your store root directory.
3. After copying all the files and folders, clear the cache.
4. Open any page of your store. Magento will install the module at the time of loading any page.
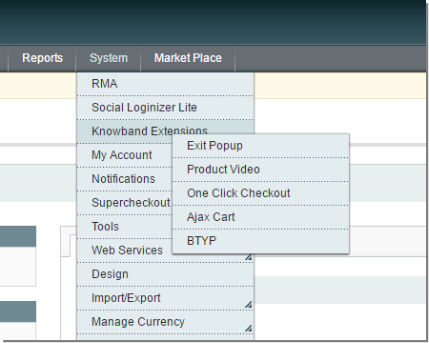
5. In the Admin Panel go to “System > Knowband Extensions > One Click Checkout”.
3.0 Extension Interface
There are two interfaces in this extension. Each interface has a different functionality according to its use. These interfaces are:
A.Admin Panel Interface (Only be accessible by admin/store owner)
B.Front End Interface (accessible to front end user)
Each interface has been described in separate section.
4.0 Admin Panel Settings
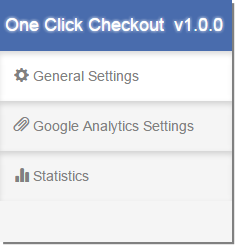
Admin Panel Settings contains the 3 tabs for settings.
4.1 General Settings
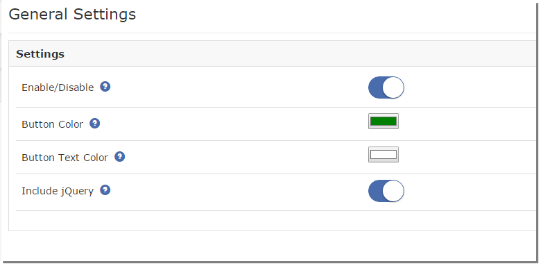
From here, Admin can enable/disable this plugin. Also look and feel of Button can be controlled here. Initially the fields in form will be already be filled with their default values.
Setting will have options as:-
Enable/Disable: This option allows user to enable or disable the Magento one click checkout extension. By default this option will be disabled.
Button Color: “Buy Now” Button color at product detail page of front end will be changed by this option.
Button Text Color: “Buy Now” Button text color will be changed by this option.
Include jQuery: This option allows us to include jQuery in our Magento single click checkout extension so that the module can work for other versions of the Magento also.
4.2 Statistics
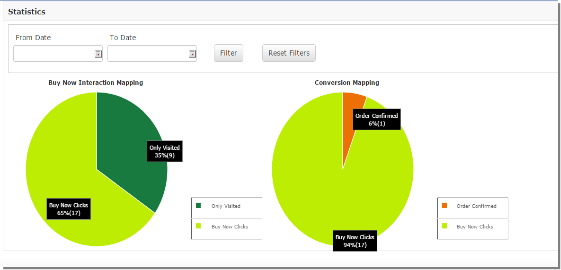
From here the store owner can see the no. of customers who visited product page and also the conversion mapping of those who clicked on “Buy Now” button and placed successful order.
Statistics: Two pie charts will be shown here. There will be a filter to select the start date and the end date to create the pie chart.
a. Buy Now Interaction mapping: It will show mapping between the number of visitors to Product details page and number of visitors who clicked “Buy Now” Button.
b. Conversion Mapping: It will show mapping between No of clicks on “Buy Now” Button and no of order placed by this this options to show actual conversion rates.
5.0 Store Front
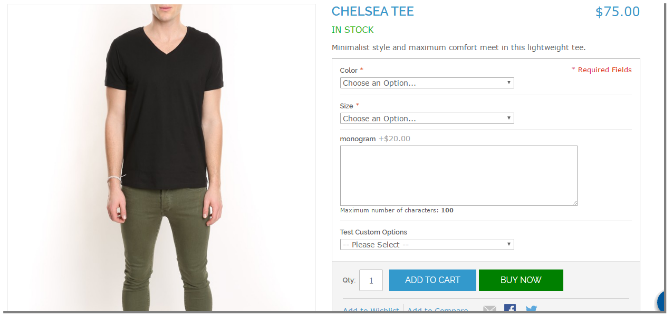
After enabling this Magento one click checkout extension, a new “Buy Now” button will be shown at product details page along with “Add To Cart” Button.
The Magento direct checkout extension at the front-end will appear as follows:
This “Buy Now” button allows user to order product instantly. On clicking “Buy Now” button, a new cart with this product will be created and it is redirected to checkout page.
On successful Order confirmation, old cart will be resumed.
After clicking “Buy Now” button, if customer will navigate to any other page then old cart will be resumed along with this new product.
You can try Knowband’s Magento One Click Checkout extension for on your Magento store. KnowBand’s Magento single click checkout module helps you increase customer engagement to your store and give the better user experience to your eCommerce customer. It also reduces the exit rate of the store by minimizing the checkout overhead involved in purchasing a single product. Moreover, the implementation of single button checkout feature doesn’t affect the product page design and layout. As the customer opts for a single buy, the existing cart items remain unaltered. Additionally, if the customer skips the single buy checkout, the product is automatically added to the cart.
How to optimize the checkout process for your Magento store to make it responsive yet simple for the online users? By reducing the multiple checkout steps involved in a checkout process of a website, customers are more likely to purchase and thereby increase the conversion rate for your store. To simplify the checkout process of your Magento store, Knowband offers Magento One Page Checkout extension which incorporates a single step checkout page on your website, referred to as Magento Supercheckout. This supercheckout page gathers and displays all the checkout fields on a single page easing customers to fill information and complete checkout for their product.
The checkout page and layout has been optimized to show all necessary steps needed to complete the order on a single page to the customer. Magento one step checkout is fully responsive for desktop, tablet, and mobile views and is perfectly compatible with all native Magento payment and shipping methods which are configurable from the backend interface.
Features of Responsive checkout for Magento
1. Magento one page checkout extension simplifies the multi-step checkout process by incorporating a single step checkout on the store.
2. Ajax based loading of Magento one step checkout eliminates the delayed loading time consumed by multiple checkout pages.
3. Magento quick checkout extension gathers and merges all the checkout field information into a single page checkout form which is convenient to fill for the customers while performing order checkout.
4. The mobile responsive feature of Magento one page supercheckout makes it compatible with all kinds of devices(mobiles or tablets), screen sizes and designs.
5. Store merchant can also enable the guest registration option for their customers which automatically generates and sends a random password to the user for further account use.
6. If guest registration with password is enabled, admin can allow their customers to fill the desired password for their account while performing guest checkout.
7. Magento one page checkout extension offers an option to enable or disable newsletters for the eCommerce store.
8. Magento fast checkout extension offers two easy social login options like Google and Facebook so that the customers can conveniently login and perform checkout on the store.
9. This one step checkout Magento extension offers customizable address fields for payment address and shipping address. Admin can show or hide the fields differently to guest and logged in customers of the store.
10. With Magento one step checkout module, admin can configure and display multiple payment and shipping methods for their shop on the frontend.
11. This Responsive checkout for Magento offers a configurable cart to the store merchants. Admin can show/hide any cart description field as per their site needs.
12. Magento one page checkout extension offers two intuitive and appealing layouts including 2-column and 3-column which are fully customizable from backend panel of the module.
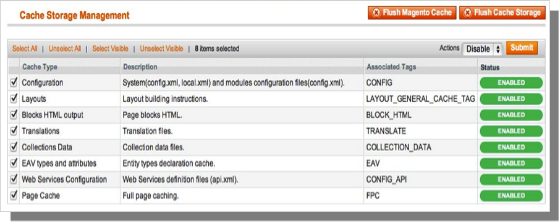
The Magento front end relies heavily on caching to provide a faster experience to customer. This is a wonderful tool, but can wreak havoc during the installation process. To ensure that the cache is not the cause of any problems, we should turn it off. This can be done from the admin console by navigating to the cache management page (System->Cache Management), selecting all caches, clicking disable from the drop-down menu, and submitting the change.
2. Disable Compilation Mode
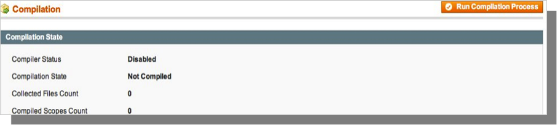
This may not be an issue for many readers, but if you are using Magentos compilation mode on your store, it is important that you remove it. Without going into to many details, compilation mode takes many files spread out over the system and condensing them into a single file that can be run very quickly. If an extensions files are not in the system when this single file is compiled, they will not be included. To check that this is disabled, go to System->Tools->Compilation. If the compiler status is Disabled, you are ready to go. If not, simply click the Disable button on the right hand side of the screen.
Choose An Installation Method
There are two different methods used to install extensions.The first involves taking advantage of the Magento Connect Manager, while the second involves manually installing the files via ftp or command line. The first option is generally used by store owners and is a relatively automated process, the problem is that if there is a problem with this process, you are at the mercy of the connect manager to tell you where the problem is coming from. Option two involves getting your hands on the files yourself and manually dropping them into the Magento installation.
Option 1: Using Magento Connect
Required Materials:
User account for Magento Connect
Magento Admin account with access to Magento Connect Manager
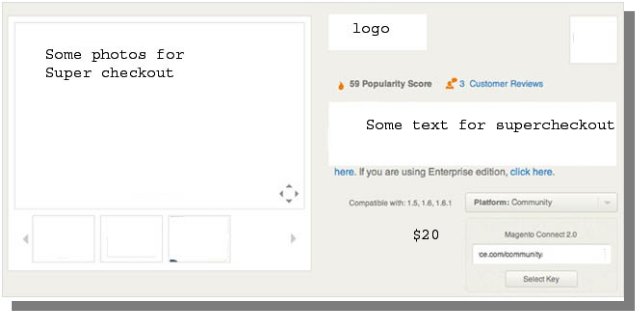
As stated before, this option is relatively easy to implement. The first step is finding the link on Magento Connect for the extension you wish to install. Once there click install now. If you are not currently logged into the site you will be prompted to do so. Next, select the version of Magento connect you are using (if in doubt, select 2.0), accept the extensions license agreement, and copy the extension key.
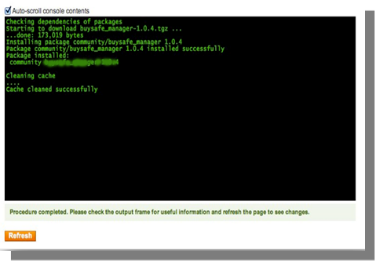
Log into your stores admin console and navigate to System->Magento Connect->Magento Connect Manager. At this point you will be prompted to re-enter your administrator credentials. In order to install an extension from the connect manager; you must have an account with full access to the administration console. If you were given limited access, Magento will not allow you to proceed. Once you are logged into the manager, simply paste the extension key into the text box and click install. A system window will appear towards the bottom of the page that will display the progress of your installation.
Congratulations, you have successfully installed the extension on your store. Be sure to test thoroughly before re-enabling the cache/compilation. If you found no problems both before and after these features have been re-enabled, you should be ready to repeat the installation process on your live site. DONT FORGET TO BACKUP ALL FILES AND DATABASES BEFORE INSTALLATION!
Option 2: Manual Installation
Required Materials:
All files used by the extension.
FTP access to your website.
The connect manager is a useful tool for installing extensions, but prefer hands-on method when it comes to installations. It feels more comfortable when you are personally in control of the process.
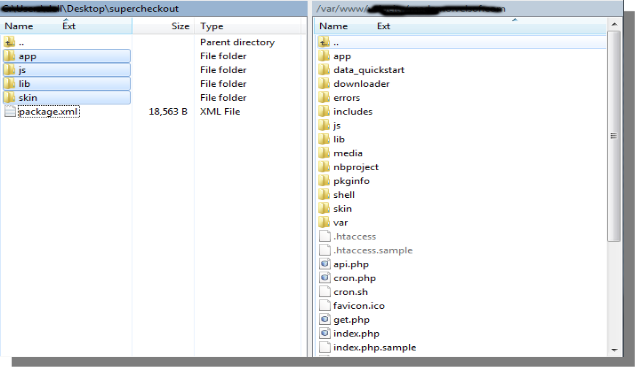
Do you see an app-code directory there, what about app-etc-modules? If you dont see these directory paths and files contained within them chances are that the extension download was faulty. Take a look at the package.xml file, this is the blueprint used by Magento Connect to arrange the files in the proper places. You may need to use this to ensure that everything is as it should be. Once you have reviewed the extension files you are ready to perform the last step. Using your ftp client, drag all of the files onto the store root of the Magento instance. Depending on the number of files in the extension, this may take a few moments.
Now go to the admin console and click Flush Cache Storage. This is the requirement for any extension that adds pages to the admin console. Logging out and back in is also required to ensure that everything loads properly. If you cannot clear the cache via the admin console for any reason, you will need to clear the cache manually via your FTP client (see the first FAQ question for assistance). That is the final step. Congratulations on a successful installation.
Troubleshooting & FAQs
I loaded all files onto my Magento store, and now get a white screen for some or all of the admin console.
This is a fairly common problem, and 99% of the time it is cache related. If you can get to it, go to System->Cache Management and click Flush Cache Storage. This will ensure that everything cached by Magento is deleted and will to be regenerated. Log out and back in to complete the process.
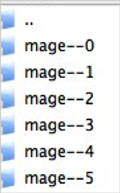
If you are completely cut off from the admin console, navigate to the var-cache directory of your website. You should see a series of directories named mage*. Delete all of these directories (DO NOT DELETE var-cache). This is the equivalent of flushing the cache storage from the admin console.
I am receiving a Magento error when accessing certain pages. How can I debug this?
This question really deserves a blog post all to itself, but a good start would be to go into the errors directory of your store. Locate the local.xml.sample file and rename it local.xml. The next time you see the error detailed information will be provided explaining where the error took place. Dont forget to change this back when you are finished troubleshooting!
I have a critical error with my webstore and need to turn off an extension I cannot access the admin console. What do I do?
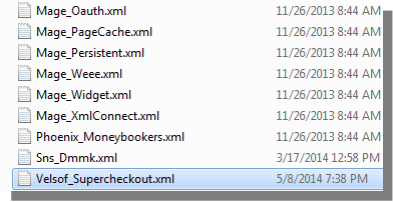
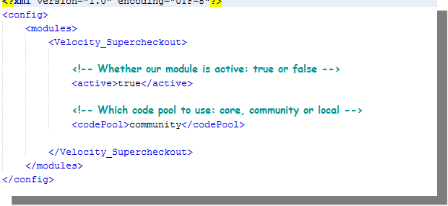
Go to the app-etc-modules directory and open the file that goes with your extension. The naming convention is generally DeveloperName_ExtensionName.xml. In this case it would be Velsof_Supercheckout.xml.
Look for the active tags in the file, change the value from true to false and save your changes. This tells Magento that the extension is disabled and not to run any code associated to it. Deleting the Magento cache is recommended (and most likely required) for this change to take effect.
General Settings
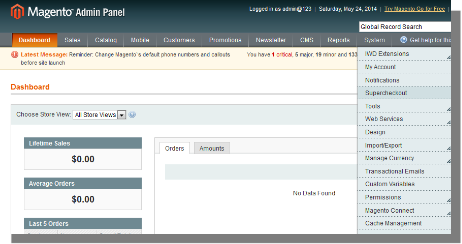
To excess Super Checkout plugin, Click on supercheckout option appearing as a sub menu in navigation menu under System main menu as shown below.
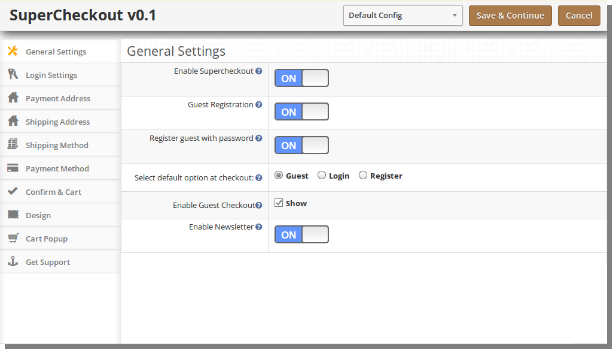
On clicking sub menu Supercheckout the module for plugin will open. It contains navigational bar at the top, menu at the left and main content in the center as shown below. To enable the plugin, switch the enable button from OFF to ON which is just to the right of Enable/Disable label.
To enable guest registration, switch the button from OFF to ON which is just to the right of Register Guest Automatically label. Enabling this would result in registering the guest to your store and an automatically generated password would be mailed to that user.
To enable registration, switch the button from OFF to ON which is just to the right of Register Guest With Password label. On enabling this password and confirm password fields will appear so that customer can register from the checkout page itself.
To change the default option from Guest, Login or Register in Login section of checkout page, select an option from given radio button. The selected option will be set as chosen option by default.
To enable or disable guest checkout by the user check/uncheck the checkbox which is just to the right of Display Guest label.
Login Tab
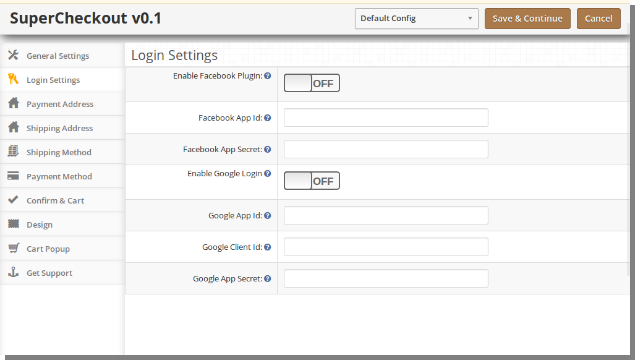
This tab of Magento One Page Checkout basically contains setting to enable /disable Facebook and Google registration & login as shown below.
To enable Facebook Registration & Login switch the button from OFF to ON which is just to the right of Enable Facebook Login label. But before you do that do get facebook APP ID and APP SECRET from https://developers.facebook.com.
Enter the APP ID and APP SECRET in their respective fields and save. You will find Facebook login button on your checkout page.
To enable Google Registration & Login switch the button from OFF to ON which is just to the right of Enable Google Login label. But before you do that do get Google APP ID, CLIENT ID and APP SECRET from https://code.google.com/apis/console. For detailed instructions to get the APP ID, download the Facebook & Google Setup guide from oepncart accout.
Enter the APP ID, CLIENT ID and APP SECRET in their respective fields and save. You will find Google login button on your checkout page.
Payment Address Tab
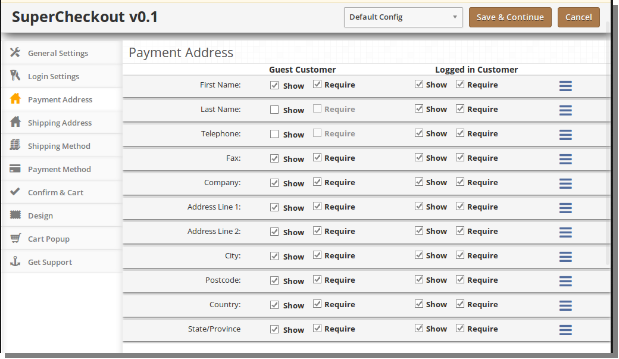
This tab of Magento One Page Checkout contains setting for the fields which is to be shown in Payment or Billing Address section in checkout page as shown below.
It consists of two sections. The one in the left is for Guest Customers and the right one for registered customers.
To make a field display/hide in the checkout page check the checkbox just to the left of Show label.
To make a field as mandatory (required field) check the checkbox just to the left of Require Label.
The fields can also be rearranged according to the requirement. To rearrange just move the cursor to the drag icon and drag & drop the field wherever it is required as shown below.
On saving, the fields will be rearranged as per the changes.
Shipping Address Tab
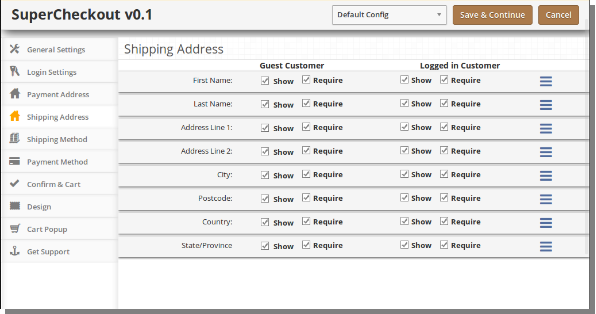
This tab of Magento One Page Checkout contains setting for the fields which is to be shown in Shipping Address section in checkout page as shown below.
It consists of two sections. The one in the left if for Guest Customers and the right one for registered customers.
To make a field display/hide in the checkout page check the checkbox just to the left of Show label.
To make a field as mandatory (required field) check the checkbox just to the left of Require Label.
The fields can also be rearranged according to the requirement. To rearrange just move the cursor to the drag icon and drag & drop the field wherever it is required which is same as payment address.
Shipping Method Tab
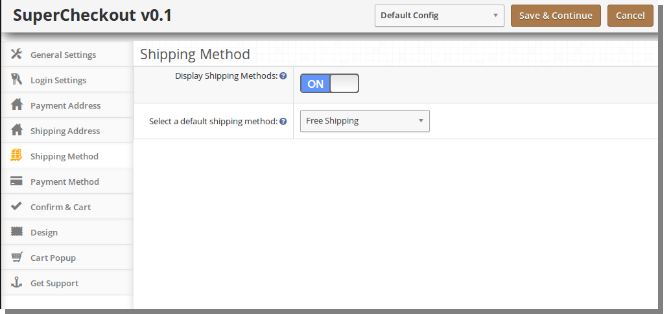
This tab of Magento One Page Checkout contains settings for shipping method which is shown in checkout page. It basically contains settings for enabling/disabling and setting the default shipping method as shown below:
To Enable/Disable the shipping methods from the checkout page switch the button from ON to OFF or vice-versa. This will disable the shipping method block from checkout page. But you should select a default shipping method (if any installed) to apply shipping charges to the order.
To get a default shipping method selected in the checkout page select the default shipping method from the dropdown. If the selected shipping method is not installed it will automatically select from installed shipping method.
Payment Method Tab
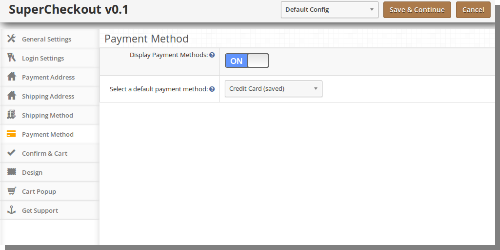
This tab of Magento One Page Checkout contains settings for payment methods shown in checkout page like enabling/disabling or selecting a default method.
To Enable/Disable the payment methods from the checkout page switch the button from ON to OFF or vice-versa. This will disable the payment method block from checkout page. But you should select a default payment method (if any installed) to get a payment method in the checkout page.
Confirm Tab
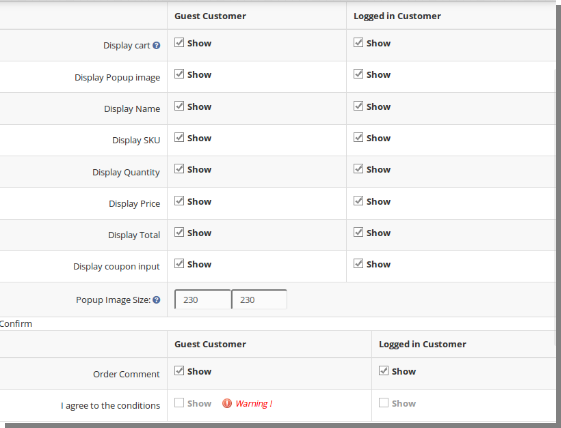
This tab contains setting of Magento One Page Checkout is for the cart and confirming the order as shown below:
Its divide in two section
a. Cart
b. Confirm
Cart
1. This tab is again divided into two sections, the left one is for Guest Customers and Right one for Registered or Logged in customers.
2. To Display/Hide cart from the checkout page check uncheck the checkbox present in front of Display Cart label.
3. To enable/ disable any column in the cart check/uncheck the checkbox in front of that respective column.
4. To enable/disable the popup images for the product check/uncheck the checkbox in front of that respective column.
5. To change the size of popup for images Enter the width and height of the popup in textbox in front of Pop Image Size label.
6. Coupon and Voucher options can also be disabled or enable by checking/unchecking the checkbox in front of that respective field.
Confirm
1. This tab is again divided into two sections, the left one is for Guest Customers and Right one for Registered or Logged in customers.
2. To enable the comment box for the order by customer check the checkbox in front of that Leave a comment for the order label & to disable uncheck the same checkbox.
3. To enable agree to the term or any other information saved in the admin for the store check/uncheck the checkbox in front of I agree to the conditions label.
Design Tab
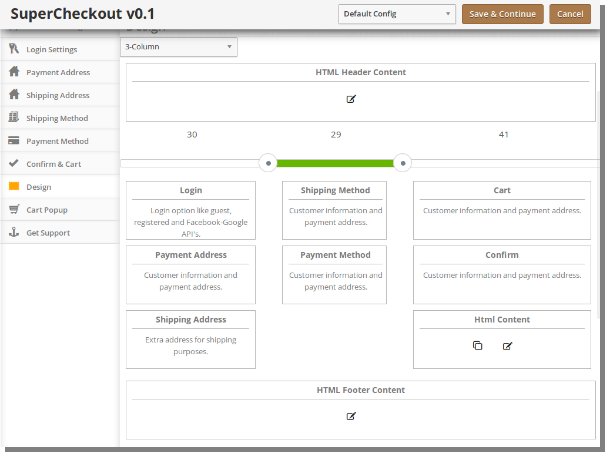
This tab contains the settings for the design of checkout page in the catalog as shown below
To change the width of any column adjust the slider present at the top as shown below :
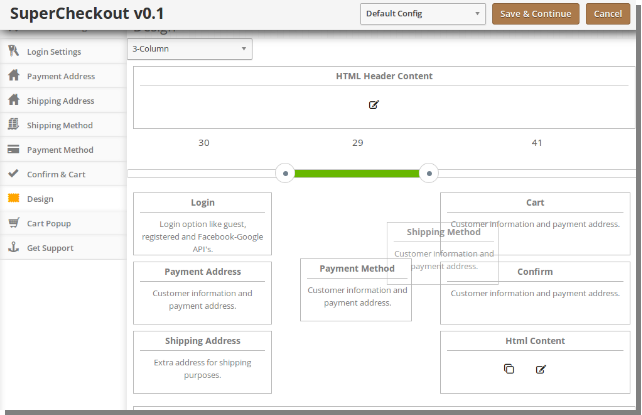
Block of different steps can also be rearranged from one column to the other or in the same column as shown below:
On saving, the block will be rearranged in the checkout page as per the changes
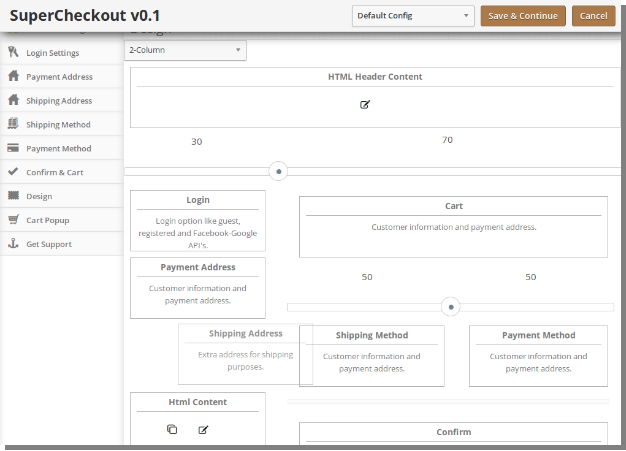
The same goes for layout with two columns as shown below:
Confirm and Cart Tab
This tab contains the settings for pop up cart that appear on adding any product to the cart.
To enable the popup cart on frontend, you can show/hide the complete cart or you can show/hide the selected cart fields only.
Admin can select and unselect the different cart fields for logged in and guest users of the store.
Admin can also set the Popup Image Size which is shown over the product shown in the cart section of the checkout.
Store merchants can also grab cutomer’s comment regarding the product by enabling and disabling the order comment field on supercheckout page.