Ever felt like buying a product immediately after seeing the ‘limited time’ offer tag? This happens with everyone, especially when you know that the deal will end soon and you will miss out on the best offer out there. This urgency is created by Countdown Timers.
The countdown timer heats the sense of urgency and scarcity, forcing the users as quickly as possible to make a purchase decision. Simply set the start and end date, and your timer is ready.
Using a countdown timer, you can run flash sales, and limited period sales offering exciting deals and promotions. The sense of urgency created by a countdown timer pushes the user to purchase through psychological tricks. Users who fear that tomorrow they may not be able to afford anything will be more likely to buy it today.
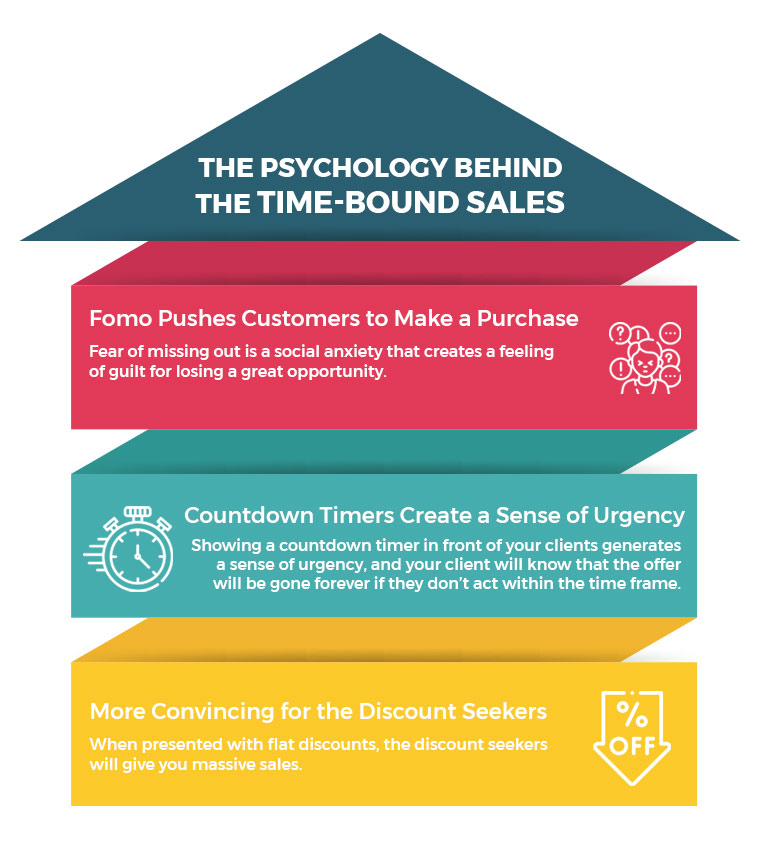
The Psychology behind the Time-Bound Sales
Both limited-quantity products and limited-time products can create a sense of urgency. However, to the scarcity theory, limited-quantity goods and limited-time deals empower sales. Anything will be more alluring the more limited its supply is.
Adding a countdown timer will boost your sales enormously. A limited-time offer means that the units’ discount is only applicable for a short period of time and that if customers do not act right away, there won’t be any more units available for purchase.
1. FOMO Puses Customers to Make a Purchase
Fear of missing out is a social anxiety that creates a feeling of guilt for losing a great opportunity. Do not let your audience go away without purchasing on your website. Use the power of FOMO (Fear of Missing Out) by adding a Countdown Timer on your website.
A countdown timer should accompany any big deal. Why? If the arrangement is there forever, what is the point of acting now? By displaying a countdown timer in front of your clients, you may create a sense of urgency because your clients will understand that the offer will end once the timer expires.
When presented with flat discounts, the discount seekers will give you massive sales. Selling clearance could be a good choice. You will sell out the goods stocked for months as a store owner and bargain seekers can get a decent deal over it. These sales can be the main contributor to your cash flow, which, by replacing the older ones, would make space for the new items.
Never go overboard and make sure you’re honest. It has been shown that urgency is effective, but you must use it honestly. Otherwise, placing the timer on every product gives a feeling that you are running out of business. So, where to put the countdown timer on your website?
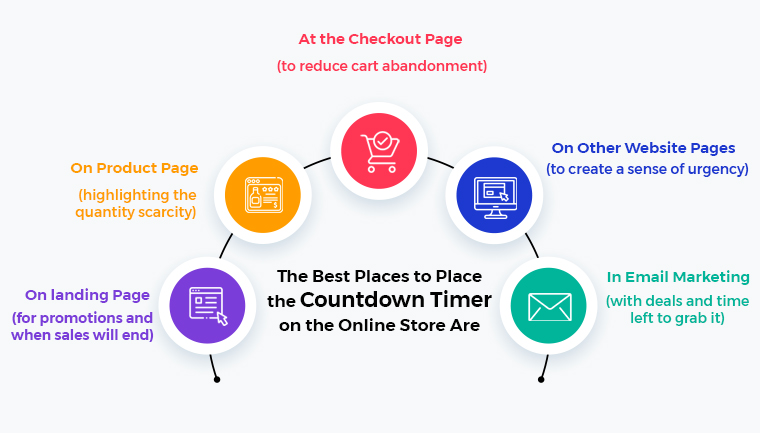
The best places to place the countdown timers on the online store are:
On the landing Page (for promotions and when sales will end)
On the Product Page (highlighting the quantity scarcity)
At the Checkout page (to reduce cart abandonment)
On other website pages (to create a sense of urgency)
In email marketing (with deals and time left to grab it)
How to implement a Countdown Timer on your eCommerce Website?
You will not need programming experience or certain skills in your website builder to implement our module. The Countdown timer by Knowband to run flash sales is available for various eCommerce platforms like PrestaShop, OpenCart and Magento.
The module is easy to install and configure. Sharing a few of them for your reference;
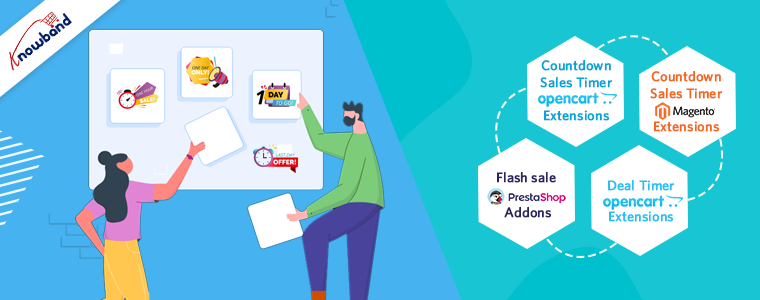
Countdown Sales Timer – Opencart Extensions
An efficient strategy to encourage large sales in the eCommerce business is to display bargain prices and free shipping on a selection of products. Due to the limited stock and discounted prices displayed by the OpenCart Countdown Sales Timer extension, customers are forced to decide right away.
Flash Sale – Prestashop Addons
The Prestashop Flash Sale Addons can encourage impulse buying and increase the likelihood that an eCommerce site. The PrestaShop plugin will build the state of urgency. The Prestashop plugin encourages customers to take advantage of the offer and place their order as quickly as feasible.
Deal Timer – OpenCart Extensions
The OpenCart Deal TimerExtensions will allow to add products to the specials list by offering discounts for a set amount of time. The admin can decide whether to display a timer or modules on each layout, position, and sort order for the product listing.
Wrap Up:
The majority of the time, urgency and scarcity push customers to make purchases, ensuring that the store’s conversion time is minimised. The KnowBand Countdown Timers were designed to make complete use of the customer’s psychology. It allows eCommerce stores to push sales efficiently by adding extra countdown clocks to exclusive items or deals.
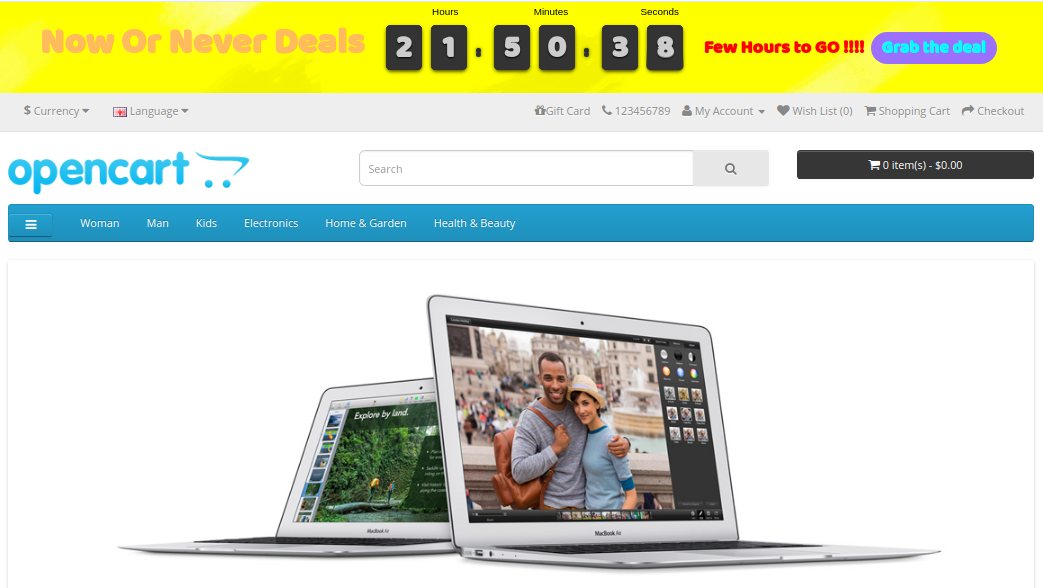
Putting a countdown timer bar at the top of the website is the best way to remind your shoppers that they have a limited amount of time to grab the product deals at the lowest rates. A sense of urgency is created using sales countdown timer which triggers their instant purchase decision. OpenCart Countdown Sales Timer extension compels shoppers to make an immediate decision by showing limited stocks and half prices. Showing sale price and free shipping on selective products are an effective tactic to provoke bulk sales on the eCommerce store. Knowband’s Sales Countdown Timer Bar for OpenCart allows admin to add a custom timer bar to their online shop promoting special events, promotions and new product launches.
Countdown timer campaigns module offers a real-time countdown timer creating awareness among customers regarding limited edition products, new arrivals, free shipping products and many more. This results in increasing conversion rates which ultimately helps e-merchants to run more effective sale campaigns/promotions. With OpenCart sale countdown module, admin can create multiple countdown timers for the homepage, product pages and category pages within the website scheduled at different dates and times.
1.1 Striking Features of Countdown Timer extension for OpenCart
OpenCart sale countdown module offers many customizable features which can be set as per business requirements. No coding is required and the store owner can set a sales timer bar for their store in seconds. Let us explore them one by one.
1. OpenCart sale countdown module displays a countdown timer bar for the entire website or selective pages to create a special feel and urgency among the visitors.
2. Using Sales Countdown Timer Bar for OpenCart, admin can show the desired text message beside a countdown timer running.
3. With the countdown timer campaigns module, Admin can easily fix the start and end time for multiple countdown timers.
4. Admin can create multiple Sales Countdown Timer Bar for OpenCart site based on different occasions and events.
5. OpenCart Countdown Sales Timer extension allows admin to choose appealing color coding for the sales countdown bar on the website.
6. The Sales Countdown Timer Bar for OpenCart can be shown at the top or bottom of the store.
7. An option to change the font style of text shown on countdown timer bar is also provided by this OpenCart Countdown Timer module.
8. To avoid confusions in different timers, admin can set a unique name corresponding to each of the sales countdown timer bars.
9. With OpenCart sale countdown module, admin can assign a unique priority or sort order for each of the set timers for the shop.
10. The button text and button link is shown over the countdown timer bar can be changed using this OpenCart extension.
11. An option to add custom CSS code is also offered by this OpenCart Countdown Sales Timer module.
12. Countdown timer campaigns module provides flexibility to display the countdown timers in selected locations or countries.
13. The OpenCart Countdown Timer module gives an option to set time after which the countdown sales timer is shown at the front.
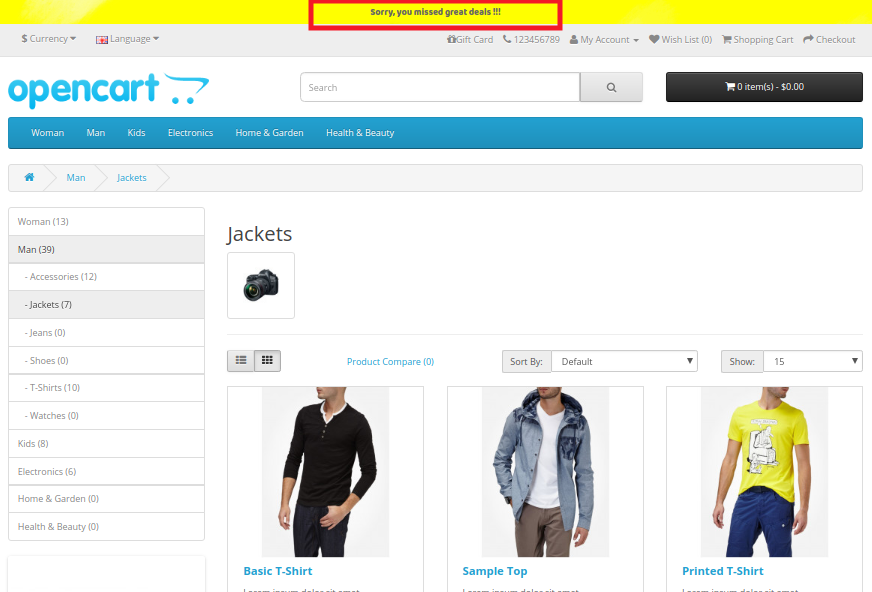
14. OpenCart admin can show a text message after the sale timer ends or expires. If no expiry message is shown then the timer will automatically end and disappear without giving any message to the visitors.
15. OpenCart sale countdown module works flawlessly in multiple languages and with multiple stores.
16. OpenCart Countdown Timer is completely mobile responsive.
17. OpenCart Countdown Sales Timer extension can be enabled or disabled on a single button click from the backend. Moreover, each of the timers can be separately enabled or disabled as per requirements.
2.0 Installation Guide of OpenCart Countdown Sales Timer extension
Before starting the installation process, you have to buy the OpenCart sale countdown module from the Knowband store. Once purchased, you will receive the following files on your registered email.
The source code of OpenCart Countdown Sales Timer extension in zipped file format.
User Manual of OpenCart Countdown Sales Timer extension
Now in order to install this OpenCart Countdown Timer Bar on your online shop, follow the given steps:
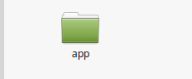
1. Unzip the zip file. You will get the folders as shown in the image below:
2. Copy all the folders of the zip file in the Root Directory of OpenCart setup via FTP manager.
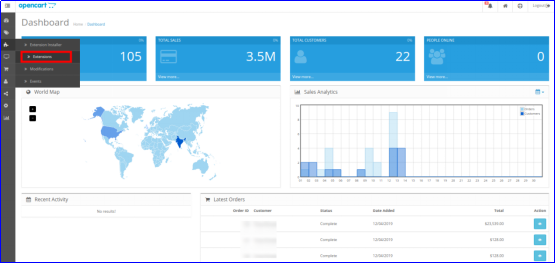
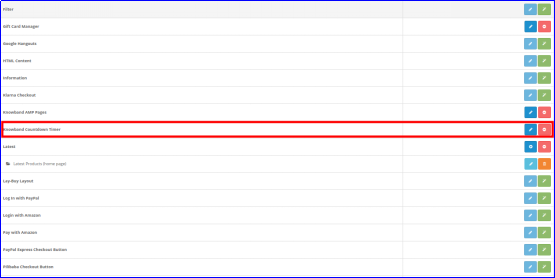
So, OpenCart Countdown Sales Timer is now successfully installed and is ready to use at your store. Go to the admin menu and click on the extensions and thereby click on configure button next to Knowband Countdown Timer.
3.0 Admin Interface of OpenCart Countdown Sales Timer Extension
Just after successful installation of Sales Countdown Timer Bar for OpenCart website, you can create and configure the countdown sales timers as per your requirements. Navigate the settings in the given order: Admin Panel > Extensions > Modules > Knowband Countdown Timer
The simple to understand admin interface of OpenCart Countdown Timer Module is divided into two broad sections namely:
1. General Settings
2. Timers
Each of these sections have been discussed in detail below. Further, the “Timer” section is sub-divided into:
1. General Settings
2. Display Settings
3. Look and Feel Settings
3.1 General Settings
The general settings of the Countdown Timer extension for OpenCart have been listed one by one.
Status: Enable or disable the complete functionality of countdown timer campaigns module on the store.
Fonts: Select the desired font style for the text information shown on the sales countdown timer bar.
3.2 Timers
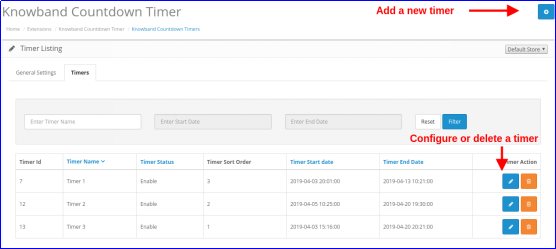
OpenCart sale countdown module provides a detailed view of the existing countdown timers. An option to edit or delete the existing timers is provided corresponding to each of the timers. Admin can easily make changes to the existing sale timers. To add a new countdown timer to the store, click on the “+” button shown at the top right corner of the admin interface. As you click on the “Add” button, you will see the following settings for the countdown timer.
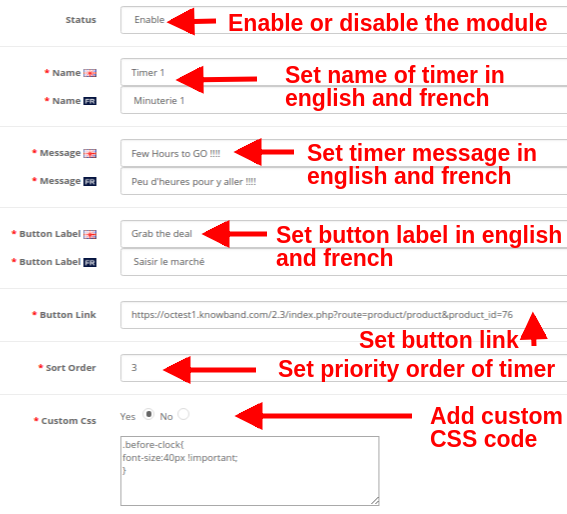
3.2.1 General Settings
Initially, the above fields are set to their default values.
Status: This option enables or disables the countdown timer.
Name: This option allows you set a name for the sales timer so that you are not confused while configuring the settings for multiple timers on the store. The name can be specified in English, French and other languages.
Message: This option sets a message or text information shown on the countdown sales timer bar. This text describes the deal or discount offer which is active on the store.
Button Label: To redirect the visitor on the deal or offer page, a button is provided on the timer bar. This option allows you to set the desired label for this timer button.
Button Link: This option lets you set the URL for the timer bar button. When the user clicks the button, they are redirected to this specific link.
Sort Order: This option allows you to set the sort order or priority value for each of the timers created for the OpenCart store. Remember, this priority value should be unique.
Custom CSS: This option includes custom CSS to improve frontend functionality of the website.
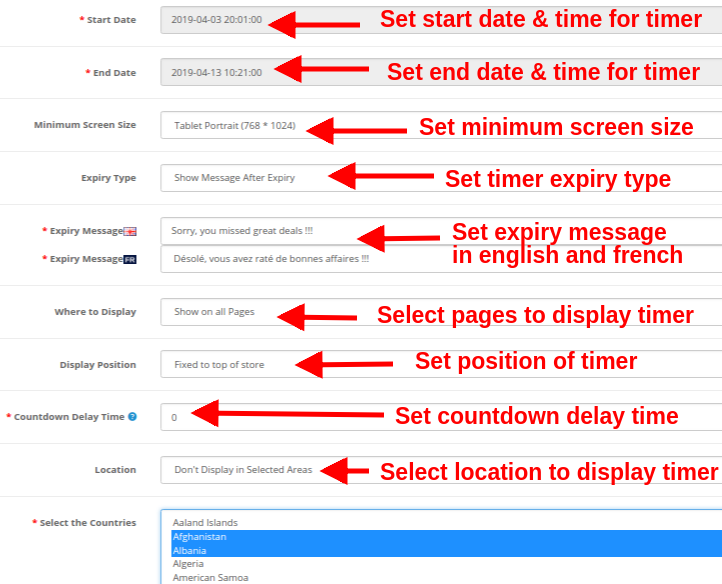
3.2.2 Display Settings
The display settings of this OpenCart Countdown Sales Timer extension control where and how the Countdown Timer block will be displayed to the visitors. The various configuration options under this section include:
Start Date: This is a mandatory field that sets the start date and time for the countdown timer.
End Date: This is a mandatory field that sets the end date and time for the countdown timer.
Minimum Screen Size: This option sets the minimum screen size(display configuration) where this countdown timer block can be seen through different devices.
Expiry Type: This option allows you to set the countdown timer expiration type. You can either set it to “Auto” or you can “show a custom message after timer expiry”.
Where to Display: This option allows you to choose the site pages where you want to display the countdown timer block on the website. You can show on your complete site or only selected pages of your site.
Display Position: You can fix the display position for the countdown timer block over the website. The three display options include:
1. Top of the store
2. Fixed to top of window
3. Bottom of the store
Countdown Delay Time: You can specify the delay time (in seconds)after which the timer block is displayed on the frontend. Set 0 if you want to display it immediately to the visitors.
Location: You can set a location where you want to show the sales countdown timer. You can set the location as global or to selected areas only.
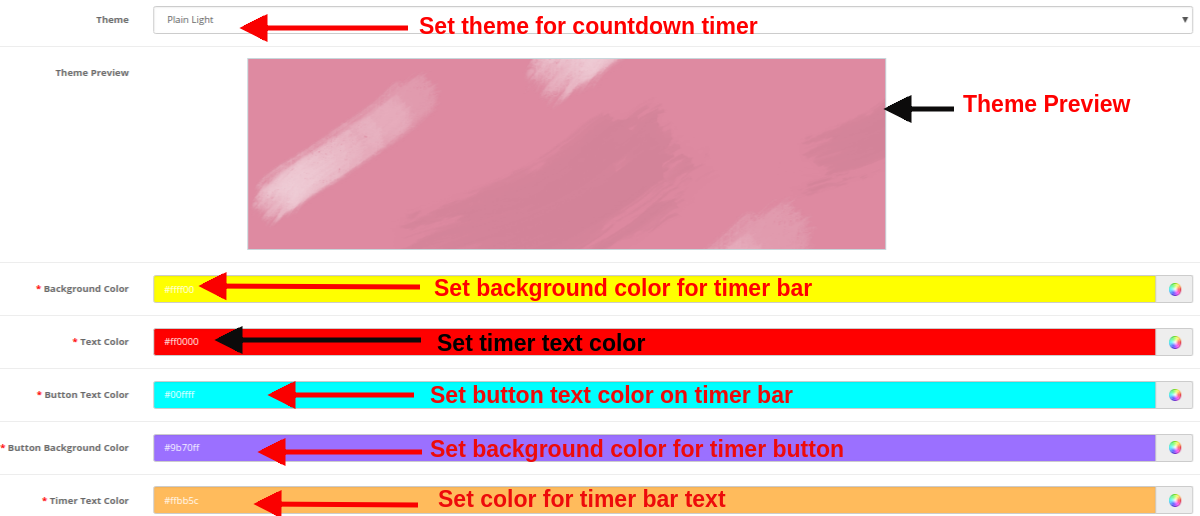
3.2.3 Look and Feel Settings
The look and feel settings of OpenCart Countdown Timer module control the frontend appearance of the countdown timer block. The various configuration options offered are:
Theme: This option allows you to set a theme for the sales countdown timer block.
Theme Preview: Using this option, you can preview the selected theme before applying the final changes to the website.
Background Color: Using this option admin can set the background color for the sales countdown timer block.
Text Color: The font color of the text shown on countdown timer block can be set using this option.
Button Text Color: Admin can change the text color on the timer button.
Button Background Color: Admin can set a desired background color for the timer button.
Timer Text Color: Select text color for the timer text shown in sales countdown block.
After this, click on the “Save” button shown at the top right corner of admin panel to save the module settings.
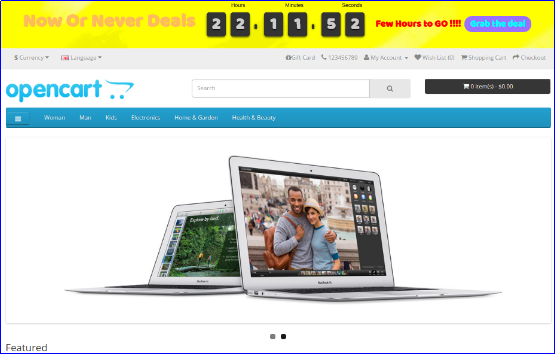
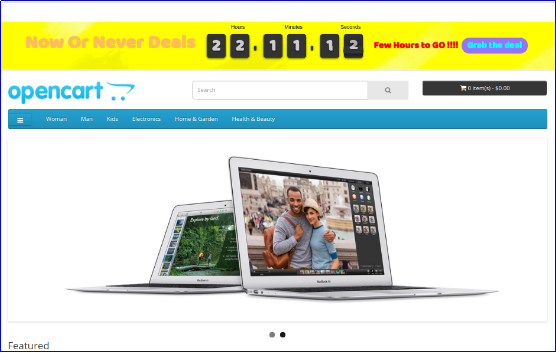
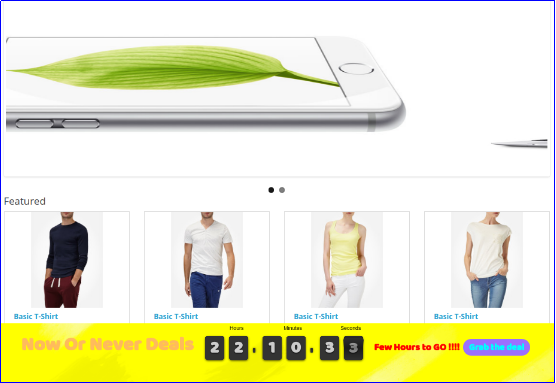
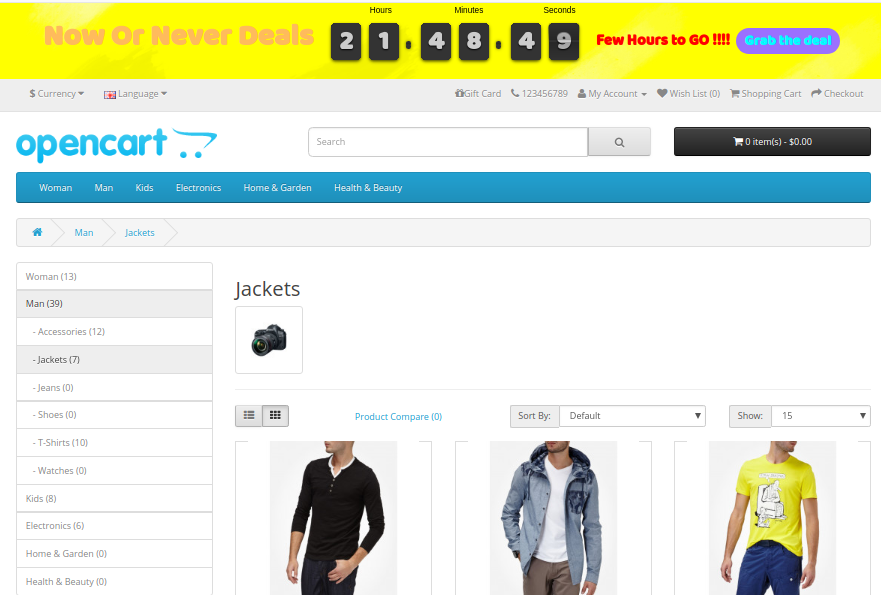
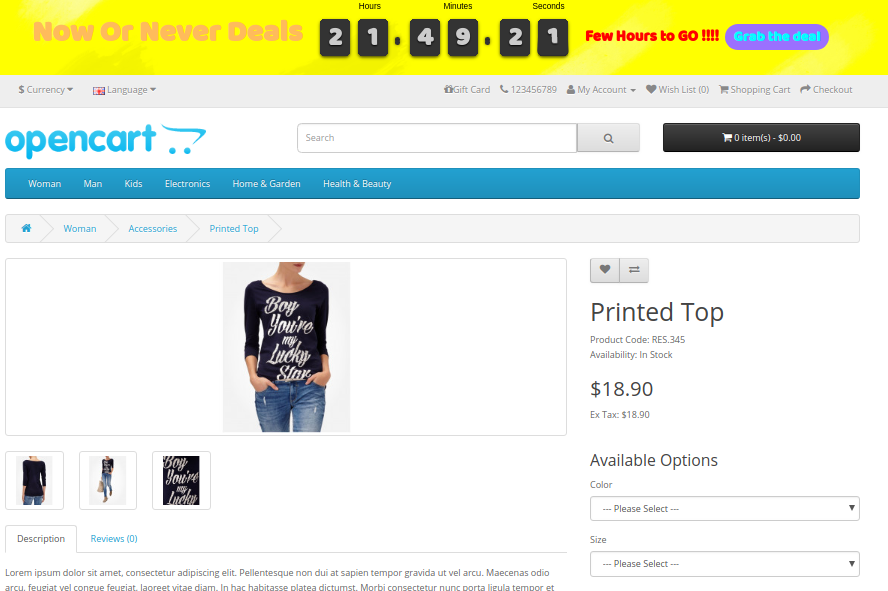
4.0 Front Interface of Countdown Timer Campaigns Module
After you have successfully configured the settings of OpenCart sale countdown module, you can see Sales Countdown Timer Bar for your OpenCart store in accordance with the selected priority values and time schedule.
Do you know an effective way to drive sales and engagements for the website? The instant process to boost conversions is to provide compelling reasons to BUY NOW for your visitors. Sales Countdown Timer campaigns seamlessly convert your hesitant buyers into leads for your store. Magento Countdown Sales Timer Extension from Knowband helps e-merchants in convincing their visitors by displaying a Countdown Timer bar on the frontend. Finding the countdown timers, customers will either act fast or will miss the deal forever.
This Countdown Timer extension for Magento is a multi-purpose module offering flexible settings to catch the attention of the customers via attractive sales countdown timers. Being a store owner, you can create unlimited custom looking timers for your store and can display them as per some fixed schedules. Magento Countdown Sales Timer extension not just stimulates purchase levels but also offers an intuitive way to promote products and categories of the store. Hence, Sales Countdown Timer Bar for Magento is an advanced promotion tool to run occasional sales, timed discount deals, boost new arrivals and launches on the store.
1.1 Striking Features of Sales Countdown Extension for Magento
Installing and configuring Magento Countdown Sales Timer extension doesn’t involve any technicalities nor it includes any source code modifications. The in-built features of this Magento module can be effortlessly modified without any assistance. The various features offered by countdown timer campaigns module have been listed below:
Magento Countdown Sales Timer extension is a quick and easy way to add real-time sale countdown timers to create urgency among store visitors.
This Sales Countdown Timer Bar for Magento is designed to match up with your store theme and requirements.
Magento sale countdown module lets you set up and schedules sales campaign between two fixed dates and time.
Create any number of countdown timers for different store products and categories without any coding efforts.
Magento Countdown Timer extension allows admin to set the desired name, description for each countdown timer.
The Countdown Timer extension for Magento allows e-merchants to set the unique priority order for each of the reminders.
Admin can show a customized button on the Sales Countdown Timer Bar for Magento website. They can set a link on that timer button as per their site requirements.
Magento Countdown Timer supports compatibility with multiple languages and site themes.
With Magento sale countdown module, admin can display a custom countdown timer expiration message on the frontend. This information is useful for the visitors to know that the prevailing deal or offer has been expired.
Using color picker tool, store merchants can also set appealing colors and predefined themes for Sales Countdown Timer Bar for Magento site.
1.2 Magento Countdown Sales Timer Benefits to Customer
With Magento Countdown Timer, customers are updated with the trending rush alerts and active campaigns on the store.
Magento sale countdown module features a landing page link which redirects the customer to the main page containing new launches or promotional offers.
1.3 Technology for Development
Language: PHP Frame Work: Magento
2.0 Installation Guide
The store admin can follow these simple steps for installing the Magento Countdown Sales Timer extension:
1. First of all download the extension package from the Knowband store.
2. You will get a zipped file containing the source code and user manual. Unzip the package on the root folder of your Magento setup via FTP manager (like Filezilla or WinSCP – download here: https://filezilla-project.org/). You’ll find the files and folders as shown in the image below:
The extension is now installed and ready for use. Now the store admin can now use and configure the Sales Countdown Timer Bar for Magento.
3.0 Admin Interface of Sale Countdown Magento Extension
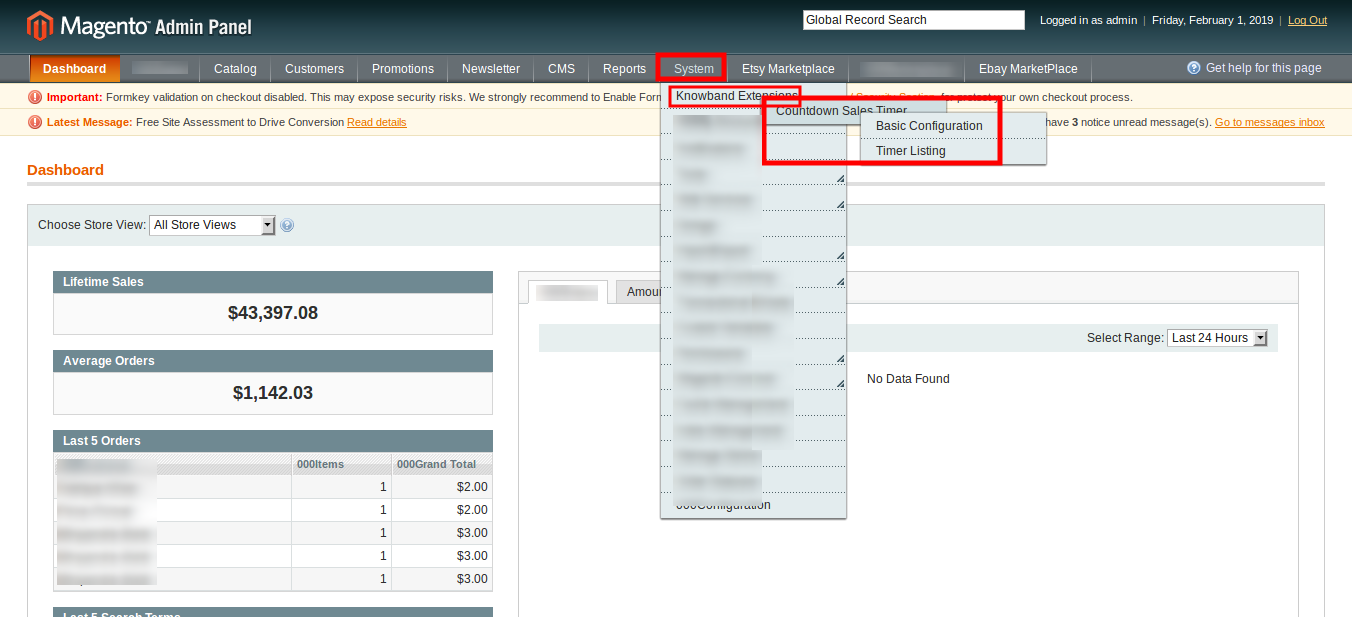
Once after you have successfully installed Magento Countdown Sales Timer extension from Knowband Store, you can now easily configure its different settings and make it ready for your Magento website. To configure the various settings of this module. Open the admin panel, go to System > Knowband Extensions > Countdown Sales Timer
The complete settings of this Countdown Timer extension for Magento is divided into two parts:
1. Basic Configuration
2. Timer Listing
Basic Configuration
The admin interface showing the basic configuration settings of this Magento module is as given below.
1. Enable the Extension: The functionality of Magento Countdown Sales Timer extension can be enabled or disabled using the provided toggle switch. 2. Include jQuery: Admin can include the jQuery library on the store’s front if the library was not present on the client store.
Timer Listing
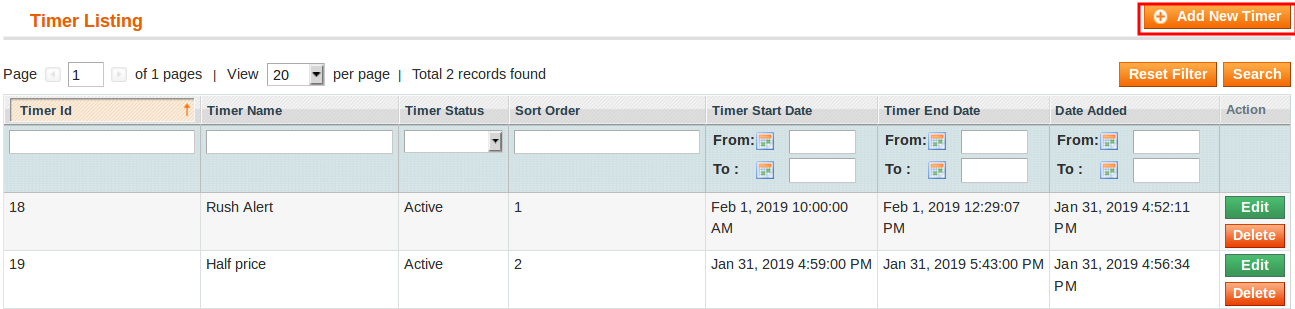
The admin interface of Magento Countdown Timer consist of a list of timer records along with filter option. The settings for each of the existing timer can be separately deleted or configured.
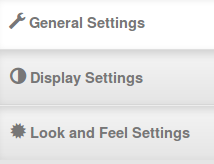
Add New Timer: Use this option if the admin wants to create a new coundown reminder for their store. To modify the settings for any existing reminder, click on Edit button corresponding to a particlar reminder record. The configuration settings for a particular countdown reminder is divided into three major sections as:
1. General Settings
2. Display Settings
3. Look and Feel Settings
Each Tab under Timer Settings of Magento Countdown Timer module has been discussed below.
3.1 General Settings
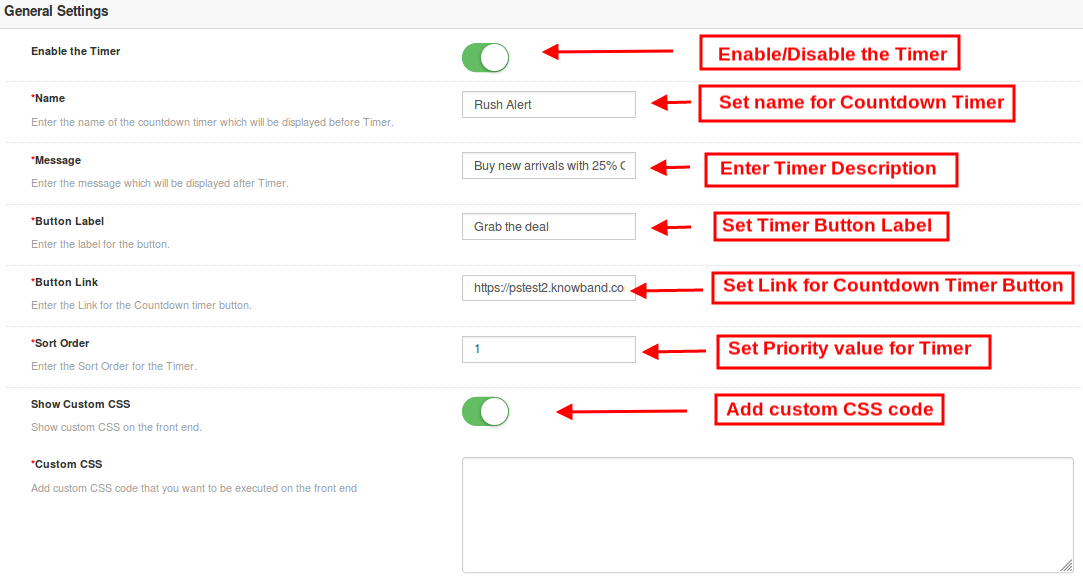
On clicking on the General Settings tab, you will see the following options as given below:
Initially the above fields are set to their default values.
1. Enable the Timer: Admin can enable or disable a selected timer using this toggle switch. 2. Name: Set a custom name for the countdown timer which will be displayed before Timer. 3. Message: Set a desired message which will be displayed after Timer. 4. Button Label: Admin can set a custom label for the button on countdown timer block. 5. Button Link: Admin can set a desired URL on button click. When the user clicks the button, they are redirected to this specific link. 6. Sort Order: Admin can set the sort order or priority value for each of the reminders created for the Magento site. Remember, this priority value should be unique. 7.Show Custom CSS: Admin can add custom CSS code to enhance the frontend functionality of the website.
After this, click on the “Save” button shown at the top right corner of admin panel to save the module settings.
3.2 Display Settings
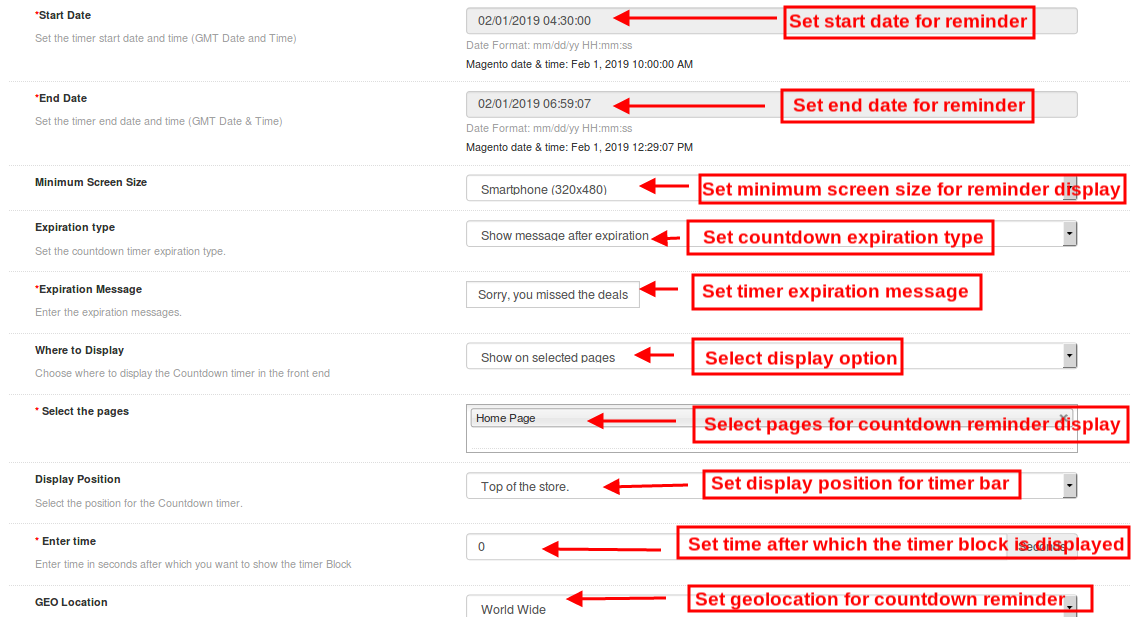
The display settings of this Magento module control where and how the Magento Countdown Timer will be displayed to the visitors. The various configuration options under this section include:
1. Start Date: Admin can set a start date and time(GMT date and time) for the counterdown timer. 2. End Date: Similarly, they can set a end date and time for the counterdown timer. 3. Minimum Screen Size: Admin can select a particular display configuration using this option. 4. Expiration Type: This option allows you to set the countdown timer expiration type. 5. Expiration Message: If the expiration type has been selected as Auto then no message is displayed after the deal expires. But if you have selected Show Message option, then set a custom expiration message in this field. 6. Where to Display: Admin can choose where they want to display the countdown timer block on their website. 7. Select Pages: If the admin wants to display the timer block on selected pages, then they can select the pages here. 8. Display Position: Site admin can fix the display position for the countdown timer block over the website. The three display options include:
Top of the store
Fixed to top of window
Bottom of the store
9. Enter Time: Admin can enter time (in seconds)after which they want to show the timer Block on the frontend. Set 0 if you want to display it immediately to the visitors. 10. Geolocation: This option lets you select the geolocation for the display of sales timer block.
After this, click on the “Save” button shown at the top right corner of admin panel to save the module settings.
3.3 Look and Feel Settings
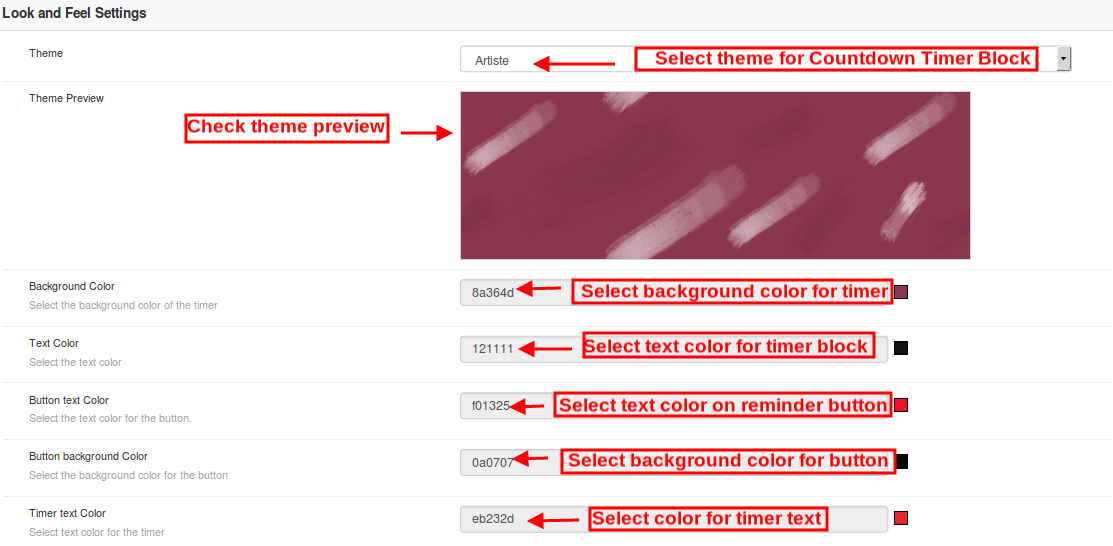
The look and feel settings of countdown magento extension control the frontend appearance of the countdown timer block. The various configuration options offered are:
1. Theme: Admin can set a particular theme for the sales timer block from the themes offered by countdown timer campaigns module. 2. Theme Preview: This option allows the admin to preview the theme before the apply the changes to their website. 3. Background Color: Using this option admin can set the background color for the sales countdown timer block. 4. Text Color: The font color of the text shown on countdown timer block can be set using this option. 5. Button text Color: Admin can change the text color on the timer button. 6. Button background color: Admin can set a desired background color for the timer button. 7. Timer Text color: Select text color for the timer text shown in sales countdown block.
After this, click on the “Save” button shown at the top right corner of admin panel to save the module settings.
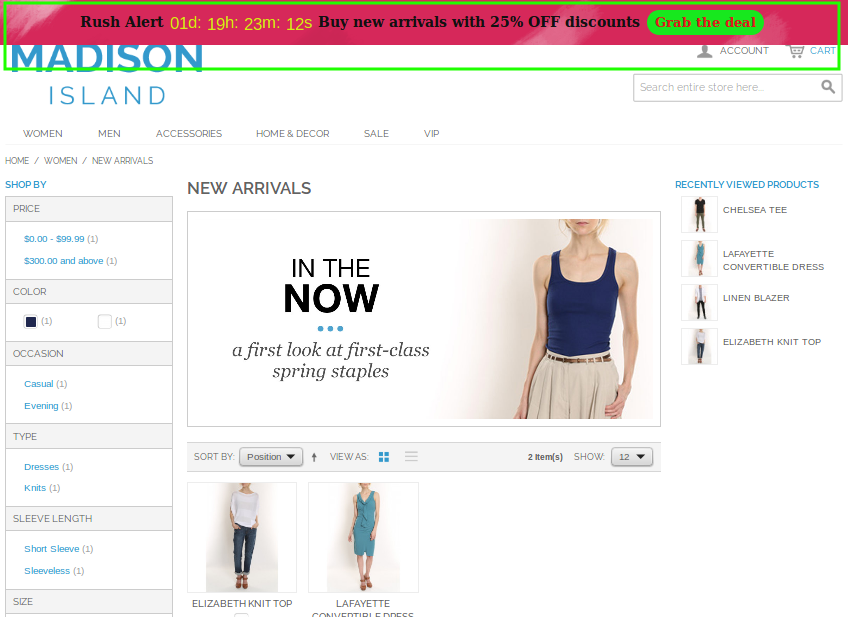
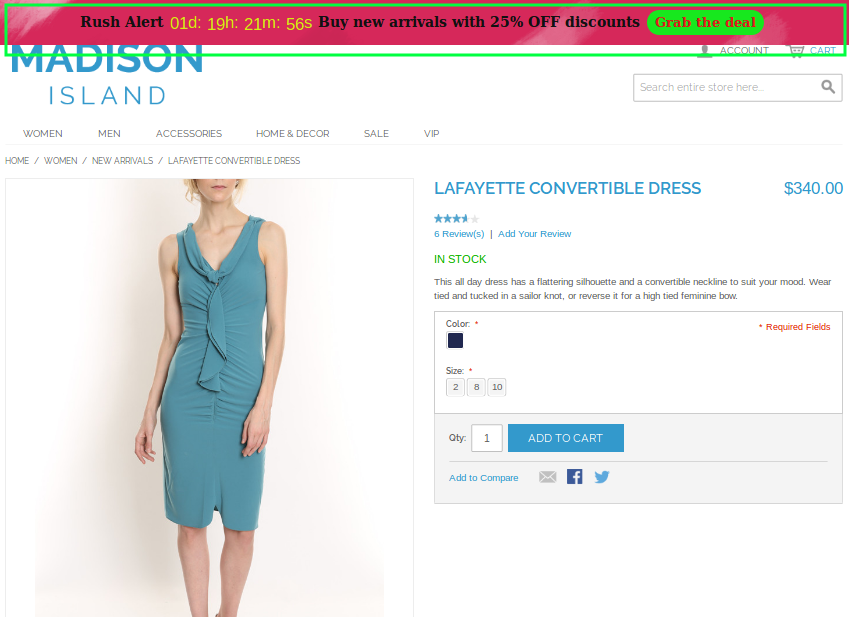
4.0 Front Interface of Magento Countdown Sales Timer extension
After you have successfully configured the settings of magento sale countdown module, you can see Sales Countdown Timer Bar for Magento store in accordance with the selected priority values and time schedule.