Magento Marktplatz Return Manager Addon

Was ist MarketPlace?

Im Allgemeinen ist ein MarketPlace "ein offener Raum, in dem früher ein Markt stattfand". Es bedeutet, dass ein Raum in Beziehung zwischen Verkäufern und Kunden steht. Es gibt mehrere Verkäufer, die Waren an mehrere Kunden verkaufen.

An Online-Marktplatz (oder Online-E-Commerce-Marktplatz) ist eine Art von E-Commerce-Site, auf der Produkt- oder Serviceinformationen von mehreren Dritten bereitgestellt werden, während Transaktionen vom Marktplatzbetreiber verarbeitet werden. Online-Marktplätze sind die wichtigste Art des Multi-Channel-E-Commerce.

In einem Online-Marktplatz werden Verbrauchergeschäfte vom Marktplatzbetreiber bearbeitet und dann von den teilnehmenden Einzelhändlern oder Großhändlern geliefert und ausgeführt (oft als "Drop Shipping" bezeichnet). Andere Funktionen können Versteigerung (vorwärts oder rückwärts), Kataloge, Bestellung, gewünschte Werbung, Handel Austausch Funktionalität und Funktionen wie RFQ, RFI oder RFP sein.

Da Marktplätze Produkte einer breiten Palette von Anbietern zusammenfassen, ist die Auswahl in der Regel breiter, die Verfügbarkeit ist höher und die Preise sind wettbewerbsfähiger als in den herstellerspezifischen Online-Einzelhandelsgeschäften.

Beispiele für Online-Marktplätze sind Amazon.com, etsy, Ebay, Snapdeal, Flipkart, Kaymu, Rakuten, und NASDAQ.

MarketPlace-Erweiterung

MarketPlace-Erweiterungen für Magento ist für die einfache Umwandlung eines einfachen Magento-Shops in einen MarketPlace mit vielen Funktionen für Kunden, Verkäufer und Ladenbesitzer entwickelt. Jeder Kunde kann sich als Verkäufer registrieren und sowohl die Eigenschaften eines Verkäufers als auch die des Kunden genießen.

Der Verkäufer verkauft Produkte im Geschäft und im Gegenzug bekommt der Ladenbesitzer prozentual eine Provision vom Gesamtverkauf des Verkäufers. Der Provisionsprozentsatz, den der Geschäftsinhaber erhält, kann geändert werden, und der Geschäftsinhaber kann den Prozentsatz auf einen beliebigen gewünschten Wert setzen.

Magento Marktplatz Return ManagerErweiterung

Einführung

Return Manager Addon fügt die Funktionalität zur Verwaltung von Rückgabeanforderungen für jede Bestellung hinzu, die von einem Kunden und einem Gastkunden aufgegeben wird. Das Plugin fügt einen Link zum Frontend hinzu, über den jeder Kunde / Gastkunde die Rückgabe eines Produkts aus einer früher aufgegebenen Bestellung beantragen kann.

Dies ist ein sehr flexibles Plugin und der Kunde kann jedes Produkt in einer Bestellung vollständig oder teilweise zurückgeben, das heißt, der Kunde kann auch die Hälfte oder weniger Menge eines Produkts in der Bestellung zurückgeben.

Installationsanleitung

Befolgen Sie die folgenden Schritte zur Installation von Magento Marketplace Return Manager

1. Laden Sie die Erweiterung herunter

2. Entpacken Sie das Paket in Ihrem Stammordner von Magento Setup per FTP-Manager (wie Filezilla oder WinSCP – hier herunterladen: https://filezilla-project.org/).

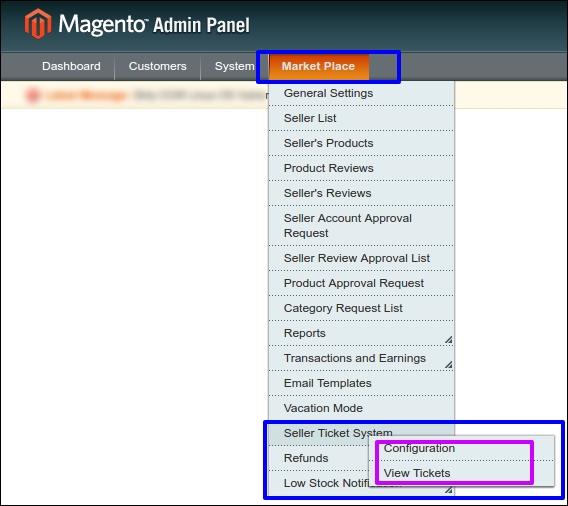
3. Im Admin-Panel unter dem Menü "Market Place" neben dem Systemmenü sehen Sie eine neue Menüoption "Rückerstattung". Falls Sie den Link unter System nicht sehen können, löschen Sie zuerst Magento Cache und überprüfen Sie dann erneut.
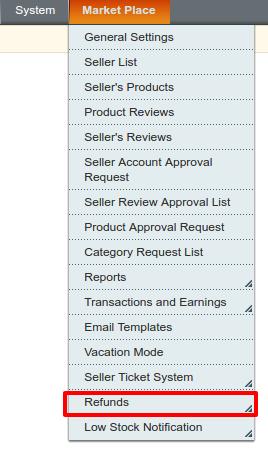
Magento Marketplace Return Manager Addon-Installationshandbuch | Wissensband

4. Damit wird die Erweiterung auf Ihrem System installiert.

Admin-Modul

Nach der Installation des Plugins im Speicher stellt das Plug-in die folgende Schnittstelle zur Verfügung:

1. Administrationsmenü

a) Konfiguration

  1. Marktplatz-Rückerstattungskonfigurationen

b) Erstattungsantrag

2. Vorderes Ende

a) Kunden-Schnittstelle

b) Verkäufer-Schnittstelle

  1. Erstattungsantrag

Jede Schnittstelle hat die Form einer Registerkarte und jede Registerkarte enthält einige spezifische Einstellungen / Funktionen, die je nach Bedarf geändert werden können. Jede Registerkarte wird unten erläutert.

Marktplatz-Rückerstattungskonfigurationen

Nach dem Klicken auf "configure link" auf MaketPlace >> Configuration (Link wird automatisch angezeigt, sobald Sie das Plugin installiert haben), öffnet das System standardmäßig die Registerkarte "Marketplace Refund Configurations", wie im folgenden Bildschirm gezeigt:
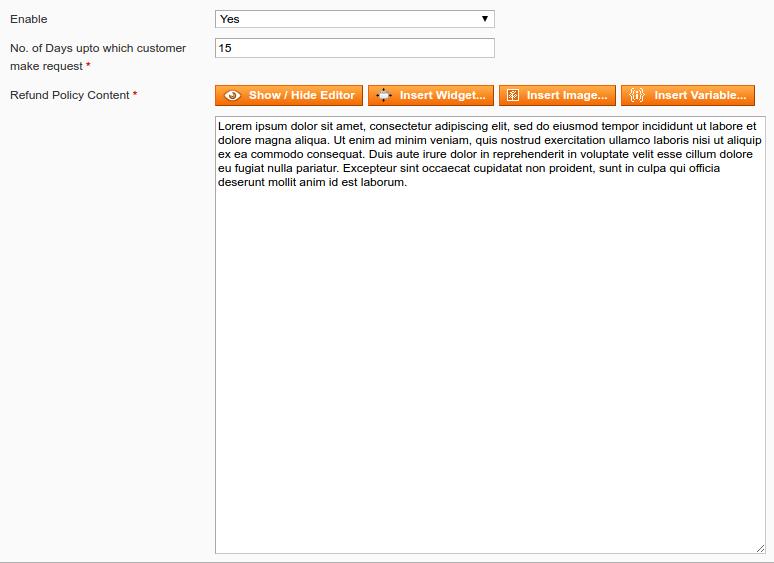
Anfänglich sind Felder in der obigen Form bereits mit ihren Standardwerten gefüllt.

1. Aktivieren deaktivieren: Anfangs wird dies "AUS" sein. Der Administrator kann das Plug-in aktivieren / deaktivieren, indem er diese Einstellung durch Auswählen von "Ja" oder "Nein" ein / ausschaltet.

2. Inhalt der Rückerstattungsrichtlinie: Mit dieser Option kann der Administrator sowohl den Text als auch das Format (HTML-Design) des Textes ändern, der bei erfolgreicher Einreichung einer Rücksendeanforderung von einem Kunden angezeigt wird.
3. Anzahl der Tage, bis zu der der Kunde eine Anfrage stellt: Mit dieser Option kann der Administrator die maximale Anzahl an Tagen festlegen, bis zu der die Rückgabe des Kaufs zulässig ist.

Aktionen

1. Der Administrator kann Richtlinieninhalte und -einstellungen über den Konfigurationslink im Admin-Steuerfeld bearbeiten.

2. Der zweite Link in der Spalte Aktionen dient zum Anzeigen der Rückerstattungsanforderung der Produkte für die Verkäufer.

Rückgabebedingungen

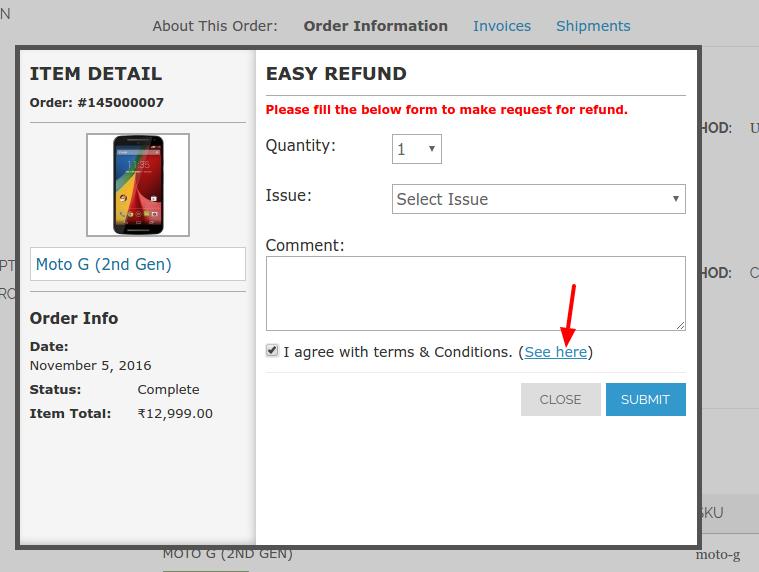
Eine Rücksendeanforderung kann nur von einem Kunden gestellt werden, wenn der Auftragsstatus von "Ausstehend" auf "Aus" geändert wird.
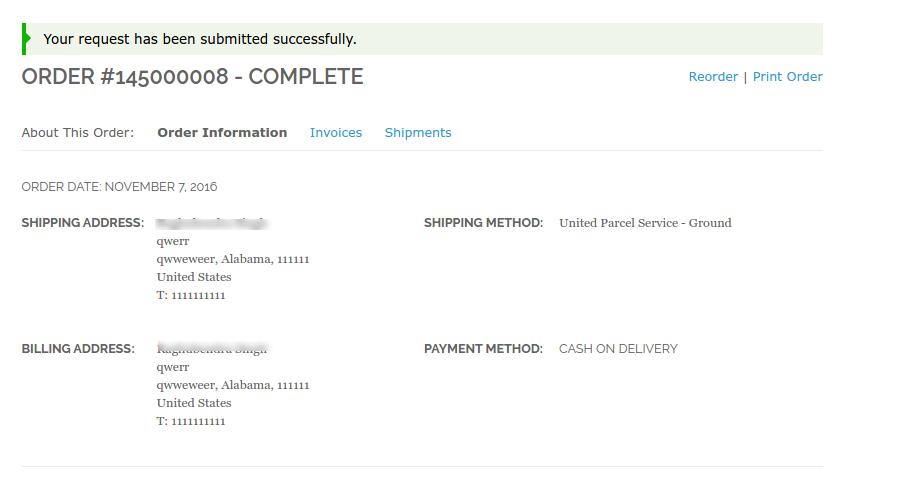
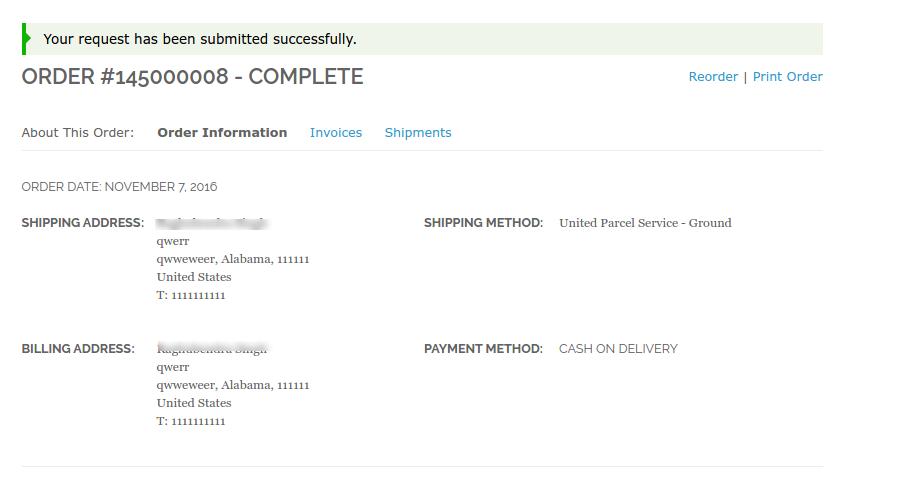
Der Kunde muss das obige Formular ausfüllen und dann auf "Senden" klicken. Daraufhin wird ein Erfolgsformular angezeigt, das die erfolgreiche Übermittlung der Rückgabeanforderung wie folgt zeigt:
Rückerstattungsanträge des Kunden

Diese Registerkarte enthält eine Liste aller ausstehenden Rückgaben, die vom Administrator nicht genehmigt wurden. Der Administrator muss eine Rückgabeanforderung genehmigen, um mehrere Vorgänge bei der Rückgabeanforderung auszuführen, wie z. B. den Status ändern und den Rückgabeprozess abschließen.
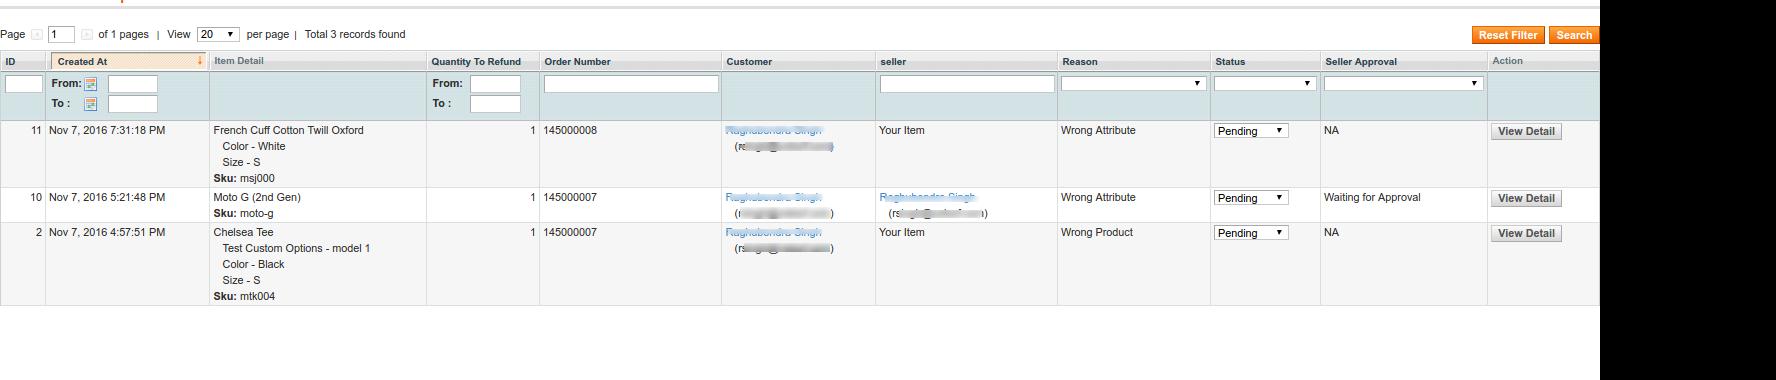
Der Administrator kann eine Rückgabeanforderung anhand der verfügbaren Aktionen vor der Liste genehmigen oder ablehnen.

Sobald der Administrator eine Rückgabeanforderung genehmigt hat, wird sie in die Liste der aktiven Rückläufer verschoben.

Wenn jedoch der Administrator eine Rückgabeanforderung ablehnt, wird diese aus der Liste entfernt und diese Aktion kann nicht rückgängig gemacht werden.

Der Administrator kann das Detail des Produkts, die Details der Bestellung und auch die Details des Kunden einsehen, indem er auf die entsprechenden Links in der Liste der ausstehenden Rückgaben klickt.

VERKÄUFER-INTERFACE FÜR RETURN-MANAGER

Der Verkäufer kann auch eine Rücksendeanfrage genehmigen oder ablehnen, indem er die Aktionen verwendet, die vor der Liste verfügbar sind.

Das Verkäufer-Interface ist auf der Registerkarte Konto >> REFUND REQUEST zu sehen
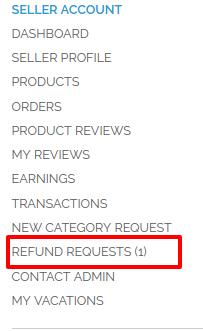
Nachdem Sie auf Rückerstattungsanfragen geklickt haben, öffnet sich ein neues Fenster, wie im folgenden Bildschirm angezeigt:
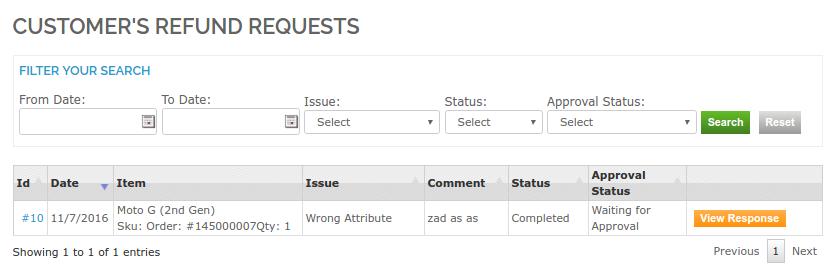
Der Verkäufer kann eine Anfrage genehmigen oder ablehnen. Wenn die Rückgabeanforderung bereits vom Administrator genehmigt wurde, ist die Option zum Anzeigen der Antwort in der gelben Schaltfläche verfügbar, wie im obigen Bildschirmausdruck gezeigt.

Nachdem Sie auf Antwort anzeigen geklickt haben, erscheint ein neues Popup-Fenster mit den Details der Rückgabeanforderung durch den Kunden.
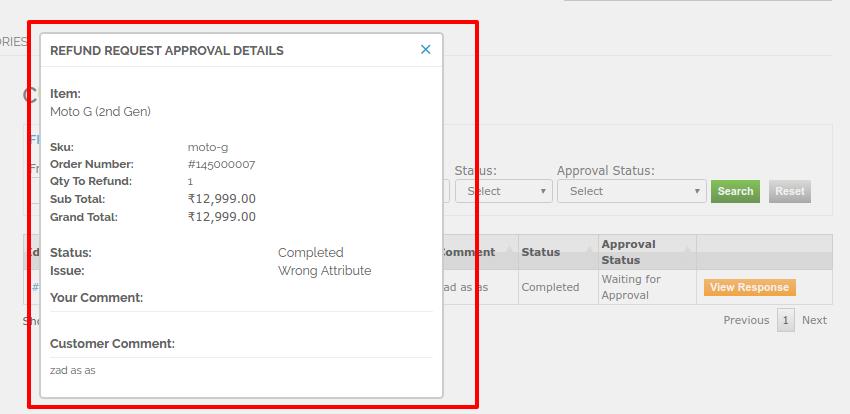
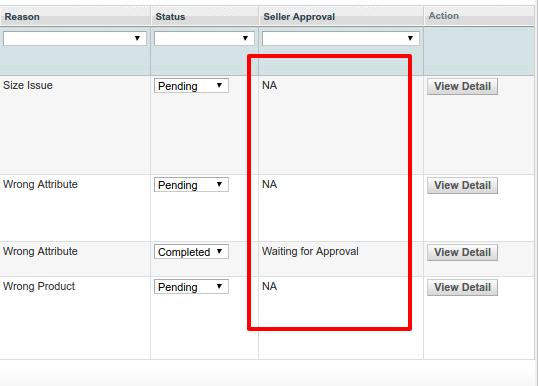
Bitte beachten Sie: Der Administrator hat Zugriff, um eine Rückgabeanforderung zu akzeptieren oder abzulehnen. Eine Rückgabe, die vom Administrator abgelehnt wurde, kann vom Verkäufer nicht genehmigt werden. Die Antwort des Verkäufers finden Sie in der Liste der Rücksendeanträge im Admin-Panel in Marktplatz >> Rückerstattungen >> Rückerstattungsanträge Tab

In dieser Auflistung wird in den Admin-Produkten die Spalte für die Verkäufergenehmigung als "Nicht zutreffend" angezeigt, wenn die Rückgabeanforderung für ein Administratorprodukt erteilt wurde, nicht das Produkt "Verkäufer".
Front-End-Modul

Der Link für den Link "Retouren" wird auf der Seite "Mein Konto" eines beliebigen Kunden auf der Seite "Anzeigenauftrag" angezeigt. Dieser Link erscheint nur für einen angemeldeten Kunden auf der Seite "Mein Konto".
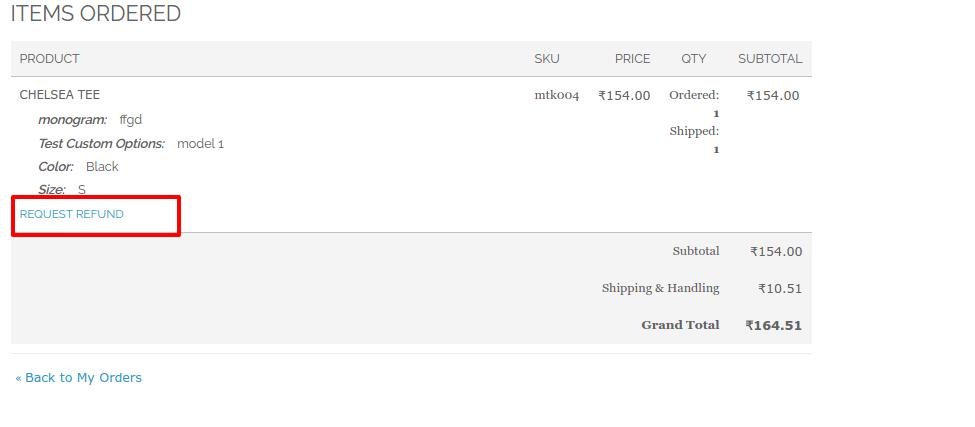
Wenn der Kunde auf diesen Link klickt, öffnet sich eine neue Seite auf der Basis des eingeloggten Status des Kunden.

Die Produkte, die in dieser Reihenfolge zurückgegeben werden können, haben eine Rückgabetaste. Über diesen Button kann der Kunde die Rückgabe des betreffenden Produkts beantragen.

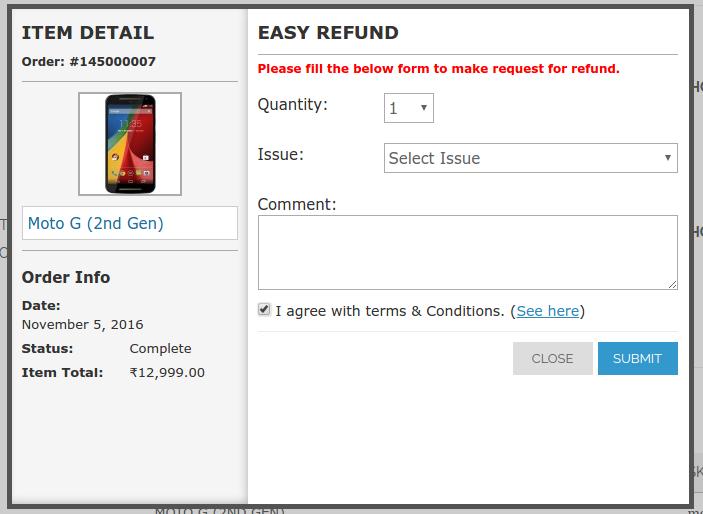
Wenn Sie auf die Schaltfläche "Rückerstattung anfordern" klicken, erscheint ein Pop-up-Fenster mit dem Formular zur Rücksendung der betreffenden Bestellung. Das Formular wird wie folgt aussehen:
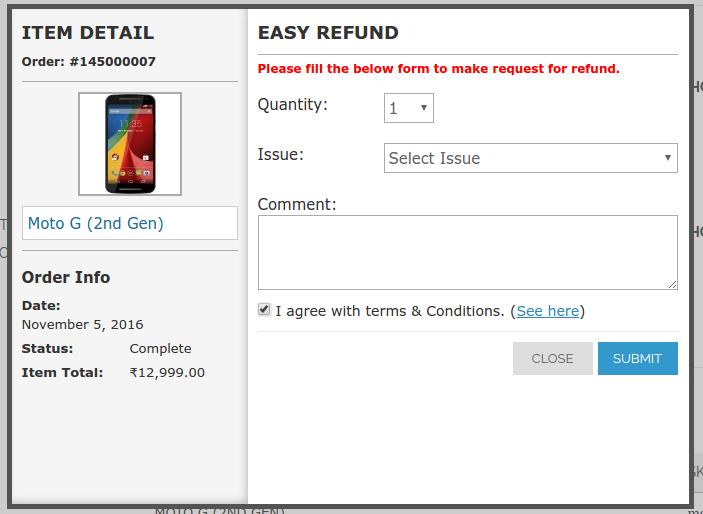
Der Kunde muss das obige Formular ausfüllen und dann auf "Senden" klicken. Daraufhin wird ein Erfolgsformular angezeigt, das die erfolgreiche Übermittlung der Rückgabeanforderung wie folgt zeigt:
Mochte dies? Sie werden diese auch mögen

Addon di Return Manager di Magento Marketplace

Cos'è MarketPlace?

In termini generali, MarketPlace è "uno spazio aperto in cui un mercato è / era precedentemente tenuto". Significa che uno spazio con relazione tra venditori e clienti. Ci sono diversi venditori che vendono merci a diversi clienti.

An mercato online (o mercato e-commerce online) è un tipo di sito di e-commerce in cui le informazioni sui prodotti o sui servizi sono fornite da più parti terze, mentre le transazioni vengono elaborate dall'operatore del marketplace. I mercati online sono il tipo principale di e-commerce multicanale.

In un mercato online, le transazioni dei consumatori vengono elaborate dall'operatore del mercato e quindi consegnate e soddisfatte dai rivenditori o dai grossisti partecipanti (spesso denominati drop shipping). Altre funzionalità potrebbero includere la vendita all'asta (diretta o inversa), cataloghi, ordini, pubblicità desiderata, funzionalità di scambio commerciale e funzionalità come RFQ, RFI o RFP.

In generale, poiché i marketplace aggregano i prodotti di una vasta gamma di fornitori, la selezione è generalmente più ampia, la disponibilità è più elevata ei prezzi sono più competitivi rispetto a negozi al dettaglio online specifici del fornitore.

Esempi di mercati online sono Amazon.com, etsy, eBay, Snapdeal, Flipkart, Kaymu, Rakuten e NASDAQ.

MarketPlace Extension

MarketPlace estensioni per Magento è sviluppato per convertire semplicemente un semplice negozio Magento in un MarketPlace con molte funzionalità per i clienti, i venditori e il proprietario del negozio. Qualsiasi cliente può registrarsi come venditore e può godere delle caratteristiche di un venditore e del cliente del negozio.

Il venditore vende prodotti sul negozio e in cambio il proprietario del negozio riceve una commissione in percentuale dalla vendita totale effettuata dal venditore. La percentuale di commissione che ottiene il proprietario del negozio può essere modificata e il proprietario del negozio può impostare la percentuale su qualsiasi valore desiderato.

Manager di ritorno di Magento MarketplaceEstensione

Introduzione

Addon Return Manager aggiunge la funzionalità per gestire le richieste di reso per qualsiasi ordine effettuato da un cliente e da un cliente ospite. Il plug-in aggiunge un collegamento al front-end tramite il quale ogni cliente / cliente può richiedere la restituzione di qualsiasi prodotto contenuto in un ordine effettuato in precedenza.

Questo è un plugin molto flessibile e il cliente può restituire qualsiasi prodotto in un ordine completamente o parzialmente, il che significa che il cliente può anche restituire metà o meno quantità di qualsiasi prodotto nell'ordine.

Manuale di installazione

Segui i seguenti passi per installare Return Manager di Magento Marketplace

1. Scarica l'estensione

2. Decomprimere il pacchetto nella cartella principale di Magento setup tramite FTP manager (come Filezilla o WinSCP – scarica qui: https://filezilla-project.org/).

3. Nel pannello di amministrazione sotto il menu "Market Place" accanto al menu di sistema, vedrai una nuova opzione di menu "Rimborso". Nel caso in cui non si riesca a vedere il collegamento sotto Sistema, cancellare prima Magento Cache e poi ricontrollare.

4. Con questo l'estensione viene installata sul tuo sistema.

Modulo di amministrazione

Dopo aver installato il plug-in nel negozio, il plug-in fornirà l'interfaccia seguente:

1. Pannello di Amministrazione

a) Configurazione

  1. Configurazioni di rimborso del mercato

b) Richiesta di rimborso

2. Fine frontale

a) Interfaccia cliente

b) Interfaccia venditore

  1. Richiesta di rimborso

Ogni interfaccia è in forma di una scheda e ogni scheda contiene alcune impostazioni / funzionalità specifiche che possono essere modificate in base alle esigenze. Ogni scheda è spiegata di seguito.

Configurazioni di rimborso del mercato

Dopo aver fatto clic su Configura collegamento su MaketPlace >> Configurazione (il collegamento verrà visualizzato automaticamente una volta installato il plug-in), il sistema aprirà le schede Configurazioni di rimborso del Marketplace per impostazione predefinita come mostrato nella schermata seguente:

Inizialmente i campi nel modulo sopra saranno già riempiti con i loro valori predefiniti.

1. Attiva / Disattiva: Inizialmente, questo sarà "OFF". L'amministratore può abilitare / disabilitare il plug-in attivando / disattivando questa impostazione selezionando "Sì" o "No"

2. Contenuto della politica di rimborso: Questa opzione consente all'amministratore di modificare il testo e il formato (HTML Design) del testo che verrà visualizzato in caso di invio riuscito di una richiesta di reso da parte di qualsiasi cliente.

3. Numero di giorni fino a cui il cliente effettua una richiesta: Questa opzione consente all'amministratore di impostare il numero massimo di giorni fino a cui è consentito il ritorno dell'acquisto.

Azioni

1. L'amministratore può modificare qualsiasi contenuto e impostazioni della policy utilizzando il collegamento di configurazione nel pannello di amministrazione.

2. Il secondo link nella colonna azioni è per visualizzare la richiesta di rimborso dei prodotti per i venditori.

Condizioni di restituzione

Una richiesta di reso può essere inoltrata solo da un cliente se lo stato dell'ordine viene modificato in modo da essere sospeso.

Il cliente deve compilare il modulo di cui sopra e quindi fare clic su invia quindi verrà visualizzato un modulo di successo che mostra l'invio riuscito della richiesta di reso, come mostrato di seguito:

RICHIESTE DI RIMBORSO DEL CLIENTE

Questa scheda contiene un elenco di tutti i resi in sospeso, ovvero non approvati dall'amministratore. L'amministratore deve approvare una richiesta di reso per poter eseguire diverse operazioni sulla richiesta di reso, come cambiare lo stato e completare la procedura di reso.

L'amministratore può approvare o rifiutare una richiesta di reso utilizzando le azioni disponibili davanti all'elenco.

Una volta che l'amministratore ha approvato una richiesta di reso, viene spostato nella Lista resi attivi.

D'altra parte se l'amministratore nega una richiesta di reso che viene rimossa dall'elenco e questa azione non può essere annullata.

L'amministratore può visualizzare i dettagli del prodotto, i dettagli dell'ordine e anche i dettagli del cliente facendo clic sui rispettivi collegamenti dall'elenco dei resi in sospeso.

INTERFACCIA DEL VENDITORE PER IL GESTORE DEL RITORNO

Il Venditore può anche approvare o rifiutare una richiesta di reso utilizzando le azioni disponibili di fronte all'elenco.

L'interfaccia del venditore può essere visualizzata nella scheda Account >> RICHIESTA DI RIMBORSO

Dopo aver fatto clic su Richieste di rimborso, si aprirà una nuova finestra come mostrato nella seguente schermata di stampa:

Il venditore può approvare o disapprovare una richiesta. Se la richiesta di reso è già stata approvata dall'amministratore, l'opzione Visualizza risposta sarà disponibile nel pulsante Giallo come mostrato nella schermata di stampa sopra.

Dopo aver cliccato su Visualizza risposta, apparirà un nuovo pop-up con i dettagli della richiesta di reso da parte del cliente.

Nota che: L'amministratore ha l'accesso per accettare o rifiutare una richiesta di reso. Un reso negato dall'amministratore non può essere approvato dal venditore. La risposta del venditore può essere visualizzata nell'elenco delle richieste di reso sul pannello di amministrazione in Marketplace >> Rimborsi >> Richieste di rimborso linguetta

In questo elenco i prodotti di amministrazione mostreranno la colonna per Approvazione venditore come N / A se la richiesta di reso è stata inserita per un prodotto di amministrazione, non il prodotto Venditori.

Modulo Front End

Il link per il link Resi verrà visualizzato nella pagina "Il mio account" di qualsiasi cliente nella pagina Visualizza ordine. Questo collegamento viene visualizzato solo da un utente registrato nella pagina "Il mio account".

Quando il cliente fa clic su questo link, si aprirà una nuova pagina sulla base dello stato di accesso del cliente.

I prodotti che possono essere restituiti in quel particolare ordine avranno un pulsante di ritorno. Attraverso questo pulsante il cliente può richiedere la restituzione di quel determinato prodotto.

Facendo clic sul pulsante "Richiesta rimborso" comparirà un pop-up contenente il modulo per la restituzione di quel particolare ordine. Il modulo apparirà come segue:

Il cliente deve compilare il modulo di cui sopra e quindi fare clic su invia quindi verrà visualizzato un modulo di successo che mostra l'invio riuscito della richiesta di reso, come mostrato di seguito:

Questo mi piaceva? Ti piaceranno anche questi

Magento Marketplace Return Manager Addon

Czym jest MarketPlace?

Ogólnie rzecz biorąc MarketPlace to "otwarta przestrzeń, w której rynek jest / był poprzednio". Oznacza to przestrzeń z relacją sprzedawców i klientów. Istnieje kilku sprzedawców sprzedających towary kilku klientom.

An rynek online (lub internetowy rynek e-commerce) to rodzaj witryny e-commerce, w której informacje o produktach lub usługach są dostarczane przez wiele stron trzecich, podczas gdy transakcje są przetwarzane przez operatora rynku. Online marketplaces są podstawowym typem wielokanałowego e-commerce.

Na rynku online transakcje konsumenckie są przetwarzane przez operatora rynku, a następnie dostarczane i realizowane przez uczestniczących sprzedawców detalicznych lub hurtowników (często nazywane drop shipping). Inne możliwości mogą obejmować aukcje (do przodu lub do tyłu), katalogi, zamawianie, pożądane reklamy, funkcje wymiany handlowej i możliwości, takie jak RFQ, RFI lub RFP.

Ogólnie rzecz biorąc, ponieważ rynki agregują produkty od szerokiej gamy dostawców, selekcja jest zwykle szersza, dostępność jest wyższa, a ceny są bardziej konkurencyjne niż w detalicznych sklepach dostawców.

Przykładami witryn internetowych są Amazon.com, Etsy, eBay, Snapdeal, Flipkart, Kaymu, Rakuten, i NASDAQ.

Rozszerzenie MarketPlace

Rozszerzenia MarketPlace dla Magento został opracowany w celu prostego przekształcenia prostego sklepu Magento w MarketPlace z wieloma funkcjami dla klientów, sprzedawców i właścicieli sklepów. Każdy klient może zarejestrować się jako sprzedawca i może cieszyć się funkcjami sprzedawcy oraz klienta sklepu.

Sprzedawca sprzedaje produkty w sklepie, a właściciel sklepu otrzymuje prowizję w wysokości procentowej od całkowitej sprzedaży dokonanej przez sprzedającego. Procent prowizji pobierany przez właściciela sklepu może zostać zmodyfikowany, a właściciel sklepu może ustawić wartość procentową na dowolną pożądaną wartość.

Magento Marketplace Return ManagerRozbudowa

Wprowadzenie

Dodatek Return Manager dodaje funkcje do zarządzania żądaniami zwrotu dla każdego zamówienia złożonego przez klienta, a także klienta gościa. Wtyczka dodaje link do frontonu, za pośrednictwem którego każdy klient / gość może ubiegać się o zwrot dowolnego produktu zawartego w złożonym wcześniej zamówieniu.

Jest to bardzo elastyczna wtyczka, a klient może zwrócić produkt w całości lub w części, co oznacza, że ​​klient może również zwrócić połowę lub mniej ilości dowolnego produktu w zamówieniu.

Instrukcja instalacji

Wykonaj następujące kroki, aby zainstalować Magento Marketplace Return Manager

1. Pobierz rozszerzenie

2. Rozpakuj pakiet w folderze głównym instalacji Magento za pomocą menedżera FTP (np. Filezilla lub WinSCP – pobierz tutaj: https://filezilla-project.org/).

3. W panelu administratora w menu "Rynek" obok menu System pojawi się nowa opcja menu "Zwrot". Jeśli nie widzisz linku w Systemie, najpierw wyczyść pamięć podręczną Magento, a następnie sprawdź ponownie.

4. Dzięki temu rozszerzenie zostanie zainstalowane w twoim systemie.

Moduł administracyjny

Po zainstalowaniu wtyczki w sklepie wtyczka zapewni następujący interfejs:

1. Panel administratora

a) konfiguracja

  1. Konfiguracje zwrotu w Marketplace

b) Żądanie zwrotu kosztów

2. Przód

a) Interfejs klienta

b) Interfejs sprzedawcy

  1. Żądanie zwrotu kosztów

Każdy interfejs ma postać karty, a każda karta zawiera określone ustawienia / funkcje, które można zmieniać w zależności od potrzeb. Każda zakładka została wyjaśniona poniżej.

Konfiguracje zwrotu w Marketplace

Po kliknięciu na link konfiguracyjny w MaketPlace >> Konfiguracja (link pojawi się automatycznie po zainstalowaniu wtyczki), system otworzy zakładki Konfiguracje Zwrotów w Marketplace, jak pokazano na ekranie poniżej:

Początkowo pola w powyższym formularzu będą już wypełnione wartościami domyślnymi.

1. Włącz / wyłącz: Początkowo będzie to "OFF". Administrator może włączyć / wyłączyć wtyczkę, włączając / wyłączając to ustawienie, wybierając "Tak" lub "Nie"

2. Treść zwrotu środków: Ta opcja umożliwia administratorowi zmianę tekstu, a także formatu (HTML Design) tekstu, który zostanie wyświetlony po pomyślnym przesłaniu prośby o zwrot przez dowolnego klienta.

3. Liczba dni, do których klient złożył wniosek: Ta opcja umożliwia administratorowi ustawienie maksymalnej liczby dni, do których dozwolony jest zwrot zakupu.

Akcje

1. Administrator może edytować dowolne treści i ustawienia polityki za pomocą linku konfiguracyjnego w panelu administracyjnym.

2. Drugi link w kolumnie działań służy do przeglądania żądania zwrotu produktów dla sprzedawców.

Warunki powrotu

Żądanie zwrotu może zostać złożone przez klienta tylko wtedy, gdy status zamówienia zostanie zmieniony na oczekujący.

Klient musi wypełnić powyższy formularz, a następnie kliknąć przycisk przesyłania, a następnie pojawi się formularz potwierdzający pomyślne przesłanie żądania zwrotu, jak pokazano poniżej:

PROŚBA O ZWROT ŚRODKÓW KLIENTA

Ta karta zawiera listę wszystkich zwrotów oczekujących, tj. Nie zatwierdzonych przez administratora. Administrator musi zatwierdzić żądanie zwrotu, aby wykonać kilka operacji na żądanie zwrotu, takich jak zmiana statusu i zakończenie procesu zwrotu.

Administrator może zatwierdzić lub odrzucić żądanie zwrotu, korzystając z działań dostępnych przed listą.

Gdy administrator zatwierdzi wniosek o zwrot, zostanie przeniesiony na listę aktywnych zwrotów.

Z drugiej strony, jeśli administrator odrzuca żądanie powrotu, które zostało usunięte z listy, a tej czynności nie można cofnąć.

Administrator może wyświetlić szczegóły produktu, szczegóły zamówienia, a także dane klienta, klikając odpowiednie łącza z listy oczekujących na zwrot.

INTERFEJS SPRZEDAJĄCY DLA ZWROTU MENEDŻERA

Sprzedawca może również zatwierdzić lub odrzucić wniosek o zwrot, korzystając z działań dostępnych przed listą.

Interfejs sprzedawcy można zobaczyć w zakładce Konto >> ZAPYTANIE REFUNDACJI

Po kliknięciu Żądania zwrotu środków otworzy się nowe okno, jak pokazano na poniższym wydruku ekranu:

Sprzedawca może zatwierdzić lub odrzucić wniosek. Jeśli żądanie zwrotu zostało już zatwierdzone przez administratora, opcja Podgląd odpowiedzi będzie dostępna w żółtym przycisku, jak pokazano na powyższym rysunku.

Po kliknięciu Wyświetl odpowiedź pojawi się nowe wyskakujące okienko ze szczegółami żądania zwrotu przez klienta.

Proszę zanotować: Administrator ma dostęp do akceptowania lub odrzucania żądania zwrotu. Zwrot odrzucony przez administratora nie może zostać zatwierdzony przez sprzedawcę. Odpowiedź sprzedawcy można zobaczyć na liście wniosków o zwrot w panelu administracyjnym w Rynek >> Zwroty >> Wnioski o zwrot środków Zakładka

W tym wykazie produkty administracyjne pokażą kolumnę dla zatwierdzenia przez sprzedającego jako brak, jeśli wniosek o zwrot został złożony dla produktu administratora, a nie produkt sprzedawców.

Moduł czołowy

Link do linku Zwroty pojawi się na stronie "Moje konto" dowolnego klienta na stronie Wyświetl zamówienie. Ten link pojawia się tylko dla zalogowanego klienta na stronie "Moje konto".

Kiedy klient kliknie na ten link, otworzy się nowa strona na podstawie zalogowanego statusu klienta.

Produkty, które kwalifikują się do zwrotu w tej określonej kolejności, będą miały przycisk zwrotu. Za pomocą tego przycisku klient może ubiegać się o zwrot tego konkretnego produktu.

Po kliknięciu przycisku "Zażądaj zwrotu" pojawi się okienko z formularzem zwrotu tego konkretnego zamówienia. Formularz pojawi się w następujący sposób:

Klient musi wypełnić powyższy formularz, a następnie kliknąć przycisk przesyłania, a następnie pojawi się formularz potwierdzający pomyślne przesłanie żądania zwrotu, jak pokazano poniżej:

Lubiłem to? Spodoba ci się to

Addon do Gerenciador de Devolução do Magento Marketplace

O que é o MarketPlace?

Em termos gerais, um MarketPlace é "um espaço aberto onde um mercado é / foi anteriormente mantido". Isso significa que um espaço com relação entre vendedores e clientes. Existem vários vendedores que vendem mercadorias para vários clientes.

An mercado on-line (Ou mercado de comércio eletrônico on-line) é um tipo de site de comércio eletrônico no qual as informações sobre produtos ou serviços são fornecidas por vários terceiros, enquanto as transações são processadas pelo operador do mercado. Mercados on-line são o principal tipo de comércio eletrônico multicanal.

Em um mercado on-line, as transações com o consumidor são processadas pelo operador do mercado e, em seguida, entregues e atendidas pelos varejistas ou atacadistas participantes (geralmente chamados de drop shipping). Outros recursos podem incluir leilões (direto ou reverso), catálogos, pedidos, anúncios desejados, funcionalidade e recursos de troca comercial, como RFQ, RFI ou RFP.

Em geral, como os mercados agregam produtos de uma ampla variedade de provedores, a seleção geralmente é mais ampla, a disponibilidade é maior e os preços são mais competitivos do que em lojas de varejo on-line específicas de fornecedor.

Exemplos de mercados on-line são Amazon.com, etsy, eBay, Snapdeal, Flipkart, Kaymu, Rakutene NASDAQ.

Extensão MarketPlace

Extensões do MarketPlace para Magento é desenvolvido para simplesmente converter uma simples loja Magento em um MarketPlace com muitos recursos para clientes, vendedores e dono de loja. Qualquer cliente pode se cadastrar como vendedor e usufruir dos recursos de um vendedor e cliente da loja.

O vendedor vende produtos na loja e, em troca, o dono da loja recebe uma comissão por porcentagem da venda total feita pelo vendedor. A porcentagem de comissão obtida pelo proprietário da loja pode ser modificada e o proprietário da loja pode definir a porcentagem para qualquer valor desejado.

Gerente de devolução do Magento MarketplaceExtensão

Introdução

O addon do Return Manager adiciona a funcionalidade para gerenciar solicitações de devolução para qualquer pedido feito por um cliente, bem como por um cliente convidado. O plug-in adiciona um link ao front-end por meio do qual qualquer cliente / cliente convidado pode solicitar o retorno de qualquer produto contido em um pedido feito anteriormente.

Este é um plugin muito flexível e o cliente pode devolver qualquer produto em uma ordem completa ou parcialmente, o que significa que o cliente também pode devolver metade ou menos quantidade de qualquer produto na ordem.

Manual de instalação

Siga os seguintes passos para instalar o Magento Marketplace Return Manager

1. Baixe a extensão

2. Descompacte o pacote em sua pasta raiz de configuração do Magento via gerenciador de FTP (como Filezilla ou WinSCP – baixe aqui: https://filezilla-project.org/).

3. No painel de administração, no menu "Market Place", ao lado do menu System, você verá uma nova opção de menu "Refund". Caso você não consiga ver o link em System, limpe primeiro o Magento Cache e depois verifique novamente.

4. Com isso, a extensão é instalada no seu sistema.

Módulo de administração

Depois de instalar o plug-in no armazenamento, o plug-in fornecerá a seguinte interface:

1. Painel de administração

a) Configuração

  1. Configurações de reembolso do mercado

b) Solicitação de reembolso

2. A parte dianteira

a) Interface com o cliente

b) Interface do vendedor

  1. Solicitação de reembolso

Cada interface está na forma de uma guia e cada guia contém algumas configurações / funcionalidades específicas que podem ser alteradas de acordo com a necessidade. Cada guia é explicada abaixo.

Configurações de reembolso do mercado

Depois de clicar em configurar link no MaketPlace >> Configuration (o link aparecerá automaticamente assim que você instalar o plug-in), o sistema abrirá as guias Configurações de Reembolso do Marketplace por padrão, conforme mostrado na tela abaixo:

Inicialmente os campos no formulário acima já estarão preenchidos com seus valores padrão.

1. Habilitar desabilitar: Inicialmente, isso será "OFF". O administrador pode ativar / desativar o plug-in ativando / desativando essa configuração selecionando "Sim" ou "Não".

2. Conteúdo da política de reembolso: Essa opção permite que o administrador altere o texto, bem como o formato (HTML Design) do texto que será exibido no envio bem-sucedido de uma solicitação de devolução por qualquer cliente.

3. Nº de dias até o qual o cliente faz uma solicitação: Essa opção permite que o administrador defina o número máximo de dias até o qual o retorno da compra é permitido.

Ações

1. O administrador pode editar qualquer conteúdo e configurações da política usando o link de configuração no painel de administração.

2. O segundo link na coluna de ações é para visualizar a solicitação de reembolso dos produtos para os vendedores.

Condições de devolução

Uma solicitação de devolução só pode ser feita por um cliente se o status do pedido for alterado para concluído a partir de pendente.

O cliente deve preencher o formulário acima e, em seguida, clicar em enviar e, em seguida, um formulário de sucesso aparecerá mostrando o envio bem-sucedido da solicitação de devolução, conforme mostrado abaixo:

PEDIDOS DE REEMBOLSO DO CLIENTE

Essa guia contém uma lista de todos os retornos que estão pendentes, ou seja, não são aprovados pelo administrador. O administrador deve aprovar uma solicitação de retorno para executar várias operações na solicitação de retorno, como alterar o status e concluir o processo de devolução.

O administrador pode aprovar ou negar uma solicitação de retorno usando as ações disponíveis na frente da lista.

Depois que o administrador aprova uma solicitação de devolução, ele é movido para a lista de devoluções ativas.

Por outro lado, se o administrador negar uma solicitação de devolução que foi removida da lista e essa ação não puder ser desfeita.

O administrador pode visualizar os detalhes do produto, os detalhes do pedido e também os detalhes do cliente, clicando nos respectivos links da lista do retorno pendente.

INTERFACE DE VENDEDOR PARA O GERENTE DE RETORNO

O vendedor também pode aprovar ou negar uma solicitação de devolução usando as ações disponíveis na frente da lista.

The seller interface can be seen in the Account>>REFUND REQUEST tab

After clicking on Refund Requests, a new window will open as shown in the screen print below:

The seller can either approve or disapprove a request. If the return request is already approved by the admin, then the option to View Response would be available in Yellow button as shown in the screen print above.

After clicking on View Response, new pop up will appear with the details of the return request by the customer.

Observe: The admin has the access to accept or deny a return request. A return denied by the admin cannot be approved by the seller. The response of the seller can be seen on the Return request listing on the admin panel in Marketplace>>Refunds>>Refund Requests aba

In this listing the admin products will show the column for Seller Approval as N/A if the return request has been placed for an admin product;not the Sellers product.

Módulo Front End

The link for the Returns link will appear on the ‘My Account’ page of any customer in View Order page. This link only appears to a logged in customer on the ‘My Account’ page.

Quando o cliente clicar nesse link, uma nova página será aberta com base no status de login do cliente.

The products that are eligible for return in that particular order will have a return button. Through this button the customer can apply for return of that particular product.

On clicking on the ‘ Request Refund’ button a pop-up will appear containing the form for return of that particular order. The form will appear as follows:

O cliente deve preencher o formulário acima e, em seguida, clicar em enviar e, em seguida, um formulário de sucesso aparecerá mostrando o envio bem-sucedido da solicitação de devolução, conforme mostrado abaixo:

Gostou disso? Você também vai gostar disso


Magento Marketplace Contact Admin Extension

What is MarketPlace?

In general terms a MarketPlace is ‘an open space where a market is/ was formerly held.’ It means that a space with relation between sellers and customers. There are several sellers selling goods to several customers.

An online marketplace (or online e-commerce marketplace) is a type of e-commerce site where product or service information is provided by multiple third parties, whereas transactions are processed by the marketplace operator. Online marketplaces are the primary type of multi channel e-commerce.

In an online marketplace, consumer transactions are processed by the marketplace operator and then delivered and fulfilled by the participating retailers or wholesalers (often called drop shipping). Other capabilities might include auctioning (forward or reverse), catalogs, ordering, wanted advertisement, trading exchange functionality and capabilities like RFQ, RFI or RFP.

In general, because marketplaces aggregate products from a wide array of providers, selection is usually more wide, availability is higher, and prices are more competitive than in vendor-specific online retail stores.

Examples of online marketplaces are Amazon.com, etsy, eBay, Snapdeal, Flipkart, Kaymu, Rakuten, and NASDAQ.

MarketPlace Extension

MarketPlace extension for Magento is developed for simply converting a simple Magento store to a MarketPlace with lots of features to customers, sellers and store owner. Any customer can register as a seller and can enjoy the features of a seller as well as customer of the store.

The seller sells products on the store and in return the store owner gets a commission by percentage from the total sale made by the seller. The commission percentage that the store owner gets can be modified and the store owner can set percentage to any desired value.

Prerequisite

The Knowband MarketPlace Extension is necessary to be installed on the system for using this MarketPlace Extension.

Magento MarketPlace Contact Admin Extension

Introduction 

The MarketPlace -Contact Admin extension is a MarketPlace extension developed by Knowband to facilitate a medium of conversation between the MarketPlace Admin and Sellers. By using this MarketPlace extension a seller can create a ticket with the MarketPlace admin. The Marketplace Admin receives an email in his registered email account regarding a new ticket that has been created by the seller or simply receives an email regarding a new message has been received from the seller. The extension provides a two way communication channel between the Admin-Seller or Seller-Admin

Installation Manual

Follow the following steps for installing MarketPlace – Contact Admin Extension

1. Download the extension package.

2. Unzip the package on your root folder of Magento setup via FTP manager (like Filezilla or WinSCP – download here: https://filezilla-project.org/).

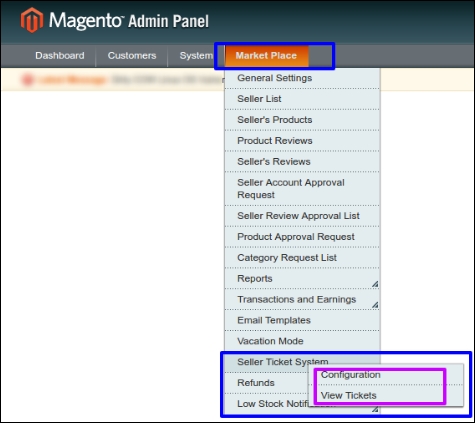
3. In Admin Panel under the Menu “Market Place” next to System menu, you will see a new menu option “Seller Ticket System”. In case you are not able to see the link under System, please clear Magento Cache first then check again.

4. With this the extension gets installed on your system.

User Manual

This User Manual will guide you through the Admin Module/Store Front settings and features of the MarketPlace – Contact Admin extension.

Admin Module

In the admin panel of Magento the MarketPlace Extension adds a separate menu (named “Seller Ticket System”) under the MarketPlace Menu tab.

MarketPlace Menu

The MarketPlace Menu consists of total 12 sub-menu options by default. With the addition of the MarketPlace – Contact Admin extension, a new menu option “Seller Ticket System” is listed which redirects to several pages for the MarketPlace Seller Ticket management.

Admin Interface

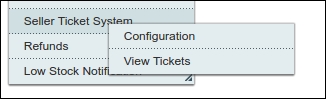
The Location of Admin Interface is under “MarketPlace>> Seller Ticket System”. The interface is then divided into two main categories i.e. “Configuration” and “View Tickets”.

Configuration

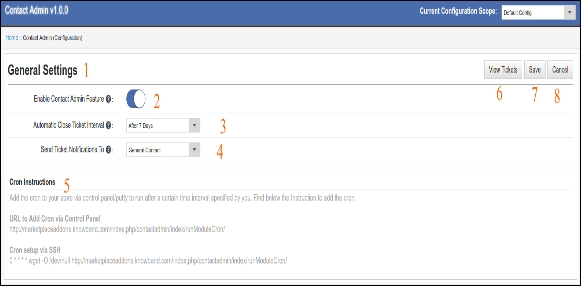
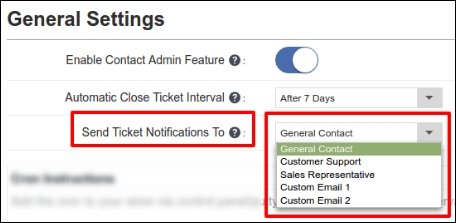
Clicking on the “Configuration” tab will open an interface to setup the “General Settings” on the extension. The general settings interface will look like this:

1. General Settings: General settings has been provided to the Admin to setup the preferences of the extension and manage the settings for the tickets and the interface of the front end on the seller panel.

2. Enable Contact Admin Feature: If this feature is enabled, the seller on the marketplace will be allowed to contact the admin from the interface provided by the extension in the seller front end.

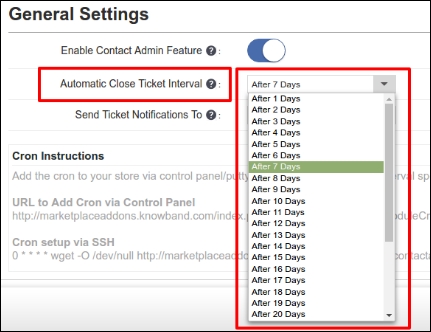
3. Automatic Close Ticket Interval: The Admin can set a time interval after which the ticket status will be automatically changed to closed.

4. Send Ticket Notifications To: By selecting a category from the below drop down list , the admin can set up an email category where the notifications from the ticket system will go. The emails are already set in the Magento admin panel, you have to just select any email account here.

5. Cron Instructions: The Cron Instruction are set to close the ticket after the set time interval in step 3.

6. View Tickets: There are two links to views the ticket. One is as provided in the 6, and other in provided in the path “MarketPlace>> Seller Ticket System”. Clicking on View in 6 will direct the admin to a new interface to view, reply and manage the tickets. This menu option is discussed in comprehension in later part of the document.

7. Save: Click save to save your settings.

8. Cancel: Click cancel to discard your settings.

View Tickets

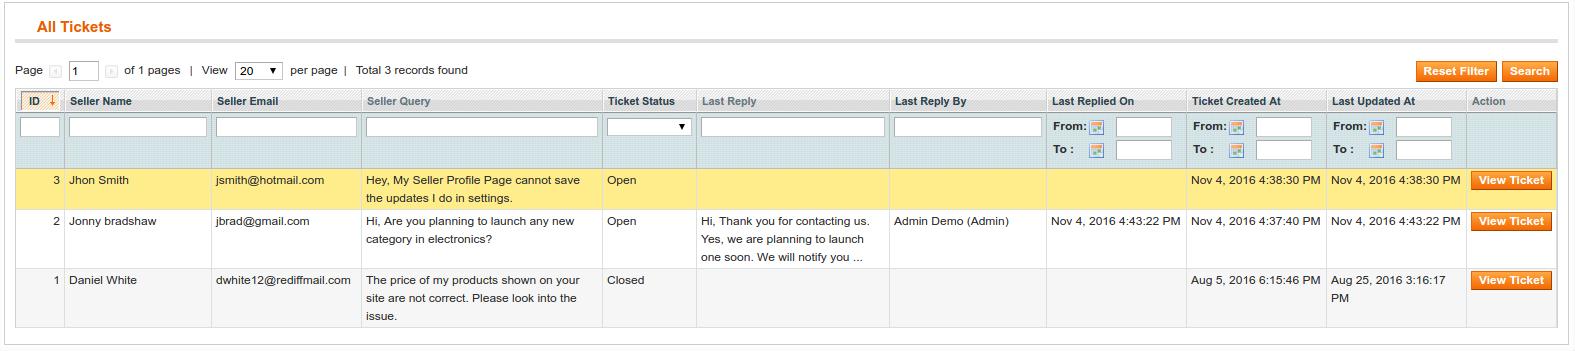
Clicking on “View Tickets” opens an interface where the admin can manage all the tickets created by the sellers on the MarketPlace. The admin can Reply to a ticket, set filters to find a ticket, close a ticket and so on.

The view Ticket interface looks like this:

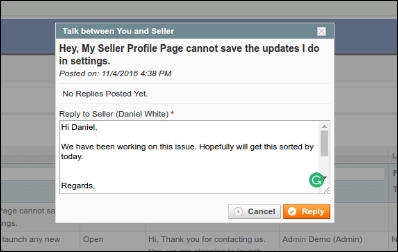
In Action tab, Clicking on View ticket will open a pop up window where the admin can reply to a ticket.

The Pop up will look something like this:

Reply: Clicking on Reply button will send the message to the seller. The seller will receive a notification on his registered email id and also on the seller inter face on the front end.

Filters in View Ticket interface

The Admin can apply multiple filters find the tickets in the list. 

1. Filter by Ticket ID
2. Filter by Seller Name
3. Filter by Seller’s Email ID
4. Filter by entering a string in Seller’s Query
5. Filter by Ticket Status
6. Filter by Last reply by Admin
7. Filter by Replied date
8. Filter by date of Ticket Creation
9. Filter by last updated date

Seller Interface

If the MarketPlace – Contact Admin extension is enabled by the admin, then all the seller Dashboards will add one extra option of “Contact Admin” in their interface on the front end.

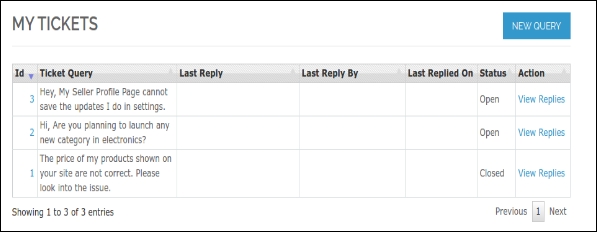
Clicking on contact admin will open an interface for ticket management which will look something like this:

To submit a new Query to the Admin 

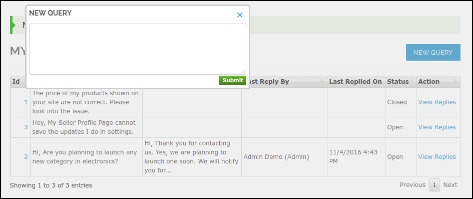
New Query: Clicking on New Query button at the top left in Blue color will allows the seller to create a new ticket with the admin. The New Query interface will look like this:

Submit: After writing the message in the text area, click submit to send a message to the MarketPlace Admin.

Viewing the tickets created by seller 

1. View Replies: Click on “View Replies” at the left side of the ticket in the ticket listing.

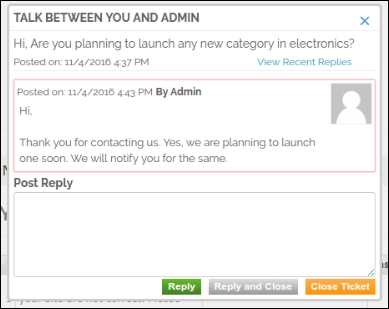
The interface to see the ticket and reply to the Admin will pop up like this:

2. Reply: After writing the message to the Admin, click Reply in Green button to send the message.

3. Reply and Close: Click Reply and close if you wan to close the ticket after sending the message.

4. Close: Click “Close ” in orange button if you wan to close the ticket simply.

You Might Also Like:

Magento MarketPlace Seller Vacation Mode Addon

What is MarketPlace?

In general terms a MarketPlace is ‘an open space where a market is/ was formerly held.’ It means that a space with relation between sellers and customers. There are several sellers selling goods to several customers.

An online MarketPlace (or online e-commerce marketplace) is a type of e-commerce site where product or service information is provided by multiple third parties, whereas transactions are processed by the MarketPlace operator. Online marketplaces are the primary type of multi channel e-commerce.

In an online marketplace, consumer transactions are processed by the MarketPlace operator and then delivered and fulfilled by the participating retailers or wholesalers (often called drop shipping). Other capabilities might include auctioning (forward or reverse), catalogs, ordering, wanted advertisement, trading exchange functionality and capabilities like RFQ, RFI or RFP.

In general, because marketplaces aggregate products from a wide array of providers, selection is usually more wide, availability is higher, and prices are more competitive than in vendor-specific online retail stores.

Examples of online marketplaces are Amazon.com, etsy, eBay, Snapdeal, Flipkart, Kaymu, Rakuten, and NASDAQ.

MarketPlace Extension

MarketPlace extension for Magento is developed for simply converting a simple Magento store to a MarketPlace with lots of features to customers, sellers and store owner. Any customer can register as a seller and can enjoy the features of a seller as well as customer of the store.

The seller sells products on the store and in return the store owner gets a commission by percentage from the total sale made by the seller. The commission percentage that the store owner gets can be modified and the store owner can set percentage to any desired value.

Prerequisite

The Knowband MarketPlace Extension is necessary to be installed on the system for using this MarketPlace Addon.

Magento MarketPlace Seller Vacation Mode Addon

Introduction

This Addon is basically developed for the sellers to let them inform their customers and the MarketPlace admin that they will not be available to sell for a particular time duration. In this module, the seller can set a specific time interval during which he will be unavailable on the MarketPlace. An alert is sent to the customers when a seller goes to vacation and a similar alert is sent once he/she is back from vacation. All these automation is done using the cron instructions.

The admin can also set a cron which will activate and deactivated the vacation mode and also sends an email to the sellers as soon as the vacation mode is activated or deactivated.

Installation Manual

Follow the following steps for installing MarketPlace – Magento MarketPlace Seller Vacation Mode Addon

1. Download the Addon package.

2. Unzip the package on your root folder of Magento setup via FTP manager (like Filezilla or WinSCP – download here: https://filezilla-project.org/).

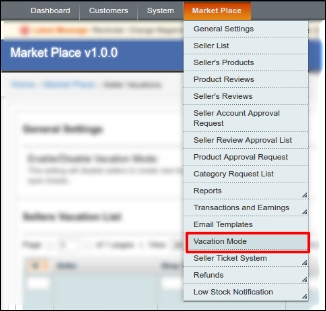
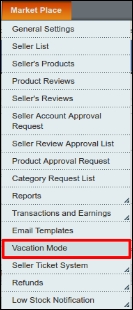
3. In Admin Panel under the Menu “Market Place” next to System menu, you will see a new menu option “Vacation Mode”. In case you are not able to see the link under System, please clear Magento Cache first then check again.

4. With this the extension gets installed on your system.

Module Interfaces

This module will be accessible through Admin as well as seller’s account.

Seller Account Interfaces

These interfaces will be accessible only by a seller in his account section.

Admin Account Interfaces

These interfaces will be accessible only by the MarketPlace Admin in his account section.

User Manual

This User Manual will guide you through the Admin Module/Store Front settings and features of the MarketPlace – Seller Vacation Mode Addon.

Admin Module

In the admin panel of Magento the MarketPlace Extension adds a separate menu (named “Vacation Mode”) under the MarketPlace Menu tab

MarketPlace Menu

The MarketPlace Menu consists of total 12 sub-menu options by default. With the addition of the MarketPlace – Contact Admin Addon, a new menu option “Seller Ticket System” is listed which redirects to several pages for the MarketPlace Seller Vacation management.

Admin Interface

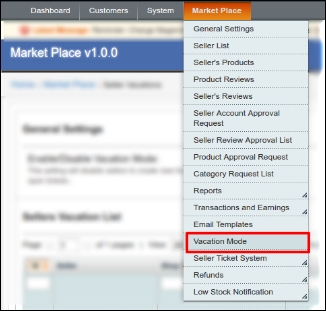
The Location of Admin Interface is under “MarketPlace>> Vacation Mode”.

Vacation Mode

How to allow/enable vacation mode for the sellers?

1. Navigate to “MarketPlace>> Vacation Mode” as shown in the screen print above. An interface similar to the below screen print will open:

2. Enable the module by enabling the setting number 2 “Enable/Disable Vacation Mode”.

3 . Click : “Save and Continue” to save the settings.

4. On the above interface in label 3, you can also view the list of sellers who have already activated the Seller vacation mode.

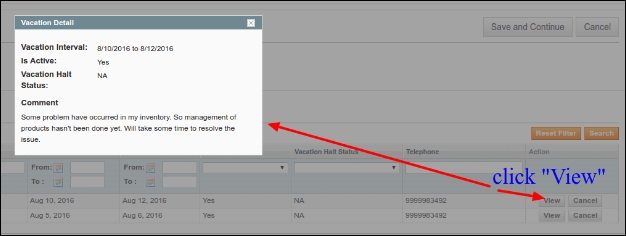
5. Click on “View” to open the details about the vacation mode activated by the seller.

Vacation Interval: The date set by the seller for starting and ending the Vacation is shown here.

Is Active: The current status of vacation mode is shown here.

Vacation Halt: If Seller has stopped the vacation mode before the specified date.

Comment: The comment or message used by the seller to inform the Admin regarding the reason for the vacation mode activation.

How to disapprove a seller vacation mode?

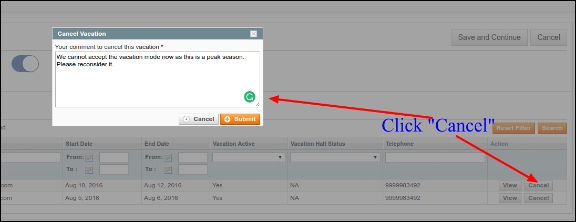
If for any reason the admin not want the seller to go on a vacation mode. The admin can deactivate the vacation mode for the particular seller at anytime by clicking “Cancel” as shown in the image below:

Clicking cancel will open a pop like above and the admin has to give a reason for not accepting the vacation mode request and then click “Submit”.

Seller Account Interfaces

This is the interface which will be accessible only through seller account section.

Menu Location

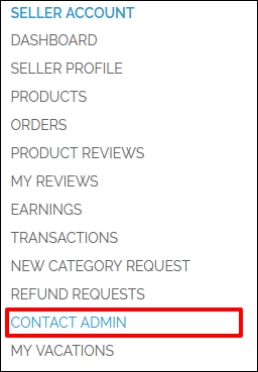
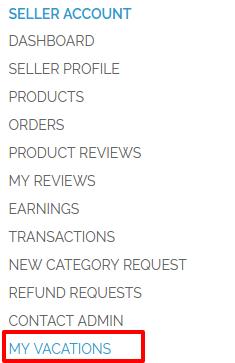
After installation, a menu(My Vacations) will be displayed to the seller in the “SELLER ACCOUNT” Menu tab as shown in below screen:

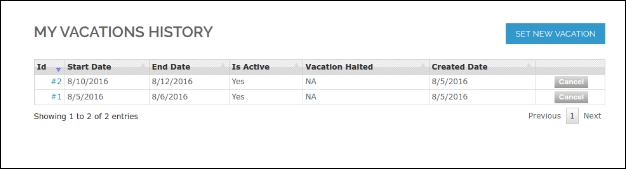
On clicking the highlighted link, the system will redirect seller to his “My Vacations History” window.

My Vacations time configuration

Here all the menu items and fields of the module are mentioned:

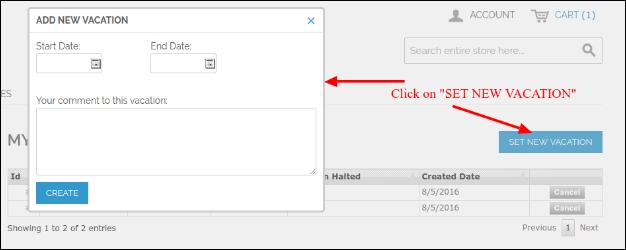
In the above window Click on “Set New Vacation” at the right top side of the interface. A new window appears for the configuration of your vacation mode.

Settings Description

1. Vacation Start Date: In this field, the seller will set the date for which he is going to vacation and will not to available on the MarketPlace. Please note : For testing also always mention the present date or date yet to come. Do not enter a past date in this field.

2. Vacation End Date: In this field, the seller will set the date when his vacation ends and will again be available on the MarketPlace.

3. Your comment to this vacation: Seller can specify the reason for activating the vacation mode. This message will be seen by the admin.

4. Save: Click Save button to save all your settings made.

Stop a vacation mode

The vacation mode automatically stops at the Vacation End Date specified by the seller.

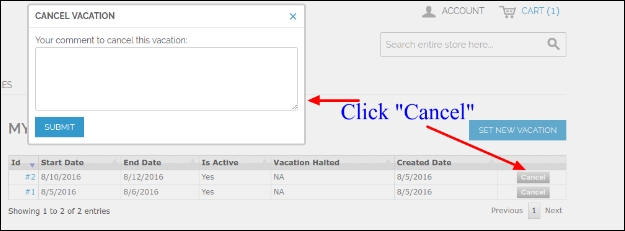
The seller can stop a vacation mode any time manually by clicking “Cancel ” as shown in this screen print below: A pop up will appear where the seller has to mention the reason/comment and click “Submit” to stop a vacation mode.

Module Work Flow

When the admin will install this module on his MarketPlace, each seller will get a sub menu on their seller account page. The once a seller sets his vacation time through the interface provided to them on their seller’s account, the cron which has been already configured in the module will start working. The module will automatically start and stop a vacation mode for a particular seller according to the time set by the seller. During the time period of the vacation mode, the particular seller’s profile will be inactive on the MarketPlace and his products will not be shown  to the customers either.

Magento MarketPlace Verkäufer Urlaubsmodus Addon

Was ist MarketPlace?

Im Allgemeinen ist ein MarketPlace "ein offener Raum, in dem früher ein Markt stattfand". Es bedeutet, dass ein Raum in Beziehung zwischen Verkäufern und Kunden steht. Es gibt mehrere Verkäufer, die Waren an mehrere Kunden verkaufen.

An online Marktplatz (oder Online-E-Commerce-Marktplatz) ist eine Art von E-Commerce-Site, auf der Produkt- oder Serviceinformationen von mehreren Dritten bereitgestellt werden, während Transaktionen vom MarketPlace-Operator verarbeitet werden. Online-Marktplätze sind die wichtigste Art des Multi-Channel-E-Commerce.

In einem Online-Marktplatz werden Verbrauchergeschäfte vom MarketPlace-Betreiber bearbeitet und dann von den teilnehmenden Einzelhändlern oder Großhändlern (oft Drop-Shipping genannt) geliefert und ausgeführt. Andere Funktionen können Versteigerung (vorwärts oder rückwärts), Kataloge, Bestellung, gewünschte Werbung, Handel Austausch Funktionalität und Funktionen wie RFQ, RFI oder RFP sein.

Da Marktplätze Produkte einer breiten Palette von Anbietern zusammenfassen, ist die Auswahl in der Regel breiter, die Verfügbarkeit ist höher und die Preise sind wettbewerbsfähiger als in den herstellerspezifischen Online-Einzelhandelsgeschäften.

Beispiele für Online-Marktplätze sind Amazon.com, etsy, Ebay, Snapdeal, Flipkart, Kaymu, Rakuten, und NASDAQ.

MarketPlace-Erweiterung

MarketPlace-Erweiterung für Magento ist für die einfache Umwandlung eines einfachen Magento-Shops in einen MarketPlace mit vielen Funktionen für Kunden, Verkäufer und Ladenbesitzer entwickelt. Jeder Kunde kann sich als Verkäufer registrieren und sowohl die Eigenschaften eines Verkäufers als auch die des Kunden genießen.

Der Verkäufer verkauft Produkte im Geschäft und im Gegenzug bekommt der Ladenbesitzer prozentual eine Provision vom Gesamtverkauf des Verkäufers. Der Provisionsprozentsatz, den der Geschäftsinhaber erhält, kann geändert werden, und der Geschäftsinhaber kann den Prozentsatz auf einen beliebigen gewünschten Wert setzen.

Voraussetzung

Die Knowband MarketPlace Erweiterung muss auf dem System zur Verwendung dieses MarketPlace Addon installiert sein.

Magento MarketPlace Verkäufer Urlaubsmodus Addon

Einführung

Dieses Addon wurde im Wesentlichen für die Verkäufer entwickelt, damit diese ihre Kunden und den MarketPlace-Administrator darüber informieren können, dass sie für eine bestimmte Zeitdauer nicht zum Verkauf verfügbar sind. In diesem Modul kann der Verkäufer ein bestimmtes Zeitintervall festlegen, während dessen er auf dem MarketPlace nicht erreichbar ist. Ein Alarm wird an die Kunden gesendet, wenn ein Verkäufer in Urlaub fährt und eine ähnliche Warnung gesendet wird, sobald er / sie aus dem Urlaub zurück ist. All diese Automatisierung erfolgt mithilfe der Cron-Anweisungen.

Der Administrator kann auch einen Cron festlegen, der den Urlaubsmodus aktiviert und deaktiviert und eine E-Mail an die Verkäufer sendet, sobald der Urlaubsmodus aktiviert oder deaktiviert wird.

Installationsanleitung

Befolgen Sie die folgenden Schritte zur Installation von MarketPlace – Magento MarketPlace Seller Vacation Mode Addon

1. Laden Sie das Addon-Paket herunter.

2. Entpacken Sie das Paket in Ihrem Stammordner von Magento Setup via FTP-Manager (wie Filezilla oder WinSCP – hier herunterladen: https://filezilla-project.org/).

3. Im Admin-Panel unter dem Menü "Market Place" neben dem Systemmenü sehen Sie eine neue Menüoption "Vacation Mode". Falls Sie den Link unter System nicht sehen können, löschen Sie zuerst Magento Cache und überprüfen Sie dann erneut.

4. Damit wird die Erweiterung auf Ihrem System installiert.

Modul Schnittstellen

Dieses Modul wird sowohl über den Admin als auch über das Konto des Verkäufers zugänglich sein.

Verkäuferkonto-Schnittstellen

Diese Schnittstellen sind nur für einen Verkäufer in seinem Account-Bereich zugänglich.

Admin-Kontoschnittstellen

Diese Schnittstellen sind nur für den MarketPlace-Administrator in seinem Kontobereich zugänglich.

Benutzerhandbuch

Dieses Benutzerhandbuch führt Sie durch die Admin-Modul / Store-Front-Einstellungen und Funktionen des MarketPlace – Seller Vacation Mode Addon.

Admin-Modul

Im Admin-Panel von Magento fügt die MarketPlace-Erweiterung ein separates Menü ("Ferienmodus") unter der MarketPlace-Menü-Registerkarte hinzu

Marketplace Menü

Das MarketPlace-Menü besteht standardmäßig aus den gesamten 12-Untermenüoptionen. Mit dem Zusatz MarketPlace – Contact Admin Addon wird eine neue Menüoption "Seller Ticket System" aufgelistet, die auf mehrere Seiten für das MarketPlace Seller Vacation Management umleitet.

Admin-Schnittstelle

Die Position der Admin-Schnittstelle befindet sich unter "MarketPlace >> Vacation Mode".

Urlaubsmodus

Wie kann ich den Urlaubsmodus für die Verkäufer zulassen / aktivieren?

1. Navigieren Sie zu "MarketPlace >> Urlaubsmodus" wie im obigen Bildschirmdruck gezeigt. Eine Schnittstelle ähnlich der folgenden Bildschirmausdruck wird geöffnet:

2. Aktivieren Sie das Modul, indem Sie die Einstellungsnummer 2 aktivieren "Aktivieren / Deaktivieren des Urlaubsmodus".

3. Klicken Sie auf: "Speichern und fortfahren" um die Einstellungen zu speichern.

4. Auf der obigen Oberfläche im Label 3 können Sie sich auch die Liste der Verkäufer anzeigen lassen, die den Verkäufer-Urlaubsmodus bereits aktiviert haben.

5. Klicke auf "Aussicht" um die Details des vom Verkäufer aktivierten Urlaubsmodus zu öffnen.

Urlaubsintervall: Das vom Verkäufer festgelegte Datum zum Starten und Beenden des Urlaubs wird hier angezeigt.

Ist aktiv: Der aktuelle Status des Urlaubsmodus wird hier angezeigt.

Urlaub Halt: Wenn der Verkäufer den Urlaubsmodus vor dem angegebenen Datum beendet hat.

Kommentar: Der Kommentar oder die Nachricht, die vom Verkäufer verwendet wurde, um den Administrator über den Grund für die Aktivierung des Urlaubsmodus zu informieren.

Wie kann man einen Verkäufer Urlaubsmodus ablehnen?

Wenn der Administrator aus irgendeinem Grund nicht möchte, dass der Verkäufer in den Urlaubsmodus wechselt. Der Administrator kann den Urlaubsmodus für den jeweiligen Verkäufer jederzeit deaktivieren, indem er auf "Abbrechen" klickt, wie in der folgenden Abbildung gezeigt:

Wenn Sie auf "Abbrechen" klicken, wird ein Pop wie oben angezeigt, und der Administrator muss einen Grund angeben, warum er die Urlaubsmodus-Anfrage nicht akzeptiert hat und dann auf klicken "Senden".

Verkäuferkonto-Schnittstellen

Dies ist die Schnittstelle, die nur über den Verkäuferkontenbereich zugänglich ist.

Menü Standort

Nach der Installation wird dem Verkäufer im Menü "VERKAUFSKONTO" ein Menü (Meine Ferien) angezeigt, wie in der folgenden Abbildung dargestellt:

Wenn Sie auf den markierten Link klicken, leitet das System den Verkäufer in sein Fenster "Meine Urlaubsgeschichte" um.

Meine Urlaubszeit Konfiguration

Hier werden alle Menüpunkte und Felder des Moduls genannt:

Im obigen Fenster klicken Sie auf "Set New Vacation" auf der rechten oberen Seite der Oberfläche. Ein neues Fenster erscheint zur Konfiguration Ihres Urlaubsmodus.

Einstellungen Beschreibung

1. Startdatum des Urlaubs: In diesem Feld legt der Verkäufer das Datum fest, zu dem er in Urlaub fahren möchte und wird nicht auf dem MarketPlace verfügbar sein. Bitte beachten Sie: Geben Sie zum Testen auch immer das aktuelle Datum oder das Datum an, das noch kommt. Geben Sie in diesem Feld kein vergangenes Datum ein.

2. Ende des Urlaubs: In diesem Feld legt der Verkäufer das Datum fest, an dem sein Urlaub endet, und steht wieder auf dem MarketPlace zur Verfügung.

3. Ihr Kommentar zu diesem Urlaub: Der Verkäufer kann den Grund für die Aktivierung des Urlaubsmodus angeben. Diese Nachricht wird vom Administrator angezeigt.

4. Sparen: Klicken Sie auf Speichern, um alle vorgenommenen Einstellungen zu speichern.

Stoppen Sie einen Urlaubsmodus

Der Urlaubsmodus stoppt automatisch am vom Verkäufer angegebenen Urlaubsenddatum.

Der Verkäufer kann einen Urlaubsmodus jederzeit manuell stoppen, indem er auf "Abbrechen" klickt, wie in diesem Bildschirm unten gezeigt: Ein Popup erscheint, wo der Verkäufer den Grund / Kommentar erwähnen muss und auf "Senden" klicken, um einen Urlaubsmodus zu stoppen.

Modul-Arbeitsablauf

Wenn der Administrator dieses Modul auf seinem MarketPlace installiert, erhält jeder Verkäufer ein Untermenü auf seiner Verkäuferkontoseite. Sobald ein Verkäufer seine Urlaubszeit über die Schnittstelle, die ihm auf dem Konto seines Verkäufers zur Verfügung gestellt wird, festlegt, wird der Cron, der bereits im Modul konfiguriert wurde, funktionieren. Das Modul startet und stoppt automatisch einen Urlaubsmodus für einen bestimmten Verkäufer gemäß der vom Verkäufer festgelegten Zeit. Während der Zeit des Urlaubsmodus ist das Profil des bestimmten Verkäufers auf dem MarketPlace nicht aktiv und seine Produkte werden nicht angezeigt

Magento MarketPlace Addon venditore modalità vacanza

Cos'è MarketPlace?

In termini generali, MarketPlace è "uno spazio aperto in cui un mercato è / era precedentemente tenuto". Significa che uno spazio con relazione tra venditori e clienti. Ci sono diversi venditori che vendono merci a diversi clienti.

An Mercato online (o mercato e-commerce online) è un tipo di sito di e-commerce in cui le informazioni sui prodotti o sui servizi sono fornite da più parti terze, mentre le transazioni vengono elaborate dall'operatore MarketPlace. I mercati online sono il tipo principale di e-commerce multicanale.

In un mercato online, le transazioni dei consumatori vengono elaborate dall'operatore MarketPlace e quindi consegnate e soddisfatte dai rivenditori o dai grossisti partecipanti (spesso chiamati drop shipping). Altre funzionalità potrebbero includere la vendita all'asta (diretta o inversa), cataloghi, ordini, pubblicità desiderata, funzionalità di scambio commerciale e funzionalità come RFQ, RFI o RFP.

In generale, poiché i marketplace aggregano i prodotti di una vasta gamma di fornitori, la selezione è generalmente più ampia, la disponibilità è più elevata ei prezzi sono più competitivi rispetto a negozi al dettaglio online specifici del fornitore.

Esempi di mercati online sono Amazon.com, etsy, eBay, Snapdeal, Flipkart, Kaymu, Rakuten e NASDAQ.

MarketPlace Extension

Estensione MarketPlace per Magento è sviluppato per convertire semplicemente un semplice negozio Magento in un MarketPlace con molte funzionalità per i clienti, i venditori e il proprietario del negozio. Qualsiasi cliente può registrarsi come venditore e può godere delle caratteristiche di un venditore e del cliente del negozio.

Il venditore vende prodotti sul negozio e in cambio il proprietario del negozio riceve una commissione in percentuale dalla vendita totale effettuata dal venditore. La percentuale di commissione che ottiene il proprietario del negozio può essere modificata e il proprietario del negozio può impostare la percentuale su qualsiasi valore desiderato.

Prerequisito

La Knowband MarketPlace Extension è necessario essere installato sul sistema per utilizzare questo addon MarketPlace.

Magento MarketPlace Addon venditore modalità vacanza

Introduzione

Questo Addon è fondamentalmente sviluppato per consentire ai venditori di informare i propri clienti e l'amministratore di MarketPlace che non saranno disponibili a vendere per un determinato periodo di tempo. In questo modulo, il venditore può impostare un intervallo di tempo specifico durante il quale non sarà disponibile su MarketPlace. Un avviso viene inviato ai clienti quando un venditore va in vacanza e un avviso simile viene inviato una volta tornato dalle vacanze. Tutta questa automazione è fatta usando le istruzioni di cron.

L'amministratore può anche impostare un cron che attiva e disattiva la modalità vacanza e invia anche una e-mail ai venditori non appena la modalità vacanza viene attivata o disattivata.

Manuale di installazione

Segui i seguenti passaggi per installare MarketPlace – Magento MarketPlace Addon per le modalità di vendita del venditore

1. Scarica il pacchetto Addon.

2. Decomprimi il pacchetto nella cartella principale di Magento setup tramite FTP manager (come Filezilla o WinSCP – scarica qui: https://filezilla-project.org/).

3. Nel pannello di amministrazione sotto il menu "Market Place" accanto al menu di sistema, vedrai una nuova opzione di menu "Modalità vacanze". Nel caso in cui non si riesca a vedere il collegamento sotto Sistema, cancellare prima Magento Cache e poi ricontrollare.

4. Con questo l'estensione viene installata sul tuo sistema.

Interfacce del modulo

Questo modulo sarà accessibile tramite l'amministratore e l'account del venditore.

Interfacce account venditore

Queste interfacce saranno accessibili solo da un venditore nella sua sezione account.

Interfacce account amministratore

Queste interfacce saranno accessibili solo dal MarketPlace Admin nella sua sezione account.

Manuale utente

Questo Manuale dell'utente ti guiderà attraverso le impostazioni del modulo Admin / Store Front e le funzionalità di MarketPlace – Addon della modalità Vacation del venditore.

Modulo di amministrazione

Nel pannello di amministrazione di Magento, l'estensione MarketPlace aggiunge un menu separato (denominato "Modalità vacanze") nella scheda Menu di MarketPlace

Menu MarketPlace

Il menu MarketPlace è composto da opzioni di sottomenu 12 totali per impostazione predefinita. Con l'aggiunta di MarketPlace – Contact Admin Addon, viene elencata una nuova opzione di menu "Seller Ticket System" che reindirizza a diverse pagine per la gestione delle vacanze del venditore MarketPlace.

Interfaccia di amministrazione

La posizione di Admin Interface è in "MarketPlace >> Vacation Mode".

Modalità vacanza

Come consentire / abilitare la modalità vacanza per i venditori?

1. Spostarsi "MarketPlace >> Modalità vacanze" come mostrato nella schermata di stampa sopra. Si aprirà un'interfaccia simile alla seguente schermata di stampa:

2. Abilitare il modulo abilitando il numero di impostazione 2 "Abilita / Disabilita modalità vacanza".

3. Fare clic su: "Salva e continua" per salvare le impostazioni.

4. Sull'interfaccia di cui sopra nell'etichetta 3, puoi anche visualizzare l'elenco dei venditori che hanno già attivato la modalità di vacanza del venditore.

5. Fare clic su "Vista" per aprire i dettagli sulla modalità vacanza attivata dal venditore.

Intervallo di vacanza: La data impostata dal venditore per iniziare e terminare la Vacanza è mostrata qui.

È attivo: Qui viene mostrato lo stato attuale della modalità vacanza.

Vacanza Halt: Se il venditore ha interrotto la modalità vacanza prima della data specificata.

Commento: Il commento o il messaggio utilizzato dal venditore per informare l'amministratore in merito al motivo dell'attivazione della modalità vacanza.

Come disapprovare una modalità di vacanza del venditore?

Se per qualsiasi motivo l'amministratore non vuole che il venditore vada in modalità vacanza. L'amministratore può disattivare la modalità di vacanza per il venditore in qualsiasi momento facendo clic su "Annulla" come mostrato nell'immagine qui sotto:

Cliccando su cancella si aprirà un pop come sopra e l'amministratore deve dare un motivo per non accettare la richiesta di modalità vacanza e quindi fare clic "Invia".

Interfacce account venditore

Questa è l'interfaccia che sarà accessibile solo attraverso la sezione dell'account venditore.

Posizione del menu

Dopo l'installazione, un menu (Le mie vacanze) verrà visualizzato al venditore nella scheda del menu "ACQUISTO VENDITORE" come mostrato nella schermata di seguito:

Facendo clic sul collegamento evidenziato, il sistema reindirizzerà il venditore alla sua finestra "La mia cronologia delle vacanze".

La mia configurazione del tempo Vacanze

Qui sono menzionati tutti gli elementi del menu e i campi del modulo:

Nella finestra qui sopra Fai clic su "Imposta nuova vacanza" nella parte superiore destra dell'interfaccia. Viene visualizzata una nuova finestra per la configurazione della modalità vacanza.

Impostazioni Descrizione

1. Data di inizio della vacanza: In questo campo, il venditore imposterà la data per la quale sta andando in vacanza e non sarà disponibile su MarketPlace. Nota: per i test, menziona sempre la data o la data attuale ancora da venire. Non inserire una data passata in questo campo.

2. Data di fine vacanza: In questo campo, il venditore imposterà la data in cui termina la sua vacanza e sarà di nuovo disponibile su MarketPlace.

3. Il tuo commento a questa vacanza: Il venditore può specificare il motivo per l'attivazione della modalità vacanza. Questo messaggio verrà visualizzato dall'amministratore.

4. Salvare: Fare clic sul pulsante Salva per salvare tutte le impostazioni effettuate.

Interrompi una modalità vacanza

La modalità vacanza termina automaticamente alla data di fine vacanza specificata dal venditore.

Il venditore può interrompere una modalità di vacanza in qualsiasi momento manualmente facendo clic su "Annulla" come mostrato in questa schermata di stampa qui sotto: Un pop-up apparirà dove il venditore deve menzionare il motivo / commento e fare clic su "Invia" per interrompere una modalità vacanza.

Flusso di lavoro del modulo

Quando l'amministratore installerà questo modulo sul suo MarketPlace, ciascun venditore otterrà un sottomenu sulla pagina del proprio account venditore. Una volta che un venditore imposta il tempo di vacanza attraverso l'interfaccia fornita loro sull'account del venditore, il cron che è già stato configurato nel modulo inizierà a funzionare. Il modulo avvierà e interromperà automaticamente una modalità di vacanza per un determinato venditore in base al tempo impostato dal venditore. Durante il periodo della modalità vacanza, il profilo del venditore in particolare sarà inattivo su MarketPlace e i suoi prodotti non verranno visualizzati

Magento MarketPlace Sprzedający tryb wakacyjny Addon

Czym jest MarketPlace?

Ogólnie rzecz biorąc MarketPlace to "otwarta przestrzeń, w której rynek jest / był poprzednio". Oznacza to przestrzeń z relacją sprzedawców i klientów. Istnieje kilku sprzedawców sprzedających towary kilku klientom.

An online MarketPlace (lub internetowy rynek e-commerce) to rodzaj witryny e-commerce, w której informacje o produktach lub usługach są dostarczane przez wiele stron trzecich, a transakcje są przetwarzane przez operatora MarketPlace. Online marketplaces są podstawowym typem wielokanałowego e-commerce.

Na rynku online transakcje konsumenckie są przetwarzane przez operatora MarketPlace, a następnie dostarczane i realizowane przez uczestniczących sprzedawców detalicznych lub hurtowników (często nazywane drop shipping). Inne możliwości mogą obejmować aukcje (do przodu lub do tyłu), katalogi, zamawianie, pożądane reklamy, funkcje wymiany handlowej i możliwości, takie jak RFQ, RFI lub RFP.

Ogólnie rzecz biorąc, ponieważ rynki agregują produkty od szerokiej gamy dostawców, selekcja jest zwykle szersza, dostępność jest wyższa, a ceny są bardziej konkurencyjne niż w detalicznych sklepach dostawców.

Przykładami witryn internetowych są Amazon.com, Etsy, eBay, Snapdeal, Flipkart, Kaymu, Rakuten, i NASDAQ.

Rozszerzenie MarketPlace

Rozszerzenie MarketPlace dla Magento został opracowany w celu prostego przekształcenia prostego sklepu Magento w MarketPlace z wieloma funkcjami dla klientów, sprzedawców i właścicieli sklepów. Każdy klient może zarejestrować się jako sprzedawca i może cieszyć się funkcjami sprzedawcy oraz klienta sklepu.

Sprzedawca sprzedaje produkty w sklepie, a właściciel sklepu otrzymuje prowizję w wysokości procentowej od całkowitej sprzedaży dokonanej przez sprzedającego. Procent prowizji pobierany przez właściciela sklepu może zostać zmodyfikowany, a właściciel sklepu może ustawić wartość procentową na dowolną pożądaną wartość.

Przesłanka

SOCZEWKI Rozszerzenie Knowband MarketPlace jest konieczne do zainstalowania w systemie w celu użycia tego AddPackPlace.

Magento MarketPlace Sprzedający tryb wakacyjny Addon

Wprowadzenie

Ten dodatek jest w zasadzie opracowany dla sprzedawców, aby mogli poinformować swoich klientów i administratora MarketPlace, że nie będą mogli sprzedawać przez określony czas. W tym module sprzedawca może ustawić określony przedział czasu, podczas którego będzie niedostępny na MarketPlace. Powiadomienie jest wysyłane do klientów, gdy sprzedawca jedzie na wakacje i podobny alert jest wysyłany po powrocie z wakacji. Wszystkie te automatyzacje są wykonywane za pomocą instrukcji cron.

Administrator może również ustawić crona, które aktywuje i dezaktywuje tryb wakacji, a także wysyła wiadomość e-mail do sprzedawców, gdy tylko tryb wakacji zostanie aktywowany lub dezaktywowany.

Instrukcja instalacji

Wykonaj następujące kroki, aby zainstalować dodatek MarketPlace – Magento MarketPlace Sprzedawca Vacation

1. Pobierz pakiet Addon.

2. Rozpakuj pakiet w folderze głównym instalacji Magento za pomocą menedżera FTP (np. Filezilla lub WinSCP – pobierz tutaj: https://filezilla-project.org/).

3. W panelu administratora w menu "Rynek" obok menu System pojawi się nowa opcja menu "Tryb wakacji". Jeśli nie widzisz linku w Systemie, najpierw wyczyść pamięć podręczną Magento, a następnie sprawdź ponownie.

4. Dzięki temu rozszerzenie zostanie zainstalowane w twoim systemie.

Interfejsy modułów

Ten moduł będzie dostępny za pośrednictwem administratora, a także konta sprzedawcy.

Interfejsy kont sprzedawców

Te interfejsy będą dostępne tylko dla sprzedającego w sekcji dotyczącej konta.

Interfejsy konta administratora

Te interfejsy będą dostępne tylko przez administratora MarketPlace w sekcji jego konta.

Instrukcja obsługi

Niniejsza instrukcja obsługi zapozna Cię z ustawieniami modułu Admin / Przedpremierowego oraz funkcjami MarketPlace – Addon na tryb wakacyjny sprzedawcy.

Moduł administracyjny

W panelu administracyjnym Magento rozszerzenie MarketPlace dodaje osobne menu (o nazwie "Tryb wakacji") w zakładce Menu MarketPlace

MarketPlace Menu

Menu MarketPlace zawiera domyślnie opcje podmenu 12. Wraz z dodatkiem MarketPlace – Contact Admin Addon, pojawia się nowa opcja menu "System Sprzedającego Ticket", która przekierowuje na kilka stron dla zarządzania MarketPlace Seller Vacation.

Interfejs administracyjny

Lokalizacja interfejsu administratora znajduje się w "MarketPlace >> Vacation Mode".

Tryb wakacyjny

Jak zezwolić / włączyć tryb urlopowy dla sprzedawców?

1. Nawigować do "MarketPlace >> Tryb wakacyjny" jak pokazano na powyższym ekranie. Zostanie otwarty interfejs podobny do poniższego wydruku ekranu:

2. Włącz moduł, włączając numer ustawienia 2 "Włącz / wyłącz tryb wakacji".

3. kliknij: "Zapisz i kontynuuj" , aby zapisać ustawienia.

4. W powyższym interfejsie na etykiecie 3 możesz także wyświetlić listę sprzedawców, którzy aktywowali tryb urlopowy Sprzedawcy.

5. Kliknij na "Widok" aby otworzyć szczegółowe informacje o trybie urlopowym aktywowanym przez sprzedawcę.

Przerwa wakacyjna: Data ustawiona przez sprzedającego na rozpoczęcie i zakończenie wakacji jest pokazana tutaj.

Jest aktywny: Bieżący status trybu urlopowego jest pokazany tutaj.

Urlop na wakacje: Jeśli sprzedawca przerwał tryb urlopowy przed określoną datą.

Komentarz: Komentarz lub wiadomość użyta przez sprzedawcę do poinformowania administratora o przyczynie aktywacji trybu wakacyjnego.

Jak odrzucić tryb wakacji sprzedawcy?

Jeśli z jakiegokolwiek powodu administrator nie chce, aby sprzedawca przeszedł na tryb urlopowy. Administrator może dezaktywować tryb wakacji dla danego sprzedawcy w dowolnym momencie, klikając "Anuluj", jak pokazano na poniższym obrazku:

Kliknięcie przycisku Anuluj spowoduje otwarcie okna jak wyżej, a administrator musi podać powód, dla którego nie akceptuje żądania trybu wakacyjnego, a następnie kliknij "Zatwierdź".

Interfejsy kont sprzedawców

To jest interfejs, który będzie dostępny tylko za pośrednictwem sekcji konta sprzedawcy.

Lokalizacja menu

Po instalacji, menu (Moje wakacje) zostanie wyświetlone sprzedawcy w zakładce Menu "KONTO SPRZEDAWCY", jak pokazano na poniższym ekranie:

Po kliknięciu podświetlonego linku system przekieruje sprzedawcę do okna "Moja historia wakacji".

Konfiguracja czasu mojego urlopu

Tutaj wymienione są wszystkie pozycje menu i pola modułu:

W powyższym oknie Kliknij "Ustaw nowe wakacje" w prawej górnej części interfejsu. Pojawi się nowe okno konfiguracji trybu wakacyjnego.

Opis ustawień

1. Data rozpoczęcia wakacji: W tym polu sprzedawca określi termin, w którym zamierza wyjechać, i nie będzie dostępny na MarketPlace. Uwaga: do testowania należy również zawsze podać aktualną datę lub datę. Nie wpisuj daty przeszłej w tym polu.

2. Data zakończenia wakacji: W tym polu sprzedawca ustawi datę zakończenia wakacji i ponownie będzie dostępny na MarketPlace.

3. Twój komentarz do tego urlopu: Sprzedawca może podać przyczynę aktywacji trybu wakacyjnego. Ta wiadomość zostanie wyświetlona przez administratora.

4. Zapisać: Kliknij przycisk Zapisz, aby zapisać wszystkie wprowadzone ustawienia.

Zatrzymaj tryb wakacji

Tryb wakacji automatycznie zatrzymuje się w Dacie zakończenia wakacji określonej przez sprzedawcę.

Sprzedawca może ręcznie zatrzymać tryb wakacyjny, klikając "Anuluj", jak pokazano na poniższym ekranie: Pojawi się okno, w którym sprzedający musi podać przyczynę / komentarz, i kliknąć "Prześlij", aby zatrzymać tryb wakacji.

Przepływ pracy modułu

Kiedy administrator zainstaluje ten moduł w swojej MarketPlace, każdy sprzedawca otrzyma podmenu na stronie swojego konta sprzedawcy. Gdy sprzedawca ustawi swój czas wakacji poprzez interfejs dostarczony im na koncie sprzedawcy, cron, który został już skonfigurowany w module, zacznie działać. Moduł automatycznie rozpocznie i zatrzyma tryb wakacji dla określonego sprzedawcy, zgodnie z czasem określonym przez sprzedającego. W okresie trybu wakacyjnego profil konkretnego sprzedawcy będzie nieaktywny w MarketPlace, a jego produkty nie będą wyświetlane

Magento MarketPlace Vendedor modo de férias Addon

O que é o MarketPlace?

Em termos gerais, um MarketPlace é "um espaço aberto onde um mercado é / foi anteriormente mantido". Isso significa que um espaço com relação entre vendedores e clientes. Existem vários vendedores que vendem mercadorias para vários clientes.

An MarketPlace on-line (Ou mercado de comércio eletrônico on-line) é um tipo de site de comércio eletrônico no qual as informações sobre produtos ou serviços são fornecidas por vários terceiros, enquanto as transações são processadas pelo operador do MarketPlace. Mercados on-line são o principal tipo de comércio eletrônico multicanal.

Em um mercado on-line, as transações do consumidor são processadas pelo operador MarketPlace e, em seguida, entregues e atendidas pelos varejistas ou atacadistas participantes (geralmente chamados de drop shipping). Outros recursos podem incluir leilões (direto ou reverso), catálogos, pedidos, anúncios desejados, funcionalidade e recursos de troca comercial, como RFQ, RFI ou RFP.

Em geral, como os mercados agregam produtos de uma ampla variedade de provedores, a seleção geralmente é mais ampla, a disponibilidade é maior e os preços são mais competitivos do que em lojas de varejo on-line específicas de fornecedor.

Exemplos de mercados on-line são Amazon.com, etsy, eBay, Snapdeal, Flipkart, Kaymu, Rakutene NASDAQ.

Extensão MarketPlace

Extensão MarketPlace para Magento é desenvolvido para simplesmente converter uma simples loja Magento em um MarketPlace com muitos recursos para clientes, vendedores e dono de loja. Qualquer cliente pode se cadastrar como vendedor e usufruir dos recursos de um vendedor e cliente da loja.

O vendedor vende produtos na loja e, em troca, o dono da loja recebe uma comissão por porcentagem da venda total feita pelo vendedor. A porcentagem de comissão obtida pelo proprietário da loja pode ser modificada e o proprietário da loja pode definir a porcentagem para qualquer valor desejado.

Requisito prévio

O Extensão Knowband MarketPlace é necessário para ser instalado no sistema para usar este Addon MarketPlace.

Magento MarketPlace Vendedor modo de férias Addon

Introdução

Este Addon é basicamente desenvolvido para os vendedores para que eles informem aos seus clientes e ao administrador do MarketPlace que eles não estarão disponíveis para venda por um determinado período de tempo. Neste módulo, o vendedor pode definir um intervalo de tempo específico durante o qual ele não estará disponível no MarketPlace. Um alerta é enviado aos clientes quando um vendedor sai de férias e um alerta semelhante é enviado quando ele volta de férias. Toda essa automação é feita usando as instruções do cron.

O administrador também pode definir um cron que irá ativar e desativar o modo de férias e também envia um e-mail para os vendedores assim que o modo férias for ativado ou desativado.

Manual de instalação

Siga os seguintes passos para instalar o MarketPlace – Magon MarketPlace Seller Vacation Mode Addon

1. Baixe o pacote Addon.

2. Descompacte o pacote em sua pasta raiz de configuração do Magento via gerenciador FTP (como Filezilla ou WinSCP – baixe aqui: https://filezilla-project.org/).

3. No painel de administração, no menu "Market Place", ao lado do menu System, você verá uma nova opção de menu "Vacation Mode". Caso você não consiga ver o link em System, limpe primeiro o Magento Cache e depois verifique novamente.

4. Com isso, a extensão é instalada no seu sistema.

Interfaces de Módulos

Este módulo será acessível através do Admin, bem como da conta do vendedor.

Interfaces da conta do vendedor

Essas interfaces serão acessíveis apenas por um vendedor em sua seção de conta.

Interfaces da conta de administrador

Essas interfaces serão acessíveis apenas pelo Admin do MarketPlace em sua seção de conta.

Manual do usuário

Este Manual do Usuário irá guiá-lo através das configurações do Módulo de Administração / Frente da Loja e dos recursos do MarketPlace – Modo de Férias do Vendedor.

Módulo de administração

No painel de administração do Magento, o MarketPlace Extension adiciona um menu separado (chamado "Modo Férias") na aba Menu do MarketPlace.

Menu MarketPlace

O menu do MarketPlace consiste no total de opções do submenu 12 por padrão. Com a adição do MarketPlace – Contact Admin Addon, uma nova opção de menu "Seller Ticket System" é listada, o que redireciona para várias páginas para o gerenciamento de férias do vendedor do MarketPlace.

Interface de administração

A localização da interface de administração está em "MarketPlace >> Modo de férias".

Modo de férias

Como permitir / ativar o modo de férias para os vendedores?

1. Navegar para “MarketPlace>> Vacation Mode” as shown in the screen print above. An interface similar to the below screen print will open:

2. Enable the module by enabling the setting number 2 “Enable/Disable Vacation Mode”.

3. clique: “Save and Continue” para salvar as configurações.

4. On the above interface in label 3, you can also view the list of sellers who have already activated the Seller vacation mode.

5. Clique em “View” to open the details about the vacation mode activated by the seller.

Vacation Interval: The date set by the seller for starting and ending the Vacation is shown here.

Is Active: The current status of vacation mode is shown here.

Vacation Halt: If Seller has stopped the vacation mode before the specified date.

Comente: The comment or message used by the seller to inform the Admin regarding the reason for the vacation mode activation.

How to disapprove a seller vacation mode?

If for any reason the admin not want the seller to go on a vacation mode. The admin can deactivate the vacation mode for the particular seller at anytime by clicking “Cancel” as shown in the image below:

Clicking cancel will open a pop like above and the admin has to give a reason for not accepting the vacation mode request and then click “Submit”.

Interfaces da conta do vendedor

Esta é a interface que será acessível somente através da seção de conta do vendedor.

Localização do Menu

After installation, a menu(My Vacations) will be displayed to the seller in the “SELLER ACCOUNT” Menu tab as shown in below screen:

On clicking the highlighted link, the system will redirect seller to his “My Vacations History” window.

Configuração do tempo das minhas férias

Here all the menu items and fields of the module are mentioned:

In the above window Click on “Set New Vacation” at the right top side of the interface. A new window appears for the configuration of your vacation mode.

Descrição das configurações

1. Data de início de férias: In this field, the seller will set the date for which he is going to vacation and will not to available on the MarketPlace. Please note : For testing also always mention the present date or date yet to come. Do not enter a past date in this field.

2. Data de fim de férias: In this field, the seller will set the date when his vacation ends and will again be available on the MarketPlace.

3. Your comment to this vacation: Seller can specify the reason for activating the vacation mode. This message will be seen by the admin.

4. Salve : Clique no botão Salvar para salvar todas as suas configurações feitas.

Stop a vacation mode

The vacation mode automatically stops at the Vacation End Date specified by the seller.

The seller can stop a vacation mode any time manually by clicking “Cancel ” as shown in this screen print below: A pop up will appear where the seller has to mention the reason/comment and click “Submit” to stop a vacation mode.

Fluxo de trabalho do módulo

When the admin will install this module on his MarketPlace, each seller will get a sub menu on their seller account page. The once a seller sets his vacation time through the interface provided to them on their seller’s account, the cron which has been already configured in the module will start working. The module will automatically start and stop a vacation mode for a particular seller according to the time set by the seller. During the time period of the vacation mode, the particular seller’s profile will be inactive on the MarketPlace and his products will not be shown? to the customers either.