Prestashop Booking and Rental System Addon – User Manual

1.0 Introduction

Buying and renting services has now become a common scenario of online markets. People commonly prefer rental products and therefore shop owners have found their way in the rental business. So, which module to try for offering 24*7 booking and rental services to your customers. Prestashop Booking and Rental System addon by Knowband helps e-merchants in adding a wonder functionality to their online shop which is referred to as booking system. Yes, Prestashop Booking System is one great module to create a dynamic booking system for your online shop giving an option to set your pricing, maintain a calendar, appointment orders very effectively from the back-office. Using eCommerce booking system, online users can easily make time-date based bookings and appointments for various products.

Prestashop Reservation And Booking Module help you to add rental products and services to your Prestashop site. Prestashop Booking Calendar addon integrates flexible booking options and a user-friendly interface to the site. Customers can check real-time availability and relatively opt for rental or booking services from the online shop. So if you are planning to offer a rental, appointment or bookable services, this is the right one for you.

1.1 Striking Features of Prestashop Booking and Rental System Addon

To provide rental services that fit your customers need, Prestashop Reservation system module has offered multiple configuration settings so that you can effectively make your online business booking ready for the customers. The simple to use backend of Prestashop Booking Calendar addon is extremely easy to use without any technical operations or coding hassles.

The various key features provided by Prestashop Rental Booking System has been listed below.

1. Prestashop Booking and Rental System addon help store owners to convert their store into an online reservation and booking store that provides many kinds of rental, appointments and room booking services to the online users.

2. Creating and listing an appointment, daily rental product, booking room, hourly rental services is a time-saving approach with the help of Prestashop Booking Calendar addon.

3. Prestashop Booking System gives an intuitive interface to add the details for bookable product/services or appointment.

4. Admin can add suitable date ranges and time slots on the product page of booking product or appointments when their business services are available to the online users.

5. The total bookable orders with their status and associated customer details can be viewed from the back-office of this Prestashop Event Booking addon.

6. Prestashop admin can provide exciting deals and discount to their customers by flashing special price rules on the product pages. This will engage and add more traffic to the site which will impact the sales system as well.

7. Prestashop Booking Calendar addon builds a rental service schedule or appointment based on the features selected by the customers.

8. Admin can show the location with every bookable product/service using the Google Place Integration feature of Prestashop Reservation system module.

9. Prestashop Service Booking module offers flexibility to add, edit and delete unlimited bookable products to their eCommerce shop.

10. Prestashop Booking and Rental System addon allow you to add two kinds of bookable services for the users which include branch and home service.

11. Prestashop Booking System flawlessly supports multi-lingual and multi-store compatibility.

12. With Prestashop Reservation And Booking Module, admin can set the initial price for the rental services or appointments at their store.

13. They can disable booking and appointments for selective days or timing using this Prestashop Booking and Rental System addon.

14. The Prestashop admin can show multiple dates and time slots available for each bookable product or service.

15. Prestashop Booking Calendar addon provides an option to show custom rental service charges corresponding to the date-time slot selected by the customer.

16. Prestashop Event Booking addon allows admin to specify the different type, category and offered facilities with the rental room or hotel services.

1.2 Technology for Development

Language: PHP
Frame Work: Prestashop

2.0 Installation Guide for Prestashop Booking Calendar Addon

The store admin can follow these simple steps for installing the Prestashop Booking and Rental System addon on their eCommerce store:

1. First of all download the addon package from the Knowband store.

2. You will get a zipped file containing the source code and user manual. Unzip the complete package in the root directory of your Prestashop store through FTP manager (like Filezilla or WinSCP – download here: https://filezilla-project.org/). You’ll find the files and folders as shown in the image below:

The Prestashop Booking System is now installed and ready for use. Now the admin can configure the various configuration settings in accordance with their Prestashop site.

3.0 Admin Interface of Prestashop Rental Booking System

Just after successful installation of Prestashop Booking and Rental System addon at your website, you can configure the booking service setting as per your needs. In the admin panel or dashboard, you will find the Knowband Booking/Reservation module along with its sub-sections listed below.
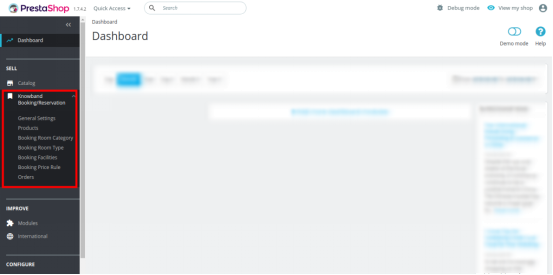
Prestashop Booking and Rental System addon

This Knowband Booking/Reservation System comprises of seven sections which have been discussed further.

1.General Settings
2.Products
3.Booking Room Category
4.Booking Room Type
5.Booking Facilities
6.Booking Price Rules
7.Orders

Each Tab of the Prestashop Booking System has been discussed below:

3.1 General Settings
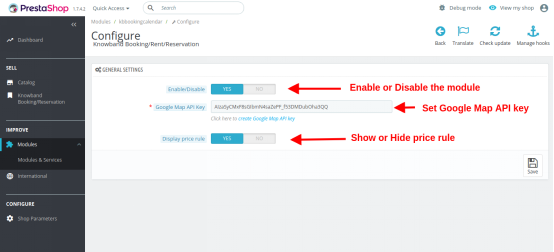
The General Settings of Prestashop Rental Booking System includes the basic configuration settings as:

1.Enable/Disable: This option enables or disables the complete functionality of the Prestashop Booking and Rental System at your store.

2.Google Map API Key: This option helps you to set the Google Map API Key. Once this unique API key is set from the backend, you can mark and display the location corresponding to every bookable product or service.

3.Display Price Rule: This option lets you show or hide the custom price rules over the product page of bookable product and rental service. To create a new price rule for different bookable products or edit the existing price rule, jump to the “Booking Price Rule” section of the dashboard.

3.1.1 How to generate the Google Map API key

The eCommerce store admin can generate the Google API key by following these steps:

  • Click on the “Get Started” button: The admin can click on this button to get Google map API key.
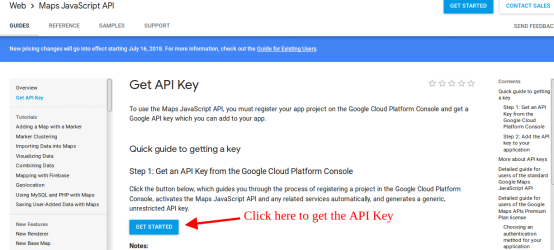
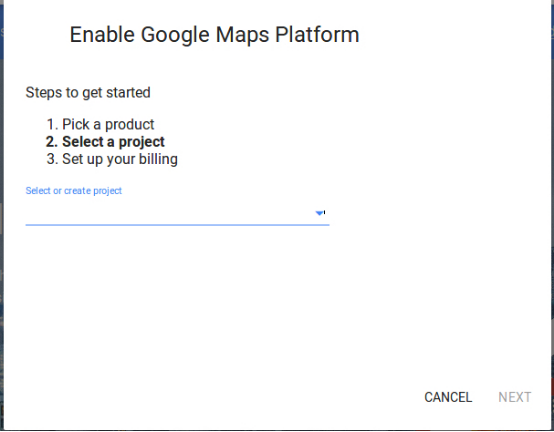
  • Pickup the products: When the admin will click the “Get Started” button this pop-up will be displayed.
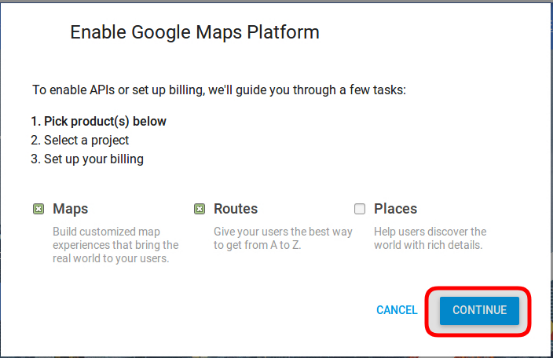
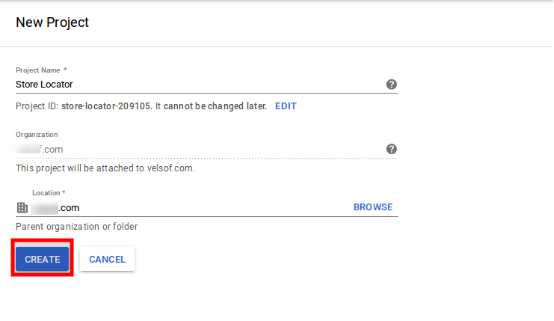
  • Project selection: The eCommerce store admin can select or create a project.

1. Select a project:
2. Create a new project:
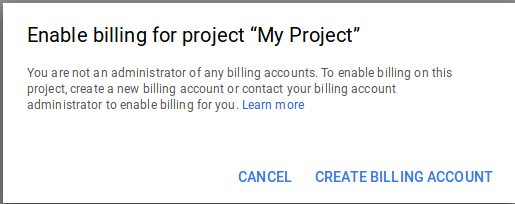
  • Setup the billing: The eCommerce store admin can now set up the billing.
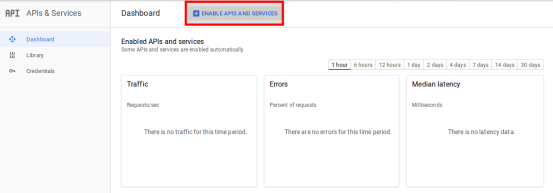
  • After billing the store admin can get their Google map API key.
    On the Credentials page, get an API key:
  • The store admin can select the API key option:
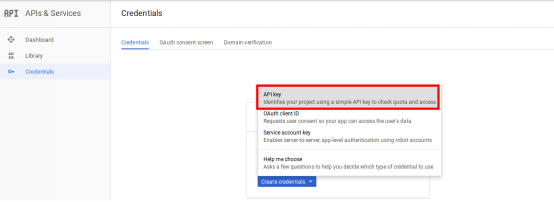
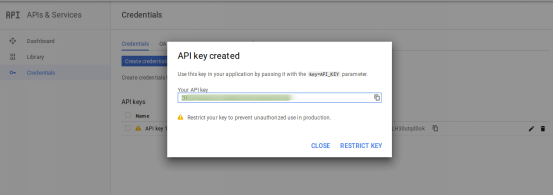
  • The admin can select the restrict key option from the dialog box to set a browser restriction on the API key.
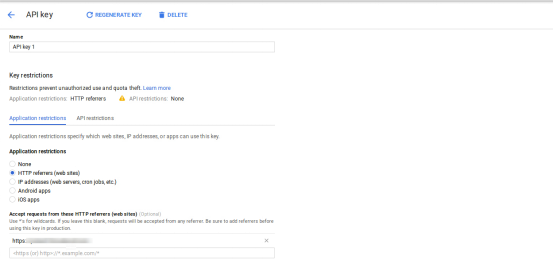
  • In the Key restriction section, the store admin can select HTTP referrers (web sites), then follow the on-screen instructions to set referrers.
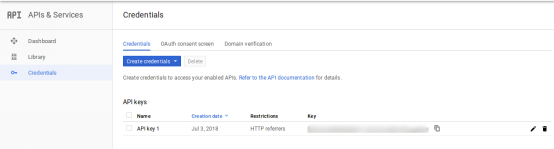
  • This way the admin can set the Google map API key.
3.2 Products

Here, you can view the complete list of daily/hourly rental products, appointments and hotel booking services added at your eCommerce store. To edit the existing details for any type of booking product/service, click on the edit option corresponding to a product listing. If you want to delete a particular listing, click on Delete option shown in the drop-down option corresponding to the product. If you don’t want to delete, simply enable or disable the product manually.

To add a new rental product or booking room service or appointments at your store, click on the Add new Booking Product option at the top right corner of the admin panel of this Prestashop Booking and Rental System addon.

1. Click on the “+” button at the top right side of the admin interface.
2. Now select the type of product you want to add to your site. The four offered options include:
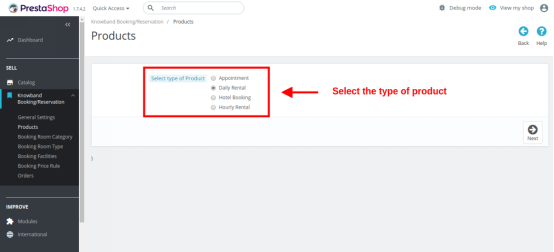
  • Appointment
  • Daily Rental
  • Hotel Booking
  • Hourly Rental

3.2.1 Add an Appointment Type Product

The Appointment type product contains the following information. In Appointment type of product, admin can show date/time slots. Admin has to set the appointment price on per day basis.

3.2.1.1 General Information
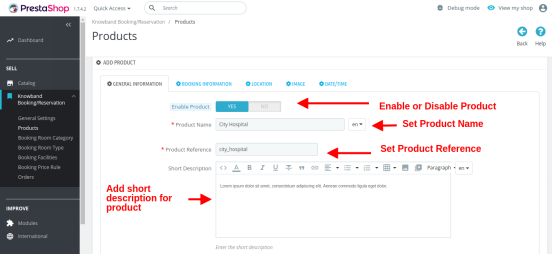
  • Enable or Disable Product: This option helps to enable or disable the current product.
  • Product Name: You can set the desired name for the product which is a mandatory field.
  • Product Reference: Set a unique reference code for the product which is a mandatory field.
  • Short Description: You can add a short one-line description for your product which displays under the product name.
  • Description: Give detailed information about the product in this field box.
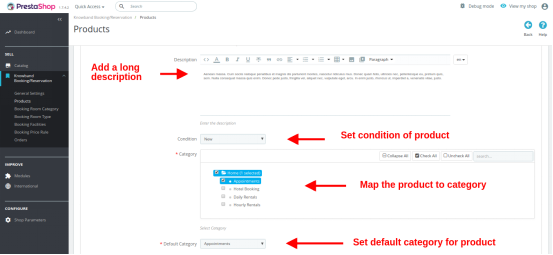
  • Condition: Set the condition of the product stating whether it is new, refurbished or used.
  • Category: Select a particular category where you want to add and show this appointment service.
  • Default Category: You can choose a default category for the product using this field.
3.2.1.2 Booking Information
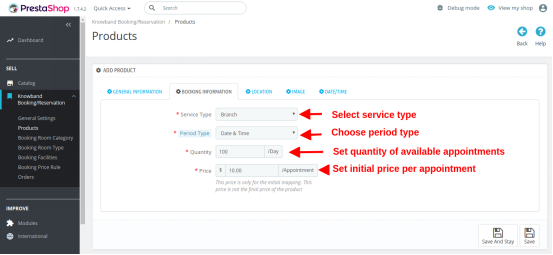
  • Service Type: This option lets you select the service type as a branch or home service.
  • Period Type: This option sets the period or schedule type that you want to display on the product page for the users. If the date is selected, then date schedules will be shown only. If the date/time option is selected then both date and time slots are shown to the customers.
  • Quantity: You can set the available quantity of bookable product or service for a day.
  • Price: You can set an initial price of the product per appointment that is shown to the user before they have done any service customization. After they have selected their product preferences, mainly date, and time schedules, the initial price is changed to the final custom price that they have to actually pay for getting service benefits.
3.2.1.3 Location
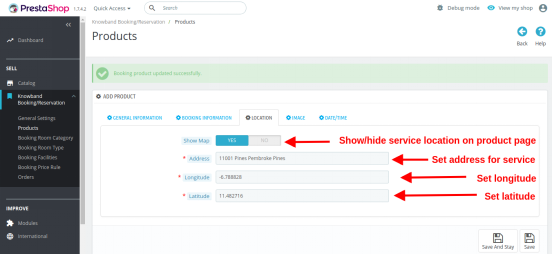
  • Show Map: You can turn Google Map ON or OFF visible at the frontend over the product page.
  • Address: This field specifies the exact location or address of that particular bookable product.
  • Longitude: This field sets the longitude coordinate of the specific location.
  • Latitude: This field sets the latitude coordinate of the specific location.
3.2.1.4 Image
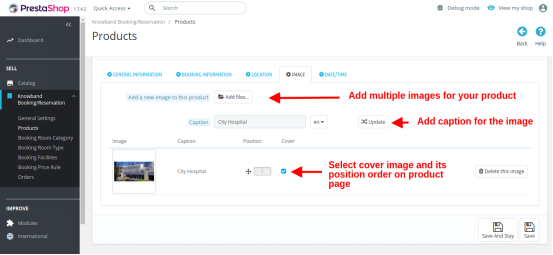
  • Add new image to this product: You can add multiple images to describe your product. You can set the display order of these images. Also, you can set any of these images as a cover image for the rental service or booking service.
  • Caption: You can give a desired caption for the product images.
3.2.1.5 Date/Time
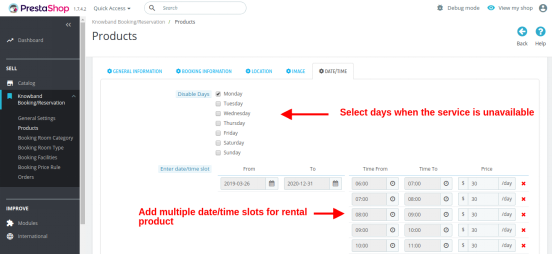
  • Disable Days: You can select all the days when the services are unavailable by the respective businesses.
  • Enter Date/Time Slot: You can create and display multiple dates and time slots on the product page. If the period type is selected as Date, then only date schedules will be shown at the backend. If the date/time is selected as period type, then you can add multiple time slots corresponding to every date range. This way you can map multiple time slots to a single date slot.
  • Final Price: You have to specify the final price corresponding to each date/time schedule added for the appointment. This final price is calculated during checkout based on customization done by the customer.
    Finally, save your created product.

3.2.2 Add a Daily Rental Product

The complete configuration settings for a rental product are the same as appointment type product.
Admin can show date/time slots for a daily rental product and can also fix a price corresponding to that schedule on per day basis.
The only difference occurs in the following listed settings:

  • Price: The initial price for the rental product is on a daily basis. Remember this is not the final price of the rental product.
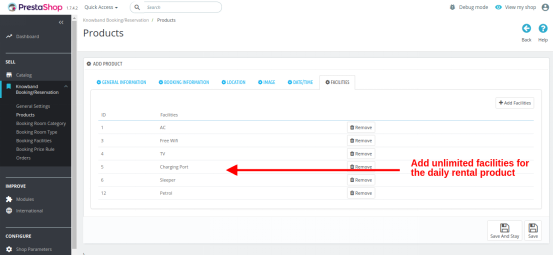
  • Facilities: This option allows you to add multiple facilities that you are offering with the daily rental product. These rent type facilities have to be first created from the “Booking Facilities” section of the admin panel. Once created, you can map them here for the particular daily rental service.
3.2.3 Add a Hotel Booking Service

The Hotel Booking service or Room Booking service contains the following information. In this room booking service, the customer has to select the check-in and check-out dates so that the room availability can be checked.

3.2.3.1 General Information
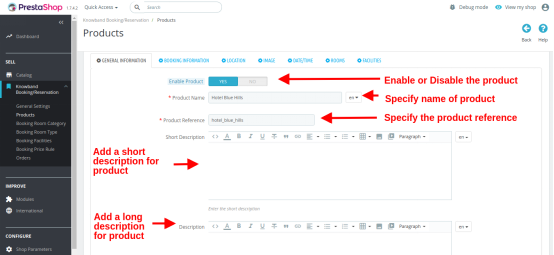
  • Enable or Disable Product: This option helps to enable or disable the Hotel room booking service.
  • Product Name: You can set the desired name for the booking service which is a mandatory field.
  • Product Reference: Set a unique reference code for the booking service which is a mandatory field.
  • Short Description: You can add a short one-line description for your room booking service which displays under the product name.
  • Description: Give detailed information about the hotel service in this field box.
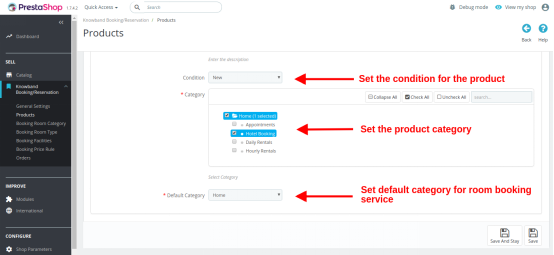
  • Condition: Set the condition of service stating whether it is new, refurbished or used.
  • Category: Select a particular category where you want to add and show this booking service.
  • Default Category: You can choose a default category for the booking service using this field.
3.2.3.2 Booking Information
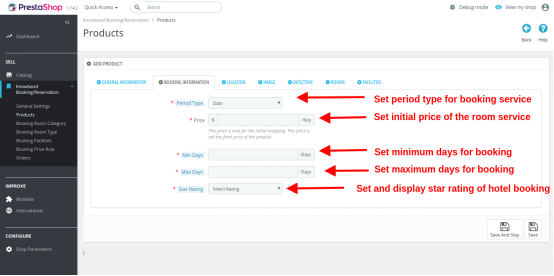
  • Period Type: This option sets the period type as Date allowing you to add multiple date slots for your hotel service.
  • Price: You can set an initial price of the booking service on a daily basis that is shown to the user before they have done any service customization. After they have selected their product preferences, mainly date slot, this initial price is added with the final custom price that they have to actually pay for getting service benefits.
  • Min days: Set the minimum days for hotel booking service.
  • Max Days: Set the maximum days for hotel booking service.
  • Star Rating: Select and display the star rating of hotel room service.
3.2.3.3 Location
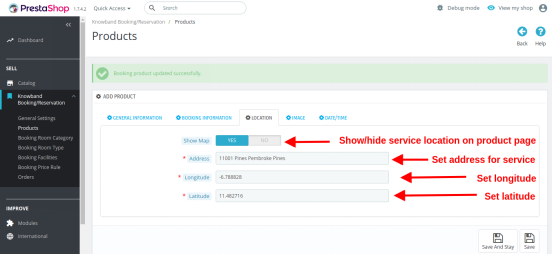
  • Show Map: You can turn Google Map ON or OFF visible at the frontend over the product page.
  • Address: This field specifies the exact location or address of that particular Hotel service.
  • Longitude: This field sets the longitude coordinate of the specific location.
  • Latitude: This field sets the latitude coordinate of the specific location.
3.2.3.4 Image
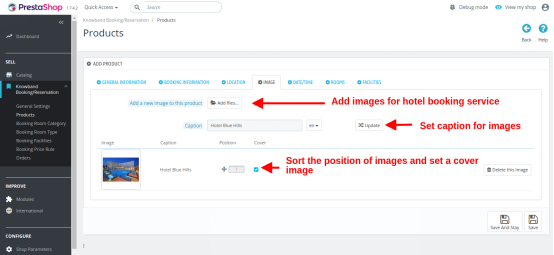
  • Add a new image to this product: You can add multiple images to describe your Hotel booking service. You can set the display order of these images. Also, you can set any of these images as a cover image for the room booking service.
    Caption: You can give a desired caption for the product images.
3.2.3.5 Date/Time
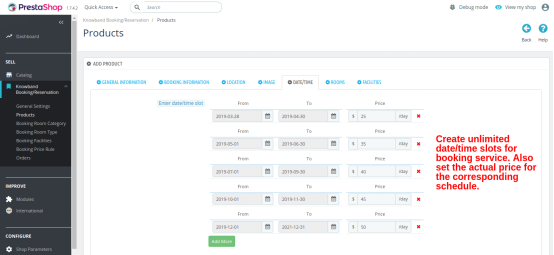
  • Enter Date/Time Slot: You can create and display multiple date schedules on the product page when your hotel services are available for the users. If there will be any conflict between the date/time range, the first occurrence will be applied.
  • Final Price: You have to specify the final price corresponding to each date slot schedule. This price is on a nightly basis. This final price is calculated during checkout based on the check-in and check-out time selected by the customer.
3.2.3.6 Rooms
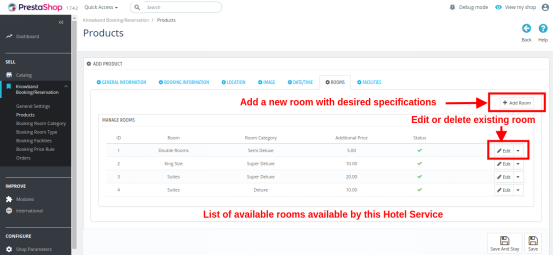
This interface will list you all the existing rooms within the particular hotel booking service. You can edit the details/specifications for any available room or you can delete them if required.
You can create a new room under this hotel service with different room type, category, and offered facilities. For this, you have to simply click on the Add Room option present at the top right corner of the interface.
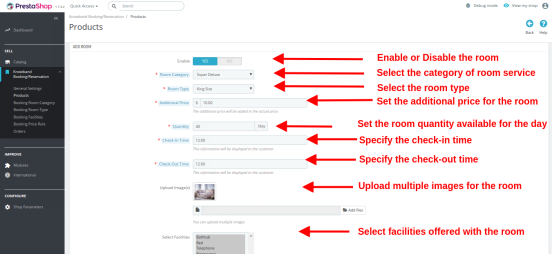
  • Enable: Enable or disable the room service.
  • Room Category: Select a particular category for room service. For this, you have to first create various categories from the “Booking Room Category” section of the admin interface. Then you have to map this room under the desired room category.
  • Room Type: Select a particular type for the room service. For this, you have to first create various room types from the “Booking Room Type” section of the admin interface. Then you have to map this room under the desired room type.
  • Additional Price: Set the additional price which is added to the initial price.
  • Quantity: Set the available quantity of rooms per day.
  • Check-in Time: Specify the check-in time for this room.
  • Check-out Time: Specify the check-out time for this room.
  • Upload Images: You can add multiple images describing the hotel room.
  • Select Facilities: Select multiple facilities that are offered with the room service. These facilities have to be first created from the “Booking Facilities” section of the admin interface. Then, you can easily map various facilities for this selected room.
3.2.3.7 Facilities
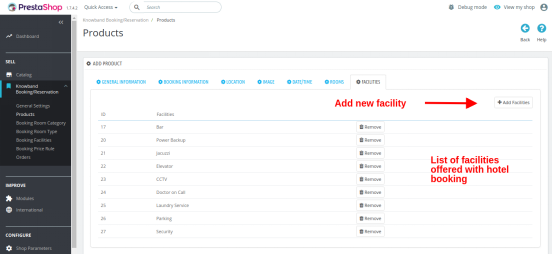
Under this section, you can map all the facilities that are being provided for the particular hotel service. These hotel facilities are also created from the “Booking Facilities” section of the admin interface.
Finally, save your created hotel/room service.

3.2.4 Add an Hourly Rental Product

The complete configuration settings for an hourly rental product are same as of daily rental type product. The customer has to pick a check-in and check-out date-time which specifies the duration for which they want the product.
The only difference occurs in the following listed settings:
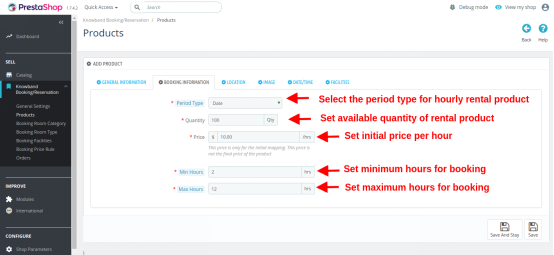
  • Period Type: This option sets the period type as Date Type for the hourly rental product.
  • Quantity: You can specify the total quantity of that hourly rental product.
  • Price: This option sets the price of the product on per hour basis.
  • Min Hours: Set minimum hours for booking.
  • Max Hours: Set maximum hours for booking.
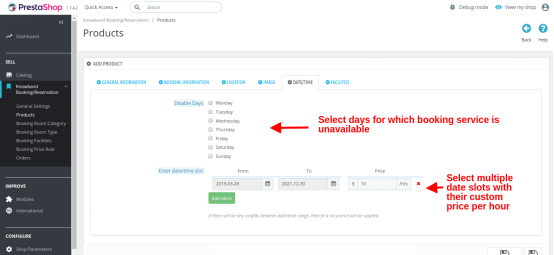
  • Disable days: Check the days on which the hourly rental product is unavailable for customer use.
  • Enter Date/Time slot: Create multiple date slots along with their final custom price on per hour basis.
  • Facilities: This option allows you to add multiple facilities that you are offering with the hourly rental product. These rent type facilities have to be first created from the “Booking Facilities” section of the admin panel. Once created, you can map them here for the particular hourly rental service.

3.3 Booking Room Category
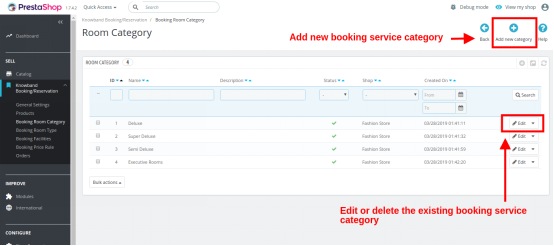
You can view and manage the list of booking room category through this interface. You can even edit or delete an existing category. For adding a new booking room category, click on the “+” button at the top right place of the admin panel.
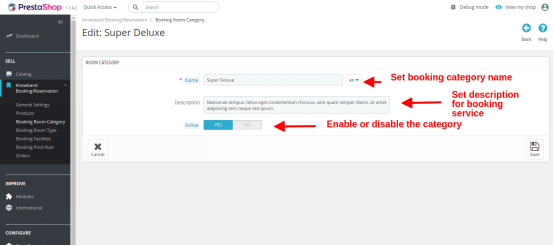
Fill the following details while creating a new booking room category:

  • Name: Set name of booking room category.
  • Description: Set a short description for the booking room category.
  • Active: Enable or disable the room category.

3.4 Booking Room Type
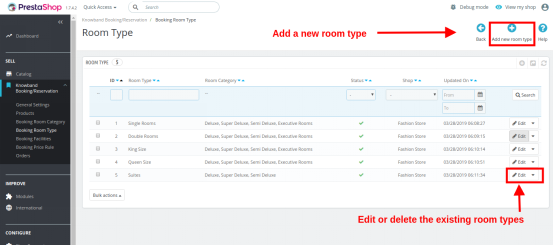
You can view and manage the list of booking room type through this interface. You can even edit or delete an existing room type. For adding a new booking room type, click on the “+” button at the top right place of the admin panel.
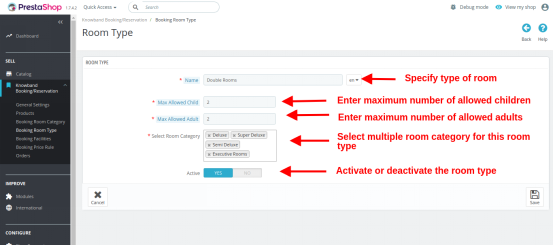
  • Name: Enter the name of room type.
  • Maximum Allowed Child: Set the maximum limit of allowed children.
  • Maximum Allowed Adults: Set the maximum limit of allowed adults.
  • Select Room Category: Select multiple room categories for this room type.
  • Active: Enable or disable the booking room type.

3.5 Booking Facilities

There are three kinds of booking facilities that can be created using this Prestashop Booking and Rental System addon.

1. Room: These facilities are mapped for particular room service.
2. Rent: These facilities are mapped for daily rental and hourly rental services.
3. Hotel: These facilities are mapped for a particular hotel booking service.
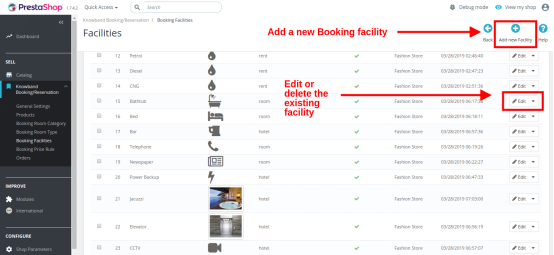
You can configure or delete the existing booking facilities from this interface. To add a new facility, click on the “+” button at the top right corner of the admin panel.
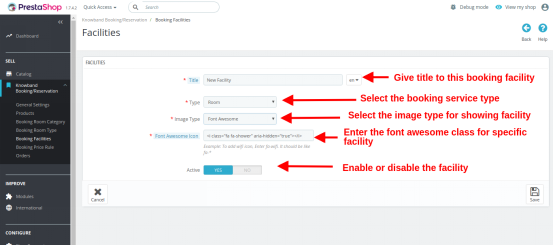
  • Title: Set a catchy title for the booking service.
  • Type: Set the booking service type for the offered facility. The three types include Room, Rent and Hotel.
  • Image Type: Specify the image type you want to use for depicting the booking facility. The two image type include Upload Image and Font Awesome.
  • Font Awesome Icon Class/Upload Image: If you have selected “Upload Image” type, then you have to browse a desired image from the local system. Else if you have selected the “Font Awesome Icon” type, then insert the font awesome class for that particular icon. For example, to depict the “Charging Port” facility, the font awesome class is “fa-plug”.
  • Activate: Enable or disable the booking facility.

3.6 Booking Price Rules
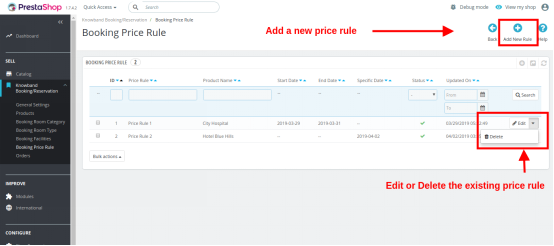
Price rules are basically created for specific products. This is a kind of offer or discount deal that you can use to entice the online users for grabbing that particular rental or booking service from the store.
The various price rules can be viewed and managed from a single interface under the Booking Price Rule Section. You can edit or delete the existing price rule. Additionally, you can create a new price rule for another bookable product on the store. To add a new booking price rule, click on the “+” button at the top right corner of the interface.
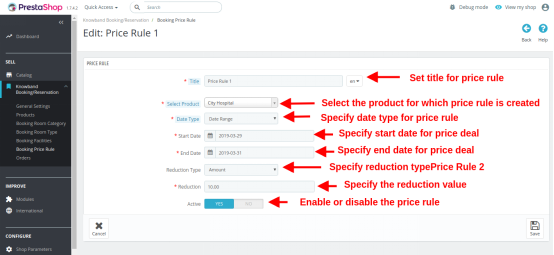
Specify the following field information while creating a new price rule.

  • Title: Set a desired catchy name for the price rule.
  • Select Product: Select the product over which you want to apply this booking price rule.
  • Date Type: Specify the date type from two options: Date Range and Specific Date.
    Start Date, End Date / Fix date: Enter the start date and end date if you have selected Date Range as Date Type. If you have selected the Specific Date option as Date Type then enter the fixed date to display the price rule.
  • Reduction Type: Set the reduction type as amount or percentage.
  • Reduction Value: If you have selected Amount as Reduction type then set the discount value you are offering to your customers. If you have chosen the Percentage type option, then set the discount percentage for the booking service.
  • Active: Enable or Disable the price rule.

3.7 Orders
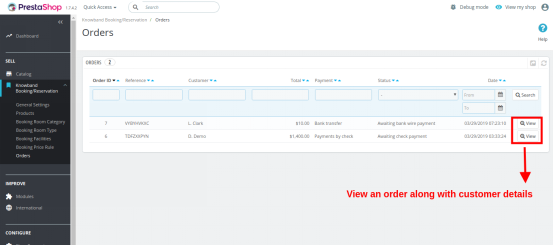
Here, the admin can view the complete list of orders placed by the customers whether it is an appointment, room booking service, daily rental product or hourly rental product. The date and time of order, customer detail, payment type, payment value and order status is also visible in this backend report of Prestashop Booking and Rental System.

4.0 Front Interface of Prestashop Reservation And Booking Module

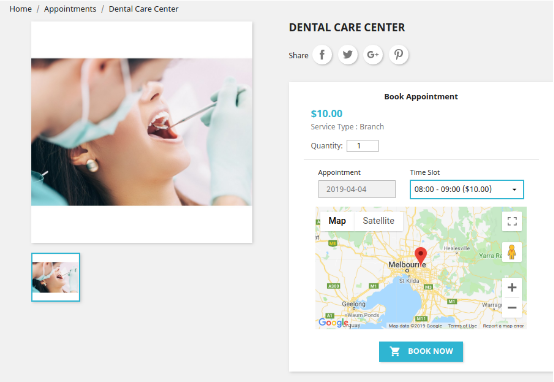
A) Appointment Type Product
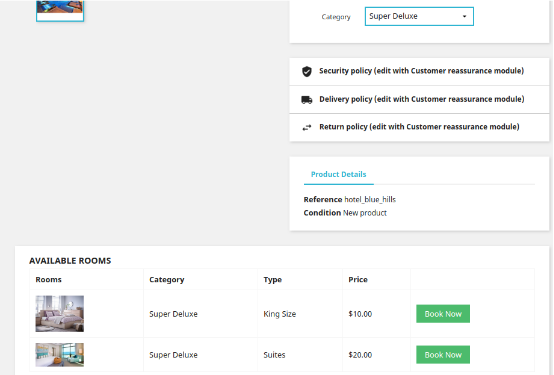
B) Hotel Booking Type Service

Available Rooms in Super Deluxe Category
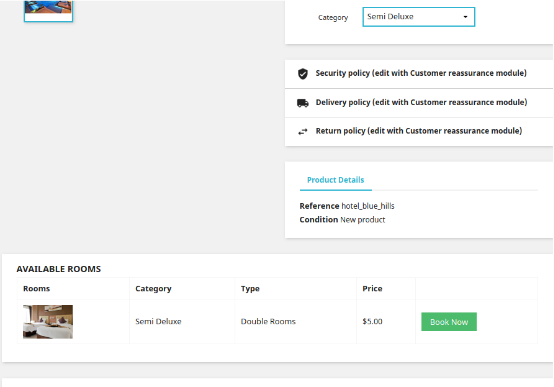
Available Rooms in Semi Deluxe Category
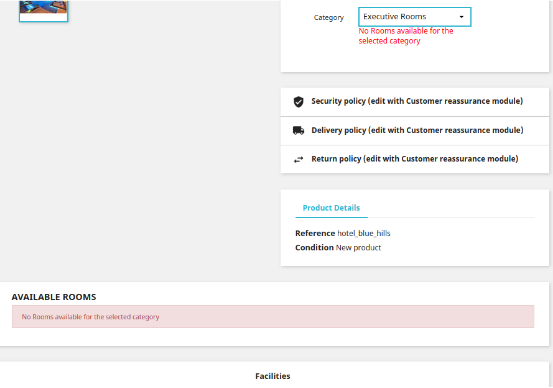
Available Rooms in Executive Rooms Category

Here you can see that there are no rooms in this category. This information is given to the frontend user in the form of an error message.
Available Rooms in Deluxe Category
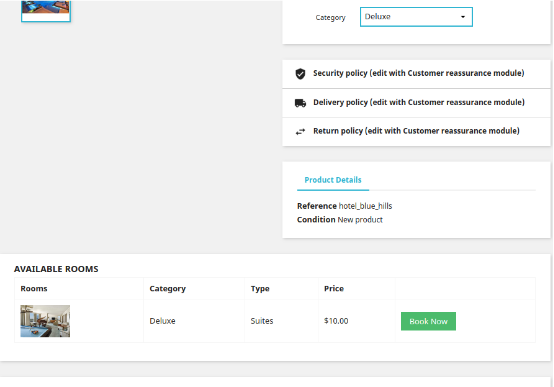
Now as the customer will select the desired room from the list of available rooms, then they will be shown a new popup as given below.
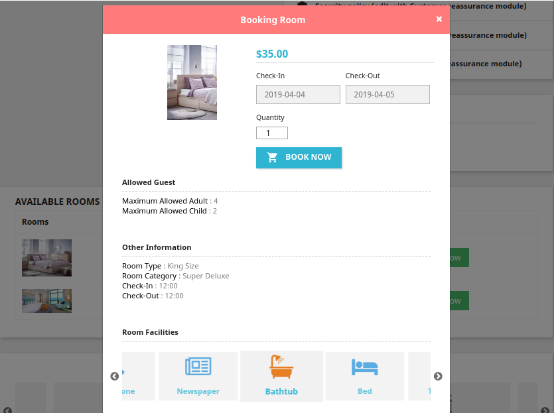
This popup gives complete details about the room selected by the customer in accordance with their needs. Now as they click on the “Book Now” button the room booking service gets added to the cart which is shown below.
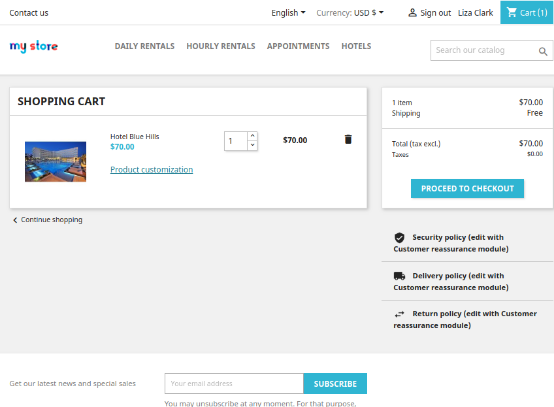
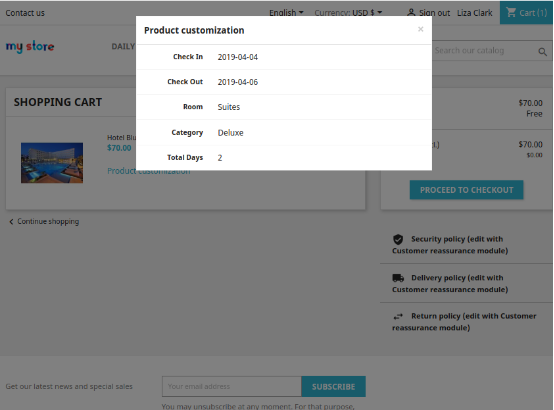
If the user wishes to check the booked room details again, they can simply click on the “Product Customization” link shown over the cart page.
This appears like the image below:
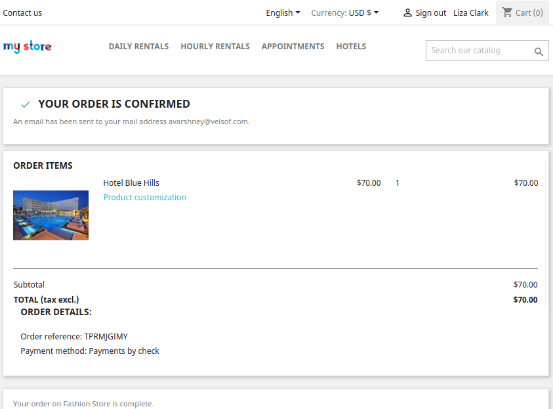
Order Confirmation Message on the frontend
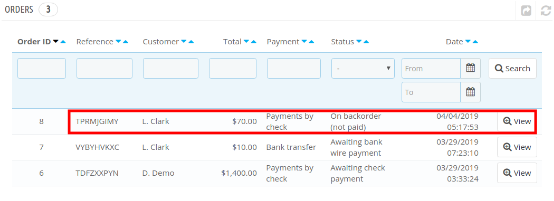
Admin can also check the order details from the admin. The backend interface showing list of store orders looks like:
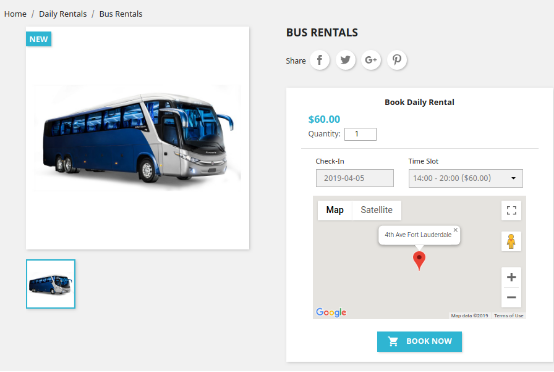
C) Daily Rental Type Product
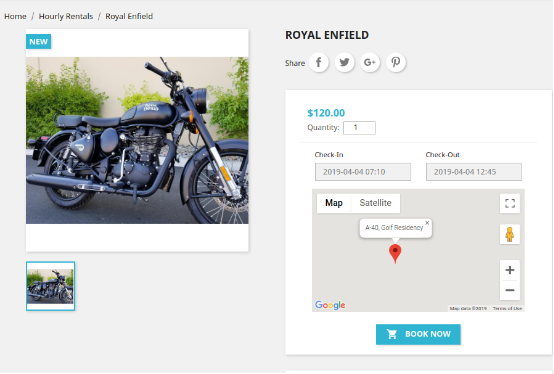
D) Hourly Rental Product
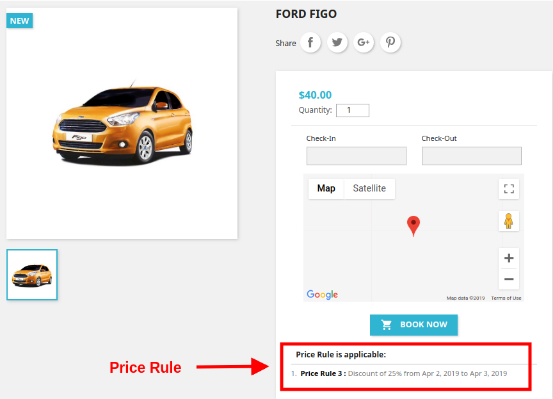
E) Price Rule for Selective Products
 

For additional guidance, please refer to the tutorial video available below, which provides a step-by-step walkthrough of this module.


 

PrestaShop Dynamic Pricing addon- User Manual

1.0 Introduction

Knowband offers PrestaShop Dynamic Pricing module which provides a facility to the store admin to calculate the dynamic prices of any product without any hassle. The online store merchant can allow the customers to customize their order and set product quantity accordingly.

The PrestaShop Dynamic Price management addon automatically calculates the exact customization cost according to the rules applied by the store admin. The Prestashop Customization Price Calculator is a highly customizable and fully-featured module that offers hassle-free rule creation for applying dynamic pricing.

1.1 Features of PrestaShop Dynamic Pricing addon

  • Admin can set the maximum and minimum customization price value easily from the admin interface of this PrestaShop Dynamic Product Pricing.
  • The PrestaShop Dynamic Pricing extension allows the admin to display or hide the weight and quantity input option from the product page.
  • Admin can enable the settings to multiply the price and weight by quantity, in this case, the price and weight will be double if the customer selects product quantity 2.
  • The store admin can add, delete, update the dynamic pricing rule easily from the admin interface of this PrestaShop Dynamic Product Pricing module.
  • PrestaShop Dynamic Product Pricing module allows setting the priority of dynamic pricing rules.
  • Multiple fields can be selected from the drop-down list available in the PrestaShop Dynamic Price management admin interface.
  • The admin can not use Color Picker, Divider, Date, Text, Text Area fields in any formula.
  • If the admin deleted any field which was used in any formula, then he has to create a new formula without including that field.
  • The newly created field will be available for creating price, weight and quantity formulas.
  • Admin can separately create price, weight and quantity formulas from the admin interface of the Prestashop Customization Price Calculator module.
  • Admin can create any kind of formula using the various operators.
  • After creating a formula, the admin needs to map the rule with products, categories, manufacturers and suppliers.
  • After rule mapping, the formulas will be applicable to that particular product, category, manufacturer and supplier.
  • Customers can view the customization price, weight and quantity easily on the same customization page.

2.0 Steps for Installation of PrestaShop Dynamic Pricing

Admin will get these files after purchasing this PrestaShop Dynamic Price management from the Knowband website:

1. The zipped file consists of the source code of the PrestaShop Dynamic Product Pricing module.

2. User Manual of this PrestaShop Dynamic Product Pricing addon.

Follow these steps to install the PrestaShop Dynamic Pricing plugin:

First of all, unzip the zipped file which includes some files and folders.

After that, copy the overall content of the folder and paste it into the “Modules” folder of the store’s directory. The admin can follow the path – Root Directory/modules/.

3. Now you can install the PrestaShop Dynamic Pricing addon. You can find that in Store Admin -> Modules and Services. It would be shown as below –

Click on the “Install” button to install the Prestashop Customization Price Calculator extension. A confirmation pop-up will be shown. Click on “Proceed with the installation” option. This step will install the Prestashop Customization Price Calculator plugin and show notification – “Module(s) installed successfully”.

3.0 Admin Settings

In the admin interface, some customization options are available by which the admin can set the dynamic pricing on the website.
The admin will get these customization options for settings:

  • Basic Settings
  • Dynamic Pricing Rules

3.1 Basic Settings

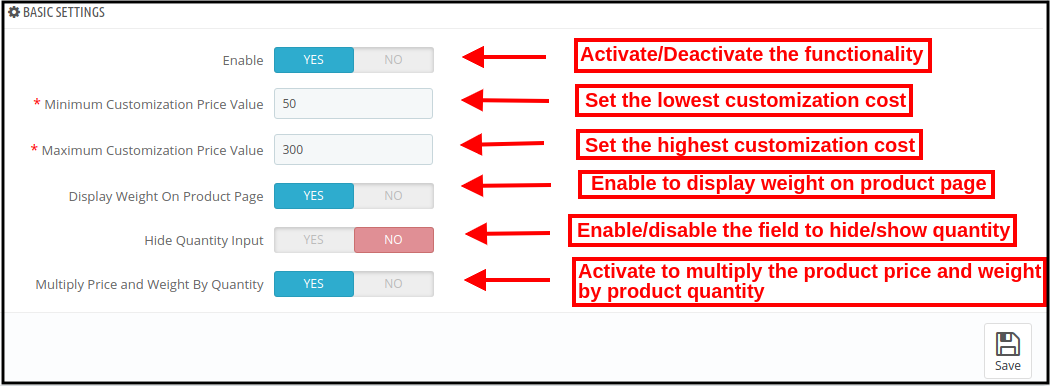
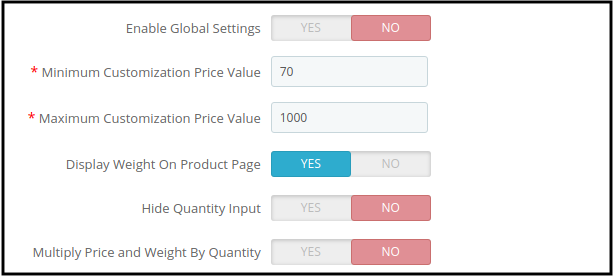
In Basic settings, you will get customization options as shown below:

  • Enable: Activate or deactivate the functionality of the PrestaShop Dynamic Pricing module easily just by toggling the button.
  • Minimum Customization Price Value: Set the lowest customization cost here. This will be the minimum customization cost for the customers.
  • Maximum Customization Price Value: Fix the highest customization cost in this menu option. The customization cost cannot be more than this value.
  • Display Weight on Product Page: You can enable the settings for showing the weight on the product page of the website. The customers can view the “customization weight” details on the product page.
  • Hide Quantity Input: Enable this field if you don’t want the customers to set the product quantity. If you want to allow the customers to set order quantity, then, disable the “hide quantity input” settings from the admin interface of this Prestashop Customization Price Calculator addon.
  • Multiple Price and Weight By quantity: Enable the settings to multiply the price and weight by quantity. For example, if the customer selects 1 product that costs 20$ and weighs 8 Kg and sets the quantity as 2, then, the price will automatically change to 40$ and the weight will be 16 kg automatically.

3.2 Dynamic Pricing Rules

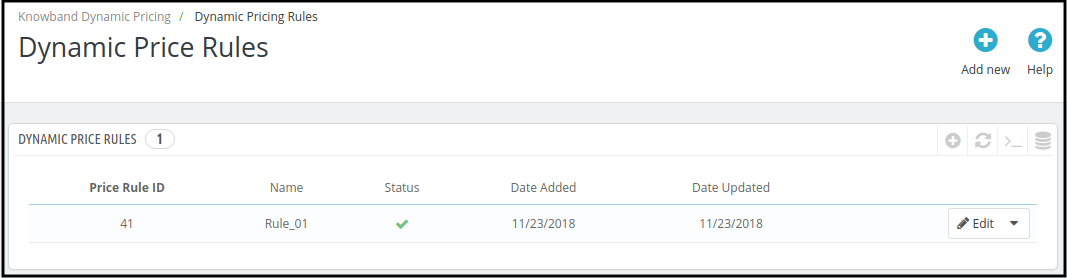
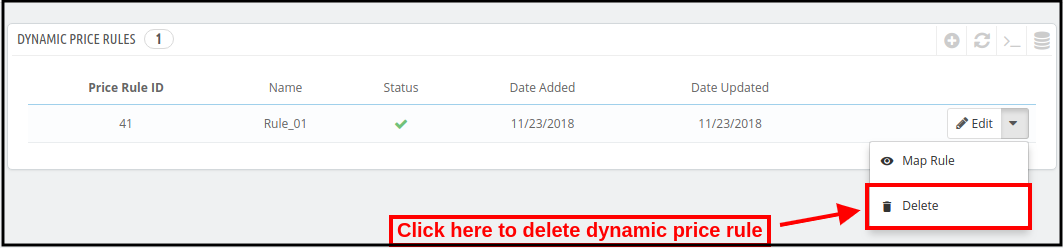
The dynamic pricing rule section displays the list of dynamic pricing rules. One can view the price rule ID, rule name, status, rule creation date and rule update date. Here, the admin can add a new dynamic pricing rule, update any rule or delete the dynamic pricing rule easily.

3.2.1 How to Add a new Dynamic Pricing Rule?

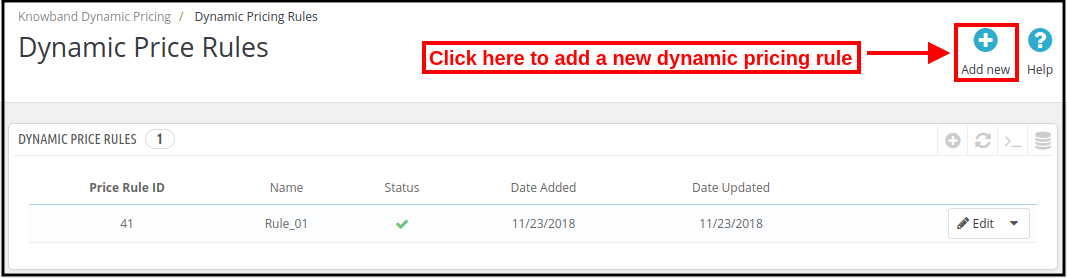
For adding a new dynamic price rule, click on the “Add new” button available Right side on the top of the page as shown below:

After clicking on the “Add new” button, you will view multiple customization options. The customization settings are shown in 4.0 section.

3.2.2 How to Update Dynamic Pricing Rule?

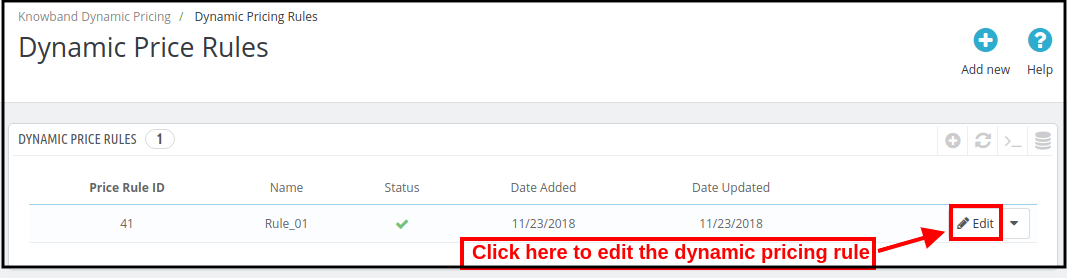
For updating the dynamic price rules, you can click on the edit button as shown below:

3.2.3 How to delete Dynamic Pricing Rule?

Click on the “delete” button for removing any dynamic price rule.

4.0 Dynamic Price Rule Customization

Admin needs to click on the “Add New” button to add a new dynamic price rule as discussed in section 3.2.1. After clicking on this button, the admin can view these customization options:

  • Dynamic Price Rule General Settings
  • Fields
  • Price Formula
  • Weight Formula
  • Quantity Formula

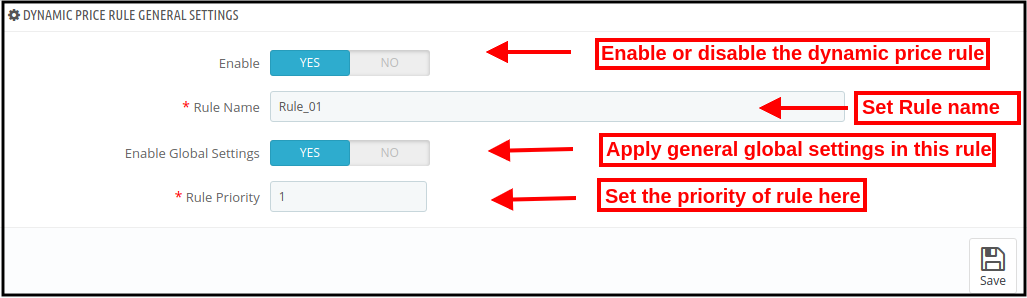
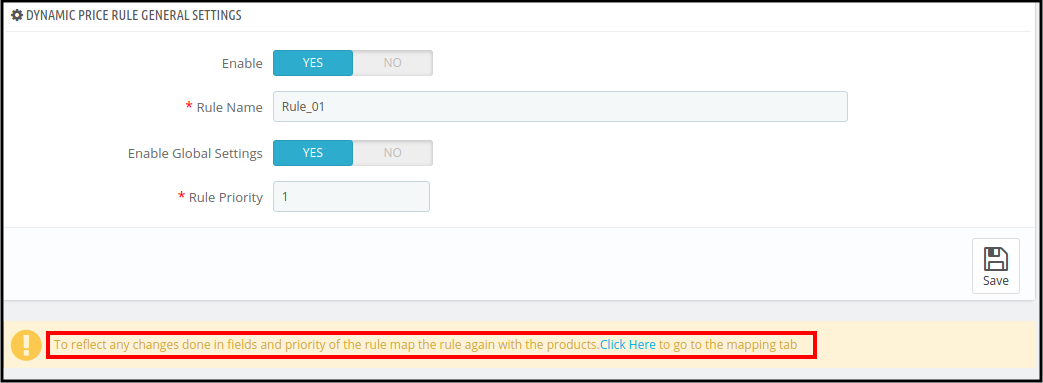
4.1 Dynamic Price Rule General Settings

For adding a new dynamic price rule, the admin needs to apply settings as described below:

  • Enable: Enable the option to activate this dynamic pricing rule.
  • Rule Name: Set the name of the rule here.
  • Enable Global Settings: Apply the globally declared settings by enabling this option. If you want to apply different settings, then, enable this option. Similar options will display which will be applied to this rule only.

  • Rule Priority: Set the priority of this new rule from the admin interface of this PrestaShop Dynamic Pricing plugin.

4.2 Fields

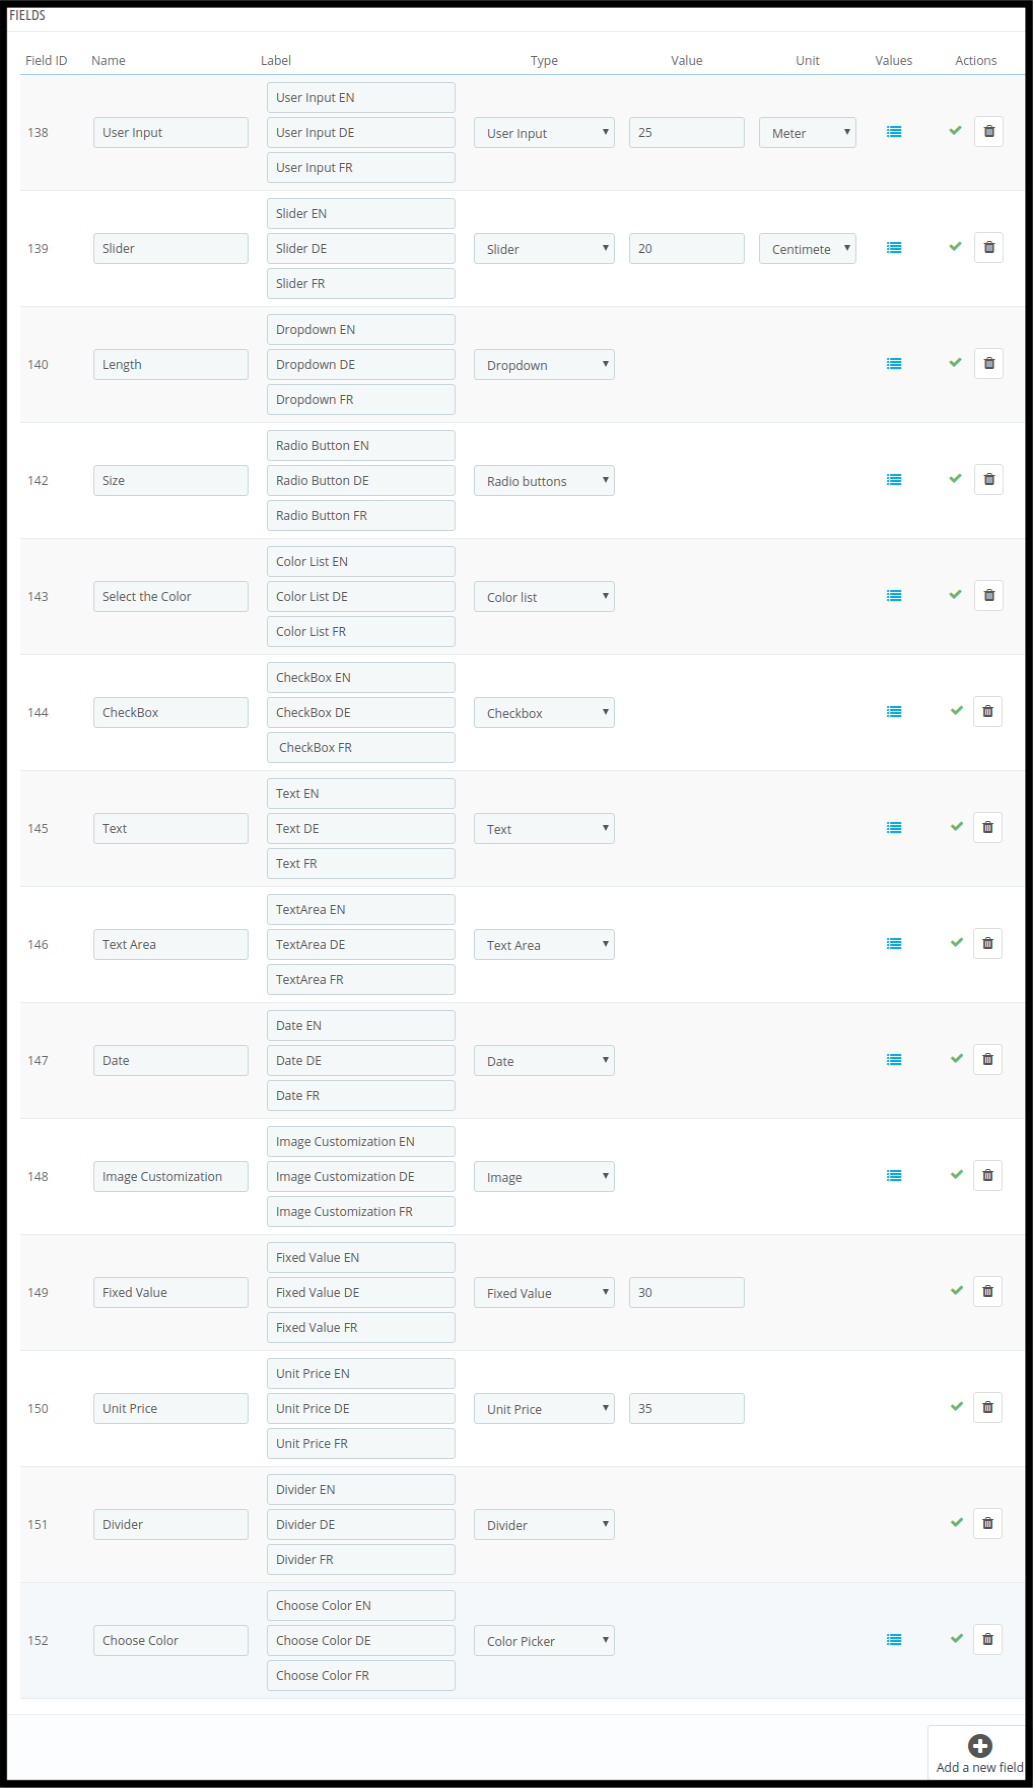
In this section, the admin can create different fields for settings the dynamic pricing rules. There are multiple field types available in this PrestaShop Dynamic Product Pricing rule.

  1. User Input
  2. Slider
  3. Dropdown
  4. Radio buttons
  5. Color list
  6. Checkbox
  7. Text
  8. Textarea
  9. Date
  10. Image
  11. Fixed Value
  12. Unit Price
  13. Divider
  14. Color picker

Admin can select field type easily from the admin interface and customize the fields accordingly.

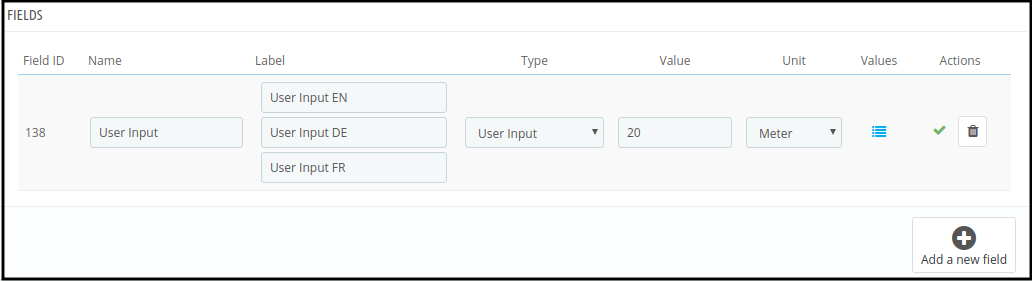
4.2.1 User input Field

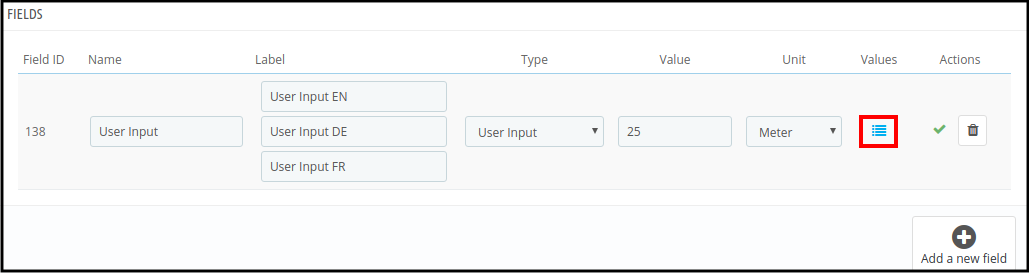
  • Name: Enter the name of the field here.
  • Label: Set the label in different languages.
  • Type: Select the User Input field from the drop-down list.
  • Value: Set the default value of the slider.
  • Unit: Select unit, i.e., Centimeter, Meter, Kilogram, Gram.
  • Values: Set the values of the user input field. For setting the field values, click on the below-mentioned option:

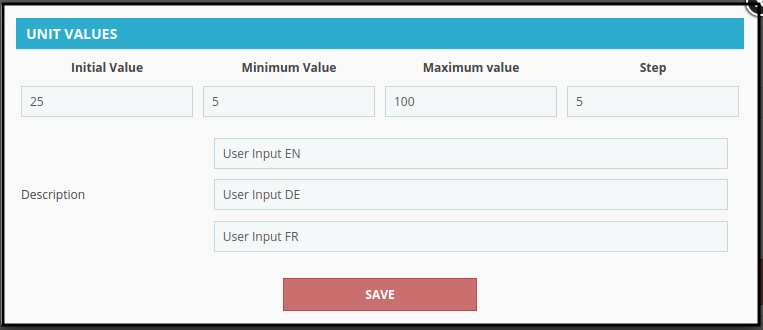
After clicking on this option, the admin can view a pop-up as shown below:

Now admin needs to enter these details as required in the popup shown above:

1. Initial value: This will be the default field value.

2. Minimum value: This will be the lowest value of the input field. There will be an error message on the product page If the customer enters any lower value.

3. Maximum value: Enter the maximum field value. The customer cannot enter the larger number.

5. Step: Admin can enter the steps with every click. If the value is 10 then after the next step the value will be 15 in the above-mentioned case.

6. Description: Admin needs to enter field descriptions in different languages. It is mandatory to enter a description in each field.

  • Actions: Click on the “X” to enable this field. You can also delete this field by clicking on “bin”.

After enabling the field, it will look like the below-mentioned image:

Now, this field is enabled and can be used in formulas.

4.2.2 Slider Field

Slider field settings are the same as input field settings. The admin can follow the same steps to create the slider field. After set-up the field will look as below:

4.2.3 DropDown Field

You can select DropDown Field in which the customers can select their choice.

Settings are the same as the above-discussed field setting.

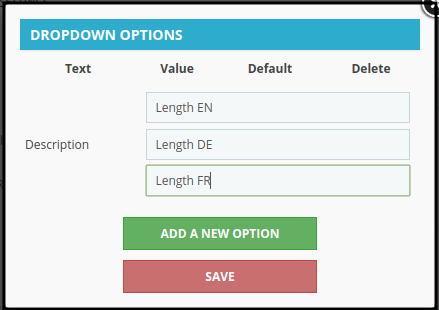
On clicking the values option, this pop-up will be shown on the same page. You can enter the dropdown field description and click on the “Add a New Option” button.

After Clicking on the “Add a New Option” button, you can view these options:

  • Text: Enter the drop-down list options in different languages.
  • Value: Enter the value for every dropdown option. This will be the customization cost for that option.
  • Default: You can make any of the options as a default.
  • Delete: You can delete any of the dropdown options anytime.

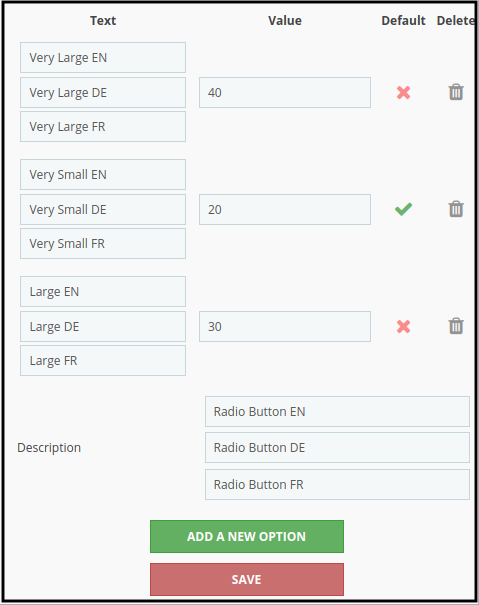
4.2.4 Radio Buttons Field

Radio buttons field setting is the same as drop-down field settings. The admin can select this Radio button field and set the name, label and field description.


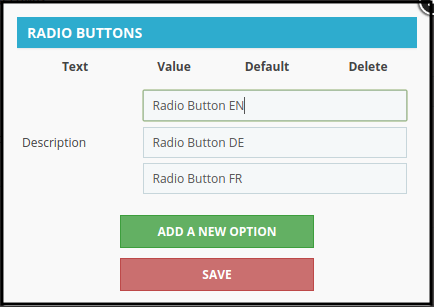
In the pop-up page, the admin can enter the field description and also add new options.

After clicking on the “Add a New Option”, the admin can enter new options and set their values. You can also make a value as the default value.

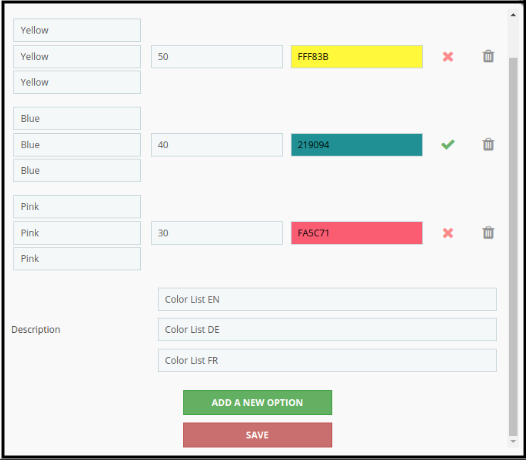
4.2.5 Color List

In this colour list field, the admin can set the prices for colour selection. After setting field names and labels in different languages, the admin can click on the value icon for value settings.

On clicking the value icon, a pop-up will open where you can enter the field description and add a new option. Admin can set different values for various colours and also make colour the default colour.

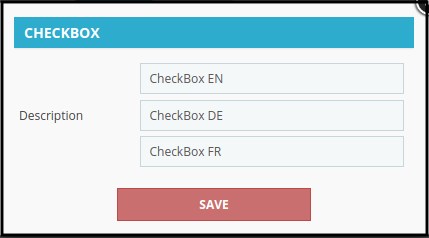
4.2.6 Checkbox

Select the checkbox field from the drop-down list, enter the field name and label. After clicking on the value section, the admin can set the description of this field.

Now, the admin can enable this field from the admin interface of this PrestaShop Dynamic Pricing plugin.


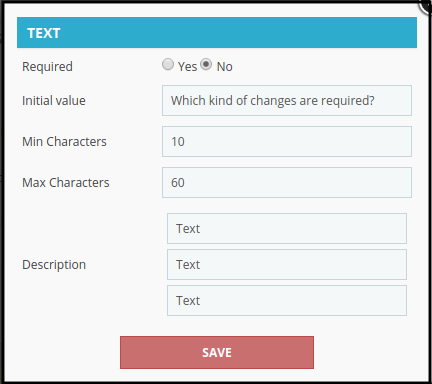
4.2.7 Text

This field setting is also the same as other fields.

After clicking on the value icon, a pop-up will open where you can set these menu options:

  • Required: Admin can make this field a mandatory field.
  • Initial Value: Admin can enter the field’s initial value here. It can be a character or numeric value.
  • Min Characters: Enter the minimum characters required in this field.
  • Max Characters: Set the maximum characters required in this field.
  • Description: Enter the field description in different languages.

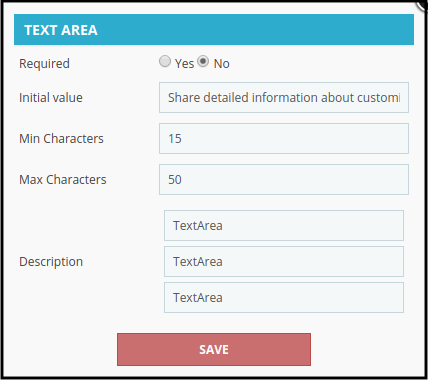
4.2.8 Text Area

Text area field settings are similar to text field settings. Admin can apply the settings for getting detailed information.

Admin can enable the field from the admin interface of the PrestaShop Dynamic Pricing addon.


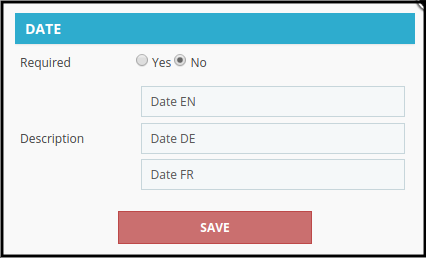
4.2.9 Date

Select the date field from the drop-down list.

After clicking the value button, the admin can set the field description and make it a required field.

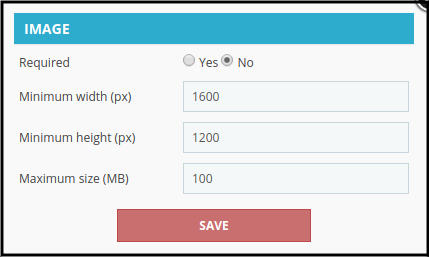
4.2.10 Image

Admin can select the image field and apply the settings accordingly.

On clicking the value, the admin can make the field a required field.
Admin can also set the minimum and maximum width along with the maximum size settings.

4.2.11 Fixed Value

Admin can select the fixed value field. It is very easy to set field name, label and field value from the admin interface. The admin can set the fixed value that he wants to use in the formula.

4.2.12 Unit Price

Admin can set the unit price value after selecting this field from the drop-down list available on the admin interface of this PrestaShop Dynamic Price management module. Admin can set per piece price.

4.2.13 Divider

Admin can show a divider by selecting a divider field from the admin interface of this Prestashop Customization Price Calculator addon. This field will divide the page into two parts.

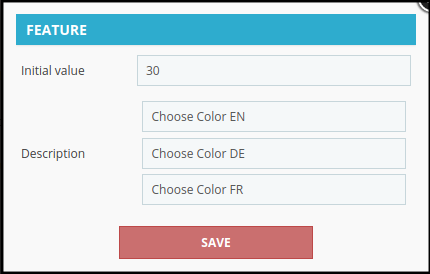
4.2.14 Color picker

Admin can select the color picker field from the drop-down list. The color picker will display below the divider.

Click on the value button for setting the initial value and description of the color picker field. Save the settings and enable the field from the admin interface of this Prestashop Customization Price Calculator module.

The overall list will look as shown below:

Before formula description, you need to know these points:

1. Color Picker, Divider, Date, Text, Text Area fields will not work in any formula.

2. If you delete any field which was included in any formula, then you have to create a new formula without including that field.

4.3 Price Formula

Admin can create a formula for price calculation from the admin interface of this PrestaShop Dynamic Product Price module.

There are +,-,(,),/ and * signs available for calculation.

Admin can also clear the formula and create a new one.

After the formula, setting click on the “save this formula” button.

This formula will calculate the customization cost and show this on the website.

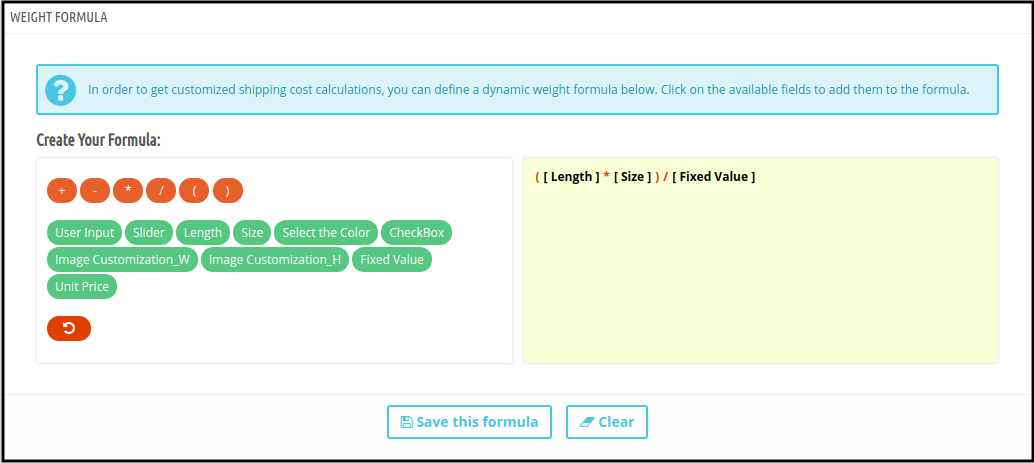
4.4 Weight Formula

This formula will calculate the total customization weight on every customization.


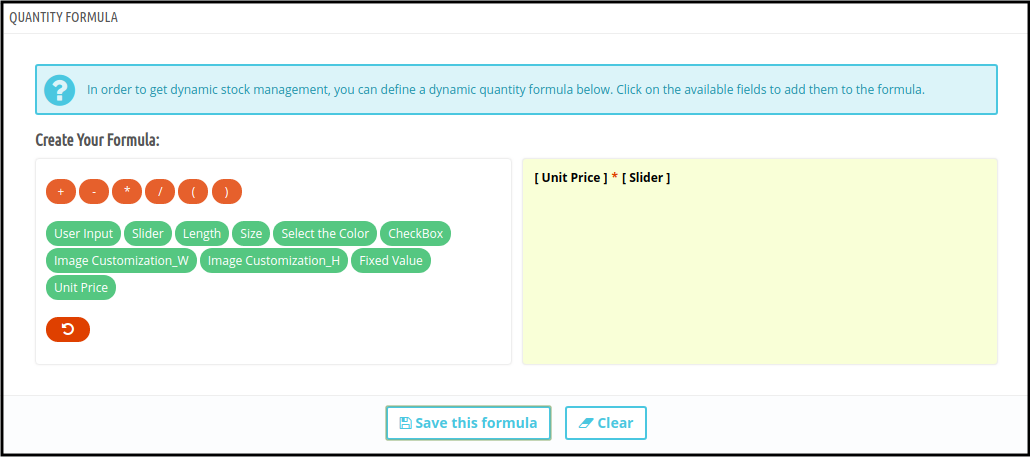
4.5 Quantity Formula

This functionality is available for setting the quantity from the admin interface. Once the admin sets the quantity, the customer can not change the quantity of the products.

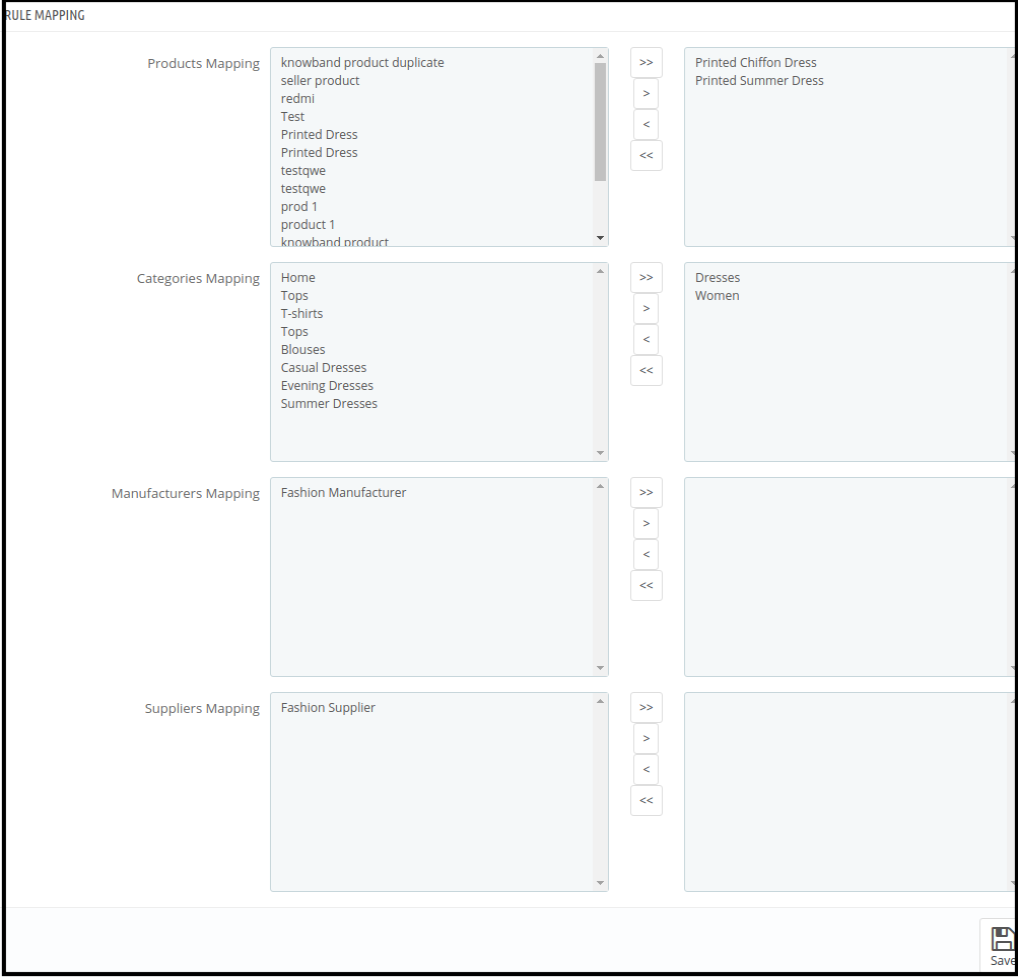
After setting the formula, the admin needs to map the categories, products, manufacturers and suppliers. This rule will be applied to those categories, products, manufacturers and suppliers on which admin map it.

After clicking on the link, this page will open:

Select the category, product, manufacturer and supplier that you want to map with this rule. Click on the > button for mapping and < sign for removing it. For moving all the categories, product, manufacturer and supplier, click on the >> and << button.

The store admin needs to save these mapping settings every time.

5.0 Front-end Interface

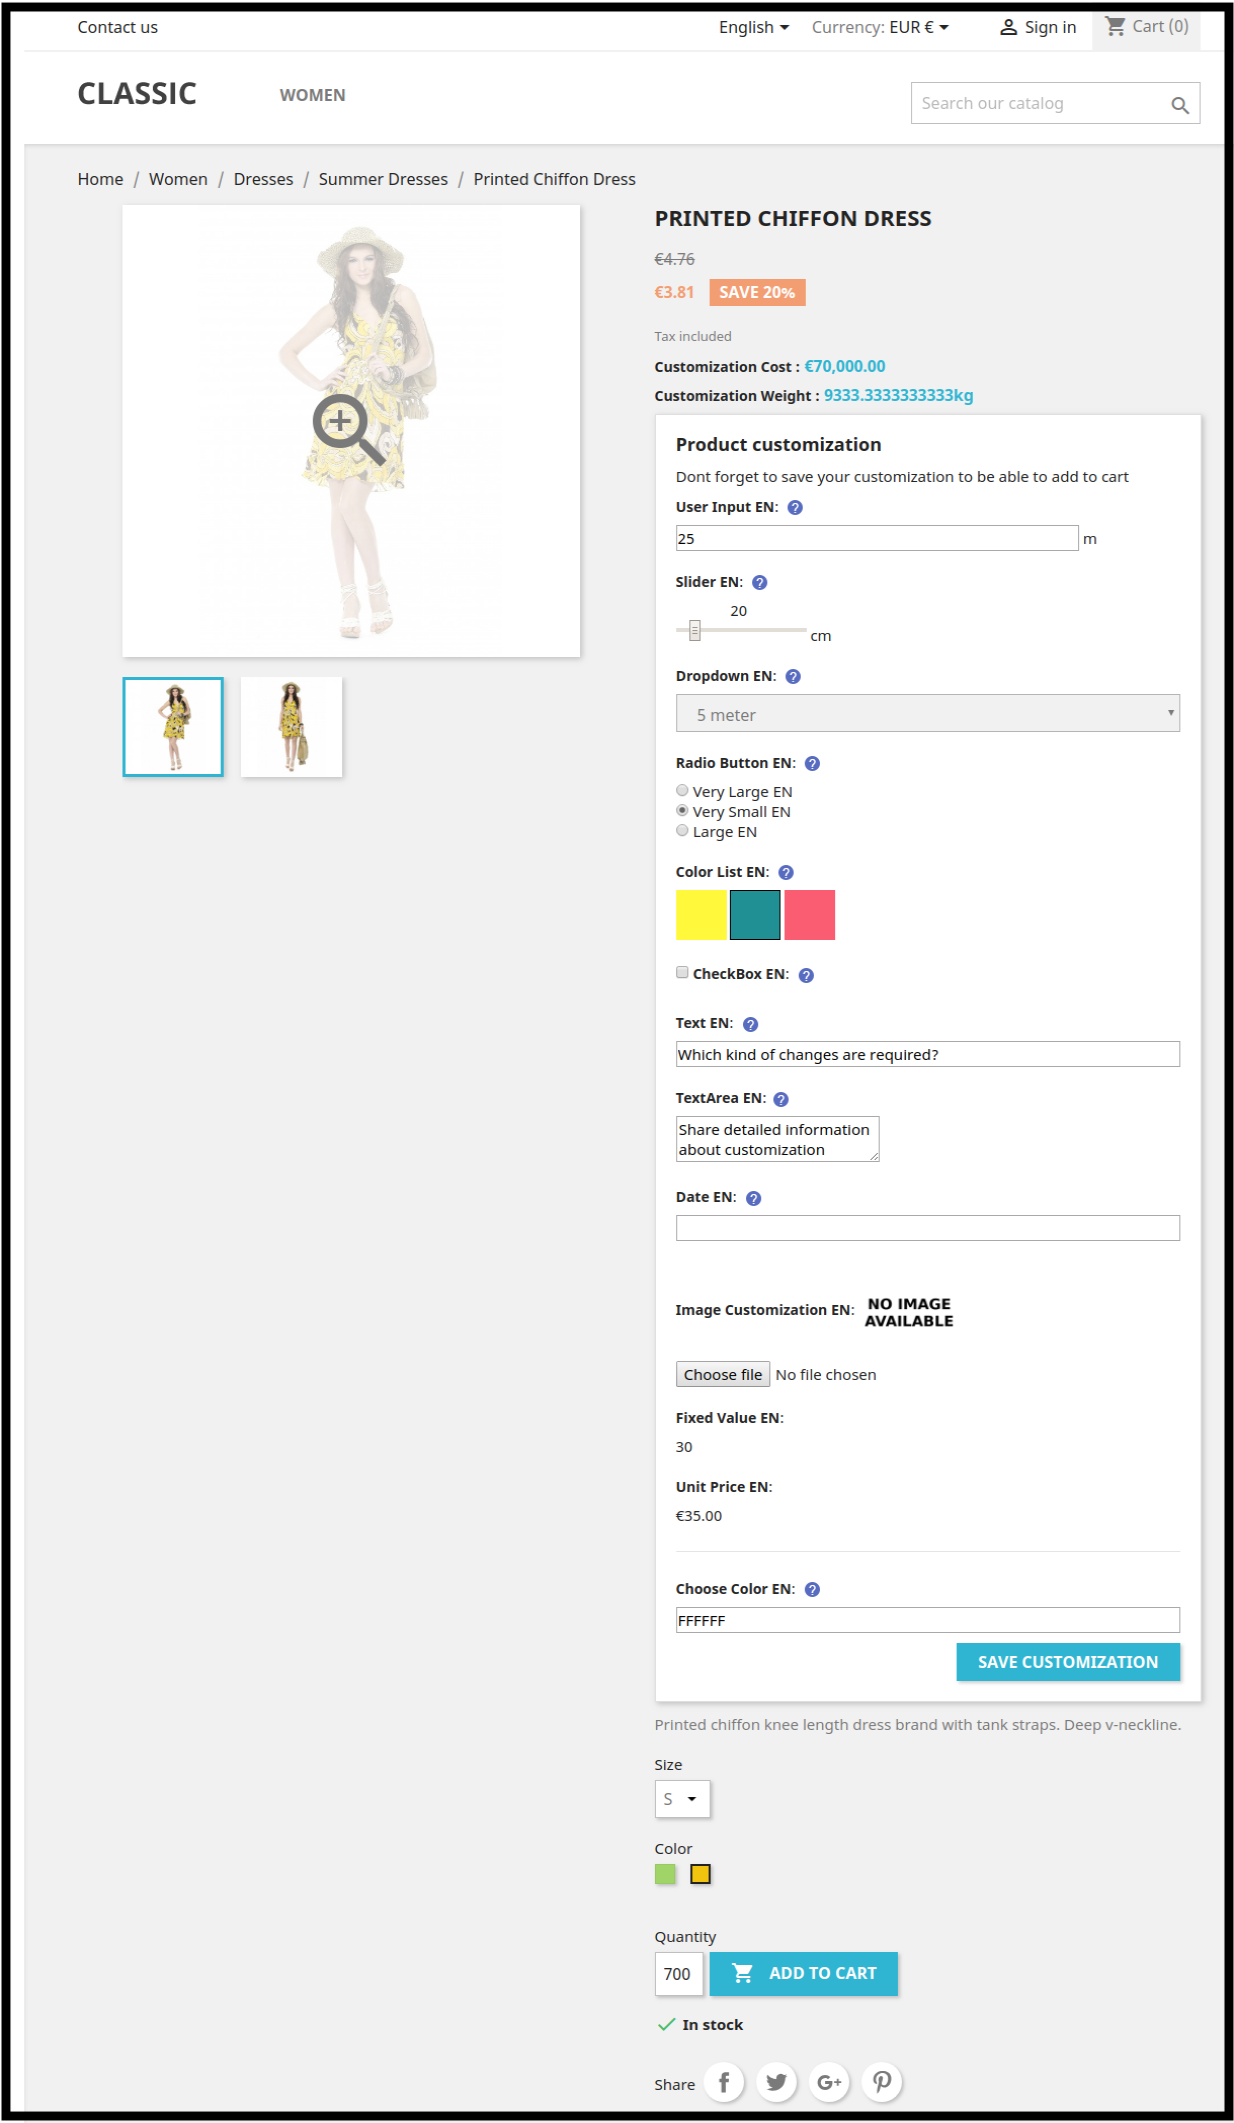
After formula set-up, the store will display as shown below:

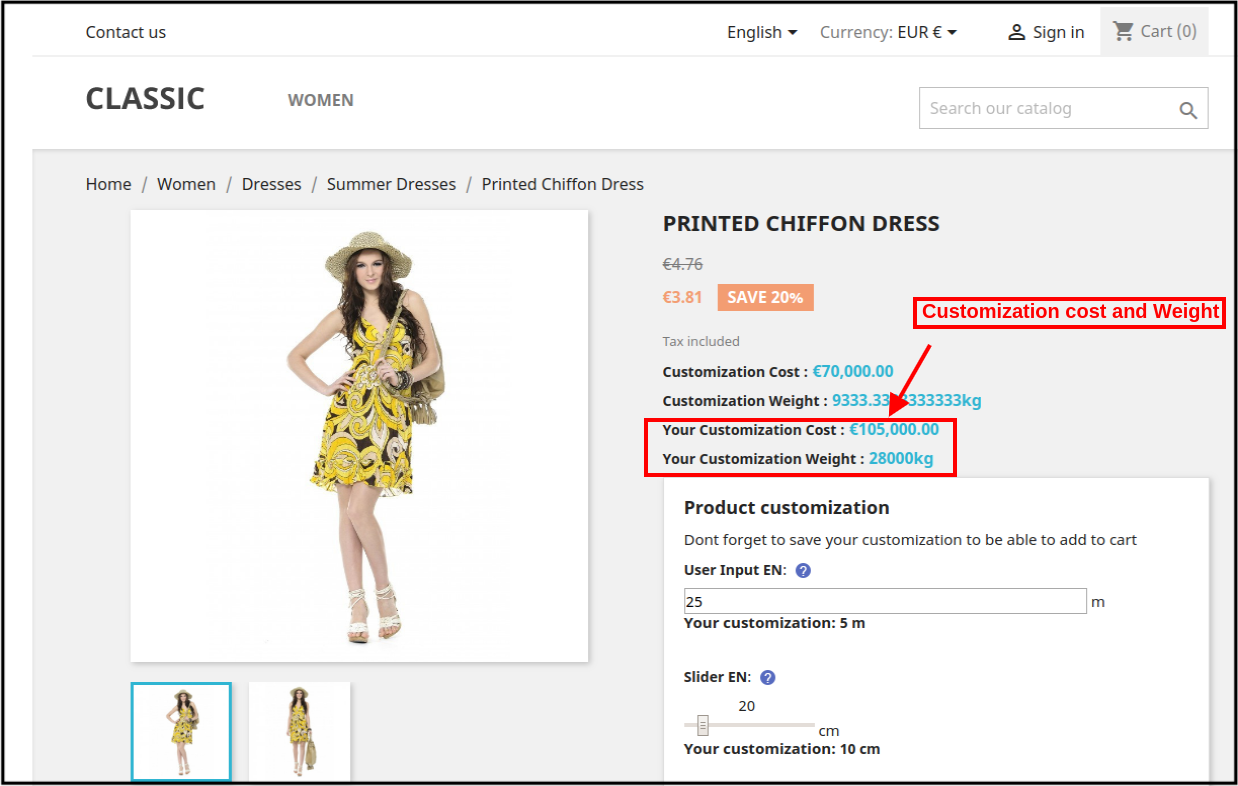
After customers customization, the customization cost will be calculated automatically.

After cost and weight calculation, the values will be set to their default value.

Admin can set the rule priority from the admin interface of this Prestashop Customization Price Calculator module.

It is mandatory to save the rule mapping settings every time.

This way the customers can view their product customization cost on the same product page easily and there is no need to calculate the cost every time. If any store admin is selling products that need required dimensions input from the user i.e wallpapers, flooring tiles, handloom products so the store merchant can use this PrestaShop Dynamic Pricing extension offered by Knowband. The best thing is that the admin needs to apply formulas a single time from the admin interface.

For more details about this PrestaShop Dynamic Pricing module, visit here:

PrestaShop Dynamic Price management module Product page Link

Admin Demo Link of PrestaShop Dynamic Pricing addon

Front-end Demo of PrestaShop Dynamic Pricing addon

Video of PrestaShop Dynamic Pricing addon

Prestashop Customization Price Calculator Module Addon Store Link

PrestaShop Website Decoration Effects Module- User Manual

1.0 Introduction

The online store owners can now decorate their stores for different occasions like Christmas, New Year or Valentine’s Day. In this winter season, set the themes according to the occasions and grab the customer’s focus and attention. Website decoration is one of the smartest strategies to optimize the UI of the site and keep the customers engaged in the store. The visual effects can make your site look better and occasion ready.

Knowband offers the PrestaShop Website Decoration Effects module which decorates the website with respect to different occasions. This way the store admin can create a positive first impression. The store merchant can customize the PrestaShop Website Decoration Effects plugin for any holiday like Christmas, New Year and many others. We have also added Extra effects for New Year.

Now, the online store admin can also set up header, footer and random elements in the new version of our PrestaShop Website Decoration Effects module. Store merchants can show/hide snow effects. Now we offer multiple different decoration elements. The store merchant can set the elements according to the requirements. The updated PrestaShop Website Decoration Effects extension also allows showing customized elements from the admin interface. There is an option to show a discount coupon strip on selected website pages.
1.1 Features Offered by Advance Prestashop Christmas Effects Addon

  1. Using PrestaShop Website Decoration Effects addon, the online store admin can decorate the store as per the occasion like New year, Christmas and Valentine’s day.
  2. The PrestaShop Website Decoration Effects addon allows admin to show various snow effects, header elements, footer elements and random elements on all the website pages or selected website pages.
  3. The online merchant has an option to show or hide snow effects, display effects on a mobile device also and set the display frequency of these effects.
  4. The online store admin can also select a specific date and time duration for showing the special effects on the website pages.
  5. Four different snow effects are available for decorating the store. Admin can use any of it as per the requirements.
  6. In the second decoration effect, the online store merchant can show different shapes like heart, diamonds or other characters.
  7. Admin can show different header elements on the selected page and duration. There are 4 header elements from which admin can select any element. The PrestaShop Website Decoration Effects plugin also allows admin to add new elements.
  8. Admin can show different footer elements on the selected page and duration. There are 8 footer elements available for decoration. The PrestaShop Website Decoration Effects plugin also allows admin to add new footer elements.
  9. The Special decoration effects plugin has some random elements for light decorations. Admin can set the element movement type as static or moving. The Snowflakes effect module allows the setting position of elements.
  10. The online merchant can show a discount coupon strip for showing discounts on occasions in a different way.
  11. Admin can also set the look and feel of a discount strip.

2.0 Steps for Installation

After purchasing the PrestaShop Website Decoration Effects addon from the store you’ll get these files:

1. A zipped file consists of the source code of this PrestaShop Website Decoration Effects addon.
2. User Manual

The store admin can follow these steps to install the PrestaShop Website Decoration Effects addon:

Follow these steps to install the PrestaShop Website Decoration Effects addon:

  • The admin needs to unzip the zipped file. This file includes some files and folders.
  • After that, the admin can copy the overall content of the folder and paste them into the “Modules” folder of the store’s directory.

The admin can follow the path – Root Directory/modules/.

3. As a store admin, you can install the PrestaShop Website Decoration Effects extension. You can find that in Store Admin -> Modules and Services. It would be shown as below –


Now, you just need to click on the “Install” button to install this PrestaShop Website Decoration Effects extension. A confirmation pop-up will be shown. Click on “Proceed with the installation” option. This step will install the PrestaShop Website Decoration Effects module and show notification – “Module(s) installed successfully”.

3.0 Admin Settings

The online store merchant can apply settings for showing special decoration effects from the admin section. Here, the admin can get these configuration settings:

  • General Settings
  • Header Element Settings
  • Footer Element Settings
  • Random Element Settings
  • Discount Coupon Settings

3.1 General Settings

In the General Settings tab, the online merchant can apply basic settings for showing decoration effects on the website front-end interface. These are the available customization options:

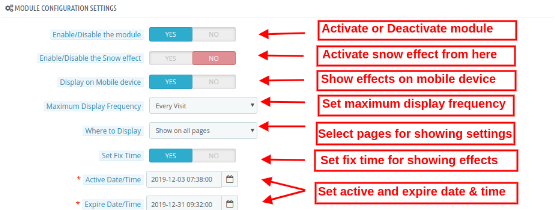
  • Enable/Disable the module: Toggle the button for activating or deactivating the PrestaShop Website Decoration Effects module.

  • Enable/Disable the Snow effect: Activate or Deactivate the settings to display/hide the snow effects on website pages.
  • Display on a mobile device: Admin can enable this tab for showing decoration effects on mobile devices.
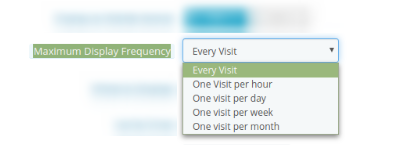
  • Maximum Display Frequency: Admin can set the frequency of showing decoration effects. Admin can show decoration effects on every visit of customers or one visit per hour/day/week/month.
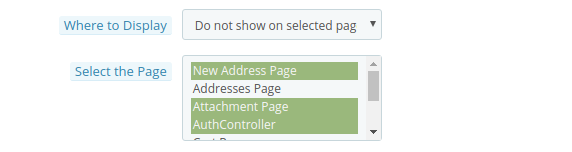
  • Where to display: Admin can select the pages for showing/hiding decoration effects. The PrestaShop Website Decoration Effects module also allows showing decoration effects on all the pages.
  • Show on all pages: Select this if you want to display these decorative effects on all the website pages.
  • Show on selected pages: You can select this option if you want to display the effects on particular webpages of the sites. On selecting this option, a new customization menu will be displayed for selecting the pages.
  • Do not show on selected pages: In this menu option, you need to select the pages on which you don’t want to display the snowflake effects.

While Enabling the snow Effects, Admin will get 4 available snow effects as shown below:

  • Select Snow Effect type: There are 4 snow effect types available in PrestaShop online store effects module. Admin can select the snow effects as per the requirements:
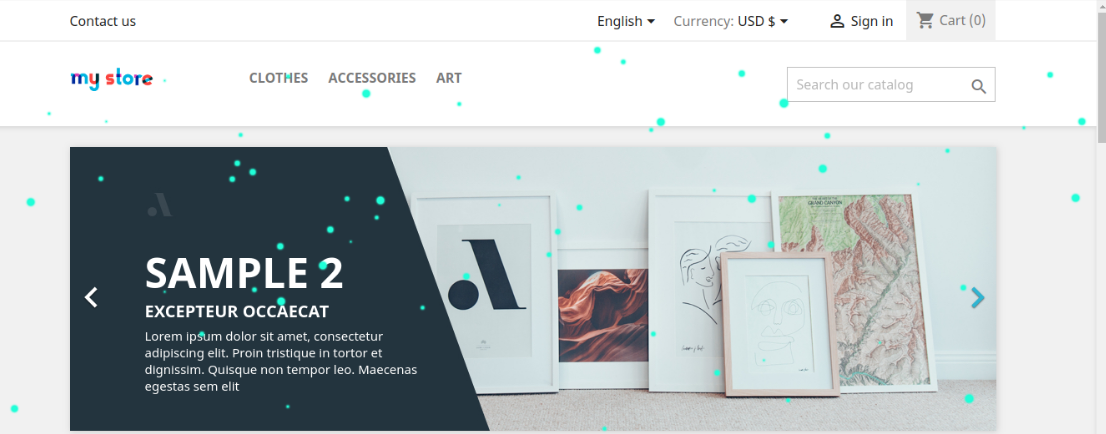
Snow Effect 1

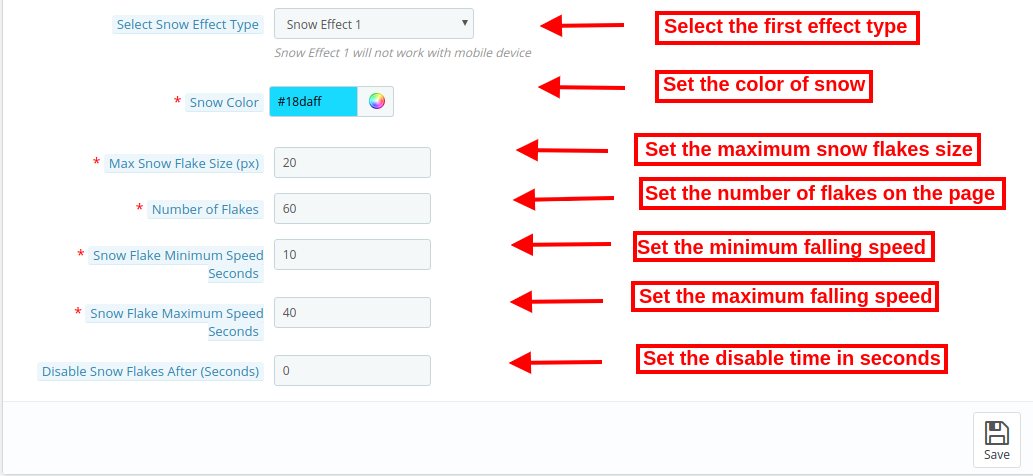
On selecting Snow effect 1, you will get these customization options:

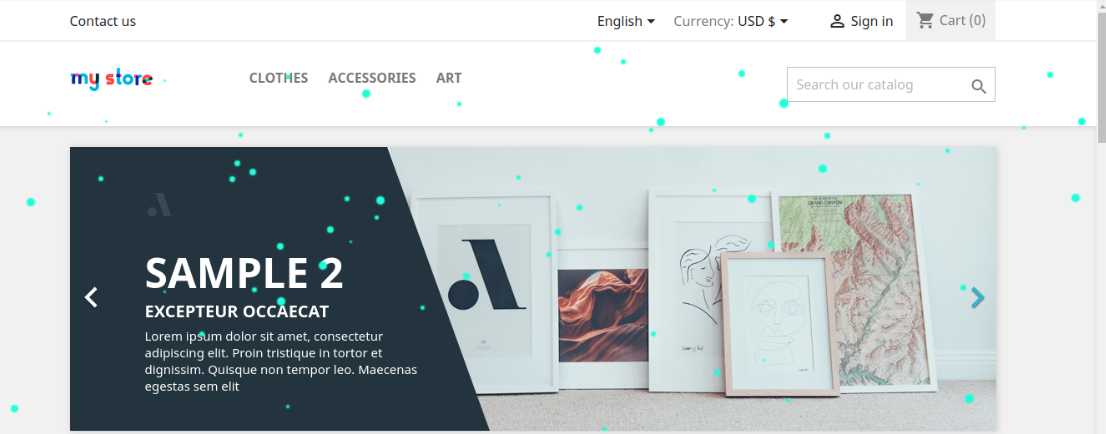
  • Snow color: There is a color picker tool by which you can set the color of the snow. In this effect, snowflakes will be displayed in the store.
  • Maximum snowflake size: In this menu option, you can set the maximum size of a snowflake. The PrestaShop Website Decoration Effects plugin will show the snowflakes as per the selected flake size.
  • Number of Flakes: Here, you can set the number of flakes for decorating the website. For dense effects, you can set a higher number but the recommended number of flakes is 25 according to the Advance PrestaShop Christmas Effects module.

  • Snowflake Minimum speed seconds: You can set the minimum speed of snowflakes in seconds.
  • Snowflake maximum speed seconds: Set the maximum snowflakes falling speed in seconds.
  • Disable snowflakes after: In this menu option, you can set the seconds after which you want to stop showing the snowflakes effect.

In the front-end interface the effect will look like the below-mentioned image:

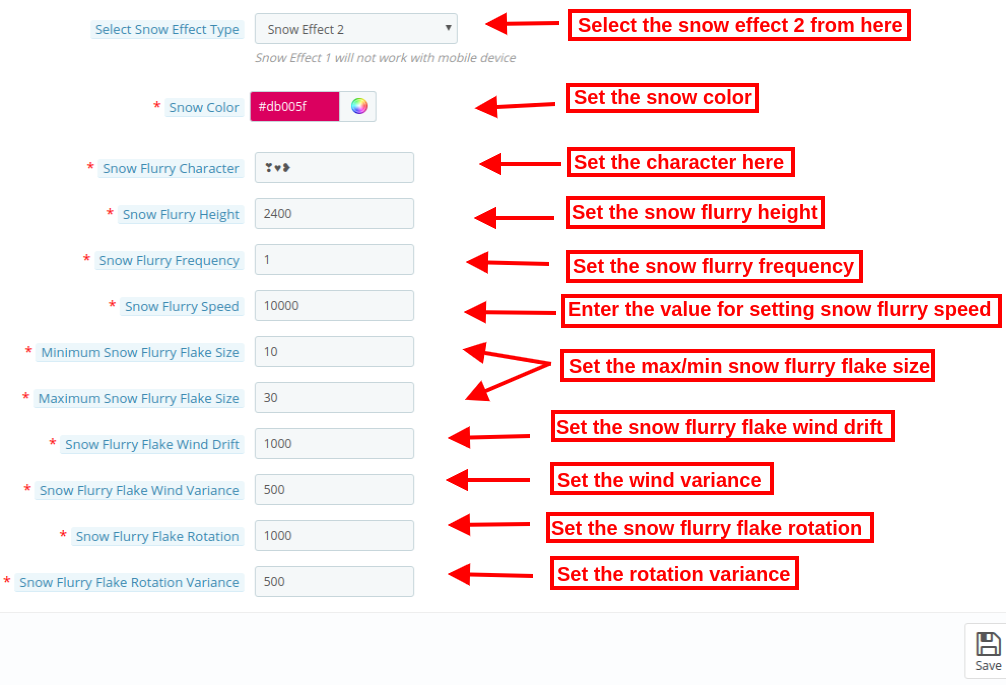
Snow Effect 2

There will be different customization options available in snow effect 2.

  • Snow color: You can select the color for the effects using the color picker tool.
  • Snow flurry characters: In this menu option, the store admin can enter any character. For example during Valentine’s Day, the admin can show roses or hearts (like ♥❥) for decorating the website. These shapes will fall down on the website pages.
  • Snow flurry height: Set the height of the flurry from the admin interface. Admin can set it (in pixels) to control the height for which the snow flurry will fall. The admin can increase the snow flurry height for showing it all over the page.
  • Snow Flurry Frequency: Set the frequency of generating new snow flurries on the website. The lower number will create more snow flurry.
  • Snow Flurry Speed: Set the falling speed of snow flurries. You can set a lower number for faster snow flurry falling speed.
  • Minimum Snow Flurry Flake Size: Here, you can set the smallest size of the snow flurry flakes.
  • Maximum snow flurry flake size: In this menu option, you can set the maximum size of snow flurry flake.
  • Snow Flurry Flake Wind Drift: This value will control how far each snow flurry will drift in pixels in the left direction. Admin can enter a negative number to make the flow on the right side of the page.
  • Snow Flurry Flake Wind Variance: This value will control the drift of every snow flurry flake using the wind drift as the base value. A lower value will create less drift.
  • Snow Flurry Flake rotation: This value controls how much a snow flurry flake will rotate in degrees while falling.
  • Snow Flurry Flake Rotation Variance: How much a flurry flake will rotate while it falls. A lower value will offer fewer random rotations.

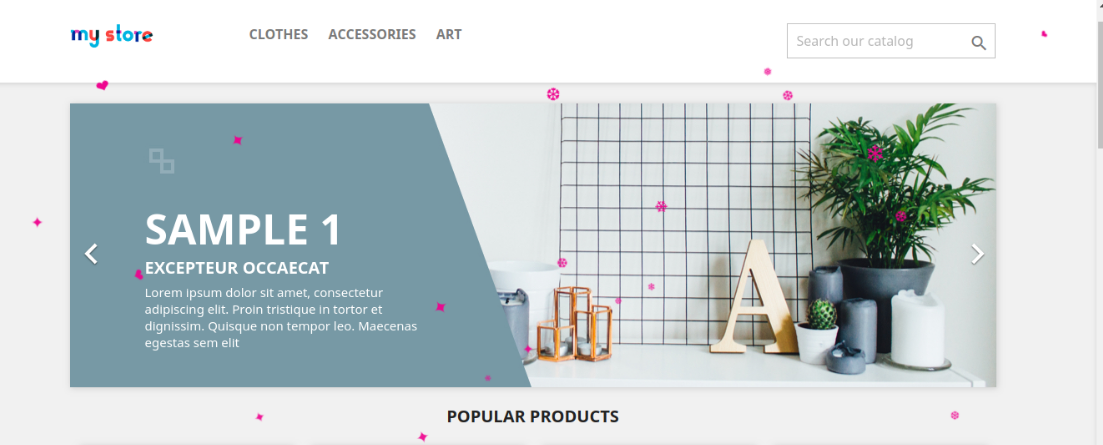
The effect will look as shown below:

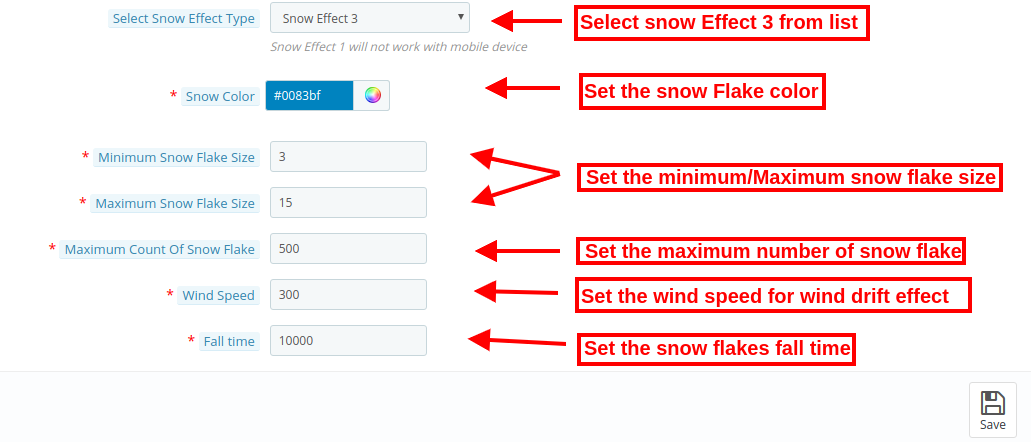
Snow Effect 3

In this effect, you will find the below-mentioned settings:

  • Snow color: There is a color picker tool by which you can set the color of the snow.
  • Minimum snowflake Size: Set the smallest size of the snowflakes from the admin interface of this Special decoration effects plugin.
  • Maximum snowflake size: In this menu option, you can set the maximum snowflake size.
  • Maximum count of snowflake: Set the maximum number of the snowflake from the admin interface of this PrestaShop Website Decoration Effects addon.
  • Wind Speed: Admin can set the wind speed value i.e., 300. The wind speed effect will show a wind drift in snowflakes. If the admin sets this value as 0, the snowflakes will fall in a straight line.
  • Fall time: Here, you can set the time taken by each snowflake. If admin sets the time 10,000 then the snowflakes will fall faster. For normal speed, the admin can set the lesser value as 1000.

View the effects:

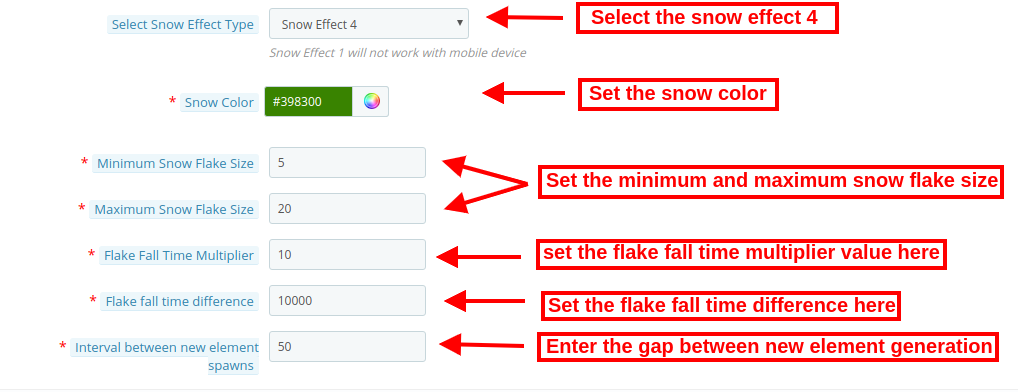
Snow Effect 4

  • Snow color: You can set the color of the snow using a color picker tool available in the PrestaShop Website Decoration Effects addon.
  • Minimum Snowflake Size: Set the smallest size of the snowflakes from the admin interface of this Special decoration effects plugin.
  • Maximum snowflake size: In this menu option, you can set the maximum snowflake size.
  • Flake falls time multiplier: Here, the store admin can enter the fall time multiplier value. The higher value will show a lower speed.
  • Flake fall time difference: Here, the admin can set the value of a difference between flakes to fall time.
  • Interval between new element spawn: The store admin can also set the difference value for the next element generation. If the value will be less, more flakes will display on the website pages.

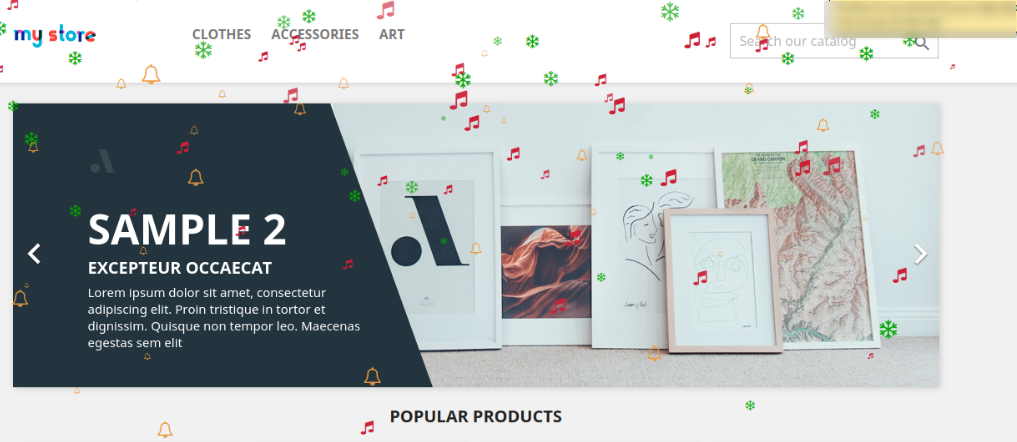
The effect will look as shown in the image below:

3.2 Header Element Settings

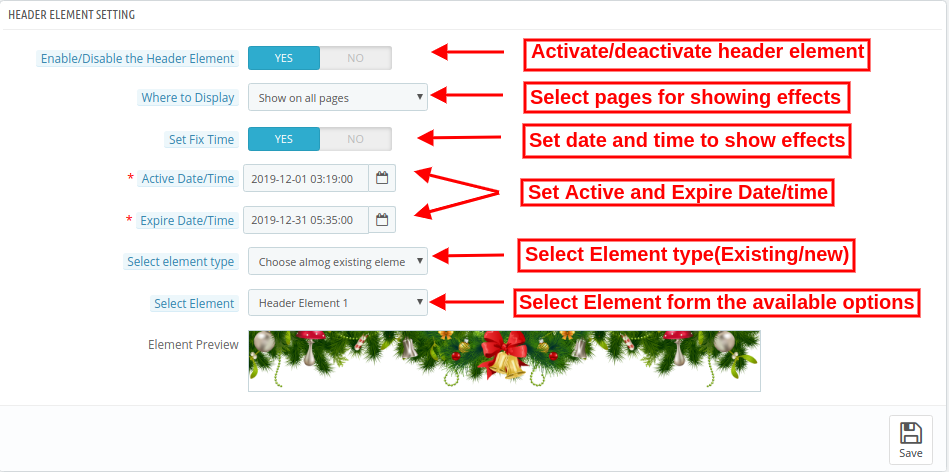
Apply header element settings and setup website header decorations:

  • Enable/disable the header Elements: Activate or deactivate the option to show/hide header elements.
  • Where to display: Select the pages on which you want to show/hide header elements effect.
  • Set Fix Time: You can set a specific time for showing decorative effects.
  • Active Date/time: Set start time from here.
  • Expire Date/time: Enter expire date and time
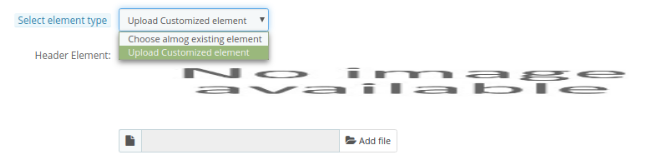
  • Select Element Type: Admin can select from available element types or upload customized elements.

  • Choose among existing elements: Admin can select from available elements.
  • Upload customized elements: Upload customized elements from the admin interface of this PrestaShop online store effects module.

  • Select Element: Select from available header elements. These are the available elements.

After applying these settings the store admin can view the impact on the website front-end interface.

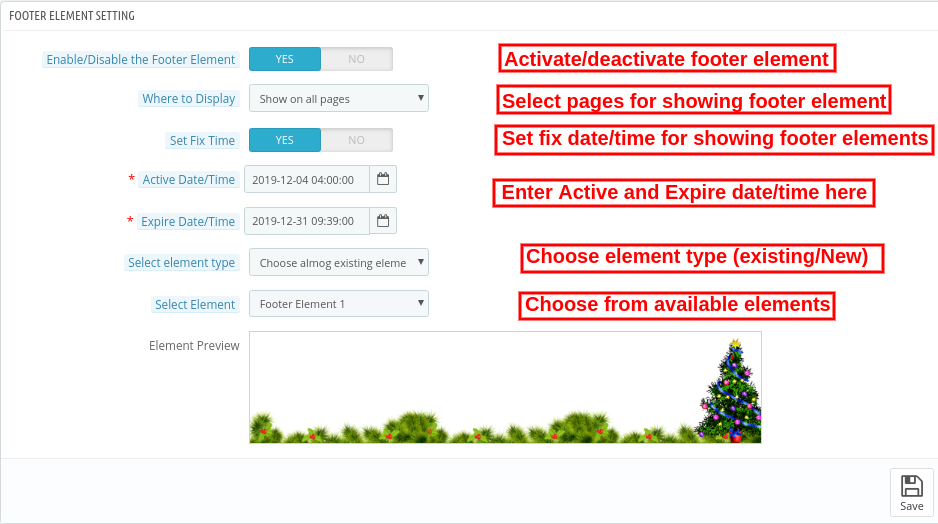
3.3 Footer Element Settings

  • Enable/disable the Footer element: Activate or Deactivate the footer elements settings for showing/hiding footer decorations.
  • Where to display: Admin can either show footer decoration effects on alpages or show the effects on selective pages.
  • Set Fix Time: Admin can also set a specific time for showing header effects on the website.
  • Active Date/time: Enter start date and time here.
  • Expire Date/time: Set Expire date/time effects.
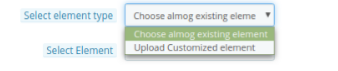
  • Select Element Type: Admin can select from available options and or upload new elements.

  • Choose among existing elements: Admin can select from available elements.
  • Upload customized elements: Admin can also upload new elements from the admin interface.
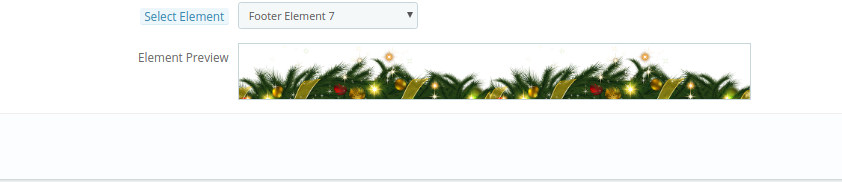
  • Select Element: Select from available header elements.

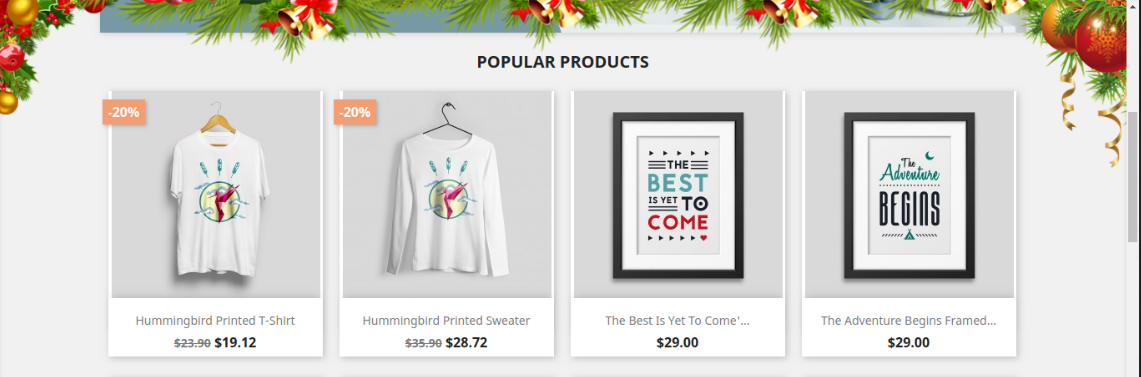
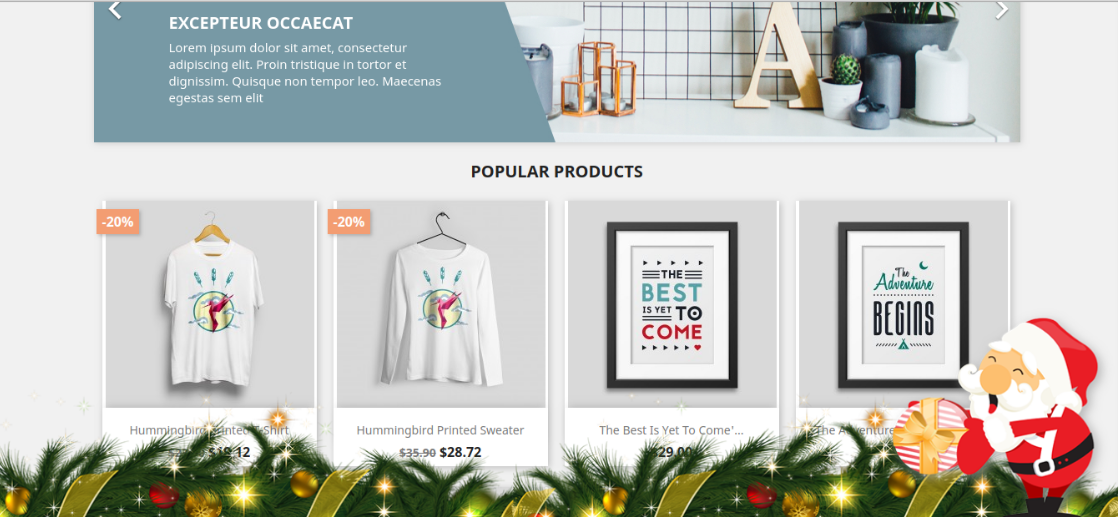
     The effect will look as shown below:

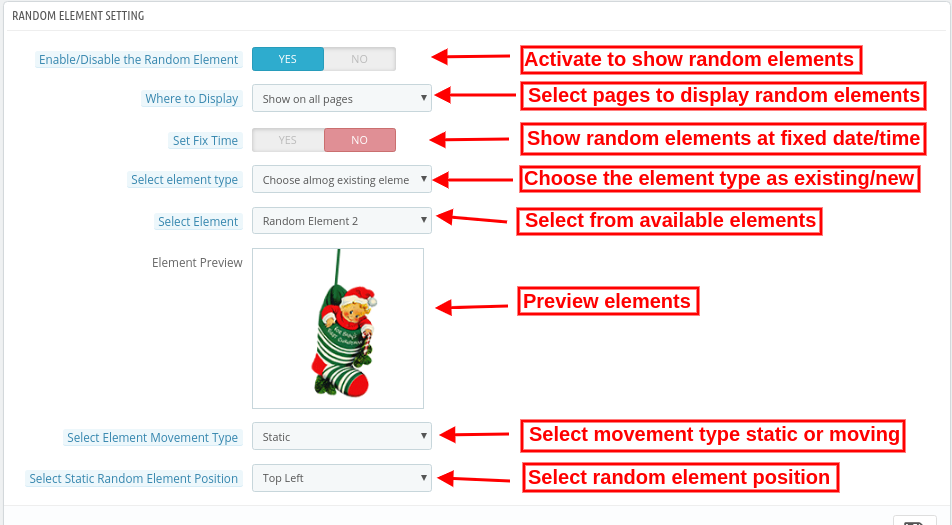
3.4 Random Element Settings

  • Enable/disable the Random Element: Admin can also show random decoration elements on the website front-end interface.
  • Where to display: Show on all the website pages or select pages for showing/hiding random elements.
  • Set Fix Time: Enter specific date/time on which you want to show random elements.
  • Active Date/time: Set start time here.
  • Expire Date/time: Set End date time here.
  • Select Element Type: Choose the element type as available or customize.

  • Choose among existing elements: As a store merchant, you can select from available elements.
  • Upload customized elements: You can also upload new elements from the admin interface.
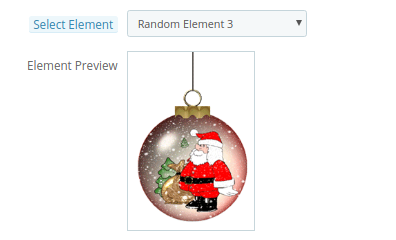
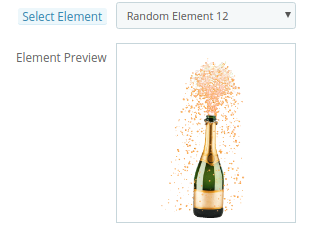
  • Select Element: Select from available header elements.


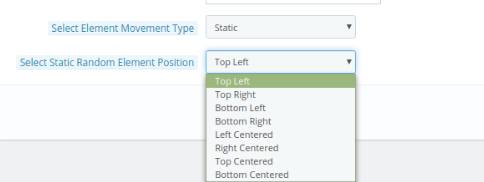
  • Select Element movement Type: Set movement type static or dynamic.

  • Select moving random element direction: Set moving random element direction.


  • Select Static Random Element Position: Set static random element direction.

The impact of these random elements will be as shown below:

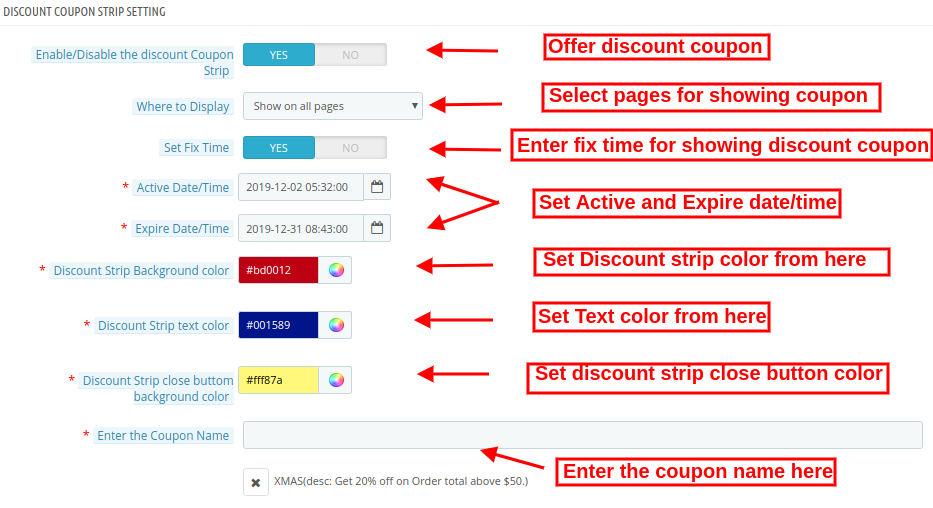
3.5 Discount Coupon Settings

The PrestaShop Website Decoration Effects plugin allows offering discount coupons on special occasions via an attractive footer bar interface.


  • Enable/Disable the Discount strip: Activate/deactivate this option to show a discount strip on the website front-end interface.
  • Where to display: Admin can select the pages on which he wants to show these discount coupons.
  • Set Fix time: Set a specific time for showing the discount coupon.
  • Active Date/time: Enter the start date/time here.
  • Expire Date/time: Enter the end date/time here.
  • Discount Strip Background color: Set the color for showing as a background color of discount strips.
  • Discount Strip text color: Set text color of the discount strip.
  • Discount strip close button background color: Set close button background color of the discount strip.
  • Enter the coupon Name: Enter the coupon name here.

4.0 Front-End Interface

The online store merchant can decorate the online store using the Advance PrestaShop Christmas Effects plugin. The online store merchant can customize the PrestaShop Snow Flurry effect addon according to the various occasions like Christmas, New Year and many others.

Different snow effects offer a variety of decorations. The online store visitors and the customer can view the decorated store.

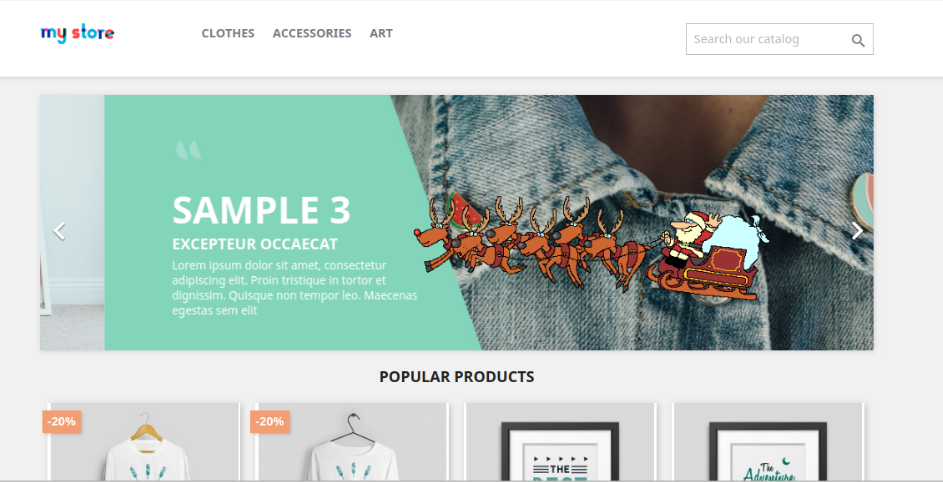
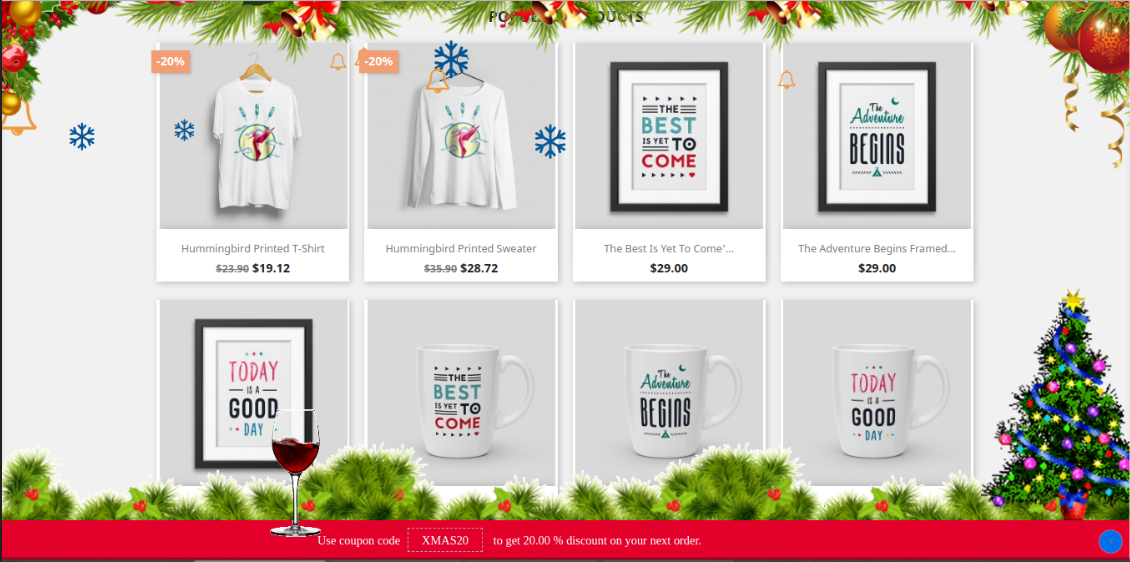
Fist Snow Effect with Elements: Here, in the image, you can view the beautiful impact of first show effect. You can also set different header, footer and random elements as per your website theme.

Second Snow Effect with Elements: In the Second snow effect, admin can show characters and set the flowing speed and other effects related settings.

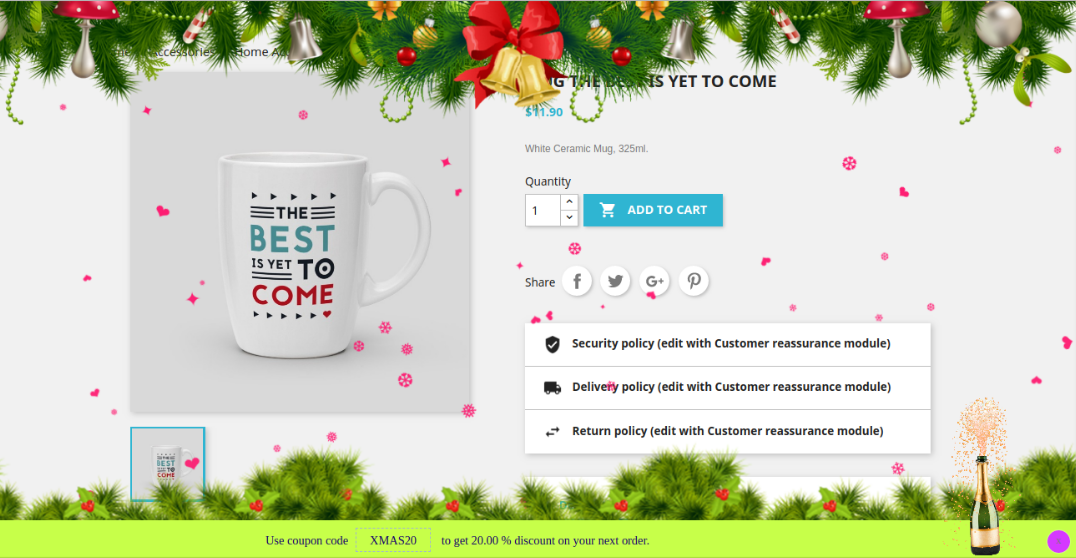
Third Snow Effect with Elements: In the third snow Effect, you can show snow flacks with different header and footer elements. Online users can view the discount strip.

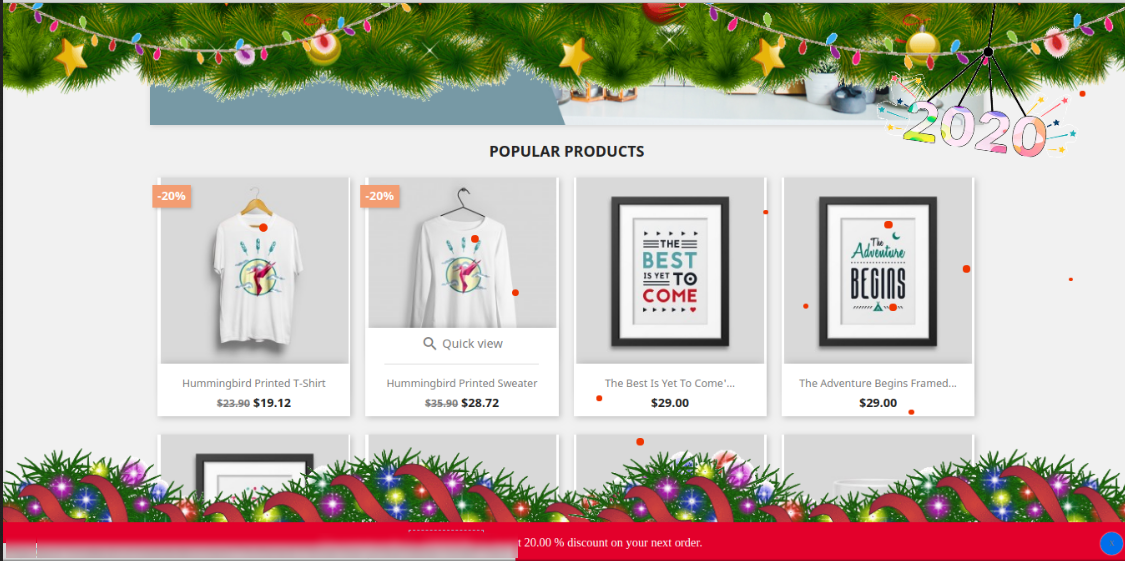
Fourth Snow Effect with Elements: In the fourth effect, online users can view colorful snow flurries with the attractive header, footer and random elements.

This way, the online store merchant can decorate the website and attract online customers. There are multiple decoration options, admin can use various options on different occasions.

5.0 Tutorial Videos Of Prestashop Website Decorator Addon

Check out the latest tutorial video for the prestashop website decorator addon. This tutorial video contains the installation, configuration, including theme selections like snow flakes or snow flurr, date and timing of the scheduling of the theme, header element settings as well as footer element settings of the module.

For more Prestashop addons visit Knowband.

For more details, visit here:

Prestashop Website Decoration Effects plugin Product page Link

PrestaShop SEO Optimizer- Clean URLs & 301/302/303 Redirection Module- User Manual

1.0 Introduction

A higher ranking on the search result page of the search engines like Google, Bing, and others is the biggest challenge for an online business. With a higher ranking, the chances of better sales also increase. In order to improve the search ranking, it is mandatory for the store owners to follow the guidelines issued by the search engines. SEO (Search Engine Optimization) is the way to increase your online presence for a better ranking on the SERPs. The On-Page SEO activities involve – website optimization, meta tag optimization, SEO-friendly URLs, keyword density and more. Among these factors, one factor is the SEO-friendly URLs which play an important role in the ranking. As per Google guidelines, Google recommends that the URL structure of a website should be as simple as possible. SEO-friendly URL is also useful for indexing process flow by the search engine bots.  In clear words, comprising SEO-friendly URLs for a website increases the chances for a website to get higher ranks in the search results. The default URL structure of PrestaShop SEO Optimizer Module includes the product id in the product page URL, Category page URL in the category page URL.

To help the store admin to create SEO-friendly URLs, Knowband has developed the URL Cleaner (SEO-friendly) Module. This PrestaShop SEO Optimizer – URL Cleaner Addon automatically generates the SEO-friendly URL by removing the ID from the URLs of products, categories, suppliers, manufacturers, CMS and all other pages of your store. It allows the admin to implement the 301, 302 or 303 redirection as per the requirement.
1.1 Features of the Prestashop URL Cleaner (SEO-friendly) Addon:

1. PrestaShop SEO-friendly URL Addon is a module that automatically converts the default URL into SEO-friendly URL.

2. The Knowband PrestaShop Rewrite URL Module removes the auto-generated ID from the URLs of the products, categories, suppliers, manufacturers, CMS and all other pages of your store.

3. With the help of this PrestaShop Fixed Duplicate URL Addon, the admin can view the duplicate URL list and modify or remove the URL as per the need.

4. PrestaShop URL Cleaner Module provides an option to the store merchant to redirect the old URL to the new URL. The Store admin has 3 choices on redirects i.e. 301 redirects, 302 redirects, and 303 redirects.

5. SEO URL PrestaShop extension is a module that helps the store merchant in improving SEO.

6. This PrestaShop URL Rewriting Module by Knowband helps the eCommerce owner to improve the website SEO.

7. The PrestaShop store admin can set the URLs to end with or without .html by using this Prestashop URL Cleaner Addon.

8. PrestaShop URL Id Remover Module is multi-store compatible.

9. SEO-friendly Prestashop URL Cleaner Module back-end interface extremely easy to use.

10. With this PrestaShop 301/302/303 Redirect Module, the admin can redirect the N no. of the old URLs to new URLs.

Technology for Development

Language: PHP

FrameWork: PrestaShop

2.0 Steps For Installation

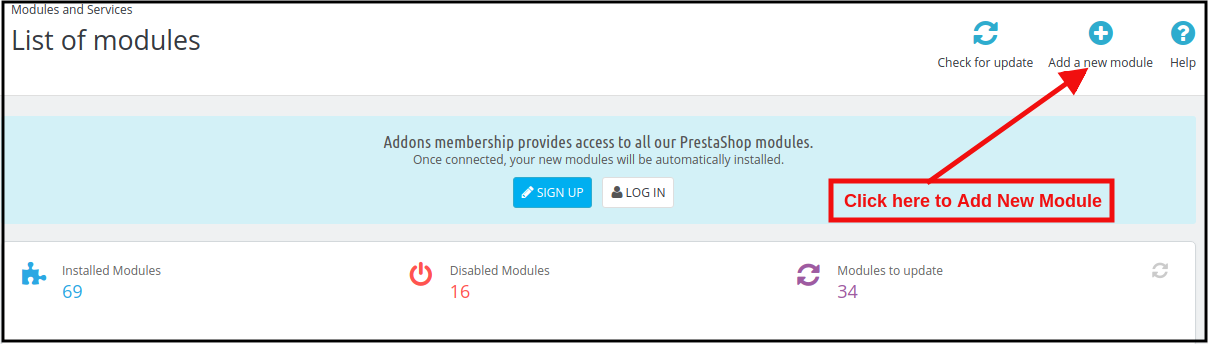
1. To upload the module click on the “Add a new module” button.

2. After clicking on Add New Module now select the module zip file.

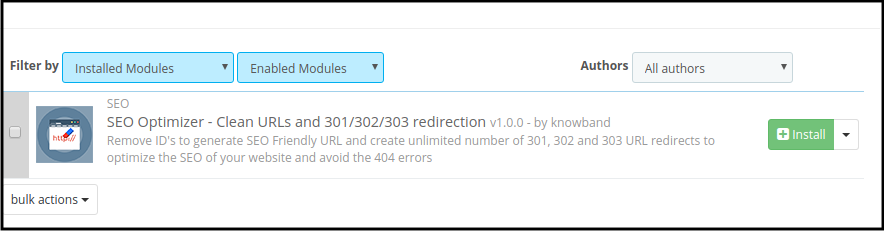
3. Now, You can find the PrestaShop SEO Optimizer Module in the module list and Click on the Install link to install the plugin.

4. After installing the module, the admin will be able to configure the module.

3.0 Admin Interface

After installing the module in the PrestaShop store, the store owner can make the changes without any hassles. There are the following sections available to the admin interface:

1. Module Configuration
2. Duplicate URL Rewrite Products
3. URL Redirection List

Each interface of this PrestaShop URL Cleaner (SEO-friendly) Module is explained below.

3.1 Module Configuration

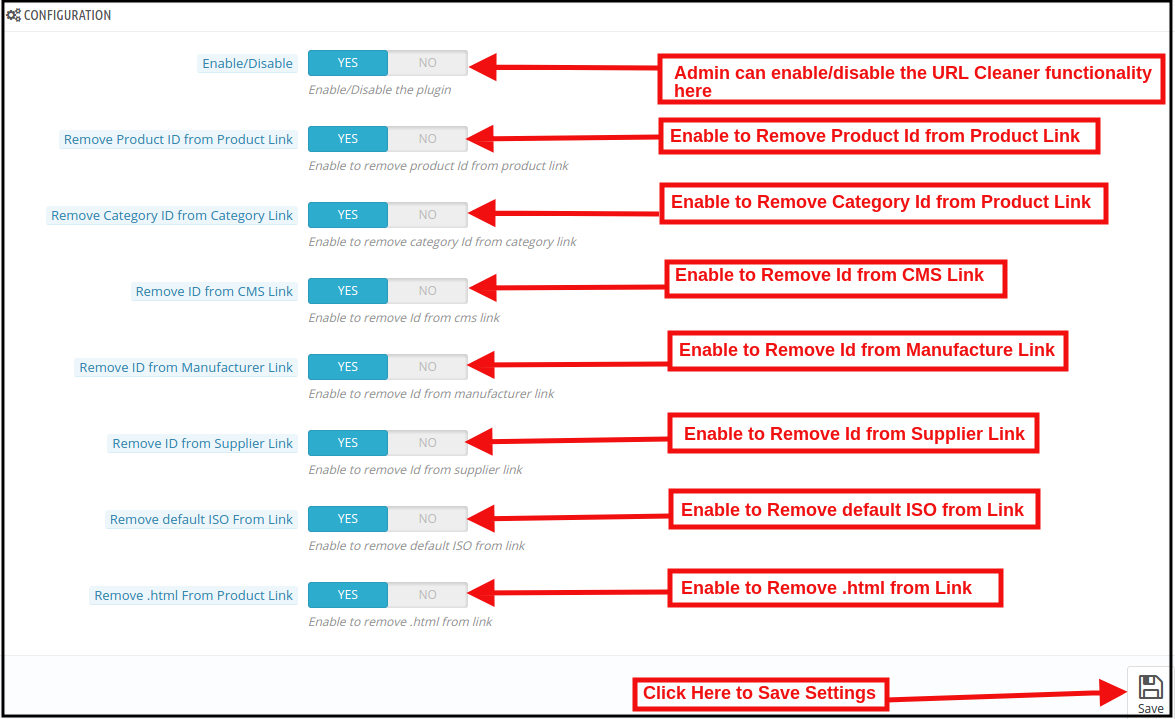
On clicking on the configure link on PrestaShop 301/302/303 Redirect Module, the system will open Configuration tabs of this Prestashop plugin by default as shown in the screen below:

Initially, the fields of this PrestaShop URL Cleaner(SEO-friendly) Addon in the above form will be already filled with their default values.
Enable/Disable: This field will enable the URL Cleaner feature. If enabled, the PrestaShop URL Cleaner will automatically convert the default store URL to SEO-friendly URLs.

Remove Product ID from the Product Link:

The default URL structure of the PrestaShop product page contains a product id and a URL like https://psm.knowband.com/urlcleaner/16/en/casual-dresses/3-printed-dress.html. As you can see the default product URL has the product id. After enabling this feature, the PrestaShop URL Cleaner Module will automatically remove the product id from the product link and the updated link will appear like this:

https://psm.knowband.com/urlcleaner/16/blouses/blouse

https://psm.knowband.com/urlcleaner/16/casual-dresses/printed-dress.html

Remove Category ID from the Category Link:

The default category page link contains the category id and a URL like https://psm.knowband.com/urlcleaner/16/8-dresses. This URL is complex and not SEO-friendly. By enabling this remove category option, the PrestaShop URL Id Remover Module removes the category id from the category link and after removing the category, the updated URL will appear like this:                  https://psm.knowband.com/urlcleaner/16/women/dresses

Remove ID from the CMS Link

The standard URL structure of the PrestaShop CMS page contains numeric values like

https://psm.knowband.com/urlcleaner/16/content/4-about-us. Using this option of PrestaShop SEO-friendly URL Module, the admin can enable this setting to remove the id from the CMS link and the automatic generated URL would look like:

https://urlcleaner16.knowband.com/content/about-us

Remove ID from Manufacture Link

By default, the Manufacture URL contains the Manufacture id in the manufacture URL. With the help of this extension, the admin can remove the id from the manufacturing link.

Remove ID from Supplier Link

PrestaShop does not have the feature to remove supplier link from the URL. After enabling this option, PrestaShop URL Cleaner Module automatically removes the id from the Supplier link.

Remove default ISO from Link

PrestaShop URL Cleaner (SEO-friendly) Module removes the default language’s ISO code from URLs and removes the language ISO code from shop’s default language. So, in this case, it will remove /es/ from all Spanish URLs, but other languages in your shop will still have ISO code in the URL.

For example: By default, the product URLs are like

https://urlcleaner16.knowband.com/en/casual-dresses/printed-dress after enabling the option URL would look like:

https://urlcleaner16.knowband.com/casual-dresses/printed-dress

Remove .html from Product Link: By enabling this option, the PrestaShop SEO Optimizer – Clean URLs & 301/302/303 redirection module remove the .html from the default product URL.

3.2 Duplicate URL Rewrite Products

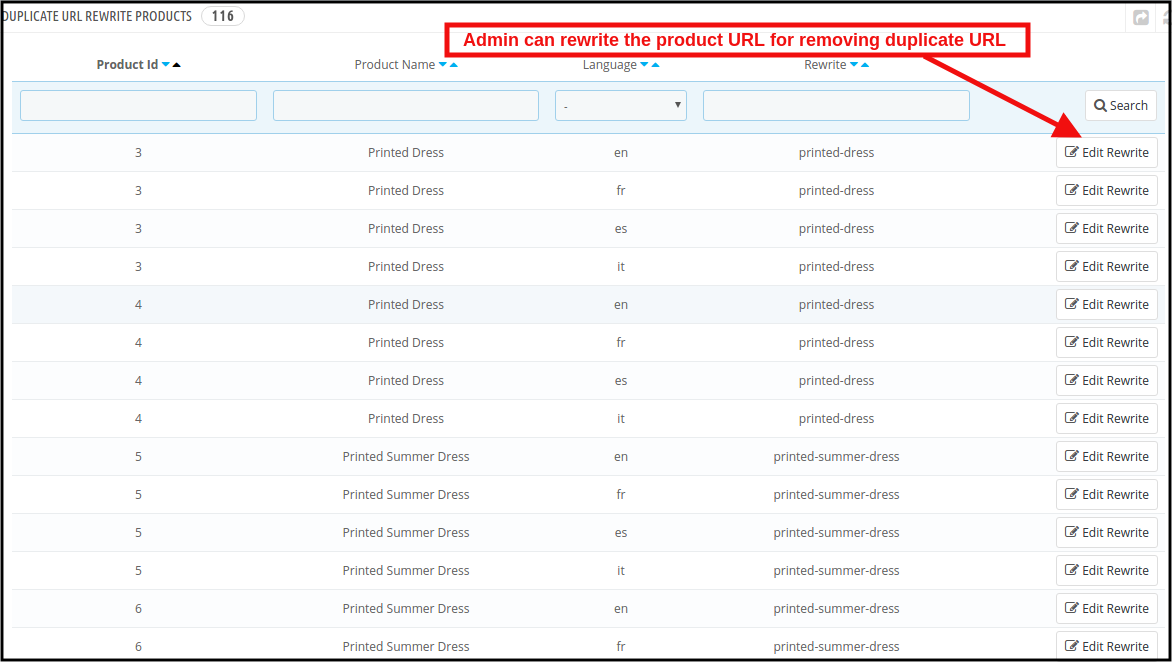
In case after removing the product ID from the product’s URL, if there are any two product’s URLs are same.

For example, The two product’s URL contains different Id like:

https://psm.knowband.com/urlcleaner/16/en/casual-dresses/3-printed-dress.html
https://psm.knowband.com/urlcleaner/16/en/casual-dresses/4-printed-dress.html

After enabling the remove product id option, the module removes the product id from the URL and product URL like:

https://psm.knowband.com/urlcleaner/16/en/casual-dresses/printed-dress.html

Then this product’s URL list will show on this tab. Find below the attached image:

In this tab, the admin can view all the Duplicate URLs and they can update rewrite value the products as per their convenience.

3.2.1 How to edit the Duplicate URL?

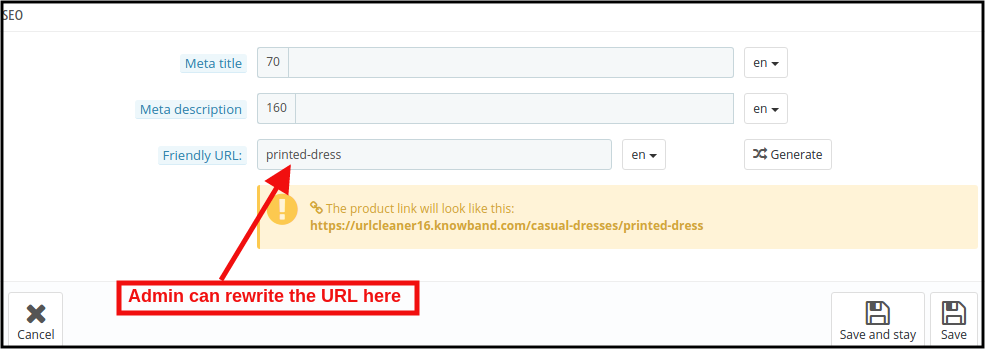
When the store admin clicks on the rewritten link, the PrestaShop URL Redirects Module will redirect the admin to the below-mentioned page:

Here, the store admin can rewrite the duplicate URLs. As soon as the admin will make changes to the URLs, these URLs get removed from the duplicate URL list.

3.3PrestaShop SEO Optimizer Module URL Redirection List

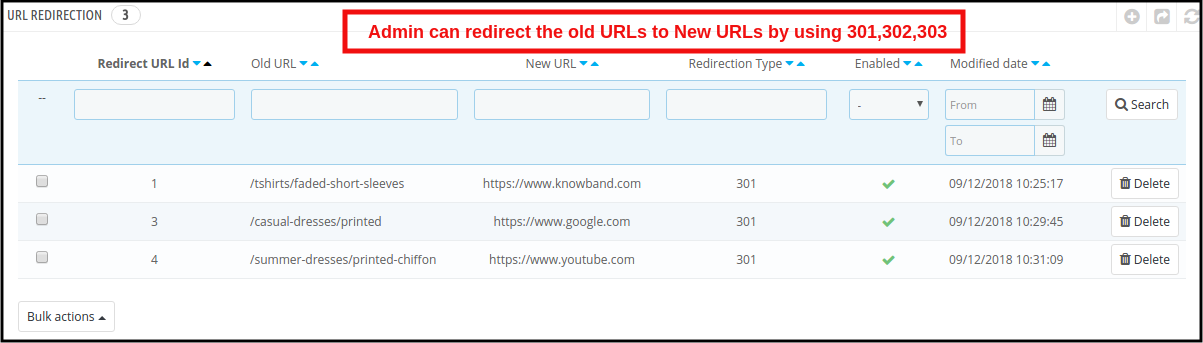
If the store admin changes the URL of any particular product page, the online retailer needs to redirect the old URLs to the new URLs. This PrestaShop 301/302/303 Redirect Module allows the PrestaShop store admin to redirect the old URLs to new ones. This PrestaShop SEO Optimizer Module offers the three redirection options including 301, 302 and 303 to the store owner.

3.3.1 How can Admin Redirect the Old URLs to New URLs?

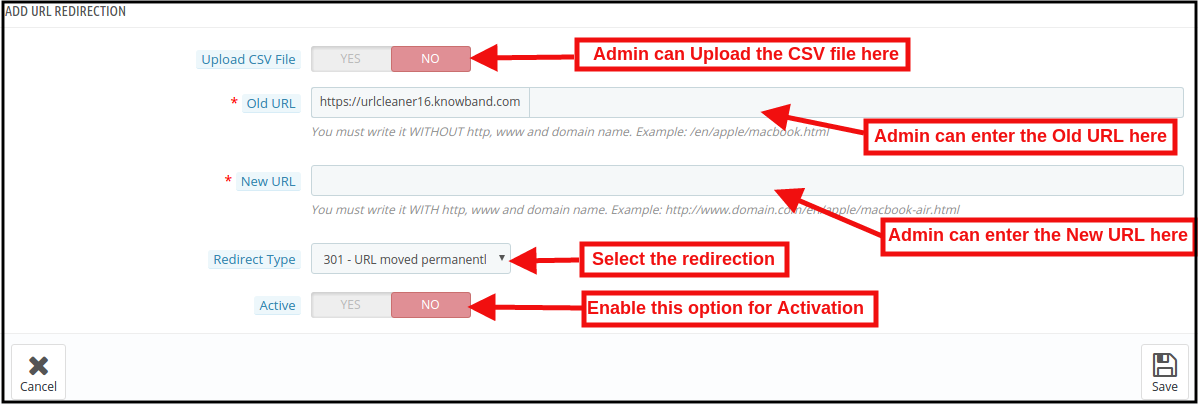
For the redirection of the old URLs to the New URLs, the store admin needs to click on the “Add New” button. After clicking on the Add New button, the below mentioned page open:

Here, the store admin can enter the Old URLs and New URLs, select the redirection from 301 (for permanent redirection), 302 (for temporary redirection) and 303 (to get the method used to retrieve information).

The admin can easily redirect the Old URLs to the New URLs.

URL Redirection through CSV file

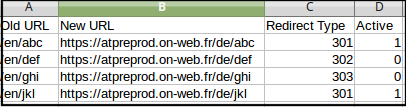
Upload CSV file: In order to redirect the multiple URLs. You can enable the Upload CSV file option. After enabling this option, the admin will be able to download sample CSV file and as per the fields defined in CSV file, the admin needs to enter the details in the CSV and upload the same.

After enabling CSV upload option, the below mentioned page open:

Choose CSV File: The Store admin can upload the sample CSV here for redirecting the products page.

Sample CSV File Format:

4.0 Front End

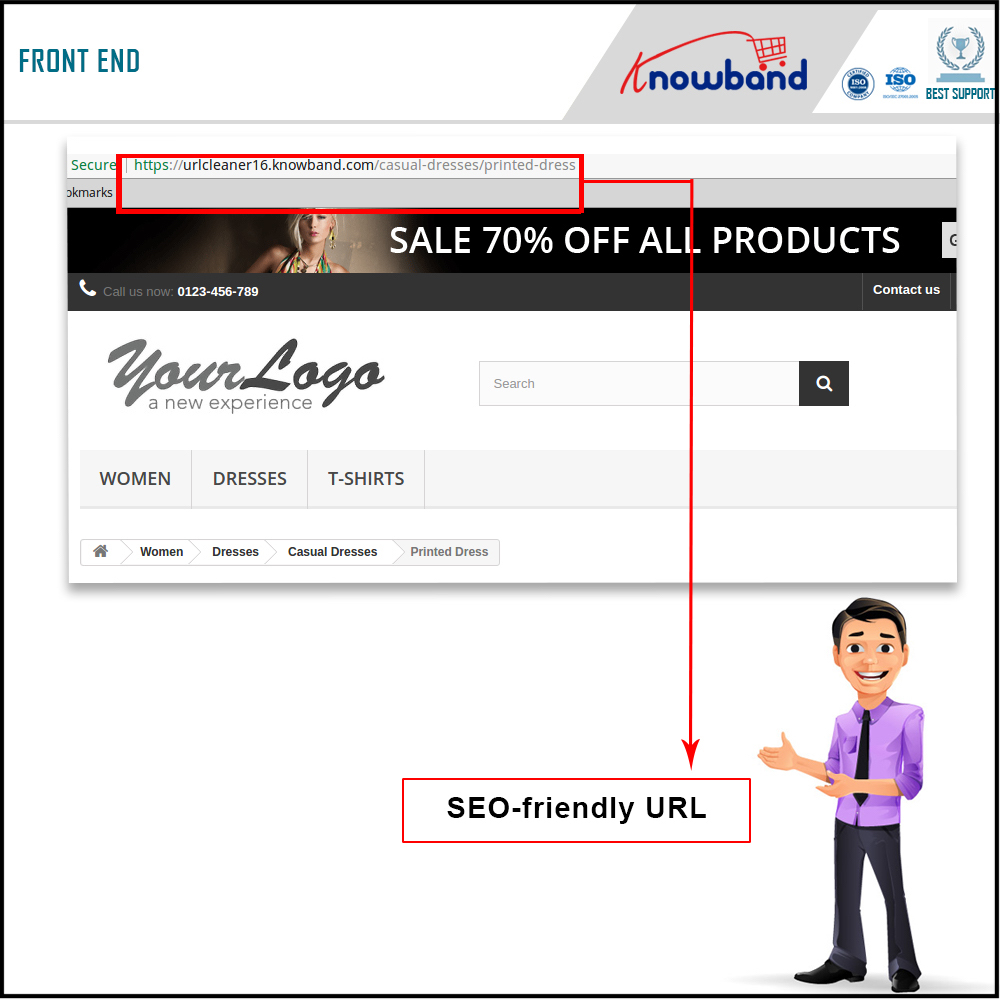
After enabling the PrestaShop URL Id Remover Module by Knowband at the front-end, the users will be able to see an SEO-friendly URL that will clearly highlight the purpose of the page. Google also recommends “A site’s URL structure should be as simple as possible. Consider organizing your content so that URLs are constructed logically and in a manner that is most intelligible to humans (when possible, readable words rather than long ID numbers).” This will also help the admin in improving the search results of the website.

The SEO-friendly URL would appear as follows:

For more information about PrestaShop SEO Optimizer- Clean URLs &301/302/303 Redirection Module:

PrestaShop SEO Optimizer- Clean URLs &301/302/303 Redirection Module Admin Demo

PrestaShop SEO Optimizer- Clean URLs &301/302/303 Redirection Module Front Demo

PrestaShop Affiliate and Referral Program Addon –User Manual

1.0 Introduction

Referral marketing is one of the best tactic to drive more traffic to your online store. Now the eCommerce store owner can get more customers and improve the sales of the website with the help of affiliate partners. The Prestashop Affiliate and Referral program addon provide an option to promote your store without investing a lot of amount and time. Knowband offers Prestashop Affiliation Program by which you can allow your customers to register as an affiliate and refer a promotion code to their friends. The affiliate customers can earn the commission for referring the customers and purchases made by those customers. This is one of the ways to spread the word-of-mouth and boost the reach of your eCommerce site.

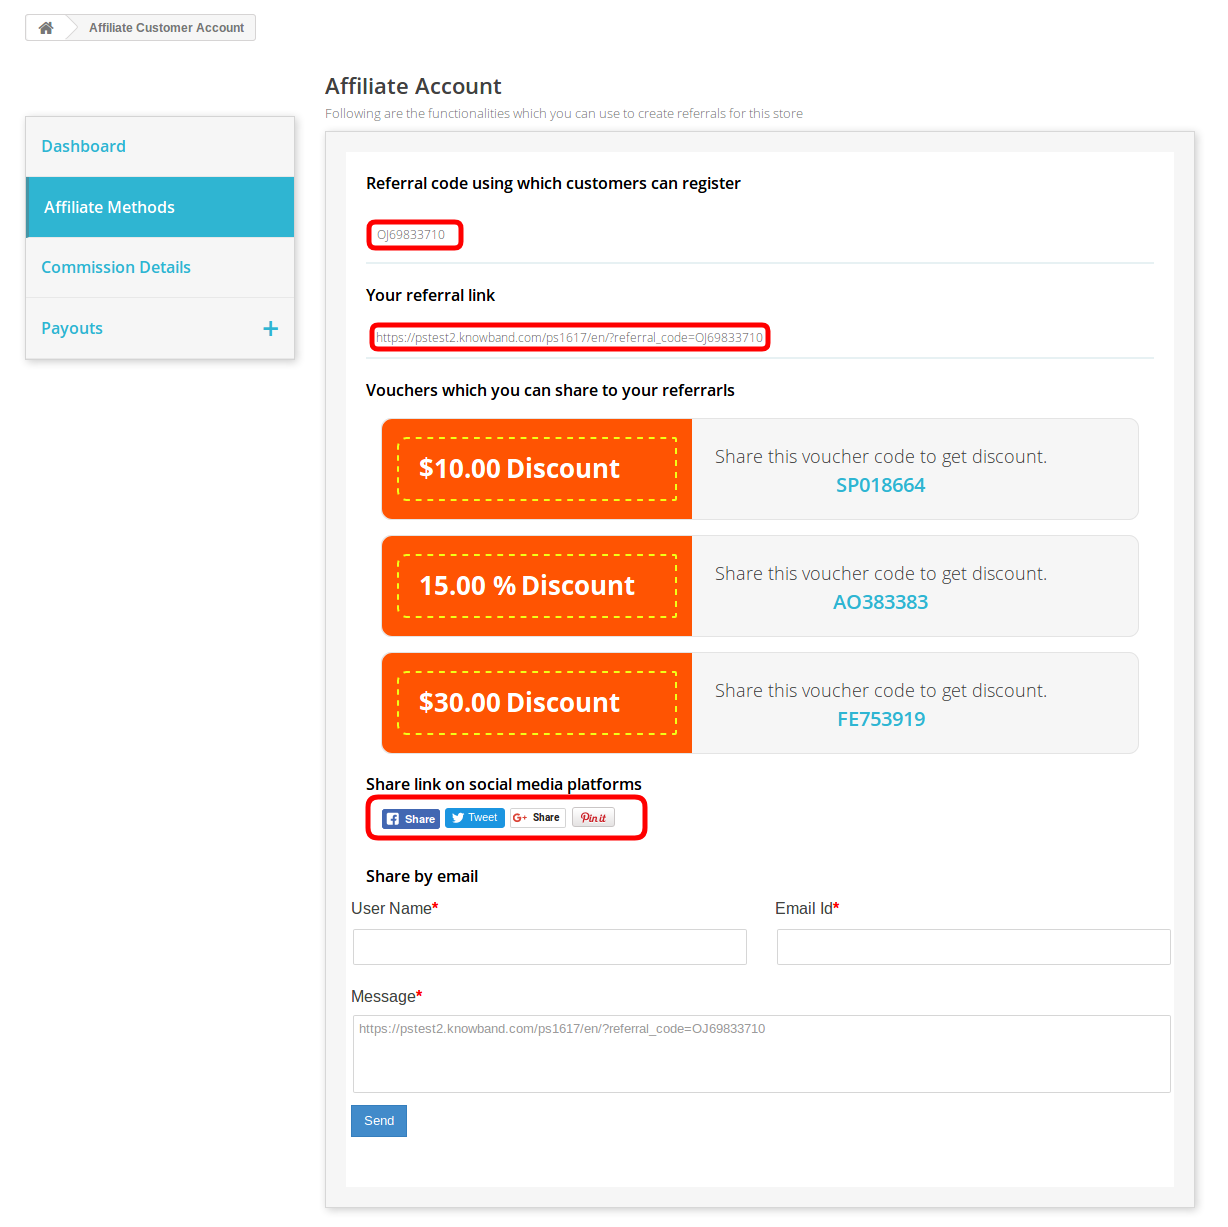
Affiliation program helps the store admin to generate more traffic of your online store which ultimately increases the chances of sales in the future. There are several ways of referrals like link sharing, referral code sharing, voucher sharing and mail sending.

1.1 Features of this Prestashop Affiliate and Referral program addon

  • The Prestashop Affiliate and Referral program addon allows the store admin to enable/disable automatic approval of affiliate customers.
  • The affiliate customer has various ways of sharing the links with their referrals.
  • Admin can set specific commission for different affiliates.
  • Prestashop Affiliate Program addon allows the admin to set the validity for the affiliates.
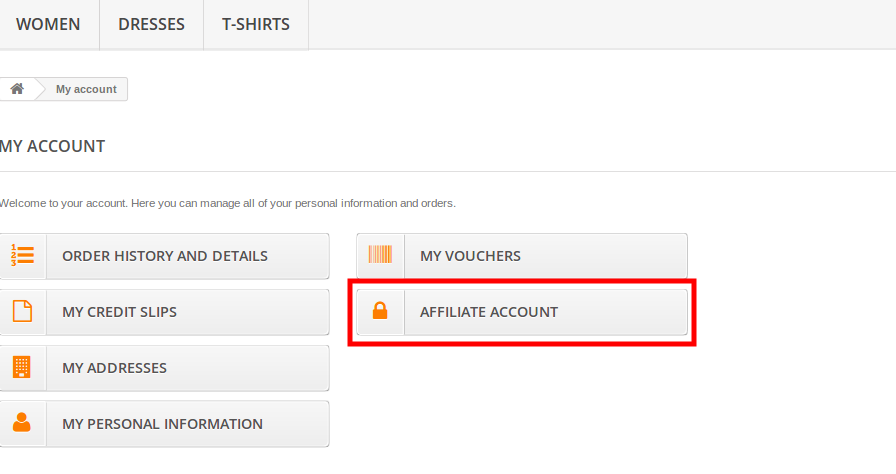
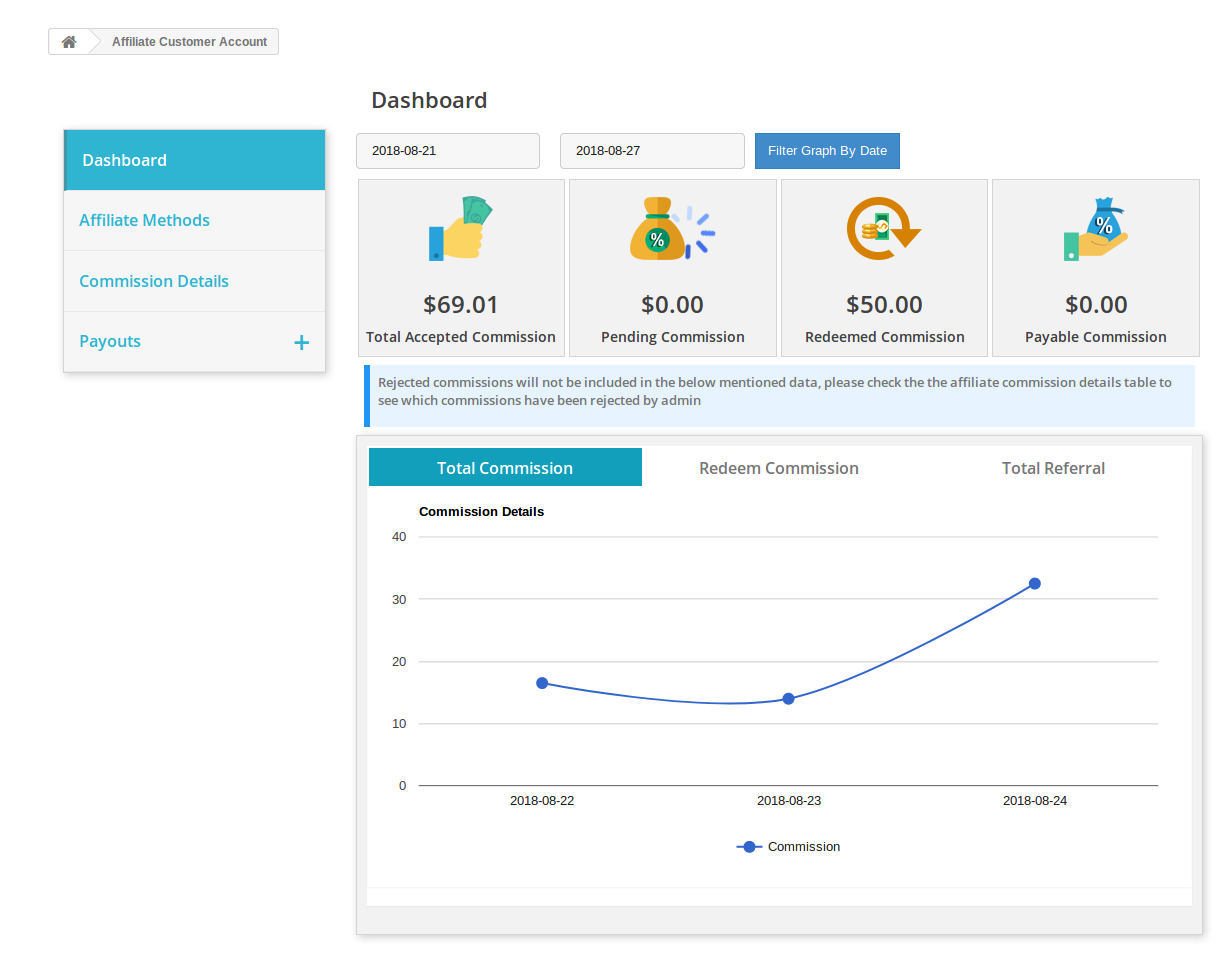
  • A separate dashboard is available in the front-end through which the affiliate customers can view their commission stats and also request for the pay-out.
  • The affiliate shares the website link with their referrals. It increases website traffic.
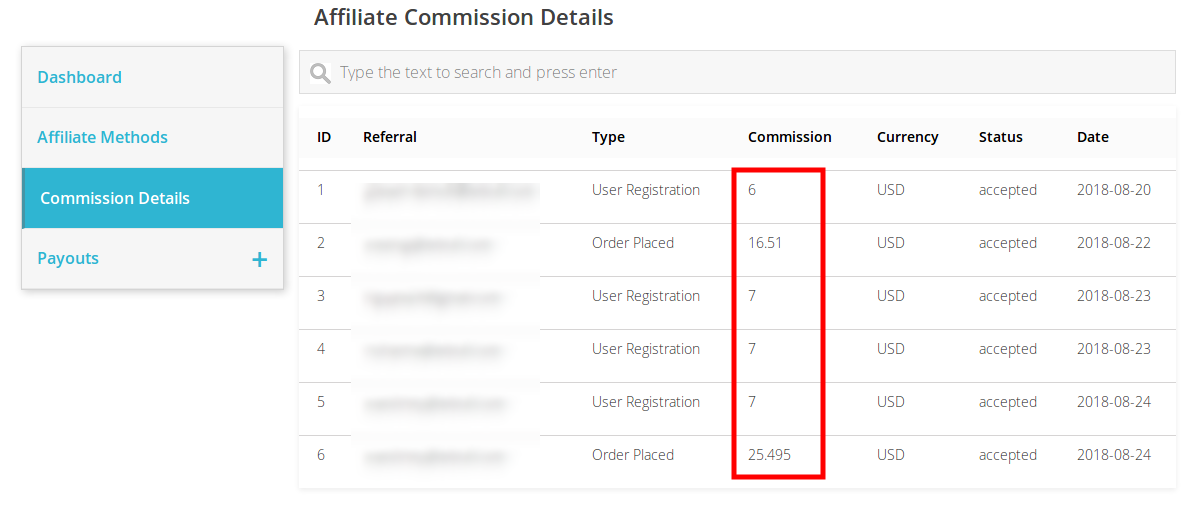
  • The admin can provide a commission to the affiliate customers for referral registration.
  • The affiliate customers can also get a commission for referral orders.
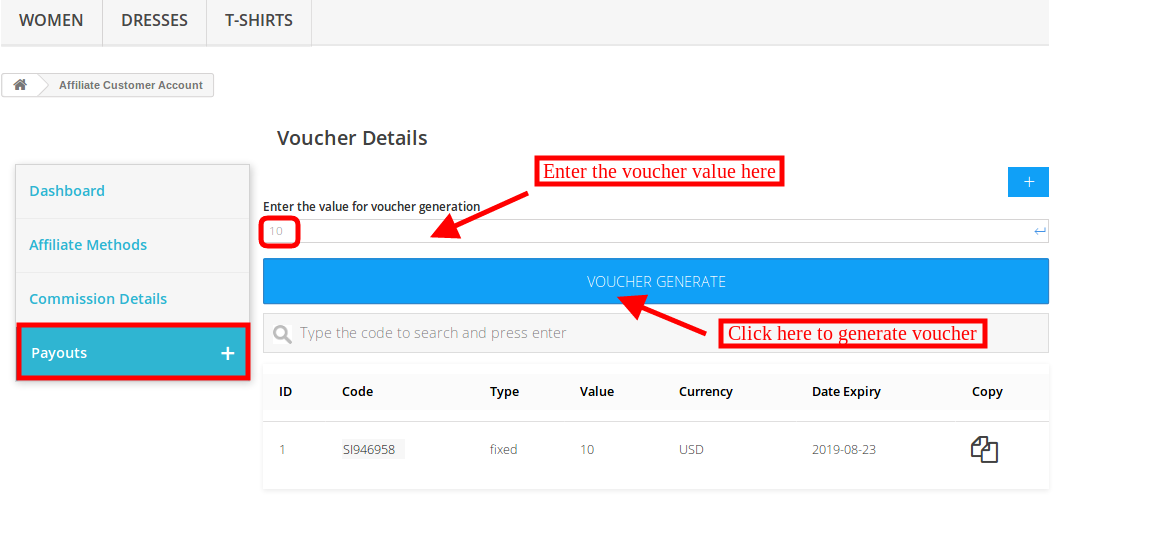
  • The affiliate customers can redeem the commission by generating a voucher or pay out request.
  • Affiliates have an option to share the vouchers with their referrals. This voucher can be used while checkout.
  • With this Prestashop Affiliate and Referral program addon, admin can also offer multiple commission functionality for the affiliate customers.

2.0 Installation Steps

The store admin will get the above files while purchasing this Prestashop Affiliate and Referral program addon:

1. The zipped file that consists the source code of this Prestashop Affiliate Program addon.

2. User Manual

In order to install this Prestashop Referral Program addon, the admin needs to follow these steps:

  • Unzip the zipped file which includes some files and folders.
  • After that, admin can copy the overall content of the folder and paste them into the “Modules” folder of the store’s directory. The admin can follow the path – Root Directory/modules/.

3. Now the store owner can install the Prestashop Referral Program addon. As an eCommerce store owner, you can find that in Store Admin -> Modules and Services.

Now you just need to click on “Install” button to install this Prestashop Affiliates module. A confirmation pop-up will be shown. Click on “Proceed with the installation” option. This step will install the Prestashop Affiliates module and show notification – “Module(s) installed successfully”.
3.0 Admin Interface

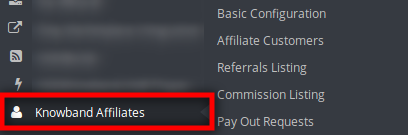
After successful installation, the store admin can configure this Prestashop Affiliate Program addon easily. There are several configuration options as shown below:

  • Basic Configuration
  • Affiliate Customers
  • Referrals Listing
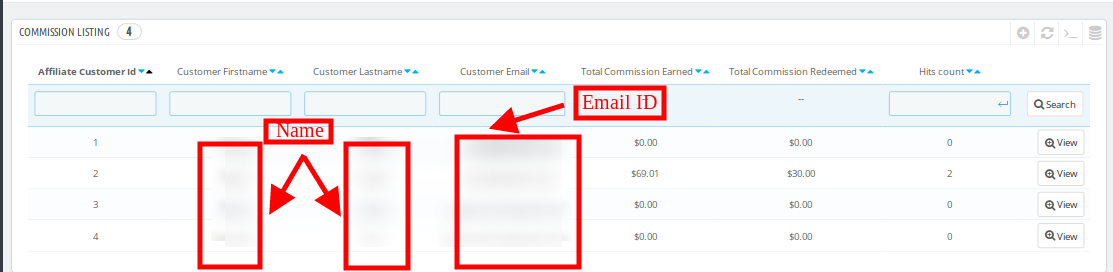
  • Commission Listing
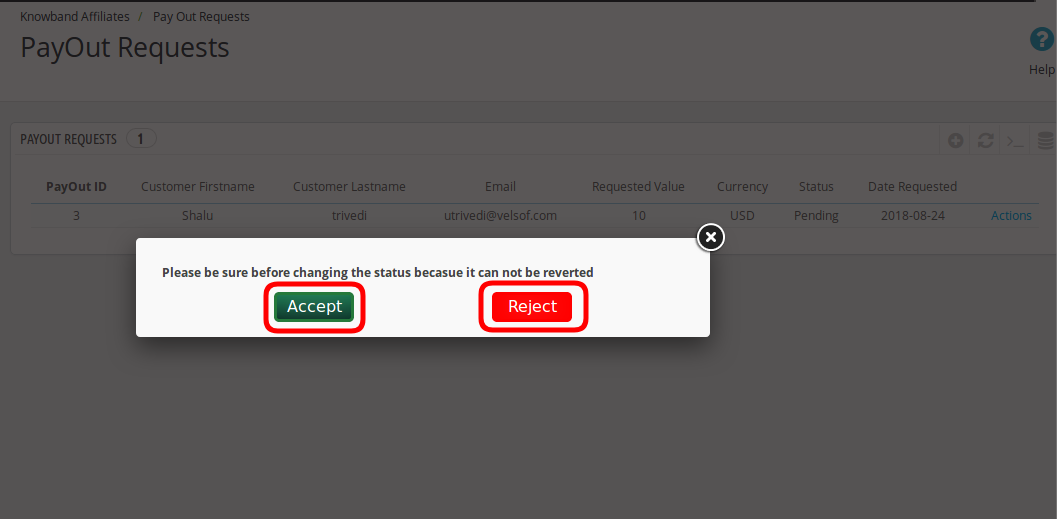
  • Pay Out Requests


3.1 Basic Configuration

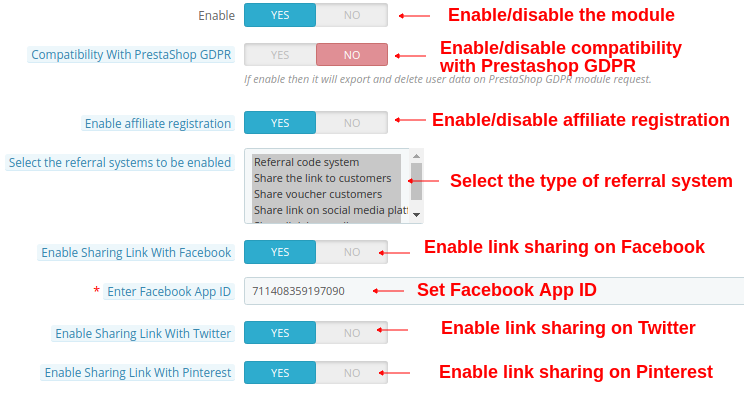
In the Basic Configuration sub-menu, the store admin can apply the settings to manage the affiliate system on the website front-end interface. The admin can configure the above options:


1. Enable: The store owner can activate or deactivate the Prestashop Affiliate Program addon just by toggling this button.

2. Compatibility with Prestashop GDPR: Admin can enable this option to export and delete user data on Prestashop GDPR module request.

3. Enable Affiliate registration: Enable this to activate or deactivate affiliate registration from the admin interface.

4. Select the referral System to be enabled: The e-merchant can choose the referral type like referral code system, Share the link to the customers, share voucher customers, Share link on social media platform, Share link by email.

5. Enable sharing link with Facebook: The store admin can activate or deactivate the option to share referral link on Facebook. Social sharing will be automatically enabled if the store admin enable this option.

6. Enable Facebook App ID: The store admin can enter the Facebook app id. The store admin can create the facebook app id by following the steps described in 3.1.1 section.

7. Enable Sharing Link With Twitter: The e-merchant can display link sharing option on twitter. The affiliate customers can share the site link to the referrals through twitter.

8. Enable Sharing Link With Pinterest: The link sharing on Pinterest option will be shown on the front-end.


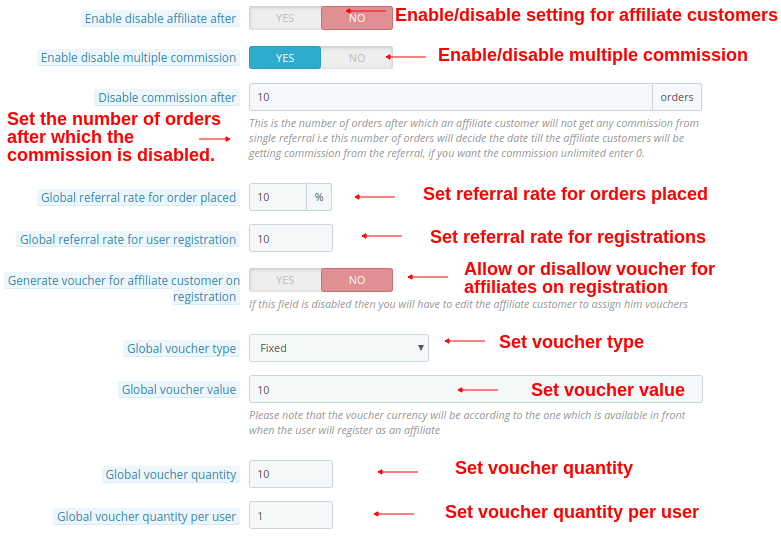
9. Enable disable affiliate after: The store admin can enable or disable this option as per the requirement. Admin can set the days after which the affiliate customer will not get any referrals.

10. Disable affiliate after: The module allows the admin to select the days after which the affiliate customer will not get referrals. If the admin disables the “Enable disable affiliate after” settings, then, this option will not be displayed.

11. Enable Disable multiple commission: This option allows admin to enable or disable multiple commission system for the affiliates.

12. Disable commission after: Admin can set the order limit after which the affiliates will not be offered commission value.

13. Global referral rate for order placed: The store admin can enter a common referral rate for all the affiliates. The global referral rate will be in percentage.

14. Global referral rate for user registration: The Prestashop Referral Program addon allows the store admin to set the basic referral rate for the user registration. The admin can set the fixed value as referral rate.

15. Generate voucher for affiliate customer on registration: The store admin can also generate a voucher and assign it to the customers if they register as an affiliate customer. The admin needs to edit the affiliate customer to assign him vouchers if this field is not active.

16. Global voucher type: Here, the store admin can select the voucher type fixed or percentage based. This voucher will be common for all the affiliate customers.

17. Global voucher value: The store admin can enter the value of global voucher.

18. Global voucher quantity: The store admin can enter the quantity of the vouchers which will be provided to all the affiliate customers for sharing with the referrals.

19. Global voucher quantity per user: The admin can enter the quantity of the vouchers which can be used by the customers at a time.

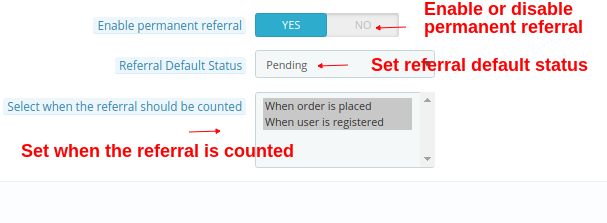
20. Enable permanent referral: Enable this option to allow permanent referral to the affiliate customers by enabling this option.

21. Referral Default Status: The store admin can set the referral default status as rejected, pending or accepted.

22. Select when the referral should be counted: The referral will be counted when user is registered or when order is places. The admin can also select both the options.

3.1.1 Steps to generate Facebook app ID

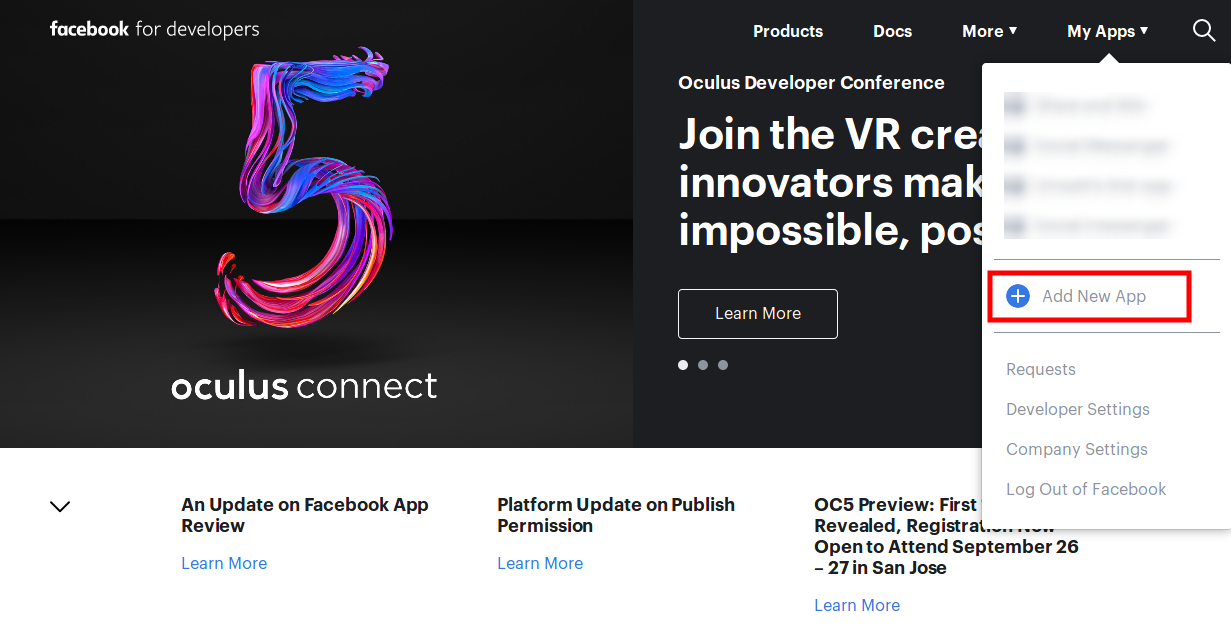
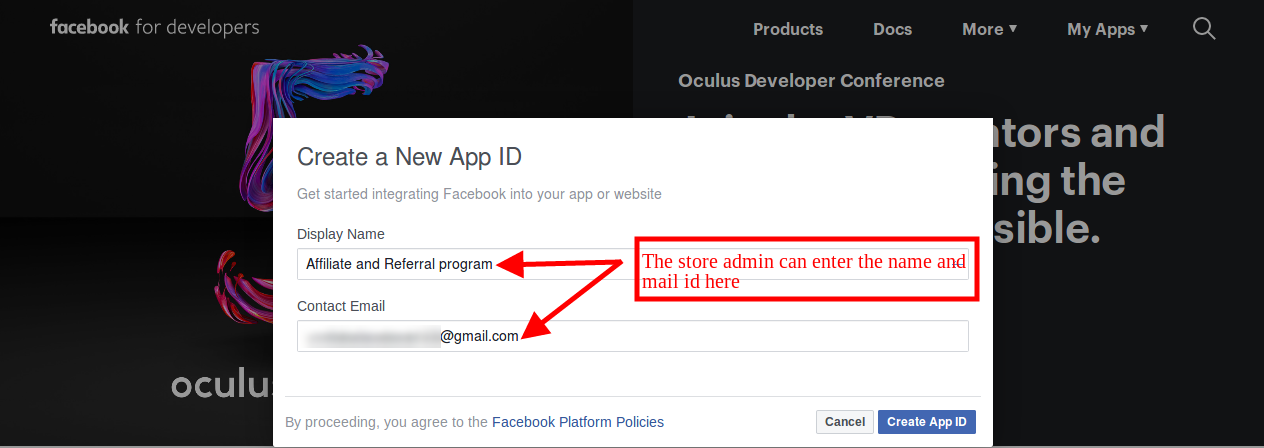
  • After that insert the “Display Name” and “contact email ID”. Click on the “Create App ID” button.

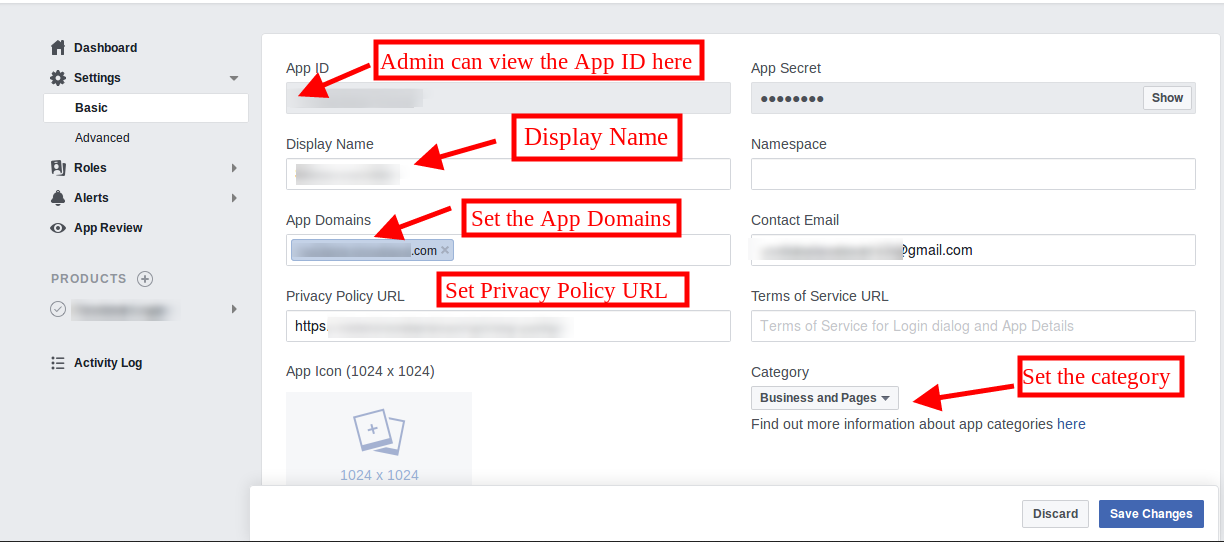
  • Go to the “Settings” and then select “Basic”. The admin can view the APP ID as shown below. The admin needs to insert app domains, category, Privacy policy URL here.

This way the admin can get the Facebook app id.

3.2 Affiliate Customers

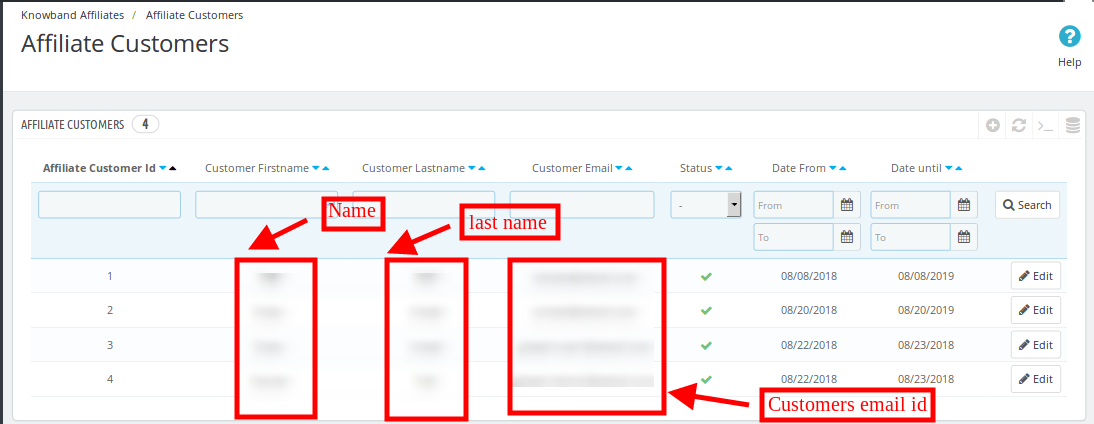
The store admin can view a list of the affiliate customers in this section of the back-end interface.

3.2.1 How to Edit Affiliate Customers details?

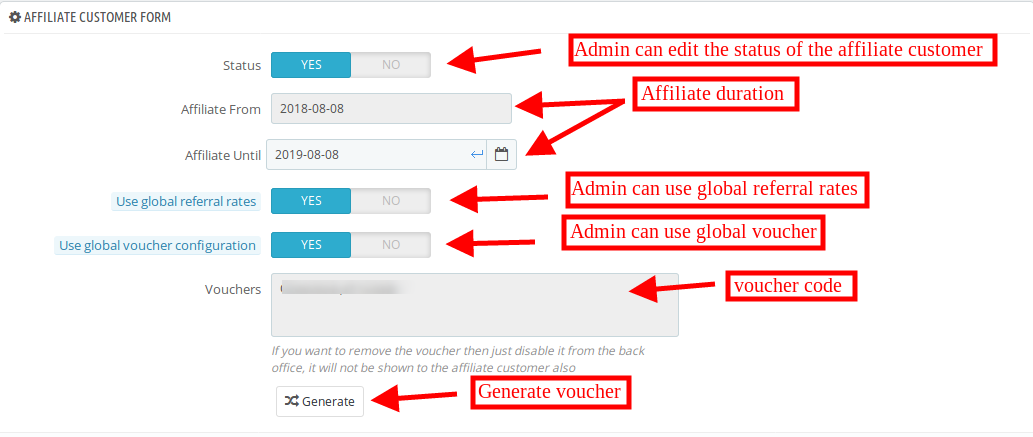
The store admin can apply the settings to edit the details related to each and every affiliate customer.

1. Status: The store admin can enable or disable the status of the affiliate customer from the admin interface.

2. Affiliate From: The admin can view the details when the customer registered as affiliates.

3. Affiliate Until: The admin can set the date till the customer will be affiliate.

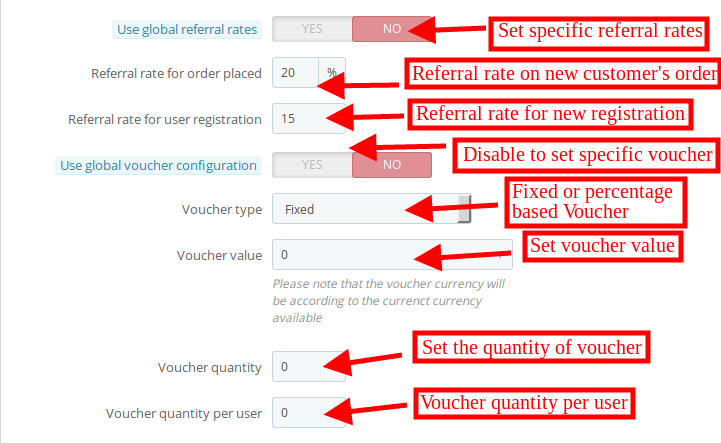
4. Use global referral rates: The store admin can use the global referral rate or set referral rate specifically for the different affiliates.

  • Referral rate for order placed: The admin can set the percentage based referral rate for order placement.
  • Referral rate for user registration: The admin can set the fixed amount of referral for user registration.

5. Use global voucher configuration: The store admin can use global voucher or configure the unique voucher for specific customer.

6. Voucher type: The admin can set percentage or fixed voucher type.

7. Voucher value: The store admin can set the voucher value from the admin interface.

8. Voucher quantity: The store owner can decide the number of the vouchers.

9. Voucher quantity per user: The admin can set the number of vouchers per users.

10. Vouchers: The admin can view the voucher code.

3.3 Referrals Listing

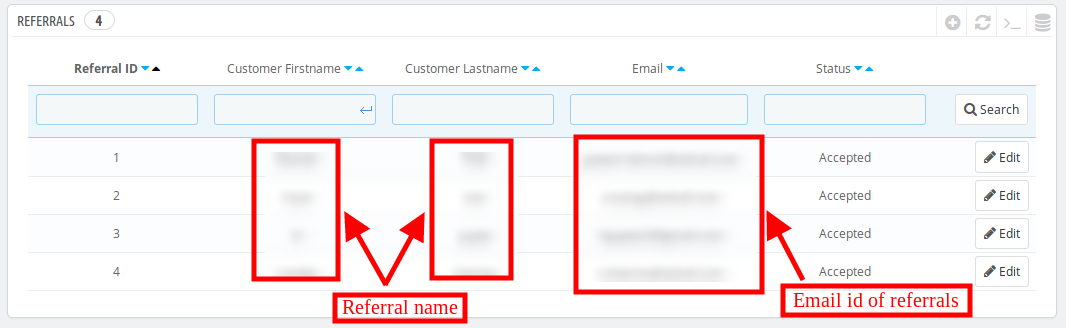
The store admin can view the referrals and their details from the admin interface. The list of the referrals will be shown as below mentioned image:

The store owner can also edit the affiliate’s status. The admin can view the above details:

1. Affiliate: The admin can view the affiliate email id from here.

2. Description: The store admin can view the activity performed by customer.

3. Commission value: The admin can view the commission value as per the configuration.

4. Commission currency: The currency type can be viewed from this section.

5. Order reference: If the new customer place any order then the order reference will be displayed here.

6. Referral status: The admin can set the status of the referral as accepted, rejected and pending.

7. Referral date: The store admin can edit the referral date from the admin interface.

3.4 Commission Listing

The store admin can view the commission details from the admin interface. The store admin can view the overall commission provided to every affiliate customer.

3.4.1 How to view the affiliate commission?

The Prestashop Affiliates module allows the eCommerce store admin to affiliates commission from the “commission listing”. The store owner can get details about the order reference, email id of the referrals, commission amount and the date on which the commission offered.

3.5 Pay Out Requests

The affiliates can redeem the commission just by clicking on the payouts option. The affiliates request to generate voucher or can send a payout request to the store admin.

The store admin can view the payout request in the “Payout request” option and then accept or reject the request.

The store admin can click on the action option and accept or reject the payout request easily. Once the admin accept the payout request, then, the status of the request will be changed to “accepted” on the website front-end.

4.0 Front-end Interface

The online customers can view the affiliate registration option on the admin interface. Once they register as an affiliate customer, they can view their affiliate account as shown below:

The affiliate customers can view the graphical representation of the total commission, redeem commission and total referral.

The affiliates can share referral code, share referral link, share vouchers, share link on social media platforms and share the store link via email.

The affiliate customers can view the rewarded commission on referrals. They can also view the status of the commission.

The affiliates can click on the payout option and after that click on the “+” for generating a voucher. The minimum value of the voucher is “10”. The affiliate can click on the “voucher generate” option for getting a voucher.

The affiliate can view the success message on the top of the website.

The affiliate customer can also get an email with the voucher code information as shown below:

The affiliate can also send payout request from the front-end. For generating the payout request, the affiliates can click on the payout option and then click on “+”. Now enter the amount of payout and click on “payout” button.

By default the request status will be “pending”.

Once the store admin accept the payout request from the admin interface, the affiliate customers can view the status.

Need Help Getting Started? Watch Our Video!

We have created an easy-to-follow YouTube tutorial to help you understand and configure the PrestaShop Affiliate and Referral Program Module. The video shows you how to enable the module, customise referral settings, and monitor affiliate activities without any hassle.

Prestashop Private Shop Addon – User Manual

1.0 Introduction

The eCommerce store owner can create his own private shop and control the sales of the store products to a selected group of customers. Knowband offers PrestaShop Private Shop Module which allows the eCommerce store owner to make the whole website as a private store. The admin can privatize the store products, categories and pages also. With the help of this Restrict categories and products addon the store admin can force the customers to login or register to visit the eCommerce store or selective section.

1.1 Salient features of Prestashop Private Shop Plugin

  • The eCommerce store admin can force the customers to login/register for accessing the website.
  • The admin can set the look and feel of the login/signup page.
  • Sends an email to the new customer whenever new registration occurs. An email is received by the customers to validate their email.
  • The Restrict categories and products module allow the e-merchant to apply the settings to approve the newly registered customer accounts automatically or manually.
  • The admin can allow/disallow Google crawler to index the private shop by enabling or disabling the settings.
  • The Restrict categories and products addon allow the admin to modify the login/signup title text.
  • The login/signup form can be in left, right or center position.
  • The admin can activate or deactivate new private registration option from the admin interface.
  • The admin can show an image, color or video to display as the background of the login/signup form.
  • The admin can set the entire shop or any specific selection as private.
  • Specific IPs are always allowed to access the eCommerce store.
  • The Prestashop Private shop addon provides a list of the private customers in the admin interface.
  • The store admin can view the details of the private customers and validate the newly registered accounts.
  • The store admin can also delete a private customer from the admin interface.
  • The Prestashop Private shop extension is multi-store compatible and offers multi-lingual support also.
  • The user-friendly and mobile responsive layout offered by this Restrict categories and products makes it hassle-free.

2.0 Installation Guide of Prestashop Private Shop

Once you purchase the Prestashop module from the store you’ll get these files:

  1. The zipped file that consists of the source code of this Prestashop Private shop addon.
  2. User Manual

Follow the following steps to install the Prestashop Private shop addon:

  • First of all, you need to unzip the zipped file. It includes some files and folders.
  • After that, you need to copy the overall content of the folder and paste them into the “Modules” folder of the store’s directoryYou can follow the path – Root Directory/modules/.
  1. Now you can install the Restrict categories and products addon. You can find that inStore Admin ->Modules and Services.It would be shown as below:

Now you just need to click on “Install” button to install this Prestashop Private shop addon. A confirmation pop-up will be shown. Click on “Proceed with the installation” option. This step will install the Private Shop Prestashop module and show notification – “Module(s) installed successfully”.

3.0 User Guide for Prestashop Private Shop

Using this Restrict category and products module, the admin can view the configuration options as shown below. Here, the eCommerce store admin can customize the Prestashop Private shop addon according to the requirements. The admin can configure these settings:

  • General Settings
  • Access Settings
  • Private Customers

3.1 General Settings

In the general settings submenu option, the eCommerce store admin can apply the settings to display and manage the look and feel of the login/signup form.

  • Enable/Disable:The Prestashop eCommerce store admin can activate/deactivate the functionality just by a single click.
  • Login/Signup Form Position: The admin can set the position to display the login/Signup form. The admin can select left, right or center position.

  • Login/Signup Form Theme: The admin can set the default or modern theme as per the requirement. While selecting the modern theme, these options will be displayed.
  • Login Page Title Text: Here the admin can set the title text which will be displayed on the Login page.
  • Signup Page Title Text: The admin can also set the signup page title text. The admin can insert the text in multiple languages.
  • Display Logo on Login/Signup Form: The Prestashop store admin can show a logo on the login/signup page by enabling the settings.

  • Login/Signup Form Opacity: The admin can enter form opacity value. The value can be between 0 to 1. For showing login form transparent, the store admin can set the form opacity 0.
  • Enable Signup: The admin can activate this option for allowing the customers to register a new account.

  • Verifying new Customer Account: If the admin wants to validate new accounts, he can enable this setting. After enabling this setting, the above option will be displayed:
  • New Account Message: The admin can set the message to show for newly registered accounts. Admin can insert HTML tags, images, and links.

  • Form Background: The admin can select the background type which he wants to apply for the login or sign/up form. The admin can insert image, apply color or show video.
  • Apply colors: The admin can select the color from the color picker box. This color will be applied in the background of the login/signup page.

  • Background image: The admin can select the image for showing as a background image on the login/signup form.

  • Apply YouTube: The Prestashop store owner can insert YouTube video link from the admin interface. The e-merchant can enter the embeded link of the Youtube URL.

  • Custom CSS:Advance user can insert custom CSS code.
  • Custom JS:The store admin can also add custom JS code for further customization.

3.2 Access Settings

The Prestashop Private shop extension allows the admin to set the accessibility according to the requirements. The eCommerce store admin can privatize the entire website or selected portion of the store. These options are available in the access settings sub-menu.

Privatize Shop type: The store admin can select the type of privatization. The admin can select complete shop or selected items.

3.2.1 While Selecting Complete Shop

  • Allow IP addresses: Admin can list the IP address. The listed IP addresses will be allowed to access front-office every time.
  • Allow Google to Crawl Your Store:The store admin can enable or disable the settings to allow or disallow Google to crawl.

3.2.2 While Selecting Selected option

  • Allow IP addresses: Admin can list the IP address. The listed IP addresses will be allowed to access front-office every time.
  • Choose Private Products: The admin can enter the product name. The admin can mark the products for the private customer.

  • Choose Private categories:The store admin can select the categories, which he wants to mark for private customers.
  • Choose Private pages:Select the pages to mark as private.

  • Allow Google to Crawl Your Store: The store admin can enable or disable the settings to allow or disallow Google to crawl.

3.3 Private customers

Once the eCommerce store admin has Restrict categories and products using the module, they will see the list of private customers from the admin interface. The admin can view the particular customer’s details and can verify the newly registered customer’s account.

  • For verifying the newly registered customer account the admin just needs to click on the highlighted icon.

  • Admin can delete the customers account from the admin interface just by clicking on the “delete” option.

  • Admin can also view the details of the private customers from the admin interface.

4.0 Front-end interface

In the frontend interface, the customers can view the login/signup page as per the settings. They can login or register to view the products. If the admin select the modern signup/login format then the front-end interface will be displayed as shown below:

New customers can register here:

The customers can click on the forget password button if required. Here, they can enter the registered email address and get the reset link on that email id.

If the store admin selects the default login/signup format, the front-end interface will be displayed as shown below:

The customers can click on the forget password button in case of login difficulty. They just need to enter their registered email id in order to get reset password link.

The customers can view this message before validation of the newly registered account.

5.0.0 Tutorial Video of Prestashop Private Shop Module

Checkout our complete tutorial videos, which cover all the features from Installation to the complete frontend working.


This module is also compatible with our Custom Registration Fields – Prestashop Addons.

For more Prestashop Addons please visit Knowband.

Prestashop Voice Search and Typing Addon- User Manual

1. Introduction

Knowband’s Prestashop Voice Search and Typing module integrates the Voice recognition functionality in your PrestaShop store with ease. With Prestashop Vocal Search Addon, the e-merchant has the ability to makes the account registration and checkout process easier and faster. The customers can insert all the required details by just speaking in the microphone. Additionally, they get an option to search the desired product using voice command. Prestashop Voice Recognition System devises a hand-free method to give inputs while query searching or while filling up checkout forms or PI forms. Voice Search and Typing addon ensure that the customer gets simple and best results with minimal efforts.

1.1 Features of Prestashop Voice Search and Typing Addon:

1. Prestashop Voice Search and Typing Addon by Knowband allows the customer to search for anything on your website just by speaking on the microphone.

2. Prestashop Responsive Voice recognition module easily recognizes the voice of the customer and processes the command.

3. The Prestashop store admin can enable/disable the vocal search option in the Search bar.

4. By using the Prestashop voice search and Typing module, the admin can enable the Voice recognition option in Mobile or Tablet device as well.

5. The store admin can enable the Voice recognition option on the Registration form as well. The Voice input works on the fields selected by the admin form the back-office.

6. Knowband Prestashop voice commander module can be enabled for the Address form, Guest Checkout form, Contact Us form, Personal information form and more.

7. The Prestashop Voice Search and Typing Module offers the admin Voice type on focus option.

8. The Customer can get the desired result easily.

9. Prestashop Voice Recognition System is multi-store compatible.

10. Prestashop Search By Voice Module by Knowband is Multilingual.

11. Prestashop Vocal Search Addon is SSL compatible.

12. Prestashop Voice Commander module is easy to use and handle.

Technology for Development

Language: PHP

FrameWork: PrestaShop

2.0 Steps For Installation of Prestashop Voice Search and Typing Addon:

1. The folder structure of the Prestashop Vocal Search Addon.


2. Copy the whole folder named as product update into your modules folder of the root directory of your PrestaShop store through FTP.

3. You will be able to find the product Voice Recognition System ready to be installed in the Modules in your PrestaShop store as shown below.

4. Click on the Install link to install the plugin.

Now, your Prestashop Search By Voice Module is ready to use and click on “Configure” link to configure this Prestashop Voice Commander module by Knowband.

3.0 Admin Interface of Prestashop Voice Search and Typing

After installing Prestashop Voice Search and Typing Module in the store, the Prestashop addon will provide the following interfaces:

1. General Settings

General Settings of this Knowband’s Voice Commander Module for Prestashop is explained below.

3.1 General Settings

In this tab of the Prestashop Voice Search and Typing Addon by Knowband, the admin can enable/disable the Voice Command feature of the various section like: Registration page, Contact us page, Additional information page, guest checkout form and Search bar of this Prestashop module in various languages. This tab will have the following options:

General Settings tab of this Prestashop Search by Voice addon has the following options:

Enable/Disable: Initially, this field of Prestashop Voice Search and Typing Module by Knowband will be disabled. The admin can enable/disable the Addon by toggling the button.

After enabling this voice search setting, it will add the Voice Search feature to your store. The customers get easy navigation option. They can browse the category or land on the desired product just by using voice assistant. This saves the effort of typing manually.

When the customer clicks on the Voice Command button, the pop-up notification appears on the screen asking permission for accessing the microphone as shown below:

After enabling the notification, the customer will be able to speak on the microphone.

Enable/Disable in Desktop Device: In this section, the store admin can enable the voice command feature in the desktop site as well.

Front End Preview:

The customers can easily browse the desktop website device just by speaking the microphone.

Enable/Disable in Mobile/Tablet Device: By using this Prestashop Vocal Search Addon, the admin can enable the Voice recognition feature on Mobile Device just by toggling the button.

Front End Preview:

Enable/Disable for Search Bar: Using this option of the Prestashop Voice Recognition System Module, the store merchant can enable the voice command functionality for Search Bar.

Enable/Disable for Registration Form: Prestashop Voice Search and Typing Module gives an option to the eCommerce retailer to enable the Voice Recognition System on the Registration form.

Select Field for Registration Form: Here, the store merchant can select the registration form field. In which they want to enable the Voice feature like: First name, Last Name and more.

Enable/Disable for Personal Information Form: This option allows the admin to offer the Voice command feature on the customer personal information form. The customer can update the information just by speaking the microphone. The addon will capture the command given by the user through a microphone and input the same in the respective field.

Select the Personal Information Field: The admin can select the field for providing the voice option.

Enable/Disable for Address Form: Prestashop Voice Search and Typing Module gives an option to the eCommerce retailer to enable the Voice Recognition System on the address form.

Select the Address Form Field: In this field, the Prestashop store admin can allow the customer to fill the Address by speaking on the Microphone. As per the requirement, the admin can enable voice commander function First name, Last name, Company name, Address and more. The customer can easily fill the personal information by speaking in the Microphone.

Enable/Disable for Guest Checkout Form: Prestashop Voice Search and Typing Addon gives an access to the guest users to fill the checkout information whatever the Guest user speaks on the microphone.

Select the Guest Checkout Form Field: With the help of Prestashop Voice Reminder module, the Prestashop store owner can enable the voice recognition feature in Guest Checkout form as well.

Enable/Disable for Contact Us Form: The Prestashop Search By Voice Module allows the store admin to enable the voice recognition function on the contact form.

Enable Voice Type on Focus: The Customers can activate the Microphone without clicking on it if the admin enables Voice type on focus setting then Microphone will be activated at the same time when the customers click on the field.

Prestashop Accelerated Mobile Pages (AMP) Addon- User Manual

1.0 Introduction of Knowband Prestashop Accelerated Mobile Pages (AMP) Addon:

Accelerated mobile pages or AMP can effortlessly boost the performance of the websites on the mobile devices. AMP provides convenient access to information on the Internet from the screens of smartphones and tablets. AMP is an advance Google technology which reduces the load time of the mobile website. With the introduction of mobile-first indexing, the goal of every eCommerce store owner should be to reduce the load time of their websites for the mobile users. High load time increases the bounce rate of the website. For increasing the performance of Prestashop store website on mobiles, Knowband offers the Prestashop Accelerated Mobile Pages (AMP) Module.

Prestashop AMP module allows the admin to convert the home page, category pages, product pages and CMS pages into fast-loading AMP pages. By limiting the data displayed, Prestashop Accelerated Mobile Pages Module reduces the load time of the mobile sites. Also, with the Prestashop addon, the e-merchant has an ability to enable/disable additional sections on the webpages like Best Sellers, Featured Products, New Arrival. You can now provide amazing user experience to your audience base who browses the site through their handheld devices. In the mobile generation, once your mobile-first customers are happy, sales will happen easily.

1.1 Features of Prestashop Accelerated Mobile Pages Module:

1. Prestashop Accelerated Mobile (AMP) Module allows the store admin to convert web page to AMP without making any core changes in the code of the website. This limits the data displayed on the mobile site, thus, boosting the load time of the same. In short, the Prestashop addon can amp up the load time of the mobile sites by creating accelerated mobile pages of the site. However, it will not affect the load time or performance of the desktop sites.

2. With the help of the Prestashop AMP Module, the store admin can convert the home page, category pages, product pages and CMS pages to AMP.

3. Knowband’s Prestashop Accelerated Mobile(AMP) addon provides an option to the store owner to customize the home page, category pages, product pages and CMS pages settings form the back-office.

4. The admin can upload the Business logo on AMP and they can also fix the width and height of the website.

5. Prestashop AMP Module offers the store merchant an option to add the Custom CSS for adding the additional functionality.

6. Google Accelerated Mobile Pages Module enables the store admin to enable/disable the display of the bestsellers option, featured and new products on home page. Apart from this, they can set the number of featured products to be shown in a particular section. The random products are automatically fetched and displayed to the user.

7. The Prestashop store owner can change the banner of the best sellers, featured and new products on the homepage.

8. Prestashop Accelerated Mobile Pages (AMP) module has provided the social media sharing options on the AMP. Even admin can add more icon by adding the script.

9. The Admin can customize the categories of AMP from the back-end of the Prestashop AMP Module. The customers to browse categories from the AMP page.

10. By using the Google Accelerated Mobile Pages Module, the admin can automatically generate AMP sitemap with the help of CRON.

11. The Admin can generate AMP sitemap by click the button.

12. Knowband’s Prestashop Accelerated Mobile Pages Addon supports Google Analytics. The eCommerce admin can enter the Analytics client Id for tracking the AMP performance.

13. Google Accelerated Mobile Pages Module supports multiple languages.

14. With the help of Prestashop AMP Module, the Prestashop store admin can set color and background color for AMP website and other different blocks of AMP.

15. Prestashop AMP module is easy to use and handle.

16. This Knowband’s Prestashop AMP Module also supports GDPR compatibilty. Admin can map the cookie policy to any CMS page of the website.

17. The eCommerce store owner can show YouTube, Vimeo and DailyMotion videos on the homepage of mobile pages.
18. Google Accelerated Mobile Pages(AMP) Addon provides an   option to display Instagram and twitter feeds on the homepage.
19. The e-merchant can manage the look and feel of cookie consent bar from the admin interface without any hassle.
20. The store admin can display advertisement on all the Mobile Pages by including Google adsense from the admin interface of Prestashop Accelerated Mobile Pages module.
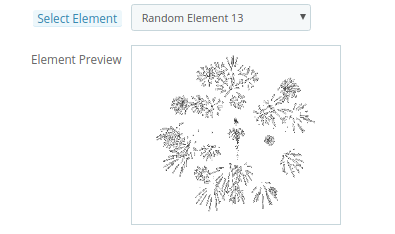
21. The store owner can also implement Facebook pixel on the mobile pages. Facebook pixel is an analytic tool which tracks the store visitors.

Technology for Development

Language: PHP

FrameWork: PrestaShop

2.0 Steps For Installation of Prestashop Accelerated Mobile Pages (AMP) Addon:

1.The folder structure of the Prestashop AMP module.

2. Copy the whole folder named as product update into your modules folder of the root directory of your PrestaShop store through FTP.

3. You will be able to find the product AMP plug-in ready to be installed in the Modules in your PrestaShop store as shown below.

4. Click on the Install link to install the plugin.

Now, your Prestashop Accelerated Mobile Pages (AMP) Plugin is ready to use and click on “Configure” link to configure this Prestashop module by Knowband.

3.0 Admin Interface

After installing Google Accelerated Mobile Pages(AMP) Module into the store, the Prestashop addon will provide the following interfaces:

1. General Settings
2. Home Settings
3. Category Page Settings
4. Product Page Settings
5. Menu Settings
6. Look and Feel Settings
7. Social Media Settings
8. Extra Icon Settings
9. Google Settings
10. Sitemap Settings

Each interface of this Knowband’s Accelerated Mobile Pages (AMP) module for Prestashop is explained below.

3.1 General Settings

General Settings tab of this Prestashop AMP addon has following options:

  • Enable/Disable: Initially, this field of Prestashop Accelerated Mobile Pages module by Knowband will be disabled. The admin can enable/disable the plugin by toggling the button.
  • Enabling this setting will convert the Website Pages into AMP.
  • Force AMP on Mobile Device: In this section of Knowband Prestashop AMP addon, the admin can enable the settings to AMP pages on Mobile Device.
  • Website Logo: Using this option of the Google Accelerated Mobile Pages(AMP) Module, the store merchant can upload or change the logo of the AMP.
  • Logo Width: Here the store admin can set the width of the Logo in Pixel.
  • Logo Height: Here the store admin can set the height of the Logo in Pixel.
  • Enable GDPR Cookie Consent Bar: Admin can enable/disable this setting to display on AMP pages.
  • Cookie Consent Message: Admin can add custom text for cookie consent bar displayed to the user.
  • Cookie Policy: Admin can select the page which is to be displayed on Cookie Policy.
  • Enable/Disable Home Page AMP: The store admin can enable/disable AMP on the Home Page of the site. After enabling the option, the admin can check the Home page AMP by clicking on the Preview button.
  • Enable/Disable Category Page AMP: The store admin can enable/disable AMP on the category pages. After enabling the option, the admin can check category page AMP by clicking on the Preview button.
  • Enable/Disable Product Page AMP: Using this option of the Prestashop Accelerated Mobile Page (AMP) addon, the store admin can enable AMP on the product pages AMP of the site and can view the same by clicking on the PREVIEW button.
  • Enable/Disable CMS Page AMP: Prestashop AMP Page Module gives an option the store retailer to convert the CMS page to AMP. The look and feel of the pages can be viewed by clicking on the Preview button.
  • Custom CSS: Prestashop store admin can add Custom CSS code as per business requirement in this section.

3.2 Home Page Settings

In this tab of the Prestashop Accelerated Mobile Pages (AMP) Addon by Knowband, the admin can enable/disable the display of new arrivals, best sellers and featured products on the AMP Home page of this Prestashop module in various languages. This tab will have the following options:

1. Home Page Settings
2. Featured Product Settings
3. Best Selling Product Settings
4. New Arrival Product Settings

3.2.1 Home Page Settings:

  • Display Custom Text: The Admin can enable/disable the Custom Text option here.
  • Custom Text: In this Google Accelerated Mobile Pages Addon, the store admin can change the text of the Home page block.

  • Display Position: The admin can select the display position that will be reflected the front end of the site.

3.2.2 Featured Products Settings:

  • Enable Featured Products: Using this option of the Prestashop AMP extension, the eCommerce store admin can enable/disable the featured products section.
  • Display Featured Products in Carousel: Here the store admin can the featured products in the carousel.
  • Random Display: The Store admin can enable/disable the Random product display option. After enabling this feature, random product display in the particular section in AMP.

  • Number of Featured Products: Knowband’s Prestashop Accelerated Mobile Pages Addon allows the store admin to select the number of products which they want to show in the Feature Product section.
  • Display Banner: The eCommerce merchant can enable/disable the display banner option.
  • Upload Banner: In this field, the store admin can upload the banner for the featured product.

3.2.2 Best Selling Products Settings:

In this tab, the Prestashop store admin can customize the settings of the best selling product. Refer to the attached screenshot below:

3.2.3 New Arrival Products Settings:

The admin has control over the display of New Arrival Product positions on AMP pages.

3.2.4 YouTube Video

Here, you can apply the settings for showing the YouTube videos.

  • Display Youtube Video: The store admin can enable or disable the settings to show youtube videos on the homepage.
  • Youtube video id: The online store admin can enter the video id in order to display it on the homepage.
  • Enable Youtube header text: The Prestashop Accelerated Mobile Pages Addon provides an option to enable the settings for showing youtube video’s header text.
  • Youtube header text: Admin can set the header text in various languages.
  • Autoplay: Admin can apply the settings for video autoplay.
  • Display controls: Admin can show the display controls by enabling the option.
  • Display positions: The store admin can show the display position for the videos.

3.2.5 Vimeo Video

The store admin can also show Vimeo videos on the website’s homepage by applying these settings.

  • Enable the settings for showing Vimeo video on the homepage. Customization options are same as youtube videos.

3.2.6 DailyMotion Video

As an eCommerce store admin, you can also show DailyMotion videos on the website homepage by applying these settings.

  • Display DailyMotion Video: The store admin can show DailyMotion videos on the homepage.
  • DailyMotion Video ID: The online store admin can enter the DailyMotion video id from the admin interface of this Google Accelerated Mobile Pages (AMP) Addon.
  • Enable DailyMotion Header Text: The store admin can enable or disable the settings from the admin interface.
  • DailyMotion Header text: Enter the header text here.
  • Autoplay: Enable to Auto play videos.
  • Enable End Screen: Enable the settings to show the end screen.
  • Enable video sharing: Allow video sharing by enabling the options.
  • Change Highlight color: Admin can also enable the settings in order to change the highlight color.
  • Highlight colors in the controls: Set the color from the color picker tool.
  • Display DailyMotion Logo: Enable the settings in order to display DailyMotion logo.
  • Display Position: Set the video position from the admin interface.

3.2.7 Instagram feed

Admin can show Instagram feeds on the homepage.

  • Display Instagram feed: Enable the settings to display Instagram feeds.
  • Feed id: Enter the feed id here.
  • Enable Instagram Header Text: Switch the button to yes in order to display header text.
  • Instagram Header Text: Enter the header text for Instagram.
  • Include Instagram Caption: Enter the Instagram caption in order to display it on the website homepage.

3.2.8 Twitter Feed

The online store admin can show twitter feed on the homepage if he wishes to do so.

  • Display Twitter Feed ID: Enable the settings in order to display twitter feeds on the homepage of the website.
  • Twitter ID: Enter the twitter id here.
  • Enable twitter header text: Enable the settings for showing header text.
  • Twitter Header text: Set the header text here.
  • Disable Twitter cards: By enabling the option you can show twitter cards on the homepage.

3.3 Category Page Settings

The Category Page Settings tab of the Prestashop Accelerated Mobile Pages Addon allows the admin to add the text and images. Apart from this, the admin can also define the position of the text on the Category page. This tab will have the following options:

  • Display Custom Text: The Admin can enable/disable the Custom message option.
  • Custom Text: Using this option of the Prestashop AMP Module, the eCommerce store admin can set the message of the category Page.
  • Display Position: In this tab, the store admin can change the display position as per desires. These changes will be reflected in the front of the store.
  • Product Image Size: The Prestashop store admin can set the Image type here.

3.4 Product Page Settings

The admin has control over product page settings on AMP pages. This tab will have the following options:

  • Display Custom Text: The Admin can enable/disable the Custom message option.
  • Custom Text: Using this option of the Prestashop AMP Module, the eCommerce store admin can set the message of the Category Page.
  • Display Position: In this option, the store admin can change the display position as per desires. These changes will be reflected in the front-end of the store.
  • Product Image Size: The Prestashop store admin can select the image size to be displayed here.
  • Display Short Description: In this option, the store admin can show the short description of the product by enabling this feature.

  • Display Long Description: The store owner has an option to show the long description of the product as per the requirement.

  • Display Product Review: By using the Prestashop Accelerated Mobile Pages Module, the store admin can enable the Product review option. After enabling this feature, product review will be shown in the front-end of the store.
  • Display Additional Info: By enabling this feature, the admin can show the additional info of the products.

  • Display Related Products: By enabling this option, the store admin can display related product. These changes will be reflected in the front of the store.

3.5 Menu Settings

In this Tab, the Prestashop store admin can configure the menus on AMP. The admin can even add new menu options. This tab will have the following options:

  • Enable/Disable: The admin can enable the AMP in menus by toggling the button.
  • Menu Title: Prestashop AMP Addon by Knowband allows the store admin to add the Menu by entering the title here.
  • Parent Menu Item: Here the eCommerce merchant can select the Parent menu as per the desire.
  • Menu Item Type: The Admin can select the item type of menu.
  • Select Category: The Store admin can select the specific page where they want to redirect the user to the defined AMP page.

NOTE: These Changes shown in the Menu Structure section.

3.6 Look and Feel Settings

The Admin can control the color settings, personalize their website AMP colors as per your needs. They can change the AMP page colors according to your theme and preferences. This tab will have the following section:

1. General Settings

2. Product Listing Settings

3. Category Settings

4. Product Settings

5. Cookie Consent Bar Settings

3.6.1 General Settings

In this tab of the Prestashop Accelerated Mobile Pages(AMP) addon by Knowband, the admin can customize the AMP Homepage settings. This tab will have the following options:

  • Background Color: The Admin can change the background color of the home page.
  • Font Color: The admin can change the font color from this section.
  • Header Background Color: This field of Prestashop Accelerated Mobile Pages (AMP) Module allows the admin to set the header background color.
  • Header Font Color: Using this option of the Prestashop AMP module, the admin can set the font color of the text displayed in the Header section.
  • Header Icon Color: The Prestashop store admin can change the icon color of the.
  • Footer Background Color: This option of the Google Accelerated Mobile Pages(AMP) Module allows the admin to set the background color of the Footer.
  • Footer Font Color: The admin can change the font color from this section.
  • Footer Lower Bar Background Color: The Store merchant can change the background color of the Footer Lower Bar.
  • Left Menu Slider Background Color: The Prestashop Merchant can change the Left menu slider background color in this section of Knowband Accelerated Mobile Pages(AMP) For Prestashop.
  • Left Menu Header Background Color: The Prestashop store admin can change the left menu header background color as per the requirement.
  • Left Menu Slider Font Color: The admin can change the font color from this section.
  • Left Menu Sidebar Icon Color: The admin can change the icon color from this section.
  • Header Left Background Color: In this section of Prestashop Accelerated Mobile Pages(AMP) Module allows the admin to set the header left background color.

3.6.2 Product Listing Settings

The admin can customize the settings of the Product listing as per the requirement. Below mentioned the option:

  • Product Title Color: In this section of Google Accelerated Mobile Pages(AMP) Module allows the admin to change the Product title color.
  • Product Title Font Size: The Store admin can set the font size of the Product.
  • Add to Cart Button Color: Knowband’s Prestashop AMP Pages module allows the admin to change the Add to Cart Button Color as per desires.
  • Add to Cart Button Font Color: The admin can customize the font color of the Add to Cart button.
  • Add to Cart Font Size: The Store admin can set the font size of the Add to Cart button.

3.6.3 Category Settings

In this tab, the store admin can customize the settings of the Category pages. These changes will be reflected in the front of the store.

  • Category Heading Font Color: The Prestashop store admin can change the category heading font color as per the requirement.
  • Category Heading Font Size: The admin can change the font color from this section.

3.6.4 Product Settings

In this section, the Admin can customize the Product settings as per the requirement. The configuration option of this section is same as discussed in the Product listing section.

3.6.5 Cookie Consent Bar

The store admin can set the look and feel of the cookie consent bar.

  • Cookie Consent Background color: Select the cookie consent background color with the help of color picker tool.
  • Consent message font color: Select the front color for consent message.
  • Background color of Accept button: Select the “Accept” button background color.
  • Font color of accept button: Set the font color of accept button using color picker tool.

3.7 Social Media Settings

In this section of the Prestashop AMP module, the store admin can enable/disable the social media sharing option on the AMP webpages. All the enabled social media sharing options will be shown on the AMP. This tab will have the following options:

  • Display Shop Address in Menu Slider: The Admin can show the Store address by enabling this feature.
  • Display Shop Email Address: The Prestashop store owner can show the email address.
  • Display Shop Contact Number: In this field, the store admin can display the contact details of the site.
  • Display Facebook Icon: The store admin has the option to display a Facebook icon in the menu bar. For this admin need to specify the Facebook page URL in the respective field.
  • Display Twitter Icon: This section the admin can enable/disable the Twitter icon.
  • Display Google Icon: By using this Option the Prestashop store merchant can display the Google icon in the menu bar. For this admin need to Specify the Google page URL in the respective field.
  • Display Linkedin Icon: In this section, the store admin can display the Linkedin icon here. The Store admin must need to enter the URL of the profile.
  • Display Tumblr Icon: The Prestashop store owner can show the Tumblr profile here.
  • Display Pinterest Icon: The Store admin has the option to display a Pinterest icon in the menu bar. For this admin need to Specify the Pinterest page URL in the respective field.

3.8 Extra Icon Settings

In this section, the admin can add the extra social media icon as per the requirement of the business. This tab will have the following options:

  • Enable Extra Icon: The Prestashop store admin can enable/disable the extra icon feature. If they want to add more social media icon then they can add here with an ease.
  • Icon Class: The Admin can enter the Icon class.
  • Icon URL: In this tab, the store admin can Icon URL as per desires. These changes will be reflected in the front of the store.

3.9 Google Settings

The store admin can apply AMP Google settings from this section.

3.9.1 Google Analytics

Admin will need to have the Analytics Client ID in order to configure this feature.

  • Enable Google Analytics: If you want to track the performance of the accelerated mobile pages of your site, this feature allows the admin to enter Google Analytics client.
  • Analytics Client Id: The eCommerce merchant can enter your Google analytics client ID to configure.

3.9.2 Google Adsense

  • Enable Google Adsense: Activate or Deactivate the functionality from here.
  • Adsense ID: Enter the Adsense ID here.
  • AMP ad type: Enter the supported AMP ad type. This way the admin can specify an identifier for the ad network. The type attribute selects the template to use for the ad tag.
  • Display Google Adsense on Homepage: Enable the option in order to display Google adsense on Homepage.
  • Display Position on Homepage: Select the position for showing Google adsense on homepage.
  • Display Google Adsense on Product page: Enable the option to show adsense on Product page.
  • Display Position on Product page: Select the position for displaying Google adsense on product page.
  • Display Google Adsense on Category page: Enable the option to show adsense on category page.
  • Display Position on Category page: Select the position for showing Google adsense on category.
  • Display Google Adsense on CMS page: Enable the option to show adsense on CMS page.
  • Display Position on CMS page: Select the position for showing Google adsense on CMS.

3.9.3 Facebook Pixel

Facebook pixel is a analytic tool which helps to track store visitors. You can also implement this to get store visitor details on the Accelerated Mobile Pages.

  • Enable Facebook Pixel: Enable or disable the option from here for implementing Facebook pixel tool to track site visitors.
  • Facebook Pixel ID: Enter the Facebook Pixel ID here.

3.10 Sitemap Settings

In this section, the store admin can generate the AMP Sitemap by clicking the button.

Generating the Sitemap are here.

How to Generate Sitemap for AMP?

The Admin can generate Sitemap by running CRON.

Accelerated Mobile Pages(AMP) module allows the store admin to setup Cron via

URLs to Add to Cron via Control Panel
Cron setup via SSH

CRON Configuration:

In order to generate the Sitemap automatically, the Prestashop store admin can set up the cron job. There are two options available in the admin panel of the module.
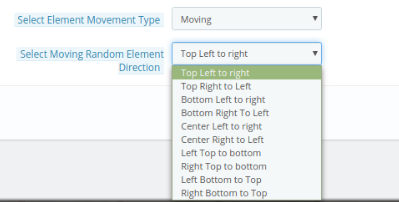
1.  The Admin can run the cron manually.

Add the cron to your store via control panel/putty to generate/update the sitemap. Please find the instructions to setup crons below –

URLs to Add to Cron via Control Panel

Generate Sitemap – 

https://psm.knowband.com/amp/16/en/module/kbamppages/cron?action=syncSiteMap&secure_key=09ce2811f9ab619dc4b64f69b134d4d4

Cron setup via SSH

Generate Sitemap – 40 * * * * curl -O /dev/null

‘https://psm.knowband.com/amp/16/en/module/kbamppages/cron?action=syncSiteMap&secure_key=09ce2811f9ab619dc4b64f69b134d4d4’

4.0 Front Interface of the Prestashop Accelerated Mobile Pages Module:

After enabling the Prestashop Accelerated Mobile Pages(AMP) Module by Knowband the store admin can enable the settings for the home page, category pages, product pages and CMS pages. As per the settings enabled by the admin, AMP will look as shown below:

Home Page:

Prestashop AMP Pages allows the admin to show the Best Seller, New Products and Features Product on the Home page. For better user engagement.
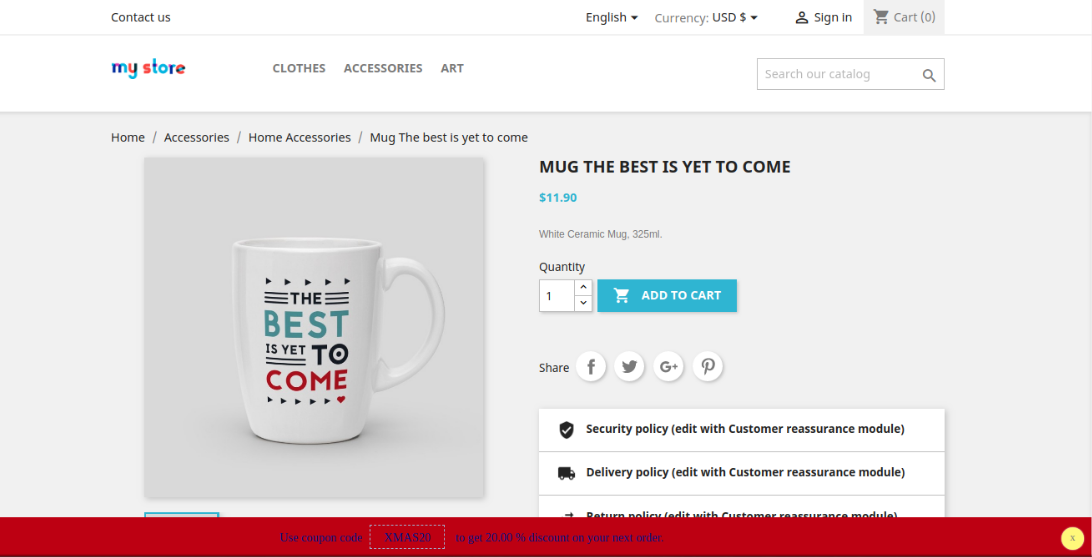
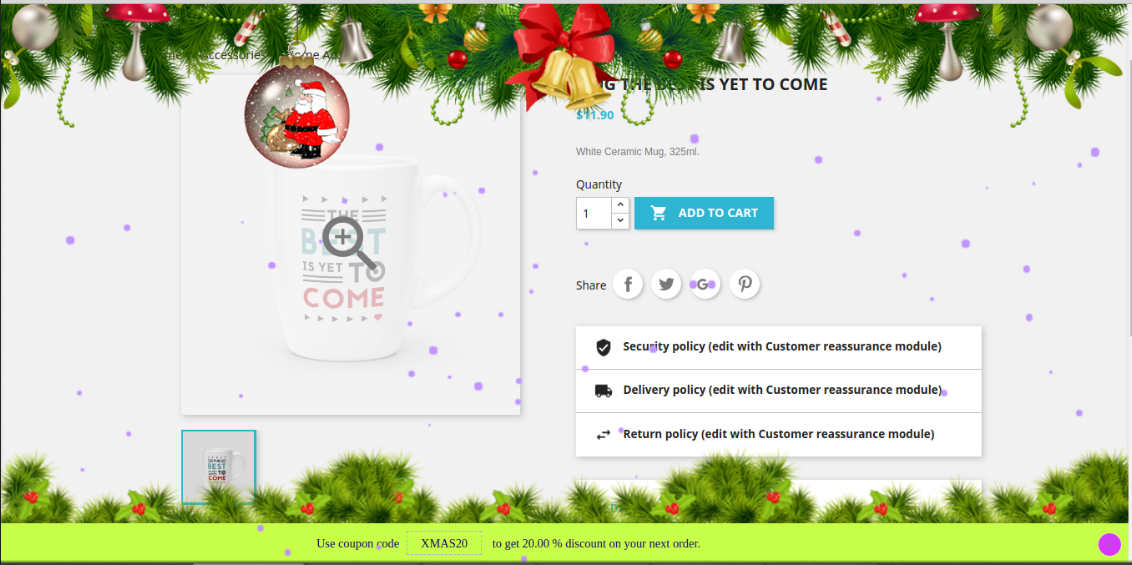
Now the online store admin can also show Youtube video, Vimeo video and Dailymotion video on the website homepage.

Apart from that, the store admin can show Instagram feeds and twitter feeds on the homepage.

Category Page

As per the setting enabled by the admin, the Category AMP Pages on the Mobile device will appear like this screenshot.

Product Page

As per the setting enabled by the admin from the back-office the layout of Product AMP Page on the Mobile device will appear like this screenshot.

CMS Page

The Admin can view the CMS page setting like below settings.

Menu Icon

Prestashop Accelerated Mobile Pages shows the Menu icon like this.

Cookie Consent Bar

Cookie consent bar will be displayed as shown below:

This way the online store admin can increase the speed of mobile website pages and offer a better store experience to the online store visitors and customers. This Prestashop Accelerated Mobile Pages module converts the general pages into accelerated mobile pages. The Prestashop Accelerated Mobile Pages Addon provides simple and easy steps to set up accelerated mobile pages. The e-merchant can separately configure the homepage, product pages and category pages. The Prestashop store admin can easily manage all the settings of Prestashop Accelerated Mobile Pages module without changing even a single line of codes. The e-merchant can also show product videos, menu items and social media icons easily.

For more information about PrestaShop Accelerated Mobile Pages(AMP) Addon:

PrestaShop Accelerated Mobile Pages Module Link

PrestaShop Accelerated Mobile Pages(AMP) Addon Admin Demo Link

PrestaShop Accelerated Mobile Pages(AMP) Addon Front Demo Link

Prestashop Accelerated Mobile Pages plugin marketplace link

Prestashop Accelerated Mobile Pages Addon Video Link