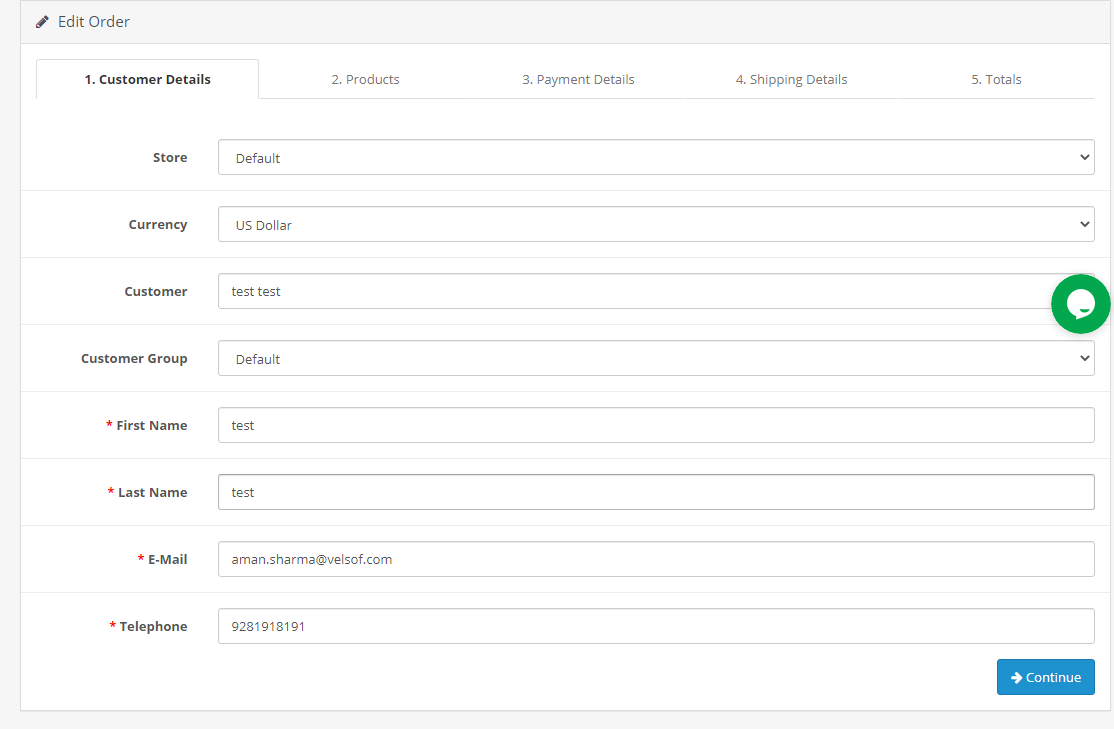
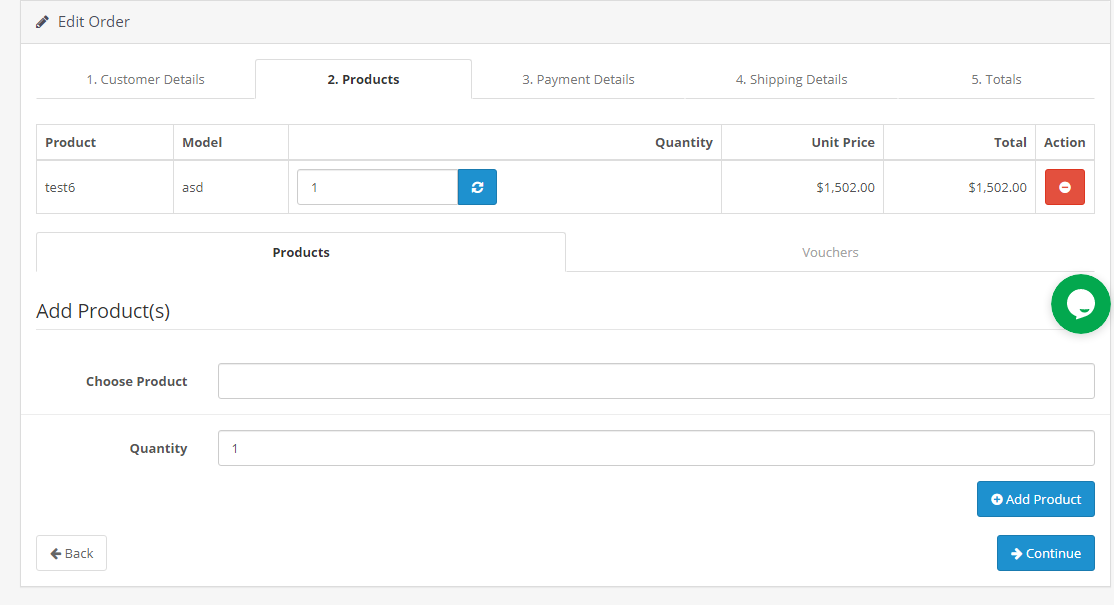
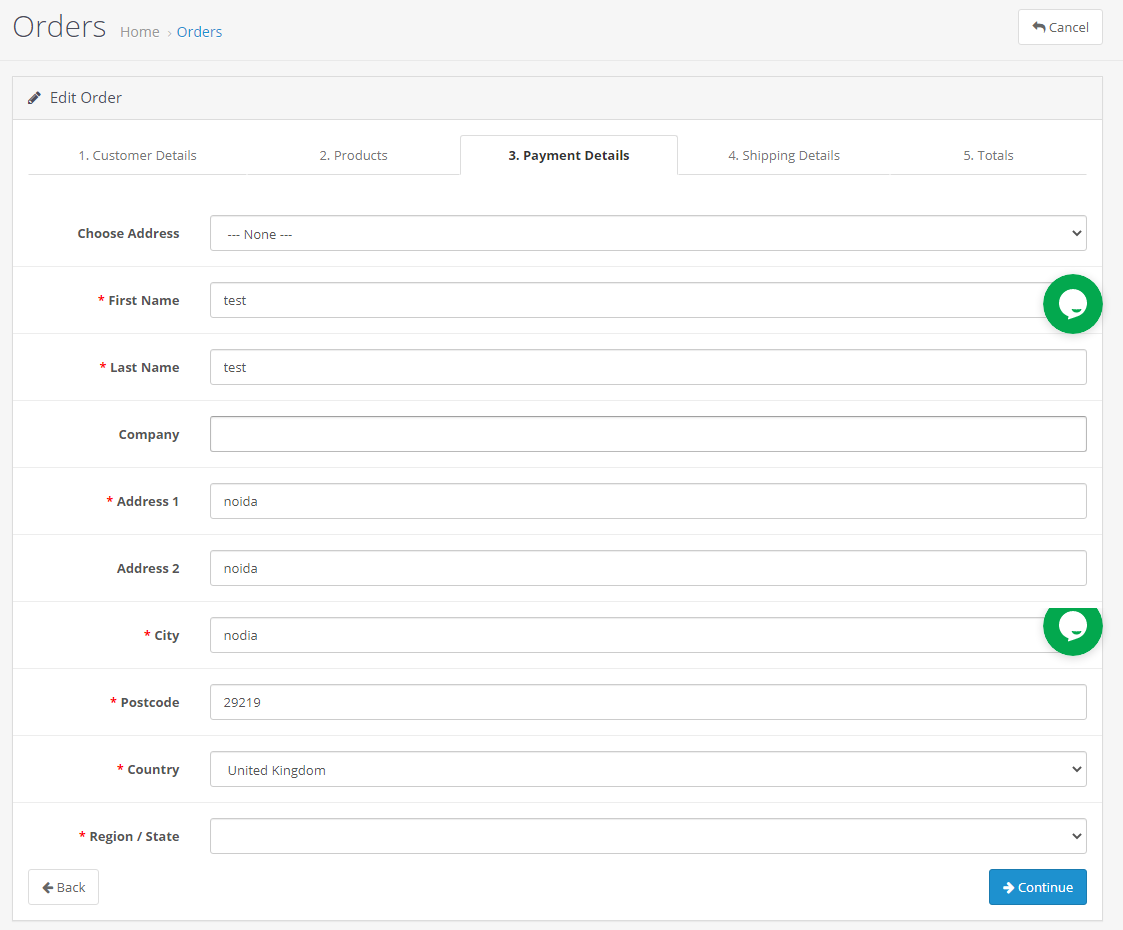
The Magento 2 store owners get an option to add additional information fields on the registration form with Magento 2 Customer Registration Fields extension. Knowband offers Magento 2 Custom Registration Fields extension that allows the admin to add custom fields on the registration form. The admin can even add and manage the look and feel of the custom fields by adding additional CSS. These details collected from the additional field can be used for marketing and sales perspective in future.
This Magento 2 Custom Fields Extension provides an option to add new custom fields and update the old custom field in the registration form. The admin can validate the custom fields from the admin interface. The Magento 2 custom registration form module allows the admin to display the details on the invoice of the customers.
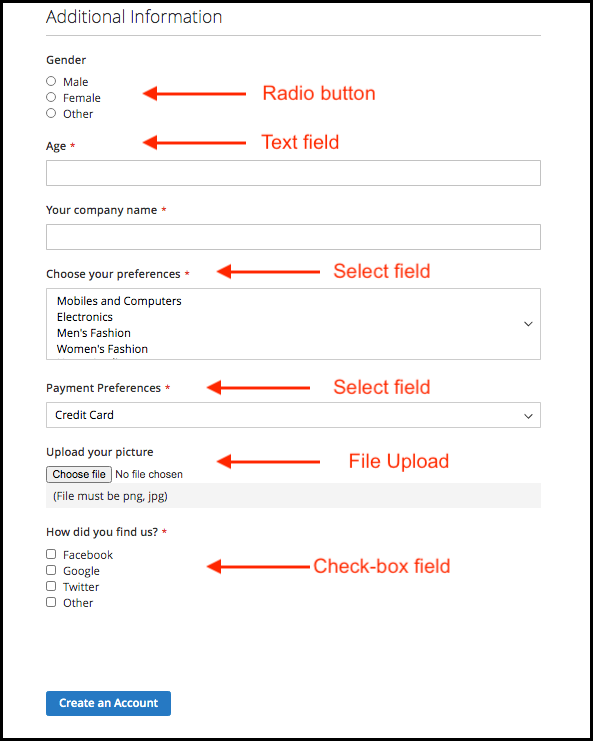
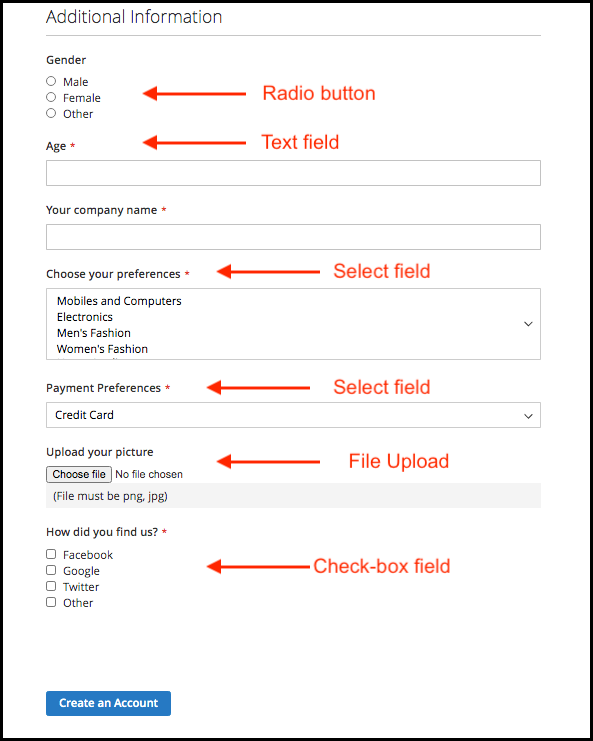
The Magento 2 Registration Fields module allows the admin to create partitions of the signup form for showing the custom fields specifically. Multiple custom fields can be selected like a text box, radio button, check boxes, date, select, text area and a file field.
1.1 Salient Features of Magento 2 Custom Registration Fields extension
New custom fields for the registration form can be created without any complicated task by using this Magento 2 Custom Registration Fields module.
The Magento 2 Registration Fields module allows the online store admin to create sections of the registration form for showing the custom fields.
The Magento 2 Custom Registration Fields extension allows the admin to create n number of custom fields. The plugin offers an option to create the custom section and the fields can be placed in the desired section with ease.
The Magento 2 custom registration form module allows the store admin to apply validations from the admin interface.
No code changes required for implementing the Magento 2 custom registration form module.
Admin can add custom CSS code to change the look and feel of the custom fields from the admin interface of this Magento 2 Custom Registration Fields plugin.
Custom registration field extension offers various fields like a radio button, text, select, text area, check-box, date and file field.
The store admin can show the customer details of the specific field on the invoice by enabling the option from the admin interface of this Magento 2 Registration Fields plugin.
Store admin can restrict the length of the custom fields from the admin interface of the Magento 2 Custom registration field extension.
The store owner can easily install, configure and use this Magento 2 Custom Registration Fields extension.
Store admin can allow the customers to edit the custom field information if required.
This Magento 2 Custom Fields plugin allows adding, updating and deleting the custom field without any difficulty.
2.0 Installation
After purchasing Magento 2 Custom Registration Fields extension, the store admin will get the following files:
1. Knowband_Customfield.zip which contain source code of the Magento 2 Custom Registration Fields extension. 2. User Manual which includes all the details and helps regarding the extension.
The steps to install the Magento 2 Custom Registration Fields extension are mentioned below:
Buy the Magento 2 Custom Registration Fields extension from Knowband. You can download the extension package.
The package has a zipped file that contains the user manual and the source code of Magento 2 Custom Registration Fields extension. Unzip the package.
Create a folder {Magentoroot}/app/code/Knowband/Customfield
Upload the extracted content in the above folder via FTP manager (like Filezilla or WinSCP – download here: https://filezilla-project.org/).
Now run below commands to install the plugin:
php -f bin/magento module:enable –clear-static-content Knowband_Customfield
php -f bin/magento setup:upgrade
php -f bin/magento setup:di:compile
php bin/magento setup:static-content:deploy
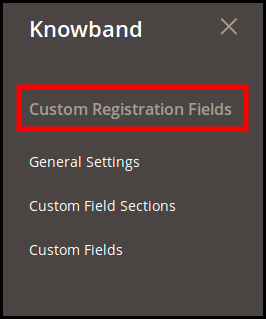
The extension is now installed and ready for use. In Admin Panel go to “Knowband Extensions >Custom Registration Fields”.
You can now configure and use the Magento 2 Custom Registration Fields extension.
3.0 Admin interface
After successful installation, the store admin can configure the custom registration field module. Once the Magento 2 Registration Fields module is installed, the admin can enter the admin interface. In this Magento 2 custom field registration extension, you will find three customization options.
General Settings
Custom Field Section
Custom Fields
3.1 General Settings
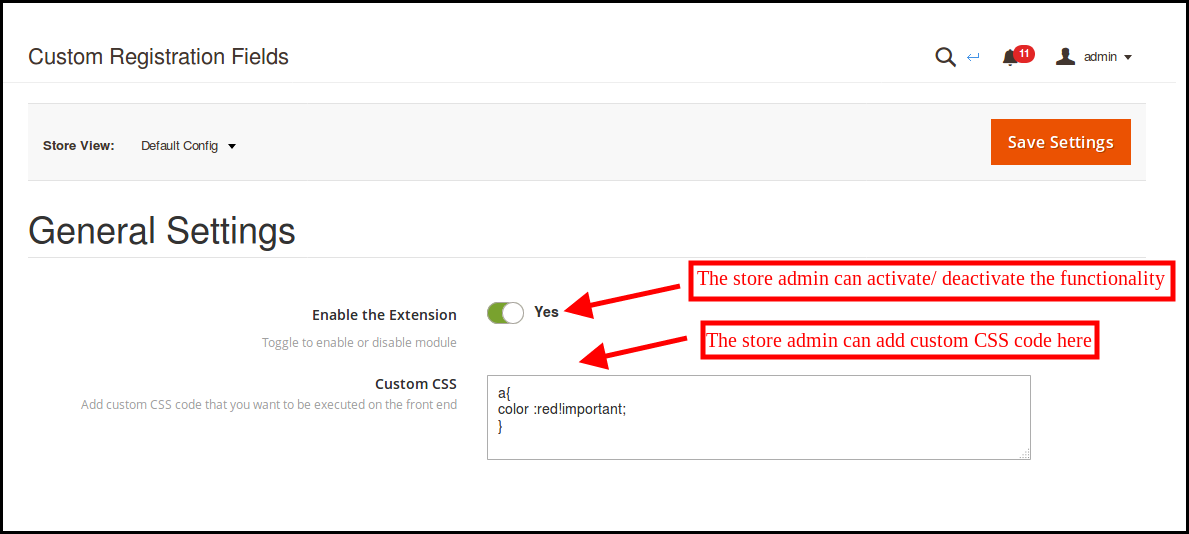
The store admin can enable the functionalities from the “general settings” menu.
Enable the Extension: The store admin can activate or deactivate the functionality from the admin interface.
Custom CSS code: The store owner can add custom CSS code to change the look and feel of custom fields.
3.2 Custom Field Sections
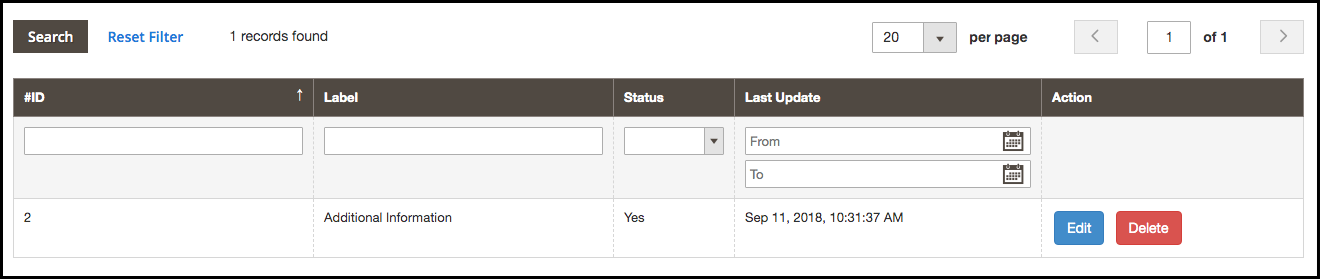
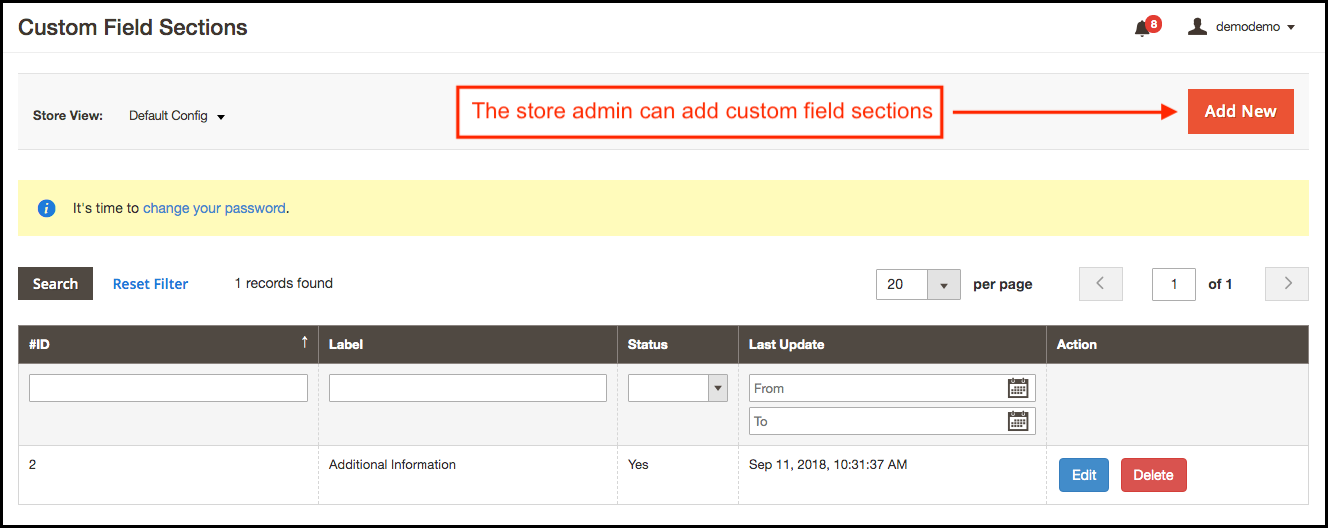
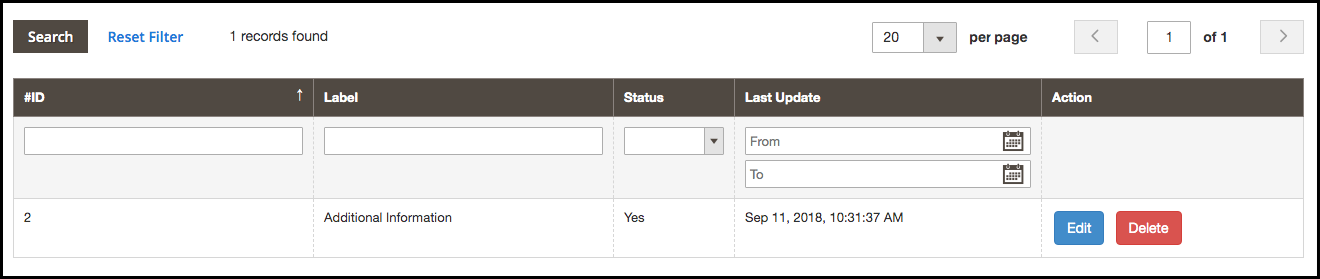
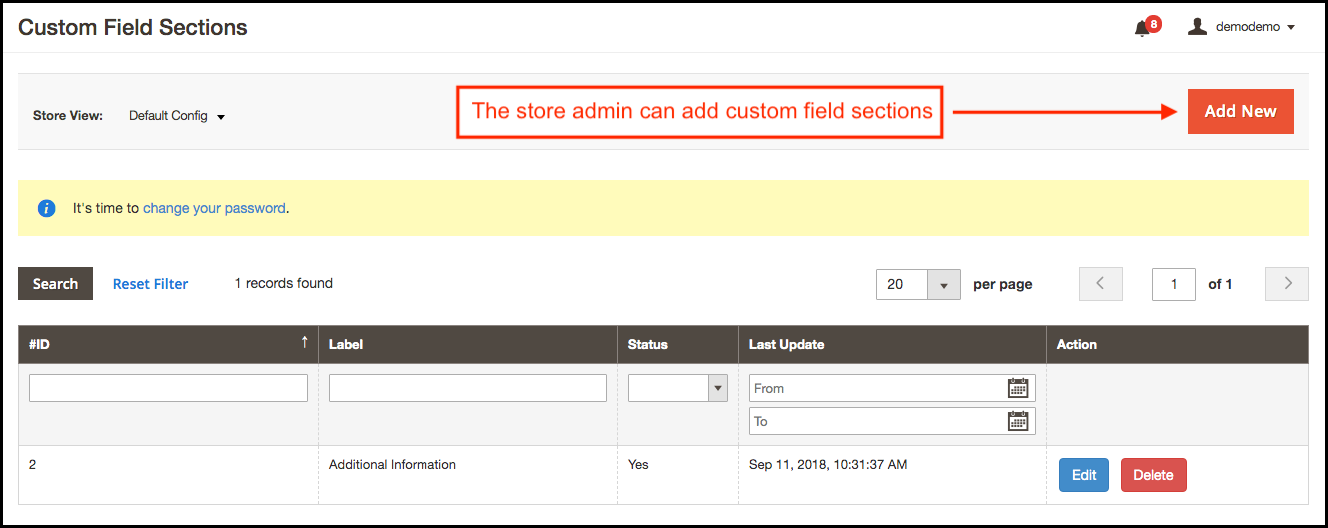
The Magento 2 Custom Fields Extension allows the admin to create the section to display the additional custom fields. Here the store admin can view the list of the custom field sections as shown below:
3.2.1 How to add a new custom section field?
The store admin can click on the add new option in order to add custom field section.
Here are various fields for the field creation:
Label: The eCommerce store admin can set the label for the custom field section from this tab.
Enable: The store admin can activate or deactivate the custom field sections as per the requirement.
3.2.2 How to edit new custom section field?
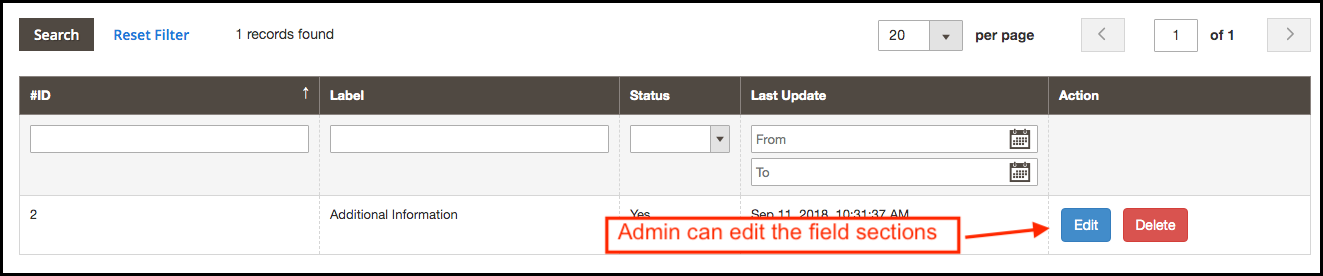
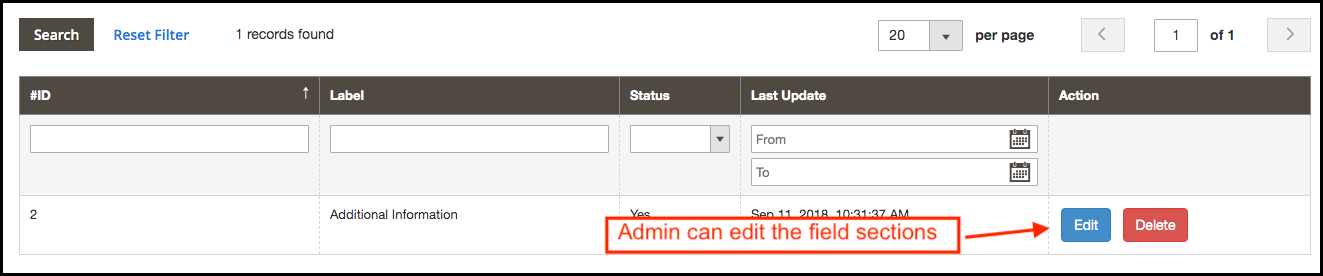
In order to edit the custom section field sections, click on the Edit button corresponding to each field. The admin can change the label name and activate the activate or deactivate this module just by clicking on the enable button.
3.2.3 How to delete new custom section field?
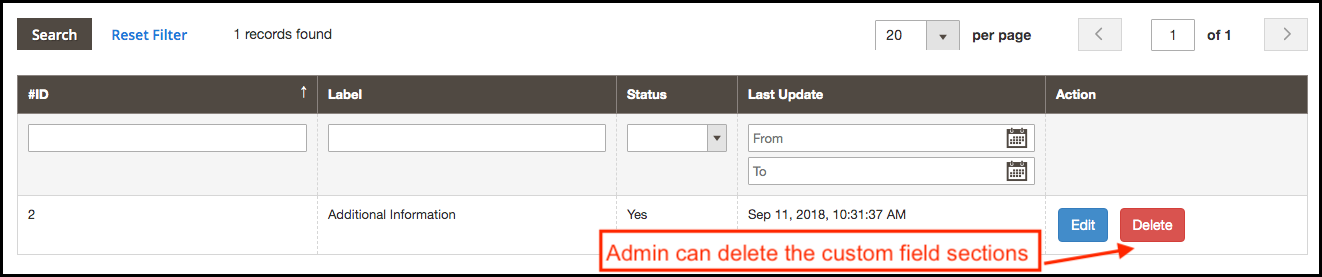
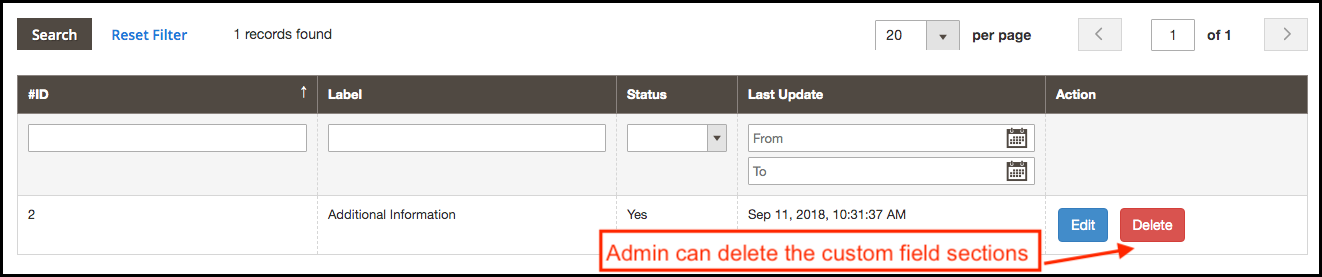
The eCommerce store admin can also delete the custom field sections by clicking on the “Delete” option.
3.3 Custom Fields
The Magento 2 store owner can display the custom field after enabling the custom field sections. The admin can set the custom fields as per the requirements.
The store admin can add, delete and update the custom fields anytime.
3.3.1 How to delete the custom field?
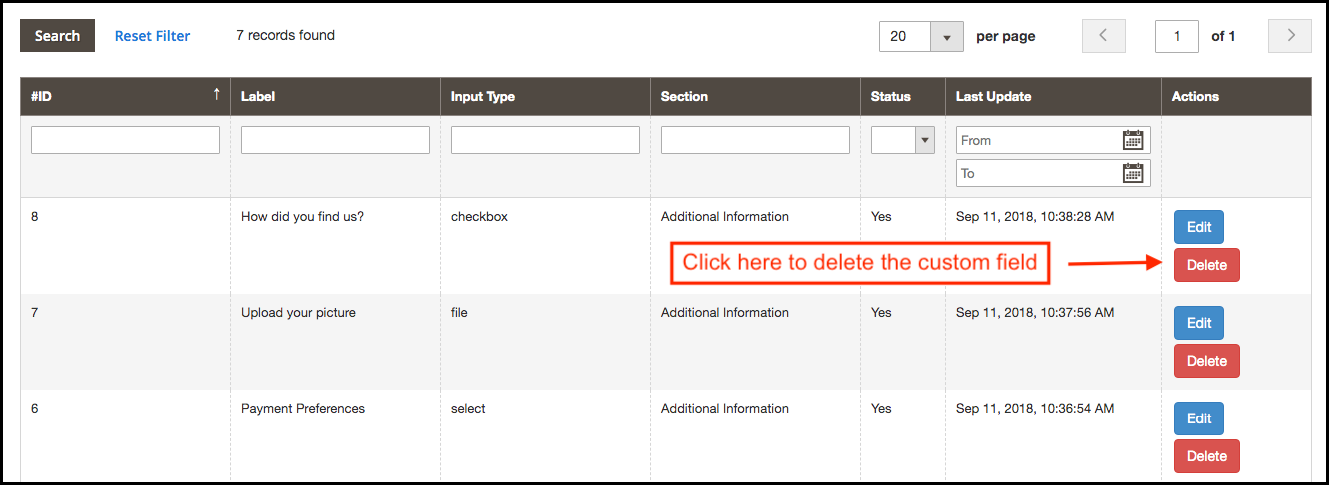
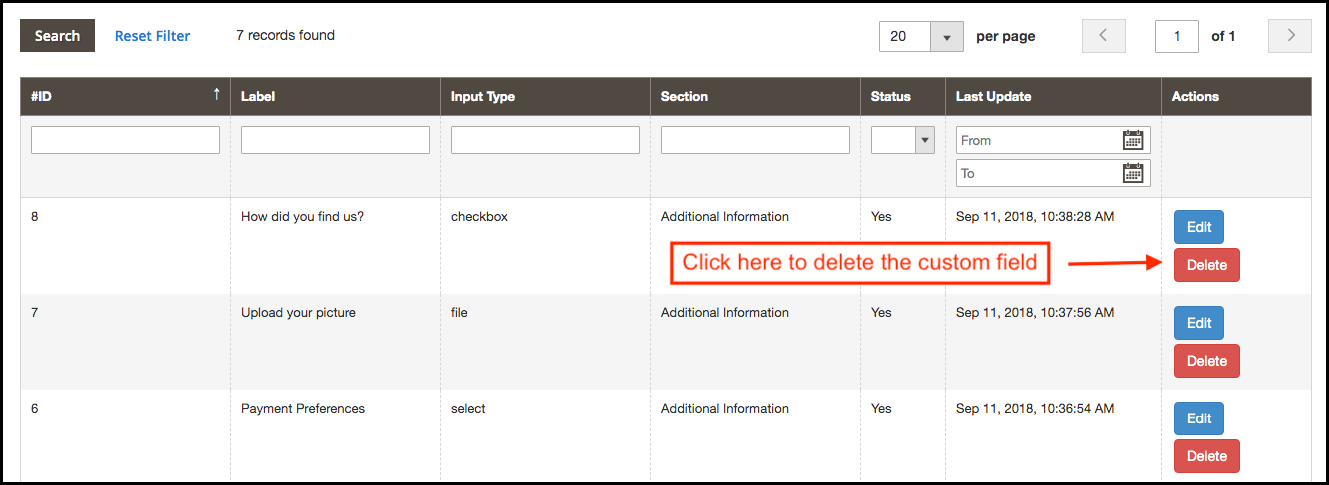
The store owner can delete any custom field from the admin interface easily. The admin can click on the delete button. After that, a confirmation pop-up will display and by selecting yes the admin can confirm the request.
3.3.2 How to edit custom field?
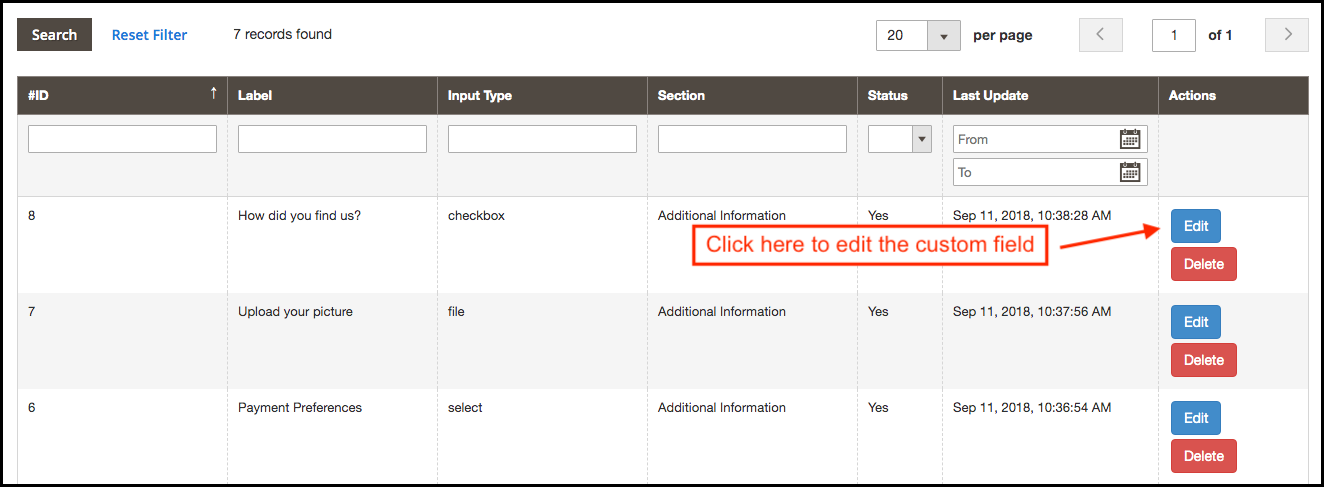
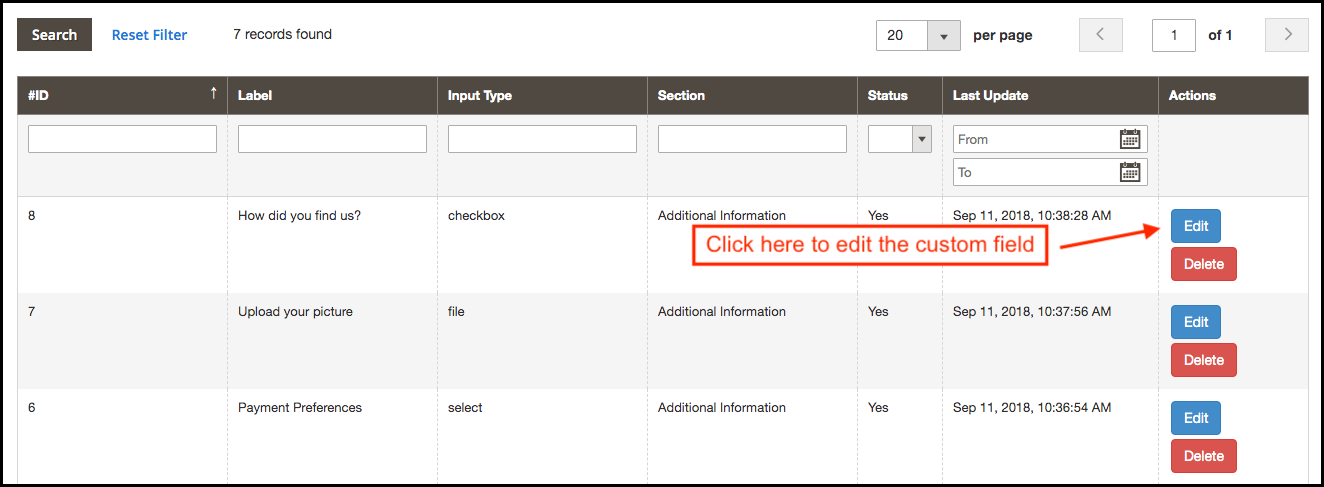
The store admin can also edit the previously created custom fields. The admin needs to click on the edit button for updating the previous settings.
3.3.3 How to add a new custom field?
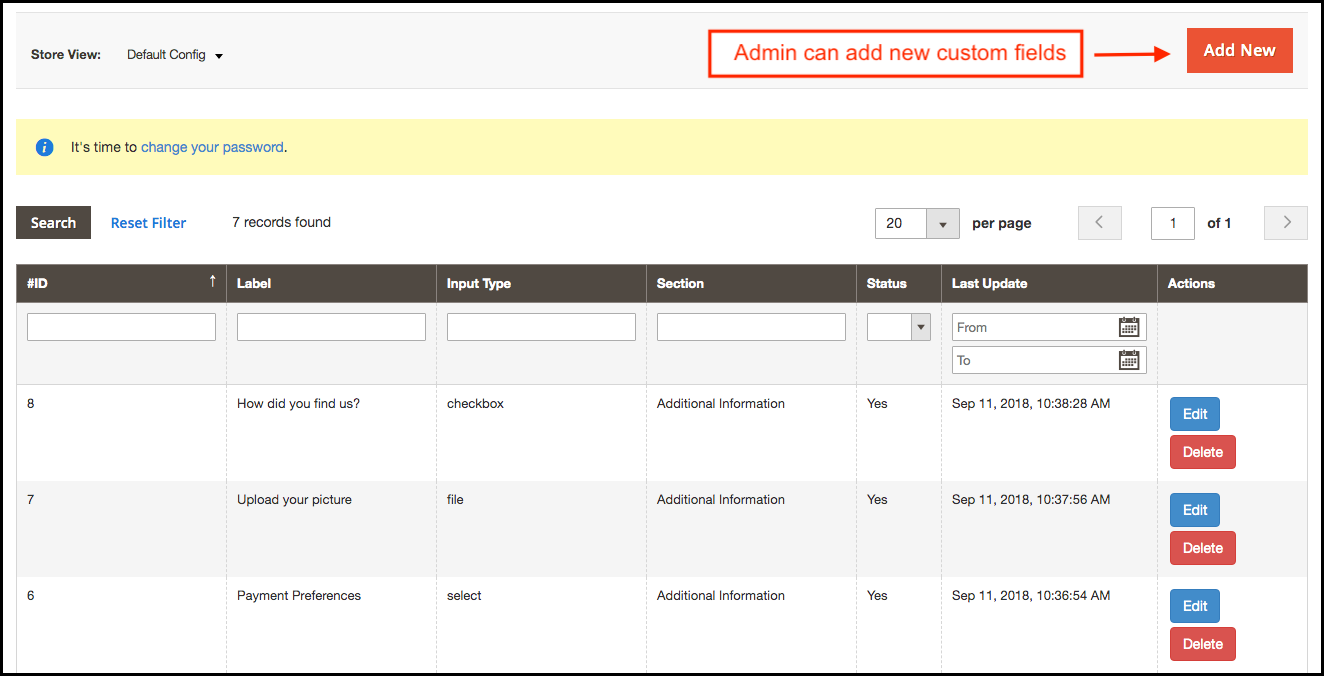
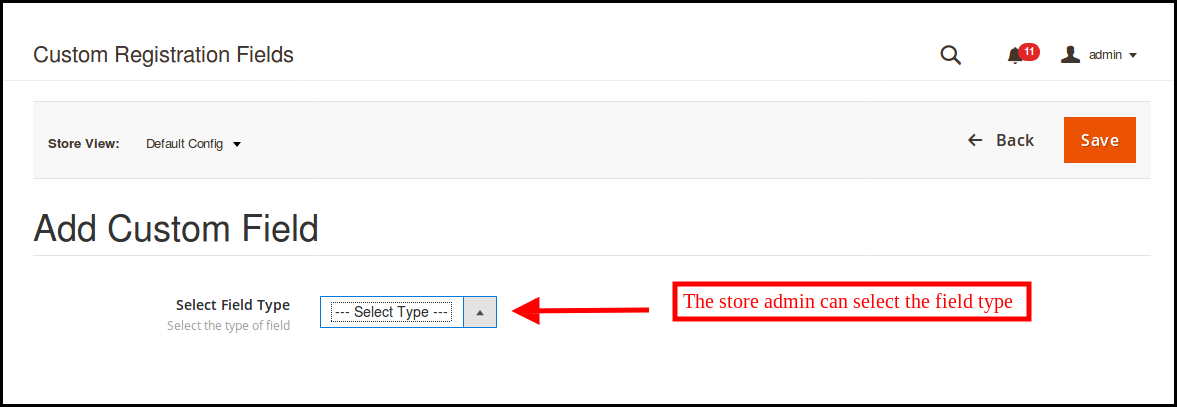
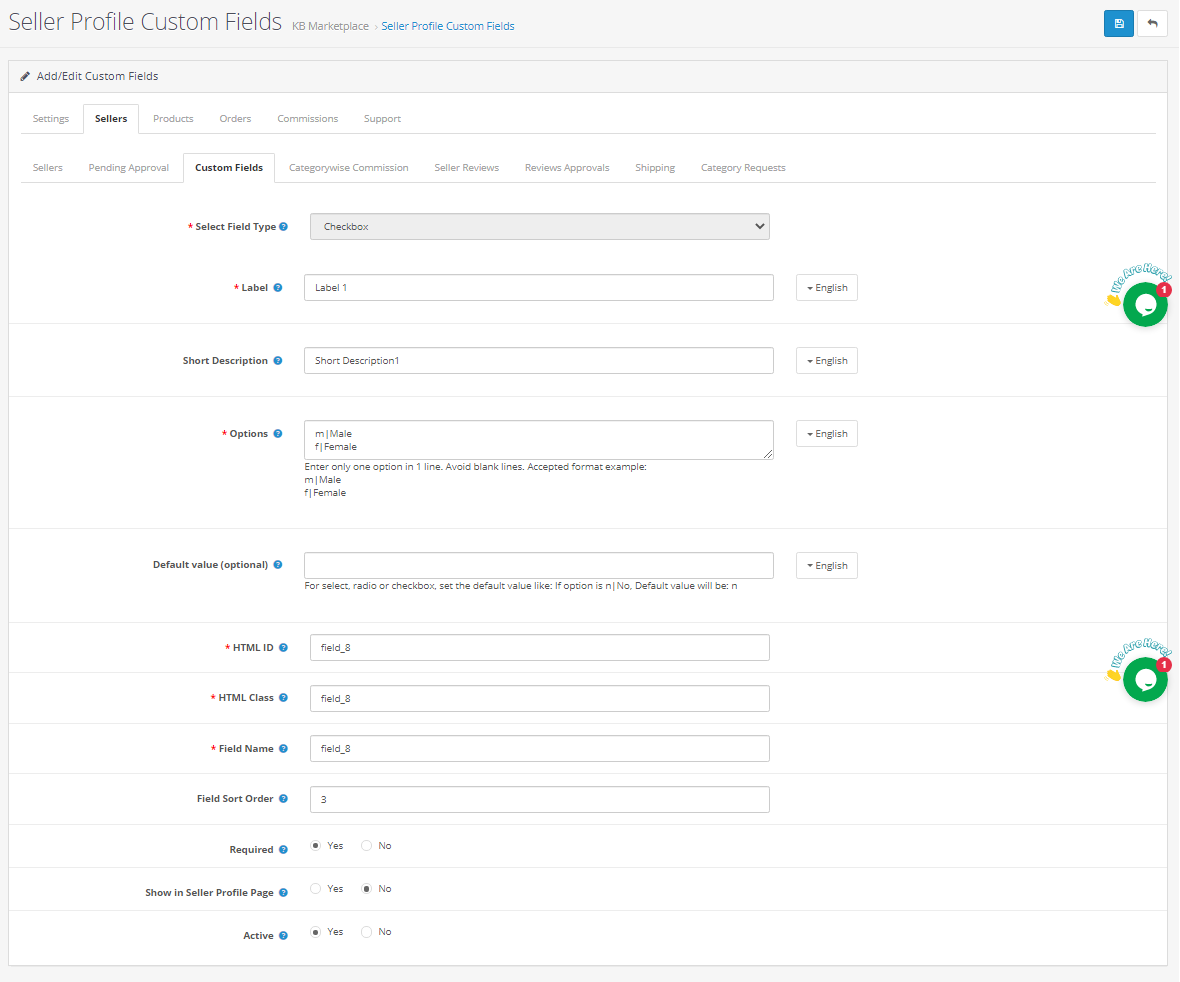
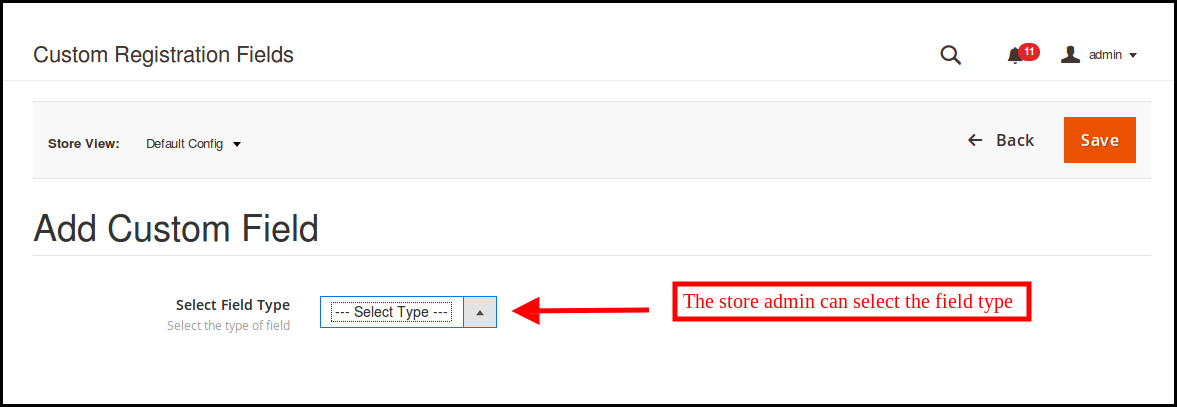
The Custom registration attributes allow the admin to add a new custom field without any hassle. The admin can click on the “Add new” option for adding a new custom field.
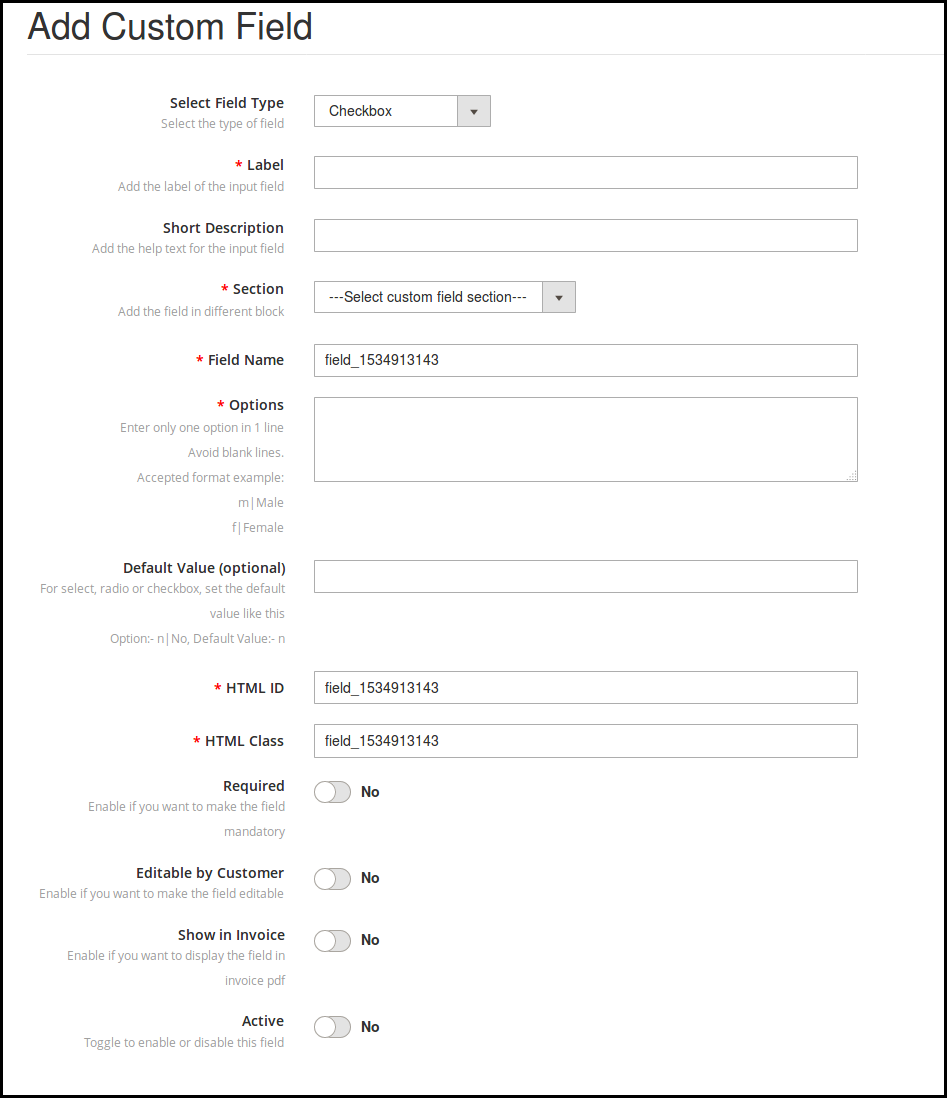
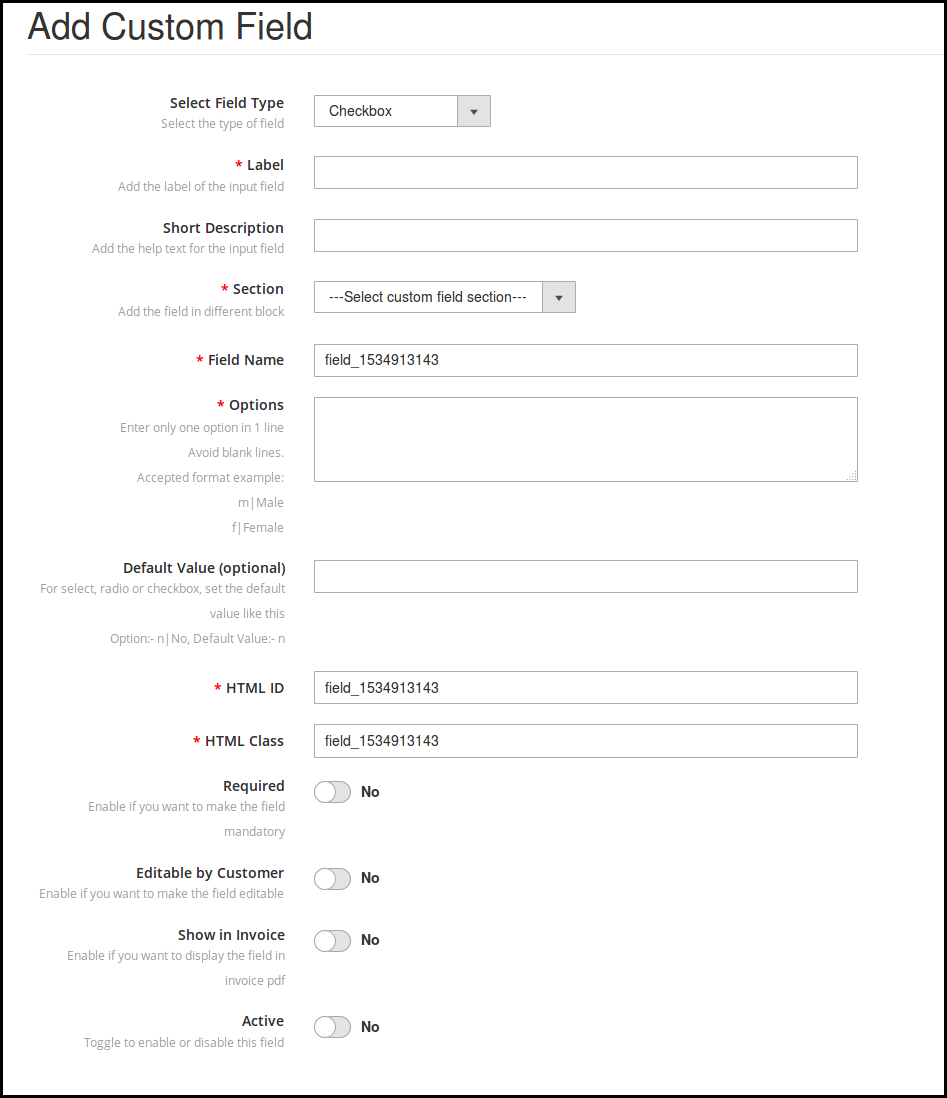
Select Field Type: The eCommerce store admin can select the field type i.e text, select option, radio button, checkbox, text area, file and date field. A drop-down list is provided to select the field.
The various options offered in this section is mentioned below:
Text
Select
Radio
Checkbox
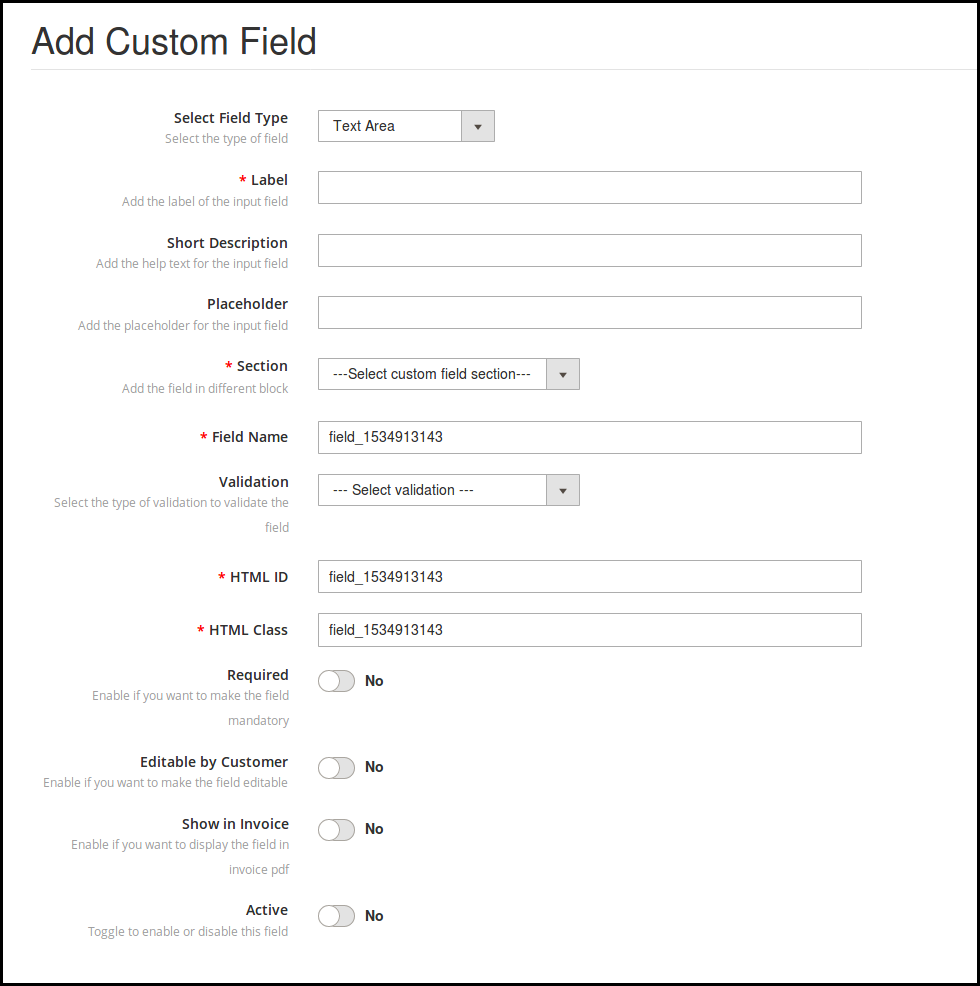
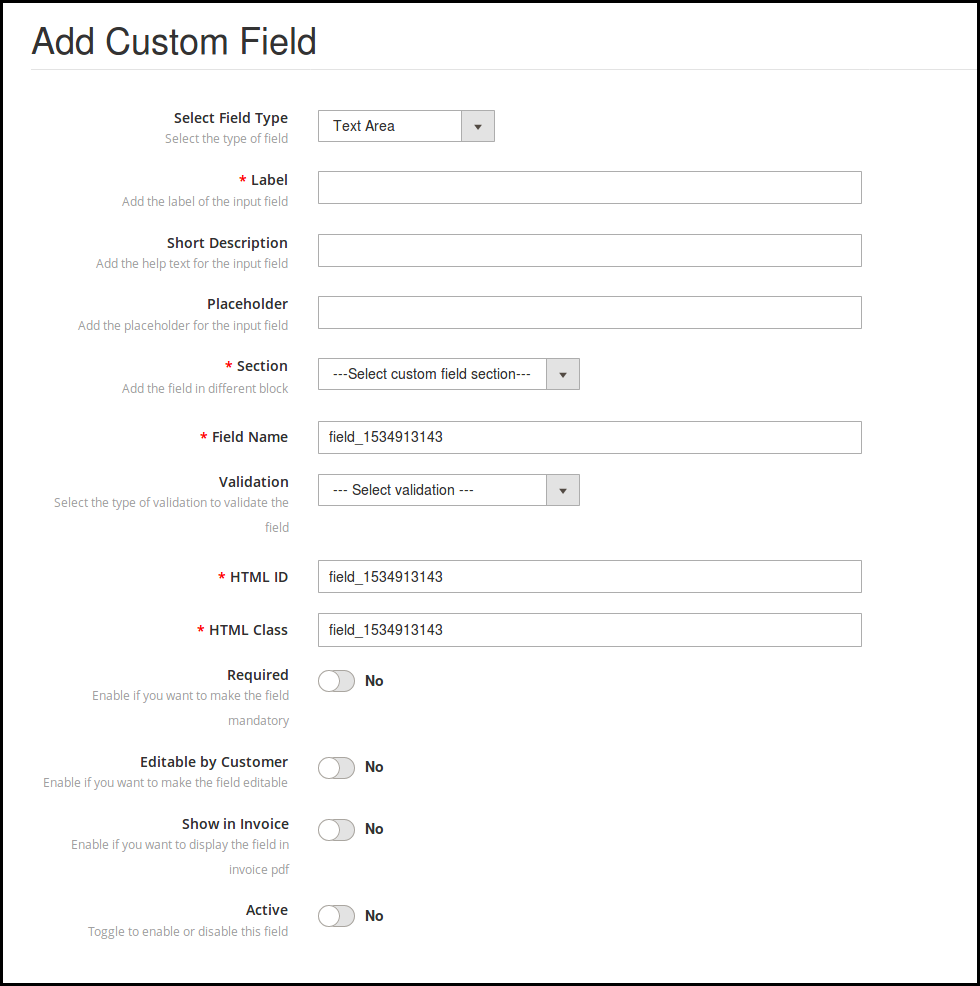
Text Area
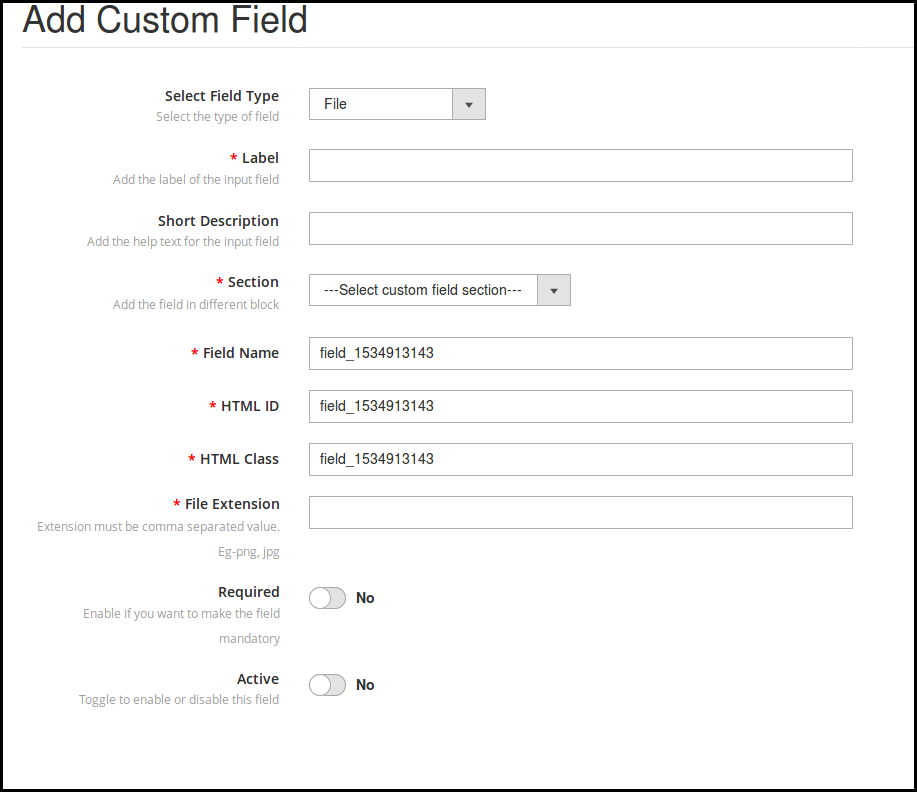
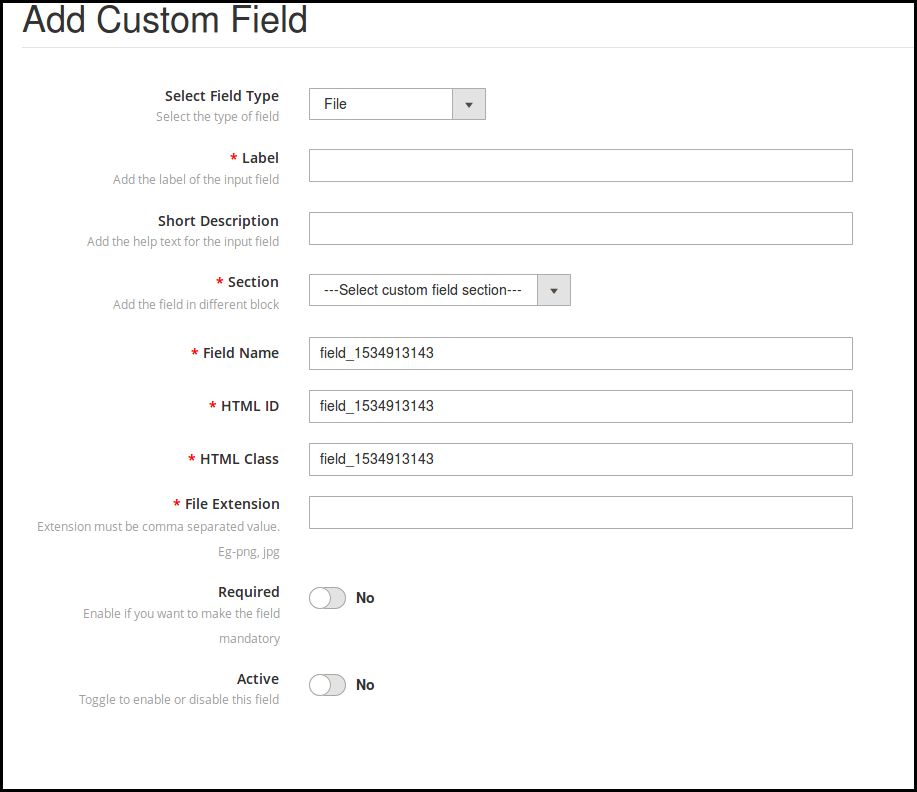
File
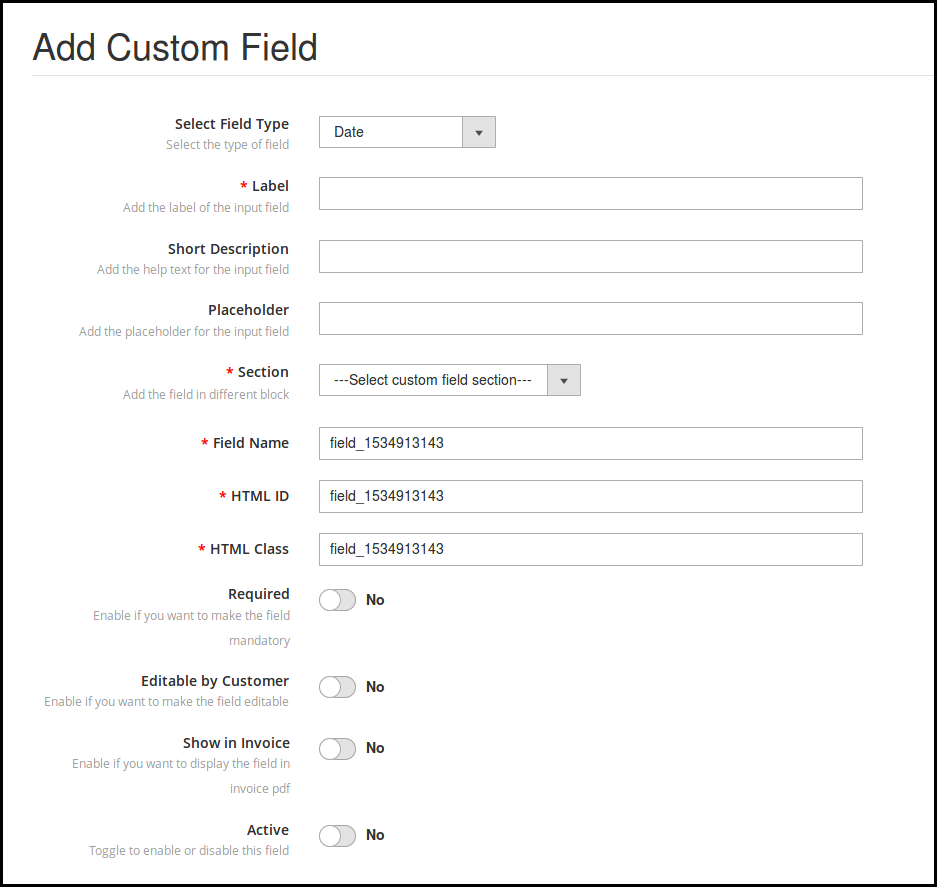
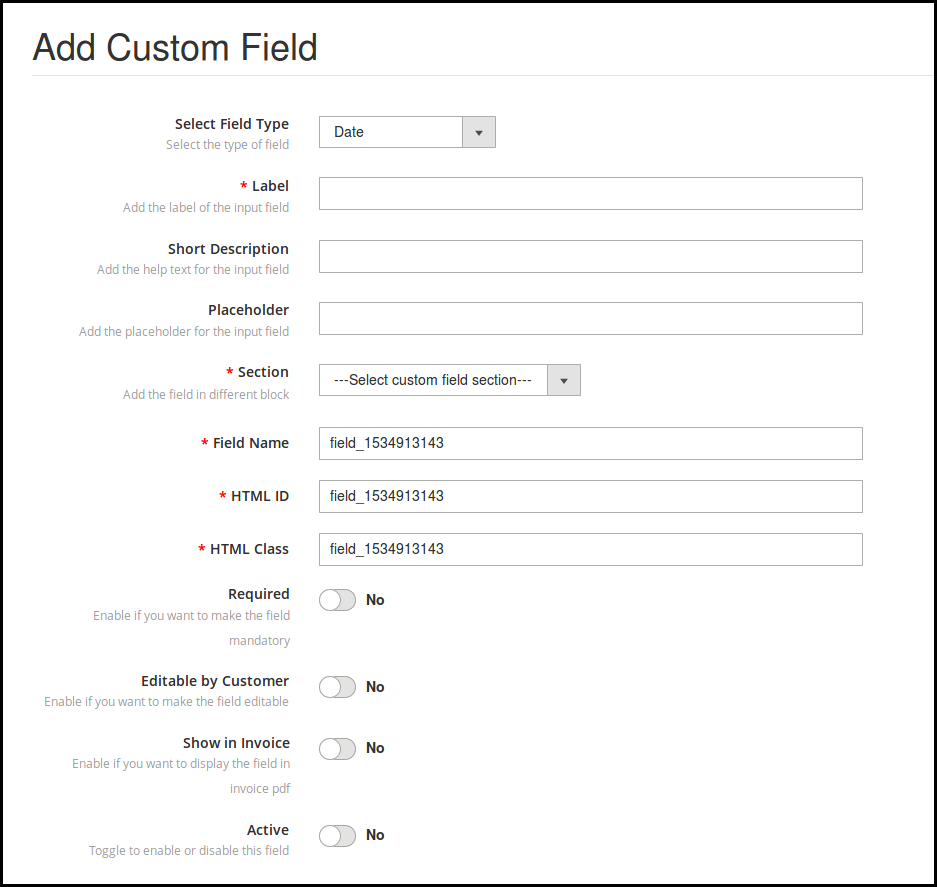
Date
Different field type required different information to be filled. Let us discuss them one by one.
3.4 Text Field
The online customers can enter their personal details in the text box. The admin can use text-box for name, last name, address and this kind of information.
The eCommerce store owner can set the text field on the front-end by applying these settings:
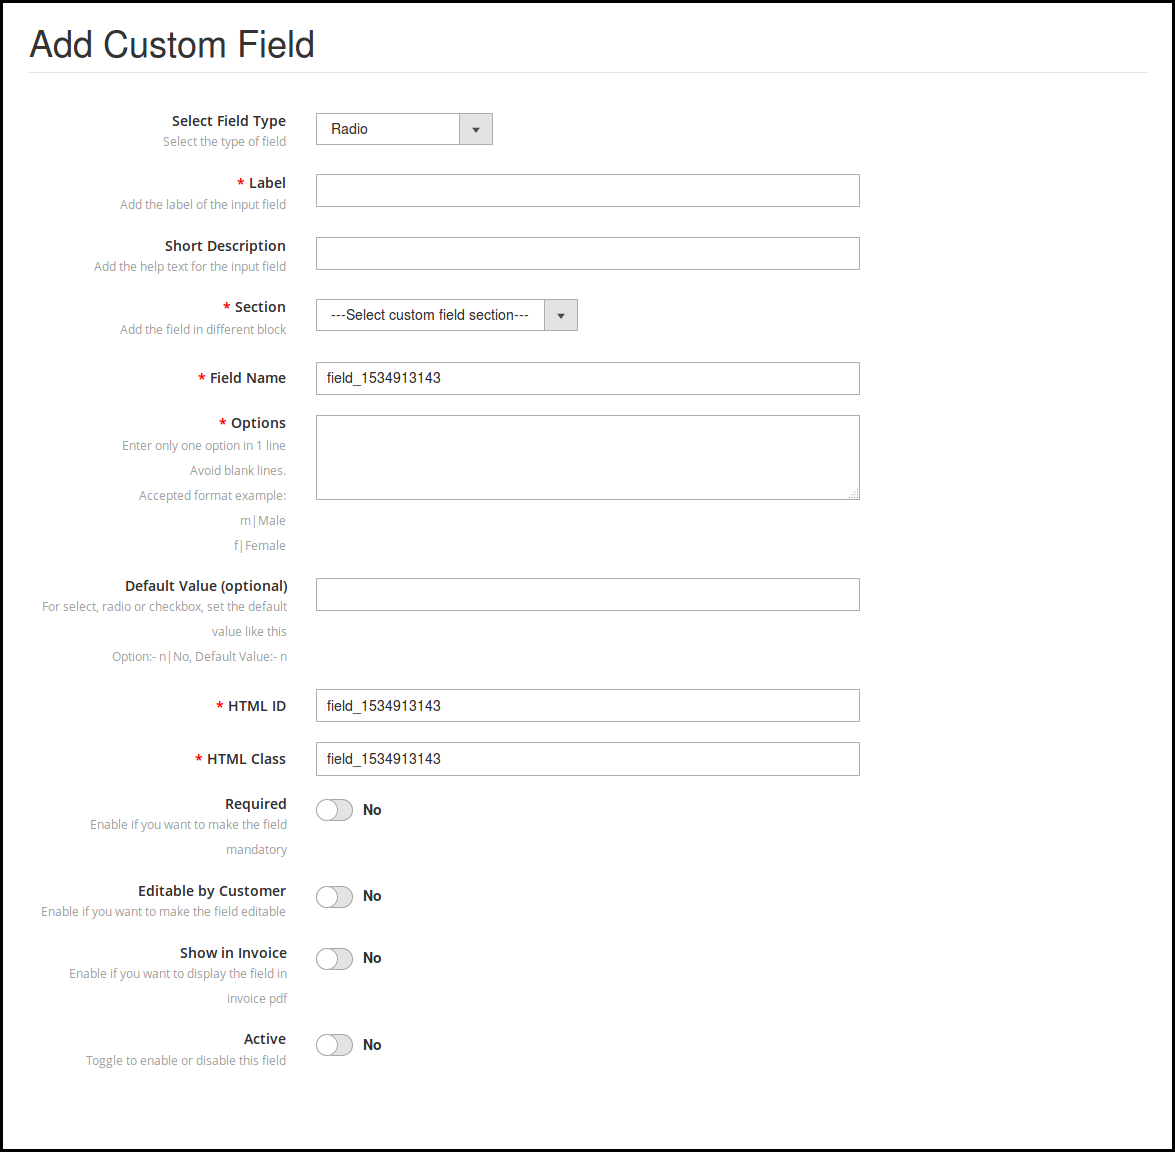
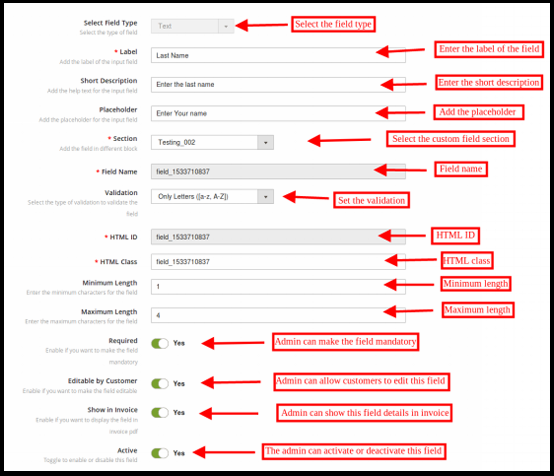
Label: The eCommerce store admin can set the label of the input field. The admin can set the name of the field.
Short Description: The store owner can set the short description from the admin interface. With the help of a short description, the customers can understand what information is required in the particular field.
Placeholder: The eCommerce store admin can enter the Placeholder in this section. Placeholder specifies the watermark that is displayed in the textbox.
Section: The store admin can select the custom field section where you want to display this particular information field. Here, the store admin can select the block where he wants to place that particular field.
Field Name, HTML ID, HTML Class: This section will provide a unique identity to the fields. It will be the same for all the three sections.
Validation: The eCommerce store admin can set the validation type for the various fields. There is no need to change the code for applying validation. The store owner can select the validation type as mentioned below:
Email
URL
Password
Number
Digits
Letters
Letter and digits
Date
If the customer will not follow the validation rules, an error message will be displayed on the registration field.
Maximum and Minimum Length: The store admin can fix the word limit by setting the maximum and minimum length. If the store admin does not enter any value, then the customers can enter the unlimited characters.
Required: The admin can set any custom Registration field as required field. If the admin set the field as required, then, an exception will be shown if the customer leaves the field as empty.
Editable by the Customer: The admin can enable or disable the option to make the field editable by the eCommerce customers. The customers can change the field information if required.
Show in Invoice: If the store admin wants to show the customers submitted field information on the invoice, then, the admin can activate this option.
Active: The store admin can activate or deactivate this field from the admin interface.
3.5 Select field
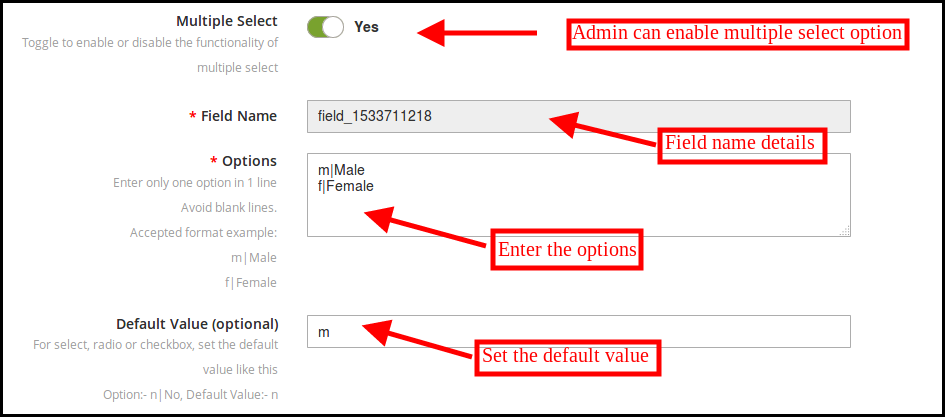
With the help of this “Select Field”, the admin can show an option to select the option from various choices. For example, the customers can select the “Gender” field.
The Label Name, Short Description, Section selection remains the same in this field type as the other ones. Here are the customization options offered to the store admin.
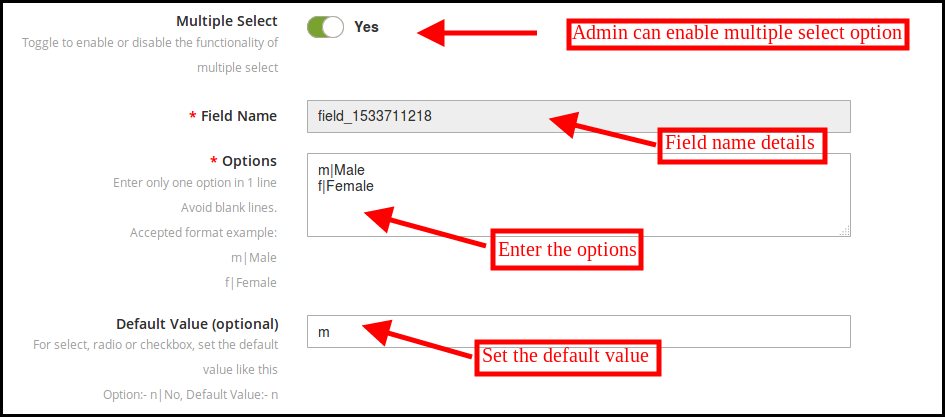
Multiple Select: The admin can allow the customers to select multiple choices by enabling this option.
Options: The different options can be entered here. Admin can enter only one option on one line.
Default Value: The admin can also insert the optional default value. This is an optional field. The store admin can set the default value for the Radio, Select or Checkbox options.
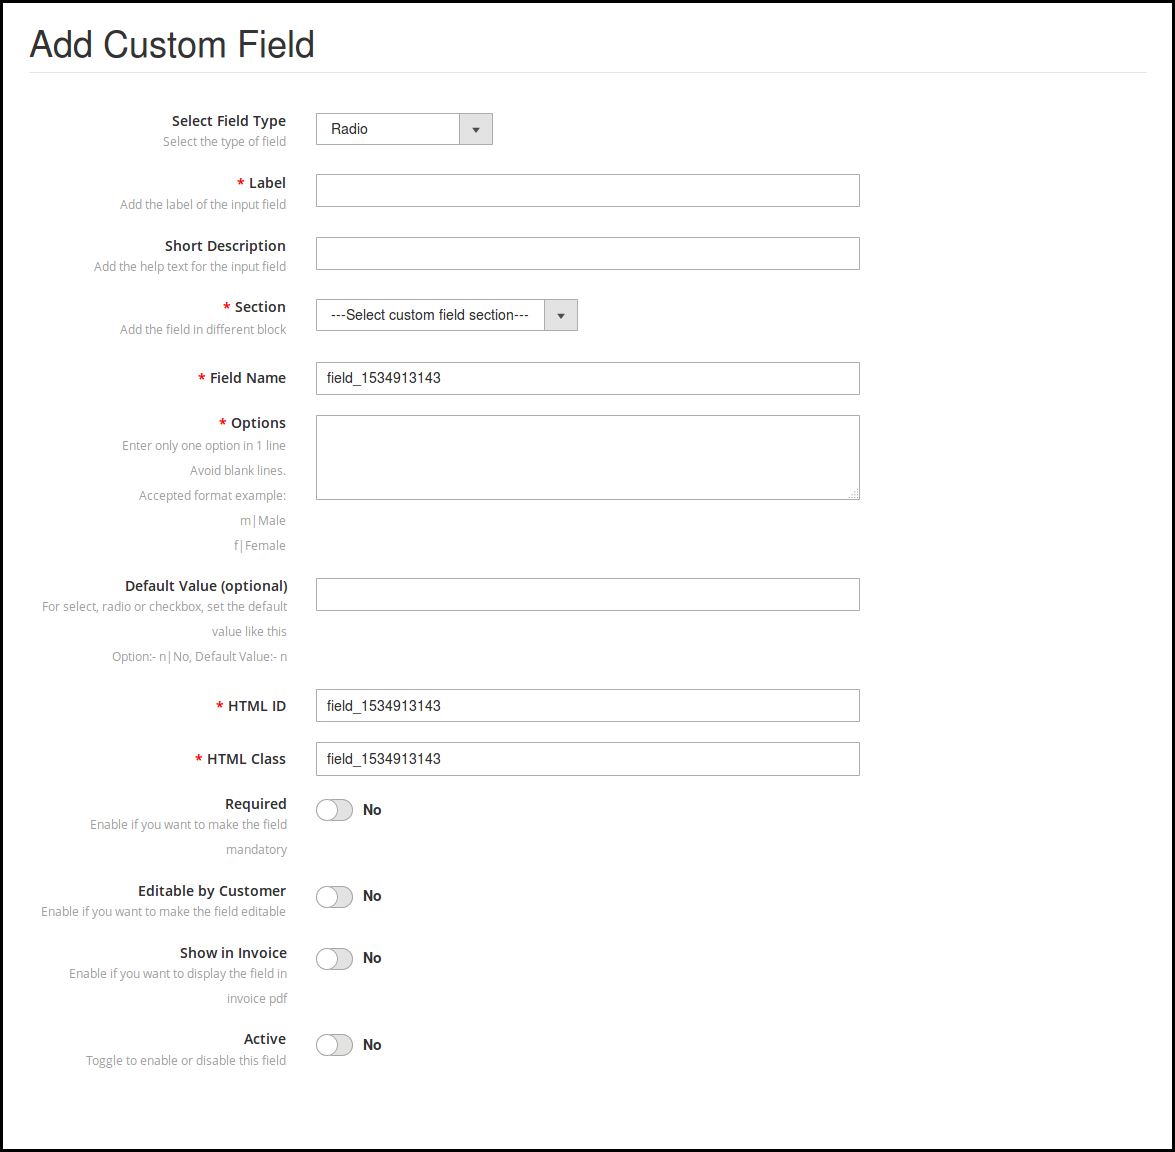
3.6 Radio
The admin can select the radio field for allowing the customers to select the only one option at a time. The customization options are the same as “select field” only “multiple selection” option is not available.
3.7 Check-box
Check-boxes allow the customers to select the option by checking the box. The functionality of the check-box is similar to radio button and select field. The admin can apply the settings easily. Same customization options are available for implementation.
3.8 Text Area
In the text field, the customers can enter the information in one line like name, surname and address. In the case when multiple lines are required for information, the text area field can be used.
3.9 File
The admin can show this file field on the registration form. The customers can upload a file like an image, document and others. The store admin can set the allowed file extensions and make it a required field if he wishes to.
3.10 Date
The Date field allows the customers to enter the date in the proper format. The admin can enter the label, short description, placeholder according to the requirement.
4.0 Website Registration Form UI
After applying the custom fields setting, the store owner can view the custom fields on the registration page of the website. The form will be shown as an image below:
Let your customers purchase gift cards for their friends and family. The store admin can create multiple Gift Cards for special occasions like Birthday, Anniversary, Valentine Day, Friendship Day, Fathers Day etc so that as per the need customers can select the gift cards for their dear ones.
Gift Card offers the following benefits:
1) Encourage customers to spend more
2) Lower return rates
3) Make last-minute shopping possible
4) Generate revenue in advance of sales
5) More convenient
Knowband offers Magento 2 Gift Card Module which provides a flexible way for your customers to purchase a gift for someone from your store. This feature-rich Magento 2 Gift Card Extension allows the online merchant to create multiple templates for gift cards and sell the gifty cards easily. The online store merchant can set the gift card amount from the admin interface and the customers can select the preferred gift card for sending to their loved ones.
1.1 Features of Magento 2 Gift Card Manager Extension:
With the help of this Magento 2 Gift Card Manager Addon by Knowband, the Online retailer can easily incorporate the Gift card functionality in their store.
Magento 2 Gift Module provides an option for the merchant to link the Gift Card option to the Header, Footer, My Account and Left Side on the Front-end as per the requirement.
The Admin can select the Gift Card order status in which the gift card orders will be marked as delivered and the Gift Card code will be generated.
Magento 2 Gift Card Vouchers Extension allows the store owner to set the Gift Card delivery gap in the number of days.
By using the responsive Knowband Magento 2 Gift Card Manager Extension, the eCommerce retailer can set the prefix for the voucher code of the gift card.
The Magento 2 Gift Card Module allows the admin to create N number of interactive gift card interfaces for various occasions including Birthdays, Halloweens, New Year, Christmas, Feast, Holidays or any other special event.
Knowband’s Magento 2 Gift Module enables the e-merchants can customize the gift card products in a few simple steps. They can fix the Product amount, validity duration and other terms at a few button clicks.
The Store Admin can enable the Free Shipping option as per the need from the back-end of the Gift Card for Magento 2.
Magento 2 Gift Card Vouchers offers the readymade email template and he/she can customize the email template as per the requirement.
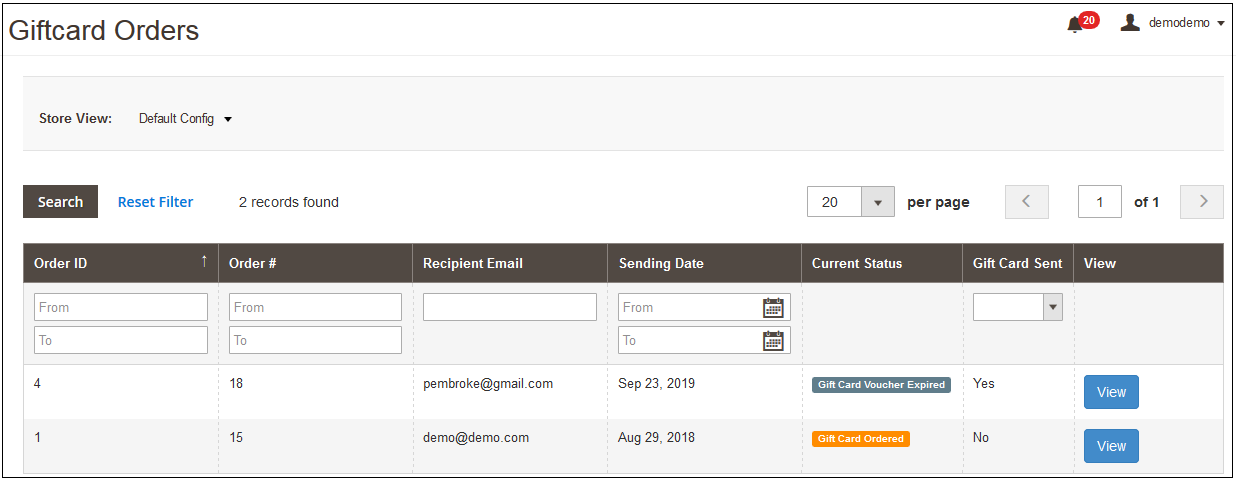
The Store admin even gets an option to keep track on the orders received for the gift card from the back-end. It involves the recipient email, date of sending as well as the status of the gift cards.
Magento 2 Send Gift Card Extension is Mobile responsive.
With the help of this Magento 2 Gift Card Extension, the Store admin has a chance to acquire new customers while retaining the existing customers.
Magento Gift Voucher is easy to use and install.
Magento Gift Card Manager Module is fully customizable.
Technology for Development
Language: PHP Frame Work: Magento
2. Installation
After purchasing Magento 2 Gift Card Extension, the store admin will get following files:
1.Knowband_Giftcardmanager.zip which contain source code of the Magento 2 Send Gift Card Extension.
2. User Manual which includes all the details and helps regarding an extension.
3. Follow the following steps to install Magento 2 Gift Vouchers extension:
The steps to install the Magento 2 Gift Card Module are mentioned below:
1. Buy the Magento 2 Gift Card Manager module from Knowband. You can download the extension package.
2. The package has a zipped file that contains the user manual and the source code of Magento 2 Gift Card Extension. Unzip the package.
3. Create a folder{Magentoroot}/app/code/Knowband/Giftcardmanager
php -f bin/magento module: enable –clear-static-content Knowband_Giftcardmanager
4. Upload the extracted content in the above folder via FTP manager (like Filezilla or WinSCP – download here: https://filezilla-project.org/).
5. Now run below commands to install the plugin:
6. The extension is now installed and ready for use. In Admin Panel go to “Knowband > Gift Card Manager”
You can now configure and use the Knowband Magento 2 Gift Card for product module.
3.0 Admin Panel
After installing Magento 2 Gift Card Manager Extension in the Magento store, the store owner can make the changes without any hassles. There are following ways in which admin will interact with Magento 2 Gift Card Vouchers module functionality:
1. Module Configuration
2. Gift Card Template
3. Gift Card Products
4. Gift Card Orders
Each interface has been explained with proper detailing in following sections.
3.1.1 Module Configuration
After clicking on the Gift Card Module, the system will open Module Configuration tabs by default.
In the Module Configuration tab of Magento 2 Gift Card Extension by Knowband, online sellers can enable Gift Card functionality and set the delivery gap, gift card prefix and more. Screenshot of the Module Configuration tab shown below:
Initially, fields in the above form will be already filled with their default values.
1. Enable the Extension: Initially, this will be “OFF”. Admin can enable/disable Magento 2 Gift Card Extension by turning ON/OFF this setting.
2. Enable Header Link: In this section, the online retailer can enable the display of the gift card option on the header.
Front End Preview:
3. Enable Left Link: By using the Magento 2 Gift Voucher Extension, the admin has can enable display of gift card link on the left side of the screen by clicking the button.
Front End Preview:
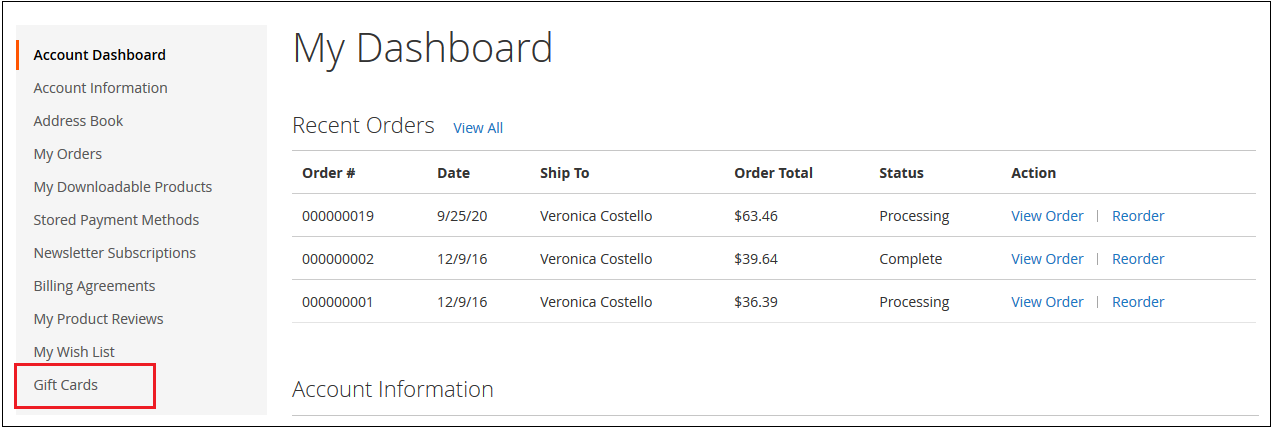
4. Enable My Account Link: The Admin can enable/disable Gift Card link in the Footer section as per the business requirement.
Front End Preview:
5. Enable Footer Link: The admin can enable the display of the gift card option in the My Account section.
Front End Preview:
6. Gift Card Prefix: In this option Magento 2 Gift Module the admin can set the prefix for the voucher code of the gift vouchers from here. The code can be entered in the format Ex: KB******
7. Gift Card Order Status: In this field of the Magento 2 Gift Cards module the admin can the default order status for the gift card orders.
As soon as the admin updates the order status for the Gift Card order, the gift card will be sent to the recipient via email.
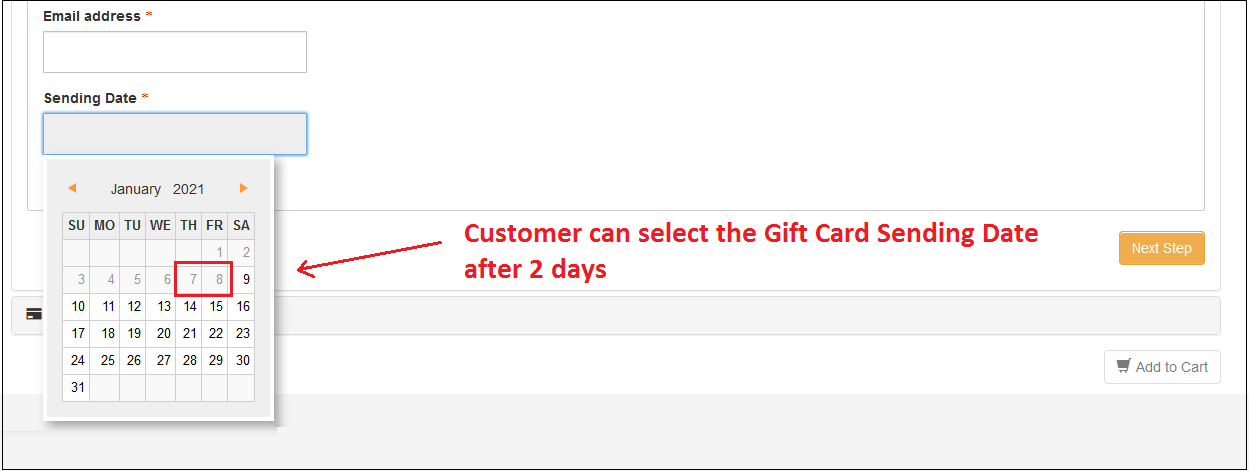
8. Minimum Gift Card Delivery Gap: This field of Magento 2 Gift Card Voucher Module allows the Store admin to enable the Voucher to send data after the specific no of days.
Ex: If gift card window values are set to 2 from the admin panel. These changes will reflect the Front End and the user will be able to select the send date after two days of the current date.
Admin Panel:
Front End Settings:
3.1.2 Email Settings
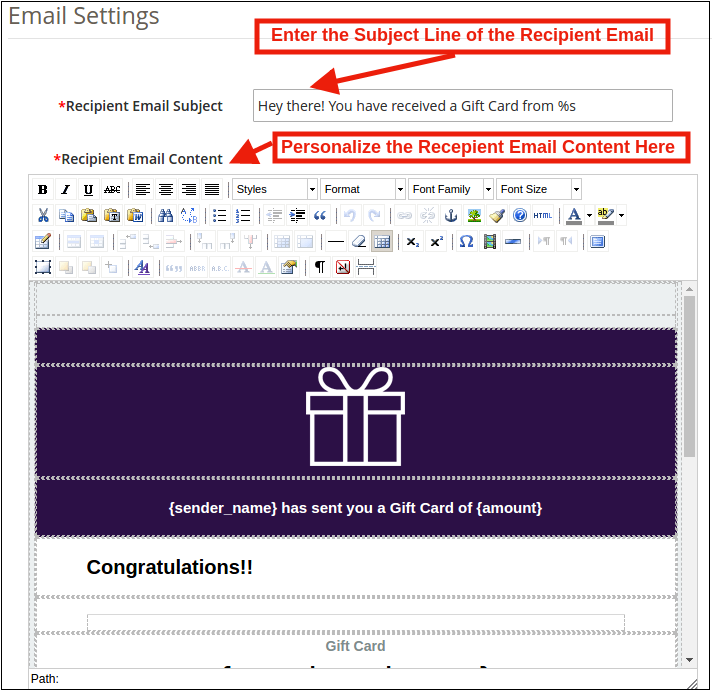
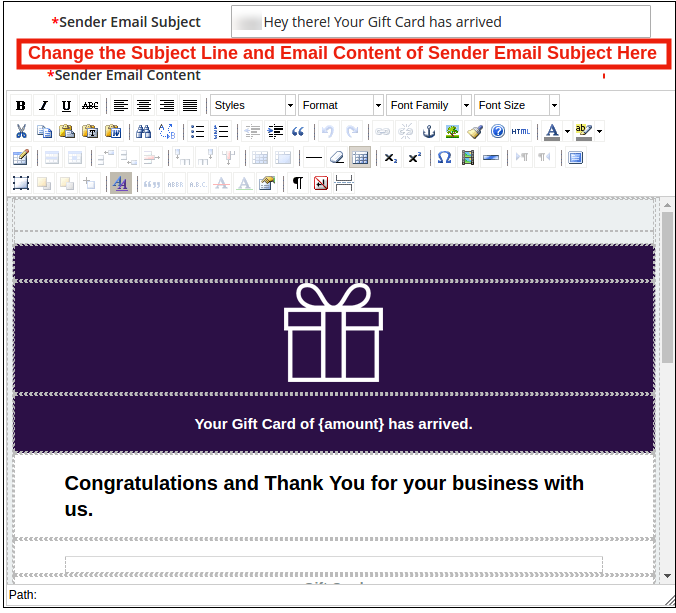
The customer gets an option to print the gift cards or else they can be sent to the receiver via email. The Magento 2 Gift module by Knowband offers default email templates that can be personalized as per the requirement of the store admin.
Recipient Email Settings:
Sender Email Settings:
3.1.3 PDF Settings
Magento 2 Send Gift Card Module also sends a PDF with along with the image, voucher code, voucher expiry date and voucher value. Users can also get the printout of the PDF.
Apart from this, the store admin can change the Gift Card prefix and update the PDF content to make it more attractive from the back-end.
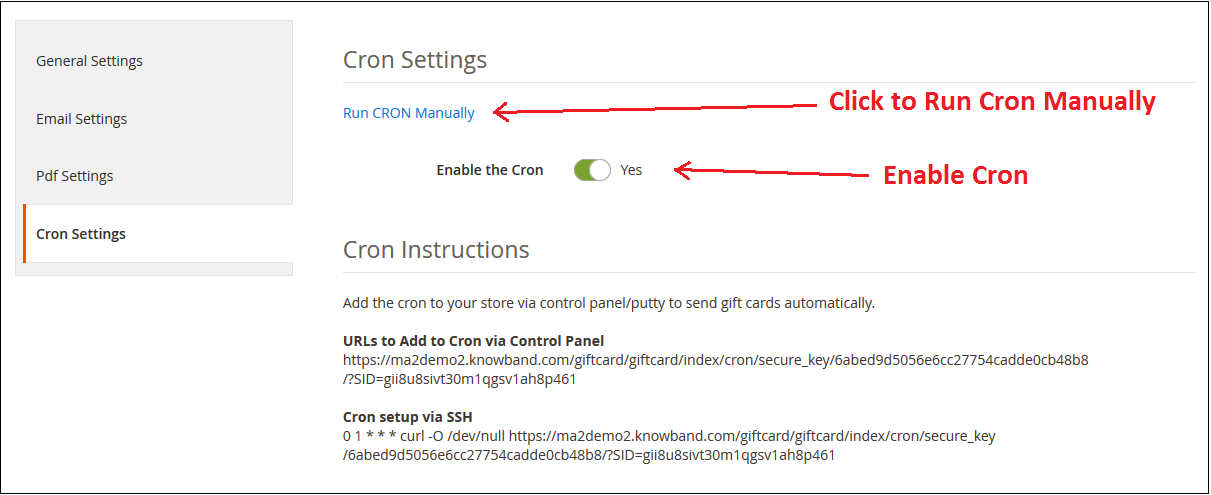
3.1.4 Cron Setting
In this tab, the eCommerce store admin can run the CRON manually or automatically.
The Admin can run the CRON to your store via the control panel to send gift card vouchers automatically.
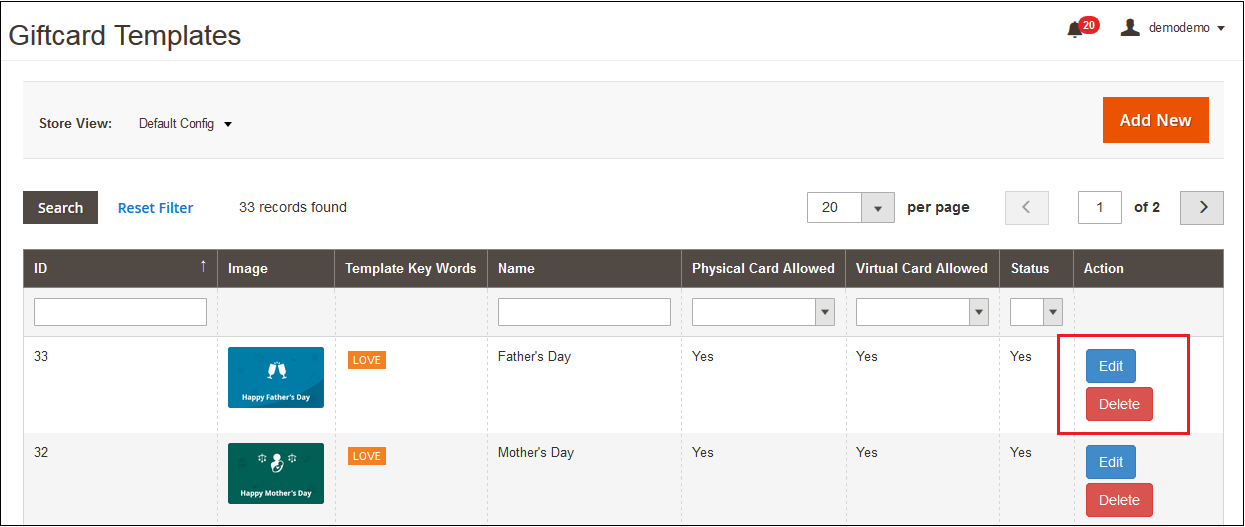
This tab shows already added Gift card templates. The admin can customize these Gift card template as per their desires. Other than this, the store merchant can edit or delete the Gift card template.
3.2.1 How to customize the template of the gift card?
3.2.1.1 Add New Gift Card Template
There is a ‘ADD NEW‘ button present on the top right corner of gift card template tab of Magento 2 Gift Card Manager Module. The store merchants can easily add new Gift Card template sets whenever they need by clicking on the button. Further details about its functionality are described in the next section.
For creating new Gift Card template, ‘Add New’ option is used. By clicking on this, the module will redirect store merchants to the gift card template configuration form as displayed in the below screen:
1. Template Name: In this option of Magento 2 Gift Voucher Extension the admin can enter the name of the New Gift Card Template like: Happy Friendship Day.
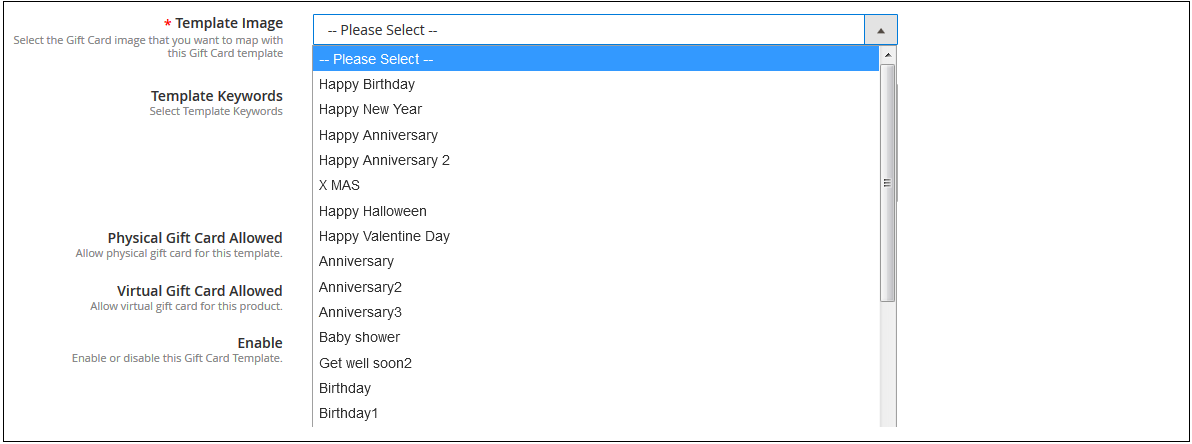
2. Template Image: Magento 2 Send Gift Card Extension by Knowband allows the store admin to select the image or the layout of the gift cards that will be shown in the front-end.
The images for the various occasions can be saved in the back-end of the Magento 2 Gift Card Extension. The admin selects the occasion in order to find the image as shown below:
The store admin can even view the images for the various events has been saved for the same.
As you click on the ‘View Image’, you’ll be redirected to the page below.
The list showcases all the gift cards that have been created and saved. You can view the complete image or even delete it if required.
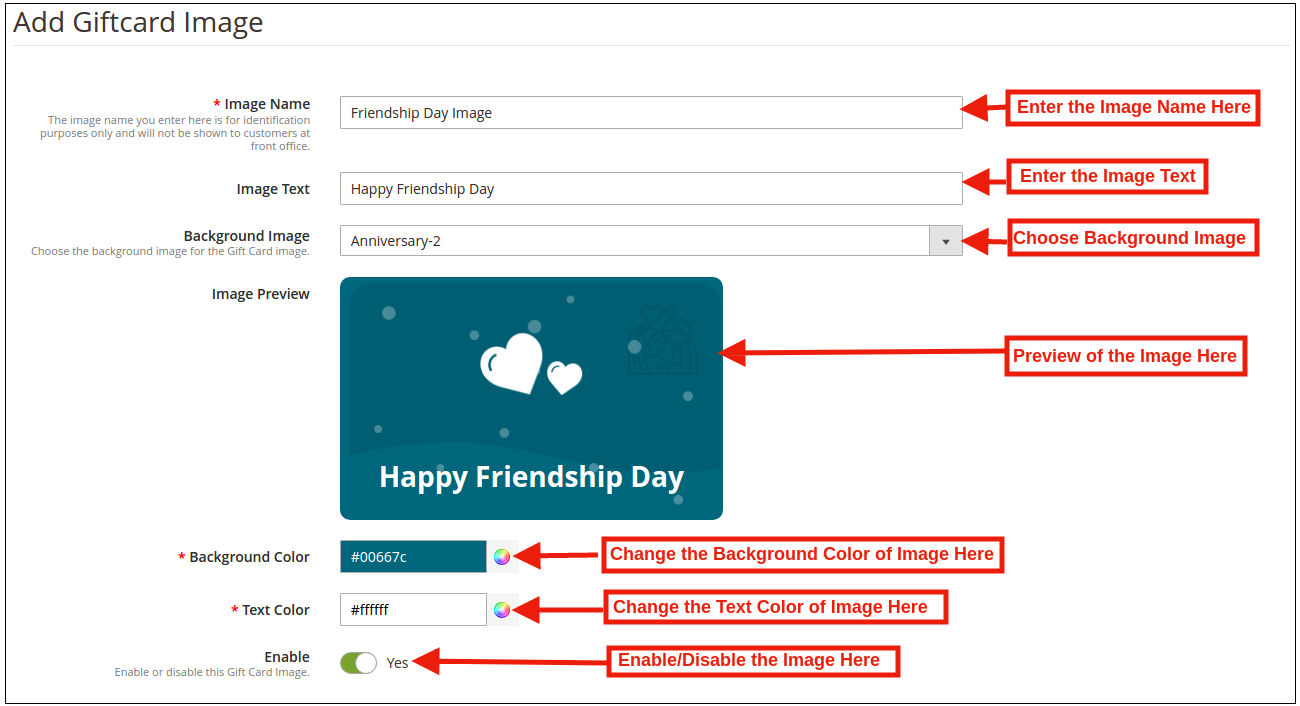
In order to create new images, click ‘Add New Image’ as shown below.
You can enter the image name and the text of the image to be shown on the gift card. Even the background image and color, as well as font color, can be changed at a button click. Preview the final image before making it live on the website.
3. Template Keywords: This option includes the list of the Keyword in this dropdown list the store admin can select the template keywords.
4. Physical Gift Card Allowed: The Magento 2 Gift Card Voucher module by Knowband allows the store admin to enable the physical gift card option for the particular gift template.
5. Virtual Gift Card Allowed: The Online retailer can enable the Virtual gift card functionality will allow the e-cards.
6. Enable: Initially, this option will be ‘ON’. The Store admin can enable/disable the settings as per the need.
3.2.1.2 Edit Gift Card Template
Magento 2 Gift Module allows the online retailer to edit or delete the gift card template as per the need. The screenshot is shown below:
3.3 Gift Card Product
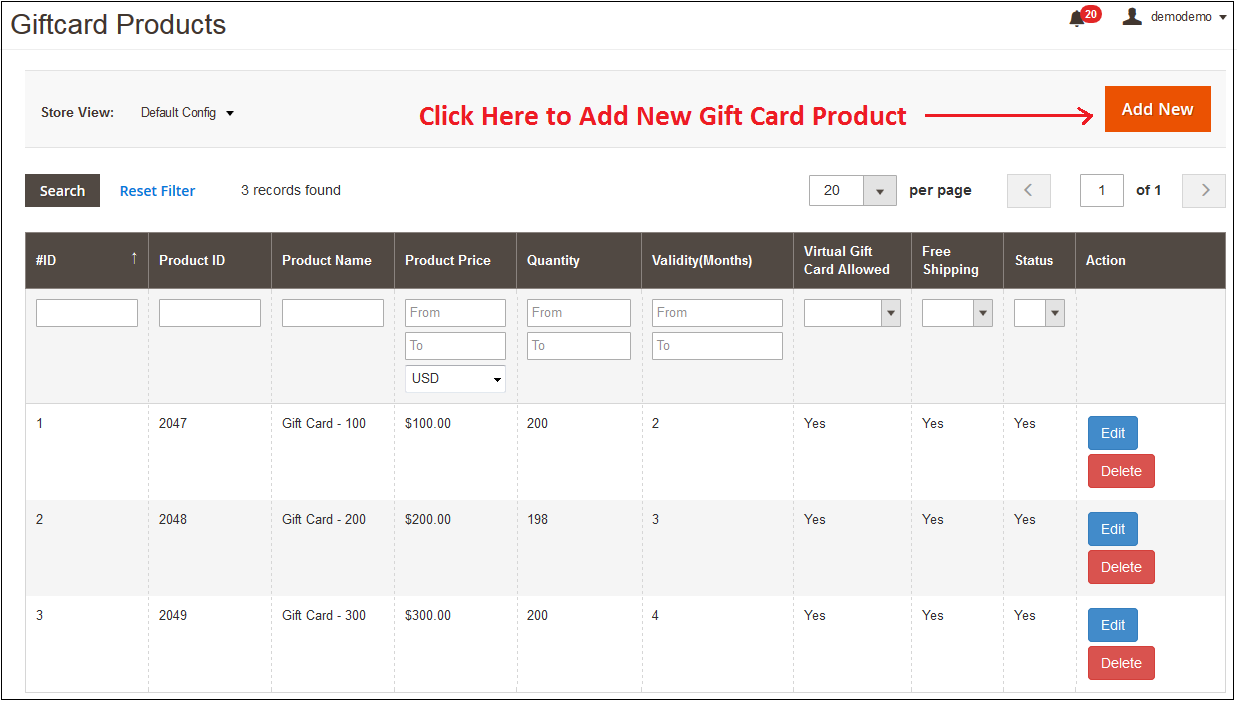
In this tab of Magento 2 Gift Voucher Module allows the store admin to add the Gift Cards product of different values like: product name, product price, quantity and more or edit the already added product from the back-end.
3.3.1 How to customize the Product of the gift card?
3.3.1.1 Add New Gift Card Product
Magento 2 Gift Card Manager Module allows the store admin to add the new Gift Card template by clicking on the ‘ADD NEW’ button present on the top right corner of gift card template tab of Gift Module.
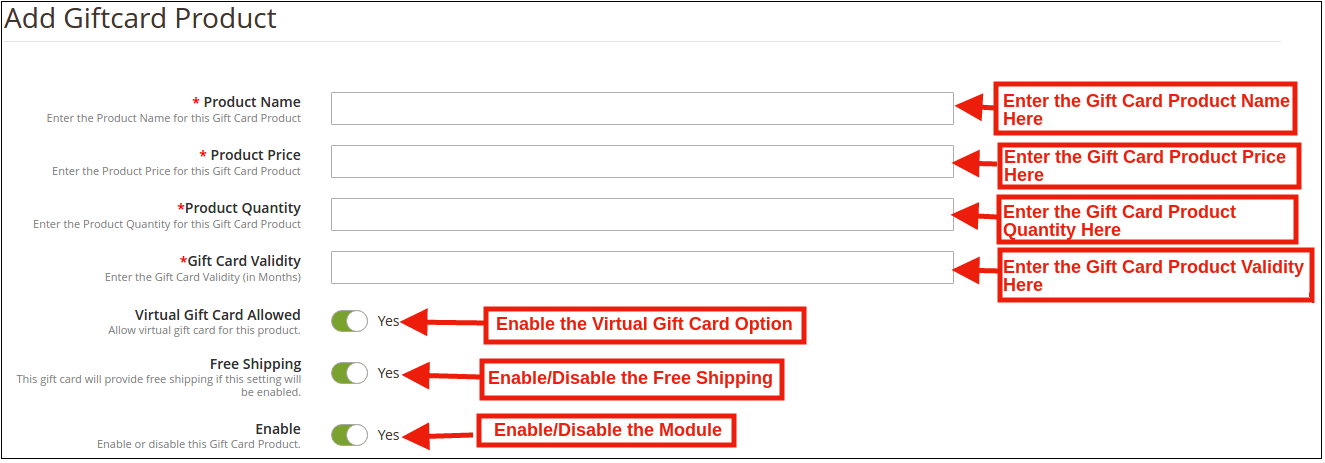
Fill out the information that you need to provide for creating the product.
Product Price: Magento 2 Gift Card Manager Module by Knowband allows the store admin to enter the price of the product.
Product Name: Enter the name of the product here. It can be Happy Anniversary, Happy Birthday, Merry Christmas or any other.
Product Quality: In this tab of Magento 2 Send Card Module the admin can enter the product quality of this gift card product.
Gift Card Validity: The validity period in months of the gift card can be entered here by using this Magento 2 Gift Module.
Virtual Gift Card Allowed: Enable e-card by switching on the button.
Free Shipping: The Magento 2 store admin can even allow free shipping to the customer.
Enable: The Magento 2 Send Gift Card Extension can be enabled or disabled from here.
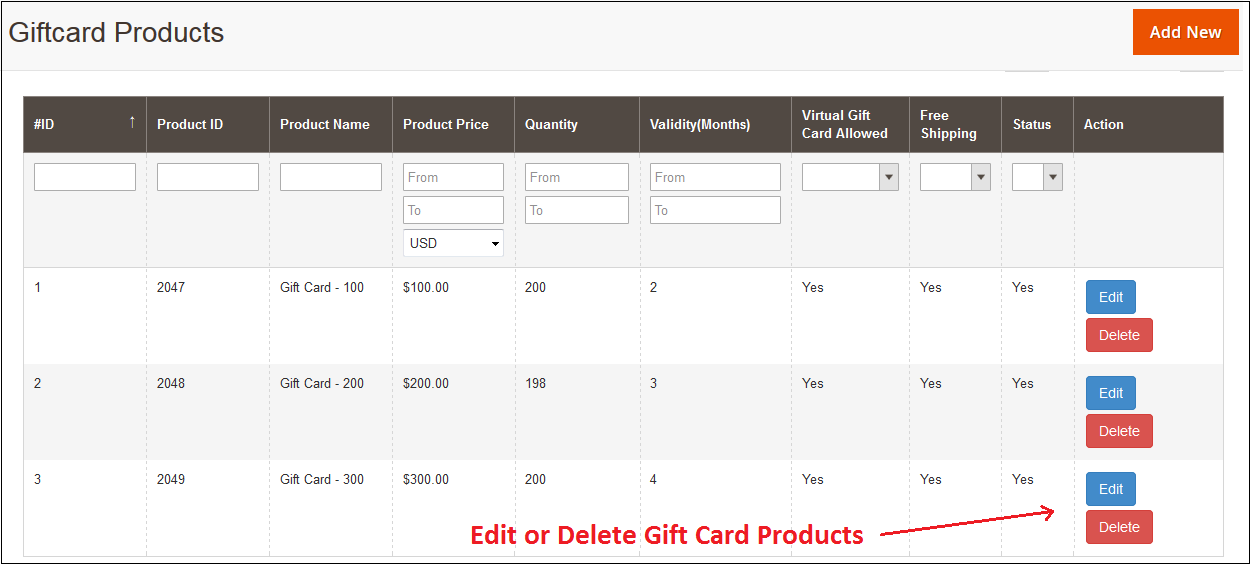
3.3.1.2 Edit and Delete Gift Card Product
The admin even gets an option to edit the gift card product or delete from the section shown below:
3.4 Gift Card Orders
In this Gift Card Order, tab provides the store admin an option to view the entire list of the orders received for the gift cards. It involves the recipient email, date of sending as well as the status of the gift cards.
In the ‘Gift Card Order’ tab go to the ‘View’ button in the right section. In this section shows the entire information about the order.
4.0 Front End
Magento 2 Gift Voucher Module adds a Gift Card link on storefront end in the Header, Footer, Left and My Account section of the module. By accessing this gift card link customers can browse the gift cards.
This link redirects the user gift card page of the site.
Gift Card Front End Header Link Preview:
Gift Card Front End Left Link Preview:
Gift Card Front End Footer Link Preview:
Gift Card Front End My Account Link Preview:
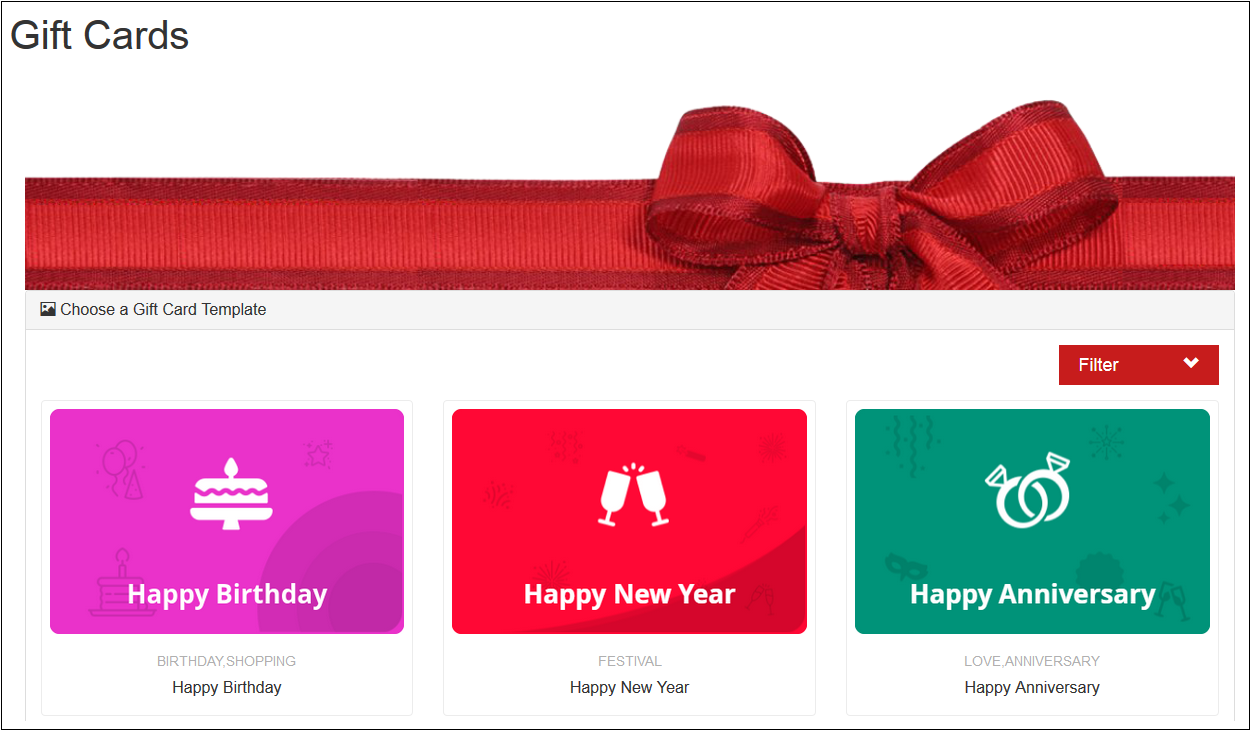
After clicking on the Gift Card link module redirect the following page:
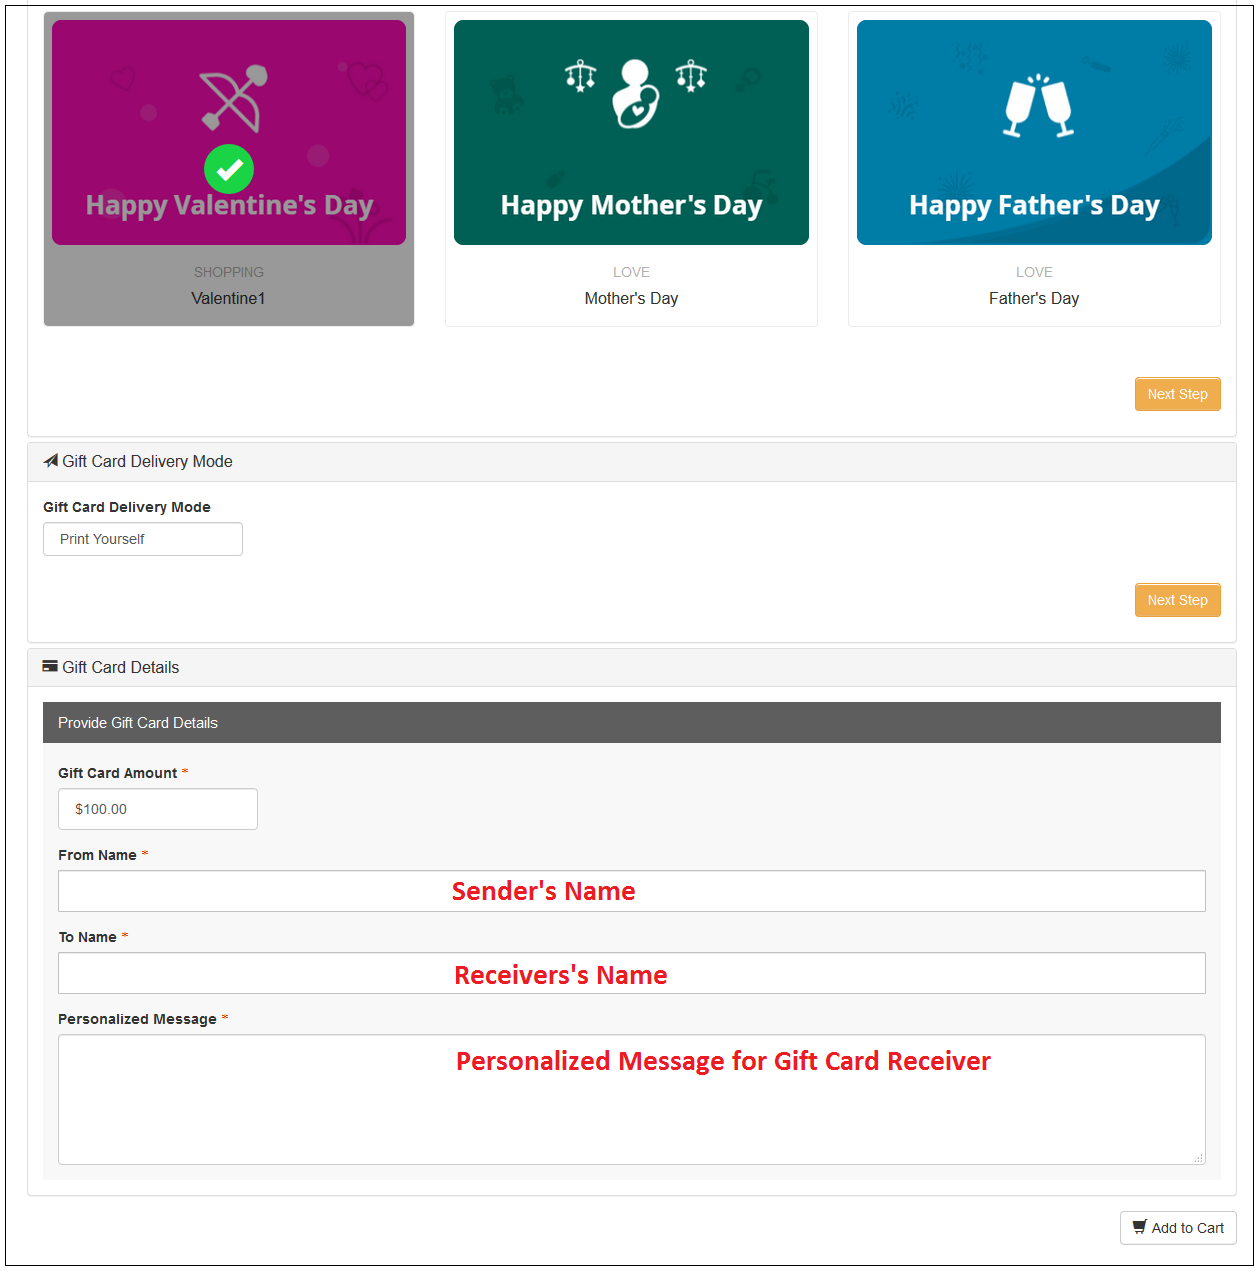
Shopping for the same is easy. The customers can select the card for the different occasion. For instance, he chooses the Happy Birthday card. All he needs to do is to click on the card.
They can print the card or send it via email. The sender and receiver name along with the message can be mentioned in the section as shown below.
Add the product to the shopping cart and proceed to the checkout page. The gift card will then be sent to the receiver.
This way, the online store admin can easily offer the facility to purchase gift cards from the website. The online merchant can set the gift card amount and also create multiple gift card templates for various occasions. Magento 2 Gift Card Manager plugin is highly customizable and offers smooth functioning. The eCommerce store merchant can show gift card options on the left side, show as a header/footer link and also show the Gift card option on my account link. The Magento 2 Gift Card Manager plugin allows the store merchant to select the order status on which he wants to send gift card.
The online merchant can also set a delivery days gap after which the gift card will be delivered. The Magento 2 Gift Card Manager Module allows sending the gift card email to the gift card sender as well as the receiver. Admin can also send a pdf document that can be printed by the customers. So the store admin can get more profit and the online users can purchase gift cards and share it with their loved ones easily.
For more details about this Magento 2 Gift Voucher extension, you can visit here:
The eCommerce store owner can create his own private shop and control the sales of the store products to a selected group of customers. Knowband offers PrestaShop Private Shop Module which allows the eCommerce store owner to make the whole website as a private store. The admin can privatize the store products, categories and pages also. With the help of this Restrict categories and products addon the store admin can force the customers to login or register to visit the eCommerce store or selective section.
1.1 Salient features of Prestashop Private Shop Plugin
The eCommerce store admin can force the customers to login/register for accessing the website.
The admin can set the look and feel of the login/signup page.
Sends an email to the new customer whenever new registration occurs. An email is received by the customers to validate their email.
The Restrict categories and products module allow the e-merchant to apply the settings to approve the newly registered customer accounts automatically or manually.
The admin can allow/disallow Google crawler to index the private shop by enabling or disabling the settings.
The Restrict categories and products addon allow the admin to modify the login/signup title text.
The login/signup form can be in left, right or center position.
The admin can activate or deactivate new private registration option from the admin interface.
The admin can show an image, color or video to display as the background of the login/signup form.
The admin can set the entire shop or any specific selection as private.
Specific IPs are always allowed to access the eCommerce store.
The Prestashop Private shop addon provides a list of the private customers in the admin interface.
The store admin can view the details of the private customers and validate the newly registered accounts.
The store admin can also delete a private customer from the admin interface.
The Prestashop Private shop extension is multi-store compatible and offers multi-lingual support also.
The user-friendly and mobile responsive layout offered by this Restrict categories and products makes it hassle-free.
2.0 Installation Guide of Prestashop Private Shop
Once you purchase the Prestashop module from the store you’ll get these files:
The zipped file that consists of the source code of this Prestashop Private shop addon.
User Manual
Follow the following steps to install the Prestashop Private shop addon:
First of all, you need to unzip the zipped file. It includes some files and folders.
After that, you need to copy the overall content of the folder and paste them into the “Modules” folder of the store’s directoryYou can follow the path – Root Directory/modules/.
Now you can install the Restrict categories and products addon. You can find that inStore Admin ->Modules and Services.It would be shown as below:
Now you just need to click on “Install” button to install this Prestashop Private shop addon. A confirmation pop-up will be shown. Click on “Proceed with the installation” option. This step will install the Private Shop Prestashop module and show notification – “Module(s) installed successfully”.
3.0 User Guide for Prestashop Private Shop
Using this Restrict category and products module, the admin can view the configuration options as shown below. Here, the eCommerce store admin can customize the Prestashop Private shop addon according to the requirements. The admin can configure these settings:
General Settings
Access Settings
Private Customers
3.1 General Settings
In the general settings submenu option, the eCommerce store admin can apply the settings to display and manage the look and feel of the login/signup form.
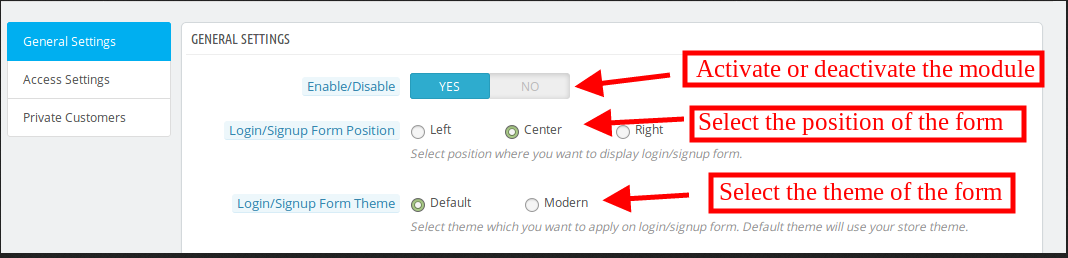
Enable/Disable:The Prestashop eCommerce store admin can activate/deactivate the functionality just by a single click.
Login/Signup Form Position: The admin can set the position to display the login/Signup form. The admin can select left, right or center position.
Login/Signup Form Theme: The admin can set the default or modern theme as per the requirement. While selecting the modern theme, these options will be displayed.
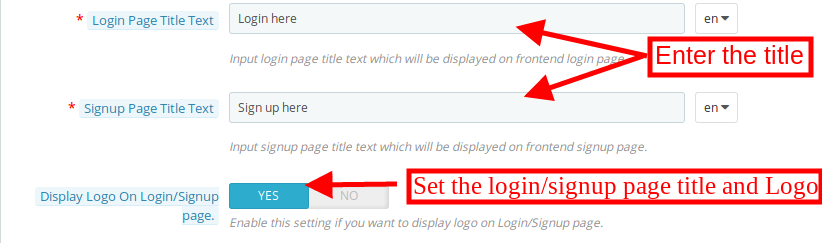
Login Page Title Text: Here the admin can set the title text which will be displayed on the Login page.
Signup Page Title Text: The admin can also set the signup page title text. The admin can insert the text in multiple languages.
Display Logo on Login/Signup Form: The Prestashop store admin can show a logo on the login/signup page by enabling the settings.
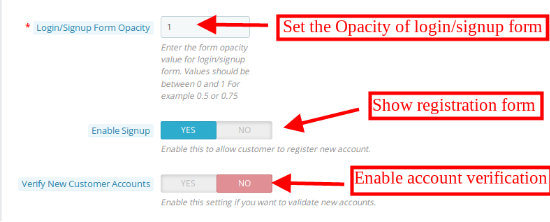
Login/Signup Form Opacity: The admin can enter form opacity value. The value can be between 0 to 1. For showing login form transparent, the store admin can set the form opacity 0.
Enable Signup: The admin can activate this option for allowing the customers to register a new account.
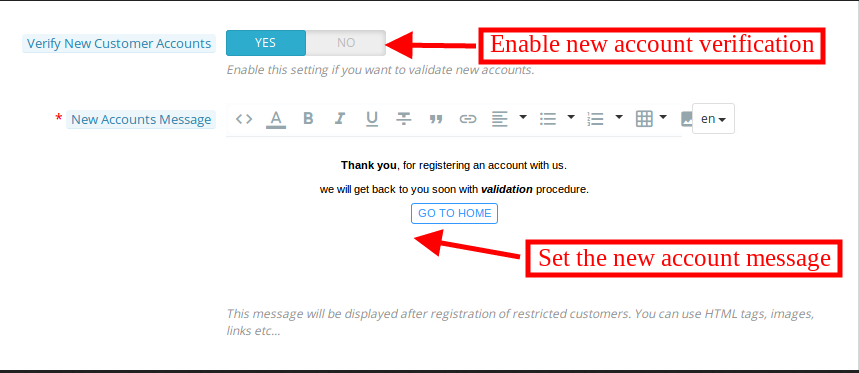
Verifying new Customer Account: If the admin wants to validate new accounts, he can enable this setting. After enabling this setting, the above option will be displayed:
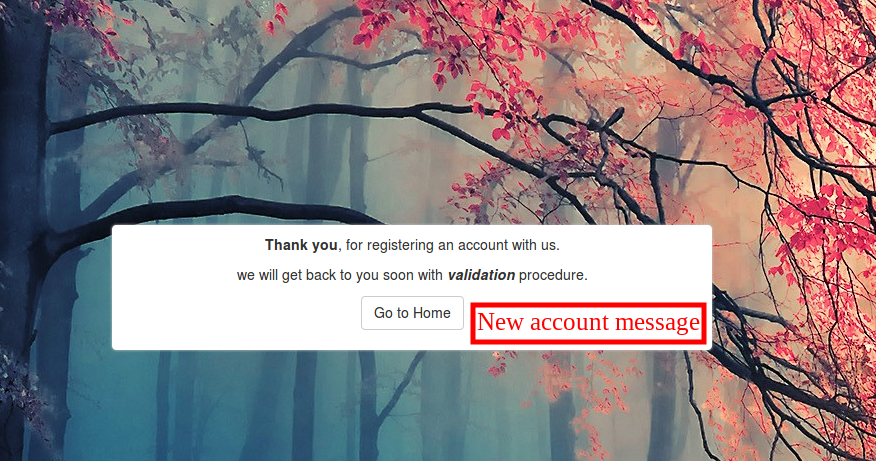
New Account Message: The admin can set the message to show for newly registered accounts. Admin can insert HTML tags, images, and links.
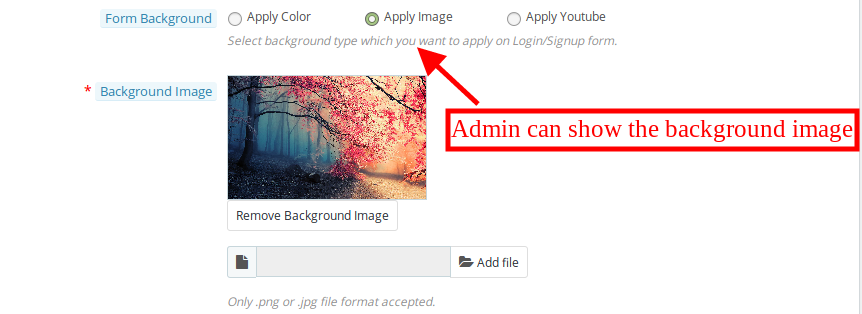
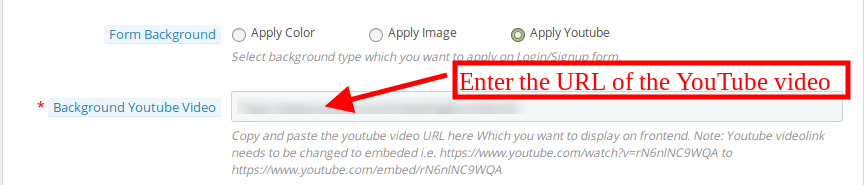
Form Background: The admin can select the background type which he wants to apply for the login or sign/up form. The admin can insert image, apply color or show video.
Apply colors: The admin can select the color from the color picker box. This color will be applied in the background of the login/signup page.
Background image: The admin can select the image for showing as a background image on the login/signup form.
Apply YouTube: The Prestashop store owner can insert YouTube video link from the admin interface. The e-merchant can enter the embeded link of the Youtube URL.
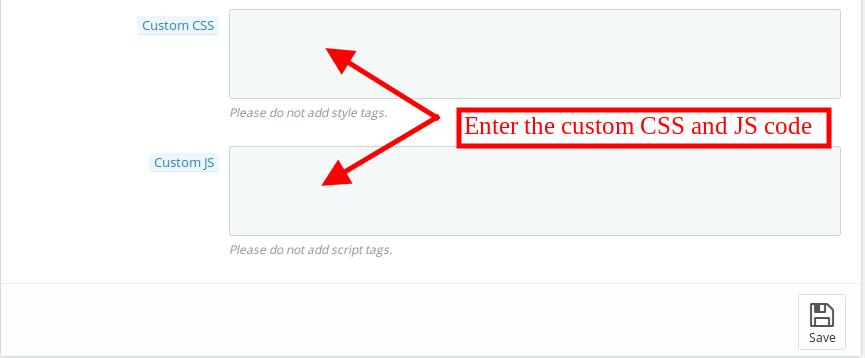
Custom CSS:Advance user can insert custom CSS code.
Custom JS:The store admin can also add custom JS code for further customization.
3.2 Access Settings
The Prestashop Private shop extension allows the admin to set the accessibility according to the requirements. The eCommerce store admin can privatize the entire website or selected portion of the store. These options are available in the access settings sub-menu.
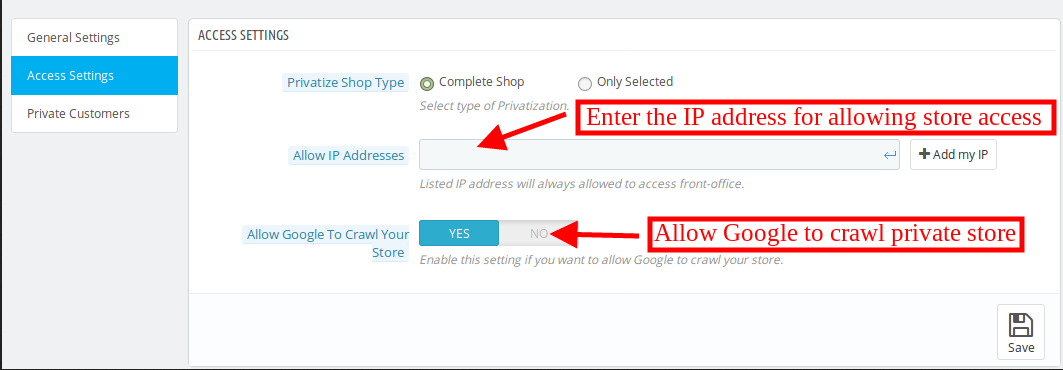
Privatize Shop type: The store admin can select the type of privatization. The admin can select complete shop or selected items.
3.2.1 While Selecting Complete Shop
Allow IP addresses: Admin can list the IP address. The listed IP addresses will be allowed to access front-office every time.
Allow Google to Crawl Your Store:The store admin can enable or disable the settings to allow or disallow Google to crawl.
3.2.2 While Selecting Selected option
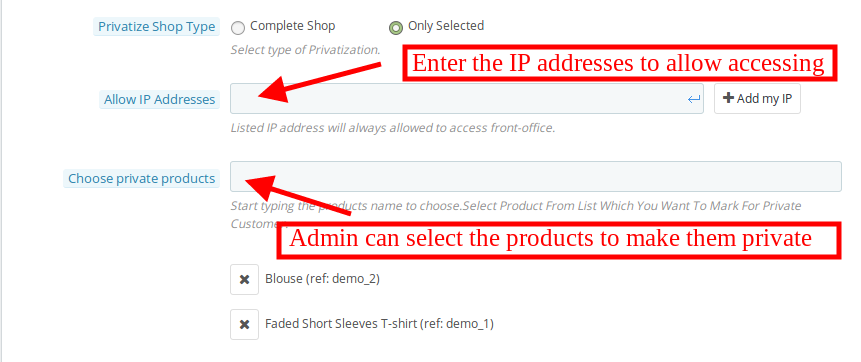
Allow IP addresses: Admin can list the IP address. The listed IP addresses will be allowed to access front-office every time.
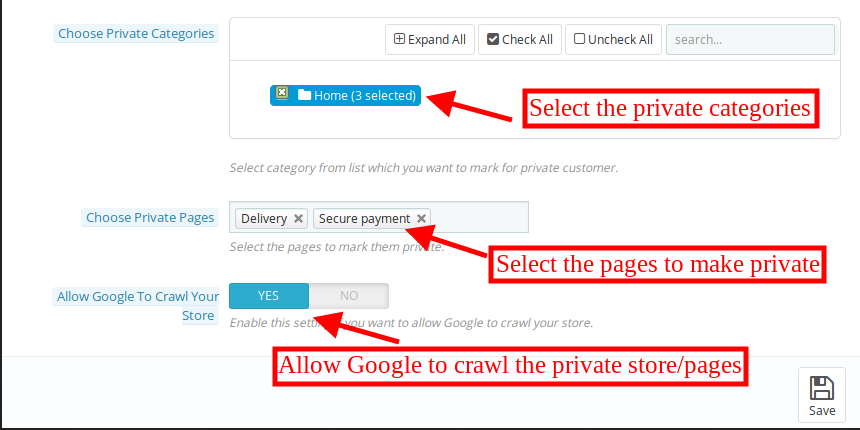
Choose Private Products: The admin can enter the product name. The admin can mark the products for the private customer.
Choose Private categories:The store admin can select the categories, which he wants to mark for private customers.
Choose Private pages:Select the pages to mark as private.
Allow Google to Crawl Your Store: The store admin can enable or disable the settings to allow or disallow Google to crawl.
3.3 Private customers
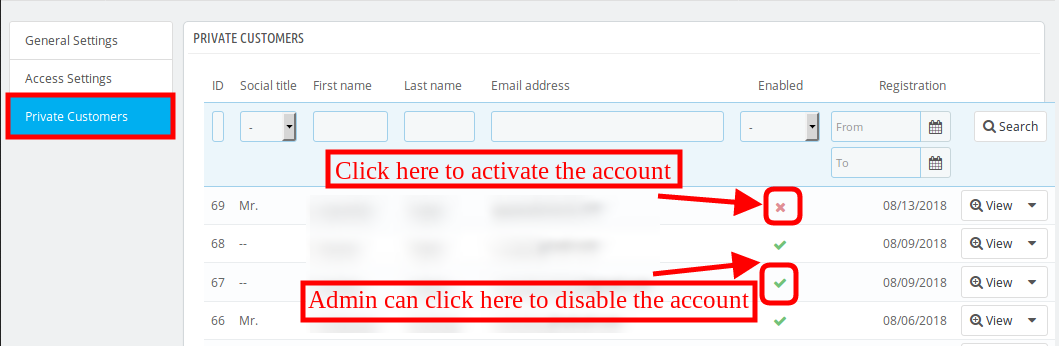
Once the eCommerce store admin has Restrict categories and products using the module, they will see the list of private customers from the admin interface. The admin can view the particular customer’s details and can verify the newly registered customer’s account.
For verifying the newly registered customer account the admin just needs to click on the highlighted icon.
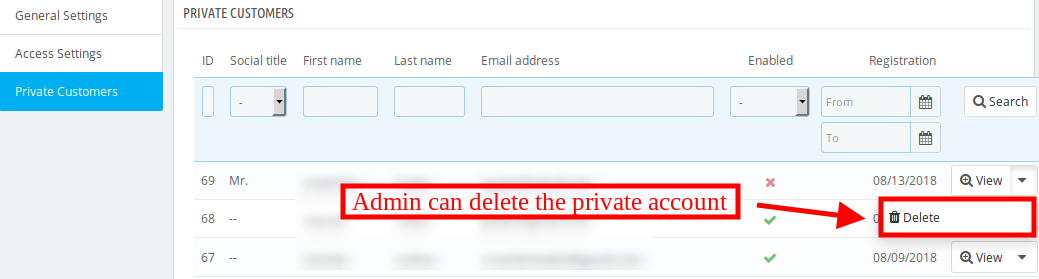
Admin can delete the customers account from the admin interface just by clicking on the “delete” option.
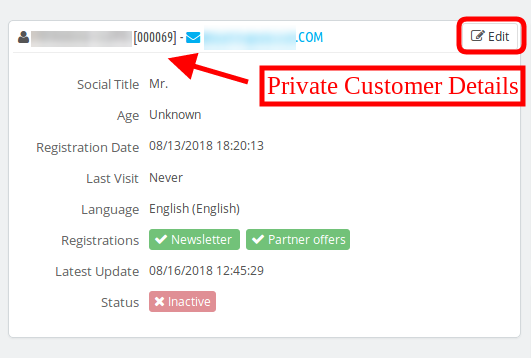
Admin can also view the details of the private customers from the admin interface.
4.0 Front-end interface
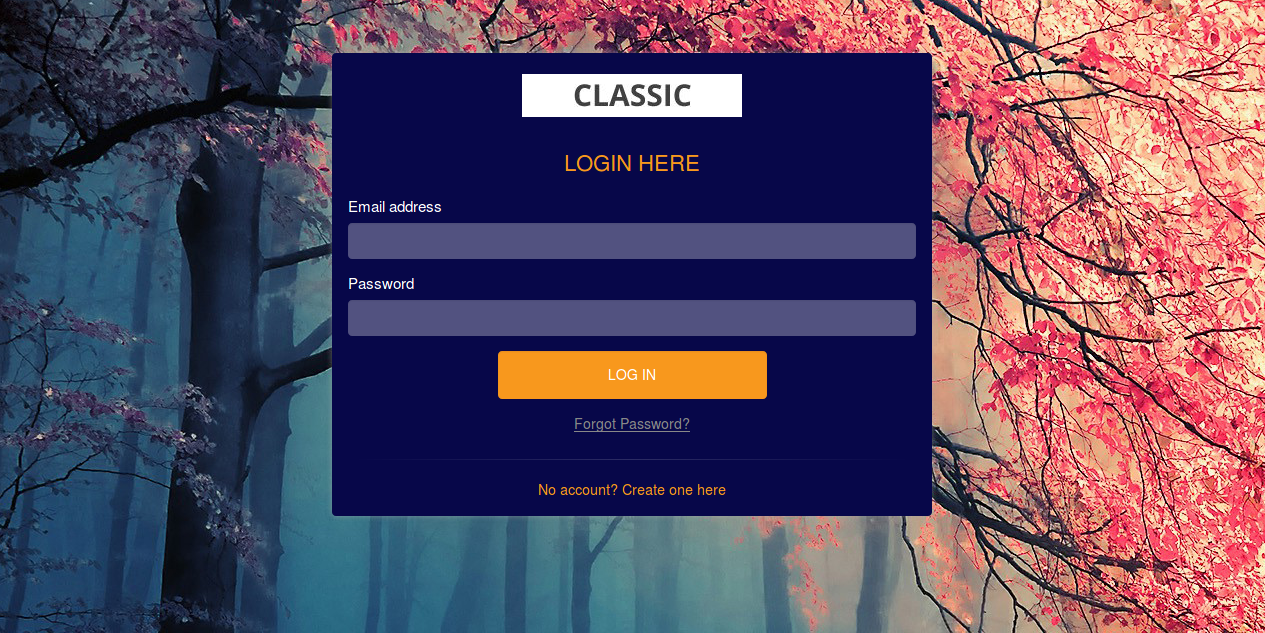
In the frontend interface, the customers can view the login/signup page as per the settings. They can login or register to view the products. If the admin select the modern signup/login format then the front-end interface will be displayed as shown below:
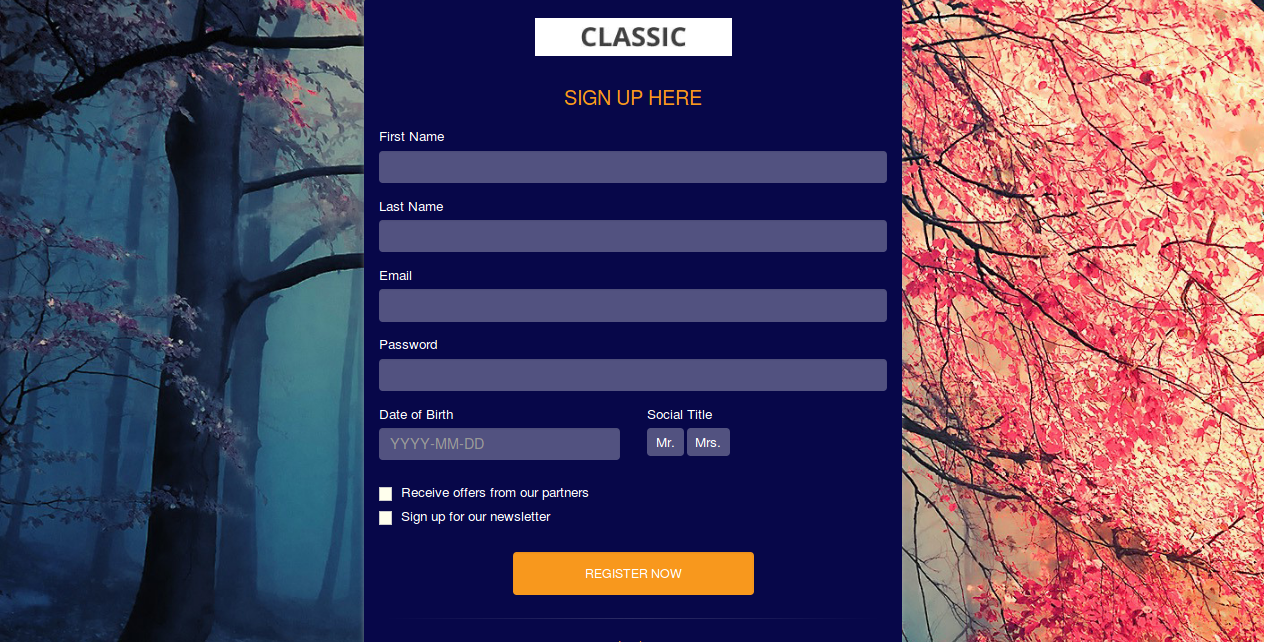
New customers can register here:
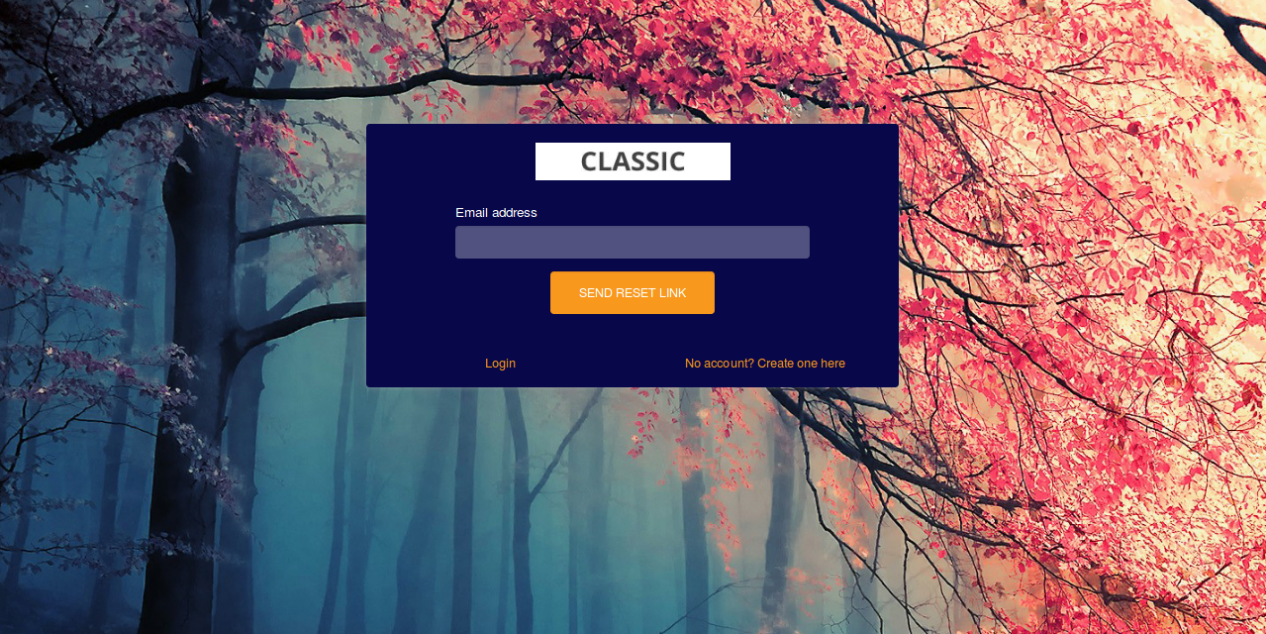
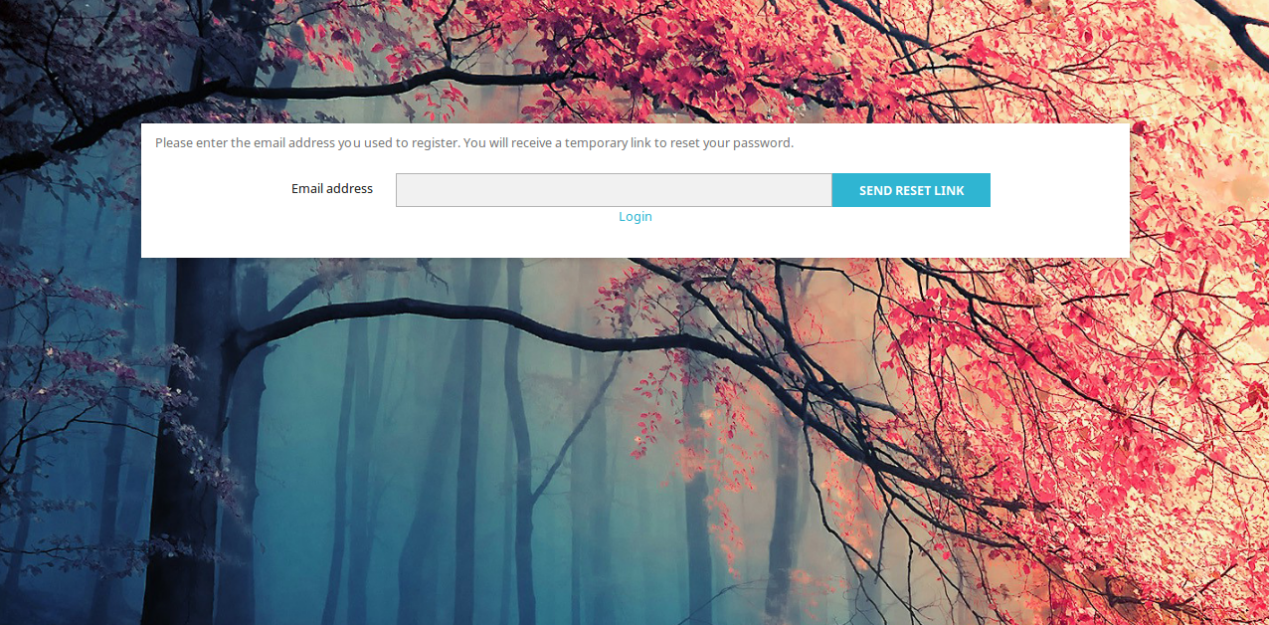
The customers can click on the forget password button if required. Here, they can enter the registered email address and get the reset link on that email id.
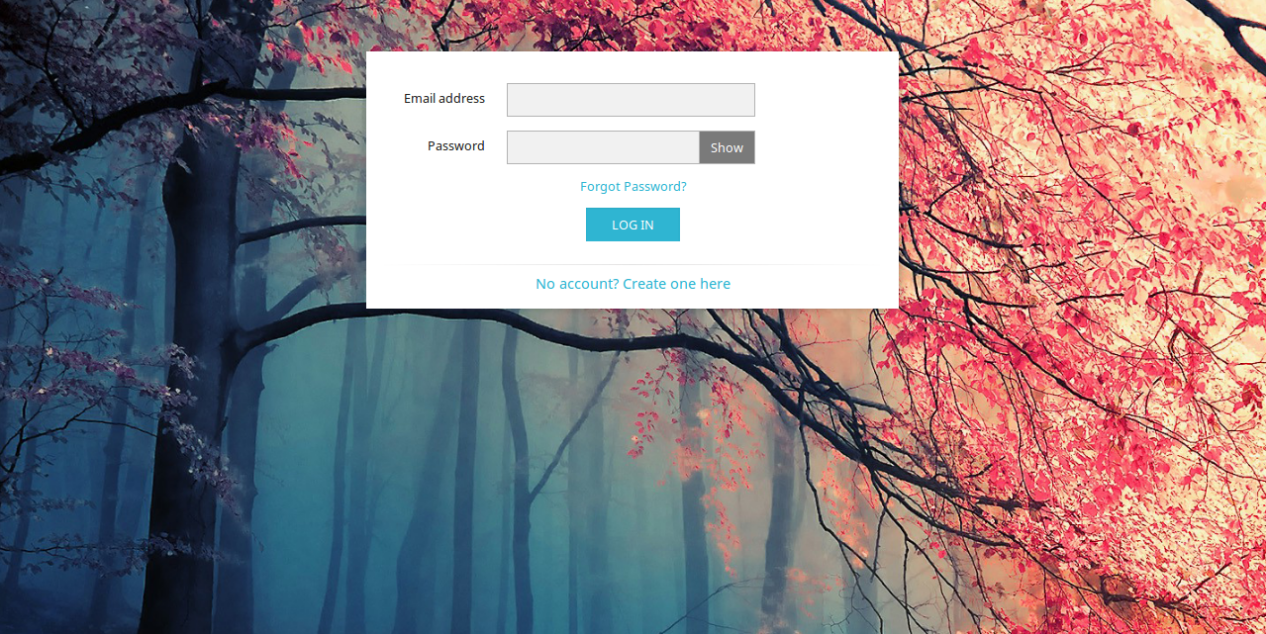
If the store admin selects the default login/signup format, the front-end interface will be displayed as shown below:
The customers can click on the forget password button in case of login difficulty. They just need to enter their registered email id in order to get reset password link.
The customers can view this message before validation of the newly registered account.
5.0.0 Tutorial Video of Prestashop Private Shop Module
Checkout our complete tutorial videos, which cover all the features from Installation to the complete frontend working.
Knowband’s Prestashop Voice Search and Typing module integrates the Voice recognition functionality in your PrestaShop store with ease. With Prestashop Vocal Search Addon, the e-merchant has the ability to makes the account registration and checkout process easier and faster. The customers can insert all the required details by just speaking in the microphone. Additionally, they get an option to search the desired product using voice command. Prestashop Voice Recognition System devises a hand-free method to give inputs while query searching or while filling up checkout forms or PI forms. Voice Search and Typing addon ensure that the customer gets simple and best results with minimal efforts.
1.1 Features of Prestashop Voice Search and Typing Addon:
1. Prestashop Voice Search and Typing Addon by Knowband allows the customer to search for anything on your website just by speaking on the microphone.
2. Prestashop Responsive Voice recognition module easily recognizes the voice of the customer and processes the command.
3. The Prestashop store admin can enable/disable the vocal search option in the Search bar.
4. By using the Prestashop voice search and Typing module, the admin can enable the Voice recognition option in Mobile or Tablet device as well.
5. The store admin can enable the Voice recognition option on the Registration form as well. The Voice input works on the fields selected by the admin form the back-office.
6. Knowband Prestashop voice commander module can be enabled for the Address form, Guest Checkout form, Contact Us form, Personal information form and more.
7. The Prestashop Voice Search and Typing Module offers the admin Voice type on focus option.
8. The Customer can get the desired result easily.
9. Prestashop Voice Recognition System is multi-store compatible.
10. Prestashop Search By Voice Module by Knowband is Multilingual.
11. Prestashop Vocal Search Addon is SSL compatible.
12. Prestashop Voice Commander module is easy to use and handle.
Technology for Development
Language: PHP
FrameWork: PrestaShop
2.0 Steps For Installation of Prestashop Voice Search and Typing Addon:
1. The folder structure of the Prestashop Vocal Search Addon.
2. Copy the whole folder named as product update into your modules folder of the root directory of your PrestaShop store through FTP.
3. You will be able to find the product Voice Recognition System ready to be installed in the Modules in your PrestaShop store as shown below.
4. Click on the Install link to install the plugin.
Now, your Prestashop Search By Voice Module is ready to use and click on “Configure” link to configure this Prestashop Voice Commander module by Knowband.
3.0 Admin Interface of Prestashop Voice Search and Typing
After installing Prestashop Voice Search and Typing Module in the store, the Prestashop addon will provide the following interfaces:
1. General Settings
General Settings of this Knowband’s Voice Commander Module for Prestashop is explained below.
3.1 General Settings
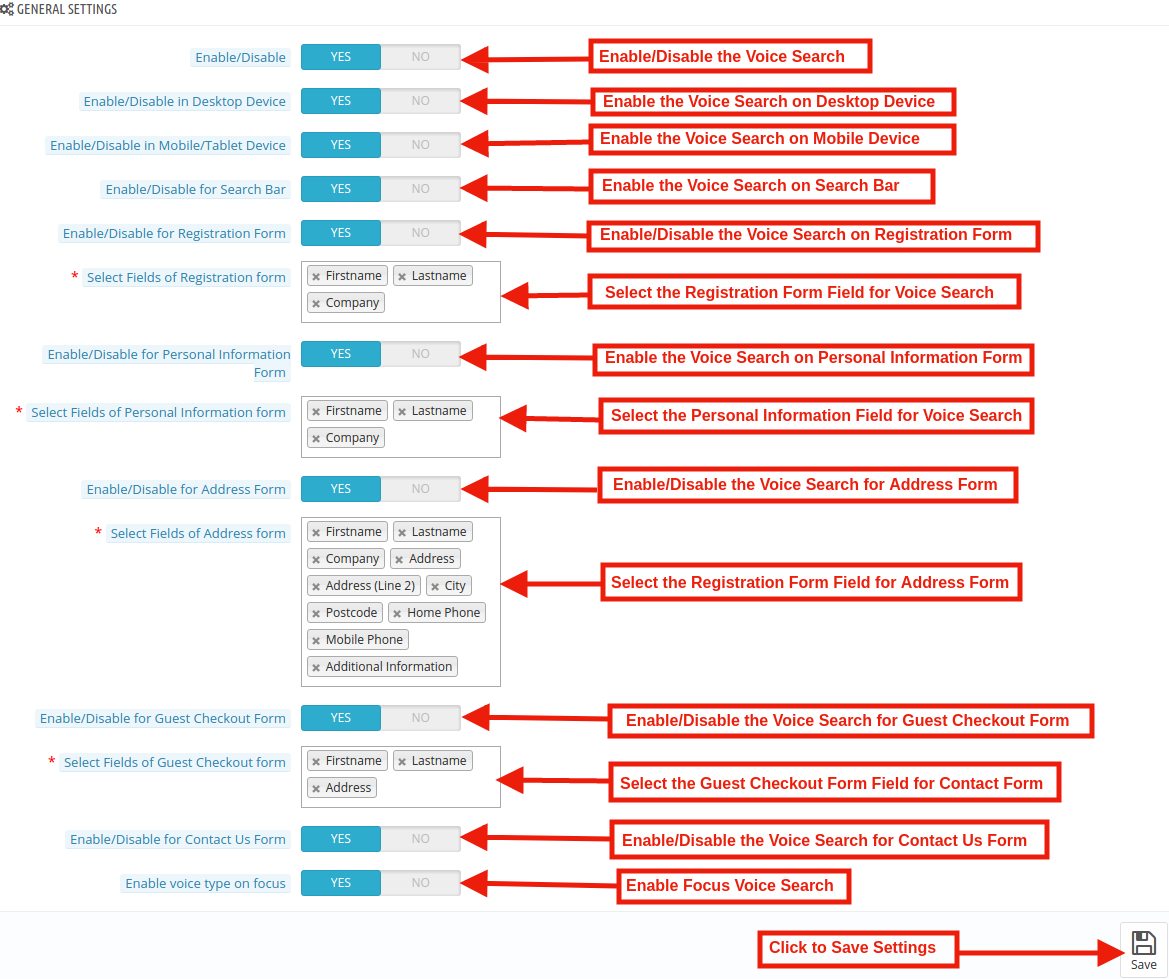
In this tab of the Prestashop Voice Search and Typing Addon by Knowband, the admin can enable/disable the Voice Command feature of the various section like: Registration page, Contact us page, Additional information page, guest checkout form and Search bar of this Prestashop module in various languages. This tab will have the following options:
General Settings tab of this Prestashop Search by Voice addon has the following options:
Enable/Disable: Initially, this field of Prestashop Voice Search and Typing Module by Knowband will be disabled. The admin can enable/disable the Addon by toggling the button.
After enabling this voice search setting, it will add the Voice Search feature to your store. The customers get easy navigation option. They can browse the category or land on the desired product just by using voice assistant. This saves the effort of typing manually.
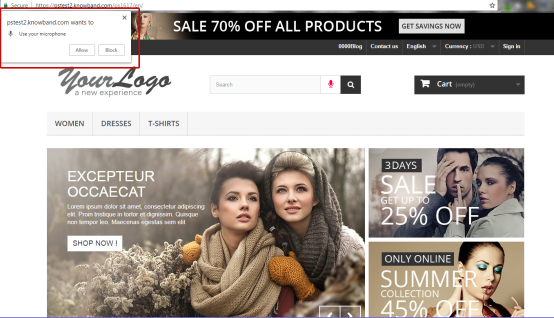
When the customer clicks on the Voice Command button, the pop-up notification appears on the screen asking permission for accessing the microphone as shown below:
After enabling the notification, the customer will be able to speak on the microphone.
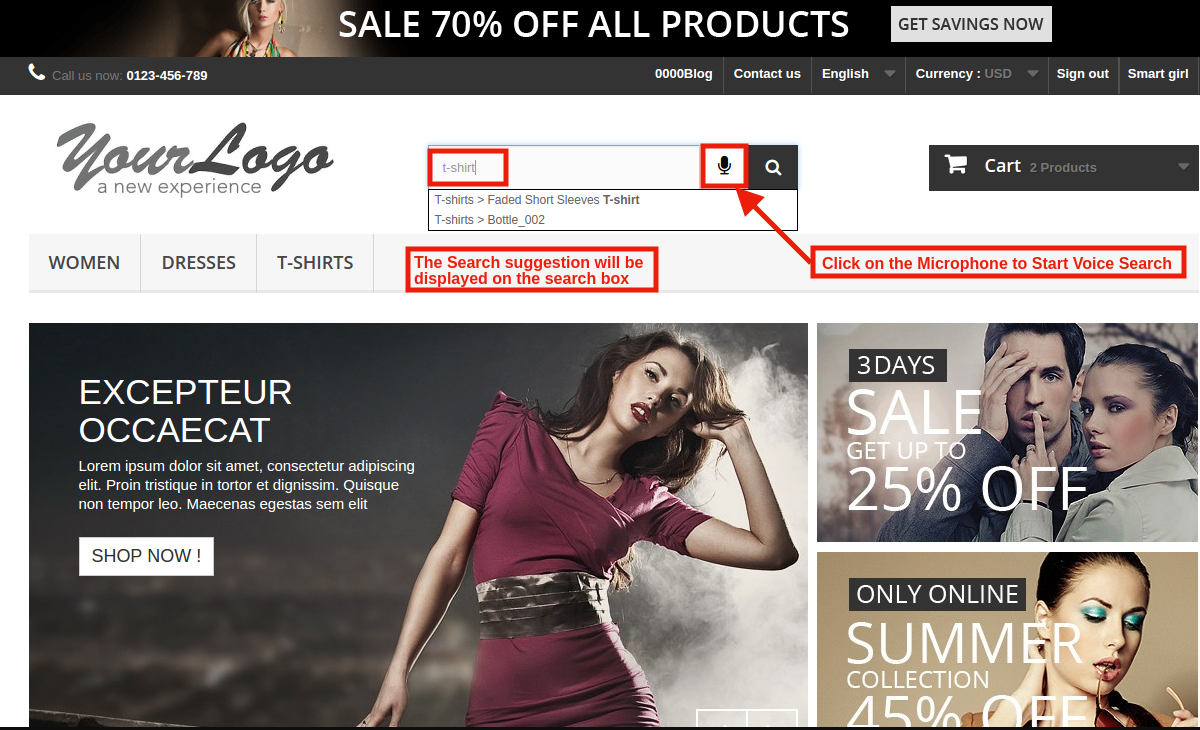
Enable/Disable in Desktop Device: In this section, the store admin can enable the voice command feature in the desktop site as well.
Front End Preview:
The customers can easily browse the desktop website device just by speaking the microphone.
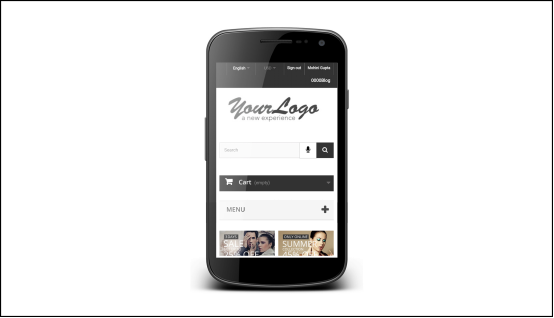
Enable/Disable in Mobile/Tablet Device: By using this Prestashop Vocal Search Addon, the admin can enable the Voice recognition feature on Mobile Device just by toggling the button.
Front End Preview:
Enable/Disable for Search Bar: Using this option of the Prestashop Voice Recognition System Module, the store merchant can enable the voice command functionality for Search Bar.
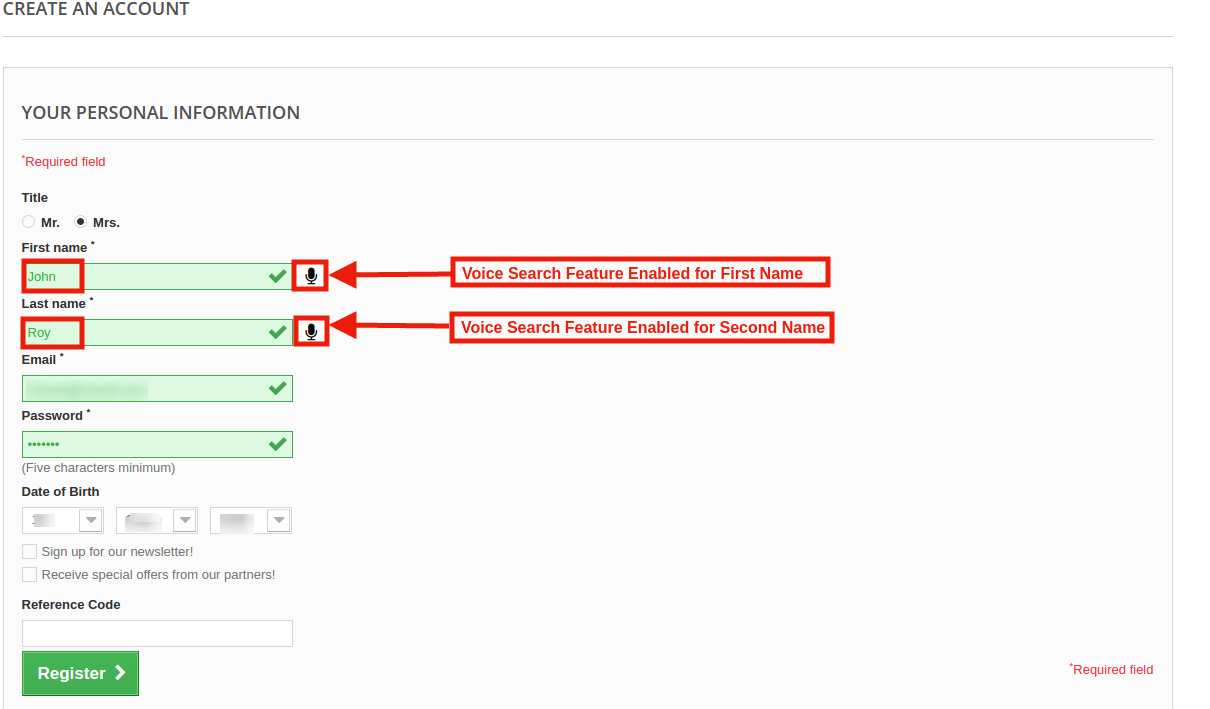
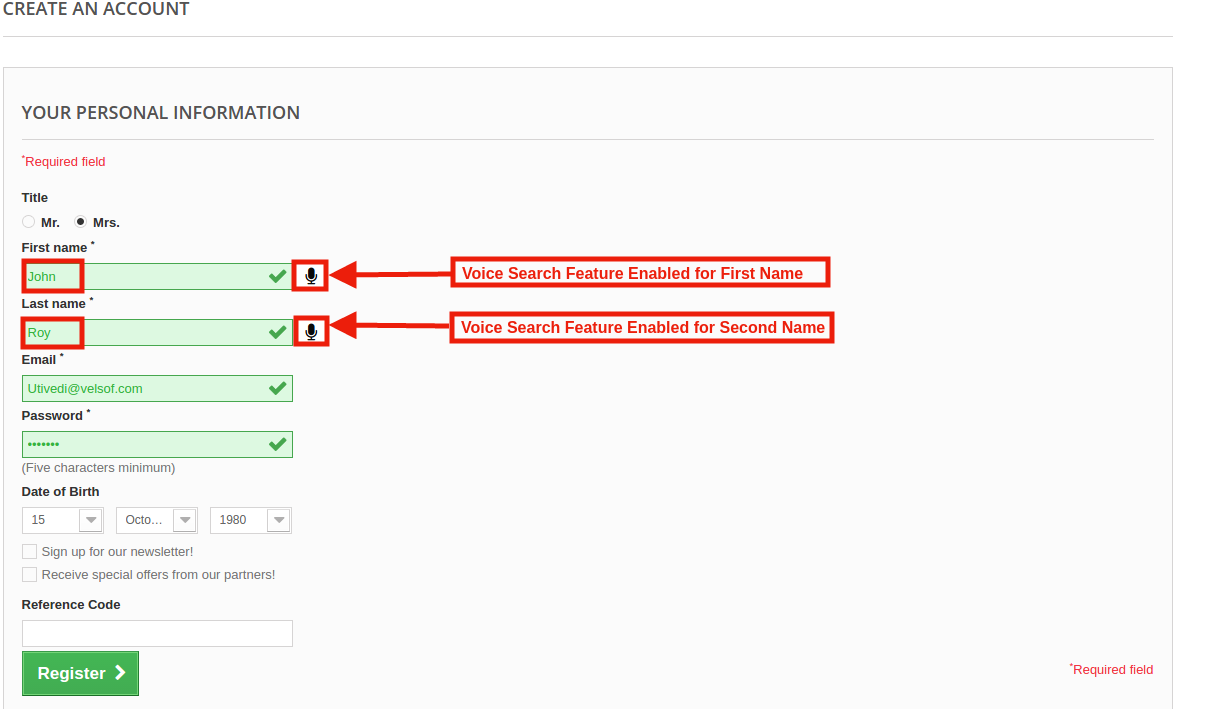
Enable/Disable for Registration Form: Prestashop Voice Search and Typing Module gives an option to the eCommerce retailer to enable the Voice Recognition System on the Registration form.
Select Field for Registration Form: Here, the store merchant can select the registration form field. In which they want to enable the Voice feature like: First name, Last Name and more.
Enable/Disable for Personal Information Form: This option allows the admin to offer the Voice command feature on the customer personal information form. The customer can update the information just by speaking the microphone. The addon will capture the command given by the user through a microphone and input the same in the respective field.
Select the Personal Information Field: The admin can select the field for providing the voice option.
Enable/Disable for Address Form: Prestashop Voice Search and Typing Module gives an option to the eCommerce retailer to enable the Voice Recognition System on the address form.
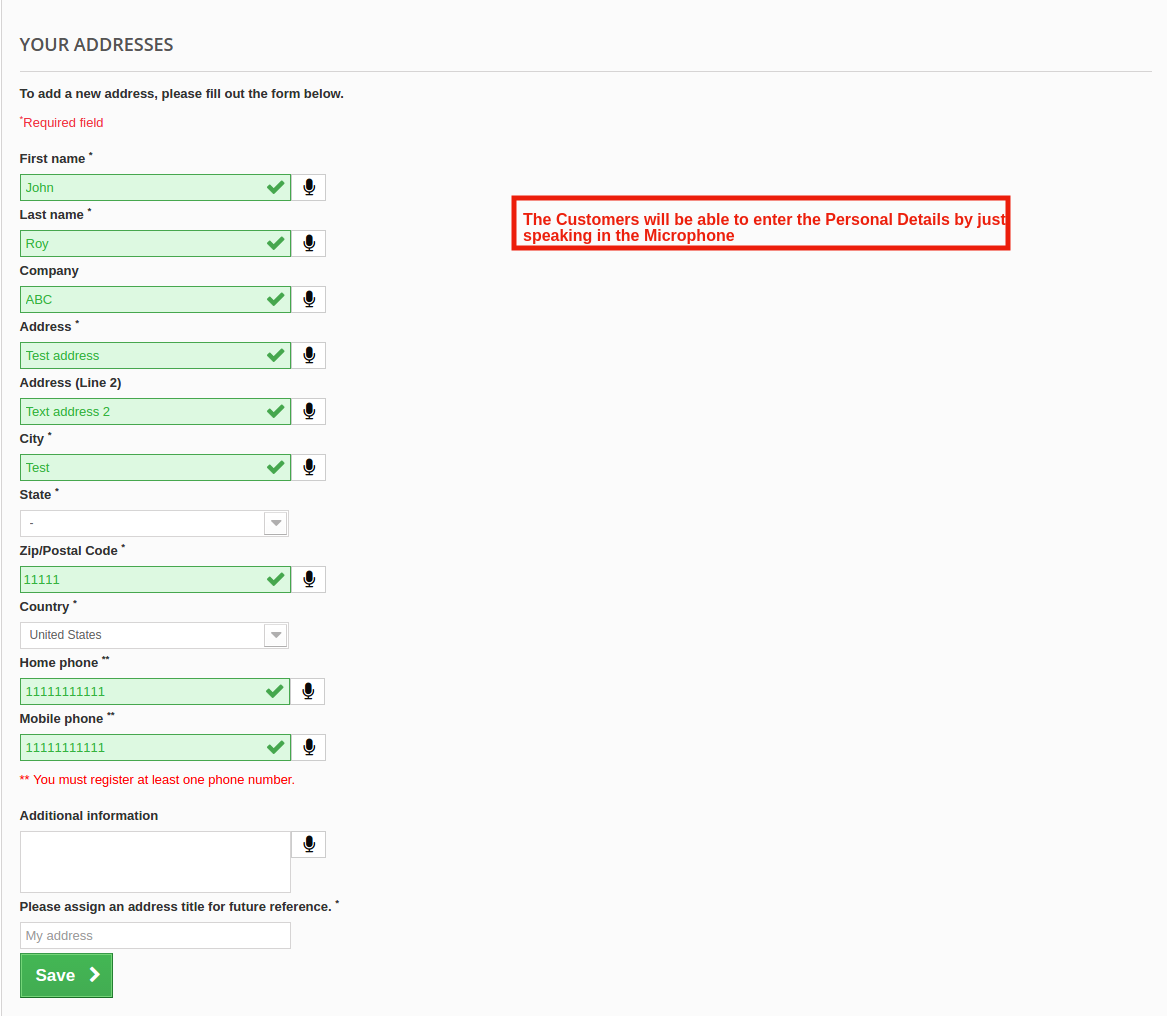
Select the Address Form Field: In this field, the Prestashop store admin can allow the customer to fill the Address by speaking on the Microphone. As per the requirement, the admin can enable voice commander function First name, Last name, Company name, Address and more. The customer can easily fill the personal information by speaking in the Microphone.
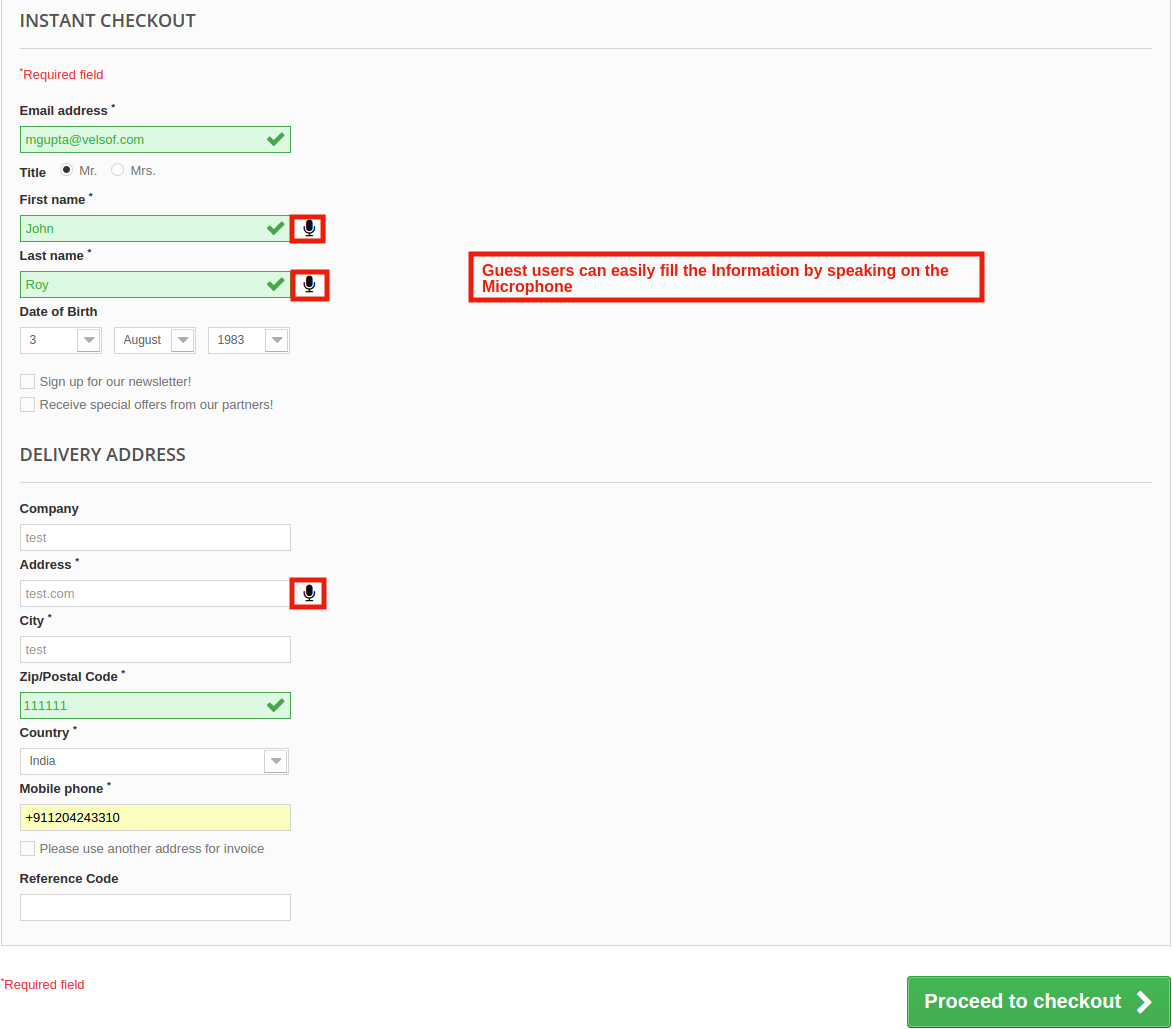
Enable/Disable for Guest Checkout Form: Prestashop Voice Search and Typing Addon gives an access to the guest users to fill the checkout information whatever the Guest user speaks on the microphone.
Select the Guest Checkout Form Field: With the help of Prestashop Voice Reminder module, the Prestashop store owner can enable the voice recognition feature in Guest Checkout form as well.
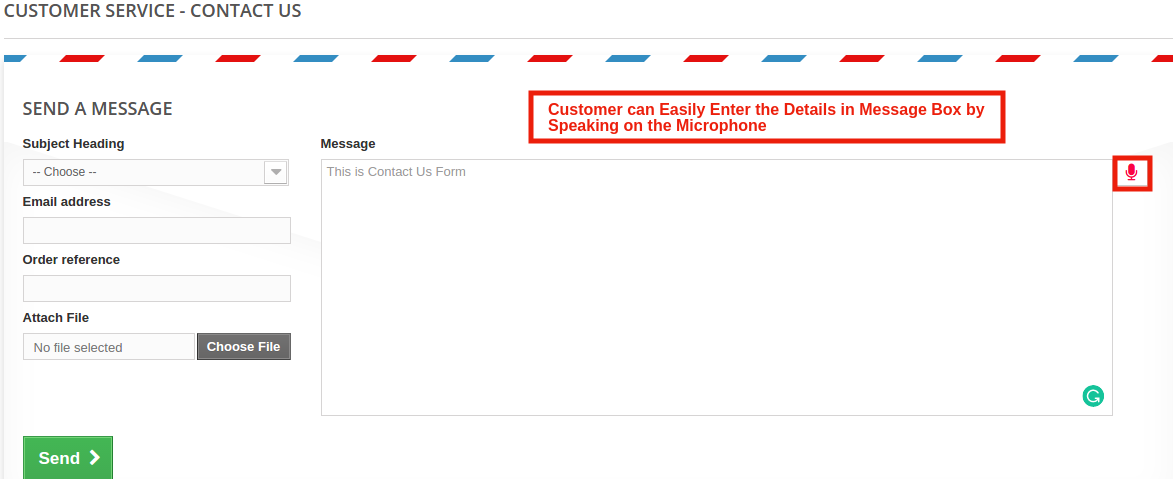
Enable/Disable for Contact Us Form: The Prestashop Search By Voice Module allows the store admin to enable the voice recognition function on the contact form.
Enable Voice Type on Focus: The Customers can activate the Microphone without clicking on it if the admin enables Voice type on focus setting then Microphone will be activated at the same time when the customers click on the field.
1.0 Introduction of Knowband Prestashop Accelerated Mobile Pages (AMP) Addon:
Accelerated mobile pages or AMP can effortlessly boost the performance of the websites on the mobile devices. AMP provides convenient access to information on the Internet from the screens of smartphones and tablets. AMP is an advance Google technology which reduces the load time of the mobile website. With the introduction of mobile-first indexing, the goal of every eCommerce store owner should be to reduce the load time of their websites for the mobile users. High load time increases the bounce rate of the website. For increasing the performance of Prestashop store website on mobiles, Knowband offers the Prestashop Accelerated Mobile Pages (AMP) Module.
Prestashop AMP module allows the admin to convert the home page, category pages, product pages and CMS pages into fast-loading AMP pages. By limiting the data displayed, Prestashop Accelerated Mobile Pages Module reduces the load time of the mobile sites. Also, with the Prestashop addon, the e-merchant has an ability to enable/disable additional sections on the webpages like Best Sellers, Featured Products, New Arrival. You can now provide amazing user experience to your audience base who browses the site through their handheld devices. In the mobile generation, once your mobile-first customers are happy, sales will happen easily.
1.1 Features of Prestashop Accelerated Mobile Pages Module:
1. Prestashop Accelerated Mobile (AMP) Module allows the store admin to convert web page to AMP without making any core changes in the code of the website. This limits the data displayed on the mobile site, thus, boosting the load time of the same. In short, the Prestashop addon can amp up the load time of the mobile sites by creating accelerated mobile pages of the site. However, it will not affect the load time or performance of the desktop sites.
2. With the help of the Prestashop AMP Module, the store admin can convert the home page, category pages, product pages and CMS pages to AMP.
3. Knowband’s Prestashop Accelerated Mobile(AMP) addon provides an option to the store owner to customize the home page, category pages, product pages and CMS pages settings form the back-office.
4. The admin can upload the Business logo on AMP and they can also fix the width and height of the website.
5. Prestashop AMP Module offers the store merchant an option to add the Custom CSS for adding the additional functionality.
6. Google Accelerated Mobile Pages Module enables the store admin to enable/disable the display of the bestsellers option, featured and new products on home page. Apart from this, they can set the number of featured products to be shown in a particular section. The random products are automatically fetched and displayed to the user.
7. The Prestashop store owner can change the banner of the best sellers, featured and new products on the homepage.
8. Prestashop Accelerated Mobile Pages (AMP) module has provided the social media sharing options on the AMP. Even admin can add more icon by adding the script.
9. The Admin can customize the categories of AMP from the back-end of the Prestashop AMP Module. The customers to browse categories from the AMP page.
10. By using the Google Accelerated Mobile Pages Module, the admin can automatically generate AMP sitemap with the help of CRON.
11. The Admin can generate AMP sitemap by click the button.
12. Knowband’s Prestashop Accelerated Mobile Pages Addon supports Google Analytics. The eCommerce admin can enter the Analytics client Id for tracking the AMP performance.
13. Google Accelerated Mobile Pages Module supports multiple languages.
14. With the help of Prestashop AMP Module, the Prestashop store admin can set color and background color for AMP website and other different blocks of AMP.
15. Prestashop AMP module is easy to use and handle.
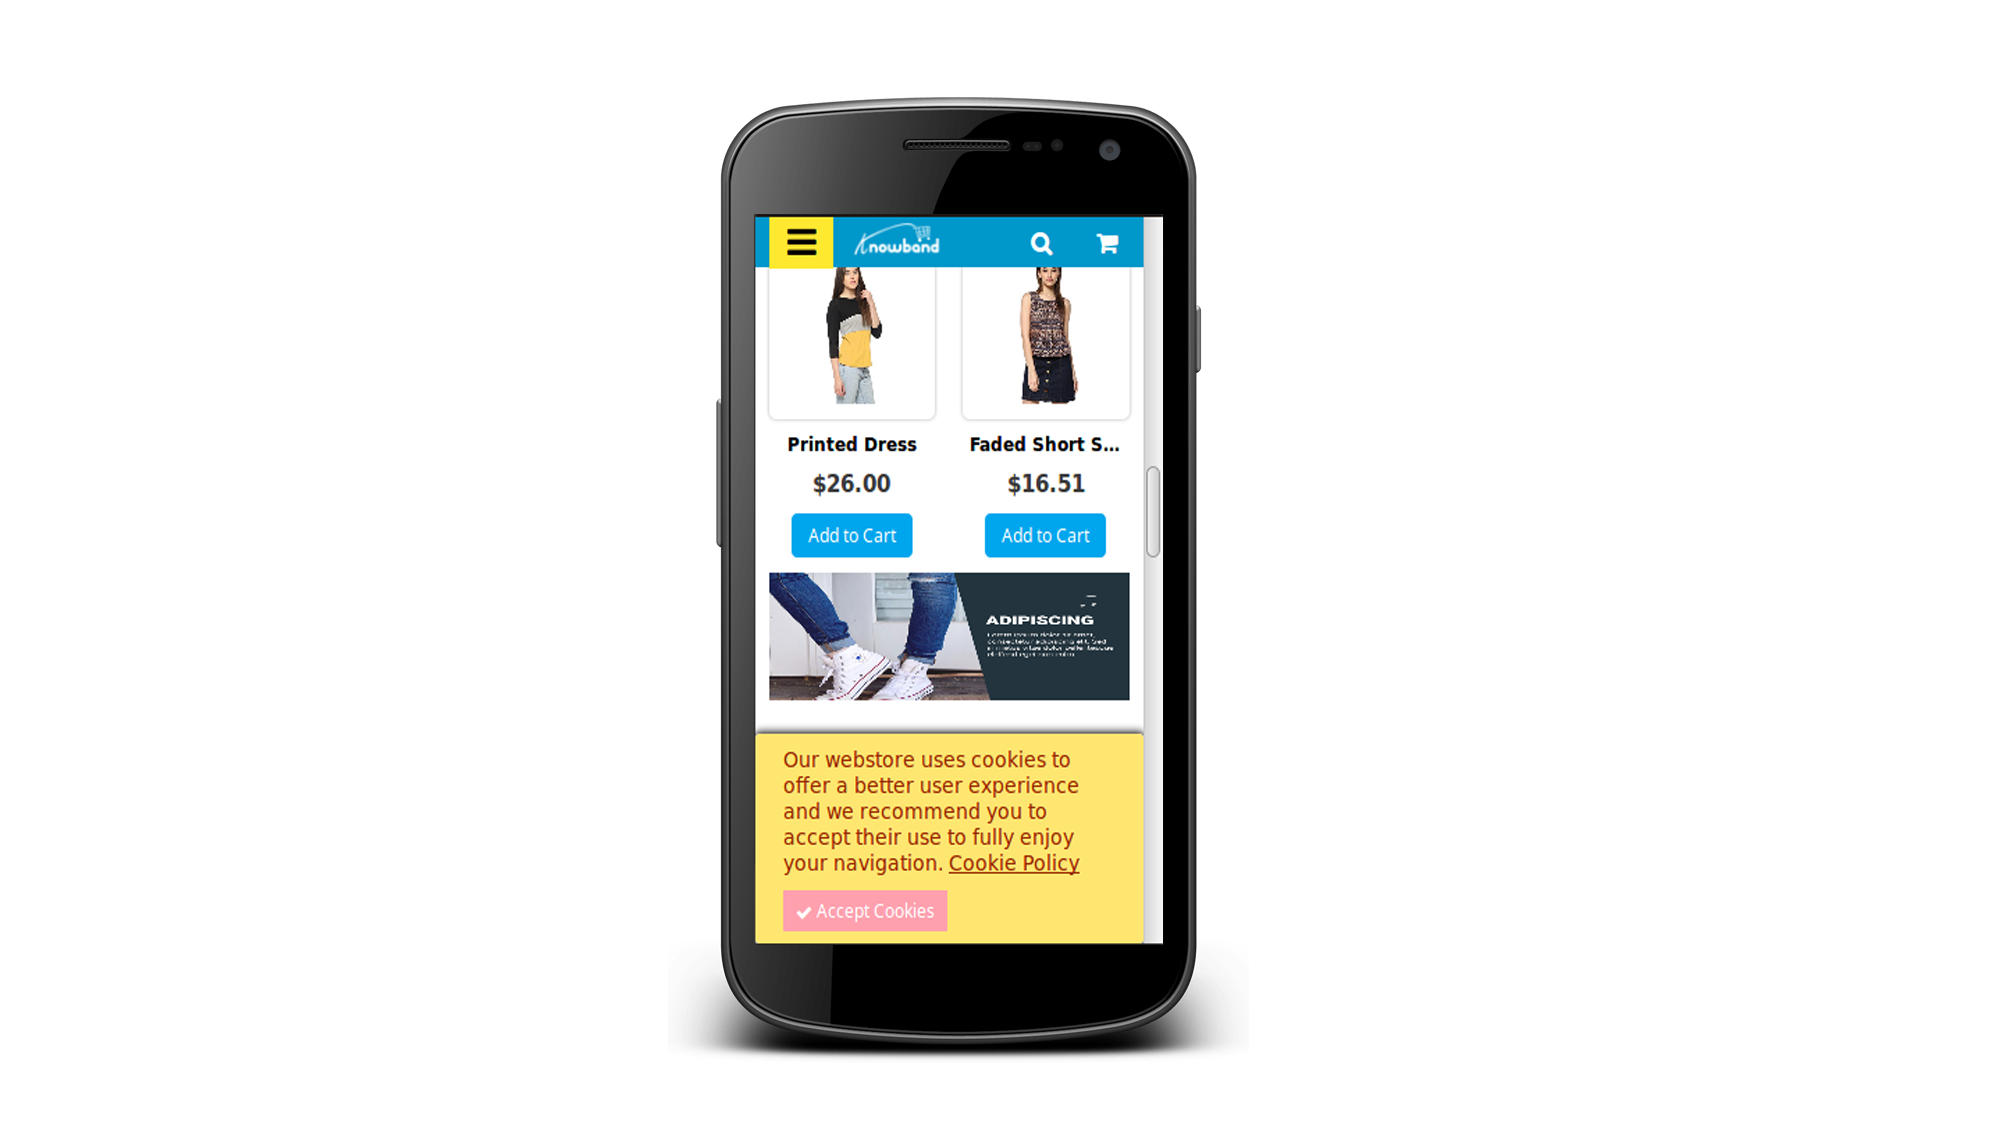
16. This Knowband’s Prestashop AMP Module also supports GDPR compatibilty. Admin can map the cookie policy to any CMS page of the website.
17. The eCommerce store owner can show YouTube, Vimeo and DailyMotion videos on the homepage of mobile pages.
18. Google Accelerated Mobile Pages(AMP) Addon provides an option to display Instagram and twitter feeds on the homepage.
19. The e-merchant can manage the look and feel of cookie consent bar from the admin interface without any hassle.
20. The store admin can display advertisement on all the Mobile Pages by including Google adsense from the admin interface of Prestashop Accelerated Mobile Pages module.
21. The store owner can also implement Facebook pixel on the mobile pages. Facebook pixel is an analytic tool which tracks the store visitors.
Technology for Development
Language: PHP
FrameWork: PrestaShop
2.0 Steps For Installation of Prestashop Accelerated Mobile Pages (AMP) Addon:
1.The folder structure of the Prestashop AMP module.
2. Copy the whole folder named as product update into your modules folder of the root directory of your PrestaShop store through FTP.
3. You will be able to find the product AMP plug-in ready to be installed in the Modules in your PrestaShop store as shown below.
4. Click on the Install link to install the plugin.
Now, your Prestashop Accelerated Mobile Pages (AMP) Plugin is ready to use and click on “Configure” link to configure this Prestashop module by Knowband.
3.0 Admin Interface
After installing Google Accelerated Mobile Pages(AMP) Module into the store, the Prestashop addon will provide the following interfaces:
1. General Settings
2. Home Settings
3. Category Page Settings
4. Product Page Settings
5. Menu Settings
6. Look and Feel Settings
7. Social Media Settings
8. Extra Icon Settings
9. Google Settings
10. Sitemap Settings
Each interface of this Knowband’s Accelerated Mobile Pages (AMP) module for Prestashop is explained below.
3.1 General Settings
General Settings tab of this Prestashop AMP addon has following options:
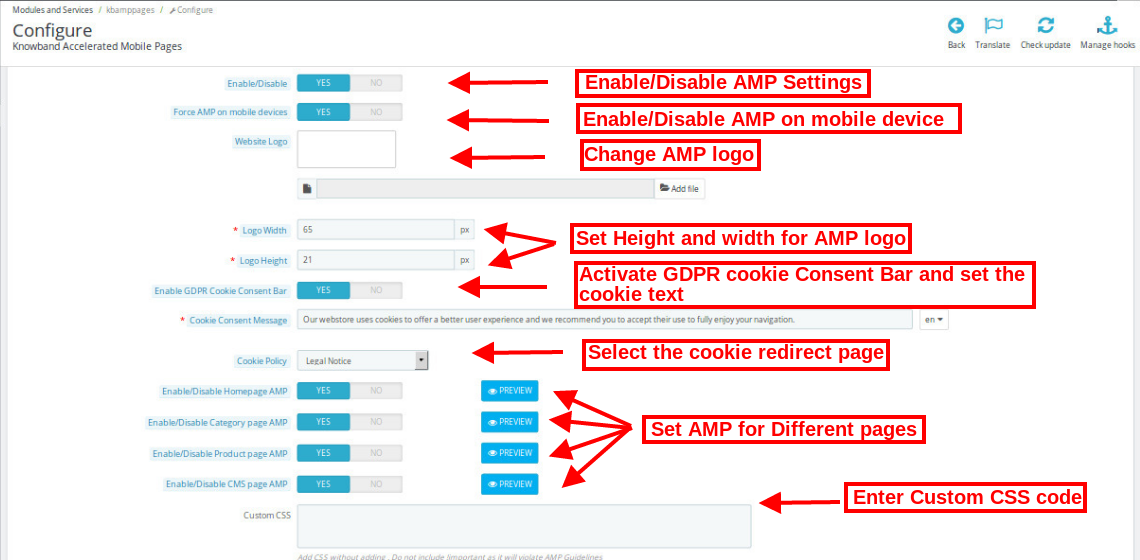
Enable/Disable: Initially, this field of Prestashop Accelerated Mobile Pages module by Knowband will be disabled. The admin can enable/disable the plugin by toggling the button.
Enabling this setting will convert the Website Pages into AMP.
Force AMP on Mobile Device: In this section of Knowband Prestashop AMP addon, the admin can enable the settings to AMP pages on Mobile Device.
Website Logo: Using this option of the Google Accelerated Mobile Pages(AMP) Module, the store merchant can upload or change the logo of the AMP.
Logo Width: Here the store admin can set the width of the Logo in Pixel.
Logo Height: Here the store admin can set the height of the Logo in Pixel.
Enable GDPR Cookie Consent Bar: Admin can enable/disable this setting to display on AMP pages.
Cookie Consent Message: Admin can add custom text for cookie consent bar displayed to the user.
Cookie Policy: Admin can select the page which is to be displayed on Cookie Policy.
Enable/Disable Home Page AMP: The store admin can enable/disable AMP on the Home Page of the site. After enabling the option, the admin can check the Home page AMP by clicking on the Preview button.
Enable/Disable Category Page AMP: The store admin can enable/disable AMP on the category pages. After enabling the option, the admin can check category page AMP by clicking on the Preview button.
Enable/Disable Product Page AMP: Using this option of the Prestashop Accelerated Mobile Page (AMP) addon, the store admin can enable AMP on the product pages AMP of the site and can view the same by clicking on the PREVIEW button.
Enable/Disable CMS Page AMP: Prestashop AMP Page Module gives an option the store retailer to convert the CMS page to AMP. The look and feel of the pages can be viewed by clicking on the Preview button.
Custom CSS: Prestashop store admin can add Custom CSS code as per business requirement in this section.
3.2 Home Page Settings
In this tab of the Prestashop Accelerated Mobile Pages (AMP) Addon by Knowband, the admin can enable/disable the display of new arrivals, best sellers and featured products on the AMP Home page of this Prestashop module in various languages. This tab will have the following options:
1. Home Page Settings 2. Featured Product Settings 3. Best Selling Product Settings 4. New Arrival Product Settings
3.2.1 Home Page Settings:
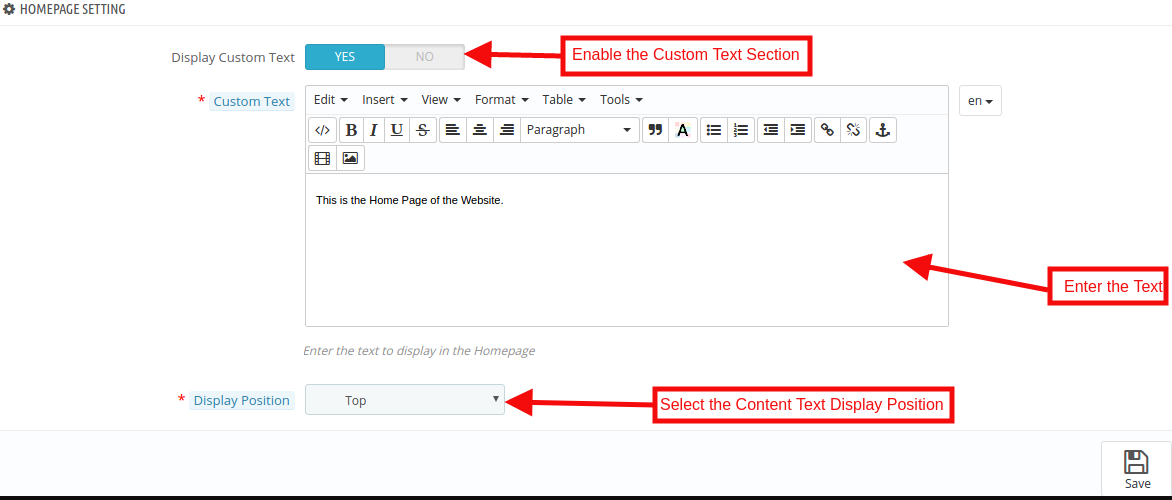
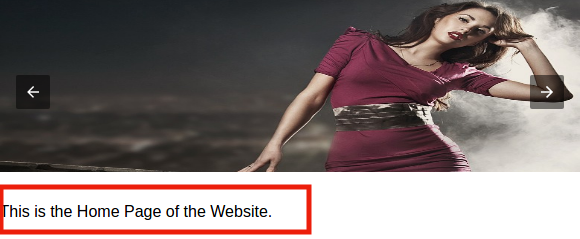
Display Custom Text: The Admin can enable/disable the Custom Text option here.
Custom Text: In this Google Accelerated Mobile Pages Addon, the store admin can change the text of the Home page block.
Display Position: The admin can select the display position that will be reflected the front end of the site.
3.2.2 Featured Products Settings:
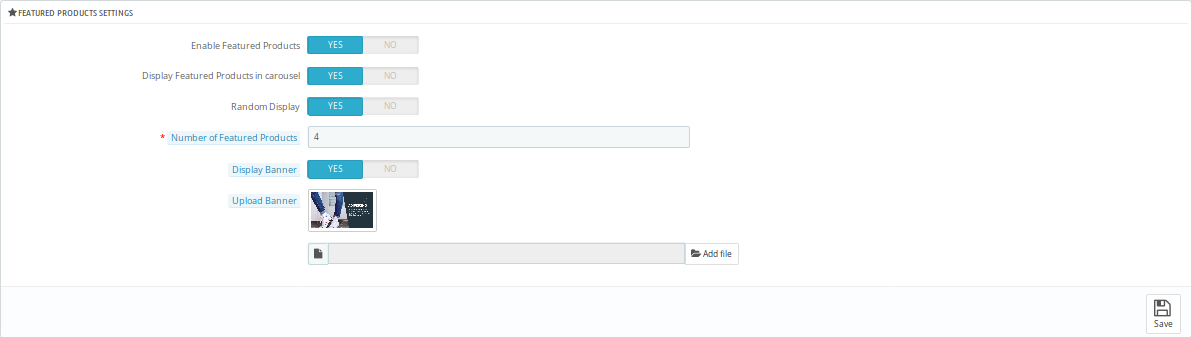
Enable Featured Products: Using this option of the Prestashop AMP extension, the eCommerce store admin can enable/disable the featured products section.
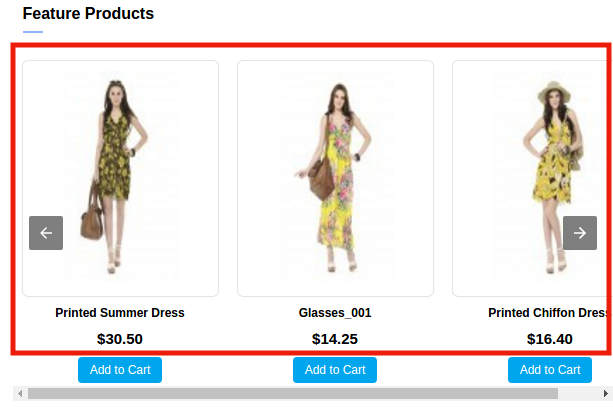
Display Featured Products in Carousel: Here the store admin can the featured products in the carousel.
Random Display: The Store admin can enable/disable the Random product display option. After enabling this feature, random product display in the particular section in AMP.
Number of Featured Products: Knowband’s Prestashop Accelerated Mobile Pages Addon allows the store admin to select the number of products which they want to show in the Feature Product section.
Display Banner: The eCommerce merchant can enable/disable the display banner option.
Upload Banner: In this field, the store admin can upload the banner for the featured product.
3.2.2 Best Selling Products Settings:
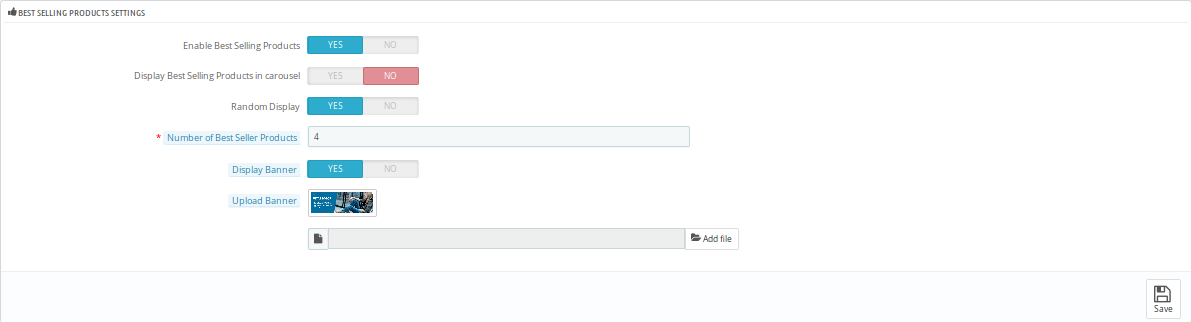
In this tab, the Prestashop store admin can customize the settings of the best selling product. Refer to the attached screenshot below:
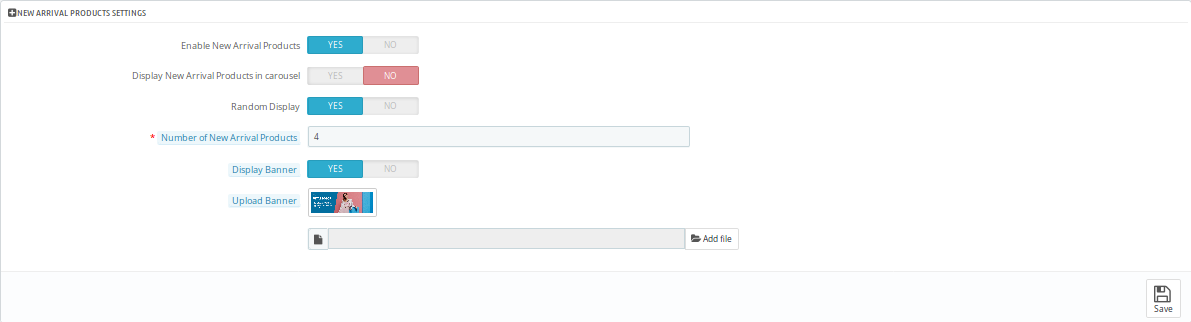
3.2.3 New Arrival Products Settings:
The admin has control over the display of New Arrival Product positions on AMP pages.
3.2.4 YouTube Video
Here, you can apply the settings for showing the YouTube videos.
Display Youtube Video: The store admin can enable or disable the settings to show youtube videos on the homepage.
Youtube video id: The online store admin can enter the video id in order to display it on the homepage.
Enable Youtube header text: The Prestashop Accelerated Mobile Pages Addon provides an option to enable the settings for showing youtube video’s header text.
Youtube header text: Admin can set the header text in various languages.
Autoplay: Admin can apply the settings for video autoplay.
Display controls: Admin can show the display controls by enabling the option.
Display positions: The store admin can show the display position for the videos.
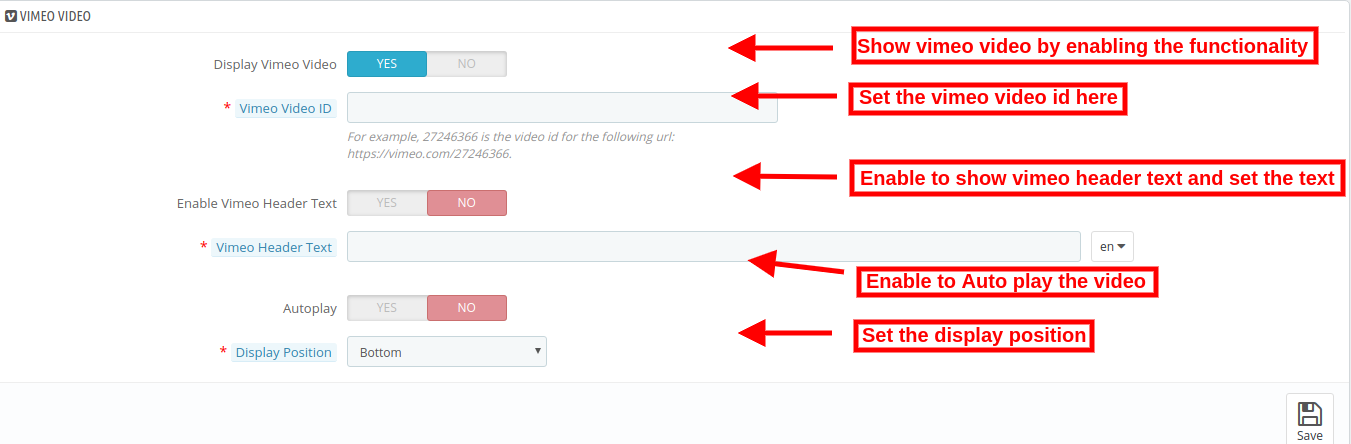
3.2.5 Vimeo Video
The store admin can also show Vimeo videos on the website’s homepage by applying these settings.
Enable the settings for showing Vimeo video on the homepage. Customization options are same as youtube videos.
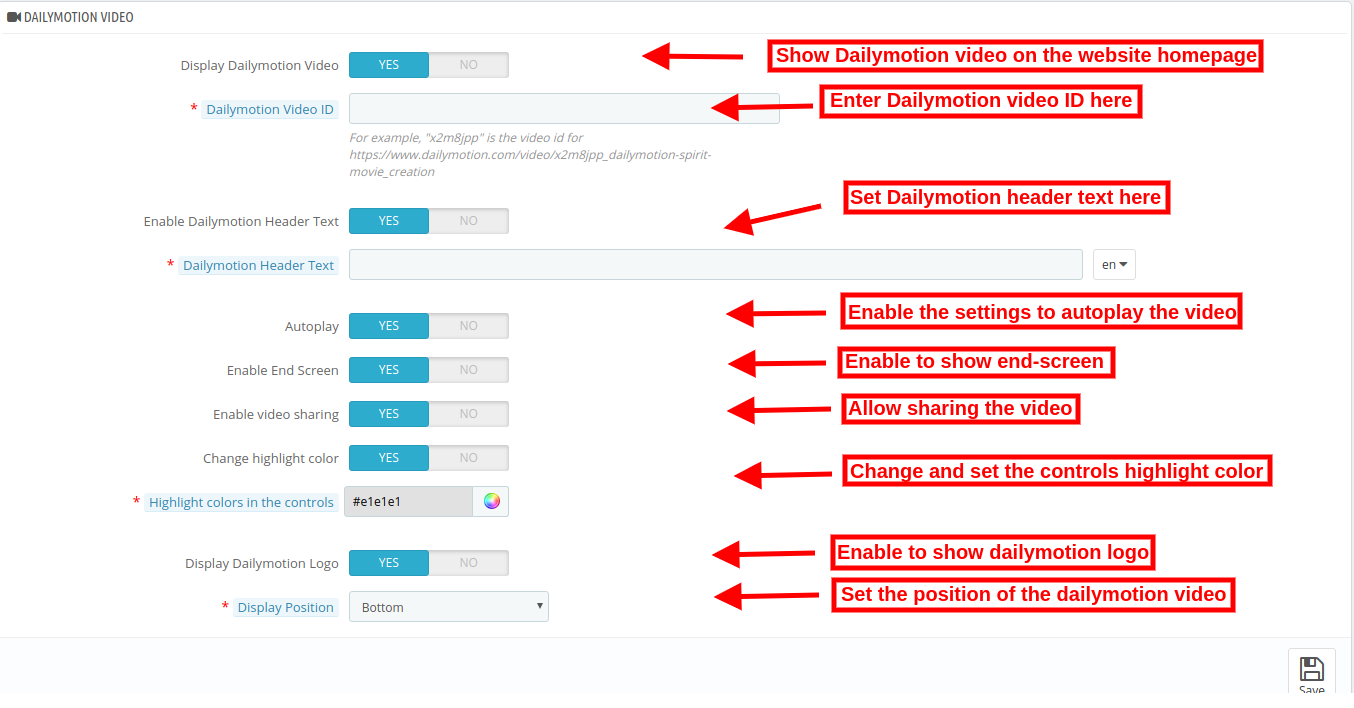
3.2.6 DailyMotion Video
As an eCommerce store admin, you can also show DailyMotion videos on the website homepage by applying these settings.
Display DailyMotion Video: The store admin can show DailyMotion videos on the homepage.
DailyMotion Video ID: The online store admin can enter the DailyMotion video id from the admin interface of this Google Accelerated Mobile Pages (AMP) Addon.
Enable DailyMotion Header Text: The store admin can enable or disable the settings from the admin interface.
DailyMotion Header text: Enter the header text here.
Autoplay: Enable to Auto play videos.
Enable End Screen: Enable the settings to show the end screen.
Enable video sharing: Allow video sharing by enabling the options.
Change Highlight color: Admin can also enable the settings in order to change the highlight color.
Highlight colors in the controls: Set the color from the color picker tool.
Display DailyMotion Logo: Enable the settings in order to display DailyMotion logo.
Display Position: Set the video position from the admin interface.
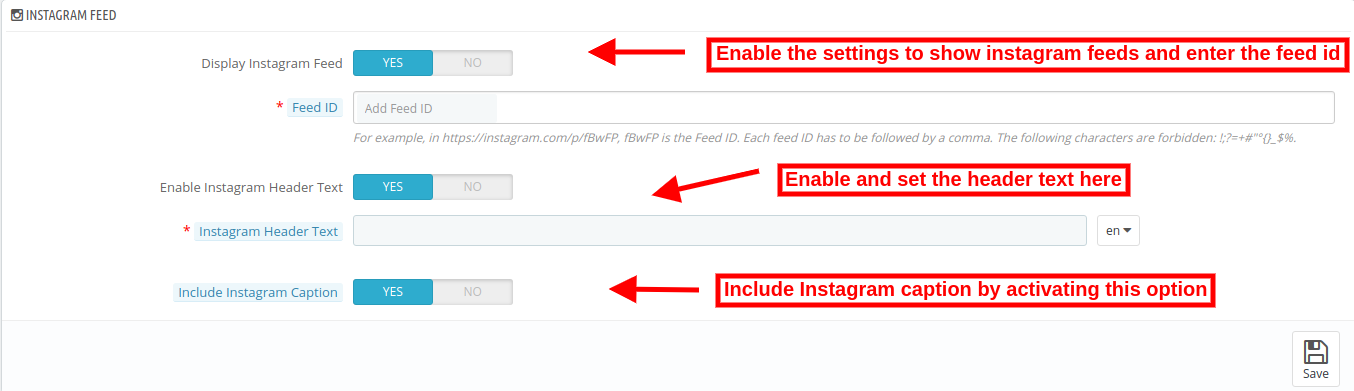
3.2.7 Instagram feed
Admin can show Instagram feeds on the homepage.
Display Instagram feed: Enable the settings to display Instagram feeds.
Feed id: Enter the feed id here.
Enable Instagram Header Text: Switch the button to yes in order to display header text.
Instagram Header Text: Enter the header text for Instagram.
Include Instagram Caption: Enter the Instagram caption in order to display it on the website homepage.
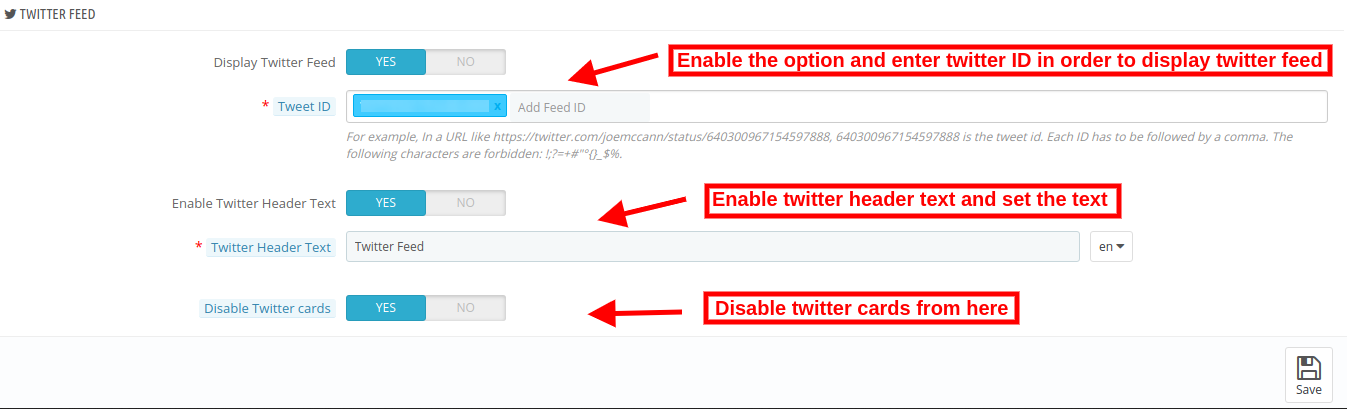
3.2.8 Twitter Feed
The online store admin can show twitter feed on the homepage if he wishes to do so.
Display Twitter Feed ID: Enable the settings in order to display twitter feeds on the homepage of the website.
Twitter ID: Enter the twitter id here.
Enable twitter header text: Enable the settings for showing header text.
Twitter Header text: Set the header text here.
Disable Twitter cards: By enabling the option you can show twitter cards on the homepage.
3.3 Category Page Settings
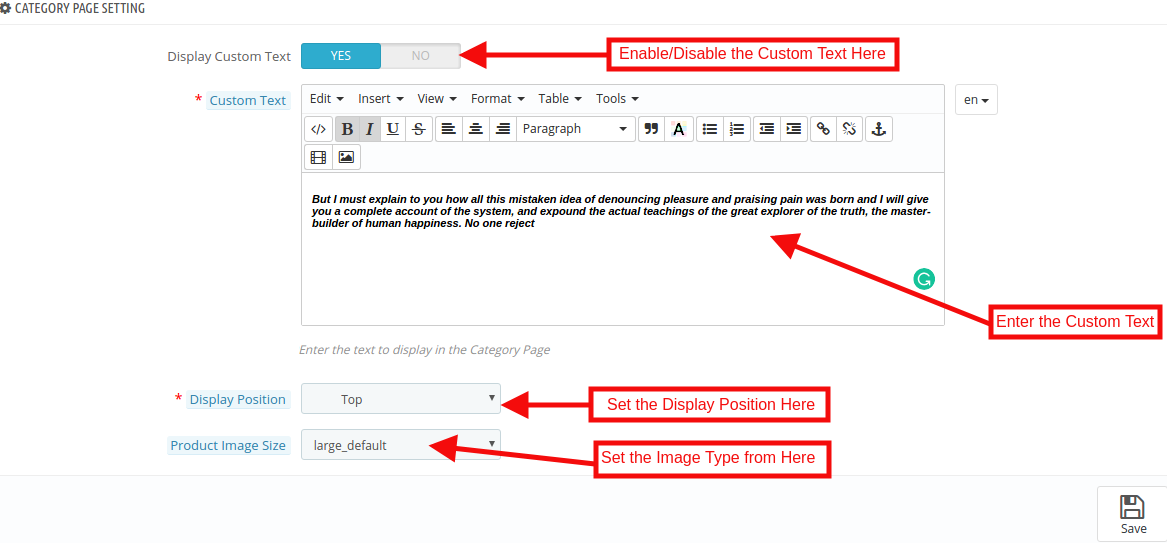
The Category Page Settings tab of the Prestashop Accelerated Mobile Pages Addon allows the admin to add the text and images. Apart from this, the admin can also define the position of the text on the Category page. This tab will have the following options:
Display Custom Text: The Admin can enable/disable the Custom message option.
Custom Text: Using this option of the Prestashop AMP Module, the eCommerce store admin can set the message of the category Page.
Display Position: In this tab, the store admin can change the display position as per desires. These changes will be reflected in the front of the store.
Product Image Size: The Prestashop store admin can set the Image type here.
3.4 Product Page Settings
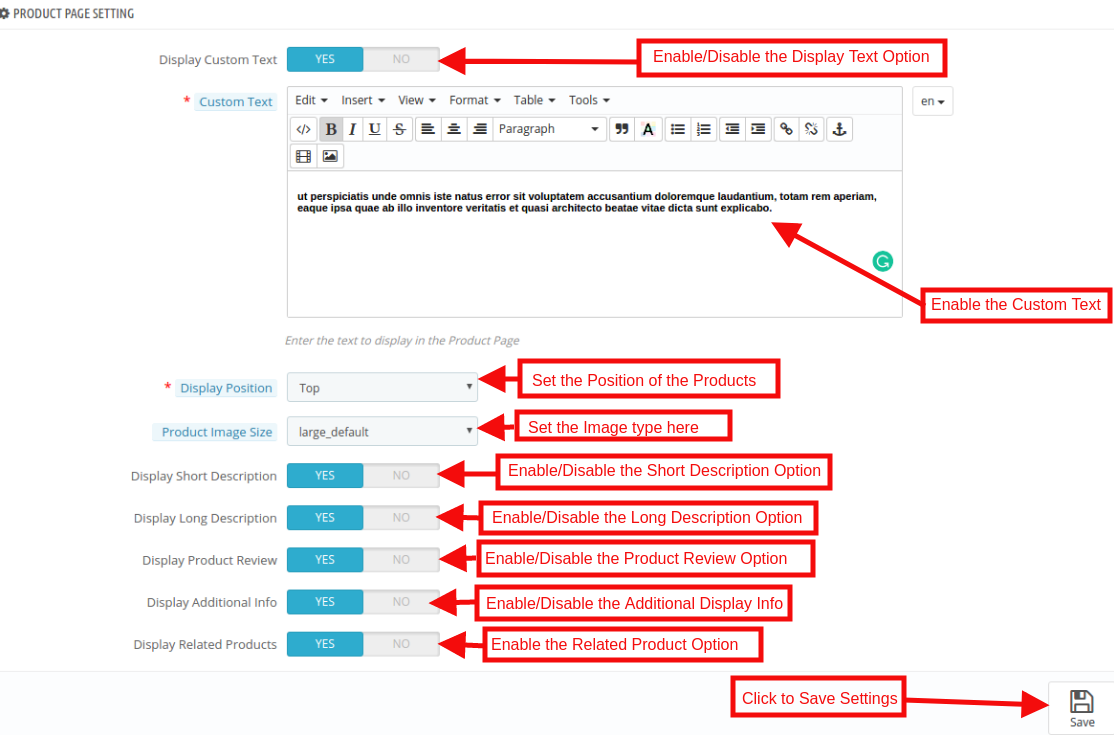
The admin has control over product page settings on AMP pages. This tab will have the following options:
Display Custom Text: The Admin can enable/disable the Custom message option.
Custom Text: Using this option of the Prestashop AMP Module, the eCommerce store admin can set the message of the Category Page.
Display Position: In this option, the store admin can change the display position as per desires. These changes will be reflected in the front-end of the store.
Product Image Size: The Prestashop store admin can select the image size to be displayed here.
Display Short Description: In this option, the store admin can show the short description of the product by enabling this feature.
Display Long Description: The store owner has an option to show the long description of the product as per the requirement.
Display Product Review: By using the Prestashop Accelerated Mobile Pages Module, the store admin can enable the Product review option. After enabling this feature, product review will be shown in the front-end of the store.
Display Additional Info: By enabling this feature, the admin can show the additional info of the products.
Display Related Products: By enabling this option, the store admin can display related product. These changes will be reflected in the front of the store.
3.5 Menu Settings
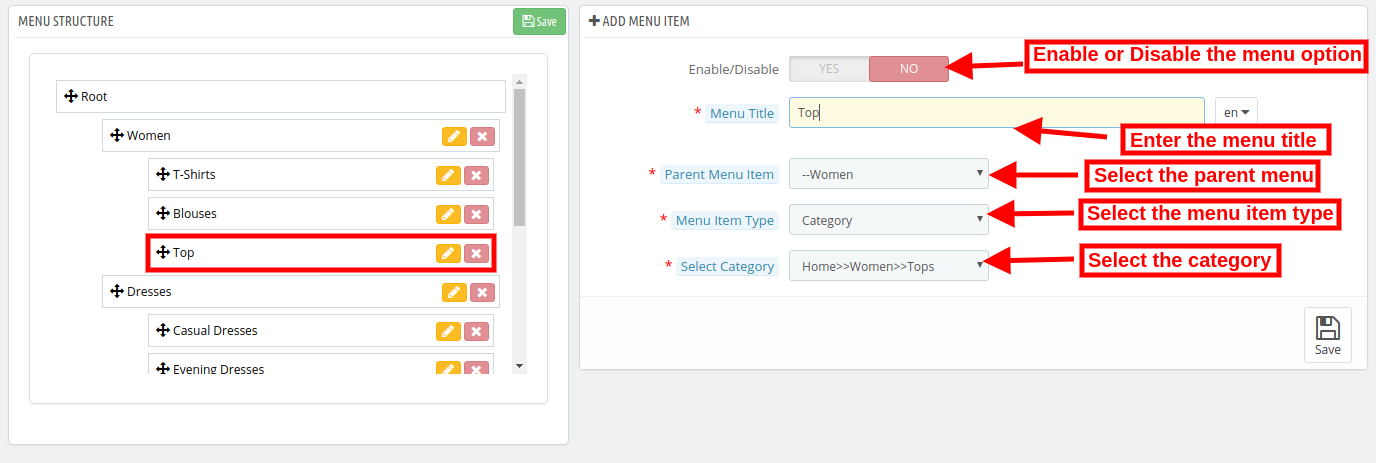
In this Tab, the Prestashop store admin can configure the menus on AMP. The admin can even add new menu options. This tab will have the following options:
Enable/Disable: The admin can enable the AMP in menus by toggling the button.
Menu Title: Prestashop AMP Addon by Knowband allows the store admin to add the Menu by entering the title here.
Parent Menu Item: Here the eCommerce merchant can select the Parent menu as per the desire.
Menu Item Type: The Admin can select the item type of menu.
Select Category: The Store admin can select the specific page where they want to redirect the user to the defined AMP page.
NOTE: These Changes shown in the Menu Structure section.
3.6 Look and Feel Settings
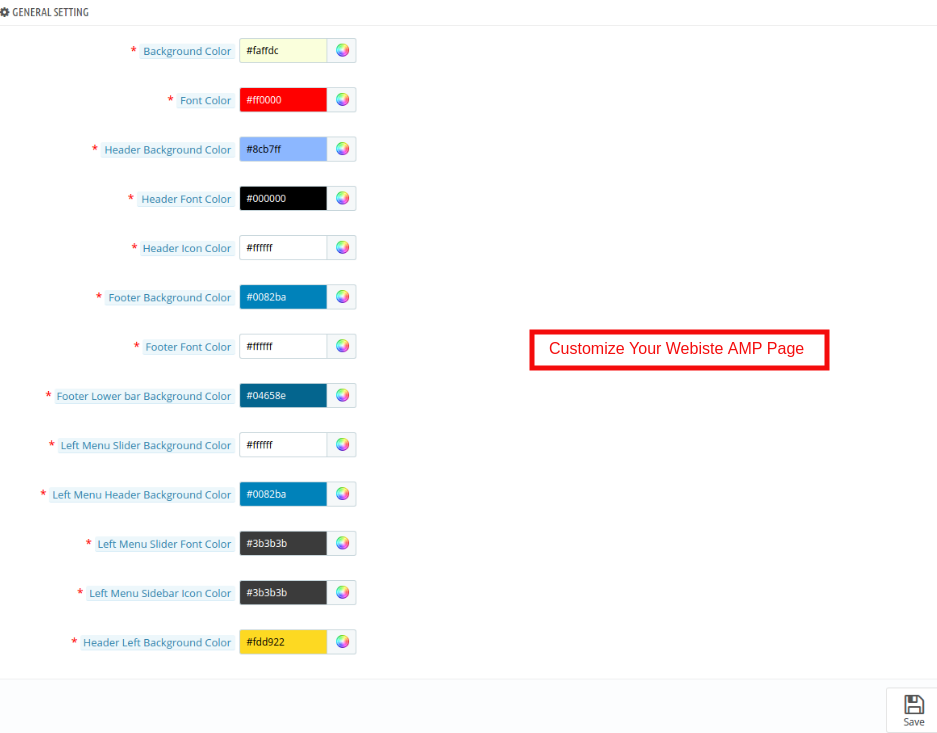
The Admin can control the color settings, personalize their website AMP colors as per your needs. They can change the AMP page colors according to your theme and preferences. This tab will have the following section:
1. General Settings
2. Product Listing Settings
3. Category Settings
4. Product Settings
5. Cookie Consent Bar Settings
3.6.1 General Settings
In this tab of the Prestashop Accelerated Mobile Pages(AMP) addon by Knowband, the admin can customize the AMP Homepage settings. This tab will have the following options:
Background Color: The Admin can change the background color of the home page.
Font Color: The admin can change the font color from this section.
Header Background Color: This field of Prestashop Accelerated Mobile Pages (AMP) Module allows the admin to set the header background color.
Header Font Color: Using this option of the Prestashop AMP module, the admin can set the font color of the text displayed in the Header section.
Header Icon Color: The Prestashop store admin can change the icon color of the.
Footer Background Color: This option of the Google Accelerated Mobile Pages(AMP) Module allows the admin to set the background color of the Footer.
Footer Font Color: The admin can change the font color from this section.
Footer Lower Bar Background Color: The Store merchant can change the background color of the Footer Lower Bar.
Left Menu Slider Background Color: The Prestashop Merchant can change the Left menu slider background color in this section of Knowband Accelerated Mobile Pages(AMP) For Prestashop.
Left Menu Header Background Color: The Prestashop store admin can change the left menu header background color as per the requirement.
Left Menu Slider Font Color: The admin can change the font color from this section.
Left Menu Sidebar Icon Color: The admin can change the icon color from this section.
Header Left Background Color: In this section of Prestashop Accelerated Mobile Pages(AMP) Module allows the admin to set the header left background color.
3.6.2 Product Listing Settings
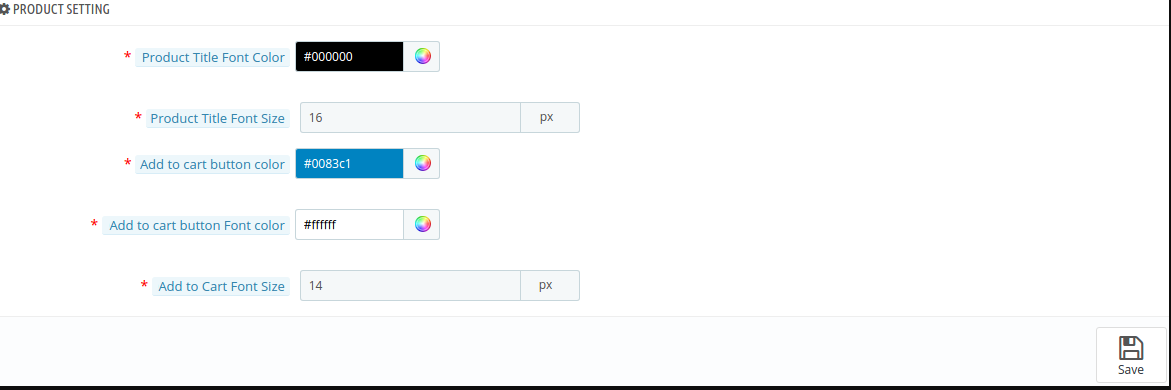
The admin can customize the settings of the Product listing as per the requirement. Below mentioned the option:
Product Title Color: In this section of Google Accelerated Mobile Pages(AMP) Module allows the admin to change the Product title color.
Product Title Font Size: The Store admin can set the font size of the Product.
Add to Cart Button Color: Knowband’s Prestashop AMP Pages module allows the admin to change the Add to Cart Button Color as per desires.
Add to Cart Button Font Color: The admin can customize the font color of the Add to Cart button.
Add to Cart Font Size: The Store admin can set the font size of the Add to Cart button.
3.6.3 Category Settings
In this tab, the store admin can customize the settings of the Category pages. These changes will be reflected in the front of the store.
Category Heading Font Color: The Prestashop store admin can change the category heading font color as per the requirement.
Category Heading Font Size: The admin can change the font color from this section.
3.6.4 Product Settings
In this section, the Admin can customize the Product settings as per the requirement. The configuration option of this section is same as discussed in the Product listing section.
3.6.5 Cookie Consent Bar
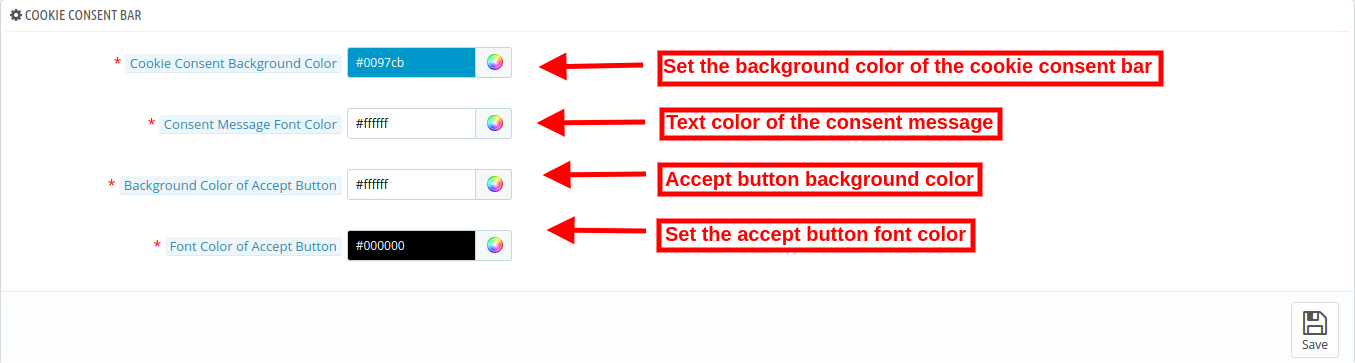
The store admin can set the look and feel of the cookie consent bar.
Cookie Consent Background color: Select the cookie consent background color with the help of color picker tool.
Consent message font color: Select the front color for consent message.
Background color of Accept button: Select the “Accept” button background color.
Font color of accept button: Set the font color of accept button using color picker tool.
3.7 Social Media Settings
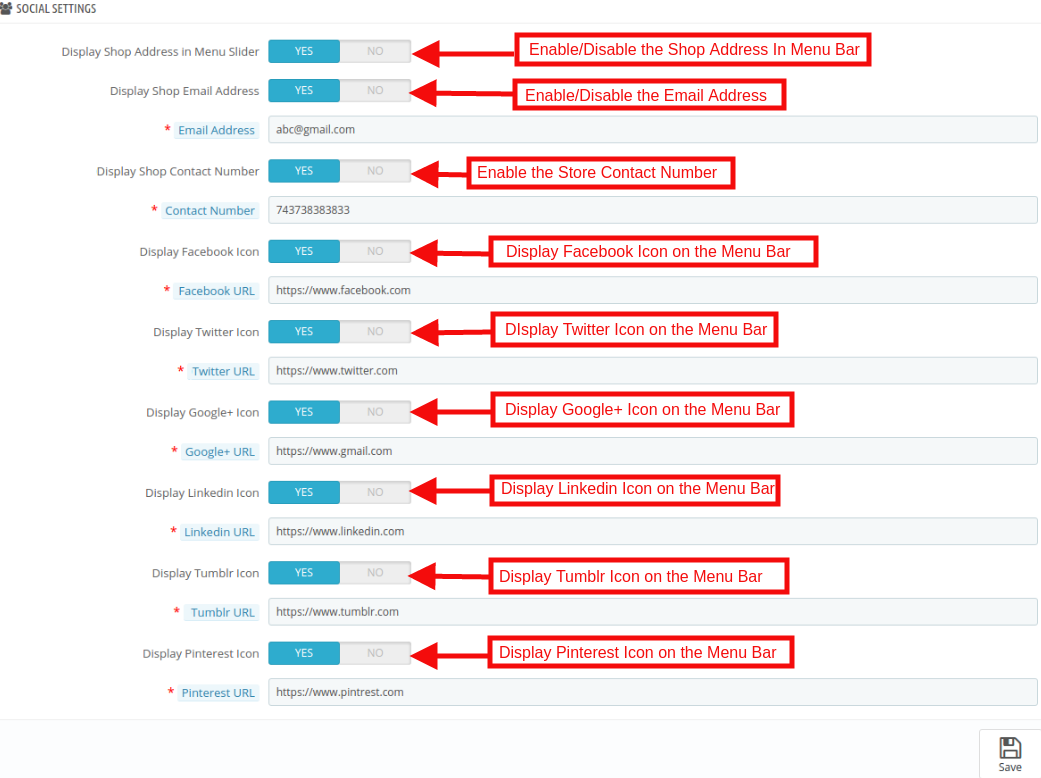
In this section of the Prestashop AMP module, the store admin can enable/disable the social media sharing option on the AMP webpages. All the enabled social media sharing options will be shown on the AMP. This tab will have the following options:
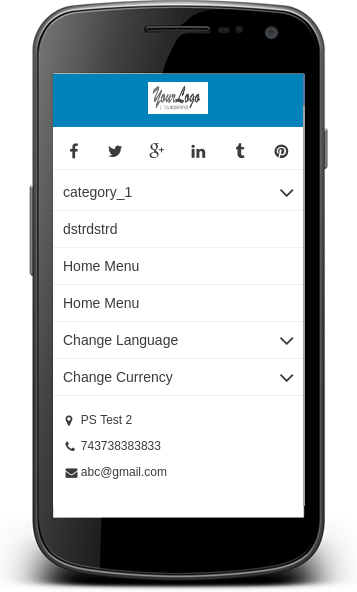
Display Shop Address in Menu Slider: The Admin can show the Store address by enabling this feature.
Display Shop Email Address: The Prestashop store owner can show the email address.
Display Shop Contact Number: In this field, the store admin can display the contact details of the site.
Display Facebook Icon: The store admin has the option to display a Facebook icon in the menu bar. For this admin need to specify the Facebook page URL in the respective field.
Display Twitter Icon: This section the admin can enable/disable the Twitter icon.
Display Google Icon: By using this Option the Prestashop store merchant can display the Google icon in the menu bar. For this admin need to Specify the Google page URL in the respective field.
Display Linkedin Icon: In this section, the store admin can display the Linkedin icon here. The Store admin must need to enter the URL of the profile.
Display Tumblr Icon: The Prestashop store owner can show the Tumblr profile here.
Display Pinterest Icon: The Store admin has the option to display a Pinterest icon in the menu bar. For this admin need to Specify the Pinterest page URL in the respective field.
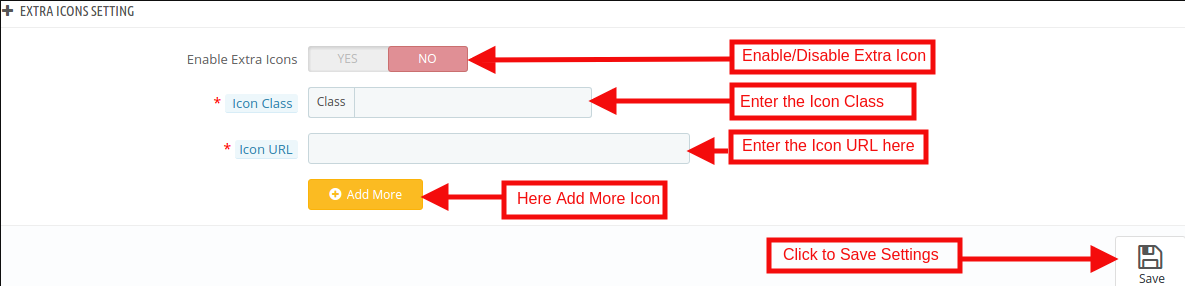
3.8 Extra Icon Settings
In this section, the admin can add the extra social media icon as per the requirement of the business. This tab will have the following options:
Enable Extra Icon: The Prestashop store admin can enable/disable the extra icon feature. If they want to add more social media icon then they can add here with an ease.
Icon Class: The Admin can enter the Icon class.
Icon URL: In this tab, the store admin can Icon URL as per desires. These changes will be reflected in the front of the store.
3.9 Google Settings
The store admin can apply AMP Google settings from this section.
3.9.1 Google Analytics
Admin will need to have the Analytics Client ID in order to configure this feature.
Enable Google Analytics: If you want to track the performance of the accelerated mobile pages of your site, this feature allows the admin to enter Google Analytics client.
Analytics Client Id: The eCommerce merchant can enter your Google analytics client ID to configure.
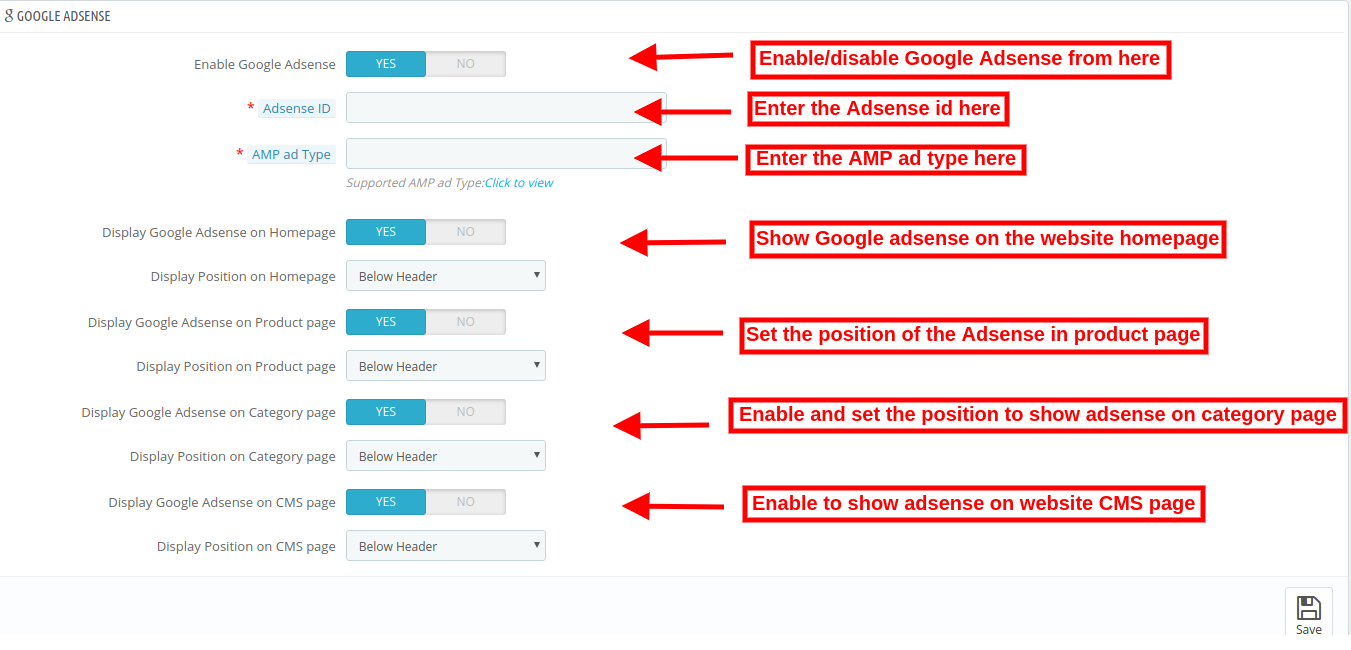
3.9.2 Google Adsense
Enable Google Adsense: Activate or Deactivate the functionality from here.
Adsense ID: Enter the Adsense ID here.
AMP ad type: Enter the supported AMP ad type. This way the admin can specify an identifier for the ad network. The type attribute selects the template to use for the ad tag.
Display Google Adsense on Homepage: Enable the option in order to display Google adsense on Homepage.
Display Position on Homepage: Select the position for showing Google adsense on homepage.
Display Google Adsense on Product page: Enable the option to show adsense on Product page.
Display Position on Product page: Select the position for displaying Google adsense on product page.
Display Google Adsense on Category page: Enable the option to show adsense on category page.
Display Position on Category page: Select the position for showing Google adsense on category.
Display Google Adsense on CMS page: Enable the option to show adsense on CMS page.
Display Position on CMS page: Select the position for showing Google adsense on CMS.
3.9.3 Facebook Pixel
Facebook pixel is a analytic tool which helps to track store visitors. You can also implement this to get store visitor details on the Accelerated Mobile Pages.
Enable Facebook Pixel: Enable or disable the option from here for implementing Facebook pixel tool to track site visitors.
Facebook Pixel ID: Enter the Facebook Pixel ID here.
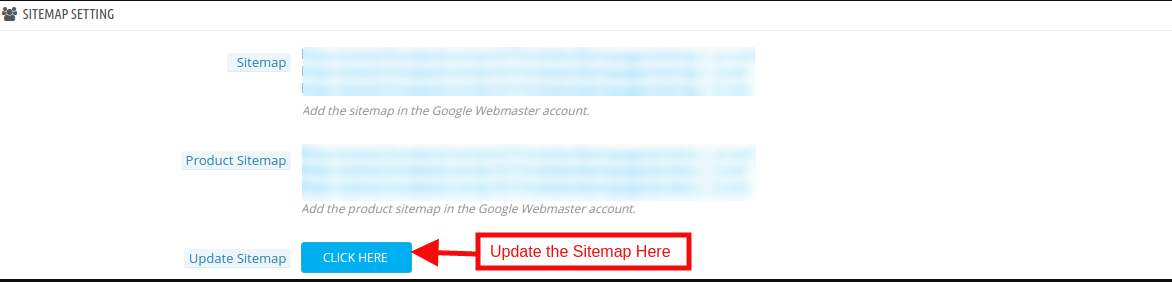
3.10 Sitemap Settings
In this section, the store admin can generate the AMP Sitemap by clicking the button.
Generating the Sitemap are here.
How to Generate Sitemap for AMP?
The Admin can generate Sitemap by running CRON.
Accelerated Mobile Pages(AMP) module allows the store admin to setup Cron via
URLs to Add to Cron via Control Panel
Cron setup via SSH
CRON Configuration:
In order to generate the Sitemap automatically, the Prestashop store admin can set up the cron job. There are two options available in the admin panel of the module.
1. The Admin can run the cron manually.
Add the cron to your store via control panel/putty to generate/update the sitemap. Please find the instructions to setup crons below –
4.0 Front Interface of the Prestashop Accelerated Mobile Pages Module:
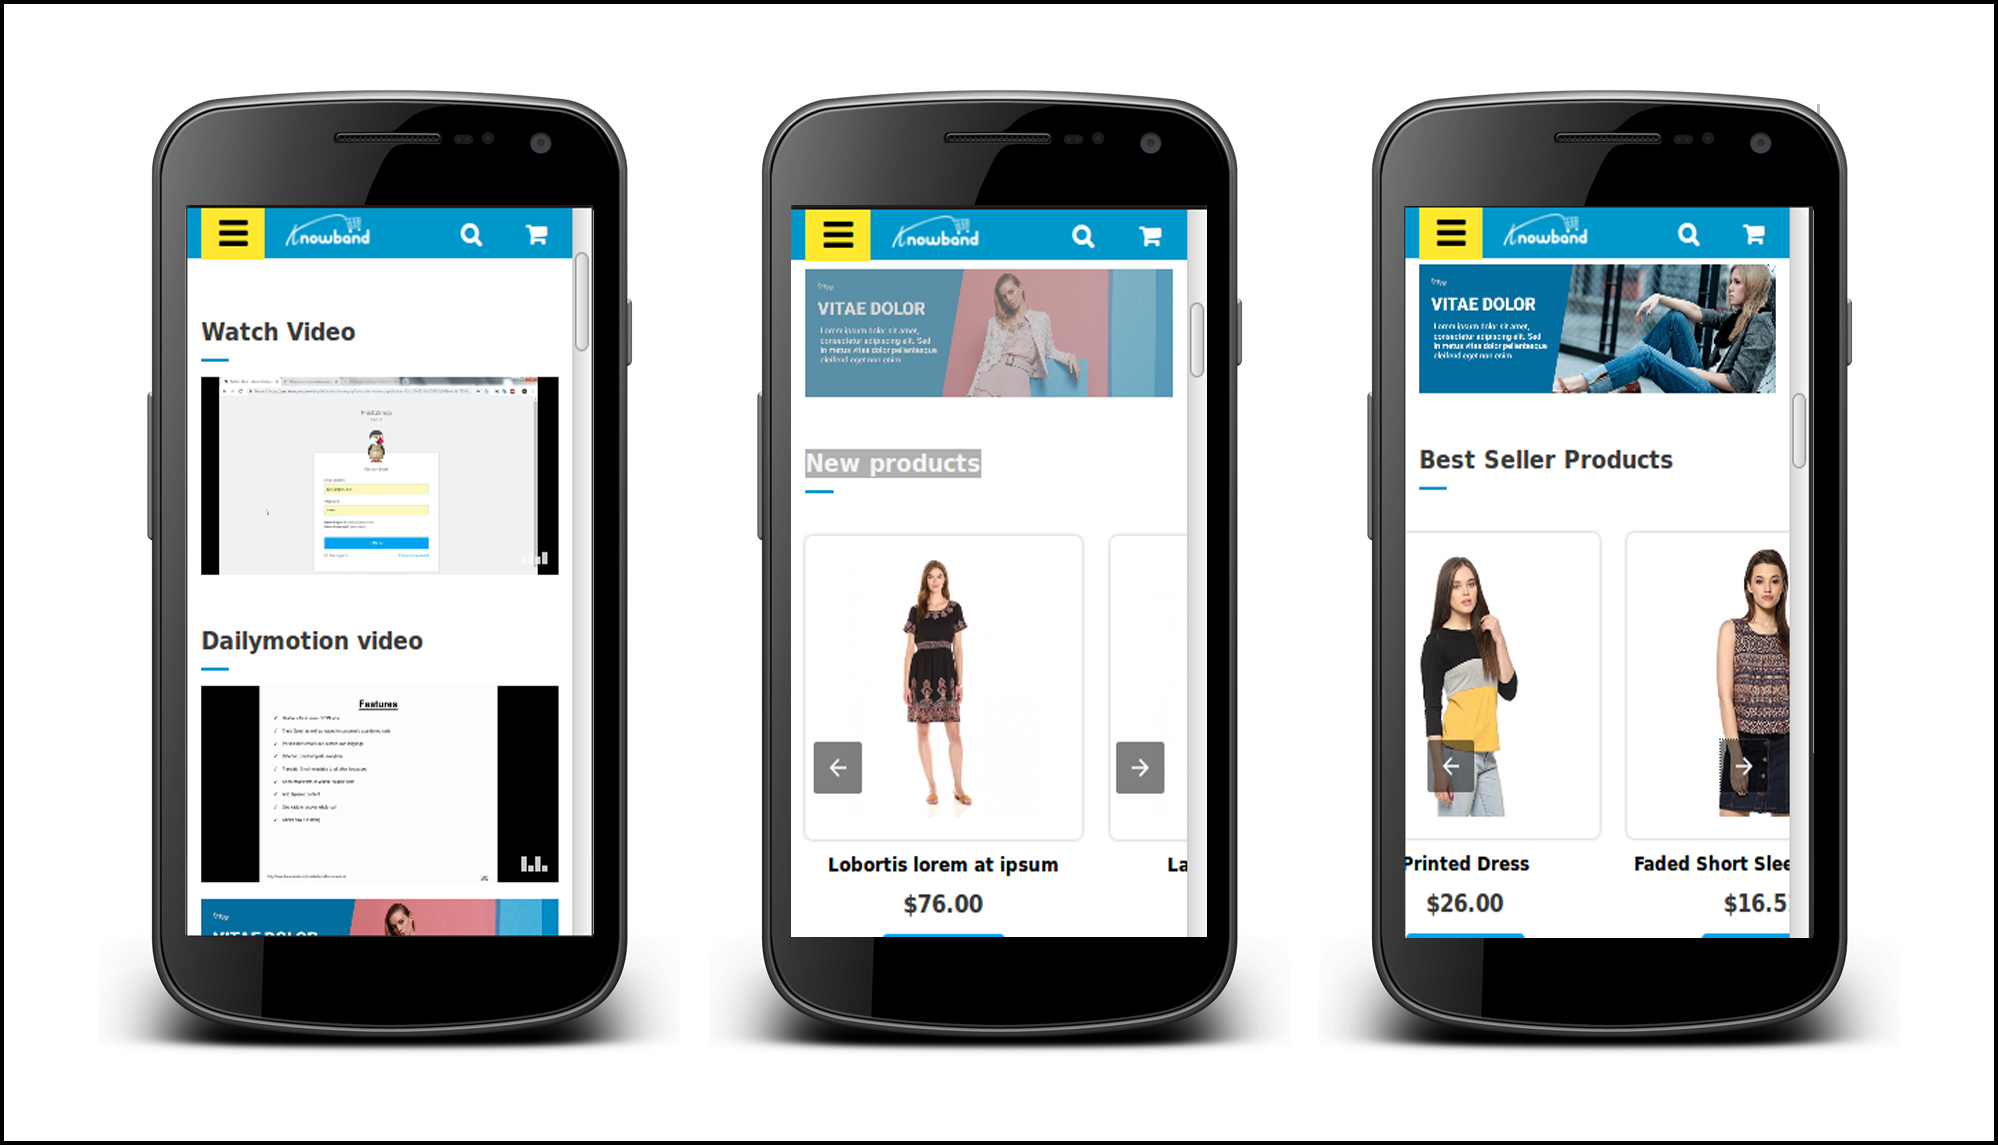
After enabling the Prestashop Accelerated Mobile Pages(AMP) Module by Knowband the store admin can enable the settings for the home page, category pages, product pages and CMS pages. As per the settings enabled by the admin, AMP will look as shown below:
Home Page:
Prestashop AMP Pages allows the admin to show the Best Seller, New Products and Features Product on the Home page. For better user engagement.
Now the online store admin can also show Youtube video, Vimeo video and Dailymotion video on the website homepage.
Apart from that, the store admin can show Instagram feeds and twitter feeds on the homepage.
Category Page
As per the setting enabled by the admin, the Category AMP Pages on the Mobile device will appear like this screenshot.
Product Page
As per the setting enabled by the admin from the back-office the layout of Product AMP Page on the Mobile device will appear like this screenshot.
CMS Page
The Admin can view the CMS page setting like below settings.
Menu Icon
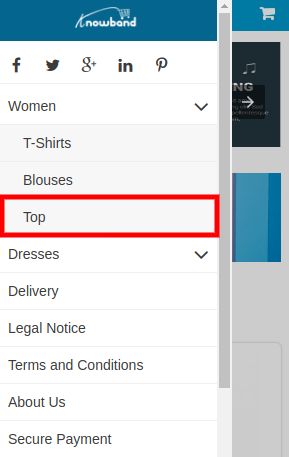
Prestashop Accelerated Mobile Pages shows the Menu icon like this.
Cookie Consent Bar
Cookie consent bar will be displayed as shown below:
This way the online store admin can increase the speed of mobile website pages and offer a better store experience to the online store visitors and customers. This Prestashop Accelerated Mobile Pages module converts the general pages into accelerated mobile pages. The Prestashop Accelerated Mobile Pages Addon provides simple and easy steps to set up accelerated mobile pages. The e-merchant can separately configure the homepage, product pages and category pages. The Prestashop store admin can easily manage all the settings of Prestashop Accelerated Mobile Pages module without changing even a single line of codes. The e-merchant can also show product videos, menu items and social media icons easily.
For more information about PrestaShop Accelerated Mobile Pages(AMP) Addon:
In order to improve products visibility and brand awareness, it is important to motivate the users to share the products on the social media platforms. The eCommerce store admin can implement Magento 2 share and win extension offered by Knowband and provide compelling reasons to the customers to share the products in their social account. Magento 2 share and get discount module allows the e-merchant to offer fixed or percentage based discount to the customers for sharing the store product on Facebook.
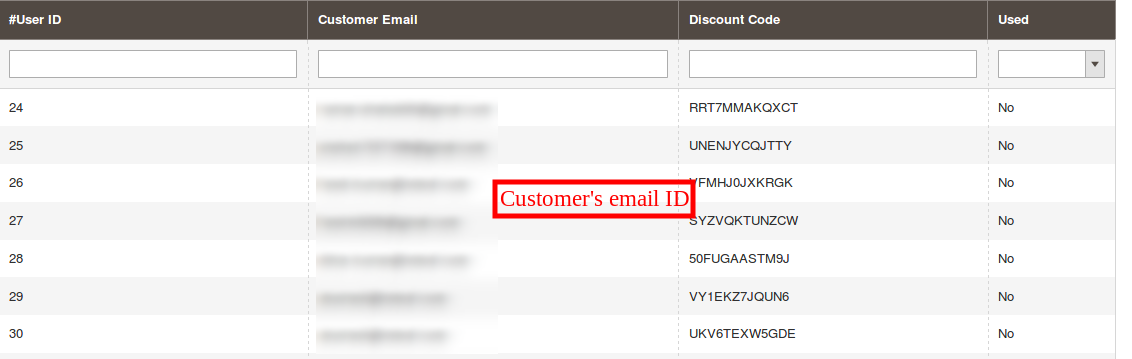
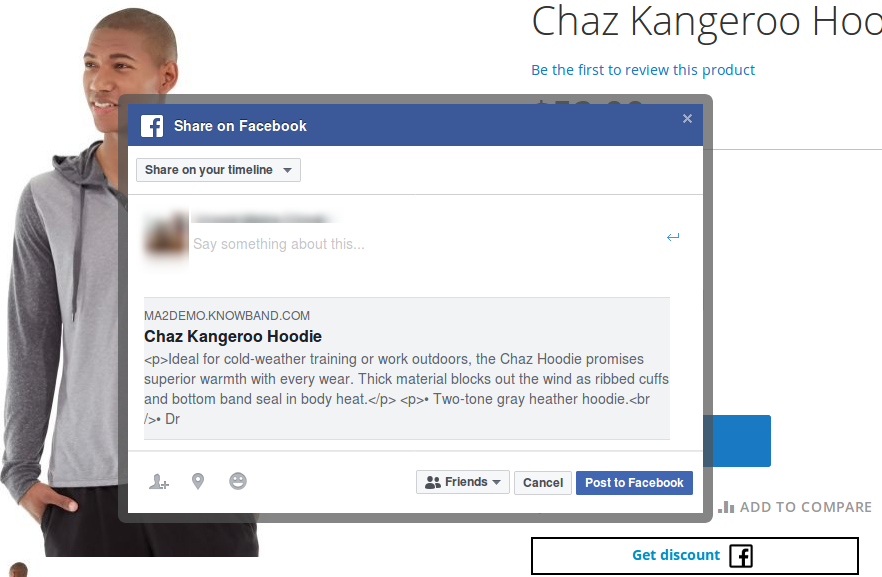
The online customers and store visitors can share the product on Facebook and get exciting offers. The admin can promote the products and brands just by offering discount coupon code with the help of this Magento 2 share and get the discount module. The coupons can be used to get discounts while shopping. The admin can select all the products or selective products to show the Facebook sharing option. In the product statistics section, the admin can view the details of coupon codes from the admin interface of this Magento 2 facebook share option. The store admin can even track whether the generated coupon code was used by the customer or not.
1.1 Admin Features
The e-merchant can offer the customers discount coupons on sharing the product on Facebook by using this Magento 2 product sharing module.
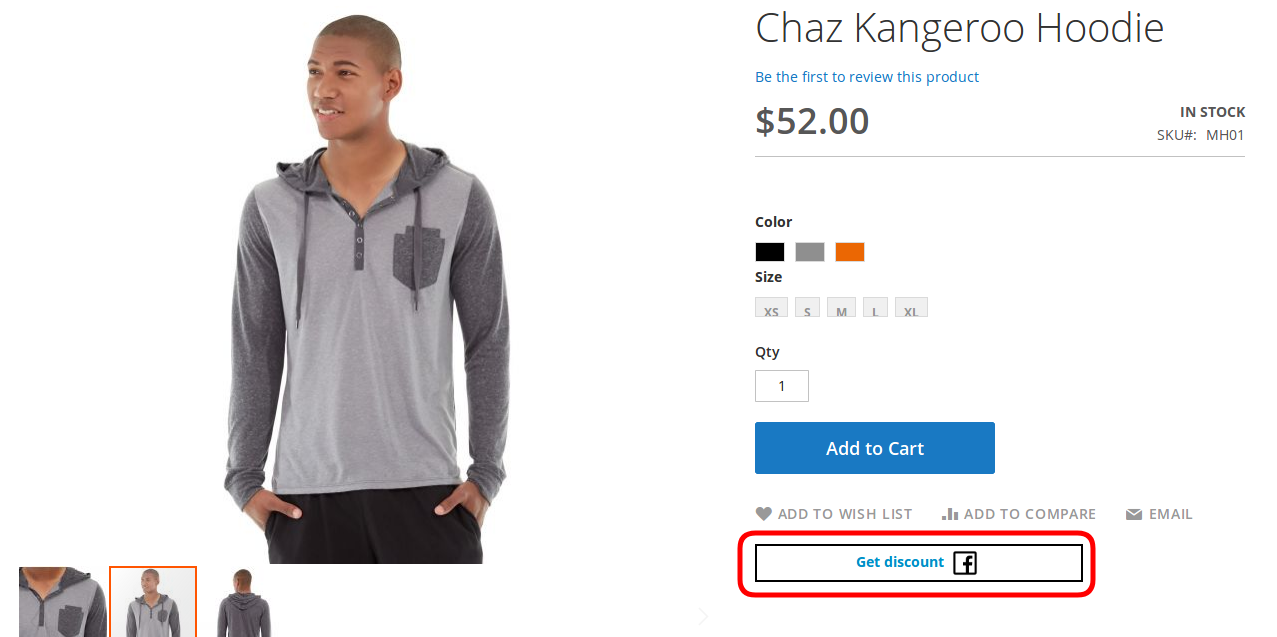
With the help of this Magento 2 share on Facebook wall plugin, the store admin can display a Facebook sharing button on the product pages of the store.
The Facebook sharing option can be displayed on every product page or on specific pages as per the requirement.
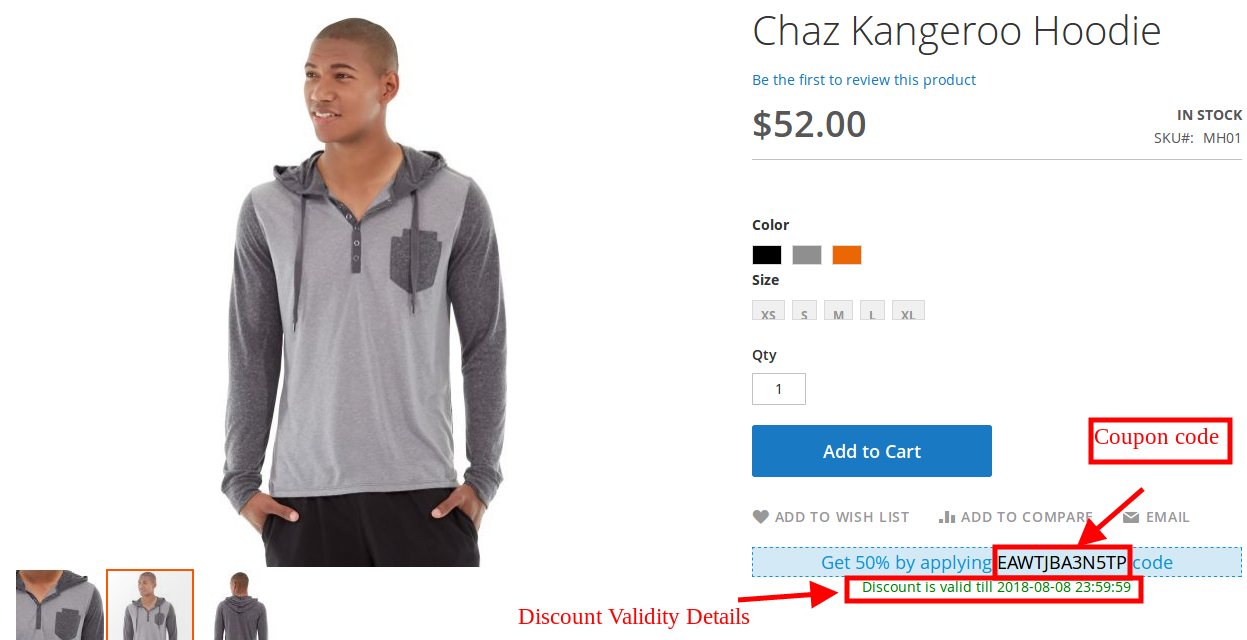
The Magento 2 Social sharing extension allows the store merchant to set the discount type, discount value and coupon validity days.
The Product share and win plugin allows the admin to view the details if coupon code has been applied or not. The admin can view these details in product statistics.
The eCommerce store owner can set the layout according to the store’s theme from the admin interface of this Magento 2 Social sharing extension.
The store admin can enable or disable discount limit from the admin interface. Thus the admin can control the discount per person per product.
The Magento 2 share on Facebook wall plugin has a user-friendly back-end interface.
By using this Facebook share and get the discount module, the admin can offer a fixed or percentage based discount to the customers.
The Magento 2 share and get discount module provides an option to the admin to add custom CSS codes.
This Magento 2 product sharing module is mobile responsive.
It is very easy to install and configure this Facebook Share and Win Discount module.
The admin can easily implement the Magento 2 Social extension without any complications.
1.2 Admin Benefits
The store owner can offer exciting discounts to online store visitors and customers.
With the help of Magento 2 share on Facebook wall plugin, the admin can allow the customers to share the store product and win discount coupon codes.
The admin can promote the products on social media and increase the product and brand awareness.
By offering discount coupons the admin can increase the chances of conversions.
With this Magento 2 share and get the discount module, the store owner can offer a better store experience to the online users.
The Magento 2 social sharing extension offers hassle-free implementation.
This Magento 2 Social sharing extension is highly customizable and offers a user-friendly interface.
2.0 Installation
After purchasing Magento 2 share and win extension, the store admin will get the following files: 1. shareandwin.zip which contain source code of the Magento 2 share and get the discount module. 2. User Manual which includes all the details and helps regarding the extension.
The steps to install the Magento 2 Social sharing extension are mentioned below:
1. Buy the Facebook share and get the discount module from Knowband. You can download the extension package. 2. The package has a zipped file that contains the user manual and the source code of Facebook share and get the discount module. Unzip the package. 3. Create a folder{Magentoroot}/app/code/Knowband/Shareandwin 4. Upload the extracted content in the above folder via FTP manager (like Filezilla or WinSCP – download here: https://filezilla-project.org/). 5. Now run below commands to install the plugin:
php -f bin/magento module:enable –clear-static-content Knowband_Shareandwin
php -f bin/magento setup:upgrade
php -f bin/magento setup:di:compile
php bin/magento setup:static-content:deploy 6. The extension is now installed and ready for use. In Admin Panel go to “Knowband Extensions >Share and Win”.
You can now configure and use the Knowband Product share and win plugin.
3.0 Admin Interface
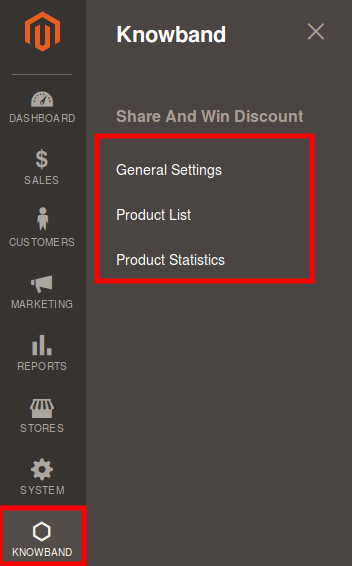
The Magento 2 eCommerce store admin can easily manage the Admin interface of the Share and Win extension. After installing the Magento 2 share on Facebook wall plugin the admin can view the below mentioned “submenu” under the “Share and Win” menu:
General Settings
Product List
Product Statistics
With the help of these available configuration options, the store admin can showcase a Facebook sharing button on the product pages.
3.1 General Settings
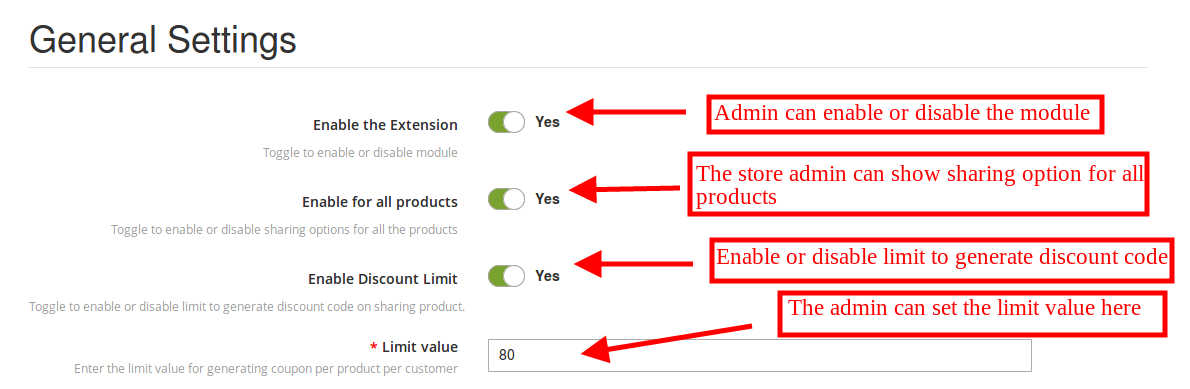
1. Enable the Extension: The eCommerce store admin can activate or deactivate the functionality just by a single click on this option.
2. Enable for all Products: The Magento 2 share and win extension allows the e-merchant to show Facebook sharing option on every product page or selected product pages. The admin can enable or disable the option as per the requirement.
3. Enable Discount Limit: The admin can activate or deactivate the discount settings.
4. Limit value: The eCommerce store owner can set the limit on the number of discounts according to the requirements. If the eCommerce store owner sets the limit 20, that means a customer can get discount 20 times for a product. That customer will not get the discount 21’s time for the same product. Thus the admin can enter the limit value for generating coupon per product per customer.
5. Layout: The Magento 2 Facebook share option allows the e-merchant to select the preferred layout. There are two different layouts for displaying the product sharing option.
The admin can also select the layout 2 which will be shown as below mentioned image.
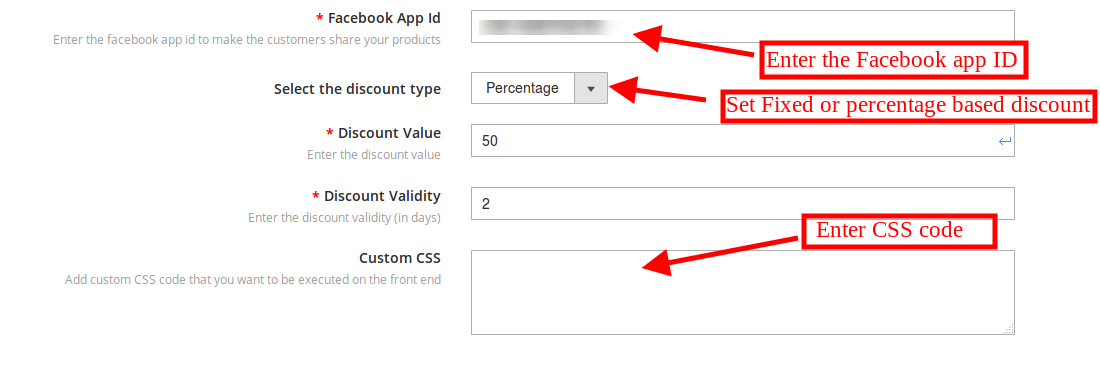
6. Facebook App ID: Enter Facebook app id here in order to connect the webpage with the Facebook. In order to get Facebook app id please refer section 3.1.1.
7. Select the Discount type: The store owner can set the discount type in percentage or fixed amount.
8. Discount Value: The store admin can set the discount value from the admin interface.
9. Discount Validity: The store owner can set the discount validity duration.
10. Custom CSS: The eCommerce store owner can add custom CSS code for further customization from this menu option of Facebook share and get discount module.
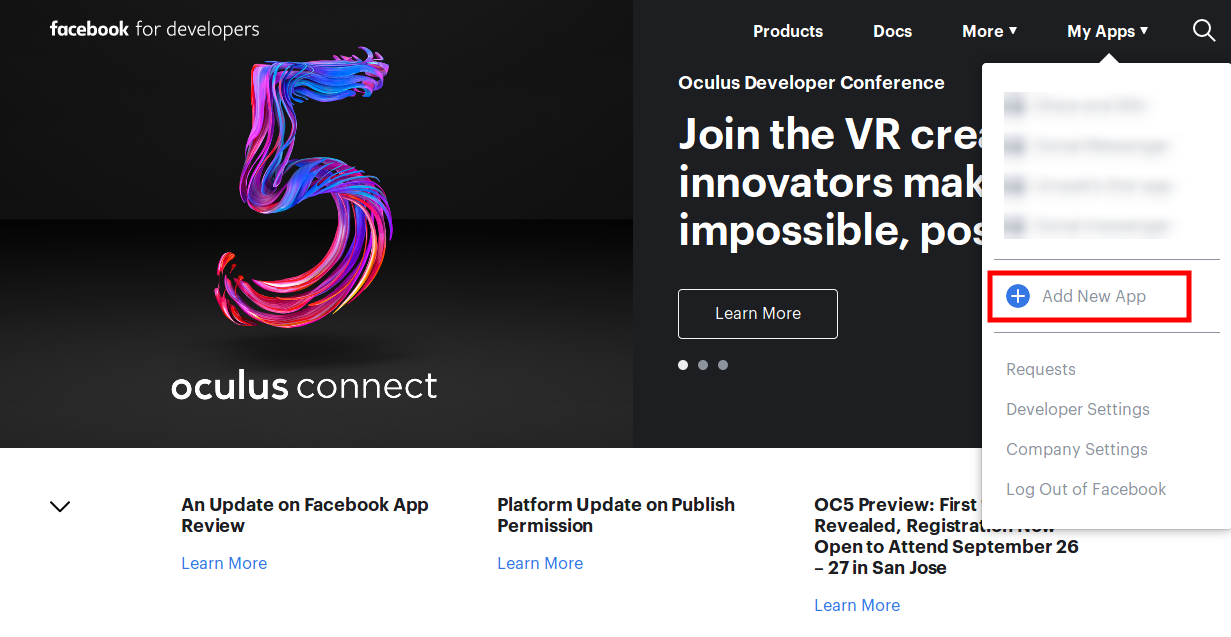
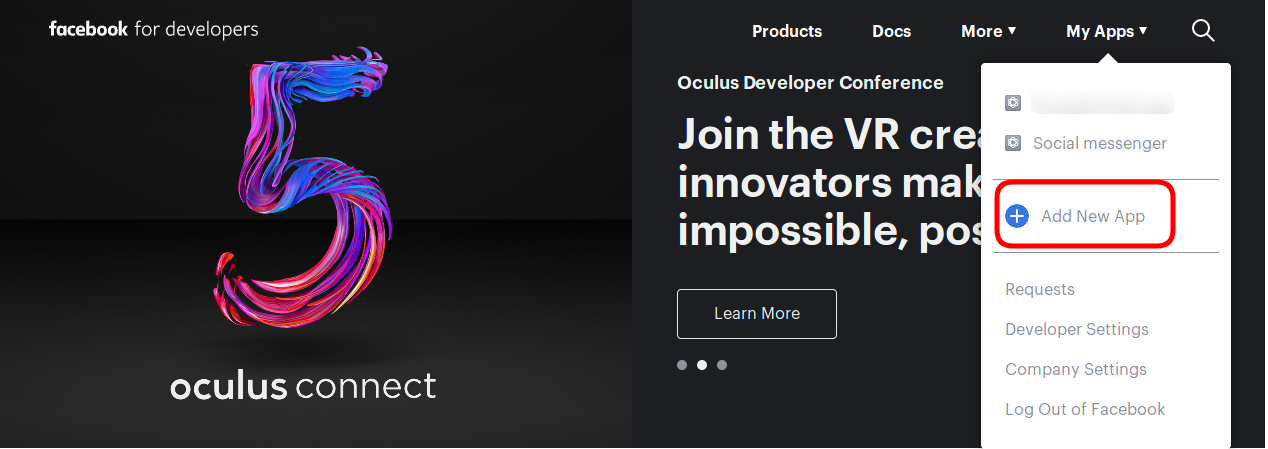
Go to the “MY APPS” option and click on the ”ADD NEW APP”.
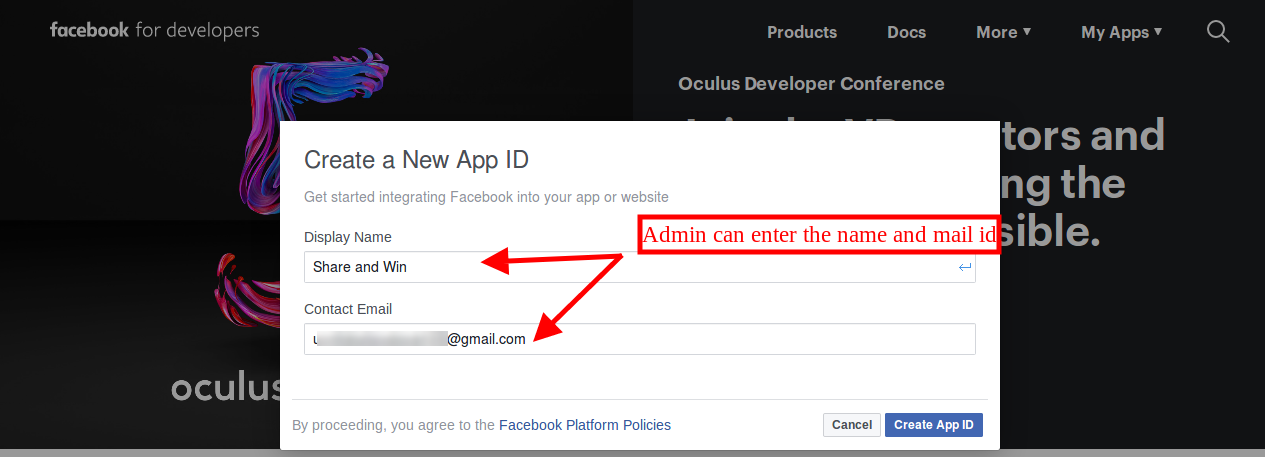
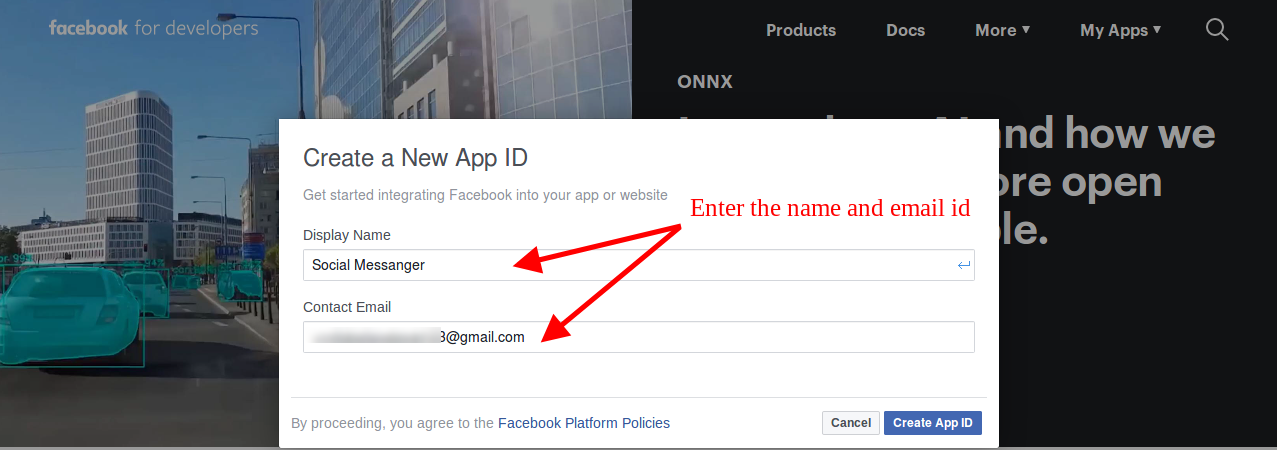
After that, the store owner needs to insert the “Display Name” and “contact email ID”. Click on the “Create App ID” button.
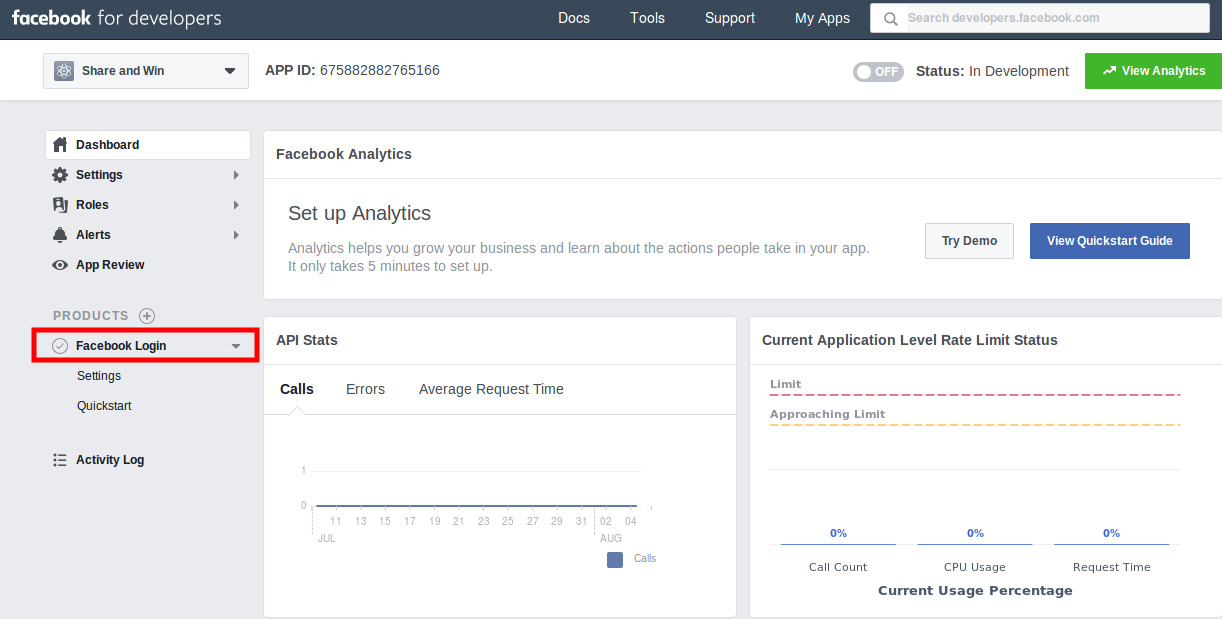
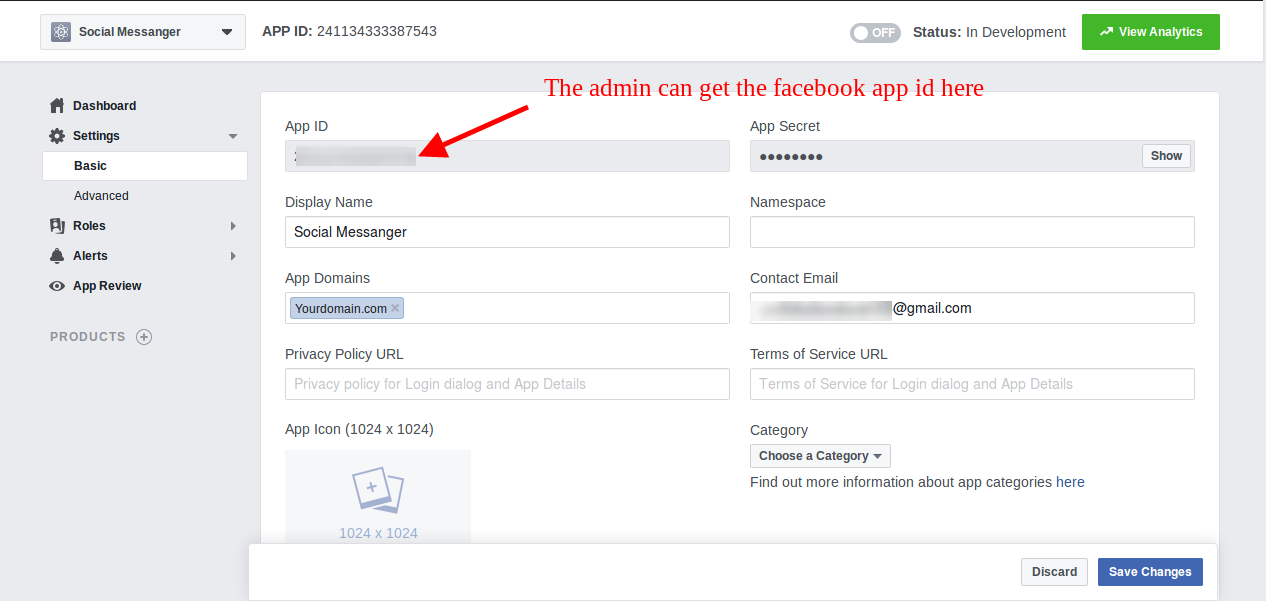
Go to the “Settings” and then select “Basic”. Here you can view the APP ID as shown below. The admin needs to insert app domains, category, Privacy policy URL here.
After that click on “Products” option and then click on Facebook login “set Up” option. After clicking this “set up” option it will be displayed like below mentioned image:
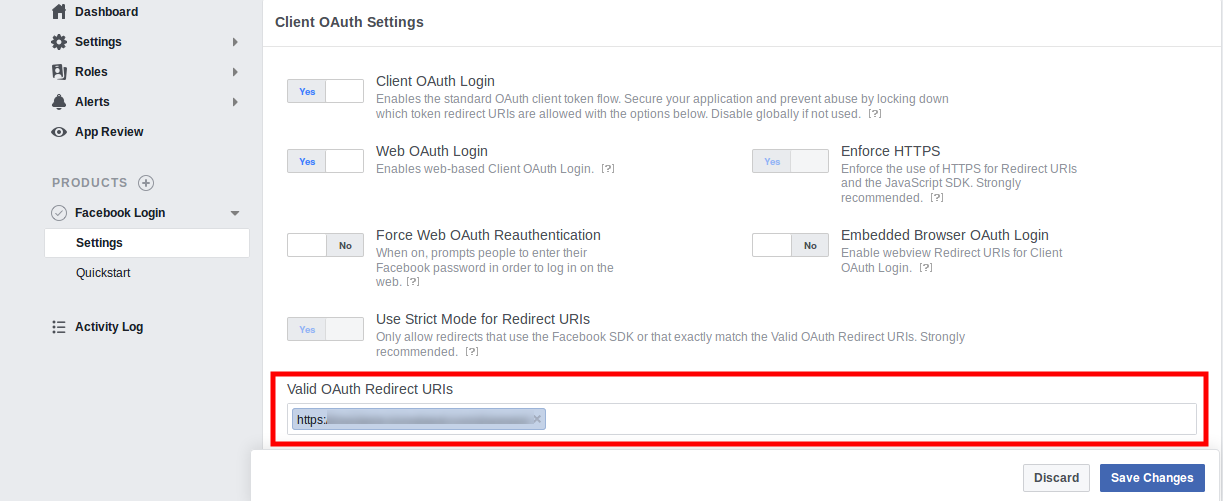
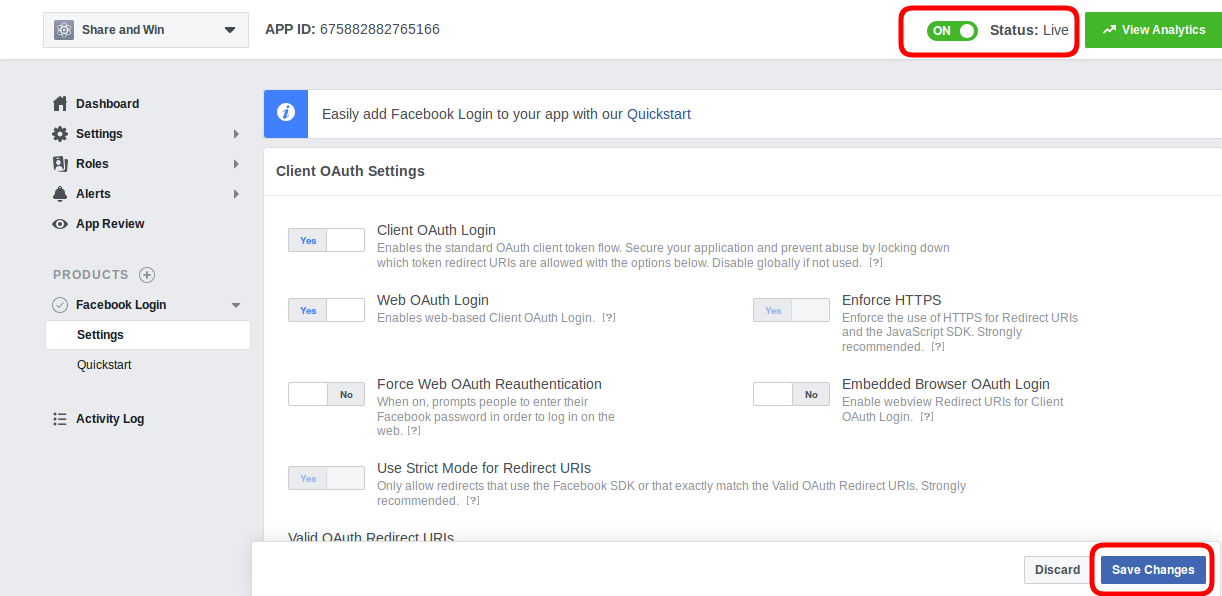
After that goto settings and insert the Valid oAuth Redirect URL’s and enable the status.
Once you enable the status, you need to click on the “save changes” option. Now the Facebook app id is ready for implementation.
3.2 Product List
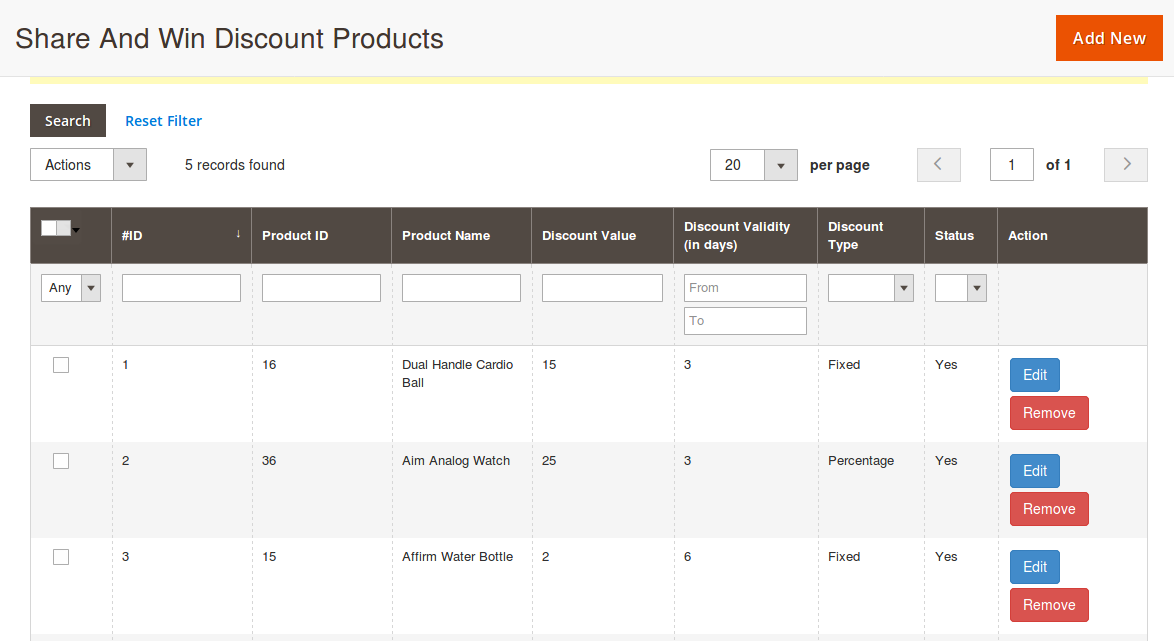
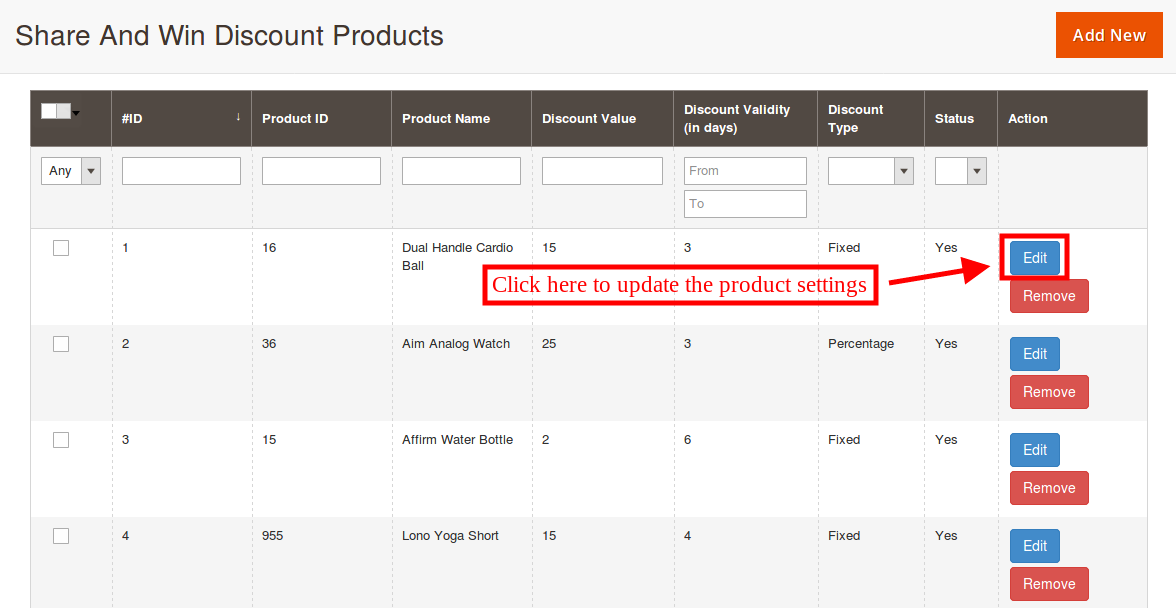
In the Product list sub-menu, the e-merchant can add those products on which he wants to show sharing button with a specific discount. Here, The store owner can add new products, update the settings and remove the products from product list.
The admin can select the specific products on which he wants to display sharing option and provide different discount.
3.2.1 How to add Products for Showing the Facebook sharing option?
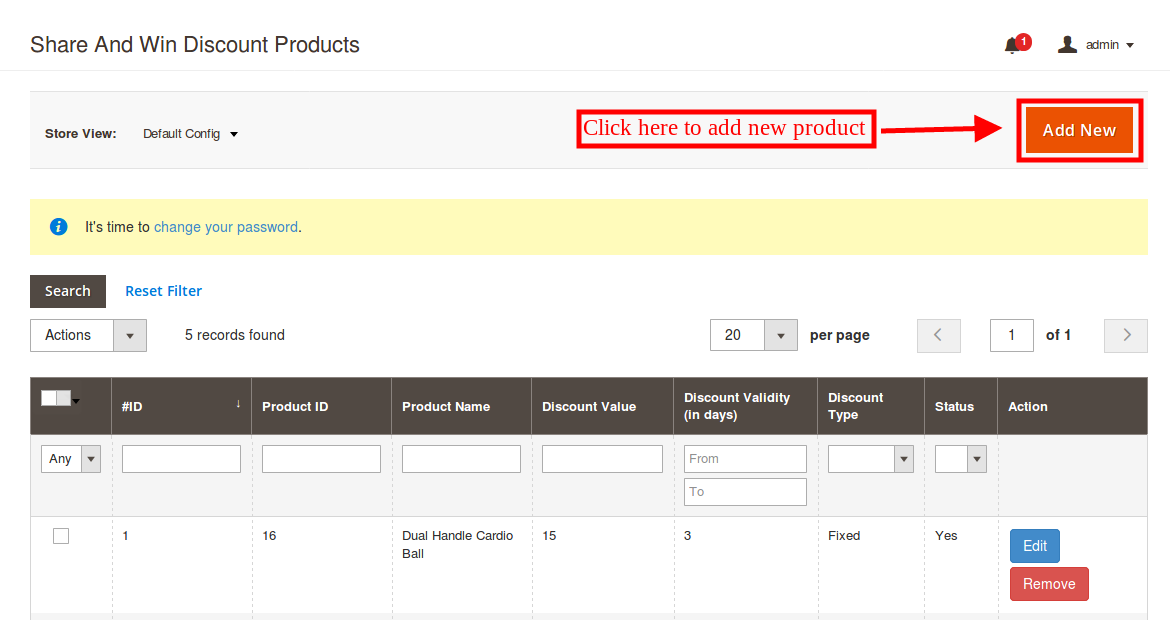
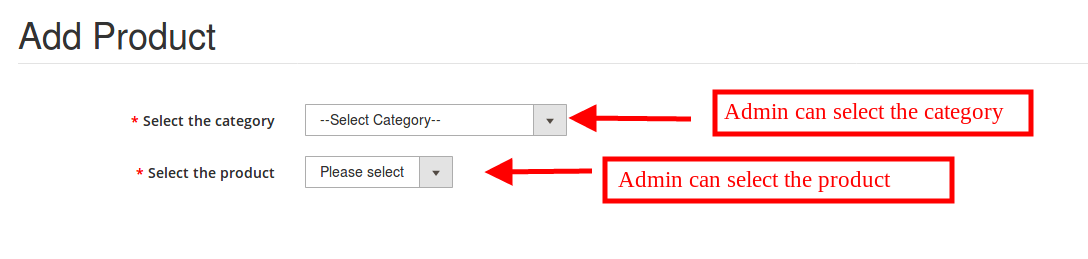
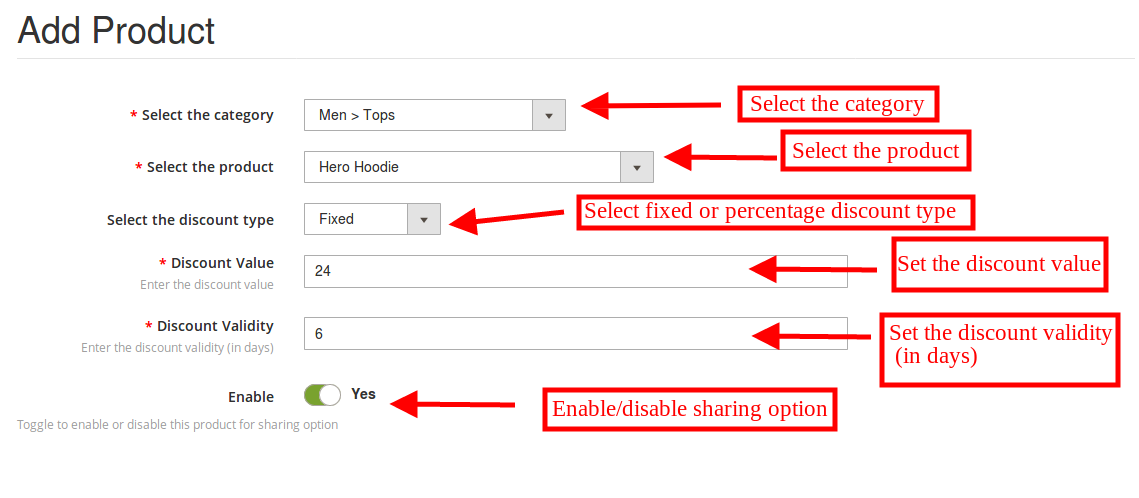
The admin needs to click on the “add new” option. Here, the eCommerce store owner can apply the settings to display sharing option on a particular product page.
1. Select the category: The admin can select the category first of all.
2. Select the Product: The admin can now select the particular product on which he wants to show the sharing button.
3. Discount type: After selecting the product the admin can view the discount type option. The admin can set the fixed or percentage based discount.
4. Discount value: The admin can set the discount value as per the need.
5. Discount validity: The store admin can also set the discount validity. The admin can set the number of days for which the coupon will be valid.
6. Enable: The admin can enable or disable the option. If the admin disables this option, then, no Facebook sharing button will be displayed on that particular page.
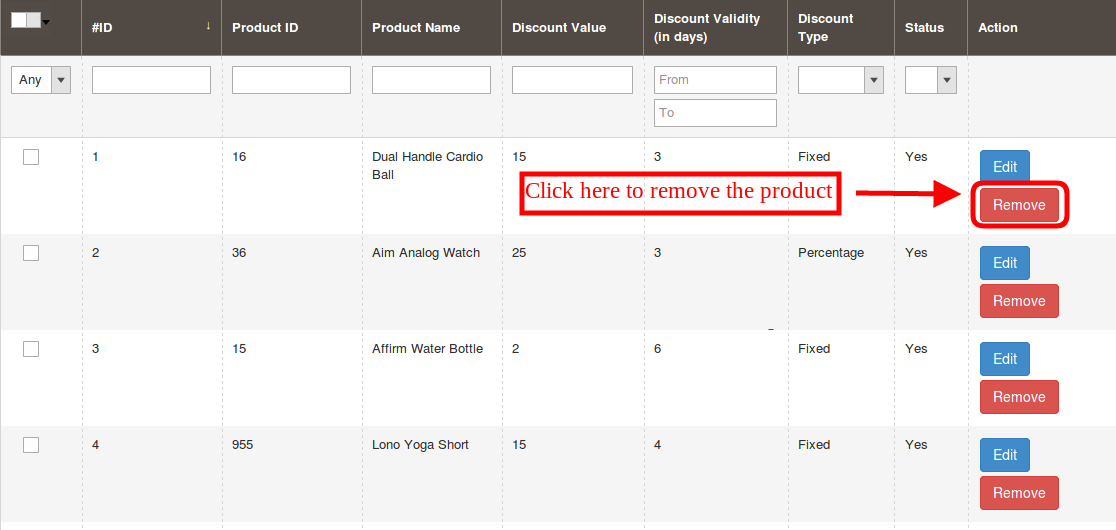
3.2.2 How to Delete Products from the Product list?
The eCommerce store owner can remove the products from the product list for which he doesn’t want to display the social sharing option anymore.
The admin just needs to click on the “remove” button.
3.2.3 How to update the Products for Showing sharing option?
The store owner just needs to click on the “edit” button for updating the settings. After that he needs to follow the same configuration option as followed in “add new product” configuration.
3.3 Product Statistics
The store owner can easily view the details of the customers if the coupon codes has been applied or not. The Product statistics option provides the coupon related details to the customers. The admin can view the customers email id and coupon codes and it’s status.
4.0 Front-end Interface
The customers can easily view the Facebook sharing option in the front-end interface. The Product share and win plugin shows product sharing option for the configured product pages.
The customers can click on the “get discount” option. After that they can share the particular product on Facebook.
After sharing the product on Facebook, they get the coupon code with validity details.
The online customers can apply the coupon code at the checkout page, as shown below:
Thus the store customer can get discount by sharing the product on Facebook.
For more details about this Magento 2 share and win extension visit:
Prestashop eCommerce store owner can now stay in touch with their store visitors via messenger with the help of Prestashop social messenger addon by Knowband. The admin can resolve the customer’s issues in real time by using this Prestashop messenger live chat module. The customers can contact the store owner with the help of live chat options and the admin can easily resolve any confusion or issue at the same time. This Prestashop Facebook messenger integration module incorporates the Facebook messenger on the online store in just a few simple steps.
This Prestashop messenger chat module for Prestashop store is highly customizable and offers smooth as well as flawless working. The admin can incorporate this functionality in the front-end with the help of Facebook page id and app id. Moreover, he can easily manage the messenger from the back-end of the Prestashop social messenger addon. The admin can provide online customer support without even changing a single line of the base code of their site. The Messenger live chat module allows the admin to set the look and feel of the social messenger icon.
1.1 Admin benefits of Prestashop social messenger addon
The Prestashop live chat support addon is very easy to implement and offers hassle-free working. Once it is installed and enabled, the Prestashop addon incorporates a social messenger in the front-end. With this, the store visitors get an option to chat with the support team of the site via their messenger account.
The Prestashop social live chat support plugin is highly customizable.
The Prestashop Facebook messenger integration extension can be activated from the admin interface.
For integrating the Facebook messenger on the eCommerce store, the admin is required to obtain the FB app ID and page ID.
The e-merchant can manage the look and feel of the messenger icon. A color picker tool is provided for selecting the icon color.
The admin can offer live chat support to the online store customers.
The admin can boost the sales and conversions on the website by providing the best solution to the customers.
By showing live chat support, the admin can build a relationship with the customers.
This kind of live chat support makes a good impression of the store.
1.2 Admin features
The admin can install, configure and use the live chat support addon easily without any complex process.
Admin can show the live chat messenger in the front-end without changing any code from the back-end.
This Facebook messenger and live chat addon offer smooth and flawless implementation.
The Prestashop Facebook messenger integration extension is fully customizable.
The online store owner can set the color of the social messenger icon from the color picker tool.
The Facebook messenger and live chat addon allow the admin to select the pages on which he wants to display the messenger.
The admin can offer the support icon and greeting message immediately or after some time.
The Prestashop live chat support addon has a mobile responsive layout.
The messenger multilingual live chat support module offers multi-lingual support.
Messenger live chat module is SSL compatible.
Prestashop messenger chat module for Prestashop store is compatible with all the Prestashop themes.
User-friendly interface.
The store admin can set specific messages for the customers which are logged-in to Facebook and which are logged-out to the Facebook.
2.0 Installation Steps for Prestashop social messenger addon
Once the store admin purchases the Prestashop social messenger addon from the Knowband store, he will get below-mentioned files:
1. The zipped file consists the source code of the Prestashop social live chat support plugin.
2. User Manual
The online store owner can follow the provided steps to install the Messenger multilingual live chat support addon.
First of all the admin needs to unzip the zipped file. This file includes a few files and folders.
Copy the all the folder and paste them into the “Modules” folder of the store’s directory. The admin can follow the path – Root Directory/modules/.
3. Now the store owner can install the messenger multilingual live chat support addon. As an eCommerce store owner, the admin can find that in Store Admin -> Modules and Services. It would be shown as below –
Now the admin can click on the “Install” button to install this module easily. A confirmation pop-up will be shown. Click on “Proceed with the installation” option. This step will install the Prestashop Social Messenger Addon and show notification – “Module(s) installed successfully”.
3.0 User manual
The admin can get various configuration options with Prestashop Social Messenger Addon. The admin can apply the settings according to the requirements.
1. Enable/Disable: It is very easy to activate or deactivate this Messenger multilingual live chat support addon. The admin can deactivate this Messenger live chat module just by a button click.
2. Facebook APP ID: Enter the Facebook app id here. The admin can generate the Facebook app id by following few simple steps.
Go to the “MY APPS” option and click on the ”ADD NEW APP”.
After that, the store owner needs to insert the “Display Name” and “contact email ID”. Click on the “Create APP ID” button.
Once the APP ID created, the admin can view the app id. Go to the “Settings” and then select “Basic”. Here you can view the APP ID as shown below.
Admin can insert the App Domain. After that click on the “save changes” option.
3. Theme Color: The store owner can set the look and feel of the messenger icon by selecting its color according to the store’s theme.
4. Page ID: Enter the Page ID here. The admin can insert the Page ID of the particular page from which he wants to handle the live chat.
3.2 Steps to generate Facebook page ID
Open the Facebook page and go to about page. At the bottom of the ”About” page, the admin can view the page id.
Go to the Settings option and then select the “messenger platform” option. Here you can enter the domain in the “White-listed domains” option.
5. Select the Page: The Prestashop messenger chat module for Prestashop store provides this configuration option to select the pages on which the admin wants to show the chat messenger. If the admin doesn’t select any page, then the module will be activated for all the pages.
6. Set Greeting Message Delay: The admin can set the time in seconds after which he wants to display the first message on the website for the customers. If the customer will set this time as “0” seconds” then the customers can get the greeting message without any delay.
7. Logged-in Greeting Message: The store owner can show a specific message to the customers which are already logged-in to Facebook. The admin can leave this option empty if he doesn’t want to display any message.
8. Logged-out Greeting Message: The store owner can display a message to the customers who are not logged-in their Facebook account. The admin can leave this option empty if he doesn’t want to display any message.
4.0 Front-end interface
Once the admin has incorporated Prestashop Social Messenger Addon on their store, the customers can view the live chat option on the store’s front-end as shown below:
The store admin can reply the customers and offer them better support on the website.
1.0 Introduction of Knowband Prestashop Web Push Notification Addon:
Web Push notification is a service that allows the eCommerce store owner to send automated push notifications on the browser to all users who have allowed web push notification. Prestashop Browser push notification addon allows the admin to display unlimited push notifications on the user’s browser even when they aren’t browsing your website.
Knowband offers Prestashop Web Push Notification addon which sends automated push notifications like Welcome Notifications, Order Status Update Notifications, Price Alert and Back in stock alert notifications, etc. It increases the chances of conversion of the lost sales by sending automated abandoned cart notifications. Prestashop web browser push notification module helps the admin to get the customer’s attention back to their store. One of the best things about browser push notification is that the store admin re-engages with their visitors without knowing their email or any other contact details.
Important: Web Push Notifications are compatible with Chrome and Mozilla browser only.
What’s new in the updated version:
In the new version of this Prestashop web push notification module, the online store merchant can configure Firebase API by following the steps provided in the admin interface of this PrestaShop module. In order to show push notifications on the browser, the online store admin needs to set API key, Project id, message sender id and server key from the module back-end interface.
1.2 Features of the Prestashop Web Push Notification Addon:
1. Prestashop web push notification extension by Knowband adds push notification functionality in your Prestashop store with the help of which the admin can show browser notification to the users.
2. This user-friendly Prestashop Web Push Notification addon allows the admin enable/disable the order status update notification option.
3. The Admin can customize the confirmation block notification button from the back-end of the Prestashop Push Notification for web browsers module.
4. Prestashop Cart Reminder Push Notification module pushes the web notification to the customer from time to time when they abandon the cart.
5. The admin can send the price alert notification to the online shoppers when the price of the subscribed product is low.
6. Knowband’s Prestashop Browser Notification addon offers the store merchant to enable the product back in stock notification functionality. It pushes a browser notification on the customer’s browser once the product is back-in-stock.
7. The Prestashop store owner can customize the look and feel of the notification block from the back-end of the Prestashop Push Notification for web browsers addon.
8. Knowland’s Prestashop web push notification module allows the store owner can change the look and feel of the Subscription box as per the website theme.
9. Prestashop Website Push Notification module offers an option for the seller to customize the confirmation pop up from the back-end.
10. The admin can change the logo of the confirmation notification box.
11. Prestashop Web Push Notification module is easy to use and handle.
12. The Knowband Prestashop Browser Notification module offers multilingual support.
13. Prestashop Push Notification for web browsers Addon is compatible with all browsers.
14. Prestashop Web Push Notification Addon is multi-store compatible.
15. The online merchant can setup web browser configuration and configure firebase API by following the provided steps along with the screenshots. The online merchant can setup API key, Project id, message sender id and server key for showing web browser notifications to the online users.
Technology for Development
Language: PHP
FrameWork: PrestaShop
2.0 Steps for Installation of Prestashop Web Push Notification Addon:
1. The folder structure of the Prestashop Browser Push Notification module.
2. Copy the whole folder named as product update into your modules folder of the root directory of your PrestaShop store through FTP.
3. You will be able to find the product web push notification plug-in ready to be installed in the Modules in your PrestaShop store as shown below.
4. Click on the Install link to install the plugin.
4. Another way is, you can zip the whole folder and then click on “Add New Module” link displaying on the top right corner of Prestashop module listing page.
5. After installing the Prestashop Push Notification for Web Browsers module, “Configure” link will be displayed instead of “Install” link as shown in below screen:
Now, your Prestashop Web Push Notification Addon is ready to use and click on “Configure” link to configure this Prestashop module by Knowband.
3.0 Admin Interface
After installing Prestashop Web Push Notification module into the store, the Prestashop addon will provide the following interfaces:
Each interface of this Prestashop browser push notification module is explained below.
3.1 General Settings
General Settings tab of this Prestashop Web Push update notification addon has following options:
3.1.1 Configuration Settings
On clicking on configure link corresponding to Prestashop Website Push Notification addon, the system will open Configuration tabs of this Prestashop plugin as shown in the screen below:
Enable/Disable: Initially, this field of Prestashop browser push module by Knowband will be disabled. The admin can enable/disable the plugin by toggling the button.
After enabling the settings the module, a confirmation box will be displayed in the in the front-end of the store. The store visitors or customers can click on ‘Approve’ to enable the push notifications.
Enable/Disable the Order Status Update: In this section of Prestashop Push Notification for web browsers addon, the admin can enable the settings to send web notification for the order status. After enabling this setting, the admin can send order status notification the customer.
The push notification for order status will be displayed as shown in the image below:
Enable/Disable the Abandoned Cart Alert: Using this option of the Prestashop Web Push Notification addon, the admin can enable the settings to send web notification for the abandoned carts of the customers.
These settings work only when the customers abandon their cart for some reasons. Then this module sends the web push notification to the customer saying “Your cart is waiting”.
Note: Web push notification module allows the admin to run cron to send the push notification immediately or after a fixed time.
Enable/Disable the Product Price Alert Settings: Using this option of the Prestashop Browser Notification addon, the admin can enable the settings to send web notification for the customer when the product price is down.
At the front-end, this Price alert notification box will appear like below screenshot:
Note: These settings are only applicable when the users subscribe for the Price Alert.
Enable/Disable the Product Back In Stock Alert Settings: Initially, this setting is enabled, this Prestashop Push Notification for web browsers Addon allows the admin to send product alert notification to the customer when the product is back in stock.
At the front-end this Back In Stock notification box will appear like below screenshot:
Note: These settings are only applicable when the user subscribes for the notification.
3.1.2 Product Sign Up Box
In this tab of the Prestashop Web Push Notification addon by Knowband, the admin can edit the Sign-Up Box settings of this Prestashop module in various languages. This tab will have the following options:
Enable/Disable Product Subscription Box Settings: In this tab, the admin can enable the product subscription box option. If enabled, the Prestashop Browser Push Notification module will show the Subscription box in the Front-end of the store where the customer can subscribe for the price alert or back in stock product.
Sign Up Price Alert Heading: Initially, this field of Prestashop Web Push Notification module allows the admin to change the heading price alert notification as per the requirement.
Price Alert Message: In this section of Prestashop Browser Push Notification module, the store admin can change the message flashed in the Price alert subscription box.
Sign Up Back In Stock Heading: This option of the Prestashop back in stock web push alert module allows the admin to edit the heading of the back-in-stock notification.
Back In Stock Message: In this Prestashop Push Notification for web browsers Addon tab, the Online retailer can change the message of the back in stock subscription box.
Sign Up Box text: The Prestahsop store admin can change the look and feel of the subscription box by picking the color from the color picker. The changes made in the back-end will be reflected in the front end.
Sign Up Box Heading Background Color: The Store merchant can change the background color of the heading of the signup box in this.
Sign Up Heading Font Color: This option of the Prestashop Website Push Notification module allows the admin to set the Heading font color as per requirement and will be reflected the front end of the site.
Sign Up Box Content Background Color: The Prestashop Merchant can change the Subscription box Content color in this section of Knowband Web Push Notification For Prestashop.
Sign Up Box Content Font Color: The admin can change the font color from this section.
Sign Up Box Content Border Color: This field of Prestashop Web Push Notification addon allows the admin to set the border color.
Sign Up Box Content Background Color: This option of the Prestashop back in stock web push alert module allows the admin to set the background color of the sign-up box.
Sign Up Box Button Font Color: Using this option of the Prestashop Browser Push Notification module, the admin can set the font color of the text displayed in the buttons.
3.1.3 Welcome Push Notification Setting
In this Prestashop Web Push Notification, the store admin can customize the look and feel of the Welcome notification box. This Welcome Notification box will be shown in the Front-end of the store when the customer enters the store. Users have an option to subscribe to the notifications or cancel the option. This tab will have the following options:
Enable/Disable: Admin will have the option to Enable/Disable the Permission Box. If enabled, the permission box in the front-end of the store.
Action Message: The Admin can change the action message that will be reflected the front end of the site.
Action Button Message: In this Prestashop Website Push Notification Addon, the store admin can change the message of the Permission box action button message.
Action Cancel Text: In this tab, the store admin can set the Cancel button text.
Display Logo: The store admin can enable/disable the option to display the logo.
Upload Logo: The online retailers can upload their own business in this section.
3.1.4 Web Browser Configuration
In the updated version, the online merchant got an option to configure Firebase API and setup these details for showing web browser notifications to the online users:
API Key: Enter the API key here.
Project ID: Enter Project Id here.
Messaging Sender ID: Here, enter messaging sender ID.
Server Key: Enter the server key here.
The online merchant can view the configuration steps along with the screenshots.
3.2 Templates
Here store owner can customize or add the Web Push notification template in this section of the Prestashop Website Push Notification addon according to the requirements.
Web push notification allows the store admin to customize the template for the following option:
1. Custom Notification Alert
2. Product Back In Stock Alert
3. Product Price Alert
4. Abandoned Cart Alert
5. Order Status Update Alert
3.2.1 How to add Custom Notification Template?
The Prestashop Web Push Notification addon by Knowband allows the store admin to add the new Custom Notification template. Following are the steps to add a Custom Notification template –
1. Go to “Web Push Template”.
2. Click on “Add New Push Template” tab. A pop-up will display to add a new push template.
3. Fill all the mandatory fields and click on the “Save” button.
The various mandatory fields are discussed below. Please find the attached screen-shot:
Notification Title: Here the admin can set the Notification title.
Message: Using this option of the Prestashop web push notification module, the eCommerce store admin can set the message that will be displayed along with the notification.
Upload Icon: In this field, the store admin can upload the icon for the notification.
Primary Link: The Store admin can add the link of any specific page where they want to redirect the user.
Action Button: In this tab, the online merchant can add the two buttons that will be displayed along with the push notification. These action buttons can be used for various promotions.
4. After the successful enter the details, the new custom template would be added in the “Web Push Template” table.
Note: The Admin can add the N no of Custom template for various promotional offers like Flash Sale, Buy 2 Get 1, Happy hours and more.
The other notification options are discussed below:
Product Back In Stock Alert: In this tab, the store admin can customize the settings of the back in stock notification like Your product is out of stock. Please find the attached screen-shot:
When the store admin changes the status of the Product quantity from the back-end of the Prestashop Web Push Notification module the Product quantity Push Notification send to the customer.
Product Price Alert: In this tab, the store admin can customize the settings of the product price alert notification. Please find the attached screen-shot:
When the store admin changes the product price/run the special deal from the back-end of the module the Push Notification send to the customer.
Abandoned Cart Alert Template: This Prestashop Browser Push Notification module offers an option for the admin to customize the abandoned cart template form the back-end.
Here the store admin can customize the Abandoned Cart template.
Order Status Update Alert: This Prestashop Web Push Notification module offers an option for the admin to customize the Order status template.
Here the store admin can customize the Order status template.
When the store admin changes the status of the order from the back-end of the Prestashop Web Push Notification module the Order Status Push Notification send to the customer.
3.3 Push Notification
Prestashop Web Push Notification module allows the admin to set up the cron to send a push notification. The Admin has the option to send push notification manually or by the setting of the cron.
3.3.1 How to send Push Notification Manually?
In order to send the Push notification manually for Update Order, Buy Now, Product Price Alert, Product back in stock and Custom Notification. The store admin needs to select the template type from the drop-down list.
For example: If the store admin wants to Push the “Order Status Notification” manually, then he has to select the “Update Order” option from the drop-down list and click on the Send to All Subscriber option.
3.3.2 How to Schedule the Notification?
There are the steps for scheduling the Notification:
1. Go the Push Notification template.
2. Select the template which you want to schedule for future notification.
3.Set the time when the admin wants to send the notification.
4. Delay notification set.
CRON Configuration:
In order to send the Push Notification automatically, the Prestashop store admin can set up the cron job. There is two option available in the admin panel of the module.
1. The Admin can run the cron manually.
2. Cron Setup via Control Panel: In order to automate the setup the admin can configure this setting.
Please find the instructions to setup crons below –
Web Push Notification For Prestashop allows the Prestashop store admin to schedule the notification for a particular time. All the scheduled notification will be displayed in the Push Delay Notification tab along with their status.
3.5 Push Subscriber
Prestashop web push notification plugin allows the admin to view the list of the subscribe browser.
3.6 Product Alert Subscriber
This Prestashop Push Notification for web browsers addon allows the online retailer to view the list of subscribed product. They can also view the product notification type like price alert or back in stock.
3.7 Push History
In this Prestashop web push notification module, the store admin can view the overall history of the web push notification. Apart from this, the admin can filter the history and view the notifications pushed for options like abandoned cart, price alert, back in stock and more.
3.8 Web Push Statistics
The complete analysis of the subscribed customers can be done with the help of report offered in this tab of the Prestashop web push notification module.
4.0 Front End Module of the Prestashop Web Push Notification module:
After enabling the Prestashop Website Notification module by Knowband the front-end user will see a confirmation block at the home page. The block of the Prestashop Browser Push Notification addon contains two buttons as to Approve or Cancel the notification. If the user Click the approve button they will be subscribed to the respective website.
The Confirmation block of Prestashop reminder email module would appear as follows:
The OpenCart-based eCommerce store owners can now create an online marketplace like Etsy and eBay with Knowband’s OpenCart Marketplace plugin. Further, just install the OpenCart Multi vendor Marketplace plugin in your store. Moreover, this will enable multi-seller functionality at your site. Third-party sellers can easily register and list their products on the site. The various aspects of the store management rest in the hands of the site admin. Thus, the seller’s profile, category request, products, and review approval happen from the back-end of the OpenCart Multi seller marketplace extension.
1.1 Admin Benefits of OpenCart Marketplace Extension
The various admin benefits of Knowband’s OpenCart Multi-vendor marketplace plugin are mentioned below:
The store admin can easily convert their single-vendor eCommerce site into a whole new and fully-functional marketplace with the help of Etsy clone for OpenCart.
The OpenCart Multi vendor Marketplace plugin supports all types of products including simple, configurable, and bundled.
The OpenCart multi-seller marketplace plugin enables the admin to set the global as well as the category-based commission to be charged to the sellers.
The store owner can easily monitor the seller’s profile and products being posted at the site. They can easily approve/disapprove the seller’s profile from the admin interface of the OpenCart Multi-vendor Marketplace plugin.
The admin can even assign the categories to the sellers. Additionally, the vendors can send a category request to the admin. These requests are processed by the store admin from the back-end of the OpenCart Multi seller Marketplace extension.
The OpenCart Marketplace Module allows the store admin to enable/disable the review/rating option from the site. If enabled, the customers can give reviews for the products as well as the sellers.
OpenCart Multi-vendor Marketplace plugin offers custom shipping options. If this feature is enabled, the sellers can add their own shipping methods.
The OpenCart Marketplace Plugin offers easy tracking of sales report and overall transaction of the site.
The store admin gets 24 default email templates to keep the sellers notified about the various aspects.
1.2 Seller Benefits of OpenCart Multi-Vendor Marketplace Extension
The third-party vendors can easily register as a seller at the site just by filling out a form.
Once the account approves, the sellers can list their products at the site from their dashboard.
The sellers can add banners, shop logos, and metadata from their dashboards. The vendors can easily make an SEO-friendly URL for their shop.
The sellers even get an option to track the overall transaction and sales report from the dashboard with ease.
The sellers get an option to add category requests. The admin can approve/disapprove their request from the back-end of the OpenCart Marketplace Extension.
If enabled from the admin panel of the OpenCart Multi seller Marketplace module, the sellers can even add their own shipping methods.
1.3 Customer Benefits of OpenCart Multi-seller Marketplace Extension
The store visitors can now choose the ideal products from a wider range of product options.
The online shoppers can view the seller’s profile on the products page. Further, only if the admin allows it.
The customers even get an option to give their reviews for the products as well as the seller.
Customers can easily contact the sellers of the product from the seller account page and raise a ticket for their queries and issues.
1.4 New Features in OpenCart Multi vendor Marketplace plugin:
Improved Admin UI: It has a dynamic and functional new admin UI for effortless management.
A new Seller Custom Form: A new custom field is available to the backend of the Multi vendor marketplace. It allows the admin to create a separate registration form for the sellers.
Now admin can allow sellers to display the seller and admin details on the invoice.
To choose the order status for which commission/earning will be calculated a field in the admin panel is now available. Previous earning was being calculated on all the order status i.e. Cancelled, Returned, etc.
Admin can decide order status options for sellers which they can use for the customer orders.
An option is now available in the admin panel to enable/ disable the sellers. All the products will be removed automatically from OpenCart Marketplace if a seller is disabled by the admin.
Admin assigns the products to the individual seller.
OpenCart Marketplace extension allows the admin to register any customer as a seller.
OpenCart Marketplace Product page and admin UI
2. Installation of OpenCart Marketplace Plugin
Purchase the OpenCart Multi-vendor Marketplace Module from the Knowband store. You’ll get the following files:
Zipped File containing the source code of the module
User Manual
Follow the steps mentioned below in order to install the open cart Multi vendor Marketplace plugin in your store:
Unzip the zipped file. The vqmod must be installed, otherwise, the plugin will not work. You’ll get the folders as shown in the image below:
Copy all the files and folders of the zip file in the Root Directory of the site.
The admin can find the OpenCart Multi-Seller Marketplace extension at the path Admin Panel -> Extensions. Install the module by clicking on the ‘Install’ button corresponding to the module.
The OpenCart Marketplace plugin is now installed and is ready to use. Go to Admin -> Main Menu -> KB MarketPlace as shown in the image below:
3. Admin Panel
The OpenCart Multi-vendor Marketplace plugin offers multiple options for the configuration and management of the online marketplace.
After that, click on the edit option of the KnowBand Marketplace.
There are 6 main menus in the configuration settings:
3.1 Setting
3.2 Sellers
3.3 Products
3.4 Orders
3.5 Commissions
3.6 Support
All the six main menus are discussed below in detail:
3.1 Settings
The various fields of this menu of the OpenCart Multi-vendor Marketplace plugin are discussed below:
3.1.1 General settings
Enable Module: Toggle the button to “enable” the module on the website.
Default Commission: Set the commission to be charged to the sellers here. The percentage amount as specified by the admin here will be applicable to all the marketplace sellers by default.
Approval Request Limit: The store admin can approve/disapprove the seller’s account from the back-end of the OpenCart Multi vendor Marketplace plugin. The sellers can send a request for account approval. The admin can set the maximum number of requests that the seller can send in this section.
New Product Limit: Fix the maximum number of new products that a seller can list in the marketplace.
Enable Seller Registration: Select ‘yes’ in order to enable the third-party seller registration.
Enable Separate seller registration form: Select ‘yes’ in order to enable the separate seller registration form.
New Product Approval Required: If he selects ‘Yes’, then, the approval of the admin will be required to list the product at the site.
Enable Seller Review: Select ‘Yes’ if you want to enable the seller review option in the front-end.
Seller Review Approval Required: If this feature is enabled, then, the review will be posted in the front-end only after the approval of the store admin.
Display Sellers on the front: Enable to display the list of the sellers in the front-end of the website.
Include Product Tax in Admin Commission: If he selects ‘Yes ’, then, product tax will be included in the admin commission.
Display Seller Details on Product Page: Enable this option to display the seller’s details on the product page of the website.
Seller Agreement: Specify the terms and conditions for the sellers in this section. The agreement details as mentioned here display in the front-end of OpenCart Multi-seller Marketplace.
Categories that the admin allows: The admin can select the category that they want to assign to the sellers in this section.
3.1.2 Order Settings:
Seller order email alert: If he selects ‘Yes’, then, an automated email will be sent to the vendors every time the order of their product is received.
Allow Order Handling: If he selects ‘Yes’, then, the sellers can handle the orders received on their products. They can process the orders and change the order status.
Allowed Status to Seller: Order statuses that are okay for sellers to update the order. It includes Cancelled, Cancelled Reversal, Chargeback, Complete, denied, processing, failed, expired, etc.
Order Status for Earning Eligibility: Order status assigned to the sellers only for which they will receive the Payouts or they will get the earnings only for the assigned order status such as complete, shipped, voided, etc. Admin can choose from the options mentioned in dropbox.
Admin Info on seller invoice: Select yes or no for sending a system-generated email to the seller on the new order.
Seller Info on seller invoice: Select yes or no for sending a system-generated email to the seller on the new order.
3.1.3 PayPal Payout Settings
Opencart Multi-Vendor Marketplace plugin offers admin access to set the PayPal Payout Settings from the backend of the store. Admin needs to activate the setting and fill the Client ID, Client Secret key, Paypal Email Subject, and Paypal Currency in the backend of the store.
3.1.4 Email Templates
The OpenCart Multi seller marketplace plugin offers 24 pre-designed email templates for various scenarios. The store admin can even edit the templates if required by clicking on the Edit button.
3.2 Sellers
3.2.1 Sellers Setting
This page of the OpenCart Multi-vendor Marketplace extension has a list of all the sellers that the store owner approves. The admin can view the list of the sellers whose accounts he approves from the Seller Account Approval List tab of the OpenCart Multi seller Marketplace extension.
Admin can enable/disable the seller from the buttons shown below.
How to Edit Seller’s Account?
The admin can even edit the profile of the vendors from the back-end of the OpenCart Multi vendor Marketplace plugin. In order to edit the same, click on the Edit button. This will redirect you to an interface of the OpenCart multi-seller marketplace extension where you can make the required changes.
3.2.1.1 General
Customer Detail: Admin can edit all the basic details of sellers on the Customers Setting Page. This includes Customer group, Name, email address, contact information, etc.
Password: Admin can set the password for the seller.
Other: It includes more settings for Newsletter subscription, Enable/Disable the seller, and categorizing the seller as safe.
Multiple Addresses: the OpenCart Multi-Vendor Marketplace allows the admin to add one or more addresses to the seller’s account.
3.2.1.2 Affiliate
Admin can add affiliate Details in the Affiliate setting.
Affiliate Details: All the information such as Company Name, Website, Tracking code, Commission Percentage.
Payment Details: The admin can add or select the tax ID and Payment Methods. In fact, the payment methods that are indexed in the extension are Cheque, PayPal, and bank transfer.
3.2.1.3 Seller
Admin can register the company as a seller by selecting the Yes button.
3.2.1.4 History
History: Seller history and comments will display here.
Add History: Admin can add comments for the seller in the History section which will display on History Table.
3.2.1.5 Transaction
Transactions: All the transactions will be shown here for the particular seller.
Add Transaction: The store owner even gets an option to add a transaction by clicking on the ‘Add New Transaction’.
3.2.1.6 Reward Points
If the admin wants to reward the seller then he/she can add the reward description and points in this section of the Sellers setting.
Reward Points: A table showing all the reward points given to the seller by the admin will display here.
Add Reward Points: Admin can add new reward points by clicking on the ‘Add Reward Points’ button.
The window will display as shown below:
3.2.1.7 IP Address
The IP address of the seller and the number of accounts registered will display here.
3.2.1.8 Seller Account configuration
OpenCart Multi-vendor Marketplace extension allows admin to set the commission amount for individual sellers.
Default commission: Admin can add the commission details in the Seller Account Configuration setting.
New Product Approval required: Select Yes if the admin wants to approve the new product and select no otherwise.
Enable Seller Review: Yes/No buttons are given to enable/disable seller reviews.
Seller Review Approval Required: If this feature is enabled, then, the review will be posted in the front-end only after the approval of the store admin.
Send email to seller on order place: If enabled then an auto-trigger mail will be sent to admin with the default email template.
Categories that the admin allows: Admin can assign categories to the seller. Sellers can only sell products from the allotted categories.
3.2.2 Pending Approval
The third-party vendors can fill up the form in order to create a seller account at the site. The seller’s profile will list in this tab of the OpenCart Multi-vendor Marketplace Plugin for approval as shown in the image below:
How to Approve/Disapprove the Seller’s Account?
The admin can approve the seller’s account at a button click from the back-end of the OpenCart Marketplace module.
Just click on the approve or disapprove button corresponding to each seller account. On clicking on the Approve button, a pop-up will display asking for permission to approve or disapprove the seller account.
Once the seller’s profile approves, the same will list in the ‘Seller List’ tab of the OpenCart Multi-vendor Marketplace module.
3.2.3 Custom Fields
(New)Admin can add a custom field for seller profile. This setting allows the admin to add one or more fields on the seller page to collect extra information from the seller.
Click on the edit button for adding or updating the custom fields. On clicking the ‘edit button’, the following window will appear:
Select Field Type: Select the field type as a checkbox
Label: Add the field name which will display on the front end of the seller dashboard.
Short Description: Add the short description for the field
Options: Add the options for the field like Male, female, or Yes, No as the accepted format mentioned in the field.
HTML Details: Add HTML ID and HTML class here.
Add New Field Details: like field name, field sort order etc.
Required: Set the field as optional or mandatory
Show in seller profile page: Select Yes if the field is to display on Seller Profile Page otherwise select no.
Active: Activate or deactivate the field by selecting yes or no options.
3.2.4 Category wise commission
With the Opencart Multi-Seller Marketplace plugin, the store admin gets access to set the commission category-wise. Admin can easily view the total earning, total commission for a particular category in Category Wise Commission. Category wise commission for the particular seller will display here as shown below:
3.2.5 Seller Review
Admin can see the seller reviews and edit them from the backend if required.
The admin can add the author details, Text, update ratings, change the date of the review.
Admin can approve or disapprove the review from the status field.
3.2.6 Reviews Approval
The list of approved and disapproved seller reviews will display here. If the admin click on the edit button then he will be directed to a new page.
Store Admin can add the author details, Text, update ratings, change the date of the review.
Status: Admin can approve or disapprove the review.
The various fields of this interface are discussed below:
Author: The name of the reviewer will be shown here. The admin can change the name if required.
Text: The review entered by the customer will be shown here. The store owner can edit the review if required.
Rating: This section will by default show the rating given by the customer. The admin can even change the rating.
Review Date is available: The date when the review is available will display here.
Status: Enable or disable the review from here. If the admin enables it, the review will display on the product page.
3.2.7 Shipping
Seller’s shipping information can be reviewed by the admin from the backend of the OpenCart Multi-vendor Marketplace. The OpenCart Multi-seller Marketplace extension comes with custom shipping options wherein the sellers can add their own shipping methods. If this feature is enabled by the store admin from the Settings Tab of the OpenCart Multi-vendor Marketplace module, then, the sellers can add their shipping methods.
The shipping templates available by the sellers will list in the Sellers Shipping tab of the OpenCart Multi vendor Marketplace plugin. All the orders shipping details like shipping zone, weight, Rate, and status will display on this page as shown below:
3.2.8 Category Requests
The admin assigns the category to the third-party seller for listing the products. The sellers can even request the admin to add a new category from their Dashboard. The category requests sent by the sellers will list in the Seller Category Request tab of the OpenCart Multi-Vendor Marketplace extension as shown in the image below:
3.3 Products
3.3.1 Seller Products
The admin approves the products from the back-end of the OpenCart Multi-vendor Marketplace extension. Further, they will list in the Sellers Products tab.
OpenCart Multi vendor Marketplace plugin- Sellers products
3.5.1 How to edit/remove the details of the products?
The store owner can edit or delete the product details of the sellers if required. Click on the ‘Edit’ or ‘Delete’ button respectively.
3.3.1.1 General
Add a general product description in the General setting tab of the product.
Product Name: Add product Name in this field.
Product Description: Add the product description in the description field.
Meta Tag Title: Enter the Meta tag here.
Listing Meta Description: Enter the Meta description of the website here.
Meta tag Keywords: Enter the meta keywords in this section. Enter the tags and separate them with comma.
Product Tags: Add all the product tags here.
3.3.1.2 Data
In the data section of Product description, the admin have to fill the details like Model, Product codes like SKU, UPC, EAN number, JAN, ISBN and MPN, Location details, Product price, Tax class, Quantity, Minimum quantity, Stock status, Shopping charges requirements, dimensions, weight etc.
3.3.1.3 Seller
Select the seller from the given seller’s list.
3.3.1.4 Links
Add details like manufacturers, categories, filters, stores, related product, etc.
3.3.1.5 Attributes
Admin can add product attributes in English and French.
3.3.1.6 Option
If required then a product option will be available from this section.
3.3.1.7 Recurring
From this section, addition of recurring profiles will happen.
3.3.1.8 Discount
The discount details on the particular product will display here.
3.3.1.9 Special
Admin can set the product on priority for a period by adding start date and end date.
3.3.1.10 Image
Upload the Image of the product here. Addition of one or more images can happen with order to display.
3.3.1.11 Reward Points
Admin can add a minimum number of points needed to buy this product.
3.3.1.12 SEO
Add SEO for the product here.
3.3.1.13 Design
From this design section, sellers can choose the layout design.
3.3.2 Product Approval List
The third-party vendors can list their product from the dashboard of their profile. The products put in from the dashboard list in this tab of the OpenCart Multi-vendor marketplace module for approval. Admin approval is required only if this feature is enabled. The store admin can, then, approve or disapprove the product at a button click.
The products put in by the sellers will list in the Product Approval List tab of the OpenCart Multi seller Marketplace module as shown in the image below:
The admin can approve or disapprove of the products by clicking on the respective button corresponding to each product. Refer to the image below:
Once the Approve or Disapprove button is clicked, a pop-up will display with the message “Do you want to approve product?”
3.3.3 Product Reviews
The customers can give ratings and write reviews for the products if this feature is enabled from the back-end of the OpenCart marketplace plugin. If enabled, the customers can leave their reviews by clicking on ‘Write a Review’.
The reviews written in the front-end will list in the back-end of the OpenCart Multi-vendor Marketplace plugin as shown in the image below:
Click on the ‘Edit’ button to edit or approve the product reviews. This will redirect you to the review edition page of the OpenCart Multi-vendor Marketplace module.
3.4 Orders
OpenCart store admin can view the list of all the orders here.
3.4.1 Seller Orders
The orders received on the seller’s product will list in the tab of the OpenCart Multi seller marketplace plugin. The store admin can view or edit the orders by clicking on the View and Edit buttons respectively.
The following window will display if admin clicks the edit button. Admin can make the changes in all the fields as required.
3.6.1 Customer Details
From this section, admin can add their customer’s details.
3.6.2 Products
From this section, admin can add their products details.
3.6.3 Payment Details
From this section, admin can add their payment details.
3.6.4 Shipping Details
From this section, the admin can add their shipping details.
3.6.5 Totals
From this section, the admin can add the details of their total.
3.4.2 Admin Orders
The admin can track the order details of their products in the Admin Order tab of the OpenCart Multi seller marketplace extension.
3.5 Commissions
3.5.1 Admin commission
The admin can view the commission earned from the marketplace in this tab of the OpenCart Multi-vendor Marketplace Plugin. The store owner gets an option to view the earnings of the seller and total earnings.
3.5.2 Seller Balance
The store admin even gets an option to view the transaction of the sellers. The admin can see the Seller Balance History as well as Transaction History in this tab of the OpenCart Multi seller Marketplace plugin.
3.5.3 Seller Payout Request
Payout Request sent by the sellers can be viewed by the admin from the backend of the Sellers Payout Request. Admin can approve/ disapprove the payout request with a few clicks. Once the admin clicks on the “Approve” button a pop window as shown in the figure will appear.
When the admin will click on the “Disapprove” button, a dialog box with a comment field will appear. Once the admin clicks the submit button after filling the comment fields, the request will disapprove.
3.6 Support
This tab is used to find the user manual of the Opencart multi-seller Marketplace Module and also to raise a support ticket for any kind of queries and issues.
4.0 Front-end UI
Once the OpenCart Multi vendor Marketplace plugin is successfully installed at the OpenCart store, third-party vendors can fill a simple form and open-up their online shop. For easy management of the shop, the seller gets access to their dashboard.
4.1 Seller Registration
The third-party vendors can easily register as a seller of the site by filling a simple registration form. In order to register as a seller, select ‘Yes’ in the Register as Seller section of the form.
4.2 Seller Dashboard
Once the registration is complete and the seller’s account approves from the back-end of the OpenCart multi-seller Marketplace plugin, the seller gets access to the Dashboard.
They can view the entire sales report and order details.
4.2.1 Seller’s Profile
The sellers can edit their profile and personalize their shop from this tab of the dashboard.
4.2.2 Seller’s Product
The sellers can follow the path mentioned below in order to add a new product.
Go to My Account -> Dashboard -> Products
The list products display in this tab of the seller’s Dashboard.
In order to add a new product click on the ‘+’ sign at the top right portion.
This will redirect you to the ‘Add New Product’ page. Fill up the required detail in order to add the product.
4.2.3 Order
The sellers can view their orders and related details in this tab of the Dashboard.
4.2.4 Product Reviews
The sellers can view the review received on their product in the Product Review Tab of their Dashboard. All the reviews received will list as shown in the image below:
4.2.4.1 How can the sellers delete the Product Reviews?
Even the sellers get an option to delete the reviews. This happens by clicking on the ‘Delete’ button corresponding to each review.
4.2.5 My Reviews
The tab of the seller’s dashboard lists out the reviews received on their profile.
OpenCart Multi vendor Marketplace plugin- My reviews
4.2.5.1 How can the Sellers Delete the Reviews on their Profile?
The sellers can even delete their profile reviews if required. This happens by clicking on the ‘Delete’ button corresponding to each review.
4.2.6 Earnings
The total earnings of the seller can be viewed in this tab. The vendors can filter the results as per requirement.
The total earning history will display as shown below:
The sellers can even view the order-wise earning as shown below:
4.2.6 Transactions
The seller can view their entire transaction history in this tab. The amount debited or credited in their account can be viewed here.
4.2.7 Payout Request
Sellers can view the list of payout request sent to the admin from the Payout Request tab. For a new payout request sellers need to fill the payout amount and reason and send it to the admin for approval.
4.2.8 Category Request
The sellers can view the categories assigned to them. Additionally, they can even send a category request to the store admin. In order to send category request, go to the Dashboard -> Category Request
4.2.9 Shipping
The sellers can view the shipping process as in the screenshot below:
4.2.10 Product Import
With the help of the product import feature, sellers can add products in bulk. They have to download the template for products upload and just fill in the information of their products and upload again to list the products in bulk.
Product Return:
The seller can see the product return list here. The seller can add a filter to search for the product returned or requested for the product return.
4.2.11 Seller Coupons
Using this feature seller’s can generate coupons for their customers. Sellers can use different variations for creating their coupons like users per coupon, coupon type etc.
4.2.12 Support System
This feature allows the sellers to view the queries of their customers in the form of tickets. When the seller clicks on the Ticket ID they are able to see the full detail about the query and even reply and change the status of the query.