OpenCart Social Messenger Extension by KnowBand offers support service on the eCommerce store. Admin can offer live chat feature to the customers in order to directly communicate with them and resolve their issues by this functionality. Admin has to integrate Facebook App ID and Facebook Page ID on the store so that customers can directly log in to their Facebook profile and resolve their queries.
Live chat is the most important feature and one of the best ways in offering full support to customers. Many a times, customers leave the cart abandoned as they had any query related to the product. Social messenger resolves customer queries immediately so that they can go for instant purchase without any inconvenience.
This OpenCart messenger chat module for OpenCart store is highly customizable and offers smooth as well as flawless working. The admin can incorporate this functionality in the front-end with the help of Facebook page id and app id. Moreover, he can easily manage the messenger from the back-end of the OpenCart social messenger plugin. The admin can provide online customer support without even changing a single line of the base code of their site. The Messenger live chat module allows the admin to set the look and feel of the social messenger icon.
1.1 Striking Features of Social Messenger Extension for OpenCart
The OpenCart social messenger extension executes the functionality of showing Facebook messenger on the website pages. Customers can chat by logging in to their messenger.
With the help of OpenCart Social Messenger plugin, store admin can offer live chat support without changing any codes. The OpenCart live chat support module is highly customizable and offers smooth functioning.
The store owner can enter the Facebook app id and Facebook page id for incorporating the Facebook messenger on the store.
The e-merchant can change the default color of the Facebook messenger. The OpenCart Facebook messenger and live chat plugin provides a color-picker tool for color selection.
Admin has the authority to display the messenger chat option on selected pages. Admin can select multiple pages for showing this chat functionality.
The e-merchant can set different greeting messages for logged in and logged out customers.
The OpenCart Facebook messenger and live chat plugin allows the store admin to set the greeting message delay time from the admin interface.
The OpenCart Messenger chat bot module allows store admin to set the time as 0 seconds if he/she wants to show the greeting message without any delay.
OpenCart Messenger chat bot module is SSL compatible and provides user-friendly interface.
Facebook messenger and live chat plugin is multi-lingual compatible. The e-merchant can communicate in saveral languages.
The OpenCart Facebook Chat messenger module is mobile responsive. Online customers can also chat on their mobile devices also.
1.2 Technology for Development
Language: PHP
Frame Work: OpenCart
2.0 Installation Guide
To install this OpenCart Social Messenger Module, please follow the following steps:
Purchase the OpenCart Social Messenger Extension from the Knowband store. You’ll get following files:
Zipped File containing the source code of the OpenCart Social Messenger module.
User Manual of OpenCart Social Messenger plugin.
Follow the steps below in order to install the OpenCart Social Messenger Extension in OpenCart store:
Unzip the zipped. You’ll get the folders as shown in the image below:
Copy all the files and folders of the zip file in the Root Directory of OpenCart setup via FTP manager.
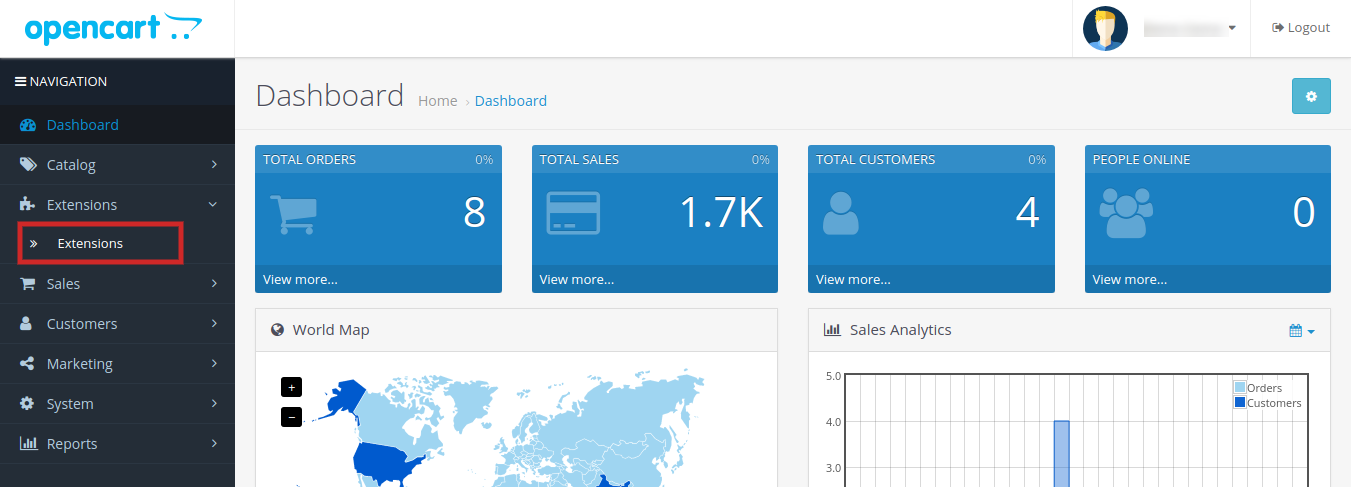
The OpenCart Social Messenger module is now installed and is ready to use. Go to Admin -> Main Menu -> Extensions as shown in the image below:
Select Social Messenger from the list of the modules and click on the Edit button.
3.0 Admin Interface of OpenCart Social Messenger Extension
OpenCart Social Messenger extension offers easy customization option to the store admin. The various Messenger live chat for OpenCart configuration options are discussed in detail below:
3.1 Edit Social Messenger Tab:
Following are the settings listed under this tab:
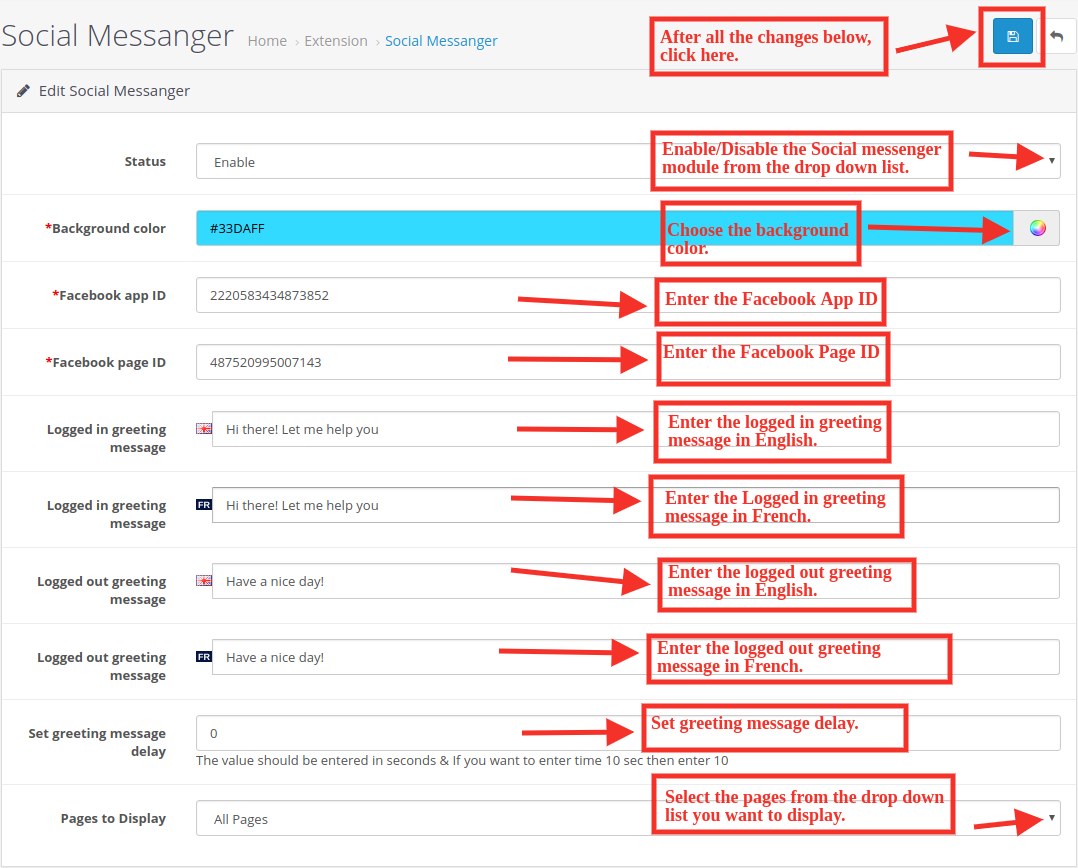
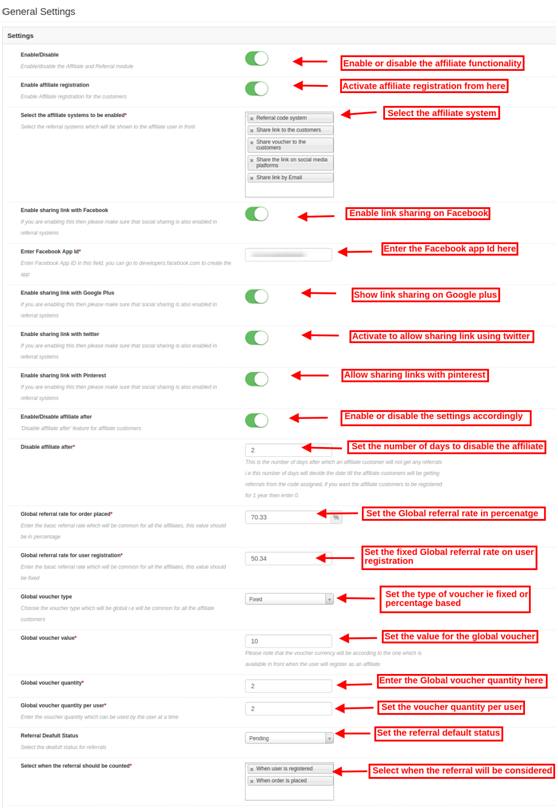
Status: Select ‘Enable’ from the drop-down list to qualify Social messenger extension on the front-end of the website. The admin just need to toggle a button in order to activate or deactivate the Facebook messenger extension.
Background color: Choose the background color from the drop-down list. This Facebook messenger and live chat plugin has a color picker tool for selecting the color of Facebook messenger. Admin can also show it’s default color.
Facebook app ID: Enter the Facebook App ID.
Facebook Page ID: Enter the Facebook Page ID.
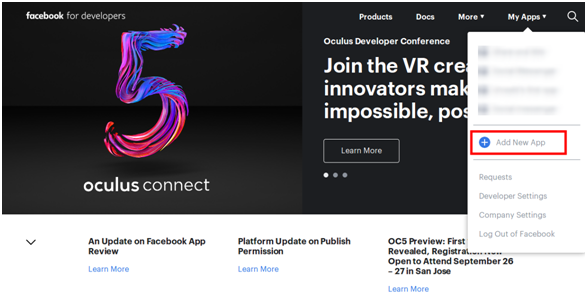
For Getting Facebook app ID and page ID follow these steps:
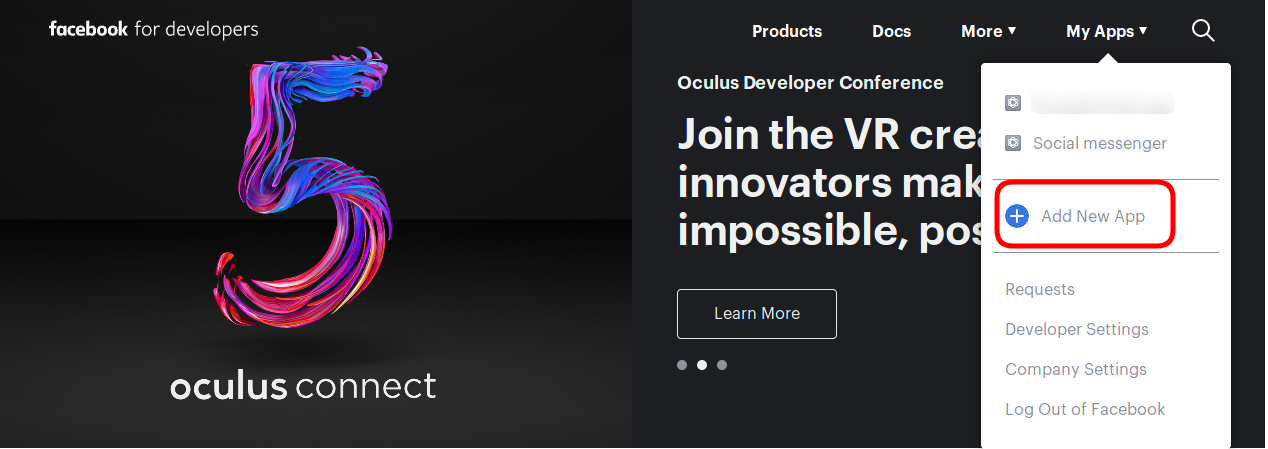
After that, Go to the “MY APPS” option and click on the ”ADD NEW APP”.
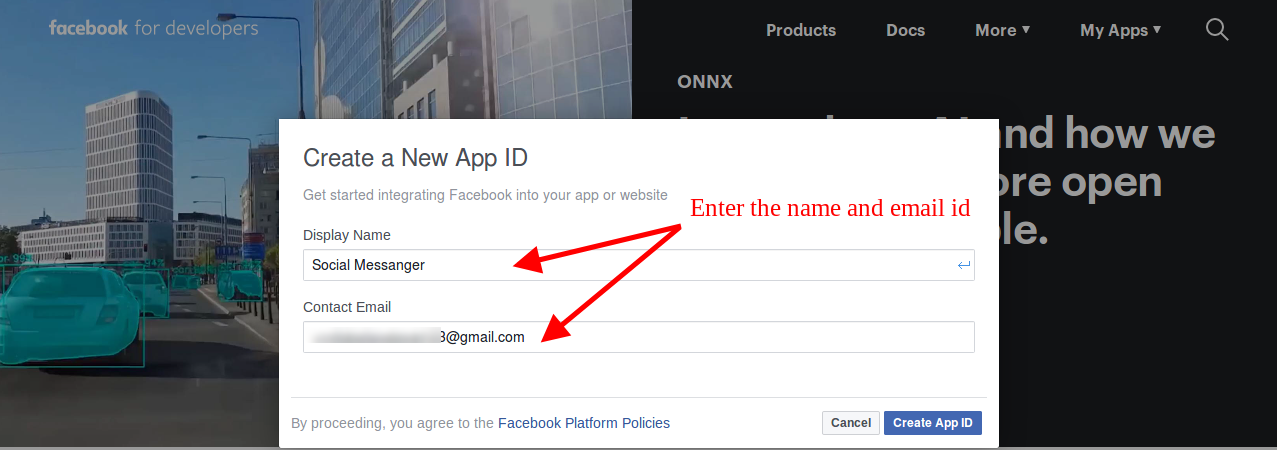
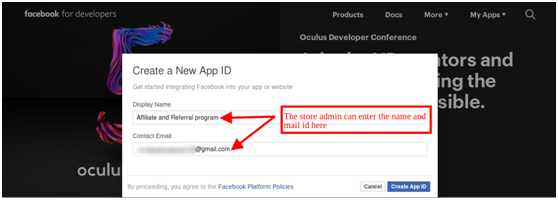
Now insert the “Display Name” and “contact email ID”. Click on the “Create APP ID” button.
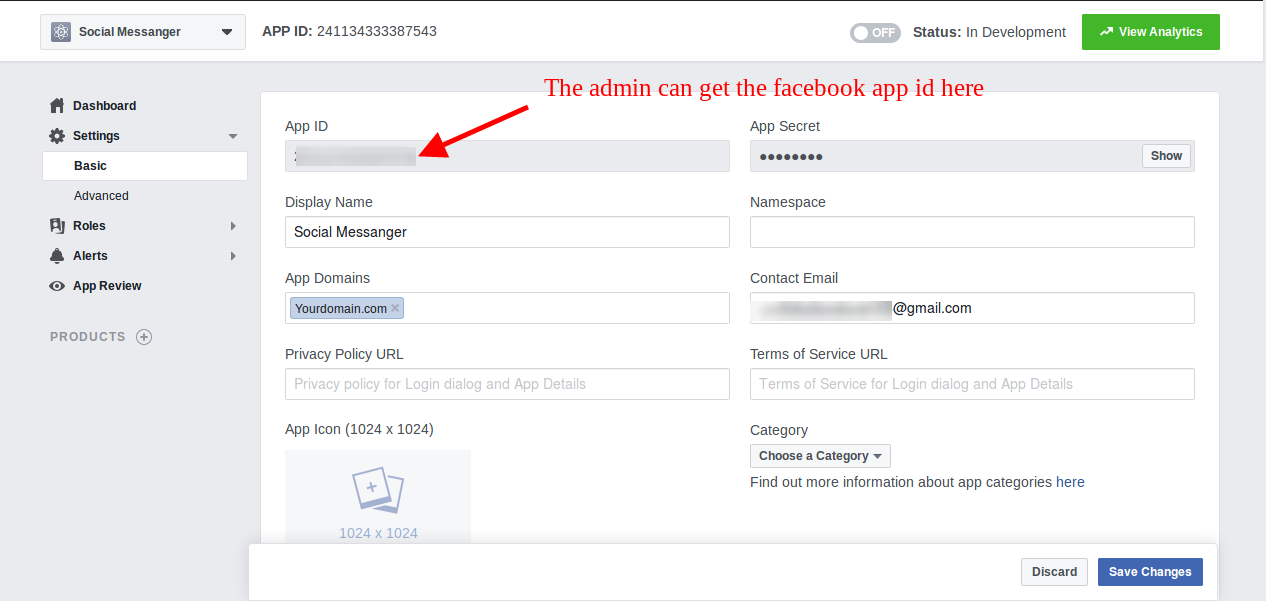
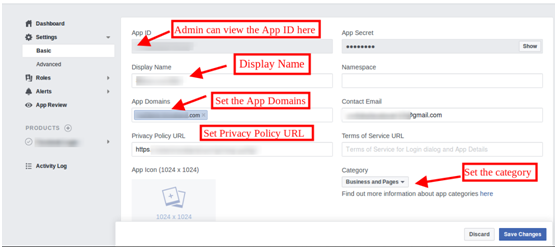
Once the APP ID created, the store owner can view the app id. Go to the “Settings” and then select “Basic”. Here you can view the APP ID as shown below.
Admin can insert the App Domain. After that click on the “save changes” option.
Steps to generate Facebook page ID
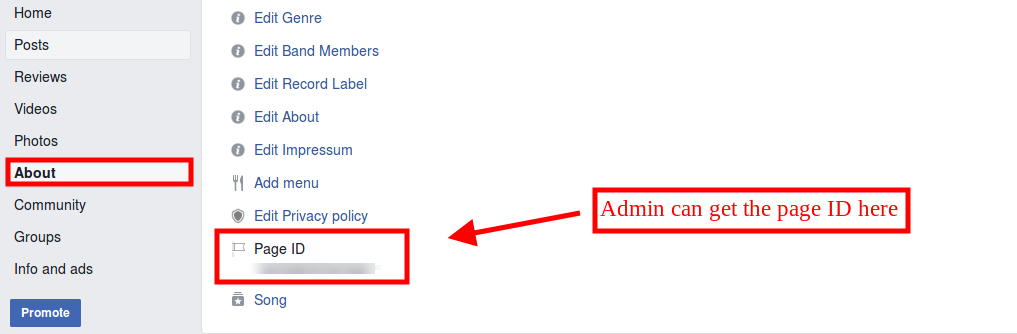
For getting Facebook page ID, open the Facebook page and go to the “about page“. At the bottom of the “about page“, the admin can view the page id.
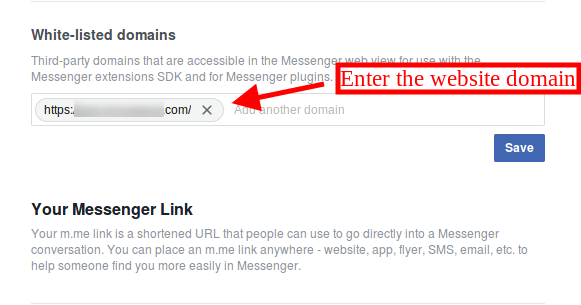
Go to the Settings option and then select the “messenger platform” option. Here you can enter the domain in the “White-listed domains” option.
This way the store admin can get the facebook app id and page id.
Logged in greeting message: Enter the logged in greeting message in the English and French languages. This Facebook messenger and live chat plugin is multi-lingual compatible.
Logged out greeting message: Enter the logged out greeting message in the English and French languages. Admin can show greeting message to Facebook logged out customers.
Set greeting message delay: Set greetings message delay time in seconds. This way, you can show a greeting message just after the customer’s arrival or after some time.
Pages to Display: Select the pages from the drop-down list on which, you want to display facebook messenger. Admin can select all the pages or specific pages for showing Facebook messenger chat option.
4.0 Front End of the OpenCart Social Messenger Module
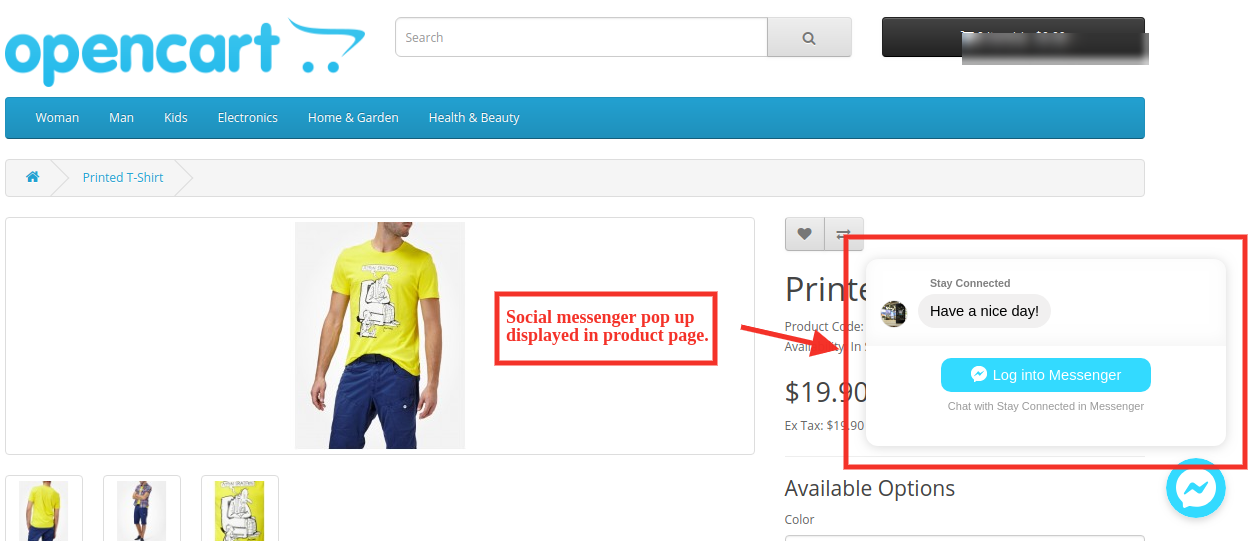
After customizing this facebook messenger integration plugin, the store admin can show facebook messenger successfully on the website front-end interface. The customers can view the live chat option on the store’s front-end as shown below:
Product Page:
2. Log in Window:
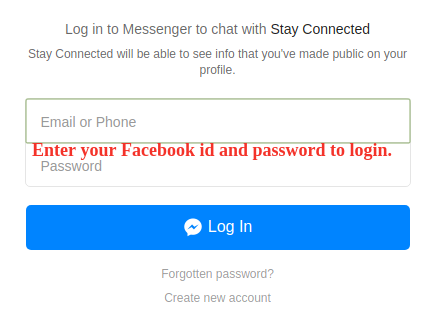
Online customers can easily login after clicking on the messenger chat box. They can chat and discuss any confusion, query or concern directly to the store admin. OpenCart Social Messenger Extension makes it very easy for the store admin to resolve customers concern. This OpenCart Social Messenger Module is multi-lingual compatible and mobile responsive. Facebook messenger for OpenCart allows the customers to directly communicate with the store admin and get the solution of their concerns in the least time.
Knowband is one of the most reputed names in the field of plugin development. We provide best plugins for platforms like- Magento,Prestashop, OpenCart and
For enhancing your business at the global level and to provide a user-friendly interface to customers, Knowband is offering OpenCart auto switch language and currency module. Whenever a user will visit the store, OpenCart auto switch language and currency converter will automatically convert the content of your OpenCart store into user familiar language and currency. Providing information in users preferred language will increase the customer retention rate which eventually decreases the bounce rate. OpenCart auto switch language will convert the language of your store based on customer geolocation. OpenCart auto switch language and currency fetch the IP address to convert the language. With OpenCart language and currency converter customer need not to manually change the language.
1.1 Benefits offered by OpenCart auto switch language and currency changer:
The various benefits offered by Knowband’s OpenCart language and currency switcher plugin are discussed below:
The store admin can set the default language for those locations whose language modules are missing.
OpenCart auto switch language and currency automatically convert the language and location based on location.
OpenCart language and currency switcher boosts the sale of your store.
OpenCart auto switch language offers multi-store compatibility.
OpenCart auto switch language and currency provide multilingual support.
OpenCart Auto change language offers SSL compatibility.
OpenCart Auto change language and currency offers a user-friendly experience.
OpenCart Auto change language and currency offers compatibility with all OpenCart theme.
OpenCart language and currency switcher offers effortless installation and configuration.
OpenCart language and currency auto switcher tracks the IP address of the customer and convert the content details accordingly.
2.0 Installation of OpenCart auto switch language and currency converter
Buy the OpenCart Auto switch language and currency from the Knowband store.
You will receive the following files:
Zipped file containing the source code of OpenCart Auto change language and currency module.
User Manual of OpenCart language and currency switcher
In order to install the OpenCart automatic language and currency converter, please follow the following steps:
Unzip the zip file. You will get the folders as shown in the image below
Copy all the folders of the zip file in the Root Directory of OpenCart setup via the FTP manager.
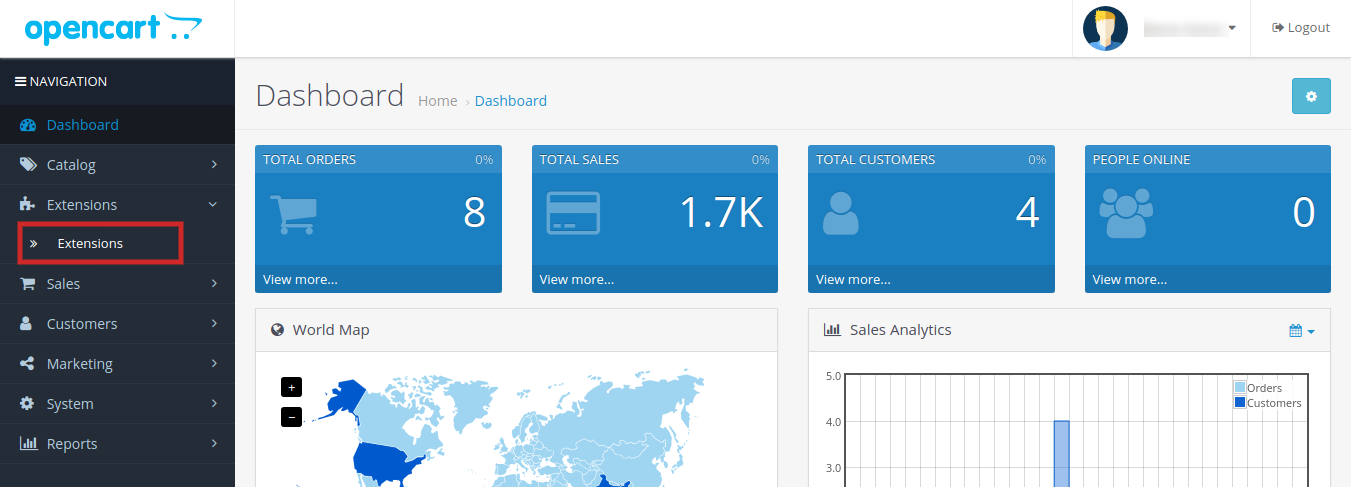
OpenCart language and currency auto switcher module is now installed and is ready to use. Go to the admin menu and click on the extensions and thereby click on the configure button next to Autoswitch language and currency converter.
3.0 Admin Panel
The OpenCart language and currency auto switcher plugin offer the following tab:
All the tabs are discussed below in detail.
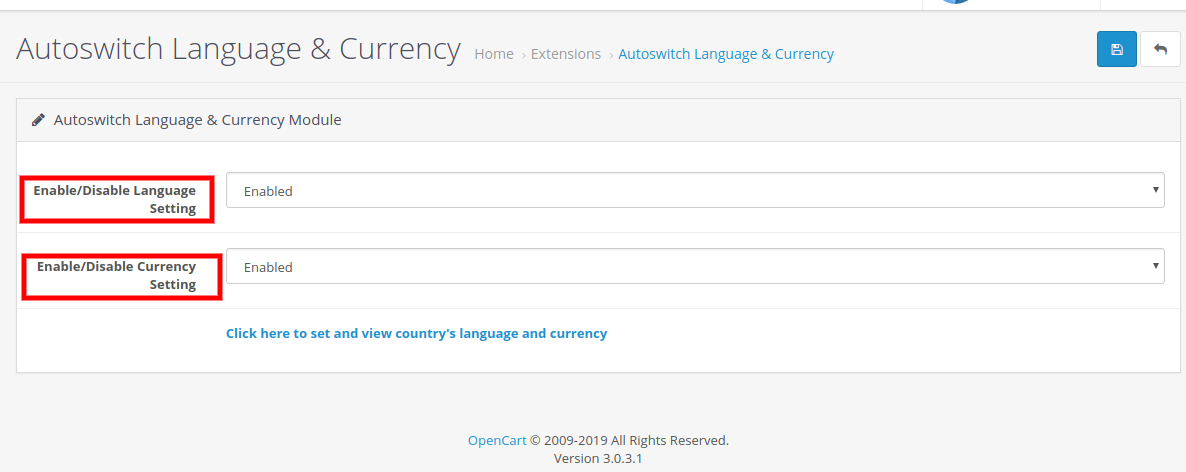
3.1 Enable or Disable Language Setting
Admin can enable and disable language settings from the admin panel of OpenCart Automatic language and currency converter.
Following are the steps to enable the language plugin:
Select the Enable language option.
Click on the save button.
Auto Language Converter will only work if this feature is enabled.
For disabling the auto language plugin :
Select the Disable language option.
Click on the save button.
3.2 Enable or Disable Currency setting
Store owner can activate and deactivate the Currency setting from the backend of OpenCart Auto change language and currency plugin.
Following are the steps to enable the currency setting:
Choose the Enable language option.
Click on the save button.
Auto Currency Converter will only work if this feature is enabled.
For disabling the auto Currency plugin:
Select the Disable Currency option.
Click on the save button.
3.3 Default language and currency setting
In order to set the default country’s language and currency, the seller needs to click on “Click here to set and view the country’s language and currency”. List of countries with their default language and currency will appear before you.
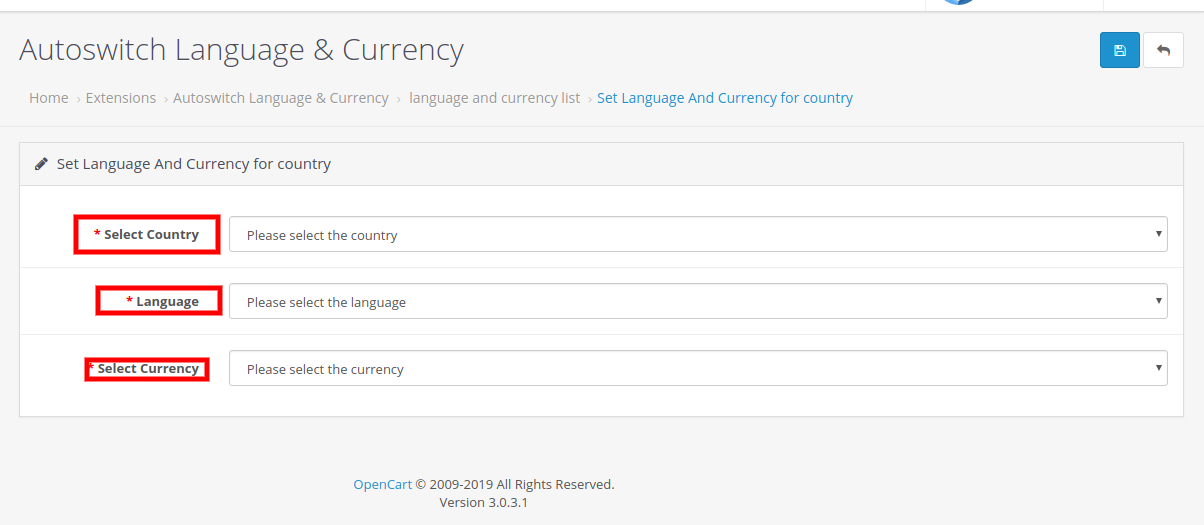
3.3.1 How to add a new Language and currency in OpenCart auto switch language and currency converter
Click on the “+” icon. A new page will appear in front of you.
Select the country from the list.
Select the language you want to assign to the respective country.
Select the currency you want to assign.
Click on the save button.
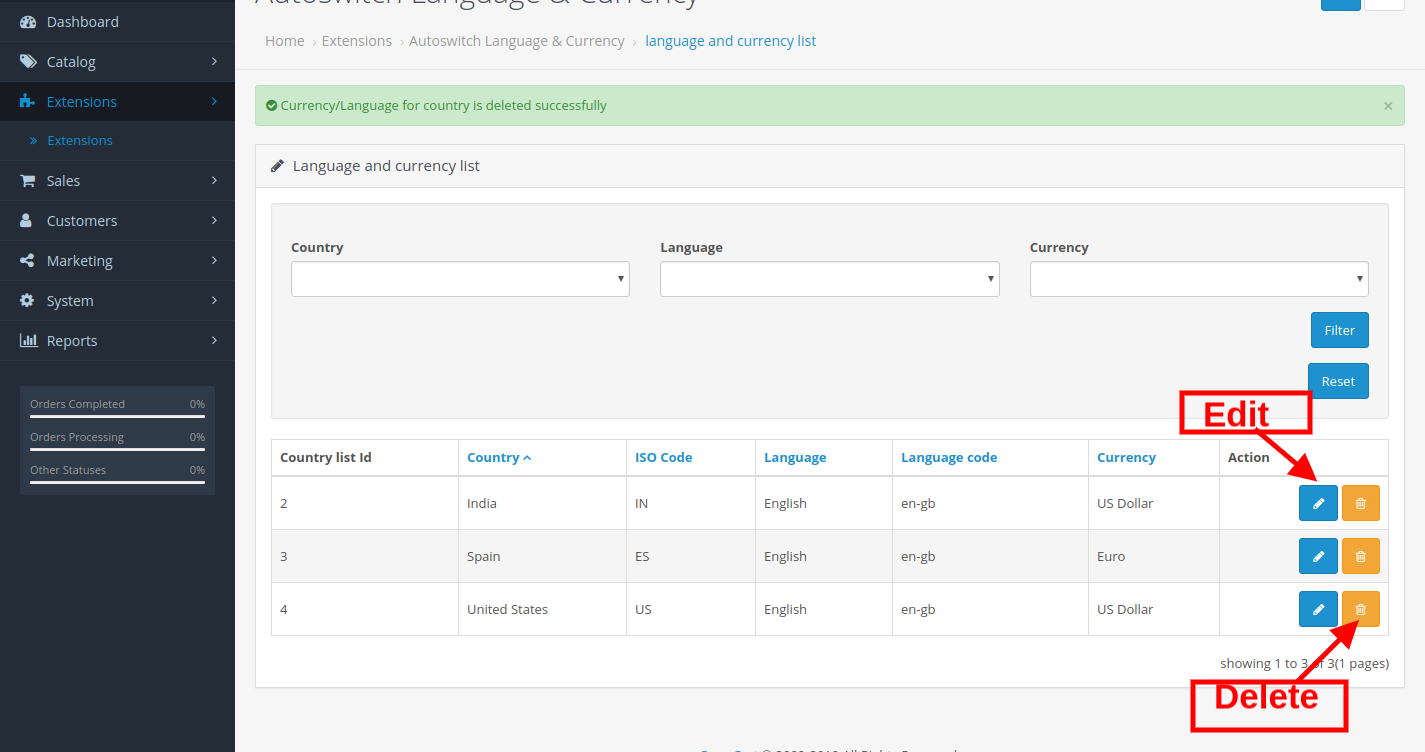
3.3.2 How to edit or delete a new Language and currency via OpenCart auto switch language and currency converter:
Click on the “edit” icon along with the listed country of which you want to change currency and language.
After making the required changes in the language and currency field.
Click on the save button and all the changes will get saved.
Click on the “edit” icon along with the listed country of which you want to change currency and language.
After making the required changes in the language and currency field.
Click on the save button and all the changes will get saved.
In order to delete any country from that list, click on the delete icon on the right side of the country and the respective country will get vanished from that list.
4.0 Front Panel
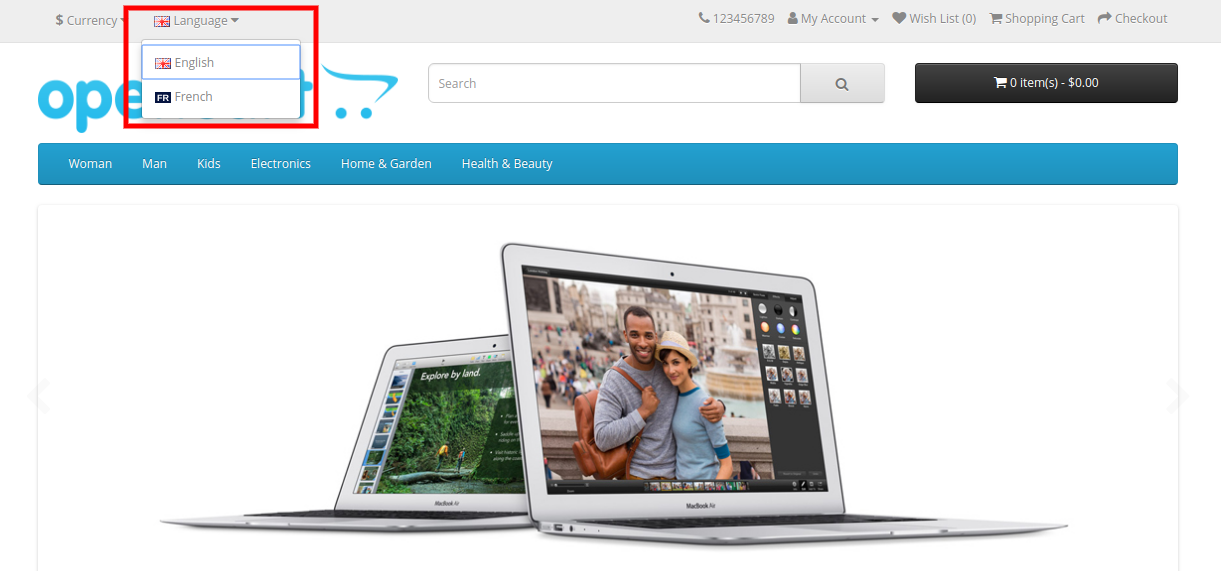
As soon as the user will open the store, the language and currency of the store will automatically switch to user familiar language and currency. If a user wants to switch the language of the store, please follow the following steps:
Click on the language tab at the top of the store.
Select the language in which you want to switch the content.
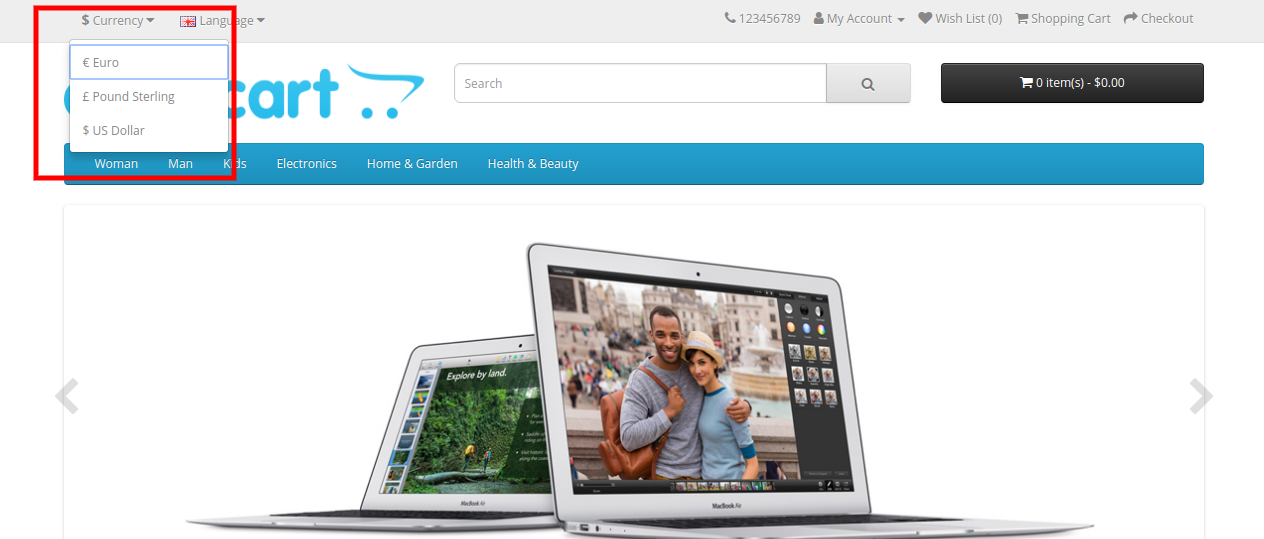
Users can easily switch the currency of the store in the following steps:
Click on the Currency tab at the top of the store.
Select the currency in which you want to make the purchase.
Watch how OpenCart language and currency switcher works:
Finally,
The OpenCart Auto Switch Language and Currency Module enable sellers to offer their products and services to each and every customer around the world without any language and currency barrier. The OpenCart language and currency auto switcher automatically changes the language and currency of the eCommerce website according to the customer’s location.
The OpenCart Auto change language and currency plugin fetches the customer’s location through the IP address of the customer’s device and changes the language and currency accordingly. With the help of OpenCart language and currency auto switcher, customers can easily understand the product description in their native language and currency to go for instant purchase. Sellers can also leverage this opportunity by making use of its tempting features and generate infinite leads.
Opencart Auto Switch Language & Currency Extension Tutorial
This tutorial walks you through all the features of the OpenCart Auto Switch Language and Currency Extension.
It explains how the extension can automatically change your store’s language and currency based on the visitor’s location, providing a seamless shopping experience.
Admins can also assign specific currencies and languages to different countries, giving you full control over your store’s regional settings.
Additionally, the tutorial covers many other powerful features designed to enhance your store’s functionality and customer experience.
For further information in detail, refer to the following links:
OpenCart Facebook Share and Win Discount Extension by KnowBand allows the store admin to display the product sharing button on the product pages of the website. It is a modern way of promoting products through social media without any advanced investments. It is the most fruitful way in order to attract more customers towards your product and eCommerce store too.
The OpenCart extension offers an easy and hassle-free product promotion and for the store admin. Admin has a nice opportunity to encourage their online customers to promote the products by offering them some amazing discounts and offers. The coupon code generated after product promotion could be accessed by admin to check whether the coupon is been applied by the customer or not.
1.1 Striking Features of Facebook Share and Win Discount Extension for OpenCart
The OpenCart Facebook Share and Win Discount Extension provides you multiple features which are fully customizable and easy to configure from the back-end interface without requiring any coding knowledge. The various striking features of the OpenCart Facebook Share and Win Discount Extension have been listed below:
The OpenCart Product share and win module allows admin to show product sharing option on the website pages.
The online users can click on the product sharing button so as to share the particular product on Facebook wall.
Store admin can offer fixed or percentage-based discount coupon to the customers for sharing the product on Facebook with the help of OpenCart Share and Win Extension.
The OpenCart Share and Win plugin offer admin to set the discount validity from the admin interface and get the discount extension.
Admin can enter the custom CSS and JS codes for the advance look and feel management via OpenCart product sharing plugin.
Admin has the authority to check the information about product sharing and discount coupon generation.
The OpenCart Facebook Share and Win Discount Module allows admin to set the Facebook app ID for incorporating Facebook.
Admin can easily install, configure and activate the OpenCart product sharing extension.
1.2 Technology for Development
Language: PHP
Frame Work: OpenCart
2.0 Installation Guide
To install this Opencart share and win Module, please follow the following steps:
Purchase the OpenCart share and win an Extension from the Knowband store. You’ll get the following files:
Zipped File containing the source code of the OpenCart share and win Extension.
User Manual of OpenCart share and win plugin.
Follow the steps below in order to install the OpenCart share and win Extension in OpenCart store:
1.Unzip the zipped. You’ll get the folders as shown in the image below:
2.Copy all the files and folders of the zip file in the Root Directory of OpenCart setup via FTP manager.
3.The OpenCart share on Facebook wall plugin is now installed and is ready to use. Go to Admin -> Main Menu -> Extensions as shown in the image below:
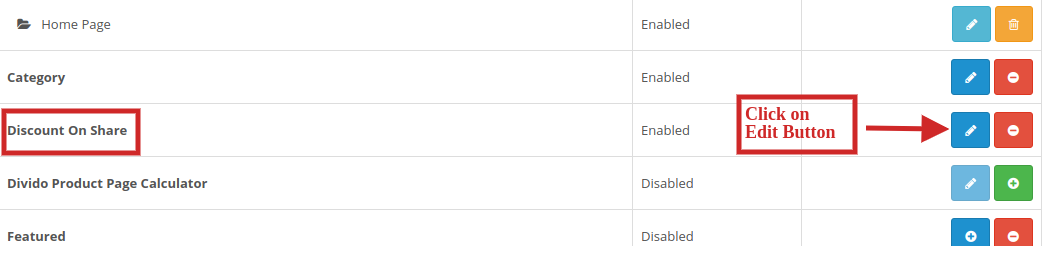
4.Select Share and Win from the list of the modules and click on the Edit button as shown in the image below:
3.0 Admin Interface of OpenCart Share and Win Discount Extension
OpenCart Facebook Share and Win Discount module offers easy customization option to the store admin. The various configuration options are discussed in detail below:
3.1 Settings
Following are the settings listed under this tab:
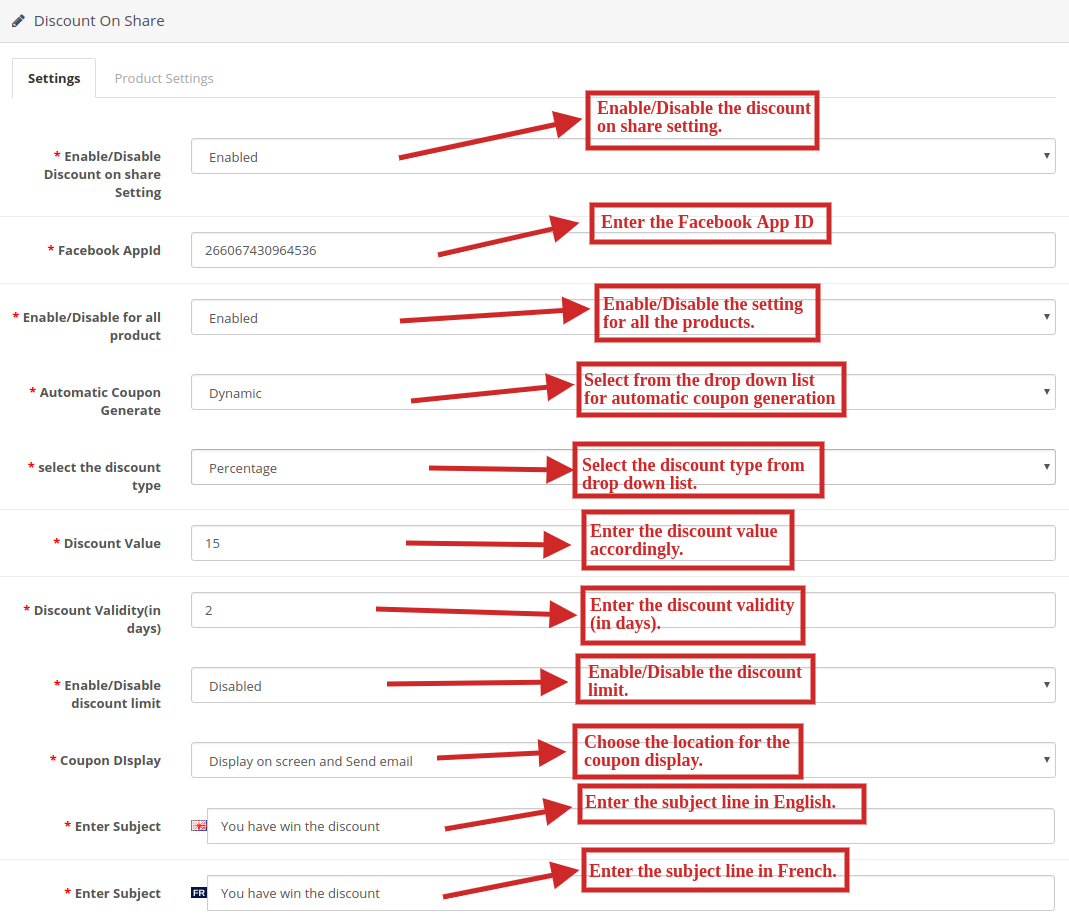
Enable/Disable Discount on share Setting: Select ‘Enable’ from the drop-down list in order to enable the OpenCart Facebook Share and Win Discount module.
Facebook App Id: Enter the Facebook app ID in order to incorporate Facebook profile to the eCommerce website. For generating Facebook APP Id please visit section 3.1.1.
Enable/Disable for all product: Select ‘Enable’ from the drop-down list in order to enable the share and wining for all the products in product listings.
Automatic Coupon Generate: Select either ‘fixed’ or ‘dynamic’ for the automatic generation of coupons from the drop down list.
Select the discount type: Select either ‘fixed’ or ‘percentage’ based discount type from the drop down list.
Discount Value: Enter the discount value you wish to give to your customers.
Discount Validity(in days): Enter the discount validity(in days) accordingly.
Enable/Disable discount limit: Select ‘Enable’ or ‘Disable’ from the drop down list to enable or disable the discount limit.
Coupon Display: Select an option from the Drop down menu for coupon display location. You can either display it on screen, send on email or both.
10.Enter Subject: Enter the subject line to be sent to the customers in English and French language.
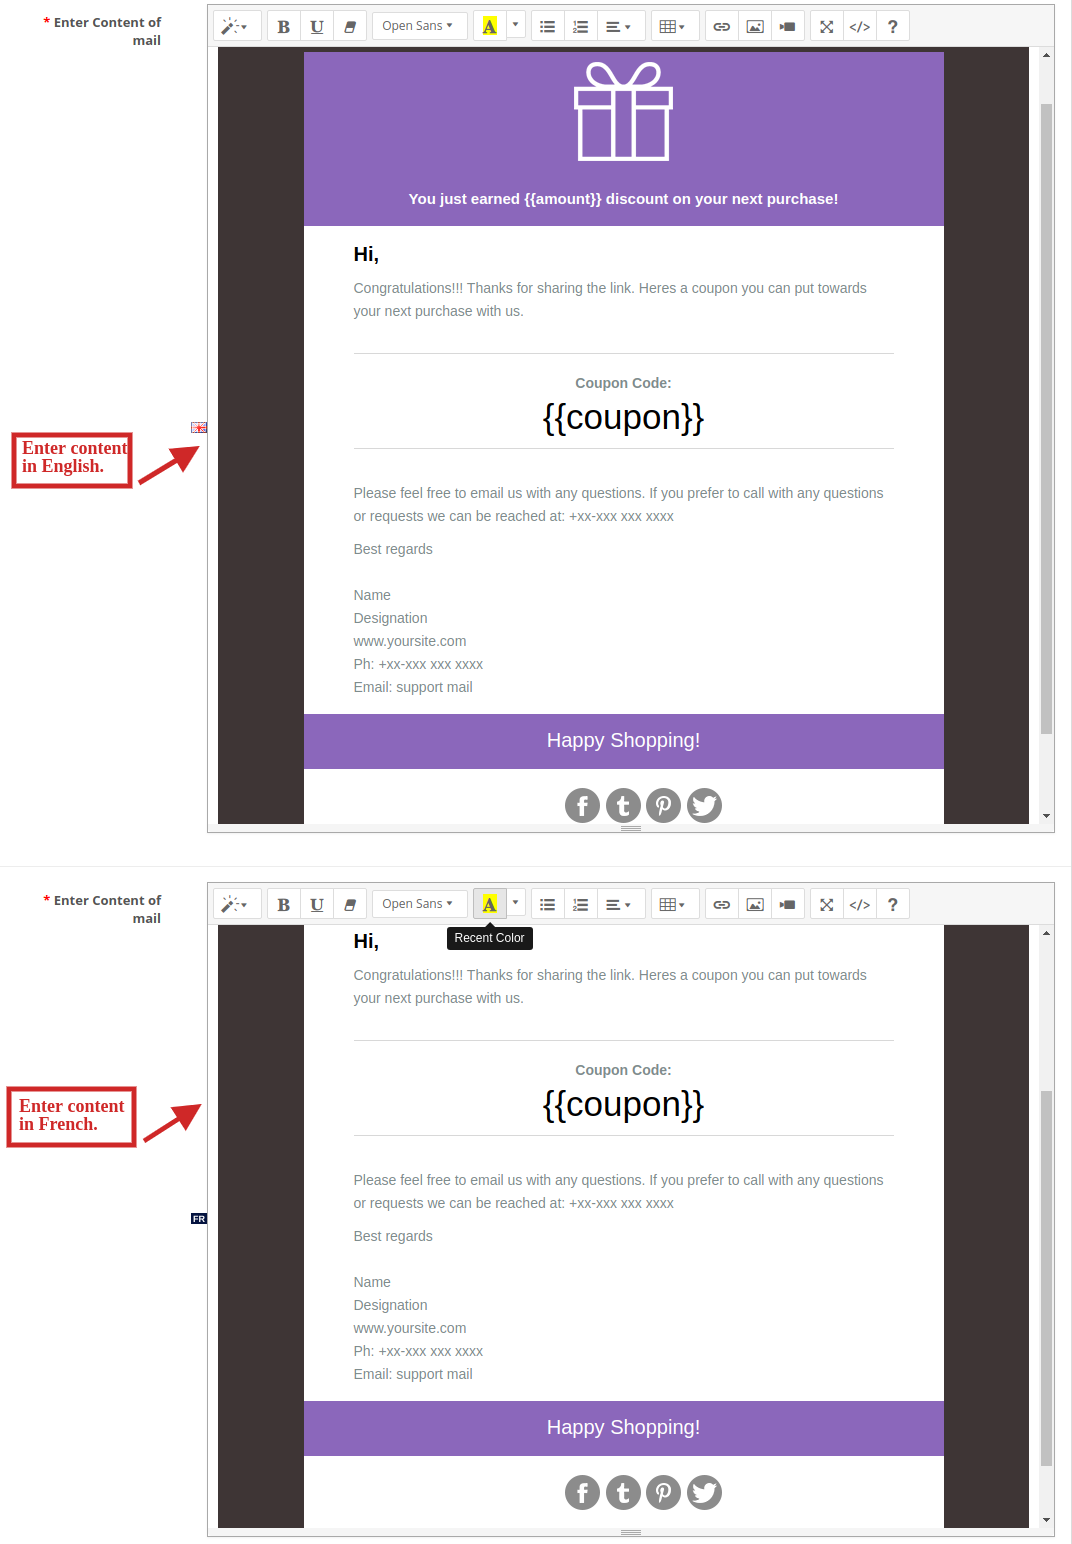
11. Enter Content of mail: Enter the content of mail to be sent to the customers in English and French language.
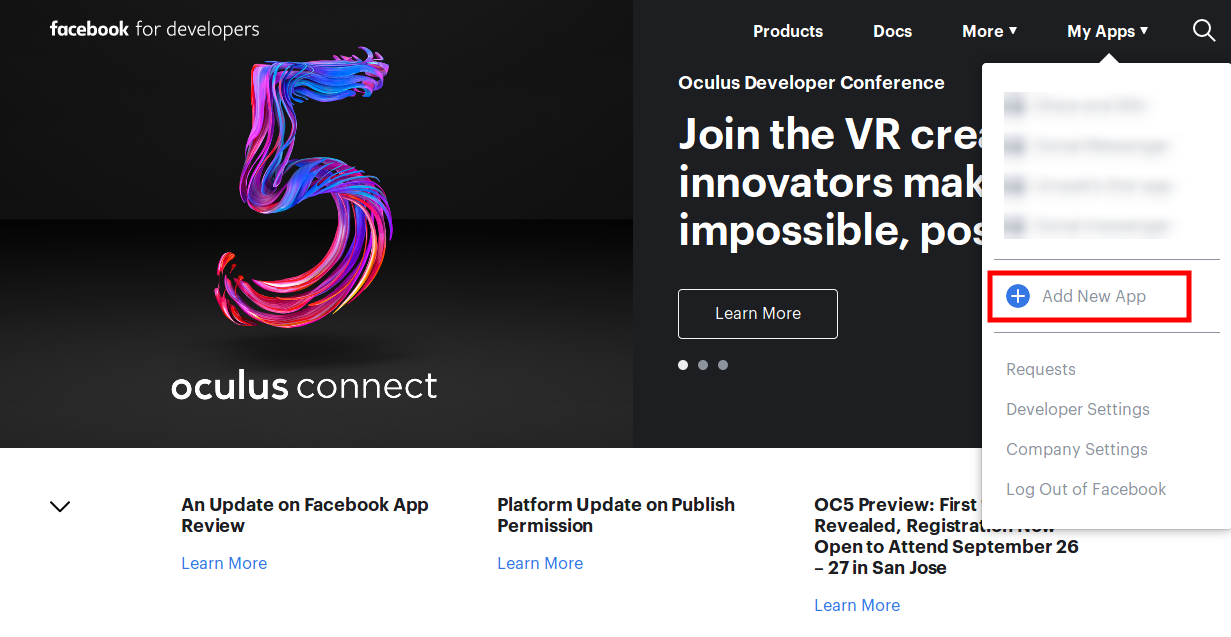
Now go to the “MY APPS” and click on ”ADD NEW APP” option.
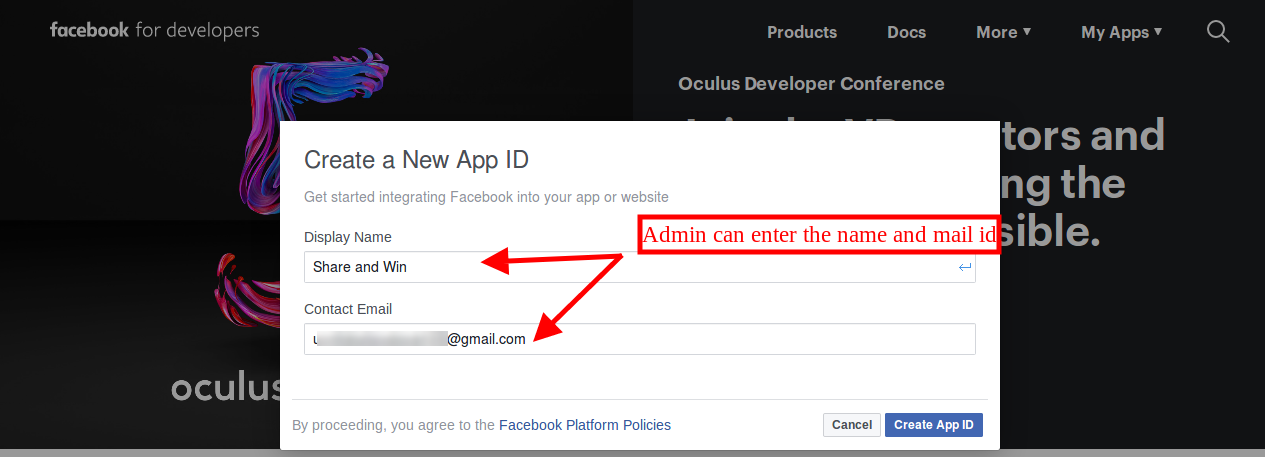
Here, enter “Display Name” and “contact email ID”. After that, click on the “Create App ID” button.
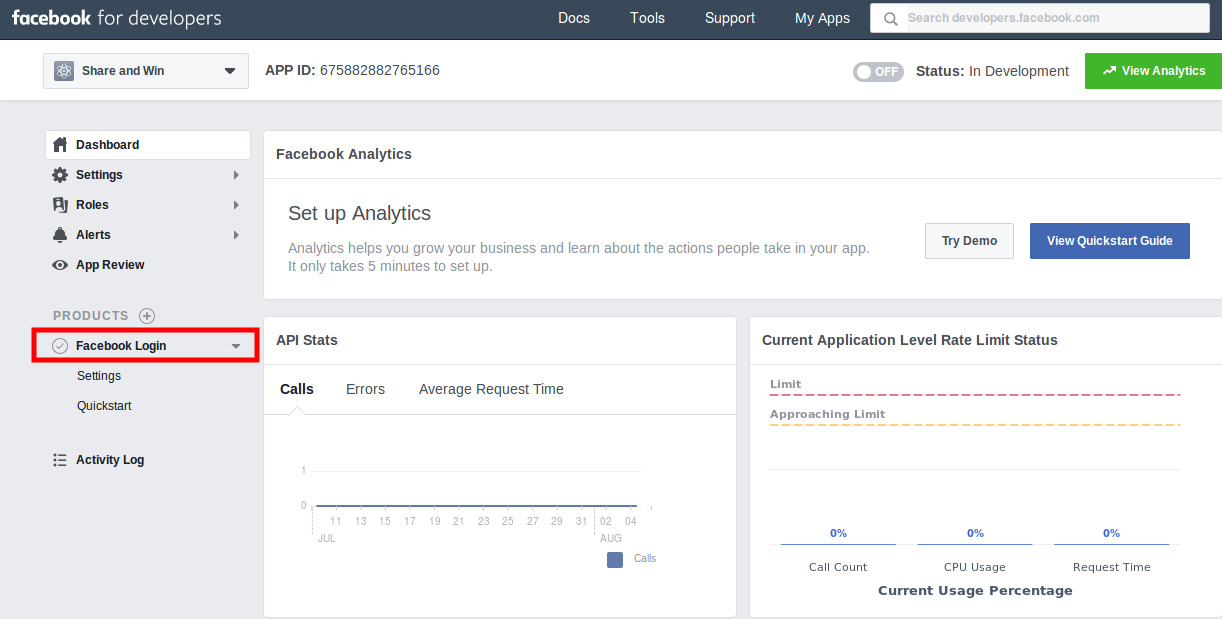
Now, go to the “Settings” and select “Basic” option. Here, you can view the APP ID as shown below. Enter app domains, category, Privacy policy URL here.
After that click on “Products” option and click on Facebook login “set Up” option. After clicking this “set up” you will view setup as shown below:
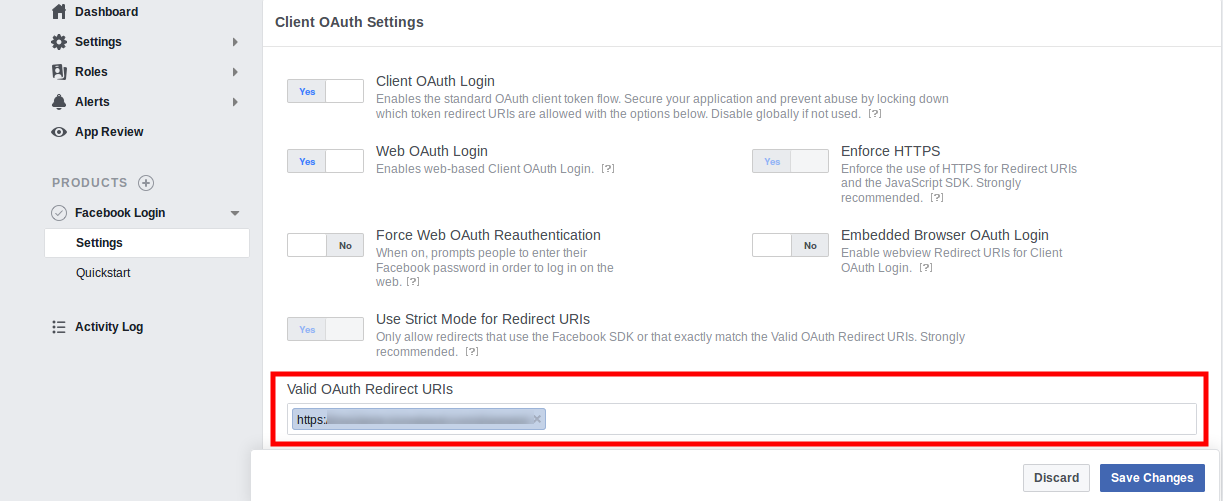
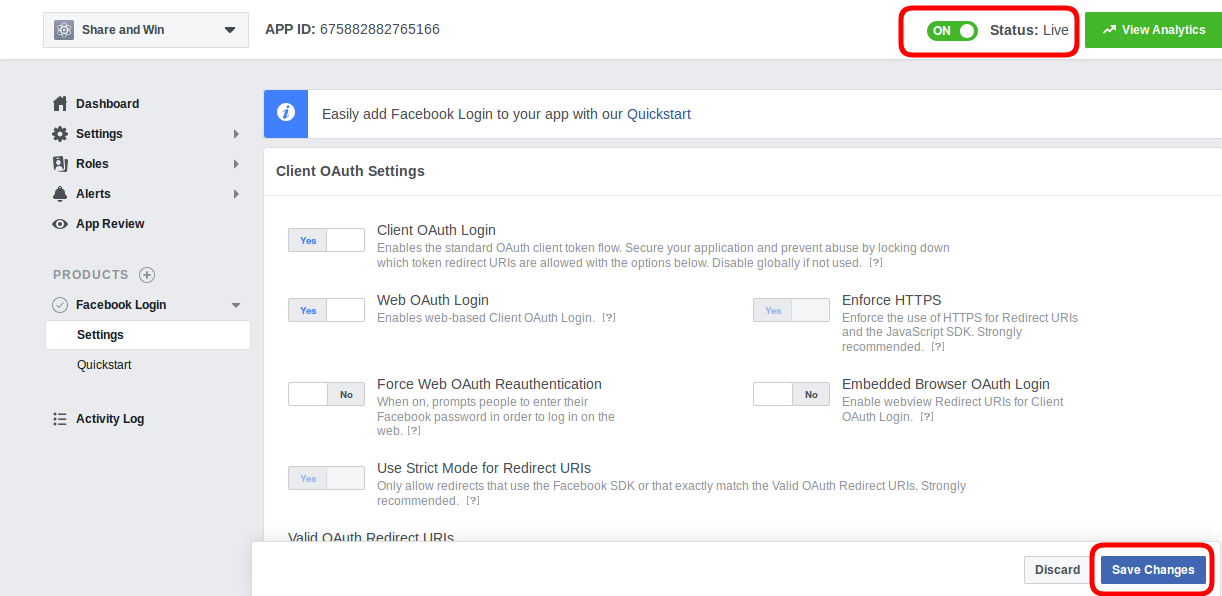
After that go to settings section and enter Valid oAuth Redirect URL’s and enable the status.
After saving all changes you can implement this Facebook app id.
3.2 Product Settings
Facebook share option extension OpenCart allows the store admin to set discount on products separately.
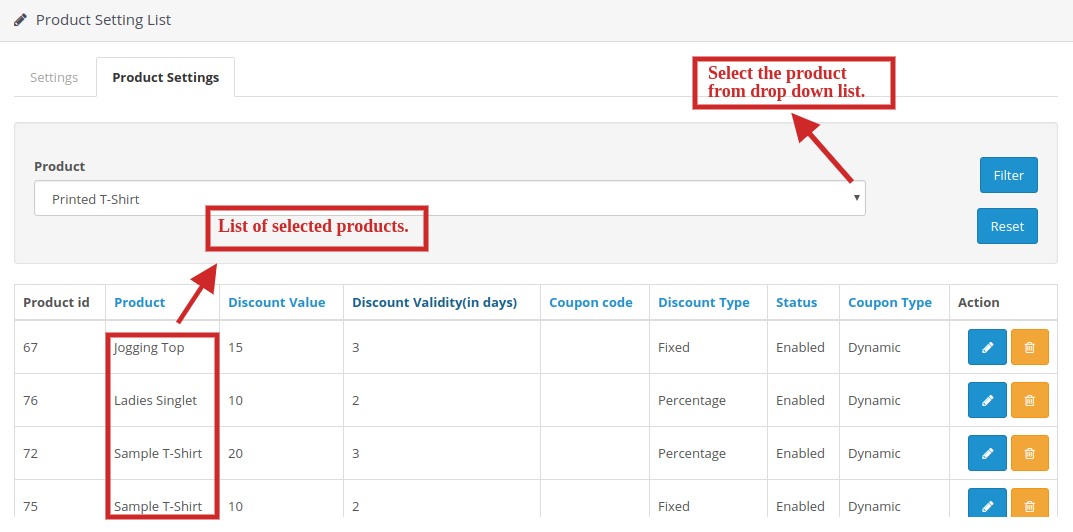
The seller can choose the products from the drop-down list accordingly on which discount has to be given.
Sellers can also set the discount value, discount validity(in days), discount type and the coupon type too.
Sellers can also enable or disable the discount offer on the selected products too.
The selected products for discount offer could be seen in the table containing all the details.
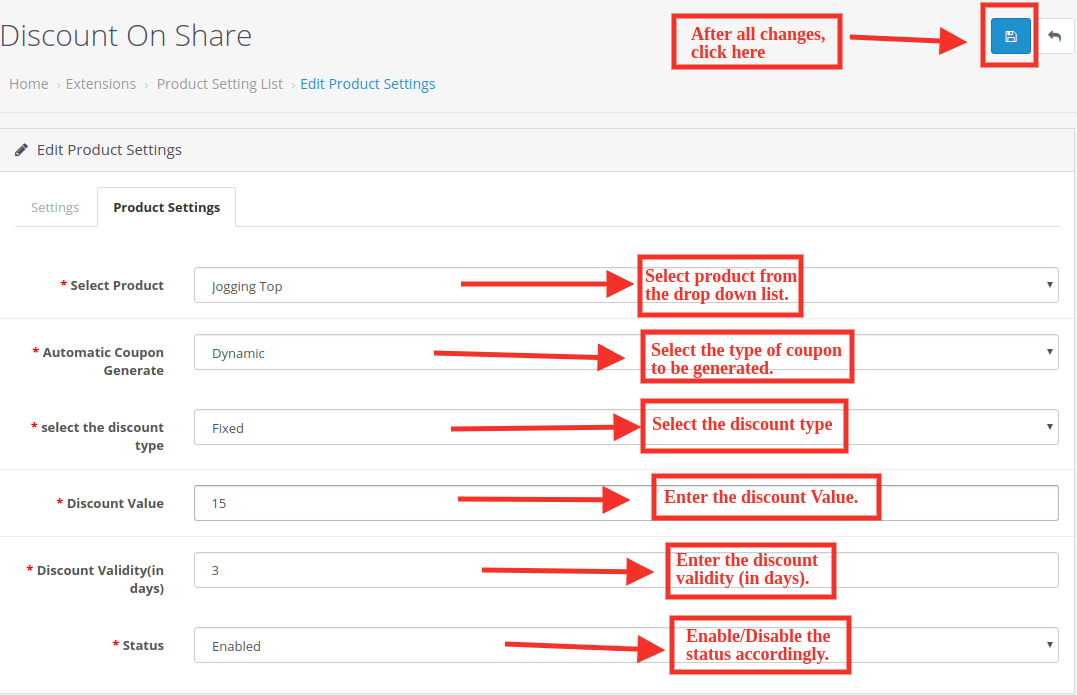
3.3 Edit Product Settings Tab
After clicking on the Edit button, you will be directed to “Edit Product Settings”. Here you can edit the product settings of the products you have already listed.
Following are the settings under this tab:
Select Product: Select the product from the drop down list.
Automatic Coupon Generate: Select the type of coupon to be generated.
Select the discount type: Select the discount type you want to provide to your customers.
Discount Value: Enter the discount value.
Discount Validity(in days): Enter the number of days you want to keep your discount valid.
Status: Enable/Disable the status accordingly.
4.0 Front End of the OpenCart Infinite Scroll Module
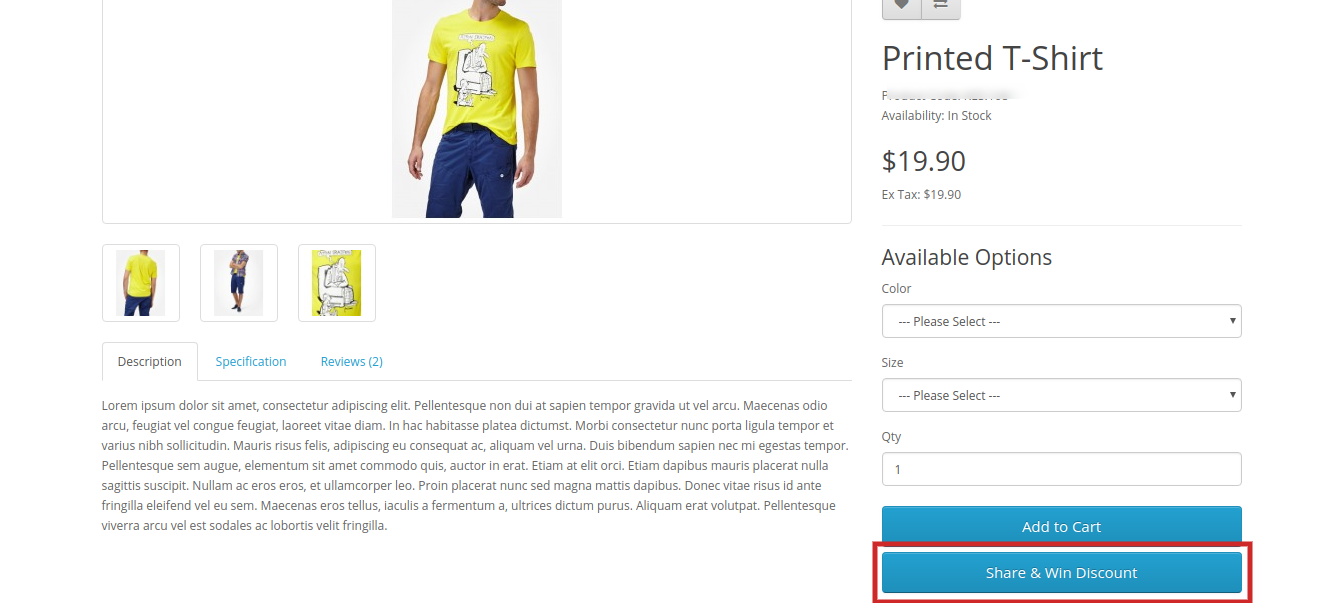
When this OpenCart Facebook Share and Win Discount Module is enabled from the back-end then a button will start appearing in the front-end of the shop on every product page. On which a text ‘Share & Win discount‘ will be written and on clicking on this button the customer can share the product and if he/she shares the product, then a discount code will be shown to that customer which will be applied to that customer only.
Share and Win Discount Tab on the product page:
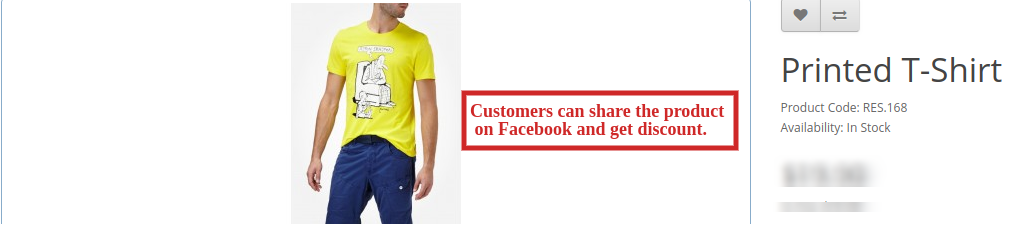
2. Share the product on Facebook and get a discount:
This way the online store merchant can use OpenCart Facebook Share and Win Discount Extension for increasing product popularity and conversion rate also. The eCommerce store merchant can set the Facebook app id for integrating it with the store. Online customers can share the products on their Facebook wall in order to get a discount coupon. The OpenCart Product share and win module is multi-lingual compatible and offers smooth functioning. The Share and get the discount extension for OpenCart is mobile compatible. The store admin can also send an email along with the coupon code. OpenCart Facebook Share and Win Discount Extension makes product promotions easy and hassle-free for the store admin.
Knowband is one of the most reputed names in the field of plugin development. We provide best plugins for platforms like – Magento,Prestashop, OpenCart and Shopify.
OpenCart Infinite scroll extension provides seamless navigation over multiple pages and a hassle-free shopping experience to online users. It slows down pagination as it is one of the biggest obstacles in working on any website. OpenCart infinite scroll enables websites to remove this hurdle by providing single-click access with the least inconvenience to the users.
Generally, customers have to browse multiple pages in search of the desired product on the website. However, this could lead to loss of time and even interest of customers too. OpenCart infinite scroll extension is the modern advancement to slow down pagination and provides seamless navigation of all the products on a single page. With the help of the dropdown scrolling module, customers can load the products of the next page on the current one just by scrolling down the page.
OpenCart Infinite scroll extension enables automatic loading of pages without even scrolling down the page. It also helps to easily navigate through the product catalog. As all the products are available on a single page, customers need not to move from one page to another for the product.
1.1 Striking Features of Infinite Scroll Extension for OpenCart
The OpenCart Infinite Scroll Extension provides you multiple features that are fully customizable and easy to configure from the backend interface without requiring any coding knowledge. The various striking features of the OpenCart Infinite Scroll Extension have been listed below:
The OpenCart fast scroll module enables automatic page loads and search results without scrolling down the page.
With the help of the OpenCart quick scroll module, customers can navigate to the next page of product listing without reloading the next page.
The OpenCart infinite scrolling plugin offers compatibility with SEO friendly URLs.
The OpenCart dropdown scrolling module gives a ‘Load More’ feature to pause infinite scroll after a definite interval of pages.
This page interval for load more feature can be set from the backend of the Infinite Scroll module.
Store admin can test the working of the Opencart infinite scroll module by enabling the sandbox setting and enter the specific IP address.
The admin interface of the OpenCart plugin is extremely easy to use and requires no use of coding knowledge to implement.
This OpenCart Infinite Scroll module offers a ‘Go to Top’ link feature to reach that start point of any product listing page.
OpenCart list view module provides SSL compatibility.
This OpenCart Infinite Scroll displays a loader while loading the next page products on the same page. This loader can be configured and disabled if required from the back-end interface.
Store admin can change the background and text color of the end page message and go to the top link.
The OpenCart Infinite Scroll Module allows the admin to show a custom message to the customers after all the product listings have been loaded on the front.
Admin can choose to display the product listings in grid or list view format via OpenCart quick Scroll module.
This Infinite Scroll extension for OpenCart gives an option to include CSS and JS code from the back-office. Using the custom CSS and JS store admin can change the look and feel of the Opencart infinite scroll module.
The OpenCart infinite scroll module offers compatibility with all the OpenCart themes, so the admin can configure the look and feel of the infinite scroll as per their site theme.
The OpenCart fast scroll module offers multi-store compatibility.
The Opencart infinite scroll module offers the store admin to set the selector settings of the module like selector pagination, selector container, etc.
The functionality of the OpenCart quick scroll module doesn’t conflict with any other installed modules of the store.
The Opencart infinite scroll module is mobile responsive.
1.2 Technology for Development
Language: PHP
Framework: OpenCart
2.0 Installation Guide
To install this OpenCart Infinite scroll Module, please follow the following steps:
Purchase the OpenCart Infinite scroll Extension from the Knowband store. You’ll get following files:
Zipped File containing the source code of the OpenCart Infinite Scroll module.
User Manual of OpenCart Infinite Scroll plugin.
Follow the steps below in order to install the OpenCart Infinite Scroll Extension in OpenCart store:
1.Unzip the zipped. You’ll get the folders as shown in the image below:
2.Copy all the files and folders of the zip file in the Root Directory of OpenCart setup via FTP manager.
3.The OpenCart Infinite Scroll module is now installed and is ready to use. Go to Admin -> Main Menu -> Extensions as shown in the image below:
4.Select Infinite Scroll from the list of the modules and click on the Edit button as shown in the image below:
3.0 Admin Interface of OpenCart Infinite Scroll Extension
OpenCart Infinite Scroll extension offers easy customization option to the store admin. The various configuration options are discussed in detail below:
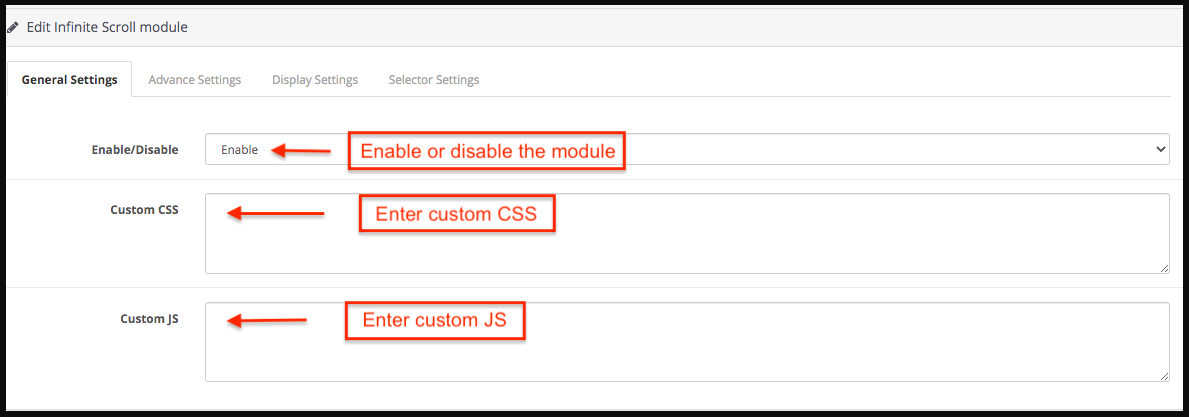
3.1 General Settings
Under this tab the store admin can find the basic settings of the module and configure the module.
Enable/Disable: Enable or disable the Opencart infinite scroll module in a single button click.
Custom JS: Enter custom JS accordingly.
Custom CSS: Store admin can enter custom CSS to change the look and feel of the Opencart infinite scroll module.
3.2 Advance Settings
From this tab the store admin can set the advance settings of the Opencart infinite scroll module.
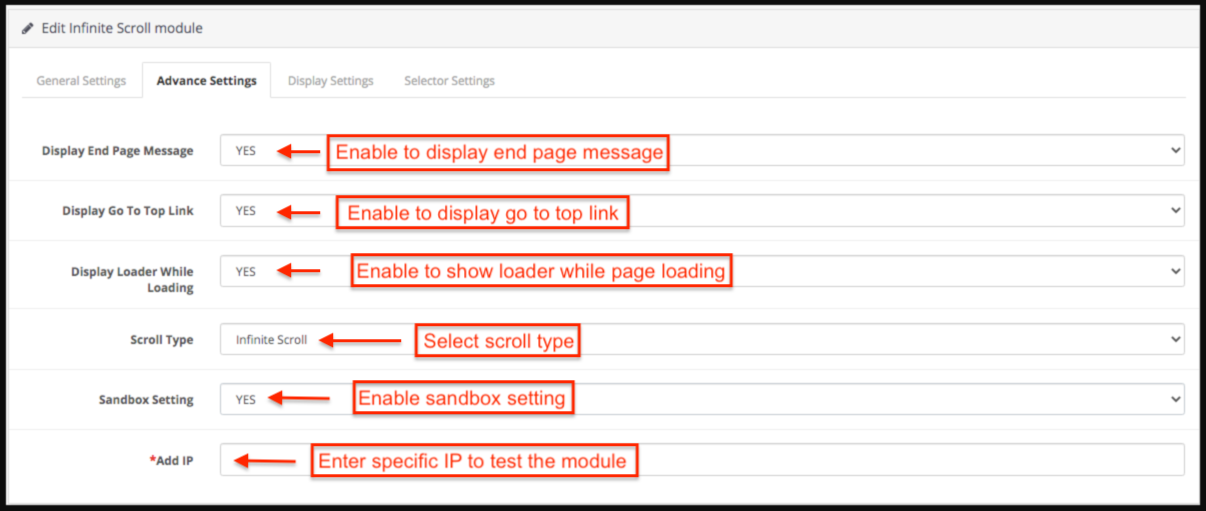
Display End Page Message: Select Yes to display the end page message. If the store admin enables this then an end page message appears at the ending of the products.
Display Go To Top Link: Select Yes to display Go to Top link. If store admin enables this then a go-to top link appears when the customer scrolls the page.
Display Loader While Loading: Select Yes to display loader while loading.
Scroll Type: Select infinite scroll from the drop-down list to select scroll type.
Show load more link after pages: If store admin selects the scroll type as load more products link then store admin has to enter the number of pages after which load more link appears.
Sandbox Setting: Select Yes or No from the drop-down list for the Sandbox setting.
Add IP: Store admin can add the specific IP address to test the working of the Opencart infinite scroll module.
3.3 Display Settings
Following are the settings listed under this tab:
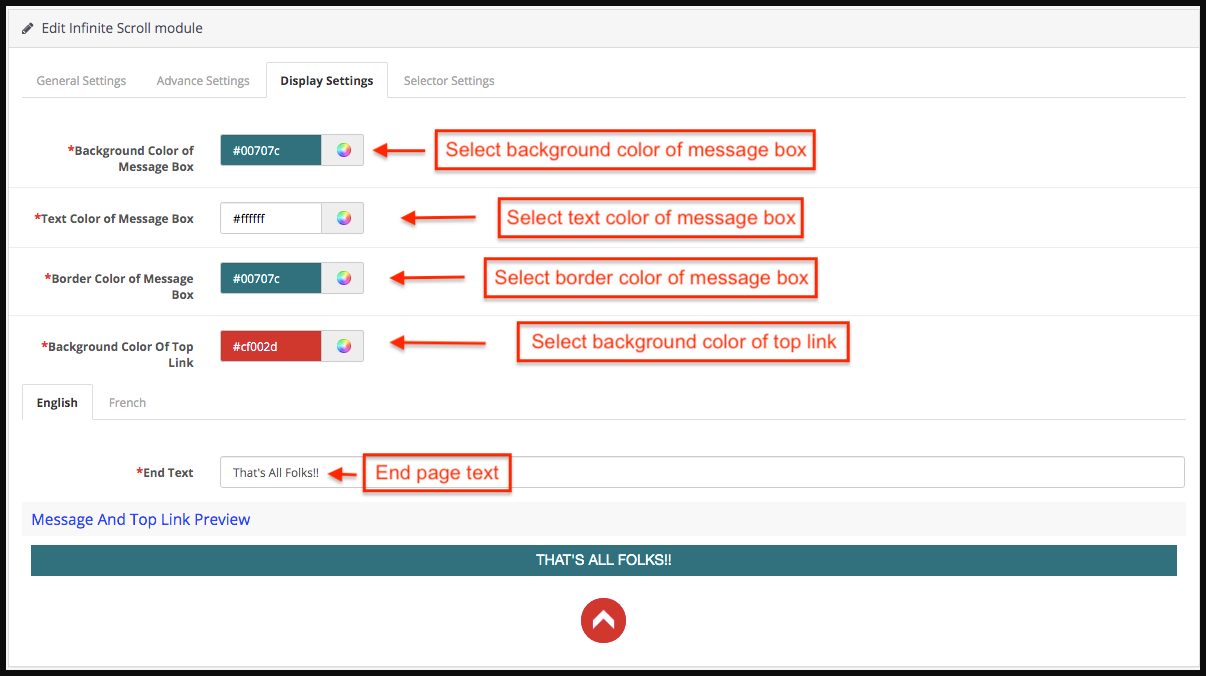
Background Color of Message Box: Select the background color of the message box.
Text Color of Message Box: Select the Text-color of the message box.
Border Color of Message Box: Select the border color of the message box.
Background Color Of Top Link: Select the background color of top link.
End Text: Enter the end text in either English or French language.
Message and Top link preview: Store admin can the seethe preview of the end page message and go to the top link.
3.4 Selector Settings:
From this tab the store admin can set the selector details of the Opencart infinite scroll module. Please do not edit these settings if you are not fully sure about it as modification in these settings may lead to improper working of the module.
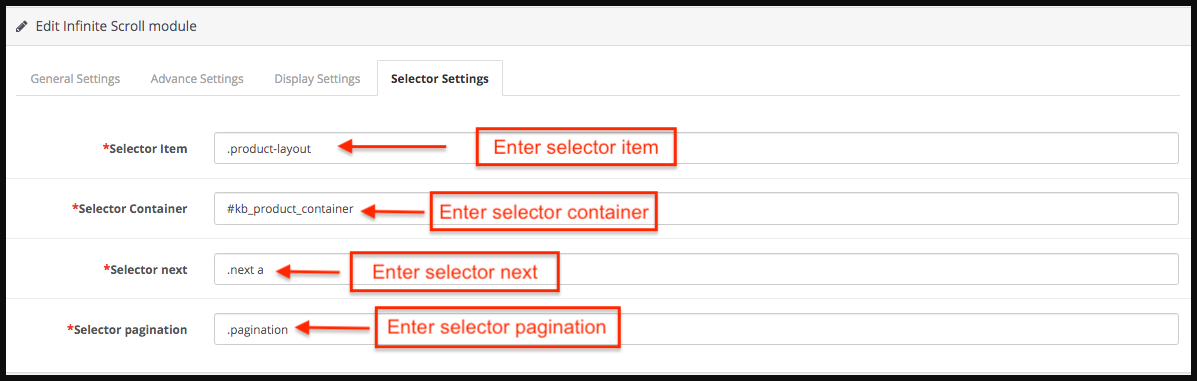
Selector Item: Enter the selector item.
Selector Container: Enter the selector container.
Selector next: Enter the selector next.
Selector pagination: Enter the selector pagination.
4.0 Front End of the OpenCart Infinite Scroll Module
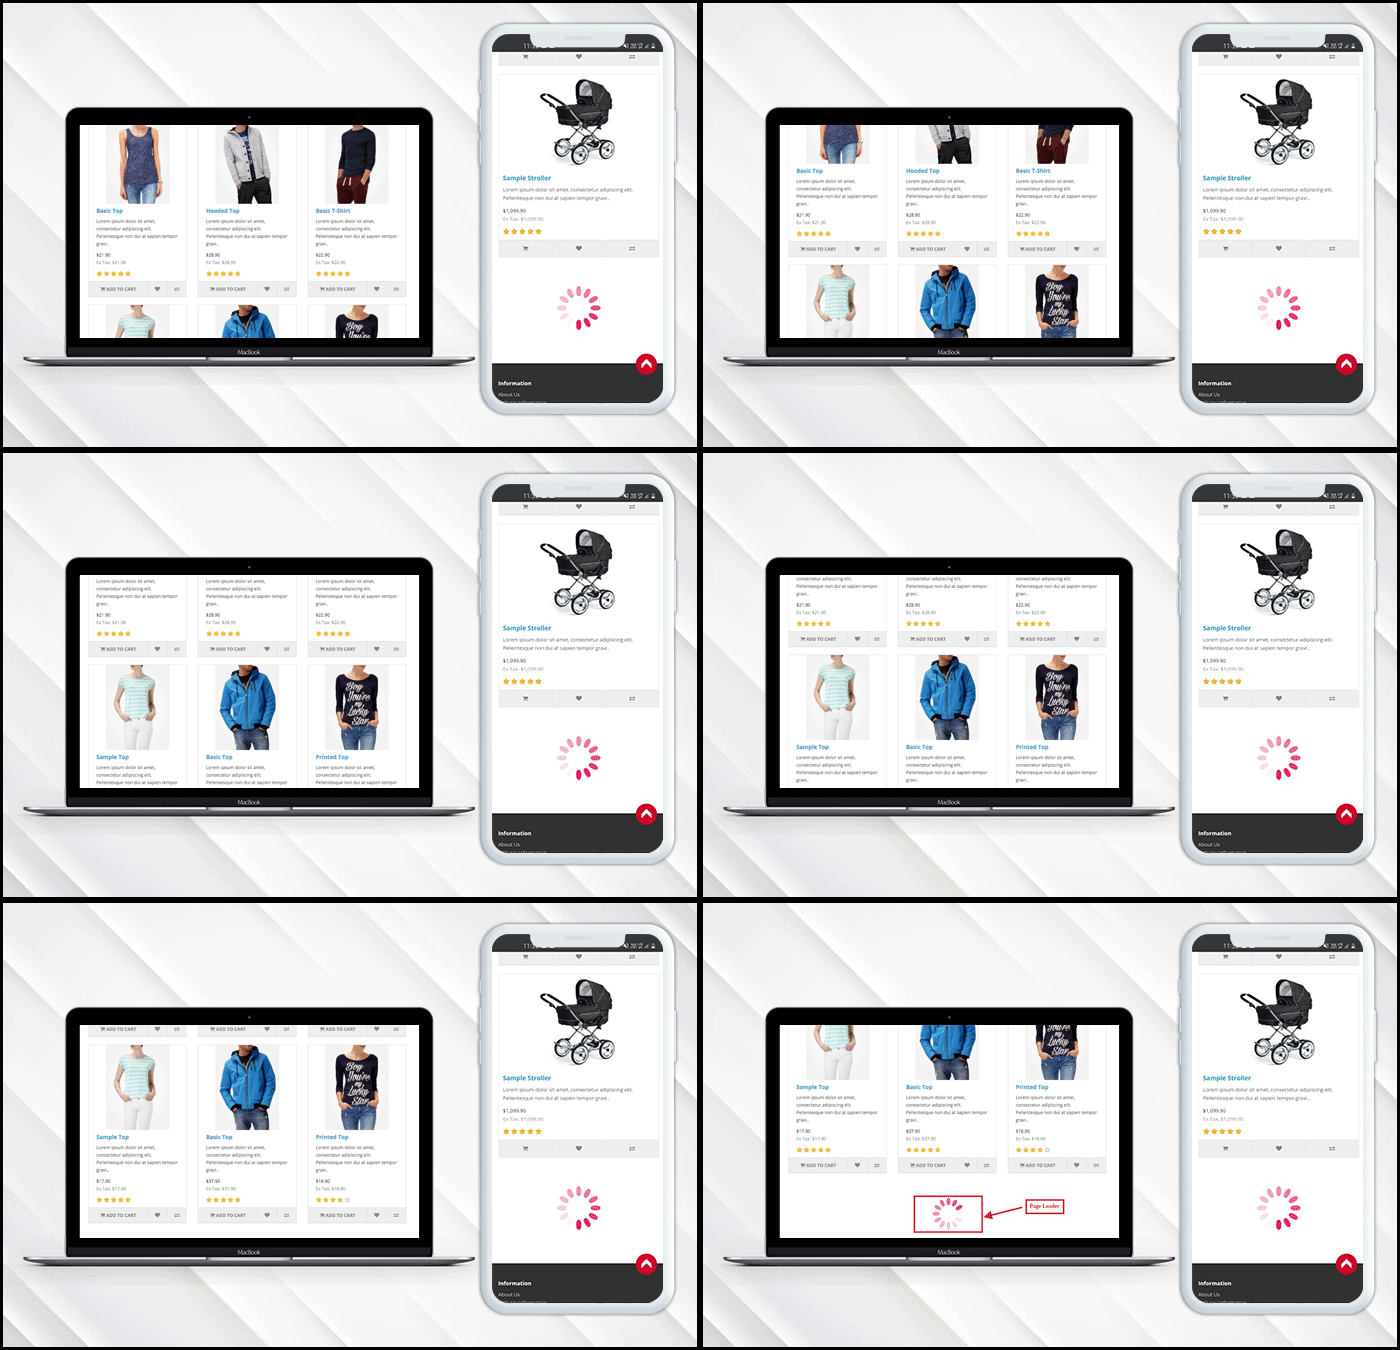
When the OpenCart list view module by Knowband is enabled from the admin panel then on every product listing page pagination of the products would not appear. The customer will be able to view all the products just by scrolling down on the page and if the display go to top link is enabled then the link will appear on the bottom right of the page to scroll the customer back to the top of the page. When all the pages are loaded a message appears in the bottom which states that all the pages are loaded now.
To help you set up and use the Knowband OpenCart Infinite Scroll extension, we have created a comprehensive YouTube tutorial. This step-by-step video guide walks you through the installation process, configuration options, and how to enable automatic product loading on your store for a smooth, seamless shopping experience.
Magneto 2 Multi vendor Marketplace allows the admin to uplift the revenue by selling the goods of third-party vendors at the same platforms. Etsy, eBay, etc, are among the best eCommerce stores, successful in keeping their customers engaged by providing services and products of different sellers at the same platform. Nowadays getting customers’ attention and keeping them busy in your store is not an easy task.
Knowband has come with Magento 2 Multi seller Marketplace module to help the admin to build their Marketplace. With the help of Magento 2, multi-vendor Marketplace extension store admins can build a Marketplace like Walmart, Etsy, and eBay and allow multiple vendors to easily register and list their products on the site. Store admin just needs to install the Magento 2 Marketplace plugin and manage everything from the backend of the store.
1.1 Admin Benefits of Magento 2 Marketplace Extension
The various admin benefits offered by Knowband’s Magento 2 Multi vendor marketplace plugin are below:
The store admin can simply upgrade their eCommerce store into a fully-featured Marketplace with the help of the Magento 2 Multi seller Marketplace module.
All types of products including Simple, configurable, and bundled are supported by Magento 2 Marketplace Module.
With the help of the Magneto 2 Multi vendor Marketplace, the store admin can set the global commission as well as a category-based commission to be charged to the sellers. Admin can add category-wise commission as well.
Seller’s profile and products at the Marketplace can be easily viewed by the store admin from the admin panel of Magento 2 Marketplace Extension.
The store admin has the access to approve or disapprove the seller account request. Moreover, do the same for the product listings.
Categories for keeping the products are assigned to the admin from the Magento 2 Multi-vendor Marketplace Module. Sellers can add their products only to the assigned categories.
The store admin has the chance to enable/disable the seller reviews and seller products reviews from the backend of the Magento 2 Multi vendor Marketplace Extension.
Magento 2 Marketplace Module offers the admin access to track the sales report and overall transaction of the site.
Default email templates for notifying the sellers are offered to the store admin by the Magento 2 Multi seller Marketplace module.
1.2 Seller Benefits offered by Magneto 2 Multi vendor Marketplace
The third-party vendors can easily register as a seller at the site just by filling a form.
Multiple sellers can register themselves at the Marketplace by filling few details in the form.
Once the admin approves their account, the sellers can easily list their products at the Marketplace from the seller dashboard.
Sellers can add their banners, shop logo, and metadata from their seller dashboard.
Sellers can effortlessly monitor the overall transaction and sales report from the seller dashboard.
New category requests can be forwarded by the sellers to the admin. In fact, the admin can approve or disapprove the category request from the back-end of the Magento 2 Multi vendor Marketplace module.
Sellers can add coupons for their store to give a discount to their customers and attract them with different offers.
1.3 Customer Benefits of Magento 2 Marketplace Extension
The customer is given a wider range of options to choose products from.
Seller’s profile can be easily viewed by the visitors on the product page.
Customers can send their valuable feedbacks for products as well as the seller.
Customers has also an option to register themselves as a seller on Magento2 Marketplace.
2.0 Installation
Buy the Magento 2 Multi vendor Marketplace extension from the KnowBand store. You’ll get the following files:
Zipped File containing the source code of the module
User Manual
Follow the steps mentioned below in order to install the Magento 2 Multi seller Marketplace extension in your store:
Unzip the zipped file. Create a folder (Magento root)/app/code/Knowband/Marketplace
Upload the extracted content in the above folder via FTP manager (like Filezilla or WinSCP – download here: https://filezilla-project.org/).
Run below commands via SSH on root Magento directory:
a) composer require phpoffice/phpexcel:1.8.1
b) composer require paypal/rest-api-sdk-php: 1.13.0
Now run the below commands to install the plugin: php -f bin/magento module:enable –clear-static-content Knowband_Marketplace
Then, php bin/magento setup:upgrade php bin/magento setup:di:compile php bin/magento setup:static-content:deploy
In Admin Panel go to the main menu -> Knowband -> Marketplace.
The Magento 2 Marketplace extension is now ready for use.
This User Manual will guide the users through the Magento 2 Multi seller Marketplace module configuration and settings.
3.0 Admin Panel
The Magento 2 Marketplace plugin offers multiple options for configuration and management of the online marketplace.
All the tabs are below in detail.
3.1 General Settings
General settings of Magento 2 Multi seller Marketplace is divided into two main types:
the General Settings and Low Stock Configuration
3.1.1 General Settings
The various fields of this General setting of the Magneto 2 Multi vendor Marketplace plugin are below:
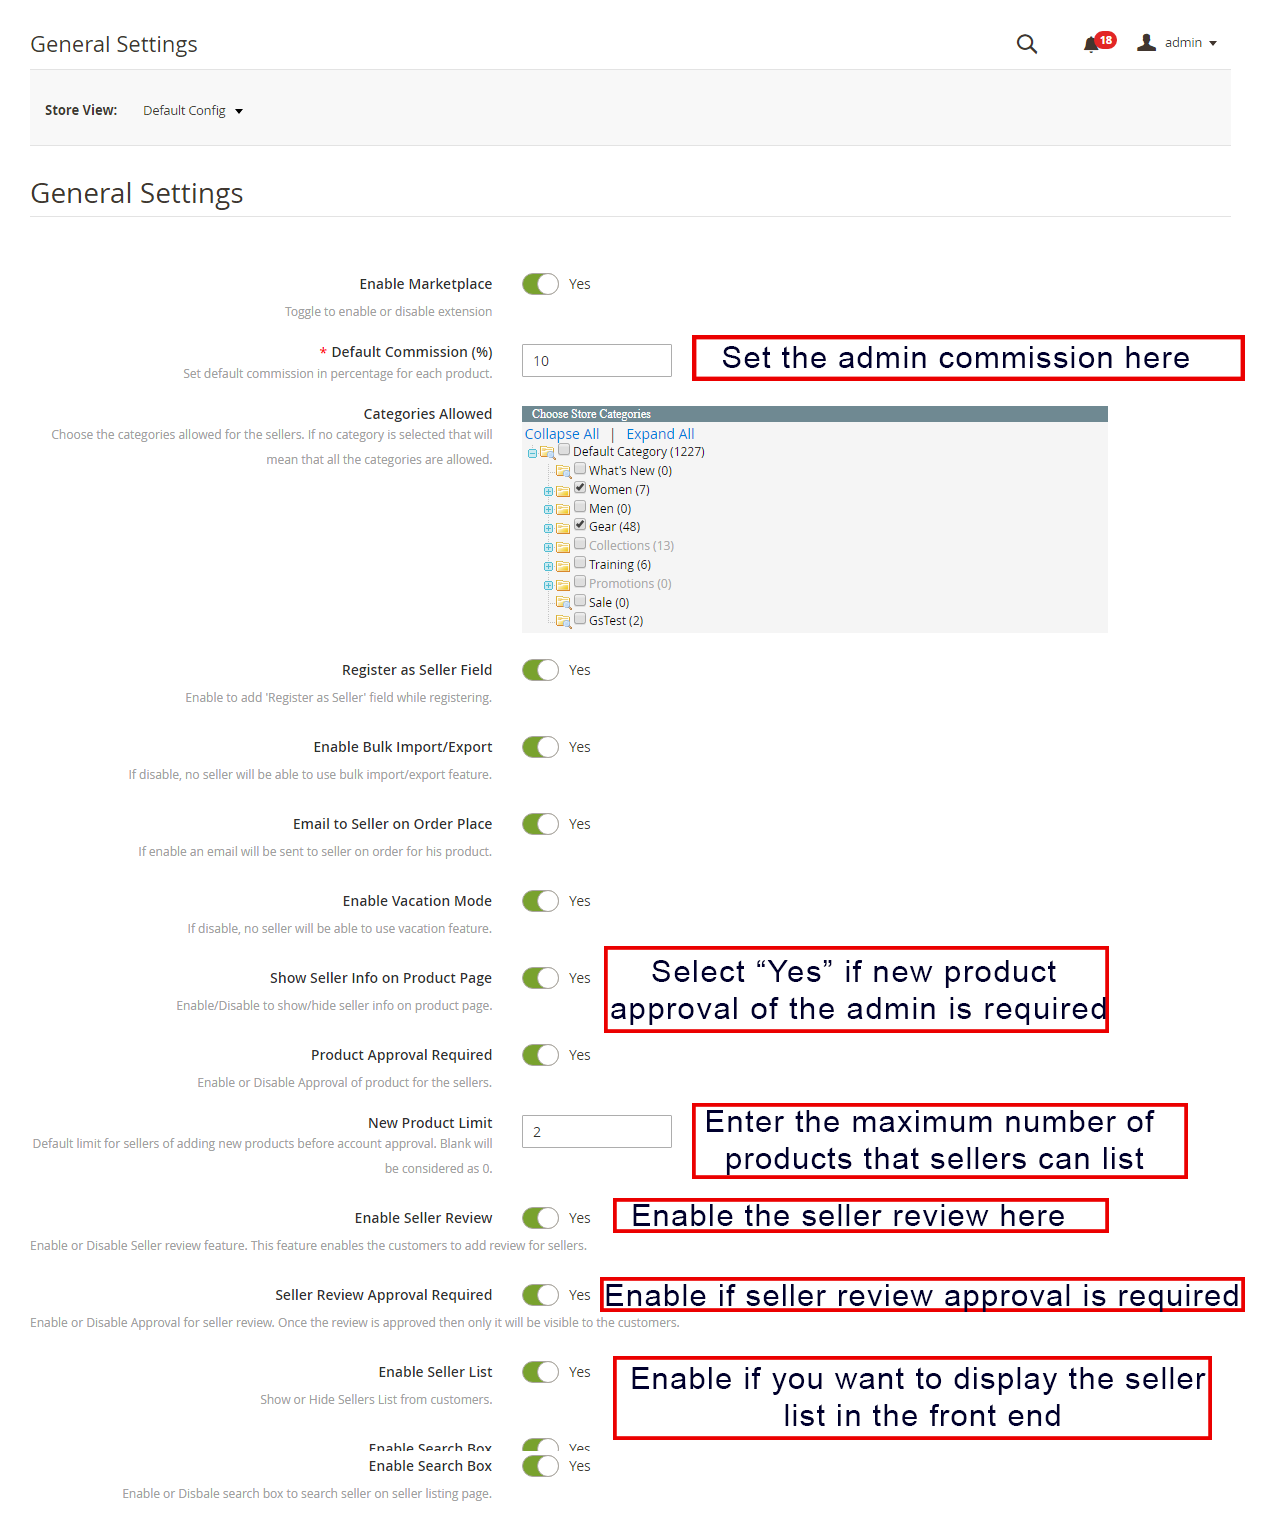
Enable Marketplace: Toggle this button to Enable/ Disable the Magento 2 Multi seller Marketplace module.
Default Commission: Admin can enter the commission to be charged to the sellers here. The percentage amount set by the admin applies to all the Marketplace sellers by default.
Categories Allowable: Admin can select the categories he wants to assign the sellers. If he selects no category here, the seller can keep the products in all the categories.
Register as Seller Field: If the admin enables then the seller can register their store at the Marketplace.
Show different registration page for Seller: If the admin enables then sellers can register themselves using a separate registration form in the front end of Magento2 Marketplace.
Enable Bulk Import/Export: Admin can allow the sellers to upload the products in bulk with a toggle of this button.
Email to seller on order place: If the admin enables this button, the seller will be notified about the orders via email.
Enable Vacation Mode: When the admin enables, this feature allows the 3.7 Sellers Reviews
All the seller reviews along with their allowable status will list in this section. Sellers to send the vacation request to the admin.
Show Seller information on Product Page: Customers can view the seller information on the product page if the admin enables this button.
Product Approval Required: If he selects ‘Yes’, then, admin approval will be required to list the product at the site.
New Product Limit: Enter the product limit here that you want the sellers to list at the Marketplace. If the field is left blank, no product will list.
Enable Seller Review: Select he selects ‘Yes’, the customers will be able to send their feedback for the sellers here.
Seller Review Approval: If the admin enables this feature, then, the review sent by the customers will be forwarded to the admin for approval. Only after the approval of the store admin, the review will be visible to the customers.
Enable Seller List: Enable this button to display the list of the sellers in the front-end of the site
Activate search box: Enable this feature to allow the customers to search sellers on the seller listing page.
Enable Seller Coupon: If the admin enables this feature, then the sellers can add coupons for their stores.
Enable Seller Customer Support: Enable this feature to allow the sellers to view and solve the queries of their customers.
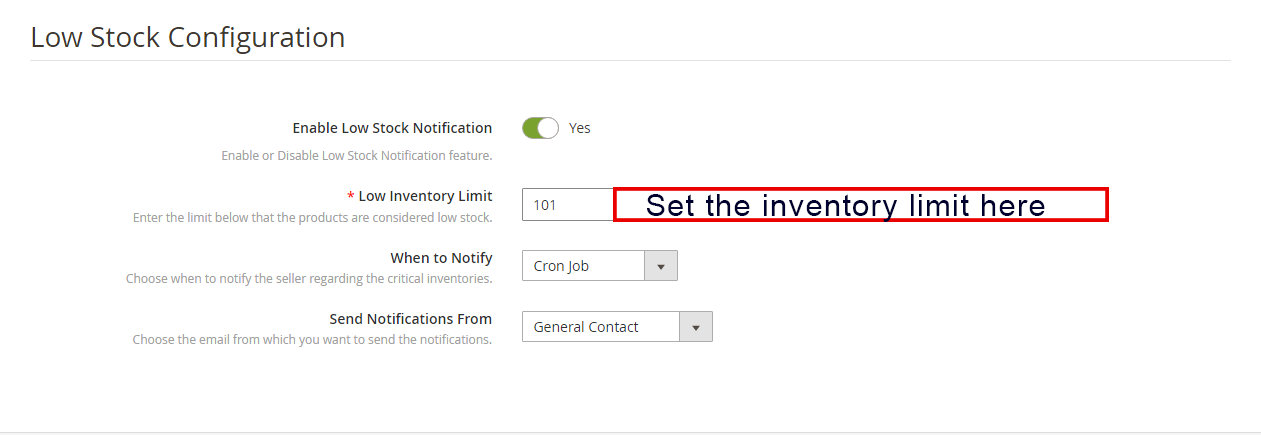
3.1.2 Low Stock Configuration
Enable Low Stock Notification: If he selects ‘Yes’ then, the sellers will be notified about the low stock via email.
Low Inventory Limit: This is a mandatory field where the admin is needed to add the limit below which the products are considered low stock.
When to Notify: Admin has the choice to select the condition when he wants to send the mail to sellers.
Send Notifications from: Select the emails which you want to send as notifications.
3.2 Custom Fields:
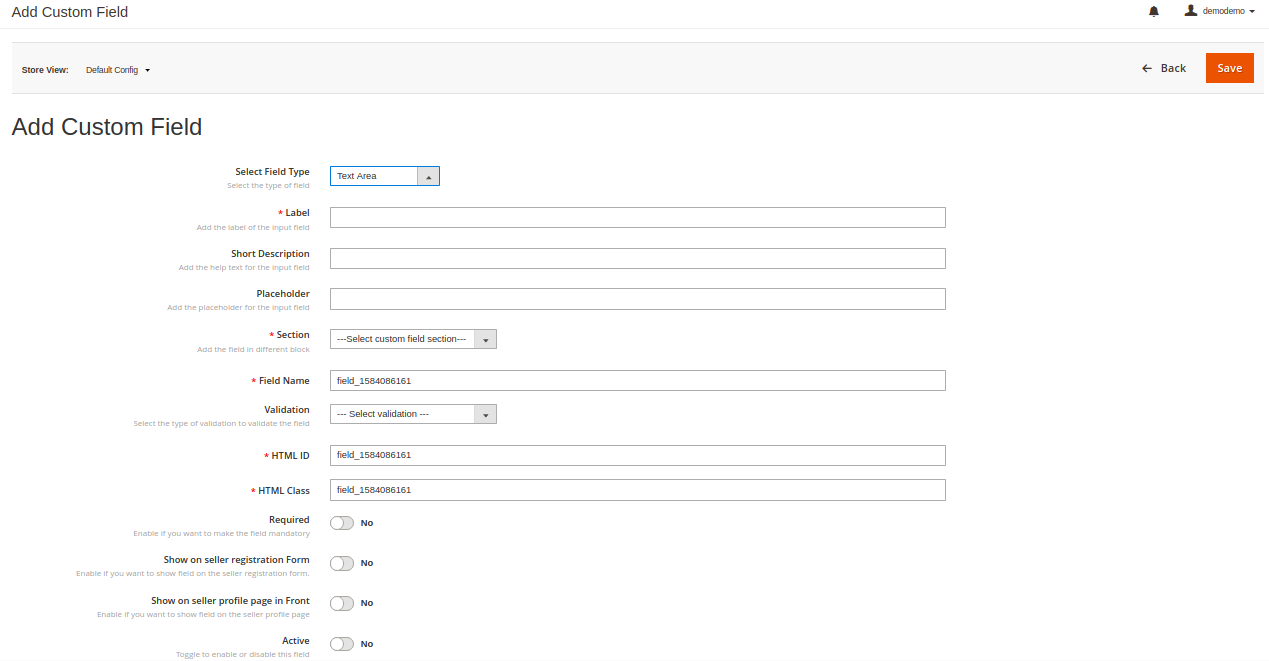
The admin can add different custom fields for the seller’s profile. Admin can align these custom fields under a different section of the seller’s profile. Admin has a variety of choices to select custom fields like text, radio, check-box, etc. And admin can make these custom fields required also.
3.3 Seller List
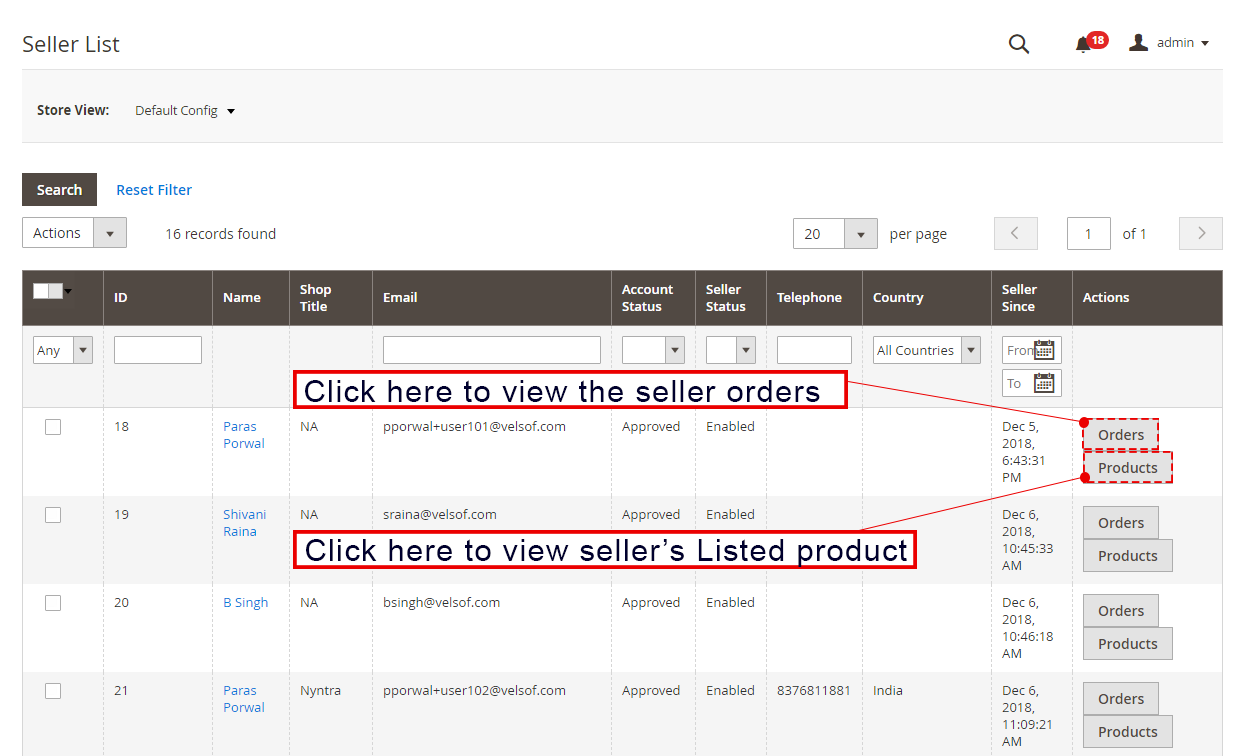
The admin can monitor the list of the sellers selling their goods at the Marketplace from the backend of the Magento 2 Multi seller Marketplace extension. Admin can view the list of orders and the seller’s products with a click on the right side of each seller.
3.3.1 How to Edit Seller’s Account
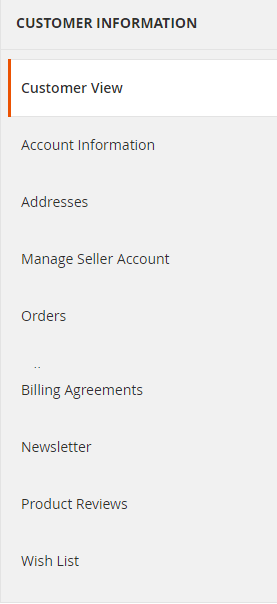
The admin even gets an option to edit the profile of the sellers. Click on the name of the seller and a new page will open in front of you. Admin can here view and edit seller account details, orders, product reviews, Customer view, etc.
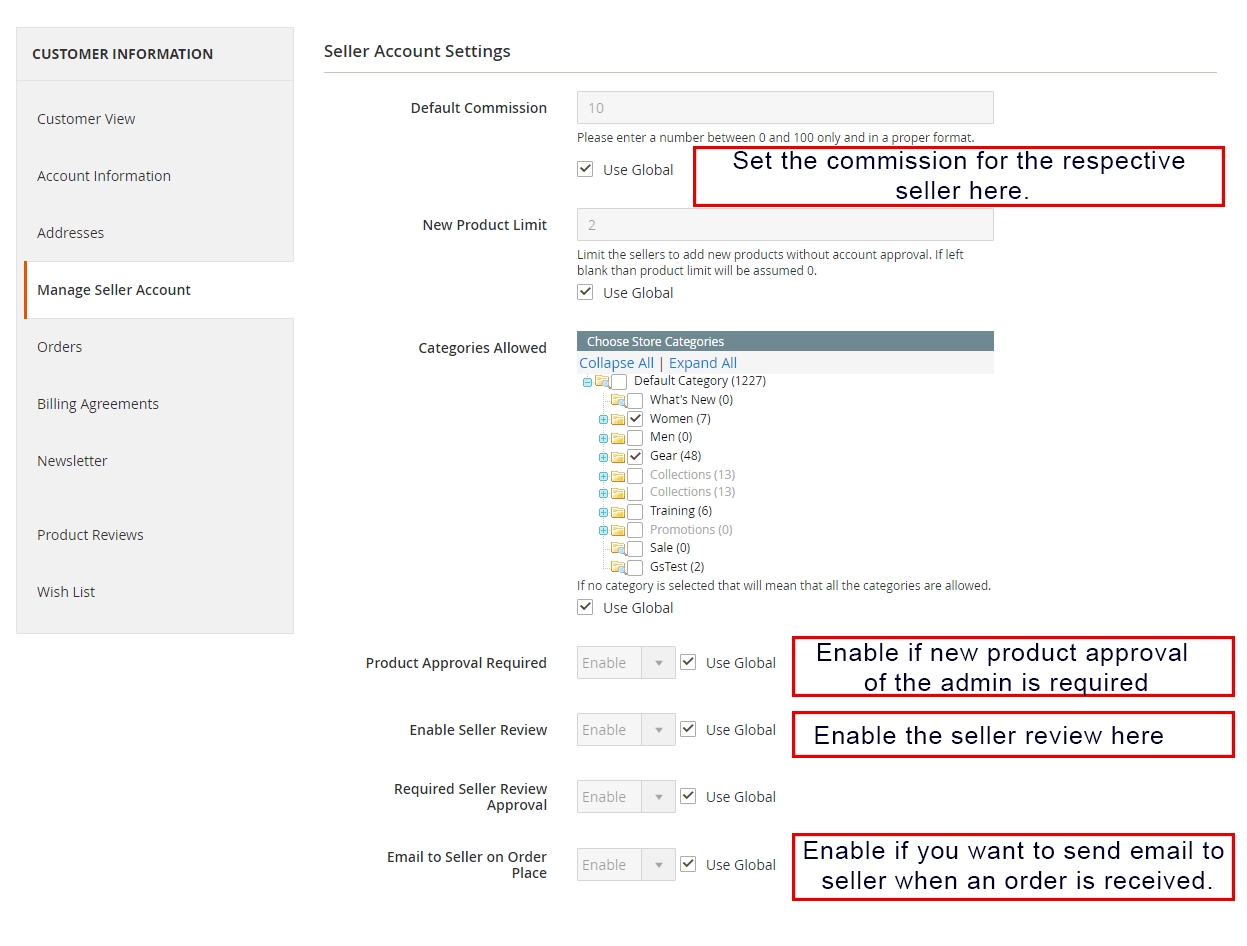
3.3.2 Seller Account Settings
The following tabs are available in the Seller Account Settings:
Default Commission: Admin has the choice to set a different commission amount of the seller in comparison with the global commission.
New Product Limit: The product limit set in the General setting tab is changeable for a particular seller. Admin can set the new product limit for a particular seller here.
Categories Allowable: Categories other than the global categories can be assigned to a particular seller here.
Product Approval Required: Product approval settings are changeable in this tab.
Enable Seller Review: Admin can change the settings for seller review here.
Required seller Review Approval: The admin can change the seller review approval settings for a particular seller in this field.
Email to seller on Order Place: If the admin wants to notify a particular seller or not on orders placed then the admin can enable or disable the settings here.
3.4 Seller Account Approval Request
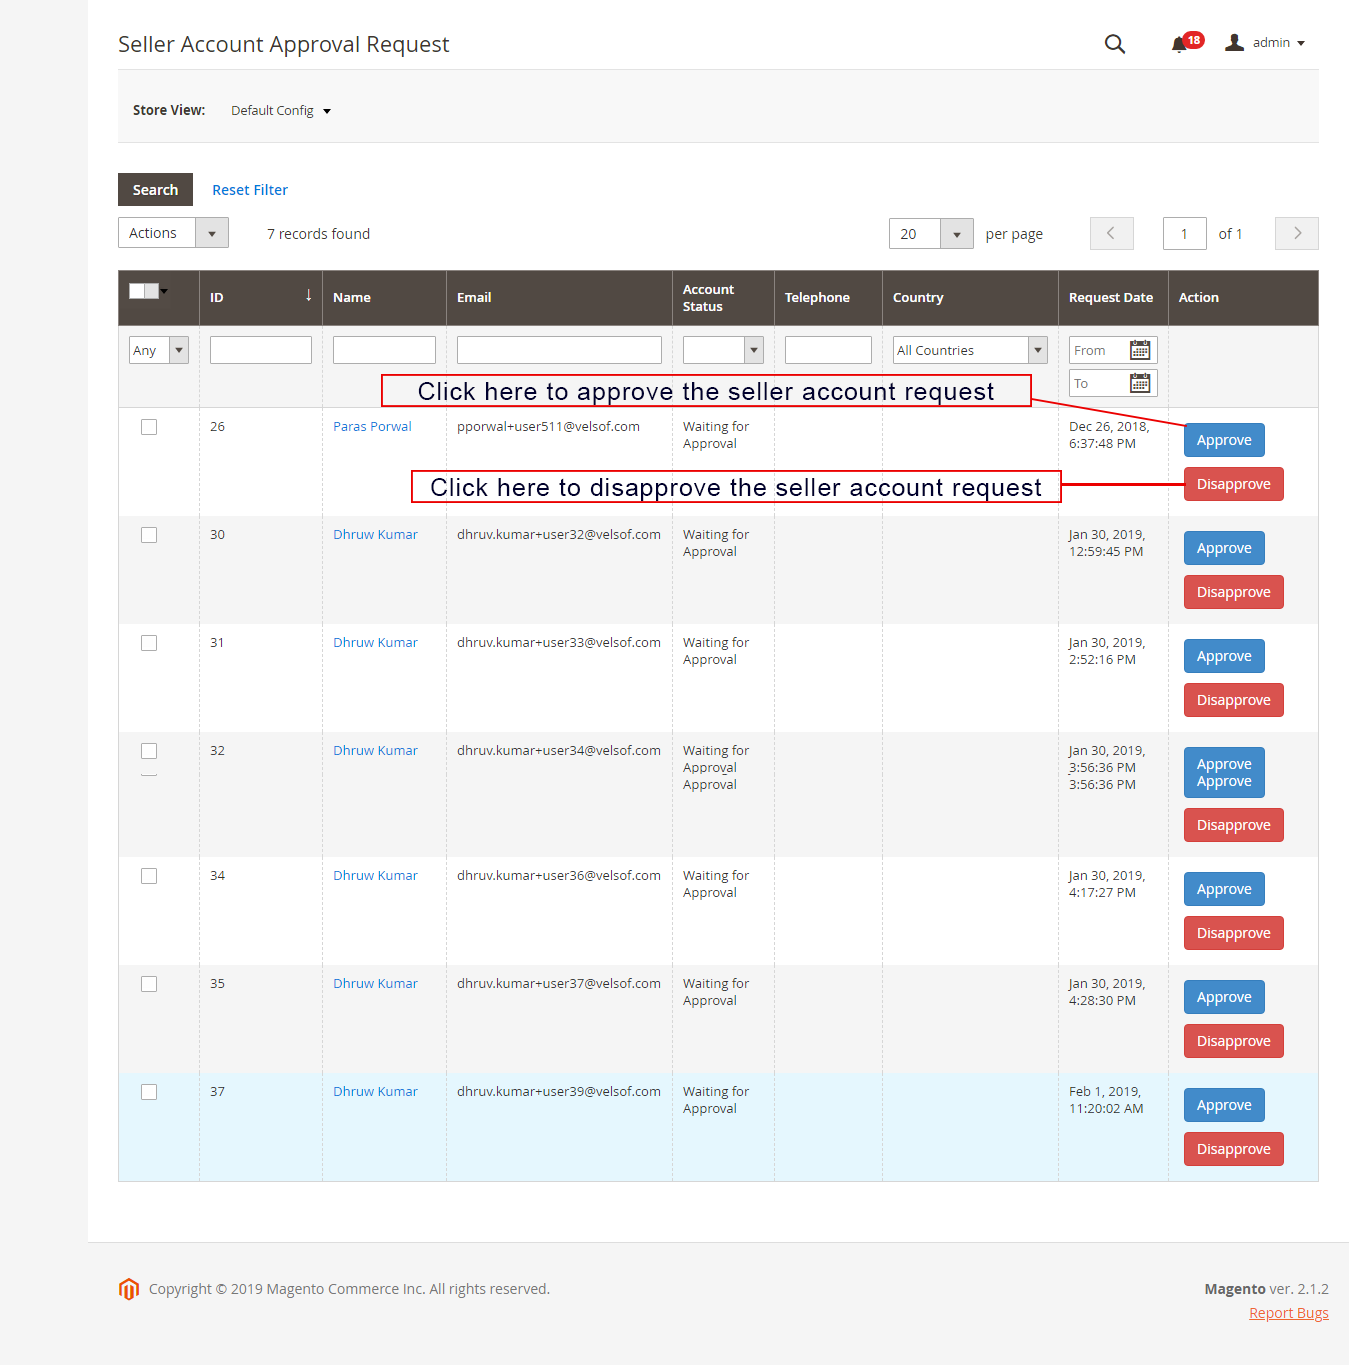
The third-party vendors can fill up the form in order to register their seller account at the site. The seller list along with their account status can be viewed by the admin in this tab of the Magento 2 Multi vendor Marketplace extension.
3.4.1 How to Approve and Disapprove the Seller’s Account
The admin can approve the seller’s account at a button click from the back-end of the Magento 2 Marketplace module.
Just click on the approve or disapprove button corresponding to each seller account as shown below:
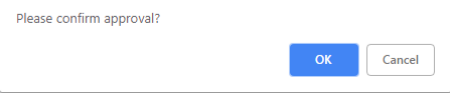
If the admin clicks on the Approve button, a pop-up will display asking for permission to approve or disapprove the seller account.
Once the admin approves the seller’s profile, the seller will list it in the ‘Seller List’ tab of the Magento 2 Multi vendor Marketplace module. If the admin clicks on the Disapprove button, a pop-up box asking for the reason for the disapproval will appear.
3.5 Sellers Product List
The admin approves the products from the back-end of the Magento 2 Multi vendor Marketplace extension will list in the Sellers Products tab.
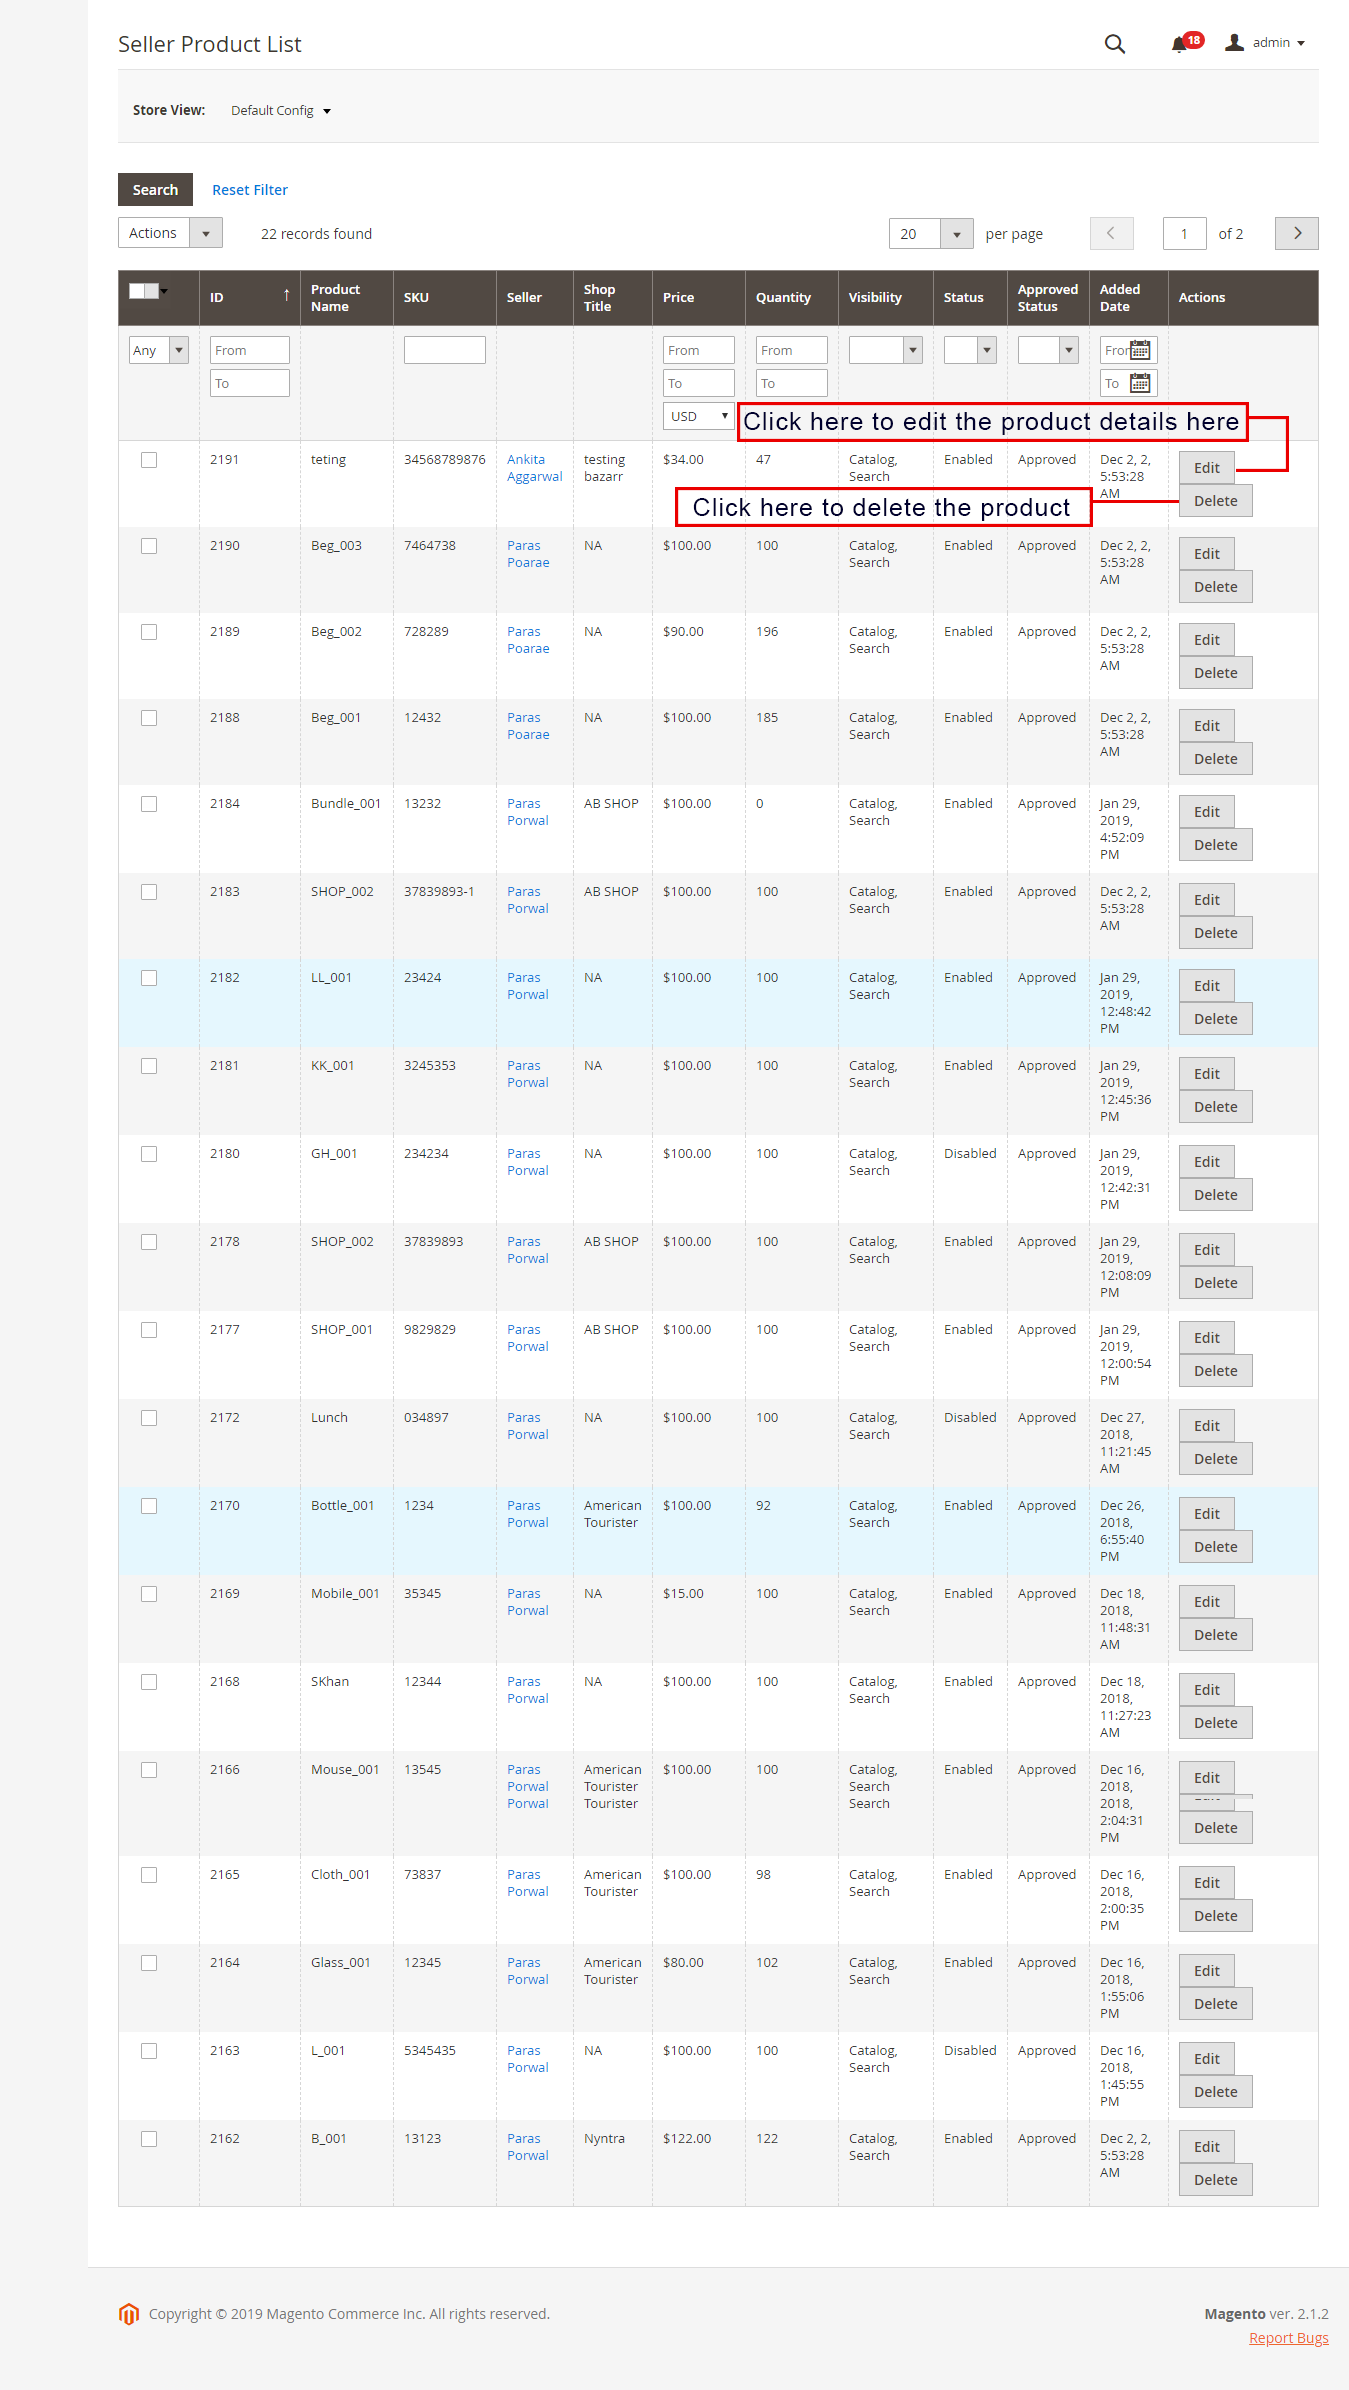
3.5.1 How to edit and remove the details of the products
The store owner can edit or delete the product details of the products list by the sellers if required. Click on the ‘Edit’ or ‘Delete’ button respectively.
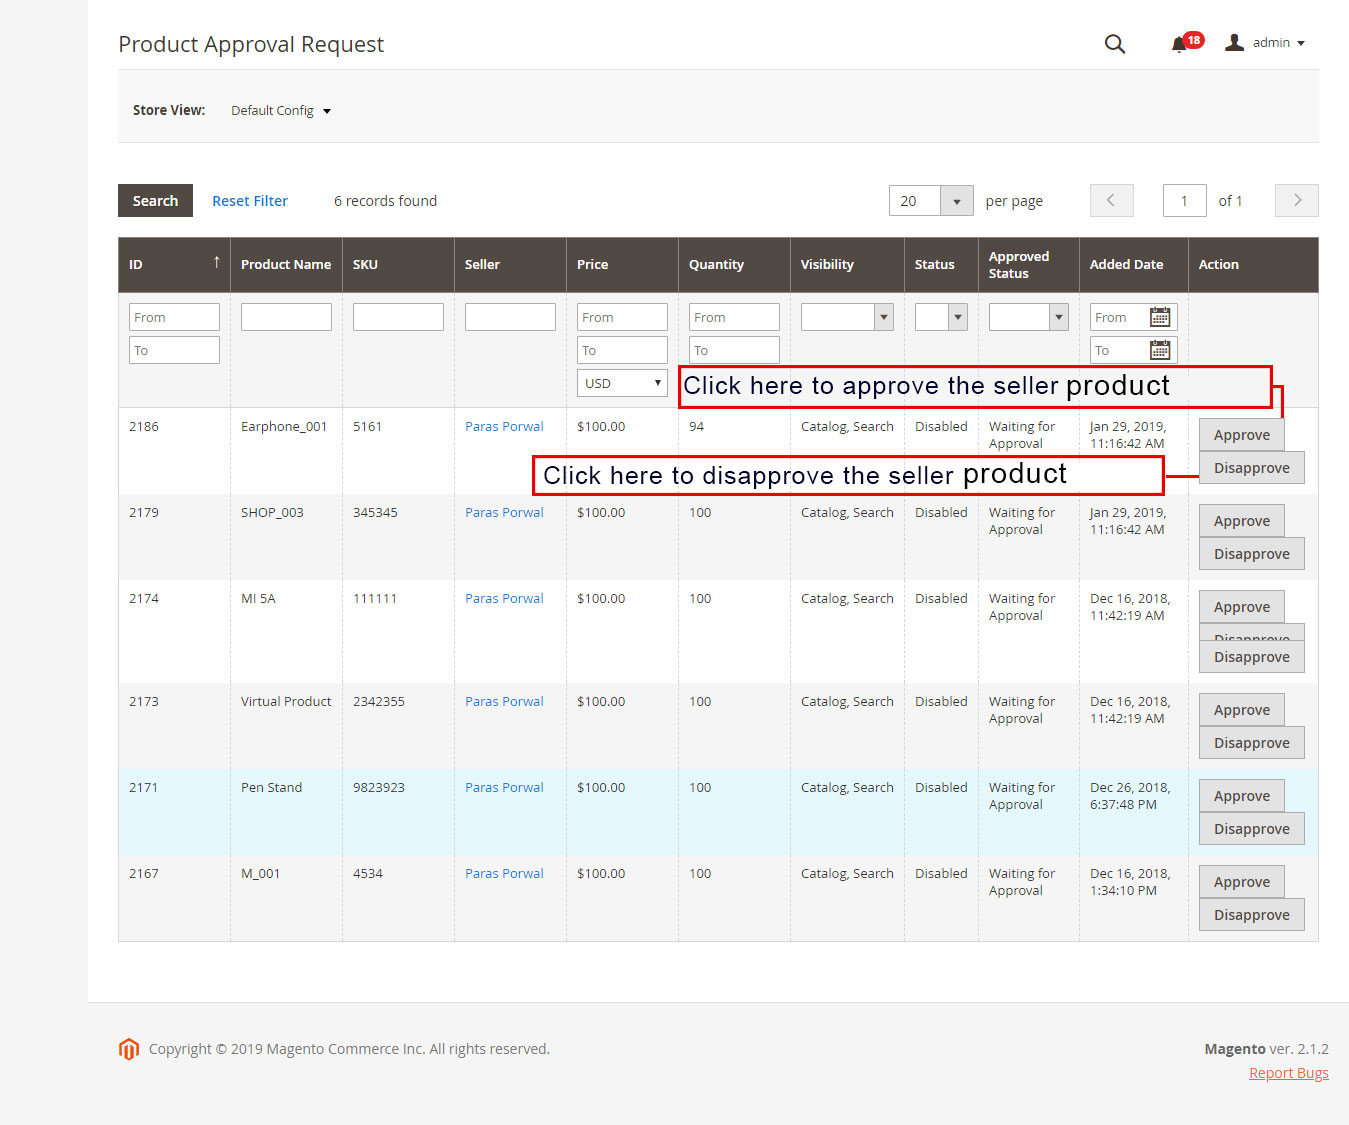
3.6 Product Approval List
The third-party sellers can list their products from the seller dashboard of their profile. The products added from the dashboard list in this tab of the Magento 2 Marketplace module for approval. Admin approval is required only if the admin enables this feature. The store admin can approve or disapprove the product at a button click.
Only the products that the admin approves get listed in the Product Approval List tab of the Magento 2 Marketplace module as shown in the figure:
If the admin clicks on the Approve button a pop-up will display with the message “Do you want to approve product?”. Click ‘Ok’ if you want to go ahead with the action.
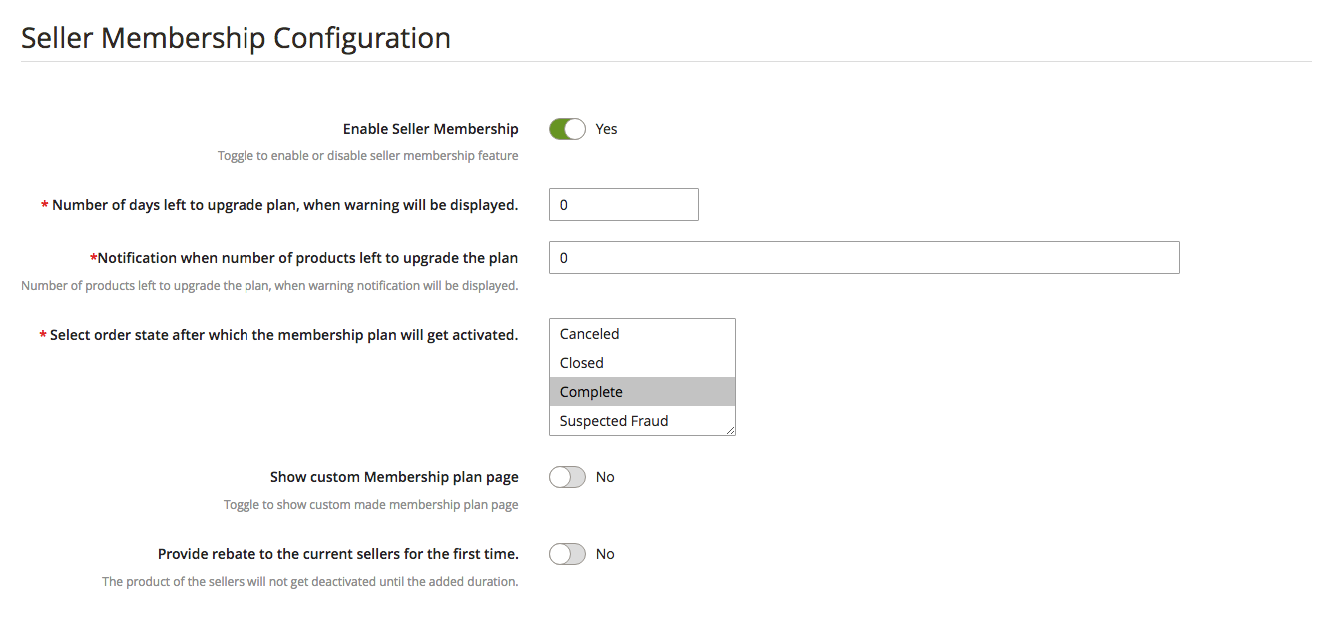
3.7 Seller Membership Configuration
This page contains all the basic settings which the Store admin needs to control the membership plans.
Enable Seller Membership: Toggle this button to enable the membership plan functionality.
The number of days left to upgrade plan when warning message will display: Enter the number of days after which a warning message will display to the sellers to upgrade plan.
Notification when the number of products left to upgrade the plan: Enter the number of products left after which a warning notification will display to the sellers to upgrade the plan.
Select order state after which the membership plan will activate: Admin can select the order state on which membership plan orders will activate.
Show custom Memerbship plan page: Using this tab admin can enable a custom membership plan page for the sellers.
Add URL for the custom page for membership plan: Enter the link of the custom membership plan page using this tab.
Provide rebate to the current sellers for the first time: If the store admin enables this button then the seller’s products remain active until this period.
Rebate Duration: Enter the Rebate duration using this button.
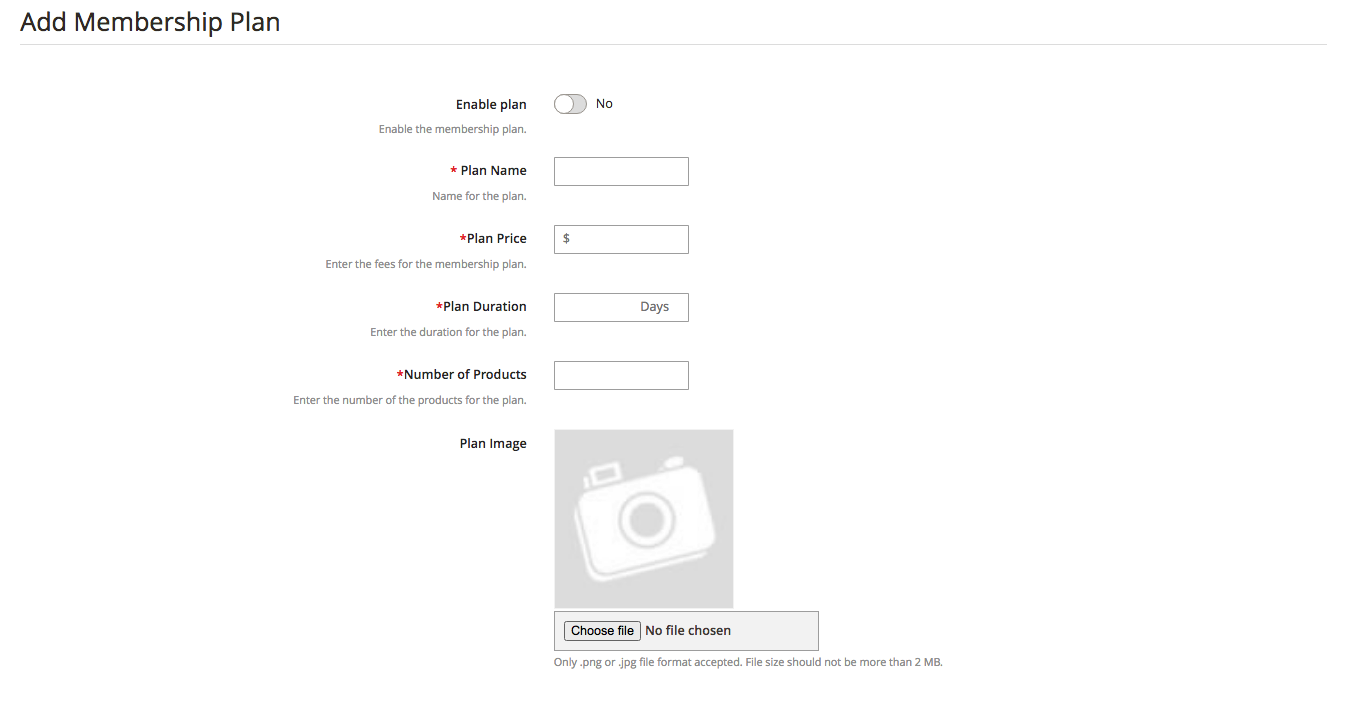
3.8 Membership Plan
Store admin can add new membership plans, edit and disable them from this page.
Enable Plan: Toggle this button to enable the membership plan.
Plan Name: Enter the membership plan name using this button.
The Plan Price: Enter the membership plan price.
Plan Duration: Enter the duration of the plan until it remains active.
Number of Products: Enter the number of products that a seller can upload to the membership plan.
Plan Image: Upload the image of the membership plan.
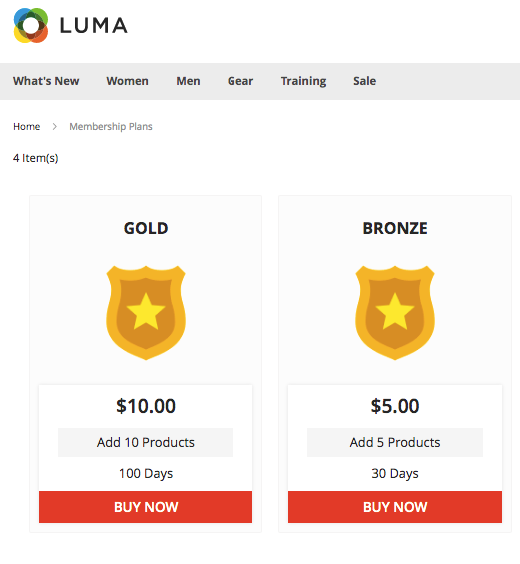
3.9 Seller Membership Plans
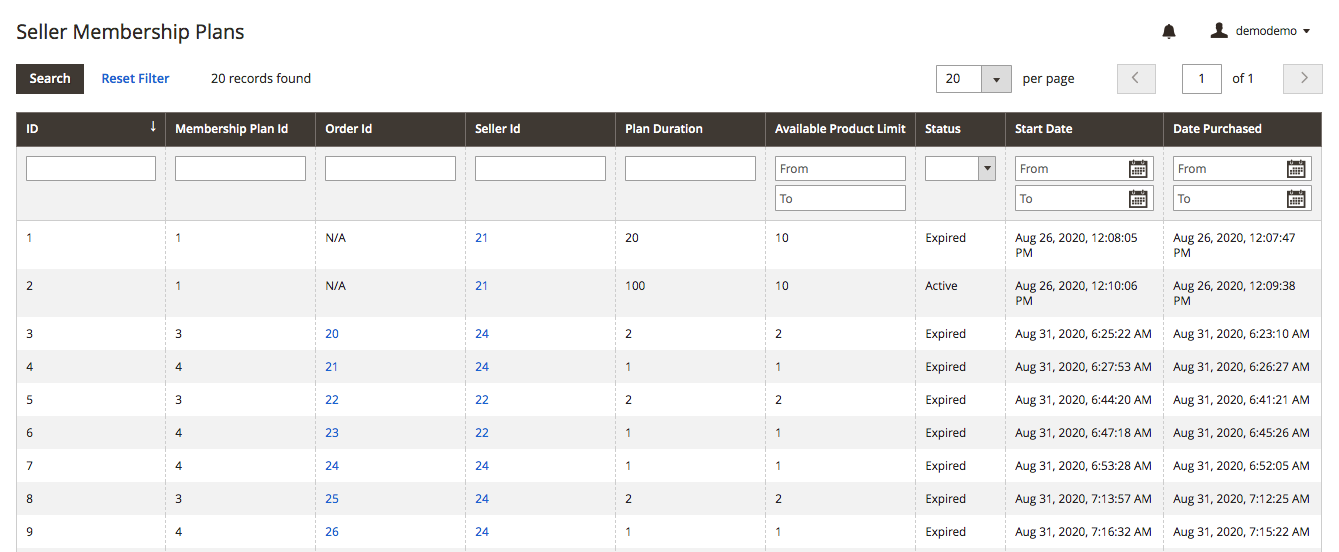
From the seller membership plan page, the store admin can view the assigned membership plans for the sellers. Store admin can view membership plan Id, order Id, seller Id, Plan duration, status, etc.
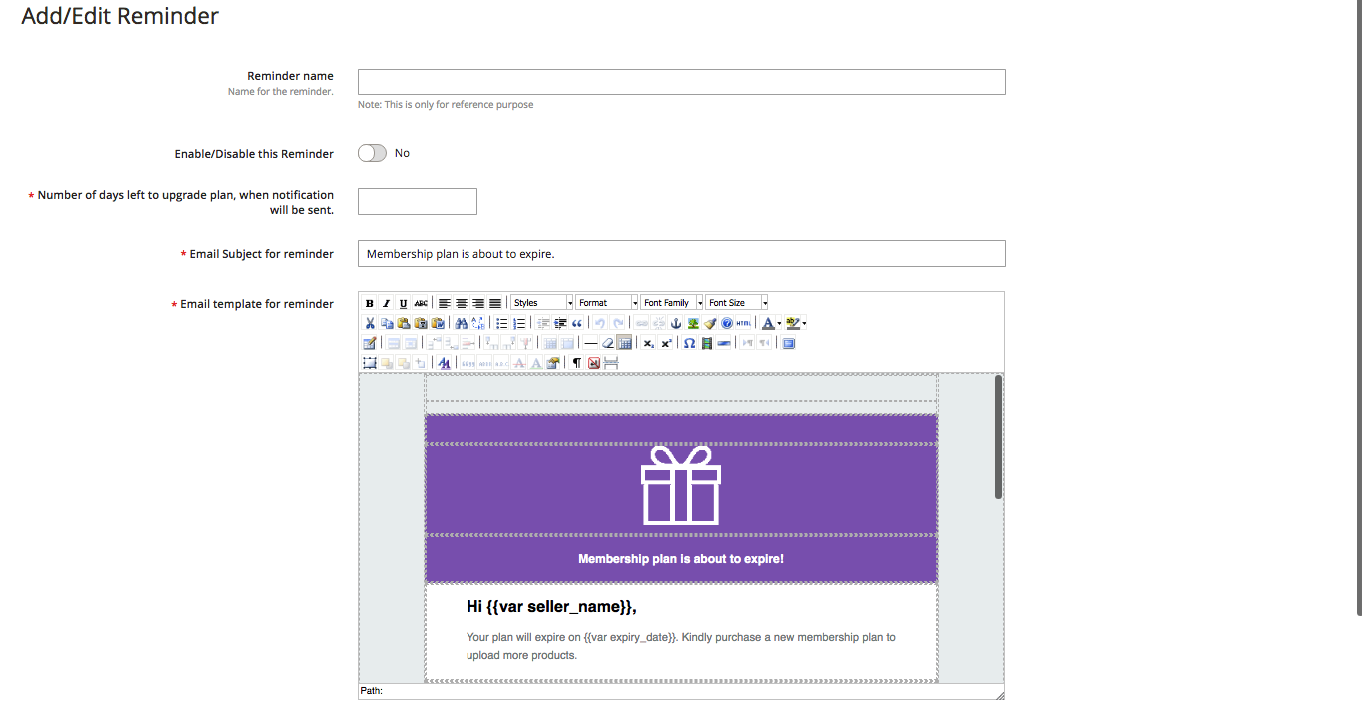
3.10 Seller Membership Reminder
Store admin can send reminder messages to the sellers whose membership plan is about to expire.
Reminder Name: Enter the name of the reminder from this tab.
Enable/Disable this reminder: Toggle this button to enable or disable the reminder.
The number of days left to upgrade plan, when notification will be sent: Enter the number of days after which warning reminder will be sent to the sellers.
Email subject of reminder: Enter the email subject of the reminder from this button.
Email template for a reminder: Customize the email template of the reminder message from this tab.
3.11 Assign Membership Plan
Store admin can assign a membership plan to the sellers by just selecting the plan and sellers.
3.12 Product Reviews
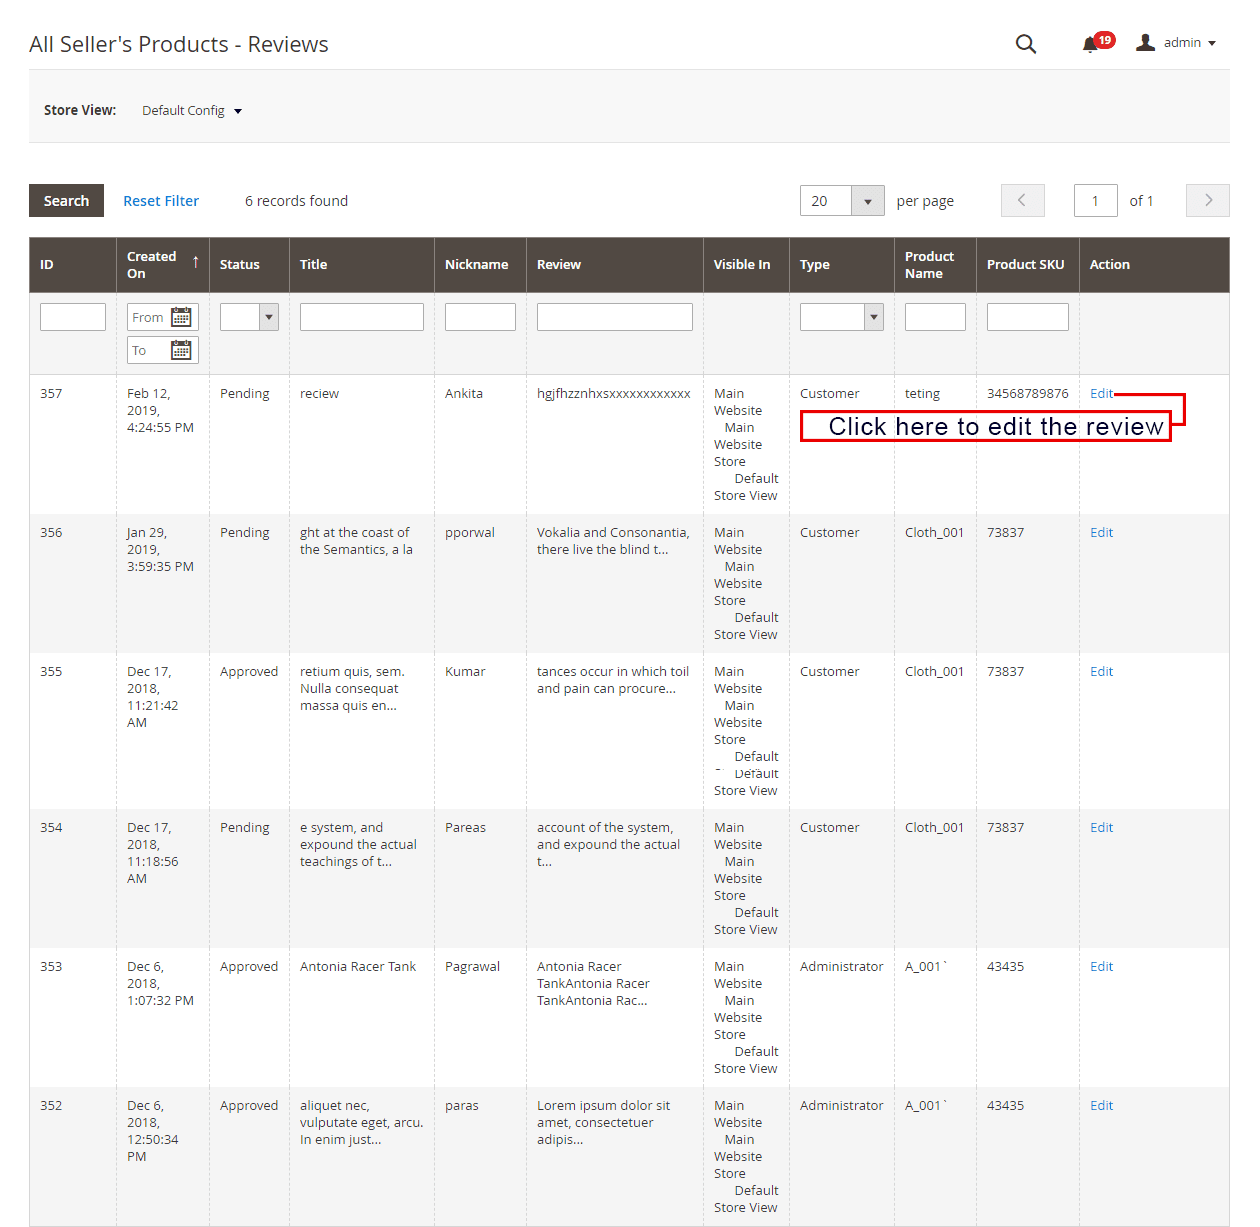
The customers can give ratings and write reviews for the products if this feature that the admin enables from the back-end of the Magento 2 Marketplace plugin. If the admin enables this, the customers can leave their reviews by clicking on ‘Write a Review’.
The reviews written in the front-end will list in the back-end of the Magento 2 Multi vendor Marketplace plugin as shown in the image below:
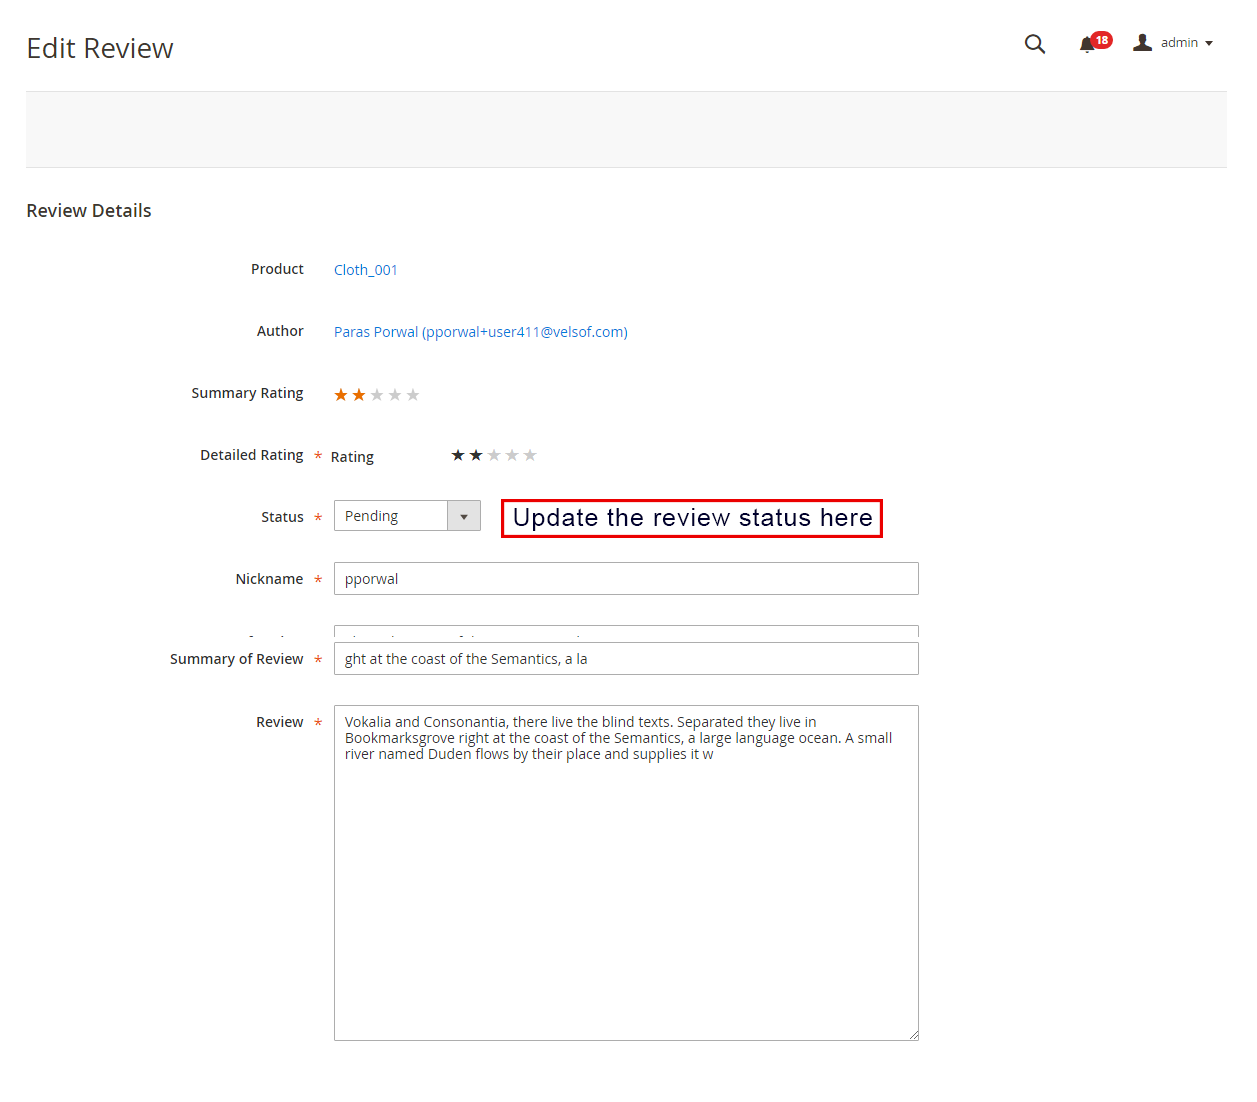
Admin can click on the ‘Edit’ button to edit or approve the product reviews. This will redirect you to the review edition page of the Magento 2 Multi vendor Marketplace module.
The various fields of this interface are below:
Product: The name of the product for which the review is posted will be shown here.
Author: The name of the customer sending the review will be shown here. The admin can change the name if required.
Summary Rating: This section will by default show the rating given by the customer.
Detailed Rating: The admin can even change the rating in this field.
Status: Admin has the access to update the status of the Review here.
Summary of Review: In this field, a summary of the review will be available.
Review: The review entered by the customer will be shown here. The store owner can edit the review if required.
To get the changes reflected, the admin needs to click on the “Save Review” button at the top right side of the page.
3.13 Sellers Reviews
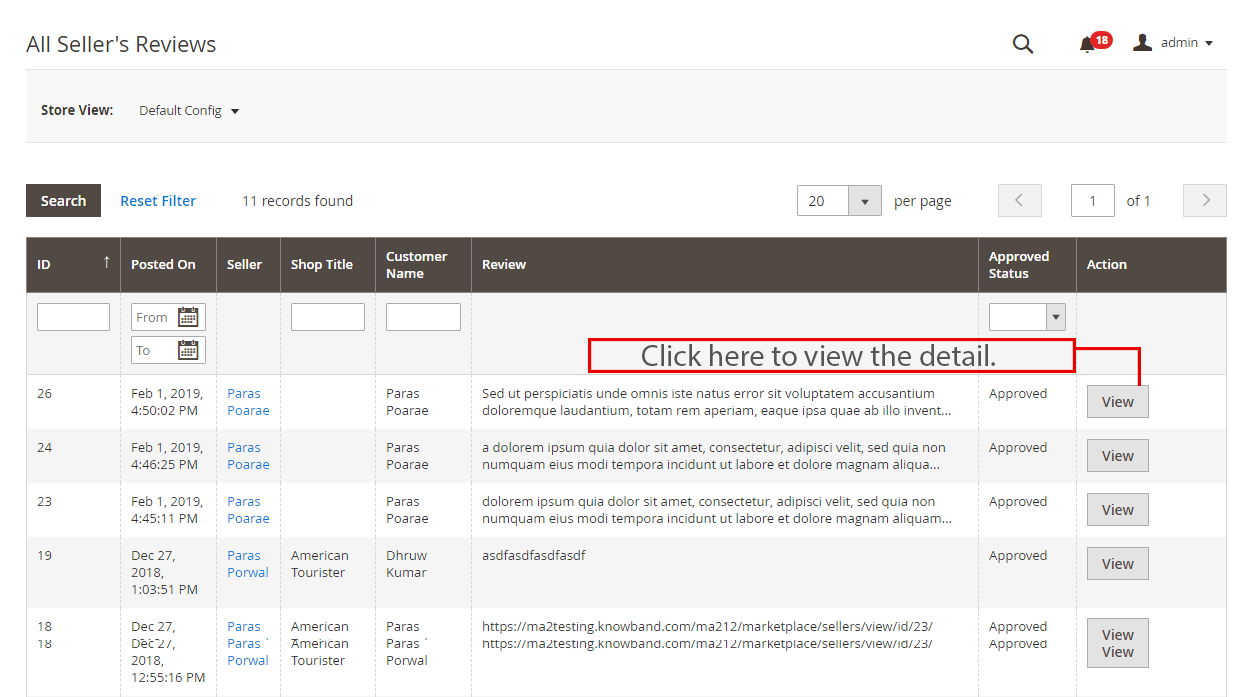
All the seller reviews along with their allowable status will list in this section.
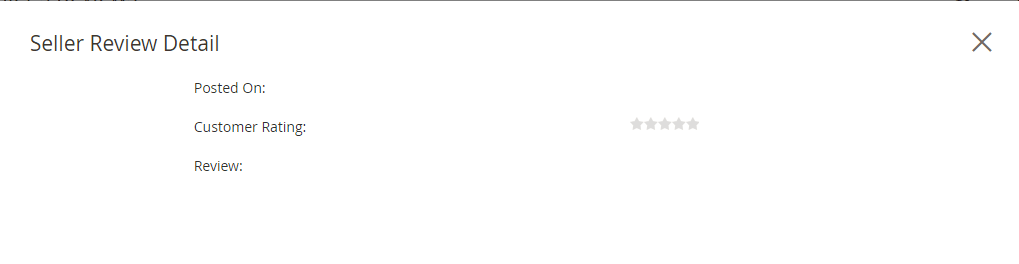
The admin can view the detailed information by clicking on the “View” button on the right side of each review. Once the view button is clicked, a pop up will appear in front of you.
3.14 Sellers Review Approval List
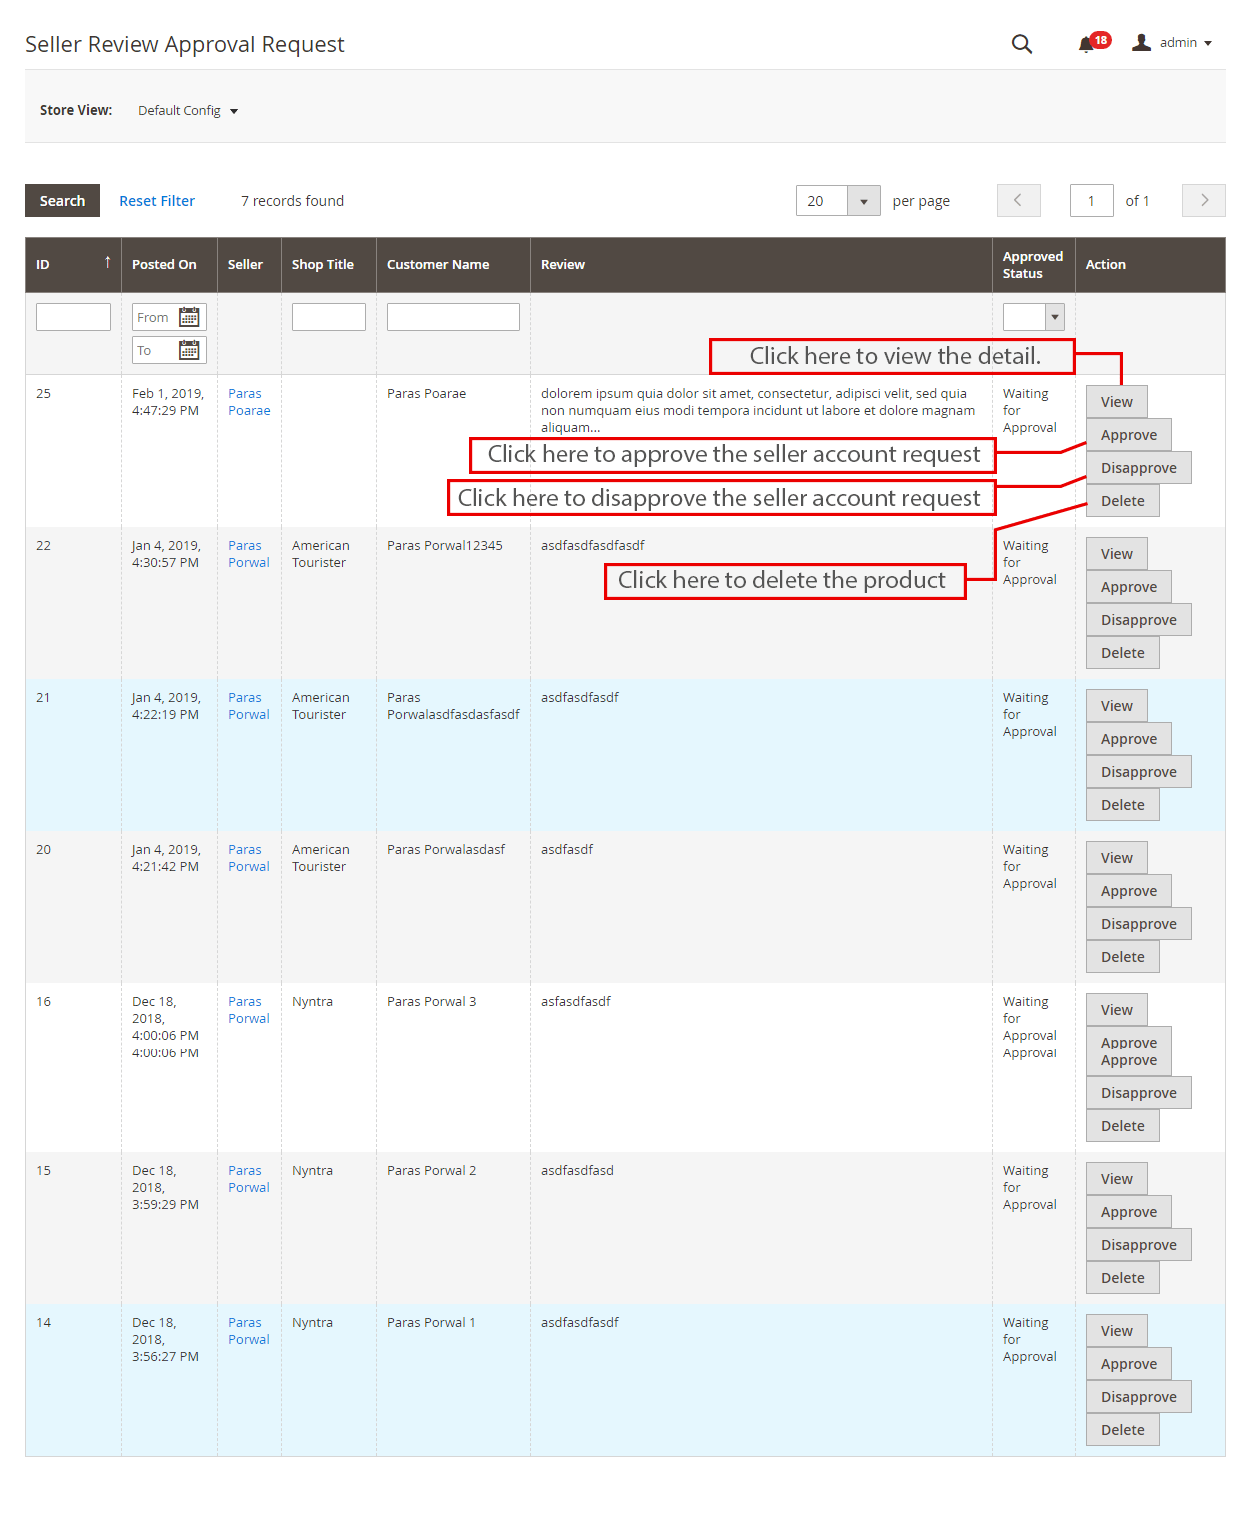
The customers can even give reviews to the sellers if the admin enables this feature from the back-end of the Magento 2 Multi seller Marketplace module. In order to leave the review, the customers can click on the ‘Write Review’ link on the product page of the website. Refer to the image below:
This will redirect them to an interface where they give ratings and reviews to the sellers. The seller’s reviews entered here will list in the Sellers Reviews Approval Request tab of the Magento 2 Multi seller Marketplace Module.
The admin can view, Approve, Disapprove and Delete the reviews by clicking on the “View”,” Approve”, “Disapprove” and “Delete” buttons respectively for respective functions.
3.15 Category Request List
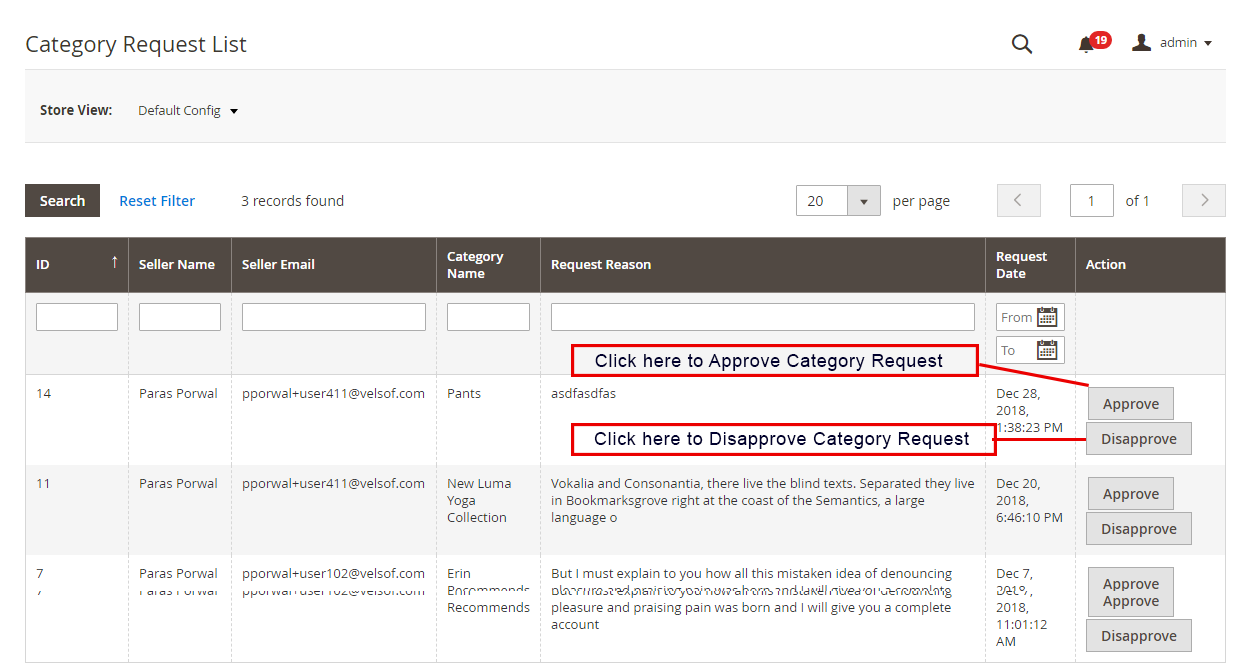
The admin assigns the category to the third-party seller for listing the products. The sellers can even request the admin to add a new category from their Dashboard. The category requests sent by the sellers will list in the Seller Category Request List tab of the Magento 2 Marketplace extension as shown in the image below:
Only after the admin approves the new category request, only then the seller will be allowable to list their product in the assigned category. Admin can approve or disapprove the new category request by clicking on the “Approve” or “Disapprove” button respectively.
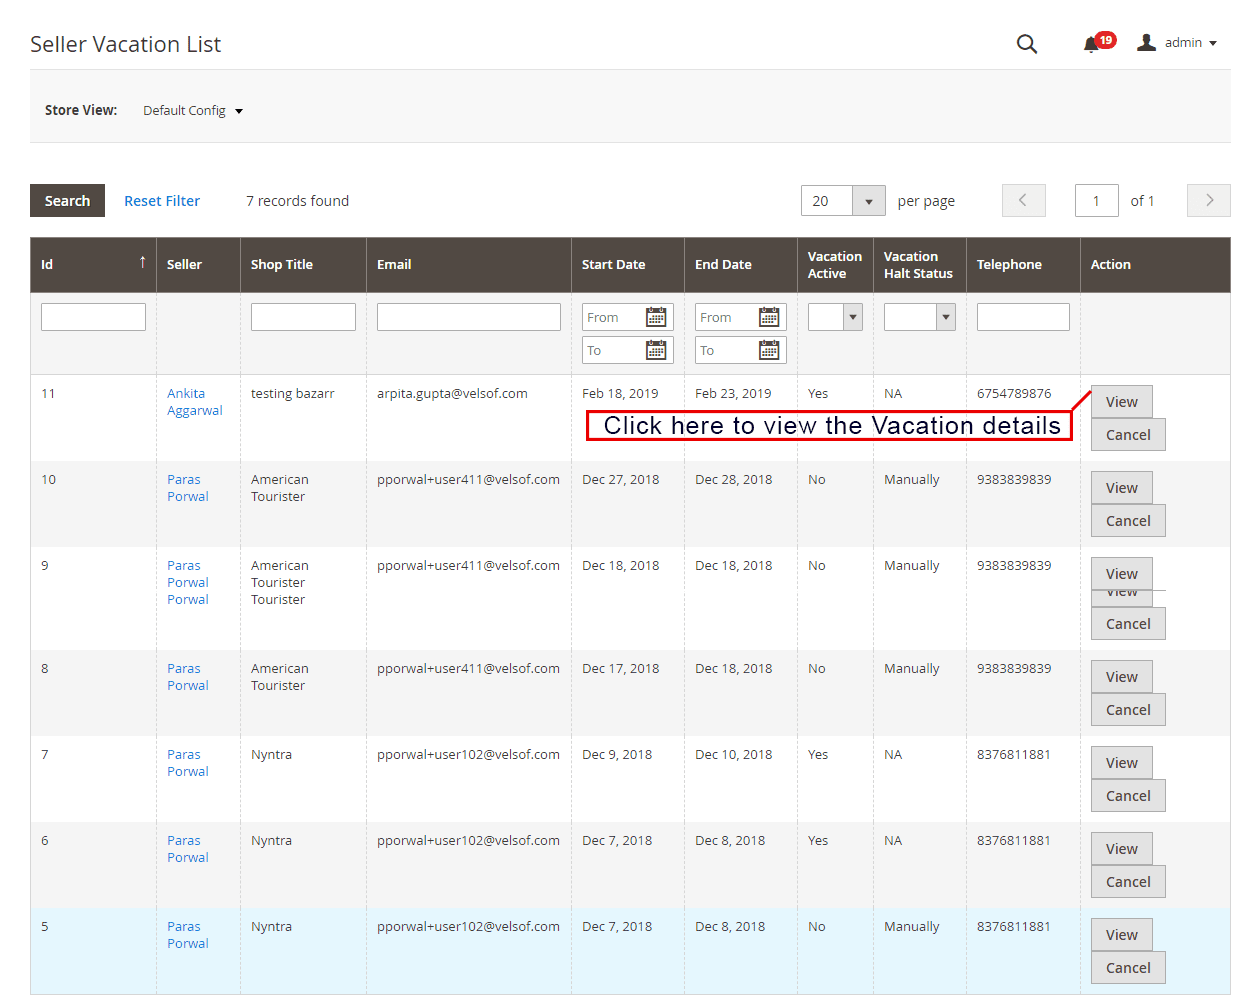
3.16 Sellers Vacation Request
The Magento 2 Marketplace extension comes with a feature that allows the sellers to go on vacation. If he enables this feature from the Settings Tab of Magento 2 Multi vendor Marketplace module, only then the sellers can request for the same. Admin can view the list of sellers on vacation from this tab
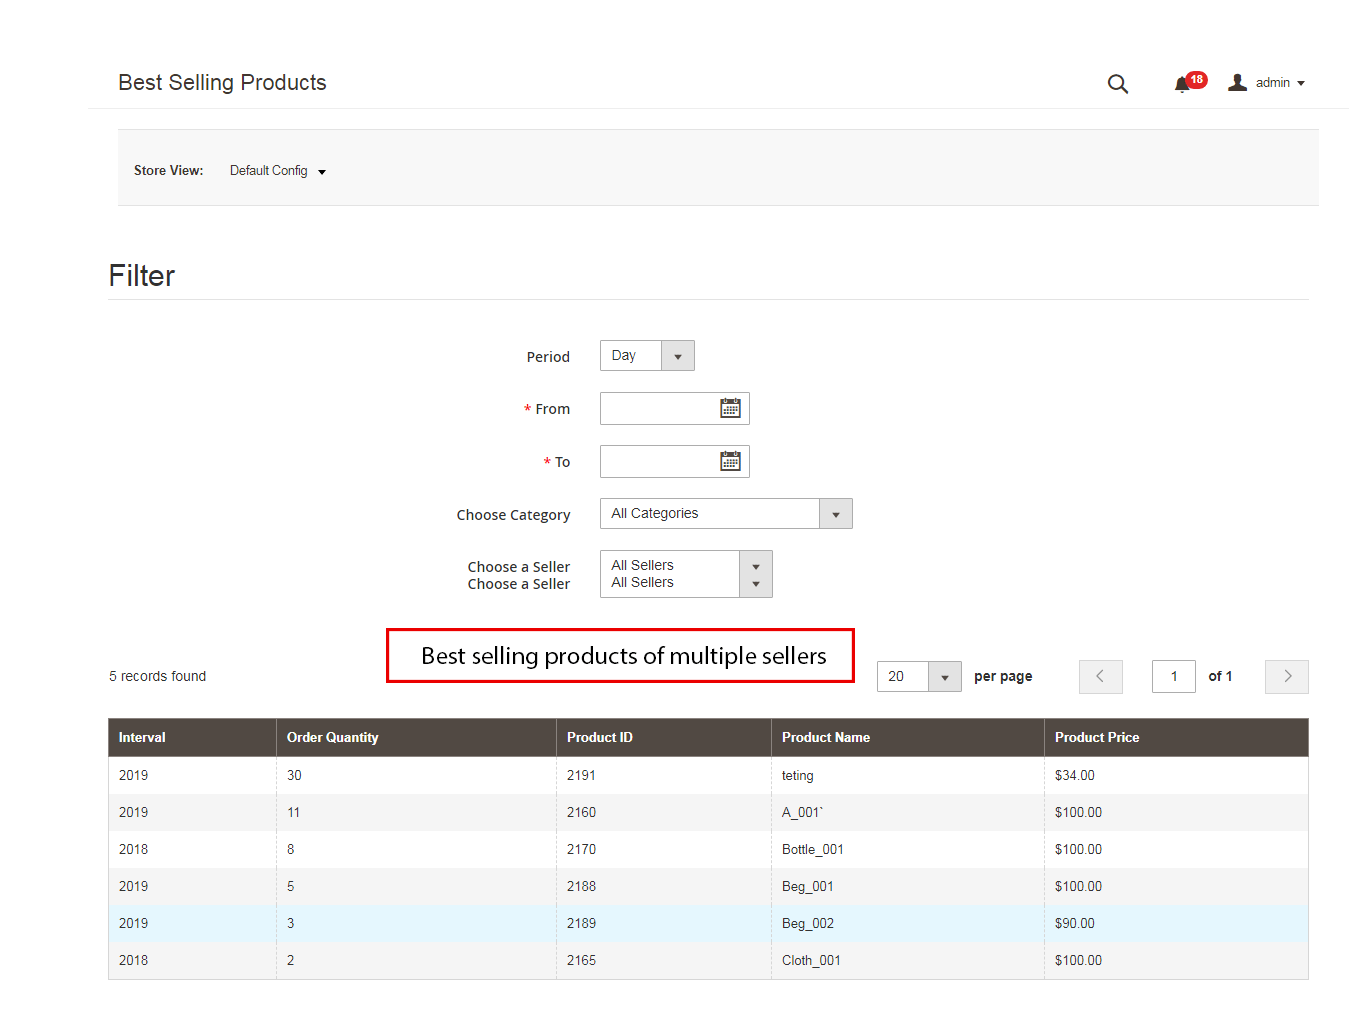
3.17 Best Selling Products
The admin can view the list of best-selling products of a particular seller. The list of best-selling products can be filtered on the basis of the time period, category, and seller.
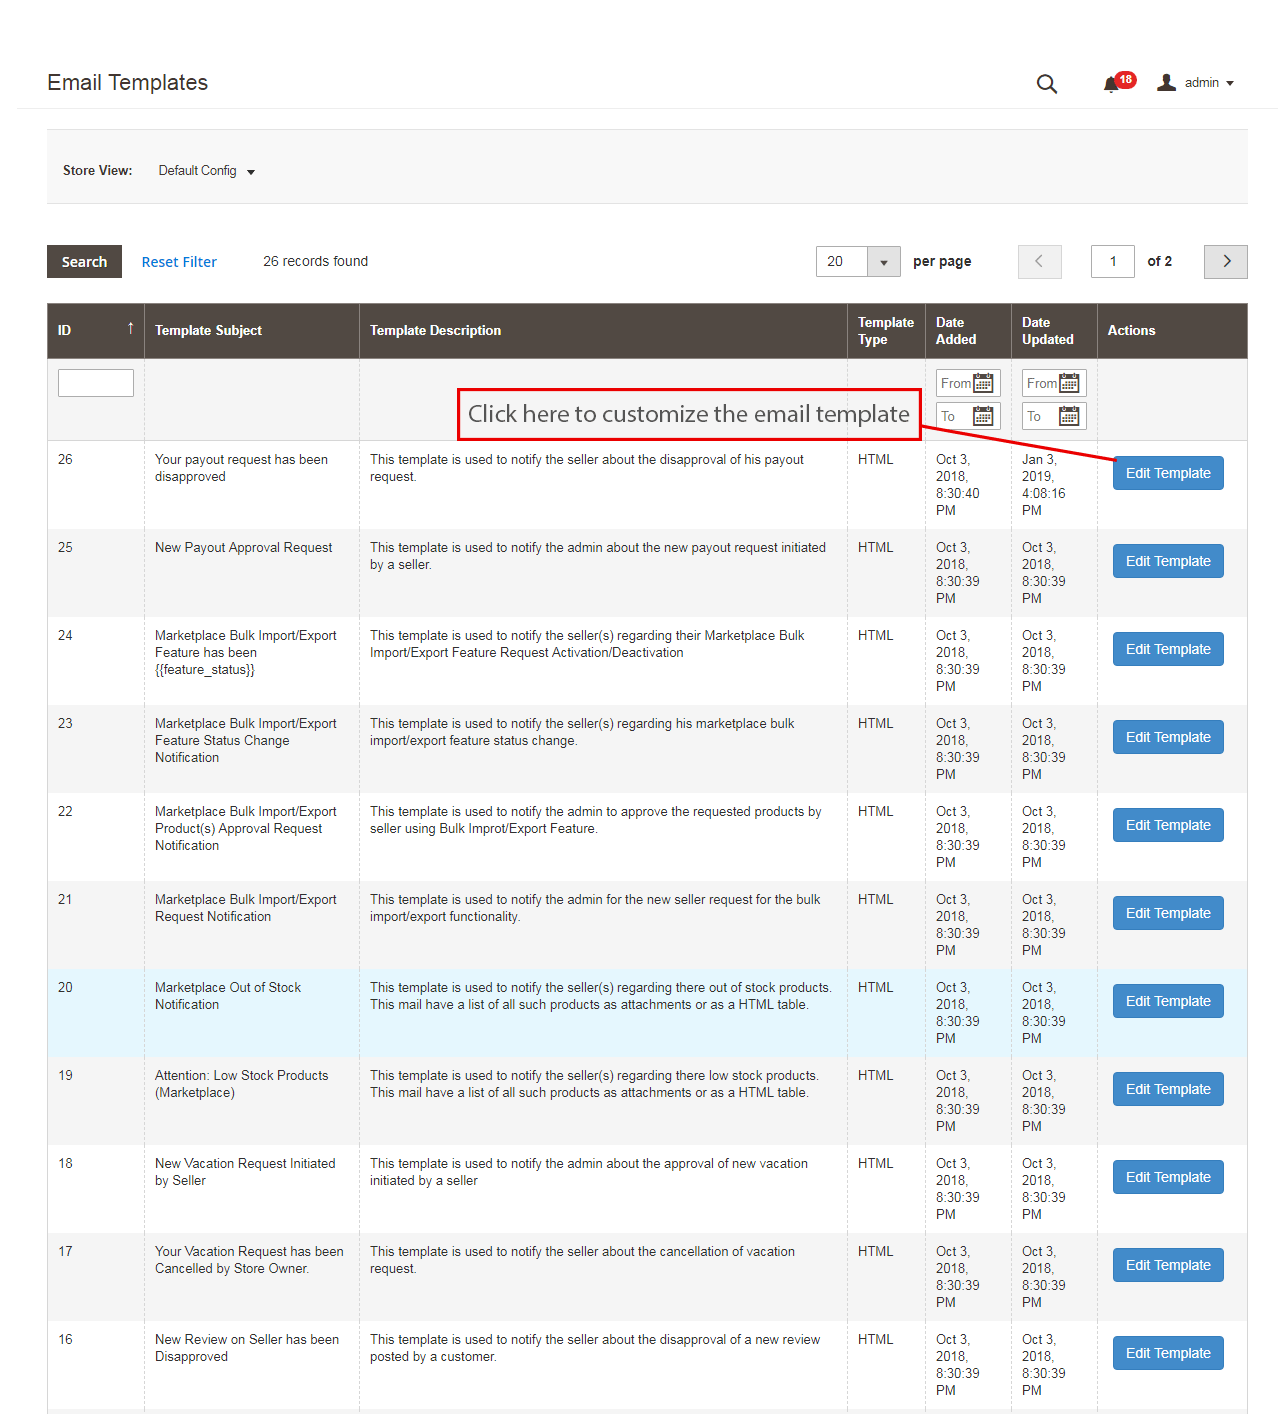
3.18 Email Templates
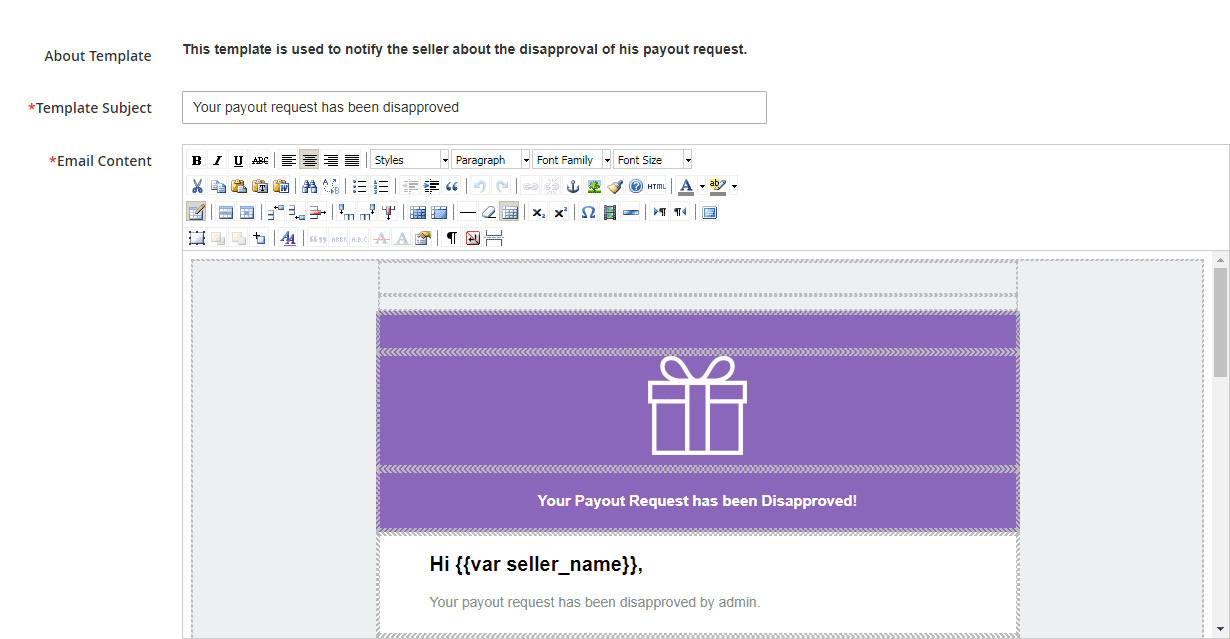
The Magento 2 Multi seller marketplace plugin offers various pre-designed email templates for various scenarios. The store admin can even customize the email templates as required by clicking on the “Edit Template” button.
On clicking the “Edit Template” button, the admin can modify the subject and the content of the email at his convenience.
3.19 Cron Instructions
The admin can run the Cron jobs to sync the changes from the backend of the Magento 2 Multi seller Marketplace module with the frontend of the store. Further, he can run Cron jobs from the backend are below:
Vacation Cron: Vacation Cron job runs to disable the seller’s products from the front end of the store when the sellers go on vacation.
Low stock Notification Cron: Cron jobs run to alert the seller about the low stock products.
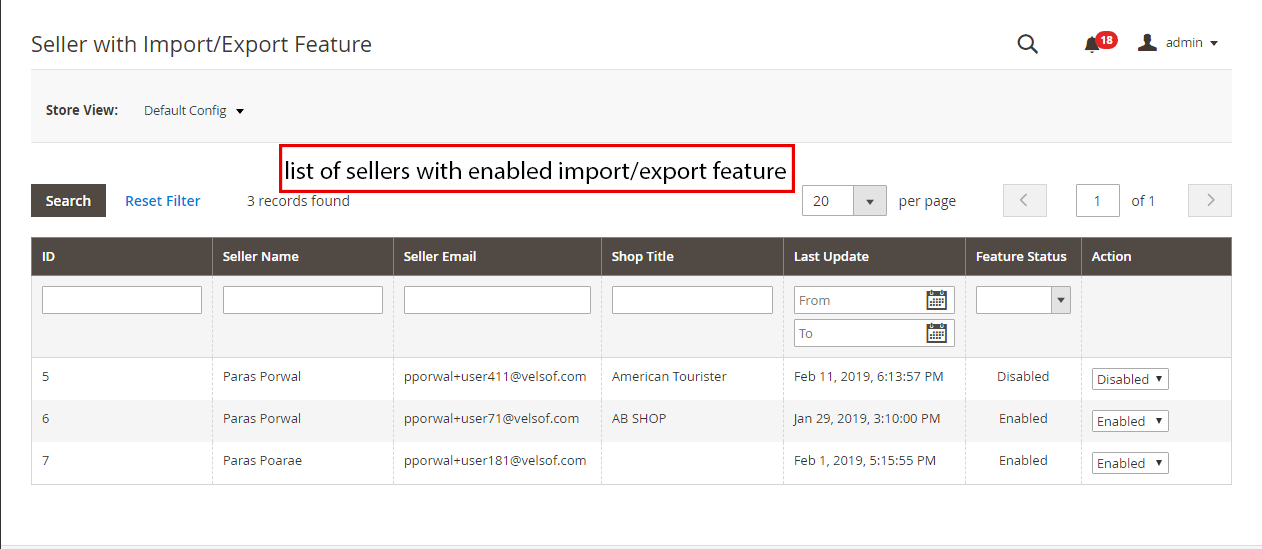
3.20 Seller with Import and Export feature
A list of sellers that can upload products in bulk from the seller dashboard can be viewed by the admin from this section. Admin can disable the feature by clicking on the “Disable” button on the right side of the seller.
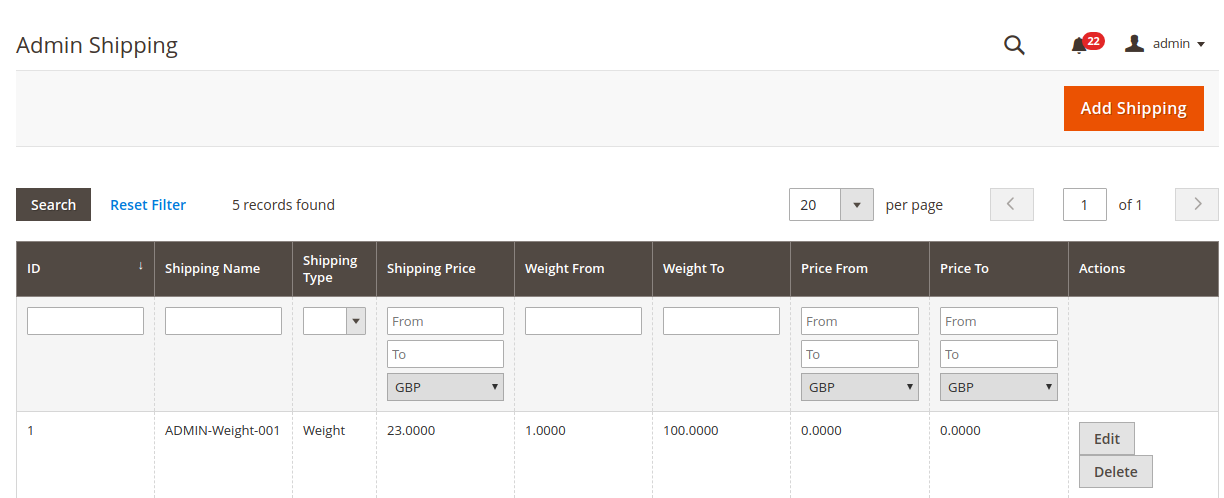
3.21 Admin Shipping
With the help of this feature, the admin can add their shipping prices based on the weight and price range of the products. This feature will allow them to fix a shipping price for a particular weight range or price range. Admins can use this feature while adding a new shipping method.
3.22 Transaction and Earnings
3.22.1 Commission
The store admin even gets an option to monitor the total transaction, seller earnings, and admin earnings. The name of the seller, along with its Email-id is also there.
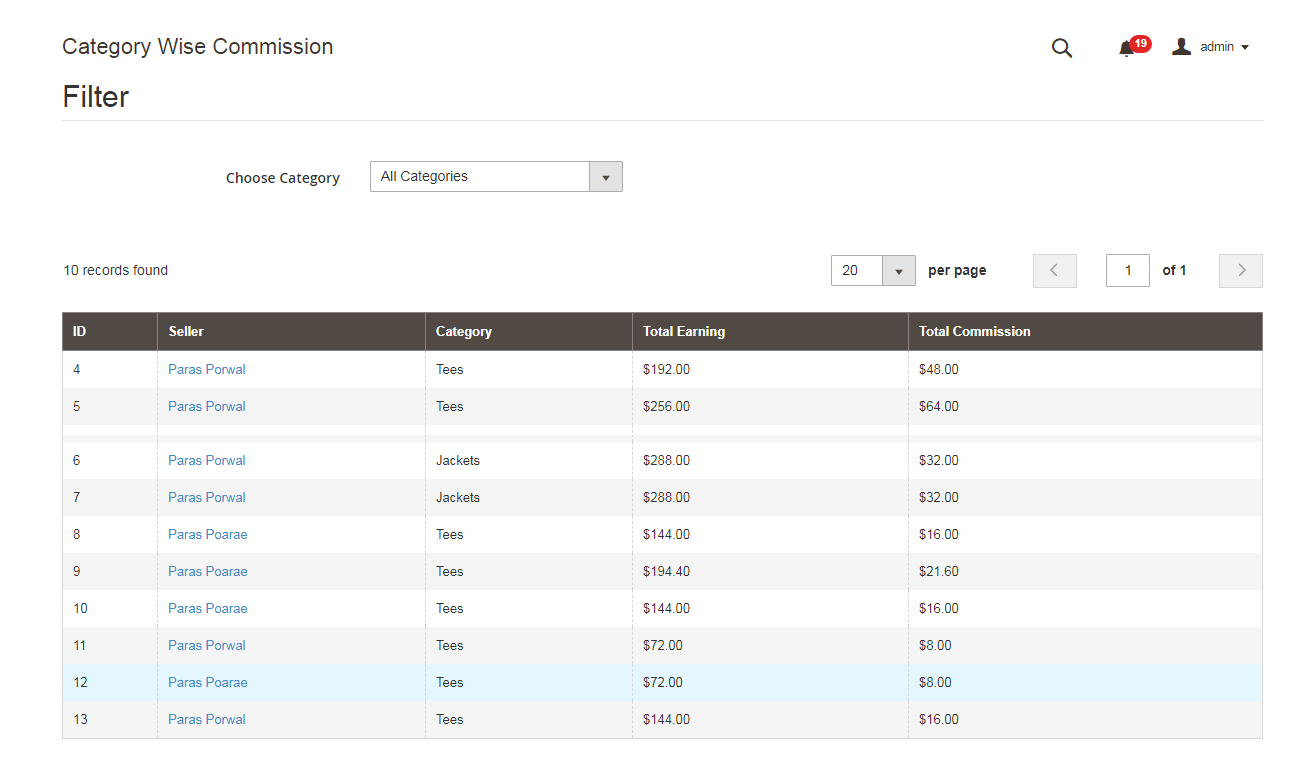
3.22.2 Category Wise Commission
With Magento 2 Marketplace module, the store admin gets access to filter the commission category-wise. Admin can easily view the total earning, total commission for a particular category in Category Wise Commission.
3.22.3 Seller Wise Commission
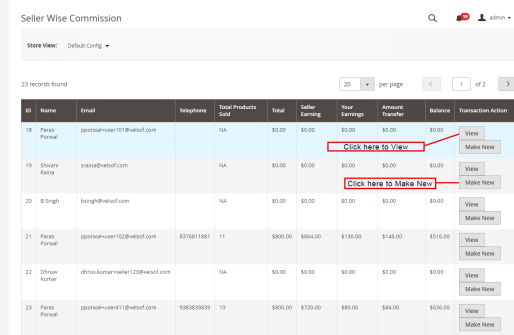
The admin can view the list of total products sold, total earning, seller earning and admin earnings from the backend of the Magento 2 Marketplace plugin. To view the detailed transaction action, the admin needs to click on the “View” button.
Moreover, Magento 2 Multi seller Marketplace extension allows the admin to add a new transaction detail from the admin panel of the store. As soon as the admin will click on the “Make New” button a pop-up will appear in front of him. Admin needs to fill in all the details in the popup and click on the submit button to submit the new transaction entry.
3.22.4 Seller Payout
The sellers can view the payout requests that the admin approves from the Sellers Payout section.
3.22.5 Seller Payout Request
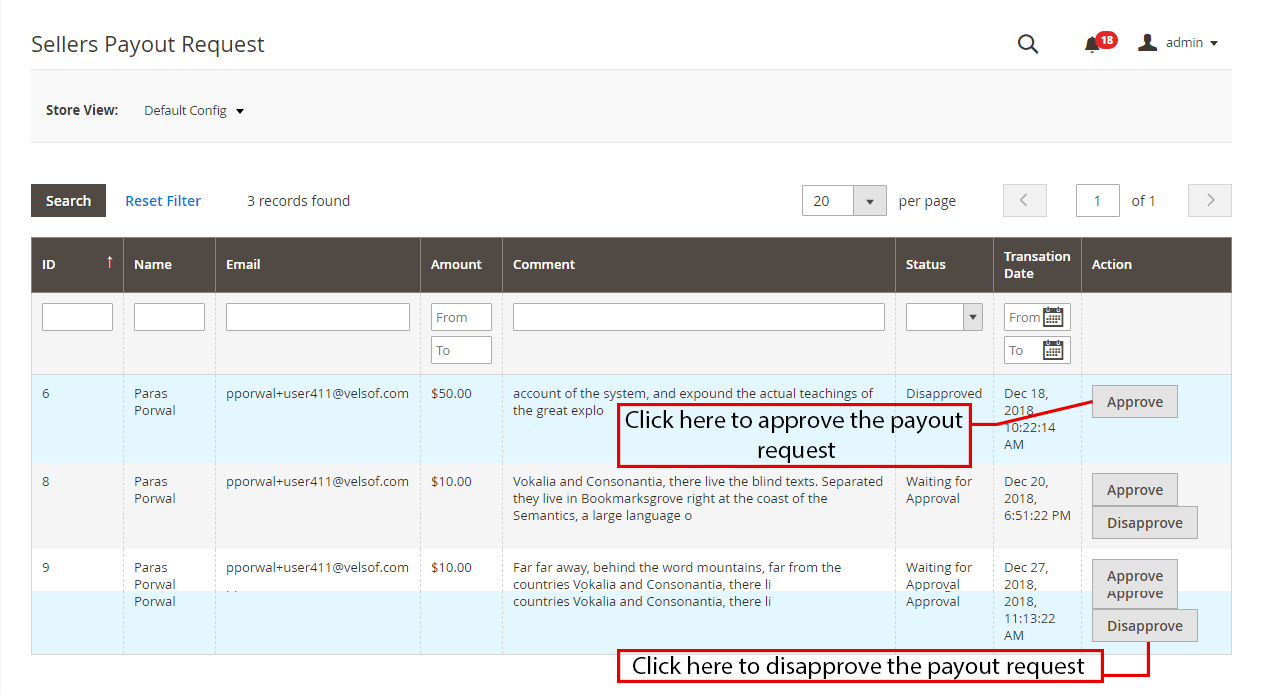
Payout Request sent by the sellers can be viewed by the admin from the backend of the Sellers Payout Request. Admin can approve/ disapprove the payout request with a few clicks. Once the admin clicks on the “Approve” button a pop window as shown in the figure will appear.
When the admin will click on the “Disapprove” button, a dialogue box with a comment field will appear. Once the admin clicks the submit button after filling the comment fields, the request will not approve.
3.22.6 PayPal Payout Request
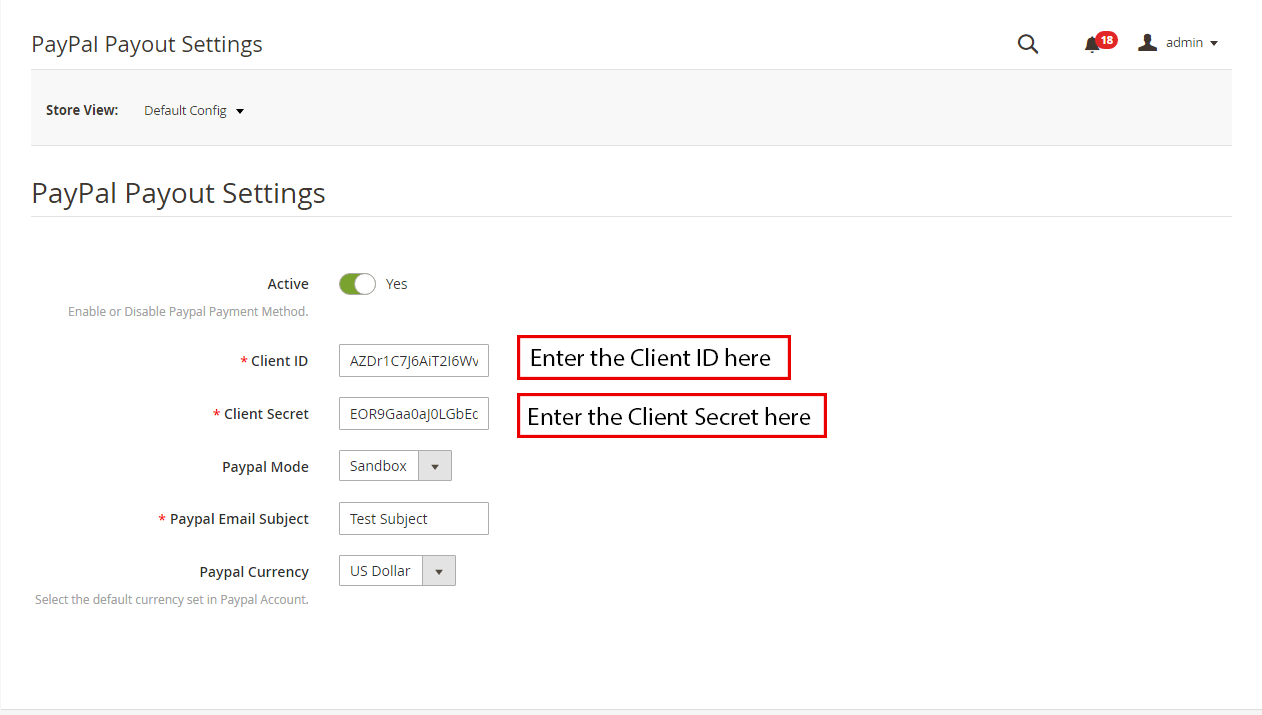
Magento 2 Multi seller plugin offers admin the access to set the PayPal Payout Settings from the backend of the store. Admin needs to fill the Client ID, Client Secret key, Paypal Mode, Paypal Email Subject, and Paypal Currency in the backend of the store.
4.0 Front-end UI
Once the Magento 2 Marketplace extension is successfully installed at the Magento 2 store, the third-party sellers can register by filling a simple form from the front end of the store. For easy management of the shop, the seller gets access to their dashboard.
4.1 Seller Registration
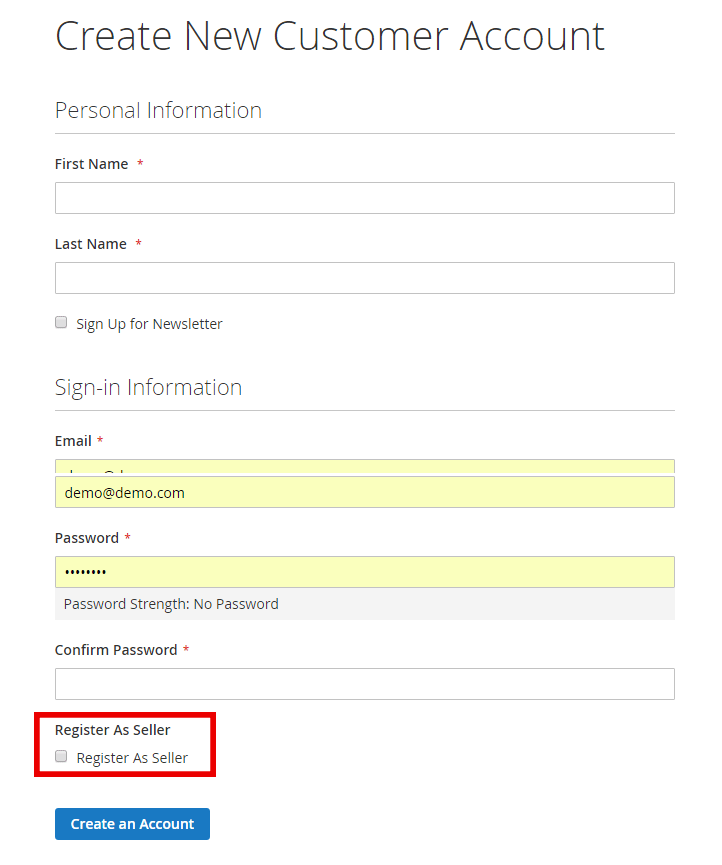
Sellers can register their accounts by filling out the registration form from the front end of the store. The registration form format is the same for both the sellers and customers. To register as Sellers, the seller needs to select an additional checkbox in the form.
4.2 Seller Dashboard
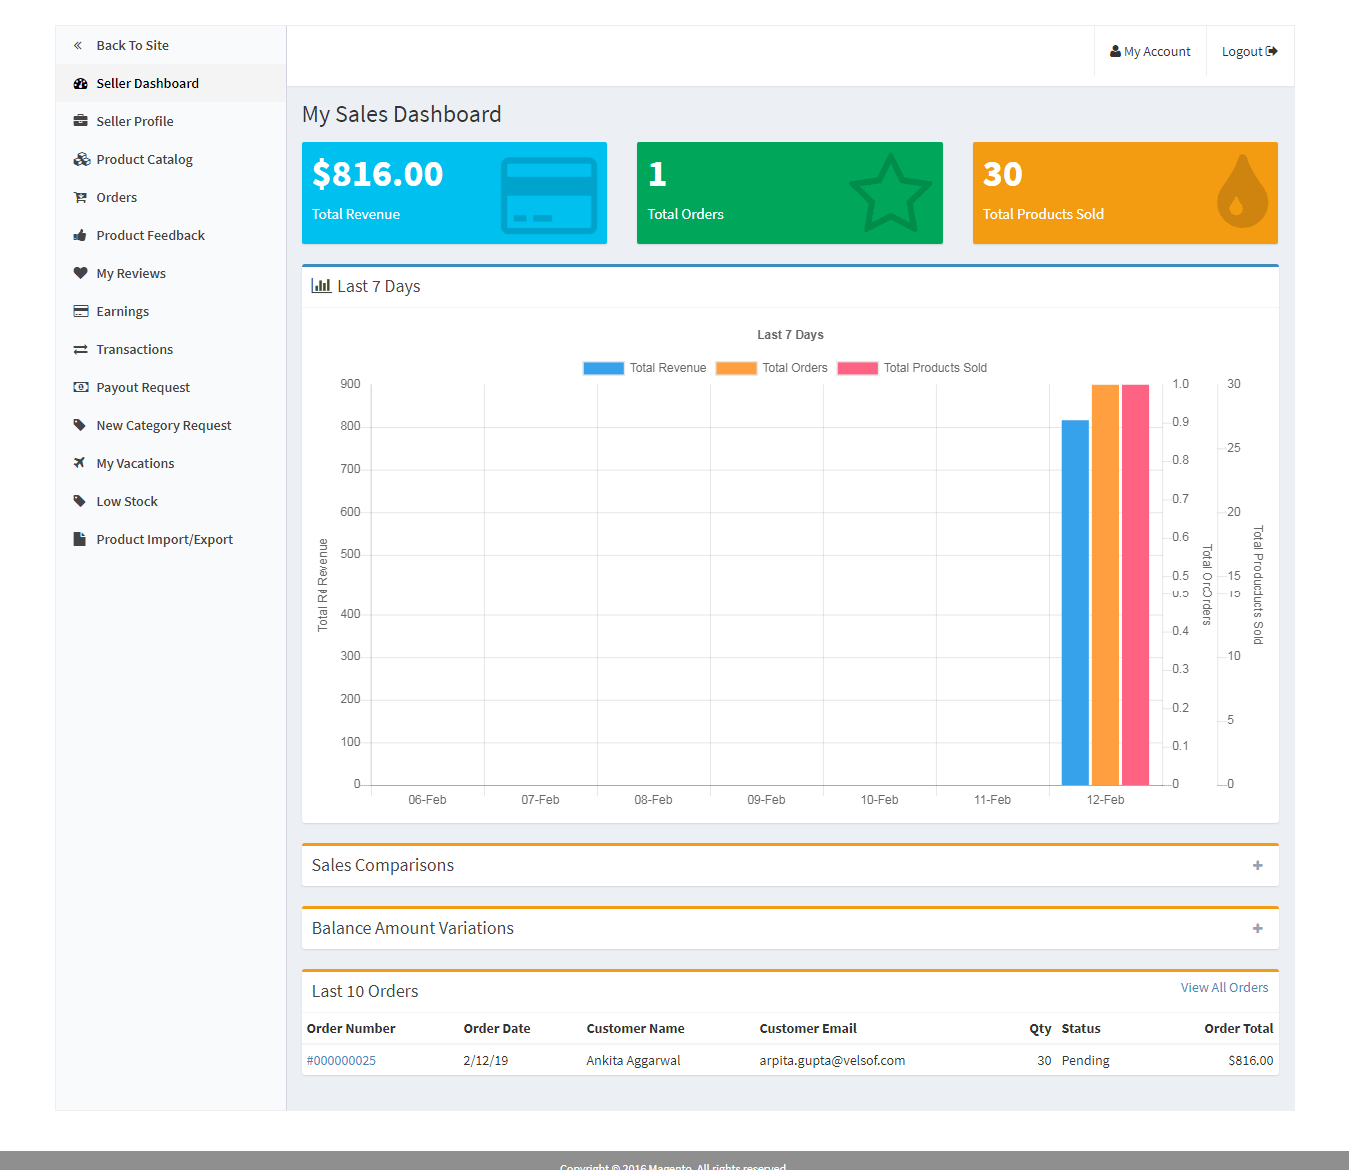
Once the account registration procedure is completed from the back-end of the Magento 2 Marketplace plugin, the seller will get access to the Dashboard. Sellers can view the entire sales report, product list, and order details from the seller dashboard. New Category requests, Payout requests, and vacation requests can be sent by the sellers from the dashboard.
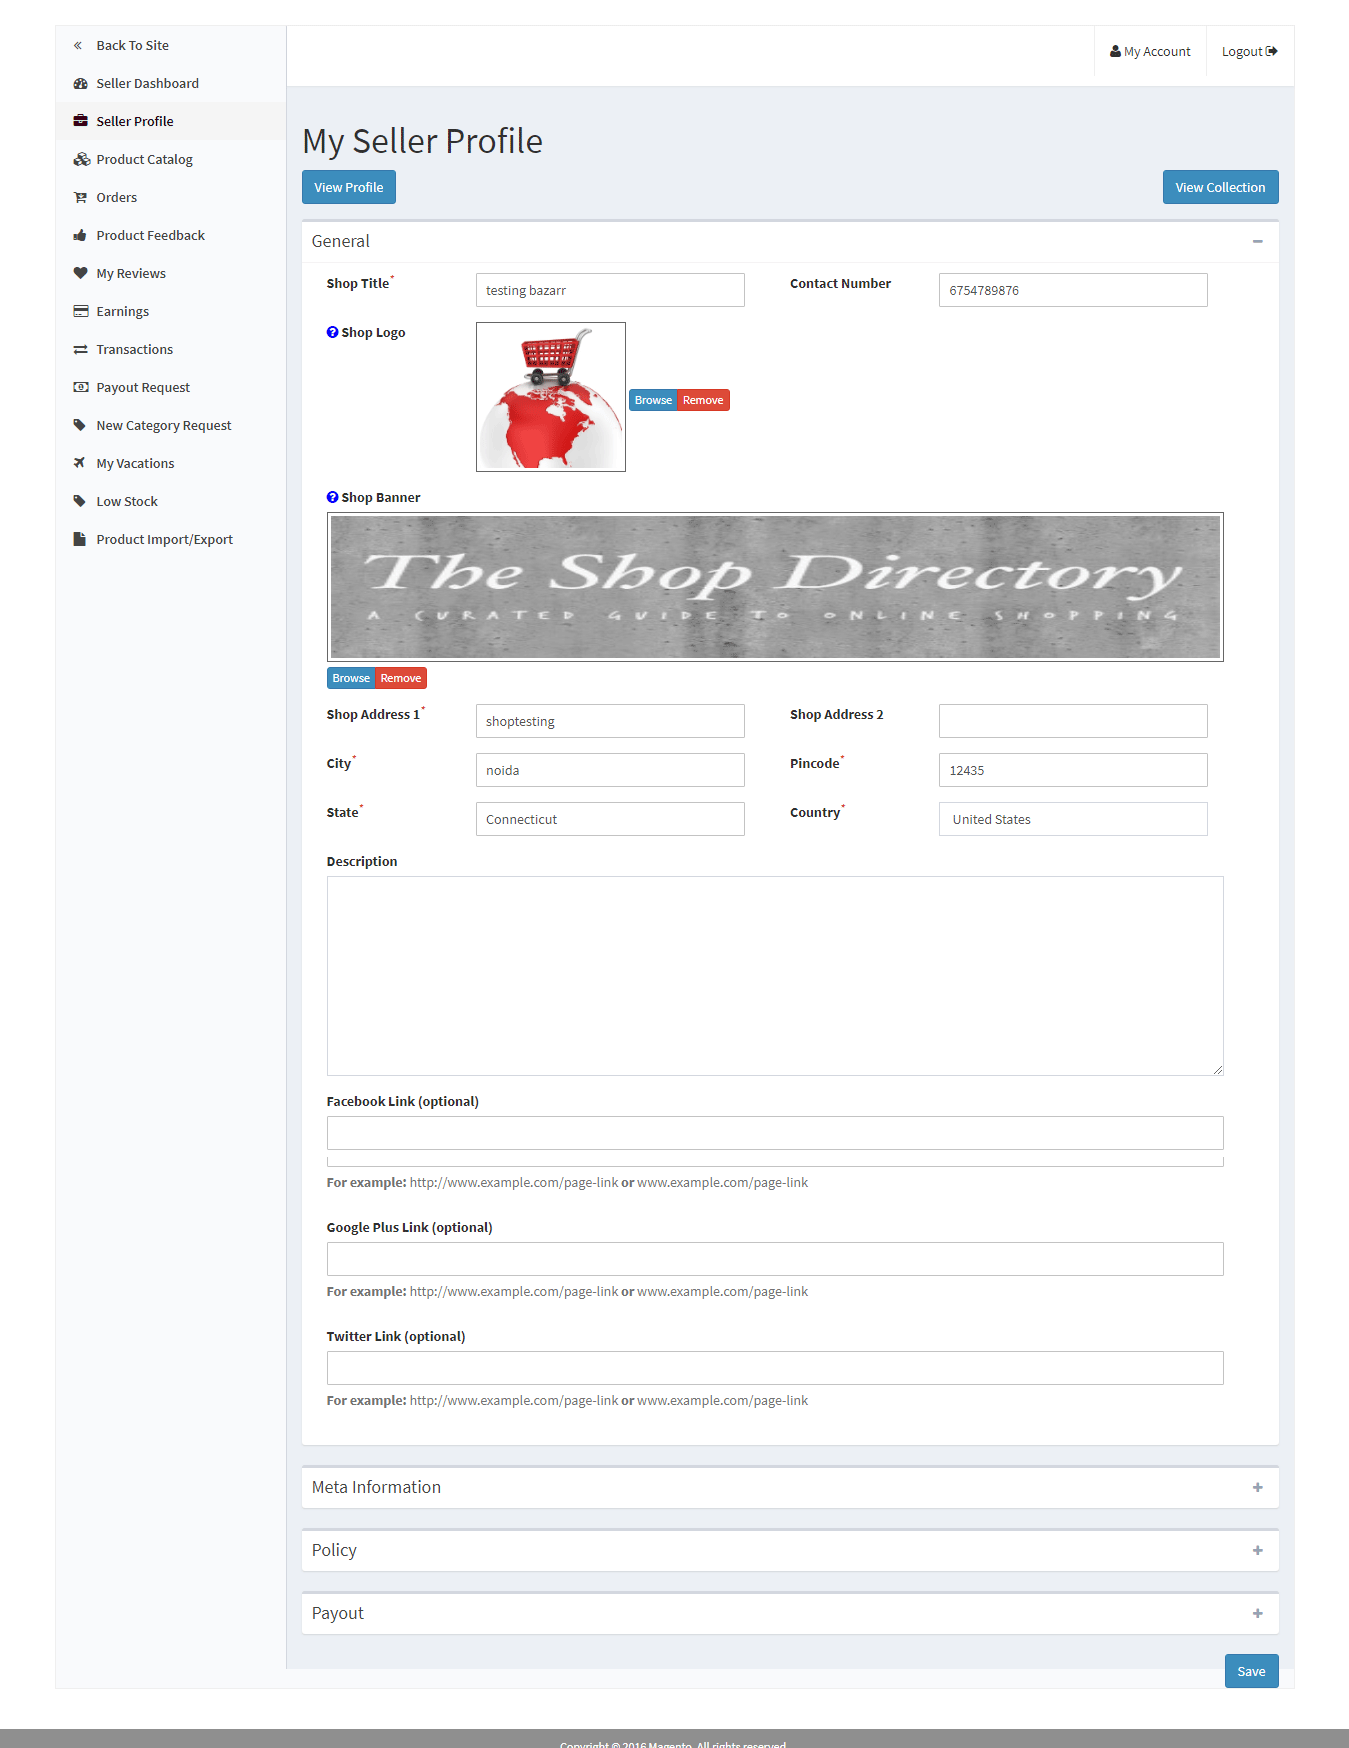
4.2.1 Seller’s Profile
The sellers can edit their profile and personalize their shop from this Seller profile tab of the dashboard. Sellers can add and edit Shop Title, Address, and Social account links in this tab.
4.2.2 Product Catalog
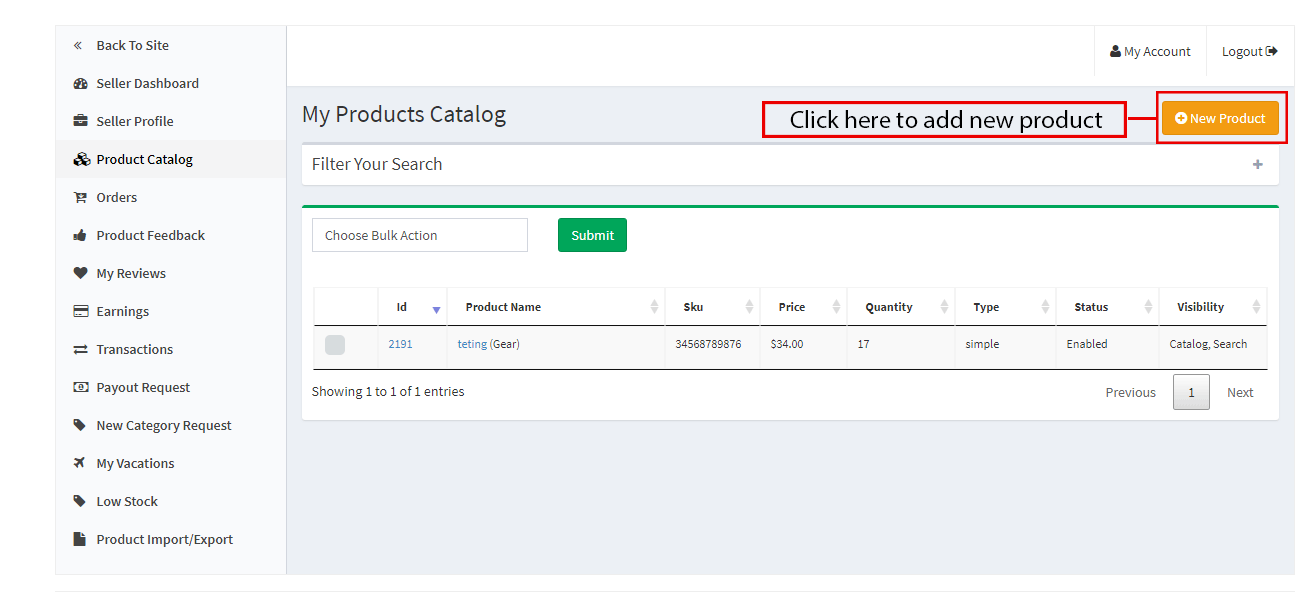
The sellers can follow the path mentioned below in order to add a new product. As soon as the seller will click on the Product Catalog, the following page will display. The seller can view the list of products listed at the Marketplace from the Product Catalog.3.15.6 PayPal Payout Request.
In order to add a new product to the list, click on the “New Product” button
Go to My Account -> Dashboard -> Products Catalog.
4.2.2.1 How to add a new product
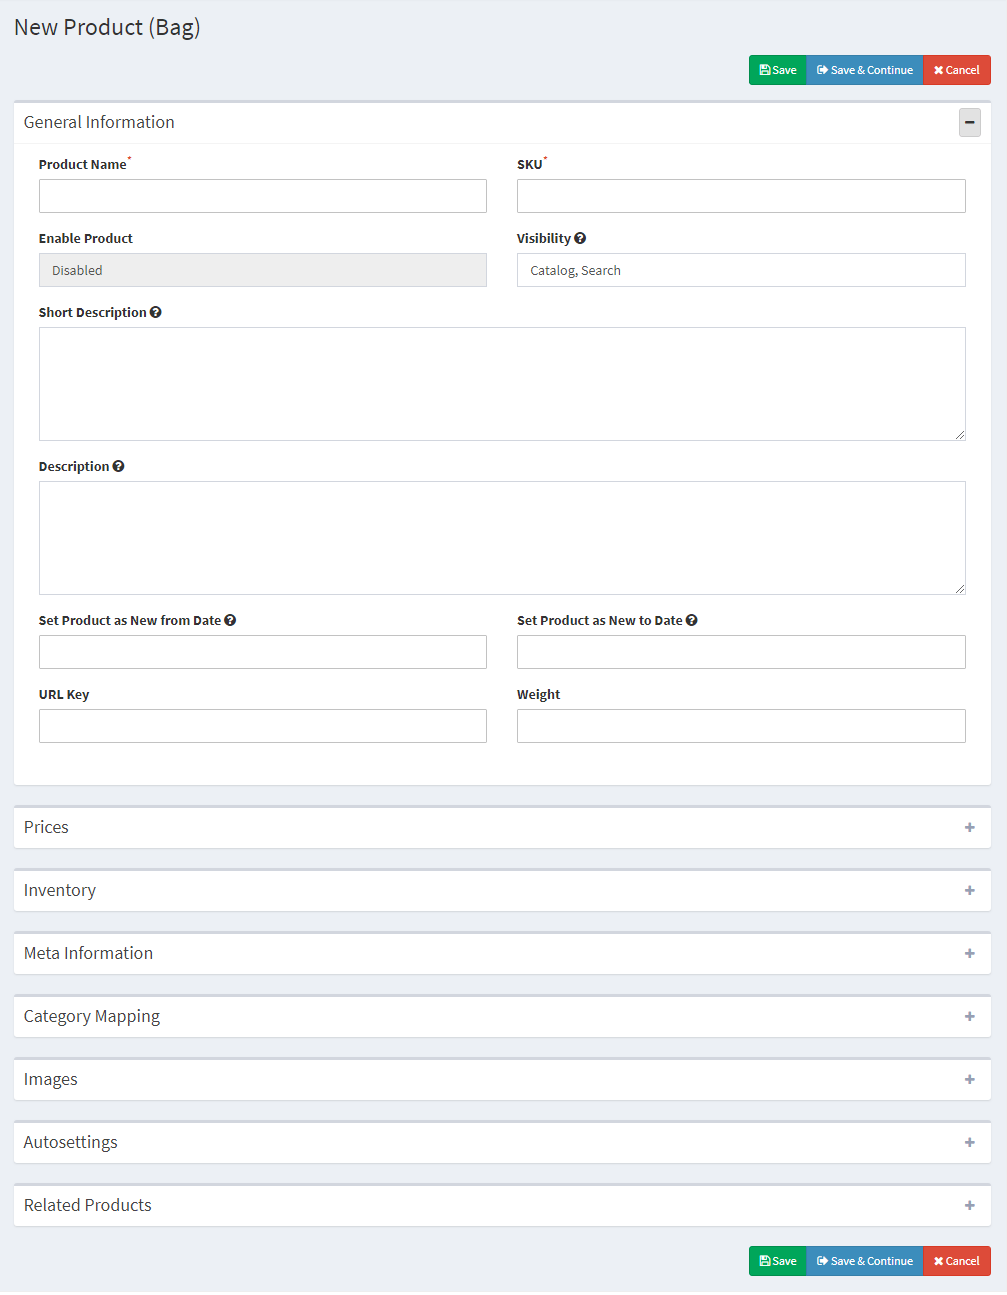
Products already listed by the sellers get listed in the Seller dashboard tab. Once the admin clicks on the “New Product” button, a popup menu with attribute fields and product type field display.
Select the attribute fields and product type field and click on the “Continue” button.
This will redirect you to the ‘New Product’ page. Fill up the mandatory field details in order to add the product.
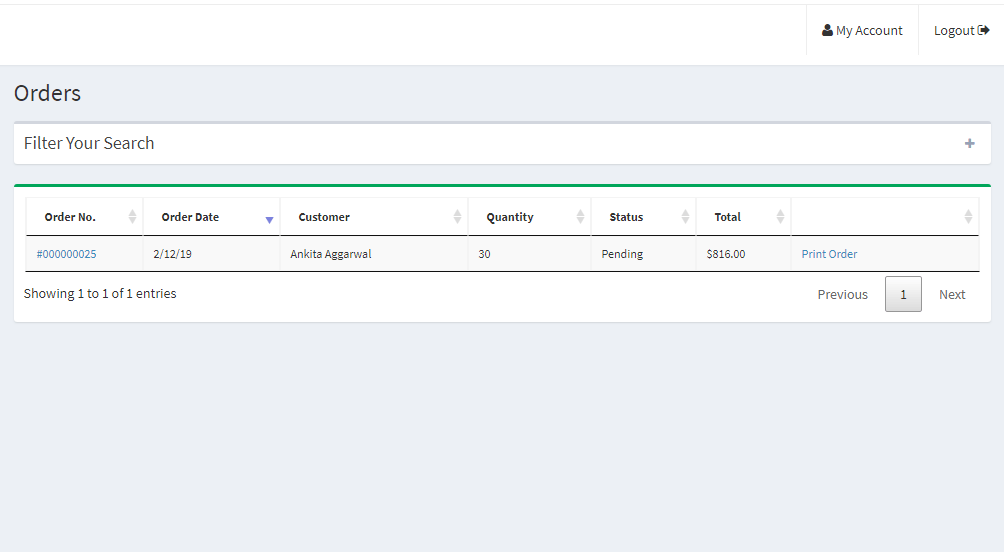
4.2.3 Orders
The list of orders and their related details can be viewed by the seller on this tab of the Seller Dashboard.
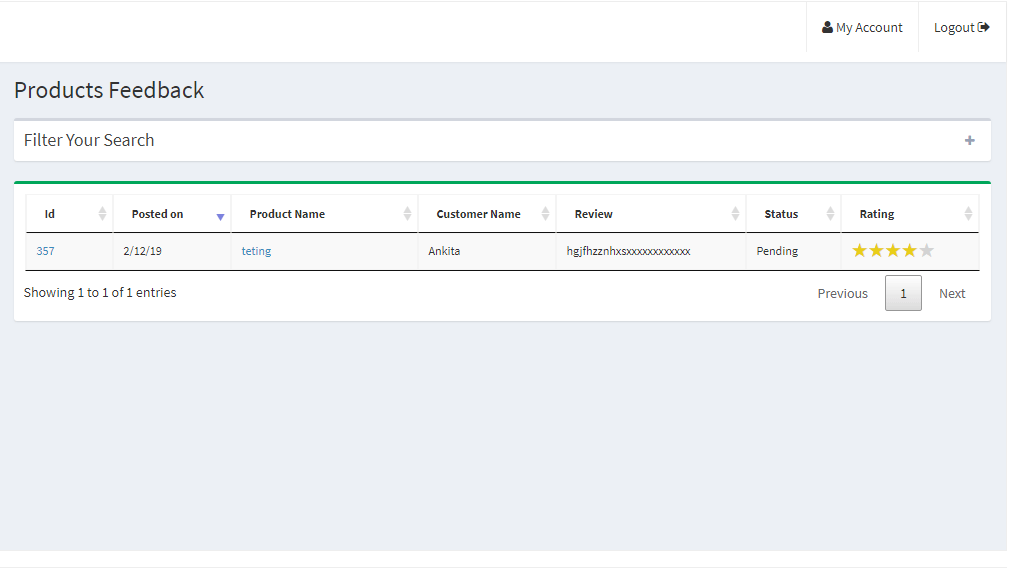
4.2.4 Product Feedback
The sellers can view the Review received on the products in the Product Review Tab of their Dashboard. All the reviews received will list as shown in the image below:
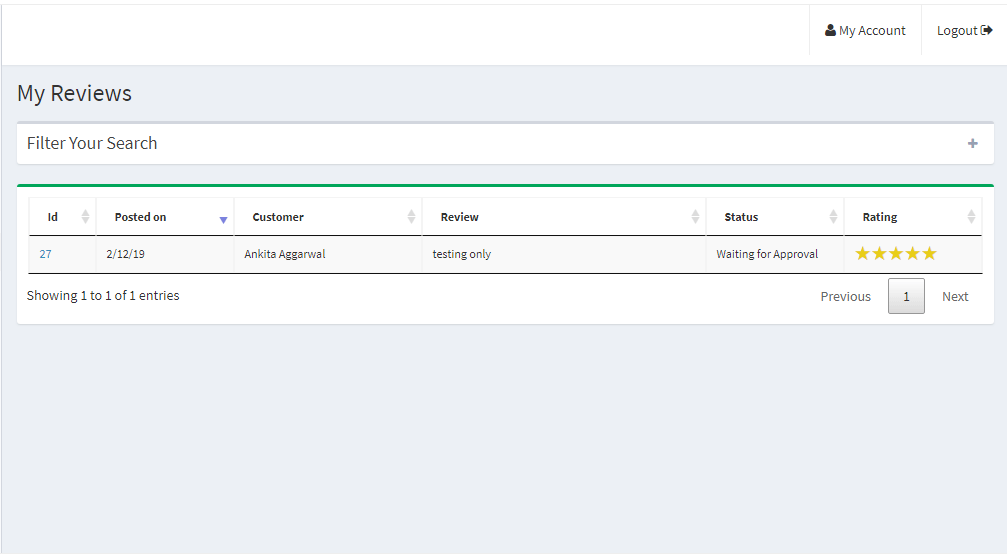
4.2.5 My Reviews
My Reviews tab in the seller’s dashboard lists out the seller reviews received on their profile.
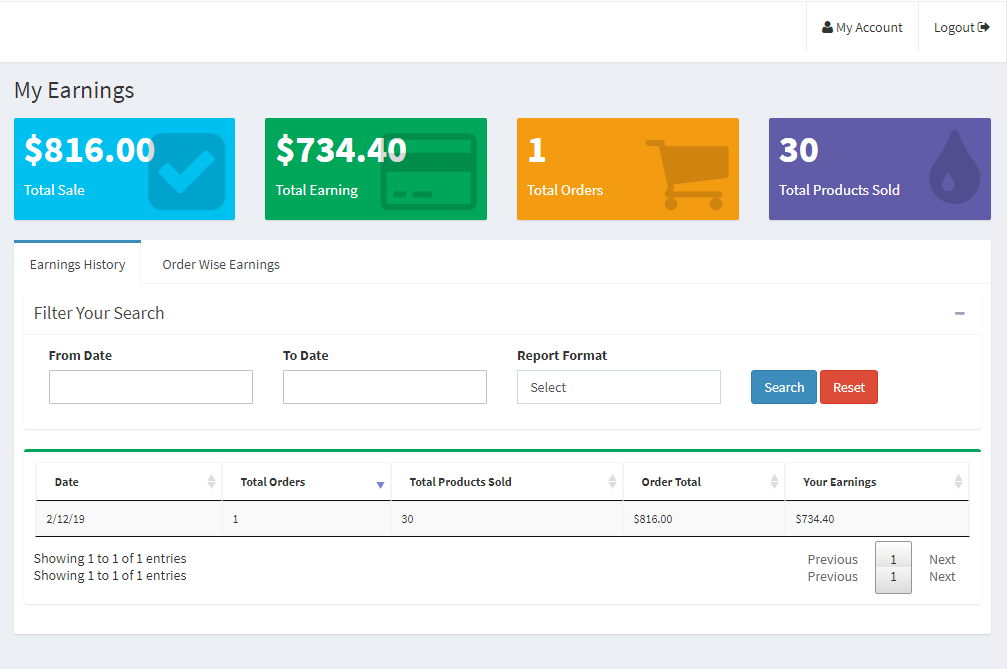
4.2.6 Earnings
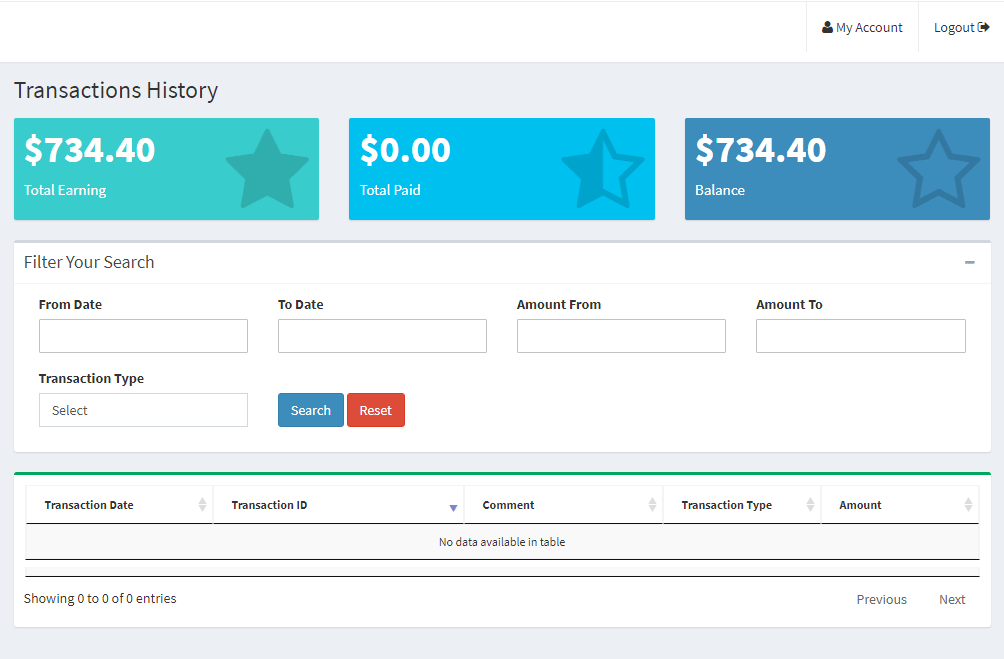
Sellers can view the total sale, total earning, total order, and total product sold in this tab. The vendors can even apply a filter to the earning results as per their requirements. The total earning history will display as shown below:
4.2.7 Transaction History
The seller can view their entire transaction history in the transaction tab.
4.2.8 Payout Request
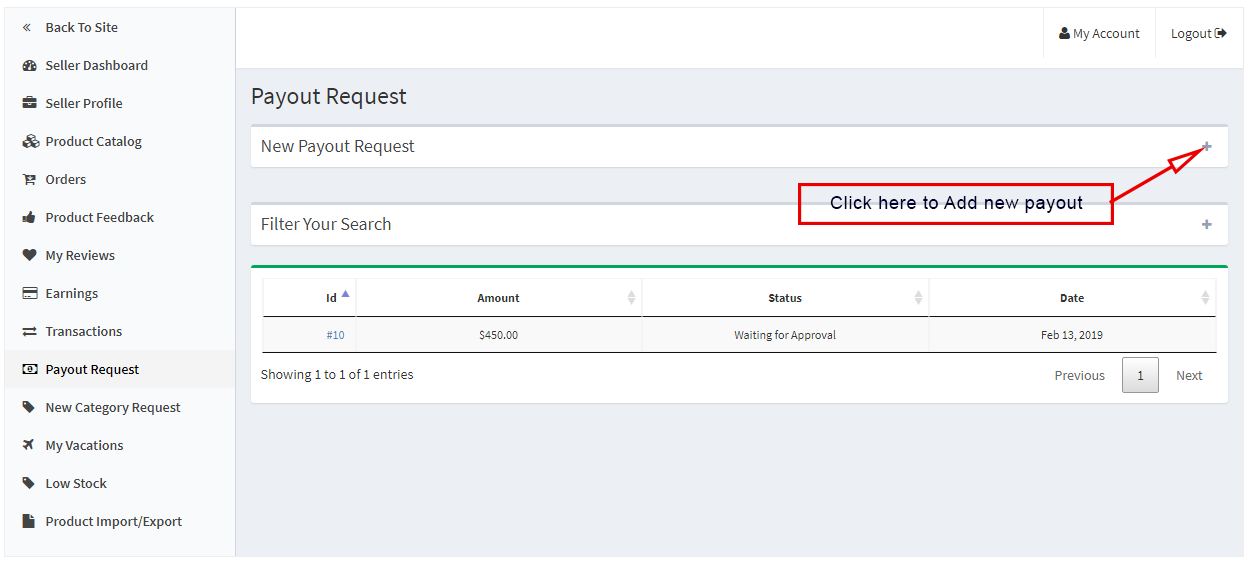
Sellers can view the list of payout requests sent to the admin from the Payout Request tab. Payout Request status can be also be monitored by the seller they can even send category requests to the store admin. Moreover, sellers can generate a new payout request by following the steps:
Go to the Dashboard -> Payout Request
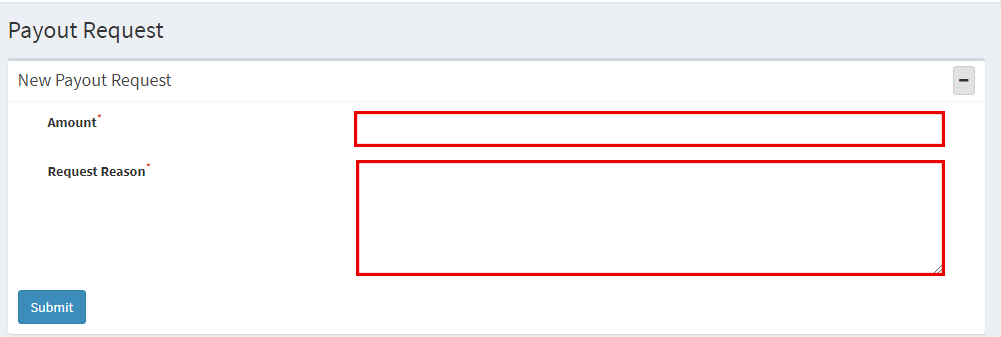
Click on the “+” icon on the right side of the New Payout Request. Once the “+” is clicked, a new dropdown will appear.
Amount: Enter the amount value here.
Request Reason: Enter the reason for Payout Reason in this field.
Click the “Submit” button at the button of the page to submit the payout entry.
4.2.9 New Category Request
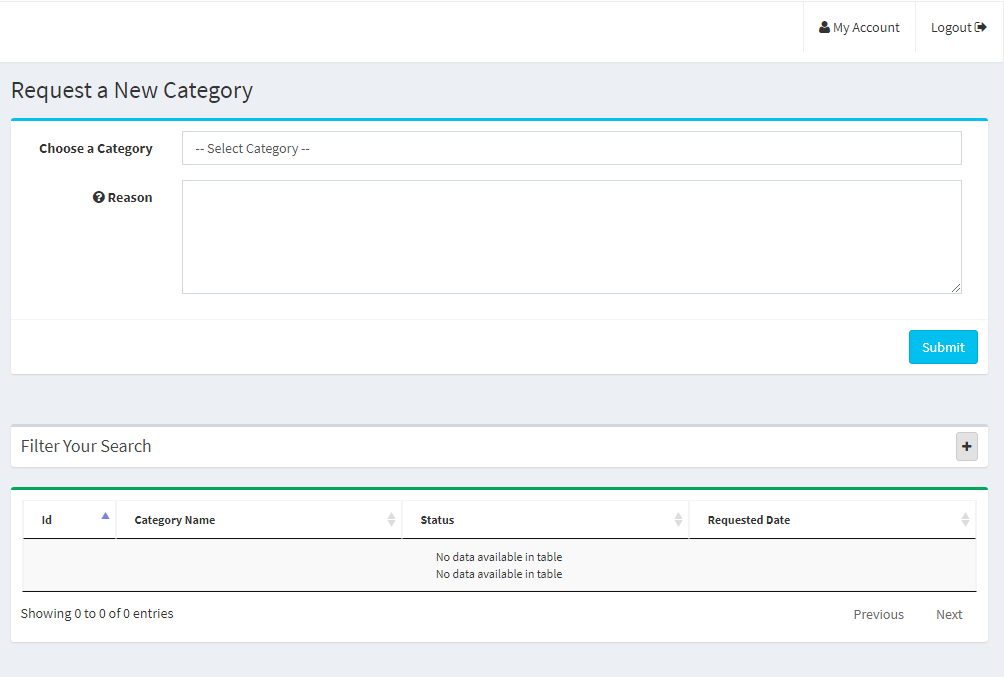
Sellers can view the categories assigned by the admin to them. Additionally, a seller can send a new category request to the store admin by following these simple steps.
In order to send a category request, go to the Dashboard -> New Category Request, a page will open in front of him.
Choose a Category: Select a category you want to request.
Reason: Give an appropriate reason for requesting that category.
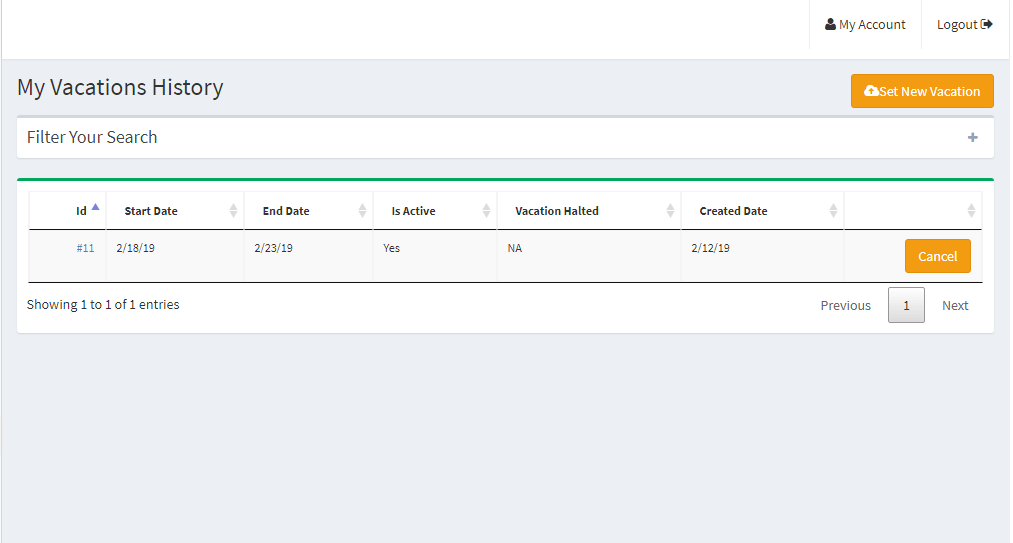
4.2.10 My Vacations
My Vacation tab displays the list of vacation requests already submitted by the sellers to the admin.
4.2.10.1 How to set a new Vacation entry
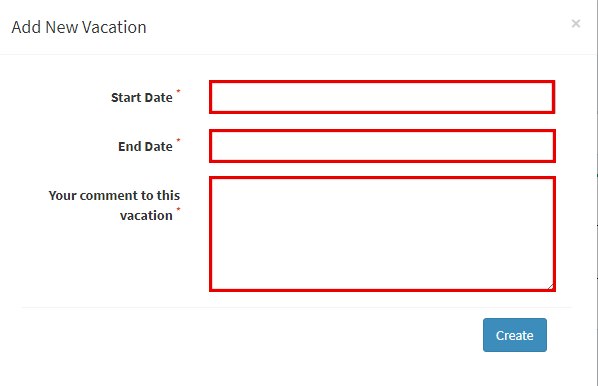
Once the seller is on the My Vacation section, click on the “Set New Vacation” button, a popup window will open in front of them with the following fields:
Start date: Enter the start date of the vacation here.
End Date: Enter the last date of vacation here.
Your comment on the vacation: Enter details related to the vacation here.
Click on the “Create” button here and the request will be sent to the admin for approval then.
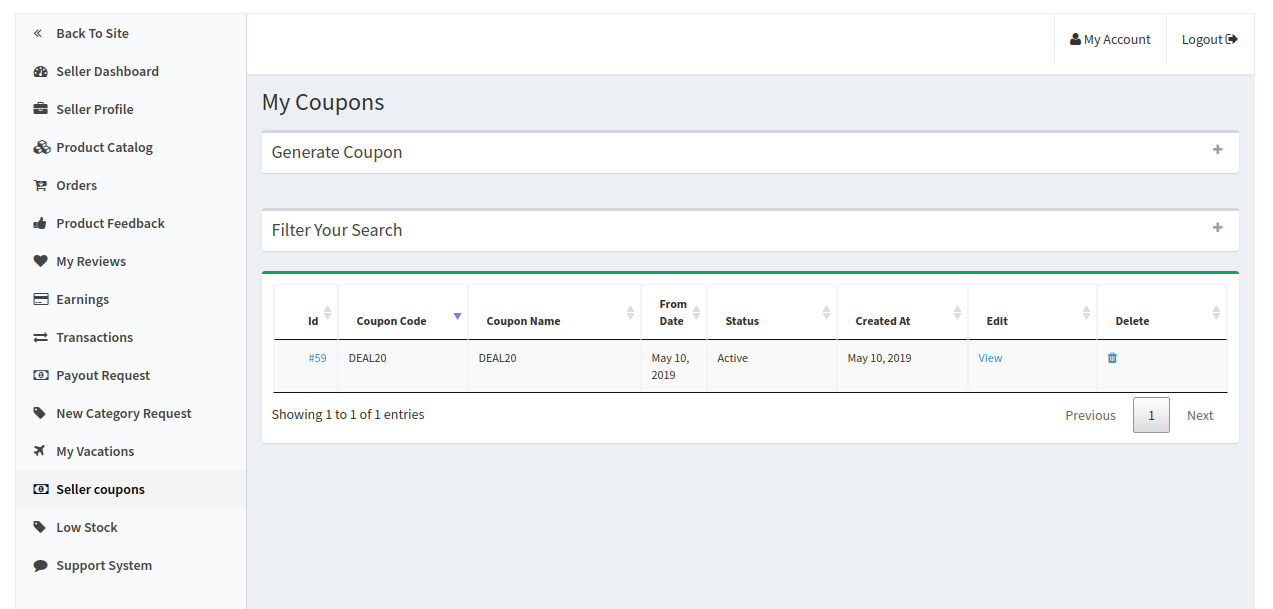
4.2.11 Seller Coupons
Using this feature sellers can generate coupons for their customers. Sellers can use different variations for creating their coupons like users per coupon, coupon type, etc.
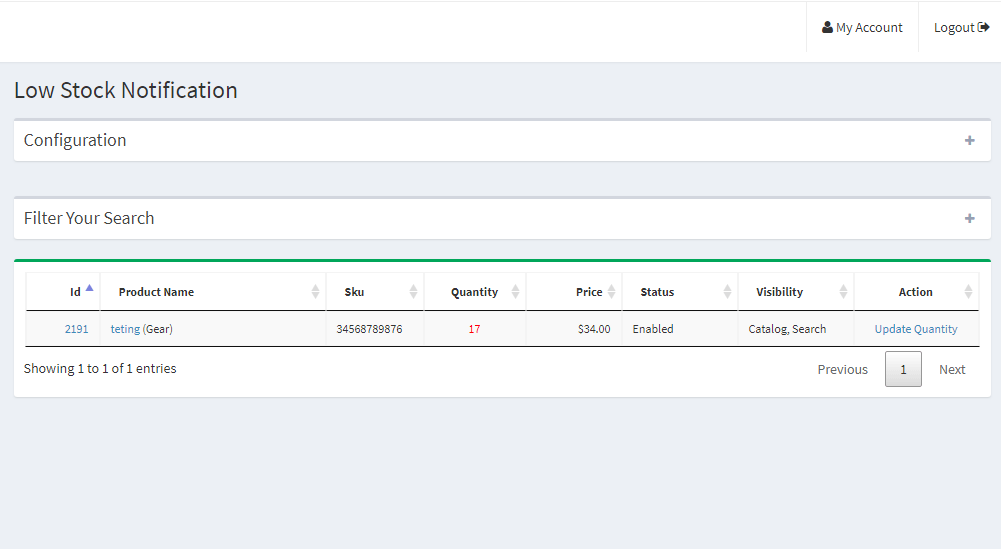
4.2.12 Low Stock
The low stock tab displays the list of products that are low in stock. The seller can set the Low stock Configuration setting from this section. Click on the “+” sign on the right side of the configuration and fill the following field there.
Low Inventory limit: Enter the threshold limit below which you want to get notified.
Receive Low Stock Notification: Enable/ disable the Low stock Notification from this field.
4.2.13 Product Import and Export
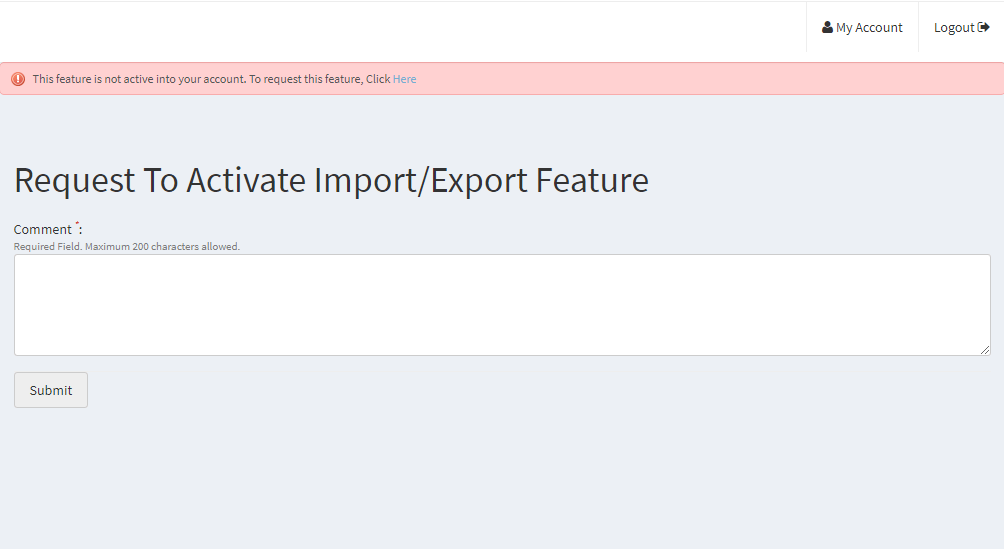
In order to upload the products in bulk, sellers need to generate a sent product import/ export request to the admin. Enter the comment in the box, and submit the request to the admin. Once the admin approves the request, only then the seller can upload the products in bulk.
4.2.14 Support System
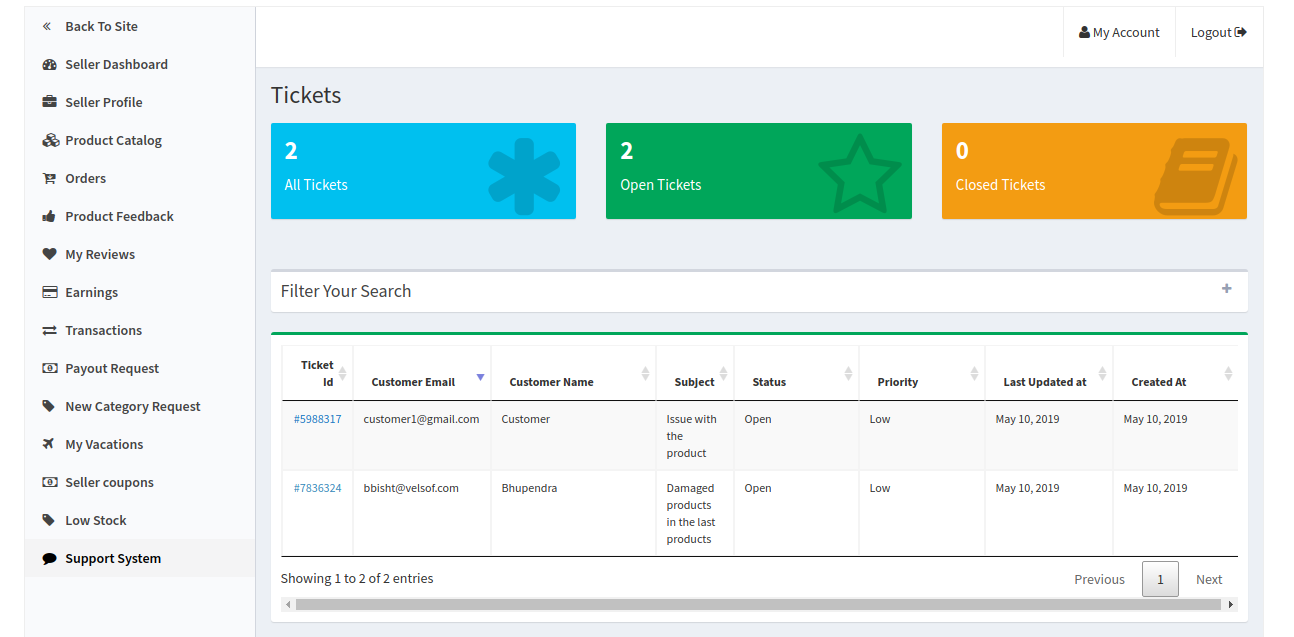
This feature allows the sellers to view the queries of their customers in the form of tickets. When the seller clicks on the Ticket ID they are able to see the full detail about the query and even reply and change the status of the query.
4.2.15 Seller Shipping
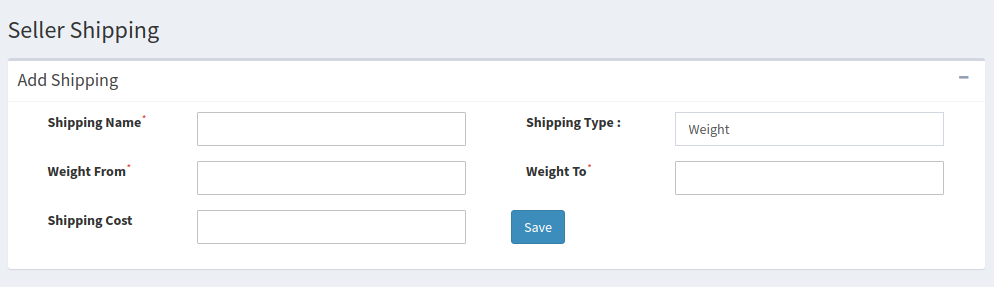
By using this feature sellers can add their shipping prices based on the weight and price range of the products. This will allow them to fix a shipping price for a particular weight range or price range. They can use this feature while adding a new shipping method.
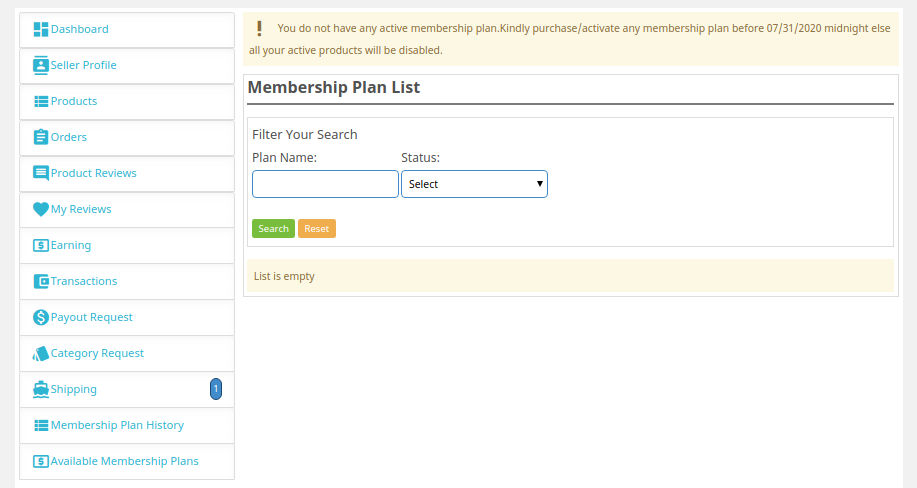
4.2.16 Seller Membership Plan
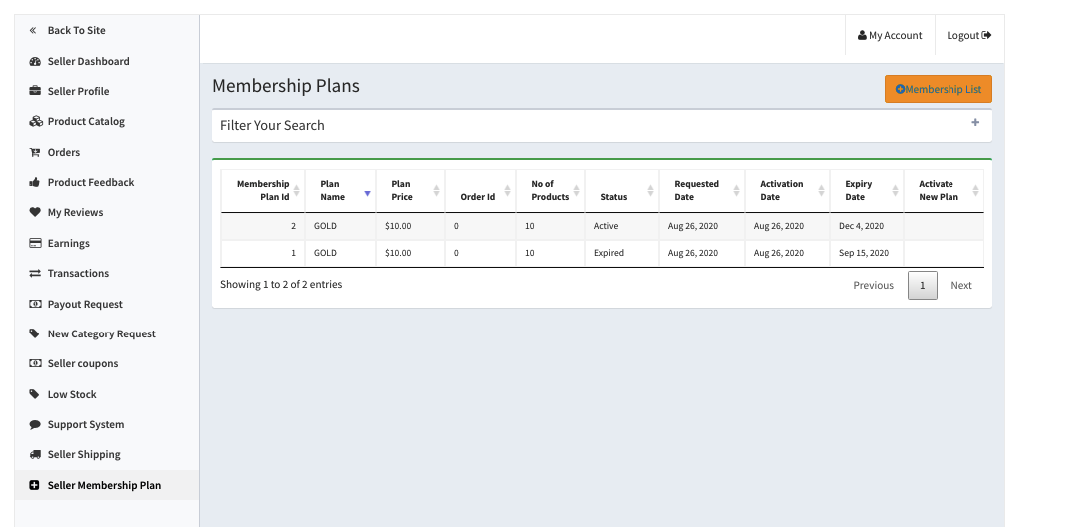
Sellers can check their membership plan history by applying filters. Under the filters, sellers have to fill in the plan name and the order ID of the membership plan for checking the history of the membership plans.
To add a new membership plan sellers have to click on the “Membership List” button.
For further information, refer to the following links:
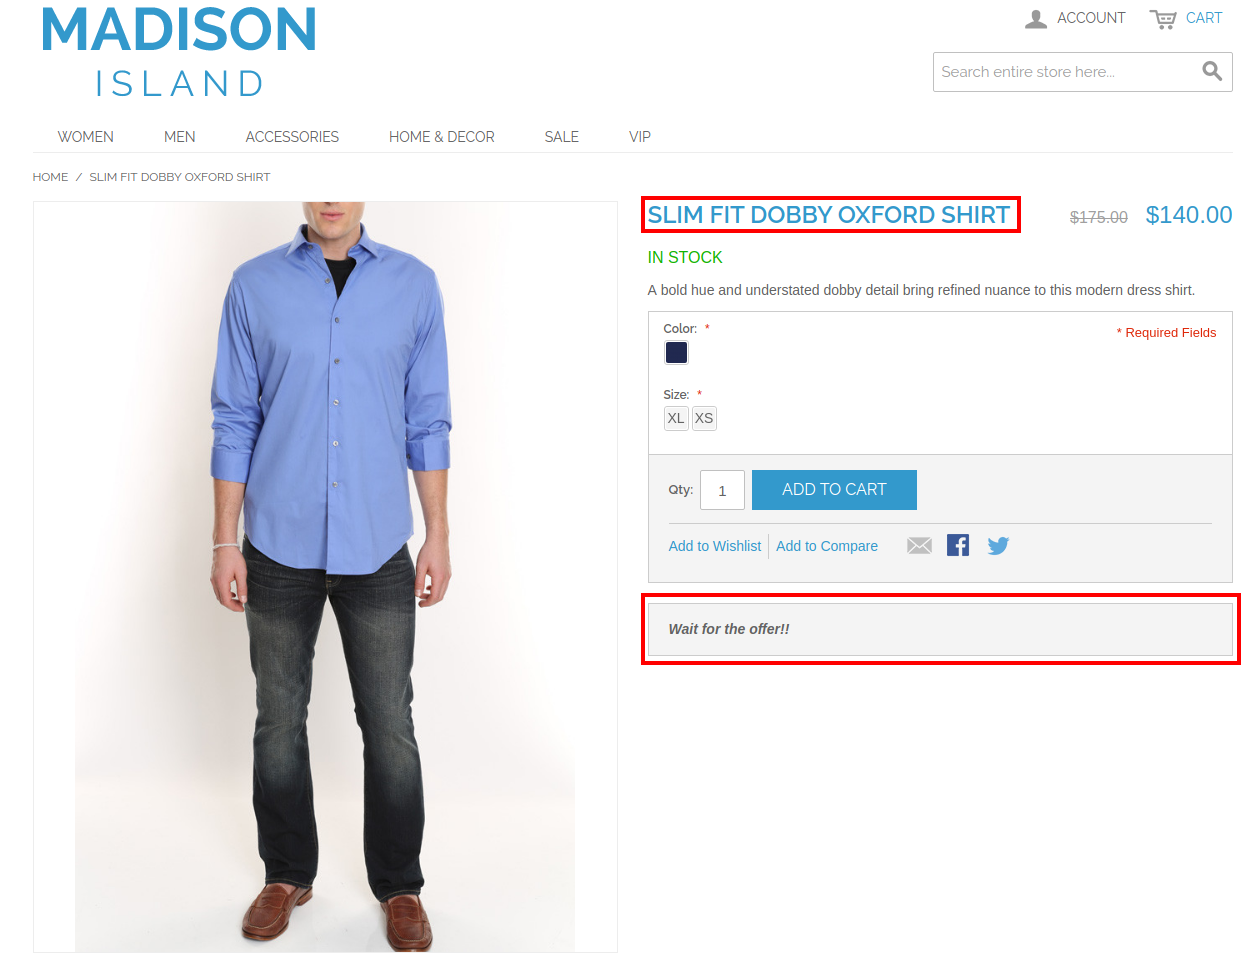
Do you know an effective way to drive sales and engagements for the website? The instant process to boost conversions is to provide compelling reasons to BUY NOW for your visitors. Sales Countdown Timer campaigns seamlessly convert your hesitant buyers into leads for your store. Magento Countdown Sales Timer Extension from Knowband helps e-merchants in convincing their visitors by displaying a Countdown Timer bar on the frontend. Finding the countdown timers, customers will either act fast or will miss the deal forever.
This Countdown Timer extension for Magento is a multi-purpose module offering flexible settings to catch the attention of the customers via attractive sales countdown timers. Being a store owner, you can create unlimited custom looking timers for your store and can display them as per some fixed schedules. Magento Countdown Sales Timer extension not just stimulates purchase levels but also offers an intuitive way to promote products and categories of the store. Hence, Sales Countdown Timer Bar for Magento is an advanced promotion tool to run occasional sales, timed discount deals, boost new arrivals and launches on the store.
1.1 Striking Features of Sales Countdown Extension for Magento
Installing and configuring Magento Countdown Sales Timer extension doesn’t involve any technicalities nor it includes any source code modifications. The in-built features of this Magento module can be effortlessly modified without any assistance. The various features offered by countdown timer campaigns module have been listed below:
Magento Countdown Sales Timer extension is a quick and easy way to add real-time sale countdown timers to create urgency among store visitors.
This Sales Countdown Timer Bar for Magento is designed to match up with your store theme and requirements.
Magento sale countdown module lets you set up and schedules sales campaign between two fixed dates and time.
Create any number of countdown timers for different store products and categories without any coding efforts.
Magento Countdown Timer extension allows admin to set the desired name, description for each countdown timer.
The Countdown Timer extension for Magento allows e-merchants to set the unique priority order for each of the reminders.
Admin can show a customized button on the Sales Countdown Timer Bar for Magento website. They can set a link on that timer button as per their site requirements.
Magento Countdown Timer supports compatibility with multiple languages and site themes.
With Magento sale countdown module, admin can display a custom countdown timer expiration message on the frontend. This information is useful for the visitors to know that the prevailing deal or offer has been expired.
Using color picker tool, store merchants can also set appealing colors and predefined themes for Sales Countdown Timer Bar for Magento site.
1.2 Magento Countdown Sales Timer Benefits to Customer
With Magento Countdown Timer, customers are updated with the trending rush alerts and active campaigns on the store.
Magento sale countdown module features a landing page link which redirects the customer to the main page containing new launches or promotional offers.
1.3 Technology for Development
Language: PHP Frame Work: Magento
2.0 Installation Guide
The store admin can follow these simple steps for installing the Magento Countdown Sales Timer extension:
1. First of all download the extension package from the Knowband store.
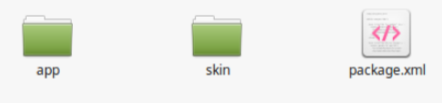
2. You will get a zipped file containing the source code and user manual. Unzip the package on the root folder of your Magento setup via FTP manager (like Filezilla or WinSCP – download here: https://filezilla-project.org/). You’ll find the files and folders as shown in the image below:
The extension is now installed and ready for use. Now the store admin can now use and configure the Sales Countdown Timer Bar for Magento.
3.0 Admin Interface of Sale Countdown Magento Extension
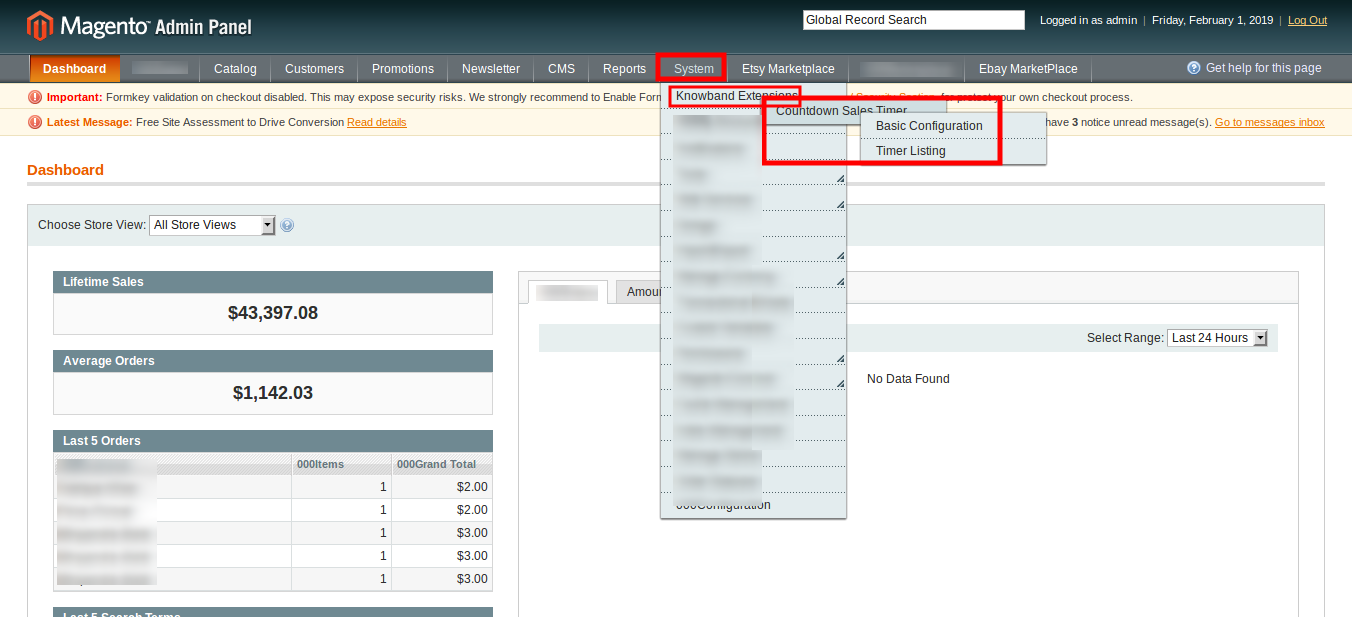
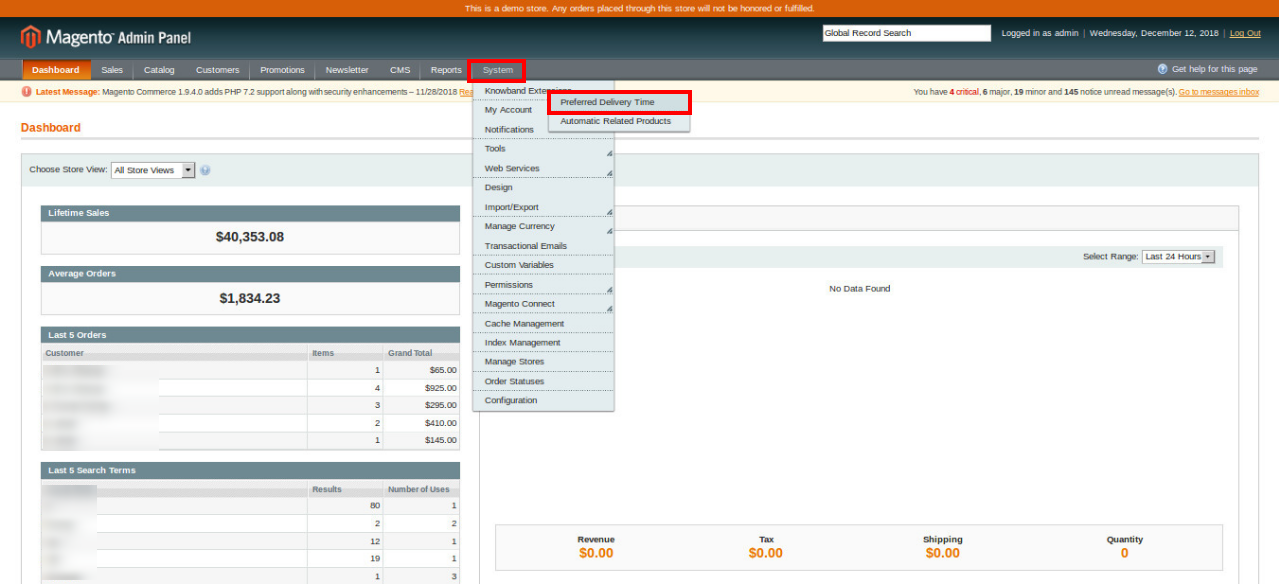
Once after you have successfully installed Magento Countdown Sales Timer extension from Knowband Store, you can now easily configure its different settings and make it ready for your Magento website. To configure the various settings of this module. Open the admin panel, go to System > Knowband Extensions > Countdown Sales Timer
The complete settings of this Countdown Timer extension for Magento is divided into two parts:
1. Basic Configuration
2. Timer Listing
Basic Configuration
The admin interface showing the basic configuration settings of this Magento module is as given below.
1. Enable the Extension: The functionality of Magento Countdown Sales Timer extension can be enabled or disabled using the provided toggle switch. 2. Include jQuery: Admin can include the jQuery library on the store’s front if the library was not present on the client store.
Timer Listing
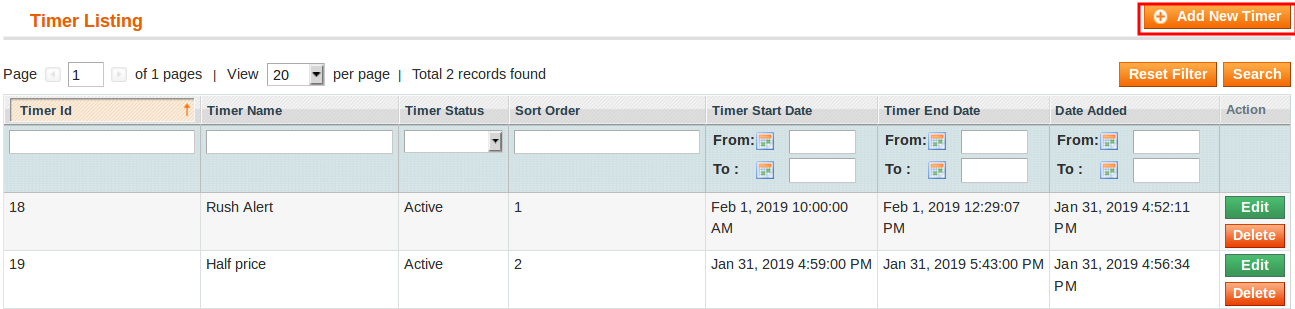
The admin interface of Magento Countdown Timer consist of a list of timer records along with filter option. The settings for each of the existing timer can be separately deleted or configured.
Add New Timer: Use this option if the admin wants to create a new coundown reminder for their store. To modify the settings for any existing reminder, click on Edit button corresponding to a particlar reminder record. The configuration settings for a particular countdown reminder is divided into three major sections as:
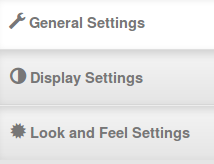
1. General Settings
2. Display Settings
3. Look and Feel Settings
Each Tab under Timer Settings of Magento Countdown Timer module has been discussed below.
3.1 General Settings
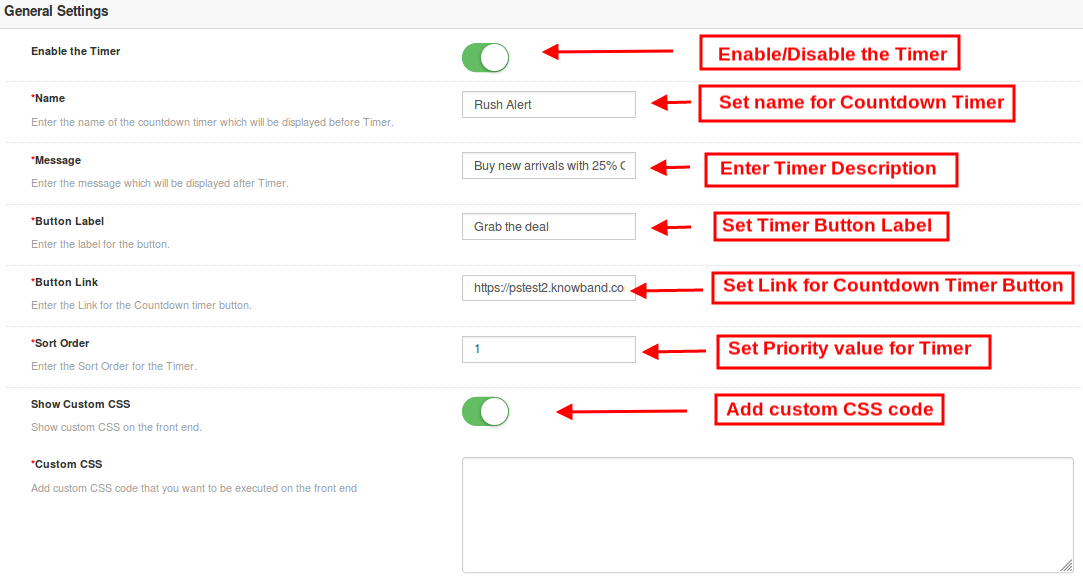
On clicking on the General Settings tab, you will see the following options as given below:
Initially the above fields are set to their default values.
1. Enable the Timer: Admin can enable or disable a selected timer using this toggle switch. 2. Name: Set a custom name for the countdown timer which will be displayed before Timer. 3. Message: Set a desired message which will be displayed after Timer. 4. Button Label: Admin can set a custom label for the button on countdown timer block. 5. Button Link: Admin can set a desired URL on button click. When the user clicks the button, they are redirected to this specific link. 6. Sort Order: Admin can set the sort order or priority value for each of the reminders created for the Magento site. Remember, this priority value should be unique. 7.Show Custom CSS: Admin can add custom CSS code to enhance the frontend functionality of the website.
After this, click on the “Save” button shown at the top right corner of admin panel to save the module settings.
3.2 Display Settings
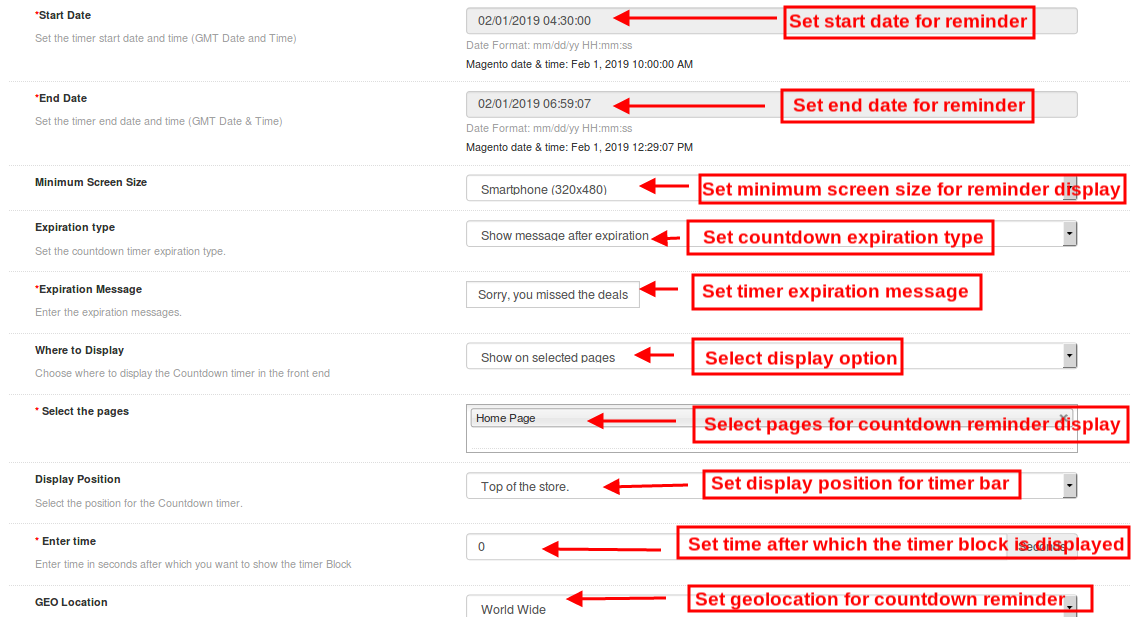
The display settings of this Magento module control where and how the Magento Countdown Timer will be displayed to the visitors. The various configuration options under this section include:
1. Start Date: Admin can set a start date and time(GMT date and time) for the counterdown timer. 2. End Date: Similarly, they can set a end date and time for the counterdown timer. 3. Minimum Screen Size: Admin can select a particular display configuration using this option. 4. Expiration Type: This option allows you to set the countdown timer expiration type. 5. Expiration Message: If the expiration type has been selected as Auto then no message is displayed after the deal expires. But if you have selected Show Message option, then set a custom expiration message in this field. 6. Where to Display: Admin can choose where they want to display the countdown timer block on their website. 7. Select Pages: If the admin wants to display the timer block on selected pages, then they can select the pages here. 8. Display Position: Site admin can fix the display position for the countdown timer block over the website. The three display options include:
Top of the store
Fixed to top of window
Bottom of the store
9. Enter Time: Admin can enter time (in seconds)after which they want to show the timer Block on the frontend. Set 0 if you want to display it immediately to the visitors. 10. Geolocation: This option lets you select the geolocation for the display of sales timer block.
After this, click on the “Save” button shown at the top right corner of admin panel to save the module settings.
3.3 Look and Feel Settings
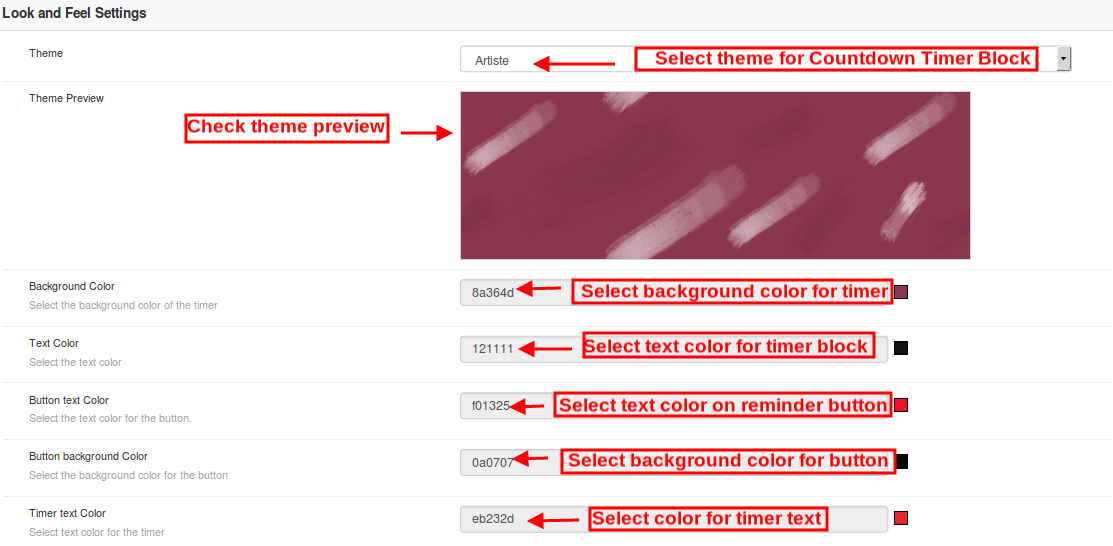
The look and feel settings of countdown magento extension control the frontend appearance of the countdown timer block. The various configuration options offered are:
1. Theme: Admin can set a particular theme for the sales timer block from the themes offered by countdown timer campaigns module. 2. Theme Preview: This option allows the admin to preview the theme before the apply the changes to their website. 3. Background Color: Using this option admin can set the background color for the sales countdown timer block. 4. Text Color: The font color of the text shown on countdown timer block can be set using this option. 5. Button text Color: Admin can change the text color on the timer button. 6. Button background color: Admin can set a desired background color for the timer button. 7. Timer Text color: Select text color for the timer text shown in sales countdown block.
After this, click on the “Save” button shown at the top right corner of admin panel to save the module settings.
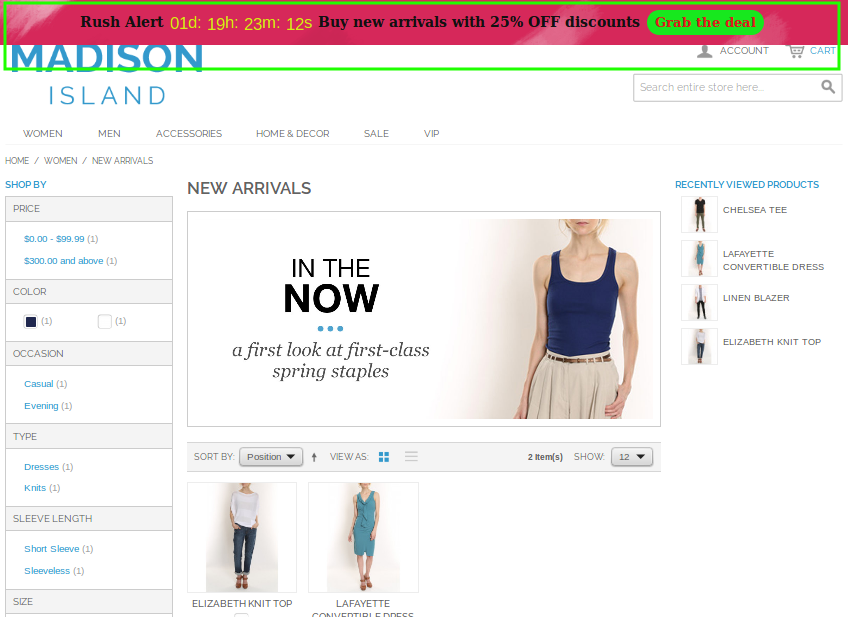
4.0 Front Interface of Magento Countdown Sales Timer extension
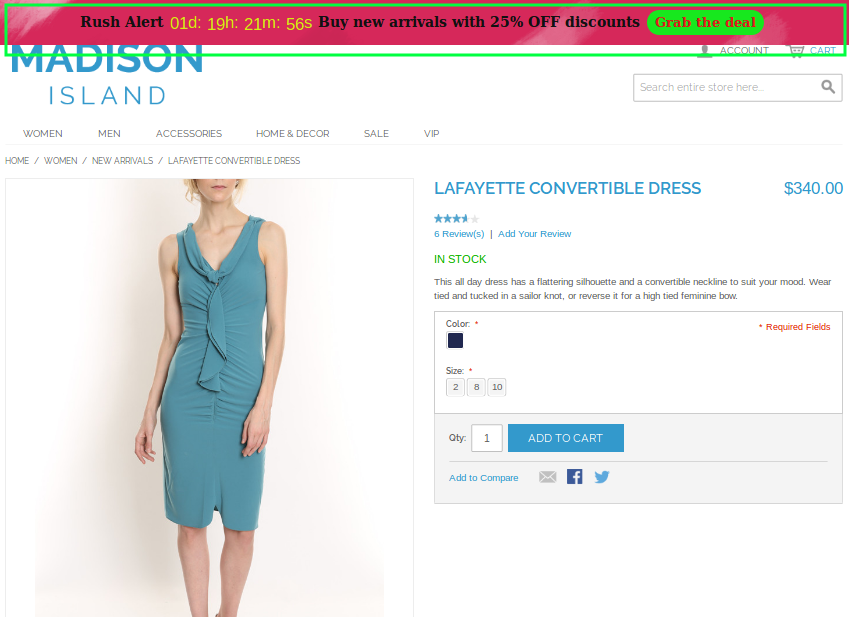
After you have successfully configured the settings of magento sale countdown module, you can see Sales Countdown Timer Bar for Magento store in accordance with the selected priority values and time schedule.
In the present time, customer belief is utmost important for higher business growth. Well many users want to buy a product but are not sure about its quality. But how exciting it would be for them if a customer posts his experience after purchasing a product so that new visitors can get full assurity about the product quality. So are you finding a way to promote your store products and encourage more customers to write reviews for the purchased product. Knowband offers Magento Review Reminder and Incentives extension that reminds your customer to write the review for the purchased product and helps to keep your customers engaged on the website.
The Magento Review Reminder and Incentive Extension is highly customizable module loaded with many features and can be used without investing any coding efforts or technicalities.This module offers admin to motivate their customers to give their reviews and ratings on the products purchased by them.
1.1 Striking Features of Review Reminder and Incentives Extension for Magento
The Magento review reminder and incentives extension provides you multiple features which are fully customizable and easy to configure from the backend interface without requiring any coding knowledge. The various striking features of the Magento review reminder and incentives extension have been listed below.
The Magento review reminder and incentives module allows the admin to keep a check on the reminder triggers as well as the incentives offered. The admin can set the timing when they want to send the reminder and fix the incentive criteria from the back-end.
The Magento review reminder and incentives module allows you to evaluate review before posting on product page. If you select automatic then reviews will be automatically approved and if you select manual then admin can approve or disapprove it.
This module allows admin to give incentives and reminders to selected group i.e either customer or buyer or both.
Admin has the full authority to set a custom title for subject line and custom template on email when a review is accepted/not accepted and incentives are included/excluded.
The functionality of Magento review reminder and incentives plugin can be enabled/disabled for the complete site or each separate pages like Homepage, Product page, Category page etc.
Magento review reminder and incentives extension offers SSL compatibility and mobile responsive interface.
Magento review reminder and incentives module works flawlessly with multiple languages.
This module allows admin to change the color of background, border or text at front end.
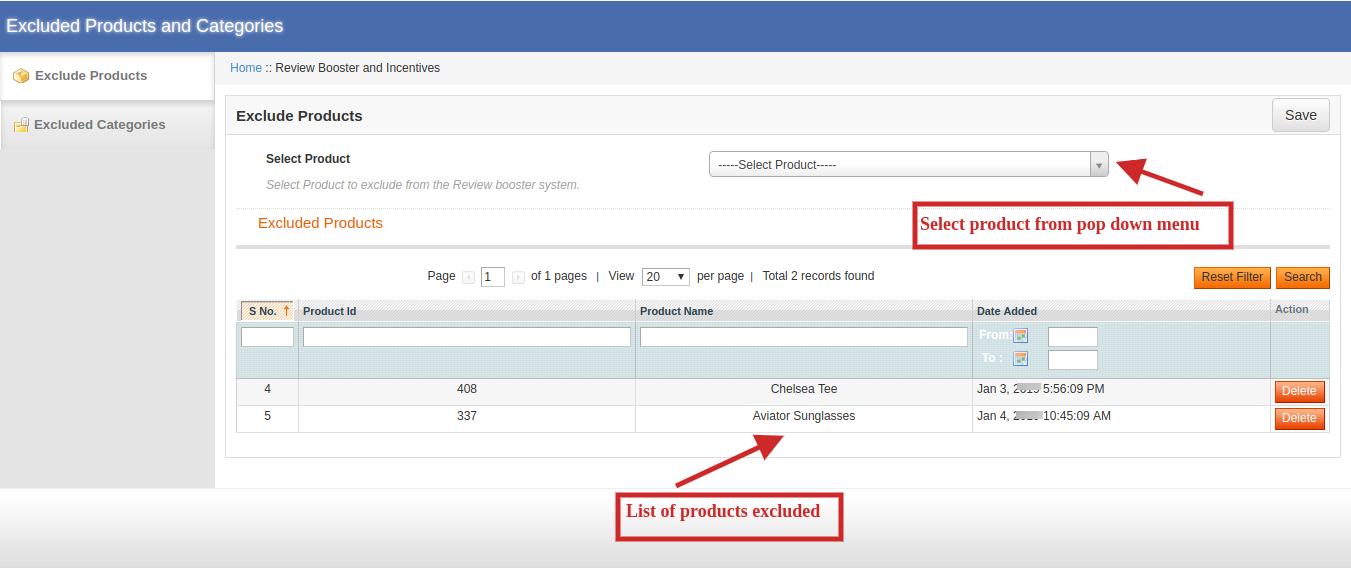
The Magento review reminder and incentives module allows admin to select from the list of products and exclude it from review booster system.
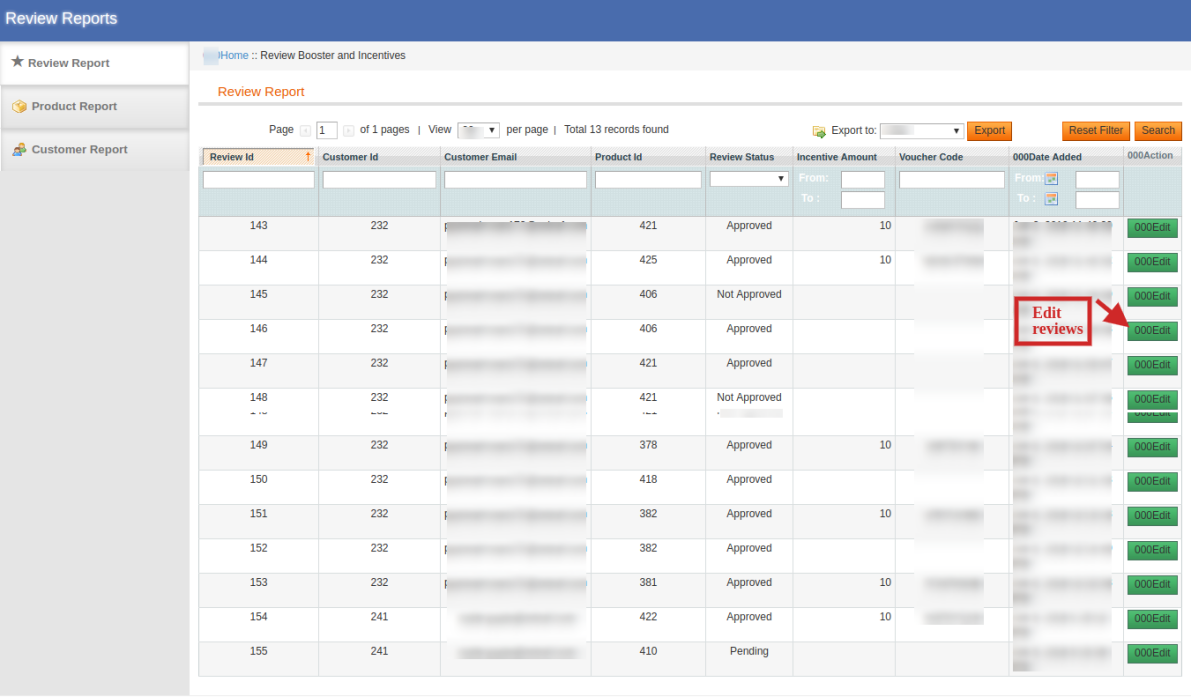
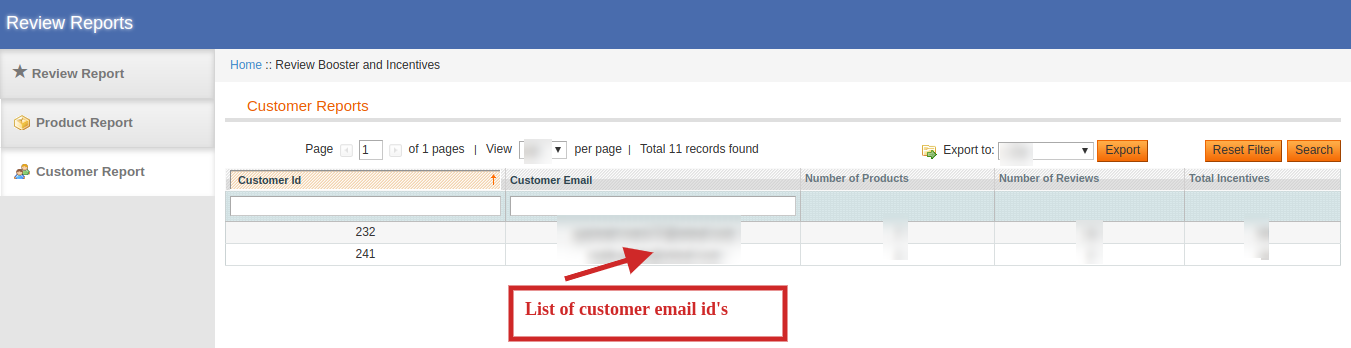
The Magento review reminder and incentives module allows admin to keep a check on customer ID and email along with the no. of reviews posted and total incentives given to them.
1.2 Technology for Development
Language: PHP Frame Work: Magento
2.0 Installation Guide
The store admin can follow these simple steps for installing the Magento Review Reminder and Incentives extension on their store:
First of all purchase the extension package from the Knowband store.
After purchasing the Magento review reminder and incentives extension from the Knowband website, install it on your system.You will get a zip extension containing the source code of the module.
Install it on your website. It would show a pop-up for your confirmation.
Click on “Proceed with the installation” option. This step will install the module and show notification – “Module(s) installed successfully”.
After installation, enable the same from the admin panel.
3.0 Admin Interface of Magento Review Reminder and Incentives Extension
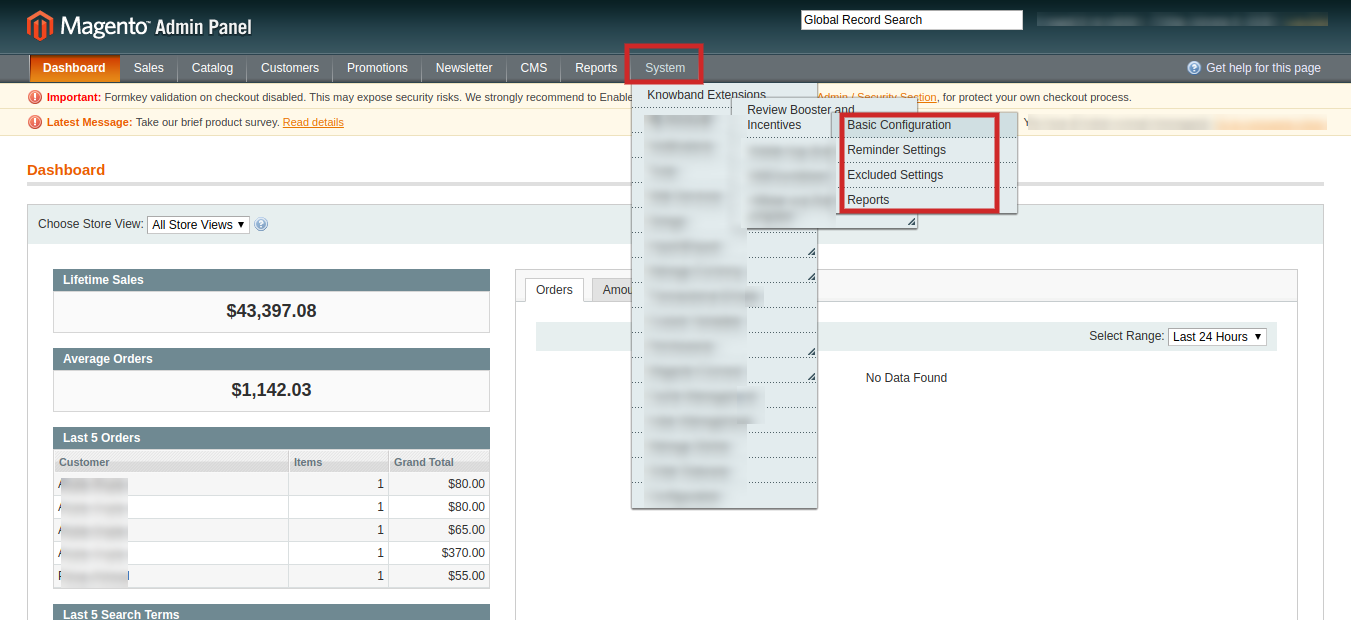
After successful installation of Magento review reminder and incentives module on your website, you can configure the review reminder setting as per your needs. In the Admin Panel, go to System > Knowband Extensions > Review Booster and Incentives.
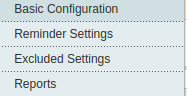
This Knowband extension offers you the following four sections.
Each Tab for the Magento Review reminder and Incentives is explained below:
Initially the fields are set to their default values.
3.1 How to set Basic Configuration
In order to set reminders admin needs to enable this functionality from the back end. It can be done by 2 ways:
General Settings:
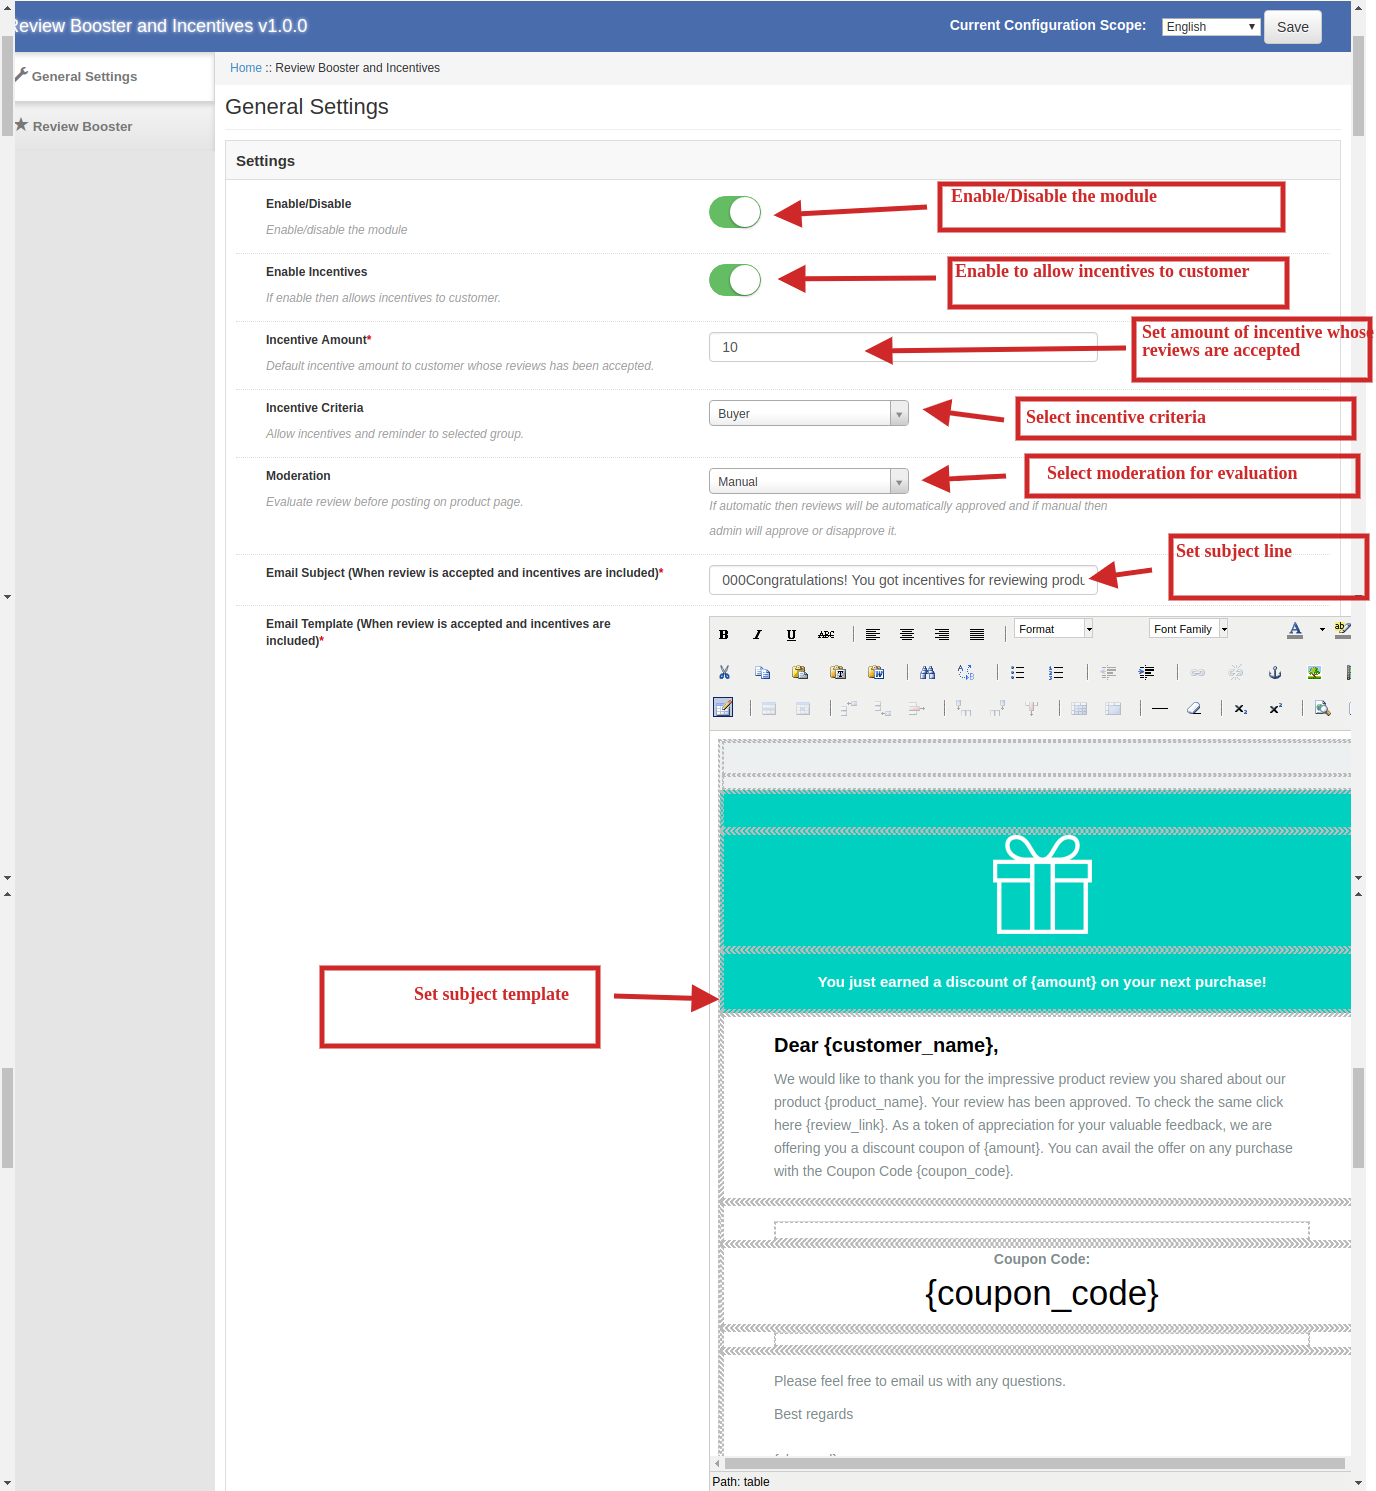
The General Settings tab of basic configuration extension for Magento offers the following configuration option.
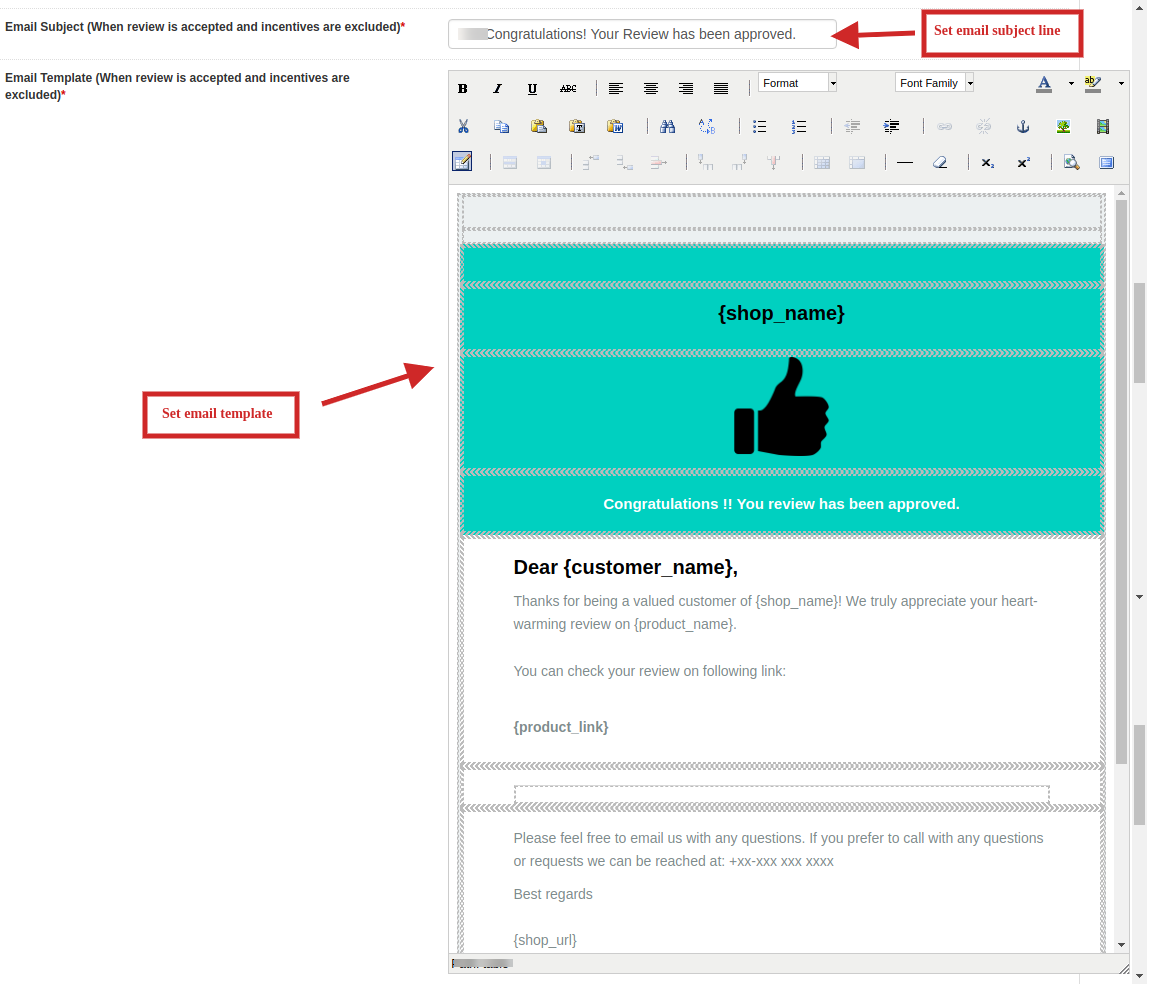
1.Enable/Disable: Admin has the authority to enable or disable the functionality of Magento review reminder and incentive module by simply toggling the switch provided in the admin interface. 2.Enable Incentives: Admin has the authority to enable incentives to customers and can set a default incentive amount of customers whose reviews have been accepted. If disabled, then there is no need to set a default incentive amount. 3.Incentive Criteria: you can allow incentives and reminders to selected group i.e either customer and buyer or both. 4.Moderation: You can evaluate review before posting on product page. If you select automatic then reviews will be automatically approved and if you select manual then admin will approve or disapprove it. 5.Email Subject (When review is accepted and incentives are included): Admin can change the subject line on email when a review is accepted and incentives are included. 6.Email Template (When review is accepted and incentives are included): You can change the template of the mail sent to a customer when review is accepted and incentives are included.
7.Email Subject (When review is accepted and incentives are excluded): Admin can change the subject line on email when a review is accepted and incentives are excluded. 8.Email Template (When review is accepted and incentives are excluded): You can change the template of the mail sent to a customer when review is accepted and incentives are excluded.
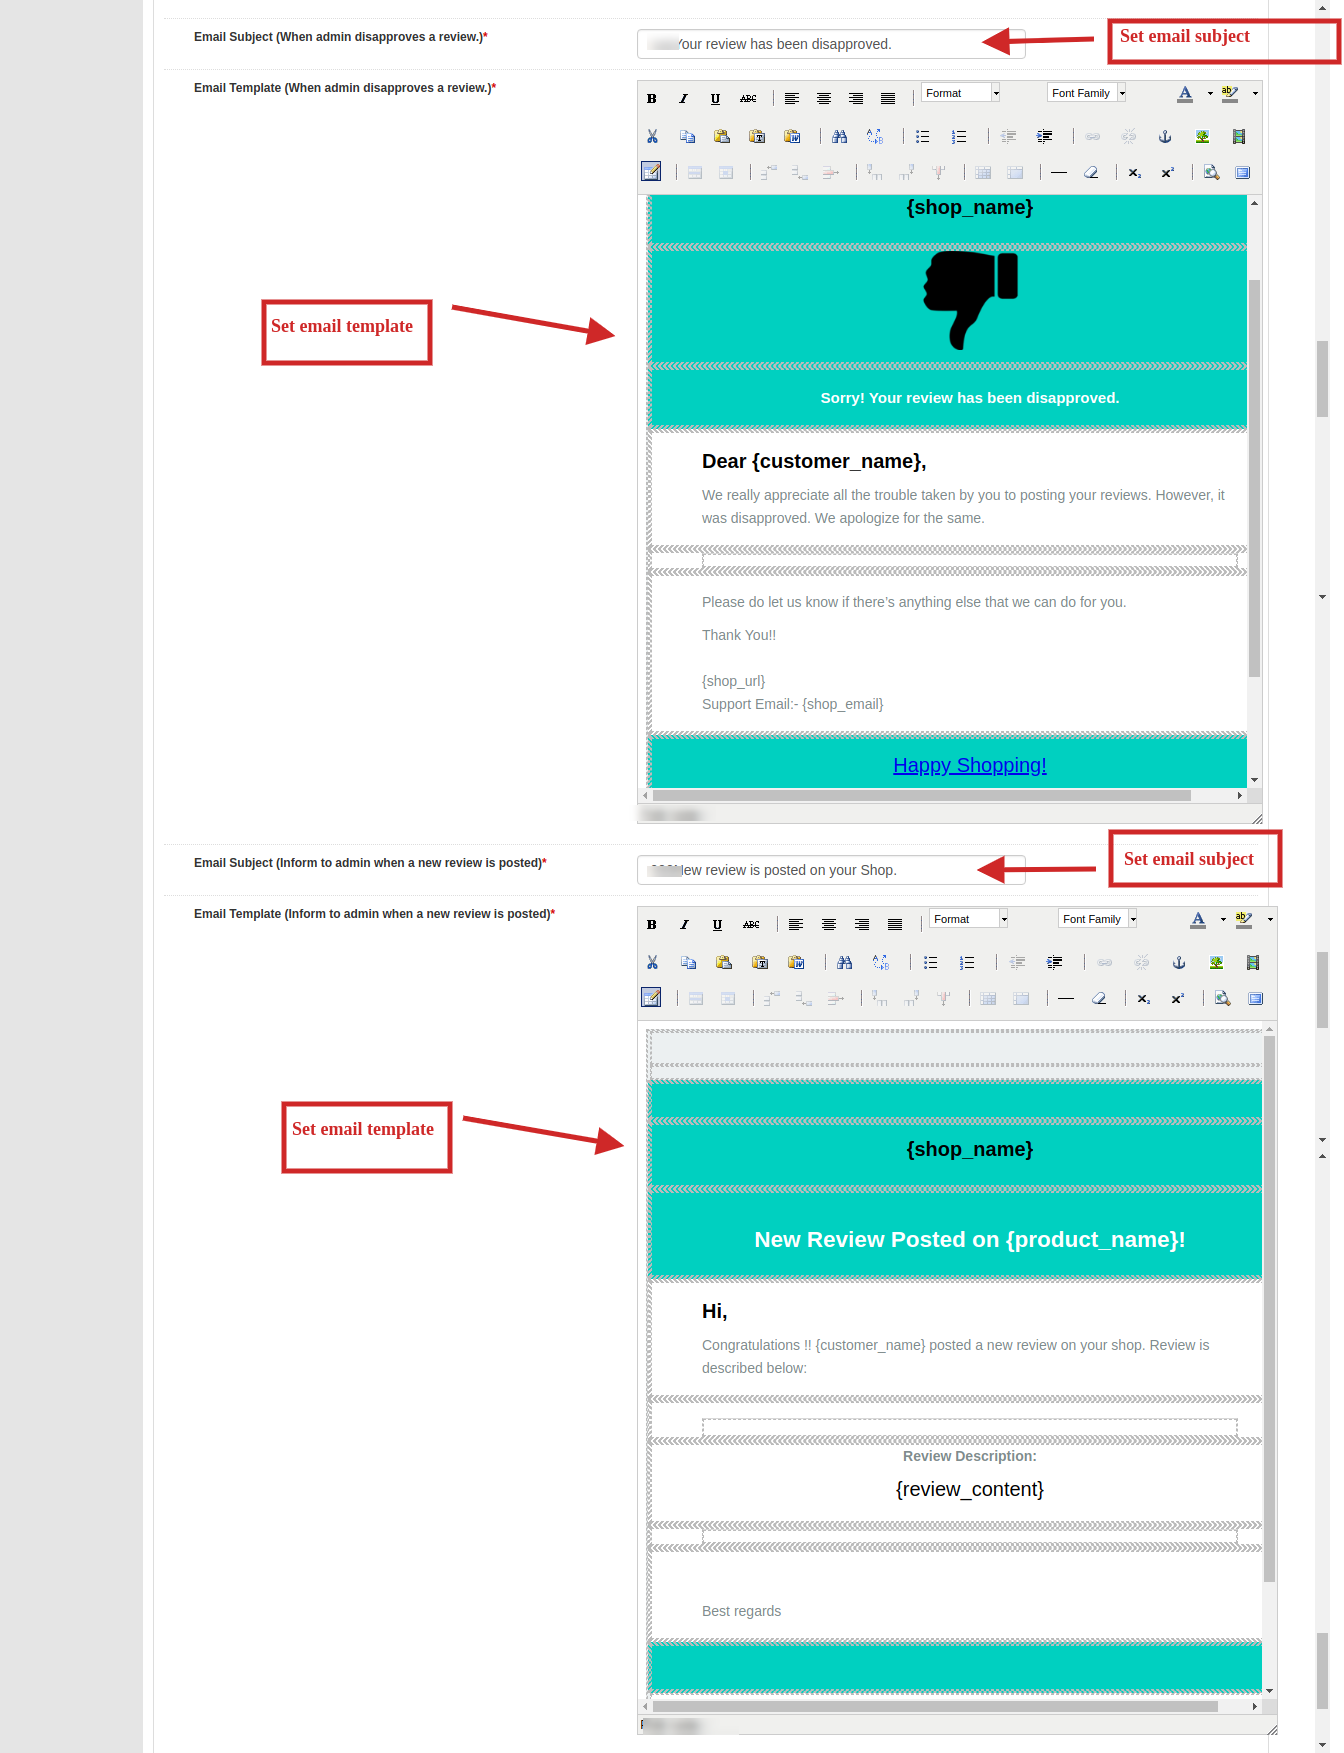
9.Email Subject (When admin disapproves a review): You can change the subject line of mail accordingly when a review is disapproved. 10.Email Template (When admin disapproves a review): You can change the template of the mail sent to a customer accordingly when review is disapproved. 11.Email Subject (Inform to admin when a new review is posted): You can add or change the subject line to keep yourself informed about a new review posted on your website. 12.Email Template (Inform to admin when a new review is posted): You can change the template accordingly to keep yourself informed about a new review posted on your website.
After all the settings of Magento related products extension have been configured, click on the “Save” button shown at the top right corner of admin panel to save the module settings.
Review Booster Settings:
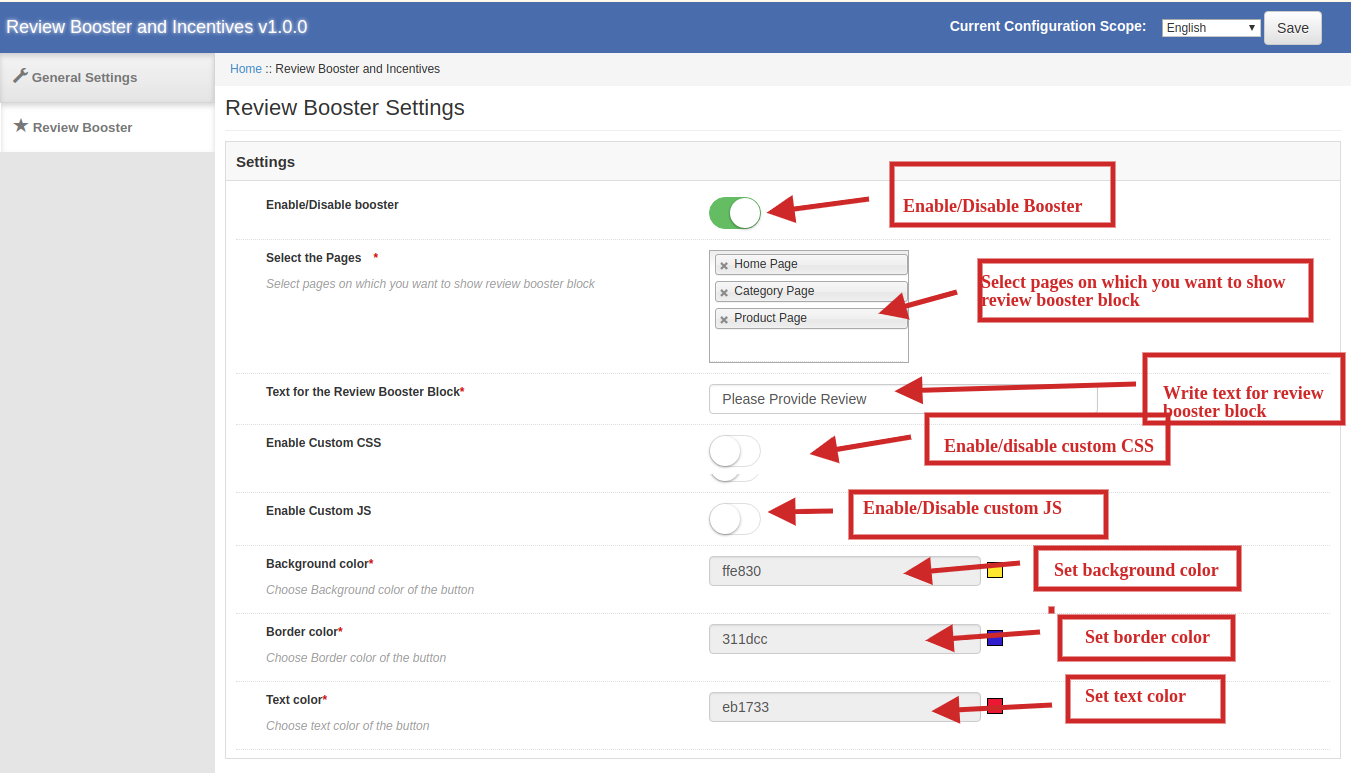
The review booster settings tab of basic configuration extension for Magento offers the following configuration options:
1.Enable/Disable Booster: Admin can enable or disable the functionality of review booster extension by simply toggling the switch provided in the admin interface. 2.Select the pages: You can select pages on which you want to show review booster block. You can choose one more than one from home page, category page and product page. 3.Text for the review booster block: You can write text accordingly which you want to publish for the review booster block. 4.Enable Custom JSS: Admin can enable and write custom JSS accordingly. You cannot use style tag for JSS. 5.Enable Custom CS: Admin can enable and write custom CS accordingly. You cannot use script tag for CS. 6.Background Color: You can choose background color of the button 7.Border Color: You can choose border color of the button. 8.Text Color: You can choose text color of the button.
After all the settings of Magento related products extension have been configured, click on the “Save” button shown at the top right corner of admin panel to save the module settings.
3.2 Reminder Settings
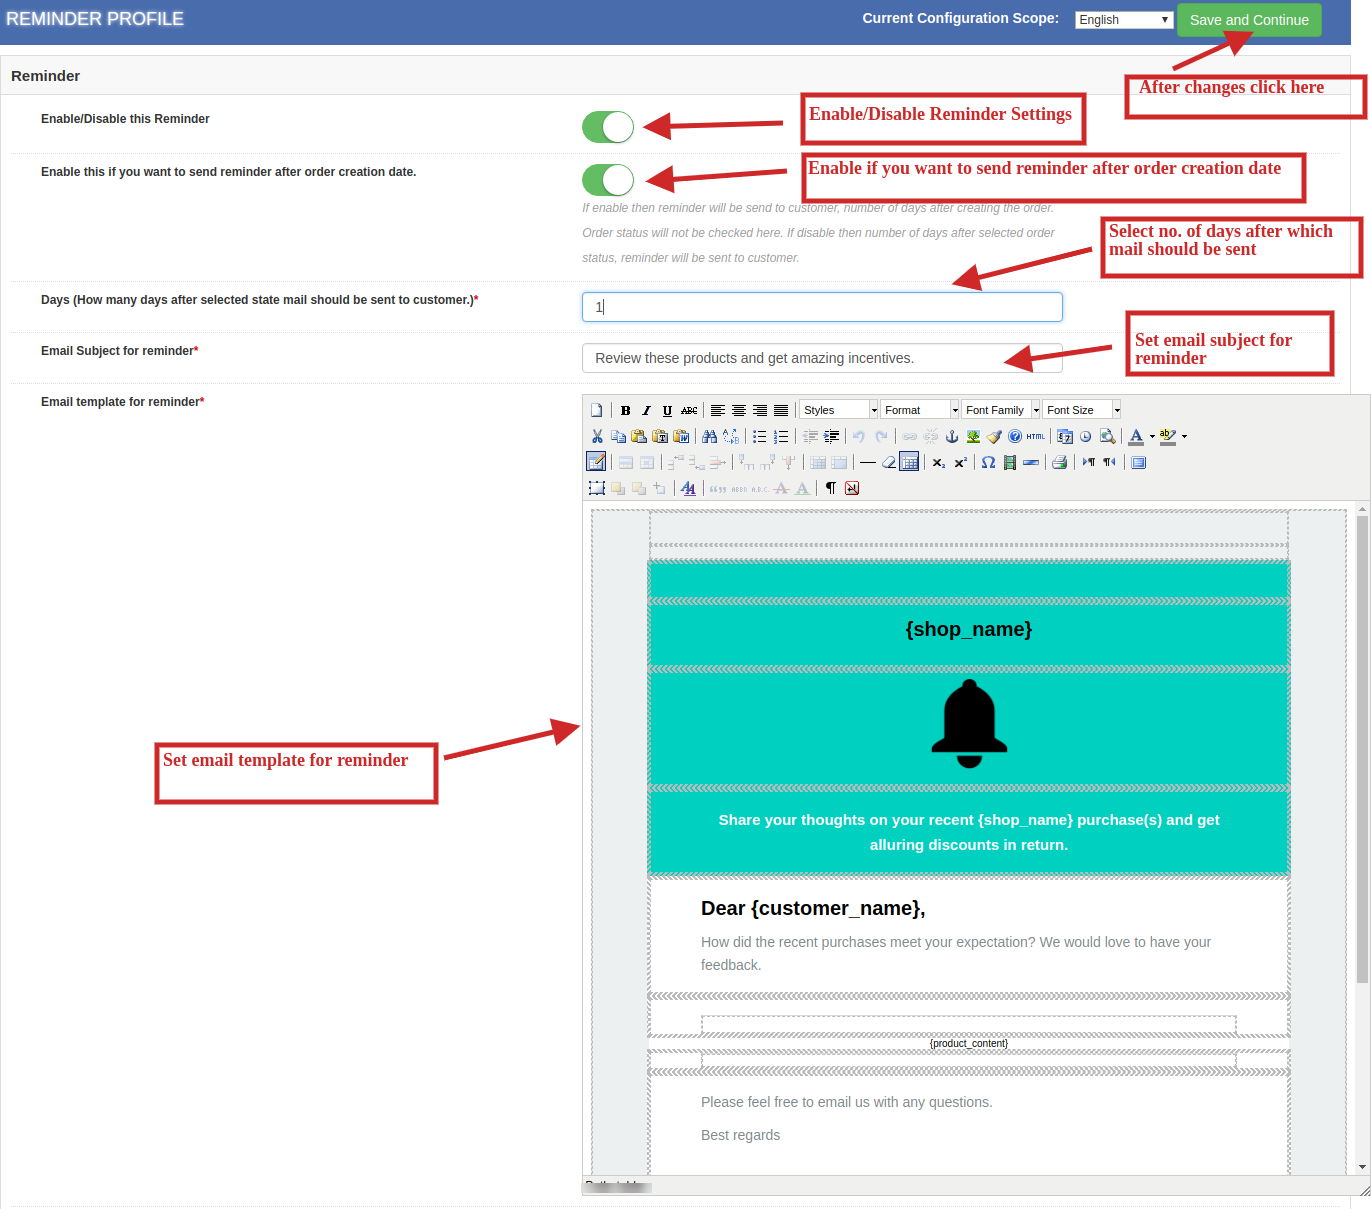
The admin can even send the reminder automatically after a certain duration from the day of order creation. The number of days after which the reminder is to be sent can be entered.
You can edit pre existing reminders or can simply click on Add Reminder button if you want to add reminder and a list of various settings will be shown as image below:
1.Enable/Disable this reminder: You can enable or disable the reminder module by simply toggling the switch provided in admin interface. 2.Enable this if you want to send reminder after order creation date: Admin can enable or disable this plugin accordingly. If enable, then reminder will be send to customer in number of days selected by admin after creating the order. Order status will not be checked here. If disable then reminder will be sent to customer after number of days selected for order status. 3.Select Status: You can select order status when you are sending a reminder to the customer. 4.Days (How many days after selected status, mail should be sent to customer): Admin can select the no. of days to send reminder mail to the customers. 5.Email subject for Reminder: You can add a subject line in reminder emails of your choice. 6. Email Template for reminder: You can change the template in reminder emails as per your choice.
After all the settings of Magento related products extension have been configured, click on the “Save and Continue” button shown at the top right corner of admin panel to save the module settings.
3.3 Excluded Settings
The reminder and incentive criteria includes all the products and categories of the store. However, if the admin wants to exclude any of the product or category from the same, this can be done from the ‘Exclude Settings’ tab. There are 2 types of exclude settings:
Exclude Products
This extension has following configuration options:
1.Select Products: Go to the product tab and add the product name you want to exclude. The products can be excluded easily by entering the name manually also. The list of excluded products would be seen just below this settings as shown above.
Exclude Categories
This extension has following configuration options:
1.Select Category: Go to the Category Tab and add the category name you want to exclude. The categories can be excluded easily by entering the name manually also. The list of excluded products would be seen just below this settings as shown.
2.After all the settings of Magento related products extension have been configured, click on the “Save” button shown at the top right corner of admin panel to save the module settings.
3.4 Reports
The customers can enter their reviews in the front-end of the website by entering their Name and Email IDs. If the setting is Automatic, then the review will be automatically posted on the website, but if it’s Manual, then, it will be posted after the approval of the admin.
1. Review Report:
In this tab, admin can view the entire list of reviews for the products at the back end. You can approve or disapprove a review by changing the pending status.
2. Product Report:
In this tab, you can see the no. of reviews on each product along with the no. of customers and total incentives given to customers.
3. Customer Report:
The reviews and the incentives can be easily tracked from the admin interface. By this tab, admin can keep a check on customer ID and email along with the no. of reviews posted and total incentives given to them.
4.0 Front Interface of Magento Advance Related Product extension
Knowband offers Magento Affiliate and Referral program extension which allows the online store admin to get more customers and traffic also. The online store admin can allow the customers to register as an affiliate and create referrals for the store. The online affiliate users can earn money for every referral. The admin can apply the settings in order to provide a referral commission. The admin can provide commission on new customer registrations or on order placed by the referred customers. The referred customers can place their order using referral code, coupon code or referral link provided by the affiliate customer.
This way the online store admin can improve website sales and traffic easily just by offering a commission to the affiliate customers. The eCommerce store admin can easily promote the store without any extra efforts. The affiliate customers can also get benefits by referring new customers. They can get commission by new customer registrations and order placed by the customers. The Magento Referral Program plugin provides an easy way to promote the website.
1.1 Basic Features of this Magento extension
The online store admin can allow the customers to register their account as an affiliate and create referrals for the store for getting an exciting commission.
The Magento Affiliate and Referral program extension allows the admin to activate or deactivate new affiliate registrations anytime.
The Magento Affiliate and Referral program plugin provides various methods to share for the referral.
The affiliate customers can send referral code, share a link, share discount voucher, share a link on social media platforms and share a link by email.
The online store admin can show an option to share the link on Facebook, Google plus, Twitter and Pinterest.
Admin can set a global referral rate for the order placed. This value will be in percentage. Admin can also set referral rate for particular affiliate customer.
The admin can also set the global referral rate for user registration. This will be a fixed value. Admin can also set specific referral rate for affiliate customers.
The Magento Referral Program plugin provides an option to select the global voucher type and set it’s value accordingly.
The online store admin can also select the action on which the referral will be counted.
The online user can get the referral commission on new user registration or when the order is placed.
The online users can register as an affiliate and create referrals for the store in order to get a commission.
The Magento Referrals module provides a dashboard for showing referral and commission-related details easily.
The Magento Affiliate Program extension provides functionality for the affiliate customers to redeem their commission by sending a request for payout.
2.0 Installation
The online store merchant can install the Magento Affiliate and Referral program extension by following these steps:
Admin can download the extension package from the Knowband store.
After downloading the extension package, you will get a zipped file. Unzip the package on the root folder of Magento setup via FTP manager (like Filezilla or WinSCP – download here: https://filezilla-project.org/). The admin will find the files and folders as shown in the image below:
3. The extension is now installed and ready for use. In the Admin Panel, go to “System > Knowband Extensions >Magento Referral Program plugin”.
Now, the store admin can use and configure the Magento Affiliates extension.
3.0 User Manual
Admin will get various customization options after installing the Magento Affiliate and Referral program extension successfully. Admin can configure the Magento extension in order to implement the affiliate functionality on the eCommerce website.
Below-mentioned are the configuration options:
Basic Configuration
Affiliate Customers
Referrals Listing
Commission Listing
Pay Out Requests
3.1 Basic Configuration
In the Basic settings field, you can apply the settings for showing affiliate system functionality on the website. The store owner can apply the settings as per the requirement.
These are the configuration options:
Enable/Disable: Activate or deactivate the Magento Affiliate and Referral program extension just by a single button toggle.
Enable Affiliate registration: Activate the settings in order to show affiliate registration options on the website front-end.
Select the Referral System to be enabled: Select the referral system from the provided options. The admin can choose from the referral code system, share the link to the customers, share voucher to the customers, share the link on social media platforms, and share the link by email.
Enable sharing link with Facebook: Activate this option in order to allow affiliate customers to share the link using their Facebook account. “Share the link on social media platform” option should be selected for this implementation.
Enable Facebook App ID: You need to enter Facebook app id in this configuration option. Follow the steps described in 3.1.1 section in order to create a Facebook app ID.
Enable Sharing Link With Google Plus: Show/hide the option of link sharing with Google plus. The affiliate customers can share the link with their Google plus account.
Enable Sharing Link With Twitter: In order to provide an option to share a link with Twitter, the admin can enable the settings.
Enable Sharing Link With Pinterest: Enable/disable the settings for showing/hiding link sharing using Pinterest.
Enable disable affiliate after:Activate or deactivate the settings as per the requirement. After enabling this option, a new configuration option will be displayed.
Disable affiliate after: Set the number of days after which you don’t want to provide any referrals to the affiliate customers. Set the days after which the affiliates will not get any referrals from the assigned code.
Global referral rate for order placed: Set the Global referral rate i.e., a common referral amount for all the affiliates. This value will be in percentage.
Global referral rate for user registration: Here, you can set the referral rate for the user registration which will be common for all the affiliates. This value will be fixed.
Global voucher type: Select the type of voucher i.e., fixed or percentage based. This will be the type of voucher which will be common for all the affiliates.
Global voucher value: Enter the value for global voucher.
Global voucher quantity: Set the number of the vouchers for providing all the affiliate customers. The affiliate customers can share the vouchers with the referrals.
Global voucher quantity per user: Enter the number of times, a user can apply these vouchers.
Referral Default status: Here, you can set the default status for the referrals. It can be accepted, rejected and pending.
Select when the referral should be counted: Magento Affiliate and Referral program extension provides an option to consider referral on new user registration or while the order is placed.
3.1.1 Steps to generate the Facebook app ID
Follow these steps in order to generate Facebook app ID:
Go to the “MY APPS” and click on ”ADD NEW APP” option.
Enter the “Display Name” and “contact email ID” details. After that, click on the “Create App ID” button.
Now, go to the “Settings” and select the “Basic” option. Here, you can get the APP ID. Now, you need to insert app domains, category, privacy policy URL here.
Thus, you can get the Facebook app ID.
3.2 Affiliate Customers
Here, in this configuration option, the online store admin can view the affiliate customer’s list. The Magento Affiliate and Referral program extension provides affiliate customers list in the admin interface.
3.2.1 How to Edit Affiliate Customer details?
Admin can click on the “Edit” button, in order to change the details of any affiliate customer.
After clicking on the “Edit” option, the online store admin can modify the details related to the affiliate customers.
Magento Affiliate and Referral program module provides these configuration options as shown below:
Status: Activate or deactivate the affiliate customer’s status from the admin interface of this Magento Affiliate and Referral program plugin.
Affiliate From: Here, you can view the date from which the customer has registered as an affiliate.
Affiliate Until: You can set the date till the customer will be an affiliate.
Use global referral rates: The online store admin has an option to use Global referral rate or set specific referral rates for the particular affiliate customer.
Referral rate for order placed: Set specific referral rate which you want to offer on order placement.
Referral rate for user registration: Set the fixed amount of referral on new user registration.
Use global voucher configuration: As a store owner, you have an option to use a global voucher or configure a specific voucher for any customer.
Voucher type: Select the percentage or fixed voucher type.
Voucher value: Set the value of the voucher.
Voucher quantity: Set the number of vouchers.
Voucher quantity per user: The admin can set the number of vouchers per users.
Vouchers: Here, you can view the generated vouchers.
Generate: Admin can click on the Generate button in order to generate new coupons as per the applied settings.
3.3 Referrals Listing
In referrals listing, the online store owner can view the referrals and their details also. The Magento Affiliate and Referral program extension provides a list of all the referral customers.
The store owner can also edit the affiliate’s status. The admin just needs to click on the “Edit” button.
After clicking on the “Edit” button, you will get these customization options:
Affiliate: Here, you can view the email id details of the affiliate customers.
Description: View the activity performed by the affiliate customer.
Commission value: Here, you can view the commission value as per the configuration.
Commission currency: Here you can view the currency type.
Order reference: Order reference will be displayed here if any referral places an order.
Referral status: Set the status of the referral as accepted, rejected and pending.
Referral date: You can also change the referral date from the admin interface.
3.4 Commission Listing
Here, in commission listing the online store admin can view the affiliate commission. The store admin can view the overall commission offered to the affiliate customers.
Admin can click on the view button in order to get the commission details. Here, the online store admin can view the email id details, commission value and it’s status.
3.5 Pay Out Requests
Magento Affiliate and Referral program extension provides an option to handle payout requests. The affiliate customers can send payout requests in order to redeem the commission. The affiliate customers can request to generate a voucher or directly ask for the payout.
The online store admin can view all the “payout requests” in this section and accept or reject the payout requests.
The store admin can view the payout request in the “Payout requests” option and then accept or reject the request.
4.0 Front-end Interface
After creating an account the online users can click on the “Affiliate and Referral Program” in order to register as an affiliate customer.
After clicking on this “Affiliate and Referral Program” option, the online users can register as affiliate customer.
Now, the online users are registered as an affiliate and they can view the details as shown below:
There are several methods to share the referral codes. The affiliate customers can share the referral codes in order to get the commission.
The affiliate customers can share referral code, share referral link, share vouchers, share the link on social media platforms and share the store link via email.
Referred users can register using referral code as shown below:
The online users can register using referral link shared by the affiliate customers or place an order with the referral link. The affiliate customer will get the referral amount as per the action performed by the referred online user.
The online users can also use voucher codes shared by affiliate customers in order to get discount. The affiliate customers will get referral commission for such orders.
This way the affiliate customers can refer the online users and get the referral commission easily.
The affiliate customers can view the rewarded commission on every referral. They can also view the status of the commission on the website front-end interface. In “Commission Details”, the online users can view each and every detail easily.
The online users can request for payout by clicking on ”Payouts” option. The online users can click on the “vouchers” in order to request for generating a voucher. The online user can also request for payout.
In order to generate vouchers, the online store admin can click on the “voucher” option. After that click on the “+” sign and enter the amount to generate voucher of that value. After that, click on the “request” button. A success message will be shown on the top of the eCommerce website.
In order to send payout request, the affiliate customers can click on the payout option. After that, they need to click on “+”. Here, the affiliate customers can enter the payout amount and enter the description. After clicking on the “Payout” button, the affiliate customers can send their request successfully.
Initially, the payout requests status will be ”pending”. The online store admin can accept or reject the “payout” request.
In the Dashboard, the affiliate customers can view the total accepted commission, pending commission, redeem commission and payable commission. A graphical representation is also available for viewing total commission, redeem commission and total referral easily.
This way, the online store merchant implements Magento Affiliate and Referral program extension module and allows the online users to refer the store to get a reward for it. The Magento Affiliate and Referral program module is highly customizable and offers smooth functioning. The e-merchant can provide multiple ways of referring to the website. The Magento Affiliate and Referral program plugin allow viewing all the affiliate customers list from the admin interface. The online merchant can also apply specific settings for each customer. The Magento Affiliate Program extension provides an option to set a referral amount from the admin interface. The online merchant can offer a specific amount on new registration and order confirmation. You can generate discount vouchers for affiliate customers for referring to the store. The online affiliate customers can refer store and get the exciting reward which can be converted in discount vouchers or the users can request for payout.
Knowband offers Magento Shipping Timer extension by which the online store admin can offer same day delivery to the online users. The Countdown timer extension for Magento implements the functionality to show a countdown timer on the website product pages. The online user has an option to get that product on the same day by confirming their order within the provided time. The online store owner can set the start time and end time for setting the duration of this countdown timer.
The Countdown timer module for Magento is highly customizable and helps the online merchant to get more conversions without any extra efforts. The Magento Countdown timer allows the admin to apply restriction on countries, categories and products for not showing the countdown timer. The admin can also select the vacation dates from the admin interface of this Magento Shipping module.
1.1 Basic Features of this Magento Shipping Timer extension
By using this Magento Shipping Timer plugin, the online store admin can insert a countdown timer on the website product pages.
Admin is allowed to set the time duration for this countdown timer. The e-merchant can set the start and finishing time from the admin interface of Countdown timer extension for Magento.
The Magento store owner can restrict the countries, categories and products from the admin interface if he doesn’t want to show a countdown timer on these products, categories and countries.
The Magento Shipping module allows setting vacation days for not offering same day delivery offer.
The e-merchant can also set the weekdays on which he wants to show countdown timer.
The admin can show a banner to the customers for providing information about the remaining time to grab the same day delivery offer.
The admin can increase conversions and profit without any complicated process.
The Magento Shipping Timer module allows showing an error message on the cart page if the customer adds any product which cannot be delivered on the same day.
The Magento Shipping module is multi-lingual compatible.
The Countdown timer extension for Magento is mobile responsive also.
2.0 Installation
The online store merchant can install the Countdown timer extension for Magento easily by following these steps:
Download the extension package from the Knowband store.
After downloading the extension package, you will get a zipped file. Unzip the package on the root folder of Magento setup via FTP manager (like Filezilla or WinSCP – download here: https://filezilla-project.org/). The admin will find the files and folders as shown in the image below:
3. The extension is now installed and ready for use. In the Admin Panel, go to “System > Knowband Extensions >Magento Shipping Timer extension”.
Now, the store admin can now use and configure the Magento Shipping Timer extension.
3.0 User Manual
After installing the Countdown timer extension for Magento, the admin will get several customization options. By applying the settings, admin can showcase the countdown timer easily on the website front-end interface. These configuration options will be available for applying the settings:
General Configuration
Shipping Orders
3.1 General Configuration
In General Configuration, you will get these customization options:
3.1.1 General Settings
In General settings, the admin can apply settings to display a countdown timer on the website product pages.
Enable/Disable this Module: Enable or disable the Magento Shipping Timer extension from the admin interface without any hassle.
Enable Country Check: Enable Country check in order to apply country-based settings.
Enable Category Check: Enable or disable the Category check as per the requirements.
3.1.2 Countdown Settings
In Countdown Settings, the admin has an option to apply settings for showing a countdown timer on the website front-end interface. There are multiple customization options as shown below:
Countdown Start Time: Set the countdown start time in 24-hour format. The countdown timer will start as per the settings.
Countdown End Time: In this customization option, the online store admin can enter countdown end time. The online users can view the countdown timer in this time duration.
Days a Week: Select the days in which you want to show countdown timer banner on the website product pages. If you don’t select any day, the countdown timer will be displayed on every day.
Vacation Dates: Enter the vacation date on which you don’t want to display this countdown timer on the website front-end interface.
3.1.3 Banner Settings
Here, the online store admin can apply the banner related settings. The online store merchant can set the banner text and provide countdown timer related details.
Primary Banner Content: Enter the message/content which you want to show on the countdown banner.
Enable Banner When Countdown is not visible: Enable or disable the settings from here. Admin can show a banner on the website front-end interface when countdown timer is not available on the product pages. This way, the customers can have an idea about same day delivery offer.
Secondary Banner Content: The online merchant can set the secondary banner content from this customization option.
Enable Warning on Cart Page: Activate or deactivate the settings in order to show a warning on cart page. If the customer will try to add any product which can not be delivered on the same date, then there will be a warning on the cart page.
Warning Banner Text: Enter the warning banner text here. The customers can view this warning message on the cart page if they add any product which can not be delivered on the same day.
3.1.4 Restriction Settings
In this section, the admin can apply the country, category and product-based restrictions. Admin can select the countries, categories and products on which he doesn’t want to display the countdown timer.
Select Countries to restrict: Select the countries for which, you don’t want to display countdown timer. The admin can select multiple countries from the drop-down list.
Select Categories to restrict: Select the categories on which, you don’t want to show countdown timer.
Select Products to Restrict: You can also select a particular product for restricting it. No countdown timer will be displayed on the selected product pages.
3.2 Shipping Orders
In shipping orders, you can view the shipping order details easily. You can view a list of orders with shipping timer and offer same-day shipping for the same.
The e-merchant can click on the “view” button in order to check order details.
4.0 Front-end Interface
The online users can view the shipping timer on the product pages. They can get same day shipping on ordering the product within the provided time.
The customers can view the banner even if count-down timer is not available. This way, they can get an idea about such same day delivery offers.
The online users will get a warning message if they add any product which cannot be shipped on the same day.
Now deliver products to your customer’s convenience by letting them choose the delivery date and time. Yes, a great way to gain customer loyalty and ensuring a positive buying experience for your online shoppers is Magento Preferred Delivery Time extension by Knowband. This eCommerce plugin provides flexible delivery options which leads to a convenient and seamless shopping experience for the customers. The Magento Order Delivery Date and Time Extension allows the customers to choose a desired date and time slot for their order delivery.
This Delivery date extension for Magento site helps e-merchant in defining their date schedule and adding multiple delivery time slots for their store customers. Preferred order delivery is one of the key elements of online shopping and the store merchants can conveniently control the order delivery settings for desired weekdays using Magento Preferred Delivery Time plugin. The order delivery date and time options offered by the site admin are visible to the customers in their order view at the checkout page. Further, the selected preferred delivery time can be updated by the customer within the allowed time limit set by the merchant.
1.1 Striking Features of Delivery date extension for Magento
This Magento Order Delivery Date and Time Extension offers you various features which are easily customizable from the backend admin panel. The delivery date and time settings can be configured in accordance with the website type and requirements. The key features of Magento Preferred Delivery Time extension have been listed below.
Magento Delivery Date and Time Extension facilitates admin to add multiple delivery time slots for the available dates and allows them to control the order delivery settings for specific weekdays.
With Magento Delivery Time/Date options, customers can conveniently choose the best-preferred delivery date and time slot for their order.
Magento Order Delivery Date and Time Extension offers flexibility to update the preferred delivery time even after an order is placed by the customer. The delivery time can be only updated if the Post Order Delivery Update option is enabled by the store merchant.
Customers can update the preferred delivery time for the allowed order status and time limit.
Using Magento Delivery Time extension, admin can add an additional note in preferred delivery section of order view page. This short note can be any extra information regarding order delivery to the customer.
Magento Delivery Time / Date module offers delivery dates skipping the gap days from the date of order.
Admin can flexibly set the Delivery days gap option from the backend of this Preferred delivery module.
Magento Preferred Delivery Time plugin allows admin to specify the time duration for the order delivery which includes start and end delivery time.
Magento Delivery Time extension allows you to configure the time slots available to the users. For example, if time slot range is 2 hours, then the preferred delivery time slots will be 8-10 AM, 10-12 AM, 12-2 PM etc.
The delivery time slot field can be completely disabled from the backend of Magento time slot delivery module.
This Delivery date extension for Magento lets you show/hide the incomplete time slot at the front end.
Admin can set the maximum calendar days for order delivery.
With Magento Preferred Delivery Time extension, store merchant can also select the days when they don’t deliver any order.
Preferred delivery date and time fields can be marked mandatory as per the admin requirements.
Magento time slot delivery module can be effortlessly configured, enabled or disabled without implementing any coding skills.
The email template of Preferred Delivery Time is fully customizable from the backend.
This Delivery date extension for Magento supports multiple languages.
This Magento Preferred Delivery Time extension offers a mobile responsive user interface.
Magento Order Delivery Date and Time Extension is compatible with the other store modules.
1.2 Technology for Development
Language: PHP Frame Work: Magento
2.0 Installation Guide for Magento Preferred Delivery Time Extension
The site admin can follow these simple steps for installing the Magento Preferred Delivery Time extension on their store:
1. First of all download the extension package from the Knowband store.
2. You will get a zipped file containing the source code and user manual. Unzip the package on the root folder of your Magento setup via FTP manager (like Filezilla or WinSCP – download here: https://filezilla-project.org/). You’ll find the files and folders as shown in the image below:
The Magento Preferred Delivery Time plugin is now installed and ready for use. Now the admin can configure this extension for their Magento site.
3.0 Admin Interface of Magento Time Slot Delivery module
Just after successful installation of Magento time slot delivery module on your website, you can configure the preferred delivery settings as per your needs. In the Admin Panel, go to System > Knowband Extensions > Preferred Delivery Time.
This Knowband extension offers a simple interface consisting of General Settings discussed below.
3.1 General Settings
The General Settings of Magento Preferred Delivery Time extension consists of the following configuration options:
Enable the extension: Admin can enable/disable the functionality of Magento Preferred Delivery Time extension using the toggle switch provided at the backend. Delivery Days Gap: Admin can set the days gap(in days) which specifies the gap of delivery dates from the date of order. Allow Time Slot: Admin can enable/disable this setting depending if they want to show the preferred delivery time slot to the customer. Time Slot Range: You can set the time slot (in hrs) which specifies the time range from start delivery time to end delivery time. Start Delivery Time: Admin can set the start time when they want to allow order delivery in 12 hrs format. End Delivery Time: Similarly, Admin can set the end time in 12 hrs format.
Allow incomplete Time range: Admin can enable or disable this setting if they want to show incomplete time range on the frontend.
Maximum Calendar Days: You can set the maximum count of days which will be available to the user as preferred delivery date. Delivery not available during these days: You can also select the days for which no delivery is available to the customers. Allow to select preferred delivery: You an enable or disable this setting for delivery date and time field. If disabled, preferred delivery date and time will be marked as mandatory fields. Allow Post Order Delivery Update: You can allow your customers to update preferred delivery time even after order is placed by enabling or disabling this option. Select Order Status: Admin can select the order status which will be required to allow post order delivery update. Enter Time Limit: Admin can limit the time duration (in hours) under which the customer can update the preferred delivery time details.
Hint Text: Admin can display this short text which can be any kind of additional information the merchant wants to display in preferred delivery section of order view page. Mail Template: The delivery time confirmation email sent to the customer can be customized from the backend section. Send mail with Order Confirmation: If this setting is enabled, then an order delivery confirmation mail is sent to the customer on their registered email.
After all the settings of time slot delivery module have been done, click on the “Save” button shown at the top right corner of admin panel to save the module settings.
4.0 Front Interface of Magento Order Delivery Date and Time Extension
At the time of checkout, customers can select the desired date and time as per their convenience to receive the order. They can choose a date as an expecting order delivery date among the available dates provided by the merchant. Further, they can choose a preferred time slot and can complete the other checkout information fields. Once the order is placed, a confirmation email specifying the order delivery date and time is sent to the customer.
In a case, the customer want a change in the order delivery date/time, they can update the delivery date/time from the order view page in their account section.
Just after the delivery details have been updated and saved, a delivery date and time slot update message is displayed on the front.