This Login as Customer Extension for Magento allows the store admin to access the customer account from the Magento store back-end. By using the Login as Customer module, the store admin can check any specific issue reported by the customer while site browsing or while placing the order.
Apart from this, Knowband’s Magento Login as Customer Module allows the store admin to test the website from user’s point of view. The Prestashop store merchant can optimize the account of users as per the requirement of the visitors.
1.1 Benefits of Magento Login as Customer Extension:
1. Log in as Customer by Knowband allows the store admin to edit the customer details without knowing the Customer Password.
2. With the help of this Magento Login as Customer, the admin can easily manage customer’s cart and orders details.
4. This Magento Login As Customer without Password extension enables the admin to login to a customer’s account with least effort.
5. It ensures customer retention by providing an effortless way to solve their problems.
6. The store owner or support team can log in directly from the customers and orders pages of the admin interface without searching their name.
7. By using Login as Client by Magento, the admin can easy to manage customer’s cart and orders.
8. Magento Login as Customer Module allows the Magento store admin to get an insight of the problem being faced by the customer by login into their account as the customer.
2.0 Installation
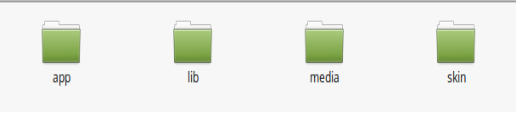
1.The folder structure of the Login as Customer module folder.
2. Copy all the folders into Magento root directory and clear the cash (if enabled).
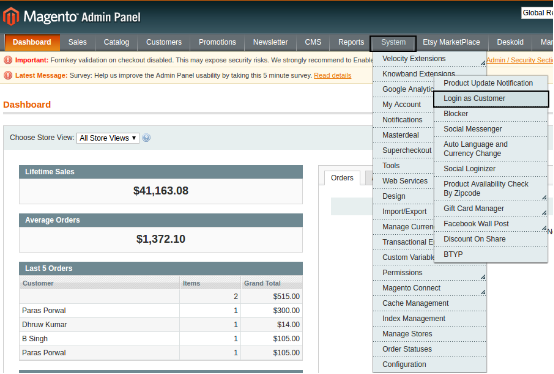
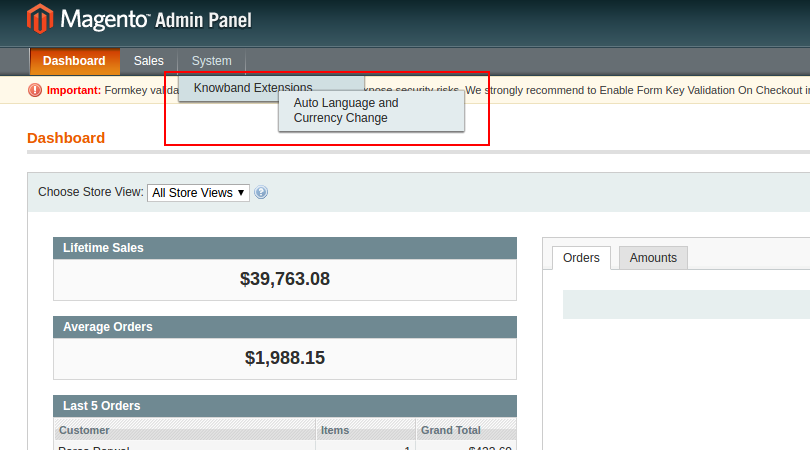
3. You will be able to find the “Login as Customer” option inside the “System > Knowband Extensions > Login as Customer”.
4. You can now configure the Magento Login as Customer as per your requirements and check its working in the front end at following URL:
After installing Magento Login as Customer Extension in the Magento store, the store owner can make the changes without any hassles. There are following sections available to admin interface: –
1. General Settings
2. Listing
3.1 General Settings
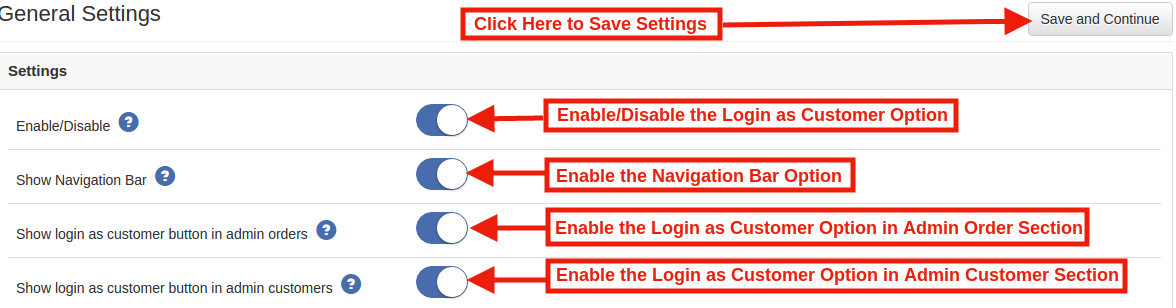
The Module configuration tab of Magento Login as Customer module by Knowband offers the basic configuration options to the Store admin. These options are listed below:
1. Enable/disable the module
2. Show Navigation Bar
3. Show Login as Customer Button Admin Order
4. Show Login as Customer Button in Admin Customer
1. Enable/disable the module: Initially, this Login as Client extension is enabled. The store admin can enable this option and will be able to log in the website as any of the registered customers. This can be done with a button toggle as shown below.
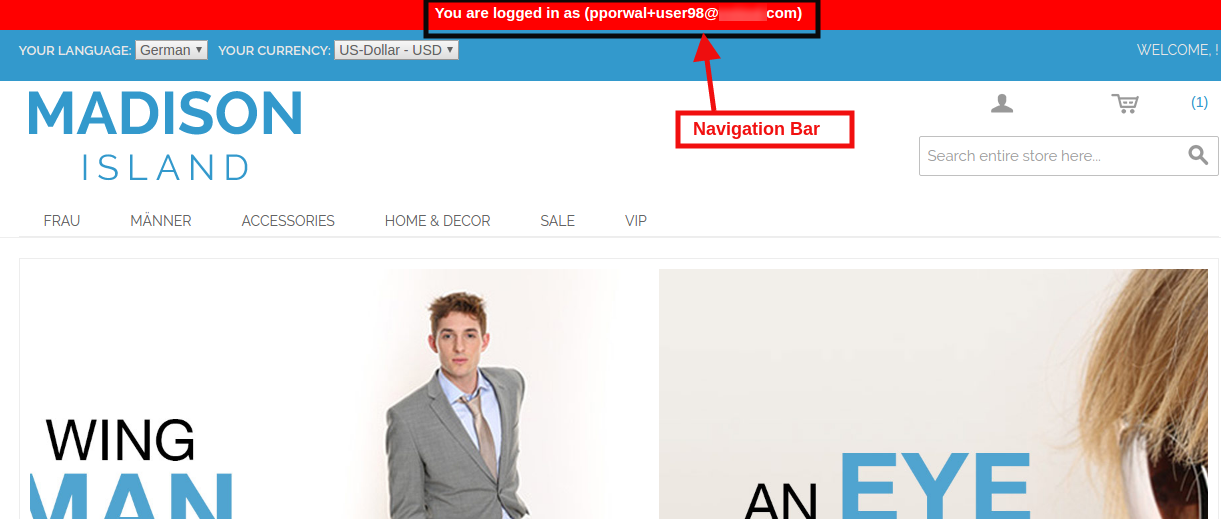
2.Show Navigation Bar: In this tab of Magento Login as Customer Extension, the admin can enable the navigation bar in the Front End of the store. After enabling this module, the navigation bar shows the name of the customer with which the admin is logged in.
Feature at Admin Interface:
Feature at Website Front End:
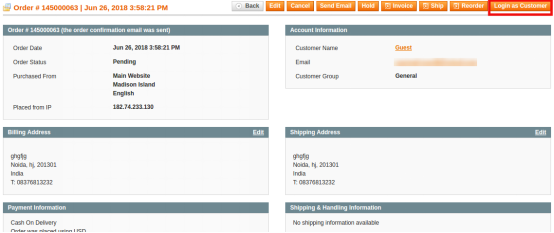
3. Show Login as Customer Button in Admin Order: This Knowband Magento Login as Client Extension enables the admin to show login as a customer in admin order section, the admin gets an access to the entire account detail of the customer which includes the cart details and transaction history from the ‘manage order tab’.
Follow the steps mentioned below to use this feature:
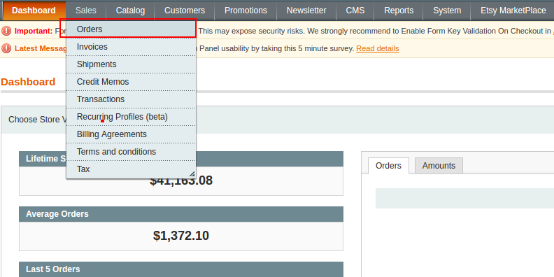
1. First, you need to go to the Sales–>Order tab in the main menu of the admin interface.
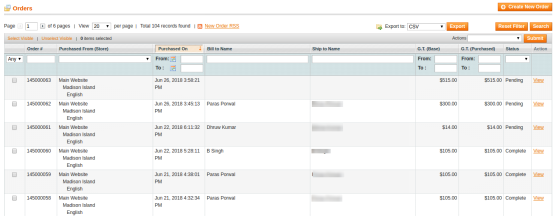
2. The tab shows the entire list of the orders placed on your web store. You can use the filters to select a particular order.
3. The tab shows the entire list of the orders placed on your web store. You can use the filters to select a particular customer.
In this tab, the store admin can log in as that particular customer. On clicking the button Login as Customer, the admin is redirected to the front-end of the website.
4. Show Login as Customer Button in Admin Customer: Admin can enable the Login as Customer Button in the Customers detail section.
Steps to access customer account:
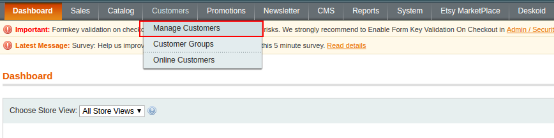
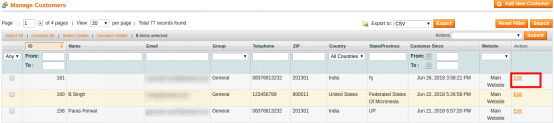
1. In order to access the customer account, Magento store admin needs to navigate to Customers–> Manage Customers.
2. On clicking the Manage Customers tab, the admin can see the information of all the registered customers. In order to access the account of any registered customer need to click on the EDIT option.
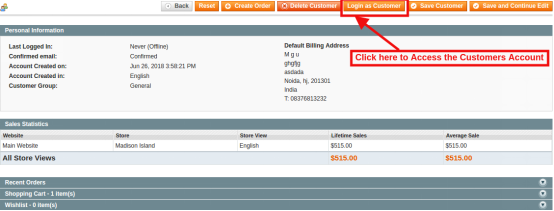
3. Now click on the Login as Customer button to access the Customer account.
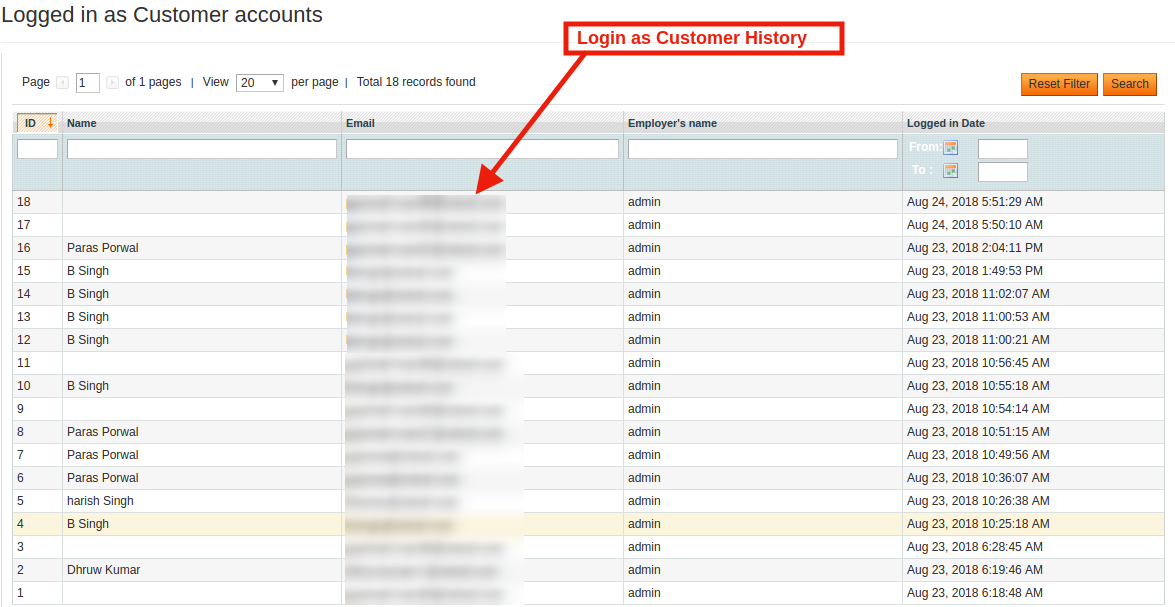
3.2 Listing (Logged in Customer History):
The Magento 2 Login as Customer Module offers a detailed report of the logged in customer history. The admin can keep a track on the customer whose personal details were used to log into the website.
4.0 Website UI
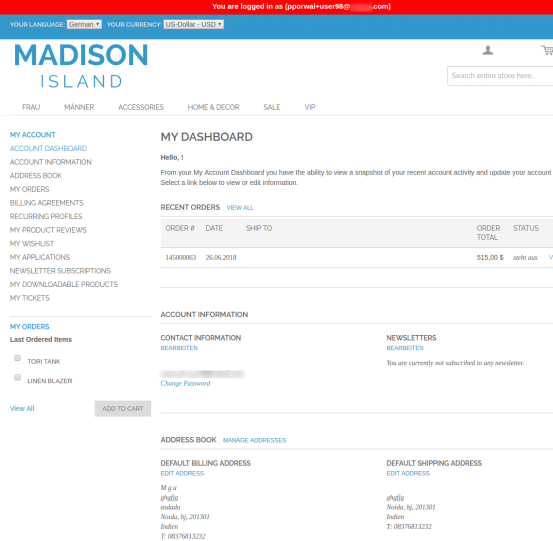
4.1 My Account Page
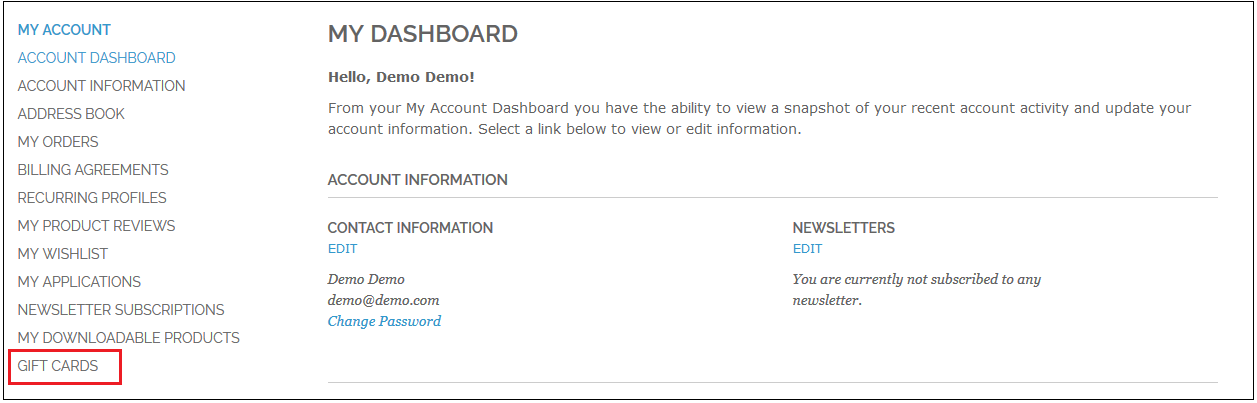
Once the store admin log into the website as a customer, he gets the access to the entire account of the customer. Now the admin deal with every problem of the customer using the simple remote access by Magento Login as Customer Module.
Browsing the eCommerce website as a store user, admin can test the store functionalities in a much effective manner. Moreover, the Login as Customer by Magento helps you in optimizing the website and providing an improved customer experience.
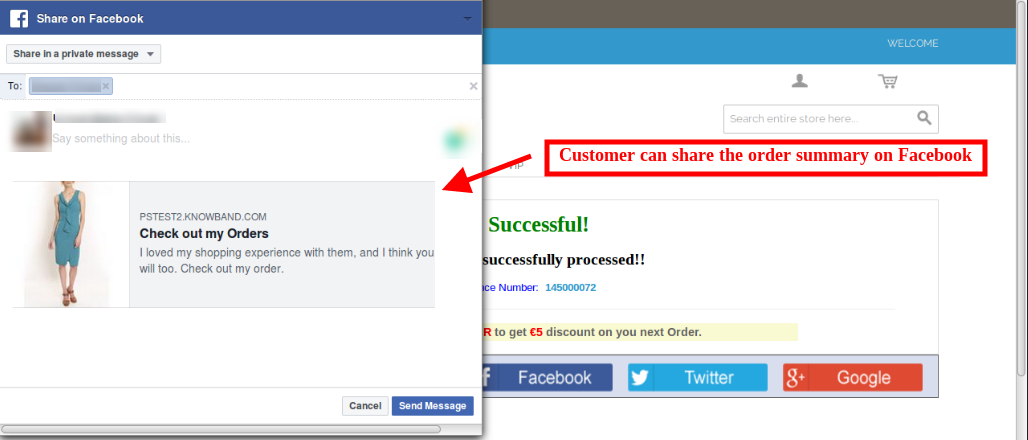
Nowadays, Social Media has become an important tool for improving brand popularity and product awareness. Social networking sites are one of the most prominent platforms eCommerce marketing and promotions. The Magento store admin can now use the social media network for improving the product and brand popularity and for the targeted audience on the social platforms as well. Knowband Order Share Buttons for Magento allows the customers to share the order summary after purchasing the product. The customers can share the order summary on Facebook, Twitter and Google plus. The store admin in Magento social promotion module has right to show all the available social media options or selected options.
1.1 Features of Magento order social share buttons plugin
The Magento order social share buttons plugin provides an option to the online buyers to share their order summary with their friends, family members and relatives on the various social media platforms.
There are multiple social media platforms like Facebook, Twitter and Google+. The customers can share the order summary just by clicking on the social media buttons in Order Share Buttons for Magento.
The admin can show all the social media options or selected options easily just by deactivating the other options from the admin interface.
The store owner can set the look and feel of the social media button block. The admin can set the text and background color of it.
The Magento social promotions module provides a color-picker tool on the admin interface for selecting the appropriate color of social sharing block accordingly.
The admin can also add custom CSS and JS code for advanced settings.
The Magento social media buttons extension offers an eye-catchy and user-friendly interface.
1.2 Admin benefits
It is very easy to install, configure and use this Magento social media buttons extension.
The admin can display an attractive order sharing button block on the website front-end.
No technical help is required for implementation of Magento social promotions module.
The admin can boost the conversion rate of the website with the help of Magento social promotions module.
In Magento order social share buttons plugin the admin can improve sales on the website by this indirect promotion technique.
The admin in Order Share Buttons for Magento can improve product/brand awareness.
This Magento social media buttons extension provides an easiest and effective way to improve product popularity and relevant traffic.
2.0 Installation Steps
The online store owner can install the Magento order social sharing extension by following these steps:
1. Download the extension package from the Knowband store.
2. The admin will get a zipped file. Now the store owner can unzip the package on the root folder of Magento setup via FTP manager (like Filezilla or WinSCP – download here: https://filezilla-project.org/). You’ll find the files and folders as shown in the image below:
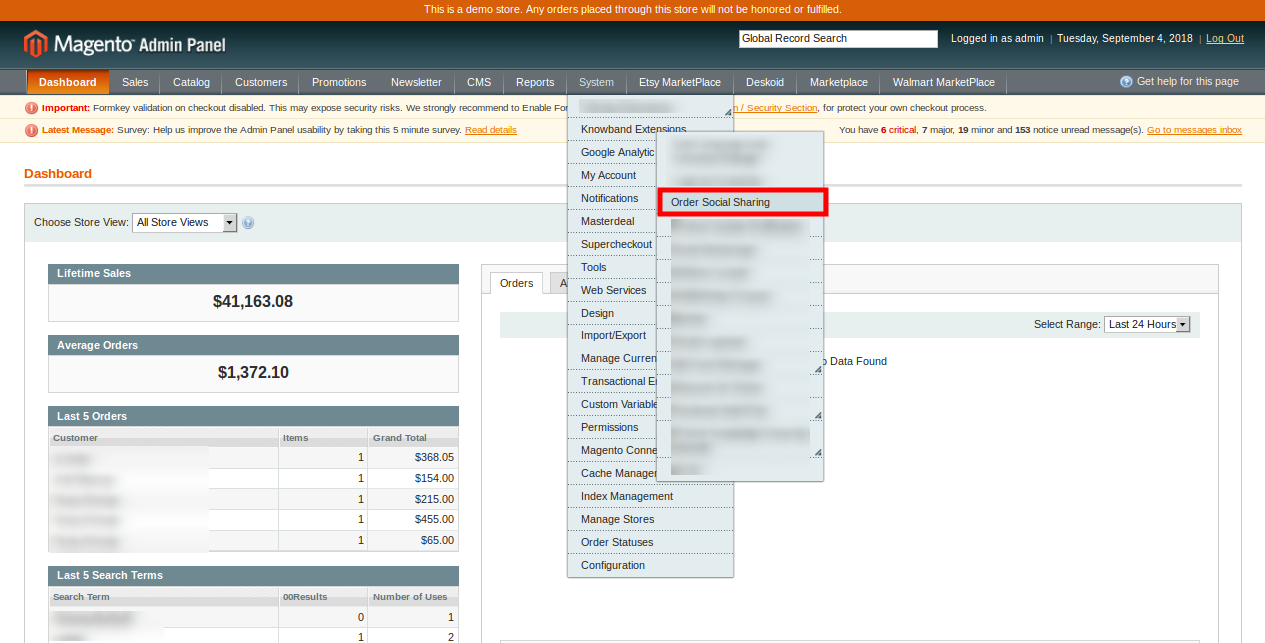
3. The Magento social media buttons extension is now installed and ready for use. In the Admin Panel, go to “System > Knowband Extensions >Order Social Sharing”.
Now the store admin can now use and configure the Magento social promotion module.
3.0 Admin Interface
After installing the Order Share Buttons for Magento, you can configure this Magento order social sharing extension by applying the setting as described. There will be two configuration options:
General Settings
Look and Feel
3.1 General Settings
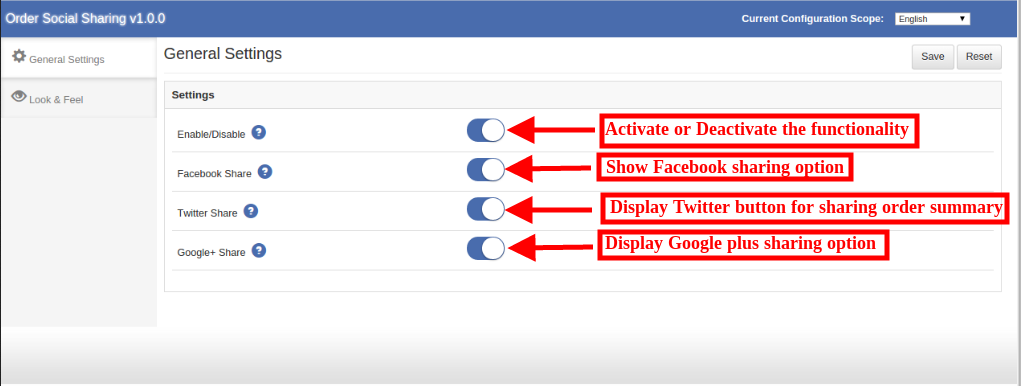
In general settings, the eCommerce store admin in Magento order social sharing module can view these customization options:
1. Enable/Disable this module: The eCommerce store owner can activate or deactivate the functionality by toggling this button.
2.Facebook Share: The admin can activate or deactivate “Facebook share” option for displaying or hiding the Facebook sharing button.
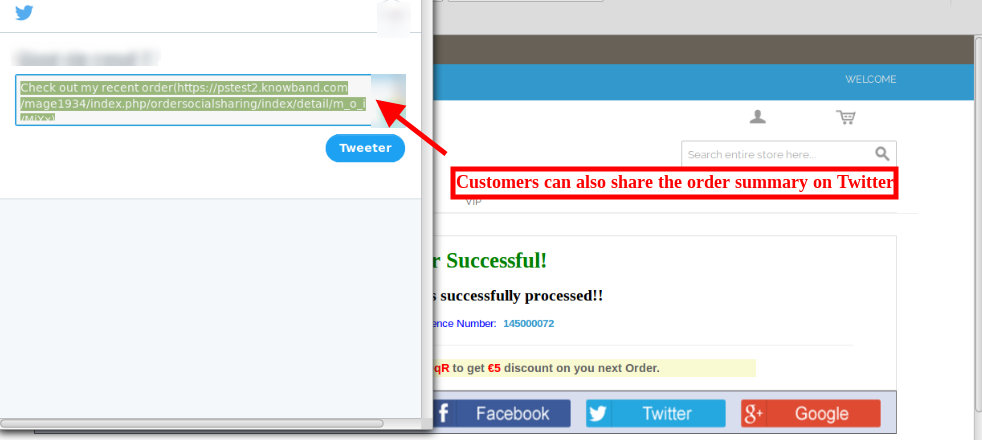
3. Twitter Share: The store owner in Magento order social sharing module can enable this option for showing the twitter button on the website front-end. The customers can click on this option and a pop-up window will open for sharing the order summary.
4. Google+ Share: The store admin can enable or disable the Google plus sharing option for showing or hiding the Google plus button from the Social media sharing block.
3.2 Look and Feel
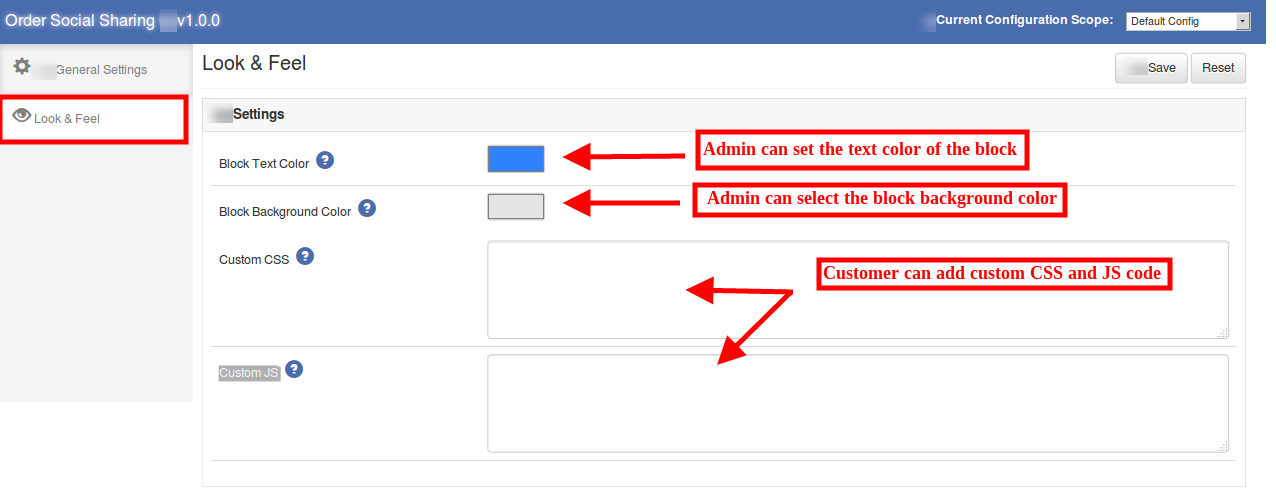
The admin can manage the look and feel of the order social sharing buttons by configuring the Magento order social sharing extension accordingly.
1. Block Text Color: The store admin can set the text color of the order sharing block. A color picker tool is available on the admin interface for easy and codes less color selection.
2. Block Background Color: The Magento social promotion module allows the admin to set the block background color according to the website theme.
3. Custom CSS: Advanced users in Magento social promotion module can add custom CSS code for the look and feel customization.
4. Custom JS: Admin can also enter custom JS code.
4.0 Front-end Interface
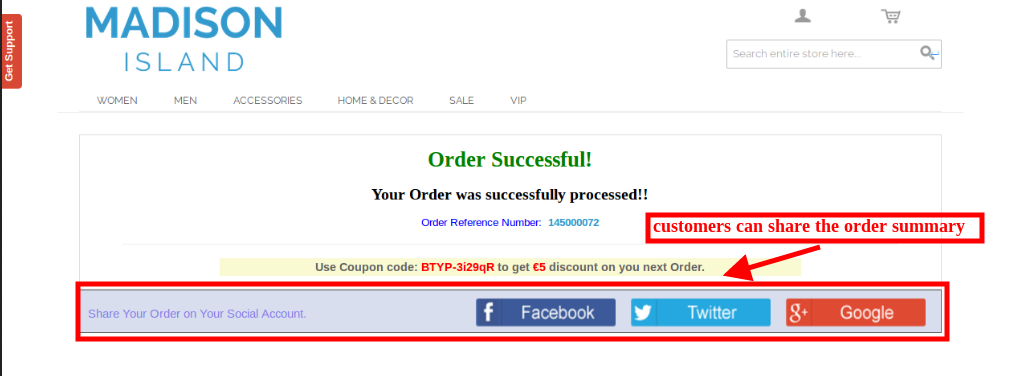
The online store visitors and customers can view the social sharing option after placing the product order. The customers can view Facebook, Twitter and Google plus button for sharing the order summary.
Customers can click on the Facebook sharing option for sharing the order summary on Facebook as shown below:
The online store customers can also share the order summary on Twitter by selecting the second option:
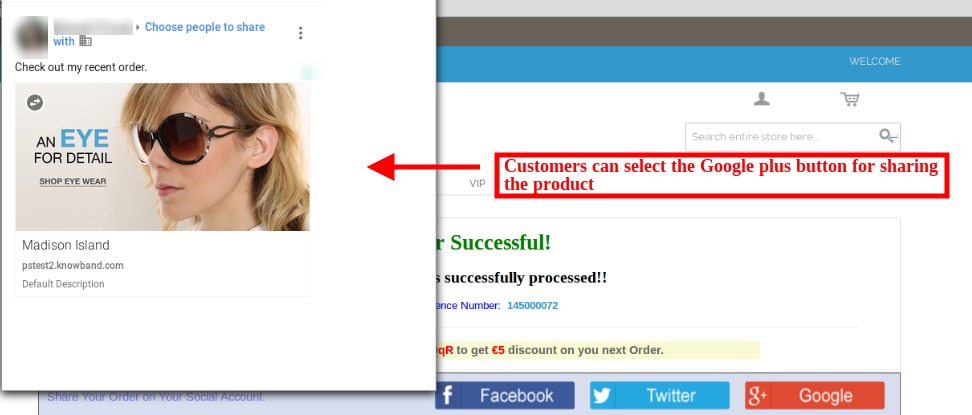
The customers can select Google plus option for sharing the product on Google plus account. The below-mentioned image will be displayed if the customer selects this option:
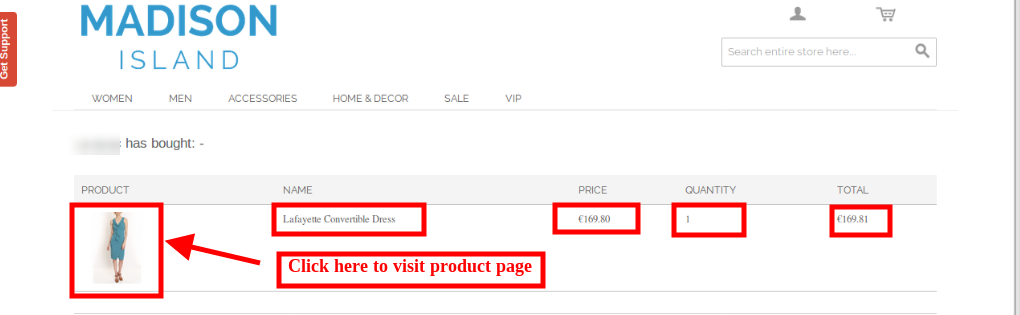
If anybody opens the link shared by the customer, he can view the order summary in a fresh page. If that person clicks on the image, that product page will be opened.
Thus the store admin using Magento order social sharing module can promote the products and brands. The online customers can share their order summary and spread the word-of-mouth of the site on the various social media platforms. This helps you boost the traffic of your site which ultimately increases the chances of conversions. This Magento order social share buttons plugin also helps the store admin to improve SEO by creating numerous valuable back-links. The admin can get high-quality referrals to the website effortlessly by Magento order social sharing extension.
The Magento store owner can now protect their eCommerce store from spams and bots. The Magento block user/bot by IP, country or user agent extension by Knowband allows the store owner to block the user/bot by restricting IP addresses, Country or User-agent. This way the eCommerce store admin can restrict or ban suspicious and unnecessary store users. The admin can show a customized message on the website for providing banishment notification.
Magento Block User by IP plugin provides an option to restrict the access of the users by IP, Country, and User-agent. The banishment can be enabled or disabled anytime from the admin interface. The online customers can also send a request to unblock them. They can send a message from the front-end, the admin can review the requests from the admin interface and take further decision to unblock the banned customers or deny the request.
1.1 Features of Magento block user by IP, country or user agent extension
The eCommerce store owner has multiple options to block the bot by blocking IP address, country code and user agent.
Admin can enter any particular IP for blocking the customer or a range of IP addresses.
The Magento Block User Extension allows the admin to enable or disable the ban anytime.
The store admin can display a custom message on the website for the banned customers.
The e-merchant can show or hide header and footer to the blocked customers.
The blocked customers can also send a request to unblock them.
There is no need to change codes from the admin interface.
It is very easy to configure this Magento Block bot by country extension.
The Magento Block User/bot by IP plugin is multi-lingual compatible.
Magento block user by IP, country or user agent extension can be installed and configured easily.
The store owner can easily activate or deactivate this Magento block bot by IP, country or user agent extension just by a button toggle.
1.2 Admin benefits
With this Magento Block User module, the store admin can take initiatives to protect the website from spammers and bots by blocking the suspicious customers and activities.
The Magento Block User module helps the store admin to remove the irrelevant website.
The admin can protect the store from malicious attacks by blocking the spammers and bots.
This Magento Block bot by country extension is highly customizable and hassle-free.
Multiple Blocking options are available to make sure that the genuine customer will not suffer.
The customers can request to unblock them from the front-end interface.
No technical help required for implementation.
2.0 Installation Steps
The store admin can follow these simple steps for installing the Magento Block User Extension:
1. First of all download the extension package from the Knowband store.
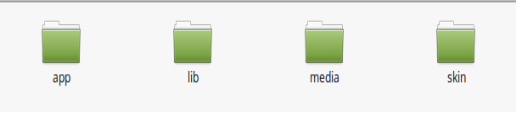
2. You will get a zipped file. Unzip the package on the root folder of your Magento setup via FTP manager (like Filezilla or WinSCP – download here: https://filezilla-project.org/). You’ll find the files and folders as shown in the image below:
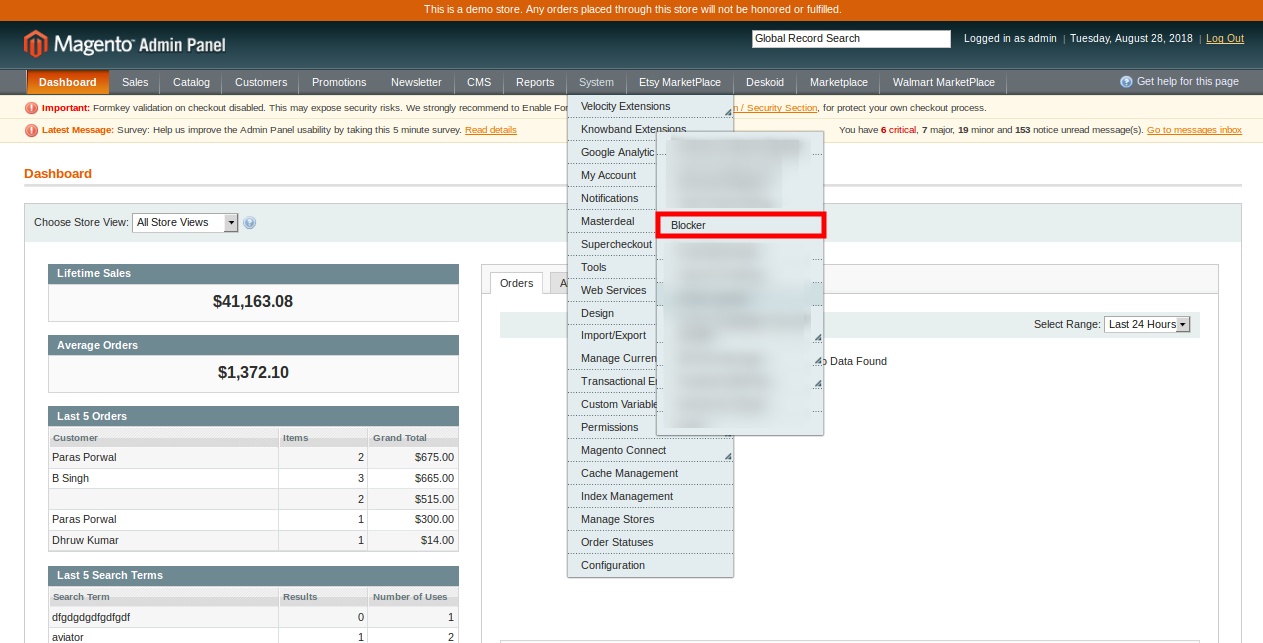
3. The extension is now installed and ready for use. In the Admin Panel, go to “System > Knowband Extensions >Magento Blocker ”.
Now the store admin can now use and configure the Magento Block User Extension.
3.0 Admin interface
After successful installation, the store admin can configure the settings from the admin interface. The admin panel has five tabs as shown below:
General Settings
Block User by IP Address
Block User by Country
Block User by User Agent
Blocked Customer Request
The admin can customize the Magento Block User/bot by country extension as per the requirement
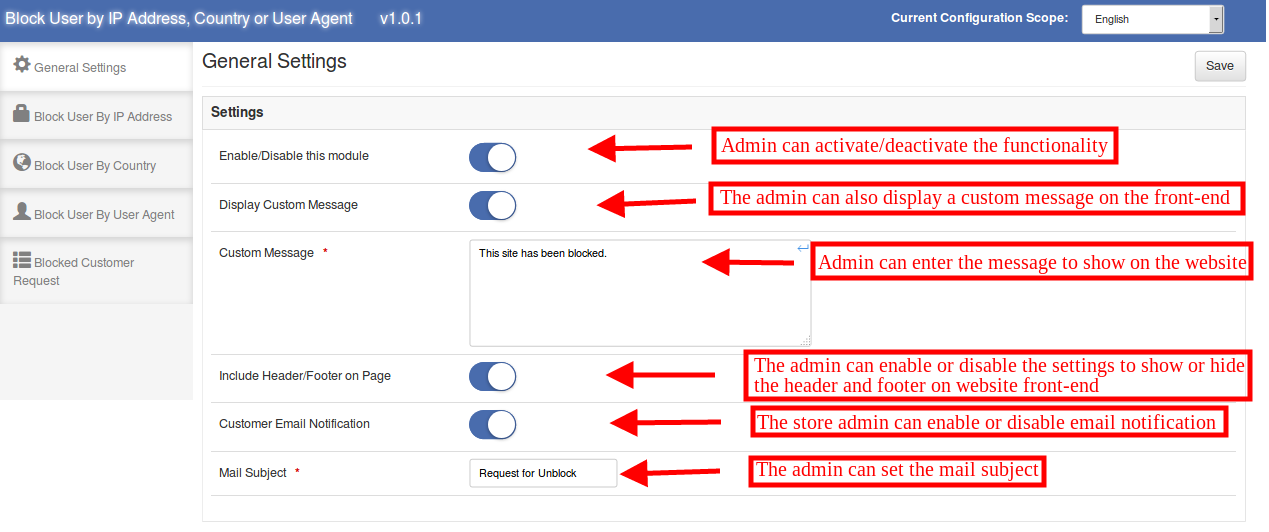
3.1 General Settings
In general settings the admin can view below-mentioned customization options:
1. Enable/Disable this module: The store admin can activate or deactivate the functionality by toggling this button.
2. Display Custom Message: The online store admin can enable or disable this option for showing or hiding a custom message. This message will be displayed to the blocked customers.
3. Custom Message: The store admin can enter the custom message here. The admin can enter a ban notification to the customers in order to inform them about banishment.
4. Include Header/Footer on Page: If this option is enabled, then, the header and footer will be shown in the webpage that displays the ban message, otherwise, the visitors will only be able to view the block notification message.
5. Customer Email Notification: The admin can enable or disable the custom email notification option. The customers can request the admin to unblock them.
6. Mail Subject: The store admin can set the Mail subject form the admin interface that is to be send with the mail.
3.2 Block User by IP Address
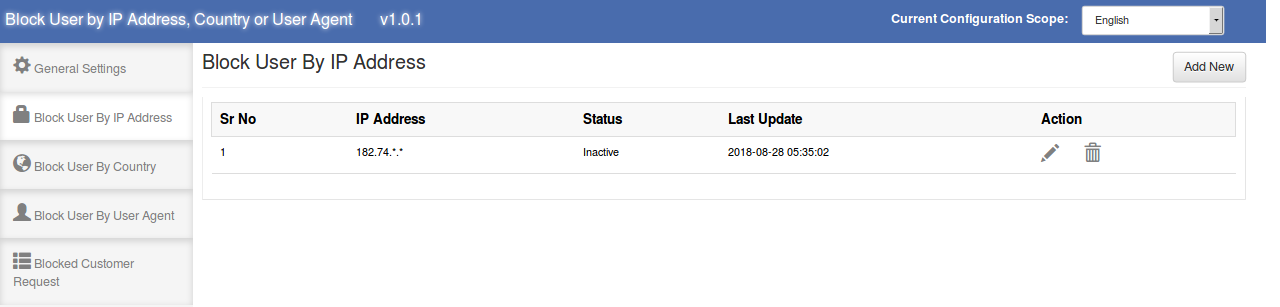
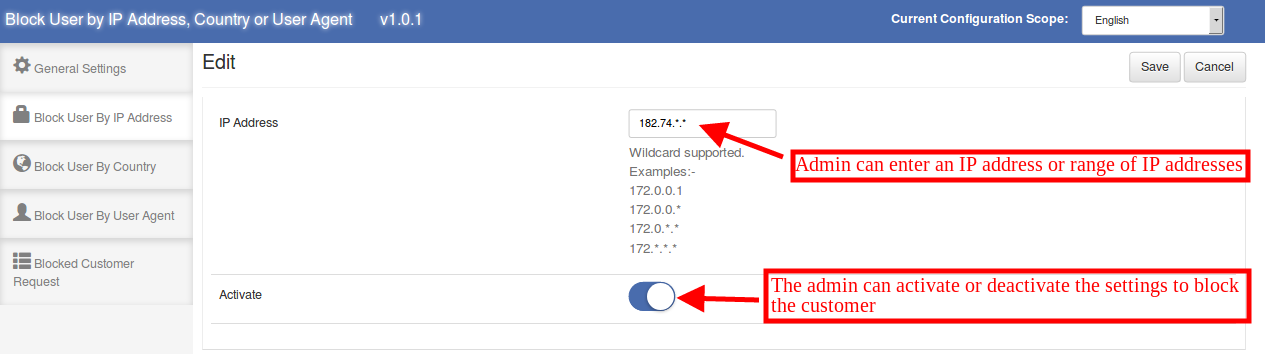
Here the store admin can view the list of blocked IP addresses of the customers. Admin can delete, edit and add new IP address to block the users. The admin can enter particular IP address or a range of IP addresses.
3.2.1 How to block a user by IP address?
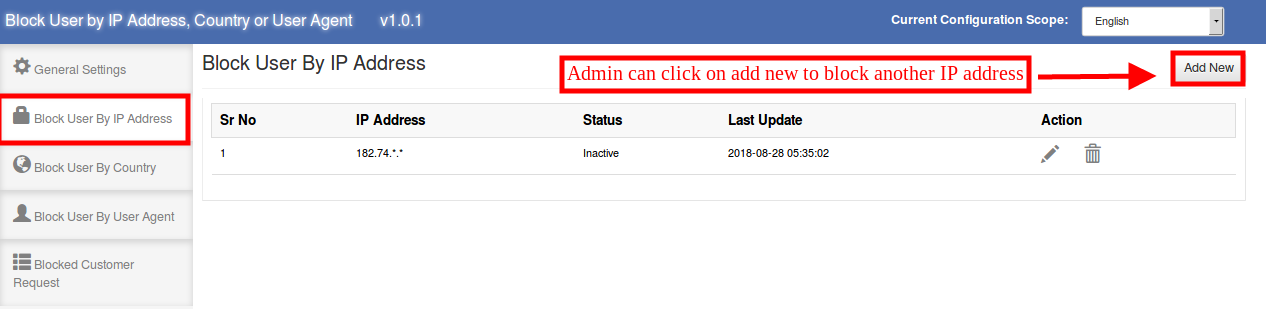
The store admin can click on the “Add New” option in order to stop a customer from accessing the site by restricting his/her IP address.
After clicking on the “Add New Option”, the admin can view the below-mentioned options:
IP Address: The store admin can enter the IP address of the customers in order to restrict them. The admin can enter a range of IP addresses like 182.*.*.* if required.
Activate: The store admin can activate or deactivate the settings to block or unblock the customers by IP address.
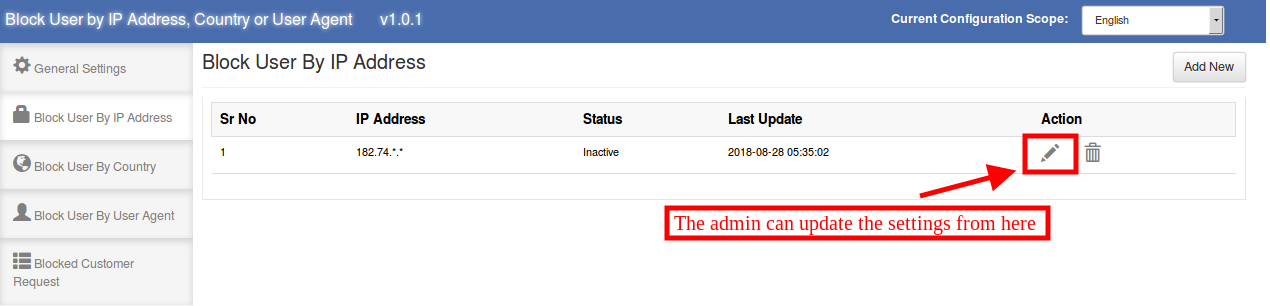
3.2.2 How to Edit “block user by IP address” settings?
The admin can click on the below-mentioned icon in order to edit the previously applied settings.
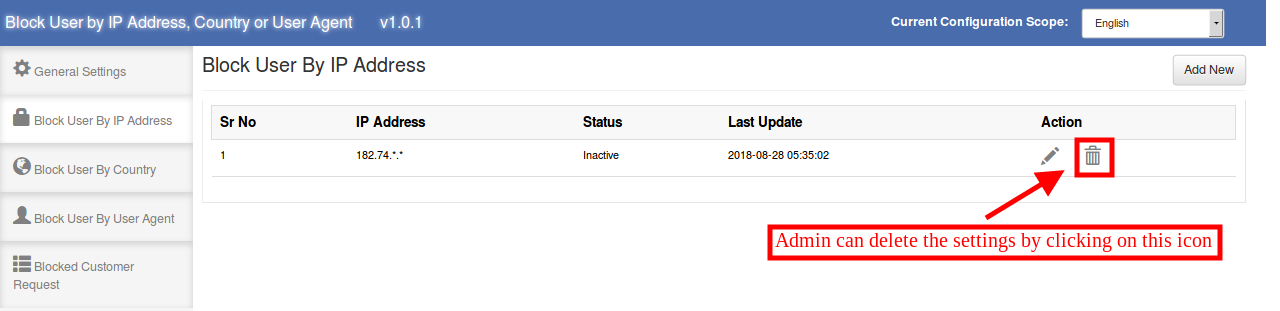
3.2.3 How to delete “block user by IP address” settings?
The admin can delete the settings by clicking on the below-mentioned icon. After that, the customers can access the website easily.
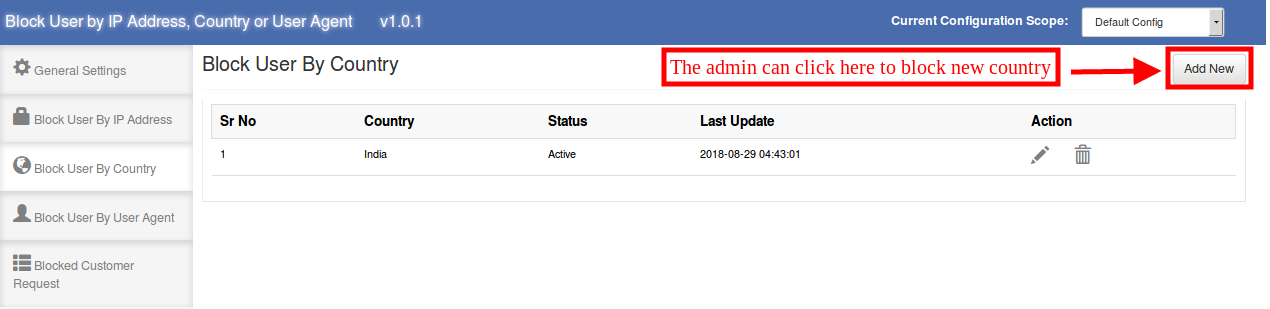
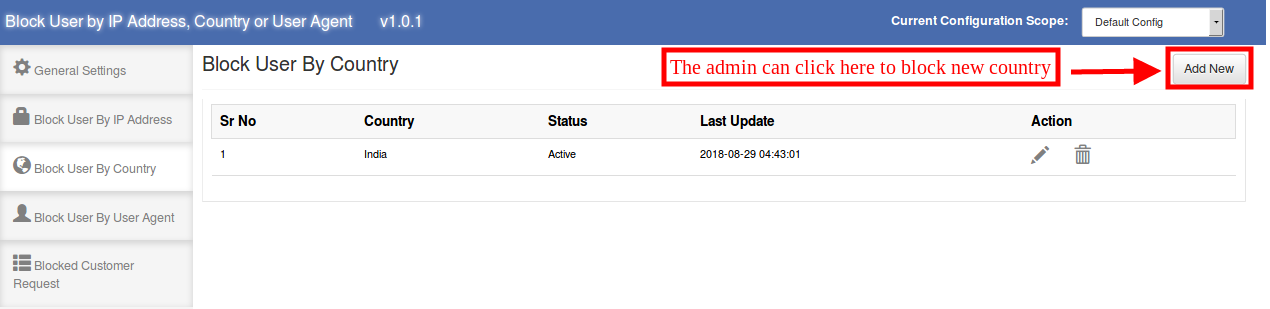
3.3 Block User by Country
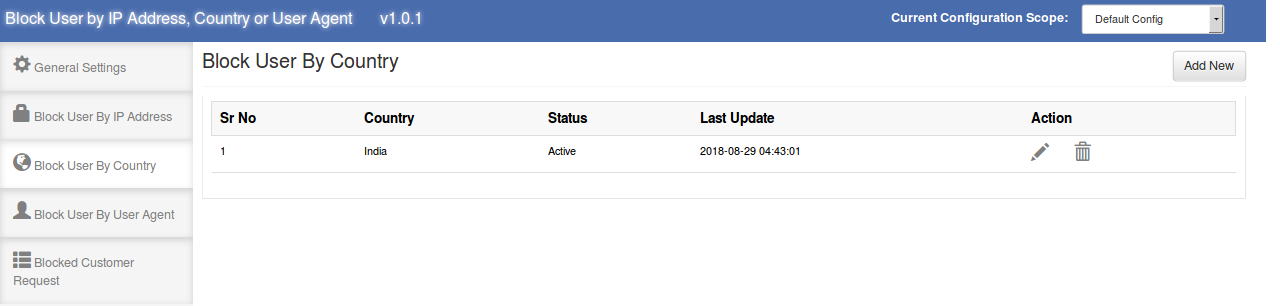
Here the eCommerce store owner can view the list of blocked countries. The store admin can add, delete or modify the country.
3.3.1 How to block a user by Country
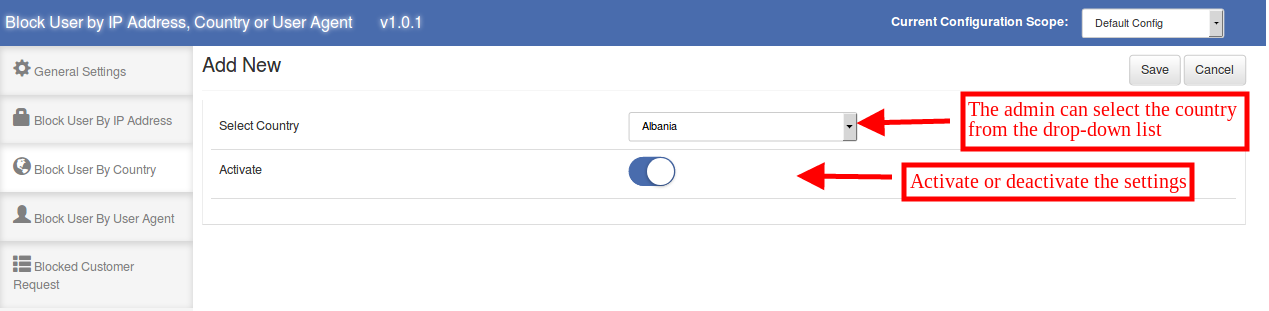
The store admin can block the users of any specific country. The admin can select the country from the drop-down list and block the customers of that country.
After clicking on the “Add New” option the admin can view the below-mentioned options:
Select Country: The admin can select the country from the available drop-down list.
Activate: The admin can activate or deactivate the banishment from the admin interface.
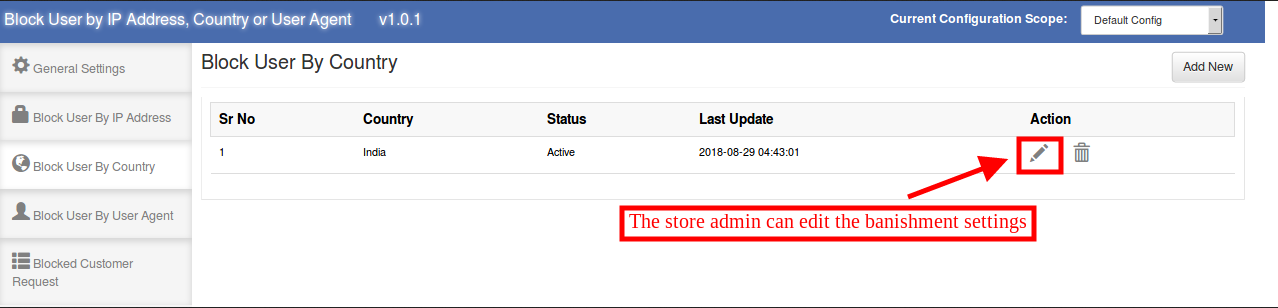
3.3.2 How to Edit “block user by Country” settings?
The admin can also edit the previous settings just by clicking on the “Edit Icon”.
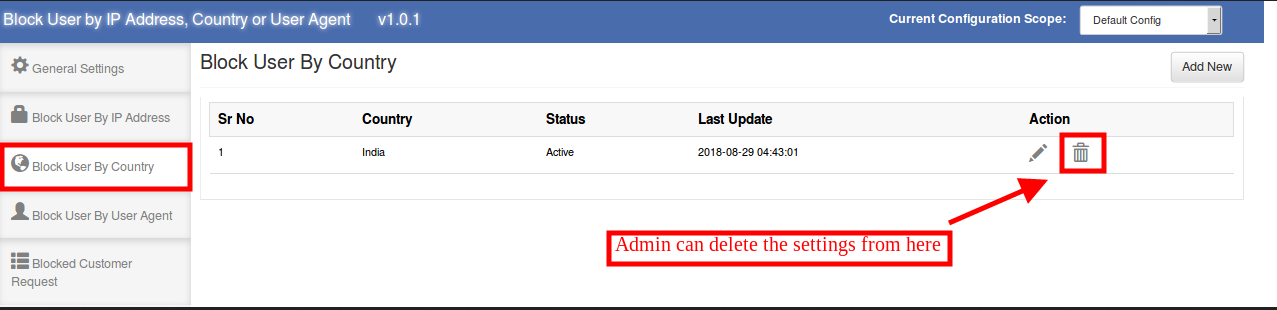
3.3.3 How to delete “block user by Country” settings?
The store admin can also delete the settings by clicking on the below-mentioned icon:
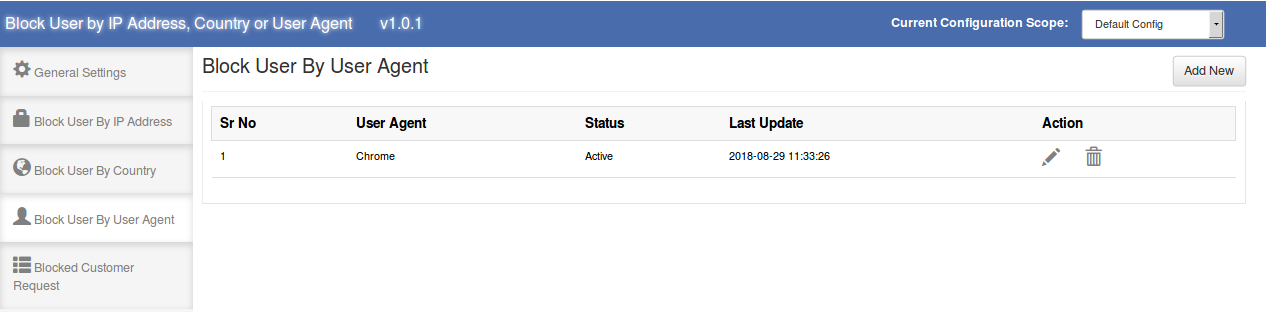
3.4 Block User by User Agent
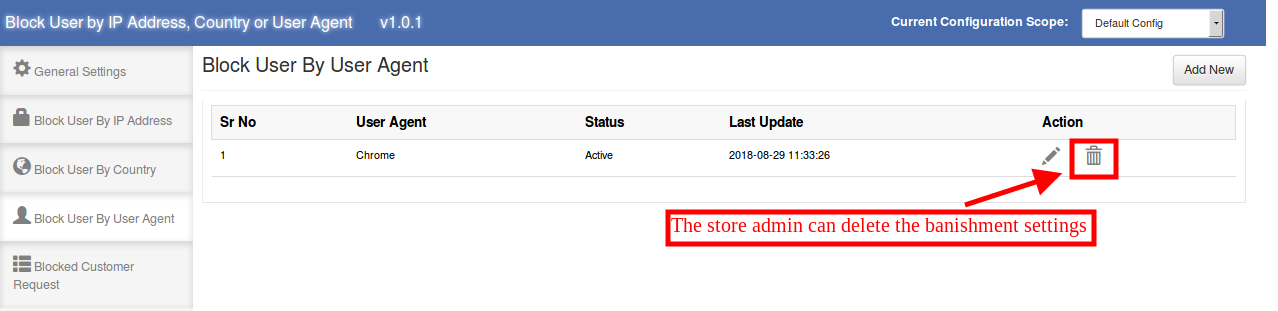
The Magento Block User Extension allows the eCommerce store admin to block the user by user agent. Here the admin can view the list of blocked user agents as shown below:
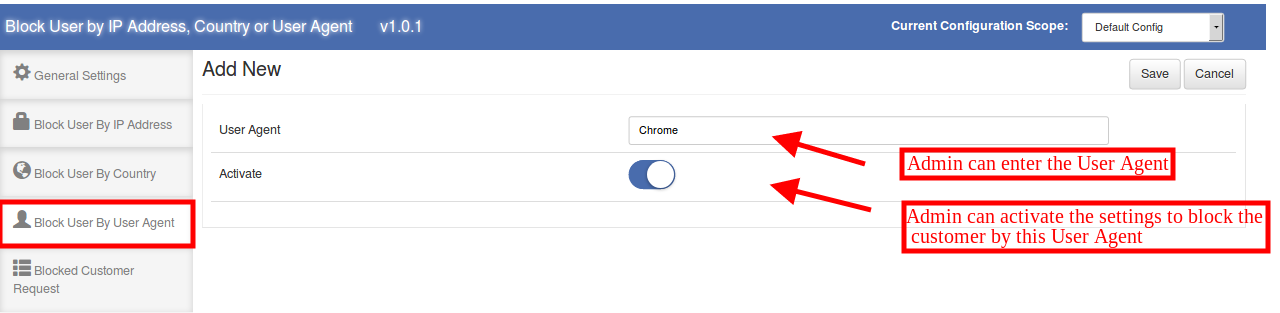
3.4.1 How to block a user by User Agent
In order to block the customer by user agent, the admin can enter the user agent name and block the customers by user agent.
The admin can view below-mentioned information:
User Agent: The e-merchant can enter the user agent name here.
Activate: The admin can enable or disable blocking by activating and deactivating the option.
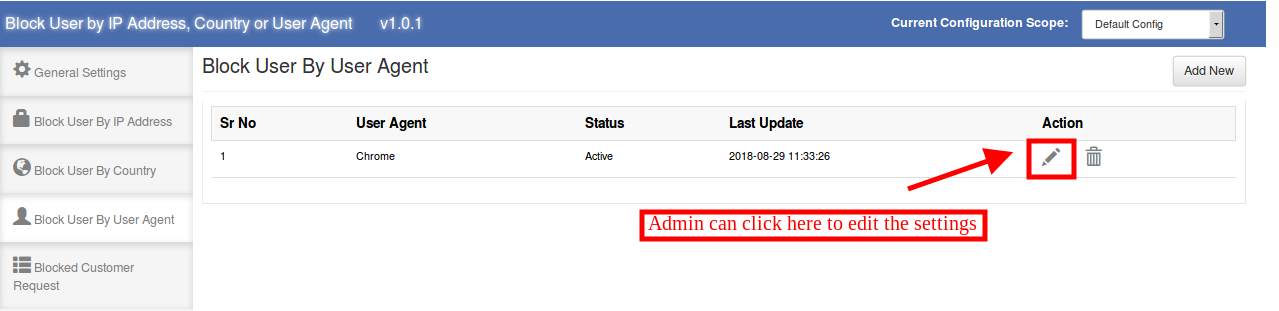
3.4.2 How to Edit “block user by User Agent” settings?
The eCommerce store admin can edit the previous settings by clicking on the “Edit Icon”. The store admin can click on this icon for editing the settings:
3.4.3 How to delete “block user by User Agent” settings?
The admin can delete the previous settings by clicking on the below-mentioned icon:
3.5 Blocked Customer Request
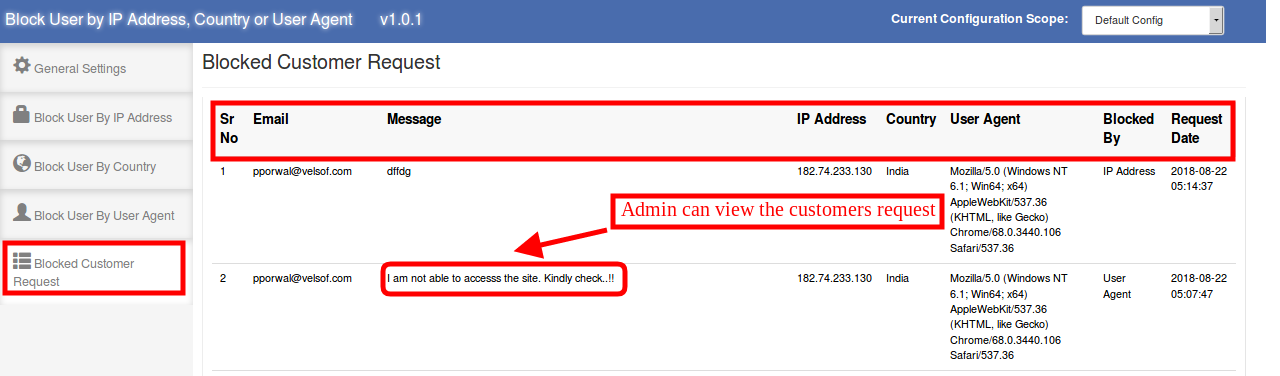
The online store users can send a request to unblock them from the admin interface. The admin can view these requests from the admin interface. Here in this “Blocked Customer Request” section, the admin can view the email id of the customers, message send by the blocked customers, IP address and user agent details. The admin can also view the details on which bases the customer has been blocked. The admin can view the request date from the admin interface.
The e-merchant can view the message and take appropriate actions.
4.0 Front-end Interface
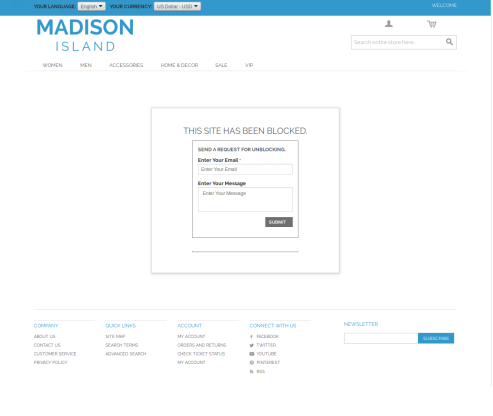
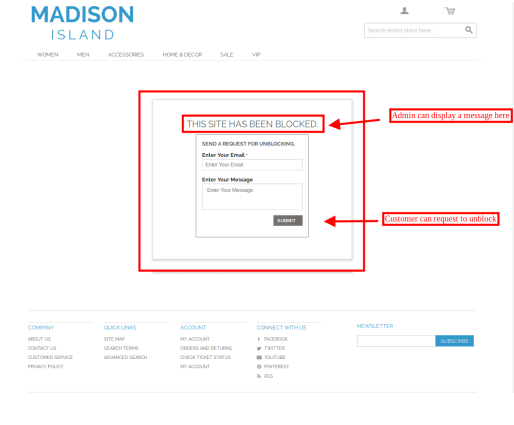
If the admin blocks the customer, then the customers won’t be able to explore the website. The message will be displayed on the website as shown below:
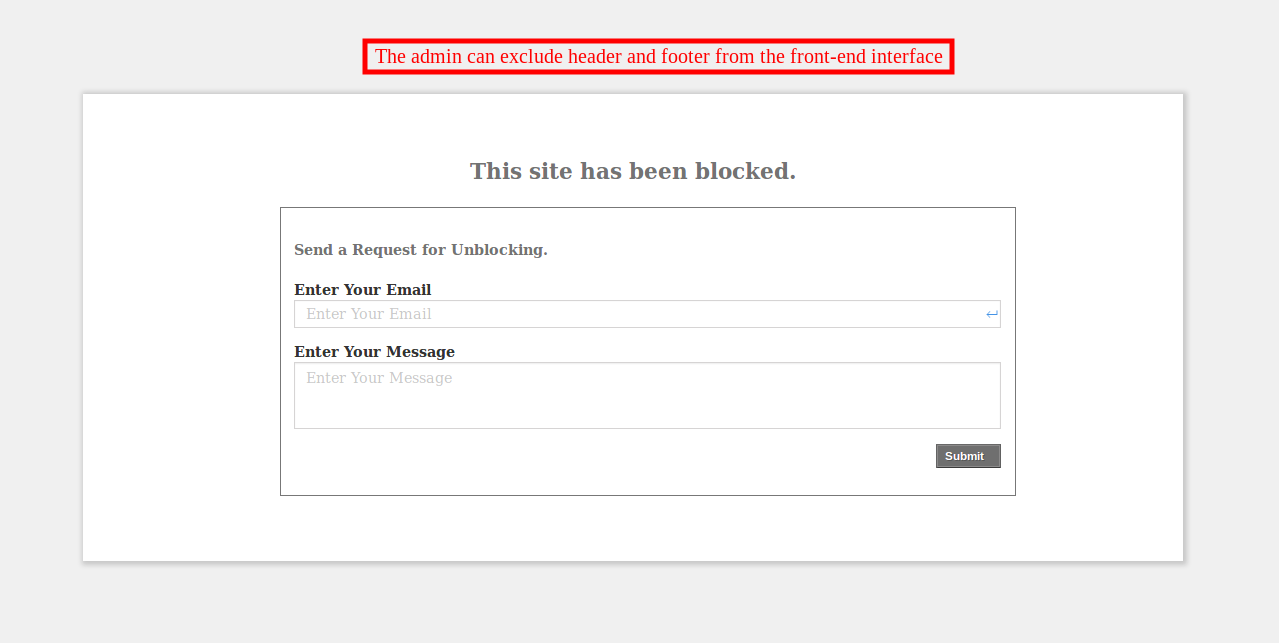
If the store admin disables the settings to show header and footer, then the front-end interface will display as shown below:
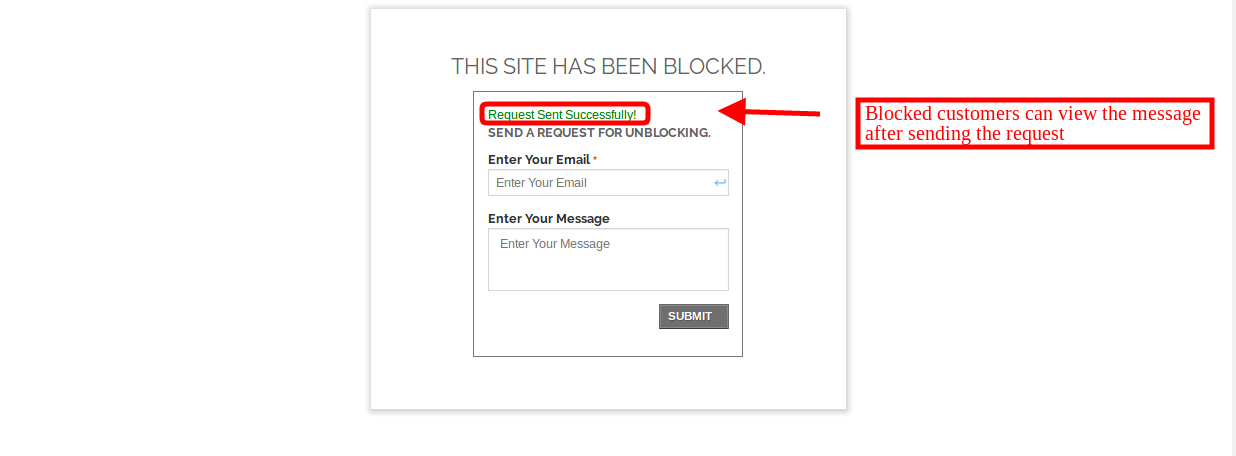
The customers can send a request to the store admin in order to unblock them and allow accessing the website. The users can enter their email id and message. After submitting the message they will see a success message on the same page.
The store admin can view the request from the admin interface and decide to unblock the customer or deny the request.
1.0 Introduction of Magento Auto Switch Language and Currency Extension:
Knowband Magento Auto Switch Language and Currency Module automatically change the language and currency of the eCommerce site according to the visitor’s country or region. The admin in Magento auto switch currency can offer a better store experience to the store visitors by providing them the relevant information in their preferred language. This is one of the must-have extensions to improve the user experience and the customer base globally.
1.1 Features of the Magento Auto change language and currency:
1. Magento language and currency autoswitcher automatically convert the language of the online store based on the location of users by detecting their IP address.
2. Magento Language and Currency switch Extension can be easily implemented on the store.
3. Knowband’s Magento Automatic language and currency converter tracks the IP address of the user and finds out their country or region of the user.
4. Magento Auto Switch Language and Currency Module convert the default language and currency according to the customer’s geolocation.
5. This Magento Auto Change Language Module is supported in multiple languages.
6. The Magento auto switch currency are SSL compatible also.
7. The Magento language and currency auto switcher by Knowband is multi-store compatible.
8. With the help of this Knowband Magento Automatic Switch Language and Currency Extension, the store admin can offer a better user experience to the customers by showing the content in their preferred language and currency.
9. The Magento auto switch currency back-end interface is extremely easy to use.
2.0 Installation
1. The folder structure of the Auto Switch Language and Currency folder.
2. Copy all the folders into Magento root directory and clear the cache (if enabled).
3. You will be able to find the “Auto Switch Language and Currency” option inside the “System > Knowband Extensions > Auto Switch Language and Currency”.
4. You can now configure the Magento language and currency autoswitcher as per your requirements and check its working in the front end at following URL:
3.0 Admin Panel
After installing Magento Language and Currency Switcher Module in the Magento store. The admin interface of the Magento language and currency switcher offers two tabs. They are mentioned below:
1. General Settings
2. Country List
Let us discuss the various customization options of Magento Automatic language and currency converter:
3.1 General Settings
The various fields of the tab of Magento Auto Change Language and Currency Extension are listed below:
1.Language Switching
2.Currency Switching
1. Language Switching: In this section of Magento Auto Switch Language Module, the admin can enable/disable the auto switch language option. After enabling this feature, it will automatically change the website language whenever customers will visit the website.
2. Currency Switching: This Knowband Magento Auto Switch Currency Extension allows the admin to enable the auto switch currency option. If this button is enabled, then, the Magento Auto Currency Switch plugin will automatically change the currency being used in the front-end.
3.2 Country List
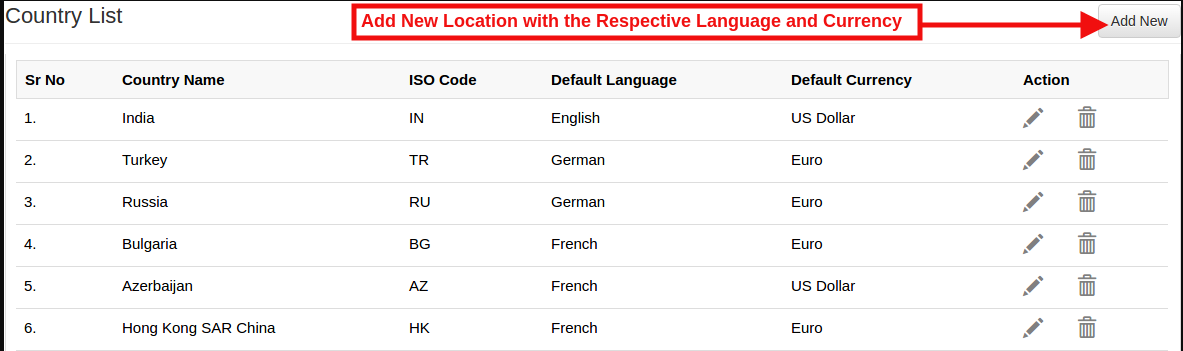
The Automatic Language and Currency Converter for Magento offers an option to the online retailer to add the Countries with preferred language and currency. For all the countries listed here with default language and currency will be different for the language.(As per the option selected by the admin)
3.2.1 How to Add New location/Country with the respective language and currency?
As per the requirement of the store the admin can add the countries here.
For adding the country the Store admin needs to Click on the ‘Add New’ button.
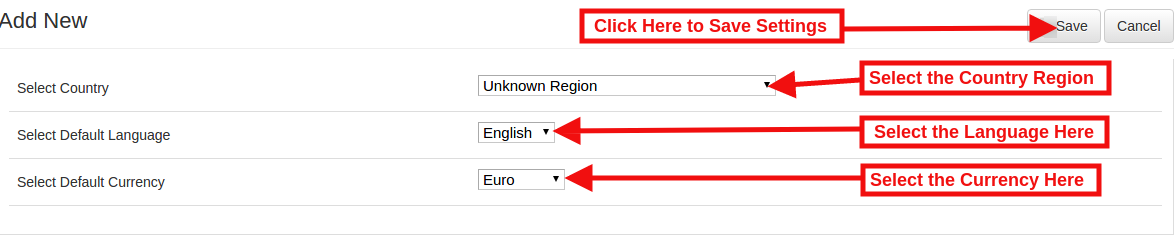
By clicking on the Add New button, the store admin will be redirected to the below-mentioned page:
Select Country: In this field of Magento Auto change currency and language, the online merchant can select the country from the drop-down list.
Select Default Language: This contains the list of languages. The admin in Magento Auto Switch Currency Module can select the language used in that particular country.
Select Default Currency: By Select default currency option of the Magento Auto change currency the Magento store admin can select the currency for the selected country.
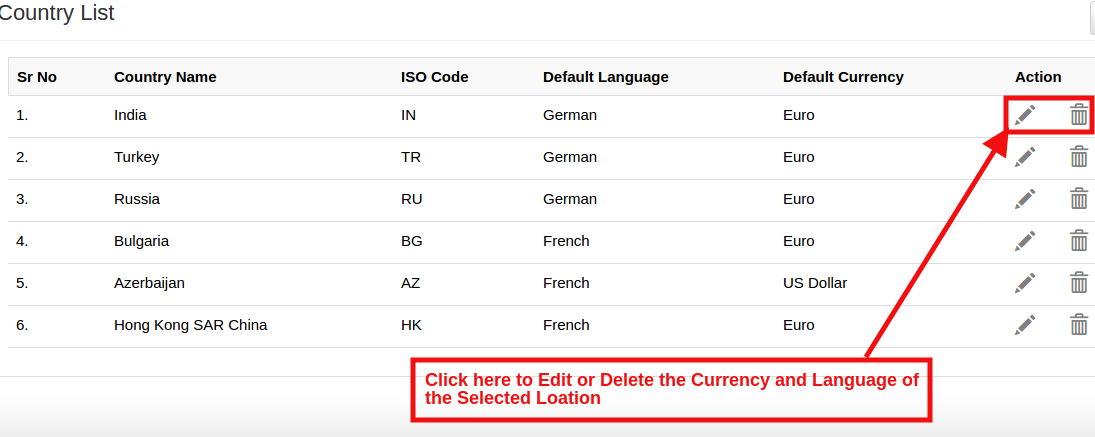
In case of admin need to update the Currency and Language for any particular Country then the admin can update the information by click on the ‘Edit’ button in Magento language and currency switcher.
Please refer the below screenshot for edit the details:
They can delete the specific country by clicking on the Delete button.
4.0 Front End
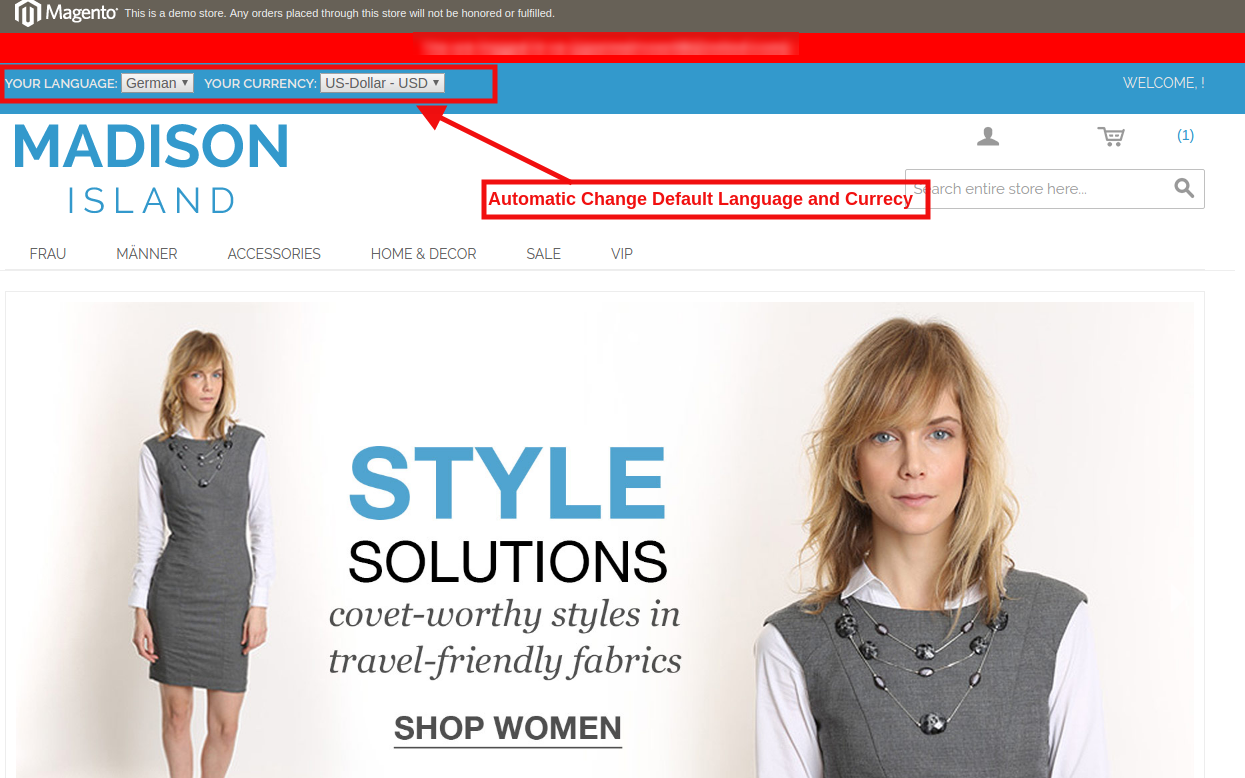
In the Front End, the Language and Currency will automatically switch according to admin configuration in Back-Office of
Magento language and currency switcher.
With Magento Auto change currency and language, the IP of the user will be detected and the default language and currency is changed automatically as shown in the image above. The changes will be based on the configuration of done in the back-end of the Magento Auto Switch Language and Currency Extension.
Magento messenger chat module for Magento store is a feature-rich Magento extension for providing live chat support to the store customers. Magento Facebook messenger integration extension by Knowband integrates the Facebook messenger on the website. The customers can ask their concerns and query easily just by sending a message. This Magento social live chat support plugin is the best way to provide support and improving customer experience.
By using this Magento live chat support extension the store admin can communicate with the customers directly, this way the admin can build a better customer relationship with the buyers. The store owner can configure this Magento Facebook messenger integration extension according to the requirement and activate or deactivate the module anytime. The online seller can incorporate the functionality by entering Facebook page id and app id in the admin interface. With the help of this Magento Messenger live chat extension, the admin can provide online customer support just by following some easy steps. The e-merchant can also set the look and feel of the social messenger icon by selecting its color. this way the store owner can easily implement the Magento Messenger live chat extension and improve the product/brand popularity.
1.1 Features
The eCommerce store admin can offer live chat support option on the website for providing better customer support and communicate with the customers directly.
The store admin can incorporate Facebook messenger on the website with the help of this Magento messenger chat module for Magento store.
It is absolutely easy to install, configure and activate this Magento Facebook messenger integration extension.
The eCommerce store owner can easily communicate with the customers and resolve their issues at the same time.
The admin needs to generate and enter the Facebook app id and page id in order to display Facebook messenger on the website.
The store owner can also set the look and feel of the messenger by selecting its color from the admin interface of this Facebook messenger and live chat extension.
The admin can show social messenger on selected pages. The Magento social live chat support plugin allows the admin to select the pages for showing the live chat option.
The Facebook messenger and live chat extension allow the admin to set the time after which the messenger will display.
The store admin can also set different greeting messages for Facebook logged-in and logged-out customers.
The messenger multilingual live chat support module is multi-lingual and SSL compatible.
User-friendly and easy to understand interface makes this Magento social messenger extension more useful.
No technical skills are required for implementing this Magento facebook messenger integration extension.
1.2 Admin benefits
Online store admin can communicate with the customers and resolve their concerns and answer their queries by chatting on Facebook messenger.
The customers can get a chance to connect with the store admin directly and clear all the confusions.
The store admin can increase sales and conversions by developing a customer relationship.
The highly customizable Magento social live chat support plugin is very easy to implement.
The store owner needs to generate and enter the Facebook app ID and page ID in order to integrate the Facebook messenger on the store.
The store admin can set the messenger color according to the website theme easily from the admin interface of this Magento Messenger live chat extension.
By using this Magento messenger chat module for Magento, the store admin can offer live chat support to the users.
By resolving the concerns and answering the queries the store admin can boost the sales and conversion rate easily.
The admin can build a relationship with the customers by offering them the best class support.
2.0 Installation Steps
The store admin can follow these simple steps for installing the Messenger live chat module:
1. First of all download the extension package from the Knowband store.
2. You will get a zipped file. Unzip the package on the root folder of your Magento setup via FTP manager (like Filezilla or WinSCP – download here: https://filezilla-project.org/). You’ll find the files and folders as shown in the image below:
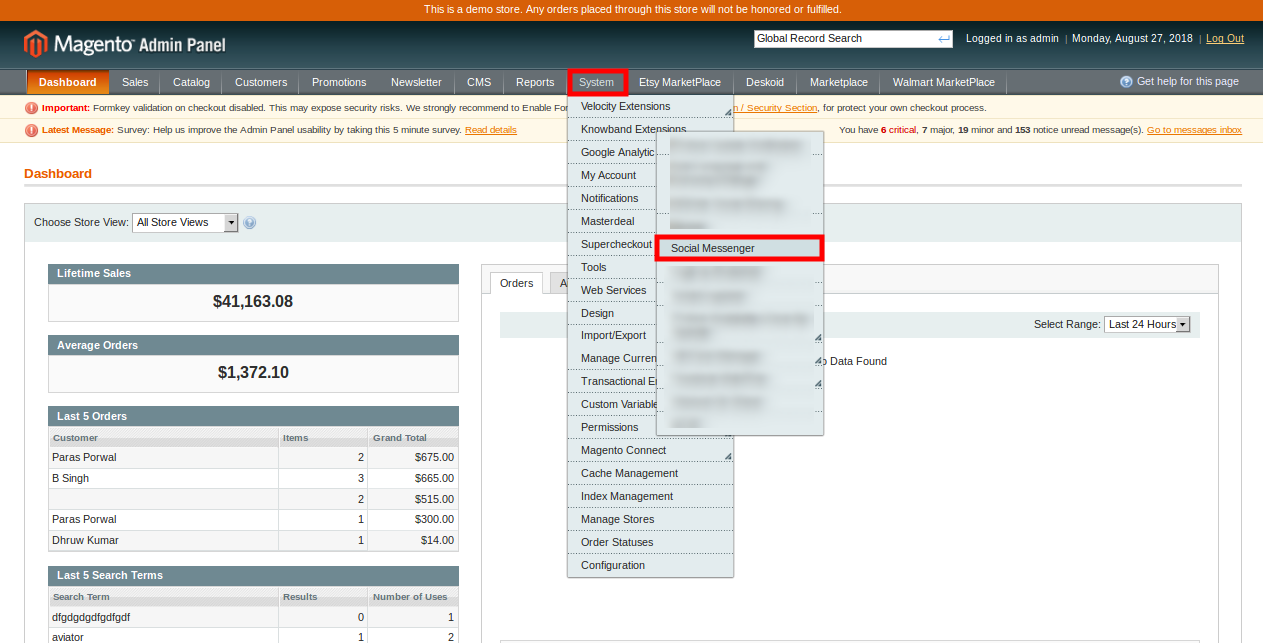
3. The extension is now installed and ready for use. In the Admin Panel, go to “System > Knowband Extensions >Magento social messenger”.
Now the store admin can now use and configure the Magento social messenger extension.
3.0 Admin interface
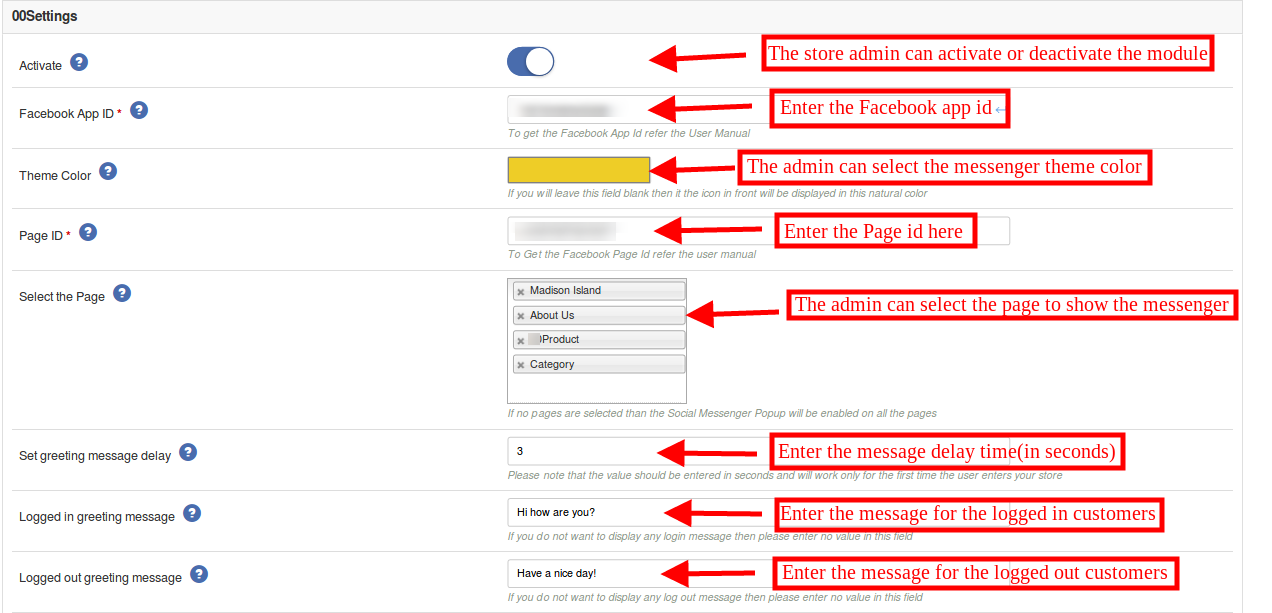
After installing the Magento social messenger module, the store admin can view the below-mentioned configuration option:
1. Enable/Disable: The store admin can activate or deactivate the Magento social live chat support extension just by clicking on this option.
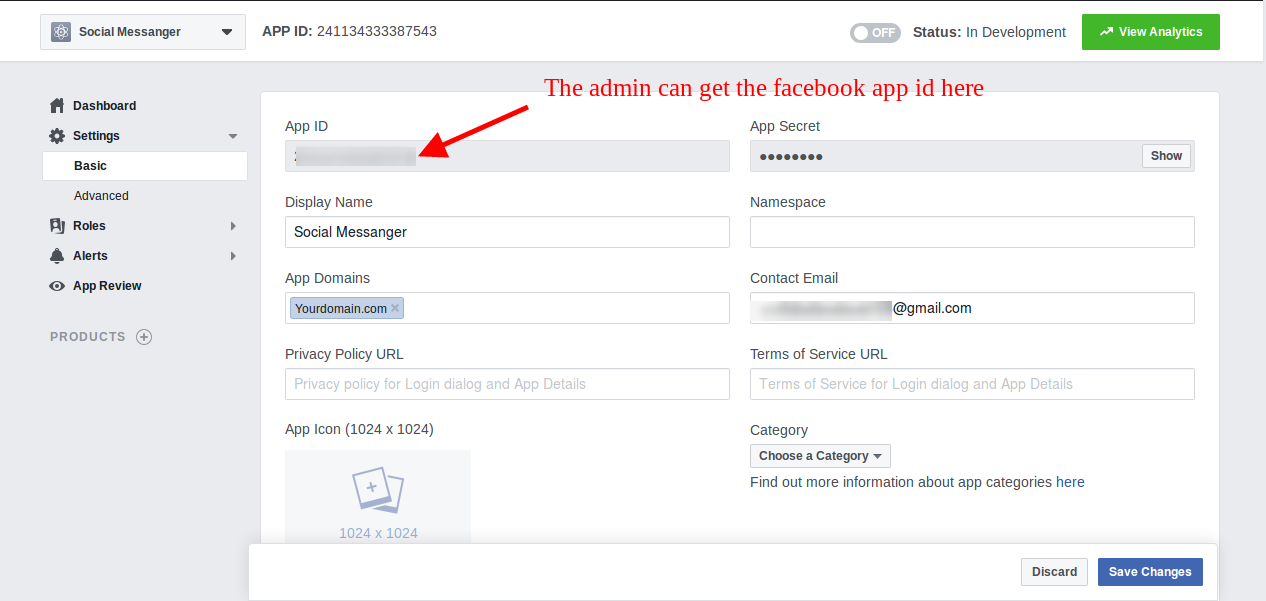
2. Facebook APP ID: The store admin can generate the enter the Facebook app id here. The admin can generate the Facebook app id by following the steps provided in 3.1 section.
3. Theme Color: The admin can set the theme color by selecting the messenger color. The admin can select the messenger color as per the store theme.
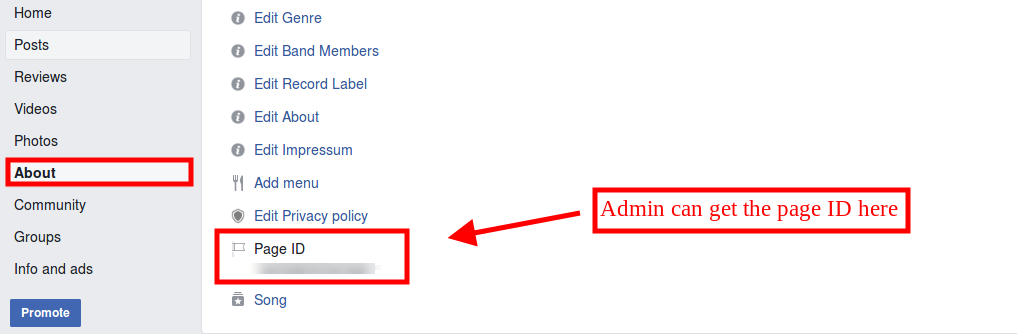
4. Page ID: The store admin can generate the Facebook page id and enter the page id in order to offer a live chat option. For generating the Facebook page id, please follow the steps provided in 3.2 section.
5. Select the Page: The Magento Facebook messenger integration extension provides an option to select the pages for displaying the Facebook messenger.
6. Set Greeting Message Delay: The online store owner can set the time (in seconds) after which the customers can view the greeting message on the website. If the store owner wants to show the greeting message without any delay, then he can enter the time ”0”.
7. Logged-in Greeting Message: The Magento social live chat support plugin allows the admin to display a greeting message for Facebook logged-in customers. The store admin can leave this customization option if he doesn’t want to show this message.
8. Logged-out Greeting Message: The admin can show a specific message for those customers which are logged-out to the Facebook. The admin can leave the section empty if he doesn’t want to show any message.
3.1 Steps to generate Facebook app ID
In order to generate a Facebook app id please follow these steps:
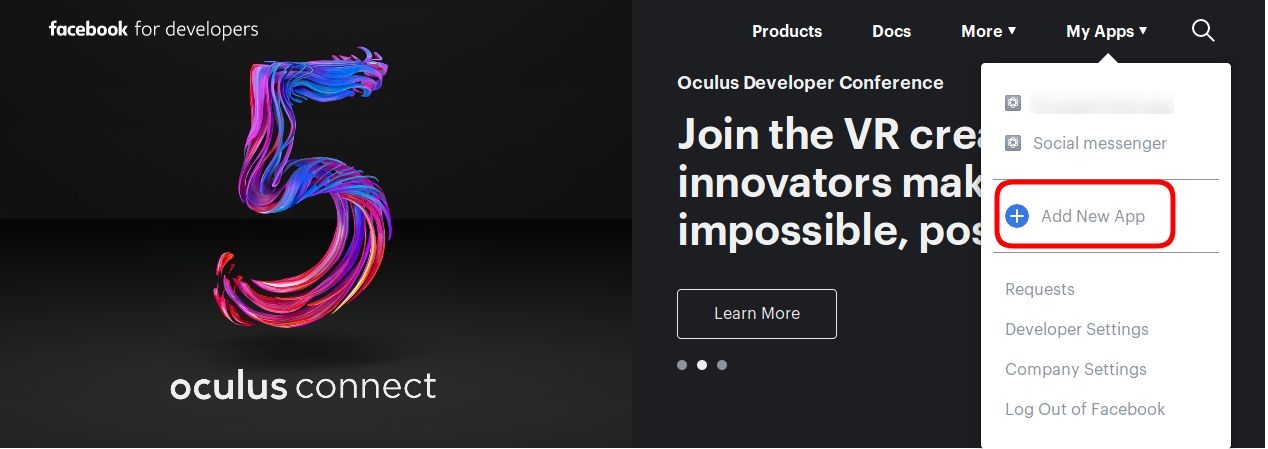
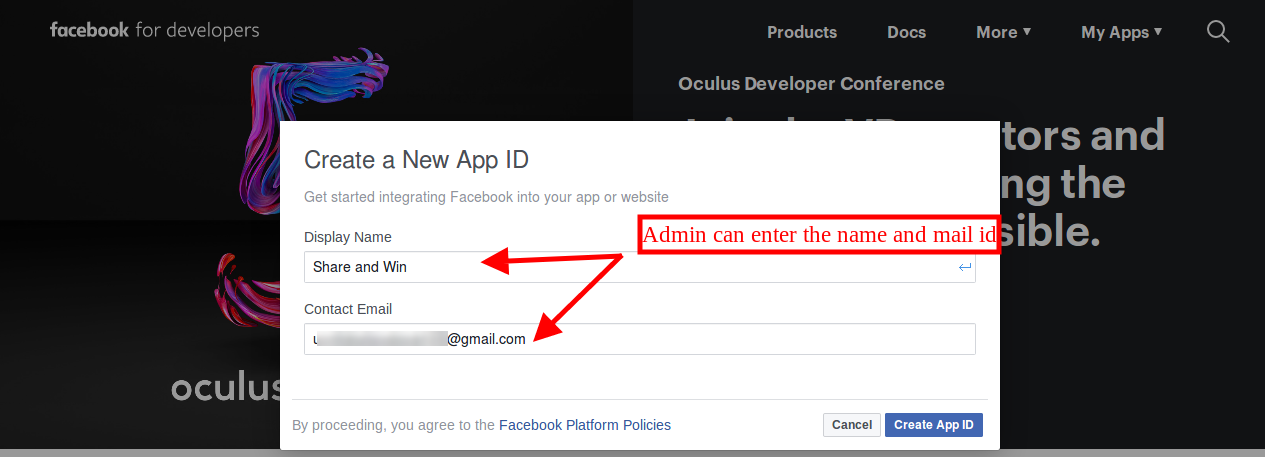
Go to “MY APPS” and click on the ”ADD NEW APP” option.
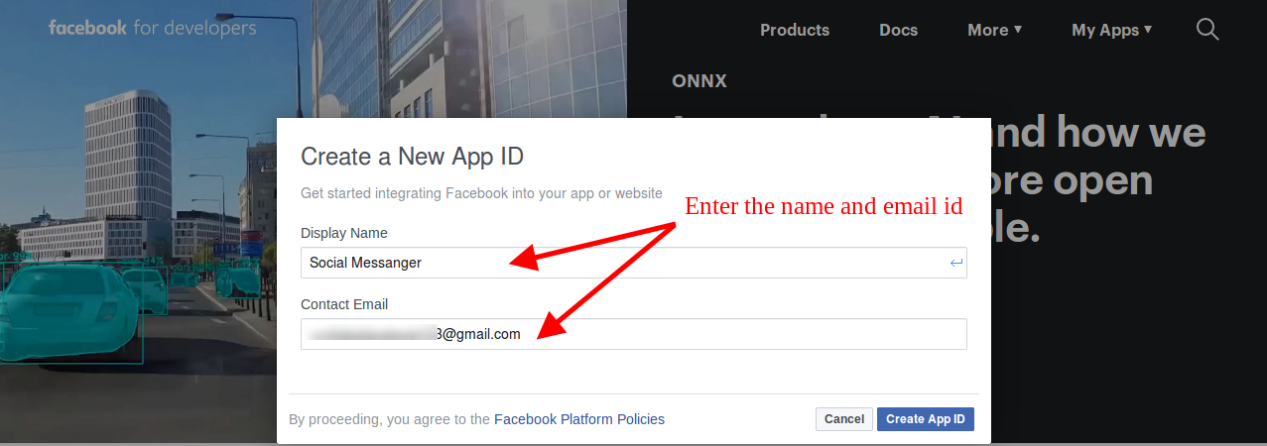
Enter the details in “Display Name” and “contact email ID”. After that, click on the “Create APP ID” button.
After clicking the “create app id” button, go to the “Settings” and then select “Basic” option. Here, the store admin can view the APP ID. The admin needs to copy this Facebook app id and copy to the admin interface app id option.
Admin can insert the App Domain. After that click on the “save changes” option.
3.2 Steps to generate Facebook page ID
The admin needs to open the Facebook page and go to “about” page. Here, the admin can view the “page id”.
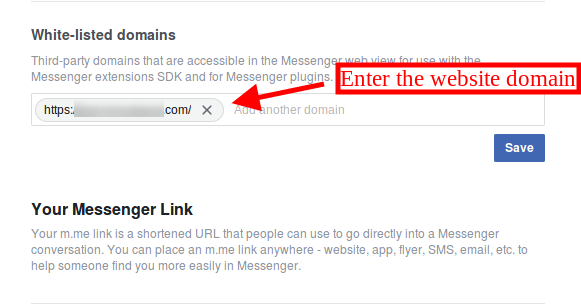
After that go to the settings option and select the “messenger platform” option. Here, the store admin can enter the domain in the “White-listed domains” option.
Now, the admin can enter the page id in the admin interface page id option.
4.0 Front-end interface
The front-end view of the Facebook messenger and live chat extension will look as shown below:
The online customers can send a message and ask their queries. They can get the quick resolution of the issues.
This way, the online store admin can easily increase the customer’s trust over the website and offer better support to the customers. Magento facebook messenger integration extension is very easy to implement and there is no need to change even a single code from the admin interface. The eCommerce store owner can easily implement live chat functionality and resolve customers concerns. Facebook messenger and live chat extension allows store admin to set the look and feel of this messenger for offering better user-experience. The Magento social live chat support plugin is highly customizable and offers smooth functioning.
The store admin can answer the queries of the customers and resolve the issues easily. This way the admin can offer live chat support on the website without any hassle. This way, the Magento social messenger extension is helpful for both the store admin as well as customers.
The Magento 2 store owners get an option to add additional information fields on the registration form with Magento 2 Customer Registration Fields extension. Knowband offers Magento 2 Custom Registration Fields extension that allows the admin to add custom fields on the registration form. The admin can even add and manage the look and feel of the custom fields by adding additional CSS. These details collected from the additional field can be used for marketing and sales perspective in future.
This Magento 2 Custom Fields Extension provides an option to add new custom fields and update the old custom field in the registration form. The admin can validate the custom fields from the admin interface. The Magento 2 custom registration form module allows the admin to display the details on the invoice of the customers.
The Magento 2 Registration Fields module allows the admin to create partitions of the signup form for showing the custom fields specifically. Multiple custom fields can be selected like a text box, radio button, check boxes, date, select, text area and a file field.
1.1 Salient Features of Magento 2 Custom Registration Fields extension
New custom fields for the registration form can be created without any complicated task by using this Magento 2 Custom Registration Fields module.
The Magento 2 Registration Fields module allows the online store admin to create sections of the registration form for showing the custom fields.
The Magento 2 Custom Registration Fields extension allows the admin to create n number of custom fields. The plugin offers an option to create the custom section and the fields can be placed in the desired section with ease.
The Magento 2 custom registration form module allows the store admin to apply validations from the admin interface.
No code changes required for implementing the Magento 2 custom registration form module.
Admin can add custom CSS code to change the look and feel of the custom fields from the admin interface of this Magento 2 Custom Registration Fields plugin.
Custom registration field extension offers various fields like a radio button, text, select, text area, check-box, date and file field.
The store admin can show the customer details of the specific field on the invoice by enabling the option from the admin interface of this Magento 2 Registration Fields plugin.
Store admin can restrict the length of the custom fields from the admin interface of the Magento 2 Custom registration field extension.
The store owner can easily install, configure and use this Magento 2 Custom Registration Fields extension.
Store admin can allow the customers to edit the custom field information if required.
This Magento 2 Custom Fields plugin allows adding, updating and deleting the custom field without any difficulty.
2.0 Installation
After purchasing Magento 2 Custom Registration Fields extension, the store admin will get the following files:
1. Knowband_Customfield.zip which contain source code of the Magento 2 Custom Registration Fields extension. 2. User Manual which includes all the details and helps regarding the extension.
The steps to install the Magento 2 Custom Registration Fields extension are mentioned below:
Buy the Magento 2 Custom Registration Fields extension from Knowband. You can download the extension package.
The package has a zipped file that contains the user manual and the source code of Magento 2 Custom Registration Fields extension. Unzip the package.
Create a folder {Magentoroot}/app/code/Knowband/Customfield
Upload the extracted content in the above folder via FTP manager (like Filezilla or WinSCP – download here: https://filezilla-project.org/).
Now run below commands to install the plugin:
php -f bin/magento module:enable –clear-static-content Knowband_Customfield
php -f bin/magento setup:upgrade
php -f bin/magento setup:di:compile
php bin/magento setup:static-content:deploy
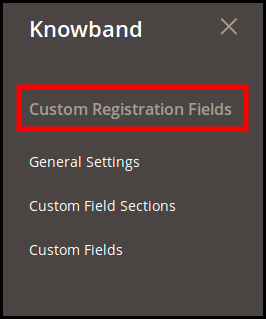
The extension is now installed and ready for use. In Admin Panel go to “Knowband Extensions >Custom Registration Fields”.
You can now configure and use the Magento 2 Custom Registration Fields extension.
3.0 Admin interface
After successful installation, the store admin can configure the custom registration field module. Once the Magento 2 Registration Fields module is installed, the admin can enter the admin interface. In this Magento 2 custom field registration extension, you will find three customization options.
General Settings
Custom Field Section
Custom Fields
3.1 General Settings
The store admin can enable the functionalities from the “general settings” menu.
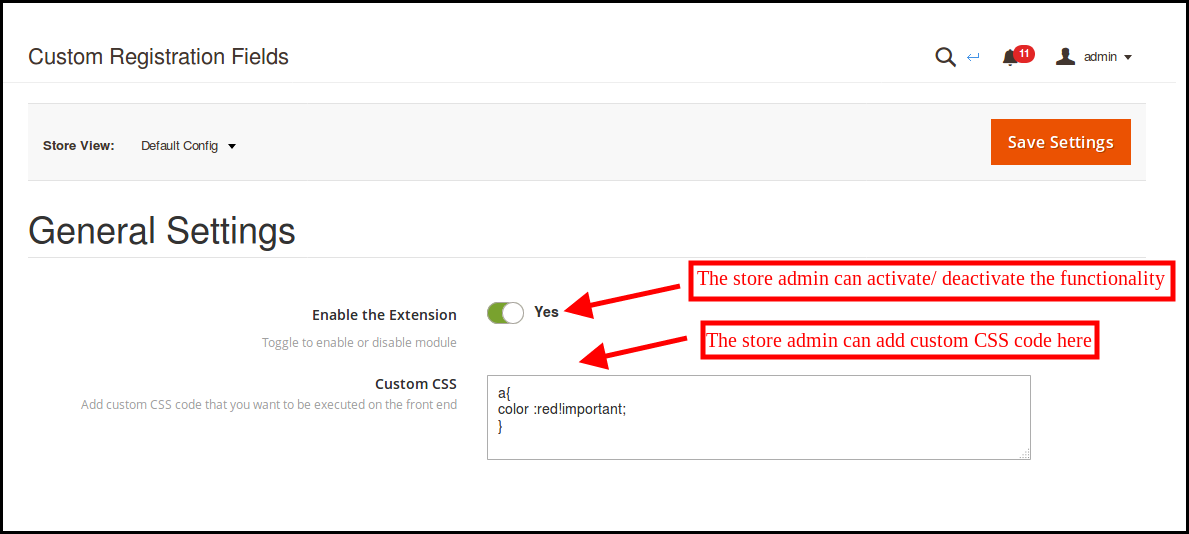
Enable the Extension: The store admin can activate or deactivate the functionality from the admin interface.
Custom CSS code: The store owner can add custom CSS code to change the look and feel of custom fields.
3.2 Custom Field Sections
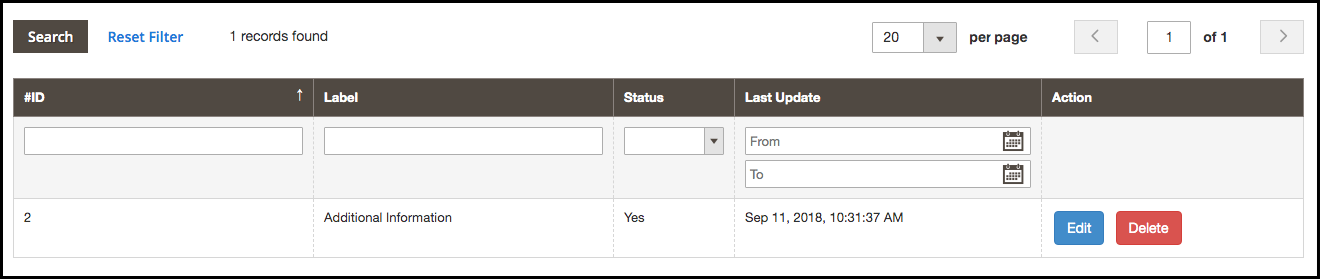
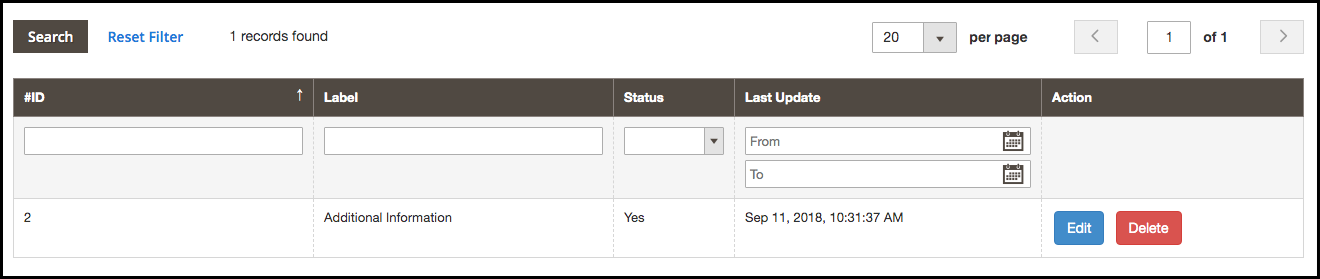
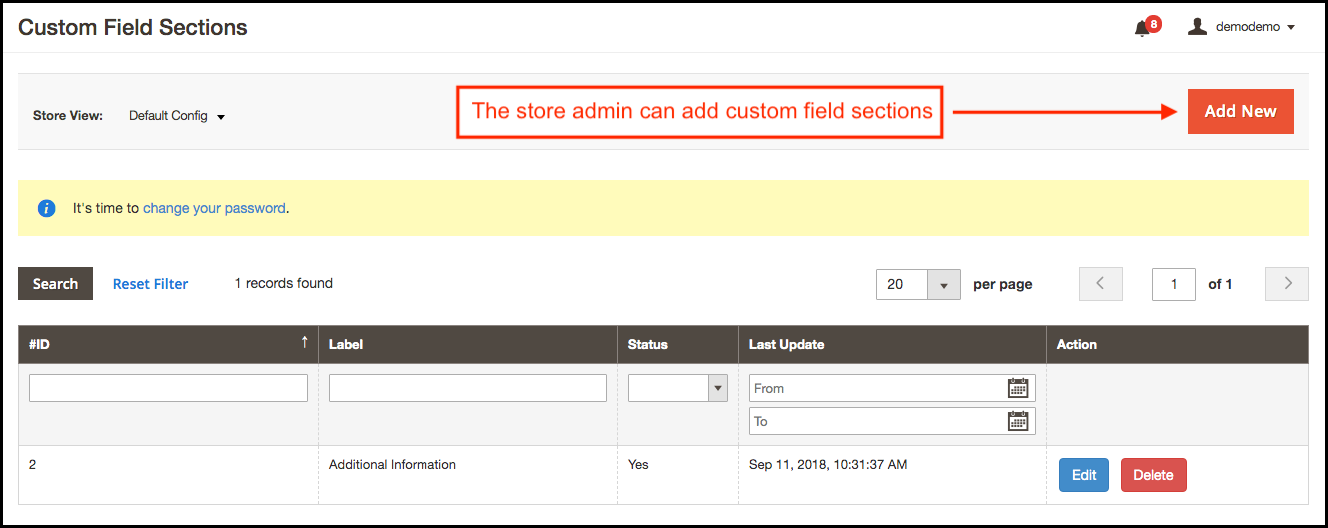
The Magento 2 Custom Fields Extension allows the admin to create the section to display the additional custom fields. Here the store admin can view the list of the custom field sections as shown below:
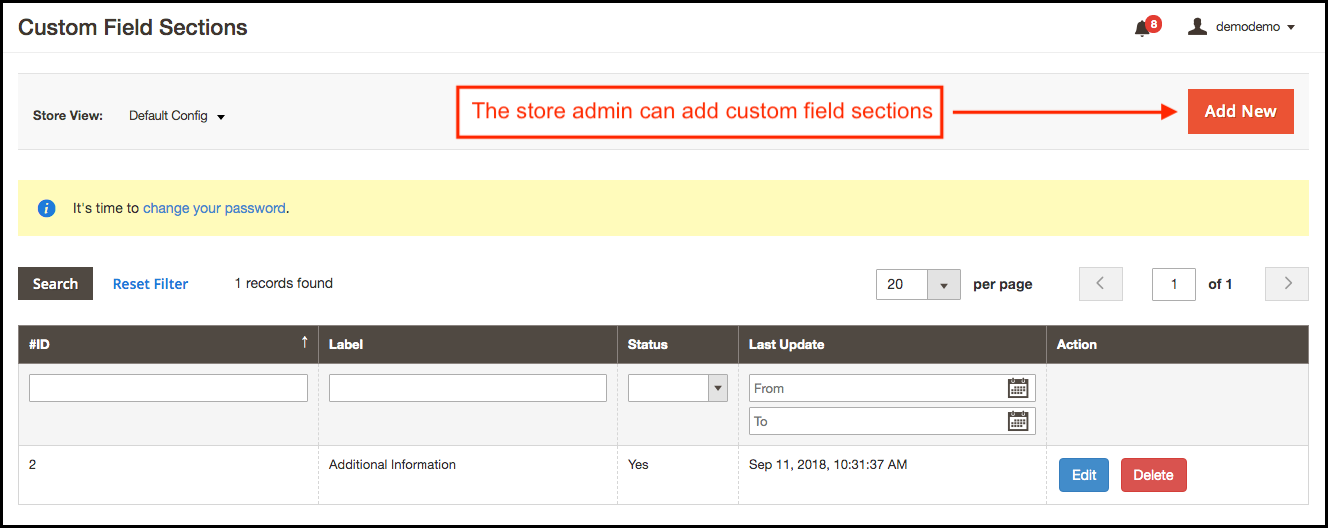
3.2.1 How to add a new custom section field?
The store admin can click on the add new option in order to add custom field section.
Here are various fields for the field creation:
Label: The eCommerce store admin can set the label for the custom field section from this tab.
Enable: The store admin can activate or deactivate the custom field sections as per the requirement.
3.2.2 How to edit new custom section field?
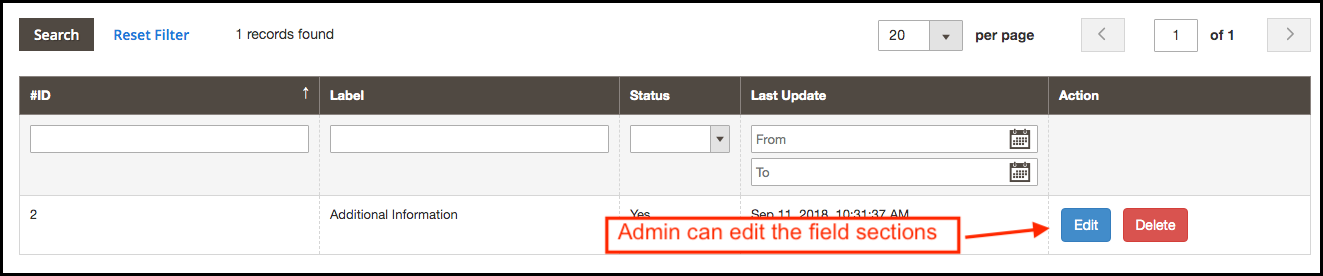
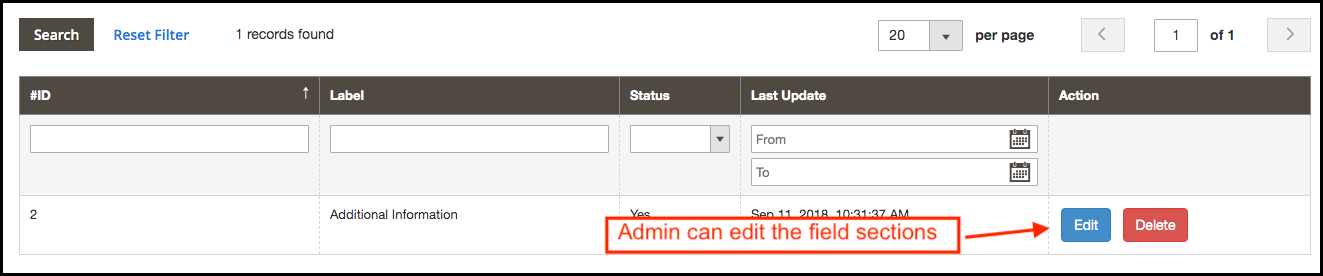
In order to edit the custom section field sections, click on the Edit button corresponding to each field. The admin can change the label name and activate the activate or deactivate this module just by clicking on the enable button.
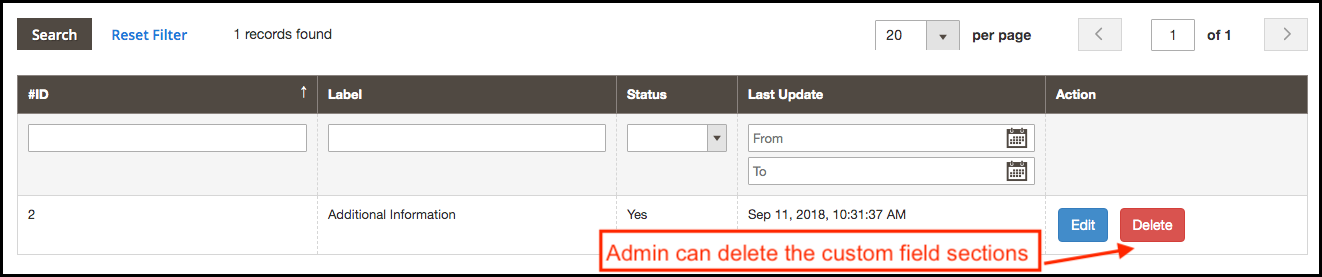
3.2.3 How to delete new custom section field?
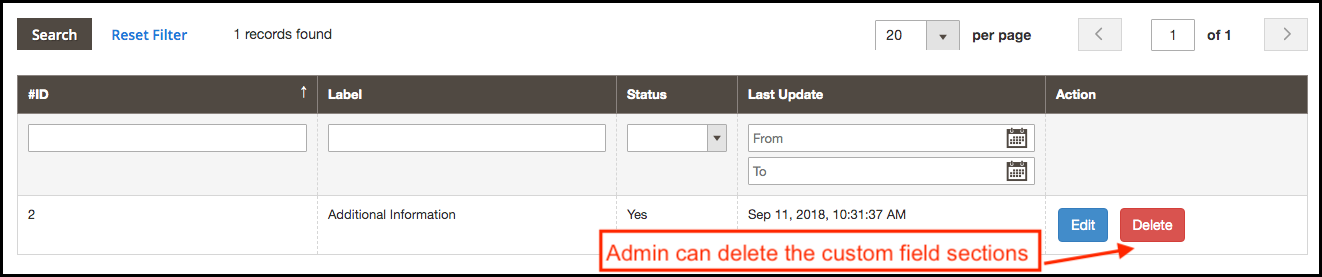
The eCommerce store admin can also delete the custom field sections by clicking on the “Delete” option.
3.3 Custom Fields
The Magento 2 store owner can display the custom field after enabling the custom field sections. The admin can set the custom fields as per the requirements.
The store admin can add, delete and update the custom fields anytime.
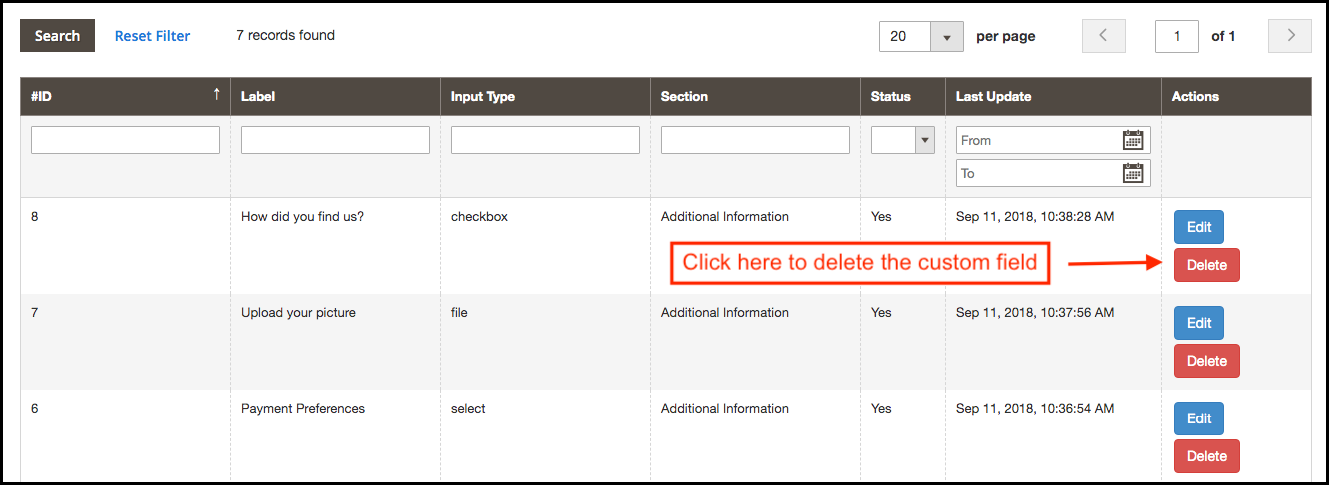
3.3.1 How to delete the custom field?
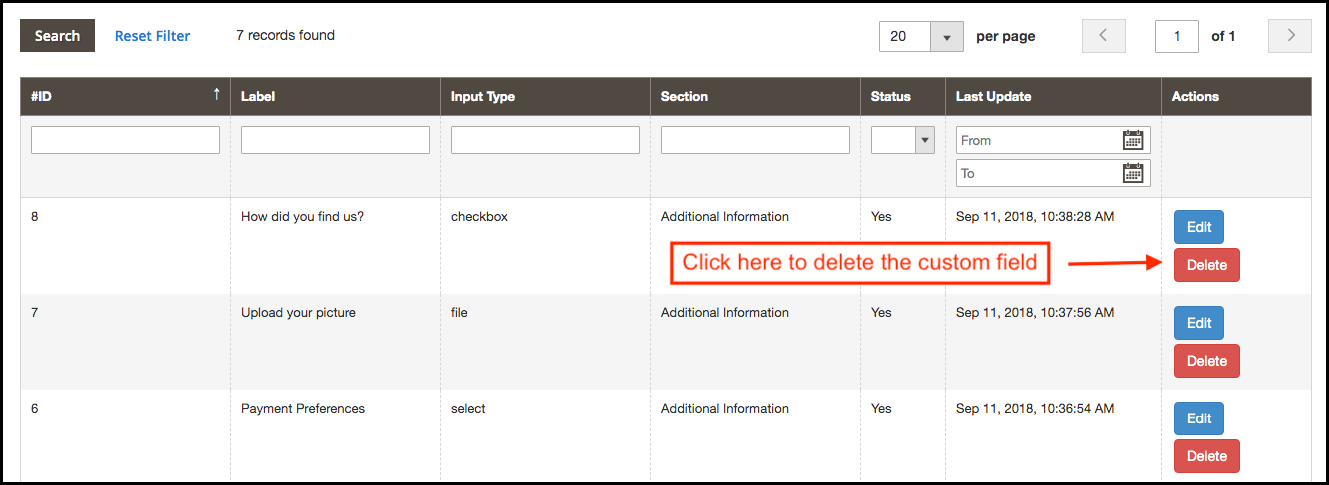
The store owner can delete any custom field from the admin interface easily. The admin can click on the delete button. After that, a confirmation pop-up will display and by selecting yes the admin can confirm the request.
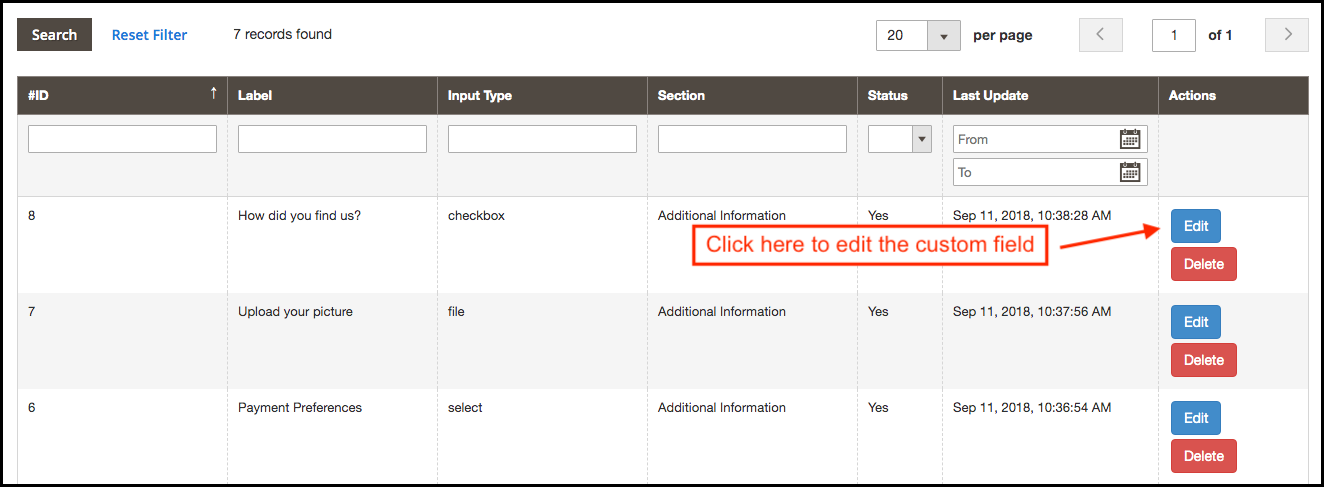
3.3.2 How to edit custom field?
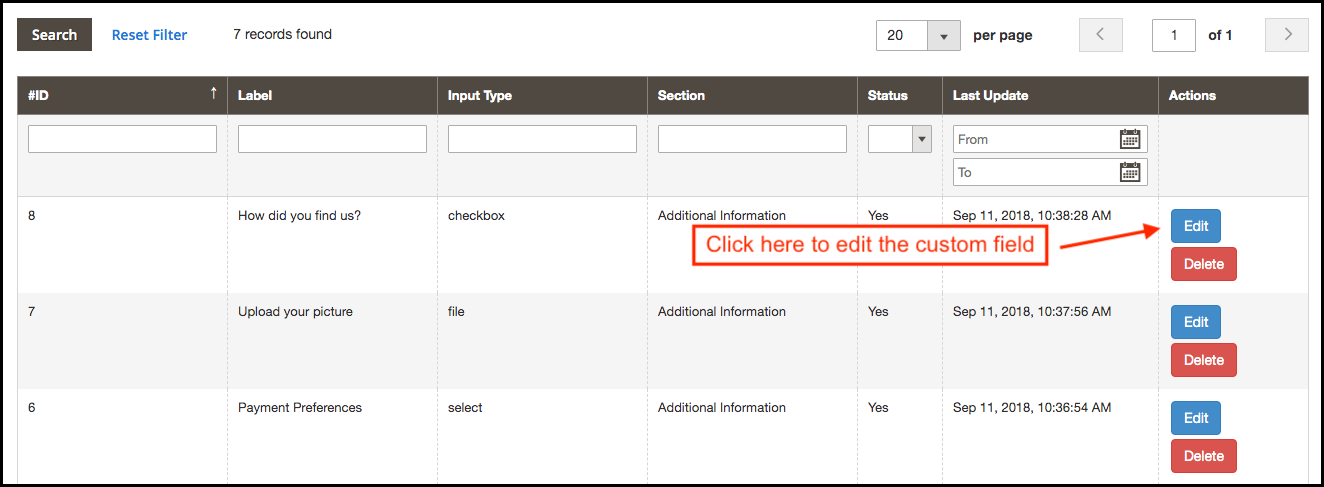
The store admin can also edit the previously created custom fields. The admin needs to click on the edit button for updating the previous settings.
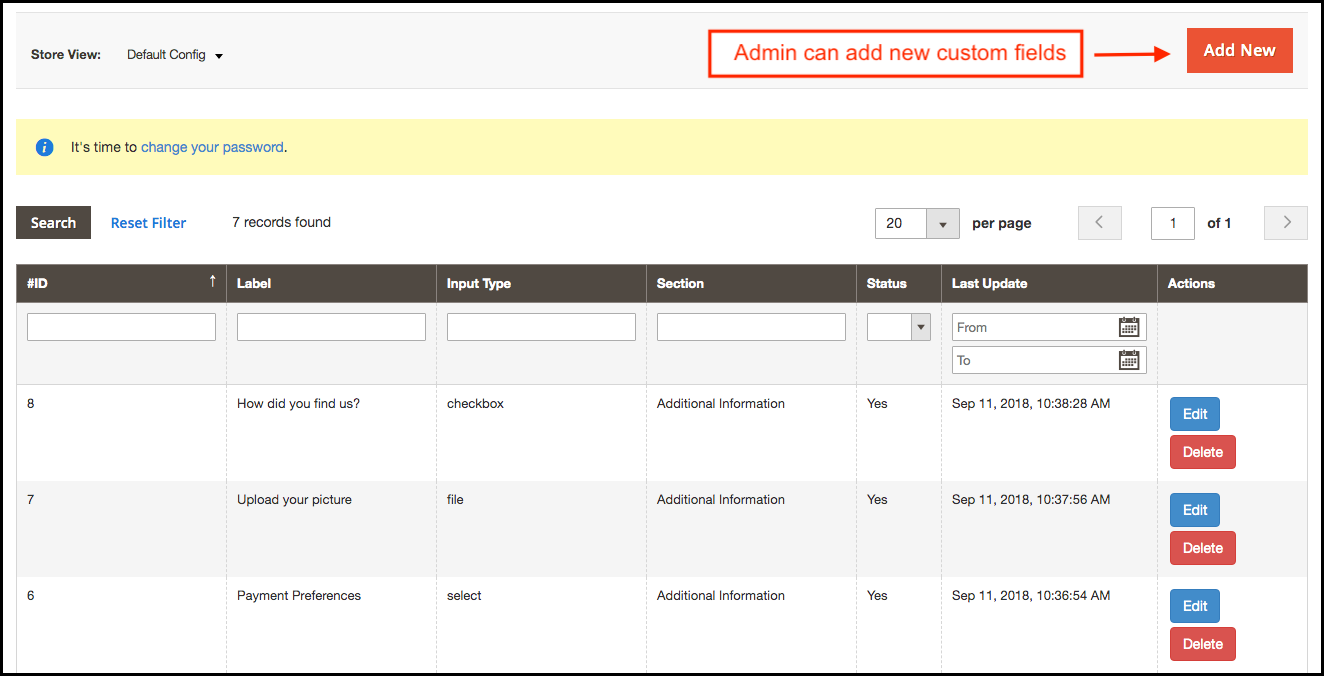
3.3.3 How to add a new custom field?
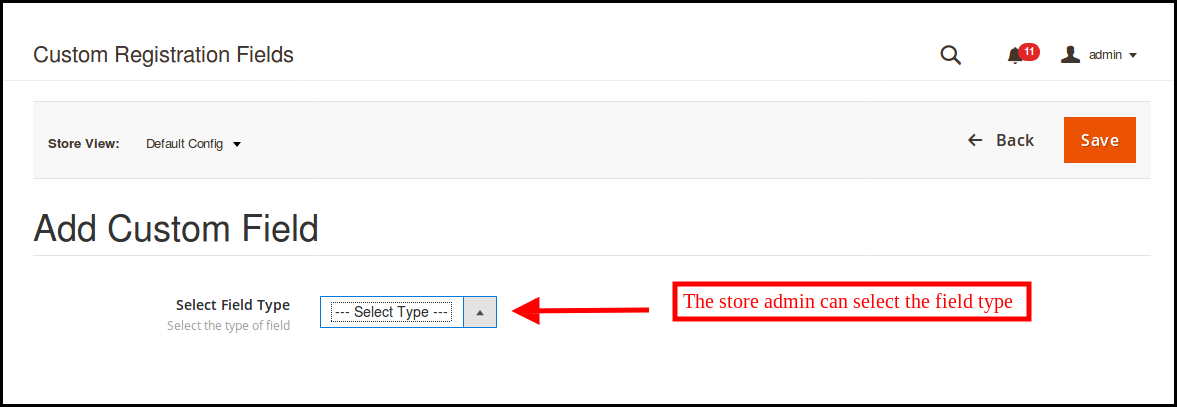
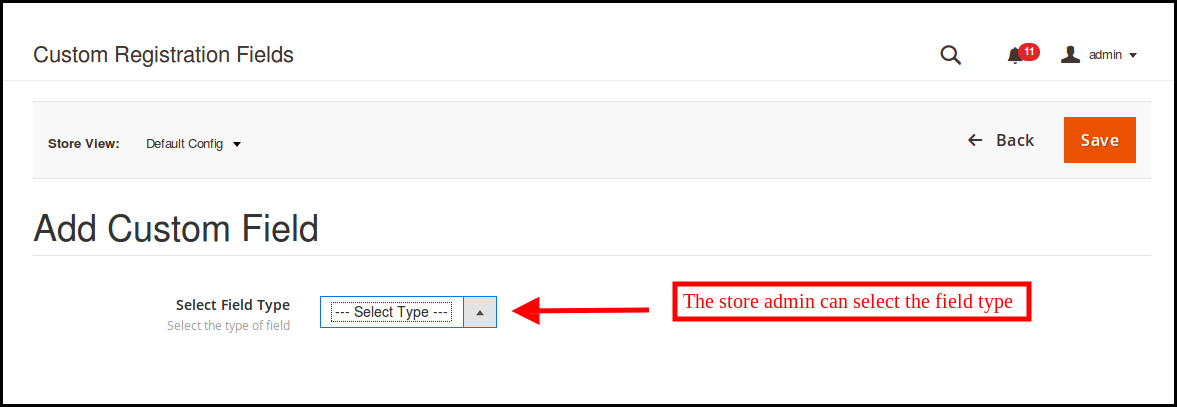
The Custom registration attributes allow the admin to add a new custom field without any hassle. The admin can click on the “Add new” option for adding a new custom field.
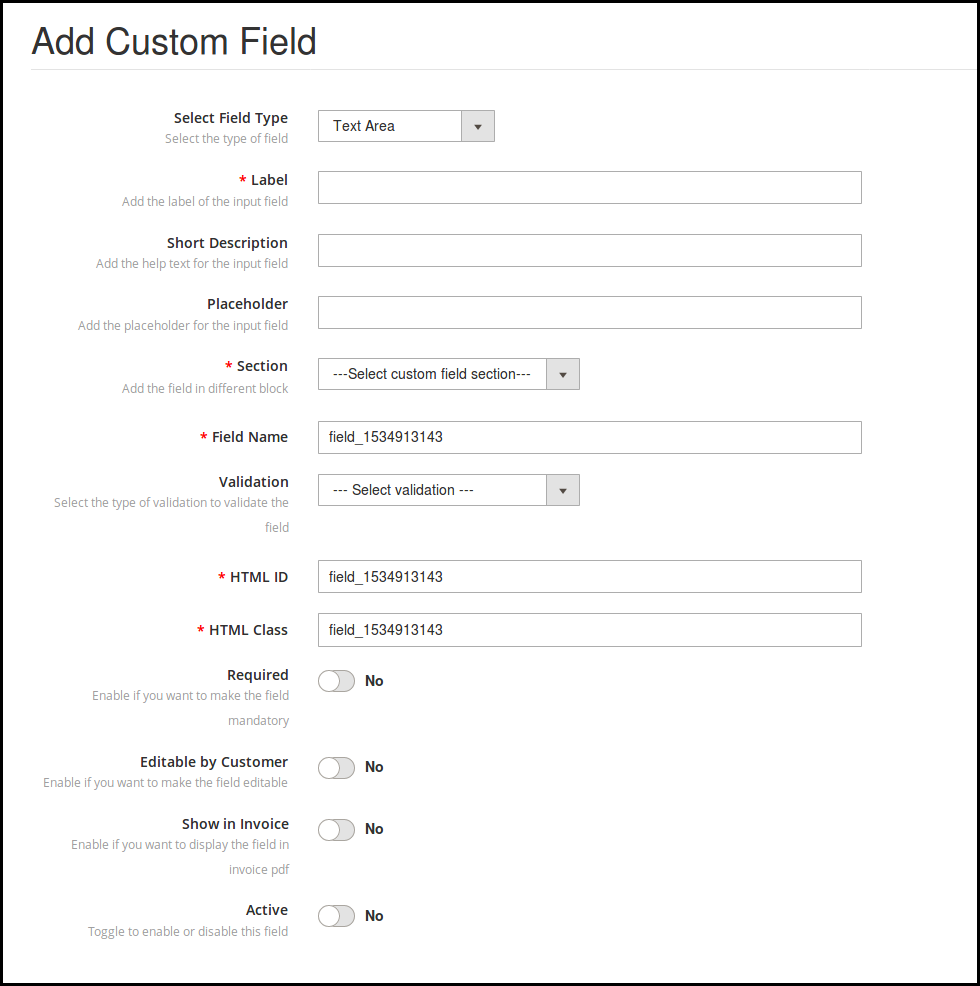
Select Field Type: The eCommerce store admin can select the field type i.e text, select option, radio button, checkbox, text area, file and date field. A drop-down list is provided to select the field.
The various options offered in this section is mentioned below:
Text
Select
Radio
Checkbox
Text Area
File
Date
Different field type required different information to be filled. Let us discuss them one by one.
3.4 Text Field
The online customers can enter their personal details in the text box. The admin can use text-box for name, last name, address and this kind of information.
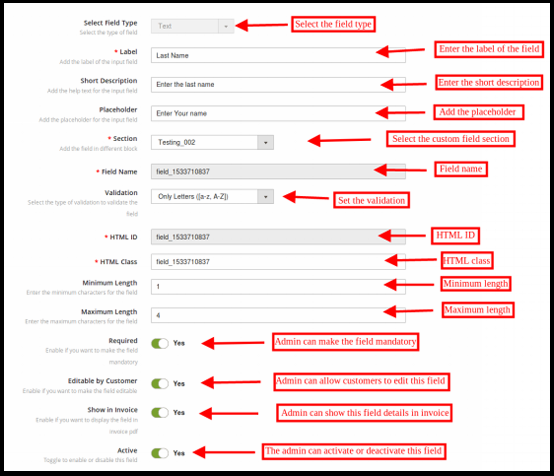
The eCommerce store owner can set the text field on the front-end by applying these settings:
Label: The eCommerce store admin can set the label of the input field. The admin can set the name of the field.
Short Description: The store owner can set the short description from the admin interface. With the help of a short description, the customers can understand what information is required in the particular field.
Placeholder: The eCommerce store admin can enter the Placeholder in this section. Placeholder specifies the watermark that is displayed in the textbox.
Section: The store admin can select the custom field section where you want to display this particular information field. Here, the store admin can select the block where he wants to place that particular field.
Field Name, HTML ID, HTML Class: This section will provide a unique identity to the fields. It will be the same for all the three sections.
Validation: The eCommerce store admin can set the validation type for the various fields. There is no need to change the code for applying validation. The store owner can select the validation type as mentioned below:
Email
URL
Password
Number
Digits
Letters
Letter and digits
Date
If the customer will not follow the validation rules, an error message will be displayed on the registration field.
Maximum and Minimum Length: The store admin can fix the word limit by setting the maximum and minimum length. If the store admin does not enter any value, then the customers can enter the unlimited characters.
Required: The admin can set any custom Registration field as required field. If the admin set the field as required, then, an exception will be shown if the customer leaves the field as empty.
Editable by the Customer: The admin can enable or disable the option to make the field editable by the eCommerce customers. The customers can change the field information if required.
Show in Invoice: If the store admin wants to show the customers submitted field information on the invoice, then, the admin can activate this option.
Active: The store admin can activate or deactivate this field from the admin interface.
3.5 Select field
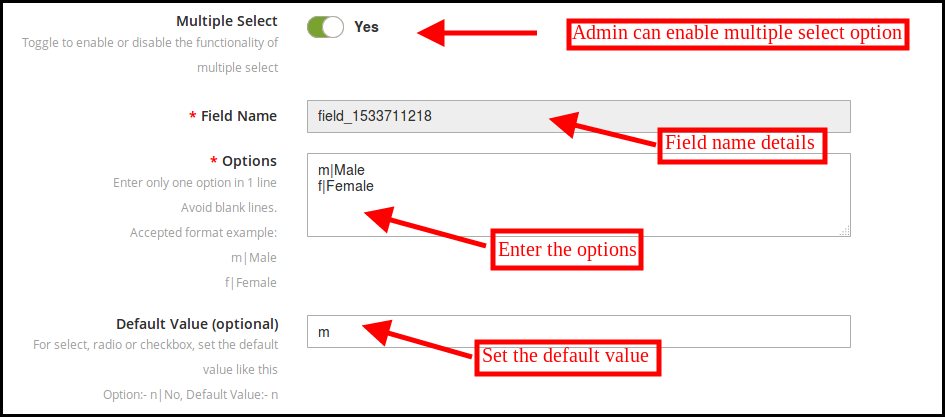
With the help of this “Select Field”, the admin can show an option to select the option from various choices. For example, the customers can select the “Gender” field.
The Label Name, Short Description, Section selection remains the same in this field type as the other ones. Here are the customization options offered to the store admin.
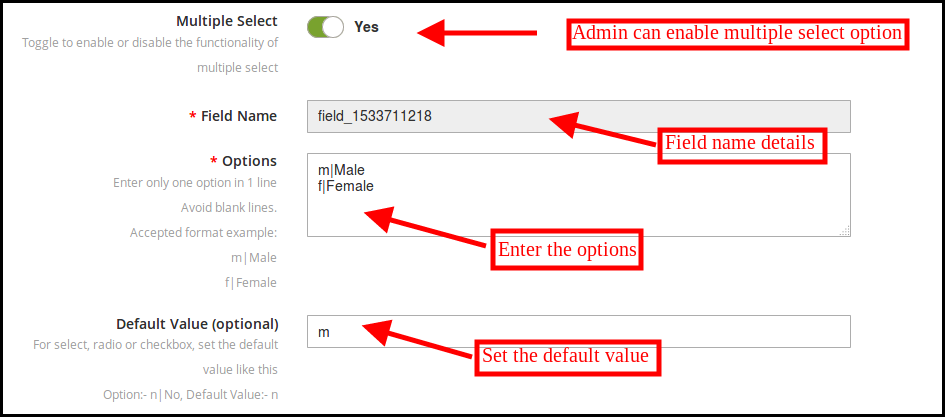
Multiple Select: The admin can allow the customers to select multiple choices by enabling this option.
Options: The different options can be entered here. Admin can enter only one option on one line.
Default Value: The admin can also insert the optional default value. This is an optional field. The store admin can set the default value for the Radio, Select or Checkbox options.
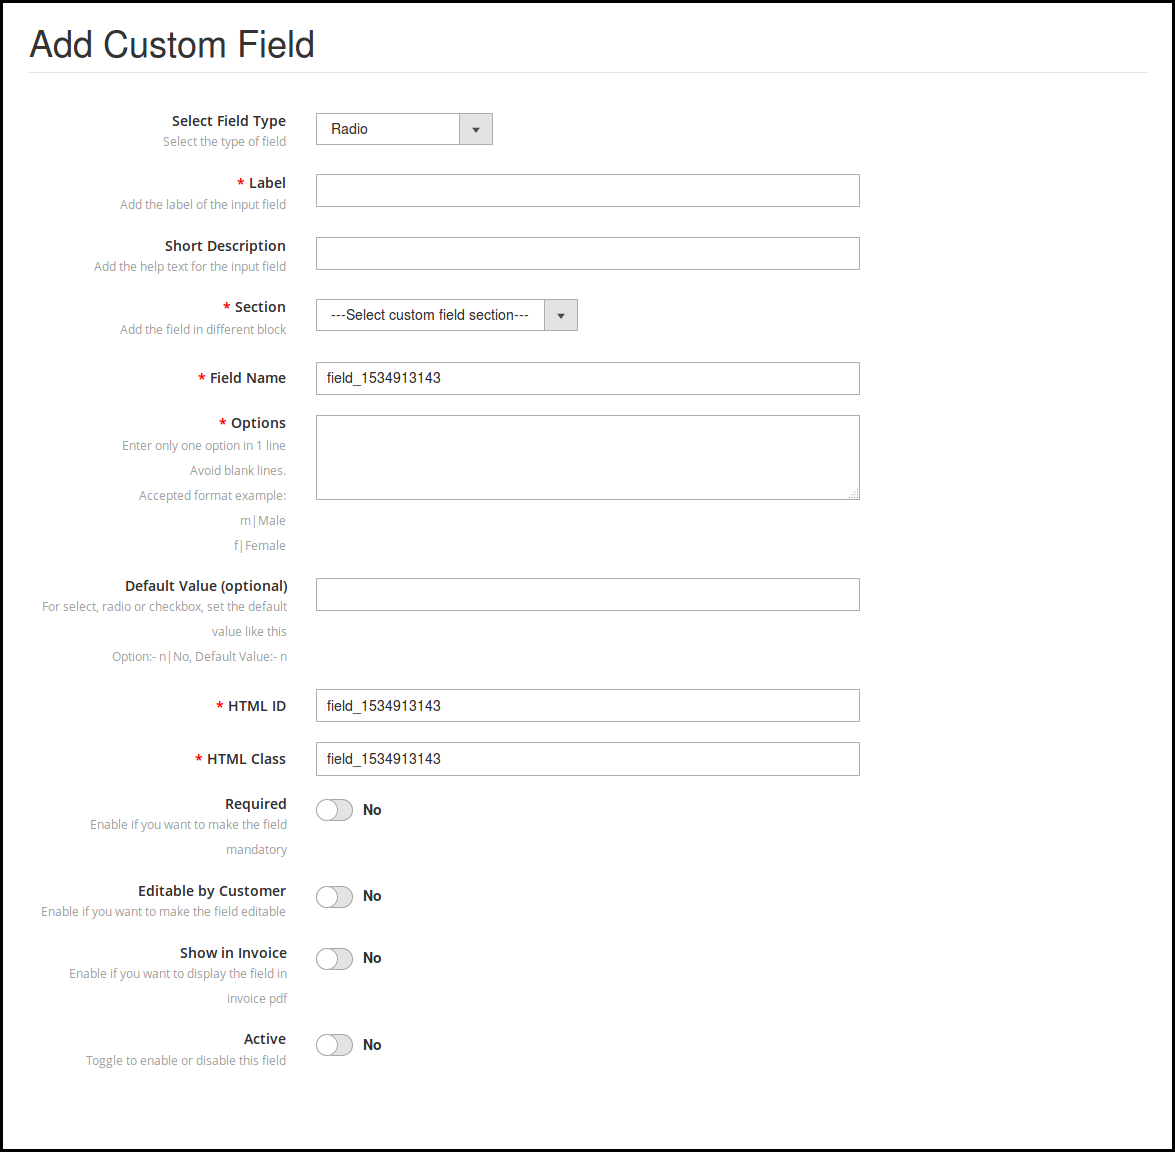
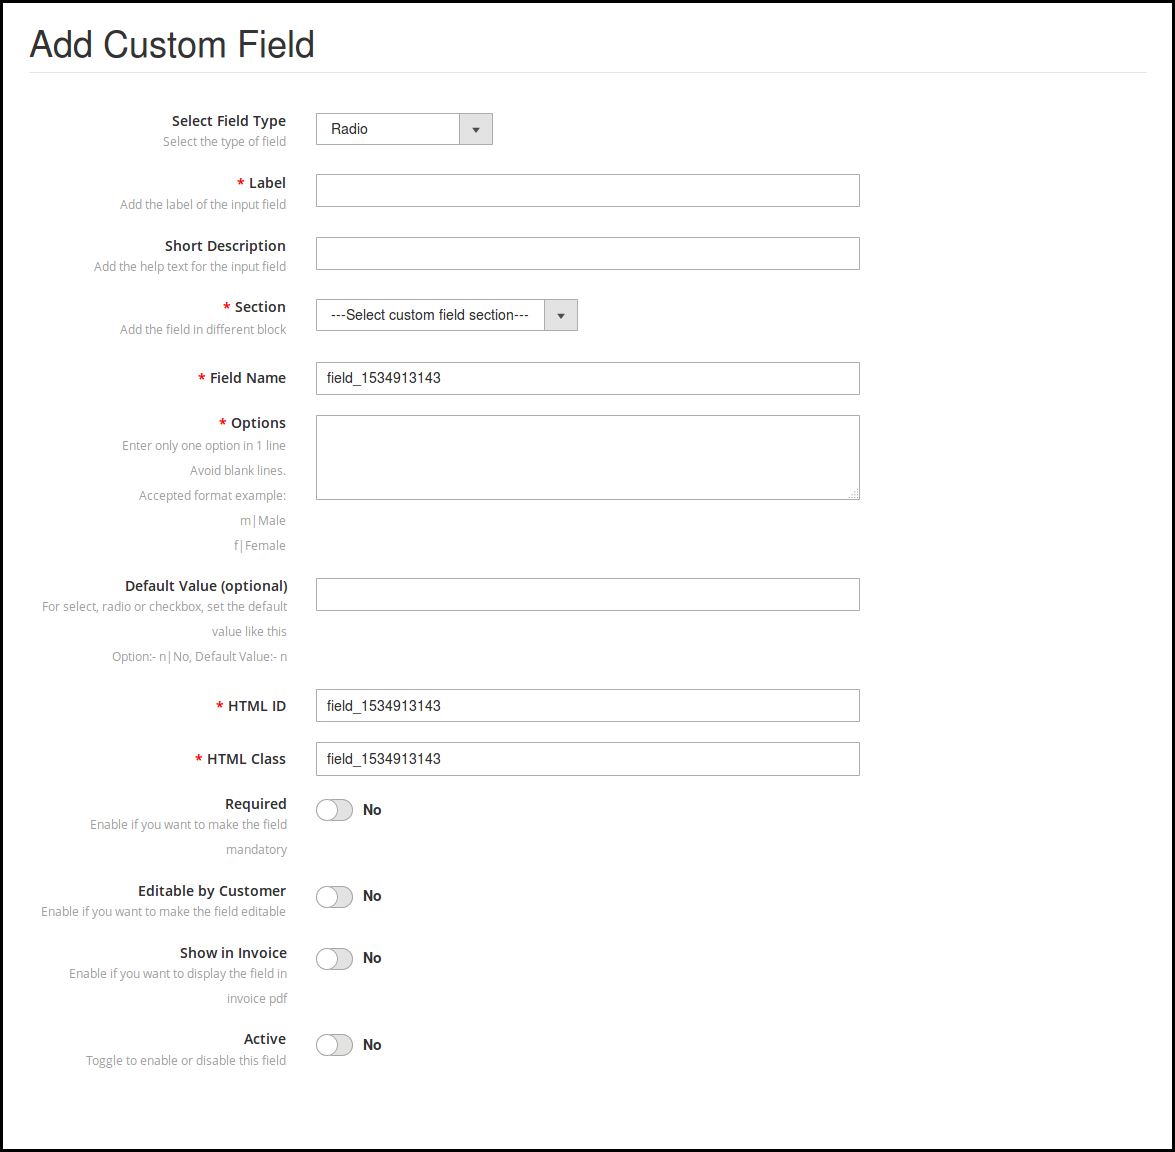
3.6 Radio
The admin can select the radio field for allowing the customers to select the only one option at a time. The customization options are the same as “select field” only “multiple selection” option is not available.
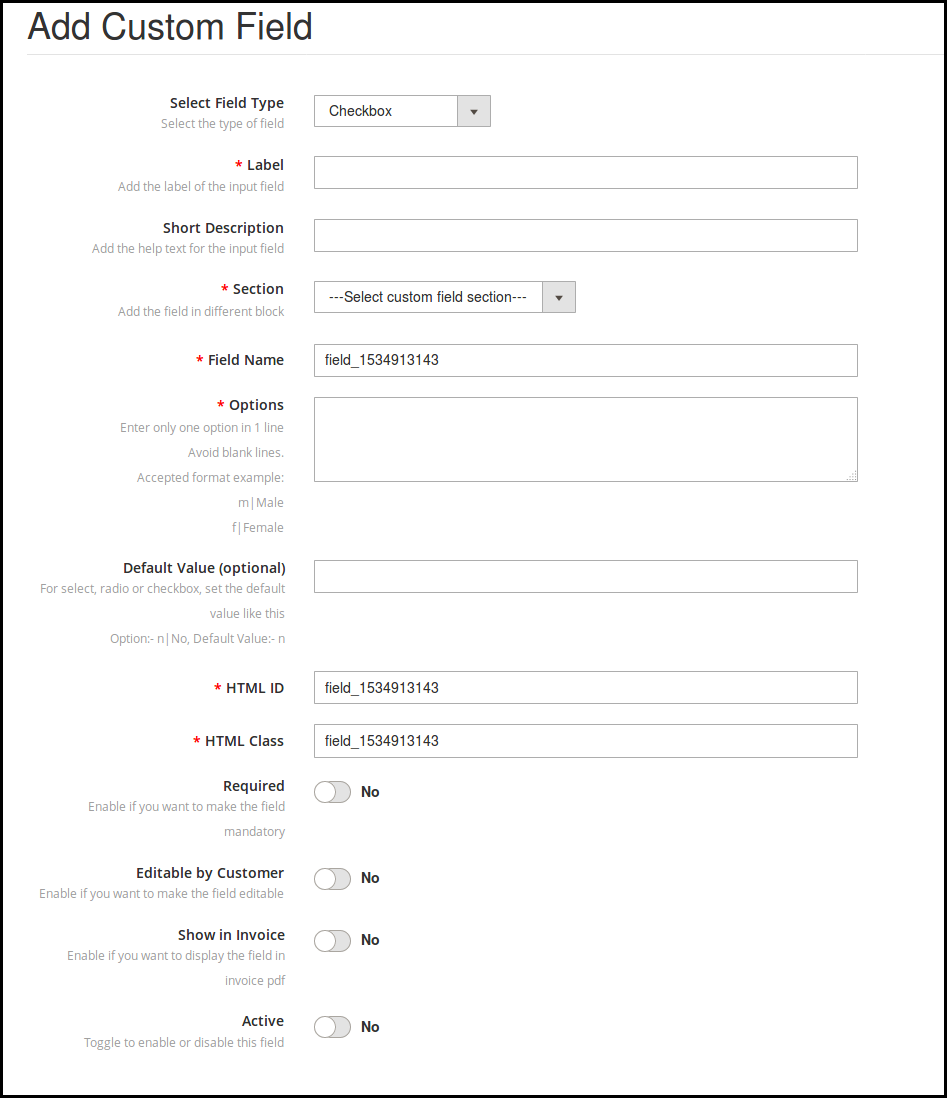
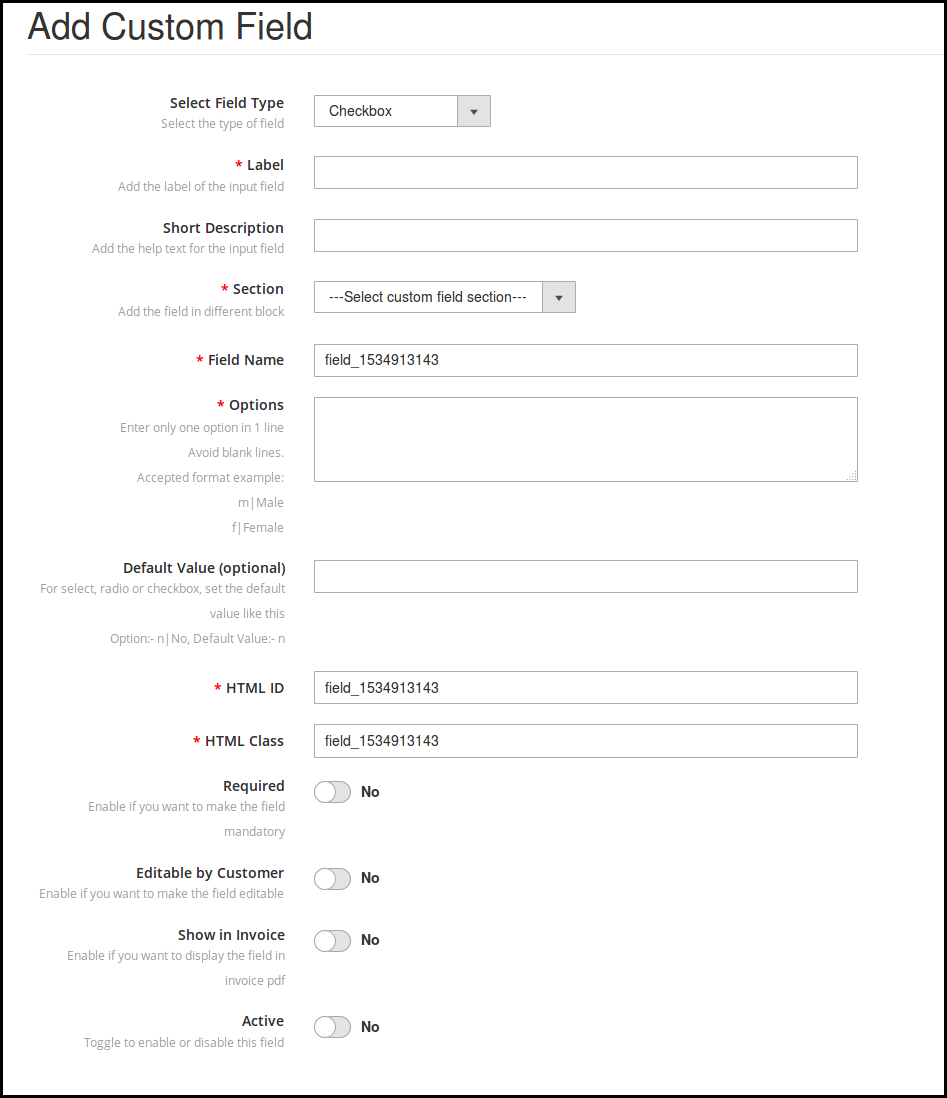
3.7 Check-box
Check-boxes allow the customers to select the option by checking the box. The functionality of the check-box is similar to radio button and select field. The admin can apply the settings easily. Same customization options are available for implementation.
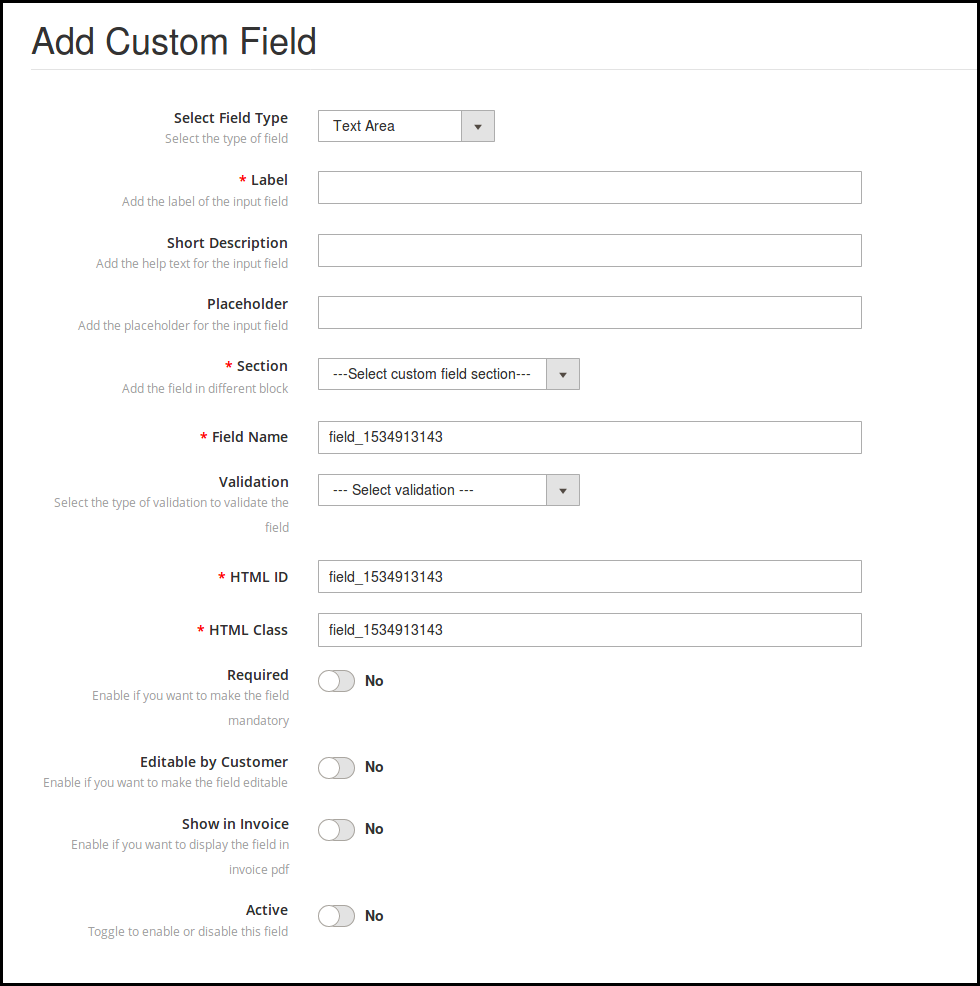
3.8 Text Area
In the text field, the customers can enter the information in one line like name, surname and address. In the case when multiple lines are required for information, the text area field can be used.
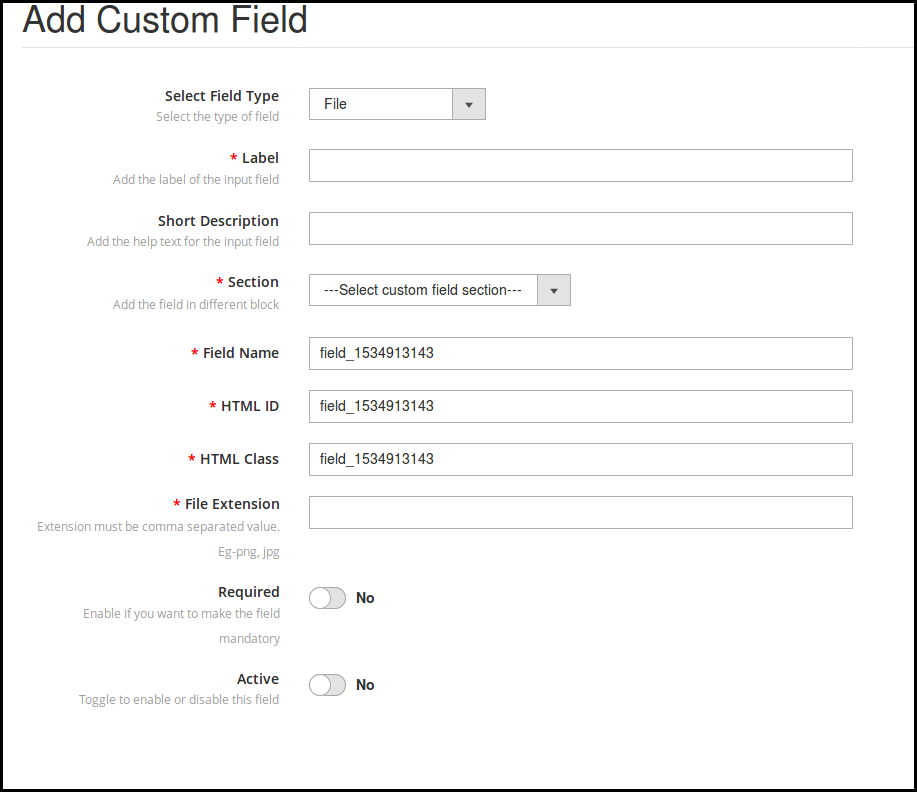
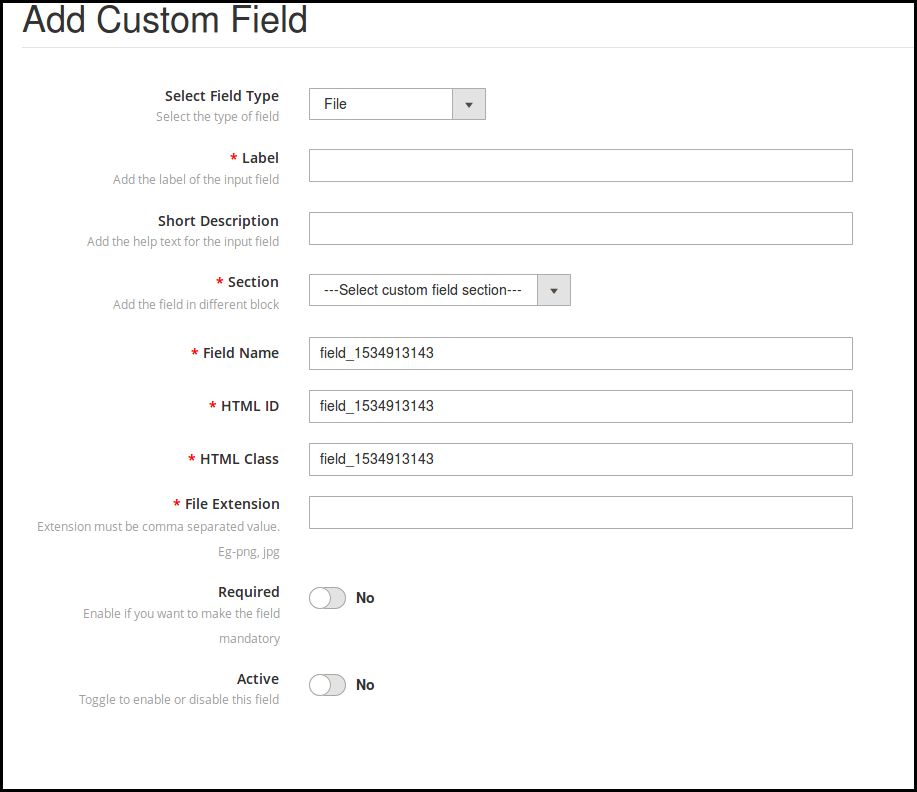
3.9 File
The admin can show this file field on the registration form. The customers can upload a file like an image, document and others. The store admin can set the allowed file extensions and make it a required field if he wishes to.
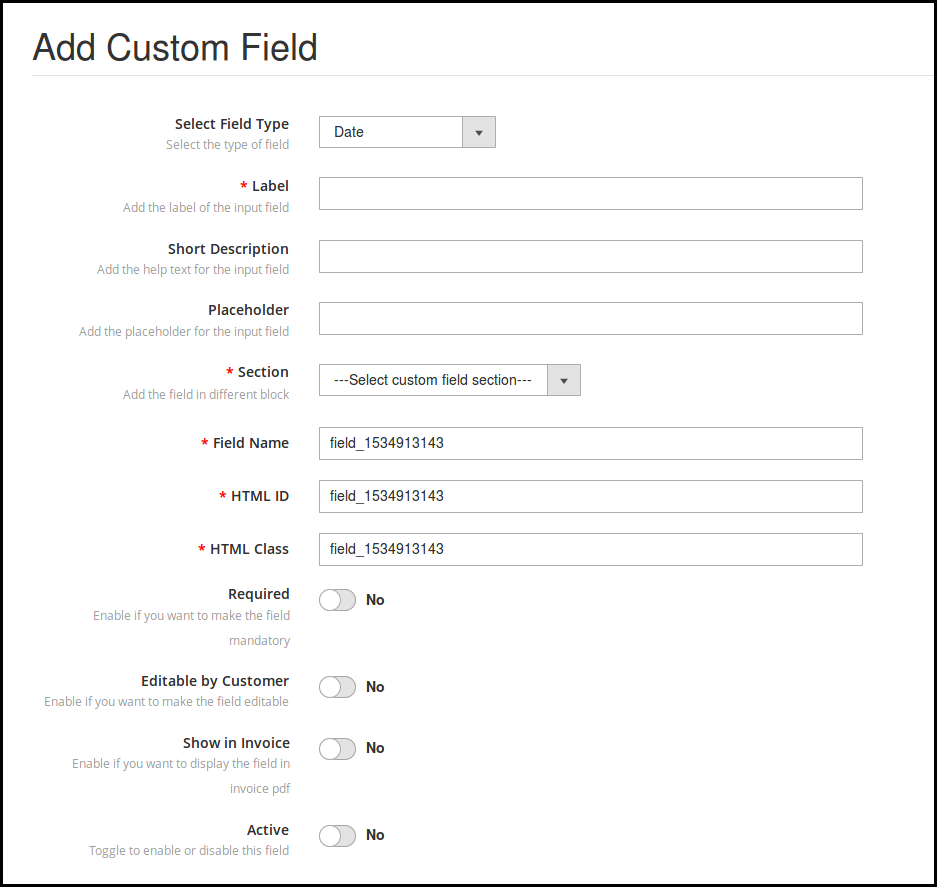
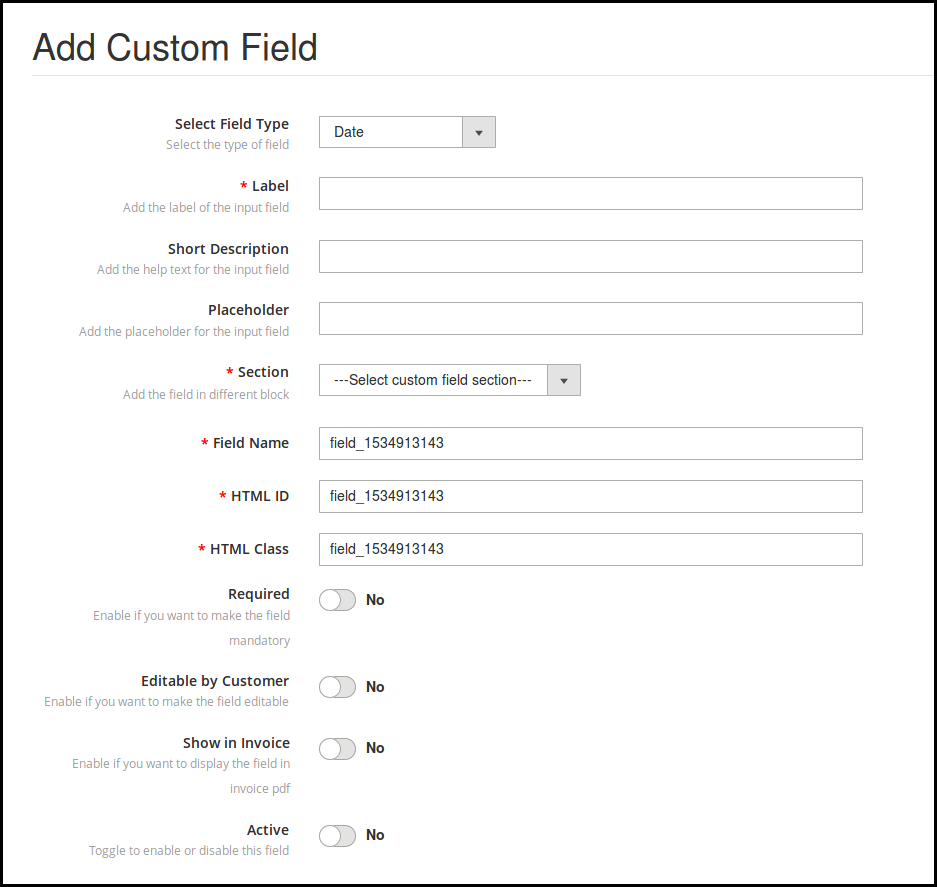
3.10 Date
The Date field allows the customers to enter the date in the proper format. The admin can enter the label, short description, placeholder according to the requirement.
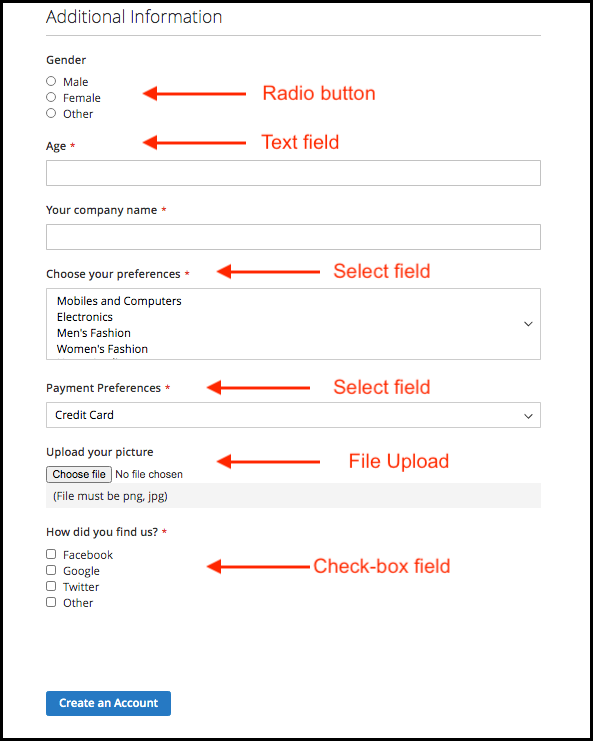
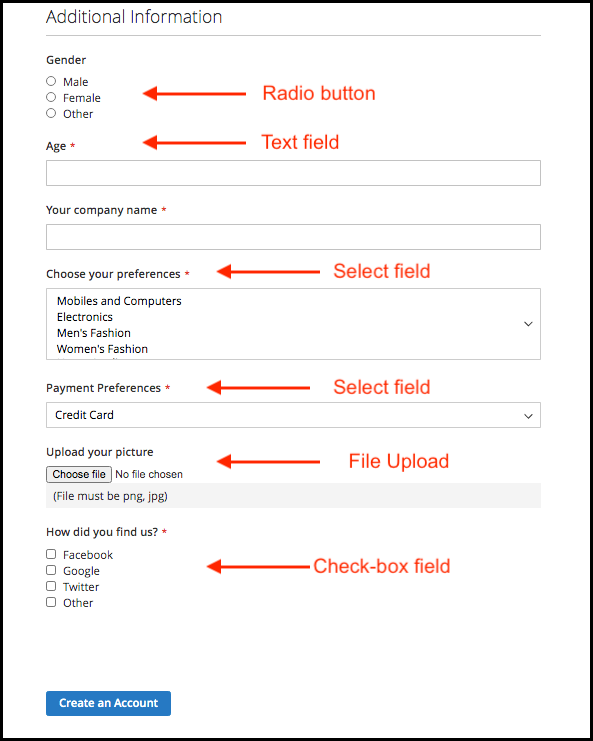
4.0 Website Registration Form UI
After applying the custom fields setting, the store owner can view the custom fields on the registration page of the website. The form will be shown as an image below:
In order to improve products visibility and brand awareness, it is important to motivate the users to share the products on the social media platforms. The eCommerce store admin can implement Magento 2 share and win extension offered by Knowband and provide compelling reasons to the customers to share the products in their social account. Magento 2 share and get discount module allows the e-merchant to offer fixed or percentage based discount to the customers for sharing the store product on Facebook.
The online customers and store visitors can share the product on Facebook and get exciting offers. The admin can promote the products and brands just by offering discount coupon code with the help of this Magento 2 share and get the discount module. The coupons can be used to get discounts while shopping. The admin can select all the products or selective products to show the Facebook sharing option. In the product statistics section, the admin can view the details of coupon codes from the admin interface of this Magento 2 facebook share option. The store admin can even track whether the generated coupon code was used by the customer or not.
1.1 Admin Features
The e-merchant can offer the customers discount coupons on sharing the product on Facebook by using this Magento 2 product sharing module.
With the help of this Magento 2 share on Facebook wall plugin, the store admin can display a Facebook sharing button on the product pages of the store.
The Facebook sharing option can be displayed on every product page or on specific pages as per the requirement.
The Magento 2 Social sharing extension allows the store merchant to set the discount type, discount value and coupon validity days.
The Product share and win plugin allows the admin to view the details if coupon code has been applied or not. The admin can view these details in product statistics.
The eCommerce store owner can set the layout according to the store’s theme from the admin interface of this Magento 2 Social sharing extension.
The store admin can enable or disable discount limit from the admin interface. Thus the admin can control the discount per person per product.
The Magento 2 share on Facebook wall plugin has a user-friendly back-end interface.
By using this Facebook share and get the discount module, the admin can offer a fixed or percentage based discount to the customers.
The Magento 2 share and get discount module provides an option to the admin to add custom CSS codes.
This Magento 2 product sharing module is mobile responsive.
It is very easy to install and configure this Facebook Share and Win Discount module.
The admin can easily implement the Magento 2 Social extension without any complications.
1.2 Admin Benefits
The store owner can offer exciting discounts to online store visitors and customers.
With the help of Magento 2 share on Facebook wall plugin, the admin can allow the customers to share the store product and win discount coupon codes.
The admin can promote the products on social media and increase the product and brand awareness.
By offering discount coupons the admin can increase the chances of conversions.
With this Magento 2 share and get the discount module, the store owner can offer a better store experience to the online users.
The Magento 2 social sharing extension offers hassle-free implementation.
This Magento 2 Social sharing extension is highly customizable and offers a user-friendly interface.
2.0 Installation
After purchasing Magento 2 share and win extension, the store admin will get the following files: 1. shareandwin.zip which contain source code of the Magento 2 share and get the discount module. 2. User Manual which includes all the details and helps regarding the extension.
The steps to install the Magento 2 Social sharing extension are mentioned below:
1. Buy the Facebook share and get the discount module from Knowband. You can download the extension package. 2. The package has a zipped file that contains the user manual and the source code of Facebook share and get the discount module. Unzip the package. 3. Create a folder{Magentoroot}/app/code/Knowband/Shareandwin 4. Upload the extracted content in the above folder via FTP manager (like Filezilla or WinSCP – download here: https://filezilla-project.org/). 5. Now run below commands to install the plugin:
php -f bin/magento module:enable –clear-static-content Knowband_Shareandwin
php -f bin/magento setup:upgrade
php -f bin/magento setup:di:compile
php bin/magento setup:static-content:deploy 6. The extension is now installed and ready for use. In Admin Panel go to “Knowband Extensions >Share and Win”.
You can now configure and use the Knowband Product share and win plugin.
3.0 Admin Interface
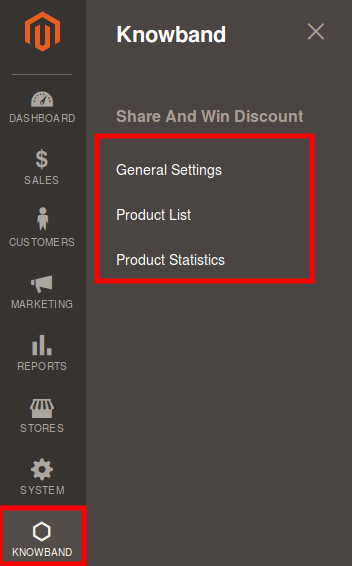
The Magento 2 eCommerce store admin can easily manage the Admin interface of the Share and Win extension. After installing the Magento 2 share on Facebook wall plugin the admin can view the below mentioned “submenu” under the “Share and Win” menu:
General Settings
Product List
Product Statistics
With the help of these available configuration options, the store admin can showcase a Facebook sharing button on the product pages.
3.1 General Settings
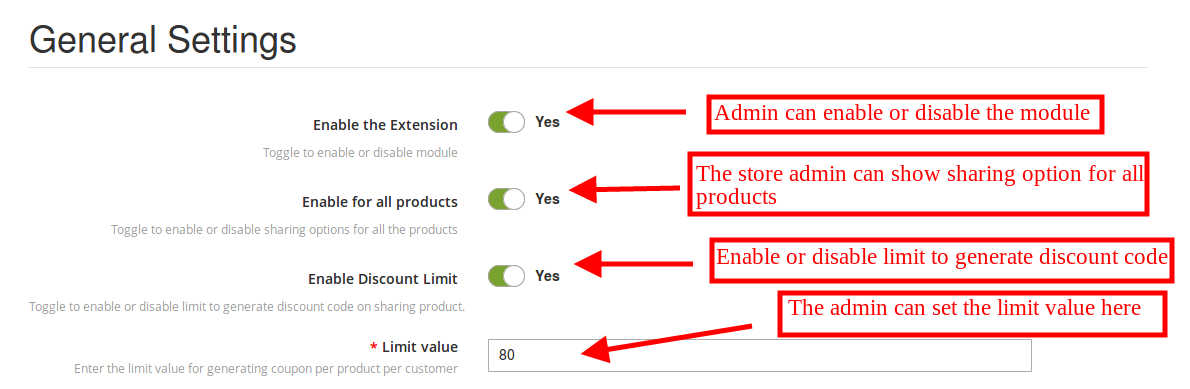
1. Enable the Extension: The eCommerce store admin can activate or deactivate the functionality just by a single click on this option.
2. Enable for all Products: The Magento 2 share and win extension allows the e-merchant to show Facebook sharing option on every product page or selected product pages. The admin can enable or disable the option as per the requirement.
3. Enable Discount Limit: The admin can activate or deactivate the discount settings.
4. Limit value: The eCommerce store owner can set the limit on the number of discounts according to the requirements. If the eCommerce store owner sets the limit 20, that means a customer can get discount 20 times for a product. That customer will not get the discount 21’s time for the same product. Thus the admin can enter the limit value for generating coupon per product per customer.
5. Layout: The Magento 2 Facebook share option allows the e-merchant to select the preferred layout. There are two different layouts for displaying the product sharing option.
The admin can also select the layout 2 which will be shown as below mentioned image.
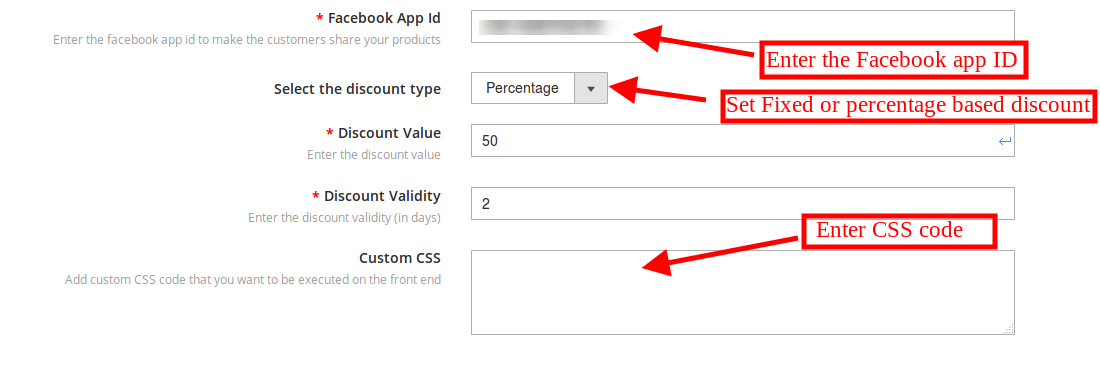
6. Facebook App ID: Enter Facebook app id here in order to connect the webpage with the Facebook. In order to get Facebook app id please refer section 3.1.1.
7. Select the Discount type: The store owner can set the discount type in percentage or fixed amount.
8. Discount Value: The store admin can set the discount value from the admin interface.
9. Discount Validity: The store owner can set the discount validity duration.
10. Custom CSS: The eCommerce store owner can add custom CSS code for further customization from this menu option of Facebook share and get discount module.
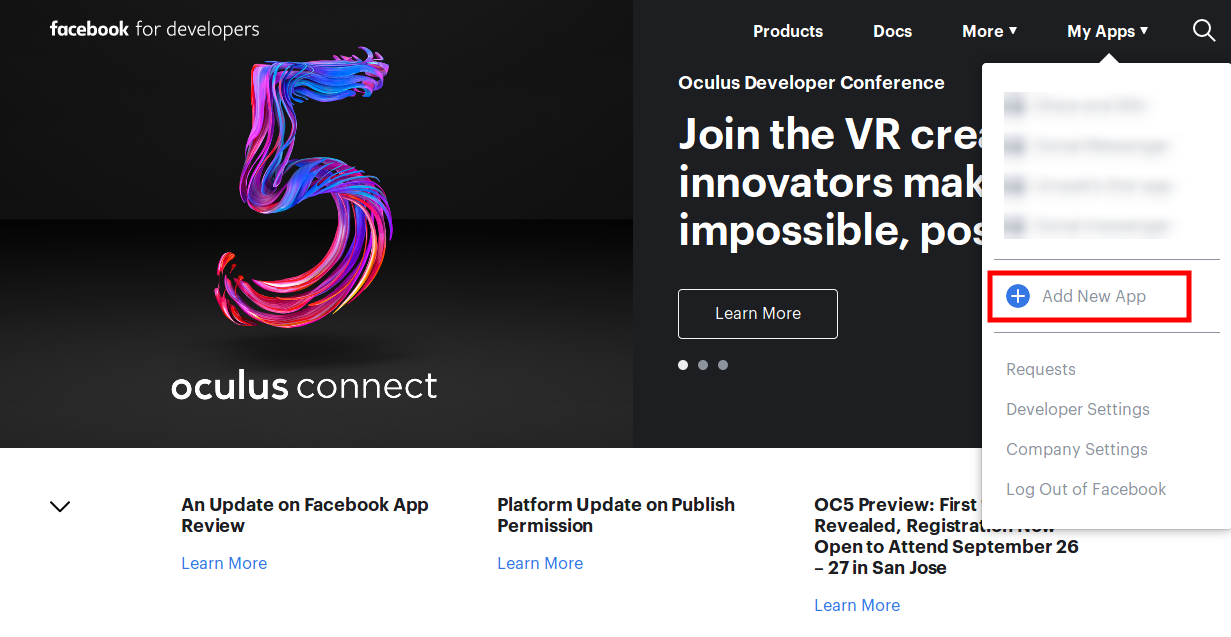
Go to the “MY APPS” option and click on the ”ADD NEW APP”.
After that, the store owner needs to insert the “Display Name” and “contact email ID”. Click on the “Create App ID” button.
Go to the “Settings” and then select “Basic”. Here you can view the APP ID as shown below. The admin needs to insert app domains, category, Privacy policy URL here.
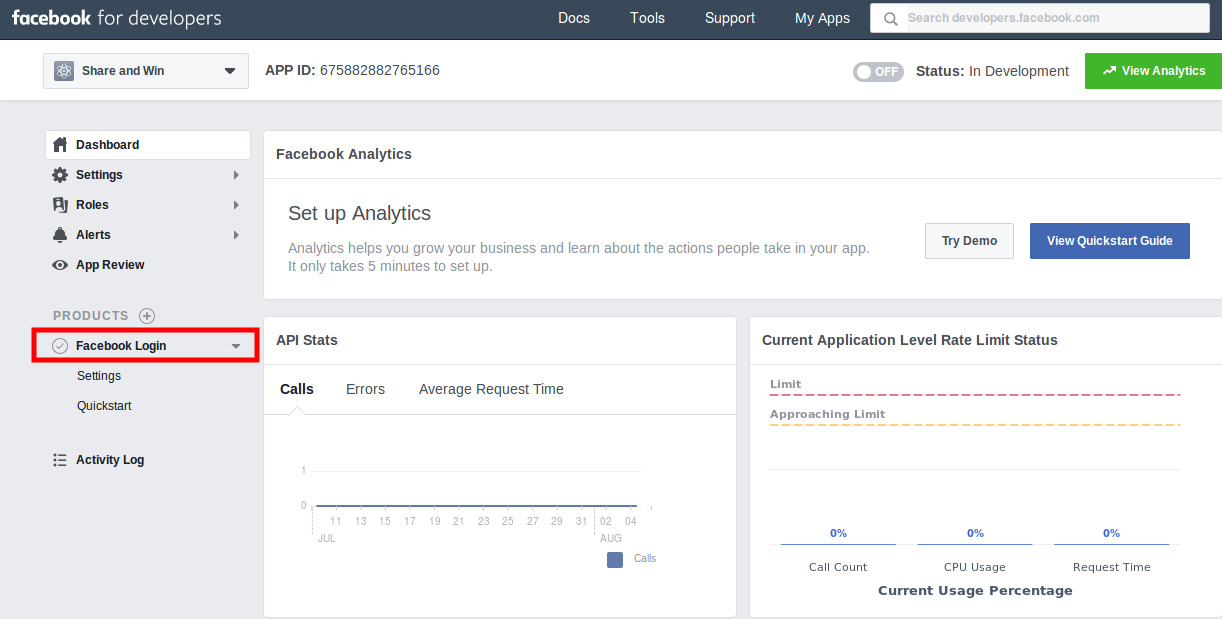
After that click on “Products” option and then click on Facebook login “set Up” option. After clicking this “set up” option it will be displayed like below mentioned image:
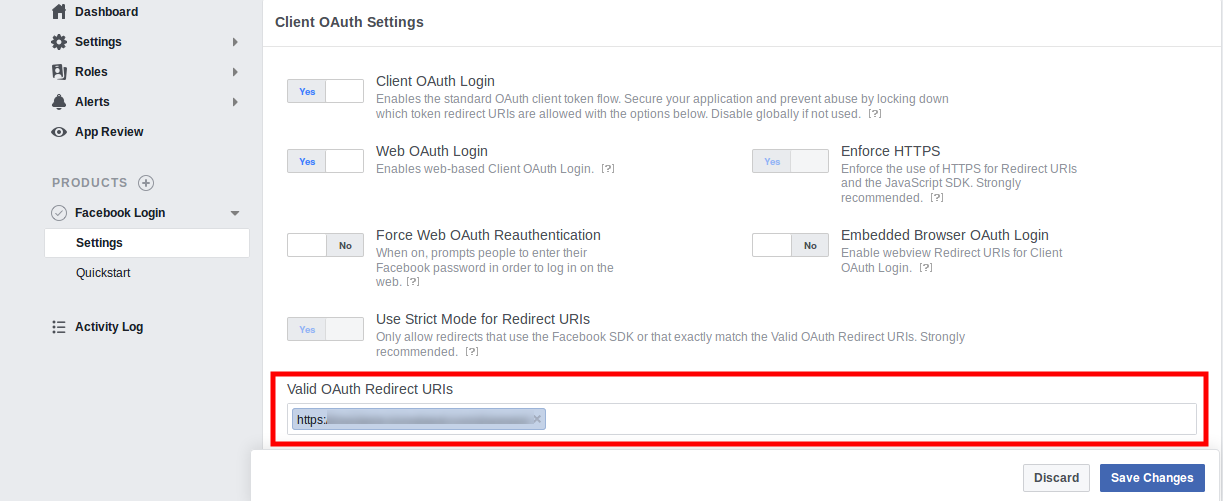
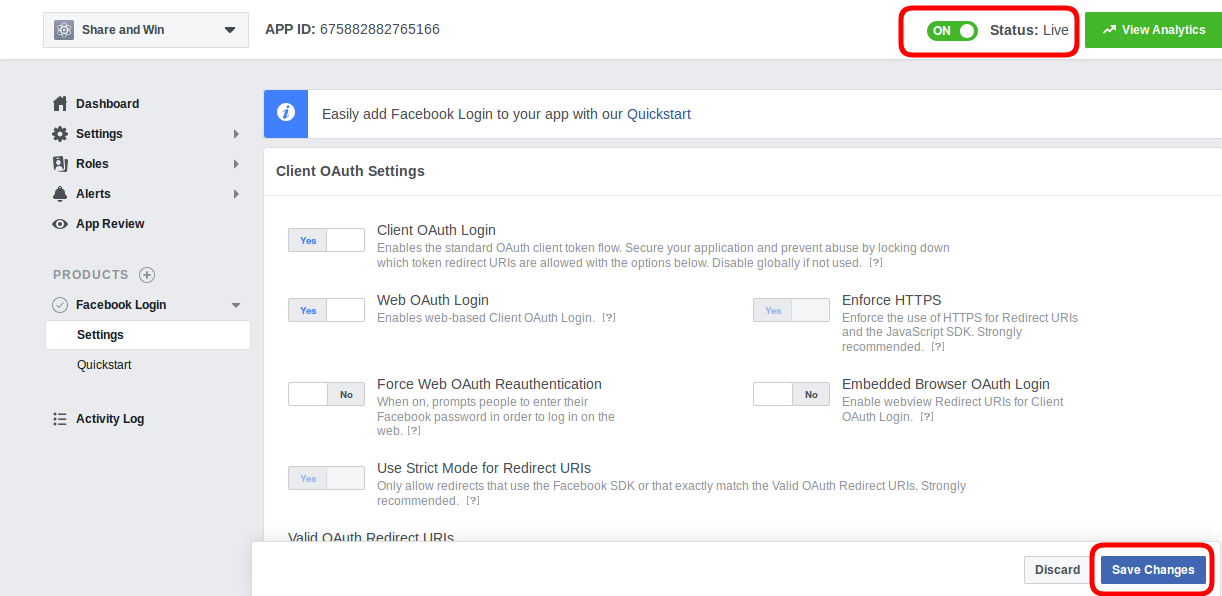
After that goto settings and insert the Valid oAuth Redirect URL’s and enable the status.
Once you enable the status, you need to click on the “save changes” option. Now the Facebook app id is ready for implementation.
3.2 Product List
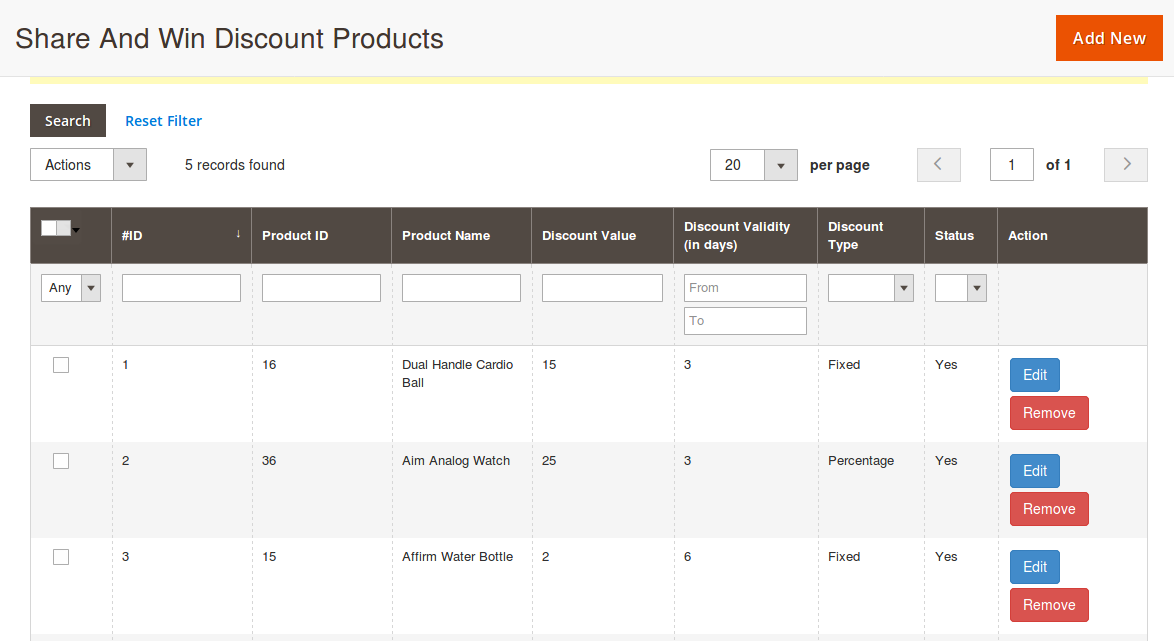
In the Product list sub-menu, the e-merchant can add those products on which he wants to show sharing button with a specific discount. Here, The store owner can add new products, update the settings and remove the products from product list.
The admin can select the specific products on which he wants to display sharing option and provide different discount.
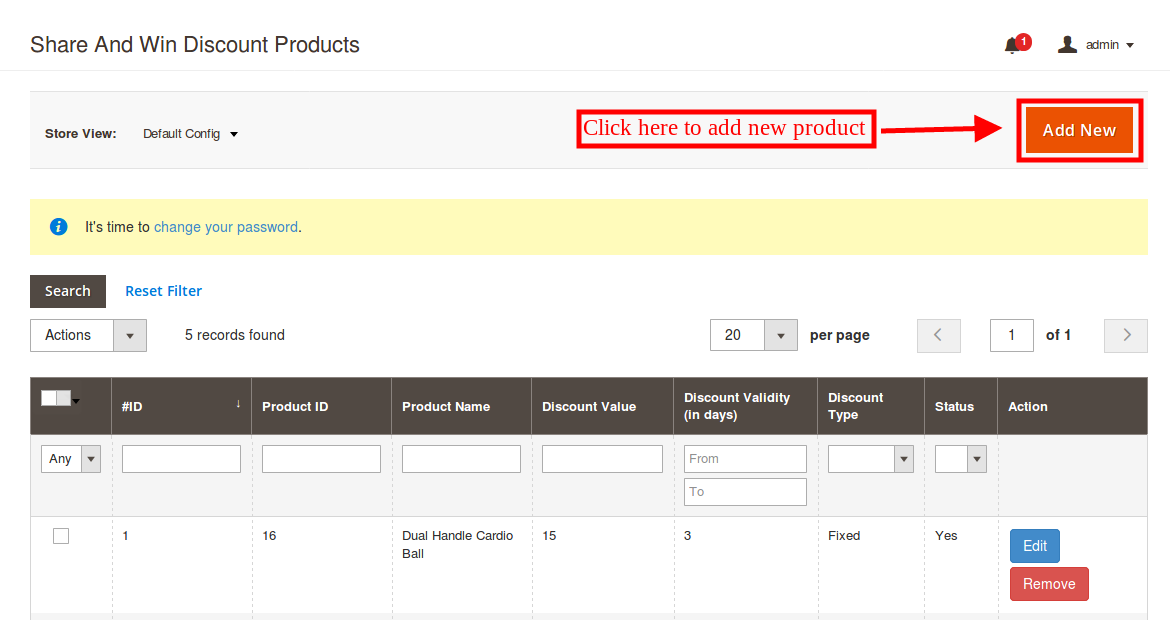
3.2.1 How to add Products for Showing the Facebook sharing option?
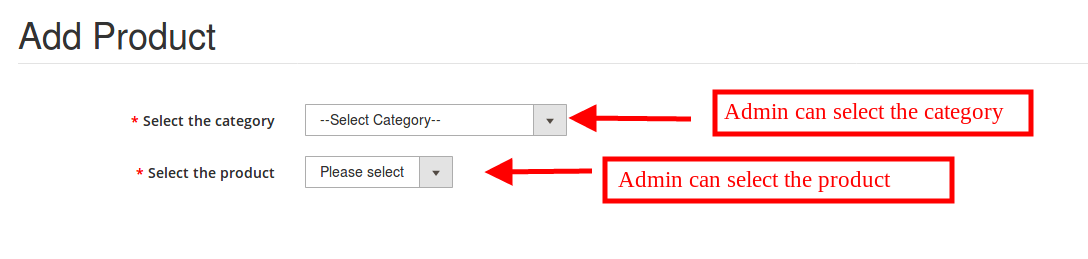
The admin needs to click on the “add new” option. Here, the eCommerce store owner can apply the settings to display sharing option on a particular product page.
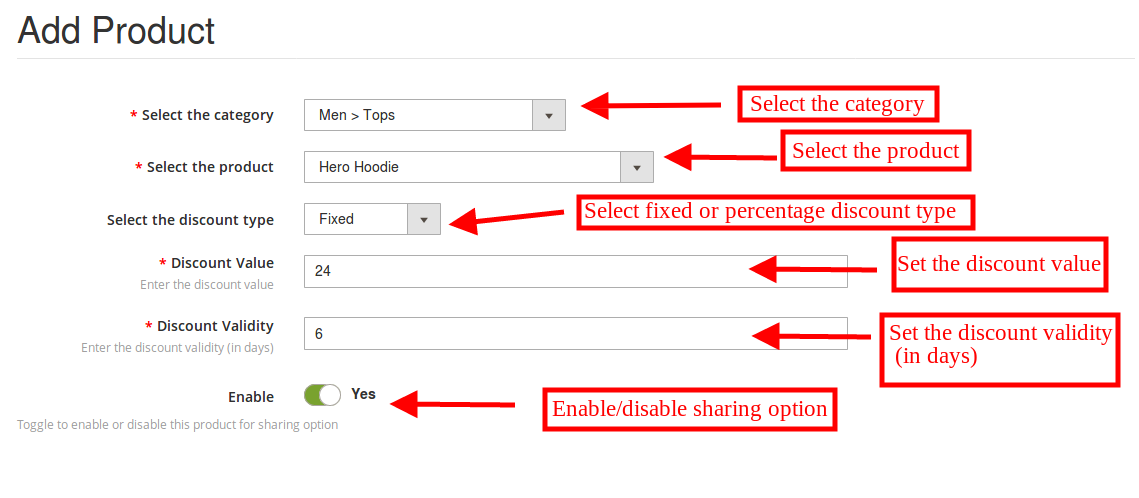
1. Select the category: The admin can select the category first of all.
2. Select the Product: The admin can now select the particular product on which he wants to show the sharing button.
3. Discount type: After selecting the product the admin can view the discount type option. The admin can set the fixed or percentage based discount.
4. Discount value: The admin can set the discount value as per the need.
5. Discount validity: The store admin can also set the discount validity. The admin can set the number of days for which the coupon will be valid.
6. Enable: The admin can enable or disable the option. If the admin disables this option, then, no Facebook sharing button will be displayed on that particular page.
3.2.2 How to Delete Products from the Product list?
The eCommerce store owner can remove the products from the product list for which he doesn’t want to display the social sharing option anymore.
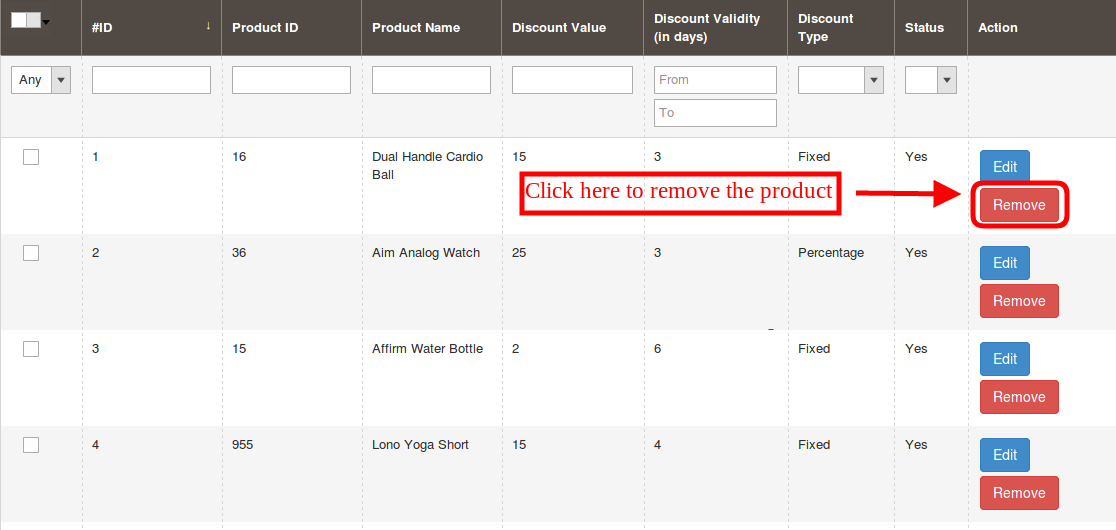
The admin just needs to click on the “remove” button.
3.2.3 How to update the Products for Showing sharing option?
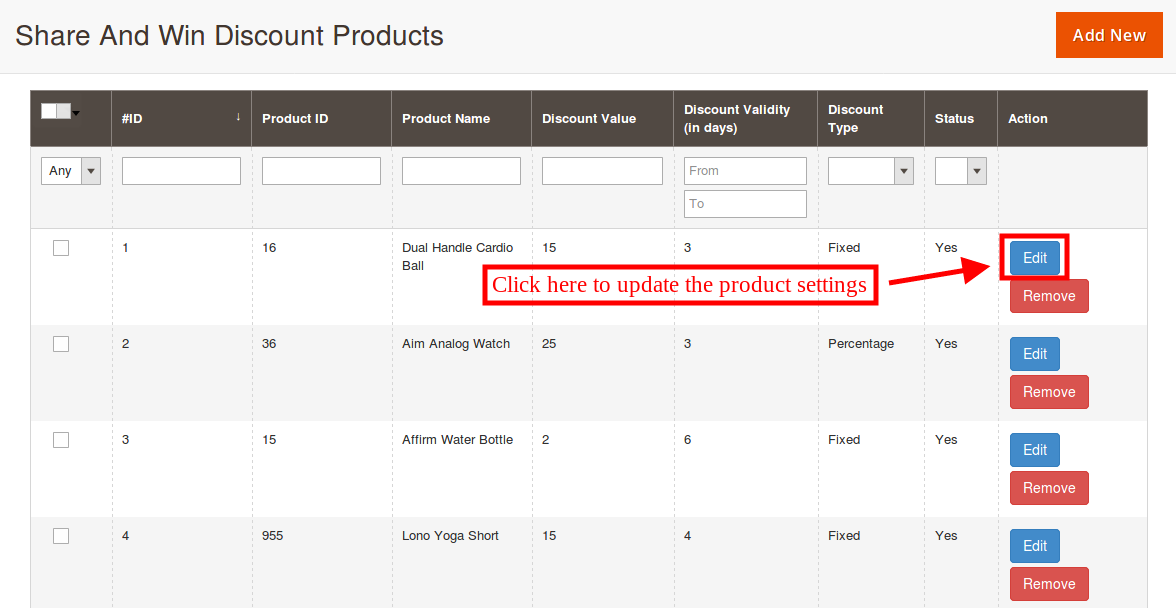
The store owner just needs to click on the “edit” button for updating the settings. After that he needs to follow the same configuration option as followed in “add new product” configuration.
3.3 Product Statistics
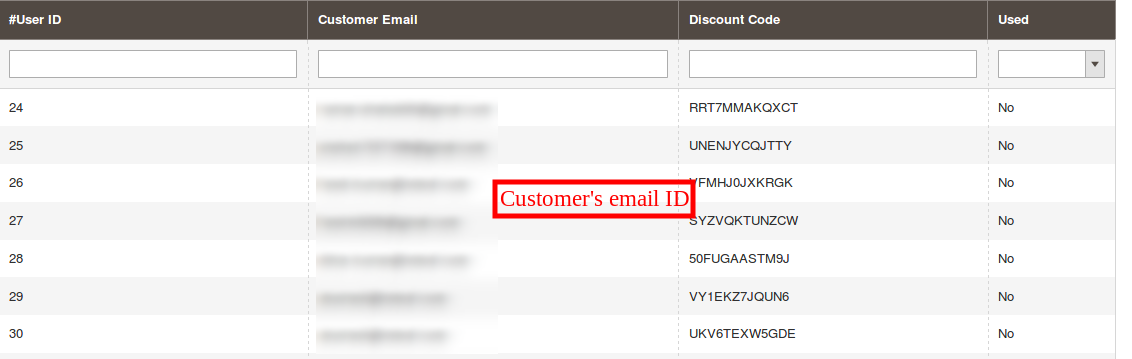
The store owner can easily view the details of the customers if the coupon codes has been applied or not. The Product statistics option provides the coupon related details to the customers. The admin can view the customers email id and coupon codes and it’s status.
4.0 Front-end Interface
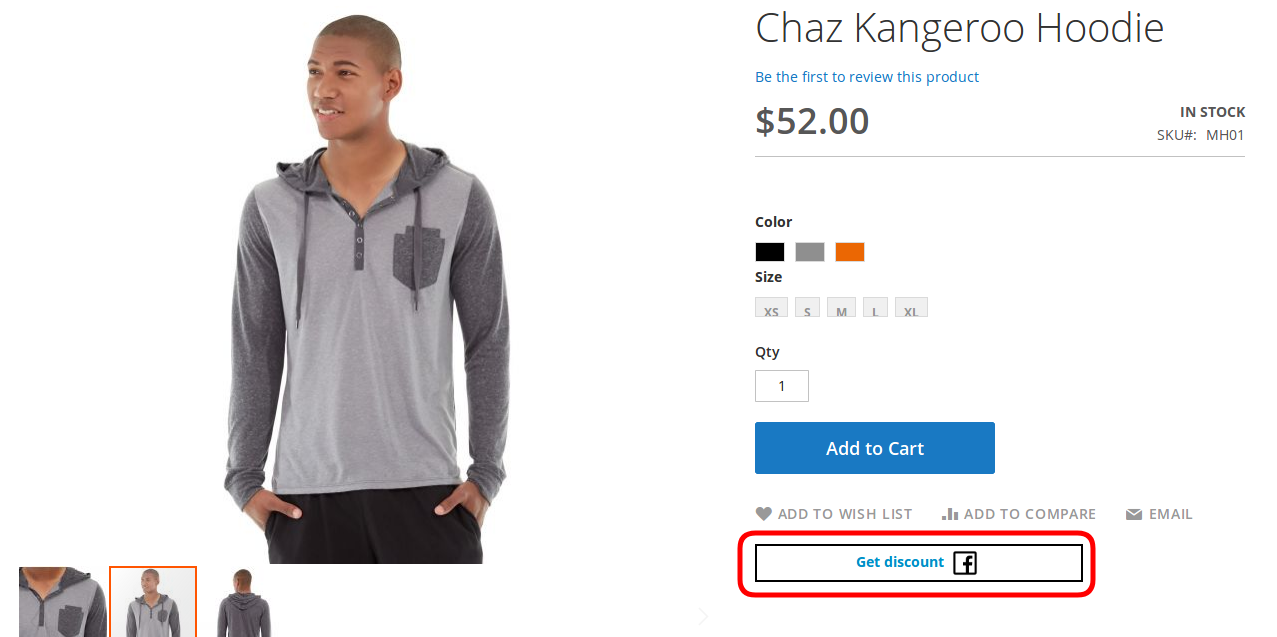
The customers can easily view the Facebook sharing option in the front-end interface. The Product share and win plugin shows product sharing option for the configured product pages.
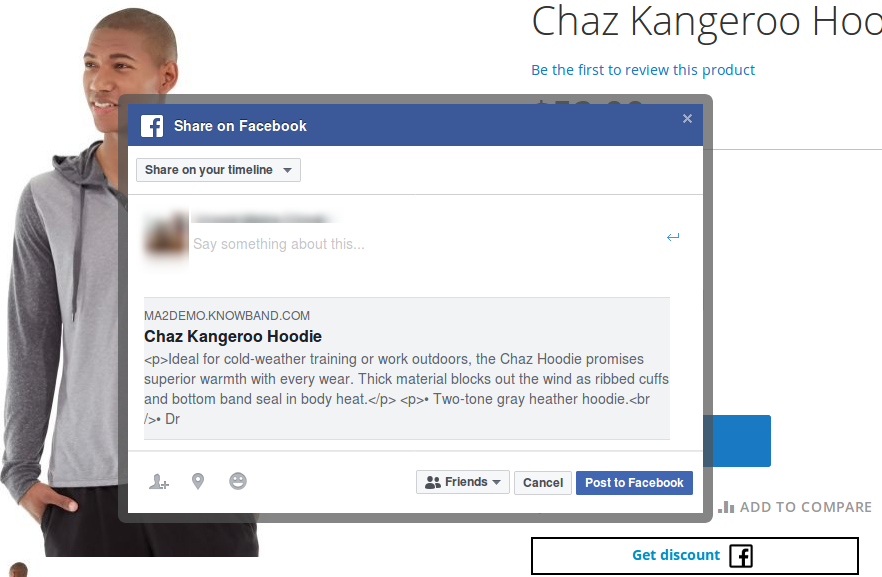
The customers can click on the “get discount” option. After that they can share the particular product on Facebook.
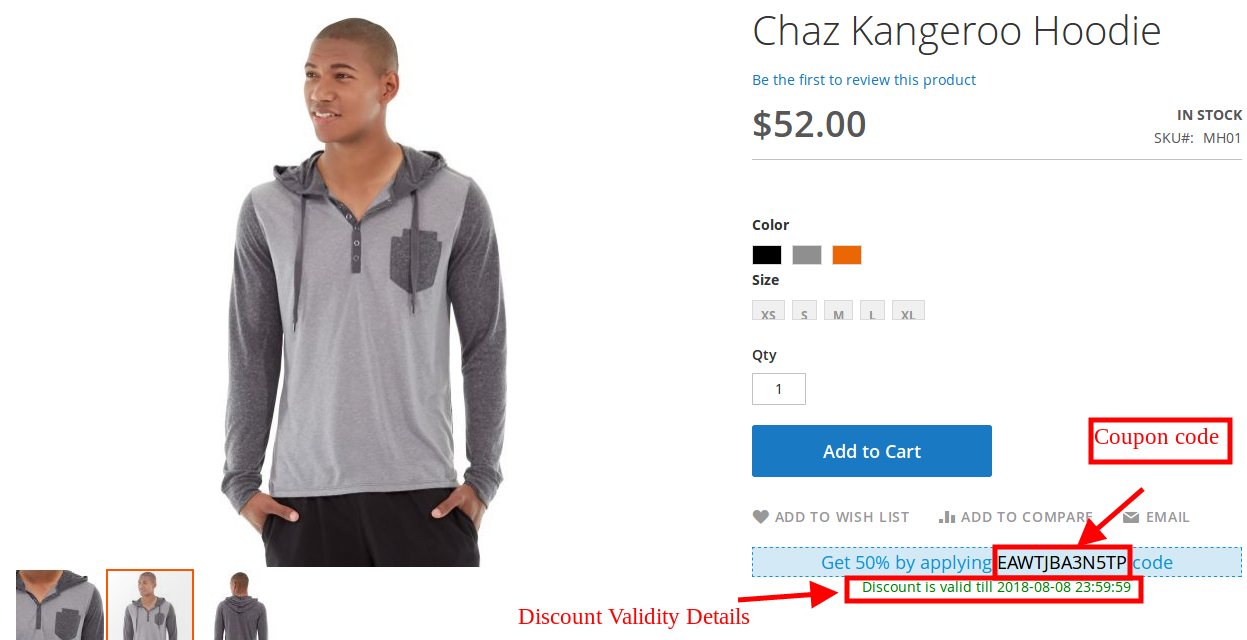
After sharing the product on Facebook, they get the coupon code with validity details.
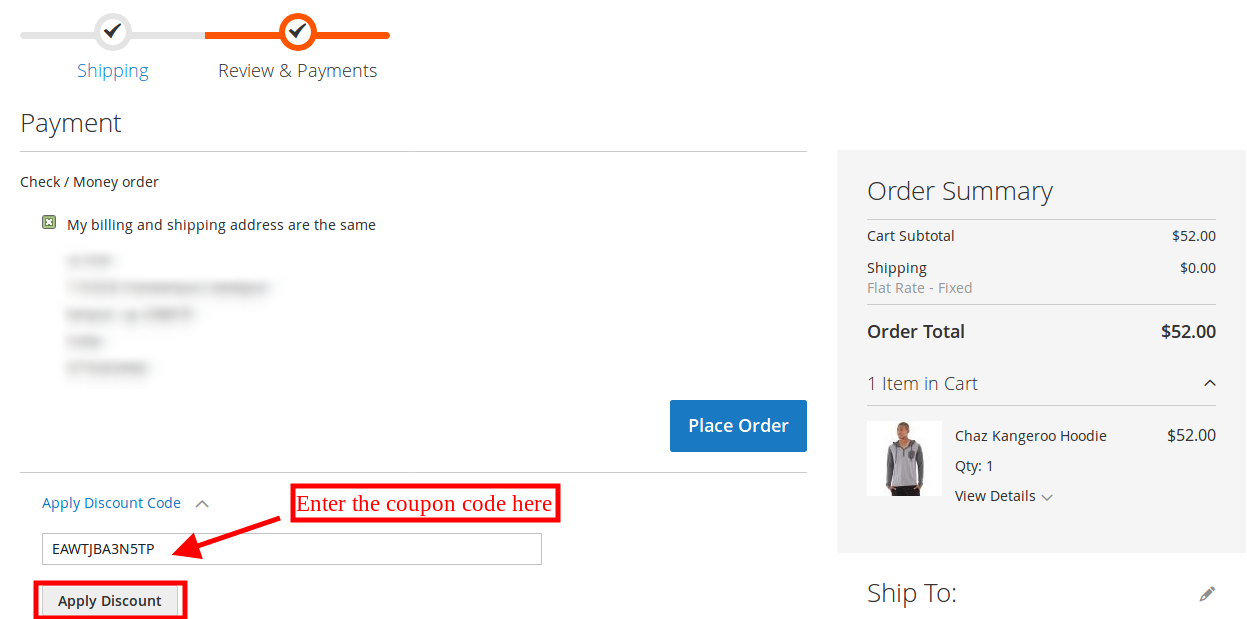
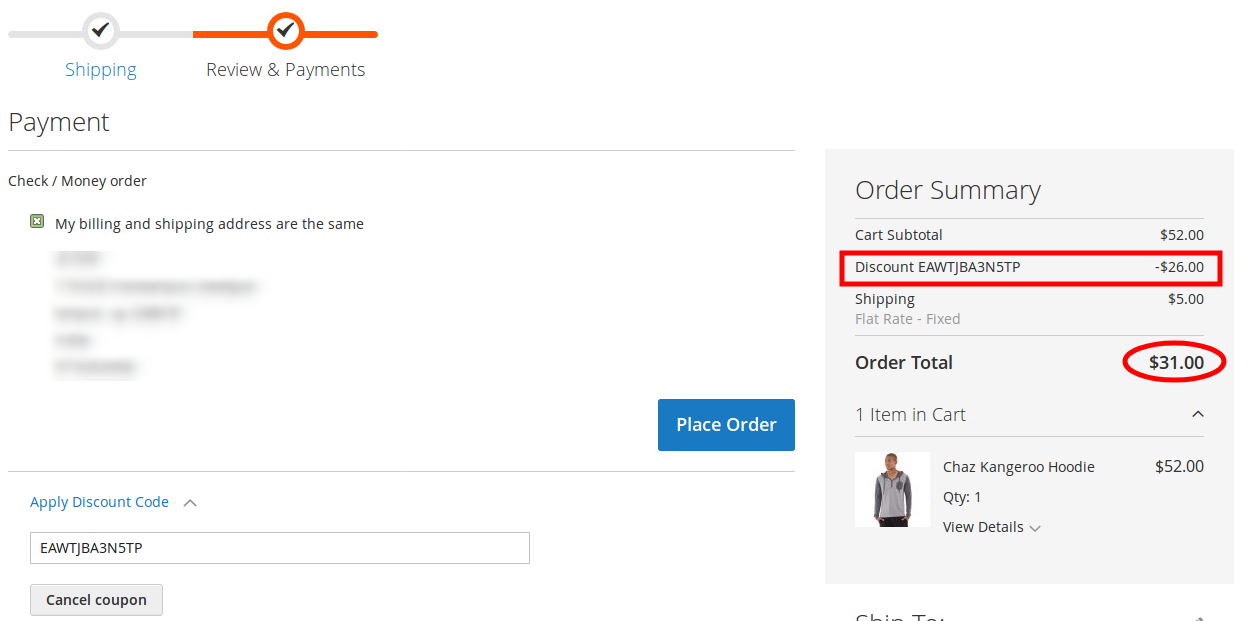
The online customers can apply the coupon code at the checkout page, as shown below:
Thus the store customer can get discount by sharing the product on Facebook.
For more details about this Magento 2 share and win extension visit:
1.0 Introduction Magento Gift Card Manager Extension.
Gift cards have become a major factor of eCommerce businesses. Knowband provides the Magento Gift Cart Manager Extension that allows the Magento store owner to offer gift cards to their customers. Magento gift voucher extension is a module that enables the admin to acquire new online consumers while retaining the existing customers.
This Magento gift card extension by Knowband gives the flexibility to a customer to buy the gift card online and send the Gift voucher to their friends via email on a specific date and time. The online shoppers can order the gift cards for the special occasions for their near and dear ones.
1.1 Features of the Magento Gift Card Manager Extension
By using the Magento gift card manager extension, the eCommerce store merchant can offer the e-gift card option to their store visitors.
Magento store owner can place the link for Gift Card anywhere in the front-end of the website.
Knowband’s Magento send gift card manager extension allows the admin to fix the minimum duration within which the gift card is delivered to the end-user after the order for the same is placed.
Magento gift card module by Knowband enables the admin to set the prefix for the Gift card.
With the help of Magento gift voucher extension, the online store owners can customize the readymade email template subject and content as per desires.
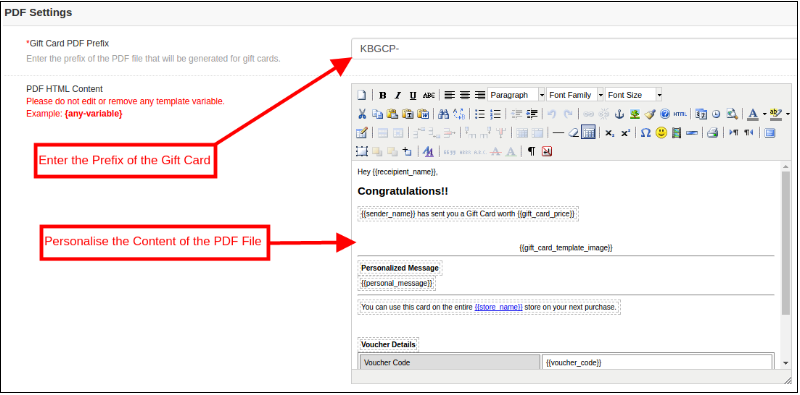
Magento gift card extension by Knowband offers the PDF customization option to the admin where they can change the Gift card prefix and content.
The Store admin can run the cron for implementing the changes automatically.
Magento gift card extension by Knowband allows the store admin to add, edit or delete the gift card template.
The online merchants can add the N number of gift card templates for various occasions including Anniversary, Birthdays, Holidays or any other special event. The default gift card designs or templates can be edited, disabled or deleted as required.
The store admin even gets an option to keep a track on the orders received for the gift card from the back-end of the Magento gift card manager extension.
Magento gift voucher extension helps the admin to increase the customer retention.
Knowband’s Magento send gift card extension is easy to install and configure.
Magento gift card extension is fully mobile responsive.
1.2 Magento Gift Card Manager Benefits for Customers:
1. Magento Gift card extension by Knowband save the valuable time of the customers. They can get the gift cards for the different occasion in case they are finding it hard to choose a tangible gift from the store.
2. The gift card option incorporated by Magento gift card module by Knowband is best for those customers who find it hard to select a gift for any occasion.
2.0 Installation
After purchasing the Magento gift card module from the store and you’ll get following files.
1. The zipped file that consists of the source code of the module
2. User Manual
Follow the following steps to install the Magento gift card manager extension:
1. The folder structure of the Gift Card Manager.
2. Copy all the folders of the zipped file and paste them into Magento root directory and clear the cash cache (if enabled).
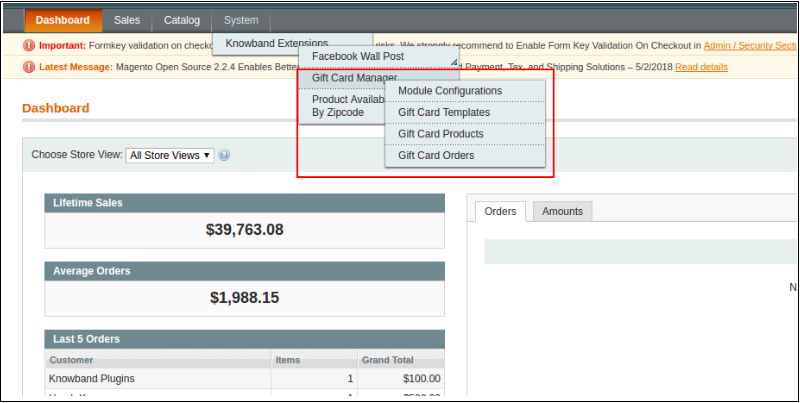
3. You will be able to find the “Gift Card Manager” option inside the “System > Knowband Extensions > Gift Card Manager”.
4. You can now configure the Magento Gift Card Manager as per your requirements and check its working in the front end.
3.0 Admin Panel
After installing Magento Gift Card Manager Extension in the Magento store, the admin gets a number of configuration options. There are following sections available to admin interface:
1. Module Configuration
2. Gift Card Template
3. Gift Card Products
4. Gift Card Orders
Let us discuss the various customization options of Magento gift voucher extension.
3.1.1 Module Configuration
The Module configuration tab of Magento gift card manager module by Knowband offers the basic configuration options to the store admin. The Module Configuration tab is discussed below.
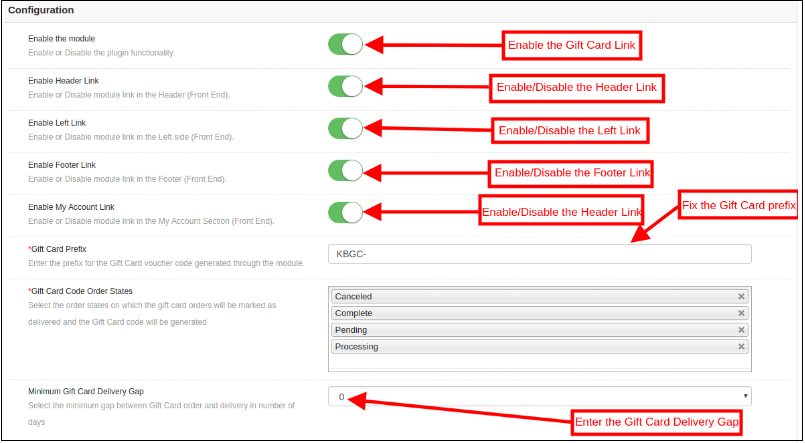
1. Enable the module: Initially, this Magento Gift voucher extension is disabled. The store admin can enable this option and offers their customer Gift card option. This can be done by toggling the button as shown below.
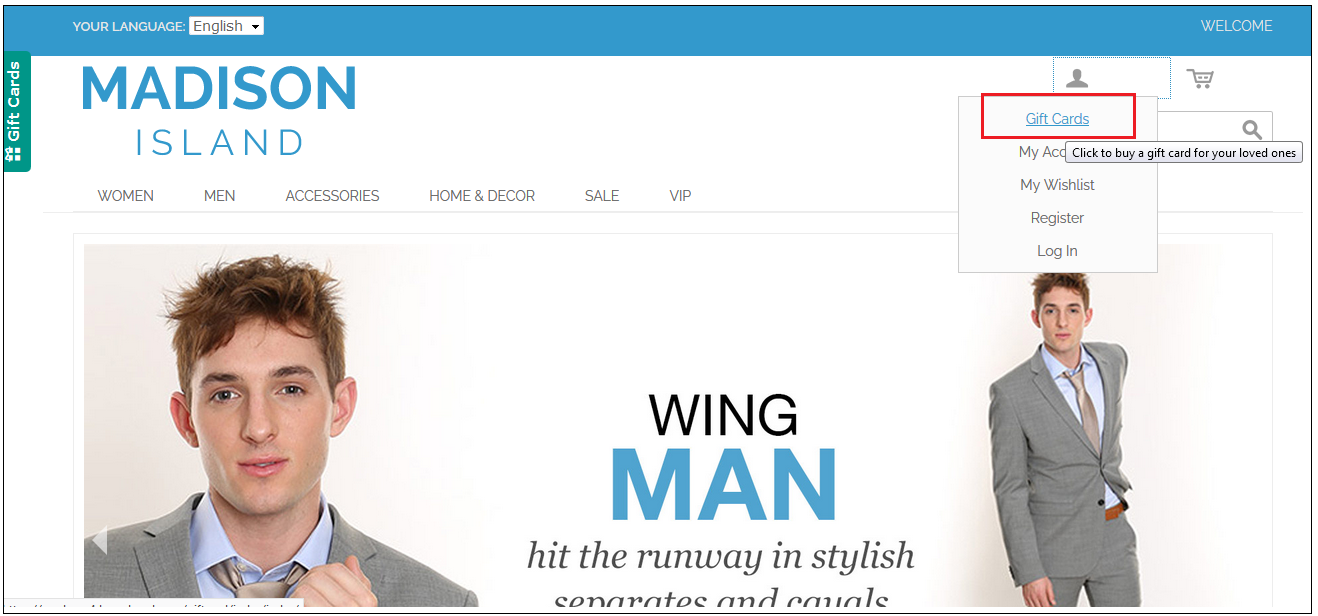
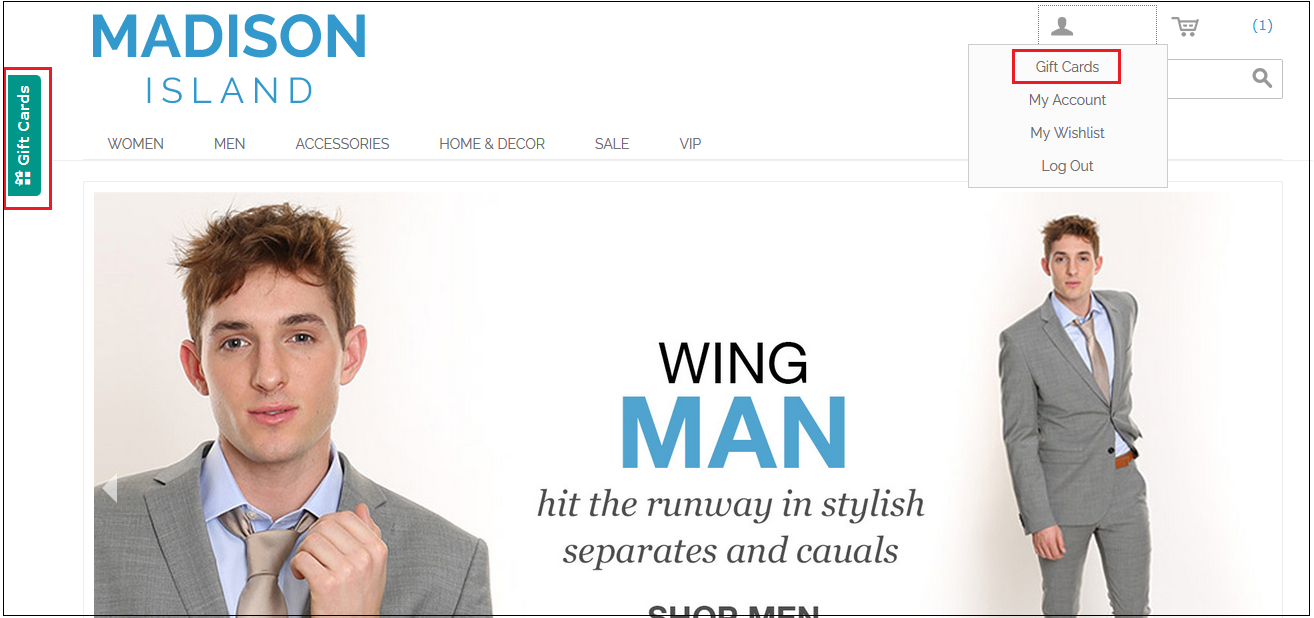
2. Enable Header Link: The Store admin can enable the button to display the gift card link in the header of the webpage.
Front End Preview:
3. Enable Left Link: In this section, the online retailer can enable the display of the link on the left side of the site.
4. Enable Footer Link: The admin can enable the display of the Gift cards link at the footer of the site.
Front End Preview:
5. Enable My Account Link: The admin can enable the Gift card link in My Account page.
Front End Preview:
6. Gift Card Prefix: With this option of Magento gift card extension, the admin can set the prefix for the voucher code of the pre-paid gift card from here. For example, the code can be entered in the format KBGC – ******
7. Gift Card order Status: The admin gets an option to select the status of the orders.
8. Minimum Gift Card Delivery Gap: Knowband Magento gift voucher allows the store admin can specify the minimum duration of the day when the order was placed and day of the gift card delivery.
3.1.2 Email Setting
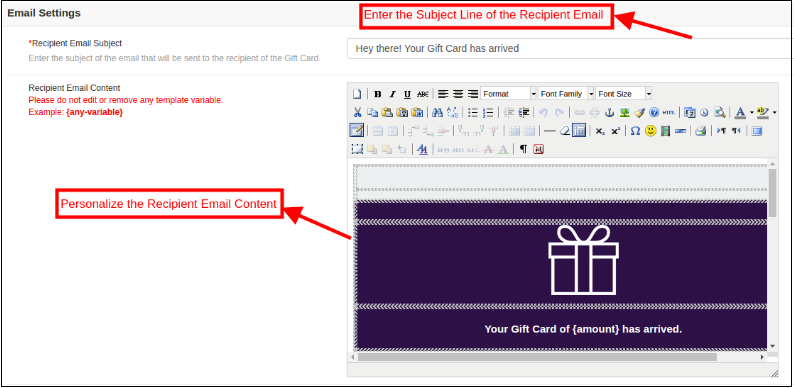
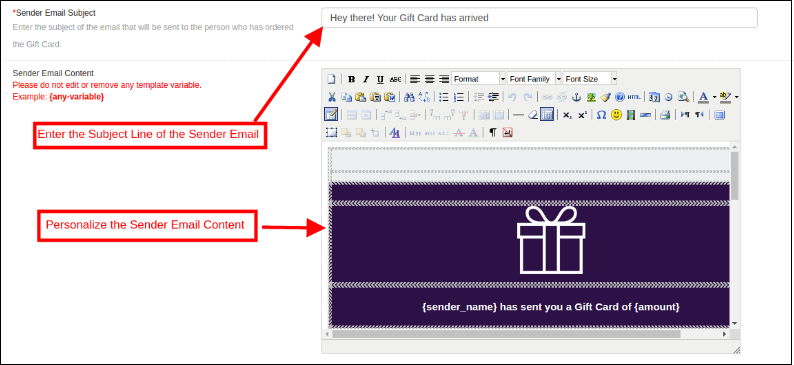
In this tab, the admin can customize the gift card email template as desires. This Magento gift card extension by Knowband offers default email templates. The entire email right from the subject line to the content can be edited and personalized as per the requirement.
This Magento gift card manager extension offers the two Email templates option.
Recipient Email Template
Sender Email Template
Recipient Email Template: In this section, the store admin can enter the subject line of the email and content as per the requirement.
Sender Email Content: In this section of Magento gift card extension, the store merchant can customize the email content as per the business requirement.
3.1.3 PDF Setting
The admin can enable the customers to download the gift card in PDF format. Magento gift voucher module offers the PDF Settings option to the admin. The buyer can print the gift cards in PDF format with the help of Magento gift card manager module. The admin can change the Gift Card prefix and PDF content from the back-end and the changes will be reflected in the PDF.
3.1.4 Cron Setting
The admin can execute the cron manually by clicking on the button shown in the image below.
Or else, the eCommerce store admin can enable automatic execution of the cron option by toggling the button as shown below.
3.2 Gift Card Template
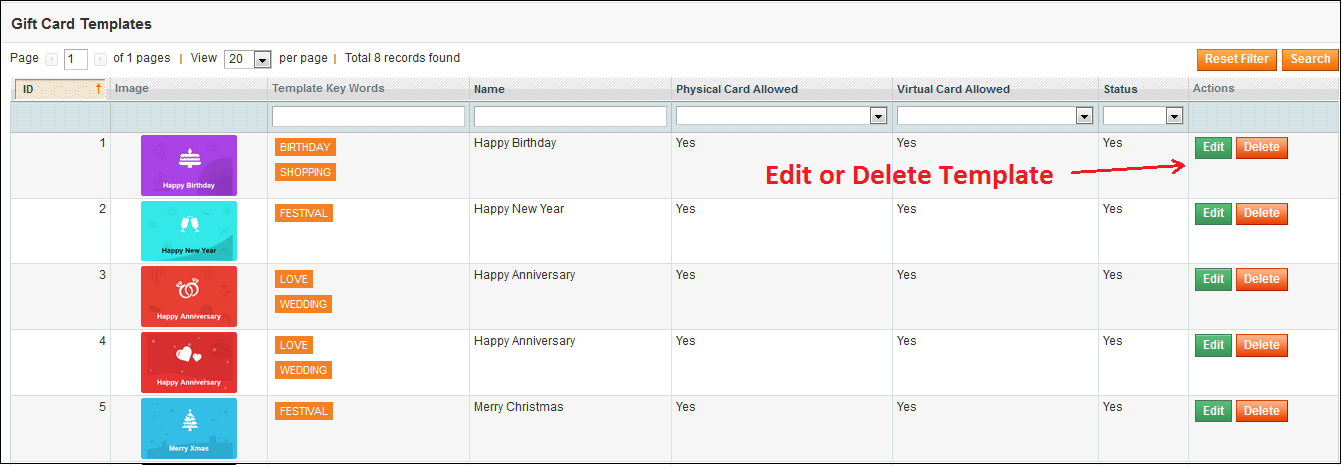
This tab lists out the default Gift card template. Admin can customize these Gift card template as per their desire. Other than this, the store merchant can edit or delete the Gift card template.
3.2.1 How to Edit and Delete Gift Card Template?
The admin even gets an option to edit the template or delete it. This can be done by clicking on the Edit or Delete button respectively as shown below:
3.2.2 How to Add New Gift Card?
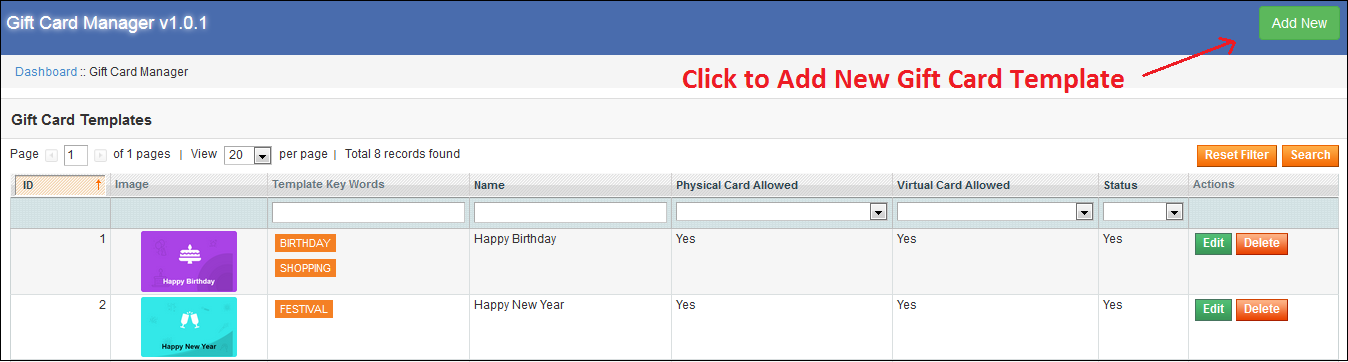
In order to create the new templates for the Magento gift card manager extension, go to the Gift Card template tab and then click on ‘Add New’ option at the top right side of the module.
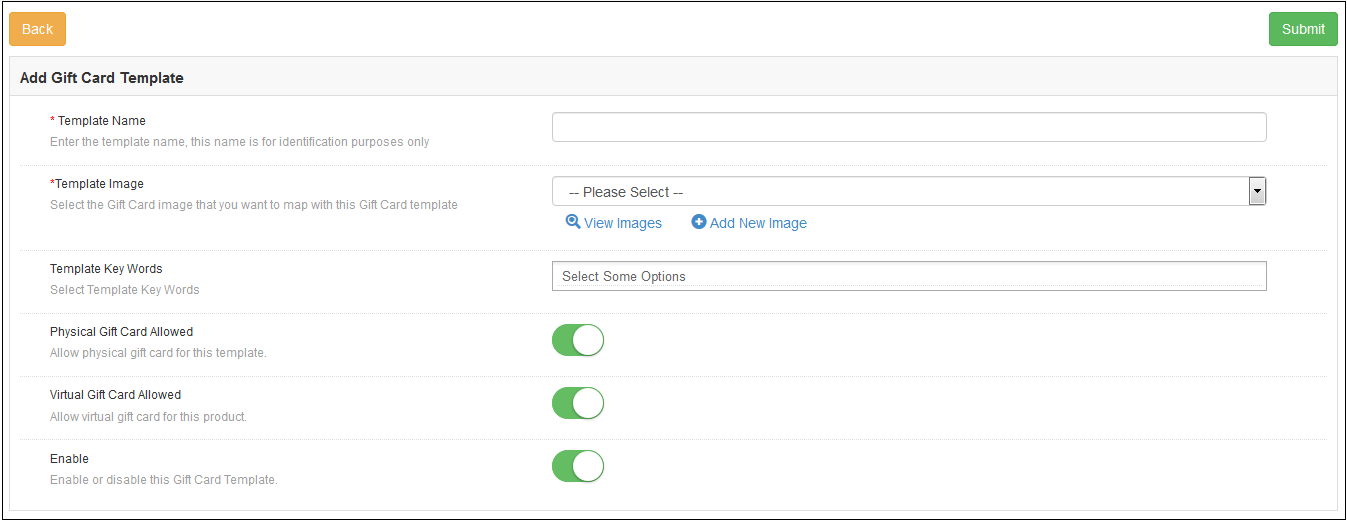
Fill-up the information in order to create the template as shown in the image:
1. Template Name: In this section of Magento send gift card extension, enter the name of the Gift Card template.
2. Template Image: The admin can select the image or the layout of the gift cards that will be shown in the front-end of the eCommerce site.
The images for the various occasions can be saved in the back-end of the Magento gift card manager extension by Knowband.
3.2.3 How to customize the template of the gift card?
3.2.4 View Gift Card Template Images
The store admin can even view the images for the various events has been saved or can create a new image for the same.
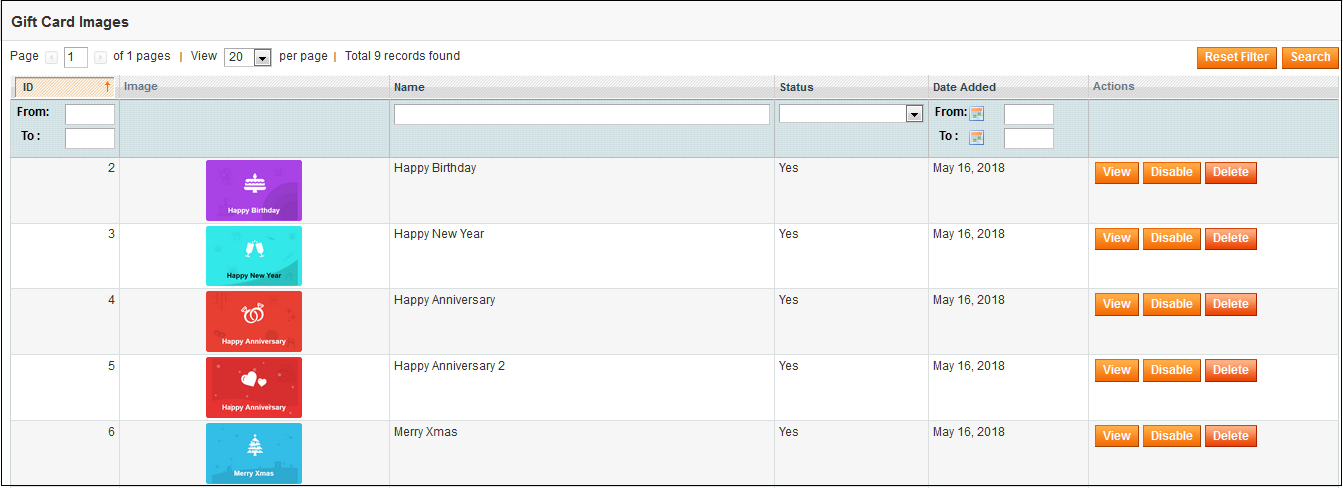
As you click on the ‘View Images’ you’ll be redirected to the page below.
The list showcases the entire images that were created and saved. You can view the complete image or even delete it if required.
In order to create new images, click ‘Add New Image’ as shown below.
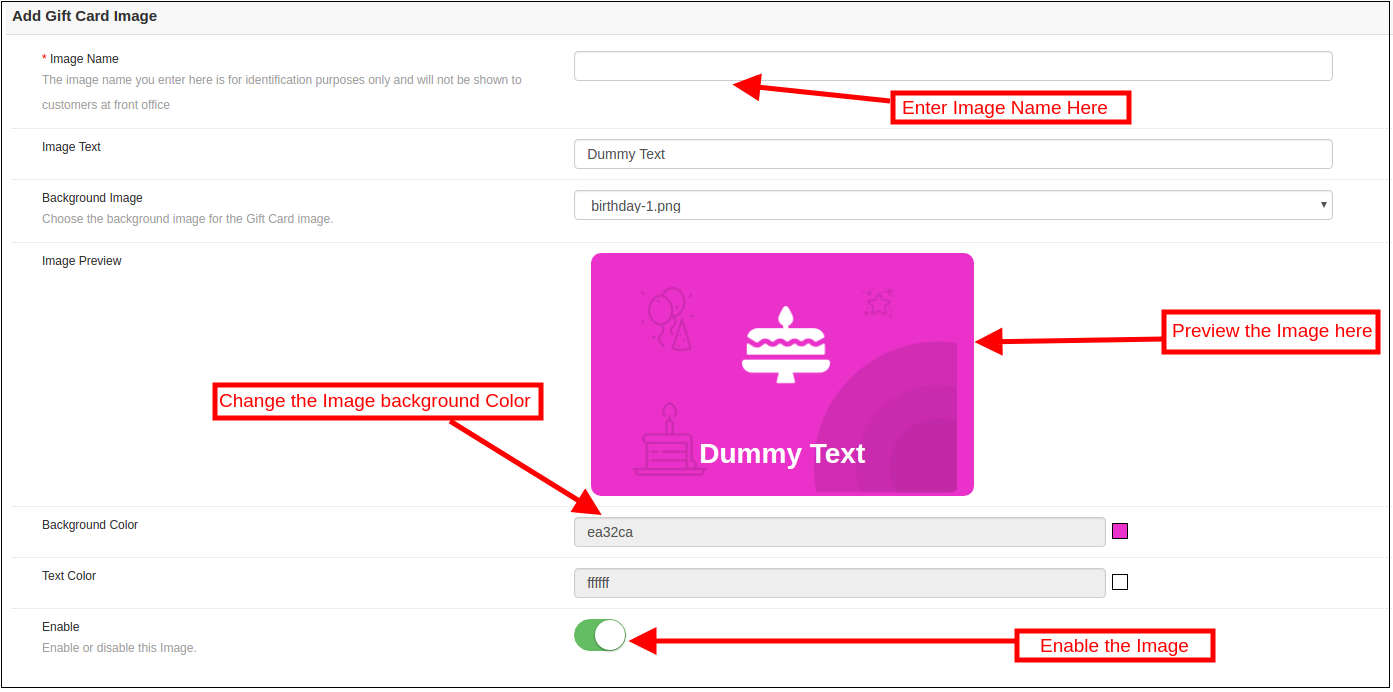
3.2.2 Add Gift Card Template Image
You can enter the image name and the text of the image to be shown on the gift card. Even the background image and color, as well as font color, can be changed at a button click. Preview the final image before making it live on the website.
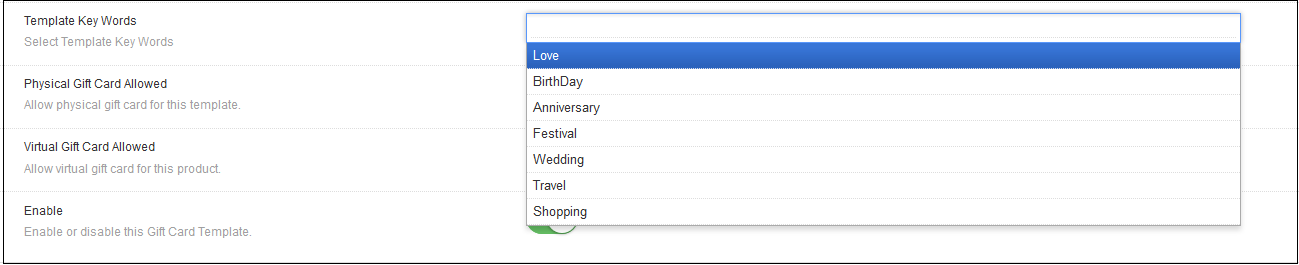
3.Template Keywords: The Magento gift card extension allows the admin to select the keywords of the gift cards.
4. Physical Gift Card Allowed: Enable this button if you want to offer the gift cards in physical form. If this functionality is enabled, then, the admin can allow the customers to send the gift card in physical form to the recipient.
5. Virtual Gift Card Allowed: The online retailer can enable the Virtual gift card functionality. This will allow the customers to download the e-cards.
6. Enable: Toggle this button to enable or disable the Gift card template.
3.3 Gift Card Product
Magento gift card template allows the e-merchants to customize the pre-paid gift card products in few simple steps.
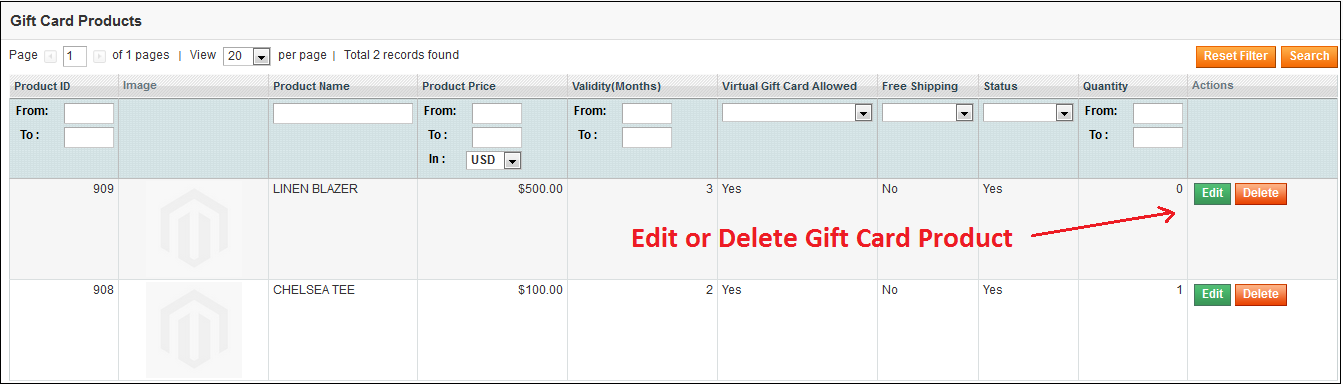
3.3.1 How to Edit and Delete Gift Card Product?
The admin even gets an option to edit/delete the gift card product from the section shown below:
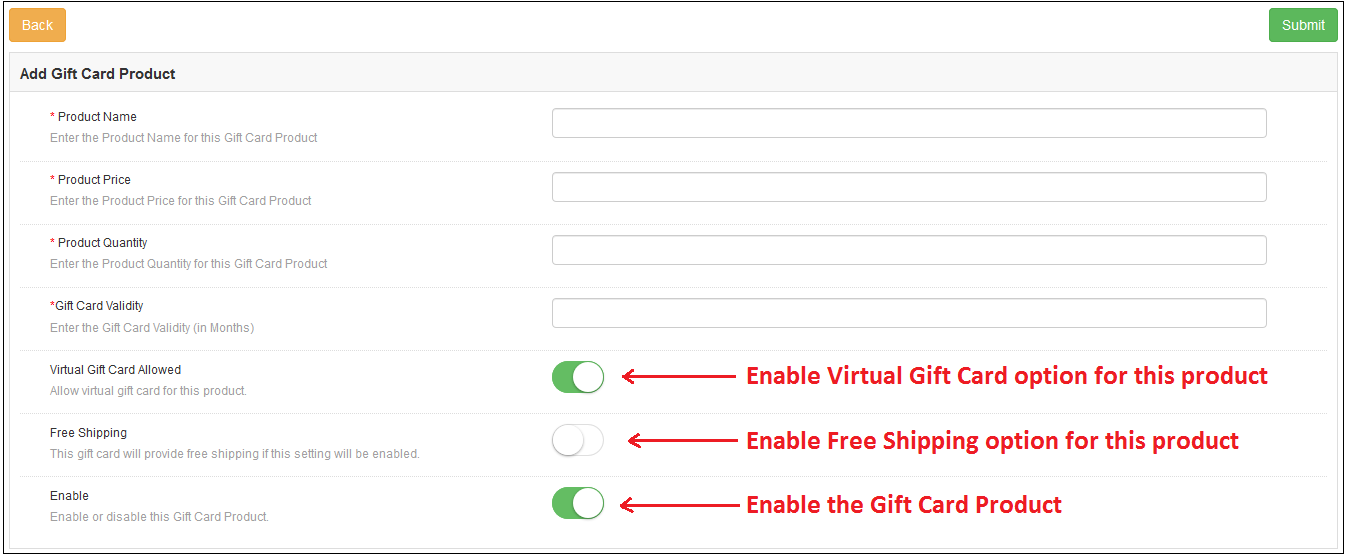
3.3.2 How to Add New Gift Card Product?
In order to create the new gift card product for the Magento gift card manager extension, go to the Gift Card template tab, then, click the ‘Add New’ option at the top right side of the module.
Listed below is the information that you need to provide for creating the product.
Product Name: Enter the name of the product here. It can be Happy Anniversary, Happy Birthday, Merry Christmas or any other.
Product Price: Enter the amount allowed in the gift card in this section.
Product Quality: Enter the product quality of this gift card product.
Gift Card Validity: The validity period in months of the gift card can be entered here.
Virtual Gift Card Allowed: Enable e-card by switching on the button.
Free Shipping: The eCommerce seller can even allow free shipping to the customer.
Enable: Gift Card Product can be enabled or disabled from here.
3.4 Gift Card Orders
The Gift Card Order tab provides the entire list of the orders received for the gift cards. It involves the recipient email, date of sending as well as the status of the gift cards.
In the ‘Gift Card Order’ tab go to the ‘View’ button in the right section. In this section shows the entire information about the order.
4.0 Website UI
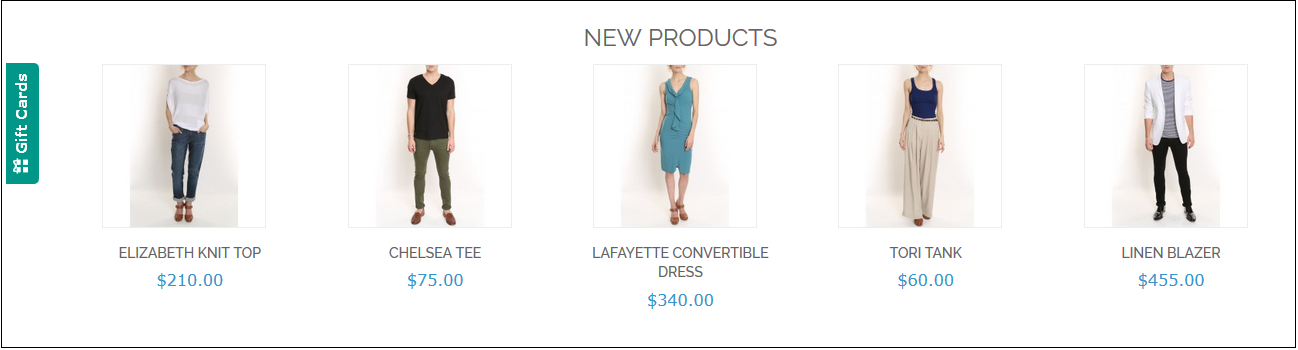
The links to the gift cards page can be viewed in the front end as opted by the store admin.
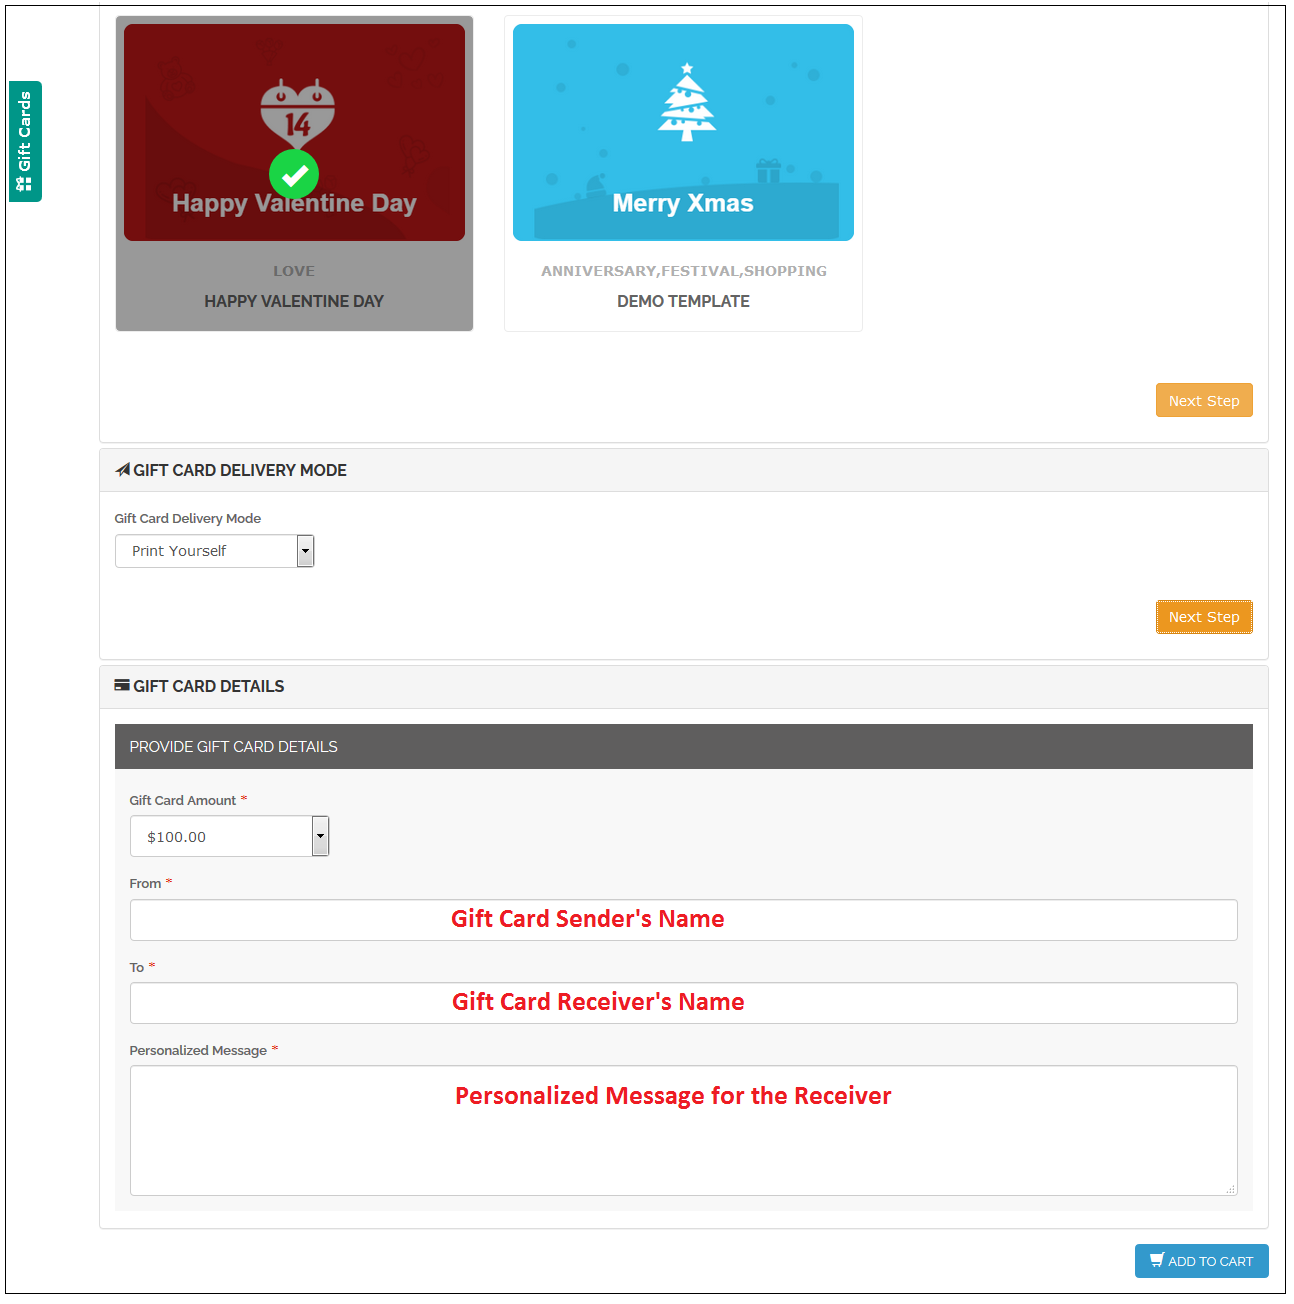
Once the store visitors click on the link, they will be redirected to the gift card page of the site.
Now, the Customer can buy the gift card and add the product to the shopping cart and proceed to the checkout page. The gift card will then be sent to the receiver.
For more details about this Magento Gift Voucher extension, you can visit here:
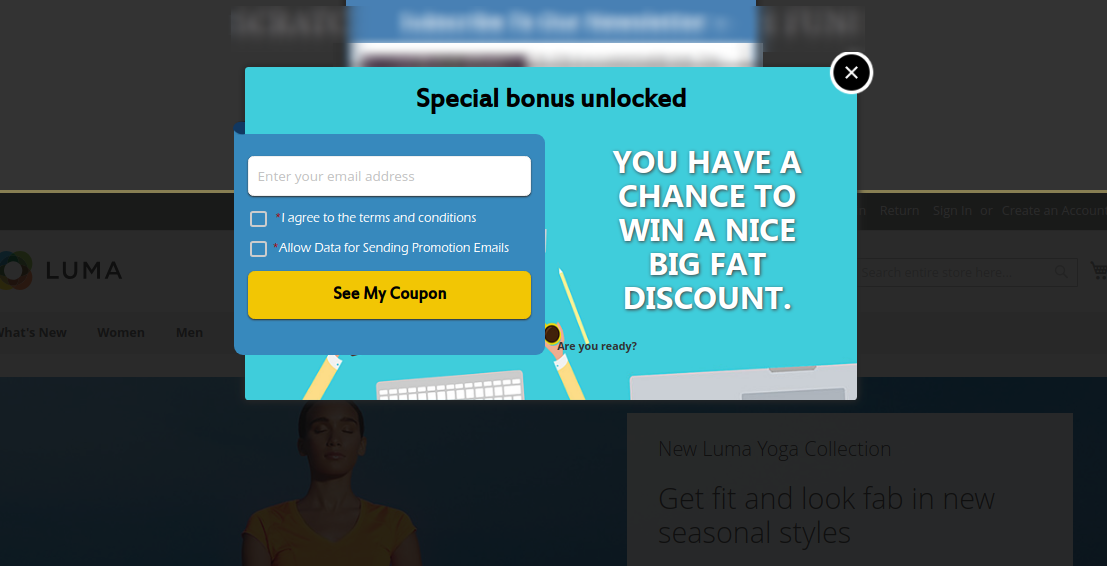
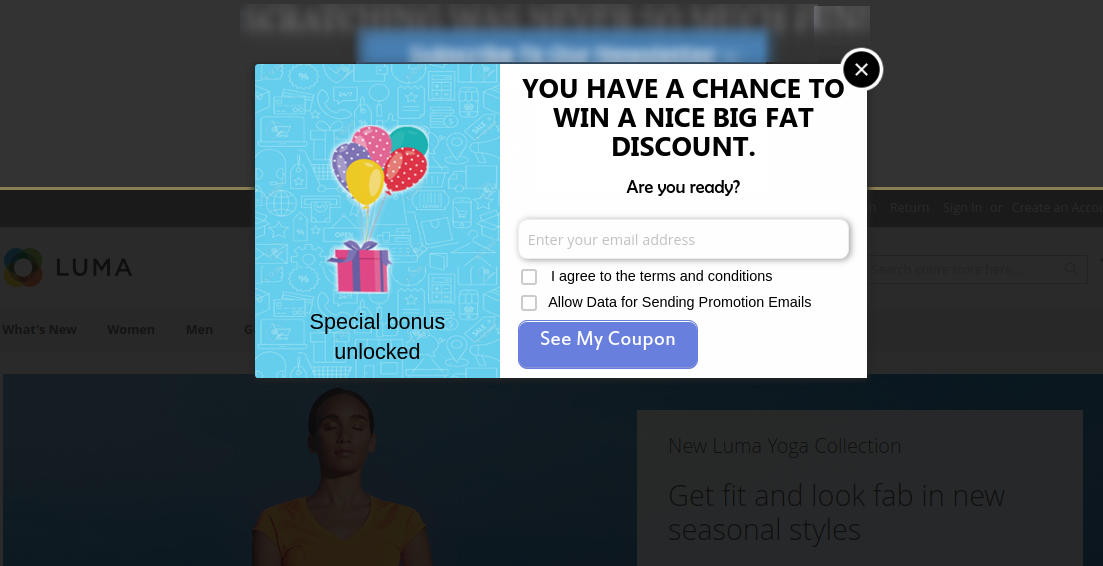
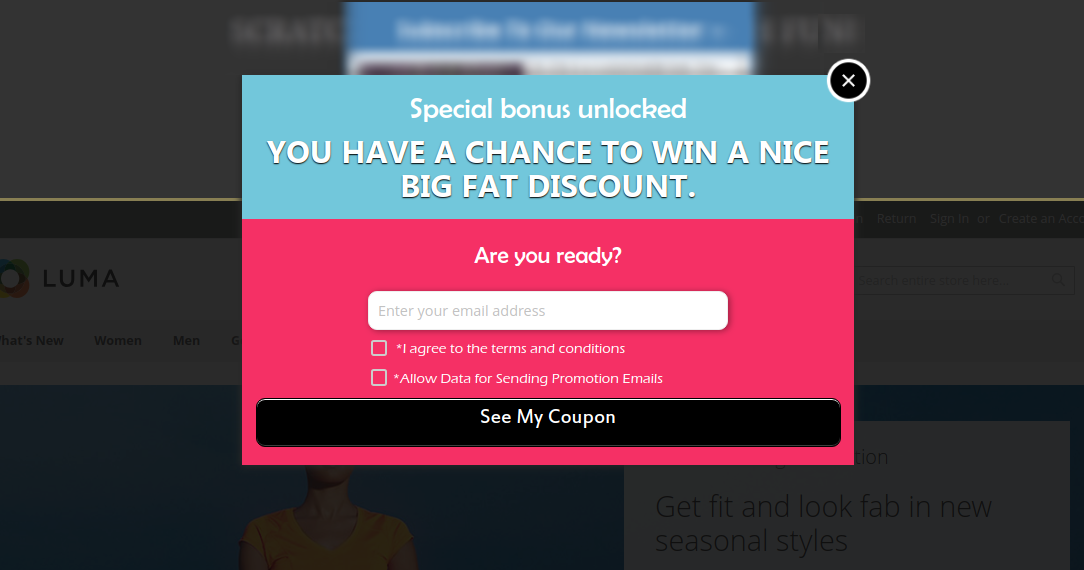
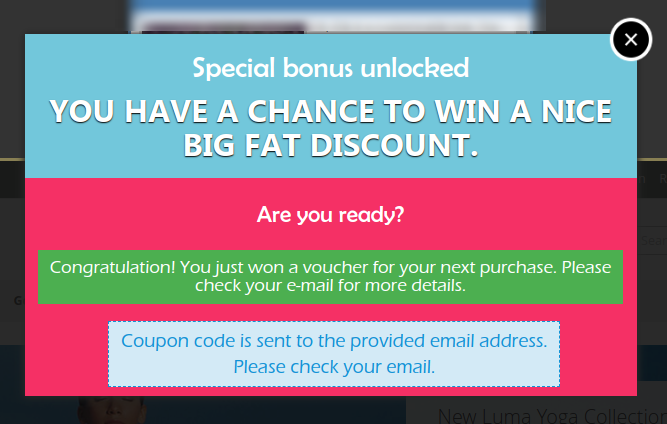
Exit popup offering discounts in exchange for email Ids has become very important when it comes to the e-commerce business. Exit Intent popup nowadays are one of the most important factors in customer engagement and increase revenue. Most e-commerce store owners use Exit popups as a tool to engage customers with the store.
Exit pop-up uses Exit-intent technology which tracks the movement of the mouse cursor and soon as the customer tries to leave the page the Exit popup appears offering discounts in exchange of the email Ids.
We at Knowband has developed an Exit Intent popup for Magento 2 users popularly known as Magento 2 Exit popup extension. This Magento 2 extension offers various features which make this Exit Intent extension far better than other Exit intent popups used. This Magento 2 Exit Intent extension offers look and feel settings which allows admin to customize the Exit popup in endless ways.
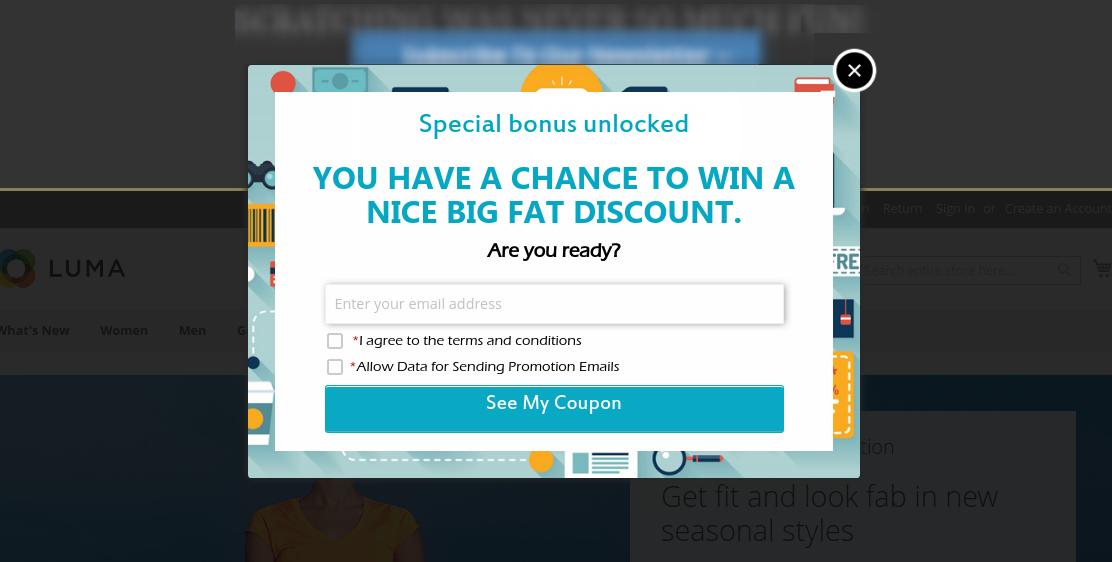
Magento 2 Exit pop up(email subscription) extension displays a responsive newsletter pop up every time a visitor tries to leave the store. The Magento 2 extension offers discount coupons to the visitors who enters their email Id in the subscription pop up and subscribe them for a newsletter or register them for a new user.
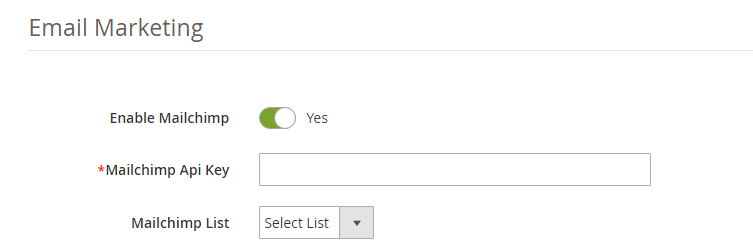
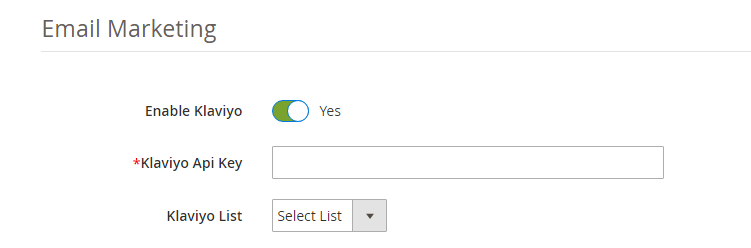
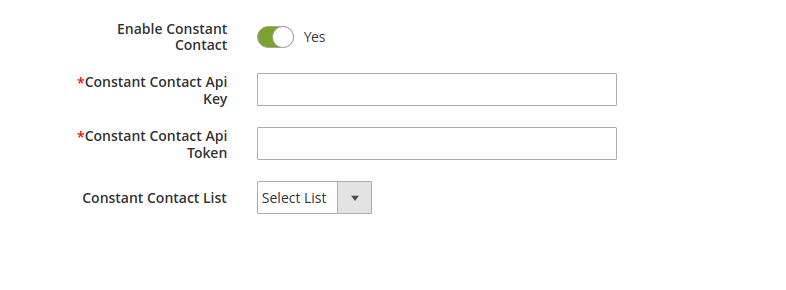
Magento 2 Exit popup offers integration with popular email service providers like MailChimp, Klaviyo, and Constant contact. All the email Ids entered in the Exit intent newsletter popup are automatically synced to the databases of these email service providers. Magento 2 admin can use these email Ids for personalized promotions or Mail campaigns.
1.1. Features of Magento 2 Exit popup extension
The Magento 2 Responsive exit popup extension incorporates the email subscription popup at Magento store front. The Newsletter popup appears as soon as the visitor tries to leave the website giving them one extra chance to engage with the store.
Magento 2 Exit popup extension offers Email Recheck option to prevent the same user to avail the discount more than once.
Magento 2 admin has an option to show the fireworks when a customer wins a discount by offering his/her email Id to make it more enticing and attractive.
Magento 2 Exit popup extension also allows admin the control over the display of the Exit popup by allowing “Popup display option”, Magento 2 admin can enter the number of days after which the popup is to be displayed to the same customer.
Magento 2 Exit Intent popup offers Custom CSS and JS for endless customizations without even touching the base code of the extension.
Magento 2 extension offers display settings under which the admin can set the maximum screen size compatibility of the Exit popup. The Exit popup will work efficiently in all the screen sizes above the selected size.
Magento 2 admin can also set the maximum display frequency for the Exit popup, the email subscription popup will appear as per the frequency selected from the dropdown.
Magento 2 admin can set the date range between which s/he wants to display the Exit intent popup to the visitors by selecting the data from the date picker field.
Magento 2 Exit popup extension allows admin to select the user group to whom s/he wants to display the Exit popup, the email subscription popup will be displayed to the selected user group only.
Magento 2 Exit Intent email subscription popup allows the admin to select the GEO locations where s/he wants to display the Exit Intent popup. The popup will be displayed only in the selected GEO location.
Magento 2 admin can also add a background image and website logo on the Exit intent popup.
Magento 2 admin can customize the text on the popup as per the requirement by customizing the Text settings offered by the Exit popup extension.
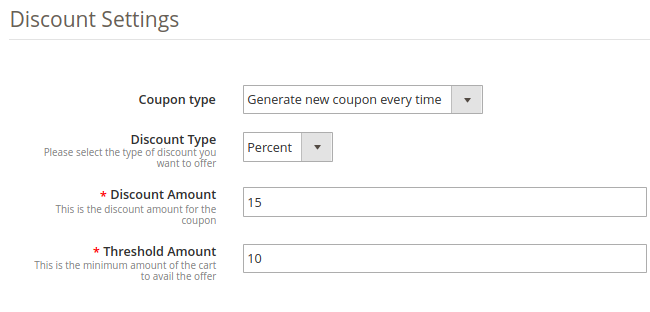
Magento 2 admin can set the discount being offered to the visitors using Discount settings, Magento admin can set the discount to be a percentage or fixed discount. Magento admin can also set the Coupon expiry time in days.
This even engages visitors for a longer time on your eCommerce store and increases the percentage of the customer retention.
Magento 2 exit intent popup offers integration with email service providers like Mailchimp, Klaviyo, and Constant contact.
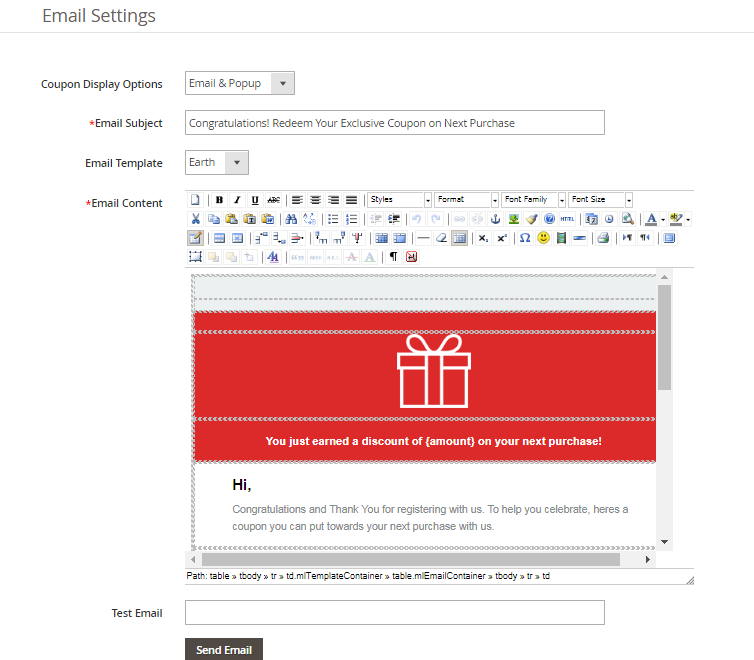
Magento 2 email subscription popup offers 5 Readymade email templates which can be later customized by the admin as per the requirement.
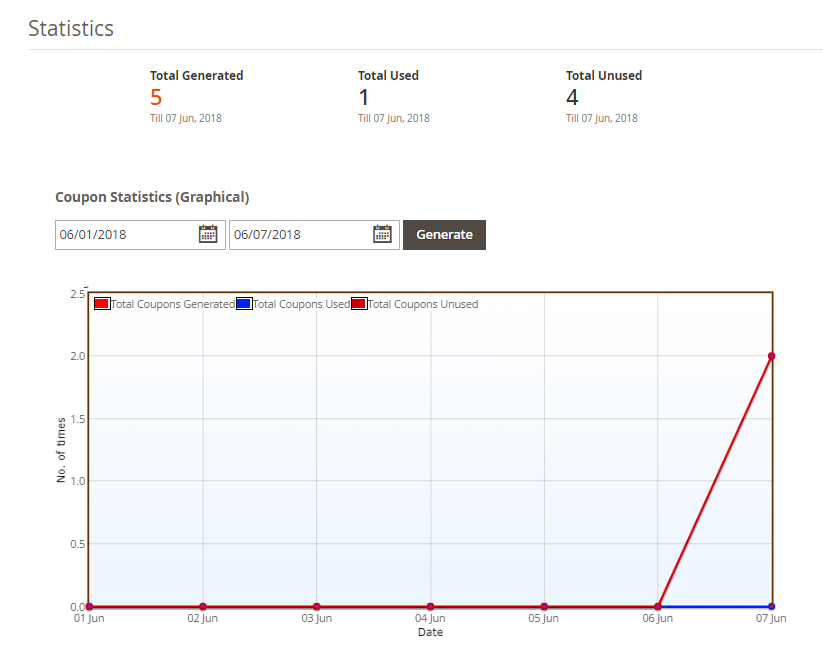
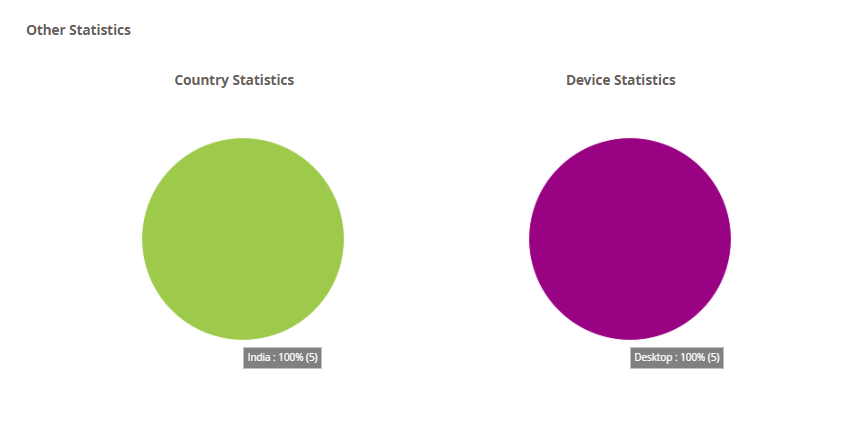
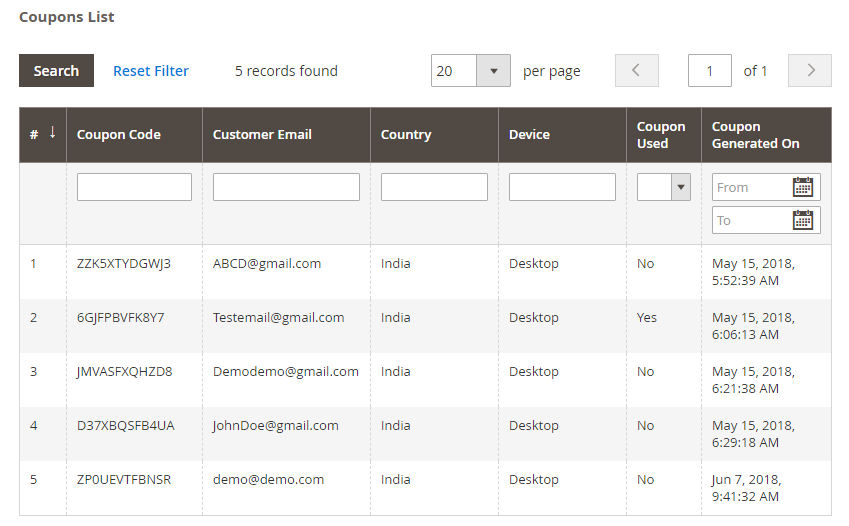
Magento 2 Exit intent email subscription popup offers a detailed report for all the Generated and used coupons, country where the Exit popup was used and in which device and the details of the customers who have entered the email Id and won the discount in terms of beautiful Line and Pie charts.
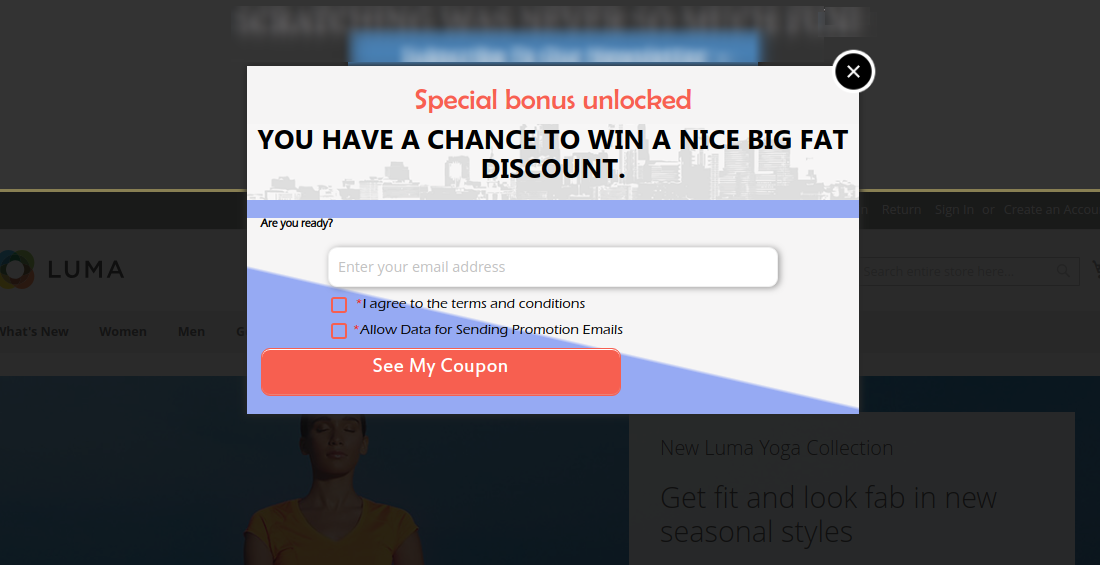
Magento 2 Exit Popup Plugin allows you to apply various appealing themes for the exit popup(email subscription popup). Theme preview option is also available for the admin before making it live.
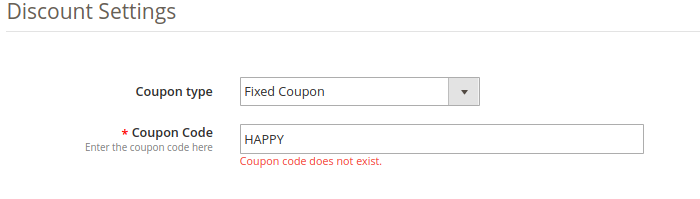
With this Magento exit popup extension, admin can generate fixed type coupons or new coupon every time.
High Impact on sales, drastically increase store conversions
Multi lingual support
Compatible with all themes
Desktop, Mobile and Tablet responsive design
1.2. Installation
Follow the following steps in order to install Magento 2 Exit Popup extension in your store:
Download the Magento 2 Exit Popup module package from Knowband store.
You’ll receive a zipped file containing the user manual and the source code of Magento 2 Exit Popup plugin. Unzip the package.
Create a folder {Magento root}/app/code/Knowband/Exitpopup
Upload the extracted content in the above folder via FTP manager (like Filezilla or WinSCP – download here: https://filezilla-project.org/).
6. In Admin Panel go to the main menu -> Knowband -> Exit.
7. The Magento 2 Exit popup extension is now ready for use.
This User Manual will guide the users through the Magento 2 Exit popup extension configuration and settings.
2.0 Admin Interface
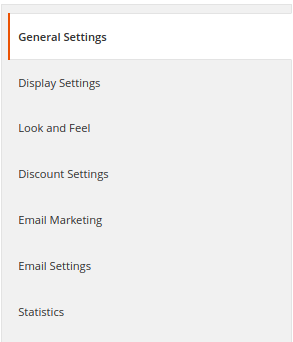
The admin Panel of Magento 2 Exit Popup module contains the 8 following tabs.
General Settings
Display Settings
Look and Feel Settings
Text Settings
Discount Settings
Email Marketing
Email Settings
Statistics
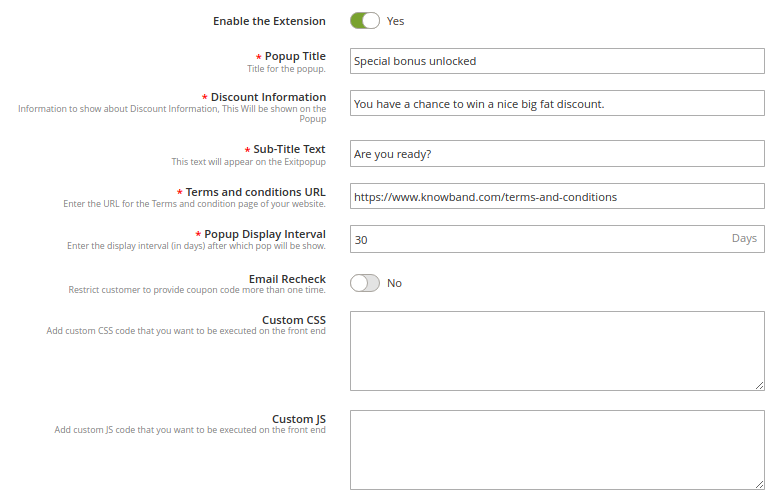
2.1. General Settings
1. Enable the Extension
Toggle this button in order to enable the Magento 2 Exit Intent email subscription popup extension. If enabled, the module and all its settings will work on the store.
2. Popup Title
This option allows you to set a custom title for the exit popup or email subscription popup.
3. Discount Information
Using this option, you can set any text which will be shown as discount information on the exit popup.
4. Sub-Title Text
This information is also shown on the exit popup below the main exit popup title.
5. Terms and Conditions URL
Using this option, you can set a URL for the Terms and Conditions page of your website.
6. Popup Display Interval
Using this setting Magento 2 admin can set the number of days after which the email subscription popup will display again to the same customer.
7. Email Recheck
Magento 2 Newsletter popup extension offers email recheck option to prevent same User/Email Id to avail the discount more than once. Toggle this button in order to enable/disable the Email recheck on the Exit Popup.
8. Custom CSS and JS
Magento 2 Exit Popup extension offers custom CSS and JS options to Magento admin for endless customization. The Newsletter popup can be completely customized and Magento 2 admin can match with the store theme.
2.2 Display Settings
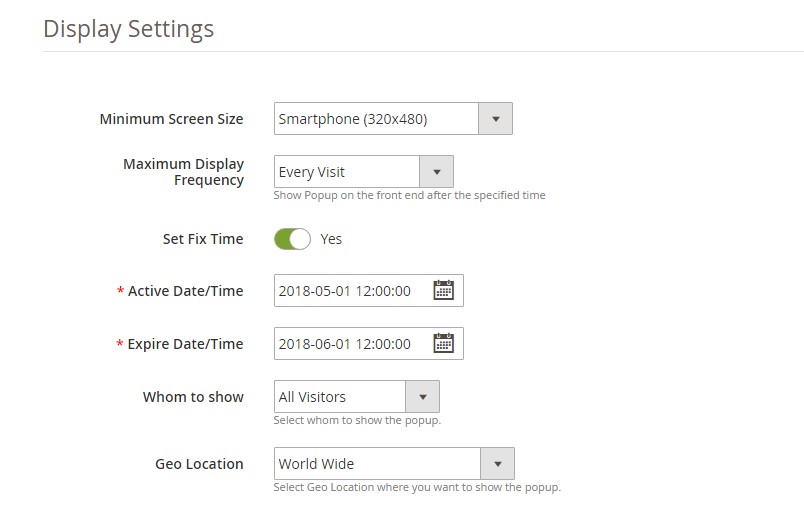
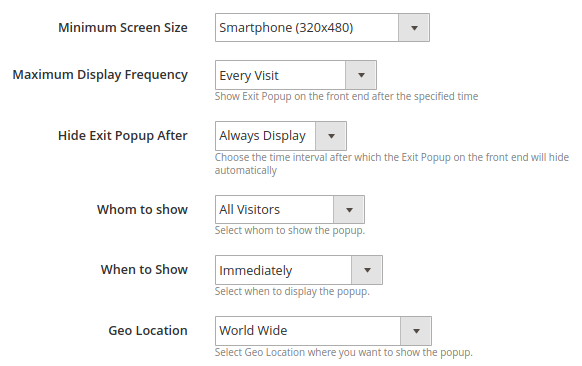
Magento 2 Exit popup extension by Knowband offers Display settings using which Magento 2 admin can control the display of the popup, like whom to show the newsletter subscription popup, in which country to show the newsletter popup etc. Let us see them in detail. But first please look at the screenshot below:
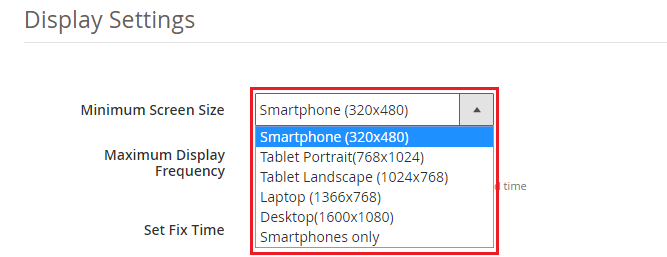
1. Minimum Screen Size
If mobile is selected as the Minimum screen size then the Exit Intent email subscription popup will work on all the screen sizes higher than the Mobile phone and on Mobile phone, if Desktop is selected as the Minimum size screen then the Newsletter popup will not display in the Mobile phone and any size screen smaller than the Desktop.
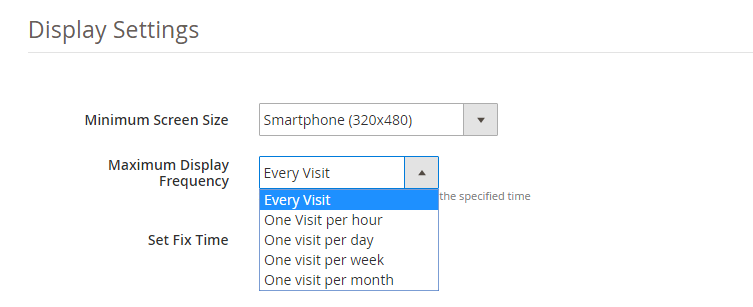
2. Maximum Display Frequency
Magento 2 Admin can set the Maximum Display Frequency of the Newsletter subscription popup using this option. The Admin can decide to show the Exit popup at every visit of the customer, or one visit per hour, per day, per week, and per month. If every visit is selected the Exit Intent popup will appear at every visit of the customer.
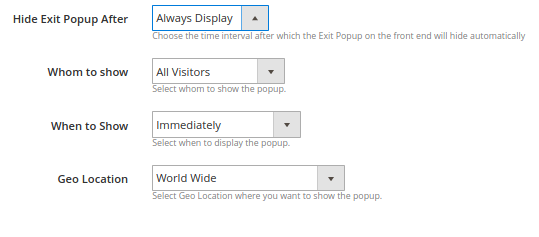
3. Hide Exit Popup After
This option of Magento 2 Exit Intent popup extension allows you to set the time interval after which the exit popup will automatically hide on the frontend.
4. Whom to Show
Magento 2 Exit popup extension offers store admin to choose the customer group whom to show the Newsletter popup using this setting. Magento 2 store admin can select to display the Exit intent popup only to the new visitors, only to the returning visitors or to all the visitors on the store. Please refer to the screenshot below:
6. When to Show
This option allows you to set the time after which the email subscription is shown to the user: immediately, after some time, after scroll down percentage or upon exit.
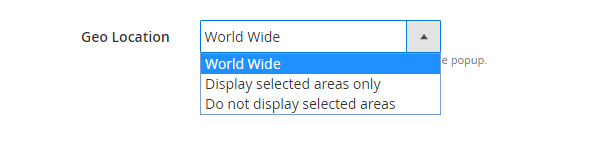
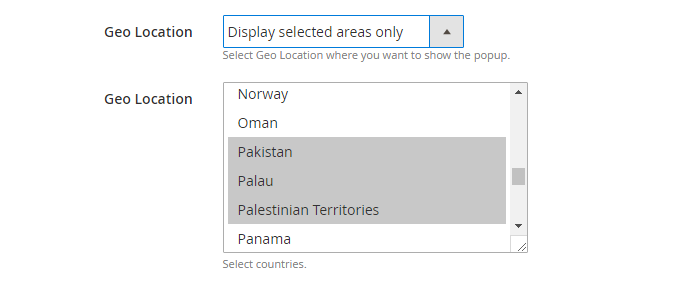
7. GEO Location
Magento 2 Exit Popup extension allows admin to select the GEO locations where s/he wants to display the Exit intent email subscription popup. Please refer to the screenshots below.
Screenshot 1
Screenshot 2
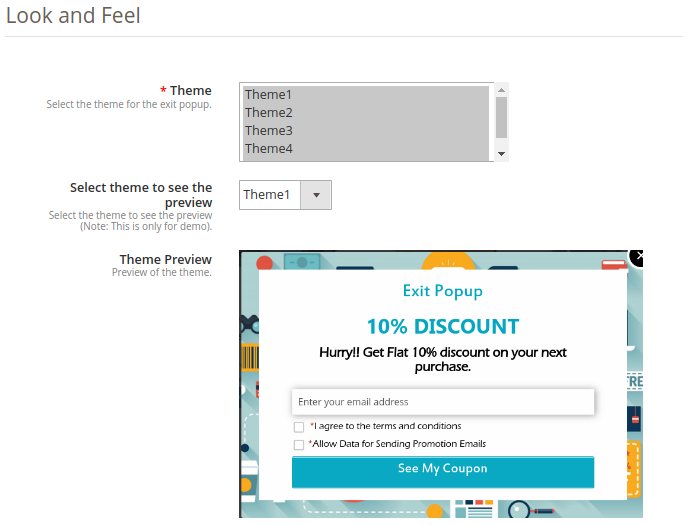
2.3 Look and Feel Settings
Magento 2 Exit popup extension gives an option to select and apply pre-defined templates for the exit popup.
1. Theme
Magento 2 store admin can choose any theme for the exit popup.
2. Preview:
The store admin can select any theme to see the preview. This option is helpful as they can check the theme before making it live on the store.
2.5 Discount Settings
Discount settings offered by this Magento 2 Exit Intent email subscription popup extension allows Magento store owner to set the discount offered to the visitor who enters his/her email Id in the email subscription popup. Admin can offer the discount randomly or some fixed discount. There are three choices that have been provided to the store owner to set the discount. These are discussed below:
1. Coupon Type: Using this option, admin can set the coupon type as a fixed-type coupon or variable-type. In fixed type coupon, admin can specify the code which has to be first generated from the admin back-office under the Cart Price Rule Settings.
Note: If the admin tries to set a coupon code which has not been set under Cart Price Rule Settings, the following error will be shown to them:
2. Discount Type: With this option, admin can set the discount type as fixed or percentage which will be offered to the user through exit popup.
3. Discount Amount: If the admin has selected the discount type as fixed, they can set any value as a discount. If the discount type is selected as a percentage they have to set a percentage discount value.
4. Threshold Amount: This option sets the minimum cart threshold value which is required to avail the offer.
2.6 Email Marketing
Magento 2 Exit popup extension offers Integrations with popular email service providers like MailChimp, Klaviyo, and Constant Contact. The email Ids captured by this Email subscription popup are automatically synced to the database of these email service providers which can be later used by the store admin to send personalized or promotional emails. Let us see how we can configure them.
1. MailChimp Integration:
Magento store admin is required to enter the MailChimp API key in order to sync it with your web store. Follow the below mentioned steps for the API key:
Step 1: Log in to your MailChimp account at https://mailchimp.com.
Step 2: Click on your Username from the menu on the top right corner.
Step 3: Select the Account in the flyout menu.
Step 4: From the account page select Extras and then API Keys.
Step 5: Your API Key will be listed in the table labeled Your API Keys. Copy the API key from there and paste in the “MailChimp API key” field.
Once this is done, the MailChimp account is synchronized.
2. Klaviyo Integration:
In order to Integrate Klaviyo with the store, Magento admin have to add the Klaviyo API Key in the provided field.
Step 1: Log in to your Klaviyo account at https://www.klaviyo.com/
Step 2: Click on your Username from the menu on the top right corner.
Step 3: Select the Account in the flyout menu.
Step 4: From the account page select Settings and then API Keys.
Step 5: Your API Key will be listed in the table labeled Your API Keys. Copy the API key from there and paste in the “Klaviyo API key” field.
Once this is done, the Klaviyo account is synchronized.
3. Constant Contact Integration:
In order to enable Constant Contact integration, toggle the Enable Constant Contact button as shown in the image below:
Enter the API key, API token in order to set up the integration. Select the list in which you want to sync the captured email IDs.
In order to generate the API Key of Constant Contact, follow the steps mentioned-below:
Step 2: Enter the Application Name field. Scroll to the bottom of the page and check the box indicating you agree to the terms of service and click Register Application.
You will, then,get your API Key information.
Step 3: Click the Get Access Token button, in order to obtain the Access Token.
2.7 Email Settings
Magento 2 Exit popup extension offers Email Settings to manage the Email sent to the customer with discount coupon codes. The extension offers readymade email templates which can be customized further as per the requirement. There are three options in which admin can share the coupon code with the customers i.e. display the coupon code in the newsletter popup itself, share the coupon code in the email sent to the customer and an option to choose both. The coupon codes are generated automatically and the emails are sent automatically as soon as a customer enters the Email Id in the email subscription popup.
Coupon Display option: Magento 2 admin can choose how to display the coupon code to the customer i.e. either on the exit intent popup, either via email or admin can choose both the options.
Email Subject: Magento 2 exit popup allows store admin to set the Email subject for the email that is sent to the customer. Emails are sent automatically but the admin has full control over the customization of the Email template.
Email Template: Magento 2 exit popup extension offers 5 Readymade email templates. These email templates are fully customizable as per the requirement.
Test Email: Magento 2 newsletter subscription popup extension by Knowband offers Test email field option to test the functionality of the emails sent.
2.8 Statistics
Magento 2 Exit popup extension offers statistics of its performance. The statistics show the comparison between the total generated and used coupons. Magento 2 newsletter subscription popup extension offers interactive graphs for total generated and used coupons. Magento 2 admin can filter the stats by selecting the date range from the date picker field, refer to image below:
Not only this Email subscription popup extension also shows the statistics in a beautiful and interactive pie charts, in which country the Exit popup extension is used and in which device, refer to the screenshot below:
Tabular Report: Magento 2 Exit popup extension generates tabular reports which shows information of the customer who has entered the email Id in the Newsletter subscription popup. The information like Email Id, the Coupon code allotted, the country where the Exit Intent popups, the device on which it was used and if the customer has used the coupon or not, refer to the screenshot below:
3.0 Front Interface
A) Magento 2 Exit popup with Theme 1
B) Magento 2 Exit popup with Theme 2
C) Magento 2 Exit popup with Theme 3
D) Magento 2 Exit popup with Theme 4
E) Magento 2 Exit popup with Theme 5
As the customer enters their email address, the following screen will be shown to them.
Disclaimer: In case the “Exit” popup does not display at the front, kindly clear the cache or delete the cookies. Sometimes cookies prevent the popup from displaying at front.
Magento Product Availability Check by Zipcode Extension by Knowband allows the user to check the availability of the product in a particular area just by entering the zipcode. The Magento Product Availability extension also offers the admin to restrict the availability in the particular area(s). With the help of this Magento Zipcode extension, the admin can change the availability status whenever he wants to.
1.1 Features offered by Magento Product Availability by Postal Code Extension:
By installing the Magento product availability by zipcode, the store admin can allow the store visitors to check the availability of the product in a particular region based on the zipcode.
The Magento Product Availability Check by Zipcode Extension allows the admin to show number of days with estimated delivery date if the product is available to the entered zipcode.
The Magento Product zipcode validator module offers the admin to disable the checkout option if the product is not available to the entered zipcode.
The admin can create various global zones.
The Magento product zipcode validator extension allows the admin to view all the list of created zones as well under the “Global Zone” configuration interface.
The module allows the admin to map the zones with product in order to specify their availability.
The global zone can be edited/deleted as well.
The admin can edit or delete the zipcodes from the created zones.
The admin can add/delete the any product(s) from the selected zone also.
The Product-Zone Mapping can be done manually or by uploading the CSV file as well.
The admin can restrict the availability in the particular area.
The admin can create the separate zones for the available and unavailable products.
2.0 Installation Steps of Magento Product Availability Check by Zipcode Extension:
Follow the simple steps in order to install the Magento Product Zipcode Validator Module:
1. Download the extension package from the Knowband store.
2. You’ll get a zipped file. Unzip the package on the root folder of your Magento setup via FTP manager (like Filezilla or WinSCP – download here: https://filezilla-project.org/). You’ll find the files and folders as shown in the image below:
3. The extension is now installed and ready for use. In Admin Panel, go to “System > Knowband Extensions > Product Availability Check by Zipcode”.
You can now configure and use the Magento Product Availability extension.
3.0 Admin Interface of the Magento product zipcode validator extension:
The product zipcode validator Magento Extension offers following interfaces to be configured:
Module Configuration
Global Zones
Product-Zone Mapping
3.1 Module Configuration of Magento Product Availability by Zipcode extension:
Enable Plugin: Enable the Magento Product Zipcode validator module by toggling this button. After enabling this, it will display a block on the product page to check the availability.
Display Delivery Date: Enable this toggle button to display the estimated delivery date of the product.
Disable Checkout: If this button is enabled, then, the customer can not place the order.
3.2 Global Zone Configuration of the Magento product zipcode validator extension:
This interface contains the list of all the zones created by the store admin. The admin can add any number of global zones to make the product available or not available to the desired zipcode(s).
3.2.1 How to add New Zone?
In order to create new zones click on the ‘Add New’ link at the top right section of the admin interface.
After clicking on the “Add New” button, you will see the following fields to configure:
Availability: Enable this button to make the product available for that particular zone.
Zone Name: Enter the name of the zone here.
Zipcode: Enter the zipcodes that are to be included in that particular zone. In case there are multiple zipcodes, enter the same separated by the comma.
Deliver By: Enter the number of days within which the products will be delivered to the customer. Only the positive integer value can be entered.
3.2.2 How to View/Edit/Delete the Global Zone(s)?
After clicking on the Global Zone configuration option, an interface will open containing all the list of created Global Zones. You can View/Edit/Delete the any of the Global Zones here.
In order to edit the zones, click on the “Edit” button. On clicking here, you will be redirected to the new web page. Here you can change the zone name and click on “Submit “ button to make changes visible.
Editing the zone
When the admin clicks on the “Delete” button under the “Global Zones” option, a popup will be shown quickly asking for the confirmation to delete the selected zone. Let’s take a look at the screen shot below:
Deleting the zone
3.2.2.1 How to edit/delete the Zipcodes?
When you click on the edit option under the “View Zone”, you will get to see the following interface, where you can change the product availability for the particular zipcode and days of delivery as well.
Editing the zipcode
When you click on the “Delete” button under “View Zone” option, then a popup will appear asking for your confirmation whether to delete the zipcode or not. Take a look at the screenshot below:
Deleting the zipcode
3.3 Product-Zone Mapping Configuration:
When you click on Product-Zone Mapping configuration, you will see the following interfaces to be configured.
In this interface, the admin can add new product-zone mapping. He can do the same manually or by uploading the CSV file.
3.3.1 How to View/Delete the Zone:
When the admin will click on “View” option, a new interface will be shown containing zone id, zone name, product id and product name along with the action of deletion of the product. Let’s take a look at the screen shot below:
View the zone
To delete the zone, the admin will just need to click on the “Delete” button. Once you click on the “Delete” button, a popup window will appear asking for the confirmation for the deletion. Take a look at the screen shot below:
Delete the zone
3.3.3.1 How to delete the product(s) from the zone:
Deletion of the product
If the admin wants to delete any particular product(s) from any zone, then he can do the same just by clicking on the “Delete” button under the Action category of the View Zone.
3.3.2 How to map the Product-Zone:
There are two ways of Product-Zone mapping. The admin can map the product-zone manually or he can do the same by uploading the CSV file as well.
3.3.2.1 How to Map the Product-Zone Manually:
Upload CSV File: This will be disabled if the admin is mapping the product-zone manually.
Search Product: Search and select the desired products from here.
Select Zone: Select the desired zone from here to which the admin wants to map the above-selected products.
3.3.2.2 How to Map Product Zone by Uploading the CSV File:
If you enable the “Upload CSV File” option, then you will see the option to upload the CSV file. By clicking on “Browse” option, you will be able to upload the CSV file. After doing this, click on “Submit” button to save the changes.
4.0 Front End of the Magento product zipcode validator extension:
Once you configure all the interfaces of this Magento product zipcode validator extension, you will see a block on the product page where the users can enter the zipcode and check the availability of the product.
When the product is available:
When the product is not available:
Find more details about this Magento extension below: