Export PHP data to .xls file

Data is any set of characters that is translated for some purpose, like for analysis. It can be any character or value, including text and numbers, pictures, sound, or video. If data is not put into context then it does not do anything to a human being or machine.

We generally export data from the websites to save it on the computer for offline used like to maintain list data and to analysis it. Excel is the best format to Export data in a file because reading large files is much easier in Excel for the user. Also, you can use additional functions like selecting individual cells to import the data, convert dates and time automatically, filters, sorting, reading formulas and their results etc.


Integrate Your PrestaShop Store with AI Chat Support

Boost engagement and conversions with instant AI replies, multilingual support, and real-time order updates.


PrestaShop AI ChatBot Module


SHOP NOW


In this blog we will learn how to export PHP data to .xls file step by step. With the help of simple PHP script you can export data to Excel and download it in a .xls file.

STEP 1: Create an Array to store the data

I have created an array ($customers_data) to store the customers details. You can create your own array as per your requirement:

$customers_data = array(
array(
'customers_id' => '1',
'customers_firstname' => 'Chris',
'customers_lastname' => 'Cavagin',
'customers_email' => 'chriscavagin@gmail.com',
'customers_telephone' => '9911223388'
),
array(
'customers_id' => '2',
'customers_firstname' => 'Richard',
'customers_lastname' => 'Simmons',
'customers_email' => 'rsimmons@media.com',
'customers_telephone' => '9911224455'
),
array(
'customers_id' => '3',
'customers_firstname' => 'Steve',
'customers_lastname' => 'Beaven',
'customers_email' => 'ateavebeaven@gmail.com',
'customers_telephone' => '8855223388'
),
array(
'customers_id' => '4',
'customers_firstname' => 'Howard',
'customers_lastname' => 'Rawson',
'customers_email' => 'howardraw@gmail.com',
'customers_telephone' => '9911334488'
),
array(
'customers_id' => '5',
'customers_firstname' => 'Rachel',
'customers_lastname' => 'Dyson',
'customers_email' => 'racheldyson@gmail.com',
'customers_telephone' => '9912345388'
)
);

STEP 2: Create a function to filter the data:

This function is used to detect double-quotes and escape any value that contains them. Without this an uneven number of quotes in a string can confuse Excel.

// Filter Customer Data
function filterCustomerData(&$str) {
$str = preg_replace("/\t/", "\\t", $str);
$str = preg_replace("/\r?\n/", "\\n", $str);
if(strstr($str, '"')) $str = '"' . str_replace('"', '""', $str) . '"';
}

STEP 3: Define file name and content header for download:

$file_name variable is used to hold the name of the file and also define content header for download.

// File Name & Content Header For Download
$file_name = "customers_data.xls";
header("Content-Disposition: attachment; filename=\"$file_name\"");
header("Content-Type: application/vnd.ms-excel");

STEP 4: Define Loop through each row in  $customers_data

//To define column name in first row.
$column_names = false;
// run loop through each row in $customers_data
foreach($customers_data as $row) {
if(!$column_names) {
echo implode("\t", array_keys($row)) . "\n";
$column_names = true;
}
// The array_walk() function runs each array element in a user-defined function.
array_walk($row, 'filterCustomerData');
echo implode("\t", array_values($row)) . "\n";
}
exit;

1. Define a variable $column_names which is used to print the column name in first row of excel.
2. Run a loop through each row and used array_walk()  function to run each row in a user defined function.

STEP 5: Run script file in your environment:

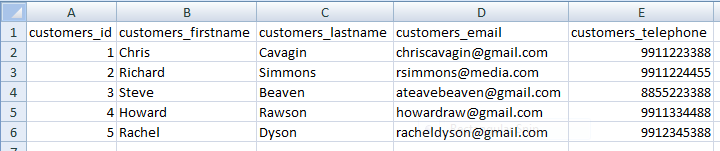
If all goes well then the filename will be named “customers_data.xls” downloaded and saved in your computer. You can open this file in Excel which look like as following:
Click here to download the complete code.

Troubleshooting Common PHP Issues in eCommerce Platforms

Learn how to troubleshoot common PHP issues in eCommerce platforms like PrestaShop, WooCommerce, OpenCart, and Magento with expert tips from Knowband.

LEARN MORE

With 13+ years of excellence in information technology, we provide web and app development technologies on various frameworks. You can also explore a wide range of Prestashop, Opencart, WooCommerce, Shopify, and Magento 2 ready-to-use eCommerce extensions.

In case you have queries/suggestions, you can reach out to our technical support portal at our email address support@knowband.com. Take a look at our bestseller module Prestashop One Page supercheckout  and  OpenCart eCommerce Mobile App.

You can also watch our latest videos here:


HubBox Error: _messageErrorTemplate is not a function

Problem Statement

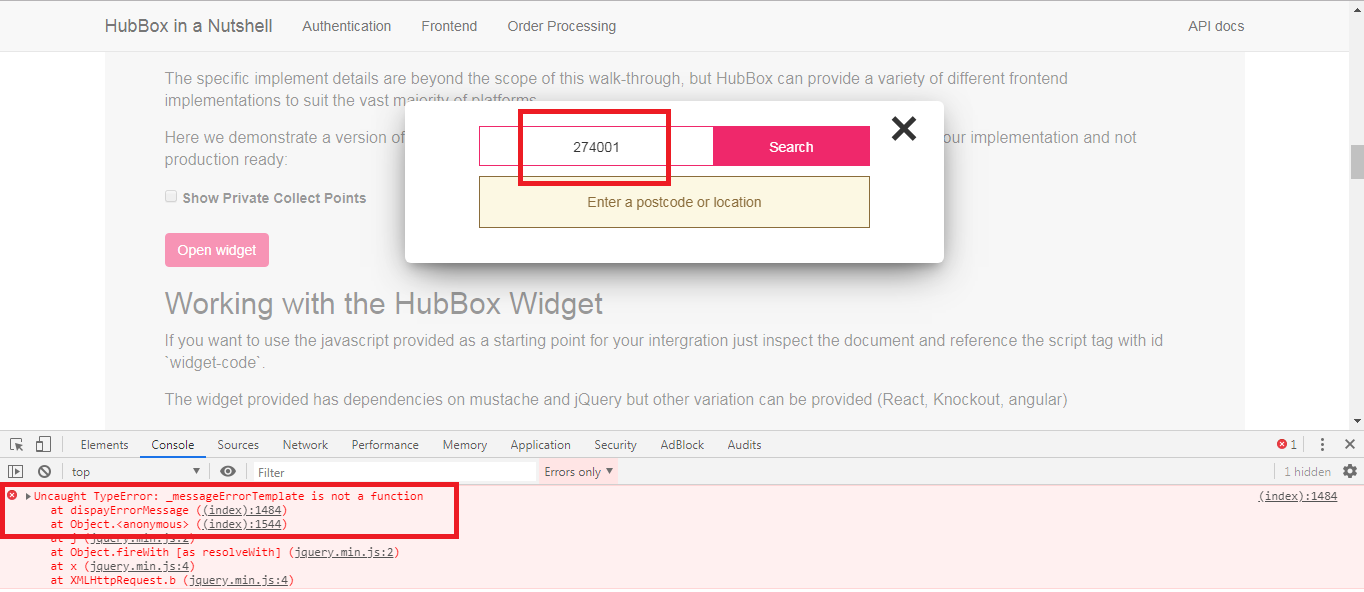
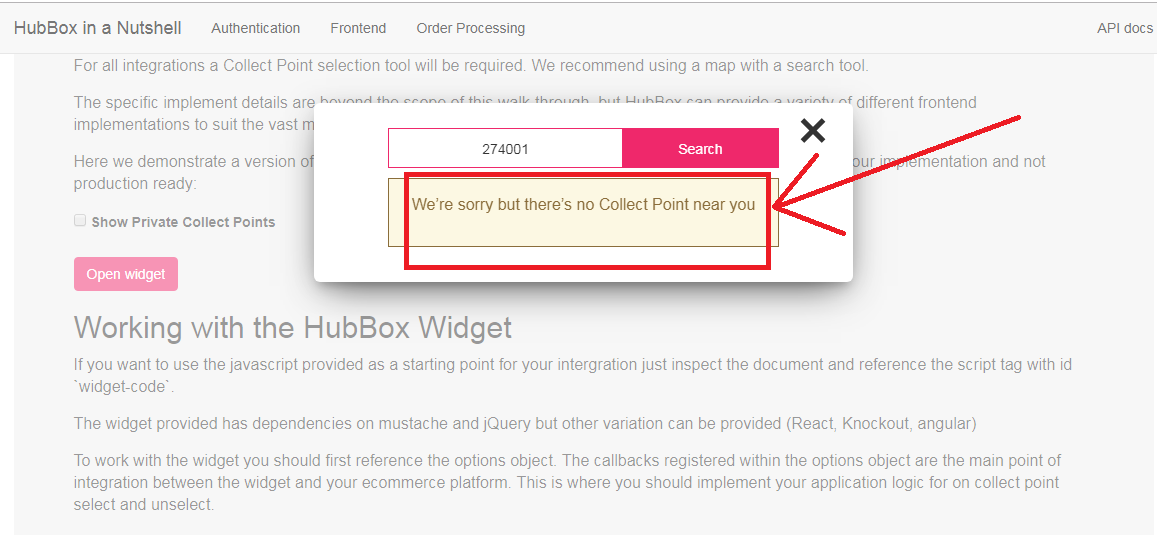
On searching the wrong address in the HubBox popup, there is no error message. When checked on the console, you are getting an error like “_messageErrorTemplate is not a function“.

Solution

The error: “_messageErrorTemplate is not a function” is coming because this function is not declared as function in the HubBox library.


To fix this issue you need to make some changes in the library of HubBox:

You need to make changes in the below two files:

1. \HubBox\Java\src\main\resources\static\index.html
2. \HubBox\Java\out\production\resources\static\index.html

In these files, search the below code:

var _messageErrorTemplate = Mustache.render(_messageError || "");
var _messageWarning = $(selectors.messages.warning).html();
var _messageWarningTemplate = Mustache.render(_messageWarning || "");

and replace this with the below code:

var _messageErrorTemplate = function() { return Mustache.render(_messageError || ""); };
var _messageWarning = $(selectors.messages.warning).html();
var _messageWarningTemplate = function() { return Mustache.render(_messageWarning || ""); };

By declaring ‘_messageErrorTemplate‘ and ‘_messageWarningTemplate‘ as function, now you will get an error message on searching wrong address in the HubBox popup.

HubBox Error: Failed to open stream /sample/../../vendor/autoload.php

Problem Statement

While using the library provided by HubBox, there is an error occurring-

require(C:\wamp64\www\HubBox\sample\src\public/../../vendor/autoload.php): failed to open stream: No such file or directory in C:\wamp64\www\HubBox\sample\src\public\index.php on line 14

Solution

This error occurred because of dependencies on files that are missed. You need to solve this issue by using below steps:

Step1: Delete the file sample/composer.lock from the library.

Step2: Make a folder with the name “vendor” under /sample/

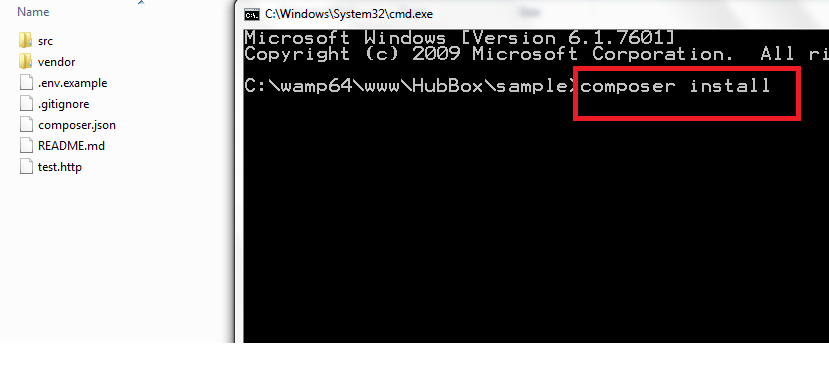
Step3: Run the command “composer install” in command prompt at /sample/


It will download all the dependency files which are required.

After successfully downloading all the dependencies, you will able to use the HubBox library.

How to add the get parameters in the pagination on CakePHP version 2.0

Problem Statement

There is no default functionality to persist the GET parameters while using “Paginator” helper in CakePHP. As per default functionality of CakePHP paginatior helper, the GET parameters will remove from the URL if you navigate to the next page. So in this blog we will learn how to add the GET parameters in the URL of page number in CakePhp version 2.0?

Solution

If you are facing this issue then you need to add a few lines of code in the beforeRender function. This function is defined in the paginator.php file (File Location: cake\libs\view\helpers\paginator.php). You need to add the following lines shown in the brown color:

public function beforeRender($viewFile) {
            $this->options['url'] = array_merge($this->request->params['pass'], $this->request->params['named']);
//Start of code
              if (!empty($this->request->query)) {
                       $get_param = $this->request->query;
                       unset($get_param['url']);
                       $this->options['url']['?'] = $get_param;
                }    
// End of code
                parent::beforeRender($viewFile);
}

SSL Certificate Installation on IIS

  • Get the zip file of the certificates.

1.  Upload *.crt file to Certificate File to convert

2. Choose Type of Current Certificate to “Standard PEM”

3. Choose Type to Convert to “PFX/PKCS#12”

4. Upload *.key file to Private Key File

5. Upload *.ca file to Chain Certificate File(Optional)

6. Set Password to PFX Password

  • Copy the *.pfx file to the Server
  • Open the Internet Information Services (IIS) Manager. From the Start screen, click or search for Internet Information Services (IIS) Manager and open it.
  • In the IIS Manager, select the server node on the top left under Connections.
  • Click on the server name.
  • From the center menu, double-click the Server Certificates button in the IIS section (it is in the middle of the menu).
  • From the Actions pane on the top right, select Import.
  • Browse to *.pfx in order to upload Certificate File(.pfx) and then enter the Password of the *.pfx file and then select “Web Hosting” as Certificate Store and Click OK to install the certificate.
  • After successful installation of SSL certificate to the server, you will need to assign that SSL certificate to the suitable website using IIS.
  • Choose the name of the server to which the certificate was installed from the Connections menu in the main IIS Manager window.
  • Under Sites select the site to be secured with SSL.
  • From the Actions menu (on the right), click on Bindings… This will open the Site Bindings window.
  • In the Site Bindings window, click Add… This will open the Add Site Binding window.
  • Under Type choose https. The IP address should be the IP address of the site or All Unassigned, and the port over which traffic will be secured by SSL is usually 443. The SSL Certificate field should specify the certificate that was installed. Click on OK then Close the Site Bindings window.
  • To Verify Installation: Test your SSL certificate by using a browser to connect to your server. Use the https protocol directive. For example, if your SSL was issued to secure.mysite.com, enter https://secure.mysite.com into your browser. Your browser’s padlock icon will be displayed in the locked position if your certificate is installed correctly and the server is properly configured for SSL.

Setup SSL on the site on Linux Server

Step by Step Guide to Setup SSL on the site on Linux Server:

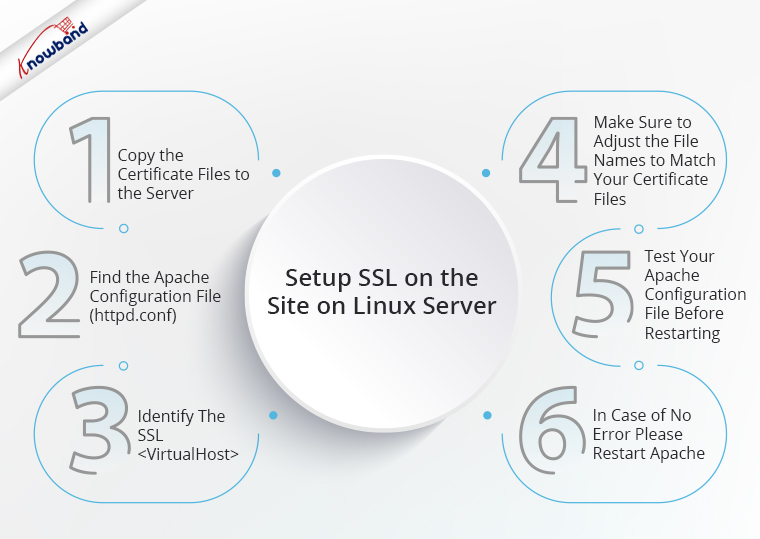
1. Copy the certificate files to the server

There should be 3 SSL files:

  • your_domain_name.crt
  • your_private.key
  • DigiCertCA.crt – This will be your chain file.

Note: Make them readable by root only to increase security.

2. Find the Apache configuration file (httpd.conf) you need to edit.

  • The name and location and name of the configuration file can vary from server to server—mainly if you’re using a special interface to manage your server configuration.
  • Apache’s main configuration file is typically named httpd.conf or apache2.conf. Possible locations for this file include /etc/httpd/ or /etc/apache2/.
  • Often, the SSL certificate configuration is located in a <VirtualHost> block in a different configuration file. The configuration files may be under a directory like /etc/httpd/, /etc/apache2/. In this directory, you need to find the conf file of the site for the site www.uksoccershop.com it will be uksoccershop.com.conf. You will find the <VirtualHost> tag in this file. In case the file uksoccershop.com.conf is not present you can use the common file httpd.conf or apache2.conf

3. Identify the SSL <VirtualHost> block you need to configure.

Below is a very simple example of a virtual host configured for SSL. The parts listed in blue are the parts you must add for SSL configuration.

<VirtualHost 192.168.0.1:443>

DocumentRoot /var/www/html2

ServerName www.yourdomain.com

SSLEngine on

SSLCertificateFile /path/to/your_domain_name.crt

SSLCertificateKeyFile /path/to/your_private.key

SSLCertificateChainFile /path/to/DigiCertCA.crt

</VirtualHost>

4. Adjust the file names to match your certificate files.

SSLCertificateFile is your DigiCert certificate file (e.g., your_domain_name.crt).

SSLCertificateKeyFile is the .key file generated when you created the CSR (e.g., your_private.key).

SSLCertificateChainFile is the DigiCert intermediate certificate file (e.g., DigiCertCA.crt)

Note: If the SSLCertificateChainFile directive does not work, try using the SSLCACertificateFile directive instead.

Recommended Blog: How to install MySQL on Windows and Linux Systems?

5. Test your Apache configuration file before restarting.

As a best practice, check your Apache configuration file for any errors before restarting Apache.

Caution: Apache won’t start again if your configuration files have syntax errors.

Run the following command to test your configuration file (on some systems, it’s apache2ctl):

apachectl configtest

6. In case of no error please restart apache using the below command

service apache2 restart

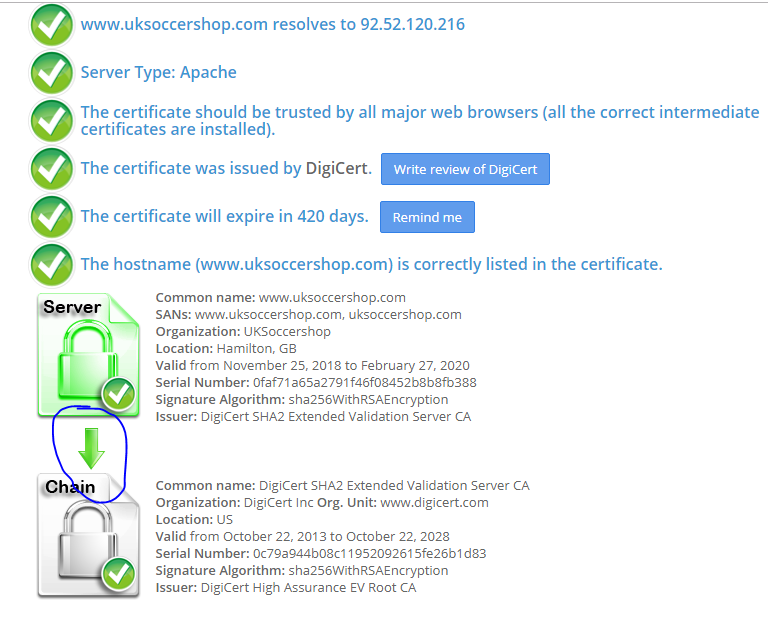
After restarting apache2, you can check whether your SSL is set up correctly or not using https://www.sslshopper.com/ssl-checker.html. In the above screenshot, you have to verify that the arrow should be green like above between server and chain. If there is no issue then your SSL is set up correctly.

Recommended Blog: SSL Certificate Installation on IIS

Final Words:

In case of an issue while implementing the code, feel free to reach out to us at support@Knowband.com. Also, Knowband offers eCommerce store plugins at the best price. We offer the smartest solution for online platforms including PrestaShop, OpenCart, Magento 2 and WooCommerce.

This May Also Interest You:

How to upgrade the Magento version on LINUX

20 Best Rental Business Ideas You Can Start With

The rental business has gained huge popularity. The growth in the rental sector in the past few years has opened a vast opportunity for small businesses to start offering rental services. Today, people prefer to book any service or product on rent rather than purchase it, the reason being renting is affordable.

The following factor opens up new doors of the rental business opportunities for the new-comers.

Thus, if you are also looking to start your rental business, here are the 20 rental business ideas to start and scale up your business in the rental niche.

1. Car Rental Business

The demand for car rental is very high. Travel freaks often rent cars for trips or vacations. This is mostly seen among college groups who like exploring places and doing adventures. So, providing a car rental facility can be a profitable and ideal way to kick-start your rental business.

You can also hand over your car to a travel agency and earn a decent income. Another idea would be to register your car on on-demand taxi booking apps like Ola and Uber.

2. House Rental

If you have multiple properties under your name, you can start a property rental business and offer some of your properties on rent and gain a decent income. You can turn your houses into PGs and welcome college students.

3. Travelling Kit Rental

People usually require a traveling kit in which they keep essential traveling items like a hiking bag, hiking waterproof rain jacket, trekking head torch, camera kit, etc. You can provide such items on a rental basis and fulfill the requirements of the travelers.

4. Room Rental Business

 Just like Airbnb and OYO, you can provide rooms to people for a limited time. People often look to book rooms for a short period when they are outside the city for work purposes. Reach out to your nearby hotels and start a partnership with them.  This is not only an ancient rental business segment but also an evergreen kind of business.

5. Campsite Rental

Adventure freaks are always in search of camping sites, so investing in the land (great if you already have) and converting it into a campground for rent can be a good rental business idea.

Furthermore, if you have properties near well-signed locations, you are already a plus. Start your rental business today with minimum investments.

6. Camp Equipment Rental

For camping enthusiasts, equipment like camping tents, airbeds, backpacks, hiking poles, camping cookware, etc can be provided on rent.

7. Fishing Rental

Fishing requires a lot of equipment. Equipment like fishing rods, fishing lines, and terminal tackle can always be provided for rent.

8. Boat Rental

Another rental business idea would be to start a boat rental business. You could start a boat rental service on the areas that are surrounded by rivers and lakes.

9. Land Rental

Today, renting out land is one of the most popular sources of income. You can lease out the land or a part of it for various purposes like agriculture, wedding, etc.

10. Furniture Rental

You can start a rental business that offers furniture for rent. Most corporate offices look to purchase furniture on rent, hence this can be an ideal solution.

11. Office Space Rental

If you have a large space, such that it can be used to set up an office, providing it on rent can make you earn a handsome amount of bucks.

12. Conference Room Rental

If there is some extra space available in your building, you can provide that space to businesses to use it as a conference room.

13. Office Equipment Rental

A corporate office requires a lot of set-ups and a set-up requires equipment like tables, chairs, printers, etc. You could rent out such office equipment.

14. Camera Rental

There is always a high demand for cameras in tourist places. If you have a wide collection of cameras, you can offer them on rent and earn a decent income. This business requires minimum assets and knowledge if you already have well-maintained and high-quality cameras.

15. Tent Rental

Tent house rent providers hardly sit idle for any day throughout the year. The bookings for events like weddings, and birthdays, are made in advance. So offering a tent rental service can make you earn a handsome income without even putting in much effort.

16. Costume and Clothing Rental

Costumes on occasions like Halloween and Christmas are worn once a year. In such cases, you can provide the costumes on rent for specific occasions.

17. Cleaning Supply Rental

People prefer to get cleaning equipment like steamers, carpet cleaners, and scrubbers on rent as these types of equipment are only required once in a while.

18. Construction Equipment Rental

Adding to our list of rental business ideas would be to offer construction equipment on rent. Since construction equipment is expensive, you could provide them on rent to the professionals and make it affordable for businesses that do not require them too often.

Construction equipment can include a scissor lift, excavator, concrete mixer, etc.

19. Wedding Dress Rental

The wedding dress rental business is seen quite often nowadays. Wedding dresses are one-time wear or max you can wear it on your first anniversary. Otherwise, those expensive outfits remain in the closet forever, just as a memory.

Start a rental business that focuses on providing wedding dresses for rent. This creates a win-win situation for both the customer and the business. Customers would not have to pay the actual amount of the dress and businesses can cover more money through rent than its original price.

20. Bicycle Rental

To support an eco-friendly environment, starting a bicycle rental business could turn out to be an amazing idea. The government in metro cities has also initiated to put bicycles at metro stations so that people avoid traveling by Car or Bike.

Not only for metro stations, but you can also start renting bicycles on areas where the crowd is heavily attracted so that more and more people make use of it.

If you are specific about Hotel/room rentals or Vehicle Rental and want to start a rental business online, you should check out our Booking and Rental system module.

Booking and Rental System Module by Knowband

The Online Booking and Rental system module helps you set up your rental business conveniently on your website.  If you have an existing website on Prestashop, Opencart, or Magento 2 you can explore Knowband’s Booking and Rental Extension.  

With the help of Booking and Rental Addon for Prestasop, you can add your rental products without any hassle and customize your booking price as per your desire. Some of the key features of the online booking system module offered by us are-

1. The Booking and Rental module lets you add multiple booking and rental services, like an appointment, hotel booking, car rental, etc. You can add your desired service and make the desired changes.

2. Option to show available date & time slots, available quantity, and the up-front booking price.

3. Flexibility to set multiple price rules for different days and timing.

PrestaShop Booking and Rental Mobile App

Explore Knowband’s Prestashop Booking and Rental Mobile App for seamless management of bookings and rentals directly from your mobile device.

SHOP NOW

This module is available for PrestaShop and OpenCart platform-

PrestaShop Booking and Rental System

OpenCart Booking and Rental System

You can also check out PrestaShop Booking and Rental Mobile App which is a combination of PrestaShop Booking and Rental System and PrestaShop Mobile App Builder.

For any assistance, you can reach out to us at support@knowband.com

How to delete products from the ePrice marketplace

Objective of the blog

This blog will help you out to know the way to delete products from the ePrice marketplace.

Methods to delete Products from the ePrice marketplace

There are two methods to delete products from the ePrice marketplace:

  1. Manually Deletion from seller central
  2. By uploading the Offer Feed

1.0 Manually Deletion from seller central  

1. Open eprice seller central login page (https://marketplace.eprice.it/login)

2. Fill seller’s credentials (username and password) and click on the “Log in” button.

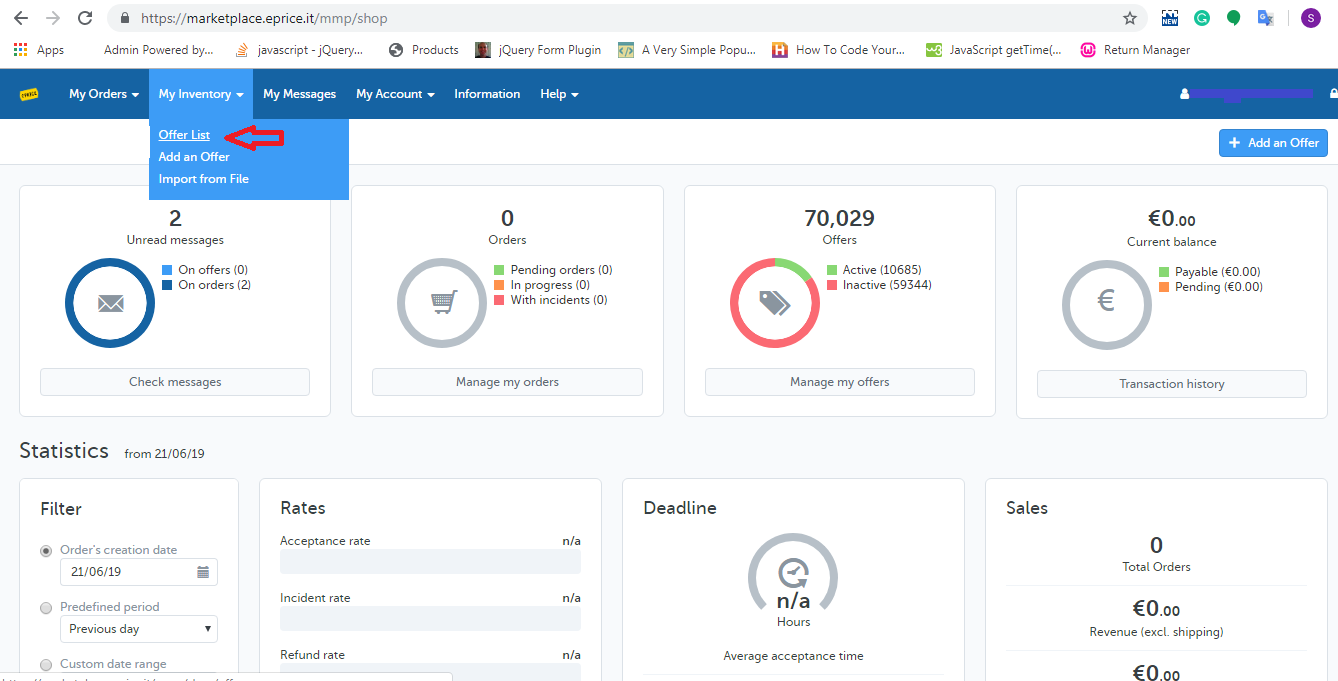
3. Choose the “Offer List” option from the “My Inventory” tab of the Home Page as shown below:

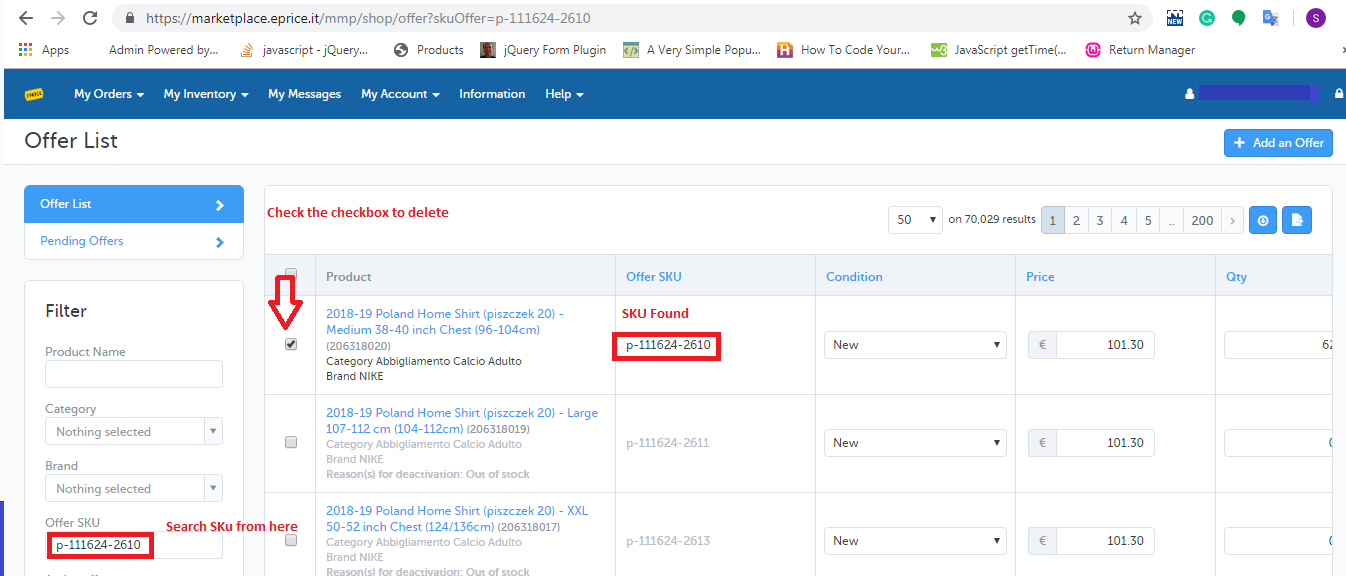
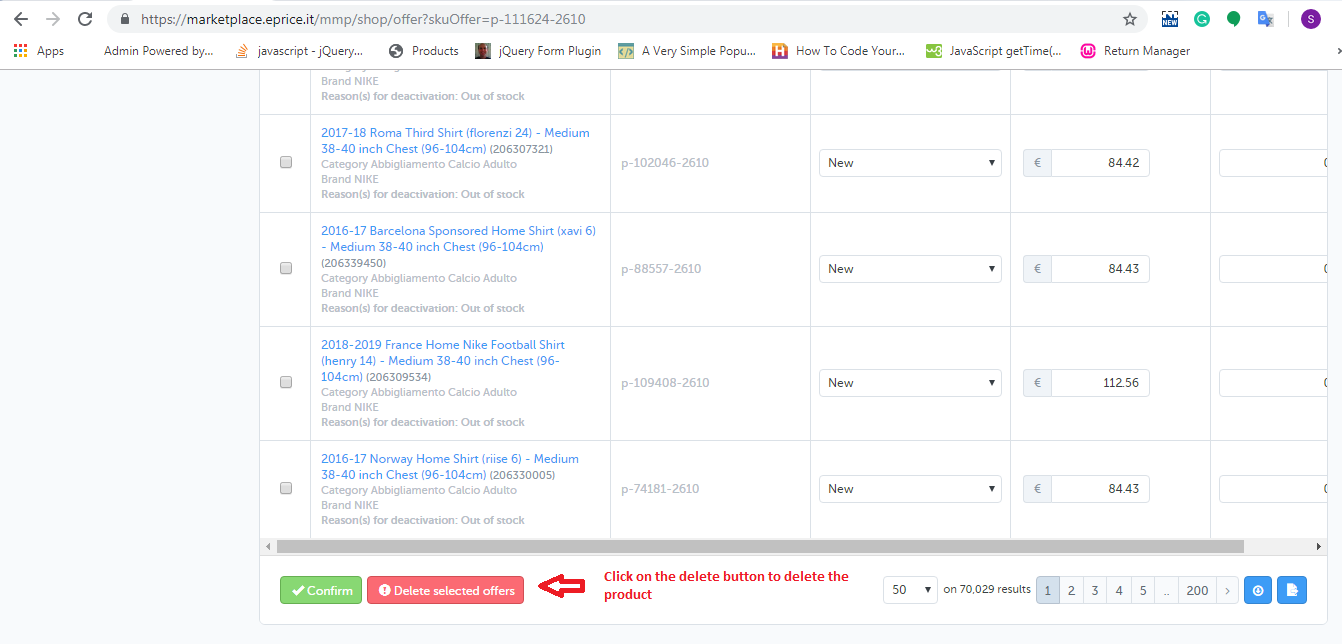
4. Search SKU from “Offer SKU” field and tick the checkbox parallel to those SKUs which you have to delete from ePrice marketplace as shown below:

5. After selecting the products you need to click on the “Delete selected button” as shown below:

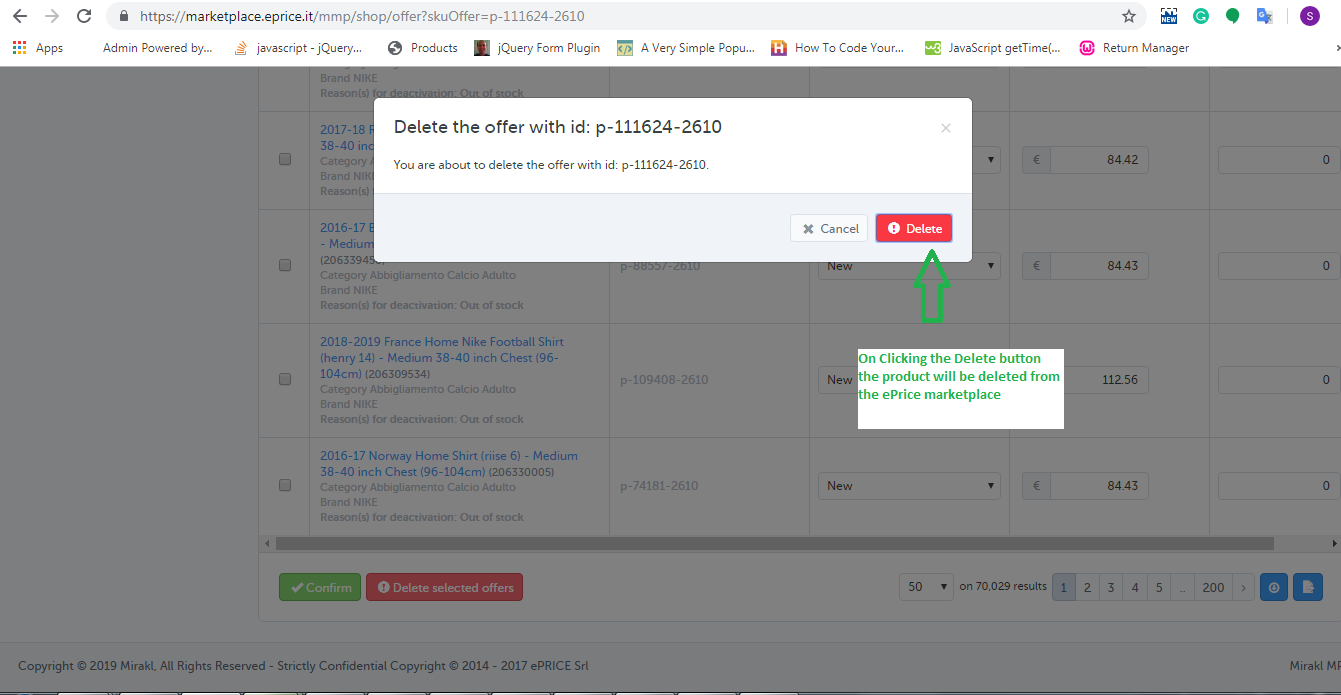
6. On clicking the “Delete Selected offers” option, you will see a popup appears on the screen in which you will find the selected SKUs and the “Delete” button to delete these products as shown below:
 

2.0 By uploading Offer Feed

By using the offer feed you can easily delete a bulk of products from the ePrice marketplace. The link to download the sample offer feed is given below:

eprice_offer_feed

In the offer feed, you have to enter the data in the two fields:

sku:  Fill SKUs which you would like to be deleted.

update-delete: Fill “DELETE” in this field.

After creating it, upload that feed on the ePrice merchant account. Follow the given steps for uploading the feed:

1. Open eprice seller central login page (https://marketplace.eprice.it/login)

2. Fill seller’s credentials (username and password) and click on the “Log in” button.

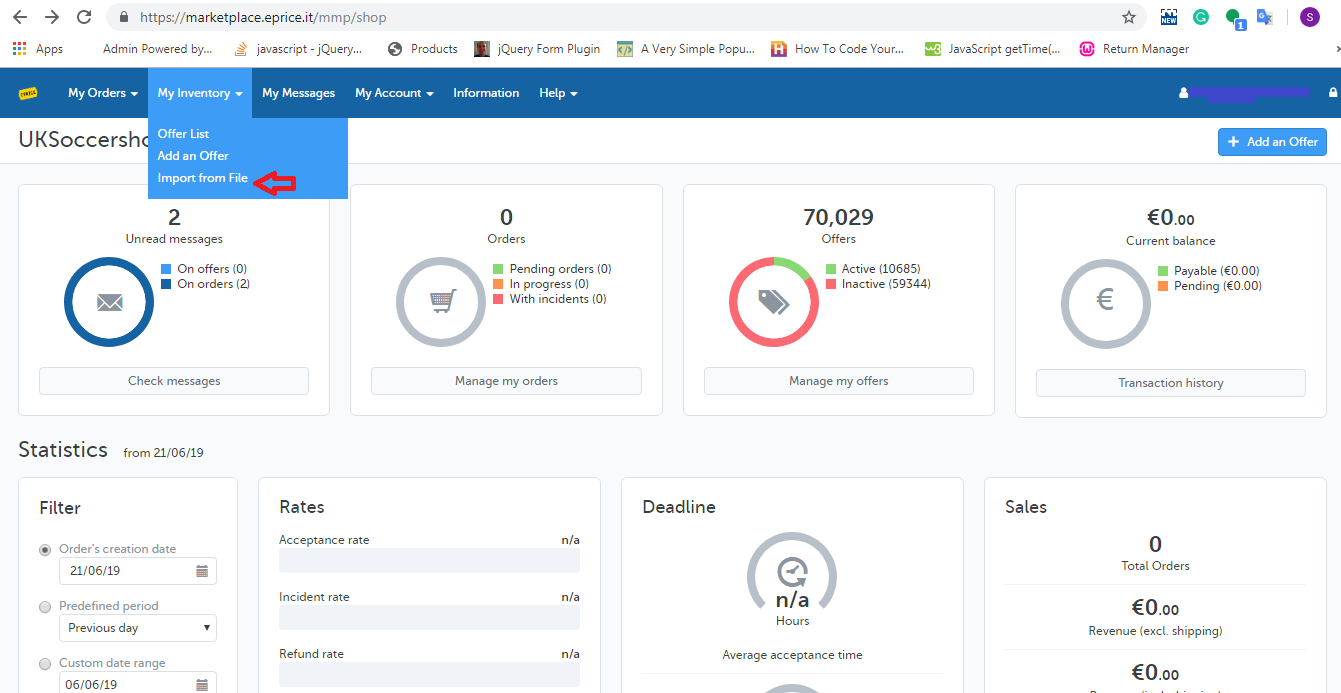
3. Open My Inventory tab and choose the “Import From File” option as shown below:

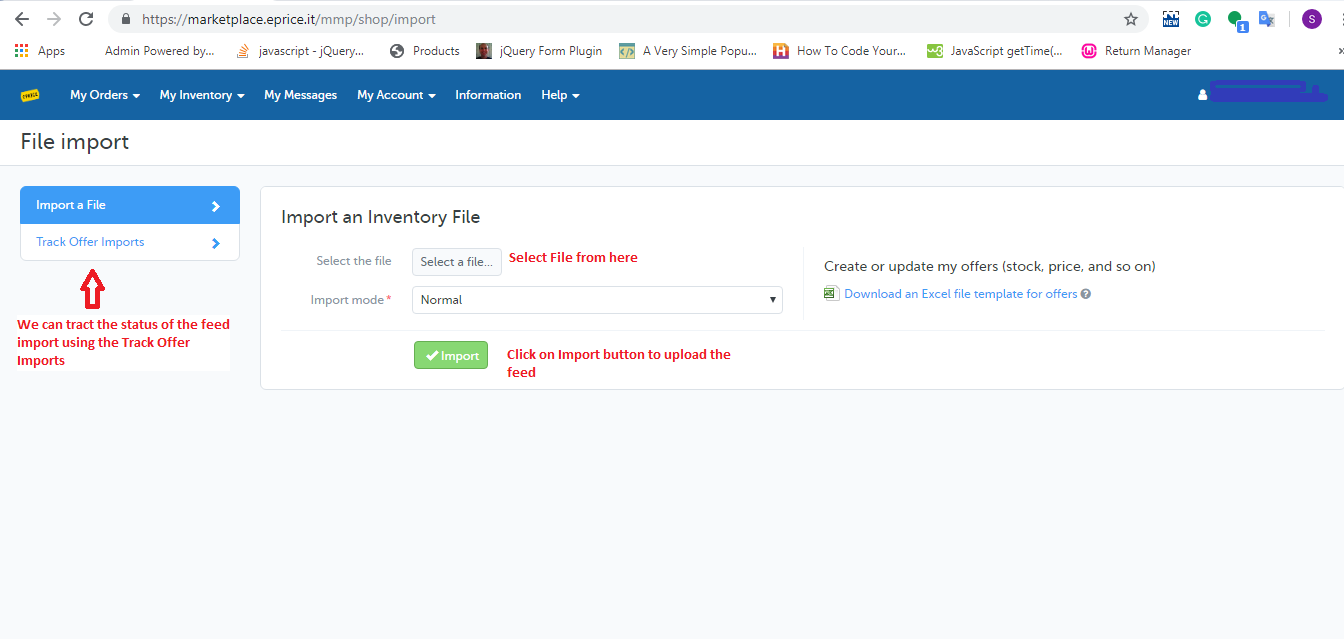
4. Upload the Offer Feed (which you have created) from the import page of eprice as shown below:

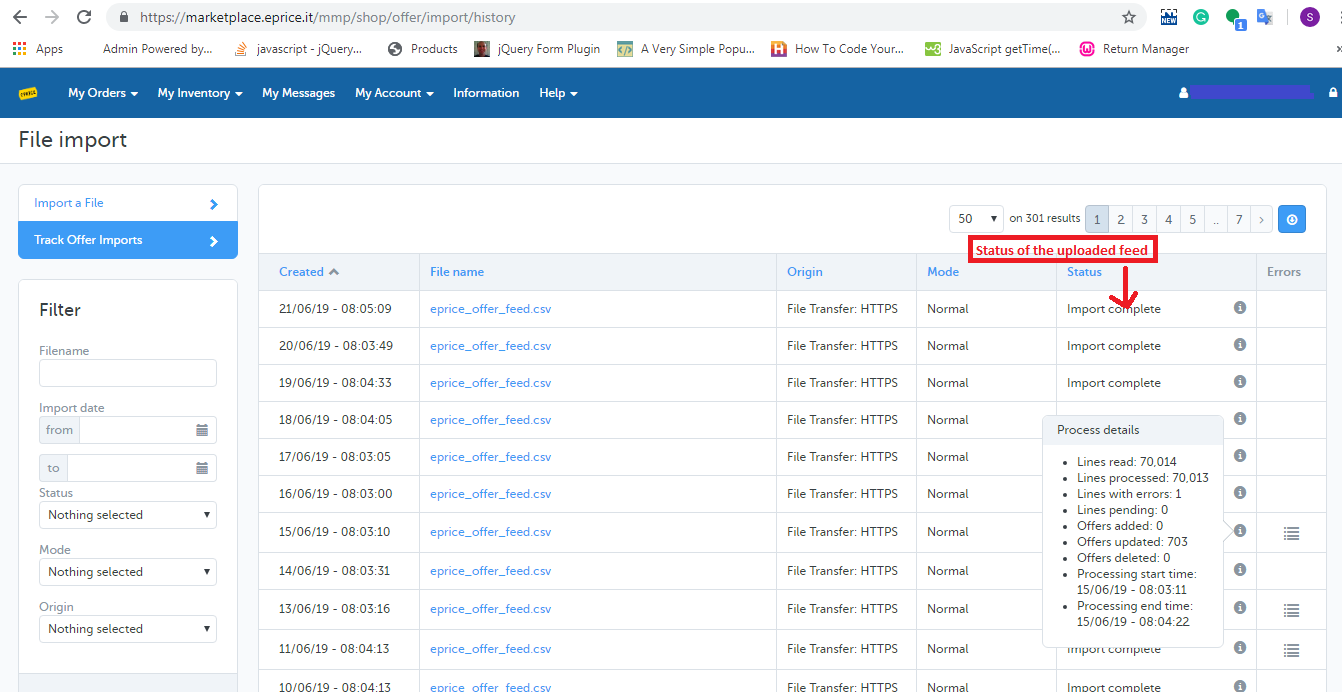
5. You can also check the status of the feed that you have uploaded by clicking “Track Offer Import”. On clicking the “Track Offer Import” option, the history page will be opened which shows a list of the uploaded feed with their processing status. You can check the same from the below image.

Copy to clipboard in JavaScript

Objectives of the blog

After the reading of this blog, you will be able to know how data can be copy to clipboard with help of java script.

Benefit of copy to clipboard functionality

In the current web world, it’s all about the user experienced from your site. During our work on any site we copy content from one place and paste at another place. It will be really helpful to the user if a site give a functionality of click to copy. It saves the time and effort of the user to select and copy the content.

Implementation of copy to clipboard functionality

Let’s see how we can add this functionality:

Step 1:

Create a HTML with a paragraph having some content and button to click. You can use any relevant element instead of paragraph for example textbox, textarea, hidden fields etc.

<body>
    <p id="txt_knoband">KnowBand boasts of the best in the industry plugins for eCommerce systems and has years of experience working with eCommerce websites.</p>
    <button onclick="onClickCopy()">Copy Text</button>
</body>

Step 2:

You will need to create a function onClickCopy() which will copy the data of the paragraph. Function will simply run “document.execCommand(“copy”)” to copy the data to the clipboard.

function copyOnClick() {
    var tempInput = document.createElement("input");
    tempInput.value = document.getElementById("txt_knoband").innerHTML;
    document.body.appendChild(tempInput);
    tempInput.select();
    document.execCommand("copy");
    document.body.removeChild(tempInput);
    alert("value copied");
}

In the last line of the script, we have simply added an alert action to inform the user that the data has been copied.

So finally when you click on the button “Copy Text”, data will be copied to the clipboard and you can simply paste by using CRTL + V.

Related Article: How to set Cookie using JavaScript

How to set Cookie using JavaScript

Objective: To learn about how to create and read the cookie using JavaScript.

Cookie is small piece of data which is saved on user device by website. It is helpful in storing any data to identify the user or to track the user. When user again visits the website, stored data can be read easily.

Step 1: To set the cookie on user device

By the function createCookie(), you can easily create the cookie by passing the name, value (data which you want to store) and expiry date.

function createCookie(name, value, days) {
if (days) {
var date = new Date();
date.setTime(date.getTime() + (days * 24 * 60 * 60 * 1000));
var expires = ';expires=' + date.toGMTString();
} else {
var expires = '';
}
//setting cookie
document.cookie = name + '=' + value + expires + '; path=/';
}

Step2: To read the cookie

You can easily read the cookie using the below function by providing cookie name.

function readCookie(name) {
var nameEQ = name + '=';
//reading the cookie
var ca = document.cookie.split(';');
//processing to get the content
for (var i = 0; i < ca.length; i++) {
var c = ca[i];
while (c.charAt(0) == ' ') {
c = c.substring(1, c.length);
}
if (c.indexOf(nameEQ) == 0) {
//returning actual content
return c.substring(nameEQ.length, c.length);
}
}
return null;
}

Example: Example to store the user name in the cookie.

if (cookies == 'yes') {
jQuery('document').ready(function () {
//reding cookie
var cook = readCookie('YourWebsite');
if (cook != 'true') {
//calling to create the cookie if not found
createCookie('YourWebsite', 'user_name=akash', 30);
}
});
}

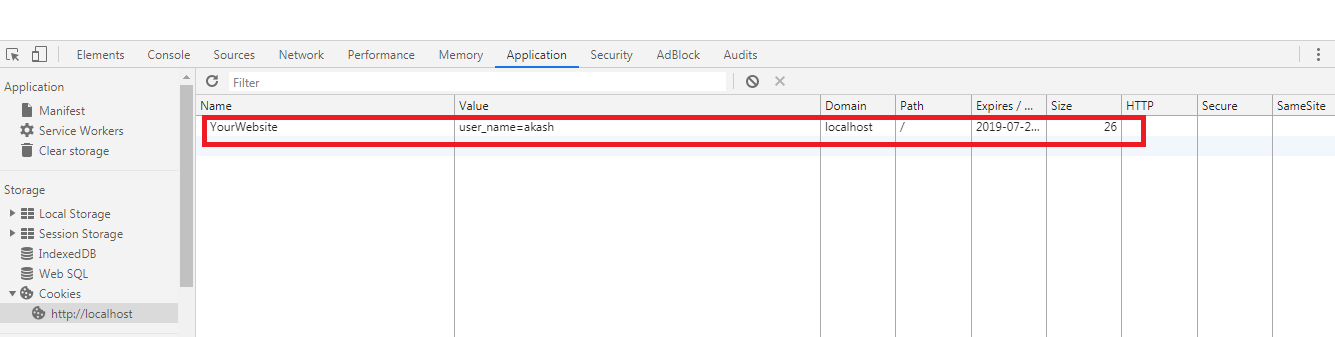
You can see the stored cookie in the console of the browser:

Dependency: You will need to include the jquery min js file to run the example. For this, you can use below line of code.

Related Blogs: Copy to clipboard in JavaScript