Etsy is a unique marketplace that mainly deals in the online trading of handmade crafts and vintage items which includes jewelry, toys, sports items, etc. It is a platform where sellers can make money out of their art and creativity and can earn a huge chunk of profits. Selling on Etsy Marketplace is still a dream for many sellers so to know the process of selling on Etsy, you can have a look at how to sell on Etsy Marketplace.
mCommerce popularity of Etsy:
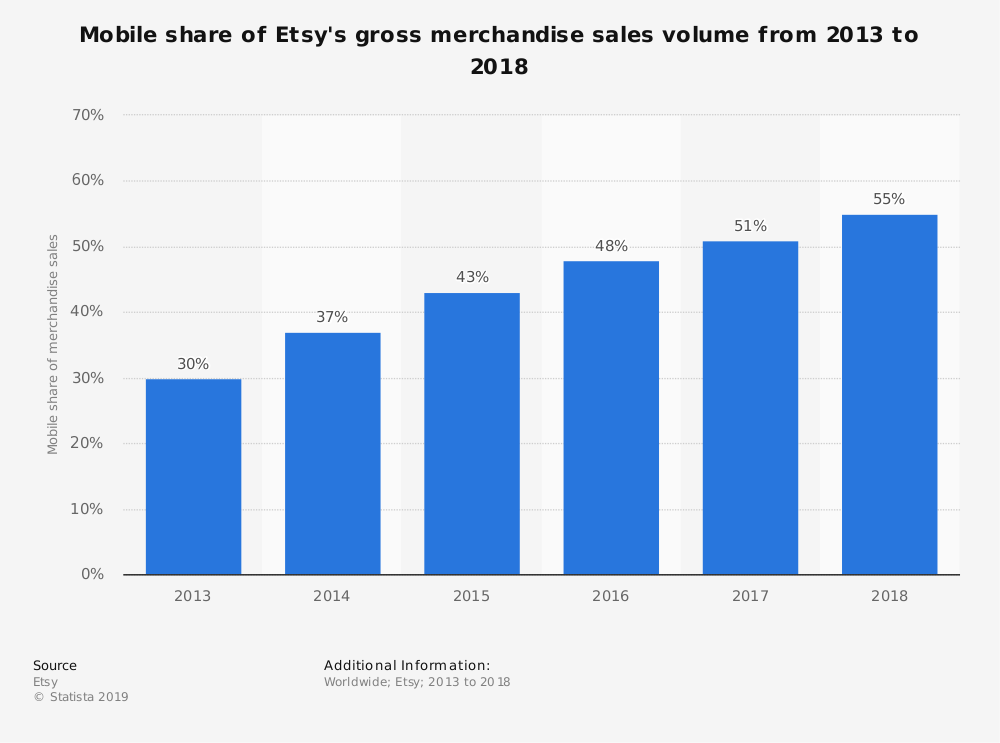
The usage of mobile apps is continuously increasing day by day. Etsy has a great mobile app that works efficiently and is been used by many customers worldwide. In 2018, 55% of the company’s gross merchandise sales were generated through mobile devices. Therefore, it’s the mobile app is offering good sales and profits.
However, the increased usage of mobile apps does not assure you of massive sales and profits. For that, it’s important to rank your products high on the Etsy search results. Sellers need to be patient and should implement the best practices to achieve their goals. However, if you’re concerned more about the product ranking on search results, you can have a look on “How to increase the sales of the Etsy Shop, It contains strategies to skyrocket your product ranking on Etsy and acquire more customer attention which will compel them to go for instant purchase.
Benefits of selling on Etsy Marketplace:
Earlier, there was no way for small vendors to sell their hand made products among huge no. of audience. These craftsmen used to sell their products in fairs, open markets, or under consignment. However, the introduction of Etsy Marketplace helped these small merchants to sell their products online as it is a quick, moderate, and easy way to access millions of customers worldwide resulting in good profits. It enabled sellers to set up their brand shop with all the facilities provided without any advanced investments. Being an eCommerce store owner for any CMS platforms like PrestaShop, Magento, Shopify, and OpenCart, they can sell on Etsy and leverage the following benefits.
Benefits are listed as follows:
1. Personalize your store:
The chance to personalize your storefront is given by fewer Marketplaces only like Etsy. Etsy gives sellers a golden opportunity which enables merchants to list their products accordingly, put the brand logo, and create personalized taglines and product-related policies. This will help sellers to enhance their brand image and become popular among customers which in result will provide immense sales.
2. Attract to a huge audience:
As we already got to know above that Etsy has 39.5 million active buyers. Undoubtedly, sellers have high chances to make good sales and profits as customers testimonials are showing their love towards Etsy. Also, it automatically provides sellers the accessibility to millions of customers all over the world. This enables them to increase their cross border sales too.
3. Customer Engagement:
It is another flexibility offered by Etsy to its third-party sellers. Etsy allows their sellers to:
Leave their social media handles,
Offer discounts and coupons on their products,
Collect emails to send reminder notifications.
These strategies help in engaging the targeted audience and also put sellers in charge of their product listings. On the other hand, it increases customer engagement on Etsy Marketplace which can compel customers to go for instant purchase.
4. Low cost of Startup:
As Etsy Marketplace has all things set up in one place, the retailer has to hardly make any investments other than some few expenses. Thus, the minimal cost is involved in selling on a Marketplace as a comparison to selling on your eCommerce website. Etsy will only charge:
Monthly Subscription Fee for selling on their platform and, listing fee or commission which is a standard amount for every product they listed on the Marketplace’s catalog.
5. Increased Brand visibility of your store:
If you are a newcomer in the eCommerce industry and trying your best to mark your presence on customers, Etsy Marketplace will help you to enhance your brand visibility and gain customer’s trust which will directly compel customers to go for instant purchase and this will result in increased sales and revenues.
6. Marketplace’s Powerful and supportive community:
Etsy makes you feel like family which indirectly brings you immense sales. Etsy has its forums and teams which always remain connected to the sellers and help in every possible way. This helps in building up the confidence of sellers which in total makes the whole Etsy Marketplace strong.
Finally,
Selling on Etsy is the least complex way to ensure good sales and revenues. Selling on Etsy Marketplace is not an easy goal to achieve so luckily if sellers get a chance to sell on Etsy, then the above-mentioned benefits will help them to ensure good profits. Regardless of the marketplace, you choose to sell on, it’s important to be aware of the latest trend going on in the eCommerce industry and implement it for a profitable business in the future.
Selling on Etsy Marketplace was not that easy before. KnowBand offers Etsy Integrators for various CMS platforms like PrestaShop, Magento, Shopify, and OpenCart, which allows sellers to integrate their eCommerce store with Etsy Marketplace via API integrator. With its seamless technology, sellers can easily present their products among the larger audiences and encourage brand awareness as well.
Whenever we think of buying handcrafted products online, the first word that comes in our mind is Etsy. Etsy Marketplace is a professional seller community that mainly focuses on handmade products or vintage items and craft-oriented products like jewelry, clothing, health and beauty and many more. It can also be considered as the C2C platform because the merchants listed on Etsy are majorly small business owners. The amazing shopping experience on Etsy makes it one of the most popular Marketplaces all over the world.
This seller’s guide is a doorway for all the aspiring sellers who are looking forward to selling on Etsy Marketplace.
Top-selling items on Etsy
Etsy is a unique e-commerce website mainly focused on handmade or vintage items and supplies, as well as unique factory-manufactured items. To sell an item on Etsy, it’s important yo keep a check on the ranking of your products too in the search results.
Before we start we should have a look at the top-selling items on Etsy Marketplace:
Jewelry.
Clothing
Craft Supplies and Tools.
Kids and Baby.
Vintage Items
Homemade or Specialized Candies.
Party decorations.
Vinyl and heat transfer supplies.
While the best sellers on Etsy Marketplace includes a wide range of categories, like jewelry, bags, clothing, home decor and furniture, toys, art, as well as craft supplies and tools.
Cost to Sell On Etsy
There are 4 various types of fees applied when you list your products for sale on Etsy Marketplace. These are as follows:
a) Listing Fee:
Listing your products online on Etsy Marketplace costs sellers an amount of 0.20 $ (excluding variations) for 4 months. For example, if you sell vintage items of which belong to 4 different categories or variations, it will cost you 0.80 dollars(4 x $0.20).
After 4 months, sellers have to renew the listings either manually or they can set an auto-renew option, and again the cost applied would be 20 cents per listing
The additional quantity is also charged by $0.20 that sells for only one transaction. It means if there are more than 1 listing in 1 order then, $0.20 will be charged on each item. For more information, you can go through the following link: Multi-Quantity Fees
b) Shipping Process Fee:
The shipping charges are set as it is used to deliver the product on a given address. Shipping charges are variable depending upon the weight of the product, location distance and shipment carrier company.
c) Transaction fee:
Under this, 2 types of fees are included. First is the shipping transaction fee and constitutes 5% of the shipping process fees.
Then the second fee comes is the transaction fee which constitutes 5% of the total value of the product. An additional 3% fee is imposed for choosing Etsy’s “Immediate Checkout”.
Apart from being reasonable, Etsy Marketplace provides you the flexibility to sell products from your online store. Thus, if you have a Magento store, you can easily sell Magento products on Etsy.
d) VAT:
Firstly we should know that there are 2 types of VAT fees: Processing fee VAT and seller services VAT.
After charging all kinds of fees, VAT is imposed if sellers use them They will only be imposed if you use fees like Etsy payment processing fee, deposit currency conversion, promoted listings, Google Shopping ads, and Targeted offers.
Now all the Manufacture related information is been given. So, let’s move further to discuss the process of selling on Etsy Marketplace:
Step 1: Get Started
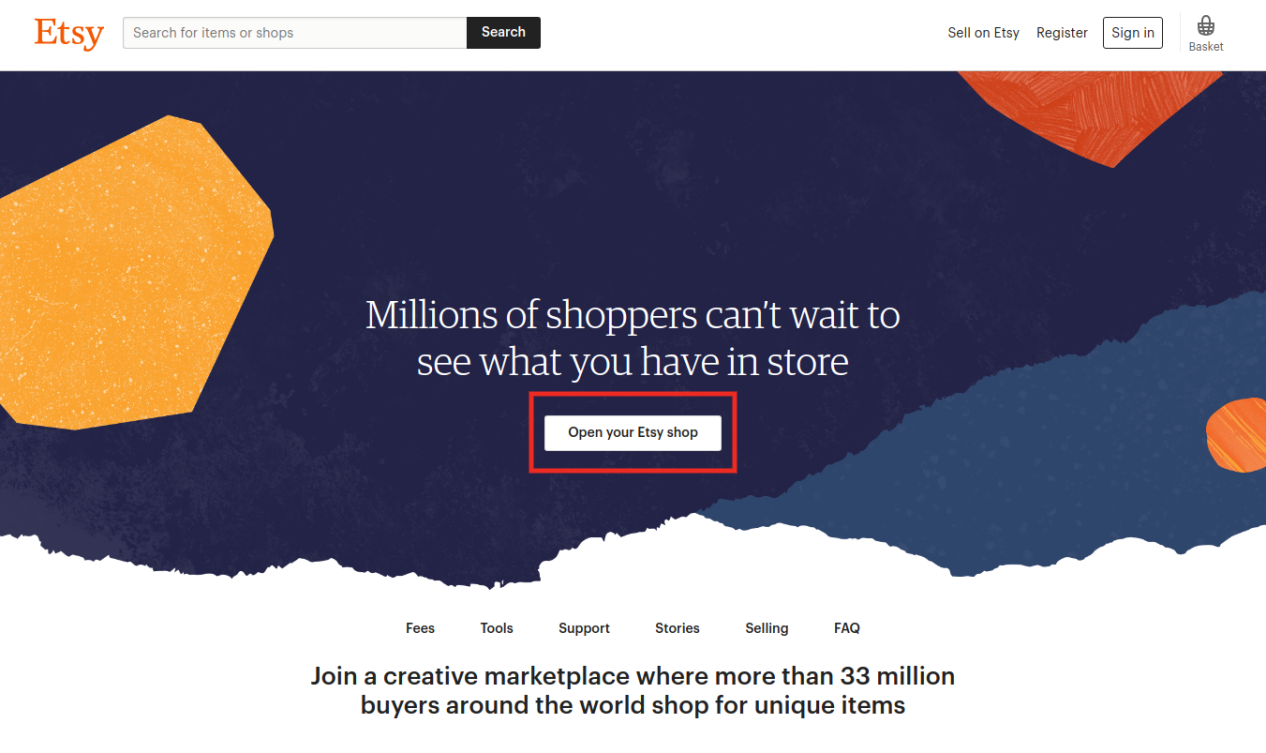
Firstly, create your seller account on Etsy and go through the Etsy policies and ensure whether Etsy Marketplace is ideal for your business or not.
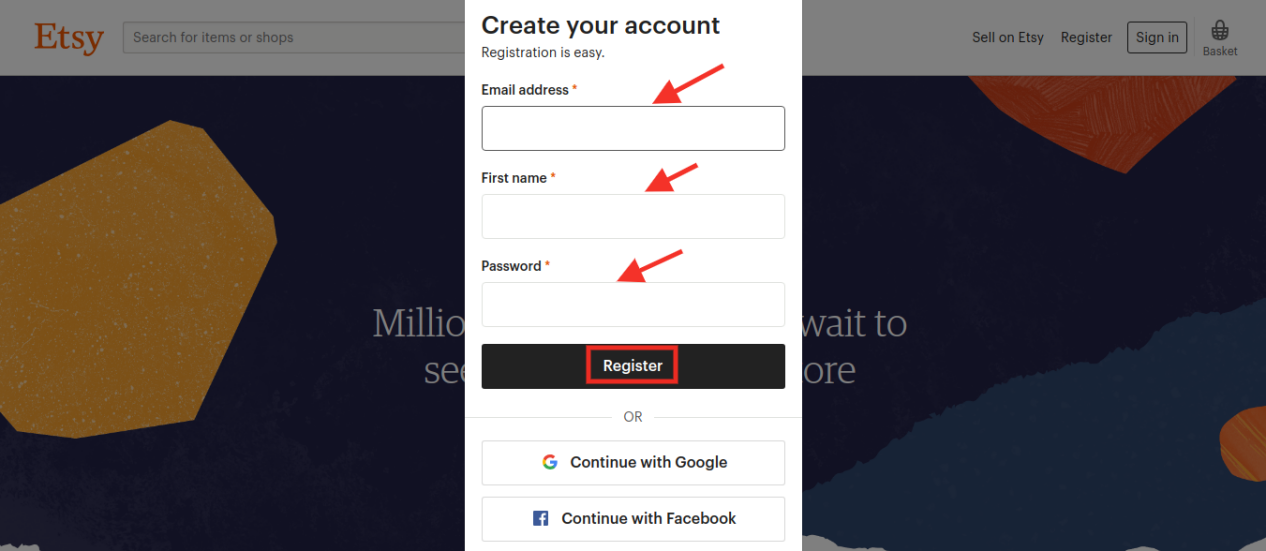
After creating your Etsy account, register your profile by entering the email address, username and password or you can directly signup through your social media account.
Step 2: After Creating Profile Create Your Own Shop
Click on the “Sell on Etsy” option, After clicking on this option, you will be redirected towards your shop page and now you have to enter some information as follows:
a) Shop Preferences
b) Name your Shop
c) Stock your shop
d) How you’ll get paid
e) Set up billing
Step 3: Section utilization of Etsy shop
This section is been included with various steps in which sellers have to upload a shop logo and cover photograph, etc. Sellers have to also update the shop’s “About” section. Leverage the facility of your shop segments to make your customers discover your shop products and go for the instant purchase.
Step 4: Branding and advertisement for the advancement of the Etsy shop
Creating an Etsy shop is not a complete process, it’s really important to make your brand shop popular on Etsy. Sellers should ascertain their shop details optimization for Etsy Search. Sellers can take a step forward and include a shop location so that your shop could be located by nearby customers. Sellers should focus on promoting their shop either through free or paid ads. They can offer great offers and discounts to their customers so that customers can go for instant purchase.
Step 5: Managing the shop by maintaining good SEO
Sellers should ensure to meet all the requirements after you cover all the above procedures for Etsy’s Dealer Insurance Approach. Sellers should be in contact with Etsy’s Survey framework and should have an idea to make their first deal.
For a good online business on Etsy, maintaining good SEO is very important which can help to increase customer engagement and optimization of the website.
Sellers should keep an eye on the following points:
The rate of customer engagement in your Etsy shop.
The reviews (either positive or negative) by your customers.
Product Listing Quality factor
Inbound links
For more information in one picture, you can have a look at the tips to rank your products up on the search results on the Etsy Marketplace.
Who pays for Shipping on Etsy buyer or seller?
Shipping charges vary from product to product. Some products are delivered without delivery charges where sellers bear the shipping cost while some products have added delivery charges and customers have to pay for it It varies from product to products. Some of the products are offered free shipping where sellers bear the cost of shipping whereas, some require buyers to pay for shipping. It depends upon the order value, shipping destination, and the shipment method chosen by the buyers.
Finally
Etsy is a global marketplace. Selling here is an opportunity for sellers who want to make money out of their talent and creativity. Etsy Marketplace is the one-stop solution for these artists and they can sell their products to earn a huge chunk of profits. They also get a chance to access a huge no. of the audience all over the world which increases your cross border sales too.
How KnowBand can help you to sell on Etsy Marketplace?
Knowband offers Etsy Integration Extension which is a smart solution for an eCommerce store owner to clear out the complexities of selling products on Walmart. It works by providing an API Integrator between an eCommerce store and the Walmart marketplace. It bridges the gap between your eCommerce store and Etsy with the help of which sellers can easily map their product listings on the Marketplace website. Once the integration is successful, the admin can update all the product listings on Walmart Marketplace from the back-end without even visiting the Marketplace site. Available for different CMS platforms like PrestaShop, Magento, Shopify, and OpenCart, sellers can easily download and install it on their website without any inconvenience.
The eCommerce store owners can now submit their products to Google Shopping and bring in new visitors to their site from the search engine with Knowband’s Magento 2 Google Shopping integration extension. The Magento 2 extension is designed to connect the store with the Google Merchant Center.
The Google Shopping Magento 2 integration module creates XML feeds and syncs them with the merchant center with the help of the cron jobs. All you need to do is to have a merchant account in the Google Merchant Center. The connection between the account and the store is done with the help of the API details.
1.1. Admin Features of Magento 2 Google Shopping Integrator:
Here are some of the key highlights of the Google Shopping Magento 2 connector:
The connection between the Magento store and the Google Merchant Center is set up at a few clicks.
The real-time synchronization makes the products listing, feed synchronization, and inventory management effortless.
Once the connection is established, the admin can list the products and related details with the help of a profile-based approach. The Magento 2 Google Shopping connector supports all types of products, simple, configurable, or downloadable.
The profile-based listing enables many-to-one category mapping options. The products of the selected category are synced in bulk with Google Shopping Magento 2 connector.
The attribute mapping becomes effortless with Google Shopping Magento 2 synchronization extension as well.
Additionally, the admin can view the product listing from the back-end of the Magento 2 Google Shopping integrator. The e-merchants can remove the listed products by clicking a button.
The Magento 2 Google Merchant Center connector is designed to achieve an error-free listing. However, in case any product is not listed successfully, you can view the error details at a button click.
The admin can create feeds for the profiles and sync them with the Google Merchant Center by executing cron in the back-end of the Google Shopping Magento 2 integrator. You can even schedule the time for feed synchronization.
The cron options offered by Magento 2 Google Shopping integrator even allow the store admin to sync the status of the products from Google Shopping to the store.
The audit log section of the Google Shopping Magento 2 connector keeps track of the status of the various task running in the back-end.
2.0 Installation
After purchasing Magento 2 Google Shopping Integration extension, the store admin will get the following files:
1. Knowband_Googleshopping.zip which contains the source code of the Google Shopping Integration Magento 2 plugin.
2. User Manual which includes all the details and helps regarding the extension.
Follow the steps mentioned below to install the Magento 2 Google Shopping Integration module at your store:
This extension requires Google Client API, so you need to add the “google/apiclient”: “^2.2” into the composer.json file and update the composer.
Get the Magento 2 Google Shopping Integrator from the Knowband store and download the extension package.
The package has a zipped file. Unzip the package.
Create a folder {Magentoroot}/app/code/Knowband/Google Shopping
Upload the extracted content in the above folder via FTP manager (like Filezilla or WinSCP – download here: https://filezilla-project.org/).
Now run below commands to install the plugin:
php -f bin/magento module:enable –clear-static-content Knowband_Googleshopping
php -f bin/magento setup:upgrade
php -f bin/magento setup:di:compile
php bin/magento setup:static-content:deploy
The extension is now installed and ready for use. In Admin Panel go to “Knowband Extensions >Google Shopping”.
You can now configure and use the Magento 2 Google Shopping Integrator.
3.0 Admin Interface
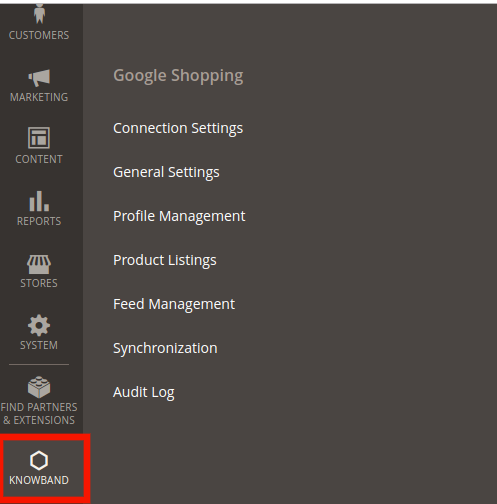
Once the installation is complete, you can find the Magento 2 Google Shopping API integrator in the main menu. Click on Knowband and you’ll find the module as shown in the image below:
3.1. Connection Settings
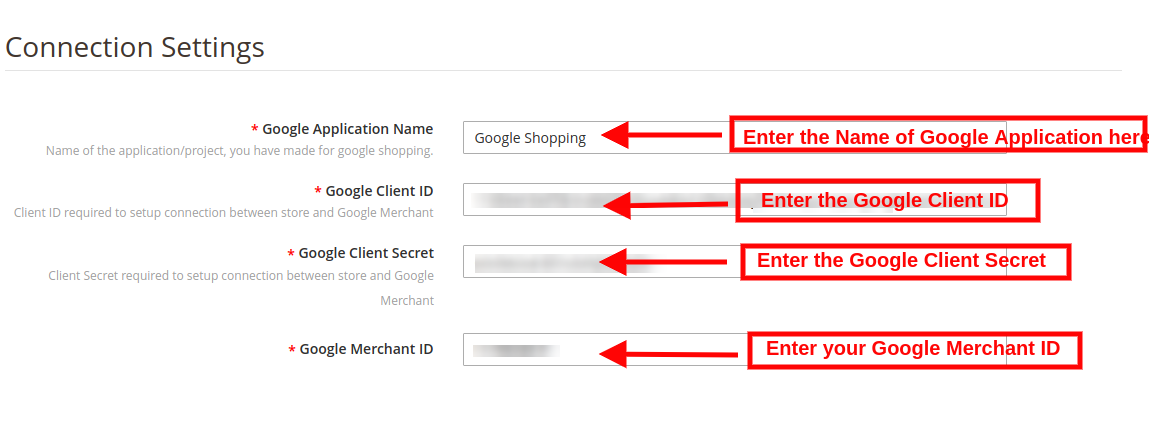
The connection can be set up between the Google Merchant Center and the Magento store from this tab of Google Shopping Magento 2 integration plugin. You need to create an account at Google Merchant Center and obtain the client ID, client Secret and Merchant ID. Refer to Appendix A.
Google Application Name: Enter the name of the project/application that you created for Google Shopping in this section.
Google Client ID: Obtain the Client ID from your Merchant account and enter the same here. This will authenticate the connection between the store and the Google Merchant.
Google Client Secret: Enter the client secret to set up the connection.
Google Merchant ID: Provide the merchant ID of your Google merchant center account here.
3.2. General Settings
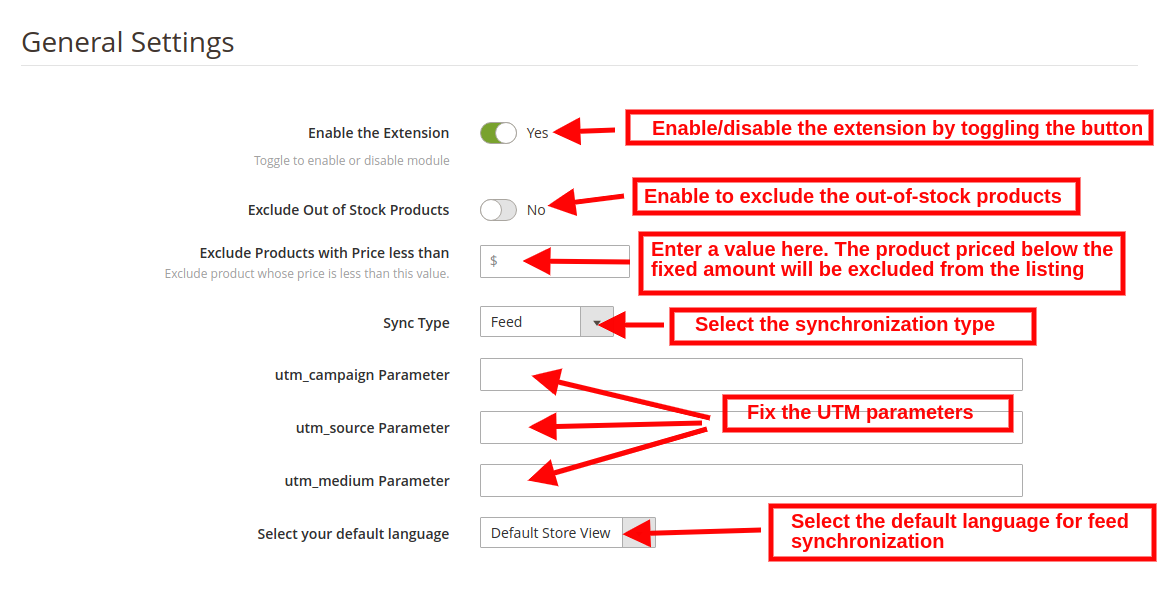
You can do the basic configuration changes in this section of the Magento 2 Google Shopping integrator. The various fields of this tab are discussed below:
Enabled: Toggle this button to activate this Google Shopping Magento 2 API integration plugin.
Exclude Out of Stock Products: The Google Shopping Magento 2 connector allows you to create a profile and list the products in bulk at the Merchant Center. However, some products may go out of stock. The admin can disable out-of-stock products by enabling this button. If enabled, only the in-stock product will be displayed in Google search results.
Exclude Products with Price less than: Enter a fixed amount. Only the products that are priced above the fixed amount will be displayed in the search results.
Sync Type: Select the synchronization type from the drop-down menu. The two options: Content API and Feed.
utm_campaign Parameter, utm_source Parameter, utm_medium Parameter: Enter the UTM for tracking the traffic received via Google Shopping.
Select your default language: The module offers multi-lingual support. Select the default language from this section.
3.3. Profile Management
The admin can create, edit or delete profiles from this tab of the Magento 2 Google Shopping Integration extension.
3.3.1 How to Create New Profiles?
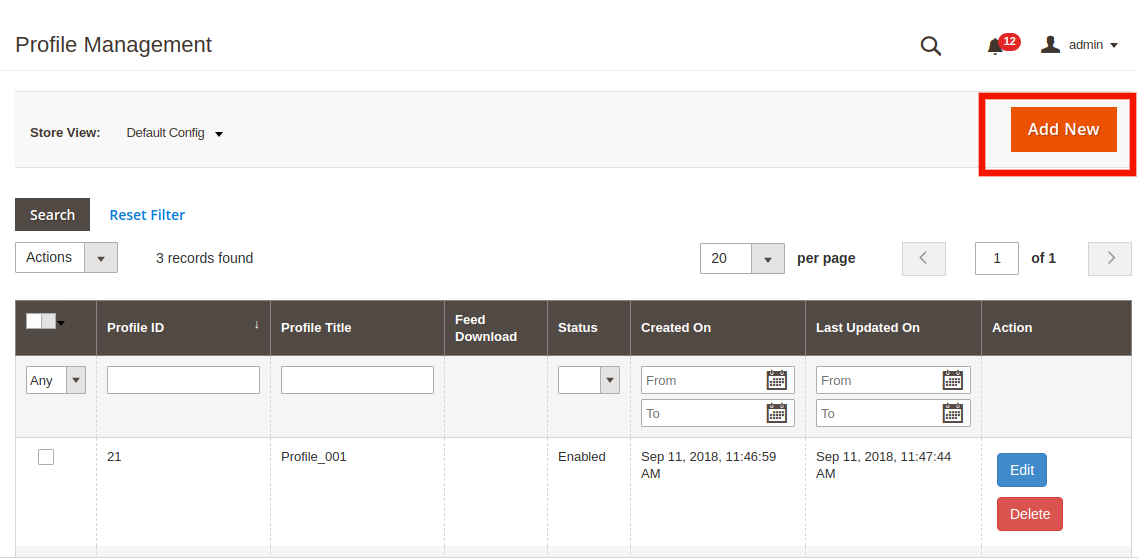
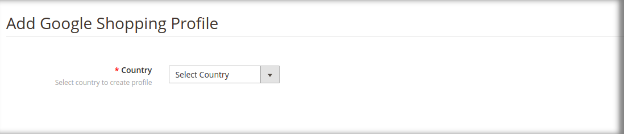
Click on the ‘Add New Profile’ or ‘+’ sign in order to create a new profile.
This will redirect you to the profile management section.
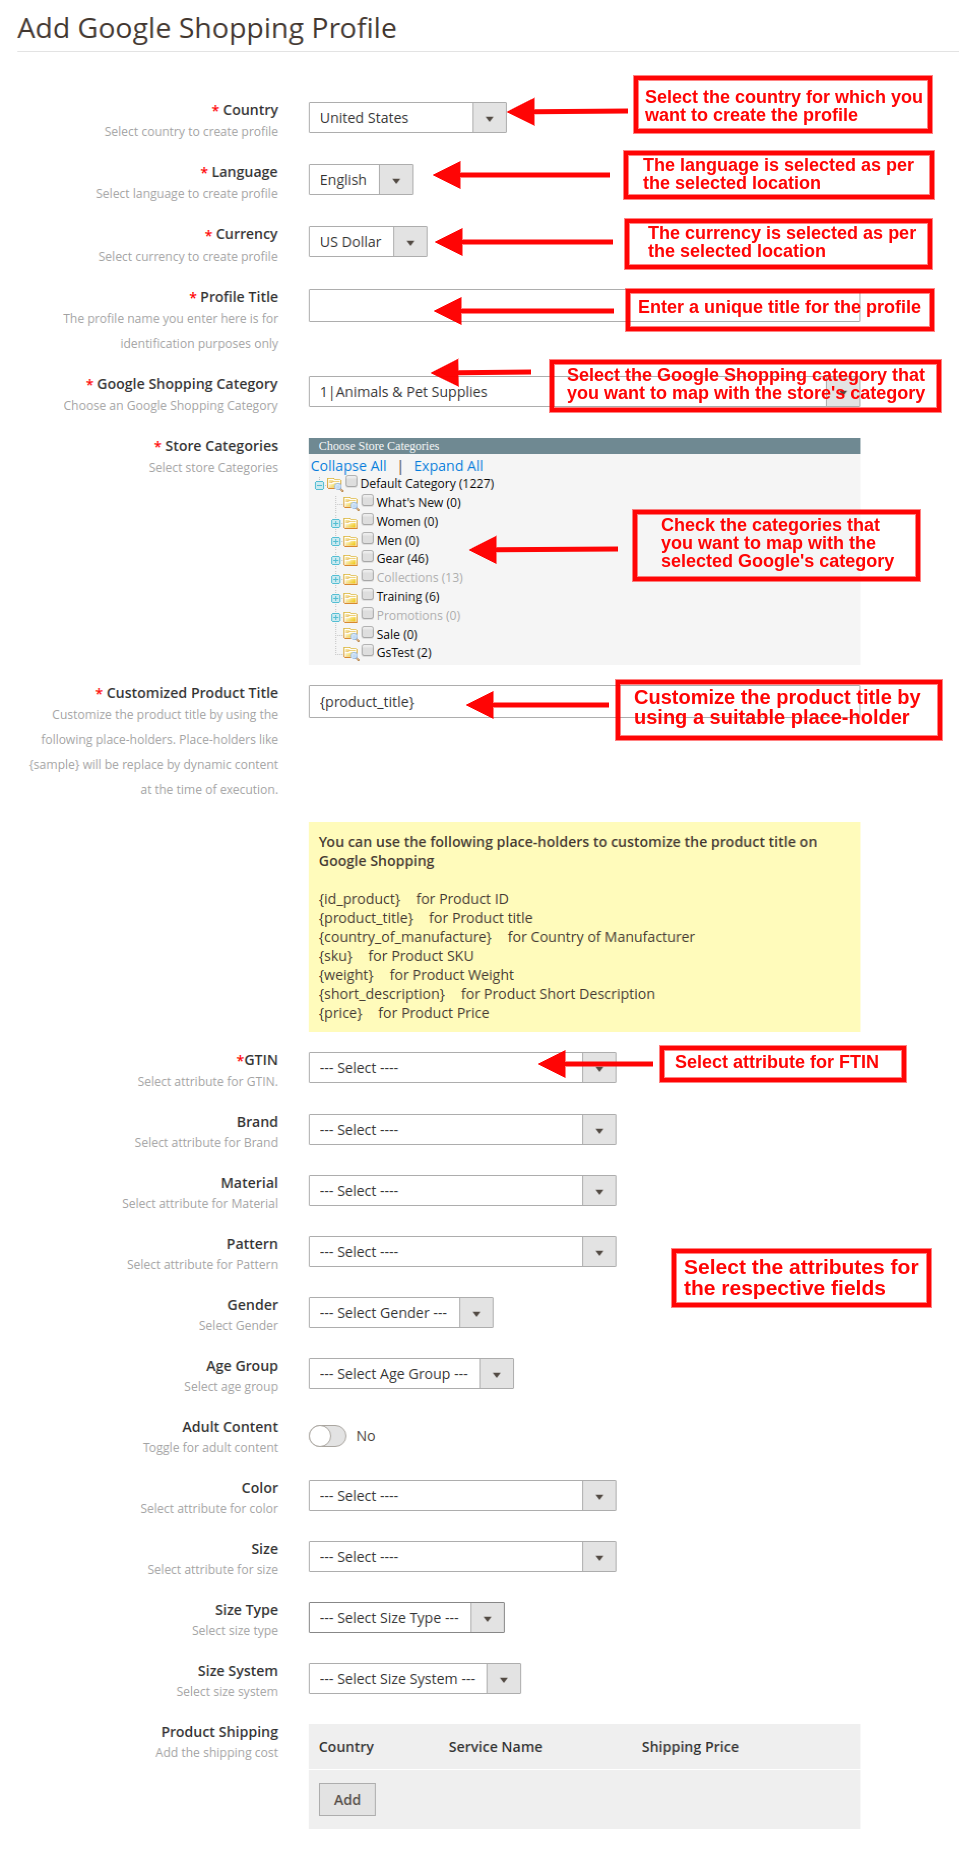
Country: Select the Country from the drop-down list.
Language: The language will be selected by default as per the country selected.
Currency: The currency will be displayed by default according to the country selected.
Profile Title: Enter the name of the profile here.
Google Category: Select the Google category that you want to map the categories of the store.
Store Category: Expand the category and check the categories that you want to map with the selected category of Google.
GTIN: Here, you will map the product unique field so that the Magento 2 Google Shopping Connector can identify products according to the mapped attribute. You must also have to provide unique field mapping for product attributes as well. The various options to choose from include: Reference No., UPC, EAN13. The mapping can then be done based on the selected attribute.
Customize Product Title: Customize the product title by using the following place-holders.
{id_product} for Product ID
{product_title} for Product title
{manufacturer_name} for Manufacturer name
{supplier_name} for Supplier name
{reference} for Product Reference
{ean13} for Product EAN13
{short_description} for Product Short Description
{price} for Product Price
Material: Select the material of the product.
Pattern: Choose the pattern from the drop-down menu.
Gender: Select the Gender for which the product is intended. The options are Male, Female or Unisex.
Age Group: Select the age group that is expected to use the product.
Adult Content: Specify if the product has any adult content or not.
Color: Use the color attribute to describe your product’s color. This information helps create accurate filters, which users can use to narrow search results.
Size: The size attribute describes the standardized size of your product. Your product Ad will appear in the results that are filtered by size.
Size Type: The attribute describes the cut of your product. The supported value for this field includes regular, petite, plus, big, tall and others. This helps create accurate filters.
Size System: With this attribute, you can explain which country’s sizing system your product uses.
Product Shipping: Select the shipping method for the particular product.
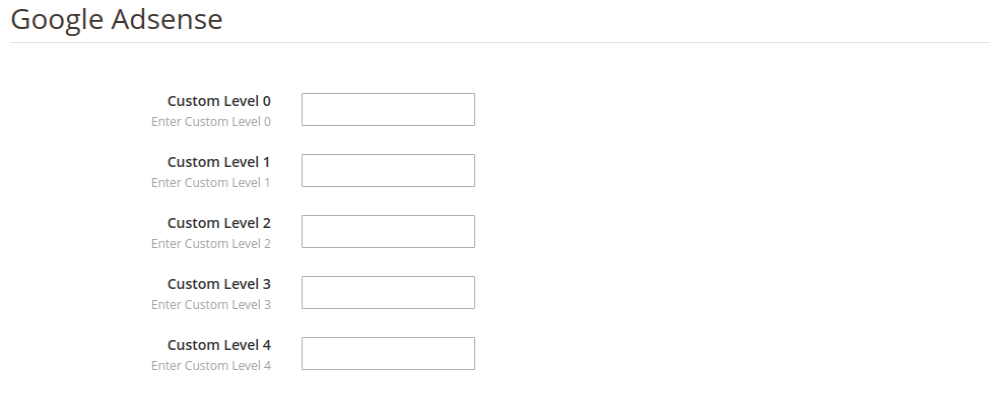
Google Adsense:
Google Adsense refers to the campaign that you’ll run on Google Adwords. Custom labels, Custom Label 0 through Custom Label 4, allow you to create specific filters to use in your Shopping campaigns. Use these filters for reporting and bidding on groups of products. The information you include in these attributes won’t be shown to users.
3.3.2 How to Edit the Existing Profile?
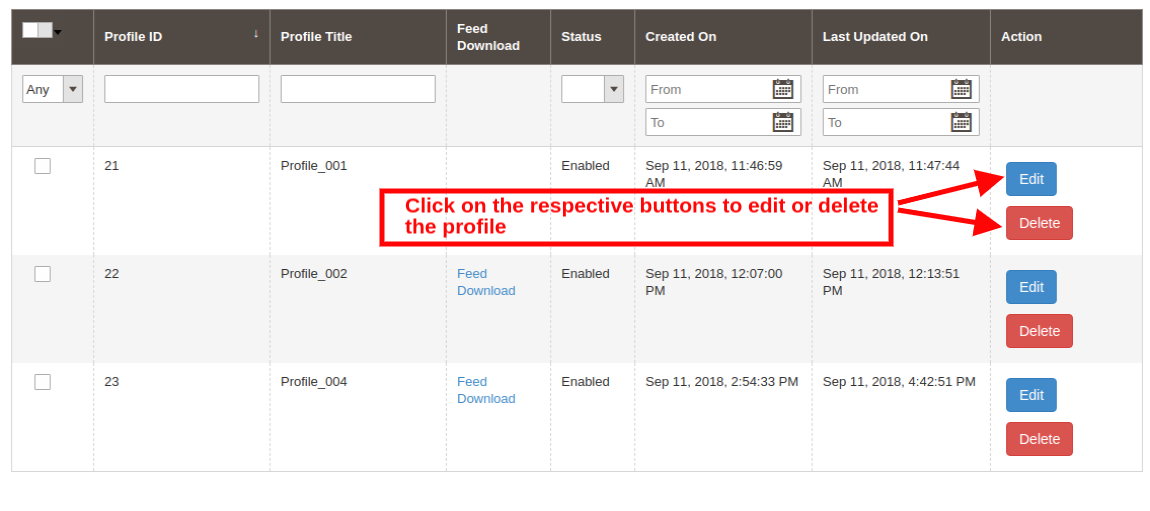
The admin can even edit or delete the profile at a button click.
Click on the Edit or Delete button corresponding to each profile respectively, in order to edit or delete them.
3.4. Feed Management
The feed is created in order to display the products on Google search results. The admin can create N number of feeds and schedule the same for synchronization.
3.4.1 How to create new feeds?
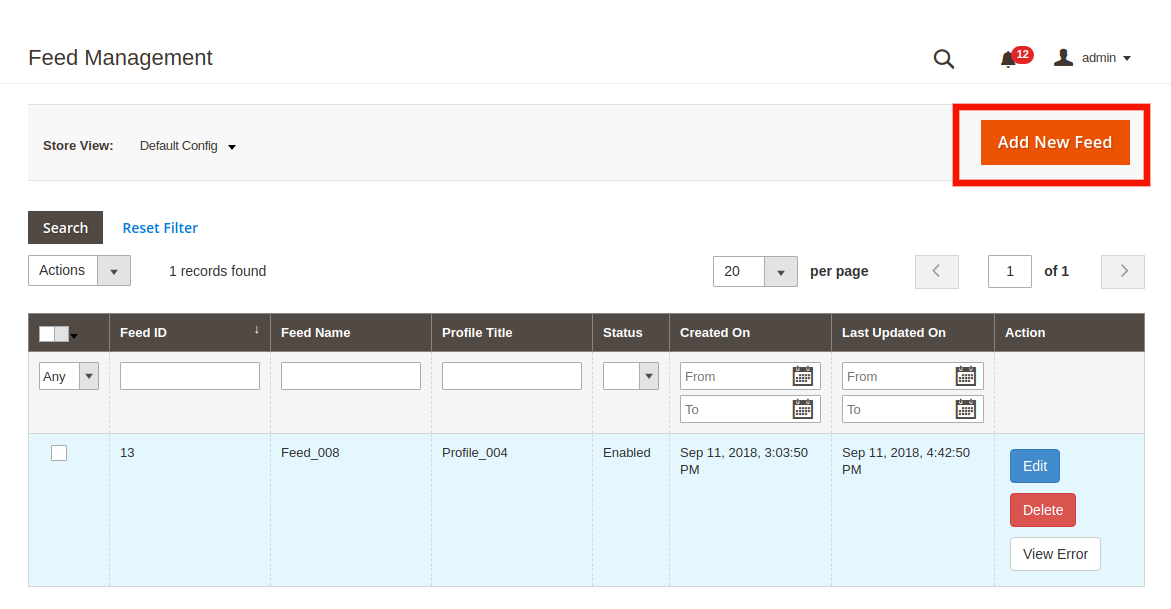
Click on the ‘Add New Feed’ or ‘+’ sign in order to create a new profile.
This will redirect you to the feed creation page of the Magento 2 Google Shopping synchronization extension. The various fields of the interface are discussed below:
Select Profile: The list of the profiles created in the profile management tab of the Magento 2 Google Shopping Integration module will be shown this tab. Select the profile whose product you want to sync with Google Merchant Center.
Feed Label: Enter a unique name for the Feed.
Feed Upload Schedule: Select the schedule of the feed upload.
Set Hour: Select the number of hours in which you want to schedule the feed.
3.4.2 How to download feeds?
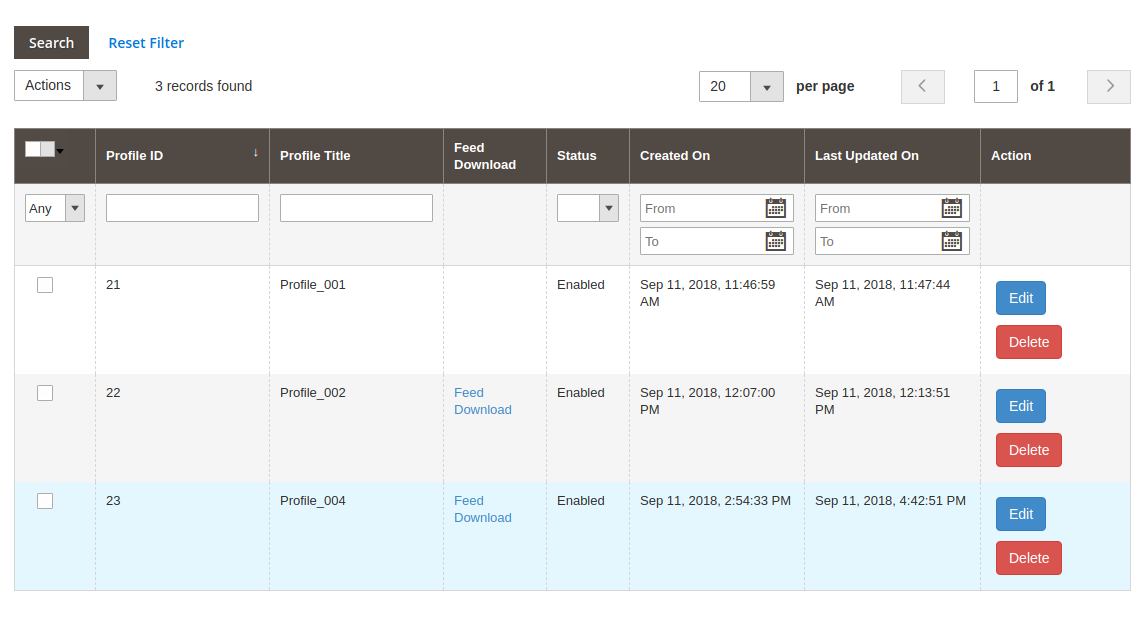
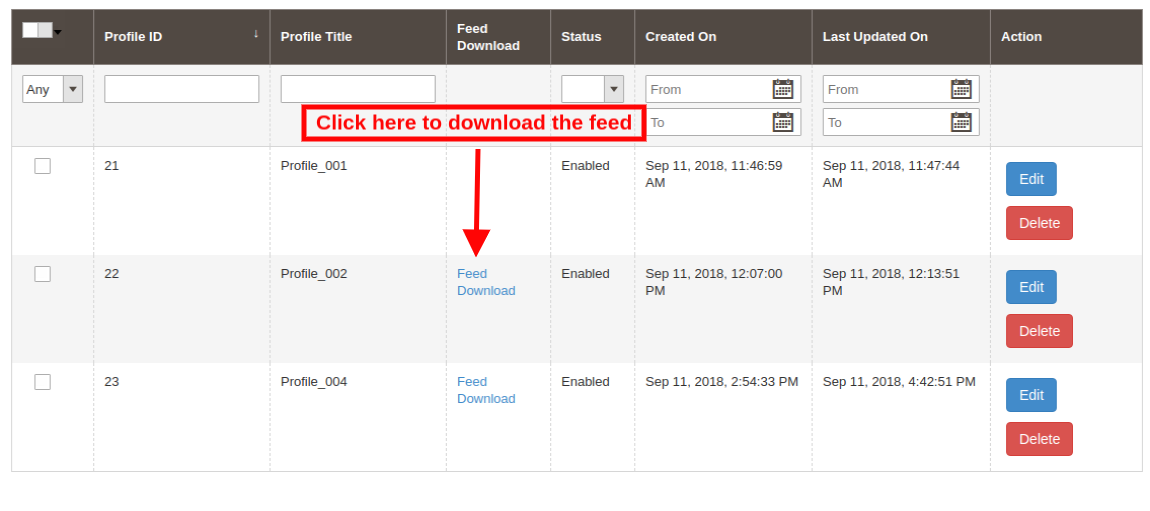
The admin can even download the feed from the respective profile. For this go to the Profile Management tab of Google Shopping Magento 2 integrator. The download option will be shown in the Feed Download section as shown below:
3.4.3 How to Edit/Delete feeds?
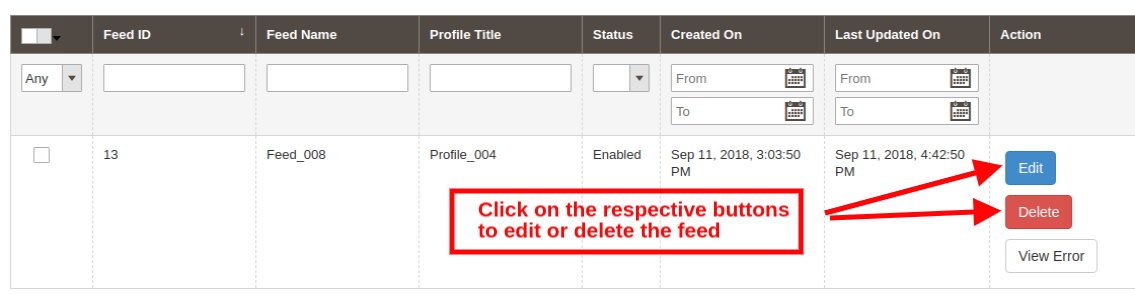
In order to edit or delete the feeds, click on the Edit or Delete button corresponding to each feed.
The admin even gets an option to view the report in case any error occurs while feed synchronization. This can be done by clicking on the View Error option as shown in the image below:
3.5. Product Listing
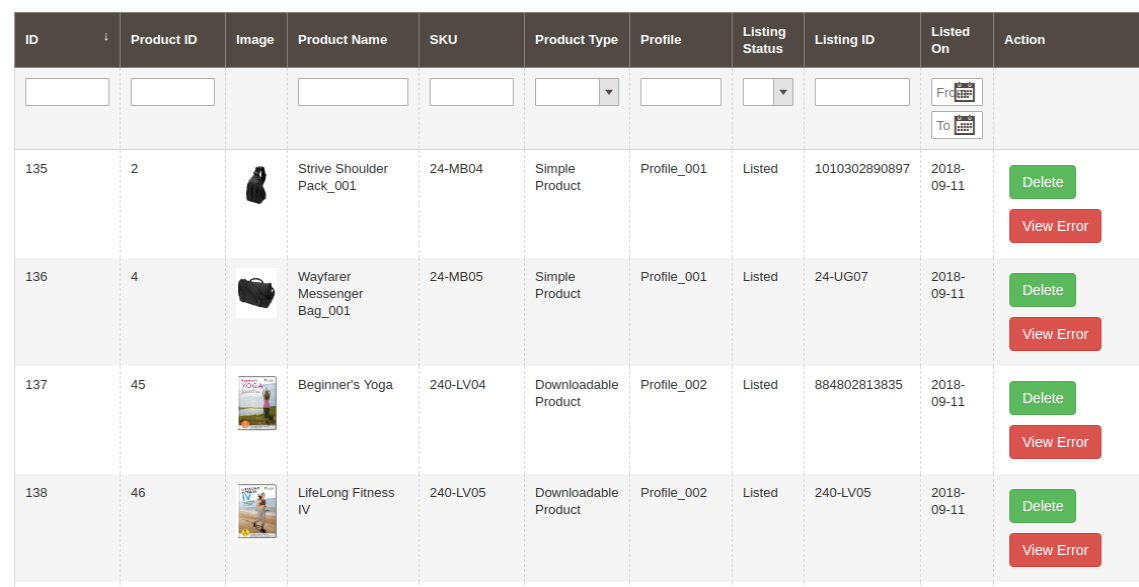
This section of the Magento 2 Google Shopping integration plugin shows the report of the products listed at the Merchant Center.
The Google Shopping Magento 2 integration module allows the following action to the admin.
Renew: The Renew button can relist the products whose listing has expired. Once this action is executed successfully, the action will be changed to ‘Halt’.
Delete: The admin can remove the product by clicking on ‘Delete’.
View Error: The admin can View Error occurred while listing the product.
3.6. Synchronization
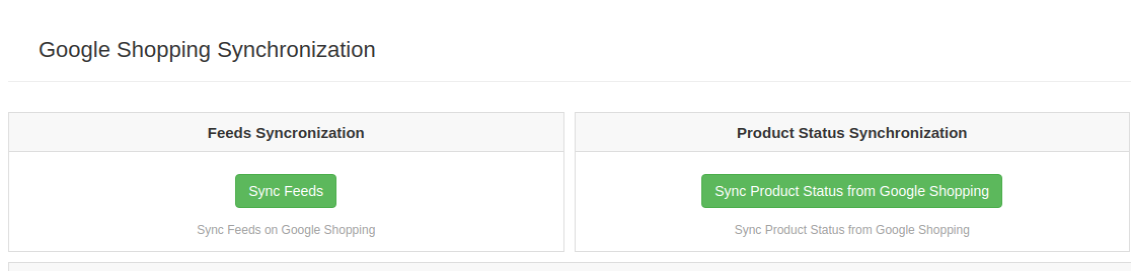
The Synchronization tab of the Magento 2 Google Shopping Integration module offers a cron option for real-time synchronization. Here are the cron options available.
Sync Feed on Google Shopping: ‘Sync Feed’ cron will synchronize the feed on Google Shopping.
Sync Products Status from Google Shopping: This button can sync the product status from Google shopping to the web store.
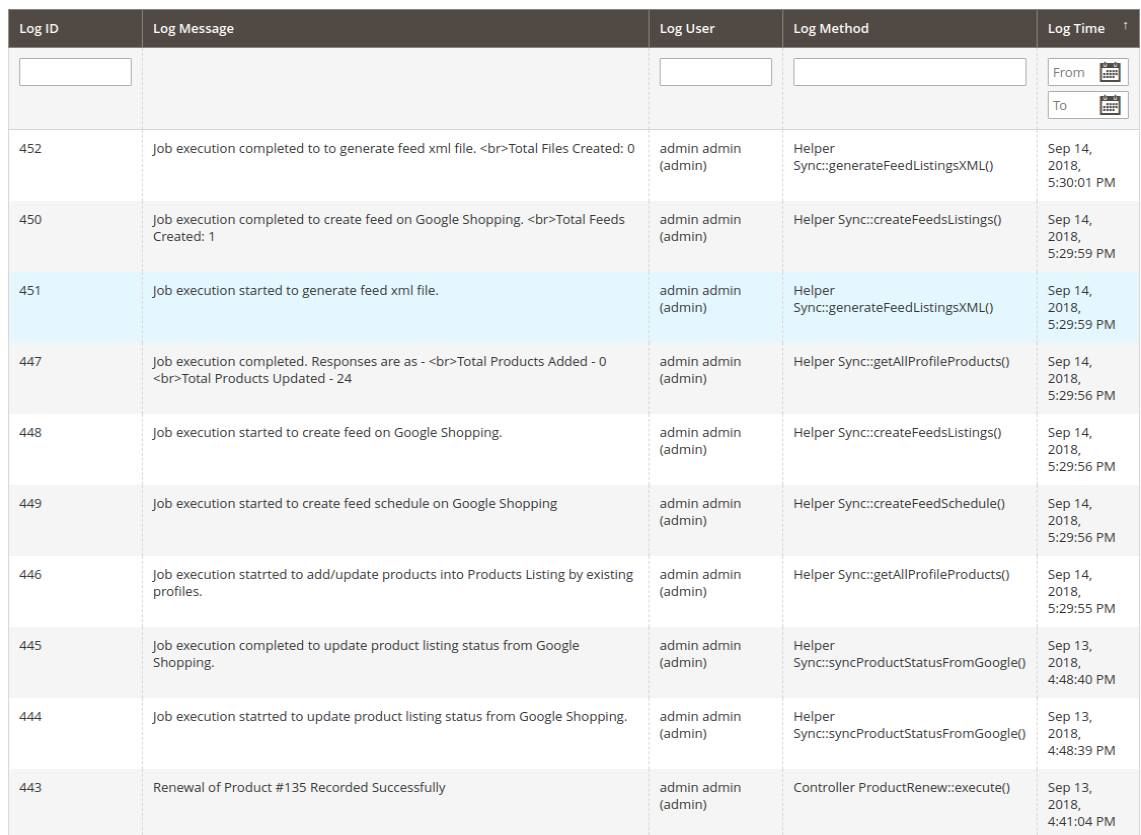
3.7. Audit Log
The admin can view the status of the task running in the back-end in the Audit Log tab of Google Shopping Magento 2 Integration plugin.
4.0. Appendix
How to Create Google Shopping Account?
Before uploading your products on Google shopping, you must have your Google merchant account. If you don’t have then please follow the below URL:
https://merchants.Google.com
Follow the instructions given on the above URL and create your account.
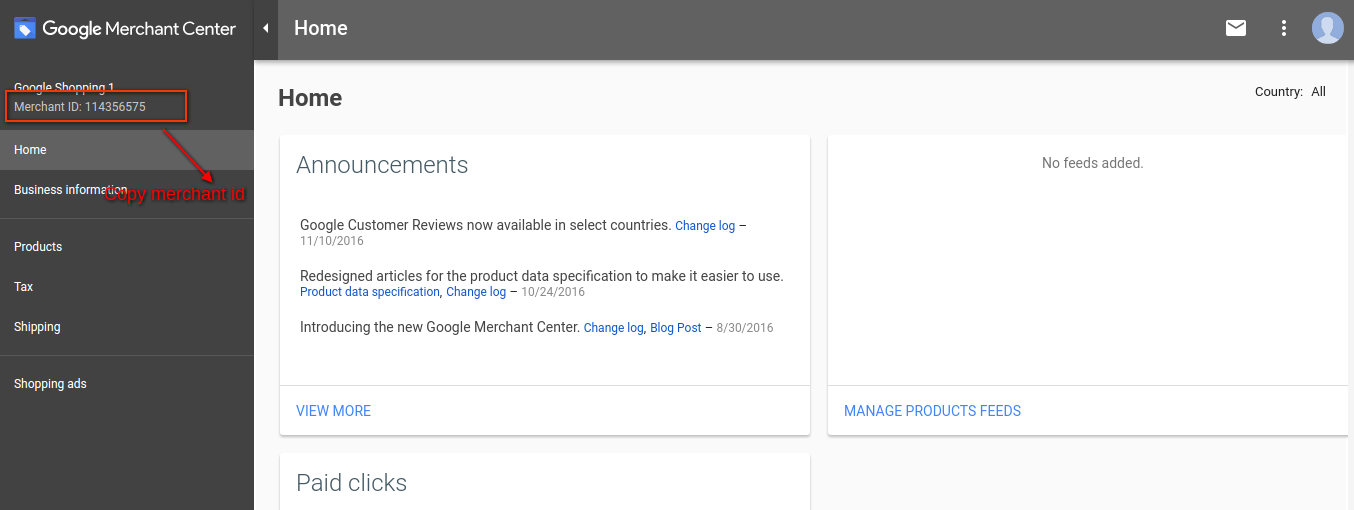
After creating your account, you will be redirected to your merchant center homepage as shown in below screen:
Copy your merchant id highlighted in the above screen and save it in module configurations.
Verify your Website for Google Merchant Account
This verification process is a compulsory process to upload your products to Google Shopping. If you do not verify your site then the module will not be able to upload products and may result in an error.
To verify your website, please follow the below instructions:
Step 1: Go to the “Business Information” tab in your Google Merchant Account.
Step 2: Under “About Your Business” tab, provide the URL of your store. For example, https://www.example.com. Save URL.
Step 3: After saving the website URL, Under the “Website” tab, Click on “Claim Your Website” link. This will show you the link to an HTML file. Download this file and upload it to your root directory of the store.
Step 4: After uploading the HTML file, execute the URL given by Google in step 3.
Step 5: Click on the “Verify & Claim” link.
4.1 How to get a Client ID and Secret?
To get Google client id and secret you need to create a project in Google developer account. Please go to the below URL to sign into the Google developer account.
https://console.developers.Google.com
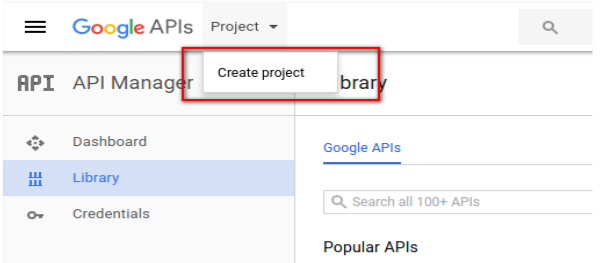
On the above URL, create a project by clicking the link shown in below screen:
Step 1: Name your Project Name and then click on the “Create” link. After creating a project, Google will redirect to the same page and your new project will be selected.
Step 2: Go to the library tab, search for “Content API for Shopping ”. Enable this API for this project.
Step 3: Click on the “Credentials” tab. This tab will show 3 tabs.
Step 4: Set your application name in “OAuth Consent Screen” and save it.
Step 5: Click on the “Credentials” tab and click on the “Create Credentials” button.
Step 6: After clicking the “Create Credentials” button, Google will be shown credentials type options. Choose “Auth client ID”.
Step 7: Set application type as “Web Application”.
Step 8: Set the “Authorized Redirect URIs” field. Your redirect URI is given on the module configuration page. Please copy from there and paste it into this field.
Step 9: Click on the “Create” button. After saving credentials, Google will generate the client id and secret for you. Copy and paste them into the corresponding field in module configuration.
Note: For more details instructions, follow URL https://developers.Google.com/identity/sign-in/web/devconsole-project
Note: If you are getting an error while getting your refresh token. Please also try after “Allowing Less Secure App” in your Google account.
For more values, please follow the below URL and read the documentation: