Magento Back in Stock Extension by Knowband – User Manual

Introduction of Magento Back in Stock Extension

This Magento back in stock extension by Knowband adds an attractive functionality to the website, which is beneficial for both store owner and customer. This Magento module helps the customers to subscribe for those products which are out of stock. Magento product stock extension adds a simple block to the product page of Magento store through which the user can subscribe by entering the email id for the respective product.

The subscribed customers for product will be visible to store owner and helps in updating the product quantity according to the requirement so that customer can buy those products.

The simple input field to enter email Id and a notify button will be available on the product page itself. Customers can easily get subscribed to the product by entering email id and start getting email corresponding to that

Installation

After purchasing Magento extension, you will get following files as shown below:

1. magentobackinstocknotification.zip(contains source code of the extension)

2. User Manual

Follow the following steps to install the Magento extension:

1. Unzip the magentobackinstocknotification.zip file.

2. Copy all the files and folders of unzipped folder into your store root directory.

3. After copying all the files and folders, clear the cache.

4. Open any page of your store. Magento will install the Magento Stock Alert module at the time of loading any page.

5. After installing, please login into your admin panel and go to the below menu:

System > Configuration > Advanced

Here you will see that ” Vss_Productnotify” module is listed.

Extension Interfaces

There are two interfaces in this Magento product stock extension. Each interface have different functionality according to its use. These interfaces are:

  1. Admin Panel Interface(Only be accessible by admin/store owner)
  2. Front End Interface(accessible to front end user)

Each interface has been described in separate section.

Admin Panel Interface

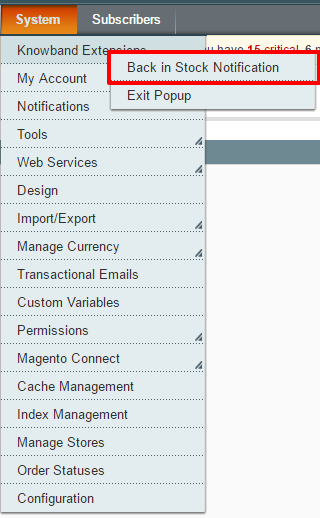
This part of the Magento Stock Alert plugin will be for admin user, through which admin can configure the settings. After installing Magento extension, Back in stock Notification menu will be visible under System > Knowband Extensions menu in the menu bar as shown in below screen:

On clicking of above menu, admin panel interface of the Magento product stock extension will open.

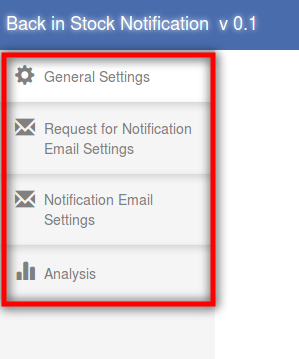
There are four tabs in the admin panel through which admin will be able to manage the functionality of this Magento plugin. These are listed below:

  1. General Settings
  2. Initial Email Settings
  3. Final Email Settings
  4. Analysis

General Settings

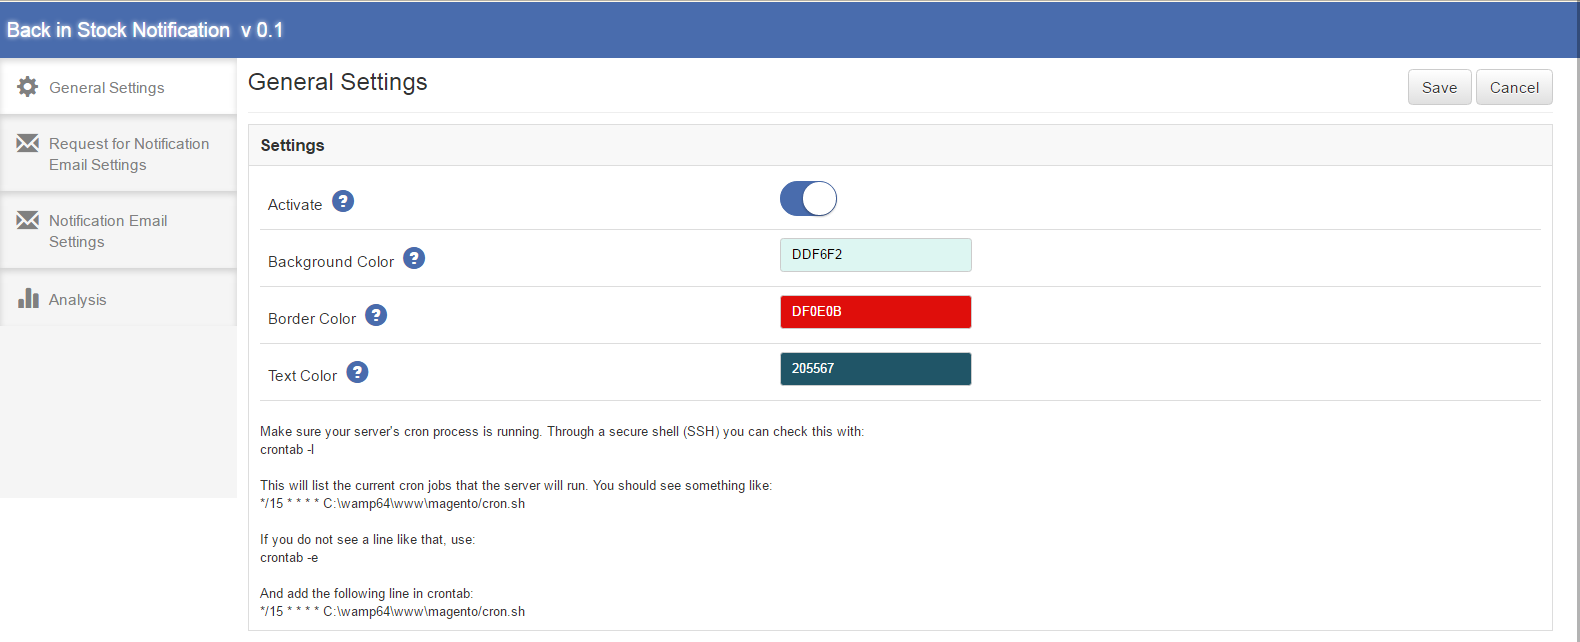
This tab will be opened by default when you click on the menu. General Settings tab of Magento Stock Alert module will have following options:

1. Activate

This will be an on/off switch. Admin will have the option to Enable/ Disable the Magento back in stock. If enabled notify block will be enabled on front end product page otherwise not.

2. Background Color

This will be a color picker palette. It will set the background color of Magento back in stock block on the product page.

3. Border Color

It will also be a color picker palette. It will set the border color of Magento product stock extension block on the product page.

4. Text Color

This will also be a color picker palette. It will set the text color in the Magento stock alert front end block on product page.

*Note: You have to make sure that Magento CRON process is running on your server to get notified your customers when any subscribed product comes in stock. Through a secure shell(SSH), you can check this with:

crontab -l

This will list the current CRON jobs that the server will run. You should see something like:

*/15 * * * * /home/user/public_html/magento/cron.sh

If you do not see a line that, use:

crontab -e

And add the following line in crontab:

*/15 * * * * /home/user/public_html/magento/cron.sh

Below is the screen shot of the this tab :

Request for Notification Email Settings

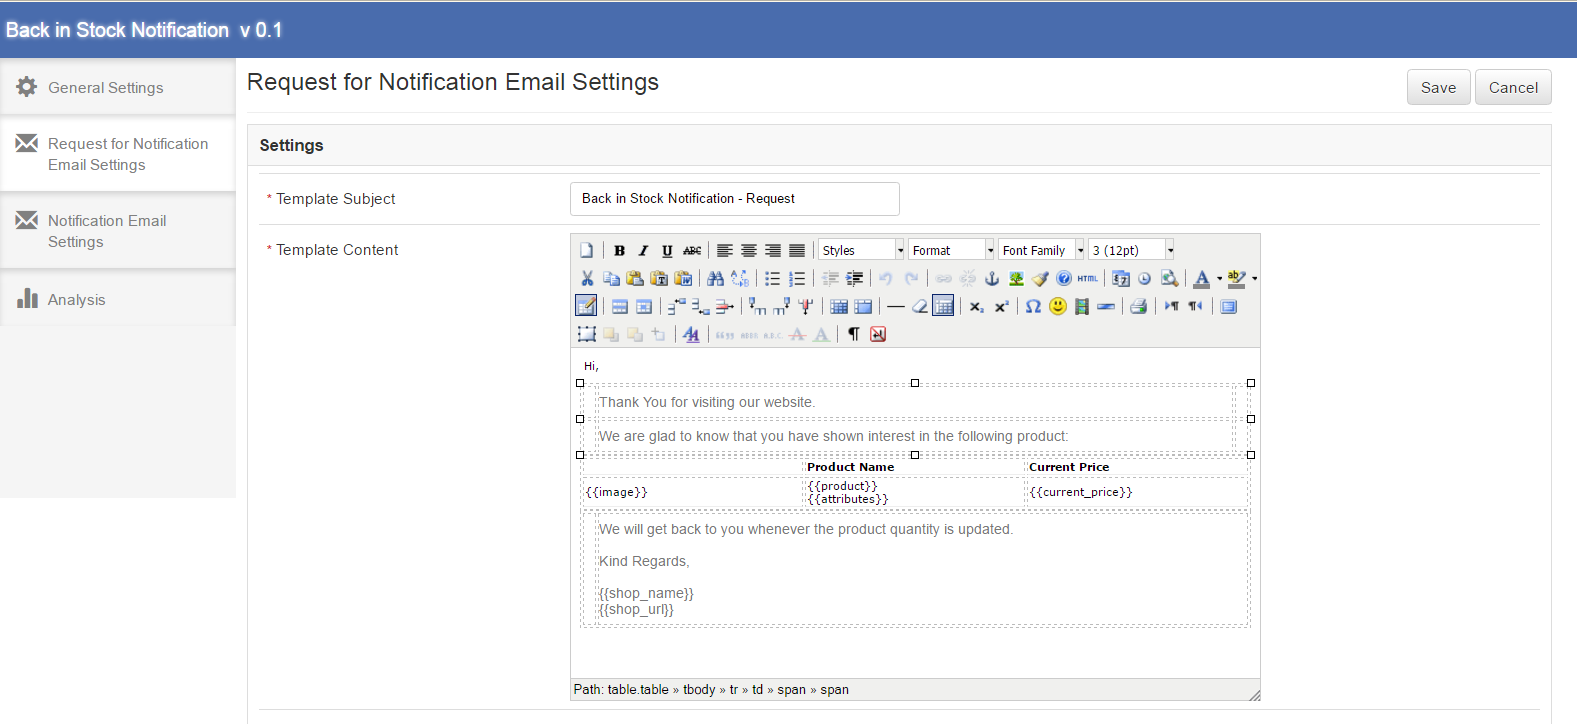
This tab of Magento back in stock extension will have the Email settings which the email will be sent when the customer subscribes himself for notifications for a particular product. This tab will have the following options:

1.  Template Subject

It will be the subject of the mail which will be sent. This field of Magento back in stock module will be mandatory and default value will be ‘Back in Stock Notification – Request’.

2. Template Content

This will be the content of the mail which will be sent initially to the customer. This field will also be mandatory. The default content of Magento stock alert plugin will be as shown in the proposed screen below. The content enclosed in {{}}, will be the variables which will be used when sending actual mail. Other than these all content would be static.

Below is the screen shot of the this tab :

Notification Email Settings

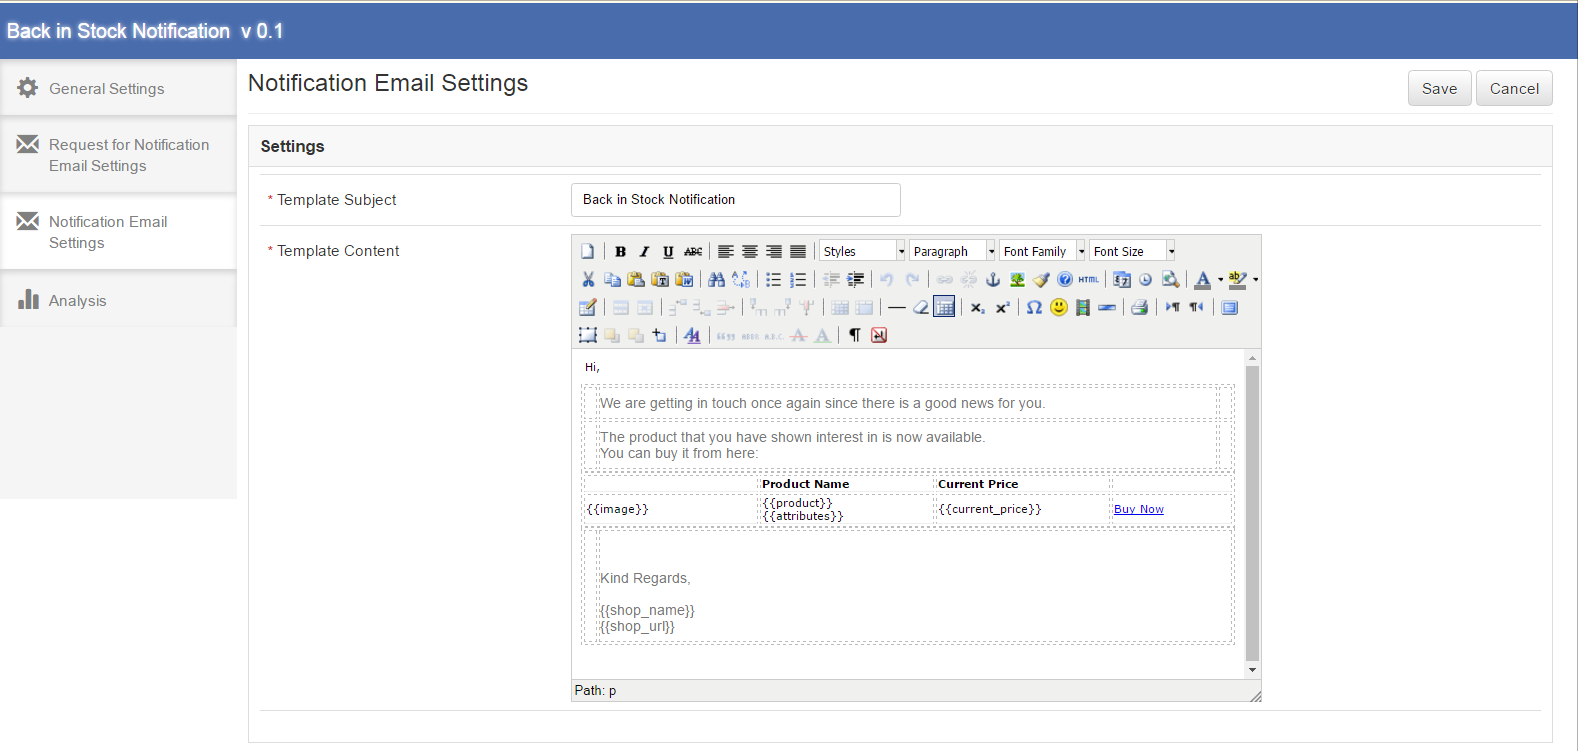
This tab of Magento product stock extension will have the Email settings which will be sent to the subscribed customers for a particular product and that product comes in stock. This tab will have the following options:

1.  Template Subject

It will be the subject of the mail which will be sent to the customer when product comes in stock. This field will be mandatory and default value of this Magento plugin will be ‘Back In Stock Notification’.

2. Template Content

This will be the content of the mail which will be sent finally to the customer when a particular product comes in stock. This field will also be mandatory. The default content of the Magento stock alert extension will be as shown in the proposed screen below. The content enclosed in {{}}, will be the variables which will be used when sending actual mail. Other than these all content would be static.

Below is the screen shot of the this tab :

Analysis

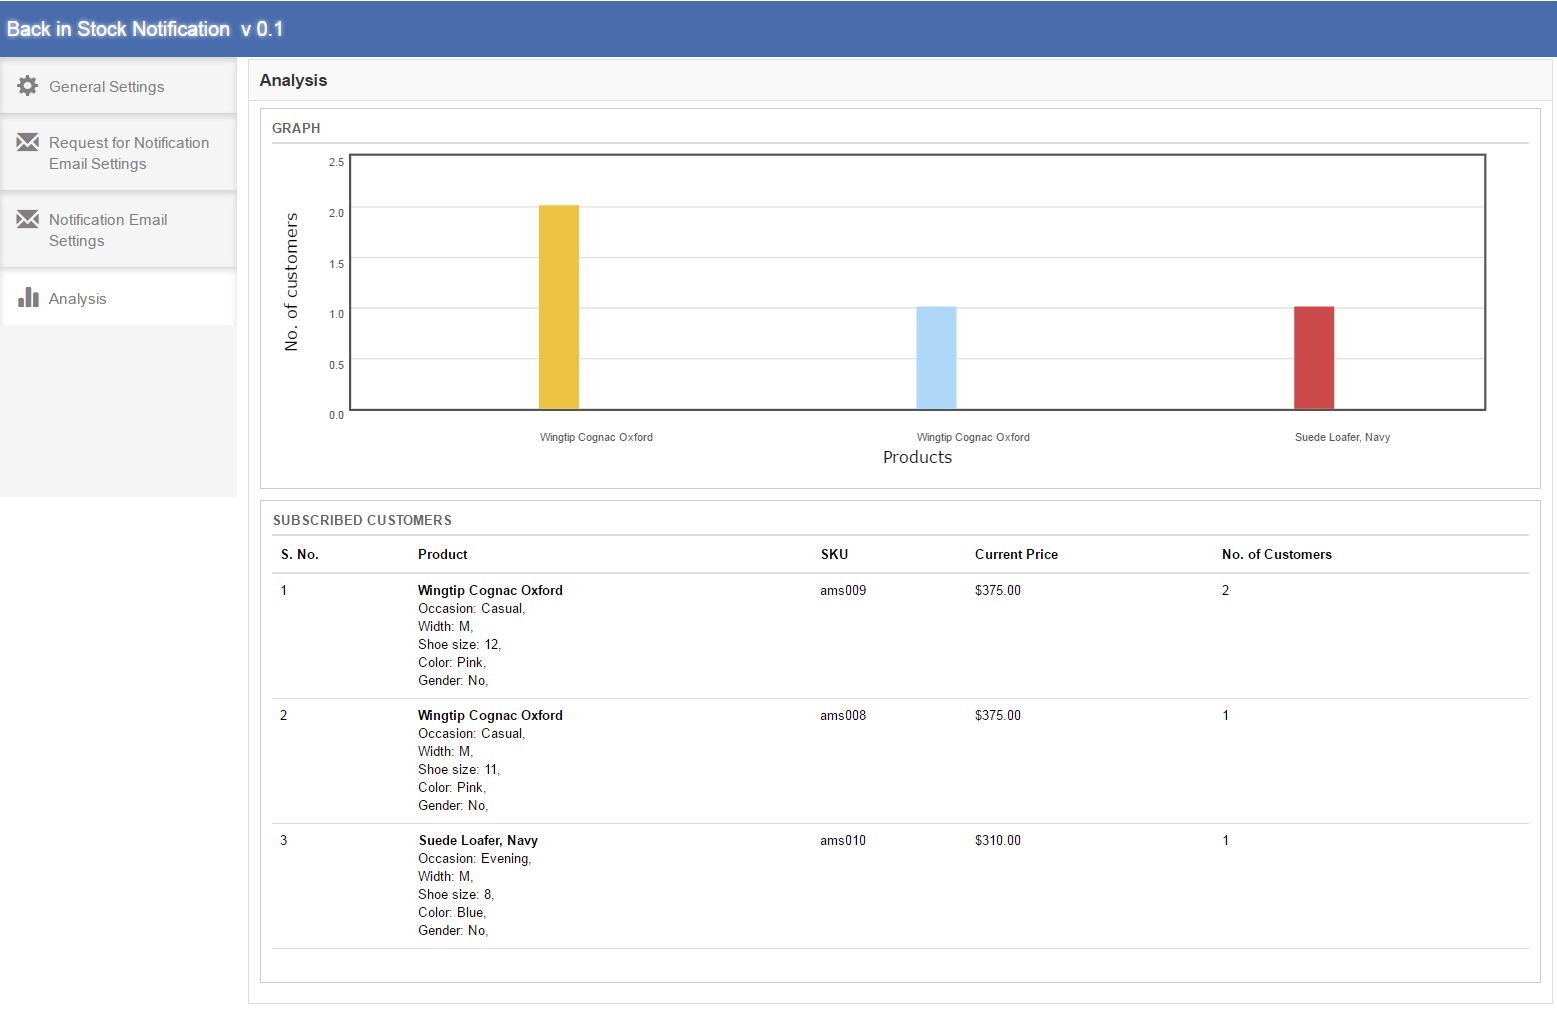
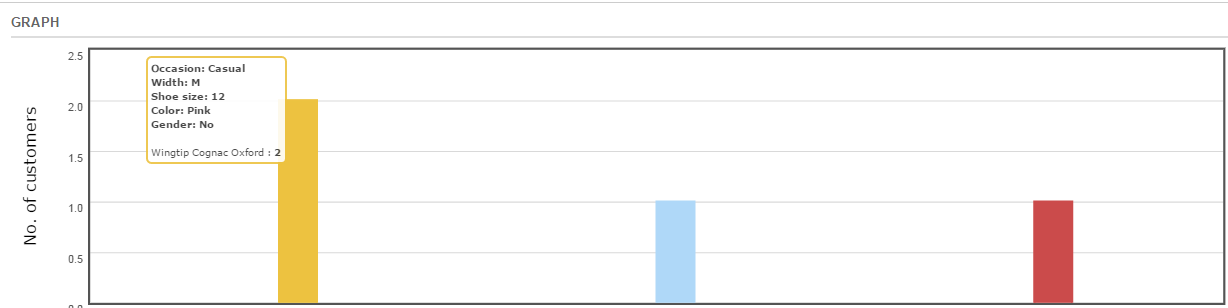
In this field of Magento product stock extension, the complete analysis of the subscribed customers can be found. This analysis would be in form of graph and in form of detailed list. It will be the analysis of top 10 products. Also, this list would only include the customers who are waiting for the notification email. This tab of the Magento stock alert extension will have two sections, which are described below:

1. GRAPH

The graph of the Magento back in stock module will show the analysis of top 10 products. Horizontally products would be shown and vertically number of customers would be shown. On hovering a bar in the graph name of the product, product attributes and number of customers which have subscribed for this product will be shown in a pop up.

2. SUBSCRIBED CUSTOMER

Subscribed customer would be a product wise detailed list. In first column of the list S. No., in second column product name and product attributes, in third column SKU of the product, in fourth column current price and in fifth column number of customers that have subscribed for this product would be shown. This list would also show top 10 products.

Below is the screen shot of the this tab of Magento stock alert plugin:

On hovering a bar in the graph a small pop up will come as below:

Front End Interface

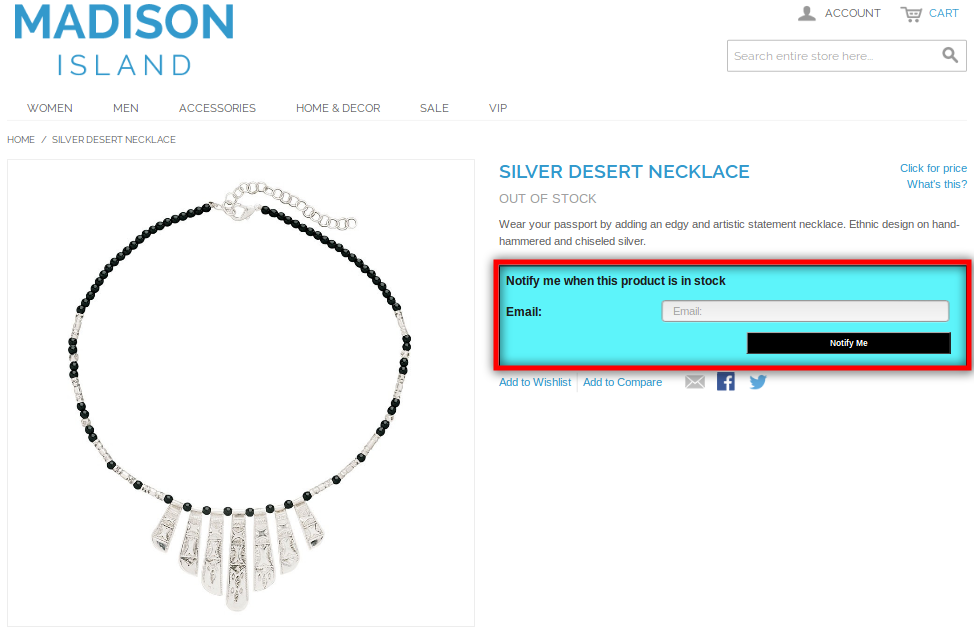
After enabling the plug in from admin, the front end user will see a subscribe box at the product page if the product is out of stock. This block will contain an input field as to enter email id and a notify button through which the user will get subscribed for the respective product.

The subscription box of Magento back in stock module should appear as follows:

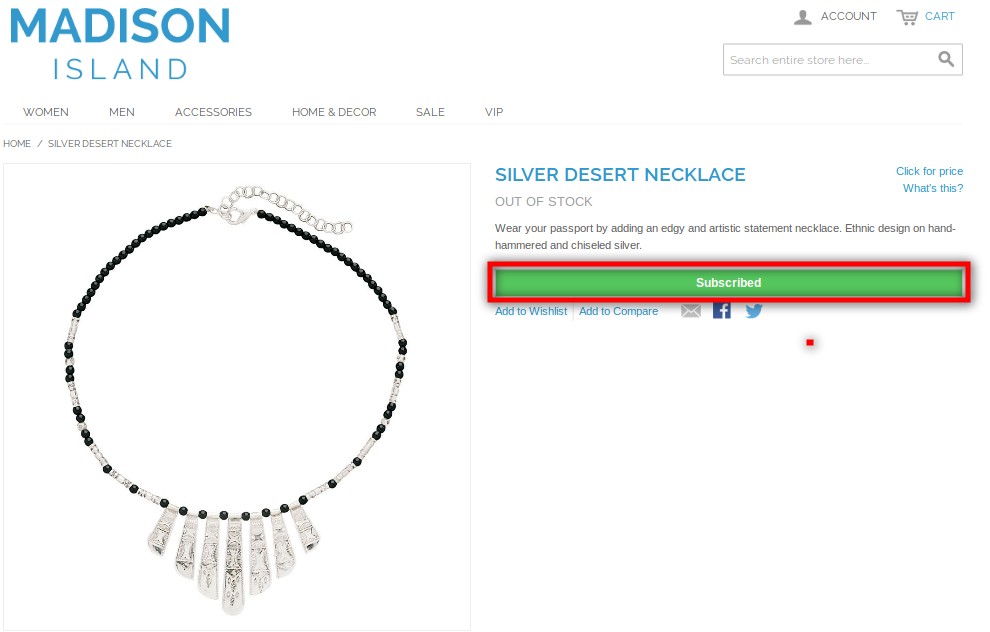
When customer enters the email id and click to the button “notify me” the initial mail will be sent to the entered email address and the message showing subscribed as below.

Note*

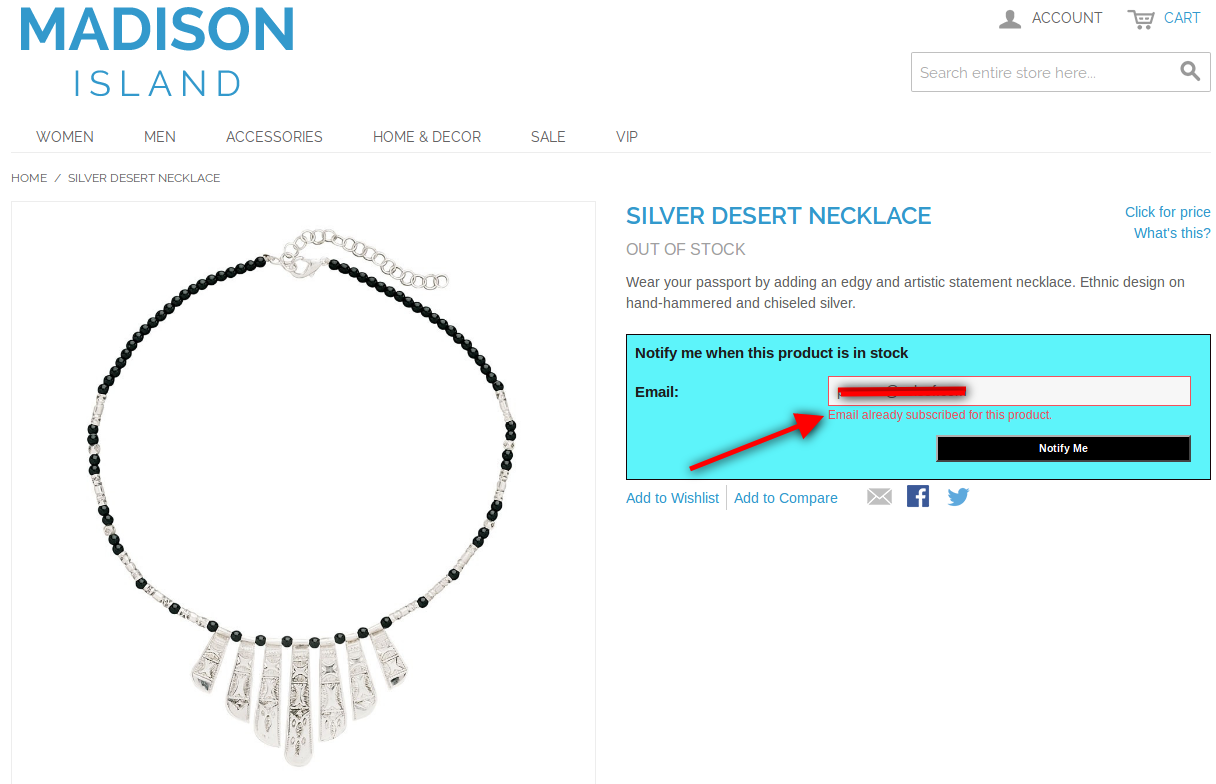
If a customer who has already subscribed for a particular product for Back in Stock notification tries to subscribe again with same email id for the same product then a message will appear showing “You have already subscribed for this product.”.

The screen shot is as following:

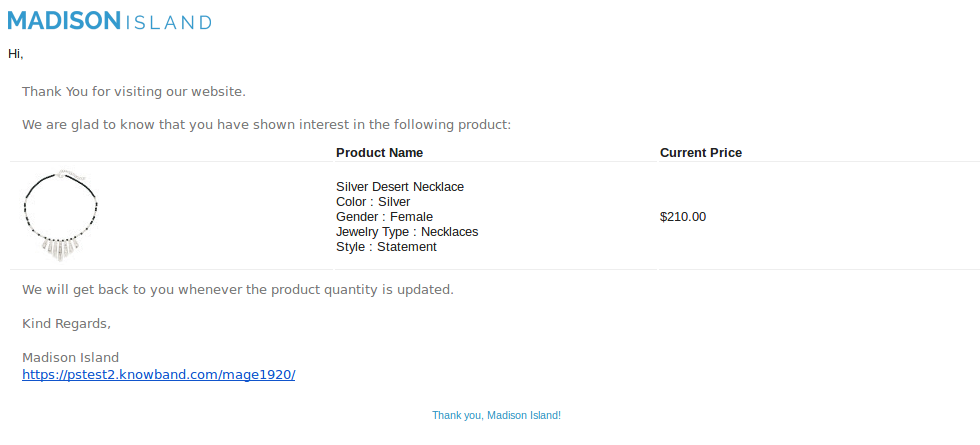
The initial mail of the Magento stock alert that will be triggered to the entered email id is as following:

Watch the video tutorial here:

Click here for Admin Demo & Front Demo.

How to show Opencart product reviews to search engines?

In Opencart, product reviews are not visible to Google because they are loaded using Jquery code. It is not good from SEO perspective because product reviews can help merchants to improve SEO of their website.

In Opencart, product page loads its main content first and then it uses a Jquery function to load product reviews of the product, due to which product reviews do not come in the source code of the page. Since Google only sees the first loaded content which is available in the page source, therefore products reviews are not crawled by Google.

This issue can be fixed in following three 3 ways:

Method #1

You can use our OpenCart Review Incentive plugin which not only shows your product ratings in Google search result but also makes required changes in Opencart product page so that Google can see all product reviews and can crawl them.

Follow the steps mentioned-below to incorporate the same.

Step 1: Purchase OpenCart Review Incentive extension from the Knowband store and install it in your store. For more information regarding the installation and configuration, click here.

Step 2: Once the installation is complete, enable it from the back-end. Set the content that you want to display at the front-end of the site.

That’s it. The customers can give reviews and they will get incentives in return.

Here are some of the other features offered by OpenCart Review Incentive module:

  • The OpenCart plugin replaces the default review system of OpenCart and shows the reviews in the page source code, so that, search engines can read the reviews.
  • Additionally, the store admin can send email reminders notifying the customers to give their reviews.
  • The customers get incentives in return of the reviews given by them. The store admin can fix the amount that they offer as an incentive to the customers.
  • The automated approach of the OpenCart customer review plugin allows the admin to set the frequency of the email.
  • Additionally, they can track the reviews received and incentives redeemed from the back-end of the OpenCart review incentive module.

Method #2

You can make all required changes by following steps which are mentioned below:

  • Edit file “/catalog/view/theme/your_theme/template/product/product.tpl”
  • Replace the following code

<div id=”review”></div>

with

<div id=”review”><?php echo $allreviews;?></div>

In the same file, you also need to replace the following code

$(‘#review’).load(‘index.php?route=product/product/review&product_id=<?php echo $product_id; ?>’);

with

//$(‘#review’).load(‘index.php?route=product/product/review&product_id=<?php echo $product_id; ?>’);

  • Now edit file “catalog/controller/product/product.php”
  • Search for “$this->load->model(‘catalog/product’);” without double quotes and add following code before first search result.

$result=$this->customreview($product_id);
$data[‘allreviews’]=$result;

Also, search for “public function index() {” without double quotes and add following code before search result.

public function customreview($product_id) {
$this->load->language(‘product/product’);

$this->load->model(‘catalog/review’);

$data[‘text_no_reviews’] = $this->language->get(‘text_no_reviews’);

if (isset($this->request->get[‘page’])) {
$page = $this->request->get[‘page’];
} else {
$page = 1;
}

$data[‘reviews’] = array();

$review_total = $this->model_catalog_review->getTotalReviewsByProductId($product_id);

$results = $this->model_catalog_review->getReviewsByProductId($product_id, ($page – 1) * 5, 5);

foreach ($results as $result) {
$data[‘reviews’][] = array(
‘author’ => $result[‘author’],
‘text’ => nl2br($result[‘text’]),
‘rating’ => (int)$result[‘rating’],
‘date_added’ => date($this->language->get(‘date_format_short’), strtotime($result[‘date_added’]))
);
}

$pagination = new Pagination();
$pagination->total = $review_total;
$pagination->page = $page;
$pagination->limit = 5;
$pagination->url = $this->url->link(‘product/product/review’, ‘product_id=’ . $product_id . ‘&page={page}’);

$data[‘pagination’] = $pagination->render();

$data[‘results’] = sprintf($this->language->get(‘text_pagination’), ($review_total) ? (($page – 1) * 5) + 1 : 0, ((($page – 1) * 5) > ($review_total – 5)) ? $review_total : ((($page – 1) * 5) + 5), $review_total, ceil($review_total / 5));

if (file_exists(DIR_TEMPLATE . $this->config->get(‘config_template’) . ‘/template/product/review.tpl’)) {
return $this->load->view($this->config->get(‘config_template’) . ‘/template/product/review.tpl’, $data);
} else {
return $this->load->view(‘default/template/product/review.tpl’, $data);
}
}

Method #3:

Knowband offers a free module that can help you show the reviews in the page source code and makes it readable by the search engines. Download this free module and install it on your store. Follow below instructions to install it.

  1. Extract the downloaded zip file.
  2. Upload the XML file from Admin panel’s Extensions > Extension Installer page.
  3. Now refresh the modifications from Admin panel’s Extensions > Modifications page.

If you face some issue or need some help to fix this bug, feel free to contact us.

This Would Also Interest You:

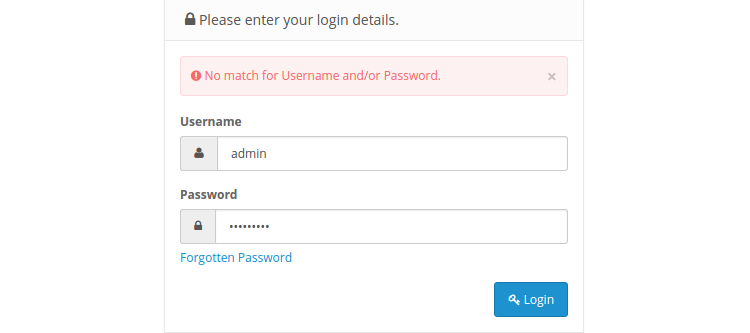
How to Reset Opencart admin password?

Have you lost your OpenCart password? You might be surprised to learn that this is a problem with admin panels quite frequently.

You can update the password in the database if you’ve forgotten your OpenCart admin password. Your account’s password must be changed using phpMyAdmin in cPanel.

Most of the times, it happens when you forget or lost your admin login password and are not even able to recover it using forgot password link. In this case, the only way to regain access to the admin panel is to reset the password directly from the database. The steps to reset the password from the database are easy, but can cause a critical issue if not performed properly. The tutorial discusses the steps to reset OpenCart admin password.

Before proceeding further, we recommend you to take backup of your complete database, just in case.

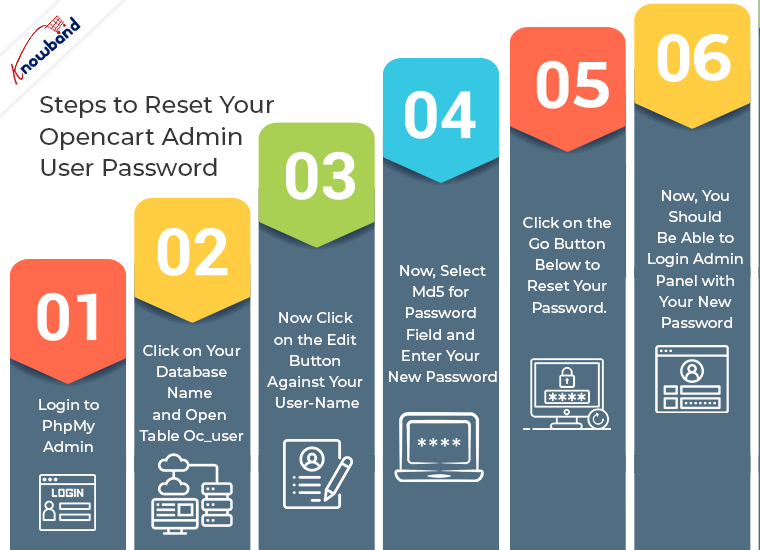
You need to perform following steps to reset your Opencart admin user password.

Step #1: Login to PhpMyAdmin. PhpMyAdmin is a tool which is used to access Mysql database.

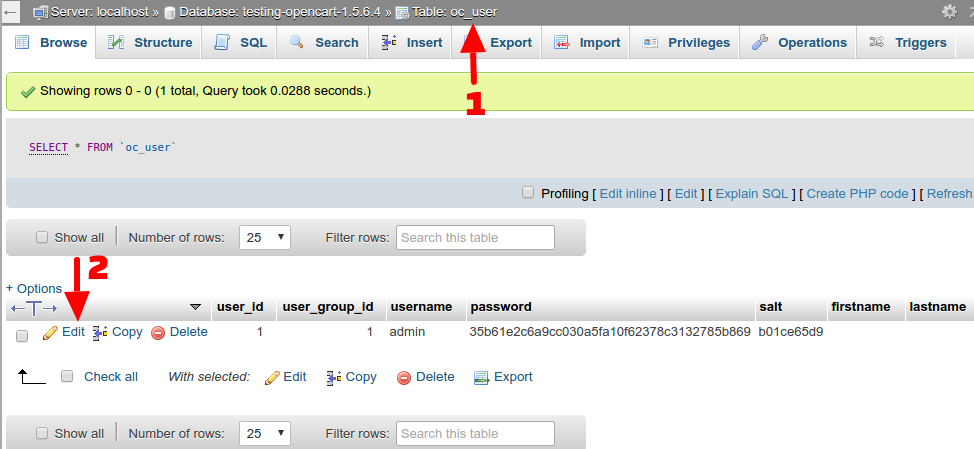
Step #2: Click on your database name and open table oc_user (we are assuming here that your database prefix is oc_).

Step #3: Now click on the edit button against your user-name.

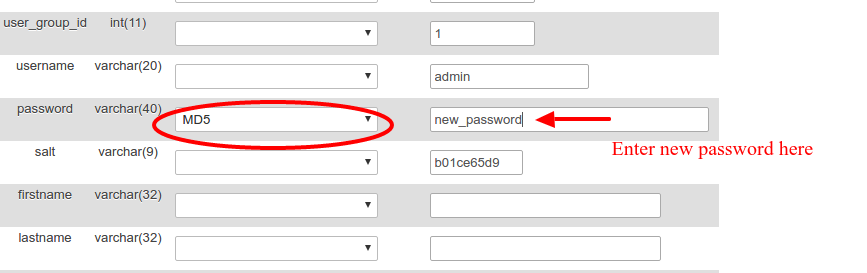
Step #4: Now, select md5 for Password field and enter your new password.

Step #5: Click on the Go button below to reset your password.

Step #6: Now, you should be able to login admin panel with your new password.

These are steps to reset OpenCart admin password.

Feel free to contact us, if you face any issues with the steps mentioned above. Moreover, visit Knowband and avail the solution to your eCommerce platform related issues for mainly these platforms- OpenCart, Magento, Magento 2, Woocommerce, and PrestaShop. We do offer customized plugin development services for these platforms.

Check out No Code Mobile App Builder Solution that every Opencart Admin must have:

How to reset Opencart admin password?

In den meisten Fällen passiert es, wenn Sie Ihr Administrator-Login-Passwort vergessen oder verloren haben und es nicht einmal mit dem Passwort-Passwort wiederherstellen können.

In diesem Fall besteht die einzige Möglichkeit, den Zugriff auf das Admin-Panel wiederherzustellen, darin, das Passwort direkt über das Administratorkennwort zurückzusetzen

Bevor Sie fortfahren, empfehlen wir Ihnen, eine Sicherungskopie Ihrer vollständigen Datenbank zu erstellen, nur für den Fall.

Sie müssen die folgenden Schritte ausführen, um Ihr OpenCart Admin-Benutzerkennwort zurückzusetzen.

Schritt # 1: Einloggen in

Schritt # 2: Klicken Sie auf Ihren Datenbanknamen und öffnen Sie die Tabelle oc_user (wir gehen hier davon aus, dass Ihr Datenbank-Präfix oc_ ist).

Schritt # 3: Klicken Sie nun auf den Bearbeiten-Button neben Ihrem Benutzernamen.

Schritt # 4: Wählen Sie nun md5 für das Passwortfeld und geben Sie Ihr neues Passwort ein.

Schritt # 5: Klicken Sie auf die Schaltfläche Los, um Ihr Passwort zurückzusetzen.

Schritt # 6: Jetzt sollten Sie in der Lage sein, sich mit Ihrem neuen Passwort in das Admin-Panel einzuloggen.

Fühlen sich frei kontaktieren Sie uns.wenn du auffällst

How to reset Opencart admin password?

Il più delle volte, succede quando dimentichi o perdi la password di accesso amministratore e non sei nemmeno in grado di recuperarla usando il link password dimenticata.

In questo caso, l'unico modo per riottenere l'accesso al pannello di amministrazione consiste nel reimpostare la password direttamente da

Prima di procedere ulteriormente, ti consigliamo di eseguire il backup del tuo database completo, per ogni evenienza.

È necessario eseguire le seguenti operazioni per ripristinare la password dell'utente amministratore di Opencart.

Passo # 1: Accedere

Passo # 2: Fare clic sul nome del database e aprire la tabella oc_user (assumiamo che il prefisso del database sia oc_).

Passo # 3: Ora fai clic sul pulsante di modifica con il tuo nome utente.

Passo # 4: Ora, seleziona md5 per il campo Password e inserisci la tua nuova password.

Passo # 5: Fare clic sul pulsante Vai sotto per reimpostare la password.

Passo # 6: Ora, dovresti essere in grado di accedere al pannello di amministrazione con la tua nuova password.

Sentiti libero di CONTATTI, se affronti

How to reset Opencart admin password?

Zazwyczaj dzieje się tak, gdy zapomniałeś lub zgubiłeś hasło logowania administratora, a nawet nie możesz go odzyskać za pomocą zapomnianego linku do hasła.

W takim przypadku jedynym sposobem na odzyskanie dostępu do panelu administracyjnego jest zresetowanie hasła bezpośrednio z

Zanim przejdziemy dalej, zalecamy na wszelki wypadek wykonanie kopii zapasowej całej bazy danych.

Musisz wykonać następujące kroki, aby zresetować hasło użytkownika admin OpenCart.

Krok # 1: Zaloguj się do

Krok # 2: Kliknij swoją nazwę bazy danych i otwórz tabelę oc_user (zakładamy tutaj, że twój prefiks bazy danych to oc_).

Krok # 3: Teraz kliknij przycisk edycji na swojej nazwie użytkownika.

Krok # 4: Teraz wybierz pole md5 dla hasła i wprowadź nowe hasło.

Krok # 5: Kliknij przycisk Go poniżej, aby zresetować hasło.

Krok # 6: Teraz powinieneś być w stanie zalogować się do panelu administracyjnego za pomocą nowego hasła.

Zapraszam do Skontaktuj się z nami, jeśli stawisz czoła

How to reset Opencart admin password?

Na maioria das vezes, isso acontece quando você esquece ou perde sua senha de login de administrador e nem consegue recuperá-la usando o link de senha esquecida.

Neste caso, a única maneira de recuperar o acesso ao painel de administração é redefinir a senha diretamente do

Antes de prosseguir, recomendamos que você faça backup de seu banco de dados completo, apenas no caso.

Você precisa executar as seguintes etapas para redefinir sua senha de usuário administrador do Opencart.

Etapa # 1: Logar em

Etapa # 2: Clique no nome do seu banco de dados e abra a tabela oc_user (estamos assumindo aqui que o prefixo do seu banco de dados é oc_).

Etapa # 3: Agora clique no botão de edição em seu nome de usuário.

Etapa # 4: Agora, selecione md5 para o campo Senha e insira sua nova senha.

Etapa # 5: Clique no botão Ir abaixo para redefinir sua senha.

Etapa # 6: Agora, você deve poder acessar o painel de administração com sua nova senha.

Sinta-se livre para contacte-nos, se você enfrentar

How to reset Opencart admin password?

In den meisten Fällen passiert es, wenn Sie Ihr Administrator-Login-Passwort vergessen oder verloren haben und es nicht einmal mit dem Passwort-Passwort wiederherstellen können.

In diesem Fall besteht die einzige Möglichkeit, den Zugriff auf das Admin-Panel wiederherzustellen, darin, das Passwort direkt über das Administratorkennwort zurückzusetzen

Bevor Sie fortfahren, empfehlen wir Ihnen, eine Sicherungskopie Ihrer vollständigen Datenbank zu erstellen, nur für den Fall.

Sie müssen die folgenden Schritte ausführen, um Ihr OpenCart Admin-Benutzerkennwort zurückzusetzen.

Schritt # 1: Einloggen in

Schritt # 2: Klicken Sie auf Ihren Datenbanknamen und öffnen Sie die Tabelle oc_user (wir gehen hier davon aus, dass Ihr Datenbank-Präfix oc_ ist).

Schritt # 3: Klicken Sie nun auf den Bearbeiten-Button neben Ihrem Benutzernamen.

Schritt # 4: Wählen Sie nun md5 für das Passwortfeld und geben Sie Ihr neues Passwort ein.

Schritt # 5: Klicken Sie auf die Schaltfläche Los, um Ihr Passwort zurückzusetzen.

Schritt # 6: Jetzt sollten Sie in der Lage sein, sich mit Ihrem neuen Passwort in das Admin-Panel einzuloggen.

Fühlen sich frei Kontaktwenn du auffällst

Your license is inactive or expired, please subscribe again!

How to reset Opencart admin password?

Il più delle volte, succede quando dimentichi o perdi la password di accesso amministratore e non sei nemmeno in grado di recuperarla usando il link password dimenticata.

In questo caso, l'unico modo per riottenere l'accesso al pannello di amministrazione consiste nel reimpostare la password direttamente da

Prima di procedere ulteriormente, ti consigliamo di eseguire il backup del tuo database completo, per ogni evenienza.

È necessario eseguire le seguenti operazioni per ripristinare la password dell'utente amministratore di Opencart.

Passo # 1: Accedere

Passo # 2: Fare clic sul nome del database e aprire la tabella oc_user (assumiamo che il prefisso del database sia oc_).

Passo # 3: Ora fai clic sul pulsante di modifica con il tuo nome utente.

Passo # 4: Ora, seleziona md5 per il campo Password e inserisci la tua nuova password.

Passo # 5: Fare clic sul pulsante Vai sotto per reimpostare la password.

Passo # 6: Ora, dovresti essere in grado di accedere al pannello di amministrazione con la tua nuova password.

Sentiti libero di CONTATTI, se affronti

Your license is inactive or expired, please subscribe again!