

PrestaShop Form Studio – All-in-One Feedback, Contact & Survey Form Builder User Guide
Create contact, feedback, survey, and custom forms with the Knowband PrestaShop Form Studio Module. Learn setup, customization, integrations, and form management in Prestashop
1.0 Introduction
Running an online store without a reliable way to collect customer input is like selling in the dark. Whether you need a simple survey form, a detailed product feedback form, or a multi-layout customer satisfaction survey, the right tool makes all the difference. PrestaShop Form Studio, All-in-One Survey & Feedback Form Builder is built exactly for this.
This PrestaShop Form Builder Addon allows store owners to create unlimited forms without writing a single line of code. From basic contact forms to survey forms, it covers every data collection scenario that an eCommerce business faces. This works equally well for solo store owners and large enterprise teams managing multiple PrestaShop websites.
What sets this PrestaShop Form Builder Addon apart is the vast range of features that it handles in one place: form creation, spam protection via Cloudflare Turnstile, email notifications to admins and customers, marketing integrations with Mailchimp and Brevo, form submission management, and IP/email blacklisting. You do not need five different modules to manage your customer communication workflow. This one PrestaShop Form Builder Module handles it all.
2.0 Installation Guide of the PrestaShop Form Studio
System Requirements
Before installing the module, confirm that your environment meets the following requirements:
- PrestaShop version 1.7.x or 8.x or 9.x.x
- PHP 7.2 or higher
- A working SMTP email configuration in your PrestaShop back office
- Write permissions on the /modules directory of your PrestaShop installation
Uploading and Installing the Module
Step 1 – Upload the module: Log in to your PrestaShop back office. Go to Modules > Module Manager and click Upload a Module (top-right). Select the ZIP file downloaded from Knowband and click Open. PrestaShop will upload and extract the files automatically.
Step 2 – Install: Once uploaded, click Install when prompted. After installation, you’ll be redirected to the module configuration page.
Step 3 – Locate if needed: If the module doesn’t appear automatically, search “Form Studio” in the Module Manager search bar and click Configure.
3.0 Common Installation Issues
- Upload fails: Your server’s upload size limit is too low. Ask your hosting provider to increase upload_max_filesize and post_max_size in PHP settings to at least 32 MB.
- Emails not sending: Check your SMTP settings under Advanced Parameters > Email in the back office. The module uses the store’s default email configuration unless overridden on a per-form basis.
- Interface appears broken or unstyled: Clear your browser cache and the PrestaShop theme cache under Design > Theme & Logo > Advanced Settings.
4.0 General Settings Admin Panel
4.0. 1 Enable or Disable the Module
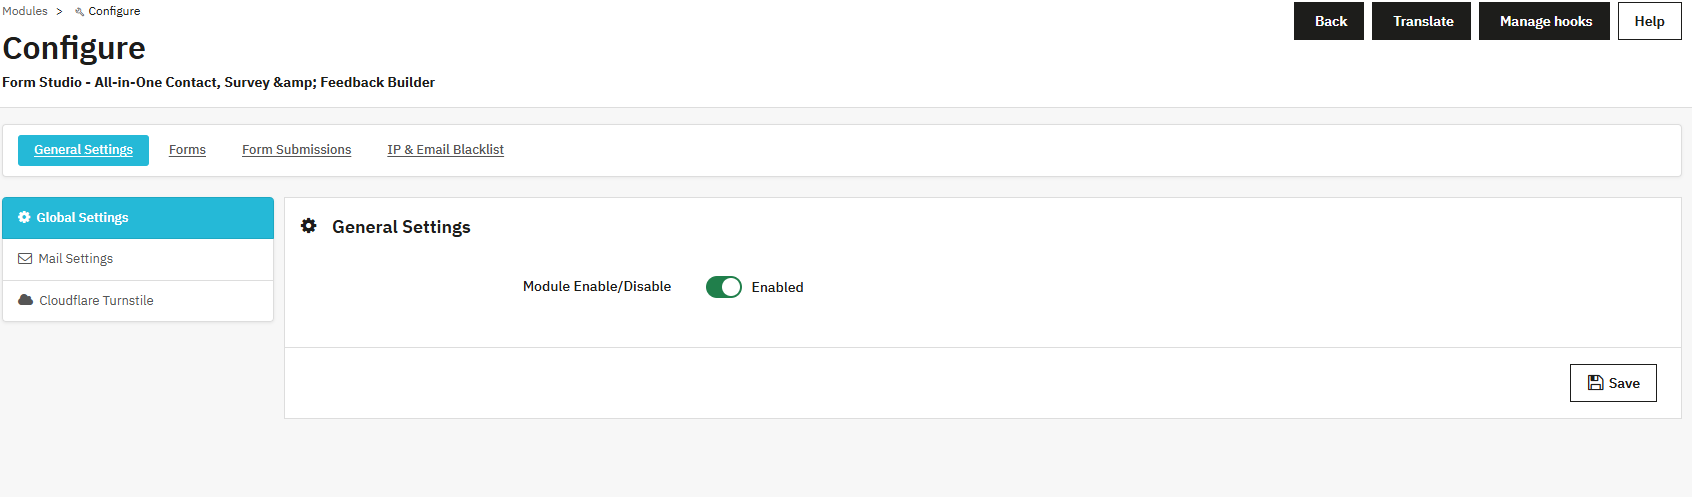
The first thing you see inside the module is the button to enable or disable the PrestaShop Survey Builder Module. When the module is enabled, all active forms are live on the front end. Disabling it hides all forms from visitors without deleting any configurations.
4.0.2 Mail Settings
The mail settings section controls how your store communicates with both admins and customers after a form is submitted.
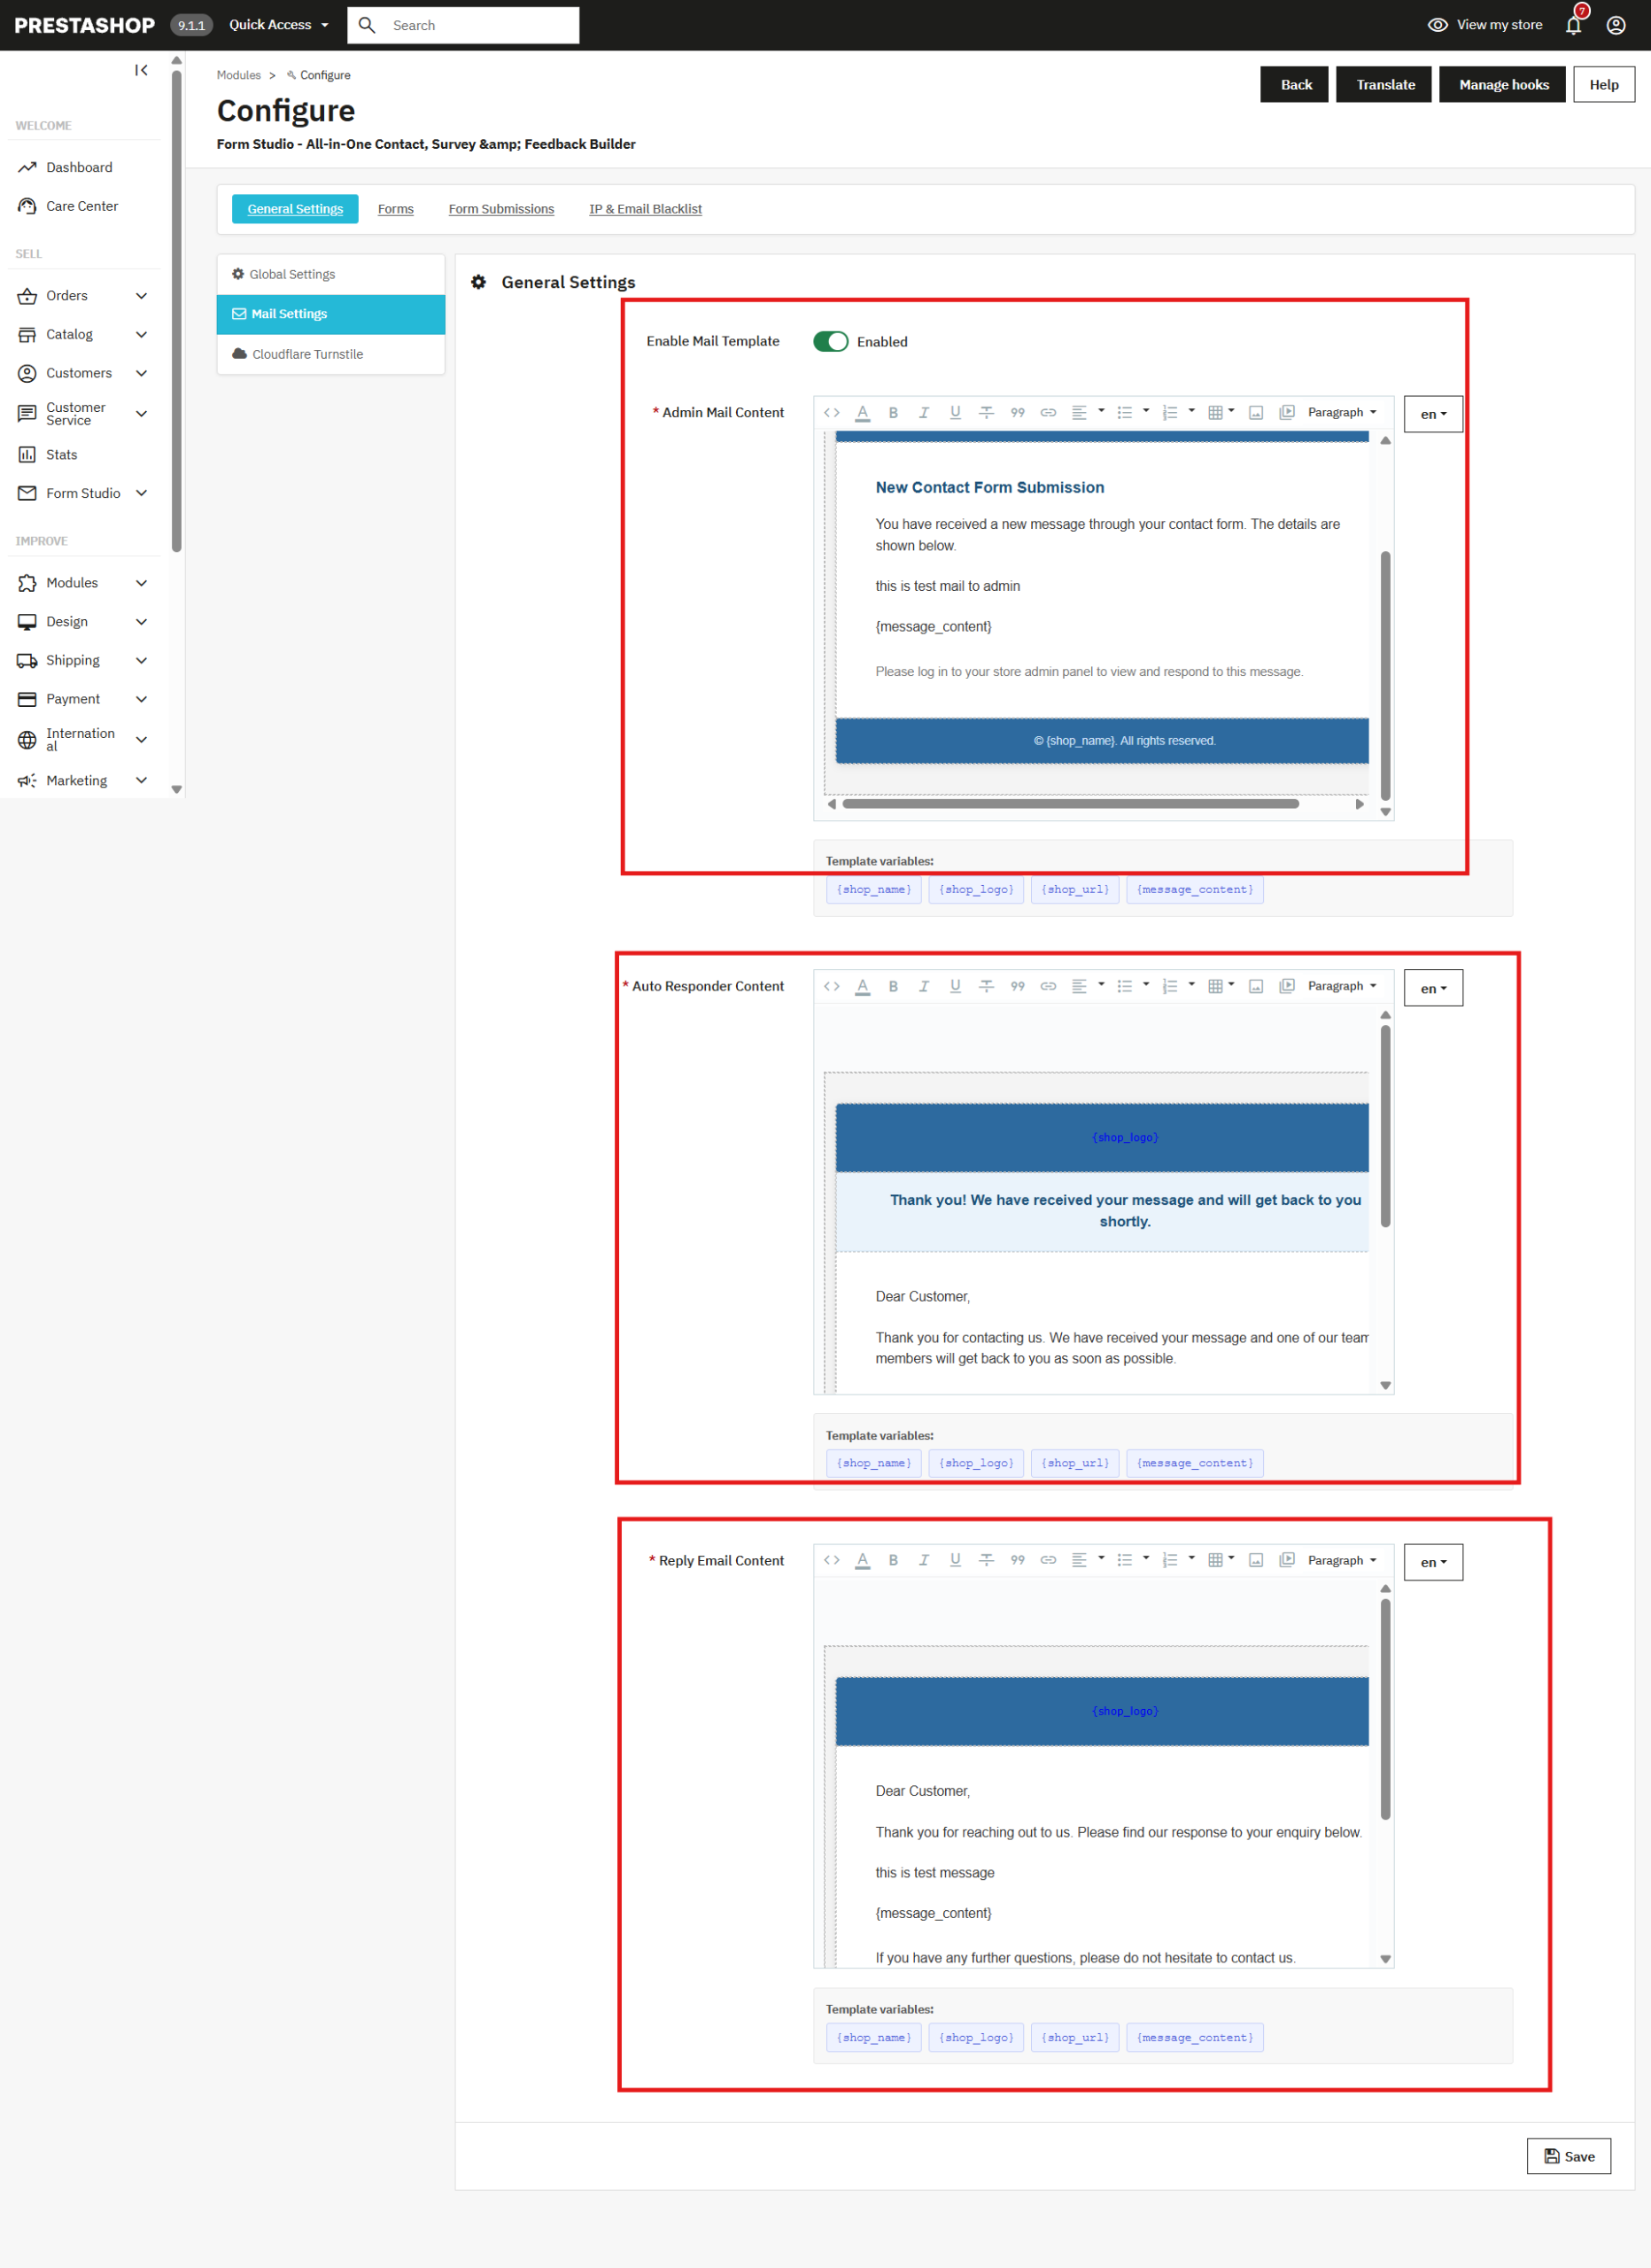
Enable Email templates: You can enable or disable the predefined email template in the PrestaShop Form Creator. If this module is on, then the mails will be delivered on the predefined email template with all variables.
Admin Mail Content: This is the email your store’s team receives whenever a form is submitted by a user. You can customise the subject, body, and format according to your store’s brand using the rich text editor. You can also add the template variables like the submitter’s name, email address, and form field values dynamically by clicking the corresponding tag in the Template Variables section.
Auto Responder Content: Auto Responder Content is the confirmation email sent automatically to the customer after they submit a form. You can use it to set expectations, share next steps, or simply thank the customer for reaching out.
Reply Email: Reply Email Content controls the format of manual replies sent by admins directly from the form submissions panel inside the back office.
All three email templates in PrestaShop Survey Builder support rich text formatting, including bold, italic, links, lists, and HTML, so your emails can match your store without any custom development.
4.0.3 Cloudflare Turnstile Spam Protection
Spam is a real problem for any public-facing form. The module integrates spam protection from PrestaShop with Cloudflare Turnstile, one of the most effective and user-friendly spam protection systems available. Unlike traditional CAPTCHA, which frustrates real users,
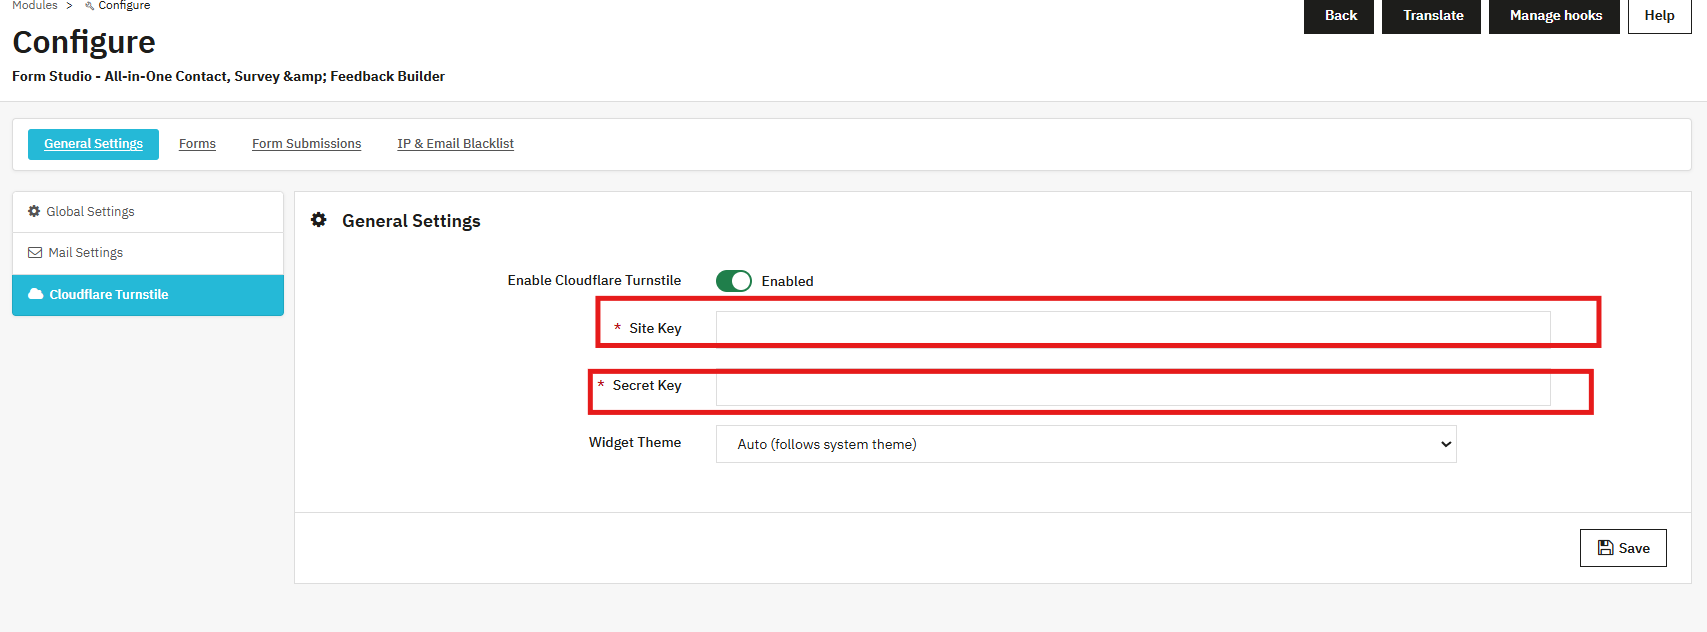
To enable spam detection, toggle Enable Cloudflare Turnstile on, then enter your Site Key and Secret Key from your Cloudflare dashboard. The Widget Theme can be set to Auto, Light, or Dark depending on your store’s design.
Once enabled, you can also add the Cloudflare Turnstile field directly inside individual forms using the form builder’s input field options.
Steps to Generate Secret Key and Site Key
- Log in to your Cloudflare account and open the Turnstile dashboard from the left side in Protect & Connect->Application Security->Turnstile.
- Click Add Widget and enter your website domain details.
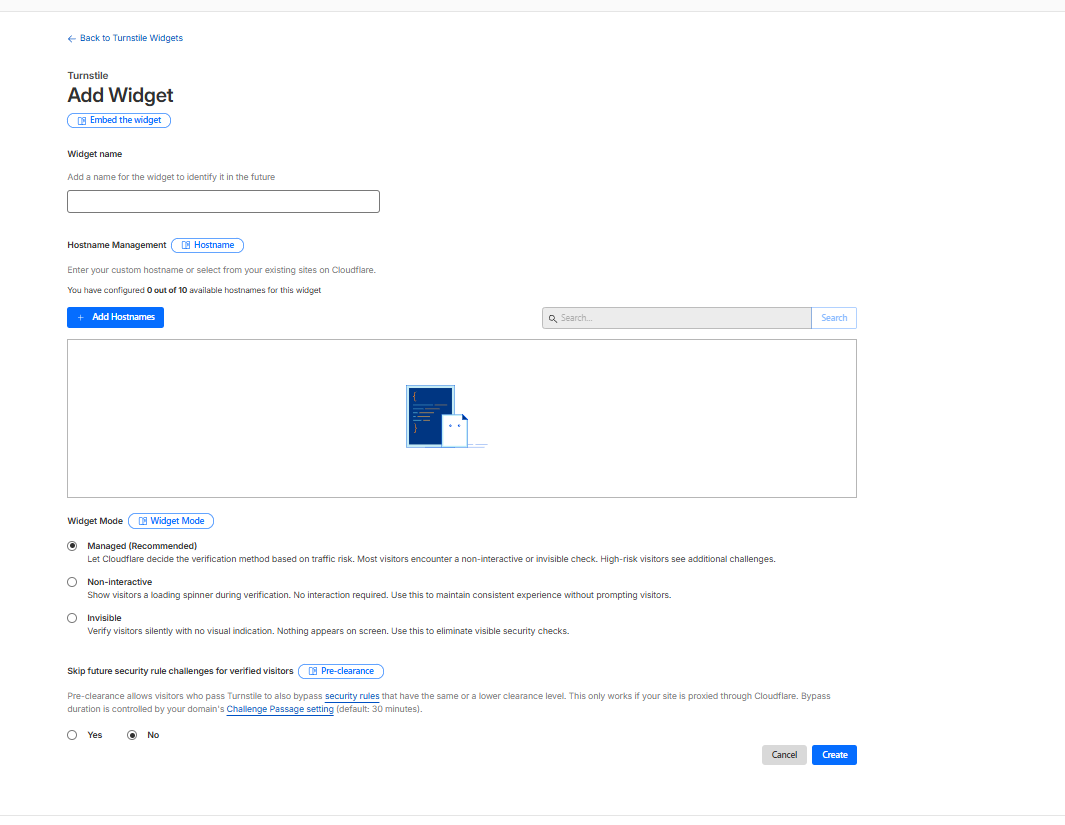

- Choose the preferred Turnstile widget mode and create the widget.
- Copy the generated Site Key and Secret Key from the dashboard.
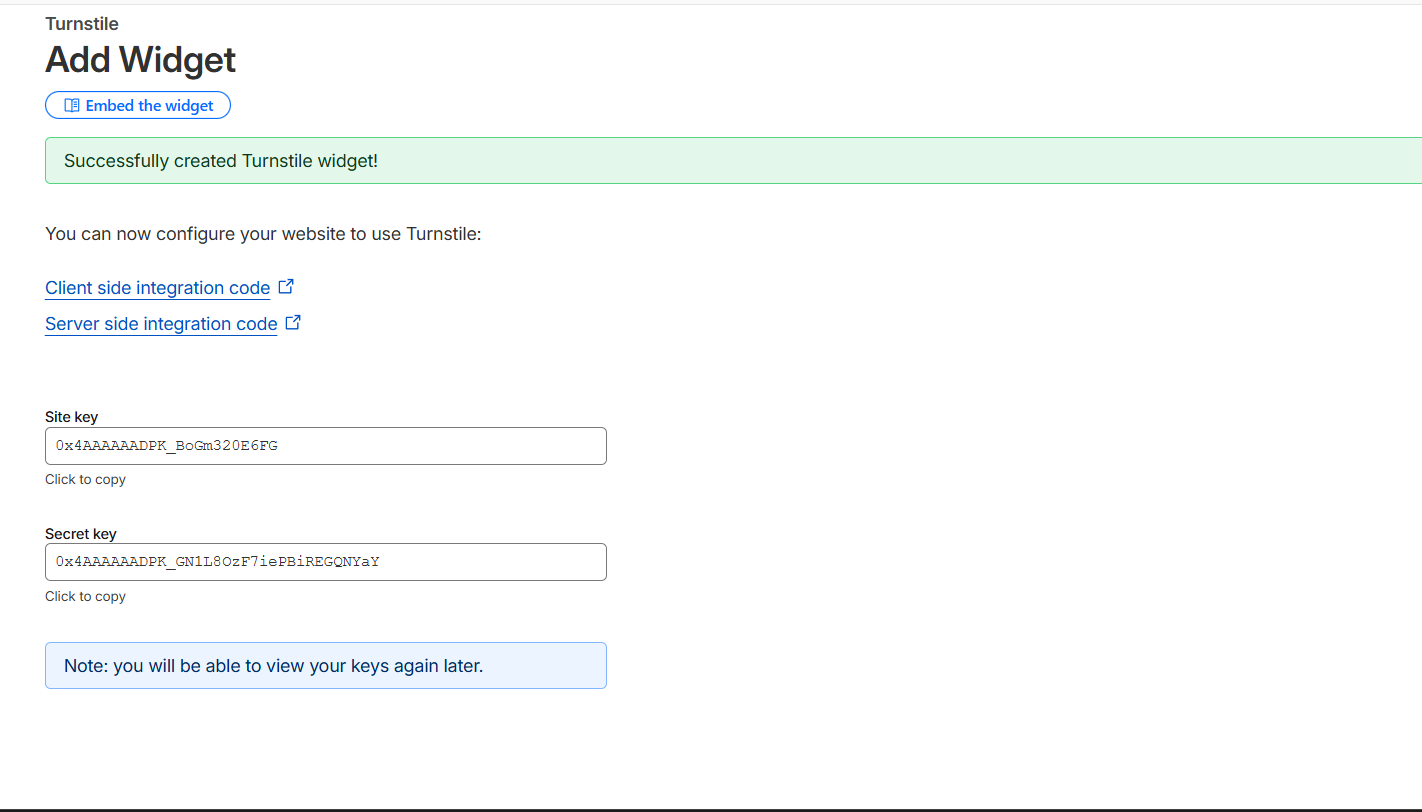

- Paste the keys into your website or module settings and save the configuration.
4.1 Creating and Adding Forms Using PrestaShop Form Builder Module
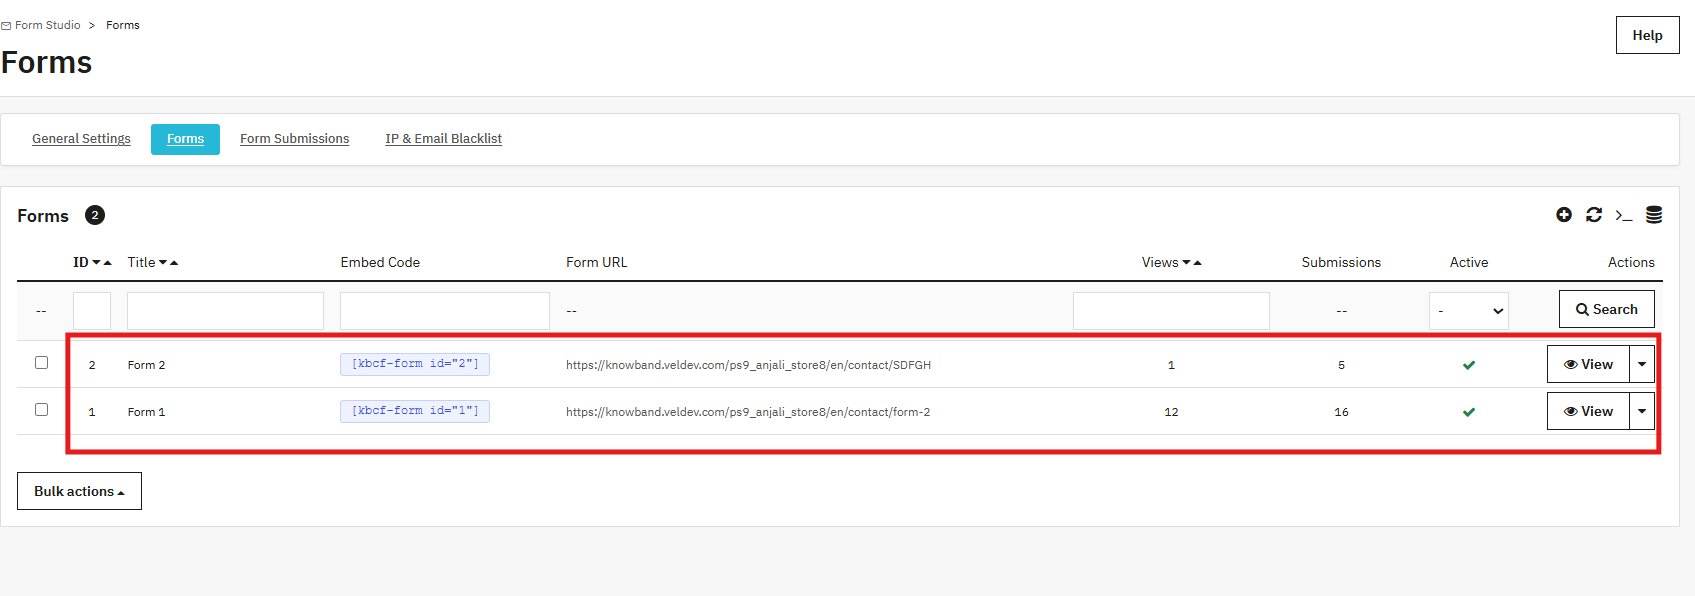
4.1.1 Adding a New Form
Click Add New Form to begin. Each form has its own independent configuration, meaning you can run different forms with different settings across different pages of your store simultaneously.
The form creation panel includes the following fields:
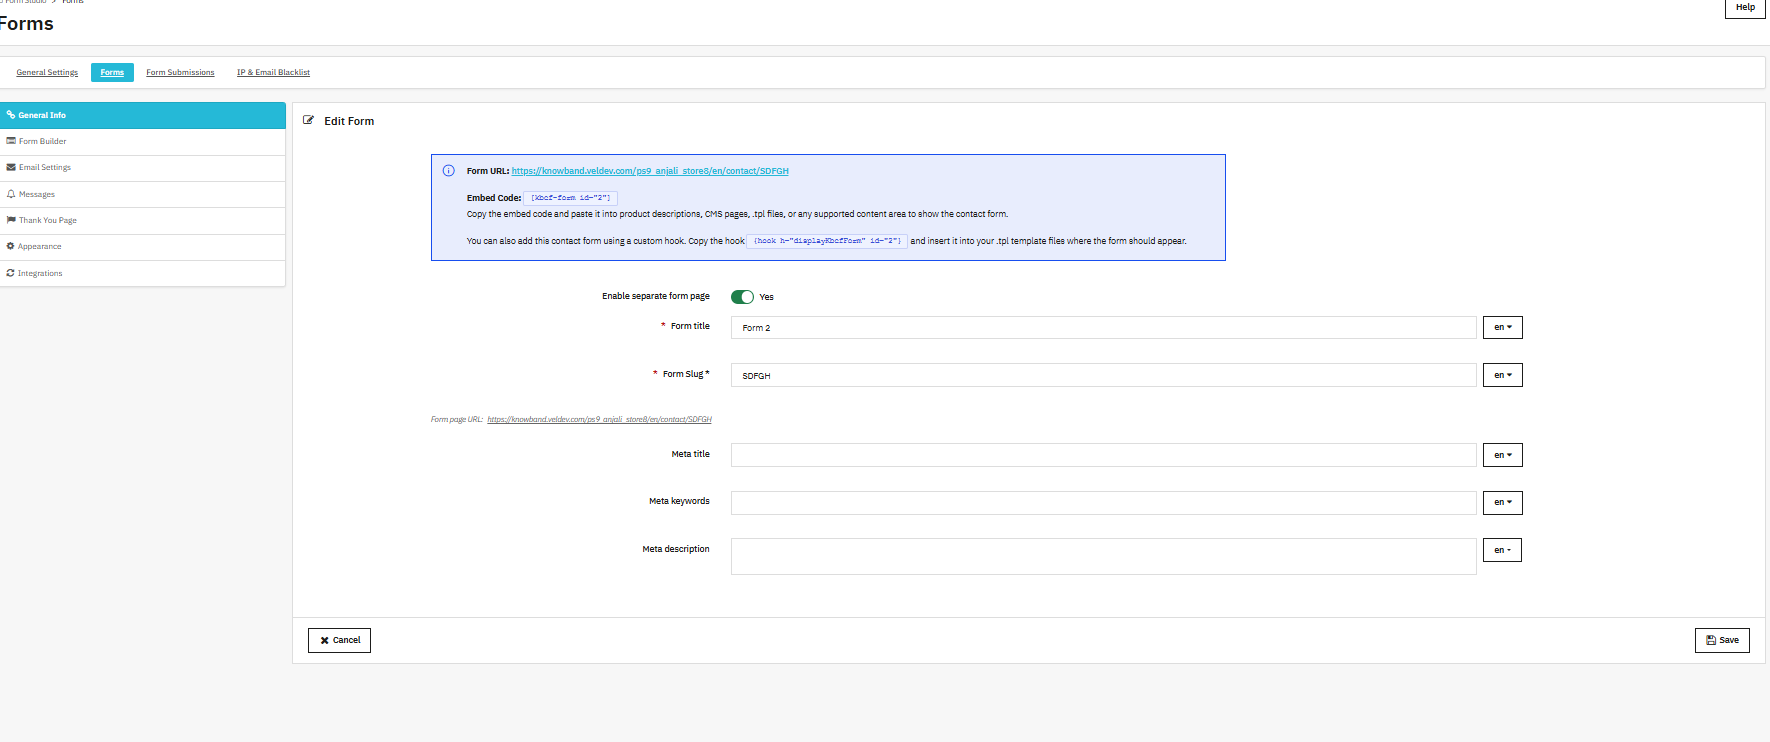
Enable Separate Form Page: This feature controls whether this form gets its own dedicated URL on your store. If this is enabled as yes, then the PrestaShop Form Studio module generates a page with the slug you provided.
Form Title: The name displayed to customers above the form. We suggest keeping it clear and descriptive so customers immediately understand what the form is for. For example: “Request a Quote,” “Share Your Feedback,” or “Get in Touch.”
Form Slug: The added slug will be added to the URL so that you can have the URL based on your requirement. For example, “thank-u” will result in yourstore.com/form/thank-u
Form Meta Title: This meta title helps in ranking the form page in the search results. For example: “Contact Our Support Team – Fashionstore.”
Form Keywords: This field’s meta keywords help in categorizing the form within the website.
Form Meta Description: This meta description of the form in PrestaShop form builder helps in search engines. For example, you can add in the form meta description as “Fill out our quick contact form and our team will get back to you within 24 hours.” This will help the customer to find the form when they search for your store’s support.
4.1.2 Designing the Form Layout
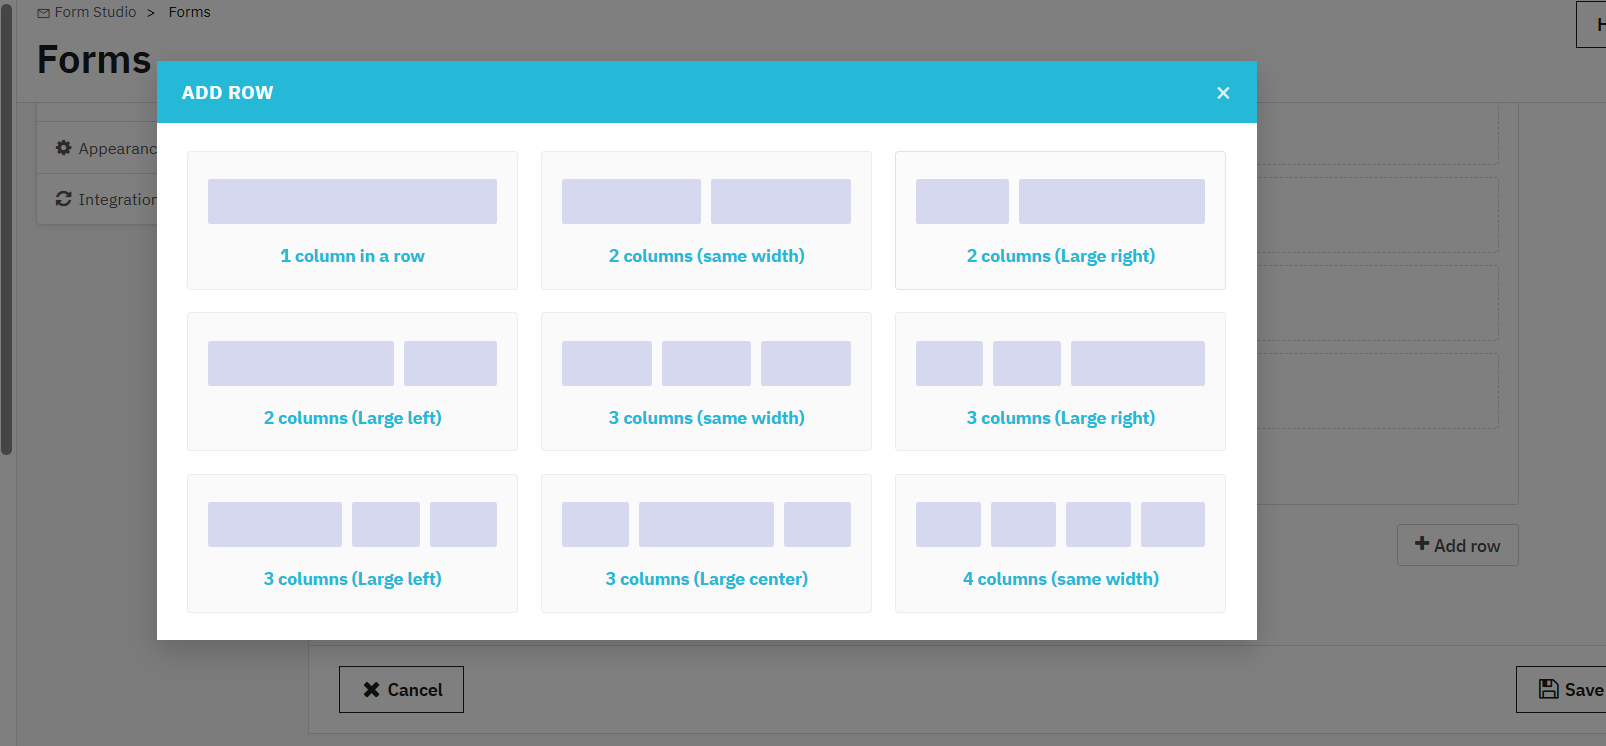
The form builder uses a column-based layout system. Before adding fields, choose how many columns each row should contain.
Options range from a single full-width column to four equal columns, with additional variants offering larger left or right columns for asymmetric layouts.
This flexibility means you can create clean, single-column survey forms as easily as complex multi-column data collection forms where related fields sit side by side using the PrestaShop Online Form Builder Module
4.1.3 Adding Input Fields
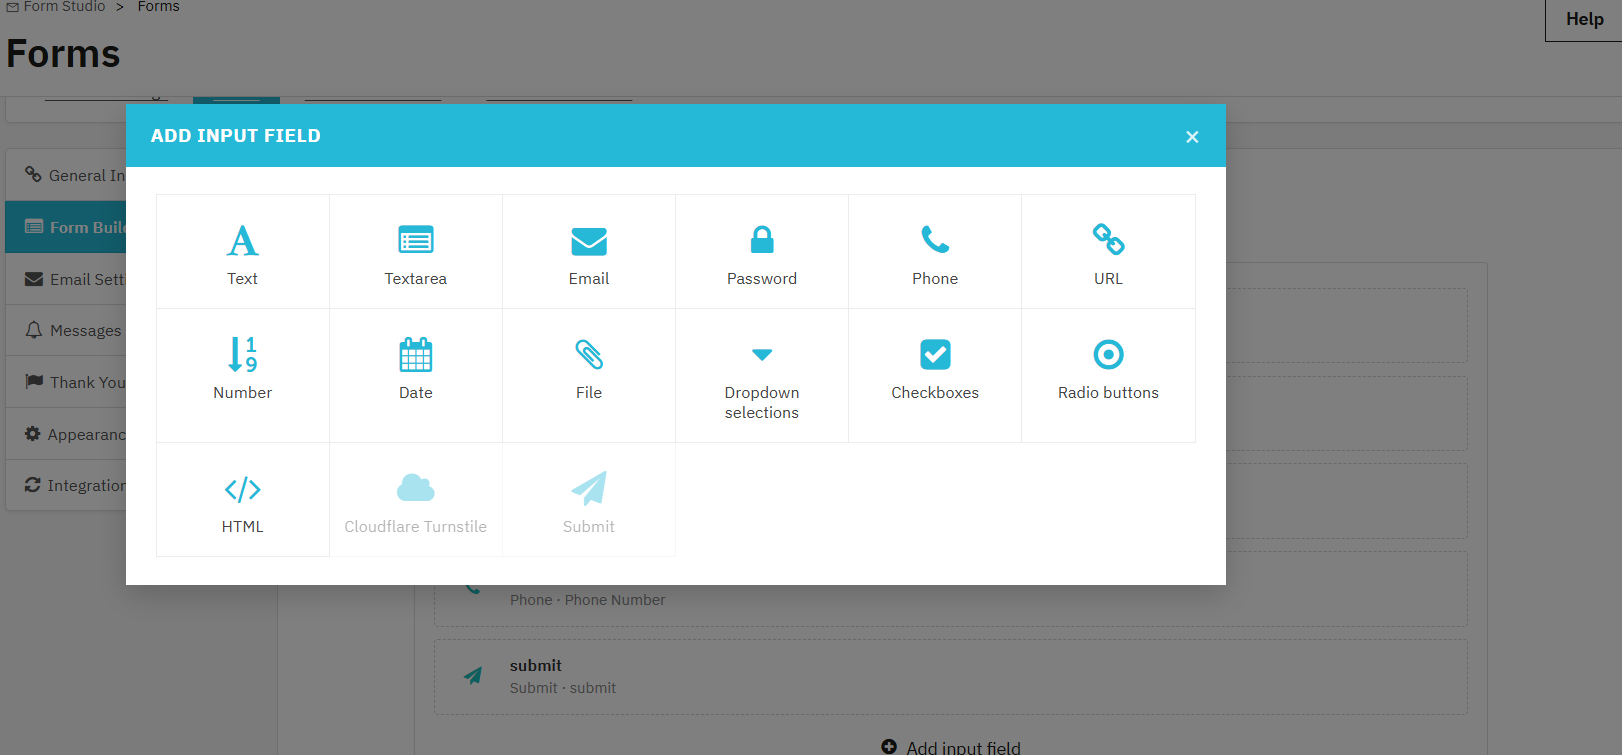
To add an input field, click Add Input Field inside any row to insert a form element. Available field types:
Text / Textarea: Collect short or long written responses from customers.
Email: Captures email addresses with format validation.
Password, Phone, URL, Number: Specialized input fields with automatic validation based on the selected field type.
Date: Allows users to select or enter dates with format validation.
File: Let’s customers upload attachments in formats you specify.
Dropdown, Checkbox, Radio button: Multiple-choice fields; choose based on how many options you have and whether single or multiple selections are needed.
HTML: Embeds custom markup inside the form, such as instructions or section headers.
Cloudflare Turnstile: Places the spam protection widget at a specific position within the form.
Submit: Submits the form and triggers configured actions such as email notifications, auto-replies, integrations, and thank-you pages.
4.1.4 Email Settings
Each form has its own email configuration, which can be managed from the contact form’s mail settings in the PrestaShop Online Form Builder Module. This is especially useful when you have multiple forms for different departments or purposes.
For the admin notification email:
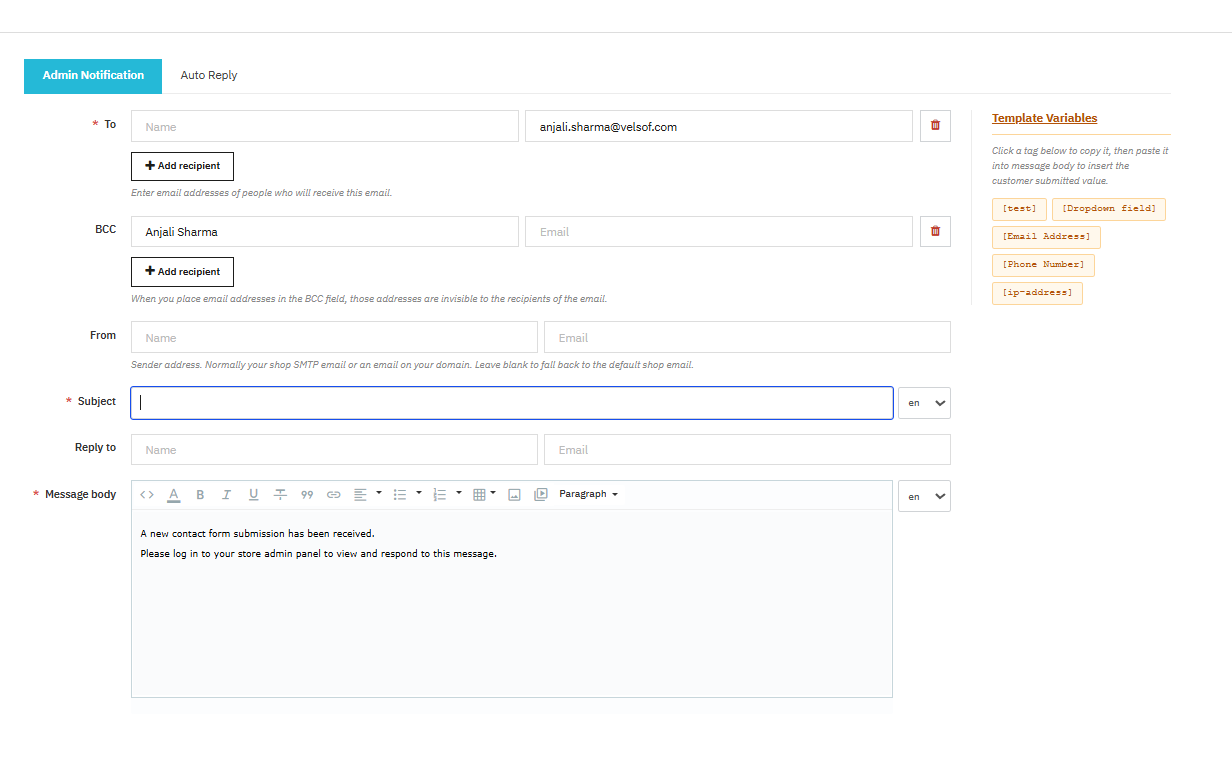
You can set: the recipient addresses in the To field; additional hidden recipients in the BCC field; a custom From address; and a Subject line that can vary by language in the PrestaShop lead generation form.
The Reply To field lets you route customer replies to a specific inbox, for example, your support team, rather than your general admin address.
The message body editor uses the same rich text interface as the general settings, and template variables let you pull in the actual values your customer submitted dynamically.
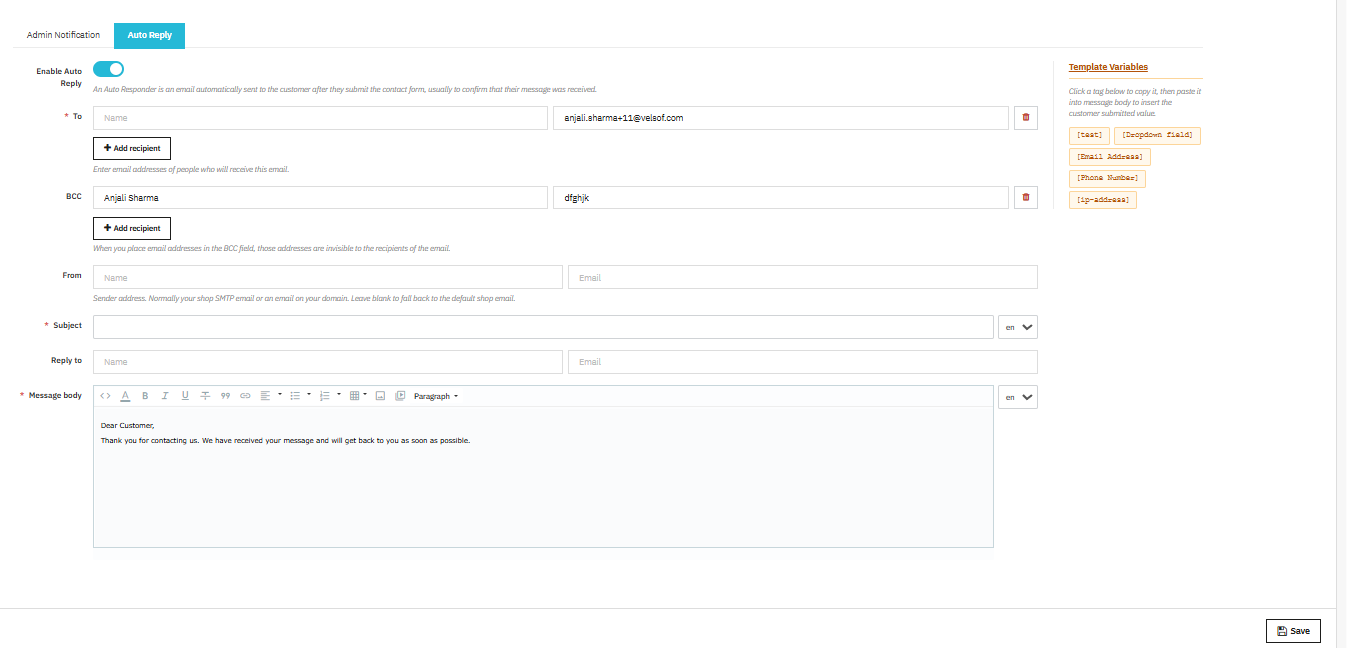
The Auto Reply section mirrors this configuration for the customer-facing confirmation email. Enable Auto Reply, then configure the To, BCC, From, Subject, Reply To, and Message Body fields. The auto-responder runs immediately after submission and does not require any manual action from your team.
4.1.5 Custom Validation Messages
Each validation scenario has its own configurable message. You can set messages for: successful submission, failed submission, spam detection, empty required fields, inputs exceeding maximum length, invalid date formats, file upload failures, unsupported file types, oversized files, PHP upload errors, invalid number formats, values below or above the allowed range, invalid email addresses, invalid URLs, invalid phone numbers, and blocked IPs or emails.
4.1.6 Display “Thank you” page after form submission
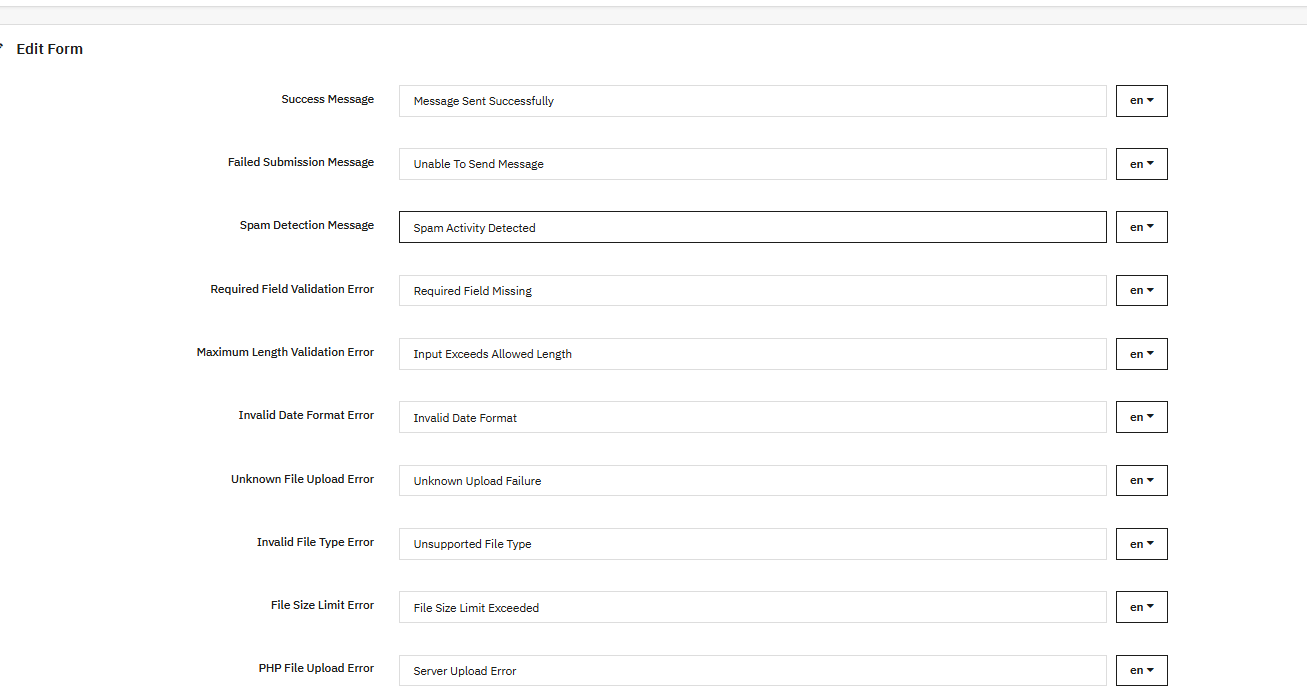
Set to “Yes” to activate a post-submission page. When disabled, the form resets after submission with no further action.
“Thank you” page type:
Once enabled, choose between:
- Default page: A built-in thank-you page configured inside the module. No separate CMS page needed.
- Custom URL: Redirects the customer to a URL you specify.
Title: The heading shown at the top of the default thank-you page.
Page alias: The URL slug for the page. Keep it short, lowercase, and hyphenated.
Content: Body text of the thank-you page, editable via the rich text editor. Supports bold, italic, underline, strikethrough, lists, tables, blockquotes, links, images, embedded videos, colored text, and raw HTML.
4.1.7 Appearance and Display Settings
From the Appearance setting, you can handle the display of the form on your website using the PrestaShop customer feedback form.
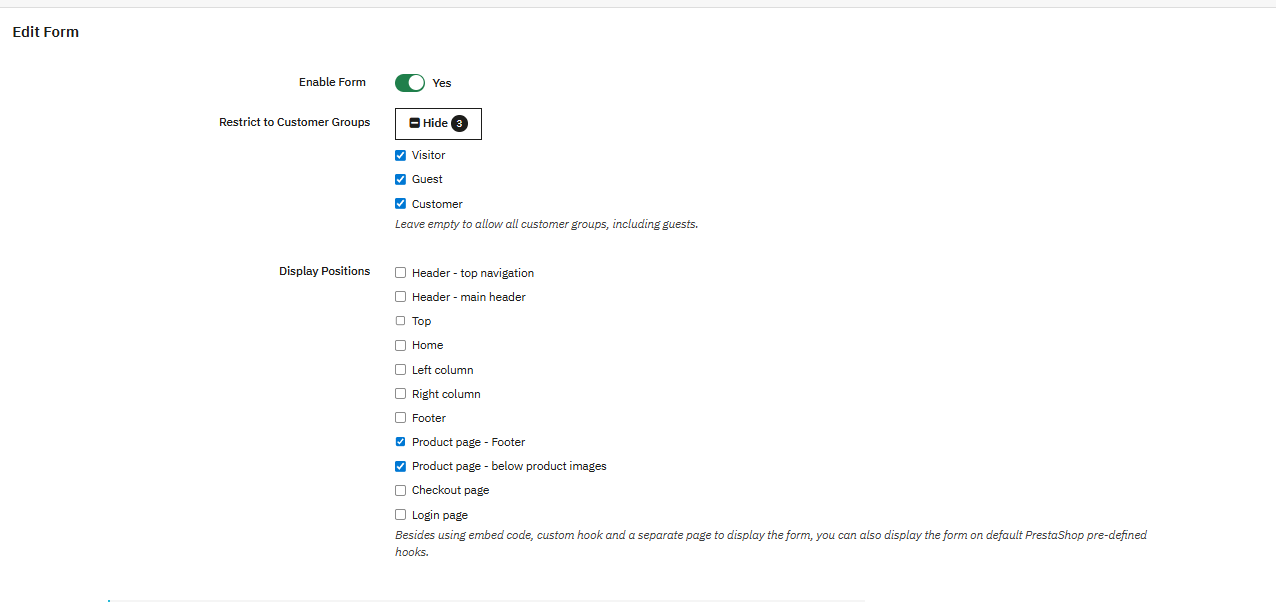
Enable Form – Turns this form on or off on the front end. “Yes” makes it live, “No” hides it. Everything you’ve configured stays saved either way using PrestaShop Online Form Builder Addon.
Restrict to Customer Groups: Choose which visitors can see this form:
- Visitor– Someone browsing without an account.
- Guest – Someone going through checkout without registering.
- Customer – Someone logged into a registered account.
Leave it empty, and everyone sees it. Moreover, you can restrict to customers for post-purchase surveys, or you can restrict to visitors for new audience lead capture.
Display Positions: Pick where the form appears. These are PrestaShop’s built-in hook locations, no custom code needed:
- Header Top Navigation: Above the nav bar, on every page.
- Header – Main Header: Inside the header, on every page.
- Top: Below the header, above the page content.
- Home: Home page only.
- Left Column: Left sidebar, if your theme has one.
- Right Column: Right sidebar, if your theme has one.
- Footer: Bottom of every page.
- Product Page – Footer: Below the product description.
- Product Page – Below Product Images: Right under the product photos.
- Checkout Page: Handy for delivery notes or order preferences.
- Login Page: Good for surveys or lead capture at login. You can also place forms via embed shortcode, a custom hook, or the form’s standalone URL if none of the above fit.
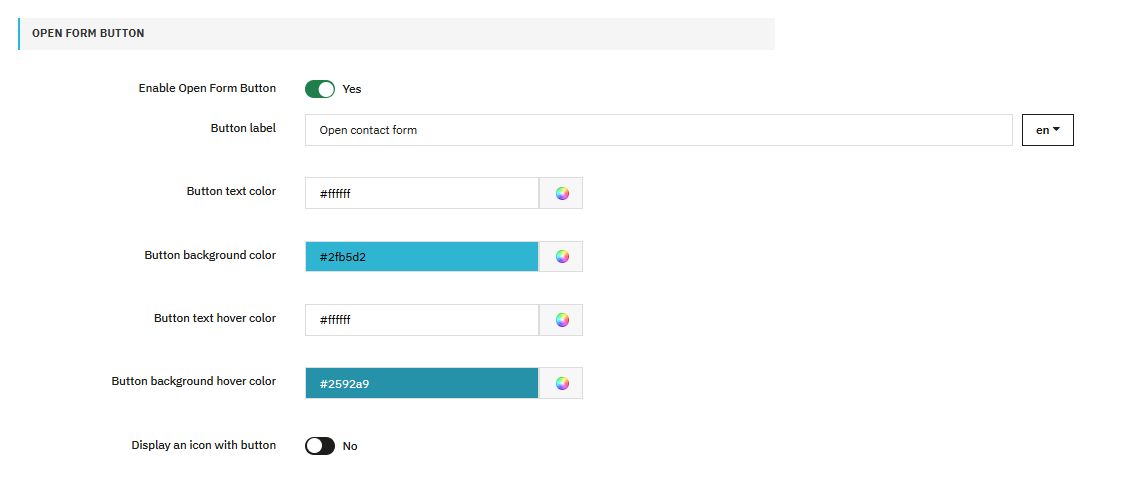
Enable Open Form Button: Adds a button that opens the form in a pop-up instead of embedding it on the page. The form only appears when the visitor clicks the button using the PrestaShop Form Builder Addon.
Floating Button: The Open Form Button sticks to the corner of the screen as the visitor scrolls, so it stays reachable from anywhere on the page.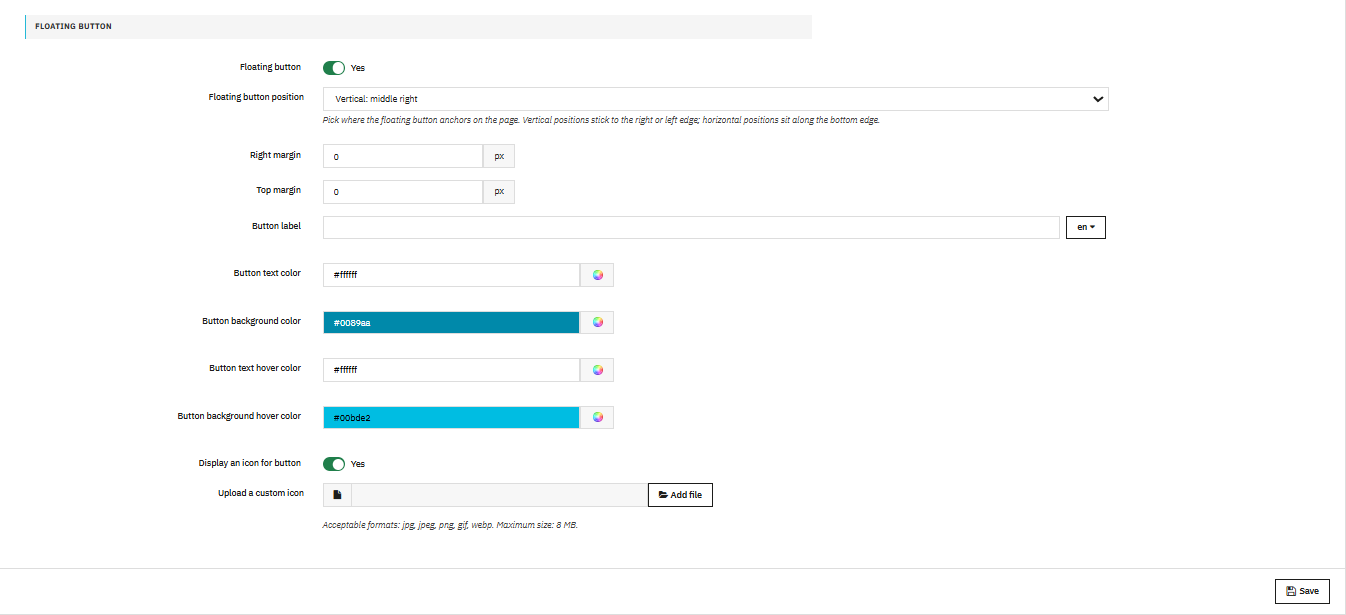
4.1.8 Email Marketing Integration
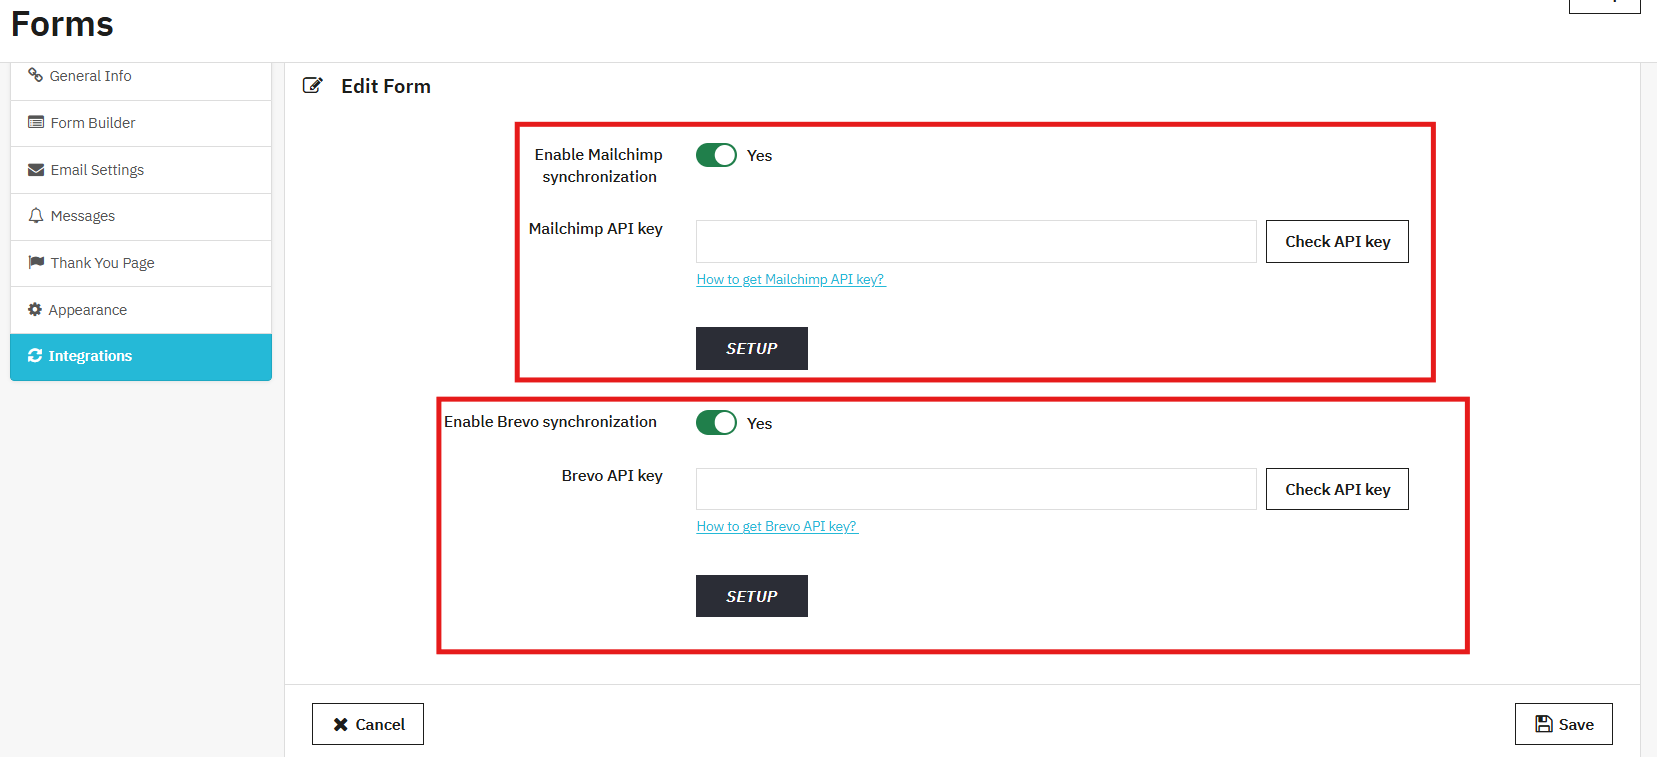
Enable Mailchimp Synchronisation: Anyone who submits the form gets added to your Mailchimp audience automatically. Connect your Mailchimp account using API Key once through the integration settings, and it handles the rest.
Enable Brevo Synchronisation: You can integrate Brevo using API keys, fetche the list, and synchronise the emails to Brevo lists.
4.2 Form Submissions Management
Every form submission on your store shows up here. You can see what was sent, which form the submission belongs to, and whether your team has replied.
Email Subject: The subject line from the admin notification email for that submission, shown in the list for quick reference.
Submission Data: A snapshot of what the customer filled in. Click the row to see the full submission with all fields and values.
Form Name: Which form the submission came from. Useful when you’re running several forms and need to filter by source.
Replied: Yes or No. Shows whether a reply has already been sent, so nothing gets missed or answered twice.
Submitted On: The date and time the submission came in, based on your store’s timezone.
Replying to a Submission
Click any row to open the full submission and reply from the same screen.
From: Your store’s name and email address as the sender.
To: The customer’s email address, pulled from their submission.
Reply-To: Pre-filled with your store’s reply address. Changes if the customer replies to your message.
Subject: Taken from the original submission so the thread stays connected. Edit it before sending if needed.
Message: Write your reply here for the customer and click on the send button to send the email.
Attachment: Attach a file if needed. Accepted formats: JPG, JPEG, PNG, GIF, ZIP, PDF. Max size 8 MB.
4.3 IP and Email Blacklist
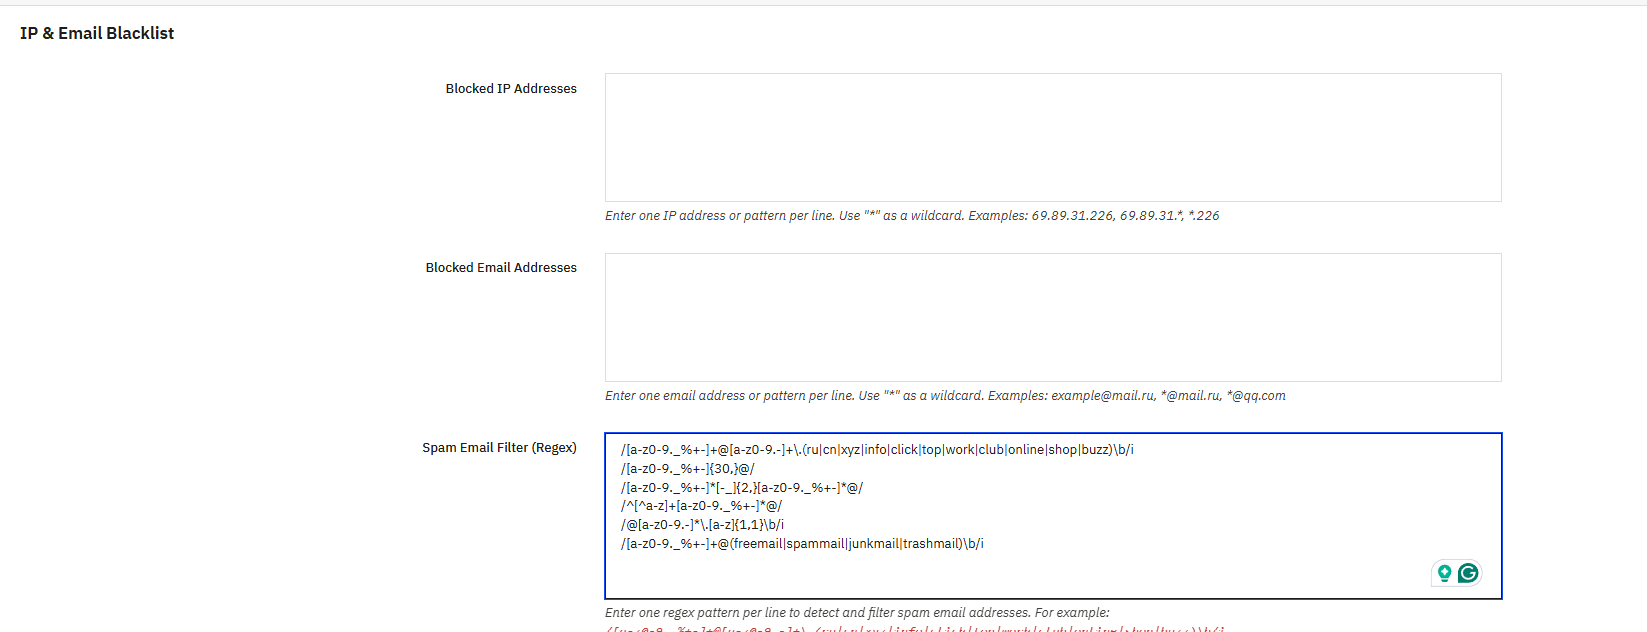
If you are dealing with repeated spam submissions or want to block certain users before they even reach your inbox, you can handle it using Knowband Prestashop Form Maker. Any entry added here is checked before the form submission is recorded or sent to anyone.
Blocked IP Addresses: Type in the IP addresses you want to block, one per line. You can enter a single exact address or use * as a wildcard to cover a whole range.
- 69.89.31.226: blocks just that one address
- 69.89.31.*: blocks every address in that range
- *.226: locks any IP that ends with 226
If you keep seeing spam from the same source, adding their IP range here stops it at the door.
Blocked Email Addresses: Works the same way as IP blocking, but for email addresses. Enter one per line, exact or with wildcards.
- [email protected]: blocks that specific address
- *@mail.ru: blocks everyone from that domain
- *@qq.com: blocks everyone from that domain
This is the quickest way to shut out domains that keep sending junk without going through submissions one by one.
Spam Email Filter (Regex): For more control, this field lets you write regex patterns that check incoming email addresses against specific rules. If an address matches any pattern you’ve added, the submission gets blocked before anything else happens. Add each pattern on its own line.
The module comes with ready-to-use example patterns that cover the most common spam scenarios: domains like .ru, .cn, .xyz, .info, .click, .top, .work, .club, .online, .shop, and .buzz; unusually long usernames; addresses with repeated dashes or underscores; addresses starting with a number; single-character TLDs; and provider names commonly associated with throwaway accounts.
5.0. Frequently asked questions
Question: What is the best PrestaShop Form Builder module in 2026?
Answer: PrestaShop Form Studio by Knowband is one of the best PrestaShop Form Builders of 2026. Unlimited forms, spam protection, email marketing integrations, and form submission management with no coding needed.
Question: How do I create a customer satisfaction survey in PrestaShop?
Answer: Install Knowband PrestaShop Form Creator, click Add New Form, set a title and slug, drop in fields, radio buttons, checkboxes, dropdowns, and text areas. The PrestaShop Advanced Form Builder Addon interface works on all screen sizes.
Question: How do I display forms on product pages?
Answer: You can modify the appearance settings in PrestaShop Form Builder, then “Product page – Footer” or “Product page – below product images” under Display Positions. For specific pages, use the embed shortcode from the custom form builder PrestaShop panel.
Question: Does the module send email notifications automatically?
Answer: Yes. The auto-responder feature is available on PrestaShop Form Maker when users make a submission. You can set the subject and message body once per form.
Question: Can I translate forms into multiple languages in PrestaShop?
Answer: Yes. Subject and Message Body fields in both the admin notification and auto-responder have tabs for each active language on your PrestaShop website.
6.0 Business use cases
Contact and support forms: Routes submissions to the right team, cuts follow-up messages. The PrestaShop checkout form builder collects extra details at the point of purchase.
Customer satisfaction survey PrestaShop: Sits on the order confirmation page. Collects feedback on shipping, product quality, and service.
Product feedback form PrestaShop: Goes on product pages or triggers post-purchase. Private forms pull more honest responses than public review systems.
PrestaShop lead generation form for wholesale and B2B: Collects business name, tax ID, purchase volume, and product categories. Leads go to Brevo or Mailchimp. Sales teams follow up without manual data entry.
Event registration: Takes name, email, company, dietary needs, and session choice. Confirmation fires via auto-responder on submission.
Style consultation (fashion): Customer submits size, budget, occasion, and preferences. Sales team replies with specific product picks.
Technical support intake (electronics): Takes model, purchase date, issue description, and photos. Cuts ticket back-and-forth. Spam protection from PrestaShop settings filters the inbox.
Post-return feedback: Asks why the item came back and what would have changed that. Feeds into product copy and buying decisions.
Subscription forms: Take interests, frequency, and format preferences. Syncs to Mailchimp or Brevo on signup. All entries are logged and exportable via the form submission management PrestaShop tools.
7.0 Conclusion
Form Studio is a complete PrestaShop Form Builder solution The module covers contact forms, surveys, feedback collection, lead generation, and submission management in one place.
Unlimited form creation, responsive design, Cloudflare Turnstile spam protection, email marketing integrations, per-form email setup, and a back-office submissions manager, all in a single module.
Building surveys in PrestaShop, collecting product feedback, handling support requests, or replacing a basic contact page, Knowband’s PrestaShop Form Studio handles all of it.
Install the PrestaShop Custom Form Creator now, set up your first form, and start collecting the data your store actually needs.