With the lockdown being imposed in many countries due to the Coronavirus pandemic, one of the problems that common people are facing is not being able to get a haircut. This might not seem a bigger concern than getting groceries and medicines, but people are having a tough time maintaining long hairs.
Some have turned into Jon Snow while some have made themselves Vin Diesel by shaving head on their own, as currently, the salon shops are closed and people are left with no other option.
If you are having a salon outlet, you probably are facing the same set of challenges that almost every other business is facing currently, i.e. “No Customers, No Sales”
This is when you can think of taking your salon business online and provide customers with the required solution. People cannot come at your outlet but how about a home-visit haircut from your end? Seems a pretty good option right where people can book a salon service online and the concerned person visits the customer’s home and gives him a haircut?
Well, our Online booking system module helps you exactly that way. If you are a salon outlet owner yourself and thinking to provide home services or if you want to create a salon chain where you could register salon outlets and act as a medium between customers and the outlets, the Online booking system module will cover all your requirements.
How to Manage your Salon Bookings through Online Booking System?
Before we delve into the online booking system module, we would like to let you know that the module is available only for the PrestaShop and OpenCart platform.
So, in order to set up your online booking system and start providing booking services, first, you need to purchase a domain name for your business, a hosting plan and choose the desired eCommerce platform, be it PrestaShop or OpenCart.
As per the selected platform, you can choose the respective module, install it and integrate on your website. The configurations are almost the same for both the modules.
Once you have successfully installed the module, here’s how you can start providing online salon services. (I am taking the example of PrestaShop here)
Step-1: Open the Admin Demo
Step-2: Head over to “Products”
The Products section will consist of some default booking services which you can customize or delete and add new ones.
Step-3: To list your salon, click on “Add New Booking Product”
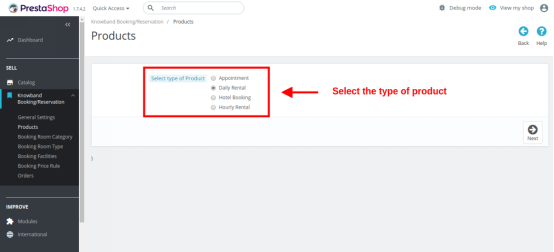
Once you click on it, you will be presented with four options: Appointment, Hotel Booking, Daily Rental, and Hourly Rental.
To be more specific about this module, it not only provides you with an appointment booking facility but also with Hotel booking and Vehicle Rental booking. So if you are involved in those kinds of businesses, you can manage such bookings with the help of this module. But since we are particular about the salon bookings in this module, only the first option (Appointment) matters to us.
Step-4: Click on Appointment
You will now be presented with five columns that are: General Information, Booking Information, Location, Image, and Date/Time.
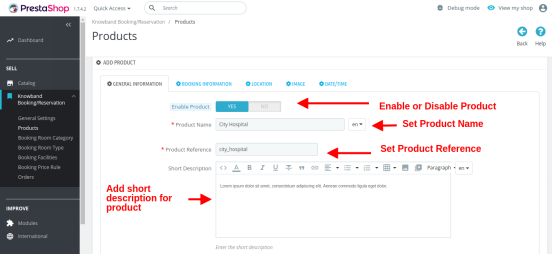
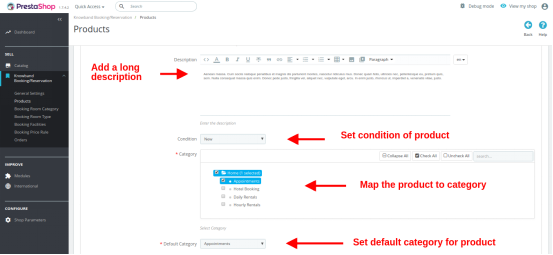
Under General Information, as the name suggests, you can give a brief about the salon service that you want to add. You can specify the name, reference, short description, long description, and give it a category.
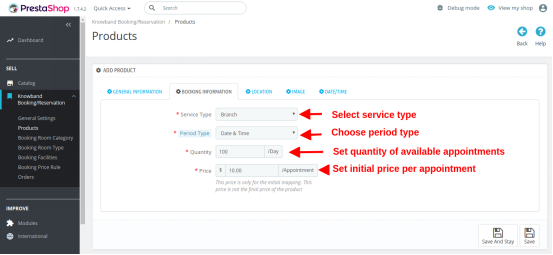
Under Booking Confirmation, you can specify the service type; Branch and Home Service. The former means that a user can confirm a booking to visit your outlet and claim the service, the latter is what this entire write-up is focused on, i.e. home service with the help of which the customers can get the service at their home.
So, in the current scenario, you need to choose home service.
Moving further, choose date and time from the “period type” option so that the customers can book the desired time slot to receive the service.
The next option we have is Quantity where you can specify the maximum number of bookings that can be made in a single day.
Then you can set an upfront booking price that will be visible to the visitors at the time of booking. Depending on the region or country, you can select the tax rule.
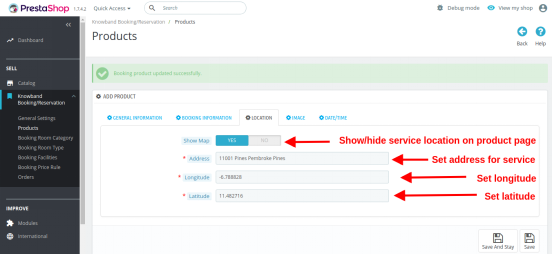
Under location, you can set up your store address so that customers can know where the service person would be coming from.
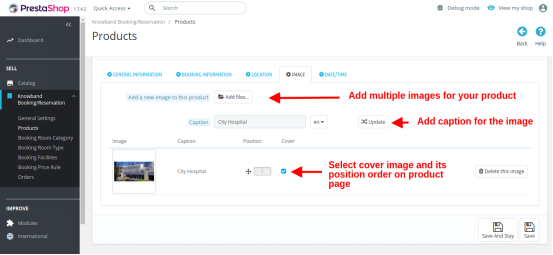
Coming to next column- Images, you can add images about that particular service and display it on the product page. The more appealing pictures you use, the higher would be the chances of a customer booking your service.
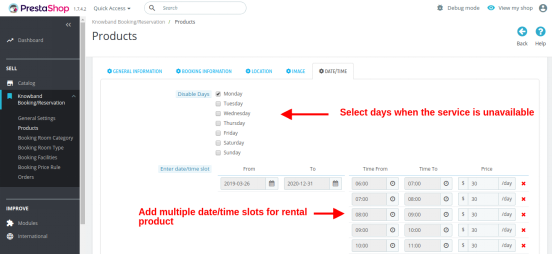
Under Date/Time, you get to specify the days for which the customers can create a booking. You can choose the days on which you don’t provide services and hence customers would not be able to make bookings on those days.
Then you can specify the date and time slot and set your price accordingly. You can define different periods for bookings, mention the timings within which the bookings can be made and fix the booking price for it.
To run offers on a particular day or for a specific period, head over to “Booking Price Rule” and make the required changes.
To view your booking orders, you can click on “orders” and track your bookings.
That’s it. This way you can add as many salon services as you want and solve customers’ haircut related concerns easily. Isn’t this amazing? Get the module by visiting the links below:
Benefits of Providing the Home-based Salon Services
For providing home services, especially during this time when cleanliness and social distancing is highly required, ensure your customers that everything will be completely sanitized. You need to win your customer’s trust so that they do not hesitate to get a home service.
The salon persons should wear proper masks and gloves and should maintain distancing from customer other family members.
If all these things are settled, you will not face a hard time getting online bookings.
Coming to the benefits-
1. Customers do not need to go outside. They can get the facility at their home and avoid social gathering outside.
2. Customers can book a service as per their convenience.
3. For peak hours, you can charge customers accordingly.
4. You can disable booking for specific days.
5. 24×7 online booking option for customers.
Things to consider before opening an Online Salon Services booking website (plus marketing ideas)
1. Create a roadmap for your salon business-
No business starts without planning. Identify how you are going to market your business, tackle the problems and be ahead of your competitors.
2. Be specific about the Regions-
When starting out, it would be challenging to target all the regions (if you are a salon chain) but if you have your own outlet, you should be targeting only the region your outlet is located in so that you can reach out to the customers conveniently.
3. Create your social media accounts-
f you want to highlight your brand in front of a huge audience, social media is the best place. For a salon services booking website, Facebook and Instagram are the best. Aware your audience about your salon business and services.
4. Do SEO for your website-
Contact SEO experts who can help you rank your website when people search for an online salon services booking website in your region. This will give you a huge organic boost.
Final Thoughts
Imagine waking up in the morning and seeing you have got bookings for the entire week and made a whopping $1000. All this can be possible if you give serious thought to move your salon business online. And this is the best time to open an online salon business.
Try out our Online booking system module and make the online booking experience of your customers convenient.
If you need any kind of help in setting up your website, you can raise a quote by clicking here or submit your query at support@knowband.com
Remember going to the movie theatres and finding out that the show is sold out? Today, we have the facility where we can check out the show timings and book seats accordingly in advance. You make the payment, book the seat and then it doesn’t matter whether the show is houseful or not. You will get your seat for sure. This has been made possible through the online booking system.
The online booking system has facilitated the lifestyle of people. From booking an appointment to booking a hotel room, everything requires only a few finger taps.
There are multiple businesses set up today that provide online booking facilities whether it is about an appointment booking, home cleaning, car or bike rental booking, etc. If you also run a booking business but offline, you should strongly consider taking it online.
What exactly is an Online Booking System?
In simplest of words, an online booking system adds booking facility on your website and lets you provide your customers with hassle-free booking. Having said that, if they want to book a service, they do not need to call and get an appointment, they can simply choose the desired date and time and confirm the booking after successful payment.
The need for an Online Booking System
In this rapidly evolving world where almost everything seems to go digital, not having an online platform could put you far away from your competitors who are providing the same sort of facilities but through an online medium.
You might not be getting too many bookings initially but if the number increases in the future, managing your bookings manually could be quite a challenging task. On the other hand, people have started moving towards online bookings due to shortage of time. So there will be some concerns for you if you do not adopt the online booking system.
Having an online booking system will put an end to the manual work and save a lot of time for you as well as your potential customers.
Benefits of Online Booking System
Here is why you should consider having an online booking system-
1. Time-saving
As I mentioned above, the online booking system saves you a lot of time since you are not required to perform anything manually. You can track your bookings, send regular email follow-ups and most importantly, you can customize your booking system as per your availability.
2. Scale-up your bookings
One of the major benefits of having an online booking system is that your prospects do not need to wait for defined hours to make a booking. All they need to do is open your website, select the day and time for which they want to have a booking and that’s it. All this happens while you are taking a peaceful nap.
With 24×7 online booking service, you can increase your bookings significantly. The unavailability of an online booking platform may compel even your regular or loyal customers to look for other alternatives, and you may lose them to your online competitors that are growing at a rapid rate.
3. Online booking system cuts down your workload
The efficiency that the online booking system provides cannot be achieved with the manual booking process. There will be no headache of receiving calls for booking, you do not need to chase your potential customers over call and get the booking confirmation. Everything would be done in a systematic manner.
4. Boost Your Revenue
You will witness a sharp increase in your bookings if you take your booking system online, which will provide you with more revenue. If you want to dominate your competitors, now is the time to mark your presence.
How to create an Online Booking System?
There are some technical ways to set up your online booking system but I would not go into the technical stuff. Instead, I would suggest installing a plugin to make your task easy.
Depending on the eCommerce platform you choose for your online booking system, you will find a number of eCommerce development services providers that will do the needful for you.
We, at Knowband, also offer online booking system facility for PrestaShop and OpenCart platform. So, if you are having a website on either of these platforms, you can have a look at-
The booking and rental system module lets you add appointment bookings, hotel bookings and rental booking facilities to your website. It is a feature-packed module that ensures that your potential customers enjoy a hassle-free booking experience on your website.
From adjusting the booking price as per different days and timing to turning off booking facility for specific days in a weekend, the module provides you with lots of configurations.
For PrestaShop store merchants, we have a special module which is a combo of PrestaShop Mobile App Builder and PrestaShop Booking and Rental System. Check out-
No tiredness, no workload, easy bookings, and almost double revenue, that’s what an online booking system does for you. And you can manage your bookings comfortably with Knowband’s booking and rental system module.
One important suggestion- Make sure that your booking website is responsive. Do not shift your entire focus on optimizing it particularly for desktop, it should be mobile-friendly so that your mobile users do not find any trouble while creating a booking.
For any assistance, you can reach out to us at support@knowband.com
Buying and renting services has now become a common scenario of online markets. People commonly prefer rental products and therefore shop owners have found their way in the rental business. So, which module to try for offering 24*7 booking and rental services to your customers. Prestashop Booking and Rental System addon by Knowband helps e-merchants in adding a wonder functionality to their online shop which is referred to as booking system. Yes, Prestashop Booking System is one great module to create a dynamic booking system for your online shop giving an option to set your pricing, maintain a calendar, appointment orders very effectively from the back-office. Using eCommerce booking system, online users can easily make time-date based bookings and appointments for various products.
Prestashop Reservation And Booking Module help you to add rental products and services to your Prestashop site. Prestashop Booking Calendar addon integrates flexible booking options and a user-friendly interface to the site. Customers can check real-time availability and relatively opt for rental or booking services from the online shop. So if you are planning to offer a rental, appointment or bookable services, this is the right one for you.
1.1 Striking Features of Prestashop Booking and Rental System Addon
To provide rental services that fit your customers need, Prestashop Reservation system module has offered multiple configuration settings so that you can effectively make your online business booking ready for the customers. The simple to use backend of Prestashop Booking Calendar addon is extremely easy to use without any technical operations or coding hassles.
The various key features provided by Prestashop Rental Booking System has been listed below.
1. Prestashop Booking and Rental System addon help store owners to convert their store into an online reservation and booking store that provides many kinds of rental, appointments and room booking services to the online users.
2. Creating and listing an appointment, daily rental product, booking room, hourly rental services is a time-saving approach with the help of Prestashop Booking Calendar addon.
3. Prestashop Booking System gives an intuitive interface to add the details for bookable product/services or appointment.
4. Admin can add suitable date ranges and time slots on the product page of booking product or appointments when their business services are available to the online users.
5. The total bookable orders with their status and associated customer details can be viewed from the back-office of this Prestashop Event Booking addon.
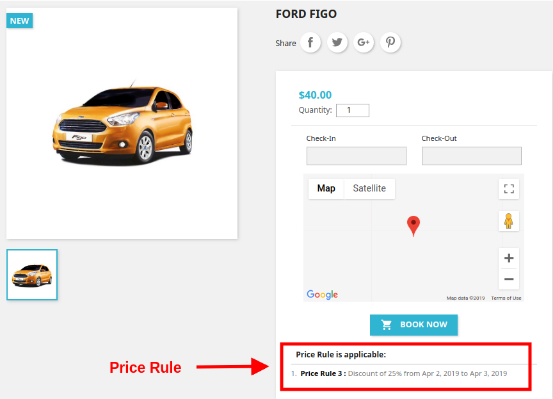
6. Prestashop admin can provide exciting deals and discount to their customers by flashing special price rules on the product pages. This will engage and add more traffic to the site which will impact the sales system as well.
7. Prestashop Booking Calendar addon builds a rental service schedule or appointment based on the features selected by the customers.
8. Admin can show the location with every bookable product/service using the Google Place Integration feature of Prestashop Reservation system module.
9. Prestashop Service Booking module offers flexibility to add, edit and delete unlimited bookable products to their eCommerce shop.
10. Prestashop Booking and Rental System addon allow you to add two kinds of bookable services for the users which include branch and home service.
11. Prestashop Booking System flawlessly supports multi-lingual and multi-store compatibility.
12. With Prestashop Reservation And Booking Module, admin can set the initial price for the rental services or appointments at their store.
13. They can disable booking and appointments for selective days or timing using this Prestashop Booking and Rental System addon.
14. The Prestashop admin can show multiple dates and time slots available for each bookable product or service.
15. Prestashop Booking Calendar addon provides an option to show custom rental service charges corresponding to the date-time slot selected by the customer.
16. Prestashop Event Booking addon allows admin to specify the different type, category and offered facilities with the rental room or hotel services.
1.2 Technology for Development
Language: PHP Frame Work: Prestashop
2.0 Installation Guide for Prestashop Booking Calendar Addon
The store admin can follow these simple steps for installing the Prestashop Booking and Rental System addon on their eCommerce store:
1. First of all download the addon package from the Knowband store.
2. You will get a zipped file containing the source code and user manual. Unzip the complete package in the root directory of your Prestashop store through FTP manager (like Filezilla or WinSCP – download here: https://filezilla-project.org/). You’ll find the files and folders as shown in the image below:
The Prestashop Booking System is now installed and ready for use. Now the admin can configure the various configuration settings in accordance with their Prestashop site.
3.0 Admin Interface of Prestashop Rental Booking System
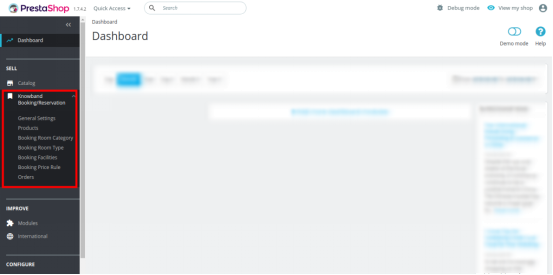
Just after successful installation of Prestashop Booking and Rental System addon at your website, you can configure the booking service setting as per your needs. In the admin panel or dashboard, you will find the Knowband Booking/Reservation module along with its sub-sections listed below.
This Knowband Booking/Reservation System comprises of seven sections which have been discussed further.
Each Tab of the Prestashop Booking System has been discussed below:
3.1 General Settings
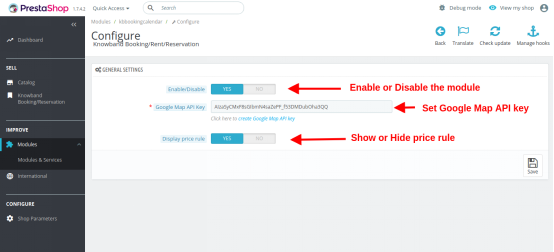
The General Settings of Prestashop Rental Booking System includes the basic configuration settings as:
1.Enable/Disable: This option enables or disables the complete functionality of the Prestashop Booking and Rental System at your store.
2.Google Map API Key: This option helps you to set the Google Map API Key. Once this unique API key is set from the backend, you can mark and display the location corresponding to every bookable product or service.
3.Display Price Rule: This option lets you show or hide the custom price rules over the product page of bookable product and rental service. To create a new price rule for different bookable products or edit the existing price rule, jump to the “Booking Price Rule” section of the dashboard.
3.1.1 How to generate the Google Map API key
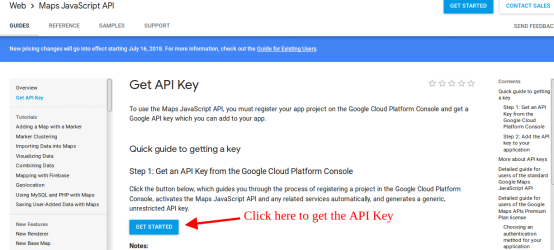
The eCommerce store admin can generate the Google API key by following these steps:
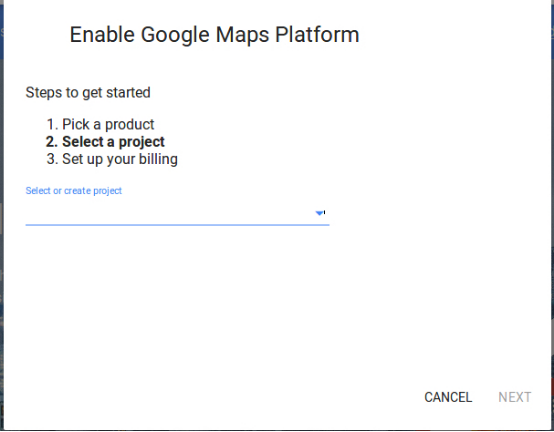
Click on the “Get Started” button: The admin can click on this button to get Google map API key.
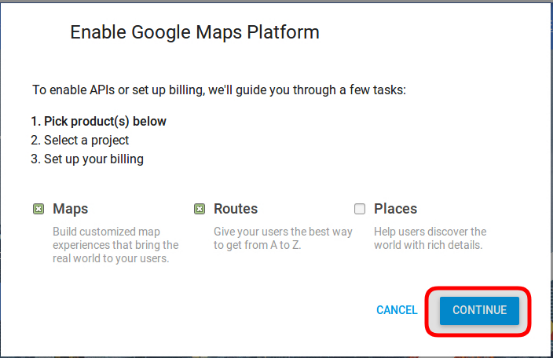
Pickup the products: When the admin will click the “Get Started” button this pop-up will be displayed.
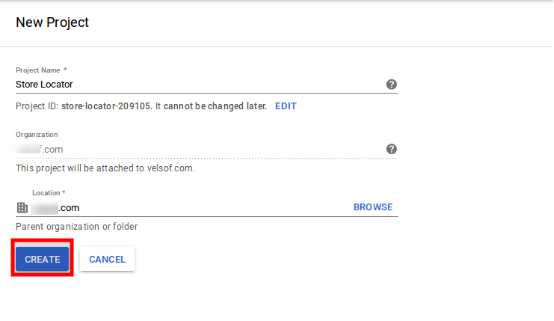
Project selection: The eCommerce store admin can select or create a project.
1. Select a project:
2. Create a new project:
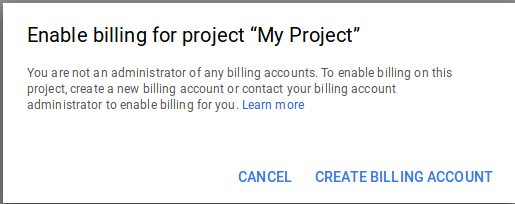
Setup the billing: The eCommerce store admin can now set up the billing.
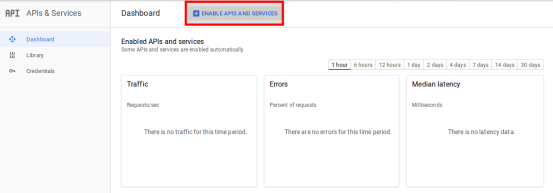
After billing the store admin can get their Google map API key.
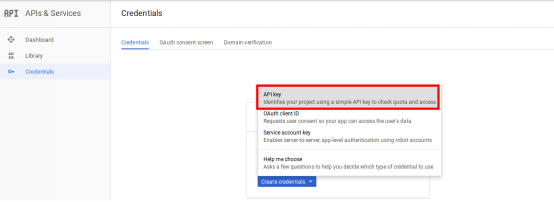
On the Credentials page, get an API key:
The store admin can select the API key option:
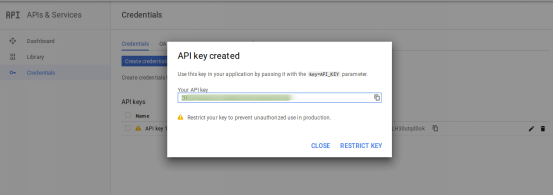
The admin can select the restrict key option from the dialog box to set a browser restriction on the API key.
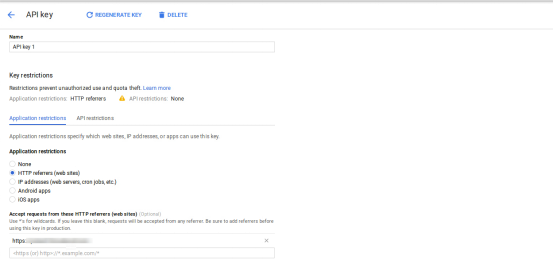
In the Key restriction section, the store admin can select HTTP referrers (web sites), then follow the on-screen instructions to set referrers.
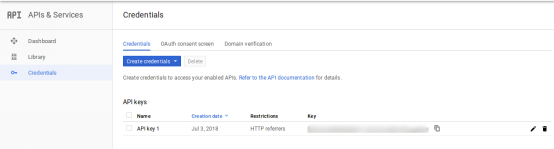
This way the admin can set the Google map API key.
3.2 Products
Here, you can view the complete list of daily/hourly rental products, appointments and hotel booking services added at your eCommerce store. To edit the existing details for any type of booking product/service, click on the edit option corresponding to a product listing. If you want to delete a particular listing, click on Delete option shown in the drop-down option corresponding to the product. If you don’t want to delete, simply enable or disable the product manually.
To add a new rental product or booking room service or appointments at your store, click on the Add new Booking Product option at the top right corner of the admin panel of this Prestashop Booking and Rental System addon.
1. Click on the “+” button at the top right side of the admin interface.
2. Now select the type of product you want to add to your site. The four offered options include:
Appointment
Daily Rental
Hotel Booking
Hourly Rental
3.2.1 Add an Appointment Type Product
The Appointment type product contains the following information. In Appointment type of product, admin can show date/time slots. Admin has to set the appointment price on per day basis.
3.2.1.1 General Information
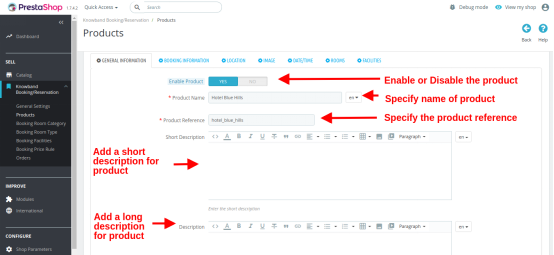
Enable or Disable Product: This option helps to enable or disable the current product.
Product Name: You can set the desired name for the product which is a mandatory field.
Product Reference: Set a unique reference code for the product which is a mandatory field.
Short Description: You can add a short one-line description for your product which displays under the product name.
Description: Give detailed information about the product in this field box.
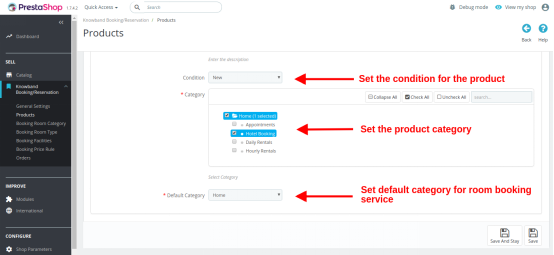
Condition: Set the condition of the product stating whether it is new, refurbished or used.
Category: Select a particular category where you want to add and show this appointment service.
Default Category: You can choose a default category for the product using this field.
3.2.1.2 Booking Information
Service Type: This option lets you select the service type as a branch or home service.
Period Type: This option sets the period or schedule type that you want to display on the product page for the users. If the date is selected, then date schedules will be shown only. If the date/time option is selected then both date and time slots are shown to the customers.
Quantity: You can set the available quantity of bookable product or service for a day.
Price: You can set an initial price of the product per appointment that is shown to the user before they have done any service customization. After they have selected their product preferences, mainly date, and time schedules, the initial price is changed to the final custom price that they have to actually pay for getting service benefits.
3.2.1.3 Location
Show Map: You can turn Google Map ON or OFF visible at the frontend over the product page.
Address: This field specifies the exact location or address of that particular bookable product.
Longitude: This field sets the longitude coordinate of the specific location.
Latitude: This field sets the latitude coordinate of the specific location.
3.2.1.4 Image
Add new image to this product: You can add multiple images to describe your product. You can set the display order of these images. Also, you can set any of these images as a cover image for the rental service or booking service.
Caption: You can give a desired caption for the product images.
3.2.1.5 Date/Time
Disable Days: You can select all the days when the services are unavailable by the respective businesses.
Enter Date/Time Slot: You can create and display multiple dates and time slots on the product page. If the period type is selected as Date, then only date schedules will be shown at the backend. If the date/time is selected as period type, then you can add multiple time slots corresponding to every date range. This way you can map multiple time slots to a single date slot.
Final Price: You have to specify the final price corresponding to each date/time schedule added for the appointment. This final price is calculated during checkout based on customization done by the customer.
Finally, save your created product.
3.2.2 Add a Daily Rental Product
The complete configuration settings for a rental product are the same as appointment type product.
Admin can show date/time slots for a daily rental product and can also fix a price corresponding to that schedule on per day basis.
The only difference occurs in the following listed settings:
Price: The initial price for the rental product is on a daily basis. Remember this is not the final price of the rental product.
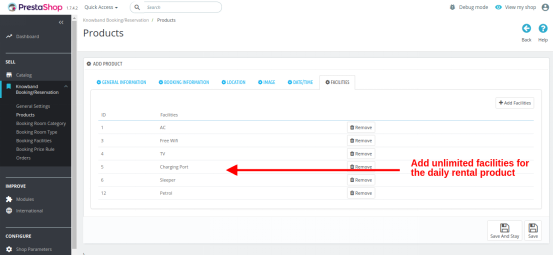
Facilities: This option allows you to add multiple facilities that you are offering with the daily rental product. These rent type facilities have to be first created from the “Booking Facilities” section of the admin panel. Once created, you can map them here for the particular daily rental service.
3.2.3 Add a Hotel Booking Service
The Hotel Booking service or Room Booking service contains the following information. In this room booking service, the customer has to select the check-in and check-out dates so that the room availability can be checked.
3.2.3.1 General Information
Enable or Disable Product: This option helps to enable or disable the Hotel room booking service.
Product Name: You can set the desired name for the booking service which is a mandatory field.
Product Reference: Set a unique reference code for the booking service which is a mandatory field.
Short Description: You can add a short one-line description for your room booking service which displays under the product name.
Description: Give detailed information about the hotel service in this field box.
Condition: Set the condition of service stating whether it is new, refurbished or used.
Category: Select a particular category where you want to add and show this booking service.
Default Category: You can choose a default category for the booking service using this field.
3.2.3.2 Booking Information
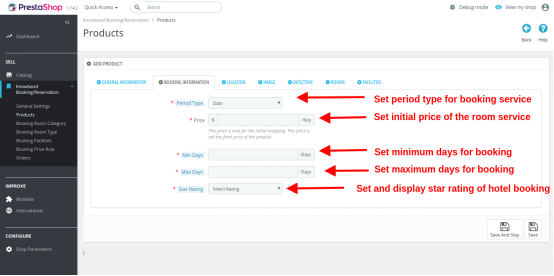
Period Type: This option sets the period type as Date allowing you to add multiple date slots for your hotel service.
Price: You can set an initial price of the booking service on a daily basis that is shown to the user before they have done any service customization. After they have selected their product preferences, mainly date slot, this initial price is added with the final custom price that they have to actually pay for getting service benefits.
Min days: Set the minimum days for hotel booking service.
Max Days: Set the maximum days for hotel booking service.
Star Rating: Select and display the star rating of hotel room service.
3.2.3.3 Location
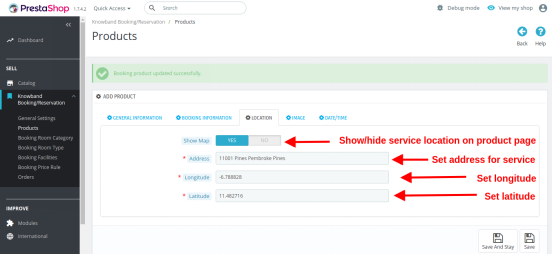
Show Map: You can turn Google Map ON or OFF visible at the frontend over the product page.
Address: This field specifies the exact location or address of that particular Hotel service.
Longitude: This field sets the longitude coordinate of the specific location.
Latitude: This field sets the latitude coordinate of the specific location.
3.2.3.4 Image
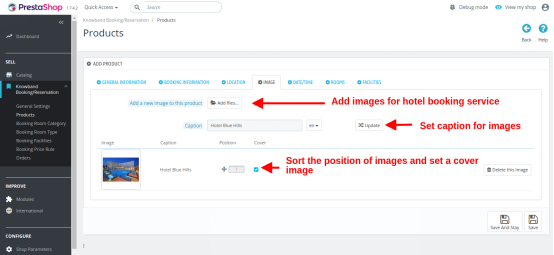
Add a new image to this product: You can add multiple images to describe your Hotel booking service. You can set the display order of these images. Also, you can set any of these images as a cover image for the room booking service.
Caption: You can give a desired caption for the product images.
3.2.3.5 Date/Time
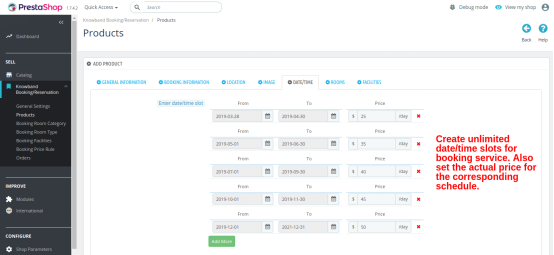
Enter Date/Time Slot: You can create and display multiple date schedules on the product page when your hotel services are available for the users. If there will be any conflict between the date/time range, the first occurrence will be applied.
Final Price: You have to specify the final price corresponding to each date slot schedule. This price is on a nightly basis. This final price is calculated during checkout based on the check-in and check-out time selected by the customer.
3.2.3.6 Rooms
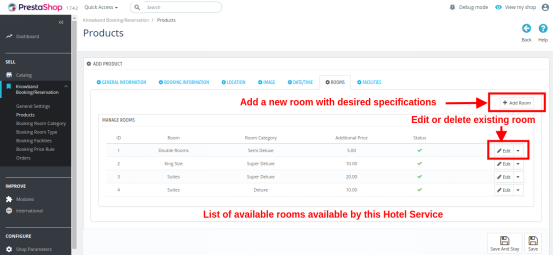
This interface will list you all the existing rooms within the particular hotel booking service. You can edit the details/specifications for any available room or you can delete them if required.
You can create a new room under this hotel service with different room type, category, and offered facilities. For this, you have to simply click on the Add Room option present at the top right corner of the interface.
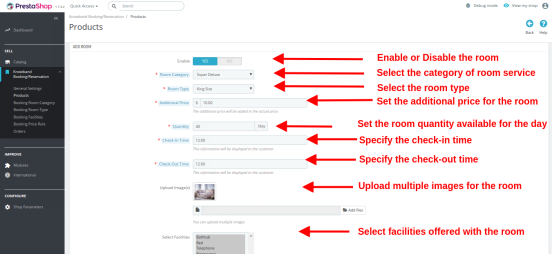
Enable: Enable or disable the room service.
Room Category: Select a particular category for room service. For this, you have to first create various categories from the “Booking Room Category” section of the admin interface. Then you have to map this room under the desired room category.
Room Type: Select a particular type for the room service. For this, you have to first create various room types from the “Booking Room Type” section of the admin interface. Then you have to map this room under the desired room type.
Additional Price: Set the additional price which is added to the initial price.
Quantity: Set the available quantity of rooms per day.
Check-in Time: Specify the check-in time for this room.
Check-out Time: Specify the check-out time for this room.
Upload Images: You can add multiple images describing the hotel room.
Select Facilities: Select multiple facilities that are offered with the room service. These facilities have to be first created from the “Booking Facilities” section of the admin interface. Then, you can easily map various facilities for this selected room.
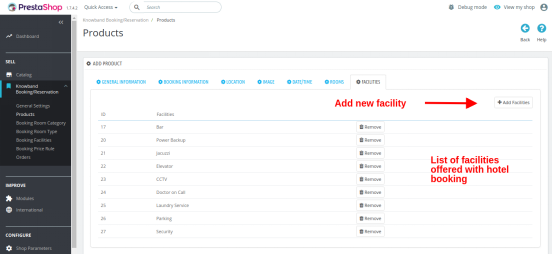
3.2.3.7 Facilities
Under this section, you can map all the facilities that are being provided for the particular hotel service. These hotel facilities are also created from the “Booking Facilities” section of the admin interface.
Finally, save your created hotel/room service.
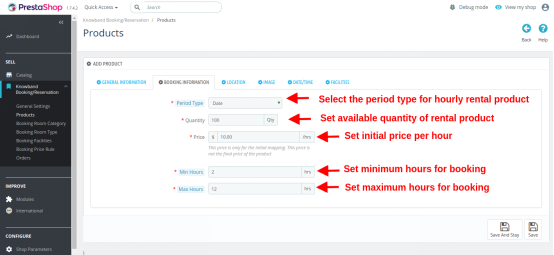
3.2.4 Add an Hourly Rental Product
The complete configuration settings for an hourly rental product are same as of daily rental type product. The customer has to pick a check-in and check-out date-time which specifies the duration for which they want the product.
The only difference occurs in the following listed settings:
Period Type: This option sets the period type as Date Type for the hourly rental product.
Quantity: You can specify the total quantity of that hourly rental product.
Price: This option sets the price of the product on per hour basis.
Min Hours: Set minimum hours for booking.
Max Hours: Set maximum hours for booking.
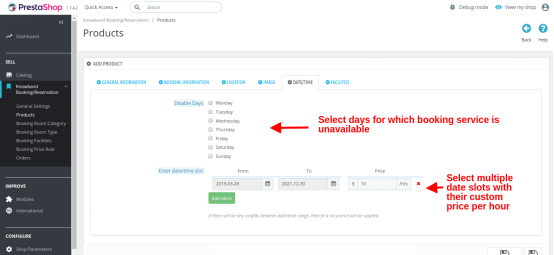
Disable days: Check the days on which the hourly rental product is unavailable for customer use.
Enter Date/Time slot: Create multiple date slots along with their final custom price on per hour basis.
Facilities: This option allows you to add multiple facilities that you are offering with the hourly rental product. These rent type facilities have to be first created from the “Booking Facilities” section of the admin panel. Once created, you can map them here for the particular hourly rental service.
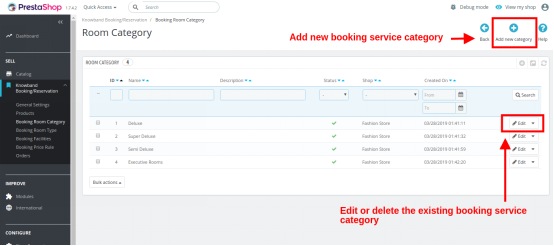
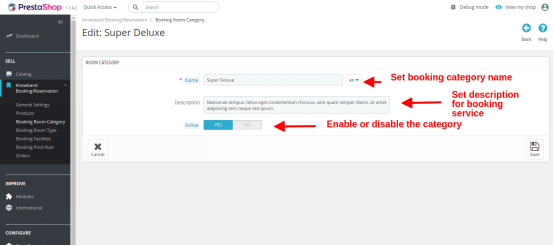
3.3 Booking Room Category
You can view and manage the list of booking room category through this interface. You can even edit or delete an existing category. For adding a new booking room category, click on the “+” button at the top right place of the admin panel.
Fill the following details while creating a new booking room category:
Name: Set name of booking room category.
Description: Set a short description for the booking room category.
Active: Enable or disable the room category.
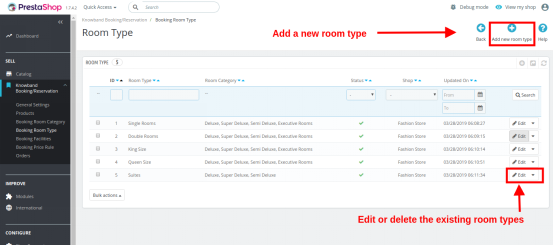
3.4 Booking Room Type
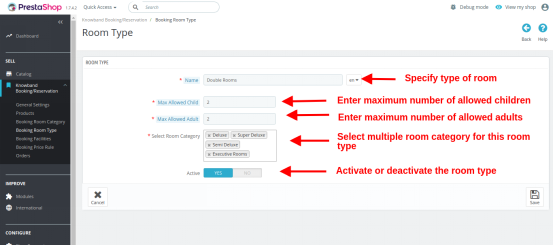
You can view and manage the list of booking room type through this interface. You can even edit or delete an existing room type. For adding a new booking room type, click on the “+” button at the top right place of the admin panel.
Name: Enter the name of room type.
Maximum Allowed Child: Set the maximum limit of allowed children.
Maximum Allowed Adults: Set the maximum limit of allowed adults.
Select Room Category: Select multiple room categories for this room type.
Active: Enable or disable the booking room type.
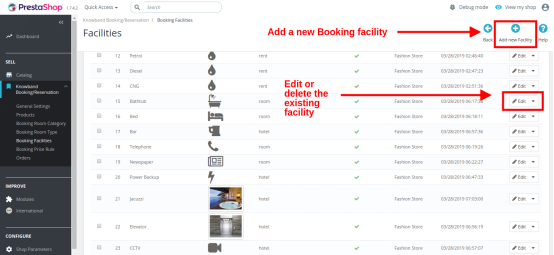
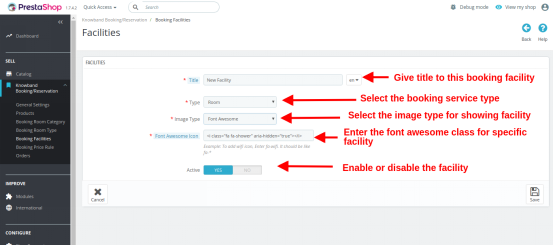
3.5 Booking Facilities
There are three kinds of booking facilities that can be created using this Prestashop Booking and Rental System addon.
1. Room: These facilities are mapped for particular room service. 2. Rent: These facilities are mapped for daily rental and hourly rental services. 3. Hotel: These facilities are mapped for a particular hotel booking service.
You can configure or delete the existing booking facilities from this interface. To add a new facility, click on the “+” button at the top right corner of the admin panel.
Title: Set a catchy title for the booking service.
Type: Set the booking service type for the offered facility. The three types include Room, Rent and Hotel.
Image Type: Specify the image type you want to use for depicting the booking facility. The two image type include Upload Image and Font Awesome.
Font Awesome Icon Class/Upload Image: If you have selected “Upload Image” type, then you have to browse a desired image from the local system. Else if you have selected the “Font Awesome Icon” type, then insert the font awesome class for that particular icon. For example, to depict the “Charging Port” facility, the font awesome class is “fa-plug”.
Activate: Enable or disable the booking facility.
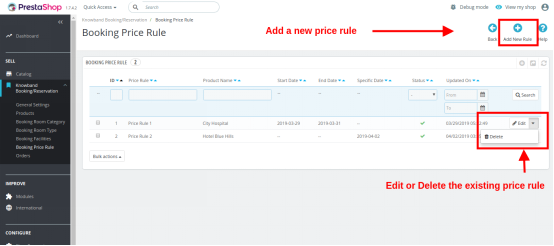
3.6 Booking Price Rules
Price rules are basically created for specific products. This is a kind of offer or discount deal that you can use to entice the online users for grabbing that particular rental or booking service from the store.
The various price rules can be viewed and managed from a single interface under the Booking Price Rule Section. You can edit or delete the existing price rule. Additionally, you can create a new price rule for another bookable product on the store. To add a new booking price rule, click on the “+” button at the top right corner of the interface.
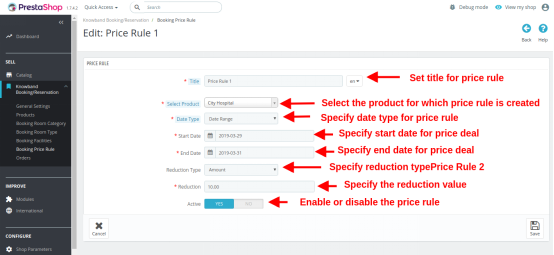
Specify the following field information while creating a new price rule.
Title: Set a desired catchy name for the price rule.
Select Product: Select the product over which you want to apply this booking price rule.
Date Type: Specify the date type from two options: Date Range and Specific Date. Start Date, End Date / Fix date: Enter the start date and end date if you have selected Date Range as Date Type. If you have selected the Specific Date option as Date Type then enter the fixed date to display the price rule.
Reduction Type: Set the reduction type as amount or percentage.
Reduction Value: If you have selected Amount as Reduction type then set the discount value you are offering to your customers. If you have chosen the Percentage type option, then set the discount percentage for the booking service.
Active: Enable or Disable the price rule.
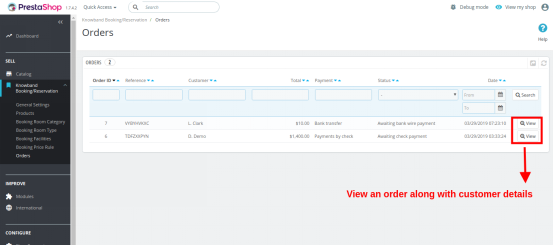
3.7 Orders
Here, the admin can view the complete list of orders placed by the customers whether it is an appointment, room booking service, daily rental product or hourly rental product. The date and time of order, customer detail, payment type, payment value and order status is also visible in this backend report of Prestashop Booking and Rental System.
4.0 Front Interface of Prestashop Reservation And Booking Module
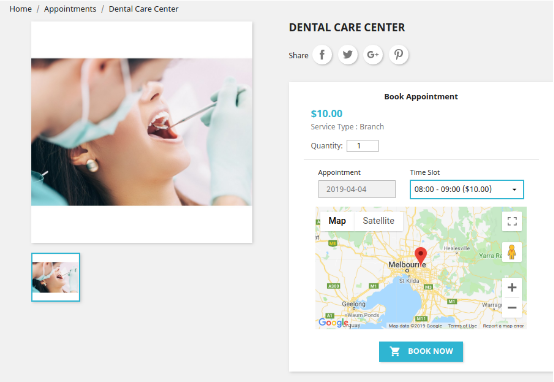
A) Appointment Type Product
B) Hotel Booking Type Service
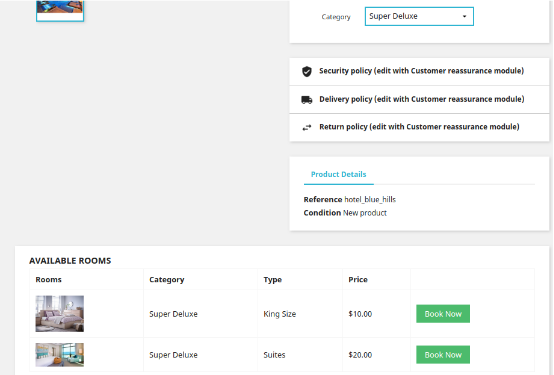
Available Rooms in Super Deluxe Category
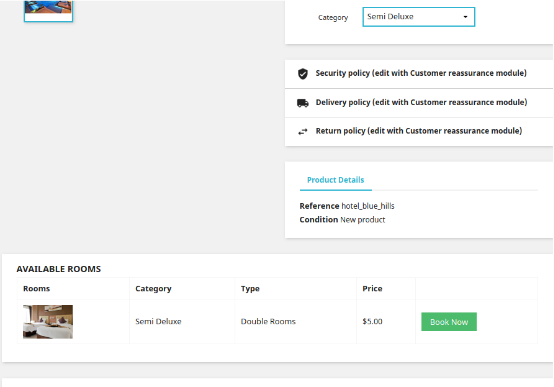
Available Rooms in Semi Deluxe Category
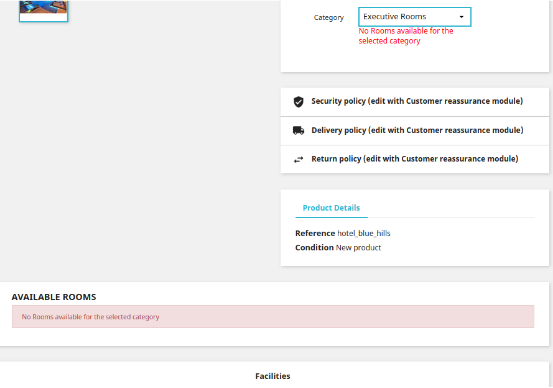
Available Rooms in Executive Rooms Category
Here you can see that there are no rooms in this category. This information is given to the frontend user in the form of an error message.
Available Rooms in Deluxe Category
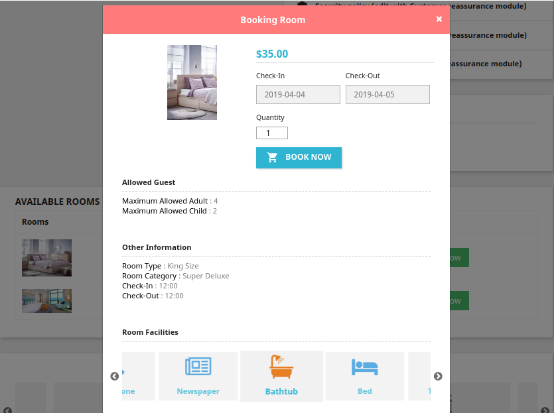
Now as the customer will select the desired room from the list of available rooms, then they will be shown a new popup as given below.
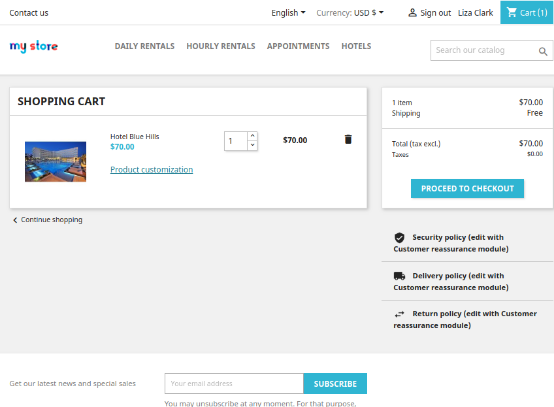
This popup gives complete details about the room selected by the customer in accordance with their needs. Now as they click on the “Book Now” button the room booking service gets added to the cart which is shown below.
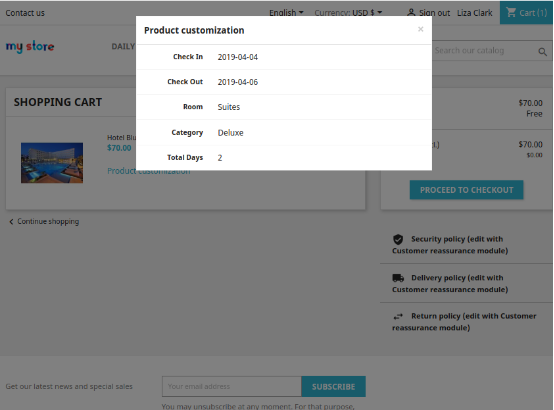
If the user wishes to check the booked room details again, they can simply click on the “Product Customization” link shown over the cart page.
This appears like the image below:
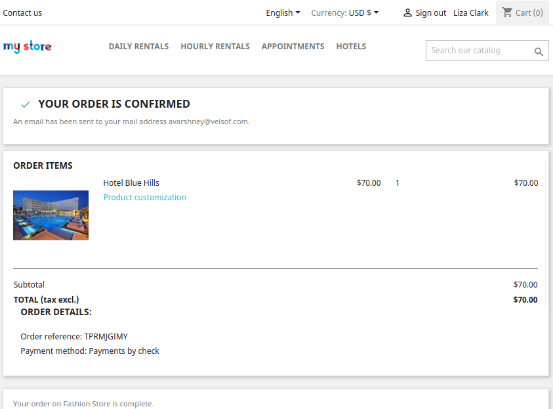
Order Confirmation Message on the frontend
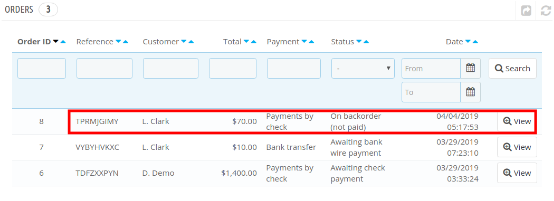
Admin can also check the order details from the admin. The backend interface showing list of store orders looks like:
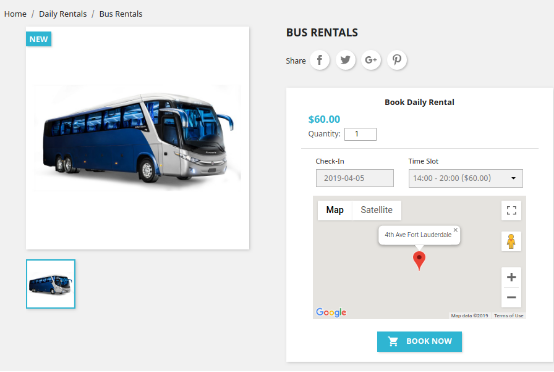
C) Daily Rental Type Product
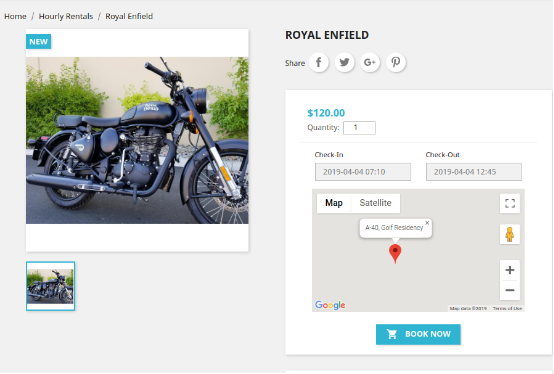
D) Hourly Rental Product
E) Price Rule for Selective Products
For additional guidance, please refer to the tutorial video available below, which provides a step-by-step walkthrough of this module.