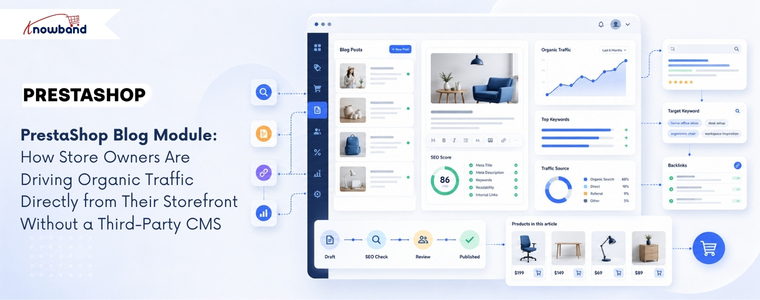
Most PrestaShop merchants looking to add a blog to their online store typically choose one of two approaches: they attach a WordPress subdomain and maintain two completely separate systems, or they give up on content marketing entirely because the setup feels too complex to manage. Each approach comes with its own set of challenges. The first creates a fragmented user experience and a technical architecture that requires managing two platforms, two hosting setups, and two content workflows simultaneously. The second leaves one of the most cost-effective long-term traffic channels completely unused. Businesses that blog consistently generate 55% more website visitors than those that don’t, according to HubSpot data that has held roughly steady for years. The challenge for PrestaShop stores specifically has been that blogging wasn’t a native capability until a dedicatedblog solution for PrestaShop, such as PrestaShop Blog Module by Knowband, brings it directly into the storefront without requiring an external CMS at all.
Why Running a Blog Outside PrestaShop Creates More Problems Than It Solves
The WordPress-on-a-subdomain approach is the most common solution, and it works, technically. But it creates a disconnect that becomes more noticeable over time. The blog lives at blog.yourstore.com or yourstore.com/blog on a separate WordPress install, which means a visitor reading a blog post has to navigate back to the main store to browse or buy. That navigation friction can reduce the conversion potential of every piece of content you publish.
From an SEO standpoint, the separation can also limit some of the internal linking benefits that make content marketing most valuable. Blog posts that link to product pages on the same domain help build that domain’s authority for product-related search terms. Blog posts on a separate WordPress install may build more authority for the subdomain itself, with less direct benefit to the main store domain.
The operational overhead matters too. Two platforms mean two sets of updates, two admin panels, two sets of plugin conflicts to manage, and content that exists in a completely different database from the store it’s meant to support. Merchants who’ve maintained this setup for more than a year rarely describe it as sustainable.
What a Native PrestaShop Blog Module Changes About the Content Workflow
A PrestaShop Blog Module embedded directly in the store admin eliminates the platform split entirely. Blog posts, categories, comments, and banners all live in the same back office where the merchant manages products, orders, and customers. No external login, no separate workflow, no synchronisation problem.
The Knowband PrestaShop Blog Module organises content management into five admin sections: General Settings, Category Management, Post Management, Comments Management, and Banner Management. Each post has its own meta title, meta description, and keyword fields, meaning every article the merchant publishes is independently optimised for search without needing a separate SEO plugin. The blog homepage also has its own configurable meta title and meta description, which makes it a properly indexed landing page rather than an afterthought.
Post creation supports rich text formatting, cover images up to 5 MB, short descriptions for short previews, and the ability to mark any post as a popular post for sidebar featuring. Multiple blog themes are selectable from the admin panel without touching code, and the layout is fully mobile responsive across all PrestaShop themes.
How the Related Products Feature Connects Content to Commerce
The most commercially valuable feature in a PrestaShop Blog Module isn’t the SEO controls; it’s the related products display on each post page. The admin can select products to display below each blog article, drawing from either a specific category or a specific manufacturer. A post about outdoor furniture care can show the relevant product range beneath the article. A buying guide for running shoes can display the appropriate category directly in the content context where the reader’s intent is highest.
This feature turns content marketing from a pure traffic play into a conversion layer. The reader who arrives via a search query about “how to maintain garden furniture” isn’t just a pageview; they’re a prospective customer already in a relevant mindset, presented with matching products at the moment their interest is active. That connection between informational content and commercial product display is what makes a native blogging solution more valuable than a detached WordPress blog that can only link to the store externally.
The PrestaShop Content Marketing Module approach, treating each blog post as both a search traffic asset and a product touchpoint, is what separates stores that use content strategically from those that treat it as a branding exercise with no measurable return.
Comment Moderation, CAPTCHA, and Building a Sustainable Content Community
Blog comments are either a community-building asset or a spam management problem, depending on how they’re configured. The module lets the admin decide: comments can be restricted to registered customers only, opened to guest users, or disabled entirely. Admin approval is required before any comment appears publicly, which means the merchant controls what gets associated with the brand.
Facebook comments or the built-in comment system are both available, depending on whether the store wants to tie community discussion to social identity or keep it self-contained. reCAPTCHA integration prevents bot submissions at the comment form level. The admin enters the site key and secret key from the Google reCAPTCHA dashboard, and the verification runs automatically on every submission.
Comment management is handled from a dedicated admin panel where each comment can be approved, disapproved, or deleted. For stores where customer conversation around product-related content is a meaningful part of the brand experience, that moderation control matters more than it seems when first setting up a blog.
SEO Architecture: Categories, Priority Controls, and Sidebar Positioning
The PrestaShop Blog Manager Module includes category and subcategory management with individual meta title and meta description fields for each category, which means the content taxonomy the merchant creates is independently searchable rather than existing purely for navigation. A category called “Kitchen Appliance Guides” can rank for category-level search queries that a list of uncategorised posts cannot.
Sidebar block positioning, for blog categories, recent posts, popular posts, and the search box, is configurable independently from the admin panel, with priority settings that control which blocks appear first. The popular posts block drives internal page depth by showing readers other content worth exploring. The recent posts block keeps repeat visitors updated on new content without any manual curation required.
For merchants running multiple PrestaShop stores, the module is multi-store and multi-lingual compatible. Each store installation can maintain its own blog content, categories, and configuration, with language-specific metadata fields for each post and category. Knowband built this compatibility into the core of the module rather than as a feature addition, which means the admin workflow scales across store configurations without additional setup.
The Traffic Argument That Makes a PrestaShop Blog Module Worth Deploying
Content marketing compounds in a way that paid advertising does not. A product page optimised for a single transactional keyword captures traffic from people already ready to buy. A blog post targeting an informational or research-phase keyword captures traffic from people who aren’t yet in the store’s funnel, and who, given a related products display and a coherent browsing experience, may well enter it.
PrestaShop stores that publish consistently on topics their target customers search for build an organic traffic base that grows over months and years without proportional increases in ad spend. The PrestaShop Blog Module makes that approach available from within the existing admin panel, with the SEO controls, related product links, and comment community tools that turn a simple content feed into a functioningPrestaShop Blog Manager Module for long-term traffic growth.
The setup requires no code changes, no external platform, and no developer. The blog deploys from the module manager and integrates with the existing store theme automatically.
Most OpenCart store owners end up securing their site the hard way: one extension for two-step login verification, another for blocking spammy bots, a third for CAPTCHA, and maybe a support ticket to their host about a firewall. OpenCart Security Manager was developed to remove that patchwork. This module puts admin-side protection, storefront defense, and file-integrity monitoring into one settings screen inside your OpenCart admin panel.
Whether you’ve been searching for an OpenCart two-factor authentication extension, an OpenCart firewall extension, protection against login brute-forcing, or a way to disguise your admin directory without stacking five separate add-ons, this single extension is built to cover that ground.
Storefront Protection: Web Application Firewall, Security Response Headers, Form Spam Filtering (CAPTCHA), Copy/Scrape Deterrents, and a storefront-wide access prompt.
File Integrity Monitoring: Scheduled scans, threat flagging, and a scan history log.
Each area is covered field-by-field later in this document, so you’ll always understand what a setting does before you switch it on.
Attackers targeting OpenCart stores tend to go after the same handful of weak points: guessable admin passwords, scripted login attempts, an admin directory sitting at its default path, unguarded contact/registration forms, and quietly altered core files. This extension is meant to close those specific doors without requiring a security consultant or a stack of unrelated add-ons.
Protection is applied in independent layers, and each layer covers a different surface – the admin login screen, storefront-facing forms, the headers your server sends back to browsers, and the files on disk.
The risk in plain terms: OpenCart, being widely used and open-source, is a routine target for automated scanning. Bots probe for default admin paths, hammer login forms with credential lists, and flood contact forms with spam. One compromised admin login can lead to stolen customer records, injected code, or a defaced storefront – outcomes that cost far more in cleanup and lost trust than the setup time this extension requires.
New Features Added to the OpenCart Advanced Security Manager Extension v1.0.1 ( Updated July 10, 2026)
Knowband’s OpenCart Security Extension has been upgraded with two major additions: a Security Dashboard and a frontend Honeypot Field under Spam Protection powered by Project Honeypot. Together, these give store owners a complete, real-time view of their store’s safety along with a stronger, hassle-free shield against automated attacks.
1. New Security Dashboard
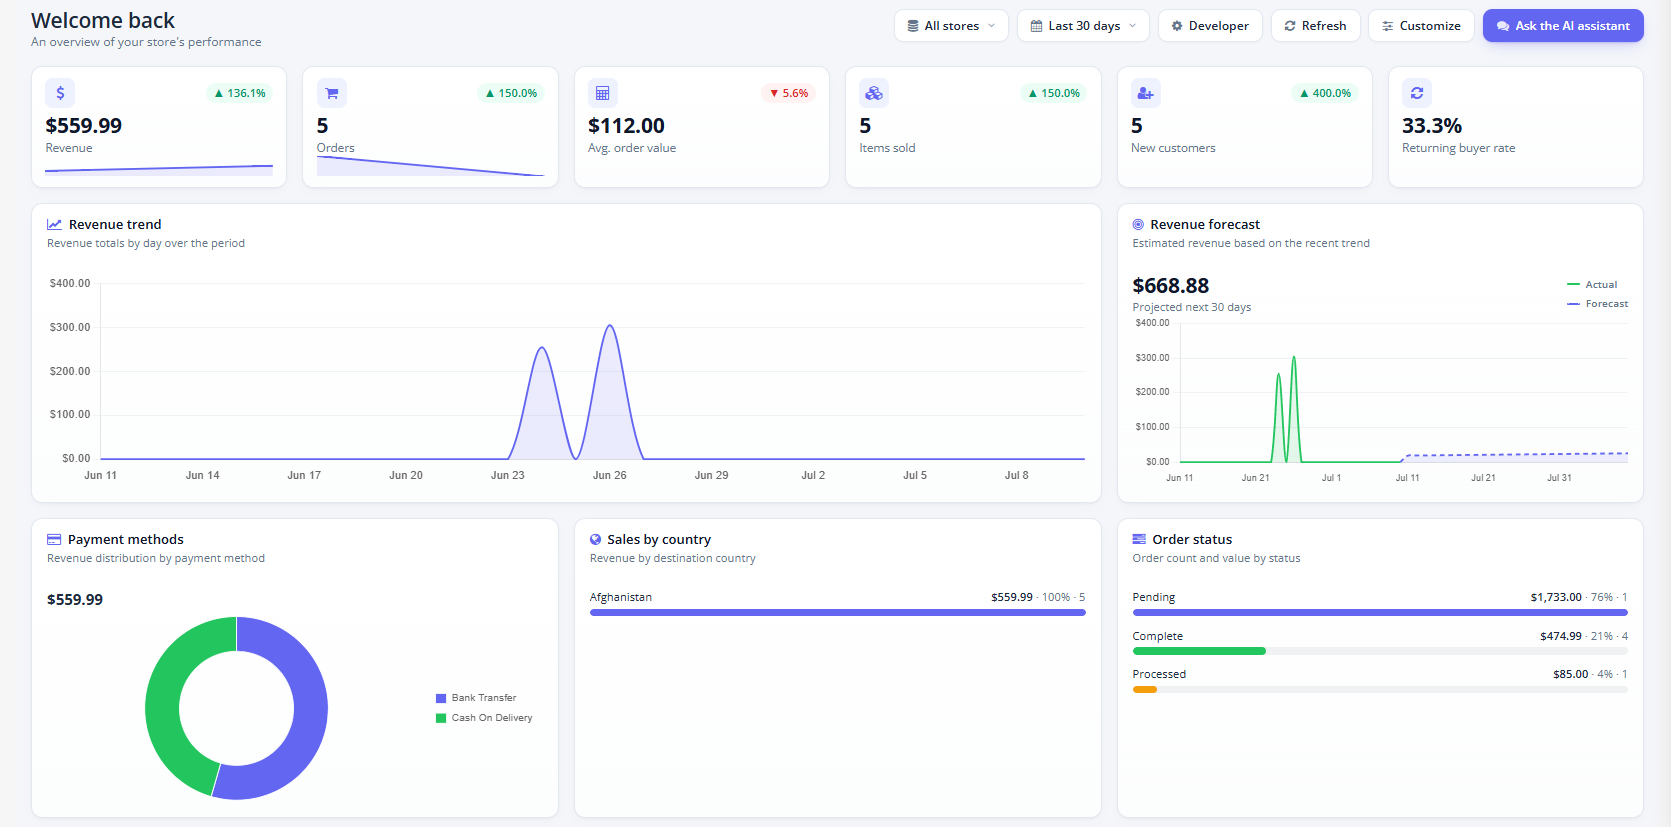
A centralised Security Dashboard is now available, giving OpenCart admins a single-screen overview of their store’s overall security health.
Key details displayed include:
Security Score
Active Security Protections
Failed and Successful Login Attempts
Login Success Rate
Two-Factor Authentication Coverage
Active IP Bans
Spam Protection Statistics
Flagged IP Addresses
Bot Trapping Activity
Recent Project Honeypot Classifications
Top Attacking IP Addresses
Top Targeted Admin Accounts
With this dashboard, merchants can track security activity as it happens and catch potential threats before they escalate.
2. Honeypot Protection
The new Honeypot feature adds an invisible layer of bot defence by embedding a hidden field within key storefront forms. Genuine shoppers never see it, but bots that auto-fill every field are instantly flagged.
Protects Registration, Login, Contact, Newsletter, and Product Review forms
Requires no theme modifications
No dependency on third-party services
Completely invisible to real customers
Reduces spam submissions and fake account creation
For added protection against more sophisticated bots, this feature pairs effectively with the OpenCart Captcha Extension.
3. Project Honeypot Integration
This release also integrates the extension with Project Honeypot, a globally trusted service that identifies known spammers and malicious IP addresses. Rather than relying solely on form-based checks, this integration evaluates a visitor’s reputation before they even interact with your store’s forms.
Key highlights:
Real-time IP reputation lookups via the Http-bl service
Observer Mode to monitor suspicious visitors without blocking them
Action Mode to automatically block flagged IP addresses
Configurable ban duration
IP whitelisting for trusted users, internal networks, and CDN services
Detailed logs showing visitor reputation scores and the corresponding action taken
Requires an admin to supply a rotating six-digit code from an authenticator app in addition to their password. This blocks account takeover even when a password has leaked, been guessed, or reused from another breach.
Example: A shop with three admin users might require 2FA for everyone except a contractor’s fixed office IP, which is exempted. Tip: whitelist your own reliable IP addresses before turning on sitewide enforcement, so you’re never prompted to enroll from a connection you can’t act from.
Login Attempt Throttling
Temporarily blocks an IP once it racks up too many failed admin logins inside a set window – no manual watching required.
Example: if a script fires 50 password guesses at the admin login in under a minute, the source IP gets banned automatically once the retry limit is hit. Tip: pair a moderate retry ceiling (5–10 tries) with a ban long enough to discourage a retry (15–30 minutes), and exempt your office or VPN IP so a typo doesn’t lock your own team out.
IP-Restricted Admin Access
Limits admin panel access to a defined list of addresses – anyone else is turned away before the login form even loads. This is the single strongest control against outside admin access, since the block happens before any credentials are checked.
Admin Directory Cloaking
This feature hides your real admin path behind a secret alternate URL; the genuine path returns a 404 to anyone who doesn’t know the alternate name. This takes your store out of the pool that bots find by scanning for common admin folder names.
Server-Level Login Prompt (HTTP Authentication)
Adds a browser-native username/password prompt in front of the admin panel, the storefront, or both – before OpenCart’s own login screen loads. This runs entirely outside the application, which is useful for staging sites, pre-launch stores, or an extra admin gate.
Web Application Firewall (WAF)
Screens incoming GET/POST data and cookies for known SQL injection, cross-site scripting, and path-traversal patterns, and blocks matches with an HTTP 403 before they reach OpenCart’s code.
Security Response Headers
Adds headers (HSTS, clickjacking protection, MIME-sniffing protection, referrer policy, permissions policy) that instruct browsers to enforce extra safeguards. This is a low-risk way to harden how browsers treat your site, and it’s frequently required on PCI and security-audit checklists.
Form Spam Filtering (CAPTCHA)
Adds CAPTCHA verification – Cloudflare Turnstile, Google reCAPTCHA, or hCaptcha – to the contact form and registration form, cutting spam submissions and fake sign-ups with no theme edits required.
Copy/Scrape Deterrents
Discourages casual content copying by disabling right-click, copy/paste, view-source, and DevTools shortcuts, raising the effort needed to casually scrape product text and images.
File Integrity Monitoring
Runs scheduled scans that compare your OpenCart installation against a known-good baseline, flagging new or altered files as possible threats – often surfacing a compromise before it shows up on the storefront.
Detailed Overview of the OpenCart Security Extension
Admin Protection – Covers your admin login and sessions: 2FA, login throttling, IP restriction, directory cloaking, server-level login prompt, and login monitoring (which includes a Users sub-view for managing individual 2FA enrollments).
Storefront Protection – covers customer-facing traffic: the firewall, response headers, spam filtering, cart-bot blocking, copy deterrents, and the storefront-wide login prompt.
File Integrity Monitoring – scan settings and history, including the cron URL used for scheduling and a searchable log of past scans.
At the top of every tab you’ll find the emergency recovery link – a permanent URL that switches off the extension’s restrictive features in one click if you ever get locked out. This is the single most important detail in this manual: find it now, before touching any other setting, and save it somewhere outside the admin panel. This is the important information that an admin owner should be aware of.
The Users view under Admin Protection lists every admin account (ID, name, email, current 2FA status) and lets you reset a lost or compromised authenticator enrollment so that person can register a new one on their next login.
Reporting lives in two places: the Login Attempt Log under Admin Protection (IP, timestamp, email, and result for every admin login attempt, once logging is turned on) and the Scan History table under File Integrity Monitoring (every scan run, manual or scheduled, with file counts, threat counts, duration, and a link to the full report).
How Each Feature Actually Works
Two-Step Verification
This uses the standard TOTP (Time-based One-Time Password) protocol – the same one behind Google Authenticator, Authy, and similar apps. When an admin turns on 2FA, or is required to via sitewide enforcement, they scan a QR code into their authenticator app, which then generates a new six-digit code every 30 seconds. That code is entered alongside the normal password at each login.
Login Attempt Throttling
Every failed admin login is logged against the IP it came from. Once failures from one IP cross the configured limit inside the configured window, that IP is blocked from further attempts until the ban period runs out.
IP-Restricted Admin Access
Once turned on, every request to the admin panel is checked against an allow-list before OpenCart’s routing runs at all. Anyone not on the list is blocked outright – they never reach the login form.
Admin Directory Cloaking
The extension intercepts requests to your real admin path and returns a 404 unless the visitor has already reached a secret alias URL, which sets a cookie and quietly forwards them to the real location.
Server-Level Login Prompt
This adds a separate, browser-native prompt – rendered by the browser itself rather than an OpenCart form – in front of the admin panel, the storefront, or both, enforced at the web-server level before any PHP logic runs.
Web Application Firewall
The WAF checks incoming query parameters, POST fields, and cookies against a library of known injection, XSS, and path-traversal patterns. A match triggers an immediate 403 before the request reaches OpenCart’s controllers.
Security Response Headers
Each toggle here adds one specific header telling the visitor’s browser to enforce a particular behavior – refusing to render the page in an iframe, refusing to guess file types, forcing HTTPS, and so on.
Form Spam Filtering
When enabled, the extension injects the chosen CAPTCHA widget into the storefront contact and registration forms automatically, with no theme editing, and verifies the response server-side before accepting a submission
Copy/Scrape Deterrents
A set of client-side restrictions – disabling copy/cut/paste, right-click, text selection, view-source, and DevTools shortcuts – applied across the storefront, with an IP whitelist for staff who need normal browser behavior.
File Integrity Monitoring
A scheduled job, triggered by your server’s cron scheduler hitting a unique, token-protected URL, scans every file in your installation, compares it to a maintained baseline of known-good OpenCart core and common extension files, and flags anything new, missing, or modified.
1.0.0 Admin Protection
Two-Step Verification
Enable 2FA – turns on 2FA support; admins are guided to set up an authenticator app at their next login.
Whitelist IPs – addresses that skip 2FA entirely, even when enforcement is on. Add your office or home network as a safety net before enforcing.
Force 2FA – requires every non-whitelisted admin to set up 2FA before proceeding. Only enable after whitelisting a trusted IP or confirming the recovery link works.
ID – identifies the admin account.
2FA Status – shows whether that account currently has 2FA enrolled. Worth reviewing periodically, especially after staff changes.
Actions – resets a lost 2FA enrollment so the user can register a new device. Use right away if someone loses their authenticator phone.
Rolling out 2FA as optional first, then switching to enforced once everyone’s enrolled, is the recommended path – it stops account takeover from a leaked, guessed, or reused password, since the password alone is no longer enough. Never enforce 2FA sitewide without first whitelisting at least one trusted IP or confirming the recovery link works, and keep that whitelist short and reviewed regularly, since those addresses bypass 2FA completely. Add “reset 2FA” to your offboarding checklist for departing staff.
Brute Force Protection
Enable throttling – Temporarily blocks an IP after too many failed admin logins. Recommended on any live store.
Max retries – Failed attempts allowed before a ban triggers. 5 is a reasonable default.
Time window (seconds) – The rolling window in which failures are counted. 300 seconds (5 minutes) works for most stores.
Ban time (seconds) – How long a banned IP stays blocked; it expires automatically.
Whitelist IPs – Addresses never counted toward the limit or banned.
Start with moderate values, check your login log after a week, and tighten if repeated attack patterns keep showing up from varied IPs. This works best paired with 2FA rather than alone – throttling slows attackers down, 2FA stops them outright even if a password is eventually guessed. Bans clear themselves once the timer runs out; there’s no need to manually unban anyone.
IP-Restricted Admin Access
Restrict Admin Access by IP: Limits admin panel access to a specific list of trusted addresses.
How It Works: Once enabled, only listed IPs can reach the admin panel; every other visitor is blocked, including anyone attempting to reach the login page. Your current IP is added automatically the moment you enable this option, so you won’t lock yourself out.
Allowed IPs (required): Only addresses entered here are permitted through.
Admin Directory Cloaking
Hide Admin Directory Name: Replaces your real back-office URL with a secret alias, removing your store from the pool of sites automated scanners find by guessing common admin paths.
How It Works: When enabled, the direct admin URL returns a 404 response, and the panel is only reachable through the alias configured below.
Alias Name: 3 to 32 letters, digits, hyphens, or underscores. Treat this as a secret, the same as a password.
Server-Level Login Prompt (Admin)
Part of the OpenCart password protection plugin functionality built into this extension, this feature adds a browser-native authentication layer in front of the admin panel itself.
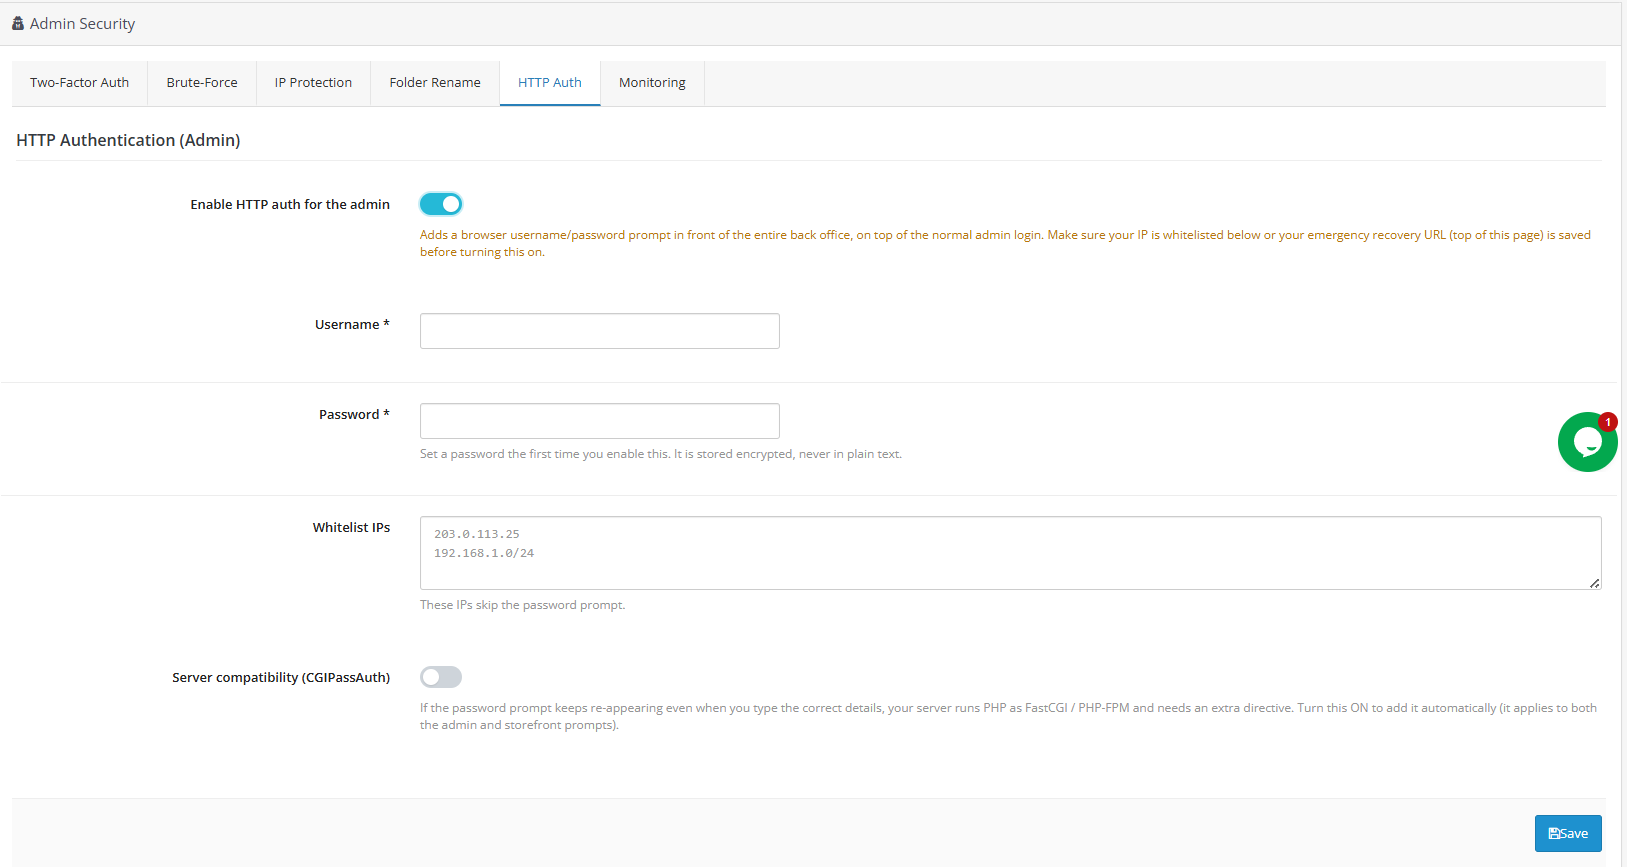
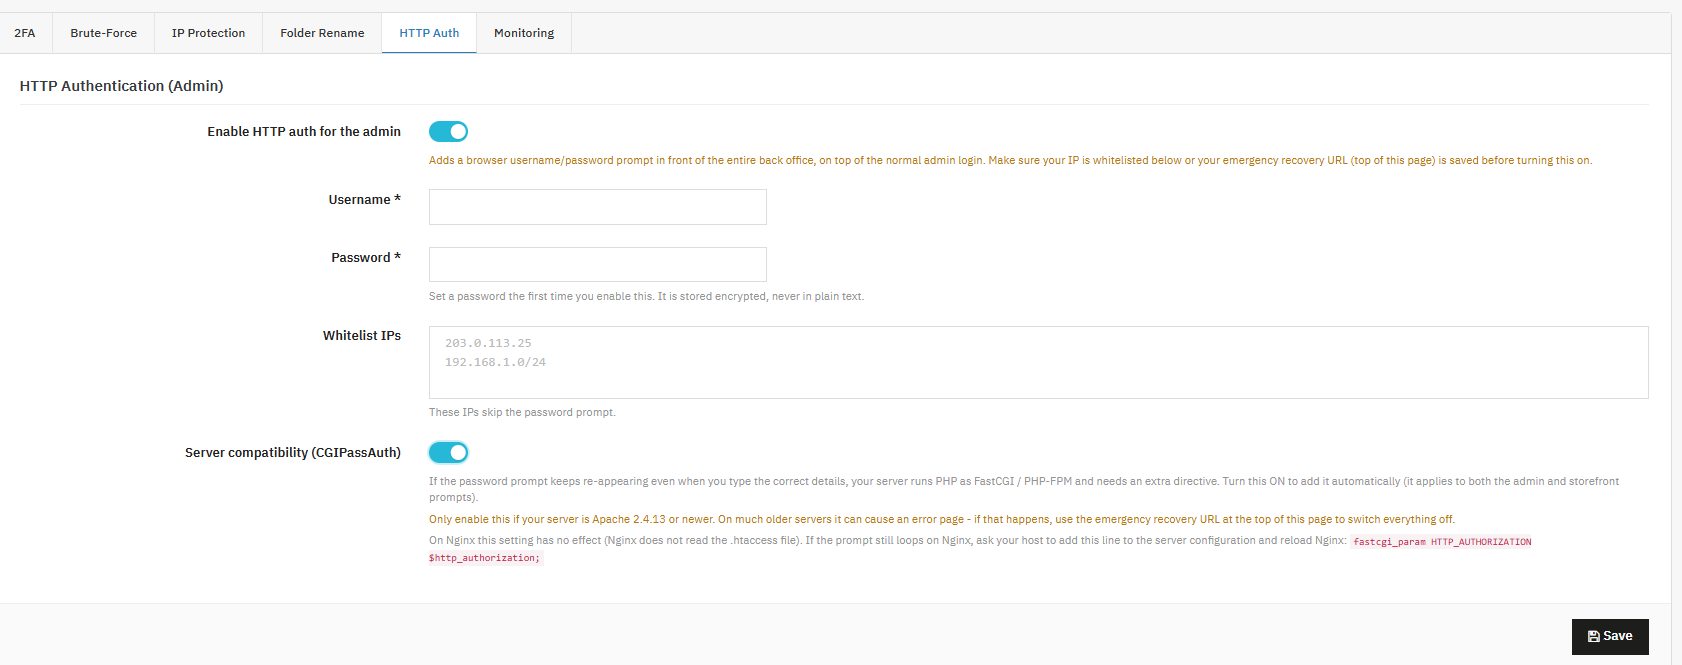
Enable HTTP Auth for the Admin: Adds a username/password prompt before the admin login screen even loads.
Username / Password: Credentials for the prompt; the password is stored encrypted and never saved in plain text.
Whitelist IPs: Addresses that skip the prompt entirely.
Server Compatibility (PHP-FPM/FastCGI): Adds a directive needed on servers where the authentication header isn’t otherwise passed through correctly.
Login Monitoring
A core feature of this OpenCart login security plugin, this tab provides visibility into every admin login attempt made against your store.
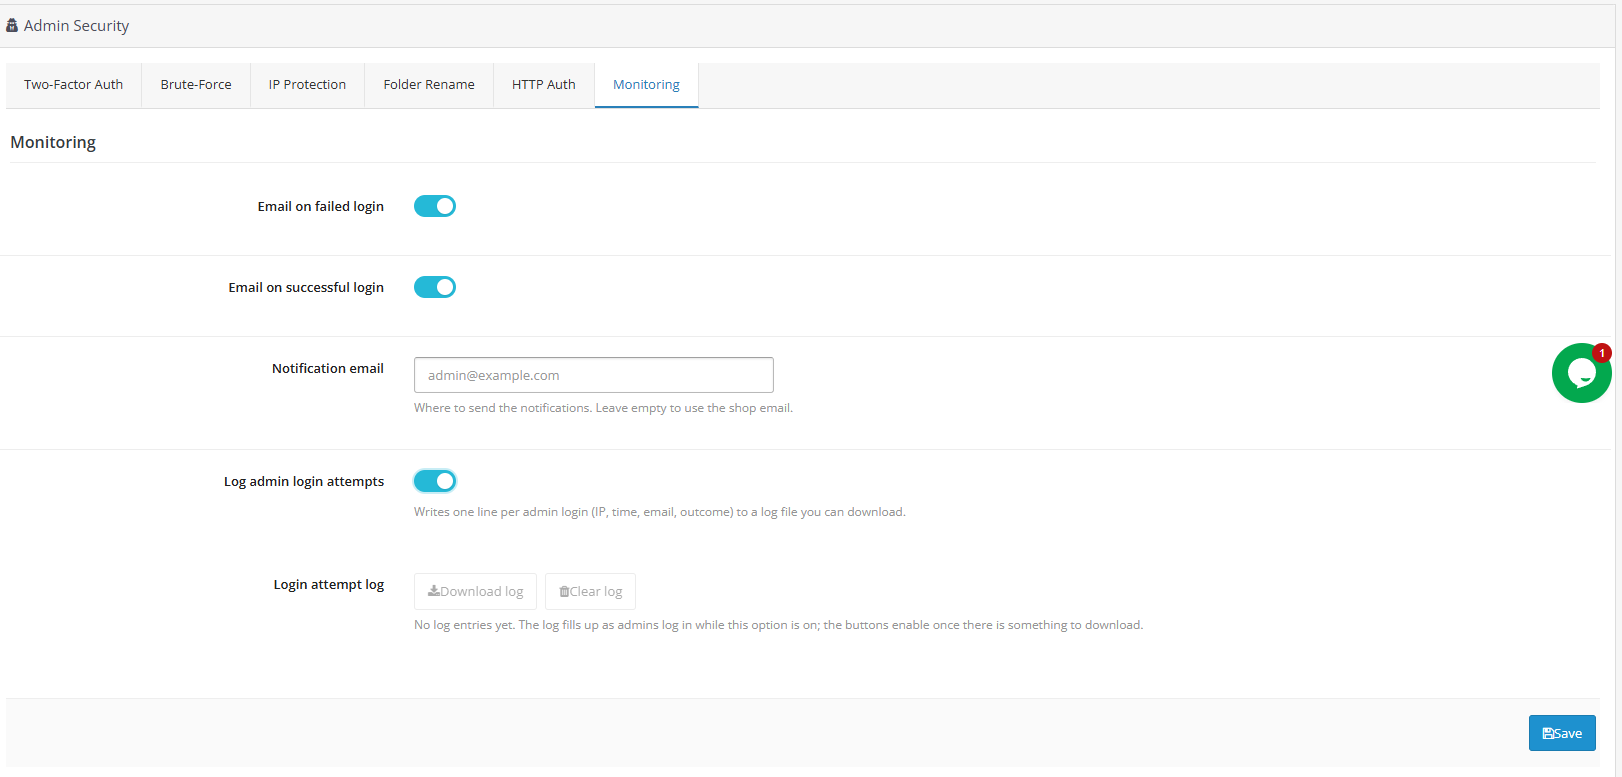
Email on Successful Login: Sends a notification whenever an admin logs in successfully.
Notification Email: Where alerts are sent; defaults to your store’s email address if left blank.
Log Admin Login Attempts: Records the IP address, time, email, and outcome for every login attempt to a downloadable log.
Login Attempt Log: The log itself; download buttons activate once entries exist.
2.0.0 Storefront Protection
Storefront Protection covers everything a customer or a bot interacts with directly. This is where the firewall, CAPTCHA, and security-header functionality of this OpenCart security extension all work side by side, each addressing a different customer-facing threat.
Web Application Firewall
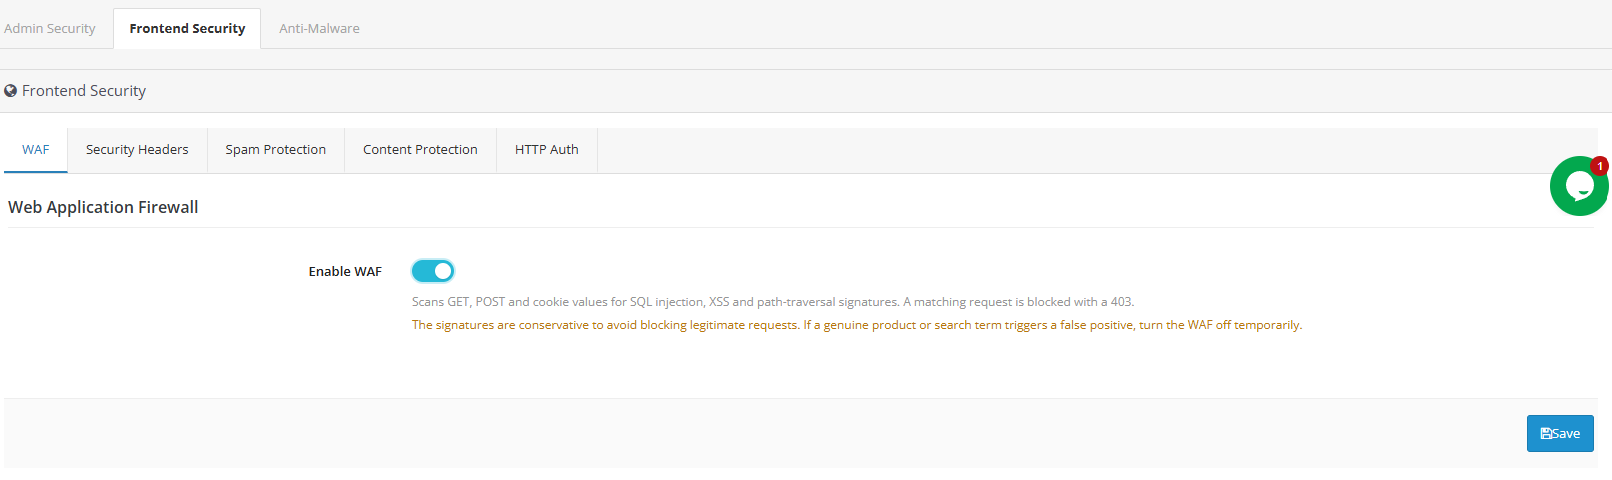
Functioning as a dedicated OpenCart firewall extension, this feature automatically blocks requests carrying known SQL injection, cross-site scripting, or path-traversal patterns before they reach the storefront’s own code. No configuration is required beyond enabling it.
Security Response Headers
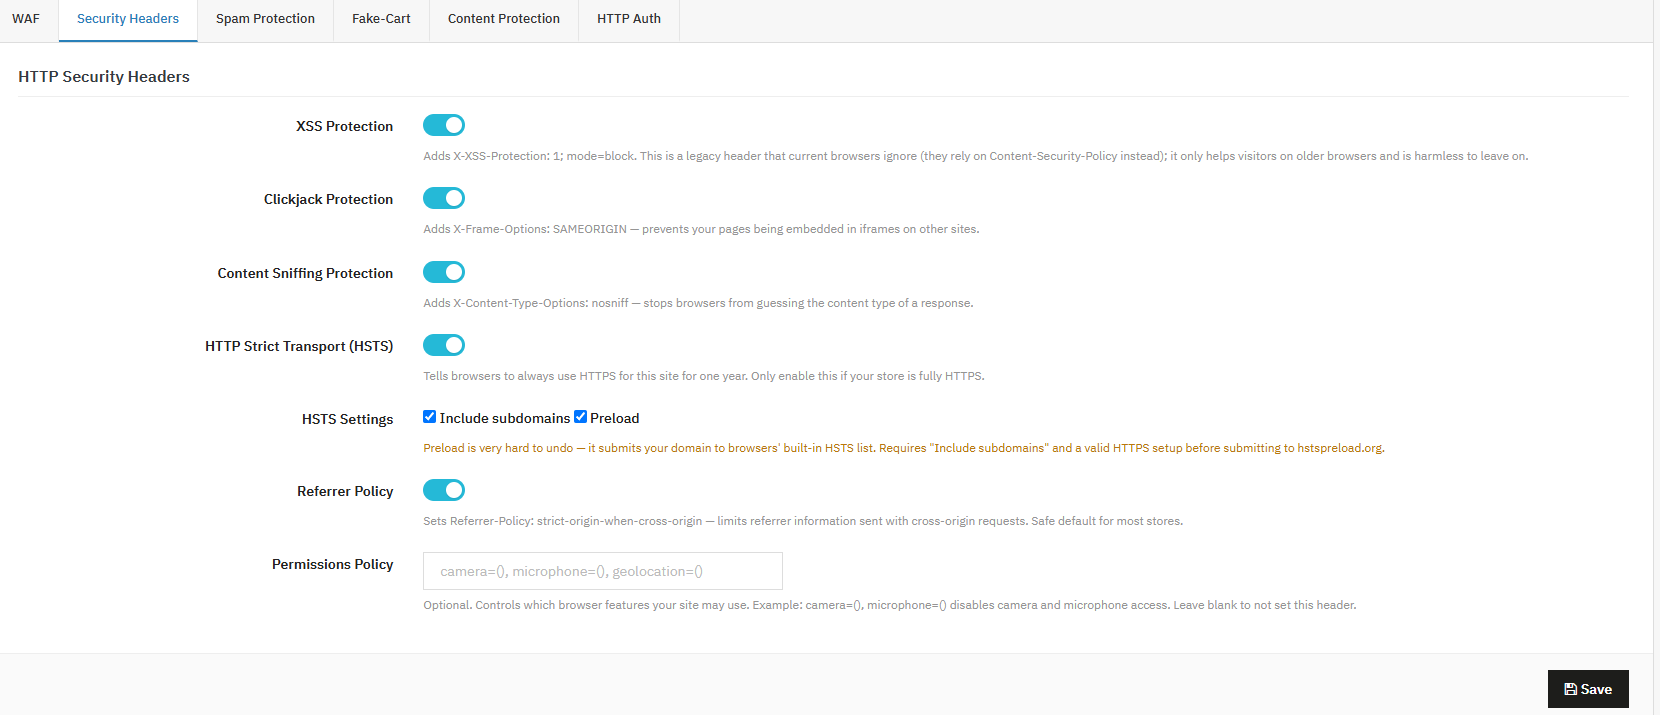
These settings add small, invisible instructions telling browsers how to handle your store safely. Most are safe to switch on and leave alone.
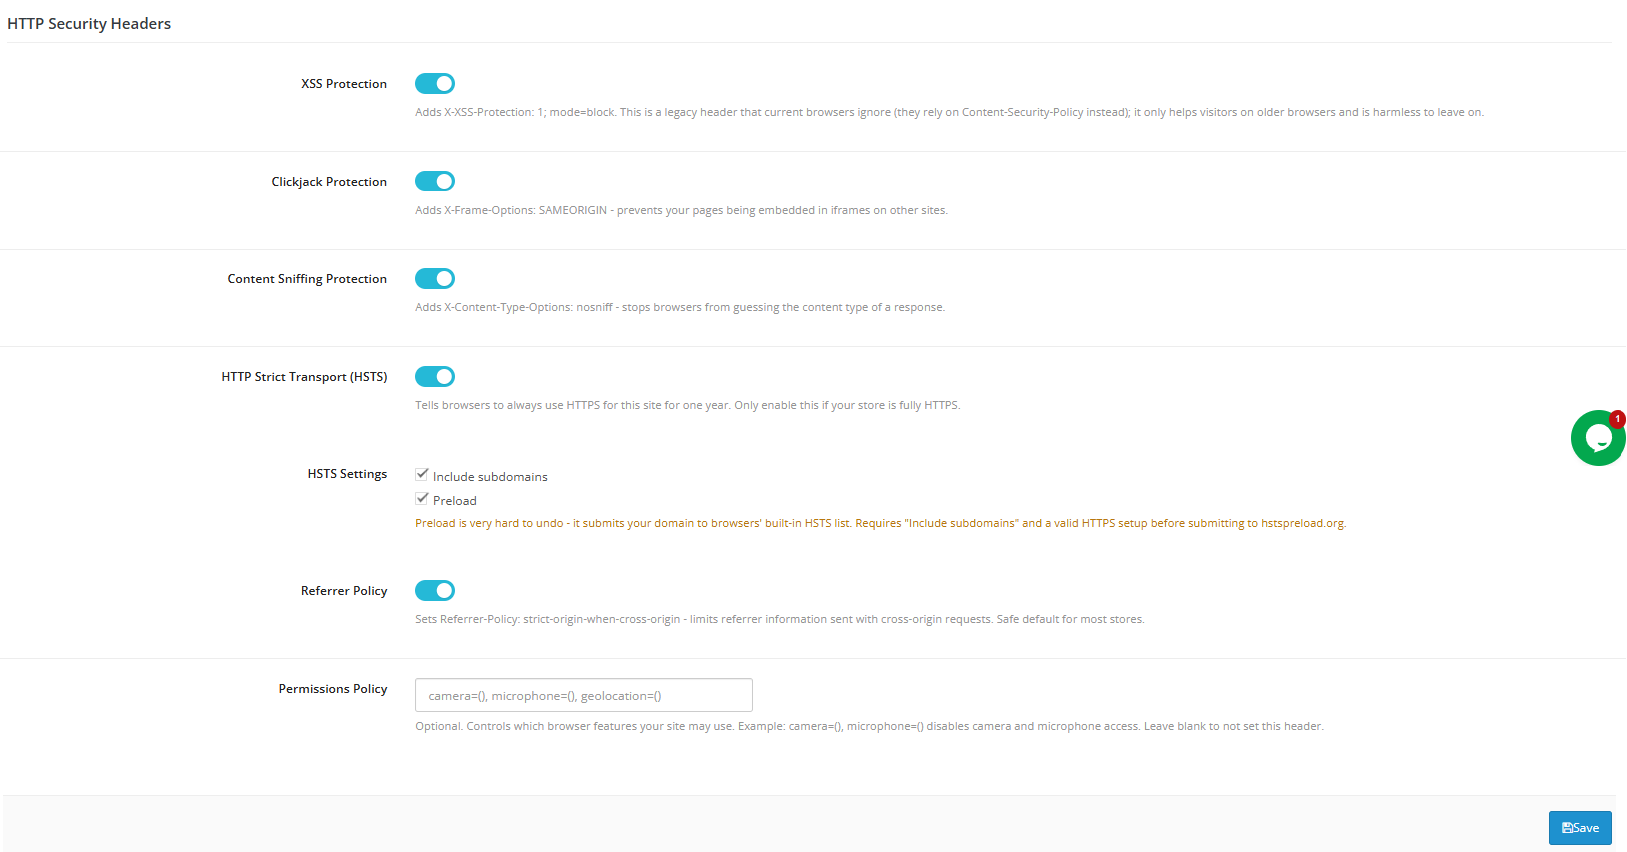
XSS Protection: An older safeguard against a specific attack type. Modern browsers have better built-in protection, but leaving this on doesn’t hurt; think of it as a backup lock for older browsers.
Clickjack Protection: Stops other sites from secretly displaying your store inside a hidden frame, a trick sometimes used to fool visitors into clicking things they didn’t mean to.
Content Sniffing Protection: Tells browsers to trust the file type your store declares instead of guessing, closing a path attackers sometimes exploit.
HTTPS-Only Browsing (HSTS): Tells browsers to always use the secure, encrypted version of your site, never the unsecured one.
Include Subdomains / Preload: Extends that rule to any subdomains you use, and can optionally register your store on a global list browsers check automatically.
Referrer Policy: Limits how much information browsers share about where a visitor came from when they click a link away from your store.
Permissions Policy: Controls which device features (camera, microphone, etc.) your store’s pages can request in a visitor’s browser.
Form Spam Filtering
1.0 Captcha
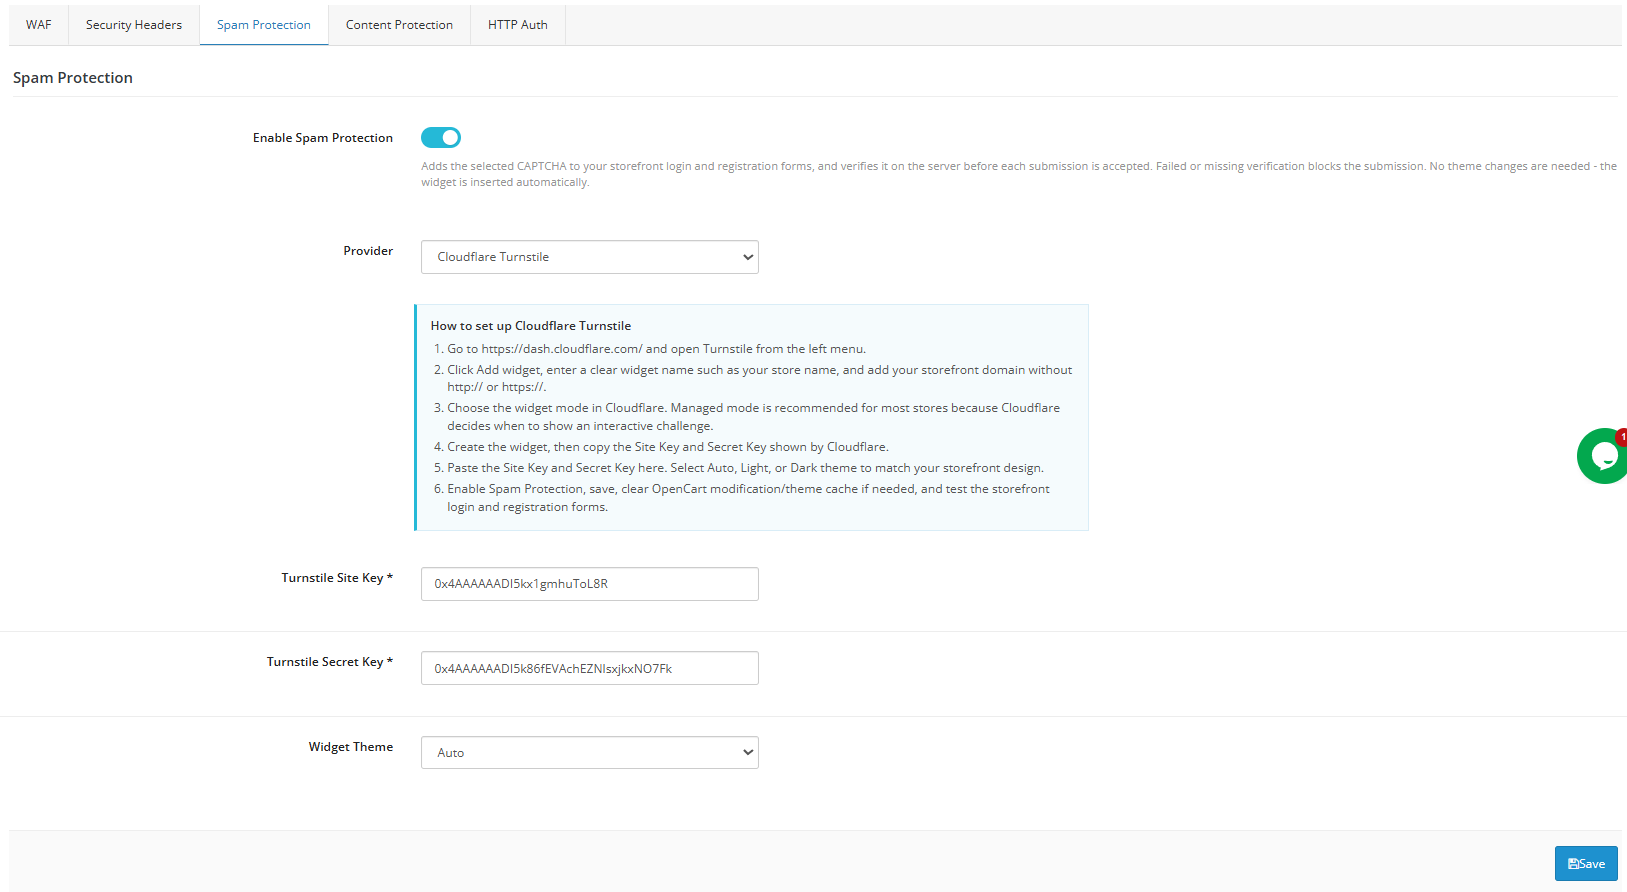
As a built-in OpenCart spam protection extension and OpenCart captcha extension, this feature keeps bots and spammers from flooding your contact and registration forms with junk submissions. It works with providers including Cloudflare Turnstile, Google reCAPTCHA, and hCaptcha, each verifying that a real visitor, not a bot, is submitting your form.
Enable Spam Protection: Adds a CAPTCHA check to your contact and registration forms, verified server-side so it can’t be bypassed.
Provider: Choose Turnstile, reCAPTCHA, or hCaptcha; each works a little differently, but all block automated spam.
Site Key / Secret Key: Codes from your chosen provider that connect your store securely.
Widget Theme: Controls how the CAPTCHA box looks (Auto, Light, or Dark).
2. [New] Honeypot Field
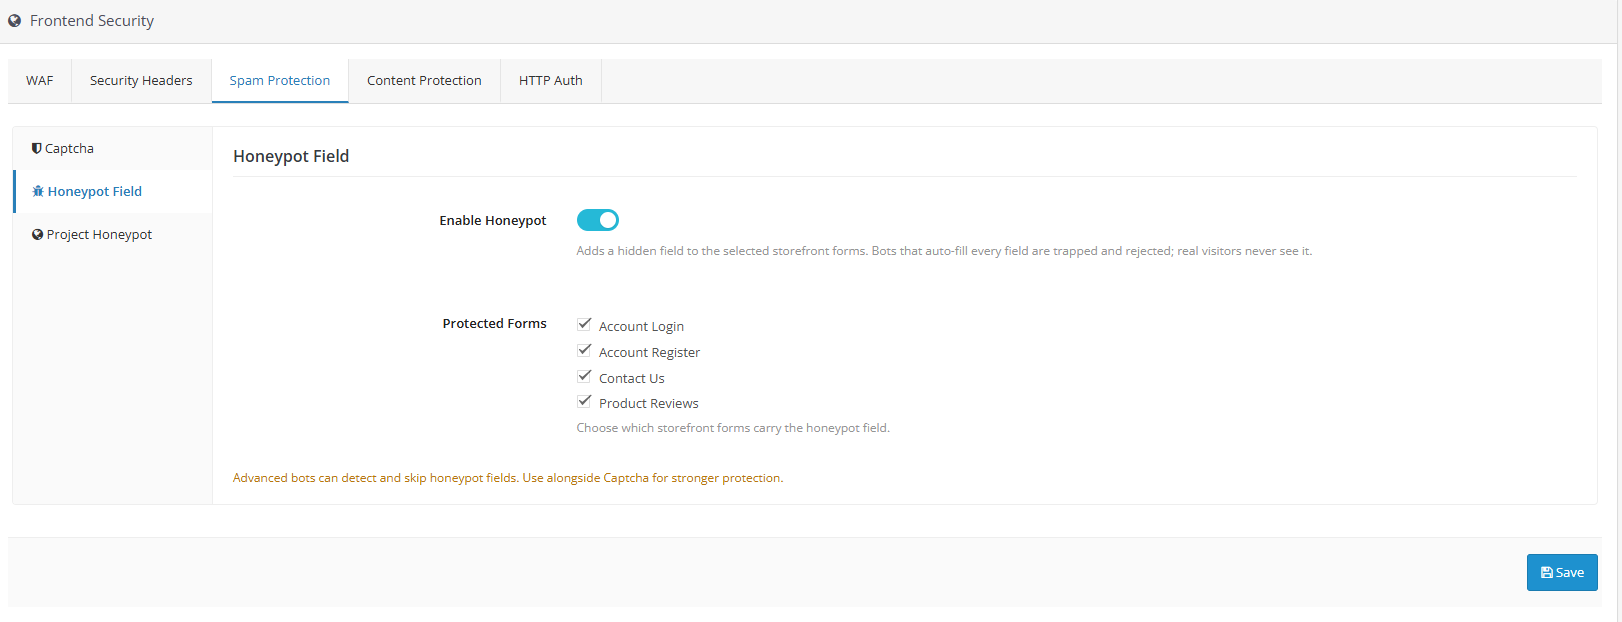
The Honeypot Field feature strengthens frontend security by embedding hidden fields within selected storefront forms. These fields stay completely invisible to human visitors, but any bot that automatically fills out every field on a form gives itself away instantly and gets blocked. It’s a low-overhead way to cut down on spam submissions, fraudulent account creation, and bot-driven login attempts, without adding any friction to the checkout or browsing experience for real shoppers.
Enable Honeypot: Switches Honeypot protection on for your store. Once active, a concealed field is silently inserted into each form you’ve selected below. Any submission where that hidden field gets filled in is flagged as bot activity and rejected before it reaches your database.
Protected Forms: Select which storefront forms Honeypot should guard. Available options include:
Registration: Prevents bots from mass-creating fake customer accounts.
Login: huts down scripted login attempts and credential-stuffing attacks.
Contact: Keeps your inbox free of bot-generated spam inquiries.
Newsletter: Blocks fake or automated subscription attempts. Note: Availability depends on your newsletter setup and active theme. If the form can’t be detected on a page, this protection is simply bypassed for that page.
Product Reviews: Shields your review/comment forms from spam entries. Note: Requires the Product Review module to be present; if the form isn’t detected due to theme differences, protection is skipped automatically.
3.0 Project Honeypot
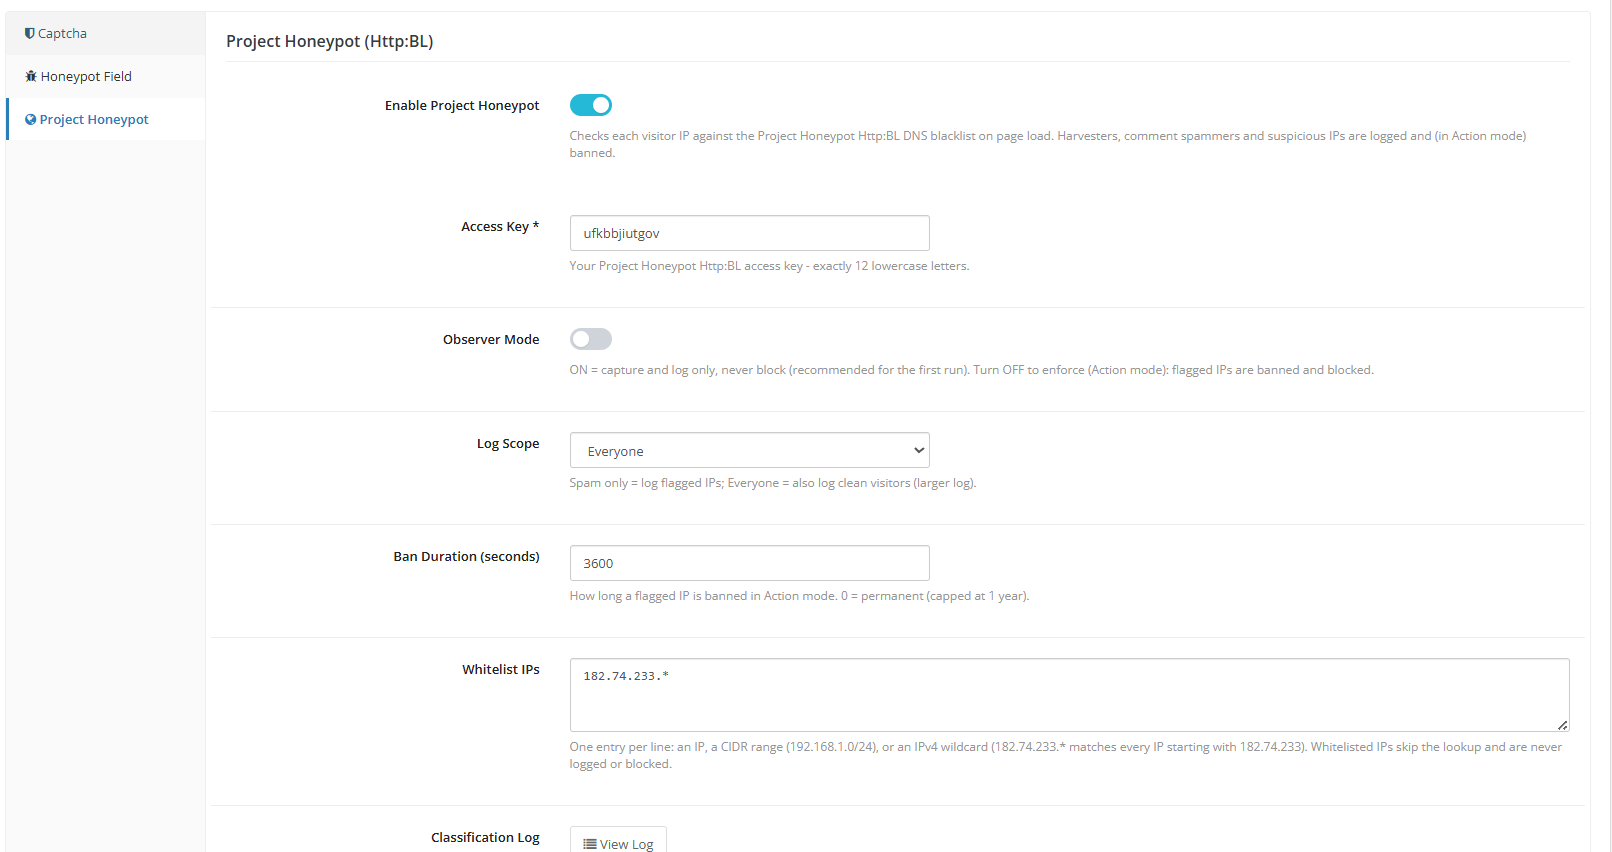
Enable Project Honeypot: The master switch for this entire module. Turning it on means every incoming visitor’s IP address gets checked against Http:BL — Project Honeypot’s DNS-based reputation database — the moment they land on a page. Unlike the form-based Honeypot field, which only triggers on submission, this check happens proactively, before the visitor interacts with anything.
Access Key: A 12-character lowercase code assigned by Project Honeypot that links your HTTP:BL queries back to your registered account. It isn’t a security credential in the traditional sense — it can’t be used to access anything, it functions more like an attribution token so the service knows which site is making the request.
Observer-Only Mode: Runs the IP lookups and logs every classification, but takes no blocking action. Use this mode first to collect data and understand your traffic patterns before enforcing anything.
Log Scope: Determines the volume of data written to the Classification Log.
Flagged IPs only – A leaner option that records just the visitors Http:BL flags as risky.
All visitors – Captures every classification, including “Safe” entries, giving you a fuller picture of your overall traffic reputation. Because this fills up faster, records are automatically cleared after 7 days.
Ban Duration (seconds): Applies once you switch to Action Mode. Determines how long a flagged IP remains blocked before it can attempt access again.
Whitelist IPs: Add specific IP addresses here to exempt them from blocking entirely, regardless of what Http:BL reports.
Classification Log: A record of each visitor’s IP, its assigned classification (Safe, Suspicious, Harvester, or Comment Spammer), and whether the action taken was observation only or an actual block. Reviewing this log during the Observer phase helps you catch any false positives before committing to Action Mode
Content Protection
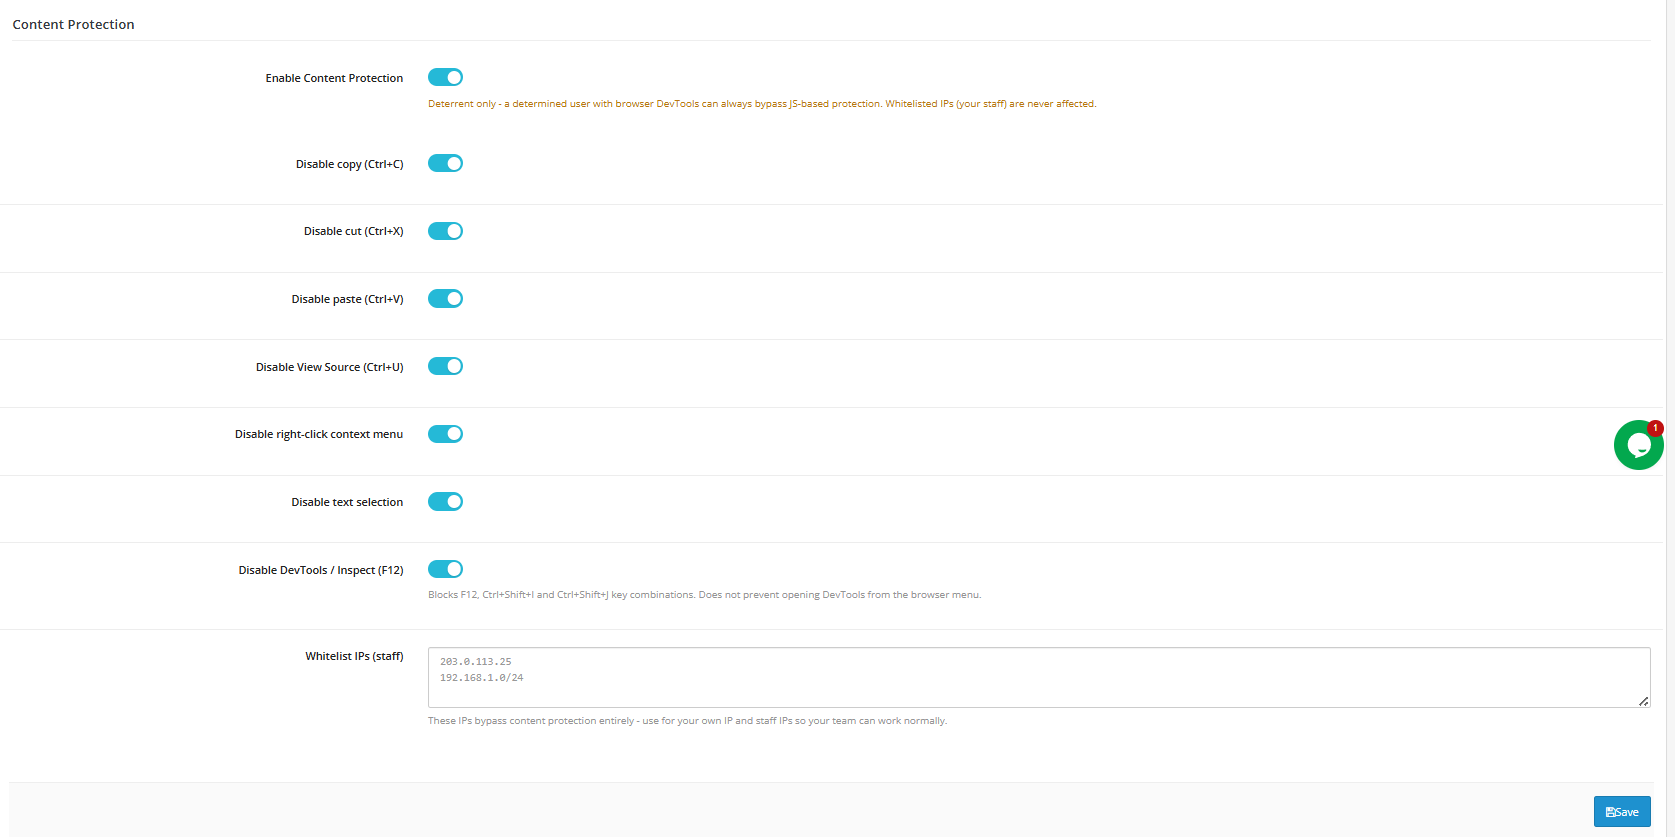
Enable Content Protection: Master toggle. This works as a deterrent only; a determined visitor can still bypass it using their browser’s developer tools.
Disable Copy/Cut/Paste: Blocks the keyboard shortcuts visitors would use to copy or paste page content.
Disable View Source (Ctrl+U): Blocks the shortcut for viewing a page’s source code.
Disable Right-Click Menu: Removes the context menu visitors could use to save images or copy content.
Disable Text Selection: Prevents highlighting or selecting text on the page.
Disable DevTools/Inspect (F12): Blocks the F12, Ctrl+Shift+I, and Ctrl+Shift+J shortcuts. Does not stop someone from opening DevTools through the browser’s own menu.
Whitelist IPs (Staff): Addresses that bypass all content-protection restrictions.
Storefront-Wide Login Prompt
Another layer of this OpenCart password protection plugin, this feature gates the entire storefront behind a browser-level username/password prompt, separate from the admin-side prompt described in Section 6.
Enable HTTP Auth for the Storefront: Adds a password prompt before any storefront page can be viewed.
Whitelist IPs: Addresses that skip the storefront prompt entirely.
This is meant to keep a pre-launch or staging store private from search engines and casual visitors. The friction here is intentional, unlike the admin-side prompt. If the prompt keeps looping even with correct credentials on a PHP-FPM/FastCGI server, enable the compatibility setting under Admin Protection to resolve it; that setting applies to both the admin and storefront prompts.
3.0.0 File Integrity Monitoring
Settings
Enable File Integrity Monitoring: Master toggle; when off, the scan endpoint returns immediately without scanning anything.
Email Alert on New Threats: Sends an alert to the admin email whenever a scan finds something new or modified. Repeat alerts for known false positives are automatically suppressed.
Exclude Paths: Relative paths, one per line, to skip during scanning, useful for suppressing known false positives such as vendor directories.
Cron URL: A unique, token-protected URL that triggers a scan whenever your scheduler requests it.
To configure this correctly: enable the feature, turn on email alerts, and add the cron URL to your hosting control panel’s scheduled tasks (or your own crontab), typically scheduled for off-peak hours such as 2 a.m. Alerts fire only for genuinely new or changed threats. Once a file has been seen and either excluded or acknowledged, repeat alerts for that item are suppressed.
Scan History
ID: Sequential identifier for each scan run.
Date: When the scan was executed.
Triggered By: Manual or scheduled (cron).
Files Scanned: Total files checked in that run.
Threats: Number of new or modified files flagged.
Duration: How long the scan took.
Status: Completion state.
View Report: Opens the detailed findings for that scan.
This tab is purely historical and filterable by date range. No configuration is needed. Review your reports after the first few scheduled scans to learn what’s “normal” for your store, since most sites see a handful of flagged files tied to routine theme or extension updates. Once that baseline is established, genuinely unusual findings will stand out more clearly. Investigate any scan where the threat count jumps well past your baseline, even if individual files don’t look obviously malicious at first glance. That’s often exactly what an early-stage compromise looks like
Conclusion
OpenCart Advanced Security Manager brings together the protections most stores end up needing piecemeal – two-step verification, login throttling, a firewall, CAPTCHA, and file-integrity scanning – into one centrally configured screen. Set up thoughtfully, starting with login monitoring and the emergency recovery link before layering on more restrictive controls, it meaningfully cuts down the most common attack paths against OpenCart stores without adding friction for real customers or your own team.
The OpenCart Advanced Security Manager is also available on the OpenCart Marketplace, and store owners can access it the module by clicking here
Most PrestaShop merchants think about growth in terms of traffic: more ads, better SEO, wider social reach. What the data increasingly shows is that the stores pulling ahead aren’t necessarily acquiring more customers; they’re keeping more of the ones they already have, and a brandedPrestaShop Mobile App is becoming the primary tool for doing that.
The math is unambiguous. Acquiring a new customer costs five to twenty-five times more than retaining an existing one, and retained customers spend up to 67% more than first-time buyers. Brands with mobile apps see up to 50% higher repeat purchase rates compared to mobile web alone, and app users purchase approximately 33% more frequently than non-app users. For a PrestaShop store with an established customer base, a dedicated app isn’t a feature addition; it’s a structural change to how the business grows.
What a PrestaShop Mobile App Does to Customer Retention That a Website Cannot
A website, however well-optimised, is passive. Customers need to remember the URL or find it through search. A branded PrestaShop Mobile App sits on the customer’s home screen, which is a qualitatively different relationship with the brand. Over a third of consumers keep their favourite brand’s app installed on their phone as a direct signal of trust and ongoing purchase intent.
The engagement gap is equally specific. Shoppers spend roughly 201 minutes per month in shopping apps, compared with around 11 minutes on mobile shopping websites. That difference isn’t explained by any single feature; it’s the cumulative effect of faster load times, saved preferences, native navigation, and the fact that an app is a contained environment without browser distractions. For merchants whose repeat customers are currently browsing, forgetting, and returning only when retargeted, that engagement gap represents recoverable revenue at low marginal cost.
Customer lifetime value responds directly to this shift. When 60% of first-time app buyers go on to make additional purchases, the app becomes less of a channel and more of a conversion funnel for turning single-purchase customers into repeat buyers who drive the majority of any store’s revenue.
Why Push Notifications Change the Economics of Re-Engagement
Email remains the backbone of eCommerce retention for most stores, but its limits are structural; average open rates rarely exceed 20%, and inbox competition compounds every quarter. Push notifications, available only to merchants with a native app, operate differently. They appear directly on a customer’s lock screen, require no inbox to compete in, and can be triggered automatically by purchase behavior or manually from the admin panel.
The Knowband PrestaShop Mobile App Builder includes automated notifications for order confirmation, delivery status updates, and abandoned cart recovery, each configurable with custom messages and time intervals. Manual campaigns can be pushed from the back office with an image, landing page redirect, and device targeting. The practical effect is that a merchant can send a back-in-stock alert, a flash sale notification, or an abandoned cart reminder, and reach customers who are already brand-familiar, without paying for an ad placement or competing in a crowded inbox.
Brands recover up to 22% of abandoned carts through automated push notifications, a channel that simply doesn’t exist for stores operating on mobile web alone. For a PrestaShop merchant running promotions or managing seasonal inventory, that recovery mechanism shifts from optional to significant quickly.
How the App Experience Drives Cross-Selling and Average Order Value
Repeat customers don’t just return more often, they buy more when they do. The app experience contributes to this directly through features that a mobile website handles inconsistently: related products on the product page, wishlist functionality that encourages return visits without requiring an immediate purchase, and a simplified checkout that removes the friction points that reduce order value on the first visit.
The PrestaShop Mobile App includes compatibility with PrestaShop’s Automatic Related Products module, bringing cross-selling directly into the app’s product pages. A customer browsing a jacket can see matching accessories without navigating away, and those related products appear in the same session where intent is already high. For stores where average order value matters as much as repeat frequency, this is a meaningful driver.
The wishlist feature compounds this over time. A customer who saves three items during one session and returns a week later for a specific purchase often converts on items they saved previously, a behavioral pattern that mobile web struggles to support because saved items depend on cookies and browser state rather than a persistent account.
The Brand Ownership Argument Most PrestaShop Merchants Haven’t Made Yet
There’s a competitive dimension to this that goes beyond retention rates. Every customer who downloads a store’s app has made a low-friction commitment to the brand; they found it, trusted it enough to install it, and allowed it to send notifications. That’s a qualitatively different customer relationship than one built through retargeting ads or search traffic, both of which disappear the moment spending stops.
A branded PrestaShop Mobile App with the store’s logo, colors, and theme deployed through Google Play and the Apple App Store gives the merchant a distribution channel they own outright. No algorithm changes, no ad auction dynamics, no platform dependency. The customer relationship exists in the app’s database, communicable directly through push notifications to a segment that opted in.
For international PrestaShop stores, the multi-currency and multi-language support built into the app extends this owned channel globally. A customer in Germany and a customer in Brazil both use the same app, see prices in their local currency, and browse in their native language without requiring separate storefronts or platform configurations.
What Building a PrestaShop Mobile App Actually Requires in 2026
The historical barrier to a branded app was development cost; custom Flutter or React Native builds ran from tens to hundreds of thousands of dollars before a single customer downloaded them. That barrier has changed for PrestaShop merchants specifically.
Knowband’s solution delivers ready-to-publish Android and iOS app files within one to two working days after a merchant shares their specifications. The app runs on Flutter with 100% synchronization to the live store, products, pricing, payment methods, shipping options, and inventory, all of which mirror the website in real time without a separate catalog to maintain.
The admin panel handles layout customization, push notification campaigns, GDPR compliance settings, and payment method configuration without requiring code access or developer involvement. For stores that have been weighing a PrestaShop Mobile App against the perceived complexity of building one, the actual setup process is considerably more straightforward than the question usually implies.
The Window for Early-Mover Advantage Is Still Open
Most PrestaShop stores have not yet deployed a branded app, which means merchants who move now face less customer-awareness competition than they will in two years. A customer who downloads a store’s app and builds a purchase habit inside it is significantly less likely to switch to a competitor, 76% of consumers who use brand apps do so more frequently when offered app-exclusive incentives, and the switching cost of an uninstall is psychologically higher than simply trying a different website.
The channel shift toward apps as the primary mobile commerce interface is already well underway in major retail categories. For PrestaShop merchants ready to stop depending entirely on paid acquisition and start building a retention-first growth model, aMobile App for PrestaShop is the infrastructure that makes that shift possible without rebuilding anything that already works.
PrestaShop Security Manager is a completed PrestaShop security module developed to replace the work of single-purpose plugins most merchants end up installing one at a time: a two-factor authentication plugin, a CAPTCHA plugin, a separate firewall extension somewhere else. Instead, this module brings admin-side protection, frontend defence, and file-integrity scanning together in one configuration screen inside your PrestaShop back office.
If you’re looking for a Complete PrestaShop 2FA module, a PrestaShop firewall module, a PrestaShop brute force protection module, or simply a way to lock down your to secure the backend without juggling these five different extensions, this Prestashop Advanced Security Manager covers all.
This module is organised into three functional areas, each with its own set of tabs:
Admin Security: The admin’s security includes the 2FA (Two-Factor Authentication), Brute-Force Protection, Admin IP Protection, Folder Rename(Hidden Admin URL), HTTP Authentication and login activity monitoring.
Frontend Security: This includes Web Application Firewall, HTTP Security Headers, Spam Protection (CAPTCHA), Fake-Cart Protection, Content Protection, and Storefront HTTP Authentication.
Anti-Malware: Scheduled scanning, threat detection, and historical scan reporting.
Each of these areas is documented in full later in this manual, with every field explained in plain language so you always know exactly what you’re turning on before you turn it on.
Update (July 8, 2026): New Features Added to the PrestaShop Security Module v1.0.1
The latest update to Knowband’s PrestaShop Security Module introduces a dashboard and a frontend security feature that is a HoneyPot Field and Project under Spam Protection. These additions give store owners a clearer view of their store’s safety and a stronger defence against automated attacks, all without any technical hassle.
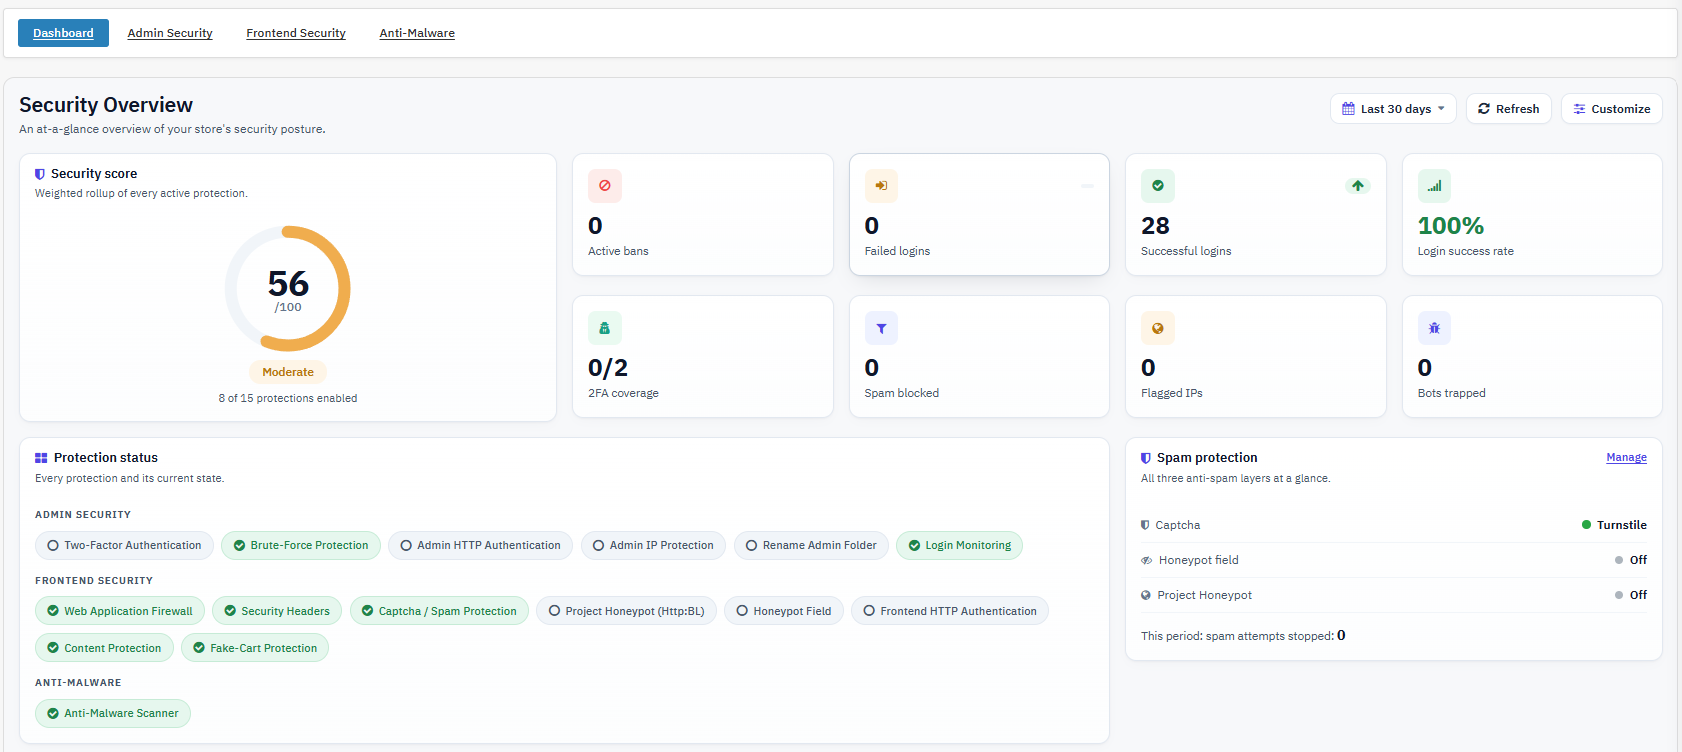
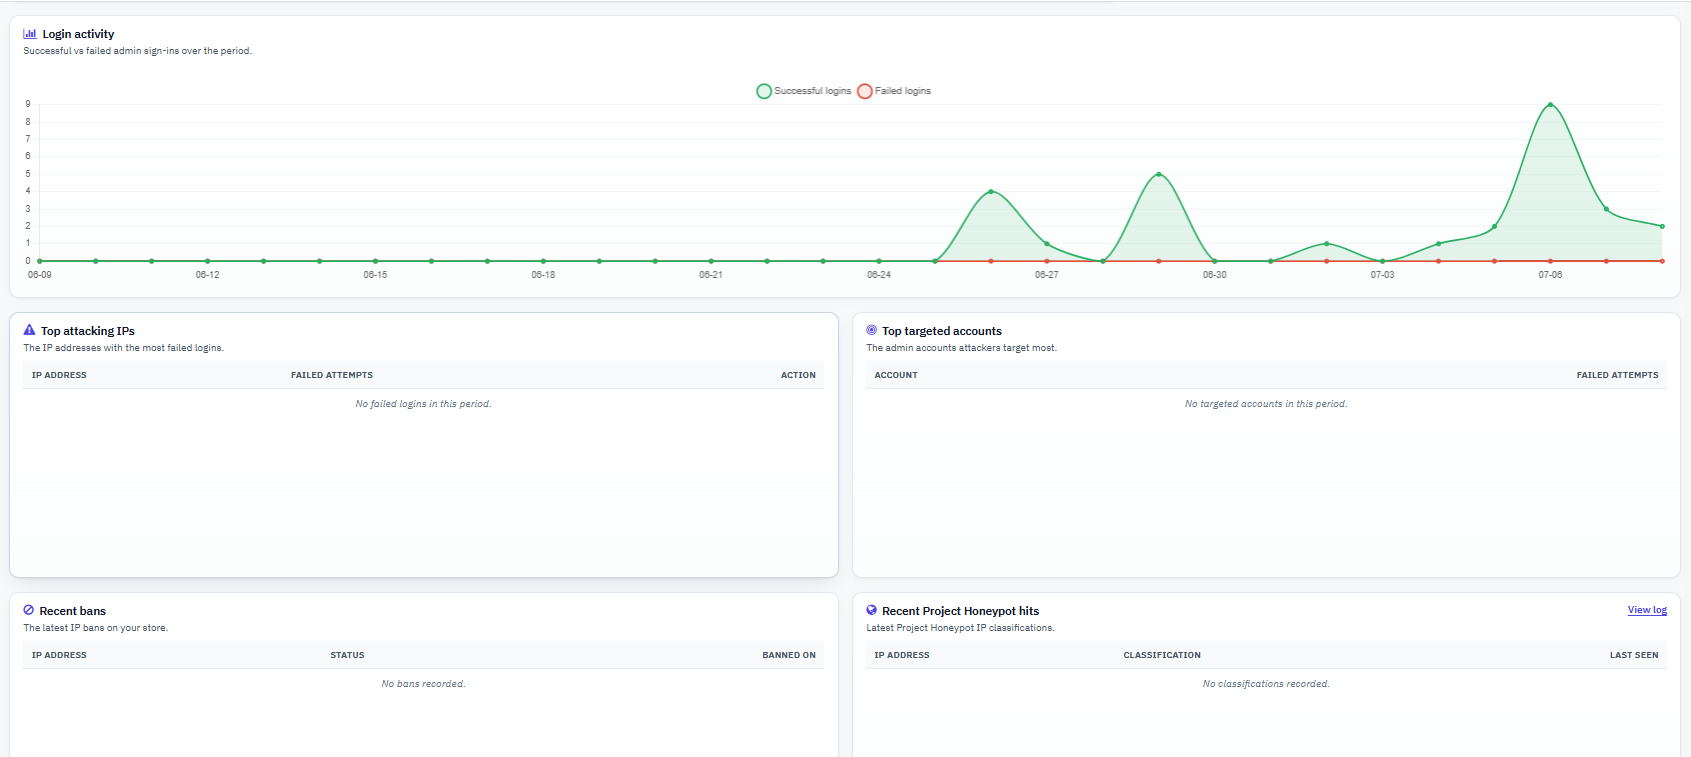
1. New Security Dashboard
A centralised Security Dashboard has been added so store admins can see their store’s complete security status from one single screen.
The dashboard shows key details such as:
Security Score
Active Security Protections
Failed and Successful Login Attempts
Login Success Rate
Two-Factor Authentication Coverage
Active IP Bans
Spam Protection Statistics
Flagged IP Addresses
Bot Trapping Activity
Recent Project Honeypot Classifications
Top Attacking IP Addresses
Top Targeted Admin Accounts
This new feature makes it easy for merchants to keep an eye on security events in real time and spot problems before they grow.
2. Honeypot Protection
A new Honeypot feature adds an invisible first layer of defence against bots. It works by placing a hidden field inside select storefront forms, real visitors never notice it, but bots that fill in every field automatically get caught right away.
Protects Registration, Login, Contact, Newsletter, and Product Comment forms
Works without changing your store’s theme
Needs no third-party service
Stays invisible to genuine visitors
Cuts down spam entries and fake sign-ups
For even stronger results, Honeypot works well together with the PrestaShop Captcha Module to stop more advanced bots.
3. Project Honeypot Integration
This update also connects the module with Project Honeypot a trusted global service that recognises known spammers and harmful IP addresses.
Unlike form-based protection alone, Project Honeypot checks a visitor’s reputation before they even reach your forms.
Main highlights include:
Real-time IP reputation checks through the Http-bl service
Observer Mode to watch suspicious visitors without blocking them
Action Mode to automatically ban flagged IP addresses
Custom ban duration settings
IP whitelist support for trusted users, office networks, and CDN services
Clear logs showing visitor reputation and the action taken
Requires admins to confirm their identity with a time-based one-time code from an authenticator app, in addition to their password. This stops account takeover even if a password is leaked, guessed, or reused from another breach.
Brute-Force Protection
Temporarily blocks an IP address that racks up too many failed admin login attempts within a defined time window, neutralizing automated credential-stuffing and password-guessing scripts without requiring any manual intervention.
If an attacker’s script tries 50 password combinations against the admin login in under a minute, the IP is banned automatically after the configured retry limit, for the configured ban period.
Admin IP Protection
Restricts back-office access to a defined list of IP addresses; everyone else is blocked before they even reach the login page. This is the strongest single control against external admin access attempts, since it blocks the request before any credentials are checked.
Folder Rename (Hidden Admin URL)
This module can hides the real admin folder behind a secret virtual URL, so the actual back-office path returns a 404 to anyone who doesn’t know the virtual name. This removes your store from the pool of sites bots find by scanning for common admin folder names.
HTTP Authentication (Admin & Frontend)
Using this module, you can add an extra browser-level username and password prompt in front of either the back office, the storefront, or both, before PrestaShop’s own login screen even loads. This is a second authentication layer that operates entirely outside the application, useful for staging environments, pre-launch stores, or an additional admin gate.
Web Application Firewall (WAF)
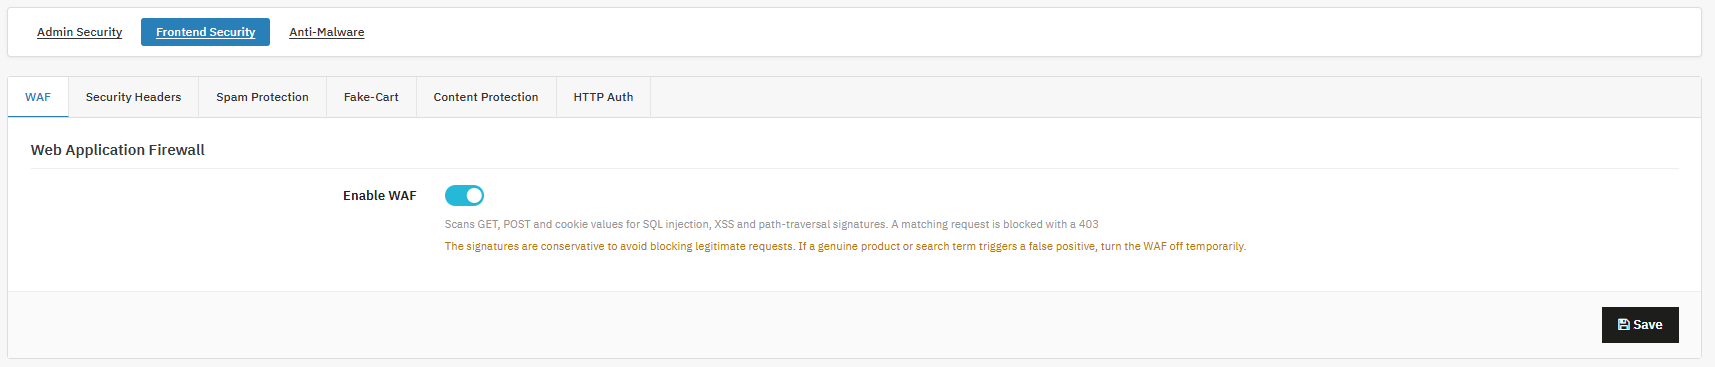
Inspects incoming GET, POST, and cookie data for known SQL injection, cross-site scripting, and path-traversal attack patterns, blocking matches with an HTTP 403 response. This catches a large share of automated exploitation attempts before they ever reach PrestaShop’s own code.
HTTP Security Headers
Adds response headers (HSTS, clickjacking protection, content-sniffing protection, referrer policy, permissions policy) that instruct browsers to enforce additional security behavior. This is a no-downside way to harden how browsers handle your site, and it’s often required for PCI and security-audit checklists.
Spam Protection (CAPTCHA)
Adds CAPTCHA verification (Cloudflare Turnstile, Google reCAPTCHA, or hCaptcha) to the contact form and customer registration form, cutting down spam submissions and fraudulent account creation without requiring any theme changes.
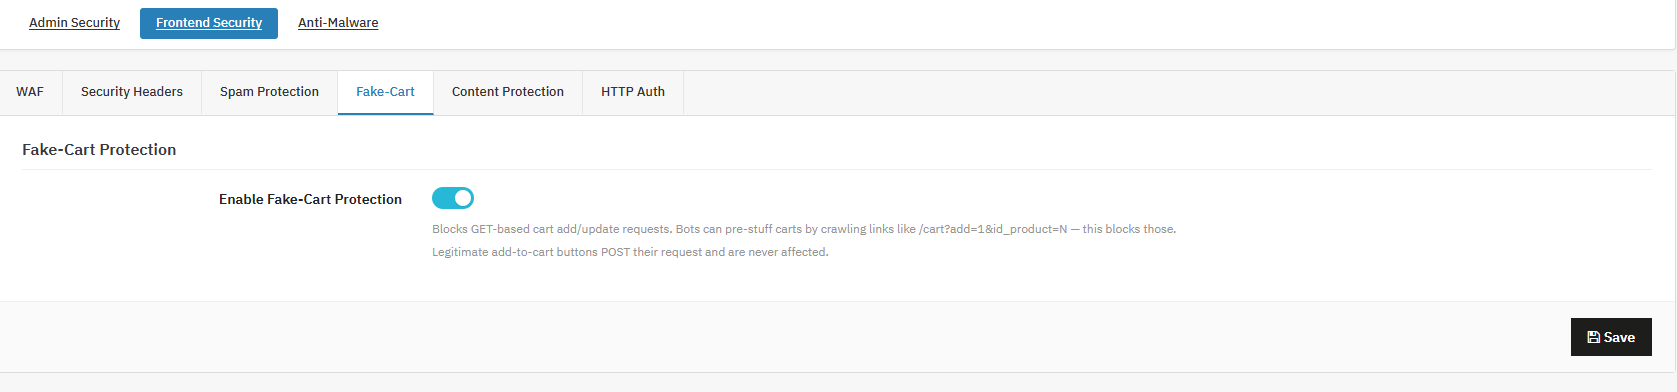
Fake-Cart Protection
Blocks GET-based cart manipulation requests, a common bot technique that crawls and pre-loads carts using URL parameters rather than real add-to-cart actions. This keeps cart and inventory data clean of bot-driven noise without affecting real customers.
Content Protection
Discourages casual content copying through right-click, copy and paste, view-source, and DevTools key-combination blocking, raising the effort required for casual scraping of product descriptions and images.
Anti-Malware Scanning
Performs scheduled file-integrity scans of your PrestaShop installation, comparing files against a known-good baseline and flagging new or modified files as potential threats. This surfaces evidence of a compromise, such as injected code, modified core files, or unexpected new files, often well before it becomes visible on the storefront.
3. Module Installation of PrestaShop Security Manager
Uploading the Module
Log in to the PrestaShop Back Office with an administrator account.
Navigate to Modules > Module Manager.
Click Upload a Module in the top-right corner.
Select the module ZIP file you downloaded after purchase.
Wait for the upload progress indicator to complete. Do not navigate away from the page during this step, as it can interrupt the file transfer on slower connections.
The module adds a new entry to your back-office menu, typically under your installed modules or a dedicated security menu item depending on your PrestaShop theme. Opening it brings you to a configuration screen organized into three top-level areas, each broken into its own tabs:
Admin Security: controls that apply to your back-office login and admin sessions, including 2FA, Brute-Force Protection, Admin IP Protection, Folder Rename, HTTP Authentication, and Login Monitoring, which includes the Employees sub-view for managing individual 2FA enrollments.
Frontend Security: controls that apply to customer-facing traffic, including the Web Application Firewall, HTTP Security Headers, Spam Protection, Fake-Cart Protection, Content Protection, and storefront HTTP Authentication.
Anti-Malware: scan configuration and historical scan reports, including the CRON URL used for scheduled scanning and a searchable, filterable log of past scans.
At the top of the configuration page, regardless of which tab you’re on, you’ll find the emergency recovery URL, a permanent link that disables the module’s restrictive features in one click if you ever lock yourself out.
Important: This is the single most important piece of information of the module in this user manual. You can copy it now, before configuring anything else, and store it outside the admin panel where you can access this information.
5. Admin Security
Admin Security is the core of this PrestaShop admin security module: the set of controls protecting the back-office login itself, which is the single highest-value target on any store. A compromised admin account gives an attacker far more reach than any frontend vulnerability, so this section deserves the most attention during initial setup.
Two-Factor Authentication ( 2FA)
Store administrators can use this PrestaShop two factor authentication module to require a time-based one-time code from an authenticator app on top of the normal password, closing the
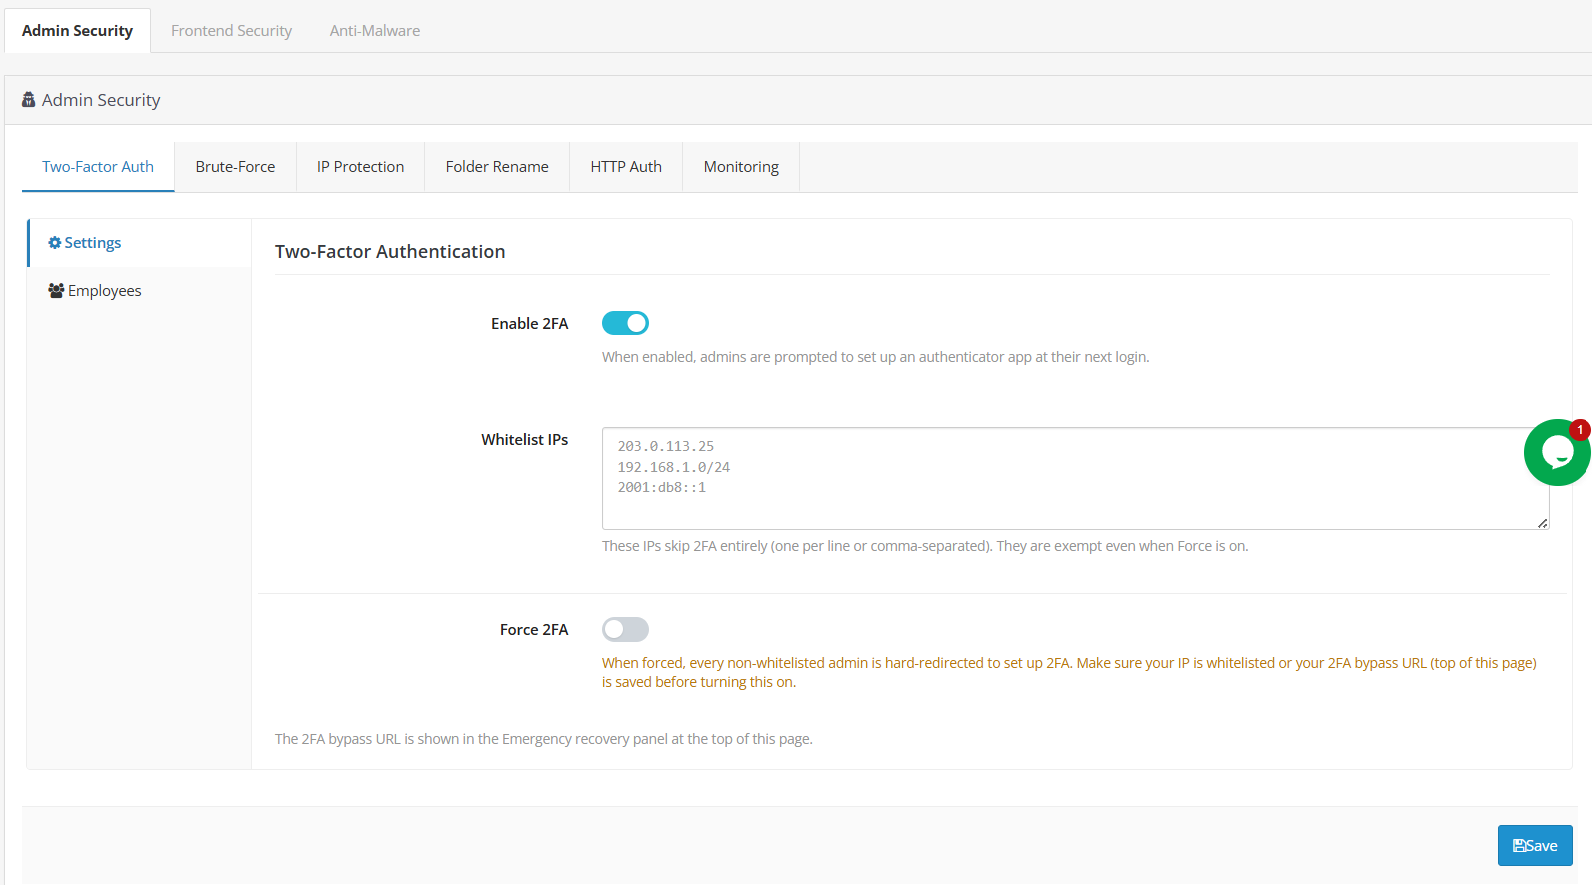
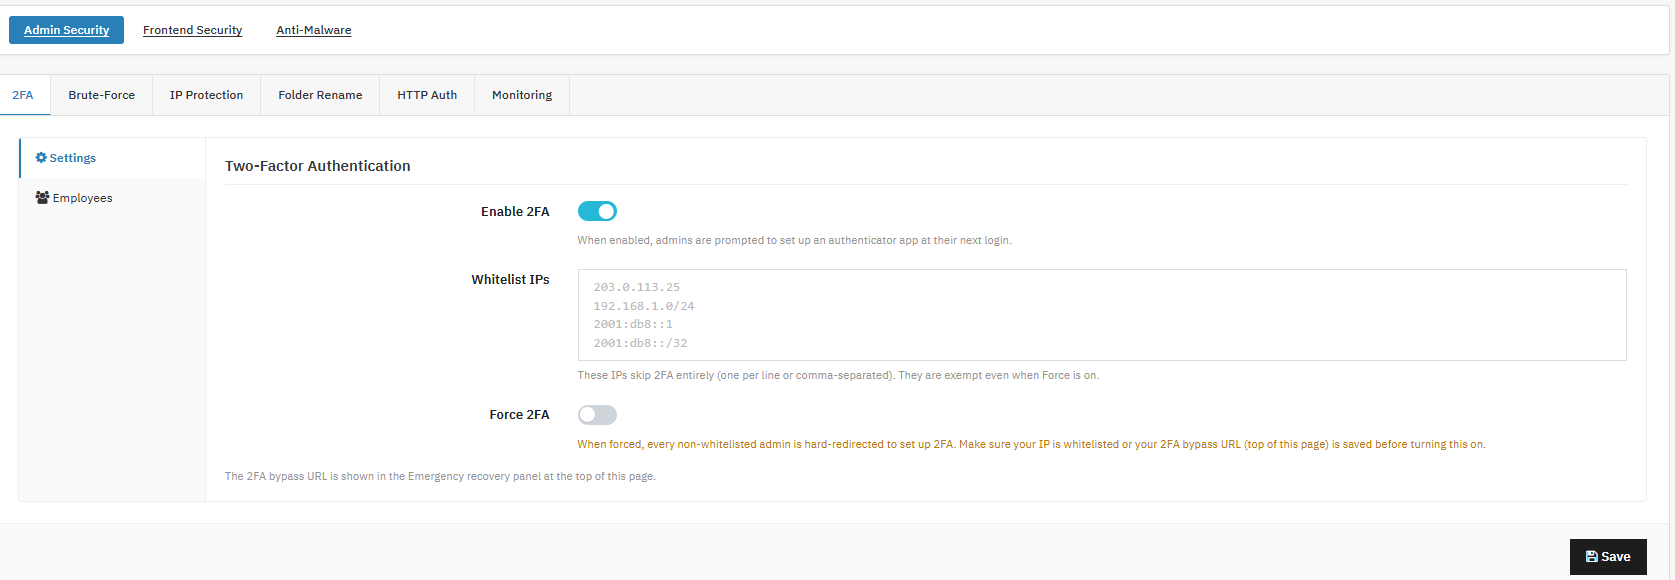
Enable 2FA: Turns on 2FA support using the toggle; admins are redirected to set up an authenticator app at their next login.
Enable for all stores, even if not yet forced.
Whitelist IPs: Store admins with added IPs that skip 2FA entirely, one per line or comma-separated; exempt even when Force is on.
It is recommended to add your office or home as a safety net before forcing 2FA.
Force 2FA: You can redirect every non-whitelisted admin to set up 2FA before they can proceed.
Also, enable only after whitelisting a trusted IP or confirming your recovery URL.
b) Employees
ID: Identifies the employee account.
2FA Status: Shows whether 2FA is currently set up for that employee or not using the 2FA status tab.
It is recommended to check periodically, especially after staff changes.
Actions: Resets (disables) a lost 2FA enrollment so the employee can set it up again.
Use immediately if an employee loses their authenticator device.
Enabling 2FA first in opt-in mode, then switching on Force 2FA once everyone has had time to enroll, is the recommended rollout path. Doing so stops account takeover from leaked, guessed, or reused passwords, since a stolen password alone is no longer enough to log in. It’s especially valuable for stores with remote or contractor access, multi-employee back offices, or any store that has experienced a previous login compromise.
Important: never force 2FA sitewide without first whitelisting at least one trusted IP or confirming the emergency recovery URL works, and keep the whitelisted-IP list short and reviewed regularly, since those addresses bypass 2FA completely. The Employees tab lets you recover a teammate’s account access without disabling 2FA protection for the whole store, which is useful for lost or replaced phones, app reinstalls, and employee offboarding. Resetting 2FA status is worth adding to your standard offboarding checklist whenever an employee leaves.
2. Brute-Force Protection
Store administrators can use this PrestaShop brute force protection module to automatically block IP addresses that exceed a defined number of failed login attempts, stopping credential-stuffing scripts without manual monitoring.
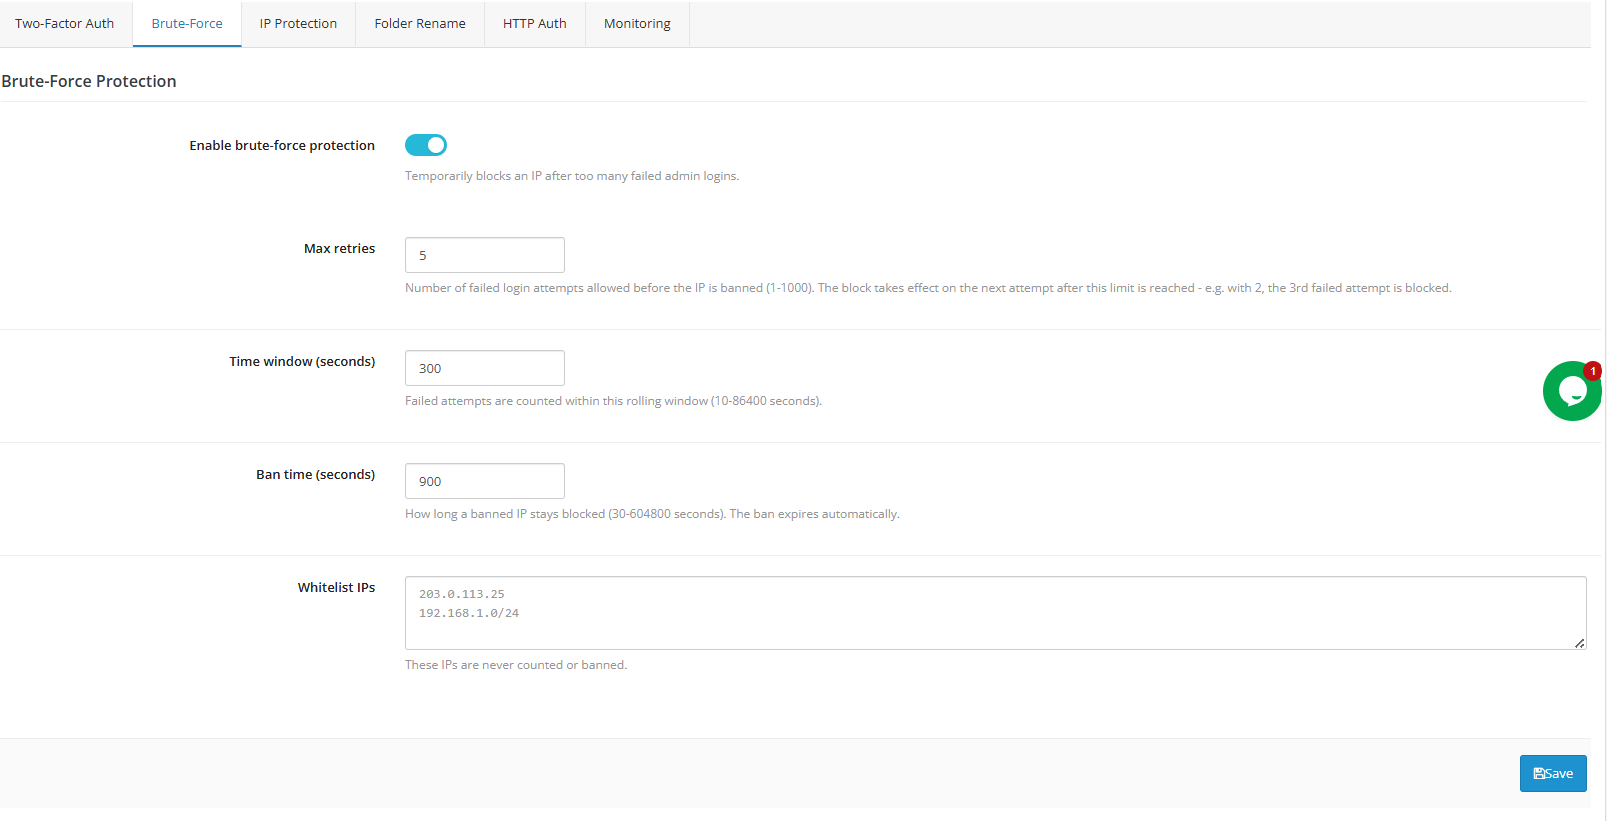
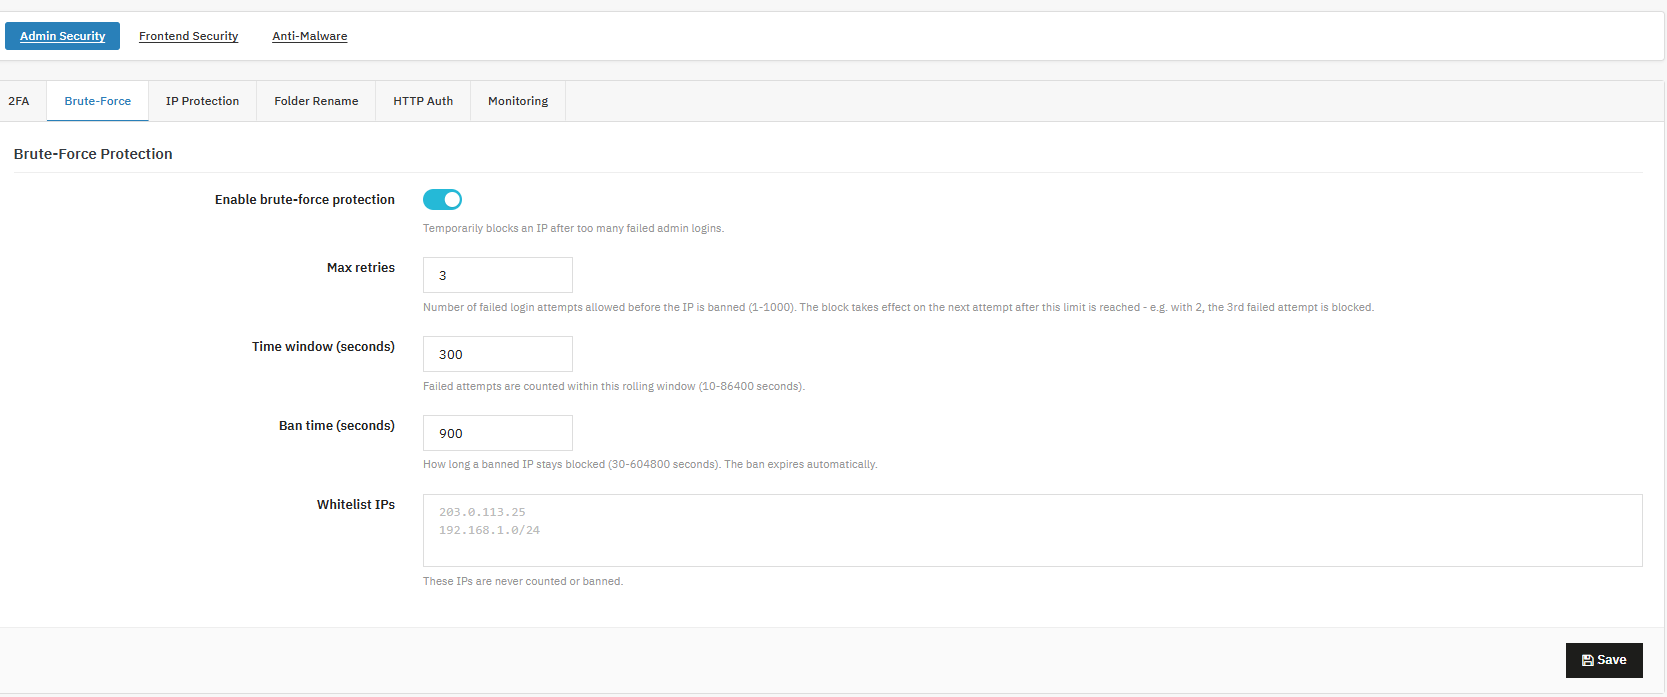
Enable brute-force protection: This feature temporarily blocks an IP after too many failed admin logins. It is recommended to enable the brute force protection on your production store.
Max retries: Max retries is the number of failed attempts allowed before a ban triggers on the next attempt after the limit.
You can add the value as 5 attempts as it is a reasonable default.
Time window (seconds): This Rolling window is time window in which failed attempts are counted.
Ban time (seconds): This ban time shows how long a banned IP stays blocked in the system, it also expired automatically.
Whitelist IPs: Add the IPs never counted or banned and add trusted office/VPN IPs.
Start with moderate values, review your login attempt log after a week, and tighten the settings if you still see repeated attack patterns from varied IPs. This is the core of the PrestaShop brute force module functionality: it directly neutralises automated password-guessing without requiring you to watch logs in real time. It’s worth combining with 2FA rather than relying on brute-force protection alone, since brute-force protection slows attackers down while 2FA stops them outright even if a password is eventually guessed. Bans are automatic and time-limited, so there’s no need to manually unban an IP; it clears itself once the ban time elapses.
3. Admin IP Protection
Store administrators can use this PrestaShop IP restriction modulehttps://www.knowband.com/prestashop-security-manager to limit back-office access to a fixed list of trusted IP addresses, blocking every other visitor, including bots that never even get to see the login page.
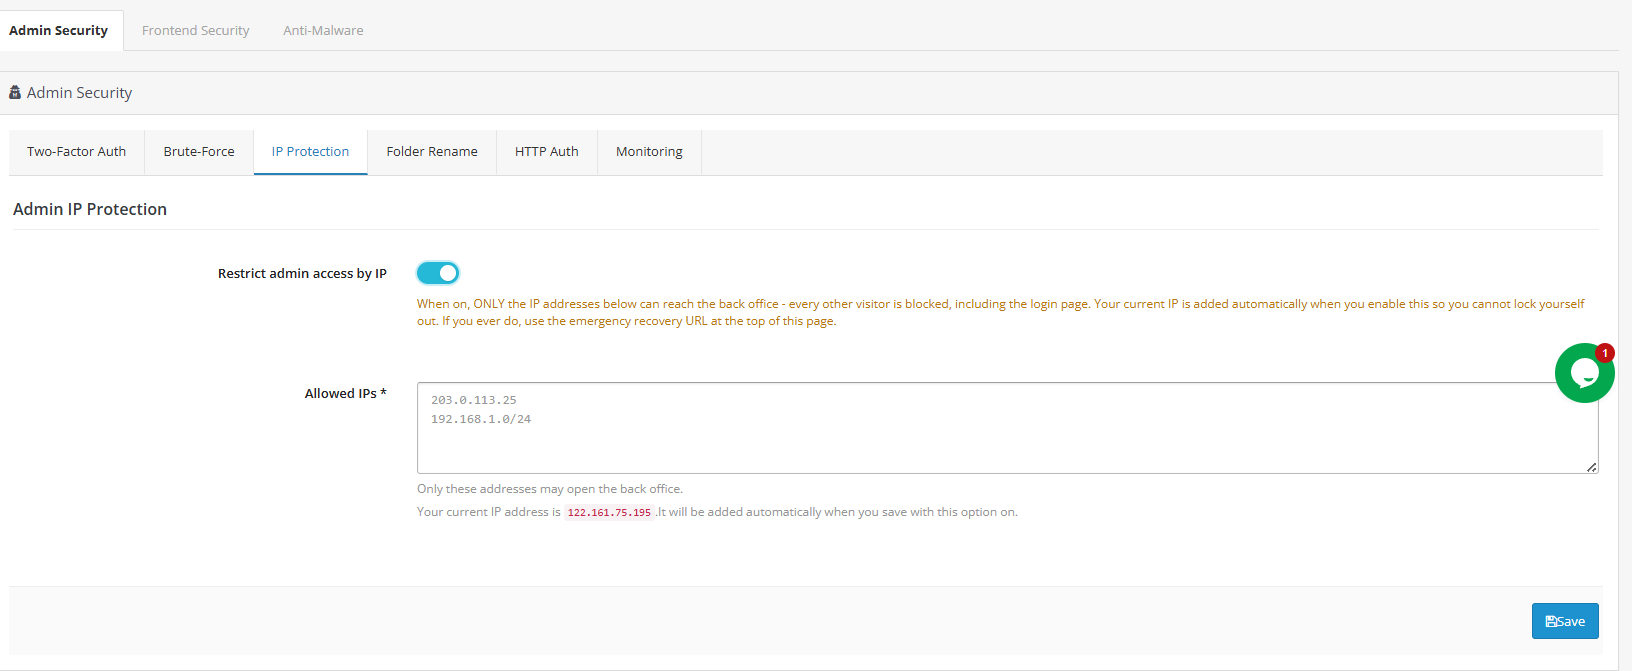
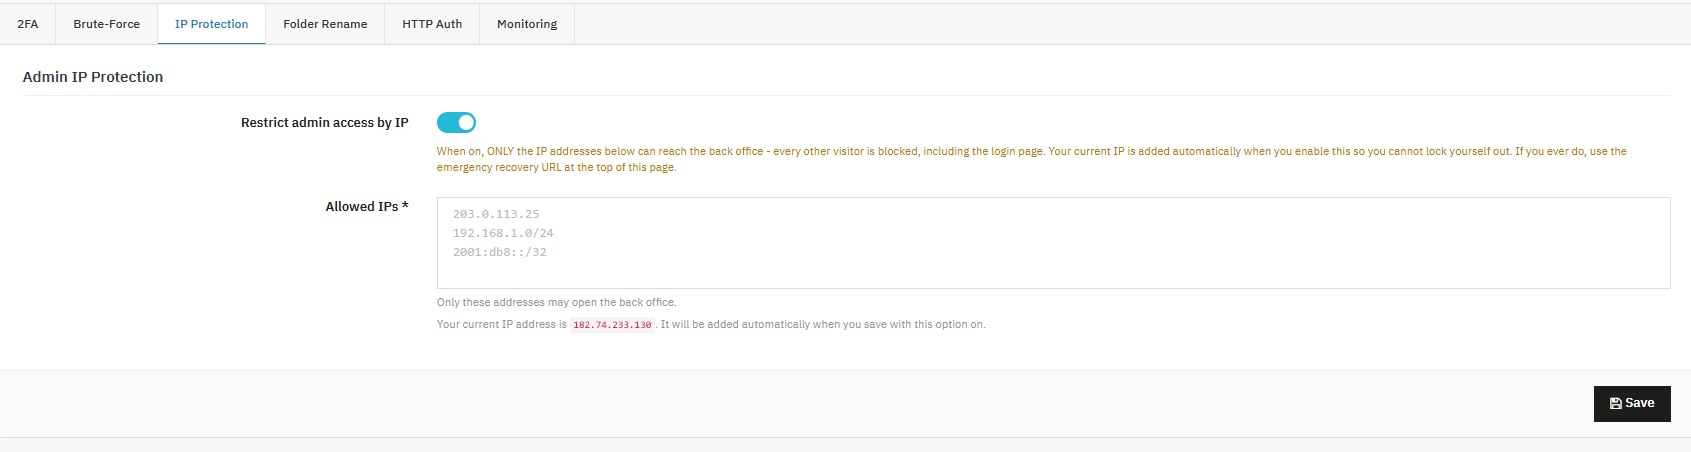
Restrict Admin Access by IP: This feature allows you to limit Back Office access to a specific list of trusted IP addresses.
How it works:
When this option is enabled, only the IP addresses listed below will be able to reach your Back Office, every other visitor, including anyone trying to reach the login page, will be blocked.
For your safety, your current IP address is automatically added to the allowed list the moment you enable this option, so you won’t accidentally lock yourself out.
Allowed IPs (required): Only the IP addresses entered here will be permitted to access the Back Office.
4. Rename Admin Folder
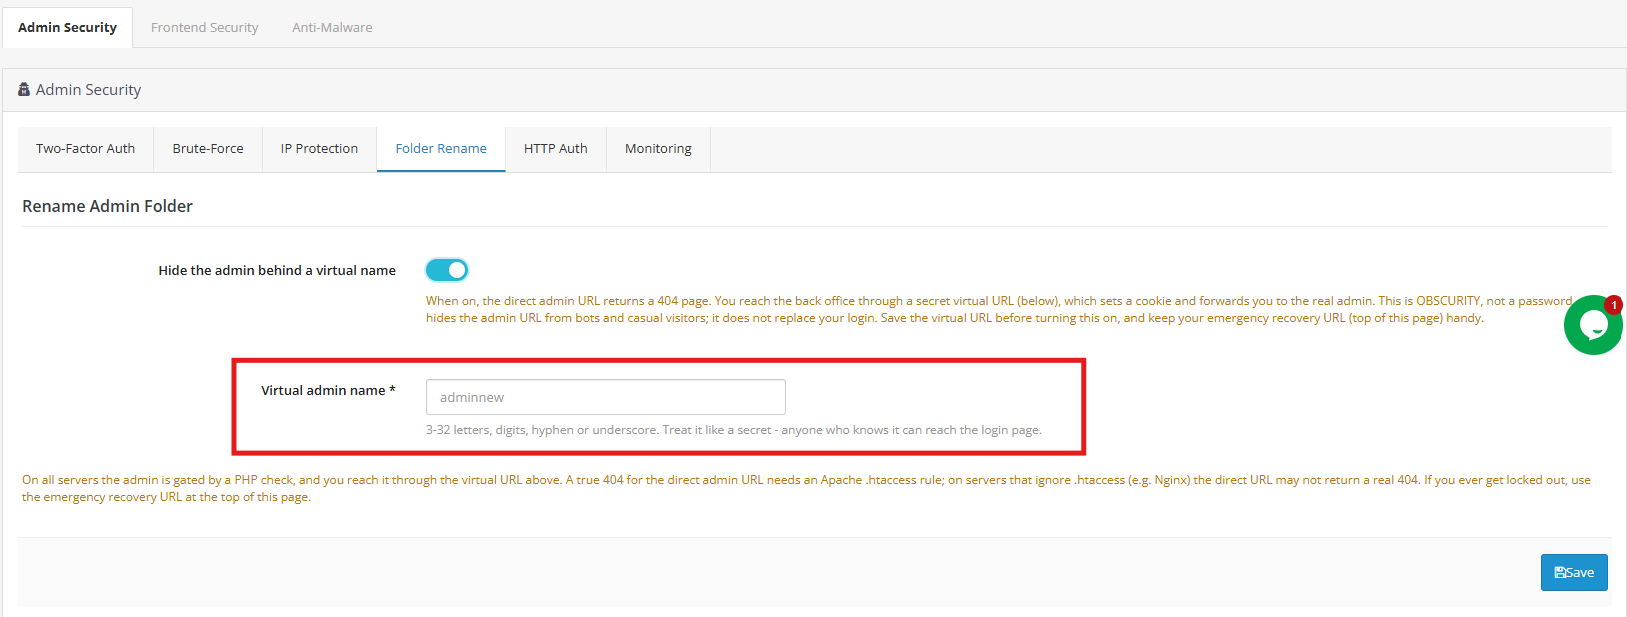
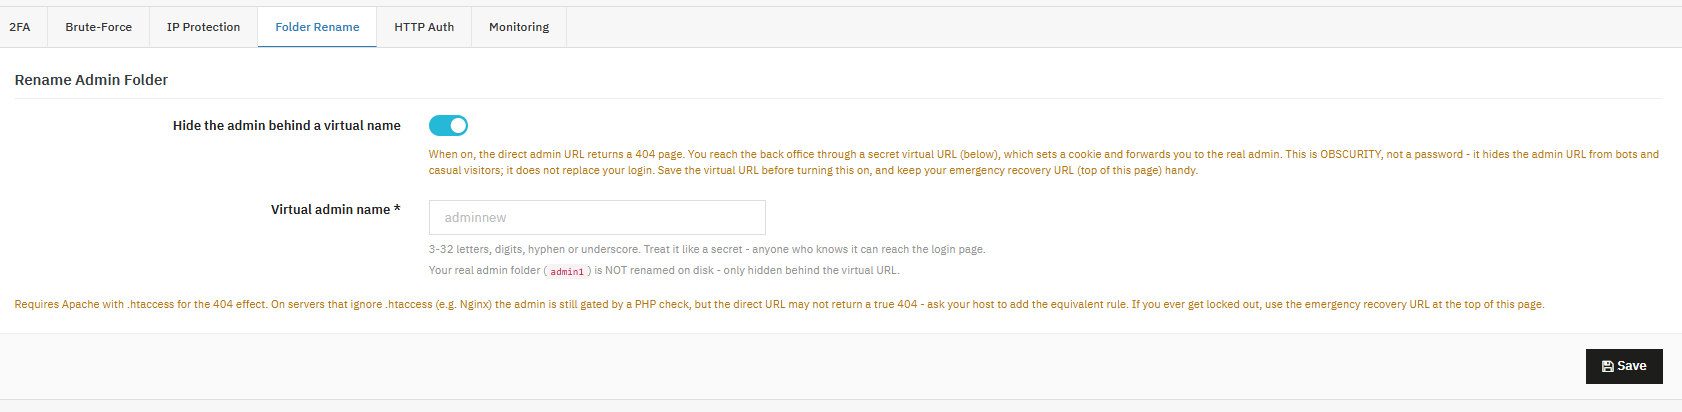
Hide Admin Folder Name: Store administrators can use this feature, part of the PrestaShop Security Module, to hide the real back-office URL behind a secret virtual address. This removes your store from the pool of sites that automated scanners find by guessing common admin folder names.
Hide the admin behind a virtual name: When this option is on, the direct admin URL returns a 404 error, and the back office can only be reached through the virtual URL you set below. Virtual admin name: Enter a name using 3 to 32 letters, digits, hyphens, or underscores. Use this name as a secret, just like a password
5. HTTP Authentication (Admin)
Store administrators can use this feature to add a browser-level username and password prompt in front of the entire back office, layered on top of the normal PrestaShop admin login as an additional gate.
Enable HTTP Authentication for the Admin
This feature is part of the PrestaShop security Module. This particular option adds a username/password prompt before the admin login screen even loads, giving you an extra layer of security on top of your regular admin credentials.
Enable HTTP auth for the admin: When this option is on, visitors must enter a username and password in a browser-level prompt before they can even see the admin login screen.
Username / Password: These are the credentials required for the HTTP auth prompt. The password is stored encrypted and is never saved in plain text.
Whitelist IPs: IP addresses listed here will skip the password prompt entirely.
Server Compatibility (CGIPassAuth): This adds a directive needed on servers running PHP as FastCGI/PHP-FPM, where the authentication header otherwise isn’t passed through correctly.
6. Login Monitoring
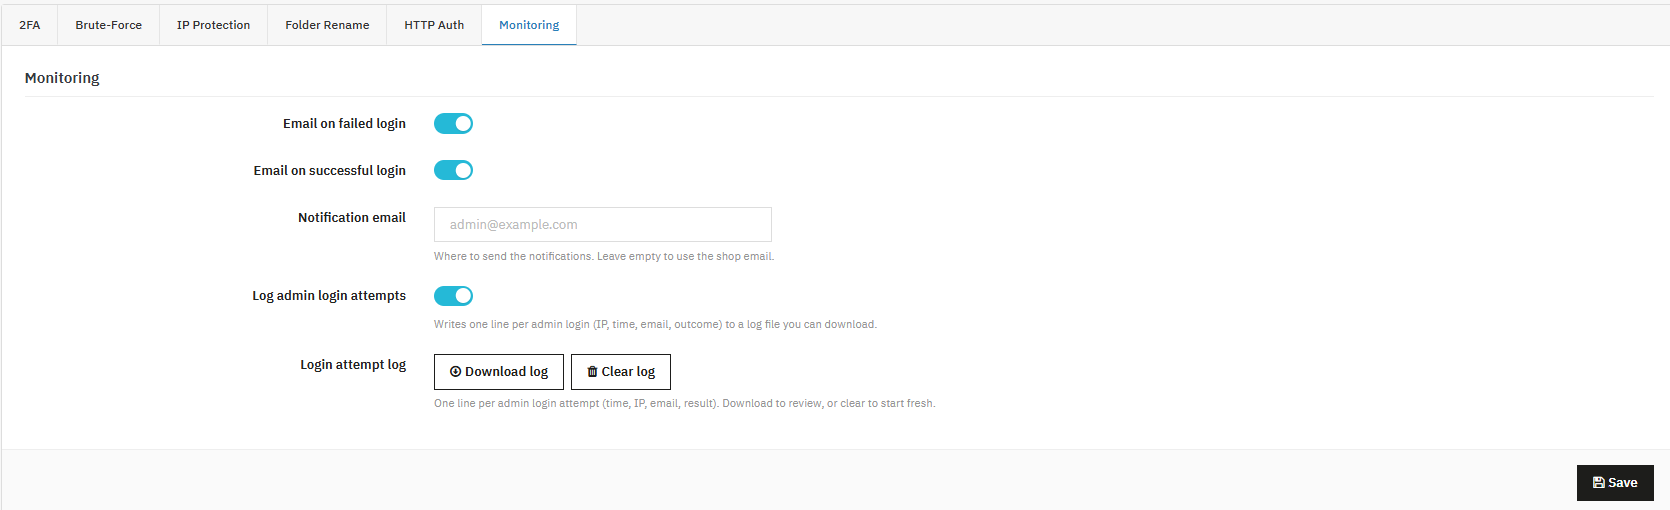
Store administrators can use this PrestaShop login security module feature to receive alerts on successful logins and maintain a downloadable audit log of every admin login attempt.
Login Notifications and Audit Log
Email on Successful Login: This option sends a notification email whenever an admin successfully logs in to the back office.
Notification Email: This is the address where login alerts are sent. If left blank, it defaults to your shop’s email address.
Log Admin Login Attempts: This option records one line per login attempt including the IP address, time, email, and outcome, to a downloadable log file.
Login Attempt Log: This is the log itself. Download buttons become active once entries exist.
6. Frontend Protection
Frontend Security protects your storefront, the part of your site every customer and every bot interacts with directly. This is where a PrestaShop firewall module, a PrestaShop captcha module, and a PrestaShop security headers module functionality all live side by side, each addressing a different category of customer-facing threat.
Web Application Firewall
Store administrators can use this PrestaShop WAF module to automatically block requests containing known SQL injection, cross-site scripting, and path-traversal patterns before they reach the storefront’s own code.
HTTP Security Headers
Store administrators can use this PrestaShop security headers module to instruct visitor browsers to enforce additional protections automatically, with no visible change to the storefront itself.
Security Headers
These settings add small, invisible instructions that tell web browsers how to handle your store safely. You don’t need to be technical to use them; most are safe to turn on and forget about.
XSS Protection This is an older safety feature that helps block a certain type of attack. Most modern browsers have better built-in protection now, but turning this on doesn’t hurt anything; think of it as a backup lock for older browsers.
Clickjack Protection This stops other websites from secretly displaying your store inside a hidden frame on their own page, a trick sometimes used to fool visitors into clicking things they didn’t mean to.
Content Sniffing Protection Browsers sometimes try to “guess” what type of file they’re looking at, which can be exploited by attackers. This setting tells browsers to trust the file type your store specifies, instead of guessing.
HTTPS-Only Browsing (HSTS) This tells browsers to always connect to your store using the secure, encrypted version of your site (HTTPS), never the unsecured version.
Include Subdomains / Preload This extends that same secure-connection rule to any subdomains you use (like blog.yourstore.com), and can optionally register your store on a global list that browsers check automatically.
Referrer Policy When someone clicks a link from your store to another site, browsers normally share some information about where the visitor came from. This setting limits how much of that information gets shared.
Permissions Policy This setting allows you to control which device features, like the camera or microphone, your store’s pages are allowed to use in a visitor’s browser.
Spam Protection
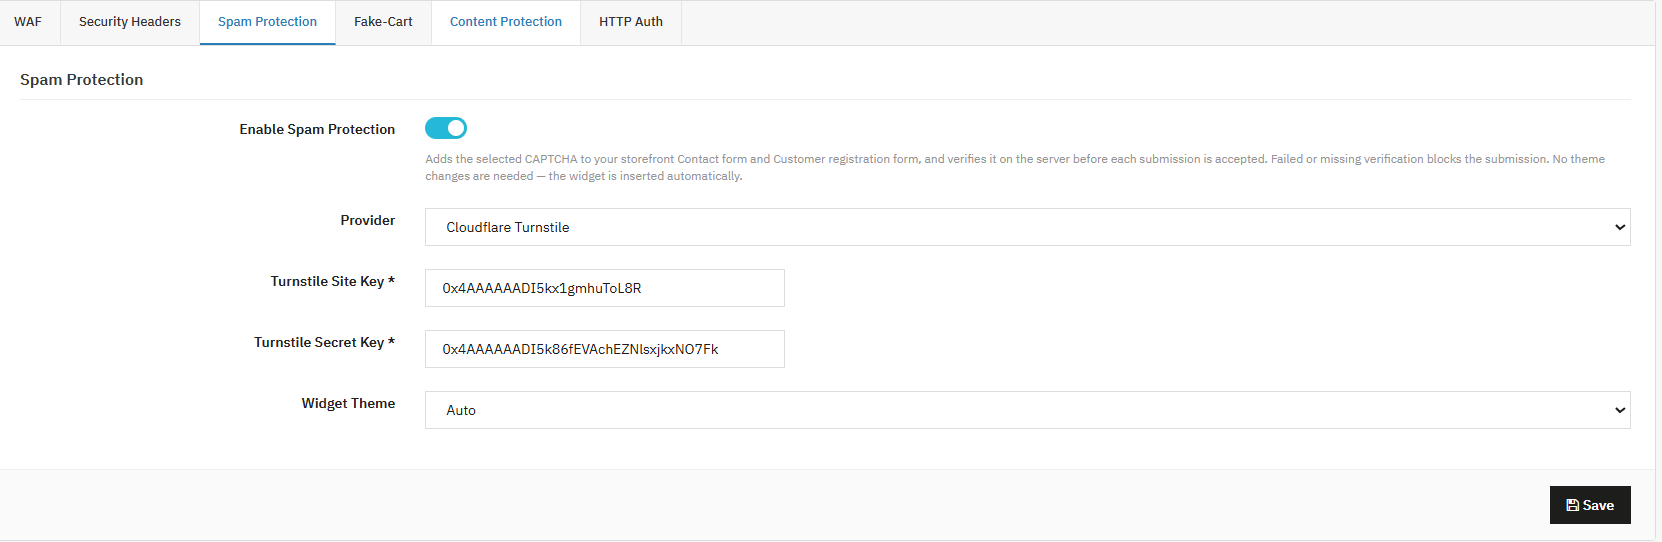
Store administrators can use this PrestaShop spam protection module and PrestaShop captcha module functionality to add CAPTCHA verification to the contact and customer registration forms automatically.
1. Spam Protection (CAPTCHA)
This feature is part of the PrestaShop Security Module, helping keep bots and spammers from flooding your contact and registration forms with junk submissions. As a built-in PrestaShop anti-spam module and PrestaShop captcha module, it works alongside other tools like a PrestaShop reCAPTCHA module, PrestaShop Cloudflare Turnstile module, and PrestaShop hCaptcha module, all designed to verify that a real visitor, not a bot, is submitting your forms.
Enable Spam Protection When turned on, this adds a CAPTCHA check to your contact and registration forms. The check happens on the server before the form is accepted, so it can’t be bypassed.
Provider This is where you choose which CAPTCHA service to use, Cloudflare Turnstile, Google reCAPTCHA, or hCaptcha. Each works a little differently, but all serve the same purpose: blocking automated spam.
Site Key / Secret Key These are special codes provided by your chosen CAPTCHA service, which connect your store to that service securely.
Widget Theme This controls how the CAPTCHA box looks like for example Auto, Light, or Dark.
2. [New] Honeypot Field
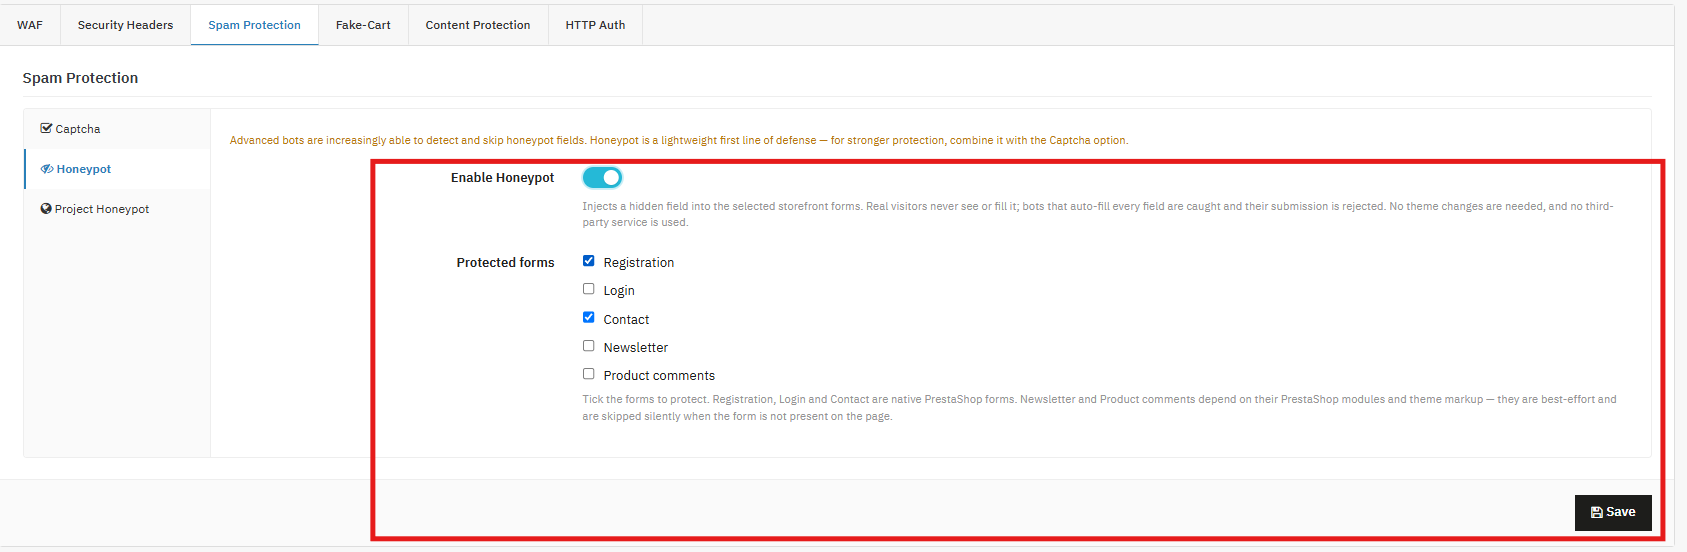
Honeypot adds an extra layer of spam protection on your frontendby placing invisible fields inside chosen frontend forms. Real visitors or customers never see these fields, but automated bots that try to fill in every field can be spotted and stopped. This light and simple protection reduces spam, fake accounts, and bot-driven logins, all while keeping the shopping experience smooth for real customers.
Enable Honeypot: Turn this setting on to activate Honeypot protection on your store.
Once enabled, the module quietly adds a hidden field to the forms you select. If a bot fills in that hidden field, its submission is marked as suspicious and blocked before it’s ever processed.
Protected Forms: Choose which forms should be covered by Honeypot protection. The module supports:
Registration – Stops automated account creation and fake sign-ups.
Login– Blocks automated login attempts and bot-based attacks.
Contact keeps spam messages and automated inquiries out of your inbox.
Newsletter– Prevents fake or automated newsletter subscriptions. Note: This depends on your newsletter module and theme setup. If the form isn’t found on a page, protection is skipped automatically.
Product Comments– Guards review and comment forms against spam and automated entries. Note: This depends on the Product Comments module and theme setup. If the form isn’t available, protection is skipped automatically.
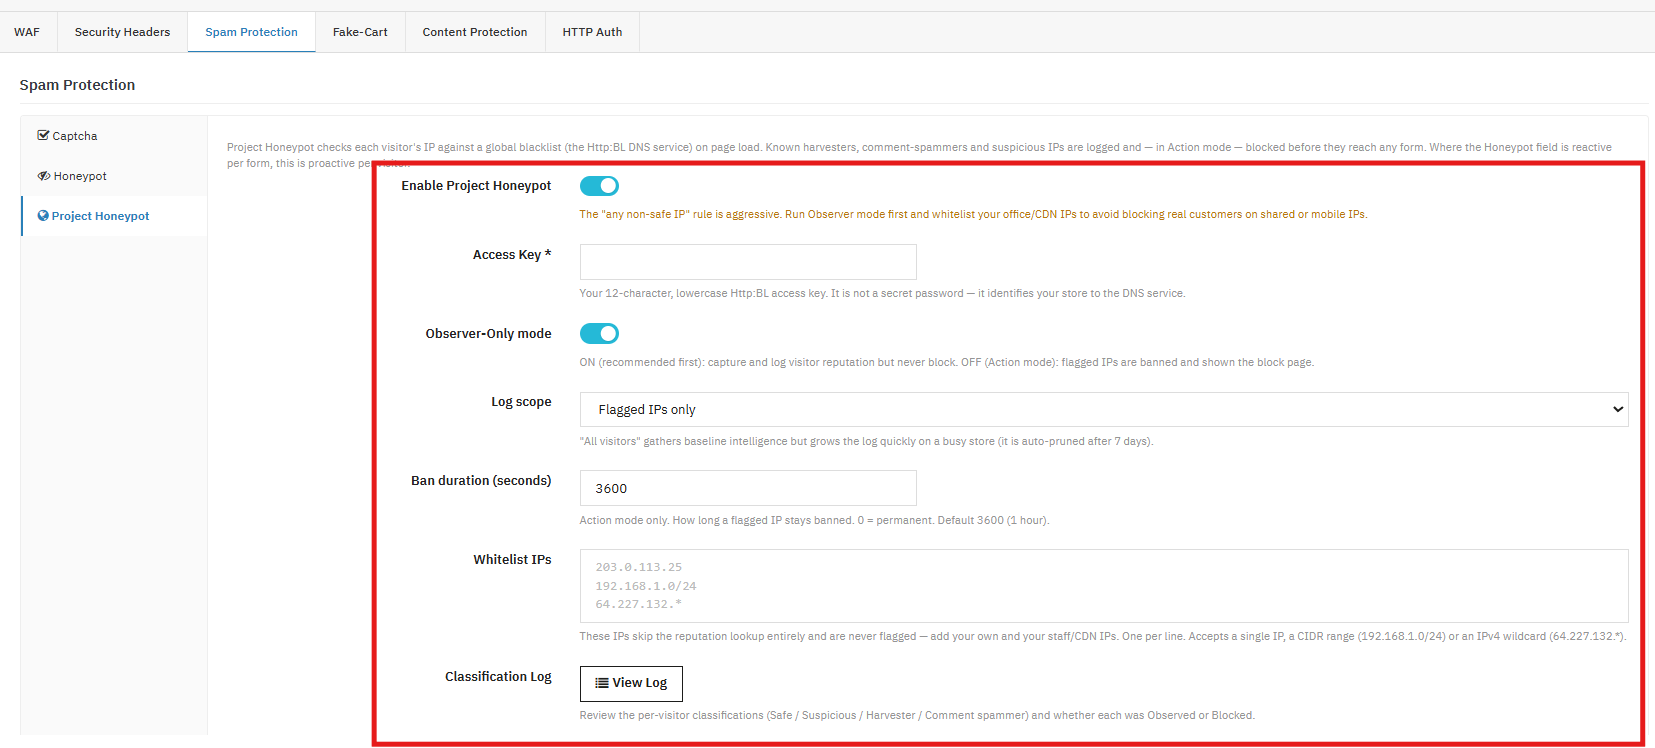
3.0 HoneyPot Projects
Enable Project Honeypot: Master on/off the tab for the whole feature. When enabled, every visitor’s IP is checked against Http: BL (Project Honeypot’s DNS-based blacklist) as soon as they load a page. This is what makes it “proactive” compared to a honeypot form field, which only reacts when someone actually submits a form. Access Key: Access key is a 12-character, lowercase identifier issued by Project Honeypot that ties your HTTP:BL lookups to your account. It’s not a secret credential (it doesn’t grant access to anything), it just tells the DNS service which site is asking, similar to an API key used for attribution/rate-limiting rather than authentication. Observer-Only mode: The IPs are looked up and classified, and everything is logged, but nobody is ever blocked. This is a data-gathering phase. Log scope: Log Scope in the PrestaShop Security Module controls how much gets written to the Classification Log. Flagged IPs only: lighter-weight, only logs visitors that Http: BL considers risky. All visitors: logs every visitor’s classification, including “Safe” ones, which is useful for building a baseline picture of your traffic’s overall reputation mix. It grows faster, so entries are auto-pruned after 7 days.
Ban duration (seconds): Only relevant once you’re in Action mode(Flagged IP). Sets how long a blocked IP stays banned before it’s allowed to try again.
Whitelist IPs- You can whitelist the IPs so that these IPs will never be blocked.
Classification Log: This shows each visitor’s IP, its classification (Safe, Suspicious, Harvester, or Comment spammer), and whether the system merely observed it or actually blocked it. This is what you review during the Observer phase to check for false positives before flipping to Action mode.
Fake-Cart Protection
Cart Manipulation Protection
This feature is used to block automated, GET-based cart manipulation, a common scripted technique that’s distinct from genuine add-to-cart actions taken by real shoppers. Store admins can rely on this Knowband feature to protect their store from bots or scripts that try to add items to a cart by directly manipulating a URL, rather than clicking through the storefront normally.
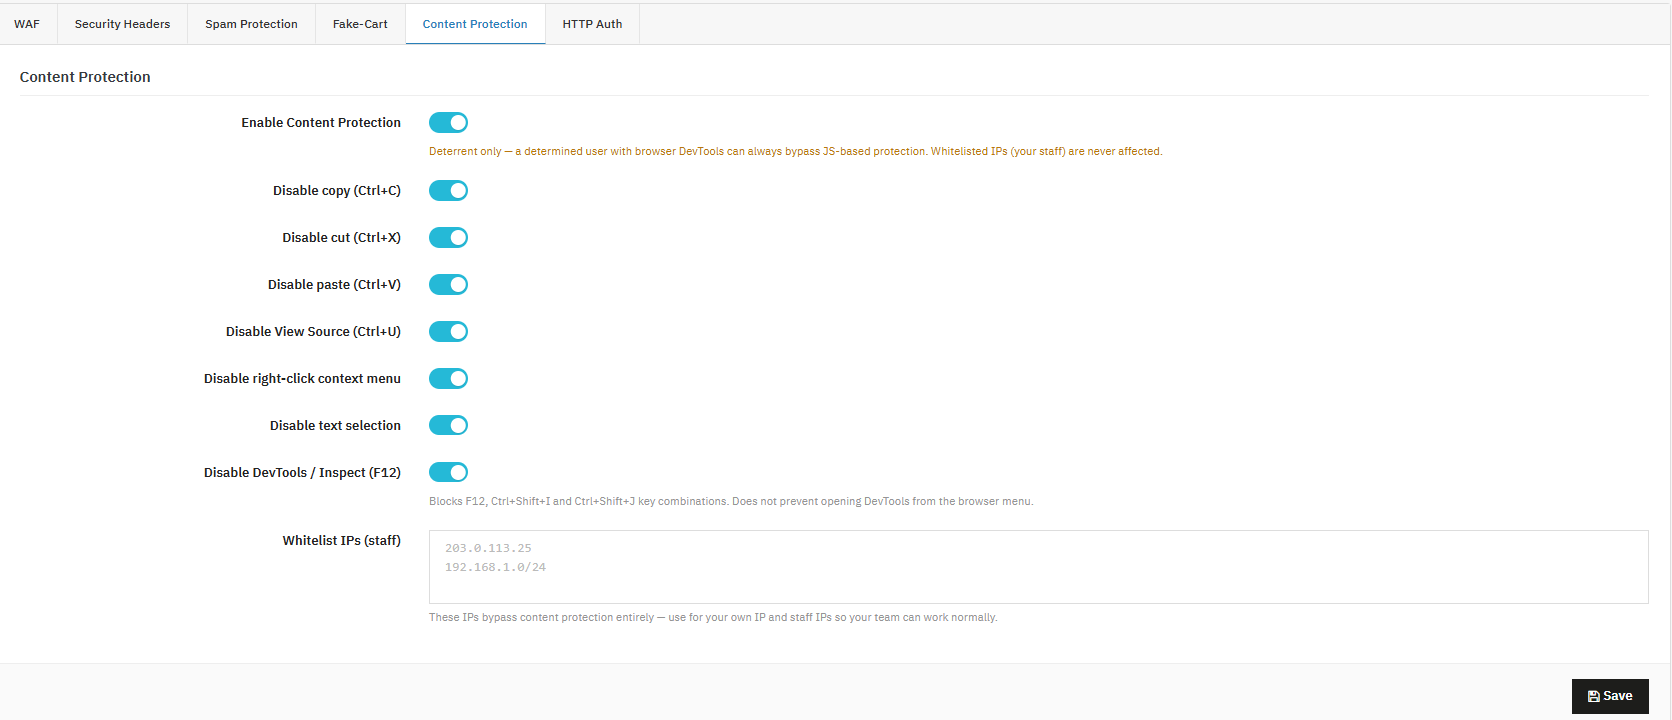
Content Protection
Store admins can use this PrestaShop content protection module to discourage casual copying of storefront text and images.
Enable Content Protection This feature is used to act as the master toggle for content protection. Keep in mind this works only as a deterrent, a determined user can still bypass it using their browser’s developer tools.
Disable Copy / Cut / Paste This feature is used to block the keyboard shortcuts visitors would normally use to copy, cut, or paste content from your pages.
Disable View Source (Ctrl+U) This feature is used to block the browser shortcut that lets visitors view your page’s source code.
Disable Right-Click Context Menu This feature is used to remove the right-click menu, so visitors can’t use it to save images or copy content.
Disable Text Selection This feature is used to prevent visitors from highlighting or selecting text on the page.
Disable DevTools / Inspect (F12) This feature is used to block the F12, Ctrl+Shift+I, and Ctrl+Shift+J shortcuts. Note that it does not stop someone from opening DevTools through the browser’s own menu.
Whitelist IPs (Staff) Store admins can use this field to list IP addresses that bypass all content protection restrictions.
HTTP Authentication (Frontend)
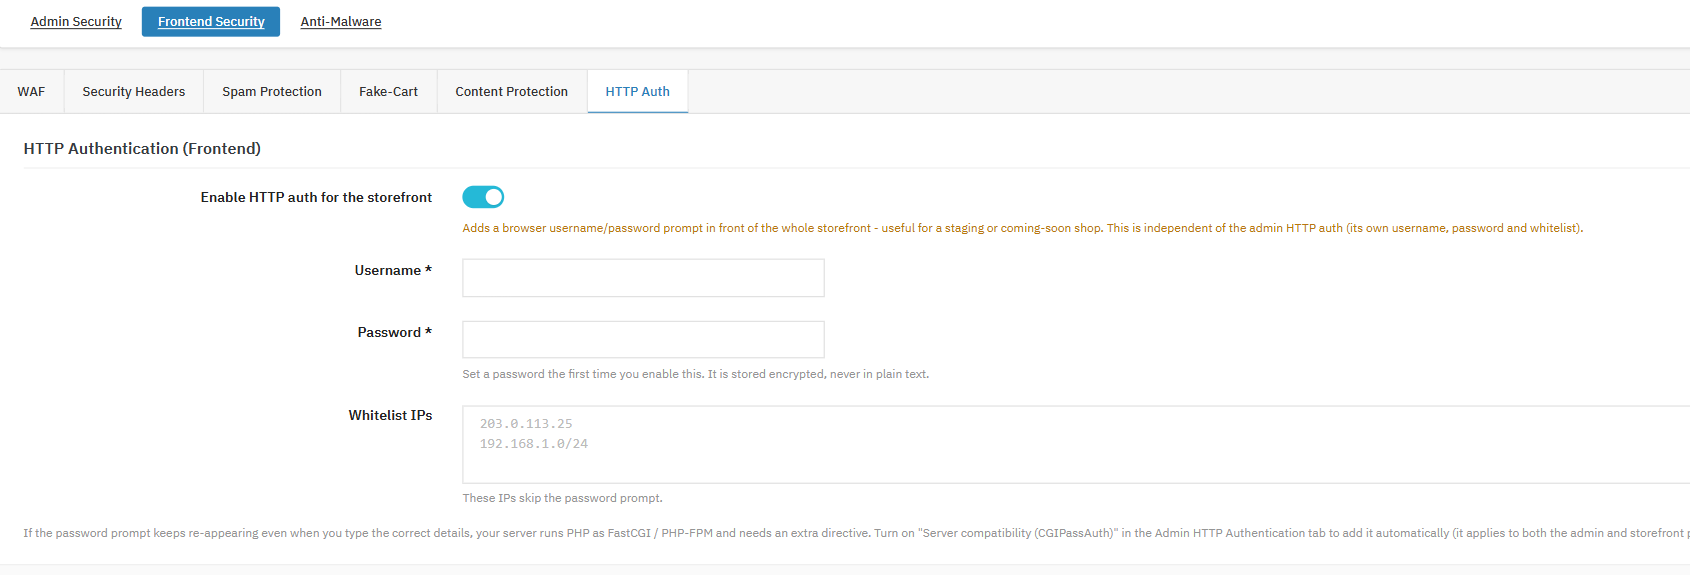
Store admins can use this Knowband Prestashop password protection module to gate the entire storefront behind a browser-level username and password prompt. This is separate from the admin HTTP authentication covered in Section 7.
Enable HTTP Auth for the Storefront This feature is used to add a password prompt in front of the entire storefront, before any page can be viewed.
Username / Password Store admins can use this field to set storefront-specific credentials, stored encrypted.
Whitelist IPs Store admins can use this field to list IP addresses that skip the storefront password prompt entirely.
This feature is used to keep a pre-launch or staging store private from search engines and casual visitors. The friction is intentional, this setting is meant to gate access completely, not work invisibly in the background.
If the password prompt keeps looping even after a correct entry on a server running FastCGI/PHP-FPM, store admins can enable the CGIPassAuth setting under Admin HTTP Authentication in Section 7, Tab 5. That setting applies to both the admin and storefront prompts.
7. Anti-Malware Protection
Anti-Malware Protection rounds out the module with scheduled file-integrity scanning, a layer that operates independently of login security and storefront protection, focused entirely on detecting unauthorized changes to your installation’s files.
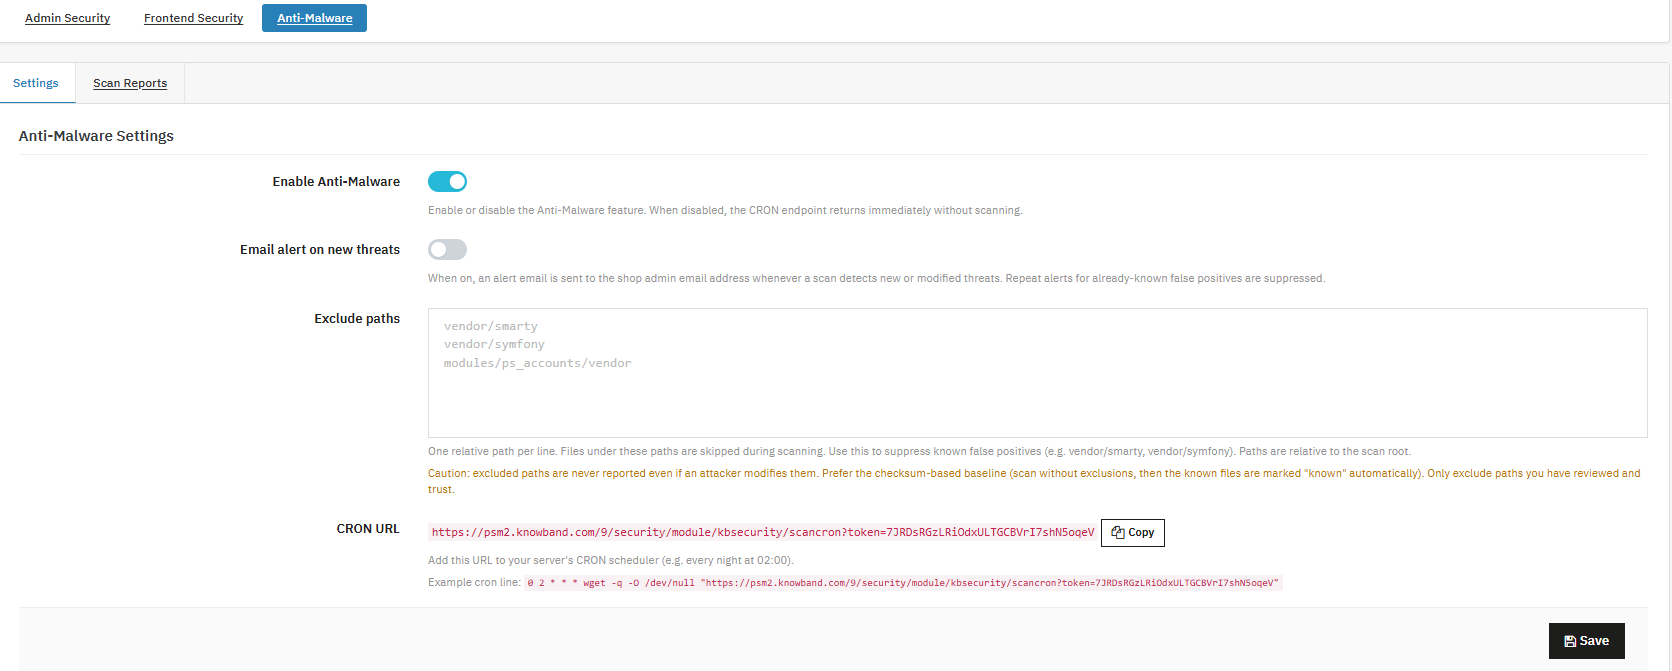
Settings
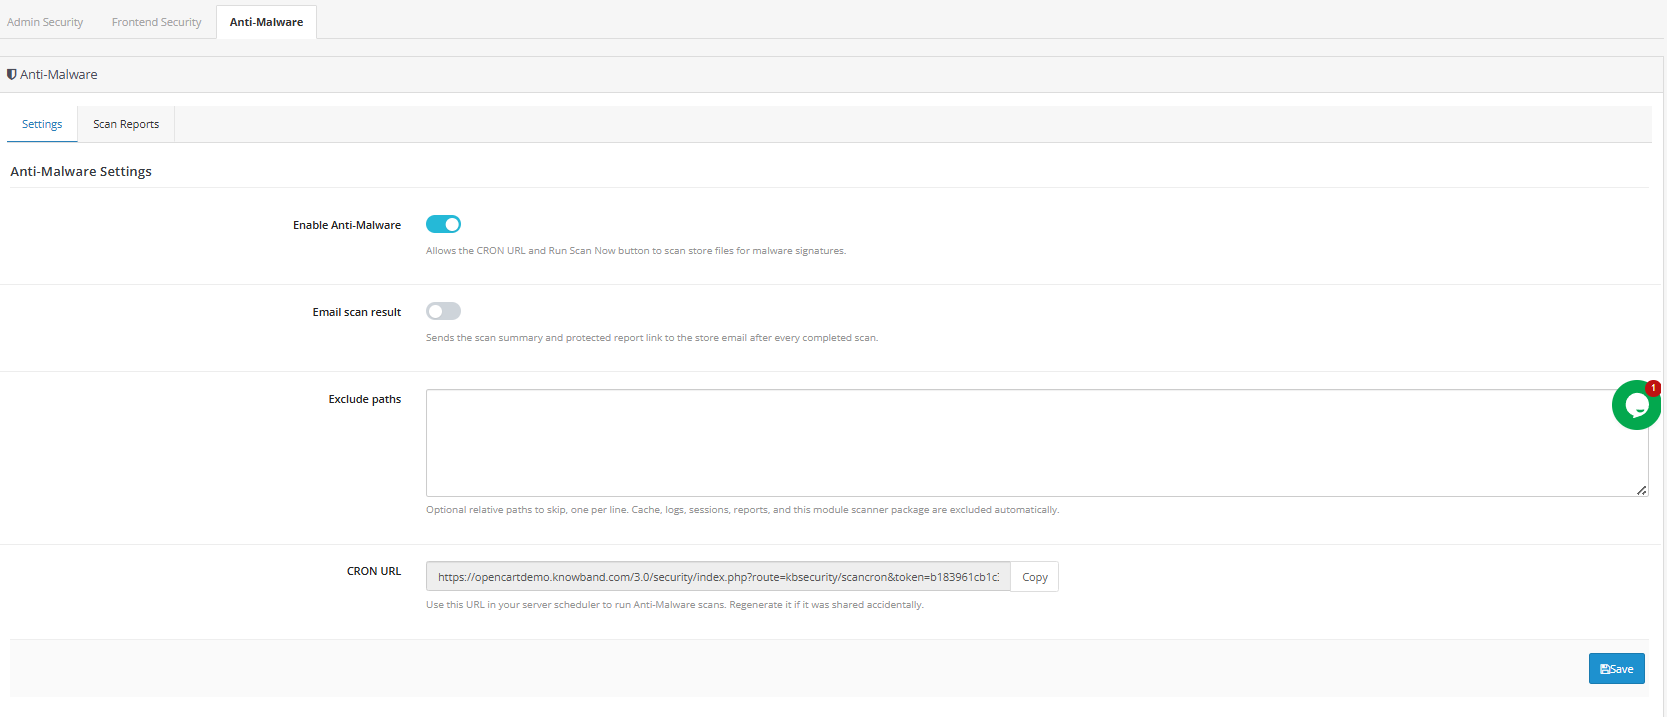
Enable Anti-Malware This feature is used to act as the master toggle for the anti-malware scanner. When disabled, the scan endpoint returns immediately without actually scanning anything.
Email Alert on New Threats This feature is used to send an alert to the shop admin email whenever a scan finds new or modified threats. Repeat alerts for known false positives are automatically suppressed, so you won’t be notified about the same item twice.
Exclude Paths Store admins can use this field to list relative paths, one per line, that should be skipped during scanning. This is useful for suppressing known false positives, such as vendor directories.
CRON URL This feature is used to provide a unique, token-protected URL that triggers a scan whenever it’s requested by your server’s scheduler.
To set things up correctly, enable the feature, turn on email alerts, and add the CRON URL to your hosting control panel’s scheduled tasks (or directly to your server’s crontab if you manage it yourself), typically scheduled for off-peak hours such as 2 a.m. Alerts only fire for genuinely new or modified threats; once a file has been seen and either excluded or acknowledged, repeat alerts for that same known item are suppressed, so your inbox won’t be flooded with the same finding night after night
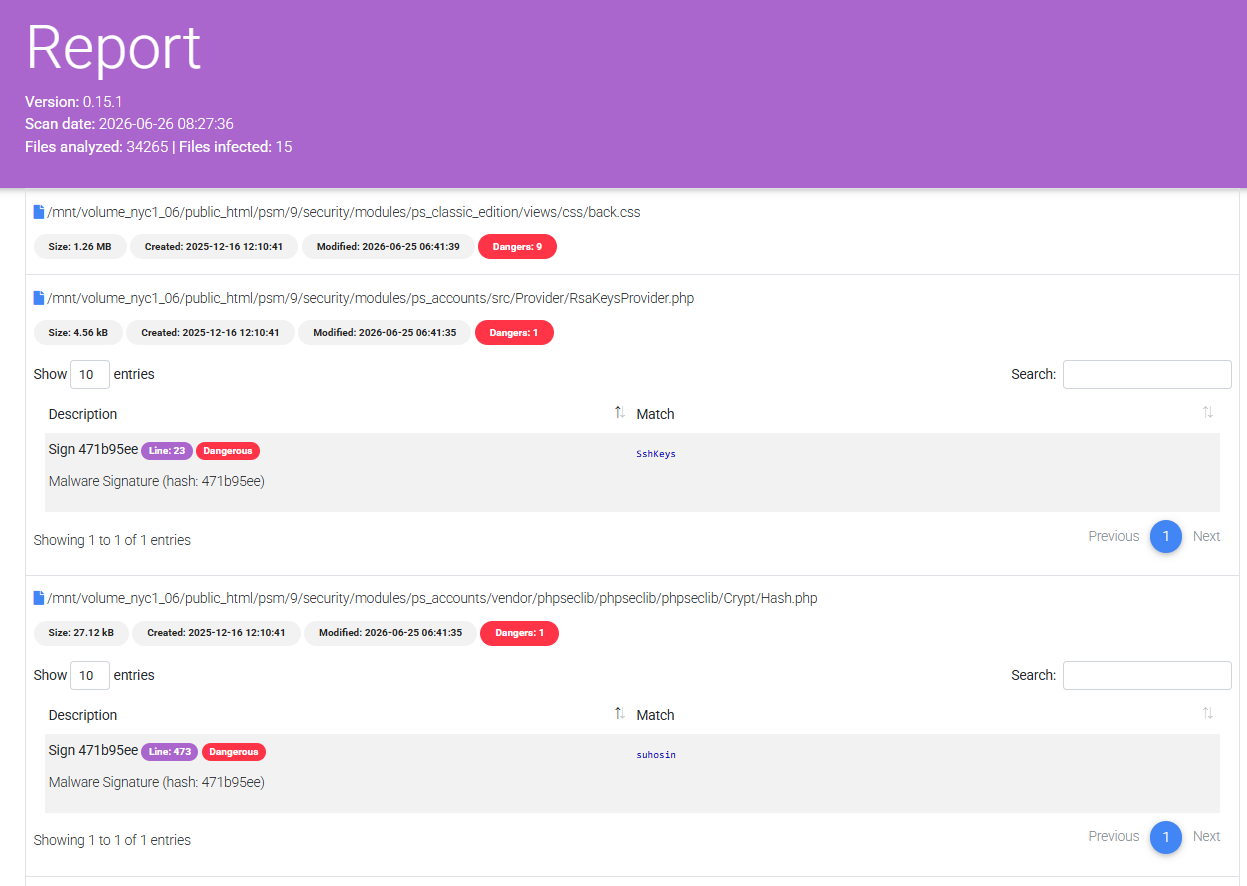
Scan Reports
ID This feature is used to assign a sequential identifier to each scan run, making individual scans easy to reference.
Date This feature is used to record when each scan was executed.
Triggered By This feature is used to show whether a scan was run manually or by the scheduled CRON job.
Files Scanned This feature is used to display the total number of files checked during that scan run.
Threats This feature is used to show the number of new or modified files flagged during the scan.
Duration This feature is used to record how long the scan took to complete.
Status This feature is used to indicate the completion state of the scan.
View Report Store admins can use this option to open the detailed findings for that specific scan.
8. Conclusion
PrestaShop Security Manager brings together the protections most stores end up needing piecemeal, including a PrestaShop 2FA module, a PrestaShop brute force module, a PrestaShop firewall module, a PrestaShop captcha module, and file-integrity anti malware scanning, into a single, centrally configured PrestaShop secure backend. Configured thoughtfully, starting with login monitoring and the emergency recovery URL before layering on more restrictive controls, it meaningfully reduces the most common attack paths targeting PrestaShop stores without adding friction for genuine customers or your own team.
Order confirmation emails have a deliverability problem that most store owners do not think about until a customer complains. WhatsApp messages achieve open rates of 95 to 98 percent against email’s 20 to 25 percent, a difference that shows up directly in how many customers actually see the updates you send them. An OpenCart WhatsApp CRM Extension takes the manual work out of it, and alerts go to the customer at the right moment without your team needing to do anything.
The Knowband OpenCart WhatsApp CRM and Order Notification Extension ties your store to the WhatsApp Business API. New order confirmations and status change alerts are sent automatically. Your support team can chat with customers in real time from within the OpenCart admin. Promotional messages can also be sent to a segmented contact list at whatever time you schedule. A chat icon on your storefront puts your agents within reach of any visitor.
This guide documents every tab and field in the extension. Every setting is described exactly as it appears in the admin panel, whether you are doing a fresh setup or working through a specific configuration.
1.1 Who Is This OpenCart WhatsApp CRM Extension For
This extension suits:
Store owners who want WhatsApp order alerts to be sent automatically without needing a developer to set it up.
Support staff who need an OpenCart WhatsApp Live Chat Extension so they can reply to customer messages from the OpenCart backend.
Merchants who want an OpenCart WhatsApp Integration Extension that covers both automated notifications and outbound marketing campaigns in one place.
Agencies that are building OpenCart stores for clients who have asked for a WhatsApp Business API connected to their shop.
2.0 Installation Guide of the OpenCart WhatsApp Live Chat Extension
Step 1: Download the Extension
After purchasing, download the videomate.ocmod.zip file, which contains the complete video plugin for OpenCart.
1. Unzip the downloaded file; this will contain the videomate.ocmod.zip and necessary folders.
2. Go to the upload folder and locate the admin and catalog files.
3. Copy these files into the root directory of your OpenCart store
Step 2: Upload via Extension Installer
Go to Extensions > Extension Installer in your OpenCart admin panel.
Upload the videomate.ocmod.zip file.
Once installed, go to Extensions > Modifications, and click Refresh to apply changes.
Step 3: Assign User Permissions
Navigate to System > Users > User Groups, then edit your group and enable permissions for extension/module/videomate.
Step 4: Enable the Module
Navigate to Extensions > Extension Installer in your OpenCart admin dashboard.
2.3 Common Installation Issues
Upload fails: Your host is probably blocking the file size. Have them increase upload_max_filesize and post_max_size in the PHP settings to at least 32 MB.
Emails not going out: Go to System, then Settings, then the Mail tab. The extension uses the store’s default mail configuration unless you have set a different one at the form level.
Page looks wrong: Do a browser cache clear. Then reset the OpenCart theme cache using the blue cog icon on the Dashboard refresh panel.
3.0 Admin Panel Overview
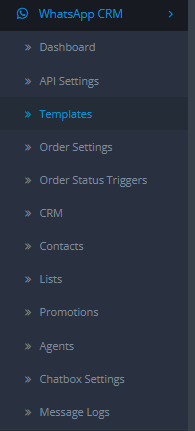
The OpenCart WhatsApp CRM Extension adds its own section to the OpenCart admin sidebar after installation. Each tab in that section has a specific job:
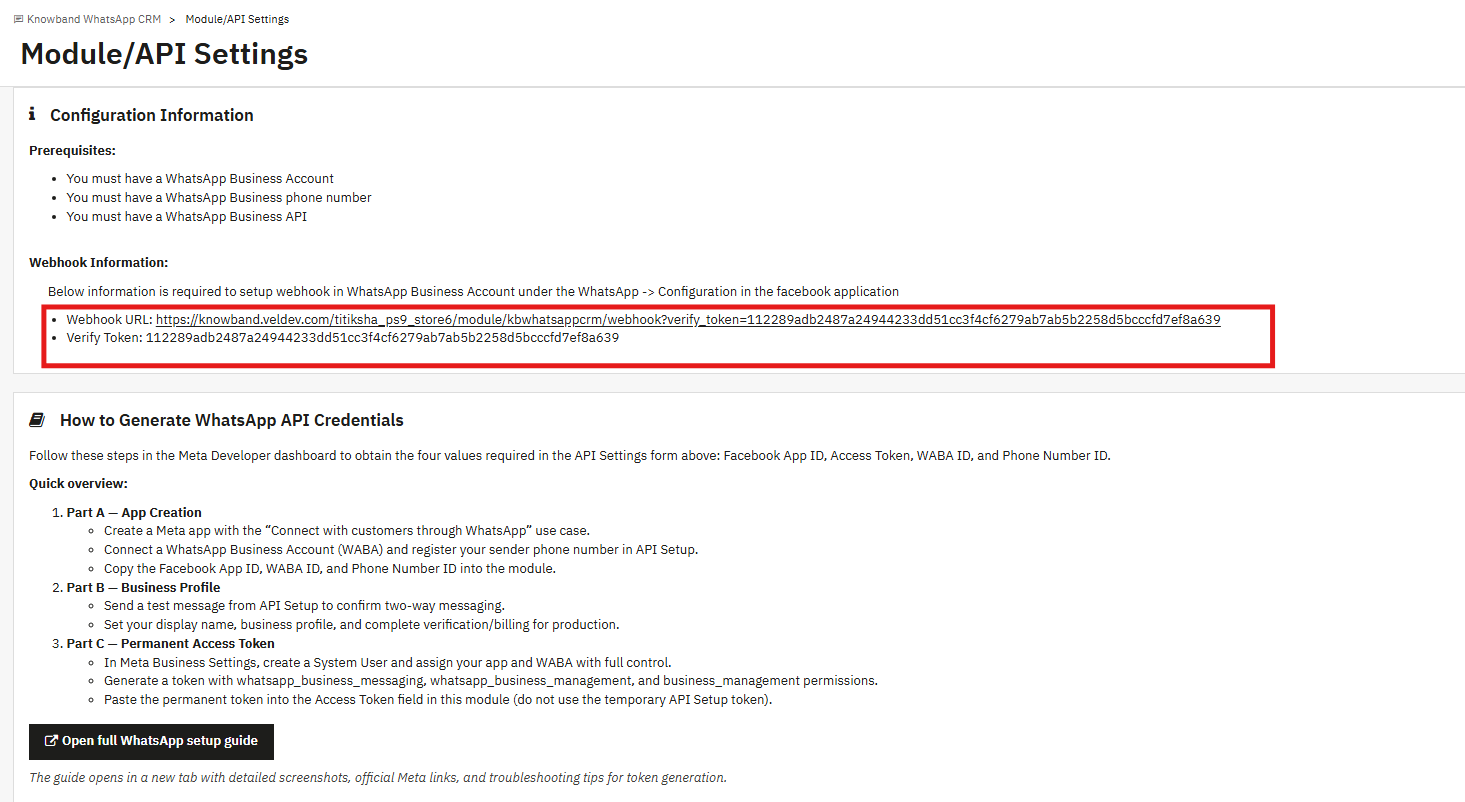
Module/API Settings: This is where your WhatsApp Business API credentials go, along with the webhook configuration.
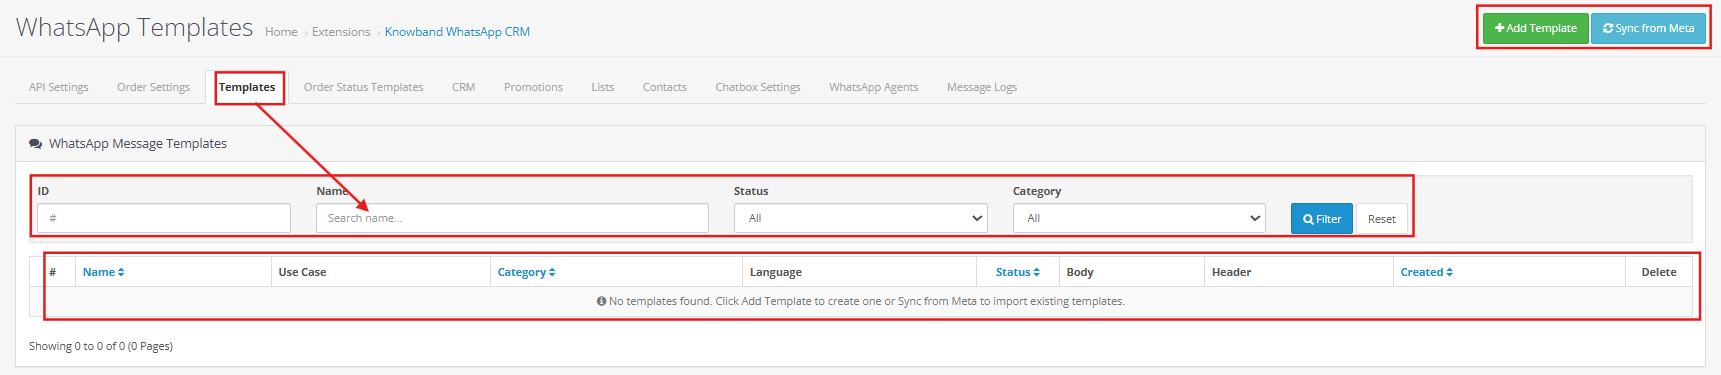
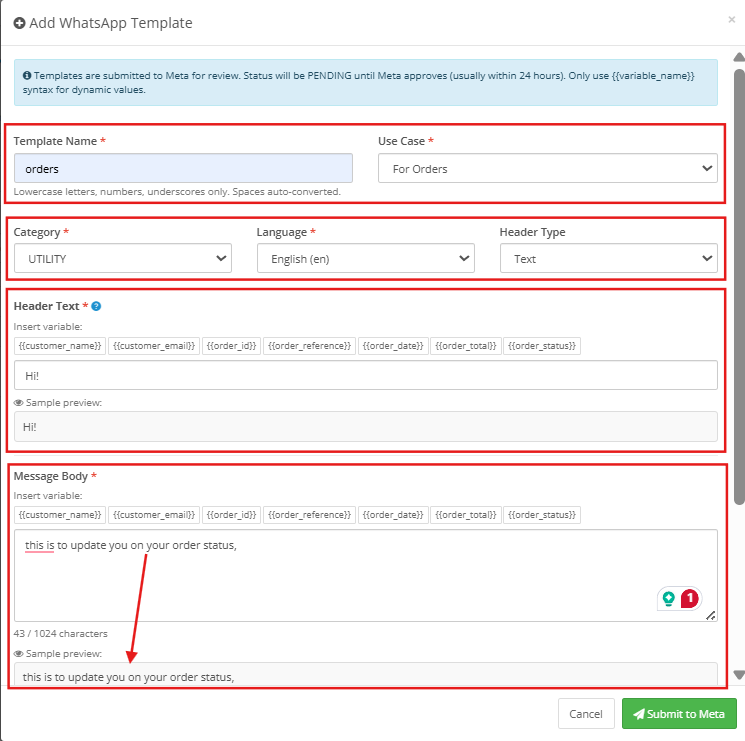
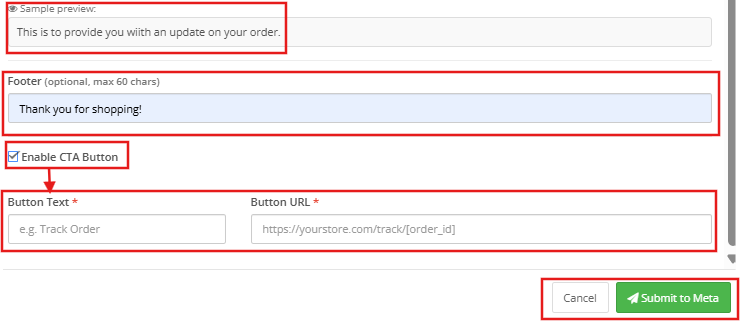
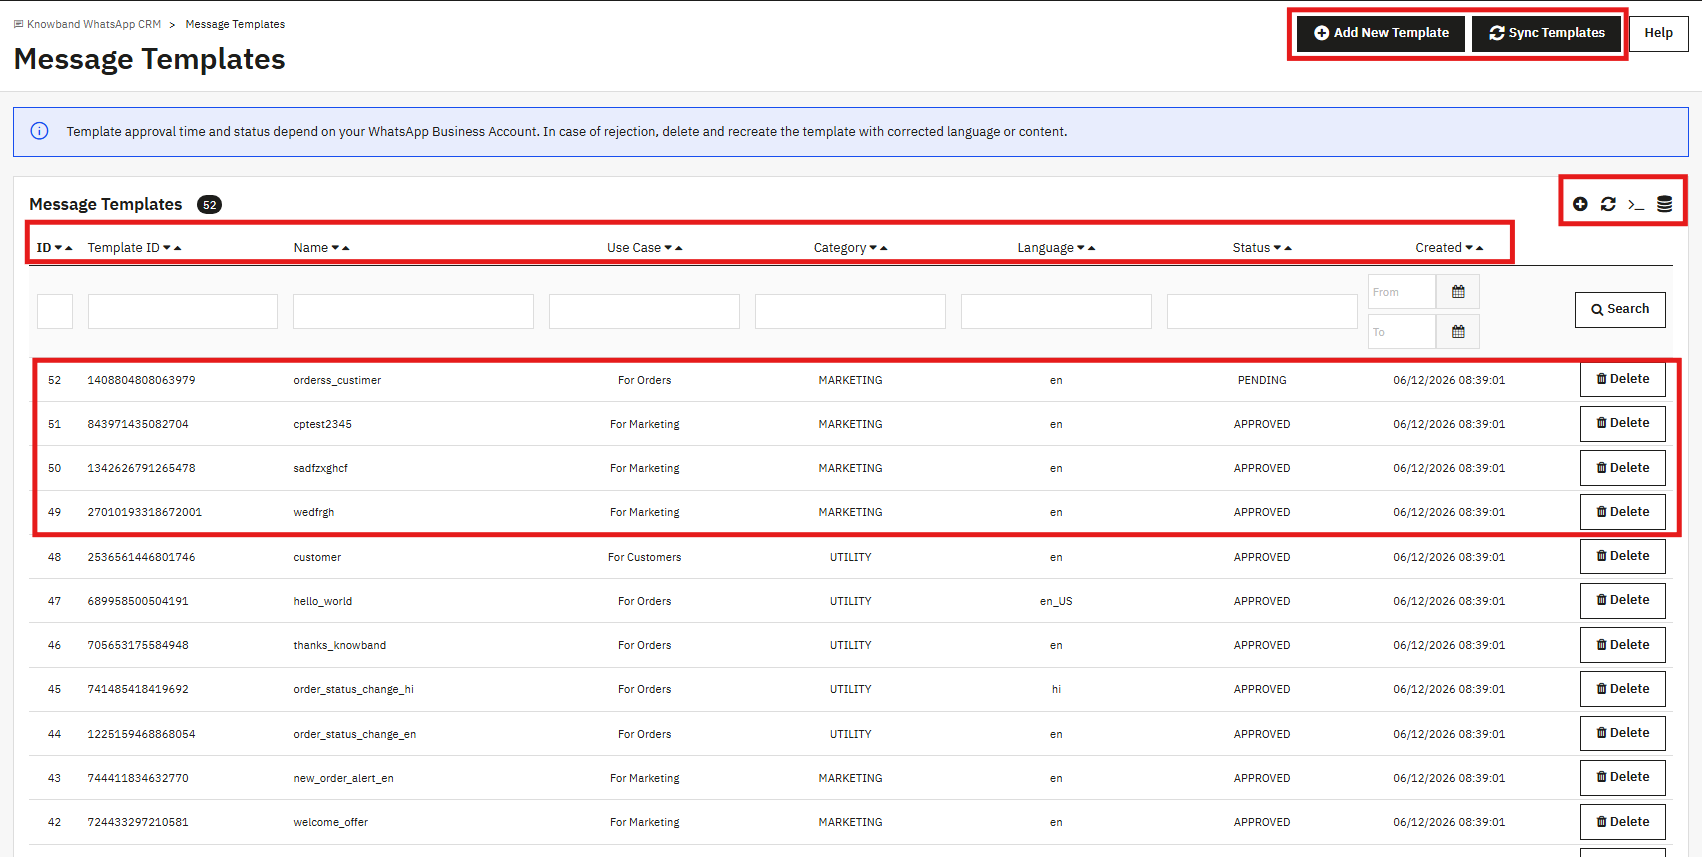
Templates: Where you write and submit templates to WhatsApp for review.
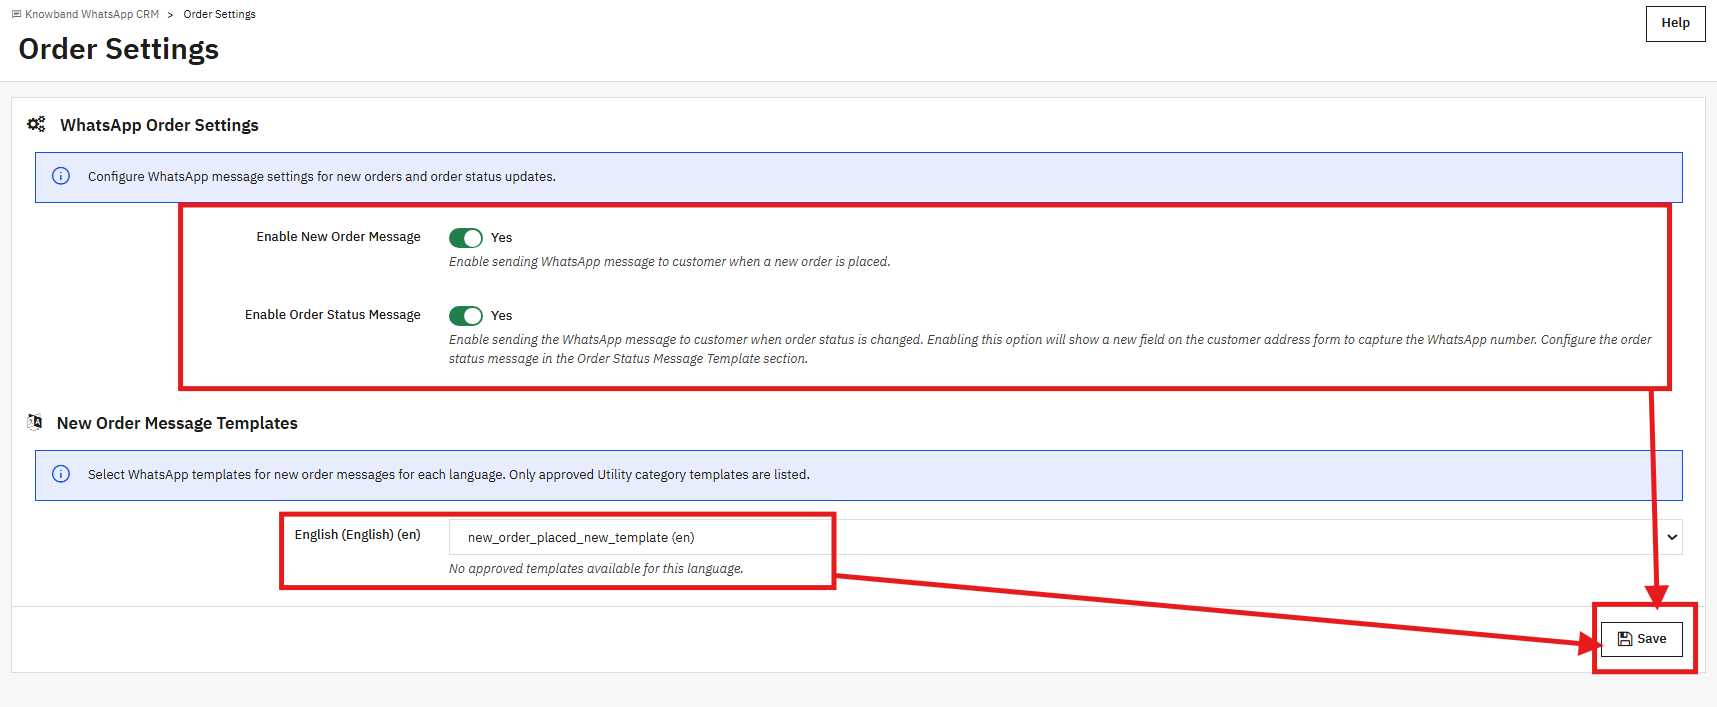
Order Settings: Decides which order-based WhatsApp alerts are active and when they are sent.
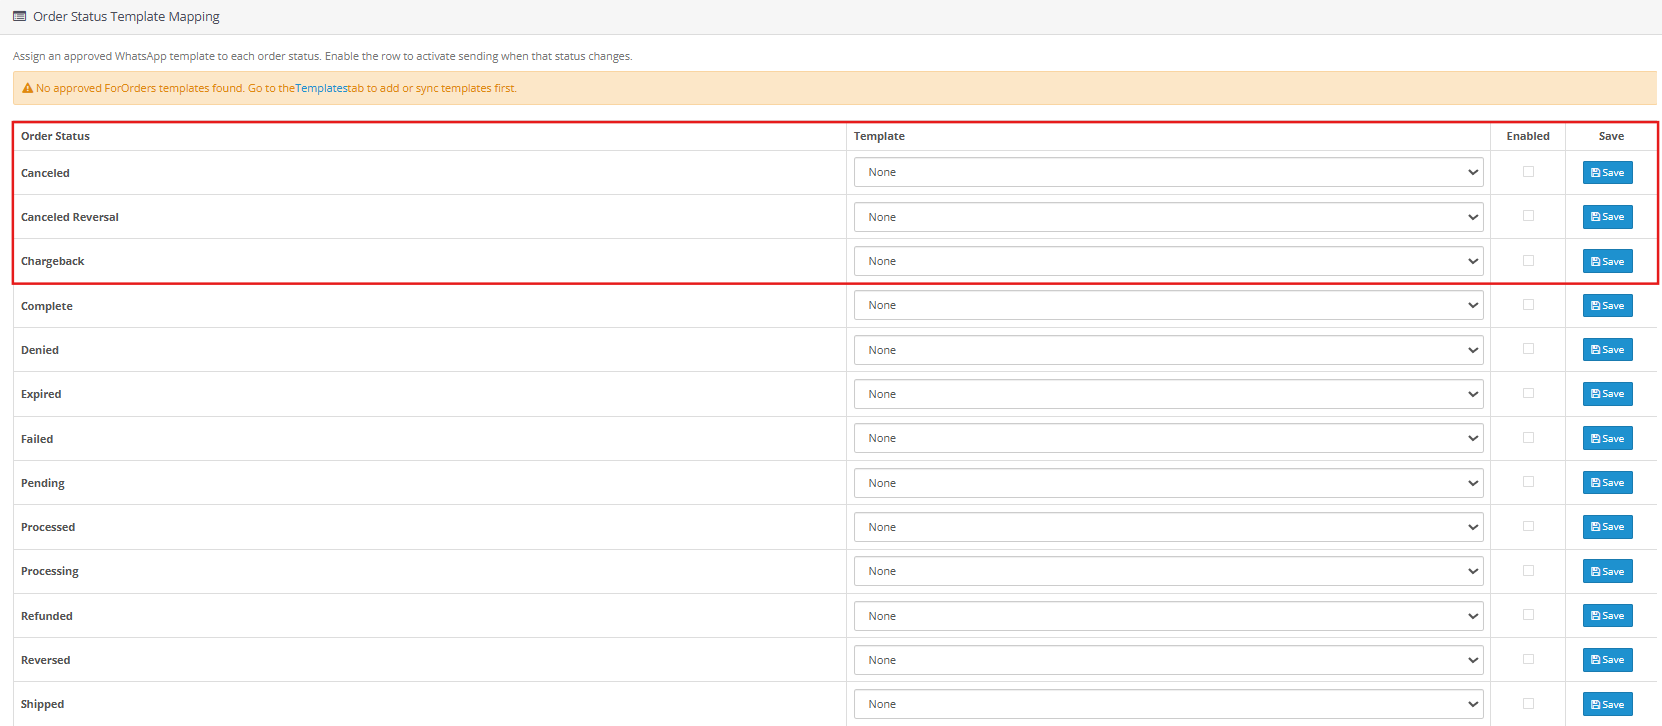
Order Status Trigger: Links each order status to the template that gets sent for it.
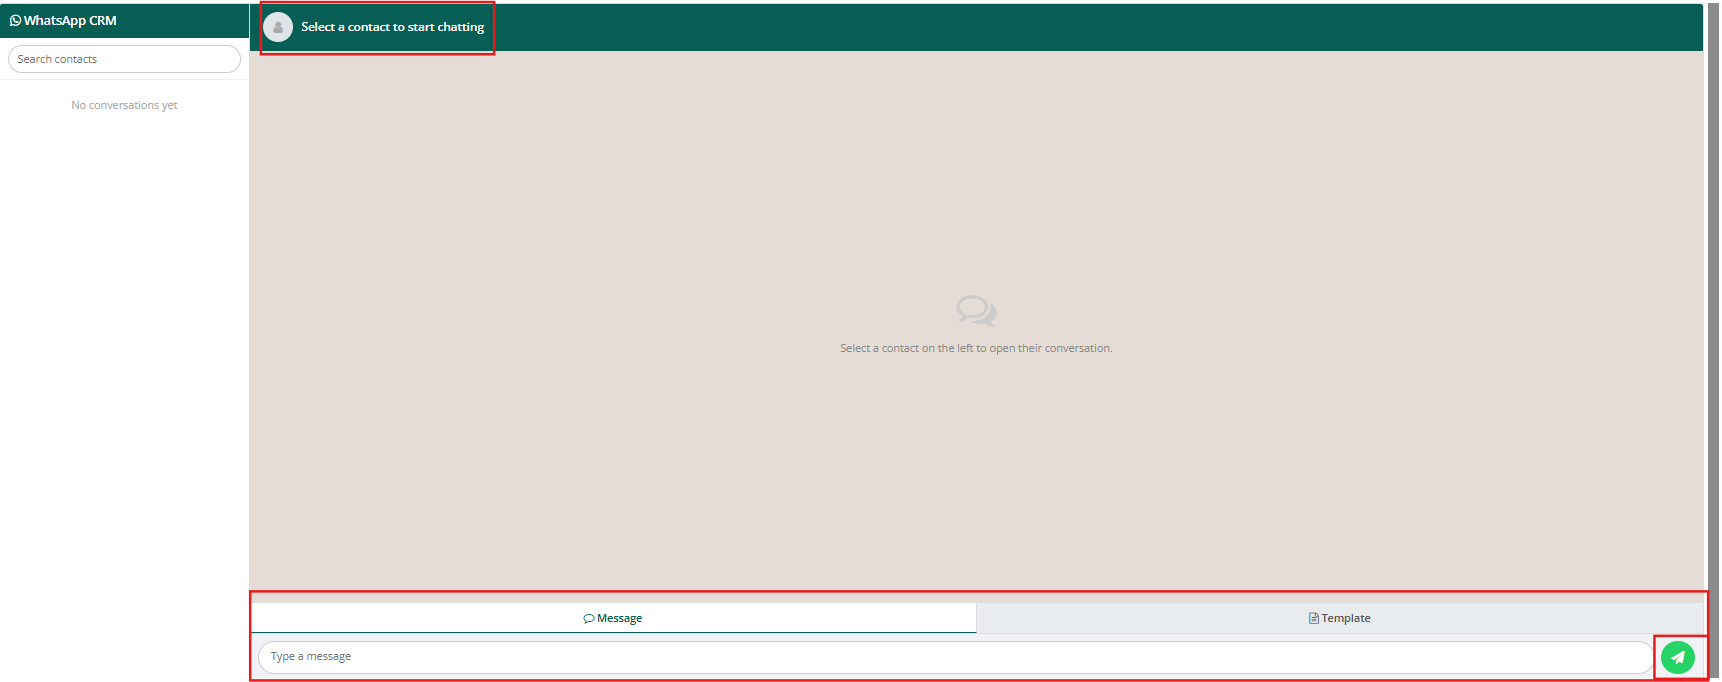
CRM: The live chat panel for two-way conversations with customers.
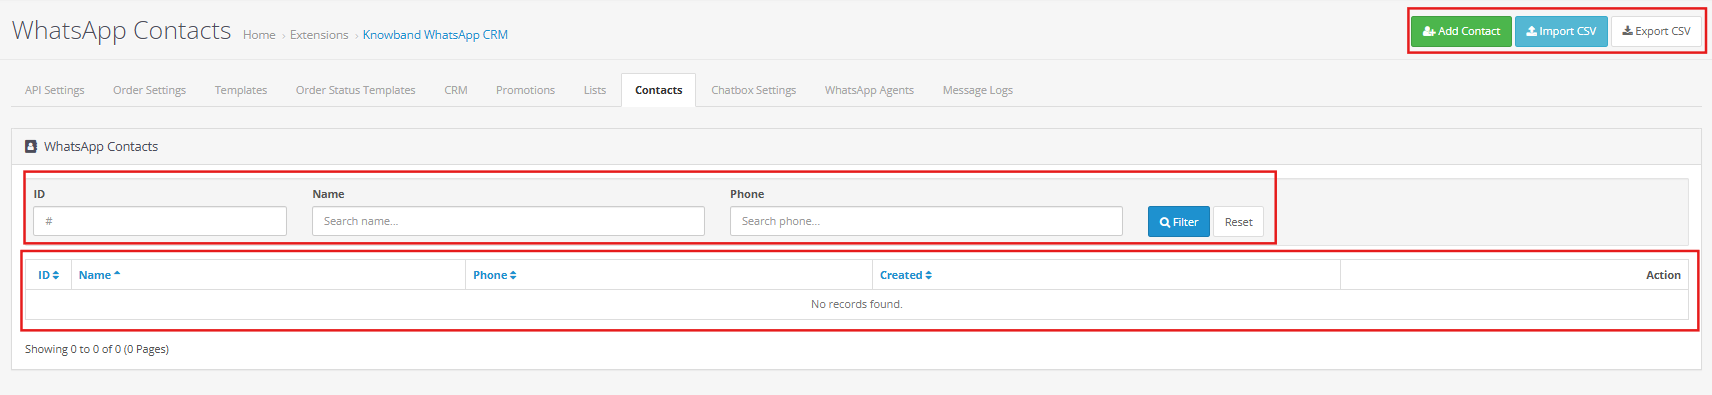
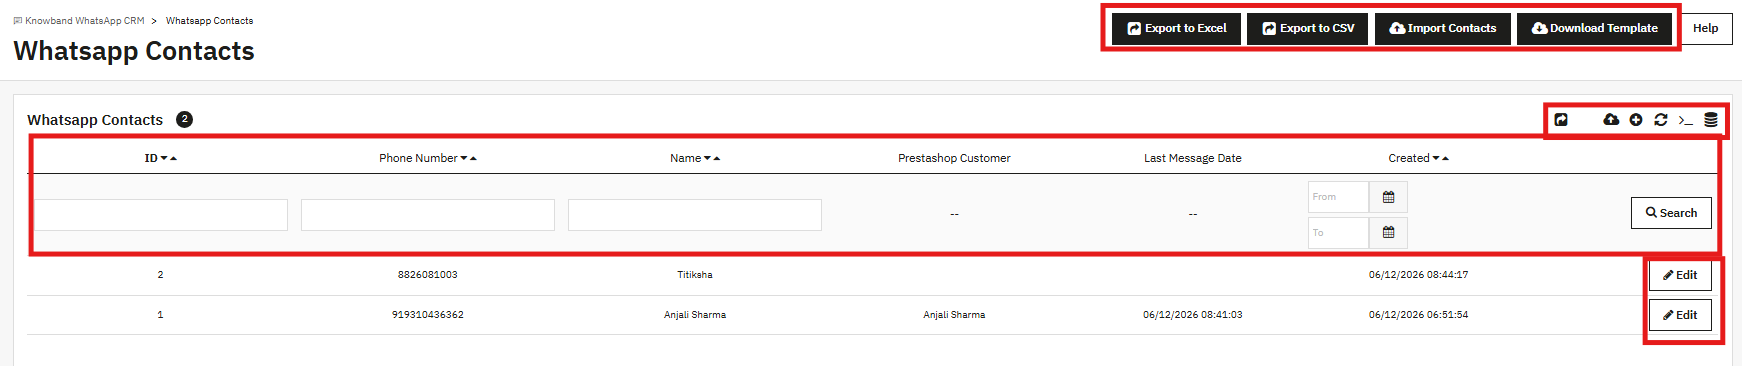
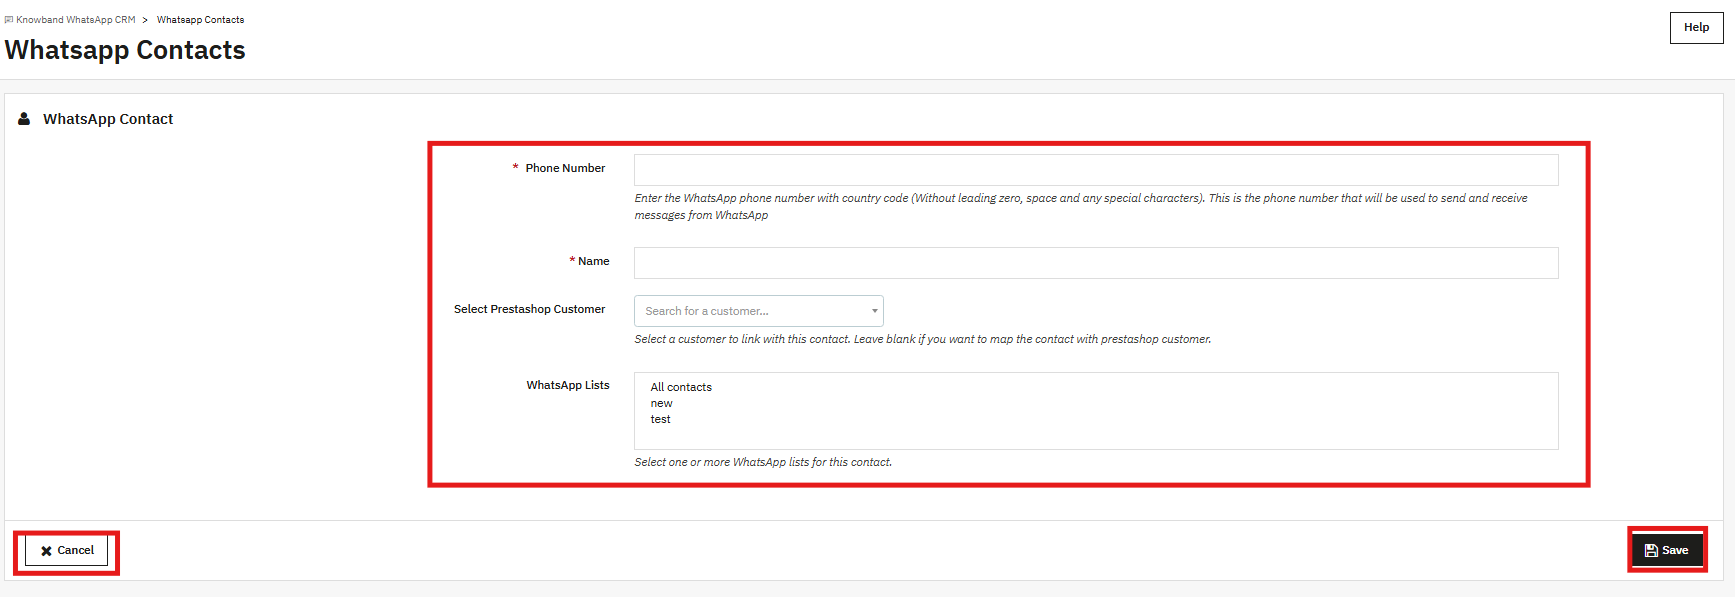
Contacts: Your full contact database, with import and export built in.
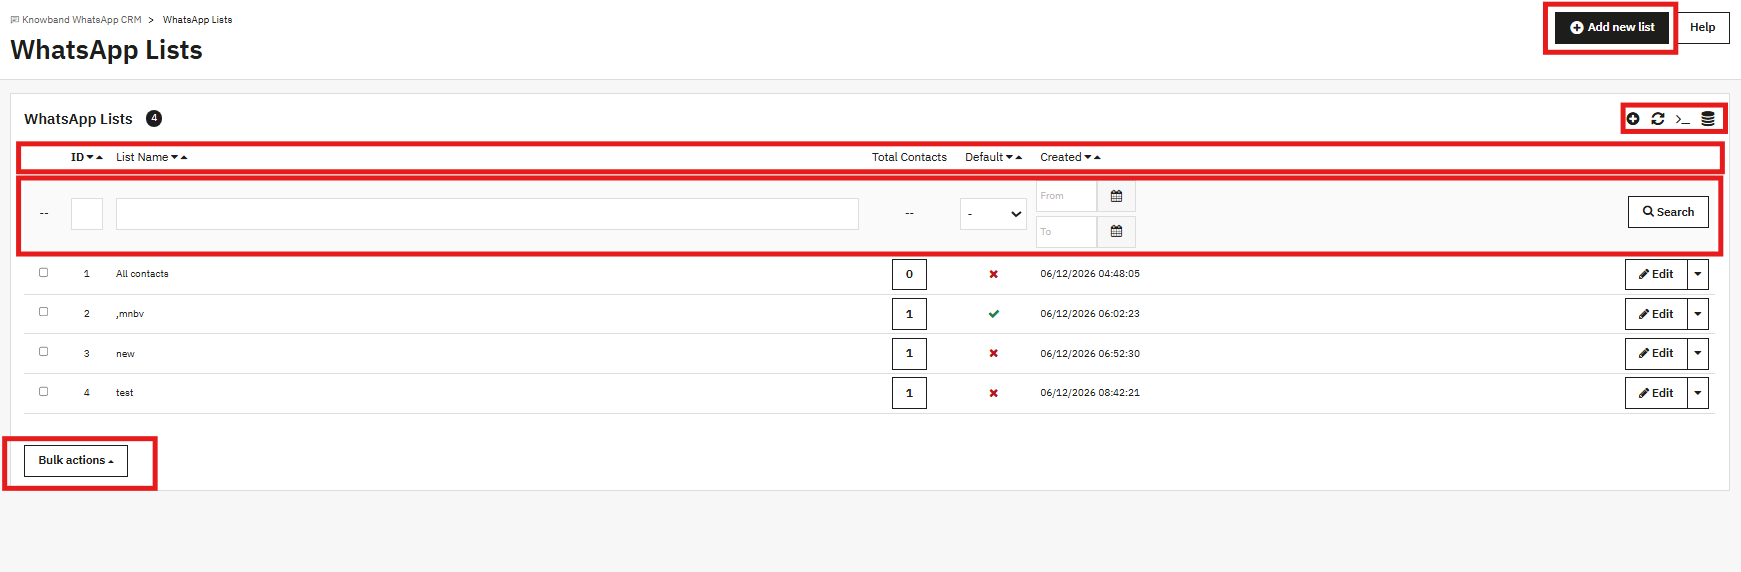
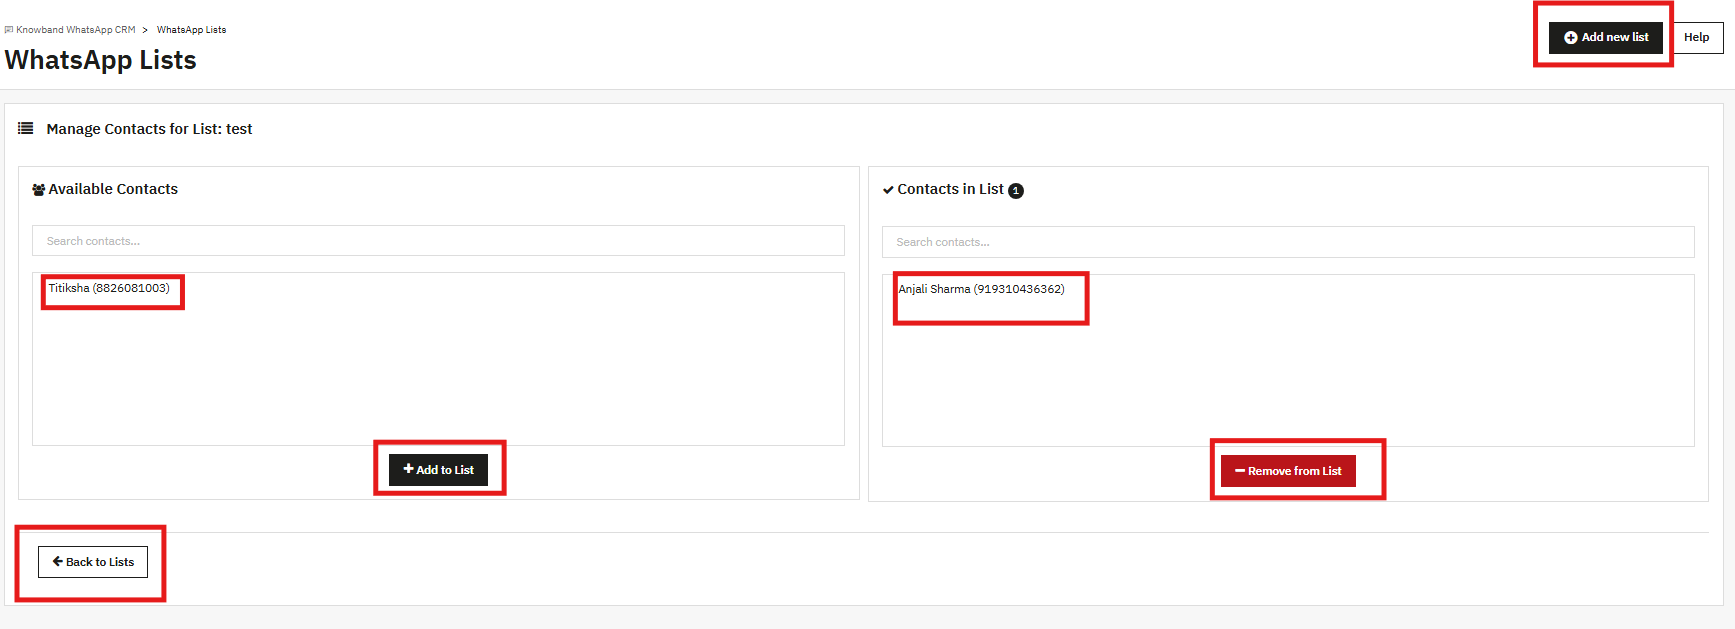
Lists: Groups of contacts that promotions get sent to.
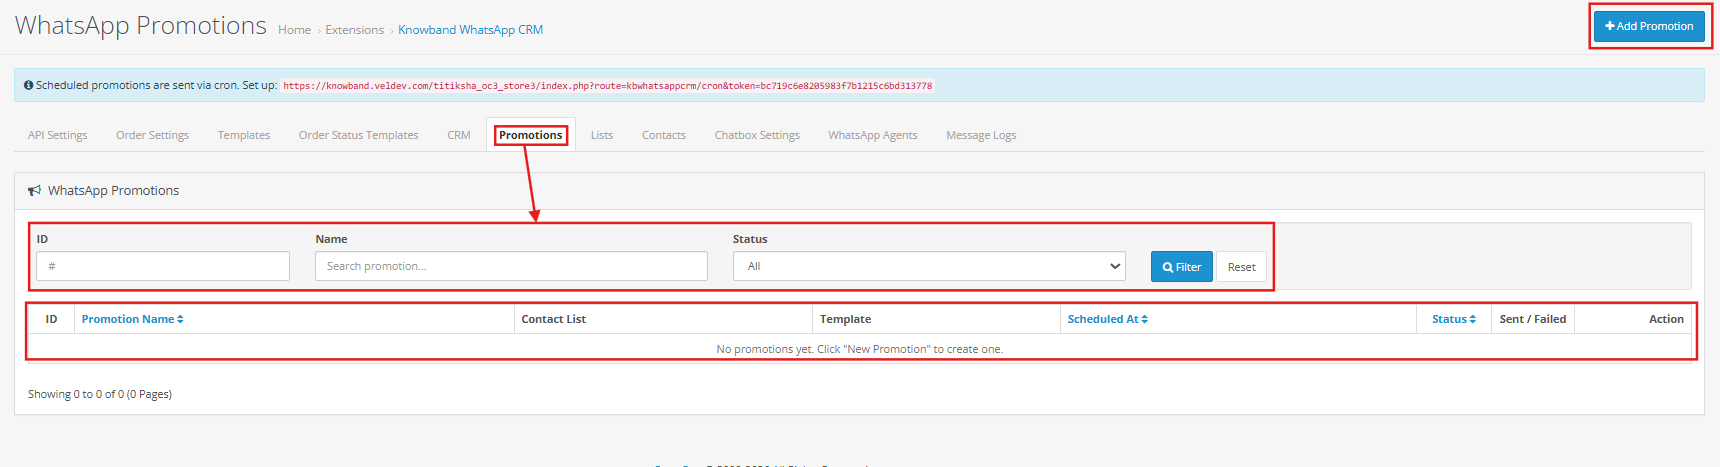
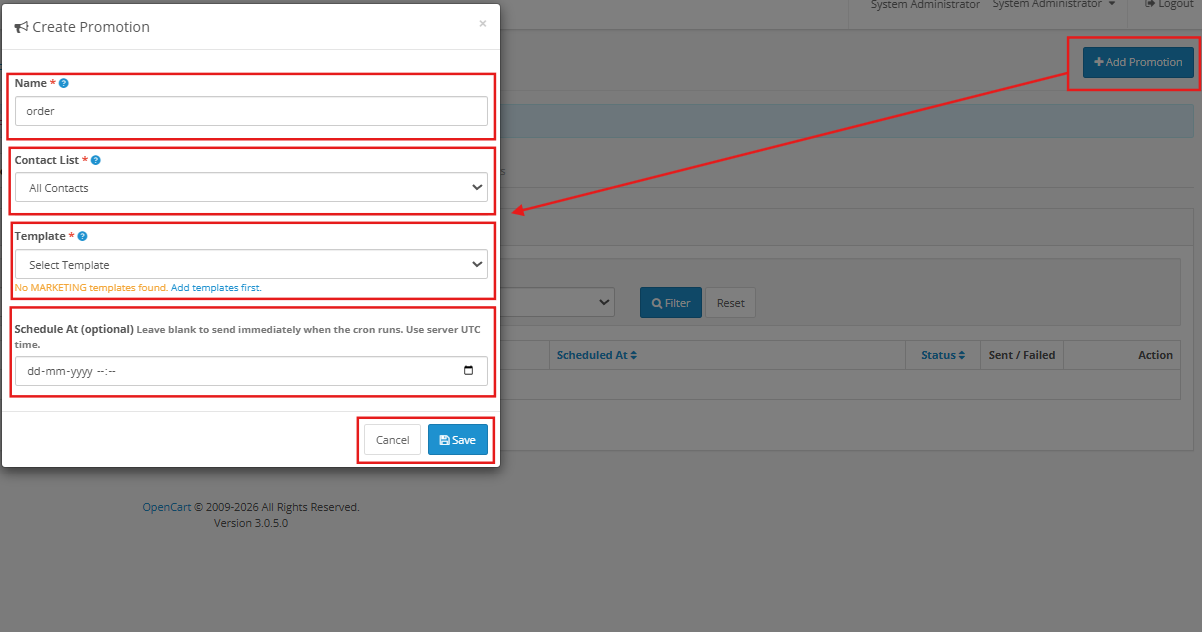
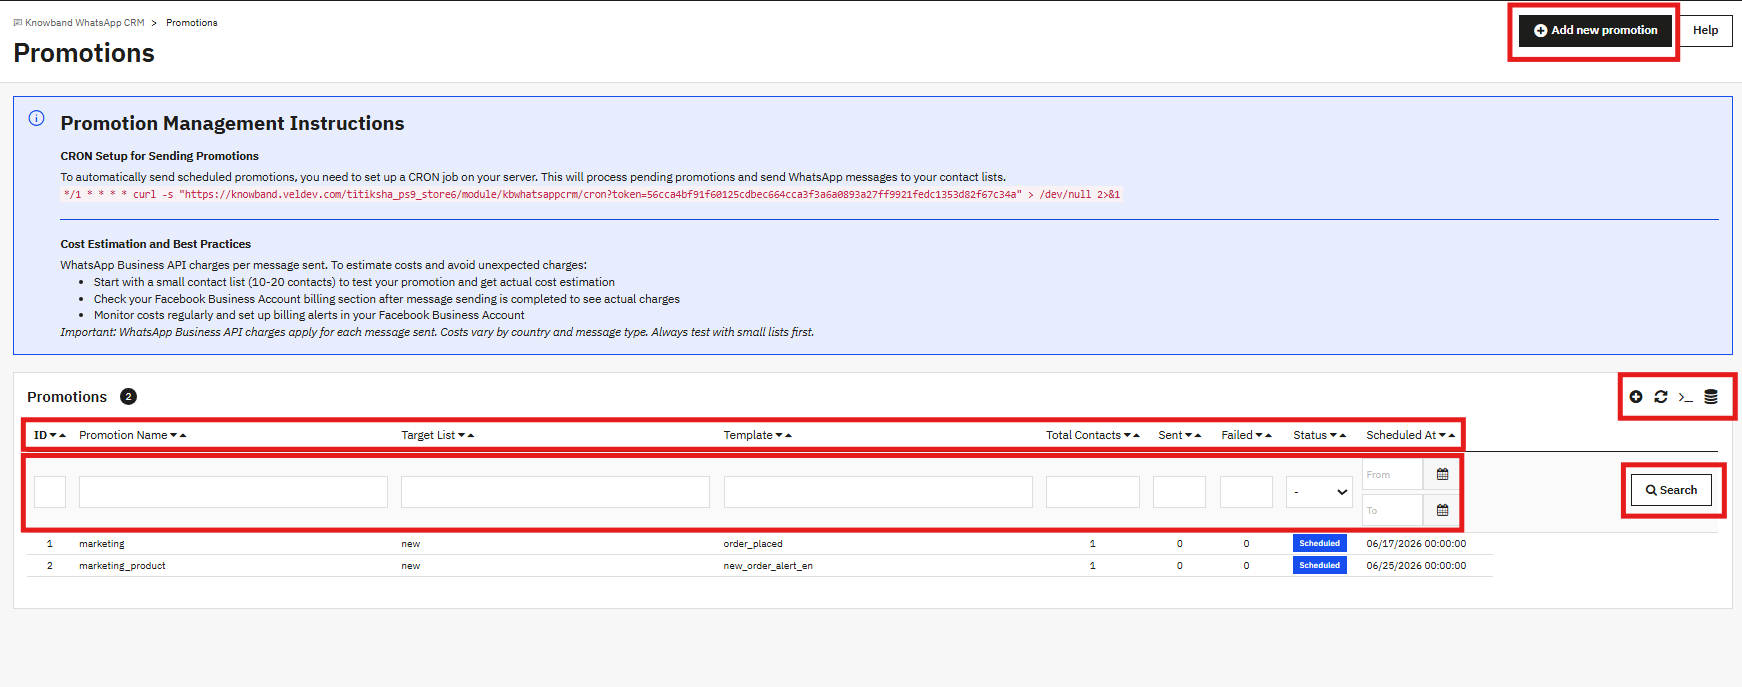
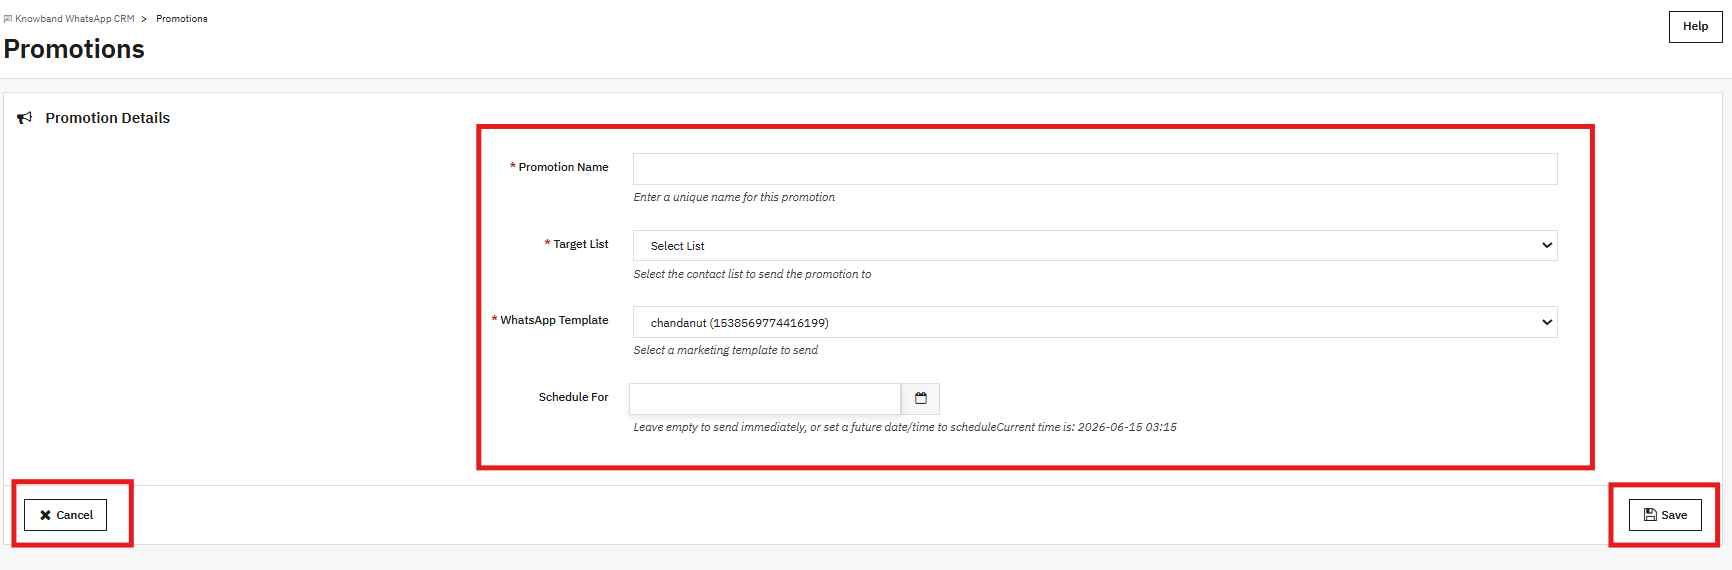
Promotions: Builds and schedules outbound campaigns to your contact lists.
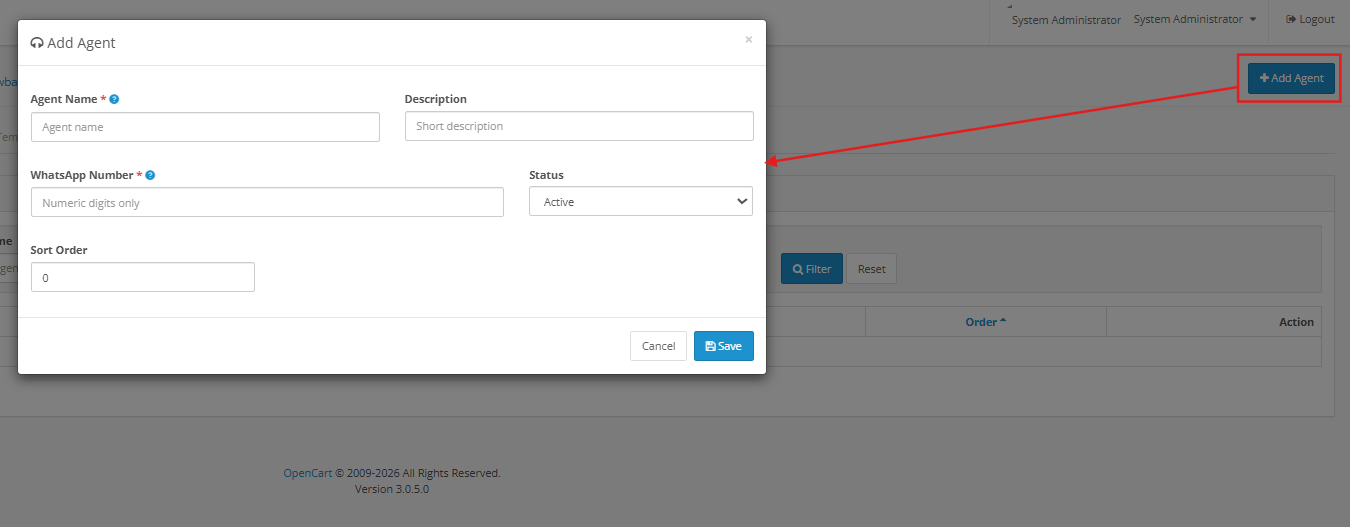
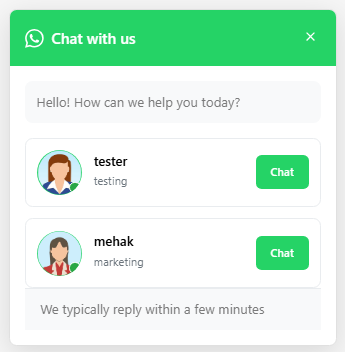
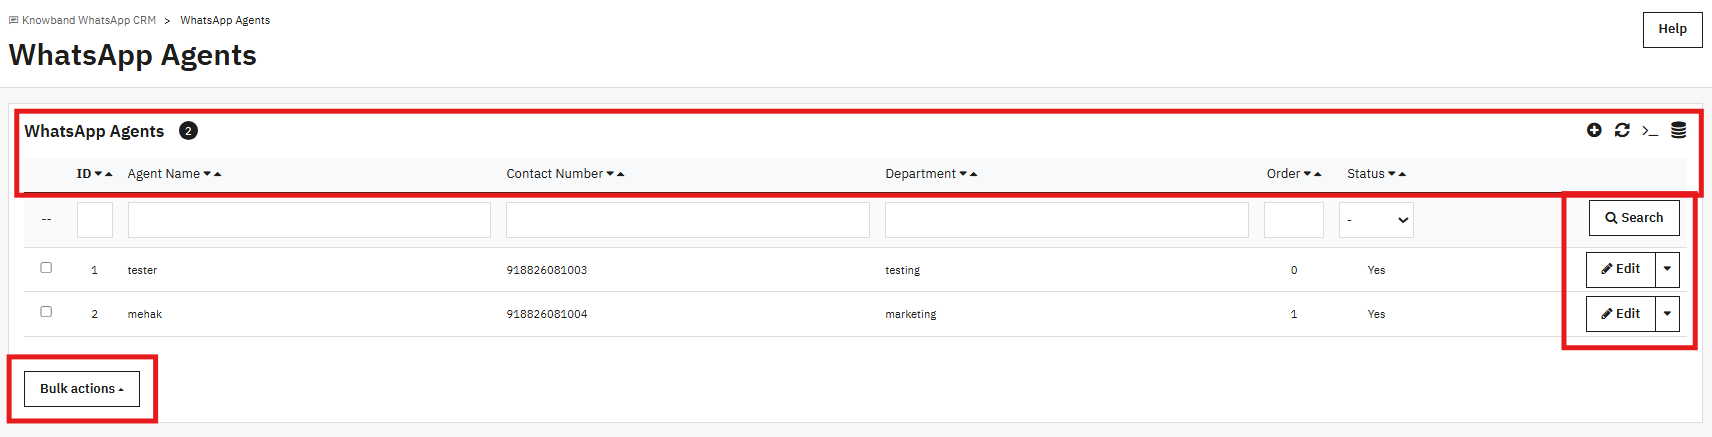
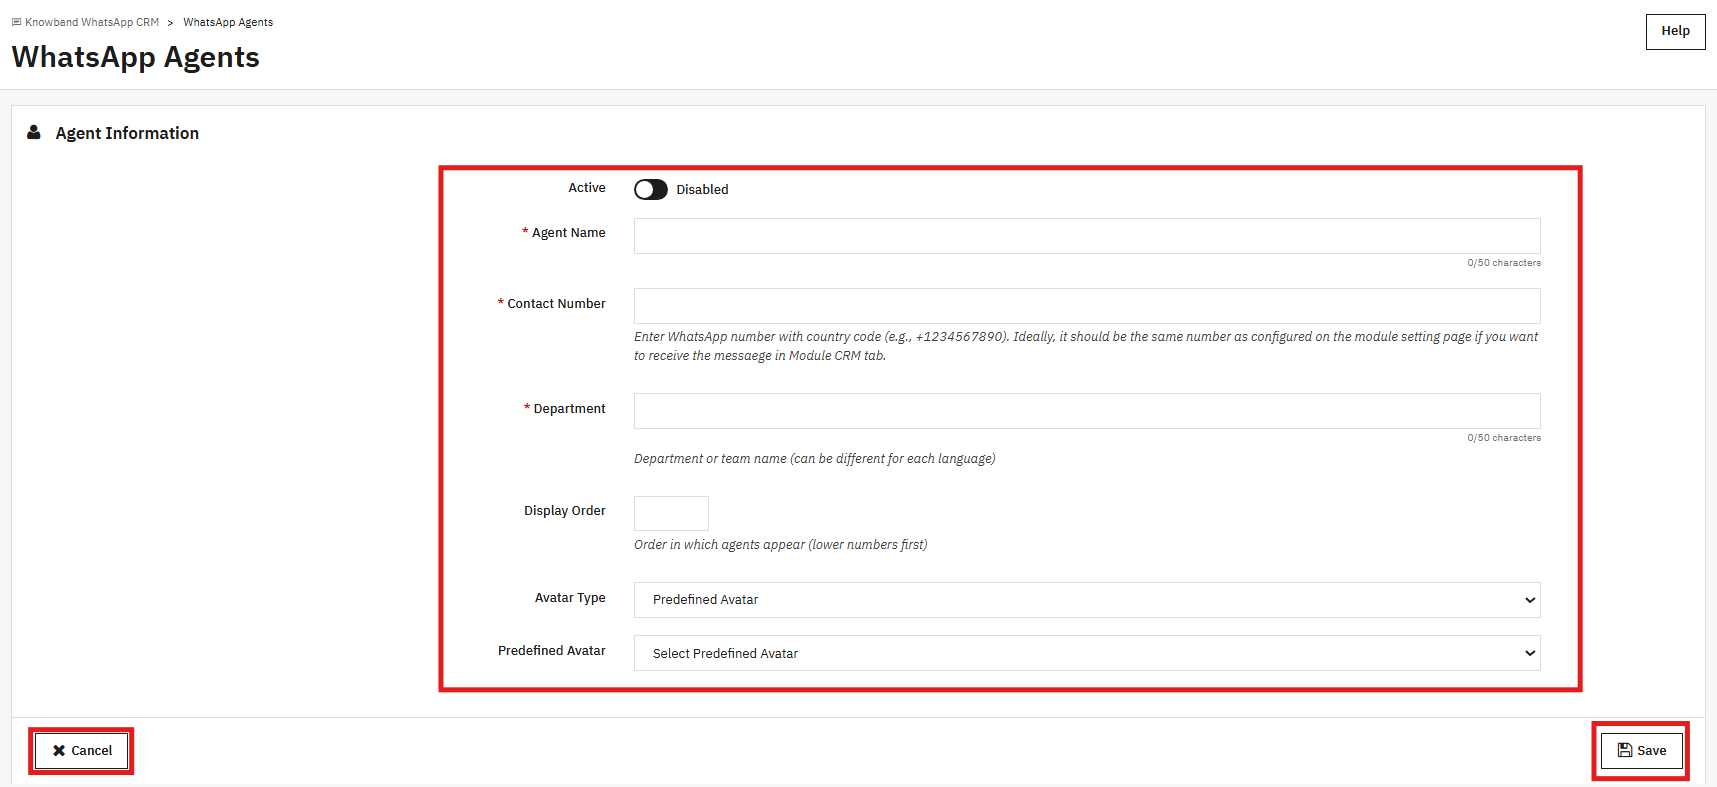
Agents: The support agents your visitors see in the storefront chat pop-up.
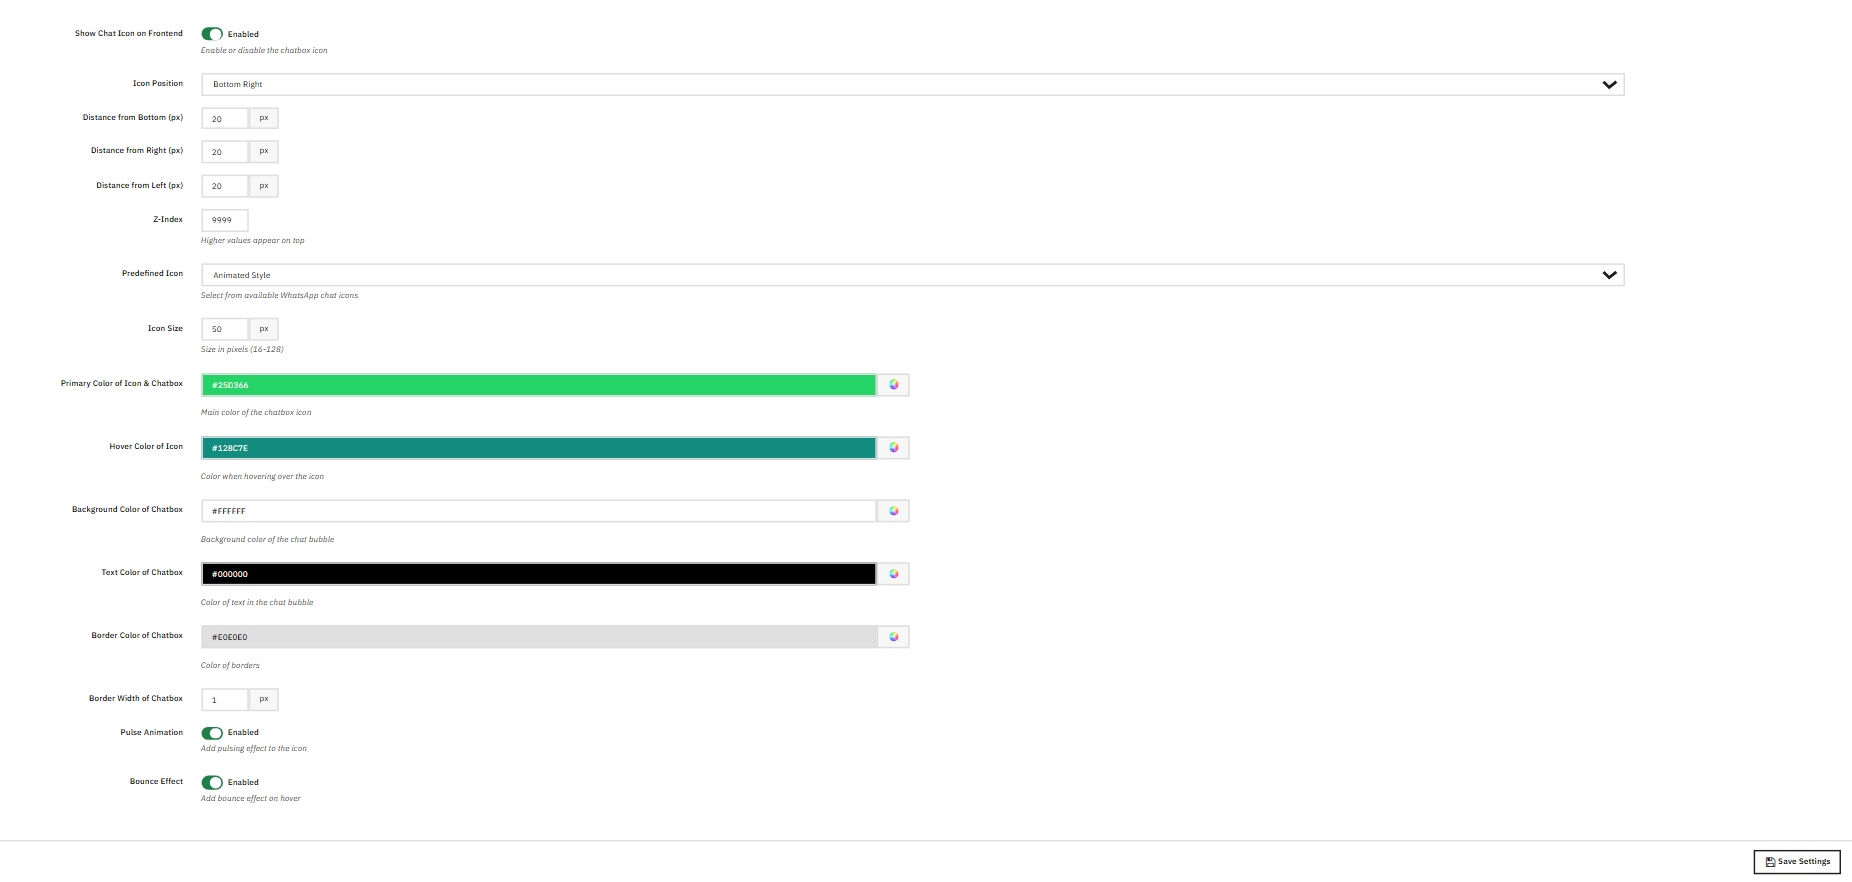
Chatbox Settings: Settings that control the floating WhatsApp icon on your storefront.
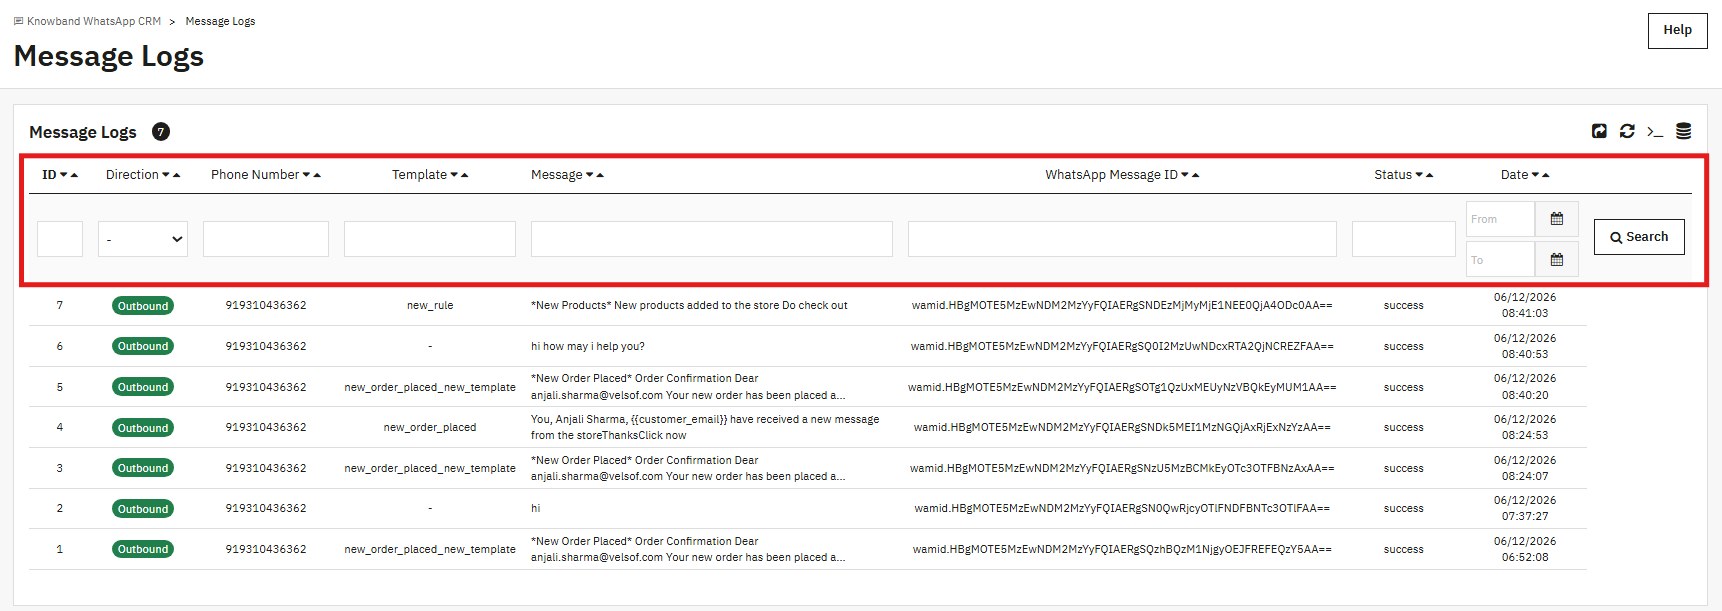
Message Logs: A timestamped record of all messages sent and received through the extension.
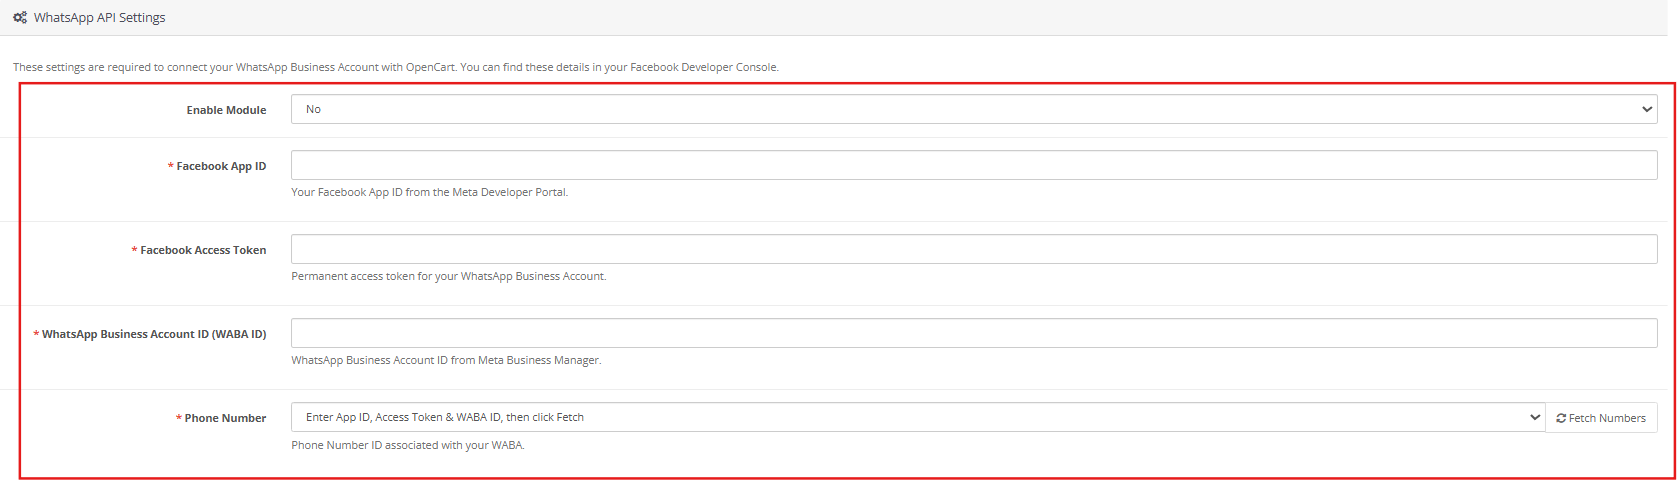
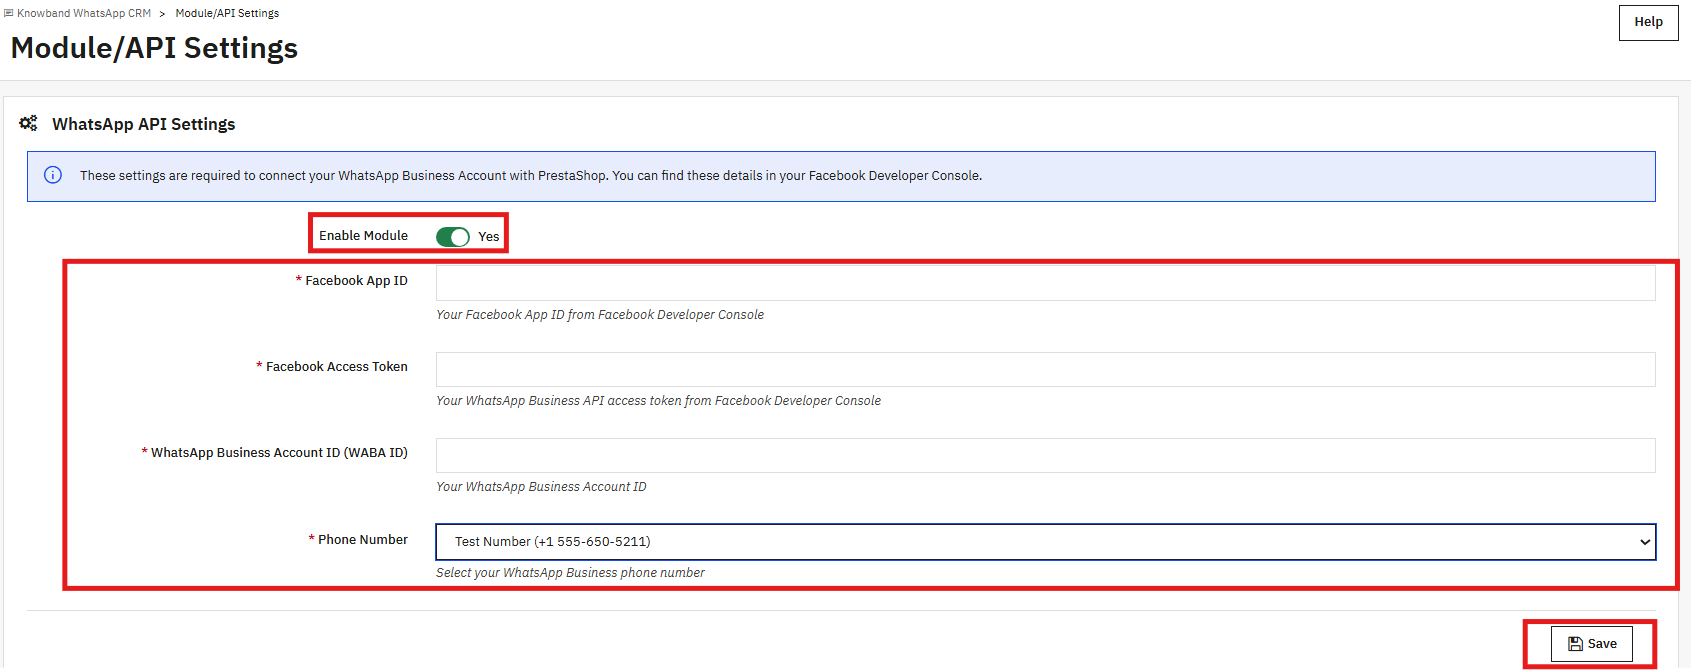
Nothing in the OpenCart WhatsApp Business API Extension works until this tab is filled in. Four credentials are required, and all four must be correct before the extension can send or receive anything.
4.1 WhatsApp API Settings
Enable Extension: You can easily enable/disable the plugin with this toggle. Turn it off, and the extension stops sending messages, and the storefront chatbox is removed.
Facebook App ID: Pull this from the Meta Developer Console. It identifies which Meta app the API request is coming from.
Facebook Access Token: This needs to be a permanent token, not the short-lived one shown in the API Setup tab. Head to Meta Business Settings, add a System User, give it full control over your app and WABA, then generate a token. The three permissions you need are whatsapp_business_messaging, whatsapp_business_management, and business_management. That token goes here.
WhatsApp Business Account ID (WABA ID): Your WABA ID lives in the Meta Developer Console, inside the WhatsApp section of your app. Copy it from there.
Phone Number: The registered WhatsApp Business number you want all messages to come from. Pick it from the dropdown.
Save the form once all four fields are filled. Any field left empty or entered incorrectly shows a validation error right away. An expired access token does the same.
4.2 Webhook Setup
Below the credential fields, the Configuration Information section shows a Webhook URL and a Verify Token that are specific to your store. These go into the Meta Developer Console.
In your Meta app, go to WhatsApp, then Configuration, and paste the two values into the webhook setup fields. After that, the extension picks up incoming messages and template status updates on its own.
The webhook is not strictly required to get started. If it is not set up yet, you can click Sync Templates inside the Message Templates tab at any time to manually pull the latest approval status from WhatsApp.
5.0 Order Settings
The Order Settings tab is where you control when the OpenCart WhatsApp Order Notification Extension sends messages and which templates it uses for them.
5.1 WhatsApp Order Settings
Enable New Order Message: When this is on, a WhatsApp message goes out to the customer every time a new order lands in your store.
Enable Order Status Message: When this is on, customers get a WhatsApp update each time their order status changes. Turning this on also adds a WhatsApp number field to the customer address form so shoppers can put in the number where they want to receive those updates.
5.2 New Order Message Templates
This section lists your store languages. For each one, pick the approved Utility template that sends when a new order is placed. The dropdown only pulls in Utility templates that WhatsApp has already approved.
If the dropdown has nothing in it, your templates are either sitting in the queue waiting on WhatsApp review, or they were categorised as Marketing instead of Utility. Create a Utility template in the Message Templates tab, wait for approval, then come back here and save your selection.
6.0 Message Templates
Templates used anywhere in the OpenCart WhatsApp CRM Extension are created and submitted here. WhatsApp has to approve a template before it can be assigned to any message flow. Both submission and status checking happen inside this tab.
6.1 Templates List
Every template tied to your WhatsApp Business Account shows up in this table. The columns cover Template ID, Name, Use Case, Category, Language, Status, and the date the template was created. Status can be Pending, Approved, or Rejected.
The Sync Templates button pulls the latest status data from WhatsApp whenever you need it. Search fields at the top let you filter by template name, category, language, or a date range.
6.2 Creating a New Template
Name: Use lowercase letters and underscores only. Spaces and special characters are not accepted.
Use Case: Pick the use case that fits: For Orders, For Marketing, or For Customers.
Category: Utility or Marketing. Any template assigned to order notifications has to be in the Utility category. WhatsApp reviews the body text and may move a template to Marketing if it reads like a promotion.
Language: Choose the language the template is written in. If your store serves customers in multiple languages, you will need a separate template for each one.
Header Type: Not required. You can leave it as No Header or add a Text, Image, Video, or Document header if the message needs one.
Message Body: The message itself. Bold, italic, and strikethrough options are in the editor toolbar. Use Insert Variable to drop in things like the customer’s name, their order ID, or the order total. The Body Preview below the editor shows you how the finished message reads as you build it.
Footer: An optional line of smaller text that sits below the main body.
Enable CTA Button: Switch this on to attach a CTA button to the message. You will need to fill in the Button Text and the URL it points to.
Hit Save when the template is ready. WhatsApp gets it for review right away. Straightforward templates are usually clear in a few minutes. More complex ones can take a few hours. Once it is approved, it shows up in Order Settings, Order Status Templates, and the CRM template list.
7.0 Order Status Triggers
Each order status in OpenCart can be paired with a Utility template in this tab. When an order hits a status that has a template assigned, the extension sends that message to the customer as an automated WhatsApp update.
Every status your store uses is listed in the table: Awaiting check payment, Payment accepted, Processing in progress, Shipped, Delivered, Canceled, Refunded, and the rest. Each row shows whether notifications are on or off and which template is currently mapped to that status.
Hit Edit on any row to change it. Toggle Enable WhatsApp Notification on, pick a Utility template for each store language from the dropdown, and save. The row reflects the change straight away.
The CRM tab is the live chat section of this OpenCart WhatsApp Live Chat Extension. Your contact threads sit in a sidebar on the left. Click on any one of them to bring up the full conversation on the right.
Two tabs are at the bottom of the chat window: Message and Template. The message is for free-text replies, though this only works during the 24-hour window that opens when a customer sends you something first. After that window closes, swap to the Template tab. Approved Marketing templates can go out from there at any time.
Automated order alerts sent by the extension also show up inside the relevant contact thread. That way, your support team always has the full picture of what the customer received before they start a reply.
9.0 Promotions
The Promotions tab is for outbound WhatsApp campaigns. You pick the list of contacts, choose the template, set when it goes out, and the extension takes it from there.
9.1 Creating a Promotion
Name: An internal name so you can tell this campaign apart from others. It is not included in the message the customer receives.
Contact List: Choose which WhatsApp List this campaign targets. Every contact on that list will get the message.
Template: Pick an approved Marketing template from the dropdown. Marketing category templates are the only ones that appear here.
Schedule at: The date and time you want the campaign to go out. It has to be in the future. If you leave this blank, the campaign runs on the next CRON trigger instead.
Save it. The campaign will sit in the list with a scheduled status. The CRON command at the top of the Promotions page needs to be added to your server if you want campaigns to send automatically. It checks for pending campaigns every minute.
After a campaign runs, the Sent and Failed numbers fill in. The WhatsApp Business API bills you per message, so it is worth sending to a small group of 10 to 20 contacts first, just to see what the actual cost looks like before you go to the full list.
10.0 WhatsApp Contacts
Every phone number the extension can message is stored here. A contact needs a phone number and a name at a minimum. Linking to an OpenCart customer account is optional.
10.1 Adding a Contact Manually
Phone Number: Start with the country code, no leading zero, no spaces or dashes. An Indian number, for example, would be entered as 919310436362.
Name: Whatever name you want displayed for this contact in the extension.
Click Save when done.
10.2 Importing Contacts in Bulk
Click Download Template to get the CSV file in the right format. Add your contact data to it, come back to WhatsApp Contacts, and click Import Contacts to upload the file. Numbers that are already in the extension get their records updated. Numbers that are not in there yet get added as new contacts. Export to Excel and Export to CSV are both available if you need to pull the whole contact list out.
11.0 WhatsApp Lists
A WhatsApp List is just a named group of contacts. Promotions target one list at a time. To create one, click Add new list, type a name, and save it. If you mark a list as Default, new contacts get added to it automatically.
You assign contacts to lists from the WhatsApp Contacts tab. One contact can be in more than one list at the same time.
12.0 Chatbox Settings
This tab is for the floating WhatsApp icon on your storefront. When a visitor clicks it, a pop-up appears listing the agents you have set up. They tap Chat next to whoever they want to speak with, and it opens a WhatsApp conversation on their phone.
Enable Chatbox: Switch this on to show the icon on the storefront, or off to hide it.
Icon Position: Where the icon sits on the screen. Options include Bottom Right and Bottom Left.
Theme Color: The main color used for the icon background and the pop-up header. It defaults to WhatsApp green, which is #25D366.
Header Title: The text shown at the top of the chat pop-up. The placeholder example is “Chat with us”; enter whatever heading you want your visitors to see when the popup opens.
Sub Title: A short line shown below the header title. Use this to set response time expectations or any brief supporting text.
Greeting Message: The opening message displayed to visitors inside the chat pop-up before they select an agent. Accepts plain text. A WhatsApp emoji picker and formatting options are available in the bottom right of the text area.
Online Text: The label shown on agent cards when the agent is available. Defaults to “Online.”
Offline Text: The label shown on agent cards when the agent is not available. Defaults to “Offline.”
Hit Save Settings once you have made your changes.
13.0 WhatsApp Agents
Agents are the people your storefront visitors see in the chat pop-up. Each agent card has a name, a department or role, and a Chat button. When a visitor taps that button, it opens a WhatsApp conversation with that agent’s number on their device.
Active: Controls whether this agent is visible in the storefront popup.
Agent Name: The name shown on the agent card. Capped at 50 characters.
Contact Number: The agent’s WhatsApp number, country code included (for example, +919876543210). If you use the same number as the one in the API Settings, conversations from this agent also appear inside the CRM tab.
Department: The team name or role shown under the agent’s name. Up to 50 characters, and it can be set differently per language.
Display Order: A number that controls where this agent appears in the pop-up. The lower the number, the higher up the agent shows.
Avatar Type: Pick a Predefined Avatar from the available options, or upload an image of your own.
14.0 Message Logs
The Message Logs tab keeps a record of every message that has passed through the OpenCart WhatsApp Messaging Extension, both sent and received. Each row tells you the Direction, the phone number it involved, the template used if any, a preview of the message text, the WhatsApp Message ID, the delivery status, and the timestamp.
Order alerts, CRM replies, and campaign messages all end up in this list. A success status means the WhatsApp API received and accepted the message. The date range, phone number, and template filters make it easy to find a specific message. When something is not delivering the way it should, this tab is the right place to start looking.
15.0 Frequently Asked Questions
Q: What is the OpenCart WhatsApp CRM Extension, and what does it do?
The Knowband OpenCart WhatsApp CRM and Order Notification Extension connects your OpenCart store to the WhatsApp Business API. Order confirmations and status change alerts go to customers on WhatsApp automatically. Your team handles live customer conversations from inside the OpenCart admin through the CRM tab. You can run scheduled WhatsApp campaigns to contact lists through the Promotions tab. A storefront chatbox lets visitors tap through to your support agents on WhatsApp directly.
Q: Does the OpenCart WhatsApp Messaging Extension require a WhatsApp Business Account?
Yes, it does. The OpenCart WhatsApp CRM Extension needs a WhatsApp Business Account, a phone number registered as a WhatsApp Business number, and a Meta Developer App that has WhatsApp Business API access set up. All three are needed before the API Settings tab can be completed and before the extension can send anything.
Q: How does the OpenCart WhatsApp Order Notification Extension send alerts when a new order is placed?
When Enable New Order Message is switched on in Order Settings, the OpenCart WhatsApp Order Status Extension sends an approved Utility template to the customer each time an order goes through. For status updates, turn on Enable Order Status Message as well. That puts a WhatsApp number field on the customer address form. Once a customer fills it in and their order moves to a status that has a template mapped in Order Status Templates, the message goes out to that number straight away.
Q: Why are no templates showing in the Order Settings dropdown of the OpenCart WhatsApp CRM Extension?
Order Settings only lists Utility templates that have been approved by WhatsApp. An empty dropdown usually means templates are still in the review queue or sitting in the Marketing category by mistake. Head to Message Templates, build a Utility template, wait for the approval to land, then go back to Order Settings. The Sync Templates button is there if you want to pull the latest approval status without waiting for the webhook.
Q: How does the live chat work inside the OpenCart WhatsApp Live Chat Extension?
The CRM tab in the OpenCart WhatsApp Messaging Extension shows all contact threads on the left side. Click a contact to open the conversation. Use the Message tab to type a reply while the 24-hour window from the customer’s last message is still open. Once that closes, the Template tab is the way to reach them; any approved Marketing template can be sent from there, regardless of when the customer last wrote. Automated order alerts from the extension appear in the thread too, so your team always has context.
Q: Can I run WhatsApp marketing promotions through the OpenCart WhatsApp CRM Extension?
Yes, through the Promotions tab. Go there, click Add new promotion, give it a name, pick a Target List, choose a Marketing template, and set a time in the future for it to go out. The CRON command on the Promotions page needs to be on your server for campaigns to send automatically; it checks every minute for anything due. Before sending to your whole list, send it at a small group of 10 to 20 contacts first to see what the API costs look like.
Q: How does the OpenCart WhatsApp Business API Extension connect to WhatsApp?
The OpenCart WhatsApp Order Status Extension also available on Opencart Marketplace with Price $49.99, connects through four fields in the Module/API Settings tab: your Facebook App ID, a permanent Access Token, your WhatsApp Business Account ID (WABA ID), and your registered phone number. On top of that, you paste the Webhook URL and Verify Token shown in the Configuration Information panel into your Meta Developer Console. With those two steps done, the OpenCart WhatsApp Business API Extension handles message sending, template approval tracking, and incoming messages without any further manual input.
Q: Can I bring existing contacts into the OpenCart WhatsApp Order Status Extension from a spreadsheet?
Yes. Open the WhatsApp Contacts tab and click Download Template to get the CSV in the right layout. Put your contact data into it, then upload it using Import Contacts. If a phone number is already in the extension, that contact’s record gets updated. Anything new gets added. Once the contacts are in, you can assign them to WhatsApp Lists and target them in your next promotion.
Q: A template was rejected inside the OpenCart WhatsApp CRM Extension. What now?
Go to Message Templates and look at what the rejected template says. WhatsApp will reject templates that put sales or promotional language inside a Utility template, contain anything inaccurate, or go against its commerce policies. Delete the rejected one, fix whatever the issue was in the body text, and submit a fresh template. If the tone was the problem, write the body more like a factual update and less like a sales message.
Q: Which versions of OpenCart work with the Knowband WhatsApp CRM Extension?
The Knowband OpenCart WhatsApp CRM Extension runs on OpenCart 3.x. If you need compatibility details for versions released after this guide was written, the extension product page on the Knowband website will have the most current information. You can also contact the Knowband support team directly.
16.0 Conclusion
The Knowband OpenCart WhatsApp CRM Extension, also known as the OpenCart WhatsApp CRM and Order Notification Extension, is a full OpenCart WhatsApp Integration Extension. Order alerts go out on their own. Live support runs through the CRM tab. Campaigns reach targeted contact lists on a schedule you define.
The only thing that happens outside the extension is pulling your API credentials from the Meta Developer Console. After that, templates, order mappings, contact lists, agent profiles, and promotions are all handled from inside OpenCart.
For help getting set up or questions about any feature, the Knowband support team is at support@knowband.com. There are also documentation pages and setup videos on the Knowband website.
Running a busy OpenCart store usually means someone has to sit down, look at the catalogue, and write captions for Facebook, LinkedIn, and X every single time a product launches or comes back into stock. The Opencart AI Social Media Post Generator Extension, also known as the OpenCart SocialAI Pro Extension, removes that issue by linking your frontend catalogue straight to an AI writing engine and to your connected social accounts, so posts can be written and published without anyone typing a single line of copy.
Three tasks happen inside this one extension automatically: the AI writes the caption, a rule decides when that caption goes out and to which network, and a history log keeps a record of everything that was ever generated, whether it was published, held as a draft, or scheduled for later.
The setup below installs the Opencart Social Media Automation Extension the same way as any other OpenCart module. From the OpenCart admin, go to Extensions and open the Installer screen. Upload the ocmod.zip file exactly as it was downloaded after purchase.
Open the FTP, copy the files under the upload folder to the site root file.
Go to the modification, refresh and clear the cache.
2.0 Admin Panel Overview
Once configuration opens for the first time, three tabs are visible across the top: General Settings, Rules, and Post History. Each one handles a different part of the workflow, and together they make up the entire Opencart AI Social Media Post Generator Extension experience.
General Settings is where the AI provider gets connected, where API keys live, and where each social account gets authorised through OAuth.
Rules are the automation layer; this is where a store owner decides which products qualify, what has to happen for a post to fire, which platforms receive it, and what tone the AI should write in.
Every post the extension has ever produced shows up here with its status, the platform it targeted, which AI engine wrote it, and whether a rule triggered it or a human did. A post can also be started from scratch directly inside this tab, without involving a rule at all.
Enable Module: Enable or disable the functionality on the frontend using the toggle.
Choosing an AI Provider: Three engines are available from a single dropdown, and a store can only run one of them at a time:
OpenAI: The OpenAI ChatGPT choices include GPT-5, GPT-5 Mini, GPT-5 Nano, GPT-4.1, GPT-4.1 Mini, and GPT-4o. Google Gemini: Gemini 3 Pro, Gemini 2.5 Pro, Gemini 3.5 Flash, and Gemini 2.5 Flash are all selectable for stores that would rather stay inside Google’s ecosystem. Anthropic Claude: Claude Opus 4.8, Claude Sonnet 4.6, and Claude Haiku 4.5 are offered for anyone who already has Claude API access or simply prefers its writing style.
Switching providers takes effect on the very next post generated; it doesn’t touch anything already sitting in Post History from before the change.
Entering the API Key: Store admins must paste the key for whichever provider was chosen above into this field. It needs to be a real, currently active key with either prepaid credit or billing turned on. A key that’s expired or been revoked will only show its error the first time the extension actually tries to generate something. The key itself stays in your store’s own database and is sent directly from your server to the provider, with nothing routed through a third party.
Temperature Slider: Store administrators can use the Temperature Slider to control the creativity and variation of AI-generated social media content. Lower values generate more consistent and predictable marketing copy, while higher values produce more creative, engaging, and diverse social media posts.
Token Ceiling: This shows how many tokens a single generation request is allowed to use, somewhere between 100 and 2,000.
Handles for X: Two optional fields sit here: one for the store’s own X handle, one for whoever is credited as the content’s author. Neither has any bearing on whether a post actually goes out; leave both blank if there’s no X presence to reference.
Linking Each Social Account: All three networks get connected from this same General Settings tab, and the Opencart Auto Publish Facebook LinkedIn Extension functionality handles each one through its own dedicated authorization flow.
Facebook: Click the Facebook connect button and a popup opens asking for posting permission on a Page. If more than one Page is managed under that account, a picker shows up so the right one can be chosen. As soon as that’s confirmed, the settings screen updates to show which Page is now linked: this is the Opencart Facebook Auto Post Extension side of the setup, and it’s usually the fastest of the three to finish.
LinkedIn: Open the LinkedIn Developer Portal first and find the app that was registered there. The Auth tab on that app holds the Client ID and Client Secret: copy both into the matching fields here. Before clicking the Connect button on this end, take the redirect URL shown in the extension and add it to the authorised redirect list inside the LinkedIn app, save that, and only then come back and finish authorising. This is the piece marketed as the Opencart LinkedIn Product Post Extension capability, and it’s the one most likely to need a second look if posts aren’t appearing: a mismatched redirect URL is the usual culprit.
X (Twitter): Inside the X Developer Portal, open Keys and Tokens for the registered app and copy the Client ID and Client Secret across into the extension. The redirect URL needs to be added to that app’s callback list too, the same way it does for LinkedIn. One thing that trips people up: the X app must have write permission turned on, not just read, or the whole Opencart Twitter Auto Post Extension connection attempt will fail at the authorisation step.
Instagram: Instagram posting isn’t part of this release. An Opencart Instagram Auto Post Extension capability is on the roadmap for a future update, but for now the extension only authorises and publishes to Facebook, LinkedIn, and X.
Rule Name Store administrators can use this setting to assign a unique and descriptive rule name for easy identification and tracking within the OpenCart AI Social Media Automation Extension.
Products / Categories / Manufacturer This feature allows merchants to define the product scope for automated social media content generation based on specific products, categories, or manufacturers.
New Product Automatically generates and publishes social media content when a new product is added to the OpenCart store.
Back in Stock Automatically creates promotional social media posts when an out-of-stock product becomes available again.
Manual Allows administrators to generate social media content manually without relying on automated trigger conditions.
Platforms Merchants can select one or more connected social media platforms, including Facebook, LinkedIn, and X (Twitter), for content distribution.
Publish Mode This feature allows administrators to define how and when generated social media content is published across selected platforms.
Immediate Publishes AI-generated social media posts instantly after content generation without requiring manual review.
Manual (Draft) Saves generated content as a draft, allowing administrators to review, edit, and approve posts before publication.
Scheduled Automatically schedules social media posts within a defined time range to maintain consistent content distribution and engagement.
Scheduled Delay Window Administrators can define a minimum and maximum publishing delay to automatically distribute social media content over a specified period.
Brand Name
This setting allows merchants to specify their brand name, enabling AI-generated content to maintain consistent brand messaging.
Industry
Store administrators can define their business industry to help the AI generate relevant and industry-specific social media content.
Tone of Voice
This feature enables merchants to customize the writing style of AI-generated posts to align with their brand communication strategy.
Emoji Usage
Administrators can control emoji usage within generated content to ensure consistency with brand and platform requirements.
Hashtag Groups
Merchants can define predefined hashtag groups to improve social media visibility, discoverability, and audience engagement.
Word Blacklist
This feature allows administrators to restrict specific words, phrases, competitor names, or sensitive terms from appearing in generated content.
Per-Platform CTA
Store owners can configure platform-specific call-to-action messages to improve engagement and conversion rates across social media channels.
Custom Instructions
Administrators can provide additional content-generation guidelines to ensure AI-generated posts align with specific marketing objectives.
Max Posts Per Cron Run / Per Day / Per Product Per Day
This feature enables merchants to control social media publishing frequency and prevent excessive or duplicate content generation.
Saving and Testing Rules
Save Rule
Store administrators can save automation rules to activate AI-driven social media content generation based on configured triggers and publishing conditions.
Generate / Run Now
This feature allows merchants to test and execute a rule instantly, generating social media content for all eligible products and selected platforms.
4.0 Post History Log in Opencart AI Social Media Post Generator Extension
Post History Overview
Store administrators can use the Post History Log to monitor, review, and manage all AI-generated social media content from a centralised dashboard.
What’s Recorded
The system records essential details including post ID, generation date, platform, product, publication status, AI provider, and associated automation rule.
Create Post
Merchants can manually generate AI-powered social media content for selected products without creating an automation rule.
Manual Post Generation
This feature enables administrators to create, review, edit, schedule, or publish custom social media content directly from the Post History section.
5.0 Steps to Generate the API Key for Opencart SocialAI Pro Plugin
Click “Get API key,” accept the terms of service, create your key, and paste it into the module’s configuration settings.
For ChatGPT API:
Obtain an OpenAI API key and configure it within the module settings.
Click on your profile (top-right) → “View API keys” → “Create a new secret key”.
Copy the key immediately and store it safely.
Conclusion
The Opencart AI Social Media Post Generator Extension covers the entire path from product data to a published post without requiring anyone to write captions by hand. As a complete Opencart Social Media Automation Extension, it handles the writing through AI, the timing and platform targeting through rules, and the record-keeping through its history log, all from inside the same OpenCart admin panel store owners already use daily.
Whether it’s running as an Opencart Auto Publish Facebook LinkedIn Extension pushing posts out the moment they’re generated, or as an Opencart Social Media Auto Scheduler Extension spacing a large batch out naturally over several days, editorial control never leaves the store owner’s hands: drafts can always be checked, edited, or held back before anything goes public. For anyone evaluating it specifically as an Opencart Social Media Marketing Automation Extension, the short version is this: one AI engine writes on-brand copy, one rules engine decides when and where it goes, and one history log keeps track of all of it, which together cover the bulk of a catalogue’s day-to-day social presence without ongoing manual effort.
Email built ecommerce communication, but WhatsApp is rapidly reshaping it. With message open rates reaching 95-98% compared to email’s 20-25%, the channel difference is not marginal; it is structural. For PrestaShop store owners still relying entirely on email for order updates, customer support, and promotional campaigns, that gap is quietly costing real revenue every month. Here is what adding a good WhatsApp CRM solution for PrestaShop to your store, like Knowband’s PrestaShop WhatsApp CRM and Order Notification Module, actually changes, and why it matters for each part of your operation.
1. Automated Order Confirmations That Customers Actually See
Order confirmation emails get buried. Spam filters catch them. Customers check their inbox hours later and still are not sure if the order went through, so they open a support ticket or they call.
When WhatsApp order notifications are shared the moment a purchase is placed, that cycle stops. The customer gets a message on the app they already check dozens of times a day, within seconds of completing checkout. For stores processing a meaningful order volume daily, eliminating “did my order go through” tickets alone is worth the integration.
The Knowband PrestaShop WhatsApp CRM Module handles this through approved Utility templates mapped to specific order events. No manual trigger is needed. The message goes out, the customer sees it, and the conversation is already logged inside your admin.
2. Real-Time Status Updates That Reduce Inbound Support Volume
Order status changes are the single most common reason customers contact eCommerce support teams. Shipped? Delivered? Delayed? Without a proactive notification, they ask.
Every order status in PrestaShop, from Payment Accepted to Shipped to Delivered to Cancelled, can be mapped to a specific WhatsApp message template. When the status changes in your back office, the alert reaches the customer automatically. They are not hunting for a tracking link buried in their inbox. They receive a message the same way a friend would send one.
This is post-purchase communication done correctly: proactive, channel-native, and requiring nothing from your support team to trigger.
3. A Live Chat Panel Inside PrestaShop, Not on Someone’s Phone
Most PrestaShop stores that handle WhatsApp customer messages do so poorly. One team member manages conversations from a personal phone. Context disappears when someone else needs to step in. Nothing is logged against the customer record.
The PrestaShop WhatsApp Business API integration moves all of that into the admin via a dedicated CRM tab. Every contact thread is visible to your team. Replies go out from the admin panel. Automated notifications appear in the same thread, so agents can see exactly what a customer received before responding.
When the 24-hour free-text window closes, agents send an approved WhatsApp message template directly from the same interface. No tool-switching. No lost context.
4. WhatsApp Marketing Campaigns Built Into Your Store Admin
Promotional campaigns typically require a separate platform, a separate contact list, and manual coordination between your store data and your messaging tool. That friction reduces how often teams actually run them.
The module’s Promotions tab removes that gap. Build a contact list from your customer database, select an approved marketing template, set a schedule, and the CRON job handles delivery. Contact list segmentation means you target the right group, not every customer at once.
WhatsApp campaign conversion rates in eCommerce markets consistently run well above email equivalents. The platform’s built-in read behavior does most of the work; the PrestaShop WhatsApp CRM Module removes the operational overhead.
5. A Storefront Chat Widget That Connects Visitors to Real Agents
Pre-purchase questions kill conversions. A visitor who cannot get a quick answer to a shipping query or a product question will leave. A generic contact form does not solve this; response times are too slow, and the channel is the wrong one.
The Knowband PrestaShop WhatsApp live chat addon places a configurable floating icon on your storefront. Visitors click it, see available support agents by name and department, and tap to open a WhatsApp conversation directly on their phone. The exchange happens in real time, without any login or form.
Agent display order, avatars, department labels, and icon styling are all configurable from inside the PrestaShop backend. The widget works on both desktop and mobile, which matters given how much eCommerce traffic arrives from phones.
6. Full Message Tracking for Improved Customer Support Management
When a customer claims they never received a shipping notification or a conversation needs to be reviewed, having a searchable record matters. Manual WhatsApp exchanges on personal phones leave nothing you can retrieve.
Every message the PrestaShop WhatsApp CRM Module sends or receives is recorded, including direction, phone number, template name, delivery status, and timestamp. Filtering by date, number, or template makes it fast to pull a specific record.
For stores managing disputes or customer escalations, this log is a practical resource, not just a convenience.
7. Centralized Contact Management With Bulk Import
Running WhatsApp campaigns requires a contact database. Building one manually is slow. The PrestaShop WhatsApp CRM Module’s Contacts tab supports CSV bulk import, so existing customer lists come in without manual data entry.
Each contact links to a PrestaShop customer account and can be assigned to one or more named WhatsApp Lists. Campaign targeting works through those lists, one promotion, one list, no overlap.
Excel and CSV export options are included, so the contact database can also feed into other tools when needed.
Why This Channel Gap Will Only Widen
WhatsApp has crossed 3 billion monthly active users, and 88% of messages are read within five minutes of delivery. Email cannot compete on speed or attention at that scale. For any PrestaShop store still routing customer communication through email alone, the distance between where customers are and where the store’s infrastructure sits grows every quarter.
The PrestaShop WhatsApp Business API integration module, also known as the PrestaShop WhatsApp CRM and Order Notification Module by Knowband, covers the full range of communication touchpoints, automated confirmations, status updates, live support, promotional campaigns, and storefront chat, from a single installation. The Knowband PrestaShop WhatsApp CRM Module requires no developer for setup; the only work that happens outside PrestaShop is generating your Meta API credentials.
If you are already handling customer WhatsApp messages manually, the PrestaShop WhatsApp live chat addon can be the right choice for you.
The SocialAI Pro is an AI Social Media Post Generator Module that connects your product catalogue directly to Facebook, LinkedIn, and X (Twitter) through AI-powered automation, which is available for Prestashop and Opencart. Store admins can generate platform-specific social media posts for any product in their catalogue, publish them automatically through rule-driven triggers, or create and send posts manually without writing a single word of copy from scratch.
This guide covers every section of the PrestaShop Social Media Automation Module from installation through to post history management. Whether you are configuring the module for the first time or setting up a new rule for a product category, every field and setting is documented here exactly as it appears in your PrestaShop admin panel.
Store admins who want automated social media posts for new products or restocked inventory without writing copy daily
Marketing teams managing social presence across Facebook, LinkedIn, and X from a single PrestaShop backend
Merchants running large or fast-moving catalogues where manual social posting is not sustainable
Agency operators managing multiple PrestaShop stores who need fully isolated social automation per store
Store owners who want brand-voice control over AI-generated content without hiring a copywriter
2.0 Installation Guide
2.1 System Requirements
Before installing the Knowband PrestaShop AI Social Media Post Generator Module, confirm your environment meets the following requirements:
PrestaShop 1.7.x, 8.x, or 9.x
PHP 7.4 or higher
A valid API key from at least one supported AI provider – OpenAI GPT, Google Gemini, or Anthropic Claude
At least one active social media platform account – Facebook Page, LinkedIn Page, or X (Twitter) account, for OAuth connection
HTTPS enabled on your store (required by all three social platform OAuth flows)
CRON access on your server if you plan to use scheduled or event-triggered automation
2.2 Installing the Knowband SocialAI Pro on PrestaShop
Store admins can complete the full installation in under five minutes through the standard PrestaShop module installer. No core file edits are required at any point.
Open your PrestaShop admin panel and navigate to Modules, then Module Manager. Click Upload a Module in the top right corner of the screen.
Select the ZIP file you received from Knowband after purchase and click Open. Once the upload completes, click Install when the prompt appears. After installation finishes, click Configure to open the SocialAI Pro settings for the first time.
If the module does not appear automatically after installation, type SocialAI Pro or Knowband Social into the Module Manager search bar and click Configure from the result.
3.0 Admin Panel Overview
Now we will see the admin panel in detail in the Prestashop SocialAI Pro Automatic Post Scheduler. When installation is successful, you will be redirected to the module’s General setting. This module consists of three individual pages tabs, including General Settings, Rules Creation, Manager and Post History.
General Settings: Where store admins configure the AI engine, enter API credentials, set token limits, and connect social media platforms through OAuth.
Rules: Where store admins create the automation rules that automatically post the social media post after clicking on generate. Each rule defines which products to post, what triggers the post, which platforms it goes to, how the content should sound, and when it publishes.
Post History: The post history feature includes the logs of every post generated through the PrestaShop AI Social Media Post Generator Module. This tab includes also including status, platform, AI engine used, source, and a preview of the content. Furthermore, store admins can also create posts manually from this tab without running a rule.
4.0 General Settings
Store admins should complete the General Settings tab before creating any rules or attempting to publish posts. This tab connects the module to both the AI models and the social media platforms that will receive automated content.
4.1 Enable Module
The Enable Module toggle is used to manage the entire PrestaShop Social Media Automation Module. If you are setting it to Yes, then it will activate all automation, rule triggers, and publishing. Setting it to No stops all outbound activity immediately so that no posts are generated, no rules fire, and no platform connections are called.
Store admins should note that enabling the module requires a valid AI API key to be saved in the API Key field below the model selection.
4.2 AI Engine Selection
The Knowband SocialAI Pro PrestaShop AI Social Media Post Generator Module gives store admins direct access to three leading AI providers OpenAI’s GPT, Anthropic’s Claude and Google’s Gemini from a single dropdown. Select the engine your store will use for content generation.
Models Available in AI Platforms
OpenAI GPT: This supports GPT-5, GPT-5 Mini, GPT-5 Nano, GPT-4.1, GPT-4.1 Mini, and GPT-4o. Store admins using OpenAI GPT Connect through their own OpenAI API key can switch between models at any time without even reconfiguring rules.
Google Gemini: The Prestashop Automated Social Media Posts supports Gemini 3 Pro, Gemini 2.5 Pro, Gemini 3.5 Flash and Gemini 2.5 Flash. Merchants can use this engine when they prefer Google’s AI infrastructure.
Anthropic Claude: Supports Claude Opus 4.8, Claude Sonnet 4.6, and Claude Haiku 4.5. Store admins who prefer Anthropic’s output quality or have existing Claude API access can connect through their Claude API key here.
Only one engine is active at a time across the entire module. Additionally, switching engines applies to all subsequent post-generation immediately. Previously generated posts in Post History are not affected by an engine change in the module.
4.3 API Key
To enable the functionality of the AI models, Store admins must enter their API key for the selected AI provider in the given field.
The API key must be a live, active key with sufficient credits or billing enabled on the provider account. An expired or revoked key returns an error on the first post-generation attempt. The key is saved locally to your PrestaShop database and called directly from your server to the AI provider’s API.
4.4 Temperature
A value of temperature 0 produces focused, consistent, and predictable output and the same product brief generates very similar copy each time. A value of 1 introduces more variation and creative phrasing, which works well for stores wanting less repetitive social copy across a large catalogue.
Kindly note that specifically, OpenAI GPT-5 and Claude Opus 4 do not accept a temperature setting. They run at their own internal default regardless of what value is entered here.
4.5 Max Tokens Per Request
Store admins set the maximum number of tokens the AI engine can use per word-generation request in this field. The accepted range is 100 to 2,000.
4.6 Twitter X Handle Settings
X Handle (Site): Store admins can add their store’s X handle, for example, @yourstore.
You can leave blank if your store does not have an active X account.
X Handle (Creator): Store admins can add their X handle, for example, @author.
These fields are optional and do not affect post publishing.
4.7 Connecting Social Media Platforms
Facebook, LinkedIn, and X are all connected from the General Settings tab inside the Knowband PrestaShop Social Media Automation Module. Setting up each platform takes just a few steps and each one follows its own process.
Facebook
Click Connect Facebook, and a pop-up window will appear on the screen. From there, grant the necessary permissions to allow posting on the Facebook Page. Anyone managing more than one Page will see a selector appear right after; just pick the correct Page from the list. The connection status will reflect the change immediately, showing the linked Page name once everything is confirmed.
LinkedIn
Before anything else, log into the LinkedIn Developer Portal and pull up the registered app. Under the Auth tab, both the Client ID and Client Secret will be listed. Copy these and drop them into the matching fields inside the module. One extra step is needed before clicking authorise, add the Redirect URL from the module and paste it into the Authorised Redirect URLs section within the LinkedIn app settings. Save that change first, then return to the module and click Connect LinkedIn to wrap up the process.
X (Twitter)
Start by visiting the X Developer Portal and opening the Keys and Tokens section for the registered app. Copy the Client ID and Client Secret and enter both into the relevant fields inside the module. The Redirect URL shown in the module also needs to be added to the callback URLs listed under the app’s authentication settings, do this before attempting to connect. Once those details are in place, click Connect Twitter/X and authorise through the pop-up. A quick thing to check beforehand: the X account needs write access switched on under its posting permissions, since the integration will not go through without it.
5.0 Rules
The Rules tab is where store admins build the automation logic that drives the Knowband PrestaShop AI Social Media Post Generator Module. Each rule is a complete instruction set that defines what gets posted, when it gets posted, where it goes, and how the copy sounds.
Store admins can see all existing rules in the Rules table. Each row shows the Rule ID, Rule Name, Products covered, Trigger type, Platforms selected, Publish Mode, Status, and a Generate button for manual runs.
5.1 Understanding the Rules Table in SocialAI Pro
The Rules table gives store admins complete control of all configured automation at a glance.
E-Merchants can create as many rules as their catalogue requires. Each rule operates independently with its own product scope, trigger, platform selection, brand voice, and publish settings.
5.0 Rules
The Rules tab is where store admins build the automation logic that drives the Knowband PrestaShop AI Social Media Post Generator Module. Each rule is a complete instruction set that defines what gets posted, when it goes out, where it is published, and how the copy sounds. Store admins can run rules manually, let them fire automatically on product events, or schedule them across a time window, all from the same rule configuration.
Rule Name: You can add the rule name to identify the rule. This name should be unique so that you do not get confused between the names. This name appears in Post History against every post the rule generates in Prestashop AI Post Generator, making it easy to trace which rule produced which content.
Products: You can select the product for which you want to generate the post. You can also select multiple products at one time.
Categories: This feature is added in case if you want to generate the post for categories.
Manufacturer: Similarly, if you want to generate a post for the manufacturer brand, you can add the manufacturer in the field.
Trigger: These are the triggers that decide the type of rule we are creating. This helps in displaying the trigger type configured, like New Product, Back in Stock, or Manual. Kindly note that rules set to Manual only fire when a store admin clicks Generate on that row.
New Product: The rule fires when a product when a new product is added to the store for the first time.
Back in Stock: The rule triggers when a product quantity goes from zero to a positive quantity. Knowband SocialAI Pro handles product variants correctly, restocking one variant does not trigger posts for other variants in the same product group.
Manual: The rule does not fire automatically. Store admins run it by clicking the Generate button on the Rules table row or by using the Run Now option inside the rule.
Platforms: This option allows the store owners to choose the platforms in which they want to share the post for example Facebook, LinkedIn, and X based on what was selected during rule setup.
Publish Mode: This publish mode shows whether this rule publishes posts immediately on trigger, or will be keep as drafts for manual review, or distributes them across a scheduled delay window.
Immediate: Posts go live on the selected platforms the moment they are generated. No admin review step occurs.
Manual (Draft): Generated posts land in Post History as Drafts. Store admins review, edit if needed, and publish each post individually from the Post History tab.
Scheduled: Posts are held after generation and released at a random point within a configurable minimum-to-maximum day window. This mode distributes bulk posts naturally across days rather than hitting all connected feeds simultaneously.
Scheduled Delay Window (Min / Max Days) Visible only when Publish Mode is set to Scheduled. Store admins enter a minimum and maximum number of days. Each generated post is assigned a random publish time within that window. The merchant can use this to make a catalogue run of 50 products appear as organic, spaced-out content rather than an automated batch.
Brand Name The store or brand name the AI includes in generated copy. Store admins enter the exact name they want referenced in posts, for example, “Knowband Store” or their store’s trading name. This ensures every post attributes content to the correct brand identity.
Industry A brief description of the store’s industry or product niche. Store admins enter this so the AI understands the market context when writing copy, for example, “digital art assets,” “fashion accessories,” or “home electronics.” The industry field shapes vocabulary and reference points in the generated output.
Tone of Voice
Store admins select the communication tone for all posts generated by this rule. Five options are available:
Professional Friendly Playful Urgent Inspirational
Emoji Usage Policy Store admins can control whether the AI includes emojis in generated posts. Store admins can choose the options from the dropdown. For example, when never is chosen, it will not add the emoji. When sparingly is added, it will add the emojis according to the content. Emojis are used more frequently on Facebook and X posts and more sparingly on LinkedIn, regardless of this setting.
Hashtag Groups
Store admins enter the hashtags they want included in generated posts for this rule. Hashtags can be entered as a comma-separated list in the module. Morover, the AI tools place them in the post according to platform convention: inline for Facebook and X, grouped at the end for LinkedIn. Leave blank to let the AI generate contextually relevant hashtags automatically.
Word Blacklist
Furthermore, store admins enter the terms separated by commas, for example, competitor names, discontinued product references, terms that conflict with brand guidelines, or any language not suitable for the target audience.
Per-Platform Call-to-Action (CTA) Phrases
Store admins enter a specific CTA phrase for each selected platform. The AI uses these phrases in the closing line of each post. For example, “Shop now at our store” for Facebook, “Explore the full catalogue” for LinkedIn, and “Grab yours today” for X. If you leave the field CTA blank, then AI will write its own closing line for that channel.
Custom Instructions
The merchant can use this for anything not covered by the structured fields above, for example, “Always mention free shipping,” “Reference the seasonal sale,” or “Keep the copy under 100 words for all platforms.” These instructions are appended to every AI prompt this rule generates.
Max Posts Per Cron Run
Sets the maximum number of posts this rule can generate in a single cron execution
Max Posts Per Day
The total number of posts this rule can generate across all cron runs within a single calendar day. Once this limit is reached, the rule stops generating for that day regardless of how many qualifying products remain.
Max Posts Per Product Per Day
Prevents the same product from being posted more than a set number of times in a single day. Store admins typically set this to 1 to avoid the same product appearing multiple times across connected feeds on the same day.
5.3 Saving and Running a Rule
Once all fields are configured, store admins click Save Rule to add it to the Rules table. The rule is immediately active if Status is set to Active and the trigger is set to New Product or Back in Stock, it will fire the next time the trigger condition is met.
For Manual trigger rules, or to test any rule immediately after saving, store admins click the Generate button on the rule’s row in the Rules table. The Knowband Prestashop AI Post Generator processes all qualifying products in the rule scope, generates platform-native posts for each selected channel, and adds them to Post History with the rule name, engine, and source recorded against each entry.
Store admins can edit any rule at any time by clicking Edit on its row. Changes take effect on the next rule run. Posts already generated by the rule before the edit are not retroactively updated.
6.0 Post History
The Post History tab in the Prestashop Auto Post Generator by AI tools is the complete record of logs of every post the Knowband SocialAI Pro PrestaShop AI Social Media Post Generator Module has generated. Moreover, store admins can review generated content, check publish status, and identify failed posts with their exact error.
Each row in the Post History table in the module contains:
ID: This is the unique identifier assigned by the PrestaShop AI-Powered Content Generator Module.
Date: This shows the exact date according to your server configuration.
Platform: This helps in identifying the platforms for which the post was generated.
Product: Name of the Product.
Preview: You can preview the social media post, which includes a unique URL for the social media post.
Rule: The rule name that triggered this post generation using the Auto Publish module.
Status: The current state of the post, Draft, Scheduled, Published, or Failed. Draft posts have been generated but not yet published. Store admins can review and edit Draft posts before sending them live.
Engine: The AI engine that generated this post, OpenAI GPT, Gemini, or Claude.
Source: Whether the post was generated automatically by a rule trigger (Auto) or created manually by an admin (Manual).
6.2 Creating a Manual Post from Post History
Store admins can create a post manually from the Post History tab without running a rule or waiting for an event trigger. This is the feature for one-off announcements, specific product highlights, flash sale posts, or any content where full admin control over timing and copy is needed.
The merchant can use this feature by clicking the Create Post button at the top of the Post History tab. Select the product, choose the target platforms, pick the AI engine and model for this post, enter any specific instructions for the copy, and click Generate. The post appears in Post History as a Manual source Draft immediately. From there, store admins can review the generated copy, edit it if needed, and publish it directly or save it as a scheduled post.
7.0 Frequently Asked Questions
Q: Can store admins switch AI engines without losing their existing rules?
Switching the AI engine in General Settings applies to all future post generation but does not affect existing rules, scheduled posts, or Post History entries. Rules do not store engine settings at the rule level; the engine is a global module setting. Additionally, store admins switching from OpenAI to Gemini mid-campaign will find that all subsequent generation uses Gemini while previously generated Draft posts retain their original engine label in Post History.
Q: Why is a post showing as Draft after the rule ran?
The merchant can check the rule’s Publish Mode setting. If the rule is set to Manual publish mode, all generated posts land in Post History as Draft regardless of the trigger. Store admins need to review and publish them from the Post History tab. To switch to automatic publishing, edit the rule and change the Publish Mode to Immediate or Scheduled.
Q: How does the Knowband SocialAI Pro handle the 280-character limit on X?
The PrestaShop AI Social Media Post Generator Module generates platform-specific copy for each channel and enforces character limits after generation. X posts are written and trimmed to fit within 280 characters before the post is saved to Post History. A post that would exceed the limit is caught and adjusted automatically; it never reaches the X API at an invalid length.
Q: Can more than one social platform be connected at the same time?
Store admins can connect Facebook, LinkedIn, and X simultaneously from the General Settings tab. Each platform maintains its own independent OAuth connection. Disconnecting one platform does not affect the others, and each rule can target any combination of connected platforms independently.
8.0 Conclusion
The Knowband SocialAI Pro PrestaShop AI Social Media Post Generator Module gives PrestaShop store admins a complete social media automation system built inside their existing admin panel. AI generates the copy. Rules decide when and where it goes. Post History keeps the full record. And store admins retain editorial control at every step through Draft review, manual post creation, and brand voice settings per rule.
For installation support, feature questions, or custom changes, contact the our support team at support@knowband.com. Module updates are available on the Knowband website.
Also available on Prestashop Addons: https://addons.prestashop.com/en/social-commerce-facebook-prestashop-modules/98107-socialai-pro-prestashop-ai-post-generator-for-facebook-linkedin-x.html
Most customers already have WhatsApp on their phones. They check it more often than email, and they respond faster there, too. For a PrestaShop store, that creates a real opportunity to reach customers where they actually pay attention.
The Knowband PrestaShop WhatsApp CRM Module ties your store directly to the WhatsApp Business API. Order confirmations go out automatically when a purchase is placed. Status change alerts fire when an order ships or is delivered. Your support team chats with customers in real time from the PrestaShop admin. And when you want to run a promotional campaign, you can send an approved marketing template to a segmented contact list on a schedule you control.
This guide walks through every section of the PrestaShop WhatsApp Integration Module. Whether you are setting it up for the first time or trying to configure a specific feature, every tab and field is documented here, from what is visible in the admin panel.
Compatible with PrestaShop 1.7.x through 9.x.
1.1 Who Is This Module For
This module works well for:
Store owners who want automated WhatsApp order notifications set up without relying on a developer.
Support staff who need to chat with customers from inside the PrestaShop backend.
Marketing teams that send WhatsApp promotions to specific customer groups.
Agencies handling PrestaShop builds for clients who need WhatsApp Business API integration.
2.0 Installation Guide of the PrestaShop WhatsApp CRM Module
2.1 System Requirements
PrestaShop 1.7.x, 8.x, or 9.x
A WhatsApp Business Account that is active
A phone number registered as a WhatsApp Business number
A Meta Developer App with WhatsApp Business API access configured
2.2 Installing the PrestaShop WhatsApp Module
Open your PrestaShop admin panel. Head to Modules, then Module Manager, and hit Upload a Module at the top right.
Pick the ZIP file you got from Knowband and click Open. PrestaShop takes it from there, uploads the file, and extracts everything automatically.
Once the upload is done, hit Install when it appears. After that finishes, click Configure to get into the module settings.
If the module does not show up on its own, type Knowband WhatsApp CRM into the Module Manager search bar and hit Configure from there.
2.3 Common Installation Issues
Upload fails: Your server’s PHP upload limit is probably too low. Ask your host to bump upload_max_filesize and post_max_size to at least 32 MB.
Module not visible after install: Clear the PrestaShop cache under Advanced Parameters, then Performance. Run the Module Manager search again.
Configuration page looks broken: Clear your browser cache and the theme cache under Design, Theme and Logo, then Advanced Settings.
3.0 Admin Panel Overview of the PrestaShop WhatsApp CRM Module
Once the PrestaShop WhatsApp Integration Module is installed, a dedicated menu section appears in your PrestaShop admin sidebar. Here is what each tab does:
Module/API Settings: Where you enter your WhatsApp Business API credentials.
Order Settings: Controls which WhatsApp order notifications fire and when.
Message Templates: Where you build and submit templates for WhatsApp approval.
Order Status Templates: Maps each order status to the template that gets sent.
CRM: The live chat panel for two-way messaging with customers.
Promotions: Runs scheduled campaigns to contact lists.
WhatsApp Lists: Named groups of contacts used as campaign targets.
WhatsApp Contacts: Full contact database with import and export options.
Chatbox Settings: Controls the floating WhatsApp icon shown on your storefront.
WhatsApp Agents: The support agents shown inside the storefront chat pop-up.
Message Logs: A record of every message sent and received through the PrestaShop WhatsApp Module.
4.0 Module/API Settings
Start here. Before anything else in the PrestaShop WhatsApp CRM Module works, you need to connect it to the WhatsApp Business API. There are four fields, and all four are required.
4.1 WhatsApp API Settings
Enable Module: The on/off switch for the whole module. Switch it off, and no messages go out; the chatbox disappears from the storefront.
Facebook App ID: Copy this from your Meta Developer Console. It tells the API which app is making the connection.
Facebook Access Token: This has to be a permanent token, not the temporary one shown during API Setup. To get a permanent token, go to Meta Business Settings, create a System User, assign your app and WABA with full control, and generate a token using these permissions: whatsapp_business_messaging, whatsapp_business_management, and business_management. Paste that token here.
WhatsApp Business Account ID (WABA ID): Found in the Meta Developer Console under your app’s WhatsApp configuration. This is the account ID for your WhatsApp Business Account.
Phone Number: Pick your registered WhatsApp Business number from the dropdown. Every automated and manual message goes out from this number.
Fill all four fields and click Save. Wrong or missing values show a validation error right away. An expired or invalid access token also triggers an error on save.
4.2 Webhook Setup
Scroll below the API form, and you will see the Configuration Information panel. It shows two things: a Webhook URL and a Verify Token, both specific to your store.
Take these over to the Meta Developer Console. Open your app, go to WhatsApp, then Configuration, and paste them into the webhook fields there. Once that is done, the module can receive inbound messages and pick up template approval status changes without you manually refreshing anything.
If you have not set up the webhook yet, you can still check template statuses by going to Message Templates and clicking Sync Templates. That pulls the latest approval data directly from WhatsApp.
5.0 Order Settings
This tab is where you decide when the PrestaShop WhatsApp CRM Module sends automated messages during the order process.
5.1 WhatsApp Order Settings
Enable New Order Message: Turn this on, and the PrestaShop WhatsApp Messenger sends a WhatsApp message to the customer every time a new order is placed on your store.
Enable Order Status Message: Turn this on, and customers get a WhatsApp alert each time their order status changes. A WhatsApp number field also appears on the customer address form so people can add the number where they want updates delivered.
5.2 New Order Message Templates
For each language your store runs, pick the approved Utility template you want to send when an order comes in. The dropdown only shows templates that are categorised as Utility and have been approved by WhatsApp.
Nothing in the dropdown? Either your templates are still waiting on WhatsApp review, or they are in the Marketing category instead of Utility. Build a Utility template in the Message Templates tab, wait for the approval, then come back here. Click Save once you have made your selections.
6.0 Message Templates
This is where WhatsApp message templates are built and submitted. Every template needs WhatsApp approval before it can be used anywhere in the module. The Knowband PrestaShop WhatsApp CRM Module handles the whole process from submission to tracking inside this tab.
6.1 Templates List
The table shows all templates connected to your WhatsApp Business Account. Each row has: Template ID, Name, Use Case, Category, Language, Status, and the date it was created. A template can be Pending, Approved, or Rejected.
Hit Sync Templates any time you want to refresh the approval status straight from WhatsApp. The search fields let you narrow down by name, category, language, or date range.
6.2 Creating a New Template
Name: Lowercase, underscores only. No spaces, no special characters.
Use of the Template: Choose For Orders, For Marketing, or For Customers, depending on where this template will be used.
Category: Choose MARKETING or UTILITY. Templates tied to order notifications must be Utility. If the body reads like a promo, WhatsApp may move it to Marketing on its own.
Language Code: Pick the language this template is written in. If your store has multiple languages, build one template per language.
Header Type: Optional field. Leave it as No Header or pick Text, Image, Video, or Document if you want something at the top.
Body: The main text of the message. Bold, italic, and strikethrough formatting is available through the B, I, and strikethrough buttons. Click Insert Variable to pull in things like the customer name, order ID, or order total. The Body Preview below the editor shows how the final message will look.
Footer: Optional. Text that appears below the body is rendered smaller.
Enable Button: Turn this on to add a button to the message. Fill in the Button Text and the Button URL.
Click Save when you are done. WhatsApp receives the template for review. Approvals usually come through within a few minutes, though some templates take a few hours. Once approved, the template is available in Order Settings, Order Status Templates, and the CRM template picker.
7.0 Order Status Templates
Every order status in PrestaShop can be mapped to a specific Utility template here. When an order reaches a status that has a template assigned, the PrestaShop WhatsApp Messenger sends that template to the customer as a WhatsApp order notification.
The full list of order statuses appears in the table: Awaiting check payment, Payment accepted, Processing in progress, Shipped, Delivered, Canceled, Refunded, and the rest. Each row shows whether notifications are Enabled or Disabled, and which template is currently assigned.
Click Edit on any row. Flip the Enable WhatsApp Notification toggle to Enabled, pick an approved Utility template from the dropdown for each store language, and save. The row updates to reflect the change right away.
8.0 CRM: Live Two-Way Chat
The CRM tab is the messaging center for this PrestaShop WhatsApp chat addon. All your contacts appear in a sidebar on the left. Clicking one opens the full conversation on the right.
At the bottom of the conversation, there are two tabs: Message and Template. The message is for free-text replies, but that only works inside the 24-hour window that opens when a customer sends you something first. Once that window closes, use the Template tab to send an approved marketing template that works at any time.
Every automated order notification the module sends also shows up in the CRM thread. Your support team can see exactly what a customer received and when, which makes it easier to respond in context.
9.0 Promotions
The Promotions tab is where you put together WhatsApp marketing campaigns. Pick a contact list, pick a template, set a time, and the module takes care of sending it.
9.1 Creating a Promotion
Promotion Name: An internal name you will recognise. It does not appear in the message.
Target List: Select one of your WhatsApp Lists from the dropdown. Every contact on that list gets the message.
WhatsApp Template: Select a Marketing category template. Only approved Marketing templates show up here.
Schedule For: Pick a date and time in the future. Past timestamps are not accepted. Leave the field empty if you want it to send on the next CRON run.
Click Save. The campaign shows as scheduled in the list. For it to send automatically, the CRON command shown at the top of the Promotions page needs to be added to your server. It runs every minute and picks up any campaigns whose scheduled time has passed.
Once a campaign finishes running, the Sent and Failed counts fill in. The WhatsApp Business API bills per message, so it is worth running a small test batch of 10 to 20 contacts before sending to your full list.
10.0 WhatsApp Lists
Lists are named groups of contacts. A promotion targets one list at a time. Click Add new list, give it a name, and save it. That is the whole process. You can mark one list as the Default if you want new contacts added to it automatically.
Contacts get assigned to lists from the WhatsApp Contacts tab. One contact can be on as many lists as you need.
11.0 WhatsApp Contacts
Every phone number you want to message through the module lives here. Each contact has a number, a name, and the option to link to a PrestaShop customer account.
11.1 Adding a Contact Manually
Phone Number: Country code first, no leading zero, no spaces, no dashes or plus signs (for example, 91xxxxxxxxxx for an Indian number).
Name: The display name for this contact.
Select PrestaShop Customer: Search for an existing customer account to link this contact to. Leave it blank if this is a standalone contact with no store account.
WhatsApp Lists: Pick one or more lists to add this contact to. Multi-select works here.
Click Save to add the contact.
11.2 Importing Contacts in Bulk
Click Download Template to grab the CSV format. Add your contacts, then come back and click Import Contacts to upload the file. If a number already exists in the module, that record gets updated. New numbers get added fresh. Export to Excel and Export to CSV are both available if you need to pull the full contact list.
12.0 Chatbox Settings
This tab controls the WhatsApp icon that floats on your storefront. Visitors click it, see a pop-up with your available agents, and tap Chat next to whoever they want to reach. That opens a WhatsApp conversation on their phone directly.
Show Chat Icon on Frontend: Turns the icon on or off.
Icon Position: Bottom Right, Bottom Left, or other available positions.
Distance from Bottom / Right / Left (px): How far the icon sits from each edge. Default is 20px on all sides.
Z-Index: Layer order relative to other elements on the page. Default is 9999.
Predefined Icon: Choose from available icon styles, including Animated Style.
Icon Size: Diameter in pixels. Accepted range is 16 to 128. The default is 50.
Primary Color of Icon and Chatbox: The main background color. Default is WhatsApp green, #25D366.
Hover Color of Icon: The color that appears when a visitor hovers over the icon. Default is #128C7E.
Background Color of Chatbox: The background of the chat popup. Default is #FFFFFF.
Text Color of Chatbox: Text color inside the pop-up. Default is #000000.
Border Color of Chatbox: The border around the pop-up. Default is #E0E0E0.
Border Width of Chatbox: How thick the border is in pixels. Default is 1.
Pulse Animation: When enabled, a pulsing ring plays around the icon.
Bounce Effect: When enabled, the icon bounces when a visitor hovers over it.
Click Save Settings when done.
13.0 WhatsApp Agents
Agents are the team members displayed inside the storefront popup. Each one shows a name, department, and a Chat button that visitors tap to open a WhatsApp conversation with that person directly.
Active: Show or hide this agent in the pop-up.
Agent Name: The name displayed in the pop-up, up to 50 characters.
Contact Number: The agent’s WhatsApp number with country code (for example, +91xxxxxxxxxx). If you use the same number as the one in the API settings, conversations also appear in the CRM tab.
Department: The team or role shown under the agent’s name. Up to 50 characters, and this can be different per language.
Display Order: The position of this agent in the pop-up relative to others. Lower numbers come first.
Avatar Type: Use a Predefined Avatar or upload a custom image.
14.0 Message Logs
Every message the PrestaShop WhatsApp CRM Module sends or receives is recorded here. Each row shows the Direction (Outbound or Inbound), the phone number, the template name if one was used, a preview of the message, the WhatsApp Message ID, the delivery status, and the date and time.
Order notifications, CRM messages, and campaign deliveries all show up in this list. A success status means the WhatsApp API accepted the message. Use the date, phone number, and template filters to narrow down what you are looking for. This is the first place to check when a message did not go through as expected.
15.0 Frequently Asked Questions
Q: What does the PrestaShop WhatsApp CRM Module do?
The Knowband PrestaShop WhatsApp CRM Module connects your PrestaShop store through a full PrestaShop WhatsApp Business API integration. New order messages and order status change notifications go out automatically via the WhatsApp Business API. Your team can handle two-way WhatsApp messaging with customers in real time from inside the admin. Marketing promotions can be sent to contact lists on a schedule. A WhatsApp chatbox widget on the storefront lets customers reach your agents directly on WhatsApp.
Q: Is a WhatsApp Business Account required for the PrestaShop WhatsApp live chat addon?
Yes, it is. PrestaShop WhatsApp Manager needs a WhatsApp Business Account, a registered WhatsApp Business phone number, and a Meta Developer App with API access. Without those three things, the API fields in Module/API Settings stay empty, the WhatsApp message templates cannot be submitted for approval, and the module cannot send anything.
Q: Why are no templates appearing in the Order Settings dropdown?
The dropdown in Order Settings only shows Utility WhatsApp message templates that WhatsApp has approved. If nothing is listed, either the templates are still pending review or they ended up in the Marketing category. Go to Message Templates, create a Utility template, wait for the approval to come through, then return to Order Settings. You can also click Sync Templates to pull the latest status without waiting for the webhook.
Q: How do WhatsApp order notifications PrestaShop stores send when an order status changes?
Once Enable Order Status Message is turned on, a WhatsApp number field appears on the customer address form. When a customer fills that in, and their order triggers an order status change notification mapped in Order Status Templates, the module sends the assigned WhatsApp order notifications to their number. You can assign a different template to each status.
Q: What is the difference between a Utility template and a Marketing template?
Utility templates are for messages tied directly to something the customer did, such as placing an order or having an order shipped. Marketing templates are for outbound promotional content sent to contact lists. Order Settings and Order Status Templates use Utility templates only. The Promotions tab and the CRM Template picker use Marketing templates only.
Q: How do I run a PrestaShop WhatsApp marketing Module promotion to a contact list?
Open the Promotions tab and click Add new promotion. Give it a name, pick a Target List, choose a Marketing template, and set a future date and time. For the PrestaShop WhatsApp marketing Module campaign to send automatically, paste the CRON command from the Promotions page into your server to enable the CRON job for WhatsApp campaigns. The CRON runs every minute and sends any campaigns due at that time. Before you run a big campaign, test it on a list of 10 to 20 contacts to get a sense of API costs.
Q: Can I import my existing contacts using the PrestaShop WhatsApp live chat addon?
Yes. Click Download Template in the WhatsApp Contacts tab to get the right CSV layout. Fill in your contact data, then upload it via Import Contacts. Numbers that already exist get updated. New numbers are added to the contact list. Once imported, contacts can be assigned to any WhatsApp List for WhatsApp contact list segmentation and use in promotions.
Q: How does the CRM live chat work in this PrestaShop WhatsApp live chat addon?
The CRM tab shows all contact threads on the left. Click any contact to open the full chat history. The Message tab lets you type a free reply as long as the customer messaged you within the last 24 hours, supporting real two-way WhatsApp messaging between your team and the customer. After that window closes, use the Template tab to send an approved Marketing template. All automated order notifications appear in the same thread, so your team has the full picture in one place.
Q: Which versions of PrestaShop does this PrestaShop WhatsApp Module support?
The Knowband PrestaShop WhatsApp CRM Module runs on PrestaShop 1.7.x, 8.x, and 9.x. Setting up PrestaShop WhatsApp Business API integration requires a Meta Developer App; full setup instructions are in the Meta Developer Console WhatsApp configuration section of this guide. Check the module product page on the Knowband website for any version-specific notes or updates that may have been released since this guide was written.
16.0 Conclusion
The Knowband PrestaShop WhatsApp CRM Module brings WhatsApp-based customer communication into your PrestaShop admin. Order alerts go out without manual effort. Your team handles support from the CRM tab without switching tools. Promotions reach customers on a list you control, at a time you set.
The only setup work that happens outside the PrestaShop WhatsApp Manager is generating your API credentials in the Meta Developer Console. Everything else, templates, order mappings, contact lists, agents, and campaigns, is configured from inside PrestaShop.
For any help with setup or questions about specific features, reach out to the Knowband support team at support@knowband.com. Product documentation and setup videos are also available on the Knowband website.
If you manage a PrestaShop store with a large catalog, you already know this routine. Export a CSV, open it in a spreadsheet, make changes, re-upload it, redo the column mapping, and hope nothing breaks this time. Then do the whole thing again next week, from scratch, because none of that configuration was saved anywhere. ThePrestaShop Catalog Import Export Module by Knowband is built specifically to fix this.
Merchants looking for a capable PrestaShop product import and export solution quickly find that the native importer covers the basics only. Combinations fail. Multi-language fields go missing. There is no scheduling and no way to automate any of it. The process consumes hours that keep adding up across every update cycle.
This post walks through where that friction actually comes from, what a proper catalog transfer workflow looks like, and how stores ranging from 200 to 50,000 products are handling it now.
Why PrestaShop’s Default Importer Is Not Good Enough for Real Catalog Work
The built-in CSV importer in PrestaShop handles a few sets of scenarios well. Uploading a basic list of new products without combinations, in one language, and for one-time imports.
The moment the catalog gets more complex, the gaps show up fast. Product combinations remain one of the biggest challenges during catalog imports, with merchants frequently reporting issues such as failed imports and incorrectly mapped attribute data in community discussions. Additionally, multilingual catalogs introduce another layer of complexity. Although PrestaShop’s default importer supports multilingual fields, managing translations through CSV files can become cumbersome as the number of languages and products grows. Merchants often need to invest extra time in preparing, validating, and updating language-specific data to ensure consistency across their catalog.
Beyond combinations and languages, the structural problem is repeatability. Every import starts over. There is no option to save a configuration, no option to automatically pull a file from an FTP location, and no transfer log to diagnose what went wrong when a batch fails silently.
What You Actually Need to Migrate a PrestaShop Store Successfully
Catalog migration between PrestaShop stores means moving from PrestaShop 1.7 to 8.x or 9.x, or splitting one store into two regional stores, which is the scenario where the native importer breaks down most completely.
Most merchants think migration means moving products. In reality, it means moving everything your store depends on to function correctly. Miss one piece and you are looking at broken pages, wrong prices, or customers seeing products in the wrong language.
Here is what a complete migration actually covers:
Your product data, including names, descriptions, SKUs, prices, tax rules, and visibility settings. Your category structure with parent-child relationships, friendly URLs, and category images intact. Product combinations and variants with size, color, material, combination references, price impact, and default combination settings all carried over correctly. Product images, including cover images, gallery images, and variant-specific images in the right order. Manufacturers, suppliers, features, and attribute groups with all their values and assignments. Stock quantities, availability settings, and out-of-stock behavior. SEO metadata, including meta titles, meta descriptions, and friendly URLs for every product and category, because losing these means losing months of search ranking work. And for multilingual stores, every translation needs to stay correctly linked to its language.
ThePrestaShop Catalog Import Export Module by Knowband handles this as a seamless transfer workflow. Export from the source store with combinations enabled, import into the destination store, and the module creates missing attribute groups and values automatically rather than throwing an error. Every language exports to the same file. No separate pass per locale, no manual field matching across files.
How Does the PrestaShop Import Export Module Profile System Work
The single feature that separates this from a basic transfer tool is the profile system. Every import or export configuration, data type, file format, language selection, column set, and FTP destination is saved as a named profile. Create it once. Run it whenever needed, or set it on a cron schedule and let it run without any manual involvement. This is what makes the PrestaShop Import Export Module genuinely useful for recurring catalog operations.
A store fetching pricing updates from a supplier feed can configure an import profile that points to the supplier’s SFTP location, runs daily via cron scheduling, and sends a completion email to the admin. If a row fails, the transfer logs show exactly which record failed and why, so only the affected rows need to be corrected and re-imported; the rest of the catalog is untouched.
That same logic applies to catalog backups. Each scheduled export generates a file timestamped and stored in the transfer history. If a bulk update produces unexpected results, a previous version can be downloaded directly from the logs and re-imported to restore the catalog to its prior state.
How Can You Bulk Update Prices in PrestaShop Without a Developer
One of the most time-consuming recurring tasks for any mid-size store is a price update across hundreds of products. The conventional approach involves either editing products one by one or attempting a CSV import that may or may not map correctly and may or may not touch only the fields that need changing.
With a PrestaShop Bulk Data Manager approach, the process is: export the catalog to XLSX, edit the price column in Excel, and import the file back with the same saved profile. The module updates only the columns that were mapped; prices change while descriptions and images remain exactly as they were.
For stores syncing from a supplier feed, even the manual edit step disappears. The supplier publishes an updated file to an FTP location, the scheduled import profile picks it up, and the catalog reflects the new prices before the store opens the next morning. No developer required, no file handling, no manual trigger.
Which File Formats Does the PrestaShop Catalog Import Export Module Support
Four file formats are supported for both import and export: CSV, XLSX, JSON, and XML. Most merchants will use CSV or XLSX for direct spreadsheet work and bulk price updates. JSON and XML become relevant when synchronising data between stores, connecting with third-party platforms, or building automated migration workflows.
Supporting all four in both directions means the same module covers the full range of catalog operations a store typically needs over a year, whether that means importing supplier feeds, migrating catalog data, synchronizing inventory updates, or exporting product information for external systems.
How Does the Module Handle Import Errors Before They Reach Your Live Store
Partial import failures are a real operational risk for stores with large catalogs. The standard outcome with most basic importers is discovering that something went wrong only after browsing the catalog and noticing broken products, at which point the damage is already live.
The column mapping screen in this PrestaShop Automated Catalog Manager shows a live preview of the first rows of the source file before the import runs. Required fields not mapped are flagged before moving forward. Duplicate field assignments are blocked. When an import does run, and a row fails, the transfer log records the row number and the specific error. The PrestaShop Automated Catalog Manager ensures admins fix only what broke, re-import only the affected rows, and the live catalog is never touched beyond what was intentional.
Who Should Use the PrestaShop Catalog Import Export Module
Not every PrestaShop store needs this. If the catalog is under 100 products, changes rarely, and migration is a one-time event, the built-in importer may be sufficient.
ThePrestaShop Catalog Import Export Module earns its place for stores managing medium to large catalogs where catalog operations recur weekly or more often, stores running multilingual setups where translation preservation is not optional, agencies managing multiple PrestaShop installations who need consistent, repeatable transfer workflows, and any merchant currently spending developer time on what should be a self-service admin task.
For those operations, the module pays for itself quickly, not in a theoretical ROI calculation, but in the hours it stops consuming every update cycle.
The full feature set, pricing, and compatibility details are available on the PrestaShop Bulk Data Manager product page. Compatible with PrestaShop 1.7.x through 9.x, with no coding required.