Magento Facebook Share And Win Extension

Introduction

This document contains user manual for Magento Facebook Share And Win Extension.

This is a very useful extension which seems to give both the sides i.e the admin and the customer certain benefits. This addon will help the admin to promote his website and product, and on the other side the customers will get discount on whatever product they purchase. This is a very interesting Magento extension because of its dual nature.

Admin will be having full control on the discount type and the discount value which he is giving and can also view the details of the discount applied on a particular product.

Installation Manual

Follow the following steps for installing Magento Facebook Share and Win Extension

1. Download the Extension package.

2. Unzip the package on your root folder of Magento setup via FTP manager (like Filezilla or WinSCP – download here: https://filezilla-project.org/).

3. In Admin Panel under the Menu “System” , you will see a new menu option “Discount on Share”. In case you are not able to see the link under System, please clear Magento Cache first then check again.
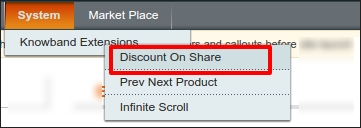
4. With this the extension gets installed on your system.

Module Interfaces

Configuration of this module will be accessible through Admin account only.While the customers can view on front end product pages.

Menu Location

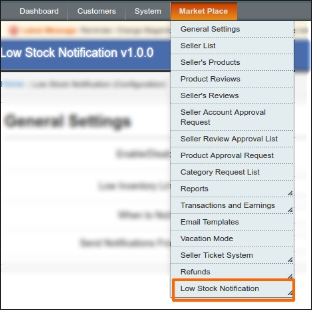
After installation, a menu will be displayed to the admin as shown in below screen:
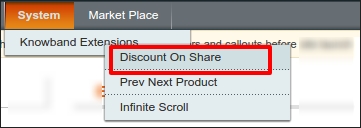
On clicking the highlighted link, system will redirect admin to his low stock alert configurations page.

Administration Module

In admin module, there will be following options to configure this plug-in and customize its look at the front-end as follows –

1. Settings
2. Analysis

Settings

This section will be having following options to configure the module –

1. Active: This option has a drop down button with two specific values ‘Yes and   ‘No’. This module will only work if this is set to ‘Yes. If this is set to ‘No’ then none of the  feature will be working and not even impacting any other section of website. By default, this option will be “No”.

2. Facebook app id: This app id is very important for this plugin to work. Admin has to enter this app id to let the customer share the product on Facebook.

3. Discount Value: In this field the admin has to give the discount value which is to be applied on that product.

4. Discount Validity: Here the admin has to enter the date up to which the discount coupon can be applied. If the validity date is expired than the coupon can be no longer applied.

5. Custom CSS: These are the fields which are given in this plugin in case if the admin wants to customize the look and feel of his plugin.
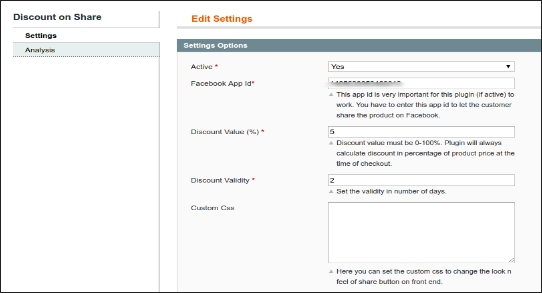
Magento Facebook Share And Win Extension-Settings | Knowband

Analysis

Discount Used History

This is the tab in which the admin can view all the details of the discount coupon’s applied on every product.

1. Select Id: Here the admin has to select the Id of the product which he/she wants to look.

2. Select Product Name: When the admin will select the Provide the name of this field will automatically get refreshed and will be filed by all the product of that name.

3. Select SKU: Filter the discount on the basis of the SKU of the product.

4. Select Attribute: When the admin will select the category of this field will automatically get refreshed and will be filed by all the product of that category.

5. Total Coupon Table: When the admin will select the product in the above option then a table will appear which will be having the details of the discount coupon and their current status applied on that particular product.

Front End

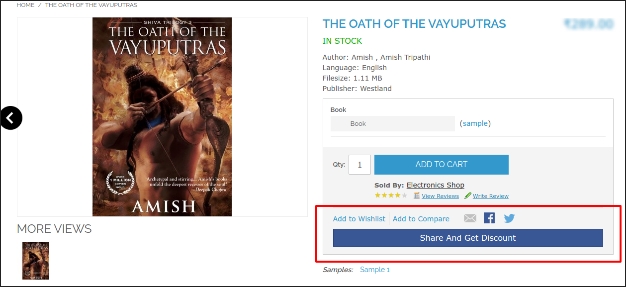
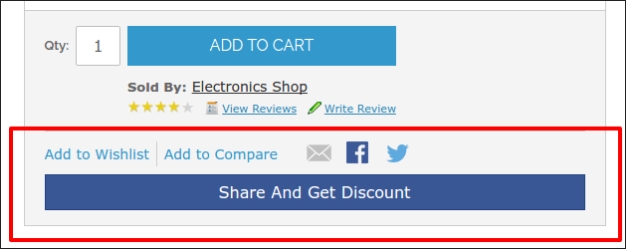
When this module is enabled from the back end then a button will start appearing in the front end of the shop on every product page. On which a text “Share to get discount!” will be written and on clicking on this button the customer can share the product and if he/she shares the product then a discount code will be shown to that customer which will be applied to that customer only.
Magento MarketPlace Low Stock Alert Addon

What is MarketPlace?

In general terms a MarketPlace is ‘an open space where a market is/ was formerly held.’ It means that a space with relation between sellers and customers. There are several sellers selling goods to several customers.

An online MarketPlace (or online e-commerce marketplace) is a type of e-commerce site where product or service information is provided by multiple third parties, whereas transactions are processed by the MarketPlace operator. Online marketplaces are the primary type of multi channel e-commerce.

In an online marketplace, consumer transactions are processed by the MarketPlace operator and then delivered and fulfilled by the participating retailers or wholesalers (often called drop shipping). Other capabilities might include auctioning (forward or reverse), catalogs, ordering, wanted advertisement, trading exchange functionality and capabilities like RFQ, RFI or RFP.

In general, because marketplaces aggregate products from a wide array of providers, selection is usually more wide, availability is higher, and prices are more competitive than in vendor-specific online retail stores.

Examples of online marketplaces are Amazon.com, etsy, eBay, Snapdeal, Flipkart, Kaymu, Rakuten, and NASDAQ.

MarketPlace Extension

MarketPlace extension for Magento is developed for simply converting a simple Magento store to a MarketPlace with lots of features to customers, sellers and store owner. Any customer can register as a seller and can enjoy the features of a seller as well as customer of the store.

The seller sells products on the store and in return the store owner gets a commission by percentage from the total sale made by the seller. The commission percentage that the store owner gets can be modified and the store owner can set percentage to any desired value.

Prerequisite

The Knowband MarketPlace Extension is necessary to be installed on the system for using this MarketPlace Addon.

Magento MarketPlace Low Stock Alert Addon

Introduction

This module is basically for the sellers on Magento MarketPlace to let them know about the decreasing stock of their products. In this module the admin can set a  specific quantity of the products and if any of his products got below this mark then the particular seller will receive an alert mail regarding the lowering of the product.

The admin can also set a cron which will send a mail to the seller as soon as the stock of any of the products is down or as soon as an order is placed making the stock of that product less from the given low stock quantity.

Installation Manual

Follow the following steps for installing Magento MarketPlace Low Stock Alert  Addon

1. Download the Addon package.

2. Unzip the package on your root folder of Magento setup via FTP manager (like Filezilla or WinSCP – download here: https://filezilla-project.org/).

3. In Admin Panel under the Menu “Market Place” next to System menu, you will see a new menu option “Low Stock Notification”. In case you are not able to see the link under System, please clear Magento Cache first then check again.

4. With this the extension gets installed on your system.

Module Interfaces

This module will be accessible through Admin account only.

Admin Account Interfaces

This is the interface which will be accessible only through seller account section.

Menu Location

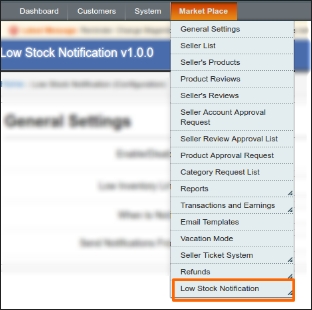
After installation, a menu will be displayed to the admin as shown in below screen:

On clicking the highlighted link, system will redirect admin to his low stock alert configurations page.

Low Stock Alert Configuration

Here all the settings of the modules are mentioned. These are explained below:

Settings Description

1. Enable/Disable : The module will only work if this field is set to enabled. If this module is disabled then the module does not work.

2. Low Inventory Limit :  In this field the admin will set the low stock quantity. If the quantity of any of the products of the seller goes below this value then the seller will receive an email after the order is placed or when the cron works.

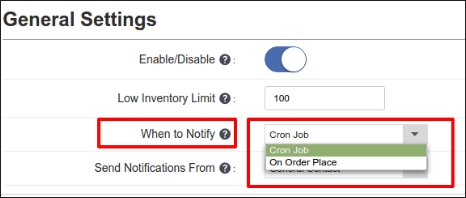
3. When to Notify : There are two options.  If “Cron Job” is enabled then the cron set up by the admin works and if “On Order Place” field is enabled then the seller will receive the mails when an order is being placed by a customer.

4. Notification Email : This is the email of the seller in which the seller will receive the low stock alert mails.

Module Work Flow

When the admin will enable the module and set the low stock quantity then after every order is placed for the products of the seller, The seller will receive an alert email if the quantity of the product is now lower then the low stock quantity set by the seller.

The seller may also receive email according to the cron set up by the admin on his server but if the admin has disabled the cron settings from his interface then he wont receive any of the emails which will be generated from the cron.

You Might Also Like:

PrestaShop 1.7 is stable now- Things you need to know before upgrading

It’s been more than one and half year since the PrestaShop came up with PrestaShop version 1.6.1.0, the last major update. The stable version of PrestaShop is finally out for all. Before that, PrestaShop has been testing the Beta versions for a long time. The development versions were already available on the official site for testing. The new version excited me too, so I did some testing. Surprisingly, I was struggling to even install it on my local host.

After going through the release notes, I discovered that PrestaShop has been through a complete makeover. On your local host you need to do some additional setups to make it compatible with the new frameworks and structures. This time, I read the release notes and instructions very carefully as I did not wanted to repeat my mistakes again and taunt the PrestaShop developers. While going through the documentations I picked up some interesting points (that I tested on my localhost too before writing) .

Major highlights of the new PrestaShop 1.7 update include:


1. Introduction of Symfony2 framework-

Based on Symphony framework, PrestaShop 1.7 is a completely new architecture. However, it’s confirmed that as of now, only Back-Office will have the new architecture. The two pages on back-office will be in radar of the new the architecture- the product page and the Module page. With the introduction of Symfony2 in the these two pages, PrestaShop 1.7 has received a complete makeover that I will be discussing in the later part. For now, until a complete transition happens, the two architectures- Symfony and twig templating engine will coexist.

With the new framework in these two pages, it is also clear that the custom modules which target the pages other then these two pages (the product page and the Module page) will not need adaptation. They will work as fine as they were working on the previous version, but the PrestaShop also recommends the developers to adapt their modules ASAP. Soon enough the new architecture would expand to the whole system.

2. A Brand new default theme along with a starter theme-

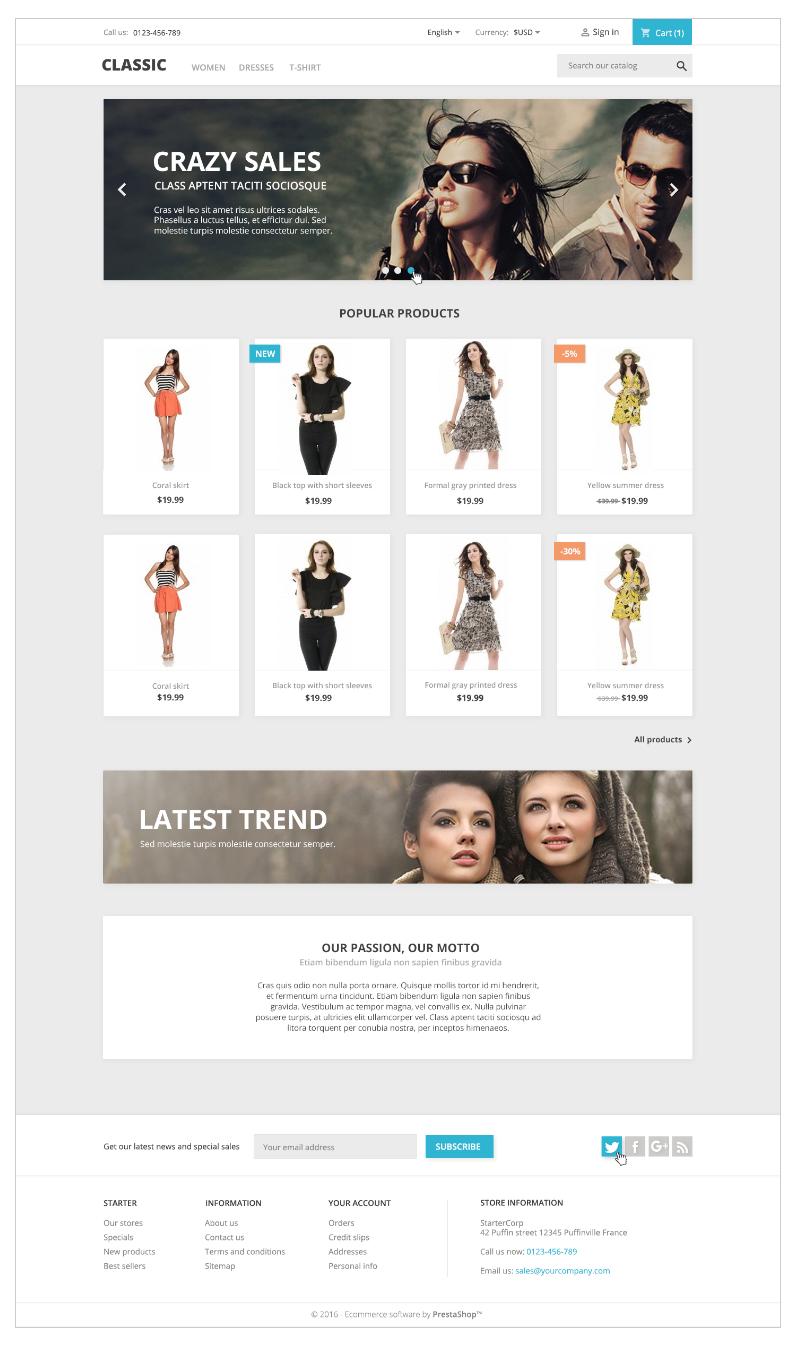
When you install any PrestaShop on your system, it welcomes you with a pre-configured theme and a set of products- The Default Theme. In PrestaShop 1.7, the new theme has a different name – “Classic”. The new Classic theme is competent to meet all the basic Web and eCommerce requirements, and off-course it is fully responsive.

Along with the “Classic” a new interesting feature called as “Starter Theme” will also be there. Basically, with Starter Theme anybody with a skill set for HTML and CSS can design a completely new PrestaShop theme from the scratch. Earlier, designing a new PrestaShop theme from the scratch was a very tricky task; it was required to have skill set for HTML and CSS, and addition, it was also required to have a comprehensive knowledge of inner PrestaShop structures. With the new Starter Theme, one can design the new PrestaShop themes in no time, and can easily replace the old default-bootstrap theme. The Starter Theme will not consist any bootstrap. It is expected that only a knowledge of CSS and markup is enough to generate the implementation.


3. The reworked Product creation page-

PrestaShop has always been popular for providing easiest user interface to the non coders. It is a non-coder who mostly do the uploading and managing of a product. The Product upload and management interface in PrestaShop 1.7 claims to provide the non-coders a hassle free interface for uploading and managing the products. The newly added Symfony framework ensures the best UX for the PrestaShop website owners until now. Not only the product upload, but the creation of product combinations have become somewhat more simpler. You have to just enter the attributes and their values, PrestaShop will generate the combinations automatically. Say, you want to create a combination for all the available colors and sizes. Just input the color:all, size:all, and its done.


New shortcuts:

Duplicate (CTRL + D): Used to save the current product and duplicate it.

Go to catalog (CTRL + Q): Used to save the current product and lead to the catalogue page.

Add new product (CTRL + P): Used to save the current product and creates a new, empty product page.

Save (CTRL + S): It will save the product and stay on the current product.

4. A new module listing – or a new App Store?-

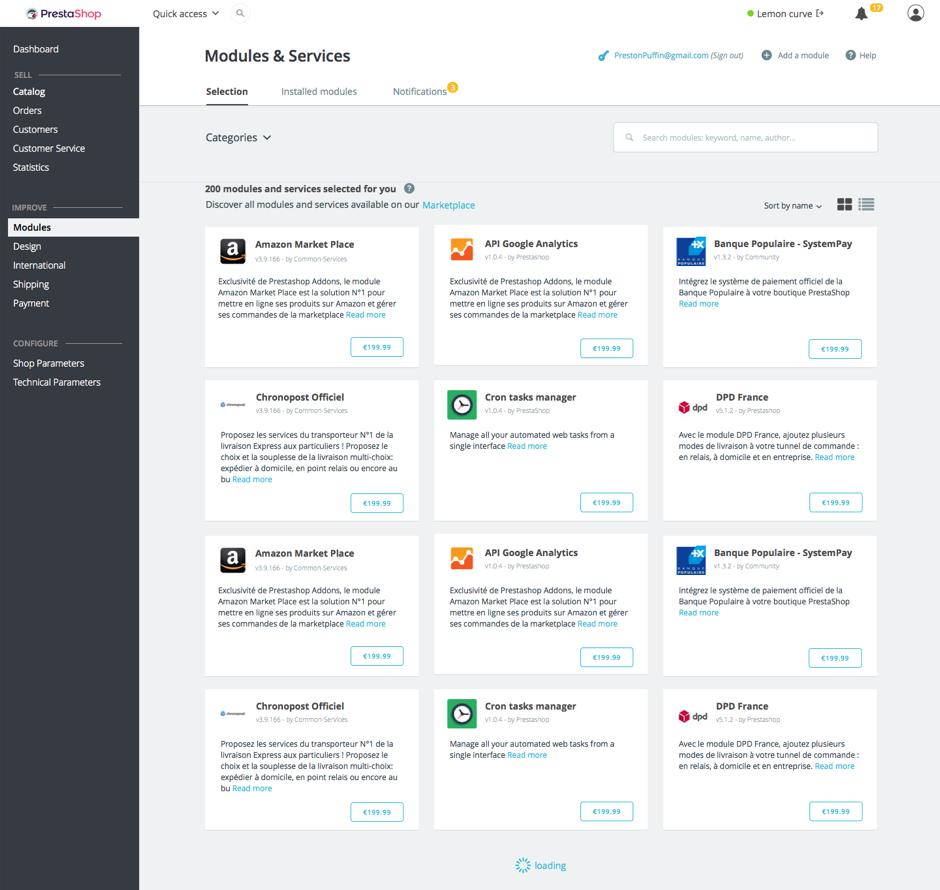
You can see a major change in the Module page. With the inclusion of Symfony2 Framework, the new module page has changed a lot. A lot means, a lot like the new interface is now more like an App store. The new modules  display is a card design view. The categories of the module have a perfect sync with the categories of the modules on the official PrestaShop store. They have also changed the filter for Installed and recommended modules. There are now two new tabs – “Selection” and “Installed modules”.

The selection tab consist of the recommended modules from the official module store. The installed module tab is used to displayed all the modules that are currently installed on the site. It is expected that with the new look of the module listing, the Module page will soon transform itself into a App Store. However, It has already been transformed up to a major extent. The new features added to the module page are:
Configuration key to check the configuration of the module.

Change log to see the new features or update whenever a new update is released by the developer of a module.

Segregation of Installed, to be installed, and needs update module in separate sub-tabs

The new architecture of modules page seems like more of an app store.

Conclusion

The new PrestaShop 1.7 update seems to be a promising one. Lets see, how far we can go with the Symfony2 and it’s architecture. As of now, we can PrestaShop 1.7 have focused largely on improving the UX for both the admin and customer point of view. The new structure claims to impact the SEO of the site in a more positive way. However, it would be interesting to see if it can compel the already established businesses to upgrade their PrestaShop store to a completely changed interface.

This Would Also Interest You

PrestaShop 1.7 è stabile ora- Cose che devi sapere prima di aggiornare

È passato più di un anno e mezzo dal PrestaShop è uscito con la versione di PrestaShop 1.6.1.0, l'ultimo aggiornamento importante. La versione stabile di PrestaShop è finalmente disponibile per tutti. Prima di ciò, PrestaShop ha testato le versioni Beta per un lungo periodo. Le versioni di sviluppo erano già disponibili sul sito ufficiale per i test. Anche la nuova versione mi ha entusiasmato, quindi ho fatto dei test. Sorprendentemente, stavo faticando persino a installarlo sul mio host locale. Dopo aver esaminato le note di rilascio, ho scoperto che PrestaShop ha subito un restyling completo. Sull'host locale è necessario eseguire alcune impostazioni aggiuntive per renderlo compatibile con i nuovi framework e strutture. Questa volta, ho letto le note di rilascio e le istruzioni con molta attenzione perché non volevo ripetere di nuovo i miei errori e schernire il Sviluppatori di PrestaShop. Passando attraverso le documentazioni ho raccolto alcuni punti interessanti (che ho provato anche sul mio localhost prima di scrivere).

Principali punti salienti del nuovo Aggiornamento di PrestaShop 1.7 includere:


1. Introduzione del framework Symfony2-

Basato sul framework Symphony, PrestaShop 1.7 è un'architettura completamente nuova. Tuttavia, è confermato che al momento solo Back-Office avrà la nuova architettura. Le due pagine sul back-office saranno nel radar della nuova architettura – la pagina del prodotto e la pagina del modulo. Con il introduzione di Symfony2 in queste due pagine, PrestaShop 1.7 ha ricevuto un restyling completo di cui parlerò nella parte successiva. Per ora, fino a quando non avviene una transizione completa, le due architetture – Symfony e il motore dei templari ramificati coesisteranno. Con il nuovo framework in queste due pagine, è anche chiaro che i moduli personalizzati target

2. Un tema predefinito nuovo di zecca insieme a un tema di avviamento-

Quando installi PrestaShop sul tuo sistema, ti dà il benvenuto con un tema preconfigurato e un set di prodotti: il tema predefinito. In PrestaShop 1.7, il nuovo tema ha un nome diverso – "ClassicoIl nuovo tema Classic è in grado di soddisfare tutti i requisiti di base del Web e dell'e-commerce e, ovviamente, è completamente reattivo.

Insieme al "Classico" una nuova interessante funzionalità chiamata come "Tema di avviamento"ci sarà anche.

?

3. La pagina di creazione del prodotto rielaborata

PrestaShop è sempre stato popolare per fornire un'interfaccia utente più semplice ai non codificatori. È un non-coder che per lo più esegue il caricamento e la gestione di un prodotto. Il Caricamento del prodotto e interfaccia di gestione in PrestaShop 1.7 afferma di fornire ai non codificatori un'interfaccia senza problemi per il caricamento e la gestione dei prodotti. Il framework Symfony appena aggiunto garantisce la migliore UX per i proprietari dei siti Web di PrestaShop fino ad ora. Non solo il caricamento del prodotto, ma la creazione di combinazioni di prodotti è diventata un po 'più semplice. Devi solo inserire gli attributi e i loro valori, PrestaShop genererà automaticamente le combinazioni. Di ', vuoi creare una combinazione per tutti i colori e le dimensioni disponibili. Basta inserire il colore: tutto, dimensione: tutto, e fatto.

?

Nuove scorciatoie:

Duplicare Utilizzato per salvare il prodotto corrente e duplicarlo.

Vai al catalogo Utilizzato per salvare il prodotto corrente e portare alla pagina del catalogo.

Aggiungi un nuovo prodotto Utilizzato per salvare il prodotto corrente e creare una nuova pagina di prodotto vuota.

Salvare Salverà il prodotto e rimarrà sul prodotto corrente.

4. Un nuovo elenco di moduli o un nuovo App Store?

Puoi vedere un cambiamento importante nella pagina del modulo. Con l'inclusione di Symfony2 Framework, il nuova pagina del modulo è cambiato molto. Molto significa, molto simile alla nuova interfaccia ora è più simile ad un App Store. I nuovi moduli
Chiave di configurazione per verificare la configurazione del modulo.

Cambio di registro per vedere le nuove funzionalità o aggiornare ogni volta che viene rilasciato un nuovo aggiornamento dallo sviluppatore di un modulo.

Segregazione di Installato, da installare, e necessita di modulo di aggiornamento in sotto-schede separate La nuova architettura della pagina dei moduli sembra più un app store. [/ Caption]

Conclusione

Il nuovo aggiornamento di PrestaShop 1.7 sembra essere promettente. Vediamo, fino a che punto possiamo andare con Symfony2 e con la sua architettura. A partire da ora, PrestaShop 1.7 si è concentrato in gran parte sul miglioramento della UX sia dal punto di vista dell'amministratore che del cliente. La nuova struttura afferma di influenzare la SEO del sito in un modo più positivo. Tuttavia, sarebbe interessante vedere se può costringere le aziende già consolidate ad aggiornare il loro negozio PrestaShop a un'interfaccia completamente cambiata.

Questo ti interesserebbe anche

Magento MockingFish Heatmap and A/B Testing Tool

Introduction

MockingFish : Heatmap and A/B Testing Tool is a magento extension that allow you to add MockingFish script automatically on all pages of your magento store.

What is MockingFish?

MockingFish is a web optimization and testing tool which allows web marketers, online business entrepreneurs and product managers to perform A/B tests. Being an easy to use testing tool, it allows websites to load faster, have a user friendly layout and eventually increase conversion rate on the website. For more details: https://www.mockingfish.com/

How it works?

Following are the steps to initiate optimoid experiments on your store :

1. Create an account on MockingFish.

2. Create New Project and Experiment.

3. Configure the experiment and get the script code.

4. Open MockingFish Module in your Magento store’s admin console.

5. Paste the script, activate the module and save the settings.

6. That’s it. Your MockingFish script is now added to every page of you store for experiments.

Installation Guide

1. Download the zip from magento store & unzip into a folder.

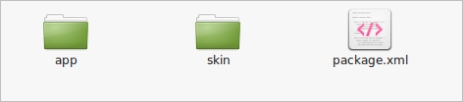
2. After unzip, following files/folders will be extract as shown in below screen:

3. Login via FTP & Drag drop all the folders into your server root directory.

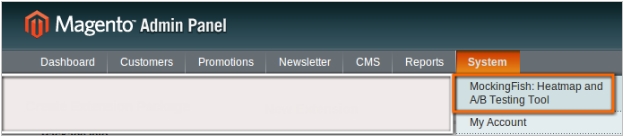
4. You will find the extension link will be displayed under System >> MockingFish : Heatmap and A/B Testing Tool.

User Manual

This module will basically work and visible in administration panel. There is no interaction of customers with this module and only administrator has access of this module.After copy this module, a link to access this module will be displayed under “System >> MockingFish : Heatmap and A/B Testing Tool”menu as shown below screen:

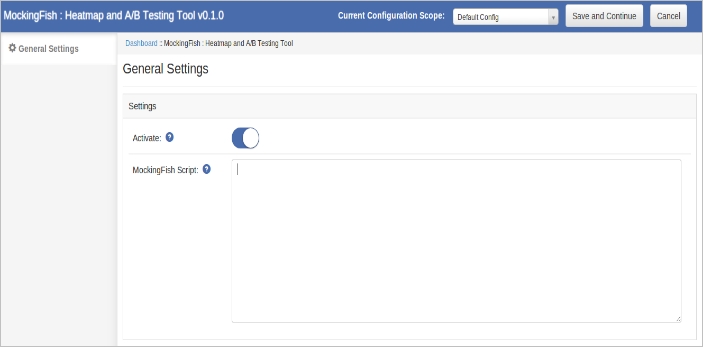
After clicking on this link, module page will be open as shown in below screen:

In module’s top navigation bar, there are following controls:

1. Current Configuration Scope : This option is used to change the store configuration scope.

2. Save and Continue : This option is used to save the module settings.

3. Cancel : This option will cancel the current changes in settings.

General Settings

On clicking the module link, this tab will be open by default as shown as above screen. This tab has following options :

1. Activate: This option is used to enable or disable the module.

2. MockingFish Script: Paste the script provided by MockingFish App Experiment.

Prestashop Google Plus Badge Module – User Manual

1.0 Introduction

Knowband offers Prestashop google+ badge module which allows eCommerce store admin to show goggle+ profile link in a customized block. This Prestashop extension allows admin to link community page, company page or personal profile. This is one of the most useful Prestashop addons which is highly customizable. Here is preview option for reviewing changes from admin panel. This Prestashop social badge plugin is multi-lingual compatible and multi-store compatible also.

1.1 Features of Prestashop Google Plus badge module

  • A preview option is available for review changes.
  • Do not conflict with any other third party module.
  • Google+badge for website is fully customizable module.
  • Customize Google+badge plugin is multi-store compatible.
  • The store admin can show or hide tagline as per the need.
  • Google+badge for website addon is multi-lingual compatible.
  • Google plus button generator extension is fully mobile responsive.
  • This Customize Google+badge is compatible with all Prestashop themes.
  • You can customize the look and feel of the block as per your website theme.
  • Prestashop social badge allows to show or hide the cover picture in the block.
  • The store admin can easily enable/ disable this module just by a button toggle.
  • Google+badge button allows admin to select from two color themes- Dark or Light.
  • Google plus button generator allows admin to choose from “Portrait” or “Landscape” layout.
  • Customize Google+badge addon allows admin to link company profile, Company page, or community page.

2.0 Installation Guide

1. Copy “googleplusbadgeage” module folder under your “root_directory/modules/”of your store via FTP or use Prestashop interface to upload the plugin.

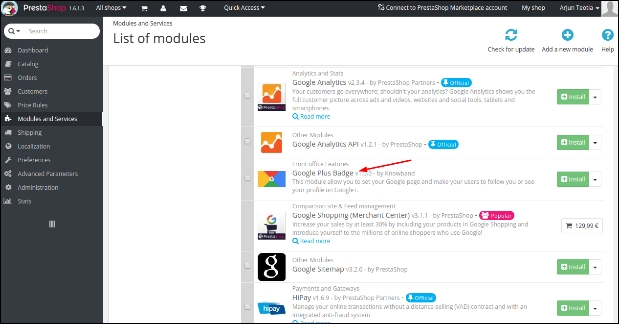
2. After copy, module will be listed on module listing page in admin panel as shown given below screen.

3. If module is not displaying on your module listing page, search it by filtering module with following details:

Keyword: googleplusbadge
Author: Knowband
Category: front-office feature
Filter by: Installed & Not Installed/Enabled & Disabled

Note:

1. When you will click on install button, a pop-up box will appear which will display warning messages. You can ignore these messages and move ahead. There will be no negative impact of this warning message on your store.

2. After installing module, a “configure” button will be in front of this plugin on module listing page as shown in screen below:

3.0 User Manual

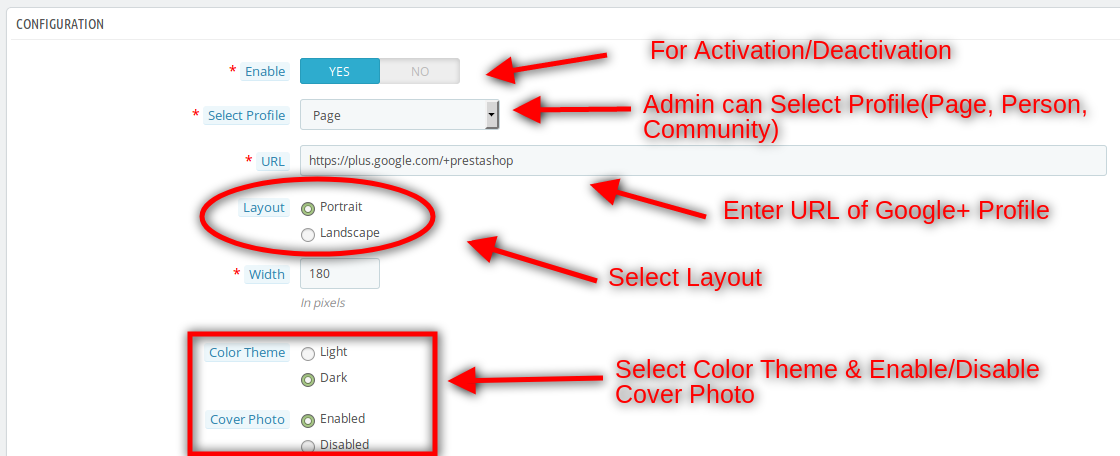
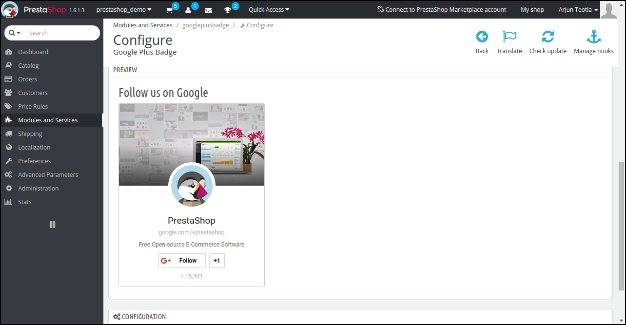
1. To access this Prestashop Google plus badge module, Click on “configure” button of googleplusbadgeage module. On clicking, module interface will be open and following screen will be display as given below:

3.1 Configuration Settings

1. Enable/Disable: To enable the Prestashop google+ badge plugin, switch the enable button from OFF to ON. The default value will be “OFF”.

2. Select Profile: The eCommerce store admin can select profile type here. Person, page or community profile can be selected.

3. URL: Enter the URL of your Google + profile which will be shown on front page.

4. Layout: The store admin can select layout of Google + badge. The default value will be “Portrait”.

5. Width: This is the width of your Google + badge. Default data will be “15” pixels. The store admin can set it as per the requirement.

6. Color Theme: This is the color theme of badge. You can either choose dark theme or light theme. The default value will be “Dark”.

7. Cover Photo: This is the option to add cover photo of your profile on the badge. The default data will be “Enabled”.

8. Tagline: This is the tagline of your badge. The default will be “Enabled”.

9. Language: You can choose any language in which your profile has been made or not. A different language badge will be like below-

4.0 Front Office Interface

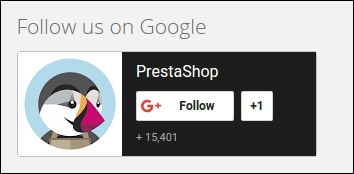
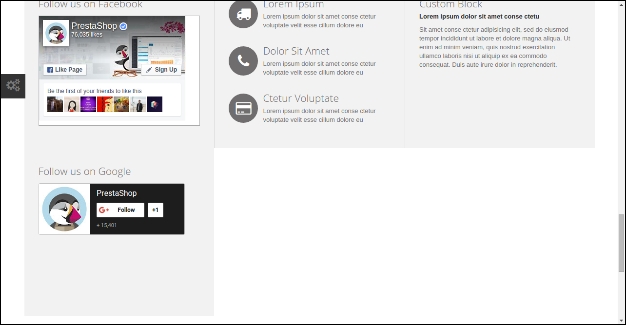
1. Default Settings Interface

2. Steps To improve the front interface:

You can easily improve the interface by unhooking Facebook block from displayHome hook. And add this module to 2nd position by following these simple steps:

a. Open the admin panel of your shop.

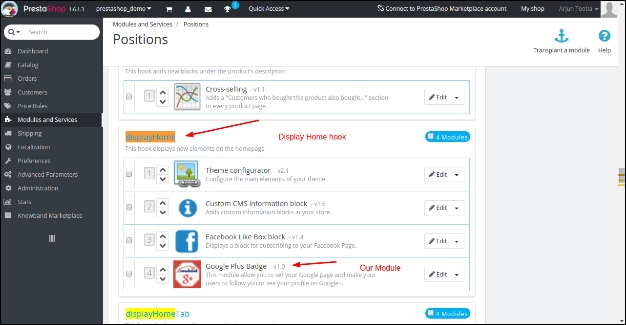
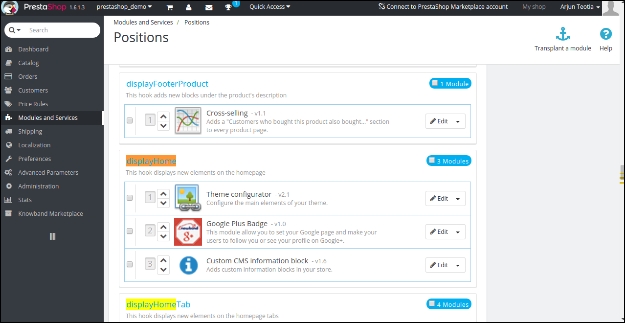
b. Click on positions under Modules and Services in left column. Now you will see a screen like below-

c. Now press ‘ctrl + F’ on your keyboard and search for hook ‘displayHome’. You will see Google plus badge module there in the list.

d. Now drag and drop Google plus badge module to 2nd positions from 4th position.

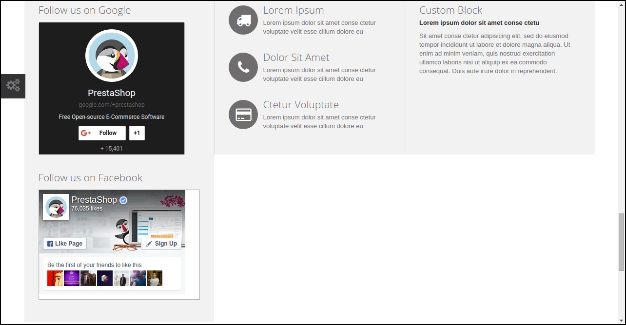
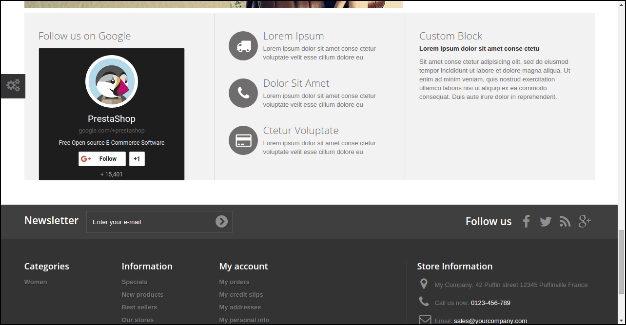
e. Now the front page will be like this-

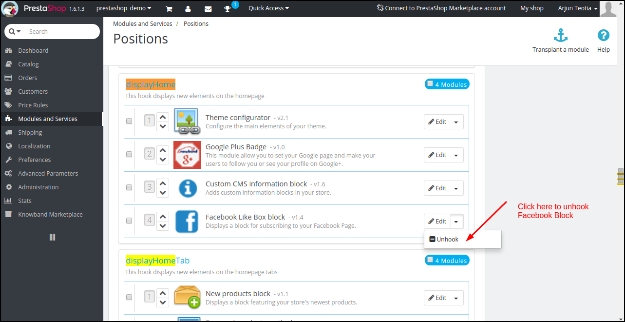
f. You can also remove Facebook block from there. To remove Facebook block follow steps, otherwise, ignore them.

g. Go back again to Positions from step ‘d’. Now click on the options of Facebook block. Click on unhook option there.

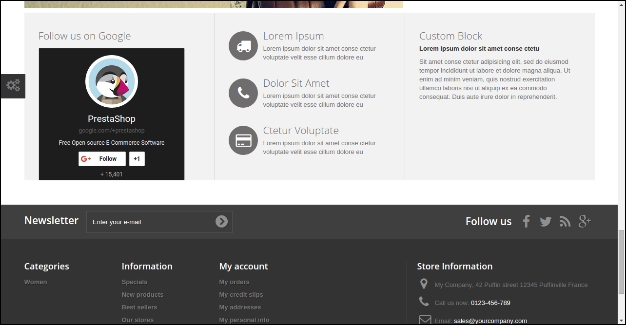
h. Now after removing Facebook block hook, your home page will look more beautiful like below-

3. Without Cover Photo Portrait mode

4. Light theme with portrait

5. With Facebook like box

For more details:

Prestashop Google Plus Badge Module Module Link: https://www.knowband.com/prestashop-google-badge

Prestashop Google Plus Badge Module Admin Demo Link:

https://ps.knowband.com/demo5/16/admin1/index.php?controller=AdminLogin&token=ffa17b0c72ff8c0ab7cf3e344c5ae4fc&redirect=AdminModules&demo_lang=en

Prestashop Google Plus Badge Module Front Demo: https://ps.knowband.com/demo5/16/en/

Prestashop Google Plus Badge Module YouTube video: https://www.youtube.com/watch?v=zJPtS8HnTU4&feature=youtu.be

Knowband Prestashop Google Plus Ausweismodul

Einführung:

Knowband bietet an Prestashop Google + Abzeichen Modul Dies ermöglicht dem eCommerce-Store-Administrator, den Link goggle + profile in einem benutzerdefinierten Block anzuzeigen. Mit dieser Prestashop-Erweiterung kann der Administrator die Community-Seite, die Unternehmensseite oder das persönliche Profil verknüpfen. Dies ist eines der nützlichsten Prestashop-Addons, das hochgradig anpassbar ist. Hier ist eine Vorschau-Option zum Überprüfen von Änderungen aus dem Admin-Panel. Dieses Prestashop Social-Badge-Plugin ist mehrsprachig kompatibel und auch Multi-Store-kompatibel.

Eigenschaften:

  • Eine Vorschauoption ist für Überarbeitungsänderungen verfügbar.
  • Widersprechen Sie keinem anderen Modul von Drittanbietern.
  • Google + Badge für die Website ist vollständig anpassbar Modul.
  • Passen Sie das Google + -Badge-Plug-in individuell an.
  • Der Store-Administrator kann Slogans je nach Bedarf ein- oder ausblenden.
  • Google + Badge für das Website-Addon ist mehrsprachig.
  • Google Plus-Button-Generator-Erweiterung ist vollständig mobil reaktionsfähig.
  • Dieses Google + -Element anpassen ist mit allen Prestashop-Designs kompatibel.
  • Sie können das Erscheinungsbild des Blocks gemäß Ihrem Webseitenthema anpassen.
  • Mit Prestashop Social Badge kann das Titelbild im Block ein- oder ausgeblendet werden.
  • Der Shop-Administrator kann dieses Modul einfach durch einen Knopfwechsel aktivieren / deaktivieren.
  • Mit der Google + Button-Schaltfläche können Administratoren zwischen zwei Farbthemen wählen: Dunkel oder Hell.
  • Google Plus Button Generator ermöglicht dem Administrator aus dem "Portrait" oder "Landscape" Layout zu wählen.
  • Anpassen des Google + -Badge-Addons ermöglicht es dem Administrator, das Unternehmensprofil, die Unternehmensseite oder die Community-Seite zu verknüpfen.

Installationsanleitung

1. Kopieren Sie den Modulordner "googleplusbadgeage" unter Ihrem "root_directory / modules /" Ihres Geschäfts via FTP oder verwenden Sie die Prestashop-Schnittstelle, um das Plugin hochzuladen.

2. Nach dem Kopieren wird das Modul auf der Modullistenseite im Admin-Panel aufgelistet, wie unten gezeigt.

3. Wenn das Modul nicht auf der Seite mit den Modullisten angezeigt wird, suchen Sie es anhand des Filtermoduls mit folgenden Details:

Stichwort: googleplusbadge
Autor: Knowband
Kategorie: Front-Office-Funktion
Filtern nach: Installiert und nicht installiert / Aktiviert und Deaktiviert

Hinweis:

1. Wenn Sie auf die Schaltfläche "Installieren" klicken, wird ein Popup-Fenster angezeigt, in dem Warnmeldungen angezeigt werden. Sie können diese Nachrichten ignorieren und fortfahren. Diese Warnmeldung wird in Ihrem Geschäft nicht negativ beeinflusst.

2. Nach der Installation des Moduls befindet sich eine "configure" -Schaltfläche vor diesem Modul auf der Modulliste, wie im folgenden Bildschirm gezeigt:

Benutzerhandbuch

1. Um darauf zuzugreifen Prestashop Google plus Badge ModulKlicken Sie auf die Schaltfläche "Konfigurieren" des googleplusbadgeage-Moduls. Beim Klicken wird die Modulschnittstelle geöffnet und der folgende Bildschirm wird wie folgt angezeigt:

Konfigurationseinstellungen

1. Aktivieren deaktivieren: Um das Prestashop google + badge-Plugin zu aktivieren, schalten Sie den enable-Button von OFF auf ON. Der Standardwert ist "OFF".

2. Wähle Profil: Der E-Commerce-Shop-Administrator kann hier den Profiltyp auswählen. Person, Seite oder Community-Profil kann ausgewählt werden.

3. URL: Geben Sie die URL Ihres Google + -Profils ein, die auf der ersten Seite angezeigt wird.

4. Layout: Der Shop-Administrator kann das Layout von Google + Badge auswählen. Der Standardwert ist "Portrait".

5. Breite: Dies ist die Breite Ihres Google + Logos. Standarddaten sind "15" -Pixel. Der Store-Administrator kann es entsprechend der Anforderung einstellen.

6. Farbthema: Dies ist das Farbschema von Abzeichen. Sie können entweder ein dunkles oder ein helles Thema wählen. Der Standardwert ist "Dunkel".

7. Titelbild: Dies ist die Option, ein Titelbild Ihres Profils auf dem Abzeichen hinzuzufügen. Die Standarddaten sind "Aktiviert".

8. Schlagzeile: Dies ist der Slogan deines Logos. Die Standardeinstellung ist "Aktiviert".

9. Sprache: Sie können jede Sprache auswählen, in der Ihr Profil erstellt wurde oder nicht. Eine andere Sprache Abzeichen wird wie folgt sein-

Front Office-Schnittstelle

1. Standardeinstellungen Schnittstelle

2. Schritte Um die Frontschnittstelle zu verbessern:

Sie können die Benutzeroberfläche leicht verbessern, indem Sie den Facebook-Block vom displayHome-Hook aushängen. Fügen Sie dieses Modul zur 2nd-Position hinzu, indem Sie die folgenden einfachen Schritte ausführen:

a. Öffnen Sie das Admin-Panel Ihres Shops.

b. Klicken Sie auf Positionen unter Module und Dienste in der linken Spalte. Jetzt sehen Sie einen Bildschirm wie unten-

c. Drücken Sie nun 'ctrl + F' auf Ihrer Tastatur und suchen Sie nach 'displayHome'. Dort sehen Sie das Google Plus-Modul in der Liste.

d. Ziehen Sie jetzt das Google Plus-Modul auf 2nd-Positionen von 4th-Position.

e. Jetzt wird die Titelseite wie folgt sein-

f. Sie können auch Facebook-Block von dort entfernen. Um Facebook Block zu entfernen, folge den Schritten, andernfalls ignoriere sie.

g. Geh zurück zu Positionen von Schritt 'd'. Klicken Sie nun auf die Optionen von Facebook Block. Klicken Sie dort auf die Option "Aushängen".

h. Nach dem Entfernen des Facebook-Block-Hooks wird Ihre Startseite nun schöner aussehen als

3. Ohne Cover Foto-Portrait-Modus

4. Helles Thema mit Porträt

5. Mit Facebook wie Box

Für mehr Details:

Modulhttps://www.knowband.com/prestashop-google-badge

Administrator https://ps.knowband.com/demo5/16/admin1/index.php?controller=AdminLogin&token=ffa17b0c72ff8c0ab7cf3e344c5ae4fc&redirect=AdminModules&demo_lang=en

Vorderseitehttps://ps.knowband.com/demo5/16/en/

Youtube https://www.youtube.com/watch?v=zJPtS8HnTU4&feature=youtu.be

Erweiterung https://addons.prestashop.com/en/social-widgets/21946-knowband-google-plus-badge.html

Bittesupport@knowband.com?for?any?query?or?custom?change?request?as?per?your?business?requirement.

Modulo Badge Google Plus di Knowband Prestashop

Introduzione:

Knowband offerte Prestashop modulo google + badge che consente all'amministratore del negozio eCommerce di mostrare il collegamento goggle + profile in un blocco personalizzato. Questa estensione Prestashop consente all'amministratore di collegare la pagina della comunità, la pagina dell'azienda o il profilo personale. Questo è uno dei componenti aggiuntivi utili di Prestashop che è altamente personalizzabile. Ecco l'opzione di anteprima per la revisione delle modifiche dal pannello di amministrazione. Questo plug-in per social badge Prestashop è compatibile anche con più lingue e compatibile con più negozi.

Caratteristiche:

  • Un'opzione di anteprima è disponibile per le modifiche di revisione.
  • Non entrare in conflitto con nessun altro modulo di terze parti.
  • Il badge Google + per il sito Web è un modulo completamente personalizzabile.
  • Personalizza il plug-in del badge Google + è compatibile con più negozi.
  • L'amministratore del negozio può mostrare o nascondere la tagline secondo le necessità.
  • Il badge Google + per l'addon del sito Web è compatibile con più lingue.
  • L'estensione del generatore di pulsanti di Google Plus è completamente mobile.
  • Questo badge Personalizza Google + è compatibile con tutti i temi Prestashop.
  • Puoi personalizzare l'aspetto del blocco secondo il tema del tuo sito web.
  • Il badge sociale di Prestashop consente di mostrare o nascondere l'immagine di copertina nel blocco.
  • L'amministratore del negozio può facilmente abilitare / disabilitare questo modulo semplicemente attivando o disattivando un pulsante.
  • Il pulsante Google + badge consente all'amministratore di scegliere tra due temi di colore: scuro o chiaro.
  • Il generatore di pulsanti di Google plus consente all'amministratore di scegliere tra il layout "Ritratto" o "Paesaggio".
  • Personalizza l'addon del badge Google + consente all'amministratore di collegare il profilo dell'azienda, la pagina dell'azienda o la pagina della community.

Guida all'installazione

1. Copia la cartella del modulo "googleplusbadgeage" sotto "root_directory / modules /" del tuo negozio via FTP o usa l'interfaccia Prestashop per caricare il plugin.

2. Dopo la copia, il modulo verrà elencato nella pagina di elenco dei moduli nel pannello di amministrazione come mostrato sotto la schermata.

3. Se il modulo non viene visualizzato nella pagina di elenco del modulo, cercarlo filtrando il modulo con i seguenti dettagli:

Parola chiave: googleplusbadge
Autore: Knowband
Categoria: funzione di front-office
Filtra per: Installato e Non installato / Abilitato e Disabilitato

Nota:

1. Quando fai clic sul pulsante Installa, verrà visualizzata una finestra popup che visualizzerà i messaggi di avviso. Puoi ignorare questi messaggi e andare avanti. Non ci sarà alcun impatto negativo di questo messaggio di avviso sul tuo negozio.

2. Dopo aver installato il modulo, un pulsante "Configura" si troverà davanti a questo plugin nella pagina di elenco dei moduli come mostrato nella schermata seguente:

Manuale utente

1. Per accedere a questo Prestashop Modulo Google Plus per badge, Fare clic sul pulsante "Configura" del modulo googleplusbadgeage. Facendo clic, l'interfaccia del modulo sarà aperta e verrà visualizzata la seguente schermata come indicato di seguito:

Impostazioni di configurazione

1. Attiva / Disattiva: Per abilitare il plug-in del badge google + di Prestashop, attiva il pulsante di attivazione da OFF a ON. Il valore predefinito sarà "OFF".

2. Seleziona profilo: L'amministratore del negozio eCommerce può selezionare qui il tipo di profilo. È possibile selezionare la persona, la pagina o il profilo della comunità.

3. URL: Inserisci l'URL del tuo profilo Google + che verrà mostrato in prima pagina.

4. Disposizione: L'amministratore del negozio può selezionare il layout del badge Google +. Il valore predefinito sarà "Ritratto".

. Larghezza 5: Questa è la larghezza del tuo badge Google +. I dati predefiniti saranno pixel "15". L'amministratore del negozio può impostarlo secondo il requisito.

6. Tema di colore: Questo è il tema del colore del badge. Puoi scegliere il tema scuro o il tema della luce. Il valore predefinito sarà "Scuro".

7. Foto di copertina: Questa è l'opzione per aggiungere una foto di copertina del tuo profilo sul badge. I dati predefiniti saranno "Abilitati".

8. Messaggio personale: Questa è la tagline del tuo badge. Il valore predefinito sarà "Abilitato".

9. Linguaggio: Puoi scegliere qualsiasi lingua in cui il tuo profilo è stato creato o meno. Un distintivo di lingua diverso sarà come sotto-

Interfaccia di front office

1. Interfaccia impostazioni predefinite

2. Passi Per migliorare l'interfaccia frontale:

Puoi facilmente migliorare l'interfaccia sganciare il blocco di Facebook dal gancio displayHome. E aggiungi questo modulo alla posizione 2nd seguendo questi semplici passaggi:

a. Apri il pannello di amministrazione del tuo negozio.

b. Clicca sulle posizioni sotto Moduli e Servizi nella colonna di sinistra. Ora vedrai una schermata come sotto-

c. Ora premi "ctrl + F" sulla tastiera e cerca "displayHome". Nell'elenco apparirà il modulo di Google Plus.

d. Ora trascina e rilascia il modulo badge Google Plus sulle posizioni 2nd dalla posizione 4th.

e. Ora la prima pagina sarà così-

f. Puoi anche rimuovere il blocco di Facebook da lì. Per rimuovere il blocco di Facebook segui i passaggi, altrimenti, ignorali.

g. Torna di nuovo alle posizioni del passaggio 'd'. Ora fai clic sulle opzioni del blocco di Facebook. Fai clic sull'opzione sgancia lì.

h. Ora dopo aver rimosso il blocco del blocco di Facebook, la tua home page apparirà più bella come sotto-

3. Senza modalità Foto di copertina

4. Tema leggero con ritratto

5. Con la scatola di Facebook

Per ulteriori dettagli:

Modulohttps://www.knowband.com/prestashop-google-badge

Admin https://ps.knowband.com/demo5/16/admin1/index.php?controller=AdminLogin&token=ffa17b0c72ff8c0ab7cf3e344c5ae4fc&redirect=AdminModules&demo_lang=en

Davantihttps://ps.knowband.com/demo5/16/en/

Youtube https://www.youtube.com/watch?v=zJPtS8HnTU4&feature=youtu.be

Aggiungi su https://addons.prestashop.com/en/social-widgets/21946-knowband-google-plus-badge.html

per favoresupport@knowband.com?for?any?query?or?custom?change?request?as?per?your?business?requirement.

Knowband Prestashop Moduł plakietki Google Plus

Wstęp:

Knowband oferuje Prestashop google + moduł odznak co pozwala administratorowi sklepu eCommerce wyświetlać link do gogli + profilu w niestandardowym bloku. To rozszerzenie Prestashop umożliwia administratorowi powiązanie strony wspólnoty, strony firmy lub profilu osobistego. Jest to jeden z najbardziej użytecznych dodatków Prestashop, który można w dużym stopniu dostosować. Tutaj jest opcja podglądu do przeglądania zmian z panelu administracyjnego. Ta wtyczka społecznościowa Prestashop jest kompatybilna z wieloma językami i kompatybilna z wieloma sklepami.

Cechy:

  • Opcja podglądu jest dostępna dla zmian opinii.
  • Nie wchodź w konflikt z żadnym innym modułem strony trzeciej.
  • Plakietka Google + dla witryny jest w pełni konfigurowalnym modułem.
  • Dostosuj wtyczkę Google + do identyfikatorów jest zgodna z wieloma sklepami.
  • Administrator sklepu może pokazać lub ukryć slogan zgodnie z potrzebami.
  • Plakietka Google + do dodatku do strony jest kompatybilna z wieloma językami.
  • Rozszerzenie generatora przycisków Google plus jest w pełni mobilne.
  • Ta plakietka Dostosuj Google + jest zgodna ze wszystkimi motywami Prestashop.
  • Możesz dostosować wygląd i styl bloku zgodnie z motywem witryny.
  • Znaczek społecznościowy Prestashop pozwala pokazać lub ukryć zdjęcie na okładce w bloku.
  • Administrator sklepu może łatwo włączyć / wyłączyć ten moduł za pomocą przełącznika przycisku.
  • Przycisk Google + znaczek umożliwia administratorowi wybór spośród dwóch kolorów – Ciemnego lub Jasnego.
  • Generator przycisku Google plus pozwala administratorowi wybrać układ "Portret" lub "Krajobraz".
  • Dostosuj dodatek do identyfikatora Google + umożliwia administratorowi powiązanie profilu firmy, strony firmy lub strony społeczności.

Instrukcja instalacji

1. Skopiuj folder modułu "googleplusbadgeage" do katalogu "root_directory / modules /" swojego sklepu za pomocą FTP lub użyj interfejsu Prestashop, aby przesłać wtyczkę.

2. Po skopiowaniu moduł pojawi się na stronie z listą modułów w panelu administracyjnym, jak pokazano poniżej na ekranie.

3. Jeśli moduł nie wyświetla się na stronie z listą modułów, wyszukaj go, filtrując następujące szczegóły:

słowo kluczowe: googleplusbadge
Autor: Knowband
Kategoria: funkcja front-office
Przefiltrować przez: Zainstalowany i niezainstalowany / włączony i wyłączony

Uwaga:

1. Po kliknięciu przycisku instalacji pojawi się wyskakujące okienko z komunikatami ostrzegawczymi. Możesz zignorować te wiadomości i iść naprzód. Nie będzie negatywnego wpływu tego komunikatu ostrzegawczego na Twój sklep.

2. Po zainstalowaniu modułu przed tą wtyczką na stronie z listą modułów pojawi się przycisk "configure", jak pokazano na poniższym ekranie:

Instrukcja obsługi

1. Aby uzyskać dostęp do tego Prestashop Google plus moduł odznak, Kliknij przycisk "configure" modułu googleplusbadgeage. Po kliknięciu interfejs modułu zostanie otwarty i wyświetli następujący ekran:

Ustawienia konfiguracji

1. Włącz / wyłącz: Aby włączyć wtyczkę Badoo + Prestashop, przełącz przycisk włączania z OFF na ON. Domyślną wartością będzie "OFF".

2. Wybierz profil: Administrator sklepu eCommerce może tutaj wybrać typ profilu. Można wybrać osobę, stronę lub profil społeczności.

3. URL: Wprowadź adres URL swojego profilu Google +, który będzie wyświetlany na stronie głównej.

4. Układ: Administrator sklepu może wybrać układ logo Google +. Wartością domyślną będzie "Portret".

5. Szerokość: To jest szerokość Twojej plakietki Google +. Domyślne dane będą pikselami "15". Administrator sklepu może ustawić go zgodnie z wymaganiami.

6. Motyw kolorystyczny: To jest motyw kolorystyczny odznaki. Możesz wybrać ciemny motyw lub jasny motyw. Domyślną wartością będzie "Dark".

7. Zdjęcie na okładce: To jest opcja dodania zdjęcia okładki swojego profilu na plakietce. Domyślne dane będą "Włączone".

8. Tagline: To jest slogan twojej odznaki. Wartością domyślną będzie "Enabled".

9. Język: Możesz wybrać dowolny język, w którym został utworzony Twój profil. Inna plakietka językowa będzie poniżej:

Interfejs Front Office

1. Domyślny interfejs ustawień

2. Kroki Aby poprawić interfejs przedni:

Możesz łatwo ulepszyć interfejs, odrygowując blok Facebooka od displayHome hook. Dodaj ten moduł do pozycji 2nd, wykonując następujące proste czynności:

a. Otwórz panel administracyjny swojego sklepu.

b. Kliknij pozycje w obszarze Moduły i usługi w lewej kolumnie. Teraz zobaczysz ekran taki jak poniżej

c. Teraz naciśnij "ctrl + F" na klawiaturze i wyszukaj hook "displayHome". Na liście pojawi się moduł Google plus znaczek.

d. Teraz przeciągnij i upuść moduł Google plus znaczek do 2 pozycji z pozycji 4.

e. Teraz strona główna będzie taka:

f. Możesz także usunąć blok Facebook z tego miejsca. Aby usunąć blok Facebooka wykonaj następujące kroki, w przeciwnym razie zignoruj ​​je.

g. Wróć z powrotem do pozycji z kroku "d". Teraz kliknij opcje bloku Facebook. Kliknij tam opcję Odłącz.

h. Teraz po usunięciu haka blokującego Facebooka twoja strona główna będzie wyglądać piękniej jak poniżej

3. Bez trybu portretu z osłoną

4. Jasny motyw z portretem

5. Z polem podobnym do Facebooka

Po więcej szczegółów:

Modułhttps://www.knowband.com/prestashop-google-badge

Admin https://ps.knowband.com/demo5/16/admin1/index.php?controller=AdminLogin&token=ffa17b0c72ff8c0ab7cf3e344c5ae4fc&redirect=AdminModules&demo_lang=en

Z przoduhttps://ps.knowband.com/demo5/16/en/

Youtube https://www.youtube.com/watch?v=zJPtS8HnTU4&feature=youtu.be

Dodatek https://addons.prestashop.com/en/social-widgets/21946-knowband-google-plus-badge.html

Proszęsupport@knowband.com?for?any?query?or?custom?change?request?as?per?your?business?requirement.

Knowband Prestashop Google Plus Badge Module

Introdução:

Banda de conhecimento ofertas Prestashop google + módulo de crachá que permite que o administrador da loja de comércio eletrônico exiba o link goggle + profile em um bloco personalizado. Esta extensão Prestashop permite que o administrador vincule a página da comunidade, a página da empresa ou o perfil pessoal. Este é um dos addons Prestashop mais úteis, altamente personalizáveis. Aqui está a opção de visualização para revisar as alterações do painel de administração. Este plugin de distintivo social Prestashop é compatível com vários idiomas e multi-store também.

Características:

  • Uma opção de visualização está disponível para alterações de revisão.
  • Não entre em conflito com nenhum outro módulo de terceiros.
  • O emblema do Google + para o site é um módulo totalmente personalizável.
  • O plug-in de personalização do emblema do Google + é compatível com várias lojas.
  • O administrador da loja pode mostrar ou ocultar o slogan de acordo com a necessidade.
  • O emblema do Google + para o site addon é compatível com vários idiomas.
  • A extensão do gerador de botões do Google plus é totalmente responsiva para dispositivos móveis.
  • Este emblema Personalizar do Google + é compatível com todos os temas do Prestashop.
  • Você pode personalizar a aparência do bloco de acordo com o tema do site.
  • Crachá social Prestashop permite mostrar ou ocultar a imagem da capa no bloco.
  • O administrador da loja pode facilmente ativar / desativar este módulo apenas com um botão.
  • O botão de crachá do Google + permite que o administrador selecione entre dois temas de cores – Escuro ou Claro.
  • O gerador de botões do Google plus permite que o administrador escolha o layout "Retrato" ou "Paisagem".
  • Personalizar o add-in de crachá do Google+ permite que o administrador vincule o perfil da empresa, a página da empresa ou a página da comunidade.

Guia de Instalação

1. Copie a pasta do módulo "googleplusbadgeage" no diretório "root_directory / modules /" da sua loja via FTP ou use a interface Prestashop para fazer o upload do plugin.

2. Após a cópia, o módulo será listado na página de listagem do módulo no painel de administração, conforme mostrado abaixo da tela.

3. Se o módulo não estiver sendo exibido na página de listagem de módulos, pesquise-o pelo módulo de filtragem com os seguintes detalhes:

Palavra-chave: googleplusbadge
Autor: Banda de conhecimento
Categoria: recurso de front-office
Filtrar por: Instalado e não instalado / ativado e desativado

Nota:

1. Quando você clicar no botão de instalação, aparecerá uma caixa pop-up que exibirá as mensagens de aviso. Você pode ignorar essas mensagens e seguir em frente. Não haverá impacto negativo dessa mensagem de aviso em sua loja.

2. Depois de instalar o módulo, um botão "configure" estará na frente deste plugin na página de listagem de módulos, como mostrado na tela abaixo:

Manual do usuário

1. Para acessar este Prestashop Google plus módulo de crachá, Clique no botão "configurar" do módulo googleplusbadgeage. Ao clicar, a interface do módulo será aberta e a tela seguinte será exibida conforme abaixo:

Definições de configuração

1. Habilitar desabilitar: Para ativar o plug-in Prestashop google + badge, alterne o botão de ativação de OFF para ON. O valor padrão será "OFF".

2. Selecione o perfil: O administrador da loja de comércio eletrônico pode selecionar o tipo de perfil aqui. Pessoa, página ou perfil da comunidade podem ser selecionados.

3. URL: Insira o URL do seu perfil do Google +, que será exibido na primeira página.

4. Layout: O administrador da loja pode selecionar o layout do Google +. O valor padrão será "Portrait".

. 5 Largura: Esta é a largura do seu emblema do Google +. Os dados padrão serão "15" pixels. O administrador da loja pode configurá-lo conforme o requisito.

6. Tema de cor: Este é o tema de cor do distintivo. Você pode escolher tema escuro ou tema claro. O valor padrão será "Dark".

7. Foto de capa: Esta é a opção de adicionar uma foto de capa do seu perfil no selo. Os dados padrão serão "Ativados".

8. Tagline: Este é o slogan do seu crachá. O padrão será "Ativado".

9. Língua: Você pode escolher qualquer idioma em que seu perfil foi criado ou não. Um distintivo de idioma diferente será como abaixo-

Interface Front Office

1. Interface de configurações padrão

2. Passos Para melhorar a interface frontal:

Você pode facilmente melhorar a interface, desconectando o bloco do Facebook do gancho displayHome. E adicione este módulo à posição 2nd seguindo estes passos simples:

a. Abra o painel de administração da sua loja.

b. Clique nas posições em Módulos e Serviços na coluna da esquerda. Agora você verá uma tela como abaixo

c. Agora pressione 'ctrl + F' no seu teclado e procure por hook 'displayHome'. Você verá o Google e o módulo de crachá na lista.

d. Agora, arraste e solte o Google mais o módulo de crachá para 2nd posições da posição 4th.

e. Agora a primeira página será assim:

f. Você também pode remover o bloco do Facebook de lá. Para remover o bloco do Facebook, siga as etapas, caso contrário, ignore-as.

g. Volte novamente para Posições do passo 'd'. Agora clique nas opções do bloco do Facebook. Clique na opção unhook lá.

h. Agora, depois de remover o bloqueio do bloco do Facebook, sua home page ficará mais bonita como abaixo.

3. Sem o modo de retrato de capa

4. Tema claro com retrato

5. Com o Facebook como caixa

Para mais detalhes:

Módulohttps://www.knowband.com/prestashop-google-badge

Admin https://ps.knowband.com/demo5/16/admin1/index.php?controller=AdminLogin&token=ffa17b0c72ff8c0ab7cf3e344c5ae4fc&redirect=AdminModules&demo_lang=en

Frentehttps://ps.knowband.com/demo5/16/en/

Youtube https://www.youtube.com/watch?v=zJPtS8HnTU4&feature=youtu.be

Adicionar https://addons.prestashop.com/en/social-widgets/21946-knowband-google-plus-badge.html

Por favorsupport@knowband.com?for?any?query?or?custom?change?request?as?per?your?business?requirement.