Prestashop Abandonn? Panier

Avec ce module install sur votre server web, vous pourrez faire l’exp rience de baisse vers le bas dans le panier taux d’abandon. Envoyant des courriels de rappel, vous serez en mesure de suivi avec les perspectives qui n’a pas r ussi compl ter l’achat et ont quitt leur panier leaven . Prestashop Abandonn panier vous permet d’envoyer des mails suivre sur mesure jusqu’ la fin de retour. Pour attirer les customers, propri taire du magasin peut m me envoyer des offres ou des remizy Promotionnelles ajout´s dans les e-mails de rappel.

Envoyant ces courriels de rappel, vous serez en mesure de montrer aux klienci komentarz vous tes profond ment pr occup et cela vous permettra de b tir la confiance forte et la fid lit des customers pour votre entreprise. Les customers se sentent appr ci’s avec le fait que vous leur valeur et essayez de r gler les chooses. Avec ce sentyment, ils pourraient prendre une d cision d’achat de votre magasin.

Caract ristiques de Prestashop Abandonn Panier e-maile de r cup ration

  • Envoyer des e-mails de r cup ration pour amener les customers revenir
  • Permettre aux customers de r cup rer automatiquement leurs chariots
  • Dołącz les d tails commerciaux panier dans les e-mails de rappel

Caract ristiques pour admin magasin

  • Cr ez votre propre mod le e-mail en utilisant du texte, des images, HTML, etc.
  • Admin peut facilement acc der des informations sur les commandes leaven es et num ro de commande
  • Admin a le contr le total de rappels envoy s, c.- -administrateur peut d cider apr s combien de temps panier sera pris comme canceln et peut galement d finir le temps de retard pour envoyer des mails
  • Possibilit de personnaliser mod le de courrier lectronique en ajoutant des variable personnalis es comme le nom du client, des informations produit, r ductions et offres dans le mod le de courrier lectronique.
  • Gérez facilement et voir toutes les entrées de panier leaven’s, c.-é-administrateur peut surveiller les performances en fonction du nombre total de chariots qui ont ‘t’ converties en ventes et commander.

Pourquoi est-il n cessaire d’installer Prestashop Abandonn panier Addon sur votre magasin

Prestashop Abandonn panier module permet d’attirer les visiteurs votre magasin pour compl ter le processus de commande. Un courrier d’alerte est envoy au compte du client qui lui donne / elle des informations d taill es sur les commandes en cours. La fonctionnalit de ce module vous permet de r cup rer les ventes de commandes qui se loigna avant de partir.

korzyści

  • Augmenter les conversions en r cup rant les ventes perdues
  • Augmenter la fid lit des customers
  • Augmenter le retour sur investissement pour votre entreprise

Installez ce module pour faire baisser les taux d’abandon de panier sur votre magasin en mettant en place un solide panier strat gie de r tablissement.

Prestashop Abandonn? Panier

Com o módulo instalado no seu servidor web, vous pourrez faire l’experience de baisse vers le bas dans le panier taux d’abandon. En envoyant des courriels de rappel, vous serez en mesure de suivi avec les perspectives qui n’a pas r ussi compl ter l’achat et ont quitt leur panier abandonn . Prestashop Abandonn panier vous permet d’envoyer des mails suivre sur mesure jusqu’ la fin de retour. Pour attirer les clients, propri taire du magasin peut m me envoyer des offres ou des remises promotionnelles ajout s dans les e-mails de rappel.

En envoyant ces courriels de rappel, vous serez en mesure de montrer aux clients comment vous tes profond ment pr occup et cela vous permettra de b tir la confiance forte et la fid lit des clients pour votre entreprise. Os clientes se sentent appr ci s avec le fait que vous leur valeur et essayez de r gler les choses. Avec ce sentiment, ils pourraient prendre une d cision d’achat de votre magasin.

Caract ristiques de Prestashop Abandonn Panier e-mails de rcup ration

  • Envoyer des e-mails de r cup ration pour amener les clients revenir
  • Permettre aux clients de r cup rer automatiquement leurs chariots
  • Inclure les d tails commerciaux panier dans les e-mails de rapel

Caract ristiques pour admin magasin

  • Crez votre propre mod le e-mail en utilisant du texte, des images, HTML, etc.
  • Admin peut facilement acder des informações sobre os comandos abandonn es et num ro de commande
  • Admin a le contr le total de rappels envoy s, c.- -administrateur peut d cider apr s combien de temps panier sera pris comme abandonn et peut galement d finir le temps de retard pour envoyer des mails
  • Possibilit de personnaliser mod le de courrier lectronique en ajoutant des variables personnalis es comme le nom du client, des informações produit, r ductions et offres dans le mod le de courrier lectronique.
  • G rez facilement et voir toutes les entr es de panier abandonn s, c.- -administrateur peut vigililler les performances en fonction du nombre total de chariots qui ont t converties en ventes et commander.

Pourquoi est-il n cessaire d’installer Prestashop Abandonn panier Addon sur votre magasin

Prestashop Abandonn panier módulo permet d’attirer les visiteurs votre magasin pour compl ter le processus de commande. Un courrier d’alerte est enviado au compte du cliente qui lui donne / elle des informations d taill es sur les commandes en cours. La fonctionnalit de ce módulo vous permet de r cup rer les ventes de commandes qui se loigna avant de partir.

benefícios

  • Aumentar as conversões en r cup rant les ventes perdues
  • Augmenter la fid lit des clients
  • Augmenter le retour sur investissement pour votre entreprise

Módulo de instalação para fazer baisser les taux d’abandon de panier sur votre magasin en mettant en place un solide panier strat gie de r tablissement.

Comment obtenir ID client et Instagram détails secrets du client?

Instagram est l’une des photos et le partage d’images site de réseautage social le plus populaire qui a été pris en charge par Facebook en 2012. La société milliards de dollars a une énorme base d’utilisateurs, plus de 600 millions pour être précis.

La plate – forme de réseau social fournit une API qui est utilisée par les développeurs pour développer des solutions de connexion sociaux pour différentes plates – formes commePrestaShop , OpenCart et Magento , etc.

Pour utiliser une connexion sociale Instagram sur votre site, tout d’abord, vous aurez besoin d’ un module de connexion sociale ( PrestaShop , OpenCart , ou Magento ), puis les détails API suivantes pour configurer Instagram le module:

  • ID client instagram
  • Instagram client secret

Comment obtenir ces détails API Instagram?

Vous devez suivre ces étapes rapides vers les détails de l’API.

Étape 1: La première étape consiste à aller à Instagram Developer Network page, puis en cliquant sur Enregistrer un nouveau client bouton en haut à droite de la page.

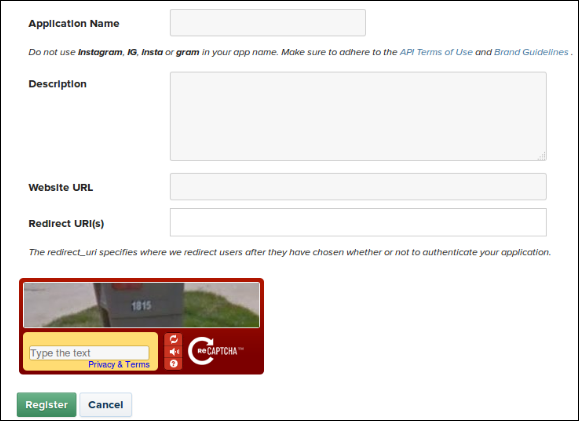
Étape 2: Ensuite, remplissez le formulaire suivant qui demande:

  • Nom de l’ application: Nom de l’application pour laquelle vous extrayez les détails de l’ API.Dans notre cas, il serait « connexion sociale ».
  • Description: Une brève description de l’application.
  • URL du site: URL complète du site vous. Dites, https://yoursite.com

Étape 3: Définir votre URL Redirect

Si vous utilisez notre module de Loginizer Social ( PrestaShop , OpenCart ou Magento ) et URL SEO Friendly pour votre magasin utilisez ce pour l’ URL de redirection –

https://www.yourstore.com/module/socialloginizer/instagram

Dans le cas contraire, utilisez ce –

https://www.yourstore.com/index.php?fc=module&module=socialloginizer&controller=instagram

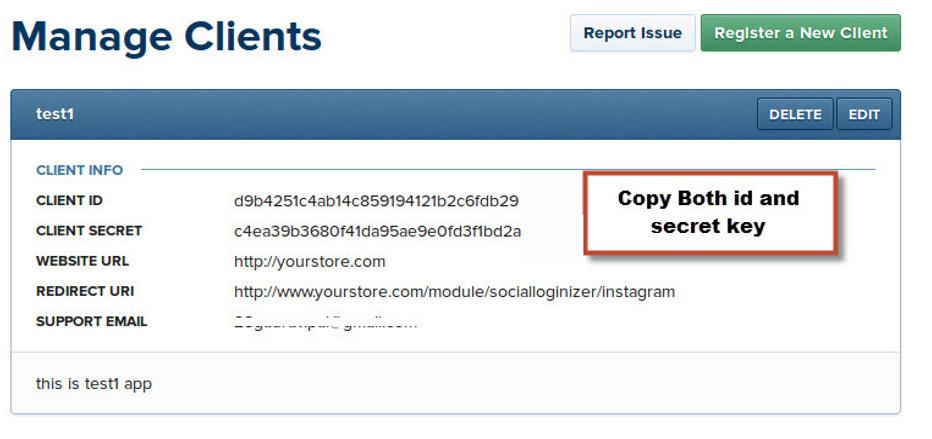
Étape 4: Après avoir rempli le formulaire, cliquez sur  Inscription bouton pour obtenir les détails de l’ API. Copier et coller ID client et secret client dans le panneau d’administration de votre plug-in.

En cas de vous utilisez notre module Loginizer social pour PrestaShop , OpenCart ou Magento , l’écran pour entrer dans les détails de l’ API ressemblera à quelque chose comme ça.

Après avoir rempli ces détails dans le champ spécifié dans votre module / plugin, vous pouvez utiliser les détails pour permettre à vos clients Connectez-vous à votre magasin en utilisant leur compte Instagram.

How to get Yahoo App ID, Consumer Key, and Consumer Secret?

Yahoo is one of the popular email services across the globe. According to a stat, there were total 225 million Yahoo users as in February 2017. This is really a huge base of users. I am certain that a large number of users on your online store must be having a Yahoo account.  You can leverage this base of users to allow a social login option using Yahoo account. In this way, you will have a quite engaging sign-up experience on your site.
To use Yahoo social login on your store you can use a Social login module that can integrate this feature. Before doing that, you will also need the following Yahoo API details to configure the Yahoo social login:

  • Yahoo Consumer Key
  • Yahoo Consumer Secret

How to get these Yahoo API details?

Follow these steps to get the Yahoo consumer key and consumer secret.

Step 1: The first step would be to visit the Yahoo Developer Network, where you need to follow the following steps.

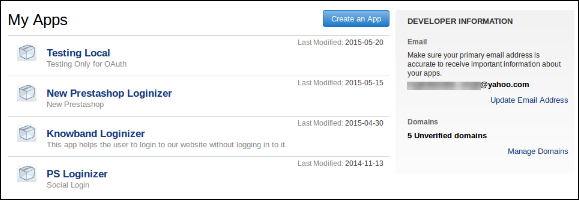
Step 2: As soon as you visit the Yahoo Developer Network, Click on Create an App button to proceed with the further steps.

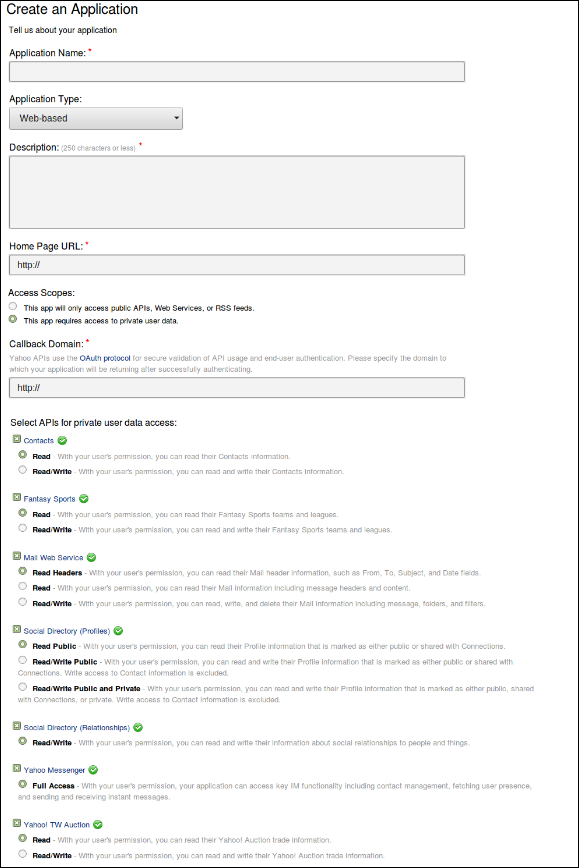
Step 3: Fill the required details as per instructions. Home URL will be your Store URL. Call back domain would be your domain name example, yoursite.com

In case you are using our Social Loginizer module (for PrestaShop, OpenCart, or Magento) and have enabled the SEO Friendly URL, then use this for callback domain:

https://www.yourstore.com/module/socialloginizer/yahoo

Otherwise, use this –

https://www.yourstore.com/index.php?fc=module&module=socialloginizer&controller=yahoo

Please make sure that the permissions for the app are properly selected in Select APIs for private user data access while creating the App as shown in the image above.

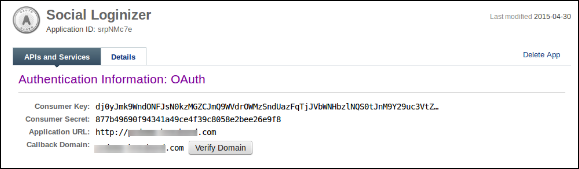
Step 4: Once the application is created you can copy your Consumer Key and Consumer Secret. From APIs and Services tab.

Step 5: Now you can use these Yahoo API details to let your customers log in to your store using their Yahoo Account.

In case you are using our Social Loginizer module (PrestaShop, OpenCart, or Magento), you can easily paste your copied API details in the specified fields as show in the image below and save the settings.

Liked This? You’ll Like These Too

How to get WordPress API details- Client ID and Client Secret?

WordPress is basically a very popular Content Management System that is used by millions of users for developing a website or a blog. A social login option via WordPress account can be integrated with a proper module or extension. But before you can start accepting WordPress login on your site, you need the following WordPress API details, Client ID and Client Secret:

  • WordPress Client ID and
  • WordPress Client Secret

You can easily get these details from the WordPress Developer network by following these steps.

Step to get WordPress API details, Client ID and Client Secret

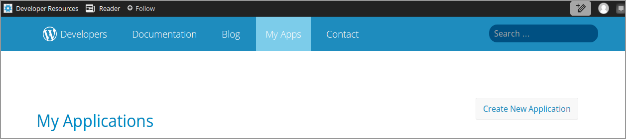
Step 1: Simply visit the WordPress Developer Website.

Step 2: On the first screen, you will get an option to create your App. Click on the Create New Application button and provide a Name for Application.

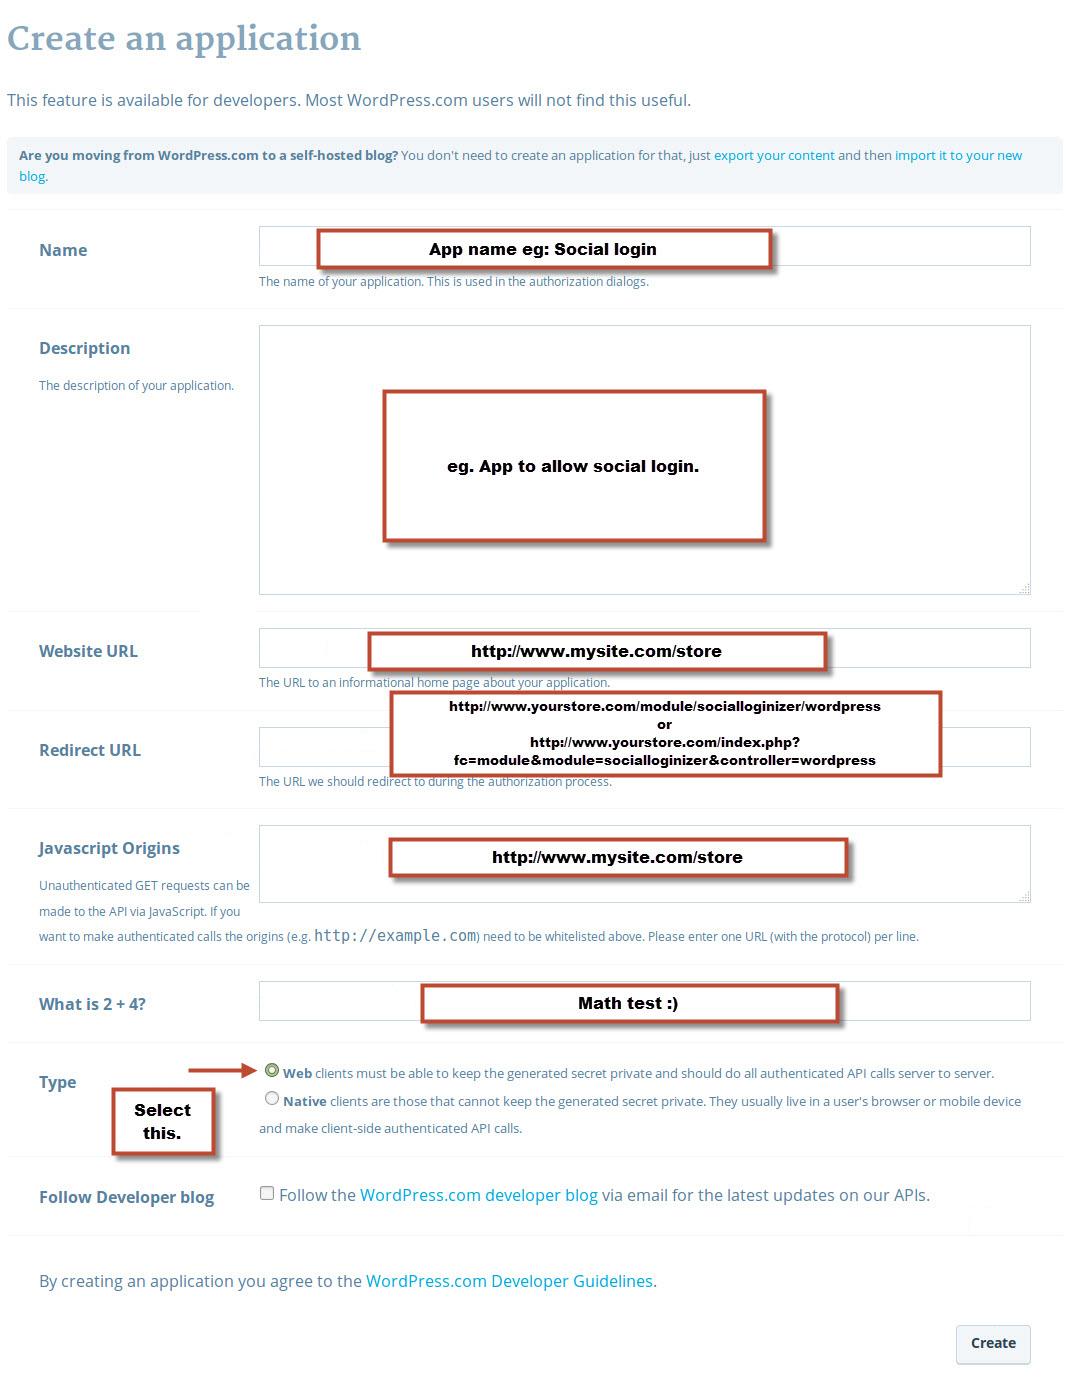
Step 3: Fill up the other details in the page and save the application. The details include:

  • Name of your Application
  • Description of your App
  • You website URL
  • Redirect URL

For example, In case you are using our social loginizer module (PrestaShop, OpenCart, or Magento) and SEO Friendly URL for your store then use this for redirect URL –

https://www.yourstore.com/module/socialloginizer/wordpress

Otherwise, use this –

https://www.yourstore.com/index.php?fc=module&module=socialloginizer&controller=wordpress

Step 4: After filling up the details, click Create button.

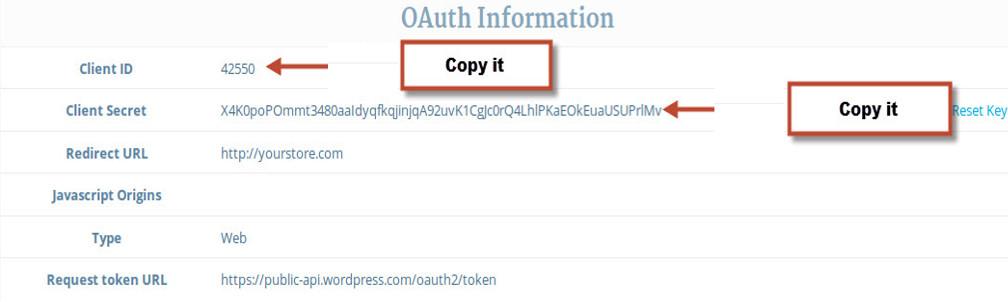
Step 5: On the next screen you will get the API details. Copy and Paste the credentials in plugin admin console.

If you want to use these API details to set up a WordPress login on your store, you can copy and paste these details on your social login module. For example,  in case you are using our social loginizer module (for PrestaShop, OpenCart, or Magento) the configuration screen looks something like this:

Liked This? You’ll Like These Too

How to get Windows Live Client ID and Client Secret key?

Windows live is an email service that is owned by Microsoft. A large number of users use this platform and have a user account on it. In addition to other popular social networks like, Facebook, Google Plus, Twitter, and Linked In, Live would also be a useful addition to your website’s social login options.

To use this platform as a social login option on your OpenCart, PrestaShop, Magento, or any other eCommerce or CMS platform, you need the following Windows Live API details.

  • Live Client ID and
  • Live Client Secret Key

To get these details you can follow this step by step guide.

Steps to get Windows live API details

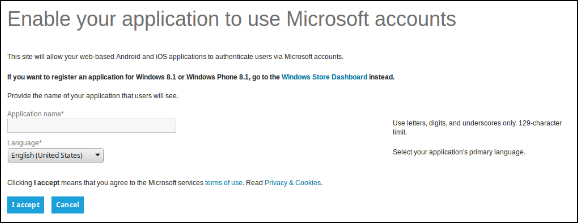
Step 1: You need to first go to Microsoft Development Center website to continue with the steps.

Step 2: In the next interface,  enter your Application name and click I Accept button. Here, we are using the Social Loginizer Module as the application.

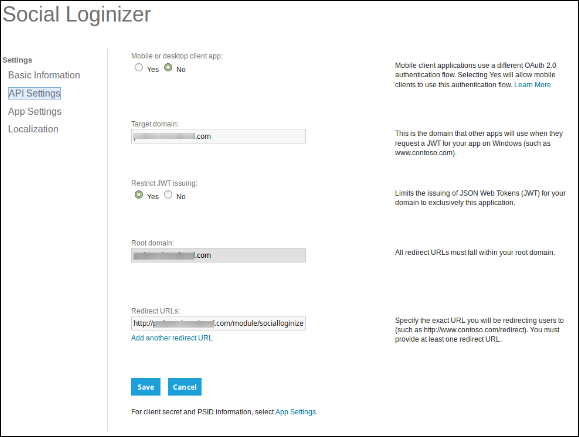
Step 3: On the next page, from the left menu, select API Settings.

Step 4: Next, provide your store domain and Loginizer Redirect URL. For example, if you are using our Social Loginizer module and have enabled SEO friendly URL too, then enter like this:

https://www.yourrstore.com/module/socialloginizer/live

In Target Domain option, enter your domain name  for example:-

https://www.yourrstore.com

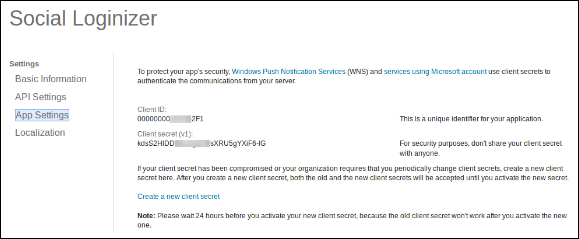
Step 5: Again, from the left menu, click App Settings option and copy your Client ID and Client Secret key.

Step 6: Now you can use the details that you have just got to let your customers log in to your store using their Live or Microsoft Account.In case you are using our Social Loginizer module (for PrestaShop, OpenCart, or Magento) then you can configure the API detail in the following interface in the module’s setting.

Liked This? You’ll Like These Too

How to get PayPal API Client ID and Client Secret?

Paypal is one of the most popular and safest payment gateway interface used by millions of users across the globe. From business accounts to individual accounts there are a huge number of PayPal users everywhere.

Are you thinking about using PayPal as one of the social login options on your site?

You have come to the right place. This article aims to educate the readers about how to use PayPal as a social login option. To use PayPal social login, you need to install a social login module on your store. You can check out the modules available for PrestaShop, OpenCart, and Magento here.  After installing the module, you need the following PayPal API details to configure the social login.

  • Paypal Client ID
  • Paypal client secret

The steps to obtain PayPal API, Client ID and Client Secret are discussed below

Steps to get Paypal API, Client ID and Client Secret

Step 1: First of all, visit Paypal Developer Network, and on the screen that appears, Login to the dashboard.

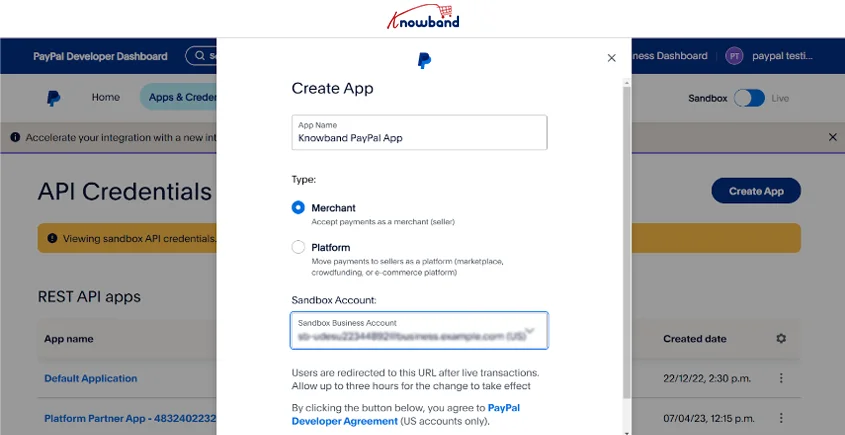
After successful log-in, you will be able to access the dashboard. Click on Create App button.

Step 2: Here is “Application details”, enter the name of your Application and click Create App Button.

Step 3: Make needful changes and save the settings. You will get the Client ID, Sandbox account details, and Secret Key on the next page. Please don’t forget to select the Login with Paypal option also.


Step 4: Set App return URL (live) as plugin redirect page URL of your store. In case you are using our Social login module (PrestaShop, OpenCart, or Magento) with SEO Friendly URL for your store, then use this for redirect URL –

https://www.yourstore.com/module/socialloginizer/paypal

Otherwise, use this –

https://www.yourstore.com/index.php?fc=module&module=socialloginizer&controller=paypal

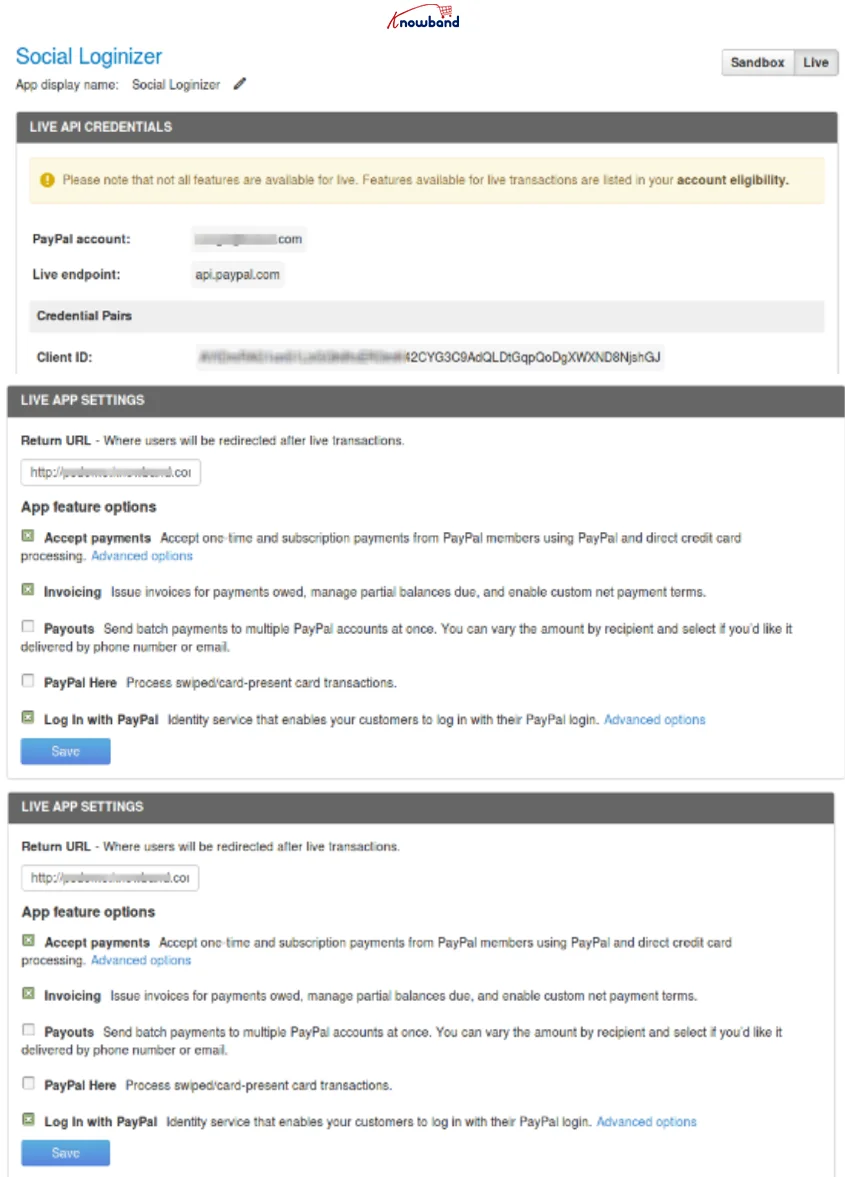
On this page itself, you will get the Client Id and Client Secret in LIVE API CREDENTIALS section. However, you cannot use them until you complete step 5.

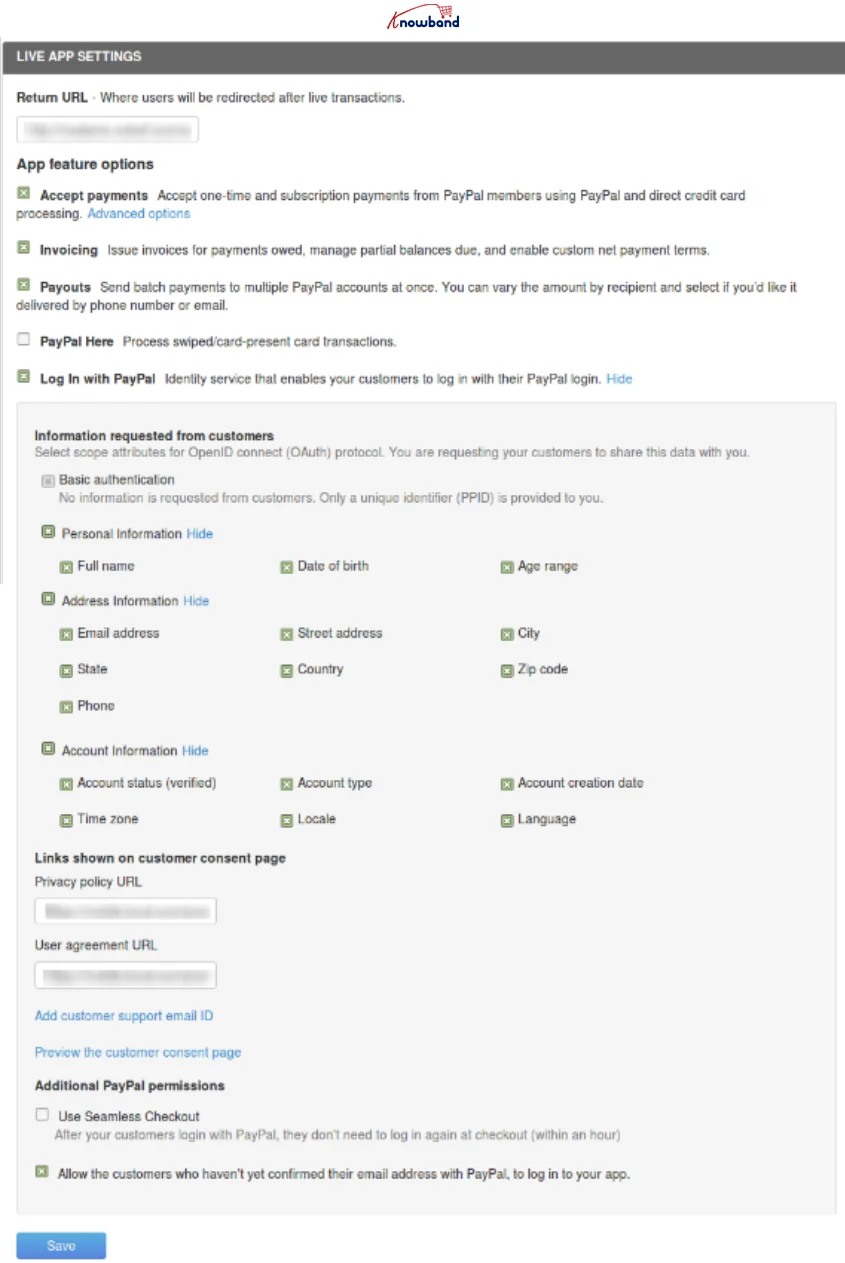
Step 5: Make sure that the live APIs are selected in the LIVE APP SETTINGS tab completely as shown below:

Step 6: Now when you have correctly selected the live APIs, you can use the client secret and client ID to let your customers log in to your store using their PayPal account.

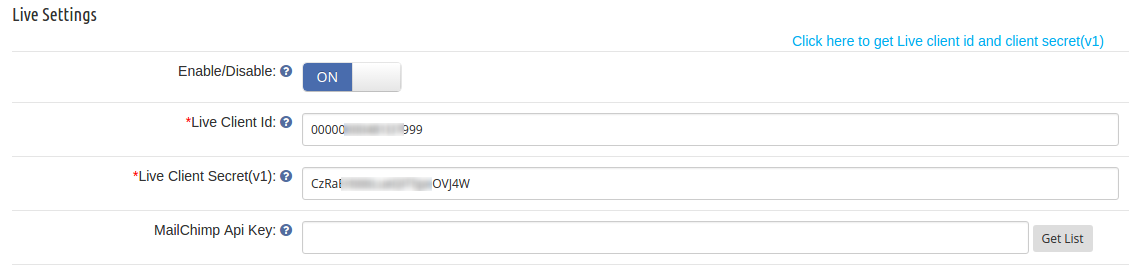
Just copy and paste these API details in specified fields of your social login module and save the configuration. You are ready to accept PayPal social login on your store. In case you are using our Social Loginizer module for PrestaShop, OpenCart, or Magento then the interface to enter the PayPal API details will look something like this.


Prestashop Social Loginizer Addon

Improve the user experience on your Prestashop store by enabling seamless social media logins with this excellent addon by Knowband.

SHOP NOW

Liked This? You’ll Like These Too

How to get Mailigen API key and Setup an email list?

Mailigen is one of the top email marketing and social marketing services. It provides different APIs to the developers for developing Mailigen integration solutions with different CMS and eCommerce platforms.

All these solutions ask for some API key and details to be entered to configure your Mailigen account on these solutions.

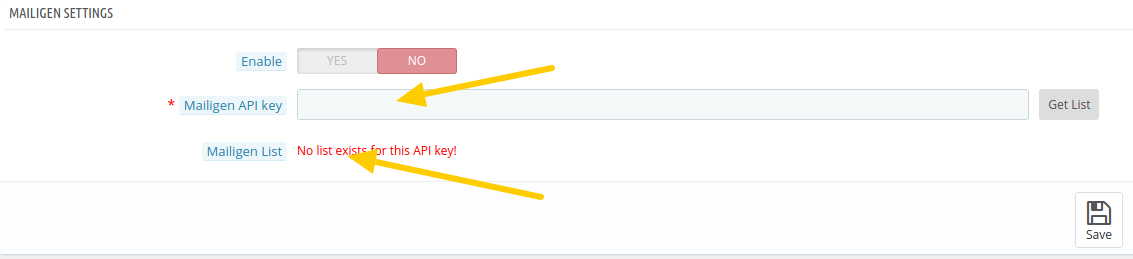
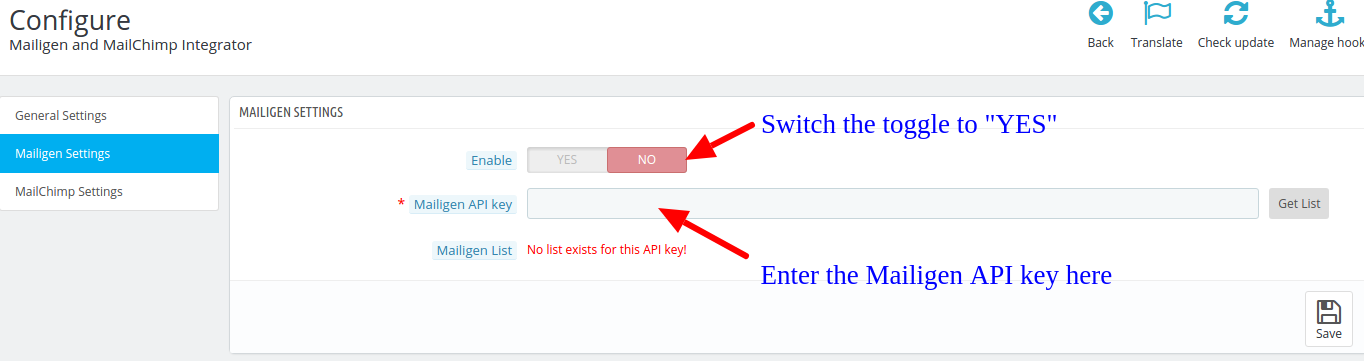
For example, to configure our Mailigen Integration module, you need Mailigen API key and Email list as shown in the configuration screen below:

Steps to get Mailigen API key and create an email list

Step 1: Visit https://www.mailigen.com and create a user account if not done already. After account creation, login to your account.

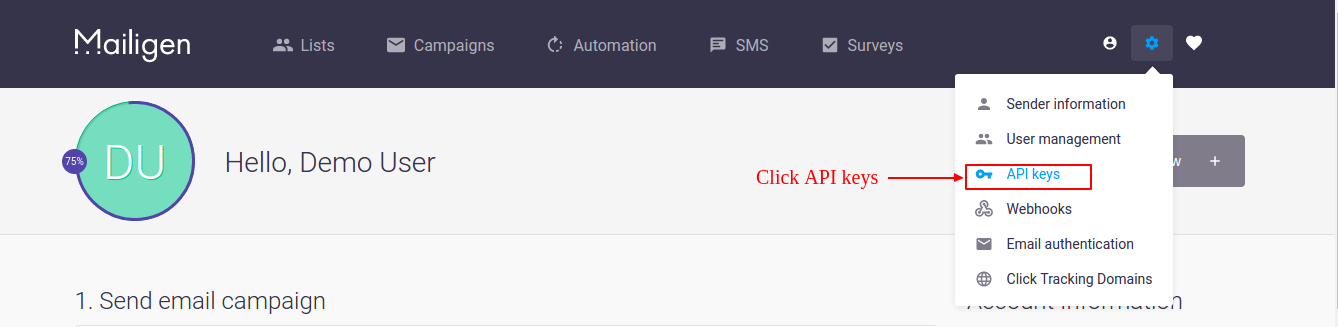
Step 2: On Dashboard, click Settings icon on the upper right corner of the dashboard as seen in the screen below.

Step 3: After clicking settings icon drop down will open, click “API Keys” in that menu. The screen is given below:

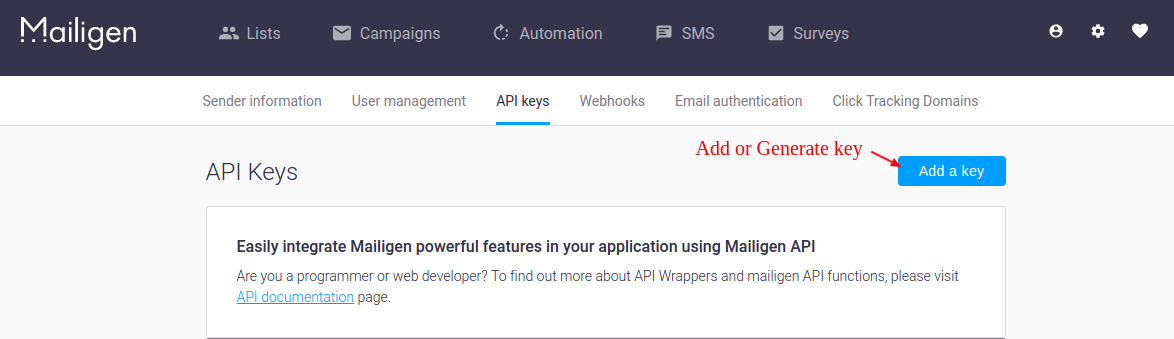
Step 4: After clicking “API keys” link, the admin will be redirected to the new page where he/she can add API key. Click “Add a key” button to create API.

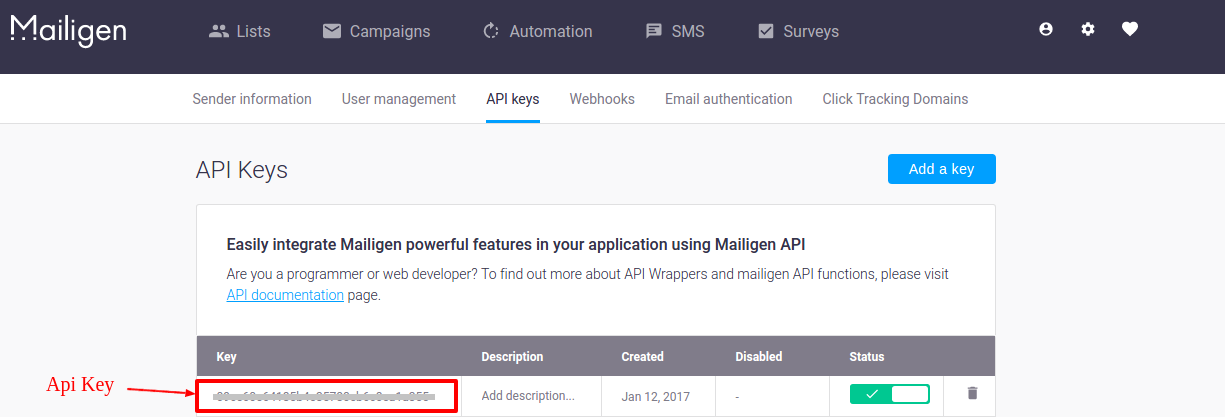
Step 5: After generation of the key, your API key will be visible in the list as shown below. Use this key to load your lists in the plugin.

To Create A Mailigen list 

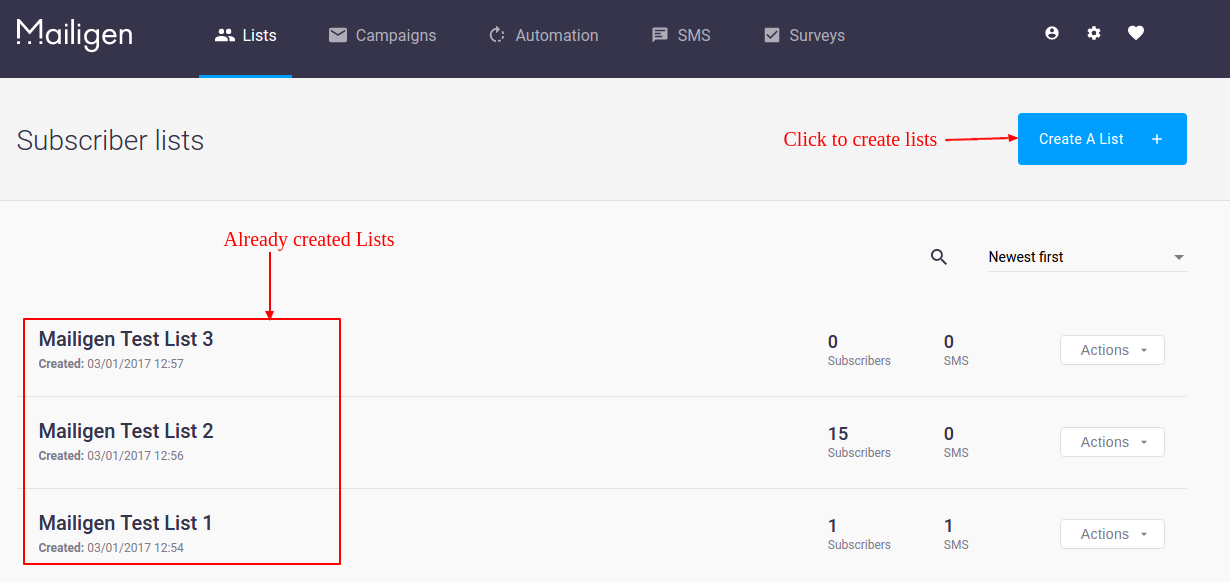
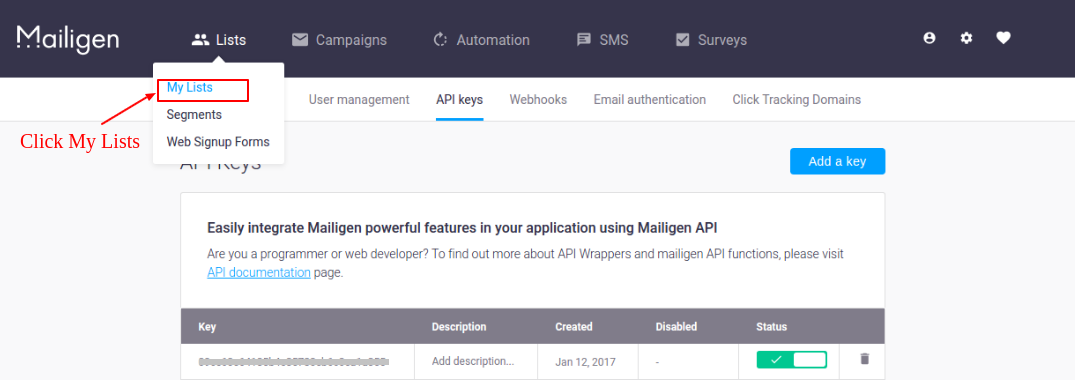
Step 6: Now to create a list, go to “Lists” tab in the upper menu. Drop down will open. Click “My Lists” link to view your lists or to new create lists.

Step 7: On My Lists page, Click “Create a list” to create a new list. After creation lists will be visible on My Lists page as shown in the screen below.

If you are using our Mailigen and MailChimp Integrator module, you can configure the Mailigen API details on the following interface.

Here you need need to enter the MailChimp API Key that you have got in the step 4, and then enable the integration by switching the toggle to “YES” before clicking on the “Save” button.

Liked This? You’ll Like These Too

How to get Vkontakte Application ID and Secure Key?

This guide aims at providing a step-wise tutorial for getting Vkontakte API details such as Application ID and Secure Key. These API details can be used to configure a Vkontakte social login on your website. The blog runs you through the process of obtaining Vkontakte Application ID and Secure Key. Read on to know how you can get the API details.

Steps to get Vkontakte Application ID and Secure Key

Step 1: Go to Vkontakte developer website and log in to your user Vkontakte account there.

PS: For configuring any social login on your website, you must be the user of the respective platform. All the customers’ information is fetched via your user account only. So, for configuring a Vkontakte login on your site, you must also have a Vkontakte account.

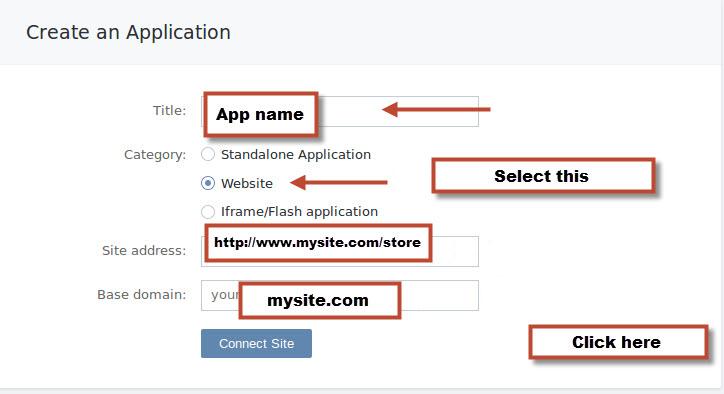
Step 2: After logging into your Vkontakte account you will be directed to a new page. Here click on “Create An Application”.

Step 3: The next interface will open up a small form that you need to fill up. Fill the form as shown in the image below:

Fill your App name, select “Website” option in the Category section. Next, provide your site URL and your base domain name.

Step 4: After filling the form, Click on “Connect Site” button.

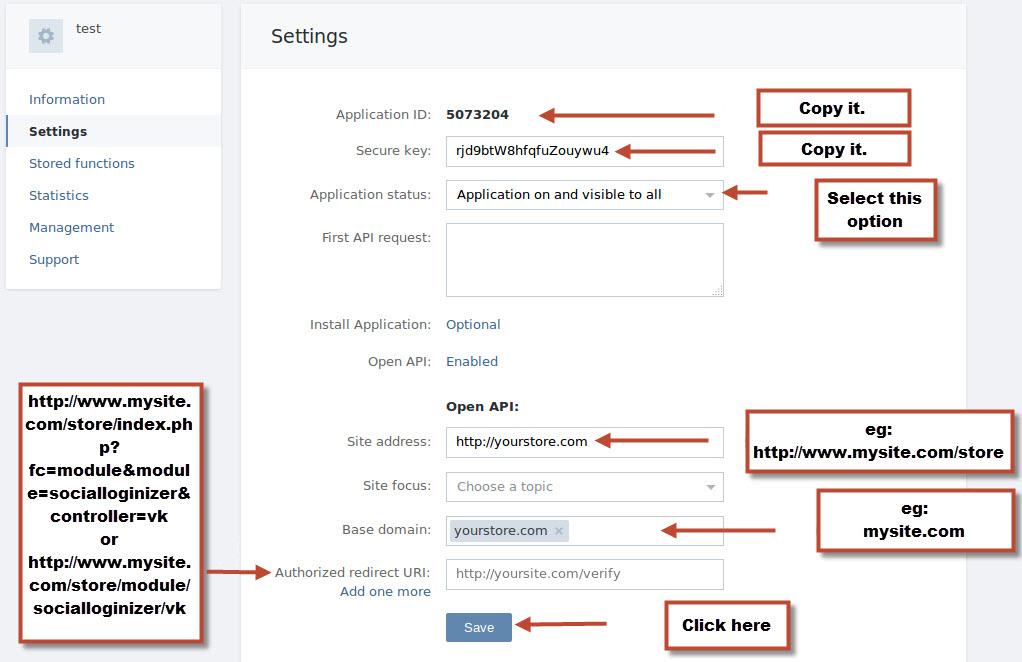
Step 5: Next, go to Settings tab from left menu bar. Here you will find your Application ID and Secure Key. But before that you need to configure the Open API by providing the site URL, and Redirect URL as shown in the image below:

Step 6: Click Save button. Now you can copy the API details and paste them in your social login module that supports Vkontakte login.

Note: If you are using our Social loginizer module (for PrestaShop, OpenCart, or Magento), you just need to copy and paste those API details in the respective fields that look like this:

Liked This? You’ll Like These Too

How to get MailChimp API key and setup an email list?

MailChimp is one of the most used email marketing software-as-a-service. Because of its free start up plan, it is the favorite email service for most of the marketers.

Like every other top email marketing software, MailChimp too provides different APIs for development and integration solutions. For example, the MailChimp API key can be used to integrate this service with any CMS or eCommerce platform through modules.

For example, the PrestaShop MailChimp integration module uses the API key to capture and sync the email data from a PrestaShop store to the MailChimp email list. There are several other solutions and modules that use the API for various types of integrations.

Steps to get MailChimp API key

Step 1: Visit https://www.mailchimp.com and create a user account, if not done already. After account creation, login to your account.

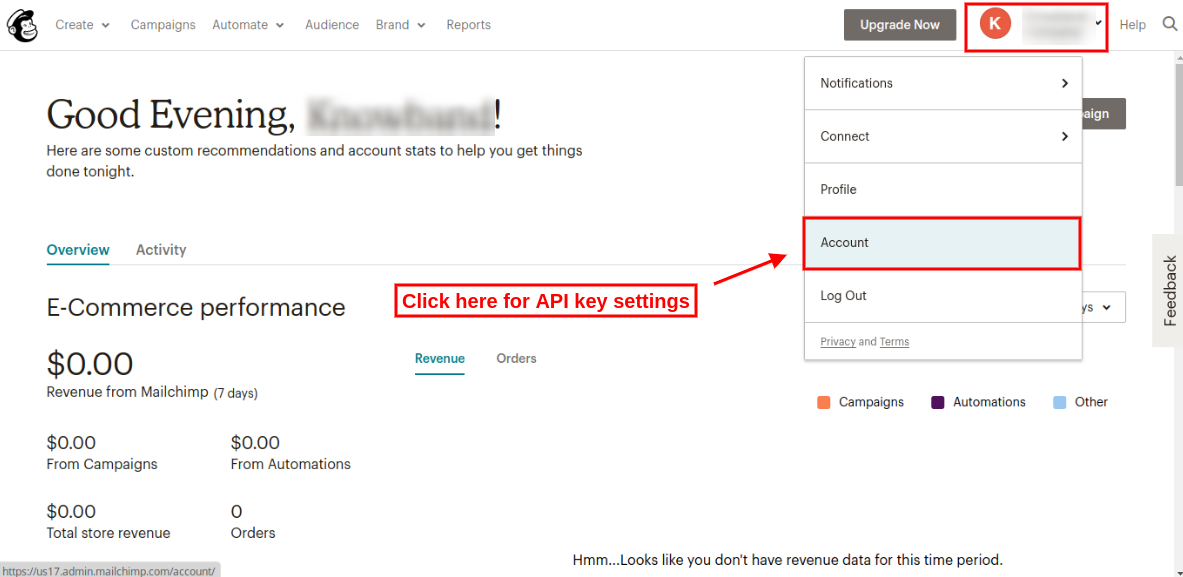
Step 2: On the Dashboard, click the button on the upper right corner of the dashboard. Drop down menu will open, click “Account” link in that menu as seen in the screen below.

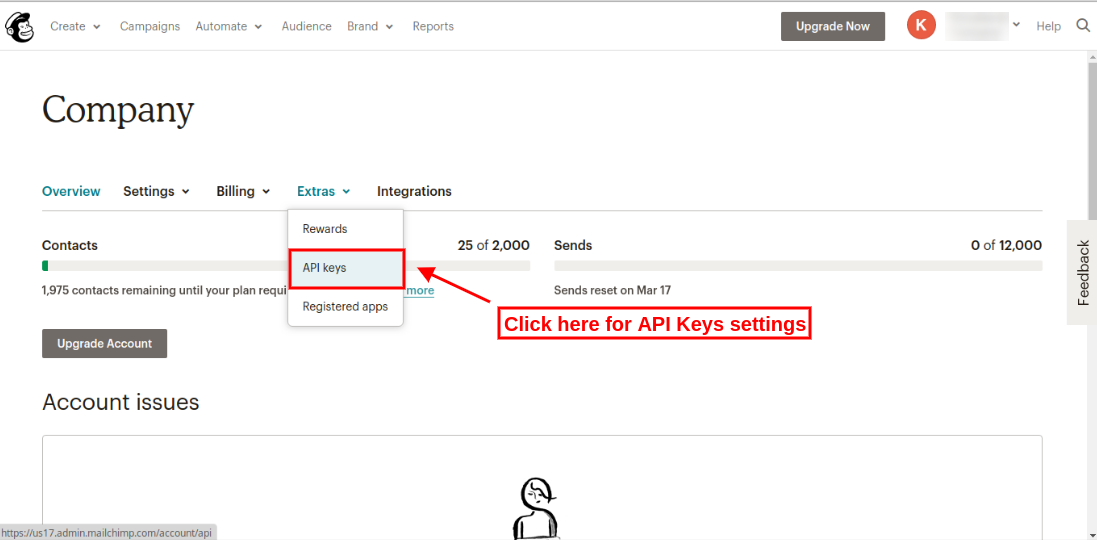
Step 3: On the Account settings page, some sub-menus will be visible. Click the “Extras” submenu to open the drop-down menu. Click “API keys” as shown in the screen below:

Step 4: On API keys page, click “Create a key” to generate an API key. After creation, a new API key will be added to your API keys list. The screen is given below:

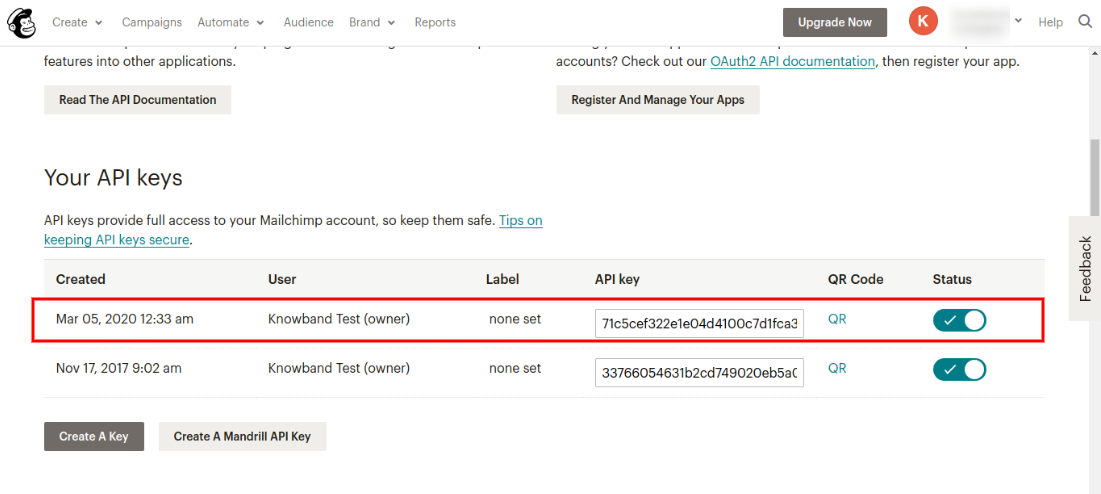
After clicking on Create a Key button, the user can view the newly created API key as shown below:

To create MailChimp Audience 

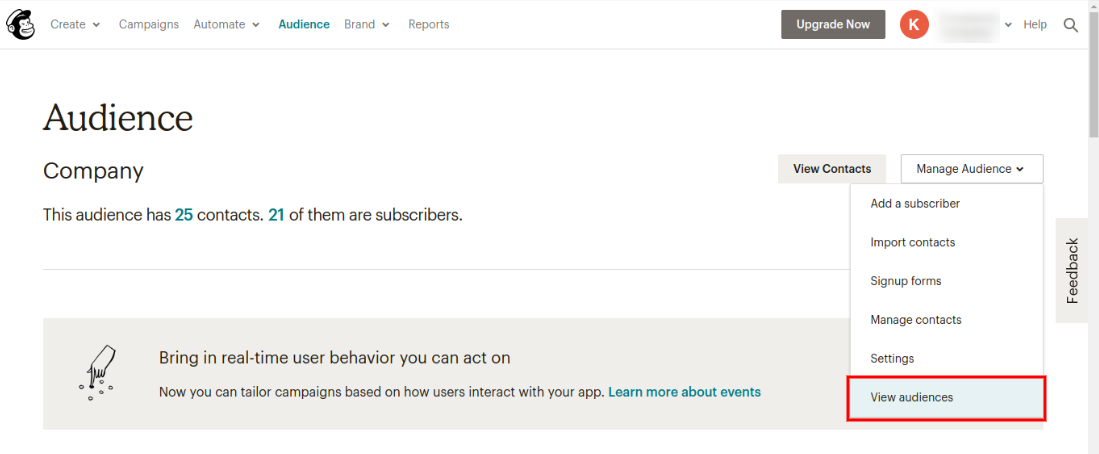
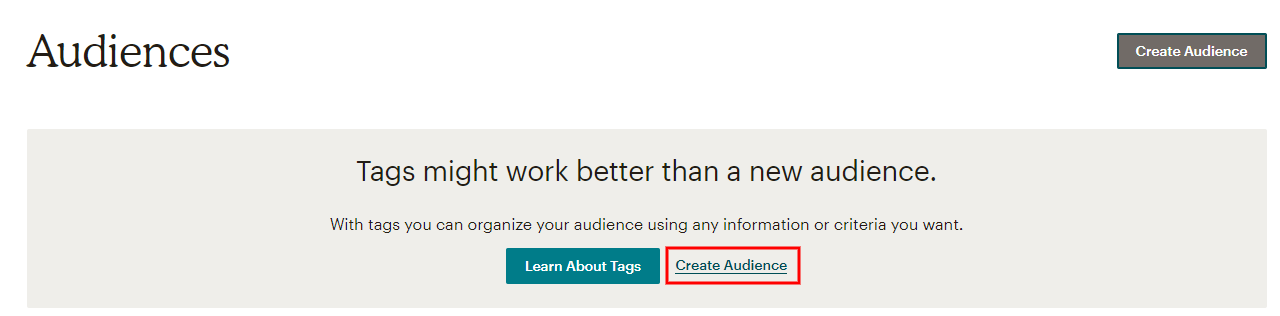
Step 5: Now to create an audience, click on the “Audience” tab in the upper menu. Admin will be redirected to a new page where he/she can view previously created audiences and also create a new audience. The screen is given below:

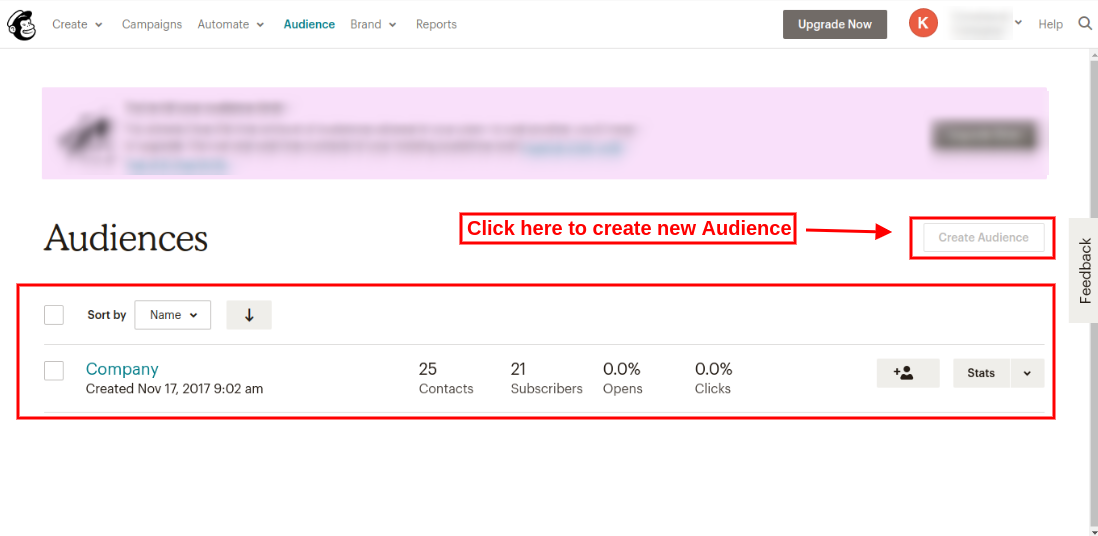
Step 6: On clicking “view audiences” option, admin can view previously created audiences as shown below:

Admin needs to upgrade his/her account for adding more audiences. In the free account, admin can create a single audience only. Admin can upgrade account and then click on “Create Audience” option as shown below:

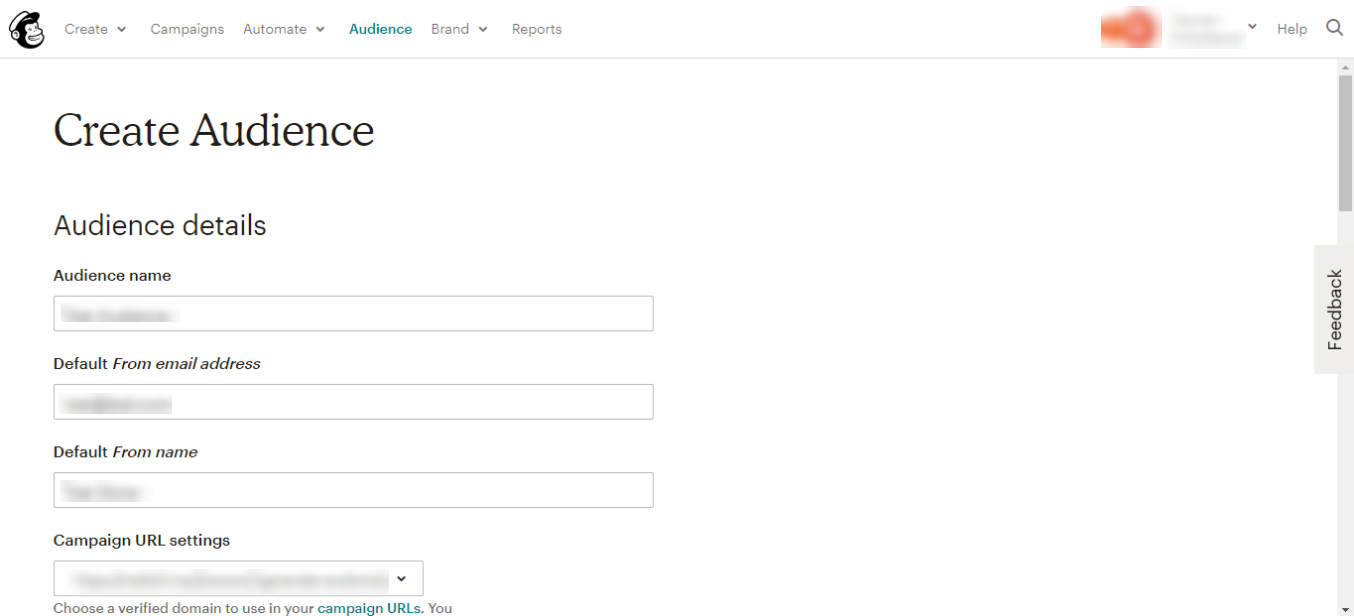
After clicking on “Create audience” option, admin needs to fill the required information:

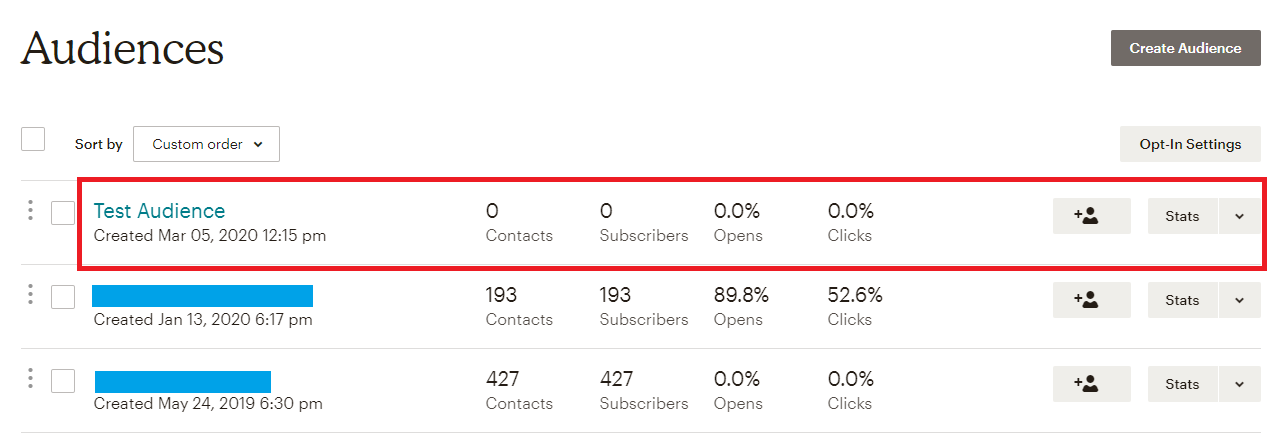
After saving all the details, the admin needs to save it. This way, admin can create new audience ash shown below:

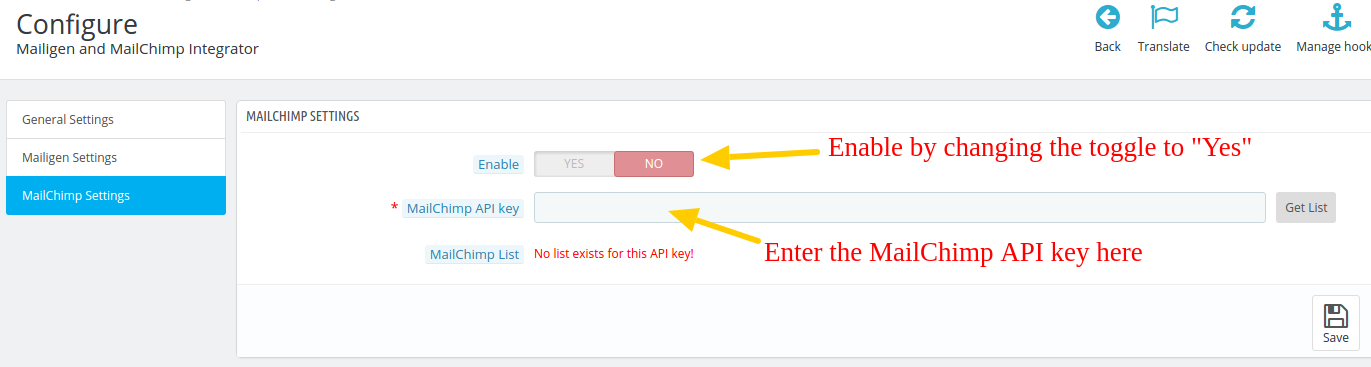
Knowband offers a Prestashop Mailigen and MailChimp Integrator module that integrates your MailChimp account with the Prestashop store. With the help of the Prestashop addon, the admin can automatically sync the details of the subscribers with the respective MailChimp and Mailigen account of the customers. You can configure the MailChimp API details on the following interface.


Here you need need to enter the MailChimp API Key that you have got in the step 4, and then enable the integration by switching the toggle to “Yes”.

Prestashop MailChimp Integration extension offers a smart sync that synchronizes the email IDs and related details of the website subscribers automatically. The email IDs are synced from the Checkout Page or from the Customer Registration Page.

Additionally, Prestashop MailChimp integrator addon developed by Knowband makes automates the entire process data synchronization and removes the tedious job of manual synchronization.

Liked This? You’ll Like These Too