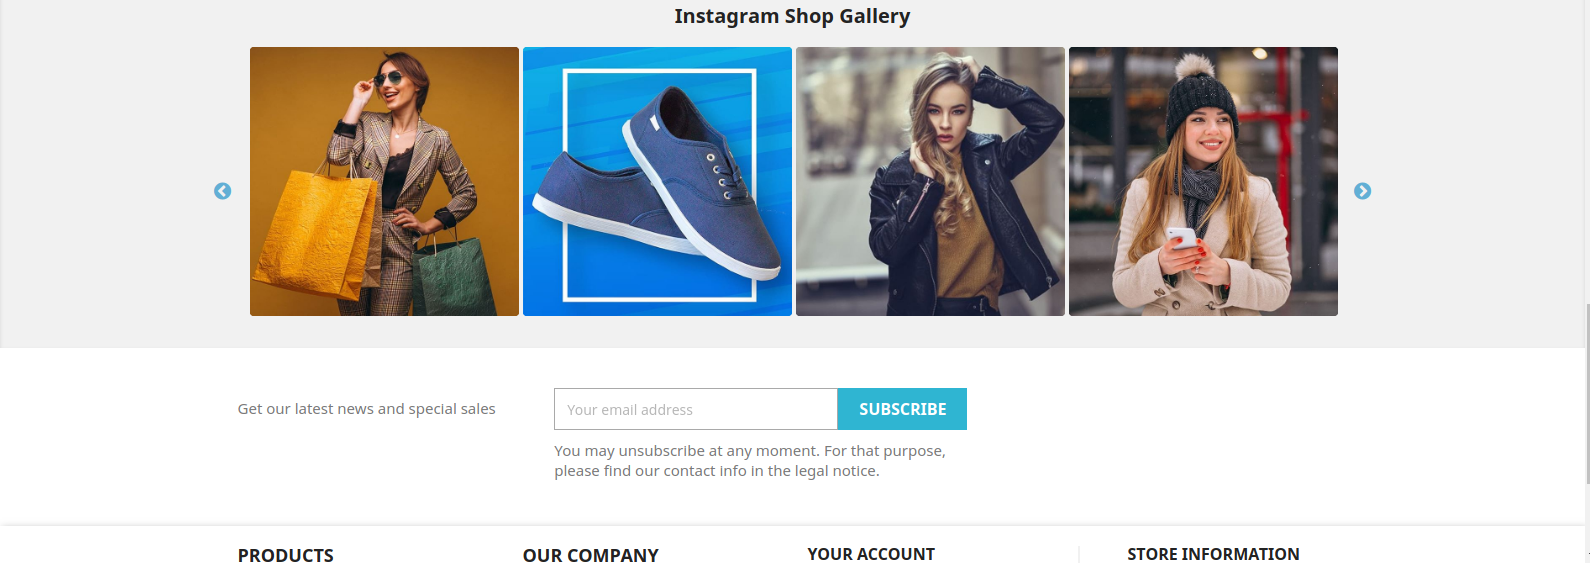
1.0 Introduction: Modern customers have a limited attention span. Meaning that when they visit an eCommerce website, the administrator has a limited time to provide them with relevant information and enticing offers. The reason behind the same is various types of information are crucial for customers to determine if a product meets their requirements.
Considering the same, we have developed the PrestaShop Product Label addon specifically for PrestaShop eCommerce merchants. The Prestashop product sticker and label module enables administrators to add dynamic stickers to their storefronts. Additionally, administrators have the flexibility to upload their stickers, customize their dimensions, and choose their desired position on the website pages.
Moreover, if you aim to inform your customers about sales, promotions, delivery times, and other important details. Knowband’s Prestashop Product badge addon for PrestaShop is the perfect solution for all your promotional business needs. This extension provides a wide range of useful features and ensures peace of mind. Let’s explore some of the key highlights offered by the PrestaShop product sticker plugin.
2.0. Major Highlighted Features Offered by Knowband’s Product Badge Addon:
The PrestaShop product sticker plugin is empowered by tons of incredible features. Not only the plugin is configurable from the back end but also provides high-quality pre-loaded stickers.
We have tried to cover up some of the most sounding features of the PrestaShop product sticker module.
The admins can boost their revenue by showing the offer discounts on products.
The PrestaShop store admins can choose the pages where they want to show the product stickers. For example, the store administrators can choose the options from the product page, product listing page, search page, home page, and much more.
The PrestaShop admins can choose to include or exclude specific products for the sticker appearance.
With the help of the PrestaShop Product Sticker module, the store admins can include the PrestaShop store categories where they want to show the responsive stickers.
Along with pre-available stickers, the admins can also upload the stickers of their own will in the module and make them appear within no time on the shopfront.
The PrestaShop store admins can manage the sticker positions on the product images right from the module backend.
The admins can schedule the start and end dates for particular stickers.
The admins can choose between all products, specific products, and special categories for the sticker appearance.
The admins can also select the rules of products like best seller products or can set minimum or maximum prices of products or new products for the sticker appearance.
3.0 Installation Guide for Prestashop Product Sticker and Label Addon:
Once you purchase the addon, follow the below steps:
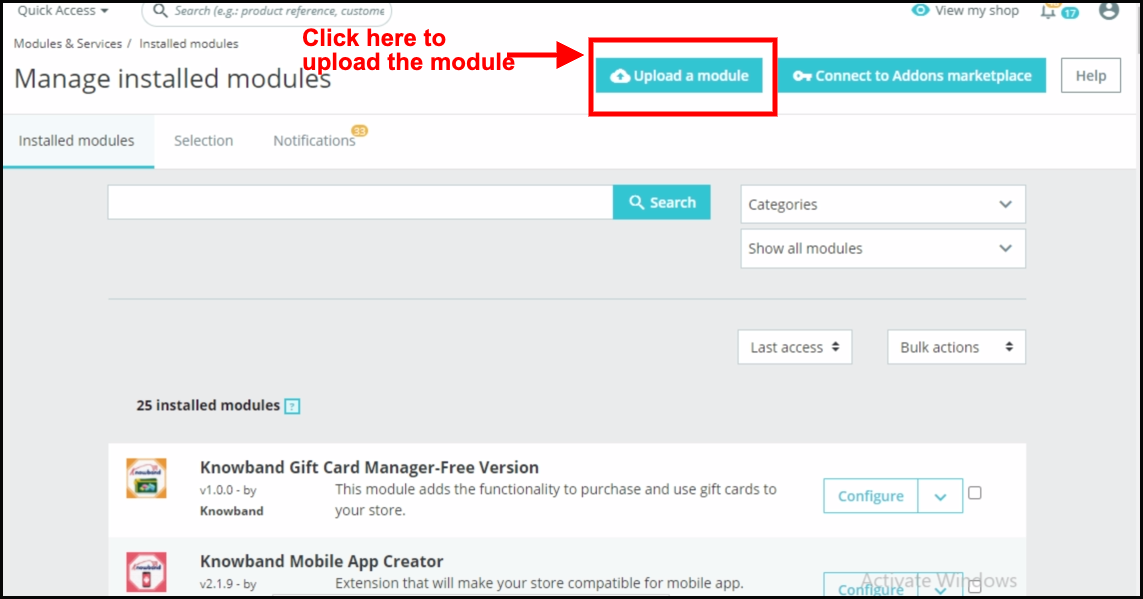
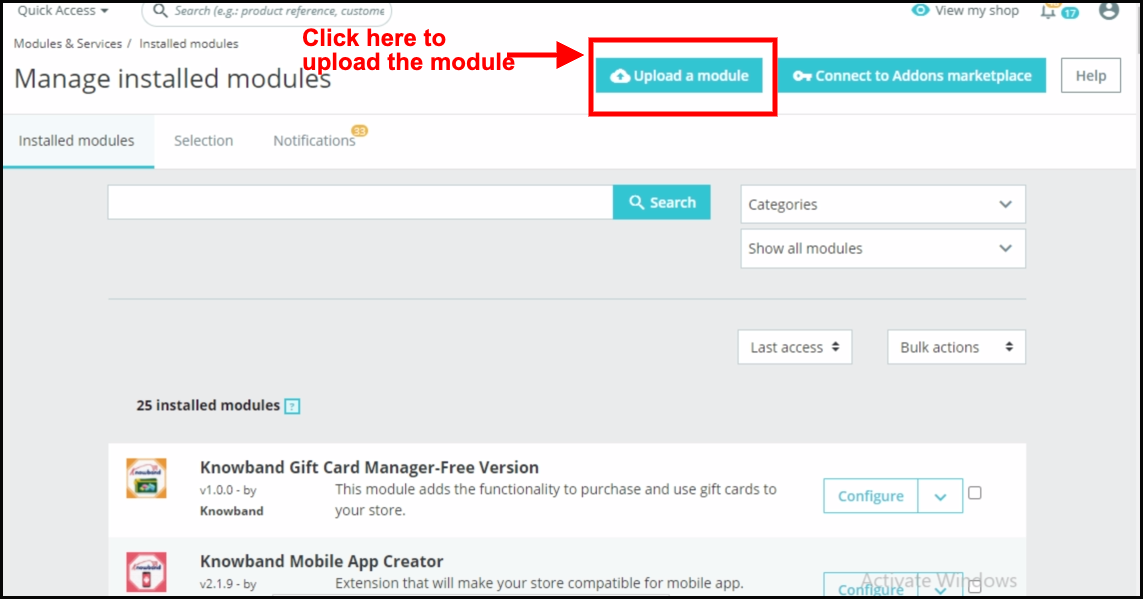
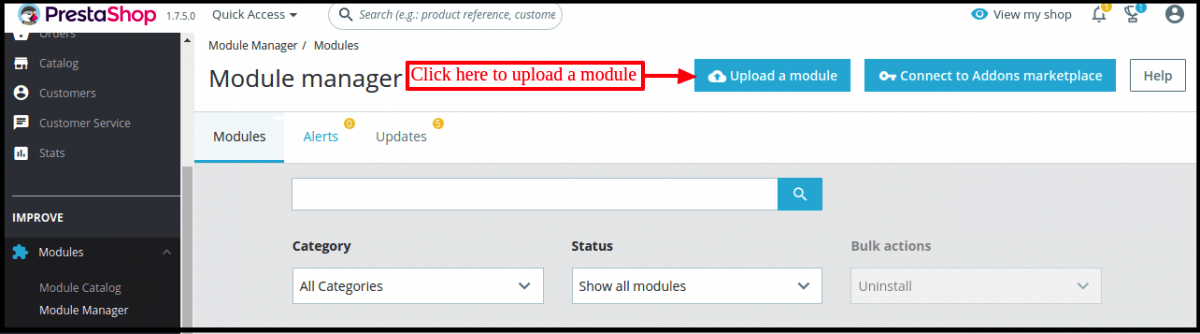
Go to the Store Admin -> Modules and Services.
Click on “Upload a module”. You can drag or drop the file or can simply select the file from the system.
Once the file is completely uploaded, a notification of “Module(s) installed successfully” will display.
The Prestashop product badge addon comes with an easy-to-configure admin panel. Using the same the Prestashop store administrator can simply configure the sticker settings and can further manage the Product stickers for the shopfront.
4.1. General Setting:
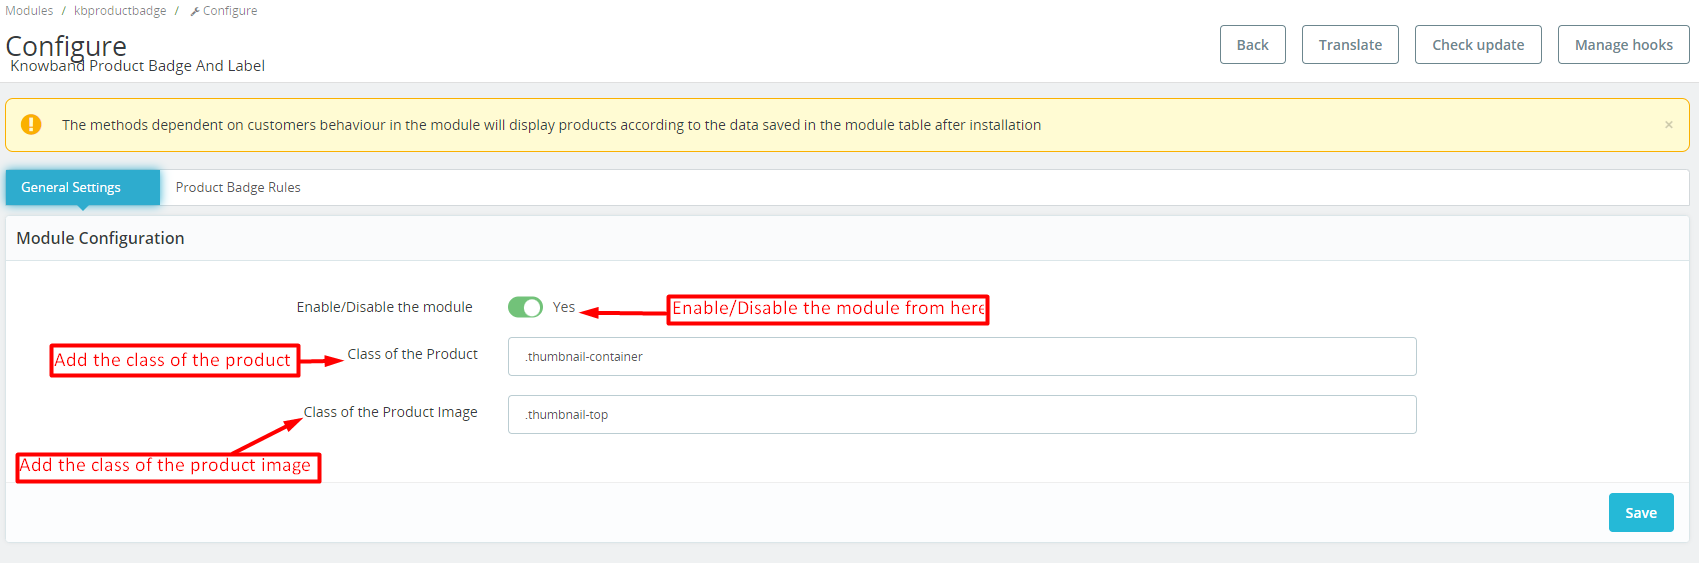
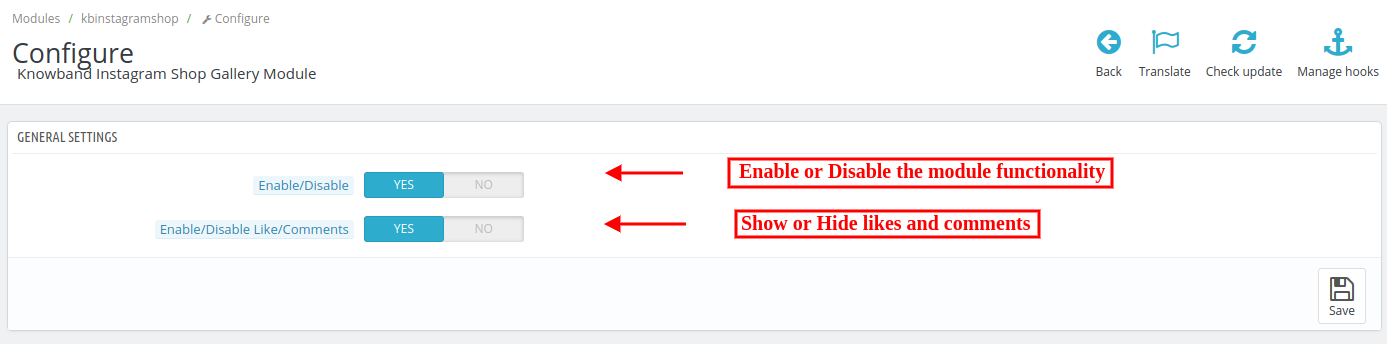
In the following tab, the admin can manage the plugin’s general settings.
Enable/Disable: You can use the following button for enabling/disabling the module.
Class of Product:
The admins can add the class of their store products on store front in this particular text box.
Class of Product Image: The particular text field is provided for the admins to enter the class of the store’s product image on storefront.
4.2. Product Badge Rules:
In the following tab, the store admin can manage basic setting operations for the product badges.
we have provided the options for adding new, editing, or deleting all the stickers. Moreover, the Prestashop store admins can find the list of all the stickers in the following tab.
Add Sticker Rule: By clicking on the following button, the store admins can create new sticker rules.
Edit Sticker: If you have already created and configured a sticker rule and now want to change the sticker settings, you can modify the same from here.
4.2.1. Product Badge Rules: General Rule Setting:
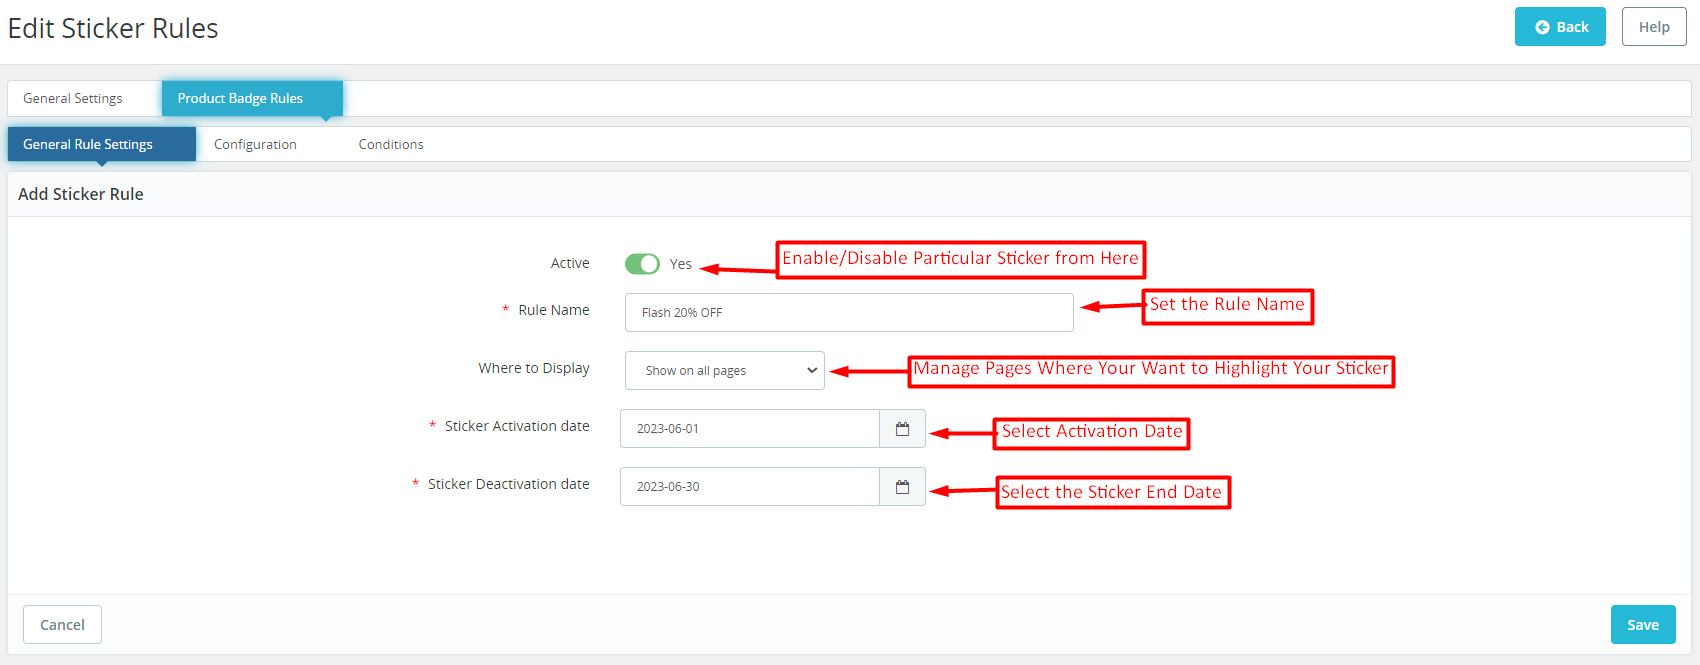
Prestashop Product sticker and Label addon provide a separate tab for managing the general sticker rules. In case the admin wants to modify the general configurations of the sticker, he can modify the same from here.
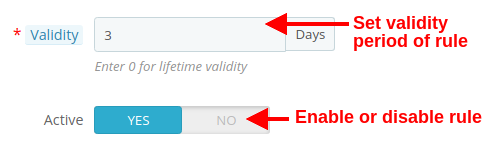
Active: With the help of this button, the store admins can enable/disable a particular product sticker.
Rule Name: You can add the sticker name from here at your convenience.
Where to Display: The Prestashop store retailers can manage the pages where they want to display the stickers. For example, we have provided the options for showing stickers on all pages and the admins can even select the specific pages where they want to show the product badges.
Sticker Activation Date: Choose the starting date of product stickers from here.
Sticker Deactivation Date: The Prestashop admin can select the end date for a particular sticker from here.
4.2.2. Product Badge Rule: Configurations:
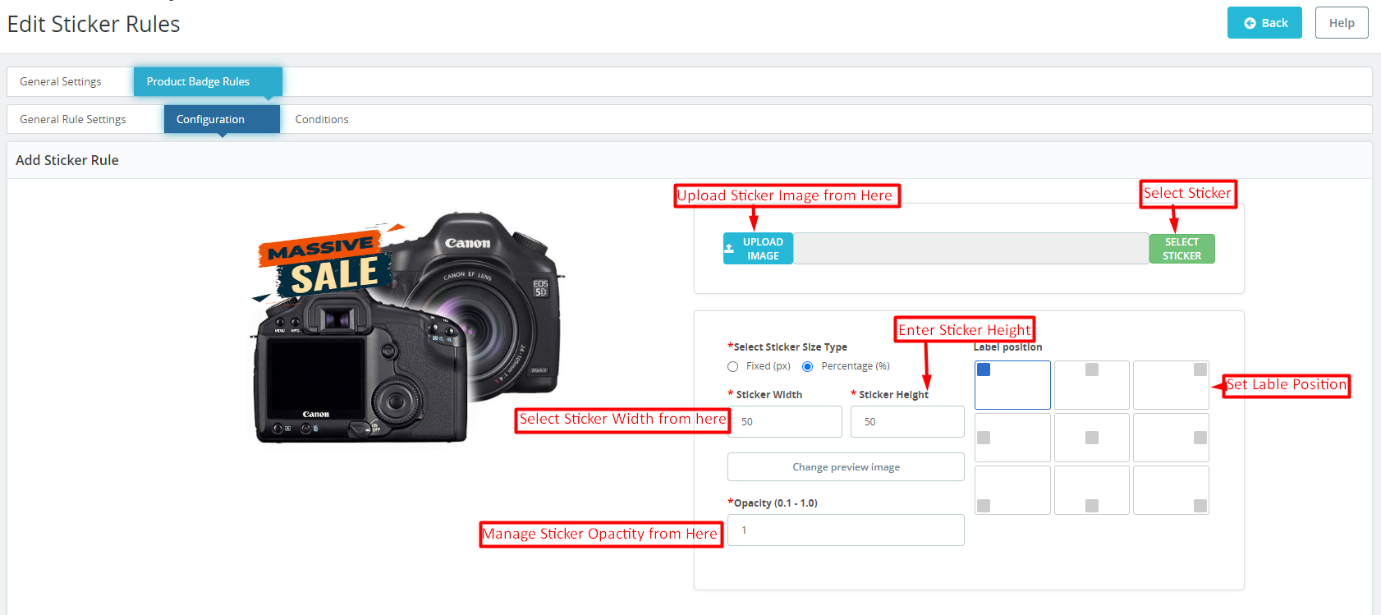
The sticker configuration tab offered by Knowband Prestashop Product Sticker and Label Addon simplifies the sticker look and feel management. The following tab allows the eCommerce store admins to choose from 20+ pre-loaded stickers and the admins can also add new stickers at their convenience.
Sticker Upload:
If you wish to upload a new sticker from your system, simply use the “Upload Sticker” button.
Sticker Size Type Selection:
We provide two options in the button below. If you prefer to set the sticker size using fixed dimensions (in pixels), click on the corresponding radio button.
Alternatively, if you want to configure the sticker size based on a percentage, we have also provided an option for the same.
Sticker Height and Width:
Using the button below, you can adjust the height and width of your product label. You can also preview the sticker’s appearance in real-time as you change its size. For percentage, the maximum height and width should be 100%.
Change Preview Image:
Administrators can select a new preview image to visualize how the product labels will look on their product images using the button.
Opacity:
You can adjust the opacity of the sticker using the following option.
4.2.3. Product badge Rules: Conditions:
In the sticker conditions tab offered by Knowband Prestashop product sticker and label module. The store admins can set different conditions for the product badges.
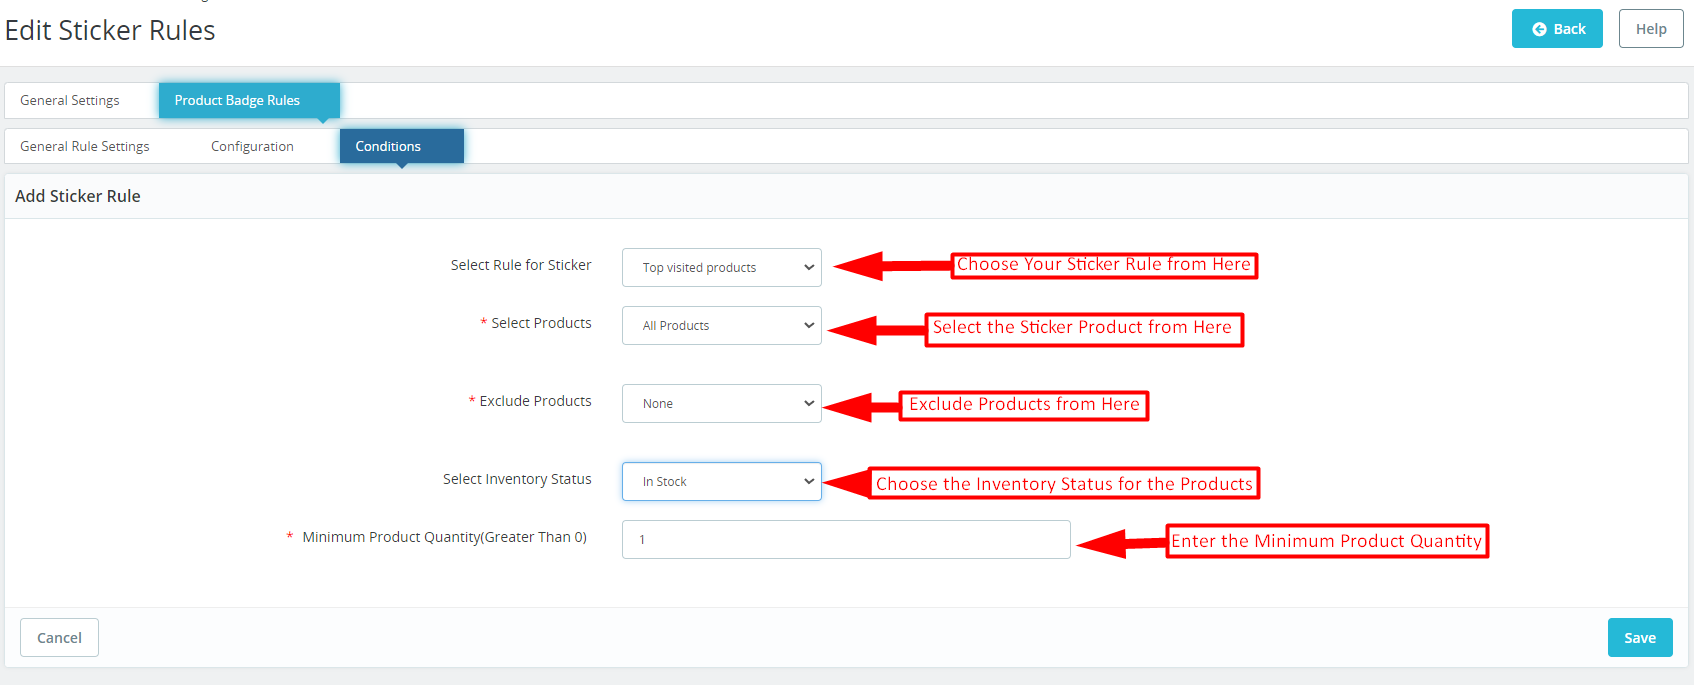
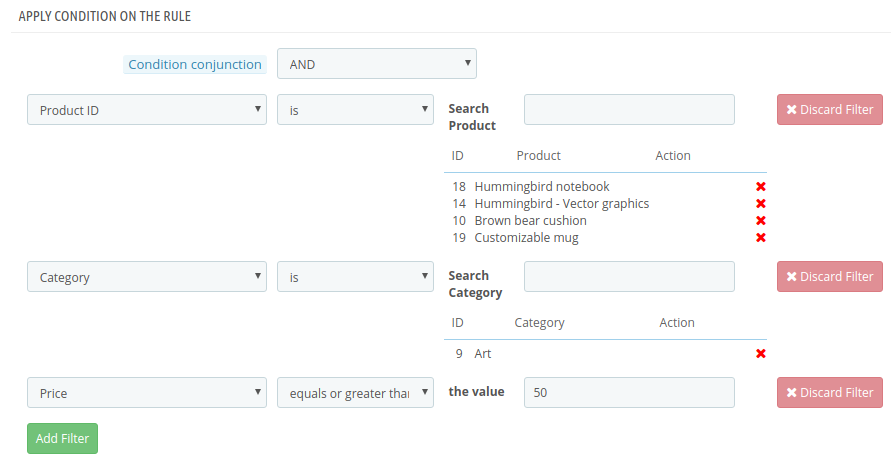
Select Rule for Stickers: You can select your sticker rule from various options provided here. We have added rules for showing stickers based on top visited products, on-sale products, best-seller products, and new products, and even the admins can add stickers based on the price value.
Select Products: As a Prestashop store admin, you can select products from here (on which you want to display the stickers). You can select the option as all products in case you do not want to exclude any specific product or category. Furthermore, you can also enter specific products and specific categories for a sticker appearance.
Exclude Products: In the following tab, the admins can exclude specific products for the product badges.
Select Inventory Status:
From here, you can select if you want to show the stickers for the in-stock or out-of-stock products only.
Minimum Product Quantity: If you are looking for showing product labels based on the product quantity in your store, you can add the specific value in the following field.
5.0. Prestashop Product Sticker and Label Addon: Front End:
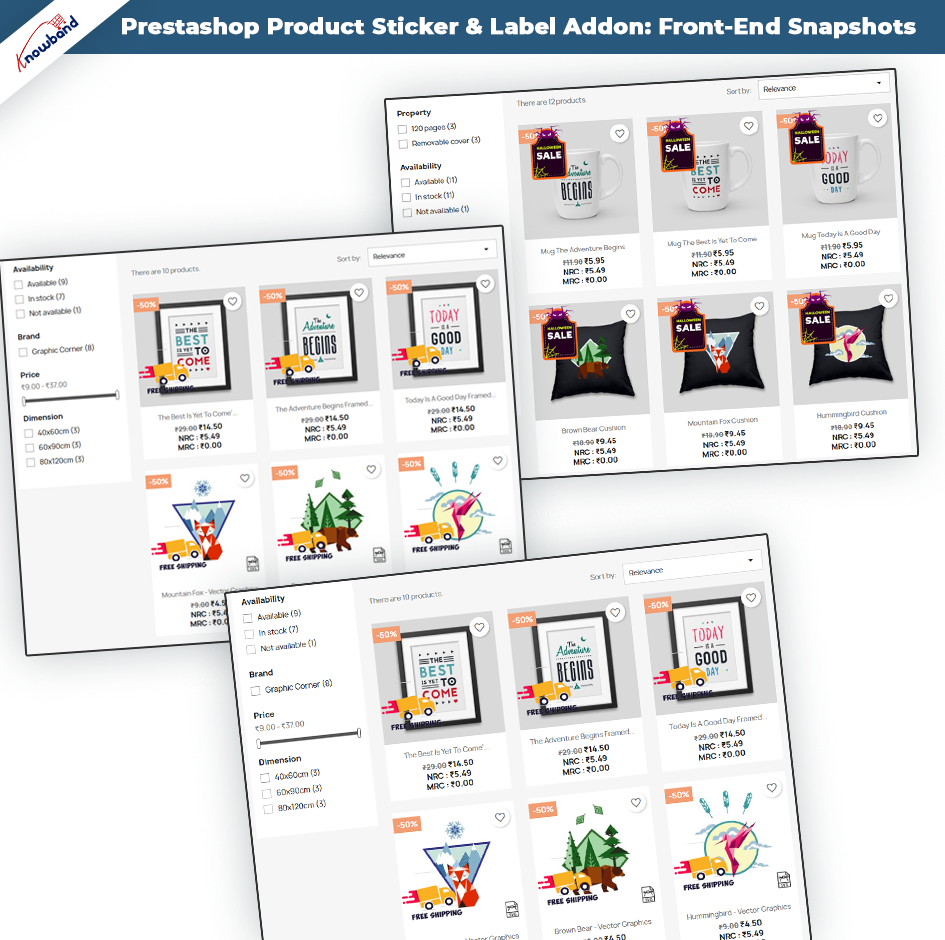
After making the changes as per convenience and saving the data from the module back-end. Prestashop store administrators can immediately assess the impact of their modifications. Prestashop Product Sticker module empowers administrators to effortlessly showcase a stunning array of high-quality stickers on their shopfronts. These visually appealing stickers serve as eye-catching elements that captivate the attention of customers. Which further helps in enhancing the overall aesthetics and professionalism of the online store.
The samples above exemplify the seamless integration and impressive front-end displays. The following examples showcase the versatility and creativity that administrators can harness to create compelling product showcases and leave a lasting impression on their customers.
Note: – Only one sticker can be displayed at once on the product image.
The stickers will be shown based on the most recent date of creation of the sticker rule. This means that the sticker rule that was created most recently will determine which stickers are displayed first.
For a quicker understanding, please refer to the demo tutorial.
Prestashop Hyperlocal Marketplace addon by Knowband is the easiest way to convert your PrestaShop eCommerce store into a fully working Hyperlocal online marketplace. In addition, connect customers to local stores. Further, using this module customers can connect with the local stores. The seller can easily list the location where they can deliver/ship their products. Moreover, this is the main reason why this module is beneficial for the sellers and also for their customers.
Customers can enter their location and check the available products and sellers in their locations. Furthermore, the store admin can manage a lot. For instance, the inventories, orders, products, and shipping methods at the Marketplace from the back interface of the Prestashop Hyperlocal Marketplace Add-on. Further, the Prestashop Hyperlocal Marketplace owner can charge a commission to the sellers/vendors on the products they sell. In fact, the sellers will get the chance to promote their brand. In addition, serve the audience of Marketplace in return for the commission they are paying to the admin.
1.1 Admin Benefits of Prestashop Hyperlocal multi-vendor marketplace:
The store admin can transform their eCommerce store into a marketplace with a few button clicks.
Ecommerce admin can approve/disapprove sellers ship area requests.
PrestaShop Hyperlocal Marketplace admin can edit/delete sellers’ ship areas.
Hyperlocal Delivery Marketplace admin can also add multiple locations as per their requirements.
Hyperlocal Service Marketplace admin can add the shipping area on behalf of sellers.
PrestaShop Hyperlocal Marketplace admin can also add multiple ship rates by using a CSV file.
Store admin can add a radius unit range that will be usable to search the seller from the customer’s location.
Admin can add custom fields for the seller’s profile. Further, he can add new custom fields or remove already addable fields.
Admin can also add a separate seller registration form under the general settings tab.
The admin can even disallow the seller to view the email ID of the customers. In fact, if the admin enables this, the sellers can request to close their shop from the marketplace.
The admin can fix the commission that he wants to charge to the sellers from the back-end of the Prestashop Hyperlocal E-commerce Business.
The admin gets complete access to approve/disapprove the products being sold on the marketplace. In addition, can even fix the quantity of the new products that a seller can add to the marketplace. Further, he can do it with the help of this Prestashop Hyperlocal Delivery Marketplace.
The store admin gets an option to approve/disapprove the seller’s profile at a button click.
The Prestashop Hyperlocal Marketplace add-on allows the store admin to track and manage the sellers operating in the marketplace easily.
The PrestaShop admin can add/remove the product or category as per the requirement from the admin interface of the Prestashop Hyperlocal Marketplace extension.
The sellers can request to add a new category to the front-end of the marketplace. Further, these requests are visible in the Prestashop Hyperlocal Service Marketplace and the admin can accept/reject them accordingly.
The seller transactions are visible from a single tab of the Prestashop Hyperlocal Delivery Business Model. Thus, the performance of the sellers is trackable.
The store admin can view the report of the commission earned from the Prestashop Hyperlocal Marketplace.
The admin can accept/reject the reviews on the products or sellers with the help of the Prestashop Hyperlocal online marketplace.
The additional features of the Prestashop Hyperlocal multi-vendor marketplace even offer an option to create custom shipping methods.
The seller can either select the default shipping method or create custom methods from their dashboard.
The PrestaShop Prestashop Hyperlocal E-commerce Business addon allows the sellers to initiate payout requests from their dashboard. In fact, the admin can approve or disapprove the payout request from the back-end of the PrestaShop addon.
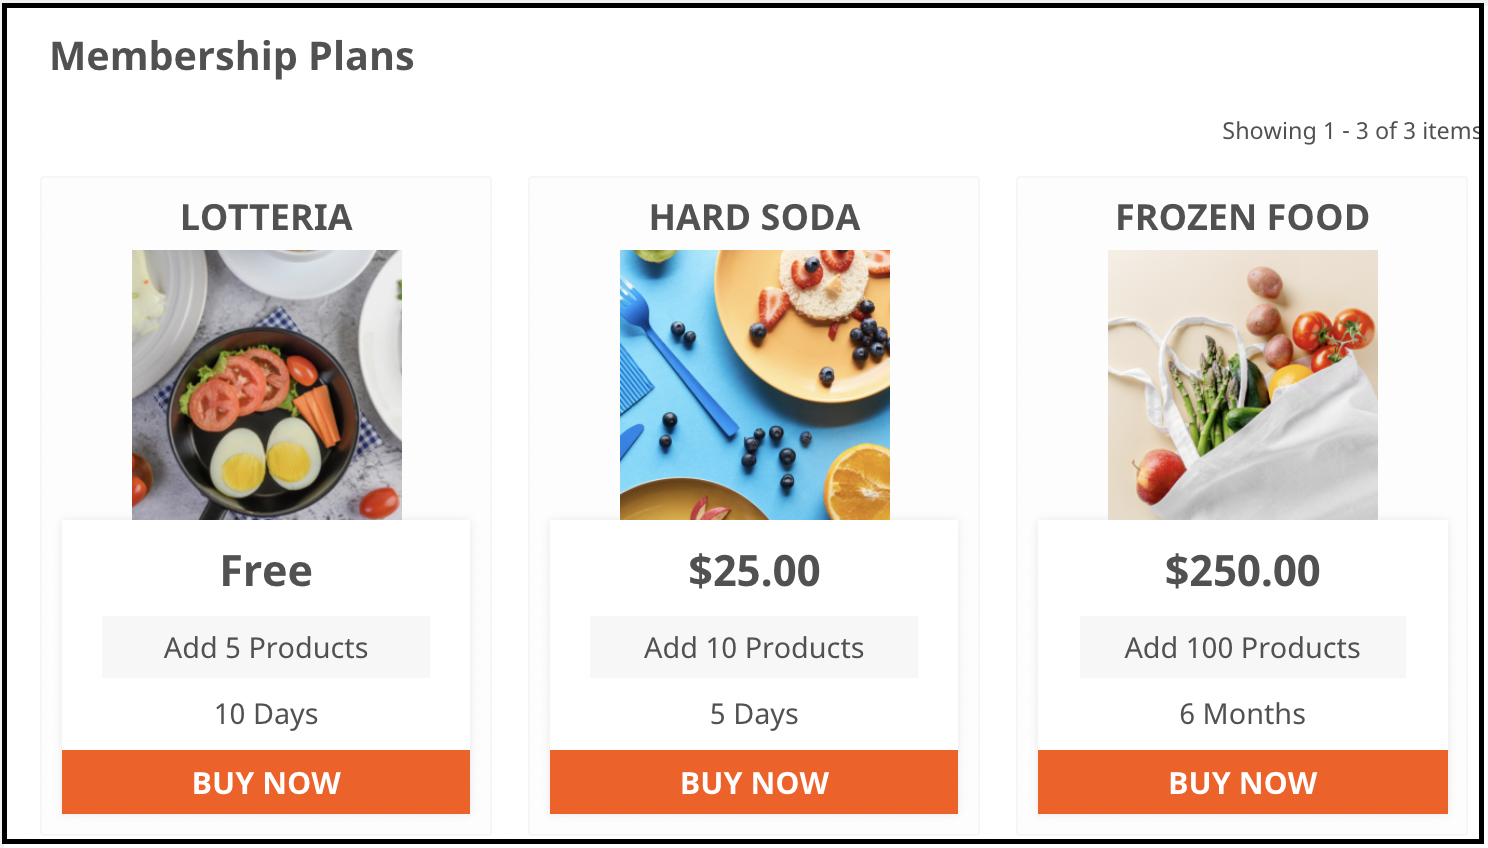
Admin can create various membership plans for the sellers.
The Admin can also enable a free membership plan feature for the sellers for one-time use.
Admin can send warning emails to the sellers from upgrading their membership plans.
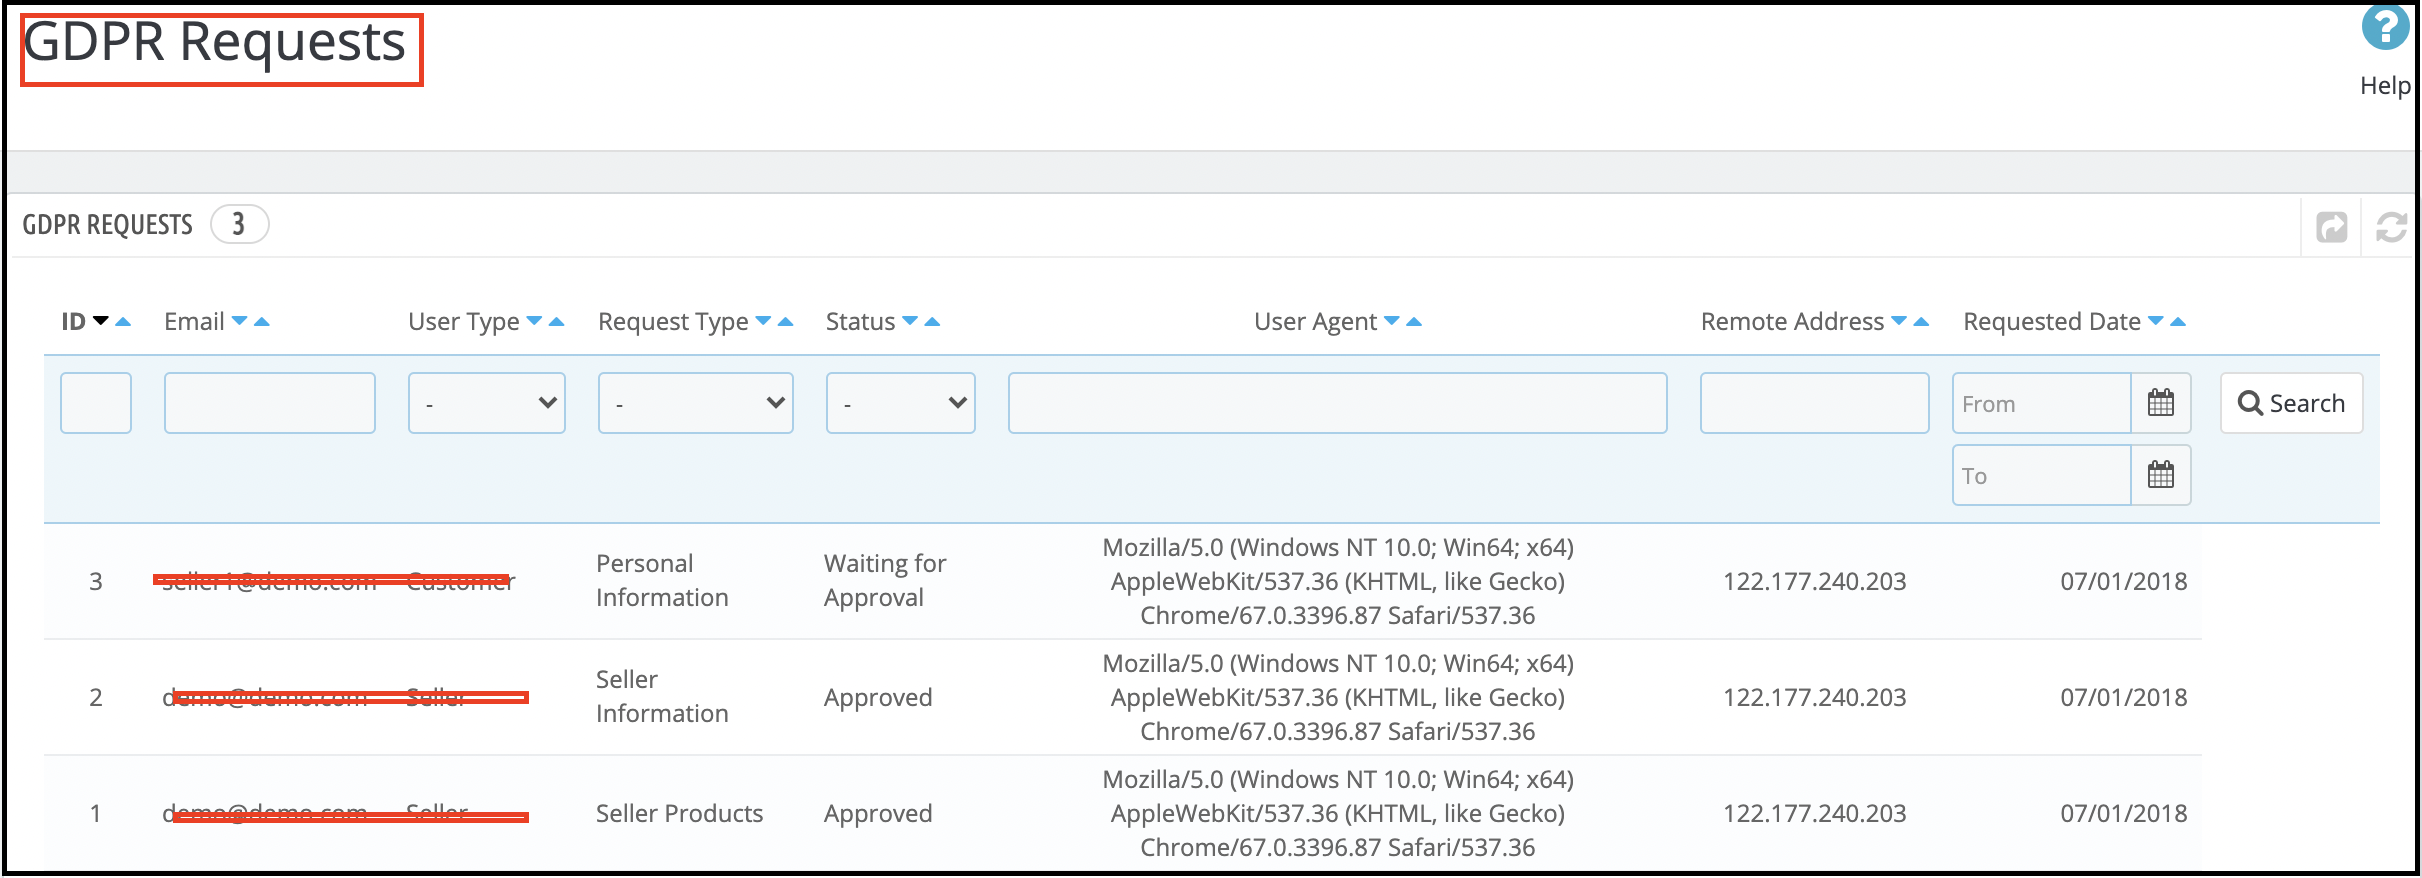
The GDPR requests raised by the sellers are visible from the back-end of the Prestashop Hyperlocal Delivery Marketplace.
The admin approves/disapproves the shop closure request of the sellers from the admin interface of the Prestashop Hyperlocal Service Marketplace.
Admin gets an option to automate the transaction payout request process which helps the admin to automate all the payment requests of the sellers.
1.2 Seller Benefits of the Prestashop Hyperlocal Marketplace Module:
The seller can add multiple ship areas as per their requirements.
The seller can edit ship areas. They can also delete ship areas.
The seller can list multiple ship rates using a CSV file.
The seller can set a default price for the shipping if the distance is out of range.
The vendors can add any type of product to the marketplace. Prestashop Hyperlocal online marketplace supports all types of products, right from the simple, configurable to the virtual and bundled products.
The sellers can even request the admin to add new categories.
The commission charges are fixed, so, the entire transaction is transparent.
The Prestashop Hyperlocal multi-vendor marketplace module makes it easier for sellers to sell their products to a larger customer base.
The dashboard allows the vendors to view their profiles, products, and orders.
A separate seller’s page makes it easier for the vendors to promote their business.
Sellers can choose from various membership plans as per the requirements.
Under the GDPR compliance, the sellers get an option to download their details in CSV format by clicking a button.
The sellers can even request the admin to remove their shop from the marketplace. This request processes from the back-end of the Prestashop Hyperlocal E-commerce Business.
1.3 Buyer Benefits
Buyers can check the availability of products and sellers easily by entering their locations.
The store visitors can now choose the ideal products from a wider range of product options.
The customers get an option to review the sellers. Customers can also review the products by using our Product Review Reminder or Default Product Comment Addon.
Online shoppers can select the product by visiting the seller’s page.
Buyers can also become a seller in Prestashop Hyperlocal Delivery Marketplace. They can also register as a seller.
2.0 Installation
Follow the following steps for installing Prestashop Hyperlocal Marketplace addon:
Once you purchase the Prestashop Hyperlocal Service Marketplace addon,
Go to the Store Admin -> Modules and Services
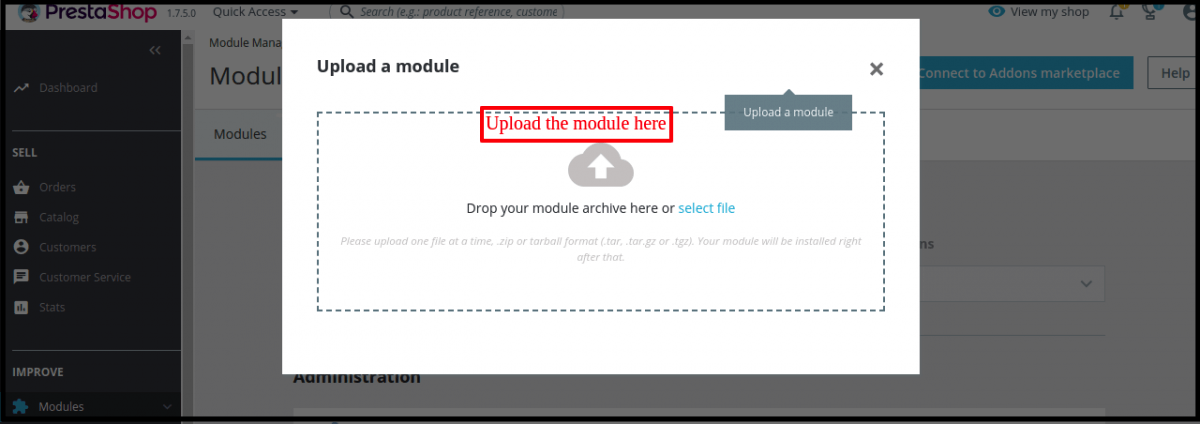
Click on “ Upload a module”. Drag or drop the file or can simply select the file from the system.
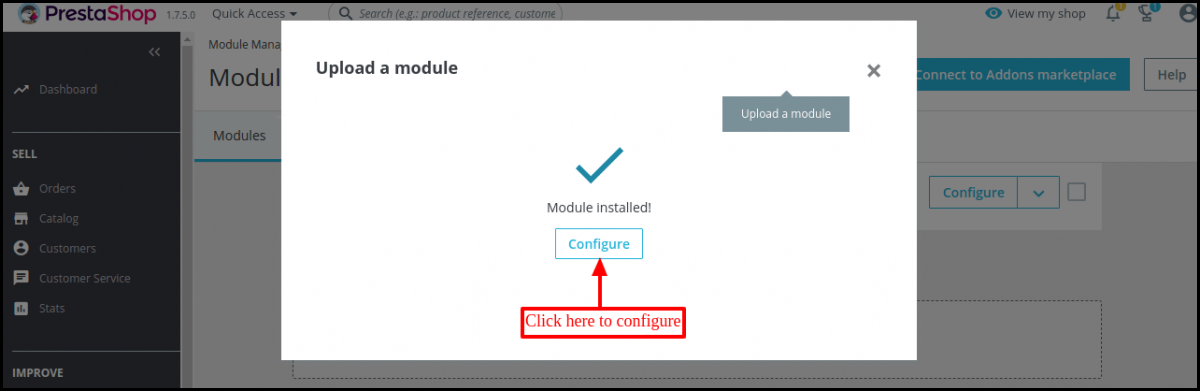
Once the file is completely uploaded, a notification of “Module(s) installed successfully” will display.
Once the Prestashop Hyperlocal Delivery Business Model installs properly the Install button will be automatically be converted to Configure.
3.0 Admin Module
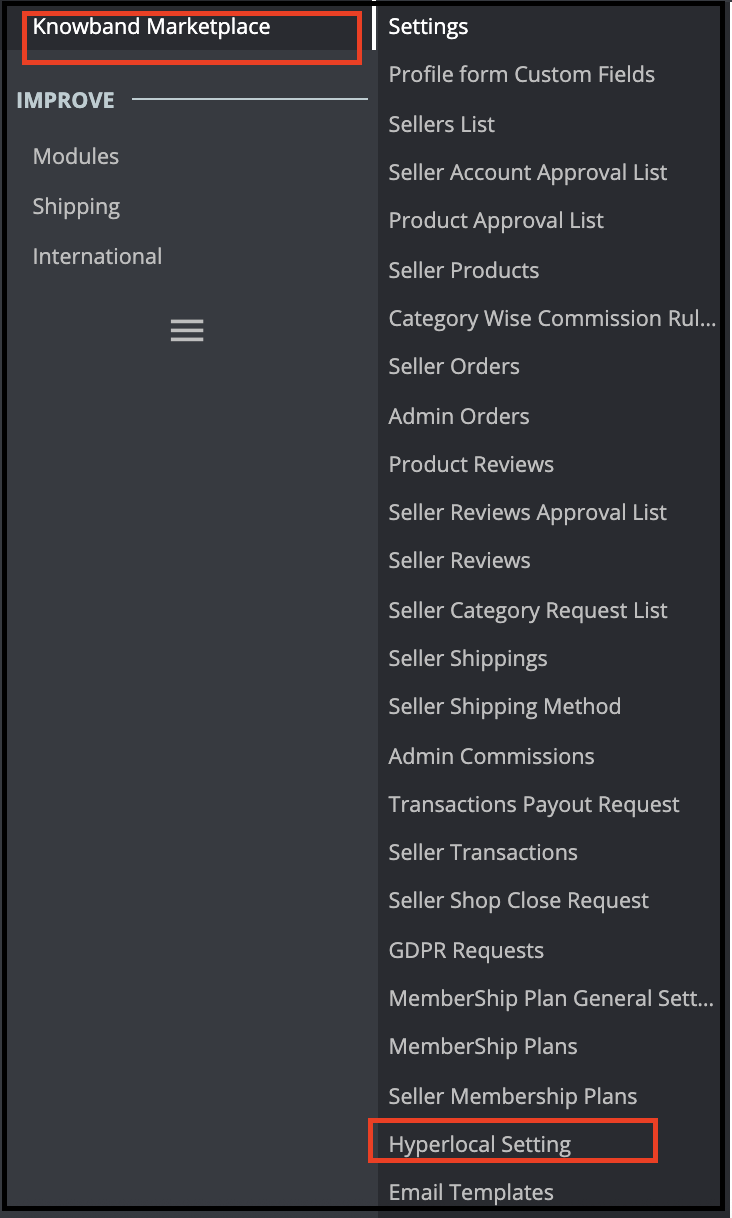
In the admin interface of the Prestashop Hyperlocal Marketplace addon, you’ll find a separate menu at the end of the menu as shown below.
The Prestashop Hyperlocal Marketplace Menu consists of several sub-menu options that direct the users to several pages in the Prestashop Hyperlocal Marketplace Addon.
3.1 Settings
The Prestashop Hyperlocal Marketplace Module’s Settings tab divides into 2 levels i.e. Seller Level Settings and Global Level Settings. This page below only controls the Global level settings for the Prestashop Hyperlocal Marketplace Module. 3.1.1 General Settings
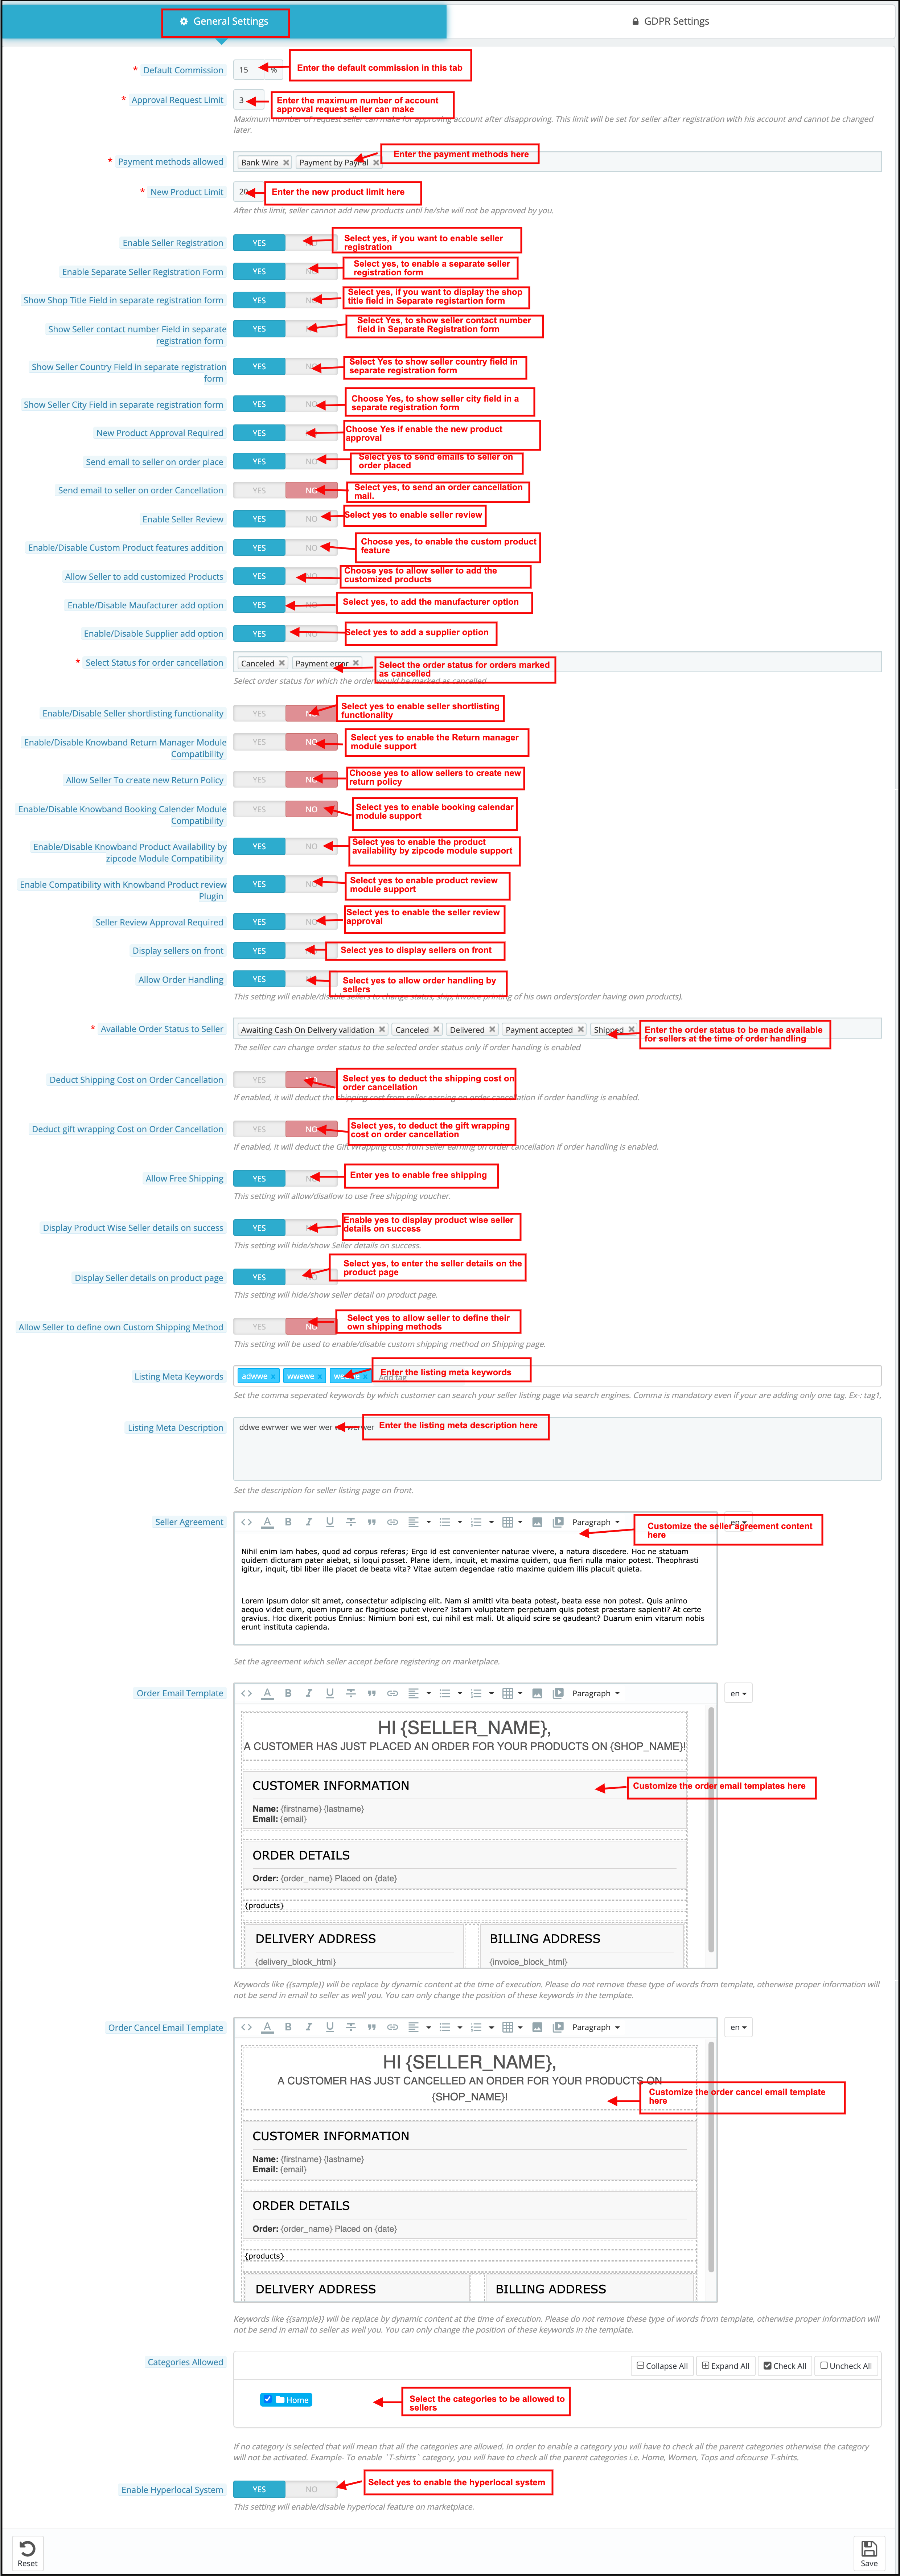
This page has all the settings that control the Prestashop Hyperlocal online marketplace and its several other features. The general settings page consists of the following fields:
Default Commission: The Prestashop Hyperlocal multi-vendor marketplace allows the sellers to fix and change the commission that is chargeable to the sellers. This section sets the default commission percentage that will charge from the sellers from the total sales made by them.
Approval Request Limit: It is the maximum number of requests that a seller can make to get a new seller account. This limit will be set for each seller after registration with his account and cannot be changed later.
Payment Methods Allowed: Select the payment methods you want to allow for transactions.
New Product Limit: Here admin can enter the maximum number of new products that a seller can add. After this limit, the seller cannot add any new product without the approval of the admin.
Enable Seller Registration: By enabling this button, the admin can allow the new or existing customer who is not a seller to register as a seller. The same ‘Register as Seller’ option is available in the Customer Tab of the PrestaShop store as well as in the front-end of the marketplace.
New Product Approval Required: Enable this field in case you want to approve a new product that a seller adds before it displays on your Prestashop Hyperlocal E-commerce Business.
Send Email to Seller on Order Place: Enable this field to send an email to the seller in case an order comes for the seller’s product(s).
Send Email to Seller on Order Cancellation: Enable this field to send an email to the seller in case an order cancels for the seller’s product(s).
Enable Seller Review: Enable this field, in case you want the customers to review the seller.
Enable/Disable Custom Product features addition: Enable this field, in case you want to add custom product features.
Allow Seller to add customizable Products: Enable this field, in case you want to allow sellers to add customizable products.
Enable/Disable Manufacturer add option: Enable this field, in case you want to add the manufacturer option.
Enable/Disable Supplier add option: Enable this field, in case you want to add the supplier option.
Order Status for cancellation: Enter the Order status to be shown at the time of cancellation.
Select order status for which the order would be marked as canceled: Select the order status to mark it when it cancels.
Enable/Disable Seller shortlisting functionality: Enable this field, in case you want to add seller shortlisting functionality.
Enable/Disable Knowband Booking Calendar Module Compatibility: Enable this field, in case you want to add Knowband Booking Calendar Module Compatibility.
Activate/Disable Knowband Return Manager Module Compatibility: Enable this field, in case you want to add Knowband Return Manager Module Compatibility.
Allow Seller To create a new Return Policy: Enable this field, in case you want to allow the seller to create a new return policy.
Enable/Disable Knowband Product Availability by zipcode Module Compatibility: Enable this field, in case you want to allow zipcode module compatibility.
Enable Compatibility with Knowband Product review Plugin: Enable this field, in case you want to allow compatibility with the product review plugin.
Seller Review Approval Required: Enable this field in case you want the seller to review for approval before it becomes visible on the storefront.
Display sellers on the front: Enable this field in case you want to show a link in the header of the Prestashop Hyperlocal Marketplace front-end about the seller’s listing page.
Allow Order Handling: This setting will enable/disable the sellers to manage and change the order status, manage the shipment of the orders and generate the invoice of their products.
Available Order Status to Seller: The seller can change order status to the selected order status. Further, only if he enables the order handling.
Deduct Shipping Cost on Order Cancellation: If the admin enables this, it will deduct the shipping cost from the seller’s earnings. Further, on order cancellation, if he enables the order handling.
Deduct gift wrapping Cost on Order Cancellation: If the admin enables this, it will deduct the Gift Wrapping cost from seller earning on order cancellation if order handling is enabled.
Allow Free Shipping: This setting will allow/disallow to use of a free shipping voucher.
Display Product Wise Seller Details on Success: If the admin enables this, the seller details will be shown on the order confirmation page.
Display Seller Details on Product Page: The seller’s detail will display on the product page if this option is enabled.
Allow Seller to define their Custom Shipping Method: Enable this functionality to allow the sellers to define their shipping methods. In case, the admin disables this feature, then, only the default shipping methods defined by the admin be shown in the Shipping tab of the seller’s dashboard.
Listing Meta Keywords: Add all the meta tags (separated by comma) by which your customers can search the Seller Listing Page via Search Engines.
Listing Meta Description: Add the description to the meta tags in the above field.
Seller Agreement: The seller agreement is customizable from this section of the Prestashop Hyperlocal Delivery Marketplace. The same agreement will display to the sellers once they register themselves in the Prestashop Hyperlocal Marketplace.
Order Email Template: The email to be sent to the sellers when an order happens for their product is customizable from here.
Order Cancel Email Template: The email to be sent to the sellers when an order cancels for their product to be customizable from here.
Categories Allowed: This option shows the categories that the admin allows for the sellers to add products. If no category is selected, all the categories that the admin allows. Moreover, if he selects some of the categories, it means that only those categories permit.
Enable Hyperlocal System: Toggling this button can enable the hyperlocal system in the marketplace.
3.1.2 GDPR Settings
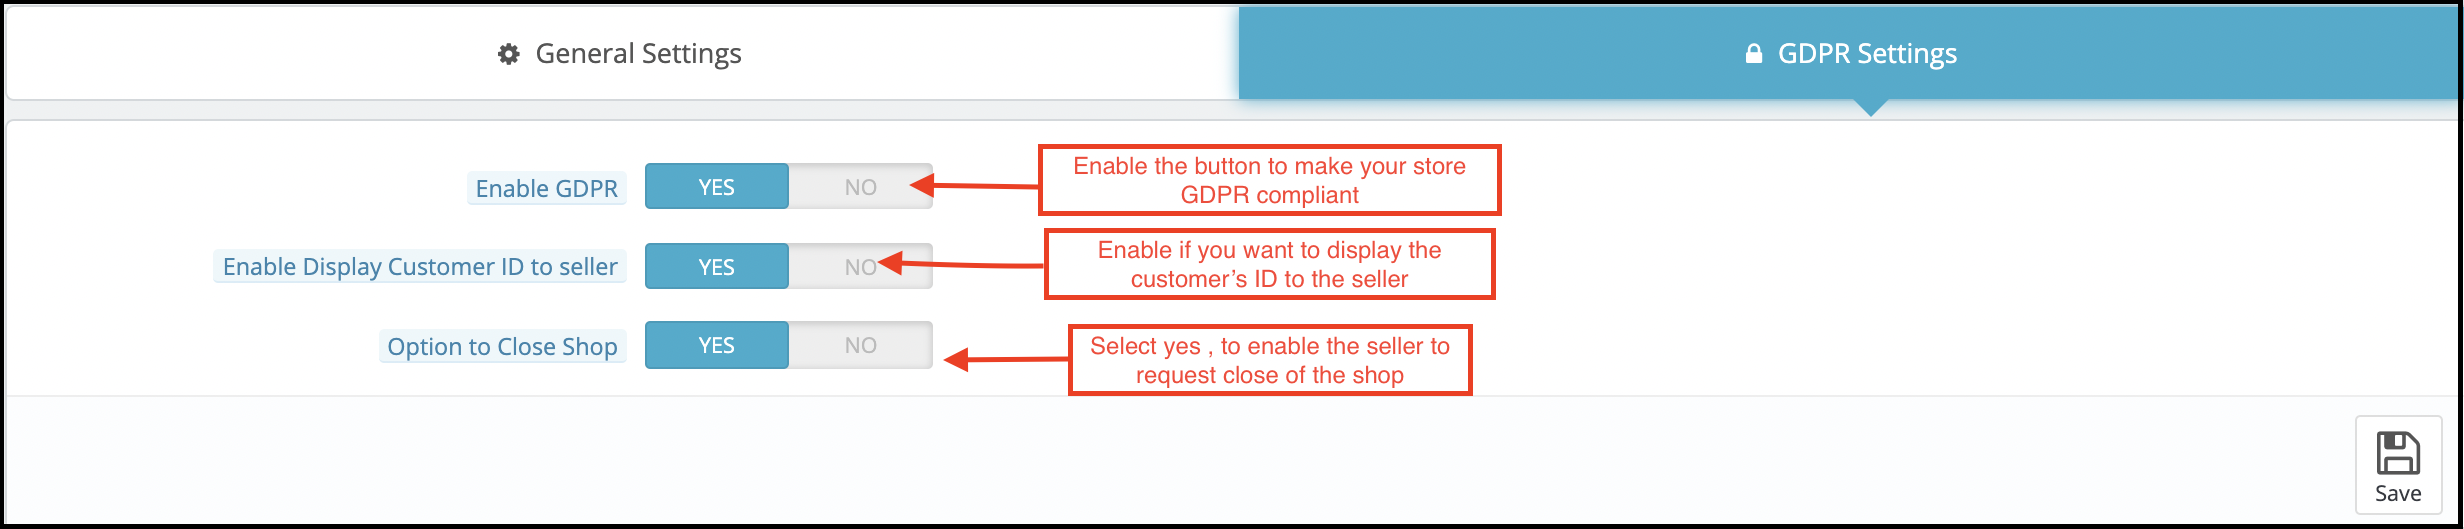
The store admin can enable the GDPR settings by clicking a few buttons in this section of the Prestashop Hyperlocal Marketplace addon. The various fields are below:
Enable GDPR: Toggle this button to enable GDPR compliance. Enable Display Customer ID to seller: Enable this feature if you want to display the customers’ ID to the third-party sellers. Option to close Shop: If the admin enables this feature, then, the sellers will get options to request for the shop closure. In fact, it displays a section in the tab in the dashboard of the sellers from where the request can be raised.
3.2 Profile Based Custom Fields
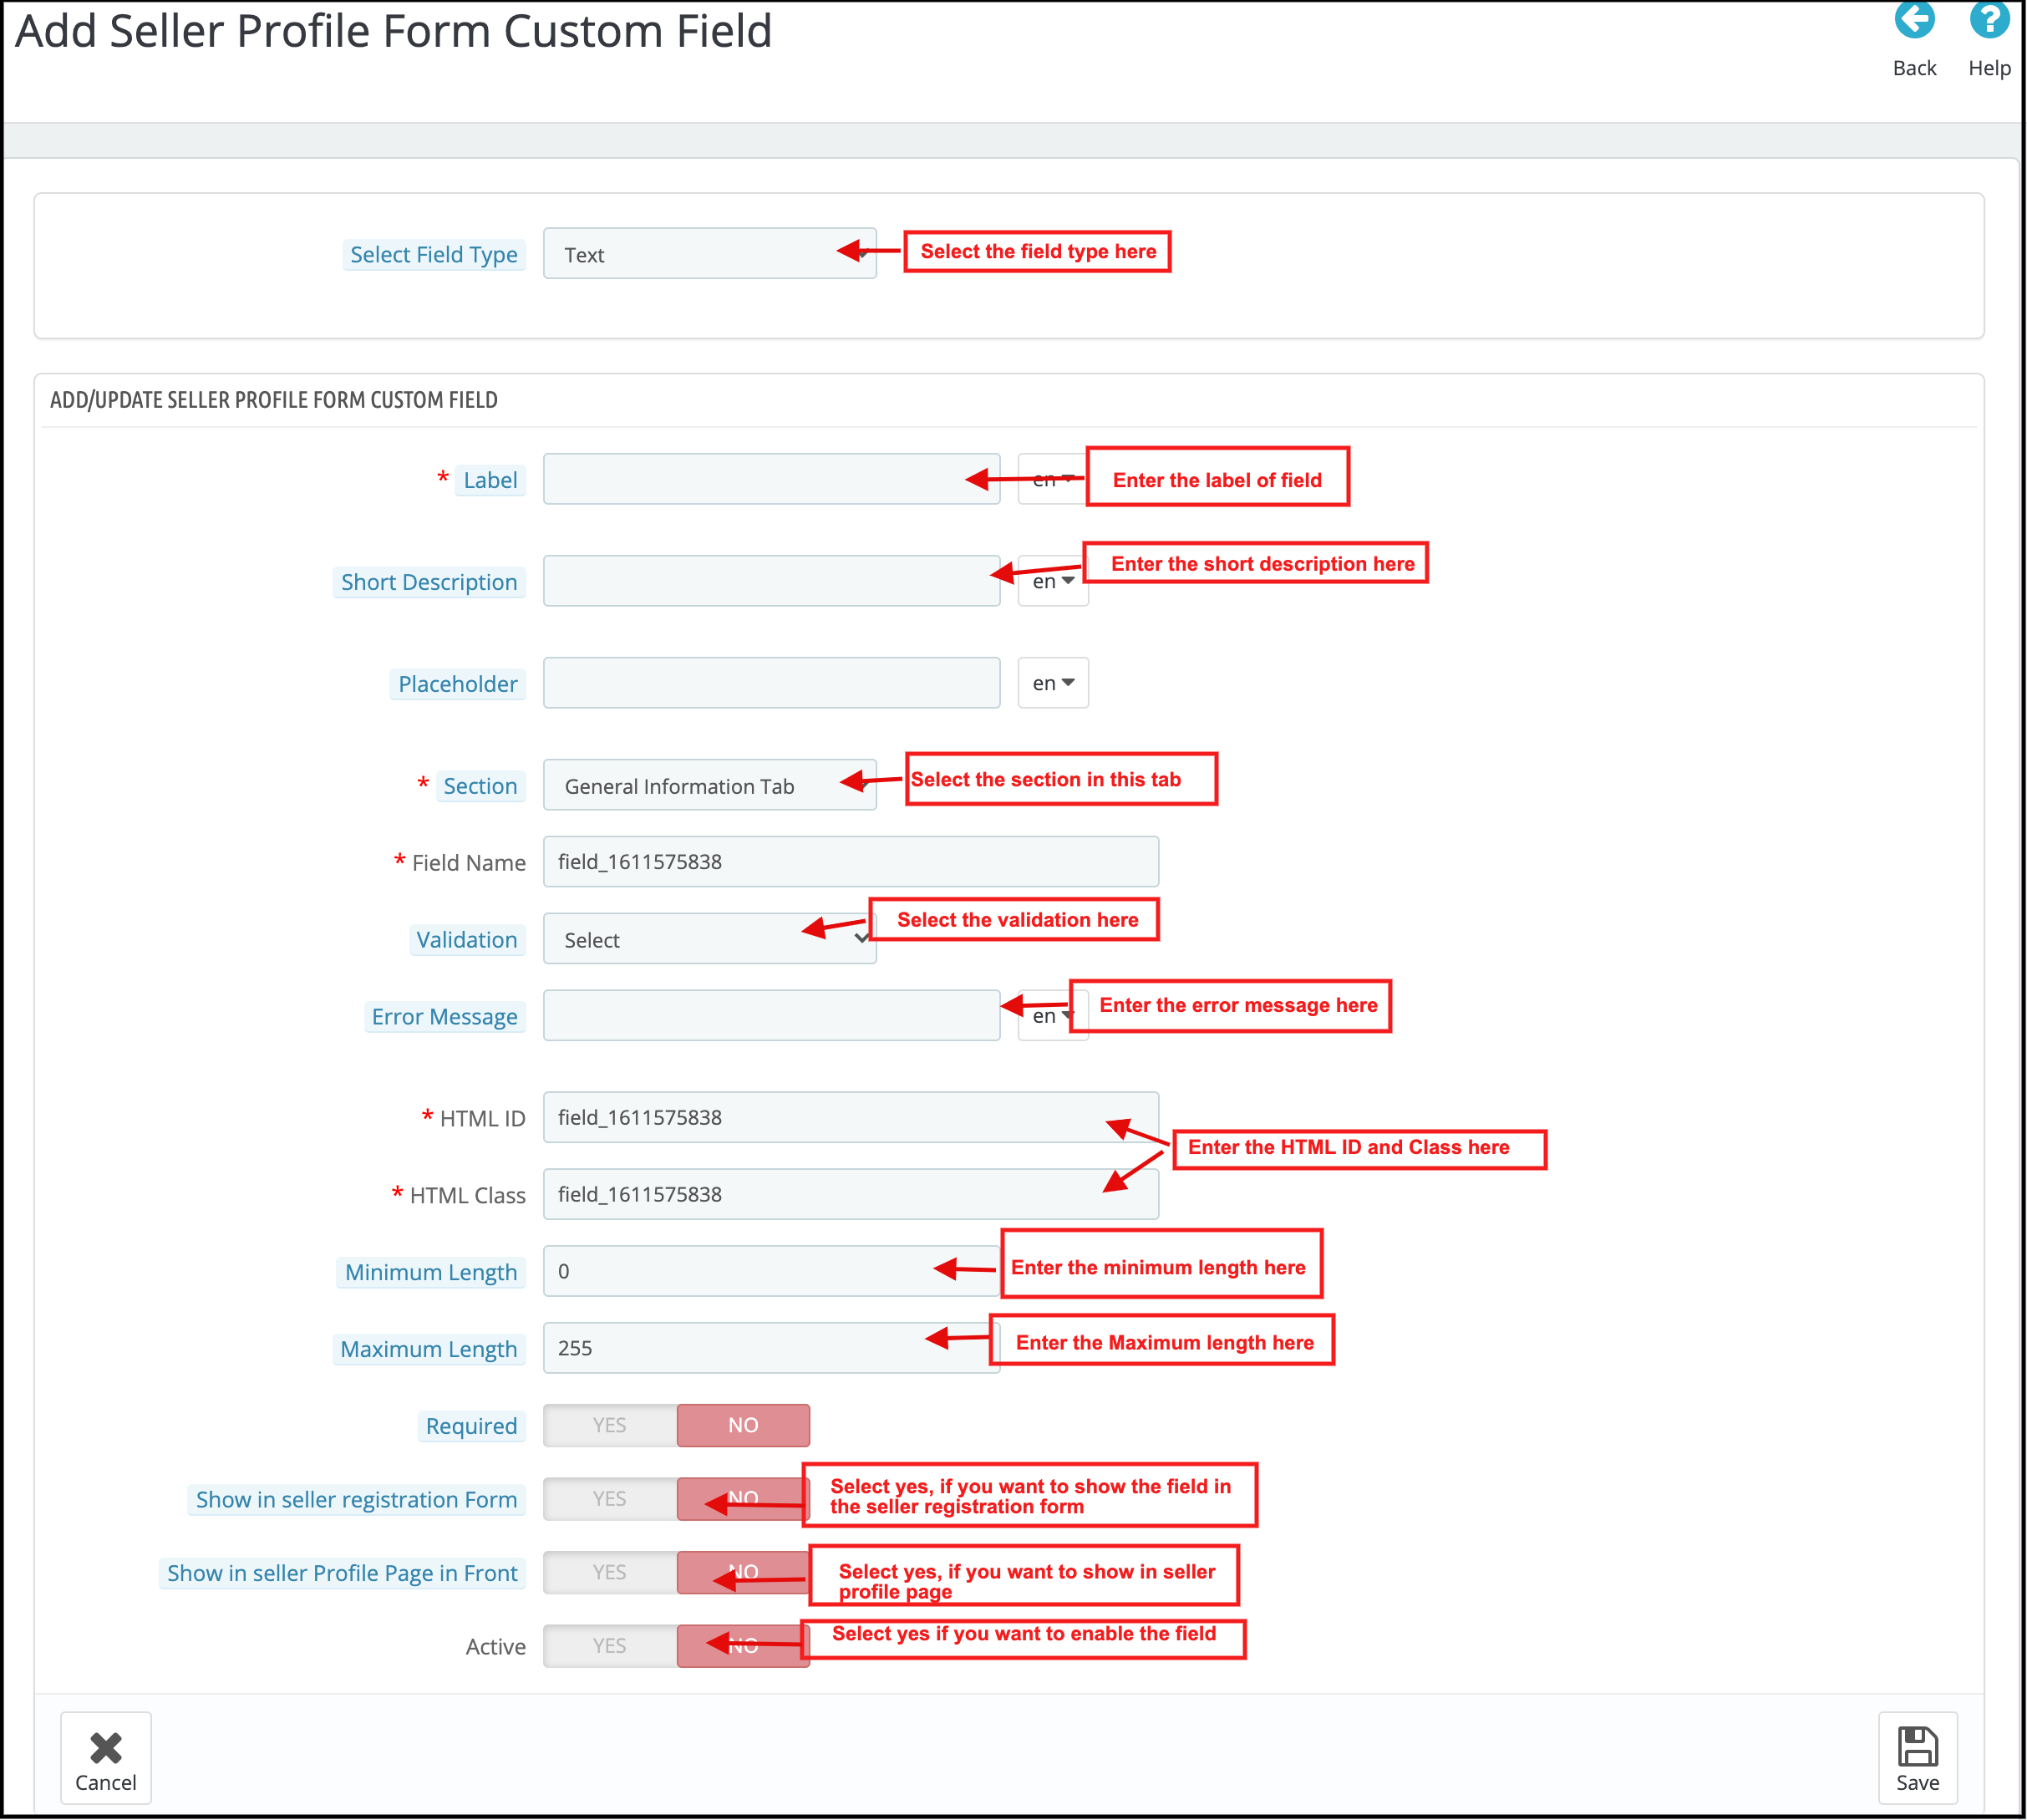
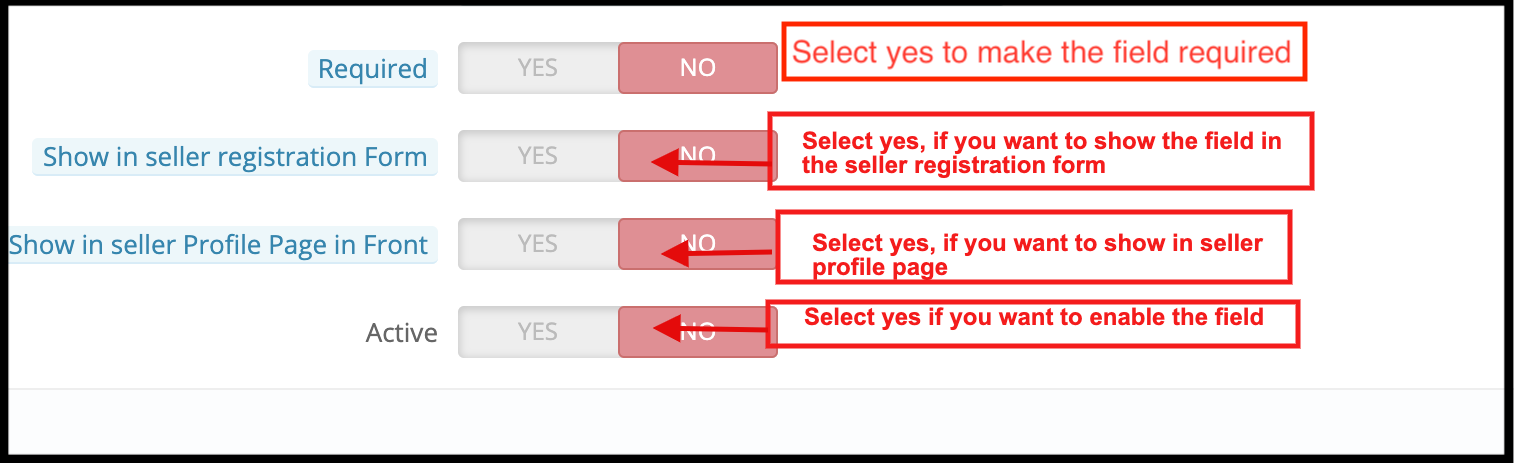
Now admin can add custom fields for the seller profile page. Moreover, even make them needful for the sellers to fill out.
Custom Fields for Seller Profile:
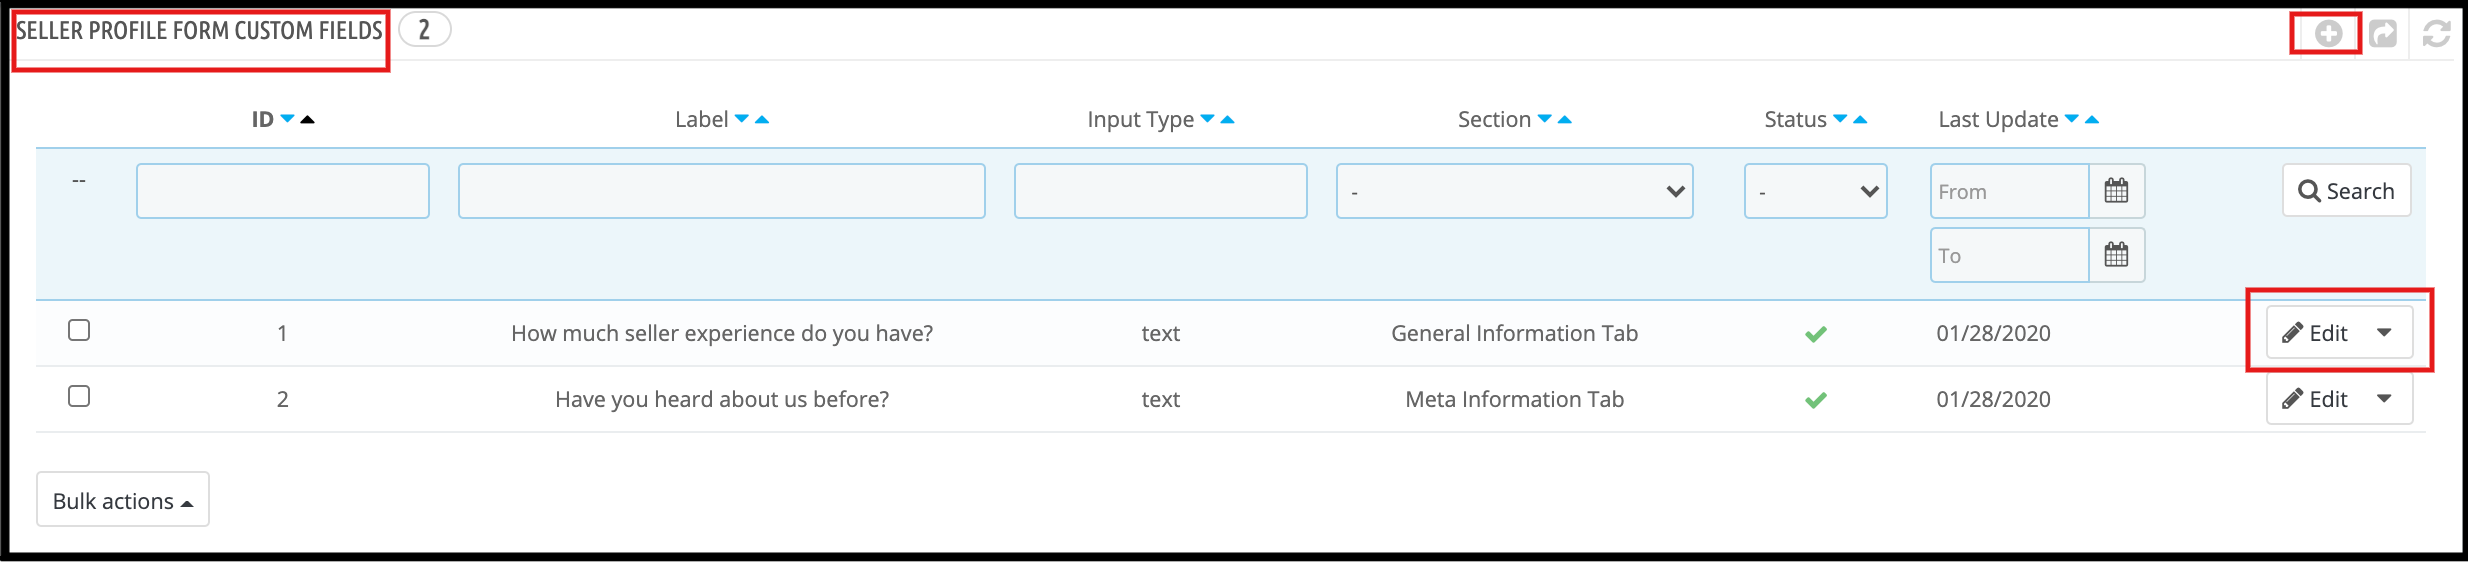
Admin can add new custom fields for the seller’s profile under the “Profile Form Custom Fields” tab. With the help of this tab, the admin can add new custom fields or delete custom fields for sellers’ profiles using Prestashop Hyperlocal Marketplace.
Show Custom Fields on Seller Front Page:
With the help of the PrestaShop Hyperlocal online marketplace, the admin can show the custom fields on the seller’s profile page. Admin can allow this functionality under the “Profile Form Custom Fields” tab.
Separate Seller Registration:
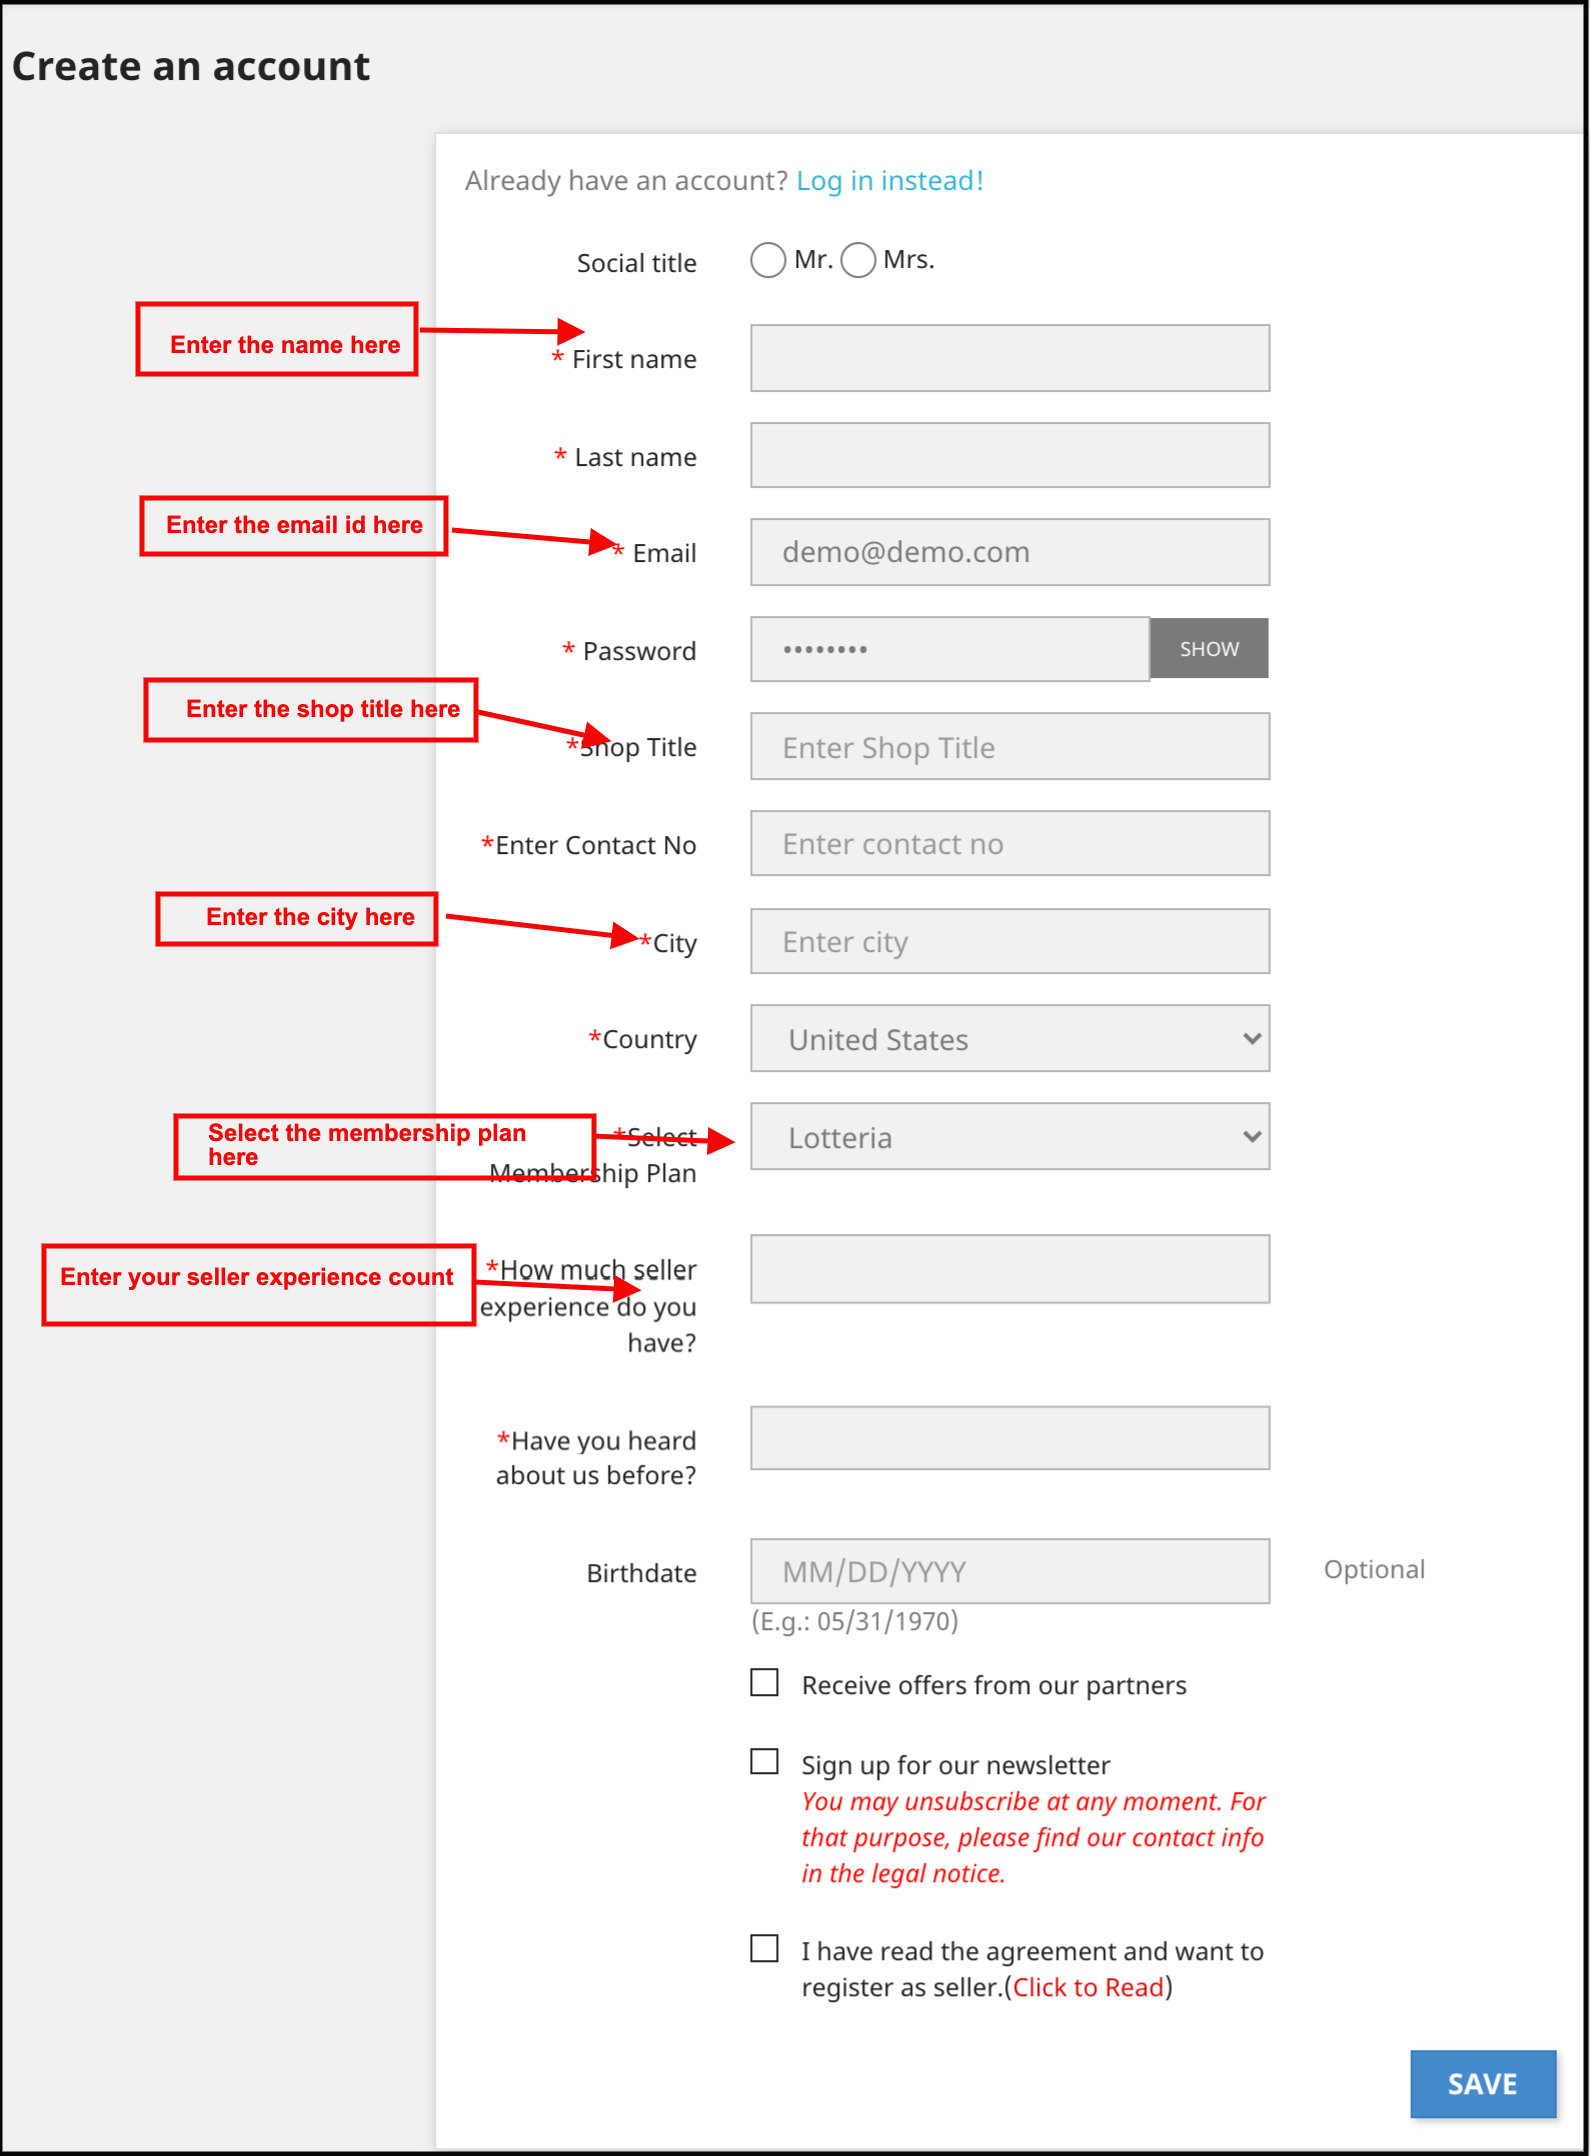
Admin can add a separate seller registration form under the “General Setting” tab of the PrestaShop Hyperlocal multi-vendor marketplace. By allowing this functionality admin is also able to add more custom fields in the seller registration form like shop title, seller contact details, seller country, etc. Custom Fields Type Selection:
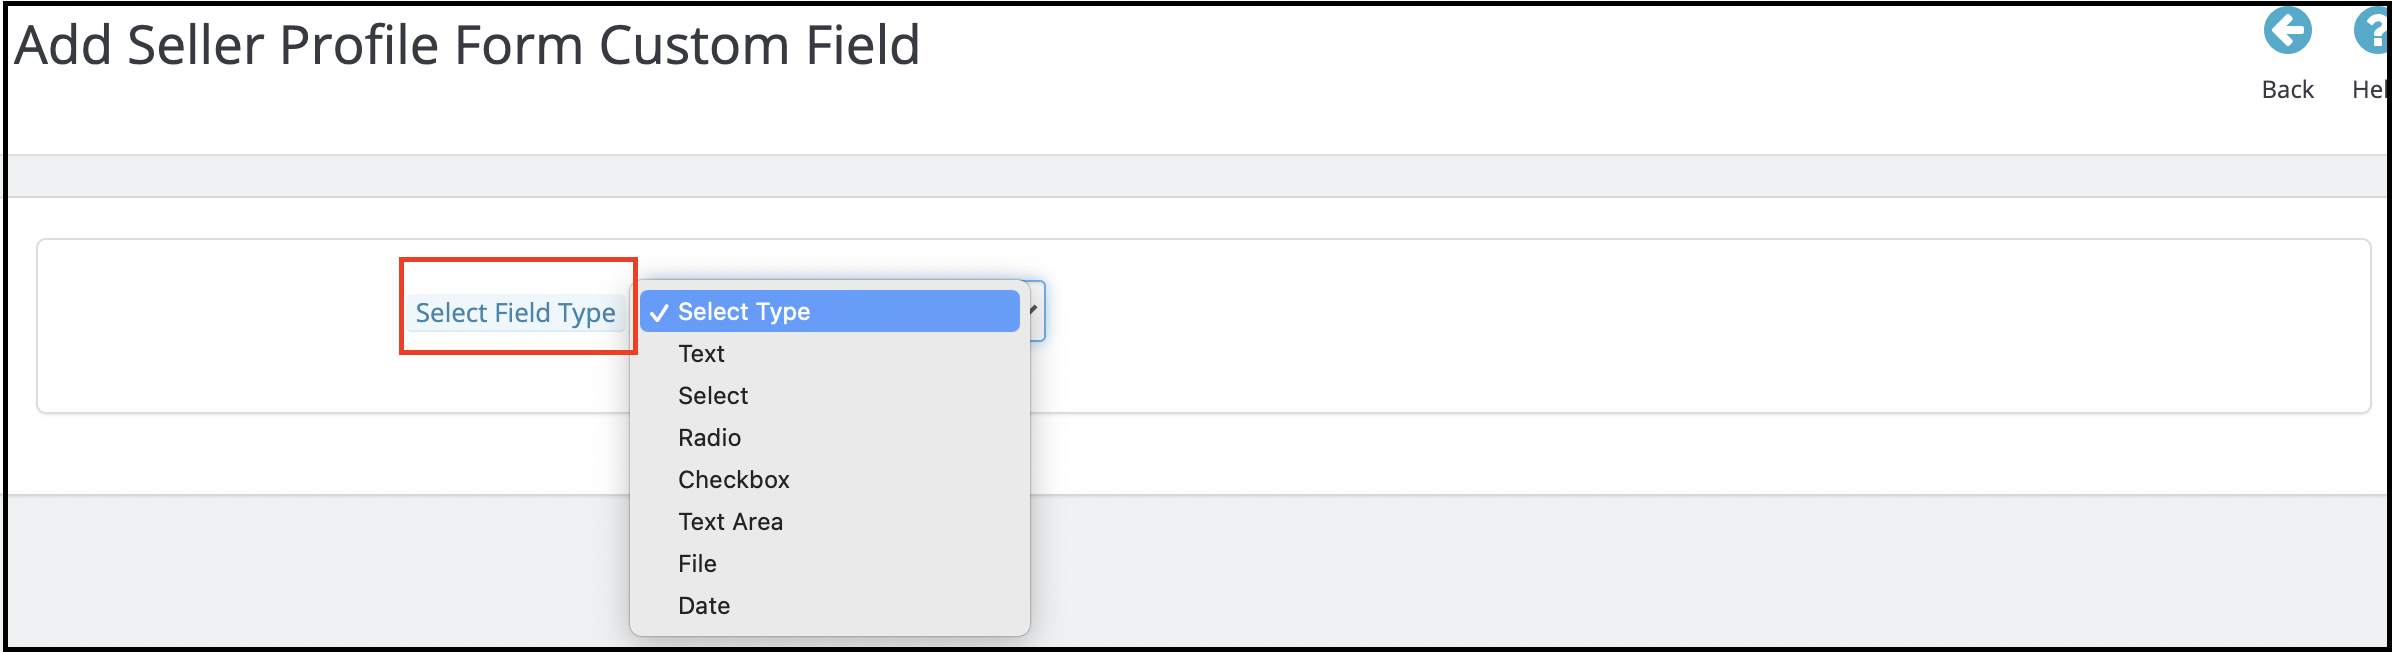
Admin can select the custom fields type which he wants to add on the seller profile page. Admin gets lots of options like checkbox, radio button, text box, etc.
Category wise Custom Fields:
Admin can map the custom fields in a particular category using the “Section” tab under Profile Form Custom Fields. With the help of this admin can map the custom fields category-wise.
Make Custom Fields Required:
Admin can make these custom fields needful using the “Required” tab.
3.3 Sellers
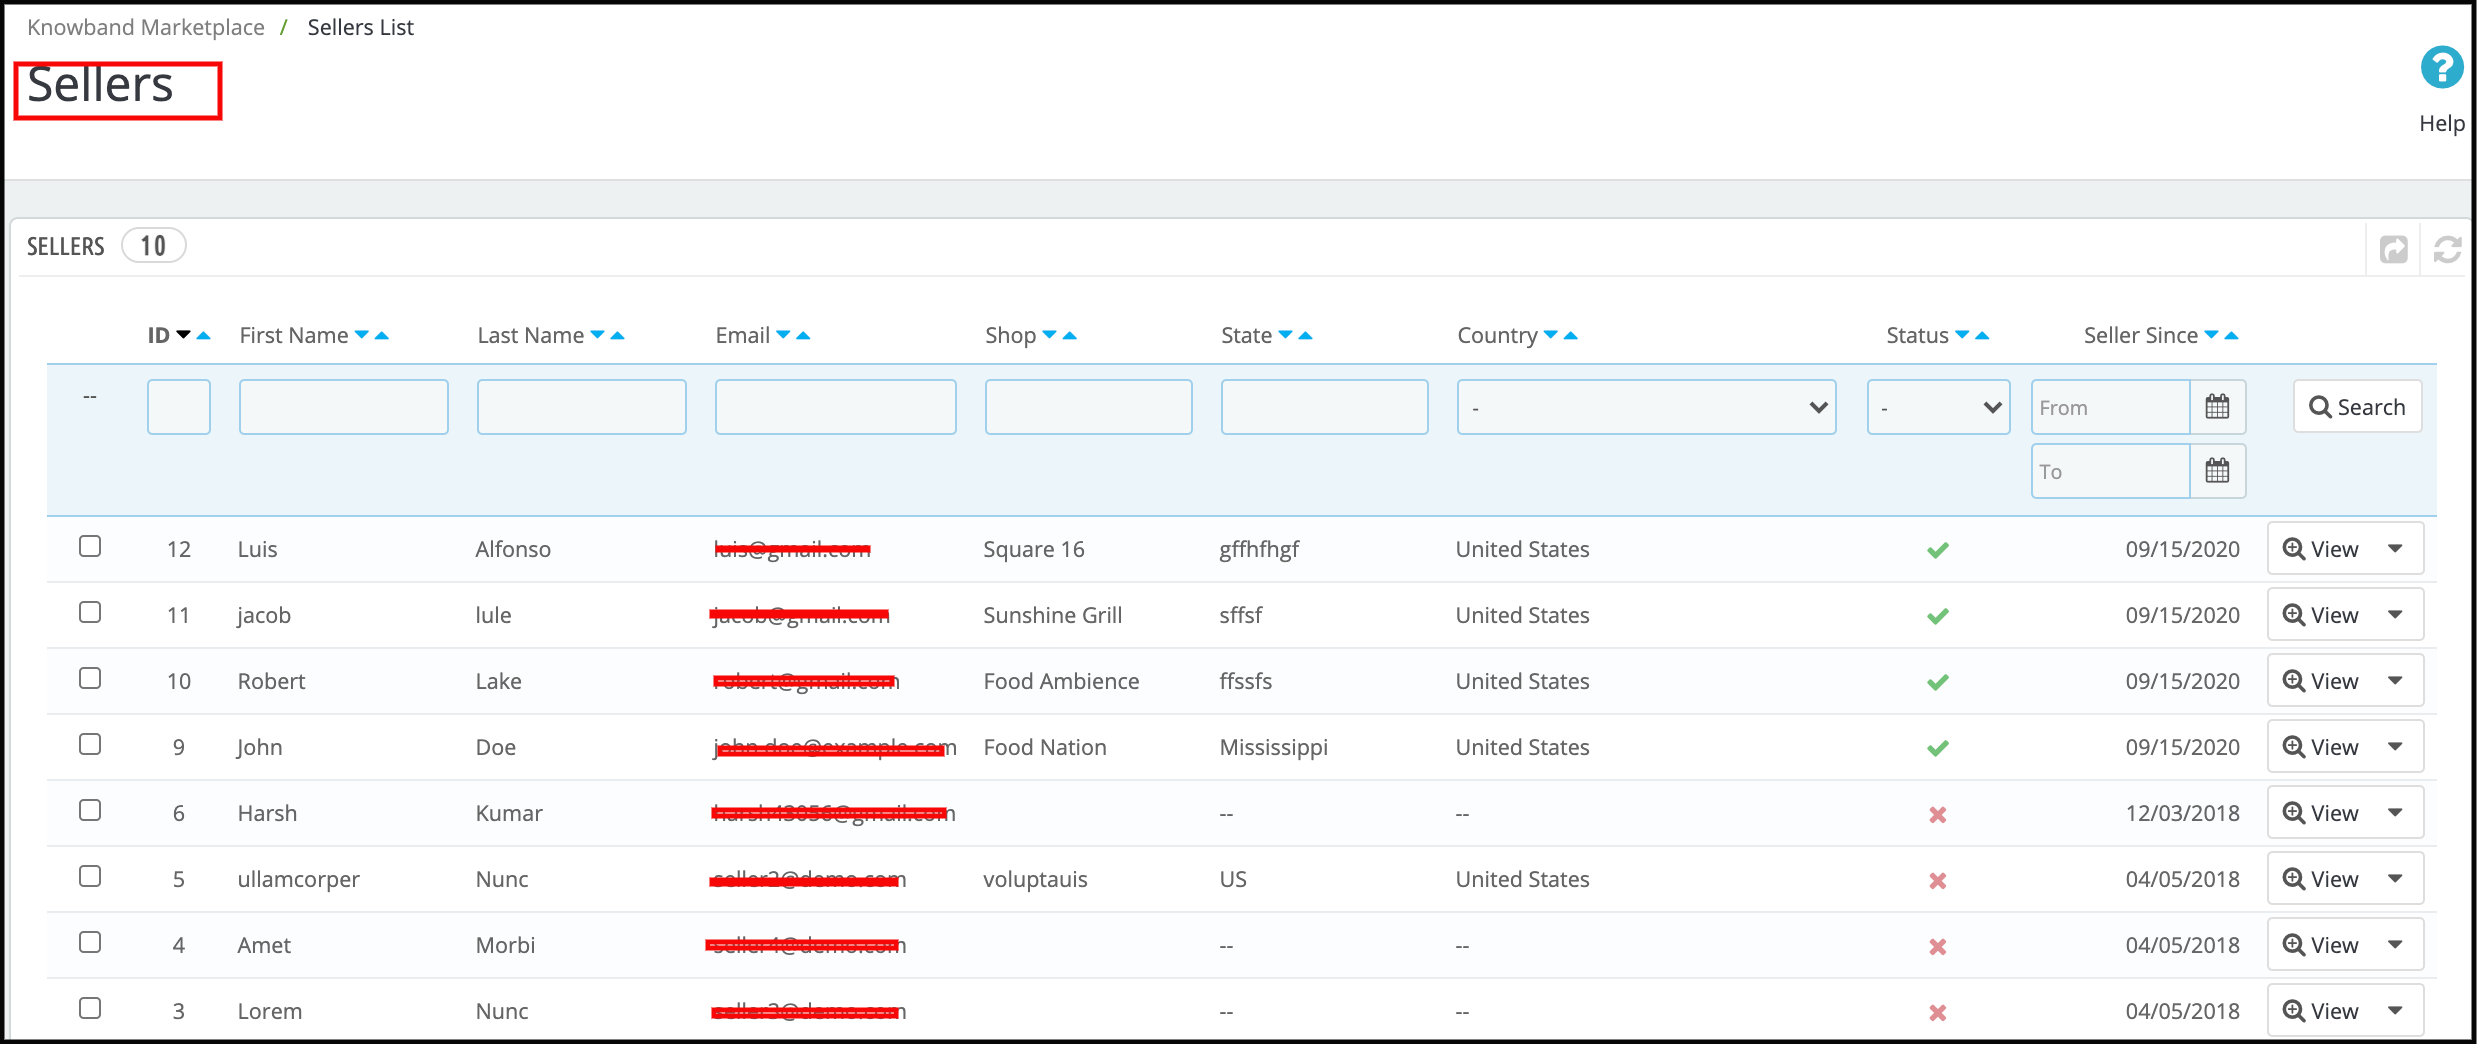
This page of the Prestashop Hyperlocal E-commerce Business extension has a list of all the sellers that the store owner approves by the store owner.
There are several filters as well to filter the list of sellers as shown in the above screenshot.
The above figure consists of a list of all the sellers that the admin approves.
The admin can also enable or disable a seller in this list using the bulk actions of the grid.
If the admin disables a seller, then, all the products of that seller are also automatically disabling. Moreover, will not be visible on the storefront.
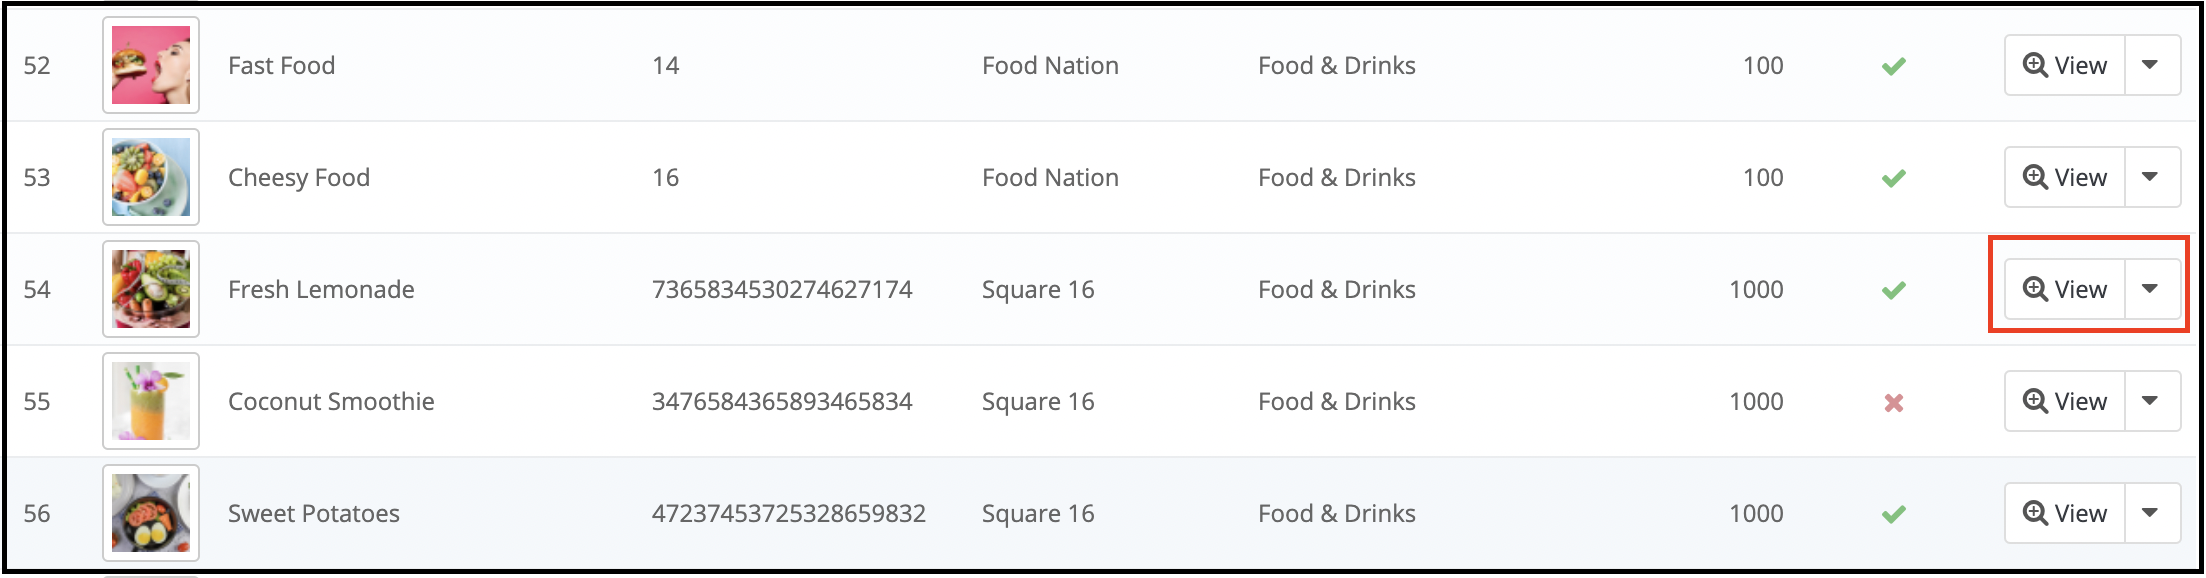
When you click on the View button, a new page opens up consisting of the information about the seller.
3.5 Seller Account Approval Request
When a seller registers or any customer registers as a seller on the Prestashop Hyperlocal Delivery Marketplace, then, it first appears in this tab of the Prestashop Hyperlocal Service Marketplace. The store admin can approve or disapprove of the seller account request.
Approve Seller Account: To approve a seller’s account, you have to click on the “Cross” button corresponding to that seller on the list from the backend.
Once the Seller account approves, it directly moves to the Sellers List and all the limits to the seller account are released.
A mail will be sent to the seller to notify them about the approval of the seller account.
Note:- The Seller Accounts that the admin approves by the store owner cannot be undone. Please use this feature carefully.
Disapprove Seller Account: To disapprove of a seller account, you have to click on the “tick” button in front of that seller on the list.
A pop-up will appear asking for the reason for disapproval of the seller account. Fill the reason and then submit the form to complete the action.
A mail will be sent to the seller notifying the disapproval of the seller account. The reason provided in the pop-up will also be sent in this mail.
Note:- Once the admin disapproves a seller, then he can again apply for the seller account, and whenever a seller does this the store owner is notified through a notification email.
3.6 Product Approval List
When a seller adds a product, then, first of all, it appears in this tab of the Prestashop Hyperlocal Marketplace extension. The store owner is also notified of the same through the mail. Then, it is up to the store owner to approve or disapprove of the product.
If the admin enables the setting (i.e. New Product Approval Required), only then, a new product appears on this list. Otherwise, it directly appears in the Product List and automatically approves and displays. Disapprove Seller Product:
To disapprove of a product, you have to click on the Disapprove button corresponding to that product on the list.
A pop-up will appear asking for the reason for the disapproval of the product. Fill the reason and then submit the form to complete the action.
Once a product disapproves a mail will be sent to the seller notifying disapproval of the product with the reason provided in the above form. The disapproved products also appear on the same list. The Store admin can approve them at any point in time.
Approve Seller Product:
To approve a product, you have to click on the Approve button in front of that product in the Product Approval list.
After approval, the product is moved from the Product Approval list to the Sellers Products list.
Note:- This action cannot be undone. Please use it carefully.
3.7 Sellers Products
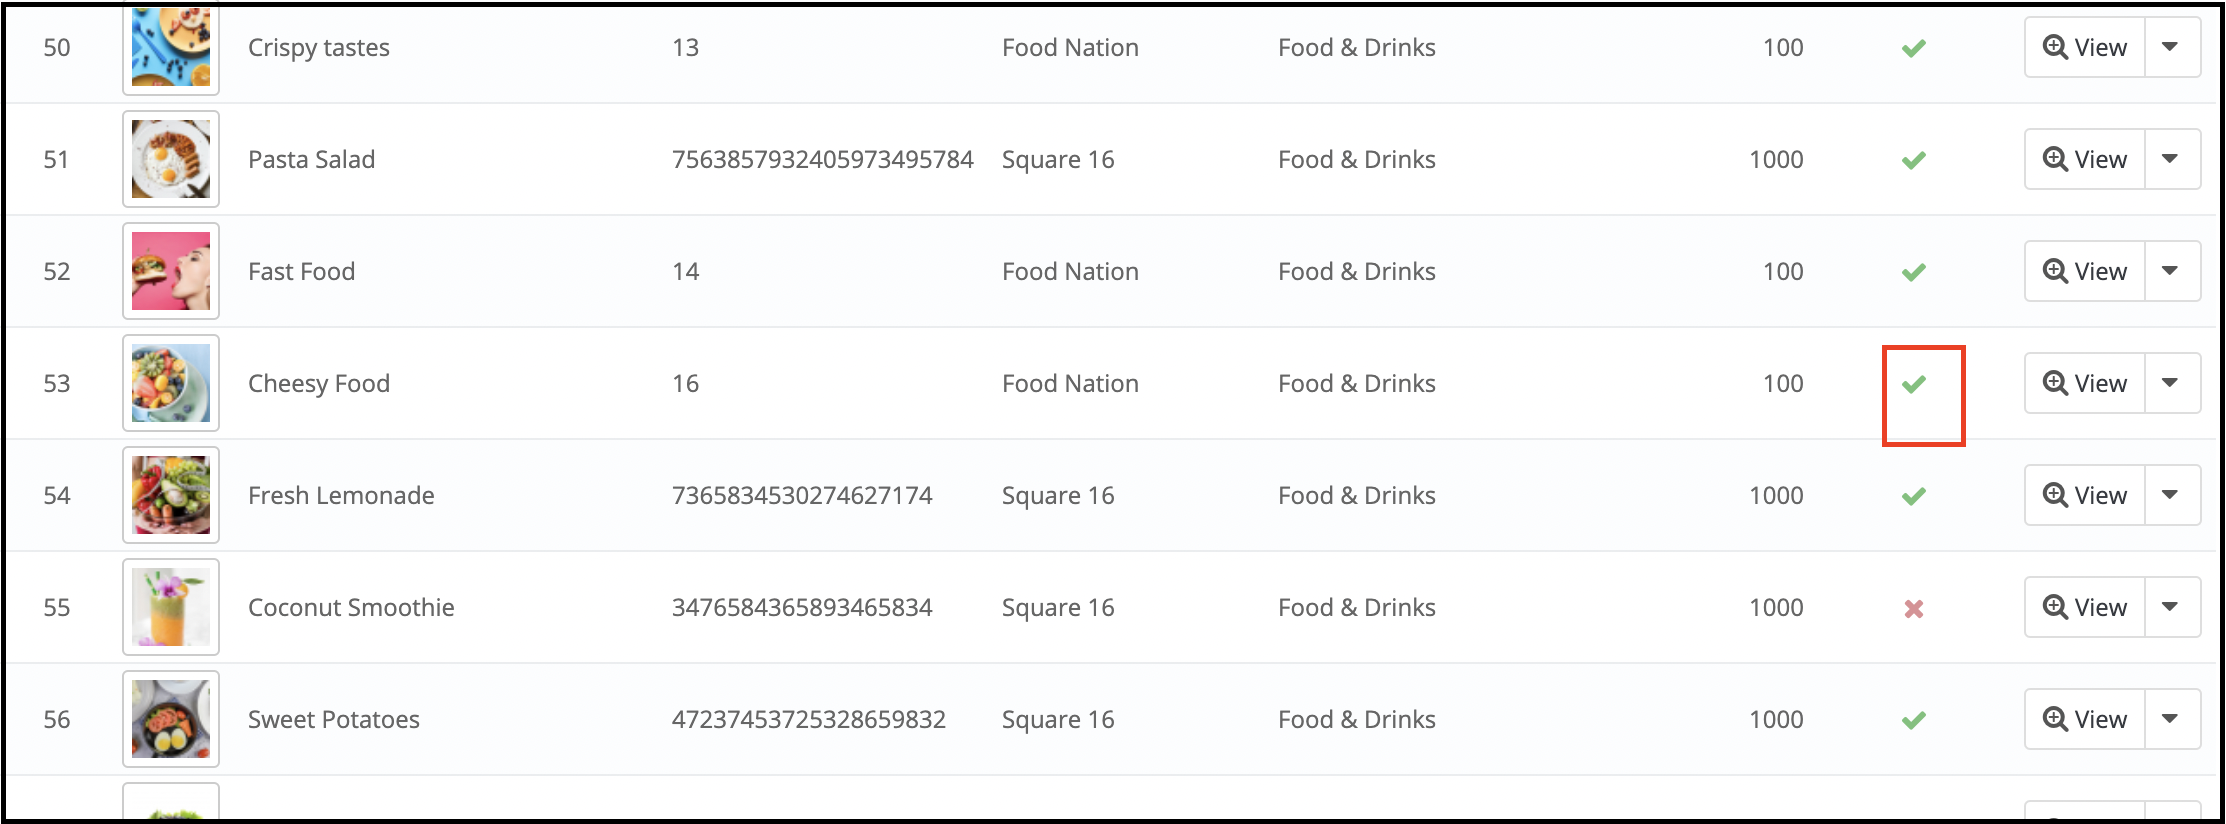
The Seller Products page of the Prestashop Hyperlocal online marketplace add-on consists of all the products the seller adds and the admin approves on the store.
If the admin disables the settings (i.e. New Product Approval Required) in the Setting tab of the Prestashop Hyperlocal multi-vendor marketplace, then a product approves directly when the seller adds it. In addition, it appears in this list. Otherwise, the product first appears in the Product Approval list.
Delete Product:
To delete a product, you have to click on the Delete button corresponding to each product as shown in the image below.
A pop-up will appear asking for the reason for the deletion of the product. To complete the action, fill in the reason and then click on the submit button.
A mail will be sent to the seller to notify the deletion of the product. The mail also contains the reason you have provided for the deletion of the product.
Note: The product delete action cannot be undone. Please use this feature carefully. Enable/Disable Product: To change the status of any product, you have to use the Bulk Action feature of the Grid. To enable/disable any product, select the product(s) and choose the action (i.e. Enable or Disable) to complete the action.
Note: Once the admin disables a product, it will not be visible at the front. To avoid disabling products and only disable a product if it is very necessary. View or Edit Product: There is also an option to view the details of any product on the list. To do that you have to click on the View button in front of that product and it will take you to the edit page of the respective product.
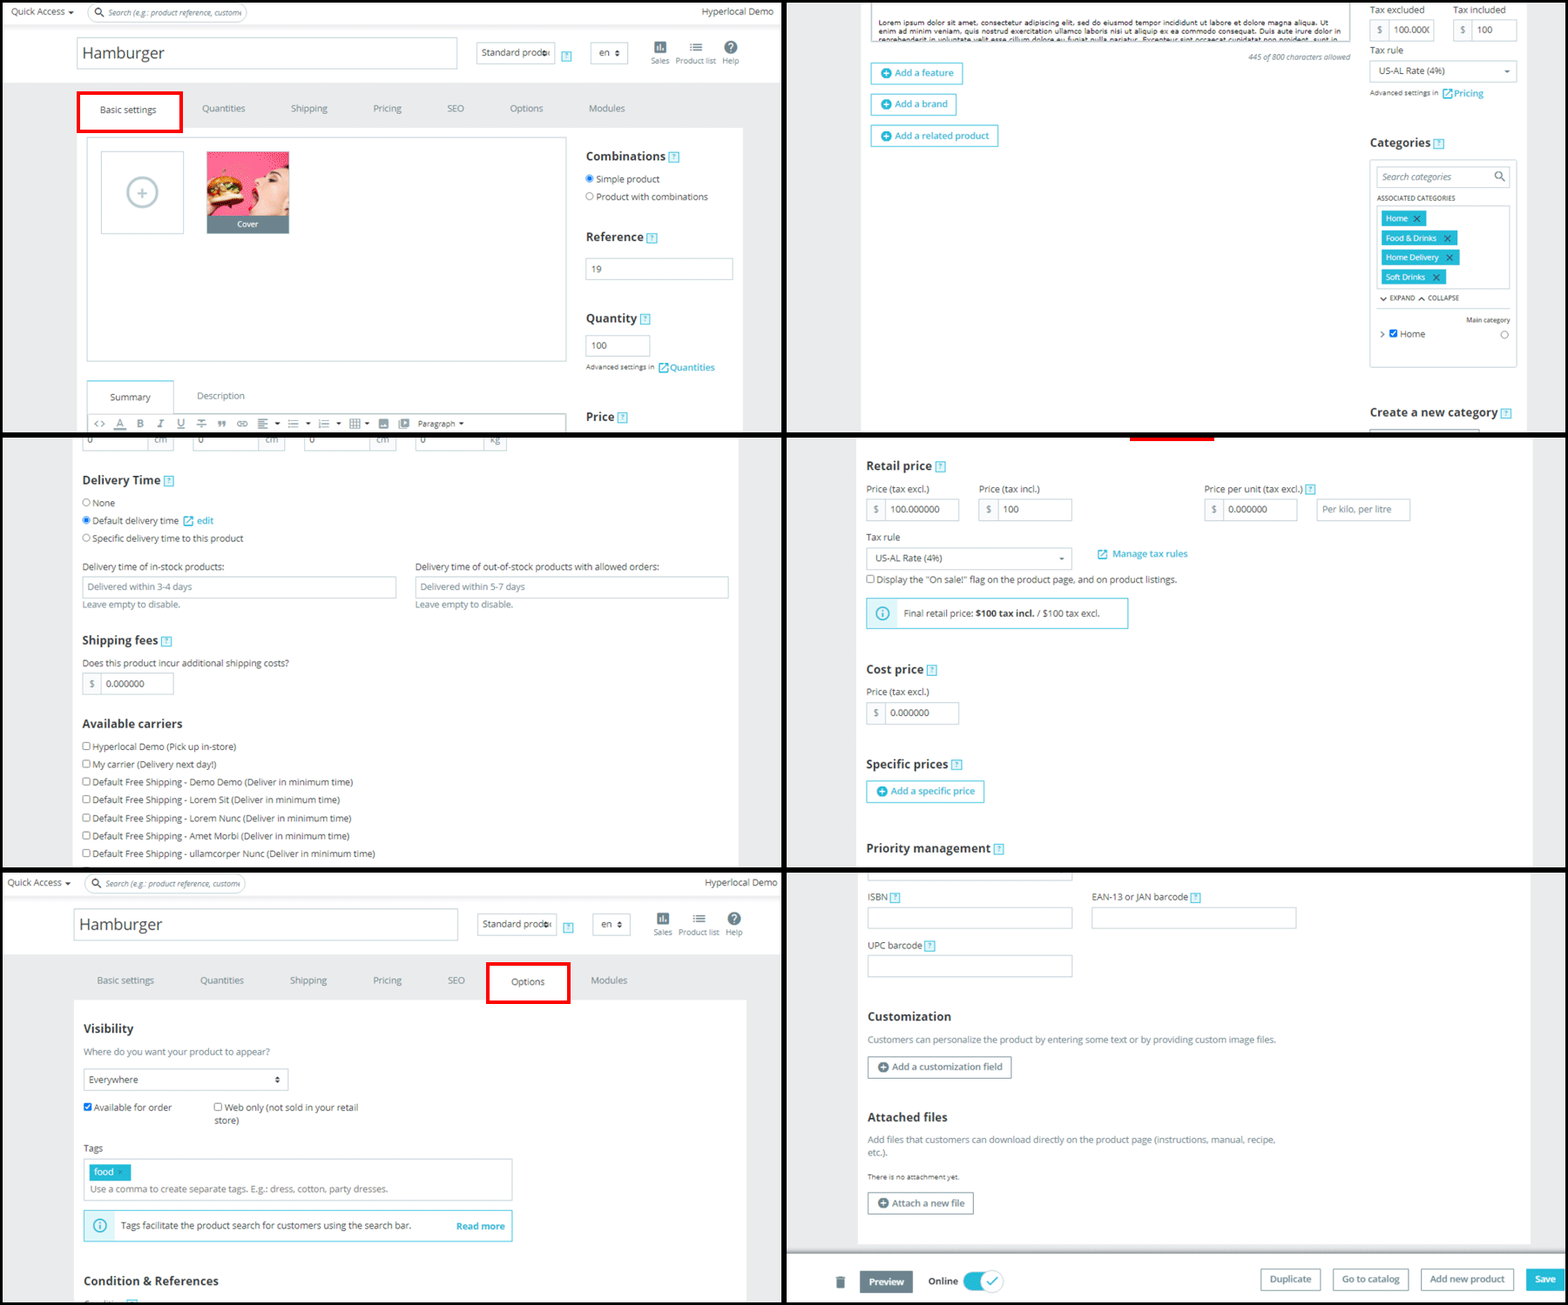
On clicking the view button, you’ll redirect to the products detail page as shown below:
The admin can make the changes as needful. Moreover, the changes will reflect in the front-end of the site.
3.8. Category Wise Commission Rules
Now, the admin can easily divide the commission according to the product category. Admin can make new categories too accordingly.
The admin can set a new category by entering a default commission. This enables the admin to charge different commission rates for different product categories.
3.9. Sellers Orders
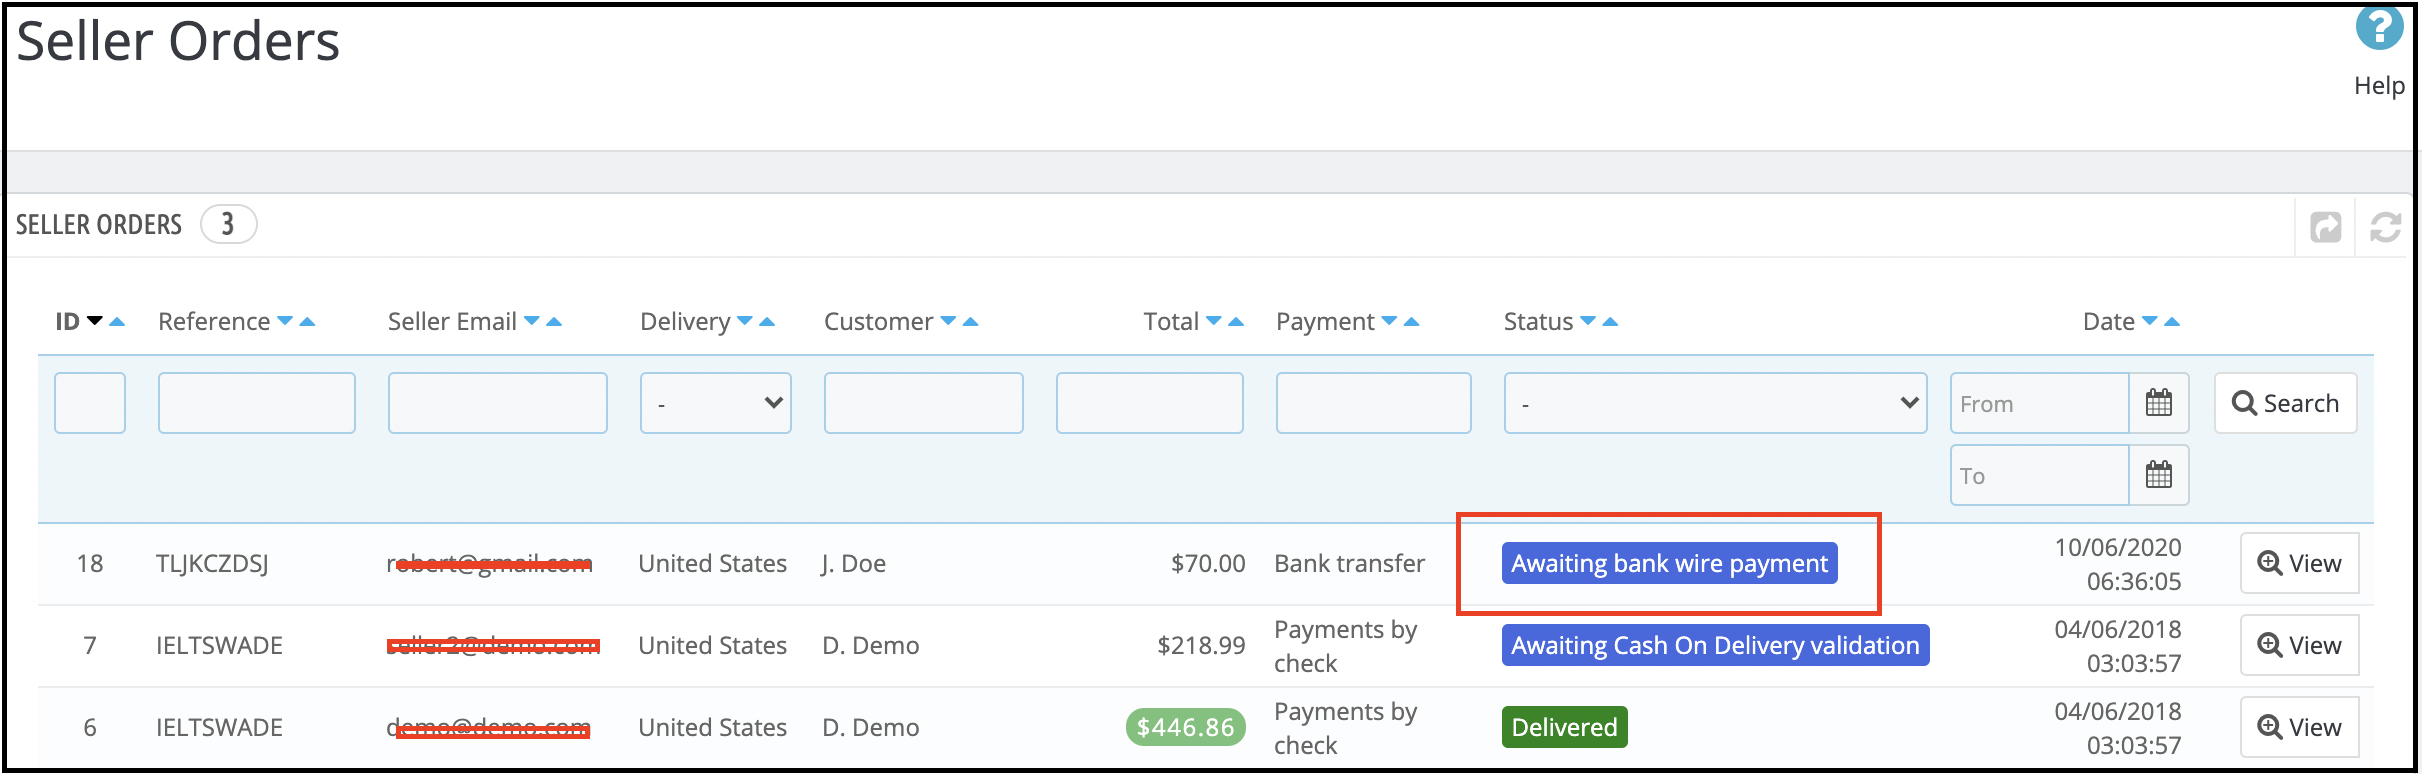
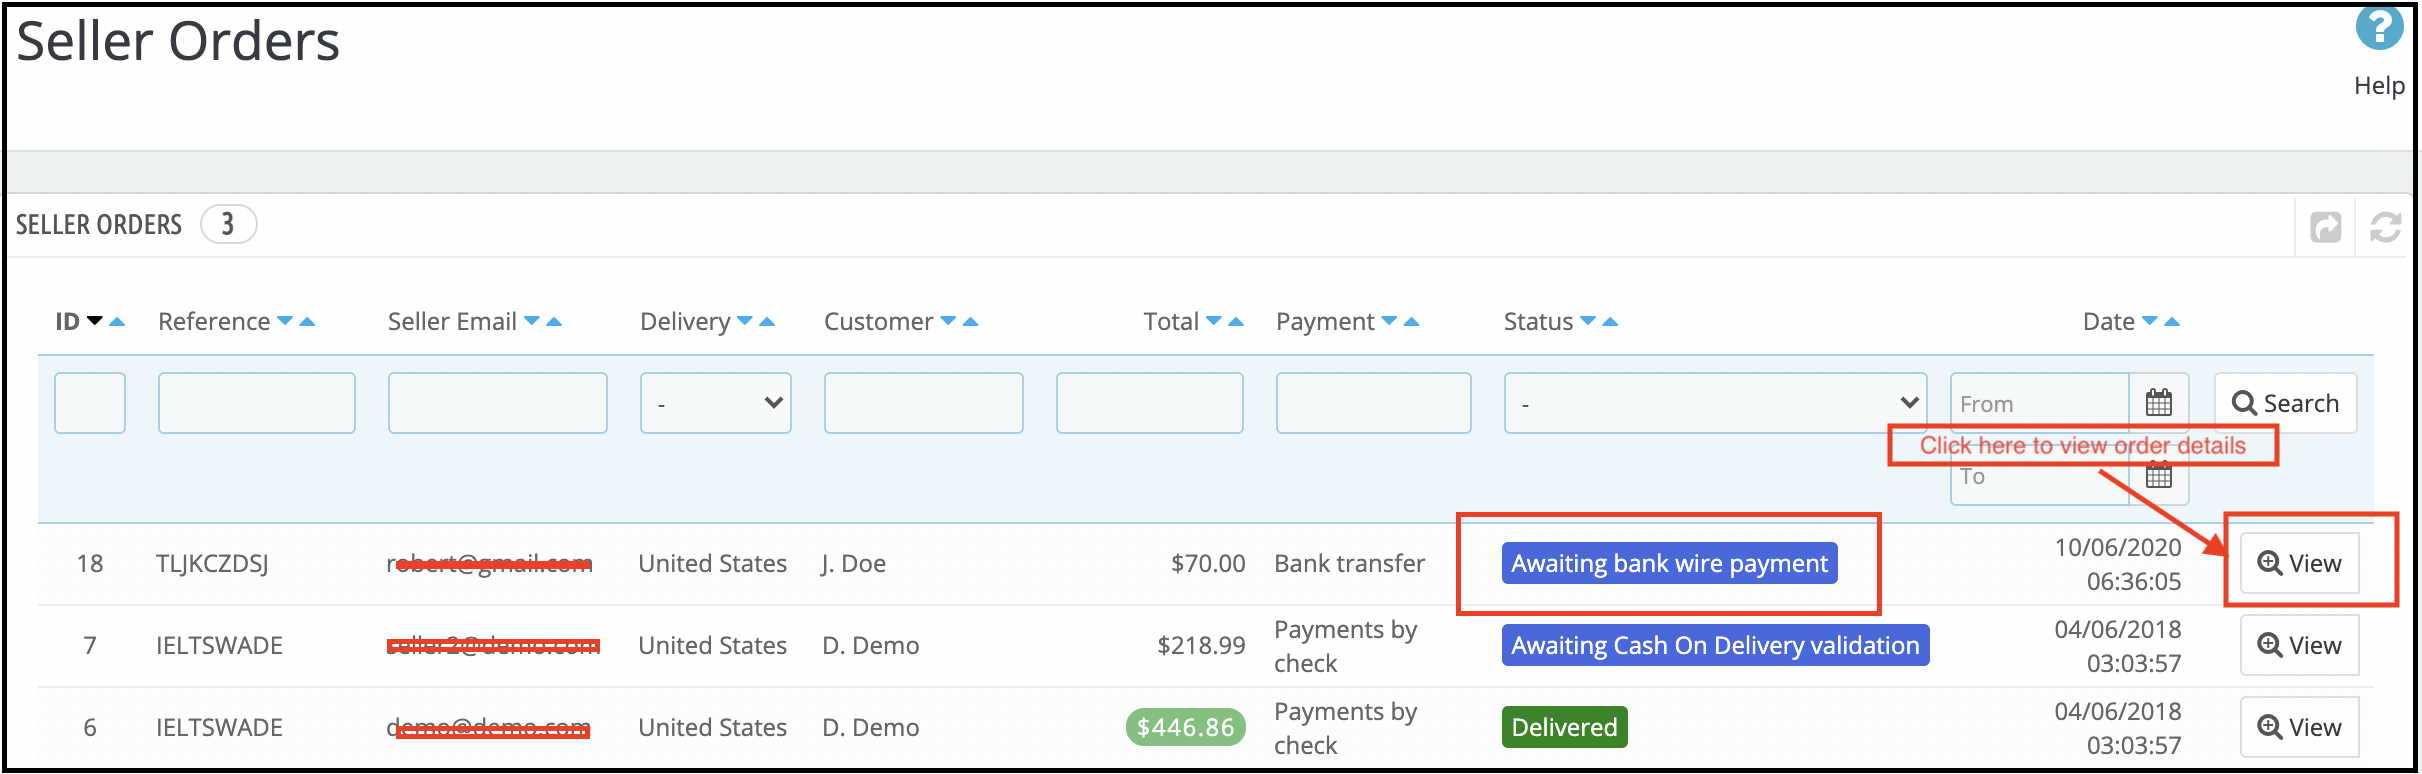
The Seller Order Tab of the Prestashop Hyperlocal Marketplace Addon consists of all the orders that the customers place for the sellers’ products. The orders shown in this list are split based on sellers which means, if there are products by different sellers in the same order then they will appear separately in this list.
View Order: There is also an option to view the details of any order on the list. To do that, you have to click on the View button in front of that order, it will take you to the order details page of the respective order. This view page is the same as when you edit any order.
3.10 Admin Order
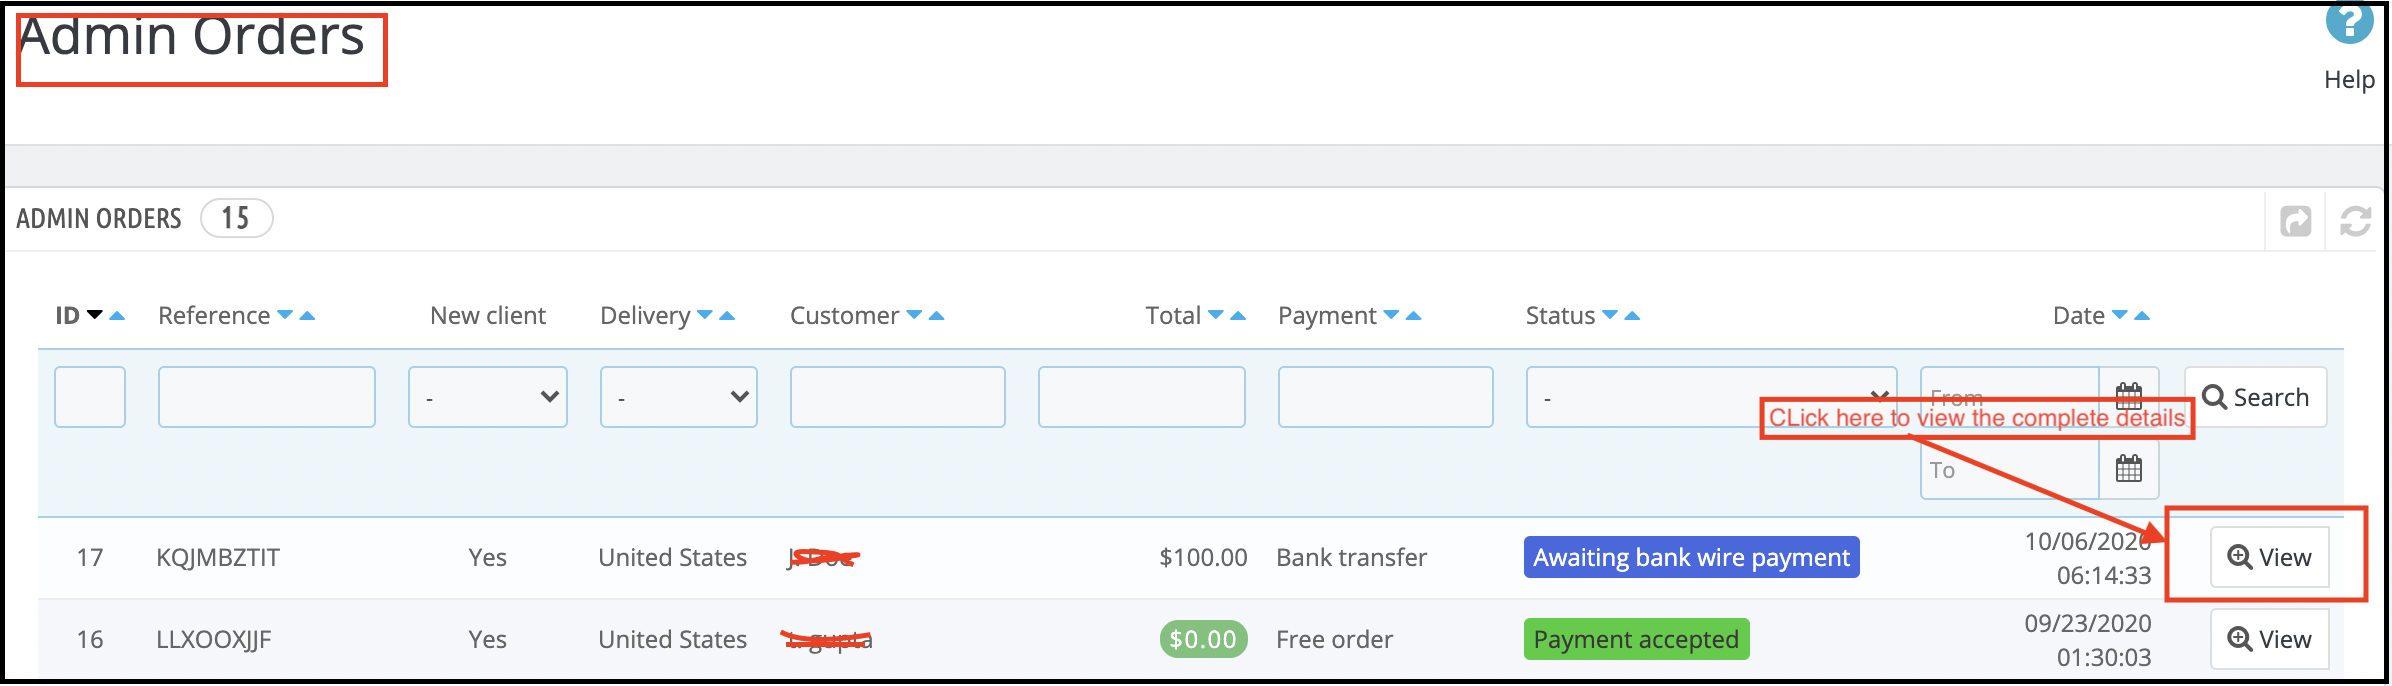
The Prestashop Hyperlocal Marketplace module allows the store admin to sell more and more products without maintaining their inventory. However, the admin can even sell their products in the marketplace. The orders received for the products of the admin are visible in the Admin Order tab of the Prestashop Hyperlocal Marketplace Marketplace addon. The orders will display as shown below:
To see the details of the order, click on the View button corresponding to each order.
3.11. Product Reviews
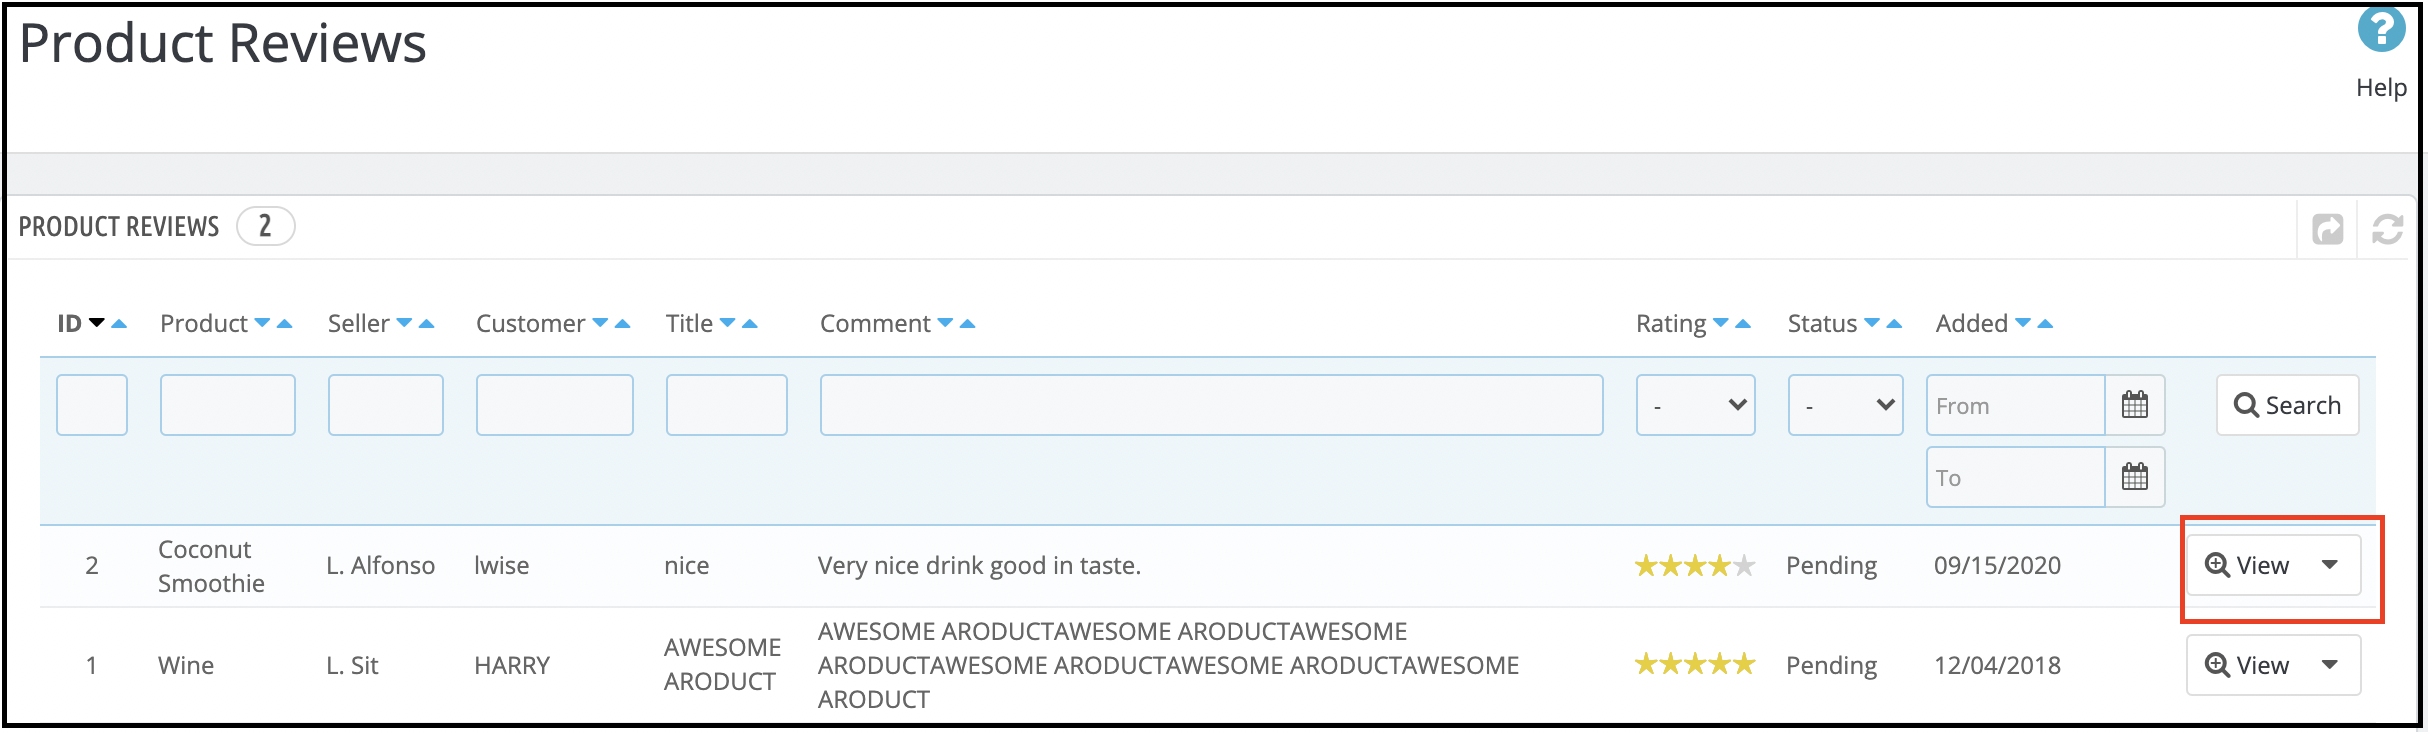
The Product Reviews page of the Prestashop Hyperlocal Marketplace plugin consists of a list of all the product reviews sent by customers on the seller’s products.
The online buyers can add a review on any of the seller’s products as shown below:
Once the customer review goes live, he’ll get a message saying that “Your comment has been added and will be available once the moderator approves it.”
These reviews then list in the Product Review tab of the Prestashop Multi seller Marketplace plugin.
View Product Review: Most of the details of the product reviews are already mentioned in the grid but some of them are not.
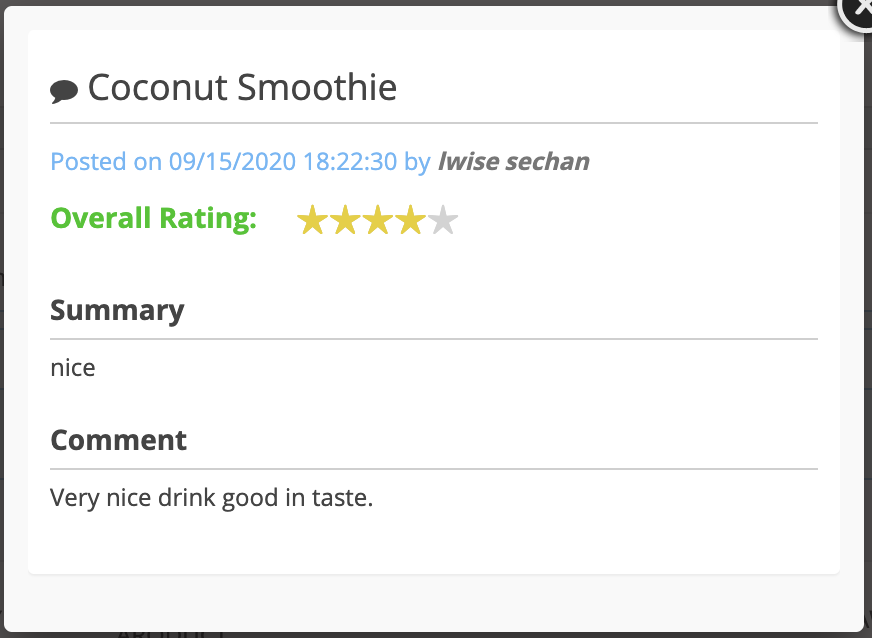
To view all the details of any Product Review, click on View Button in front of that review. A pop-up will appear having all the details of the product review.
As you click, you can see the complete review as shown in the image below:
Delete Product Review: To delete a product review, you have to click on the delete button in front of that product review on the list.
Note:- The product review deletes action cannot be undone. Please use this feature carefully. Approve Product Review: The product reviews that the customers add for the seller’s products will appear in the list here with the status Waiting for Approval and it will not be shown on the storefront to other customers until it approves. To approve it, you have to click on the Approve button in front of the product review.
3.12. Seller Review Approval List
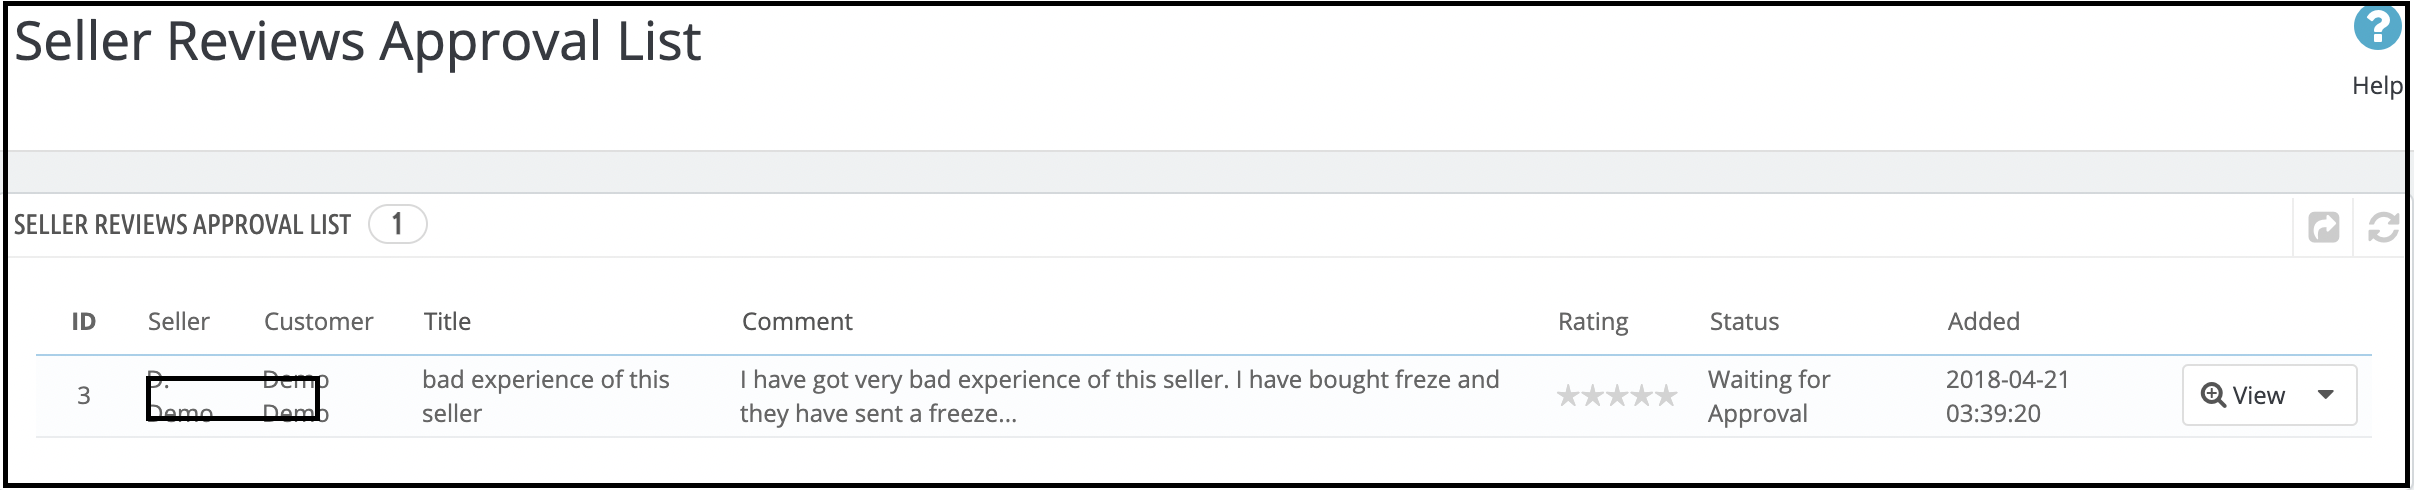
This tab of the Prestashop Hyperlocal Marketplace extension contains all the Seller Reviews that the customers post. In addition, no action happens against them. If the admin enables the settings (i.e. Seller Review Approval Required), then, only any seller review that the customer post appears in this list otherwise, it directly appears in the Seller Reviews list.
The reviews that are pending approval will display as shown in the image below:
View Seller Review: To view all the details of a seller review you have to click on the View button in front of that review in the list.
On clicking the View button, a Pop-up will appear having all the details of the corresponding seller review.
Approve Seller Review: To approve a seller review, you have to click on the Approve button in front of that review on the list.
Once the admin approves a seller review, it becomes visible on the front end. Moreover, is transferrable to the seller review list.
Note:- This action cannot be undone. Please use it carefully.
Disapprove Seller Review: To disapprove of a seller review, you have to click on the Disapprove button in front of that review on the list. A pop-up will appear asking for the reason for disapproval of the seller’s review. Fill the reason and then submit the form to complete the action.
Once the admin disapproves a seller review, it transfers to the seller reviews list and cannot be found anywhere else.
Note:- This action cannot be undone. Please use it carefully.
Delete Seller Review: To delete a seller review, you have to click on the Delete button in front of that review on the list.
A pop-up will appear asking for the reason for the deletion of the seller review. Fill the reason and then submit the form to complete the action.
Once a seller review deletes, it is completely removed from everywhere.
Note:- This action cannot be undone. Please use it carefully.
All this can be done at a button click with the help of the Prestashop Hyperlocal Marketplace extension.
3.13. Sellers Reviews
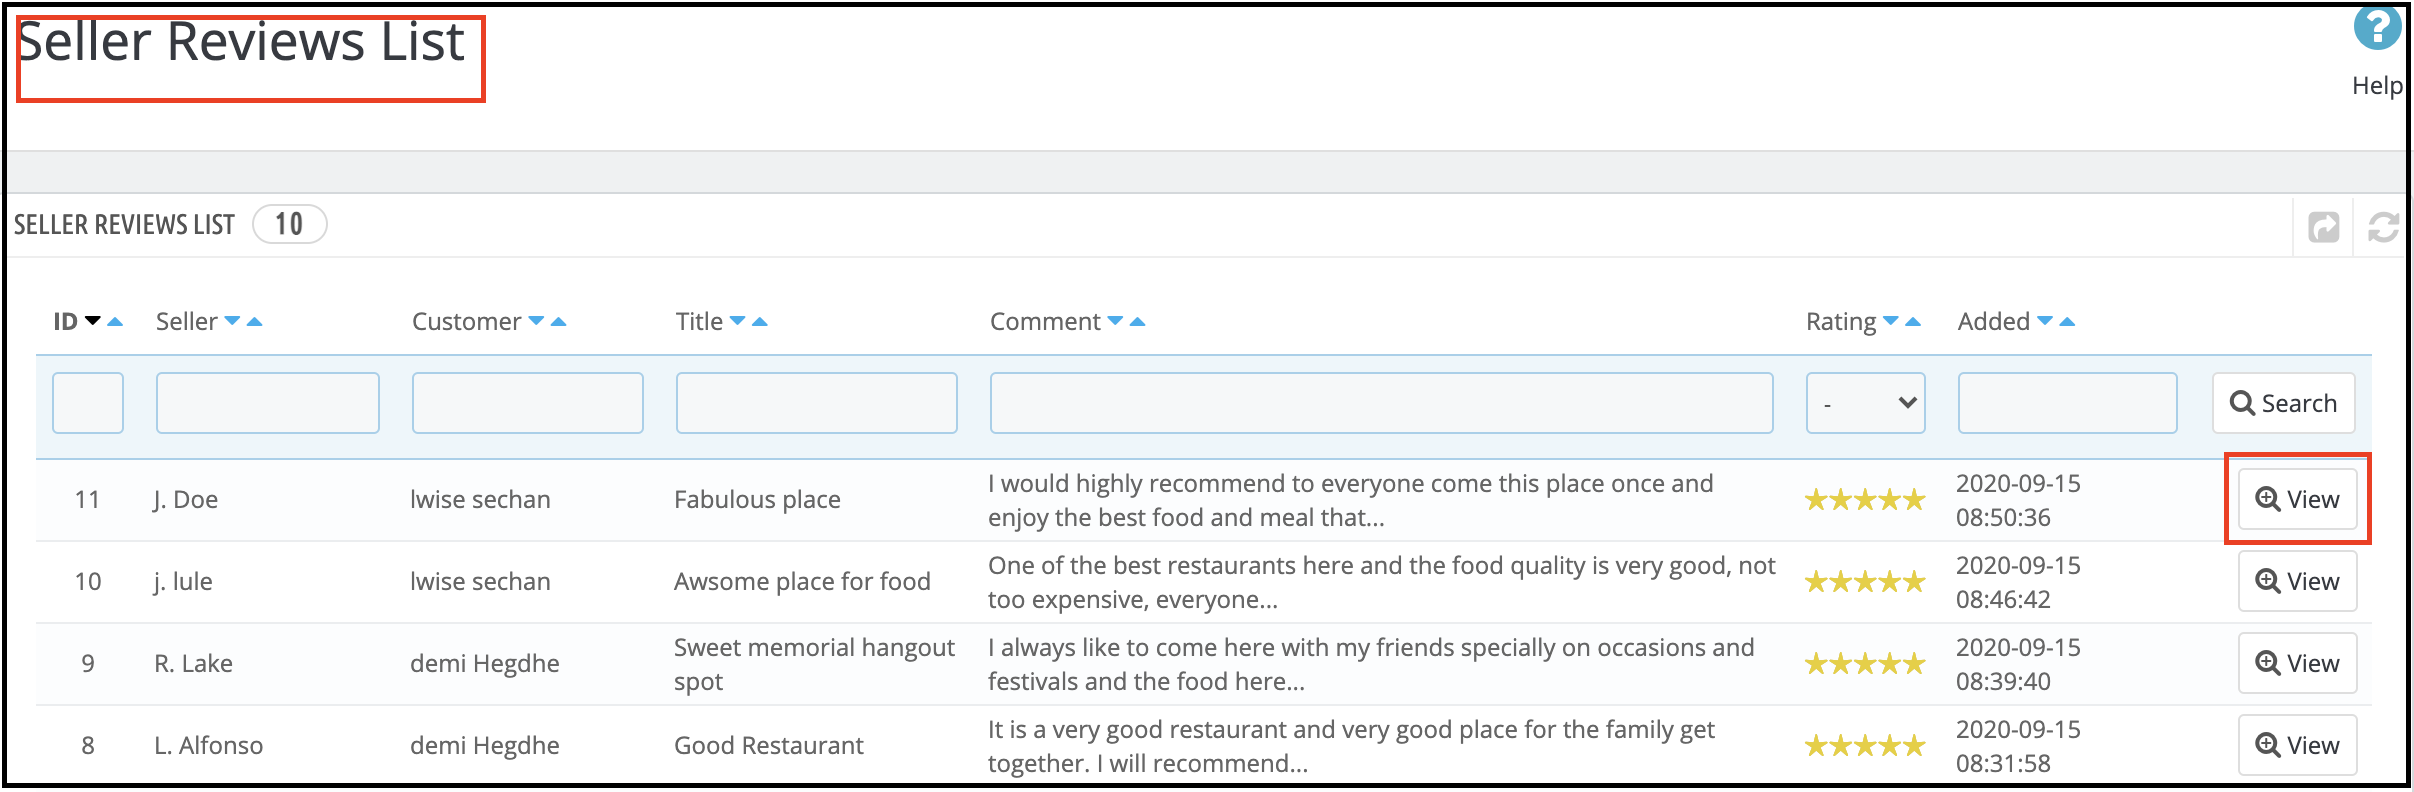
This Seller Reviews tab of the Prestashop Hyperlocal Marketplace extension contains a list of all the Sellers Reviews done by customers in the store.
If the admin disables the setting (i.e. Seller Review Approval Required), then a seller review approves directly when the customer adds it. Moreover, appears on this list. Otherwise, the review first appears in the Seller Review Approval list.
Note:- The Seller Reviews that the store owner disapproves also appear in this list.
View Seller Review: To view all the details of a seller review you have to click on the View button in front of that review in the list. On clicking the View button, a Pop-up will appear having all the details of the corresponding seller review.
3.14. Seller Category Request List
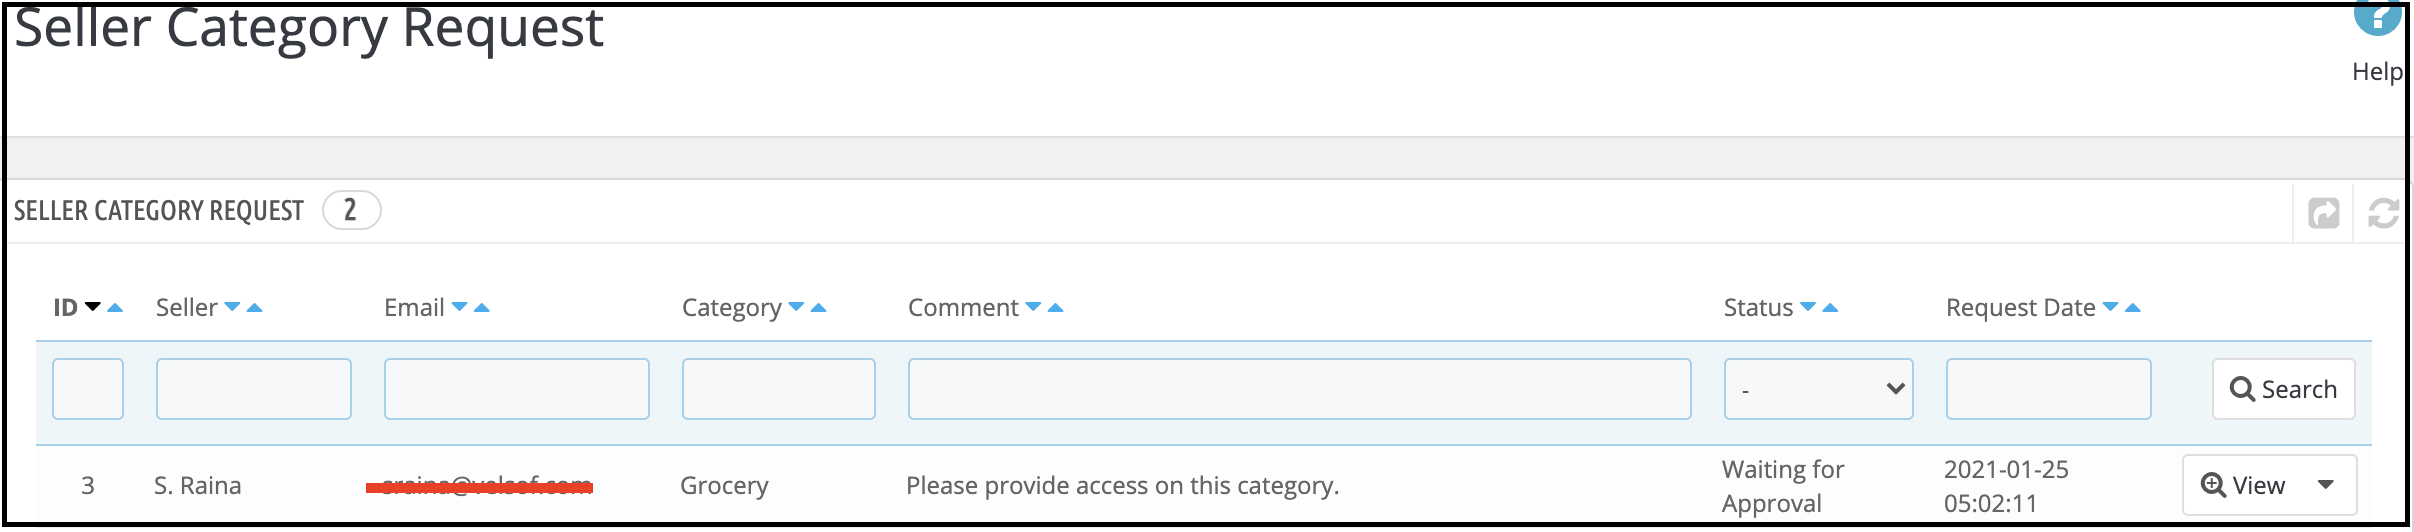
A seller can add products only to those categories that the admin allows to him/her. In case, the seller needs to add a product to a category that the admin does not allows then the seller can request for the category. All those category requests appear on this list. A mail is also sent to the store owner to notify them about the Request for Category. Then, it is up to the store owner to approve or disapprove the request.
View Category Request: To view the details of a category request, you have to click on the View button in front of that category request on the list.
On clicking the View button a Pop-up will appear having all the details of the corresponding category request. Approve Category Request: To approve a category request, you have to click on the Approve button in front of that category request on the list. Note:- This action cannot be undone. Please use it carefully. Disapprove Category Request: To disapprove of a category request, you have to click on the Disapprove button in front of that category request on the list.
A pop-up will appear asking for the reason for disapproving the category request. In fact, fill the reason and then submit the form to complete the action. Note:- This action cannot be undone. Please use it carefully.
3.15. Seller Shippings
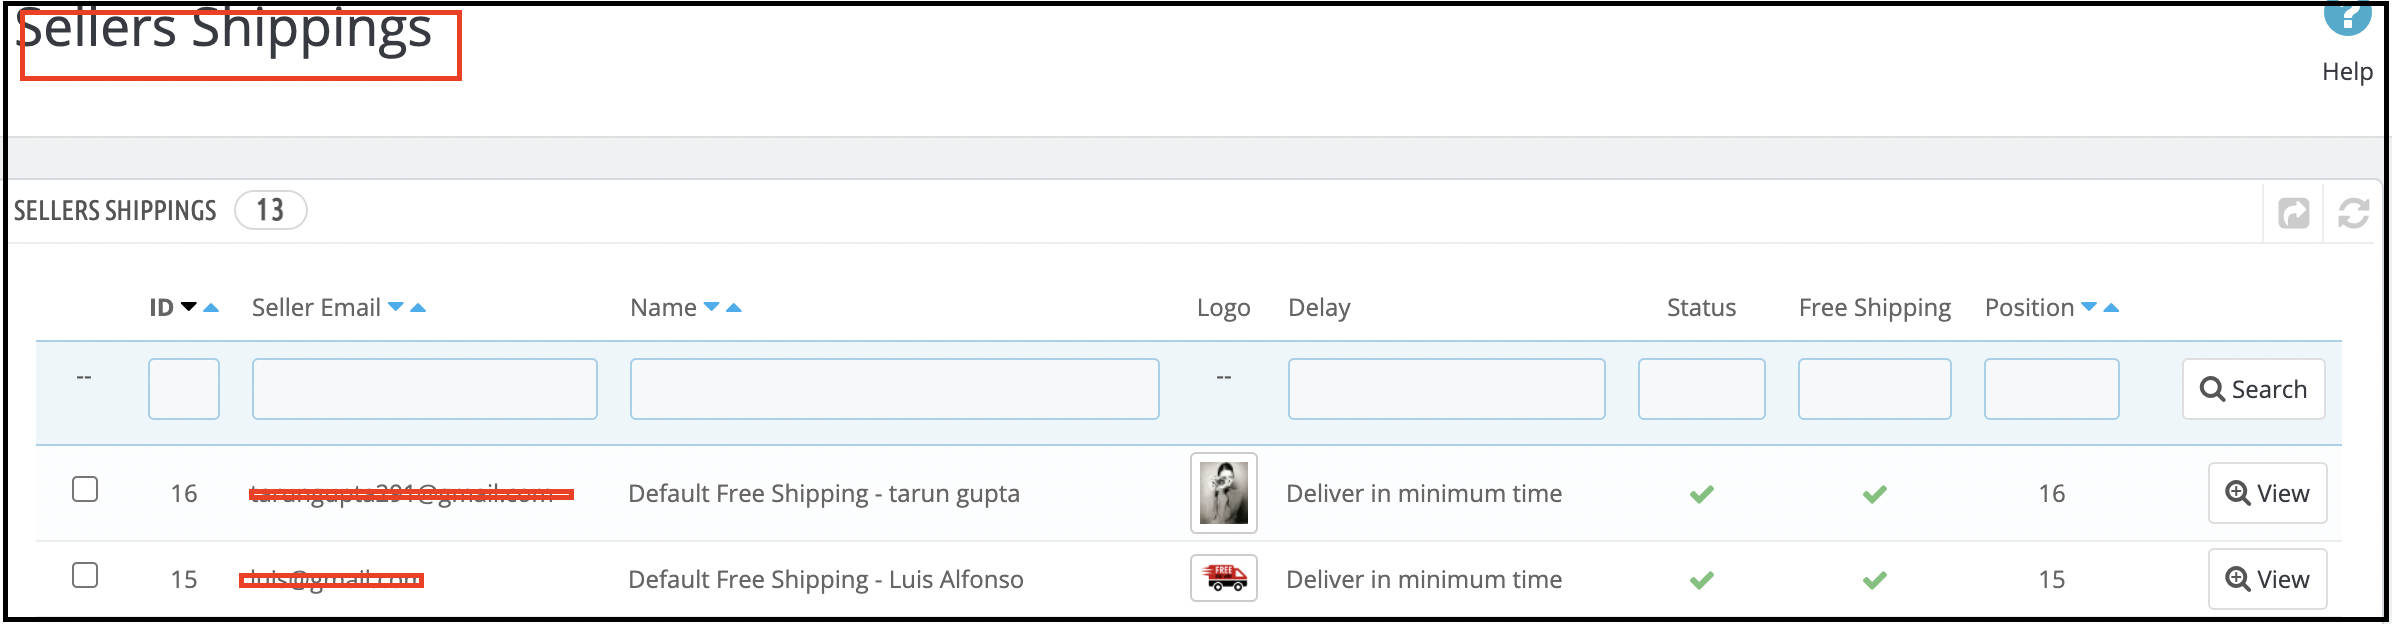
Whenever a new seller comes onboard to the system, a default shipping method addition applies to all the products by default and it is free as well. Further, the seller can add a new shipping policy and can map products to it as well. However, until then, all the products are mappable to the default shipping policy only. Furthermore, the Seller Shipping tab of the Prestashop Hyperlocal Marketplace addon page contains a list of all the shipping methods that are created for the sellers present in the system.
View Shipping: To view the details of a seller’s shipping, you have to click on the View button in front of that entry.
On clicking the button, a new page opens up having details of the respective shipping method. Note:-
The admin will not be able to delete or edit any shipping method for any seller. In fact, if tries he/she will redirect to the Carrier Listing page with the corresponding error.
By default, all the products for a seller will be mappable to the Default shipping method for the respective seller. Further, default shipping methods can identify with the name Default Free Shipping – Seller Name.
3.16. Seller Shipping Methods
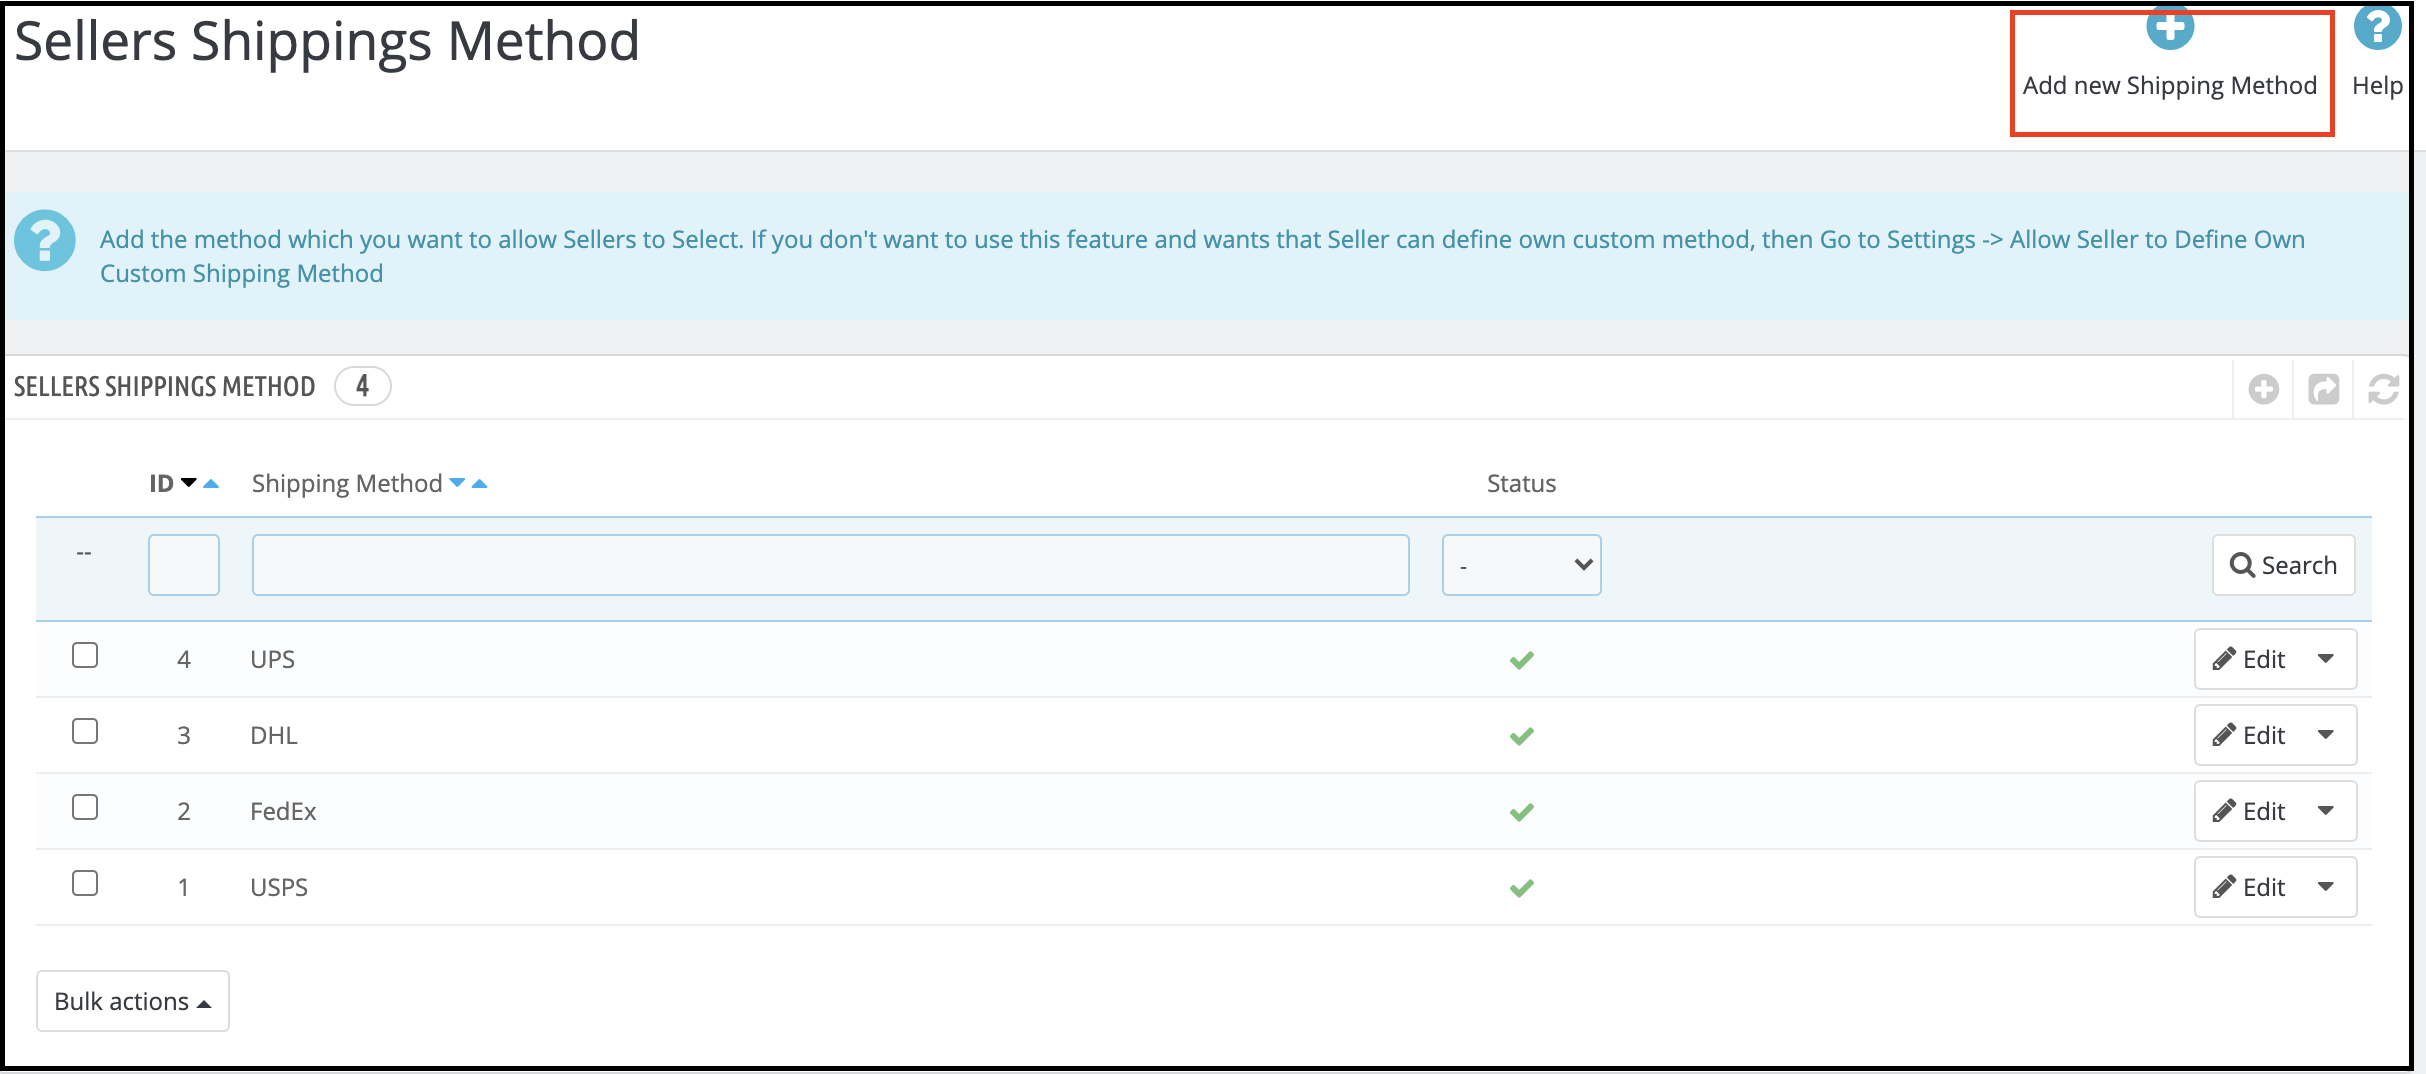
Prestashop multivendor marketplace extension allows the sellers to define their shipping methods. Further, for this, the admin has to enable the ‘Allow Seller to define own Custom Shipping Method’ feature from the Setting tab of the Prestashop Hyperlocal Marketplace module. 3.16.1 How can the admin add Shipping Methods?
The admin can add custom shipping methods in this tab. In fact, to add custom shipping methods, click on the ‘Add New Shipping Methods’ link or the ‘+’ sign in the top-right position.
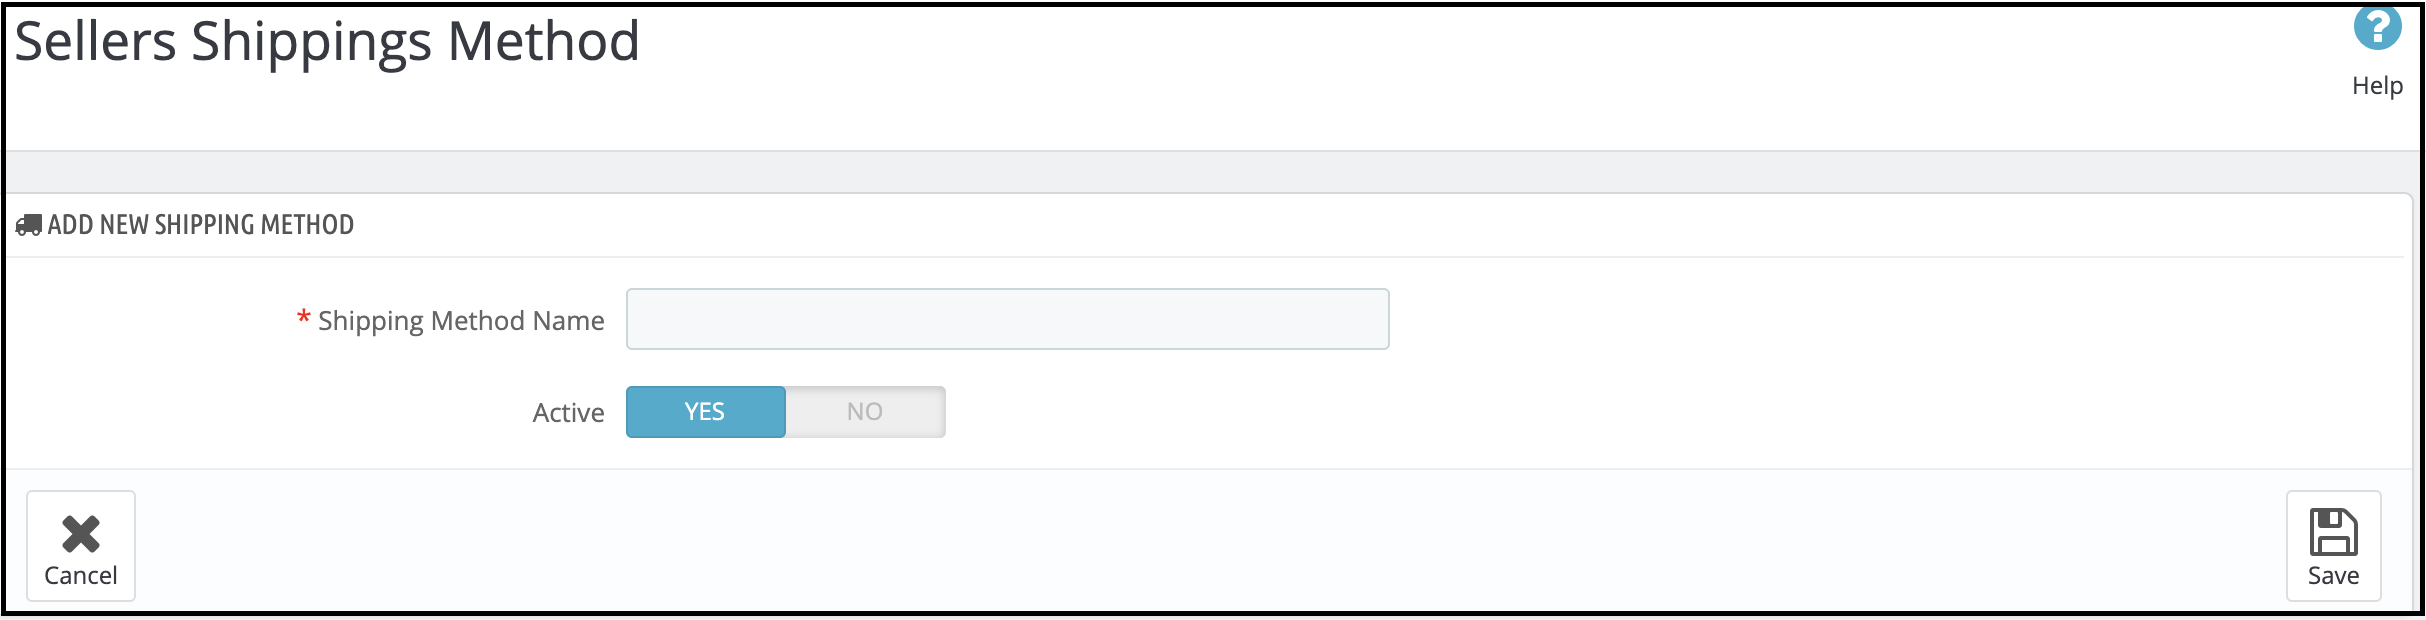
This will redirect you to the shipping methods creation page of the Prestashop Hyperlocal Marketplace addon.
Shipping Method Name: Enter the name of the shipping methods. Active: Toggle the button to activate or deactivate the shipping method.
The shipping methods will list as shown below. Further, the admin can edit or remove them by clicking on the Edit or Delete button corresponding to each shipping method. 3.16.2 How can the admin add custom Shipping Methods that they want to allow the sellers to select?
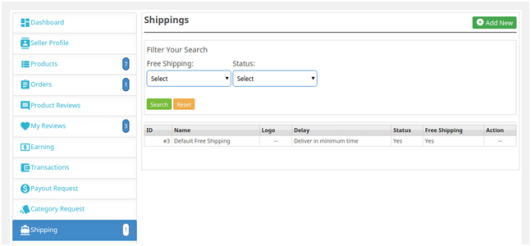
The seller can create their shipping methods from their dashboard. Go to the Dashboard -> Shipping tab.
The various shipping methods created by the sellers will list in this tab.
To add new methods, click on the ‘Add New’ link as shown in the image below:
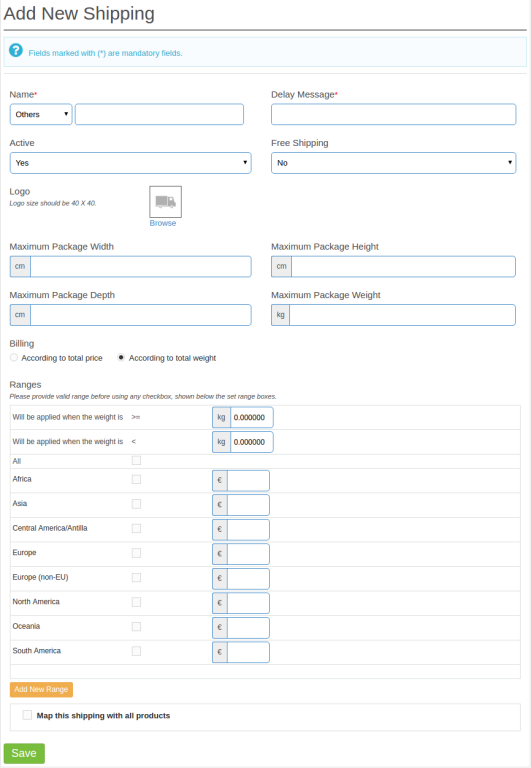
You’ll head to the shipping methods creation page. Here, you have to fill the various field as below:
The various shipping methods will list in the drop-down menu. To create a new one, select ‘Others‘. Further, enter the name of the shipping method.
The sellers can create the shipping methods by entering the fields as shown in the image below.
3.17. Admin Commissions
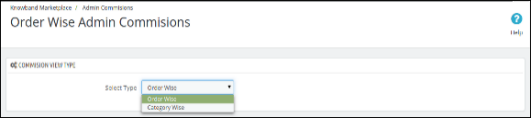
The Admin Commissions tan of the PrestaShop Hyperlocal Marketplace extension contains a filter through which the admin can filter the commissions earned in the form of Order Wise or Category Wise selection. Further, by default, the page shows Order Wise Admin Commissions. In fact, the Prestashop Hyperlocal Marketplace module makes it easier for the store admin to manage the commission structure of the marketplace.
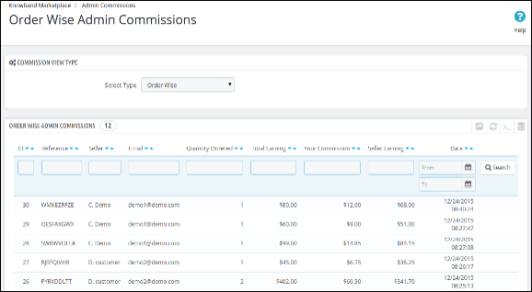
3.17.1 Order Wise Admin Commissions
This list contains all the commissions earned by the store owner on every order comes for any seller’s product. In fact, this list is split based on orders for selling products.
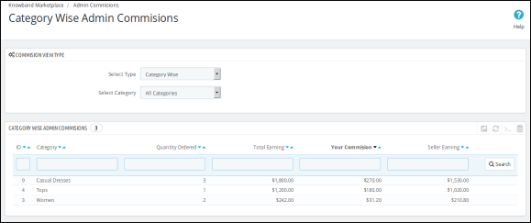
3.17.2 Category wise commissions
This list shows the total commission earned by the store owner from a seller. Furthermore, the store owner can also use filters to filter the commission reports category-wise.
It helps the store owner to identify commissions from different categories. Moreover, which category has produced how much commission.
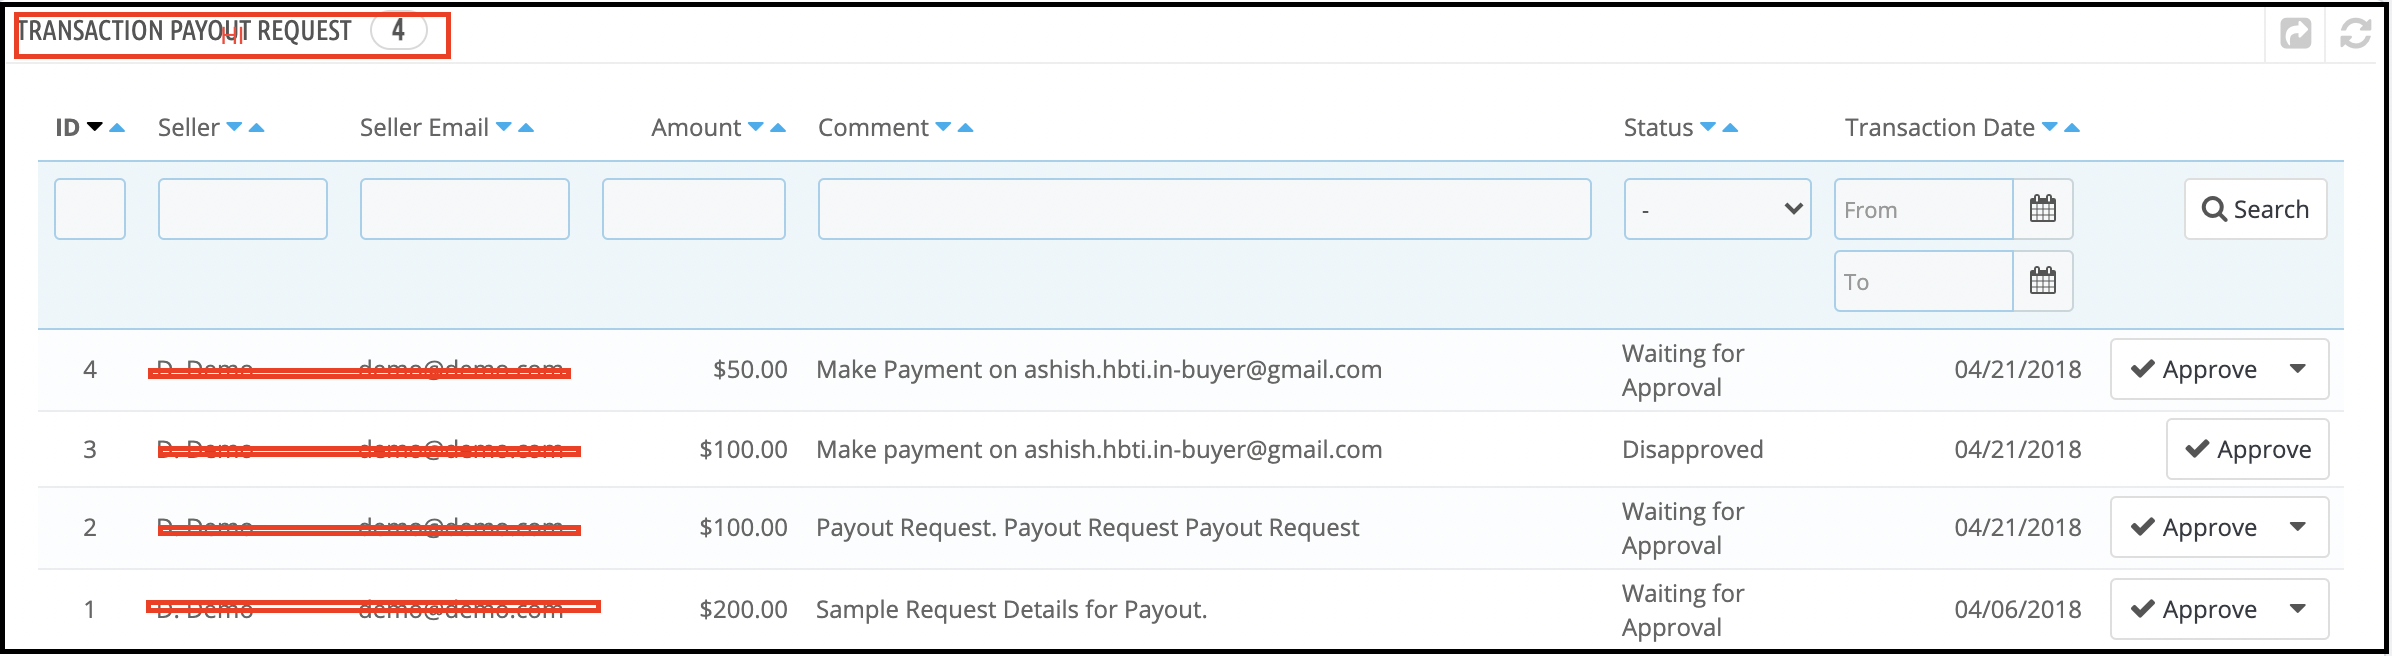
3.18. Transaction Payout Request
With this additional feature, the sellers can request the store admin for any payout. Further, the admin was in charge of any of the payment that was to be made to the sellers. However, the sellers can now initiate a payout request from their dashboard. The admin can approve or deny the payout request of the sellers from this tab of the PrestaShop Hyperlocal marketplace addon. In fact, there are three payment methods. For instance, Bank Wire, Pay by Check, and PayPal.
The admin can use PayPal if the seller opts for this payment method.
Click on the Configuration link of the Transaction Payout Request tab of the PrestaShop multi-seller marketplace module.
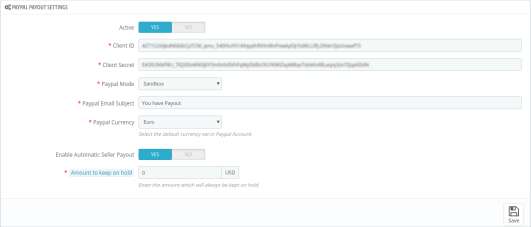
Admin can enable automatic seller payout which helps the admin to automate the payout request process. In fact, he can either use cron URLs for this setup or use the “Process Paypal Payout Status” cron directly. Furthermore, the admin can also add a particular amount which will always be kept on hold for sellers.
Enter the API details of the PayPal details as shown in the image below:
Active: Toggle the button to activate the PayPal payout settings. Client ID: Enter the Client ID of your PayPal account here. Client Secret: Enter the secret key here. PayPal Mode: Select the mode, that is, Sandbox or Live from the options drop-down menu. The PayPal Email Subject: Enter the email subject for PayPal here. PayPal Currency: Select the default currency set in your PayPal account. Enable Automatic Seller Payout: Toggle the button to activate automatic seller payout. Amount to keep on hold: Enter the amount which will always be kept on hold for sellers. 3.18.1 How can the seller create a Transaction Payout Request?
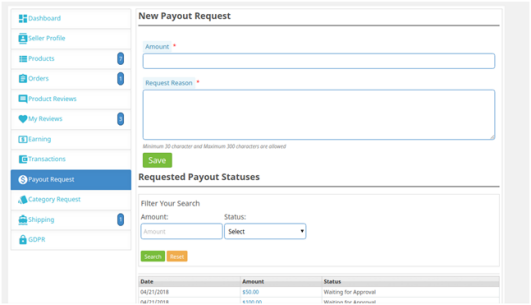
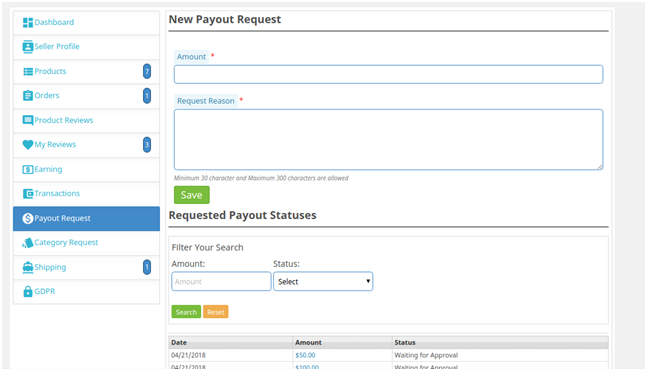
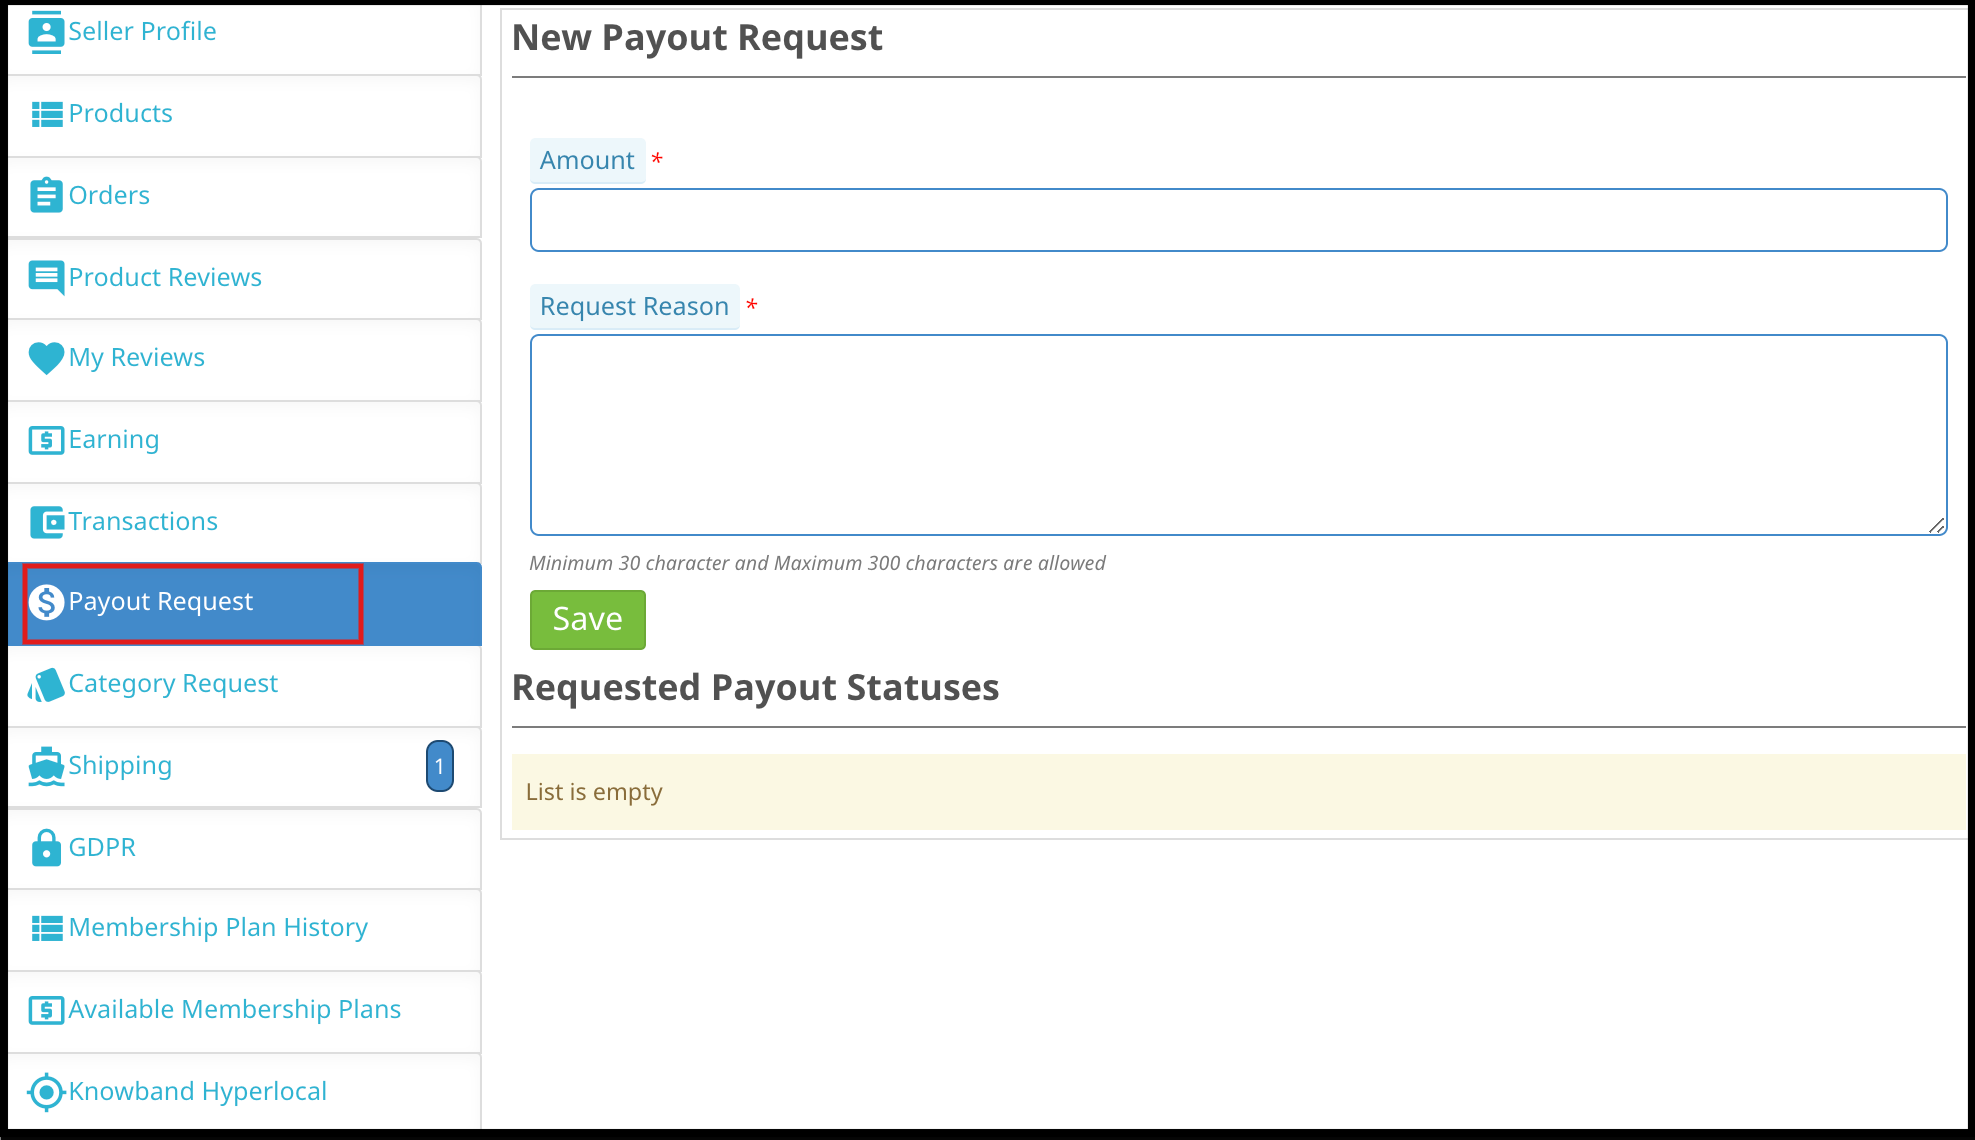
To create the payout request, the seller needs to click on the Payout Request tab of the dashboard of their account.
The seller needs to fill the various fields as below:
Amount: Enter the amount that you are requesting for the payout.
Request Reason: Specify the reason for which the payout request initiates.
As the Save button is clicked, the payout request will list as shown in the image below:
The same payout request will list in the admin interface of the Prestashop multi-seller marketplace extension. 3.18.2 How can the admin approve/disapprove the Transaction Payout Request?
The admin can approve or reject the payout request by clicking on the Approve or Disapprove button corresponding to each request.
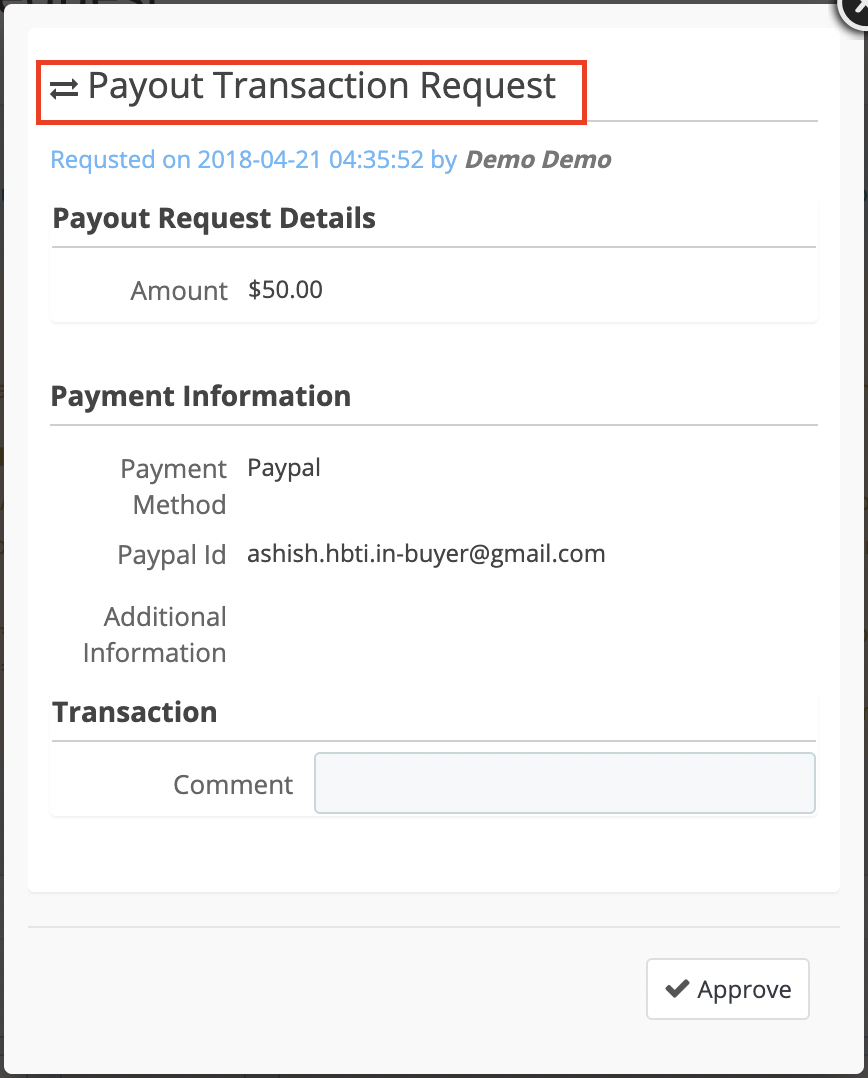
In case, the admin approves the payout, then, a popup will display as shown in the image below:
If the payment methods are Bank wire or Pay by Check, then, the admin will have to enter the Transaction ID.
Once the admin successfully approves the request, the transaction will save in the Transaction Table.
In the case of the PayPal payment method, a request will be sent to PayPal. Moreover, based on the response, a success or error message will display. If the admin successfully approves the request, it is addable to the Transaction table.
3.19 Seller Transactions
The system does not automatically transfer the amount to the seller’s account. Hence, the store owner has to keep records of the balance for all the sellers. In addition, manually transfer money to the seller and later on, enter the details of the transaction to keep a record of the same.
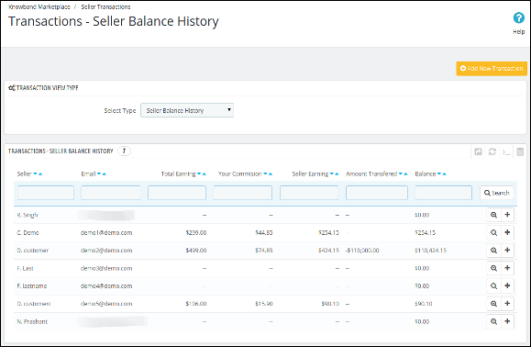
The Prestashop Hyperlocal Marketplace module allows the admin to view two types of transactions of the sellers, that is, Seller Balance History and Transaction History.
The Seller Transactions page of the Prestashop Hyperlocal Marketplace plugin keeps the track of the seller transactions. In addition, the remaining balance of sellers. 3.19.1 Seller Balance History
This list of the Prestashop Hyperlocal Marketplace plugin contains all the balance variations for all the sellers in the system. Further, the list shows the total sales of the seller, seller earnings, and your commission. In fact, this list helps the store owner to identify the earnings. Moreover, categorize them seller-wise.
3.19.2 View Transactions Details
To view the details of the transactions done for a particular seller, you have to click on the View button in front of that seller.
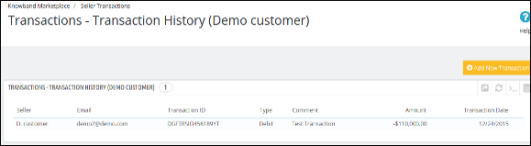
On clicking on the View button in front of any seller, a new page will open up having a list of all the transactions done for the corresponding seller.
You can also add a new transaction for the current seller by clicking on the Add New Transaction button on the top right-hand side of the above page. 3.19.3 Create New Transaction from the back-end of the Prestashop Hyperlocal Marketplace Module
To add a new transaction detail for any seller, you have to either click on the Make New button in front of the seller. Likewise, you can also click on the Make New Transaction button on the top right-hand side of the page.
On clicking the button a new block appears (form for adding a new transaction) at the top asking for the details of the transaction. Further, fill the form. Moreover, submit it to complete the action.
Note:- This action cannot be undone. Please use it carefully. 3.19.4 Transactions History
This page contains a list of all the transactions done to date to all the sellers available in the system.
You can also add a new transaction for any seller by clicking on the Add New Transaction button on the top right-hand side of the above page.
3.20. Seller Shop Close request
If the admin enables this from the back-end of the Prestashop Hyperlocal Marketplace plugin, the sellers can request the admin to close their shop.
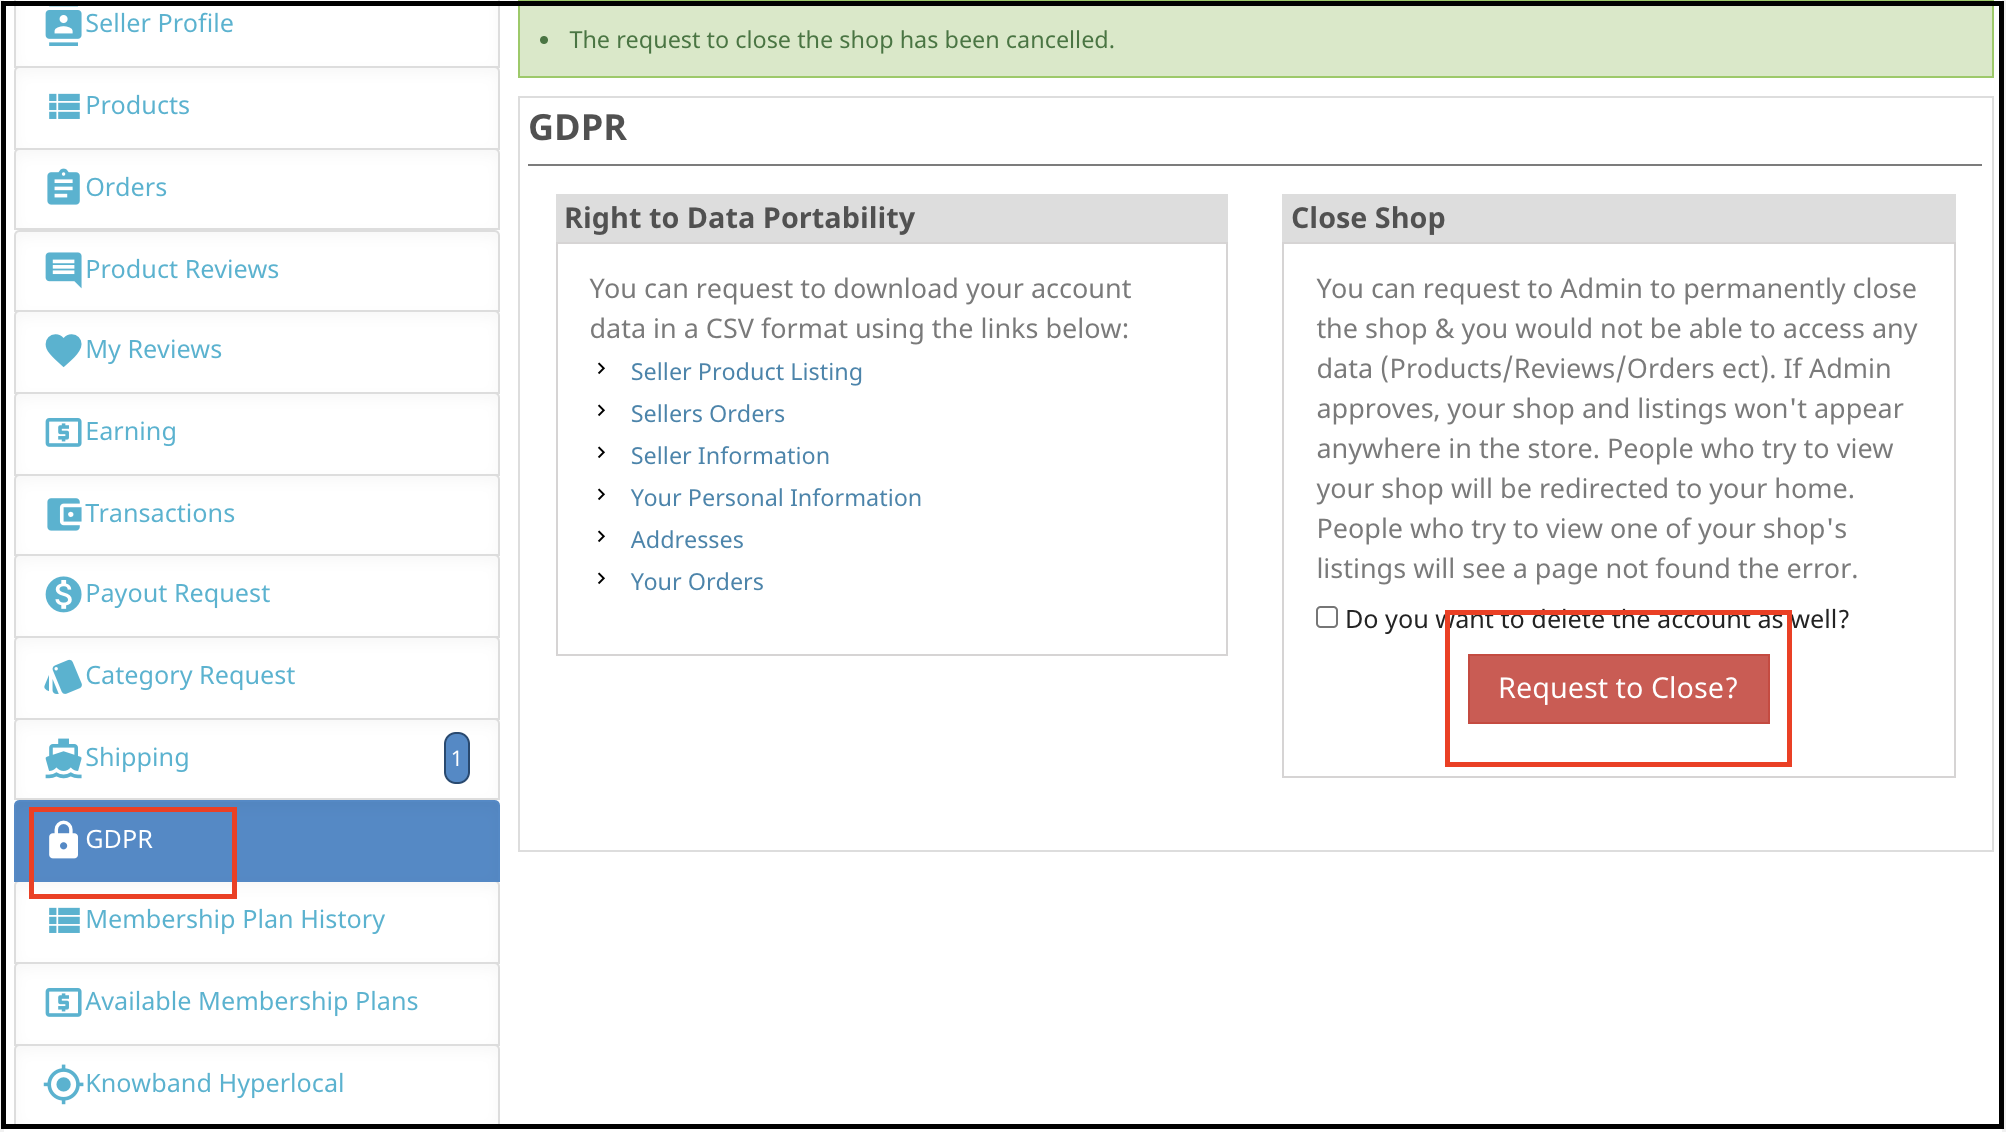
The request to delete the sellers’ account can initiate by just clicking a couple of buttons from the dashboard. The image of the front-end interface is shown below:
Once the request is sent, the admin can view the same from the Seller Shop Close Request tab of the Prestashop multi-seller marketplace extension.
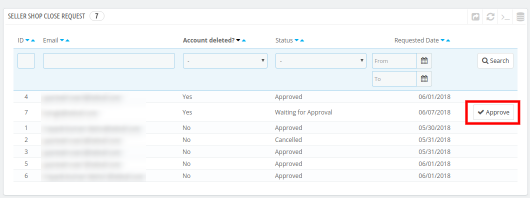
Further, the confirmation mail is sent to the seller. In fact, once the sellers provide the confirmation, an ‘Approve’ button is available corresponding to the request. Thus, the admin can click the same and complete the request.
The entire list of the shop closure request and their status displays in this section of the Prestashop multi-seller marketplace plugin as shown in the image below:
3.21. GDPR Request
The sellers can download their data in CSV format just by clicking the links provided in the GDPR section of the dashboard.
In fact, the admin can view the GDPR requests that initiate from this section in the back-end of the Prestashop Hyperlocal Marketplace module as shown in the image below:
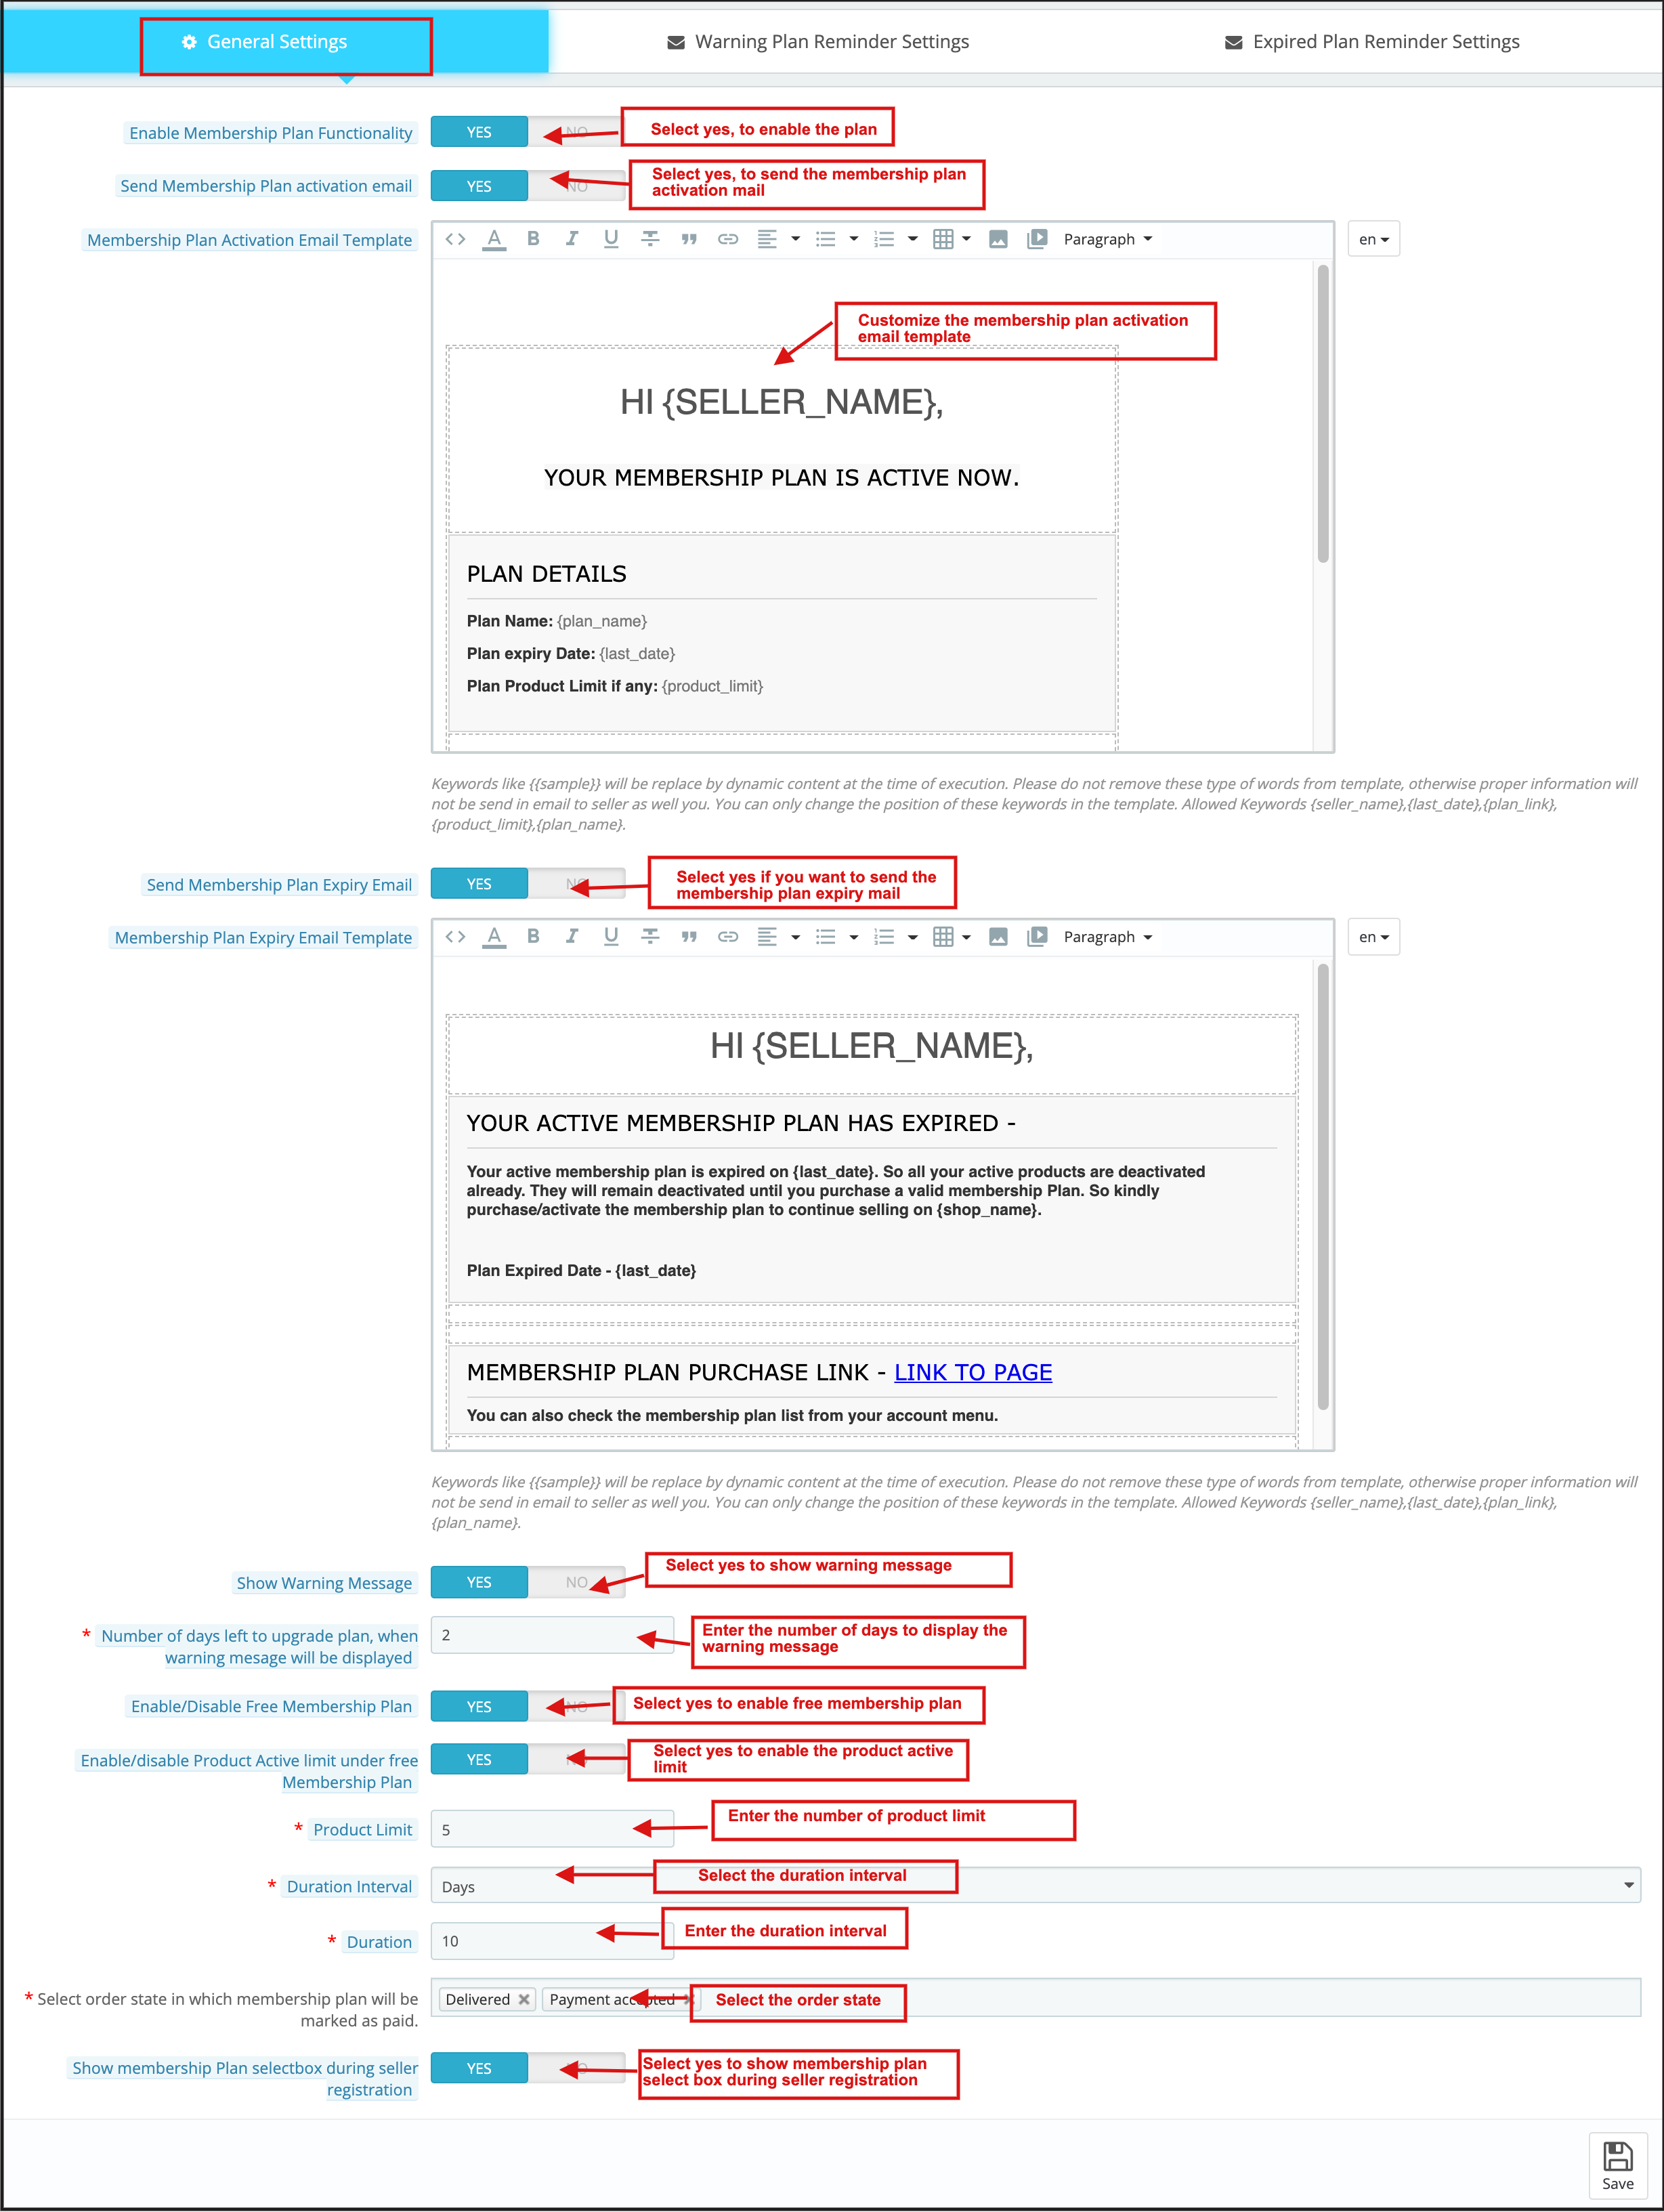
3.22 Membership plans general settings
This page contains all the settings which the Store admin needs to control the membership plans.
Enable membership plan functionality: By enabling this button store admin to allow all the new and existing sellers to purchase a membership plan.
Send membership plan activation email: If the admin enables this feature, an email is sent to those sellers whose membership plan is activated.
Send membership plan expiry email: If the admin enables this feature, an email is sent to those sellers whose membership plan is expired.
Show warning message: Store admin can use this feature to show a warning message to those sellers whose membership plan is about to expire.
The number of days left to upgrade the plan: The store admin can also adjust the number of days to upgrade the membership plan. Furthermore, a warning message will be shown to the sellers during this period for upgrading their plans.
Enable disable free membership plan: If the admin enables this feature, a free membership plan will add to the seller’s membership plans.
Enable disable product active limit under the free membership plan: Store admin can enable and disable the product listing limit under the free membership plan.
Product limit: Store admin can adjust the product listing limit using this tab.
Duration interval: Admin can adjust the duration interval of the free membership plan. For instance, days, months, and years.
Duration: Admin can set the duration of the free membership plan after which this plan is deactivated.
Select order state in which membership plan will be marked as paid: Admin can select the order state on which free membership plan orders will mark as paid.
Show membership plans select box during seller registration: If the admin enables this, then sellers can select the membership plan at the time of registration.
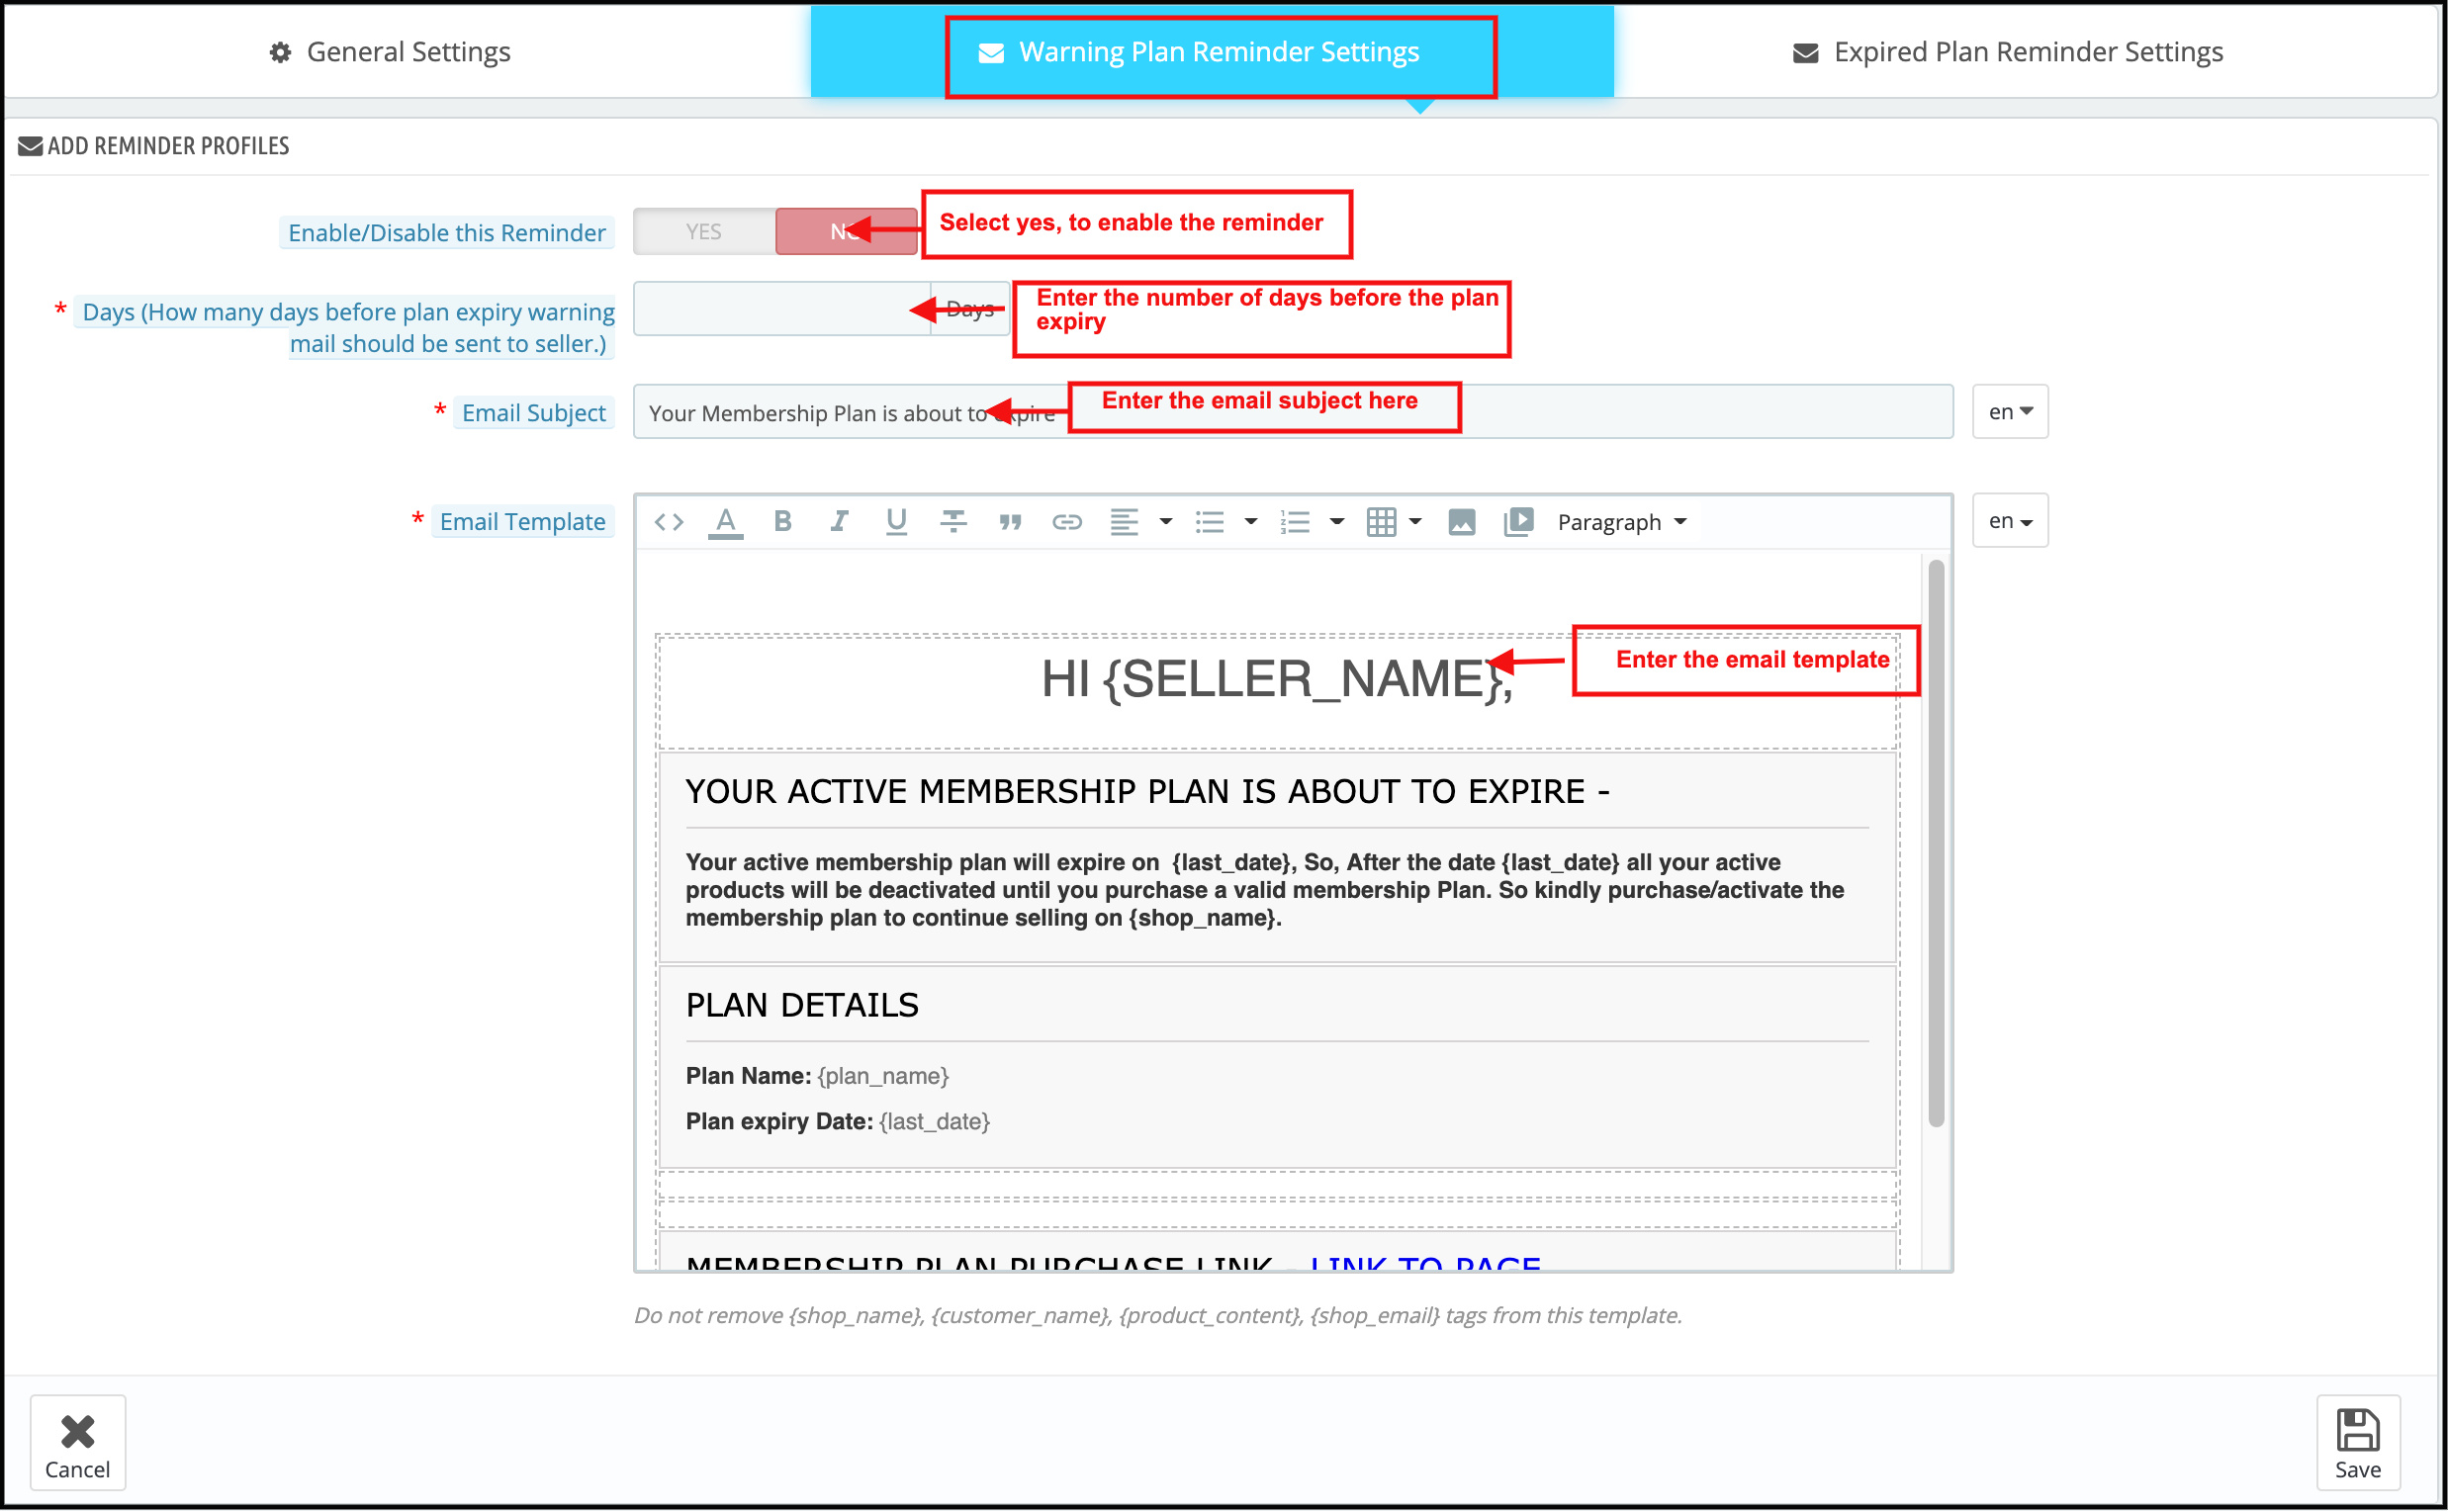
Warning plan reminder setting:
Admin can enable this functionality to send a warning email to the sellers whose plan is about to expire. In fact, the admin can set the number of days before plan expiry warning mail should be sent to the seller.
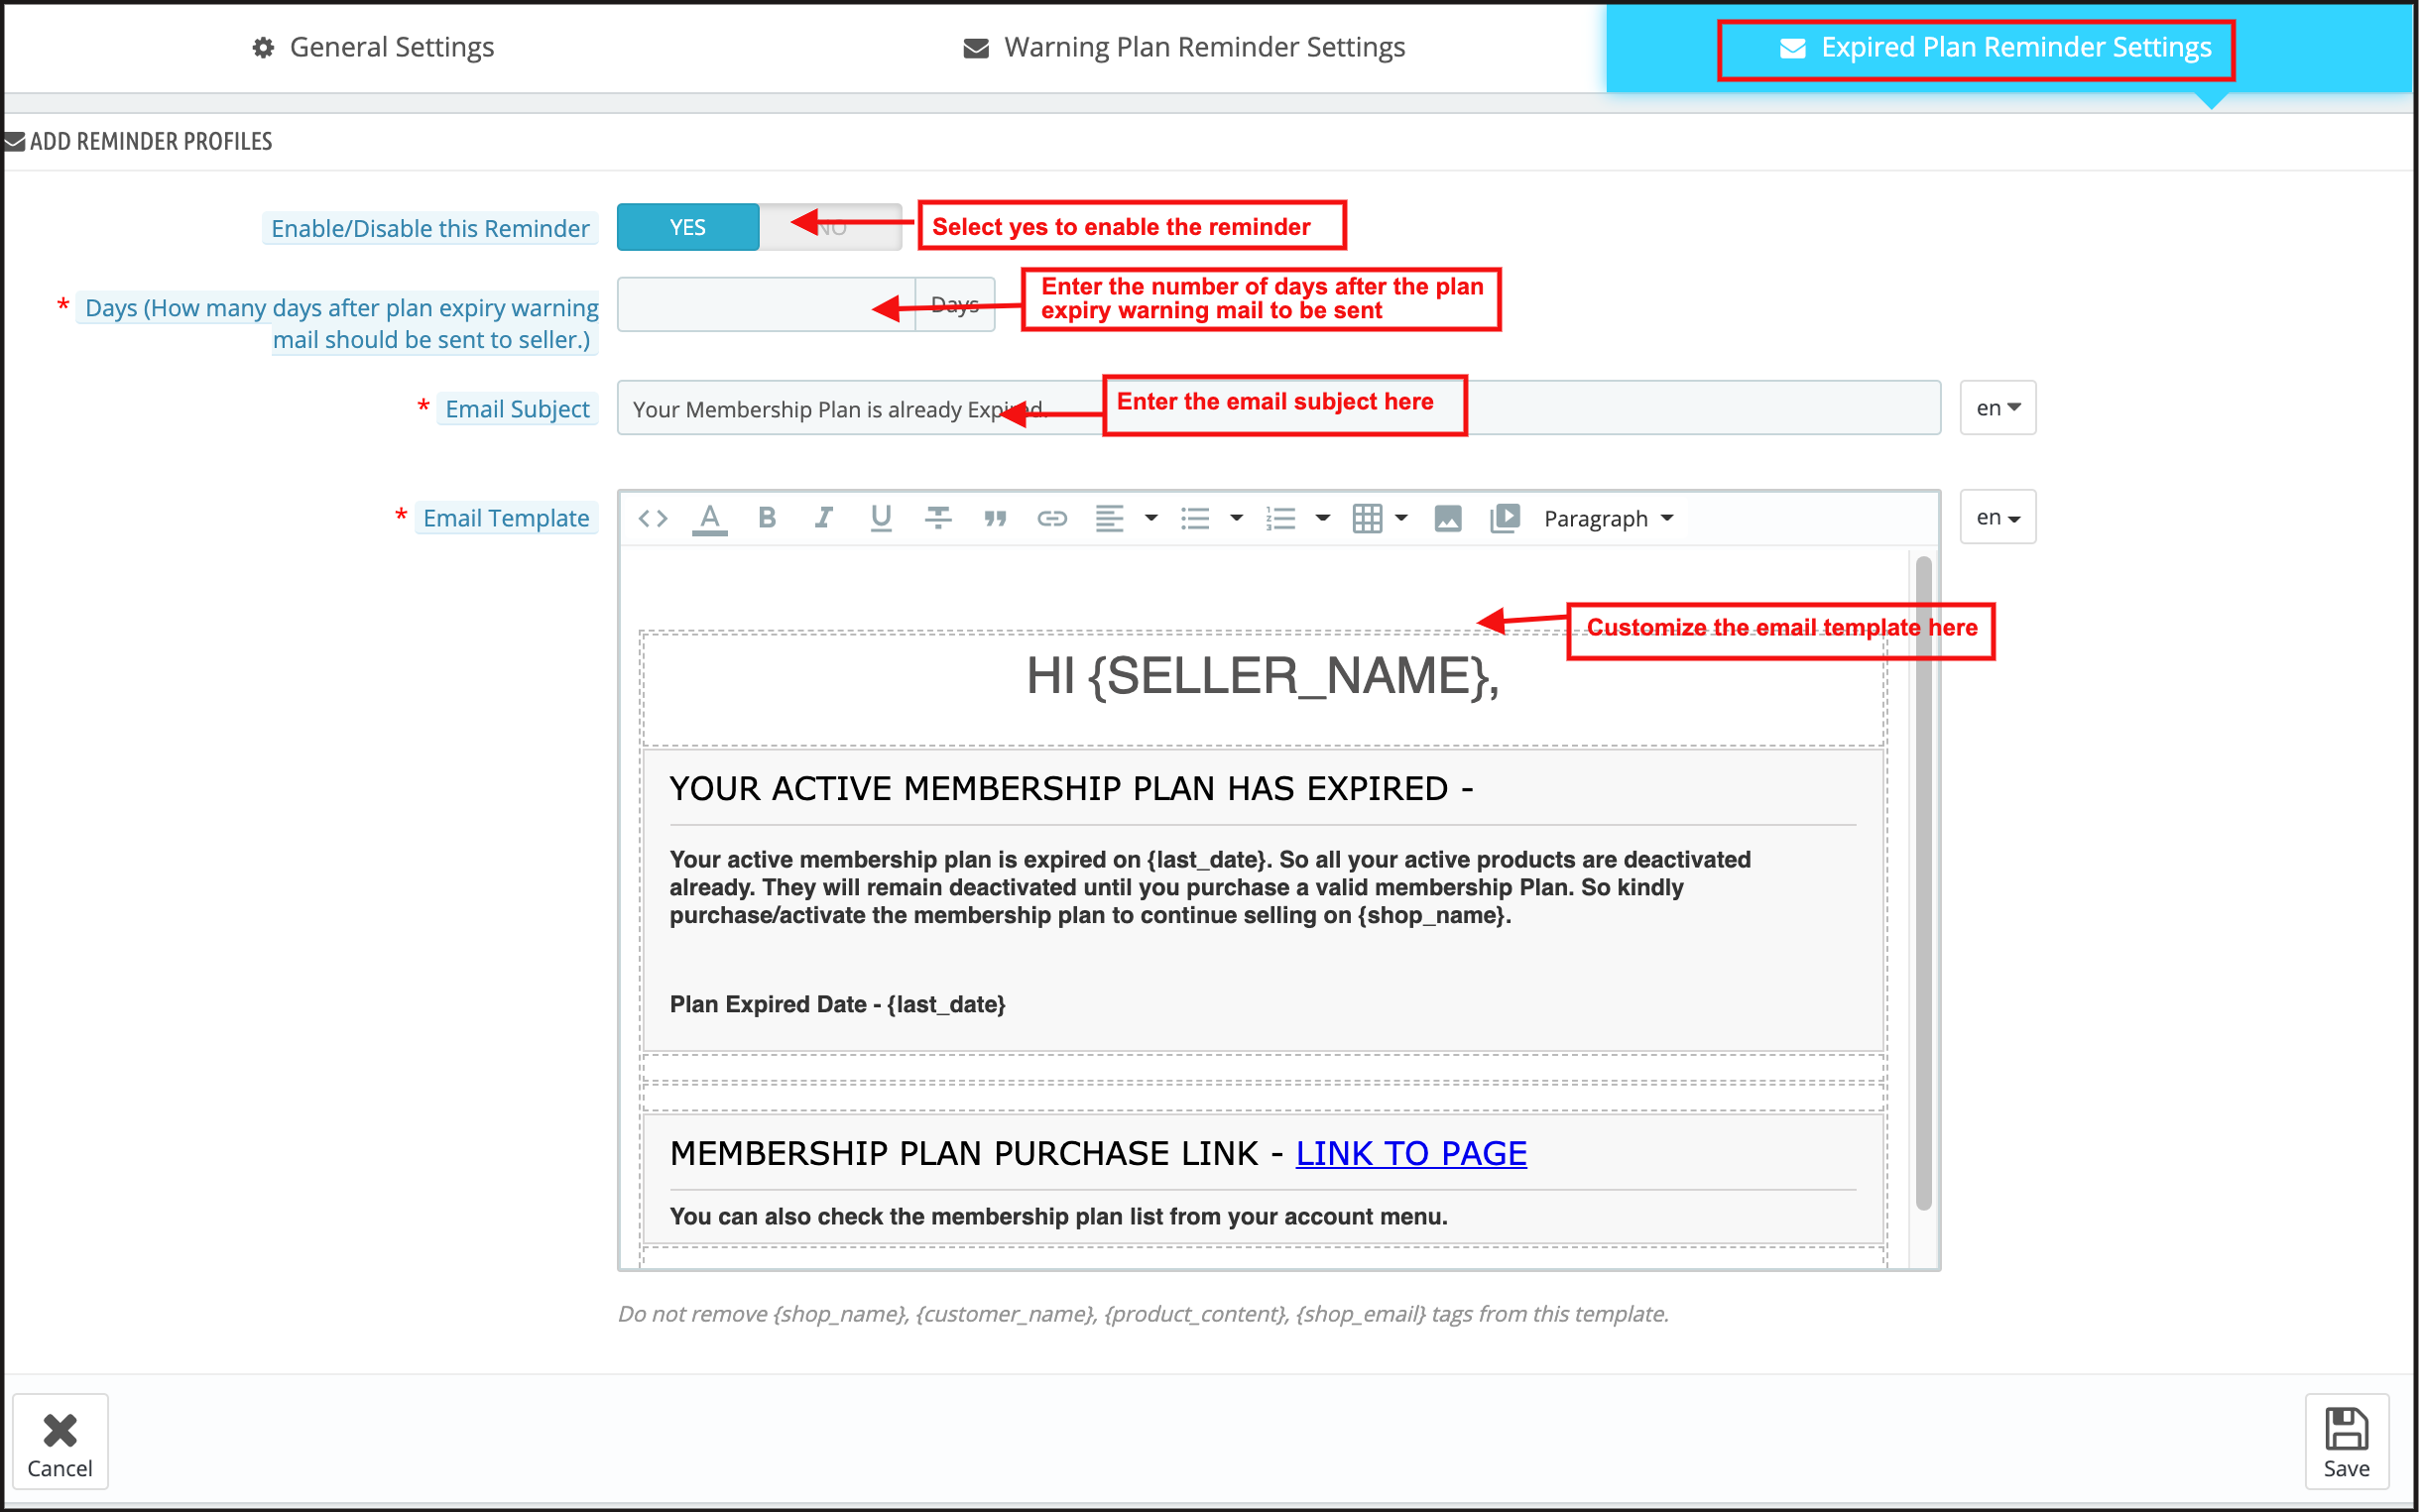
Expired plan reminder settings:
Admin can enable this functionality to send an email to those sellers whose membership plan is expired. Further, the admin can also set the number of days after the plan expiry warning email should be sent to the seller.
3.23 Membership Plans
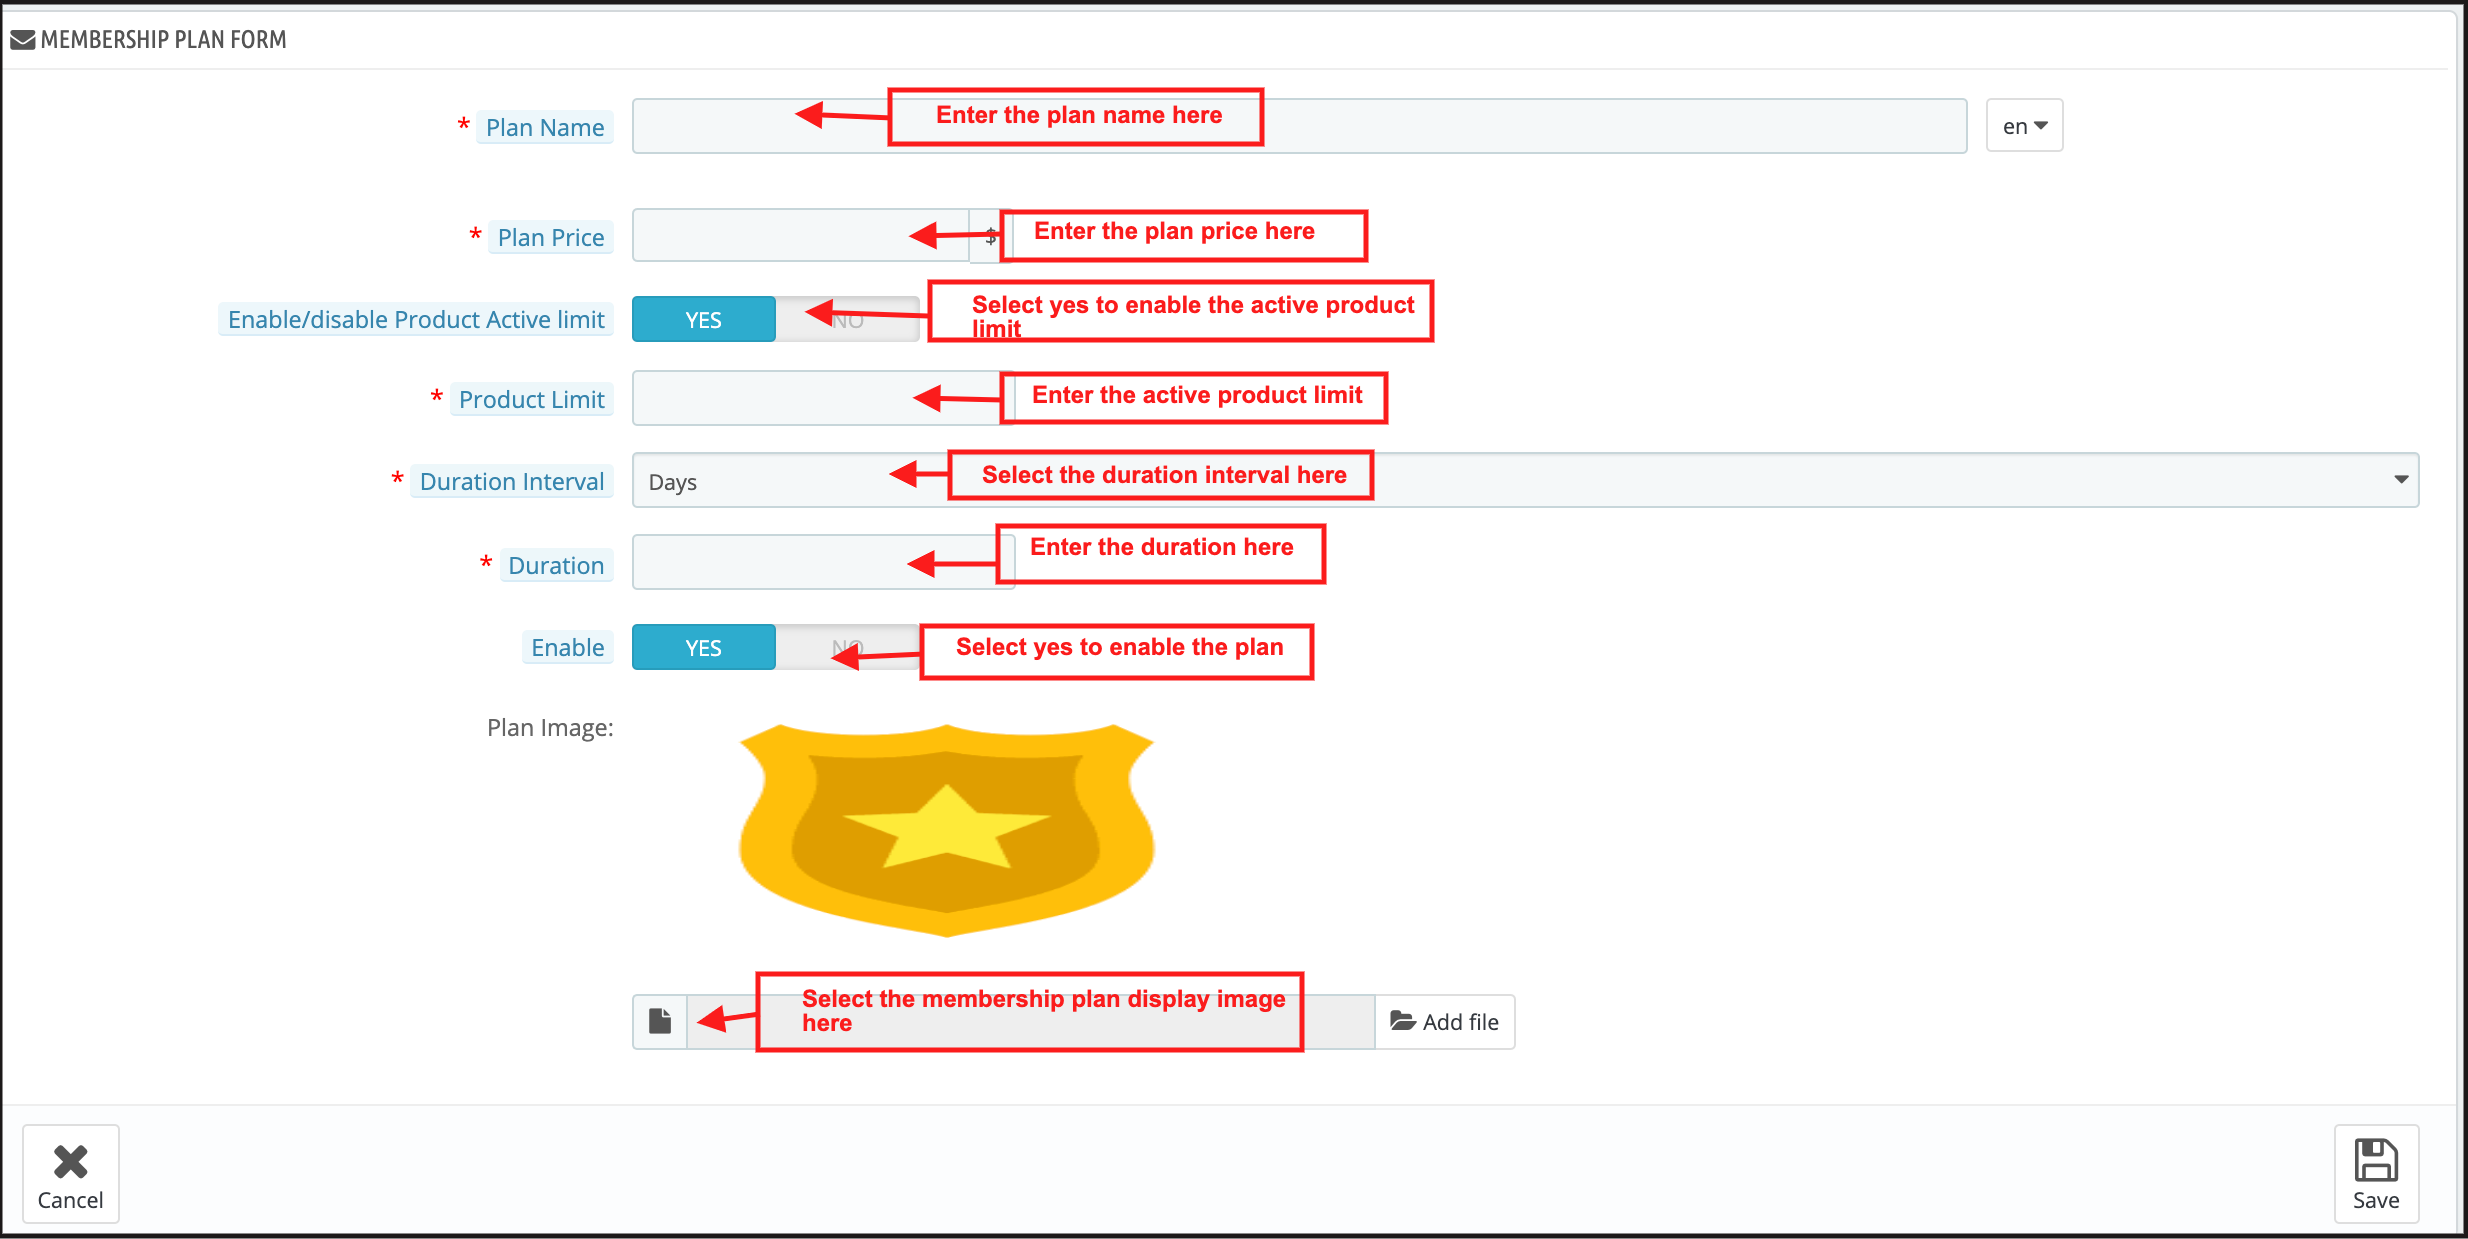
Store admin can create a new membership plan under the membership plans tab. Further, after clicking on the add new button, a new membership plan form opens with the following fields:
Plan name: Admin can set the Plan name which displays to the sellers.
Plan price: Admin can set the plan price using this tab.
Enable/disable product active limit: Using this feature admin can enable the product listing limit for that particular membership plan.
Plan duration interval: Store admin can set the plan duration interval using this tab.
Duration: Admin can set the duration for which the plan remained active.
Enable: Using this tab admin can enable or disable the membership plan.
Plan image: Admin can choose the plan image which he wants to show to the sellers.
3.24 Seller membership plans
From this tab, the admin can check the seller’s plan details like their first name, last name, email, shop name, etc.
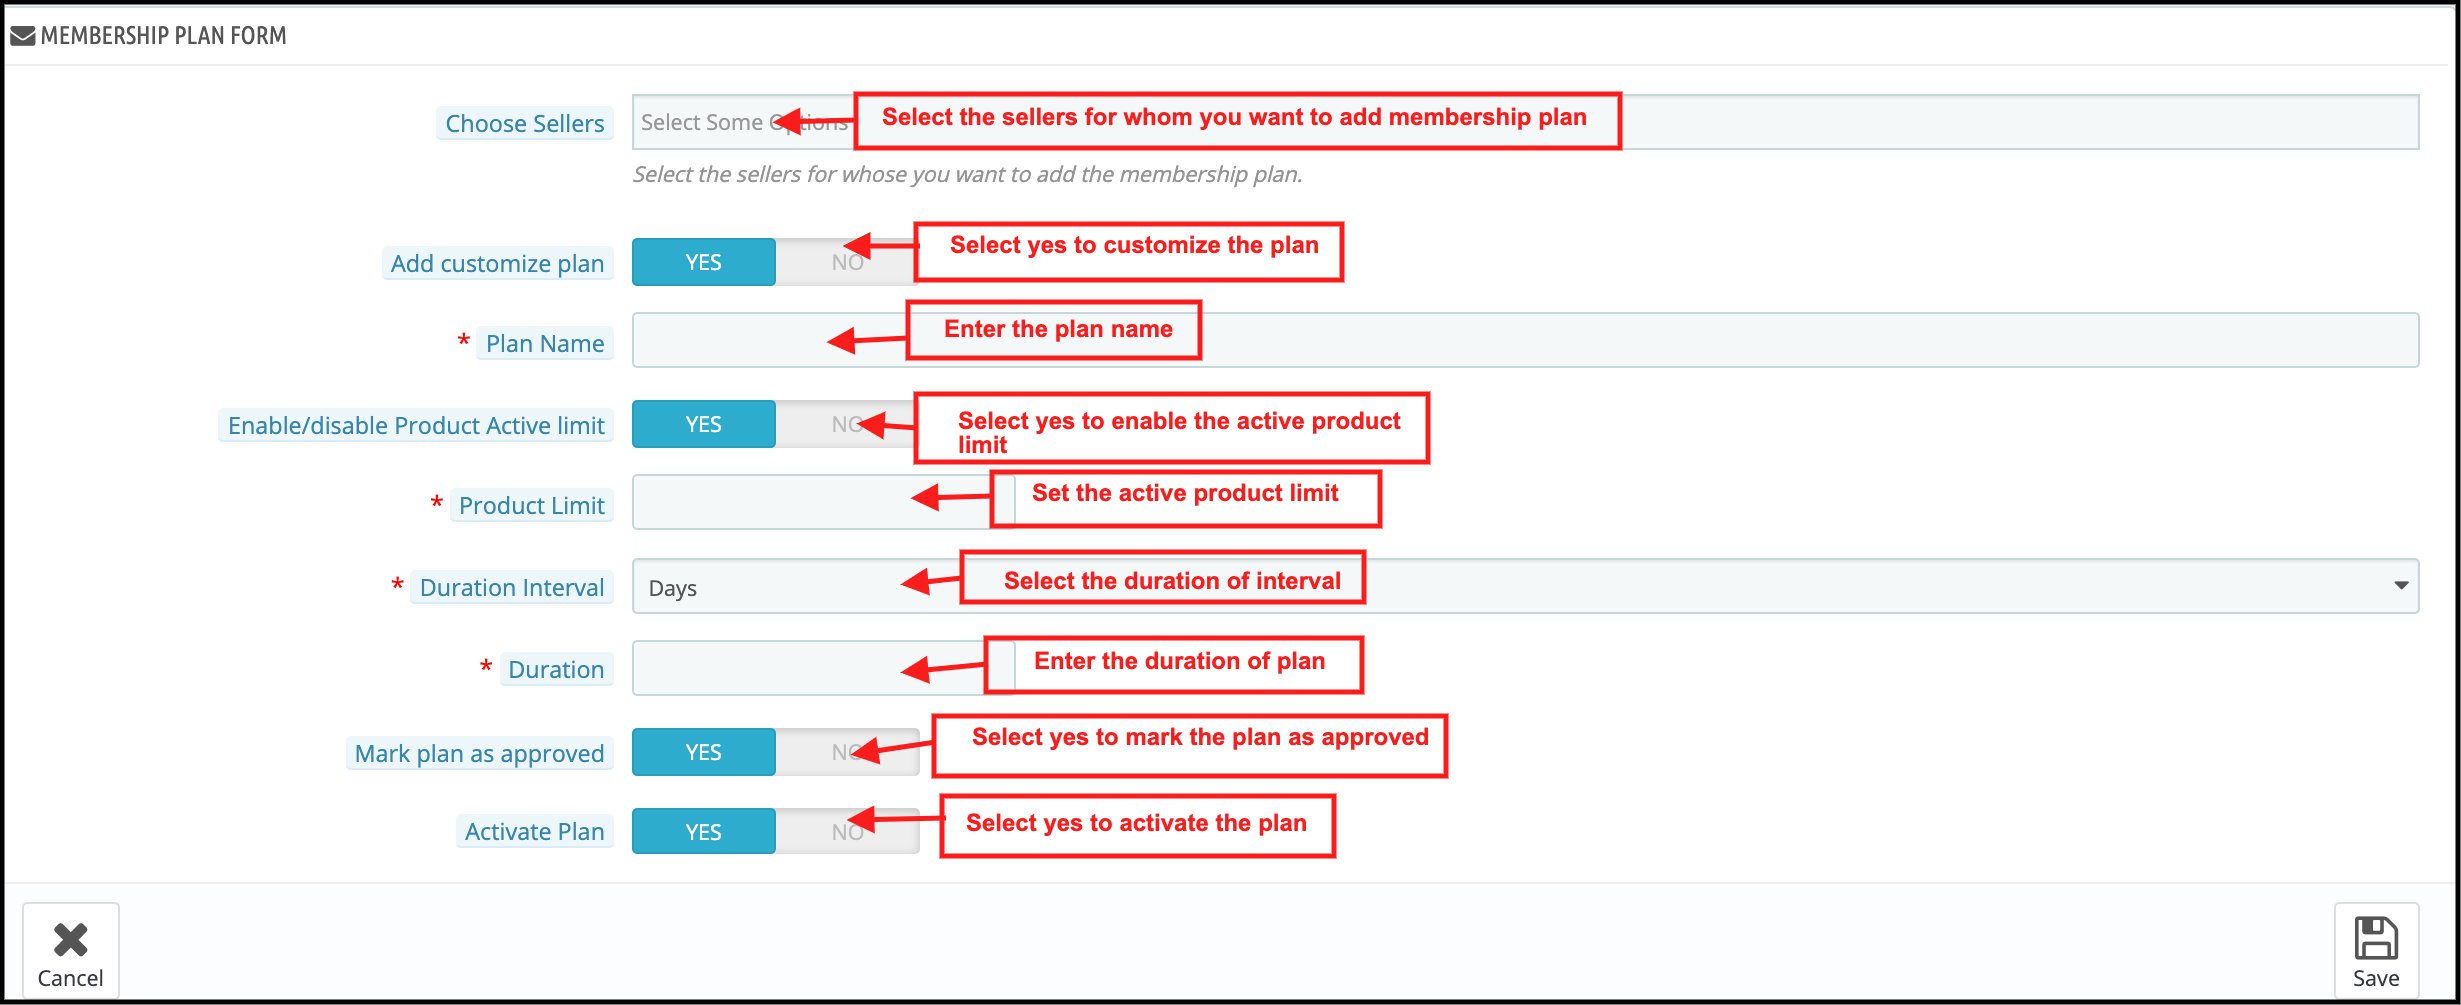
From the add new option, store admin can add new seller plan details by filling in the following details:
Choose sellers: Admin can choose the seller for which the admin wants to add plan details.
Add customized plan: Admin can also customize the plan details by filing the details. For instance, plan name, product active limit, duration interval, and duration details.
Mark plan as approved: If the admin enables this, then the seller plan will approve.
Activate plan: The store admin can activate the seller’s plan by enabling this button.
3.25 Hyperlocal Setting
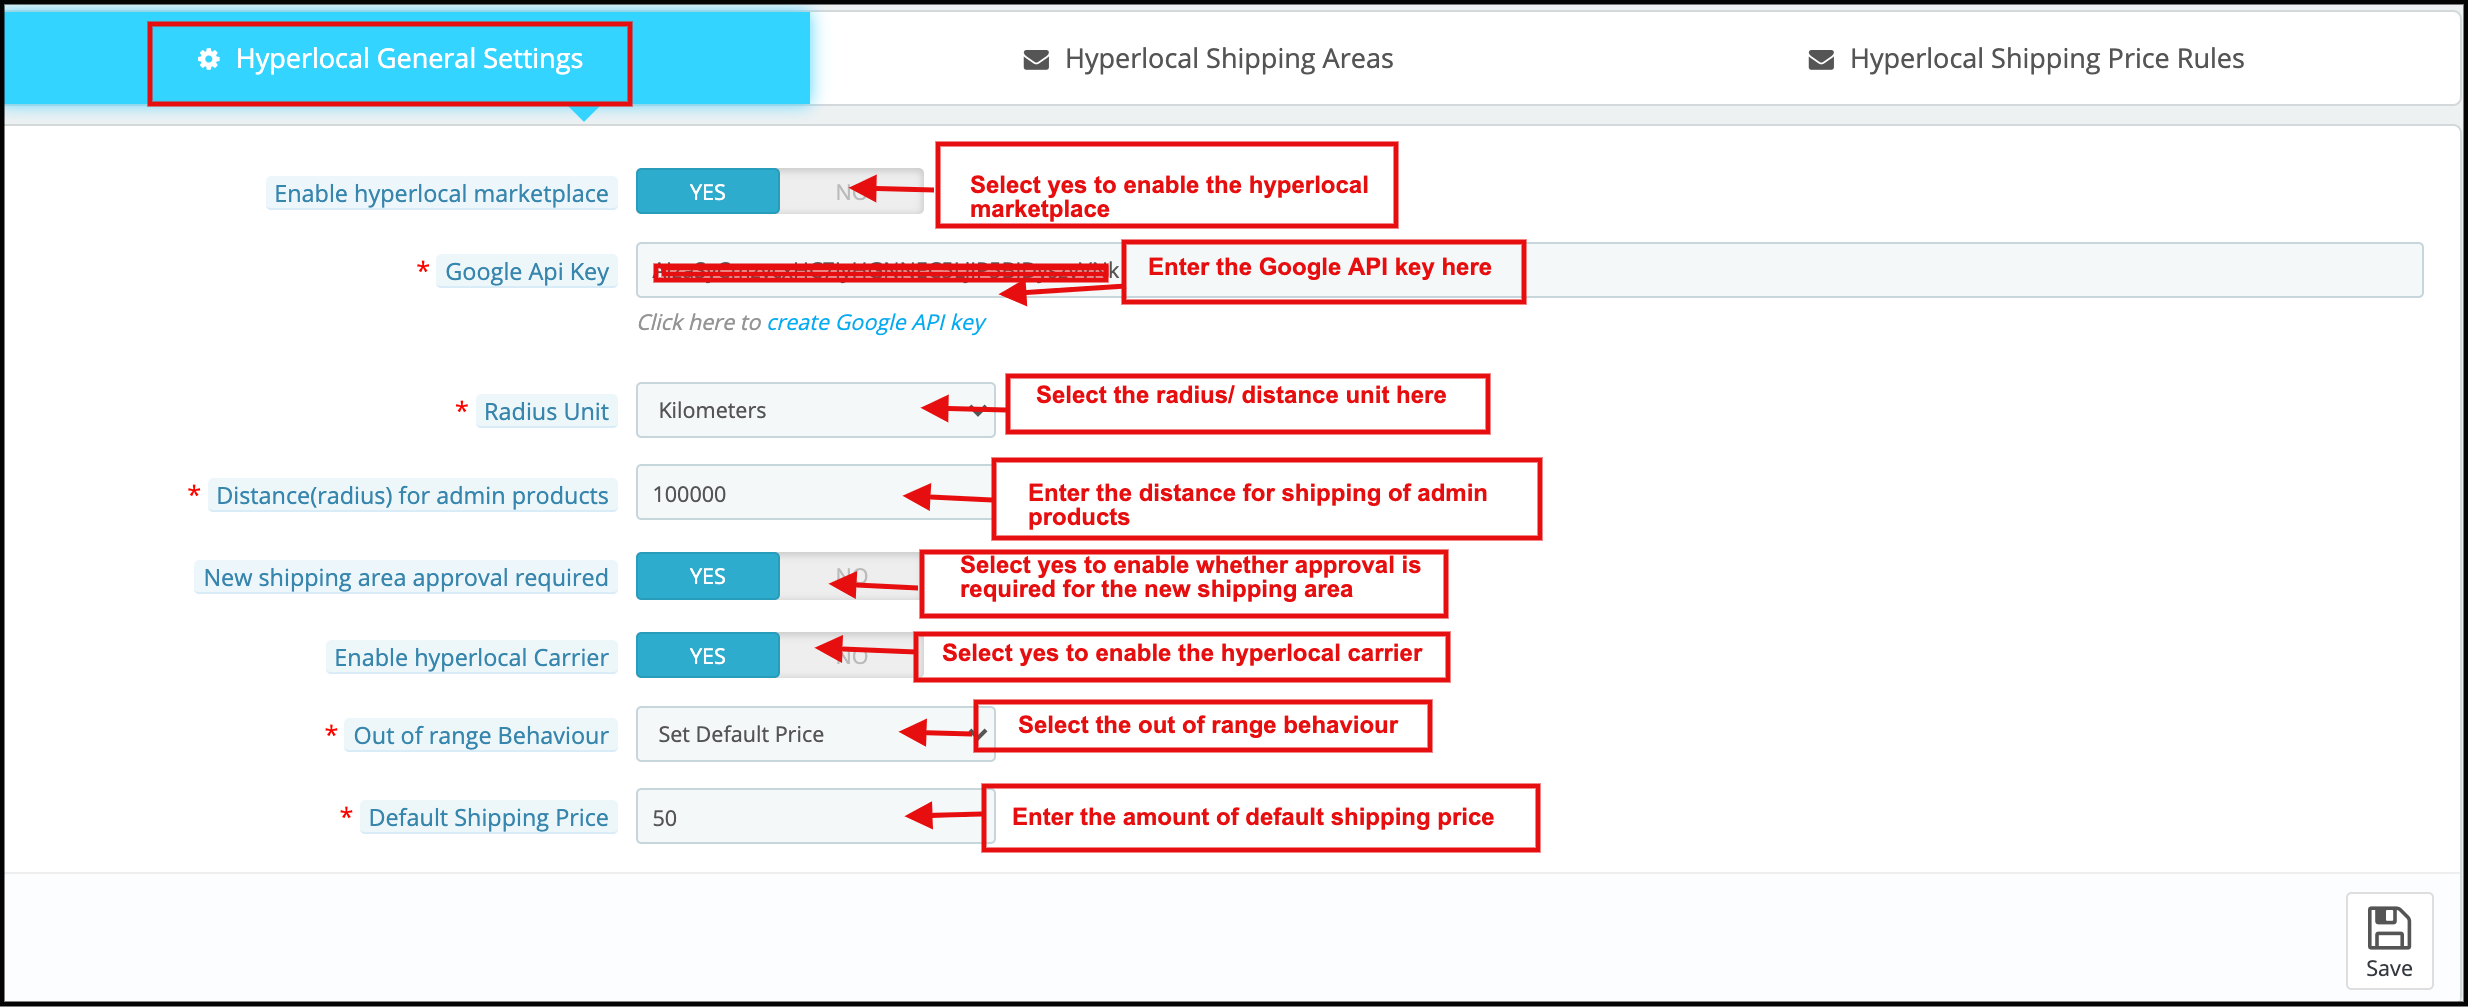
Using hyperlocal settings, store admin can add ship areas where they can ship their products. Store admin can also ship areas on the behalf of sellers. This page contains all the settings which the admin needs to control the hyperlocal feature.
Enable Hyperlocal Marketplace: By enabling this button store admin can start hyperlocal functionality in their marketplace.
Google API key: Admin needs to enter Google API key for fetching locations.
Radius Unit: Admin can select radius type in miles or kilometers.
Distance for admin products: Admin can enter distance for the ship areas as per their requirements.
New shipping area approval required: If the admin enables this button then sellers need approval for ship areas.
Enable Hyperlocal Carrier: If the store admin can enable this button then sellers can map their products with the hyperlocal carrier.
Out of Range Behavior: If shipping distance is out of range then admin/seller can set default price.
Default Shipping Price: Admin can enter a default shipping price for out of range of products shipping.
Hyperlocal Shipping Areas:
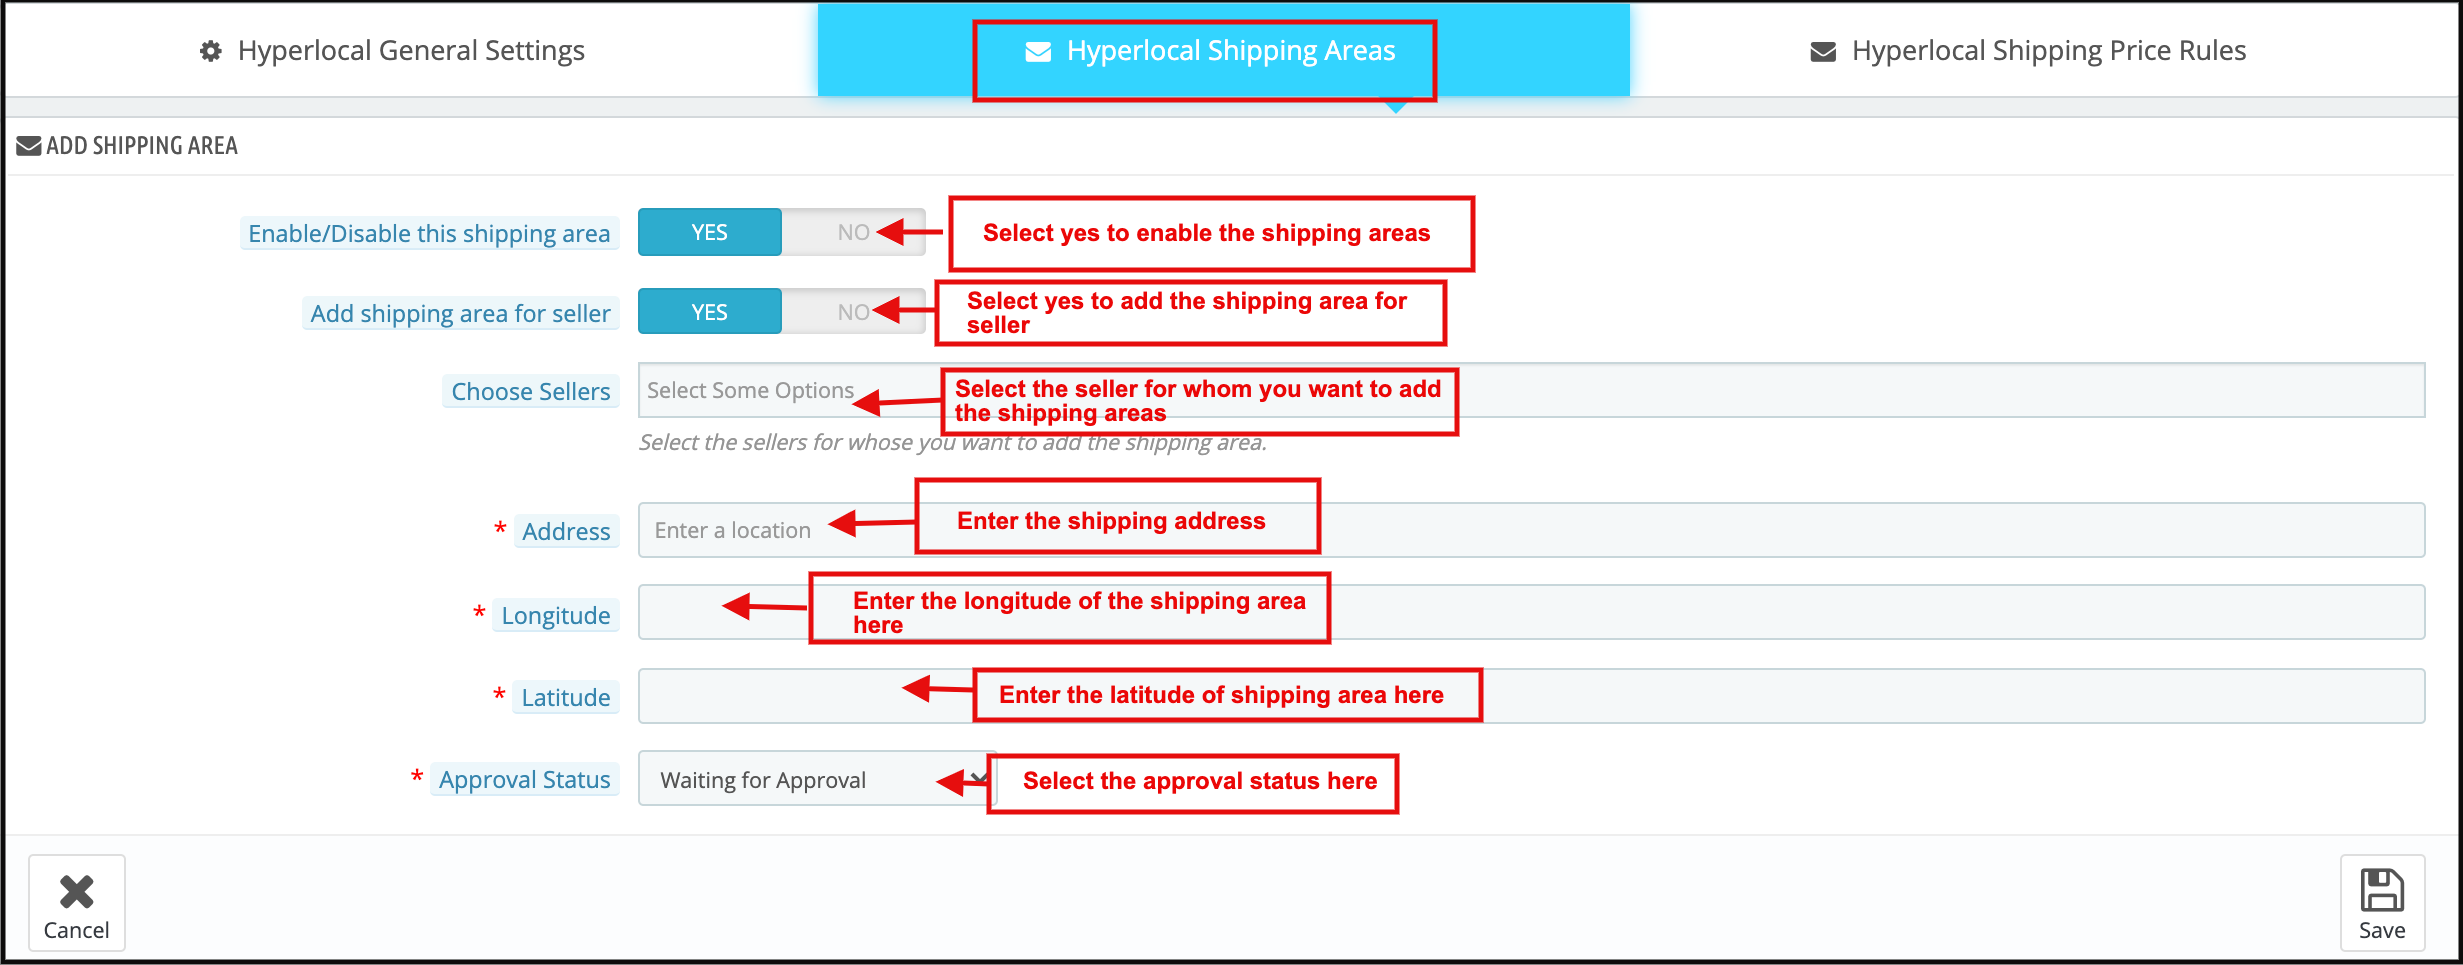
Store admin can add multiple shipping areas using this tab.
Enable/Disable Shipping Area: Admin can enable or disable the shipping area using this button.
Add Shipping Area for Seller: If admin enables this button then store admin can assign the shipping area to other sellers as well.
Choose Sellers: Admin can select the sellers for the shipping area.
Address: Store admin need to enter a location for the shipping area.
Longitude: Enter the longitude of the area using this tab.
Latitude: Enter the latitude of the area using this tab.
Approval Status: After entering all the information admin can assign a status to the shipping area.
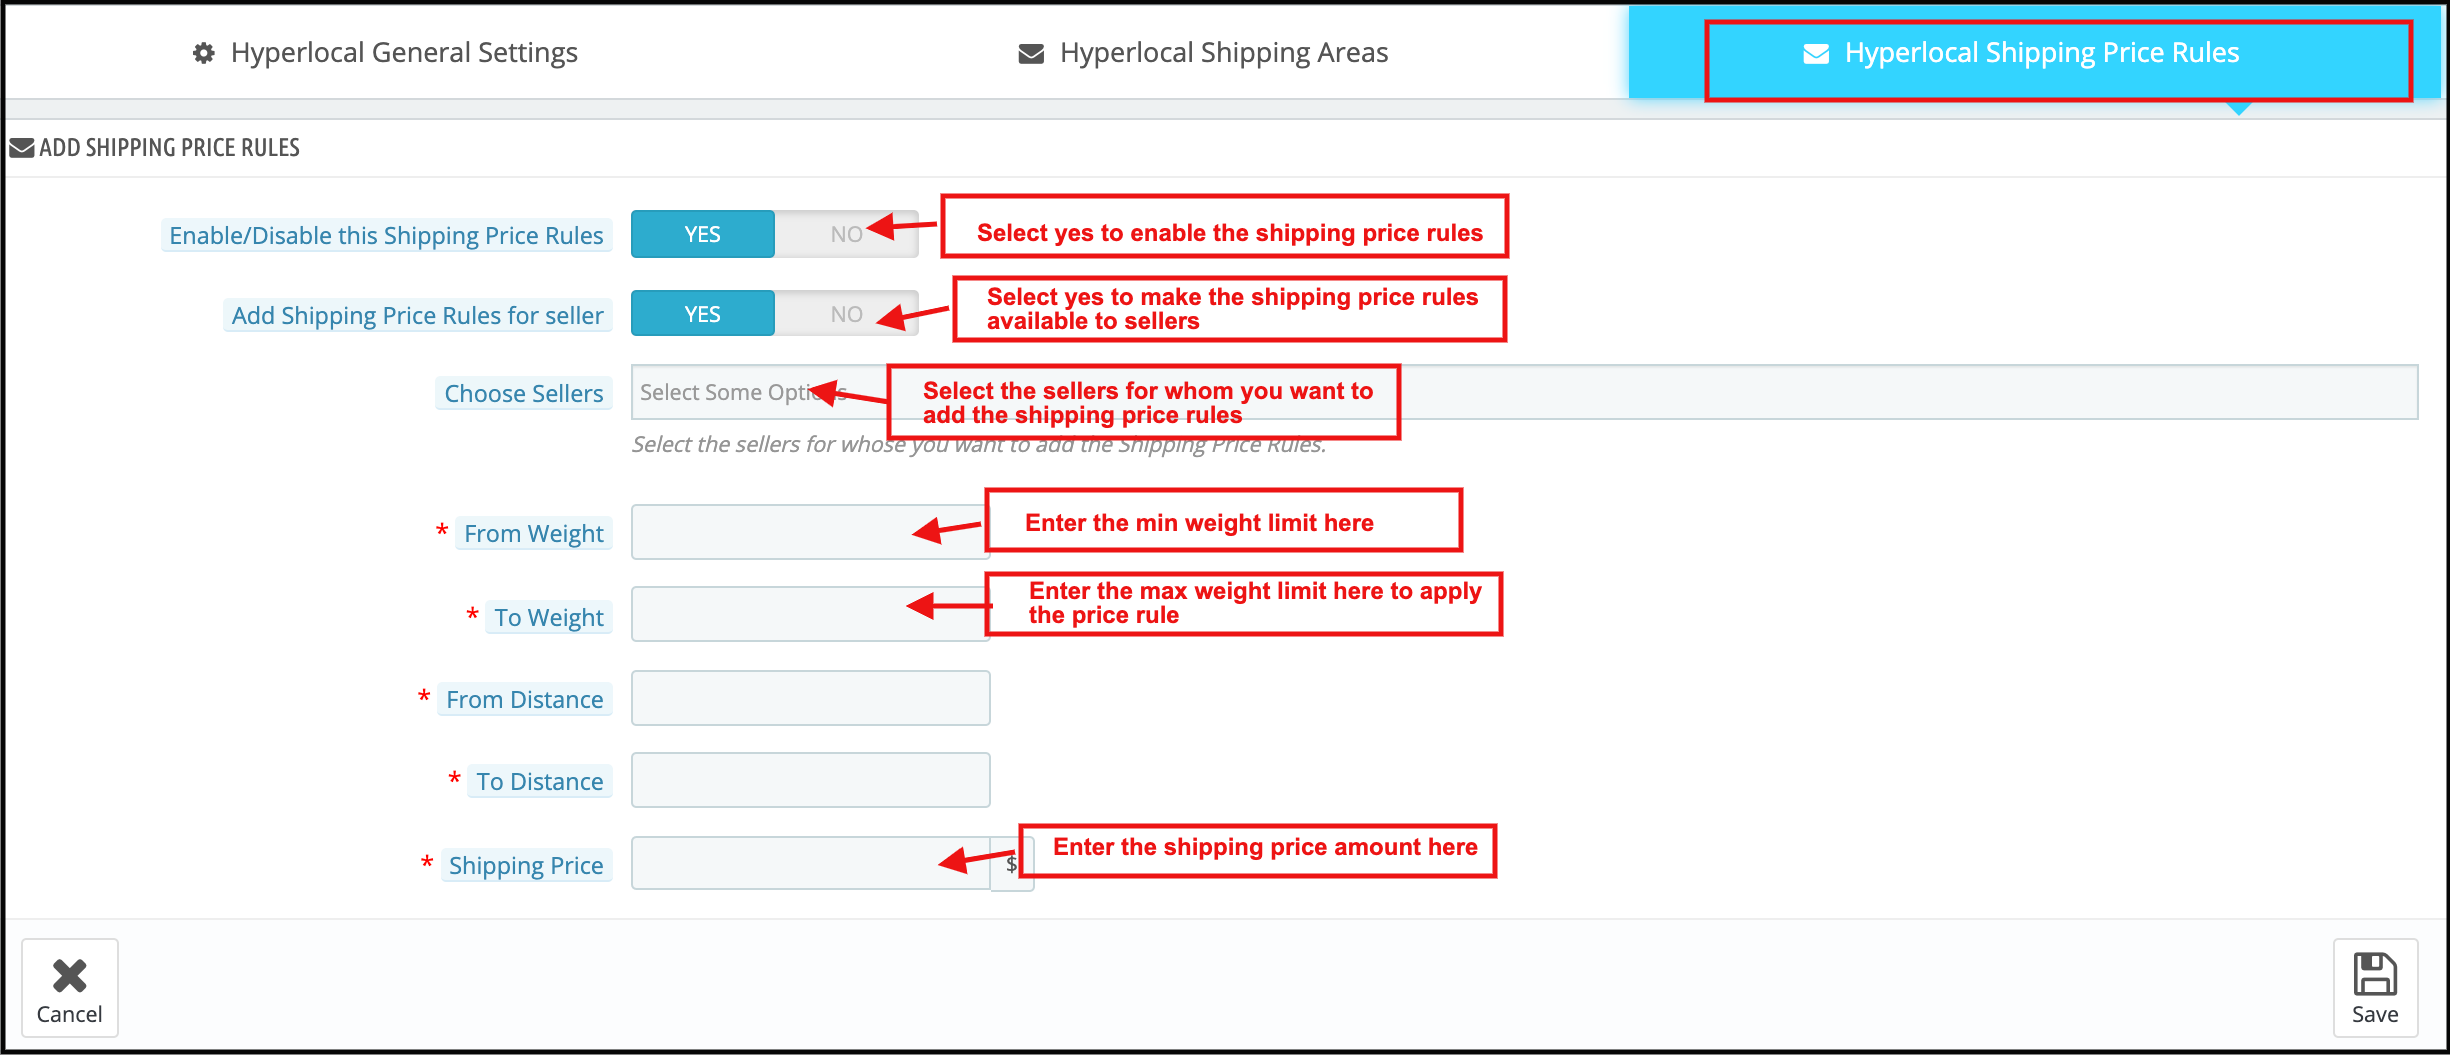
Hyperlocal Shipping Price Rules:
Using this tab store admin can add shipping price rules.
Enable/Disable Shipping Price Rules: Admin can toggle this button to enable or disable shipping price rules.
Add Shipping Rules for Sellers: By enabling this button store admin can add the shipping price rules for the sellers also.
Choose Sellers: Admin can choose the sellers for adding shipping price rules.
Weight: Admin can select the weight range for the shipping price rules.
Distance: Store admin can select the distance range for the shipping price rules.
Shipping Price: Using this button admin can enter the shipping price.
4.0 Seller Account
Any seller has access to several pages that are for handling the functionality of a seller account. Further, the link for all these pages is there on the My Account page of a customer who is also a seller.
Register As Seller Field (Register Page)
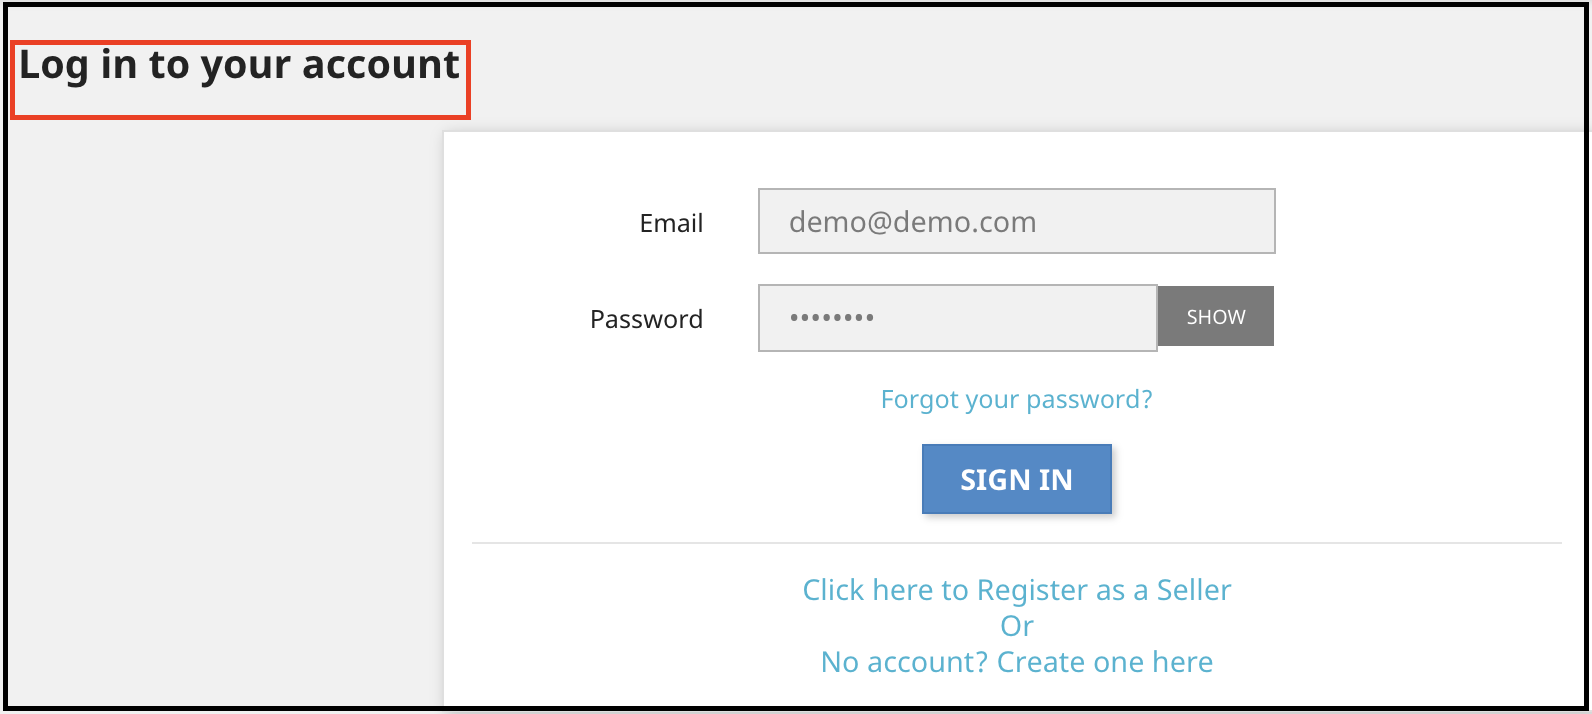
If a new customer is registering on the Store then simply enter your mail id according to the screenshot given below.
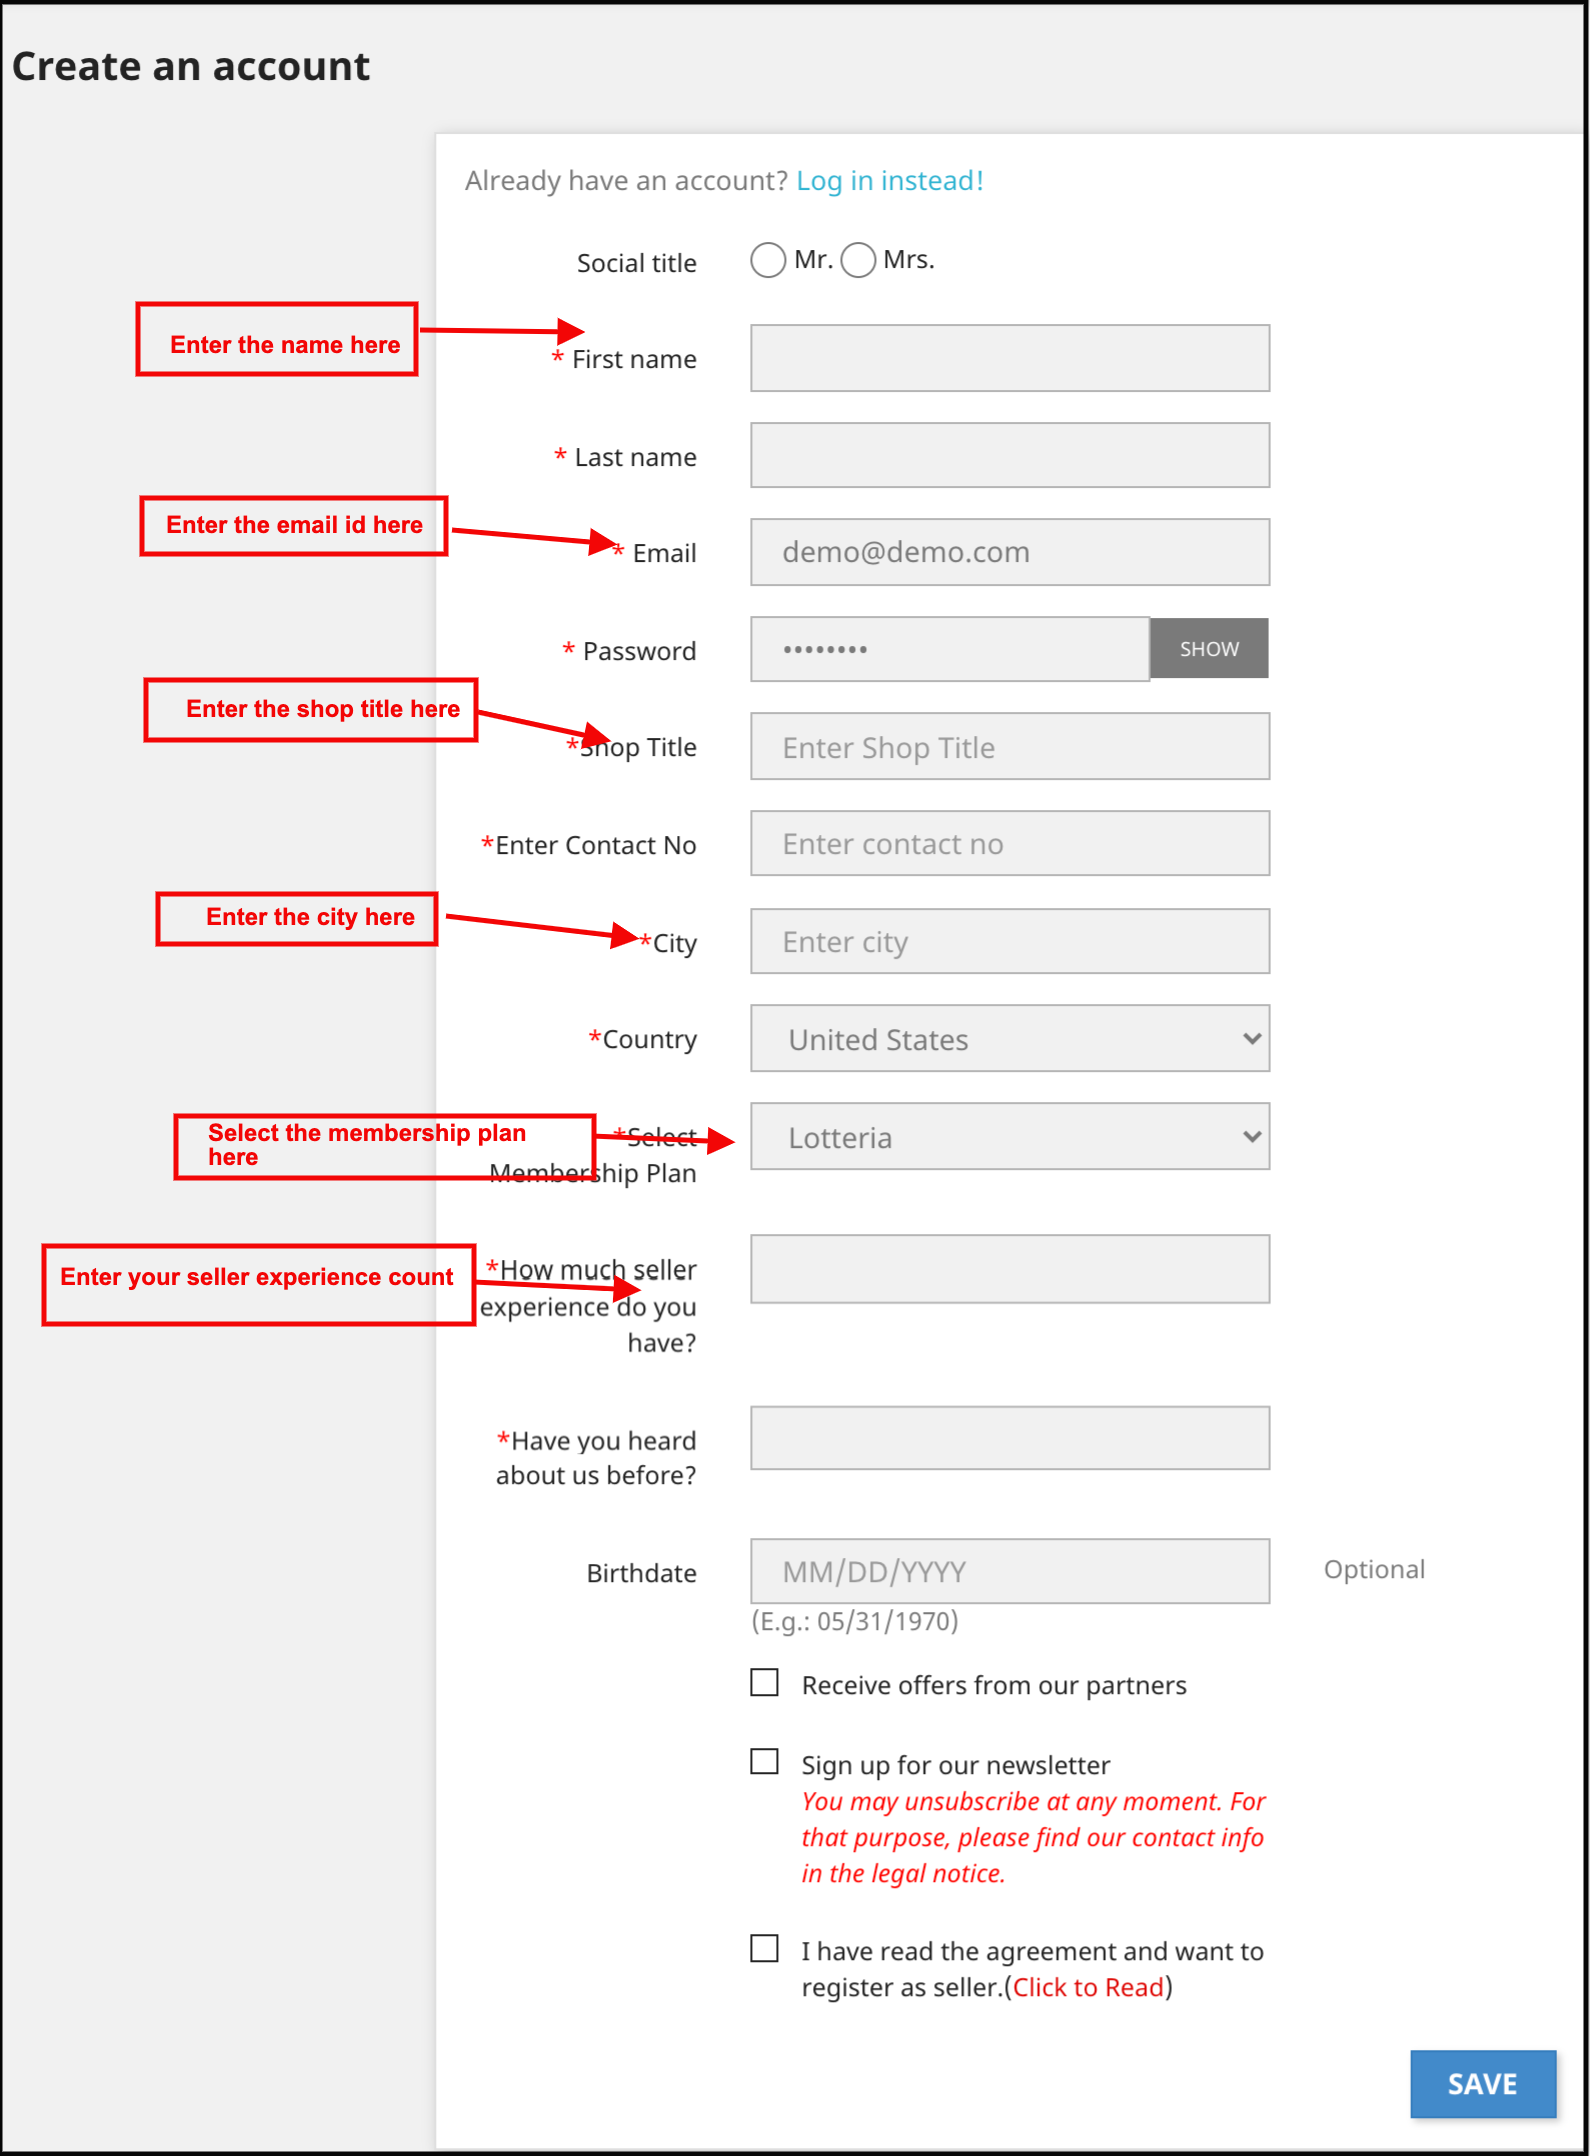
After clicking on “Create an Account”, you have to enter your information as given in the screenshot below.
Once the merchant becomes a seller of the marketplace, he can avail of all the functionality of the module. Moreover, boost his sales effortlessly.
The Dashboard of the sellers includes a GDPR section. Further, customers can download their data. In addition, can even delete their accounts with ease.
4.1 Seller’s Profile
The sellers can edit their profile. Moreover, personalize their shop from this tab of the dashboard.
4.2 Seller’s Product
The sellers can follow the path mentioned below to add a new product.
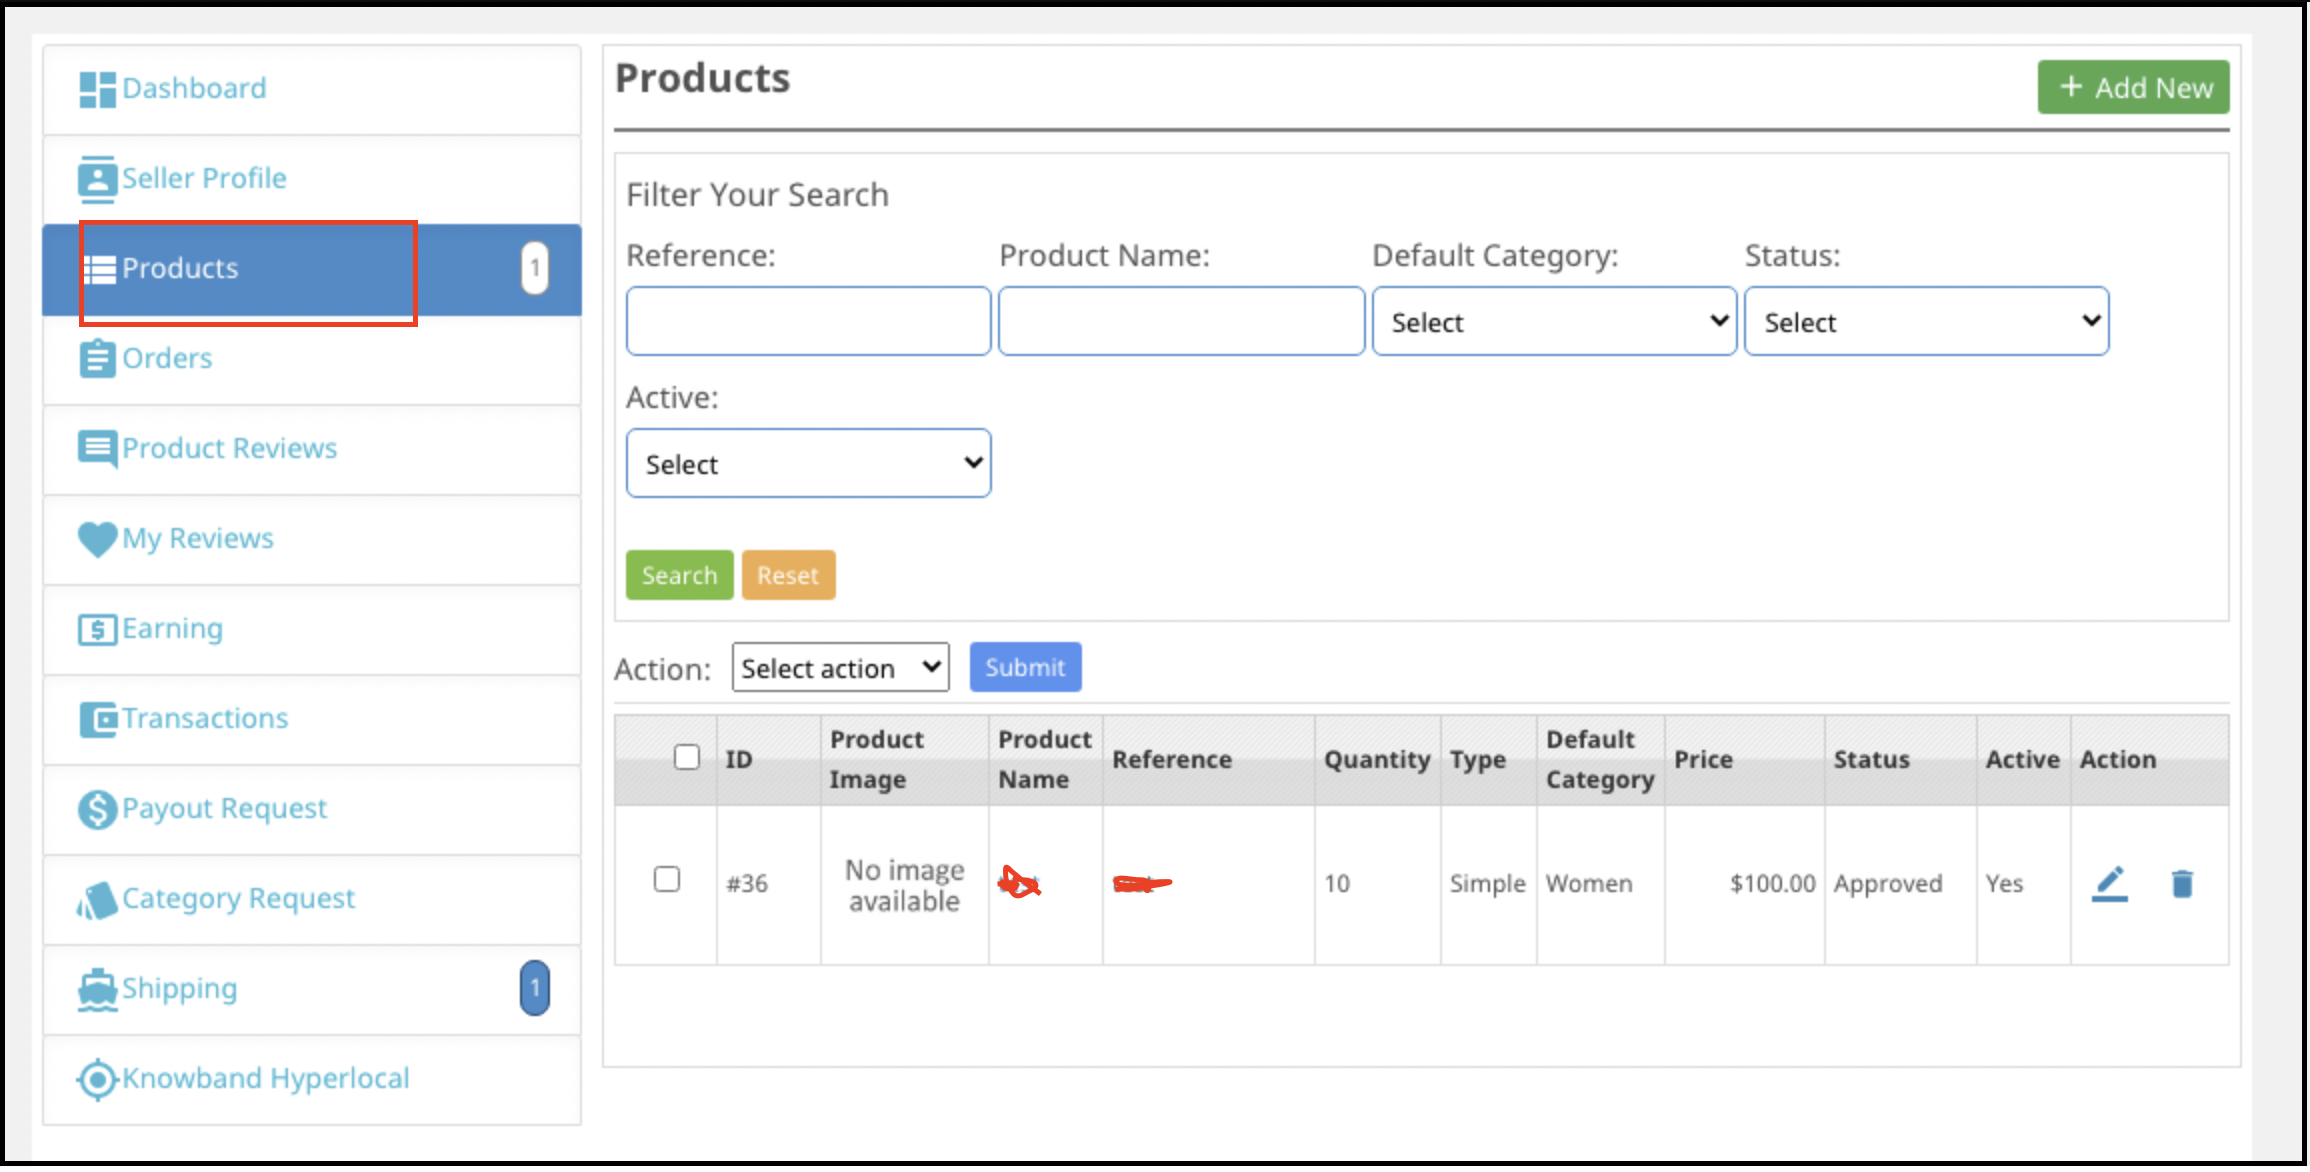
Go to My Account -> Dashboard -> Products
The already listed products are visible in this tab of the seller’s Dashboard.
To add a new product click on the ‘+’ sign at the top right portion.
This will redirect you to the ‘Add New Product’ page. Here, fill up the nedful details to add the product.
4.3 Order
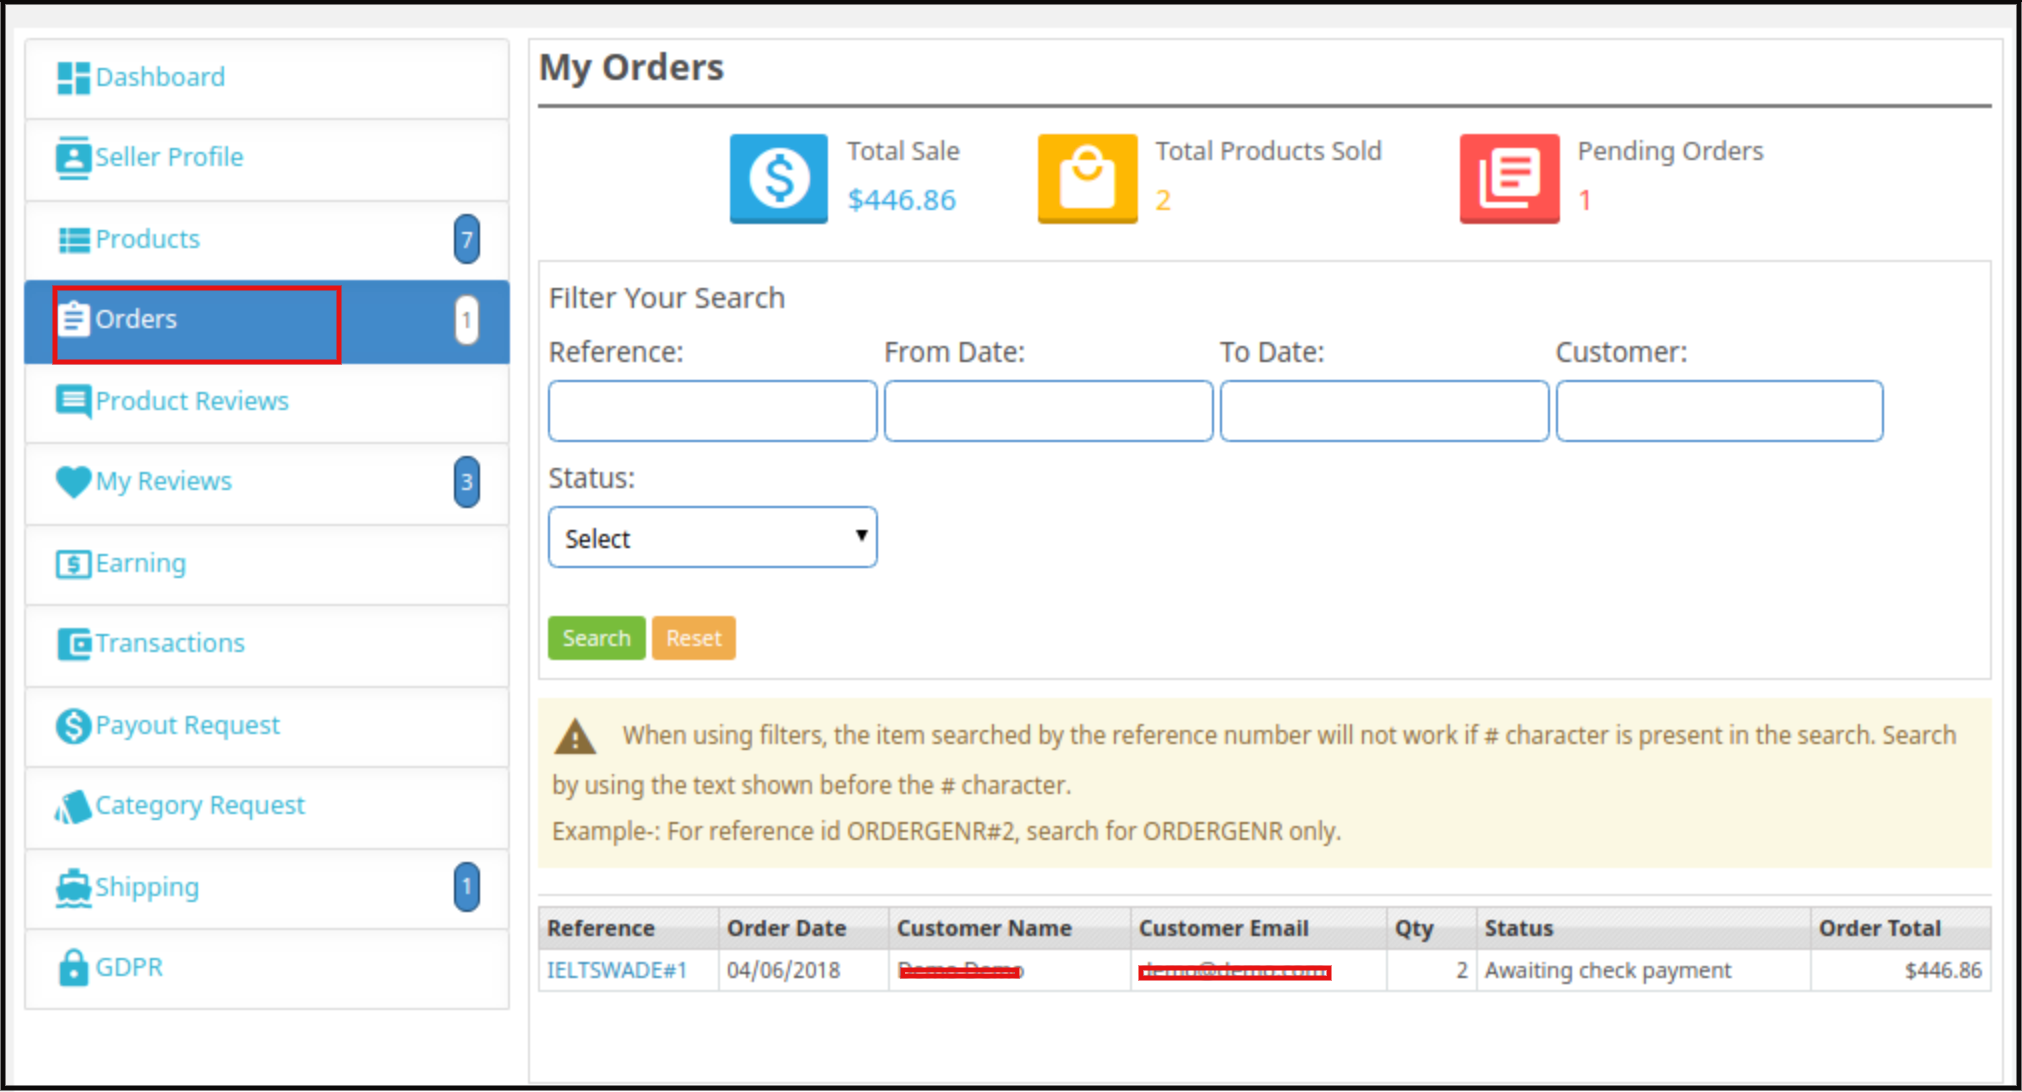
The sellers can view their orders and related details in this tab of the Dashboard.
4.4 Product Reviews
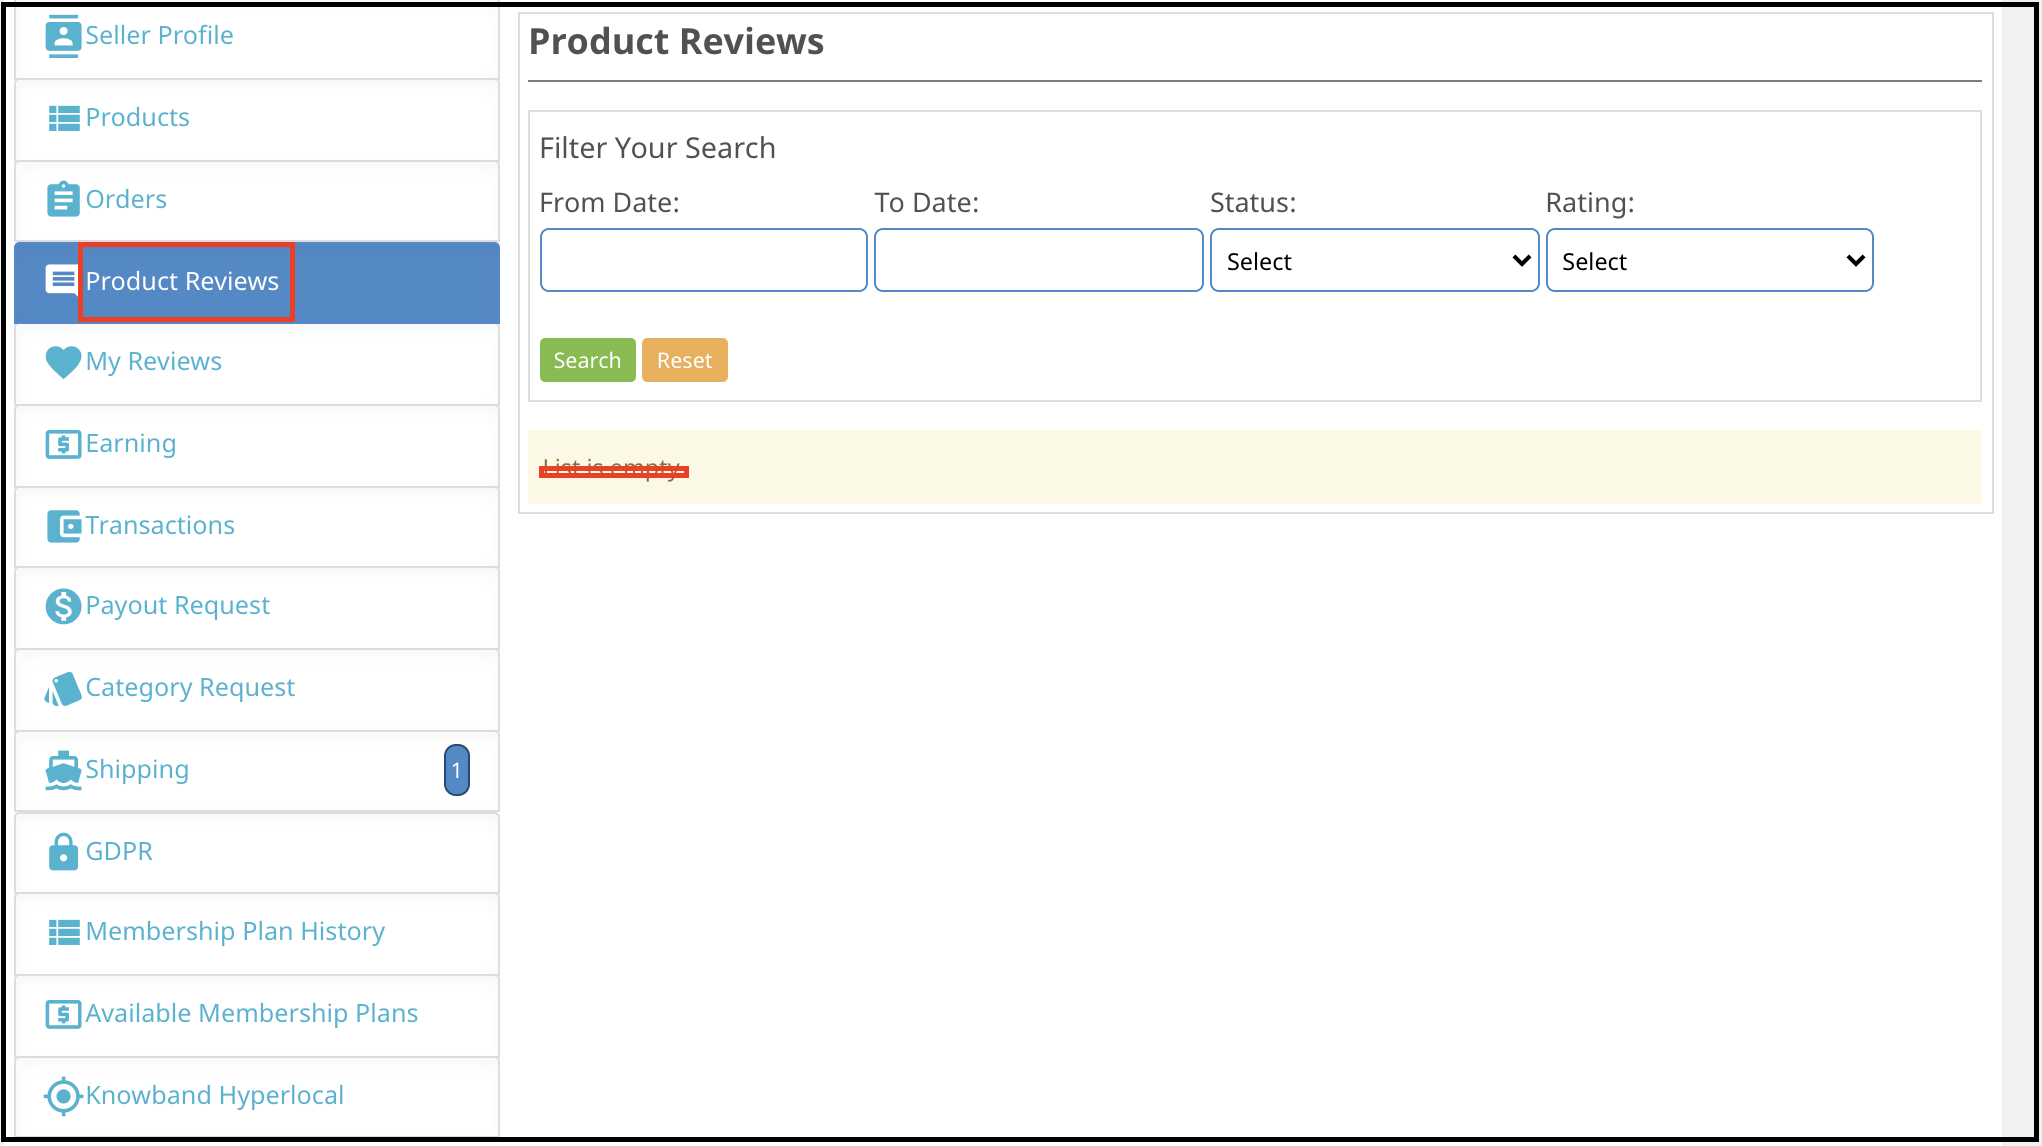
The sellers can view the review received on their product in the Product Review Tab of their Dashboard. Furthermore, all the reviews received will list as shown in the image below:
4.5 My Reviews
The tab of the seller’s dashboard lists out the reviews received on their profile.
4.6 Earnings
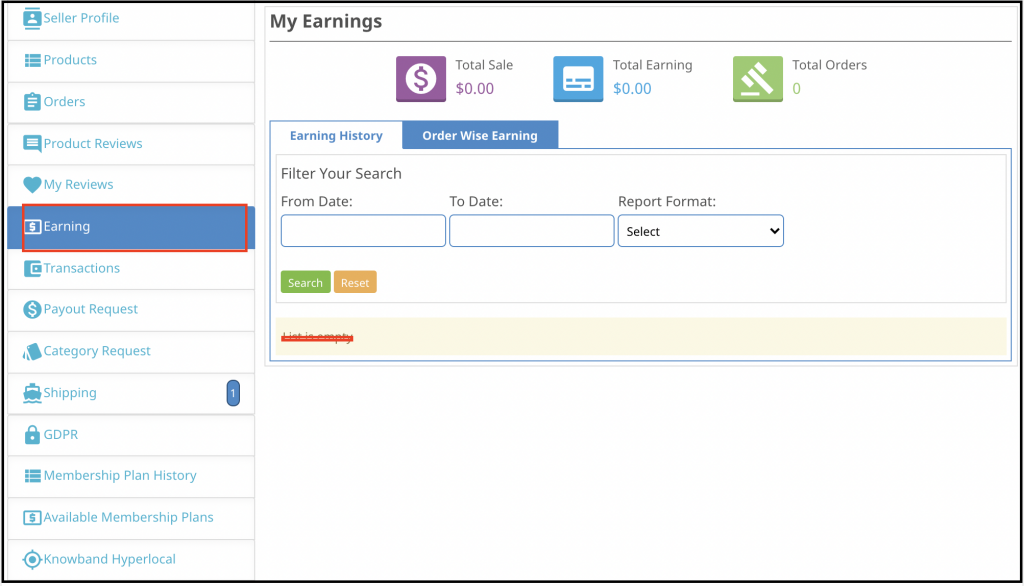
Seller Earnings are visible in this tab. In fact, the vendors can filter the results as per requirement.
The total earning history will display as shown below:
4.7 Transactions
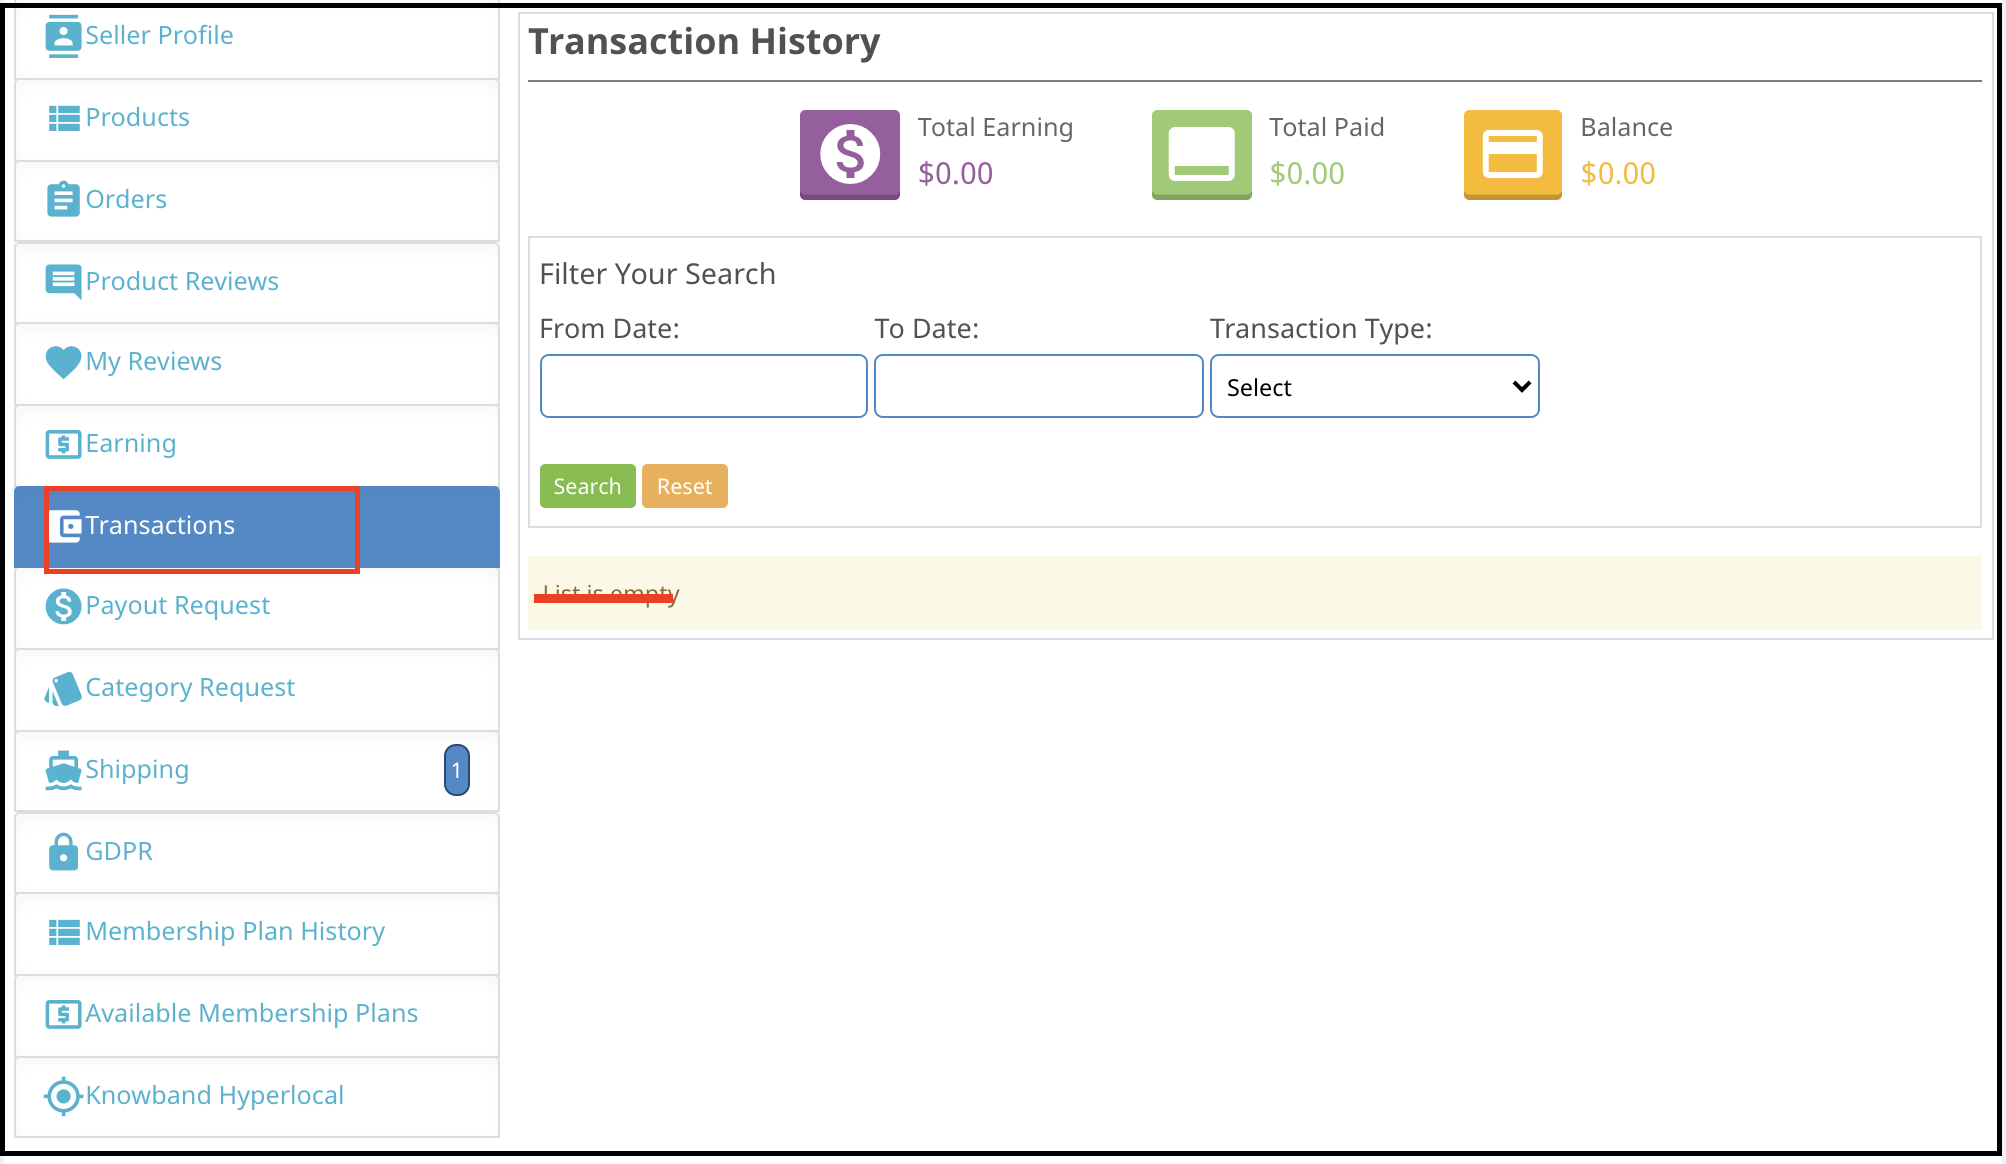
The seller can view their entire transaction history in this tab. Further, the amount debited or credited in their account is available here.
4.8 Payout Request
Sellers can view the list of payout requests sent to the admin from the Payout Request tab. In fact, for a new payout, request sellers need to fill the payout amount and reason. Moreover, send it to the admin for approval.
4.9 Category Request
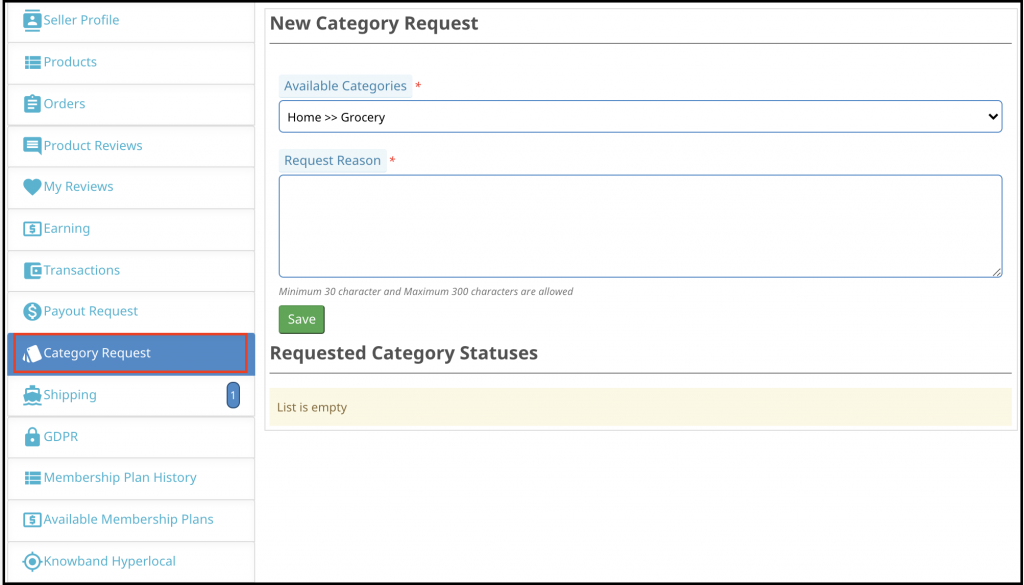
The sellers can view the categories assigned to them. Additionally, they can even send a category request to the store admin. To send a category request, go to the Dashboard -> Category Request.
4.10 Shipping
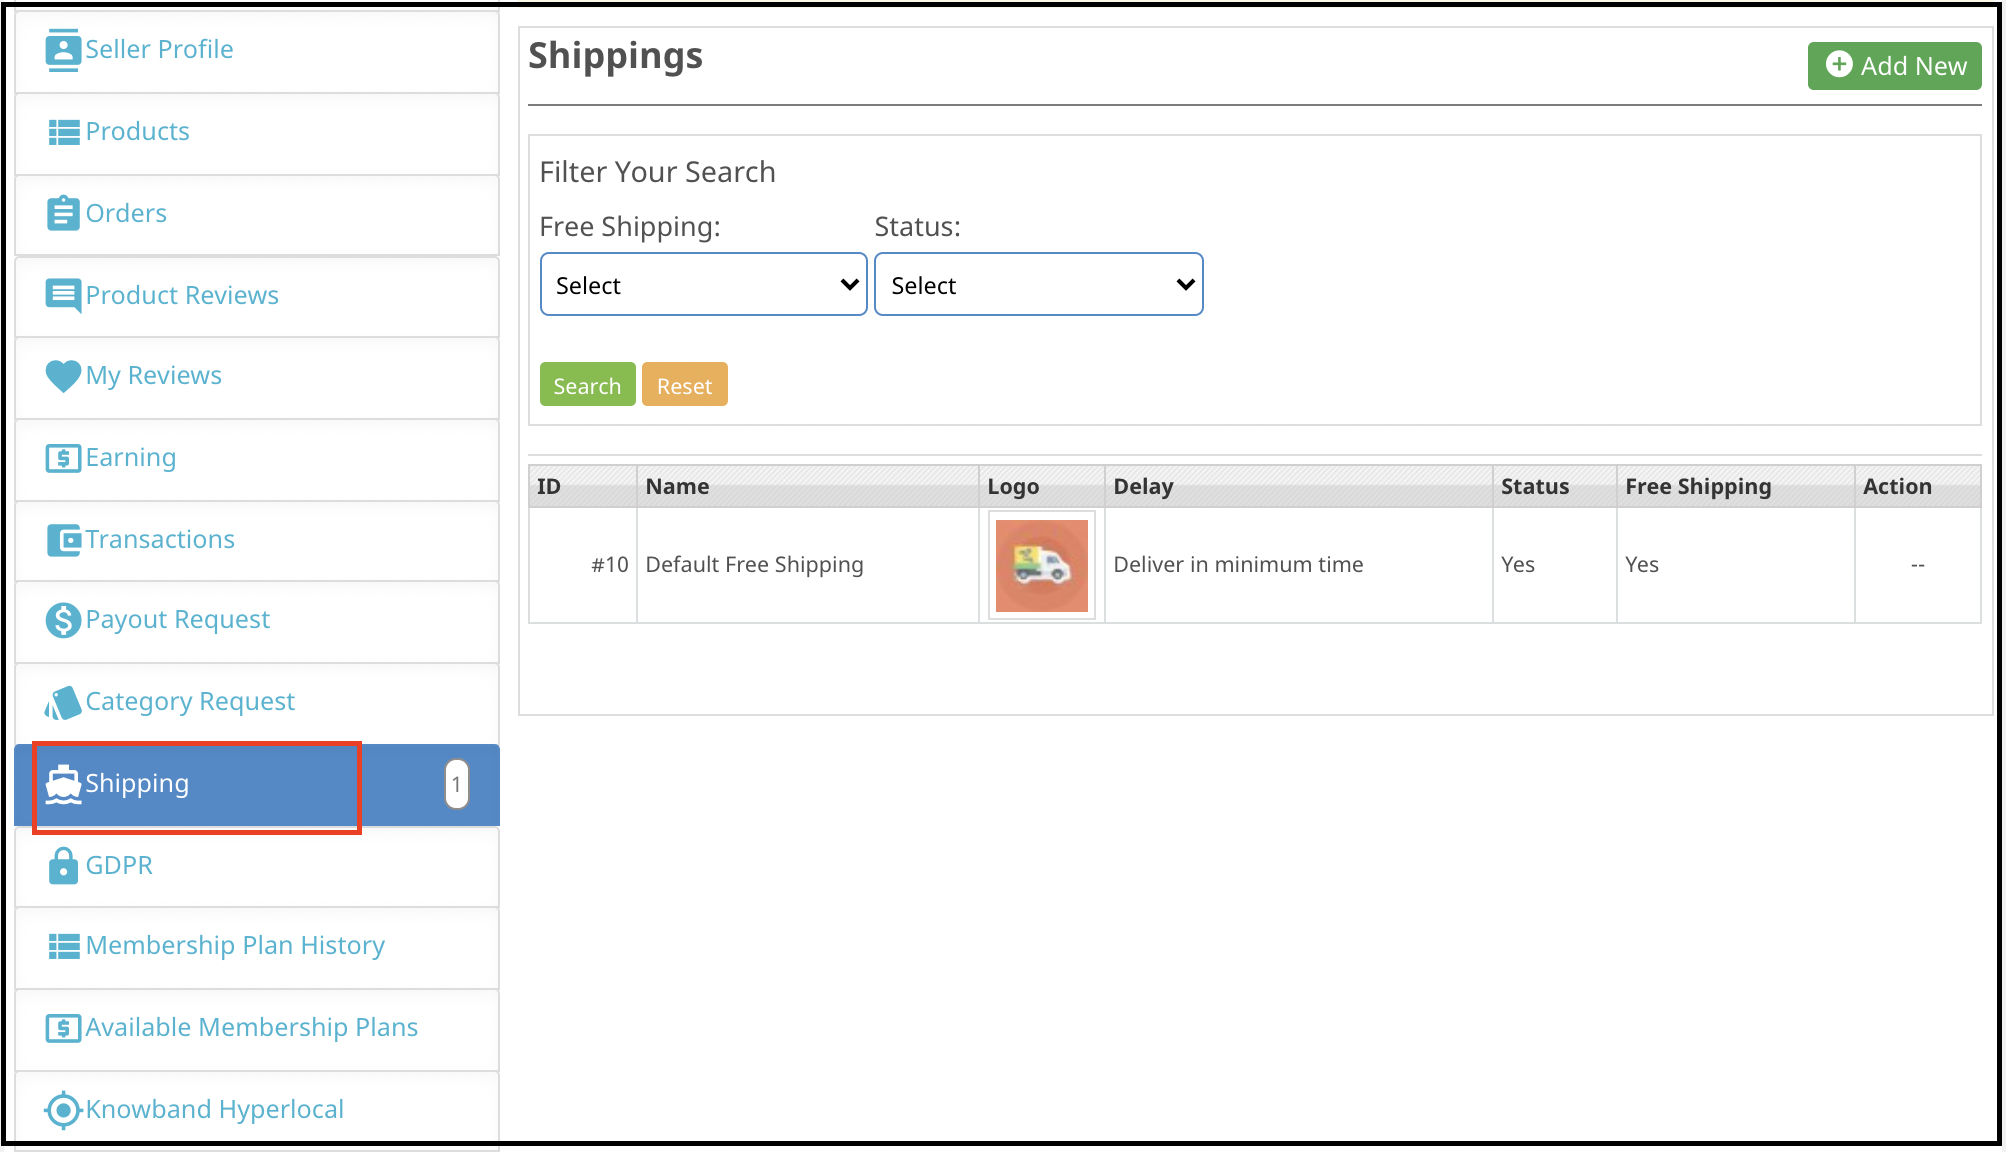
The sellers can view the shipping process as in the screenshot below:
4.11 GDPR
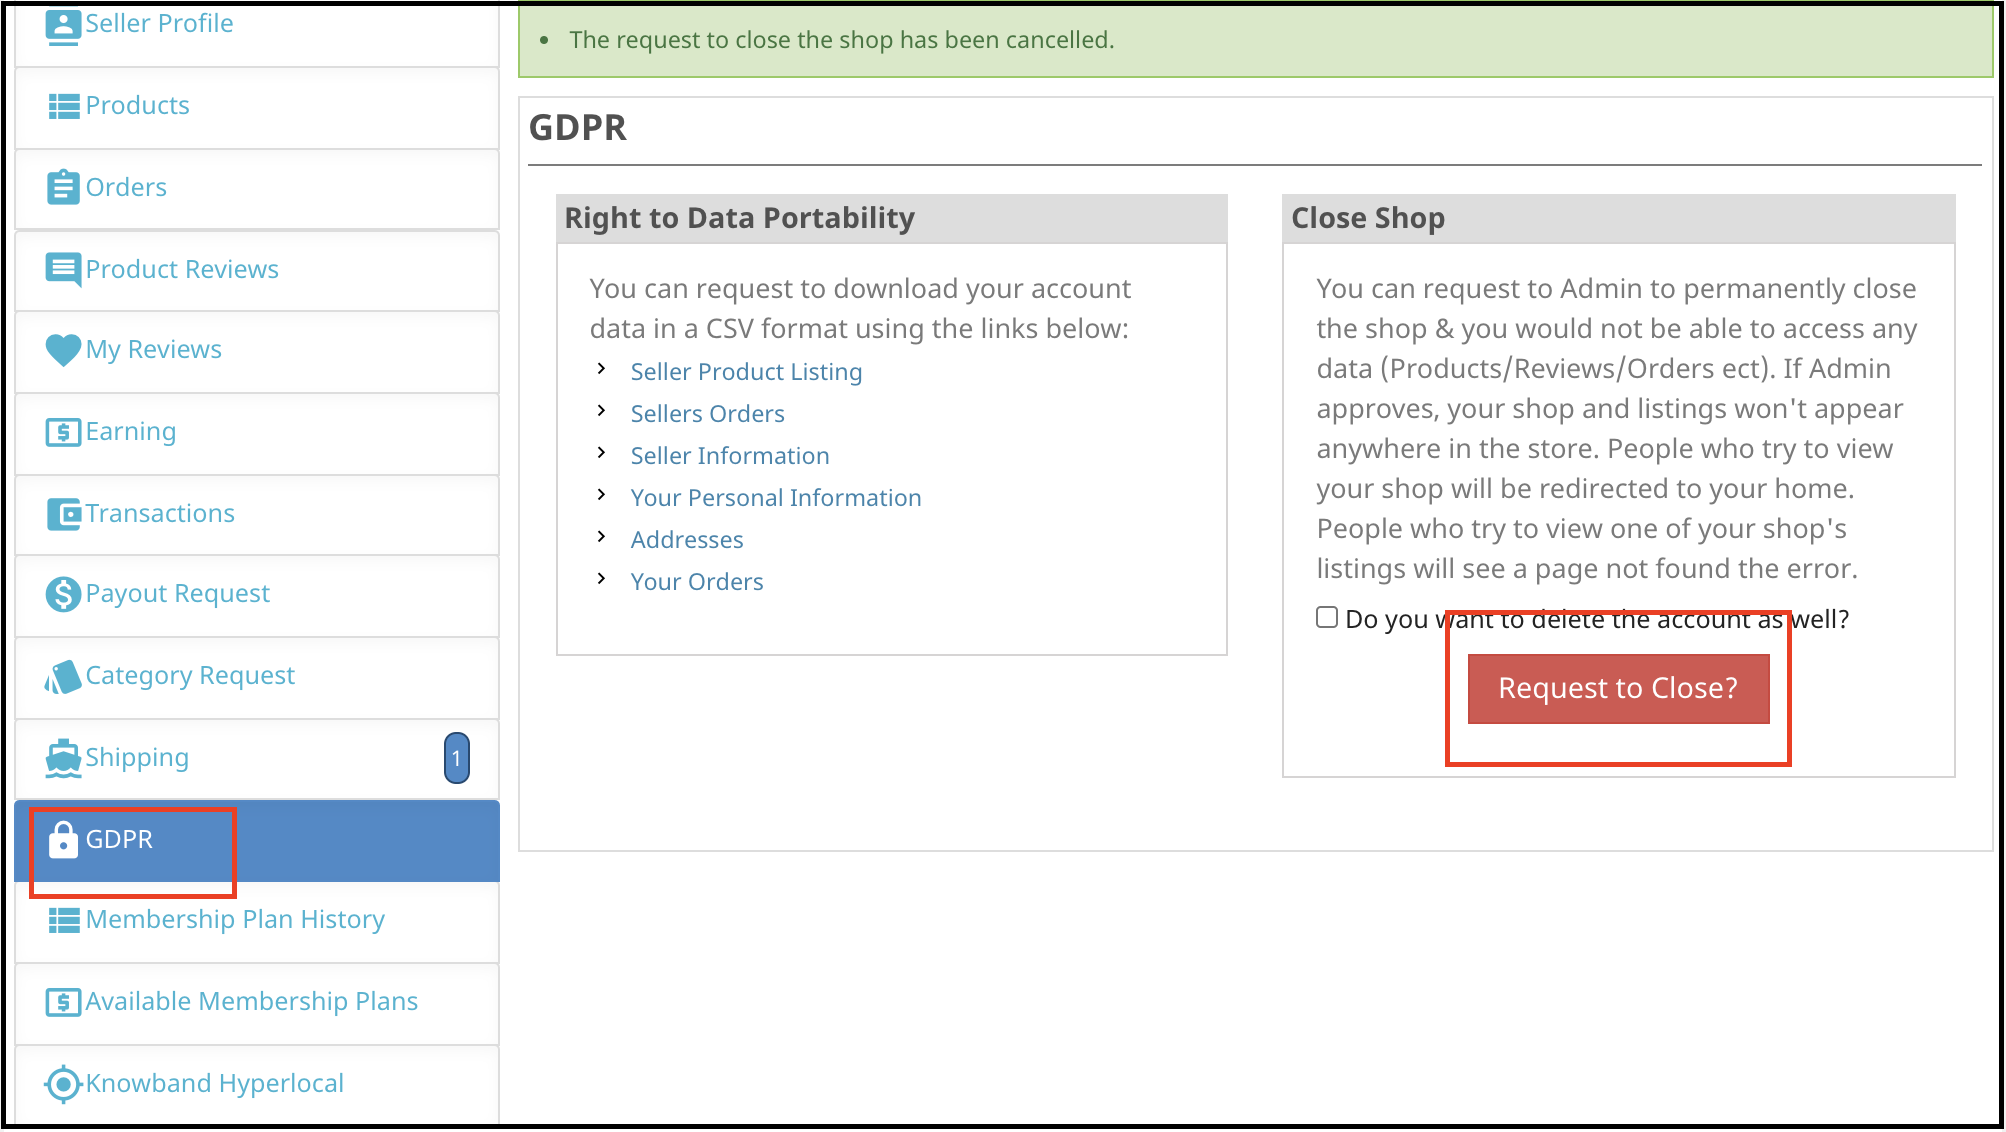
The sellers can request to download the account details from the store owner using this tab. Further, the downloaded account details will be available in CSV format.
Sellers can also request the store owners to close their shop by clicking on the “Request to Close” button. In fact, the store admin can approve the request from the admin panel of the Prestashop Hyperlocal Delivery Business Model.
4.12 Membership plan history
Sellers can check their membership plan history by applying filters. Further, under the filters, sellers have to fill in the plan name and the status of the membership plan for checking the history of the membership plans.
4.13 Available membership plans
Using this tab sellers can buy membership plans by checking the plan details.
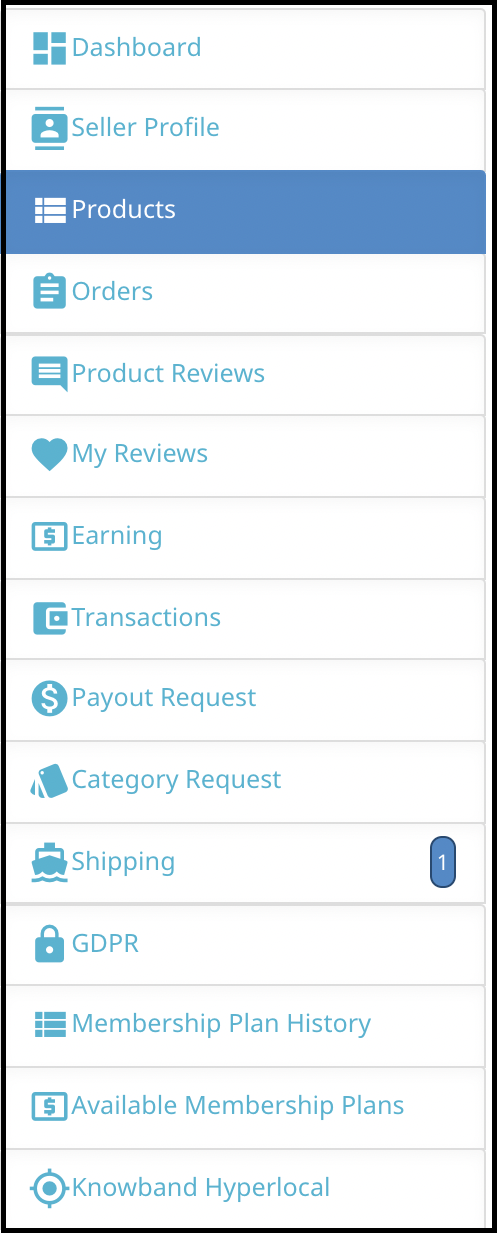
4.13 Knowband Hyperlocal
Using the Prestashop Hyperlocal Delivery Business Model feature sellers can add ship areas where they can ship their products. In fact, if the shipping distance is out of range then the seller can also add a default price for their shipping. Using this feature sellers can perform various operations. For instance, adding ship rates, adding multiple ship areas, adding ship rate in bulk, etc.
The rapid growth in the mCommerce industry has led to the urgency of having an eCommerce mobile app. But, creating mobile apps involves a lot of coding & other technicalities. Why not turn your online website into a web-app instead?
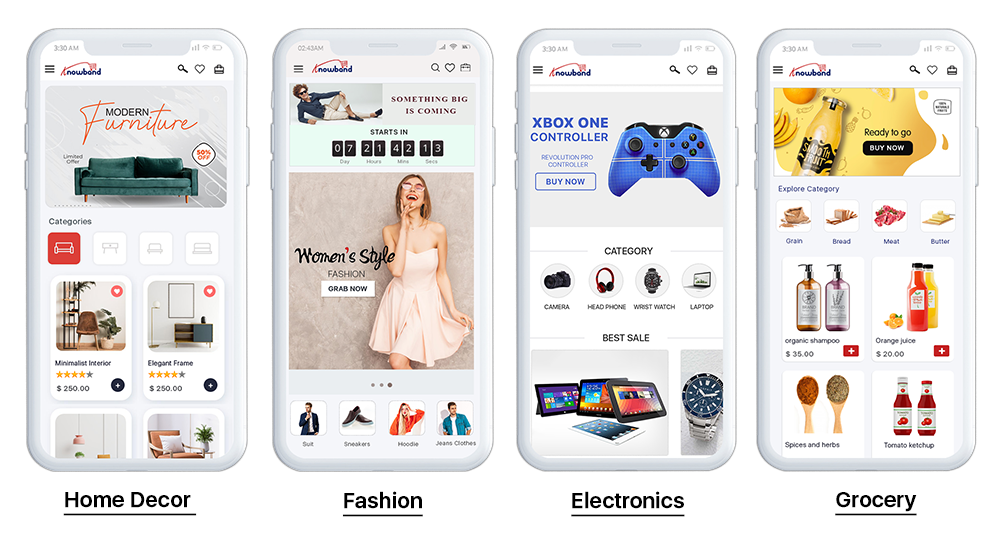
Offering an optimized PrestaShop eCommerce PWA app i.e. would enhance the mobile shopping experience to the users. This PrestaShop PWA App Builder module is designed & built to transform your store into a web-application which can be managed from a friendly backend panel. These apps come up with various extended features than native apps like offline mode & platform independency which makes them a hassle-free & seamless shopping solution for users.
1.1 View Demo App:
Before purchasing the extension, view demo app functioning by opening PrestaShop PWA Demo App URL on your browser.
–> iOS devices do not offer any inbuilt “Add To Home Screen” prompt, so users need to manually add the PWA Mobile App to the home screen of iPhone or iPad.
–> iOS does not support web push notifications, hence the push notifications can be sent only to the Android device from the admin panel of PrestaShop PWA Mobile App Builder.
[NEW UPDATE] PrestaShop PWA supports RTL Language Scripts
The PrestaShop PWA Mobile App Creator now supports all worldwide languages including RTL (Right To Left) ones like Arabic, Hebrew, Persian, etc. The store admin can bring all languages of their store on the Progressive Web App and can even add any RTL languages as per the requirement. On the other hand, the mobile shoppers won’t face any issue in accessing the PrestaShop PWA Mobile App in their preferred language.
Compatible With PrestaShop Multi-vendor Marketplace
The PrestaShop Multi-vendor Marketplace module is fully compatible with PrestaShop PWA Mobile App. The Progressive Web App displays the seller section with all marketplace sellers on the same application. The seller details remain in real-time sync with the marketplace web and will be updated automatically on the PrestaShop eCommerce PWA application.
Note: The multivendor PWA mobile app for PrestaShop is only customer-centric. This means there won’t be any seller dashboard or management from the app-end. The store admin can manage the sellers from PrestaShop Marketplace module and the same will be updated on the app instantly.
2.0 Admin Panel Screens
The PrestaShop PWA Mobile App can be fully configured using these handy admin tabs and settings. All you need to do is to make some necessary clicks and button toggles to make the changes in the Progressive Web App. Let’s discuss each one of them in detail:
2.1 General Settings
As the name suggests, these general configuration settings are for all sorts of regular change in Progressive Web Applications(PWA). The options under this tab make the app function on online shopper’s devices.
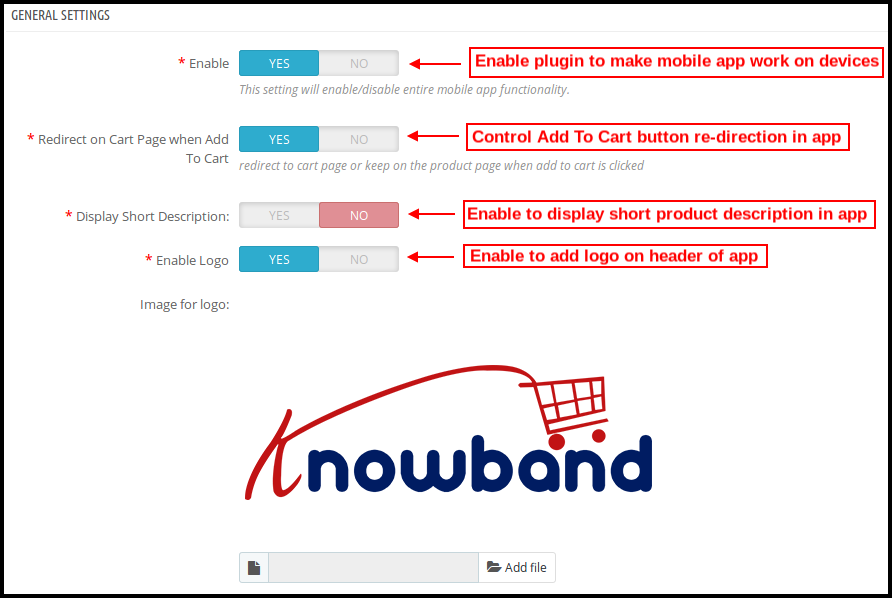
a) Enable Plugin: Enable the PrestaShop PWA module to make the app work on mobile devices. b) Redirect on Cart Page when Add To Cart: This functionality allows admin to control “Add To Cart” button redirection. The users can be redirected to the shopping cart or kept on the product screen on tapping “Add To Cart”. c) Display Short Description: Enable to display short product description on the product screen of Progressive Web App(PWA). d) Enable Logo: Add logo of your store on the header of Progressive Web App (PWA) and showcase your brand to users.
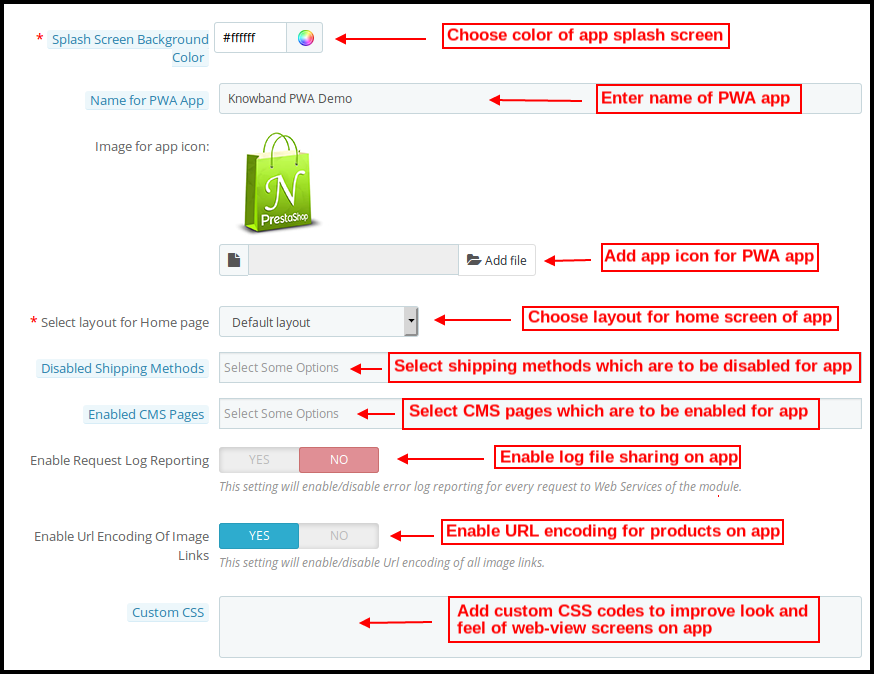
e) Splash Screen Background Color: Choose the right color option for the background of Progressive Web App(PWA) splash screen. f) Name For PWA App: Choose the name of your PWA for Prestashop as per your choice. g) Select Layout: Choose the desired Home Page Layout for your PrestaShop app. You can create multiple home screen layouts in the backend as per various festivals & themes & use them as per your store requirement. h) Disabled Shipping Methods: Disable shipping methods from working in Progressive Web App(PWA) whichever you don’t feel right. On the website, they will work usually fine. i) Enabled CMS Pages: Choose desired CMS pages to be displayed on the PrestaShop PWA app. j) Enable Request Log Reporting: Enable option to share log file on the progressive web apps in order to get details of any sort of abnormal behavior from app. k) Enable URL encoding of Image links: Enable this functionality to support Non-ASCII characters on the Progressive Web App(PWA).
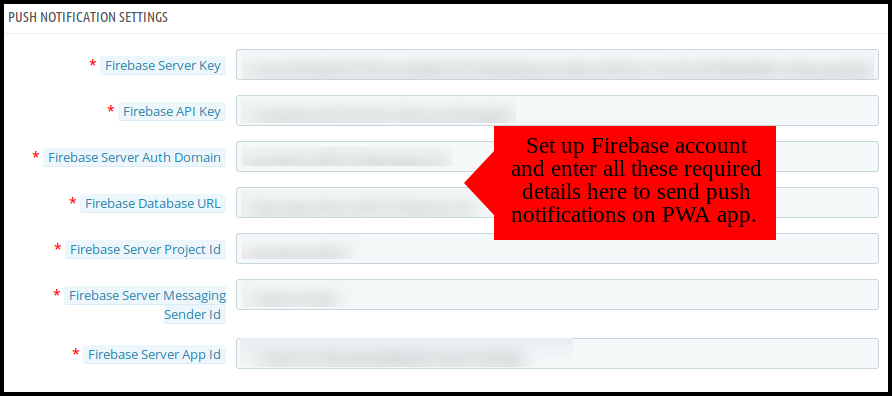
2.2 Push Notifications Settings
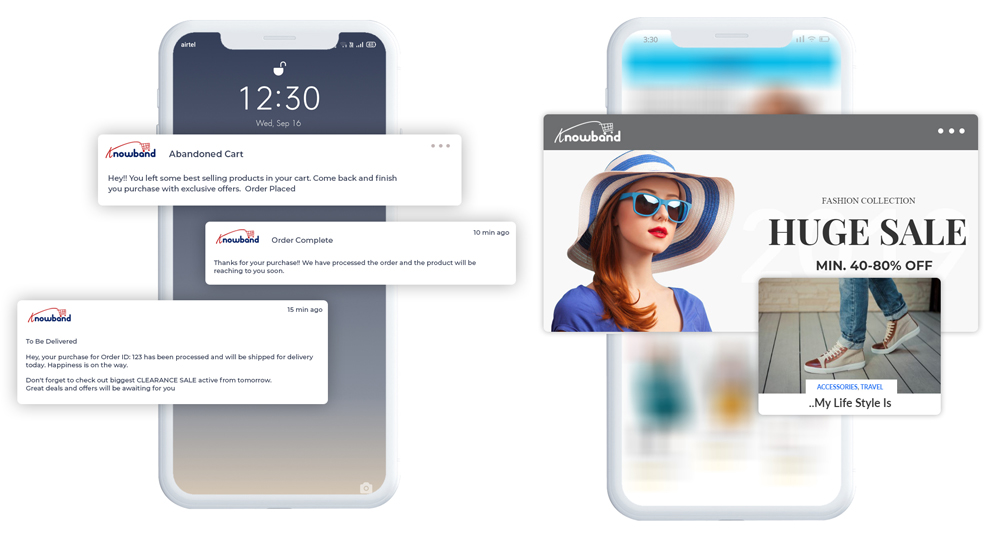
Push notifications are the handy tool to market and promote your store products, deals and sale offers. The settings under this tab allow users to configure and send unlimited push notifications on PrestaShop PWA app.
The various details under these settings will be obtained when you’ll set the Firebase account. Here is step by step process to do so:
2.21 How To Set Up Firebase Account?
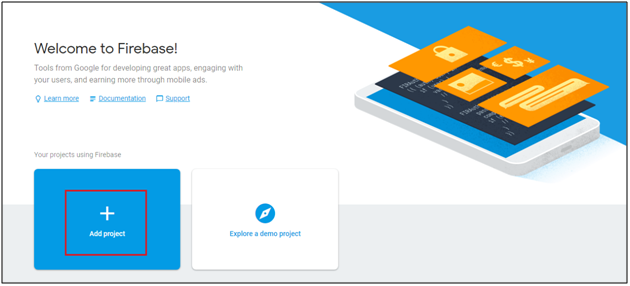
Step 1: Login Google Firebase
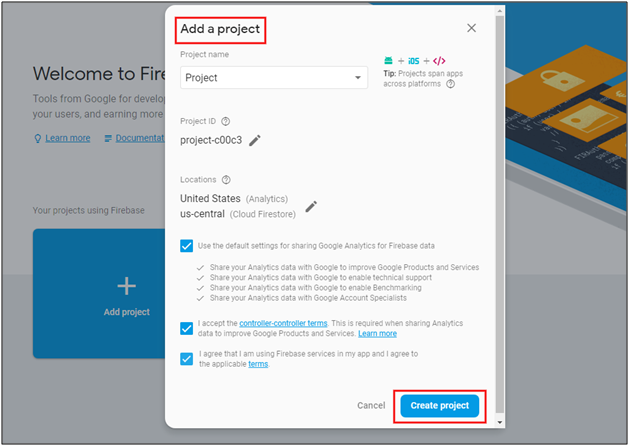
Step 2: Create New Project
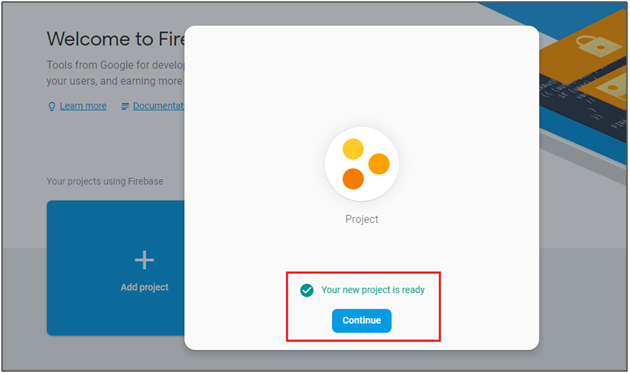
As you click on Add Project, following dialog box will pop up:
It will take a few seconds to create the project. Once the project is ready, click continue.
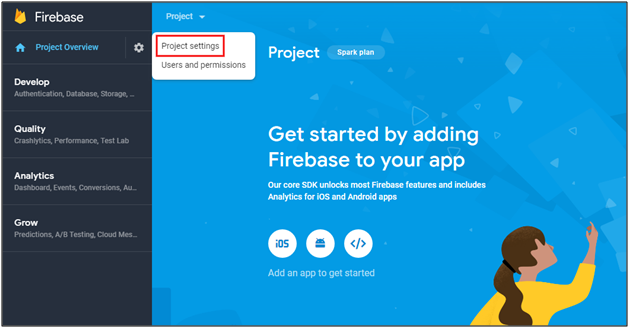
Step 3: Manage Project Settings
Once the project is created, click on Project settings.
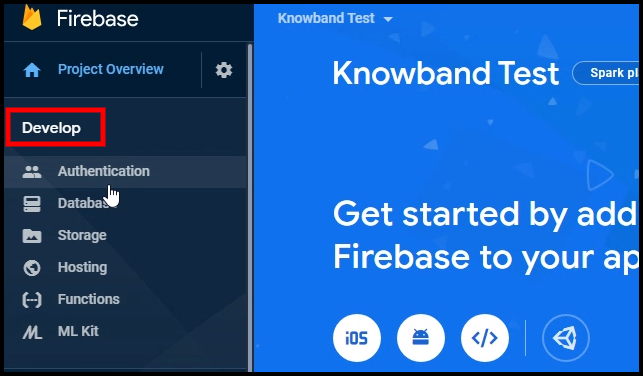
Step 4: Go to Authentication options:
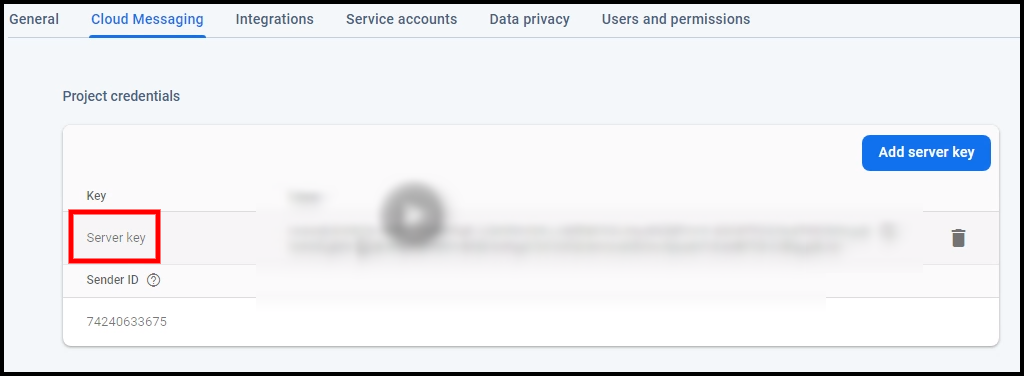
Step 5: Find Firebase Keys
In the project settings, click on Cloud messaging settings. From here, you can directly get the server key.
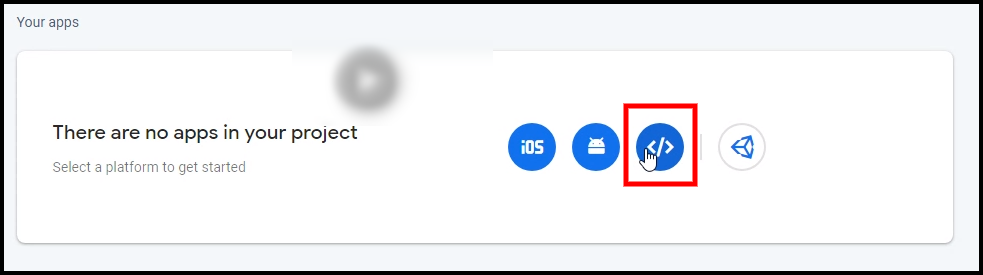
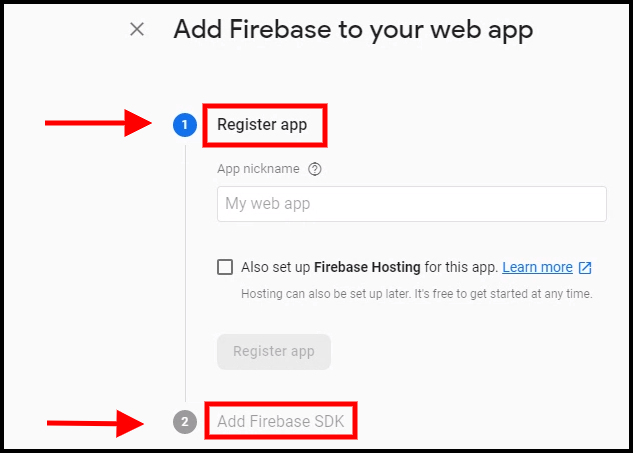
Step 6: Add your Web-App to Firebase
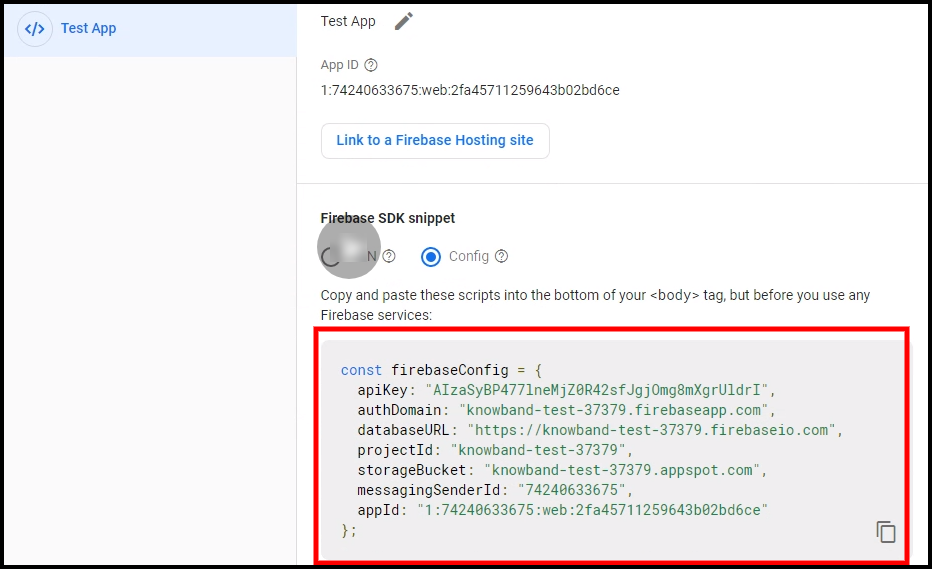
Step 7: Get other firebase related details and paste the same in PWA for Prestashop module admin panel.
Step 8: Get firebase server key from cloud messaging tab in Settings:
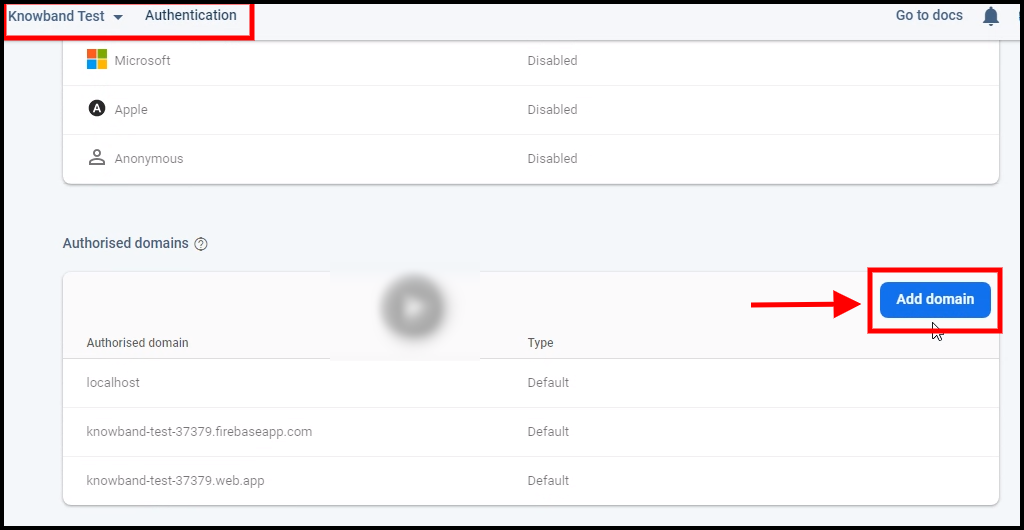
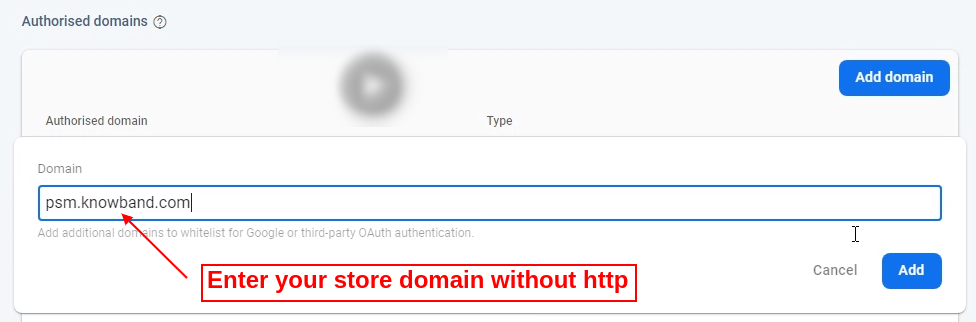
Step 9: Add your domain in authentication>>sign-in.
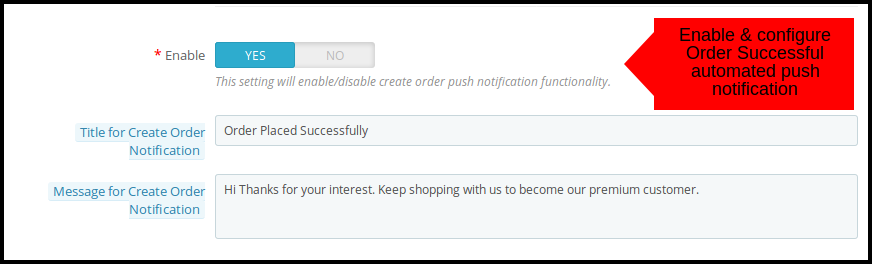
A) Successful Order Push Notification:
Enable/Disable automated Push Notification sent to the app users for successful order creation from PrestaShop PWA app Builder.
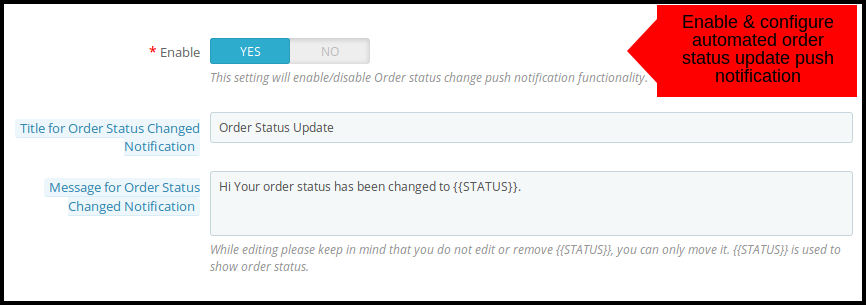
B) Order Status Update Push Notification:
Enable/Disable automated Push Notification sent to the app users for any update regarding their previous order delivery status. The users get to view this status under “Order Details” tab of PWA app
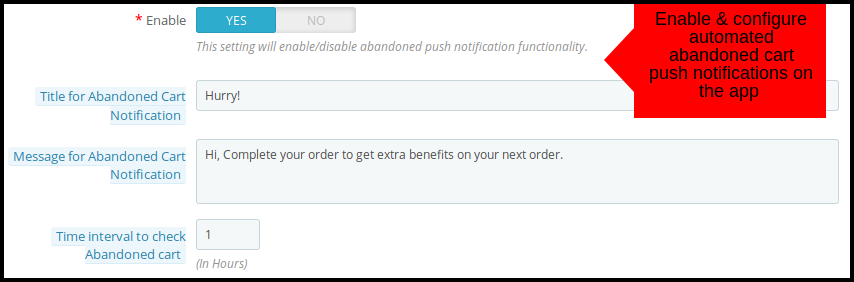
C) Abandoned Cart Push Notification:
Enable/Disable automated push notification sent to the users who have abandoned cart without successful purchase. This push notification will be sent to users automatically after entered time interval.
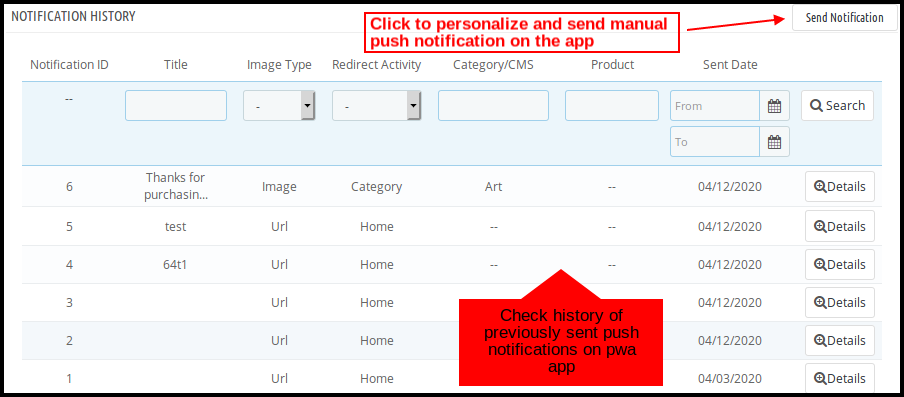
2.2 Push Notifications History
Here the store admin can view complete history of push notifications sent to Progressive Web App (PWA). Along with that, the store admin can even personalize the manual notification and send the same to Progressive Web App users.
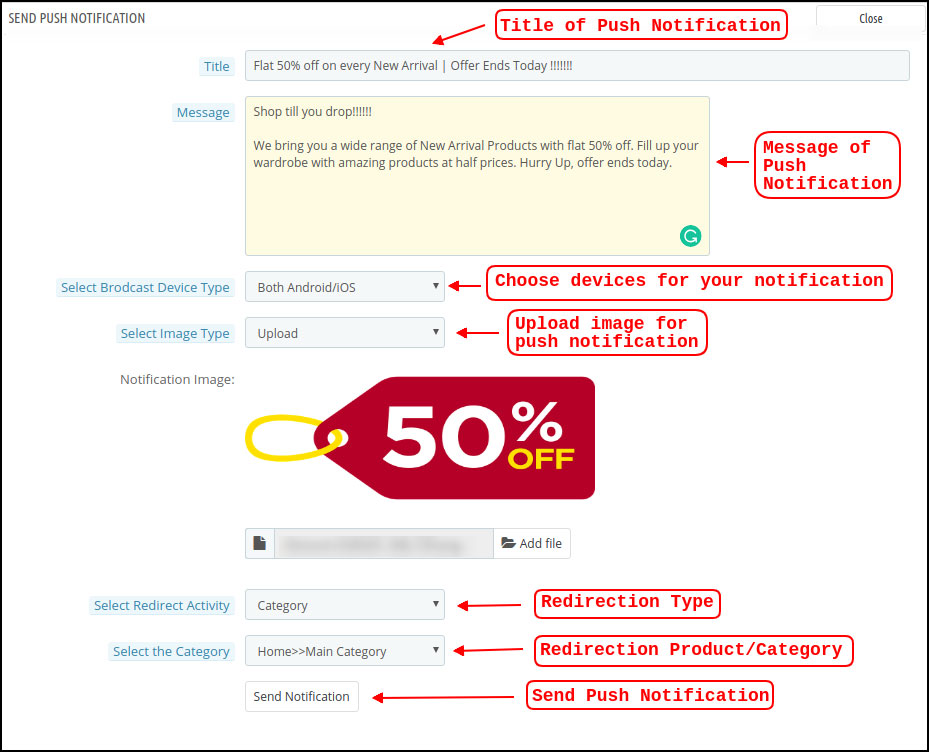
A) Send Notification:
What’s better to design and send push notifications as per the need? This option allows store owners to configure and send a custom notification manually to PrestaShop PWA app users.
2.3 Home Page Layout
The PrestaShop PWA module allows the store admin to bypass the restrictions of having fixed home screen UI and design the one suiting their business need. This tab allows the store admin to craft and save multiple layouts and use them as per the running occasions and festivals.
In order to configure the home page layouts of PWA app, following elements are available in the back-end:
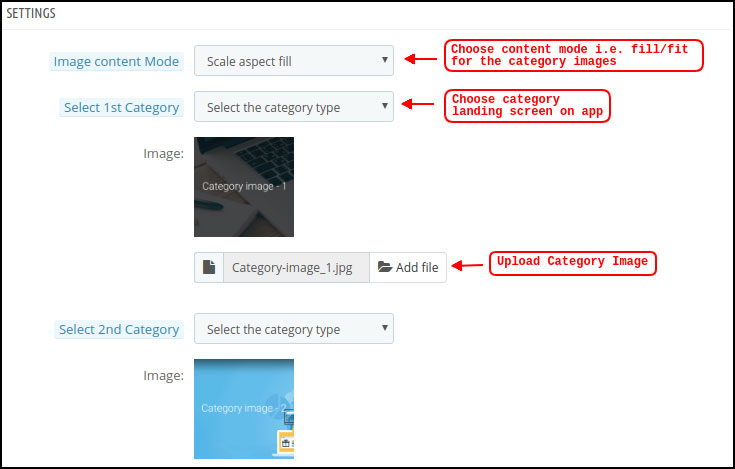
A) Top Categories:
Top categories are displayed in the form of small squares on the home screen of Progressive Web App(PWA). Their images and redirection links can be configured from here. These categories can be used for highlighting top brands on the app home screen. The PrestaShop PWA module allows maximum 8 categories in which minimum 4 are mandatory.
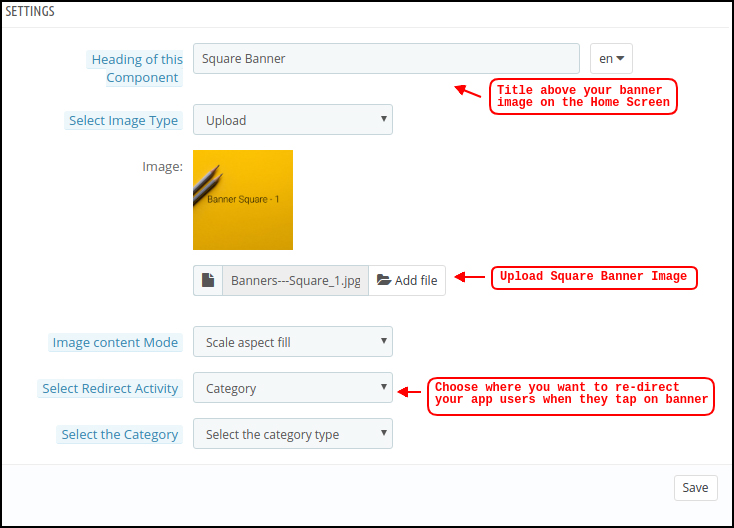
B) Square Banner:
Square Banner listing on the Progressive Web App(PWA) home screen offers a square-shaped banner block in which the store admin can use desired image. The relevant redirection link can be used for these banners.
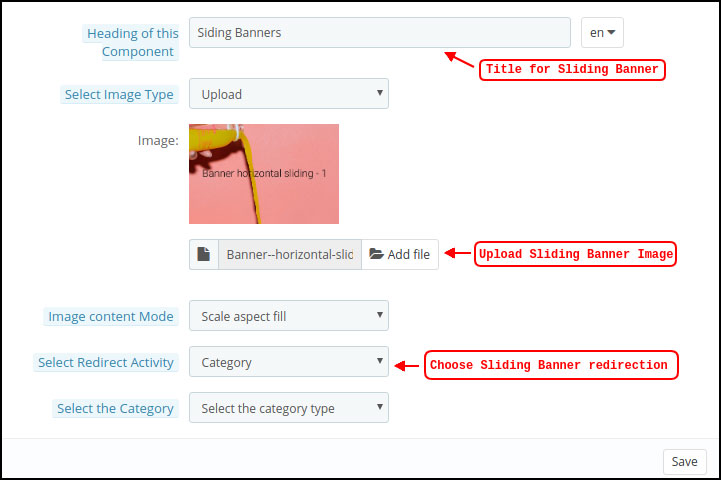
C) Horizontal Sliding Banner:
These are the rectangle-shaped banner block available in horizontal sliding on the home screen of PrestaShop PWA app. For this also, image and redirection link is fully configurable.
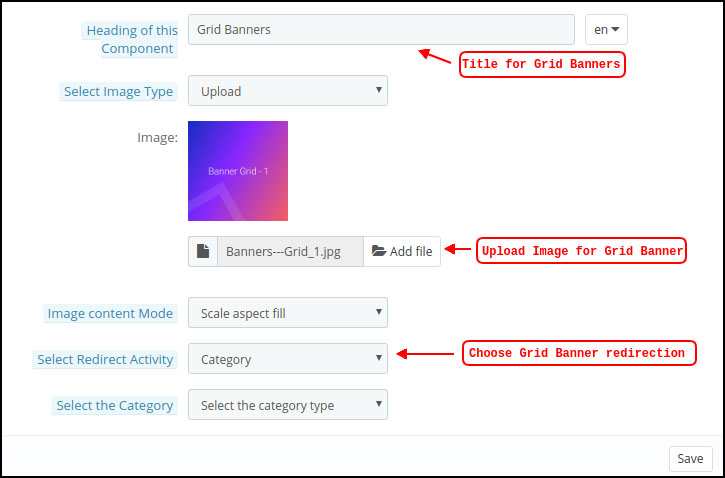
D) Grid Banners:
These are square-shaped banners listed on the home screen of Progressive Web App(PWA) in the form of grid view. The store admin can add as many banners as required and set their redirection link.
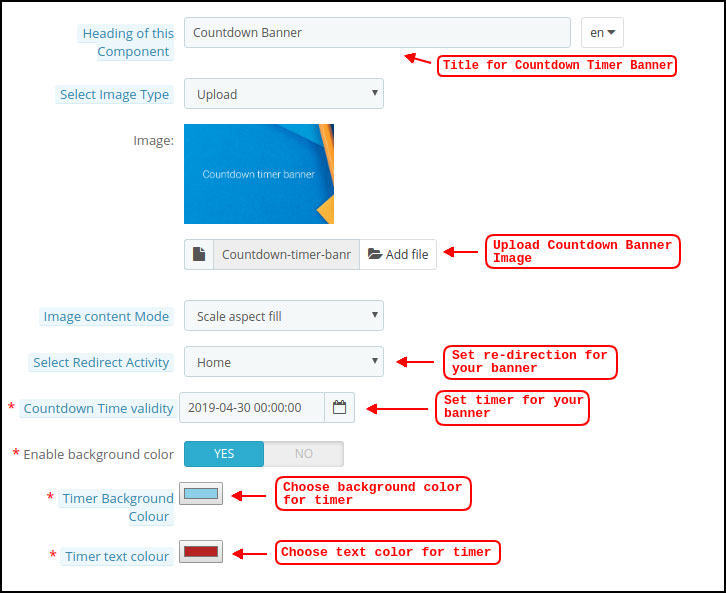
E) Countdown Timer Banner:
The PrestaShop PWA module allows the store admin to configure and add a timer based banner on the home screen of web-app. The store admin can add banner image & landing screen along with timer till the banner is to be displayed on the progressive web app home screen. Once the timer is over, the banner will be removed automatically.
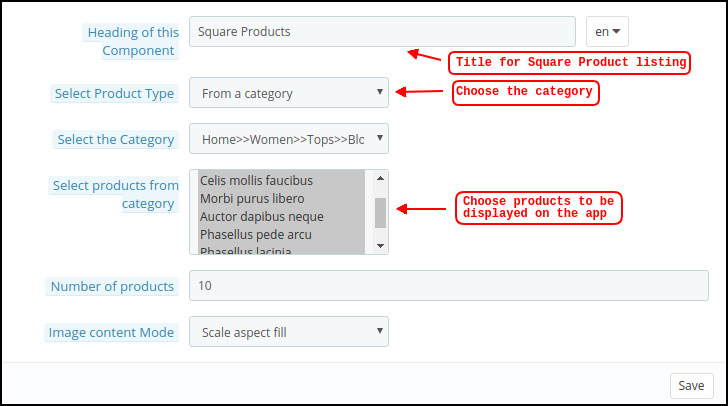
F) Square Products:
As of banners, the PrestaShop PWA mobile apps allows showcasing products in square block listing. The admin get to choose the products for this element.
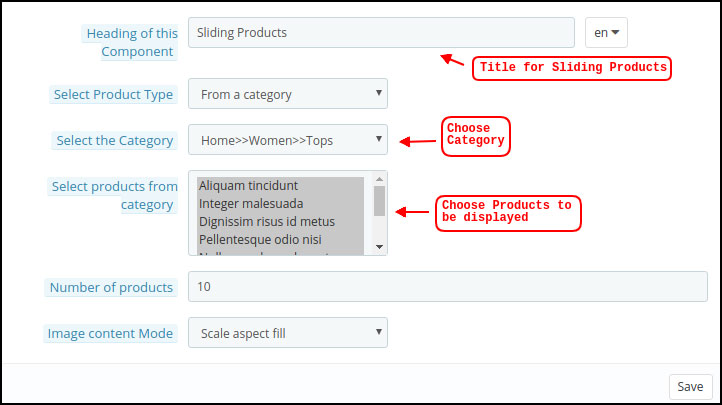
G) Horizontal Sliding Products:
You can add the products in the form of horizontal sliding. The chosen products could be of the store admin choice like New Arrivals, Best Sellers, custom products etc.
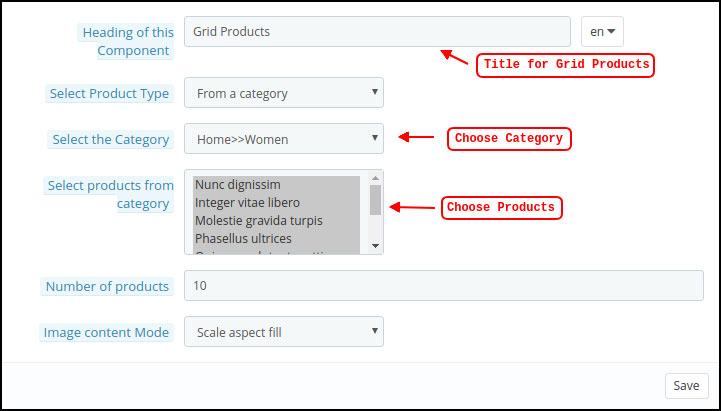
H) Grid Products:
Products can also be added on the home screen in the form of grid view block listings. The store admin can choose desired products and quantity to be displayed on the home screen of PrestaShop PWA app Builder.
I) Recently Accessed Products:
The PrestaShop Mobile PWA module allows store owner to add a recent tab element on home screen of web application. It will display all products which are browsed by users recently.
Note: The store admin can add up to 20 elements while designing layout in the backend panel.
2.4 How to get Facebook App details?
Facebook App can be created by following below-mentioned steps:-
Step 1: Go to given URL: https://developers.facebook.com/apps/
Step 2: Click on the “Add a New App” button.
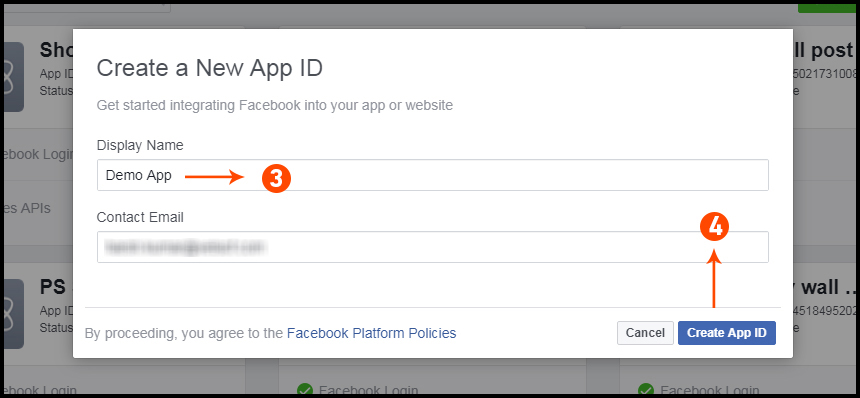
Step 3&4: Enter your App name and email id, then click on “Create App ID” button.
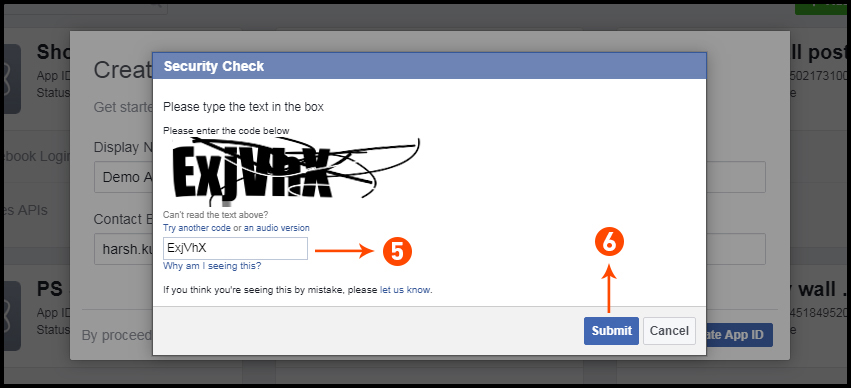
Step 5&6: After clicking on Create App ID you will have to go through a security check as shown:
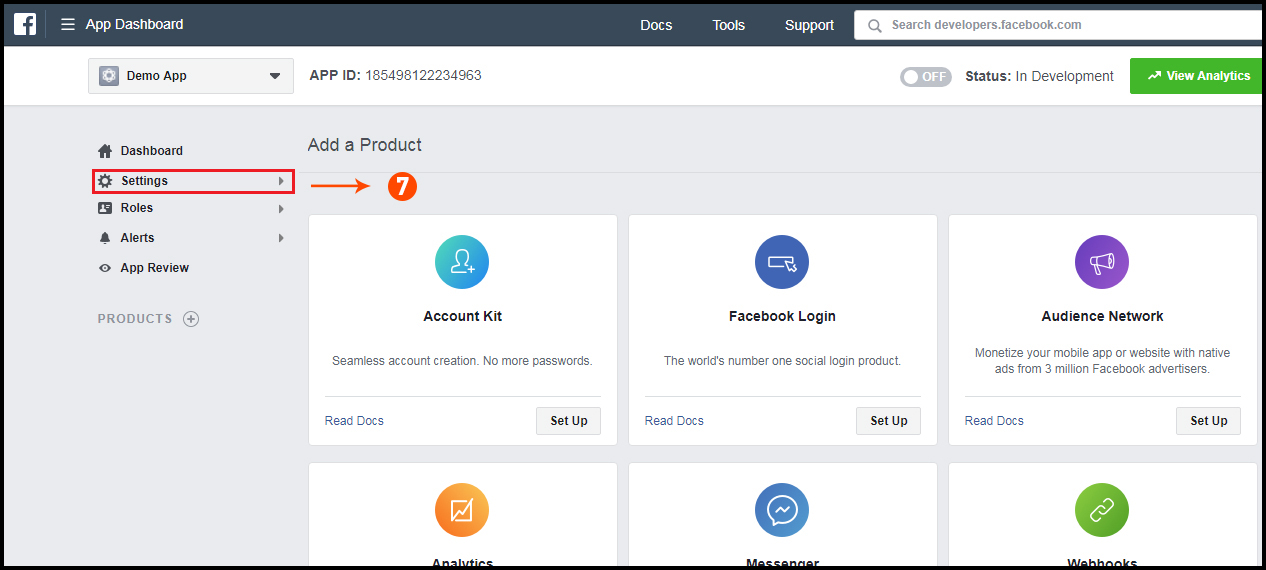
Step 7: Click on “Setting” tab.
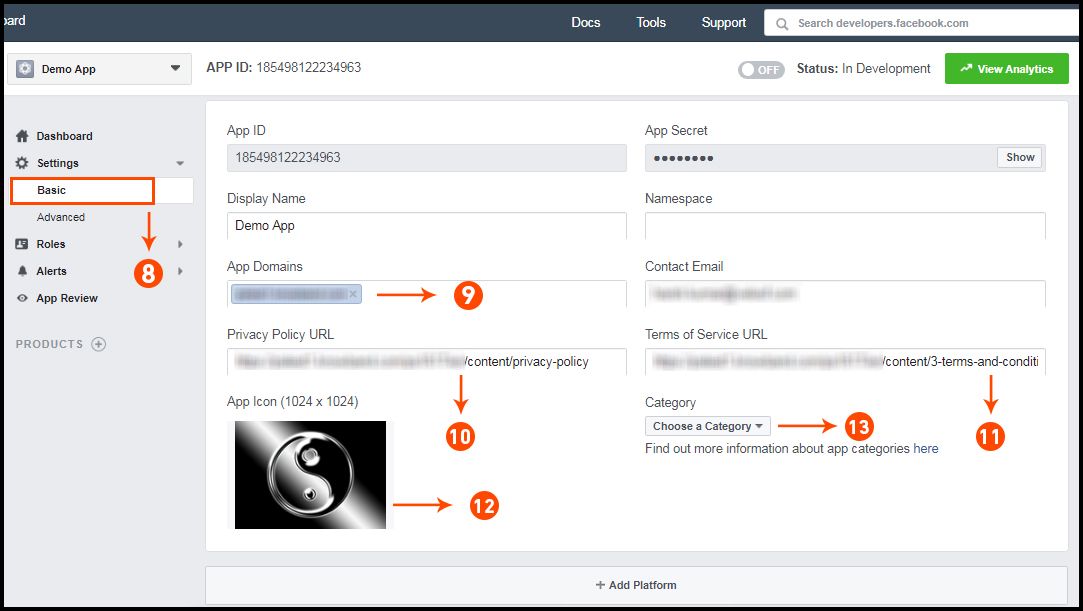
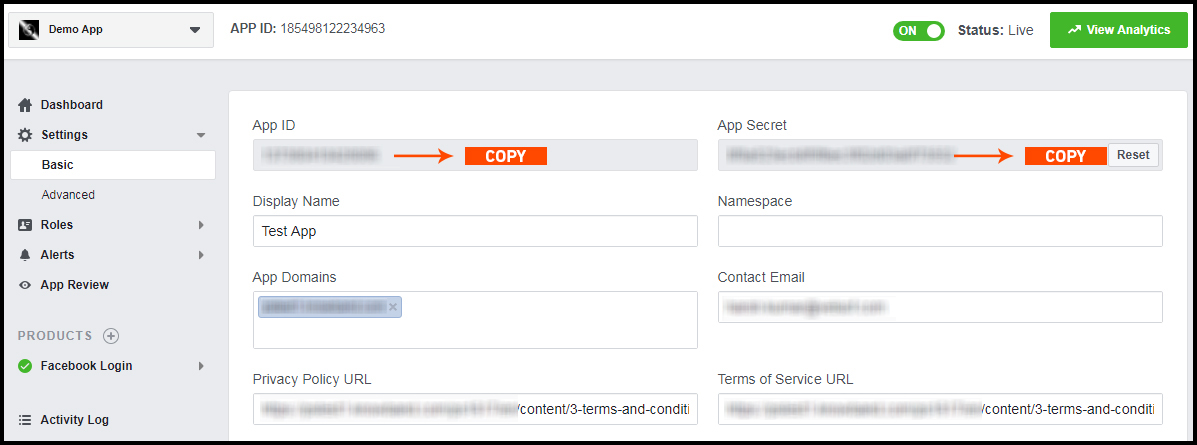
Step 8-13: Two option will be available in the dropdown, Basic and Advanced, click on “Basic”. And then enter your “App Domain”, “Contact Email”, ”Privacy URL”, ”Terms and Conditions URL”, ”Add Logo”, ”Select Category” and click on “Save Changes” button.
App Domains:
yourdomain.com is correct
yourdomain.com/store is incorrect
www.domain.com is incorrect
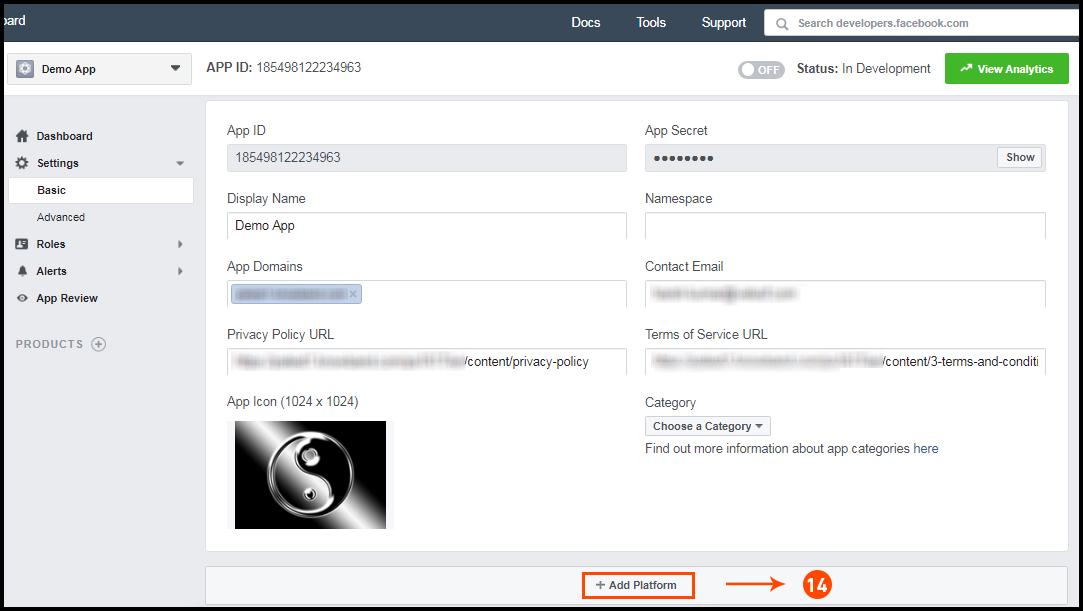
Step 14: Now click on “+Add Platform”.
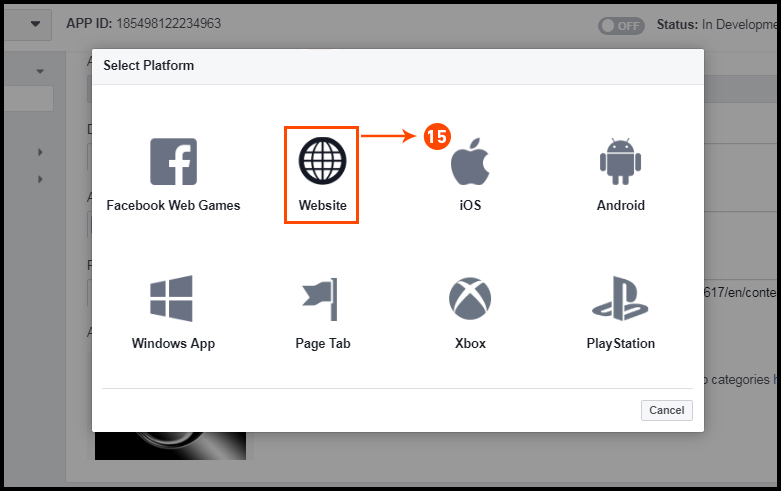
Step 15: And select Website as Platform.
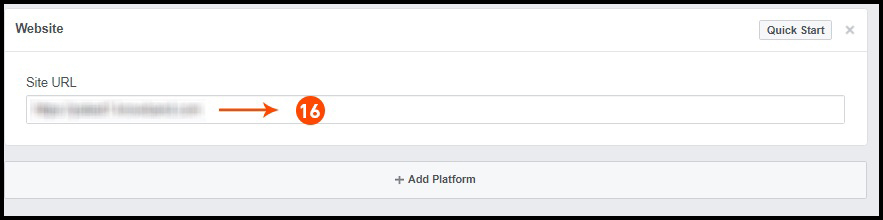
Step 16: Now Enter your site URL.
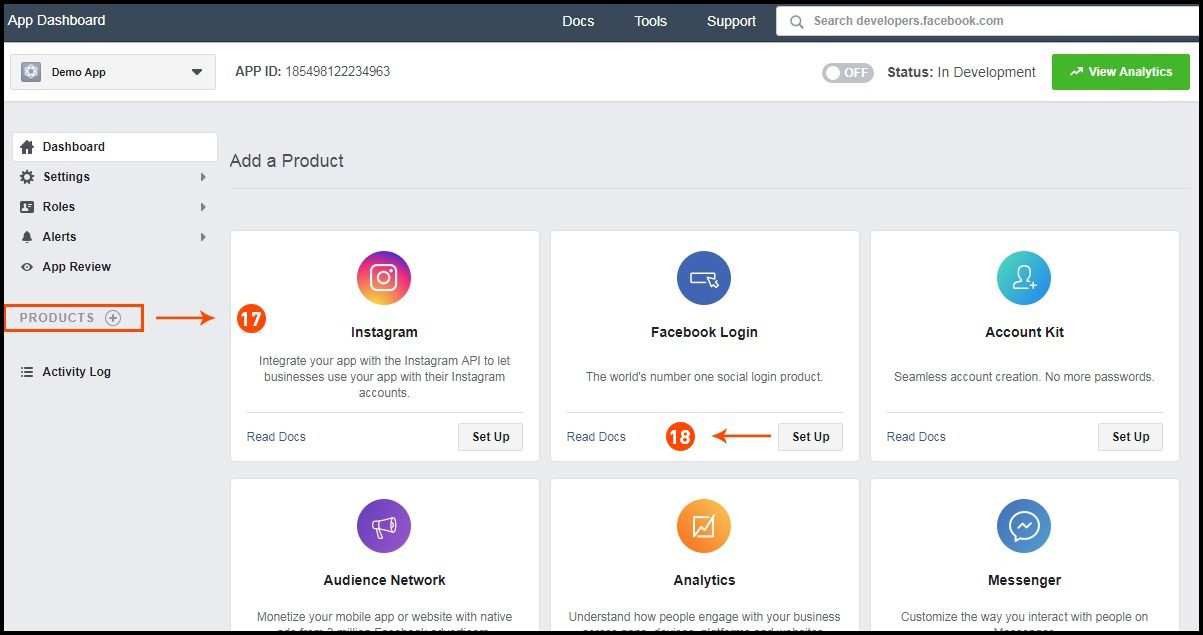
Step 17&18: Click on “Products+” and select Facebook login.
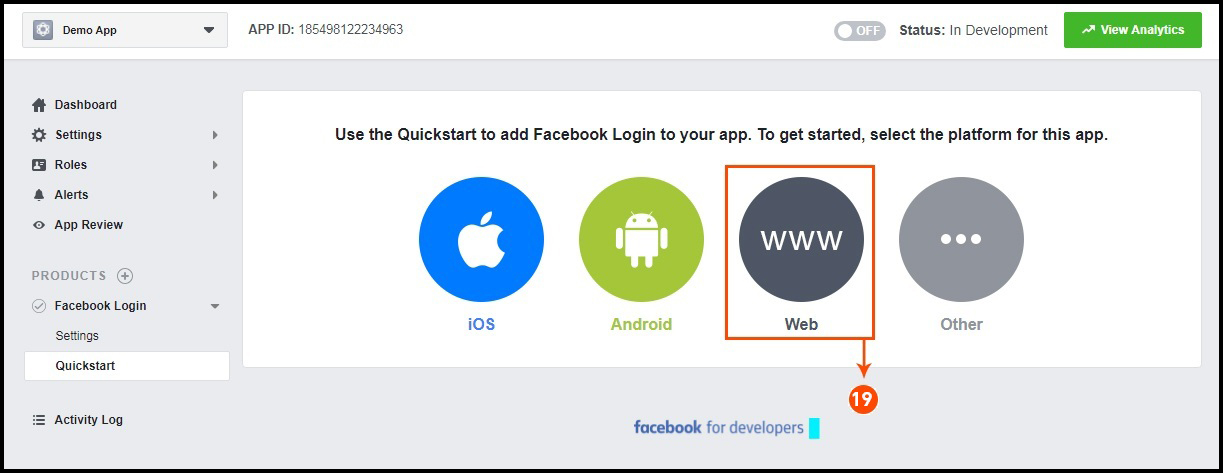
Step 19: Select web as the platform for the app.
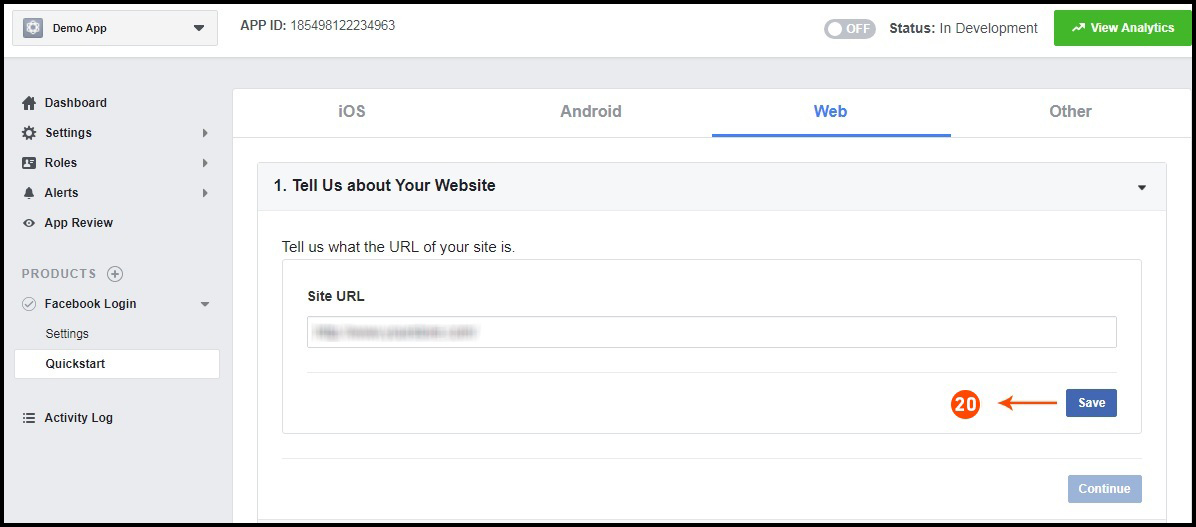
Step 20: Now click on save.
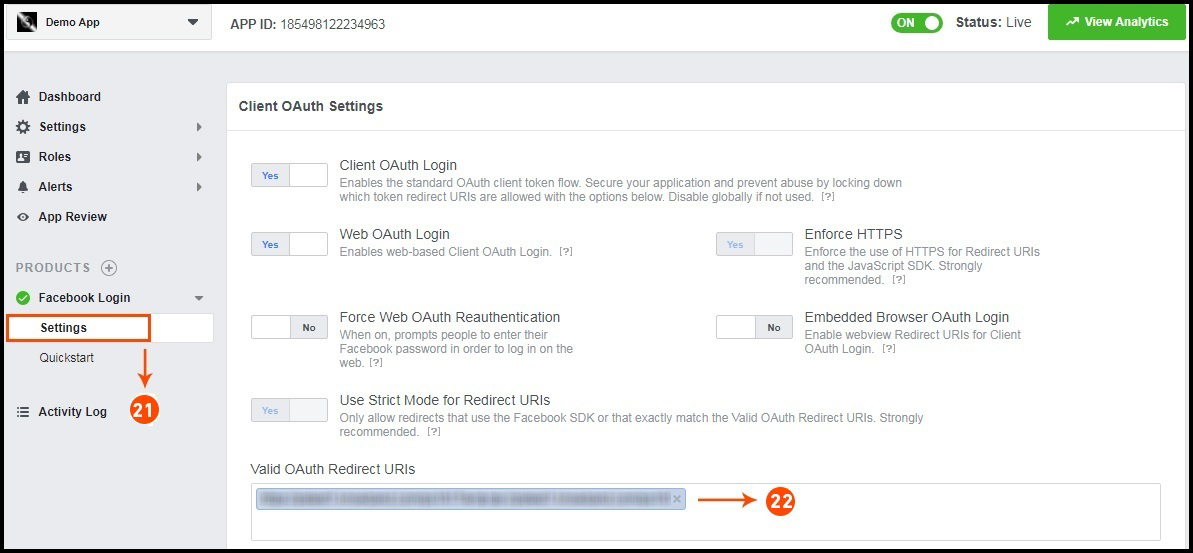
Step 21&22: Click on Settings and add a Valid OAuth Redirect URIs.
Valid OAuth Redirect URIs:
https://example.com/pwa-app/login
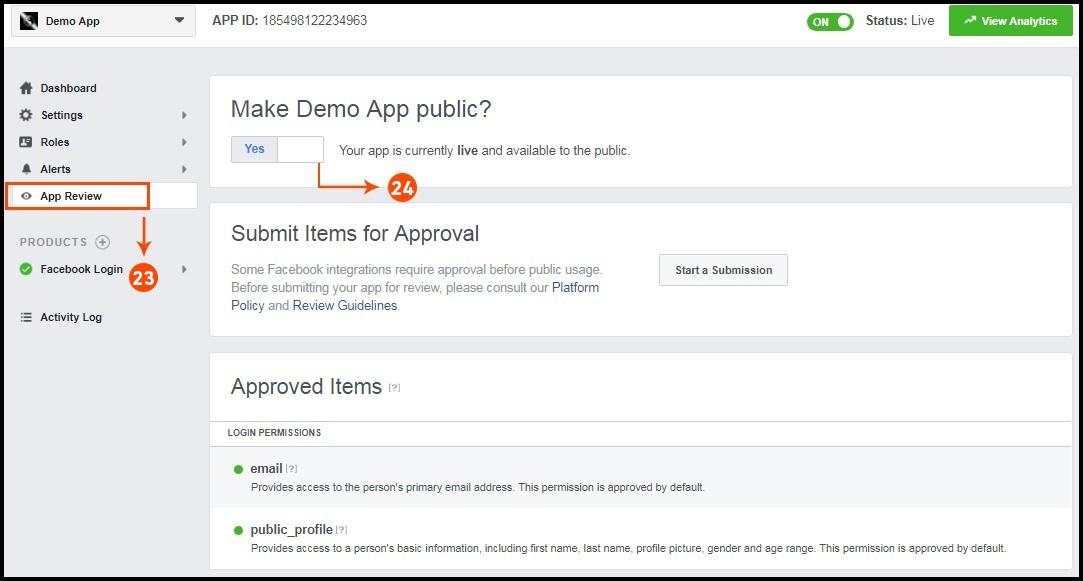
Step 23&24: Click on “App review”. And mark “Make ‘your app name’ Public” to Yes.
Final Step: Copy the App ID and App Secret and paste it into the fields provided in the module.
2.5 How to get Google App details?
Go to Google Developers Console
(https://console.developers.google.com/project) or click on link given top right of the respective tab in module configuration page.
Now click on Create Project on the left of the page.
Enter a name for your project and proceed to the next step.
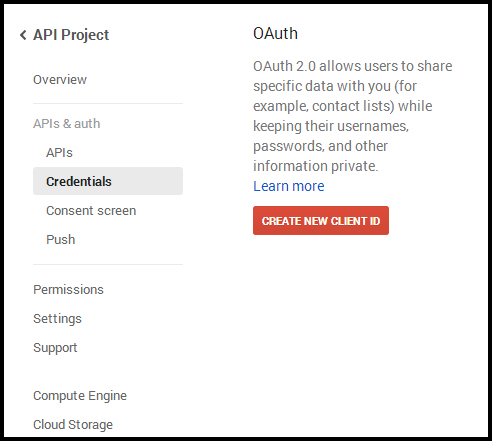
Now click on APIs and auth-> Credentials from the left menu as shown below.
Click Create New Client ID button from the right panel of the screen.
You may have to fill the form for Consent Screen before proceeding. To do so, that you have to click on Consent Screen in the left menu as shown in the image above.
Fill the pop-up form with below details:
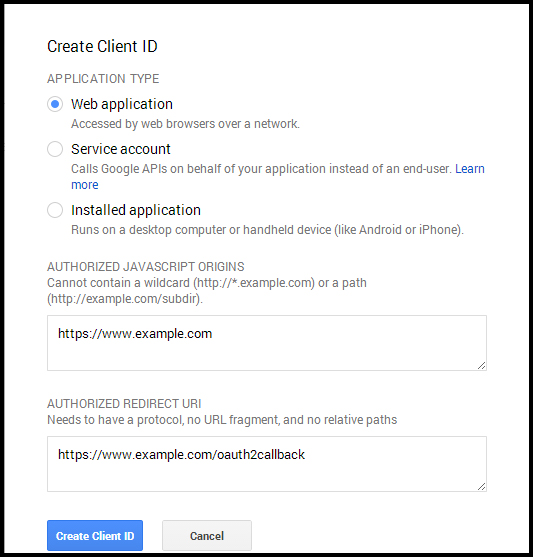
Application Type: Web Application. Authorized JavaScript Origins: Your store domain name (https://www.yourstore.com). Authorized redirect URI or URI of Loginizer redirect page:
https://example.com/pwa-app/login
Now click Create Client ID button to get your Client ID and Client Secret Key.
Now you can use the client secret and client ID to let your customers login to your store using their Google account.
3.0 Front End PWA App Screens:
3.1 Home Screen
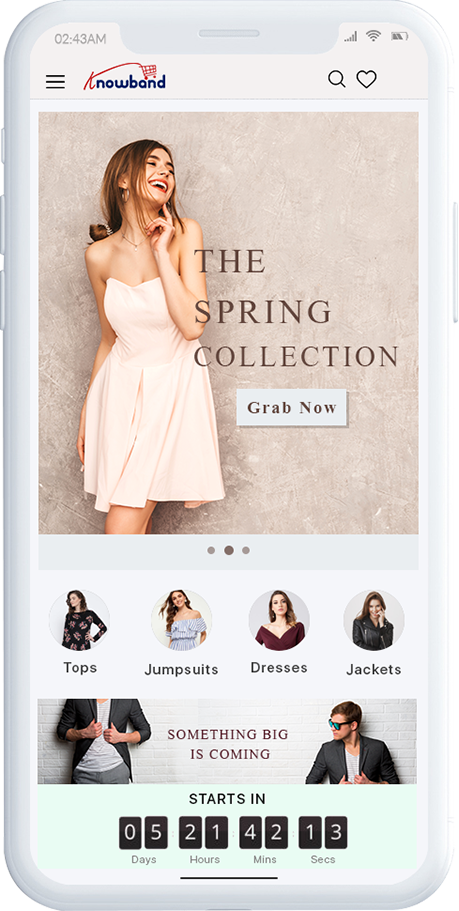
1. Dynamic Layout:
Using various designing elements, the store admin can create dynamic layout as per the need.
2. Store Logo:
Add store logo on the header of the Progressive Web App(PWA).
3. Shopping Cart:
The shopping cart icon on the top-right corner of the home screen allows users to switch on cart screen.
4. Navigation Menu:
Browse the categories in the apps with left navigation menu on the home screen.
3.2 Accordion Menu (Navigation Bar)
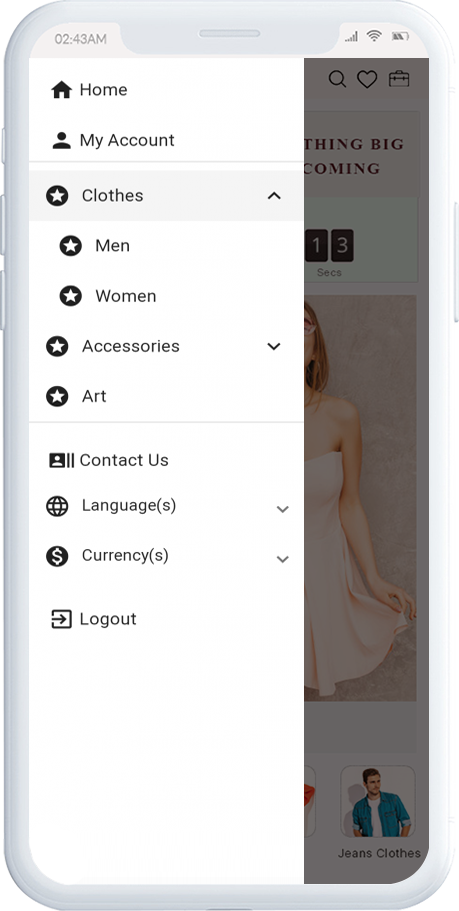
The Progressive web app come up with proper categorization of products as available on the website. Mobile shoppers can easily browse products from multiple categories. All CMS pages are also available in Accordion Menu. It provides the following options:
1. My Account:
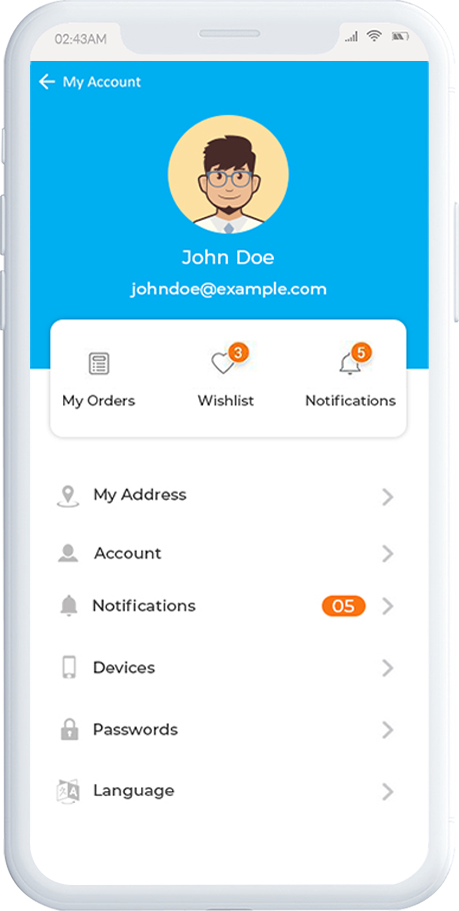
My Account option contains all the user personal, shipping, order information. The PWA app shoppers get to view all the stored data related to them & can update the same as well.
2. Categories
Categories displayed in left navigation menu of Progressive Web app(PWA) are the same as of your website.
3. CMS Pages:
Various CMS pages like About Us, Contact Us, Terms & Conditions, etc. Can be accessed from here.
4. Language(s)
The language option allows PWA app users to view the web-app in their desired language. All available languages are displayed under this option only.
5. Currency(s)
All available currencies on your website are displayed here on PrestaShop PWA app Creator Module.
6. Login/Logout
Users can easily sign-in/sign-out from PrestaShop Progressive Web App via this option.
3.3 Category Screen:
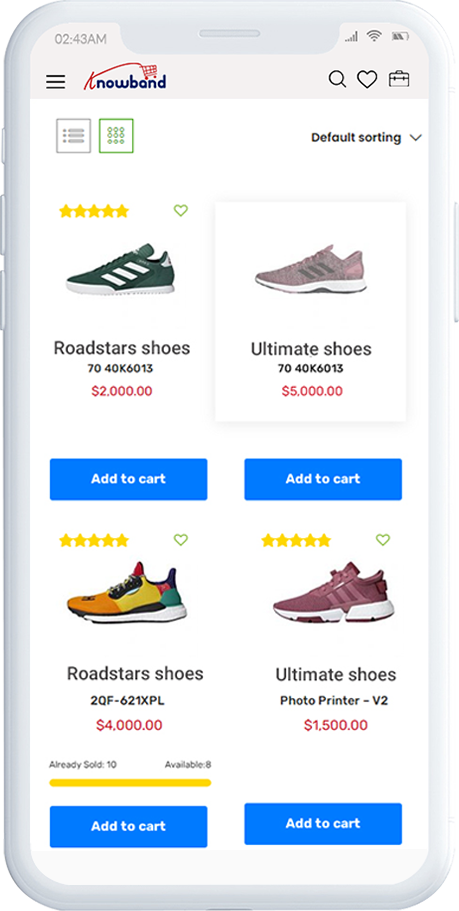
1. Multiple Views:
The categories on Progressive Web App(PWA) for PrestaShop can be viewed in both list and grid view.
2. Sorting:
This option allows the online shoppers to choose the sort order in order to narrow down the search and get desired product with ease.
3. Filter:
Option to filter products simplifies product search. Users can filter all products under categories using various attributes like size, color, price etc.
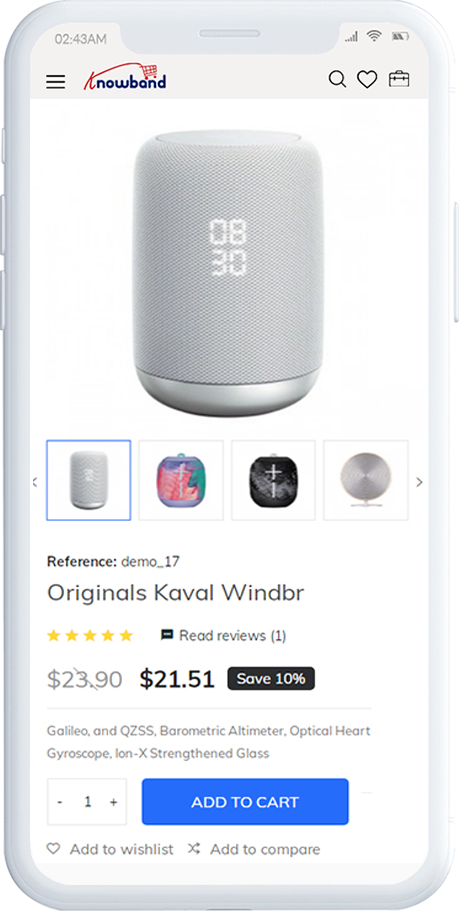
3.4 Product Screen:
The product screen of your Progressive Web App(PWA) is simple & intriguing. Multiple images of the same product are displayed along with name & price. The product availability is also displayed as “In Stock” or “Out Of Stock” based on inventory status. It contains the following other options:
1. Product Info & Care
The complete product information as available in the inventory will be displayed here.
2. Short Description
Users get to read the short description of your product to quickly make up their mind about purchase.
3. Product Options:
All the options related to the product like size, color, etc. are displayed here.
5. Add To Cart:
This button allows users to add product into cart. The users can further process the cart for purchase.
6. Product Social Sharing:
Sharing option for the product allows users to share product on multiple social channels.
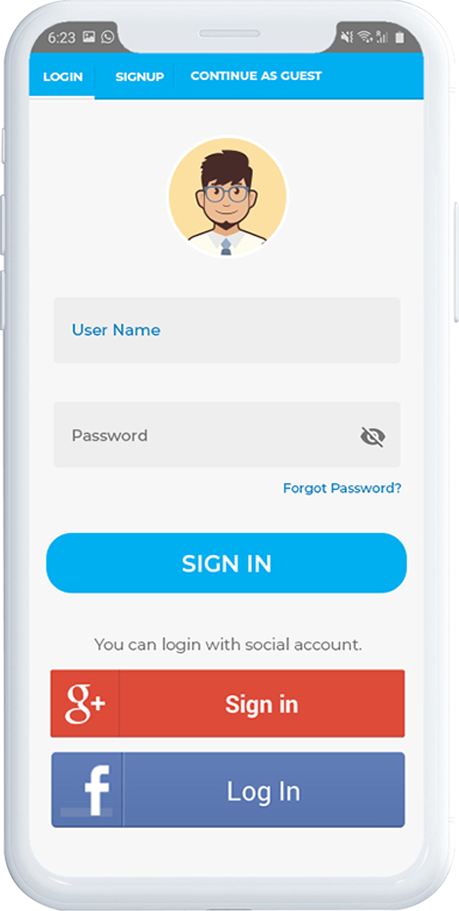
3.5 Login Screen
The Progressive Web App(PWA) offers various one-tap login options & make sign-in/registration process more seamless:
1. Login
The app users can easily authenticate & login into PWA apps using their previous email login credentials.
2. Sign Up
All the new app users can sign-up & create their account on the store from the PrestaShop PWA App. The sign-up form asks for only necessary details to create account.
3. Login with Facebook
The users can log in into PWA app using their Facebook Account Credentials.
4. Login with Google+
The users can login into Prestashop Progressive Web application (PWA) using their Google Account Credentials.
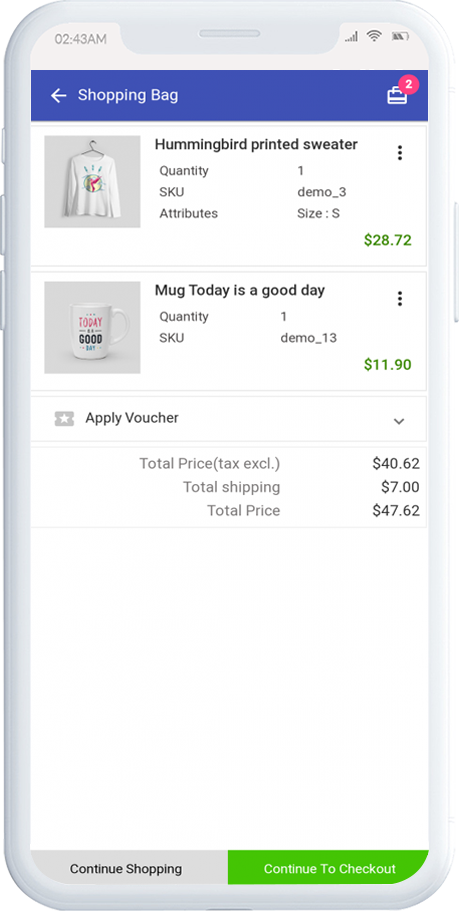
3.6 Shopping Cart Screen:
The Shopping Cart screen of your Prestashop Progressive web application will display all products added into the shopping cart. The app users can view Product name, quantity, total price & shipping cost. This screen has the following options:
1. Apply Voucher
This option allows the users to use website coupons and grab discount offers.
2. Total Product Price
The users get to view the complete cost of their shopping bag before proceeding further. It is automatically updated according to any update with product quantity or new addition.
3. Update Product Quantity
The PWA app users can even update the product quantity with the “Update Quantity” option.
4. Remove Product
The app users can simply remove the product from the cart by simply tapping “Remove” option.
5. Continue Shopping
Users can leave the cart to browse more products on your progressive web app for Prestashop.
6. Continue To Checkout
The PWA app users can proceed further to the checkout & payment screens just by tapping the “Continue To Checkout” option.
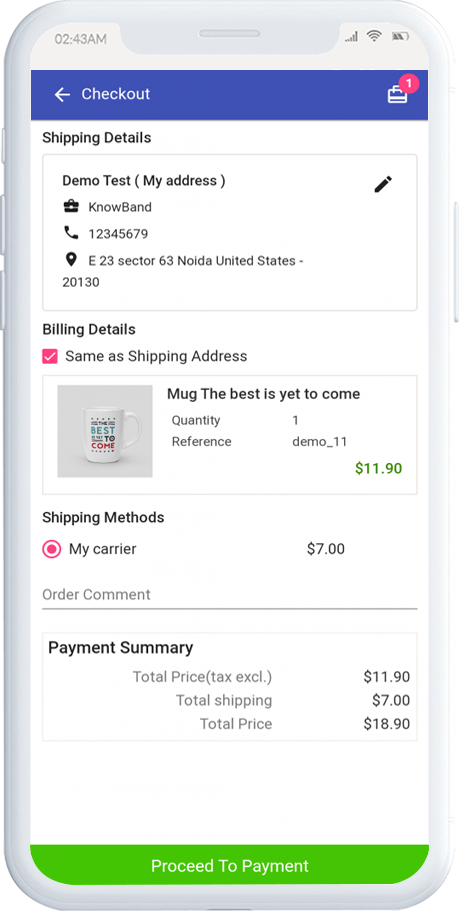
3.7 Checkout Screen
The progressive web apps with PrestaShop Progressive Web App (PWA) module have a simplified single-screen checkout with only relevant information. The users can view complete checkout details like shipping details, billing details, order summary, order comment, payment summary.
1. Shipping & Billing Details
This screen provides details of the shipping & billing addresses saved by the user. The user can also edit/save the new shipping address if needed.
2. Order Summary
The progressive web app for Prestashop users get to view product details before making payment.
3. Shipping Methods
All available shipping methods are displayed here. Users can choose the one suiting their need.
4. Order Comment
Users can also add any comment related to their order which will be visible to store admin on the order web-page in the backend.
6. Payment Summary
This section displays the complete breakdown payment details involved with purchase.
7. Proceed To Payment
The Prestashop Progressive Web Application (PWA) app users will be re-directed to the Payment screen after tapping the “Proceed To Payment” button.
3.8 Payment Screen:
The payment screen of PrestaShop PWA App has all web-view payments available on the store. Online shoppers can find similar payment experience on both website and progressive web apps.
3.9 My Account Screen
My account screen of the PrestaShop Progressive Web App (PWA) allows users to view their complete details saved on the app including a list of previous orders.
3.10 Order Detail Screen
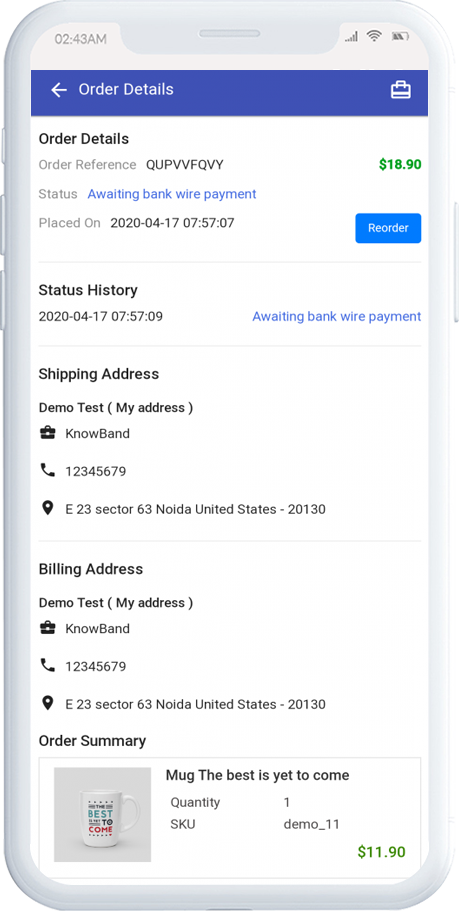
Order details screen of PrestaShop Progressive Web App Maker provides complete details of specific order from PWA app. Users can easily view shipping address, product summary, shipping and payment method, and total cost summary etc. There is even an option to keep a track of order status and its delivery.
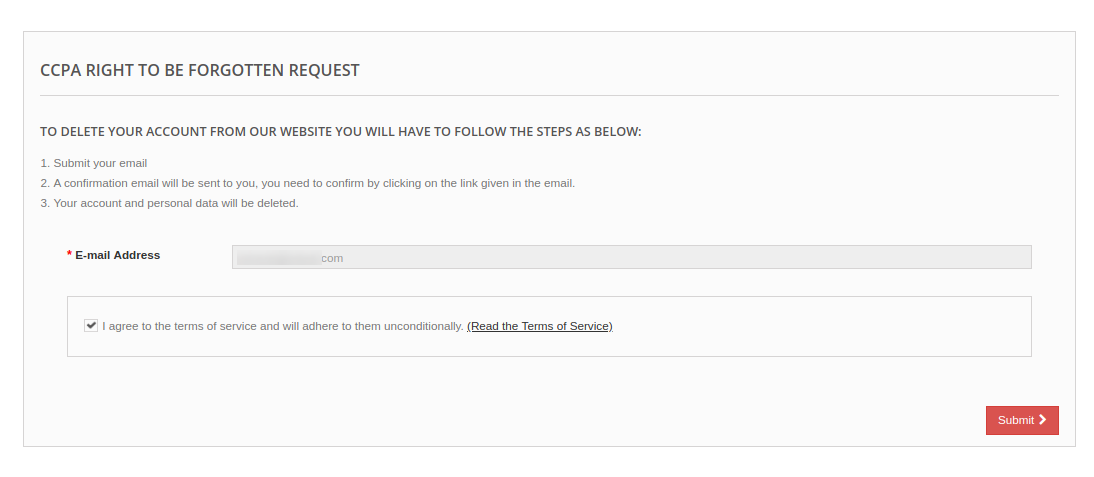
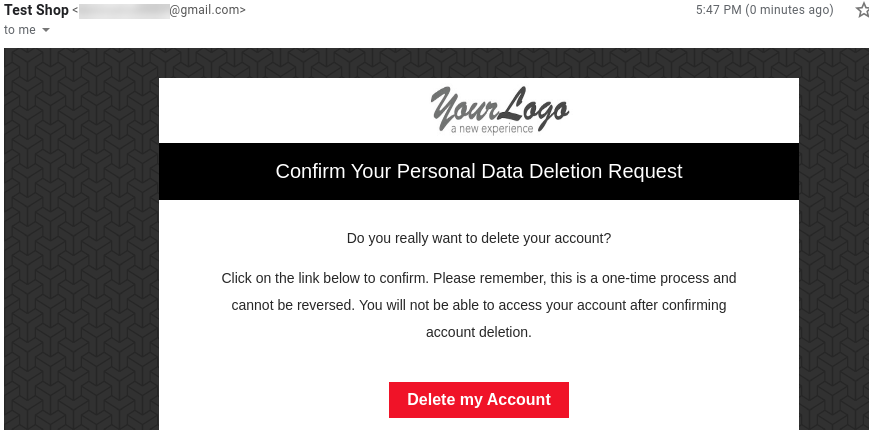
California Consumer Privacy Act ie CCPA is one of the most detailed privacy law. CCPA targets those companies and firms that collect and/or sell customer’s personal information. California Consumer Privacy Act provides overall control to the online users of California over their data. The deadline for CCPA implementation is January 1, 2020.
The difference between GDPR and CCPA is that the GDPR centers around all information identified with the EU customers however though the CCPA considers both the buyer and family unit as recognizable elements and, now and again, just considers information gave by the shopper rather than information sourced or obtained from outsiders.
Knowband offers PrestaShop CCPA Addon by which the online store merchant can easily make his store CCPA compatible. The store merchant can meet all the CCPA requirements easily without any hassle. With this PrestaShop CCPA Compliance module, the online merchant can cover all the rights of the consumers provided by CCPA. The online merchant can also provide a simple and user-friendly interface to the customers for accessing CCPA rights.
With this CCPA PrestaShop compliance module, the online users will get these rights:
Right to Access Personal Data
Right to Data Portability
Right to be Forgotten
Right to Data Rectification
Right to User Consent
The online users can access their CCPA rights by sending requests from the front-end interface of this PrestaShop CCPA Compliance module.
1.1 Features Offered by PrestaShop CCPA Module
Simple to meet CCPA Requirements: The online store merchant can use the PrestaShop CCPA Compliance addon and meet all the CCPA requirements easily without any complicated implementation.
Cookie usages and setting: The PrestaShop California Consumer Privacy Act Module allows the online merchant to set up and show a Cookie consent bar on the website front-end. This way, the online users can understand the use of cookies and accept it.
Show CCPA Header Link on the Website: The online store merchant can show a header link to the customers. The online merchant can also set the text for the header link. The online users can click on this header link and access their CCPA rights.
Right to access Personal Data: The online store admin can allow the customers to access personal data by requesting for it. They just need to enter their email id for accessing their personal data.
Data portability: With this PrestaShop CCPA plugin, The online store merchant can allow Californian users to access and download their personal information, address and order details.
Offer Right to be forgotten: The online merchant can allow the users to send forget the request. This way the online users can enter their email id and request for deleting personal information.
Right to Data Rectification: The online store admin can allow the online users to send a request for data rectification. This way, the online users can update their personal information easily.
Right to User Consent: The online users of California can also update their user consent data if they wish to do so.
2.0 Installation
First of all, purchase the PrestaShop CCPA Addon and download the zip file of the CCPA module from the Downloads section of your Knowband account.
After that, you will get:
1) CCPA.zip (source code of the module)
2) User Manual
To install the module in the store follow the below-mentioned steps:
1) Unzip the ccpa.zip file.
2) Copy the entire content, that is, the files and folders of the unzipped folder. Paste the same into the “Modules” folder of your store’s directory. Follow the below-mentioned address path – Root Directory/modules/.
3) The Prestashop CCPA plugin is all set to be installed in the store. Go to the Store Admin and then to ‘Modules and Services’.
4) Click on the “Install” button just next to your module. It would show a pop-up for your confirmation. Click on “Proceed with the installation” option. This step will install the module and show notification – “Module(s) installed successfully”.
5) Once the installation is complete, you will get access to the admin interface of the module by clicking on the “Configure” button.
3.0 Admin Settings
After the successful installation of the PrestaShop CCPA module, the online store admin can configure CCPA and implement the functionality easily by following the configuration steps.
These are the configuration options:
CCPA Settings
Cookie Consent Bar
User Consent
CCPA Data Portability
CCPA Forgot Request
CCPA Rectification Request
CCPA Personal Data Request
CCPA Email Template
CCPA Geo-Targeting
CCPA CRONS
CCPA User Consent Data
3.1 CCPA Settings
In CCPA Settings, the online store merchant can apply general settings related to CCPA implementation. Please check the available configuration options below:
Enable The Plugin: Toggle the button to yes for enabling the CCPA functionality.
Maximum Request per Day: Enter the number of requests customers can send on a single day.
Enable Right of access to personal data: The online store merchant can allow the online users to send personal data access requests and get personal data like account details, orders and address details in CSV format.
Send Personal Report via Email: Enable this option if you want to send a personal report to the users via email.
Enable Right to data portability: Allow/disallow online users to download personal data by enabling this option. The online users can request for data portability from the admin interface of this PrestaShop CCPA plugin.
Enable to update information in order: The online store admin can enable this option for updating the order information if the customer asks to delete his account.
Enable To Generate Fake Email ID: Enable the option for generating fake email id in case of customer data deletion. This way, the e-merchant can save the customer’s email id with this fake email id.
Enable Right to be forgotten: You can enable or disable the right to be forgotten option by selecting yes or no. The online users can request to be forgotten by sharing their email id.
Action to be taken for orders: Admin can delete orders, fill random data or take no action when customers request to be forgotten.
Time to process request deletion: Enter the days after which the action will be taken to forget the request.
Enable Right to Data Rectification: Admin can enable this option for showing the data rectification option. Customers can update personal details using this option.
Enable Store policy acceptance: The online users will be restricted to accept store policy before accessing CCPA rights.
Store Policy Page: Select the page for showing to the customers for store policy.
Physical Location of your Server with hosting details: Admin needs to enter the country name where the server is located.
Purge Request Day: Admin can enter the days after which the customer’s details will be deleted.
Display Header Menu: Admin can select yes to show the header menu.
Header menu Text: Admin can Enter the text in various languages for showing on the header menu.
Admin Email Address: Enter the email id where you want to get all the email notifications related to CCPA requests.
Enable Description for Personal Information: The online store merchant can enable this option if he wants to show a description of the personal information field.
Personal Information Description: Enter Personal Information Description here in various languages.
Enable Description for Address: Enable to show address description.
Address Description: Enter Address Description here in various languages.
Enable Description for Orders: Enable to show order description.
Order Description: Enter Order Description here in various languages.
List the third-party service providers with whom you share the personal data of customer: Admin needs to enter third-party service providers name with whom store admin shares customer data. Admin needs to enter the service provider name, service type and description.
3.2 Cookie Consent Bar
The online store merchant can also show a cookie consent bar at the website front end. The online users can accept or discard it. Admin has an option to customize the appearance of the cookie bar from the admin interface.
3.2.1 Cookie Bar Settings
1. Cookie Consent Bar:
Enable the EU Cookie Law Notification: Enable the field for showing a cookie bar on the store front-end interface.
Cookie Name: Enter the cookie name without any space.
Cookie Lifetime: Set the cookie duration ie how long the cookie will be stored on the user’s device.
Terms and Condition of use: List the details of the cookies on a Cookie Policy page and select that page from here.
Display Close Button: The store merchant has an option to remove the Close button from the Cookie Consent Bar.
2. Appearance Settings:
Admin can easily set the look and feel Cookie Consent Bar:
Notification Position: Set the cookie bar position on the website bottom or top.
Effect when hiding the notification: Admin can select the options like Fade, Hide or Slide from the drop-down list.
Notification Message: Set the notification message in multiple languages.
Background Color: Set-Cookie bar background color.
Background Opacity: Set the background opacity from here.
Notification Message Font Color: Set the font color of the notification message.
Background Color of Accept Button: Set the accept button background color from the available color options.
Font Color of Accept Button: Choose the font color of the accept button.
Background Color of Cookie Settings Button: Set BG color of cookie settings button.
Font Color of Cookie Settings Button: Set font color of more cookie settings button.
3.2.1 Cookie Blocker
‘Cookie Blocking‘ functionality works based on disabling the module functionality. If cookies of any particular module are already created & the user opts to disable that module then the cookie will remain in the browser but module functionality will stop working so there will not be any use of those cookies. For example, If Google Analytics cookies are already created in the browser & user blocks the Google Analytics module, then the cookies will remain in the browser but the Google Analytics module will not be able to send the tracking data to Google.
Admin can also add a new cookie blocker, Edit the cookie blocker and add modules in available cookie blocker.
3.3 CCPA User Consent
The store merchant can view a user consent list in the CCPA User Consent section.
Admin has an option to add, delete and modify the user consents as per the requirements. Click on the “+” button for adding new user consent. These are the configuration options:
Title: Set the user consent title here.
Content: Write a description for user consent here.
Form type: Select form type as registration form or Contact form.
Consent URL: Select the page URL where you want to redirect the online users.
Required: Enable this option to make this field a required field.
3.4 CCPA Data Portability
The online store admin can check the log of the data portability requests from the back-end interface of this PrestaShop CCPA Module.
3.5 CCPA Forgot Request
From here, the online merchant can view the forget requests log easily. The admin can view a list of users who have requested for data deletion requests.
3.6 CCPA Rectification Request
The PrestaShop CCPA Compliance module keeps the log of the data rectification requests. This information can be used for modifying the customer data on the third party services.
3.7 CCPA Personal Data Request
CCPA module for PrestaShop keeps the log of all the personal data requests. The store admin can view these requests from CCPA personal data Request section.
3.8 CCPA Email Template
CCPA PrestaShop compliance module has customizable email templates for sending emails to the customers on various requests.
Confirm Your CCPA Account Deletion Request: This template is used to send a confirmation mail to the customer when the customer requested for Account deletion.
Your Account has been deleted: Send a confirmation mail to the customers after account deletion.
Confirm Your CCPA Personal Data Portability Request: This template is used to send a confirmation mail to the customer when a customer requested for Personal Data Portability.
Customer has requested for CCPA: This template is used to send a confirmation mail to the customer when the customer requested for Personal Data Report.
Your CCPA Personal Data Report: This template is used to send Personal Data Report to the customer when he/She confirmed the requests.
Customer has confirmed CCPA Request: This template is used to send a notification mail to Admin regarding customer CCPA access.
3.9 CCPA Geo-Targeting
In the CCPA Geo-Targeting field, the online store merchant can select the IP and countries for showing specific functionality.
1. Geo-targeting using IP
Enable/disable: The online merchant can activate or deactivate the functionality as per the requirements.
Enter the IP address: Enter the IP address here.
Select the CCPA Functionality to Display: Select the functionality which you want to show to the selective customers.
2. Geo-targeting using Country
Enable/Disable: Activate or deactivate this functionality.
Select Country/Region: Select the country/region from here.
Select the CCPA Functionality to Display: Choose the functionality you want to show on selected countries.
3.10 CCPA CRONS
The online merchant can setup Cron for processing the customer’s forget to request and deleting customer’s requests on a single click.
3.11 CCPA User Consent Data
In user consent data details, the e-merchant can view the user consent data list in which he can check the consents accepted by customers.
4.0 Front-end Interface
The e-buyers can click on “Knowband CCPA” header link and view cookie bar :
The online users can also access CCPA rights from CCPA Tab available in my account section as shown below:
Ones they click on this CCPA link, online users will get these options:
1. Right to Access Personal Data: Online users can click on “CCPA Personal Data Access Request” for getting personal data reports. They need to enter email id and click on the search option.
Ones the online user submits the personal data access request, they will get a confirmation request as shown below:
After confirmation, the online users can get an email along with the account details, address information, order details, Third-party service provider details and CCPA Requests details.
2. Right to Data Portability: Customers can request for data portability for downloading personal information, address and orders.
After clicking on the submit button, users will get a confirmation email as shown below:
After clicking on “confirm”, customers can download the personal data as shown below:
The online users can get a CSV file along with personal information.
3. Right to be Forgotten: The online users can send a request for using their right to be forgotten. In this option, they need to click on the “Personal Data Request Forgotten” link and provide email details.
After submitting the email details, the users will get a confirmation email on their registered email id. The users can delete their account by clicking on the provided link.
4. Right to Data Rectification: The online consumers can click on provided “Data Rectification” link and update their data, Address and password:
After updating the information, online users need to click on save button. They can view the confirmation page after saving the details successfully.
5. Right to User Consent: The online users can also update user consent data by clicking on “Edit Consent data” link:
Online users can edit user consent and save settings. After saving these settings, the PrestaShop CCPA Addon will show a confirmation page.
This way the online store merchant can use PrestaShop California Consumer Privacy Act Module and implement CCPA compliance easily.
Improve the search experience of your customers on your store. Incorporate Knowband’s Prestashop Image Search Addon and help your customers to search for a product using product image. This saves the time of your customers and improves their shopping experience as well. Through machine learning, the Image Search addon recognizes the image uploaded by a customer and displays relevant results.
1.1 Striking Features of Prestashop Image Search Addon
Prestashop Image Search Addon is highly customizable plugin with no technical changes involved. You can upload or add as many images for your eCommerce store and map them corresponding to products. Lets quickly check different features offered by this Prestashop Image Recognition System.
1. Prestashop Image Search module allows your customers to search products at your store using an image.
2. You can provide “Search Products by Image” option on search bar of website.
3. With Prestashop Image Search module, you can enable or disable Visual Same Search Button on the product pages.
4. You can enable or disable the automatic image sync feature to map images corresponding to products.
5. You can run the cron file to manually map the images to products. Once mapped, they will appear in image search results.
6. Prestashop Image Search Addon supports multi-lingual and multi-store compatibility.
7. You have an option to set threshold percentage ranging between 50 to 100. Based on this value, the matched search results are shown.
8. You can set the number of products which will be displayed on the search result page.
9. Prestashop Image Recognition System is simple to enable or disable from back-office interface.
10. The total details like Total Images, Total Mapped Images, Total Unmapped Images, Total Images yet to be Synced are shown at back-office of module.
1.2 Technology for Development
Language: PHP Frame Work: Prestashop
2.0 Installation Guide for Prestashop Image Search Addon
You can follow these simple steps for installing the Prestashop Image Search module on your eCommerce store:
1. Firstly, download the addon package from the Knowband store.
2. You will get a zipped file containing the source code and user manual. Unzip the complete package in the root directory of your Prestashop store through FTP manager (like Filezilla or WinSCP – download here: https://filezilla-project.org/). You’ll find the files and folders as shown in the image below:
3. The Prestashop Image Search module is all set to be installed at your store. Go to the Store Admin and then to ‘Modules and Services’.
4. Click on the “Install” button just next to your module. It would show a pop-up for your confirmation. Click on “Proceed with the installation” option. This step will install the module and show notification – “Module(s) installed successfully”.
3.0 Admin Interface of Prestashop Image Recognition System
Once you have successfully installed Prestashop Image Search Addon on your store, you can configure the Image Search settings from the admin backend. The module settings are categorized under two tabs as shown below:
Here in this interface of Prestashop Image Search Addon, you will find two tabs as listed below.
1.General Settings
2.Unmapped Image Log
Each section of this Prestashop Image Search module has been discussed below.
3.1 General Settings
Enable/Disable: Using this option, you can enable or disable the functionality of Prestashop Image Search module for your store.
Enable Image Search Option on Search Bar: This option shows or hide the Image Search option on the Search Bar.
Enable Visual Same Search Button: This option enables or disables the “Search Visually Same Products” button on the product page.
Enable Automatic Image Sync: If this option is enabled, then it will automatically map all the newly added unmapped images. If this is disabled, you have to hit and run cron file manually in order to map the unmapped images.
Threshold Percentage: Using this option, you can set a threshold percentage match value ranging between 50 to 100. Based on this value, module shows the image search results on the frontend. For best results, set the threshold value as 95.
Product Per Page: With this option, you can set the number of products or search results which will be shown per page.
API Key: This option will set the API key for Clarifai account. The steps to generate API key are provided at the back-office.
A) Total Images: This count is incremented as you will add new images to any product. B) Total Mapped Images: This count indicates total mapped images either automatically or manually by running cron. C) Total UnMapped Images: This count indicates total unmapped images due to some error like API not found or wrong API key. D) Total Images Yet To Be Synced: The value indicates the images which were not mapped automatically or using cron file. Once you hit the cron file or enable the “Enable Automatic Image Sync” option, the count becomes zero.
3.2 Unmapped Image Log
Under this tab of Prestashop Image Search module, you will find details of unmapped images. All the images that are unmapped because of wrong API key are listed along with details like Product ID, Product Name, Error Description, Error Status Code and Upload Date.
4.0 Front Interface of Prestashop Image Recognition System
A) Image Search Option at Front
B) Choose file for “Search by Image” option
C) When relevant search results are found for the uploaded image.
D) When no results are found for the uploaded image.
The online store merchant can use one of the most popular social media platforms .ie Instagram for increasing website conversion rate and sales by showing already tagged Instagram images on the website pages. Knowband offers Prestashop Instagram Shop Gallery module implements functionality to showcase Instagram photos on the website pages. Admin can also show a specific top navigation link on the website. The online users can click on the link and view all the Instagram images in Insta Gallery. The online merchant has an option to show related products on the Instagram photo popup. The online users can buy the products by clicking on the “Shop Now” link.
1.1 Salient Features of Instagram Integration Extension
With the help of this PrestaShop Instagram Shop Gallery addon, the online store admin can show already tagged Instagram photos on the eCommerce website.
It is very easy to install, configure and customize the Prestashop Instagram Shop Gallery module. The admin can enable or disable the overall functionality anytime from the admin interface of the Shoppable Instagram plugin for PrestaShop.
The online merchant can show the top navigation link on the website. Online visitors can view all the enable Instagram photos just by clicking on this link.
Admin can map products with the Instagram images and allow online users to buy it just by clicking on the “Shop Now” button.
Admin can also create and improve business profiles using this Prestashop Instagram Shop Gallery module.
The online merchant can display all the Instagram photos, approved photos, photos having related products and approved photos having related products as per his preferences.
With multiple image select feature, admin can also select multiple images or photos simultaneously which he wants to show on the website.
Admin can set the URL key for the Instagram galley page from the admin interface of this Shoppable Instagram plugin for PrestaShop.
The PrestaShop Instagram extension allows the eCommerce store admin to create new Instagram galleries and update it easily.
The eCommerce store merchant can set title, image visibility and limitations. The store merchant can also show it on the main Insta Gallery page.
The online merchant can set the position of Instagram photos for almost every website page.
Prestashop store admin can show multiple photos on the Instagram gallery from the admin interface of the PrestaShop Instagram Shop Gallery addon.
Admin can fetch the Instagram photo using the hashtag. This Shoppable Instagram module allows selecting Instagram tagged photos or saved photos.
Admin can enable or disable any photo, approve/disapprove it and also show related products by mapping it.
The PrestaShop Instagram product tag feed module is multi-lingual compatible.
This PrestaShop Instagram Shop Gallery addon has a mobile responsive layout.
This Instagram Integration Extension automatically shows likes, comments and date of posting of every Instagram photo.
1.2 Benefits of this PrestaShop Instagram extension
The online merchant can use this PrestaShop Instagram Shop Gallery addon for showing Instagram photos on the website without changing even a single line of codes.
The online merchant can offer a better store experience and attract store visitors by showing eye-catchy photos on almost every website page.
PrestaShop Instagram extension is highly customizable and offers smooth functioning.
There is no need to change even a single line of codes while using Instagram Integration Extension.
The mobile responsive layout of this PrestaShop Instagram gallery shop module allows store visitors to view the functionality on their mobile devices.
Customers can view attractive Instagram images on the website pages and click on any image to view it.
There is no need to authenticate the account for viewing the images.
2.0 Steps to Install this PrestaShop Instagram Extension
You will get these files after purchasing this PrestaShop Instagram Shop Gallery addon:
1. A zipped file consists of the source code of this Prestashop Instagram Shop Gallery module.
2. User Manual
Follow these steps to install the PrestaShop Instagram gallery shop module:
Unzip the zipped file. This file includes some files and folders.
Now copy the overall content of the folder and paste it into the “Modules” folder of the store’s directory. The admin can follow the path – Root Directory/modules/.
3. As a store admin, you can install the PrestaShop Instagram product tag feed module. You can find that in Store Admin -> Modules and Services.
Now, you just need to click on the “Install” button to install this Instagram Integration Extension. A confirmation pop-up will be shown. Click on “Proceed with the installation” option. This step will install the Instagram Integration Extension and show notification – “Module(s) installed successfully”.
3.0 Admin Interface
After successful installation, the online store admin can easily configure the Prestashop Instagram Shop Gallery module for showing Instagram gallery on the website.
A. Configuration Page
Admin can apply General Settings from this section. There are two basic settings as shown below:
Enable/Disable: Activate or Deactivate this option for enabling/disabling module functionality.
Enable/Disable Like/Comment: Enable this option if you want to show likes and comments of Instagram photos.
Apart from general settings, these are the configuration options for showing Insta gallery on the website:
Check the configuration method which is described below mentioned sections.
3.1 Instagram Page
Here, you can apply settings for showing the Instagram page on the website. These are the configuration options, the admin needs to know:
Enable Instagram Page: Enable or Disable the PrestaShop Instagram Shop Gallery addon functionality.
Top Navigation Link: Enable to show navigation links on the top of the website.
Page Title: Enter the title which you want to show as the page title. You can set the title in multiple languages. This PrestaShop Instagram Shop Gallery addon is multi-lingual compatible.
Image Visibility: You can control the image visibility from here. You can showcase all the photos, only approved photos, photos having related products or those approved photos which also have related products.
Image Limit: You can set an image limit for showing a particular number of photos. If you don’t want to apply any limit on the number of photos then set image limit 0.
Page URL key: Here, you can enter the key for showing on the Instagram page URL.
3.2 Instagram Gallery Listing
In the Instagram gallery list, you can view a list of all Instagram galleries. You can also add a new Instagram gallery, update the previously created galleries or delete it. In this list, you can view the title of the Instagram gallery, activate/deactivate it, view the image limit and activate/deactivate the Instagram page. As an eCommerce store admin, you can also add pictures in any Instagram gallery from the admin interface of Shop on your Instagram gallery addon.
3.2.1 Add new Instagram Gallery
You can click on the “+” sign for adding a new Instagram gallery. Please follow these steps for customization:
Active: Enable or disable new Instagram gallery.
Instagram Gallery Title: Set the gallery title in different languages.
Image Visibility: You can control the image visibility by showing all photos, approved images, images having related products and approved images with related products.
Image Limit: Enter the maximum number of images which you want to show from this gallery.
Include in Main Page: Enable the settings if you want to show this Instagram gallery on the Instagram page.
Select Hooks: You can select the position where you want to show Instagram gallery. This Prestashop Instagram Shop Gallery module allows displaying the gallery at header, footer, left column or right column. You can select multiple options if you wish to do so.
Select Pages: As a store merchant you can select product page, category page, the home page, CSM page and manufacturer page also.
3.2.2 Update Instagram Gallery
Click on the “Edit” button and apply the required changes easily.
3.2.3 Delete Instagram Gallery
On clicking the “Delete” button, you will see a popup warning. Click yes and the module will delete the particular gallery.
3.3 How to Add Photos in Instagram gallery
Here, you can view the list of previously added images. As a store merchant, you can also modify and delete image anytime. You can view the image status, image, hashtag, sort order of the image and check if the image is approved or not. For adding a new image, you just need to click on “Add New Image” button.
Instagram Hashtag: Enter the Instagram hashtag for searching images according to it. You can search for images from Instagram or show from saved images. After clicking on the “Fetch” button, you will get multiple images based on a searched hashtag. You can select the image for showing in the gallery.
Image: Here, you will view the selected image.
>> MULTIPLE IMAGE SELECT
Status: Enable or disable the image status.
Approve: You can approve or disapprove this image.
Choose Products: You can select some products for mapping with the Instagram image.
On Front-end Interface, the image will look as below:
Admin can also delete and edit any image from the admin interface of this Instagram shop module. Admin can view the list of all the images and edit or update any image from the admin interface.
After clicking on Edit button, you just need to apply the required changes and save it.
Admin can also delete any image by clicking on “Delete” button from the admin interface.
4.0 Front-end Interface
After full configuration, the online merchant can implement an Instagram gallery on the website.
A.Instagram Shop Page:
The online users can view a header link for visiting the gallery page. They can view all the activate images on the Gallery page as shown below:
B. Likes and Comments:
Online buyers can view image likes and comments easily as shown below:
The online merchant can show Insta photos on different website pages like homepage, product pages, category pages, CMS pages and manufacturer pages in different positions.
1. Homepage View:
Admin can show Insta photos on different positions like below:
Header:
Footer:
2.Category Page View:
Similarly, an online merchant can show Insta photos on category page in different positions.
Sidebar bottom view:
3.Product page View:
The online users can also show Insta photos on the product page at header and footer
Online users can click on the photo and view the Instagram image popup. In Instagram image popup, customers can view likes, comments and date of posting.
Online users can also click on the Follow button for following the profile. Online users can also buy mapped related products by clicking on Shop now.
Online users will be redirected on clicking the Follow button from the Instagram image popup. Here, they can follow the particular profile from which the image has been posted.
This way, the online store merchant can use this Shoppable Instagram plugin for PrestaShop and showcase already tagged Instagram images on the website. The Shoppable Instagram plugin for PrestaShop provides an option to show unlimited attractive images on different website pages. The online users can view Instagram images and also check the related products with the Insta photos. The online store admin can this way promote the products indirectly and increase sales on the website. It is very easy to implement the PrestaShop Instagram extension and use it. The Instagram Integration Extension is mobile responsive and offers smooth functioning also.
For more details about Shoppable Instagram plugin for PrestaShop, Please Visit here:
Ever searched for something on a site and thought it should also have a Google search Feature? Well you can do it now by Prestashop Google Custom Search Addon by Knowband. Through the Prestashop Custom Google Search Module, you can add a custom Google search feature on Web Store. It means that whenever a customer will search something on your website, it will show the search result from Google. As a Web store owner, you can also set the Websites from only which the search will be shown to your customers from the backend.
PS Google Custom Search easily incorporates your web store search with your Prestashop Web store search.
How it works?
2.0 Features of Prestashop Custom Google Search Module
3.0 Installation Guide for PS Google Custom Search
The store admin can follow these simple steps for installing the Prestashop Custom Google Search Module on their eCommerce store:
1. Firstly, download the addon package from the Knowband store.
2. You will get a zipped file containing the source code and user manual. Unzip the complete package in the root directory of your Prestashop store through FTP manager (like Filezilla or WinSCP – download here: https://filezilla-project.org/). You’ll find the files and folders as shown in the image below:
The Prestashop Custom Google Search addon is now installed and ready for use. Now the admin can configure the various configuration settings in accordance with their Prestashop site.
4.0 Admin Interface of Prestashop Google Custom Search Plugin
Just after successful installation of Prestashop Custom Google Search Module at your website, you can configure Custom Google Search settings as per your needs. In the admin panel or dashboard, Click on “Modules and Services” and then on “Configure” button provided next to Google Custom Search Module.
Once Clicked on Configure, the following page will open Up:
4.0.1 General Settings
From this setting of the Prestashop Google Custom Search module, Store owner can enable/disable the complete module and do much more. The following screen will be shown to the Admin:
Improve the conversion rates of your store with the help of customer reward system. Integrate Knowband’s Prestashop Loyalty Points addon at your store that grants loyalty points to your customer upon creating a new account on the store, placing an order for a particular product or a specific product in the category and other events. The loyalty points can be converted to loyalty discount coupons by the customers during their next purchase from the store. This Prestashop Loyalty points and discount addon helps in increasing customer retention and reorders letting customers to collect more & more reward points which they can redeem during future orders. Thus Prestashop Loyalty points system implements a customizable reward and discount scheme at your store to encourage customer orders and signups.
1.1 Striking Features of Prestashop Loyalty Points Module
Prestashop Loyalty Points addon is highly customizable plugin with no core changes required. You can define as many loyalty points rule for your eCommerce store and award loyalty based discount vouchers to your customer. Lets quickly check different features offered by this Prestashop Loyalty points and discount addon.
Prestashop Loyalty points system grants loyalty points to your customers for placing an order with specific cart value, creating an account , ordering a certain product etc. The loyalty points are defined specific for different rules.
Prestashop Loyalty reward points can be offered manually or automatically to the customers based on their cart value, product selection or site activity.
Prestashop purchase points addon allows an option to set order status when the loyalty points are added to the customer account.
With Prestashop Loyalty points and discount addon, you can set the order status when the loyalty points assigned to any customer are automatically cancelled.
With this Loyalty points module, you can set the discount equivalent to a single loyalty point. This discount value can be set in any desired currency.
Prestashop Loyalty points addon gives an option to set minimum cart amount to be eligible to apply loyalty discount coupon.
The tax over Prestashop loyalty discount coupons can be enabled or disabled from the backend.
Loyalty points module for Prestashop allows you to set various progression names in multiple languages.
Prestashop Loyalty Points addon lets you create unlimited loyalty points rules based on customer’s Cart, Product or Behavior.
With this loyalty point module, you can set the title, description, number of loyalty points, start date, end date and validity for each rule.
You can modify, enable, disable or delete the existing rules from the back-office of Reward points module.
The status and detailed history for Prestashop loyalty discount coupons can be viewed at the backend.
With Prestashop customer loyalty system, you can easily get into the details of loyalty points earned by the customers of store.
The different email sent for points credit, points cancellation and points redemption can be modified from the back-office of this Prestashop Loyalty reward points module.
Prestashop Loyalty points system is simple to enable or disable from back-office interface.
Prestashop loyalty discount module is multi-lingual compatible.
1.2 Technology for Development
Language: PHP Frame Work: PrestaShop
2.0 Installation Guide for Prestashop Loyalty Points and Discount Addon
You can follow these simple steps for installing the Prestashop Loyalty Points addon on your eCommerce store:
1. Firstly, download the addon package from the Knowband store.
2. You will get a zipped file containing the source code and user manual. Unzip the complete package in the root directory of your Prestashop store through FTP manager (like Filezilla or WinSCP – download here: https://filezilla-project.org/). You’ll find the files and folders as shown in the image below:
3. The Prestashop Loyalty Point plugin is all set to be installed in the store. Go to the Store Admin and then to ‘Modules and Services’.
4. Click on the “Install” button just next to your module. It would show a pop-up for your confirmation. Click on “Proceed with the installation” option. This step will install the module and show notification – “Module(s) installed successfully”.
3.0 Admin Interface of PrestaShop Purchase Points Addon
Just after successful installation of Prestashop Loyalty Points addon at your website, you can create and apply as many loyalty points rules for your store. You can grant loyalty points to your customers manually or automatically based on various criteria. In the admin panel or dashboard, click on “Knowband Loyalty Points”. It will list you various configuration tabs as shown in the given screenshot.
Here, in this interface of Prestashop Loyalty points system, you will see five sub sections under Loyalty Points module.
General Settings
Loyalty Points Rules
Loyalty Points Balance
Loyalty Points History
Email Notifications
Each section of this Prestashop Loyalty points and discount addon has been discussed below.
3.1 General Settings
Under the general settings of Loyalty points module for Prestashop, you can perform the basic settings for the reward points system.
Enable/Disable: This option fully enables or disables the loyalty point system for the store.
1 Point: This option sets the currency value equivalent to each loyalty point. You can set this amount in any selected currency.
Minimum amount in which the voucher can be used: This option sets the minimum cart amount over which the coupon can be applied.
Apply taxes on the voucher: This option will enable or disable the taxes over the discount voucher.
Order status when points are awarded: This option sets the order status when the loyalty points are awarded.
Order status when points are cancelled: This option sets the order status when these loyalty points are cancelled.
As shown in the below screenshot, you can set the names for various loyalty points progression. Theses names are applicable to complete module settings.
3.2 Loyalty Points Rule
Under this section of Prestashop purchase points addon, you can create multiple loyalty points rule based on various customer activity. Each rule can be modified, enabled, disabled or deleted as per site requirements.
The above screen shows the list of existing loyalty point rules at your store. These can be modified, deleted or you can create a new rule as discussed below.
To create a new loyalty point rule for your store, click on the “Add new Rule” button at the top right screen. Initially, it will only show you the “Configuration” tab. Once you will save the Configuration options, it will show you the next two tabs: “Conditions” and “Notifications”.
Following options are listed under the “Configuration” tab of new rule.
1. Configuration
Title: This option sets the title for the loyalty point rule.
Description: This option allows you to set a small description of the rule.
Rule Type: Using this option, you can set the rule type out of three options as Cart Rule, Product Rule, or Behavior Rule as shown below.
Loyalty Points: Using this option, you can set the number of loyalty points for this selected rule.
Start Date: This option defines the start date for the rule.
End Date: This option defines the end date for the rule.
Validity: This option will set the validity period of the loyalty points (in days). If set to 0, the loyalty points has lifetime validity.
Active: Enable or disable the rule using this option.
2. Conditions
For the selected rule type, you can select the rule conditions as shown below.
Condition Conjunction: This option will select the conjunction type as “OR” or “AND”.
A) Conditions for Cart Rule
You can create any type of rule using conjunctions: “AND” & “OR”
Admin can apply conditions on the basis of Total Amount, Total Items quantity, Total weight, Payment Method, Shipping Method.
Below are the examples of the rules that can be created using these conditions:
1.This rule works when (total amount >= 10) and (total items quantity > 5) and (total weight ≠ 15) and (payment method = check/wire) and (shipping method = my carrier) are all applicable to customer’s cart. To get specific points, all conditions should be TRUE. (Refer below screenshot)
2.This rule works when (total amount < 10) or (total items quantity > 5) or (total weight ≠ 15) or (shipping method = Fashion store/my carrier) is applicable to customer’s cart. To get specific points, any one condition should be TRUE. (Refer below screenshot)
Similarly, you can create other rules as well with different filters and values.
B) Conditions for Product Rule
You can create any type of rule using conjunctions: “AND” & “OR”
Admin can apply conditions on the basis of Product ID, Category, Price.
Below are the examples of the rules that can be created using these conditions:
1.This rule works when (product ID is 2/18/14) or (category is 4/5) is TRUE. To get specific points, any one condition should be TRUE. (Refer below screenshot)
2.This rule works when (product ID is 2/18/14) and (category is 4/5) and (price >= 50) is TRUE. To get specific points, all the conditions should be TRUE. (Refer below screenshot)
Similarly, you can create other rules as well with different filters and values.
C) Conditions for Behavior Rule
Admin can apply condition on the basis of customer’s sign up and customer’s first order.
1. First Order – The Loyalty points will be granted to the customers when they place their first order on the store.
2. Sign Up – The Loyalty points will be granted to the customers when they will create an account on the store.
3. Notifications
The Notification tab shows the configuration options for email sent to the customers when they earn loyalty points through the selected rule. The options include:
Active: This option enables or disables the notification for the selected loyalty point rule.
Subject: This option sets the subject for the email sent to customers upon winning loyalty points at the store.
Template: This option sets the email content or body which details about the loyalty points they have earned on the store.
3.3 Loyalty Points Balance
Here in this section of Prestashop Loyalty points and discount addon, you can check the status of loyalty points granted to various customers of the store. You can view the details of each of the customer who have been granted the loyalty and discount points.
You can click the “Refresh” button in order to update the loyalty points records for store customers. Click on “View” button to check the details of a particular record (all records of the same customer) like shown in the image below.
You can edit the various order records of a same customer by clicking on the “Edit” button. To assign the loyalty points manually, click on “Add Points” button as shown in the image above. When you add points manually, you will see the following configuration options.
Title: The option sets the order or reference number for crediting loyalty points to the customer’s account.
Customer: With this option, select the name or email of the customer to whom you want to reward loyalty points.
Reward Points: Set the number of loyalty points you want to offer to the customer.
Validity: Set the validity of loyalty points using this option. Set this as 0 for infinite days validity.
Status: This option sets the status of the loyalty points granted to the customer.
If you want to add loyalty points manually for bulk customers, you can simple upload a .csv file as shown below.
Field Separator: This field allows you to specify the type of field separator you have used in your CSV file for separating various records.
CSV File: This option allows you to browse and upload the .csv file saved at your local space.
3.4 Loyalty Points History
With Prestashop Loyalty points system, you can view the loyalty points history along with the customer details. From this panel, you can manually grant loyalty points to the customers.
By clicking on Add Points button, you will be shown the below screen. (already discussed in 3.3 section)
On clicking the “Edit” button corresponding to any record, you will be shown the below screen.
Title: This option will allow you to modify the reference title or order title.
Customer: This option allows you to change the customer name or email who are assigned these loyalty points.
Reward Points: This option lets you set the loyalty points.
Validity: With this option, you can change the validity period for the rewarded loyalty points.
Status: This option lets you change the status of those loyalty points. The status of these points can be checked from the customer’s “Account Dashboard”.
3.5 Email Notifications
Prestashop purchase points addon gives you flexibility to modify/edit the email templates when loyalty points are credited to customer account, loyalty points are deducted and when loyalty points are redeemed into discount coupons.
Click on the “Edit” button to configure the email template with the given options:
Subject: This option allows you to set a subject for the email sent to the customer for credited points, deducted points or redeemed points.
Email Content: This option allows you to set the content for the email sent to the customer for credited points, deducted points or redeemed points.
4.0 Front Interface of PrestaShop Loyalty Points System
As soon as the customer redeems the loyalty points, a discount voucher is generated and all Available Points are turned into Converted Points.
A) When Product Rule is set for specific product and categories, you will see the following screen.
1.6 Version:
1.7 Version:
B) When Behavior rule is set. Like when customer sign-ups on the store or place their first order. The below screenshot shows how the customer gets loyalty points for signing up on the store.
1.6 Version:
1.7 Version:
C) When customer’s cart follows some criteria based on total amount, total items quantity, total weight, payment method or shipping method. The below screenshot shows how the customer gets loyalty points for placing an order as per defined cart rule.
1.6 Version:
1.7 Version:
D) Customer can convert their available points into a discount amount. The loyalty points are redeemed into a discount voucher which can be applied for next purchase.
1.6 Version:
Customers can use the loyalty points and generate the vouchers.
1.7 Version:
On clicking the Redeem Points button, you will see the following popup box on the screen.
As the customer clicks on OK button their available loyalty points are converted into a discount coupon code as shown below.
By clicking the desired discount code, it automatically gets copied into the Promo Code box as shown.
E) Customer can check the complete status of their loyalty points from their Dashboard.
1.6 Version:
1.7 Version:
On clicking the Loyalty Points option, customer will jump to the below screen. Here they can check the complete status of their loyalty points, their reward history, discount vouchers generated from points etc.
Version 1.6:
Version 1.7:
5.0.0 Tutorial Video of Prestashop Loyalty Points Module
Checkout our complete tutorial videos, which cover all the features from Installation to the complete frontend working.
A product video is an explainer video that effectively demonstrates the benefits of a product. A demo video increases conversion rates by providing a creative and engaging story that demonstrates how your product functions in the real world, and what kind of impact it has. By using narrative and metaphor, a product video can create a better lasting impression in the consumer’s mind, leaving the product features to be experienced rather than explained.
People are more likely to retain information received through video because the information is presented through audio and visual channels. Therefore, if you need to express something about a product quickly and memorably, video is the best way to do it. Knowband offers Prestashop Product Video module for the Prestashop store admin that allows him/her to add the product videos on their store’s product pages. This Prestashop extension allows the sellers to present their products confidently that make the customers sure about their products.
This Prestashop Product Video addon will provide an interface and functionality to the Prestashop eCommerce website admin to show their product pages with high-quality product videos from YouTube, Vimeo, and Daily Motion.
1.1 Benefits
1.2 Features
2.0 Admin Interface
Admin will have 4 settings available which are described below.
2.0.1 General Settings
General Settings will have simple customization functionalities options like deciding the position and Layout of the Video. The page will look like as shown below:
Positions to Show Video:
Product Footer (Bottom of the Page)
Product Right Column
Video Layouts:
Layout 1
Layout 2
2.0.2 YouTube Settings
Admin can change YouTube video Settings from this Option. YouTube Settings Tab page will look like as the one below.
2.0.3 Vimeo Settings
Admin can change Vimeo video Settings from this Option. Vimeo Settings Tab page will look like as the one below.
2.0.4 Daily Motion Settings
Admin can change Daily Motion video Settings from this Option. Daily Motion Settings Tab page will look like as the one below.
3.0 How to Add a New video to a Product?
To add a New Video to a Product, Follow these simple steps:
4.0 User Interface
The Front end will look like as shown below to the customers.
Being a store owner you have always thought of multiplying your store conversions but not about the shopping experience of your customers. A happy and satisfied customer is the one who returns back to the store in search of some more items. So if you want returning customers on your store, make the customer experience lasts forever by integrating Prestashop Product Designer/Customizer addon at your eCommerce store.
With the help of Prestashop Custom Product Design module, store merchants can offer intuitive and creative online product customization options to their customers so that they can turn the basic version of the product into a modern, elegant and unique design. Prestashop product customization addon allows admin to show the product customization panel page as the user clicks over the Customize button on the product page. Customers can easily add rich colored texts with effects, upload their images with filters, add a QR code to make it suitable for their needs.
1.1 Striking Features of Prestashop Product Customization Addon
No coding technicalities are required to configure or modify the settings of the Prestashop Custom Product Design module. Everything comes easy with this module. Lets quickly check different features offered by this Prestashop addon.
Prestashop Product Designer/Customizer addon helps to offer a wide range of customizable products at your online shop.
Using Prestashop custom product designer addon, customers can easily buy and take the benefits of the extended online products which can be personalized as per their needs.
Online Product Designer adds a designer view for products so that the potential buyers get an opportunity to customize the product in real time. Product configurator module lets Prestashop admin add a different set of customization options for each different product on the shop.
With the integration of Prestashop product designer module, customers can access the product customization panel with any product they wish to purchase like T-shirts, mug, rings or any other kind of product that can be personalized as per their needs.
Prestashop product customization addon shows a Customize button for every customizable product on the store. Admin can enable customization options for desired products only.
The complete functionality of Prestashop Product Designer/Customizer addon can be enabled or disabled. When this module is disabled, the standard product customization options are shown on the product page.
Advanced product customizer module shows the real-time customization price calculation on the product page.
With Prestashop custom product designer addon, admin can set the product design sides which are available to the user.
Product configurator module allows admin to enable or disable PDF file download options for the customers on the frontend.
Prestashop Extended Product Customization module gives an option to add pre-defined images for a product. The pre-defined images are usually defined into groups. Customers can upload and set any picture of their own.
Customer can flexibly use desired fonts, colors, and filters for the product using this Prestashop product designer module.
This Advanced product customizer module lets admin define prices for different customization options.
Prestashop product customization module also gives an option to personalize the product using QR code for which admin can define a separate price.
Prestashop custom product designer addon automatically adds a Complete Design Fixed Price to the final customized price for a product.
Prestashop Product Designer/Customizer addon supports multi-store and multi-lingual compatibility.
Prestashop custom product designer addon is mobile responsive and compatible with various Prestashop themes.
1.2 Technology for Development
Language: PHP
Frame Work: Prestashop
2.0 Installation Guide for Advanced Product Customizer module
The store admin can follow these simple steps for installing the Prestashop product customization addon on their eCommerce store:
1. Firstly, download the addon package from the Knowband store.
2. You will get a zipped file containing the source code and user manual. Unzip the complete package in the root directory of your Prestashop store through FTP manager (like Filezilla or WinSCP – download here: https://filezilla-project.org/). You’ll find the files and folders as shown in the image below:
The Prestashop custom product designer addon is now installed and ready for use. Now the admin can configure the various configuration settings in accordance with their Prestashop site.
3.0 Admin Interface of Prestashop Advanced Product Customizer module
Just after successful installation of Prestashop Product Designer/Customizer addon at your website, you can configure product customization panel settings as per your needs. In the admin panel or dashboard, Click on “Modules and Services” and then on “Configure” button provided next to Knowband Product Designer/Customizer.
Here, in the next interface, you will find the complete settings of Product Designer/Customizer module along with its sub-sections as listed below.
This Knowband Product Customization module consists of four sub-sections which have been discussed further.
1.Configuration
2.Fonts
3.Colors
4.Image Group
Each Tab of the Prestashop Extended Product Customization module has been discussed below:
3.1 Configuration
Under the configuration settings of Prestashop product customization addon, you can perform the basic settings for customization panel shown on the frontend to the customers.
Enable/Disable: With this option, you can completely enable or disable the functionality of Prestashop Extended Product Customization module for customers.
Display the option to download PDF in cart: You can enable or disable this option to download the design image in PDF on Admin Order Page.
Show design preview in invoice PDF: Enable or disable this option to display or hide the design preview in invoice PDF.
Maximum number of slides: Using this option, you can set maximum number of product sides that are allowed customization from frontend.
3.2 Fonts
Under this section of Prestashop product designer module, store owner gets the option to add several fonts that the customer can choose to print a styled text on the product.
The first interface shown below shows you a list of existing fonts that are available on frontend. A new font can be added or the existing font can be modified or deleted.
Here you can perform the other two actions as:
1. Adding a new font
To add a new font style, perform the following steps:
Click on the Fonts tab and then on the “+” (Add Font) button at the backend panel. You will be shown the below interface.
Active: This option will enable or disable the font.
Font Title: Using this option, you can set the font title same as mentioned in Google Font.
Embed @import Font: In order to use the Google Font, you have to embed the import Font class. For this, you have to:
Click on “Google Fonts” link provided just below the option. The below screen will be shown to you.
Choose any desired font and click on the Add “+” button for that font style.
Upon adding a font, you will be shown a popup which will list you the font family you have selected. Click on Embed tab and then on @Import button.
Copy the @import URL for that font and paste it to the Embed @import Font field.
2. Edit an existing font
If you want to edit the existing font, simply click on Edit button given next to the font style. You will see the following options:
Active: Enable or disable the font style.
Font Style: Edit the font title using this option.
Embed @Import Font: Modify the import URL for that particular font.
3.3 Colors
Under this section of Product configurator module, you can define your own color palette and allow your customers to pick any color for the selected product.
The following interface shows you a list of existing colors which can be edited or you can add a new color if required.
1. Adding a new color
Color Code: With this option, pick a desired color to be shown on product customization page.
Active: Enable or disable the color.
2. Edit an existing color
Color Code: With this option, pick a desired color to be shown on product customization page.
Active: Enable or disable the existing color.
3.4 Image Groups
For a selected product, the customer can select any default images provided by the store owner or they can upload a new custom image for the product customization.
The default images have been categorized as image groups. These existing image groups can be edited or you can even add a new image group.
1. Adding a new image group
Image Group Name: You can set a desired name for the image group.
Upload Image: You can upload and set a image group logo image.
Active: This option will enable or disable the image group.
2. Edit an existing image group
Image Group Name: You can set a desired name for the image group.
Upload Image: You can upload and set a image group logo image.
Active: This option will enable or disable the image group.
To view, add or delete the images inside any image group, click on the “View Images” option corresponding to the image group.
You will be shown the following interface.
Here, you can add a new image, delete or change the existing images within a group.
4.0 Customization Settings for Site Products
The configuration settings for fonts, colors, image groups discussed in section 3.2, 3.3. And 3.4 are applicable for all the site products. These settings can be referred to as Global settings. Other than this, the settings can be also be done on a product level. These settings are particular to the product which the admin has configured from the back-office. Below discussed are the product customization settings for individual products. The site admin can apply these settings differently for any product on the store. To configure the product customization settings for individual products, follow the listed steps:
1.In the admin panel, go to “Catalog” option in the left Menu Bar of the interface.
2.Click on “Products” option under “Catalog”.
You will see a list of store products along with an option to edit or configure the product. The screen for store products has been shown below:
Upon clicking the “Edit” button for a product, you can will find the following configuration settings. Choose the Product Designer/Customizer tab.
Now, the complete product designer/customizer settings are divided into four groups namely:
Configuration
Prices
Text
Sides
4.1 Configuration
Enable/Disable: This option will enable or disable the product customization panel on product page at frontend.
Required for Product Customization: Enable this option if you want to mandate product customization for customers.
Upload Image Size: This option will set maximum size for image upload.
Upload Image Price: This option will set the price for uploading an image.
Display the option to download PNG: Enable or disable the option to download PNG image.
Allow image upload: Enable or disable image upload option on product customizer page.
Resize the text: Enable this option to allow text resize.
Display Rotator to the text: Enable this option to allow text rotation.
Display option for QR Code: Enable or disable his option to add QR code on product.
Display Transparency for Images: Enable this option to display transparency option for images.
Display Filters for Images: With this option, you can enable or disable image filters.
Filters for Images: Select multiple filters that you want to show at frontend on product customization page.
4.2 Prices
Text fixed price: This option allows you to set a fixed price for the text.
Enable Cost per character: You can enable this option if you want to charge cost per character.
Complete Design Fixed Price: This option allows you to set a fixed price for the complete design. This price is added to the total customization cost.
QR Code Price: You can set a price for QR code using this option.
4.3 Text
Display Text block: You can show or hide the text block option on product customization page.
Maximum Text length: Using this option, you can set a maximum length for the text.
Minimum Text length: Using this option, you can set a minimum length for the text.
Allow text transparency: You can enable or disable this option for text transparency.
Allow text curve: You can enable or disable this option for text curve.
4.4 Sides
Enable the Side: With this option, you can enable or disable the side.
Side Name: This option lets you set the name for the side.
Side Image: This option allows you to upload an image showing the product side.
These settings are for one side of a product. You can do the same settings for other sides of a product also. Note: Here, You can only configure the settings of the number of sides as mentioned in the “configuration settings” of product customizer module. For example, if you have set the “maximum no of sides” count as 2, then you can only configure the settings for side 1 and side 2.
How to Configure Fonts, Colors, and Image Groups?
While you are changing the customization settings for a product, you will find the options to select different Fonts, Colors, Image Groups at the top right side of screen. You will find three options as:
1. Configure Fonts
All the fonts that have been added in the section 3.2 are listed here in this interface. You can directly enable or disable any font.
2. Configure Colors
All the colors that have been added in the section 3.3 are listed here in this interface. You can directly enable or disable any color.
3. Configure Image Groups
All the image groups that have been added in the section 3.4 are listed here in this interface. You can directly enable or disable any image group.
On clicking the “View Images” button, you will see the following screen.
Once the Online Product Designer has been installed and configured for the store, the Product Designer/Customizer settings tab is shown in the general settings of the store products. If you want to enable or disable the product customization page for a product, you can simply configure the product settings under the “Products catalog” at back-office.
When the Product Designer/Customizer module is enabled for a product, it will show a “Customize” button on its product page as shown below:
On clicking the Customize button, the customer will be shown a screen pop-up which will consists of various product design and customization settings. Customers can add any color, custom text, custom image or QR code for a product as per their shopping needs.
Your customers can perform any type of customization like:
1.Color
2.Image
Customers can add an image to the product. They can choose any default image from image group or they can upload their own image or they can add a QR code to the product.
2a. Choose an image
2b. Upload image
Let’s suppose that the customer is adding the uploaded image on the back side of Hoodie.
2c. Add QR code
3.Text
Saving Product Customization
Similarly, the customer can apply customizations to other products of the store like mug and phone cases.
Shopping Cart Summary Page for Customized Product
The below frontend image shows how the custom product displays on the cart page with different options to the customers after clicking on “Save Customization” button.
Customer can view the Invoice of this customized product as shown below.
Order History Page with Invoice
On clicking the Details button, customer will see the following screen:
Order View from Admin Panel
Admin can view the order invoice and all the configuration regarding the product customization from back-office. The details of an order can be viewed under the Orders section of Admin Panel.
On clicking the View button corresponding to a product, admin can check the complete order details of the custom product.
On clicking the View Details button, admin will see the complete details of personalized product in the form of a popup screen as shown below.
Admin can click the “Preview” option to see the custom image added to the product which looks like below.
Tutorial: Watch the Video Guide
To help you set up and use the PrestaShop Product Designer/Customizer Module, we have prepared a detailed YouTube tutorial video. This video walks you through the installation, configuration, and usage of the module step by step.
Watch the tutorial here:
For additional assistance, customisations, or queries, contact our support team at: support@knowband.com