Opencart Free Shipping Manager module is a feature-rich module which allows the online merchant to offer free shipping to the online users. The store merchant can apply conditions and rules for free shipping benefits.
The online users can show a free-shipping block on the cart summary page. Opencart Free Shipping Manager plugin allows admin to set the minimum order amount and weight for availing free shipping. By offering free shipping to online users, admin can increase sales and reduce cart abandonment cases.
Admin can also select countries where he wants to implement any free shipping rule. This way, online users can shop for their desired products without paying any shipping charges.
1.1 Features offered by Opencart Free Shipping Manager plugin
As a store merchant, you can offer free shipping to the consumers.
This Opencart Free Shipping Manager module allows setting terms and conditions for offering free shipping. Admin can add multiple free shipping rules.
The Free Shipping Price module for OpenCart allows setting the minimum order price and order weight for availing the discount.
Admin can also set the look and feel of the shipping block OpenCart module admin interface.
Admin can enable or disable any free shipping rule anytime. There is an option to select countries from the list for offering free shipping.
Free Shipping Price module for OpenCart provides an option to the store admin for setting the priority of free shipping rules.
Online consumers can check the cart summary page for getting exact detail for meeting the free shipping conditions.
The OpenCart Free Shipping extension is multilingual compatible and also compatible with all the OpenCart themes.
2.0 Installation Steps
Purchase Opencart Free Shipping Manager plugin from the Knowband store. You will receive these files after purchasing it:
First, you will get a source code zipped file.
User Manual
Follow below-mentioned steps to install Free Shipping Price module for OpenCart:
1. Unzip the received zip file. You will get the folders.
2. Copy all the folders of the zip file in the Root Directory of OpenCart setup via FTP manager.
3. There will be a file named kbpdf_free_Shipping.ocmod.xml (In case of Openvar v3.0.x file name would be kbfree_shipping.ocmod.zip). Upload the same file from the page “Admin -> Extension -> Extension Installer -> upload”.
So, the OpenCart Free Shipping Manager extension is now successfully installed and ready to use at your store.
3.0 Admin Settings
After installing the OpenCart free shipping module, the e-merchant can apply the settings for offering free shipping.
There are following sections available to the admin interface:
Module Configuration
Free Shipping
3.1 Module Configuration
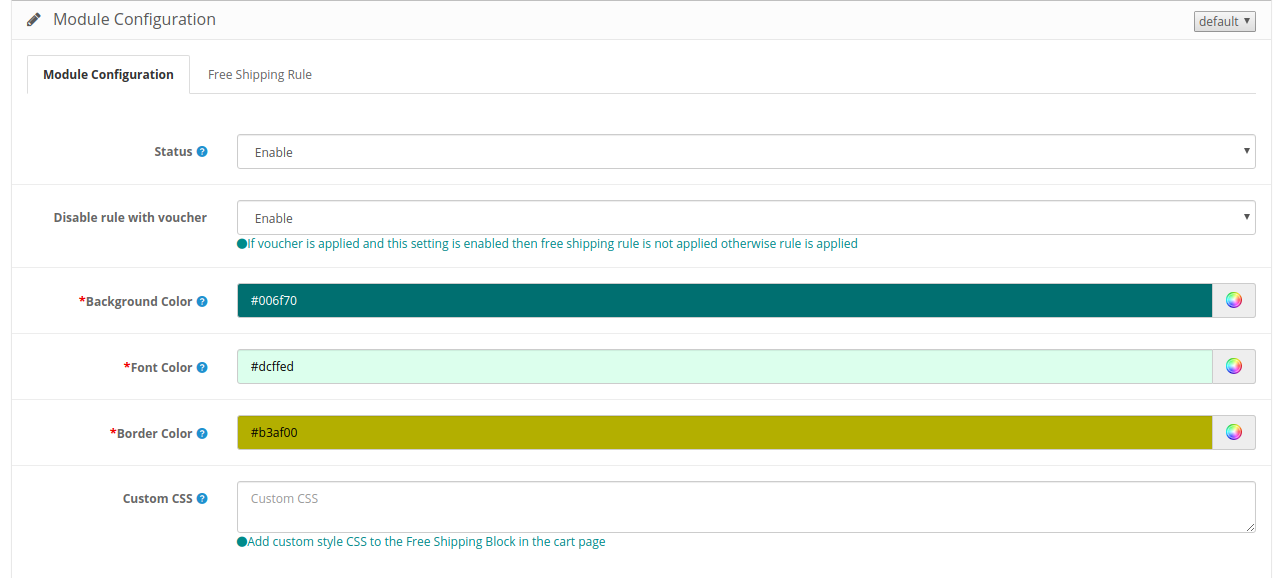
In the module configuration section, the online merchant can set up a general configuration of the Opencart Free Shipping Manager module.
Check the customization options here:
Status: Activate or deactivate the module functionality from here.
Disable rule with voucher: Once this setting is disabled, the free shipping offer will not be applicable even when the voucher is applied.
Background Color: Select the background color.
Font color: Choose the font color from here.
Border Color: Select the border color here.
Custom CSS: Enter the Custom CSS code here.
3.2 Free Shipping
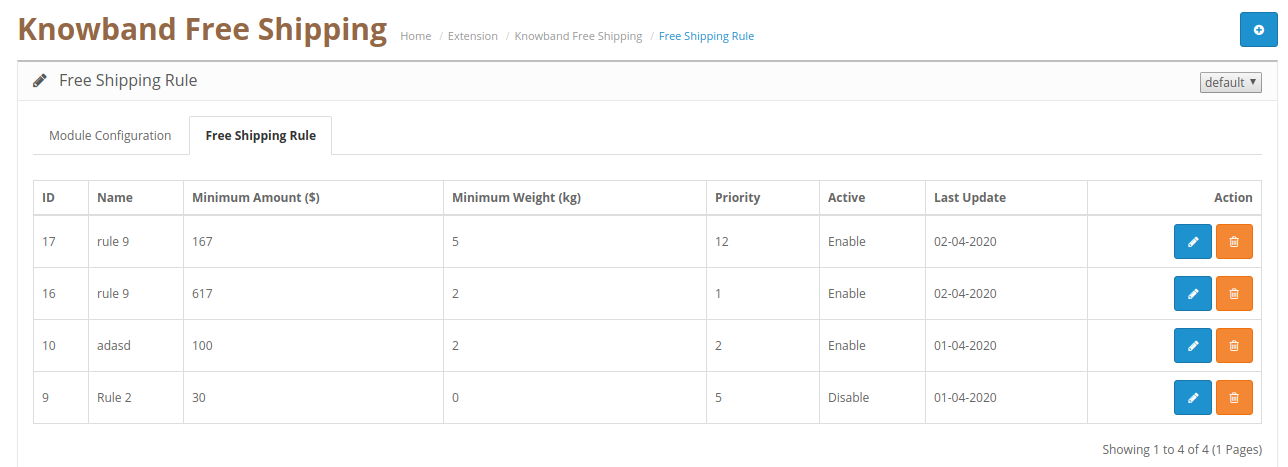
In the free shipping rule section, the online merchant can set up free shipping rules. The OpenCart free shipping module allows creating multiple free shipping rules.
3.2.1 Steps to add new Free Shipping Rule
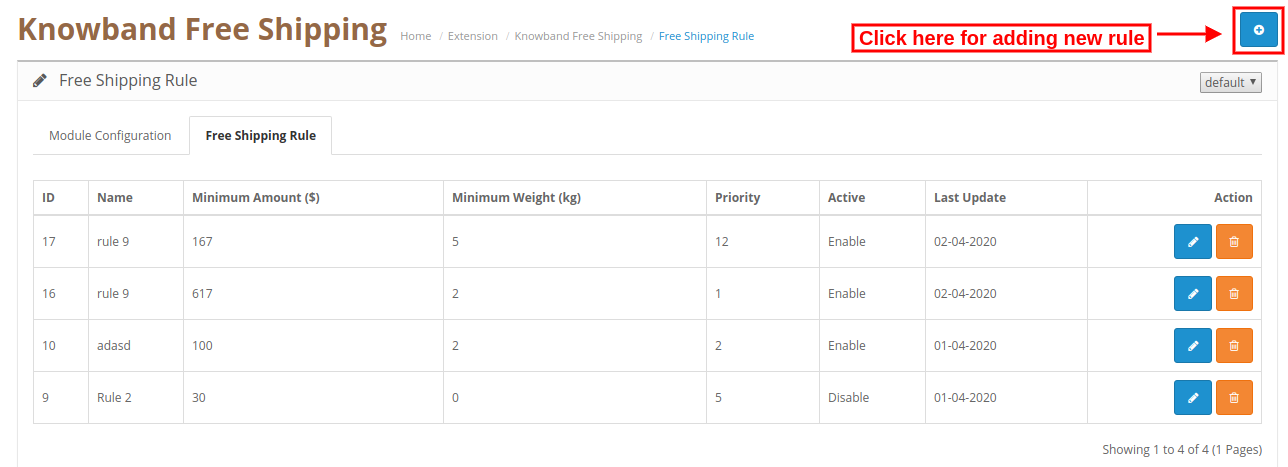
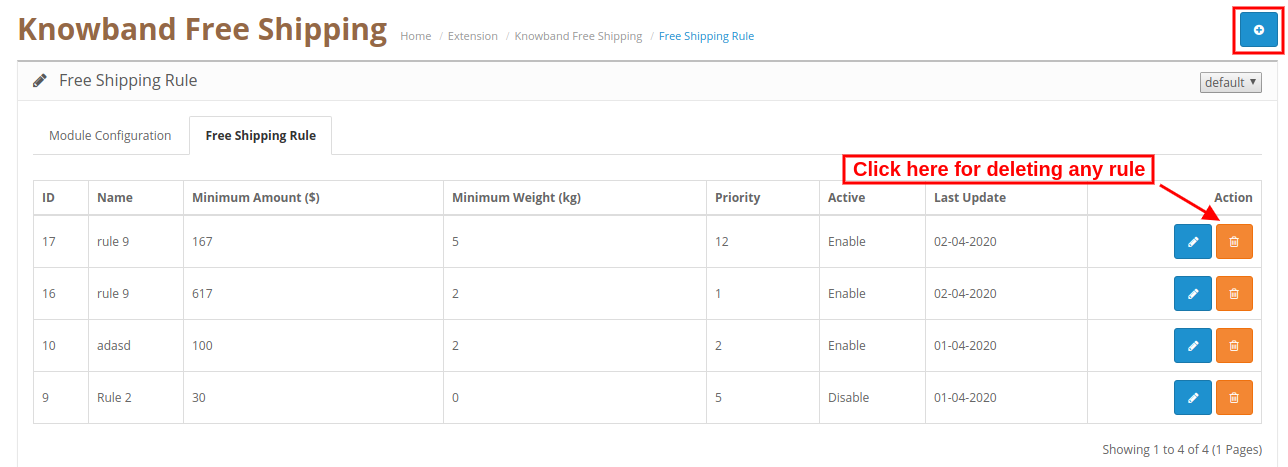
Admin can add new rules from the admin interface. For adding a new rule, the admin needs to click on the “+” button.
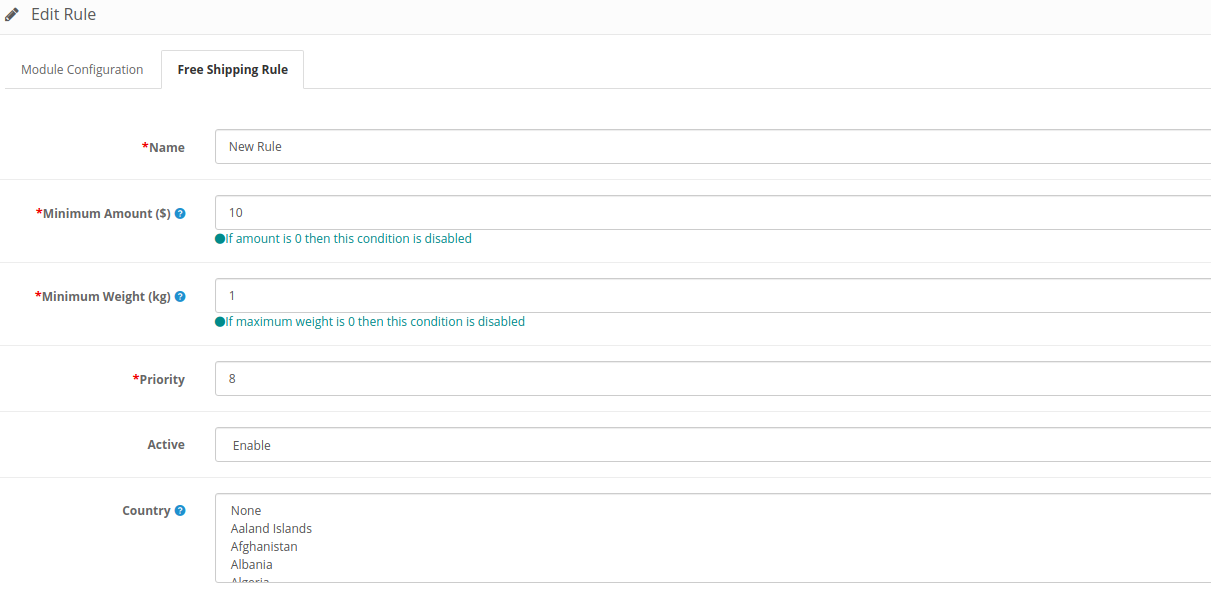
After clicking on this button, enter these details as shown below:
Name: Enter Rule name here.
Minimum amount: Set the minimum amount for availing free shipping.
Minimum Weight: Enter the minimum weight of the overall order for which you can offer free shipping. If the maximum weight of the order is 0 then this condition will not work.
Priority: Admin can set the priority of the free shipping rule.
Activate: Activate the rule from here.
Country: Admin can select the country from the list for which he doesn’t want to implement any particular rule.
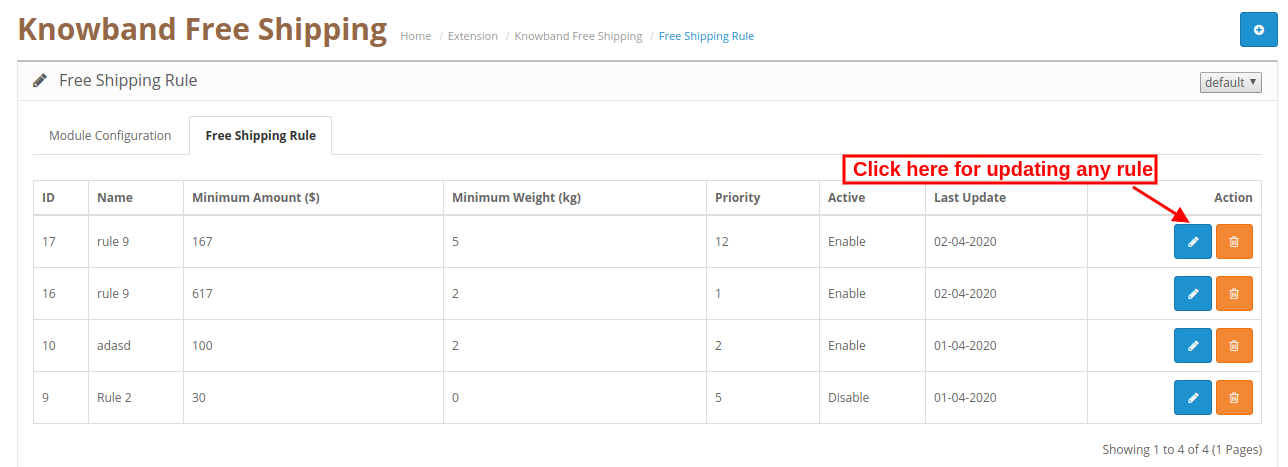
3.2.2 Steps to Delete free Shipping Rule
Admin can click here for deleting any free shipping rule. Check the below screenshot for more details:
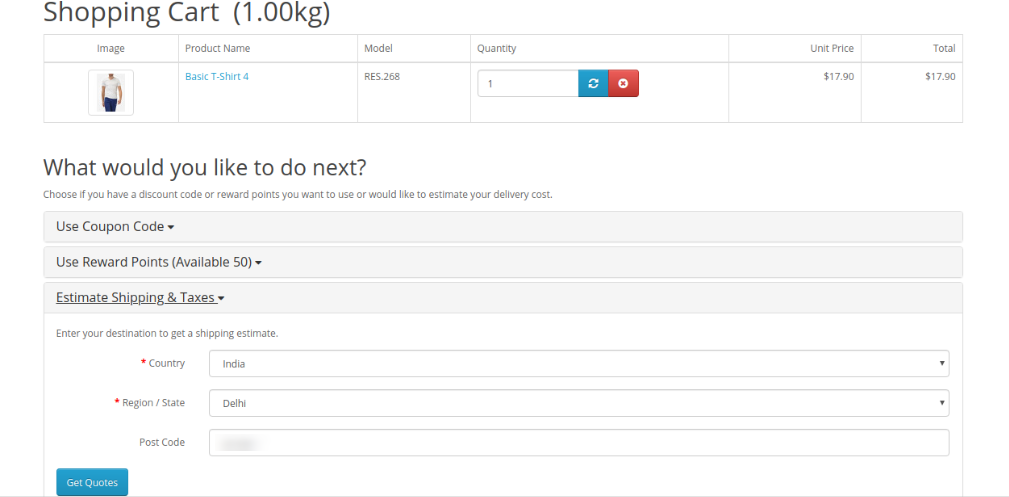
3.2.3 Steps to Update free Shipping Rule
Admin can click here for updating any free shipping rule. Check this screenshot:
4.0 Website UI
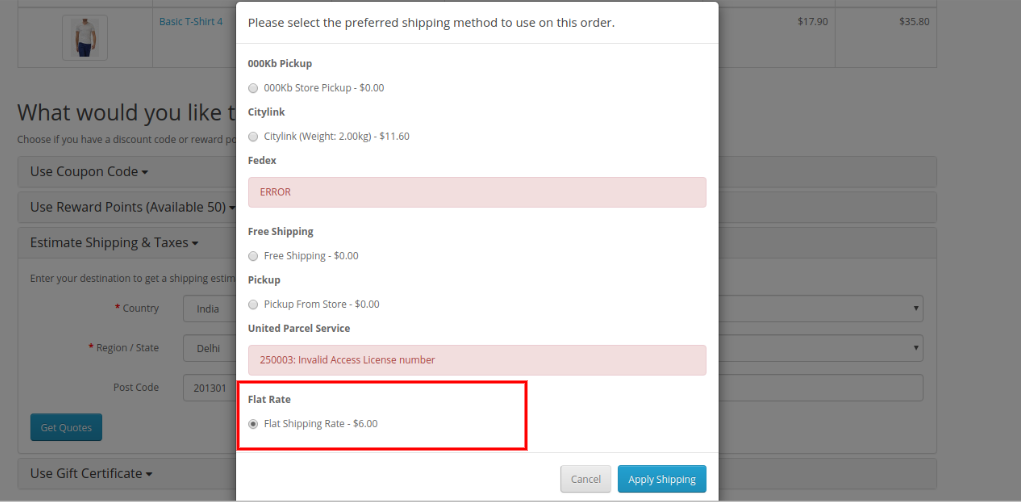
In the website front-end interface, the online users can view the impact. After adding any product in the cart, online users can select the “Estimated Shipping and taxes” option and enter country and area details here. Check the below-mentioned screenshot:
After submitting all details, online users can select shipping fat rates as shown below:
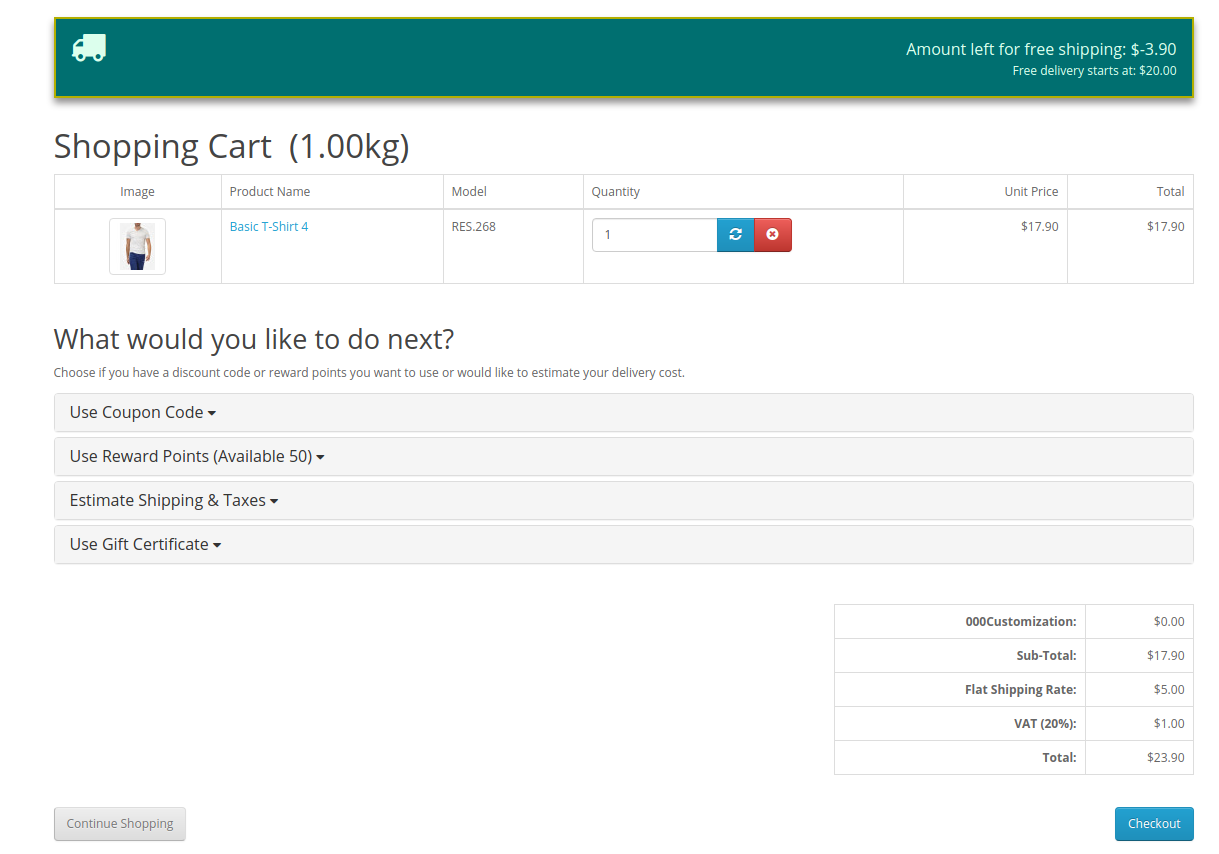
After selecting shipping flat rates and clicking on apply shipping, the online users can view a free shipping block on the cart review page. They can get exact information about the remaining amount for availing free shipping.
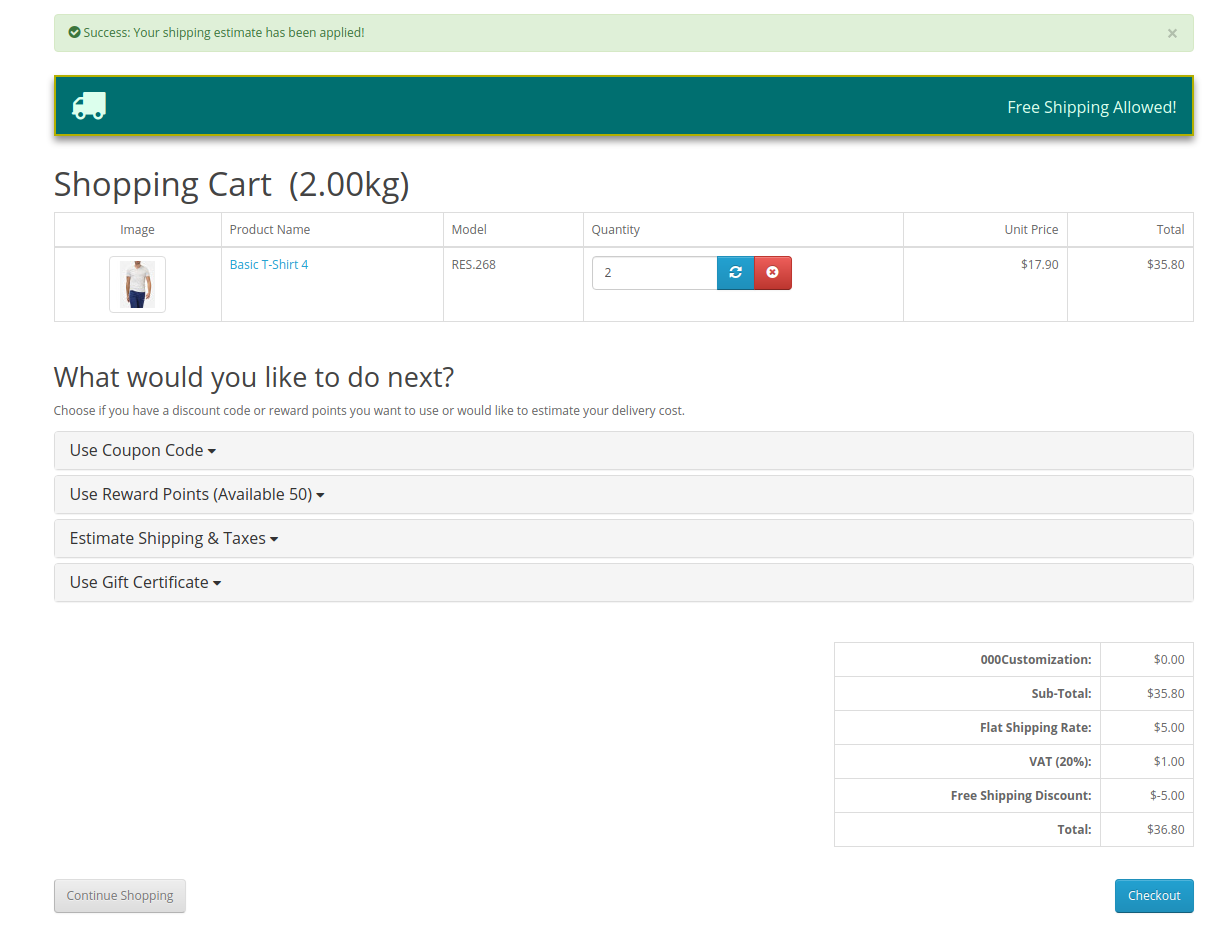
As shown here, $3.90 remaining for availing free shipping. After adding another product, online users can view the free shipping message as shown below:
The online users can avail free shipping only if they fulfill all the conditions applied by store admin.
This way, the online users can avail free shipping while shopping for their desired products from your online store.
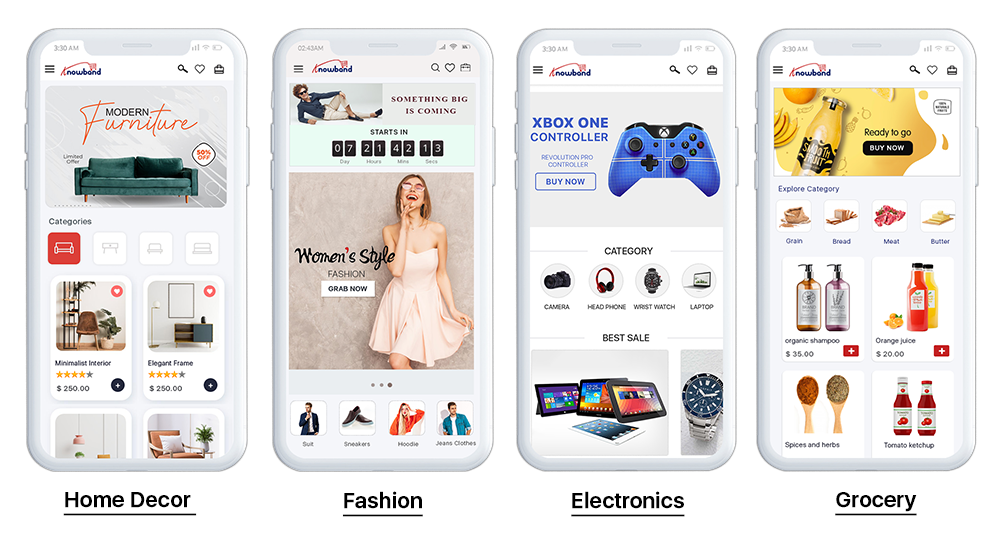
The rapid growth in the mCommerce industry has led to the urgency of having an eCommerce mobile app. But, creating mobile apps involves a lot of coding & other technicalities. Why not turn your online website into a web-app instead?
Offering an optimized PrestaShop eCommerce PWA app i.e. would enhance the mobile shopping experience to the users. This PrestaShop PWA App Builder module is designed & built to transform your store into a web-application which can be managed from a friendly backend panel. These apps come up with various extended features than native apps like offline mode & platform independency which makes them a hassle-free & seamless shopping solution for users.
1.1 View Demo App:
Before purchasing the extension, view demo app functioning by opening PrestaShop PWA Demo App URL on your browser.
–> iOS devices do not offer any inbuilt “Add To Home Screen” prompt, so users need to manually add the PWA Mobile App to the home screen of iPhone or iPad.
–> iOS does not support web push notifications, hence the push notifications can be sent only to the Android device from the admin panel of PrestaShop PWA Mobile App Builder.
[NEW UPDATE] PrestaShop PWA supports RTL Language Scripts
The PrestaShop PWA Mobile App Creator now supports all worldwide languages including RTL (Right To Left) ones like Arabic, Hebrew, Persian, etc. The store admin can bring all languages of their store on the Progressive Web App and can even add any RTL languages as per the requirement. On the other hand, the mobile shoppers won’t face any issue in accessing the PrestaShop PWA Mobile App in their preferred language.
Compatible With PrestaShop Multi-vendor Marketplace
The PrestaShop Multi-vendor Marketplace module is fully compatible with PrestaShop PWA Mobile App. The Progressive Web App displays the seller section with all marketplace sellers on the same application. The seller details remain in real-time sync with the marketplace web and will be updated automatically on the PrestaShop eCommerce PWA application.
Note: The multivendor PWA mobile app for PrestaShop is only customer-centric. This means there won’t be any seller dashboard or management from the app-end. The store admin can manage the sellers from PrestaShop Marketplace module and the same will be updated on the app instantly.
2.0 Admin Panel Screens
The PrestaShop PWA Mobile App can be fully configured using these handy admin tabs and settings. All you need to do is to make some necessary clicks and button toggles to make the changes in the Progressive Web App. Let’s discuss each one of them in detail:
2.1 General Settings
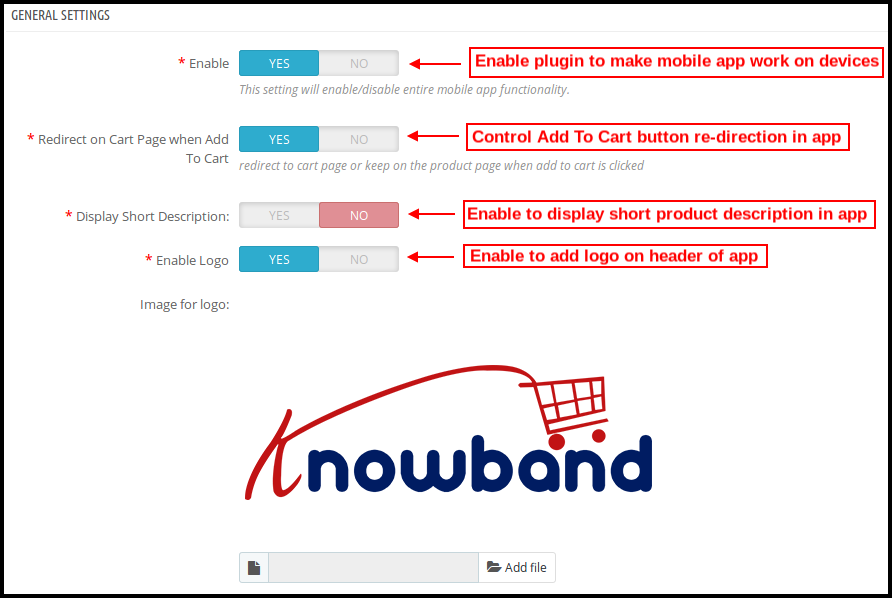
As the name suggests, these general configuration settings are for all sorts of regular change in Progressive Web Applications(PWA). The options under this tab make the app function on online shopper’s devices.
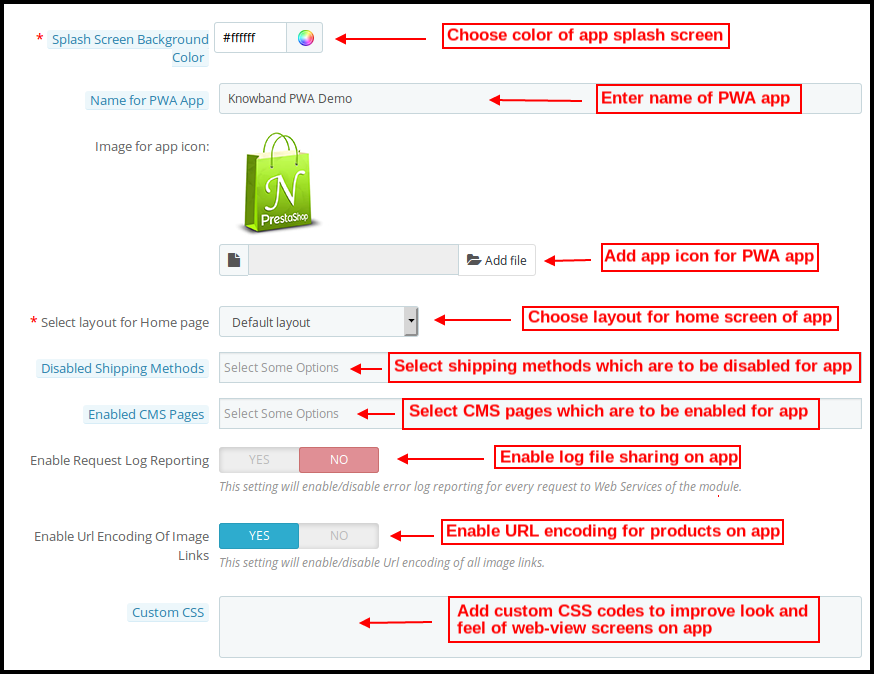
a) Enable Plugin: Enable the PrestaShop PWA module to make the app work on mobile devices. b) Redirect on Cart Page when Add To Cart: This functionality allows admin to control “Add To Cart” button redirection. The users can be redirected to the shopping cart or kept on the product screen on tapping “Add To Cart”. c) Display Short Description: Enable to display short product description on the product screen of Progressive Web App(PWA). d) Enable Logo: Add logo of your store on the header of Progressive Web App (PWA) and showcase your brand to users.
e) Splash Screen Background Color: Choose the right color option for the background of Progressive Web App(PWA) splash screen. f) Name For PWA App: Choose the name of your PWA for Prestashop as per your choice. g) Select Layout: Choose the desired Home Page Layout for your PrestaShop app. You can create multiple home screen layouts in the backend as per various festivals & themes & use them as per your store requirement. h) Disabled Shipping Methods: Disable shipping methods from working in Progressive Web App(PWA) whichever you don’t feel right. On the website, they will work usually fine. i) Enabled CMS Pages: Choose desired CMS pages to be displayed on the PrestaShop PWA app. j) Enable Request Log Reporting: Enable option to share log file on the progressive web apps in order to get details of any sort of abnormal behavior from app. k) Enable URL encoding of Image links: Enable this functionality to support Non-ASCII characters on the Progressive Web App(PWA).
2.2 Push Notifications Settings
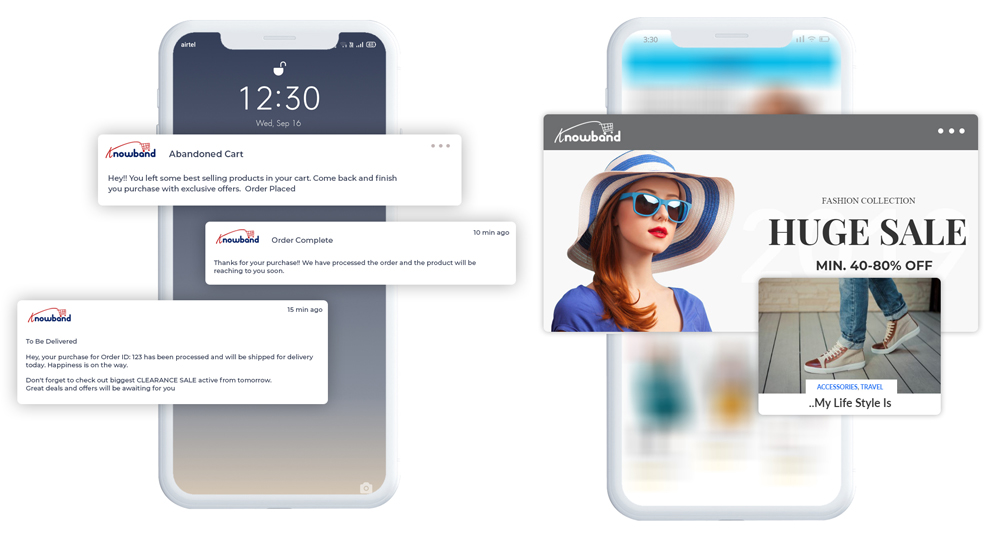
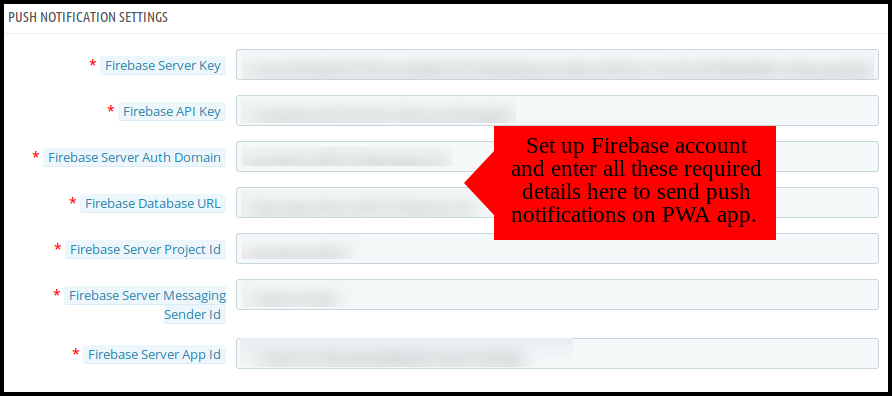
Push notifications are the handy tool to market and promote your store products, deals and sale offers. The settings under this tab allow users to configure and send unlimited push notifications on PrestaShop PWA app.
The various details under these settings will be obtained when you’ll set the Firebase account. Here is step by step process to do so:
2.21 How To Set Up Firebase Account?
Step 1: Login Google Firebase
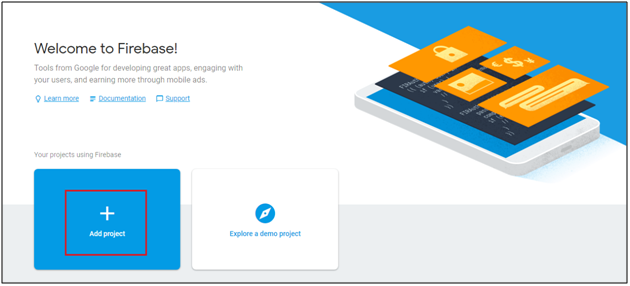
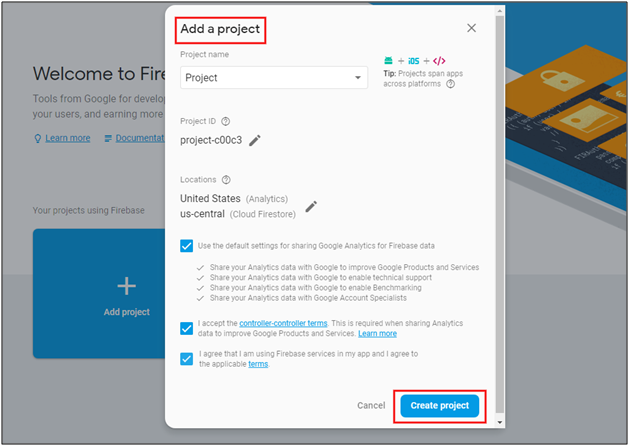
Step 2: Create New Project
As you click on Add Project, following dialog box will pop up:
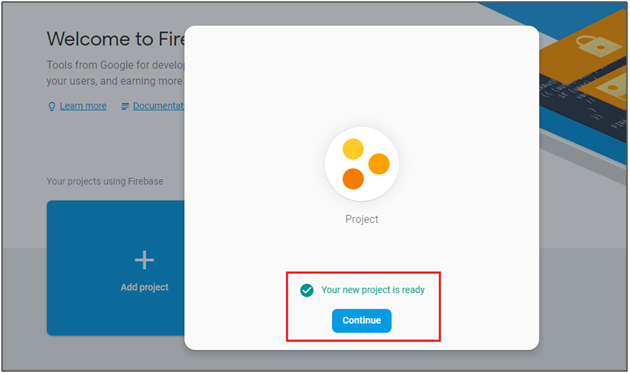
It will take a few seconds to create the project. Once the project is ready, click continue.
Step 3: Manage Project Settings
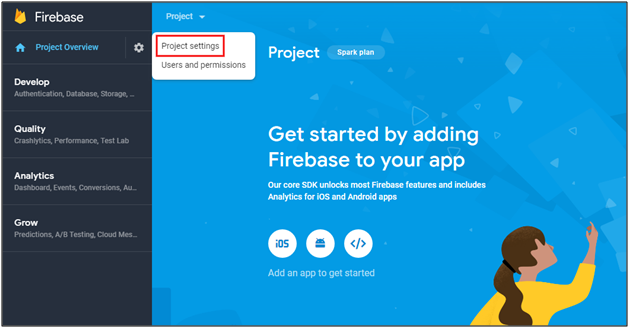
Once the project is created, click on Project settings.
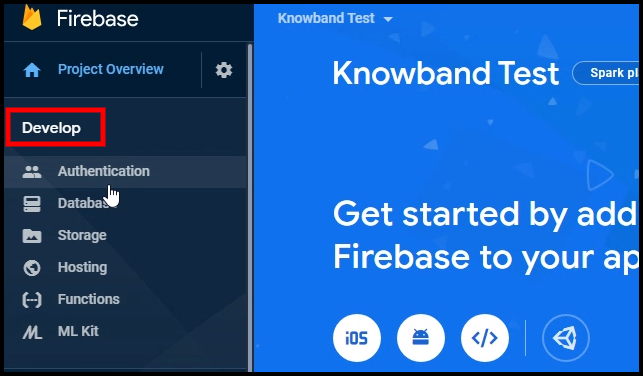
Step 4: Go to Authentication options:
Step 5: Find Firebase Keys
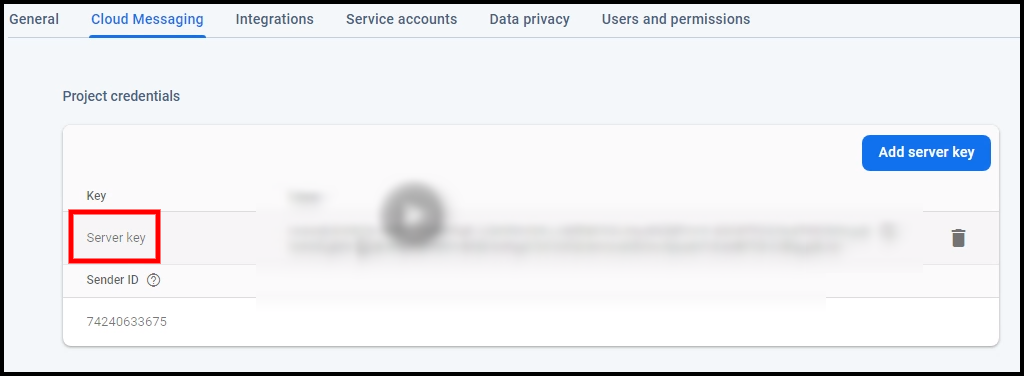
In the project settings, click on Cloud messaging settings. From here, you can directly get the server key.
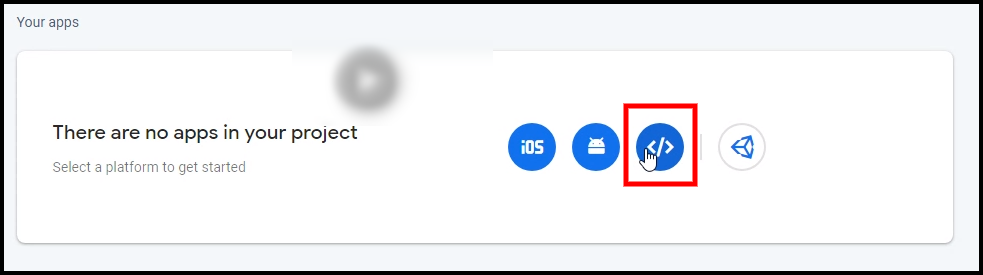
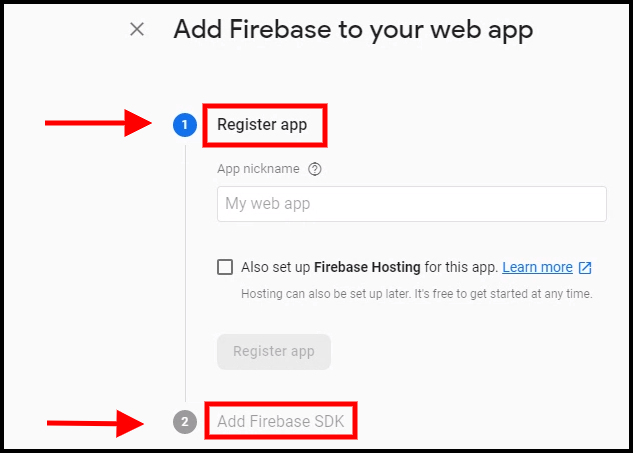
Step 6: Add your Web-App to Firebase
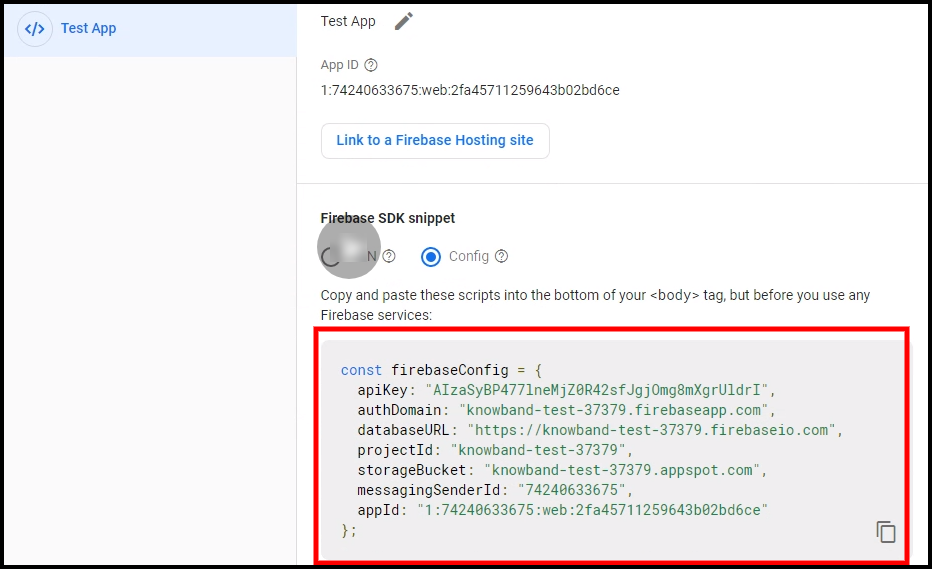
Step 7: Get other firebase related details and paste the same in PWA for Prestashop module admin panel.
Step 8: Get firebase server key from cloud messaging tab in Settings:
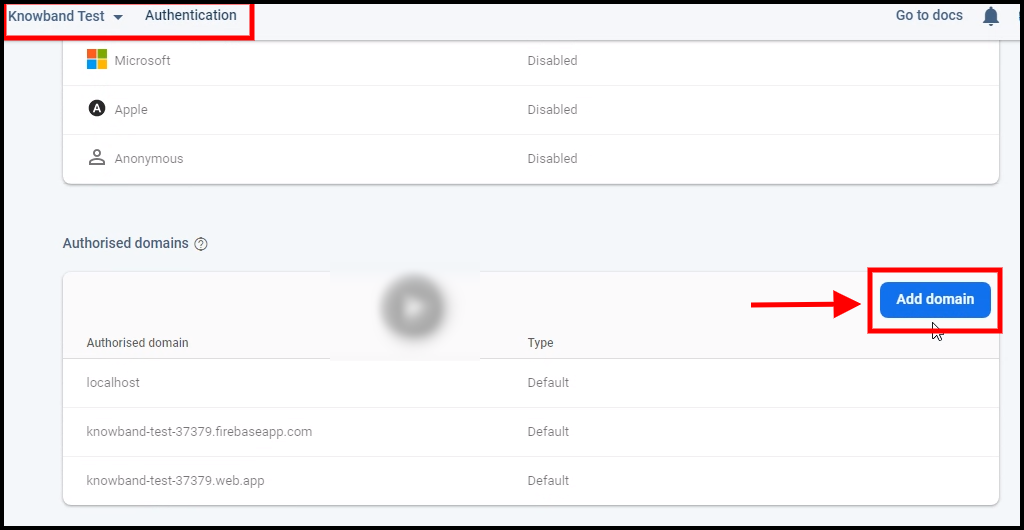
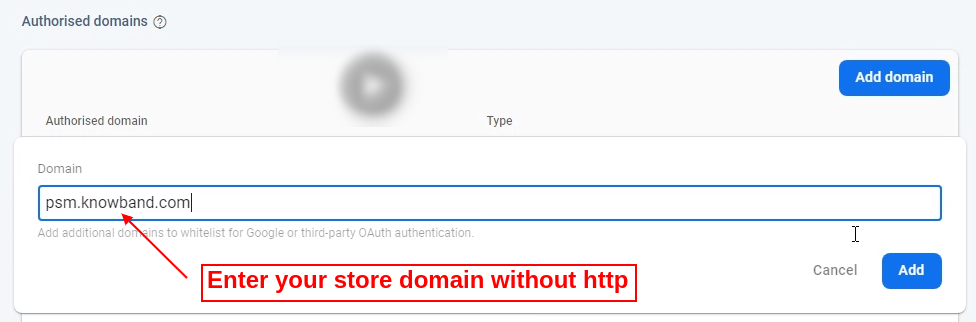
Step 9: Add your domain in authentication>>sign-in.
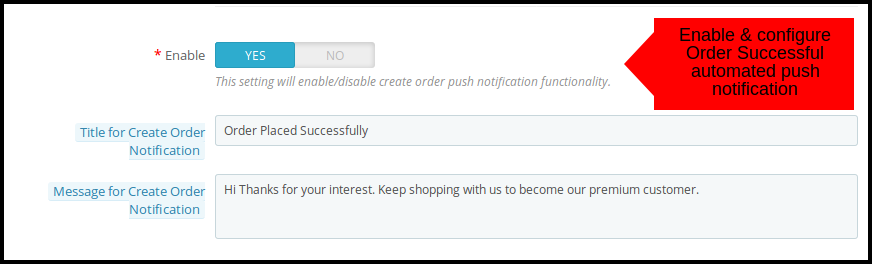
A) Successful Order Push Notification:
Enable/Disable automated Push Notification sent to the app users for successful order creation from PrestaShop PWA app Builder.
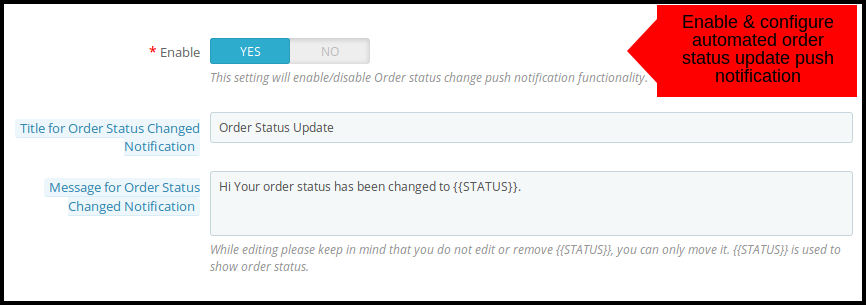
B) Order Status Update Push Notification:
Enable/Disable automated Push Notification sent to the app users for any update regarding their previous order delivery status. The users get to view this status under “Order Details” tab of PWA app
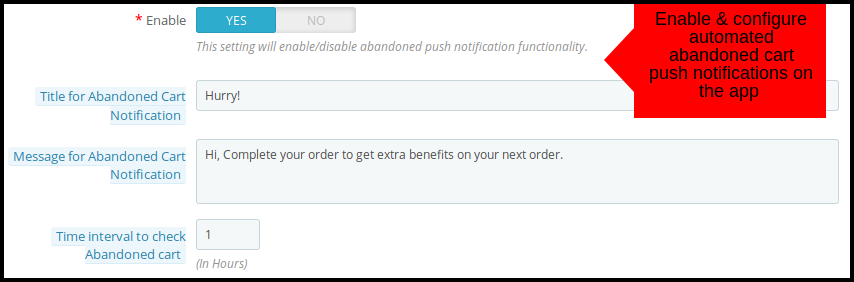
C) Abandoned Cart Push Notification:
Enable/Disable automated push notification sent to the users who have abandoned cart without successful purchase. This push notification will be sent to users automatically after entered time interval.
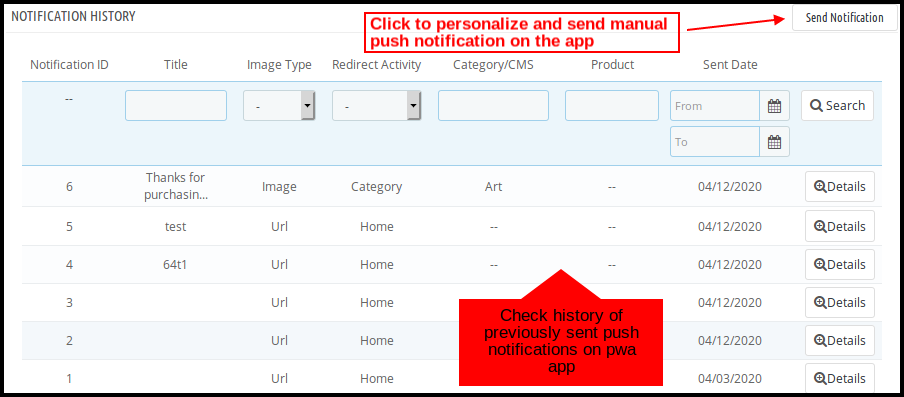
2.2 Push Notifications History
Here the store admin can view complete history of push notifications sent to Progressive Web App (PWA). Along with that, the store admin can even personalize the manual notification and send the same to Progressive Web App users.
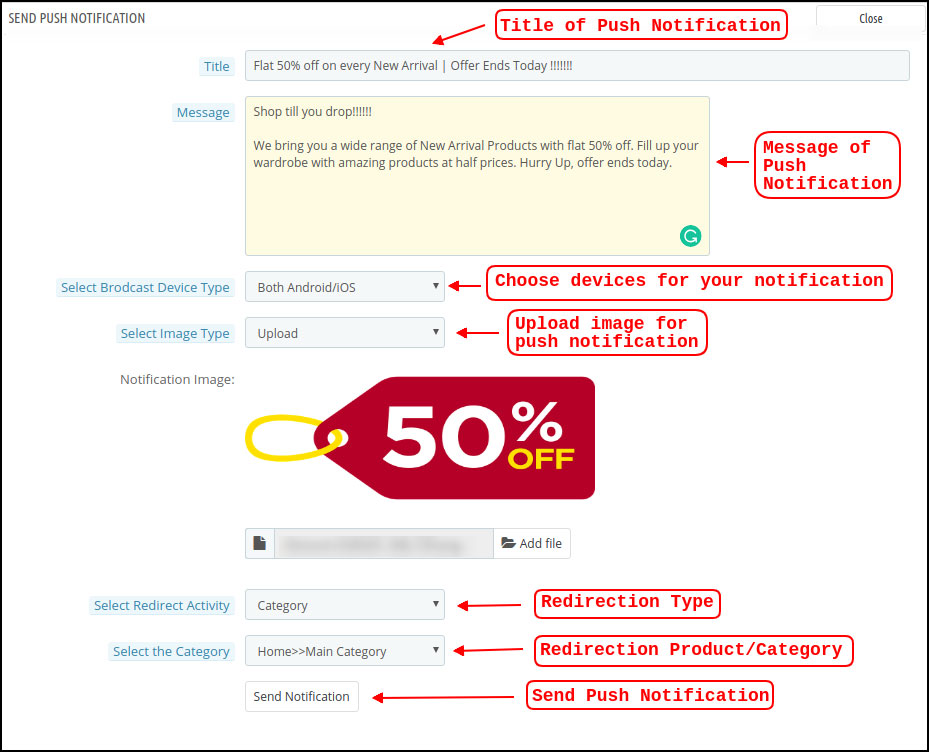
A) Send Notification:
What’s better to design and send push notifications as per the need? This option allows store owners to configure and send a custom notification manually to PrestaShop PWA app users.
2.3 Home Page Layout
The PrestaShop PWA module allows the store admin to bypass the restrictions of having fixed home screen UI and design the one suiting their business need. This tab allows the store admin to craft and save multiple layouts and use them as per the running occasions and festivals.
In order to configure the home page layouts of PWA app, following elements are available in the back-end:
A) Top Categories:
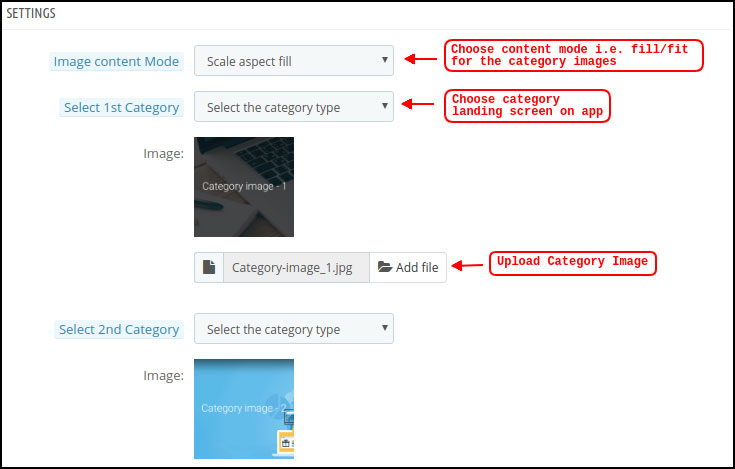
Top categories are displayed in the form of small squares on the home screen of Progressive Web App(PWA). Their images and redirection links can be configured from here. These categories can be used for highlighting top brands on the app home screen. The PrestaShop PWA module allows maximum 8 categories in which minimum 4 are mandatory.
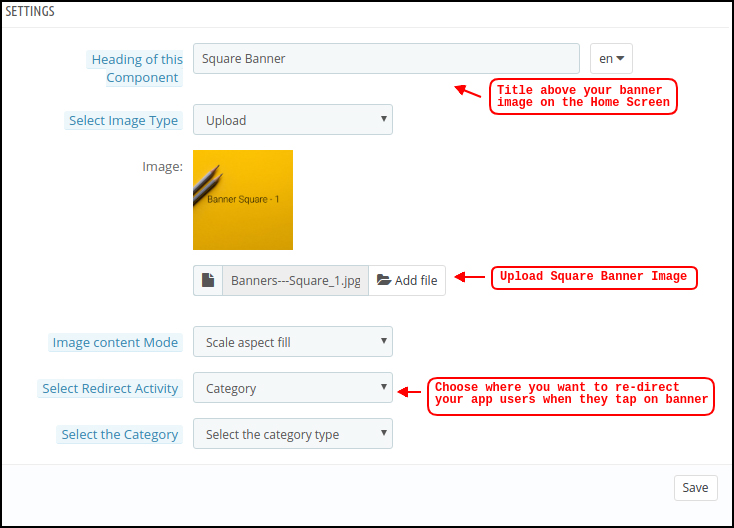
B) Square Banner:
Square Banner listing on the Progressive Web App(PWA) home screen offers a square-shaped banner block in which the store admin can use desired image. The relevant redirection link can be used for these banners.
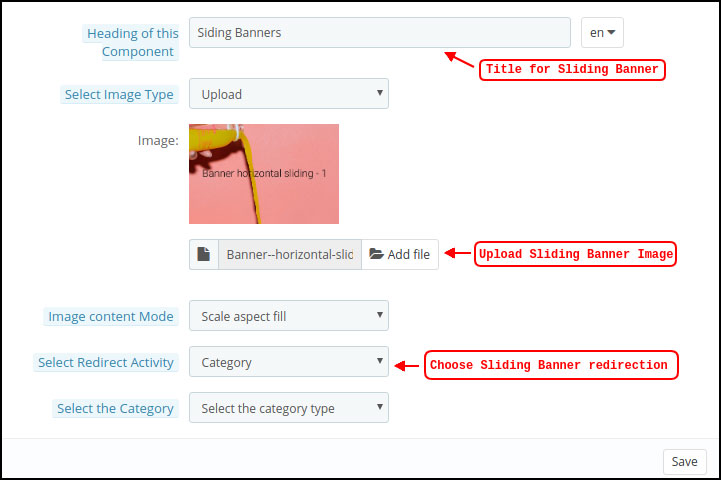
C) Horizontal Sliding Banner:
These are the rectangle-shaped banner block available in horizontal sliding on the home screen of PrestaShop PWA app. For this also, image and redirection link is fully configurable.
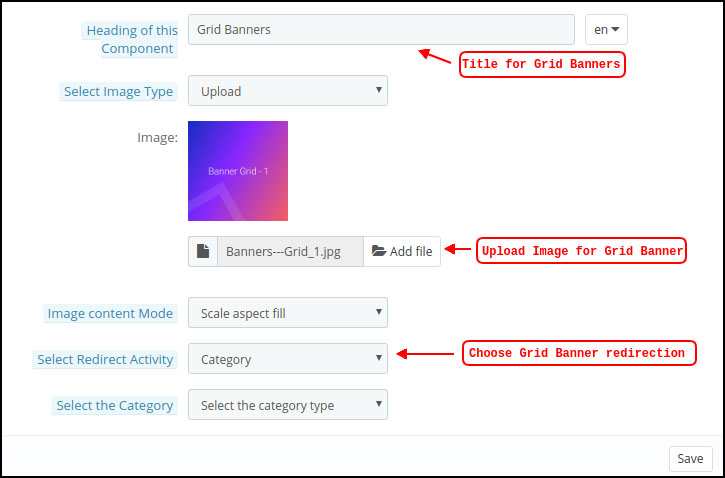
D) Grid Banners:
These are square-shaped banners listed on the home screen of Progressive Web App(PWA) in the form of grid view. The store admin can add as many banners as required and set their redirection link.
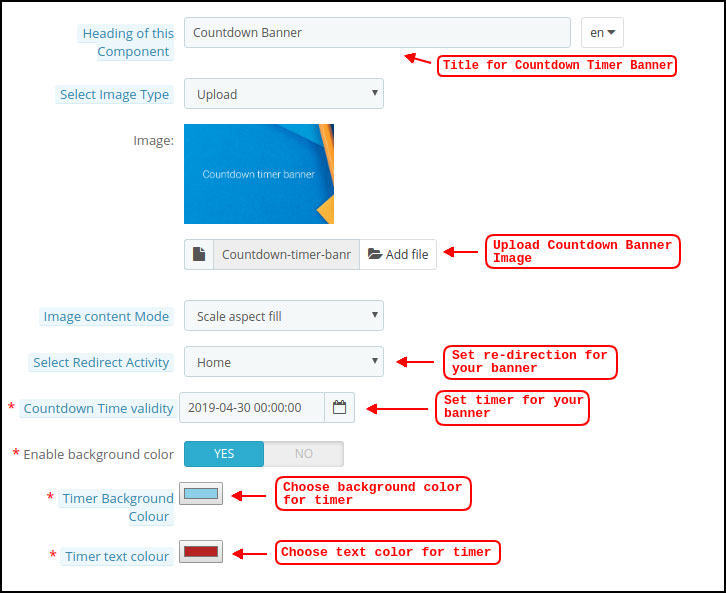
E) Countdown Timer Banner:
The PrestaShop PWA module allows the store admin to configure and add a timer based banner on the home screen of web-app. The store admin can add banner image & landing screen along with timer till the banner is to be displayed on the progressive web app home screen. Once the timer is over, the banner will be removed automatically.
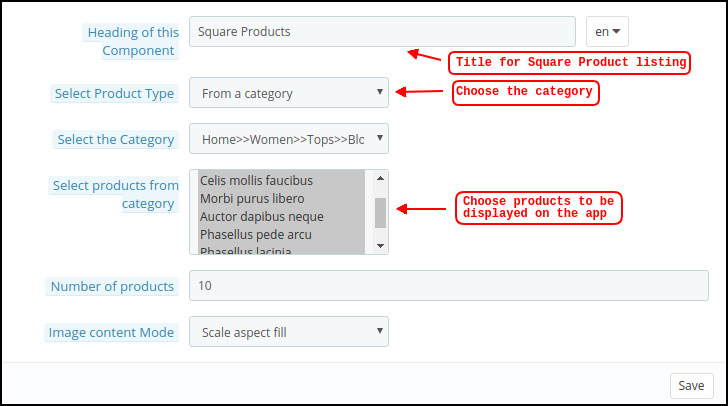
F) Square Products:
As of banners, the PrestaShop PWA mobile apps allows showcasing products in square block listing. The admin get to choose the products for this element.
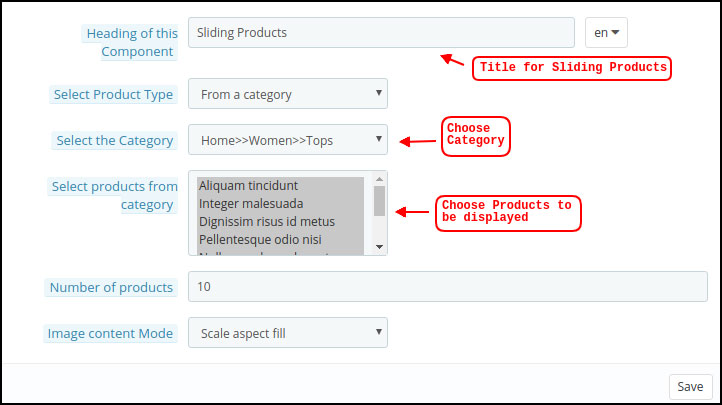
G) Horizontal Sliding Products:
You can add the products in the form of horizontal sliding. The chosen products could be of the store admin choice like New Arrivals, Best Sellers, custom products etc.
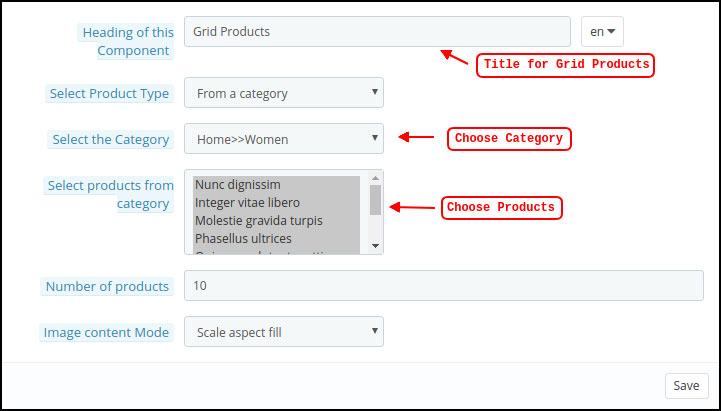
H) Grid Products:
Products can also be added on the home screen in the form of grid view block listings. The store admin can choose desired products and quantity to be displayed on the home screen of PrestaShop PWA app Builder.
I) Recently Accessed Products:
The PrestaShop Mobile PWA module allows store owner to add a recent tab element on home screen of web application. It will display all products which are browsed by users recently.
Note: The store admin can add up to 20 elements while designing layout in the backend panel.
2.4 How to get Facebook App details?
Facebook App can be created by following below-mentioned steps:-
Step 1: Go to given URL: https://developers.facebook.com/apps/
Step 2: Click on the “Add a New App” button.
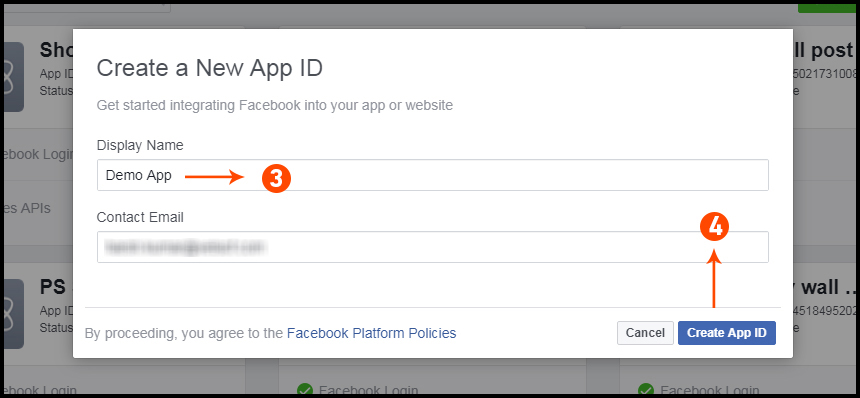
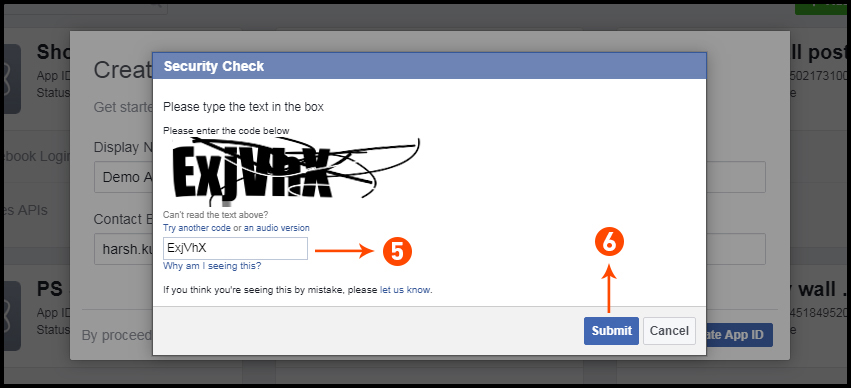
Step 3&4: Enter your App name and email id, then click on “Create App ID” button.
Step 5&6: After clicking on Create App ID you will have to go through a security check as shown:
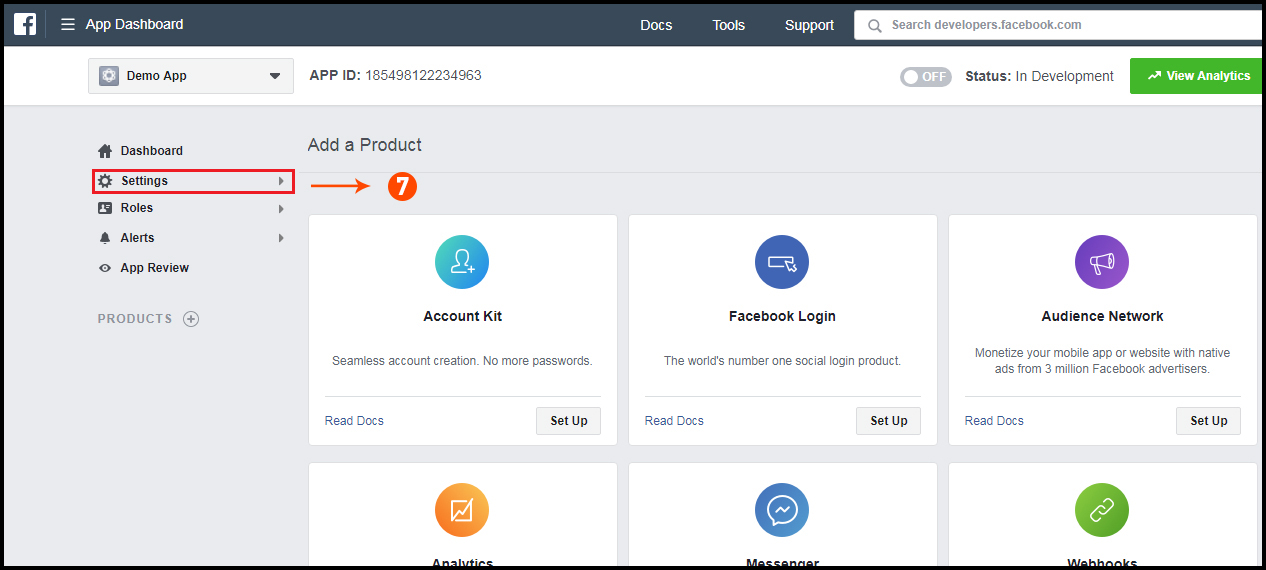
Step 7: Click on “Setting” tab.
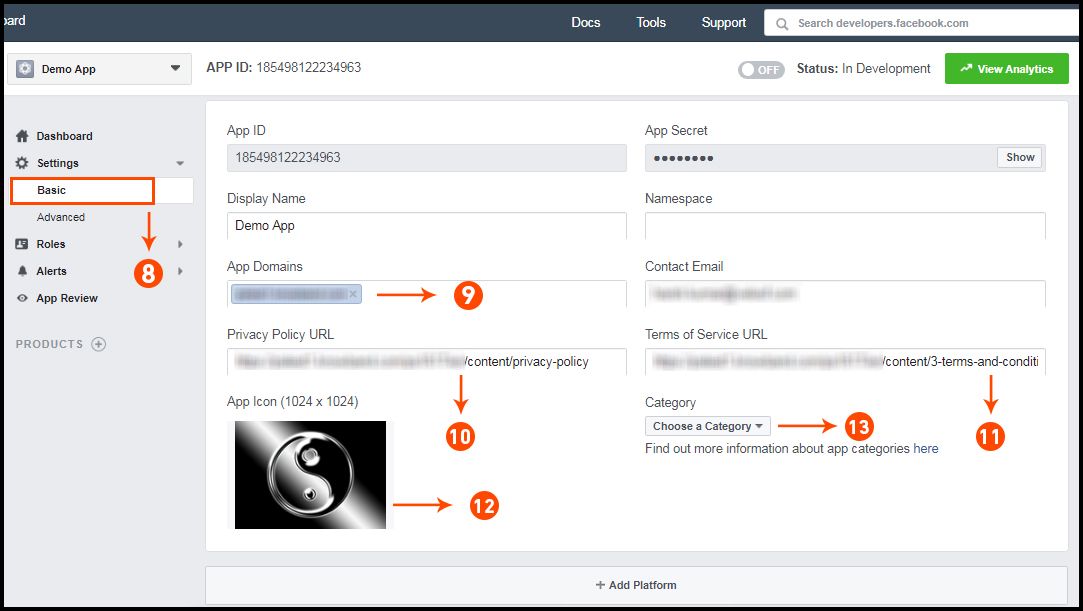
Step 8-13: Two option will be available in the dropdown, Basic and Advanced, click on “Basic”. And then enter your “App Domain”, “Contact Email”, ”Privacy URL”, ”Terms and Conditions URL”, ”Add Logo”, ”Select Category” and click on “Save Changes” button.
App Domains:
yourdomain.com is correct
yourdomain.com/store is incorrect
www.domain.com is incorrect
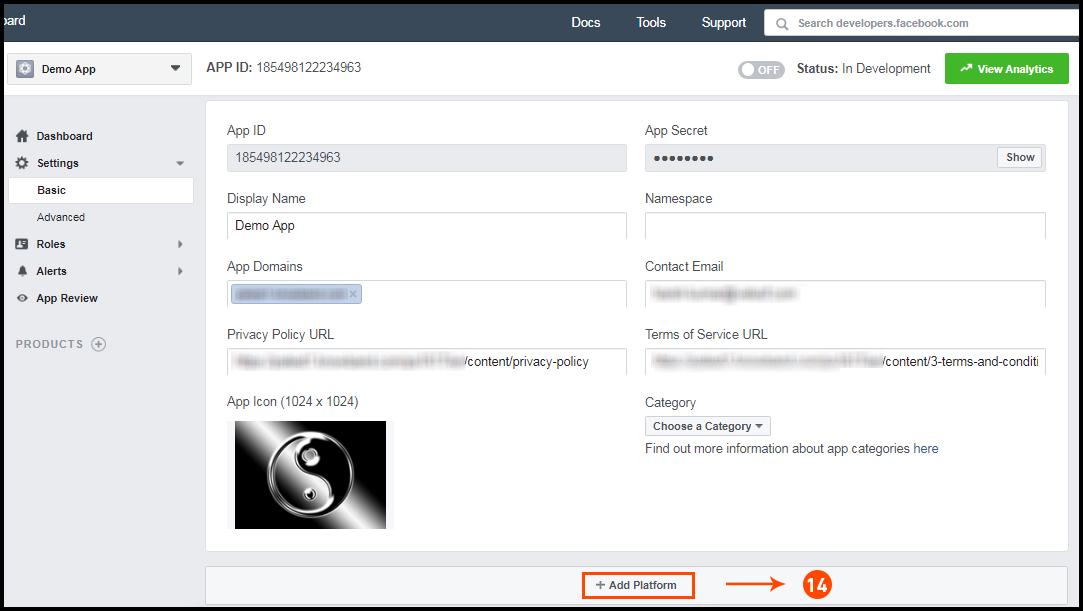
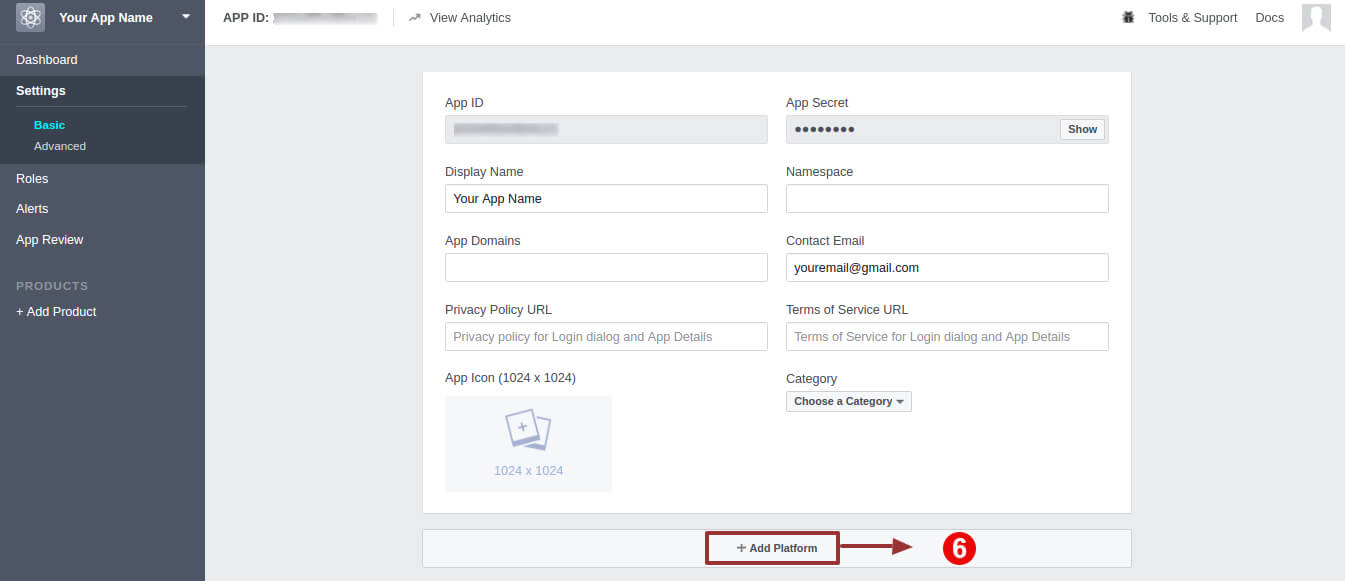
Step 14: Now click on “+Add Platform”.
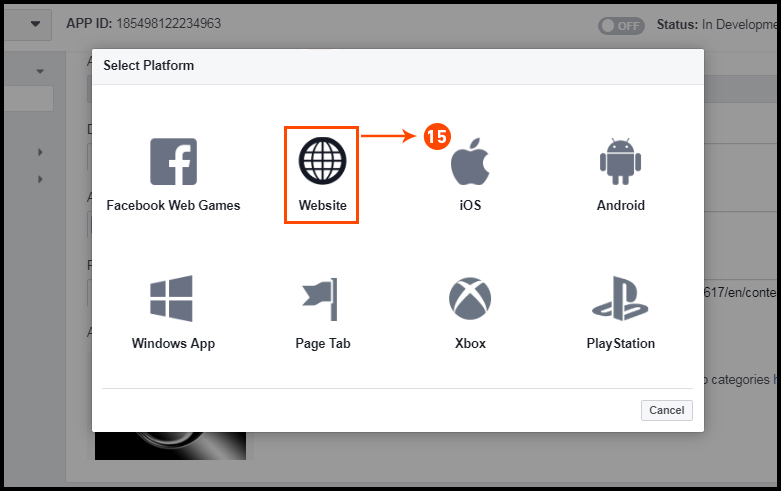
Step 15: And select Website as Platform.
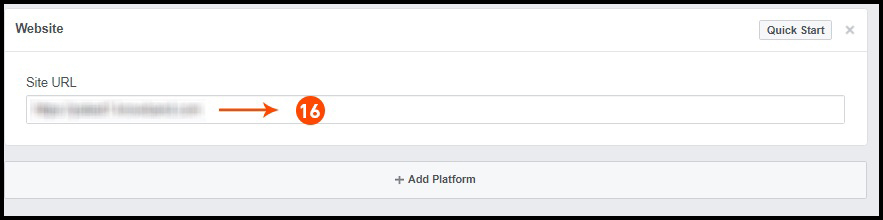
Step 16: Now Enter your site URL.
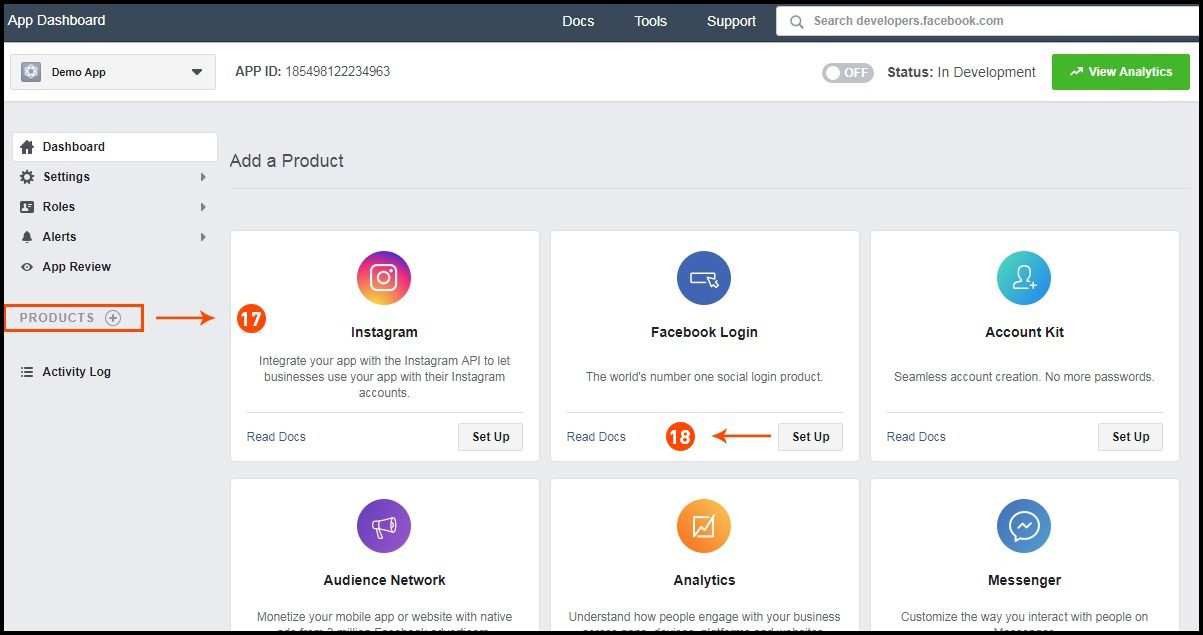
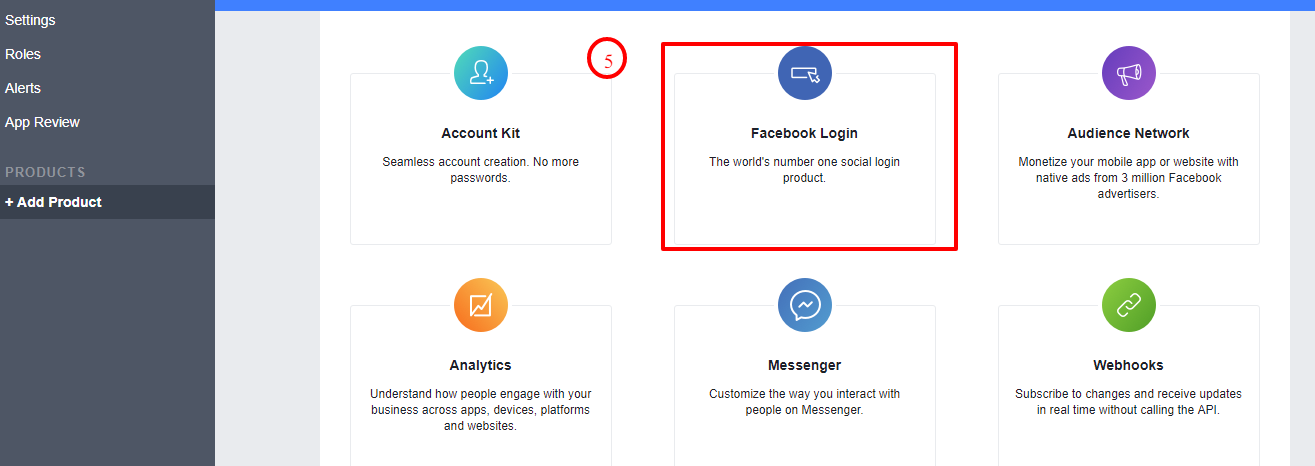
Step 17&18: Click on “Products+” and select Facebook login.
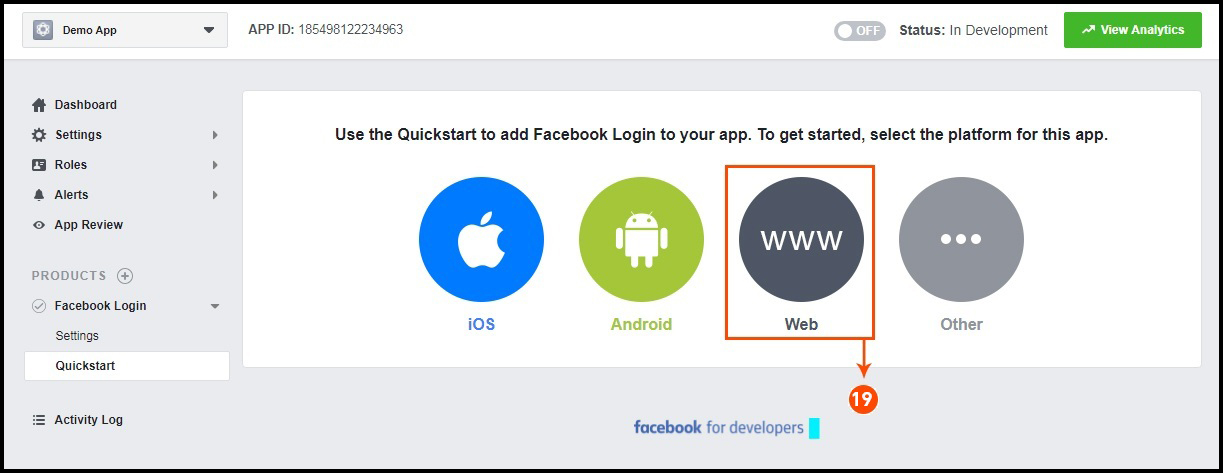
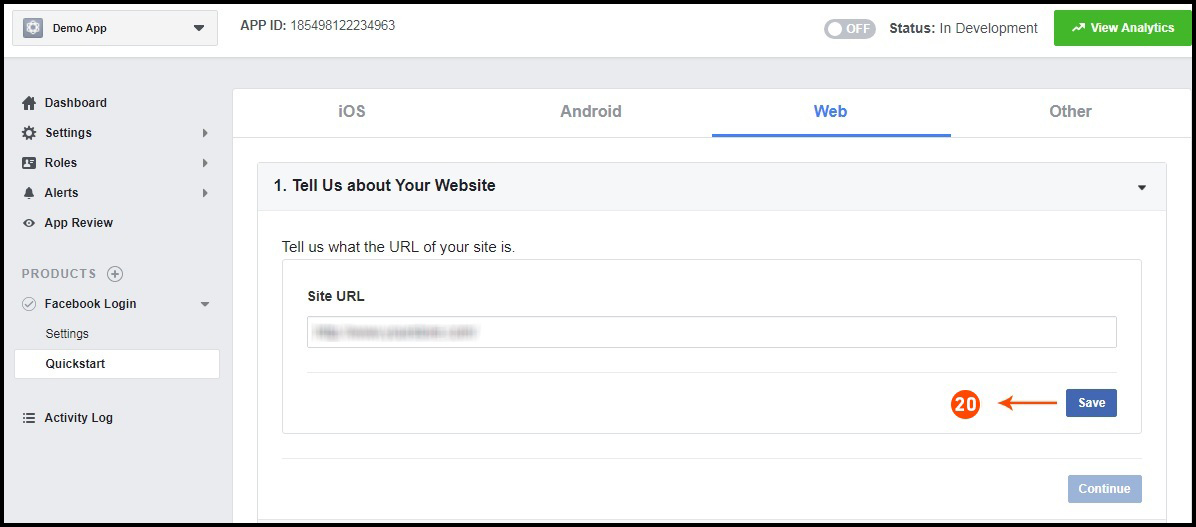
Step 19: Select web as the platform for the app.
Step 20: Now click on save.
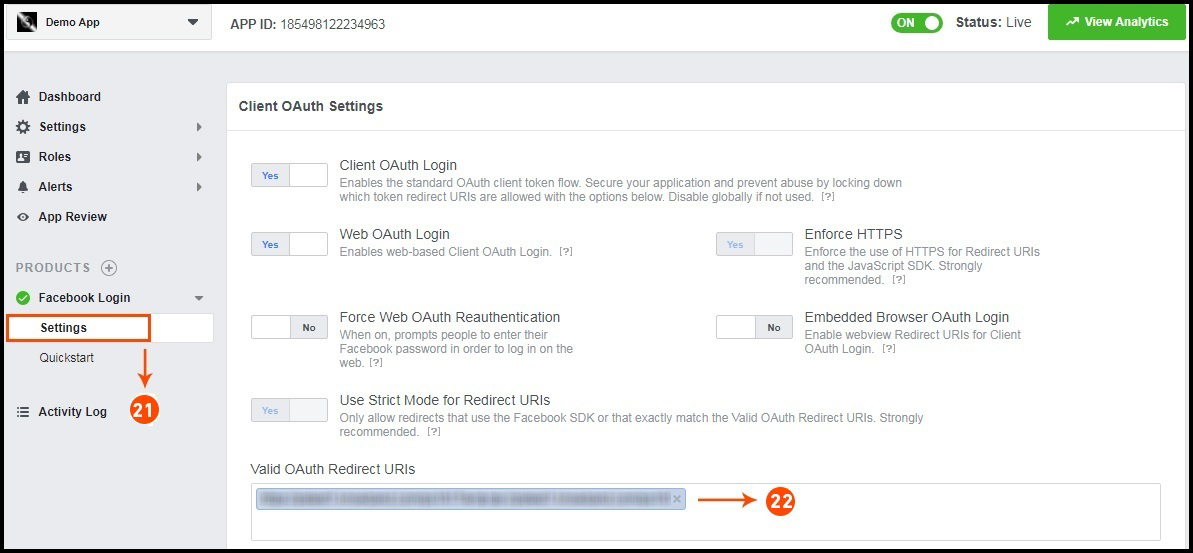
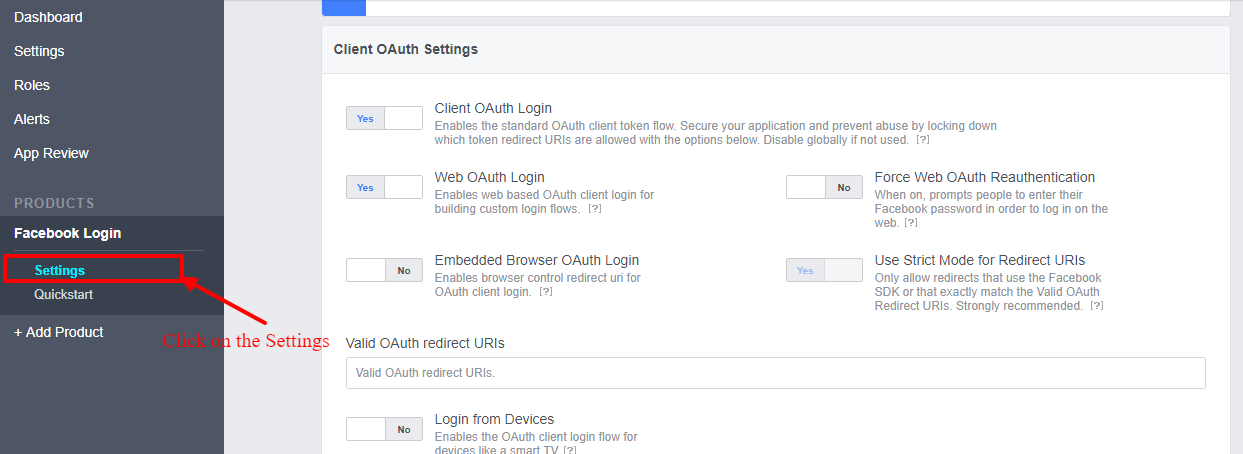
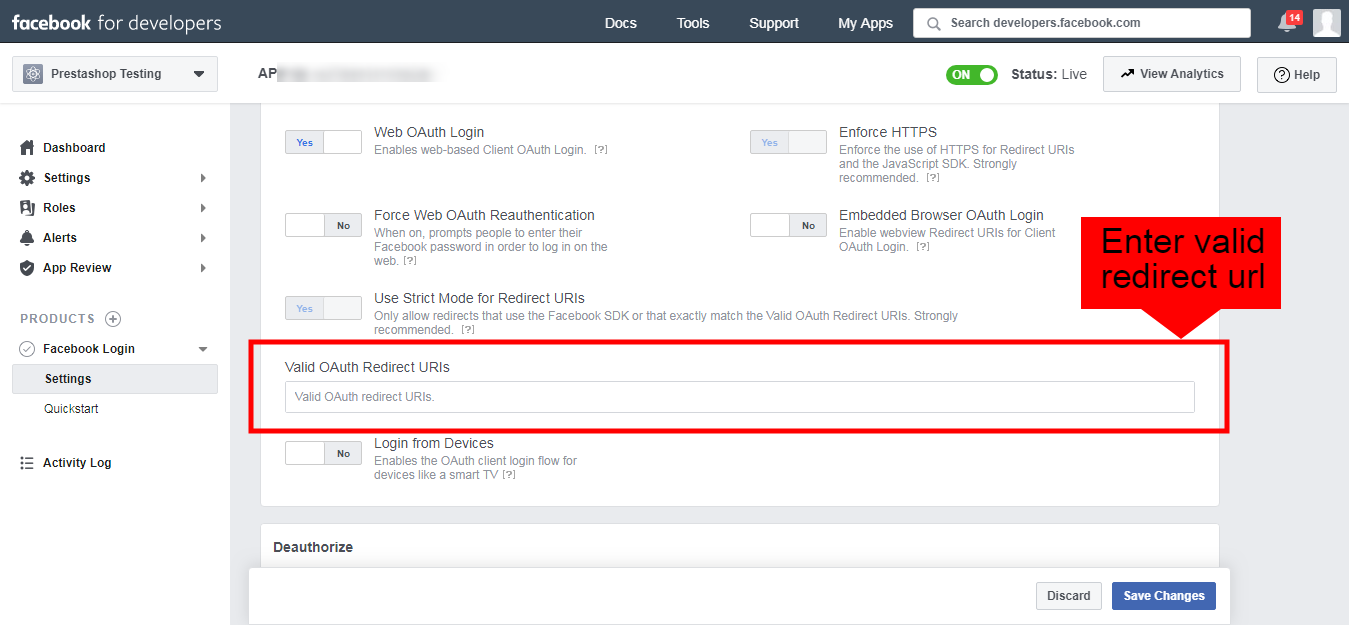
Step 21&22: Click on Settings and add a Valid OAuth Redirect URIs.
Valid OAuth Redirect URIs:
https://example.com/pwa-app/login
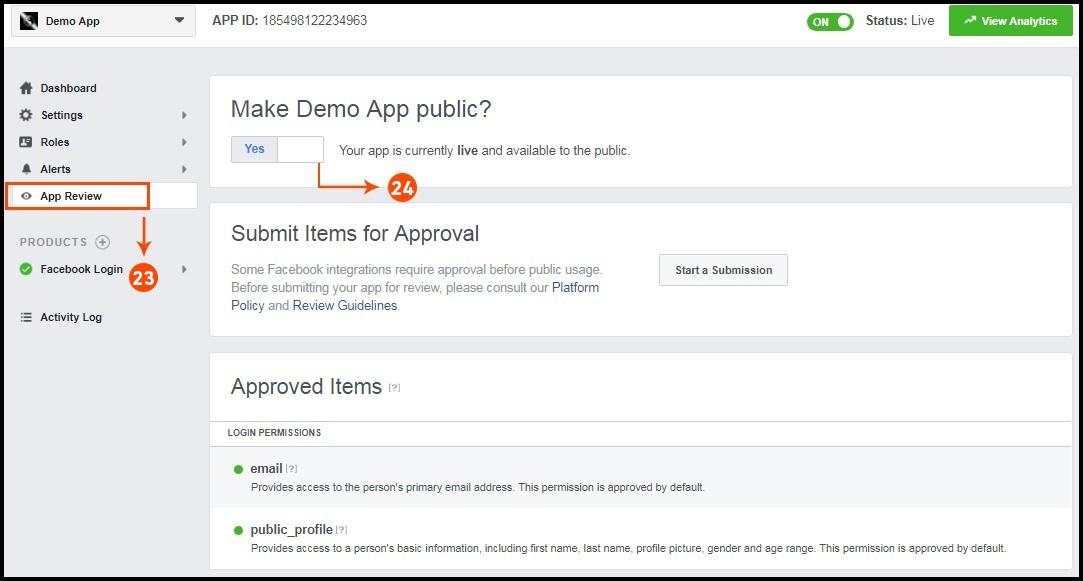
Step 23&24: Click on “App review”. And mark “Make ‘your app name’ Public” to Yes.
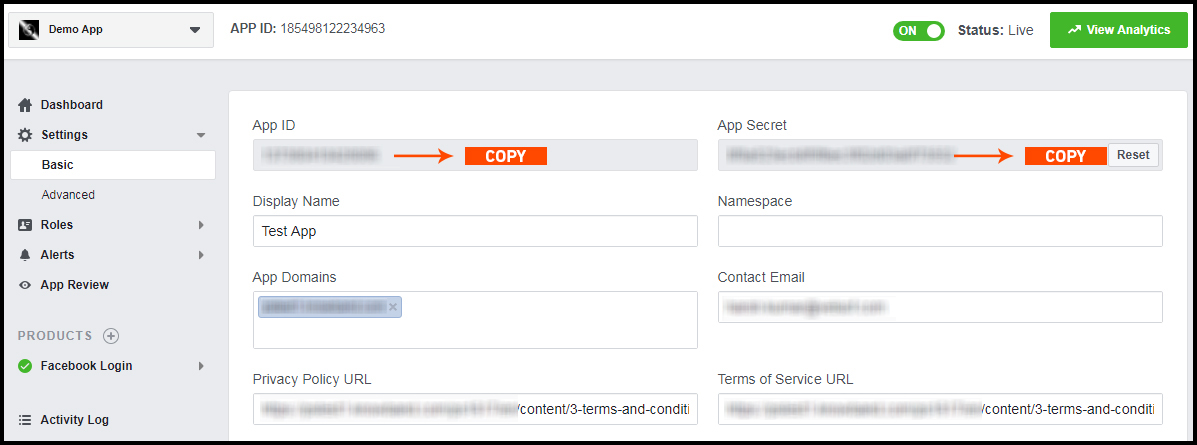
Final Step: Copy the App ID and App Secret and paste it into the fields provided in the module.
2.5 How to get Google App details?
Go to Google Developers Console
(https://console.developers.google.com/project) or click on link given top right of the respective tab in module configuration page.
Now click on Create Project on the left of the page.
Enter a name for your project and proceed to the next step.
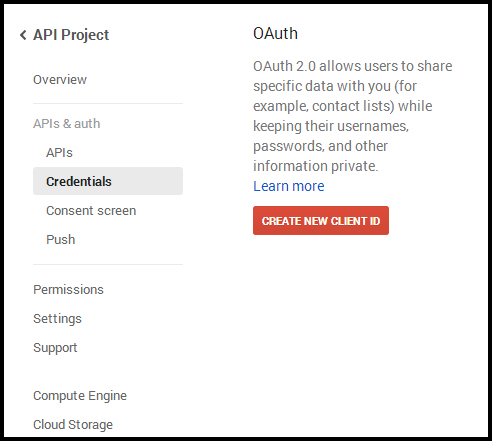
Now click on APIs and auth-> Credentials from the left menu as shown below.
Click Create New Client ID button from the right panel of the screen.
You may have to fill the form for Consent Screen before proceeding. To do so, that you have to click on Consent Screen in the left menu as shown in the image above.
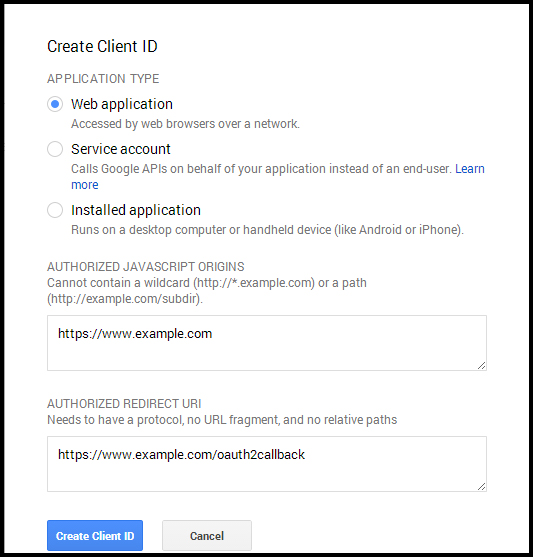
Fill the pop-up form with below details:
Application Type: Web Application. Authorized JavaScript Origins: Your store domain name (https://www.yourstore.com). Authorized redirect URI or URI of Loginizer redirect page:
https://example.com/pwa-app/login
Now click Create Client ID button to get your Client ID and Client Secret Key.
Now you can use the client secret and client ID to let your customers login to your store using their Google account.
3.0 Front End PWA App Screens:
3.1 Home Screen
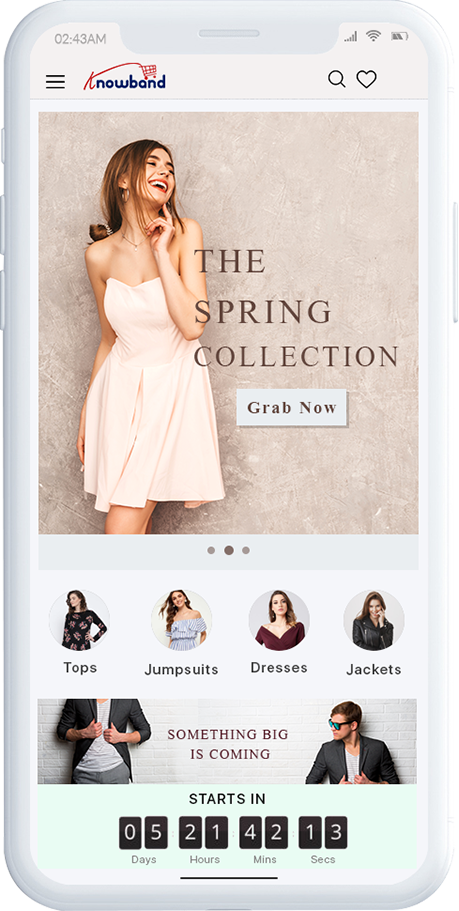
1. Dynamic Layout:
Using various designing elements, the store admin can create dynamic layout as per the need.
2. Store Logo:
Add store logo on the header of the Progressive Web App(PWA).
3. Shopping Cart:
The shopping cart icon on the top-right corner of the home screen allows users to switch on cart screen.
4. Navigation Menu:
Browse the categories in the apps with left navigation menu on the home screen.
3.2 Accordion Menu (Navigation Bar)
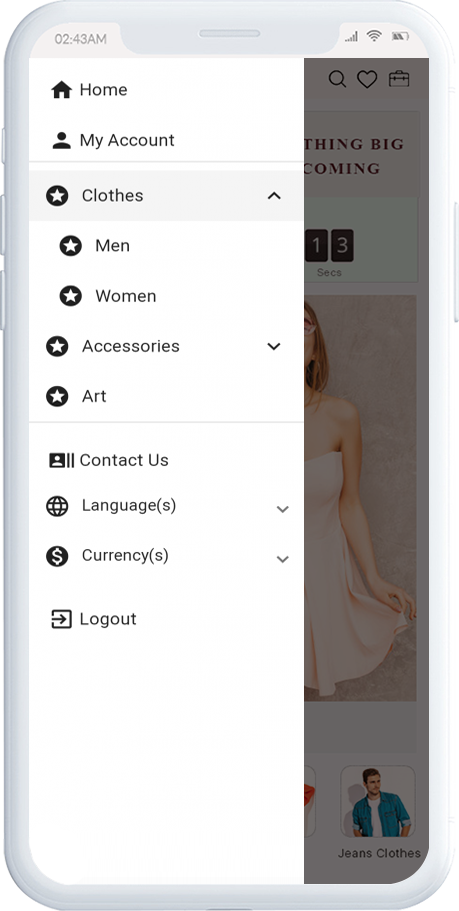
The Progressive web app come up with proper categorization of products as available on the website. Mobile shoppers can easily browse products from multiple categories. All CMS pages are also available in Accordion Menu. It provides the following options:
1. My Account:
My Account option contains all the user personal, shipping, order information. The PWA app shoppers get to view all the stored data related to them & can update the same as well.
2. Categories
Categories displayed in left navigation menu of Progressive Web app(PWA) are the same as of your website.
3. CMS Pages:
Various CMS pages like About Us, Contact Us, Terms & Conditions, etc. Can be accessed from here.
4. Language(s)
The language option allows PWA app users to view the web-app in their desired language. All available languages are displayed under this option only.
5. Currency(s)
All available currencies on your website are displayed here on PrestaShop PWA app Creator Module.
6. Login/Logout
Users can easily sign-in/sign-out from PrestaShop Progressive Web App via this option.
3.3 Category Screen:
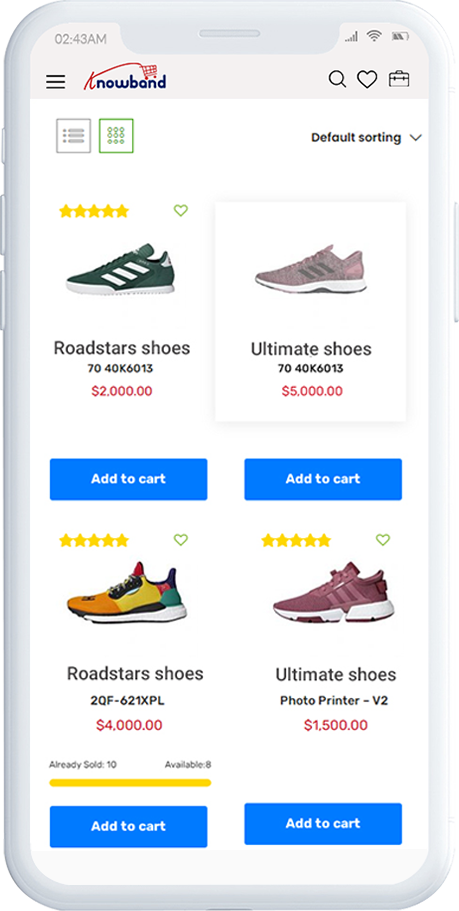
1. Multiple Views:
The categories on Progressive Web App(PWA) for PrestaShop can be viewed in both list and grid view.
2. Sorting:
This option allows the online shoppers to choose the sort order in order to narrow down the search and get desired product with ease.
3. Filter:
Option to filter products simplifies product search. Users can filter all products under categories using various attributes like size, color, price etc.
3.4 Product Screen:
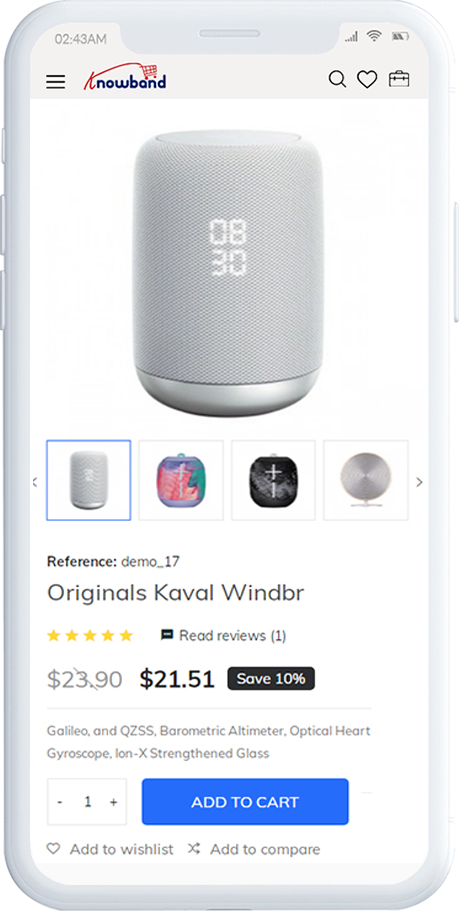
The product screen of your Progressive Web App(PWA) is simple & intriguing. Multiple images of the same product are displayed along with name & price. The product availability is also displayed as “In Stock” or “Out Of Stock” based on inventory status. It contains the following other options:
1. Product Info & Care
The complete product information as available in the inventory will be displayed here.
2. Short Description
Users get to read the short description of your product to quickly make up their mind about purchase.
3. Product Options:
All the options related to the product like size, color, etc. are displayed here.
5. Add To Cart:
This button allows users to add product into cart. The users can further process the cart for purchase.
6. Product Social Sharing:
Sharing option for the product allows users to share product on multiple social channels.
3.5 Login Screen
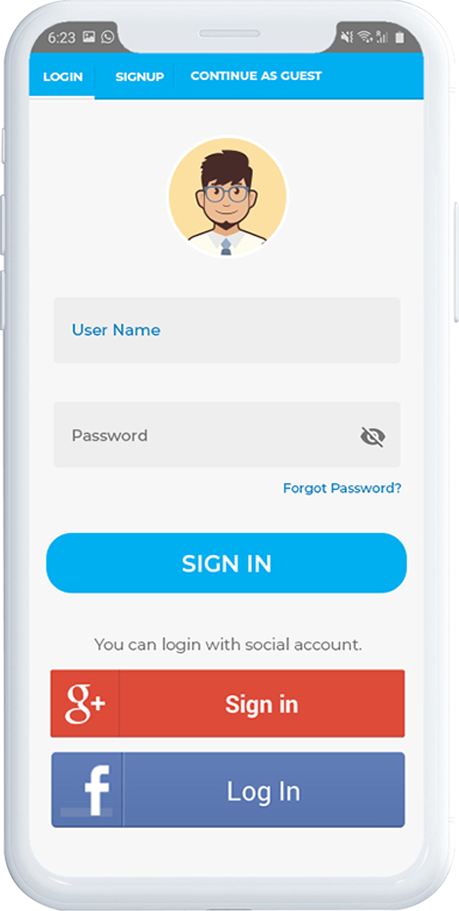
The Progressive Web App(PWA) offers various one-tap login options & make sign-in/registration process more seamless:
1. Login
The app users can easily authenticate & login into PWA apps using their previous email login credentials.
2. Sign Up
All the new app users can sign-up & create their account on the store from the PrestaShop PWA App. The sign-up form asks for only necessary details to create account.
3. Login with Facebook
The users can log in into PWA app using their Facebook Account Credentials.
4. Login with Google+
The users can login into Prestashop Progressive Web application (PWA) using their Google Account Credentials.
3.6 Shopping Cart Screen:
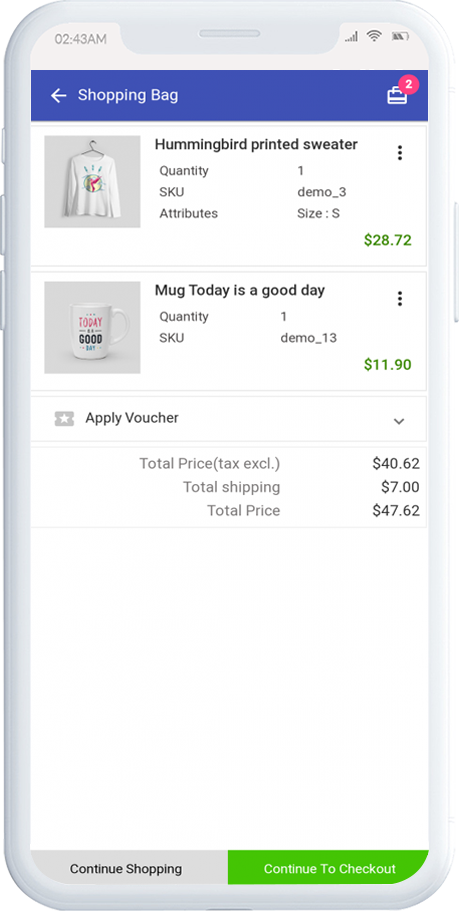
The Shopping Cart screen of your Prestashop Progressive web application will display all products added into the shopping cart. The app users can view Product name, quantity, total price & shipping cost. This screen has the following options:
1. Apply Voucher
This option allows the users to use website coupons and grab discount offers.
2. Total Product Price
The users get to view the complete cost of their shopping bag before proceeding further. It is automatically updated according to any update with product quantity or new addition.
3. Update Product Quantity
The PWA app users can even update the product quantity with the “Update Quantity” option.
4. Remove Product
The app users can simply remove the product from the cart by simply tapping “Remove” option.
5. Continue Shopping
Users can leave the cart to browse more products on your progressive web app for Prestashop.
6. Continue To Checkout
The PWA app users can proceed further to the checkout & payment screens just by tapping the “Continue To Checkout” option.
3.7 Checkout Screen
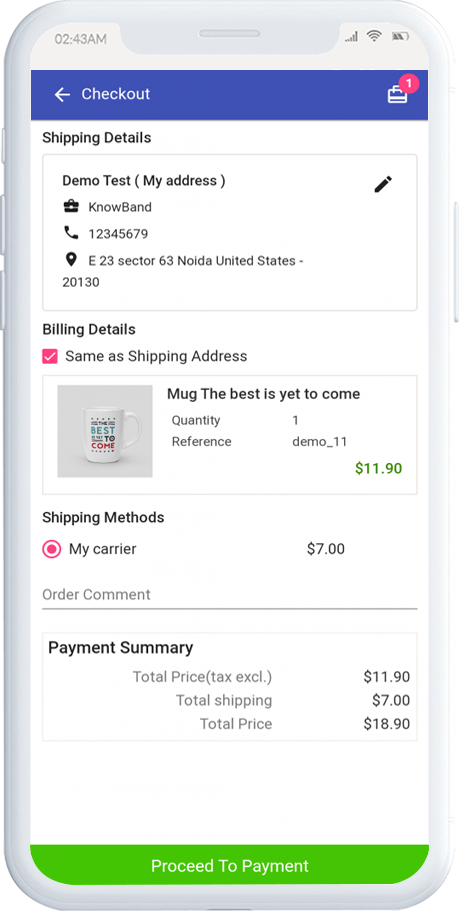
The progressive web apps with PrestaShop Progressive Web App (PWA) module have a simplified single-screen checkout with only relevant information. The users can view complete checkout details like shipping details, billing details, order summary, order comment, payment summary.
1. Shipping & Billing Details
This screen provides details of the shipping & billing addresses saved by the user. The user can also edit/save the new shipping address if needed.
2. Order Summary
The progressive web app for Prestashop users get to view product details before making payment.
3. Shipping Methods
All available shipping methods are displayed here. Users can choose the one suiting their need.
4. Order Comment
Users can also add any comment related to their order which will be visible to store admin on the order web-page in the backend.
6. Payment Summary
This section displays the complete breakdown payment details involved with purchase.
7. Proceed To Payment
The Prestashop Progressive Web Application (PWA) app users will be re-directed to the Payment screen after tapping the “Proceed To Payment” button.
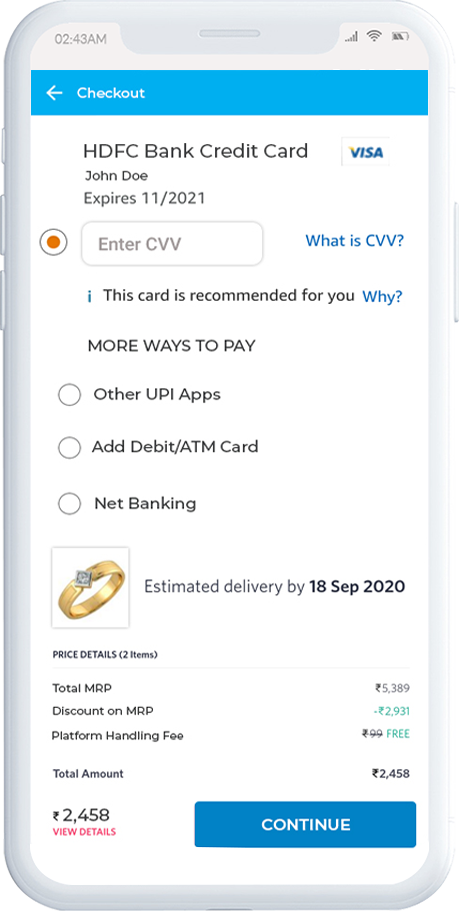
3.8 Payment Screen:
The payment screen of PrestaShop PWA App has all web-view payments available on the store. Online shoppers can find similar payment experience on both website and progressive web apps.
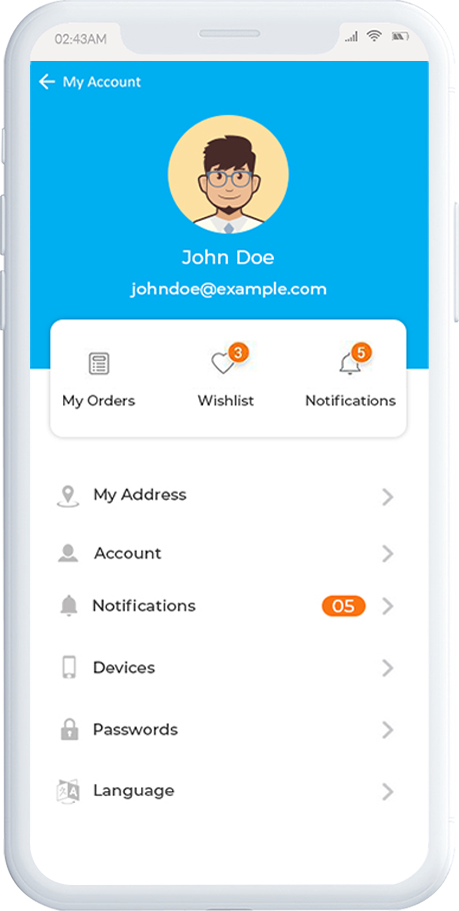
3.9 My Account Screen
My account screen of the PrestaShop Progressive Web App (PWA) allows users to view their complete details saved on the app including a list of previous orders.
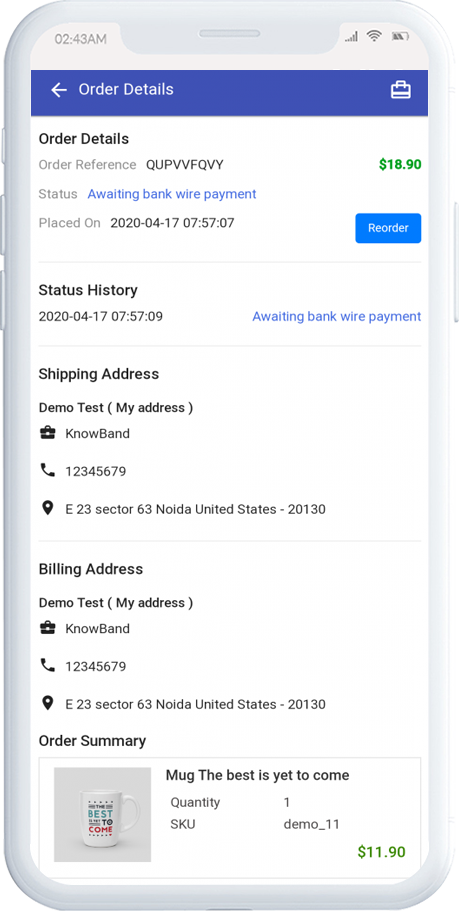
3.10 Order Detail Screen
Order details screen of PrestaShop Progressive Web App Maker provides complete details of specific order from PWA app. Users can easily view shipping address, product summary, shipping and payment method, and total cost summary etc. There is even an option to keep a track of order status and its delivery.
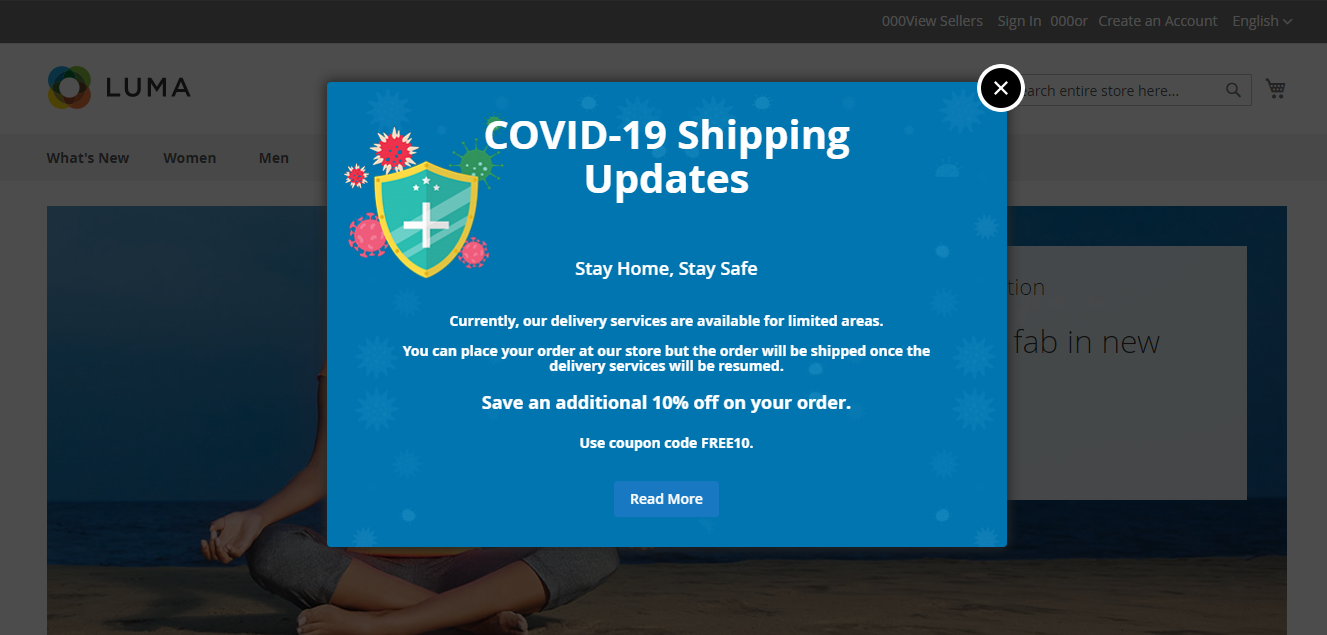
The COVID-19 pandemic is a serious disease the world is facing right now. Because of this pandemic, businesses all over the world are facing serious challenges to deliver their services to their customers all over the world. Most of the countries are facing a lockdown situation by which the businesses are facing difficulty in shipping and delivering their products.
Knowband offers Free OpenCart COVID-19 Information Popup extension by which you can educate your customers about your current status of Shipping and Delivery Services. With this Popup extension, you can also restrict your shipping services to certain countries where you are not delivering due to COVID-19. You can display an error message to your customers about the unavailability of your shipping and delivery services in their country due to the Corona Virus pandemic. The extension is easy to use, install and configures and offers a user-friendly interface. You can easily customize the look and feel of the extension from the back-end.
Features of Free COVID19 Information Popup extension:
Easy Installation and Configuration: The Free COVID-19 Information Popup extension is super easy to install and configure. You don’t need any advanced coding knowledge.
Allow Shipping Services to Selected Countries: With this extension, you can easily select the countries where you are currently shipping and delivering your products.
Easy Look and Feel Customization: The extension is very easy to customize. From the back end of the extension, you can upload or replace the background banner of the popup, the text and its color in the popup. You can even offer special deals and discount with the respective coupon code in the Popup.
Predefined Popup Template: The Free COVID-19 Information Popup extension offers Predefined Text, banner and Popup Template. The text in this template can be easily customizable.
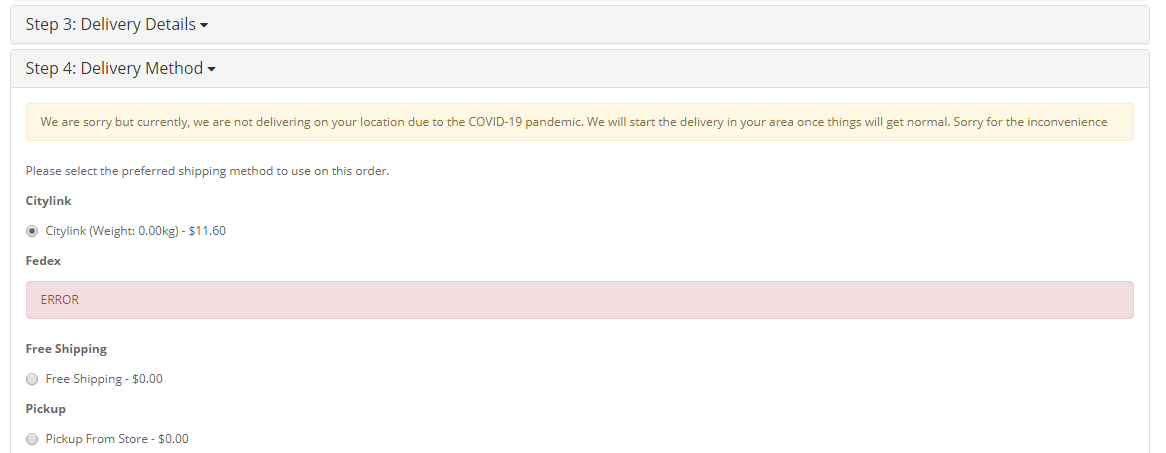
Display Country Restriction Message: The Free COVID-19 Information Popup extension allows you to restrict the shipment of your products to those countries where you are unable to deliver due to the Corona Virus pandemic. With this extension, you can display and configure the Country Restriction message which will be displayed if the customer enters non-delivery country in the delivery address at the checkout page.
Set Popup Display Frequency: The store admin can set the frequency to display the COVID-19 Information Popup from the back end. The admin can set the frequency to One hour per visit, One day per visit, One week per visit, One month per visit.
Enable or Disable the Extension: You can easily enable or disable the extension from the back end.
Merchant Benefits of Free COVID – 19 Information Popup:
With this extension, the store admin can inform the customers about the shipping and delivery services.
The e-merchant can also educate the customers about the protective measures they can take to protect themselves from the Corona Virus.
With this extension, the e-merchant can restrict the customers to place orders for the countries he is unable to provide the shipping service.
The store owner can also highlight the special deals on the Popup.
Customer Benefits of COVID – 19 Information Popup:
With the help of this extension, the customers get to know about the current status of the shipping and delivery services of the store.
The Popup educates the customers about the protective measures for the COVID-19 virus.
2.0 Installation:
Once you download Free COVID-19 Information Popup extension, you will receive the following files on your registered email address:
Source code of COVID-19 Information Popup extension in zipped file format.
User Manual of COVID-19 Information Popup extension.
Now in order to install this COVID-19 Information Popup extension on your online shop, follow the given steps:
Unzip the zip file. You will get the folders as shown in the image below
Copy all the folders of the zip file in the Root Directory of OpenCart setup via FTP manager.
Now in the admin panel, click on Extensions in left side menu. Then click on Extension Installer ( Home->extension).
Now, Upload the covid19_popup.ocmod.xml. A success message is shown once the file is uploaded.
After file is uploaded go to Home->Modification
You will find a file with name COVID-19 Popup (this means your ocmod has been installed successfully). Click on the corresponding “+” icon to enable it. The green icon turns into red as shown below.
Finally, click on the refresh button (This is mandatory).
Finally, the COVID-19 Information Popup extension is successfully installed and ready to use at your store. Go to the admin menu and click on the Extensions and then on Modules. Click the configure button next to Knowband Knowband COVID19 Information & Shipping Availability Checker.
3.0 Admin Interface:
After installing the COVID-19 Information Popup extension, the admin can configure the extension from the ‘Knowband’ tab. The admin panel includes the following categories:
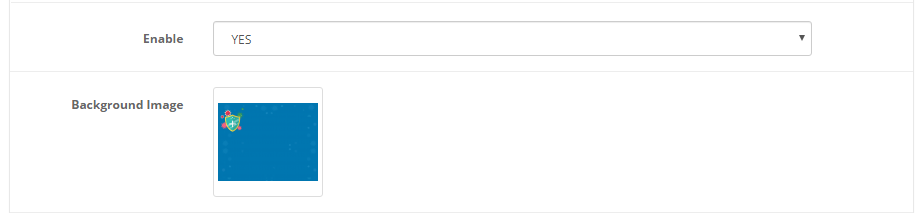
Enable/disable the Extension: This tab allows the store admin to enable or disable the extension in a single click.
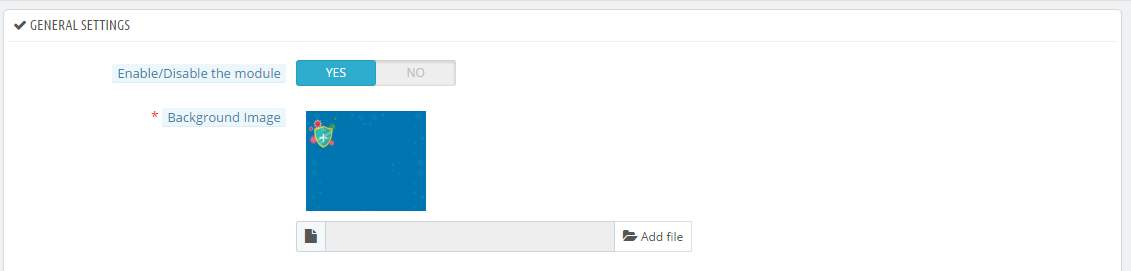
Background Image: From this tab, you can upload or replace the background image of the COVID-19 Information Popup.
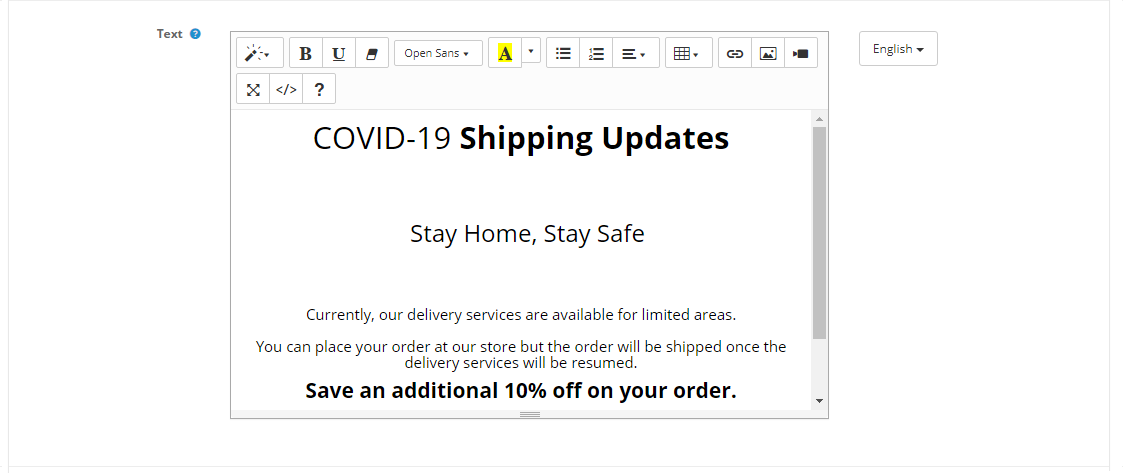
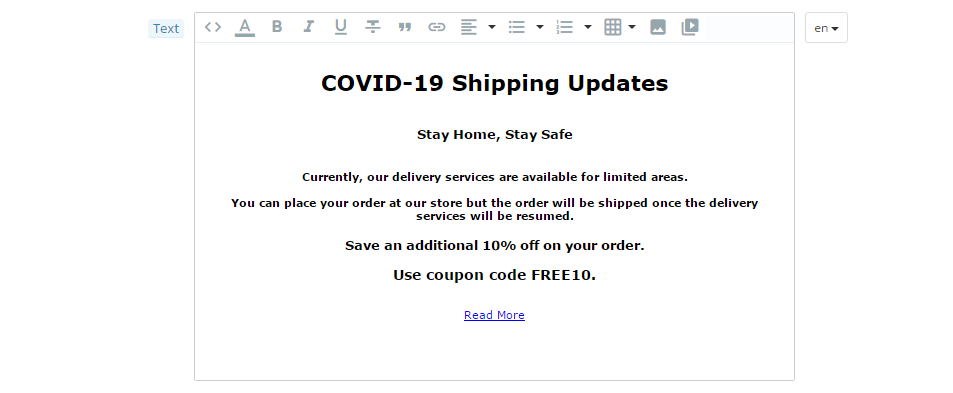
Text: From this tab, you can customize the text displayed at the popup. The predefined template is quite easy to customize without any coding efforts. You can display your special deals and discounts also from this template.
Text Color: This tab allows you to customize the text color.
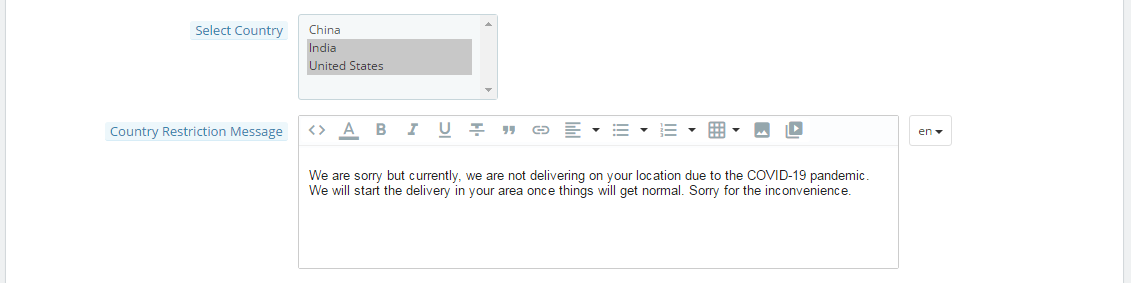
Select Country: You can select the countries where you want to provide your shipping services. If you want to select multiple countries, you can do it by selecting countries with ‘Ctrl’ button. If the country is not selected in this tab, the customer will not be able to place order for that particular country.
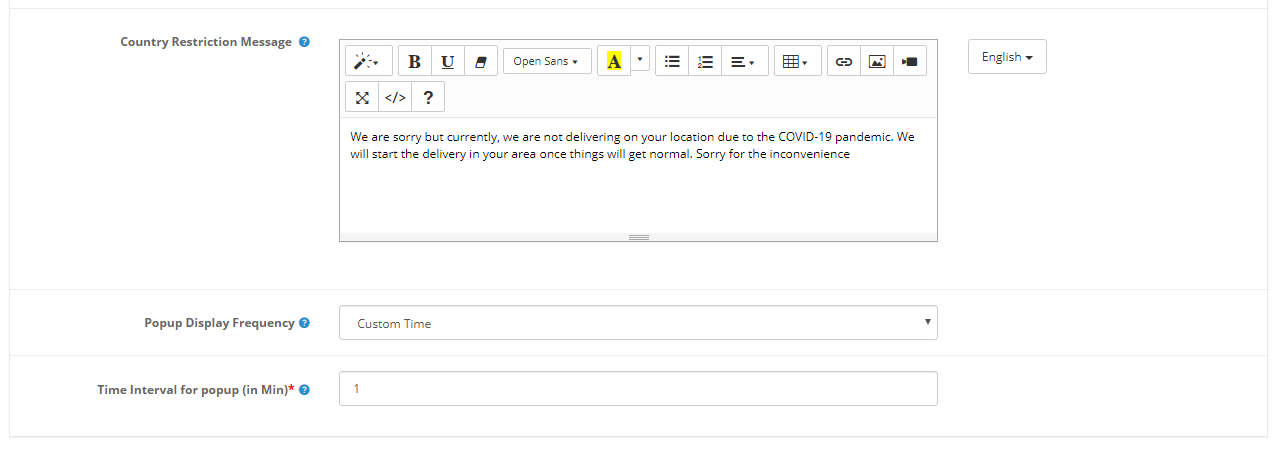
Country Restriction Message: This tab allows you to add and customize the Country Restriction Message to be displayed at the Checkout page.
Front-end:
Time Interval for Popup (in Min): From this tab, you can set the gap interval to display the Popup again on the website.
The COVID-19 pandemic has seriously affected businesses all over the world. Because of this Corona virus, many countries are facing a lockdown situation to stop the virus from spreading. After the lockdown situation, product shipping and delivery services are now more challenging.
Knowband offers Free COVID19 Information & Shipping Availability Checker module, by which the e-merchants can inform their customers about their shipping and delivery operations status with an Information Popup on their website. On this popup, the store admin can highlight the current status of their store services, can provide links to educate the customers about this pandemic, and can highlight deals and discounts too. The Free COVID19 Information & Shipping Availability Checker module offers a user-friendly interface and is quite easy to use and configure.
1.1 Features of Free COVID19 Information & Shipping Availability Checker:
Easy to Install and Configure: The Free COVID19 Information & Shipping Availability Checker can be easily installed and configured. The store admin doesn’t require any advanced technical knowledge is required to do it.
Select Country to Allow Shipping: The Free COVID19 Information & Shipping Availability Checker module allows you to select the countries where you want to allow shipping of your products. You can simply select the countries and save the settings from the admin interface.
Specify Time Interval for Popup: The store admin can select and set the time interval to display the COVID-19 Information Popup again on the Front end of the website.
Restrict Countries for Shipping: From the back office of this module, the admin can add a customizable message for the customers of those countries where you do not ship your products or are not shipping the products due to Corona virus outbreak.
Popup Display Frequency: The store admin can set the display frequency of the COVID-19 Popup from the back office of the module.
Customizable Look and Feel: The store admin can upload or replace the background banner, customize the banner text and text color from the back office of the Free COVID19 Information & Shipping Availability Checker module.
Enable/disable the Module: The module can be enabled or disabled from the admin interface in a single click.
1.2 Merchant Benefits of Free COVID – 19 Information Popup:
The Free COVID19 Information & Shipping Availability Checker module offers COVID-19 Information Popup by which the e-merchant can inform his customers about the current status of the shipping and delivery services of his store.
With this module, the e-merchant can educate his customers about the COVID-19 virus and inform them about the preventive measures to be taken against this pandemic.
The Free COVID19 Information & Shipping Availability Checker module also allows the e-merchant to allow checkout and shipping of the store products only to selected countries where he can actually deliver his services. If the store owner is unavailable to deliver products in a country, the module will show an error message regarding the unavailability of the delivery of product.
1.3 Customer Benefits of COVID – 19 Information Popup:
With this Free COVID19 Information & Shipping Availability Checker module, the customers get to know about the current status of online store. The module informs the customers if the product is not available for delivery in his country. This way, he is saved from order cancellation issue.
By knowing protective measures through the COVID-19 Information Popup, the customer can save themselves from this pandemic.
2.0 Installation:
After purchasing PrestaShop Free COVID19 Information & Shipping Availability Checker module, the store admin can install the module in very easy and simple steps. The store admin will get the above files while purchasing this Free COVID19 Information & Shipping Availability Checker module:
The zipped file that consists the source code of this Free COVID19 Information & Shipping Availability Checker module.
User Manual
In order to install this Free COVID19 Information & Shipping Availability Checker module, the admin needs to follow these steps:
Unzip the zipped file which includes some files and folders.
After that, admin can copy the overall content of the folder and paste them into the “Modules” folder of the store’s directory. The admin can follow the path – Root Directory/modules/.
Now the store owner can install the Free COVID19 Information & Shipping Availability Checker module. As an eCommerce store owner, you can find that in Store Admin -> Modules and Services.
Now you just need to click on “Install” button to install this Free COVID19 Information & Shipping Availability Checker module. A confirmation pop-up will be shown. Click on “Proceed with the installation” option. This step will install the Prestashop Free COVID19 Information & Shipping Availability Checker module and show notification – “Module(s) installed successfully”.
3.0 Admin Interface:
The store admin can easily configure the Free COVID19 Information & Shipping Availability Checker module from the admin interface. After installing the extension, the admin can configure the extension from the ‘Knowband’ tab. The admin interface includes the following categories:
3.1 General Settings:
Enable/disable the Extension: The e-merchant can enable or disable the Free COVID19 Information & Shipping Availability Checker module from General Settings in a single click.
Background Image:The background banner of the COVID19 Information Popup can be uploaded , deleted or replaced from this tab.
Text: From the Text tab, the store admin can add and customize the COVID19 Information Popup banner text.
Text Color: From this tab, the admin can choose the color of the text displayed in the banner at the front office.
Select Country:From this tab, the e-merchant can select those countries where he wants to allow shipping and checkout of the products of his store.
Country Restriction Message: If a country is not selected in the ‘Select Country’ tab, the module will show an error message at the checkout page highlighting the unavailability of the product in that particular location. From the ‘Country Restriction Message’ tab, the store admin can add and modify this error text.
Time Interval for Popup (in Min):The admin can specify the time interval in minutes to display again the COVID19 Information Popup on the website.
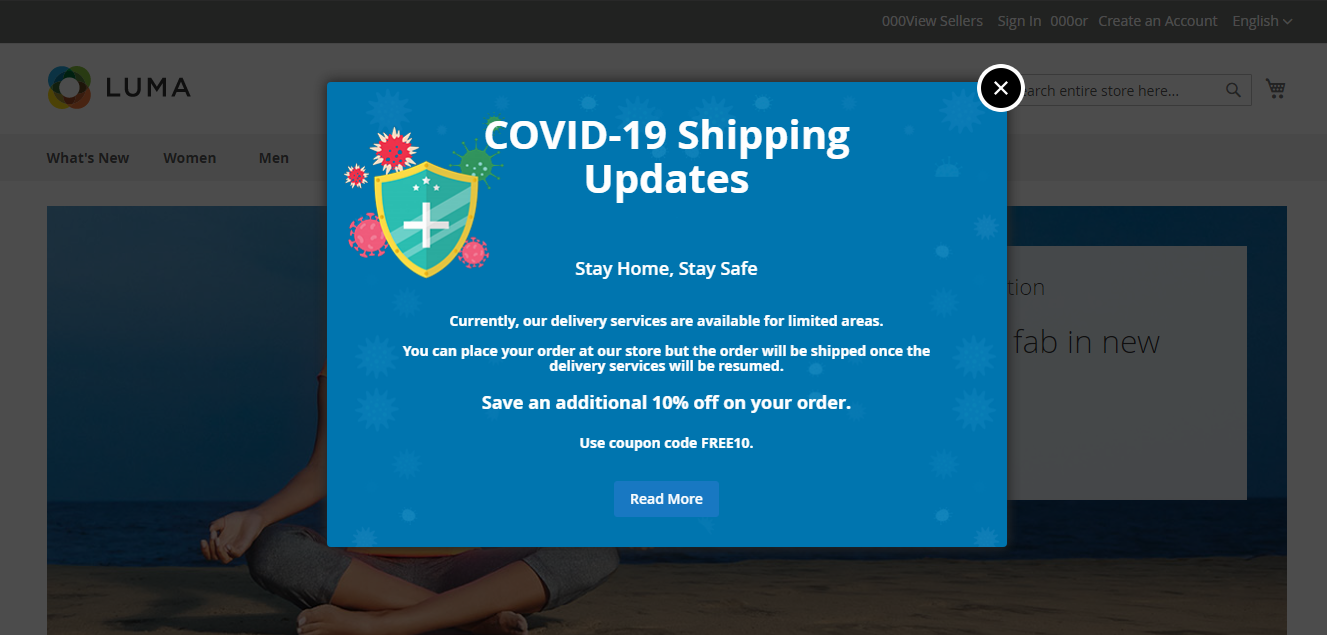
The Magento 2 Free COVID – 19 Information Popup extension allows the store admin to display a COVID – 19 Information Popup in which they can notify their customers about the current update on their Shipping and Delivery services. With this Popup extension, the store admin can educate the customers on basic protective measures against this infectious disease COVID-19. Because of the lockdown situation in many countries, the shipping and delivery services of many businesses are negatively affected. With this COVID – 19 Information Popup, the store owner can update the customers about the shipping and delivery services easily.
1.1 Features of Free COVID – 19 Information Popup:
Easy to Install and Configure: The COVID – 19 Information Popup extension is quite easy to install and configure and no coding efforts are required to integrate this Popup on your website.
Choose Geo Location: With this feature, you can display the COVID – 19 Information Popup worldwide or you can choose specific countries to display the popup.
Specify Display Frequency: This extension allows you to set the display frequency of the COVID – 19 Information Popup on your website. You can display this popup on every visit, hourly, daily, weekly, or monthly basis.
Customizable Look and Feel: The admin can customize the COVID – 19 Information Popup banner, and text as per their business needs and requirements. The admin can also change the color of the text in the Popup.
1.2 Merchant Benefits of Free COVID – 19 Information Popup:
By displaying the COVID – 19 Information Popup, the merchants can educate their customers and spread awareness about the infectious disease.
The merchants can notify their customers about their shipping and delivery services during the quarantine period using the COVID – 19 Information Popup.
The merchants can also display current deals and discounts on the Popup with the respective Coupon Code.
1.3 Customer Benefits of COVID – 19 Information Popup:
The COVID – 19 Information Popup can play a major role in educating the visitors of your website. The customers will get the right information about the basic protective measure against this new COVID-19 virus with this COVID – 19 Information Popup.
With this Popup, the customers will be updated about the shipping and delivery services of your company.
2.0 Installation:
After purchasing Magento 2 Covid Popup extension, the store admin will get the following files:
Knowband_Covidpopup.zip which has the source code of this Magento 2 COVID-19 Popup plugin.
User Manual, with all the basic details and information.
2.1 The steps to install the Magento 2 COVID-19Popup Extension are mentioned below:
Download the Magento 2 COVID-19 Popup module from Knowband.
The package has a zipped file that contains the user manual and the source code of the Magento 2 COVID-19Popup module. Now, Unzip this package.
Create a folder {Magentoroot}/app/code/Knowband/Covidpopup
Upload the extracted content in the above folder via FTP manager (like Filezilla or WinSCP – download here: https://filezilla-project.org/).
Now run below commands to install the plugin:
composer require geoip2/geoip2:^2.9.0
php bin/magento module:enable Knowband_Covidpopup
php bin/magento setup:upgrade
php bin/magento setup:di:compile
The extension is now installed and ready for use. In Admin Panel go to “Knowband ->Free COVID-19Information”. You can now configure and use the Knowband COVID-19 Popup plugin.
3.0 Admin Interface:
The store admin can easily configure the COVID – 19 Information Popup extension from the admin interface. After installing the extension, the admin can configure the extension from the ‘Knowband’ tab. The admin interface includes the following categories:
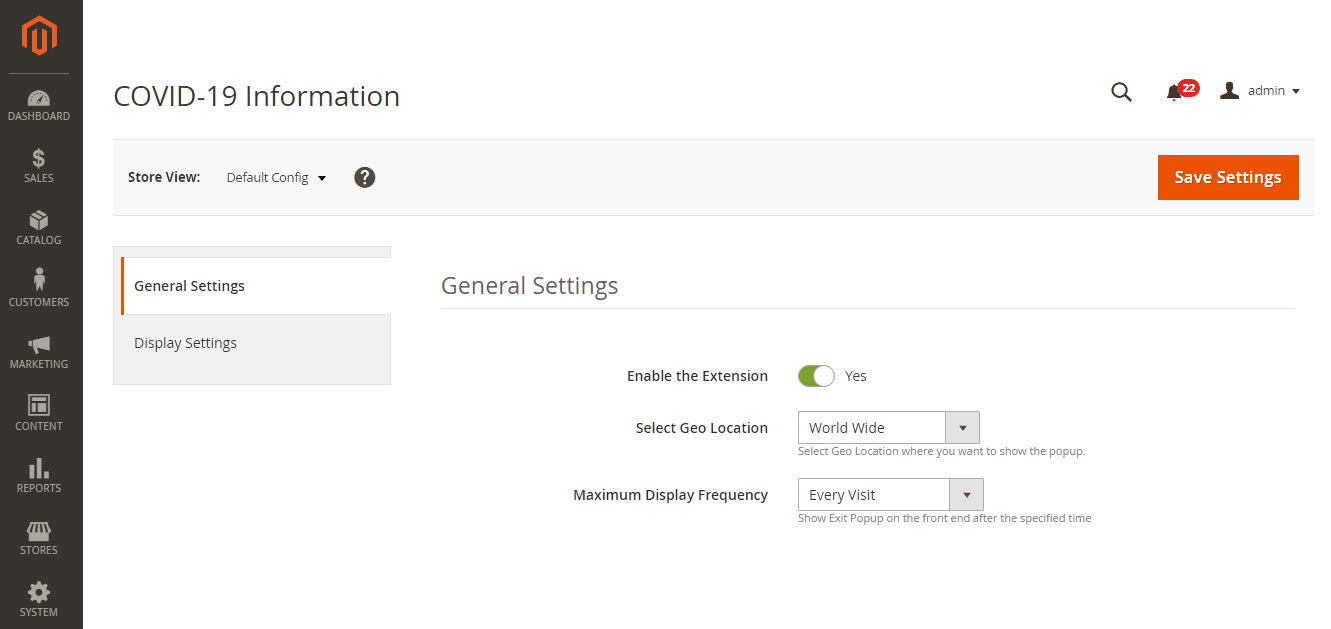
3.1 General Settings:
Enable the Extension: From this button, you can enable or disable the COVID – 19 Information Popup extension.
Select Geo Location:From this tab, the admin can select the Geo Locations in which he wants to display this COVID – 19 Information Popup. The admin can display the Popup worldwide or in selected countries.
Maximum Display Frequency:From this tab, the admin can set the frequency to display the COVID – 19 Information Popup i.e., on Every Visit, One Visit per hour, One Visit per day, One Visit per week, One Visit per month.
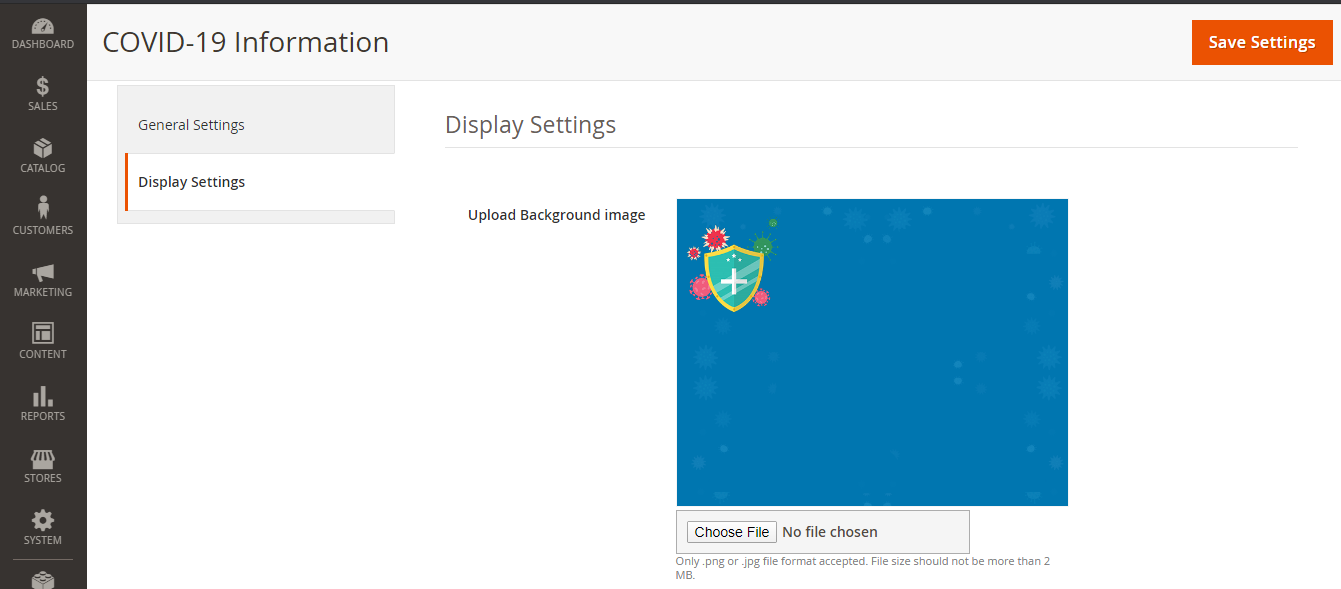
3.2 Display Settings:
Upload Background Image: The store admin can upload and replace the Popup banner from this tab by clicking the ‘Choose File’ button.
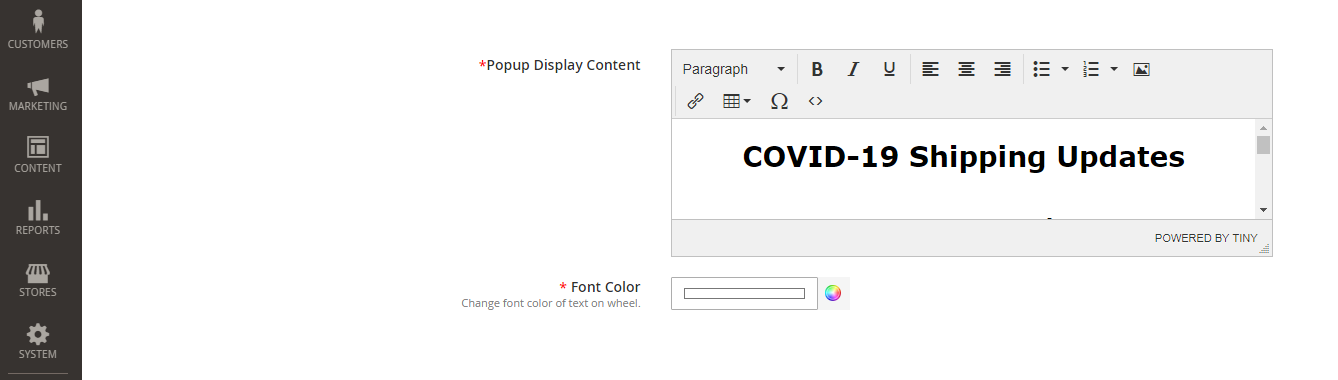
Popup Display Content: The text in the COVID – 19 Information Popup can be easily customized from this tab.
Font Color:From this tab, the admin can change the font color of the text in the COVID – 19 Information Popup.
Now make the overall process of checkout easy and faster by implementing one-page checkout. Knowband offers Prestashop Smart One Page Checkout Addon which replaces the default checkout process with one-page advance checkout. The online merchant can make the overall process easy and convenient for online users
The online buyers can view a one-page checkout popup at the same time when they click on the “Add to Cart” button. The Prestashop simplified checkout addon makes the checkout process very simple and effective for online users. There is no need to follow the lengthy process of checkout while shopping online. The store admin can enable testing mode before implementing it. Admin can set the look and feel of checkout buttons. By making the process of checkout simpler, the online merchant can increase sales and profit.
1.1 Features offered by PrestaShop Smart One Page Checkout Addon
The online users can view the checkout popup at the same time when they click on the “Add to cart” button on the product page. This module offers AJAX-based popup.
The online merchant can allow guests and registered customers to checkout easily.
Admin can enable test mode and check it before implementing it.
Admin can add specific IP addresses if he doesn’t want to offer smart one-page checkout to all the customers.
Prestashop Smart One Page Checkout Addon allows the online merchant to set the look and feel of the checkout button. Admin can preview the button color easily from the admin interface. The online merchant can enter custom CSS and JS codes also.
Admin can offer Facebook login and Google login option on the checkout page. From the admin interface, admin can get the configuration steps of the Google app and Facebook app.
Admin can setup Klaviyo, MailChimp and Sendinblue email integrator sites and save email id details of subscribers.
This Prestashop Quick checkout addon offers auto address filling functionality.
Admin can select from available payment methods and delivery methods easily from the admin interface of this Prestashop One Page Advanced Checkout.
Admin can also hide payment methods from shipping methods.
Admin can also check the customer’s consent by entering the email ID/order reference number.
The Prestashop Smart One Page Checkout addon offers GDPR compliance.
The Prestashop Smart One Page Checkout addon is multi-lingual compatible, multi-store compatible and offers smooth functioning.
2.0 Installation
First of all, purchase the Prestashop Smart One Page Checkout Addon and download the zip file from the Downloads section of your Knowband account.
You will get smartonepagecheckout.zip (source code of the module) and User Manual after downloading the zip file.
To install the module in the store follow the below-mentioned steps:
1) Unzip the smartonepagecheckout.zip file.
2) Copy the entire content, that is, the files and folders of the unzipped folder. Paste the same into the “Modules” folder of your store’s directory. Follow the below-mentioned address path – Root Directory/modules/.
3) The Prestashop simplified checkout addon is all set to be installed in the store. Go to the Store Admin and then to ‘Modules and Services’.
4) Now click on the “Install” button just next to your module. There will be a pop-up for your confirmation. Click on “Proceed with the installation” option. This step will install the Prestashop simplified checkout addon and show notification – “Module(s) installed successfully”.
5) Once the installation is complete, you will get access to the admin interface of the module by clicking on the “Configure” button.
3.0 Admin Settings
The online store admin can easily apply the settings from the admin interface and implement smart one page checkout functionality. These are the configuration options as shown below:
General Settings
Customizer
Login
Email Marketing
Addresses
Payment method
Delivery Method
Ship2pay
custom Fields
cart
customer consent
GDPR Settings
3.1 General Settings
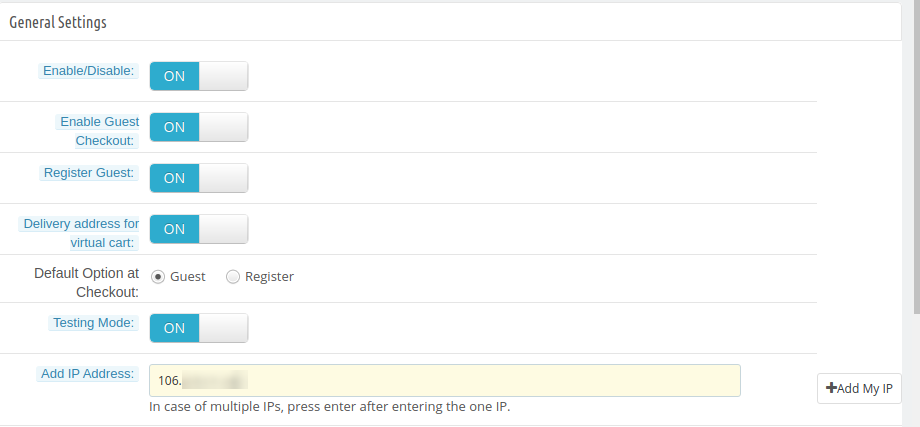
In General settings, the online merchant can apply these settings as described below:
Enable/disable: Activate or deactivate the module functionality.
Enable Guest Checkout: Activate the Guest checkout option by toggling the button.
Register Guest: Allow guest registration option.
Delivery address for Virtual cart: Enable this option for showing delivery address. While deactivating this option, it will show the invoice address and hide the delivery address for virtual products.
Delivery Option at Checkout: Admin can select guests or register as a default option at the checkout page.
Testing Mode:
Testing Mode: Enable the option if you want to test the module before implementation.
Add IP address: Enter the IP addresses if you want to show smart one-page checkout on specific IP addresses. Separate every IP address with a comma.
3.2 Customizer
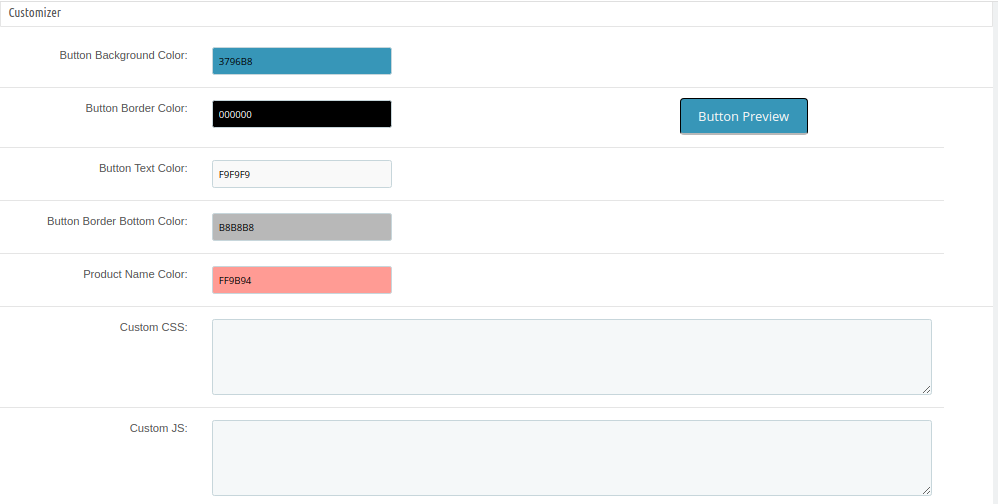
In Customizer settings, admin can set the look and feel of smart one-page checkout button and also apply advance appearance settings as shown below:
Button Background Color: Set the background color for the button.
Button Border Color: Set the button border color from the admin interface.
Button Text Color: Set the button text color from here.
Button Border Bottom Color: Set button border-bottom-color from here.
Product Name Color: Here, set the product name color.
Custom CSS: Enter custom CSS code for the advance look and feel settings.
Custom JS: Enter JS codes for more appearance settings.
3.3 Login
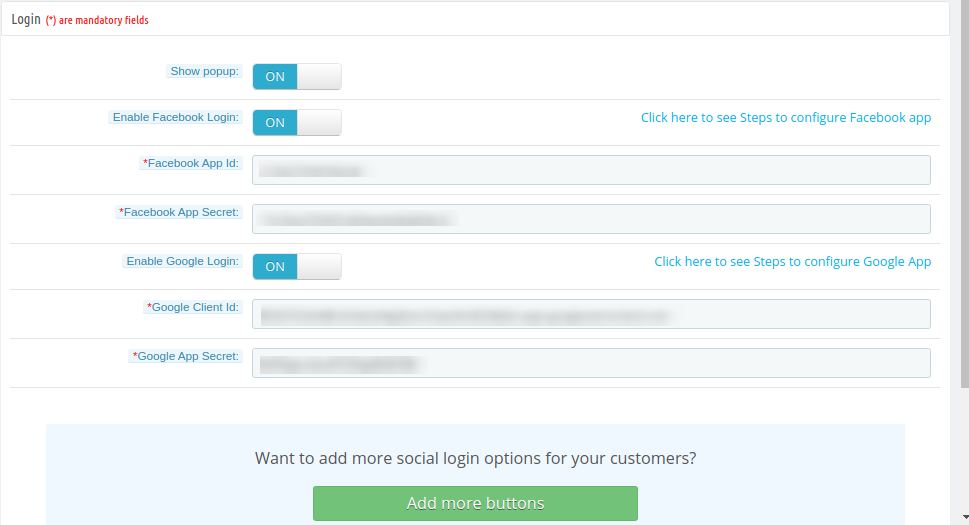
In login settings, admin can offer social login options to online users like Facebook and Google login options:
Show popup: If this setting is enabled then Facebook or Google Login Page will be open in a pop up after clicking on the login options.
Enable Facebook Login: Enable this option for showing the Facebook login button.
Facebook App Id: Admin can check the configure steps for Facebook app ID generation and enter the Facebook app id here. Visit 3.3.1 Section for getting steps to generate Facebook app id and app secret.
Facebook App Secret: Here, Enter Facebook App Secret.
Enable Google Login: Activate if you want to show Google login option on the checkout page.
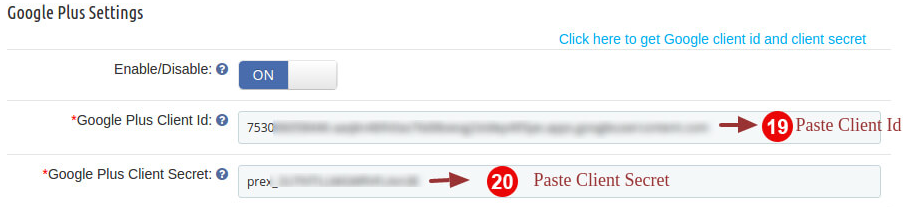
Google Client Id: Admin can check the steps to configure Google App and enter Google client Id here.
Google App Secret: Enter Google app secret here. Visit 3.3.2 Section for getting steps to generate Google app id and client id.
3.3.1 How to setup Facebook Login
For Generating Facebook App id and app secret follow these steps:-
Step 6: Now in the settings section, there will be two options available in the dropdown list, Basic and Advanced. You need to click on “Basic” settings and click on the “+Add Platform” button.
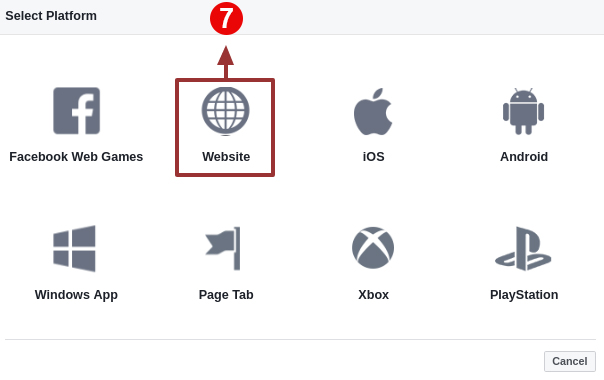
Step 7: Now select the website as your platform.
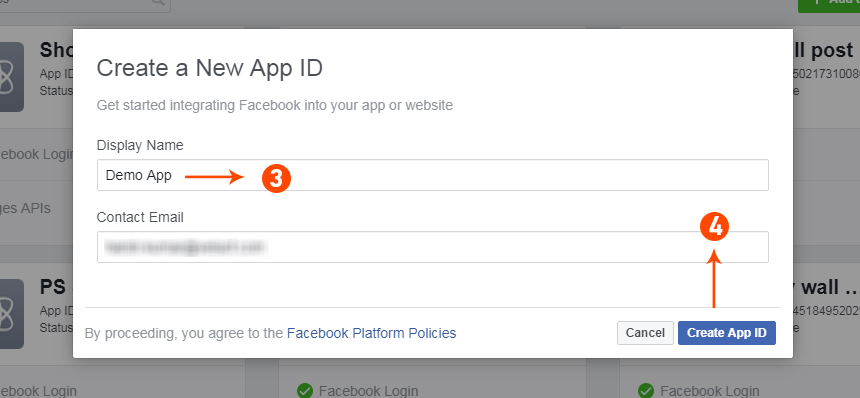
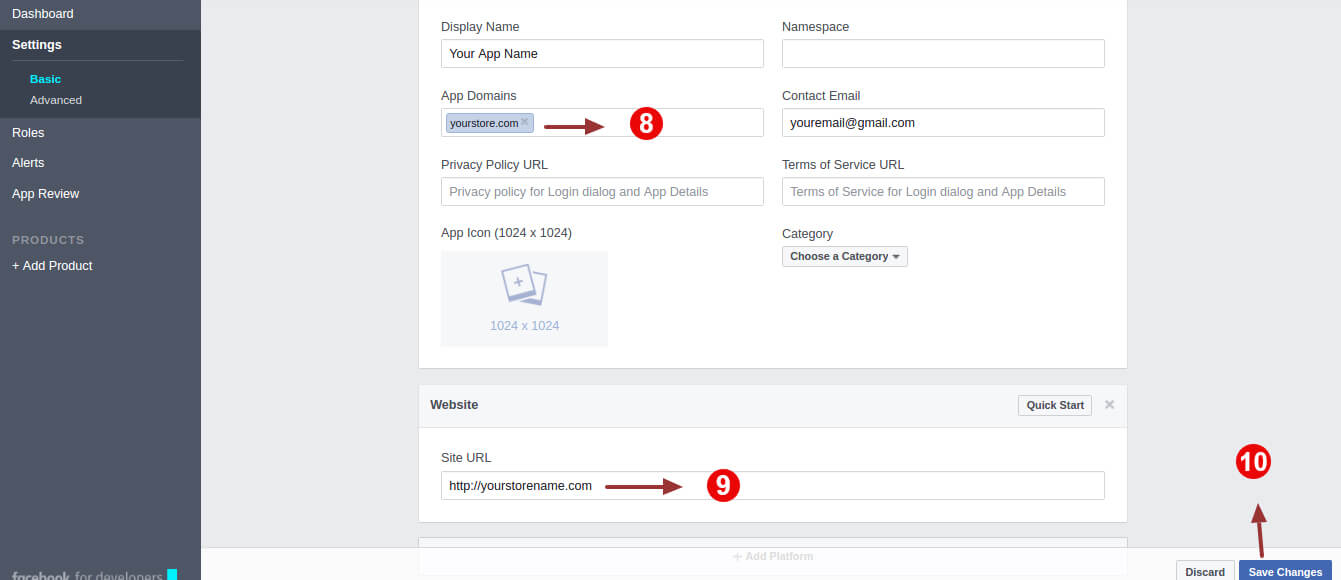
Step 8,9,10: In the basic settings enter these details:
In step 8, enter App Domain:www.example.com
For Step 9 use Site Url: https://www.example.com/
After that save the changes.
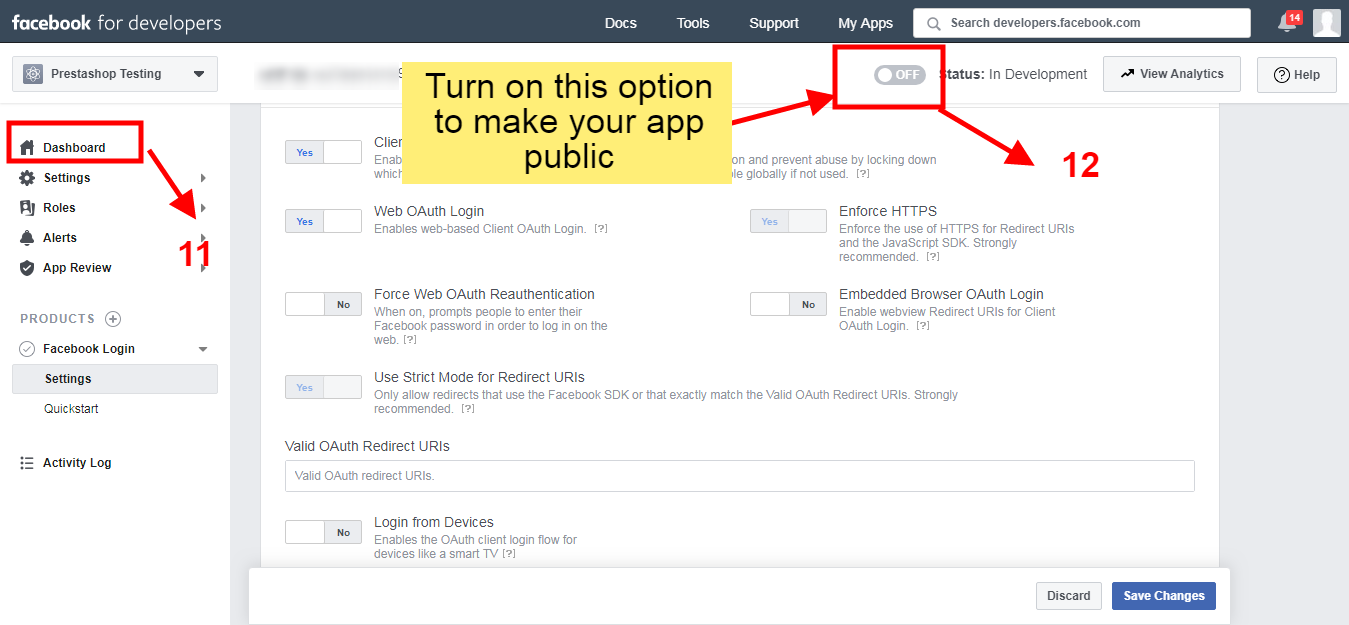
Step 11 and 12: Go to the dashboard and turn on the option for making the app public:
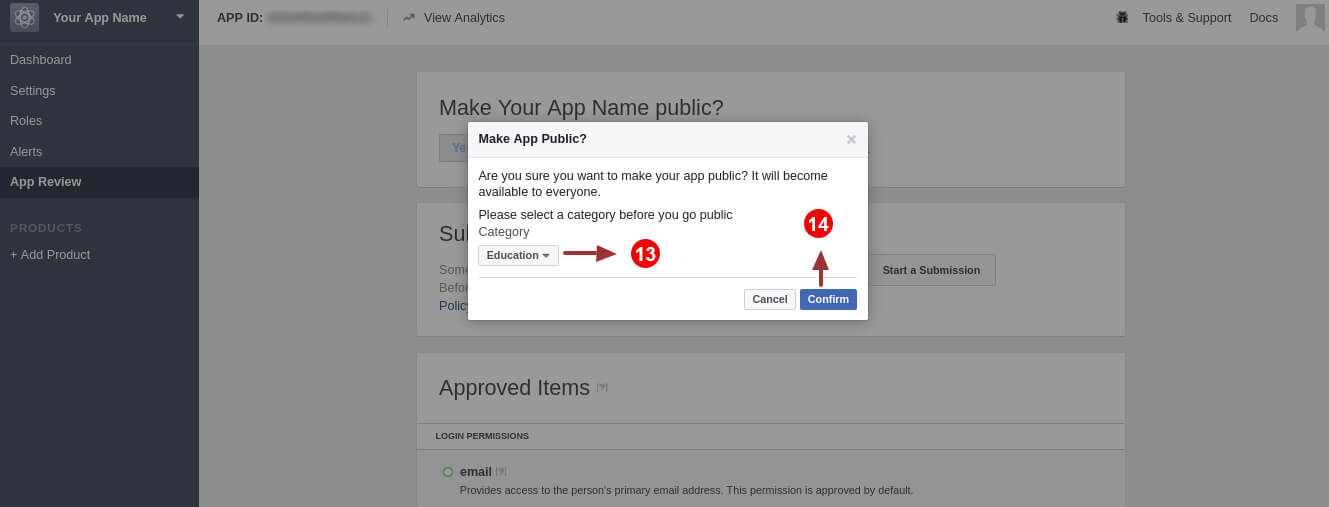
Step 13,14: Select the category and click on the Confirm button.
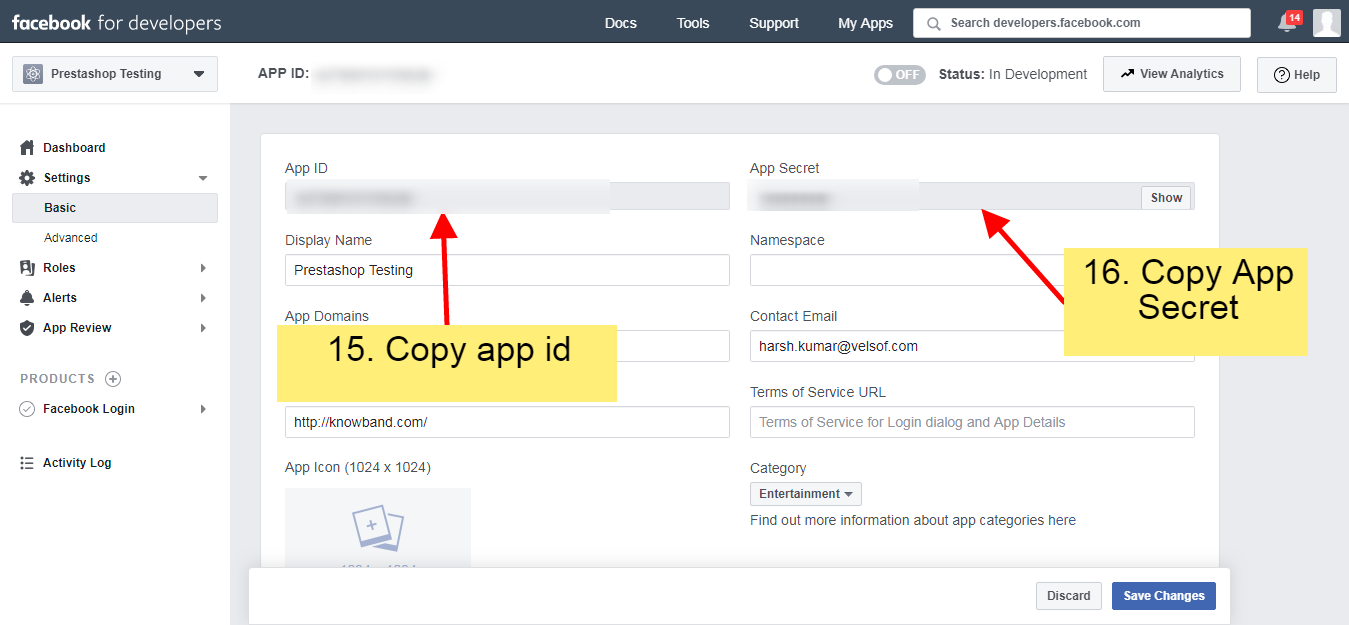
Step 15,16: Copy the App ID and App Secret from here:
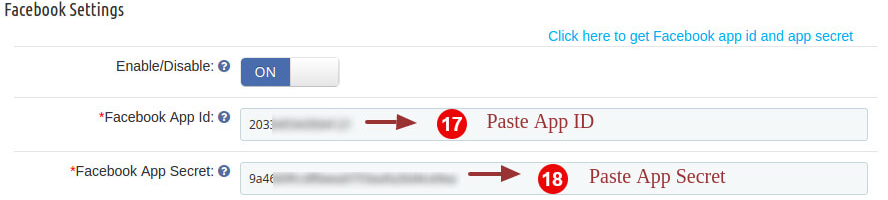
Step 17, 18: Enter app id and app secret into the fields provided in the module.
3.3.2 How to setup Google Login
Follow the below steps to get a client id and client secret.
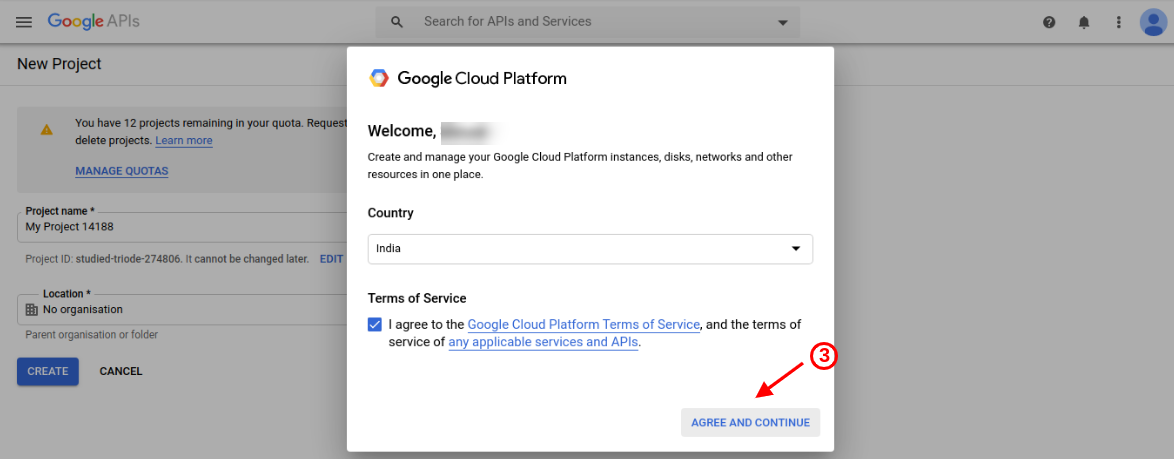
Step 3: Select the country and check on agree with terms and conditions. After that click on the continue button.
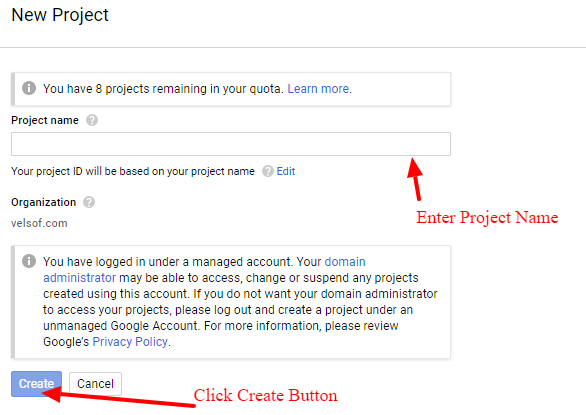
Step 4, 5: Enter your desired Project Name and click on the “Create” option.
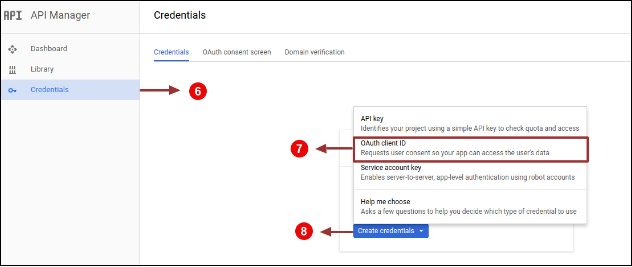
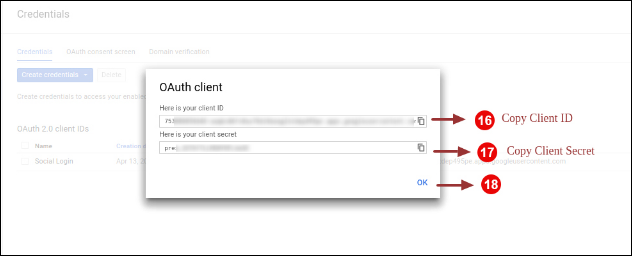
Step 6,7 & 8: Go to API Manager, click on Create Credentials and select the OAuth client ID option.
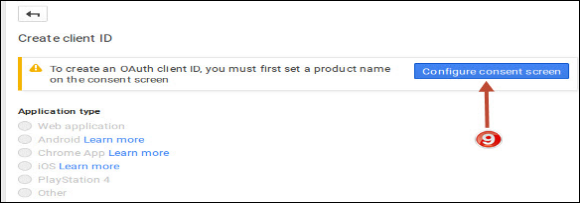
Step 9: Click on the “Configure consent screen” button.
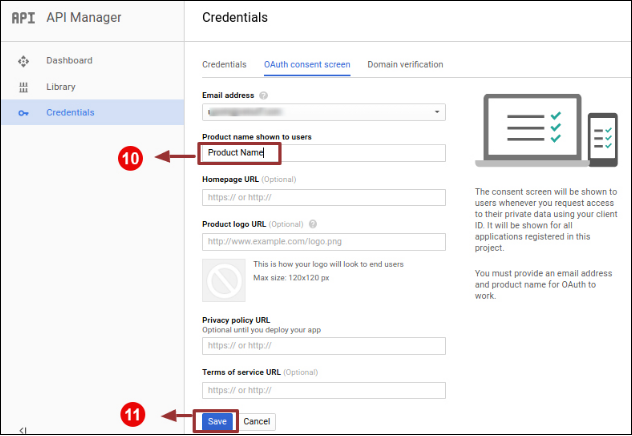
Step 10, 11: Enter “Email Id”,“Product Name” and then click on “Save” button.
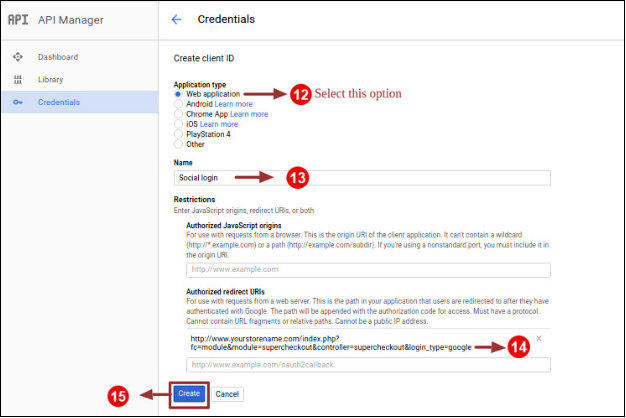
Step 12,13 & 14,15: Select “Web application”, Enter “Name “, “Authorized Redirected URIs“ as mentioned below and click on “Create” Button.
Use Authorized javascript origins: https://www.example.com/
Use Authorized Redirect Url: https://www.example.com/index.php?fc=module&module=kbstepcheckout&controller=kbstepcheckout&login_type=google
Step 16, 17, 18: Copy Client ID and Client Secret.
Step 18, 19: Paste Client ID and Client Secret in the Text Field shown below:
3.4 Email Marketing
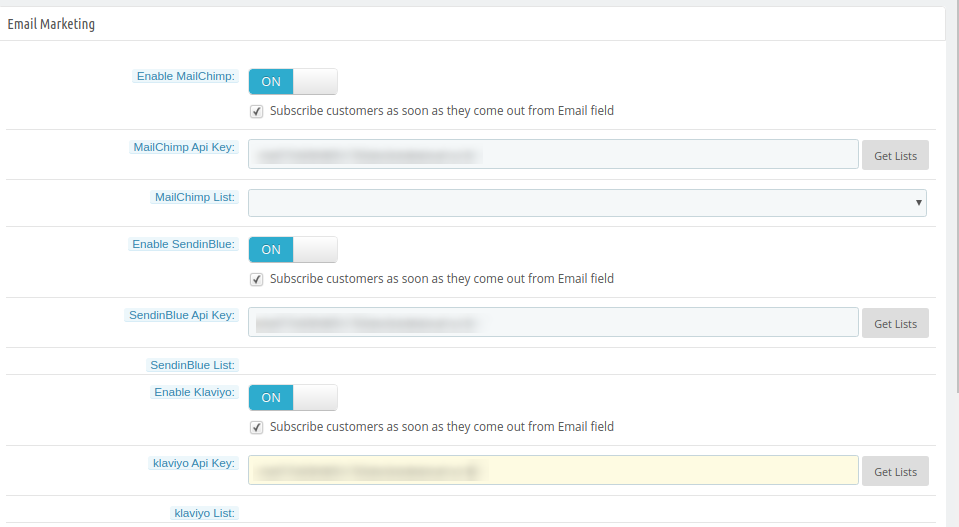
The online merchant can setup Klaviyo, MailChimp and Sendinblue email integrator sites and save email id details of subscribers. The store admin can save the user’s email ID details easily.
Enable MailChimp: Activate this option for saving email id details in MailChimp.
MailChimp API key: Enter API key here.
MailChimp List: Choose the list in which you want to save the email id details.
Enable SendinBlue: The online merchant can also configure Sendinblue.
SendinBlue API key: Enter SendinBlue API key here.
SendinBlue list: Select the list from available options.
Enable Klaviyo: Enable Klaviyo option for saving email id.
Klaviyo API Key: The online merchant can enter Klaviyo API Key here.
Klaviyo list: Select the list from here.
3.5 Addresses
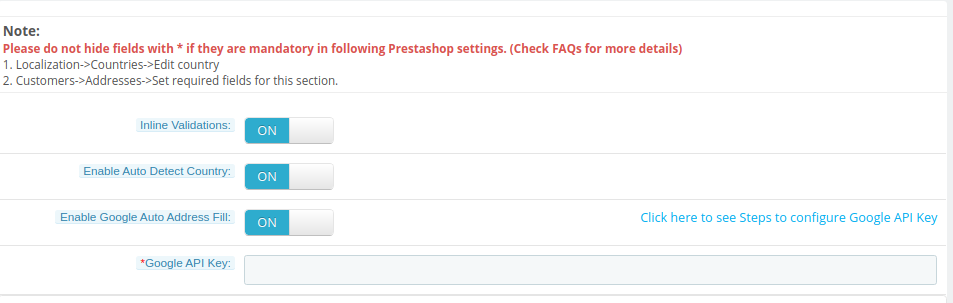
In address settings, admin can configure auto address filling options as shown below:
Inline Validations: Admin can activate or deactivate inline validators.
Enable Auto Detect Country: Activate country auto-detect functionality.
Enable Google Auto Address Fill: Activate for automatically address filling functionality.
Google API Key: Admin can check the Steps to configure Google API Key and enter it here.
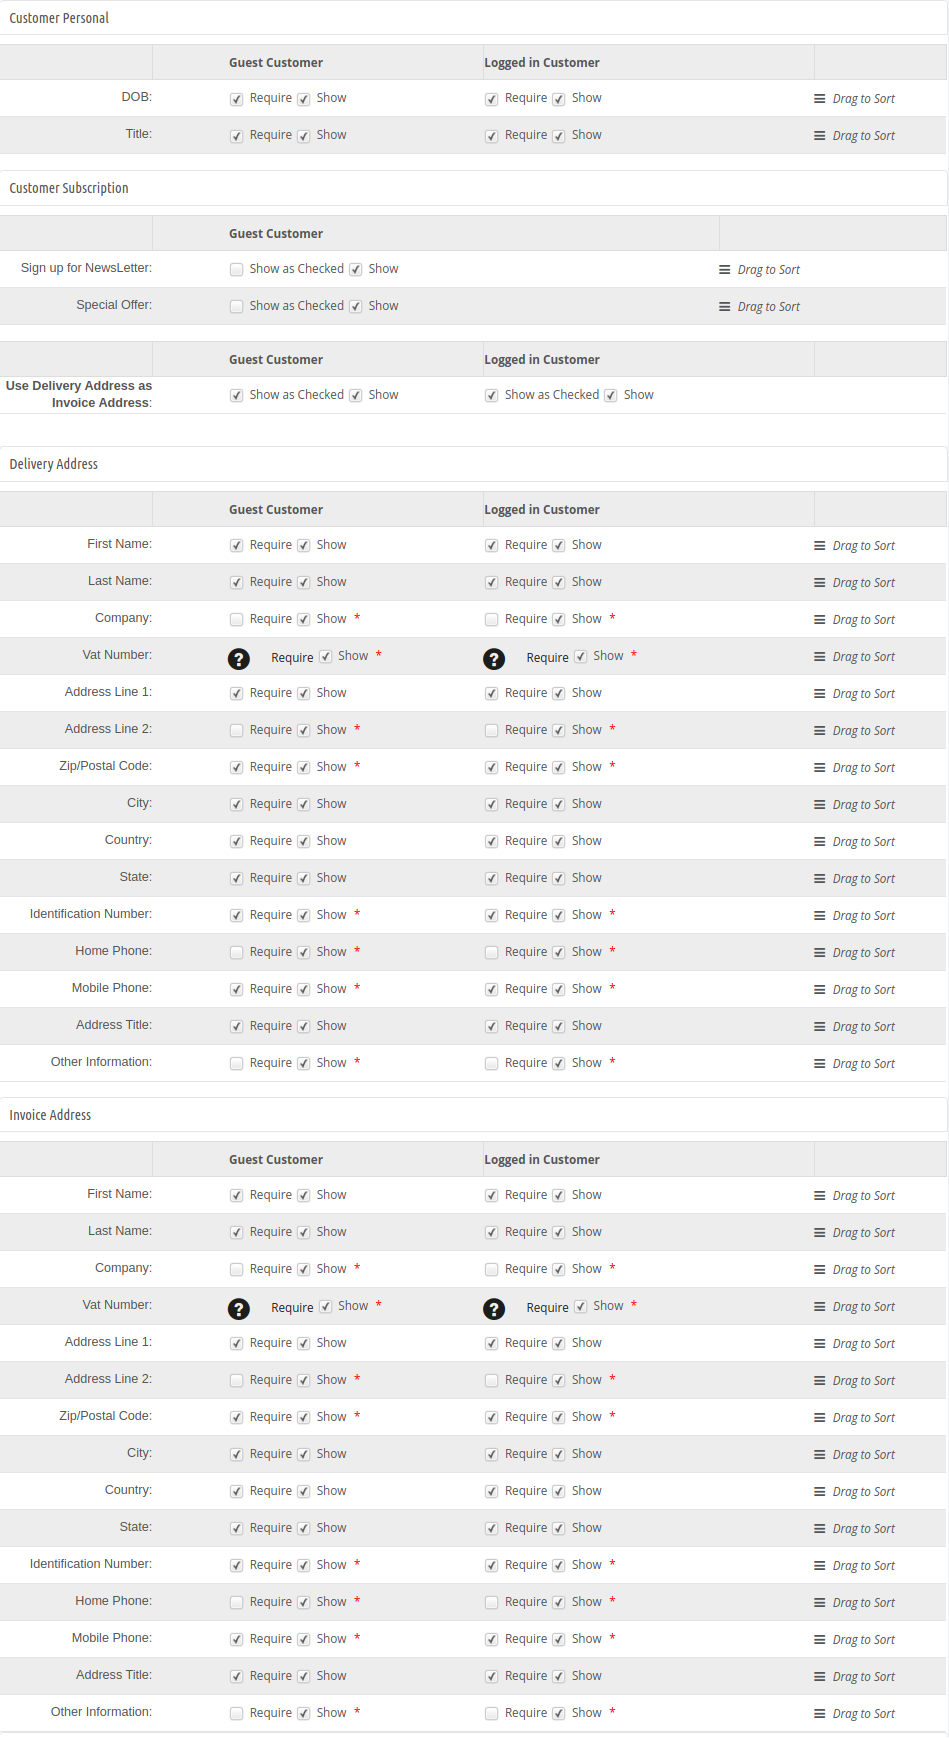
Admin can also view field details of guest and registered customers:
Important points:
To make a field show/hide in the Prestashop Smart one page checkout page, check the checkbox just to the left of Show label.
To make a field of this Smart checkout Prestashop checkout addon as mandatory (required field), check the checkbox just to the left of Require Label.
The fields of the Prestashop Smart One Page Checkout Extension can also be rearranged according to the requirement. To rearrange just hold Drag to sort and drag & drop the field vertically, wherever it is required.
On saving, the fields will be rearranged as per the changes.
3.6 Payment method
In the payment method section, admin can set payment method related conditions as shown below:
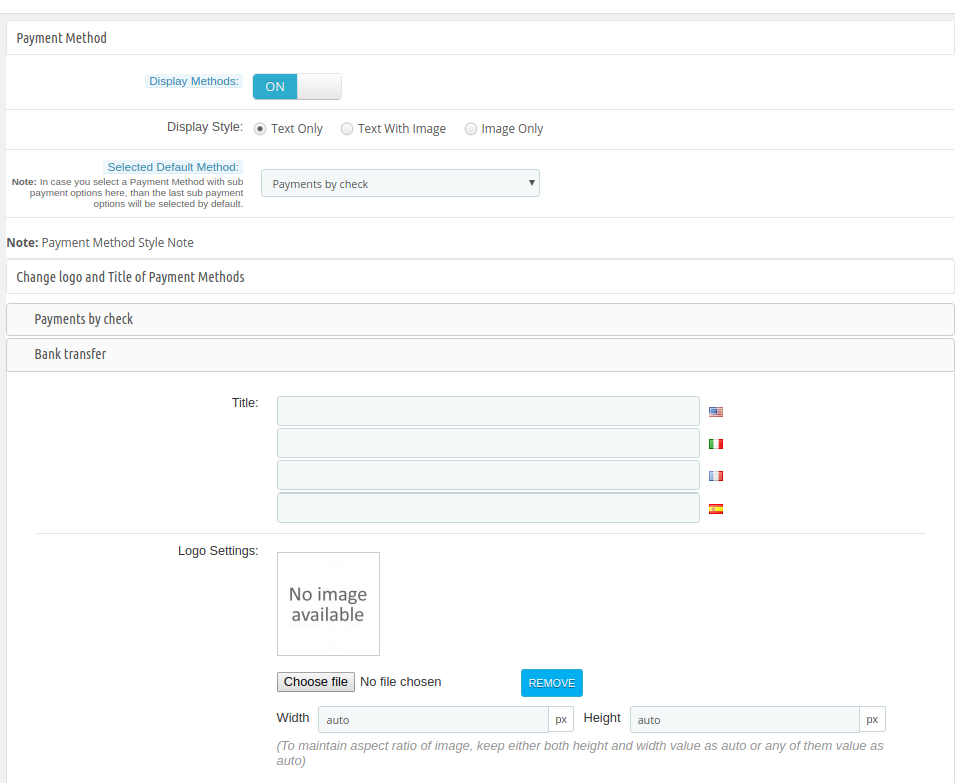
Display Methods: To Enable/Disable the payment methods on the Smart checkout page, switch the button from ON to OFF or vice-versa. This will disable the payment method block from the checkout page. By default, this option of the
Prestashop Smart checkout addon will be enabled.
Display style: There are 3 options in this field of the Prestashop Smart One Step Checkout Addon to display how your payment methods will be displayed on the checkout page.
Selected Default method: Choose the default payment method from the list which will be displayed as selected at the time, when the customer comes on the checkout page.
Admin can change the logo and title of available payment methods.
3.7 Delivery method
In this section of Prestashop Quick checkout addon, admin can apply delivery methods related settings:
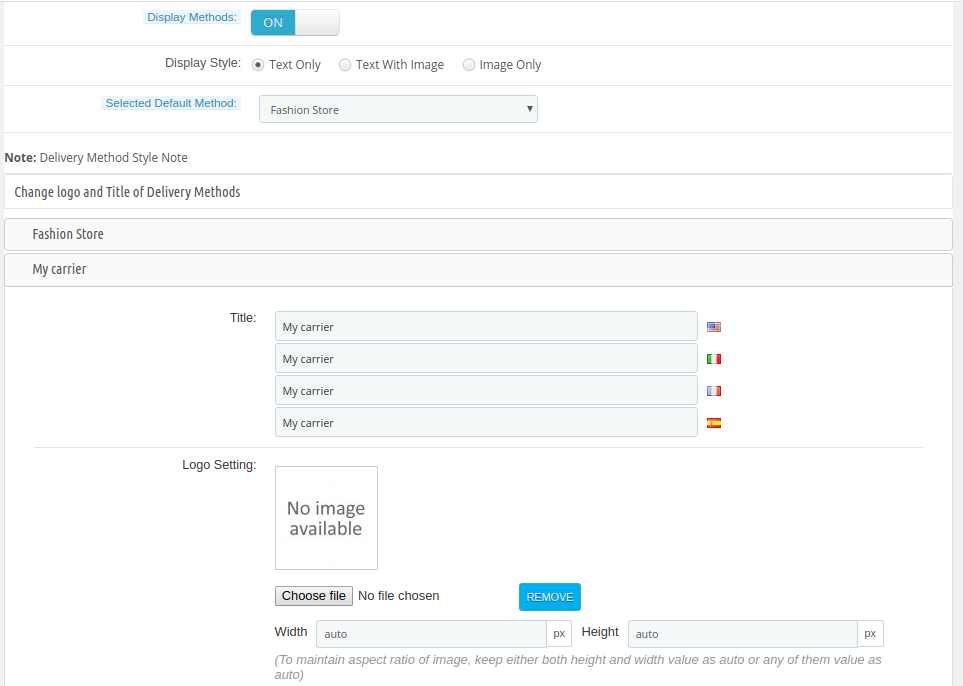
Display Methods: To Enable/Disable the delivery methods on the checkout page switch the button from ON to OFF or vice-versa. This will disable the delivery method block from the checkout page. By default, this will be enabled.
Display style: There are 3 options in this field of the Prestashop fast checkout addon to display how your delivery methods will be displayed on the checkout page.
Selected Default method: Choose the default delivery method from the available list which will be displayed as selected at the time, when the customer comes on the checkout page.
Admin can change the logo and title of available payment methods.
3.8 Ship2pay
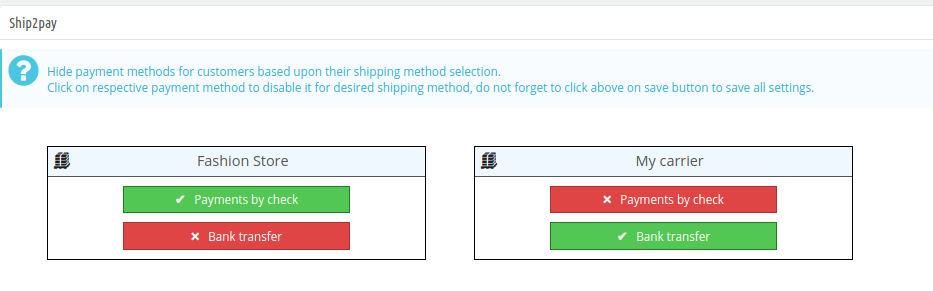
From here, admin can hide the payment methods for all the available shipping methods. Admin just needs to click on the payment method for showing or hiding it.
3.9 Custom Fields
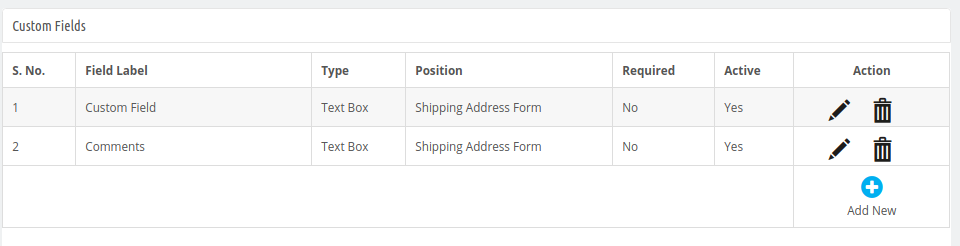
Admin can also create custom fields as per the requirements. In the Custom fields section, admin can view the list of all the created custom fields. Admin can edit, delete and make new custom fields easily.
How to Create new Custom Fields:
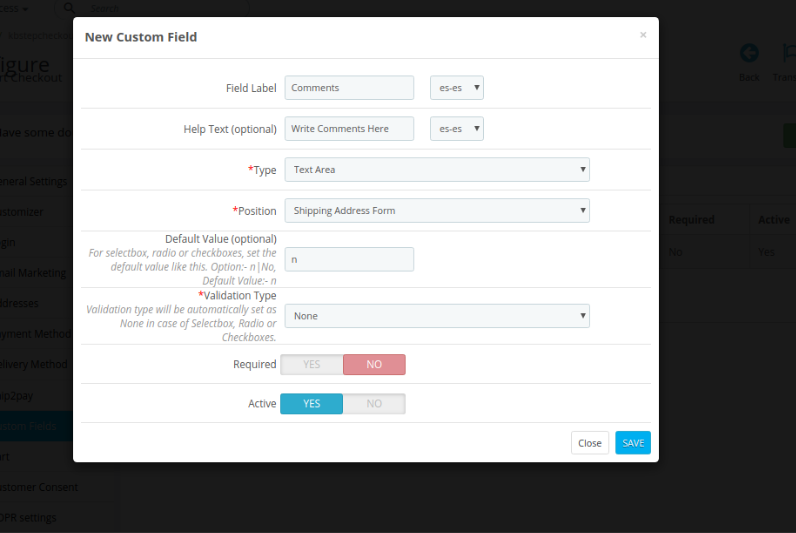
For adding a new custom field, the admin needs to click on the “+” button and enter these details as shown below:
Field Label: Enter the label for the new custom field.
Help Text: Enter help text for this new custom field.
Type: Select type of custom input field like text box, select box, text area, radio button, checkboxes and date.
Position: Select the position where you want to show this custom field.
Default value: For select box, radio or checkboxes admin needs to set value. By default, this value will be n.
Validation Type: Set validation type from the available options like int, URL, name, email and date.
Required: Make this field as a required field.
Active: Activate the field by enabling this option.
Admin can click on the bin button for deleting the custom fields and click on the edit button for changing the custom field settings.
3.10 Cart
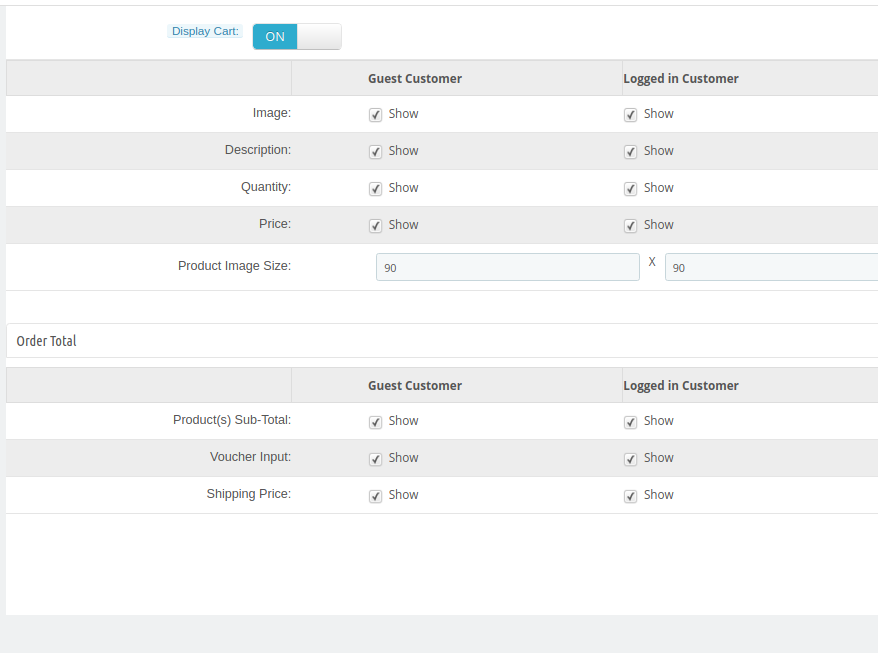
Admin can enable the “Display Cart” option for showing cart. Admin can select the fields which he wants to show to the guest and logged in customers.
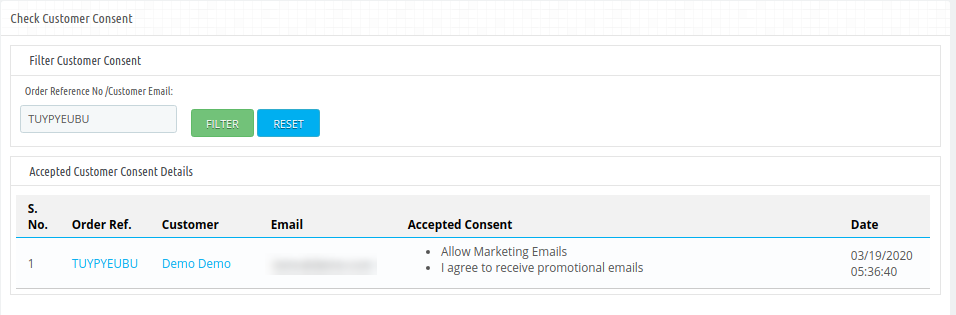
3.11 Customer Consent
Enter the Order Reference number or customer email id from the filter customer consent section.
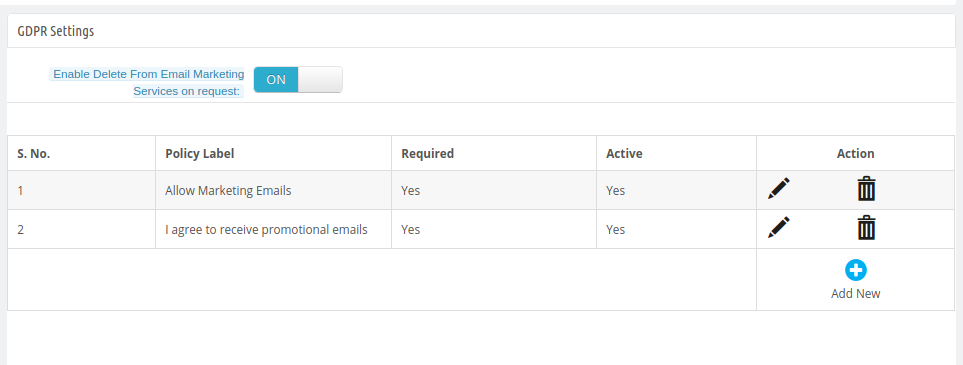
3.12 GDPR Settings
Enabling Delete from Email Marketing Services on Request: Activate or deactivate the settings as per the requirements. By enabling the option, admin can delete customer details from email marketing services on their request.
Admin can view a list of policies and also add new GDPR policies, delete and edit any policy.
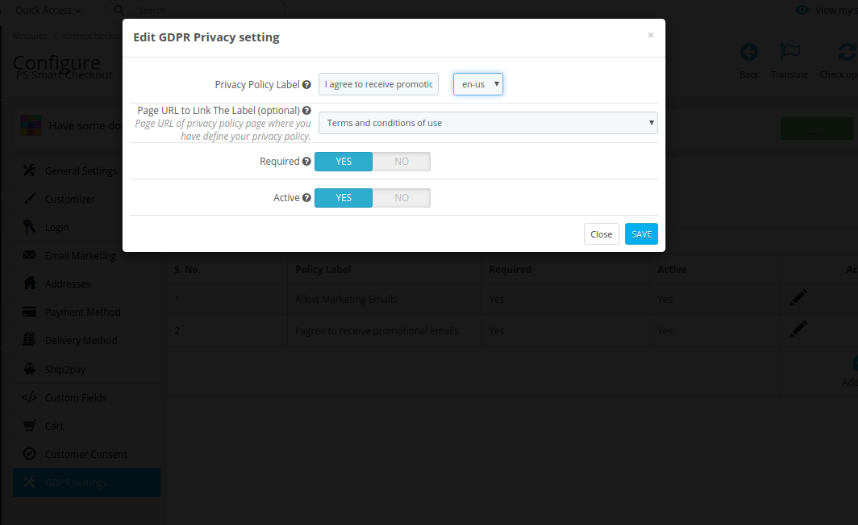
Privacy Policy Label: Admin can set the label for privacy policy in different languages.
Page URL to link the label: Admin can select the page to link the label.
Required: Make this policy mandatory.
Active: Enable the option for activating this privacy policy.
4.0 Front-end Interface
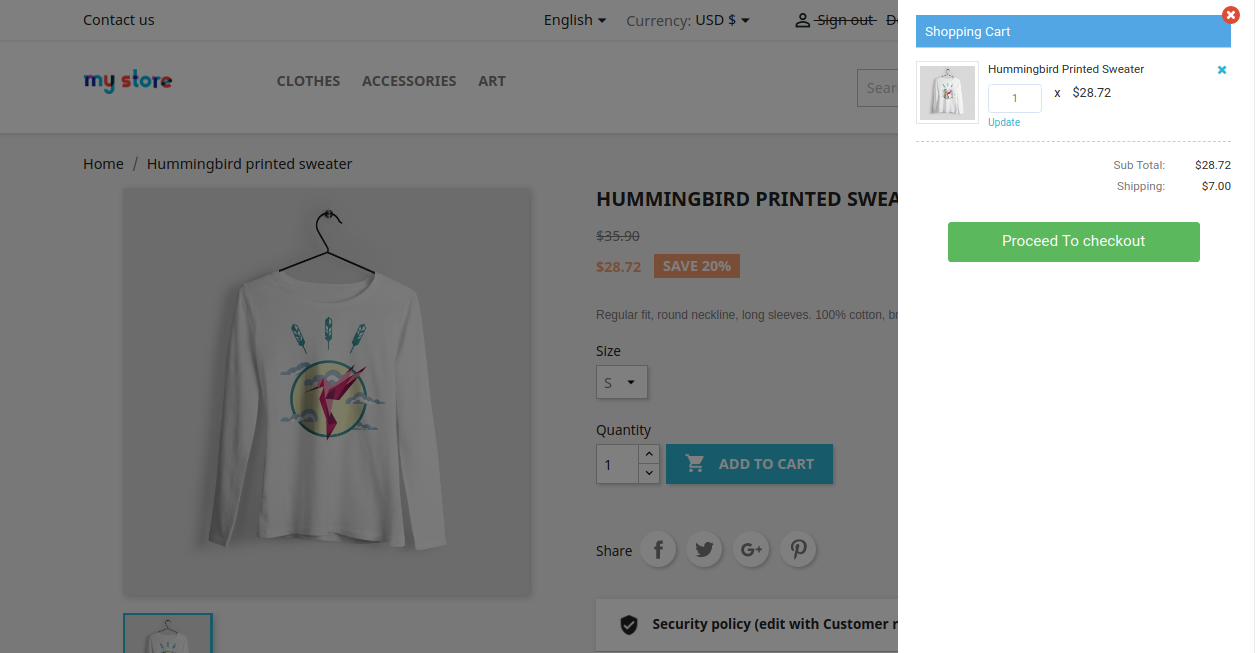
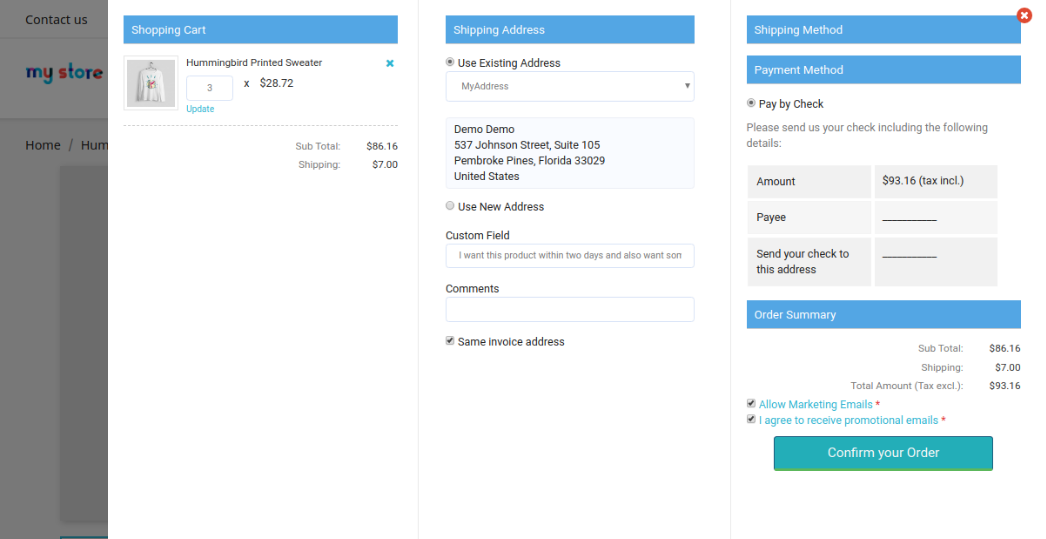
After a successful configuration, the admin can offer a simple and hassle-free checkout option. The online users will get smart one-page checkout popup as soon they click on “add to cart option”. Please check the below Screenshot for better details:
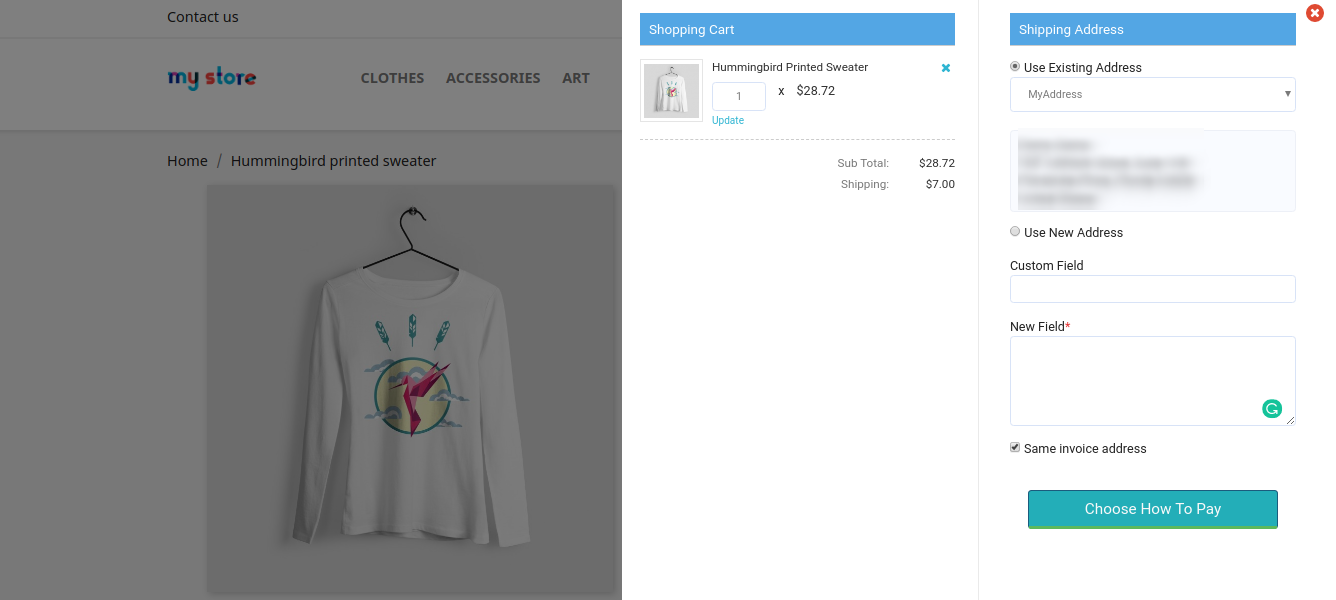
After that, online users need to click on “proceed to checkout” for further process.
Here, online users need to select a shipping address or add a new address.
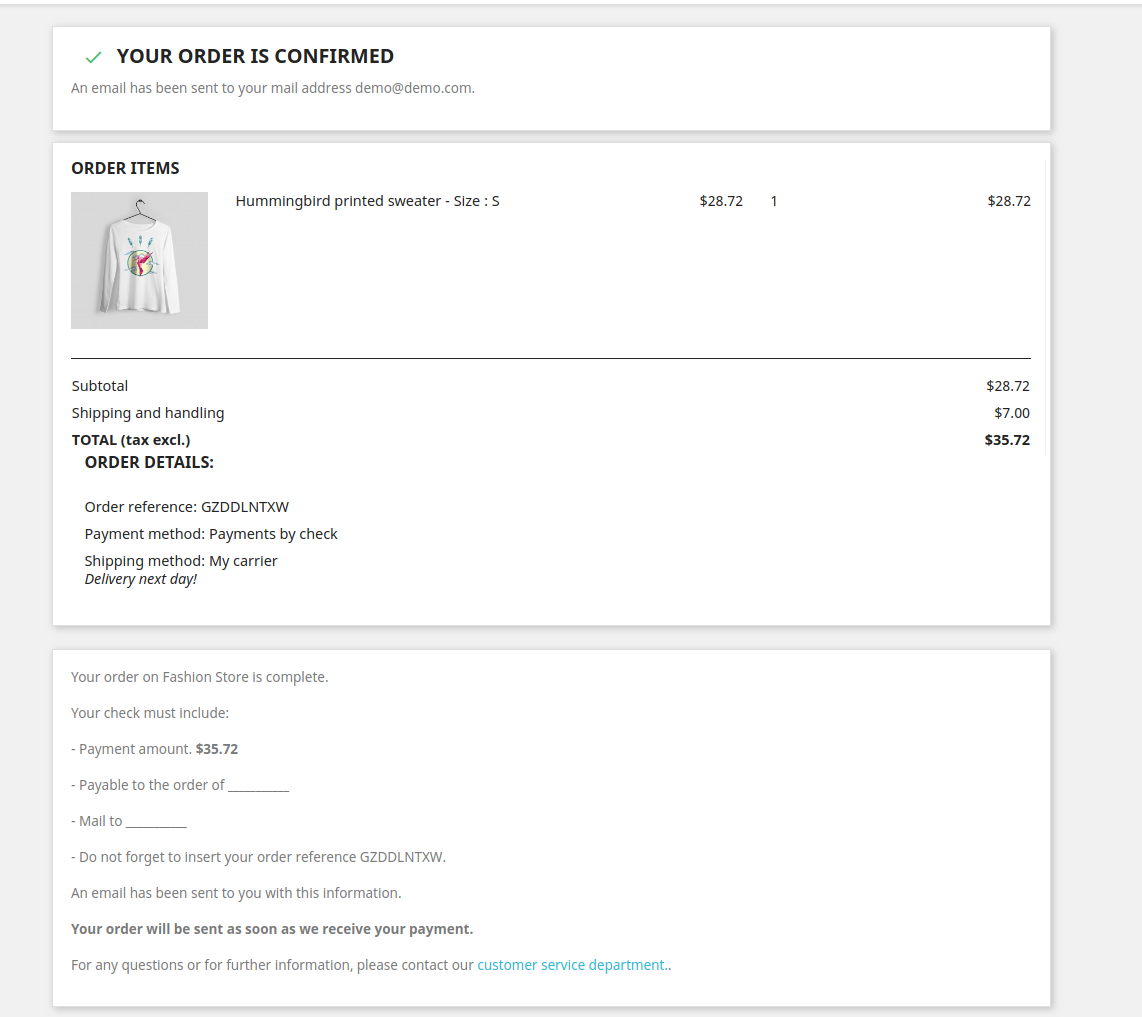
After that, online users can select the shipping method and payment method. After that, they can confirm the order easily.
Online users can check the order summary from this page easily.
Now the online merchant can implement a reward system on the website and increase website profit easily. Knowband offers Magento 2 Loyalty Points Extension which allows the store admin to offer loyalty points to the online buyers on specific events. The online users can get loyalty points on their birthday, first order, new signup, ordering any specific product or product of a specific price. This way, online buyers can collect loyalty points and convert them into vouchers while placing the next order.
By offering loyalty points to the customers, the online merchant can assure repeated orders from the same customers. The Magento 2 Loyalty reward points module allows the online merchant to set the behavior rules and product cart rules. Only those customers who’ll meet these conditions will get loyalty points.
1.1 Basic Features of this Magento 2 Loyalty Points Extension
The online merchant can offer loyalty points to online buyers and get more orders.
The online merchant can assure customer retention and customer acquisition by offering loyalty points to the buyers.
The online merchant can apply Cart rule and Behavior rule from the Magento 2 Loyalty Points Extension admin interface. This way, he can control the overall process of offering loyalty points.
The online merchant can set the amount per loyalty point, validity days and expiry information. Admin can also send an email notification for informing the online users regarding loyalty points expiry.
Admin is allowed to offer loyalty points on the customer’s birthday by setting the amount and selecting the customer group for this.
The store merchant can offer loyalty points to any customer by setting the loyalty points, validity days, loyalty point status and selecting the email id for sending loyalty points. The Magento 2 Loyalty Points module also has an option to upload the CSV file for adding loyalty points.
Admin can view the customer’s loyalty point balance and also modify the status or any other detail.
Customizable email templates are available for sending an email notification to the customers. Admin can also customize the email templates from the admin interface of Magento 2 Loyalty points and discount module.
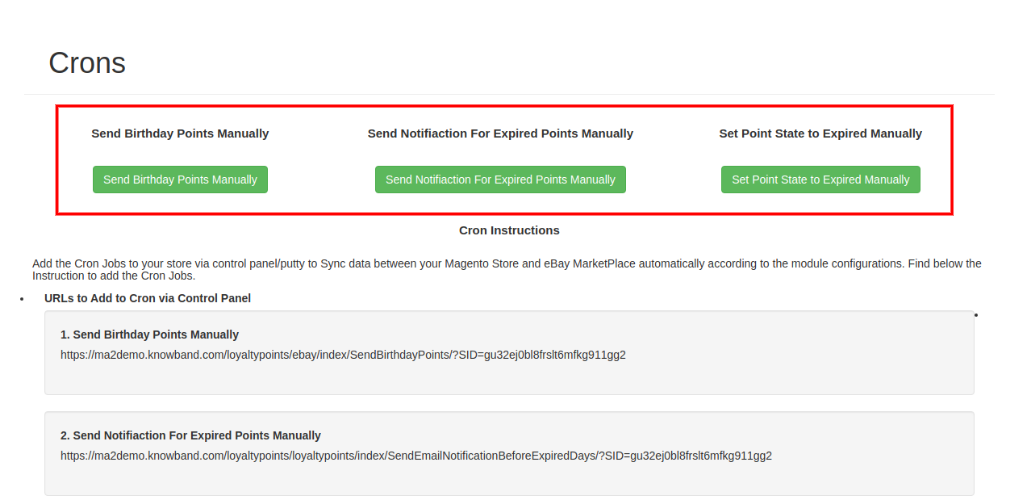
Cron settings are available for sending birthday points, expired points notifications on a single click. Admin can also change the loyalty points state to expire using these cron settings.
2.0 Installation
After purchasing Magento 2 Loyalty Points Extension, the store admin will get the following files:
Knowband_Loyaltypoints.zip which has the source code of this Magento 2 Loyalty Points module.
User Manual, with all the basic details and information.
The steps to install the Magento 2 Loyalty Points Extension are mentioned below:
Buy the Magento 2 Loyalty Points Extension from Knowband. You can download the extension package.
The package has a zipped file that contains the user manual and the source code of Magento 2 Loyalty Points module. Now, Unzip this package.
Create a folder {Magentoroot}/app/code/Knowband/Loyaltypoints
Upload the extracted content in the above folder via FTP manager (like Filezilla or WinSCP – download here: https://filezilla-project.org/).
The extension is now installed and ready for use. In Admin Panel go to “Knowband Extensions > loyalty points”.
You can now configure and use the Knowband’s Magento 2 Loyalty reward points module.
3.0 Admin Interface
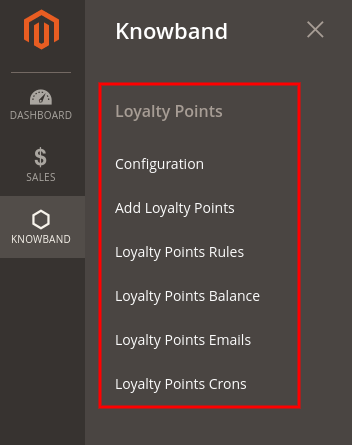
After installing the Magento 2 Loyalty Points Extension, the e-merchant can configure is as per the requirements. There are multiple configuration options as shown below:
Configuration
Add Loyalty Points
Loyalty Points Rules
Loyalty points balance
Loyalty points Emails
Loyalty Points Crons
3.1 Configuration
In Configuration settings, the online merchant will get these options:
General Settings
Label Settings
Birthday Settings
3.1.1 General Settings
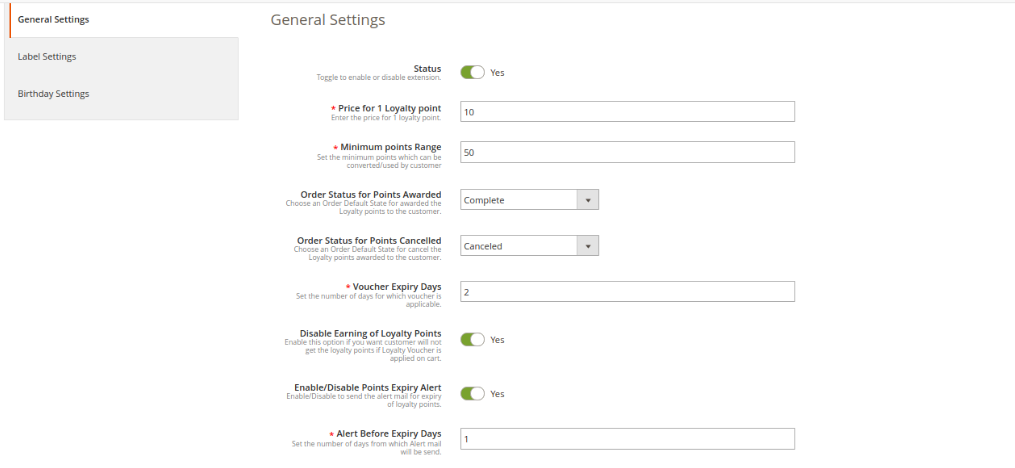
In General Settings, there are options to apply basic settings related to loyalty points. The online merchant will get these options here:
Status: Toggle the button for activating or deactivating loyalty points functionality in your store.
Price for 1 loyalty point: Set the price per loyalty point from here.
Minimum Points Range: Set the minimum points which need to be used by the customers while converting it to the voucher.
Order Status for Points Awarded: Set the default order status on which customers will get loyalty points.
Order Status for Points canceled: You can also set the order status on which loyalty points will be canceled from the customer’s account.
Voucher Expiry days: Set the number of days after which voucher will be expired.
Disable Earning Of Loyalty Points: Enable this field if you don’t want to offer loyalty points to the customers when they apply loyalty vouchers in the cart.
Enable/Disable Points Expiry Alert: Activate this option if you want to send an email to alert the customers about the expiry of loyalty points.
Alert Before Expiry Days: Set the number of days before which you want to send an alert.
3.1.2 Label Settings
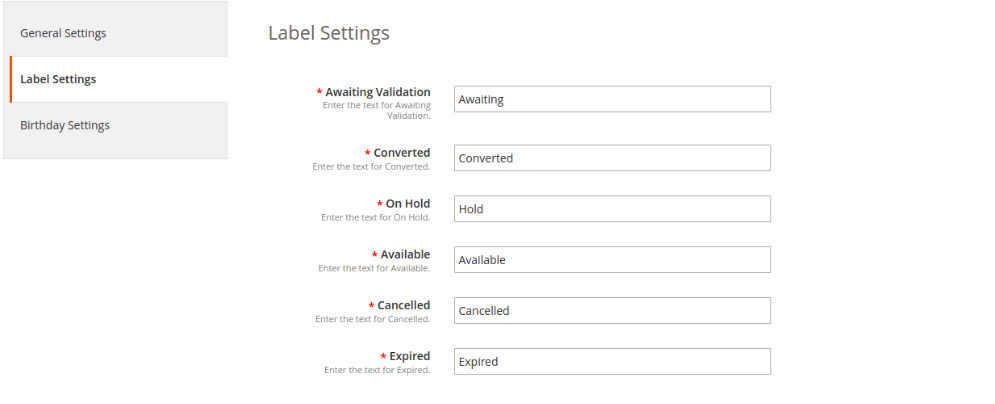
In this section, the online merchant can set the label for loyalty points. The Magento 2 Loyalty reward points module allows the store admin to set the label for Awaiting Validation, Converted, On Hold, Available, Canceled and Expired loyalty points.
3.1.3 Birthday Settings
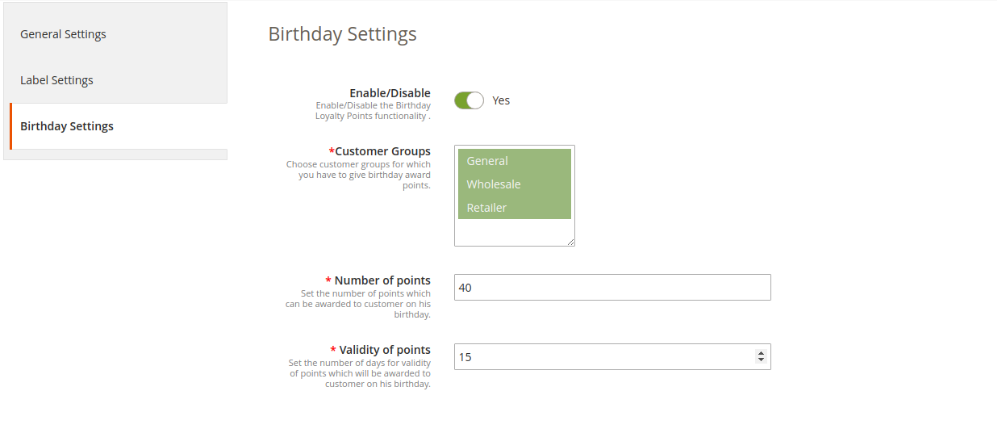
The Magento 2 Loyalty points and discount module allows offering birthday loyalty points to the customers. These are the customization options as shown below:
Enable/Disable: Toggle the button for activating or deactivating the settings to offer loyalty points on birthdays.
Customer Groups: Choose the customer group to which you want to offer birthday loyalty points.
Number of points: Enter the loyalty points which you want to offer on the birthday.
Validity of Points: Set the number of days for which loyalty points will be valid.
3.2 Add Loyalty Points
In this section, the online merchant can apply the settings for offering loyalty points to the customers. Admin can offer loyalty points to any specific customer or offer to multiple customers by uploading the CSV file. These are the configuration options available in this section:
Add Points
Add points using CSV
3.2.1 Add Points
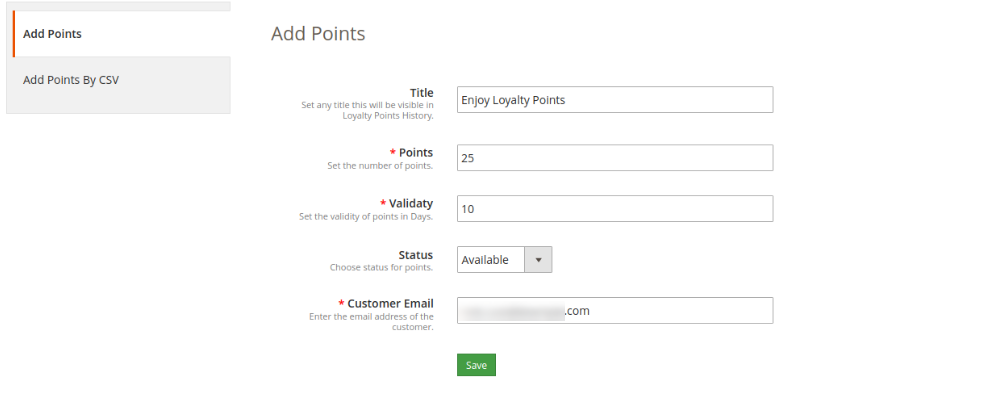
The online merchant can offer loyalty points for the customers by selecting their email id. Check the customization options below:
Title: Set the loyalty points title from here.
Points: Enter the number of loyalty points which you want to offer.
Validity: Set the points validity days from here.
Status: Select the initial status for loyalty points.
Customer Email: Enter the customer’s email id here.
3.2.2 Add Points Using CSV
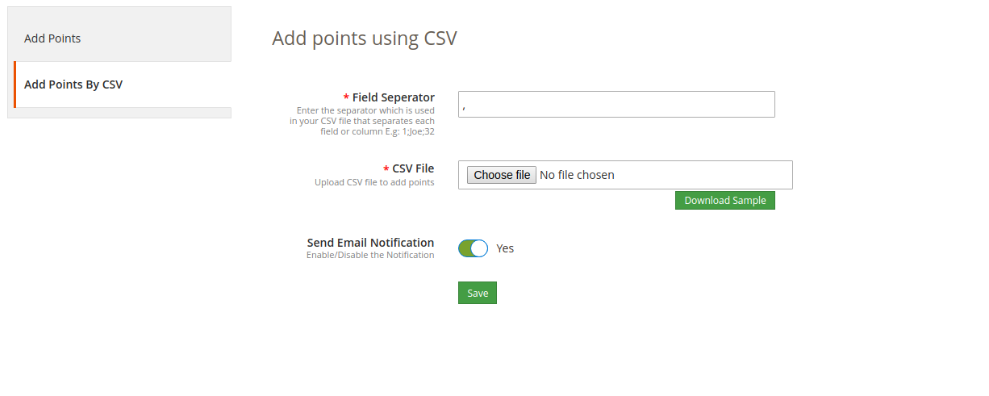
The online merchant can download the sample CSV file and then add loyalty points with other details. After that, he can upload the updated CSV files for offering loyalty points.
Field Separator: Set the field separator for columns.
CSV File: Upload CSV File to add loyalty points. (From the download button, admin can first download the sample CSV file)
Send Email Notification: Enable email notification for notifying the customers regarding offered loyalty points.
3.3 Loyalty Points Rules
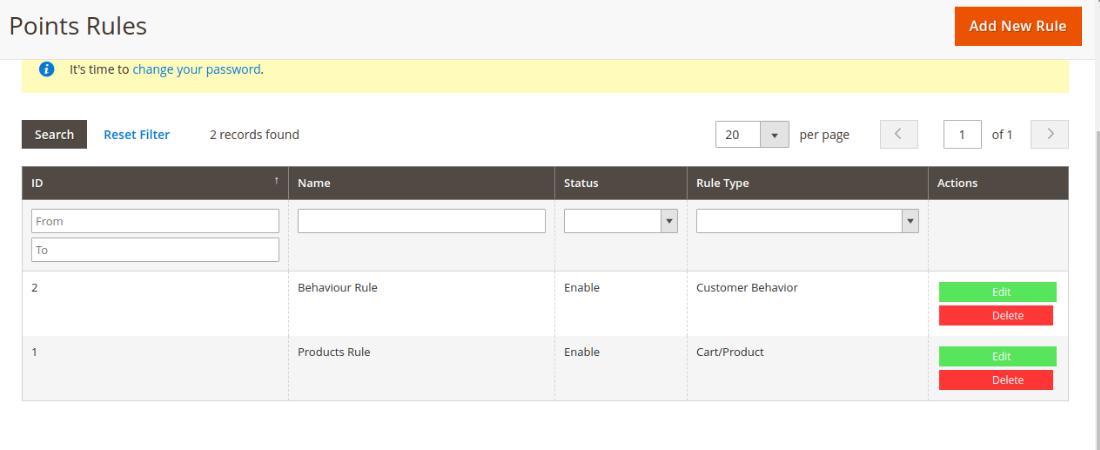
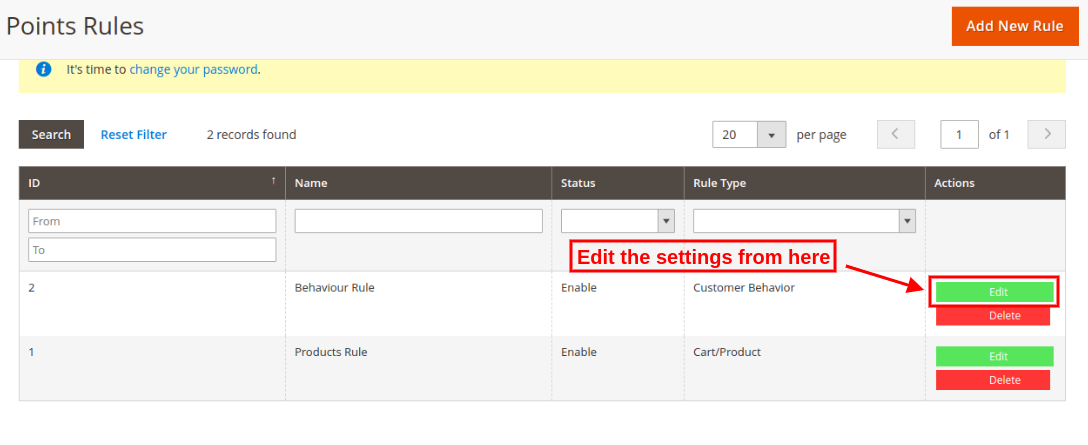
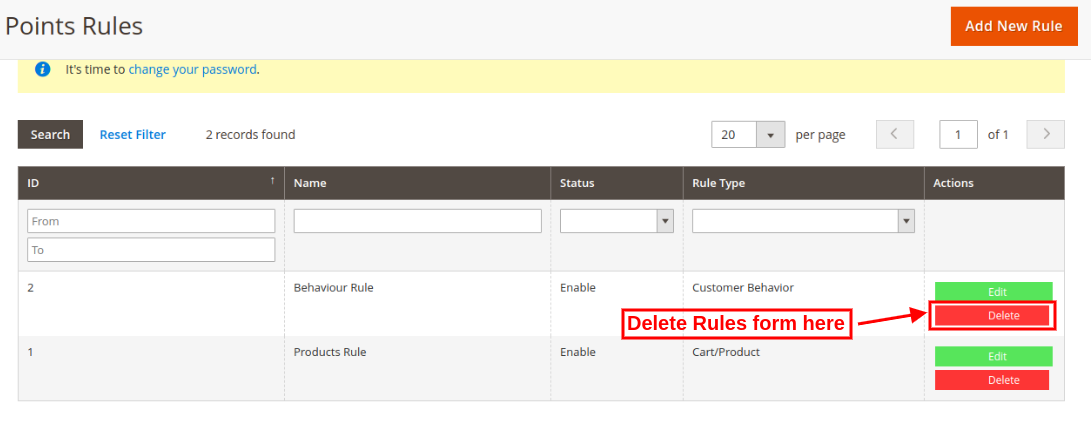
Admin can add various customer behavior and cart/product rules for offering loyalty points. The Magento 2 Loyalty points and discount module allows adding various rules without any limitations. The online merchant can edit or delete any rule anytime from the Magento 2 Customer reward points module back-end.
3.3.1 Add new Loyalty Rule
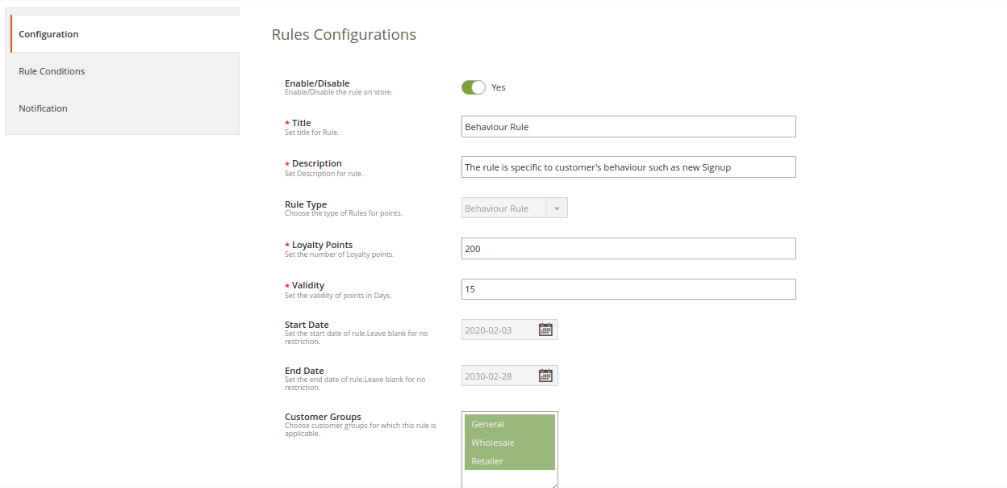
Admin can apply these settings for adding new rules from the admin interface:
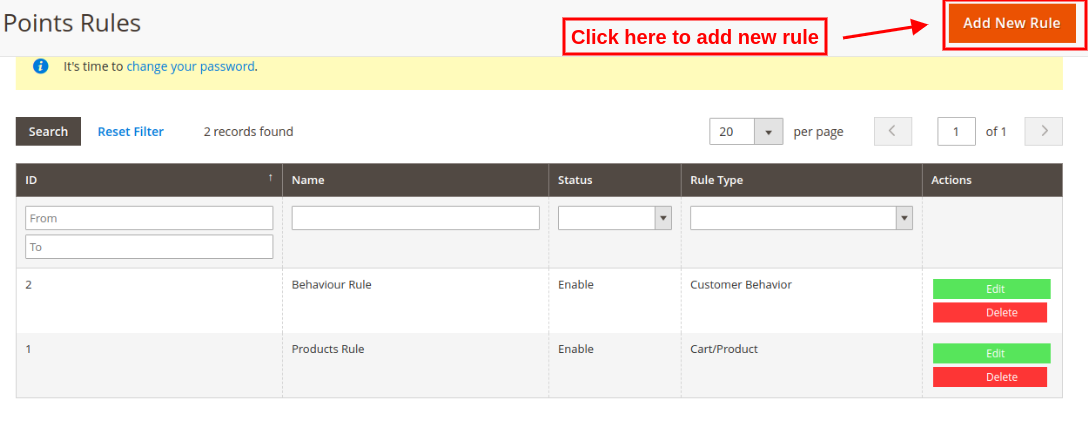
Admin needs to click on “Add New Rules” option and apply these settings:
Enable/Disable: Activate or deactivate the rule.
Title: Enter the rule title.
Description: Enter the rule description.
Rule Type: Select the rule type ie. Product cart rule and behavior rule.
Loyalty Points: Enter the number of loyalty points.
Validity: Set the validity of loyalty points in days
Start Date: Set the start date of the rule. You can leave it blank if you don’t want to apply any restrictions.
End Date: Here, set the end date for the rule. You can leave it blank for no restriction.
Customer Groups: Select the customer’s group for which this loyalty rule is applicable.
There are several rule types that are based on product cart and behavioral rule.
A. Product Cart Rule
1. Offer loyalty points based on the cart subtotal
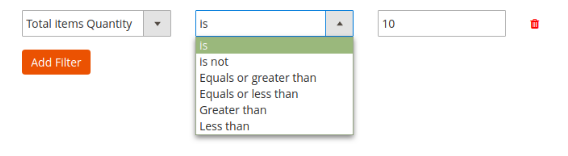
There is an option to apply conditions on cart subtotal amount. The store merchant can apply the condition to offer loyalty points to the customers when the cart subtotal is any specific amount, is not a specific amount when cart total amount is equal to or greater than selected amount when cart amount is equal or less than the selected amount, greater than the selected amount, less than the amount.
2. Offer loyalty points based on the item quantity
The online merchant can provide loyalty points to the customers when they shop for specific product quantity. Similar conditions as “cart subtotal” will be applied for item quantity also.
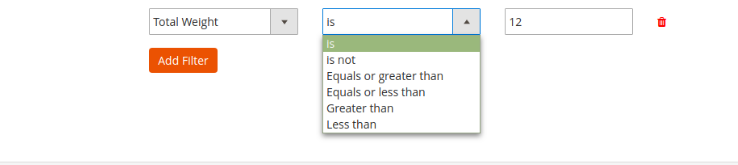
3.Offer loyalty points based on the total weight
Admin can also set the condition related to the weight of the products. Admin needs to define what should be the total weight of the cart to earn loyalty points.
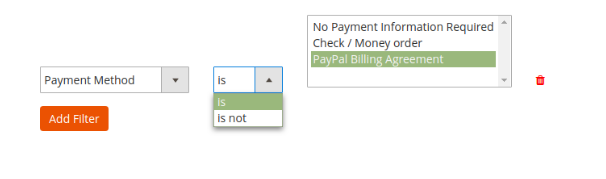
4. Offer loyalty points based on the Payment method
The store merchant can offer loyalty points to those customers who select or do not select any specific payment method.
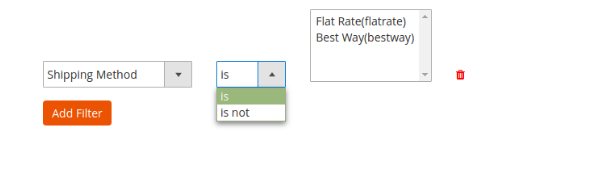
5. Offer loyalty points based on the shipping method
The store admin can provide loyalty points when a customer opts for the defined shipping service.
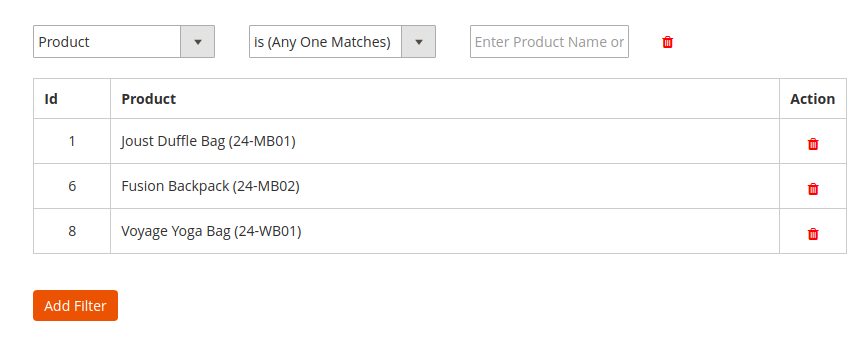
6.Offer loyalty points based on the product
Admin can offer loyalty points when cart products match with all/any selected product or no product matches at all as shown below:
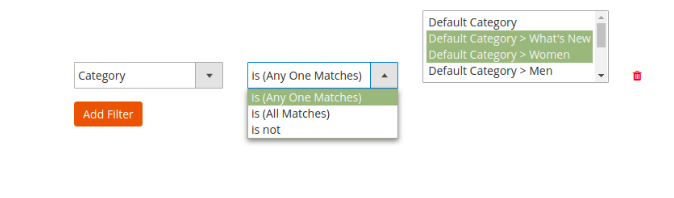
7.Offer loyalty points based on the category
The online merchant can offer loyalty points when customers purchase from a certain category(all or any matches)/do not purchase from the specific category.
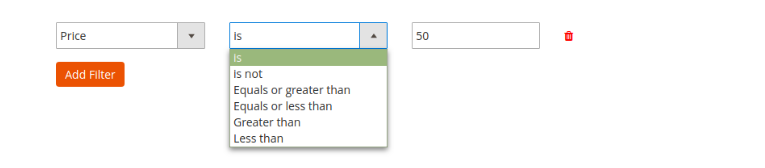
8.Offer loyalty points based on the price
The Loyalty points extension for Magento allows the store admin to offer loyalty points when the cart price meets conditions as per the module settings. Similar conditions as “cart subtotal” can be included in Price Settings.
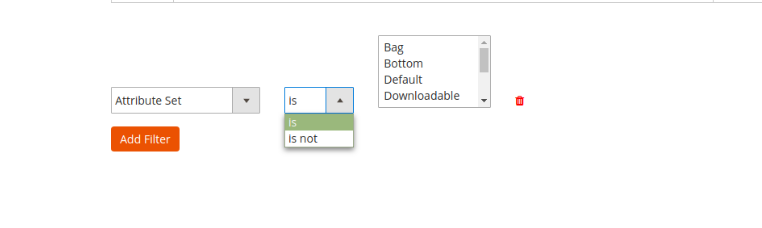
9.Offer loyalty points based on the attribute set
The online store admin can set the conditions related to attribute sets. The customers can get reward points if added products from/not from a specific attribute set.
Note: The online merchant can select “AND” or “OR” condition conjunction from the condition section. Admin can select “AND” if he wants customers to meet all the conditions. If he wants to offer loyalty points to the customers in meeting any of the condition then he’ll select “OR” conjunction.
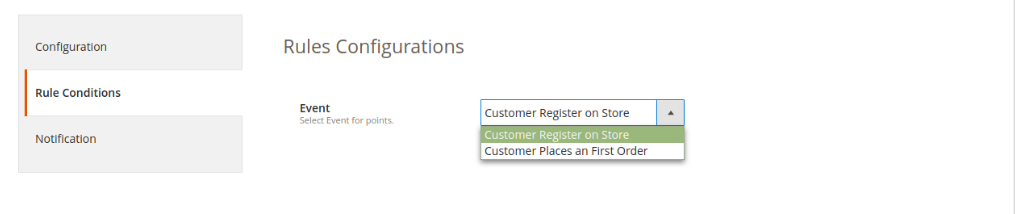
B. Behavior rule
1. Offer loyalty points on registration
The online users can earn loyalty points when they signup in the store.
2. Offer loyalty points on first order
The store merchant can also offer loyalty points on customer’s first order.
Email Notification: The online merchant can send an email with the loyalty point details will be sent to the customers if they get any loyalty point. The online merchant can enable or disable the settings for sending an email notification. The online merchant can also customize the email template easily.
3.3.2 Edit Loyalty Rule
The online store admin can also modify the rule settings from Magento 2 Loyalty reward points plugin admin interface.
Admin can apply changes and also add new conditions in any rule.
3.3.3 Delete Loyalty Rule
The Magento 2 Loyalty reward points module allows deleting the loyalty rules easily by clicking on the “Delete” button.
3.4 Loyalty points balance
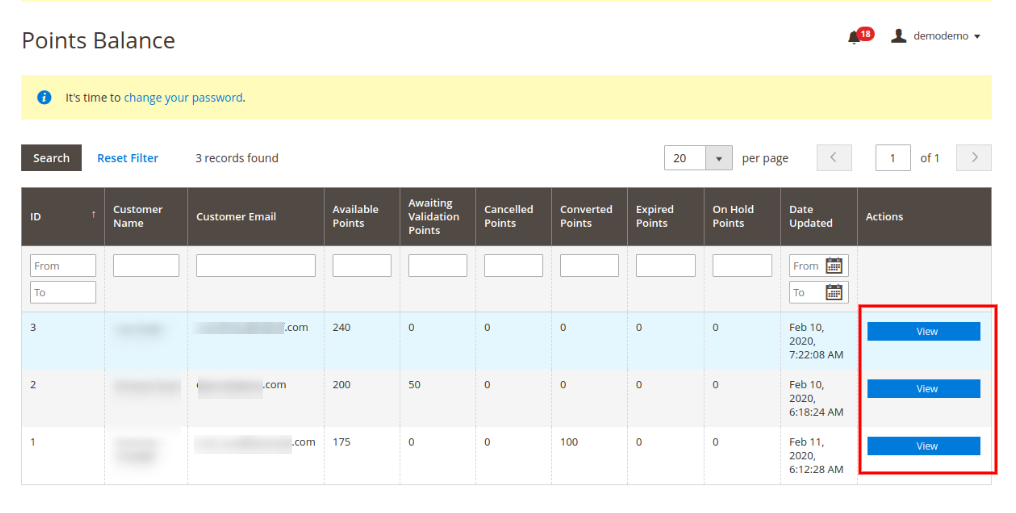
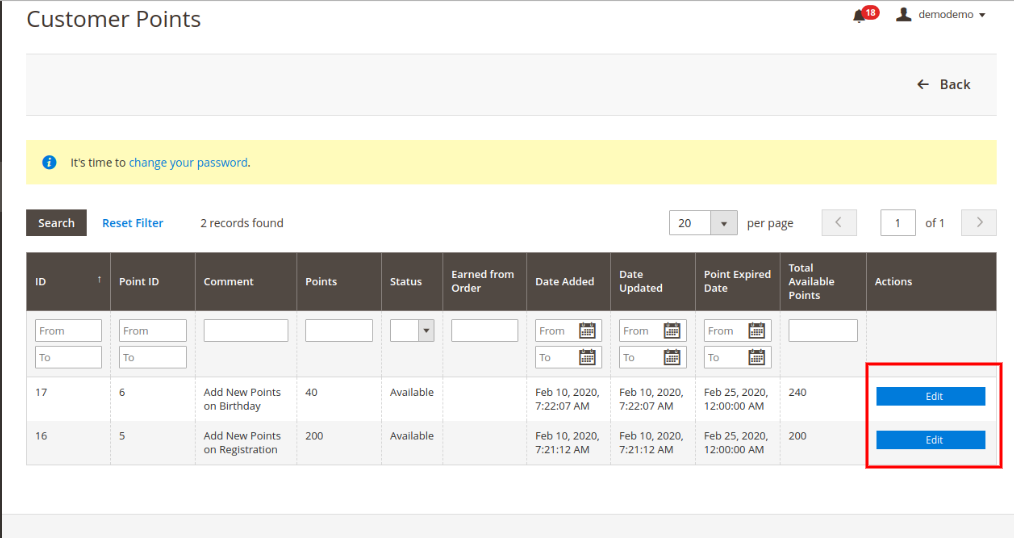
Magento 2 Loyalty points system plugin allows the online merchant to view the list in which the store merchant can view the loyalty points balance of any customer. There is a filter option available for ease of store admin.
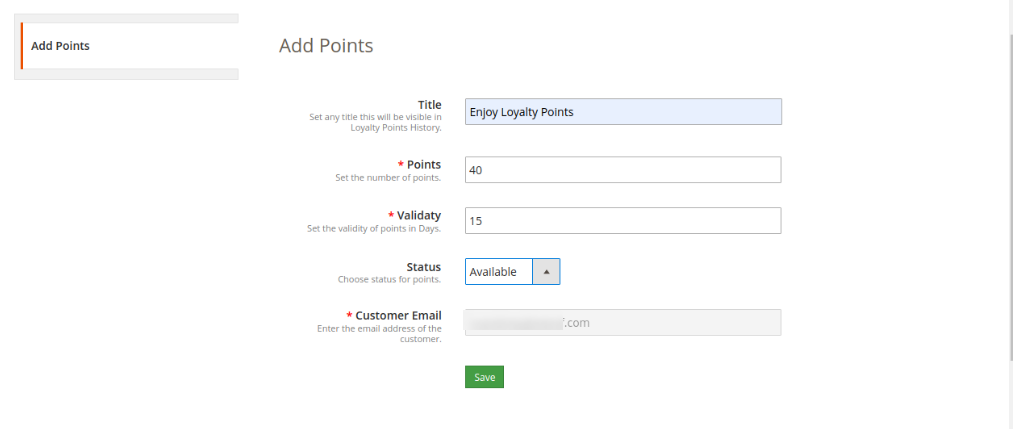
After clicking on the view button, the online merchant can get a list of all the reward points earned by that particular customer. The store merchant can also modify the loyalty points from here:
These are the options which can be modified:
Title: Enter the new title for showing on loyalty points history.
Points: Set the number of loyalty points.
Validity: Set the validity of loyalty points in days.
Status: Change the status of loyalty points.
Customer Email: view the email id details.
3.5 Loyalty Points Emails
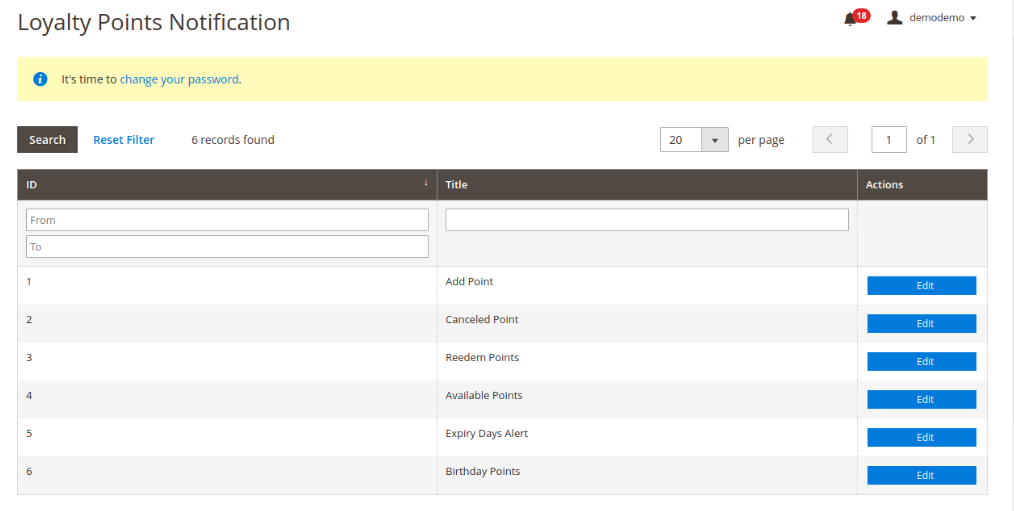
In this section of Loyalty points extension for Magento 2, the online merchant can view the list of email templates for various status:
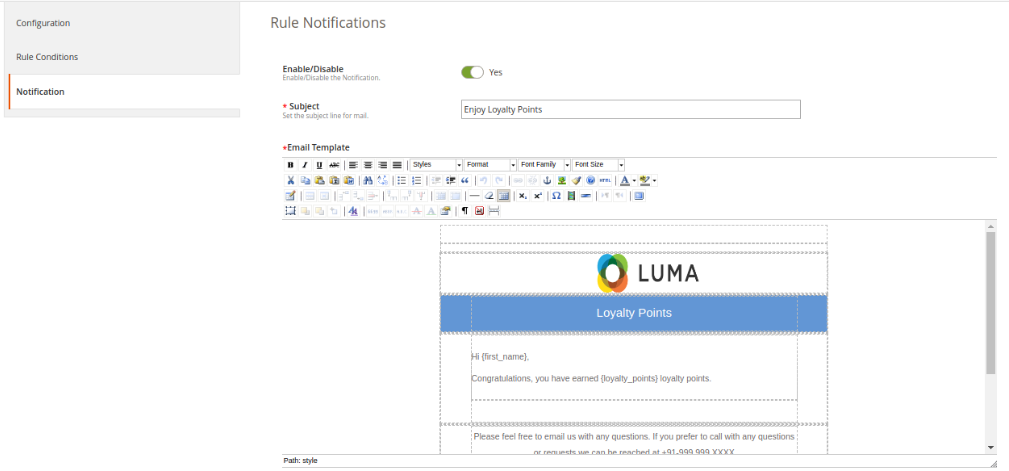
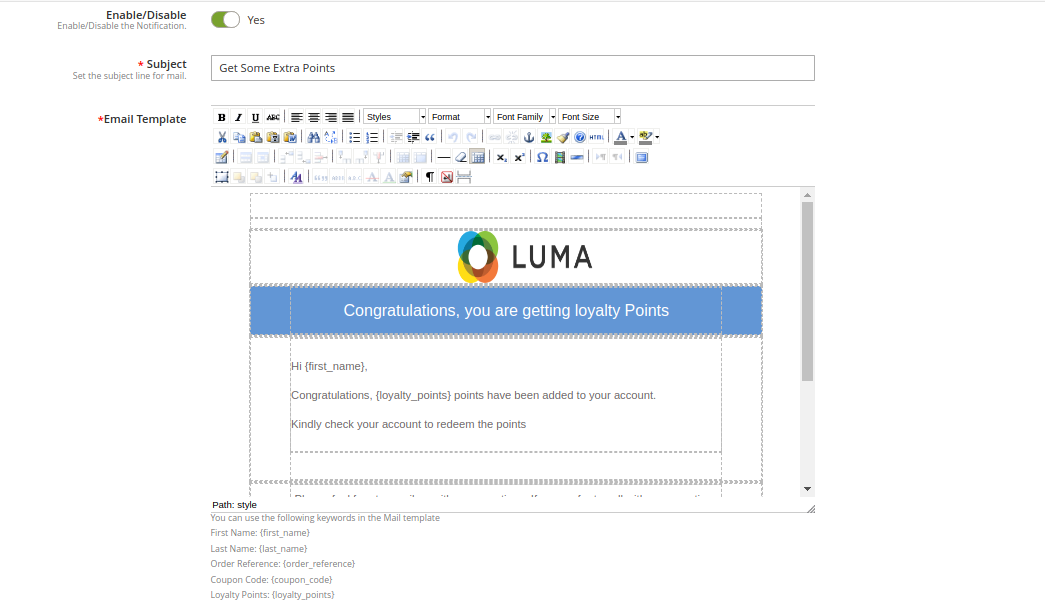
Admin can click on the “Edit” button and customize the email templates for sending to the customers:
Enable/Disable: Admin can enable or disable this option.
Subject: Enter the subject line for the email.
Email Template: The online merchant can configure the email by adding images, HTML text and description.
3.6 Cron Instructions
Admin can also configure cron and manage the overall process of offering loyalty points easily with the help of crons. This way, admin can send birthday points manually, send a notification for expired points and set the loyalty point state to expired manually.
4.0 Front-end Interface
The online buyers have an option to get loyalty points on signup, first-order events and they can also get loyalty points on any specific order and cart state.
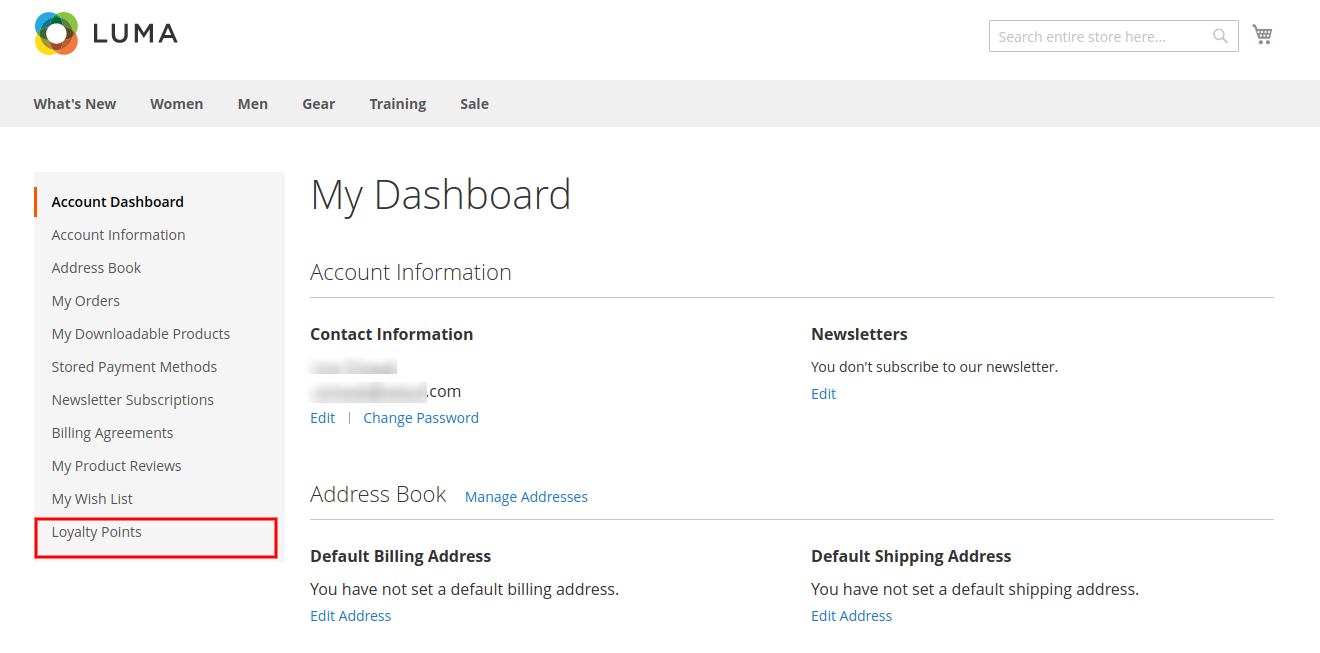
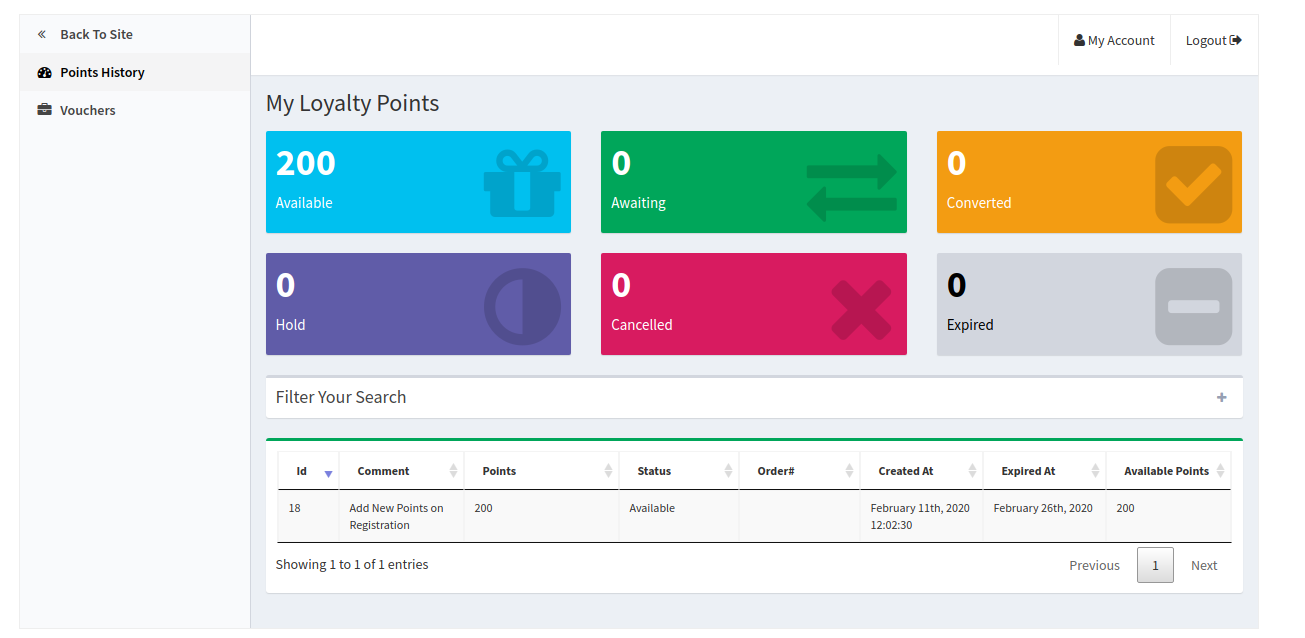
They can check an additional field in the “My Account” section. This field is “Loyalty Points” in which, the online users can view the loyalty point details as shown below:
The online users can view the loyalty points details on the “loyalty points history” and they can convert the loyalty points into the discount coupon.
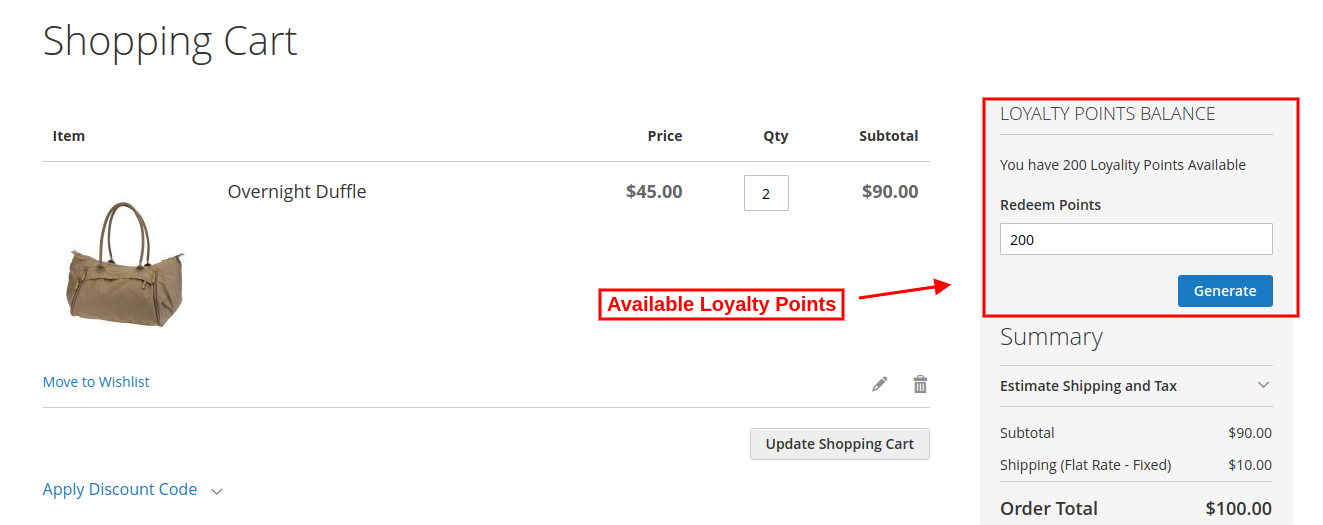
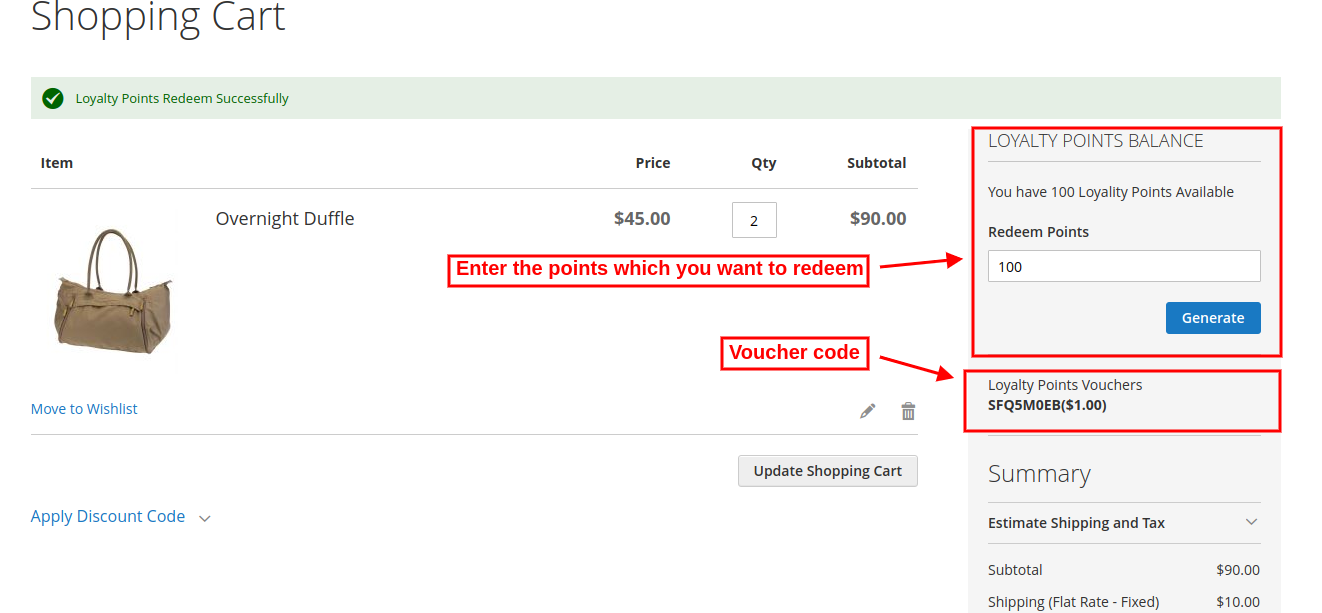
The online users can view the total available loyalty points.
The online users can enter the amount which they want to use for the ordered product as shown below:
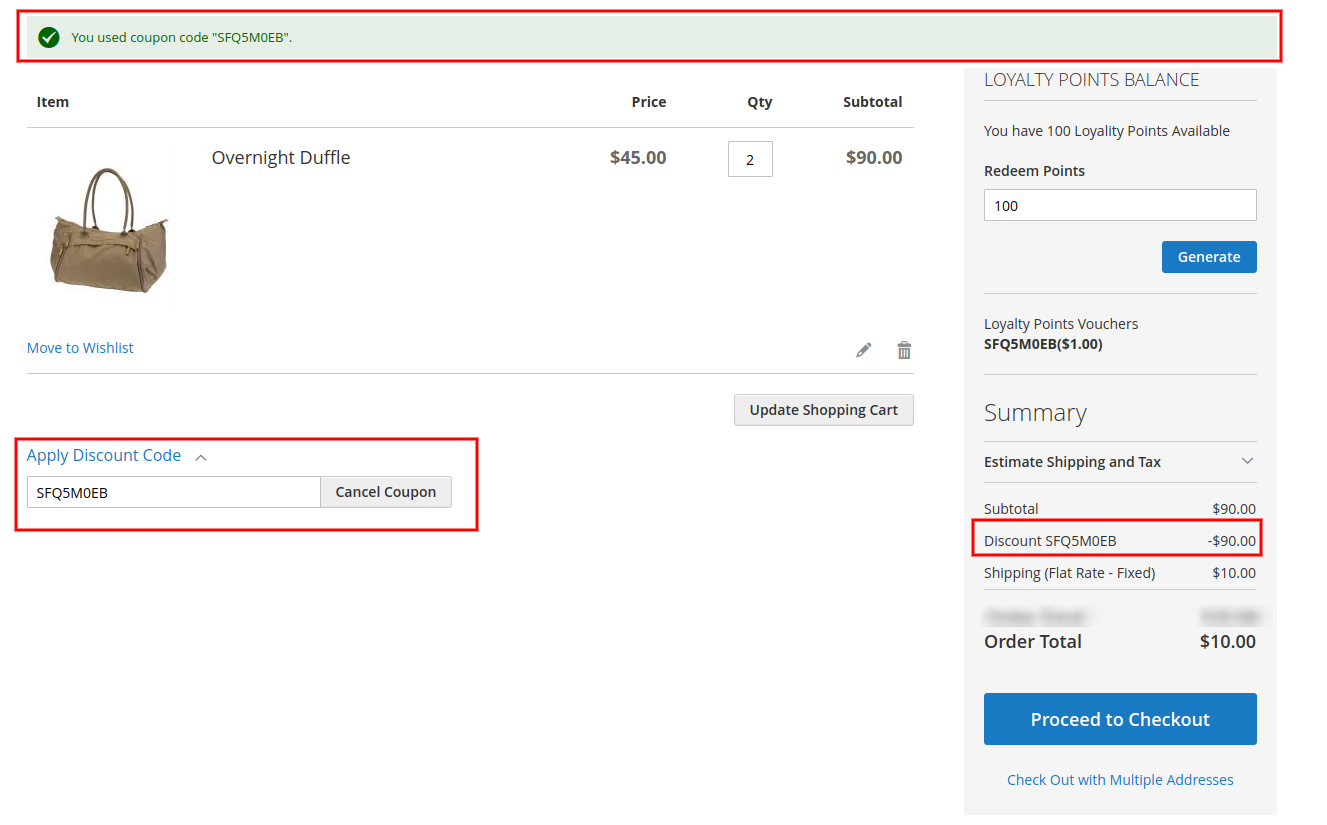
After generating the coupon code, online users can apply it as shown below:
This discount coupon will be applicable to the subtotal amount. The customers can apply the coupon and get a discount on the ordered product. They need to pay delivery charges(if any).
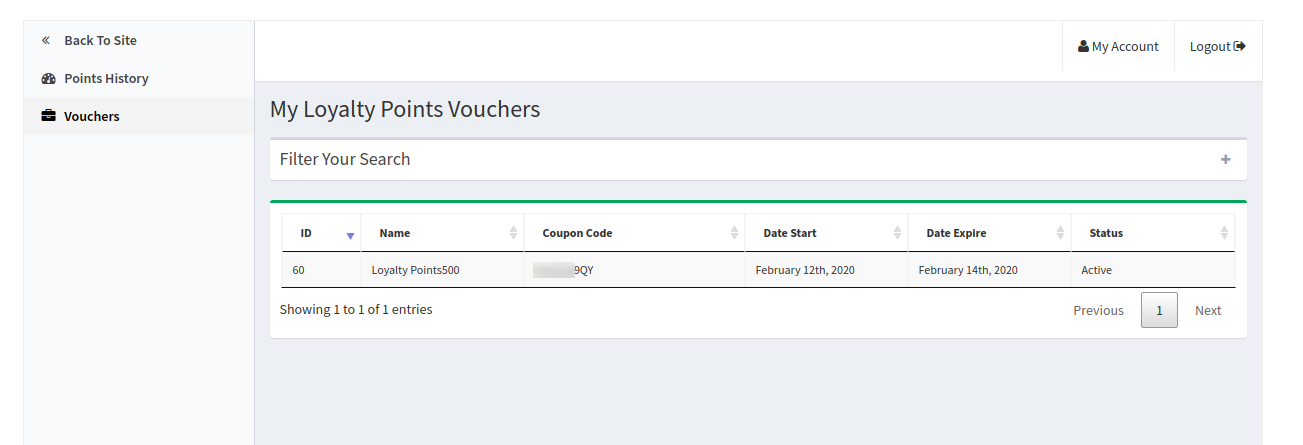
The online users can also view the created voucher details in “vouchers” section as shown below:
The online users can view the coupon code and validity days also.
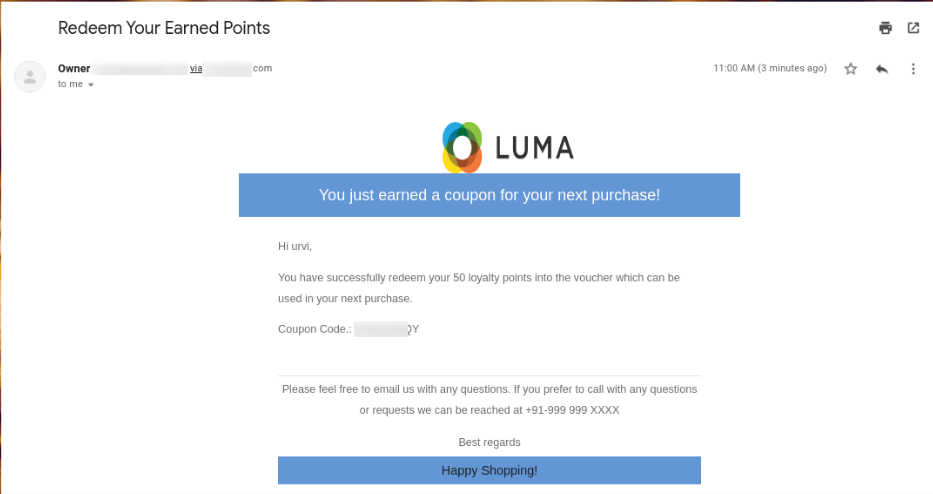
After placing the order, the online users will also get an email notification. The Magento 2 Loyalty reward points module sends a separate notification whenever the customers get any loyalty points related information.
This way, the online users can get loyalty points and enjoy shopping.
Knowband offers Magento 2 Preferred delivery time module by which the online store merchant can allow the customers to select the preferred delivery date and time for receiving the order. The online users can select the preferred date from the available calendar and time from the drop-down list. This way, the online merchant can deliver the products as per the customer’s requirements. The Magento 2 Delivery Date and Time Extension makes it easy to implement preferred delivery date-time functionality implementation. Customers can also get an option to change their preferences after placing their order. The Magento 2 Delivery Date and Time module is mobile responsive and offers smooth functioning.
1.1 Magento 2 Order Delivery Date and Time Extension Features
The online store merchant can use Magento 2 Preferred Delivery Time Module for implementing preferred date-time selection functionality.
The online store merchant can set delivery days gap and select calendar days from which customers can select the preferred delivery dates.
The online store merchant has an option to define the time slot and time slot range from the Magento 2 Delivery Date and Time Extension admin interface.
The Magento 2 Delivery Date and Time Extension allows admin to select weekdays on which delivery will be unavailable.
There is an option for online users to change their order delivery preferences even after placing the order. The e-merchant can set the time limit and order status on which customers can change their delivery preferences.
Ready-made email templates are available in Magento 2 Delivery Date and Time module which can be further customized for sending an order confirmation email to the customers.
There is an option to set weekdays on which order delivery will not be available for the consumers.
This Magento 2 Delivery Time/Date module is mobile responsive and offers smooth functioning.
The delivery time slot selection module for Magento 2 offers a user-friendly interface.
2.0 Installation
After purchasing Magento 2 Preferred Delivery Time extension, the store admin will get the following files:
1.Preferreddeliverytime.zip which has the source code of this Magento 2 Preferred Delivery Time Module.
2.User Manual, with all the basic details and information.
The steps to install the Magento 2 Preferred Delivery Time Module are mentioned below:
Buy the Magento 2 Preferred Delivery Time Module from Knowband. You can download the extension package.
The package has a zipped file that contains the user manual and the source code of Magento 2 Preferred Delivery Time Module. Now, Unzip this package.
Create a folder {Magentoroot}/app/code/Knowband/Preferreddeliverytime
Upload the extracted content in the above folder via FTP manager (like Filezilla or WinSCP – download here: https://filezilla-project.org/).
Now run below commands to install the plugin:
1.php bin/magento module:enable Knowband_Preferreddeliverytime
2. php bin/magento setup:upgrade
3. php bin/magento setup:di:compile
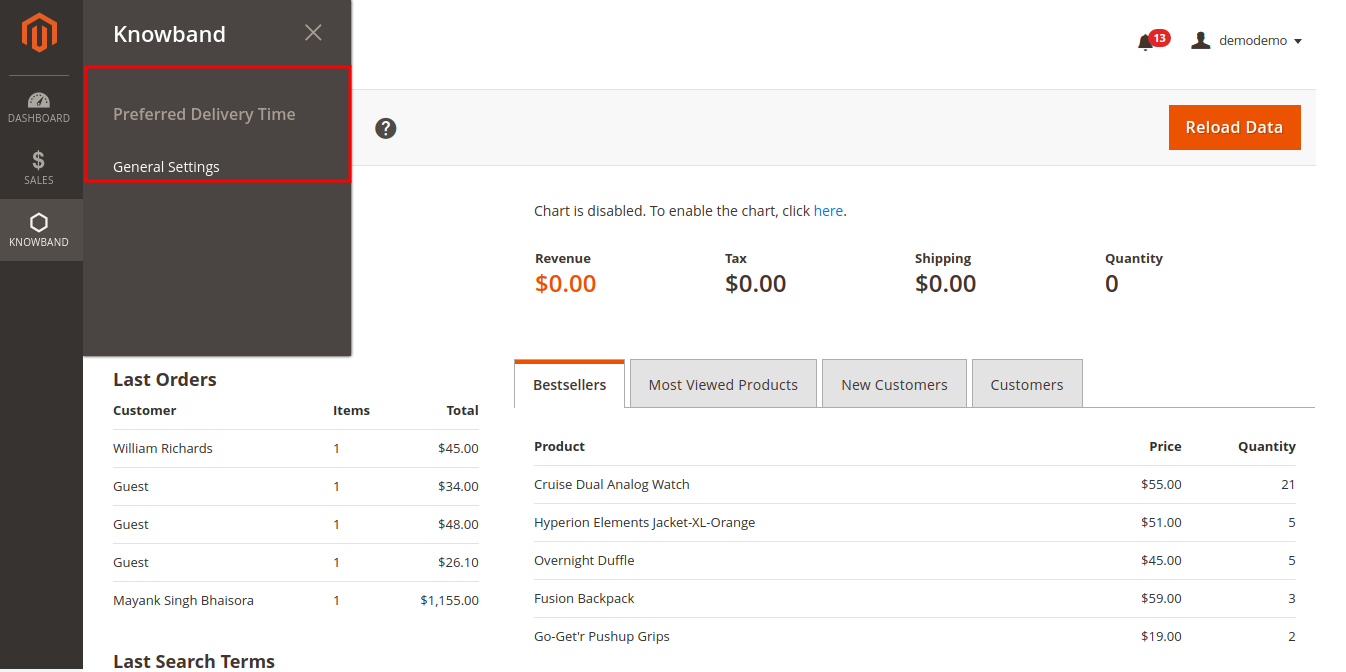
The extension is now installed and ready for use. In Admin Panel go to “Knowband Extensions > Preferred Delivery Time”.
You can now configure and use the Knowband Magento 2 Preferred Delivery Time Module.
3.0 Admin Settings
After successful installation, the online store admin can apply settings for implementing the preferred delivery date and time option for the customers. These are the configuration options as shown below:
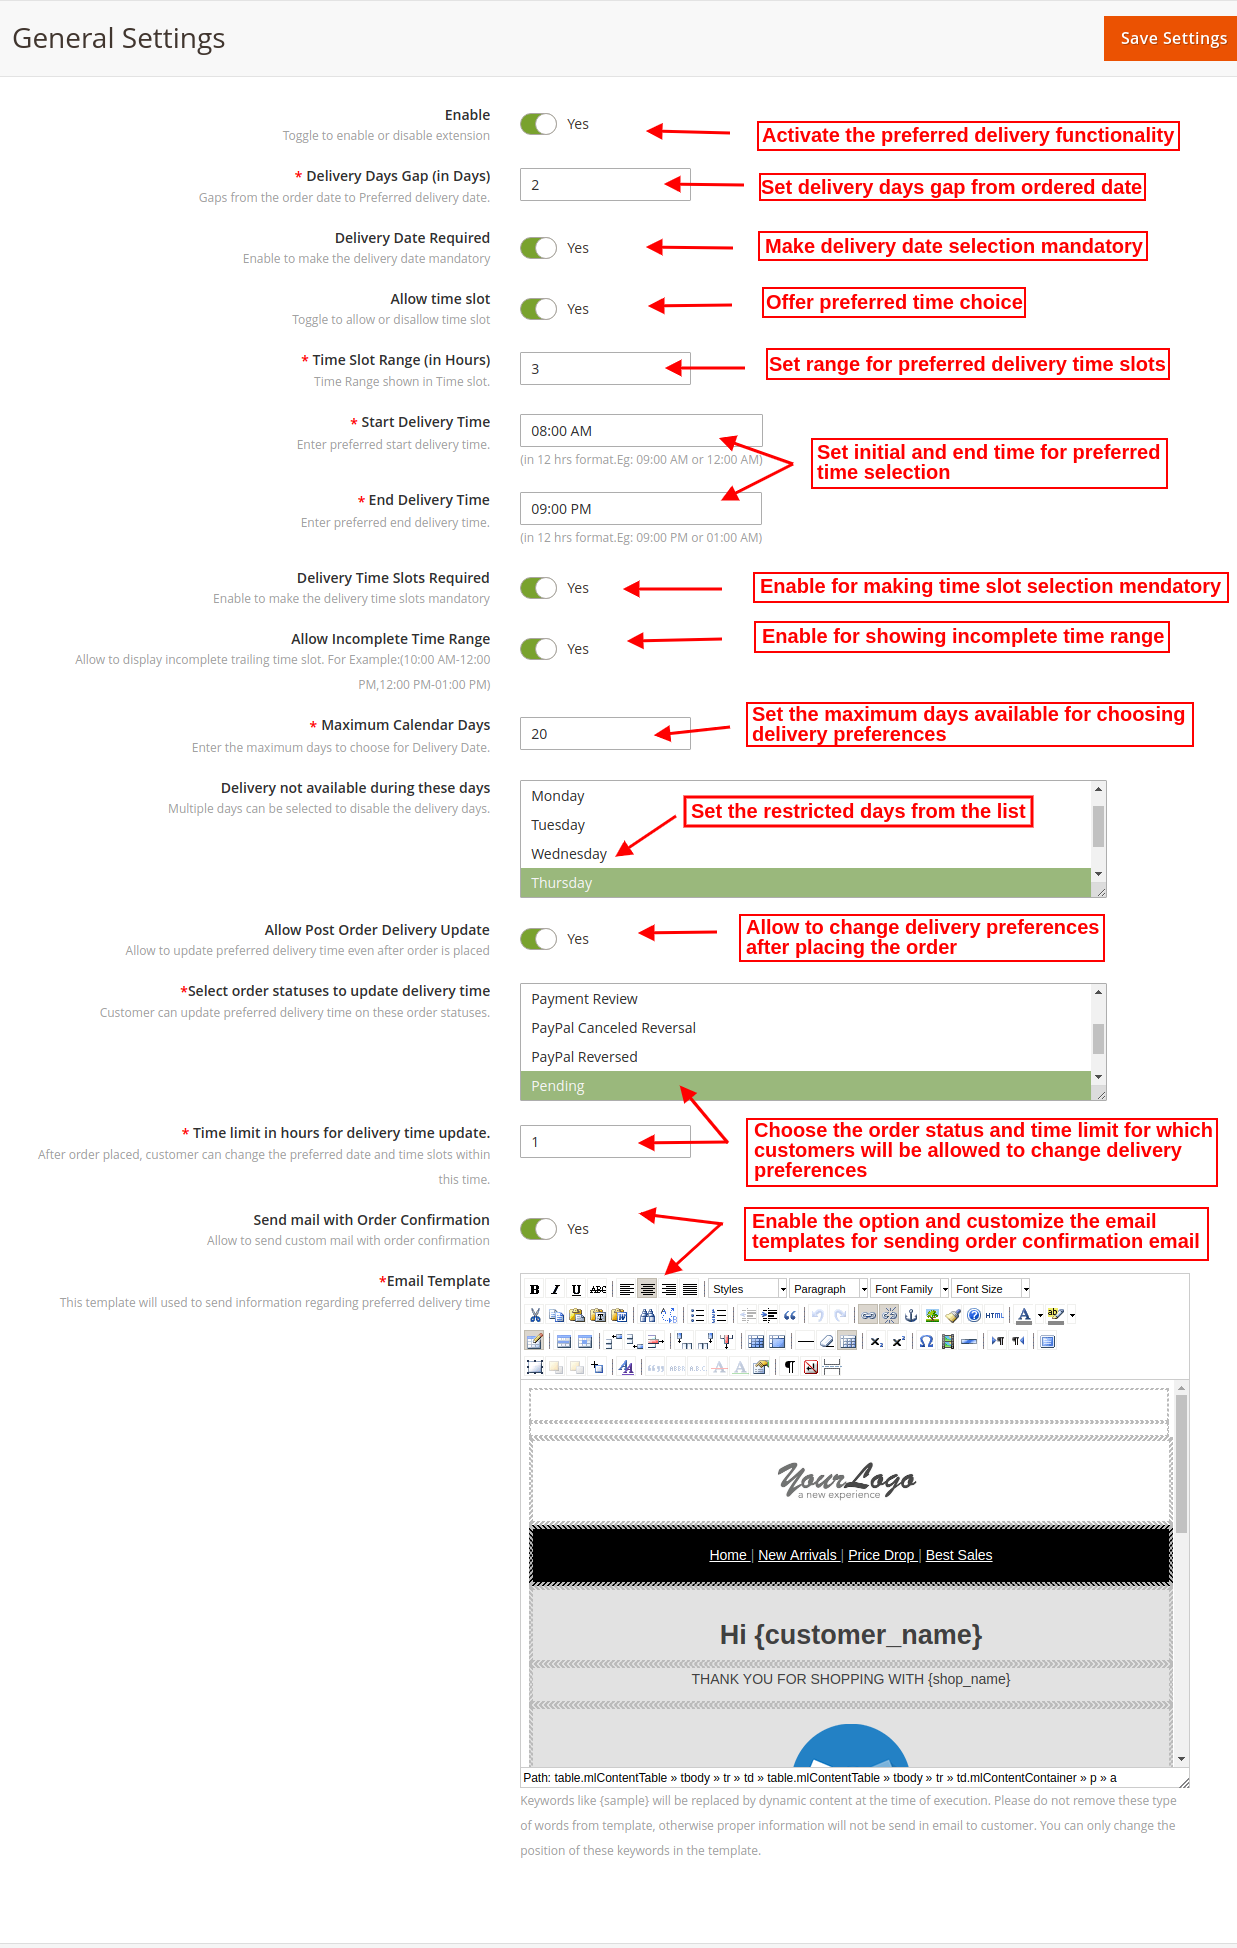
3.1 General Settings
In the General Settings tab, the online store merchant can apply these settings as shown below:
Enable: The online store merchant can activate or deactivate the module functionality by a single button toggle.
Delivery Days Gap(in Days): Set the delivery days gap which you want to show while selecting the preferred delivery date.
Delivery Date Required: Set delivery date selection mandatory for the customers.
Allow Time Slot: Allow customers to select a time slot for receiving the order.
Time Slot Range(in Hours): The eCommerce store merchant can set a time slot range from the admin interface.
Start Delivery Time: Set the Preferred start delivery time in 12 hours format.
End Delivery Time: Set preferred end delivery time in 12 hours format.
Delivery Time Slot Required: Make time slot selection mandatory for the customers by enabling the option.
Allow Incomplete Time Range: Enable this option if you want to allow showing incomplete time range ie 8 PM to 10 PM and 10 PM to 11 PM.
Maximum Calendar Days: Admin can set the maximum days available for selecting preferred delivery.
Delivery not Available During These days: Select the days on which delivery will not be available. Customers will not be able to select these days for delivery preference.
Allow Post Order delivery Update: Enable this option if you want to allow the customers to update delivery preferences after placing the orders.
Select Order Statuses to Update Delivery time: The e-merchant can also select the order status on which customers can change their preferred delivery date and time. Admin can select multiple statuses at a time.
Time Limit in hours for delivery time update: Admin can set the hours limit for allowing customers to update their preferred delivery date and time. Customers can update their preferred delivery date and time within the provided time limit.
Send mail with order confirmation: The online merchant can enable this option for sending an order confirmation email to the customers along with the date-time preference details.
Email templates: The online store merchant can customize the email templates for sending an order confirmation email to the customers.
4.0 Front-end Interface
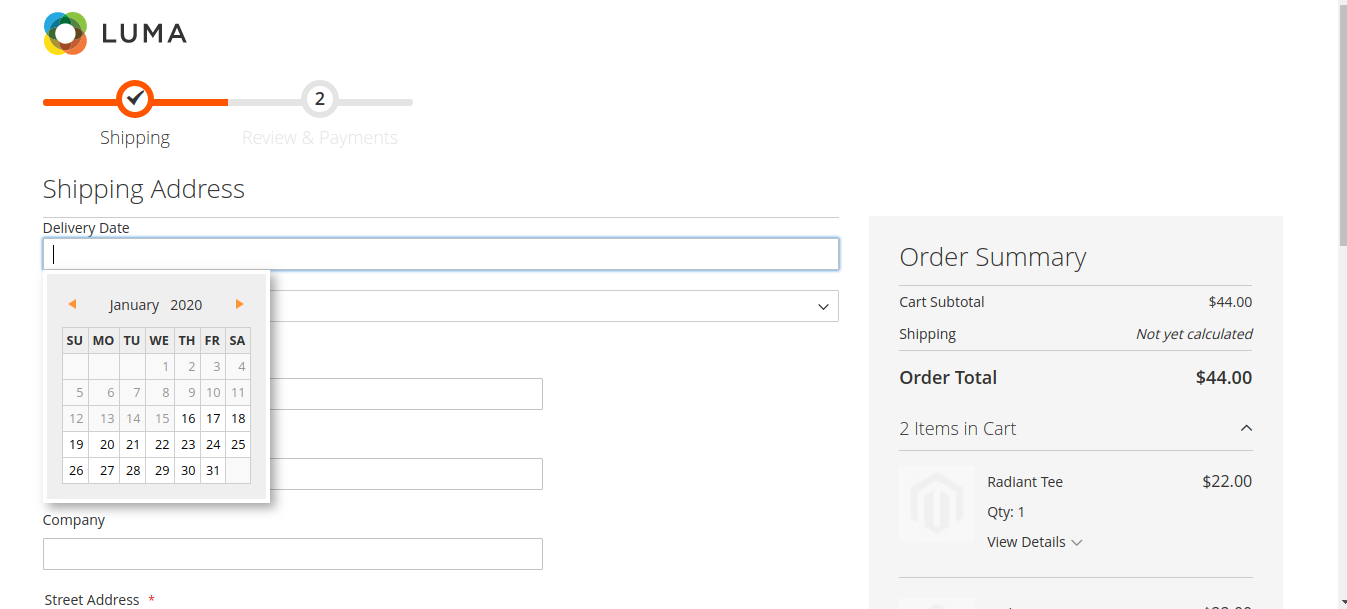
The online users can view the delivery date preference option while checkout. The online users can select the preferred date from the available dates from the calendar as shown below:
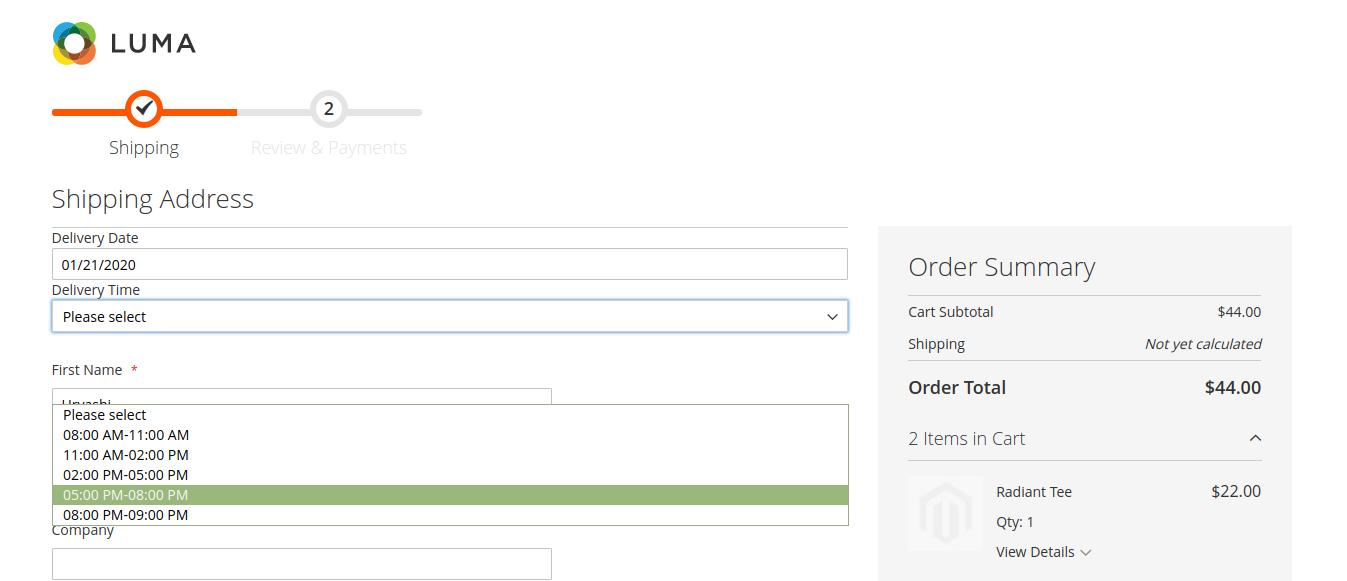
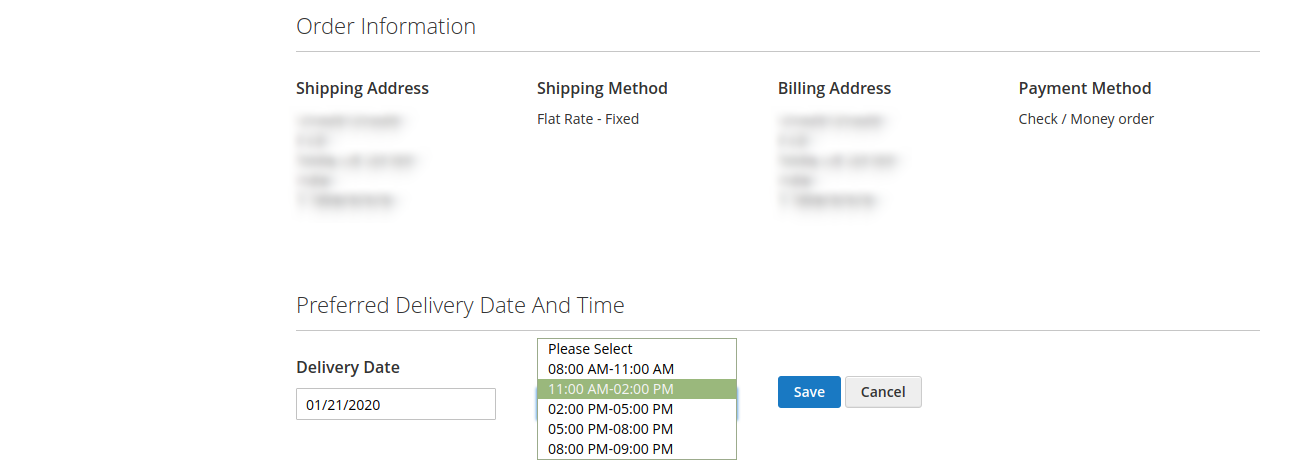
The e-Commerce store merchant can select the preferred time slot from the drop-down list as shown below:
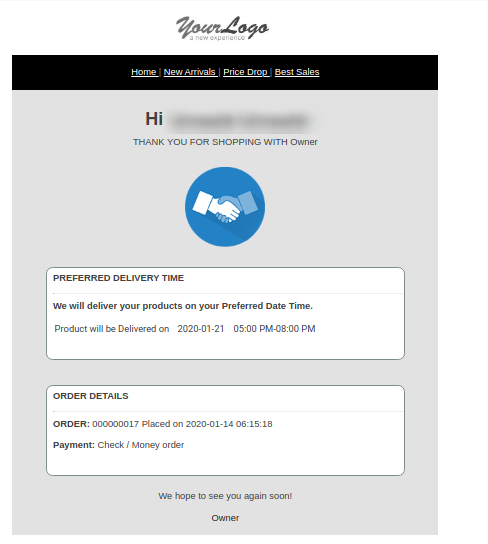
The online users can get an order confirmation email on their registered email id.
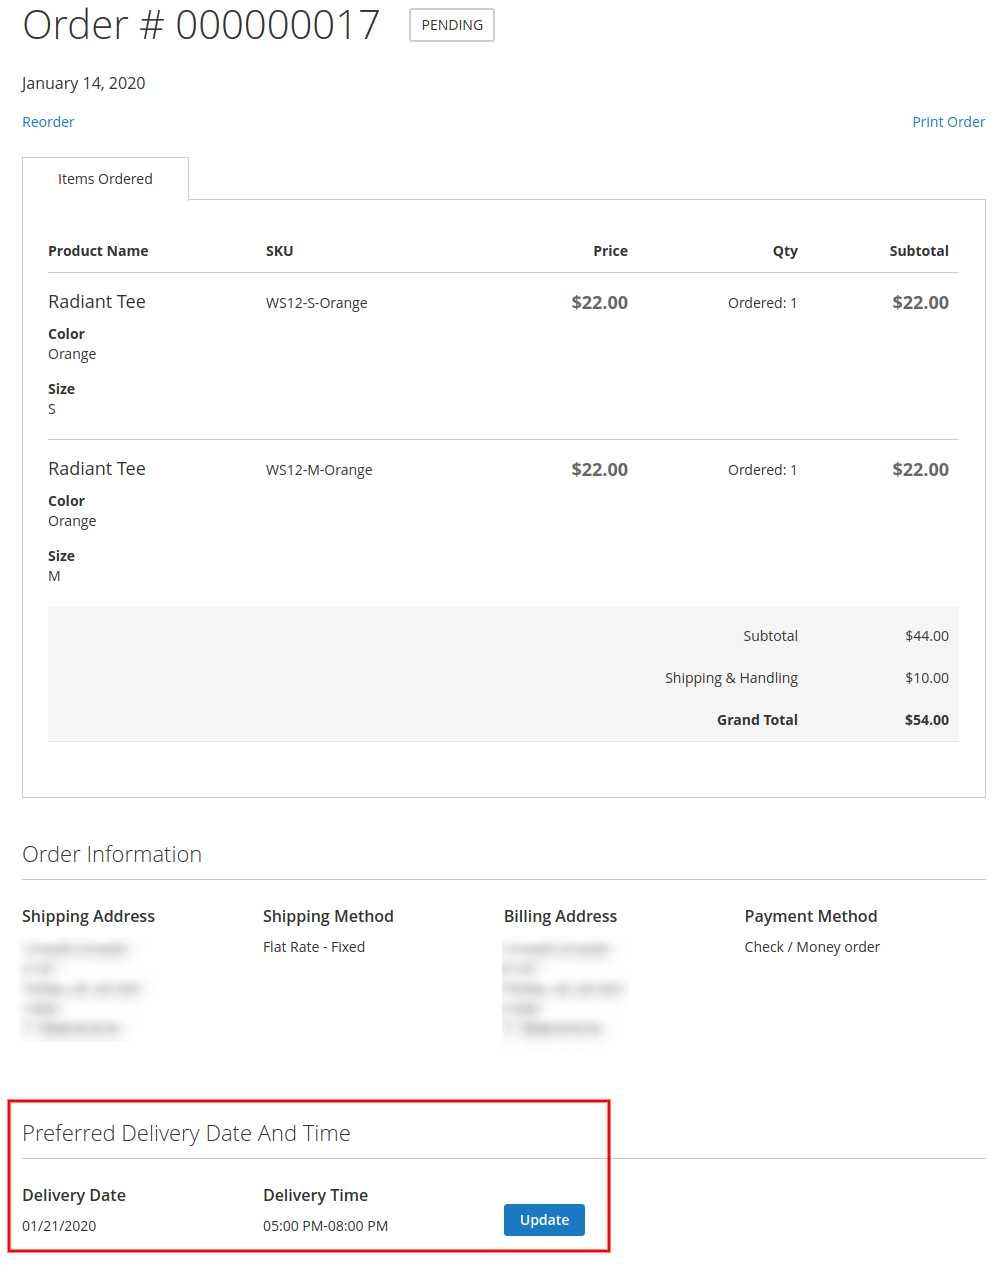
The online users can also update their delivery preferences from their order section. They just can need to click on “update” button as shown below:
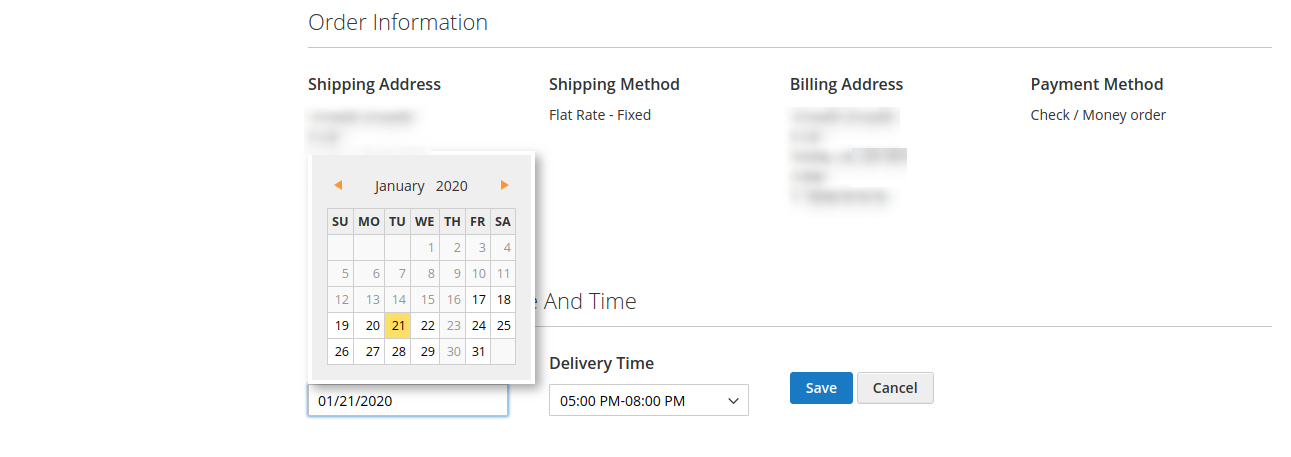
The online users just need to click on the calendar date from available dates as shown below:
They can also select a different time slot from the available drop-down list:
This way, they can successfully update the preferred delivery date and time.
Preferred delivery date and time view on the Admin interface:
The e-merchant can also view the customers preferred delivery date and time by viewing orders from the admin interface.
Admin can click on the view button for checking the delivery preferences.
This Magento 2 Preferred Delivery Time Module also shows preferred delivery date and time in invoice. The customers can go to the invoice section after generating invoice as shown below:
The online store admin can click on view to check the delivery preferences details in the order invoice:
California Consumer Privacy Act ie CCPA is one of the most detailed privacy law. CCPA targets those companies and firms that collect and/or sell customer’s personal information. California Consumer Privacy Act provides overall control to the online users of California over their data. The deadline for CCPA implementation is January 1, 2020.
The difference between GDPR and CCPA is that the GDPR centers around all information identified with the EU customers however though the CCPA considers both the buyer and family unit as recognizable elements and, now and again, just considers information gave by the shopper rather than information sourced or obtained from outsiders.
Knowband offers PrestaShop CCPA Addon by which the online store merchant can easily make his store CCPA compatible. The store merchant can meet all the CCPA requirements easily without any hassle. With this PrestaShop CCPA Compliance module, the online merchant can cover all the rights of the consumers provided by CCPA. The online merchant can also provide a simple and user-friendly interface to the customers for accessing CCPA rights.
With this CCPA PrestaShop compliance module, the online users will get these rights:
Right to Access Personal Data
Right to Data Portability
Right to be Forgotten
Right to Data Rectification
Right to User Consent
The online users can access their CCPA rights by sending requests from the front-end interface of this PrestaShop CCPA Compliance module.
1.1 Features Offered by PrestaShop CCPA Module
Simple to meet CCPA Requirements: The online store merchant can use the PrestaShop CCPA Compliance addon and meet all the CCPA requirements easily without any complicated implementation.
Cookie usages and setting: The PrestaShop California Consumer Privacy Act Module allows the online merchant to set up and show a Cookie consent bar on the website front-end. This way, the online users can understand the use of cookies and accept it.
Show CCPA Header Link on the Website: The online store merchant can show a header link to the customers. The online merchant can also set the text for the header link. The online users can click on this header link and access their CCPA rights.
Right to access Personal Data: The online store admin can allow the customers to access personal data by requesting for it. They just need to enter their email id for accessing their personal data.
Data portability: With this PrestaShop CCPA plugin, The online store merchant can allow Californian users to access and download their personal information, address and order details.
Offer Right to be forgotten: The online merchant can allow the users to send forget the request. This way the online users can enter their email id and request for deleting personal information.
Right to Data Rectification: The online store admin can allow the online users to send a request for data rectification. This way, the online users can update their personal information easily.
Right to User Consent: The online users of California can also update their user consent data if they wish to do so.
2.0 Installation
First of all, purchase the PrestaShop CCPA Addon and download the zip file of the CCPA module from the Downloads section of your Knowband account.
After that, you will get:
1) CCPA.zip (source code of the module)
2) User Manual
To install the module in the store follow the below-mentioned steps:
1) Unzip the ccpa.zip file.
2) Copy the entire content, that is, the files and folders of the unzipped folder. Paste the same into the “Modules” folder of your store’s directory. Follow the below-mentioned address path – Root Directory/modules/.
3) The Prestashop CCPA plugin is all set to be installed in the store. Go to the Store Admin and then to ‘Modules and Services’.
4) Click on the “Install” button just next to your module. It would show a pop-up for your confirmation. Click on “Proceed with the installation” option. This step will install the module and show notification – “Module(s) installed successfully”.
5) Once the installation is complete, you will get access to the admin interface of the module by clicking on the “Configure” button.
3.0 Admin Settings
After the successful installation of the PrestaShop CCPA module, the online store admin can configure CCPA and implement the functionality easily by following the configuration steps.
These are the configuration options:
CCPA Settings
Cookie Consent Bar
User Consent
CCPA Data Portability
CCPA Forgot Request
CCPA Rectification Request
CCPA Personal Data Request
CCPA Email Template
CCPA Geo-Targeting
CCPA CRONS
CCPA User Consent Data
3.1 CCPA Settings
In CCPA Settings, the online store merchant can apply general settings related to CCPA implementation. Please check the available configuration options below:
Enable The Plugin: Toggle the button to yes for enabling the CCPA functionality.
Maximum Request per Day: Enter the number of requests customers can send on a single day.
Enable Right of access to personal data: The online store merchant can allow the online users to send personal data access requests and get personal data like account details, orders and address details in CSV format.
Send Personal Report via Email: Enable this option if you want to send a personal report to the users via email.
Enable Right to data portability: Allow/disallow online users to download personal data by enabling this option. The online users can request for data portability from the admin interface of this PrestaShop CCPA plugin.
Enable to update information in order: The online store admin can enable this option for updating the order information if the customer asks to delete his account.
Enable To Generate Fake Email ID: Enable the option for generating fake email id in case of customer data deletion. This way, the e-merchant can save the customer’s email id with this fake email id.
Enable Right to be forgotten: You can enable or disable the right to be forgotten option by selecting yes or no. The online users can request to be forgotten by sharing their email id.
Action to be taken for orders: Admin can delete orders, fill random data or take no action when customers request to be forgotten.
Time to process request deletion: Enter the days after which the action will be taken to forget the request.
Enable Right to Data Rectification: Admin can enable this option for showing the data rectification option. Customers can update personal details using this option.
Enable Store policy acceptance: The online users will be restricted to accept store policy before accessing CCPA rights.
Store Policy Page: Select the page for showing to the customers for store policy.
Physical Location of your Server with hosting details: Admin needs to enter the country name where the server is located.
Purge Request Day: Admin can enter the days after which the customer’s details will be deleted.
Display Header Menu: Admin can select yes to show the header menu.
Header menu Text: Admin can Enter the text in various languages for showing on the header menu.
Admin Email Address: Enter the email id where you want to get all the email notifications related to CCPA requests.
Enable Description for Personal Information: The online store merchant can enable this option if he wants to show a description of the personal information field.
Personal Information Description: Enter Personal Information Description here in various languages.
Enable Description for Address: Enable to show address description.
Address Description: Enter Address Description here in various languages.
Enable Description for Orders: Enable to show order description.
Order Description: Enter Order Description here in various languages.
List the third-party service providers with whom you share the personal data of customer: Admin needs to enter third-party service providers name with whom store admin shares customer data. Admin needs to enter the service provider name, service type and description.
3.2 Cookie Consent Bar
The online store merchant can also show a cookie consent bar at the website front end. The online users can accept or discard it. Admin has an option to customize the appearance of the cookie bar from the admin interface.
3.2.1 Cookie Bar Settings
1. Cookie Consent Bar:
Enable the EU Cookie Law Notification: Enable the field for showing a cookie bar on the store front-end interface.
Cookie Name: Enter the cookie name without any space.
Cookie Lifetime: Set the cookie duration ie how long the cookie will be stored on the user’s device.
Terms and Condition of use: List the details of the cookies on a Cookie Policy page and select that page from here.
Display Close Button: The store merchant has an option to remove the Close button from the Cookie Consent Bar.
2. Appearance Settings:
Admin can easily set the look and feel Cookie Consent Bar:
Notification Position: Set the cookie bar position on the website bottom or top.
Effect when hiding the notification: Admin can select the options like Fade, Hide or Slide from the drop-down list.
Notification Message: Set the notification message in multiple languages.
Background Color: Set-Cookie bar background color.
Background Opacity: Set the background opacity from here.
Notification Message Font Color: Set the font color of the notification message.
Background Color of Accept Button: Set the accept button background color from the available color options.
Font Color of Accept Button: Choose the font color of the accept button.
Background Color of Cookie Settings Button: Set BG color of cookie settings button.
Font Color of Cookie Settings Button: Set font color of more cookie settings button.
3.2.1 Cookie Blocker
‘Cookie Blocking‘ functionality works based on disabling the module functionality. If cookies of any particular module are already created & the user opts to disable that module then the cookie will remain in the browser but module functionality will stop working so there will not be any use of those cookies. For example, If Google Analytics cookies are already created in the browser & user blocks the Google Analytics module, then the cookies will remain in the browser but the Google Analytics module will not be able to send the tracking data to Google.
Admin can also add a new cookie blocker, Edit the cookie blocker and add modules in available cookie blocker.
3.3 CCPA User Consent
The store merchant can view a user consent list in the CCPA User Consent section.
Admin has an option to add, delete and modify the user consents as per the requirements. Click on the “+” button for adding new user consent. These are the configuration options:
Title: Set the user consent title here.
Content: Write a description for user consent here.
Form type: Select form type as registration form or Contact form.
Consent URL: Select the page URL where you want to redirect the online users.
Required: Enable this option to make this field a required field.
3.4 CCPA Data Portability
The online store admin can check the log of the data portability requests from the back-end interface of this PrestaShop CCPA Module.
3.5 CCPA Forgot Request
From here, the online merchant can view the forget requests log easily. The admin can view a list of users who have requested for data deletion requests.
3.6 CCPA Rectification Request
The PrestaShop CCPA Compliance module keeps the log of the data rectification requests. This information can be used for modifying the customer data on the third party services.
3.7 CCPA Personal Data Request
CCPA module for PrestaShop keeps the log of all the personal data requests. The store admin can view these requests from CCPA personal data Request section.
3.8 CCPA Email Template
CCPA PrestaShop compliance module has customizable email templates for sending emails to the customers on various requests.
Confirm Your CCPA Account Deletion Request: This template is used to send a confirmation mail to the customer when the customer requested for Account deletion.
Your Account has been deleted: Send a confirmation mail to the customers after account deletion.
Confirm Your CCPA Personal Data Portability Request: This template is used to send a confirmation mail to the customer when a customer requested for Personal Data Portability.
Customer has requested for CCPA: This template is used to send a confirmation mail to the customer when the customer requested for Personal Data Report.
Your CCPA Personal Data Report: This template is used to send Personal Data Report to the customer when he/She confirmed the requests.
Customer has confirmed CCPA Request: This template is used to send a notification mail to Admin regarding customer CCPA access.
3.9 CCPA Geo-Targeting
In the CCPA Geo-Targeting field, the online store merchant can select the IP and countries for showing specific functionality.
1. Geo-targeting using IP
Enable/disable: The online merchant can activate or deactivate the functionality as per the requirements.
Enter the IP address: Enter the IP address here.
Select the CCPA Functionality to Display: Select the functionality which you want to show to the selective customers.
2. Geo-targeting using Country
Enable/Disable: Activate or deactivate this functionality.
Select Country/Region: Select the country/region from here.
Select the CCPA Functionality to Display: Choose the functionality you want to show on selected countries.
3.10 CCPA CRONS
The online merchant can setup Cron for processing the customer’s forget to request and deleting customer’s requests on a single click.
3.11 CCPA User Consent Data
In user consent data details, the e-merchant can view the user consent data list in which he can check the consents accepted by customers.
4.0 Front-end Interface
The e-buyers can click on “Knowband CCPA” header link and view cookie bar :
The online users can also access CCPA rights from CCPA Tab available in my account section as shown below:
Ones they click on this CCPA link, online users will get these options:
1. Right to Access Personal Data: Online users can click on “CCPA Personal Data Access Request” for getting personal data reports. They need to enter email id and click on the search option.
Ones the online user submits the personal data access request, they will get a confirmation request as shown below:
After confirmation, the online users can get an email along with the account details, address information, order details, Third-party service provider details and CCPA Requests details.
2. Right to Data Portability: Customers can request for data portability for downloading personal information, address and orders.
After clicking on the submit button, users will get a confirmation email as shown below:
After clicking on “confirm”, customers can download the personal data as shown below:
The online users can get a CSV file along with personal information.
3. Right to be Forgotten: The online users can send a request for using their right to be forgotten. In this option, they need to click on the “Personal Data Request Forgotten” link and provide email details.
After submitting the email details, the users will get a confirmation email on their registered email id. The users can delete their account by clicking on the provided link.
4. Right to Data Rectification: The online consumers can click on provided “Data Rectification” link and update their data, Address and password:
After updating the information, online users need to click on save button. They can view the confirmation page after saving the details successfully.
5. Right to User Consent: The online users can also update user consent data by clicking on “Edit Consent data” link:
Online users can edit user consent and save settings. After saving these settings, the PrestaShop CCPA Addon will show a confirmation page.
This way the online store merchant can use PrestaShop California Consumer Privacy Act Module and implement CCPA compliance easily.
Knowband offers OpenCart Image Search Extension which implements image search functionality on the website. The online users just need to upload an image from the website front-end interface and as a result, they can view the matched products. Admin can set a higher threshold value from the admin interface for offering accurate results. The online merchant can show an image search option near the search box and on product pages as the “Search Visually same product” button.
The eCommerce store merchant can check total images, mapped images, unmapped images and total images yet to be synced. There is a specific link for viewing the reasons behind the unmapping of the images. This way, the online store merchant can implement an email search on the website and offer a better store experience to the customers.
1.1 Features of OpenCart Image Search Extension
Online merchants can implement image search functionality on the website using the OpenCart Image Search Extension.
This OpenCart Image Search Extension recognizes the uploaded image and provides matching products in the search result.
The online users just need to upload images for searching the desired products.
There is an option to display the image search option near the search bar. Admin just needs to enable this option from the admin interface of this Search by Image module for OpenCart.
The eCommerce store merchant can also enable us to show the “Search visually same Products” button on the website’s product pages.
The Search by Image module for OpenCart has the functionality to sync the newly added product images automatically.
There is an option to set threshold percentage according to which, admin can show more accurate results of image search. The range can vary from 50 to 100 where 95 is the recommended value for accuracy of results.
OpenCart Image Search plugin provides steps for generating an API key from the clarified portal.
The OpenCart store admin can view total available images and mapped images details in the OpenCart Image Recognition System admin interface.
The online store admin can also view the number of unmapped images along with un-mapping reasons.
The online sellers can also view the number of images that needs to be synced.
With this Search by Image plugin for OpenCart, admin can offer a better user experience to the customers.
OpenCart Image Recognition System has a Machine Learning feature that recognizes the uploaded images and shows matching product images in the image search result.
2.0 Installation
Buy OpenCart Image Search Extension from the store. You will receive these files:
First, you will get a source code file of the OpenCart Image Search Extension in a zipped file format.
User Manual of this OpenCart Image Search module.
Follow below-mentioned steps to install OpenCart Image Search Extension:
1. Unzip the received zip file. You will get the folders.
2. Copy all the folders of the zip file in the Root Directory of OpenCart setup via FTP manager.
3. There will be a file named kbimage_search.ocmod.xml (In case of Openvar v3.0.x file name would be kbimage_search.ocmod.zip). Upload the same file from the page “Admin -> Extension -> Extension Installer -> upload”.
So, OpenCart Image Search Extension is now successfully installed and ready to use at your store.
Now go to the admin menu and click on the extensions and thereby click on the configure button next to the OpenCart Image Search module.
3.0 Admin Interface
After the successful installation of OpenCart Image Search Extension, the online store merchant can easily implement the conditions and show the image search option on the website front-end interface.
There are two configuration sections:
General Settings
Unmapped images
3.1 General Settings
In the General settings section, the online store merchant can apply the basic settings for image search. The OpenCart Image Search module is highly customizable and offers smooth functioning to the users.
These are the configuration options:
Status of the module: Activate or deactivate this OpenCart Image Search Extension functionality by enabling or disabling this option.
Enable Image Search Option On search bar: The online merchant can show or hide the image search button from the search bar.
Enable Visual same search button: Admin can show or hide a button on the product page to search visually the same images. Customers just need to click on this button to view similar product images.
Enable Automatic image Sync: The online store merchant can activate this configuration option for automatically syncing the newly added product images.
Threshold percentage: Admin needs to add a range between 50 to 100 as a threshold percentage.
Product Per Page: The store admin can add the number of products he wants to show for the image search results.
API key: Admin can check the steps to generate an API key in the provided link and set it from the admin interface.
Apart from these settings, the admin needs to configure CRON setup and admin can run cron manually for image mapping. Steps for API key generation are given and admin can easily follow the steps to generate an API key.
Admin can also check the number of total images, mapped images and number of images that needs to be synced. Apart from that, admin can also check the data of unmapped images and he can click on the link for getting the reason behind unmapping.
3.2 Unmapped Image Log
Admin can click on the provided URL for checking the details of the unmapped image. Here admin can view the product id and reason behind the unmapping of the image.
4.0 Front-end Interface
The online users can view the image search options on the website’s front-end interface and use it for their convenience.
The online users can view the image search option on the search bar as shown below:
Online users just need to upload an image and click on the search button for the proceeding image search option. Check the below-mentioned image:
In search results, online users can view the products which meet the search criteria and they can easily find the desired products without any hassle or time taking process.
The search result will show an error in case of the unavailability of matching images.
The OpenCart Image Search plugin also provides an option to show “visually similar product”. The online users can click on this button and check the visually same products.
This way, the online users can easily get the desired products without wasting much time and efforts. The eCommerce store merchant can easily configure the Search by Image module for OpenCart and implement image search functionality.