Magento 2 Claude AI Content Generator/Translator Addon – User Manual

The Magento 2 Claude AI Content Generator/ Translator Plugin is a cutting-edge solution designed to streamline content creation and generation for Magento 2 store owners. Powered by Claude AI, the Magento 2 Claude AI Translator module enables merchants to generate high-quality SEO optimized product descriptions, engaging product titles, category descriptions, meta titles and meta descriptions for both product and category as well.  As a result, businesses can attract more visitors, improve search engine rankings, and boost conversions effortlessly.

Moreover, the Claude AI Content Generator for Magento 2 integrates seamlessly with Claude 3 Haiku, Claude 3.5 Haiku, Claude Sonnet old and Claude Sonnet new AI engines, ensuring a smooth and hassle-free experience. The Magento 2 SEO Content Translator Plugin is a SEO Content Generator, guaranteeing unique, compelling, and search engine-friendly content. Additionally, Knowband’s Magento 2 Claude AI Content Translator Extension allows merchants to expand globally with accurate and natural-sounding translations.

1.0 Key Features of Magento 2 Claude AI Content Generator/Translator Extension

AI-Powered Content Generation: The Magento 2 Claude SEO Content Generator/Translator Plugin by Knowband enables merchants to create compelling product descriptions, meta titles, and SEO-friendly content effortlessly. By leveraging the advanced Claude AI model, the extension ensures that all content is engaging, informative, and optimized for better search engine rankings.

Cutting-Edge AI Technology: The AI-driven translation extension for Magento 2 utilizes Anthropic’s latest Claude AI models, including Claude 3.5 Sonnet new and old, and Claude 3 Haiku new and old. Moreover, with these advanced AI engines, merchants can generate high-quality content and precise translations, enhancing the store’s global reach.

Smart AI-Powered Translation: The Magento 2 AI Translation Extension guarantees accurate and contextually relevant translations with minimal effort. As a result, merchants no longer need to translate product details manually, saving time while ensuring linguistic accuracy across different markets.

User-Friendly Installation & Configuration: Designed for seamless integration, the Magento 2 Claude AI Content Generator Extension features an intuitive interface. Additionally, even store admins with no coding experience can easily install, configure, and start using the extension without any hassle.

Bulk Content Creation for Large Catalogs: Ideal for businesses with a vast inventory, the Claude AI Content Generator for Magento 2 can generate content in bulk. Furthermore, this automation eliminates the need for manual content creation, streamlining product management and enhancing efficiency.

Global Language Support: Magento 2 AI Content Generator Plugin supports multiple languages, including right-to-left (RTL) scripts, catering to international businesses. Furthermore, the extension is compatible with various Magento 2 versions, making it a reliable and versatile solution for online merchants.

2.0 Steps To Generate Claude AI API For Magento 2 Claude AI Generator

To activate the Magento 2 Claude AI Content Generator Plugin in your Magento 2, you must first generate an API Key. Follow these steps to integrate it seamlessly:

Step 1: Claude API Key Generation

Step 2: Configure the API Key in Magento 2

  • Access your Magento 2 Admin Panel and navigate to Stores → Configuration → Knowband → Magento 2 Claude AI Generator/Translator.
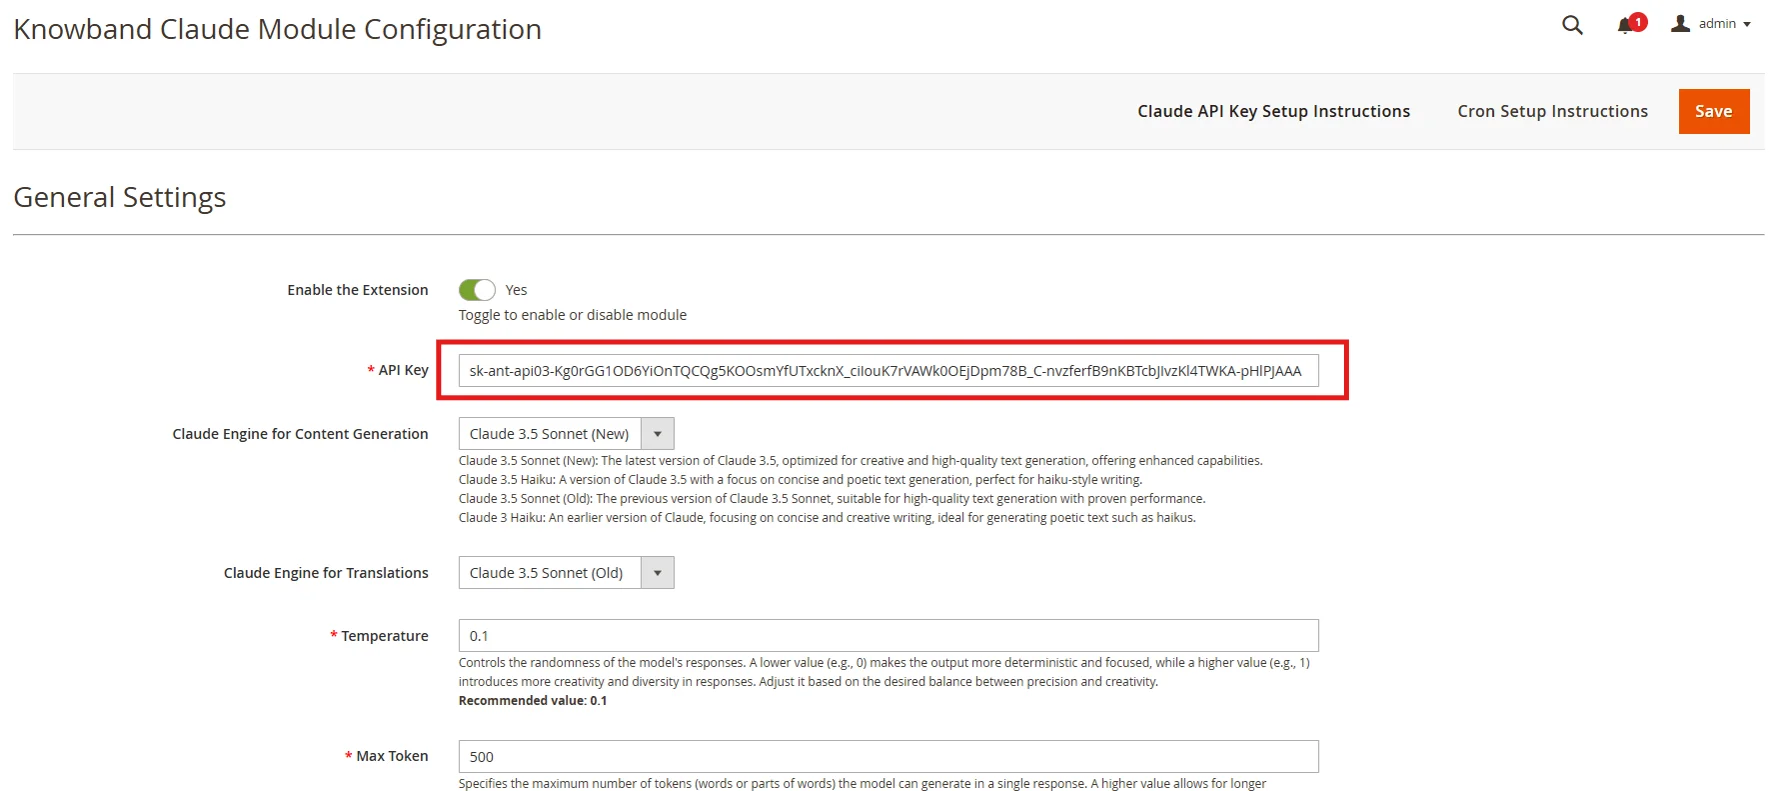
  • Find the “API Key for Claude” field and paste the copied key into it.

Step 3: Save the Settings:

  • After adding the API Key in General Settings, click “Save” to store the settings. The Claude AI module will now use this key to interact with the Claude API.

Smarter Content Starts Here – Claude for OpenCart

Easy setup, no code needed.

🛍️ Get Claude AI Now

3.0 Admin Interface Overview:

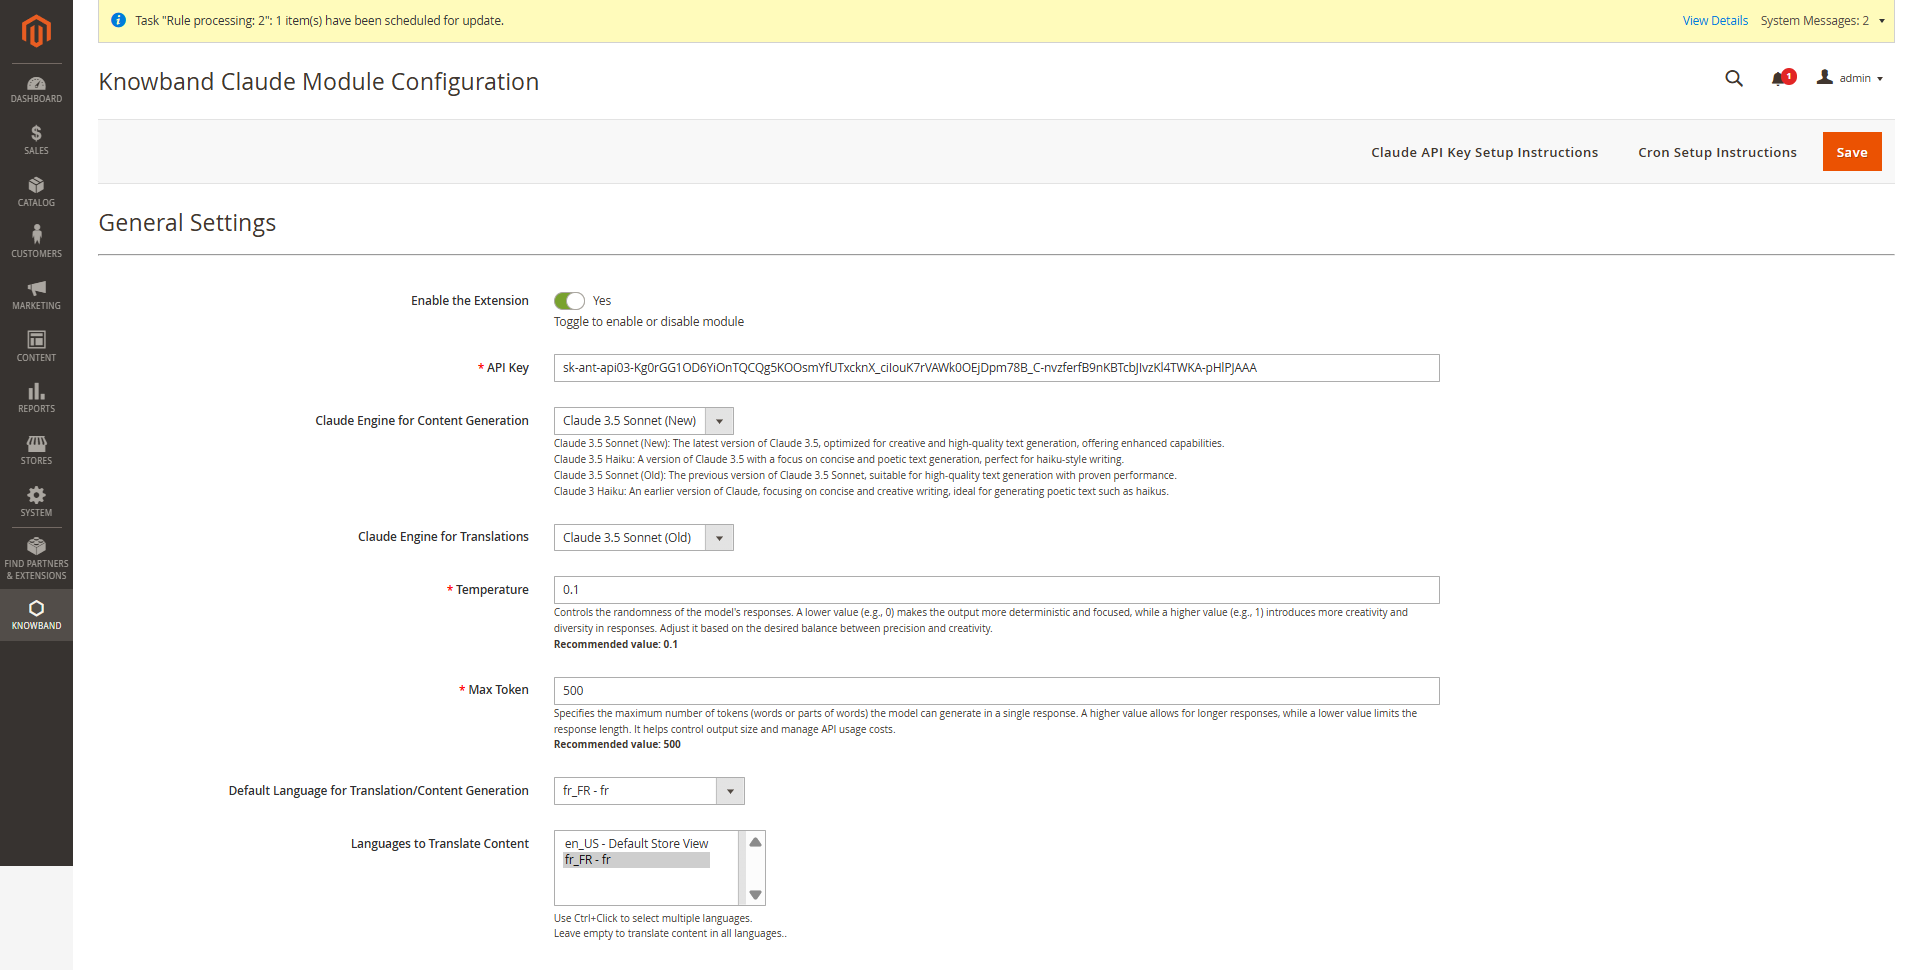
The Magento 2 Claude Translator Extension by Knowband provides store admins with an intuitive interface to configure settings and efficiently manage bulk content generation and translation.
3.0.1 Key Configuration Options

Enable/Disable – Activate or deactivate the Magento 2 Claude Content Generator with a single tab.

API Key for Claude – Enter your Anthropic API Key(Claude API Key) in the provided field to enable the functioning of the Knowband AI-powered content generator/Translator Module

Claude Model Selection – Choose from Claude 3.5 Sonnet (New), Claude 3.5 Sonnet (Old), and Claude 3.5 Haiku as well as Claude 3 Haiku, to generate content based on your store’s requirements.

Temperature: Adjust the creativity of the content —higher values generate more creative content, while lower values ensure consistency and focused content.

Maximum Tokens: Set a token limit (default: 500), representing text fragments used by the AI.

Claude Engine for Translations: Choose from Claude 3.5 Sonnet (New), Claude 3.5 Sonnet (Old), Claude 3.5 Haiku and Claude 3 Haiku to generate content tailored to your store’s needs.

Primary Language: Set your default language of the store for content generation and translation in the general settings.

Target Languages: Choose multiple target languages to expand your store’s global reach and improve accessibility for international customers.

3.0.2 Magento 2 Claude AI Content Generator Prompts
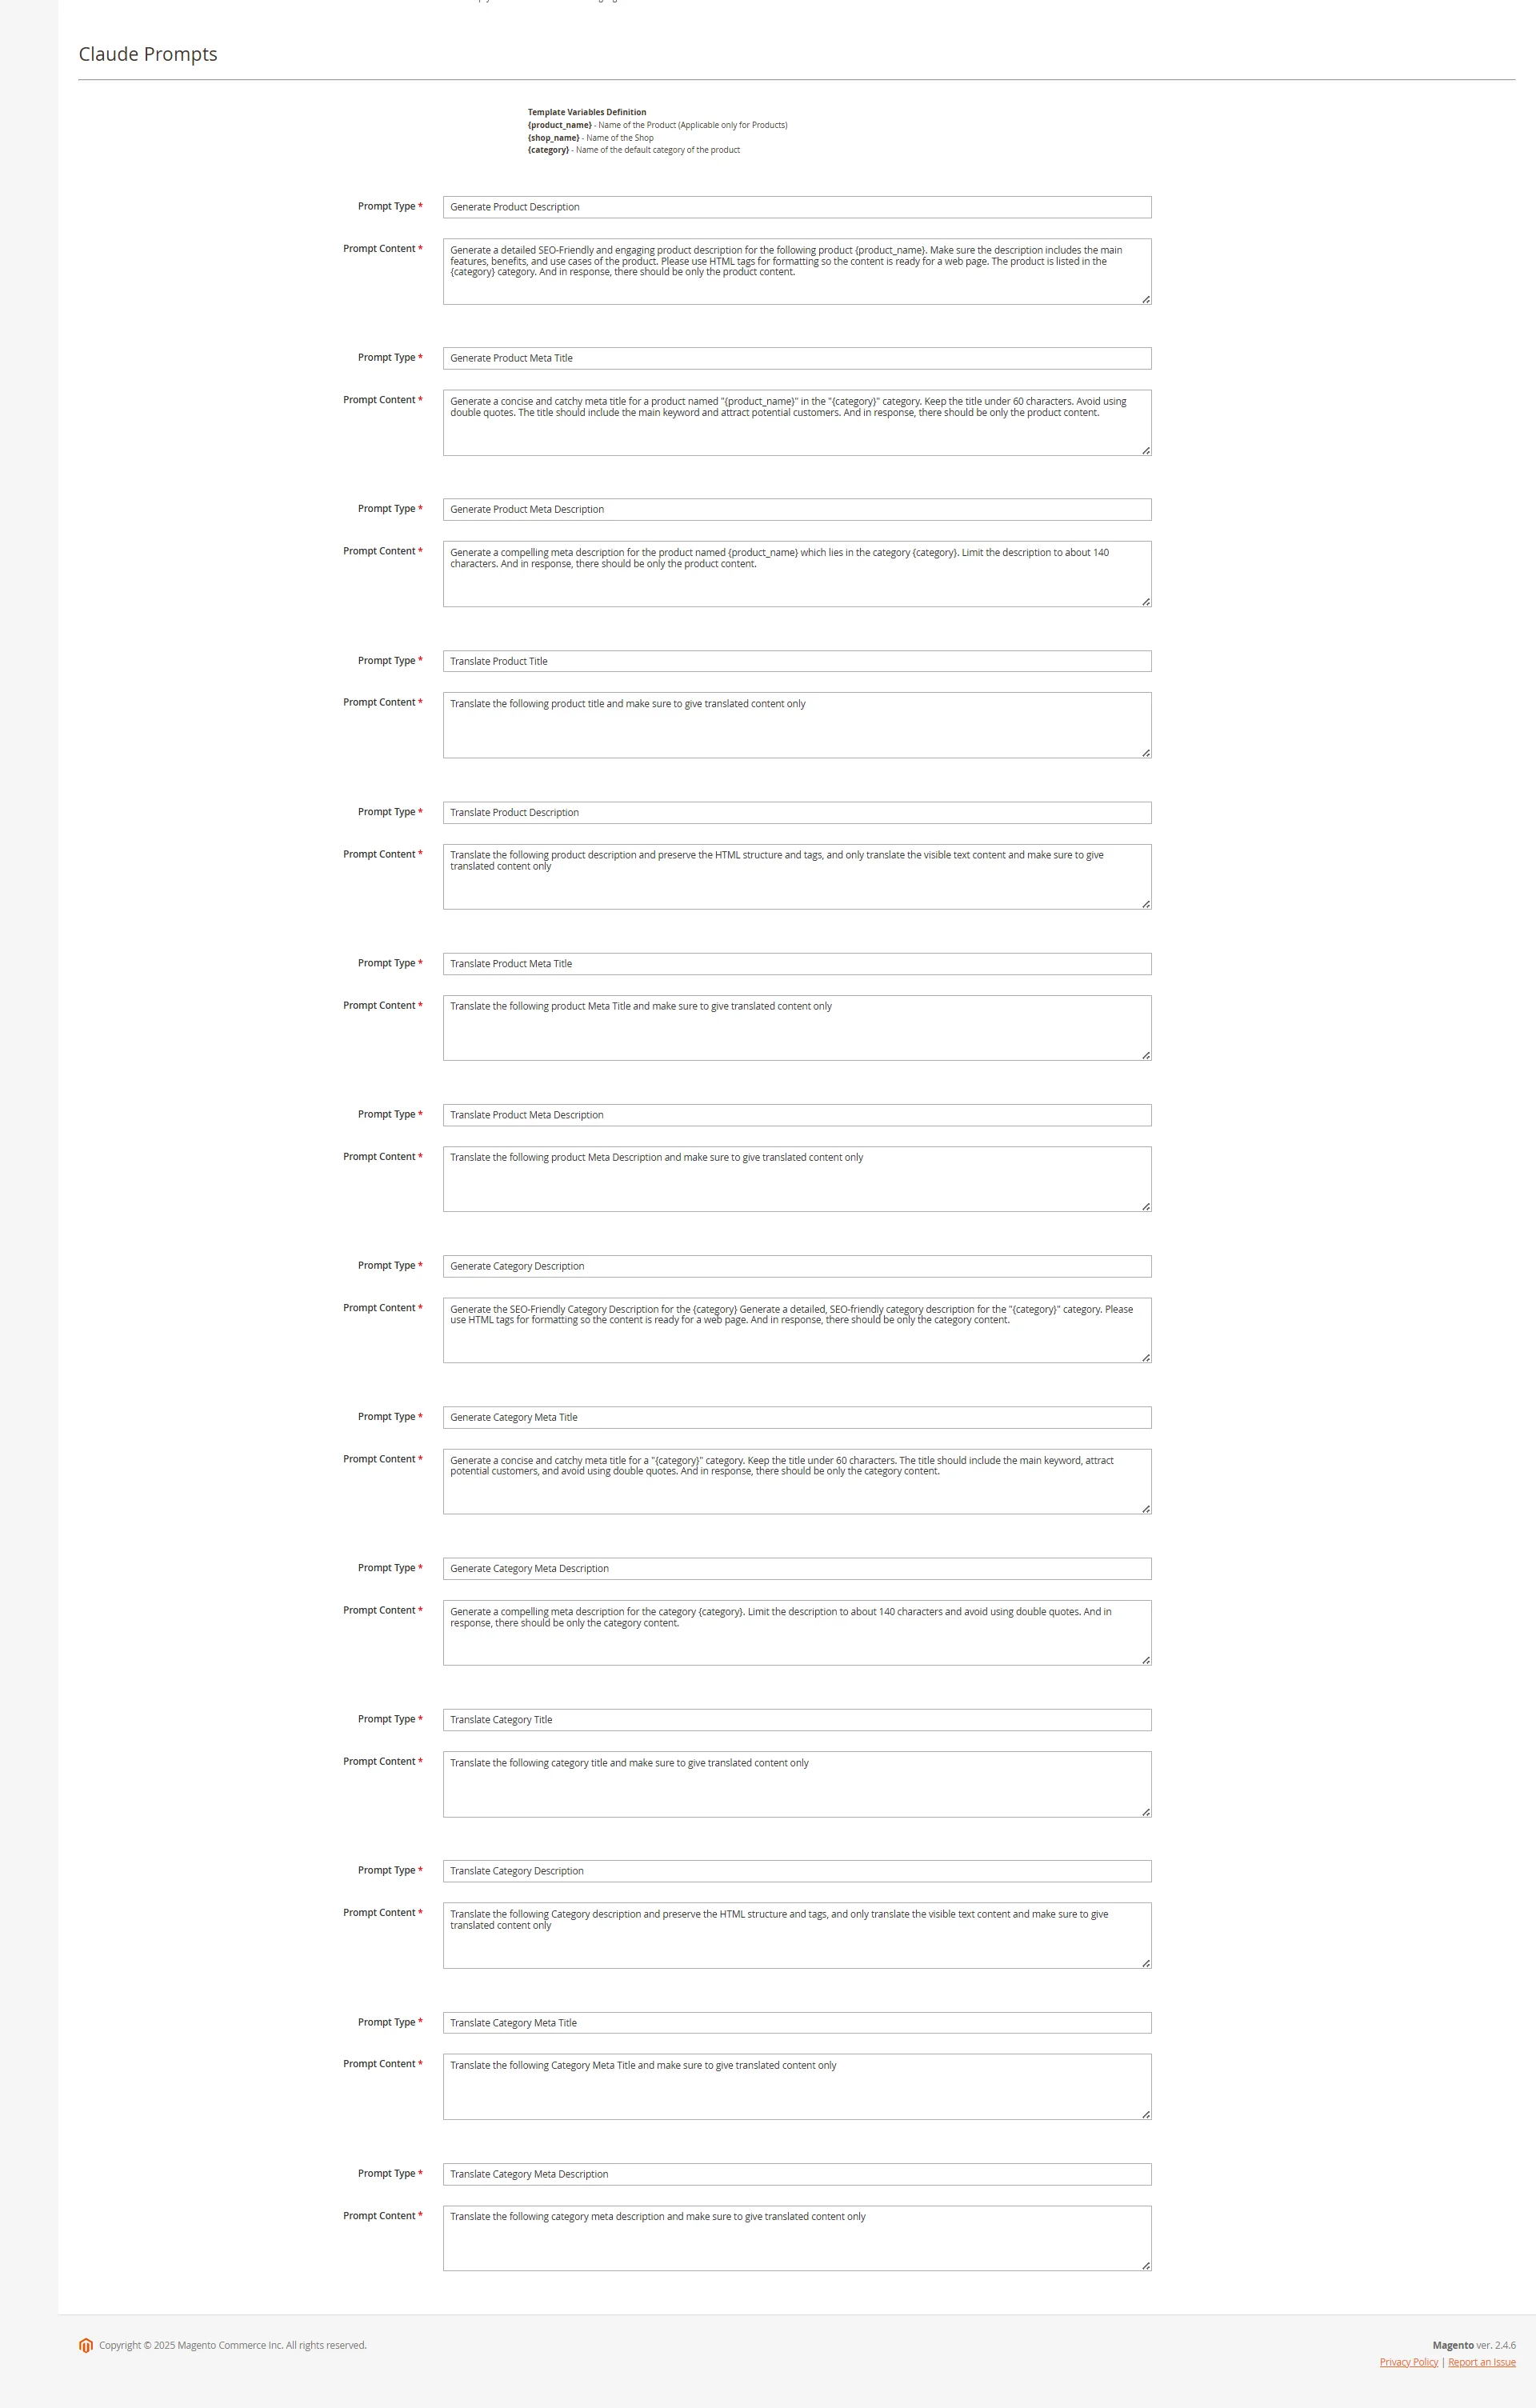
The Magento 2 Content Generator Module includes 14 pre-configured prompts tailored for various e-commerce content needs.

Knowband Magento 2 Claude Content Generator Extension AI Prompts 

Generate Product Description: Creates SEO-friendly, formatted descriptions for products, ensuring the generated data is accurate and in context.

Generate Product Meta Title: Crafts optimized meta titles (under 60 characters) with relevant product and category keywords. 

Generate Product Meta Description: Produces engaging meta descriptions within 140 characters. 

Translate Product Title: Converts product titles accurately into multiple languages. 

Translate Product Description: Accurately translates product descriptions while retaining HTML formatting.

Translate Product Meta Title: Converts meta titles into multiple languages with precision.

Translate Product Meta Description: Provides accurate translations of meta descriptions across various languages.

Generate Category Description: Creates SEO-optimized category descriptions with proper HTML structure. 

Generate Category Meta Title: Generate concise, keyword-rich meta titles (under 60 characters). 

Generate Category Meta Description: Creates compelling meta descriptions (within 140 characters). 

Translate Category Title: Converts category titles, descriptions (maintaining HTML structure), and meta details into multiple languages.

Translate Category Description: Translates accurate category descriptions while maintaining HTML structure.

Translate Category Meta Title: Converts category meta titles into multiple languages with precision.

Translate Category Meta Description: Delivers accurate translations of category meta descriptions across various languages.

3.0.3. Knowband’s Magento 2 Claude Prompts Task Log

The Magento 2 Claude AI Content Generator/ Translator maintains a detailed activity log of all executed prompts, allowing users to track content generation and translation tasks efficiently.

The task log includes:

Prompt Type: Specifies whether the task involved content generation or translation.

Product/Category: Identifies the associated product or category.

Language: Displays the source and target languages for translations.

Previous Content: Shows the original content before modification.

New Content: Records the updated or translated content.

Timestamp: Logs the date and time of execution for tracking and auditing purposes.

RollBack Feature: Enables users to restore previous content instantly if the new version is unsatisfactory. Moreover, this feature ensures flexibility by allowing store owners to revert to the last saved version with a single click, maintaining content quality and accuracy.

4.0 Pending Task Logs of Magento 2 Claude AI Plugin

The Pending Task Logs feature in Knowband’s Magento 2 AI Content Generator Extension allows users to efficiently manage and monitor content generation and translation tasks before execution. 

How Pending Task Logs Work

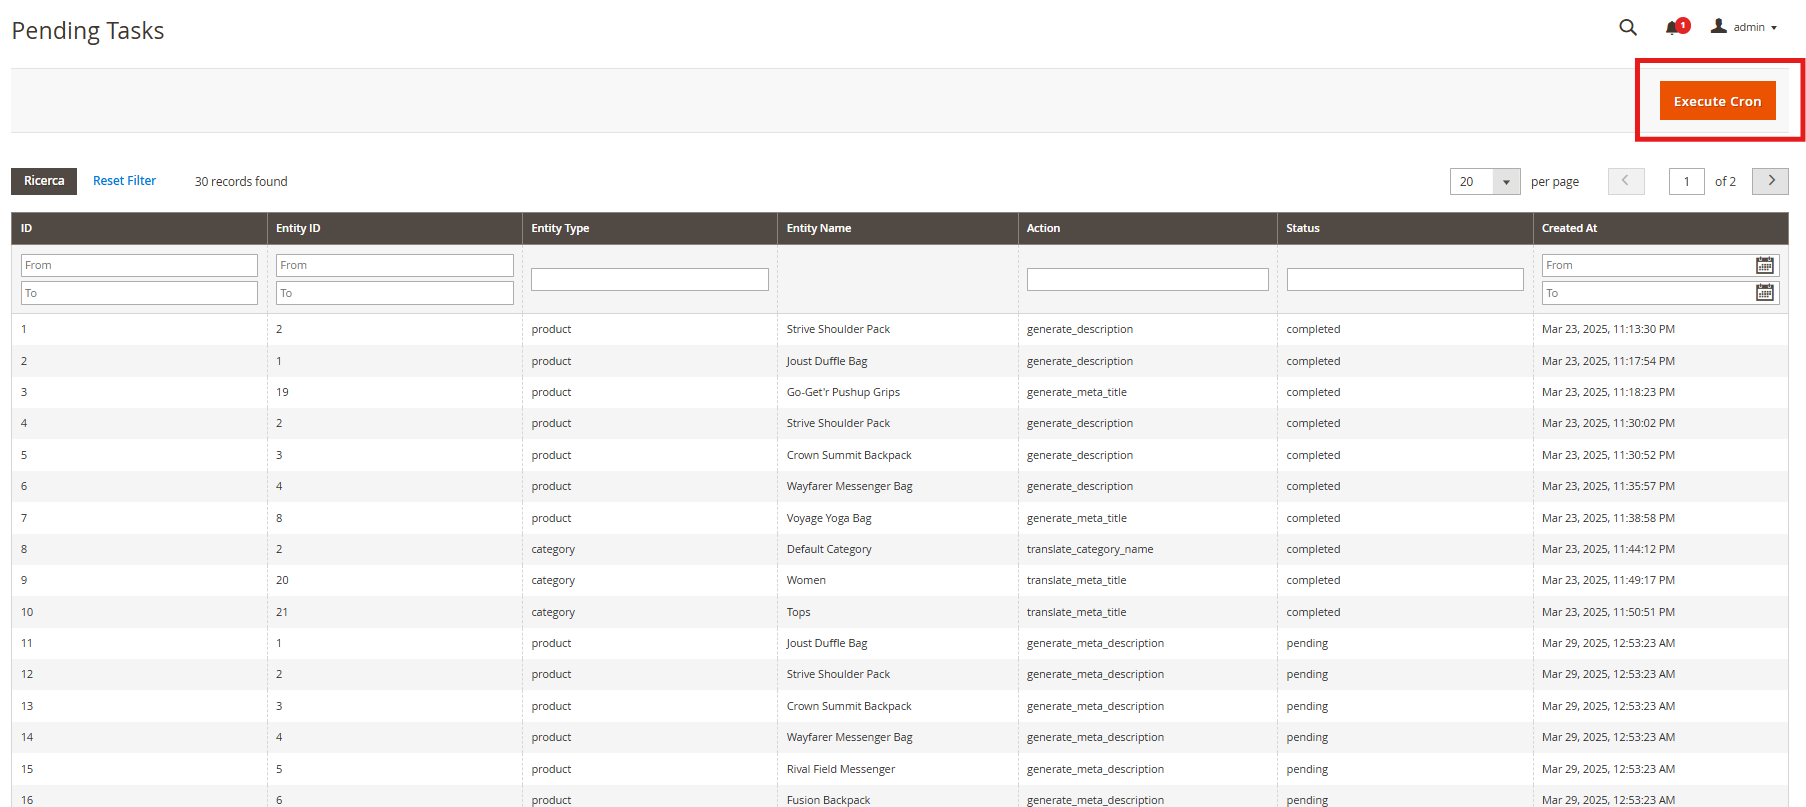
When a content generation or translation request is initiated, it is first stored in the Pending Task Logs section. Users can review, modify, prioritize, or delete tasks before execution. Moreover, the “Execute Cron” tab allows manual or scheduled processing, ensuring accuracy and efficient workflow management.

5.0. Steps to Execute the Prompts 

The Knowband PrestaShop Claude AI Content Translator module streamlines content generation and translation through a structured process. 

Follow these steps to execute prompts efficiently:

Step 1: Product/Category Selection: Choose the products or categories for which you want to generate or translate AI-powered content.

Content includes product descriptions, category descriptions, titles, meta titles, and meta descriptions.
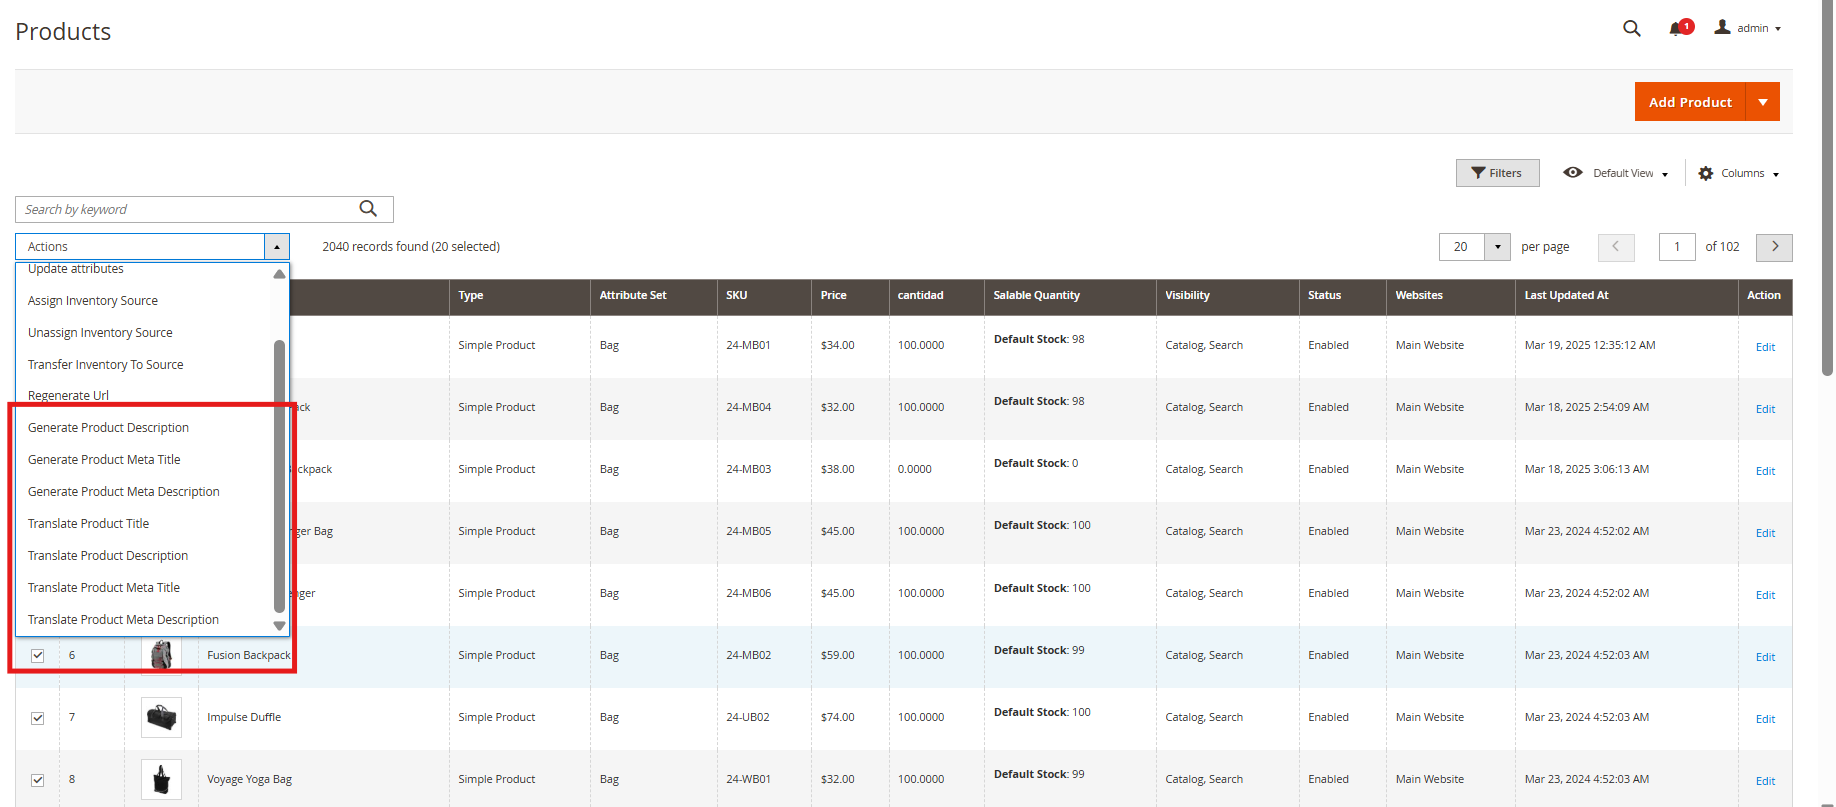
Step 2: Task Execution: Once selections are made, the system sends the content generation or translation requests to the Pending Task Logs for processing.

Managing Pending Task Logs: Review, modify, or remove pending tasks before execution, ensuring accuracy and preventing unnecessary content changes.

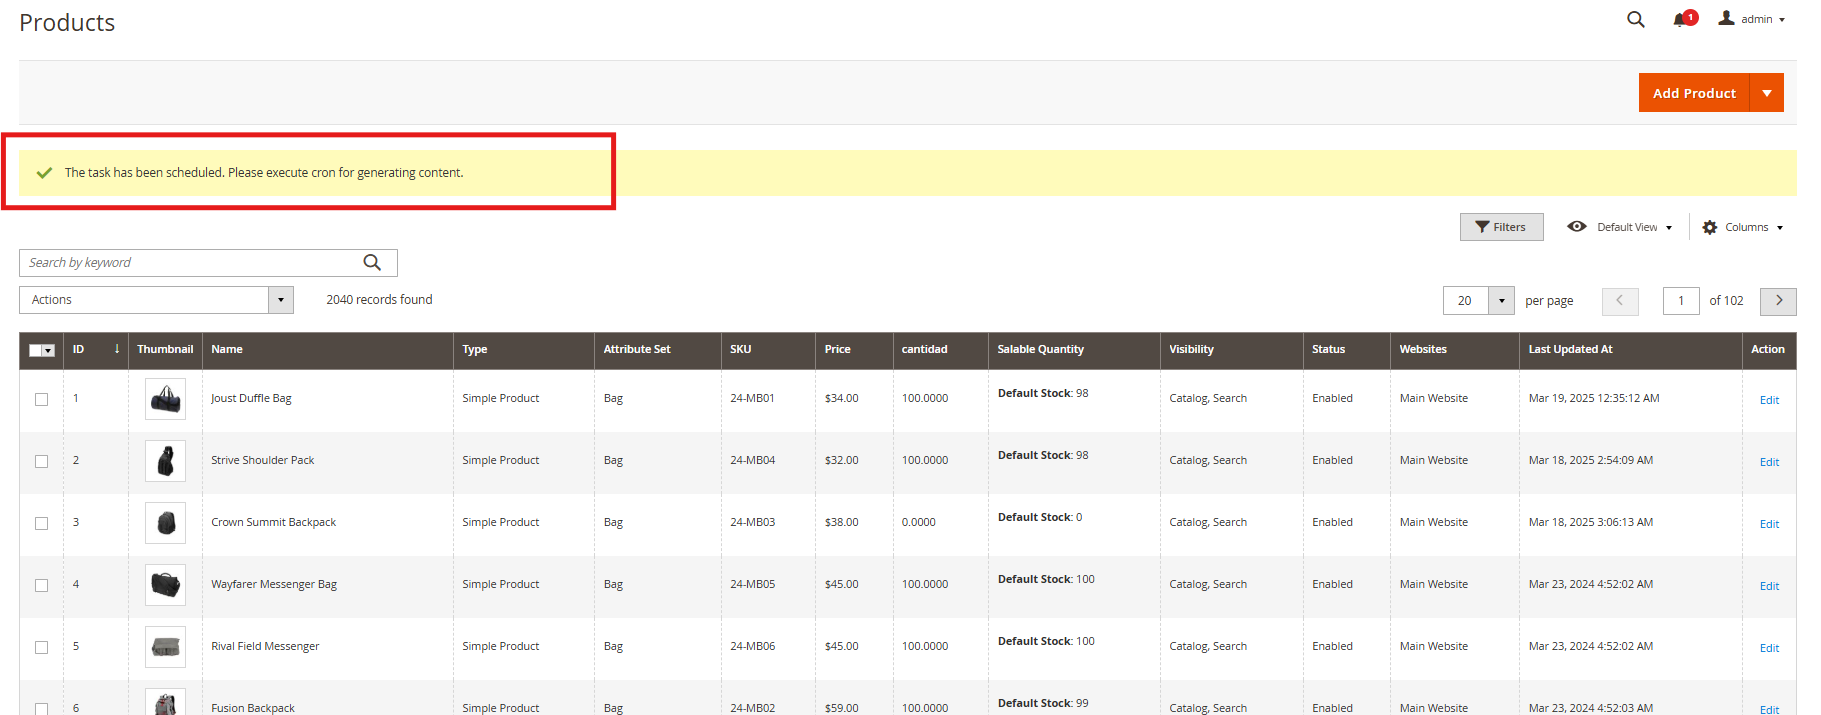
Step 3: Executing the Cron Job: Run the cron job to process all pending tasks automatically.

The generated or translated content is applied to the respective products/categories seamlessly.


Magento 2 Gemini AI Content Generator/Translator Extension – User Manual

Knowband’s Magento 2 Gemini AI Content Generator/Translator Extension helps store owners create and translate content quickly using Google’s Gemini AI technology. With the Magento 2 Gemini AI Extension, store owners can easily generate product descriptions, meta titles, meta descriptions, category descriptions, meta titles, meta descriptions and SEO content without spending hours writing.

The Magento 2 Gemini AI Extension also translates your content into different languages, helping you reach customers worldwide. It’s easy to use and works for all types of online stores, whether you have a small shop or a large marketplace.

The Magento 2 Gemini AI Extension saves you time and ensures all your product listings look professional and appealing to both customers and search engines. Simply install the extension, and you can start generating high-quality content right away. The Gemini AI Extension for Magento 2 utilizes Google’s advanced Gemini AI models, including Gemini 2 Flash, Flash Light Preview, Gemini Flash 1.5, Gemini Flash 8B, and Gemini 1.5 Pro, which generate and translate SEO optimized content.

2.0.0 Key Features of the Knowband’s Magento 2 Gemini AI Content Generator/Translator Extension

Automated Content Generator: The Magento 2 Gemini AI Content Generator/Translator allows the admin to generate SEO Optimized content for the products. 

Focused Content Translator:  The Magento 2 Gemini AI-powered content Translator translates the generated content as well as product titles. Additionally, the Magento 2 Gemini Powered Translator Extension supports all the languages that are listed on your store.

Gemini Engines: The Gemini AI Extension for Magento 2 uses Google Gemini AI models, including Gemini 2 Flash, Flash Light Preview, Gemini Flash 1.5, Gemini Flash 8B, and Gemini 1.5 Pro, which generate and translate focused and SEO optimized content.

Bulk Product Content Generator: The Knowband’s Magento 2 Content Generator Extension can generate SEO-optimized content and translate the content into multiple languages with the focused content.

User-Friendly Interface: The Magento 2 Gemini AI Content Generator provides a user-friendly interface for the store admin as it doesn’t require any coding knowledge.

Global Market Reach: The Magento 2 Gemini AI Plugin benefits the user by increasing international sales by providing SEO-optimized and focused content translation in all the store’s languages.

Accurate Translation: The Magento 2 Gemini AI plugin translates the generated content and product title accurately into multiple languages.

3.0 Steps to Generate  the Gemini API Key to Enable Knowband’s Magento 2 Gemini AI-Powered Content Generator Plugin

To enable Gemini AI functionality in your Magento 2 Gemini AI Extension, follow these 3 steps to get your API key.

Step 1: Obtain an API Key

  1. Visit the Google AI Studio to generate the API Key

(https://aistudio.google.com/app/apikey)

  1. Click on “Create new secret key”. Make sure to copy the key.

Step 2: Add the API Key to the Magento 2 Gemini

  • In Magento 2 Backend, go to the “Knowband Gemini” General Configuration page.
  • Add the Gemini API Key into the provided “API Key ” field.

Step 3: Save the Settings:

  • After pasting the API Key in General Settings, click “Save”. Now, you can use Knowband’s Magento 2 Gemini Module Extension.

4.0 Admin Interface Panel


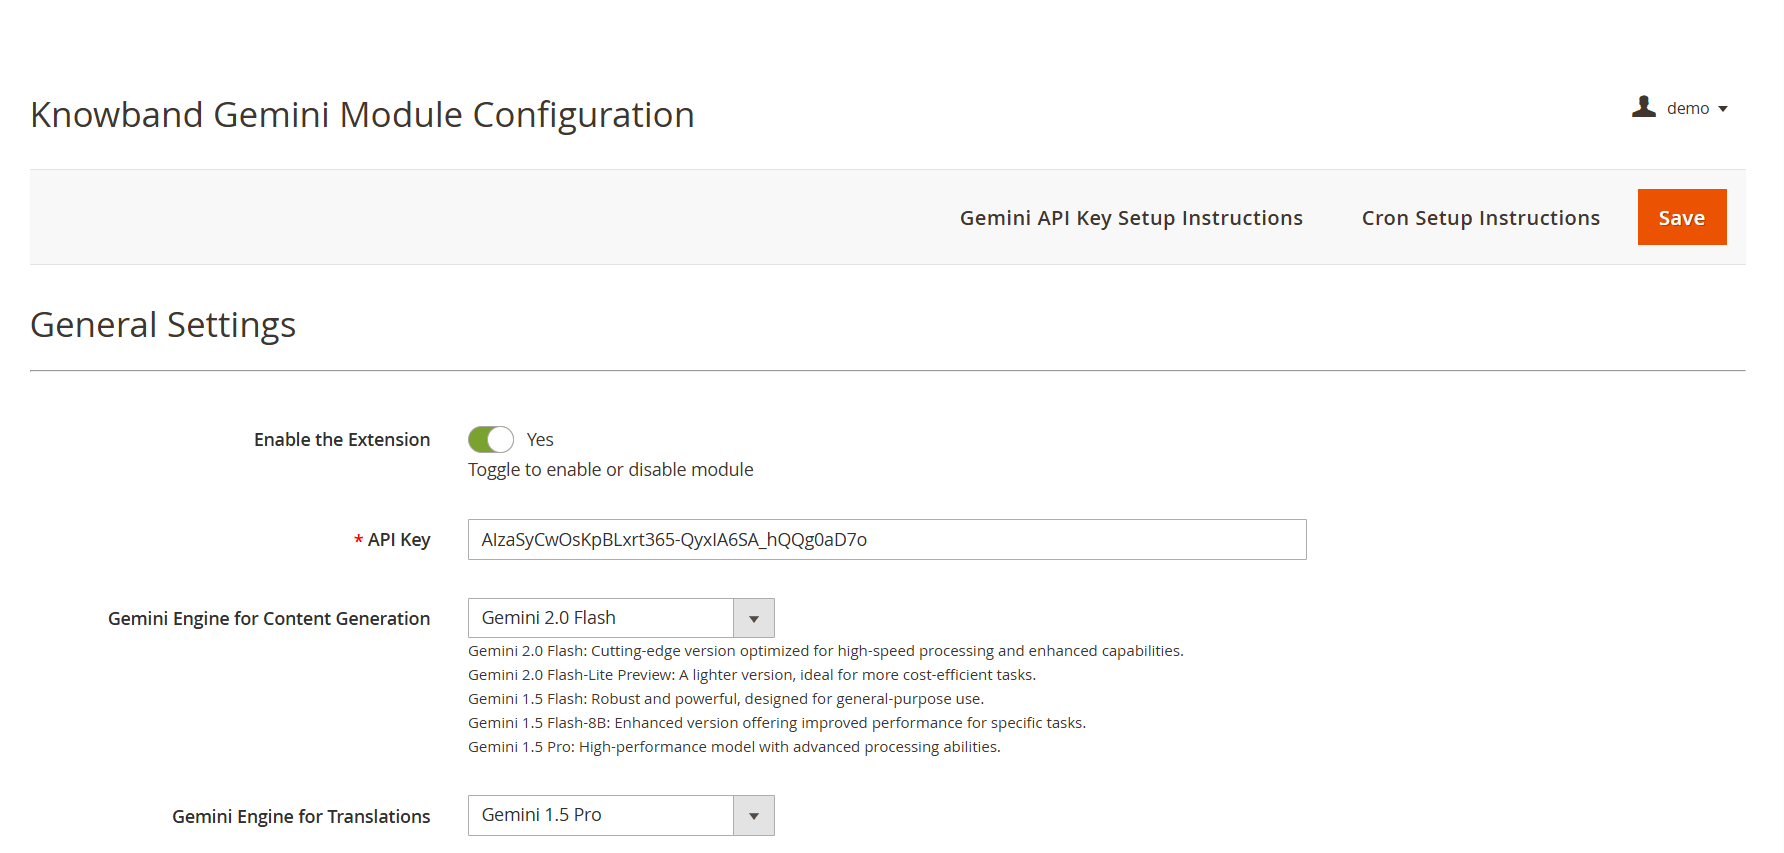
API Key: Add your API KEY from Google AI Studio in the required field.

Gemini AI Model Selection: The Magento 2 Content Generator Extension offers Google’s latest Gemini AI models, including Gemini 2 Flash, Flash Light Preview, Gemini Flash 1.5, Gemini Flash 8B, and Gemini 1.5 Pro to generate the content.

Temperature: The e-merchants can adjust the temperature from 0.0 to 1.0 – higher values represent more creative content, while lower values represent more accurate content.

Maximum Tokens: The Knowband’s Magento 2 Gemini Content Generator allows the admin to set a token limit (default: 500). The token represents the number of words that the AI Model can generate.

Gemini AI Engine for Translations:  The Magento 2 Gemini Translator Extension provides various Gemini AI Models, including Gemini 2 Flash, Flash Light Preview, Gemini Flash 1.5, Gemini Flash 8B, and Gemini 1.5 Pro, to select the model that the store owners want.

Primary Language: The admin can select the store’s default language for content generation and translation of the products

Target Languages: The Magento 2 Gemini Translator Extension provides the option for store owners to select which languages they store owners want their content to be translated into.

Prestashop Gemini AI Content Generator/Translator Module

No Coding Skills Required

Buy Now

4.0.2. Gemini AI Prompts:

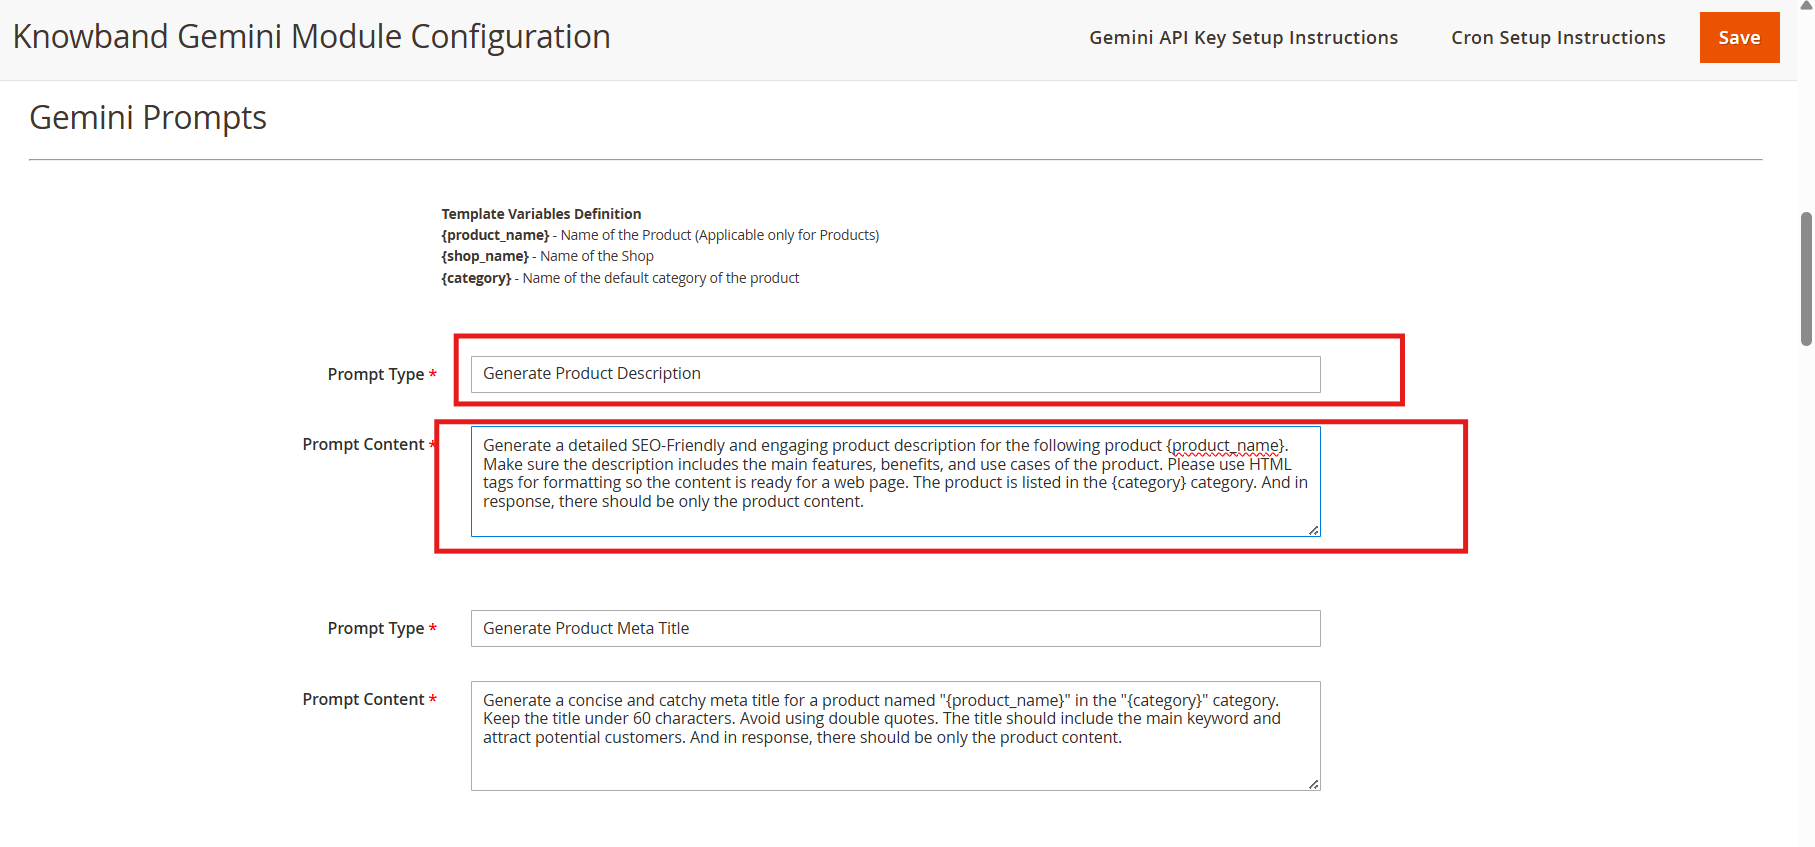
The Magento 2 Gemini AI Content Generator Extension features 14 pre-configured prompts designed for various e-commerce content needs. Also, the store owner can change the content of the prompts based on their needs.

Knowband Magento 2 Gemini AI Content Translator AI Prompts

Generate Product Description: Generate the description based on the product name and category. The store owner can also change the content for the Generate Product Description prompt.

Generate Product Meta Title: Generates SEO- optimized meta titles under 60 characters, including keywords and product categories to increase the search rank.

Generate Product Meta Description: The prompt generates the product meta descriptions of the product within 140 characters maintaining accurate and context-aware information according to the product.

Translate Product Title: Translates the product titles or names to multiple languages selected on the store.

Translate Product Description: The prompt translates the product descriptions while preserving HTML formatting and focused content.

Translate Product Meta Title: Translate Product Meta Titles to multiple languages according to the store theme.

Translate Product Meta Description: The prompt translates Product meta descriptions to multiple languages,, maintaining translated content focused and accurate.

Generate Category Description:  The Generate Category Description prompt generates a category description while preserving the formatting and information of the product.

Generate Category Meta Title: Translate category meta titles within 60 characters with keywor,ds maintaining the category meta title SEO Optimized and focused.

Generate Category Meta Description: Translates category meta descriptions within 140 characters, focusing on the generated meta keywords.

Translate Category Title: The prompt is to translate category titles into multiple different languages based on the needs of the store.

Translate Category Description: Translates category descriptions in the multiple languages selected on the configuration of the extension while maintaining the HTML structure and generated category descriptions.

Translate Category Meta Title:  Translates category meta titles to multiple languages keeping the accurate translation of generated or added meta titles.

Translate Category Meta Description: Translates category meta descriptions to multiple languages, focused on the prompt’s content.

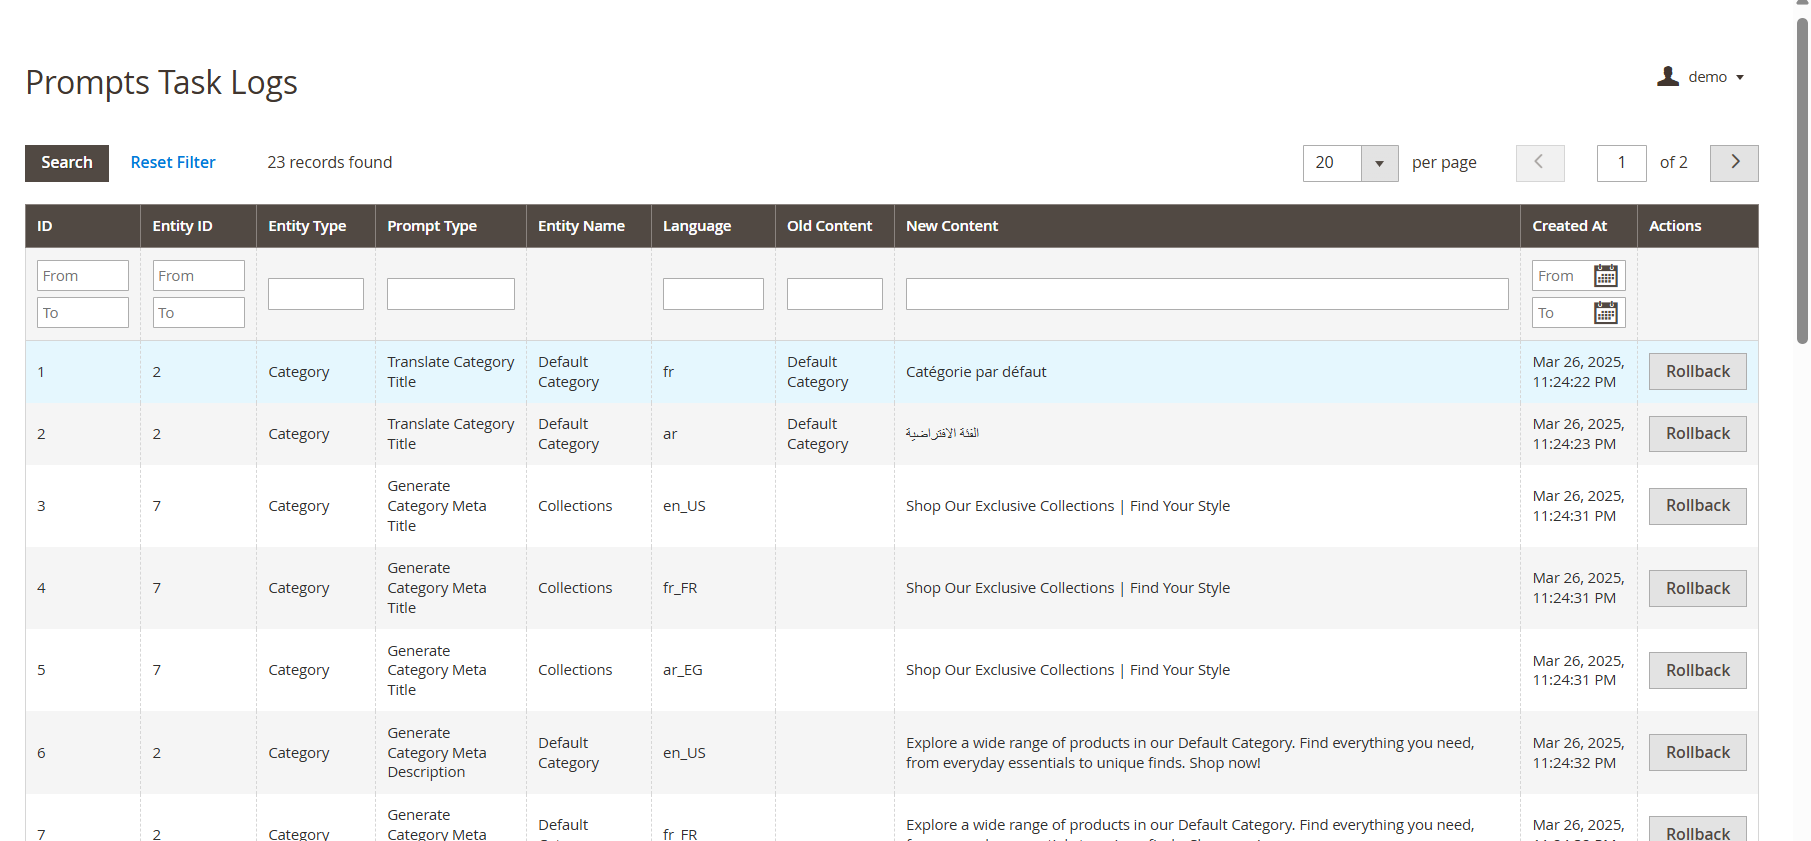
4.0.3. Gemini AI Task Log:


The Task Logs keep a record of all changes and actions performed within the store. Additionally, Knowband’s Magento 2 Gemini AI Extension maintains detailed logs, allowing store owners to track modifications, review past actions, and, if necessary, undo or revert changes for better control and accuracy.

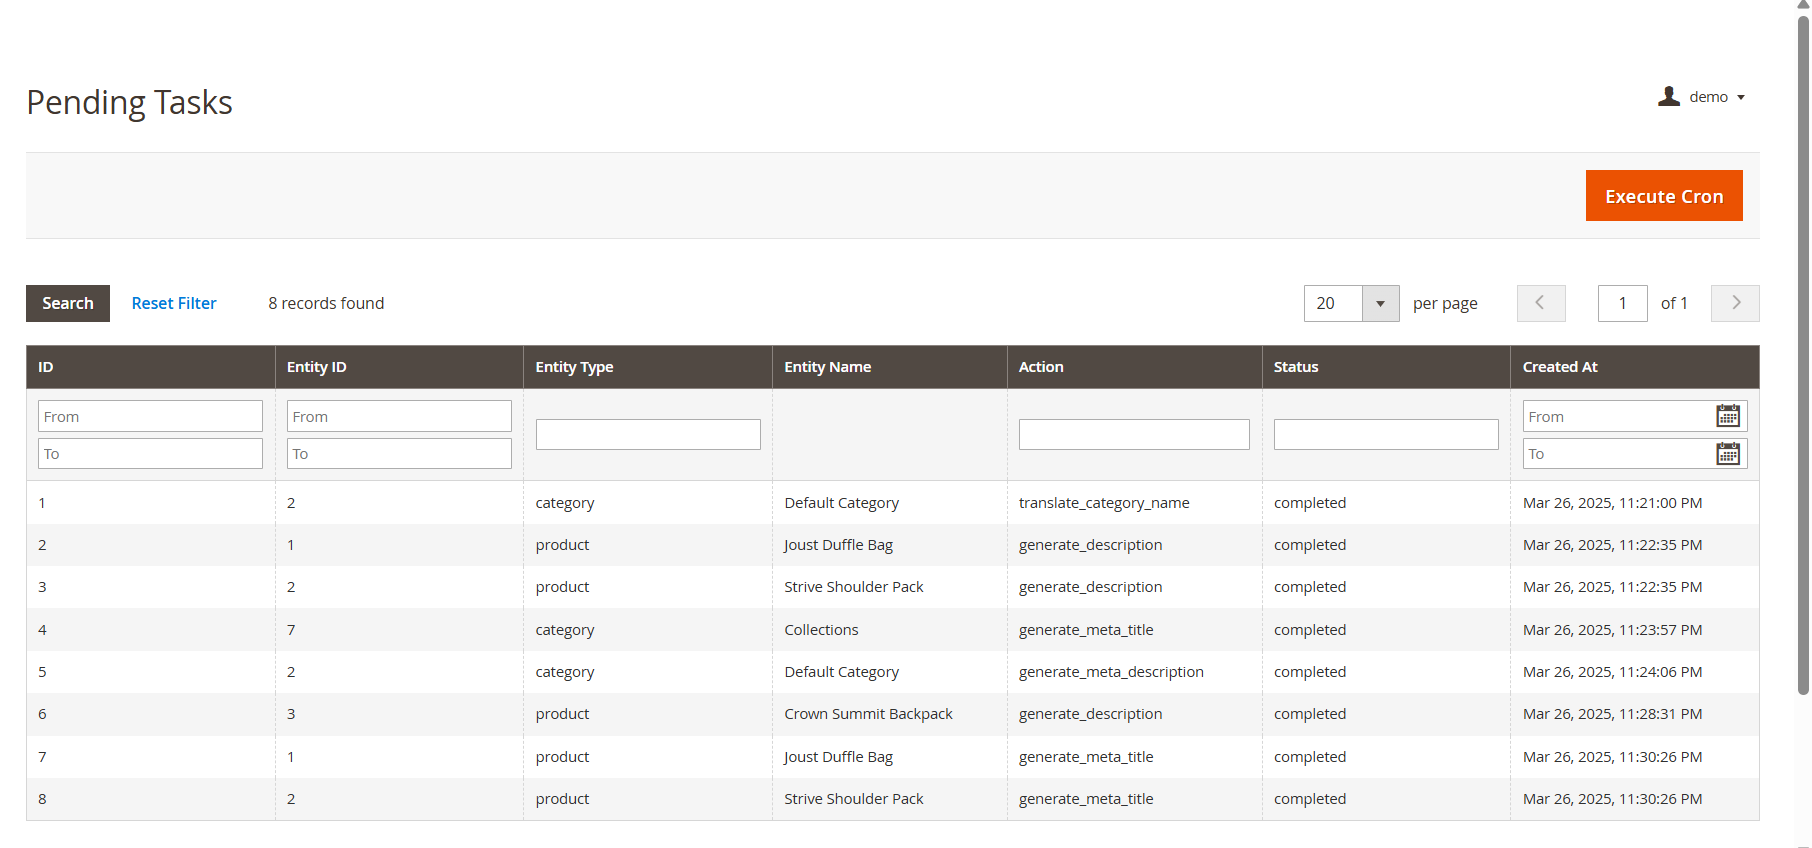
4.0.4 Pending Task Logs

The Pending Task Logs feature in Knowband’s Magento 2 Gemini Content Generator Extension allows users to efficiently manage and monitor content generation tasks before execution. When users initiate a content generation request, it does not get processed immediately. Instead, all tasks are first stored in the Pending Task Logs, providing a tab “ Execute Cron” to execute pending tasks.

5.0. Steps to Execute the Prompts 

The Knowband’s Magento 2 Gemini Content Generator Extension provides an efficient way to manage content generation tasks through a structured process. The key steps involved in this feature are:

  • Product Selection: Users start by selecting the products for which they want to generate or translate AI-powered content, such as product or category descriptions, titles, meta titles, and meta descriptions.
  • Executing the Task: After selecting the products, users execute the task, which sends all content generation requests to the Pending Task Logs section.
  • Managing Pending Task Logs: All pending tasks are stored in the log, allowing users to review, modify, or remove any task before final execution.
  • Executing the Cron Job: To complete the process, users run a cron job that automatically processes all pending tasks and applies the generated content to the respective products.

Magento 2 ® Google Tag Manager (gtag, GA4, GTM Events) – User Manual

The Magento 2 Google Tag Manager Plugin by Knowband offers a simple and efficient way to connect Google Tag Manager (GTM) to your Magento 2 store. With this easy-to-use module, store owners can manage and integrate multiple Google tags without requiring technical expertise. Furthermore, the Magento 2 gtag Manager Plugin enables tracking of essential events like Add to Cart, Product Views, Checkout Initiation, Order Completion, and more, providing valuable insights into customer interactions.

The Magento 2 Google Analytics Integration Plugin also supports capturing UTM parameters, allowing you to analyze the performance of your marketing campaigns. Thus, by understanding which campaigns drive traffic and conversions, you can refine your strategies, allocate ad budgets effectively, and boost your ROI.

Designed to enhance tracking and optimize conversions, the Magento 2 GTM Extension is ideal for improving user experience and achieving better results. Whether you rely on GA4 or GTM, this module simplifies the integration process, so you can focus on growing your business.

1. Key Features Offered by Magento 2 GA4 Integration Plugin:

Effortless Google Tag Integration: Add Google Analytics, Google Ads, and GA4 to your Magento 2 store without any coding skills.

Instant Event Tracking: With the Magento 2 Gtag Integration Plugin, the store admin can monitor user activities in real-time, such as Add to Cart, Product Views, and Checkout Initiation, to gain immediate insights into customer behavior.

Track UTM Parameters: Easily capture UTM parameters to measure the success of your marketing campaigns and identify the most effective channels.

Advanced eCommerce Tracking: Google Analytics for Magento 2 helps the admin gain detailed insights into sales performance with enhanced tracking of events like Product Detail Views, Add to Cart, and Order Confirmations.

Simple Setup and Configuration: Enjoy a hassle-free experience with a user-friendly interface that makes setting up and managing tags quick and easy—no technical knowledge required!

Intuitive Dashboard: The module provides ease of all tags and events management directly from your Magento 2 admin panel with a simple and organized dashboard.

Multi-Language Support: The Magento 2 GTM module supports multiple languages, making it ideal for stores that cater to diverse audiences.

1.1. How to Find Your Google Tag Manager Container ID?

Step 1: Log in to your Google Tag Manager account.

Step 2: Either create a new container or choose an existing one.

Step 3: Locate the Container ID, which appears in the format GTM-XXXXXX, in the top-right corner of the Google Tag Manager dashboard.

Step 4: Copy the Container ID and paste it into the GTM Container ID field within this module’s configuration settings.

You can also refer to the module’s functionality overview video for more information about the Container ID generation steps.

1.2. How to Locate Your Google Analytics Measurement ID?

Step 1: Log in to your Google Analytics Account.

Step 2: Choose the property for which you need the Measurement ID.

Step 3: Go to Admin > Data Streams and select your web data stream.

Step 4: Find the Measurement ID, which appears in the format G-XXXXXXXXXX.

Step 5: Copy the Measurement ID and enter it in the Google Analytics Measurement ID field in the module’s configuration.

Integrate GA4 on Your Prestashop Store

No Coding Skills Required

SHOP NOW

1.3. How to Set Up Events in Google Tag Manager?

Step 1: Download the GTM Events file. You can find the download link in the module’s configuration section under the Instructions tab.

Step 2: Log in to your Google Tag Manager account.

Step 3: In Google Tag Manager, go to Admin > Import Container.

Step 4: Upload the downloaded JSON file from your computer.

Step 5: Select the workspace where you want to add the events and choose either the Merge or Overwrite option based on your requirements.

Step 6: Click Confirm to finalize the import process.

Step 7: Save and publish your container to enable the events in Google Tag Manager.

If you encounter any issues during the setup, feel free to reach out to us at support@knowband.com for assistance.

Admin Panel Overview:

The Magento 2 Google Analytics Integration Extension comes with an intuitive and easy-to-manage admin dashboard that allows the store admin to configure and manage the plugin without even any technical expertise.

2.1 General Settings:

  • Enable the Extension: Enable/Disable the GA4 tracking on your Magento 2 store with this button.
  • GTM Container ID: Insert the “Google Tag Manager Container ID” in the following text field. Please follow the steps mentioned above to extract the GTM Container ID from the GTM console.
  • Google Analytics Measurement ID: Add the “Google Analytics Measurement ID” here.

2.1 GTM Events Configurations:

This tab provided under the Magento 2 Google Analytics Module lists all the Google Analytics Events in a single interface. Further, the store admin can easily enable/disable the analytics events with the Enable/Disable “Toggle” button.

  • Page View: Enable the “Page View” analytics event from this button.
  • View Product: Get the data insights when a customer views a product on your store.
  • View Category: Manage the “View Category” tag from here.
  • Add to Cart: Get insights when a customer adds products to the cart with the “Add to Cart” event.
  • Remove from Cart: Capture the analytics when the customers remove items from the cart.
  • Checkout Begins: Gather the insights as soon as the customer opts in for the checkout process on your Magento 2 store.
  • Checkout Page: Enable/Disable the “Checkout Page” Google Tag Manager event from here.
  • Add/Update Address: Track when the customers add or update their addresses.
  • Shipping Details: Get the insights when the customers fill in the shipping details during the checkout.
  • Order Success Page: Track the real-time insights from the order success page.
  • Apply Discount: Enable/Disable the “Apply Discount” tracking event with the “Apply Discount” tag.
  • View Cart: Capture the insights when a customer views the cart.
  • Customer Registration: Gather the data during customer registration on your eCommerce store.
  • Customer Login: Manage the “Customer Login” tracking insights from here.
  • Add to Wishlist: This tag provides the analytics data when the customers add something to the Wishlist.
  • Search: Check what your customers are looking for and implement the strategies with better insights.
  • Track UTM Parameters: Enable/Disable the UTM parameters tracking from here.

2.2. Configuration Steps:

The Magento 2 no-code Google Tag Manager integration provides easy-to-follow instructions, removing the need for technical skills to set up the module. The store admin can quickly access the required credentials by following the simple steps outlined below:

These steps will guide the store admin through the module setup. However, if you encounter any issues during the connection process or with the module, feel free to contact us at support@knowband.com or submit a ticket on knowband.com/helpdesk.

Magento 2 ® ChatGPT Content Generator/Translator Extension – User Manual

The Magento 2 ChatGPT Content Generator and Translator Plugin is a powerful tool designed to streamline content management for Magento 2 stores. With advanced AI technology, it simplifies content creation and translation, making it a must-have for modern eCommerce businesses. This plugin enables you to create engaging product and category descriptions, attractive titles, and SEO-friendly content to boost your store’s visibility and enhance customer experience.

Beyond generating content, the plugin integrates seamlessly with Magento 2 and includes a translation feature. The AI-powered Magento 2 ChatGPT Content Translator helps store owners expand into new markets with accurate and context-aware translations.

Whether you’re managing multilingual content or improving your content strategy, the Magento 2 ChatGPT Content Generator saves time and effort. By leveraging ChatGPT Engines 3.5 and 4.0, it delivers high-quality, multilingual content that takes your online store to the next level.

Key Features of Knowband’s Magento 2 ChatGPT Content Generator/Translator Plugin:

1. Effortless Content Creation

Easily generate high-quality product titles, detailed descriptions, and optimized meta tags, ensuring consistency across your store while saving time.

2. Advanced Dual AI Engine Support

Powered by ChatGPT models 3.5 and 4.0, the plugin delivers advanced content creation and precise translations, catering to bulk product needs.

3. SEO-Friendly Content

Create optimized content that enhances your store’s search engine rankings and attracts more visitors.

4. Seamless AI-Powered Translation

Translate store content into multiple languages effortlessly, paving the way for global business expansion.

5. User-Friendly Design

With an intuitive interface, the plugin is easy to use, even for store admins with no technical expertise.

6. Category and Meta Tag Management

Simplify the creation and translation of category names and meta descriptions for a professional and polished look.

7. Bulk Content Processing

Perfect for stores with large inventories, the plugin allows batch processing of items to save time and increase efficiency.

8. Streamlined Operations

Simplify content-related tasks for smoother product updates and better operational efficiency, regardless of business size.

9. Multi-Language Support

Compatible with all languages, including RTL scripts, the plugin ensures flexibility for businesses worldwide.

2.0 Setting Up the ChatGPT Key for Your Plugin

Follow these simple steps to configure the API key and activate ChatGPT functionalities in your Magento 2 plugin:

Step 1: Generate an API Key

  1. Visit the OpenAI API Key Generation page.
  2. Log in to your OpenAI account or create one if you don’t have an account yet.

  1. Click on “Create new secret key” to generate a unique API key.
  2. Copy and securely save the key, as it will only be displayed once.

Important: Verify Billing Status

To ensure uninterrupted functionality, make sure your OpenAI account has an active billing setup:

  1. Visit the OpenAI Billing Overview page.
  2. Check your account balance and add funds if necessary.
  3. Remember, insufficient credits can cause API requests to fail.

Once you’ve set up the API key and verified billing, your Magento 2 ChatGPT plugin will be fully configured and ready to generate and translate high-quality content for your store.

Also Available for Prestashop eCommerce Platform

SHOP NOW

Admin Panel Overview:

The Magento 2 AI Content Translator provides the store admin with an easy-to-manage and intuitive module dashboard. Let’s have a quick overview on all the different options provided in module backend.

Configurations:

Enable Disable the Extension: This button is used to enable/disable the module.

API Key: Insert the API key generated by following the steps in point 2.

ChatGPT Engine for Content Generation: The Content Generator and Translator Plugin for Magento 2 comes with 4 powerful ChatGPT Engines to take care of all your SEO rich content needs.

GPT-4: Highly capable model designed for complex tasks, offering superior accuracy and depth.

GPT-4o: Optimized for balancing cost and performance.

GPT-3.5-turbo: Cost-effective, suitable for general tasks.

GPT-4-turbo: Advanced model with improved accuracy and context handling.

Select the engine for content generation.

ChatGPT Engine for Translations: Choose the suitable engine for content translation from the dropdown list.

Temperature: Enter the value between 0.1 to 0.9. This value defines the creativity and uniqueness of the content. Where the lower number stands for more precise data, increasing the temperature could lead to more optimized and creative content generation.

Max Token: Enter the number of maximum tokens used in a single prompt execution.

Default Language for Translation/Content Generation: Select the default language for content generation on your store.

Languages to Translate Content: Choose the languages to translate the content.

ChatGPT Prompts:

Generate Product Description: Generate a detailed SEO-Friendly and engaging product description for the following product {product_name}. Make sure the description includes the main features, benefits, and use cases of the product. Please use HTML tags for formatting so the content is ready for a web page. The product is listed in the {category} category.

Generate Product Meta Title: Generate a concise and catchy meta title for a product named “{product_name}” in the “{category}” category. Keep the title under 60 characters. Avoid using double quotes. The title should include the main keyword and attract potential customers.

Generate Product Meta Description: Generate a compelling meta description for the product named {product_name} which lies in the category {category}. Limit the description to about 140 characters.

Translate Product Title: Translate the following product title and make sure to give translated content only.

Translate Product Description: Translate the following product description and preserve the HTML structure and tags, and only translate the visible text content and make sure to give translated content only.

Translate Product Meta Title: Translate the following product Meta Title and make sure to give translated content only.

Translate Product Meta Description: Translate the following product Meta Description and make sure to give translated content only.

Generate Category Meta Title: Generate a concise and catchy meta title for a “{category}” category. Keep the title under 60 characters. The title should include the main keyword, attract potential customers, and avoid using double quotes.

Generate Category Meta Description: Generate a compelling meta description for the category {category}. Limit the description to about 140 characters and avoid using double quotes.

Translate Category Title: Translate the following category title and make sure to give translated content only.

Translate Category Meta Title: Translate the following Category Meta Title and make sure to give translated content only.

Translate Category Meta Description: Translate the following category meta description and make sure to give translated content only.

3. ChatGPT Prompts Task Log:

The following tab displays a detailed record of completed tasks for the admin. It includes information such as the executed prompt type, product name, product category, language, previous content, and newly generated content.

Admins can also filter the task log using criteria such as Filter ID, Prompt Type, or Product Name, making it easier to locate specific data.

How to Use ChatGPT Prompts?

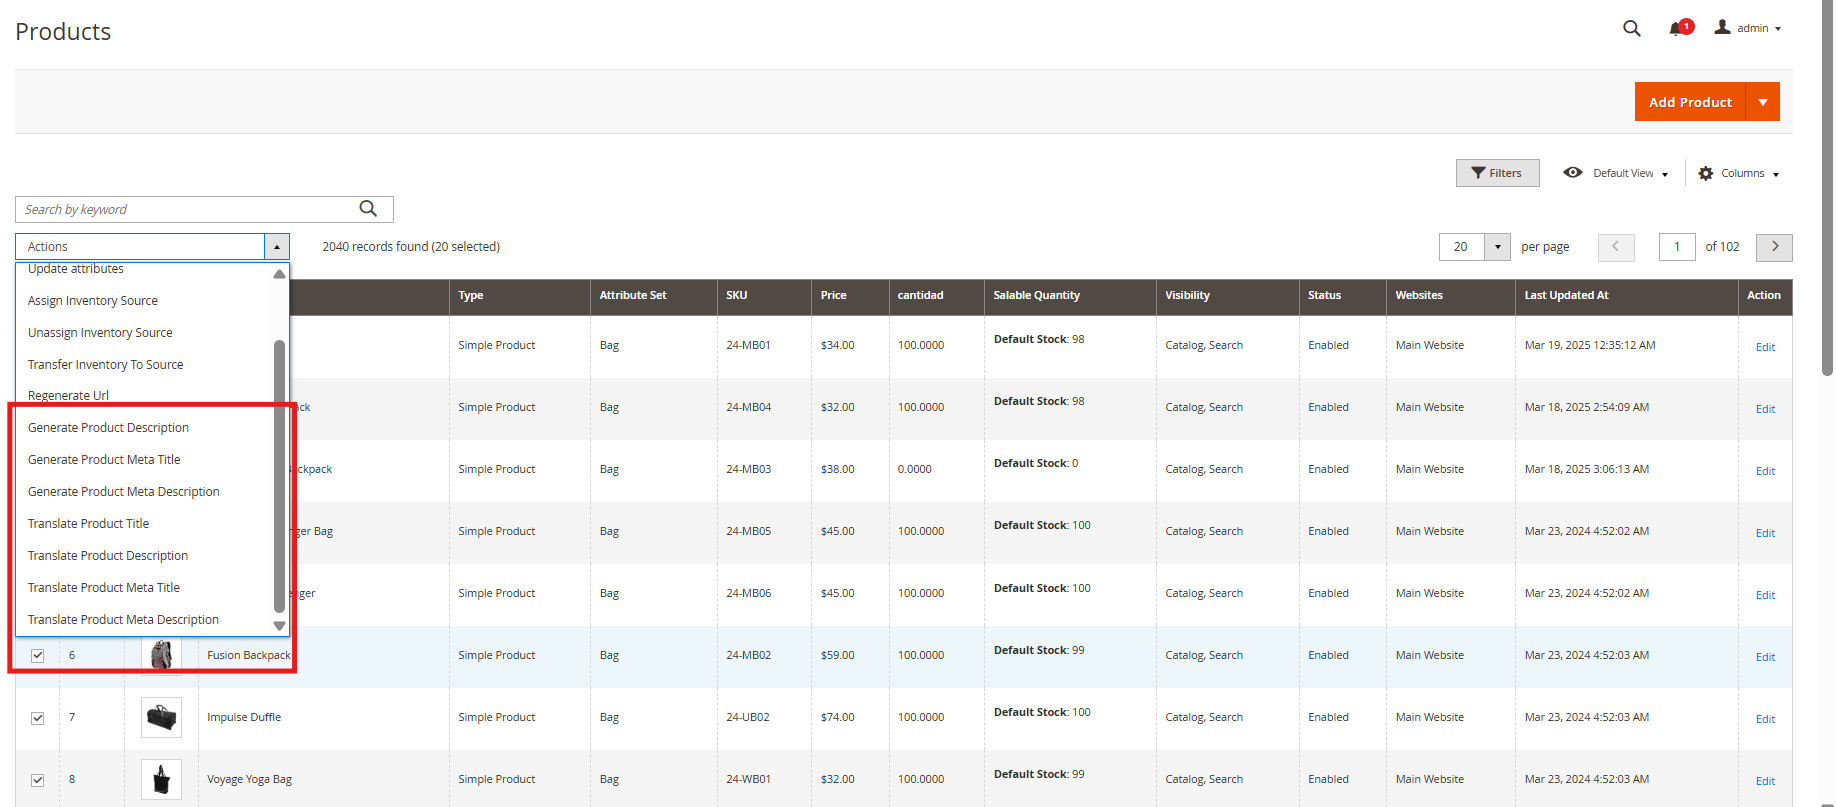
To use ChatGPT prompts, store admins can go to Catalog >> Products in the admin panel.

Executing Prompts with the Magento 2 AI Content Generator Plugin

  1. Select the products you want to update from the list.
  2. Open the Bulk Actions tab, as illustrated in the guide.
  3. Choose the desired prompt to perform the required action on the selected products.

This efficient workflow enables admins to generate or translate content for multiple products simultaneously, saving time and effort.

Magento 2 eBay Integrator – User Manual

1.0 Introduction

eBay Marketplace Integrator for Magento 2 offers the quickest means to the Magento 2 store owners to integrate their store with the very popular eBay marketplace. The eBay integration allows the merchants to manage the inventory and orders from a single interface.

Headquartered in San Jose, California, eBay is a multinational eCommerce corporation that popular as an online auction and shopping site. It facilitates consumer-to-consumer and business-to-consumer sales and offers an easy and customizable interface for sellers across the globe to list and sell their products effortlessly. eBay operates in over 30 nations. The product listing of eBay combines 800+ million product listings that are not just unique but are even coupled with great deals.

eBay Marketplace connector module for Magento 2 offers a smart solution to the e-merchants to integrate their store with the eBay Marketplace. The store admin can list products to the marketplace and sync the orders from the marketplace to their Magento 2 store.

1.1 Merchant benefits of eBay Integrator for Magento 2:

  • The Magento 2 eCommerce sites can easily expand their reach by integrating their store with the popular marketplace with the help of this eBay integrator for Magento 2.
  • The eBay API integrator for Magento 2 allows the store admin to sell their products to a larger audience base.
  • eBay integration for Magento 2 allows the sellers to sync their site with any of the eBay sites.
  • The eBay connector module for Magento 2 offers multi-currency and multi-lingual support that helps you offer the services according to the target customer.
  • The eBay integration plugin for Magento 2 is easy-to-understand and the admin can start selling in the marketplace in a few simple steps.
  • The user-friendly interface of the eBay connector extension for Magento 2 makes it easier for the store admin to manage their merchandise from a single platform.
  • The merchants can add/remove the product, manage the details and inventory from the admin panel of the eBay integration plugin for Magento 2.
  • The admin can manage the shipping methods for the eBay store from the admin panel of the eBay Marketplace connector extension for Magento 2.
  • Profile-based product listing of the eBay API integration module for Magento 2 makes it easier for the merchants to list the products in bulk.
  • Even the order processing becomes easier with the robust eBay API integrator for Magento 2.
  • The seller can check the reason for the error product rejection and rectify accordingly from the back-end of the eBay integrator for Magento 2.
  • The eBay API integration plugin for Magento 2 comes with free support for 3 months.
  • The eBay connector extension for Magento 2 is easy-to-use. Further, the admin can configure it with the least effort.

2.0 Installation

Follow the following steps for installing the eBay Magento Marketplace integration extension:

1. Download the Magento 2 eBay connector extension package.

2. Unzip the package in your root folder of Magento setup via FTP manager (like Filezilla or WinSCP – download here: https://filezilla-project.org/).

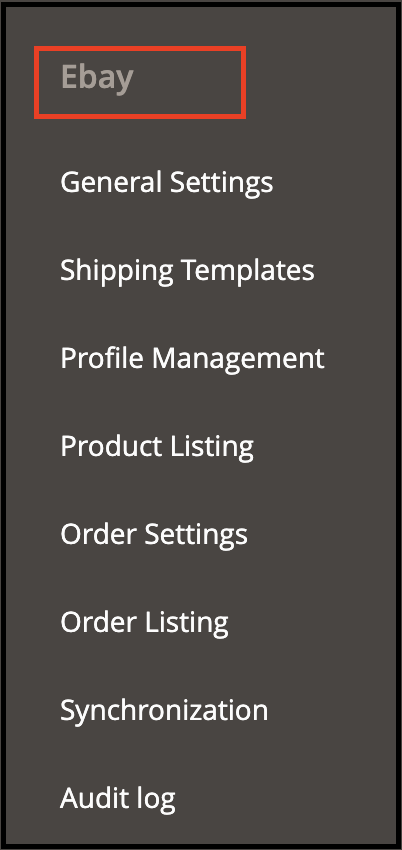
3. In the admin panel, go to eBay Marketplace in the main menu.

4. The Magento 2 eBay Marketplace connector module is now ready for use.

This User Manual will guide the users through the Magento 2 eBay integration extension configuration and settings.

2.1 eBay Marketplace Integration- Seller Account Setup

To start selling on eBay Marketplace you need to have a seller account on eBay. In this section, we are listing all the steps to create a seller account on eBay. Please find them below –

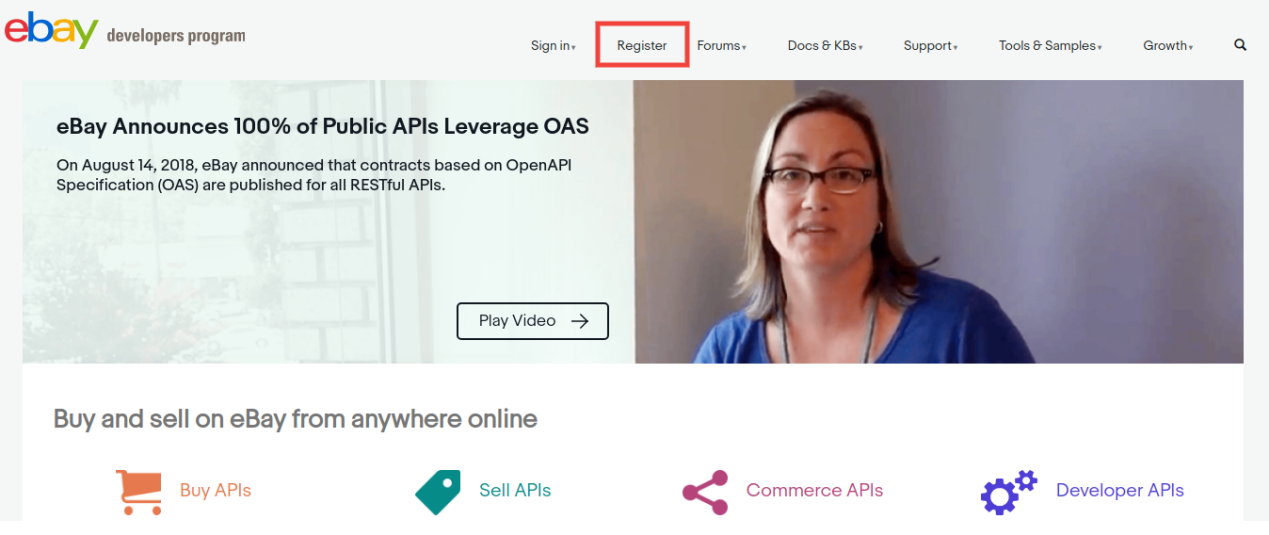
  • Click on the “Register” button for registration.


  1. After filling-in valid data click on join and you will head to the application creation page.


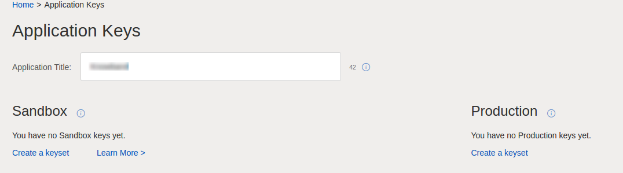
  1. Enter the application name and click on ‘Create a keyset’ under the Production section, a new form will be opened.

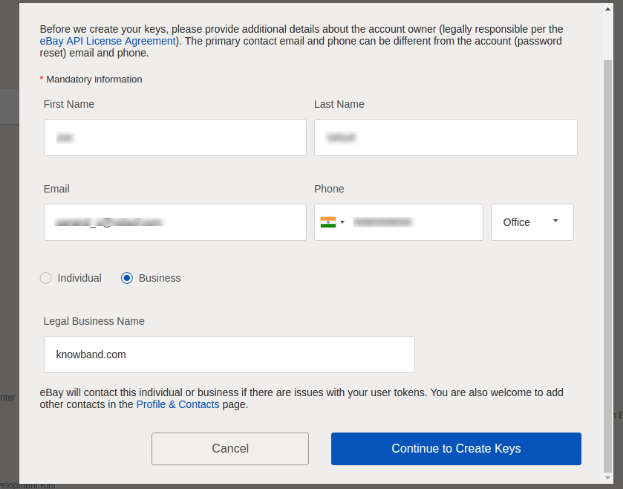
  1. Enter the details and click on Continue to create Keys.
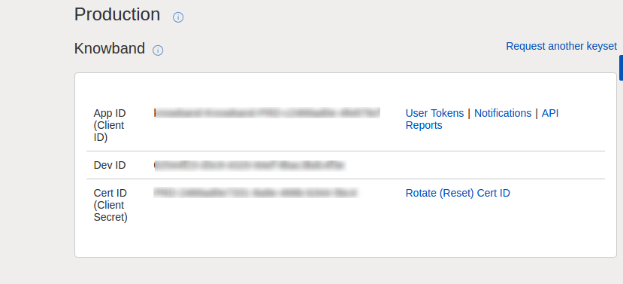
  2. The application keys will be shown.

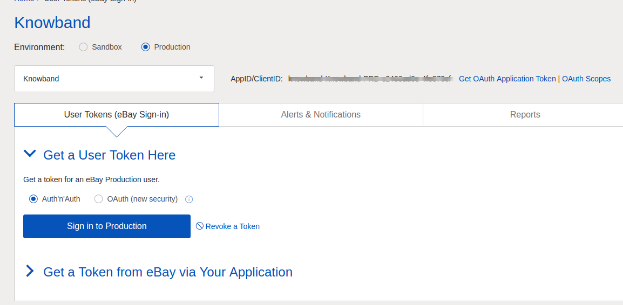
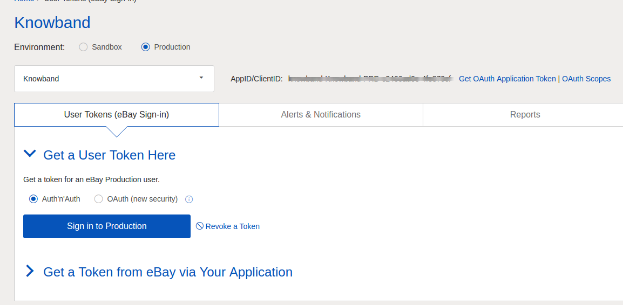
  1. To create a user token, click on the User Tokens link in the above image.

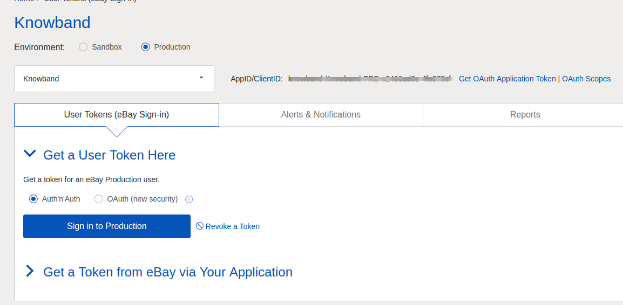
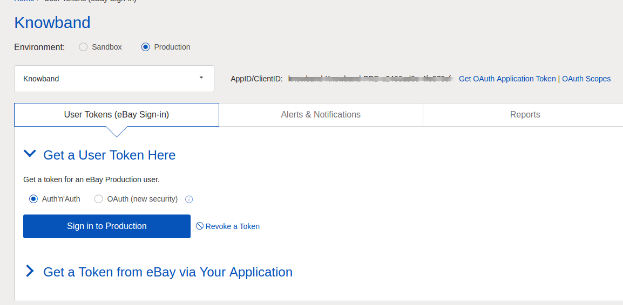
  1. Click on ‘Sign in to Production’ to get a token.

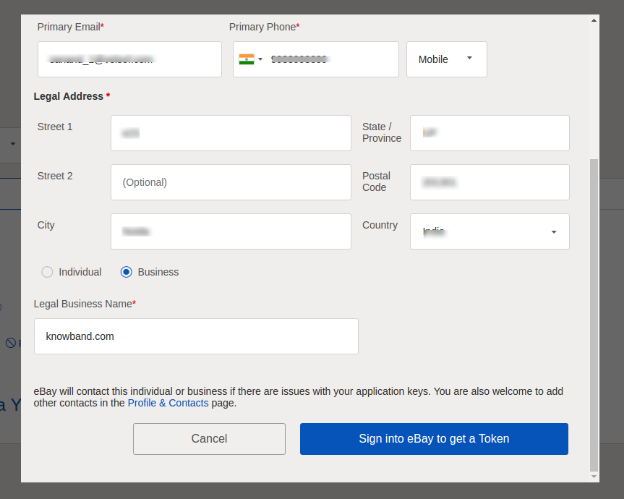
  1. Fill in the details and click on “Sign in to eBay to get a Token”.
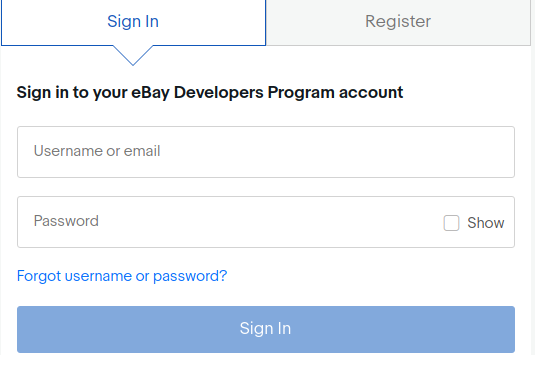
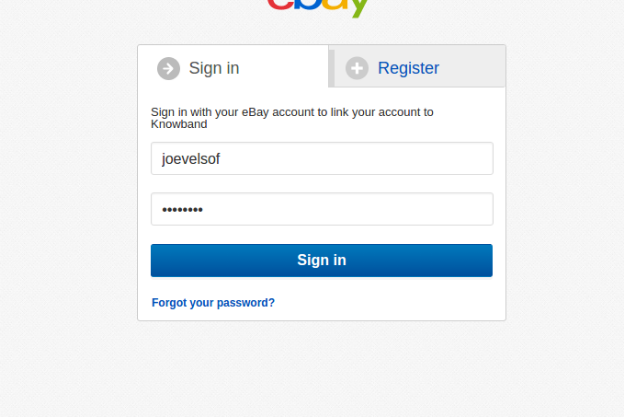
  2. Sign into an already created eBay Seller account or register as shown below:

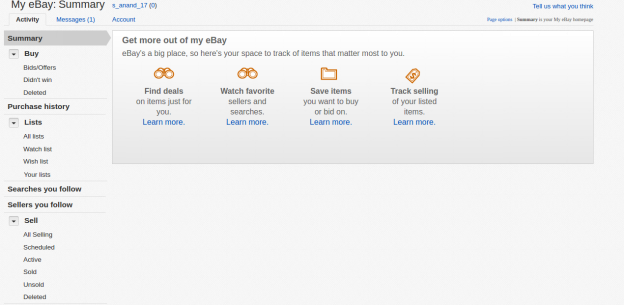
11. On clicking register and filling in details you will head to your Seller eBay account.

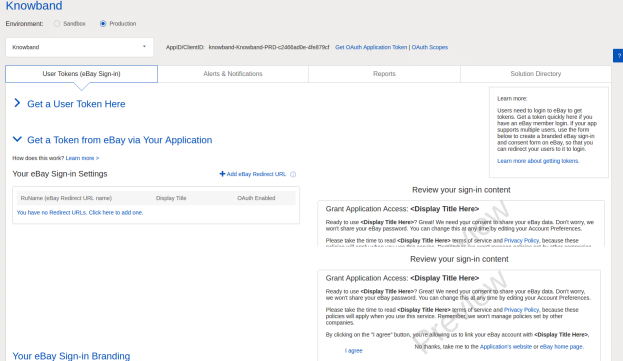
2.2 To Get a token from eBay via your application

  1. To create a user token, click on the User Tokens link in the below image.

Steps to reach this screen:-

A. Login into your developer’s eBay account.

B. On successful login, you will see the below-added screen.

  1. Click on “Get a Token from eBay Via Your Application.”

Steps to reach this screen:-

A. Click on “User Tokens” from the above screen.

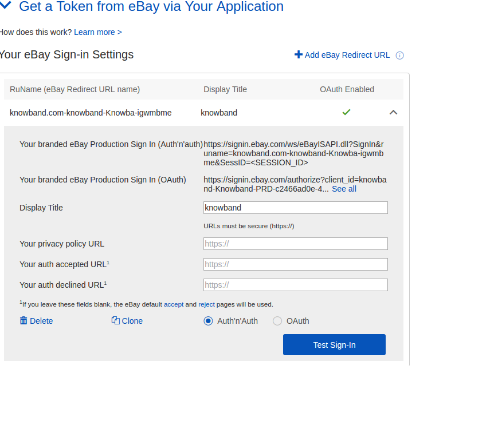
  1. Click on add eBay redirect URL and fill the form and save.

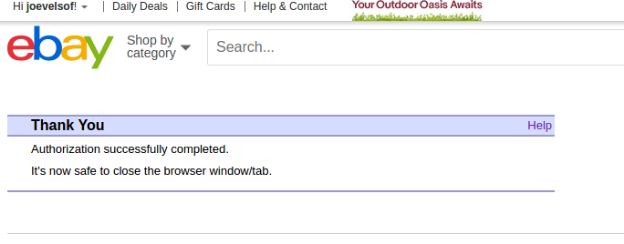
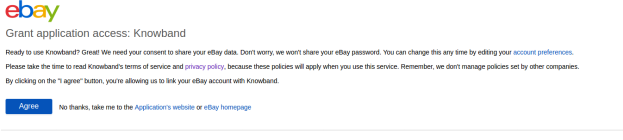
  1. On clicking I agree from the right side form, you will head to the authentication page.

3.0 Admin Interface of eBay Integrator for Magento 2:

The Admin Panel of the eBay API Integration extension for Magento 2 offers 8 configuration options.

  1. General Settings
    2. Shipping Templates
    3. Profile Management
    4. Product Listing
    5. Order Setting
    6. Order Listing
    7. Synchronization
    8. Audit Log

3.1 General Settings

Once you have created a seller’s account, you need to fill-up the form to validate the synchronization of the store with the marketplace. Navigate to Admin Interface>eBay Marketplace>General Settings.

Fill out the form shown in the General settings section. Each field for the configuration panel of the eBay connector plugin for Magento 2 is explained below:-

1. Enable/Disable

Enable/disable the eBay API integrator for Magento 2 by toggling this button.

2. Account Type

The admin can either choose the Sandbox account or the Production eBay account. The sandbox account is for testing purposes. While the Production account is for the final store integration.

3. Dev Id

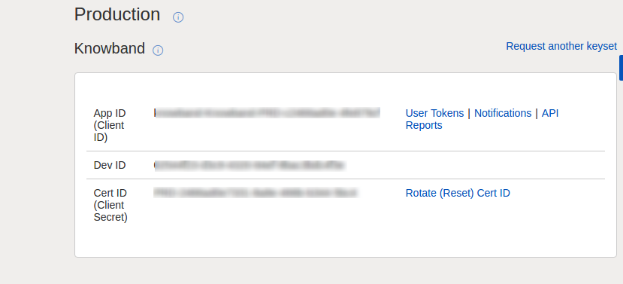
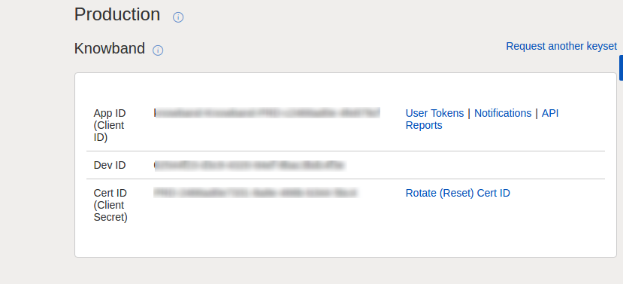
Enter the Dev ID of your eBay account in this section. To find your Dev ID, sign in to the eBay developer account. In the application key section, you’ll find App ID, Dev ID, and Cert ID as shown in the image below.

4. App Id

Copy the App ID from your eBay account and copy the same in this field.

5. Cert Id

Enter the Cert Id of the eBay account in this section. You can find the Cert Id as shown in the above image.

6. RU Name

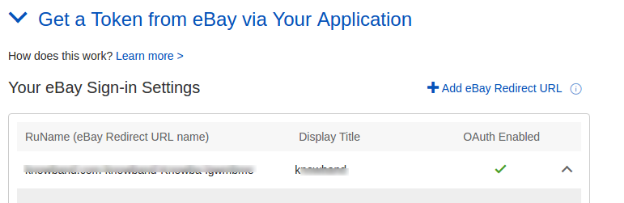
Enter the RU Name of the eBay account. To obtain your RU name, go to the ‘Get a Token from eBay via Your Application’ tab after adding a redirect URL.

7. Paypal Email

Enter a valid PayPal ID connected to your eBay account. Follow the steps mentioned below:

  1. Log in to your eBay seller account.
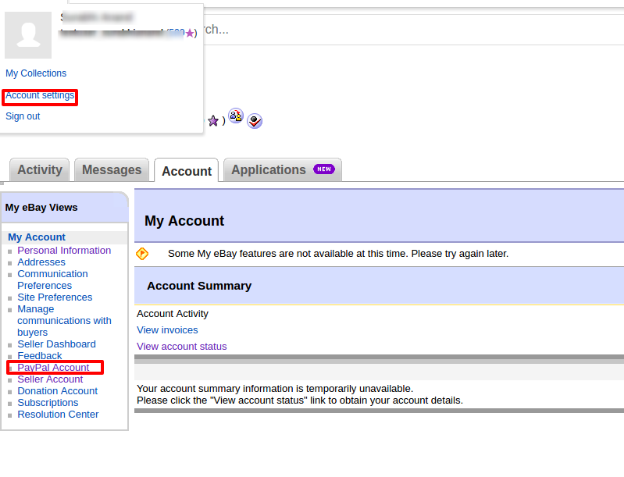
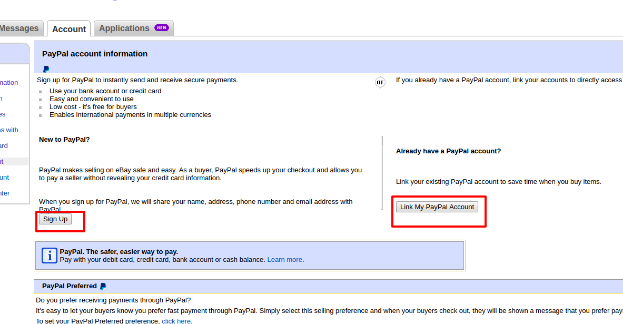
  2. Click on account settings from the top-left dropdown and click on Paypal account.

  1. Now Sign up or link your already created PayPal account with the eBay seller account.

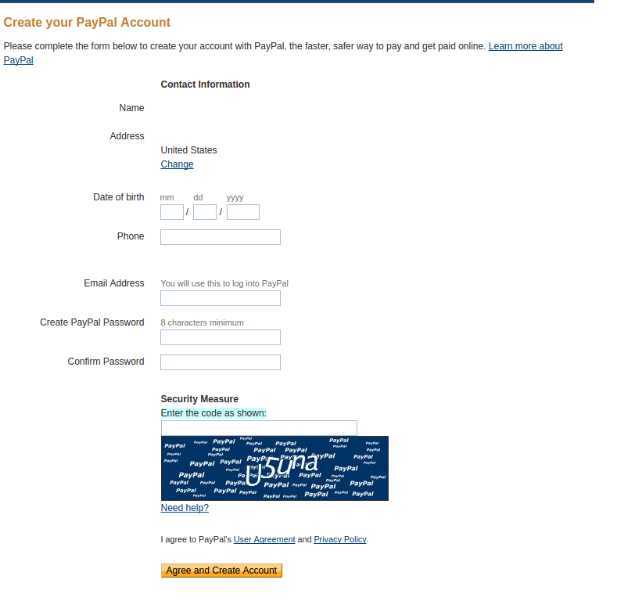
  1. On clicking Sign Up, you will move to the PayPal account creation page. Just create a profile by filling in the details and linking it to your seller’s account.

8. Token Listing Link

Click on this link to add the tokens for eBay countries. To get the access token, you need to click on Sign in to Production as shown in the below image.

Sign in to the account from the form below:-

Click on I agree and get access tokens.

3.2 Shipping Templates

The Magento 2 store admin gets to create an N number of shipping templates from the back-end of the eBay Integration extension for Magento 2.

3.2.1 How to create New Shipping Templates?

To create new shipping templates, click on the ‘Add New’ button.

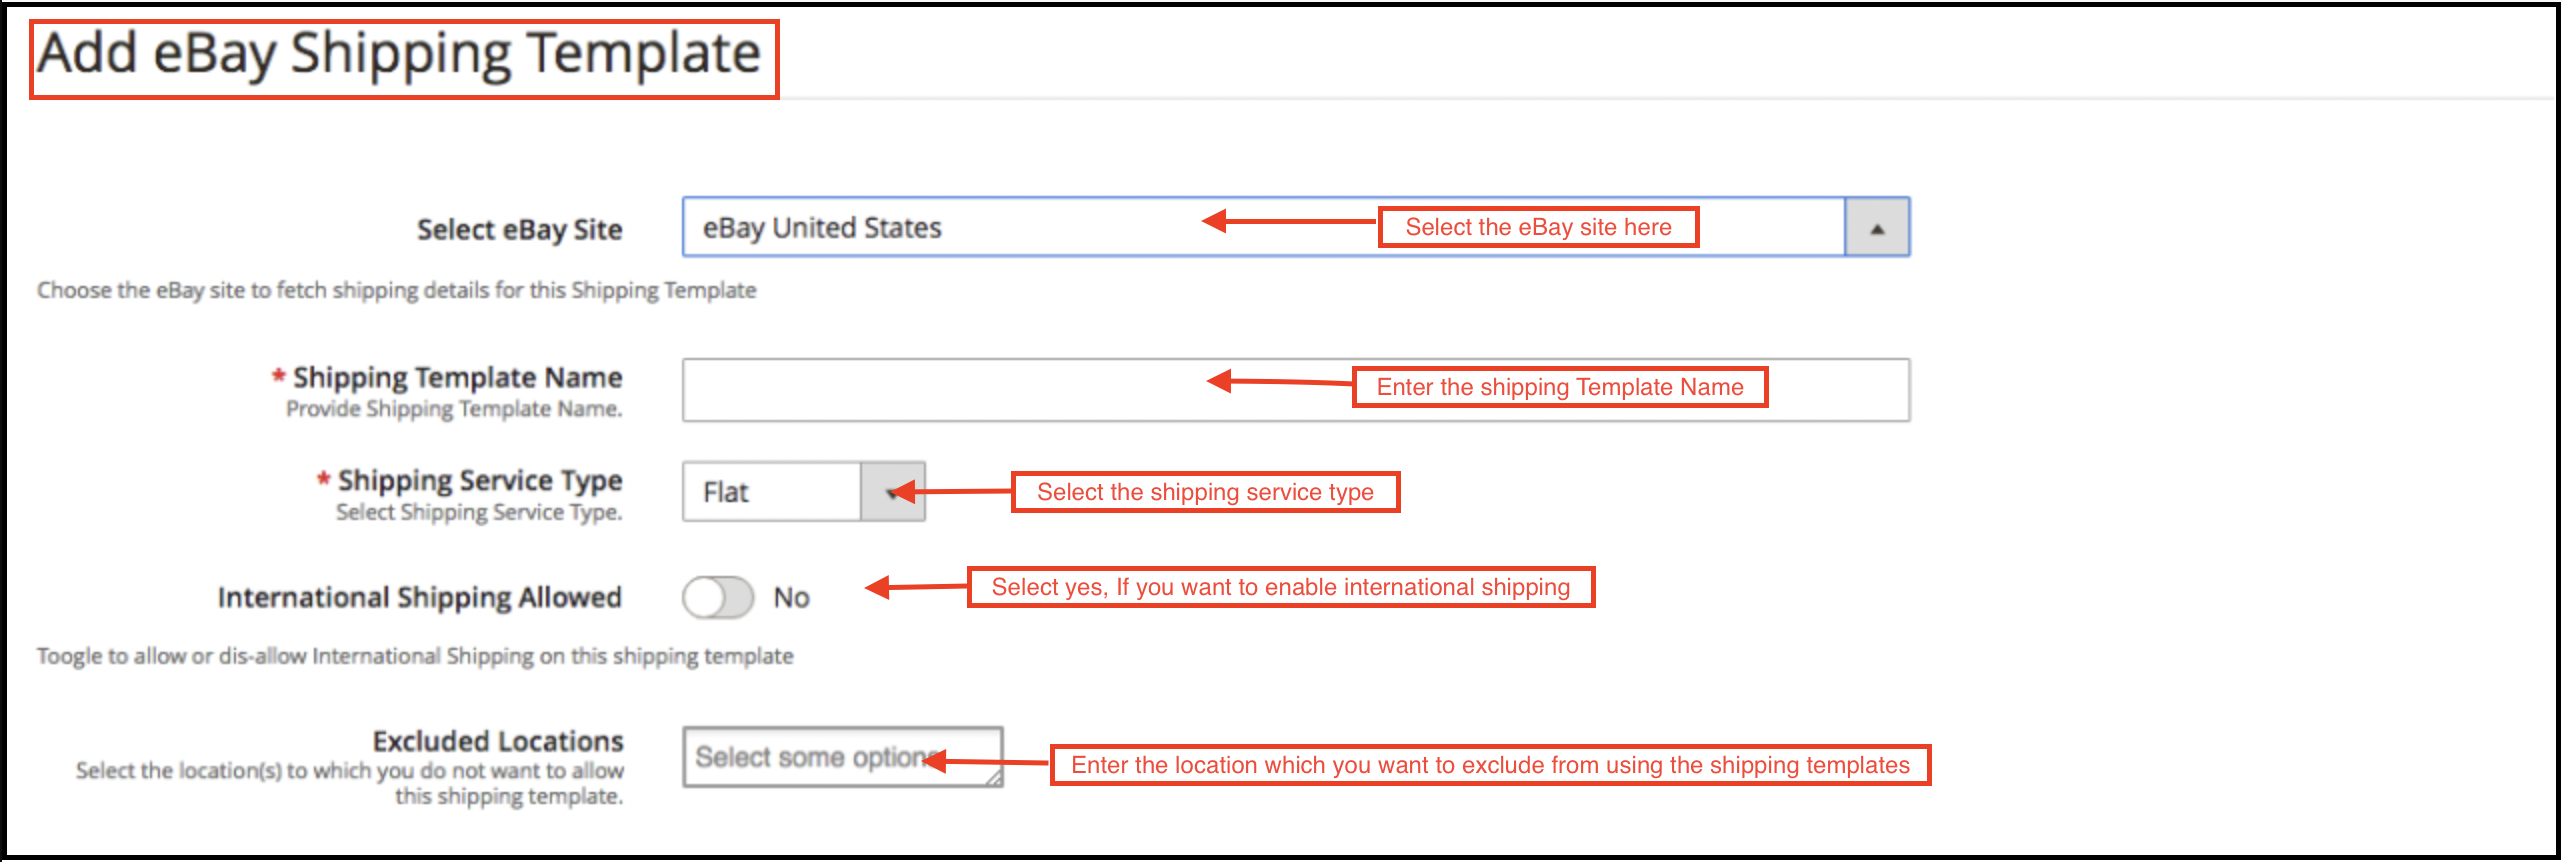
You’ll move to the shipping template creation page.

  • Select eBay Site: First, select the eBay site for which you are creating the shipping template.

  • Shipping Template Name: Enter a name for the shipping template.
  • Shipping Service Type: Select the shipping service type.
  • International Shipping Allowed: Switch on the button if you want to allow international shipping.
  • Excluded Location: Select the locations (if any) that you want to exclude from this shipping method.


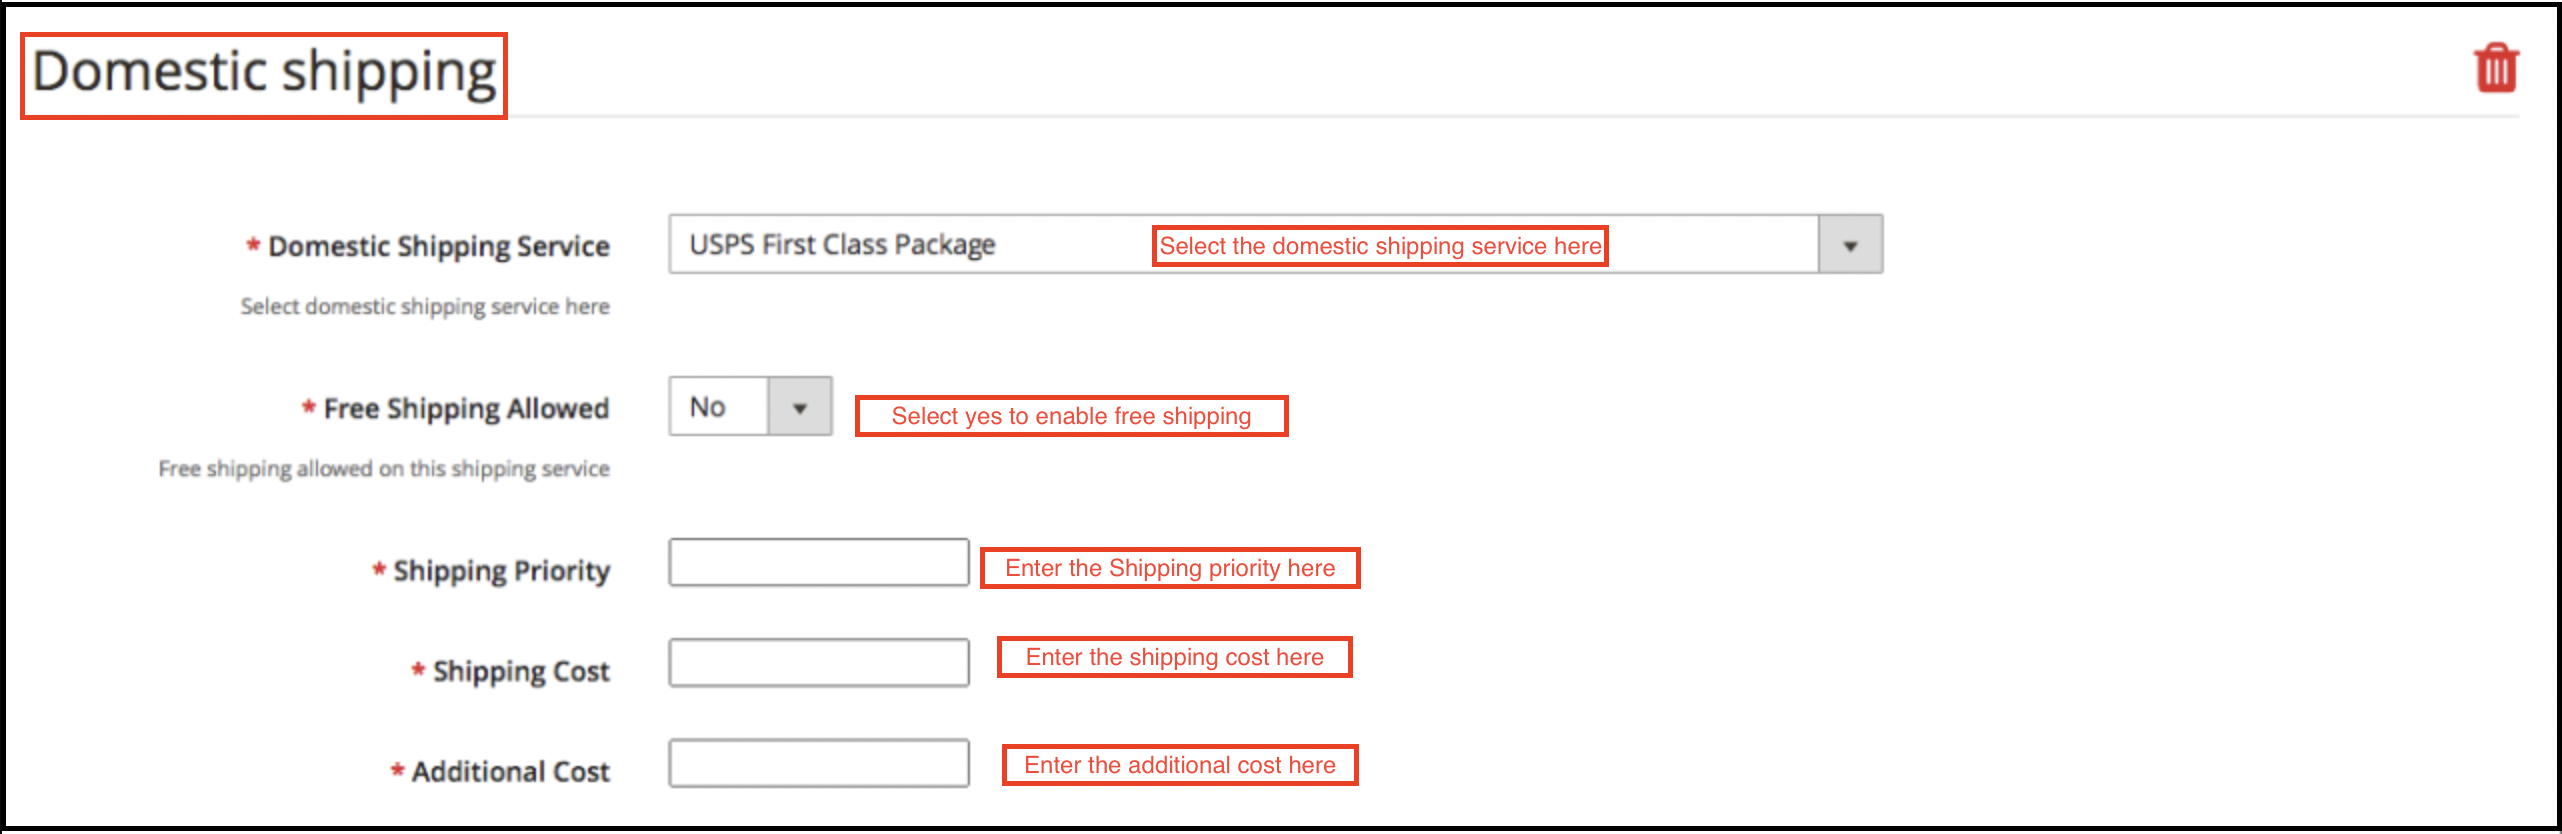
Fill the below-mentioned fields for domestic shipping:

  • Domestic Shipping Service: Select the domestic shipping service from here.
  • Free Shipping Allowed: Select ‘Yes’ if you want to allow free shipping services.
  • Shipping Priority: Set the priority for the shipping methods. The options will display in the front-end as per the priority set.
  • Shipping Cost: Enter the Shipping Cost that is chargeable.
  • Additional Cost: Specify the additional cost that is chargeable.

3.2.2 How to Edit/Delete Shipping Templates?

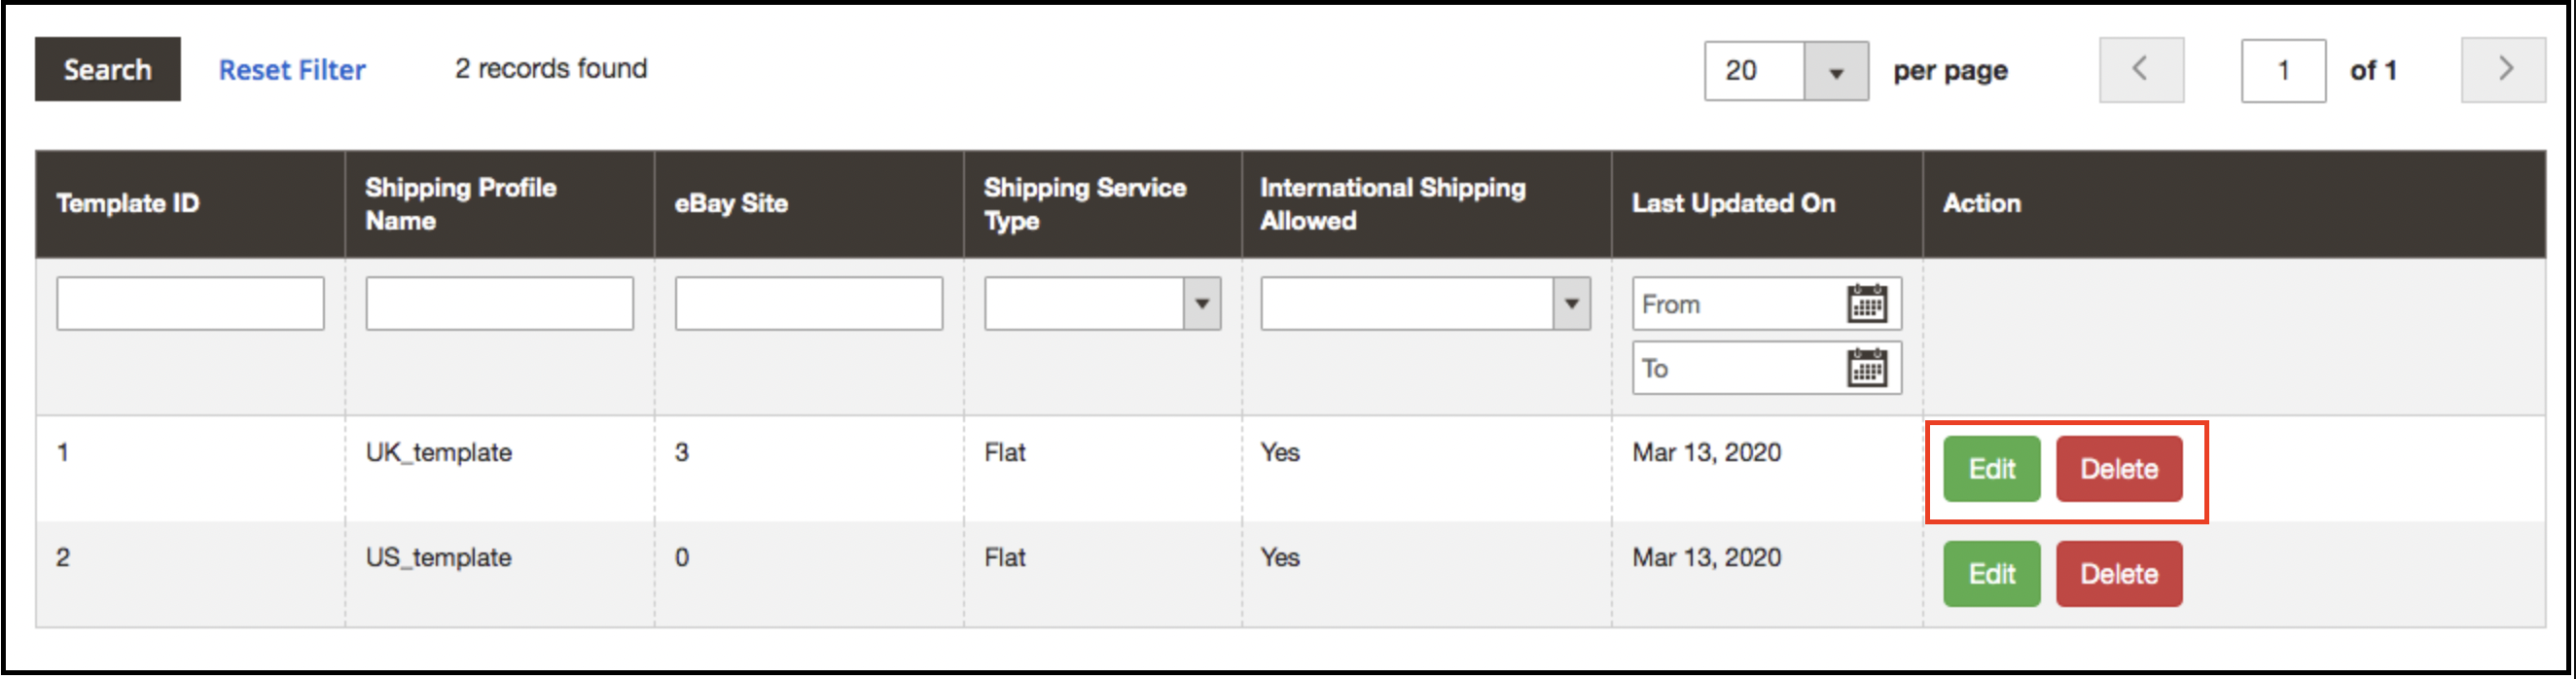
The admin can edit/delete the shipping template by entering the Edit or Delete button as highlighted in the image below:

3.3 Profiles Management

The eBay Marketplace Integrator plugin for Magento 2 offers an option of the profile-based product listing. The profiles created in the admin interface of the eBay connector plugin for Magento 2 can be viewed in this tab. The admin can create a new profile and edit or delete the already created profiles.

3.3.1 How to Add New Profiles?

Follow the steps, to create new profiles, Go to the Admin Panel>eBay Marketplace>Profile Management.

Click on the ‘Add New’ button as shown below:

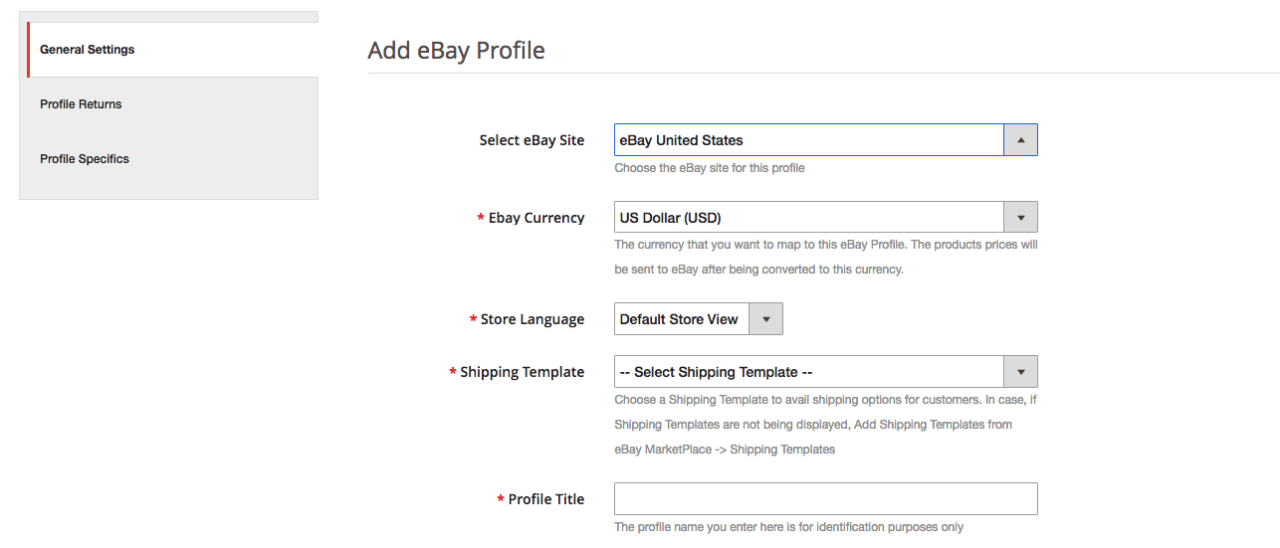
The profile creation tab of the eBay Integration plugin for Magento 2 is categorized into three tabs. They are:

  • General Setting
  • Profile Return
  • Profile Specifics

3.3.1.1 General Settings

Once the admin selects the eBay site, he has to enter the following information.

eBay Currency: The currency will be automatically selected as per the eBay site selected by the admin. The store admin can even change the currency if required.

Store Language: The store admin needs to select the language as per the selected eBay site.

Shipping Template: The shipping options created in the Shipping Template Tab will be listed here. Select the shipping option that you want to display to the marketplace customer.

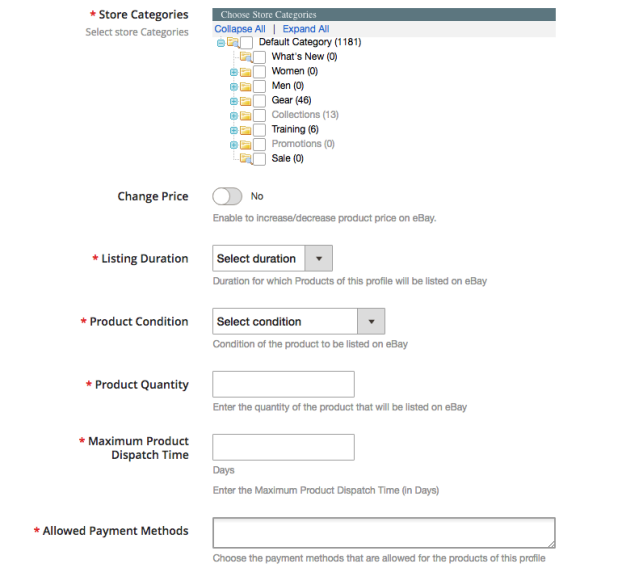
eBay Category: Select the eBay category from the dropdown menu in which you want to map the categories of the store.

Store Categories: Check the categories that you want to map in the selected category of eBay. The eBay integrator for Magento 2 allows the admin to map multiple categories of the Magento 2 store with a single category of eBay. To list multiple eBay categories, you are supposed to create multiple profiles.

Listing Duration: Select the duration for which the products of the profile are to be listed in the marketplace.

Product Condition: The default conditions are listed in the drop-down menu. Select the condition of your product.

Product Quantity: Enter the quantity of the product here.

Maximum Product Dispatch Time: Enter the maximum expected product dispatch time.

Allowed Payment Methods: Select the payment methods that you want to allow for this particular profile.

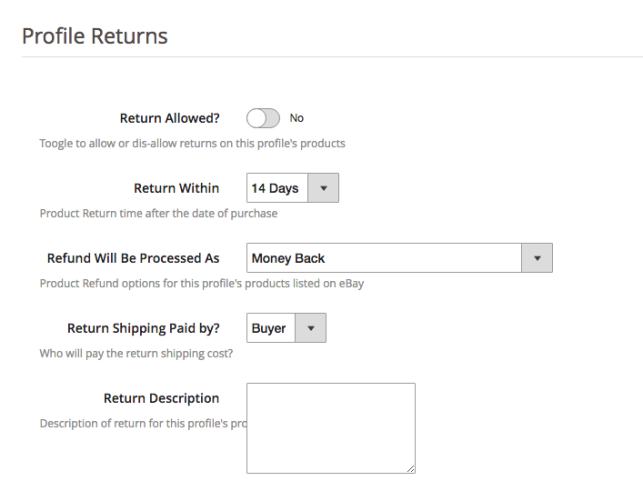
3.3.1.2 Profile Returns

The store admin can manage the return requests of the marketplace from the back-end of the eBay API integrator for Magento 2. Here are some of the customization options offered in this tab.

Return Allowed: Enable the button if you want to allow the return option in this profile.

Return Within: Enter the maximum number of days within which the return request should be initiated.

Refund will Process: As selected how the refund will be offered to the customer.

Return Shipping Paid by?: Select who will pay for the shipping cost of the returned product.

Return Description: Enter a short description for the return option here.

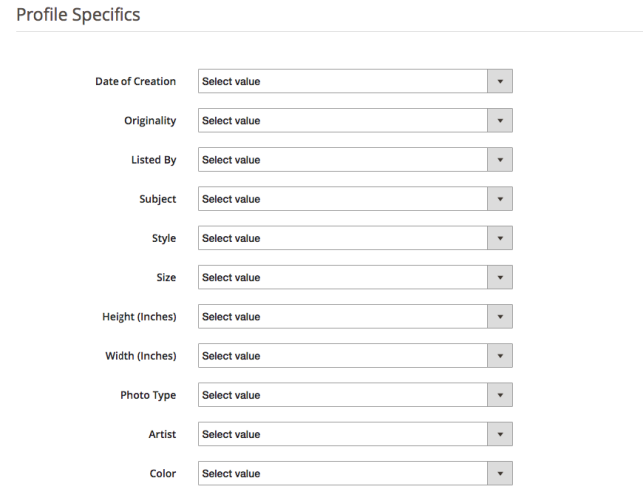
3.3.1.3 Profile Specifics

Profile specifics will appear as per the category of eBay selected in the General Setting tab of the Profile Management. This tab includes fields like Type, Brand, Model, Color, Features, and others. Fill up the fields as per the category selected and the product mapping will be done accordingly. The specifics marked by * are mandatory. Other specifics can be left blank.

3.3.2 How to Edit/Delete the existing Profile?

Click on the ‘Edit or Delete’ button to edit/delete the profile as shown in the image:

The admin can enable/disable the Profiles by selecting the option in the ‘Active’ tab.

3.4 Product Listing

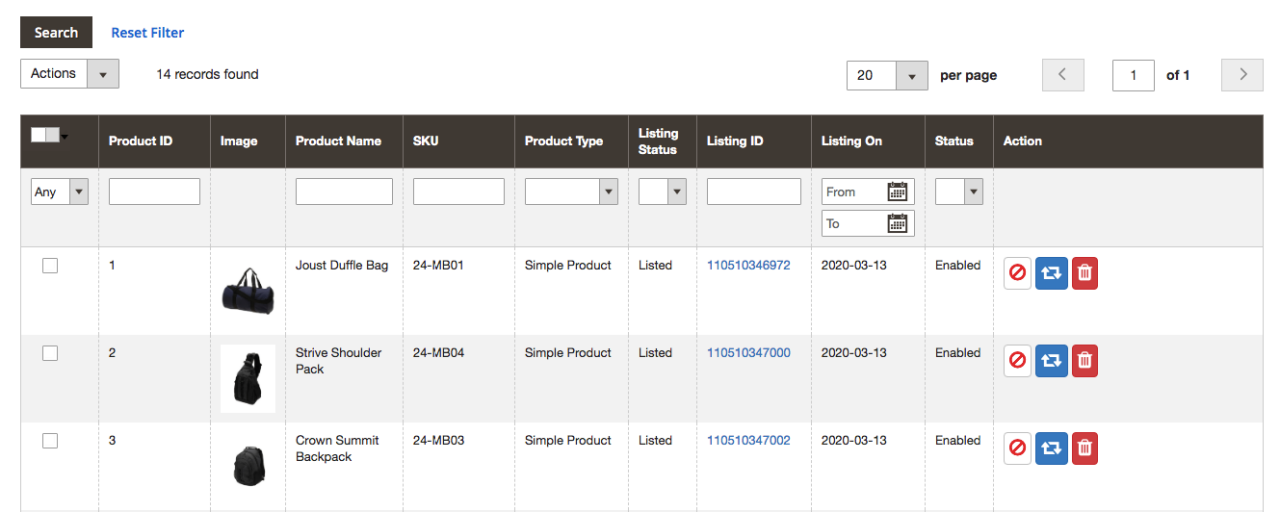
The store admin can view all the products listed in the marketplace from the Product Listing tab of the eBay Integration extension for Magento 2.

Here are some of the listing options offered in this tab of the eBay connector plugin for Magento 2.

Revise

The store admin can click on the ‘Revise’ button to update any change in the product detail. Whether you make a change in the product description, pricing, or quantity of the products, all the changes will be updated in the marketplace by this button.

Delete

This option allows the admin to delete the product from eBay Marketplace. Click on the “Delete” action corresponding to each product listing if you want to remove it from eBay.com.

Disable Products

The admin can disable the products that are listed For this, click on the ‘Disable Product’ action.

Adding products from the product listings tab

If you want to add a product to the product listing tab, the admin has to create a profile of the product in the Profile section of the module. There you will get a step-by-step procedure of creating a profile and adding the product in the products listing tab.

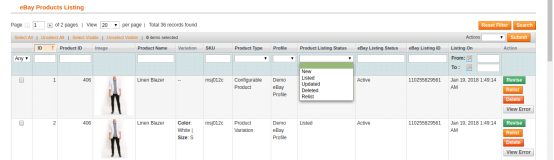
Different statues in the filter of the product listing

Here are some different statuses in the filter of the product listing.

  • New: After applying this filter, the admin can view the new products listed on the Marketplace.
  • Listed: After applying this filter, the admin can view the listed products listed on the Marketplace.
  • Updated: After applying this filter, the admin can view the updated products listed on the Marketplace.
  • Deleted: After applying this filter, the admin can view the list of disabled products.
  • Relist: After applying this filter, the admin can view the relist products listed on the Marketplace.

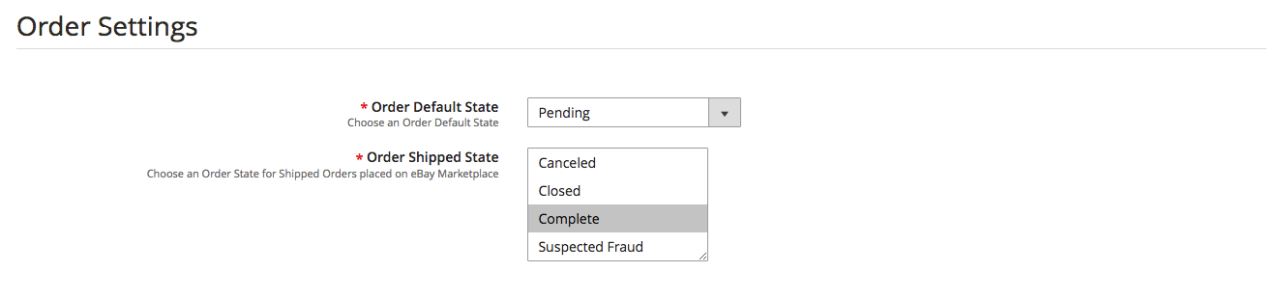
3.5 Orders Settings

The eBay connector for Magento 2 offers two-way integration. The admin can mark which status will display when an order syncs.

It includes three options:

Order Default State: Select the default status of the orders that will display in the marketplace.

Order Shipped State: Select the status for shipped orders.

Note –

  • The default status is the first status of the order when it is placed in the store.
  • Shipped status means that ordered items have been shipped.

To update the change in the order status by executing cron in the Synchronization tab of the eBay Marketplace connector plugin for Magento 2.

3.6 Orders Listing

The orders available from the marketplace will sync to the Magento 2 store. Furthermore, when the cron executes in the Synchronization tab.

The orders are listed as shown in the image below. To view the details and process the same click on the ‘View’ button corresponding to each order.

The store admin can now see the following details of each order.

It offers basic information like order date, status, billing and shipping address, payment information, gift options, item ordered, comments history.

3.7 Synchronization

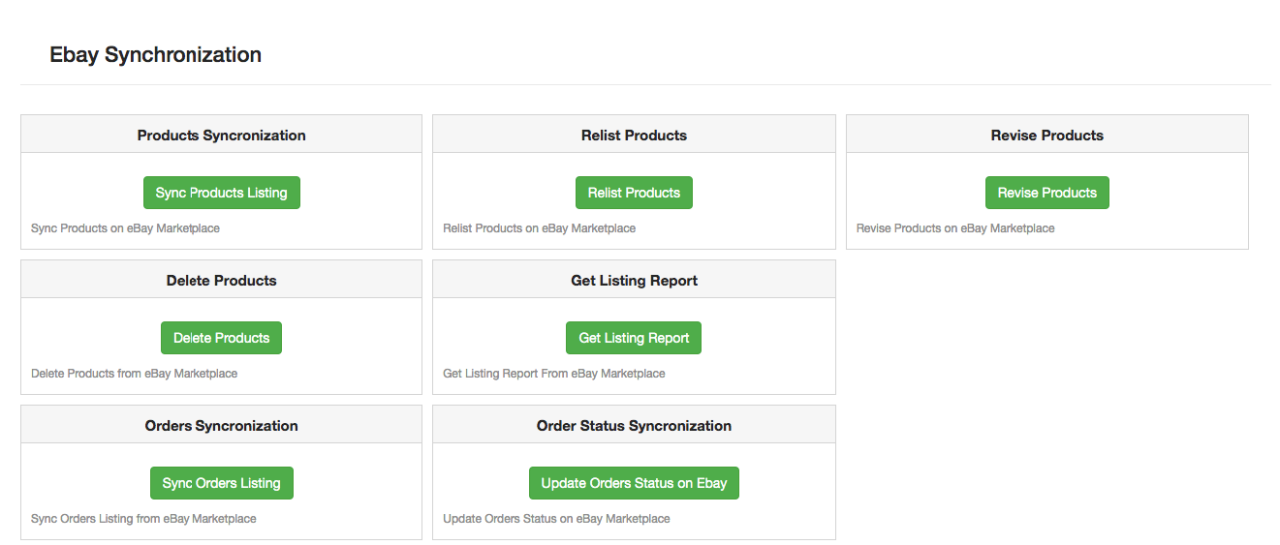
The eBay integration for Magento 2 allows easy synchronization between both stores. All the synchronization jobs can be performed from this tab.

The synchronization tab of the eBay connector module for Magento 2 offers two synchronization options. That is Product and Order synchronization.

3.7.1 How to sync the products on eBay Marketplace?

Click on the “Sync Product Listing” button as shown below.

It will add products in the marketplace with the respective product details.

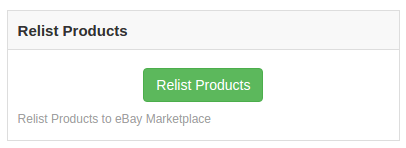
3.7.2 How to Relist the product on the eBay Marketplace?

Click on the “Relist Products” button as shown below.

This will relist the expired products in the marketplace. It will update the listing of the products whose relisting was initiated in the Product Listing tab.

3.7.3 How to Revise the product on the eBay Marketplace?

Click on the ‘Revise Product’ as shown below to revise the products on the marketplace. Any change in the product details, image, pricing, etc can sync by executing this cron offered by eBay Integrator for Magento 2.

3.7.4 How to Remove a product on the eBay Marketplace?

Click on the ‘Delete Products’ as shown below to remove products from the marketplace. The admin has to click on the ‘Delete’ button in the products listing tab before executing this cron eBay Integrator for Magento 2.

3.7.5 How to Import the listing report from the eBay Marketplace?

By executing ‘Get Products Listing Report’, the admin can import the report of the product listing from the marketplace. The eBay status column will fill up when this action executes by eBay Integrator for Magento 2.

3.7.6 How to sync Orders from the eBay Marketplace?

Click on the “Sync Orders Listing” button as shown below.

It would perform the following actions:

  • The plugin will sync the Orders and related details from eBay Marketplace to the Magento 2 store.
  • It creates the orders in the Magento 2 store as per the details of the order received from the Marketplace.

3.7.7 How to sync Order Status to the eBay Marketplace?

Click on the “Update Order Status on eBay” button as shown below.

It would perform the following actions

  • The cron checks if there is any status update recorded by the eBay integrator for any order.
  • The updates are then synchronized accordingly.
  • It updates the Status of Orders as per the configuration settings modification in the “Order Settings” tab of the admin interface of the eBay Integration module for Magento 2.

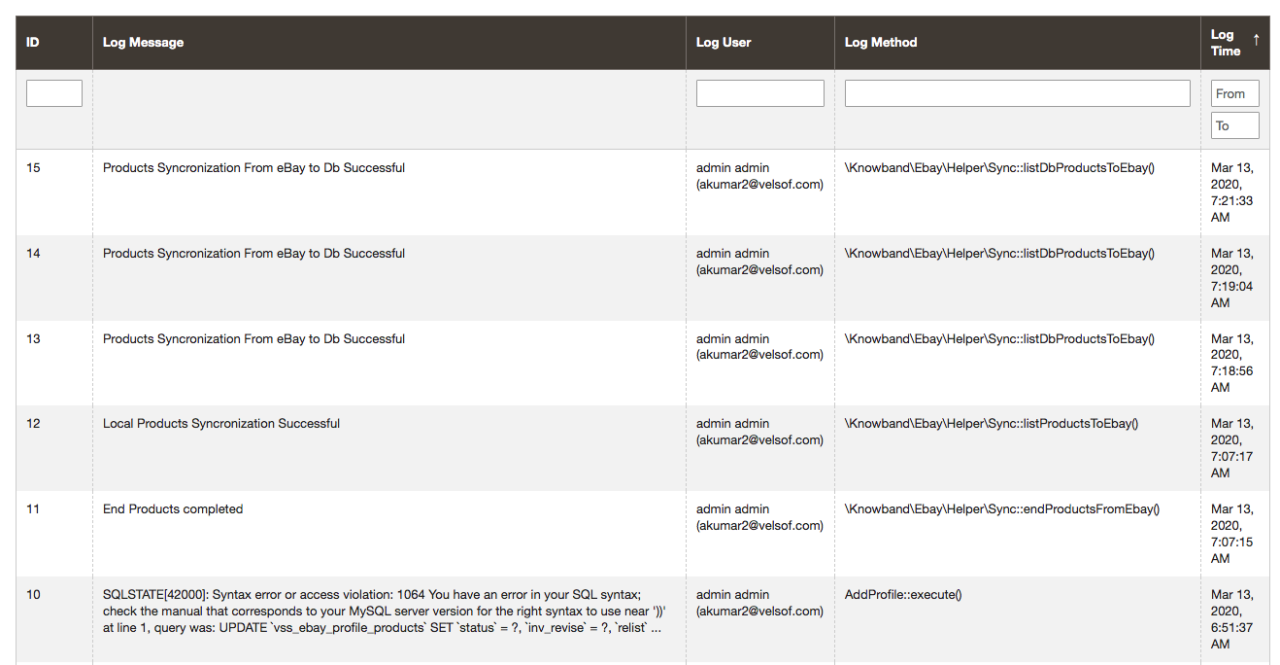
3.8 Audit Log

This tab offers an overview of all the tasks being performed in the back-end of the eBay Integrator extension for Magento 2.

Magento 2 One Page Checkout extension – User Manual

1.0 Introduction:

The checkout page is one of the most important pages on an eCommerce website as the customers decide whether they are finally going to purchase the product or not. If your checkout page is simple and optimized, then there are very fewer chances for cart abandonment. With Magento 2 Quick checkout extension, you can replace the default checkout page with a fast and responsive One Page Checkout. The extension eliminates the unnecessary steps from the multi-page checkout and simplifies the checkout process.

Magento 2 One Step Checkout offers advanced features like Guest Checkout and Social Login that ease the checkout process and help the customers to place their orders quickly. The interactive and clean UI of the Supercheckout provides your customers with a better shopping experience. Magento 2 Single Page Checkout extension helps to reduce the cart abandonment rate by making the checkout process easier and smoother and helps in improving the conversion rate of the business.
1.1 Salient Features of Magento 2 Simplified Checkout extension:

  1. The extension offers a Guest checkout feature which allows the customers to checkout without creating a separate account. The store admin can also enable register guests with a password feature.
  2. The extension allows the customers to login with social accounts including Google and Facebook that save the customers to remember many login credentials.
  3. The Quick Checkout Extension Magento 2 allows the store admin to choose from 2 different customizable layouts. The admin can choose a 2-column checkout layout or 3-column checkout layout from the back end.
  4. Magento 2 One Page Checkout extension allows the store admin to hide/show the address fields on the checkout page. The admin can also make the fields optional or mandatory to fill from the back end.
  5. With the extension, the store owner can rearrange the checkout fields with drag and drop features.
  6. Magento 2 Fast Checkout extension supports multiple payments and delivery methods that give the customers a variety of options to choose from.
  7. The addon is completely mobile responsive.
  8. The Magento 2 Single Page Checkout extension allows the store admin to customize the cart section of the checkout page. The admin has the option to display/hide or rearrange the fields as per the needs. The e-merchant can do it for logged-in customers as well as guest customers.
  9. The extension can be enabled or disabled from the General Settings in the back office.

2.0 Installation Guide:

  1. After purchasing the Magento 2 One Page Supercheckout from the Knowband store, you will receive the following files on your registered email address:
  • Source code of the Magento 2 Single Page Checkout addon in zipped file format.
  • User Manual of the extension
  1. Unzip the package of the extension.
  2. Create a folder {Magentoroot}/app/code/Knowband/Supercheckout
  3. Upload the extracted content in this folder through FTP manager (like Filezilla or WinSCP: you can download from here: https://filezilla-project.org/).
  4. Now run the following commands to install the extension:

php bin/magento setup:upgrade

php bin/magento setup:di:compile

php bin/magento setup:static-content:deploy

Now, the Magento 2 One Page Checkout extension is installed on your store and ready to use and configure.

3.0 Admin Interface of the Magento 2 Quick Checkout extension:

After successfully installing the extension, you can configure the checkout fields as per your needs from the back end. To configure the extension, go to Admin panel > Knowband > Supercheckout >Configuration

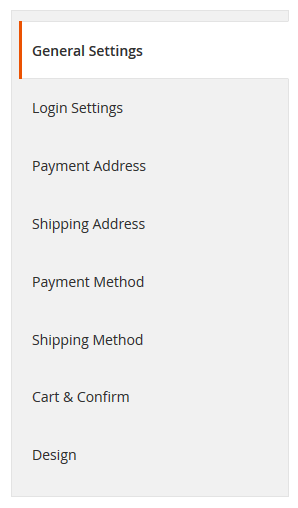
The Admin Interface of the Magento 2 Simplified Checkout extension contains the following 8 sections:

  1. General Settings
  2. Login Settings
  3. Payment Address
  4. Shipping Address
  5. Payment Method
  6. Shipping Method
  7. Cart & Confirm
  8. Design
  9. Each of the sections is discussed below:

3.1 General Settings:

The General Settings section contains the following configurable options:

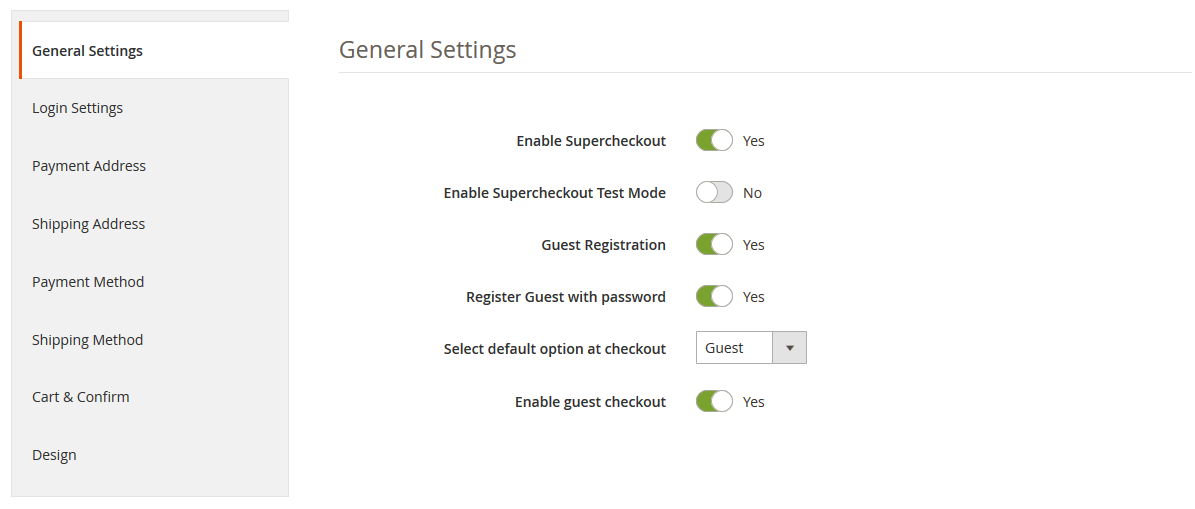
  • Enable Supercheckout: From this option, the store admin can enable or disable the Quick Checkout Extension Magento 2 on the online store.
  • Enable Supercheckout Test mode: This option allows the admin to test the Supercheckout before making it live on the online store.
  • Guest Registration: This option enables registration of the guest accounts.
  • Guest Registration with Password: If this feature is enabled then the extension will register the guest accounts with their passwords.
  • Select the default option at checkout: From this option, the admin can choose the default option which will be displayed first when the customer will open the Supercheckout page. The admin can choose from 3 options i.e., Guest, Register, log in from the back end of the Magento 2 Fast Checkout extension.
  • Enable Guest Checkout: This option enables the Guest checkout feature at the Supercheckout page.

3.2 Login Settings:

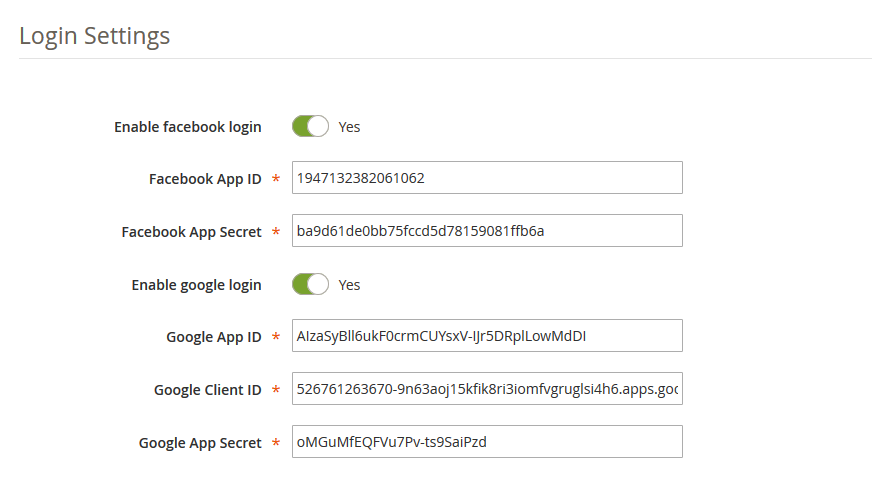
  • Enable Facebook Login: This option allows the admin to add Login with the Facebook feature on the checkout page. In order to make this feature functional, the admin needs to add Facebook App ID and Facebook App Secret in the Login Settings tab.
  • Enable Google Login: This option allows the store admin to add Login with Google feature. To make this feature functional, the admin needs to add Google App ID, Google Client ID, Google App Secret.

3.3 Payment Address:

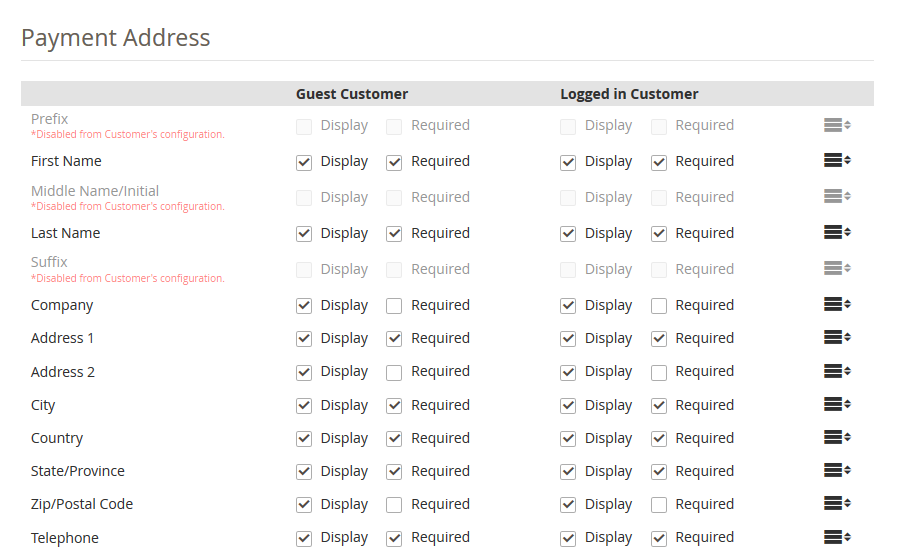
From the Payment Address tab of the back end of the One Page Checkout for Magento 2, the store admin can customize the Payment Address fields. The admin can show/hide any address field or make any field optional or mandatory to fill for the customers. The store admin can re-arrange the address fields also by simply dragging and dropping them.

The admin can do these customizations for both logged-in customers as well as for guest customers.

3.4 Shipping Address:

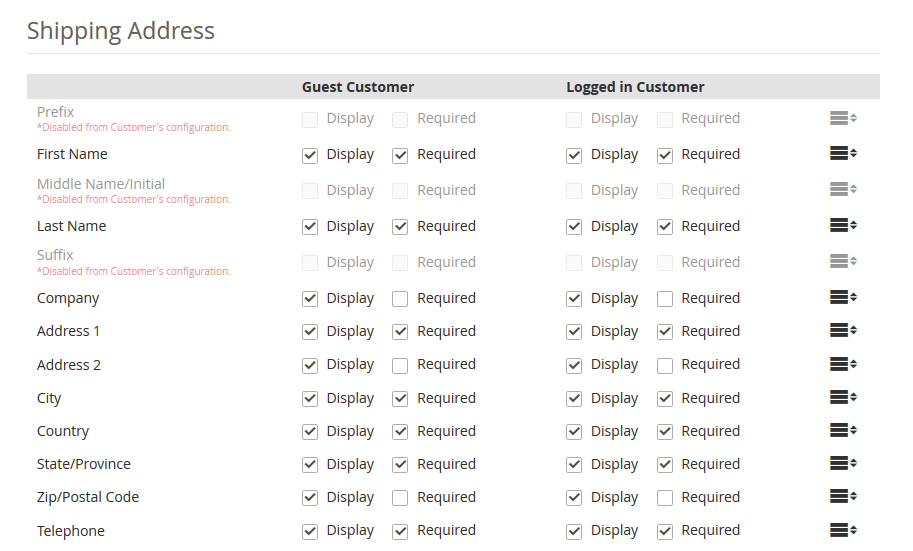
From this tab, you can customize the Shipping Address fields. Like Payment Address fields, you can show/hide or make any field optional or mandatory to fill. Magento 2 One Page Supercheckout allows these customizations for both guest customers as well as logged-in customers.

3.5 Payment Methods:

This tab contains settings for enabling or disabling the Payment methods. You can show or hide the payment methods from the checkout page. From this section, you can also select a default payment method for your online store.

3.6 Shipping Methods:

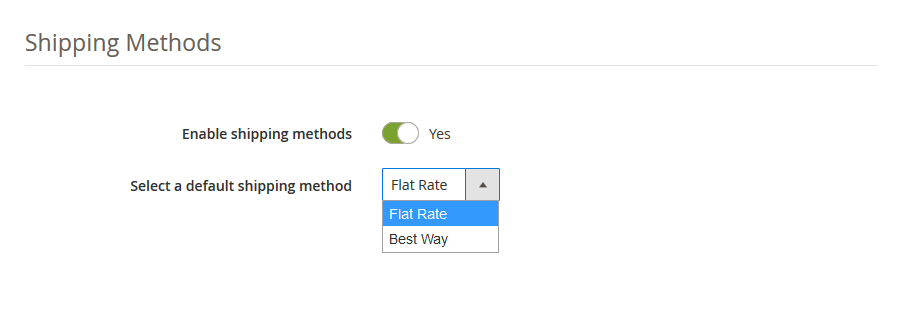
This Shipping Methods tab allows you to enable or disable the Shipping methods from the checkout page. From this section, you can also select the default shipping method for your online shop.

3.7 Cart and Confirm:

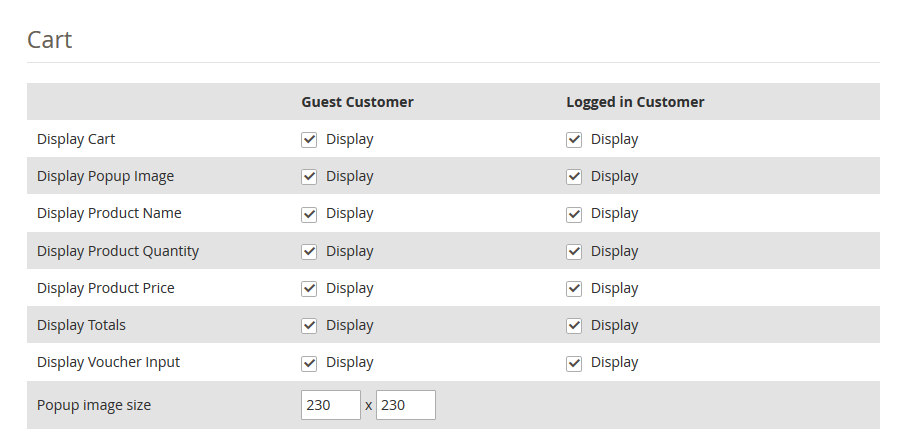
From this tab, you can customize the cart summary/cart block displayed on the checkout page. Magento 2 Single Page Checkout addon allows you to display or hide the cart fields for both logged-in as well as guest customers. You can show or hide cart, product name, image, quantity, price, total value, and voucher input. You can also specify the size of the Popup image from this tab.

3.8 Design:

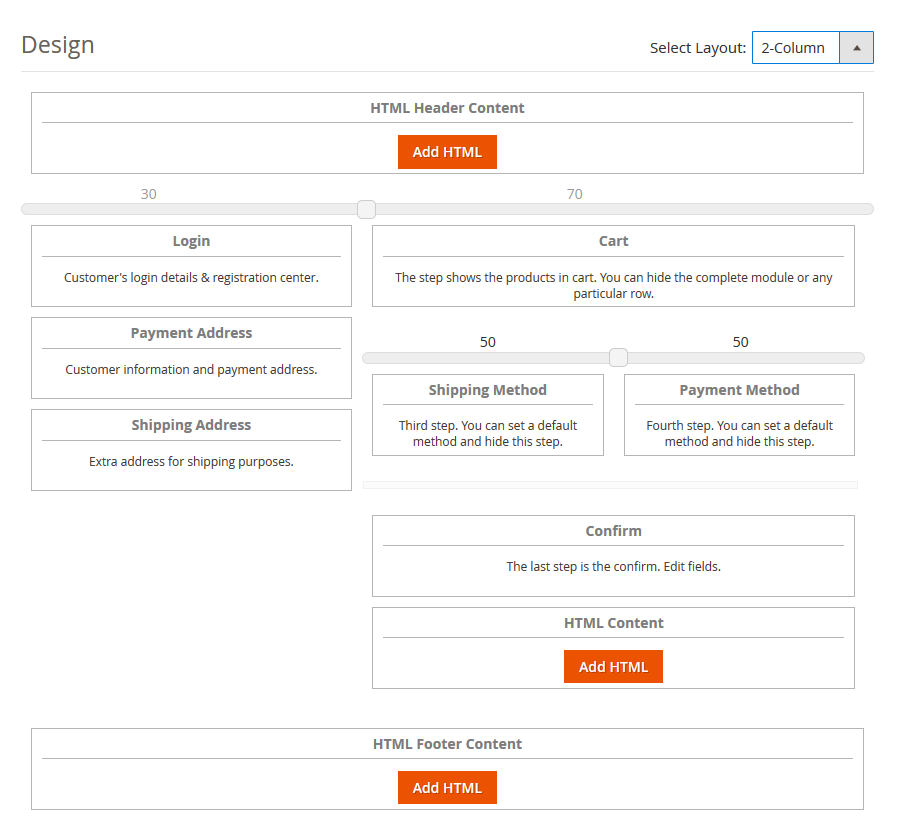
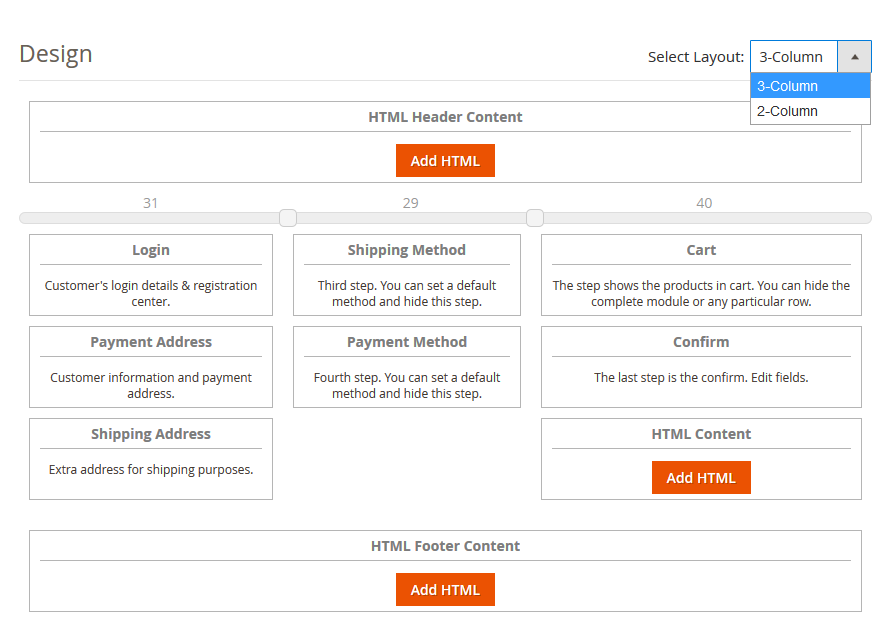
The Design section allows you to select from 2 different checkout page layouts. You can choose from a 2-column or 3 column layout for the checkout page. From this section, you can do various customizations including adding re-arranging the checkout blocks with drag and drop feature, adding HTML content blocks, etc.

You can also change the width of any column from the back end of the Magento 2 One Page Supercheckout.

2-Column Layout:

3-Column Layout:

4.0 Front-End Interface:

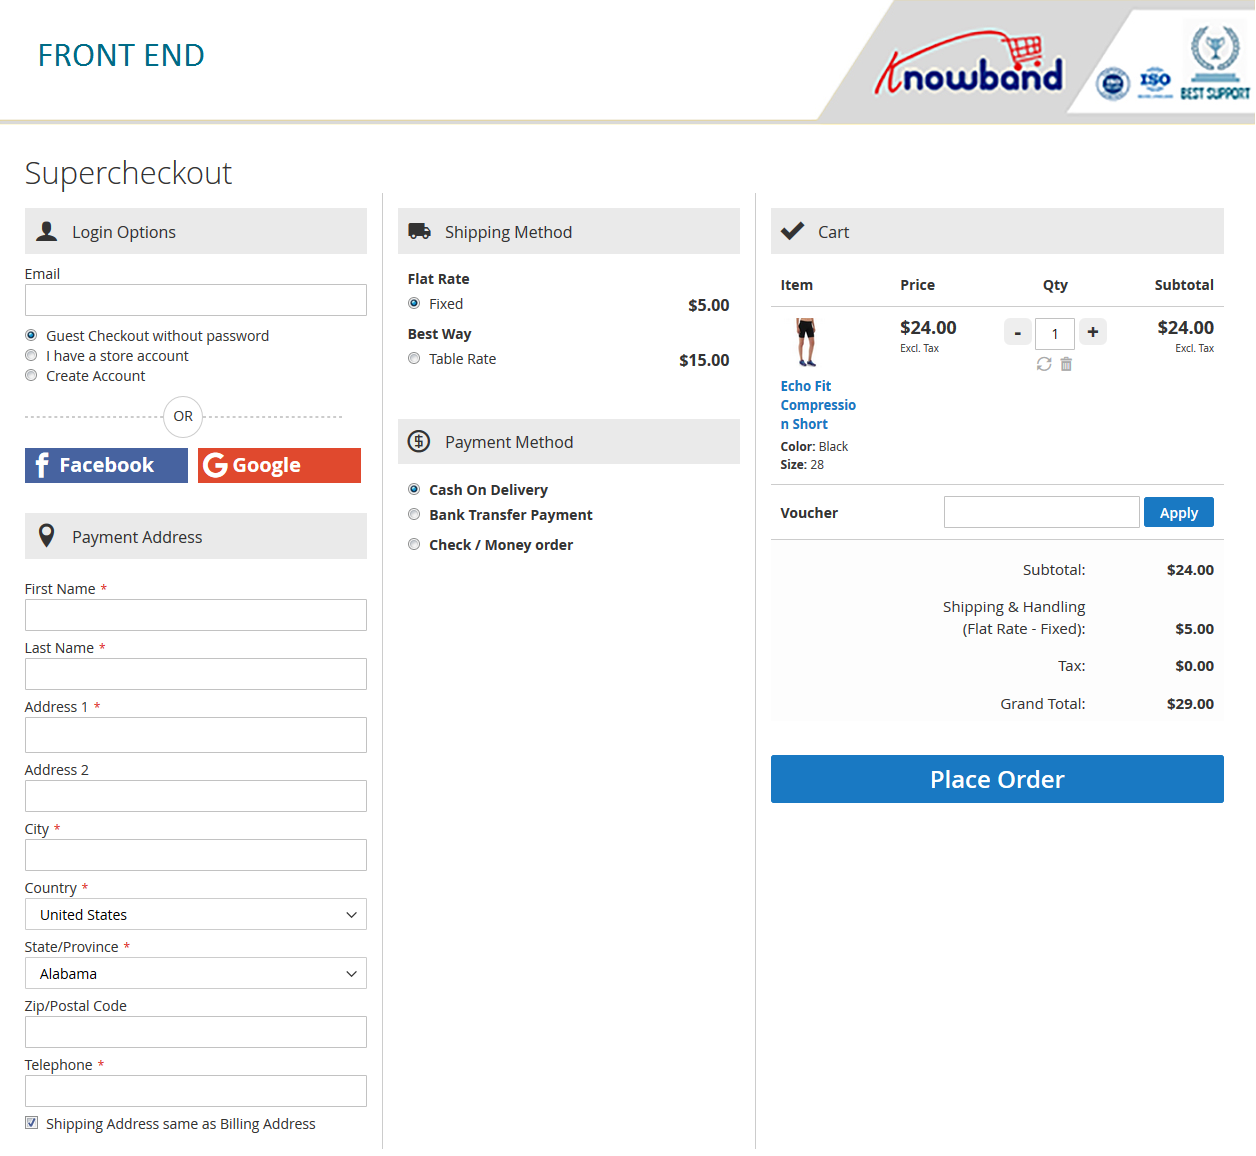
When the customers add a product to the cart and proceed to checkout, then they will see the following One Page SuperCheckout on their screens:

Magento 2 Loyalty Points Extension- User Manual

1.0 Introduction

Now the online merchant can implement a reward system on the website and increase website profit easily. Knowband offers Magento 2 Loyalty Points Extension which allows the store admin to offer loyalty points to the online buyers on specific events. The online users can get loyalty points on their birthday, first order, new signup, ordering any specific product or product of a specific price. This way, online buyers can collect loyalty points and convert them into vouchers while placing the next order.

By offering loyalty points to the customers, the online merchant can assure repeated orders from the same customers. The Magento 2 Loyalty reward points module allows the online merchant to set the behavior rules and product cart rules. Only those customers who’ll meet these conditions will get loyalty points.

1.1 Basic Features of this Magento 2 Loyalty Points Extension

  • The online merchant can offer loyalty points to online buyers and get more orders.
  • The online merchant can assure customer retention and customer acquisition by offering loyalty points to the buyers.
  • The online merchant can apply Cart rule and Behavior rule from the Magento 2 Loyalty Points Extension admin interface. This way, he can control the overall process of offering loyalty points.
  • The online merchant can set the amount per loyalty point, validity days and expiry information. Admin can also send an email notification for informing the online users regarding loyalty points expiry.
  • Admin is allowed to offer loyalty points on the customer’s birthday by setting the amount and selecting the customer group for this.
  • The store merchant can offer loyalty points to any customer by setting the loyalty points, validity days, loyalty point status and selecting the email id for sending loyalty points. The Magento 2 Loyalty Points module also has an option to upload the CSV file for adding loyalty points.
  • Admin can view the customer’s loyalty point balance and also modify the status or any other detail.
  • Customizable email templates are available for sending an email notification to the customers. Admin can also customize the email templates from the admin interface of Magento 2 Loyalty points and discount module.
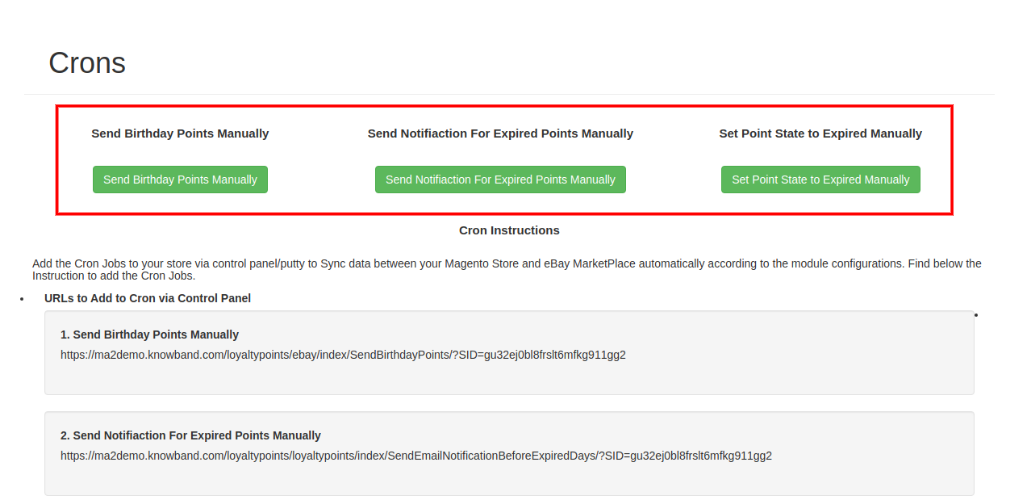
  • Cron settings are available for sending birthday points, expired points notifications on a single click. Admin can also change the loyalty points state to expire using these cron settings.

2.0 Installation

After purchasing Magento 2 Loyalty Points Extension, the store admin will get the following files:

  1. Knowband_Loyaltypoints.zip which has the source code of this Magento 2 Loyalty Points module.
  2. User Manual, with all the basic details and information.

The steps to install the Magento 2 Loyalty Points Extension are mentioned below:

  • Buy the Magento 2 Loyalty Points Extension from Knowband. You can download the extension package.
  • The package has a zipped file that contains the user manual and the source code of Magento 2 Loyalty Points module. Now, Unzip this package.
  • Create a folder {Magentoroot}/app/code/Knowband/Loyaltypoints
  • Upload the extracted content in the above folder via FTP manager (like Filezilla or WinSCP – download here: https://filezilla-project.org/).

Now run below commands to install the plugin:

1. php bin/magento module:enable Knowband_Loyaltypoints
2. php bin/magento setup:upgrade
3. php bin/magento setup:di:compile

The extension is now installed and ready for use. In Admin Panel go to “Knowband Extensions > loyalty points”.
You can now configure and use the Knowband’s Magento 2 Loyalty reward points module.

3.0 Admin Interface

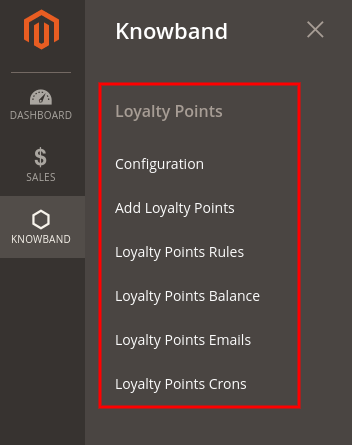
After installing the Magento 2 Loyalty Points Extension, the e-merchant can configure is as per the requirements. There are multiple configuration options as shown below:

  • Configuration
  • Add Loyalty Points
  • Loyalty Points Rules
  • Loyalty points balance  
  • Loyalty points Emails
  • Loyalty Points Crons

3.1 Configuration

In Configuration settings, the online merchant will get these options:

  • General Settings
  • Label Settings
  • Birthday Settings

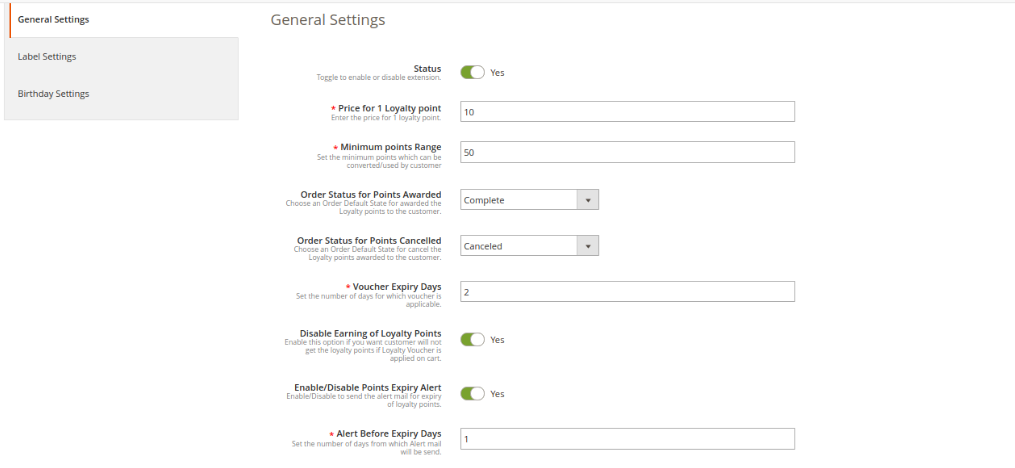
3.1.1 General Settings

In General Settings, there are options to apply basic settings related to loyalty points. The online merchant will get these options here:

  • Status: Toggle the button for activating or deactivating loyalty points functionality in your store.
  • Price for 1 loyalty point: Set the price per loyalty point from here.
  • Minimum Points Range: Set the minimum points which need to be used by the customers while converting it to the voucher.
  • Order Status for Points Awarded: Set the default order status on which customers will get loyalty points.
  • Order Status for Points canceled: You can also set the order status on which loyalty points will be canceled from the customer’s account.
  • Voucher Expiry days: Set the number of days after which voucher will be expired.
  • Disable Earning Of Loyalty Points: Enable this field if you don’t want to offer loyalty points to the customers when they apply loyalty vouchers in the cart.
  • Enable/Disable Points Expiry Alert: Activate this option if you want to send an email to alert the customers about the expiry of loyalty points.
  • Alert Before Expiry Days: Set the number of days before which you want to send an alert.

3.1.2 Label Settings

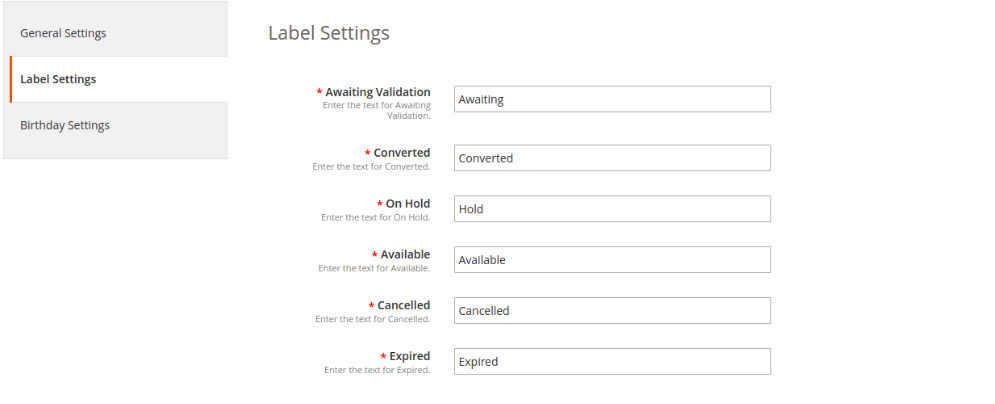
In this section, the online merchant can set the label for loyalty points. The Magento 2 Loyalty reward points module allows the store admin to set the label for Awaiting Validation, Converted, On Hold, Available, Canceled and Expired loyalty points.

3.1.3 Birthday Settings

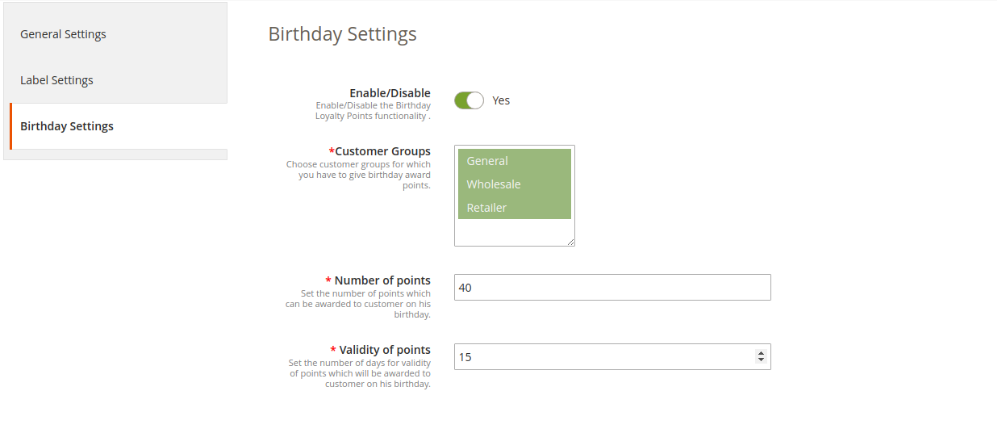
The Magento 2 Loyalty points and discount module allows offering birthday loyalty points to the customers. These are the customization options as shown below:

  • Enable/Disable: Toggle the button for activating or deactivating the settings to offer loyalty points on birthdays.
  • Customer Groups: Choose the customer group to which you want to offer birthday loyalty points.
  • Number of points: Enter the loyalty points which you want to offer on the birthday.
  • Validity of Points: Set the number of days for which loyalty points will be valid.

3.2 Add Loyalty Points

In this section, the online merchant can apply the settings for offering loyalty points to the customers. Admin can offer loyalty points to any specific customer or offer to multiple customers by uploading the CSV file. These are the configuration options available in this section:

  • Add Points
  • Add points using CSV

3.2.1 Add Points

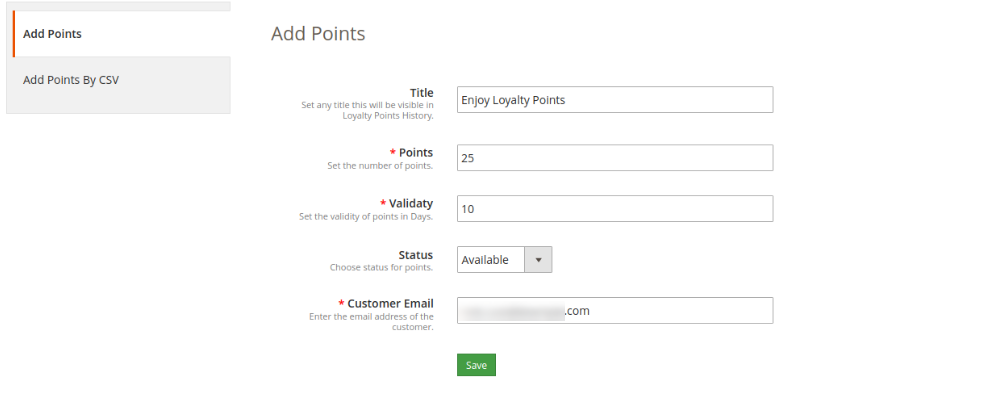
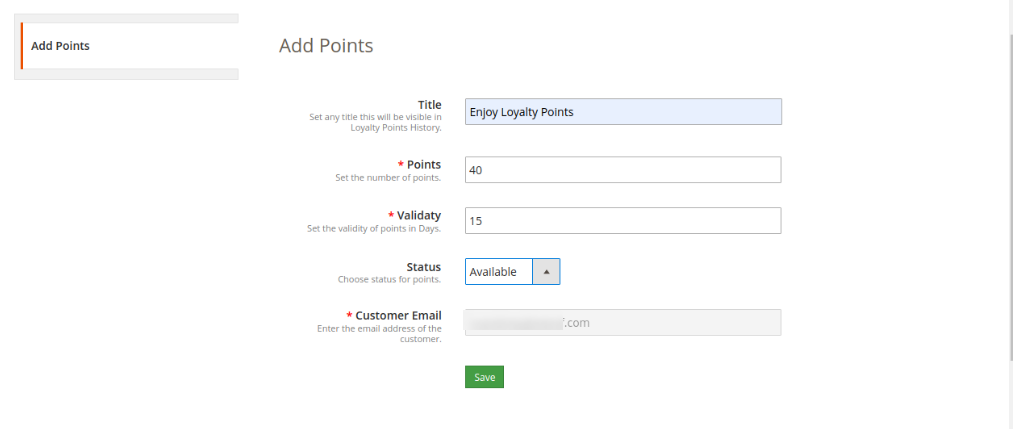
The online merchant can offer loyalty points for the customers by selecting their email id. Check the customization options below:

  • Title: Set the loyalty points title from here.
  • Points: Enter the number of loyalty points which you want to offer.
  • Validity: Set the points validity days from here.
  • Status: Select the initial status for loyalty points.
  • Customer Email: Enter the customer’s email id here.

3.2.2 Add Points Using CSV

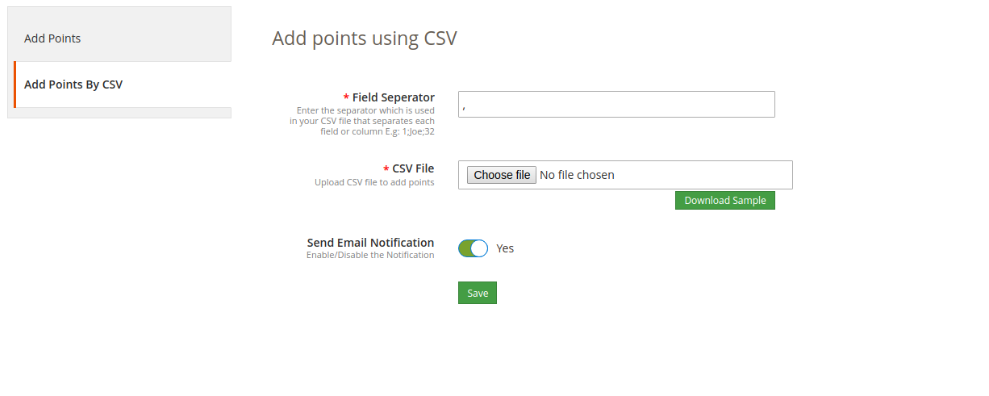
The online merchant can download the sample CSV file and then add loyalty points with other details. After that, he can upload the updated CSV files for offering loyalty points.


  • Field Separator: Set the field separator for columns.
  • CSV File: Upload CSV File to add loyalty points. (From the download button, admin can first download the sample CSV file)
  • Send Email Notification: Enable email notification for notifying the customers regarding offered loyalty points.

3.3 Loyalty Points Rules

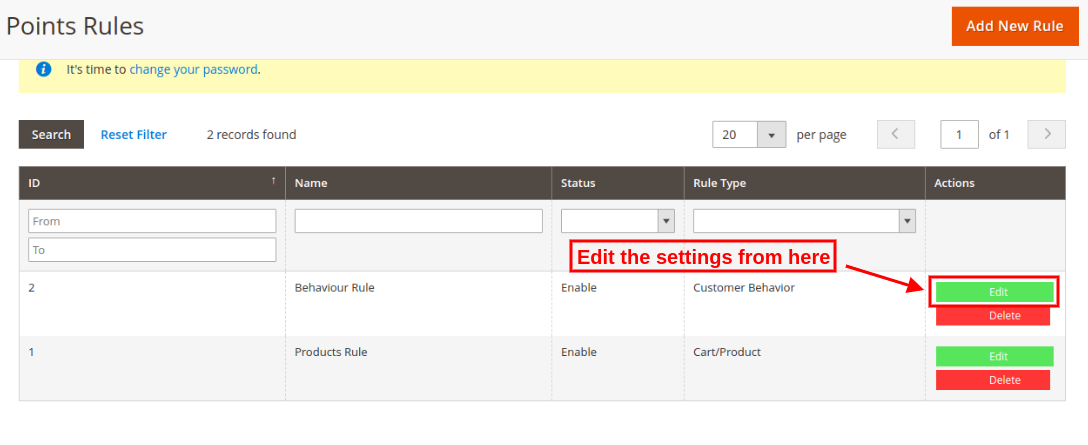
Admin can add various customer behavior and cart/product rules for offering loyalty points. The Magento 2 Loyalty points and discount module allows adding various rules without any limitations. The online merchant can edit or delete any rule anytime from the Magento 2 Customer reward points module back-end.

3.3.1 Add new Loyalty Rule

Admin can apply these settings for adding new rules from the admin interface:

Admin needs to click on “Add New Rules” option and apply these settings:

  • Enable/Disable: Activate or deactivate the rule.
  • Title: Enter the rule title.
  • Description: Enter the rule description.
  • Rule Type: Select the rule type ie. Product cart rule and behavior rule.
  • Loyalty Points: Enter the number of loyalty points.
  • Validity: Set the validity of loyalty points in days
  • Start Date: Set the start date of the rule. You can leave it blank if you don’t want to apply any restrictions.
  • End Date: Here, set the end date for the rule. You can leave it blank for no restriction.
  • Customer Groups: Select the customer’s group for which this loyalty rule is applicable.

There are several rule types that are based on product cart and behavioral rule.

A. Product Cart Rule

1. Offer loyalty points based on the cart subtotal

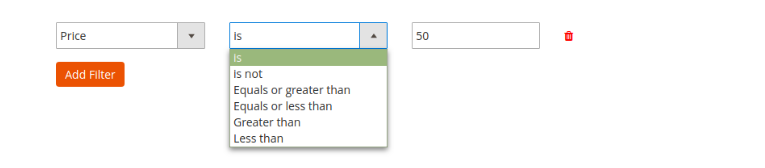
There is an option to apply conditions on cart subtotal amount. The store merchant can apply the condition to offer loyalty points to the customers when the cart subtotal is any specific amount, is not a specific amount when cart total amount is equal to or greater than selected amount when cart amount is equal or less than the selected amount, greater than the selected amount, less than the amount.

2. Offer loyalty points based on the item quantity

The online merchant can provide loyalty points to the customers when they shop for specific product quantity. Similar conditions as “cart subtotal” will be applied for item quantity also.

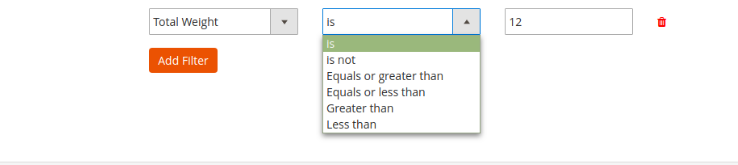
3.Offer loyalty points based on the total weight

Admin can also set the condition related to the weight of the products. Admin needs to define what should be the total weight of the cart to earn loyalty points.

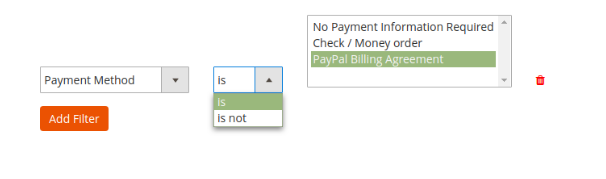
4. Offer loyalty points based on the Payment method

The store merchant can offer loyalty points to those customers who select or do not select any specific payment method.

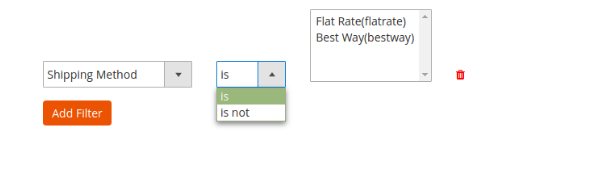
5. Offer loyalty points based on the shipping method

The store admin can provide loyalty points when a customer opts for the defined shipping service.

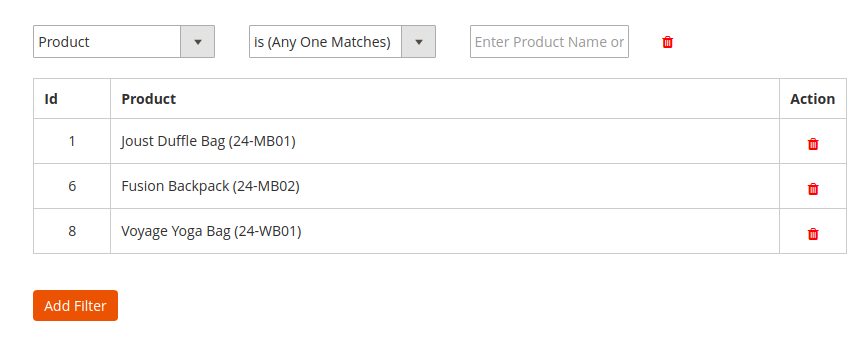
6.Offer loyalty points based on the product

Admin can offer loyalty points when cart products match with all/any selected product or no product matches at all as shown below:

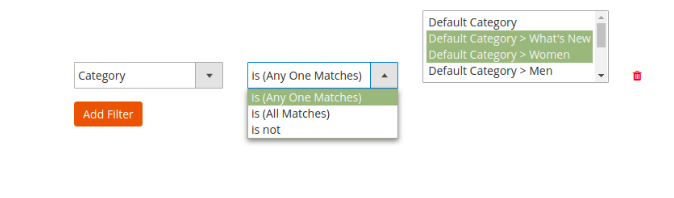
7.Offer loyalty points based on the category

The online merchant can offer loyalty points when customers purchase from a certain category(all or any matches)/do not purchase from the specific category.

8.Offer loyalty points based on the price

The Loyalty points extension for Magento allows the store admin to offer loyalty points when the cart price meets conditions as per the module settings. Similar conditions as “cart subtotal” can be included in Price Settings.


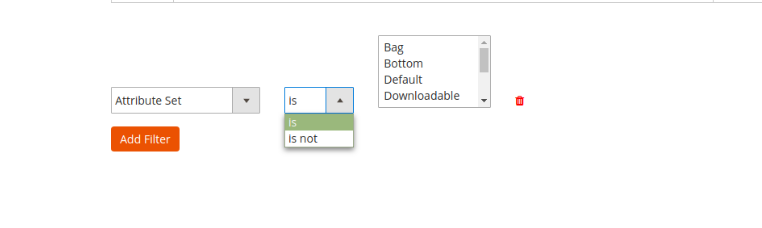
9.Offer loyalty points based on the attribute set

The online store admin can set the conditions related to attribute sets. The customers can get reward points if added products from/not from a specific attribute set.

Note: The online merchant can select “AND” or “OR” condition conjunction from the condition section. Admin can select “AND” if he wants customers to meet all the conditions. If he wants to offer loyalty points to the customers in meeting any of the condition then he’ll select “OR” conjunction.

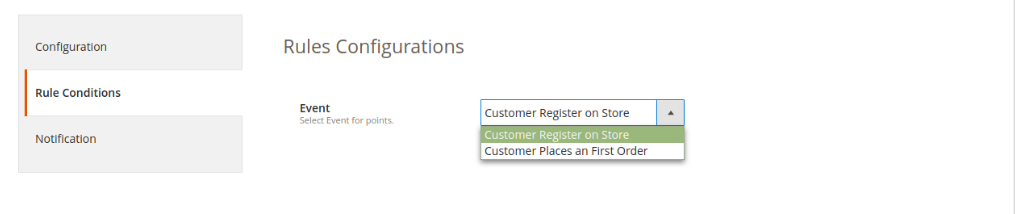
B. Behavior rule


1. Offer loyalty points on registration

The online users can earn loyalty points when they signup in the store.

2. Offer loyalty points on first order

The store merchant can also offer loyalty points on customer’s first order.

Email Notification: The online merchant can send an email with the loyalty point details will be sent to the customers if they get any loyalty point. The online merchant can enable or disable the settings for sending an email notification. The online merchant can also customize the email template easily.

3.3.2 Edit Loyalty Rule

The online store admin can also modify the rule settings from Magento 2 Loyalty reward points plugin admin interface.

Admin can apply changes and also add new conditions in any rule.

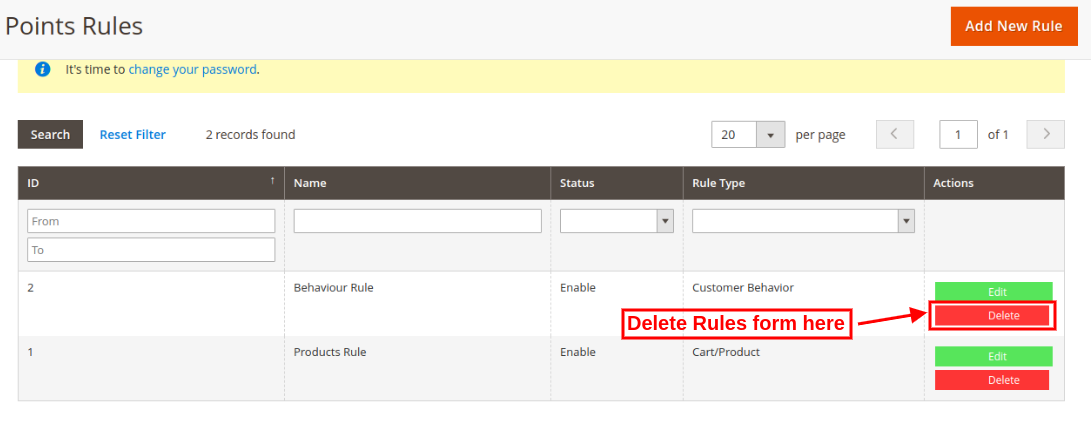
3.3.3 Delete Loyalty Rule

The Magento 2 Loyalty reward points module allows deleting the loyalty rules easily by clicking on the “Delete” button.

3.4 Loyalty points balance

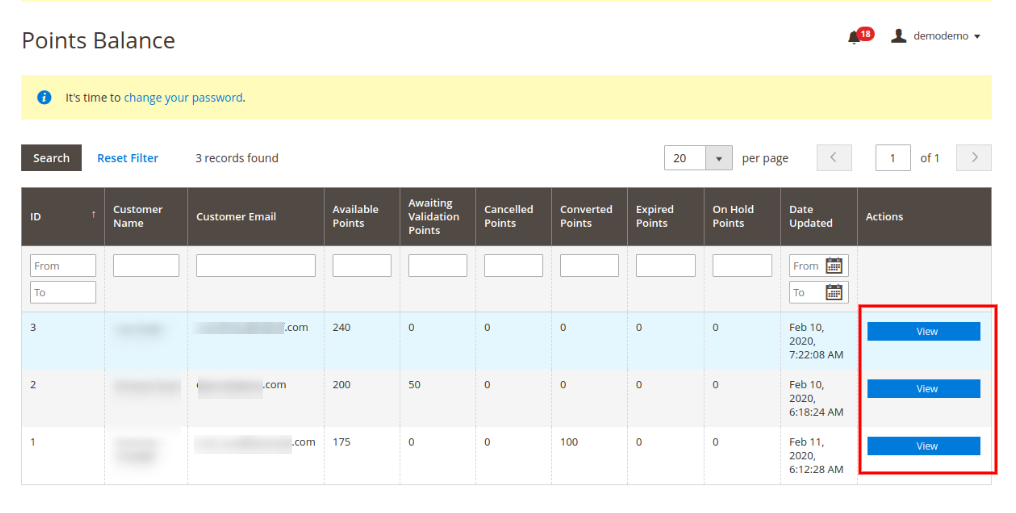
Magento 2 Loyalty points system plugin allows the online merchant to view the list in which the store merchant can view the loyalty points balance of any customer. There is a filter option available for ease of store admin.

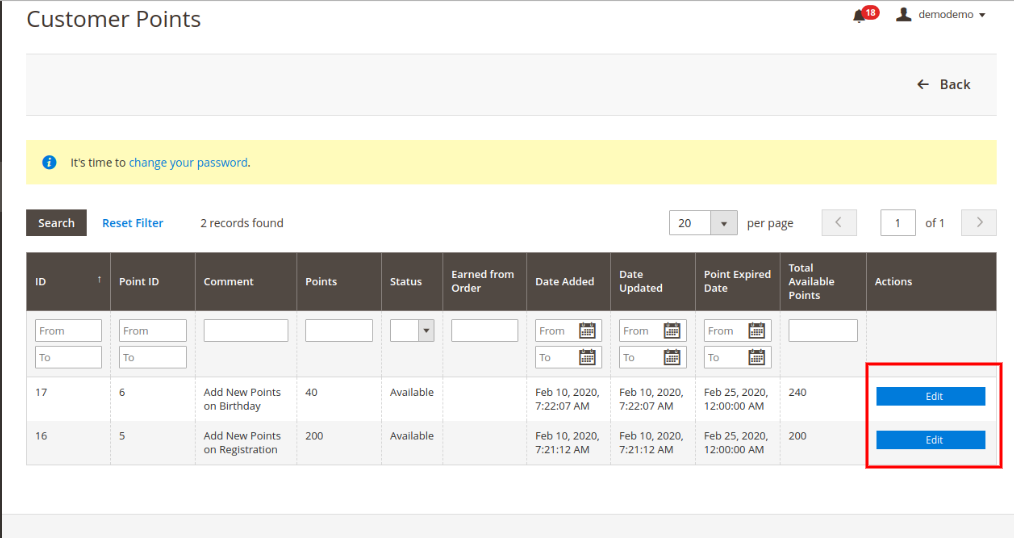
After clicking on the view button, the online merchant can get a list of all the reward points earned by that particular customer. The store merchant can also modify the loyalty points from here:

These are the options which can be modified:

  • Title: Enter the new title for showing on loyalty points history.
  • Points: Set the number of loyalty points.
  • Validity: Set the validity of loyalty points in days.
  • Status: Change the status of loyalty points.
  • Customer Email: view the email id details.

3.5 Loyalty Points Emails

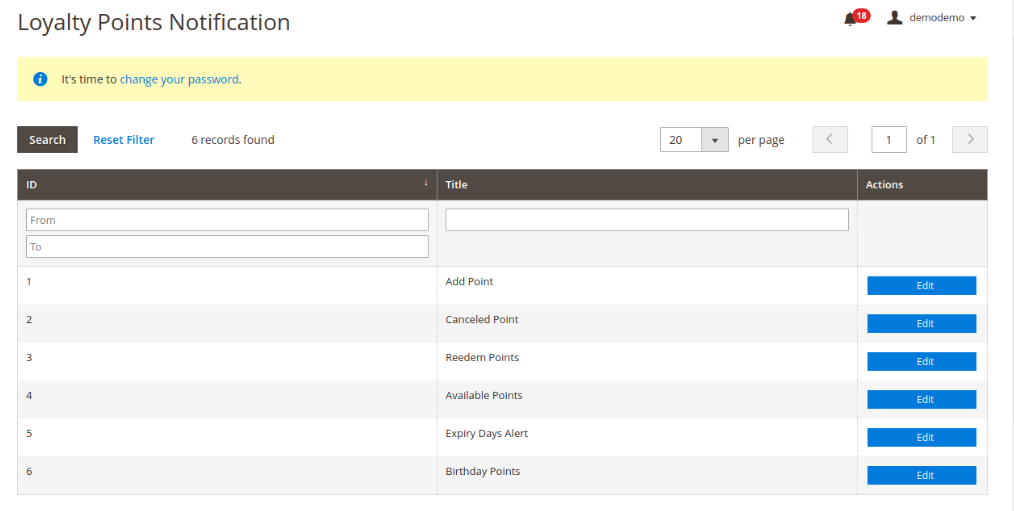
In this section of Loyalty points extension for Magento 2, the online merchant can view the list of email templates for various status:

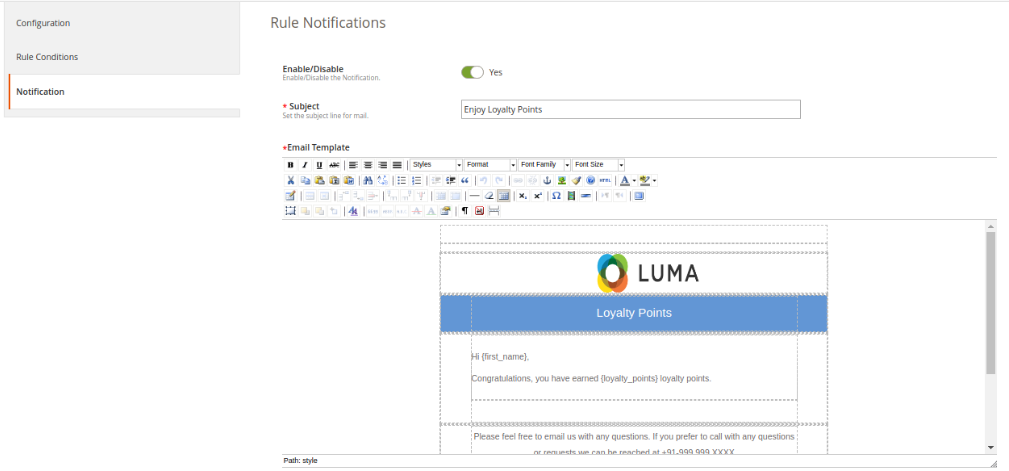
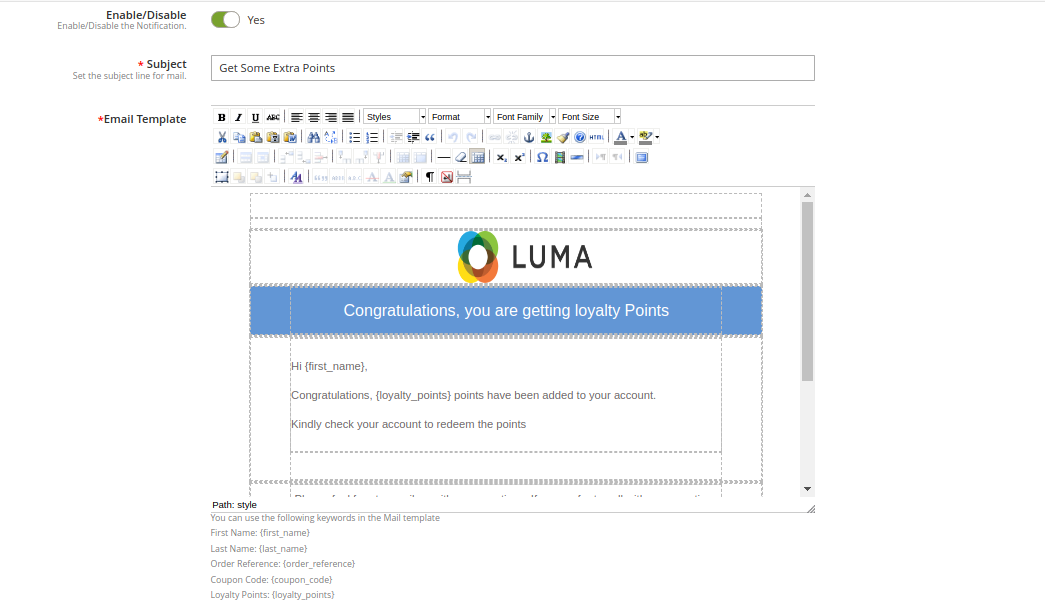
Admin can click on the “Edit” button and customize the email templates for sending to the customers:

  • Enable/Disable: Admin can enable or disable this option.
  • Subject: Enter the subject line for the email.
  • Email Template: The online merchant can configure the email by adding images, HTML text and description.

3.6 Cron Instructions

Admin can also configure cron and manage the overall process of offering loyalty points easily with the help of crons. This way, admin can send birthday points manually, send a notification for expired points and set the loyalty point state to expired manually.

4.0 Front-end Interface

The online buyers have an option to get loyalty points on signup, first-order events and they can also get loyalty points on any specific order and cart state.

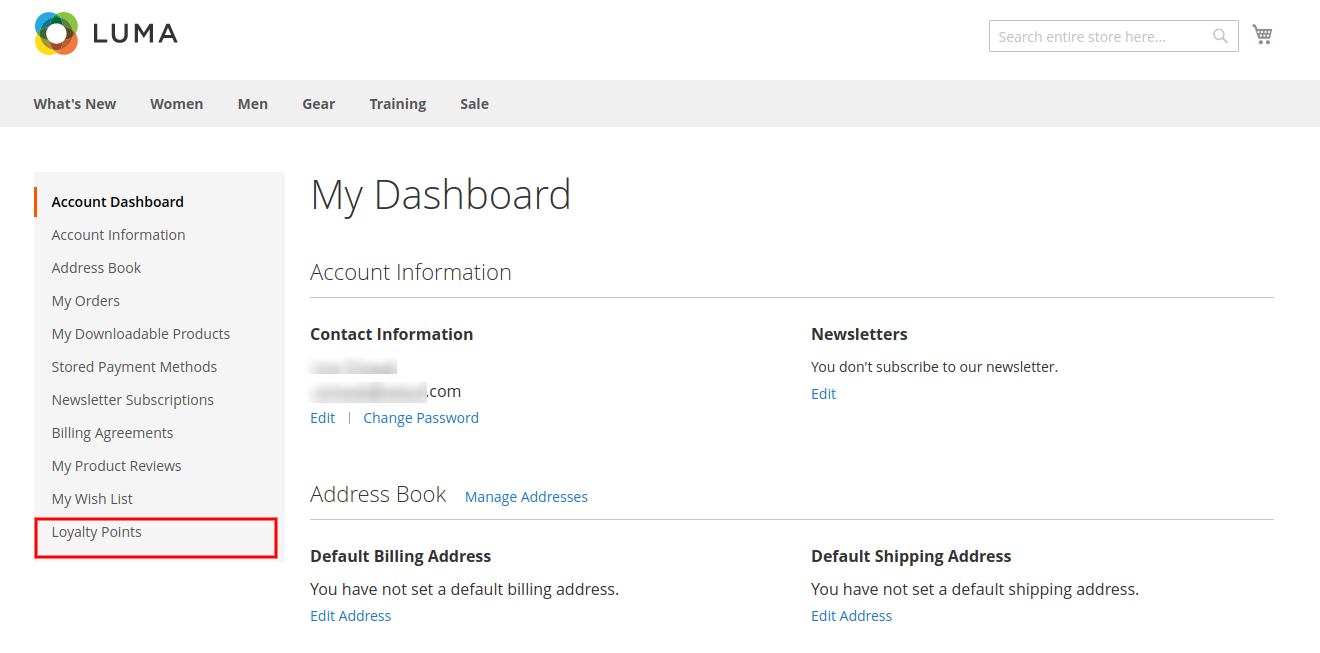
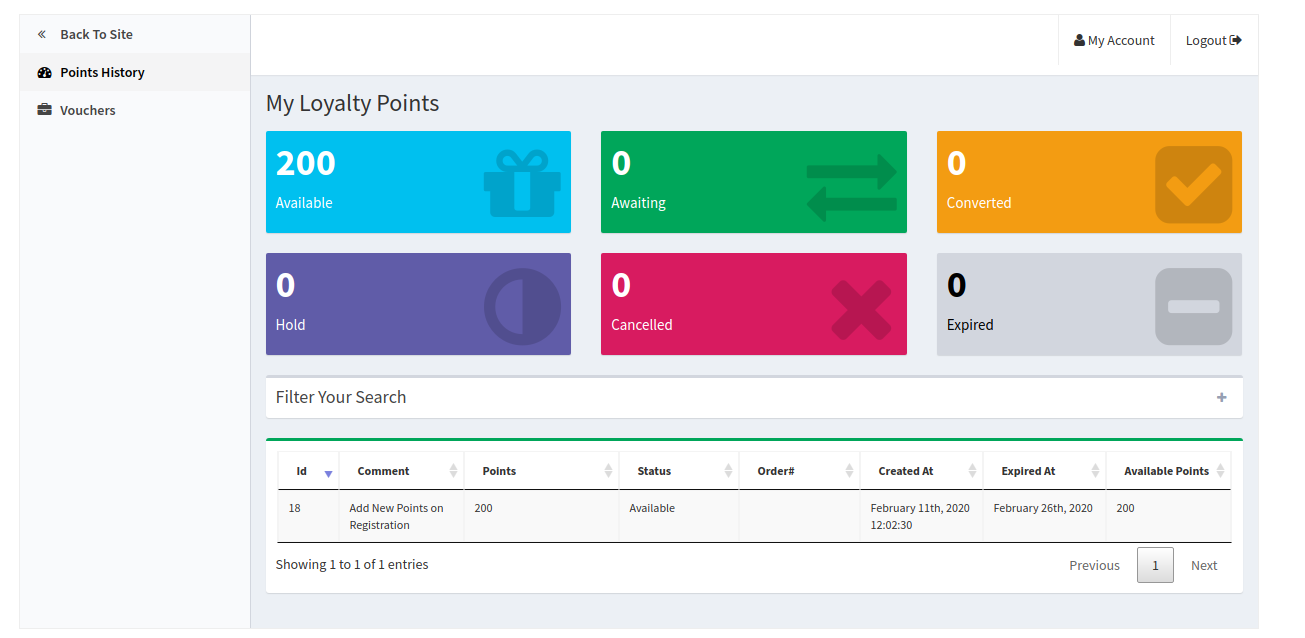
They can check an additional field in the “My Account” section. This field is “Loyalty Points” in which, the online users can view the loyalty point details as shown below:

The online users can view the loyalty points details on the “loyalty points history” and they can convert the loyalty points into the discount coupon.


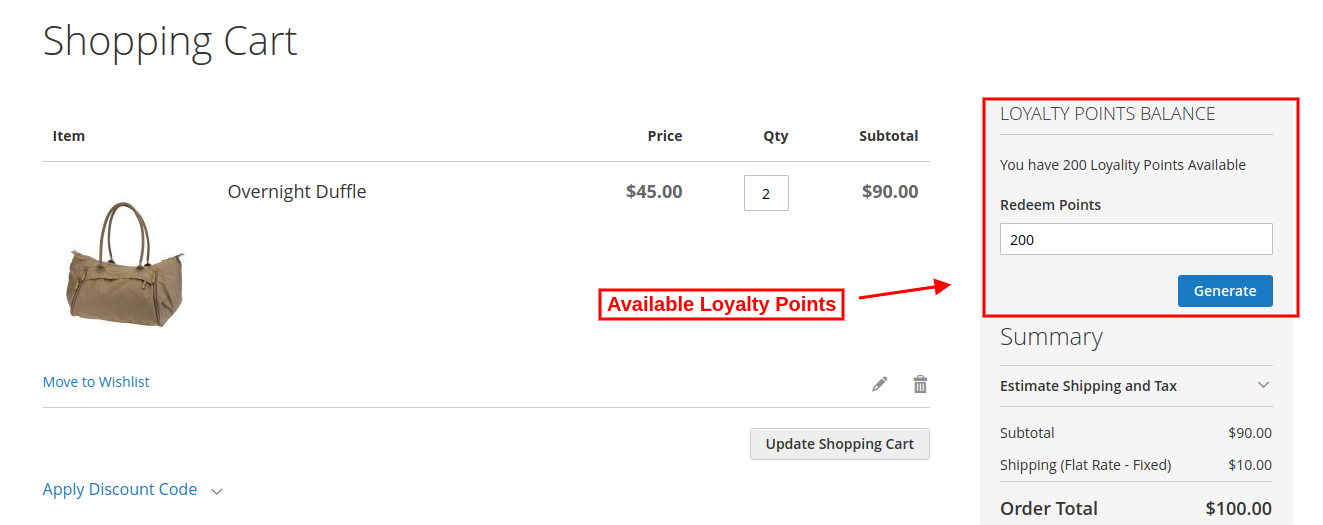
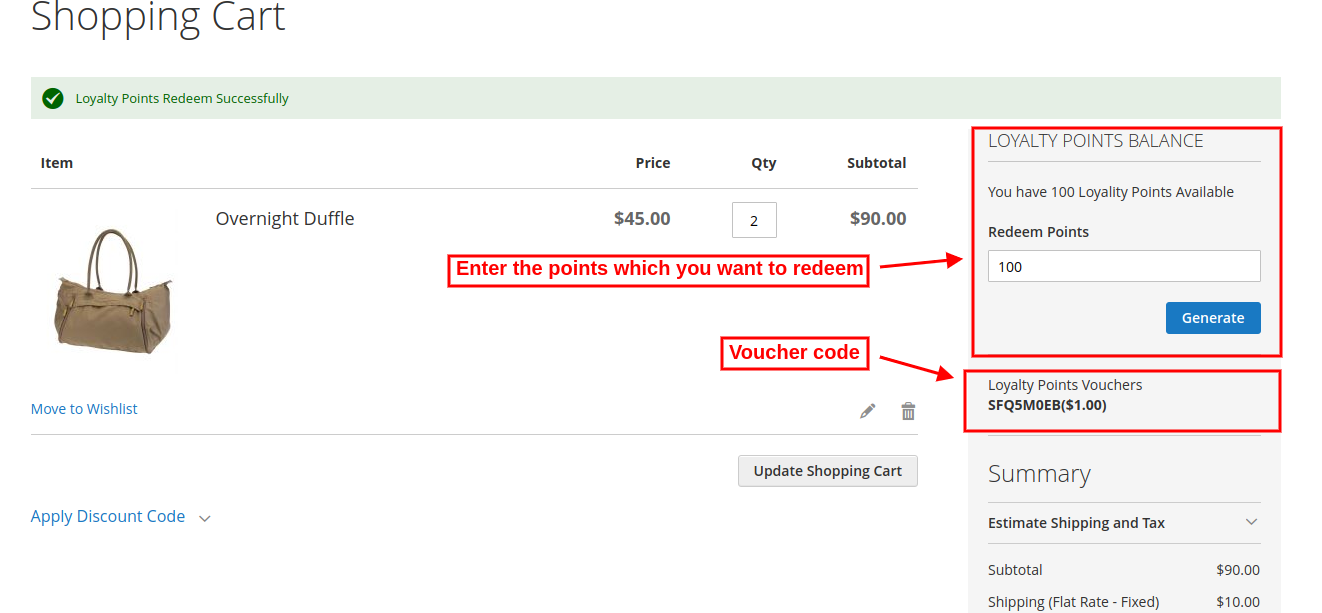
The online users can view the total available loyalty points.

The online users can enter the amount which they want to use for the ordered product as shown below:

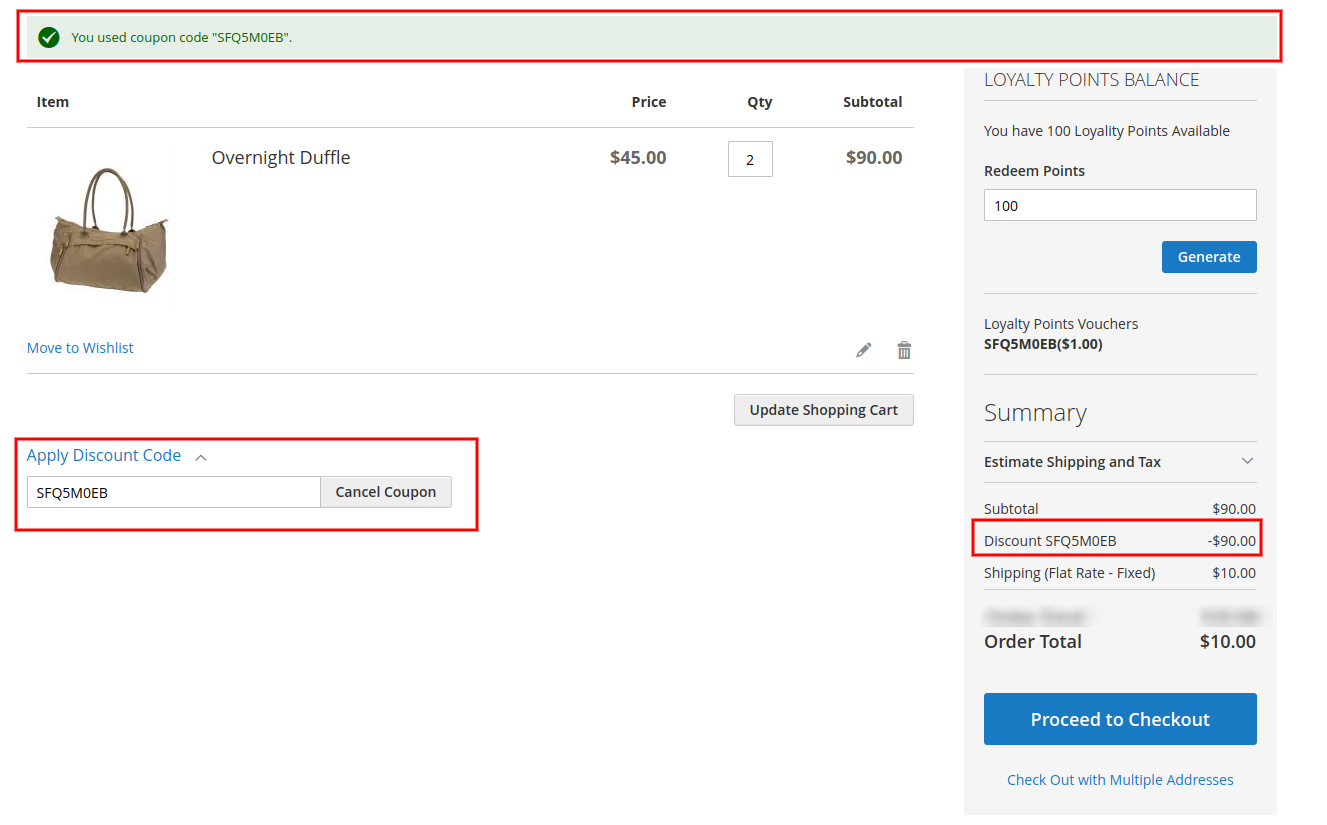
After generating the coupon code, online users can apply it as shown below:


This discount coupon will be applicable to the subtotal amount. The customers can apply the coupon and get a discount on the ordered product. They need to pay delivery charges(if any).

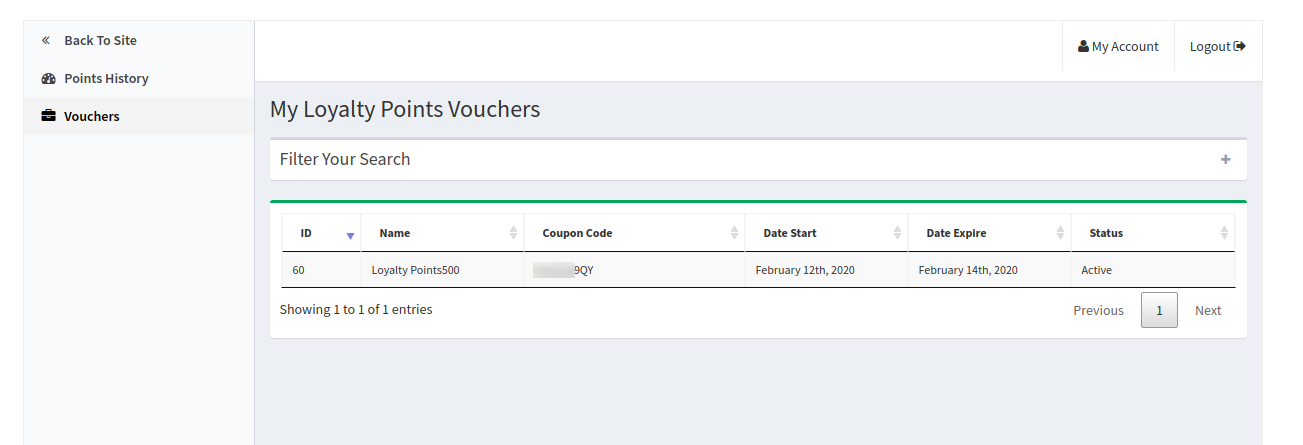
The online users can also view the created voucher details in “vouchers” section as shown below:

The online users can view the coupon code and validity days also.

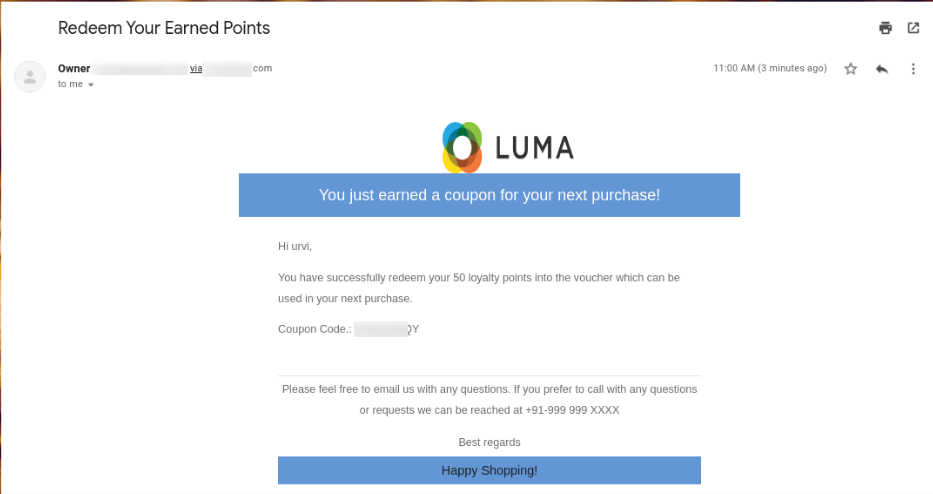
After placing the order, the online users will also get an email notification. The Magento 2 Loyalty reward points module sends a separate notification whenever the customers get any loyalty points related information.

This way, the online users can get loyalty points and enjoy shopping.

Magento 2 Preferred Delivery Time extension- User Manual

1.0 Introduction

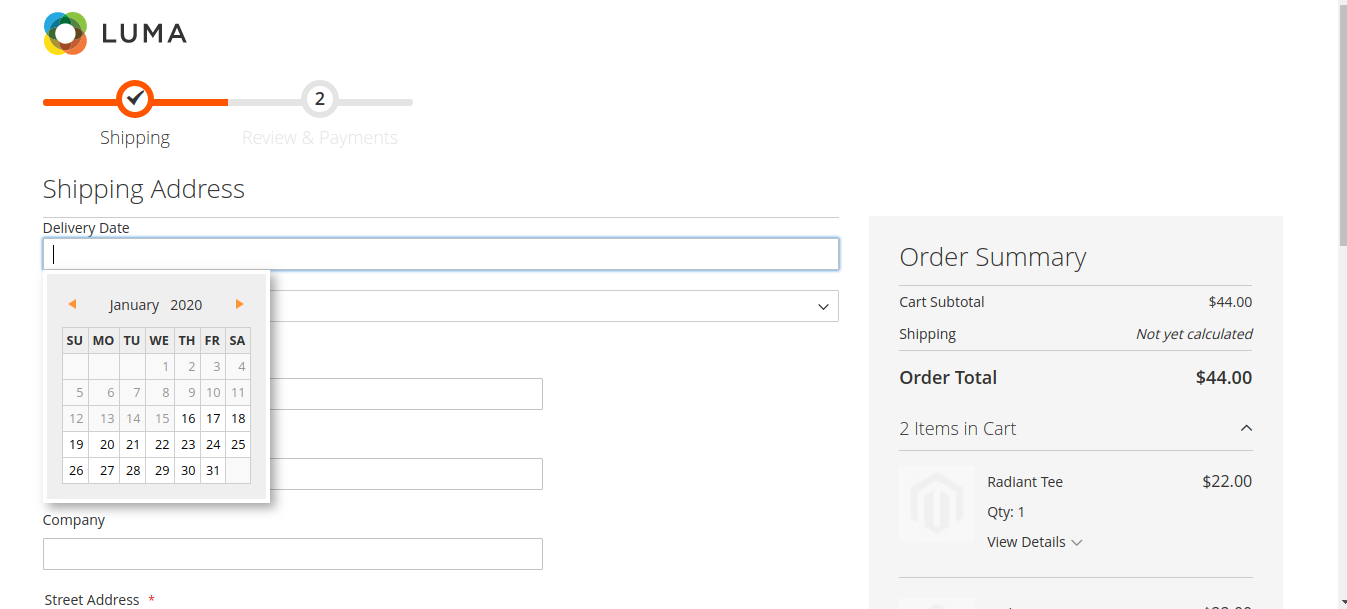
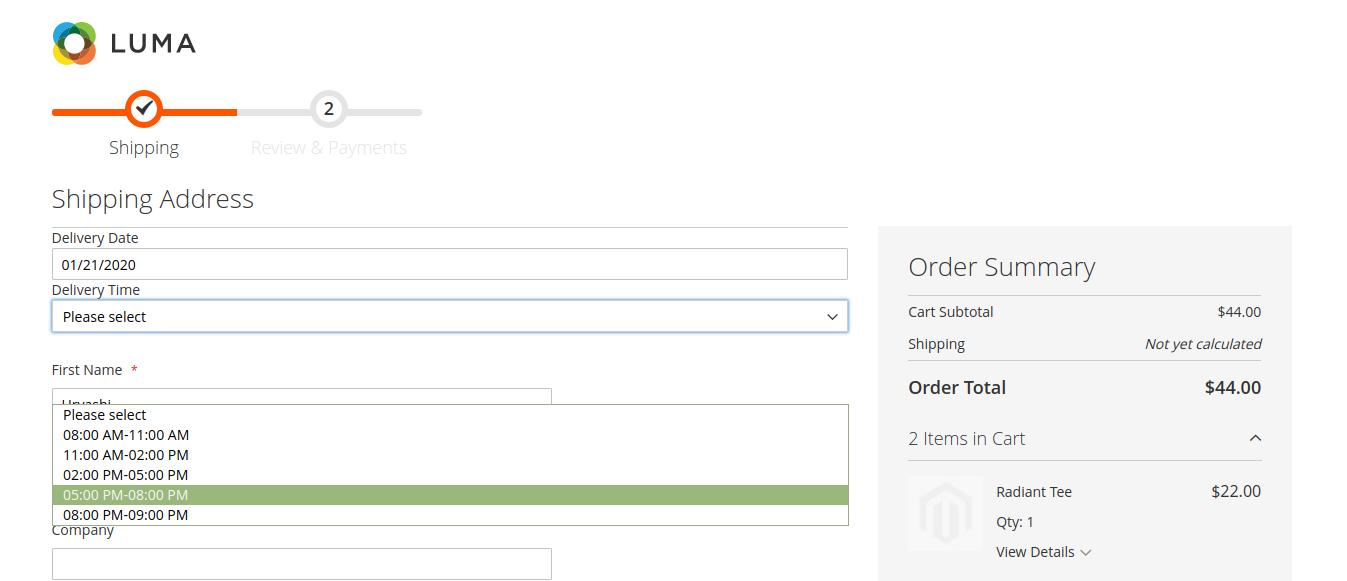
Knowband offers Magento 2 Preferred delivery time module by which the online store merchant can allow the customers to select the preferred delivery date and time for receiving the order. The online users can select the preferred date from the available calendar and time from the drop-down list. This way, the online merchant can deliver the products as per the customer’s requirements. The Magento 2 Delivery Date and Time Extension makes it easy to implement preferred delivery date-time functionality implementation. Customers can also get an option to change their preferences after placing their order. The Magento 2 Delivery Date and Time module is mobile responsive and offers smooth functioning.

1.1 Magento 2 Order Delivery Date and Time Extension Features

  • The online store merchant can use Magento 2 Preferred Delivery Time Module for implementing preferred date-time selection functionality.
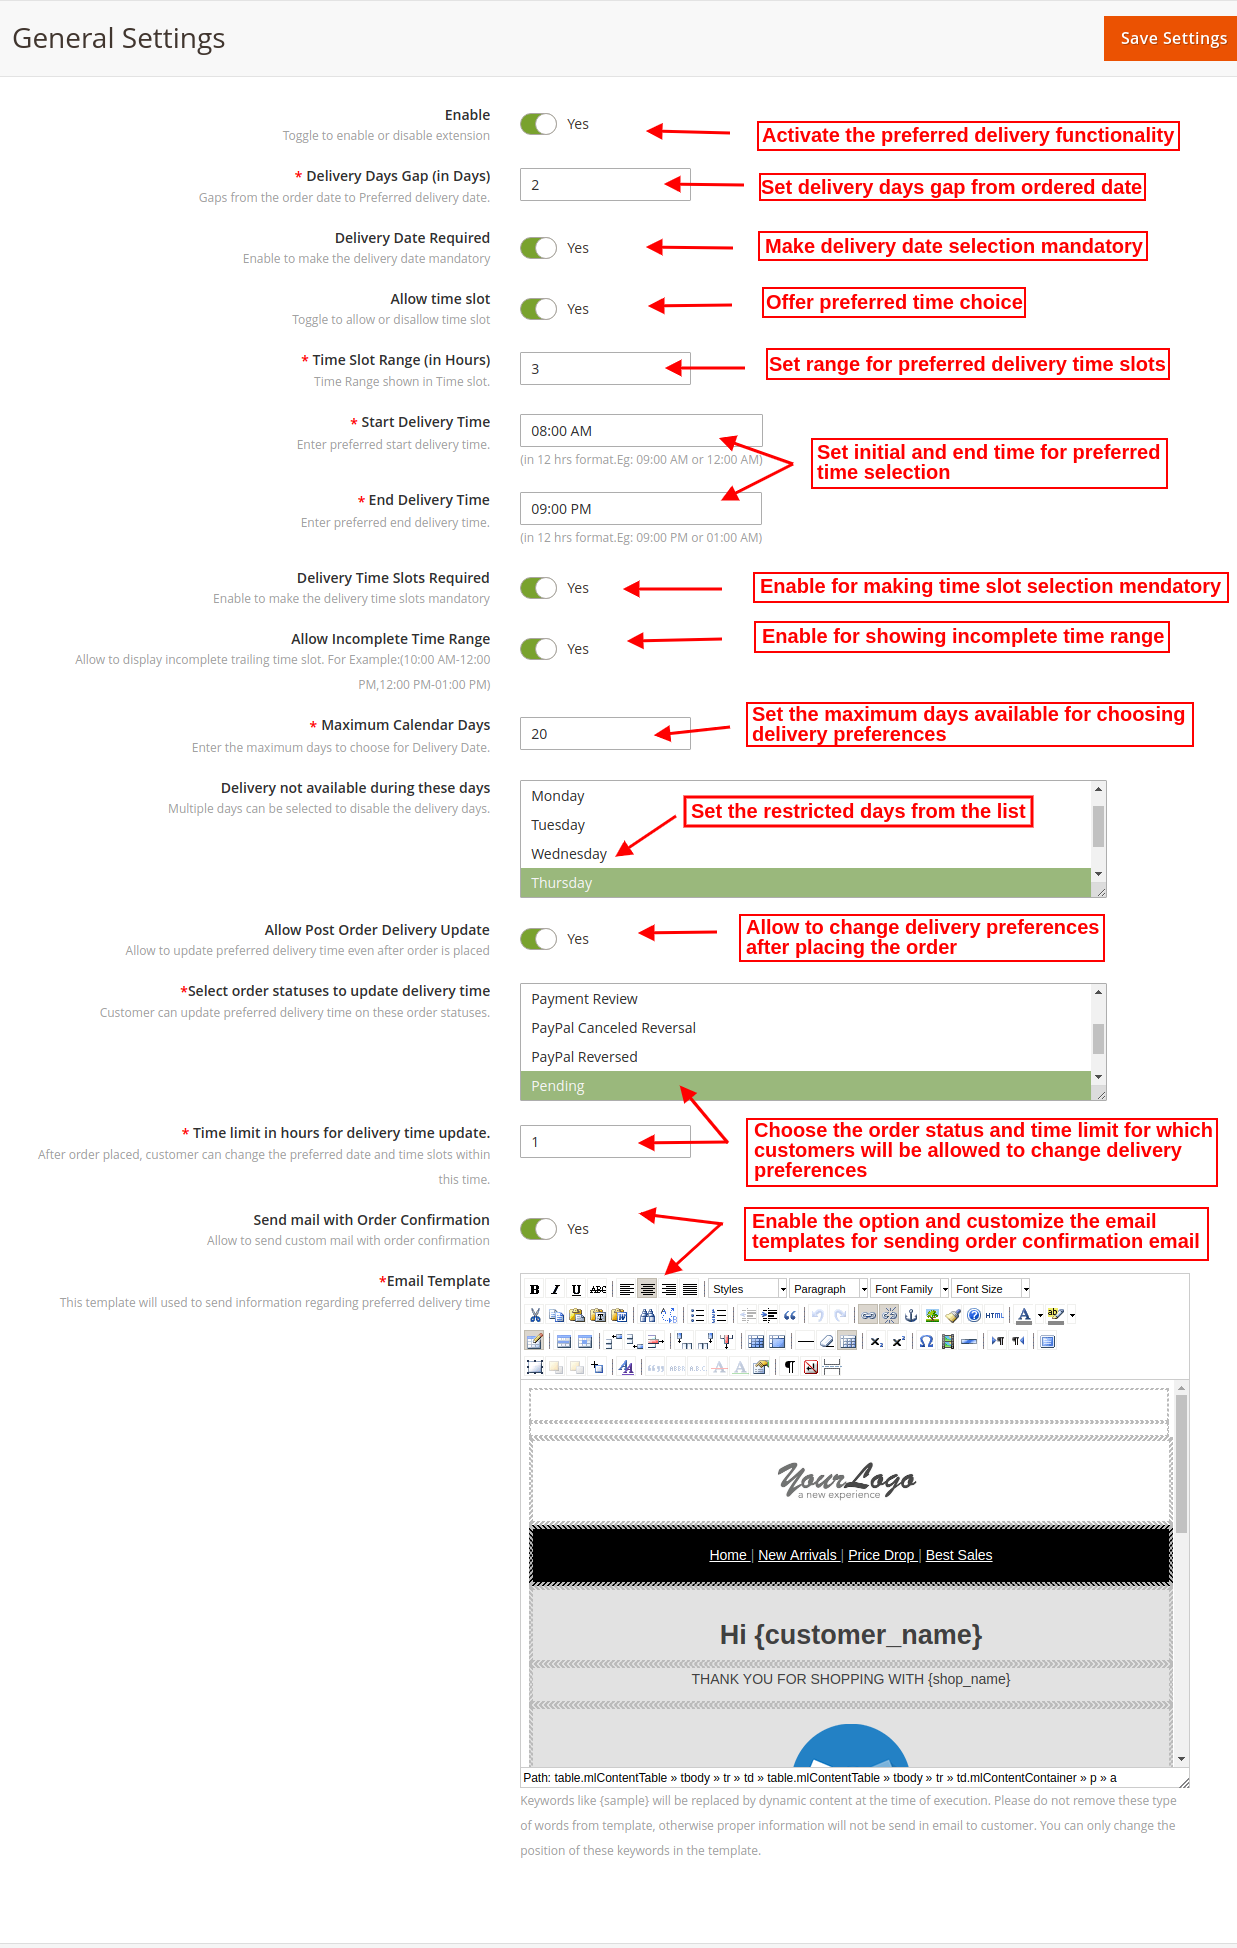
  • The online store merchant can set delivery days gap and select calendar days from which customers can select the preferred delivery dates.
  • The online store merchant has an option to define the time slot and time slot range from the Magento 2 Delivery Date and Time Extension admin interface.
  • The Magento 2 Delivery Date and Time Extension allows admin to select weekdays on which delivery will be unavailable.
  • There is an option for online users to change their order delivery preferences even after placing the order. The e-merchant can set the time limit and order status on which customers can change their delivery preferences.
  • Ready-made email templates are available in Magento 2 Delivery Date and Time module which can be further customized for sending an order confirmation email to the customers.
  • There is an option to set weekdays on which order delivery will not be available for the consumers.
  • This Magento 2 Delivery Time/Date module is mobile responsive and offers smooth functioning.
  • The delivery time slot selection module for Magento 2 offers a user-friendly interface.

2.0 Installation

After purchasing Magento 2 Preferred Delivery Time extension, the store admin will get the following files:

1.Preferreddeliverytime.zip which has the source code of this Magento 2 Preferred Delivery Time Module.

2.User Manual, with all the basic details and information.

The steps to install the Magento 2 Preferred Delivery Time Module are mentioned below:

  • Buy the Magento 2 Preferred Delivery Time Module from Knowband. You can download the extension package.
  • The package has a zipped file that contains the user manual and the source code of Magento 2 Preferred Delivery Time Module. Now, Unzip this package.
  • Create a folder {Magentoroot}/app/code/Knowband/Preferreddeliverytime
  • Upload the extracted content in the above folder via FTP manager (like Filezilla or WinSCP – download here: https://filezilla-project.org/).
  • Now run below commands to install the plugin:
    1.php bin/magento module:enable Knowband_Preferreddeliverytime
    2. php bin/magento setup:upgrade
    3. php bin/magento setup:di:compile

The extension is now installed and ready for use. In Admin Panel go to “Knowband Extensions > Preferred Delivery Time”.
You can now configure and use the Knowband Magento 2 Preferred Delivery Time Module.

3.0 Admin Settings

After successful installation, the online store admin can apply settings for implementing the preferred delivery date and time option for the customers. These are the configuration options as shown below:

3.1 General Settings

In the General Settings tab, the online store merchant can apply these settings as shown below:

  • Enable: The online store merchant can activate or deactivate the module functionality by a single button toggle.
  • Delivery Days Gap(in Days): Set the delivery days gap which you want to show while selecting the preferred delivery date.
  • Delivery Date Required: Set delivery date selection mandatory for the customers.
  • Allow Time Slot: Allow customers to select a time slot for receiving the order.
  • Time Slot Range(in Hours): The eCommerce store merchant can set a time slot range from the admin interface.
  • Start Delivery Time: Set the Preferred start delivery time in 12 hours format.
  • End Delivery Time: Set preferred end delivery time in 12 hours format.
  • Delivery Time Slot Required: Make time slot selection mandatory for the customers by enabling the option.
  • Allow Incomplete Time Range: Enable this option if you want to allow showing incomplete time range ie 8 PM to 10 PM and 10 PM to 11 PM.
  • Maximum Calendar Days: Admin can set the maximum days available for selecting preferred delivery.
  • Delivery not Available During These days: Select the days on which delivery will not be available. Customers will not be able to select these days for delivery preference.
  • Allow Post Order delivery Update: Enable this option if you want to allow the customers to update delivery preferences after placing the orders.
  • Select Order Statuses to Update Delivery time: The e-merchant can also select the order status on which customers can change their preferred delivery date and time. Admin can select multiple statuses at a time.
  • Time Limit in hours for delivery time update: Admin can set the hours limit for allowing customers to update their preferred delivery date and time. Customers can update their preferred delivery date and time within the provided time limit.
  • Send mail with order confirmation: The online merchant can enable this option for sending an order confirmation email to the customers along with the date-time preference details.
  • Email templates: The online store merchant can customize the email templates for sending an order confirmation email to the customers.

4.0 Front-end Interface

The online users can view the delivery date preference option while checkout. The online users can select the preferred date from the available dates from the calendar as shown below:

The e-Commerce store merchant can select the preferred time slot from the drop-down list as shown below:

The online users can get an order confirmation email on their registered email id.

The online users can also update their delivery preferences from their order section. They just can need to click on “update” button as shown below:

The online users just need to click on the calendar date from available dates as shown below:

They can also select a different time slot from the available drop-down list:

This way, they can successfully update the preferred delivery date and time.

Preferred delivery date and time view on the Admin interface:

The e-merchant can also view the customers preferred delivery date and time by viewing orders from the admin interface.

Admin can click on the view button for checking the delivery preferences.

This Magento 2 Preferred Delivery Time Module also shows preferred delivery date and time in invoice. The customers can go to the invoice section after generating invoice as shown below:

The online store admin can click on view to check the delivery preferences details in the order invoice:

Magento Google Shopping Integrator Extension – User Manual

1.0 Introduction

Magento Google Shopping Integration addon by Knowband offers a hassle-free way to upload the products of the Magento store on Google Shopping. Displaying the product ads on the search result is one of the ways to get thousands of visitors on your site.

Google Shopping allows the e-merchants to display its product on Google’s search result page. Powered by AdWords and Google Merchant Center, this is one of the ways to allows the users to search for the products on online shopping websites and compare prices between different vendors. The Magento Google Shopping Integration makes it easier for the store owners to display their products on Google’s SERP.

The Magento Google Shopping Integration module automatically syncs feed from the Magento store to the Google Merchant Center Account. Also, the store admin can sync the product status back to the store’s database by executing cron in the back-end of the Google Shopping Magento Feed Synchronization plugin.

1.1 Features offered by Knowband’s Magento Google Shopping integrator

  • The Magento Google Shopping Integration addon automates the entire process of listing the products on Google Shopping from the eCommerce site.
  • The store admin can automatically update the product inventory between the two stores from the back-end of the Google Shopping Magento Integration extension.
  • The Magento Google Shopping API integration offers real-time synchronization of products, inventory and between the Google Shopping API and Magento store is an easy means to excel the online businesses.
  • The store admin gets an option to create N number of profiles in the back-end of the Magento Google Shopping Integration extension.
  • The profile-based upload allows the admin to list the products in bulk. Moreover, any changes required in the product details can be done by making changes in the profile created in the back-end of the Google Shopping Magento API integration addon.
  • The store admin gets an easy option to keep a track of the products listed in the Google merchant center in the ‘Product Listing’ tab of the Magento Google Shopping connector.
  • Magento Google Shopping Feed synchronization plugin even allows the admin to delete the products or view the errors that occurred while product listing.
  • The real-time synchronization offered by the Magento Google Shopping Integration module makes tracking and feed management easier for the store admin.
  • The status of the actions performed can be viewed in the audit log section of the Google Shopping Magento Integrator.

2.0 Installation

  • Download the extension package of the Magento Google Shopping integration plugin from Knowband.
  • Unzip the package in your root folder of Magento setup via FTP manager (like Filezilla or WinSCP – download here: https://filezilla-project.org/).
  • In Admin Panel go to Google Shopping Marketplace in the main menu.
  • The Magento Google Shopping integrator is now ready for use.

This User Manual will guide the users through the Magento Google Shopping synchronization extension configuration and settings.

3.0 Admin Interface

Once the Magento Google Shopping Integration extension add-on is installed, it will display 5 tabs in the main menu of the admin interface. Each tab is explained one-by-one in the next section.

3.1 General Settings

  • Enable the Extension: Toggle to Enable or Disable the module.
  • Exclude Out of Stock Products: Toggle to Exclude out of stock products.
  • Exclude Products with Price less than: Enter value to exclude products whose price is less than this value.
  • Sync Type: Select the Sync Type.
  • utm_campaign Parameter: Enter the utm_campaign parameter.
  • utm_source Parameter: Enter the utm_source parameter.
  • utm_medium Parameter: Enter the utm_medium parameter.

3.2 Profile Management

The admin can create, edit or delete profiles from this tab of the Magento Google Shopping Integration extension.

3.2.1 How to Create a New Profile?

Click on the ‘Add New’ button sign to create a new profile.
You’ll be redirected to the profile creation page of the Google Shopping Magento Integrator as given below.

Select the Country from the drop-down list.

After this, you will get a full list of settings as the screenshot below:

  • Country: Select the country to create a profile.
  • Select Language: Select language to create a profile.
  • Select Currency: Select currency to create a profile.
  • Profile Title: The profile name you enter here is for identification purposes only.
  • Google Shopping Category: Choose Google Shopping Category.
  • Store Categories: Select store Categories.
  • GTIN: Select attribute for GTIN.
  • Brand: Select attribute for Brand.
  • Material: Select attribute for Material.
  • Pattern: Select attribute for Pattern.
  • Gender: Select Gender.
  • Age Group: Select Age Group.
  • Adult Content: Toggle for adult content.
  • Color: Select Color.
  • Size: Select Size.
  • Size Type: Select Size Type.
  • Size System: Select Size System.
  • Product Shipping: Choose a Shipping Template to avail of shipping options for customers. In case, if Shipping Templates are not being displayed, Run Synchronization -> Sync Shipping Templates.

Google Adsense

  • Custom Label 0: Enter Custom Label 0
  • Custom Label 1: Enter Custom Label 1
  • Custom Label 2: Enter Custom Label 2
  • Custom Label 3: Enter Custom Label 3
  • Custom Label 4: Enter Custom Label 4

3.2.2 How to Edit or Delete the Existing Profile?

The created profile in the Magento Google Shopping Synchronization addon can be viewed in the admin interface. Click on ‘Edit’ to edit the profile or click on ‘Delete’ to delete the existing profile. The edit option opens the page filled with all the details shown in the above screenshot. You can edit and save it accordingly.

3.3 Products Listing

The listed products can be viewed in this section of the Google Shopping Magento Connector as shown in the image below.

  • The admin can remove the product by clicking on ‘Delete’.
  • The admin can view the Error occurred while uploading the product.

3.4 Synchronization

The Synchronization tab of the Magento Google Shopping Integration extension offers easy integration with the help of cron jobs. The Magento Google Shopping Feed synchronization allows the admin to sync the feeds to Google merchant and syncs the product status back to the store.

  • Product Synchronization: This cron will synchronize the products on Google Shopping.
  • Product Status Synchronization: This cron will synchronize the product status on Google Shopping.

3.5 Audit Log

The admin can view all the jobs running and the errors occurred in the same. The status of the jobs can be viewed in this tab of the Magento Google Shopping Integration plugin.

For more values, please follow the below URL and read the documentation:

https://support.google.com/merchants/answer/7052112?hl=en

Magento Google Shopping Integrator Extension Module Link

Magento Google Shopping Integrator Extension Admin Demo Link

Magento Social Wall Post Extension – User Manual

1.0 Introduction

Social media integration is the essential functionality for most of the eCommerce sites today. Social media platforms like Facebook and Instagram provide you the only space to grab lots of traffic as well as sales. Magento Social Wall Post Extension helps you showcase the new arrivals and limited stock products of your store among a wide range of audience. This way Social feed integration is the best means to engage your social media audience on your main website. The social feeds sent on Facebook and Instagram help to gain customer trust which certainly leads to higher conversion levels.
Knowband’s Magento Social Wall Post module allows you to display product related posts on your official pages at Facebook and Instagram. Moreover, Magento Social Feed extension serves as the best tool to announce promotions and discounts with limited product stocks.

1.1 Striking Features of Social Wall Post Extension for Magento

This Magento Social Wall Post module provides you various customizable features to display feeds from your website at any Facebook page or Instagram page. In order to integrate Magento Social Feed extension, you have to configure various functionality without any source code modifications. But first, lets take a quick overview into the features of Instagram Wall Post for Magento.

1. Magento Facebook Wall Post Extension publishes feeds on your Facebook and Instagram pages based on product, category, new arrival or limited stock product.

2. The various product feeds sent using Magento Social Wall Post module are compatible with mobile and tablet devices.

3. With Magento Instagram Post module, you can create manual or automatic posts for social media pages.

4. With the help of Social Wall Post Extension for Magento, you can share selected product and category feeds without any hassles.

5. Using Magento Social Feed extension, create as many posts with custom title, description, images, and product link. These posts or feeds can be scheduled for a particular date and time.

6. Magento social media integration module allows easy integration of your Facebook and Instagram account. You just have to follow the configure the configuration steps for connecting your social accounts.

7. For each product related or category related posts, Magento Social Wall Post module allows you set a custom text and social network to send any post.

8. With Magento Social Feed extension, you can send limited stock alerts to your Facebook and Instagram wall.

9. Magento Social Wall Post module gives an option to set the product quantity below which the stock alert feed is automatically sent to Facebook and Instagram users.

10. Magento Instagram Post module provides an option to set a desired message for the stock alert wall post.

11. Magento Facebook Wall Post Extension helps you to offer discount coupon along with limited stock alerts sent to social media walls. For each discount coupon, you can set a fixed discount type, value, validity and quantity which can be modified from backend.

12. Magento Facebook Wall Post Extension executes cron jobs to publish scheduled posts, send new product posts & limited stock alerts on social wall.

13. Magento Facebook Post module allows you to set a description and image size for the product feeds shown on Facebook and Instagram page.

14. Magento Social Feed extension allows you to display product price in selected currency.

15. This Instagram Wall Post for Magento shares new products feed on social network wall along with a custom description.

16. Magento Facebook Post module is multi-store and multi-lingual compatible.

17. The functionality of Social Wall Post Extension for Magento doesn’t conflicts with other installed modules on the store.

1.2 Technology for Development

Language: PHP

Frame Work: Magento

2.0 Installation Guide of Social Wall Post Extension for Magento

1. Once after you purchase Magento Social Wall Post module from the Knowband store, you will get the following files on your registered email.

  • Source code file of Magento Social Wall Post extension in zipped file format.
  • User Manual of Magento Social Wall Post module.2. Download the files.

2. Unzip the package in the root folder of your Magento setup via FTP manager (like Filezilla or WinSCP – download here: https://filezilla-project.org/). You’ll find the files and folders as shown in the image below:

The Magento social media integration module is now installed for your store and is ready to configure without any coding hassles.

3.0 Admin Interface of Magento Facebook Wall Post Extension

Once you have successfully installed Magento Social Wall Post module on your website, you can send or share unlimited product feeds on Facebook and Instagram. Whether there is any new product arrival or limited product stock alert, you have to configure the Magento social media integration module settings as per your business needs. Navigate to the module settings in the given order: Admin Panel >> System >> Knowband Extensions >> Social Network Wall Post

The easy to understand admin interface of Social Wall Post Extension for Magento has been divided into two broad sections as:

1.Module Configuration
2.Cron Settings

Each of these sections have been discussed in detail below.

3.1 Module Configuration

The configuration settings of this Magento Facebook Wall Post Extension is sub-divided into six sections as:

1. General Settings
2. Facebook App Settings
3. Instagram Settings
4. Alert Settings
5. Manual Post Settings
6. Schedule Post Settings

Each of these sub-section have been discussed in the next section.

3.1.1 General Settings

  • Max no of Products per Cron: This option will set the number of products which will be posted on social network wall per cron. Like, if the value is set to 2, then only two posts will be published on executing a single cron instruction.
  • Product Description: This option sets the product description type which is shown on the social media post. The options include Meta description, short description and long description.
  • Product Image Size: This option sets the image size for the products shown in feeds. This options include Thumbnail, base image, and small image.
  • Show Price: Enable or disable this option to show product price on wall posts.
  • Currency: This option allows you to select currency of product price Indian rupee or US dollar.
  • Select Categories: This option helps you to select the categories from which the products will be posted on social wall. If no category is selected then products from all category will be posted.
  • Post New Products: Enable or disable new product posts on social wall (Facebook and Instagram).
  • New Product Post Description: With this option, you can set a desired post description for new products.

3.1.2 Facebook App Settings

  • Enable Facebook Post: This option allows you to enable or disable wall posts on Facebook page.
  • Facebook App ID: This option will set app ID required to setup connection with Facebook.
  • Facebook App Secret: This option will set the Facebook App Secret key to setup connection with Facebook.
  • Facebook Access Token: This option sets the Facebook Access Token for setting up connection with Facebook.
  • Choose Page: Once the various keys are set, it will show you all the pages for which the app permission is granted.
3.1.2.1 Steps for Facebook Configuration

The steps for Facebook configuration are:

  • Login to your account at https://developers.facebook.com. If you dont have a account, create one.

  • Click on the “My Apps” dropdown menu, click on “Create App” option.

  • Now, set the “Display Name” for your app and then click on “Create App ID” button.

Your App is now created. It will be now listed under “My Apps” dropdown section.

  • Click on the App you created. It will show you the dashboard.
  • Click on the Settings option.

  • Under Basic tab, click on “Add Platform” option at bottom of the screen.

  • Choose Website option.

  • Enter the URL of your website under “Site URL” field.

  • Enter the site URL into “App Domains” and site privacy policy URL into “Privacy Policy URL”.

  • Select “Shop Category” suitable for your site. Suppose, you have selected as Shopping.

  • Now go to “Facebook App Settings” in your module settings.
  • Copy the “App ID” and “App Secret” data from Facebook developer UI to your admin interface of your module as shown below:

  • Now, enable the “Allow API Access to App Settings” option under Advanced tab. Then, click on “Save Changes” button.

  • Under App Review tab, enable the toggle button shown at the top side of screen.

  • It will show the following confirmation screen. Click on “Confirm” button.

  • Go to Graph API Explorer at https://developers.facebook.com/tools/explorer in a new tab. Select your App and it will show you an Access Token for it.

  • Click on “Get User Access Token” and select the permissions.

  • Select publish_actions, manage_pages, user_photos, pages_show_list, publish_pages and user_managed_groups options and click Get Access Token. Click “OK” when asked permission.

  • Click on “Get Access Token” button.


  • Click OK to finish.
  • Copy the Facebook Access Token and paste it in the Facebook App Settings of your module. The Facebook App configuration is successfully done.
  • Under the Facebook App Settings, there is an option to select the Facebook Pages. All the pages for which app permissions is given will be listed in its dropdown. Select any page.

3.1.3 Instagram Settings

  • Enable Instagram Post: This option will enable or disable posts or feeds on Instagram wall.
  • Username: This option allows you to specify the Instagram username.
  • Password: This option allows you to enter Instagram account password.
3.1.3.1 Steps for Instagram Configuration

The steps for Instagram configuration are provided inside the module settings as shown in the screenshot below.

3.1.4 Alert Settings

  • Enable Stock Alert: Enable or disable product stock alerts on connected social walls.
  • Stock Quantity Left: This option sets product quantity below which limited stock feeds are sent to Facebook and Instagram wall.
  • Wall Post Text for Stock Ending Alerts: This option allows you to set text for stock ending alert posts.
  • Generate Coupon for Stock Alerts: This option enables or disables discount voucher with stock alerts.
  • Voucher Name: With this option, you can set a name or title of the discount voucher.
  • No of Vouchers: This option specifies the quantity of discount vouchers available for customer use.
  • Voucher Type: This option specifies the type of discount voucher as fixed or percentage.
  • Voucher Value: This option sets the discount value offered using discount voucher.
  • Voucher Validity: This option sets the validity of discount voucher (in hours).

3.1.5 Manual Post Settings

You can manually post the selected products and categories of the website under this section.

  • Search Product: This option allows you to select products that you want to manually post on Facebook and Instagram page.
  • Select Social Networks: This option lets you select the social network where you want to send the post or feed. You can select it as Facebook or Instagram.
  • Wall Post Text for Products: With this option, you can set the desired text for the manual posts.

  • Search Categories: This option allows you to select categories that you want to manually post on Facebook page.
  • Select Social Networks: This option lets you select the social network where you want to send the post or feed. You can select this option as Facebook as Category posts are not supported with Instagram.
  • Wall Post Text for Categories: With this option, you can set the desired text for the manual posts.

3.1.6 Schedule Post Settings

Under the Schedule Post Settings of this Magento module, you can view the list of all scheduled posts. You can edit them or delete them only if they are unpublished. Once they are published or posted on connected social media pages, you cannot edit those posts. Such posts can be viewed only.
The published posts are marked as “Posted” while the unpublished posts are marked as “Pending”.

Note: A scheduled post will be marked as “Posted” only if the post is published on both the social streams, Facebook and Instagram. If any error occurs while posting the feed on Facebook or Instagram, then status will be shown as “Pending”. Even if the product is posted only on Facebook or Instagram, then also the status is shown as “Pending”.

To create a new scheduled post, fill up the following configuration options:

  • Title: This option will set the title for the scheduled wall post.
  • Messages: This option sets the message for the social wall post.
  • Description: This option sets the description of the social wall post.
  • Link: With this option, you can set a link for the scheduled wall post. The link can be targeted for a selected product, category, or any other page.

  • Select Image Type: You can select the image type. You can either upload an image from the local system or set the image via link.
  • Preview: With this option, you can preview the uploaded image or fetched image from specific URL.
  • Image: If the Image Type is selected as Upload, this option allows you to browse and upload a desired image.

  • Post Date: This option lets you specify the date and time for scheduling the specific social wall post.

3.2 Cron Settings

Under this Cron Settings tab of Magento Social Wall Post Extension, you can manually run cron commands for performing various actions such as:

Send Scheduled Post Manually: Hit this cron to send all the post which are scheduled before current time will be posted.

Sync Products Manually: Hit this cron to sync limited stock alert feeds in the table.

Send Posts Manually: Hit this cron to manually send posts for stock ending products and new products of the store.

Under this tab, you can check/view records for new product feeds and limited stock alert feeds.

Note: New Product Feeds are automatically added/updated to this table as soon as new product is added to the store from backend. While the stock alert feeds are only updated in this table once you run the cron “Sync Products Manually”.

Note: Make sure that all the product details are correctly entered while you add any new product in the catalog. If you further modify any product detail after saving the product, that product wont be counted as a new product.

4.0 Front Interface of Magento Social Wall Post module

The front UI for this module can be checked from Facebook and Instagram account which are configured with this Social Wall Post module.

A) New Product Feed

For Facebook

For Instagram

B) Limited Product Stock Alert Feed

For Facebook

For Instagram

C) Product Feed on Facebook and Instagram

For Facebook

For Instagram


D) Category Feed on Facebook