Shivam Verma is an experienced software engineer in PHP development and Database design. His area of interest is website development. He likes to be aware of his surroundings and to learn new things by observing others. He believes that by doing this we can learn new things and can also enhance our knowledge everyday. He has started writing technical blogs with a view to help others in studying and learning new things in an easy way.
The objective of this blog is to help you know how to fix the issue –“last file is not zipping”. If you are facing the same issue then this blog will help you. Example- If there are 4 text files then only 3 files are zipping.
Reason for this issue:
The zip_close($zip) function is not working due to which the file was unlinking before creating zip.
Solution:
You need to replace zip_close($zip) by $zip->close() to fix this issue.
Sample Code is given below:
$zip = new ZipArchive();
// zip 2 days older files
foreach (glob($directory. '/*.txt') as $a_file) {
if (filemtime($a_file) < time() - 172800) { //2 days older 172800
$filename_array = explode("/", $a_file);
$key = sizeof($filename_array) - 1;
$filename = $filename_array[$key];
$source_path = $directory.'/';
$zip_file = $source_path.str_replace('.txt','',$filename).".zip";
if ($zip->open($zip_file, ZipArchive::CREATE) !== TRUE) {
exit("cannot open".$zip_file."\n");
}
$zip->addFile($a_file,$filename);
}
}
$zip->close(); // Replaced zip_close($zip) by $zip->close();

// Move 90 days olders in the Archive and remove the files which are older than 180 days
foreach (glob($directory.'/*.zip') as $a_file) {
// remove files which older than 180 days.
if (filemtime($a_file) < time() - 15552000) { //180 days older 15552000
unlink($a_file);
}
}
Summary
In this blog, we have changed the zipping close function in order to fix the given issue.
The objective of this blog is to help you know how the setting of any custom plugin is created. Nowadays, most of the plugins contain settings to allow users to alter the functionality of the plugin according to their choice.
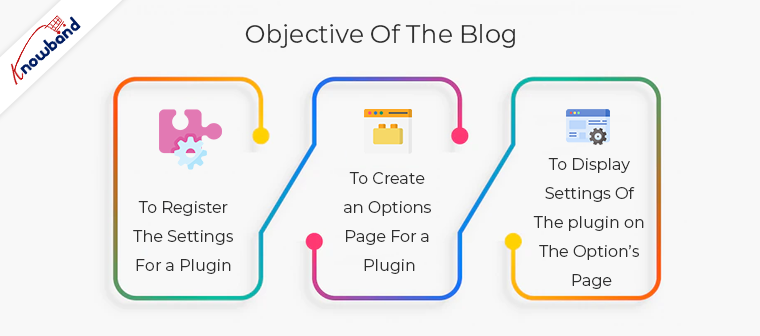
In this blog, we are creating the custom plugin for your reference. The basic requirements to add the setting of the plugin are:
To register the settings for a Plugin
To create an Options Page for a plugin
To display Settings of the plugin on the Option’s Page
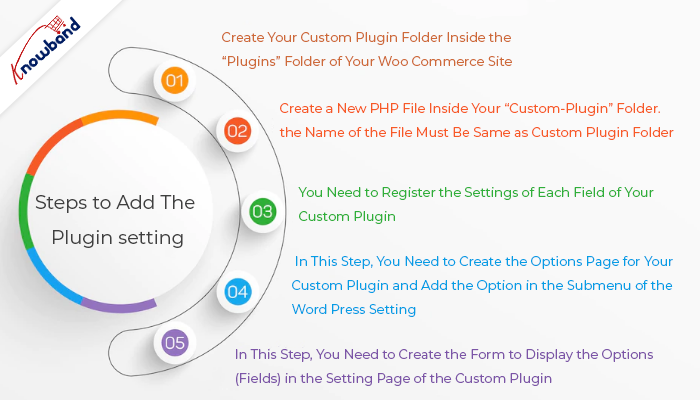
Steps to add the plugin setting:
1. Create your custom plugin folder inside the “plugins” folder of your Woo Commerce site.
In the sample code, we have created a folder “custom-plugin”.
2. Create a new PHP file inside your “custom-plugin” folder. The name of the file must be same as custom plugin folder. In the sample code, we have created a file “custom-plugin.php”.
3. You need to register the settings of each field of your custom plugin. This step whitelist your plugin setting options (fields) that are used to save the plugin setting data in the wp_options table. Here, I have registered the setting for my custom-plugin as shown below and added that code to the “custom-plugin.php” file.
/*
* Plugin Name: Custom Plugin
* Description: This plugin is the custom plugin and created by velsof
* Version : 1.0.0
* Author: Velsof
*/
function custom_plugin_register_settings() {

register_setting(‘custom_plugin_options_group’, ‘first_field_name’);

register_setting(‘custom_plugin_options_group’, ‘second_field_name’);

register_setting(‘custom_plugin_options_group’, ‘third_field_name’);

}
add_action(‘admin_init’, ‘custom_plugin_register_settings’);
To learn more about “register_setting” you can check the document
4. In this step, you need to create the options page for your custom plugin and add the option in the submenu of the Word Press setting. In the sample code, we have written the code of options page below and added the same to the “custom-plugin.php” file.
function custom_plugin_setting_page() {

// add_options_page( string $page_title, string $menu_title, string $capability, string $menu_slug, callable $function = '' )

add_options_page('Custom Plugin', 'Custom Plugin Setting', 'manage_options', 'custom-plugin-setting-url', 'custom_page_html_form');

// custom_page_html_form is the function in which I have written the HTML for my custom plugin form.
}
add_action('admin_menu', 'custom_plugin_setting_page');
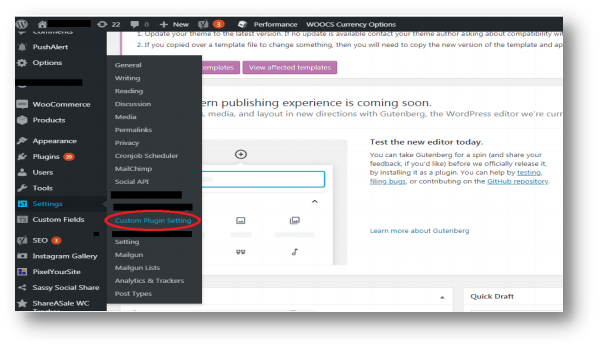
After completing this step you will be able to see the option of your custom plugin in the Word press setting as shown in the image below:
5. In this step, you need to create the form to display the options (fields) in the setting page of the custom plugin. Here, I have created a function “custom_page_html_form” as shown below and added the same to the “custom-plugin.php” file.
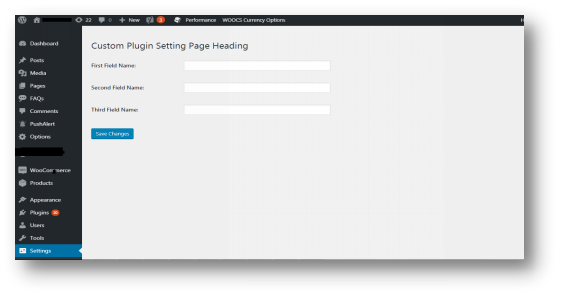
After completing this step the form of your custom plugin will be created and the data will be saved in the database on clicking the button “Save Changes” as shown below:
Note: If you get the error “options page not found” on saving the setting of the custom plugin. Then you need to follow the below steps:
You can create straightforward applications that only retrieve the order information you require using the Orders API section of the Amazon Marketplace Web Service (Amazon MWS). This makes it possible for you to create unique applications quickly, easily, and adaptably in fields like demand-based decision support tools, order synchronisation, and order research.
Important: The role Amazon assigns you after you submit the Developer Registration and Assessment form determines your access to Amazon MWS data. See Registering to Use Amazon MWS for more details.
Objective of the blog
After reading this blog, you will be able to understand how sellers can get the Amazon orders using API.
Let’s know about the order’s API
Amazon orders API helps the sellers to get the order’s details and synchronized the Amazon orders on their custom application. This is very helpful for retrieving order updates in real-time and the sellers can also get the order status (shipped or unshipped) information easily for all orders by using API.
How to synchronized Amazon orders on custom application
First of all, you need the credential of Amazon MWS (Market Place Web Service) API. If you still don’t have, you can get the help from this blog
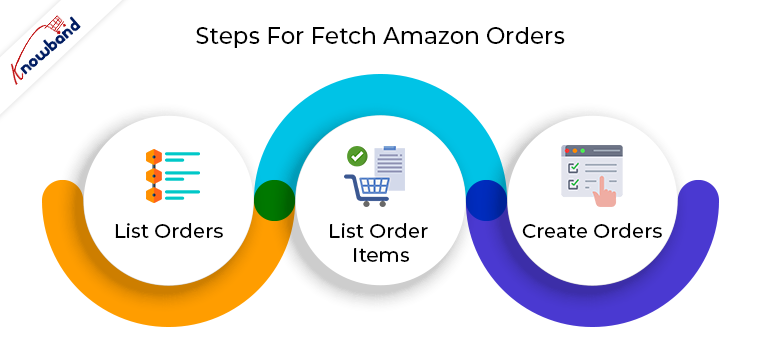
To fetch Amazon orders on your end, you need to follow the below steps:
1. List Orders – In this step, you need to send a request to Amazon to get the orders from Amazon for a particular time interval.
You need to send the following data given below in the request:
mws.amazonservices.co.uk/Orders/2013-09-01
?AWSAccessKeyId=XXXXXXXXXXXXXXX
&Action=ListOrders
&SellerId= XXXXXXXXXXXXXX                                // Here write your merchant id
&SignatureVersion=2                                             // Here write your signature version
&Timestamp= gmdate("Y-m-d\TH:i:s\Z", time())     // Write the time stamp &Version=2013-09-01
&Signature=1234Knowband1234example1234                              // Here you need to write the signature
&SignatureMethod=HmacSHA256                     // Here write your signature method
&LastUpdatedAfter=date("Y-m-d\TH:i:s\Z", strtotime('-24 hour'));  //request to get orders for last 24 hours only from Amazon
&OrderStatus.Status.1=Unshipped                // Here you need to add the status for which you want to fetch the orders
&OrderStatus.Status.2=PartiallyShipped
&OrderStatus.Status.3=Shipped
&MarketplaceId.Id.1= XXXXXXXXXXXXX
AWSAccessKeyId=XXXXXXXXXXXXXXXXXXXX
In the response, you will get an order feed file which will contain the list of orders which are placed on Amazon in the last 24 hours and have the requested order status.
Here is the sample order feed file.
2. List Order Items – From the first step, you will only get order details (like Amazon orders id, purchase date, etc) not order item details (ordered product detail). To get the order’s item details, you will need to send a separate request to Amazon. You need to send request corresponding to each order. If you need details for 5 Amazon orders then you will need to send 5 requests.
The request is given below:
e.g $Amazon_order_id = 112-5028700-7051869
mws.amazonservices.co.uk/Orders/2013-09-01
?AWSAccessKeyId=XXXXXXXXXXXXXXXXXXXX
&Action= ListOrderItems
&SellerId=‘XXXXXXXXXXXXXX’;           // Here write your merchant id,
&'AmazonOrderId'=$Amazon_order_id       // Here write the order id for which you want to get detail
// Here you need to write the signature, when you send HTTP requests to AWS, you need to sign the requests so that AWS can identify who sent the request
&Signature=1234Knowband1234example1234
&SignatureVersion=2                                 // Here write your signature version
&SignatureMethod=HmacSHA256               // Here write your signature method
&Timestamp=gmdate("Y-m-d\TH:i:s\Z", time())      // Write the time stamp
&Version=2013-09-01
In response of the request, you will get the descriptive detail of the order. The sample is given below:
3. Create Orders – This step is the final step and from step 1 & 2, you got all the details of the Amazon orders which you need to create orders on your application. By parsing the above XML feeds (list order and list order item), you can create orders on your application.
If an Amazon order is already created on your application then you can use the step 1 to update the order status of that order.
If you require any assistance or custom development, please feel free to reach us at support@knowband.com.
You can also check out marketplaces integration modules for Prestashop, Opencart, Magento, and Magento 2 here.
Convert your store into a native Android and iOS app with our No Code Mobile App Builder solution. Know more here:
This blog will enable you to understand the way of deleting the products from the Fyndiq marketplace using seller central account.
Steps to delete Products using Seller-Central
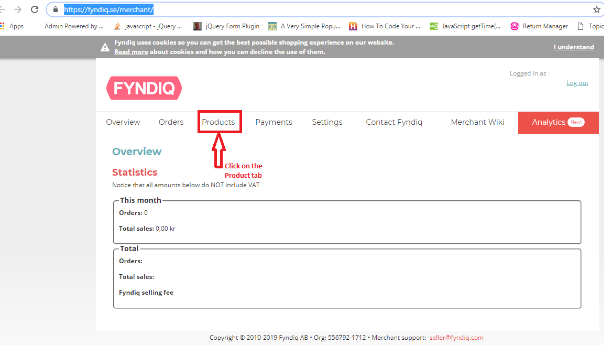
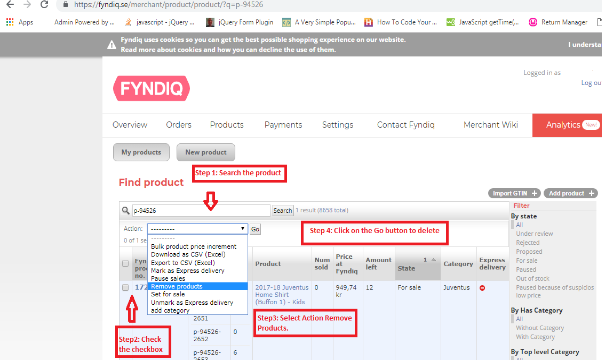
2. Click on the Products tab of the home page as shown below: 3. In the product page, you need to follow the following steps to delete the product from the Fyndiq marketplace.
Search the product by using the product name/SKU.
Tick the checkbox of the products which you need to delete.
Select the “Remove products” option from the “Action” dropdown.
Click on the “Go” button to delete the product.
These above steps are shown in the image below:
Summary
This blog will enable you to understand the way of deleting the products from the Fyndiq marketplace using seller central.
There is no default functionality to persist the GET parameters while using “Paginator” helper in CakePHP. As per default functionality of CakePHP paginatior helper, the GET parameters will remove from the URL if you navigate to the next page. So in this blog we will learn how to add the GET parameters in the URL of page number in CakePhp version 2.0?
Solution
If you are facing this issue then you need to add a few lines of code in the beforeRender function. This function is defined in the paginator.php file (File Location: cake\libs\view\helpers\paginator.php). You need to add the following lines shown in the brown color:
public function beforeRender($viewFile) {
            $this->options['url'] = array_merge($this->request->params['pass'], $this->request->params['named']);
//Start of code
              if (!empty($this->request->query)) {
                       $get_param = $this->request->query;
                       unset($get_param['url']);
                       $this->options['url']['?'] = $get_param;
                }
// End of code
                parent::beforeRender($viewFile);
}
After reading this blog, you will be able to understand how the seller can change inventory and fulfillment latency for products on Amazon using API.
Let’s know about the Fulfillment Latency
Fulfillment latency is the number of days in which the seller needs to dispatch the order after getting the order from Amazon. It can also be defined as the maximum time available to the seller to dispatch the parcel. The fulfillment time is set by the seller corresponding to each product. Fulfillment latency is also known as handling time.
Amazon fulfillment API helps the seller to set the product’s inventory and fulfillment latency time on Amazon.
How do change the Fulfillment Latency & Inventory for products using API?
Let us know about the fields that you will need to send in the request to Amazon:
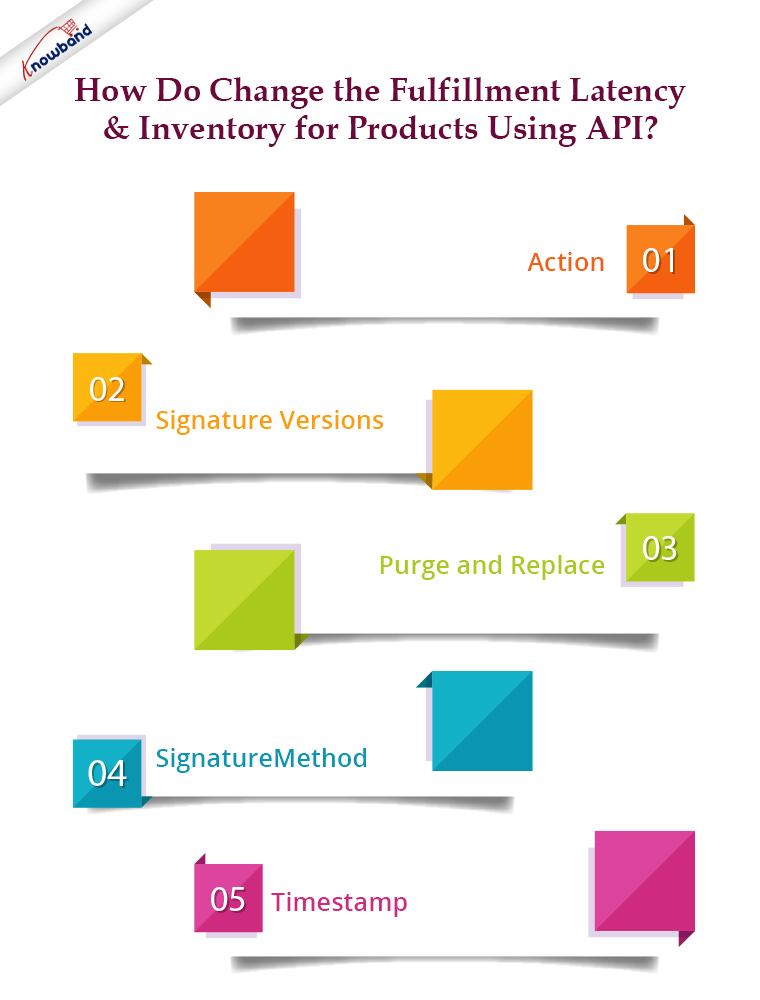
Action
This field specifies the action which needs to be performed on the request and this helps to determine what parameter should be in the request.
Signature: Whenever you send the HTTP request to Amazon, you need to add the signature with the URL. By checking the signature, Amazon can identify the merchant from whom the request has been received. We use a hash value (HmacSHA256), some data of the request, and a secret access key to create a signature.
Signature Versions
2 signature versions are supported and these versions are:
(1)Version 4: (2)Version 2:
Both versions can be used to sign the request but we recommend you to sign your request with Signature Version 4 in this blog, signature version 2 is used.
Purge and replace
The purge and replace field replaces the existing listing of products from Amazon if its value is true. So you always need to set its value to false in the request if don’t want to remove listingsting from AmazFreeTypeType
Feed type specifies how the data should be processed. To change fulfillment latency and inventory, you need to specify the feed type “_POST_INVENTORY_AVAILABILITY_DATA_”.
Signature Method
Signature methods hash-based based protocols and you need to apply these methods to calculate signatures. E.g. HmacSHA256
Timestamp
In this field, you need to add the time at which you are making the request.
To change the fulfillment latency and inventory of the product, you need to send the following data in the request to Amazon:
$url =
https://mws.amazonservices.co.uk                               // Here you need to write the End point
/?AWSAccessKeyId=XXXXXXXXXXXXXXXXXXXX              // Here write your AWS Access Key
&Action=SubmitFeed                                        // Action should be SubmitFeed   &FeedType=_POST_INVENTORY_AVAILABILITY_DATA_  // Feed Type
&MarketplaceIdList.Id.1= XXXXXXXXXXXXXX                 // Here write your marketplace list id
&Merchant=XXXXXXXXXXXXXX                                     // Here write your seller id or merchant id
&Signature=1234Knowband1234example1234         // Here you need to write the signature
&SignatureMethod=HmacSHA256                                  // Hash method which used to create signature
&SignatureVersion=2
&Timestamp=gmdate("Y-m-d\TH:i:s\Z",time()))
&Version=2009-01-01
&PurgeAndReplace=false                                            // Always set purgeAndReplace Value as false
                                                                                   // else it will replace all the existing product data
You will also need to create the XML file which will contain inventory and fulfillment latency details of those SKUs for which you want to change the fulfillment latency and inventory. The sample feed is given below:
$xml_file = Full path of the XML file on the server
You need to send the request UXML XML data and header together in a request. The header values are used by the server for an end-to-end check on the data and for detecting unintentional modifications to the data further in the transition.
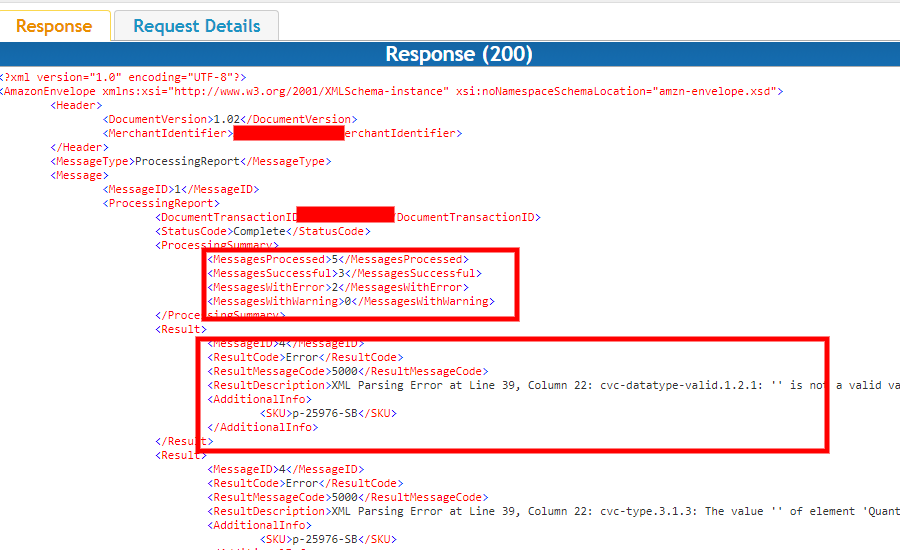
In the response, you will get the number of the SKU which are successfully processed (means fulfillment latency and inventory have been changed) and the number of SKU tis is not processed due to error, as given in the screenshot of the response feed below:
Summary
After reading this document, you (seller) can easily change the fulfillment latency and inventory of products on Amazon using Amazon MWS API.
Knowband offers eCommerce development services and can assist you in creating a brand-new eCommerce website. To provide our customers with the greatest and most efficient post-sale service, we have a dedicated support team that is constantly on hand to help them. We continue to fulfill our duties to clients that want help with urgent website issues even on the weekends.
The best Magento, Opencart, Prestashop, and Magento 2 modules are also available. One Page SuperCheckout, Multi-Vendor Marketplace, Mobile App Builder, Spin and Win Module, Abandoned Cart, and more popular modules are just a few of what Knowband has to offer. You can reach us at support@knowband.com if you have any questions.
2. Fill seller’s credentials (username and password) and click on the “Log in” button.
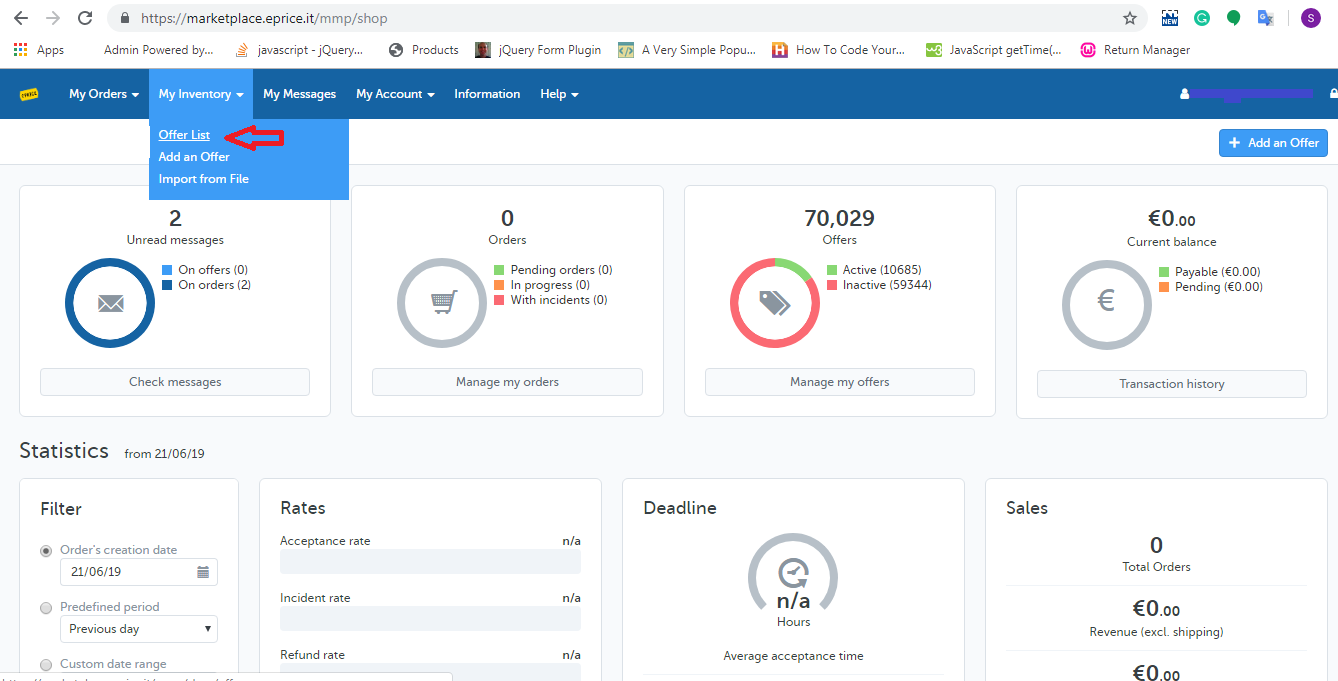
3. Choose the “Offer List” option from the “My Inventory” tab of the Home Page as shown below:
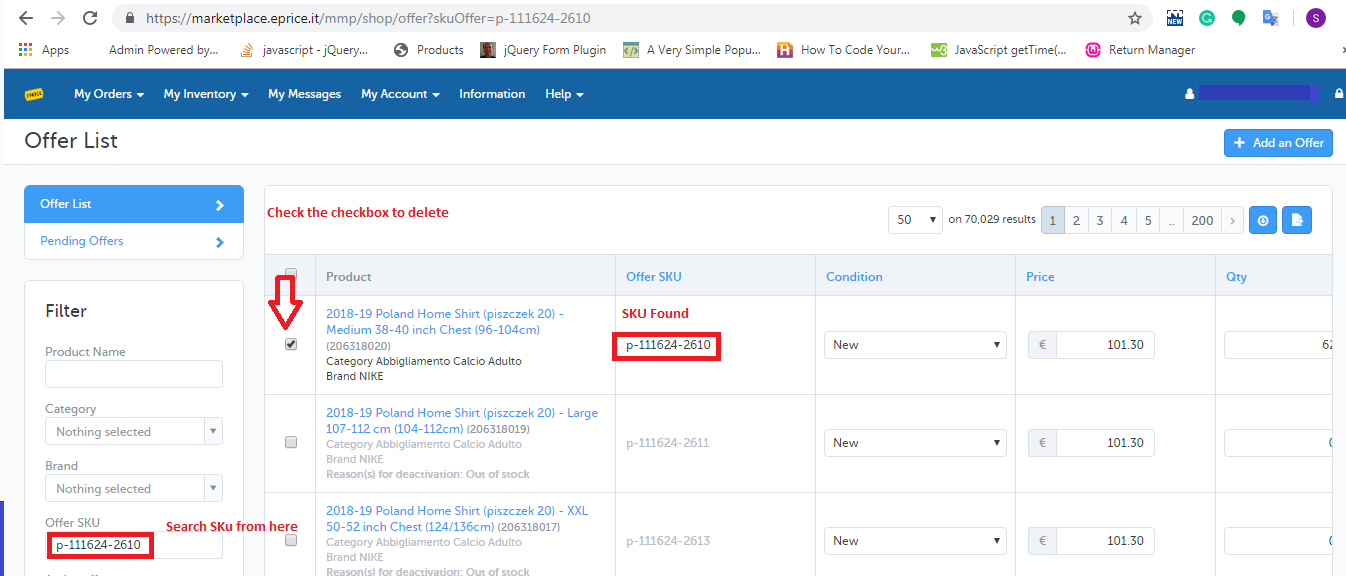
4. Search SKU from “Offer SKU” field and tick the checkbox parallel to those SKUs which you have to delete from ePrice marketplace as shown below:
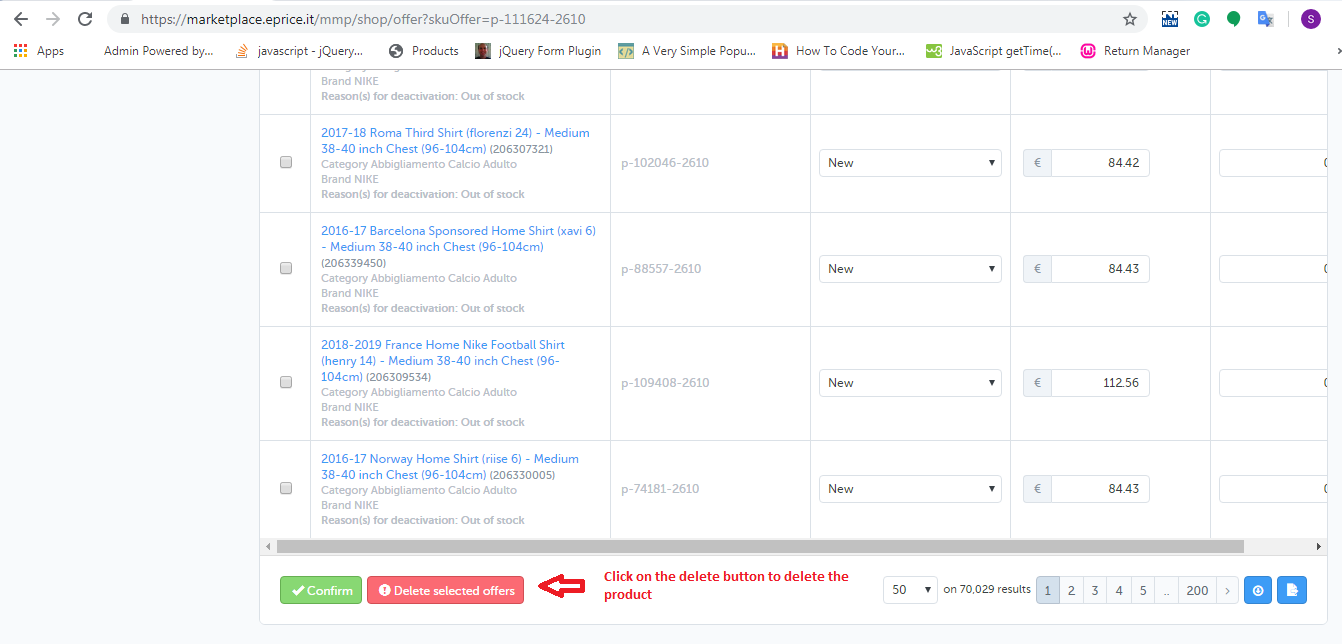
5. After selecting the products you need to click on the “Delete selected button” as shown below:
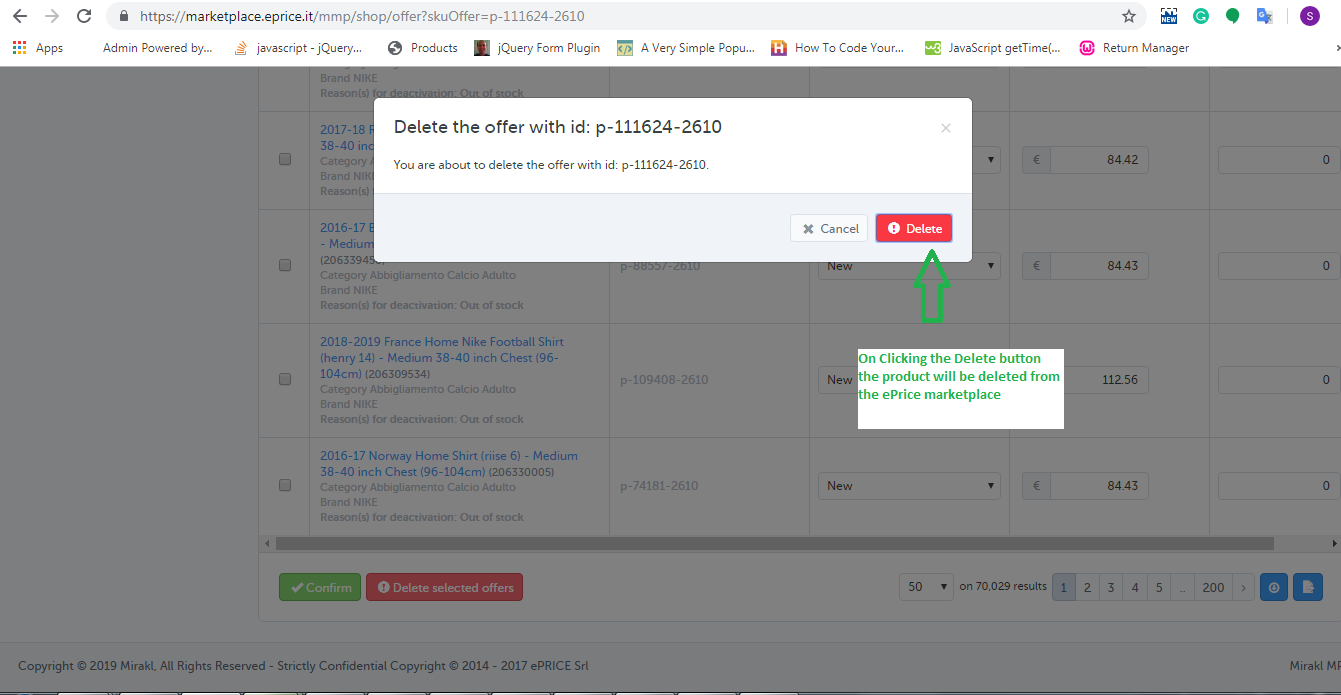
6. On clicking the “Delete Selected offers” option, you will see a popup appears on the screen in which you will find the selected SKUs and the “Delete” button to delete these products as shown below:
2.0 By uploading Offer Feed
By using the offer feed you can easily delete a bulk of products from the ePrice marketplace. The link to download the sample offer feed is given below:
2. Fill seller’s credentials (username and password) and click on the “Log in” button.
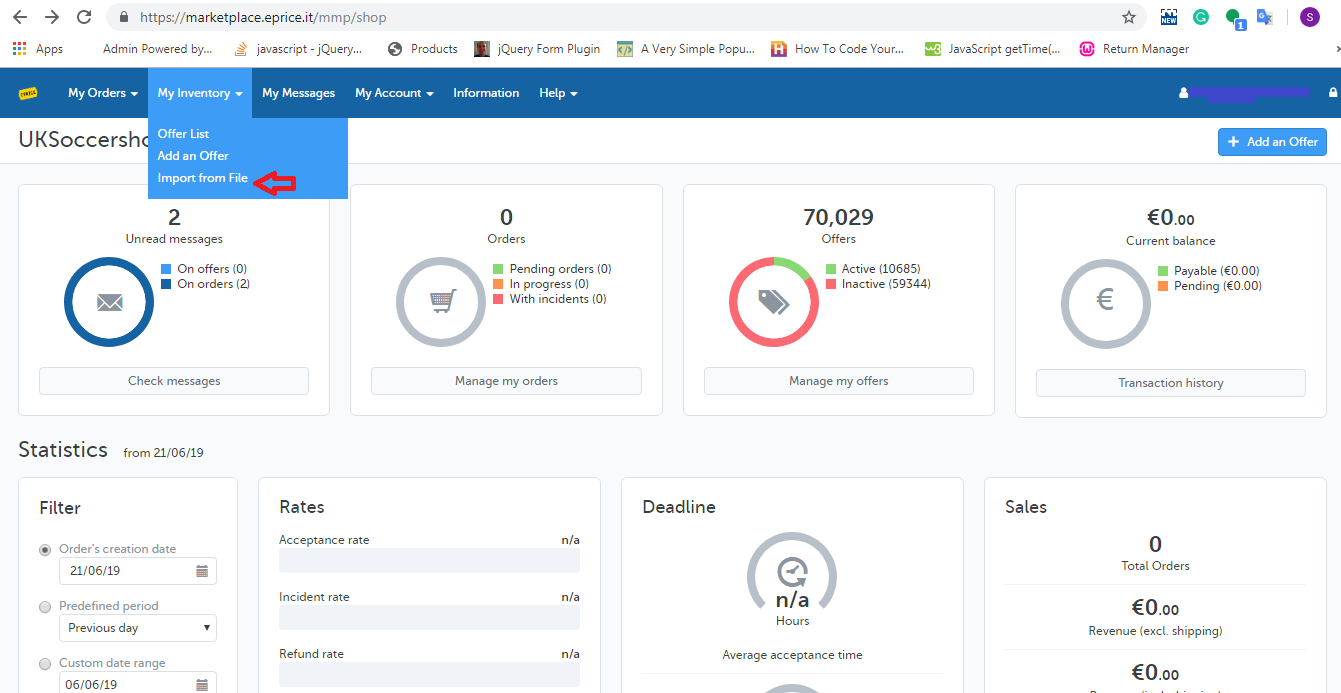
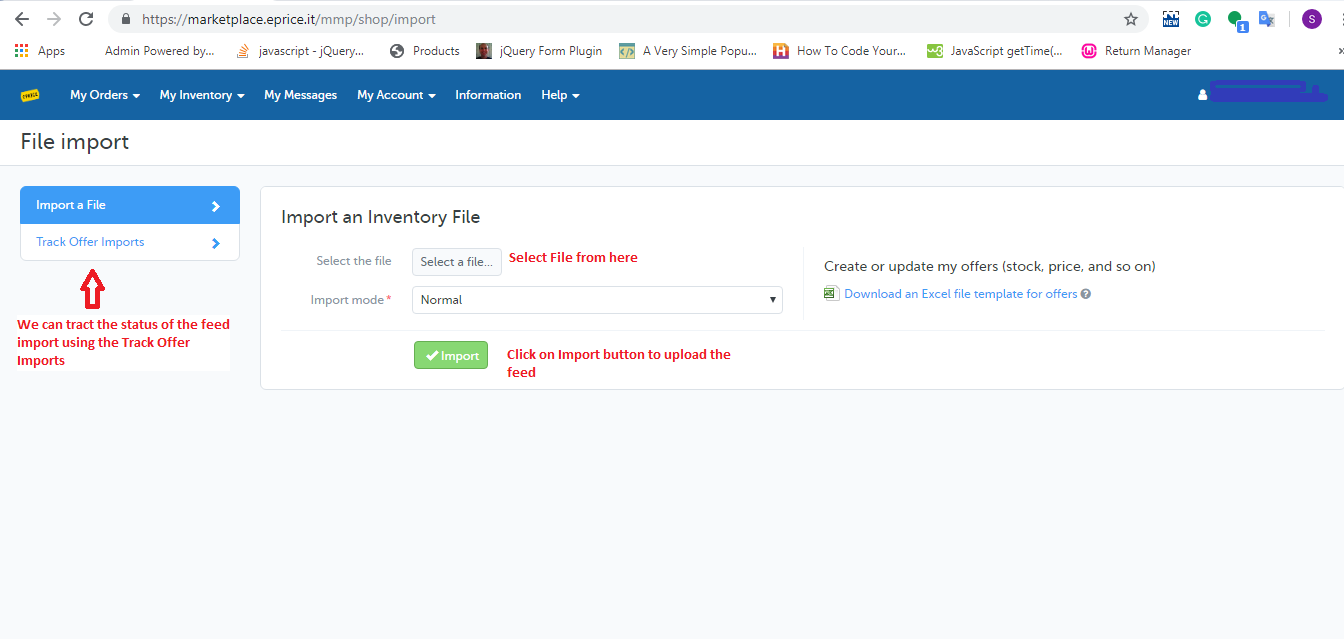
3. Open My Inventory tab and choose the “Import From File” option as shown below:
4. Upload the Offer Feed (which you have created) from the import page of eprice as shown below:
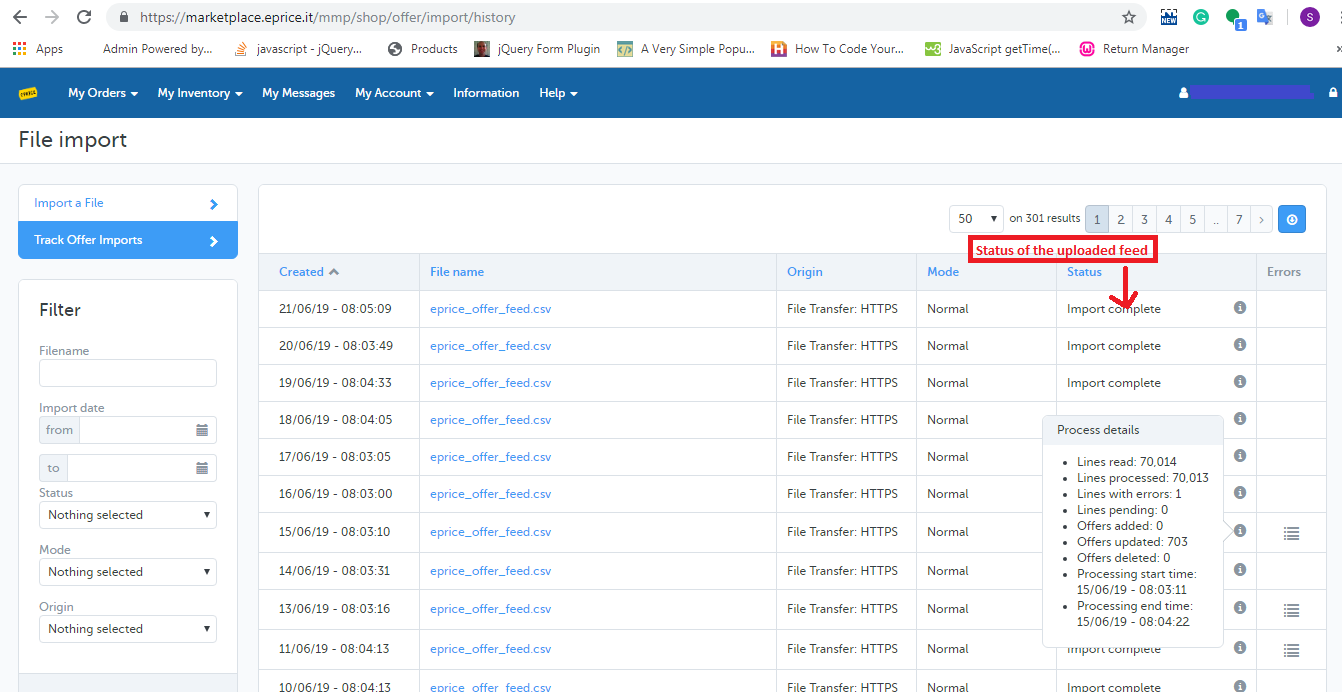
5. You can also check the status of the feed that you have uploaded by clicking “Track Offer Import”. On clicking the “Track Offer Import” option, the history page will be opened which shows a list of the uploaded feed with their processing status. You can check the same from the below image.
This blog helps us to learn how a seller can delete its products from the Newegg marketplace.
Methods to delete Products from the Newegg marketplace
You can delete products from the Newegg marketplace by using seller account
Delete manually from seller account
1. Open the Newegg seller portal (URL- https://sellerportal.newegg.com).
2. Fill the credentials (User Name and Password) and click on the Login button.
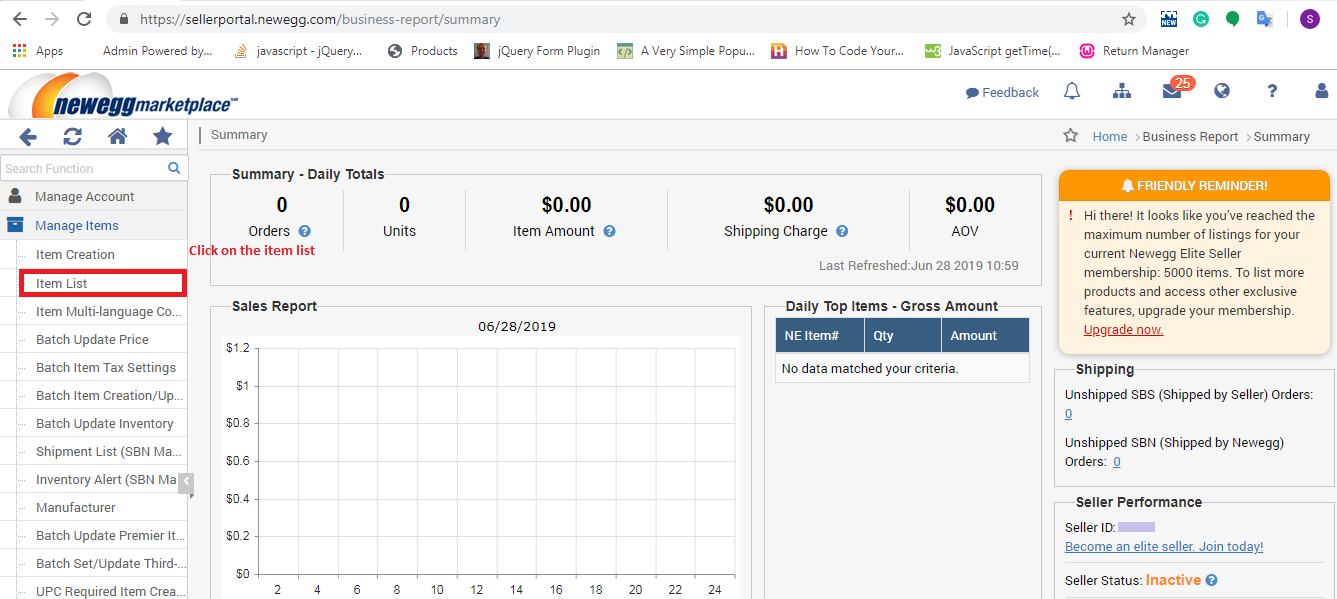
3. After logging in you have to select the “Item List” from the “Manage Items” section as shown in the image below:
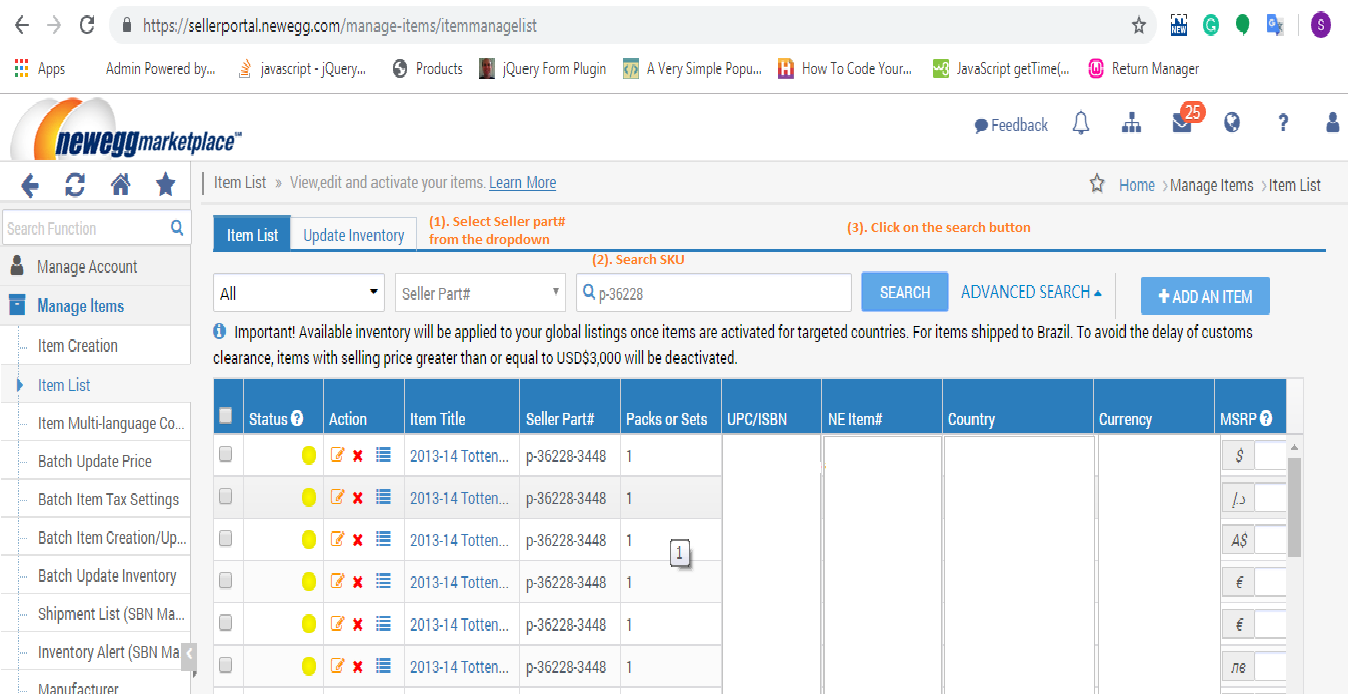
4. In the Item list page, you will need to click on the Search button after entering the SKU in the search box as shown in the image below.
5. On clicking the search button, the searched SKU list will be appeared where you need to follow the following steps to delete the products.
I.Check the checkbox of the products.
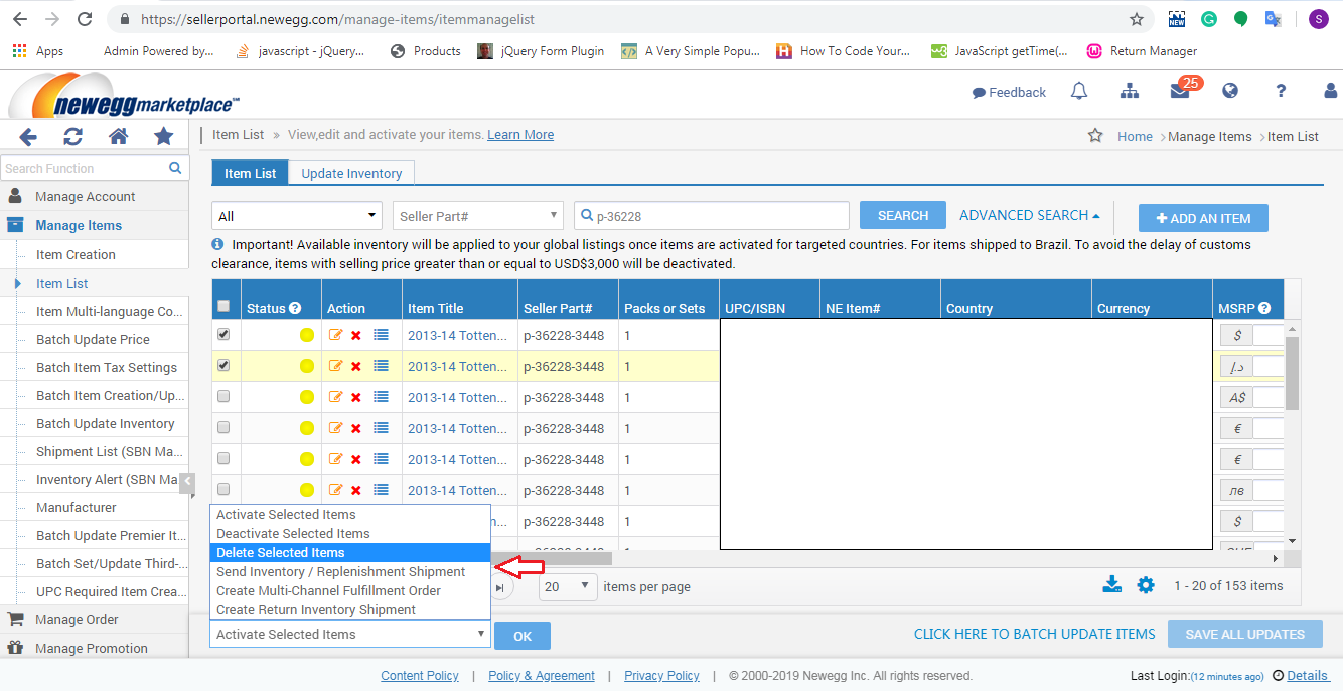
II.Select the “Delete Selected Item” option from the drop-down (located at the lower of the page) and click on the OK button to delete the selected product as shown in the below image:
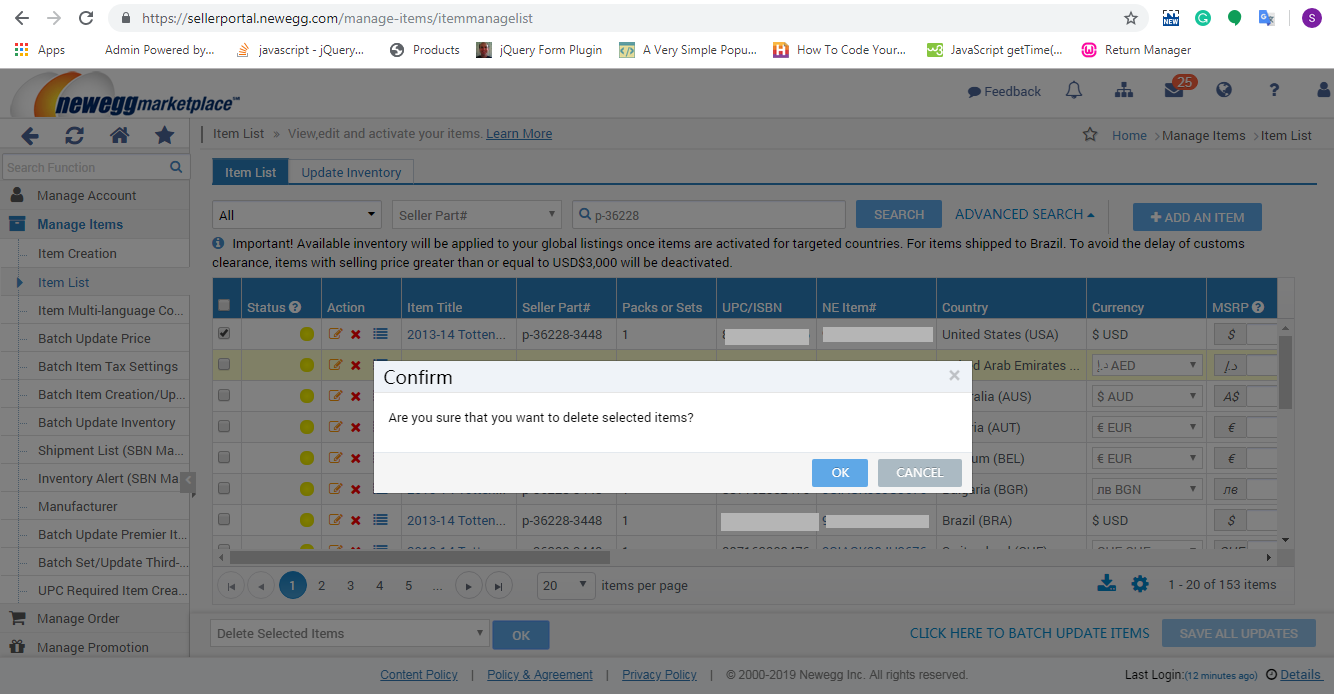
6. On clicking the OK button, a popup will be displayed on the screen for the confirmation and you will need to click on the OK button of the popup to delete the selected products as shown in the image below:
Summary
This blog helps you (seller) to delete your products from the Newegg marketplace.
After reading this blog, you can understand how the seller can delete the products from MercadoLibre marketplace.
Method to delete Products from MercadoLibre Marketplace:
You can delete products from MercadoLibre marketplace by two methods:
Delete manually from the merchant account
Using CSV file.
1. Delete manually from the merchant account
1. Login into MercadoLibre merchant account (URL: https://cbt.mercadolibre.com/secure/login/merchant/).
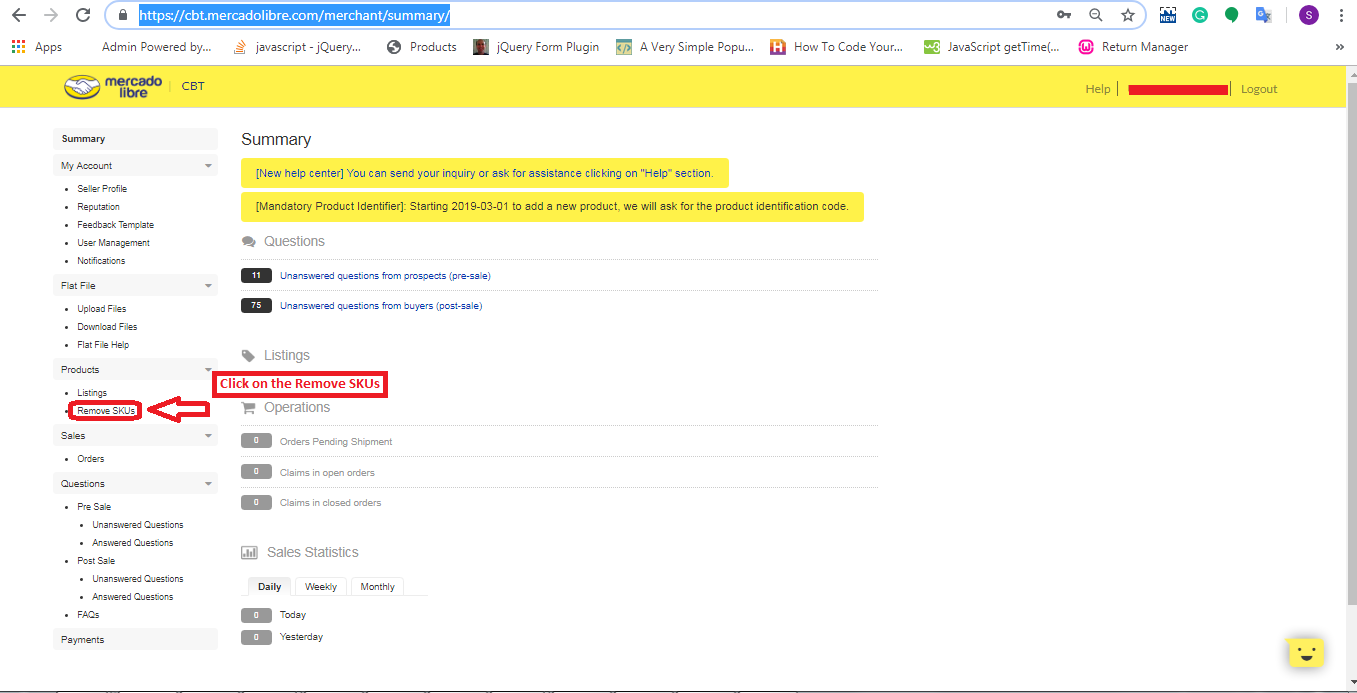
2. After login, you will be redirected to the summary page where you will need to click on the “Remove SKUs” link on the left side as shown in the image below:
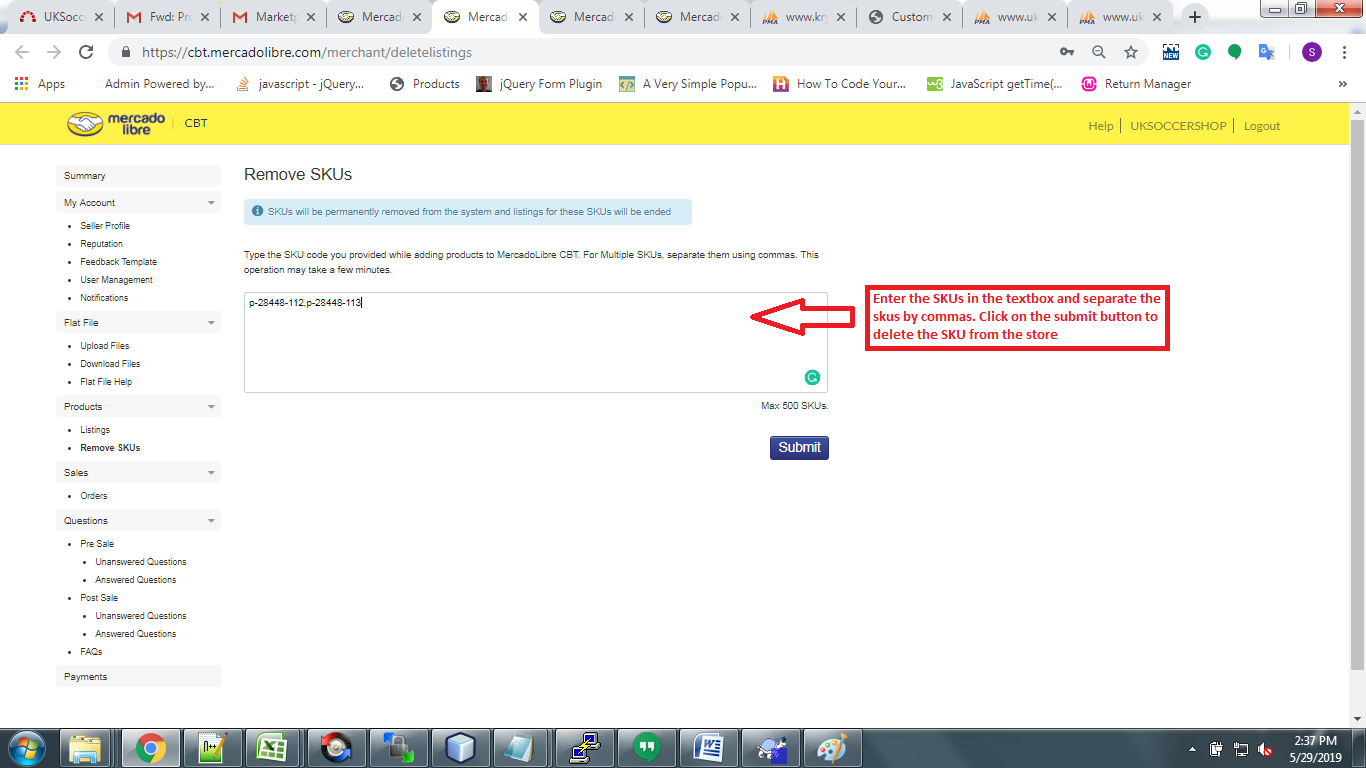
3. Then, You will need to enter product SKUs in the textbox and click on the submit button to delete as shown in the image below:
2. Using csv file
You can delete products in bulk from Mercadolibre marketplace using a CSV file.
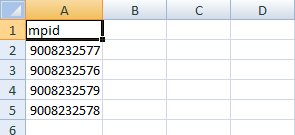
1) Create a “CSV” File with a column name: “mpid” and add all the MPID.
Example:
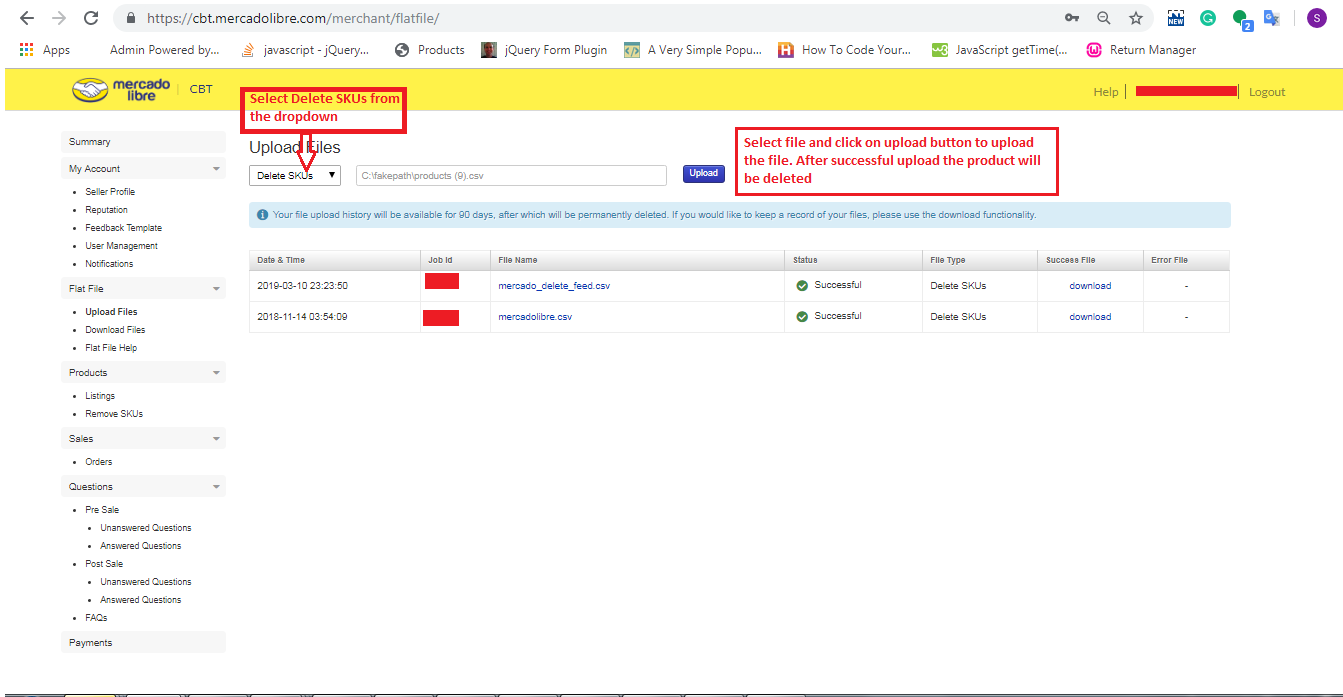
2) Go to the Merchant Portal -> Flat Files -> Upload Files
Select “Delete SKUs” option
Here you can upload CSV file that you have created in step 1 to delete the products as shown in the image below:
Hope it helps. Do let me know in the comments in case of any confusion.
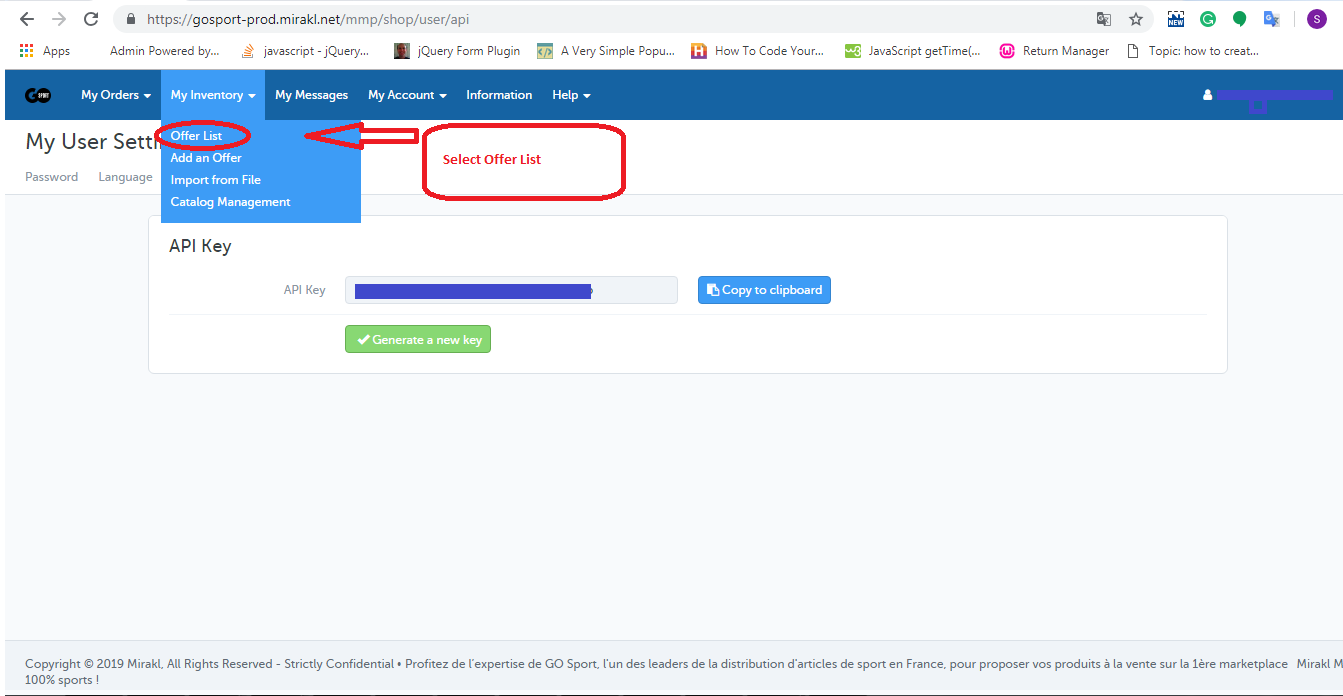
2. After logging you will need to select the offer list from the “My Inventory” tab as shown in the image given below:
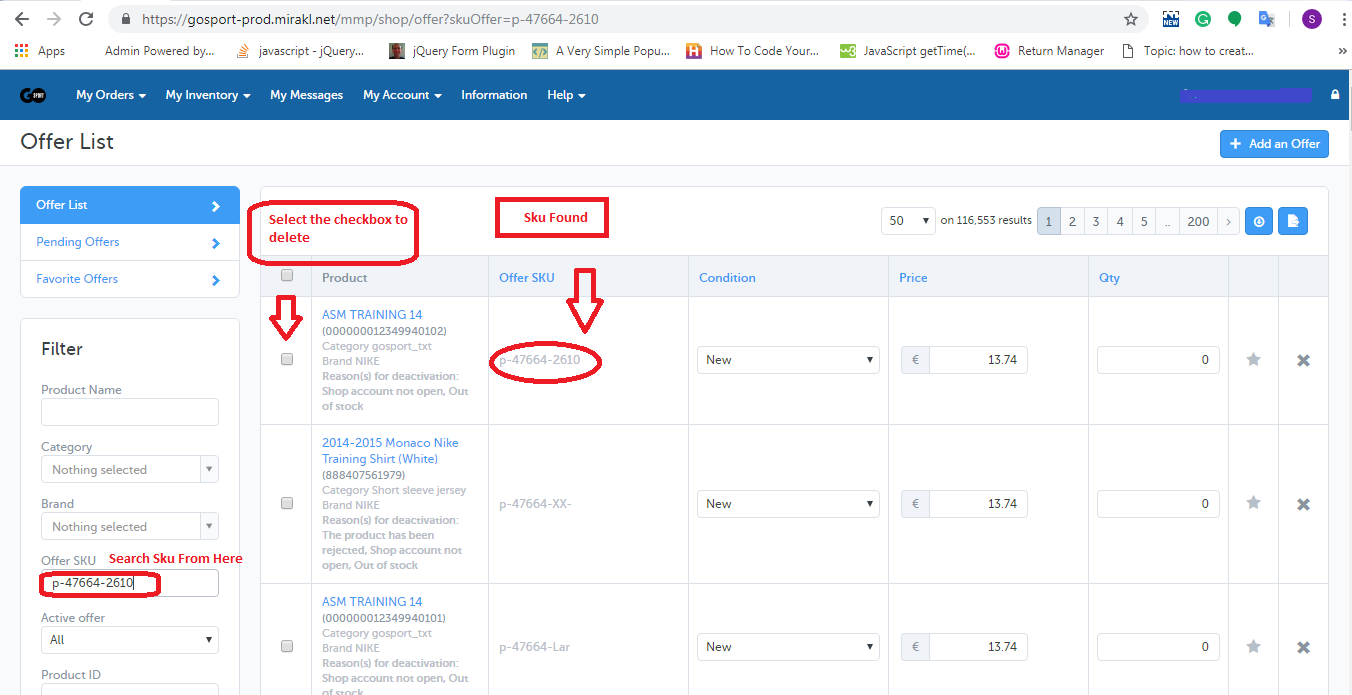
3. In the offer list page, you will need to search the SKU by using “Offer SKU” field and check the checkboxes corresponding to those SKU which you want to delete as shown in the image below.
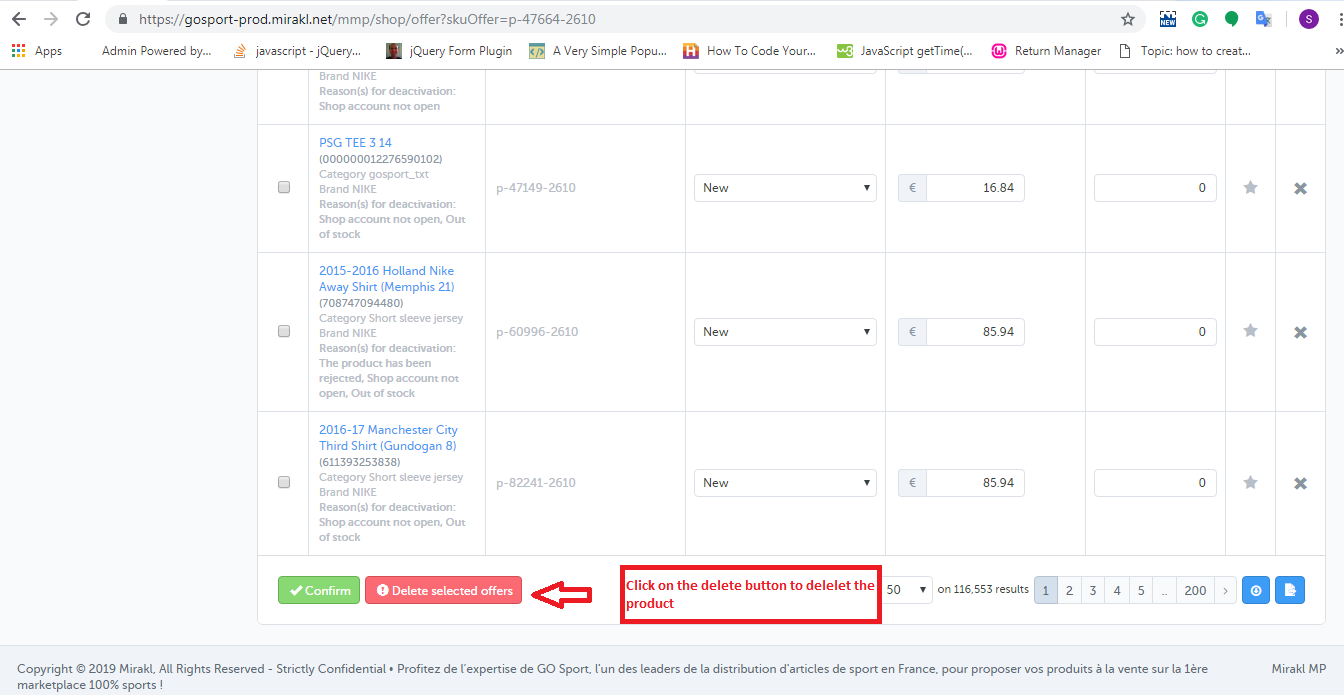
4. At the bottom of the page, you will find a button to delete the product as shown in the image below.
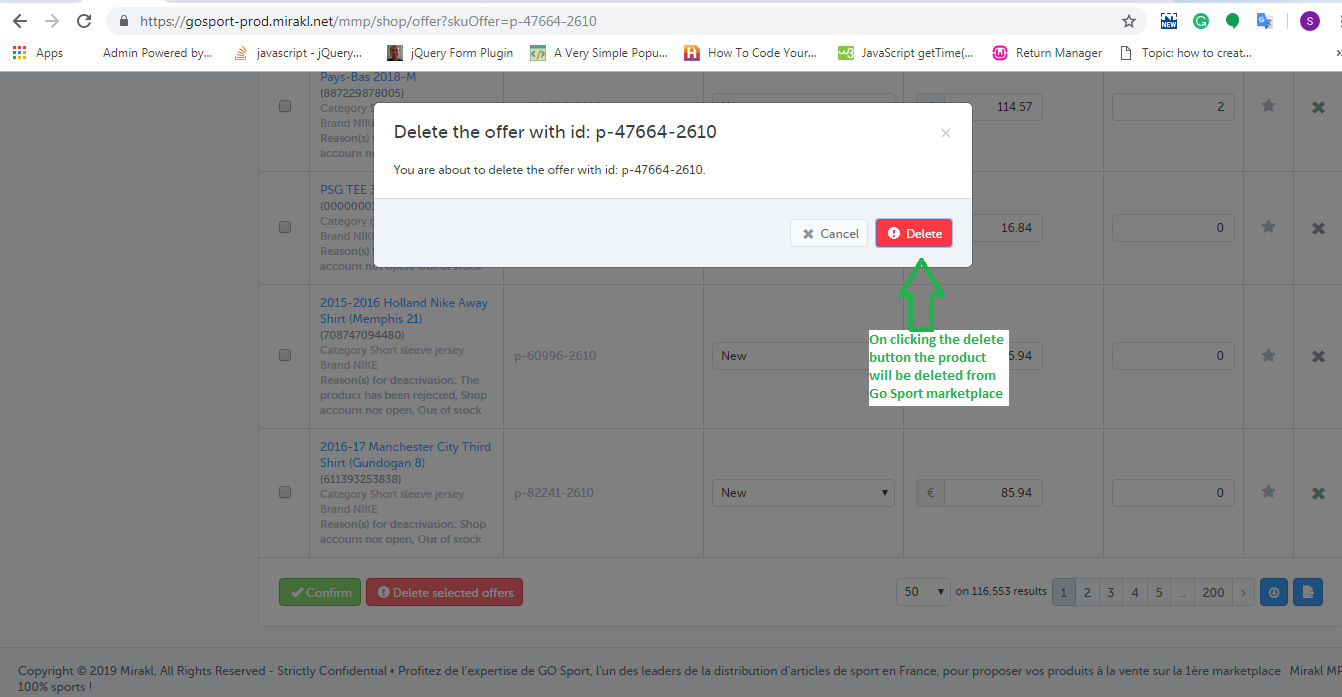
5. On clicking that button, a popup will be appeared on the screen which will show the list of SKUs that you have selected to delete and the button to delete those SKUs. This is shown in the image below:
2.0 Using Inventory Feed
You can delete the products in bulk from the Go Sport marketplace using inventory feed. You can download the sample inventory feed from the link given below:
In this feed, you need to fill the data in the following fields:
SKUs: Enter the SKU which you want to delete
update-delete: Enter “DELETE” in this column. After creating the feed, you will need to upload the feed on the Go Sport merchant account. The steps are given below:
2. After logging in, you will need to select the “Import From File” option from the “My Inventory” tab.
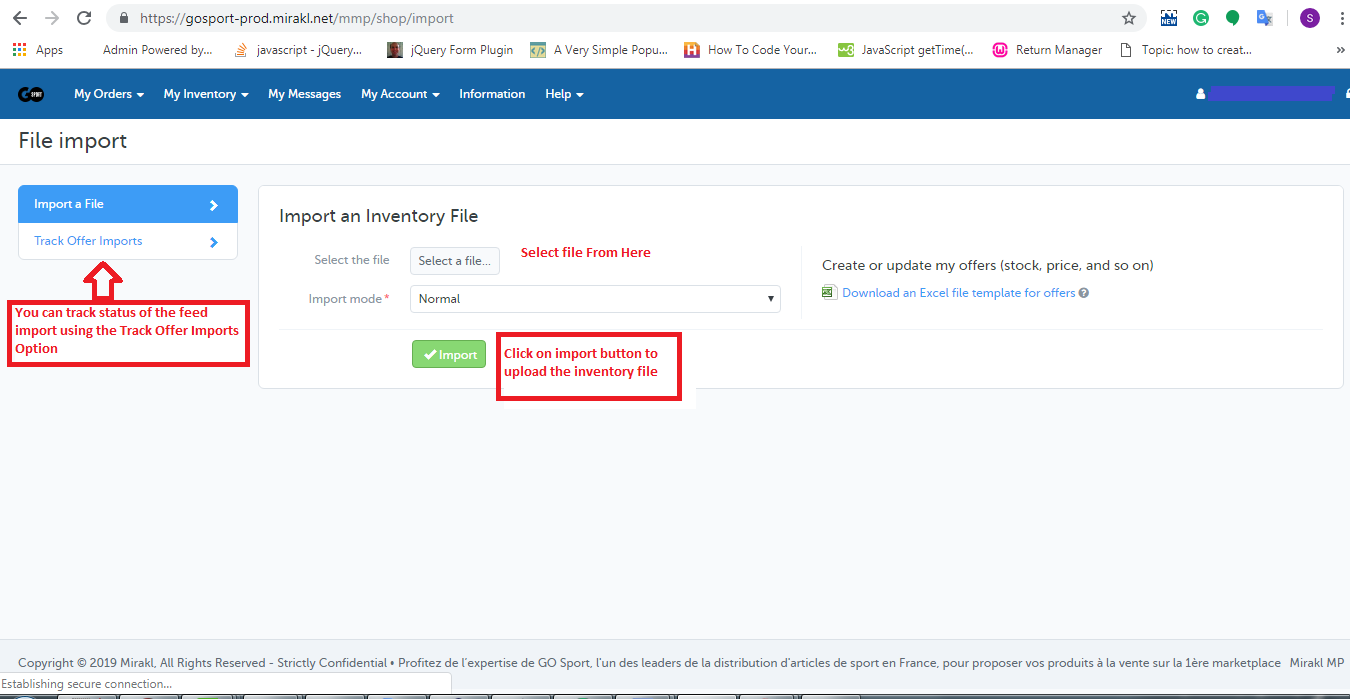
3. On the Import file page, you will need to upload the feed as shown in the image:
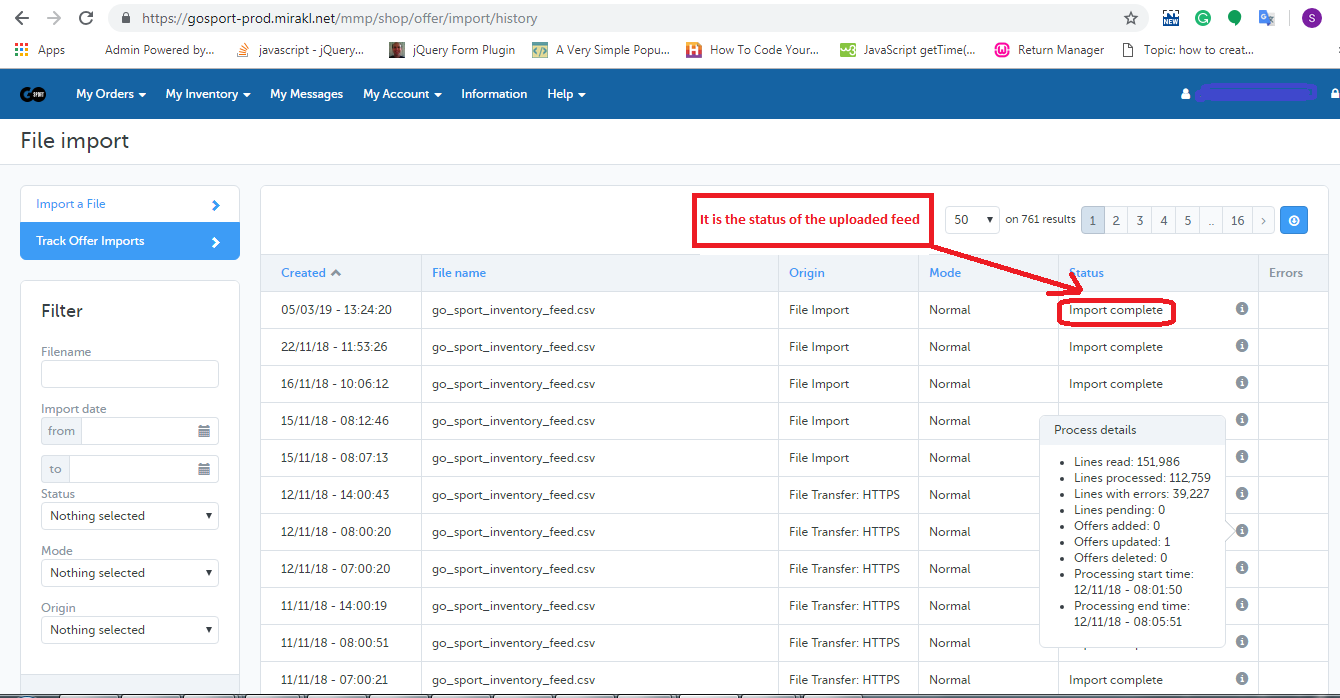
4. You can track the status of the uploaded feed using Track Offer Import Option as shown in the image given above. On clicking on the Track Offer Import option, a new page will be opened where you can check the status of the uploaded feed. If the feed is imported successfully then you can also check the processing status of the feed as shown in the image below:
Summary
After reading this document you (seller) can easily delete your products from the Go Sport marketplace.