We boast of the best in the industry plugins for eCommerce systems and has years of experience working with eCommerce websites.
We provide best plugins for platforms like - Magento, Prestashop, OpenCart and Shopify. We also provide custom module development and customization services for the website and modules.
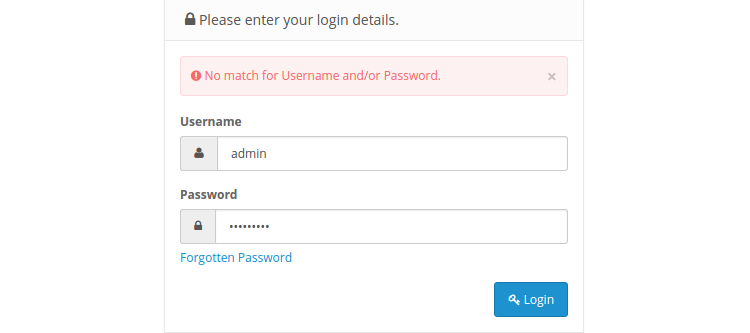
Zazwyczaj dzieje się tak, gdy zapomniałeś lub zgubiłeś hasło logowania administratora, a nawet nie możesz go odzyskać za pomocą zapomnianego linku do hasła.
W takim przypadku jedynym sposobem na odzyskanie dostępu do panelu administracyjnego jest zresetowanie hasła bezpośrednio z
Zanim przejdziemy dalej, zalecamy na wszelki wypadek wykonanie kopii zapasowej całej bazy danych.
Musisz wykonać następujące kroki, aby zresetować hasło użytkownika admin OpenCart.
Krok # 1: Zaloguj się do
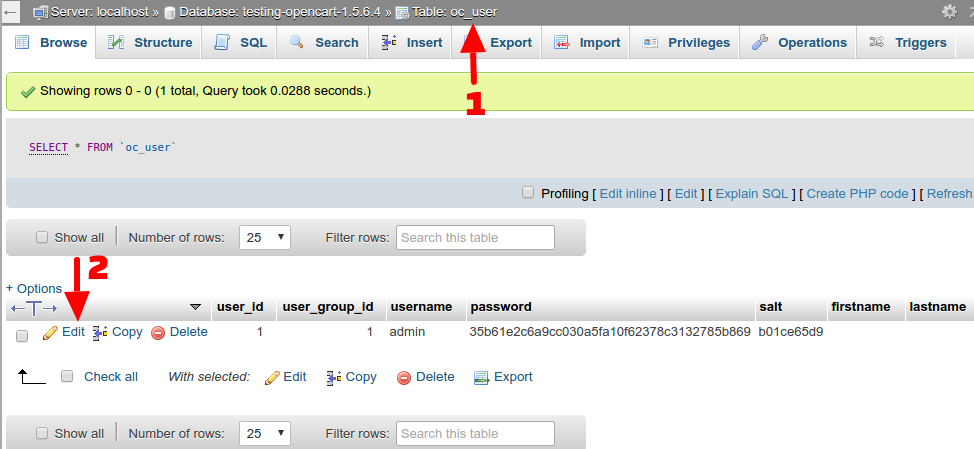
Krok # 2: Kliknij swoją nazwę bazy danych i otwórz tabelę oc_user (zakładamy tutaj, że twój prefiks bazy danych to oc_).
Krok # 3: Teraz kliknij przycisk edycji na swojej nazwie użytkownika.
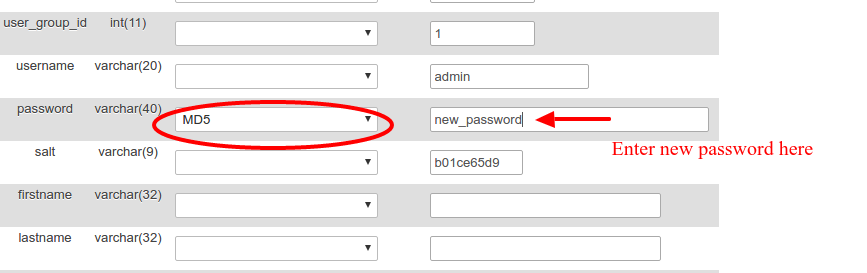
Krok # 4: Teraz wybierz pole md5 dla hasła i wprowadź nowe hasło.
Krok # 5: Kliknij przycisk Go poniżej, aby zresetować hasło.
Krok # 6: Teraz powinieneś być w stanie zalogować się do panelu administracyjnego za pomocą nowego hasła.
Na maioria das vezes, isso acontece quando você esquece ou perde sua senha de login de administrador e nem consegue recuperá-la usando o link de senha esquecida.
Neste caso, a única maneira de recuperar o acesso ao painel de administração é redefinir a senha diretamente do
Antes de prosseguir, recomendamos que você faça backup de seu banco de dados completo, apenas no caso.
Você precisa executar as seguintes etapas para redefinir sua senha de usuário administrador do Opencart.
Etapa # 1: Logar em
Etapa # 2: Clique no nome do seu banco de dados e abra a tabela oc_user (estamos assumindo aqui que o prefixo do seu banco de dados é oc_).
Etapa # 3: Agora clique no botão de edição em seu nome de usuário.
Etapa # 4: Agora, selecione md5 para o campo Senha e insira sua nova senha.
Etapa # 5: Clique no botão Ir abaixo para redefinir sua senha.
Etapa # 6: Agora, você deve poder acessar o painel de administração com sua nova senha.
There are times when the store visitors land up on the website looking for a product, but leaves the website because the product are not in stock .They find the same on some other stores and you lose a conversion. You’ll never know why the visitors left your site without purchasing anything. In order to find the problem and rectify the issue, you must enhance customer’s engagement with your site, so that, you can get them back if they are leaving your store for this reason.
Here store owner can change the various settings of this Prestashop plugin according to requirements, which will be reflected on front end as well as in admin panel.
To install this plug-in, please follow the following steps:
1. Add all whole plugin folder to the modules folder into the root directory of the PrestaShop Store.
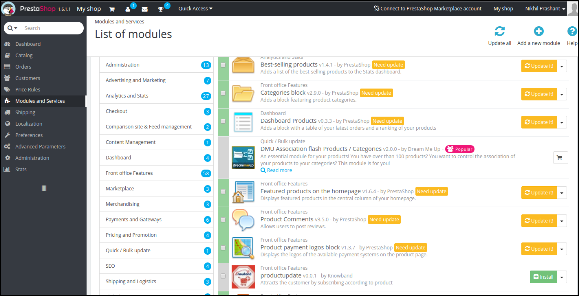
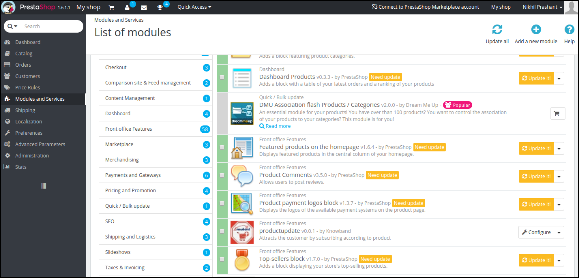
2. After adding plug-in files, the system will list the plug-in on module page.
3. Click on install/uninstall according to need.
4. Another way is, you can zip the whole folder and then click on Add New Module link displaying on top right corner of module listing page as shown in below screen:
5. After installing this Prestashop module, Configure link will be displayed instead of Install link as shown in below screen:
6. Now, your Prestashop out of stock subscription module is ready to use and click on Configure link to configure module.
Admin Interface
After installing this Prestashop notification addon, the admin will get following interfaces:
General Settings
Request for Notification Email Settings
Notification Email Setting
Analysis
General Settings
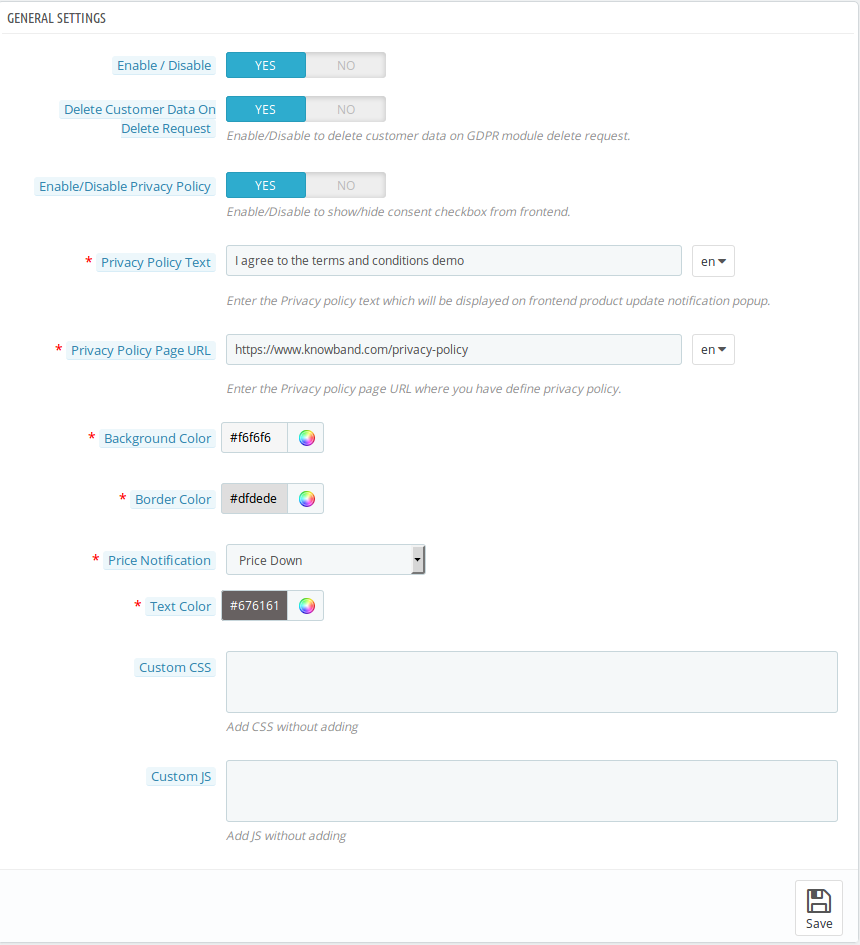
When you click on configure button, system will open general setting field by default. This field has following options:
Initially fields in above form will be already filled with their default values.
Enable/Disable: Initially, this Prestashop out of stock notification addon by Knowband is set to NO option. You must need to set this to YES in order to get the benefits of the addon.
Delete Customer Data on Delete Request: Enabling this functionality will enable the option for the customers to request for personal data deletion.
Enable/Disable Privacy Policy: The Prestashop product update notification module allows the admin to display or hide the privacy policy at front end.
Privacy Policy Text: This field of the Prestashop product update module allows the admin to set the desired privacy policy text. The privacy policy text can be edited whenever needed.
Privacy Policy URL: The admin can link the privacy policy to the desired choice of URL. The URL can also changed whenever required.
Background Color: This field of Prestashop product update notification addon is filled with some default value at initial level. Admin can change the background color of the subscription box by selecting a color from the color picker which will be reflected at the front end.
Border Color: In this field, the admin can change the border color of the subscription box according to his preference.
Price Notification: This field of the product update notifcation Prestashop provides the admin to select the type of price level to notify subscribers. The admin can either select Price Down, Price Up or Both type of price level.
Text Color: The respective Prestashop plugin even allows the admin to customize the text-color of the subscription box as per his choice.
Custom CSS & JS: Both of these option allows to the admin to change the look and feel of this Prestashop in stock notification addon by Knowband.
Request for Notification Email Settings:
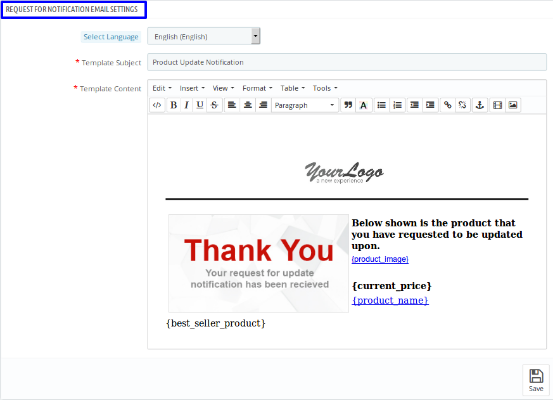
Once you select the language, following fields will be shown:
Select Language: In this field of Prestashop product update addon, the admin can select from four of the languages, i.e. English, French, Spanish & Italian.
Template Subject: Here, the admin can enter the text of his choice as subject. By default, the subject of the email is Product Update Notification.
Template Content: This is the body of the email that user receives after subscription. The admin can modify the text as per his preferences.
Notification Email Settings
The admin can manage the following two things under this category of Prestashop out of stock subscription module by Knowband:
Product Quantity Update Notification
Product Price Update Notification
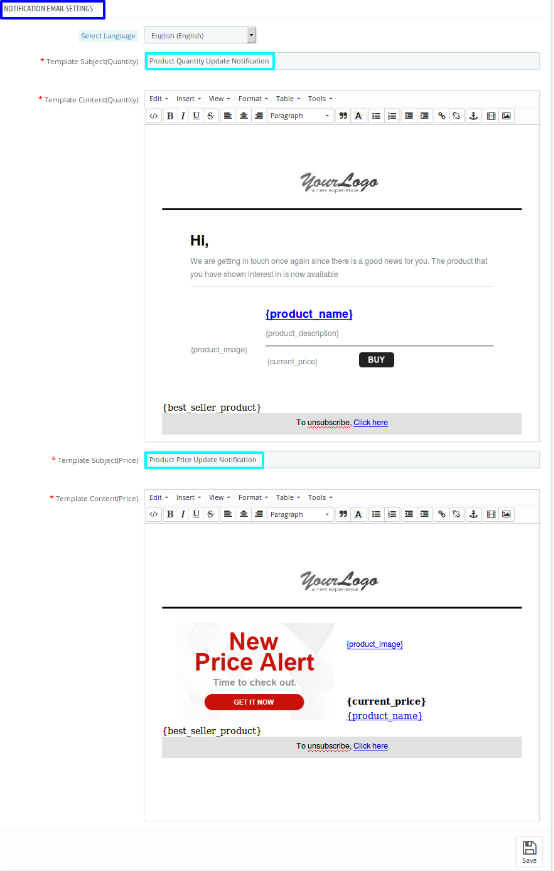
Once you select the language of your choice, you’ll be able to see following settings:a.
Product Quantity Update Notification: Product Quantity Update Notification is the template subject of the email. This is for the Out of Stock products. When the product, for which, customer has subscribed will be in stock then this email will be sent to the subscribers automatically. The admin can change the template subject and template content as per his choice.
Product Price Update Notification: This is the second part of the Notification Email Setting have Product Price Update Notification as template subject. This is for when there is change in the product price according to your setting that you have saved in General Setting under “Price Notification” field. Here, also, the admin can change the template subject and template content as per his choice.
Analysis:
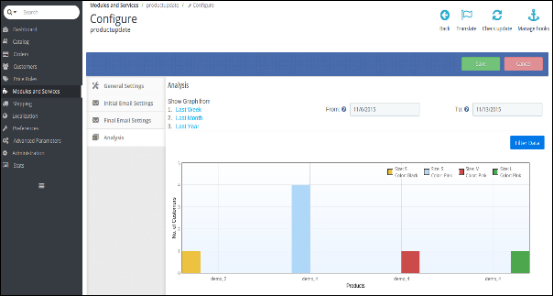
In analysis section of this Prestashop product update notification addon, the admin can see the overall report of subscribed product and customers in the form of graph and in the form of detailed list as well. When you select a date range, the graph will be displayed the top 10 products.
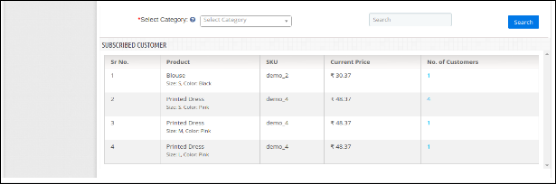
With the help of selected category and search element, the admin can see all the details about subscribed products along with the number of customer subscribed. For more details of the subscribed customer, admin will just need to click on the “number of customer”. By doing so, he can see the details about the subscribed customer in the pop-up menu.
Front End Module:
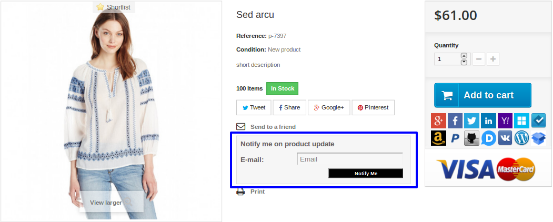
Once you enable this Knowband Prestashop notification addon at the back end, user will see the subscription box at the product page. The box contains a input field to enter the email id and a Notify Me button, through which, the customer will be subscribed to the respective product.
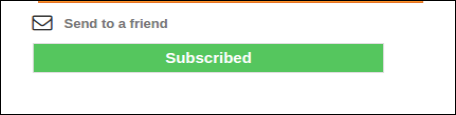
When a customer enters the email id and clicks to the button notify me the initial email will be sent to the entered email address and the message showing subscribed.
There will be a case when the entered email for subscription and the respective already exist, in that case the subscriber will be updated and the updated email will be sent again to the email.
Es gibt Zeiten, wenn die Ladenbesucher auf der Web site nach einem Produkt landen, aber die Web site verlassen, weil das Produkt nicht auf Lager ist. Sie finden das selbe auf einigen anderen Speichern und Sie verlieren eine Umwandlung. Sie werden nie wissen, warum die Besucher Ihre Website verlassen haben, ohne etwas gekauft zu haben. Um das Problem zu finden und das Problem zu beheben, müssen Sie die Interaktion des Kunden mit Ihrer Website verbessern, sodass Sie sie zurückerhalten können, wenn sie Ihr Geschäft aus diesem Grund verlassen.
Das Prestashop Produkt Updated Notification Modul des Knowbands ist DSGVO konform.
Schritte für die Installation von Prestashop Product Update Notification Addon
1. Ordnerstruktur des Plug-Ins für Produktaktualisierungen
2. Kopieren Sie den gesamten Ordner, der als Produktupdate bezeichnet wird, in Ihren Modulordner des Stammverzeichnisses Ihres PrestaShop-Speichers über FTP.
3. Sie können das Produktupdate-Plug-In für die Installation in den Modulen in Ihrem PrestaShop-Shop wie unten gezeigt finden.
4. Klicken Sie auf den Link Installieren, um das Programm zu installieren Prestashop-Plugin.
Admin-Modul
Hier kann der Shop-Inhaber die verschiedenen Einstellungen dieses Prestashop-Plugins entsprechend den Anforderungen ändern, die sowohl im Frontend als auch im Admin-Panel berücksichtigt werden.
Befolgen Sie die folgenden Schritte, um dieses Plug-in zu installieren:
1. Fügen Sie den gesamten Plugin-Ordner zum Modul-Ordner in das Stammverzeichnis des PrestaShop Stores hinzu.
2. Nach dem Hinzufügen von Plug-in-Dateien listet das System das Plug-in auf der Modulseite auf.
3. Klicken Sie je nach Bedarf auf Installieren / Deinstallieren.
4. Eine andere Möglichkeit besteht darin, den gesamten Ordner zu komprimieren und dann auf den Link Add New Module (Neuer Modul hinzufügen) zu klicken, der oben rechts auf der Modullistenseite angezeigt wird, wie in der folgenden Abbildung gezeigt:
5. Nach der Installation dieses Prestashop-Moduls wird der Link Konfigurieren anstelle des Links Installieren angezeigt, wie in der folgenden Abbildung dargestellt:
6. Jetzt ist Ihr Prestashop Out-of-Stock-Abonnementmodul einsatzbereit und Sie klicken auf Konfigurieren, um das Modul zu konfigurieren.
Admin-Schnittstelle
Nach der Installation dieses Prestashop-Benachrichtigungs-Addons erhält der Administrator folgende Schnittstellen:
Allgemeine Einstellungen
Anfrage für Benachrichtigungs-E-Mail-Einstellungen
Benachrichtigungs-E-Mail-Einstellung
Analyse
Allgemeine Einstellungen
Wenn Sie auf die Schaltfläche Konfigurieren klicken, öffnet das System standardmäßig das Feld für allgemeine Einstellungen. Dieses Feld hat folgende Optionen:
Anfänglich sind Felder in der obigen Form bereits mit ihren Standardwerten gefüllt.
Aktivieren deaktivieren: Anfangs ist dieses Prestashop Out of Notification Addon von Knowband auf NO gesetzt. Sie müssen dies auf YES setzen, um die Vorteile des Addons zu nutzen.
Löschen Sie Kundendaten in der Löschanforderung: Wenn diese Funktionalität aktiviert wird, können die Kunden die Löschung persönlicher Daten beantragen.
Aktivieren / Deaktivieren der Datenschutzrichtlinie: Das Prestashop-Produktupdatbenachrichtigungsmodul ermöglicht es dem Administrator, die Datenschutzrichtlinie am Frontend anzuzeigen oder auszublenden.
Datenschutzrichtlinie Text: In diesem Feld des Prestashop-Produktaktualisierungsmoduls kann der Administrator den gewünschten Datenschutzrichtlinientext festlegen. Der Text der Datenschutzrichtlinie kann bei Bedarf geändert werden.
Datenschutz URL: Der Administrator kann die Datenschutzrichtlinie mit der gewünschten URL-Auswahl verknüpfen. Die URL kann auch bei Bedarf geändert werden.
Hintergrundfarbe: Dieses Feld des Prestashop-Produktupdate-Benachrichtigungs-Addons ist auf der Ausgangsebene mit einigen Standardwerten gefüllt. Der Administrator kann die Hintergrundfarbe der Subskriptionsbox ändern, indem er eine Farbe aus der Farbauswahl auswählt, die am Frontend reflektiert wird.
Randfarbe: In diesem Feld kann der Administrator die Rahmenfarbe der Abo-Box nach seinen Wünschen ändern.
Preisbenachrichtigung: Dieses Feld der Produktaktualisierungsbenachrichtigung Prestashop bietet dem Administrator die Möglichkeit, den Preistyp für die Benachrichtigung der Abonnenten auszuwählen. Der Administrator kann entweder "Preis runter", "Preis aufwärts" oder "Beide" auswählen.
Textfarbe: Mit dem entsprechenden Prestashop-Plugin kann der Administrator sogar die Textfarbe der Abo-Box nach Belieben anpassen.
Benutzerdefiniertes CSS und JS: Beide Optionen ermöglichen es dem Administrator, das Aussehen und Verhalten dieses Prestashop im Add-on-Addon von Knowband zu ändern.
Anfordern
Einmal
Sprache wählen: In diesem Bereich des Prestashop-Produktupdate-Addons kann der Administrator aus vier Sprachen auswählen, dh Englisch, Französisch, Spanisch und Italienisch.
Vorlage Betreff: Hier kann der Administrator den Text seiner Wahl als Betreff eingeben. Der Betreff der E-Mail ist standardmäßig die Produktaktualisierungsbenachrichtigung.
Vorlageninhalt: Dies ist der Hauptteil der E-Mail, die der Nutzer nach dem Abonnement erhält. Der Administrator kann den Text gemäß seinen Einstellungen ändern.
Benachrichtigung
Das
Produkt
Produkt
Einmal
Benachrichtigung über Produktmengenaktualisierung: Produktmengenaktualisierungsbenachrichtigung ist der Vorlagen-Betreff der E-Mail. Dies ist für die Out of Stock Produkte. Wenn das Produkt, für das sich der Kunde angemeldet hat, vorrätig ist, wird diese E-Mail automatisch an die Abonnenten gesendet. Der Administrator kann den Vorlageninhalt und den Vorlageninhalt nach seiner Wahl ändern.
Produktpreisaktualisierungsbenachrichtigung: Dies ist der zweite Teil der Benachrichtigungs-E-Mail-Einstellung, der die Produktpreisaktualisierungsbenachrichtigung als Vorlage unterliegt. Dies ist der Fall, wenn sich der Produktpreis gemäß Ihrer Einstellung ändert, die Sie in der Allgemeinen Einstellung unter "Preisbenachrichtigung" gespeichert haben. Auch hier kann der Administrator den Vorlagen- und Vorlageninhalt nach seiner Wahl ändern.
Analyse:
Im Abschnitt "Analyse" dieses Prestashop-Produktsupdate-Benachrichtigungs-Addons kann der Administrator den Gesamtbericht des abonnierten Produkts und der Kunden in Form eines Diagramms und in Form einer detaillierten Liste anzeigen. Wenn Sie einen Datumsbereich auswählen, werden in der Grafik die besten 10-Produkte angezeigt.
Mithilfe der ausgewählten Kategorie und des Suchelements kann der Administrator alle Details zu abonnierten Produkten zusammen mit der Anzahl der abonnierten Kunden anzeigen. Für weitere Details des abonnierten Kunden muss der Administrator nur auf die "Nummer des Kunden" klicken. Auf diese Weise kann er im Popup-Menü die Details zum abonnierten Kunden sehen.
Vorderseite
Sobald Sie dieses Knowband Prestashop-Benachrichtigungs-Add-On am Backend aktiviert haben, wird der Benutzer die Abonnement-Box auf der Produktseite sehen. Die Box enthält ein Eingabefeld zur Eingabe der E-Mail-ID und eine Schaltfläche Benachrichtigen, über die der Kunde das jeweilige Produkt abonniert.
Wenn ein Kunde die E-Mail-ID eingibt und auf die Schaltfläche klickt, wird mir mitgeteilt, dass die ursprüngliche E-Mail an die eingegebene E-Mail-Adresse und die Nachricht mit dem Abonnement gesendet wird.
Es wird einen Fall geben, wenn die eingegebene E-Mail für das Abonnement und die entsprechenden bereits existieren, in diesem Fall wird der Abonnent aktualisiert und die aktualisierte E-Mail wird erneut an die E-Mail gesendet.
Fühlen Sie sich frei, uns unter support@knowband.com für jede Anfrage oder benutzerdefinierte Änderung Anfrage gemäß Ihrer Geschäftsanforderung zu kontaktieren.
Ci sono momenti in cui i visitatori del negozio arrivano sul sito Web alla ricerca di un prodotto, ma lascia il sito Web perché il prodotto non è in magazzino. Trovano lo stesso su altri negozi e perdi una conversione. Non saprai mai perché i visitatori hanno abbandonato il tuo sito senza acquistare nulla. Per trovare il problema e correggere il problema, devi aumentare il coinvolgimento del cliente con il tuo sito, in modo che, se lo desideri, puoi riprenderli se lasciano il tuo negozio per questo motivo.
Il modulo di notifica aggiornato del prodotto Prestashop di Knowband è conforme a GDPR.
Passaggi per l'installazione del componente aggiuntivo di notifica dell'aggiornamento del prodotto Prestashop
1. Struttura delle cartelle della cartella del plugin di aggiornamento del prodotto.
2. Copia l'intera cartella denominata come aggiornamento del prodotto nella cartella dei moduli della directory principale del tuo negozio PrestaShop tramite FTP.
3. Potrai trovare il plug-in di aggiornamento del prodotto pronto per essere installato nei moduli nel tuo negozio PrestaShop come mostrato di seguito.
4. Fare clic sul collegamento Installa per installare il Plug-in Prestashop.
Modulo di amministrazione
Qui il proprietario del negozio può modificare le varie impostazioni di questo plug-in Prestashop in base alle esigenze, che si rifletteranno sul front-end e nel pannello di amministrazione.
Per installare questo plug-in, si prega di seguire i seguenti passi:
1. Aggiungi tutta la cartella di plug-in completa alla cartella dei moduli nella directory principale di PrestaShop Store.
2. Dopo aver aggiunto i file plug-in, il sistema elencherà il plug-in sulla pagina del modulo.
3. Clicca su Installa / Disinstalla secondo necessità.
4. Un altro modo è che puoi comprimere l'intera cartella e fare clic sul link Aggiungi nuovo modulo visualizzato nell'angolo in alto a destra della pagina di elenco dei moduli, come mostrato nella schermata di seguito:
5. Dopo aver installato questo modulo Prestashop, verrà visualizzato il collegamento Configura invece del collegamento Installa come mostrato nella schermata di seguito:
6. Ora, il modulo di abbonamento Prestashop esaurito è pronto per l'uso e fai clic su Configura link per configurare il modulo.
Interfaccia di amministrazione
Dopo aver installato questo addon di notifica Prestashop, l'amministratore otterrà le seguenti interfacce:
Impostazioni generali
Richiesta di impostazioni e-mail di notifica
Impostazioni e-mail di notifica
Analisi
Impostazioni generali
Quando fai clic sul pulsante Configura, il sistema aprirà il campo delle impostazioni generali per impostazione predefinita. Questo campo ha le seguenti opzioni:
Inizialmente i campi nel modulo sopra saranno già riempiti con i loro valori predefiniti.
Attiva / Disattiva: Inizialmente, questo addon di notifica Prestashop esaurito da Knowband è impostato su NO opzione. È necessario impostare questo su SÌ per ottenere i vantaggi dell'add-on.
Elimina i dati cliente sulla richiesta di cancellazione: Abilitando questa funzionalità si abiliterà l'opzione per i clienti di richiedere l'eliminazione dei dati personali.
Abilita / Disabilita l'informativa sulla privacy: Il modulo di notifica di aggiornamento del prodotto Prestashop consente all'amministratore di visualizzare o nascondere la politica sulla privacy al front-end.
Testo della politica sulla privacy: Questo campo del modulo di aggiornamento del prodotto Prestashop consente all'amministratore di impostare il testo della privacy policy desiderato. Il testo della politica sulla privacy può essere modificato ogni volta che è necessario.
URL della privacy: L'amministratore può collegare la politica sulla privacy alla scelta dell'URL desiderata. L'URL può anche essere modificato quando richiesto.
Colore di sfondo: Questo campo di addon di notifica di aggiornamento del prodotto Prestashop viene riempito con un valore predefinito al livello iniziale. L'amministratore può modificare il colore di sfondo della casella di sottoscrizione selezionando un colore dal selettore di colori che verrà riflesso nella parte anteriore.
Colore del bordo: In questo campo, l'amministratore può cambiare il colore del bordo della casella di abbonamento in base alle sue preferenze.
Notifica del prezzo: Questo campo della notifica di aggiornamento del prodotto Prestashop consente all'amministratore di selezionare il tipo di livello di prezzo per informare gli abbonati. L'amministratore può selezionare Prezzo basso, Prezzo alto o Entrambi i tipi di livello di prezzo.
Colore del testo: Il rispettivo plug-in di Prestashop consente anche all'amministratore di personalizzare il colore del testo della scatola di abbonamento come da sua scelta.
CSS e JS personalizzati: Entrambe queste opzioni consentono all'amministratore di modificare l'aspetto grafico di questo Prestashop nell'aggiornamento delle notifiche di Knowband.
Richiesta
Una volta
Scegli la lingua: In questo campo di add-on di aggiornamento del prodotto Prestashop, l'amministratore può selezionare da quattro delle lingue, cioè inglese, francese, spagnolo e italiano.
Oggetto del modello: Qui, l'amministratore può inserire il testo di sua scelta come soggetto. Per impostazione predefinita, l'oggetto dell'e-mail è Notifica di aggiornamento del prodotto.
Contenuto del modello: Questo è il corpo dell'email che l'utente riceve dopo l'iscrizione. L'amministratore può modificare il testo secondo le sue preferenze.
Notifica
Il
Prodotto
Prodotto
Una volta
Notifica aggiornamento quantità prodotto: La notifica di aggiornamento della quantità di prodotto è il modello oggetto dell'e-mail. Questo è per i prodotti Out of Stock. Quando il prodotto, per il quale il cliente è iscritto, sarà disponibile, questa email verrà inviata automaticamente agli abbonati. L'amministratore può modificare l'oggetto del modello e il contenuto del modello secondo la sua scelta.
Notifica aggiornamento prezzo prodotto: Questa è la seconda parte delle impostazioni e-mail di notifica con la notifica di aggiornamento del prezzo del prodotto come oggetto del modello. Questo è per quando c'è un cambiamento nel prezzo del prodotto in base alle impostazioni che hai salvato in Impostazioni generali nel campo "Notifica prezzi". Qui, inoltre, l'amministratore può cambiare l'oggetto del modello e il contenuto del modello secondo la sua scelta.
Analisi:
Nella sezione di analisi di questo addon di notifica di aggiornamento del prodotto Prestashop, l'amministratore può vedere il report complessivo del prodotto sottoscritto e dei clienti sotto forma di grafico e sotto forma di elenco dettagliato. Quando selezioni un intervallo di date, sul grafico verranno visualizzati i prodotti 10 migliori.
Con l'aiuto della categoria selezionata e dell'elemento di ricerca, l'amministratore può vedere tutti i dettagli sui prodotti sottoscritti insieme al numero di clienti iscritti. Per maggiori dettagli sul cliente iscritto, l'amministratore dovrà solo fare clic sul "numero di clienti". In questo modo, può visualizzare i dettagli sul cliente iscritto nel menu a comparsa.
Davanti
Una volta abilitato questo addon di notifica di Knowband Prestashop nel back-end, l'utente vedrà la casella di sottoscrizione nella pagina del prodotto. La casella contiene un campo di immissione per inserire l'ID e un pulsante di notifica, tramite il quale il cliente verrà abbonato al rispettivo prodotto.
Quando un cliente immette l'id dell'email e fa clic sul pulsante, l'email iniziale verrà inviata all'indirizzo e-mail inserito e al messaggio che viene visualizzato.
Ci sarà un caso in cui l'e-mail inserita per la sottoscrizione e la rispettiva già esistente, in tal caso l'abbonato verrà aggiornato e l'e-mail aggiornata verrà inviata nuovamente all'e-mail.
Non esitate a contattarci all'indirizzo support@knowband.com per qualsiasi richiesta o richiesta di modifica personalizzata in base alle vostre esigenze aziendali.
Zdarzają się sytuacje, gdy użytkownicy sklepu trafiają na stronę szukając produktu, ale opuszczają witrynę, ponieważ produkt nie jest dostępny w magazynie. Są takie same w niektórych innych sklepach i tracisz konwersję. Nigdy nie dowiesz się, dlaczego użytkownicy opuścili Twoją witrynę, nie kupując niczego. Aby znaleźć problem i rozwiązać problem, musisz zwiększyć zaangażowanie klientów w witrynie, aby móc je odzyskać, jeśli opuszczą Twój sklep z tego powodu.
Właściciel sklepu może zmienić różne ustawienia tej wtyczki Prestashop zgodnie z wymaganiami, które zostaną odzwierciedlone na interfejsie użytkownika, a także w panelu administracyjnym.
Aby zainstalować tę wtyczkę, wykonaj następujące kroki:
1. Dodaj cały folder wtyczek do folderu modułów do katalogu głównego Sklepu PrestaShop.
2. Po dodaniu plików wtyczek system wyświetli listę wtyczek na stronie modułu.
3. Kliknij na instalację / odinstalowanie zgodnie z potrzebą.
4. Innym sposobem jest skompresowanie całego folderu, a następnie kliknięcie linku Dodaj nowy moduł w prawym górnym rogu strony z listą modułów, jak pokazano na poniższym ekranie:
5. Po zainstalowaniu tego modułu Prestashop, link Konfiguruj zostanie wyświetlony zamiast łącza instalacji, jak pokazano na poniższym ekranie:
6. Teraz Twój Prestashop z modułu subskrypcji magazynowej jest gotowy do użycia i kliknij Konfiguruj łącze, aby skonfigurować moduł.
Interfejs administracyjny
Po zainstalowaniu tego dodatku do powiadomienia Prestashop, administrator otrzyma następujące interfejsy:
Ustawienia ogólne
Żądanie ustawień powiadomień e-mail
Ustawienie wiadomości e-mail z powiadomieniem
Analiza
Ustawienia ogólne
Po kliknięciu przycisku konfiguracji system otworzy domyślnie ogólne pole ustawień. To pole ma następujące opcje:
Początkowo pola w powyższym formularzu będą już wypełnione wartościami domyślnymi.
Włącz / wyłącz: Początkowo ten Prestashop z giełdy powiadomień o stanie zapasów przez Knowband jest ustawiony na opcję NIE. Musisz ustawić to na TAK, aby uzyskać korzyści z dodatku.
Usuń dane klienta na żądanie usunięcia: Włączenie tej funkcji umożliwi opcję żądania usunięcia danych osobowych przez klientów.
Włącz / wyłącz politykę prywatności: Moduł powiadomień o aktualizacji produktu Prestashop umożliwia administratorowi wyświetlenie lub ukrycie polityki prywatności na pierwszym planie.
Tekst polityki prywatności: To pole modułu aktualizacji produktu Prestashop umożliwia administratorowi ustawienie pożądanego tekstu polityki prywatności. Tekst polityki prywatności można edytować w razie potrzeby.
URL polityki prywatności: Administrator może powiązać politykę prywatności z żądanym wyborem adresu URL. Adres URL może również ulec zmianie w razie potrzeby.
Kolor tła: To pole dodatku do powiadomienia o aktualizacji produktu Prestashop jest wypełnione pewną wartością domyślną na poziomie początkowym. Administrator może zmienić kolor tła pola subskrypcji, wybierając kolor z próbnika kolorów, który zostanie odzwierciedlony na interfejsie użytkownika.
Kolor ramki: W tym polu administrator może zmienić kolor ramki subskrypcji zgodnie z własnymi preferencjami.
Powiadomienie o cenie: To pole powiadomienia o aktualizacji produktu Prestashop zapewnia administratorowi wybór typu poziomu cen, aby powiadomić subskrybentów. Administrator może wybrać obniżenie ceny, podwyższenie ceny lub oba rodzaje poziomu cen.
Kolor tekstu: Odpowiednia wtyczka Prestashop pozwala nawet administratorowi dostosować kolor tekstu pola subskrypcji zgodnie z własnym wyborem.
Niestandardowe CSS i JS: Obie te opcje umożliwiają administratorowi zmianę wyglądu i sposobu działania tego Prestashopa w dodatku do powiadomień giełdowych przez Knowband.
Żądanie
Pewnego razu
Wybierz język: W tym polu dodatku do aktualizacji produktu Prestashop administrator może wybrać jeden z czterech języków, tj. Angielskiego, francuskiego, hiszpańskiego i włoskiego.
Temat szablonu: W tym miejscu administrator może wprowadzić wybrany przez siebie tekst jako temat. Domyślnie tematem wiadomości e-mail jest powiadomienie o aktualizacji produktu.
Zawartość szablonu: Jest to treść wiadomości e-mail, którą użytkownik otrzymuje po subskrypcji. Administrator może zmodyfikować tekst zgodnie ze swoimi preferencjami.
Powiadomienie
The
Produkt
Produkt
Pewnego razu
Powiadomienie o aktualizacji ilości produktu: Powiadomienie o aktualizacji ilości produktów jest szablonem wiadomości e-mail. Dotyczy produktów z magazynu. Kiedy produkt, na który klient dokonał subskrypcji, będzie dostępny w magazynie, ten e-mail zostanie automatycznie wysłany do subskrybentów. Administrator może zmienić temat szablonu i zawartość szablonu zgodnie z własnym wyborem.
Powiadomienie o aktualizacji cen produktu: Jest to druga część ustawienia Powiadomienie o e-mailu, które jako temat szablonu ma powiadomienie o aktualizacji cen produktu. Jest tak w przypadku zmiany ceny produktu zgodnie z ustawieniem zapisanym w Ustawieniach ogólnych w polu "Powiadomienie o cenie". Tutaj również administrator może zmienić temat szablonu i zawartość szablonu według własnego wyboru.
Analiza:
W dziale analizy tego dodatku do aktualizacji produktu Prestashop administrator może zobaczyć ogólny raport subskrybowanego produktu i klientów w formie wykresu oraz w postaci szczegółowej listy. Po wybraniu zakresu dat na wykresie zostaną wyświetlone najlepsze produkty 10.
Za pomocą wybranej kategorii i elementu wyszukiwania administrator może zobaczyć wszystkie szczegóły dotyczące subskrybowanych produktów wraz z liczbą subskrybowanych klientów. Aby uzyskać więcej informacji o subskrybowanym kliencie, administrator będzie musiał kliknąć "numer klienta". Dzięki temu może wyświetlić szczegóły dotyczące zasubskrybowanego klienta w wyskakującym menu.
Z przodu
Po włączeniu tego powiadomienia Addband Prestashop na zapleczu użytkownik zobaczy pole subskrypcji na stronie produktu. W polu tym znajduje się pole wprowadzania, w którym można wprowadzić identyfikator e-mail oraz przycisk Powiadom mnie, za pomocą którego klient będzie subskrybować dany produkt.
Gdy klient wprowadzi identyfikator e-mail i kliknie przycisk, powiadom mnie, że pierwsza wiadomość e-mail zostanie wysłana na podany adres e-mail, a wiadomość zostanie wyświetlona zasubskrybowana.
Pojawi się przypadek, w którym wprowadzony adres e-mail dla subskrypcji i odpowiedni już istnieje, w takim przypadku subskrybent zostanie zaktualizowany, a zaktualizowana wiadomość e-mail zostanie wysłana ponownie na adres e-mail.
Há momentos em que os visitantes da loja chegam ao site à procura de um produto, mas deixam o site porque o produto não está em estoque. Eles encontram o mesmo em algumas outras lojas e você perde uma conversão. Você nunca saberá por que os visitantes deixaram seu site sem comprar nada. Para encontrar o problema e corrigir o problema, você deve aprimorar o envolvimento do cliente com seu site, para que você possa recuperá-lo caso esteja deixando sua loja por esse motivo.
Aqui o dono da loja pode alterar as várias configurações deste plugin Prestashop de acordo com os requisitos, que serão refletidos no front end, bem como no painel de administração.
Para instalar este plug-in, siga os seguintes passos:
1. Adicione toda a pasta do plugin à pasta modules no diretório raiz da PrestaShop Store.
2. Depois de adicionar arquivos de plug-in, o sistema listará o plug-in na página do módulo.
3. Clique em instalar / desinstalar de acordo com a necessidade.
4. Outra maneira é, você pode zipar toda a pasta e clicar no link Adicionar Novo Módulo exibido no canto superior direito da página de listagem do módulo, conforme mostrado na tela abaixo:
5. Depois de instalar este módulo Prestashop, o link Configurar será exibido em vez do link Instalar, conforme mostrado na tela abaixo:
6. Agora, seu módulo de assinatura de Prestashop está disponível para uso e clique em Configurar link para configurar o módulo.
Interface de administração
Depois de instalar este addon de notificação Prestashop, o administrador receberá as seguintes interfaces:
Configurações gerais
Solicitação de configurações de e-mail de notificação
Configuração de e-mail de notificação
Análise
Configurações gerais
Quando você clica no botão configurar, o sistema abre o campo de configuração geral por padrão. Este campo tem as seguintes opções:
Inicialmente os campos no formulário acima já estarão preenchidos com seus valores padrão.
Habilitar desabilitar: Inicialmente, este add-on de notificação Prestashop fora de estoque por Knowband é definido como opção NO. Você precisa definir isso como SIM para obter os benefícios do complemento.
Excluir dados do cliente na solicitação de exclusão: A ativação dessa funcionalidade permitirá a opção para os clientes solicitarem a exclusão de dados pessoais.
Ativar / desativar a política de privacidade: O módulo de notificação de atualização do produto Prestashop permite ao administrador exibir ou ocultar a política de privacidade no front end.
Texto da Política de Privacidade: Este campo do módulo de atualização do produto Prestashop permite ao administrador definir o texto desejado da política de privacidade. O texto da política de privacidade pode ser editado sempre que necessário.
URL com Política de Privacidade: O administrador pode vincular a política de privacidade à escolha desejada de URL. O URL também pode ser alterado sempre que necessário.
Cor de fundo: Este campo do addon de notificação de atualização do produto Prestashop é preenchido com algum valor padrão no nível inicial. O administrador pode alterar a cor de fundo da caixa de assinatura selecionando uma cor no seletor de cores que será refletida no front end.
Cor da margem: Nesse campo, o administrador pode alterar a cor da borda da caixa de assinatura de acordo com sua preferência.
Notificação de Preços: Este campo da notifcação de atualização do produto Prestashop fornece ao administrador para selecionar o tipo de nível de preço para notificar os assinantes. O administrador pode selecionar o preço para baixo, o preço para cima ou o tipo de nível de preço.
Cor do texto: O respectivo plug-in Prestashop permite até que o administrador personalize a cor do texto da caixa de assinatura conforme sua escolha.
CSS personalizado e JS: Ambas as opções permitem que o administrador altere a aparência deste Prestashop no addon de notificação de ações da Knowband.
Pedido
Uma vez
Selecione o idioma: Neste campo do addon de atualização do produto Prestashop, o administrador pode selecionar quatro idiomas, por exemplo, inglês, francês, espanhol e italiano.
Assunto do Modelo: Aqui, o administrador pode inserir o texto de sua escolha como assunto. Por padrão, o assunto do email é Notificação de atualização do produto.
Conteúdo do Modelo: Este é o corpo do email que o usuário recebe após a assinatura. O administrador pode modificar o texto de acordo com suas preferências.
Notificação
o
produtos
produtos
Uma vez
Notificação de atualização de quantidade de produto: Notificação de atualização de quantidade de produto é o assunto do modelo do email. Isto é para os produtos fora de estoque. Quando o produto, para o qual o cliente se inscreveu, estará em estoque, então este e-mail será enviado para os assinantes automaticamente. O administrador pode alterar o assunto do modelo e o conteúdo do modelo conforme sua escolha.
Notificação de atualização do preço do produto: Esta é a segunda parte da Configuração de e-mail de notificação que contém a notificação de atualização do preço do produto como assunto do modelo. Isso ocorre quando há uma alteração no preço do produto de acordo com a sua configuração que você salvou na Configuração geral, no campo "Notificação de preço". Aqui, também, o administrador pode alterar o assunto do modelo e o conteúdo do modelo conforme sua escolha.
Análise:
Na seção de análise deste addon de notificação de atualização de produto Prestashop, o administrador pode ver o relatório geral do produto e dos clientes inscritos na forma de gráfico e também na forma de lista detalhada. Quando você seleciona um intervalo de datas, o gráfico será exibido nos principais produtos 10.
Com a ajuda da categoria selecionada e do elemento de pesquisa, o administrador pode ver todos os detalhes sobre os produtos inscritos junto com o número de clientes inscritos. Para mais detalhes sobre o cliente inscrito, o administrador só precisará clicar no "número de cliente". Ao fazer isso, ele pode ver os detalhes sobre o cliente inscrito no menu pop-up.
Frente
Depois de ativar este addon de notificação do Knowband Prestashop no back-end, o usuário verá a caixa de assinatura na página do produto. A caixa contém um campo de entrada para inserir o ID do email e um botão Notificar-me, através do qual o cliente será inscrito no respectivo produto.
Quando um cliente insere o ID de e-mail e clica no botão, notifique-me que o e-mail inicial será enviado para o endereço de e-mail digitado e a mensagem exibida se inscreveu.
Haverá um caso quando o e-mail digitado para assinatura e o respectivo já existirem, nesse caso o assinante será atualizado e o e-mail atualizado será enviado novamente para o e-mail.
Sinta-se livre para nos contatar em support@knowband.com para qualquer consulta ou solicitação de mudança personalizada de acordo com sua exigência de negócios.
Earlier in Marketplace if the admin has to transfer sellers cut which the seller has earned from selling his products then he has to do that manually using his account, but using this module the admin can transfer money to the seller or can also take the refund from the seller when needed, but for this both the admin and the seller must use their PayPal account.
Steps for Installation
To install this ad-don, please follow the following steps:
1. Add ad-don folder under modules folder of your system.
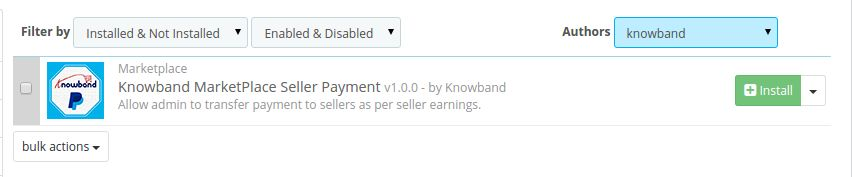
2. After adding this ad-don folder, system will list the ad-don on module page under front office feature category as given below:
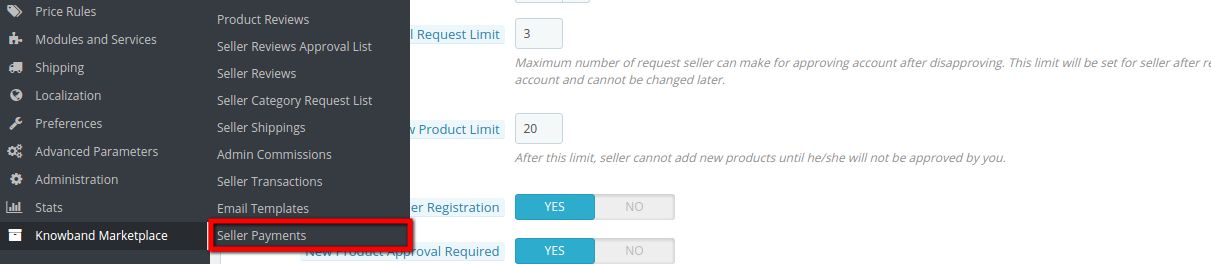
After installation, a sub menu will be added in the Knowband Marketplace menu and will be named as SELLER PAYMENT.
On clicking the highlighted link, system will be redirected to the Seller Balance Payment Page where all the listing of the seller with PayPal accounts will be listed and the admin can make the payment to the seller and also take the refund from the seller.
Seller Payment Configuration
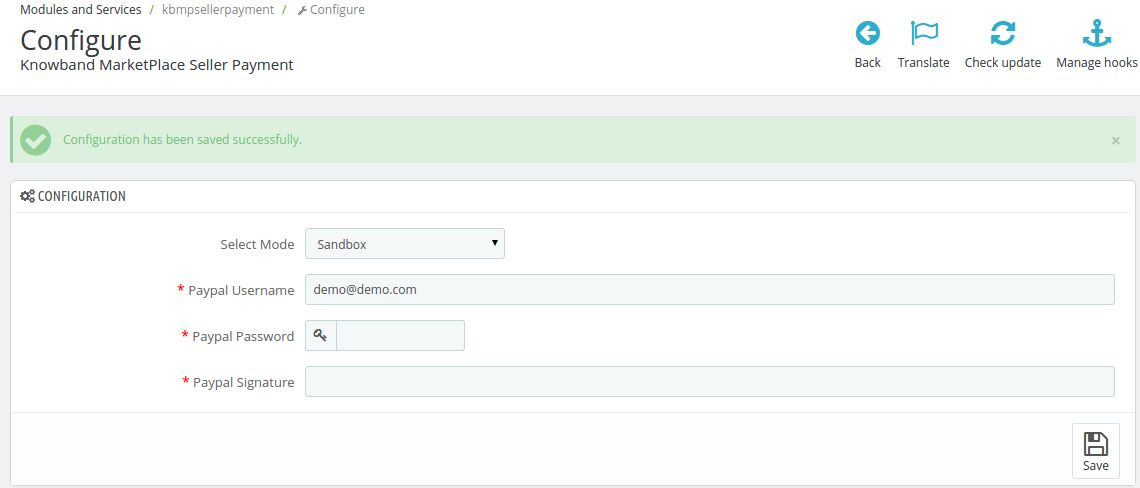
Here is the configuration Page for the admin in the admin account.
Settings Description
1. Select Mode: This field has two options 1. Sandbox 2. Live. When the module is on sandbox mode then the module is on the testing mode and can be tested by the admin till he gets sure and if the module is set for the live mode then it is live working on the store.
2. PayPal User name: In this field the admin has to enter his user name of the PayPal account to which the admin will make the payment or request for the refund.
3. PayPal Password : Here the admin has to enter the PayPal account password.
4. PayPal Signature: Enter the PayPal signature associated with your account.
Seller Balance Payment
Here the seller can make payment or request for the refund from the seller.
Settings Description For Transfer Payment to Seller
1. Seller: This field will contain the seller shop title.
2. Email: This contains the seller email id.
3. PayPal Email: Here the PayPal Email of the seller is provided.
4. Total Earning: Displays the total earning done by the seller from t
5. Your Commission: This field shows the admin what commission does he deserves from the seller total earning.
6. Seller Earning: Here the seller earning is shown after the admin commission is removed from it.
7. Amount Transferred: This shows the admin that how much amount the admin has transferred to the seller.
8. Balance: This is the balance between the seller and the admin that the admin should transfer to the seller.
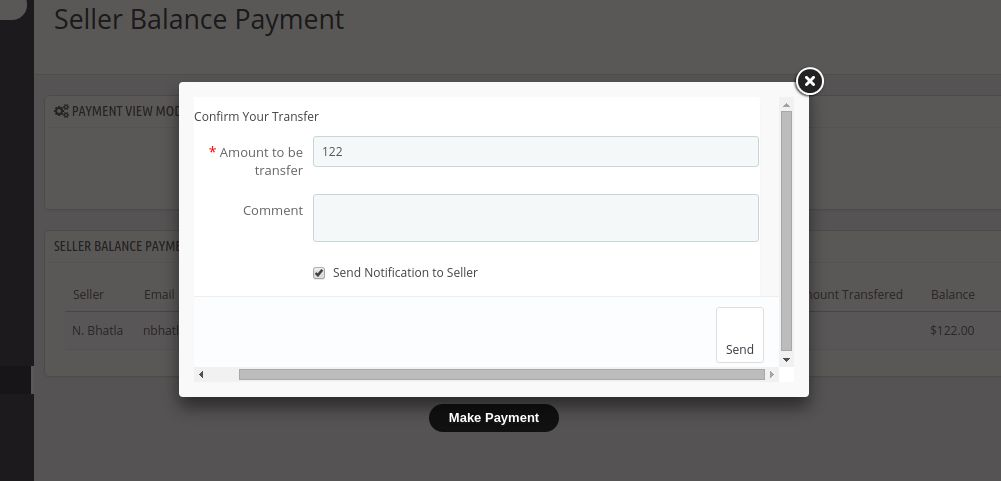
9. Make Payment: When the admin clicks on Make Payment then a pop up appears as shown in the below screen shot from where the admin can transfer the amount to the particular seller.
A. Amount to be transferred: Here the admin has to enter the amount which he wants to transfer to the seller PayPal account.
B. Comment: The admin can also enter any comment which he wants to add to the transfer of payment which he is doing.
C. Send notification to seller: If this filed is checked by the admin the an email is send to the seller whenever the admin transfers any payment to the seller.
Settings Description For Refund Payment from Seller
1. Seller: This field will contain the seller shop title.
2. Email: This contains the seller email id.
3. PayPal Email: Here the PayPal Email of the seller is provided.
4. Amount: This is the amount which the admin has transferred to the seller earlier and can be refunded by using this transaction.
5. Transaction Id: This is the transaction id which was generated to the transaction which the admin has done to the seller earlier.
6. Account ID: This is the account ID of the seller to which he account has been transferred.
7. Transaction Pay Key: This is the key which is generated for the transaction which is done.
8. Refund Back: When the admin will click on this button then the account which has been transferred by the admin using this transaction will be refunded back to the admin account.
Module Location
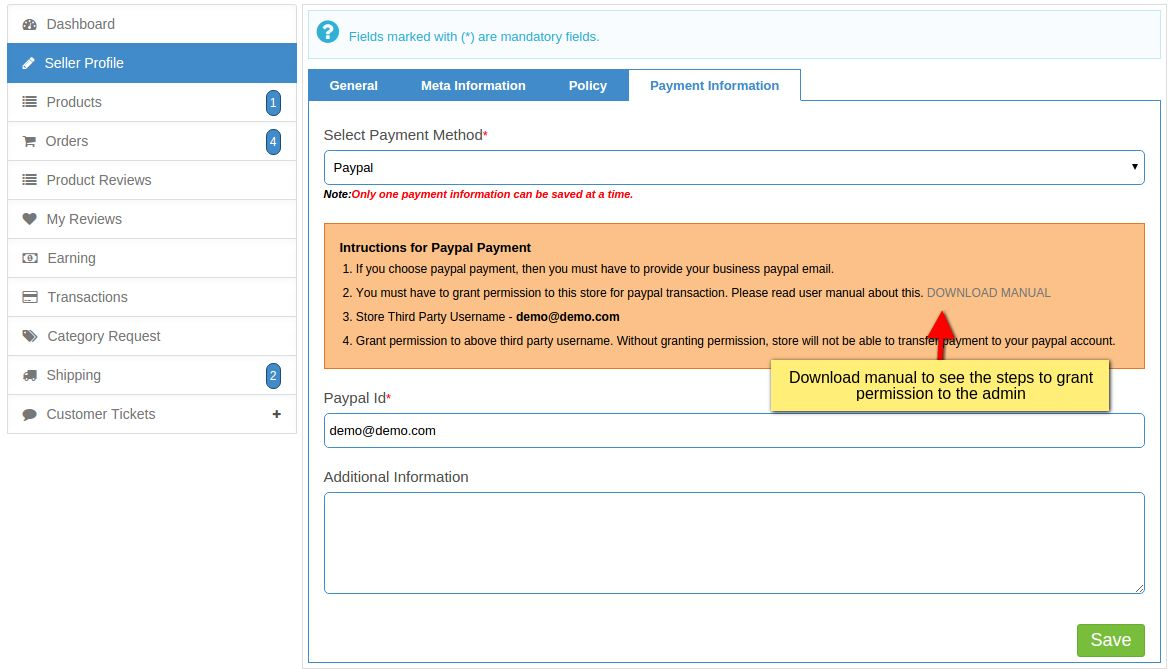
The module will appear when the seller will select PayPal as their payment option. Here the seller will see all the instruction which he/she has to follow to make the PayPal payment.
The instruction are given in the screen shot below.
Seller can also download a manual to see the steps of STEPS TO GRANT PERMISSION TO THE ADMIN for refund request.
NOTE: Please test the module in the sandbox test mode and check the permissions which the admin has to be granted to complete the refund transaction.
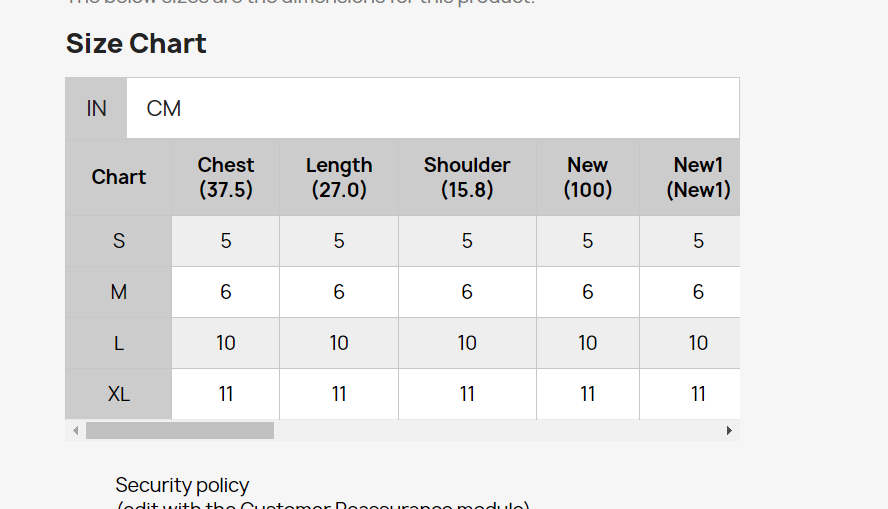
The Prestashop Product Size chart addon is a Size Chart creating module for Prestashop. Using this extension, the merchant can show the different types of size charts for each category, product, and manufacturers available on his/her store.
The eCommerce store admin can assign a single chart in ‘n’ number of the category in a single configuration. Products under the default category will show the size chart on the product landing page. The eCommerce store admin can assign the created size chart on any product or any category or any manufacturer. And, a product can have a unique size chart which means, any merchant can assign a pre-configured chart to any product.
The eCommerce store admin can assign the chart to a particular product or products of a particular category or products of a particular manufacturer. Thus with the help of this Prestashop Product Size chart module the eCommerce store owner can easily resolve the size-related issues of the store customers. The user-friendly interface of this Prestashop size catalog extension makes it more useful.
Features –
The Prestashop Product Size chart module allows the eCommerce admin to display the size chart on the product pages of the eCommerce store.
It’s very easy to install and configure this Prestashop size guide addon.
The store admin can enable/disable this Prestashop size catalog extension without any hassle.
The Prestashop Size Chart Popup addon is fully customizable.
The Prestashop Size Chart link module offers a simple and hassle-free implementation.
No technical knowledge is required for the configuration of this size chart popup addon.
The Prestashop size catalog extension provides an option to add images, guidelines or any HTML content to the size chart.
The Prestashop size guide for a category of products, a single product, or a manufacturer.
An unlimited number of rows and columns on the size charts can be added as per requirement.
The Prestashop Product Size chart extension provides the preview option.
Helps in making the purchase decision.
The Prestashop Size Catalog plugin is multi-lingual Compatible.
What’s New in 1.0.7 Update:
Customizable Size Chart:
You can now customize the size chart according to your needs and preferences, providing a more personalized experience for your customers.
UNIT Feature Update:
With this feature, Admin has the ability to specify the unit of measurement for the size charts
Custom CSS and JS:
You can now load your own custom CSS and JS files, allowing you to further customize and enhance the look and feel.
Improved Popup:
The all-updated 1.0.7 Size Chart Module allows for popups to be displayed over the other popups or directly on the product page under the “Add to Cart” button, providing a more seamless and user-friendly experience to both users and Presta admins.
New Rule Options:
Now, the Prestashop store admins can find two new rule options based on product reference and attribute, giving administrators more flexibility and control over how they map charts with products.
Multistore Compatibility:
The all-new Prestashop Size Chart module is now compatible with multistore. The PrestaShop store admins can now manage and customize their e-commerce platform with greater ease and efficiency.
Benefits offered by Prestashop Product Size Chart:
With the help of this Prestashop size guide addon the store admin can create appropriate size charts just by entering values.
The Prestashop size catalog extension allows e-merchant to set the size chart on a particular category, product or manufacturer.
This size chart will be available on every product page for a better store experience.
The admin can add n number of rows and columns in the size chart.
A preview option is available on the back-end.
This size related information reduces product return based on size issues.
With the help of Prestashop size catalog extension, the customers can view the size chart before purchasing the product.
The Prestashop product size table allows adding text and images in the size chart for better understanding.
The customers can easily understand the guidelines given with the size chart.
The Size Chart module offers admins to use the module for their Multi-Store Prestashop stores.
Along with all the pre-tailored options, the admins can now also add custom CSS and JS to improve the look and feel of their Product Size chart.
To install the Prestashop product size table addon, please follow the following steps:
1. Add the addon folder to the modules folder of your system.
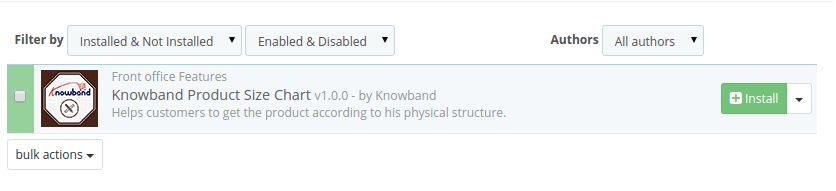
2. After adding this addon folder, system will list the addon on module page under front office feature category as given below:
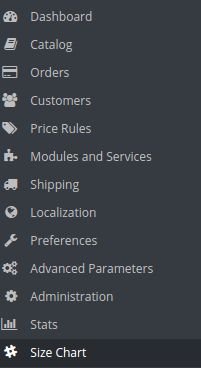
After the module is installed a new entry in the menu bar of the shop starts appearing in the back end with the name ‘Size Chart’. This menu will contain a sub-menu which further will be containing the following options.
1. Attributes Set
2. Chart
3. Category/Manufacturer Chart
4. Category Chart
5. Product Chart
Each section is described in detail below.
Configuration Setting:
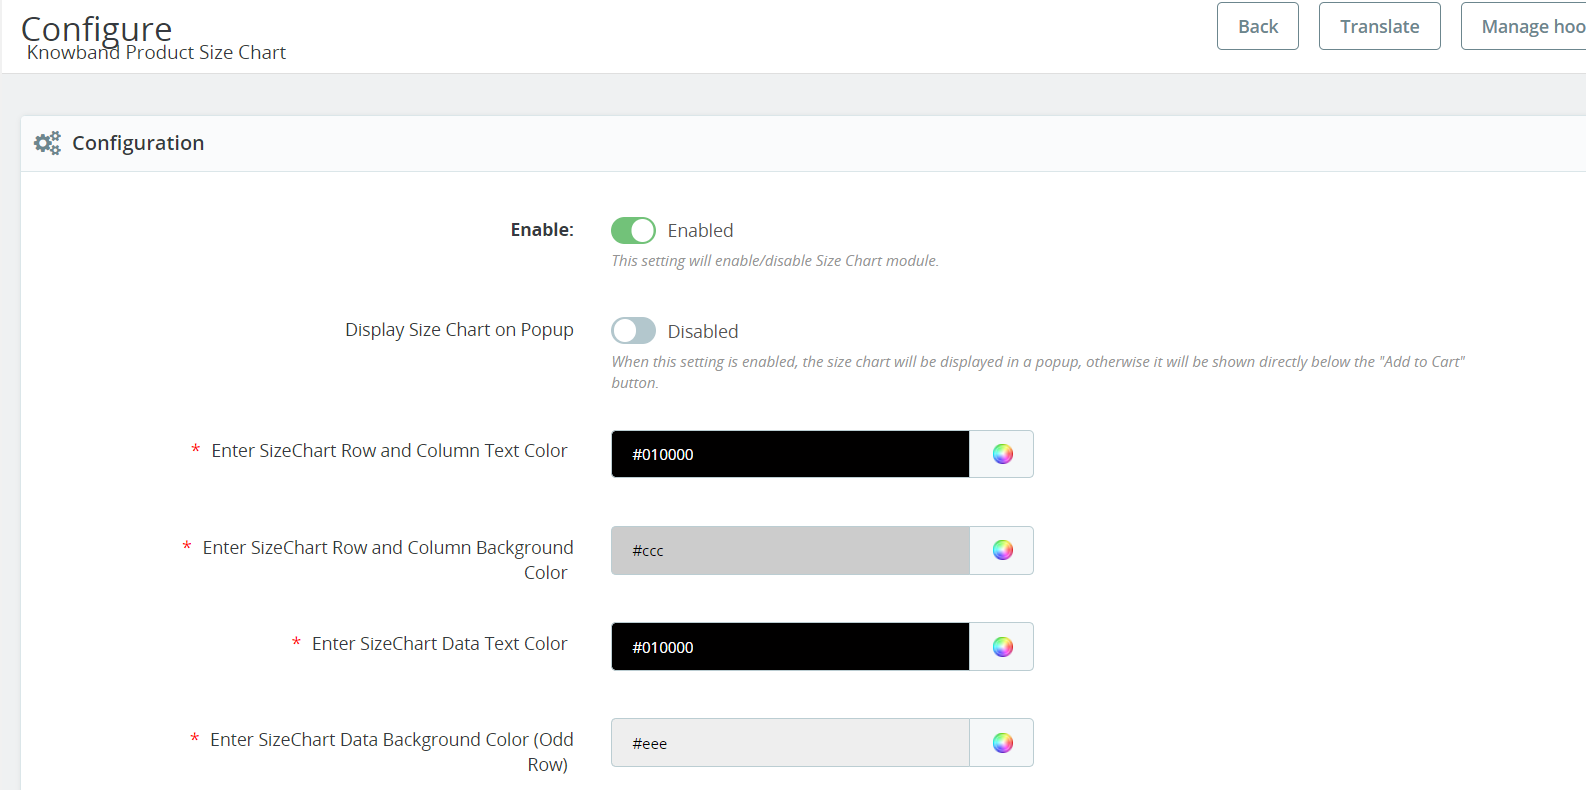
In the following tab, the store admins can configure their Prestashop Size chart module and choose all the major size chart attributes such as component colours, CSS, JS, etc.
Enable/Disable:
The store admins can enable/disable the module with the help of this particular button.
Display Size Chart on Popup:
When this setting is enabled, the size chart will be displayed in a popup, otherwise, it will be shown directly below the “Add to Cart” button.
Enter SizeChart Row and Column Text Color:
This particular option will manage the row and column text color of the size chart.
Enter SizeChart Row and Column Background Color:
Like text color, the Prestashop store admins can manage the background color of size chart rows and columns.
Enter Size Chart Data Text Color:
With the help of this button, the store admins can manage the text color of size chart data.
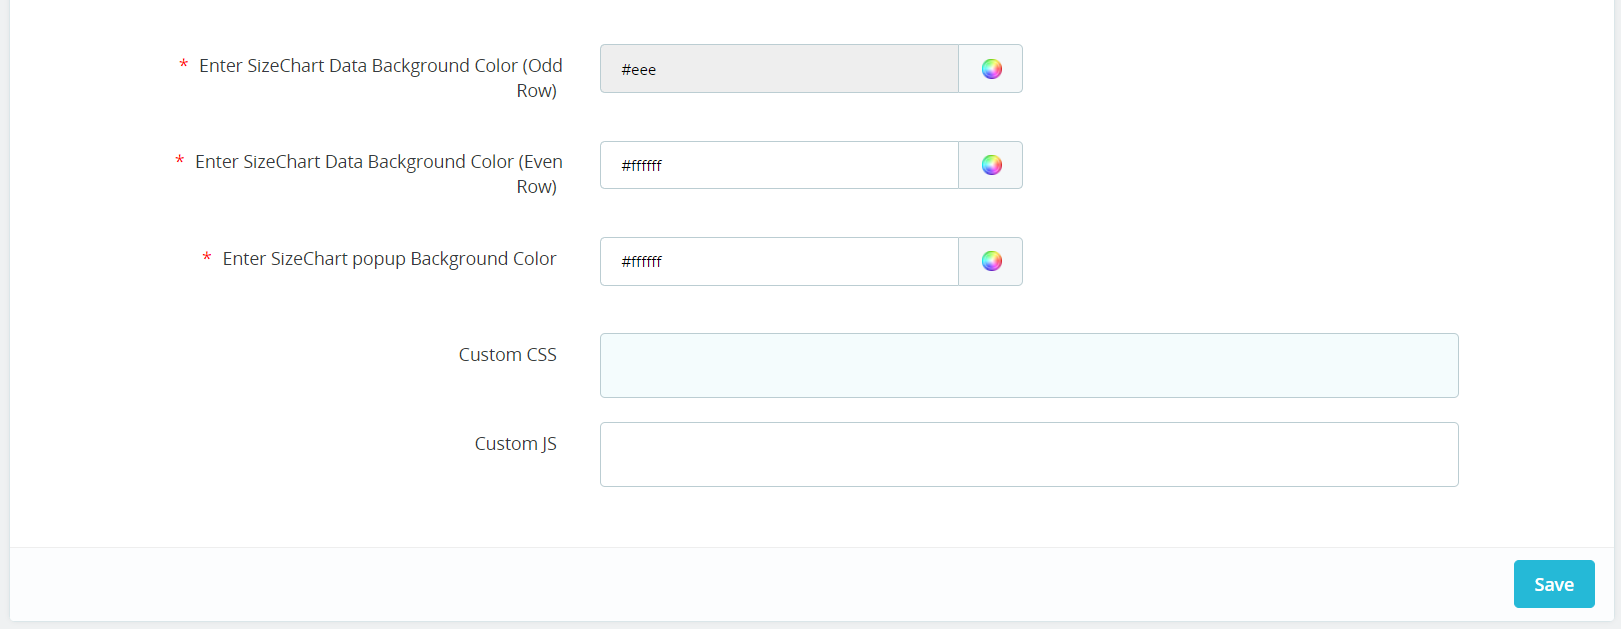
Enter SizeChart Data Background Color (Odd Row):
You can choose the color of the background of the size chart data from here. This option will manage the background color for the odd row only.
Enter SizeChart Data Background Color (Even row):
Like odd rows background color, the Prestashop store retailers can manage the the data background color for the even rows from this option.
Enter SizeChart Popup Background Color:
This option will allow the store admins to manage the SizeChart popup background color.
Custom CSS:
In the following text field, the admins can enter customized CSS to make their size chart sounding.
Custom JS:
Likewise, this particular field can be used for adding customized JS for the size chart.
Attributes Set
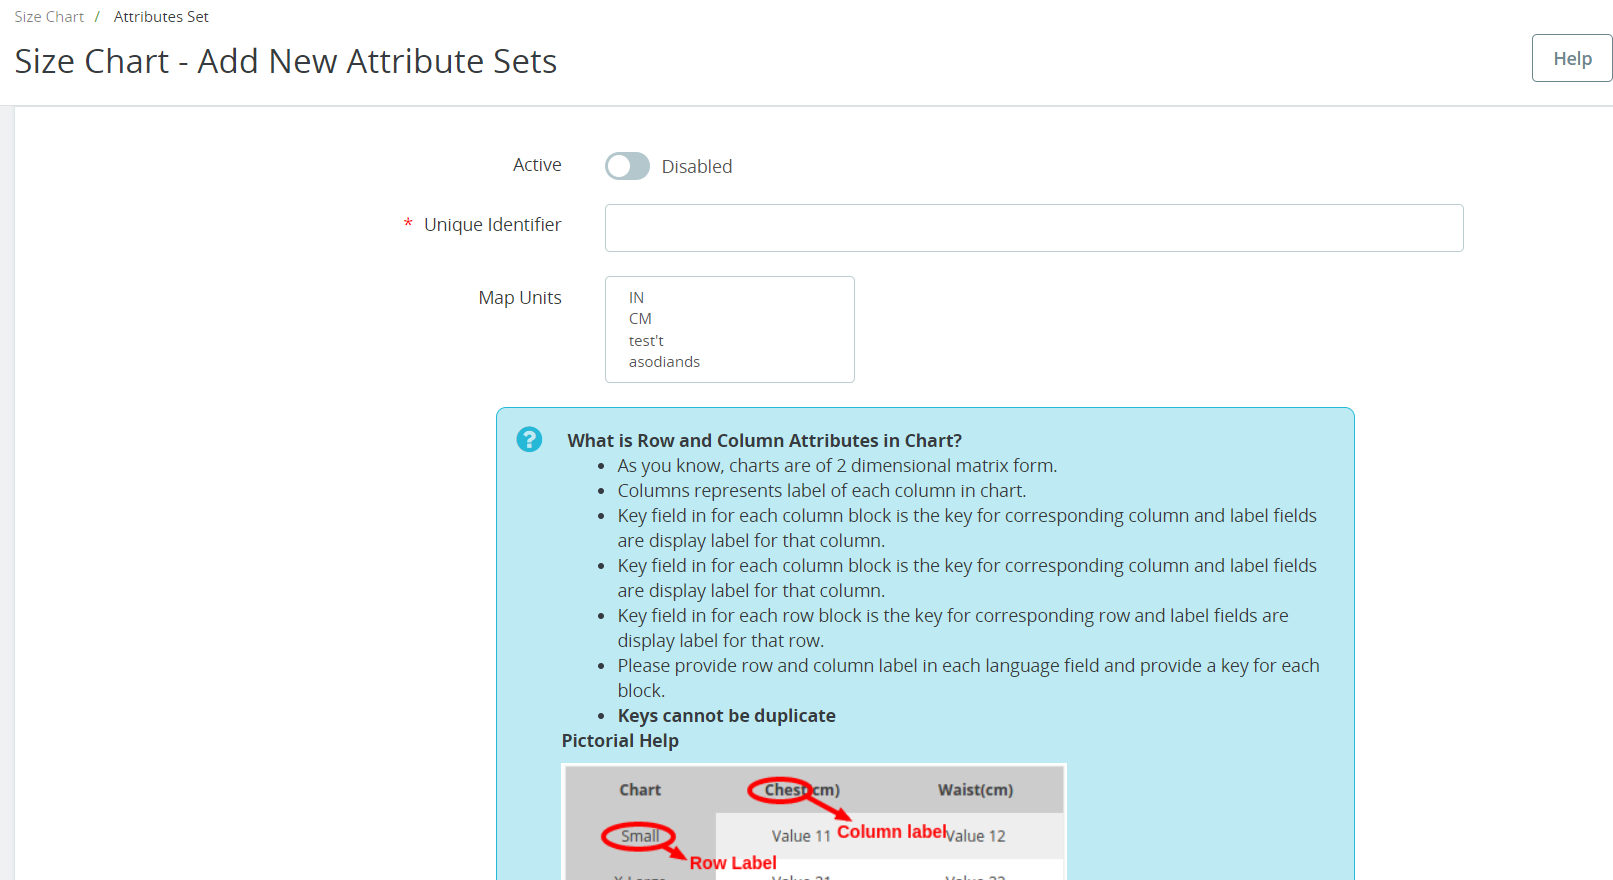
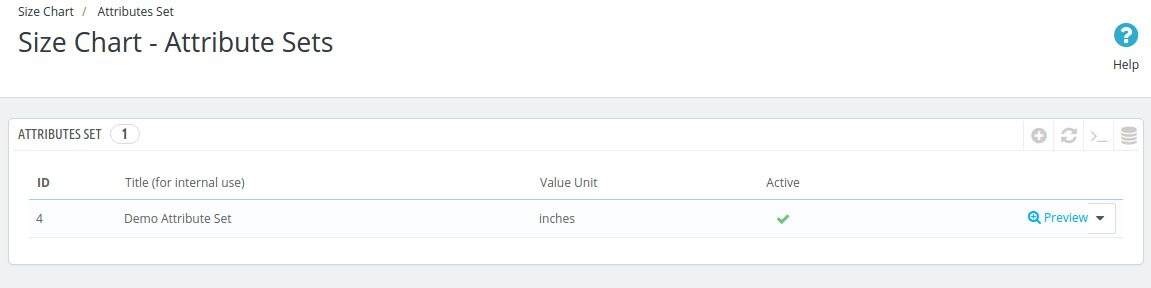
Once the admin will click on this option, a table appears which will contain the details of all the attributes of the chart which has been created to date. The admin can also create new attributes set by clicking on the add icon above the table. After the admin will click on the add icon, a new form appears containing the following fields.
1. Active: This field indicates whether the particular attribute set is enabled or not. The attribute set will only work if it is enabled.
2. Unique Identifier: In this field, the admin has to enter the unique name of the attribute set from which the attribute is going to be identified in the back end of the shop to create full-size chart.
3. Map Units: This feature allows you to choose the units that you wish to associate with the size charts. By visiting the size chart unit page, you can create Units for the size chart of your choice and then map them to your preferred charts using this option.
4. Value Unit: This is the field where the admin will choose the unit of the attributes set may be in inches, cms, kms, grams.
5. Chart Column Labels: In this field, the Prestashop eCommerce store admin has to choose the chart column labels and their name in the different store languages. The admin can add ‘n’ number of column labels.
6. Chart Row Labels: In this field, the eCommerce store admin has to choose the chart row labels and their names in different store languages. The admin can add ‘n’ number of column labels.
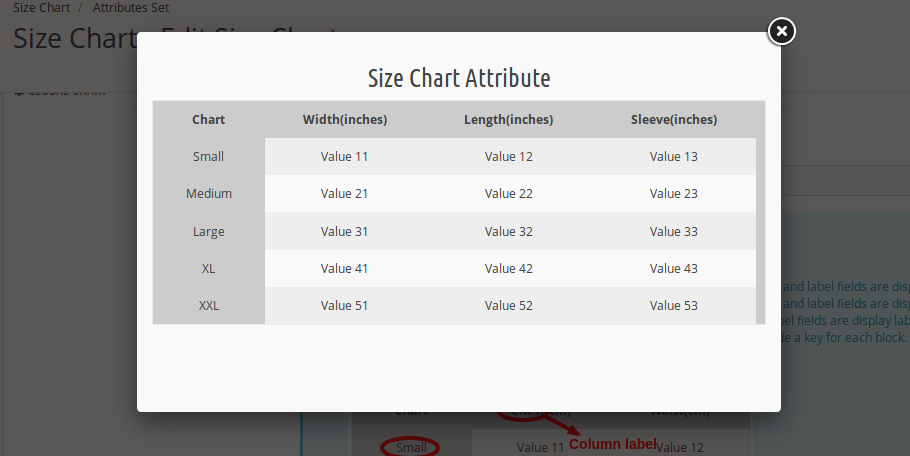
7. Preview: By clicking on this link the Prestashop store admin can view the preview of the attributes set which will be created by the values that are filled above.
8. Actions: Actions like edit and delete are also available to edit the entries which are already done by the admin.
Charts
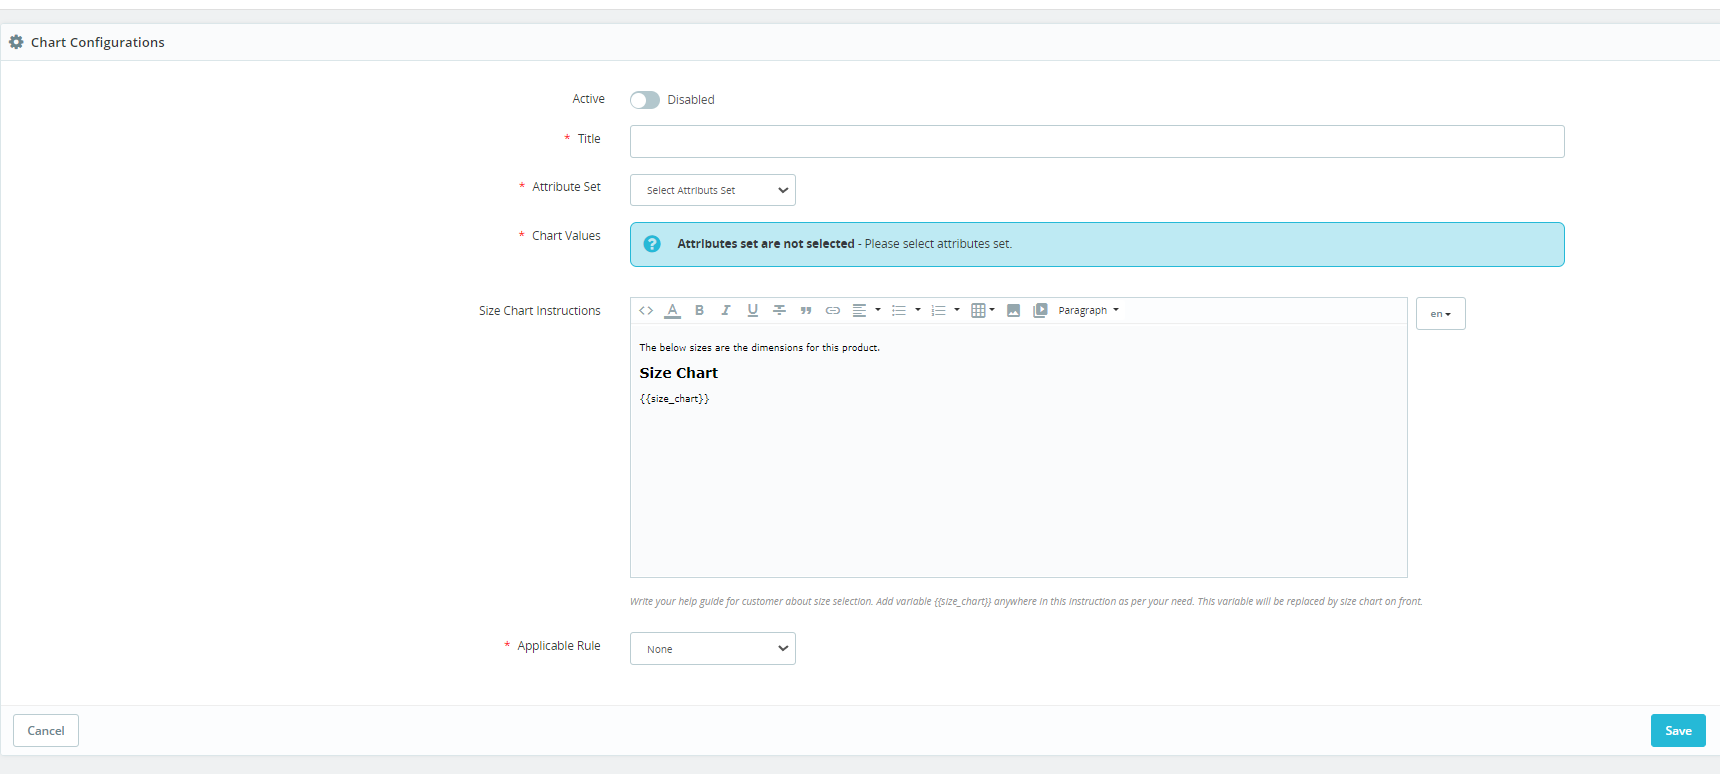
Here, the admin will create the full chart using the attribute sets which were created in the previous tab. To create a chart, the eCommerce store admin has to click on the add button on the right side of the chart. As soon as the eCommerce store admin clicks on that add button, a new form appears with the following options.
1. Active: From here, the Prestashop store admin can set the chart enabled or disabled. The chart will be displayed only if it is enabled.
2. Title: This is the title of the chart which is for internal use only to uniquely identify the chart when assigning them to the product, category or manufacturer.
3. Attributes Set: This field will contain all the data attribute sets which were created earlier and are enabled. The admin can choose any of the attributes set in this field.
4. Chart Values: After the admin selects the attributes set, then he/she has to fill in the values which will be reflected where this chart will be used.
5. Size Chart Instructions: Here, the admin can add up the instructions which he/she feels are important for the customers to understand the above attribute set chart.
6. Actions: Actions like edit and delete are also available to edit the entries which are already done by the admin.
7. Applicable Rule: From here, the admins can select the rule for which the product chart is going the display on the product page. Instance, we have provided 2 options here. Using the first one, the store admins can add the conditions for a chart based on product features such as color, conditions, and more. Apart from it using the other option (reference), the admins can add the product reference in the text field and the chart will be automatically applicable for all the products that are having mentioned references.
Manufacturer Chart
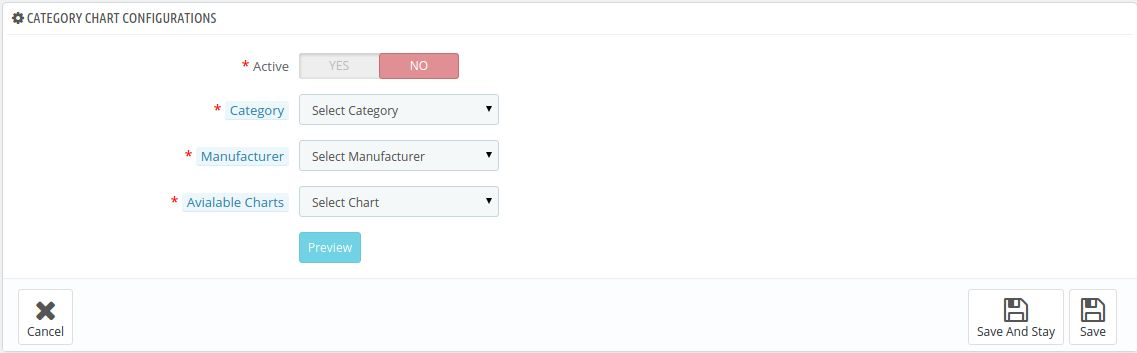
A table appears in this tab. This table shows which charts are mapped to which manufacturer. To add a new entry, the admin can click on the add icon appearing on the right side of the table. The following form appears after clicking on the add icon button –
1. Active: This is the field that decides whether the chart should be enabled or disabled. The chart only works if it is enabled from this end.
2. Category: Here the admin may select the category of the products where this chart should appear.
3. Manufacturer: In this field, the admin has to select the manufacturer to which this particular chart is to be mapped.
4. Available Chart: In this field, all the charts which are created till now are listed. The admin can select any of the charts from this field and then save the settings.
5. Preview: Admin can also view the preview of the chart by clicking on the preview button below.
6. Actions: Actions like edit and delete are also available to edit the entries which are already done by the admin.
Category Chart
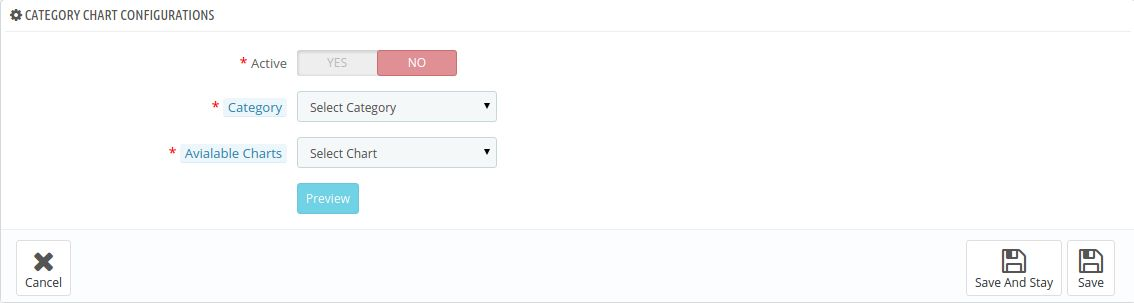
In this tab, a table appears. This table shows that which charts are mapped to which category. The following form appears after clicking on the add icon button –
1. Active: This is the field that decides whether the chart should be enabled or disabled. The chart only works if it is enabled from this end.
2. Category: Here, the Prestashop store admin may select the category of the products where this chart should appear.
3. Available Chart: In this field, all the charts which are created till now are listed. The admin can select any of the charts from this field and then save the settings.
4. Preview: The eCommerce store admin can also view the preview of the chart by clicking on the preview button below.
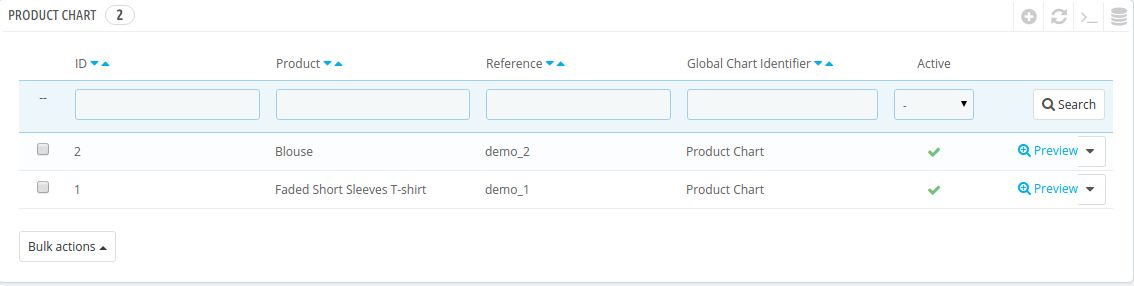
Product Chart
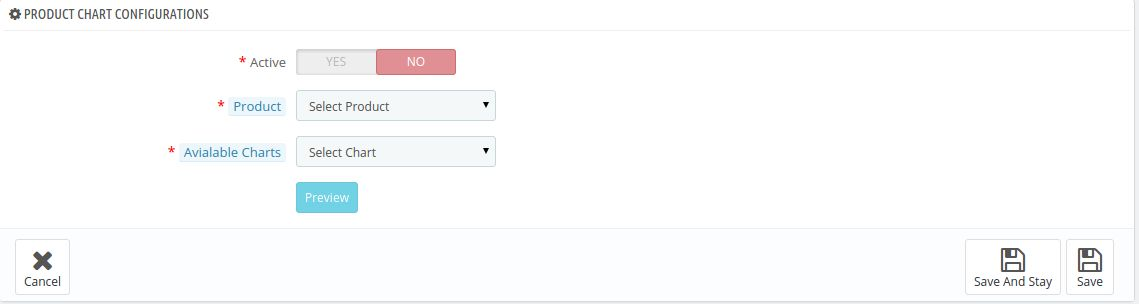
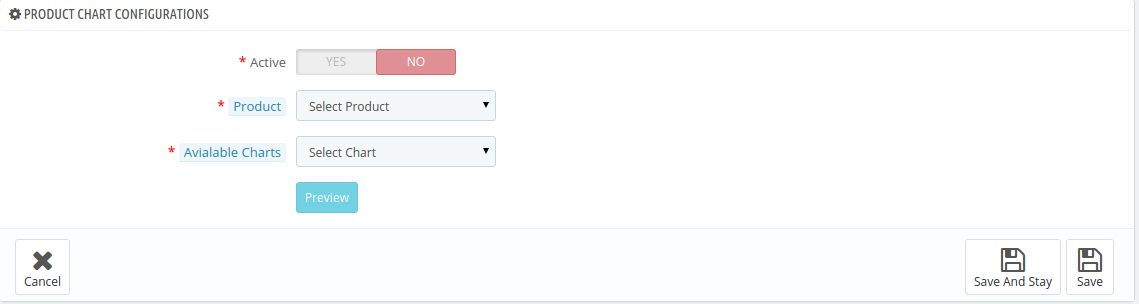
A table appears in this tab. This table shows that which charts are mapped to which product. The following form appears after clicking on the add icon button –
1. Active: This is the field that decides whether the chart is enabled or disabled. The chart only works if it is enabled from this end.
2. Select Product: In this field, all the products which are available in this particular store appear and the admin can choose any one of those products and get that product mapped with that particular chart.
3. Available Chart: In this field, all the charts which are created till now are listed. The admin can select any of the charts from this field and then save the setting.
4. Preview: Admin can also view the preview of the chart by clicking on the preview button below.
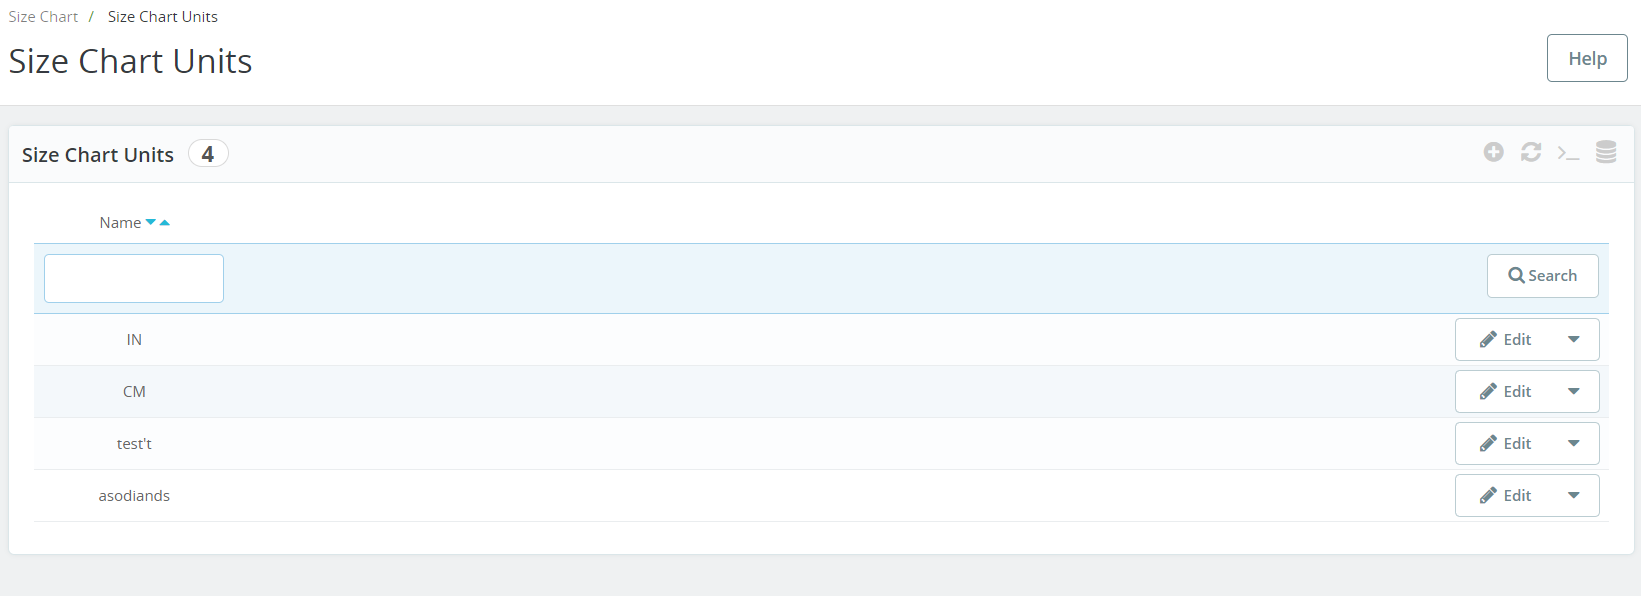
Size Chart Units:
In the following tab offered by the Prestashop size chart addon, the admin can manage all the size chart units. Not only the admin can modify the added units but also can add as many units as he wants for the size charts.
Front End Module
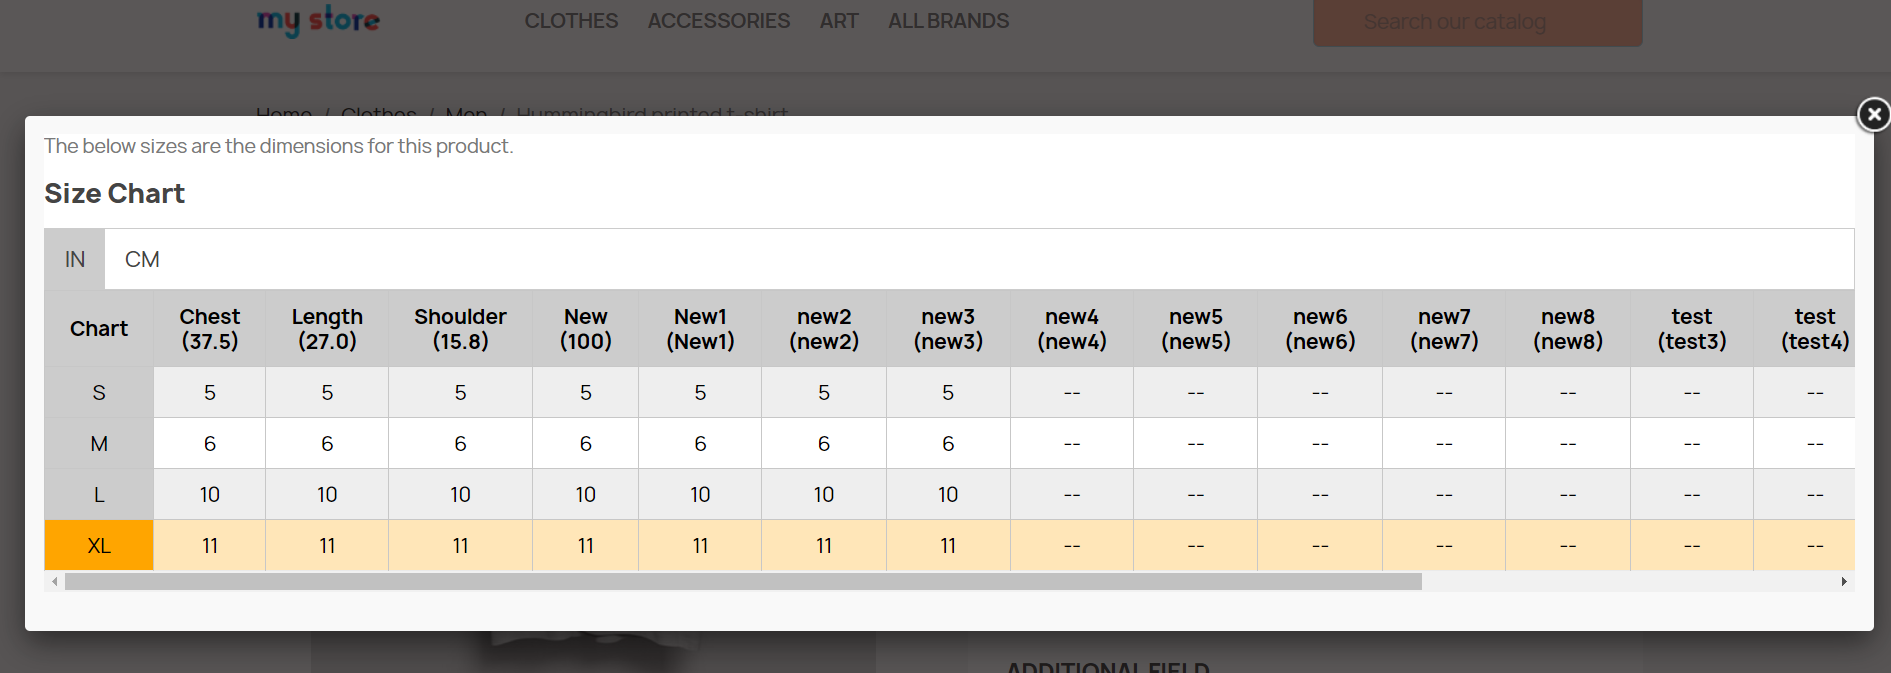
When this extension is enabled from the back end with all the entries done, then a link named ‘VIEW SIZE CHART’ appears on the right side of the page just like the screenshot below.
Also, if “Display size chart on popup” is enabled then the “View Size Chart” button is available otherwise, the chart is displayed directly under the Add to Cart button.
It may be a case when a product has a chart mapped to itself and it also has a chart mapped to its category and it also has a chart mapped to its manufacturer. In this case, the priority of the chart has been decided. So, the priority of a product chart is higher than the priority of the category chart and the priority of the category chart is higher than the priority of the manufacturer chart.
So, the chart on the product page is shown according to the priority basis which has been explained above.
When the customer will click on the link, a pop-up will appear with all the data of size for that product.
Thus this Prestashop product size chart addon makes shopping easy for the online customers. The admin can reduce the complexity of choosing the perfect size. By using this Prestashop product size table plugin the admin can display size charts on the product page. The customers can buy the products easily after viewing the size chart.
Prestashop Size Chart Addon: Video Tutorial
For a more visual and hands-on understanding of how to install, configure, and use the Knowband Prestashop Size Chart Addon, we have created a step-by-step video tutorial.
This video covers:
Module installation
Creating and customising size charts
Assigning size charts to products
Front-end display and functionality
Watch the full tutorial below to get started quickly and make the most out of this addon.
For more information about this Prestashop Size Chart Popup Addon please visit Knowband.
Introduction of PrestaShop Product Quantity Update Addon:
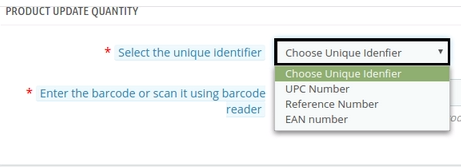
This PrestaShop Product Quantity Update by Scanner module is basically developed for the Prestashop eCommerce site owners to let them update their product quantity on the site without any hassle. It provides an option to update the product quantities without going to the product listings on the back end. A separate interface is provided at the back end which allows the product quantity update based on the:
UPC Number
Reference Number
EAN Number
Steps for Installation:
To install this Prestashop product quantity addon by Knowband, please follow the following steps:
1. Add add-on folder to the modules folder on your system.
2. After adding this Prestashop addon folder, the system will list the add-on on module page under front office feature category as given below:
These interfaces will be accessible only by the admin in his modules section.
Menu Location:
An Admin can access the interface of this Prestashop module by navigating to the following address:
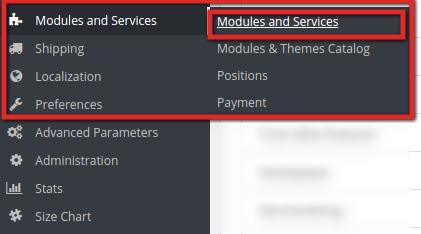
1. Navigate to Modules and Services >> Modules and Services
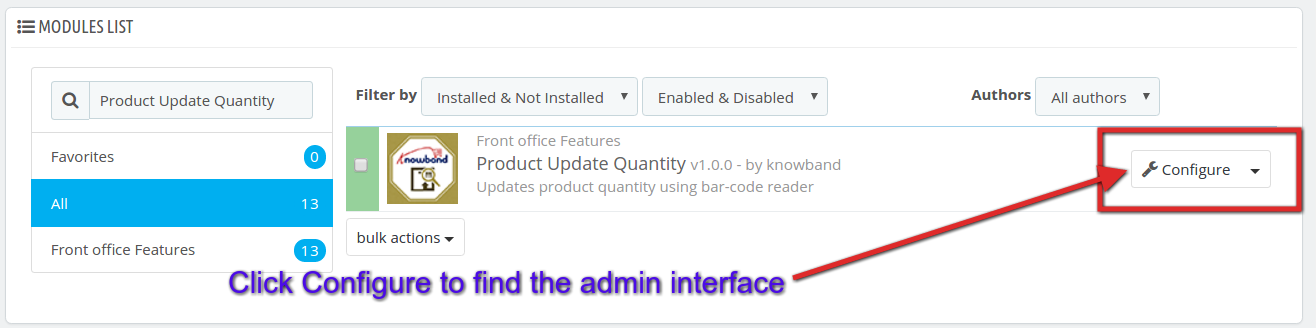
2. The list of Prestashop modules installed on your site will open. Now search for Product Update Quantity in the search box, you will find the following interface. In the following interface click on the Configure button:
Admin Configuration Panel:
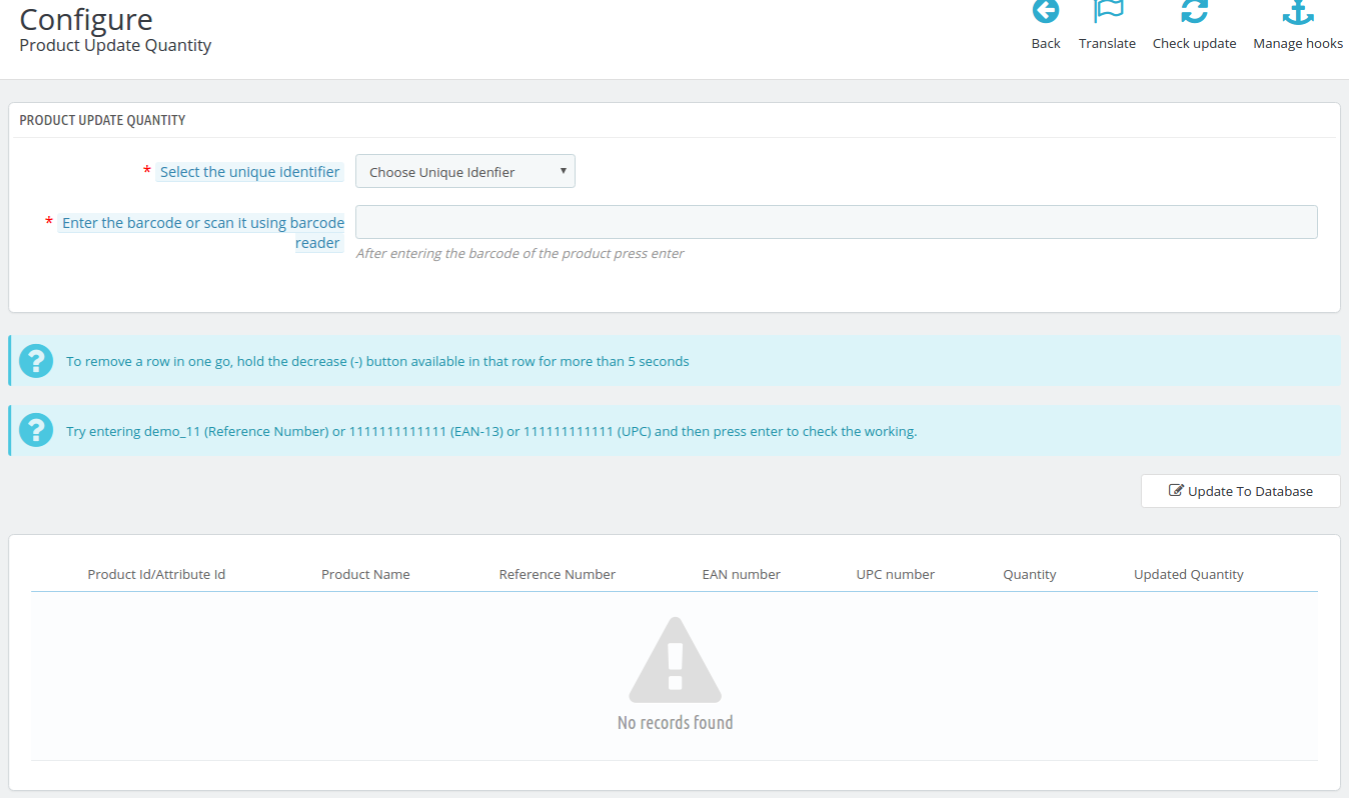
The Admin configuration interface of this Prestashop Quantity update addon by Knowband looks like this:
Update the Product Quantity based on UPC Number:
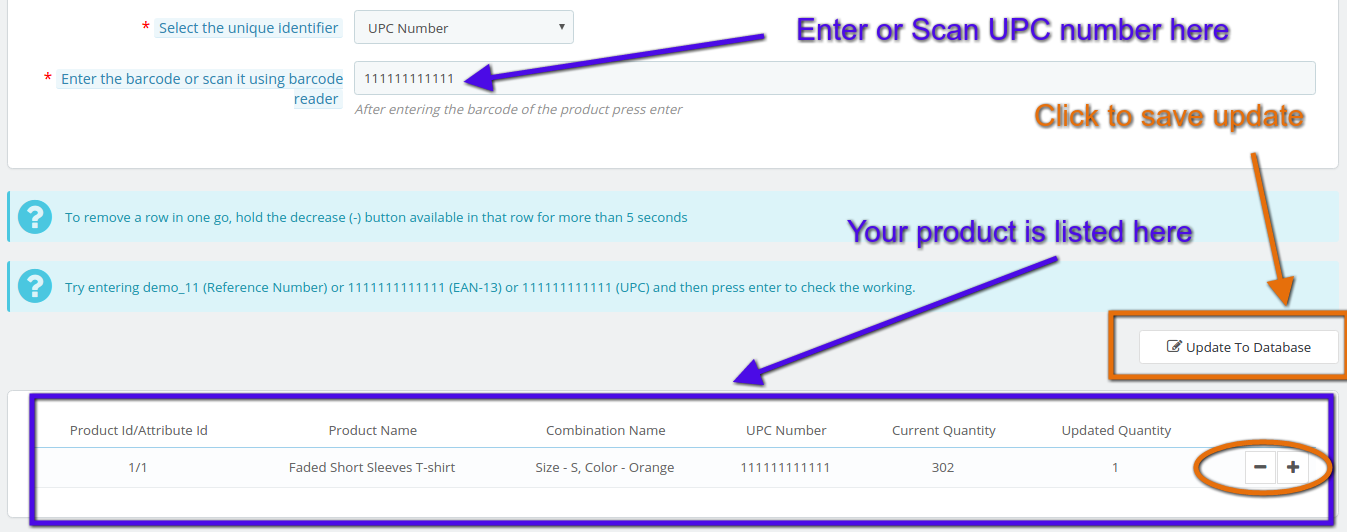
To update the product quantity based on UPC Number, follow the following steps:
1. Select UPC Number from the drop-down list in ‘Select Unique Identifier’ menu option.
2. Scan the UPC number of the product ( you can even enter the UPC number manually in the text filed to entering the bar-code or scan it using the bar-code reader).
3. Your product will be listed below in the interface as shown in this screen shot:
4. You can re-scan the UPC number of the other products in the list to add a quantity or you can also increase or decrease the quantity by clicking + or – as shown in the screen shot above.
5. After you update the desired quantity of the products it will shown in Updated Quantity that how many new products you have added in the list for this particular UPC number. Click on ‘Update To Database’ to save your product quantity update for the particular UPC number.
6. Similarly, you can perform the Product Quantity update based on EAN number or Reference Number too. Just don’t forget to select the items from the drop-down list according to your need.