OpenCart Loyalty Points Extension – User Manual

1.0 Introduction

Did you know that increasing your customer retention rate by 5% boosts your profits by as much as 95%? But far too often, businesses choose to focus on attracting new shoppers – not looking after existing ones. Understandably, you want to grow your customer base. But how do you keep hold of the people who are more likely to buy from you again? Well, one solution is to create a customer loyalty program that rewards those shoppers who come back. Knowband OpenCart Loyalty Points Extension can easily solve this problem.

1.1 What are Loyalty Points?

Loyalty points are the reward-based points that are awarded to the customers when they fulfill some conditions on your online store. These conditions can be anything like a specific product, minimum cart value, category, etc. The points collected by the customer can be converted into discounts which can be used by the customer to decrease some amount of the cart.

A loyalty points program is a marketing strategy designed to encourage customers to continue to shop or use the services of a business associated with the program. This is used to engage the customer in making more and more shopping decisions on our web store by giving them more and more points so that the customer has more and more interest in buying more items from the store.

The process of creating a loyalty point program can be a very difficult task, hereby Knowband’s OpenCart Loyalty Points extension will simplify this task for you. This plugin allows the admin to create different types of conditions, if the customer satisfies any of these conditions, the customer will be automatically awarded the loyalty points defined by the admin. This reward point extension will also keep the track of the loyalty points rewarded.

1.2 How does it work?

The working of the OpenCart Loyalty Points module is explained by the following points.

  • Firstly the Admin needs to create rules in the loyalty point rules tab.
  • The Admin also needs to add conditions according to the rules type he/she is creating.
  • Once the rules are created, if the customer fulfills the conditions of a rule, the customer will be rewarded according to the points stated in that particular rule he/ she fulfilled.
  • Once the customer gains some points, they can use those points to get discounts on their next purchase.
  • Once the customer has applied points in the cart and placed an order, the points will be automatically removed according to the points they have used.

1.3 Salient Features of the OpenCart Loyalty Point module

  1. OpenCart Loyalty points system grants loyalty points to your customers for placing an order with a specific cart value, creating an account, ordering a certain product, etc. The loyalty points are defined specifically for different rules.
  2. OpenCart Loyalty reward points can be offered manually or automatically to the customers based on their cart value, product selection, or site activity.
  3. With this Loyalty points module, you can set the discount equivalent to a single loyalty point. A custom conversion rate can be set to different currencies of the module.
  4. OpenCart Loyalty points module gives an option to set minimum cart amount to be eligible to apply loyalty points discount.
  5. The tax over OpenCart loyalty discount coupons can be enabled or disabled from the backend.
  6. The loyalty points module for OpenCart allows you to set various progression names in multiple languages.
  7. OpenCart Loyalty Points module lets you create unlimited loyalty points rules based on the customer’s Cart, Product, or Behavior.
  8. With this reward point plugin, you can set the title, description, the number of loyalty points, start date, end date, and validity for each rule.
  9. You can modify, enable, disable or delete the existing rules from the module Admin settings of the Reward points extension.
  10. The status and detailed history of OpenCart loyalty discount points can be viewed at the backend.
  11. With the OpenCart customer loyalty system, you can easily get into the details of loyalty points earned by the customers of the store. It keeps a list of customers with how many points they have spent, available, and on hold.
  12. The different emails sent for points, credit points cancellation and points redemption can be modified from the back-office of this OpenCart Loyalty reward points module.
  13. OpenCart Loyalty points system is simple to enable or disable from the module Admin settings interface.
  14. The OpenCart loyalty points module is multi-lingual compatible.

2.0 Installation Guide

Once purchased, you will receive the following files in your registered email.

Source code of OpenCart Loyalty Points module in zipped file format.

User Manual of OpenCart Loyalty Points module.

Now to install this on your OpenCart Store, follow the given steps:

Step 1: Unzip the zip file. You will get the folders as shown in the image below

opencart-loyalty-points-extension_installation_step-1

Step 2: Now choose the OpenCart version according to your store and open that specific OC folder. After opening it you will see the following content.

Step 3: Copy and paste the content inside the upload folder inside your Opencart store folder.

Step 4: Go to Extensions and then Installer. From here, you can upload the ” kbloyalty_point.ocmod.zip” (for OC3.0.x) file and install the extension.
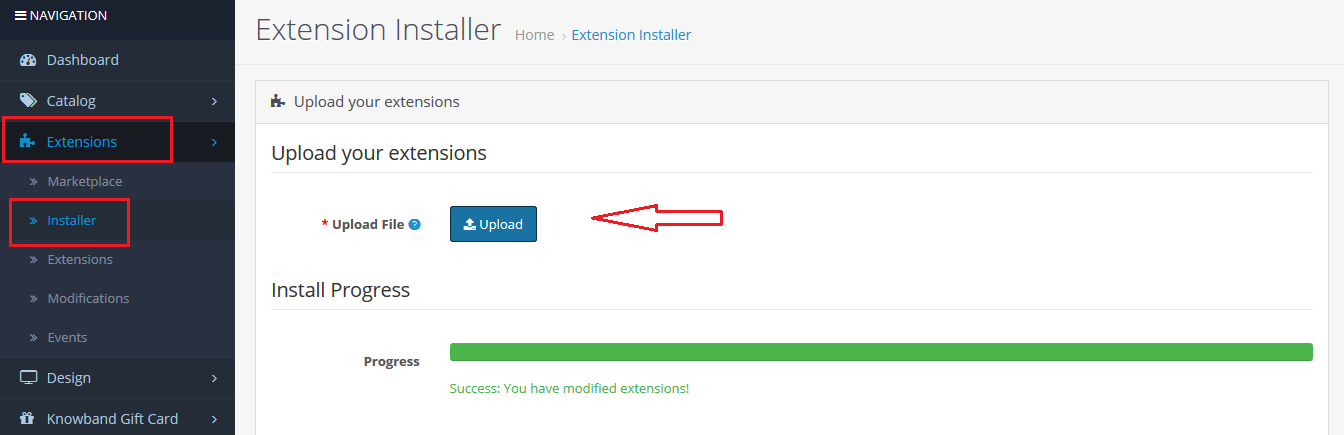
So, the OpenCart Loyalty Points Module is now successfully installed and is ready to use at your store. Go to the admin menu and click on the extensions. Choose the Extension Type as Modules. You will find a list of modules. Select the Knowband Loyalty Point Module.

3.0 Admin Interface

The Admin Interface of OpenCart Abandoned cart recovery email extension includes the following main settings:

  • Module Configuration
  • Loyalty Points Rules
  • Loyalty Points Balance
  • Loyalty Point History

3.0.1 Module Configuration

This tab consists of all the module configurationally settings.

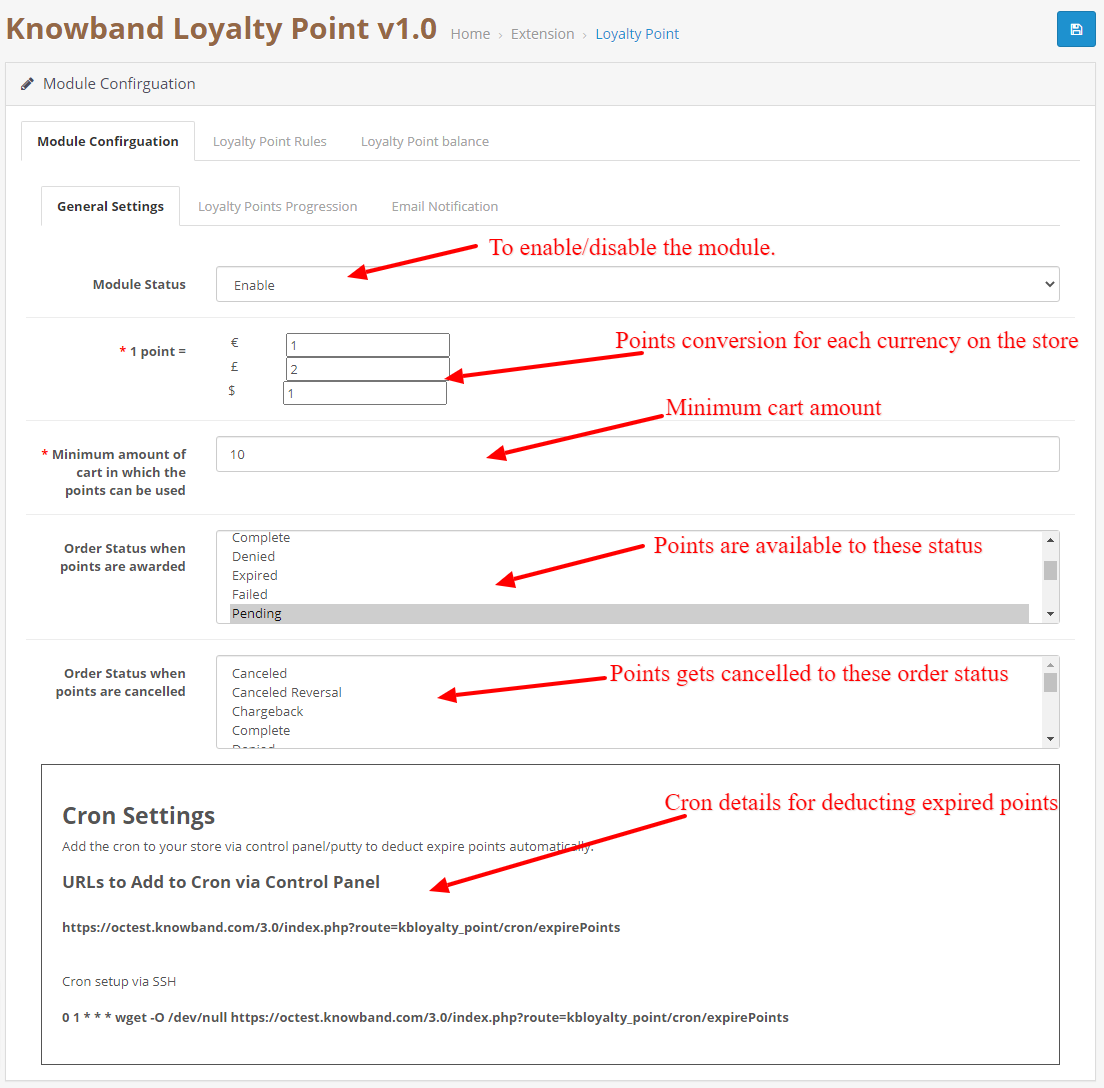
3.0.2.1 General Settings

  1. Enable/Disable: Initially, this field of the OpenCart loyalty points module by Knowband will be “OFF”. Admin can enable/disable the Opencart module by turning ON/OFF in this setting.
  2. Point Conversion: In this field, you can set the conversion rate for each currency added to your store.
  3. Minimum Cart Amount: This filed allows you to set a minimum cart amount on which the points can be used or not.
  4. Apply Taxes:  If enabled, the discount generated by the points will be applied to the taxes as well and if it is disabled the discount will not be applied to the taxes.
  5. Order Status for Available points:  If the order status gets the selected status from admin the points will be automatically available to the customer.
  6. Order status for Cancelled points: If the order status gets the selected status from admin the points will be automatically available to the customer.
  7. Cron Settings: Details of the cron are showed, This cron is used to deduct available points from the customer who has not used and passed the expiration date.
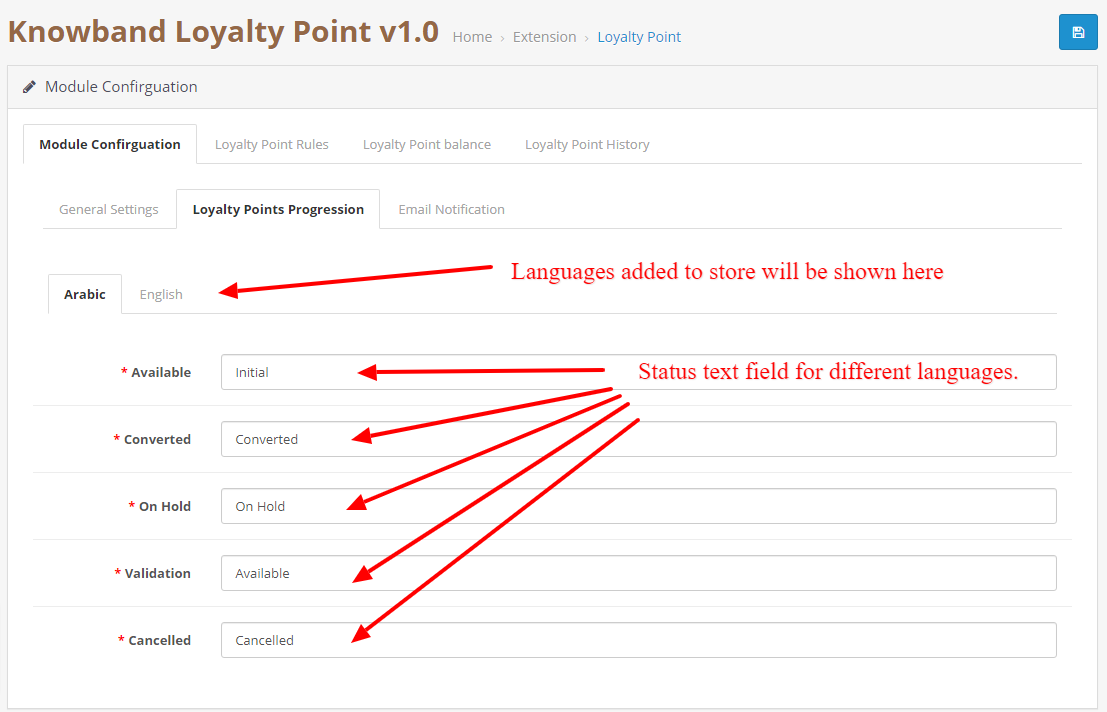
3.0.2.2 Points Progression Settings

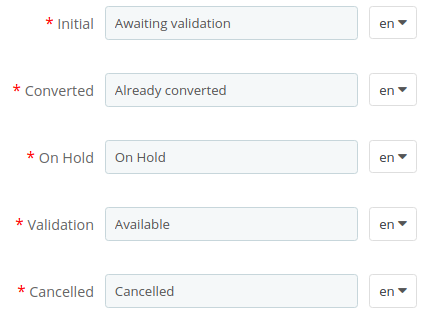
This allows you to change the language/text as per your requirement of the loyalty points progression statuses. You can change the language for each status in each language added to your store.
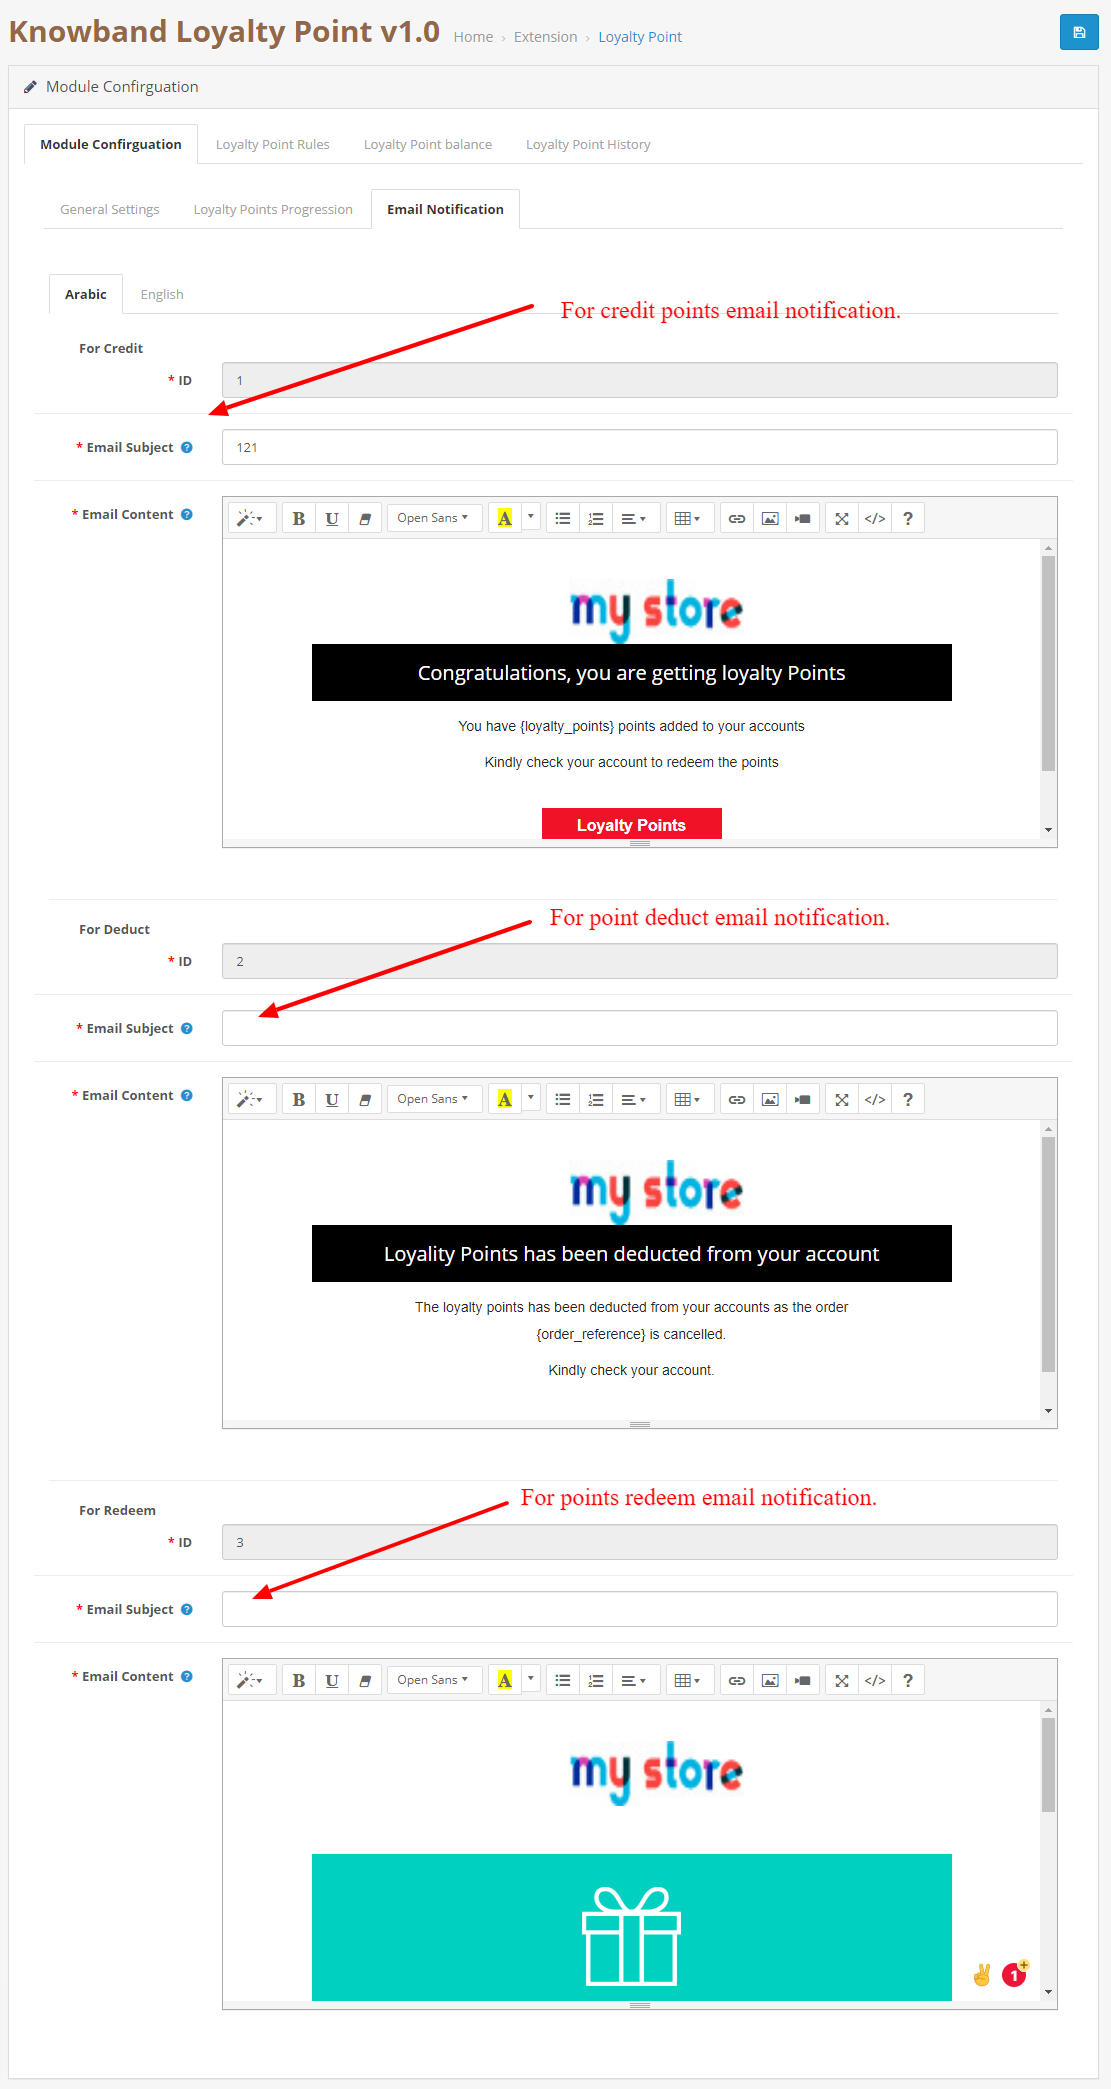
3.0.2.3 Email Notification.

In this tab, you can customize the credit, deduct and redeem notification emails for each language.
3.0.3 Loyalty Point Rules

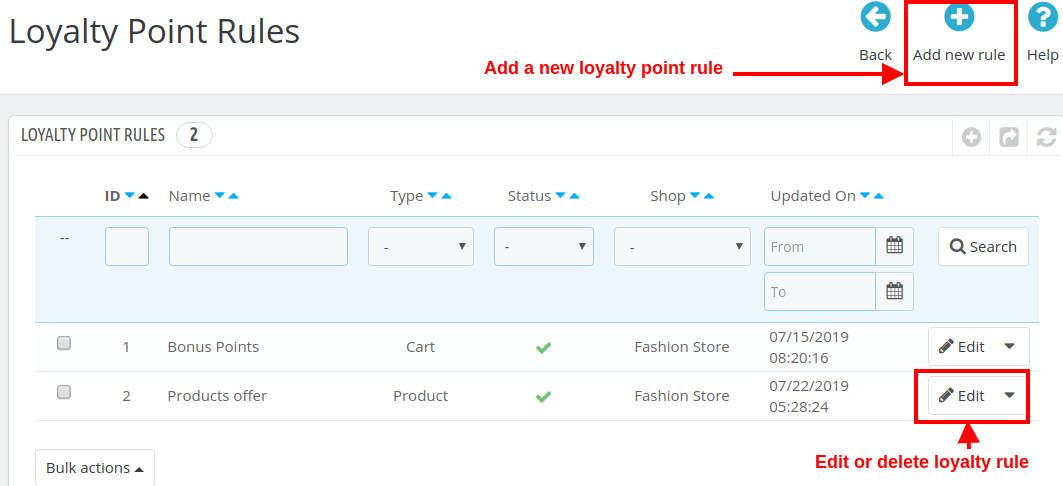
In this tab, you can see all the rules that are created in the store. The Admin can create new rules and edit the existing rules using this tab.

3.0.3.1 New Rule

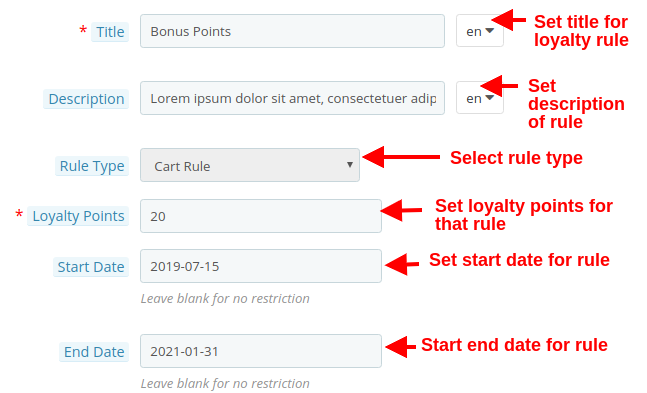
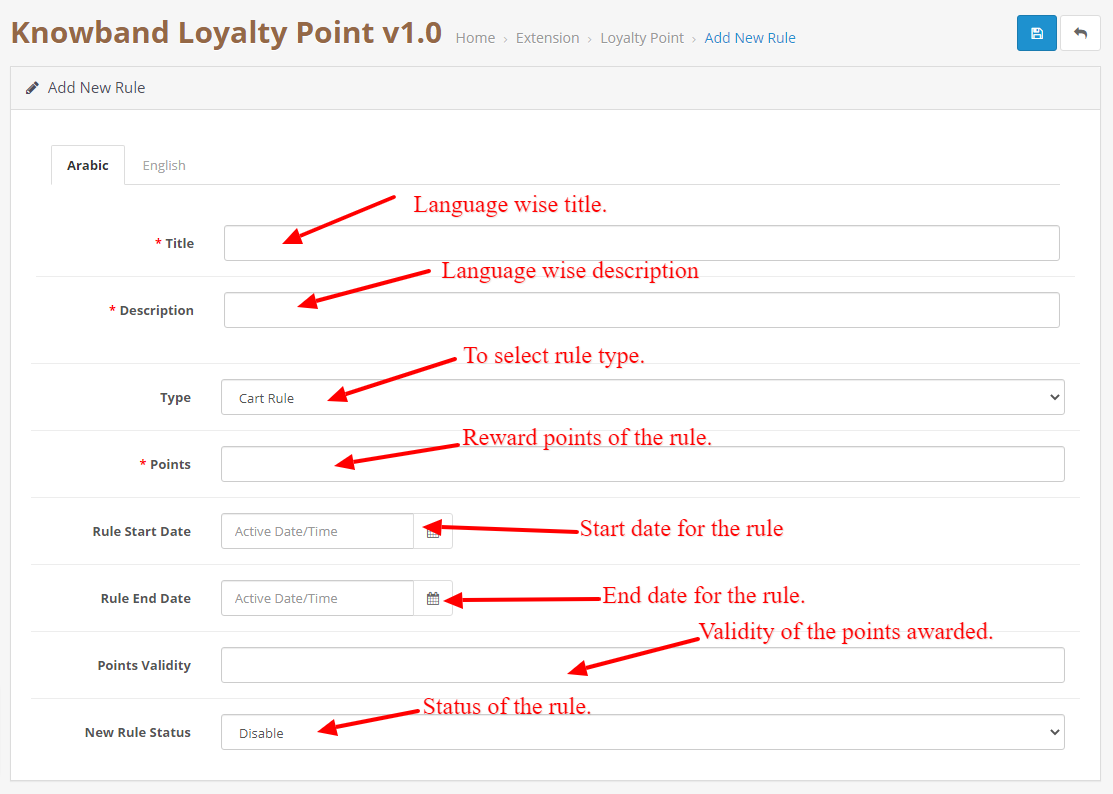
When the Admin will click on the new rule button, they will be redirected to the New rule page. On this page, you can create a new rule by filling the form.

  • Title: Add a title to the rule in each language added to the store.
  • Description: Add description to the rule in each language added to the store.
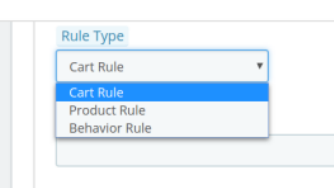
  • Rule Type: Select the rule type. It can be a cart, product, or behavior rule.
  • Points: Add the number of points that will be awarded to the customer if the conditions are fulfilled.
  • Rule Start Date: This field will be used to add a Start date for the rule.
  • Rule End Date: This field will be used to add an End date for the rule.
  • Validity: This field is used to add validity to the points which will be added to the customer. You can add no. of days in the field.
  • Rule Status: To enable/disable the rule.
3.0.3.2 Edit Rule

This page is used to edit the rule data. It consists of the following tabs:

  • Configuration: This tab is exactly similar to add a new tab but here you can change the details of the rules except for the rule type.
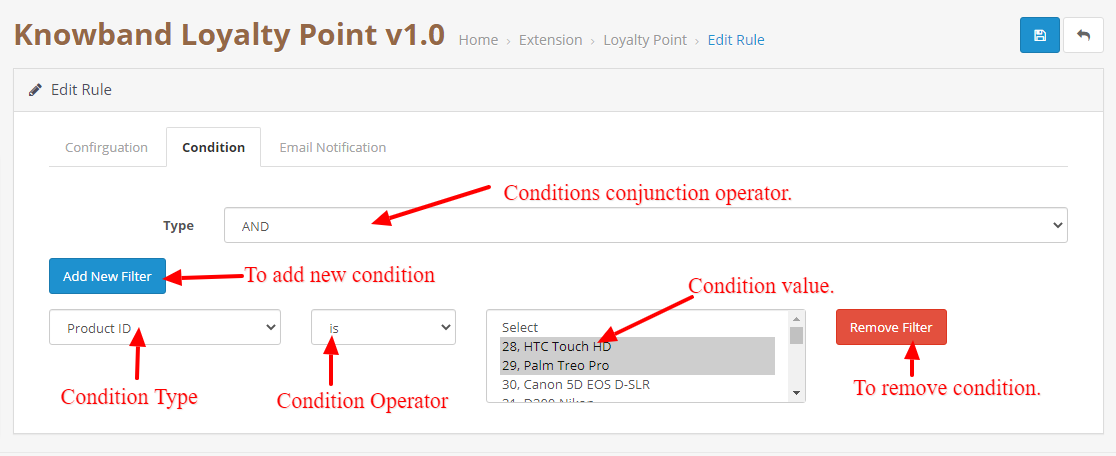
  • Condition: This tab is used to add the condition to the rule. The admin can add or delete the conditions as per their liking and different rule types have different conditions.
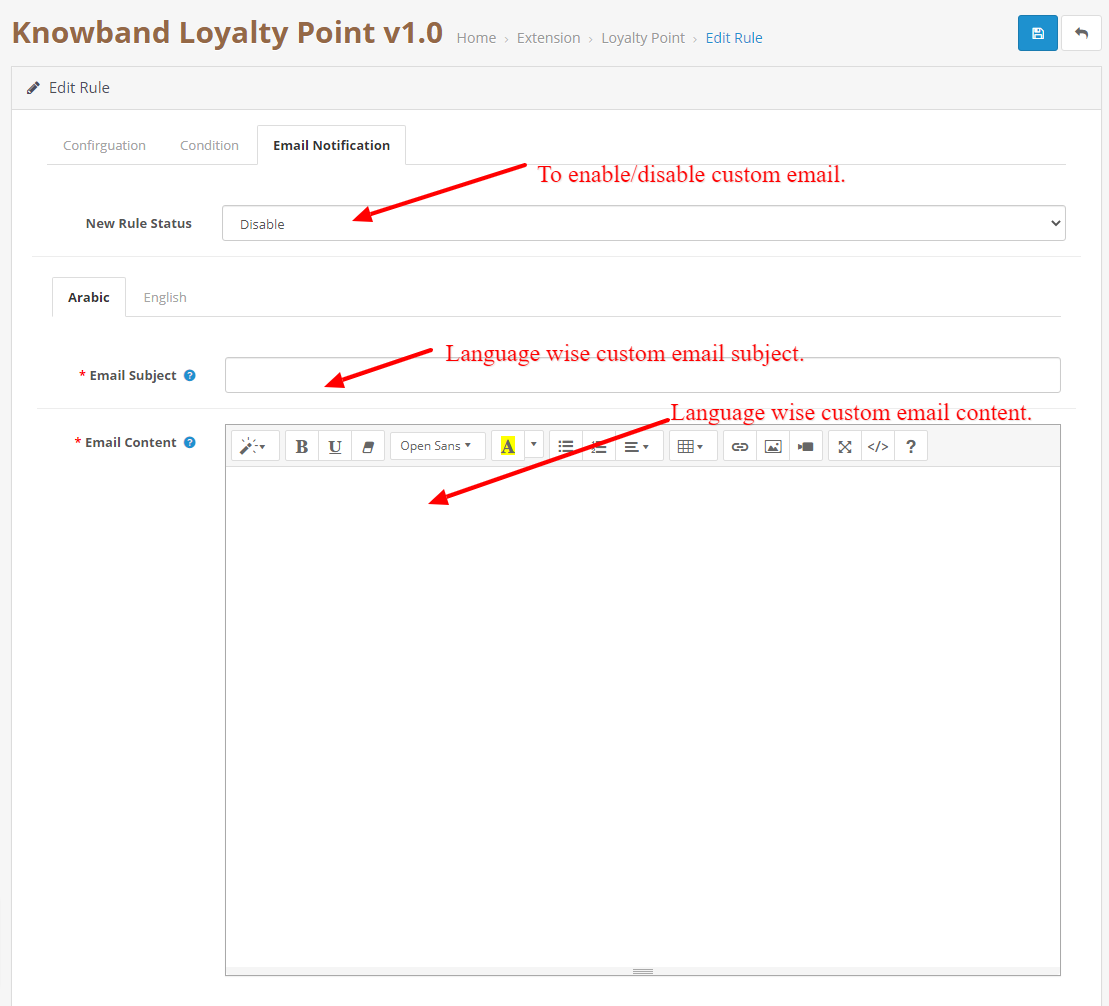
  • Email Notification: This is to add a custom rule notification. This email will be sent if the rule condition is satisfied by the customer and points are awarded to the customer.
3.0.4 Loyalty Point Balance

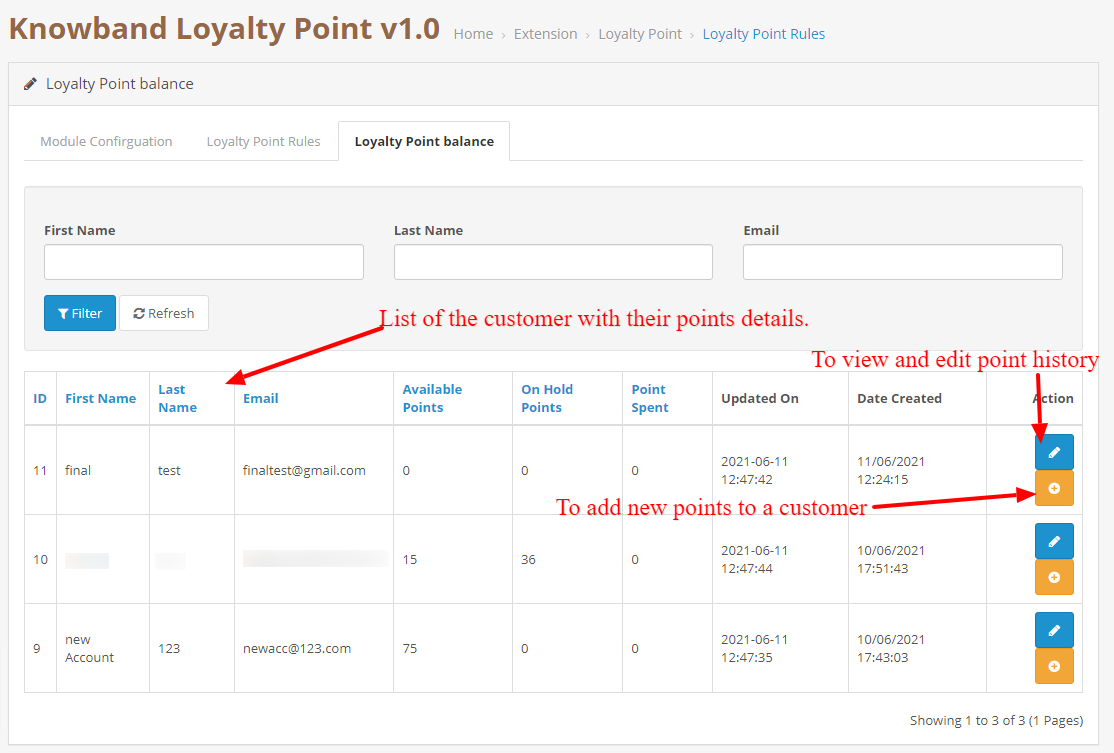
This tab consists of a listing of each customer that has been awarded points. It will contain a list which will describe how many points are available to the customer, how much are on hold, how much they have spent.
3.0.4.1 Loyalty Point History

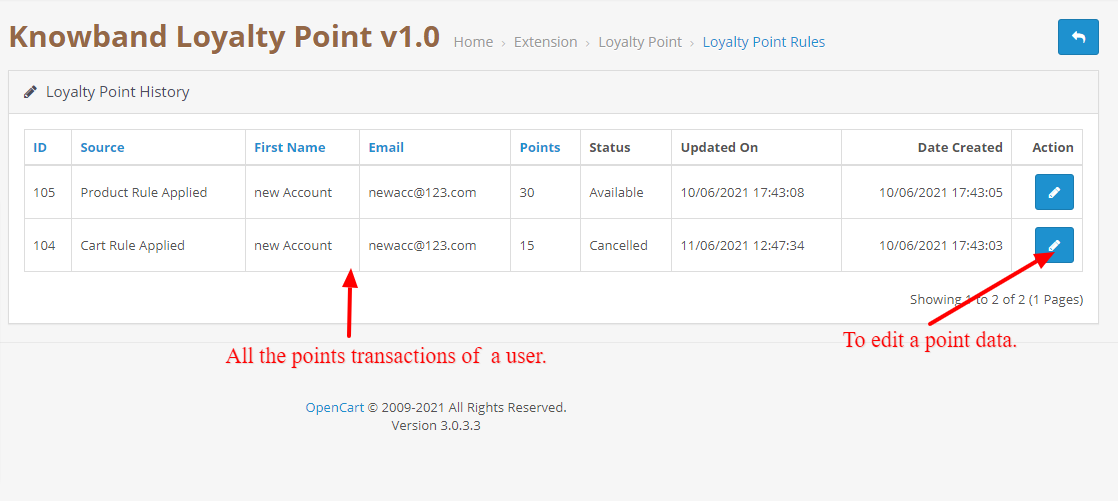
When the Admin will click on the edit history button, they will be redirected to the history page which will show all the transactions of the selected customer.
3.0.4.1.1 Edit Point Data

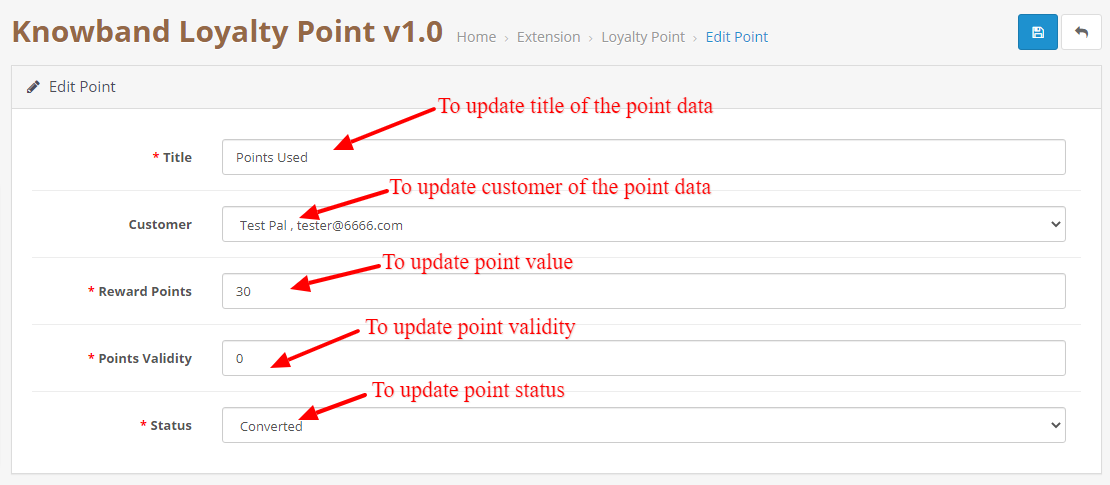
This page can be used to change the point data. This can be used to change the status of the point, point value, point title, and validity. This page is also similar to add a new point data page but this is used to update the data.
3.0.4.1.2 Add New Point Data

This will be opened when the admin will click on the add points button in the balance tab. This is used to add new points to the selected customer.

4.0 User Interface

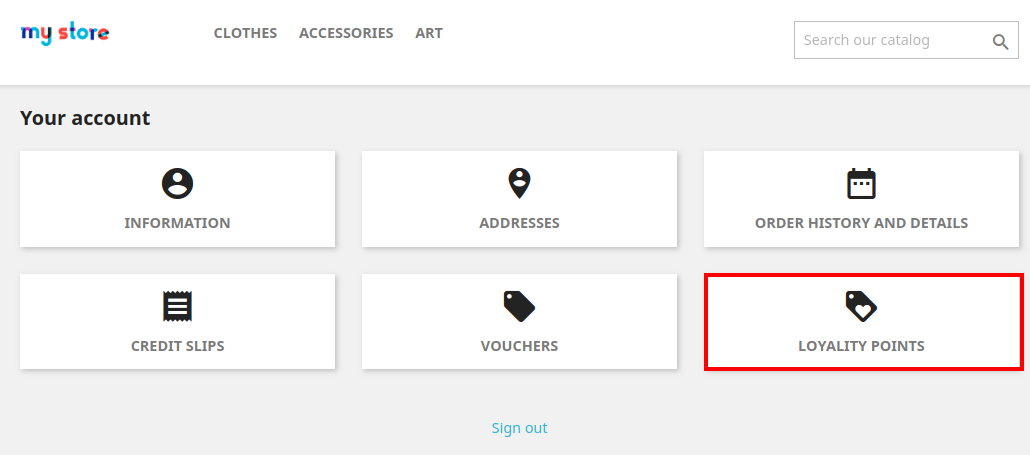
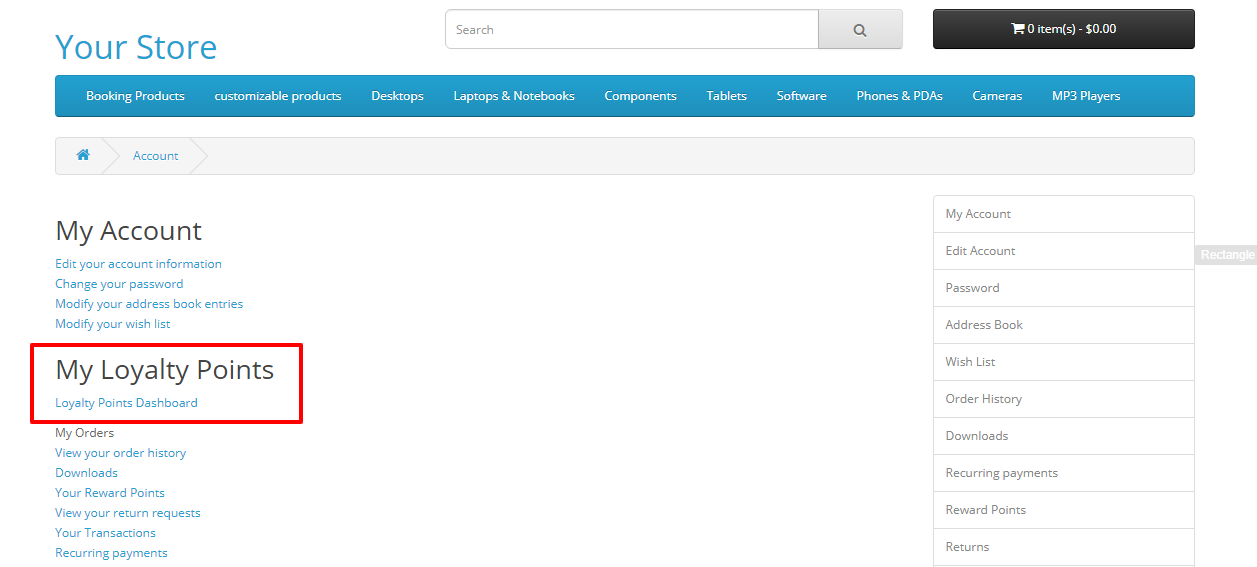
4.1 Once the module is enabled from the customer can go to their loyalty point dashboard by clicking the Loyalty points dashboard in the account section.
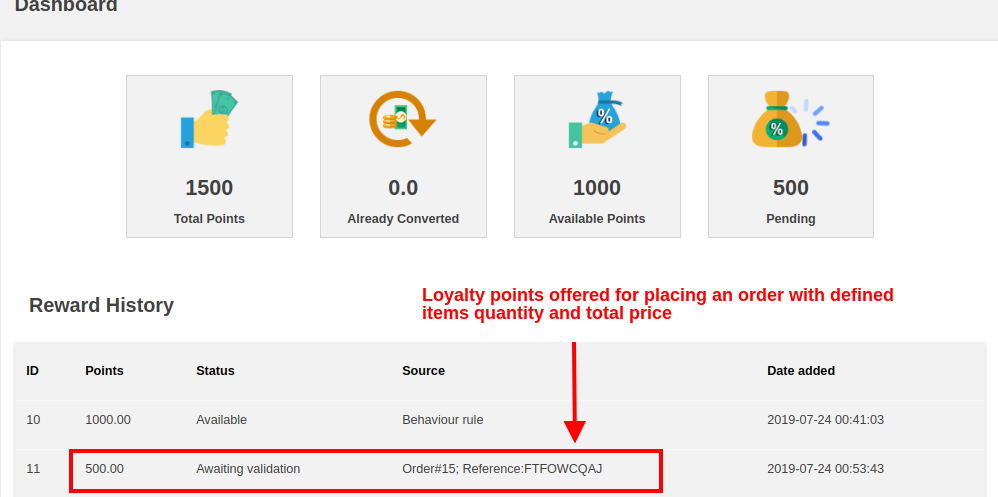
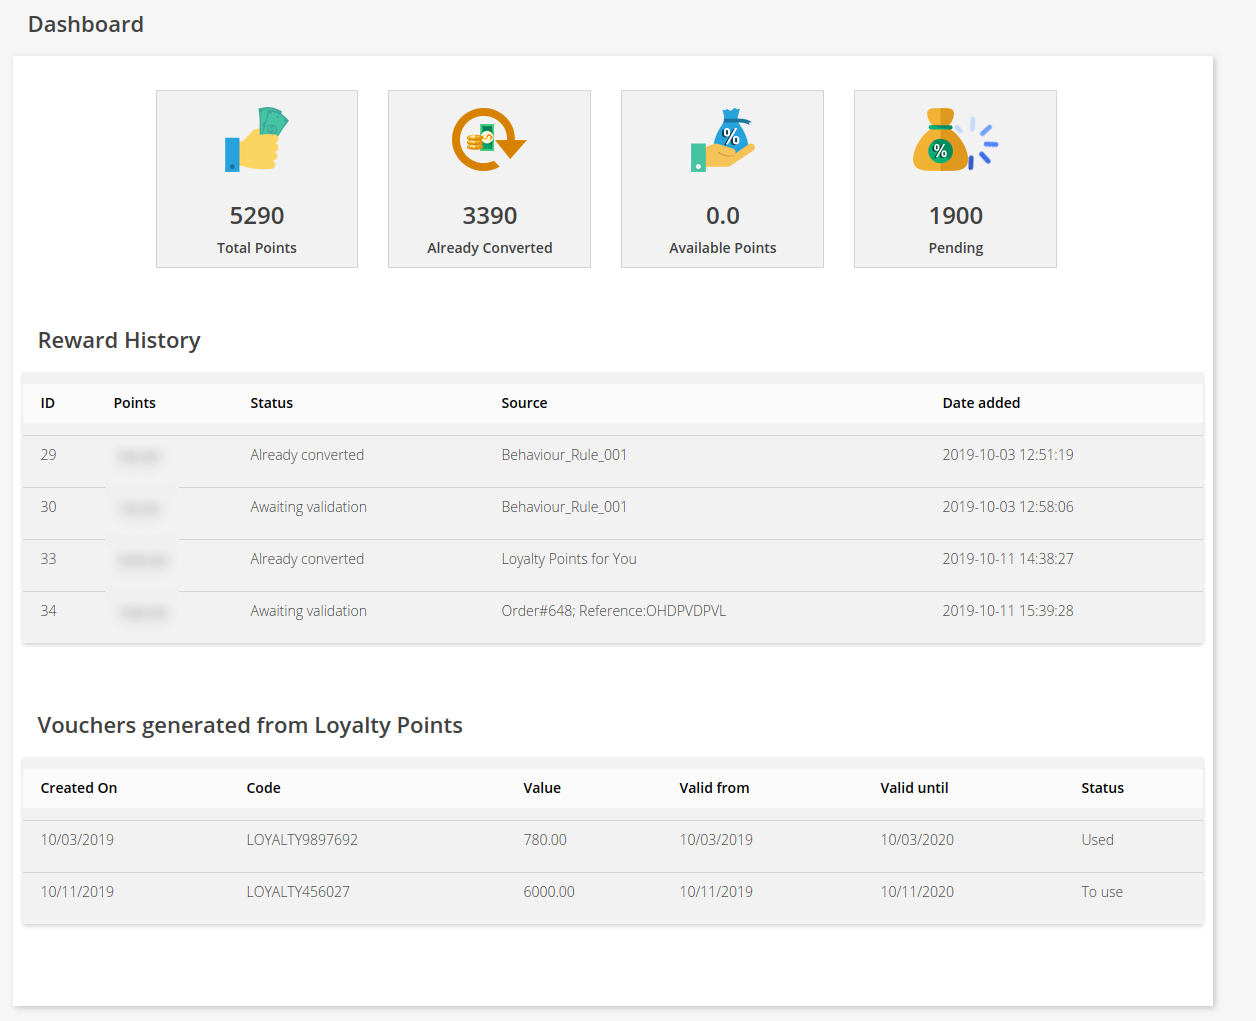
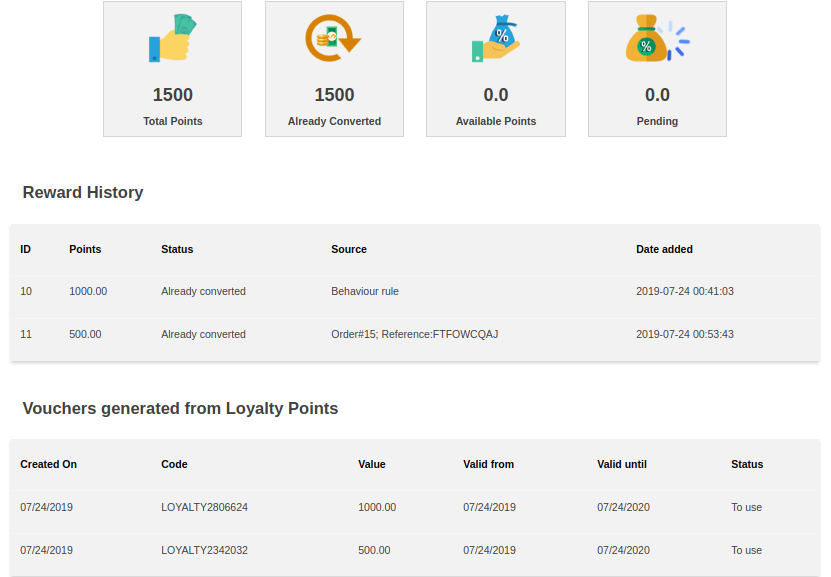
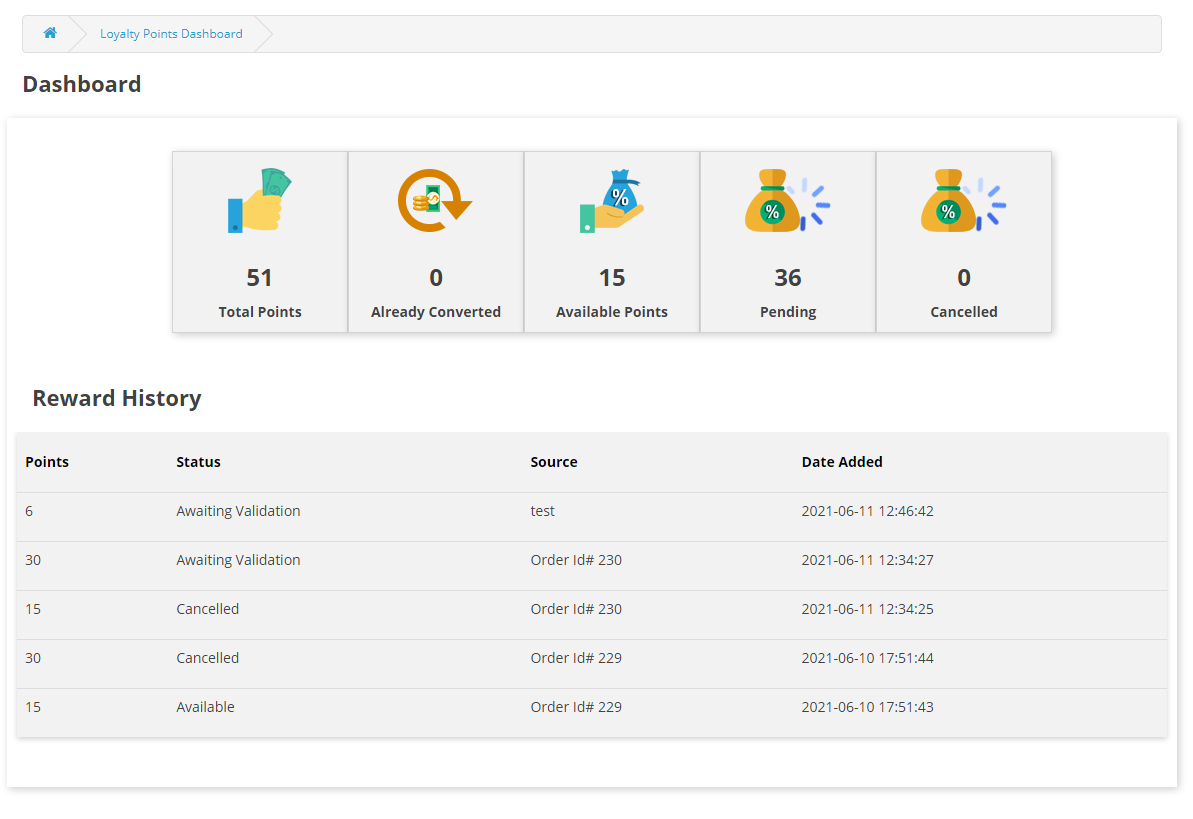
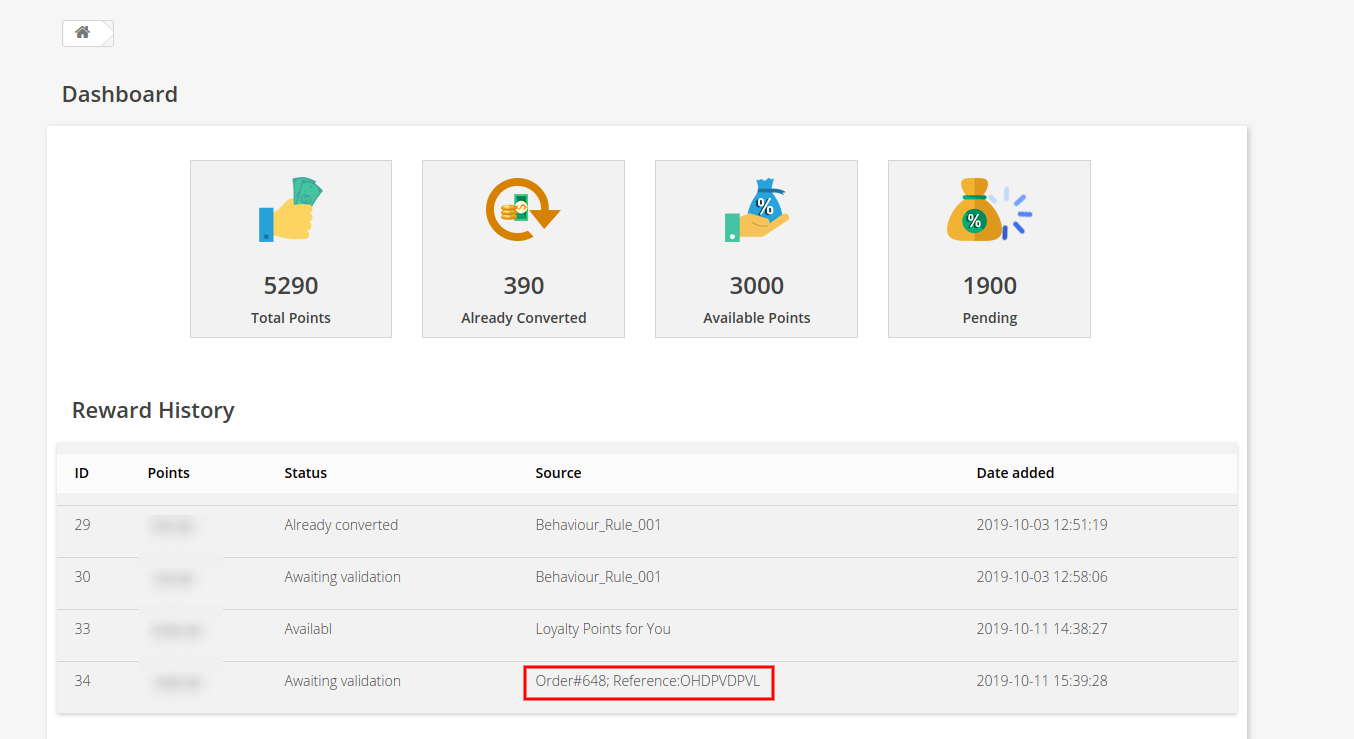
4.2 In the dashboard the customer can see all the point transactions as well as how many points are available to them, how many they have spent and how many points are on hold.
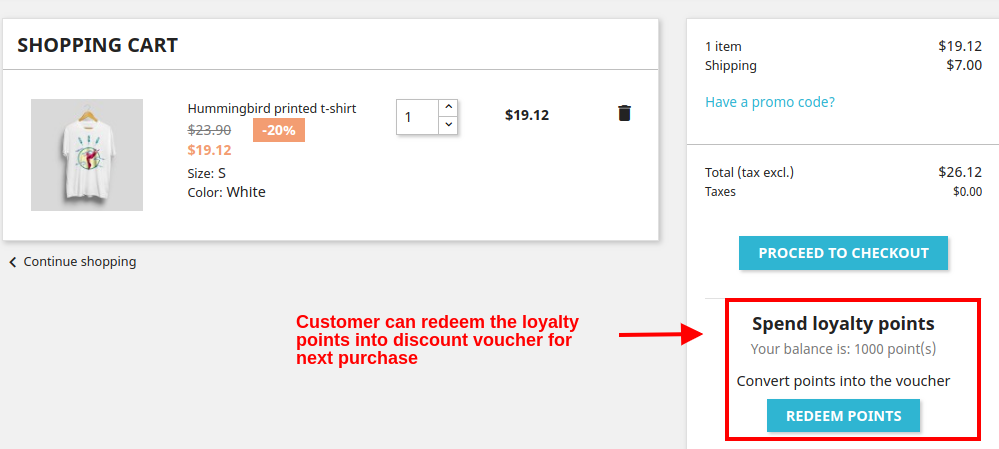
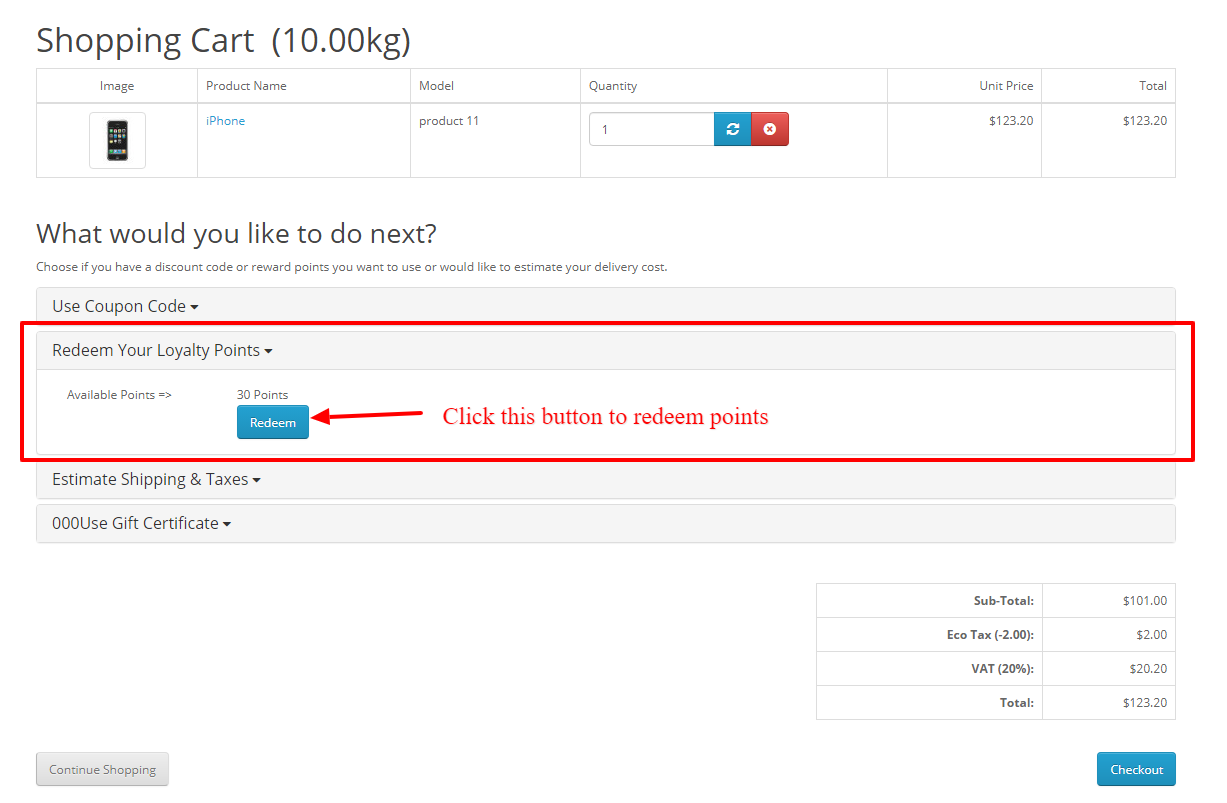
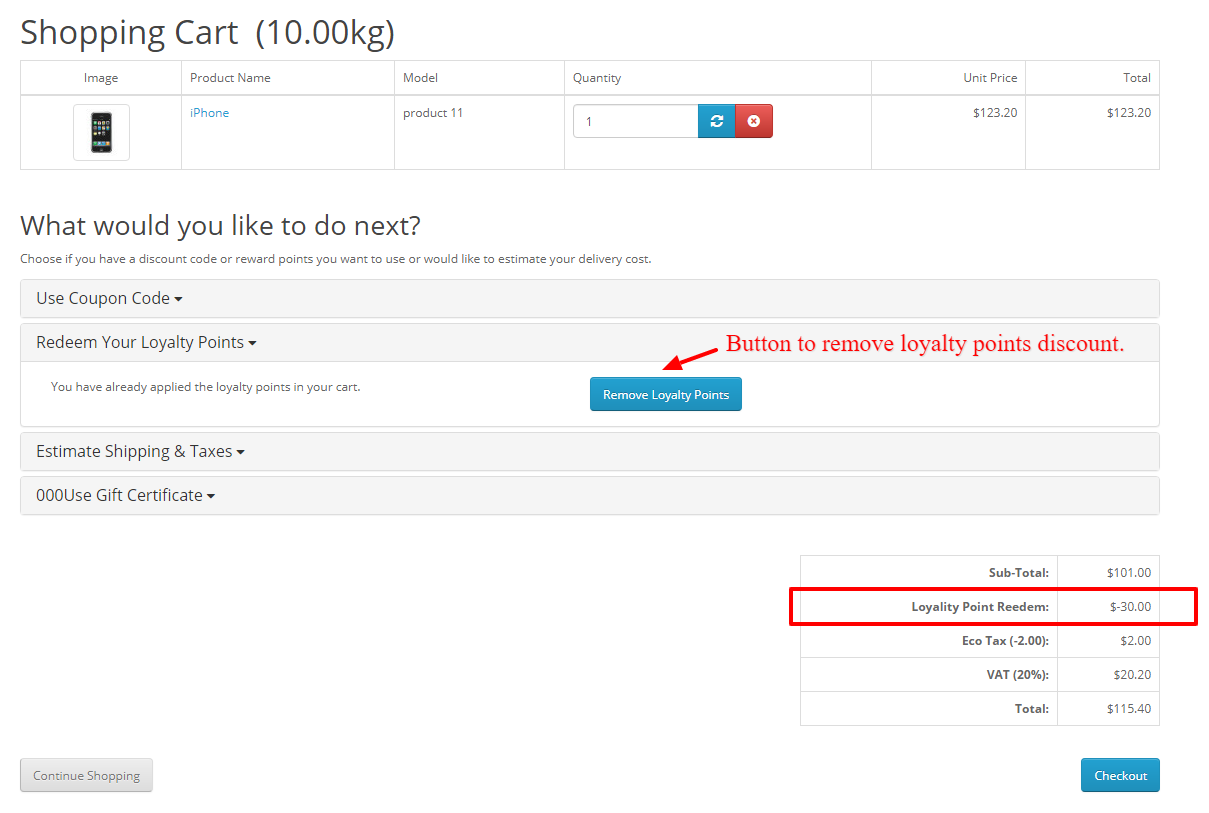
4.3 If the customer has some loyalty points then an accordion will be shown on the cart page where the customer can use those points to convert them into discounts. They just have to click on the redeem now button and the points will be converted into discounts.
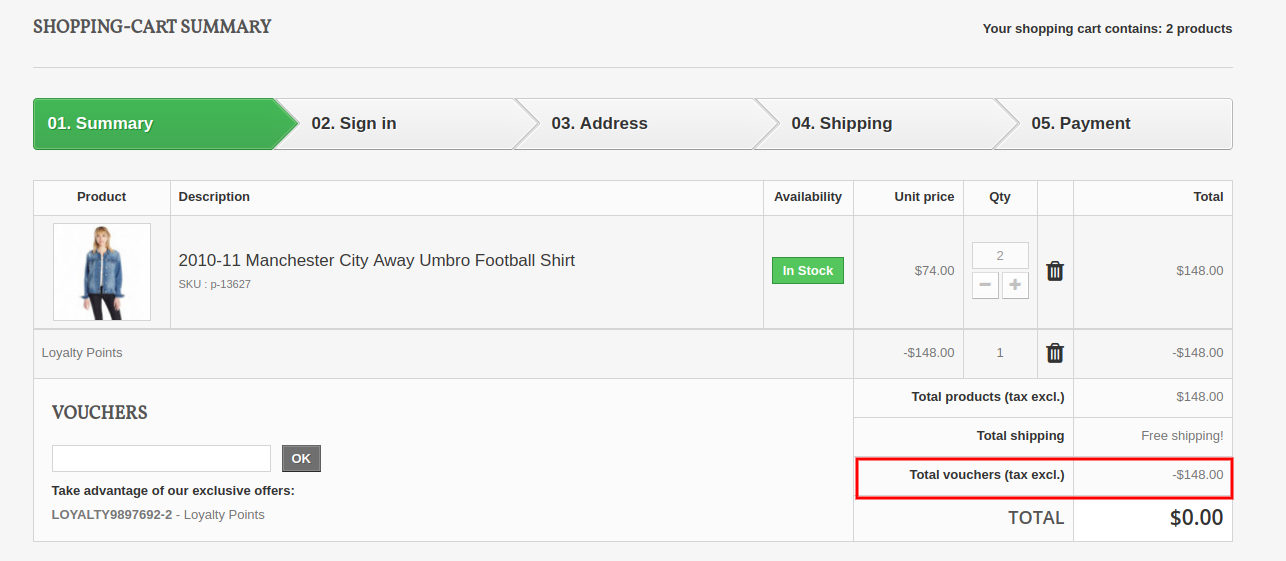
4.4 Once the points are redeemed they will be shown in the cart total section and the customer can also cancel points if they want to by clicking on the remove points button.
In case of any issue, drop an email to support@knowband.com OR click here to raise the ticket.

Buy OpenCart Loyalty Points extension: https://www.knowband.com/opencart-loyalty-points

Admin Demo:

Front Demo:

OpenCart Loyalty Points extension from the OpenCart Marketplace:

Giving Customers a Personalized Shopping Experience can Boost Online Sales

When exploring your Instagram or Facebook, you always see feeds that are of interest.  Google’s discover feed also shows you the content which you like and would like to spend time on.  Naturally, this makes you feel exclusive, and you spend more time without keeping the time track. 

Can you give the same experience to your customers while shopping? Ecommerce brands like Myntra or Amazon try to target their inactive leads with personalized email marketing. Giving your customer a personalized shopping experience in this competitive environment could be the right plan to survive in a long race.

Understand the shopping journey of buyers with data and use it well for customer experience personalization. With that, customers who get exclusive treatment will do word-of-mouth marketing.

As an eCommerce store owner, you might have given thought to this. But, you may struggle with How to do it? 

Know your customer personally

When you are spending a lot of time and money on focused target marketing, you just don’t need a customer who will make a one-time purchase but your business demands a loyal one. For target marketing, you can consider gathering demographic and psychographic details from a customer. The demographic information can be collected from registration forms but for psychographic information you need more data. To get the details like the interests, values, profession, and lifestyle, you can add custom fields to your registration page.

Proving your customer with loyalty points or rewards at every step of the form filling process will encourage them to fill it. This way, you can get more relevant information for future marketing and product personalization.

You can always ask for:

  •         Their first name 
  •         Birthday  
  •         products they’re interested in
  •         A preferred channel of communication

Some might like receiving emails but in a limited number while other millennials prefer receiving an SMS just after the purchase is made. It is good to ask the preferred channel of communication for targeted marketing. You can even ask for their interests and genre if a person is buying a book from your store.

A large number of people have no issues if a company spoof into the customer’s information which can provide them with a wow experience. From a report, it has been found that 76% of customers expect companies to understand their demands and requirements. So, people like getting a personalized experience, and it is now a trend that can be followed by an eCommerce store owner to compete with others in the market. Personalization can lead to impulsive buying.

Better to communicate with your customers

Remind your customers about the products they liked to buy or visited but did not make the purchase. You can send a push notification for back-in-stock products. You can ask them to look into their wishlist to reduce the abandoned cart.

It has been found that 95% of millennials do shopping while doing other things. Most of them shopped while watching TV or chatting with a friend. Half of the people bought when they are bored with waiting for someone, and some do it when they are traveling.

It is crucial to choose the right means of communication for interacting with your customer. The selection of a communication channel should be based on the data you have collected. Customers often receive promotional emails and notifications which grab their attention and make them shop more.

Putting efforts in the right direction can help you boost conversion rates and customer retention. Millennials prefer texting overcall. You can use a chat app to provide a solution to their queries. This will be a great deal to give them more customer experience personalization.

Effective use of data for persona

You have the data in your system and what a waste if you are not using it well. Your system knows your customer better than you do.

  •         Have you ever been in a situation when you called a person with the wrong name? This happened to me once, and I never want that to happen again. It instantly loses trust in a relationship. Send emails or greet them in-store by calling their name. This builds up an interactive connection between you and your customer.
  •         You can take the help of segment email marketing by categorizing your customers according to their psychographic data
  •         You can enhance the customer experience by offering them products related to their last purchase. A study says, 44% of the customers intended to buy from the same brand or company after getting a personalized shopping experience.
  •         Understand the need of your customer as per their geographic location. Implement geolocation-based marketing strategies. Add a store locator to your website. In-store shopping is still a trend in millennials.

PrestaShop modules you should not miss on

Do you know that you can enhance the personalized customer experience by adding extensions to it?

It is challenging to keep your customers at a checkout page or the product page when they are doing two things at a time. You must have some striking, captivating website features which will keep them attentive and focused on their purchase. Why not with personalized features that you can add with these modules?

Collect more information

With PrestaShop Custom Registration Fields, the owner of the PrestaShop store will collect information about the customer by adding custom fields to the registration form of the website. Additional Order Forms/Field Manager addon for PrestaShop is another module that can help you gather more information. Custom fields on the order form can be generated with this PrestaShop Additional Order Forms Manager without making any adjustments to the code on the web page.

How to use it?

You can ask your customer to fill up the details which can be optional. You can add this field to the registration form. This way you can collect information about birthdays, anniversaries, or any of the interests which can help you promote your products. You can send a personalized message on their birthday with a greeting or any discount coupon. Store owners can use additional information to develop their services and eventually make more profit from their company.

Celebrate birthdays or anniversaries

You can give discount vouchers or coupons to your customers on their Birthday. Birthday Coupon -PrestaShop addon is a module that can inspire your customers to shop from your store on their birthdays.

How to use it?

You can send an email with a personalized message on their special day. This email will include the birthday coupon or discount voucher. The voucher sent through the mail will be valid for a limited time. The addon comes with multiple default templates. You can use it for various occasions.

Make them loyal customers

It is a dream for brands to have loyal customers. From research, it is found that about 30% of people like to buy the same brand and around 40% choose the same brand if they are offering personalized products.  For customer retention and conversions, you can give loyalty points or reward points to your customers.

The PrestaShop Reward Points addon incorporates the reward points feature into your PrestaShop store and allows the admin to offer the rewards point to online shoppers every time they purchase items. 

How to use it?

Store owners can give reward points to the customer after every purchase they do. This comes with a set of terms and conditions. The module helps the admin to add multiple rules for redeeming those points. Customers can redeem those points at some point of purchase which will keep them engaged in your store.

Another extension that can help you with customer retention and customer conversion is PrestaShop Loyalty Point Module.

How to use it?

There are some rules like Cart Rule, Product Rule, and Behaviour rule for loyalty points. Store owners can offer loyalty points on a specific cart amount, product quantity, based on the payment method, particular product or category, shipping services, etc. It can be given to new customers while placing their first order.

Display recently viewed items

Automatic Related Products addon for the PrestaShop store can help you show the relevant products to your customers. This feature can be added to multiple pages of your eCommerce store.

How to use it?

The feature will show related products to your customers, and this will motivate them to see more and more on your eCommerce store. If they are not satisfied with the one product, they can see more until they get the one.

Add more product details

Admin can add n number of details for a product with Advance Product Attribute/Field – PrestaShop Addon. This module allows you to show descriptive information about the product. 


How to Use it?

It has a simple configuration, and the admin can ask customers to provide more information about the product. If they like the product or not? If they need any modifications?  By collecting additional customer details, the sellers can better represent them. As a result, online shoppers will have the same user experience with this PrestaShop Additional Field Module on the Product tab.

Attractive email subscription module

Spin And Win – Entry, Exit, and Email Subscription Popup by PrestaShop have a gamified interactive look. It attracts the buyer’s attention and allows them to win offers like discount coupons or free shipping. This is one of the best sellers of PrestaShop and a fantastic module to collect the email addresses of your customer.

 How to use it?

You can Get Personal in Email Marketing and send personalized Emails using the information which is provided by the customers. The emails should be sent based on customer behavior. You can go for a personal recommendation to offer a personalized customer experience to your customer. Try to re-engage your leads with promotional messages or pop-up notifications. Email marketing is a free and reliable option to give a customer personalization experience to users.

Greet your customer

Greetings are most valuable when you are building a relationship. Customer-trader relationship is most important when it comes to business. You can use a Better thank you page module for your PrestaShop store.


How to use it?

Add a Better thank you page module to your PrestaShop store and use it to show a pop-up when the customer is leaving your store or after the successful purchase. Also, you can add customized banners or discount coupons for their next purchase. This way, it can help you boost customer retention and make your customer satisfied.

Final thoughts

Increase your sale by providing a personalized shopping experience to your customers. In this era of millennials, Personalisation is the only way to attract a loyal customer base to your store. Create Special Campaigns Based on user behavior and make them feel unique. They don’t like to be treated as a number but an individual. So, It’s time to boost your sales with a customer experience by providing personalization. 

Recommended Reads:

How to Simplify the Online Shopping Experience of Customers?

Give Best Infinite/Endless Scrolling Experience to Your eCommerce Customers

Prestashop Loyalty Points Addon – User Manual

1.0 Introduction

Improve the conversion rates of your store with the help of customer reward system. Integrate Knowband’s Prestashop Loyalty Points addon at your store that grants loyalty points to your customer upon creating a new account on the store, placing an order for a particular product or a specific product in the category and other events. The loyalty points can be converted to loyalty discount coupons by the customers during their next purchase from the store. This Prestashop Loyalty points and discount addon helps in increasing customer retention and reorders letting customers to collect more & more reward points which they can redeem during future orders. Thus Prestashop Loyalty points system implements a customizable reward and discount scheme at your store to encourage customer orders and signups.

1.1 Striking Features of Prestashop Loyalty Points Module

Prestashop Loyalty Points addon is highly customizable plugin with no core changes required. You can define as many loyalty points rule for your eCommerce store and award loyalty based discount vouchers to your customer. Lets quickly check different features offered by this Prestashop Loyalty points and discount addon.

  1. Prestashop Loyalty points system grants loyalty points to your customers for placing an order with specific cart value, creating an account , ordering a certain product etc. The loyalty points are defined specific for different rules.
  2. Prestashop Loyalty reward points can be offered manually or automatically to the customers based on their cart value, product selection or site activity.
  3. Prestashop purchase points addon allows an option to set order status when the loyalty points are added to the customer account.
  4. With Prestashop Loyalty points and discount addon, you can set the order status when the loyalty points assigned to any customer are automatically cancelled.
  5. With this Loyalty points module, you can set the discount equivalent to a single loyalty point. This discount value can be set in any desired currency.
  6. Prestashop Loyalty points addon gives an option to set minimum cart amount to be eligible to apply loyalty discount coupon.
  7. The tax over Prestashop loyalty discount coupons can be enabled or disabled from the backend.
  8. Loyalty points module for Prestashop allows you to set various progression names in multiple languages.
  9. Prestashop Loyalty Points addon lets you create unlimited loyalty points rules based on customer’s Cart, Product or Behavior.
  10. With this loyalty point module, you can set the title, description, number of loyalty points, start date, end date and validity for each rule.
  11. You can modify, enable, disable or delete the existing rules from the back-office of Reward points module.
  12. The status and detailed history for Prestashop loyalty discount coupons can be viewed at the backend.
  13. With Prestashop customer loyalty system, you can easily get into the details of loyalty points earned by the customers of store.
  14. The different email sent for points credit, points cancellation and points redemption can be modified from the back-office of this Prestashop Loyalty reward points module.
  15. Prestashop Loyalty points system is simple to enable or disable from back-office interface.
  16. Prestashop loyalty discount module is multi-lingual compatible.

1.2 Technology for Development

Language: PHP
Frame Work: PrestaShop
2.0 Installation Guide for Prestashop Loyalty Points and Discount Addon

You can follow these simple steps for installing the Prestashop Loyalty Points addon on your eCommerce store:

1. Firstly, download the addon package from the Knowband store.

2. You will get a zipped file containing the source code and user manual. Unzip the complete package in the root directory of your Prestashop store through FTP manager (like Filezilla or WinSCP – download here: https://filezilla-project.org/). You’ll find the files and folders as shown in the image below:

3. The Prestashop Loyalty Point plugin is all set to be installed in the store. Go to the Store Admin and then to ‘Modules and Services’.

4. Click on the “Install” button just next to your module. It would show a pop-up for your confirmation. Click on “Proceed with the installation” option. This step will install the module and show notification – “Module(s) installed successfully”.

3.0 Admin Interface of PrestaShop Purchase Points Addon

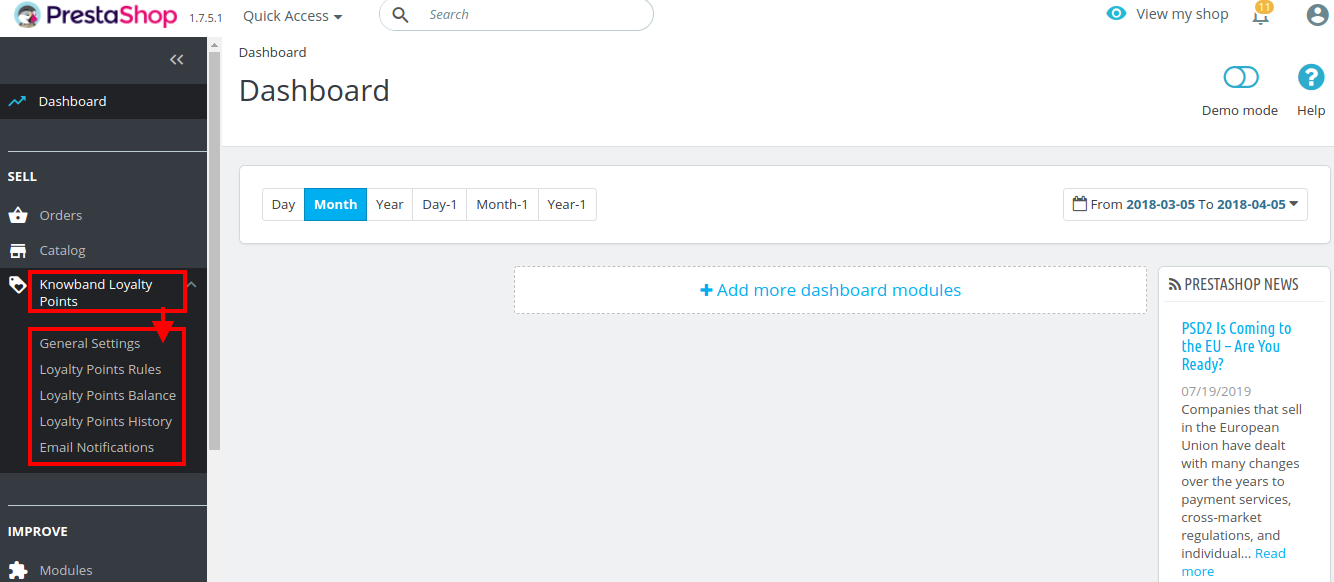
Just after successful installation of Prestashop Loyalty Points addon at your website, you can create and apply as many loyalty points rules for your store. You can grant loyalty points to your customers manually or automatically based on various criteria. In the admin panel or dashboard, click on “Knowband Loyalty Points”. It will list you various configuration tabs as shown in the given screenshot.

Here, in this interface of Prestashop Loyalty points system, you will see five sub sections under Loyalty Points module.

  • General Settings
  • Loyalty Points Rules
  • Loyalty Points Balance
  • Loyalty Points History
  • Email Notifications

Each section of this Prestashop Loyalty points and discount addon has been discussed below.

3.1 General Settings

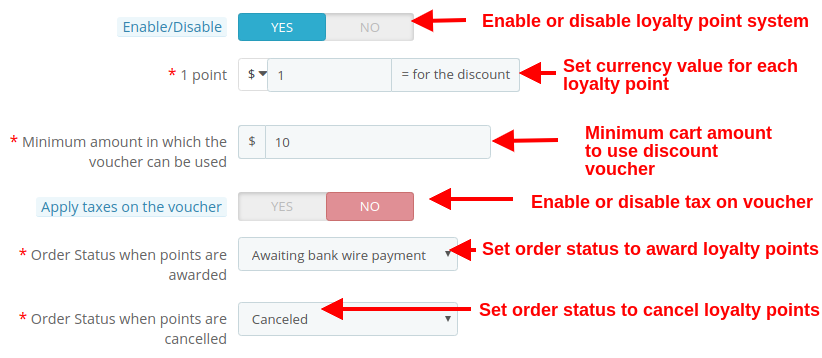
Under the general settings of Loyalty points module for Prestashop, you can perform the basic settings for the reward points system.

  • Enable/Disable: This option fully enables or disables the loyalty point system for the store.
  • 1 Point: This option sets the currency value equivalent to each loyalty point. You can set this amount in any selected currency.
  • Minimum amount in which the voucher can be used: This option sets the minimum cart amount over which the coupon can be applied.
  • Apply taxes on the voucher: This option will enable or disable the taxes over the discount voucher.
  • Order status when points are awarded: This option sets the order status when the loyalty points are awarded.
  • Order status when points are cancelled: This option sets the order status when these loyalty points are cancelled.

As shown in the below screenshot, you can set the names for various loyalty points progression. Theses names are applicable to complete module settings.

3.2 Loyalty Points Rule

Under this section of Prestashop purchase points addon, you can create multiple loyalty points rule based on various customer activity. Each rule can be modified, enabled, disabled or deleted as per site requirements.

The above screen shows the list of existing loyalty point rules at your store. These can be modified, deleted or you can create a new rule as discussed below.

To create a new loyalty point rule for your store, click on the “Add new Rule” button at the top right screen. Initially, it will only show you the “Configuration” tab. Once you will save the Configuration options, it will show you the next two tabs: “Conditions” and “Notifications”.

Following options are listed under the “Configuration” tab of new rule.

1. Configuration

  • Title: This option sets the title for the loyalty point rule.
  • Description: This option allows you to set a small description of the rule.
  • Rule Type: Using this option, you can set the rule type out of three options as Cart Rule, Product Rule, or Behavior Rule as shown below.

  • Loyalty Points: Using this option, you can set the number of loyalty points for this selected rule.
  • Start Date: This option defines the start date for the rule.
  • End Date: This option defines the end date for the rule.

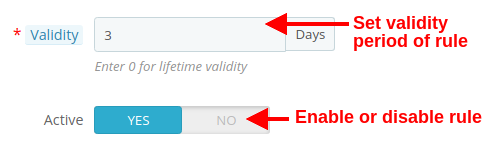
  • Validity: This option will set the validity period of the loyalty points (in days). If set to 0, the loyalty points has lifetime validity.
  • Active: Enable or disable the rule using this option.

2. Conditions

For the selected rule type, you can select the rule conditions as shown below.

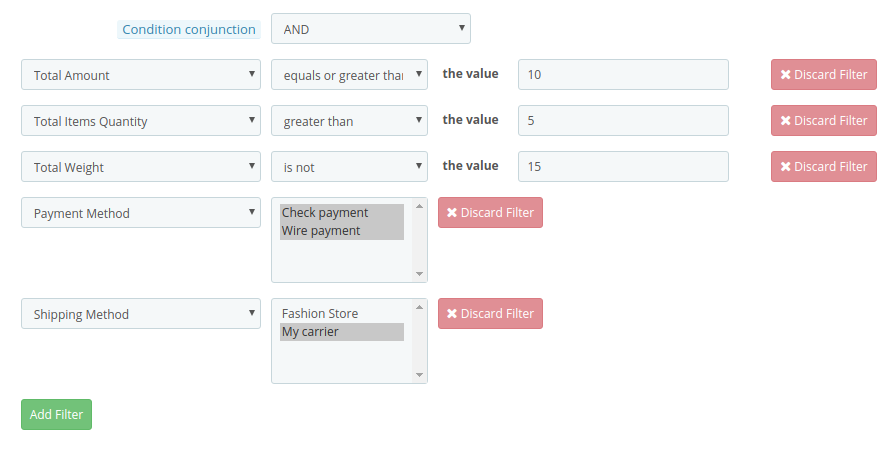
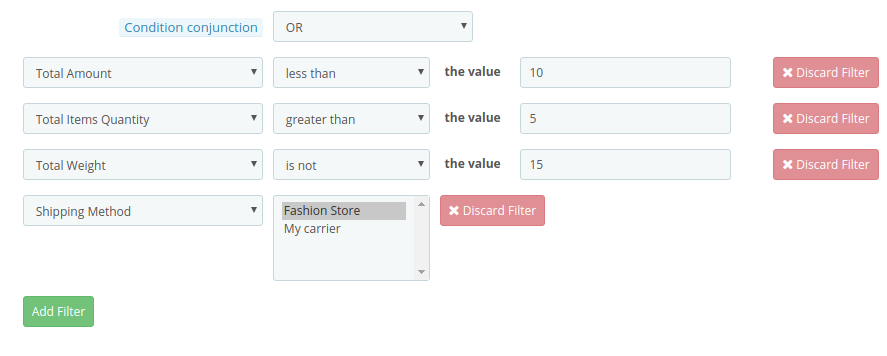
  • Condition Conjunction: This option will select the conjunction type as “OR” or “AND”.

A) Conditions for Cart Rule

  • You can create any type of rule using conjunctions: “AND” & “OR”
  • Admin can apply conditions on the basis of Total Amount, Total Items quantity, Total weight, Payment Method, Shipping Method.
  • Below are the examples of the rules that can be created using these conditions:

1.This rule works when (total amount >= 10) and (total items quantity > 5) and (total weight ≠ 15) and (payment method = check/wire) and (shipping method = my carrier) are all applicable to customer’s cart. To get specific points, all conditions should be TRUE. (Refer below screenshot)

2.This rule works when (total amount < 10) or (total items quantity > 5) or (total weight ≠ 15) or (shipping method = Fashion store/my carrier) is applicable to customer’s cart. To get specific points, any one condition should be TRUE. (Refer below screenshot)

Similarly, you can create other rules as well with different filters and values.

B) Conditions for Product Rule

  • You can create any type of rule using conjunctions: “AND” & “OR”
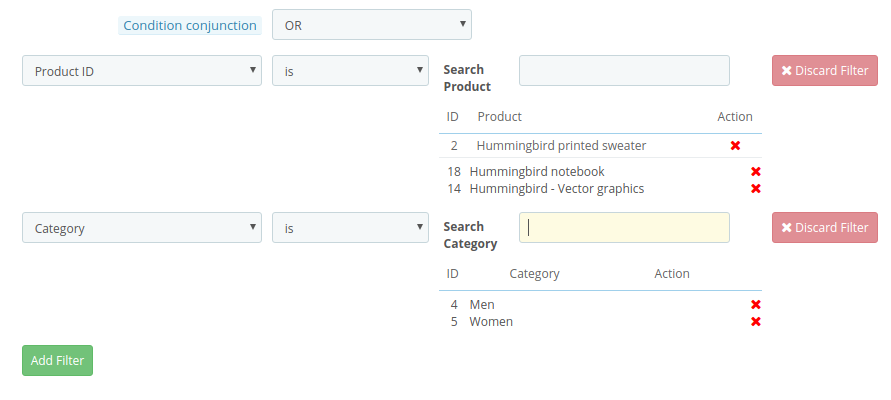
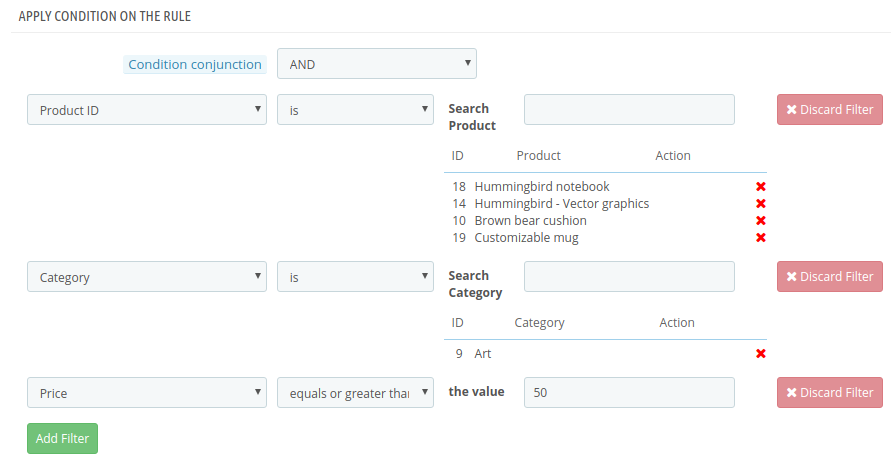
  • Admin can apply conditions on the basis of Product ID, Category, Price.
  • Below are the examples of the rules that can be created using these conditions:

1.This rule works when (product ID is 2/18/14) or (category is 4/5) is TRUE. To get specific points, any one condition should be TRUE. (Refer below screenshot)

2.This rule works when (product ID is 2/18/14) and (category is 4/5) and (price >= 50) is TRUE. To get specific points, all the conditions should be TRUE. (Refer below screenshot)

Similarly, you can create other rules as well with different filters and values.

C) Conditions for Behavior Rule

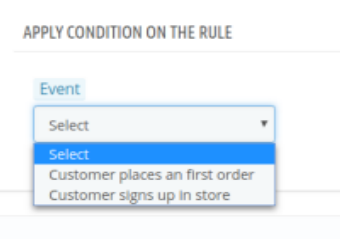
Admin can apply condition on the basis of customer’s sign up and customer’s first order.

1. First Order – The Loyalty points will be granted to the customers when they place their first order on the store.

2. Sign Up – The Loyalty points will be granted to the customers when they will create an account on the store.

3. Notifications

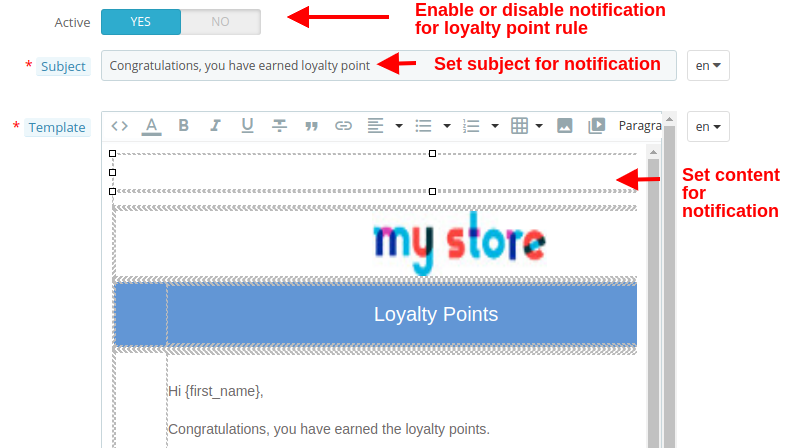
The Notification tab shows the configuration options for email sent to the customers when they earn loyalty points through the selected rule. The options include:

  • Active: This option enables or disables the notification for the selected loyalty point rule.
  • Subject: This option sets the subject for the email sent to customers upon winning loyalty points at the store.
  • Template: This option sets the email content or body which details about the loyalty points they have earned on the store.

3.3 Loyalty Points Balance

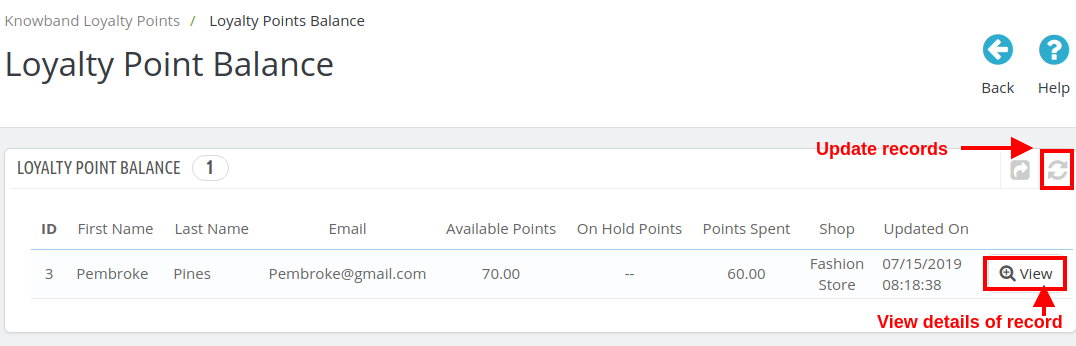
Here in this section of Prestashop Loyalty points and discount addon, you can check the status of loyalty points granted to various customers of the store. You can view the details of each of the customer who have been granted the loyalty and discount points.

You can click the “Refresh” button in order to update the loyalty points records for store customers. Click on “View” button to check the details of a particular record (all records of the same customer) like shown in the image below.

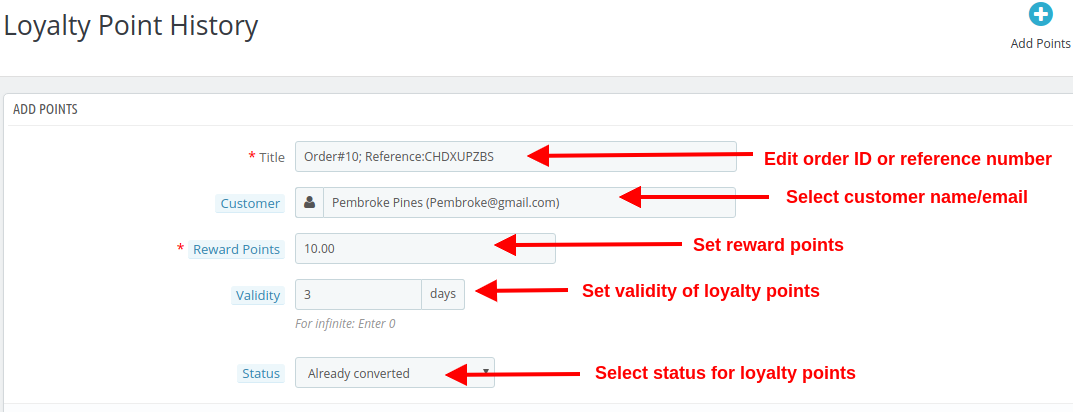
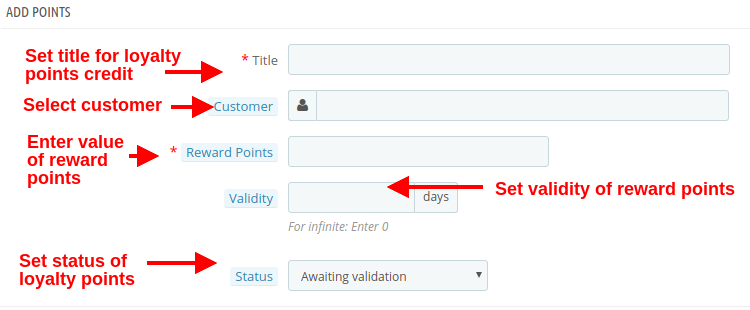
You can edit the various order records of a same customer by clicking on the “Edit” button. To assign the loyalty points manually, click on “Add Points” button as shown in the image above. When you add points manually, you will see the following configuration options.

  • Title: The option sets the order or reference number for crediting loyalty points to the customer’s account.
  • Customer: With this option, select the name or email of the customer to whom you want to reward loyalty points.
  • Reward Points: Set the number of loyalty points you want to offer to the customer.
  • Validity: Set the validity of loyalty points using this option. Set this as 0 for infinite days validity.
  • Status: This option sets the status of the loyalty points granted to the customer.

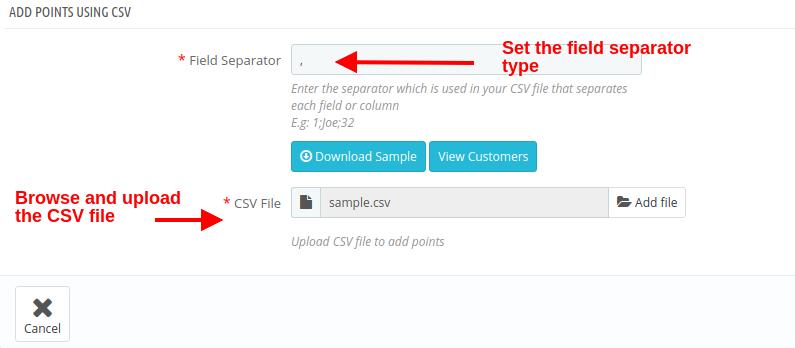
If you want to add loyalty points manually for bulk customers, you can simple upload a .csv file as shown below.

  • Field Separator: This field allows you to specify the type of field separator you have used in your CSV file for separating various records.
  • CSV File: This option allows you to browse and upload the .csv file saved at your local space.

3.4 Loyalty Points History

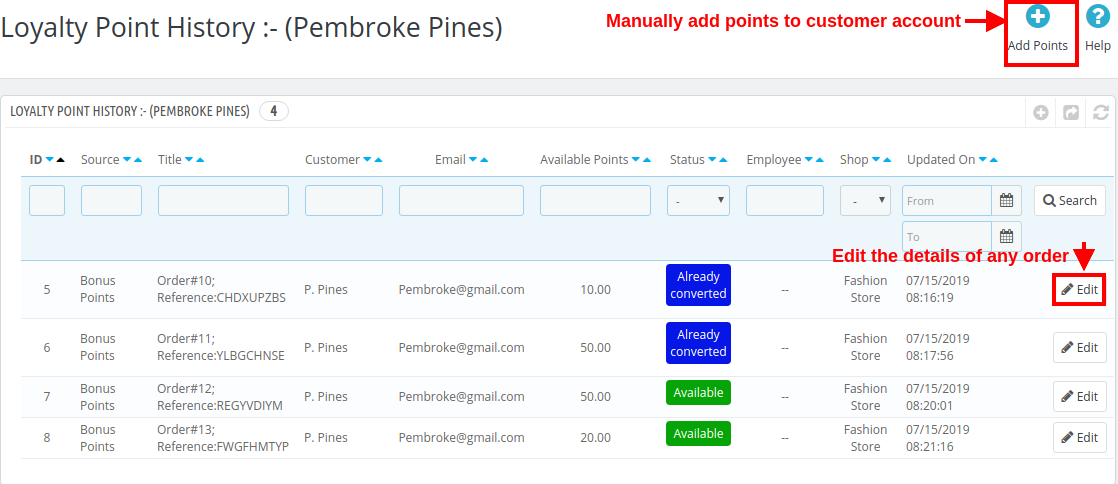
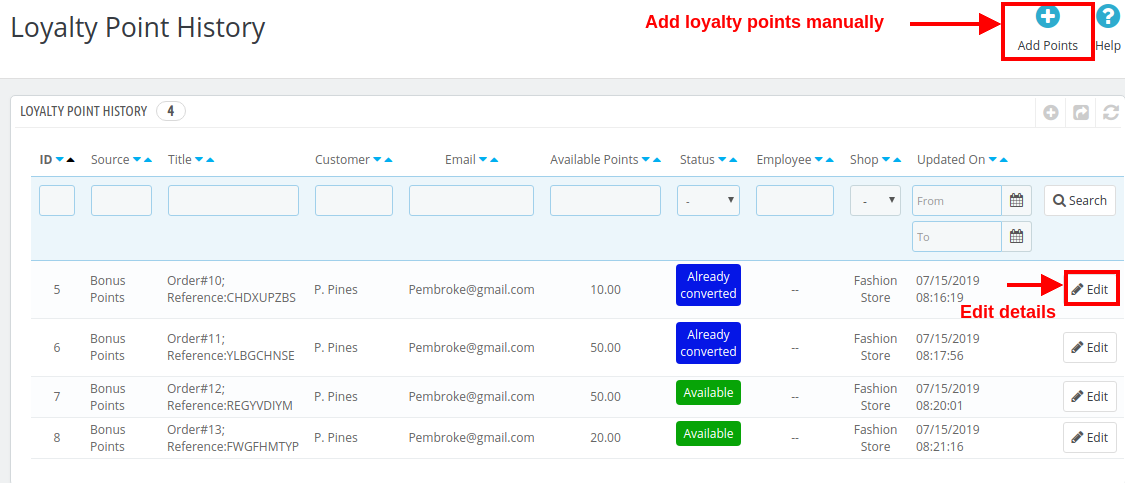
With Prestashop Loyalty points system, you can view the loyalty points history along with the customer details. From this panel, you can manually grant loyalty points to the customers.

By clicking on Add Points button, you will be shown the below screen. (already discussed in 3.3 section)

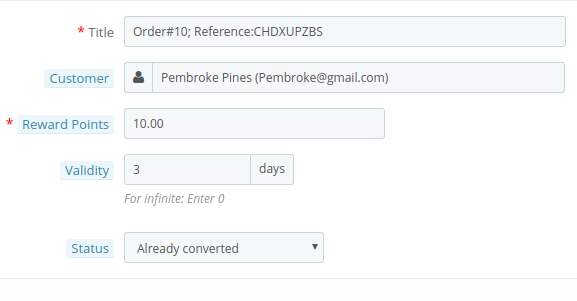
On clicking the “Edit” button corresponding to any record, you will be shown the below screen.

  • Title: This option will allow you to modify the reference title or order title.
  • Customer: This option allows you to change the customer name or email who are assigned these loyalty points.
  • Reward Points: This option lets you set the loyalty points.
  • Validity: With this option, you can change the validity period for the rewarded loyalty points.
  • Status: This option lets you change the status of those loyalty points. The status of these points can be checked from the customer’s “Account Dashboard”.

3.5 Email Notifications

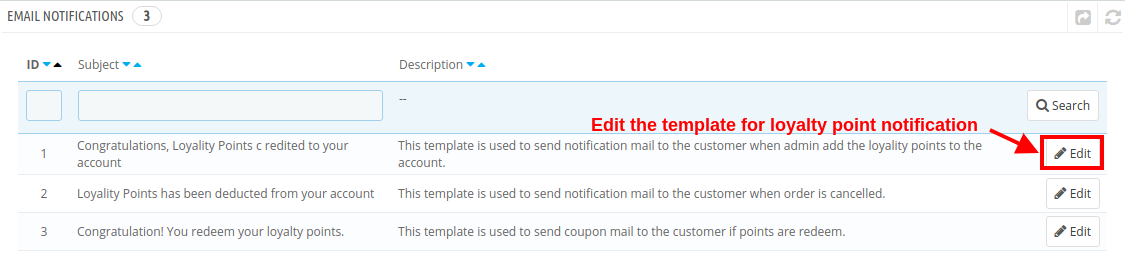
Prestashop purchase points addon gives you flexibility to modify/edit the email templates when loyalty points are credited to customer account, loyalty points are deducted and when loyalty points are redeemed into discount coupons.

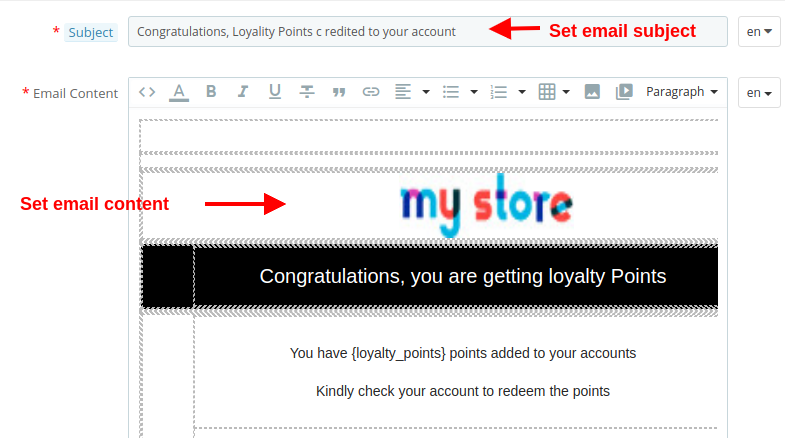
Click on the “Edit” button to configure the email template with the given options:

  • Subject: This option allows you to set a subject for the email sent to the customer for credited points, deducted points or redeemed points.
  • Email Content: This option allows you to set the content for the email sent to the customer for credited points, deducted points or redeemed points.

4.0 Front Interface of PrestaShop Loyalty Points System

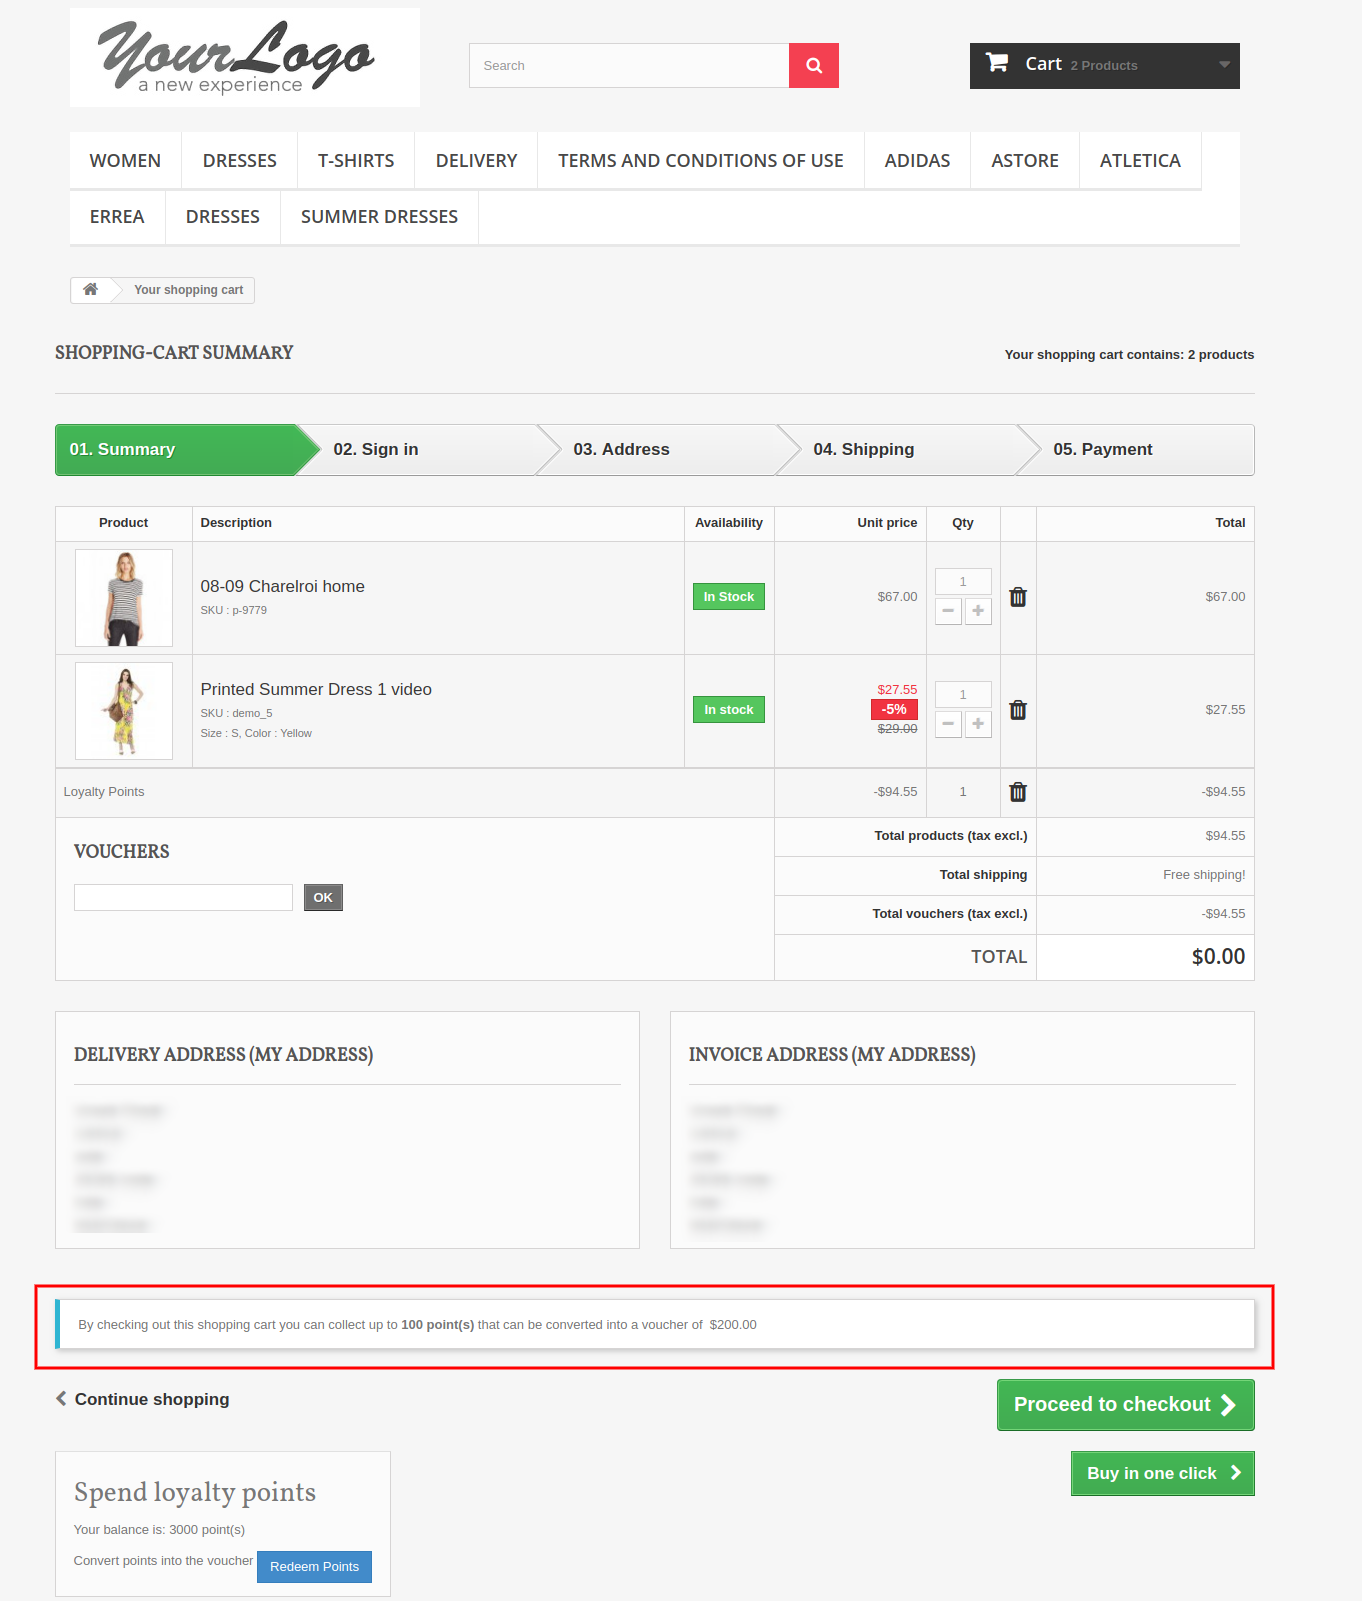
As soon as the customer redeems the loyalty points, a discount voucher is generated and all Available Points are turned into Converted Points.

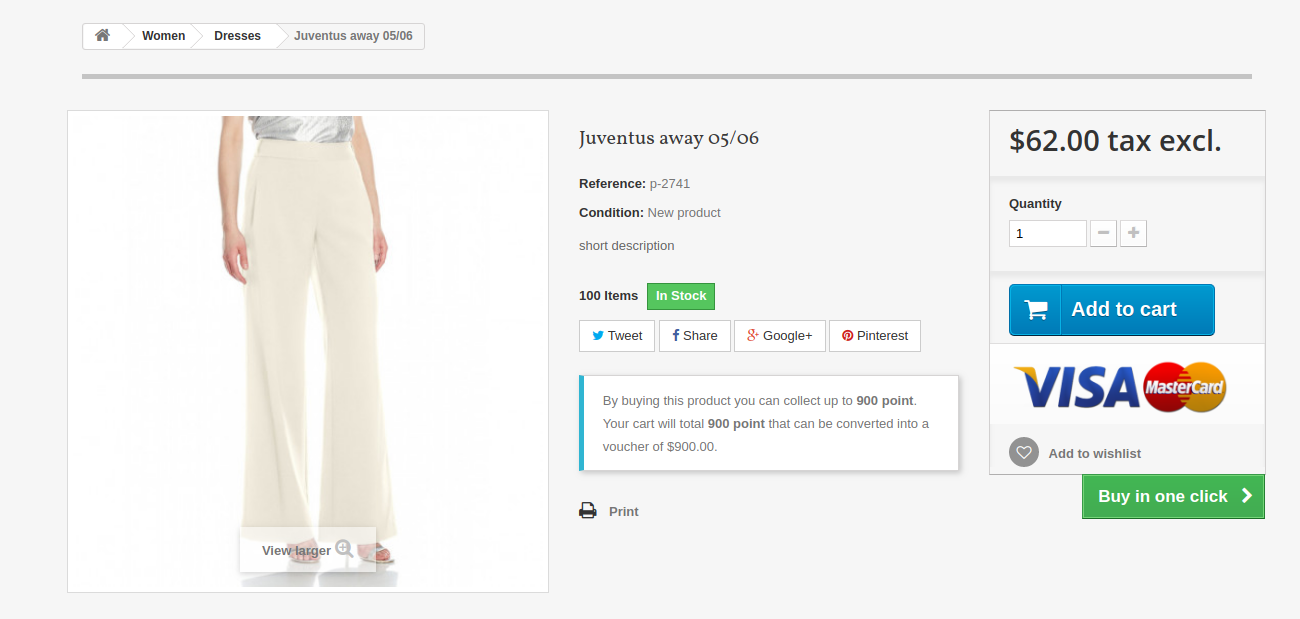
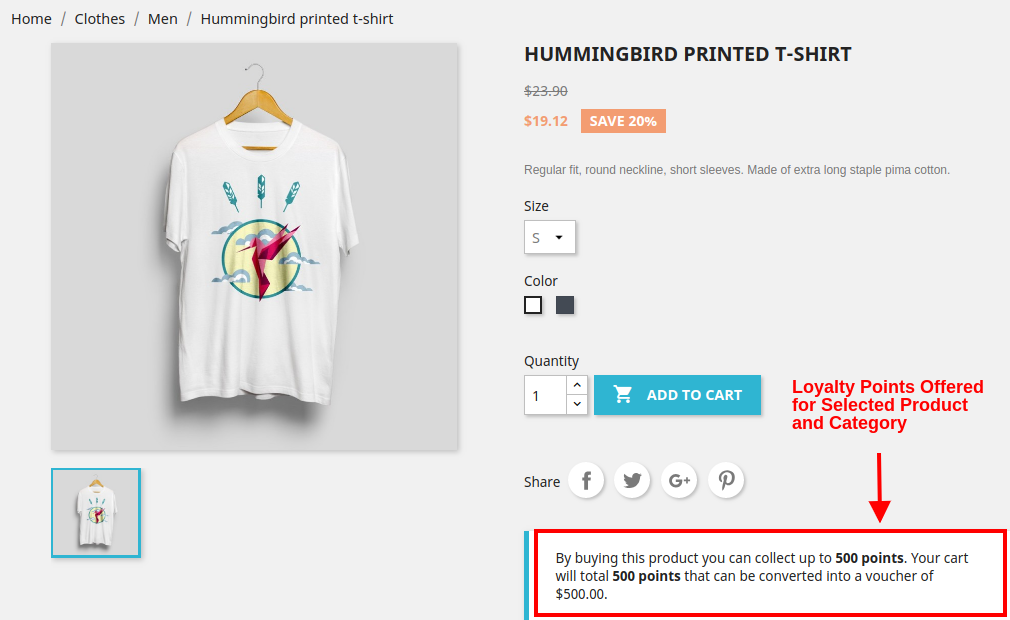
A) When Product Rule is set for specific product and categories, you will see the following screen.

1.6 Version:

1.7 Version:

B) When Behavior rule is set. Like when customer sign-ups on the store or place their first order. The below screenshot shows how the customer gets loyalty points for signing up on the store.

1.6 Version:

1.7 Version:


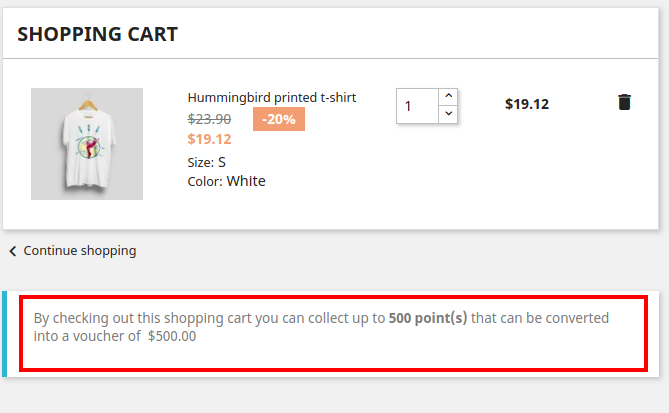
C) When customer’s cart follows some criteria based on total amount, total items quantity, total weight, payment method or shipping method. The below screenshot shows how the customer gets loyalty points for placing an order as per defined cart rule.

1.6 Version:

1.7 Version:


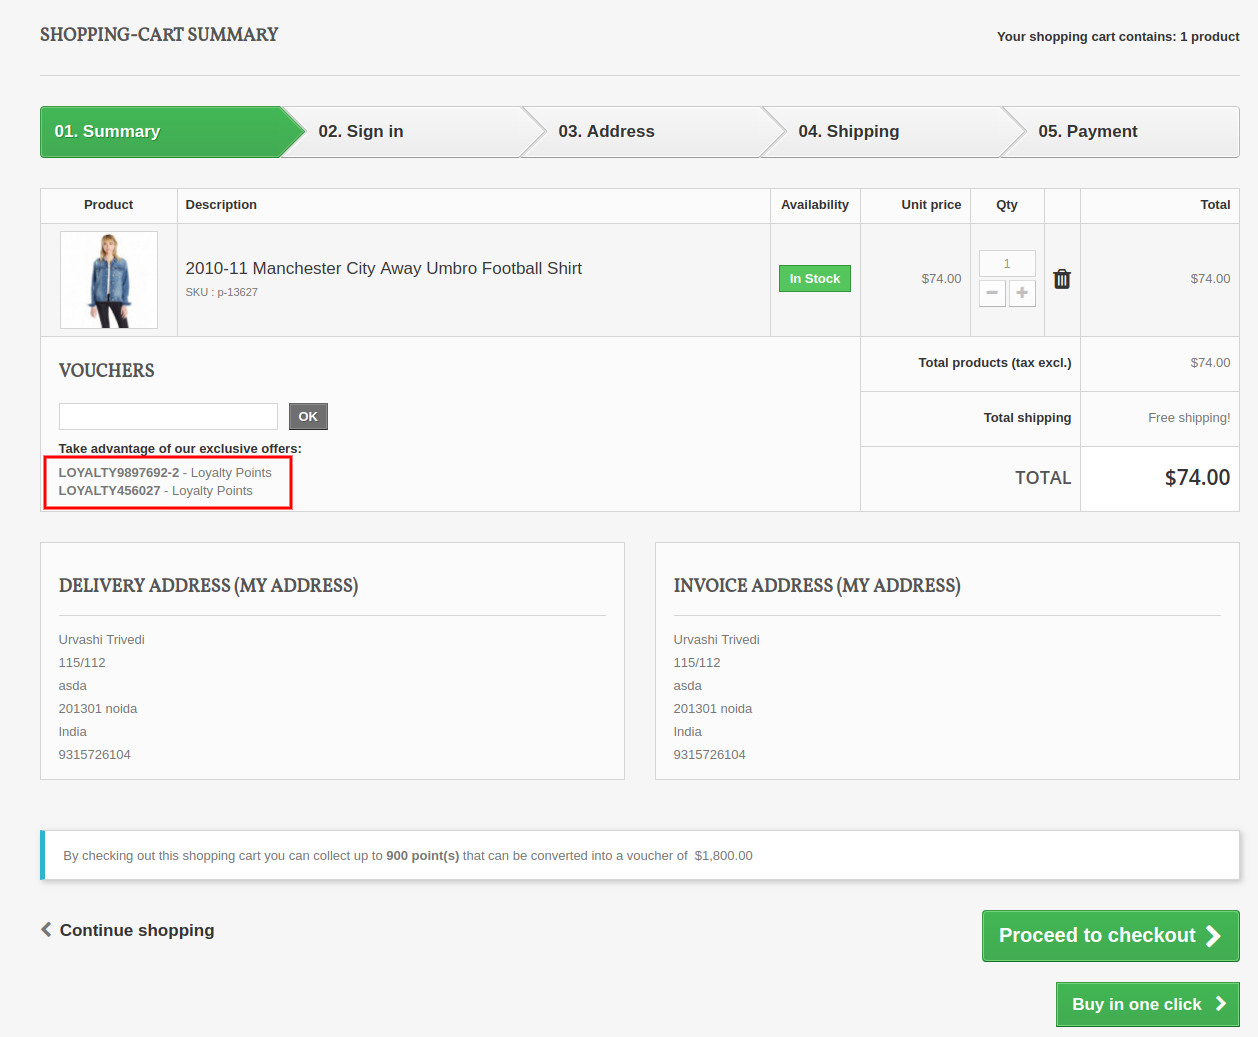
D) Customer can convert their available points into a discount amount. The loyalty points are redeemed into a discount voucher which can be applied for next purchase.

1.6 Version:

Customers can use the loyalty points and generate the vouchers.

1.7 Version:

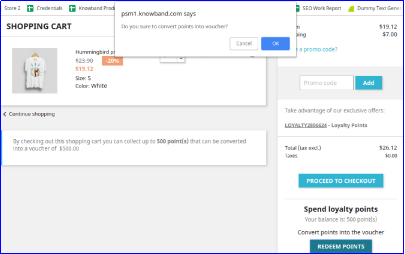
On clicking the Redeem Points button, you will see the following popup box on the screen.

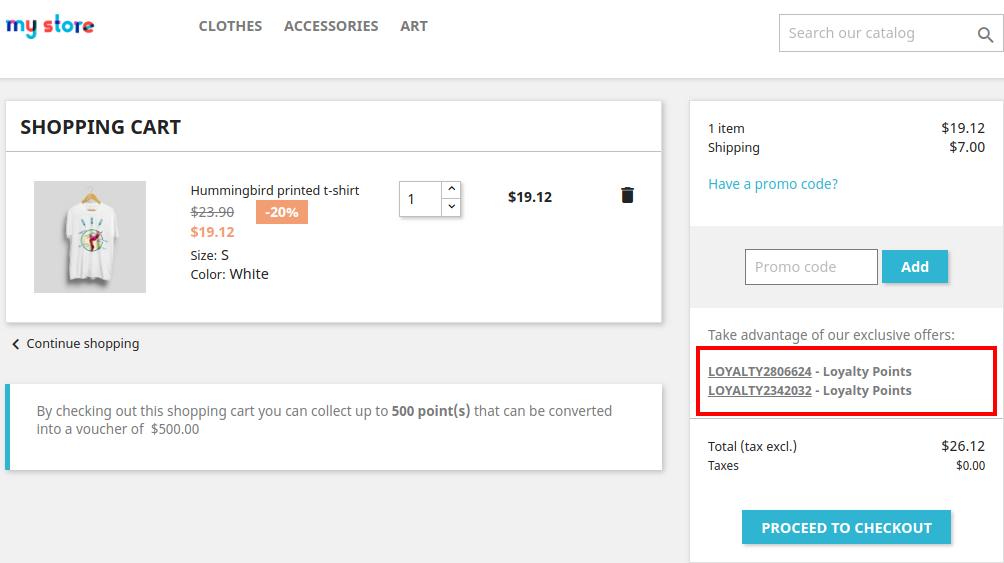
As the customer clicks on OK button their available loyalty points are converted into a discount coupon code as shown below.

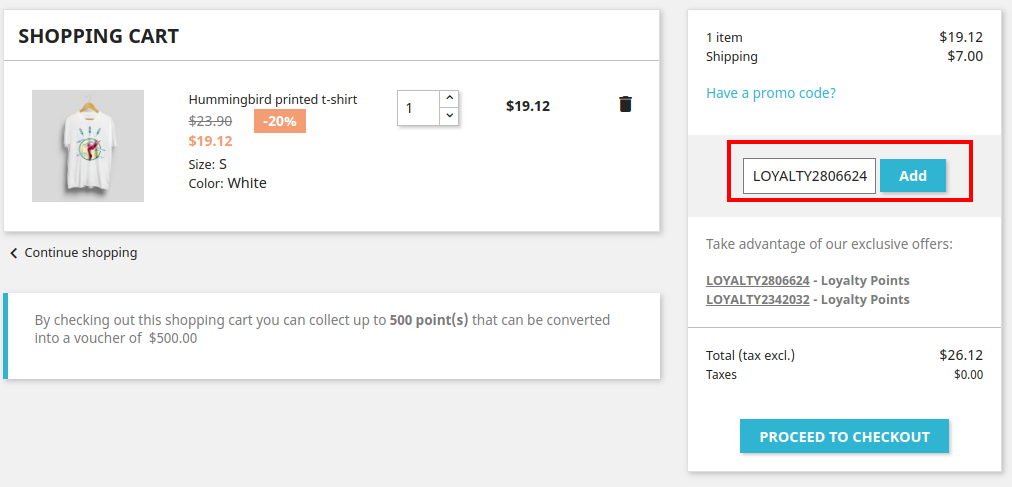
By clicking the desired discount code, it automatically gets copied into the Promo Code box as shown.


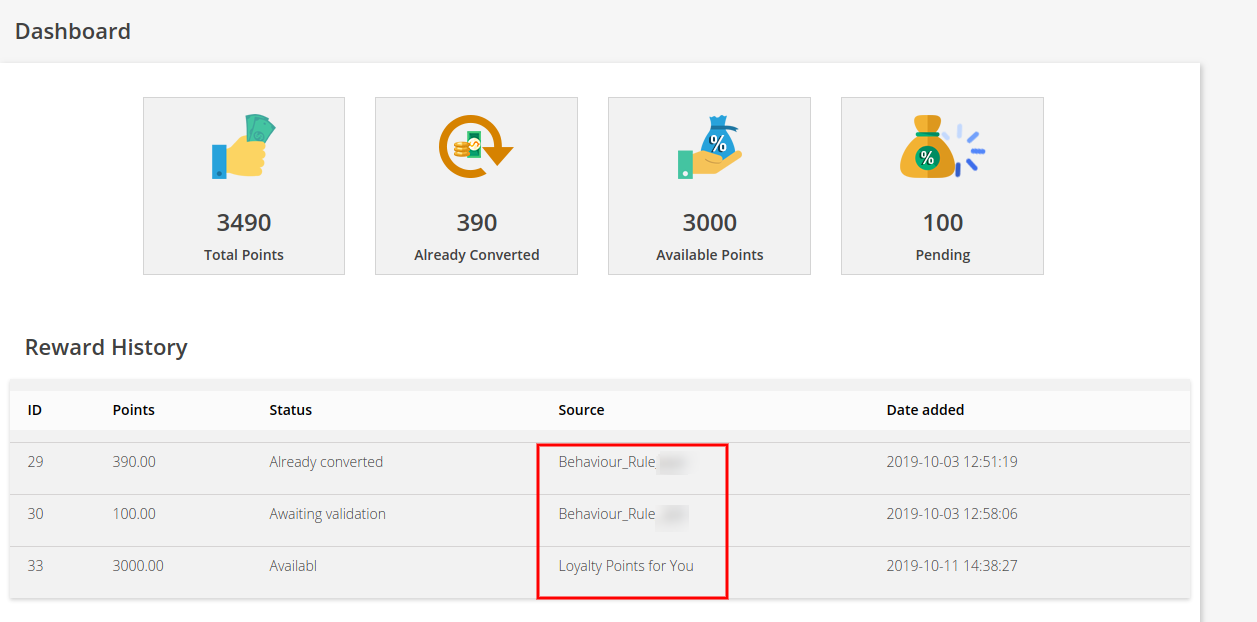
E) Customer can check the complete status of their loyalty points from their Dashboard.

1.6 Version:

1.7 Version:

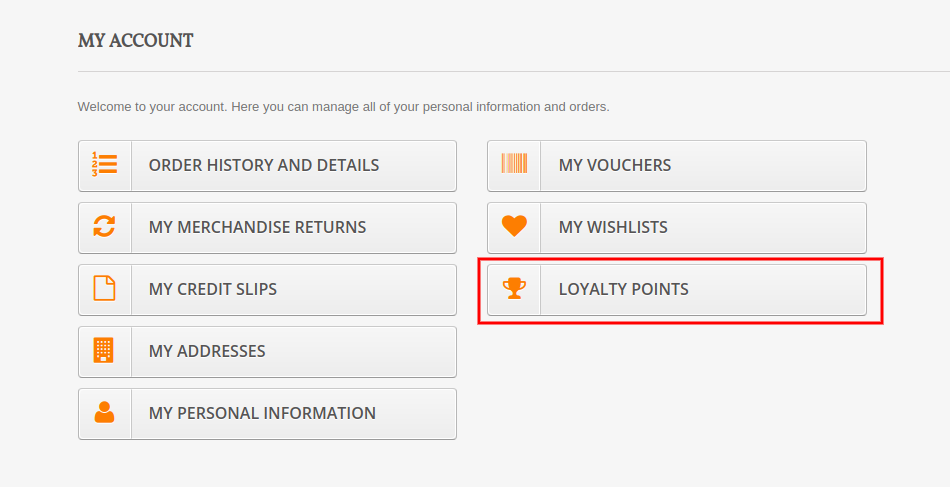
On clicking the Loyalty Points option, customer will jump to the below screen. Here they can check the complete status of their loyalty points, their reward history, discount vouchers generated from points etc.

Version 1.6:

Version 1.7:

5.0.0 Tutorial Video of Prestashop Loyalty Points Module

Checkout our complete tutorial videos, which cover all the features from Installation to the complete frontend working.