A lot of OpenCart & Prestashop shops are losing their customers at checkout. And the reason behind it is that the general checkout process consists of an excessive number of steps and multiple fields to fill out. Research indicates that over 65% of online customers abandon the site during the checkout process when they find the process to be time-consuming or difficult to comprehend. When customers get frustrated, they stop buying, and the store loses an easy sale.
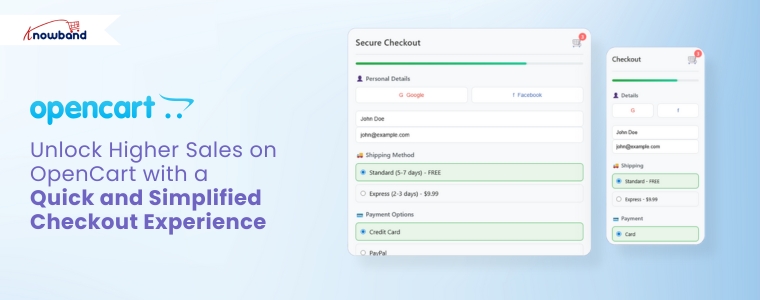
Hence, the easiest way to solve this issue is by using the OpenCart One Page Super Checkout by Knowband. This addon integrates all the checkout elements, including cart details, address, shipping, payment, and the order summary on a single page. With this, customers can make orders within seconds without switching several pages.
This smooth and fast experience reduces the number of drop-offs and increases conversions. With this addon, store owners can finally offer a checkout that customers enjoy using.
By integrating the Prestashop responsive one-step checkout addon, merchants can reduce cart abandonment and increase conversions. This powerful Prestashop fast checkout addon supports major payment gateways such as PayPal, Stripe, Authorize.Net, Braintree, Amazon Pay, Apple Pay, Google Pay, Square, Klarna, Worldpay, Mollie, Skrill, Neteller, Payoneer, and 2Checkout, providing shoppers with a variety of secure and convenient ways to pay. Offering multiple trusted payment methods helps build customer confidence and ensures more orders are completed successfully.
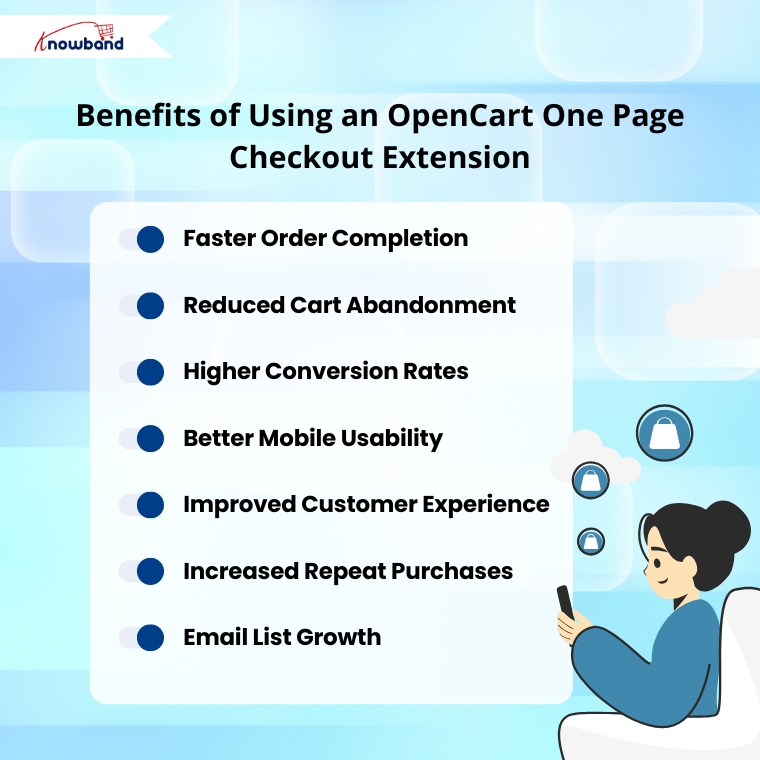
Benefits of the OpenCart One Page Checkout Extension
Quick Checkout, Increased Conversions.
Knowband’s OpenCart One Page Supercheckout Plugin has everything on a single page. Customers can fill in the details in a short time and complete the purchase without getting lost. Thus, once the checkout is made quicker, the conversion rate automatically increases.
Lower Cart Abandonment
Moreover, the PrestaShop Quick Checkout Module eliminates all those unnecessary steps that frustrate customers. No more loading new pages. No more long forms. This simple and clean screen keeps the customers on track and reduces the number of abandonments.
Better Mobile Shopping Experience
Most users today make purchases on mobile phones. The Responsive One Page Checkout Plugin for OpenCart is compatible with all screens, including mobiles, tablets, and desktops. Hence, customers can place their orders with ease, no matter the device they are using.
Fast Orders with Guest Checkout
Generally, when people are forced to create an account during checkout, they leave instantly. Using the Knowband Prestashop One Step Checkout Addon, customers can easily check out as guests.
Easy Setup With No Coding
The OpenCart Simplified Checkout Plugin does not need technical skills. The extension can easily be installed by store owners, and they can configure the entire extension in just minutes.
Integrate Your PrestaShop Store with AI Chat Support
Boost engagement and conversions with instant AI replies, multilingual support, and real-time order updates.
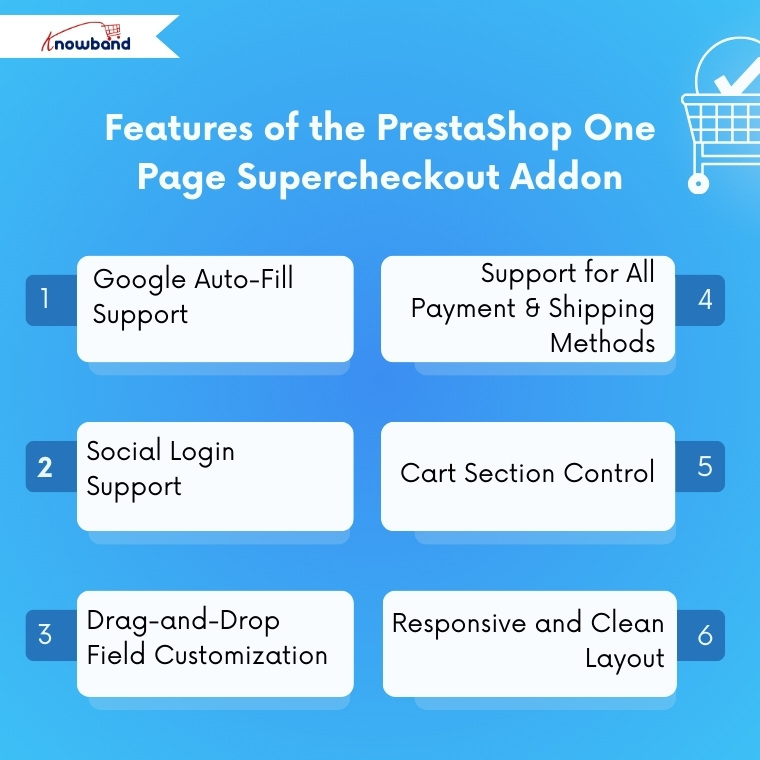
The checkout form includes auto-fill to help customers enter their address faster. Thus, this reduces typing time and prevents mistakes, leading to a smoother buying process.
Social Login Support
Moreover, with the PrestaShop One Page Checkout Module by Knowband, customers can sign in using Facebook, PayPal, and Google. Thus, this saves them from creating new accounts and speeds up the purchase process.
Drag-and-Drop Field Customization
Store owners can fully customize the checkout layout. The OpenCart fast checkout extension allows adding, removing, and rearranging fields with simple drag-and-drop options. Hence, you can shape your checkout page based on your store’s needs.
Support for All Payment & Shipping Methods
The plugin works smoothly with all payment or shipping methods added to the store. In addition, admins can also customize how these methods appear by adding logos and short descriptions.
Cart Section Control
Moreover, store owners can choose what to display in the cart section on the checkout page. For example, they can show stock details or price information only to registered users while hiding them from guest users.
Responsive and Clean Layout
Last but not least, the OpenCart one-step checkout extension by Knowband provides a clean and organized layout that is easy to understand. This helps customers complete their order faster without getting confused.
Conclusion
Knowband has developed the Prestashop One Page Super Checkout Module, which is one of the strongest upgrades that any opencart & prestashop store can make in 2026. The module makes a slow, multi-step checkout process of checkout process fast and friendly for the customer. This module consists of great features such as social login, checking out as a guest, auto fill, drag and drop customization, and more.
This enhanced experience results in a reduction in the number of unfinished orders, increases successful orders, and improves customer satisfaction. Thus, Knowband’s OpenCart One Page Supercheckout Extension is the best option that you can invest in case you want to expand your opencart and prestashop store by reducing checkout friction and speeding up sales.
For more information, you can refer to the https://www.onepagesupercheckout.com/, here you can find the detailed information of Knowband’s One Page Supercheckout, which is available for Prestashop, Opencart & Magento 2.
These days, people demand things quickly. Long forms are lengthy and can lead even keen shoppers to give up. One additional click can increase the possibility of cart abandonment. If you use PrestaShop or OpenCart, one of the fastest methods to increase your sales is to make your checkout easier.
The Knowband Prestashop One Page Super Checkout Addon is the solution to this problem. Knowband developed this module to make the checkout process for stores as easy as possible. It has replaced the multi-step checkout process with one smooth page. Hence, your customers can make purchases easily, eliminating cart abandonment and increasing your sales.
Why Store Owners Go for Knowband’s Prestashop One-Page Super Checkout Module
First off, they’re fast. Everything from billing, shipping, payments, and confirmation lands on one tidy page. No more bouncing around screens or waiting for pages to reload. You end up with way less confusion, a much quicker checkout, and more finished orders.
They’re also flexible. Store owners get to tweak fields, pick layouts, and control the checkout experience without calling in a developer. Want to let people buy as guests or log in with Google or Facebook? No problem. Both modules handle that, so customers can zip through checkout without needing an account.
Plus, it all works smoothly on all devices. Phone, tablet, desktop, it doesn’t matter. The checkout page looks sharp and works smoothly. That means more customers finish what they started.
At its core, both modules aim to make checkout flawless for customers and merchants.
All-in-One Checkout Page
Everything you need, personal info, shipping, delivery choices, and payment details, shows up on a single page. Customers can fix mistakes or change details right there, no back-and-forth between screens.
Easy Login Options
Let people check out as guests, or log in with Google, Facebook, or PayPal. Signing in is quick, which means fewer folks drop off before buying.
Auto Address Detection
The Prestashop One Page Checkout Addon use the API to guess the shopper’s country and region. So forms fill up faster, and there’s less chance for typos.
Custom Fields Your Way
Moreover, admins can rename, hide, or move fields around. Mark them required or optional, just drag and drop until the form fits your business.
Additionally, the module allows admins to create multiple customer groups or profiles and assign different input fields to each profile. This helps collect only relevant information from different types of customers, making the checkout experience more personalized and efficient.
Supports All Payments and Shipping
Plug into any big payment gateway or shipping provider. Want to add PayPal, Stripe, or Apple Pay? Do it from the admin panel, along with reordering or disabling options.
Free Shipping Progress Bar
The One Page Checkout module also offers a free shipping progress bar that encourages customers to add more products to their cart in order to qualify for free shipping. This not only improves the shopping experience but also helps increase the average order value.
GDPR-Ready
Moreover, staying compliant is easy. Modules for both PrestShop and OpenCart let you add consent checkboxes and link straight to your privacy policy page.
Built for Mobile
The design works with any screen size. Hence, whether people shop on a phone or tablet, checkout stays smooth and simple.
How the Prestashop One Page Checkout Module Works
General Settings
Here, admins can switch the module on or off with just a click. Moreover, admins can also enable/disable guest checkout, newsletter option test mode, and more.
Social and Guest Logins
Here, the admin just needs to flip a switch to let people sign in with Google, Facebook, and PayPal. Shoppers finish faster, and you lose fewer sales to annoying sign-up forms.
Customisation Settings
Here, you can pick your layout: one, two, or three columns. Moreover, you can also customise the positioning of all the elements in all the columns that yoy have selected.
Payment and Shipping Address
Here, admins can drag and drop all the fields to reorder, hide what they don’t need, or make things mandatory. The form gets cleaner, faster, and personalised according to your store’s needs.
Payment and Shipping Method
The Opencart One Page SuperCheckout Extension supports every payment and shipping method you’ve got. Rearrange, remove, or add new gateways, like PayPal or Apple Pay. Moreover, here you can customise how the methods should look in the frontend: with a logo, or just text.
Conclusion
Setting up the OpenCart One Page Checkout Plugin is easy. You don’t need to know a single line of code. Anyone can handle it from the backend with ease.
Here’s the thing: checkout can make-or-break your store’s sales. If the checkout is clunky, shoppers will abandon their carts. When it’s smooth and all on one page, like with Knowband’s PrestaShop and OpenCart One Page Checkout Modules, you keep people moving and buying.
It doesn’t matter if you’re on PrestaShop or OpenCart. With Knowband’s One Page Checkout Addon, you cut down on clicks, speed up sales, and send customers away happy. That’s the whole point.
In today’s fast-paced eCommerce landscape, customers expect convenience at every step, especially during checkout. Unfortunately, a complex or time-consuming process can quickly drive them away. For this reason, adopting an OpenCart One Page Checkout solution is needed. Knowband’s OpenCart One Page Advanced Checkout Extension simplifies the checkout experience by making it quicker, more user-friendly, and highly efficient for customers.
Why You Need a Simplified Checkout in OpenCart
While attracting traffic through promotions and SEO is important, a poor checkout experience can unfortunately cancel all your efforts. Indeed, long forms, multiple page loads, and confusing steps increase cart abandonment significantly. However, an OpenCart simplified checkout module eliminates these issues by combining everything into one responsive, easy-to-complete page.
Furthermore, Knowband’s OpenCart fast checkout extension streamlines the buyer journey, helping your customers complete orders quickly and effortlessly. As a result, it not only improves user experience but also directly boosts your conversions.
Must-Have Features of Knowband’s One Page Checkout for OpenCart
Below are the features that make this OpenCart quick checkout extension an essential addition to your store:
Unified Checkout on One Page
First and foremost, the OpenCart Single Page Checkout combines billing, shipping, payment, and confirmation into a single view. Consequently, this eliminates the need for reloading pages or navigating multiple steps, making it easier for customers to place orders without distractions.
Social Login for Faster Access
Additionally, typing login details can be a hassle, especially on mobile. Therefore, this OpenCart responsive checkout popup allows customers to sign in with their Google or Facebook accounts, reducing friction and making the process significantly faster.
Guest Checkout with Background Registration
Additionally, the module allows customers to check out as guests while automatically generating an account behind the scenes. This feature benefits customers who want a fast checkout experience and, simultaneously, store owners who want more registered users.
Custom Field Control
Similarly, every store has different requirements. With this OpenCart One Page Supercheckout, you can manage the visibility and requirement status of each checkout field. The result? A clean, focused checkout that only asks for what’s necessary.
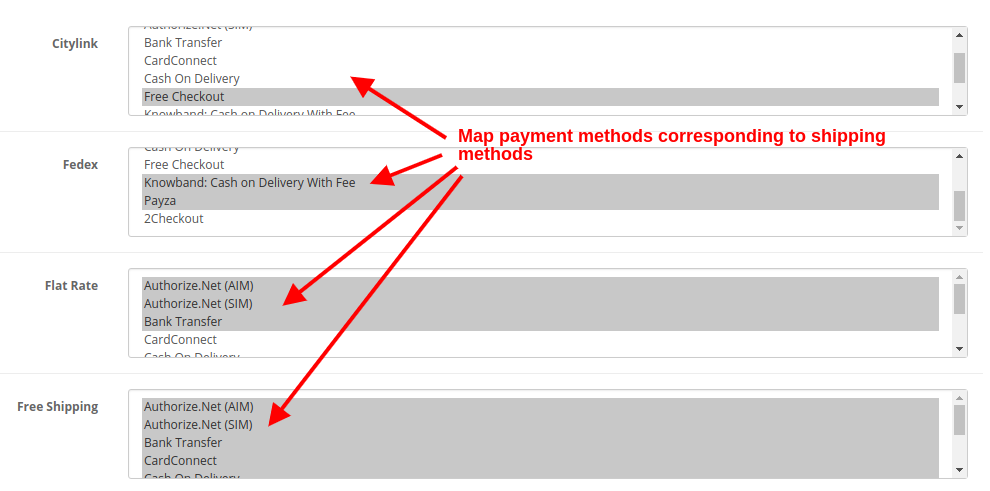
Intelligent Shipping-to-Payment Mapping
In addition, the module intelligently connects shipping methods to their respective payment options. This minimises confusion and ensures that customers see only the relevant choices during checkout.
Integrated Newsletter and Mailchimp Support
Furthermore, the OpenCart Free One Step Checkout module includes an optional newsletter signup checkbox. It also syncs directly with Mailchimp, allowing you to grow your mailing list automatically while customers complete their orders.
Mobile-Friendly and Multilingual
Finally, today’s shoppers use a range of devices and speak different languages. This OpenCart responsive checkout popup adapts perfectly to smartphones, tablets, and desktops. It also supports multilingual and multi-store setups for global businesses.
Benefits of Using Knowband’s OpenCart One-Page Checkout Extension
This OpenCart One Page Advanced Checkout Extension offers everything a modern eCommerce store needs:
Easy installation and configuration—no coding required
Customizable fields to suit your store’s specific needs
Social login, guest checkout, and email capture built in
Compatible with multilingual and multi-store OpenCart setups
Optimised for both desktop and mobile users
Proven to boost user satisfaction and sales
Final Thoughts: Streamline Your Checkout, Boost Your Revenue
To sum up, a fast and efficient checkout process is essential for any successful online store. Knowband’s OpenCart One Page Checkout module combines powerful features with a sleek, user-friendly interface to deliver exactly that.
If you’re looking for an OpenCart fast checkout extension that reduces abandonment, increases conversions, and improves mobile shopping, this is the ideal solution. With the OpenCart One Page Supercheckout, you get the same powerful results—more sales, fewer abandoned carts, and a better shopping experience for your customers.
Upgrade your store today and experience the difference a single page can make.
Running a successful eCommerce store takes more than just uploading products and waiting for customers. To begin with, you need the right plugins to attract, engage, and convert visitors. Choosing the best OpenCart Extensions is crucial. Moreover, the right extensions improve user experience, reduce cart abandonment, and increase sales.
In this article, we’ll explore three powerful and best OpenCart Extension by Knowband. Furthermore, each one serves a unique purpose. When used together, they can transform your store into a high-converting machine.
Let’s get started!
Top OpenCart Plugins That Increase Sales
1. Smooth Shopping with the OpenCart One Page Checkout Extension
A long and confusing checkout process leads to lost sales. Shoppers don’t want to fill out long forms or go through multiple steps. That’s why the OpenCart One Page Checkout Pro Extension is essential.
Thus, this extension replaces your default checkout with a fast, single-page design. Everything, from billing, shipping, payment, and confirmation, is displayed on one screen. Moreover, the customers can quickly review and complete their orders with minimal distractions.
Key Features:
All-in-One Layout: With this OpenCart One Page Checkout Pro extension, your customers don’t need to switch between pages. They can view all checkout details in one go, which reduces friction and speeds up the purchasing process.
Social Login Options: Customers can log in using their Google, Facebook, or other social accounts. This saves them time, allowing them to complete their purchase faster. Fewer barriers lead to higher conversions.
Guest Checkout: With this feature, customers can place an order without creating an account. If they wish, an account is created after the purchase, which eliminates friction for first-time buyers.
Drag-and-Drop Customization: You can easily add, remove, or reorder form fields. No coding required! This means you can tailor the checkout process to suit your specific business needs.
Payment & Shipping Mapping: The extension shows only relevant payment and shipping options based on the customer’s selections. For example, if the shipping location supports Cash on Delivery, it will be shown as an option. This keeps the process streamlined and clear.
Responsive Design: Whether customers are shopping from a phone, tablet, or desktop, the checkout page adapts perfectly. This ensures the experience is smooth across all devices, keeping customers satisfied.
Moreover, this module simplifies the purchasing process and reduces friction. As a result, you can close more sales quickly.
2. Recover Lost Orders with the OpenCart Abandoned Cart Module
Every store faces cart abandonment. Customers may get distracted or unsure about the price. The good news is you can win them back.
Automated Email Reminders: The module sends follow-up emails at preset intervals. These emails remind customers of their abandoned carts, prompting them to complete their purchases.
Detailed Cart Information in Emails: The emails include essential details like product names, images, and prices. This helps customers remember exactly what they left behind, making it easier for them to finalize the purchase.
Customizable Email Templates: Additionally, you can easily change the design and message of your email reminders to match your store’s branding and tone. Moreover, this adds a personal touch, making your emails more engaging.
Discount Coupon Integration: Thus, offering a discount coupon in the abandoned cart email can increase the likelihood of recovery. Customers are more likely to return if they know they’ll get a special deal.
Insightful Reports: In addition, you can track how many abandoned carts were recovered and how much revenue was regained. This data helps you analyze and improve your cart recovery efforts.
Furthermore, all of this happens automatically. While you focus on your business, the Abandoned Cart Module works to recover lost sales.
3. Grab Attention with the OpenCart Product Sticker and Label Extension
Great products sometimes go unnoticed. With so many items on your site, key deals can be lost. That’s where the OpenCart Product Sticker Module comes in.
Moreover, this module allows you to add eye-catching stickers like “New,” “Sale,” “Bestseller,” or custom tags to product images. Furthermore, these stickers attract attention and guide customers toward important items.
Key Benefits:
Upload Custom Stickers: You can upload your own custom sticker designs to match your brand. Moreover, this gives you more flexibility in how your products are presented.
Multiple Placement Options: Additionally, you can choose where the sticker appears on the product image. Moreover, from top left to bottom right, you have complete control over sticker placement.
Rule-Based Automation: With this feature, you can set specific rules for badges. For example, you can display a “Low Stock” badge for products with fewer than five items in stock. The system will automatically apply these rules for you.
Schedule Stickers: In addition, plan ahead for sales events. For instance, you can schedule a “Weekend Sale” sticker to appear Friday and disappear Sunday night. Moreover, this saves time, as you don’t have to manually activate and deactivate stickers.
Mobile-Friendly Design: Stickers look great on all screen sizes.
Pre-Made Templates: Use built-in designs if you’re not a designer.
This module helps create urgency and excitement. As a result, it drives more conversions by highlighting the best products.
Final Thoughts
In conclusion, to succeed online, you need to focus on the customer journey, from arrival to checkout. This is where Knowband’s OpenCart modules truly make a difference.
Here’s a quick recap:
First, use the Opencart one-page checkout to simplify the purchase process.
Next, recover lost sales automatically with the OpenCart Abandoned Cart Module.
Furthermore, each module is easy to install, fully customizable, and designed to improve performance. Moreover, when used together, they create a faster, smarter, and more user-friendly shopping experience.
So, upgrade your OpenCart store with the right modules and start converting more visitors into happy customers.
Every 1 out of 10 online users compel to abandon their cart just because of the long and complicated checkout. Further, you can optimize your site checkout to an interesting one by incorporating OpenCart One Page Advanced Checkout Extension from Knowband. In fact, the OpenCart responsive checkout popup module turns up the entire checkout process to a single ajax based popup. Furthermore, which triggers over the screen as the customer opts to purchase a product from the store. Thus, this One Page Checkout for OpenCart reduces cart abandonment by offering the entire purchase process on a single popup, without loading the next page.
1.1 Features of One Page Checkout for OpenCart
Incorporating One Page Checkout for the OpenCart store is no big deal as it offers simple customization without involving any technical skills or existing code modifications. So, quickly allow your customers to purchase the product through a single popup, giving them faster checkout. Moreover, a less interruption experience. Thus, below listed are the striking highlights of this OpenCart One Page Checkout extension.
1. OpenCart One Page Checkout module displays the total checkout fields in the form of a responsive ajax based checkout popup on the frontend. Further, of the website without redirecting to another URL.
2. This One Page Checkout for OpenCart provides a seamless way to boost the newsletter subscriptions for the online business.
3. The responsive checkout popup incorporated using the OpenCart simplified checkout module can be easily enabled or disabled using the toggle button given at the backend.
4. The guest registration feature of the OpenCart responsive checkout popup automatically registers the customer with the site. In addition, send them the login password on their email.
5. You have the flexibility to enable or disable the guest checkout functionality of the OpenCart One Page Checkout module.
6. Using this OpenCart Single Page checkout extension, you can add CSS code to the advanced checkout page.
7. OpenCart Single Page checkout module offers a testing mode feature that lets you test the advanced checkout page functionality on a specific IP.
8. With OpenCart simplified checkout module, give customers the benefit of social login options. For instance, Google and Facebook over the checkout page.
9. OpenCart fast checkout extension allows you to show/hide payment and shipping address fields differently for logged-in and guest customers of the store.
10. The custom address field marks are needful or optional with the help of this OpenCart One Page Supercheckout module.
11. Using One Page Checkout for the OpenCart site, you can provide multiple shipping and payment methods to the customers which are configurable from the backend.
12. OpenCart responsive checkout popup module eases you in setting a desired logo image and title for each of the payment and shipping methods displayed on the supercheckout page.
13. The ship2pay feature of OpenCart quick checkout extension automatically selects the payment method corresponding to each shipping method selected by the customer.
14. OpenCart responsive checkout popup extension offers a configurable cart whose fields can be fixed as per business needs.
15. OpenCart One Page Checkout module is multi-store and multi-lingual compatible.
16. OpenCart quick checkout extension offers a mobile responsive layout to the customers.
17. The MailChimp Integrator feature of OpenCart Single Page checkout automatically syncs the customer data with the connected MailChimp account of the seller.
1.2 Front Interface of OpenCart Responsive Checkout Popup Module
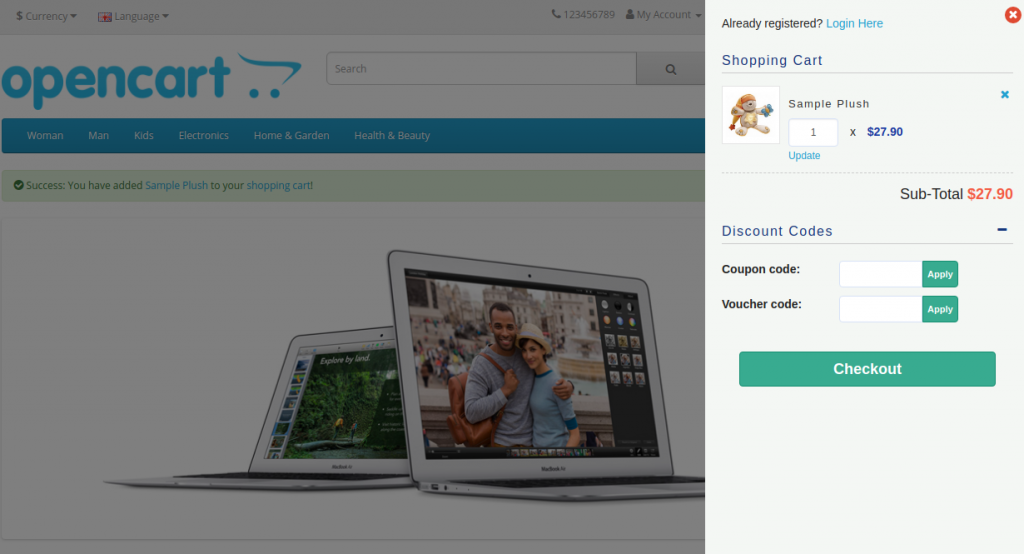
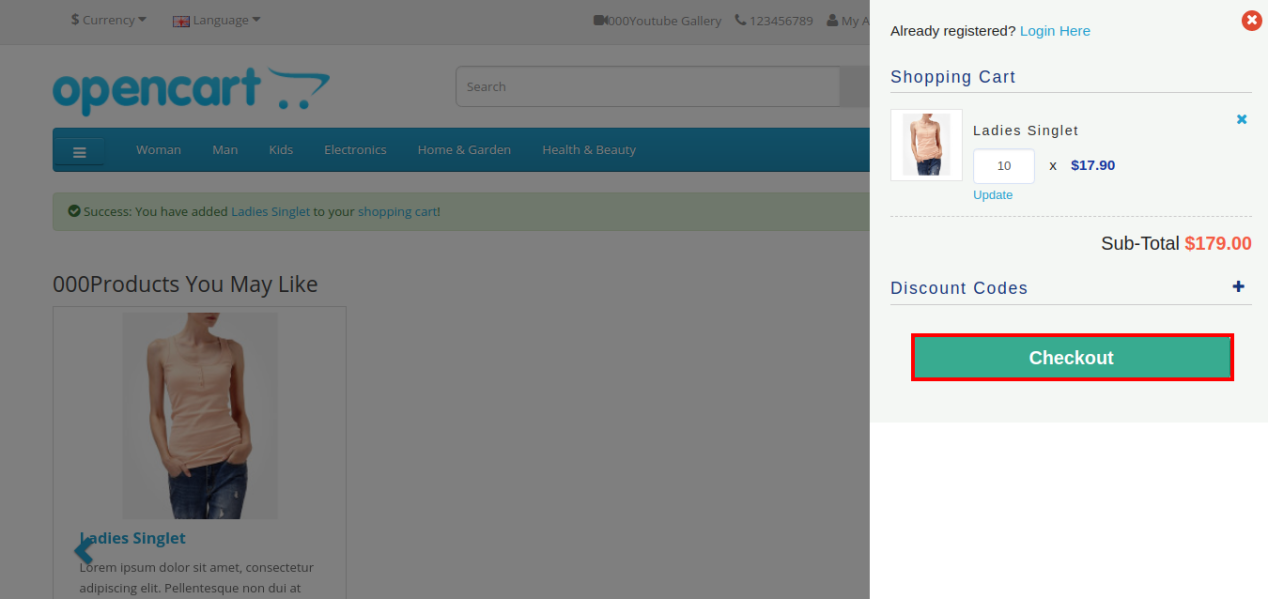
When the user clicks on the “Add to Cart” button corresponding to a product, they will see the following responsive checkout slider on their screen.
Cart Summary Section of OpenCart One Page Advanced Checkout
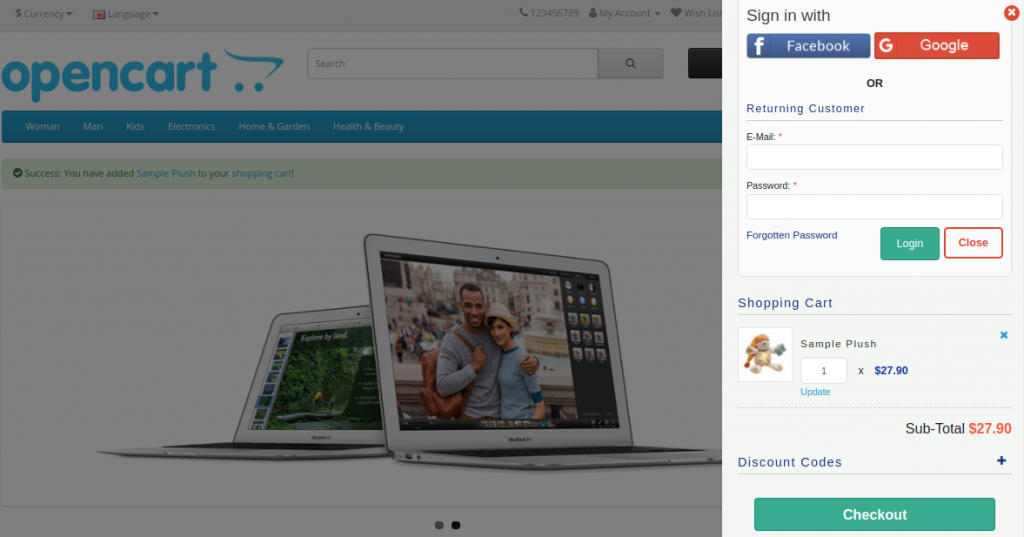
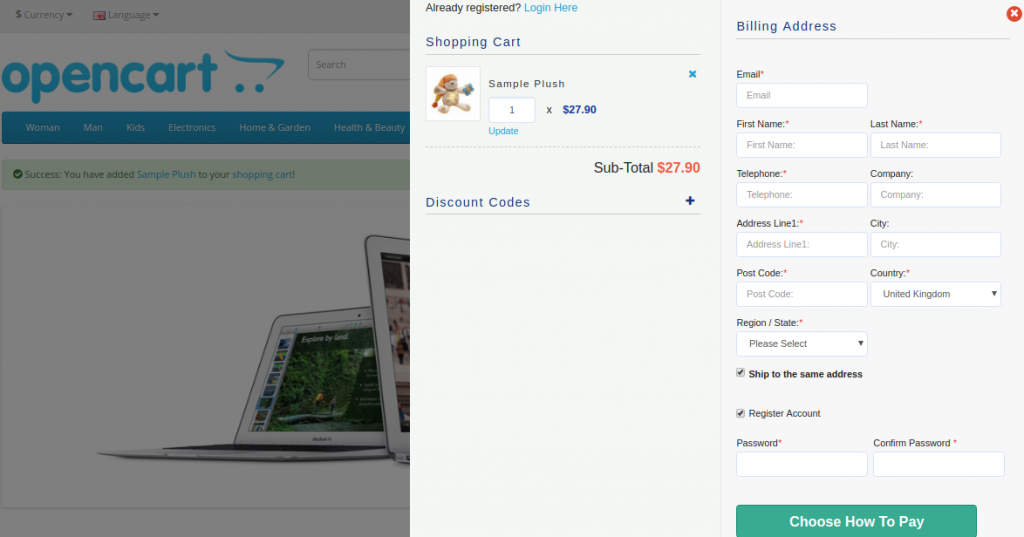
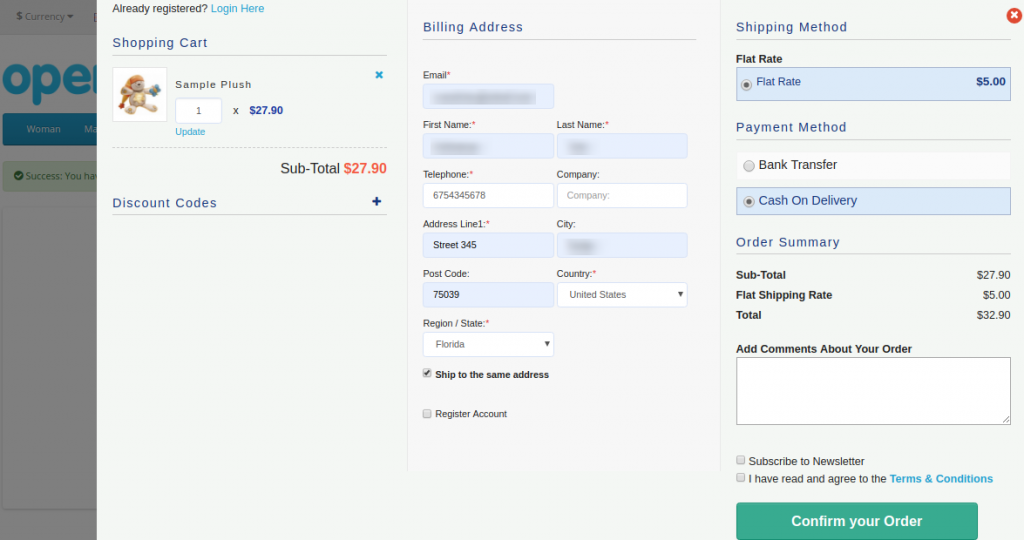
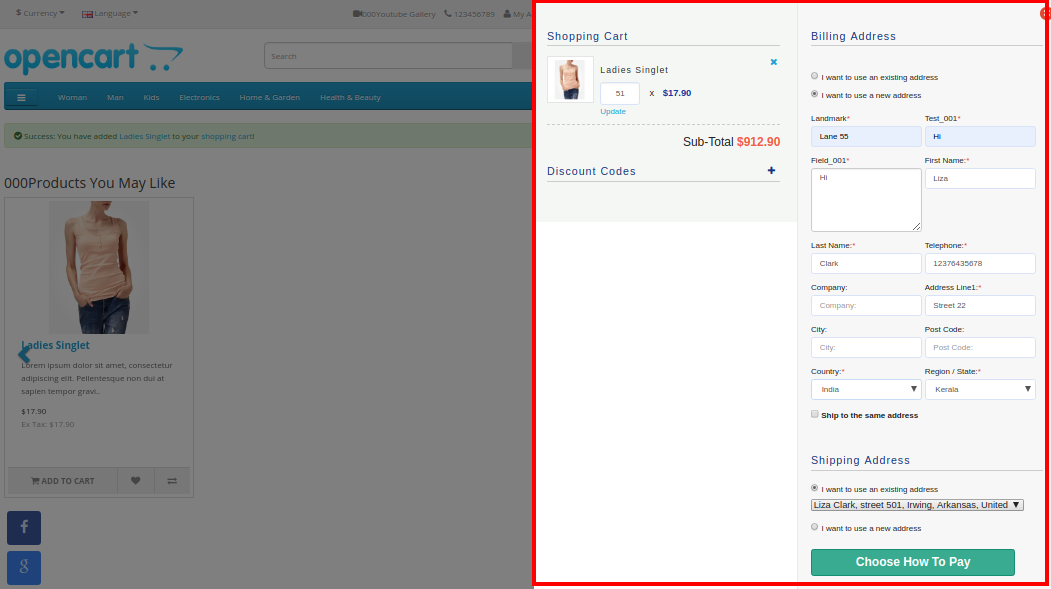
Further, as they click on the “Checkout” button, they can view and complete the complete advanced checkout form in a single go as shown in the images below:
Account Login Section
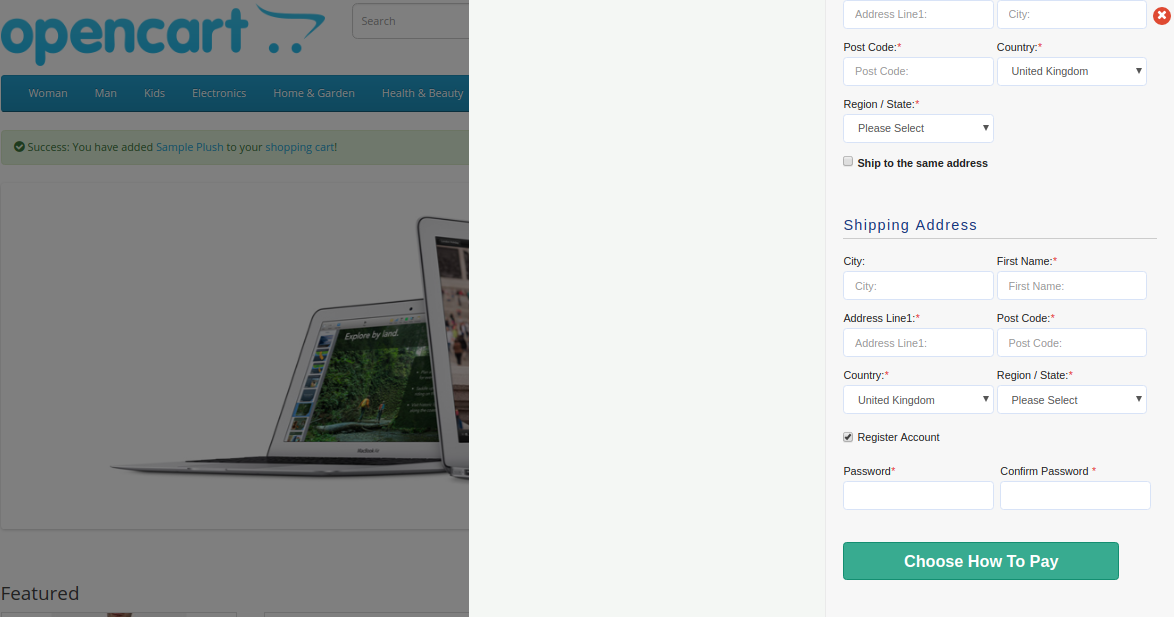
If the customer unchecks the “Ship to same address” checkbox, then they will see the shipping address section as shown below:
Shipping and Payment Method Section
2.0 Installation Guide of OpenCart One Page Advanced Checkout Extension
Before starting the installation process, you have to buy the OpenCart One Page Checkout module from the Knowband store. Further, once purchased, you will receive the following files in your registered email.
Source code of OpenCart One Page Advanced Checkout Extension in zipped file format.
User Manual of OpenCart One Page Checkout extension.
Now, to install this OpenCart Advanced Checkout on your online shop, follow the given steps:
1. Unzip the zip file. You will get the folders as shown in the image below
2. Copy all the folders of the zip file in the Root Directory of OpenCart setup via FTP manager.
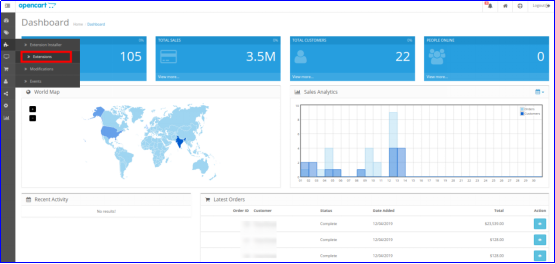
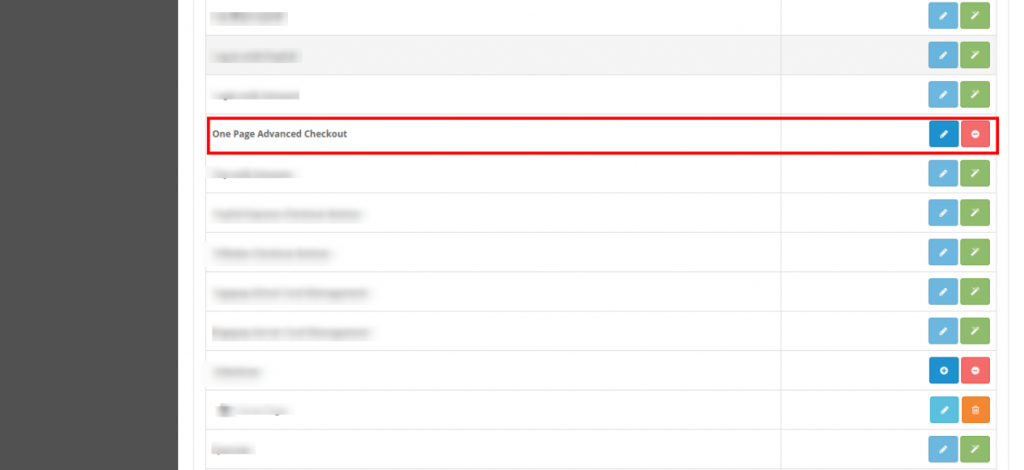
So, OpenCart One Page Advanced Checkout is now successfully installed. In addition, is ready to use at your store. Further, go to the admin menu. Moreover, click on the extensions and thereby click on configure button next to One Page Advanced Checkout.
3.0 Admin Interface of OpenCart Responsive Checkout Popup
Just after successful installation of One Page Checkout for OpenCart the website, you can configure the checkout form fields as per your requirements. Furthermore, you have to navigate the settings in the given order: Admin Panel > Extensions > Modules > One Page Advanced Checkout
The simple to understand admin interface of OpenCart fast checkout extension is divided into nine sections namely:
General Settings
Login Settings
Payment Address
Shipping Address
Shipping Method
Ship2Pay
Payment Method
Cart
Newsletter
3.1 General Settings
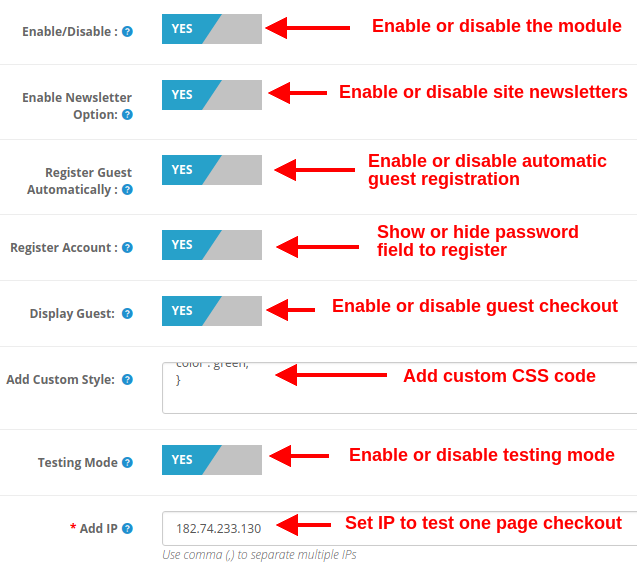
Enable/Disable: This option lets you enable or disable the complete functionality of One Page Checkout for Opencart the website. If disabled, the standard Opencart checkout is shown to the customers.
Enable Newsletter Option: Using this option, you can show or hide the newsletter subscription box for your site. If the customer checks the newsletter option, they will subscribe to site updates(newsletter).
Register Guest Automatically: You can enable automatic registration for your guest customers (users who perform guest checkout). This option will automatically send a password to the customer for further use of the account.
Register Account: By enabling this option, you can give password fields on single page checkout where the user can enter their password to register.
Display Guest: This option will show or hide the guest option in the login section of checkout. Using this option, users can perform guest checkout for their items.
Add Custom Style: This option allows you to include additional custom style (CSS code), displayed on the front of their website.
Testing Mode: You can enable this option to test the one page checkout module functionality before making it live for the customers.
Add IP: This option allows you to enter the specific IP address where you want to test the advanced supercheckout features.
3.2 Login Settings
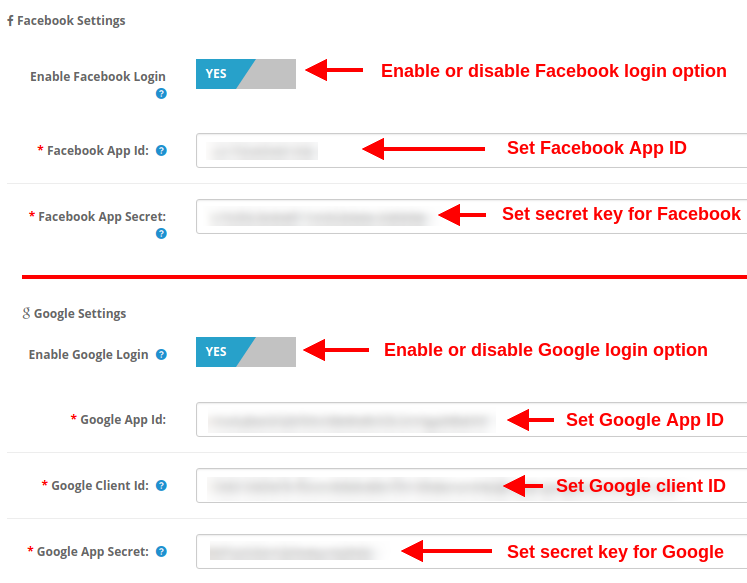
Enable Facebook Login: This option will enable or disable the Facebook login option displayed on the front of one page checkout form.
Facebook App ID: This option allows you to set the Facebook App ID required to connect with your Facebook account.
Facebook App Secret: This option will set the Facebook App Secret Key.
Note: You can get the Facebook app ID and secret key from https://developers.facebook.com/ which has been discussed in section 3.2.1
Enable Google Login: This option will enable or disable the Google login option displayed on the front of one page checkout form.
Google App ID: This option allows you to set the Google App ID required to connect with your Google account.
Google Client ID: This option allows you to set the Google client ID.
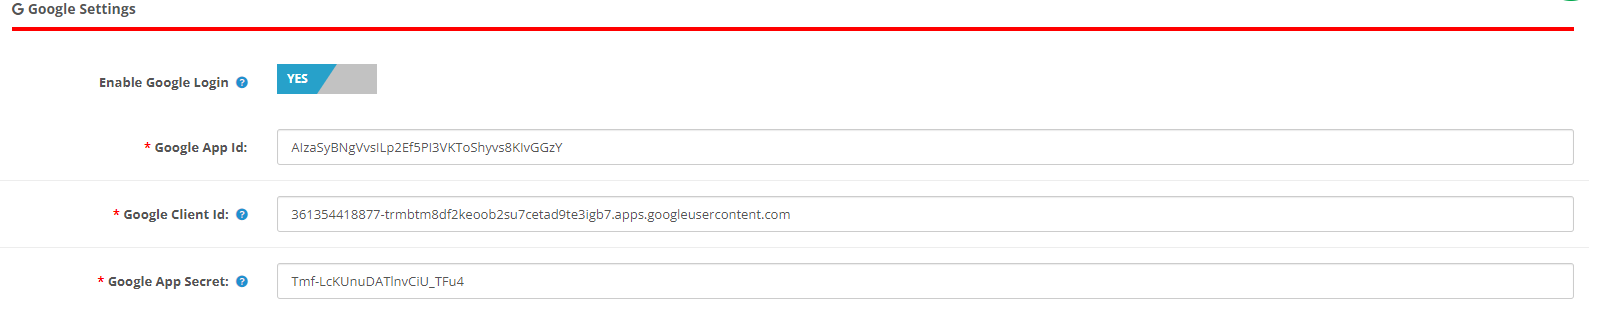
At last, Google App Secret: This option will set the Google App Secret Key.
Note: You can get the Google app ID, client ID, and secret key from https://code.google.com/apis/console which has been discussed in section 3.2.2
3.2.1 How to setup Facebook Login
Facebook App can be created by below-mentioned steps:-
1: Go to the given URL: https://developers.facebook.com/apps/
2: Click on the “Add a New App” button.
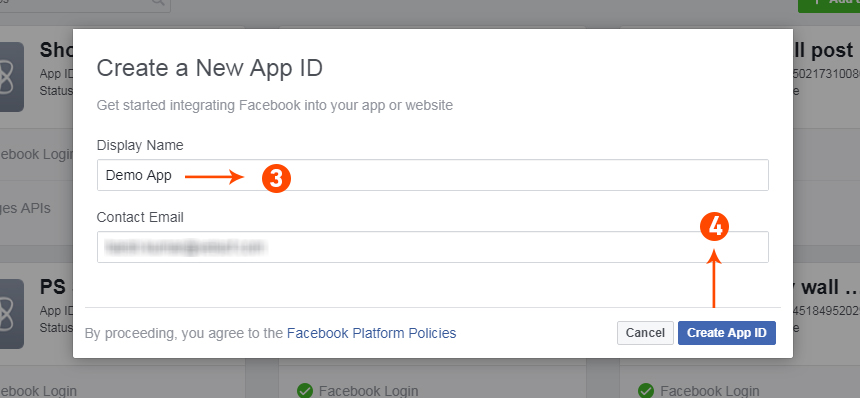
3&4: Enter your App name and email id, then click on the “Create App ID” button.
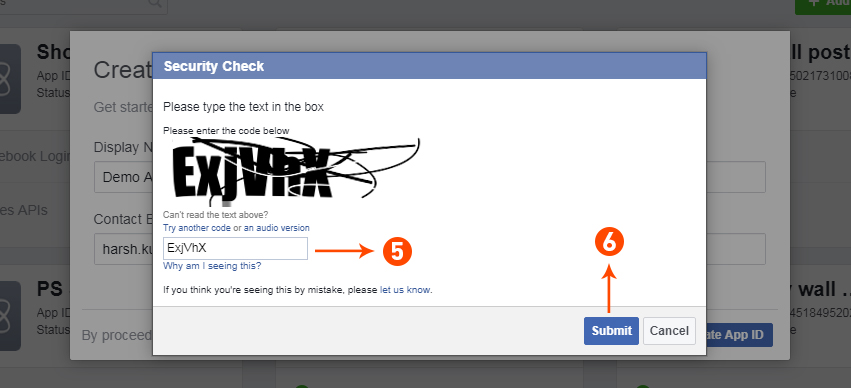
5&6: After clicking on Create App ID you will have to go through a security check as shown:
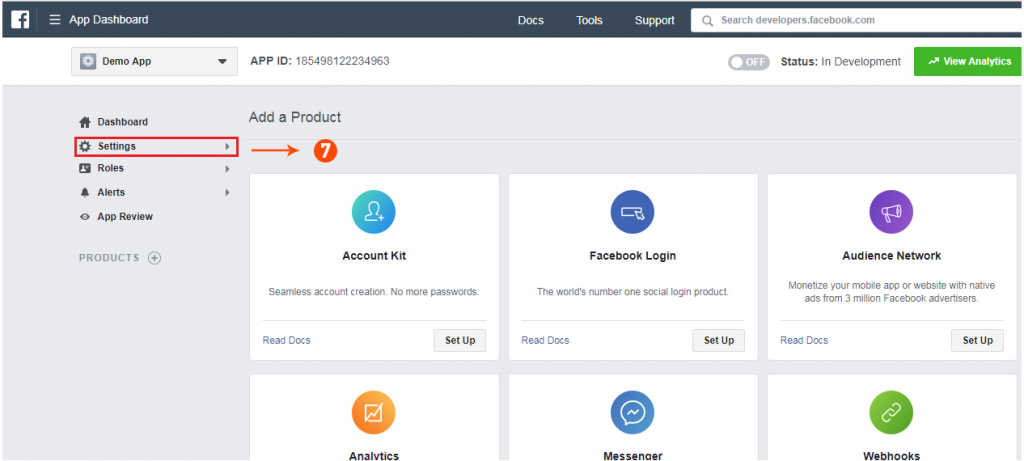
7: Click on the “Setting” tab.
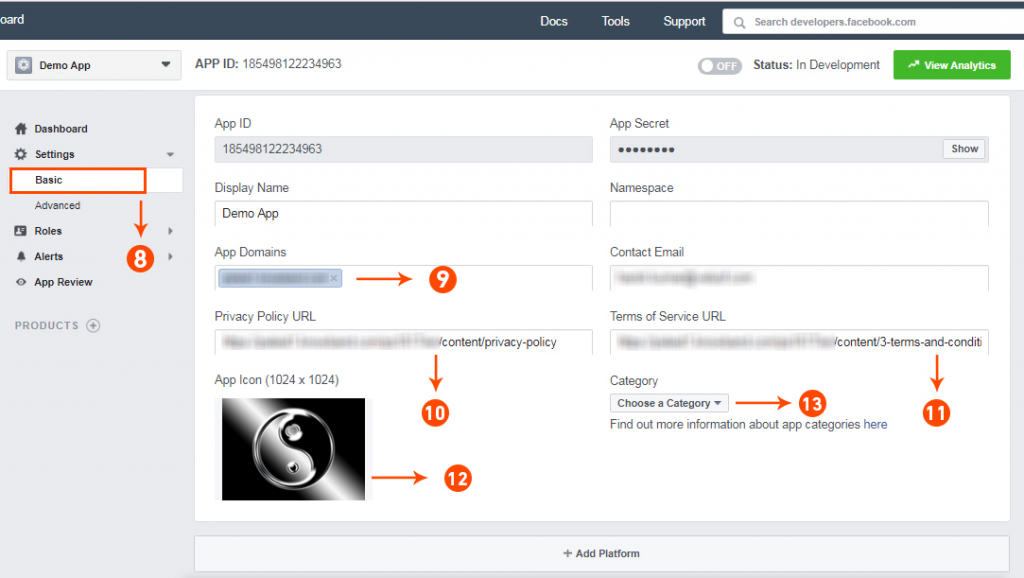
8-13: Two options will be available in the dropdown, Basic and Advanced, click on “Basic”. And then enter your “App Domain”, “Contact Email”, ”Privacy URL”, ”Terms and Conditions URL”, ”Add Logo”, ”Select Category” and click on the “Save Changes” button.
App Domains:
yourdomain.com is correct
yourdomain.com/store is incorrect
www.domain.com is incorrect
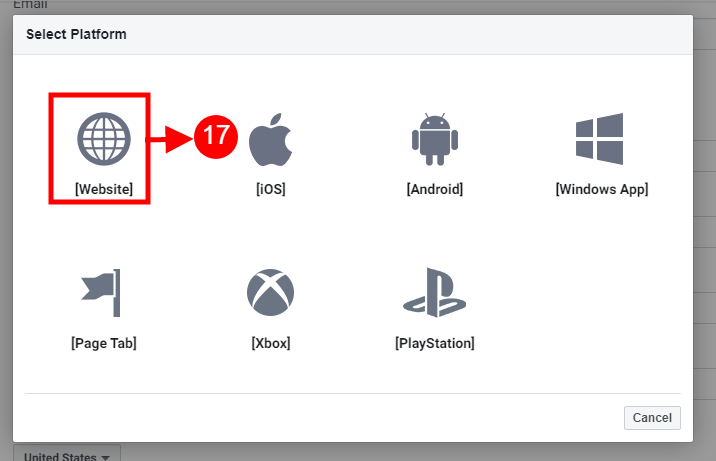
14: Now click on “+Add Platform”.
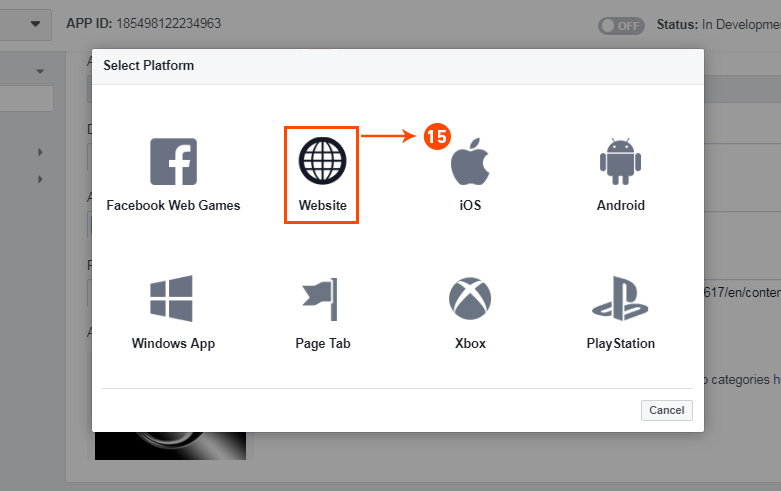
15: And select Website as Platform
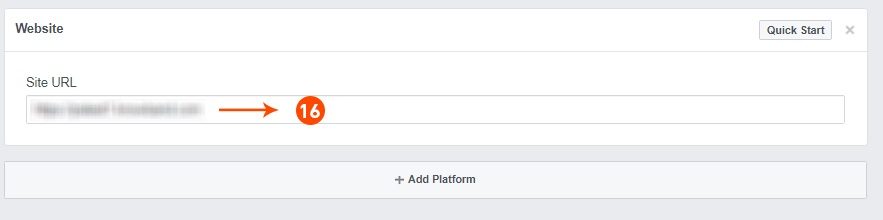
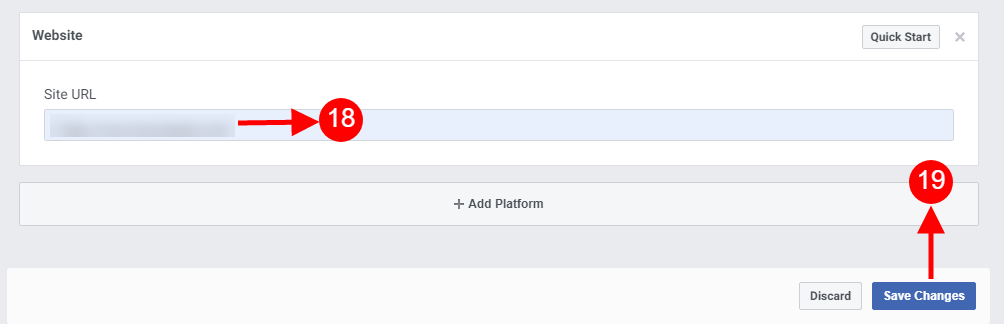
16: Now Enter your site URL.
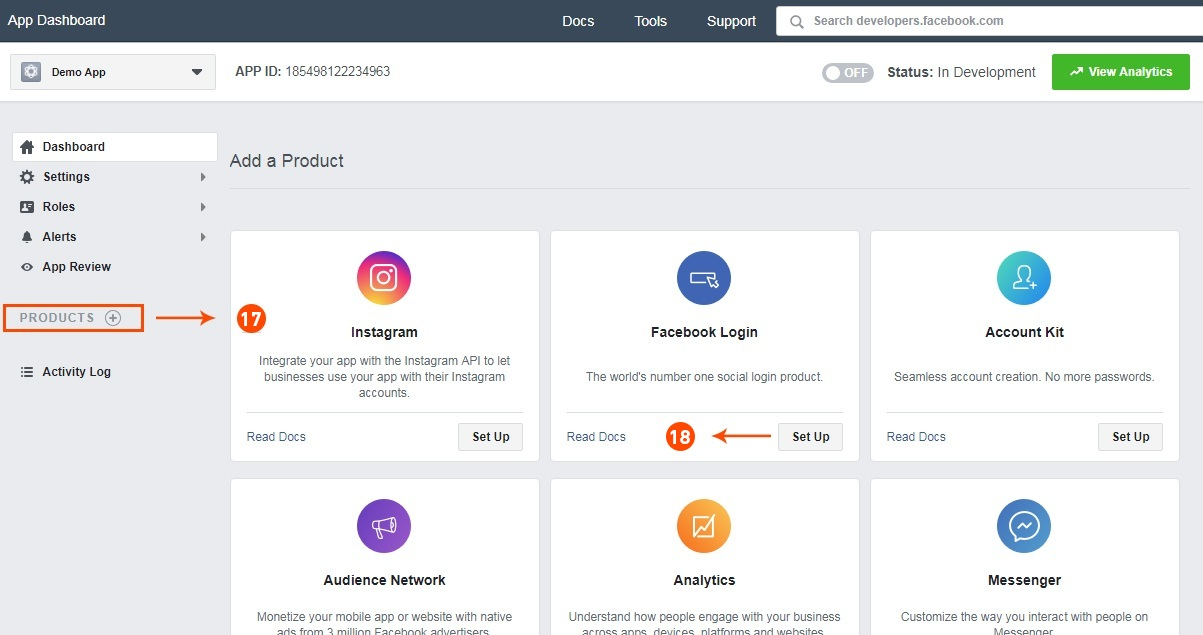
17&18: Click on “Products+” and select Facebook login.
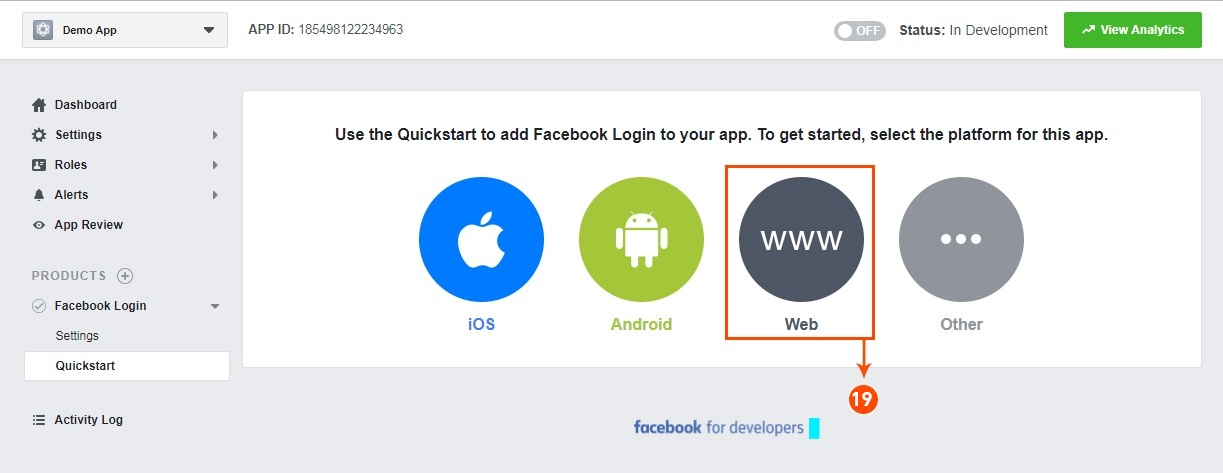
19: Select web as the platform for the app.
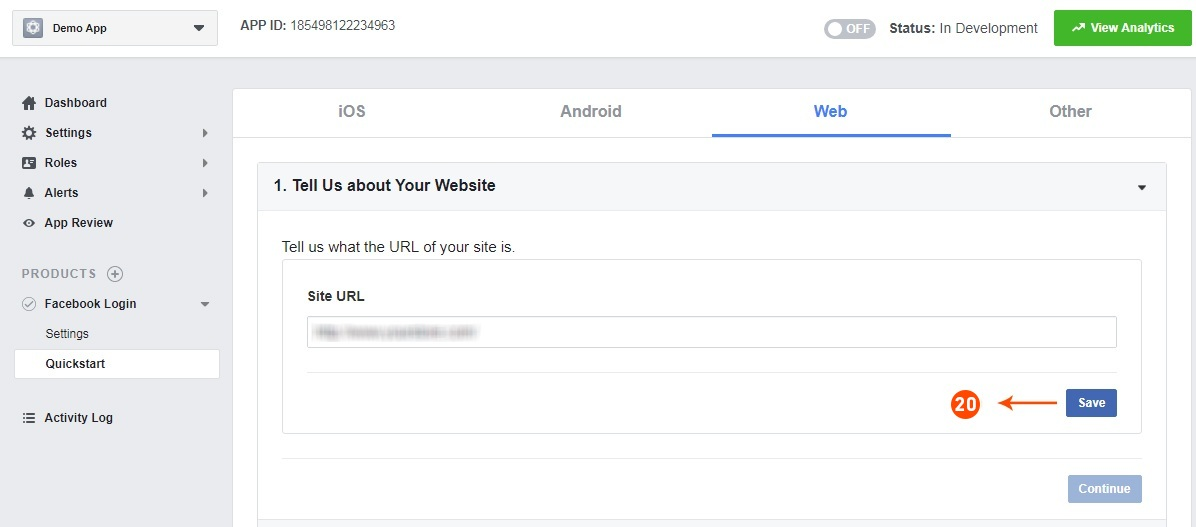
20: Now click on save.
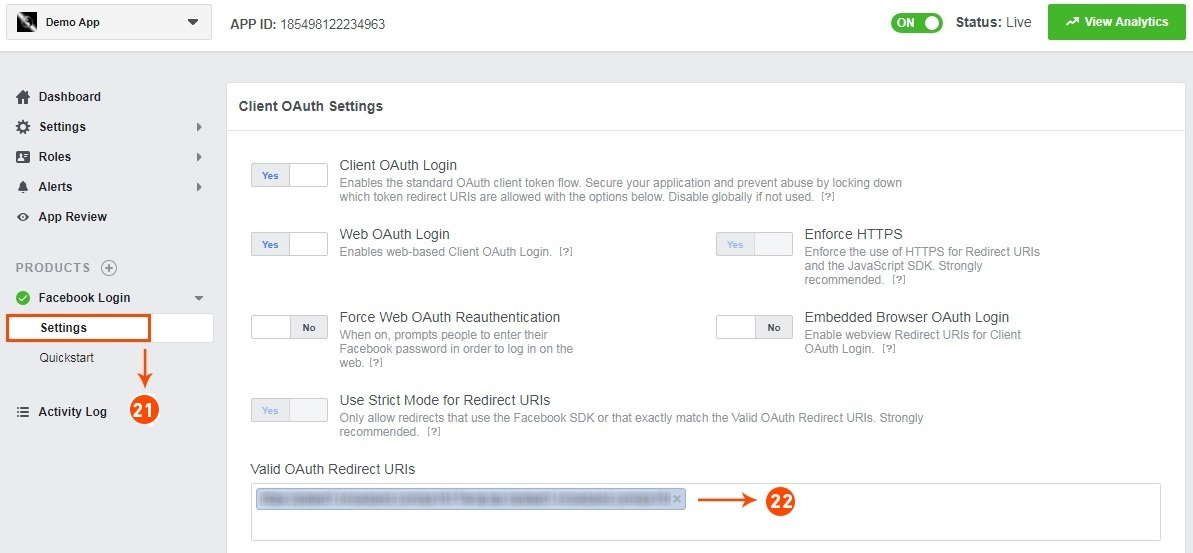
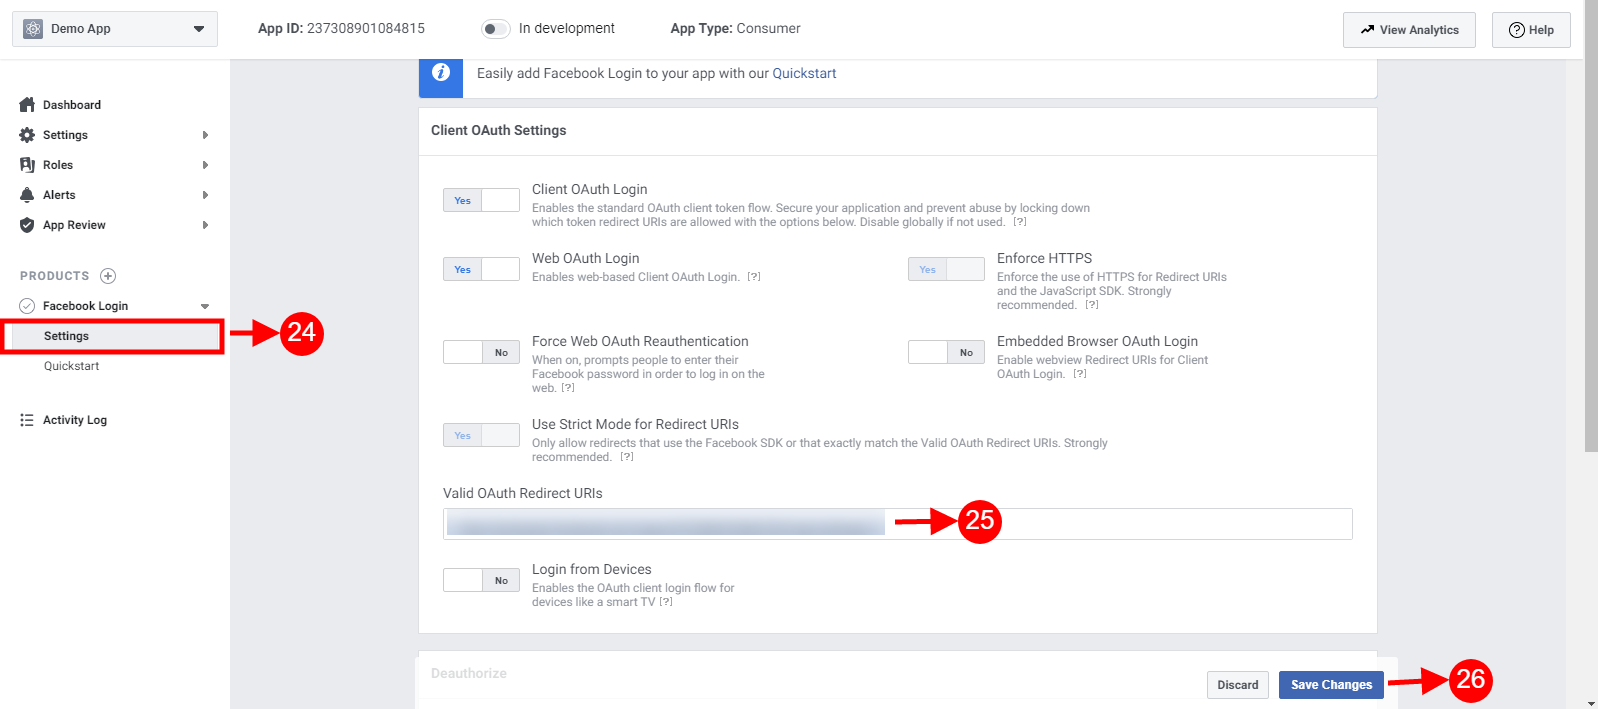
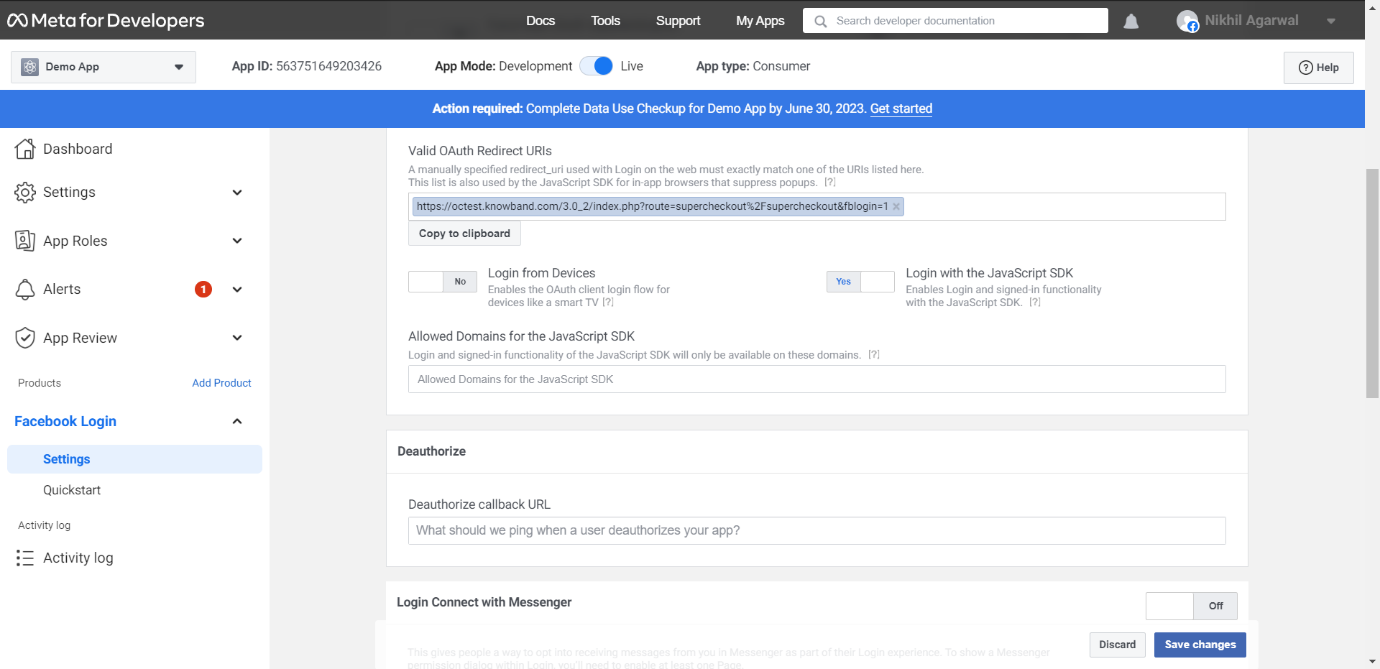
21&22: Click on Settings and add a Valid OAuth Redirect URIs.
Valid OAuth Redirect URIs:
https://your_store_url/index.php?route=kbstepcheckout/kbstepcheckout&fblogin=1
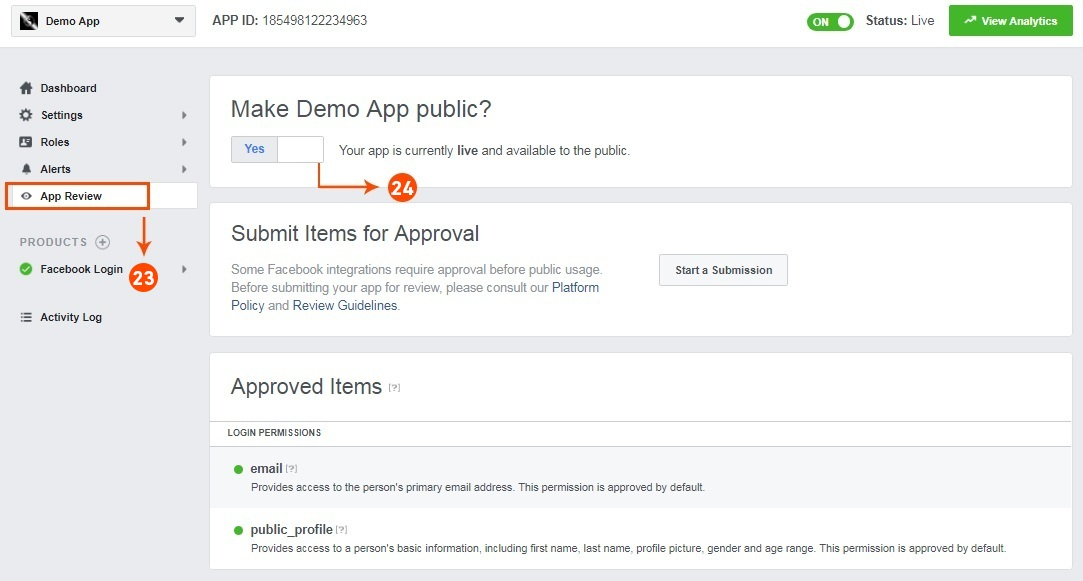
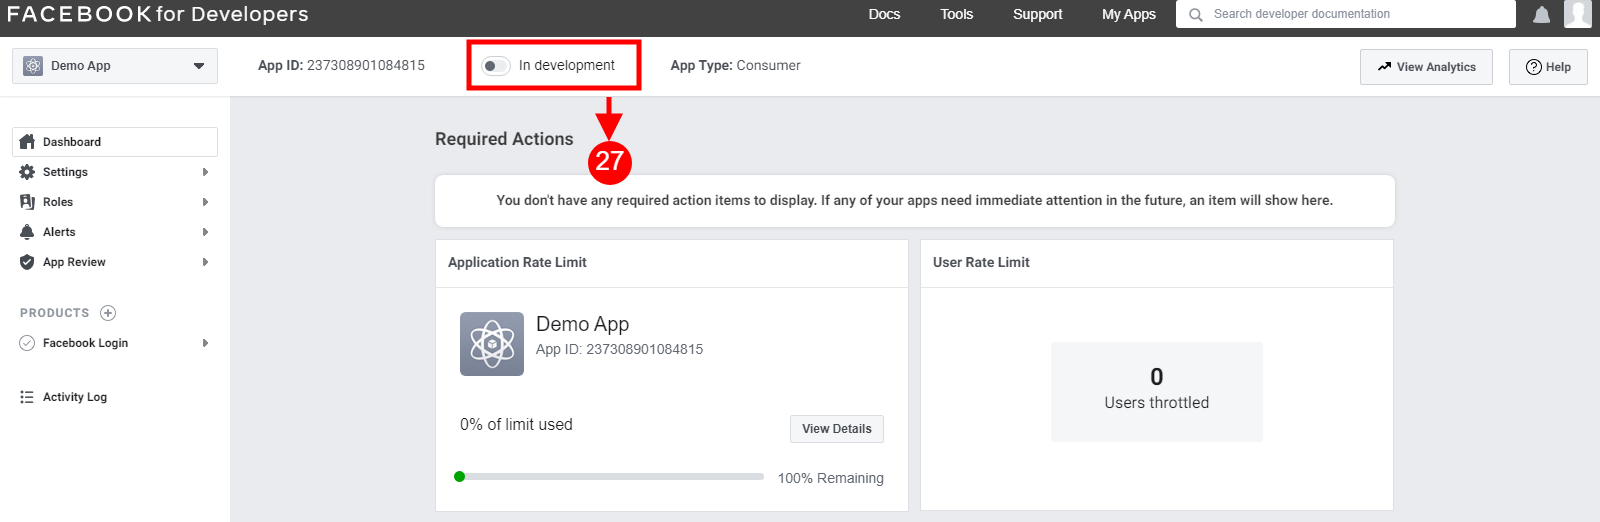
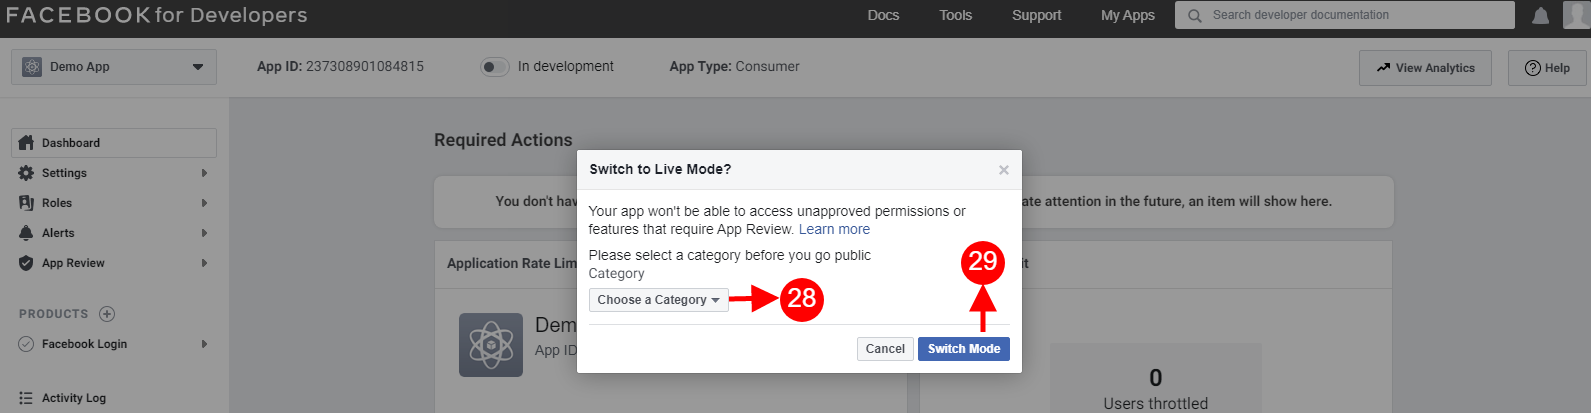
23&24: Click on “App review”. And mark “Make ‘your app name’ Public” to Yes.
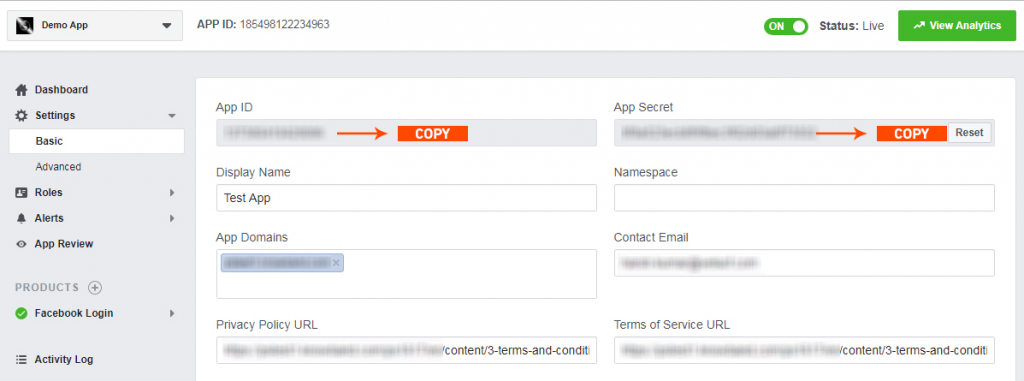
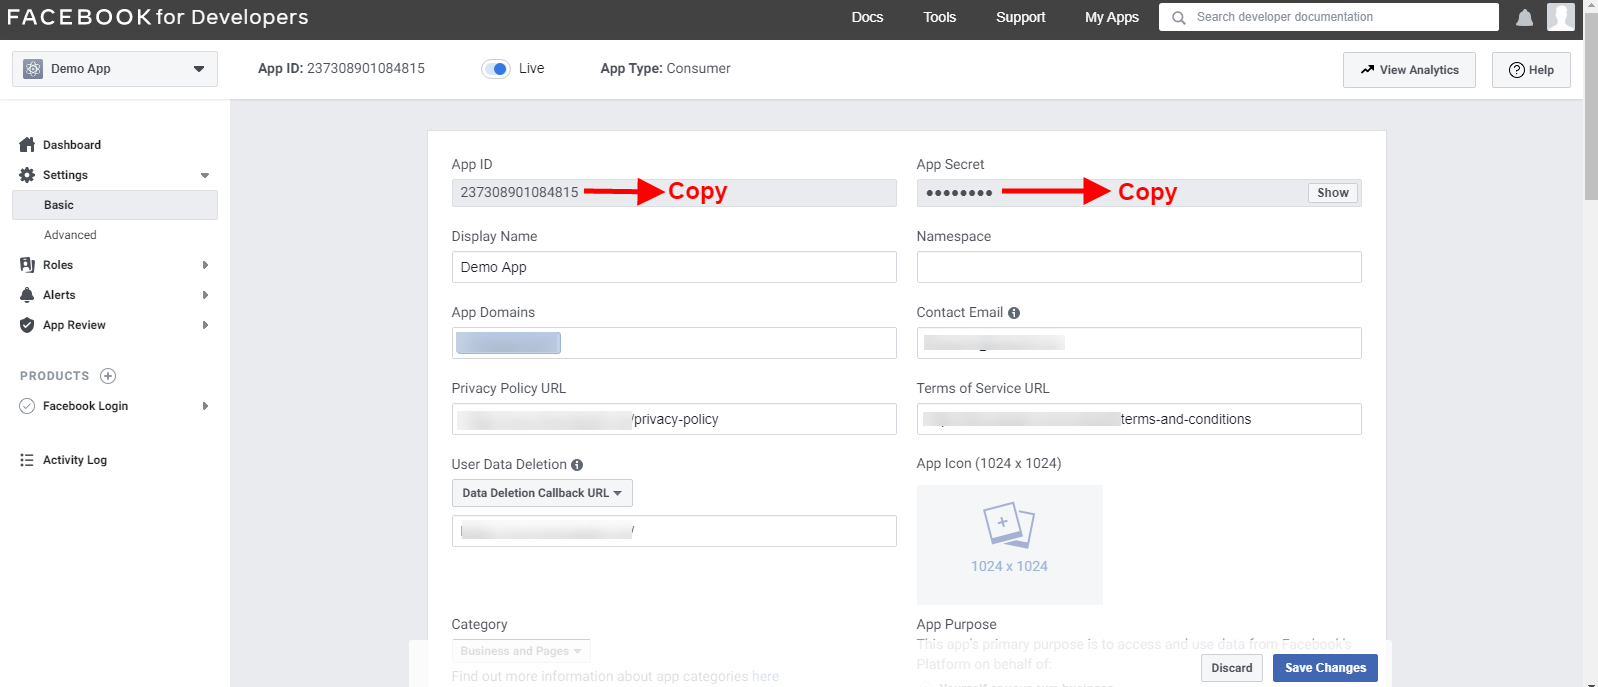
Final Step: Copy the App ID and App Secret and paste it into the fields provided in the module.
3.2.2 How to setup Google Login
Follow the below steps to get the client id and client secret.
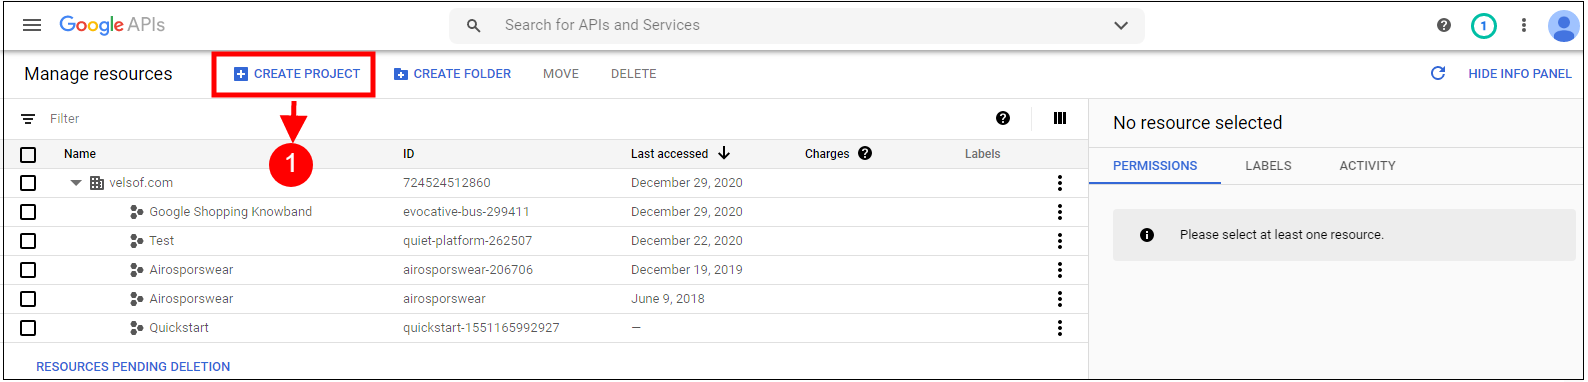
1. Go to the link “ https://console.developers.google.com/project ”.
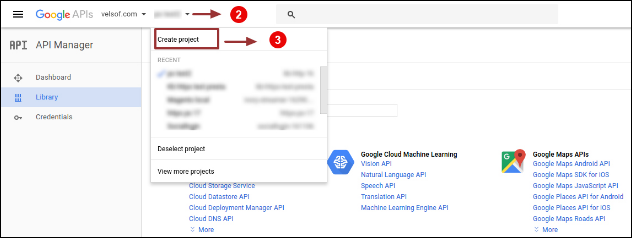
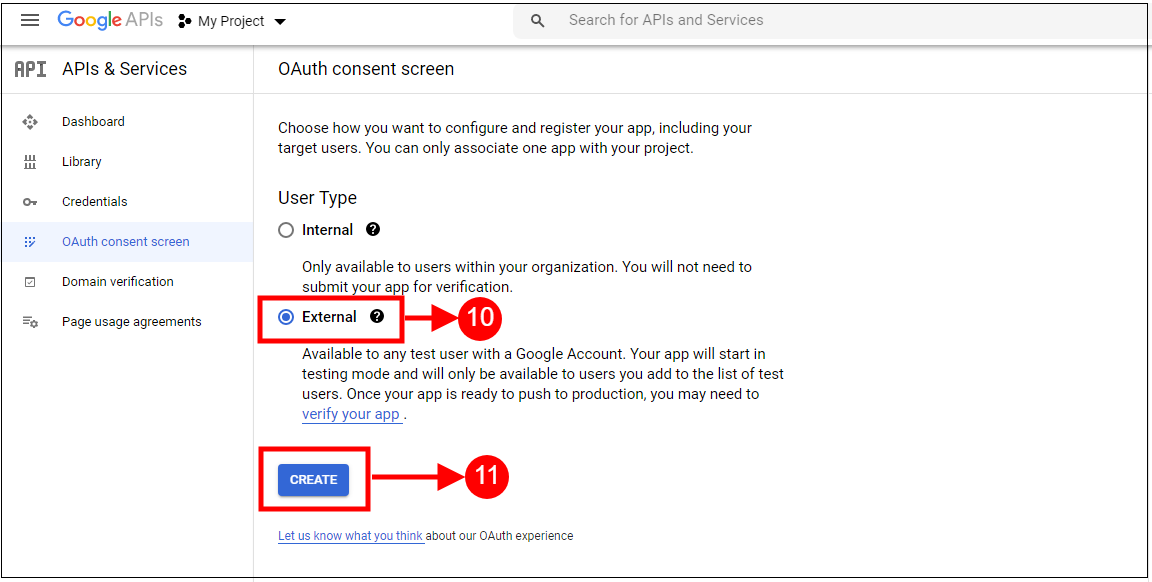
2. Click on the drop-down option highlighted in button “ 2 ” and then click on “Create a project”.
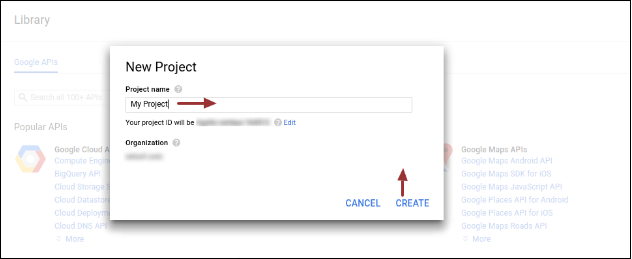
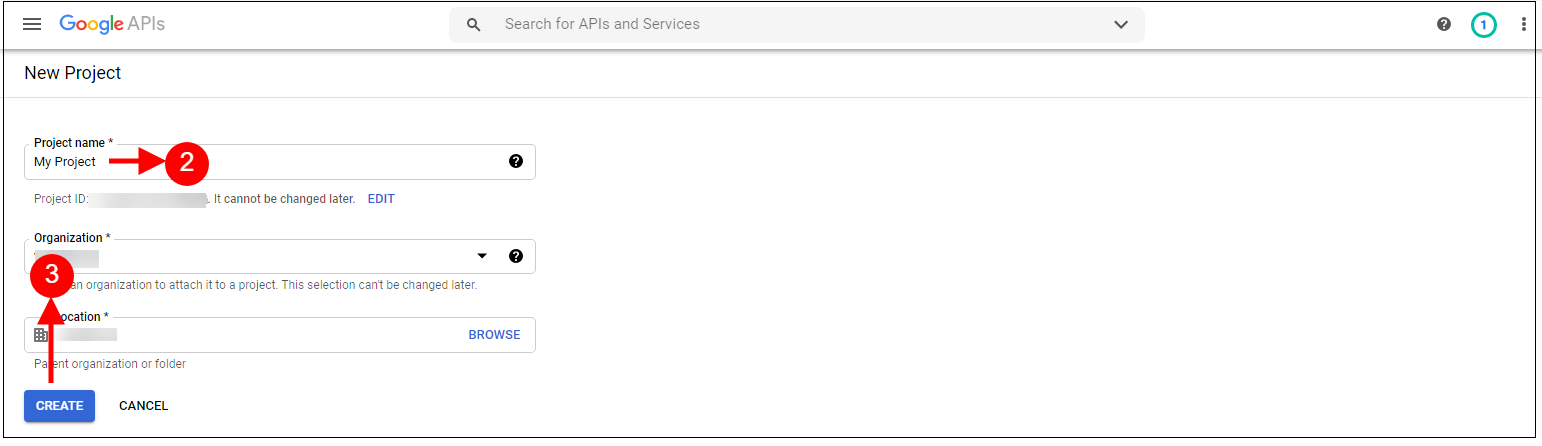
3. Enter your desired Project Name and click on “Create”.
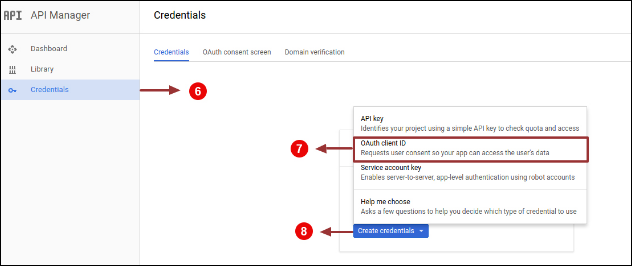
4. Go to API Manager, click on Create Credentials and select the OAuth client ID option.
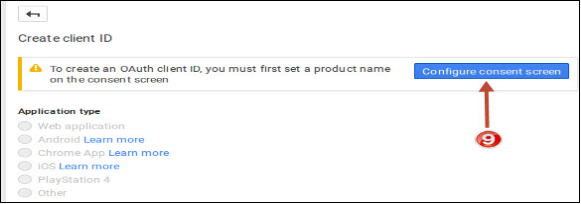
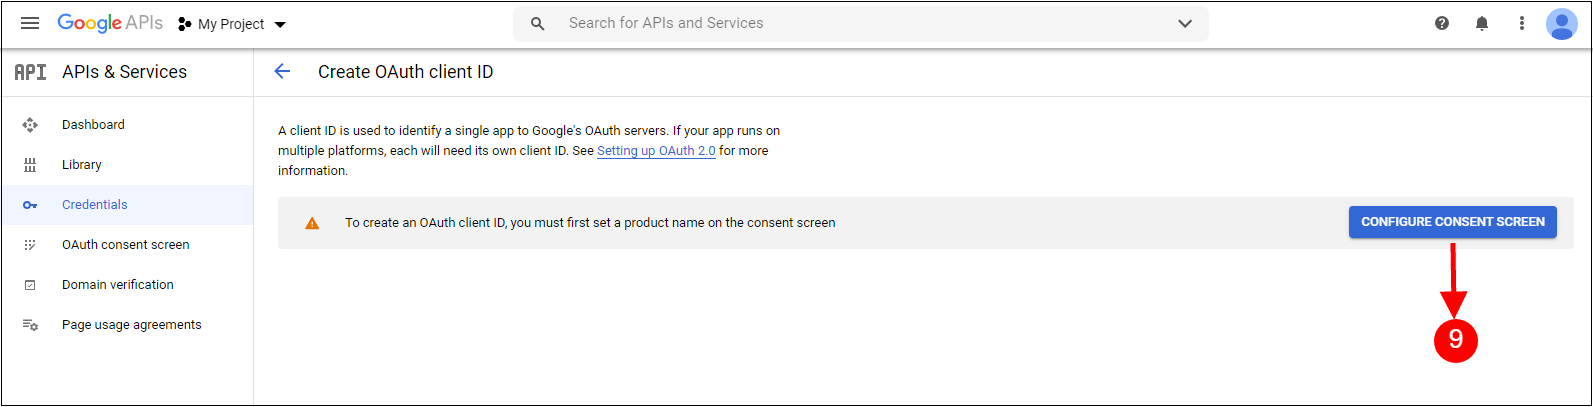
5. Click on the “Configure consent screen” button.
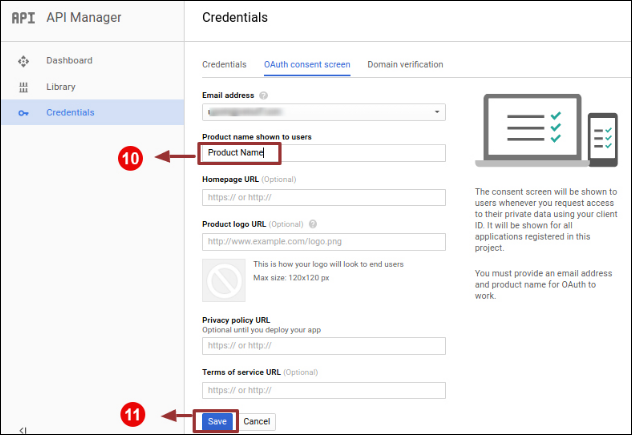
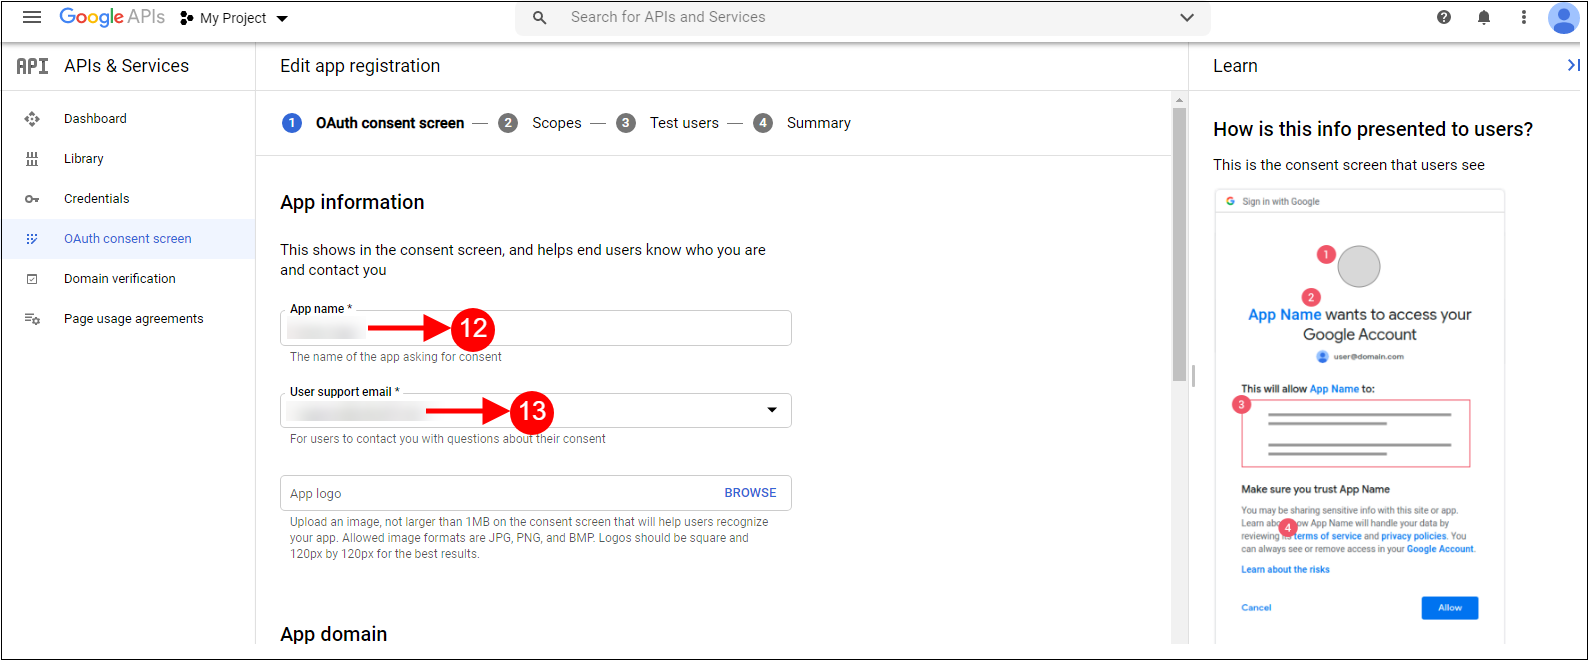
6. Enter “Email Id”, “Product Name” and then click on the “Save” button.
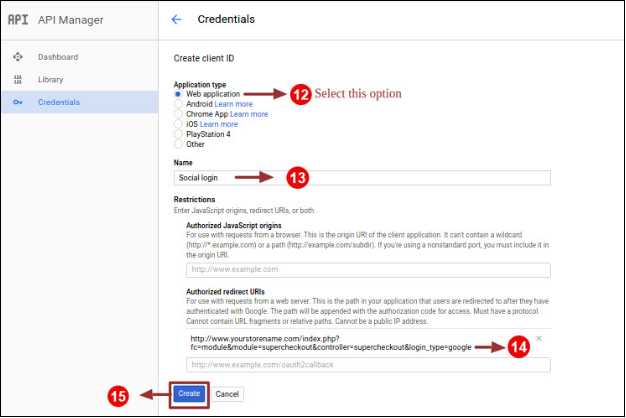
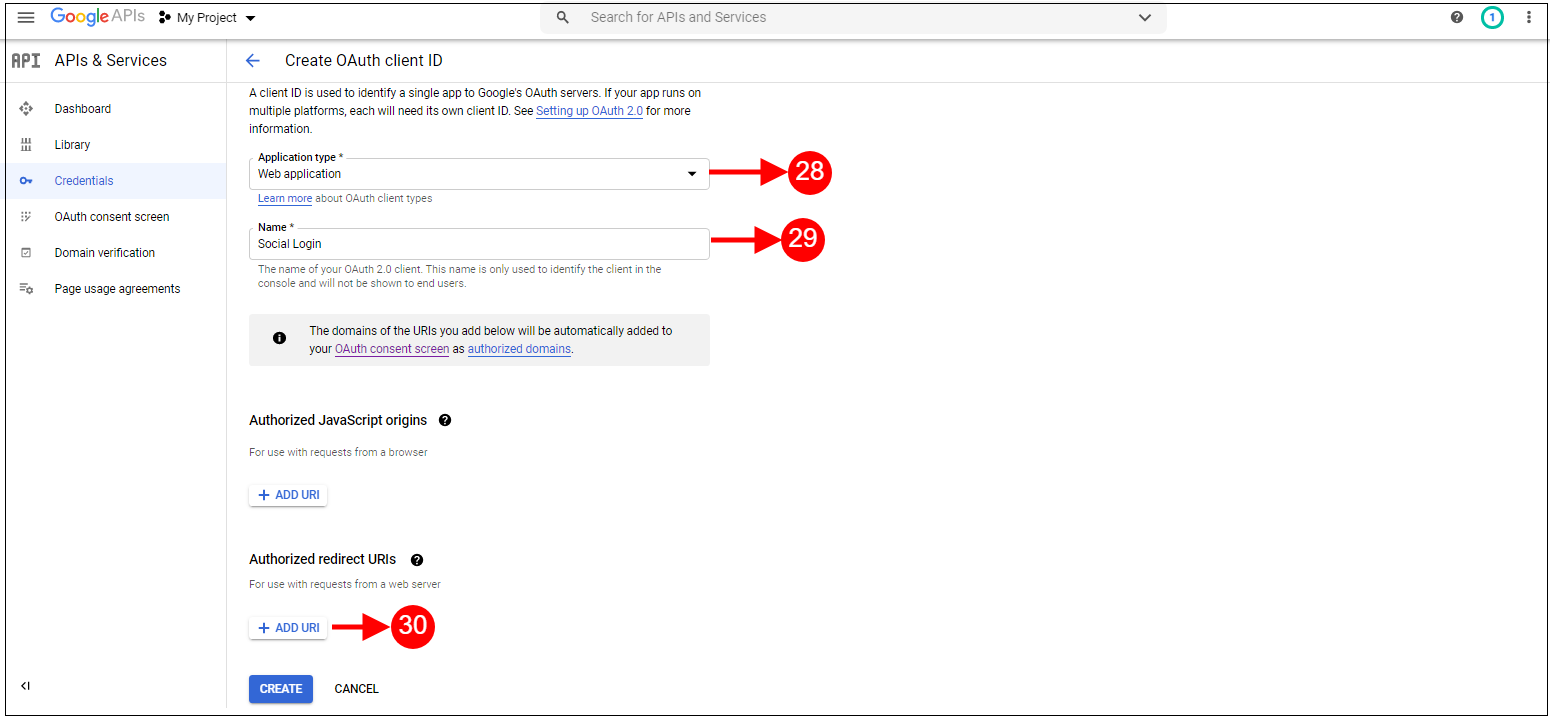
7. Select “Web application”, Enter “Name “, “Authorized Redirected URIs“ as mentioned below and click on the “Create” Button,
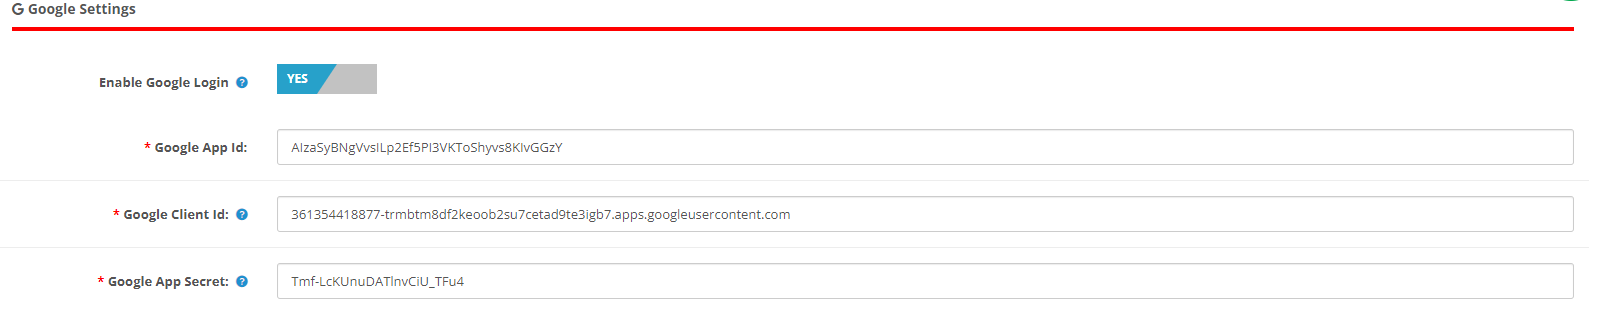
9. Paste Client ID and Client Secret in the Text Field shown below in the Prestashop one-page checkout module’s admin panel.
How to Generate the Google API key:
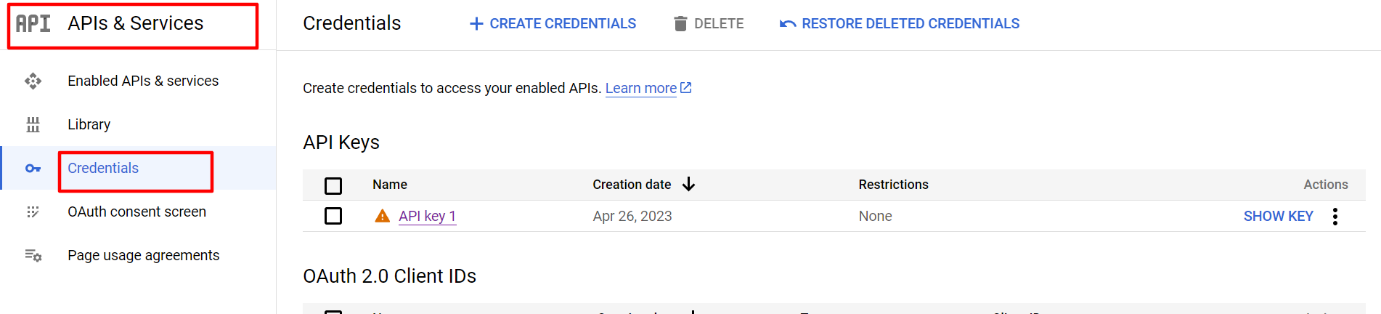
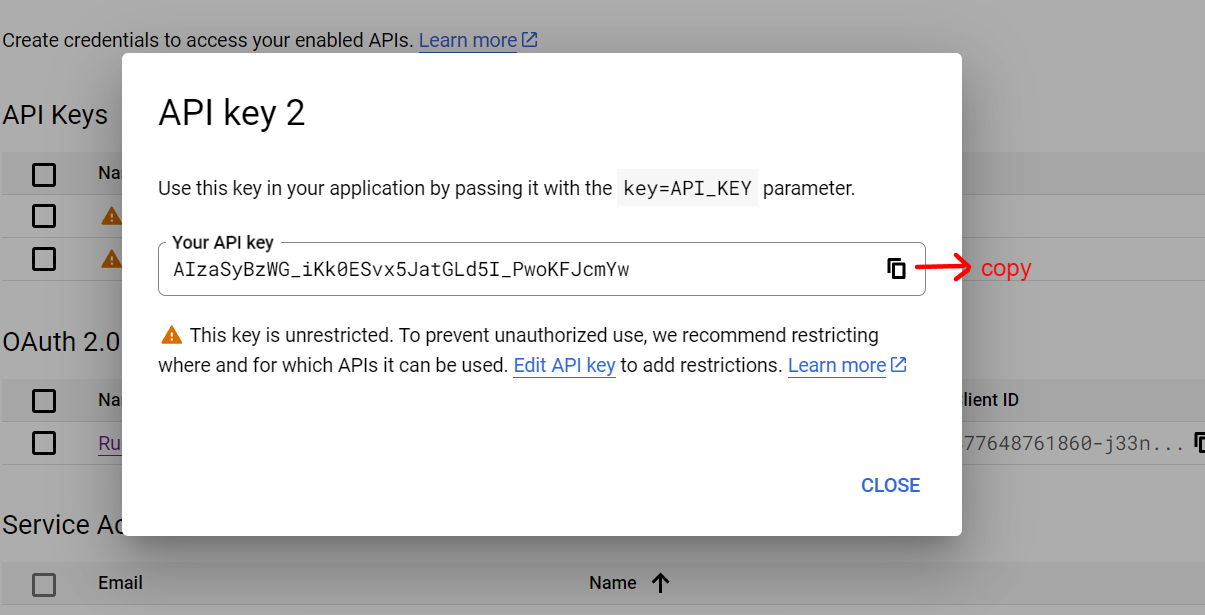
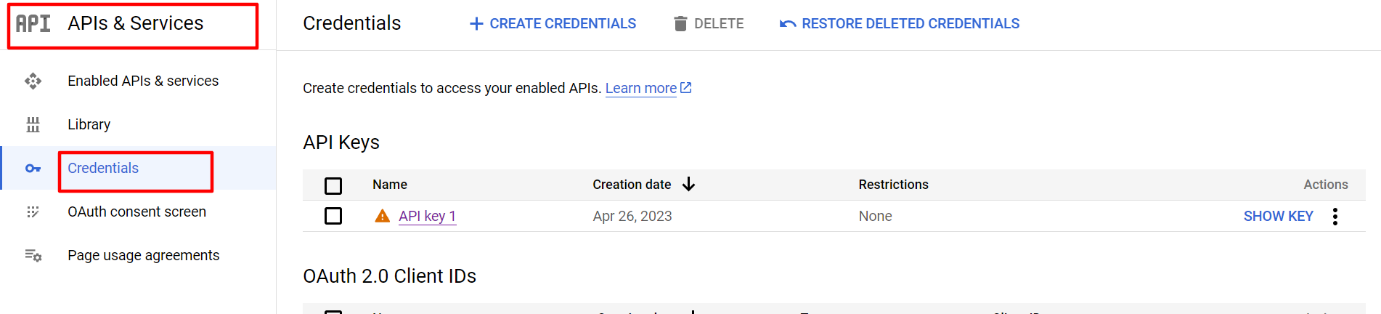
1) Go to API Manager, click on the left menu, click on API & Services, and then click on Credentials.
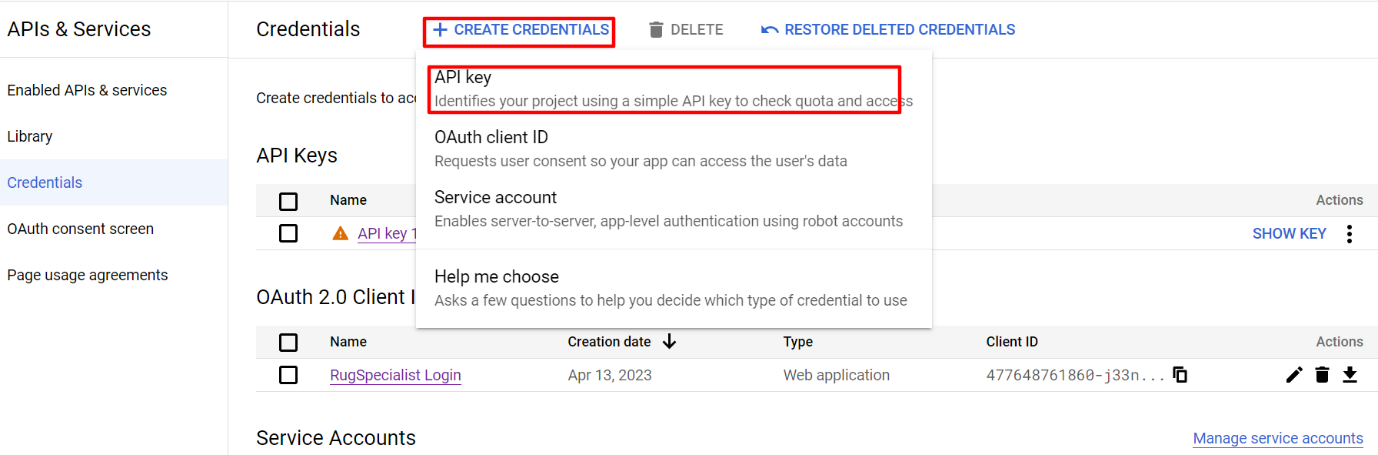
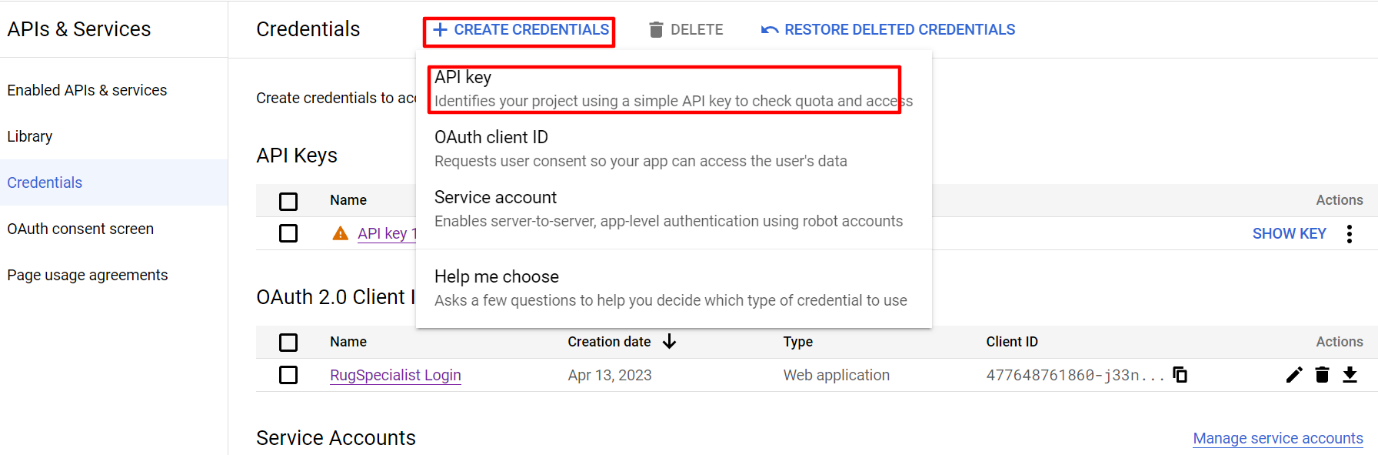
2) Click on Create Credentials & then select the API key.
3)Copy the API key and enter the same into the Google App Id field of the admin end module’s login page
3.3 Payment Address
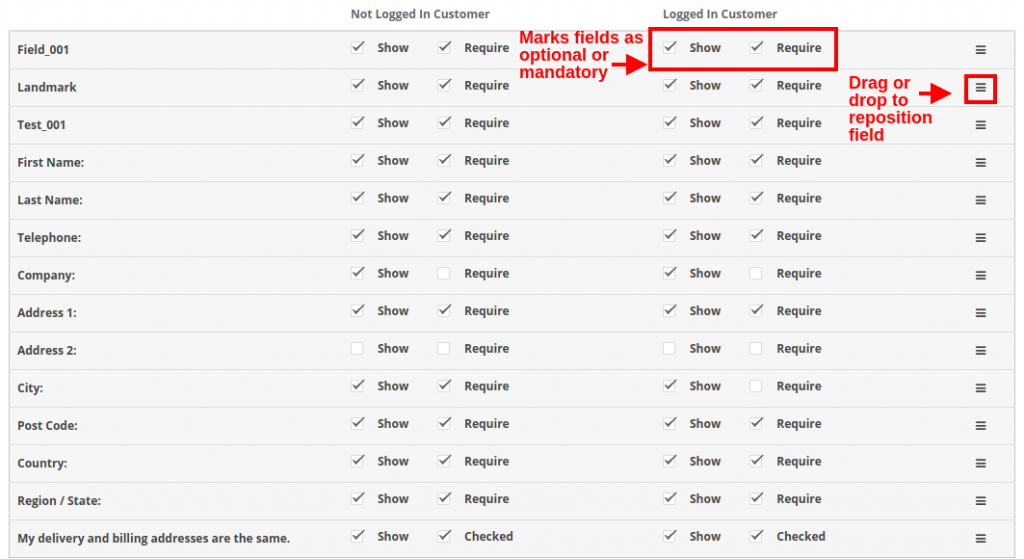
OpenCart One Page Checkout allows you to show or hide any field for payment address. The fields can be separately enabled or disabled for logged-in and logged-out customers. You can mark any field as required, differently for logged-in and logged-out customers of the store. Additionally, you can reorder the address fields using a simple drag and drop action.
3.4 Shipping Address
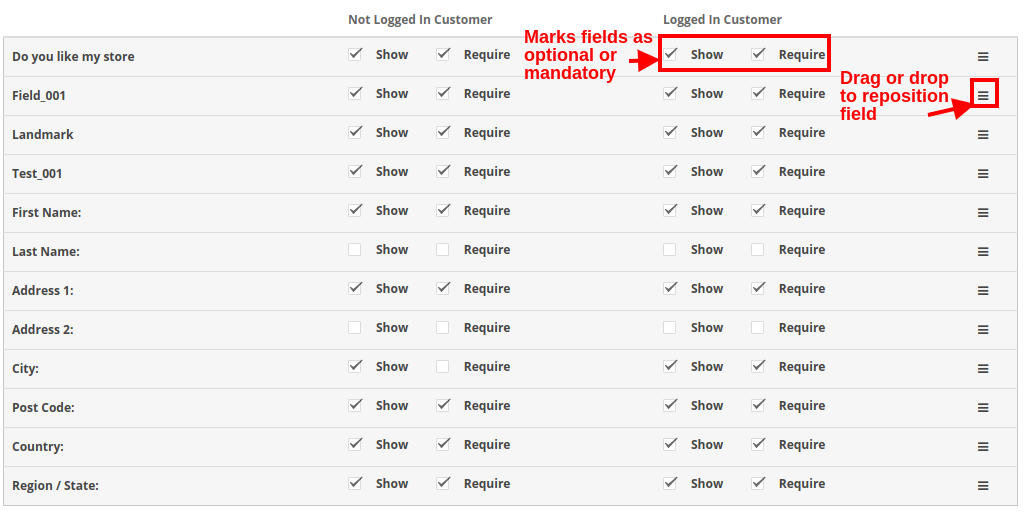
OpenCart responsive checkout popup module allows you to show or hide any field for the shipping address. The fields can be separately enabled or disabled for logged-in and logged-out customers. Using OpenCart One Page Advanced Checkout, you can mark any field as required, differently for logged-in and logged-out customers of the store. Additionally, you can reorder the address fields using a simple drag and drop action.
Note: To include and show more custom fields in the Payment Address, Shipping Address, cart section, or account section of the checkout, you can refer to section 3.10
3.5 Shipping Method
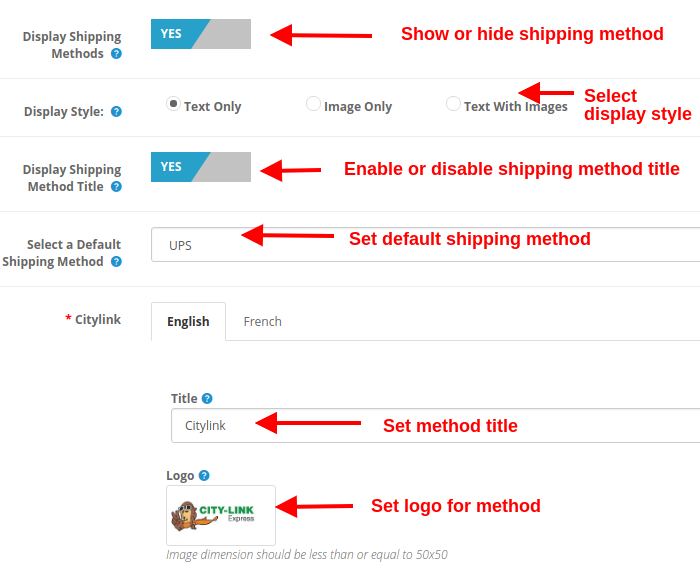
Display Shipping Methods: This option will show/hide the complete list of shipping methods provided on the advanced checkout page.
Display Style: With this option, you can select the display style for the shipping methods. It can be only logo image, only text, or both.
Display Shipping Method Title: This option will enable or disable the title for the particular shipping method.
Select Default Shipping Method: With this option, you can select any shipping method as the default method.
Title: This option sets the desired title for the shipping method.
Logo: This option sets the logo image for the shipping method.
Likewise, you can modify the title and logo image for all the shipping methods using this OpenCart One Page Advanced Checkout module.
3.6 Ship2Pay
3.7 Payment Method
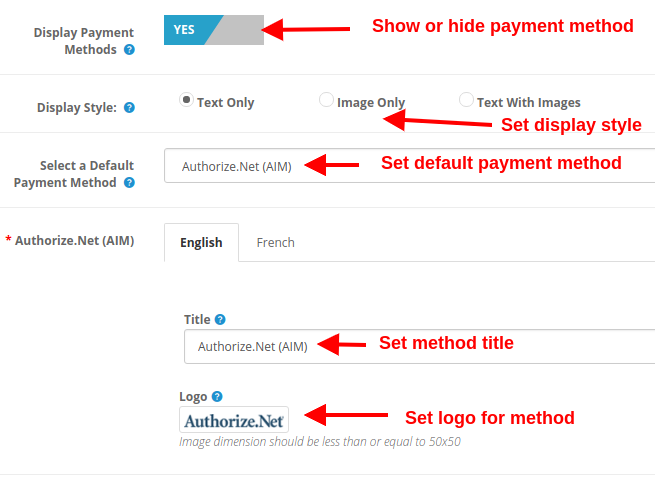
Display Payment Methods: This option will show/hide the complete list of payment methods provided on the advanced checkout page.
Display Style: With this option, you can select the display style for the payment methods. It can be only logo image, only text, or both.
Select Default Payment Method: With this option, you can select any payment method as the default method.
Title: This option sets the desired title for the payment method.
Logo: This option sets the logo image for the payment method.
Likewise, you can modify the title and logo image for all the payment methods with the help of one page supercheckout.
3.8 Cart
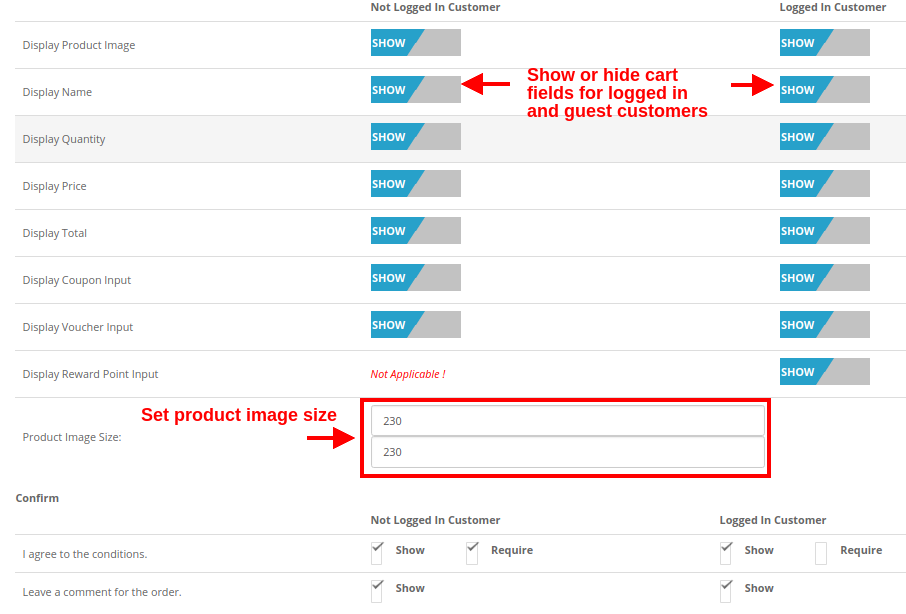
Under this section of OpenCart One Page Supercheckout, you can customize the cart and display it the way you want at your store. The image size of cart items can be easily modified by setting the image height and width.
Product Image Size: This option allows you to set the image size for the products shown in the cart section of the one page checkout.
Moreover, you can show or hide the various cart fields to log in and log out customers of the store. Fields like “Agree to the Conditions”. Moreover, order comments marked as optional or optional as per your site requirements.
3.9 Newsletter
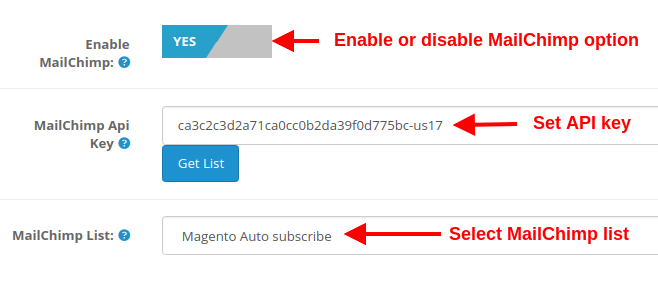
Enable MailChimp: This option of Opencart one page supercheckout, allows you to enable or disable the MailChimp Integration functionality for your store.
MailChimp API Key: With this option, you can set the MailChimp API key which will connect your site to the MailChimp account of the seller.
MailChimp List: Using this option, you can fetch and select the particular list connected to the MailChimp account.
3.9.1 How to configure MailChimp
Login to your Mail Chimp account.
Click on the right corner tab > Choose Profile > Extras > API Keys.
Here Admin Can Create an API key by clicking on the “Create a Key” button.
Copy the API key.
Admin can also make a Different list for Each Social login customer by clicking on “List” in the Top Menu Bar.
Now Paste the API Key in the Provided Mail chimp API Key section and click on the “Get List” Button.
Select the list from the Dropdown menu.
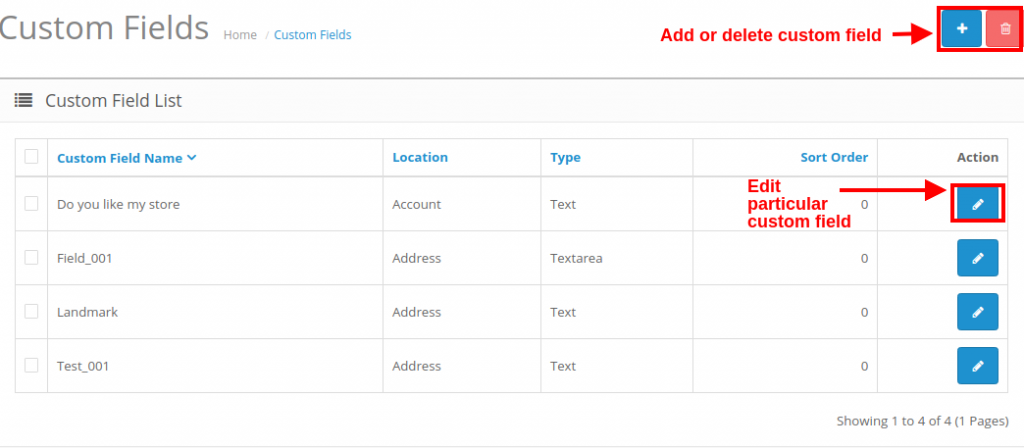
3.10 How to add edit or delete custom fields to the Supercheckout page
In order to add custom fields to any section of One Page Checkout, you can go to the “Custom Fields” option under the “Customers” tab at the left side section of the admin interface.
Most of the visitors leave the checkout for the desired product just because they find the process complex and lengthy to complete. This ultimately leads to more and more number of abandoned carts. To control the exit and cart abandonment rates, Knowband has offered OpenCart One Page Checkout Pro plugin for OpenCart stores. Further, by implementing One Page Checkout for your eCommerce site, you can improve the conversion rates as it replaces the multi-step checkout page with a single page checkout.
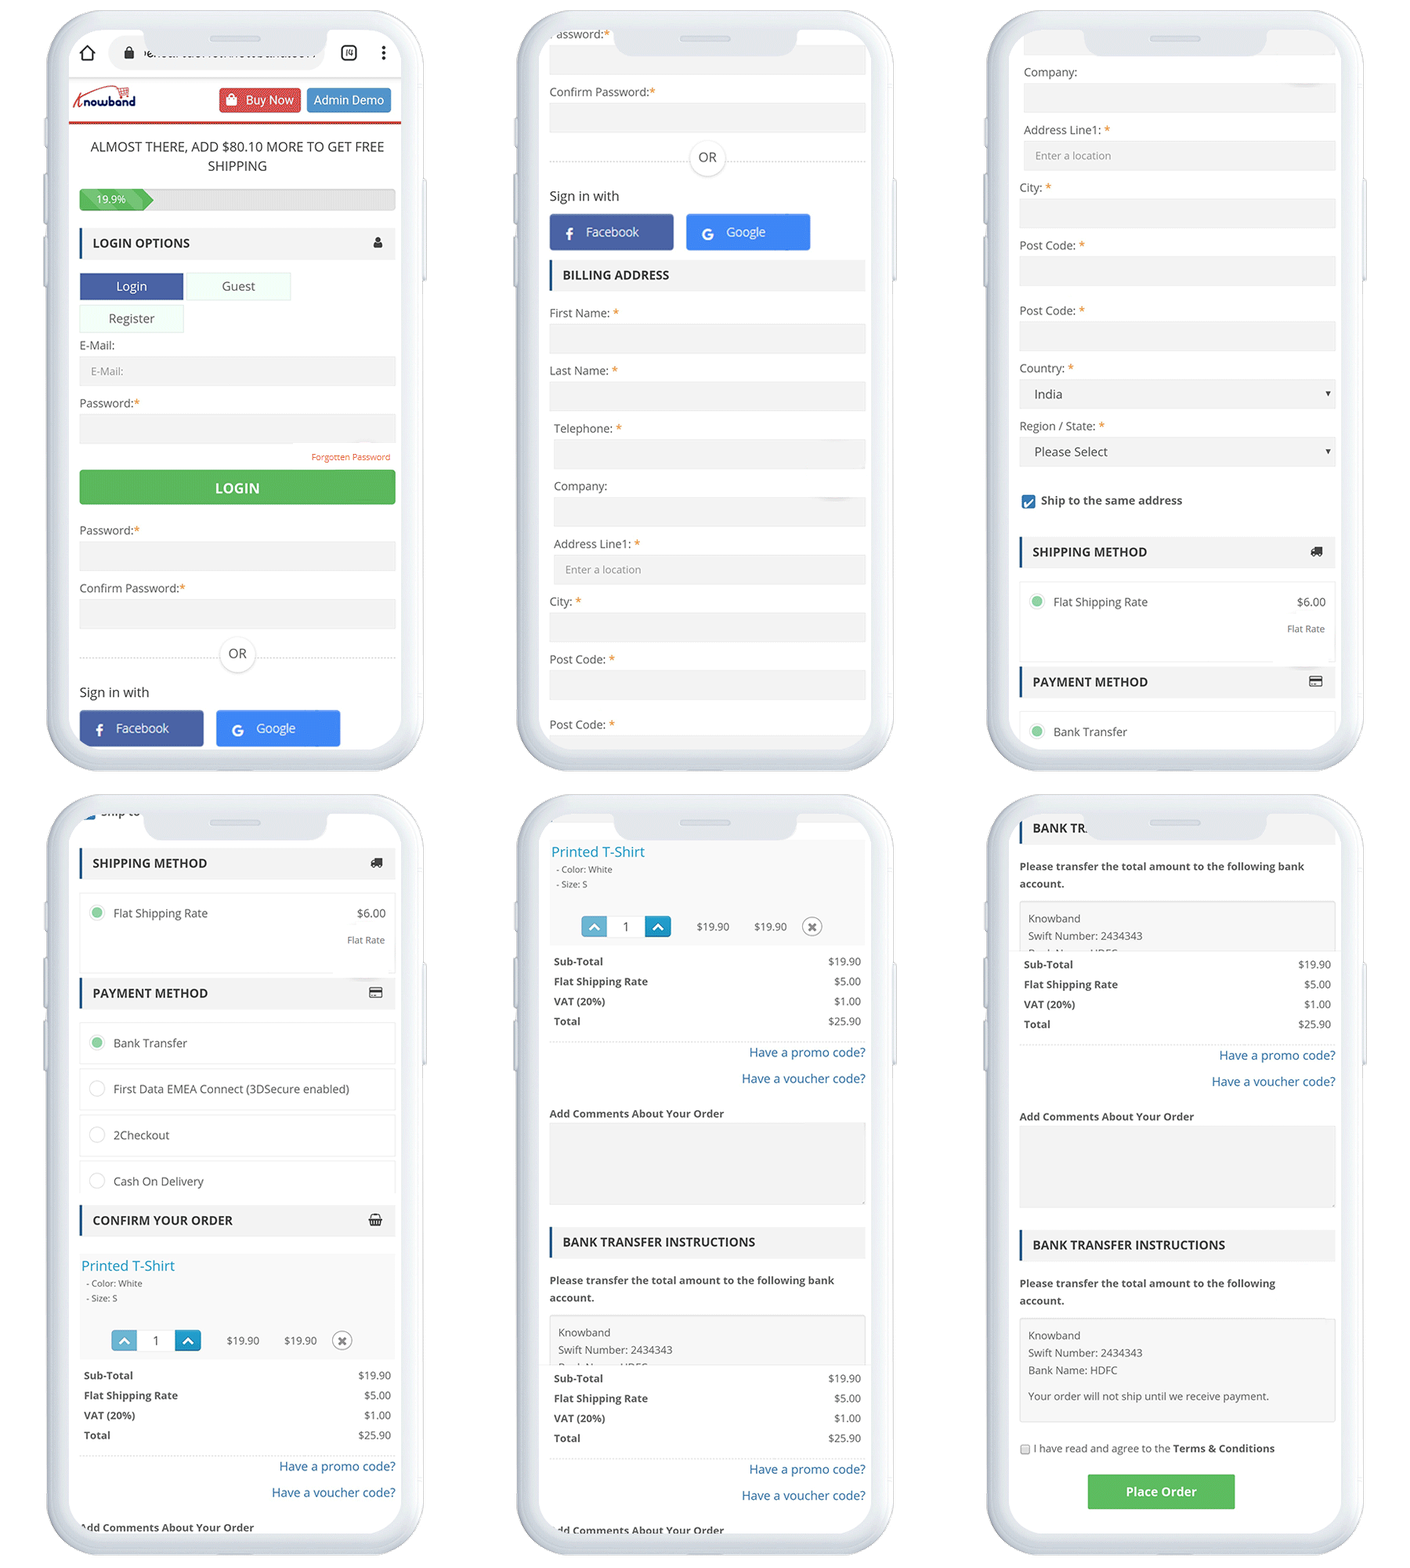
Mobile View:
Salient Features of the OpenCart One Page Checkout extension:
The extension offers Guest checkout functionality by which the users can easily and quickly complete their orders as guest customers without creating a new account on the online store.
The OpenCart Fast Checkout extension allows the customers to quickly log in to the website using their Google, Facebook, and Paypal accounts.
The fields on the checkout page can be easily customized by the admin from the back-end of the OpenCart One Page Checkout Pro extension. The store admin can show or hide any of the fields from the checkout page or can make them optional or mandatory for the users to fill. The admin can also re-arrange the position fields with drag and drop functionality.
The store owner can easily customize the look and feel of the checkout page including changing the color of the buttons, background button color, text color, etc.
The OpenCart One Page Supercheckout offers multi-store and multi-lingual compatibility.
The OpenCart One Step Checkout extension supports nearly all the major shipping and payment methods that boost the confidence of the customers to choose their desired method from the checkout page.
The e-merchant can apply any of the design layouts from 3 different checkout layouts I.e., 1-column, 2-column, or 3-column. The fields can be easily rearranged by dragging and dropping.
The OpenCart Quick Checkout module offers integration with MailChimp, Klaviyo, and SendinBlue that allows you to sync your users’ database automatically with these accounts of yours without any manual efforts.
The e-merchant can also customize the look and feel of the extension through custom CSS and JS.
The OpenCart Responsive One Step Checkout module offers the Testing mode feature by which the store owner can check and view the customizations done before making the customizations live on the website.
The OpenCart Simplified Checkout module offers the Ship2Pay feature by which the store owner can map particular payment methods with selected delivery methods. It hides all the other payment methods on selecting a particular delivery method and shows only those payment methods that are mapped to the selected delivery method to the user.
2.0 Installation Guide of OpenCart One Page Checkout extension
Before starting the installation process, you have to buy the OpenCart One Page Checkout extension from the Knowband store. Once purchased, you will receive the following files in your registered email.
Source code of OpenCart One Page Checkout Extension in zipped file format.
User Manual of OpenCart One Page Checkout extension.
Now to install this OpenCart Single Page Checkout on your online shop, follow the given steps:
1. Unzip the zip file. You will get the folders as shown in the image below
2. Copy all the folders of the zip file in the Root Directory of OpenCart setup via FTP manager.
Steps to install the OCMOD file
After unzipping the folder, you will find a file supercheckout_pro.ocmod.xml as shown below:
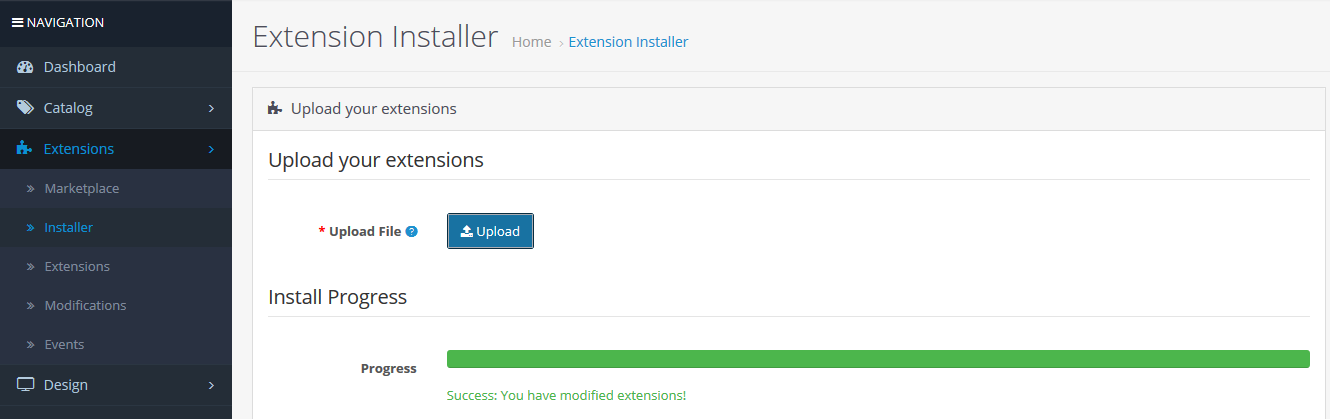
Now in the admin panel, click on Extensions in the left side menu. Then click on Extension Installer ( Home->extension).
Now, Upload the supercheckout_pro.ocmod.xml. A success message is shown once the file is uploaded.
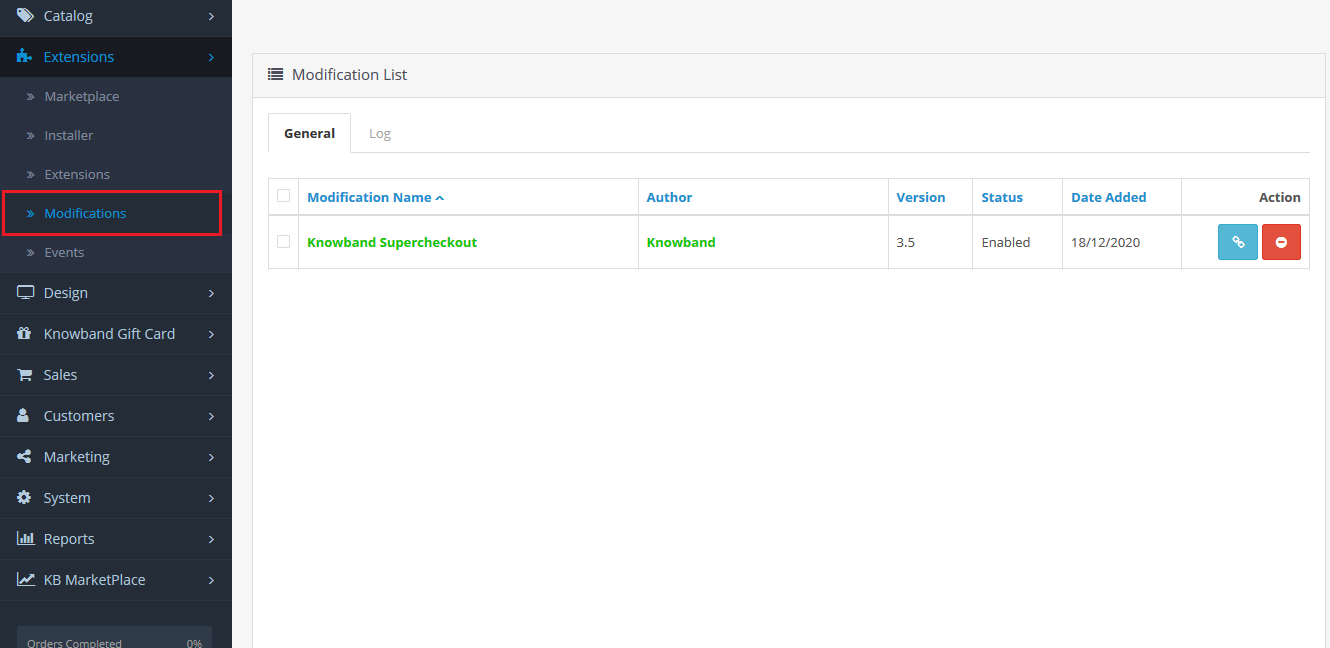
After the file is uploaded go to Home->Modification
You will find a file with the name Supercheckout Pro v2.8 (this means your ocmod has been installed successfully). Click on the corresponding “+” icon to enable it. The green icon turns into the red as shown below.
Finally, click on the refresh button (This is mandatory).
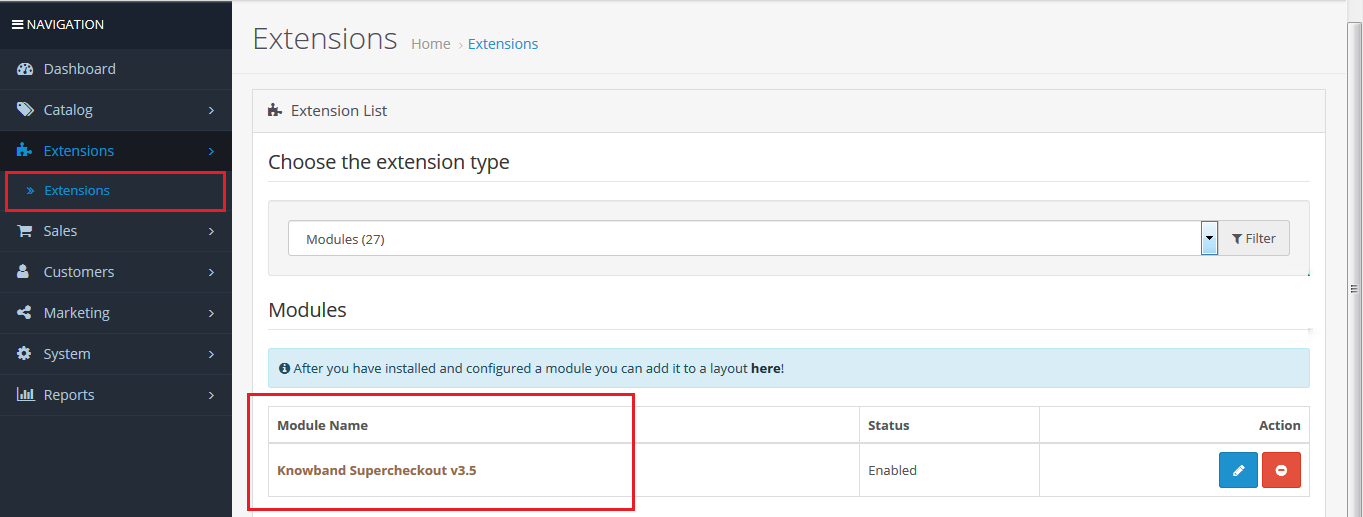
So, OpenCart One Page Checkout Pro is now successfully installed and is ready to use at your store. Go to the admin menu and click on the Extensions and then on Modules. Click the configure button next to Knowband Supercheckout.
3.0 Admin Interface of OpenCart responsive one step checkout module
Just after the successful installation of the One Page Checkout for OpenCart website, you can configure the checkout form fields as per your requirements. You have to navigate the settings in the given order: Admin Panel > Extensions > Modules > Knowband Supercheckout
The easy to understand admin interface of OpenCart One Page Checkout Pro is divided into ten sections namely:
1. General Settings
2. Customizer
3. Login Settings
4. Payment Address
5. Shipping Address
6. Shipping Method
7. Ship2Pay
8. Payment Method
9. Cart
10. Design
11. Newsletter
Each of these sections has been discussed below:
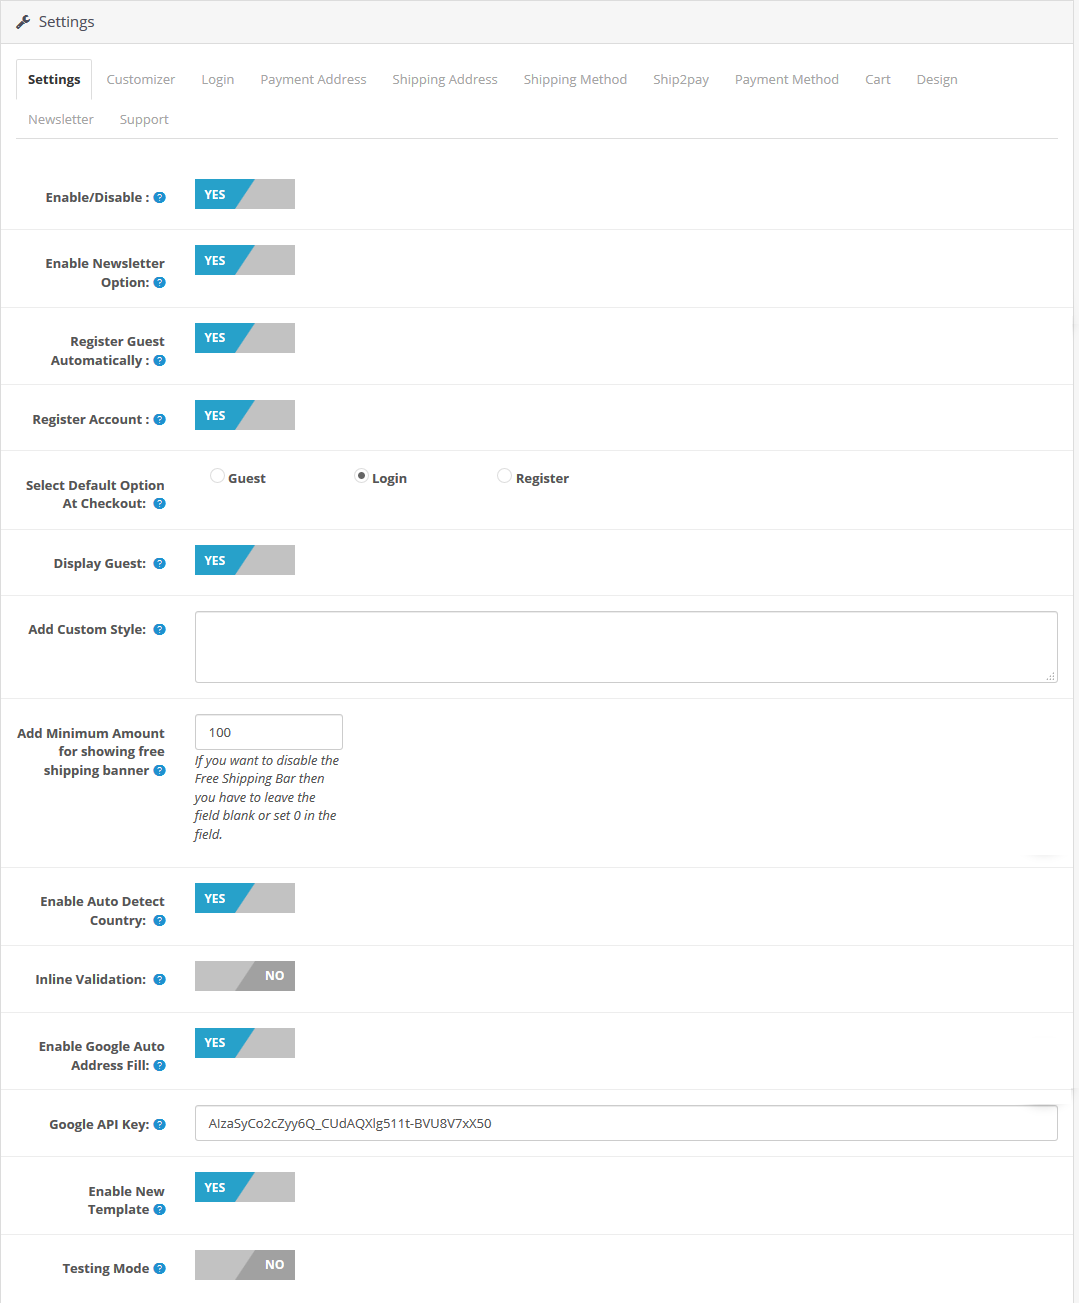
3.1 General Settings
Enable/Disable: Using this option, you can enable or disable the complete functionality of the OpenCart One Page Checkout Pro plugin from OFF to ON.
Enable Newsletter Option: You can enable or disable the Newsletter option on the Supercheckout page. Once you have enabled this button, the following will be the cases:
a.) Newsletter option will be visible to Guest checkout customers, only if you have enabled Register Guest Automatically option.
b.) Newsletter option will always be visible to customers if they are creating a new account.
c.) Newsletter option will never be visible to logged-in customers.
Register Guest Automatically: You can enable this option to automatically register the guest customers at your store. By enabling this option, you can register your customers to the store and send them a generated password on their email.
Register Account: By enabling this field, you can show a password field on the supercheckout page so that the new users can easily set the desired password for their account.
Select Default Option at Checkout: With this option, you can set a default option in the login section of your OpenCart One Page Supercheckout page out from the options as Guest, Login, and Register.
Disable Guest: You can enable or disable the guest functionality for the users in the login section of One Page Checkout.
Add Custom Style: With this option, you can add or include custom style to the Supercheckout page. To apply some custom CSS on the Supercheckout page, you can write that CSS in the text box which is just to the right of the Add Custom Style label. For eg: You can change the color of the buttons on the Supercheckout page.
Add Minimum Amount for showing free shipping banner: From this tab, the admin can add a minimum amount which is required after which the customers will be eligible to get free shipping of their order.
Enable Auto-detect Country: After enabling this feature, the extension will detect and fill the country of the user automatically in the country section.
Inline Validation: With this feature, the extension displays an error every time the user misses filling a mandatory field on the checkout page.
Enable Google Auto-address to fill: As soon as the user starts typing his address, the extension suggests his address if this feature is enabled.
Enable or Disable New Template: With the OpenCart One Page Checkout extension, the store owner can either apply the new or old checkout template as per his desire from the General settings.
Testing Mode: This option helps you to enable or disable the test mode functionality of this OpenCart One Page Checkout extension.
Testing URL: Once you enable the testing mode, you can set a supercheckout URL where you can test the functionality of one page checkout.
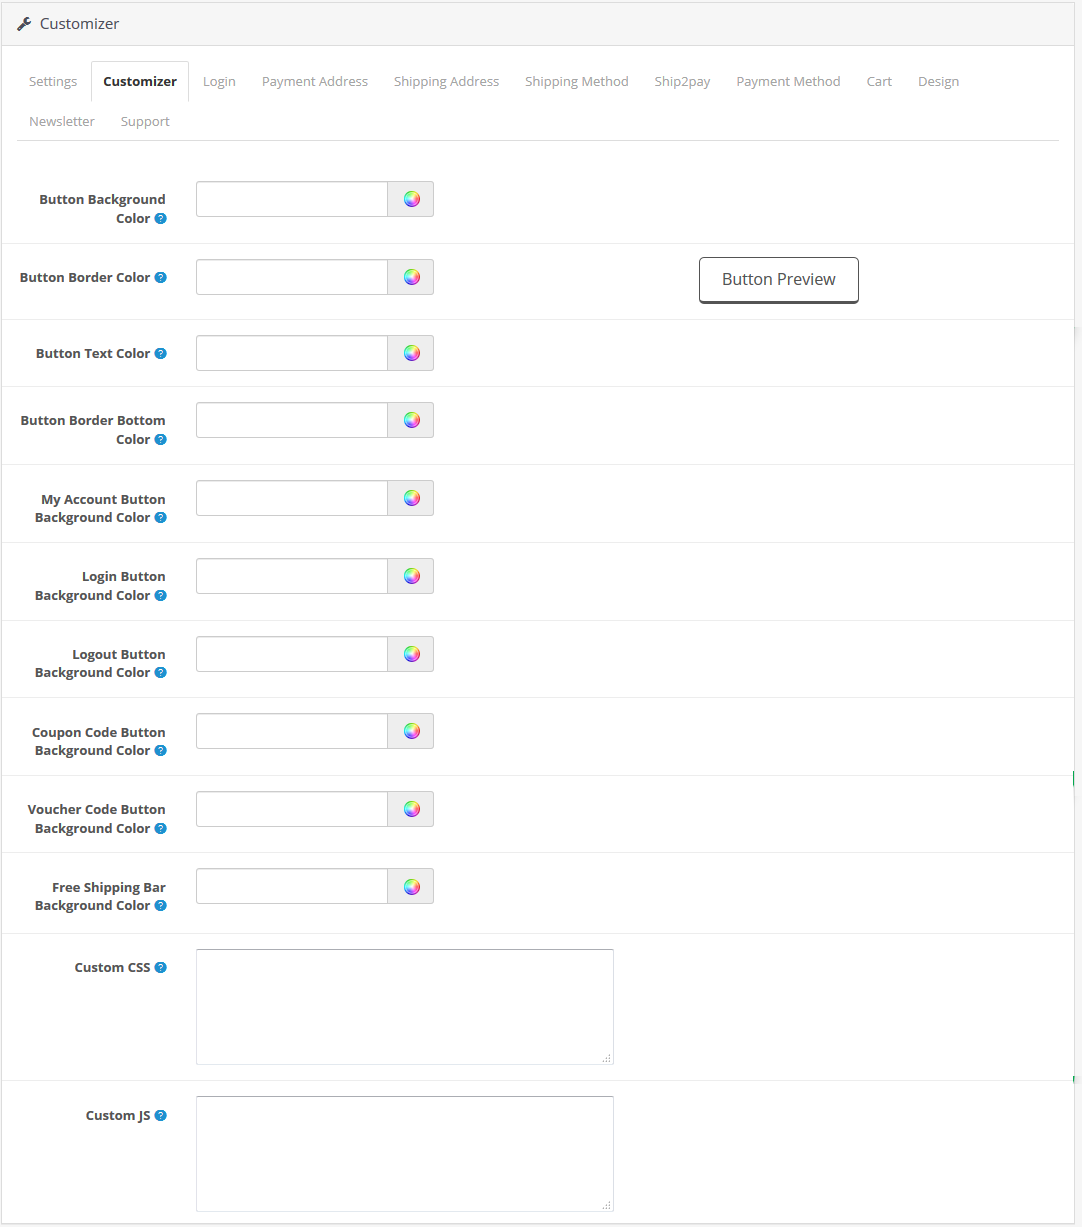
Customizer
From the Customizer tab, you can customize the Button Background Color, Button Border Color
Button Preview, Button Text Color, Button Border Bottom Color, My Account Button Background Color, Login Button Background Color, Login Button Background Color, Logout Button Background Color, Coupon Code Button Background Color, Voucher Code Button Background Color, etc.
Free Shipping Bar Background color: This section allows you to change the background color of the Free Shipping Bar on the checkout page.
Custom CSS and JS: This section allows you to customize the look and feel of the checkout page with custom CSS and JS.
3.2 Login
Under this tab, you will find options to configure Facebook, Google, and Paypal login options as shown below.
Enable Facebook Login: With this option, you can enable/disable the Facebook Login option on One Page Checkout.
Facebook App ID: This option lets you set the Facebook App ID which can be generated using Facebook Developer’s account.
Facebook App Secret: Using this option, set the secret key generated using Facebook Developer’s account.
Enable Google Login: With this option, you can enable/disable the Google Login option on One Page Checkout.
Google App ID: This option lets you set the GoogleApp ID.
The Google Client ID: This field lets you set the Google client ID created from the Google console.
Google App Secret: Using this option, you can set the App secret key generated using Google console.
Enable Paypal Login: With this option, you can let your customers log in through their Paypal accounts.
Paypal Client ID: This option lets you add your Paypal Client ID.
Paypal Client Secret: This option lets you add your Paypal Client Secret ID.
For detailed instructions to generate App ID, App Secret Key, and Client ID, jump to the next section.
3.2.1 How to Set up Facebook Login?
Facebook App can be created by below-mentioned steps:-
1: Go to the given URL: https://developers.facebook.com/apps/
2: Click on the “Create App” button.
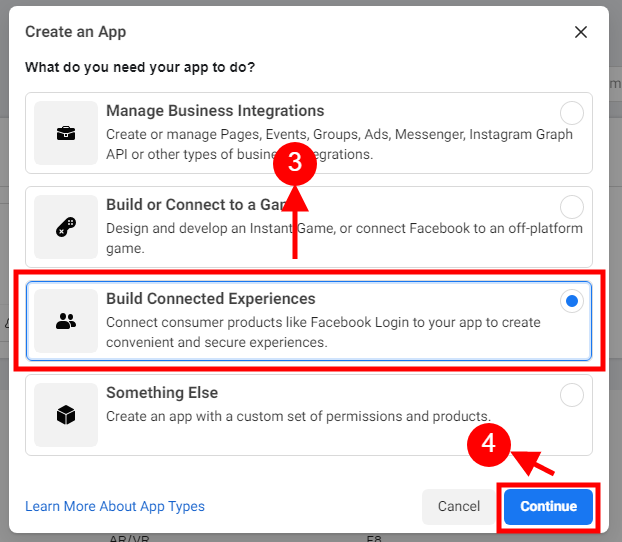
3&4: Select the “Build Connected Experiences” option and click on the ‘Continue’ button.
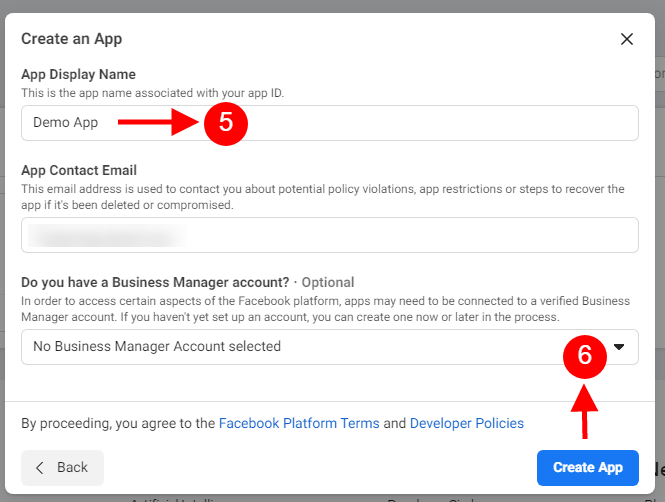
5&6: Add “App Display Name”, “App Contact Email”, and choose from the “Do you have a Business Manager Account?” and then click on the “Create App” button.
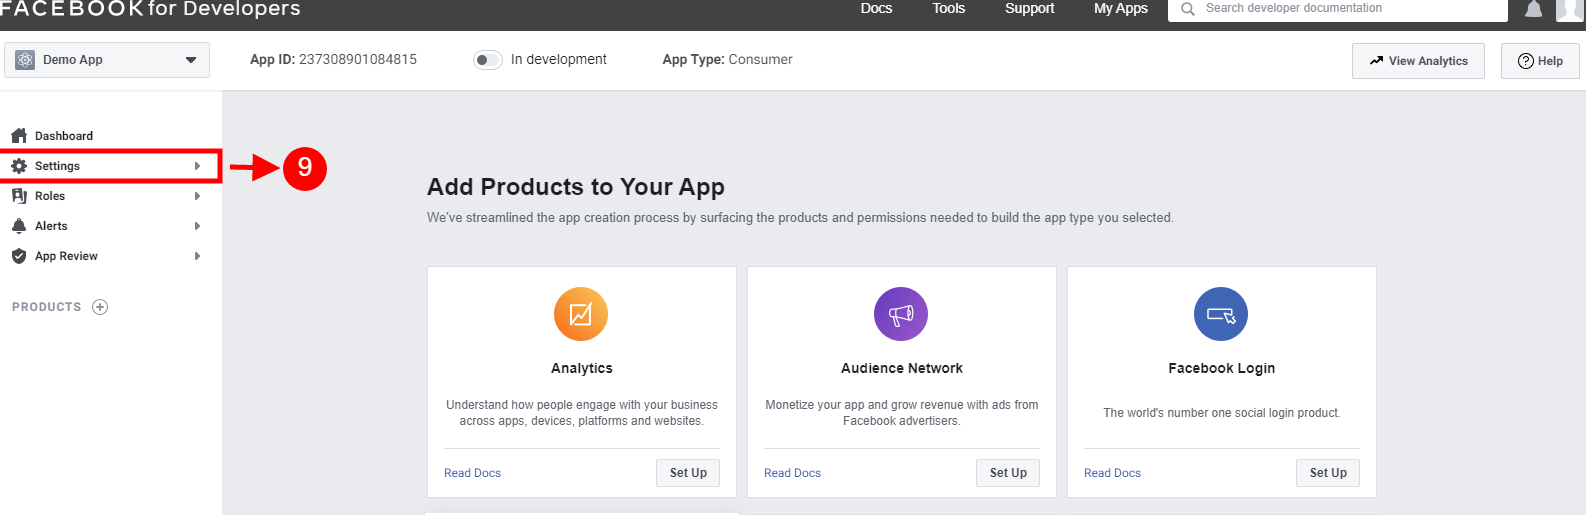
7&8: After clicking on Create App ID you will have to go through a security check as shown:
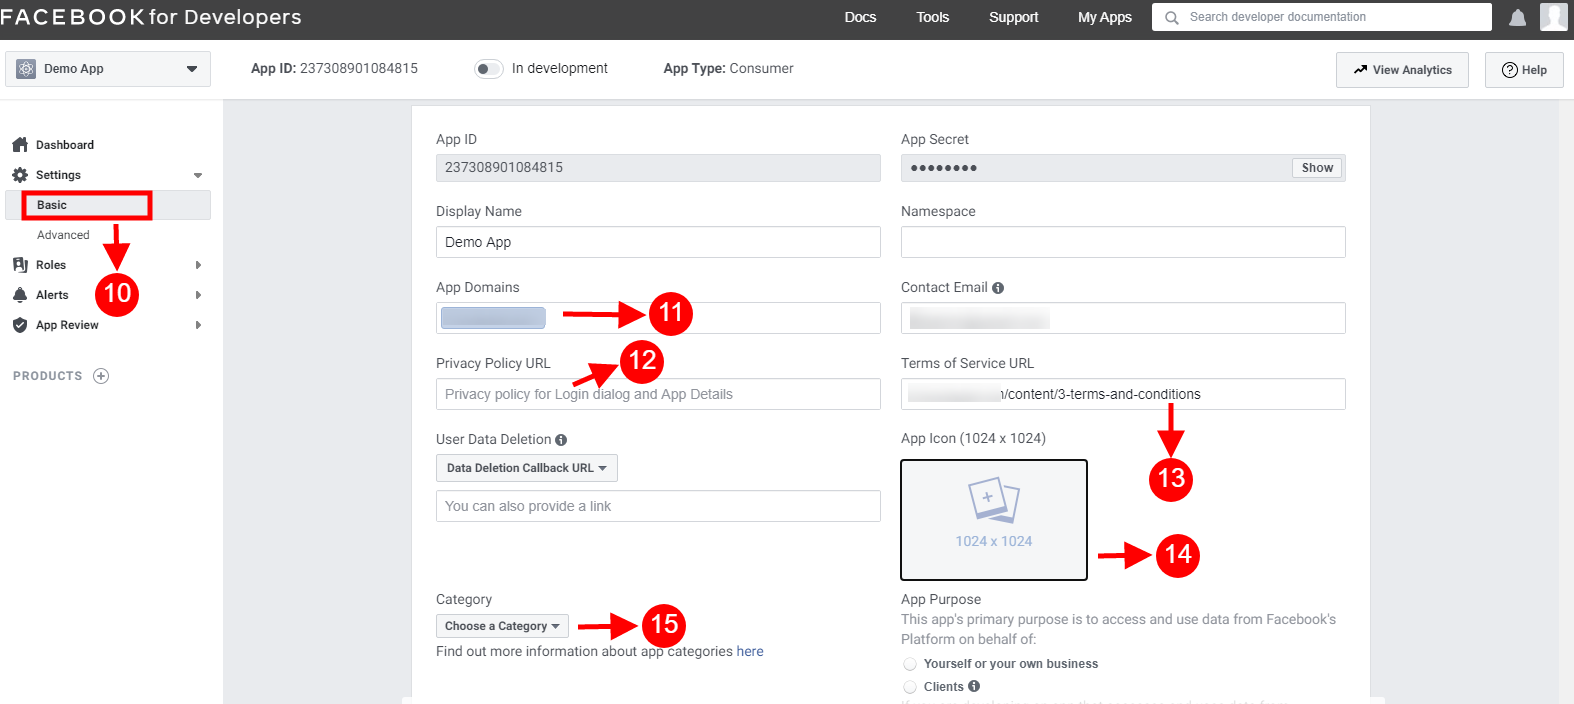
10-15: Two options will be available in the dropdown, Basic and Advanced, click on “Basic”. And then enter your “App Domain”, ”Privacy URL”, ”Terms of Service URL”, ”Add Icon”, ”Select Category” and click on the “Save Changes” button.
App Domains:
yourdomain.com is correct
yourdomain.com/store is incorrect
www.domain.com is incorrect
16: Now click on “+Add Platform”.
17: And select Website as Platform.
18&19: Now Enter your site URL.
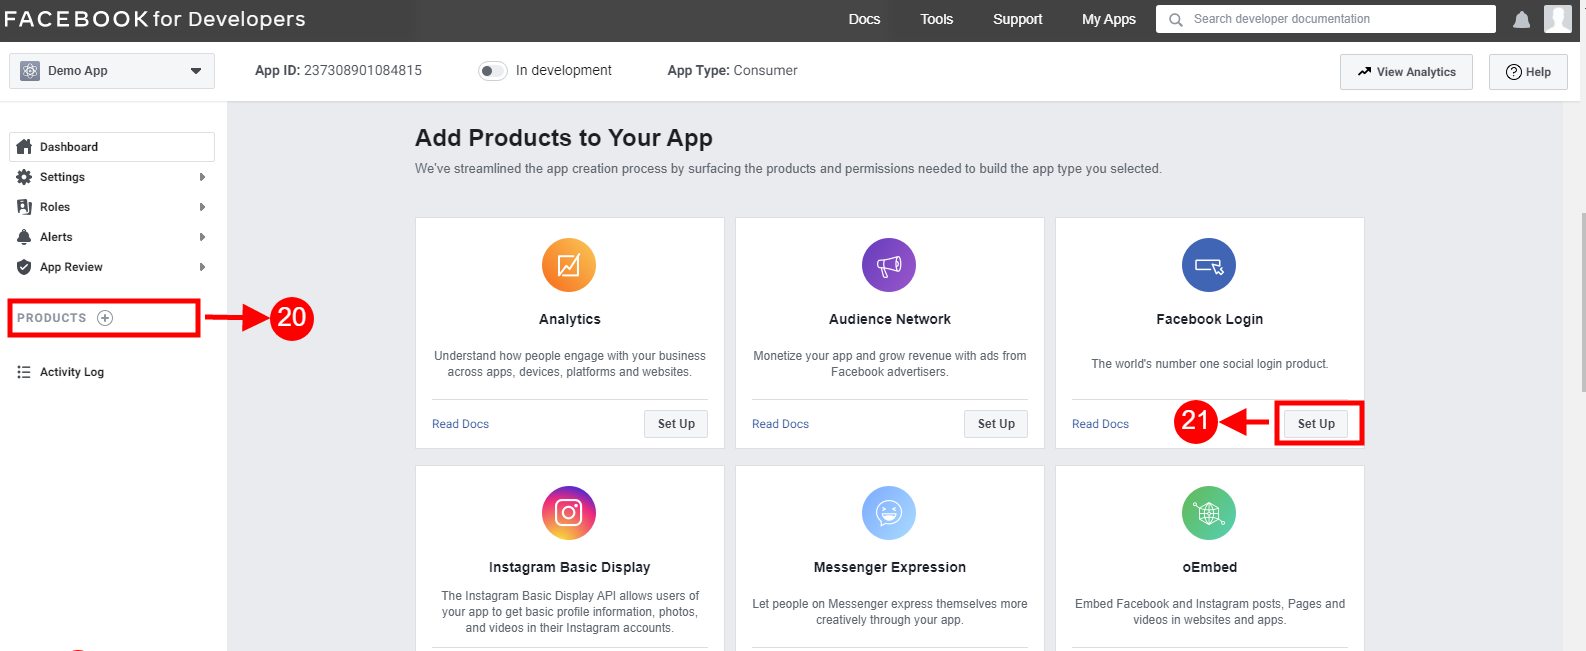
20&21: Click on “Products+” and click on the Setup button from the Facebook login tab.
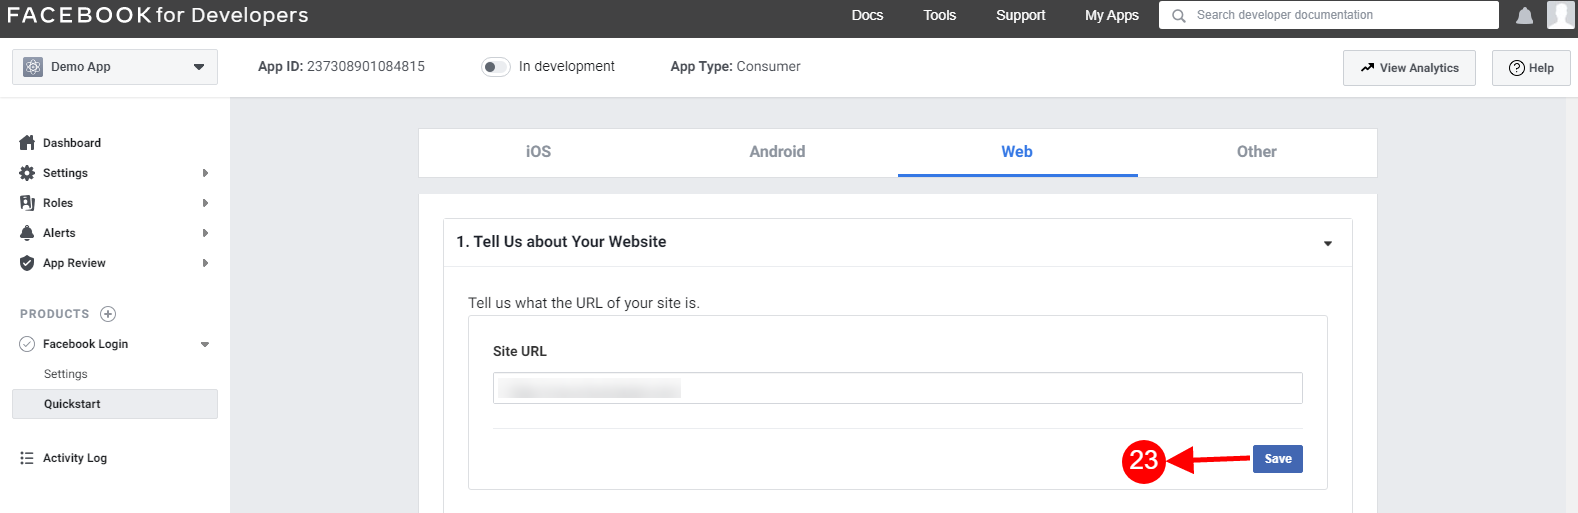
22: Select the web as the platform for the app.
23: Add Site URL and click on save.
24-26: Click on Settings and add a Valid OAuth Redirect URIs.
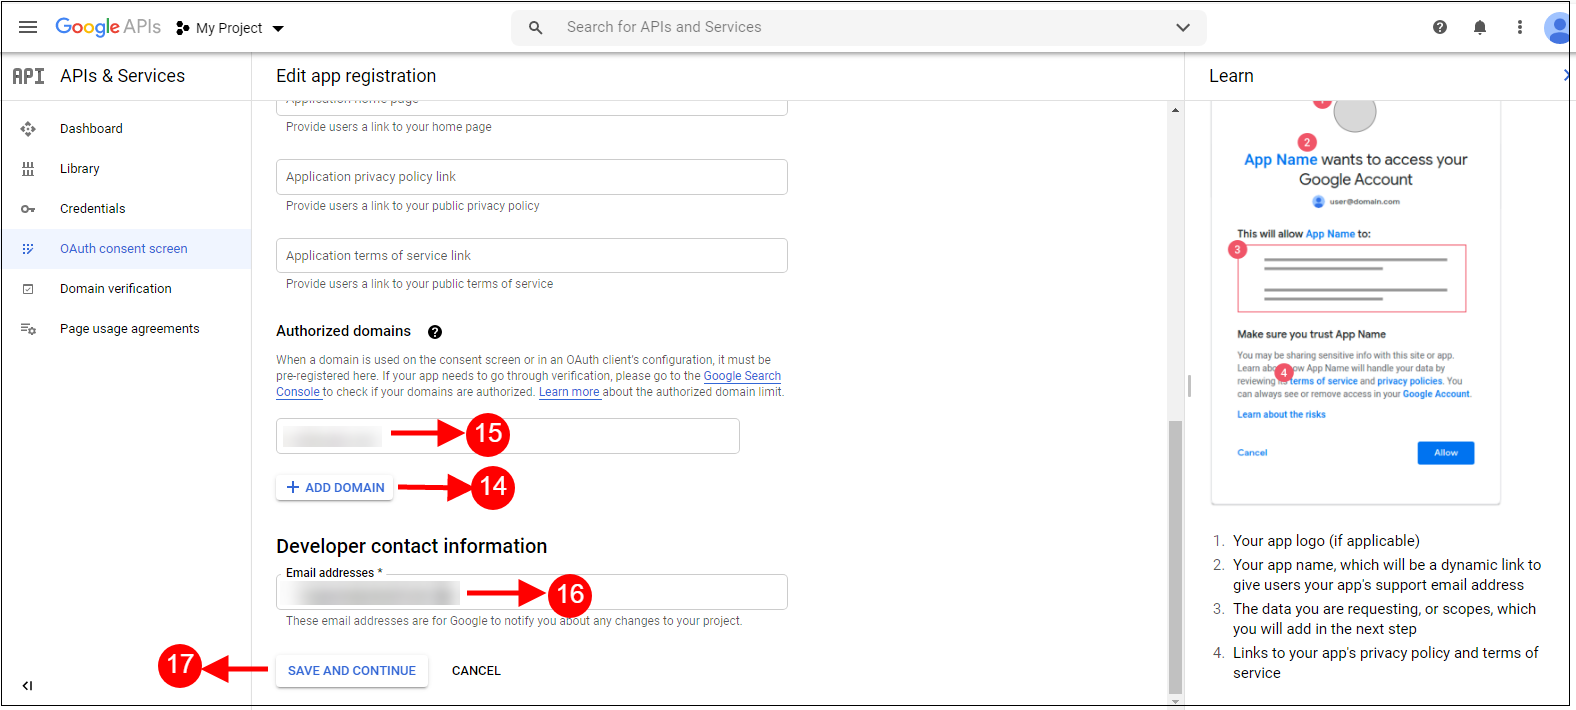
9. Click on Add Domain and add Authorised Domain and then click on Save and Continue.
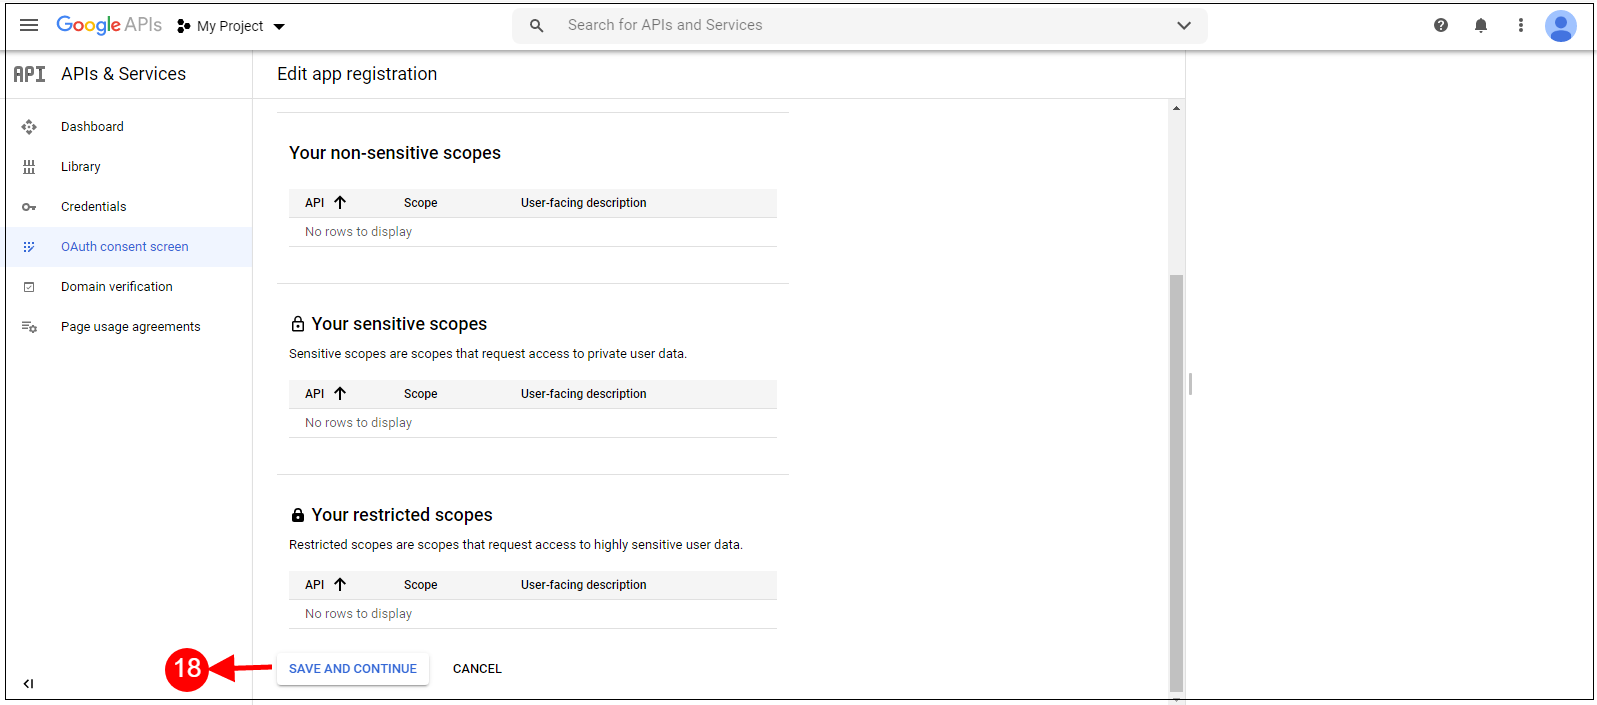
10. Click on Save and Continue button.
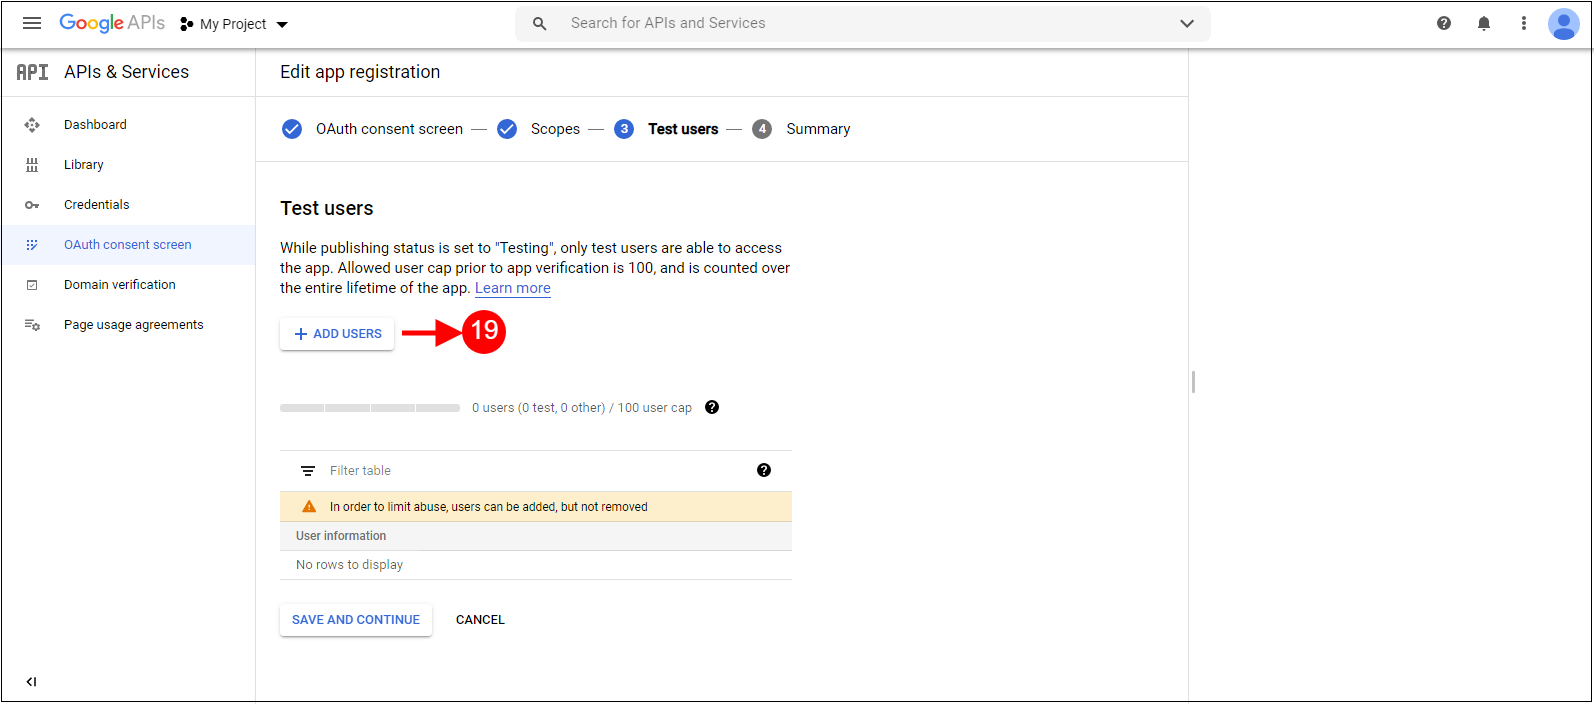
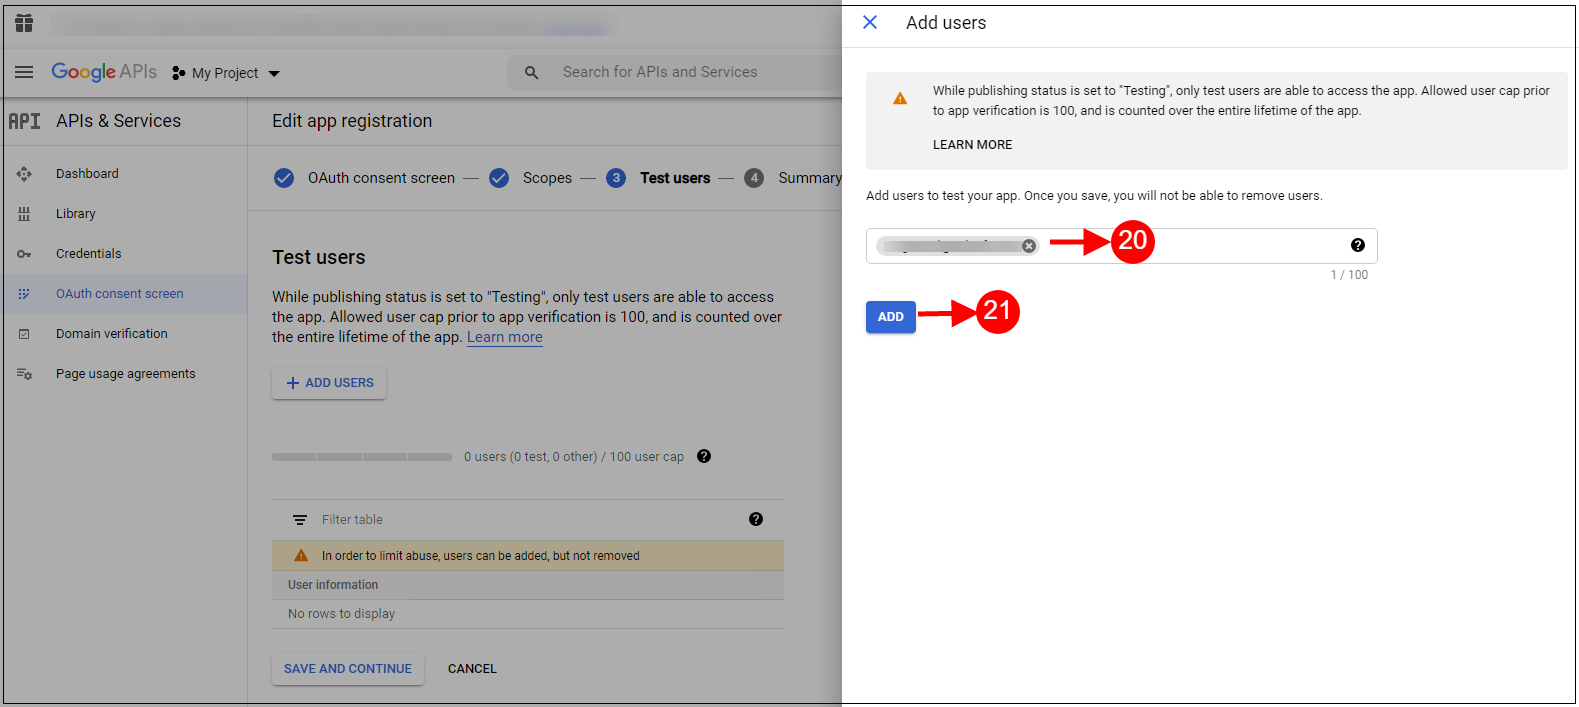
Click on +Add Users.
11. Add a user name and click on Add button.
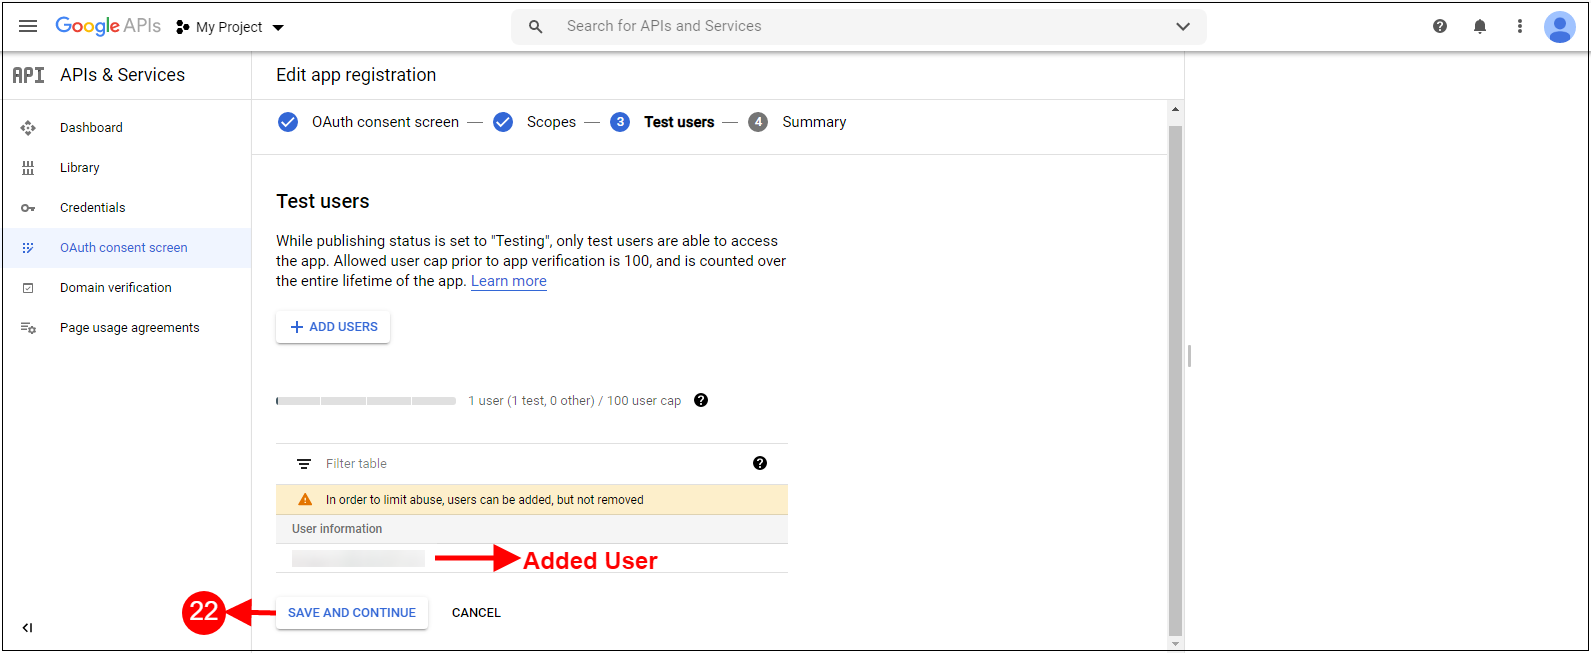
12. The Added user will be visible and then click on Save and continue button.
13. Click on the Oath content screen and then click on Publish Add button.
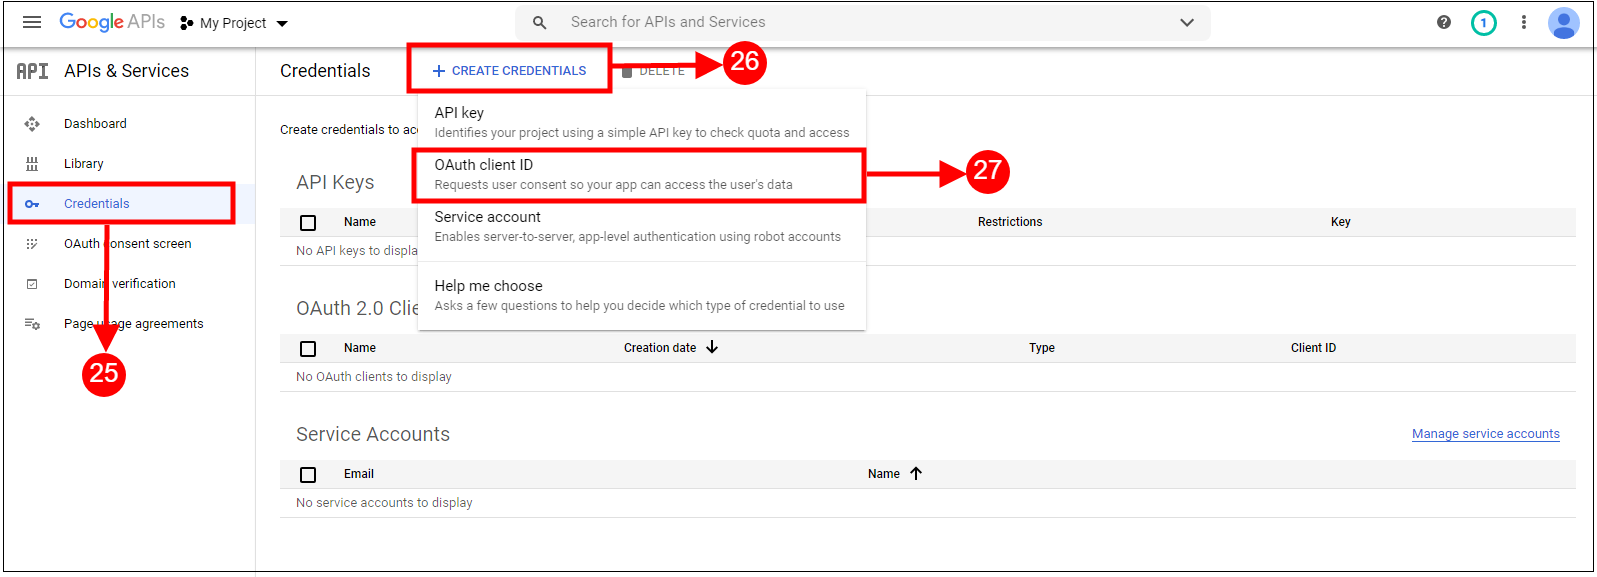
14. Click on Credentials and then +Create Credentials button and then select Oath Client ID.
15. Add Application type and Name and then click on Add button.
16. Add the URLs and then click on Create button.
17. Copy and paste Client ID and Client Secret in the Text Field shown below in the Prestashop one page checkout module’s
How to Generate the Google API key:
1) Go to API Manager, click on the left menu, click on API & Services, and then click on Credentials.
2) Click on Create Credentials & then select the API key.
3)Copy the API key and enter the same into the Google App Id field of the admin end module’s login page.
3.3 Payment Address
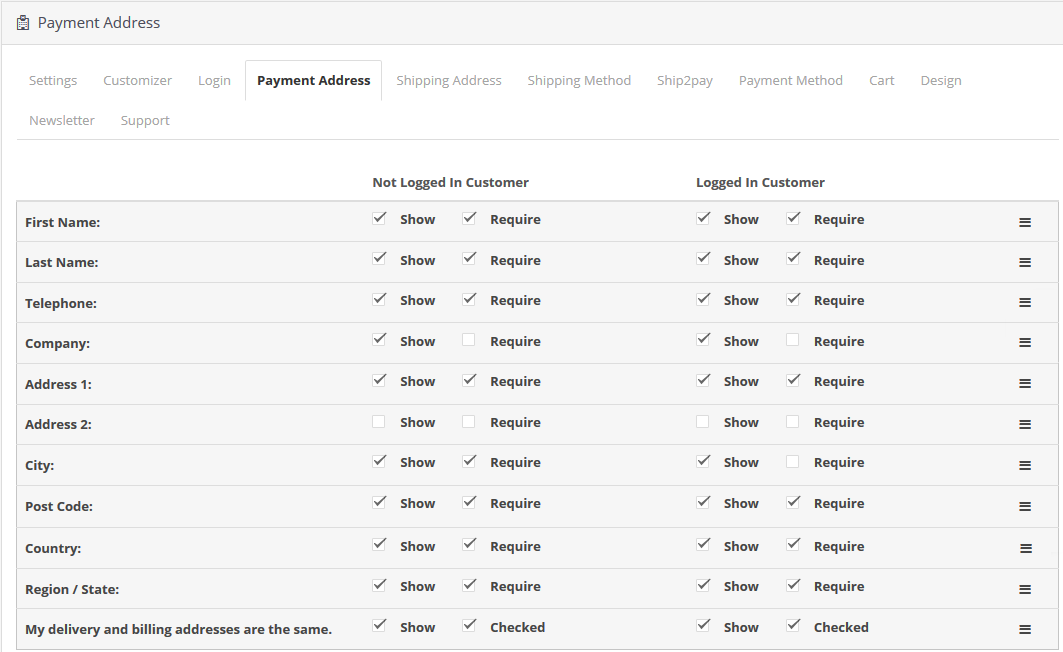
This tab contains settings for the fields which are to be shown in the Payment or Billing Address section on the checkout page as shown below.
It consists of two sections. The one on the left is for Guest Customers and the right one for logged-in customers.
To make a field display/hide in the checkout page check the checkbox just to the left of the Show label.
To make a field mandatory (required field) check the checkbox just to the left of Require Label.
The fields can also be rearranged according to the requirement. To rearrange just move the cursor to the drag icon and drag & drop the field wherever it is required as shown below.
On saving, the fields will be rearranged as per the changes.
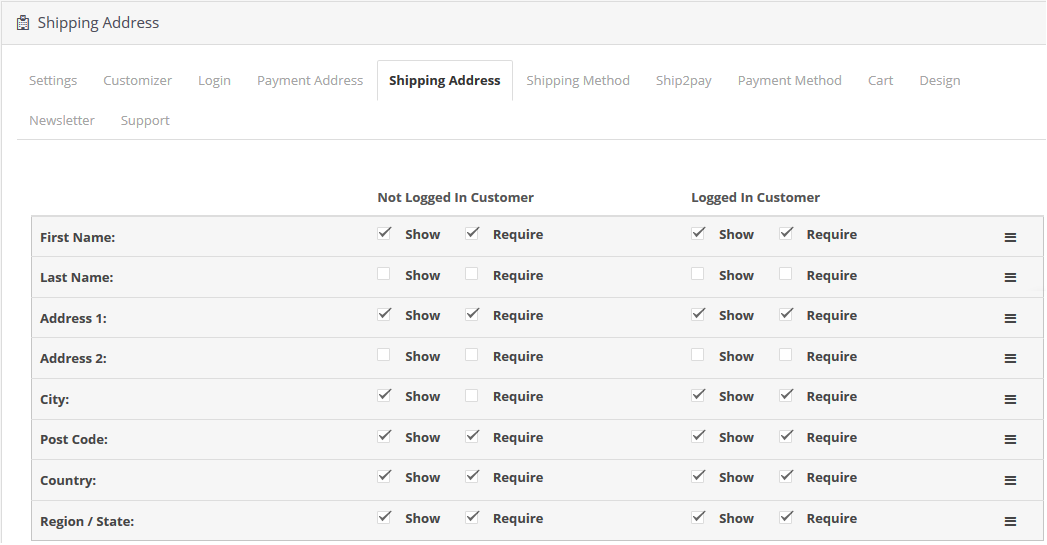
3.4 Shipping Address
This tab contains settings for the fields which are to be shown in the Shipping Address section on the checkout page as shown below.
It consists of two sections. The one on the left is for Guest Customers and the right one for registered customers.
To make a field display/hide in the checkout page check the checkbox just to the left of the Show label.
To make a field mandatory (required field) check the checkbox just to the left of Require Label.
The fields can also be rearranged according to the requirement. To rearrange just move the cursor to the drag icon and drag & drop the field wherever it is required as shown below.
On saving, the fields will be rearranged as per the changes.
3.5 Shipping Method
This tab contains settings for the shipping method which is shown on the checkout page. It contains settings for enabling/disabling and setting the default shipping method as shown below:
Display Shipping Methods: By this option, you can show/hide the shipping methods on the checkout page. For this, you have to switch the button from ON to OFF or vice-versa.
Display Style: This option allows you to select the display style for the shipping methods you have added to your website. You can choose any style out of three options as Text Only, Image Only, or Text with Images.
Display Shipping Method Title: With this option, you can enable or disable the title for the shipping methods displayed on the checkout page.
Select a Default Shipping Method: This option helps you to select any method as the default shipping method for your store.
Title: With this option, you can set titles corresponding to each of the shipping methods added and configured for your store. You can set the title in English or French language.
Logo: This option allows you to set the desired logo corresponding to each of the shipping methods configured for your store.
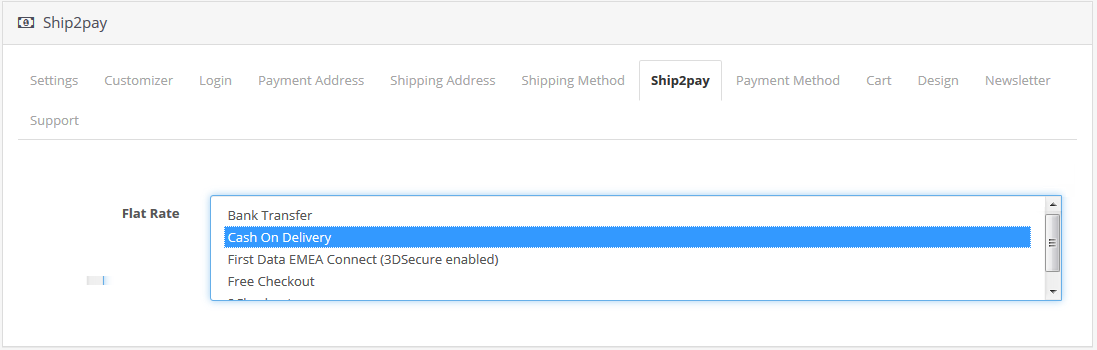
3.6 Ship2Pay
The ship2pay feature offered by the OpenCart Supercheckout module automatically disables the payment methods based on the shipping method selected by the customer. That is, the admin can map some particular payment options with some particular Shipping options on the store.
3.7 Payment Method
This tab contains settings for payment methods shown on the checkout page like enabling/disabling or selecting a default method.
Display Payment Methods: By this option, you can show/hide the payment methods on the checkout page. For this, you have to switch the button from ON to OFF or vice-versa.
Display Style: This option allows you to select the display style for the payment methods you have added to your website. You can choose any style out of three options as Text Only, Image Only, or Text with Images.
Select a Default Payment Method: This option helps you to select any method as the default payment method for your store.
Title: With this option, you can set titles corresponding to each of the payment methods added and configured for your store. You can set the title in English or French language.
Logo: This option allows you to set the desired logo corresponding to each of the payment methods configured for your store.
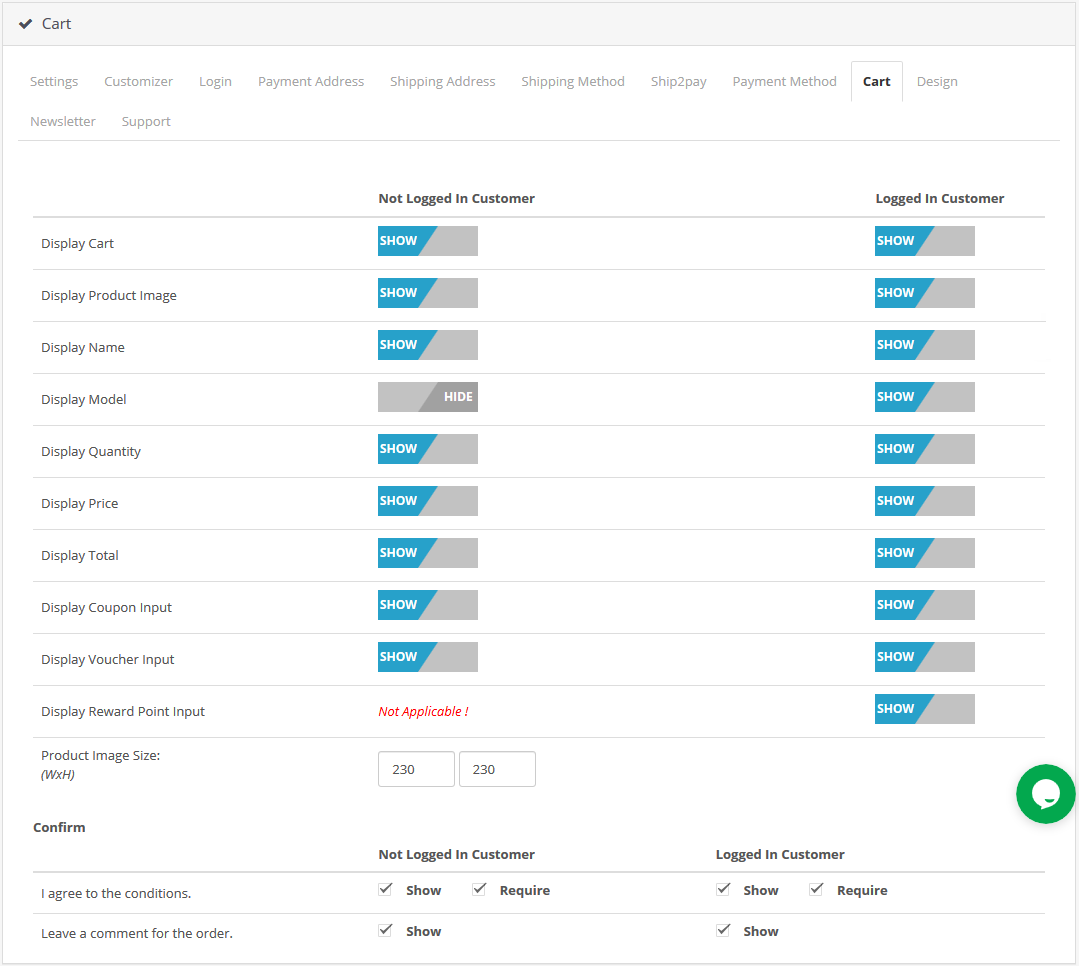
3.8 Cart
Under this section, you will find the cart fields divided into two sections, the left one is for Guest Customers, and the Right one is for Registered or Logged in customers.
To Display/Hide the cart from the checkout page check uncheck the checkbox present in front of the Display Cart label.
In order to enable/ disable any column in the cart check/uncheck the checkbox in front of that respective column.
To enable/disable the popup images for the product check/uncheck the checkbox in front of that respective column.
To change the size of image popup, enter the width and height of the popup in textbox in front of Product Image Size label.
Coupon , Reward Points and Voucher options can also be disabled or enable by checking/unchecking the checkbox in front of that respective field. Kindly note that rewards point text box will only be visible on Supercheckout page once following three conditions are fulfilled.
a.) Customer must be logged in.
b.) He must have atleast 1 reward point in his account.
c.) He must have a product in the cart which can be purchased with reward points.
Confirm:
This tab is again divided into two sections, the left one is for Guest Customers and Right one for Registered or Logged in customers.
To enable the comment box for the order by customer check the checkbox in front of that Leave a comment for the order label & to disable uncheck the same checkbox.
To enable agree to the term or any other information saved in the admin for the store check/uncheck the checkbox in front of I agree to the conditions label.
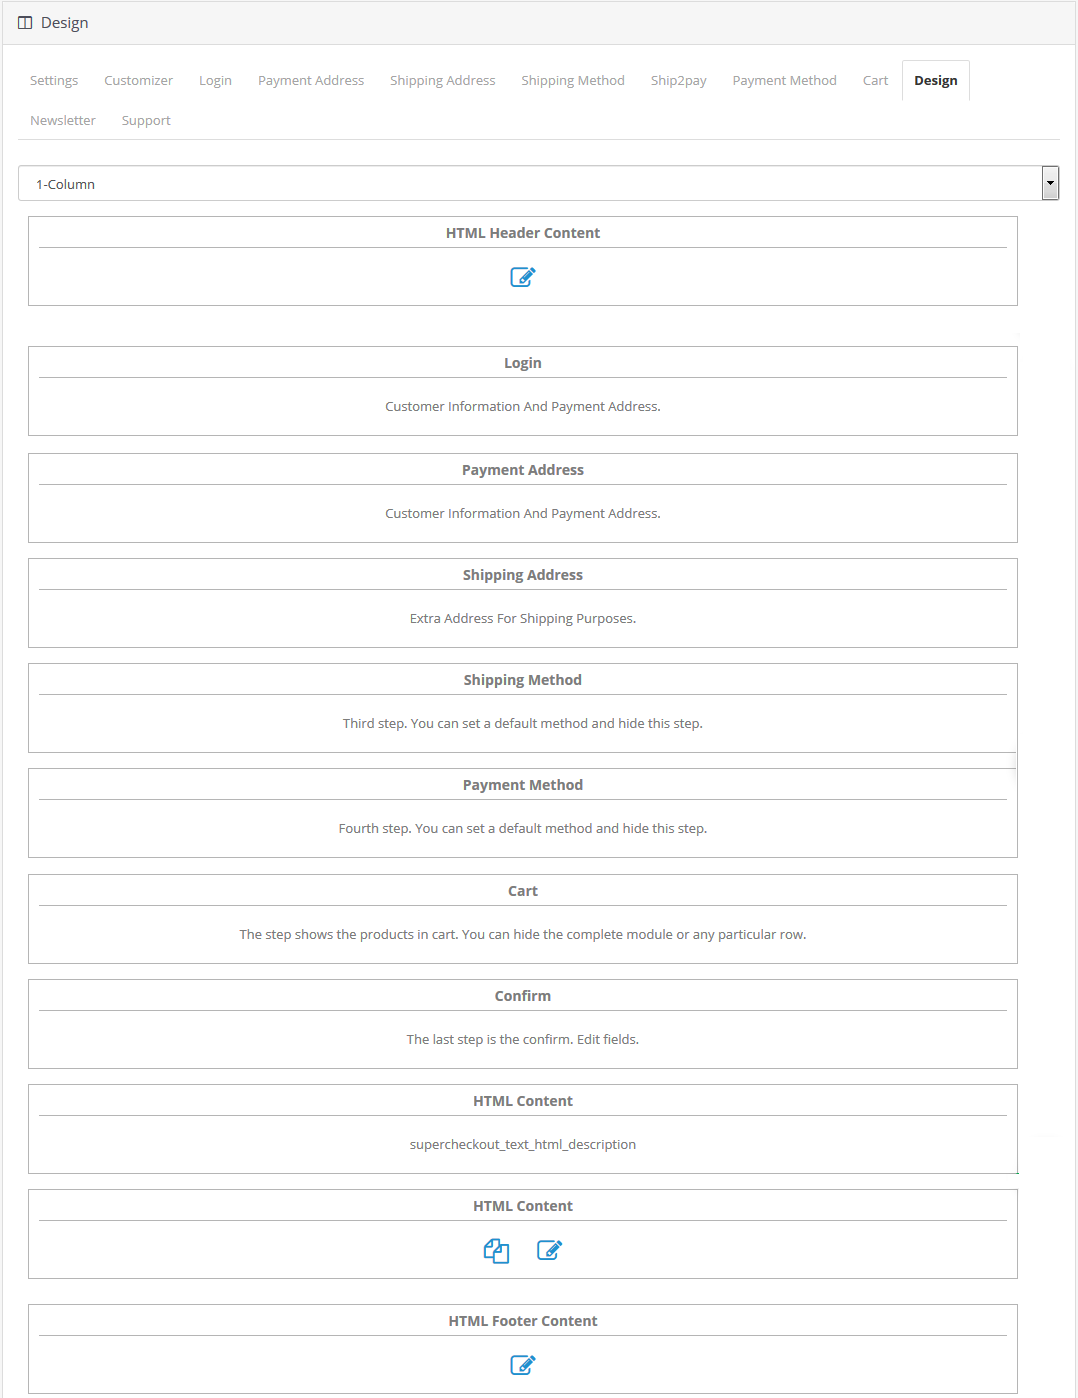
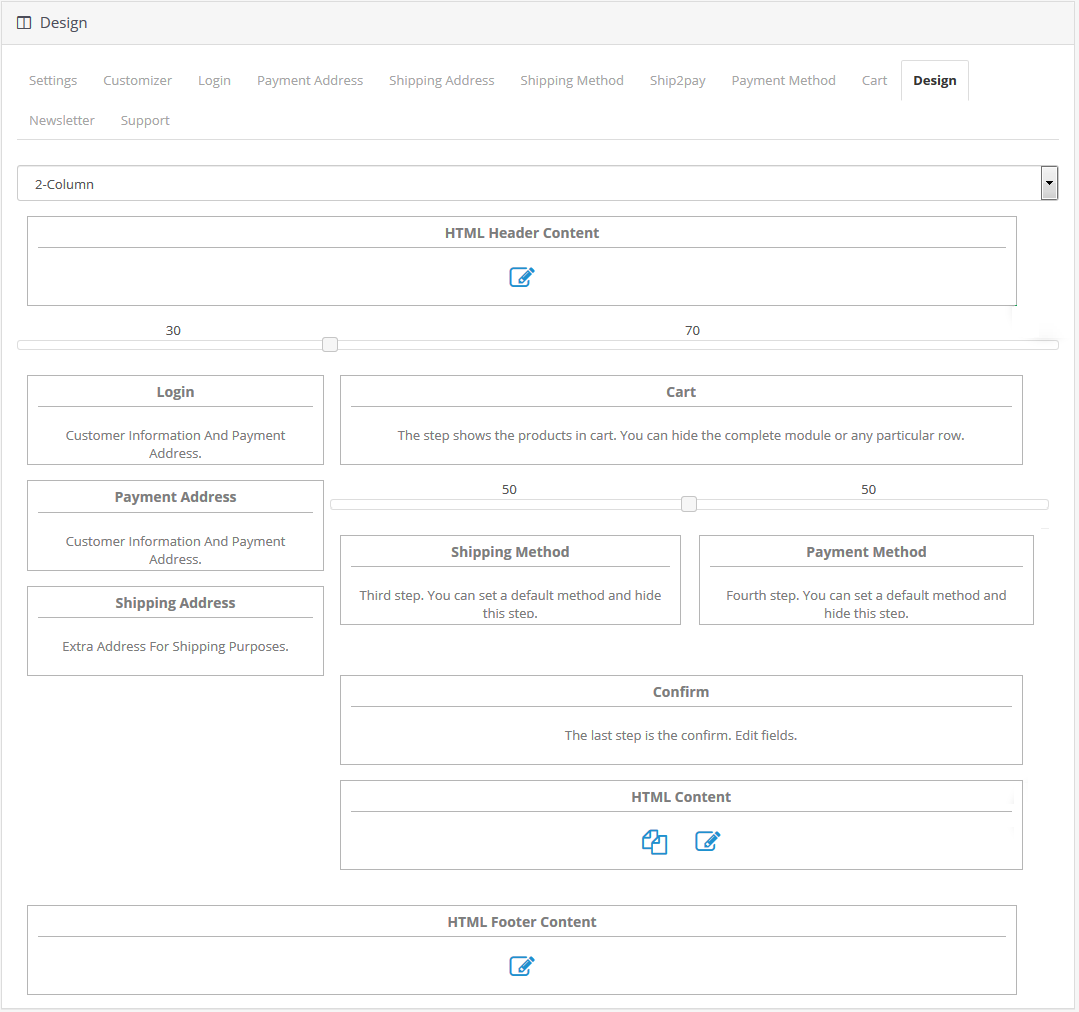
3.9 Design Tab
This tab contains the settings for the design of OpenCart One Page Checkout Pro as shown below:
1-Column
2-Column
3-Column
You can easily change the width of any column adjust the slider present at the top as shown below.
Also, you can reposition different blocks of checkout page using simple drag and drop action. On saving, the block will be rearranged in the checkout page as per the changes.
3.10 Newsletter
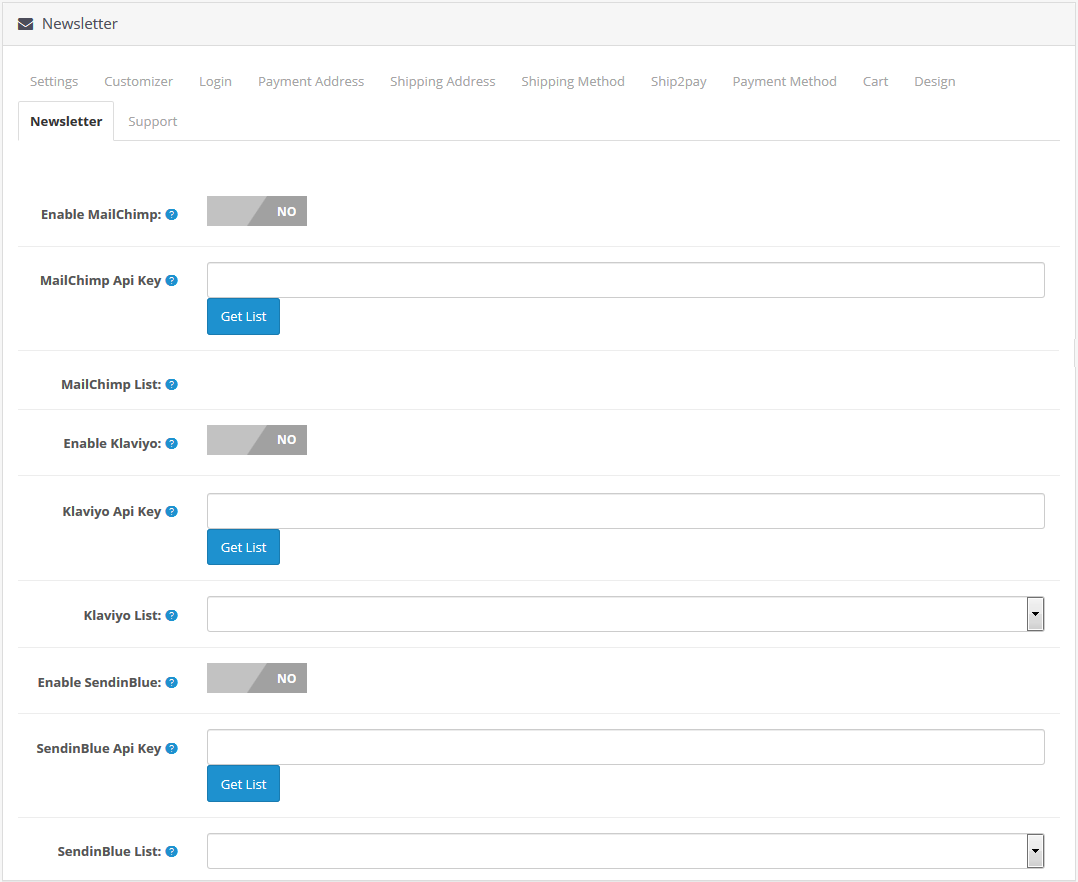
By clicking on the Newsletter tab of the OpenCart responsive one-step checkout module, you can configure the MailChimp, SendinBlue, and Klaviyo Integrator settings as shown below:
Enable MailChimp: You can enable or disable the MailChimp Integrator functionality for your store. You can enable this option if you want to boost newsletter subscriptions for your store.
MailChimp API Key: This option helps you to set the Mailchimp API key for capturing customer’s emails.
MailChimp List: Once the key is configured with this OpenCart fast checkout extension, you can fetch and select the MailChimp List.
The same can be done for SendinBlue and Klaviyo.
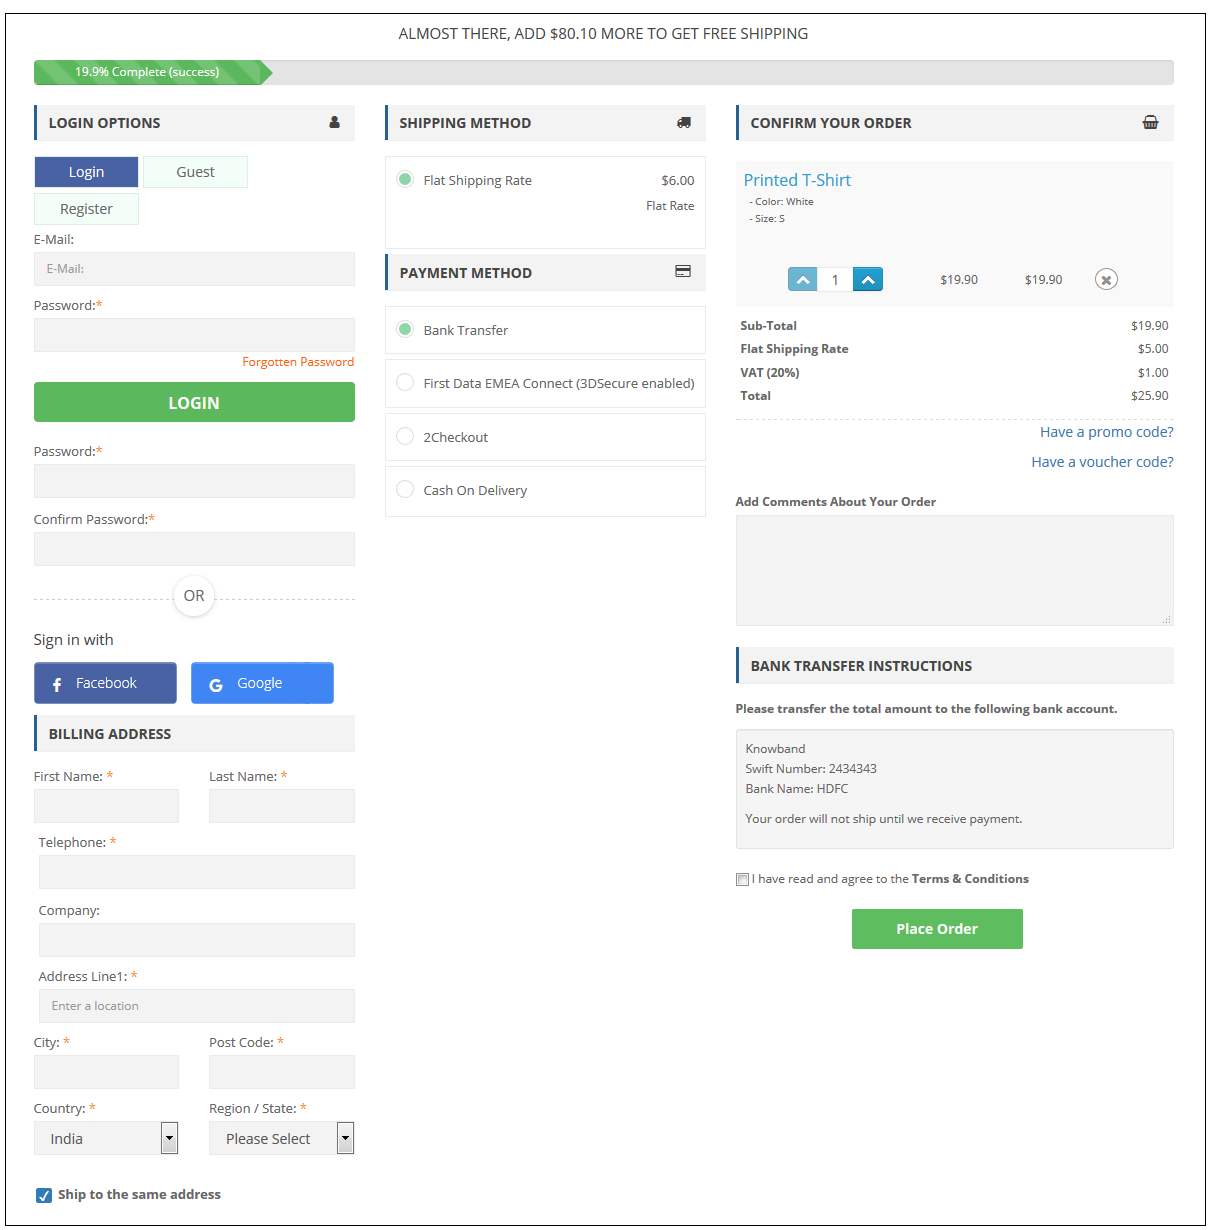
4.0 Front Interface of OpenCart One Step Checkout Extension
When the user clicks on “Add to Cart” button corresponding to a product and performs its checkout, they will see the following supercheckout on their screen.
5.0 Tutorial of Opencart One Page Checkout Pro by Knowband
To make the installation, setup, and configuration process completely hassle-free, we have created a detailed and easy-to-understand tutorial for OpenCart One Page Checkout Pro by Knowband. This step-by-step guide walks you through everything, from downloading and installing the module to configuring all its powerful features for a faster, smoother, and more user-friendly checkout experience.
Whether you are new to OpenCart or an experienced user, the tutorial ensures you can effortlessly customise fields, manage social login options, enable guest checkout, configure payment and shipping methods, and optimise the overall design without any confusion.
Watch the full tutorial here to ensure a seamless installation and smooth operation of the One Page Checkout Pro Extension.