Expanding market reach is one of the biggest challenges for eCommerce businesses. Nowadays, customers have access to all the major marketplaces as well as offline markets which makes it harder to find new customers.
For the same reason, staying ahead of the curve by implementing new strategies is crucial for success. Therefore, for WooCommerce store owners, reaching a wider audience through multiple marketplaces is a strategy that can significantly boost sales and brand visibility. Moreover, with the launch of Knowband’s revamped WooCommerce Google Shopping Connector and WooCommerce eBay Marketplace Connector plugins, integrating your store with these powerful platforms has never been easier.
In this article, we’ll explore the importance of selling on marketplaces and delve into the latest features of these two essential tools.
The Importance of Selling on Marketplaces
Selling on online marketplaces like Google Shopping and eBay offers numerous benefits for eCommerce businesses:
Increased Visibility: Marketplaces have a massive user base that provides an instant boost to your product’s visibility and unlocks a wider customer audience for you.
Trust and Credibility: Consumers often trust well-known marketplaces, which can enhance the credibility of your products.
Diverse Customer Base: Marketplaces have their own promotional strategies to drive more traffic. Thus, reaching out to diverse demographics becomes easier, as marketplaces attract customers from various backgrounds.
Improved SEO: Products listed on multiple platforms improve search engine rankings, driving more organic traffic to your store.
Streamlined Operations: Integrating your store with marketplaces can automate many processes, saving time and reducing errors.
Introducing the Revamped WooCommerce Google Shopping Connector
What is WooCommerce Google Shopping Connector?
The WooCommerce Google Shopping Connector is a powerful tool designed to seamlessly integrate your WooCommerce store with Google Shopping. Furthermore, this integration allows you to create and manage product listings, synchronize inventory, and optimize your product feed for better performance on Google Shopping.
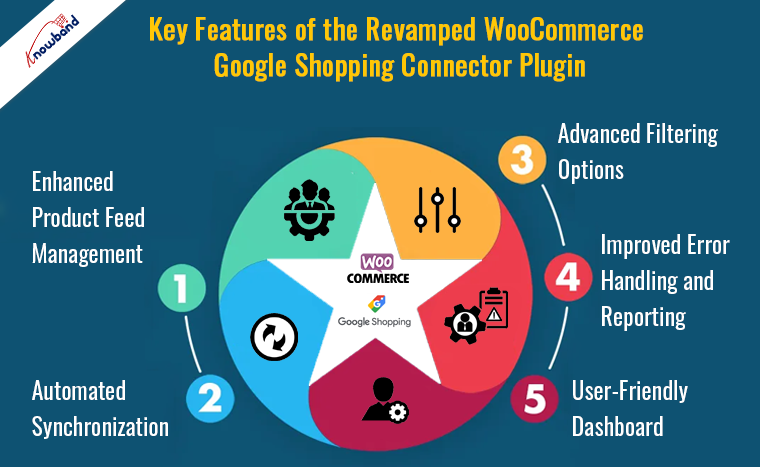
Key Features of the Revamped WooCommerce Google Shopping Connector Plugin:
Enhanced Product Feed Management: The revamped version offers a more intuitive interface for managing your product feed. You can easily map product attributes, set custom labels, and ensure that your listings meet Google’s specifications.
Automated Synchronization: The WooCommerce Google Shopping Synchronizer ensures that your product data is always up-to-date. Moreover, the automated crons ensure that the changes made in your WooCommerce store are automatically reflected in your Google Shopping feed, eliminating the need for manual updates.
Advanced Filtering Options: With advanced filtering options, you can choose which products to include in your Google Shopping feed. This helps in optimizing your listings by focusing on the products that perform best.
Improved Error Handling and Reporting: The new version comes with enhanced error handling and detailed reporting features. You can easily identify and fix issues that might affect your product listings’ performance on Google Shopping.
User-Friendly Dashboard: The updated dashboard provides a comprehensive view of your product feed status, synchronization logs, and performance metrics, making it easier to manage your integration.
Knowband’s WooCommerce Google Shopping Connector
Boost your WooCommerce store’s visibility with Knowband’s Google Shopping integration, making it easy to list and manage products on Google Shopping.
By leveraging the capabilities of the WooCommerce Google Shopping Integration Plugin, store owners can ensure their products reach the right audience on Google Shopping, driving more traffic and sales.
Discover the New Features of WooCommerce eBay Marketplace Connector
What is WooCommerce eBay Marketplace Connector?
The WooCommerce eBay Marketplace Connector is designed to integrate your WooCommerce store with eBay, one of the largest online marketplaces. This plugin allows you to list products, synchronize inventory, and manage orders directly from your WooCommerce dashboard.
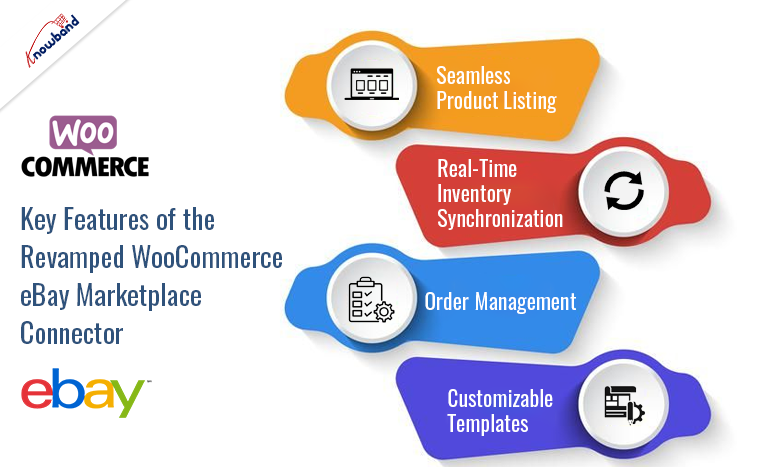
Key Features of the Revamped WooCommerce eBay Marketplace Connector
Seamless Product Listing: The updated eBay WooCommerce Connector by Knowband simplifies the product listing process. Furthermore, you can create and manage eBay listings directly from your WooCommerce store, ensuring consistency across both platforms.
Real-Time Inventory Synchronization: The WooCommerce eBay Integration Module offers real-time inventory synchronization. Stock levels are automatically updated on eBay whenever a sale is made in your WooCommerce store, preventing overselling and stockouts.
Order Management: With the WooCommerce eBay Integration Plugin, managing orders is a breeze. You can handle all eBay orders from your WooCommerce dashboard, streamlining your operations and saving time.
Customizable Templates: The revamped version includes customizable templates for eBay listings. This feature allows you to create professional and attractive product listings that stand out in the crowded marketplace.
Knowband’s WooCommerce eBay Marketplace Connector
The WooCommerce eBay Marketplace Integration Extension by Knowband helps you sync and manage your WooCommerce store with eBay effortlessly.
The integration of your WooCommerce store with major marketplaces like Google Shopping and eBay is a strategic move to expand your business and reach a wider audience. Therefore, the revamped WooCommerce Google Shopping Connector and WooCommerce eBay Marketplace Connector plugins offer enhanced features that make this process easier and more efficient than ever.
By utilizing the WooCommerce Google Shopping Integration Module and the WooCommerce eBay Integration Addon, you can automate and streamline your operations, focus on growing your business, and enjoy the benefits of increased visibility and sales. Explore these powerful tools today and take your WooCommerce store to new heights. You can watch our latest videos here:
In the fast-paced world of eCommerce, expanding your reach and increasing sales is essential. As an Opencart store owner, you may often feel the need to reach more customers and boost your sales. At Knowband, we understand these challenges and aim to simplify your efforts with our new range of free marketplace connectors for Opencart. These powerful extensions seamlessly integrate your Opencart store with leading marketplaces like Google, eBay, and Etsy, helping you sell more with less effort.
Update for Etsy Sellers – January 3, 2026
The latest version of Knowband’s Etsy Connector for PrestaShop and OpenCart now supports OpenAPI authorization, ensuring seamless and secure integration with Etsy’s latest API requirements.
It is important for users to upgrade the extension by January 18, 2026, as older versions may lose connectivity, which can interrupt product and inventory synchronization.
Additionally, this update enables sellers to manage and sync Etsy return policies directly from their website dashboard, simplifying store operations and policy management.
Choosing Knowband’s free marketplace connectors for Opencart brings many benefits. The Opencart marketplace connectors are designed to be user-friendly and to ensure that even those with limited technical expertise can easily set up and manage their integrations. Furthermore, by automating key processes such as inventory synchronization and order management, these connectors reduce merchants’ workload and allow them to focus on other important aspects.
Furthermore, integrating your Opencart store with major marketplaces like Google, eBay, and Etsy offers significant opportunities for growth.
Transitioning from Free to Paid Versions:
The paid versions of these connectors come with advanced functionalities such as more detailed analytics, enhanced customization options, and priority support. Transitioning from the free to the paid versions is seamless, ensuring that your existing integrations and data remain intact. This upgrade path provides a flexible solution for merchants as their needs evolve and their business grows.
Knowband’s Free Marketplace Connectors:
Opencart Free Google Marketplace Integration Extension:
Google Shopping or Google Merchant Console is an important platform for online retailers because it showcases your products directly in Google search results. Moreover, with the Opencart Free Google Marketplace Integration Extension, you can easily connect your Opencart store to Google Shopping. This integration ensures that your product listings are always up-to-date.
When your products appear in Google search results, they become more visible to potential customers. This increased visibility can drive significant traffic to your store and can enhance your chances of making sales. The seamless integration allows for automatic synchronization of product details, prices, and stock levels. This automation not only saves time but also ensures that your customers always see accurate product information.
Opencart Free Google Marketplace Integration Extension
Explore Knowband’s Opencart Free Google Marketplace Integration Extension, simplifying product listing ads on Google to enhance your e-commerce visibility.
Free eBay Marketplace Connector Plugin for Opencart:
eBay is a trusted and well-known name in online retail, with millions of active buyers around the world. On the other hand, Knowband’s Free eBay Marketplace Connector plugin for Opencart allows you to tap into this vast market by integrating your Opencart store with eBay. This plugin simplifies the process of listing and managing your products on eBay, making it easier to reach a broader audience and increase sales.
Newest Updates:The latest release of Knowband’s eBay Connector for PrestaShop and OpenCart introduces improvements to handle eBay API rate limits more efficiently, ensuring smoother data synchronisation even during ebay API usage.
Additionally, the extension now supports inventory comparison, helping sellers keep their product stock accurate across eBay and their online store.
With the eBay Marketplace Connector, you can synchronize your inventory and orders between your Opencart store and eBay. This ensures that any changes in your product listings, such as price updates or stock availability, are automatically reflected on eBay. Thus, by managing everything from one central location, you can maintain better control over your operations and ensure a consistent shopping experience for your customers.
Etsy Opencart Synchronization Extension for Opencart
Easily integrate your OpenCart store with eBay for free with Knowband’s OpenCart eBay Integration module.
Etsy is known for its vibrant community of buyers who seek unique and handcrafted products. Therefore, for merchants selling such items, Etsy is an ideal platform to expand their reach. The Opencart Free Etsy marketplace integrator allows you to connect your Opencart store to Etsy, enabling you to list your products effortlessly on this popular marketplace.
This Etsy OpenCart Marketplace Integration module is especially beneficial for merchants who specialize in crafts, vintage items, and artisanal goods. Moreover, by showcasing your products on Etsy, you can attract a niche audience that appreciates and seeks out these types of items. The extension ensures that your product listings on Etsy are synchronized with your Opencart store, making inventory management straightforward and efficient.
Opencart Free Etsy Marketplace Integrator
Explore free OpenCart Etsy Integration by Knowband for seamless store integration and enhanced selling on Etsy marketplace.
In conclusion, Knowband’s free marketplace connectors for Opencart are excellent tools to help you expand your sales and reach more customers with minimal effort. By integrating your Opencart store with Google Shopping, eBay, and Etsy, you can easily manage your products across multiple platforms. These connectors are designed to be user-friendly and save you time, allowing you to focus on growing your business. Start using these free tools today and see the positive impact on your eCommerce operations. As your business grows, consider upgrading to our paid versions for even more features and benefits. At Knowband, we are dedicated to supporting your success in the competitive world of online retail.
eBay is undoubtedly one of the best marketplaces in the eCommerce industry. With over 187 million active consumers, eBay is offering amazing services to both consumers as well as sellers.
Aside from products and sellers, eBay is a well-known multi-vendor marketplace for algorithm updates. Moreover, the major marketplace has its in-built SEO algorithms to manage the rankings of sellers.
On top of that, selling on the eBay marketplace is an absolutely easy task. You do not require to have any specific kind of technical knowledge for being an eBay seller. Furthermore, the marketplace offers ease of payment methods to the seller community. The sellers can even add cards, PayPal, and many more payment methods to their eBay shop just by following some simple steps.
Thus, in the following article, we are going to spread light on how new sellers can add payment methods to their eBay shops.
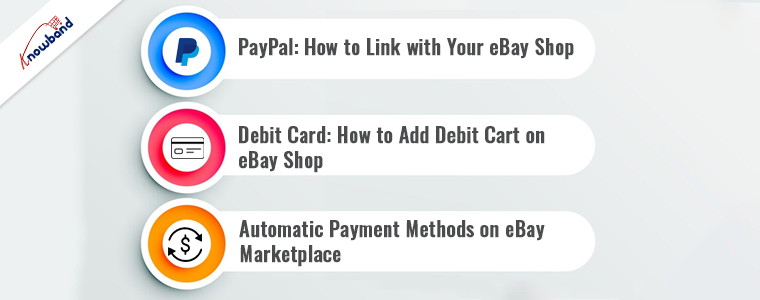
1. PayPal: How to Link with Your eBay Shop!!
PayPal is a widely introduced payment method with millions of transactions per day. Likewise, eBay allows sellers to add PayPal as a payment method on their store-front. One can simply add the PayPal payment method on eBay just by following the below-mentioned steps.
1.1.Log in to Your eBay dashboard.
1.2.Visit the eBay admin panel and then click on the account settings.
1.3.Click on Payments>>PayPal.
1.4.If you already have a PayPal account, you can simply add the details here. Otherwise, you can always create a new one by clicking on the signup button.
1.5. By following the above steps, you will be redirected to PayPal.
1.6.Come back to the eBay admin panel>>Payments>>PayPal.
1.7.Click on become verifies button.
1.8.Authenticate yourself with a PayPal account and all set to go.
2. Debit Card: How to Add Debit Cart on eBay Shop!!
Adding debit cards on eBay shop is a pretty easy task. Follow the below-mentioned steps to add debit card payment options to your eBay shop.
2.1. Click on the top left corner buttons.
2.2.Go to Account settings.
2.3.Choose the option payment options from the appeared tab.
2.4. Choose to add payment methods.
2.5.Pick the debit or credit card option.
2.6.Fill in all the details on the appeared page. After getting done with all the details, click on add. All good to go.
3. Automatic Payment Methods on eBay Marketplace:
Automatic payment methods help sellers to minimize headaches during the eBay invoice cycle. The monthly ebay fee gets deducted automatically when the sellers add automatic payment methods on the eBay Marketplace.
Here are the steps to add automatic payment methods on the eBay marketplace.
3.1.Click on the top left corner of your eBay dashboard.
3.2. Visit the account settings page.
3.3.Click on the personal info tab. And then, hit the business info button.
3.4.Click on the financial information tab. Choose the update your automatic payment methods.
3.5.Choose your suitable payment option among PayPal, credit, debit card, or checkout accounts.
3.6.Fill in all the details and click on the save button.
In the above article, we have discussed how to add payment methods to your eBay shop just by following the simple steps. Although eBay is known for changing its algorithms. Yet, we believe the above information is surely helpful for you.
Do You Know!!
Do you know that if you are selling the products from your personalized eCommerce website and are willing to sell the products on eBay? You can simply manage your eBay shop from your personal shop’s admin panel.
One can simply manage both eBay and a personal eCommerce shop at his fingertips. And can even sell their products on eBay Marketplace at an increased/decreased price with real-time stock management.
Want to know more? Feel free to find us at our official email address support@knoband.com for your beloved queries and suggestions.
eBay Marketplace Integrator for Magento 2 offers the quickest means to the Magento 2 store owners to integrate their store with the very popular eBay marketplace. The eBay integration allows the merchants to manage the inventory and orders from a single interface.
Headquartered in San Jose, California, eBay is a multinational eCommerce corporation that popular as an online auction and shopping site. It facilitates consumer-to-consumer and business-to-consumer sales and offers an easy and customizable interface for sellers across the globe to list and sell their products effortlessly. eBay operates in over 30 nations. The product listing of eBay combines 800+ million product listings that are not just unique but are even coupled with great deals.
eBay Marketplace connector module for Magento 2 offers a smart solution to the e-merchants to integrate their store with the eBay Marketplace. The store admin can list products to the marketplace and sync the orders from the marketplace to their Magento 2 store.
1.1 Merchant benefits of eBay Integrator for Magento 2:
The Magento 2 eCommerce sites can easily expand their reach by integrating their store with the popular marketplace with the help of this eBay integrator for Magento 2.
The eBay API integrator for Magento 2 allows the store admin to sell their products to a larger audience base.
eBay integration for Magento 2 allows the sellers to sync their site with any of the eBay sites.
The eBay connector module for Magento 2 offers multi-currency and multi-lingual support that helps you offer the services according to the target customer.
The eBay integration plugin for Magento 2 is easy-to-understand and the admin can start selling in the marketplace in a few simple steps.
The user-friendly interface of the eBay connector extension for Magento 2 makes it easier for the store admin to manage their merchandise from a single platform.
The merchants can add/remove the product, manage the details and inventory from the admin panel of the eBay integration plugin for Magento 2.
The admin can manage the shipping methods for the eBay store from the admin panel of the eBay Marketplace connector extension for Magento 2.
Profile-based product listing of the eBay API integration module for Magento 2 makes it easier for the merchants to list the products in bulk.
Even the order processing becomes easier with the robust eBay API integrator for Magento 2.
The seller can check the reason for the error product rejection and rectify accordingly from the back-end of the eBay integrator for Magento 2.
The eBay API integration plugin for Magento 2 comes with free support for 3 months.
The eBay connector extension for Magento 2 is easy-to-use. Further, the admin can configure it with the least effort.
2.0 Installation
Follow the following steps for installing the eBay Magento Marketplace integration extension:
1. Download the Magento 2 eBay connector extension package.
2. Unzip the package in your root folder of Magento setup via FTP manager (like Filezilla or WinSCP – download here: https://filezilla-project.org/).
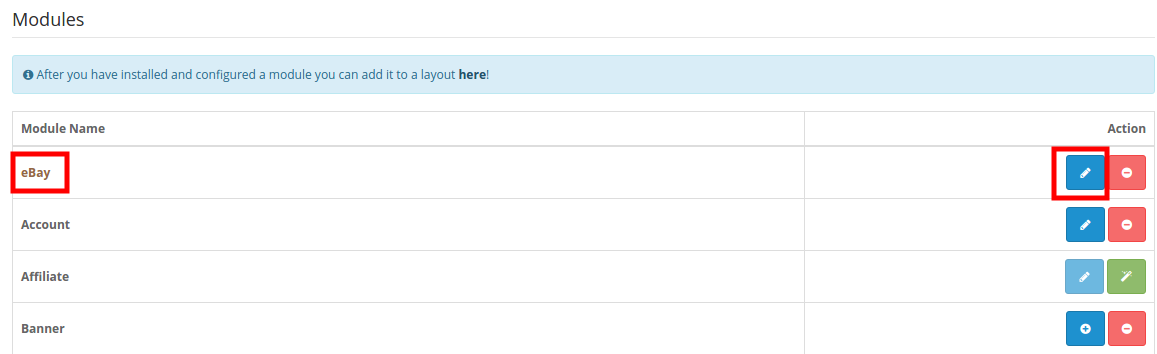
3. In the admin panel, go to eBay Marketplace in the main menu.
4. The Magento 2 eBay Marketplace connector module is now ready for use.
This User Manual will guide the users through the Magento 2 eBay integration extension configuration and settings.
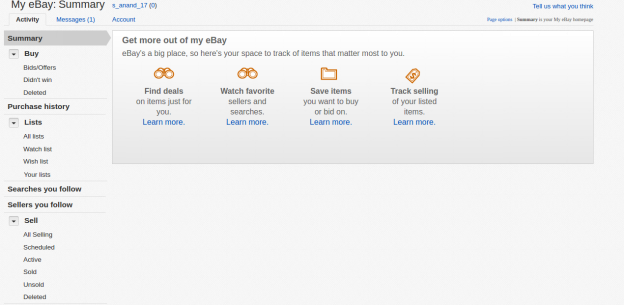
To start selling on eBay Marketplace you need to have a seller account on eBay. In this section, we are listing all the steps to create a seller account on eBay. Please find them below –
After filling-in valid data click on join and you will head to the application creation page.
Enter the application name and click on ‘Create a keyset’ under the Production section, a new form will be opened.
Enter the details and click on Continue to create Keys.
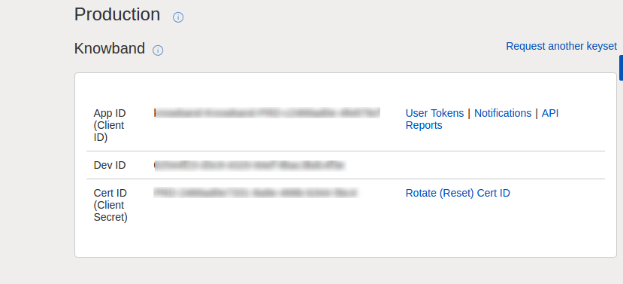
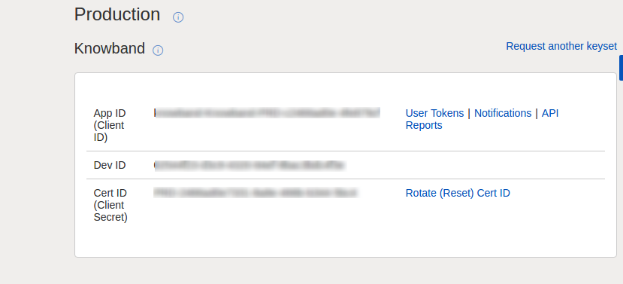
The application keys will be shown.
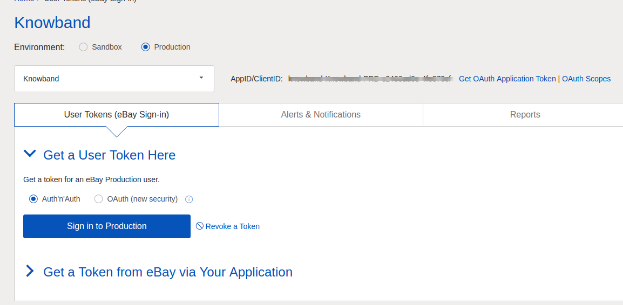
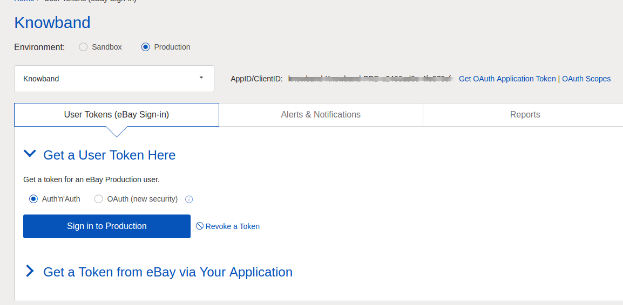
To create a user token, click on the User Tokens link in the above image.
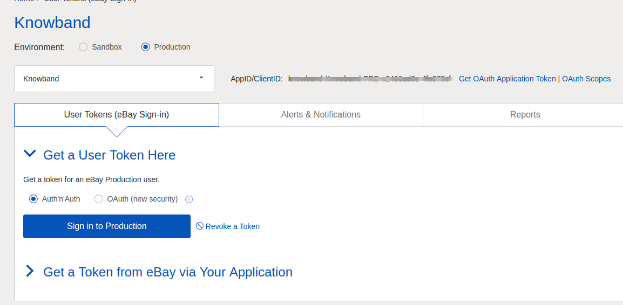
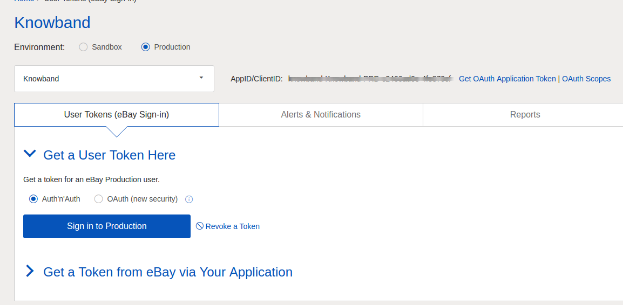
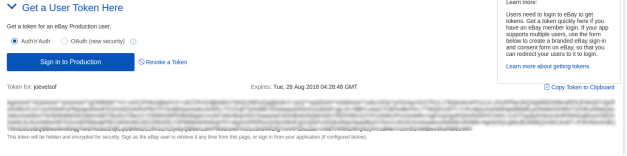
Click on ‘Sign in to Production’ to get a token.
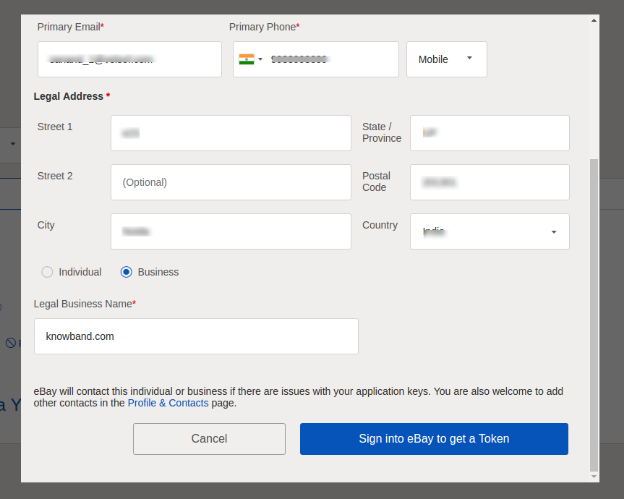
Fill in the details and click on “Sign in to eBay to get a Token”.
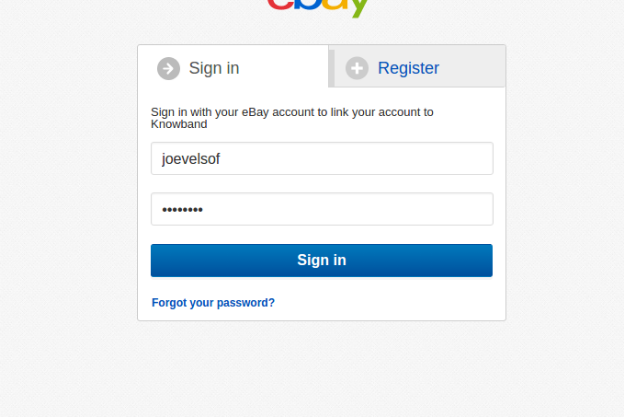
Sign into an already created eBay Seller account or register as shown below:
11. On clicking register and filling in details you will head to your Seller eBay account.
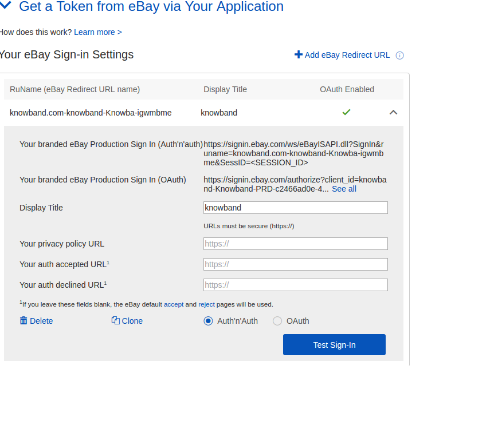
2.2 To Get a token from eBay via your application
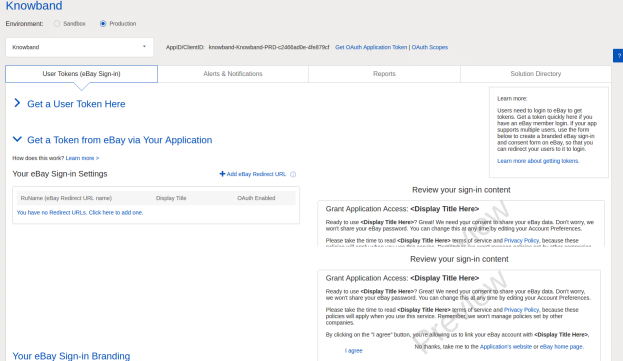
To create a user token, click on the User Tokens link in the below image.
Steps to reach this screen:-
A. Login into your developer’s eBay account.
B. On successful login, you will see the below-added screen.
Click on “Get a Token from eBay Via Your Application.”
Steps to reach this screen:-
A. Click on “User Tokens” from the above screen.
Click on add eBay redirect URL and fill the form and save.
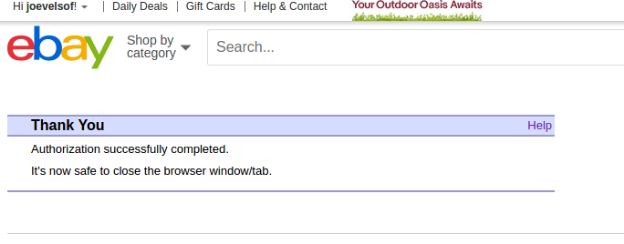
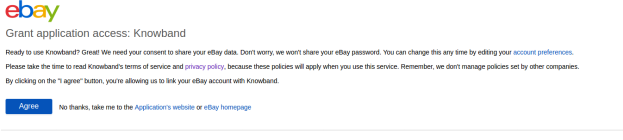
On clicking I agree from the right side form, you will head to the authentication page.
3.0 Admin Interface of eBay Integrator for Magento 2:
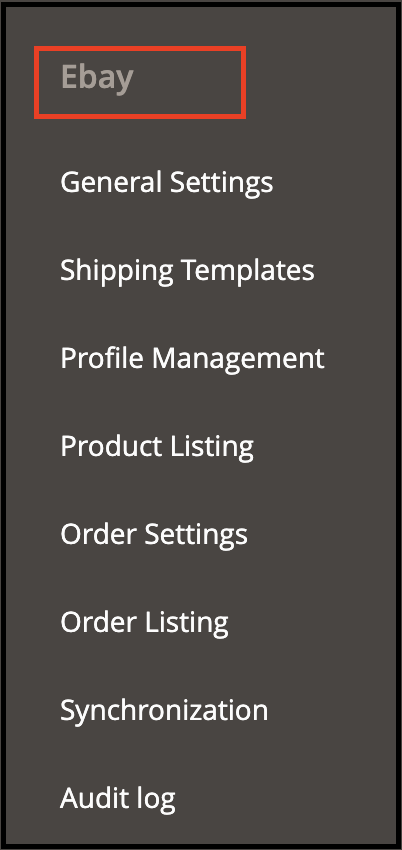
The Admin Panel of the eBay API Integration extension for Magento 2 offers 8 configuration options.
General Settings
2. Shipping Templates
3. Profile Management
4. Product Listing
5. Order Setting
6. Order Listing
7. Synchronization
8. Audit Log
3.1 General Settings
Once you have created a seller’s account, you need to fill-up the form to validate the synchronization of the store with the marketplace. Navigate to Admin Interface>eBay Marketplace>General Settings.
Fill out the form shown in the General settings section. Each field for the configuration panel of the eBay connector plugin for Magento 2 is explained below:-
1. Enable/Disable
Enable/disable the eBay API integrator for Magento 2 by toggling this button.
2. Account Type
The admin can either choose the Sandbox account or the Production eBay account. The sandbox account is for testing purposes. While the Production account is for the final store integration.
3. Dev Id
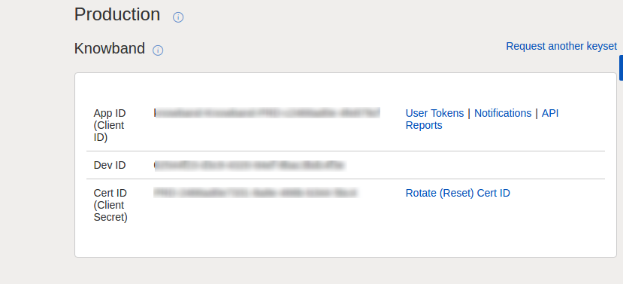
Enter the Dev ID of your eBay account in this section. To find your Dev ID, sign in to the eBay developer account. In the application key section, you’ll find App ID, Dev ID, and Cert ID as shown in the image below.
4. App Id
Copy the App ID from your eBay account and copy the same in this field.
5. Cert Id
Enter the Cert Id of the eBay account in this section. You can find the Cert Id as shown in the above image.
6. RU Name
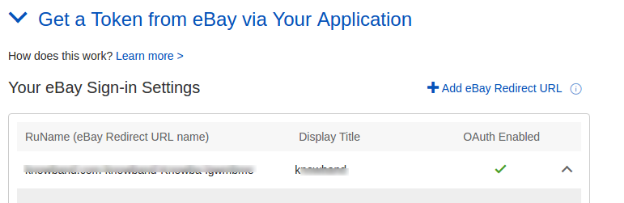
Enter the RU Name of the eBay account. To obtain your RU name, go to the ‘Get a Token from eBay via Your Application’ tab after adding a redirect URL.
7. Paypal Email
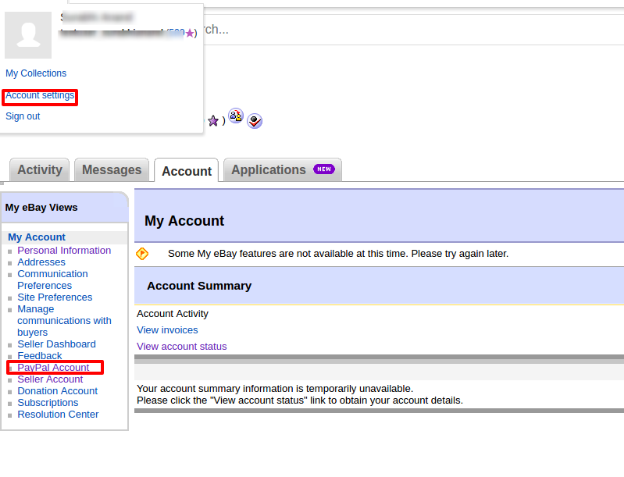
Enter a valid PayPal ID connected to your eBay account. Follow the steps mentioned below:
Log in to your eBay seller account.
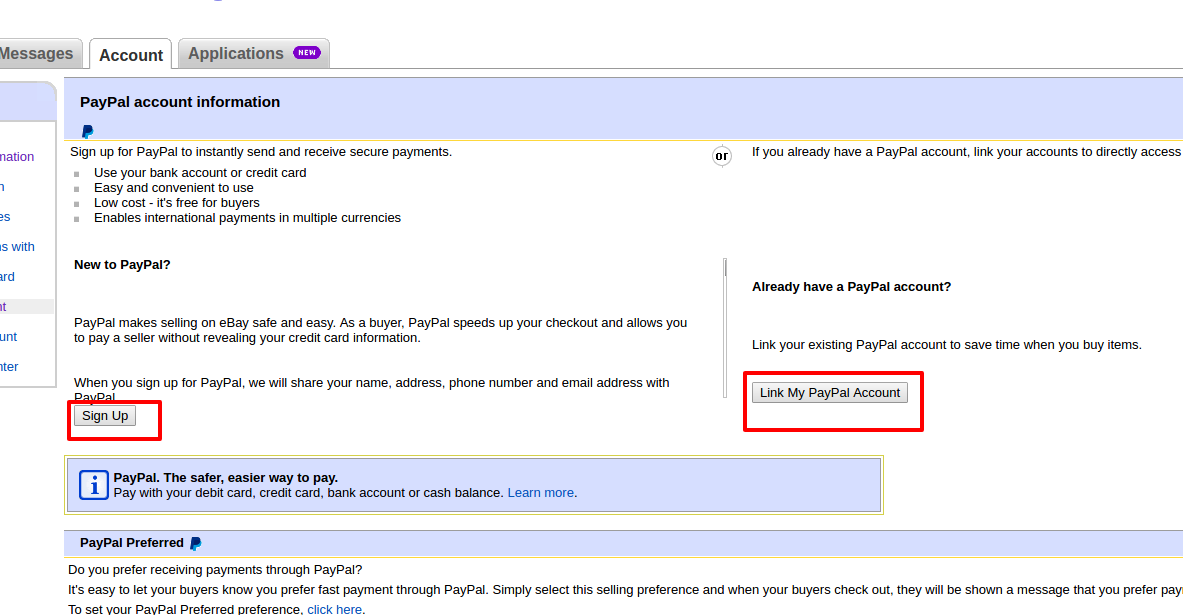
Click on account settings from the top-left dropdown and click on Paypal account.
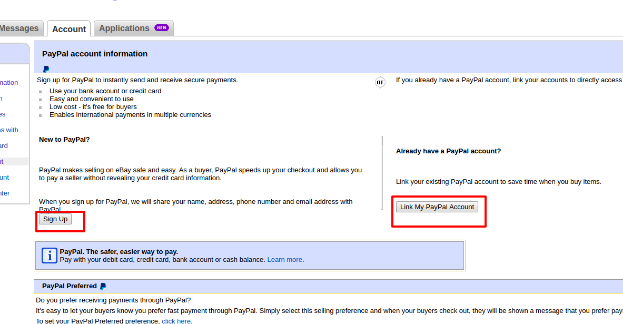
Now Sign up or link your already created PayPal account with the eBay seller account.
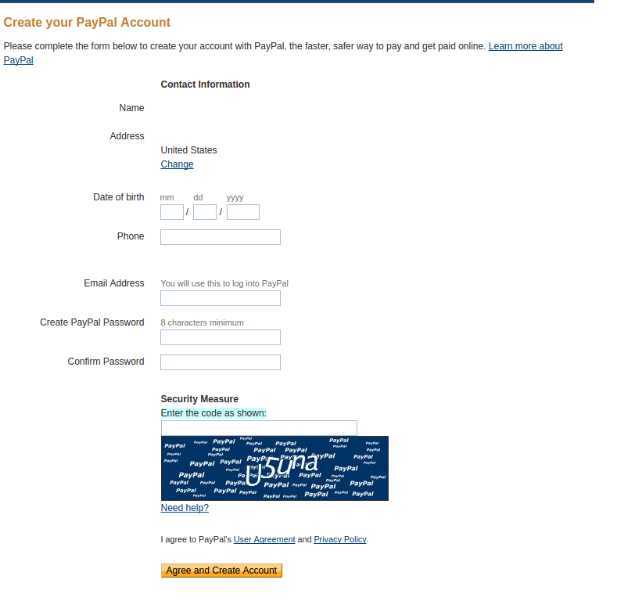
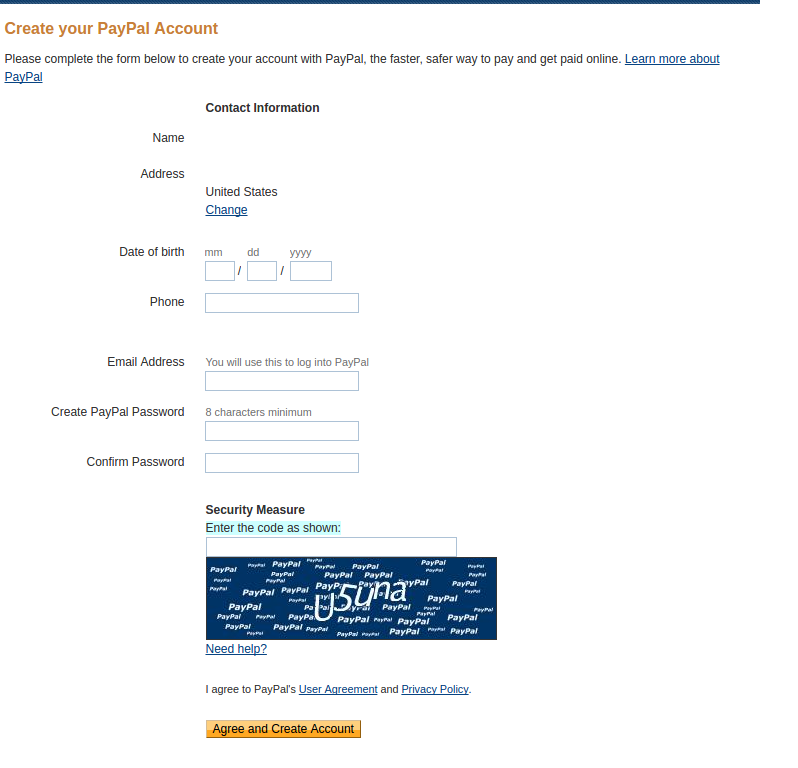
On clicking Sign Up, you will move to the PayPal account creation page. Just create a profile by filling in the details and linking it to your seller’s account.
8. Token Listing Link
Click on this link to add the tokens for eBay countries. To get the access token, you need to click on Sign in to Production as shown in the below image.
Sign in to the account from the form below:-
Click on I agree and get access tokens.
3.2 Shipping Templates
The Magento 2 store admin gets to create an N number of shipping templates from the back-end of the eBay Integration extension for Magento 2.
3.2.1 How to create New Shipping Templates?
To create new shipping templates, click on the ‘Add New’ button.
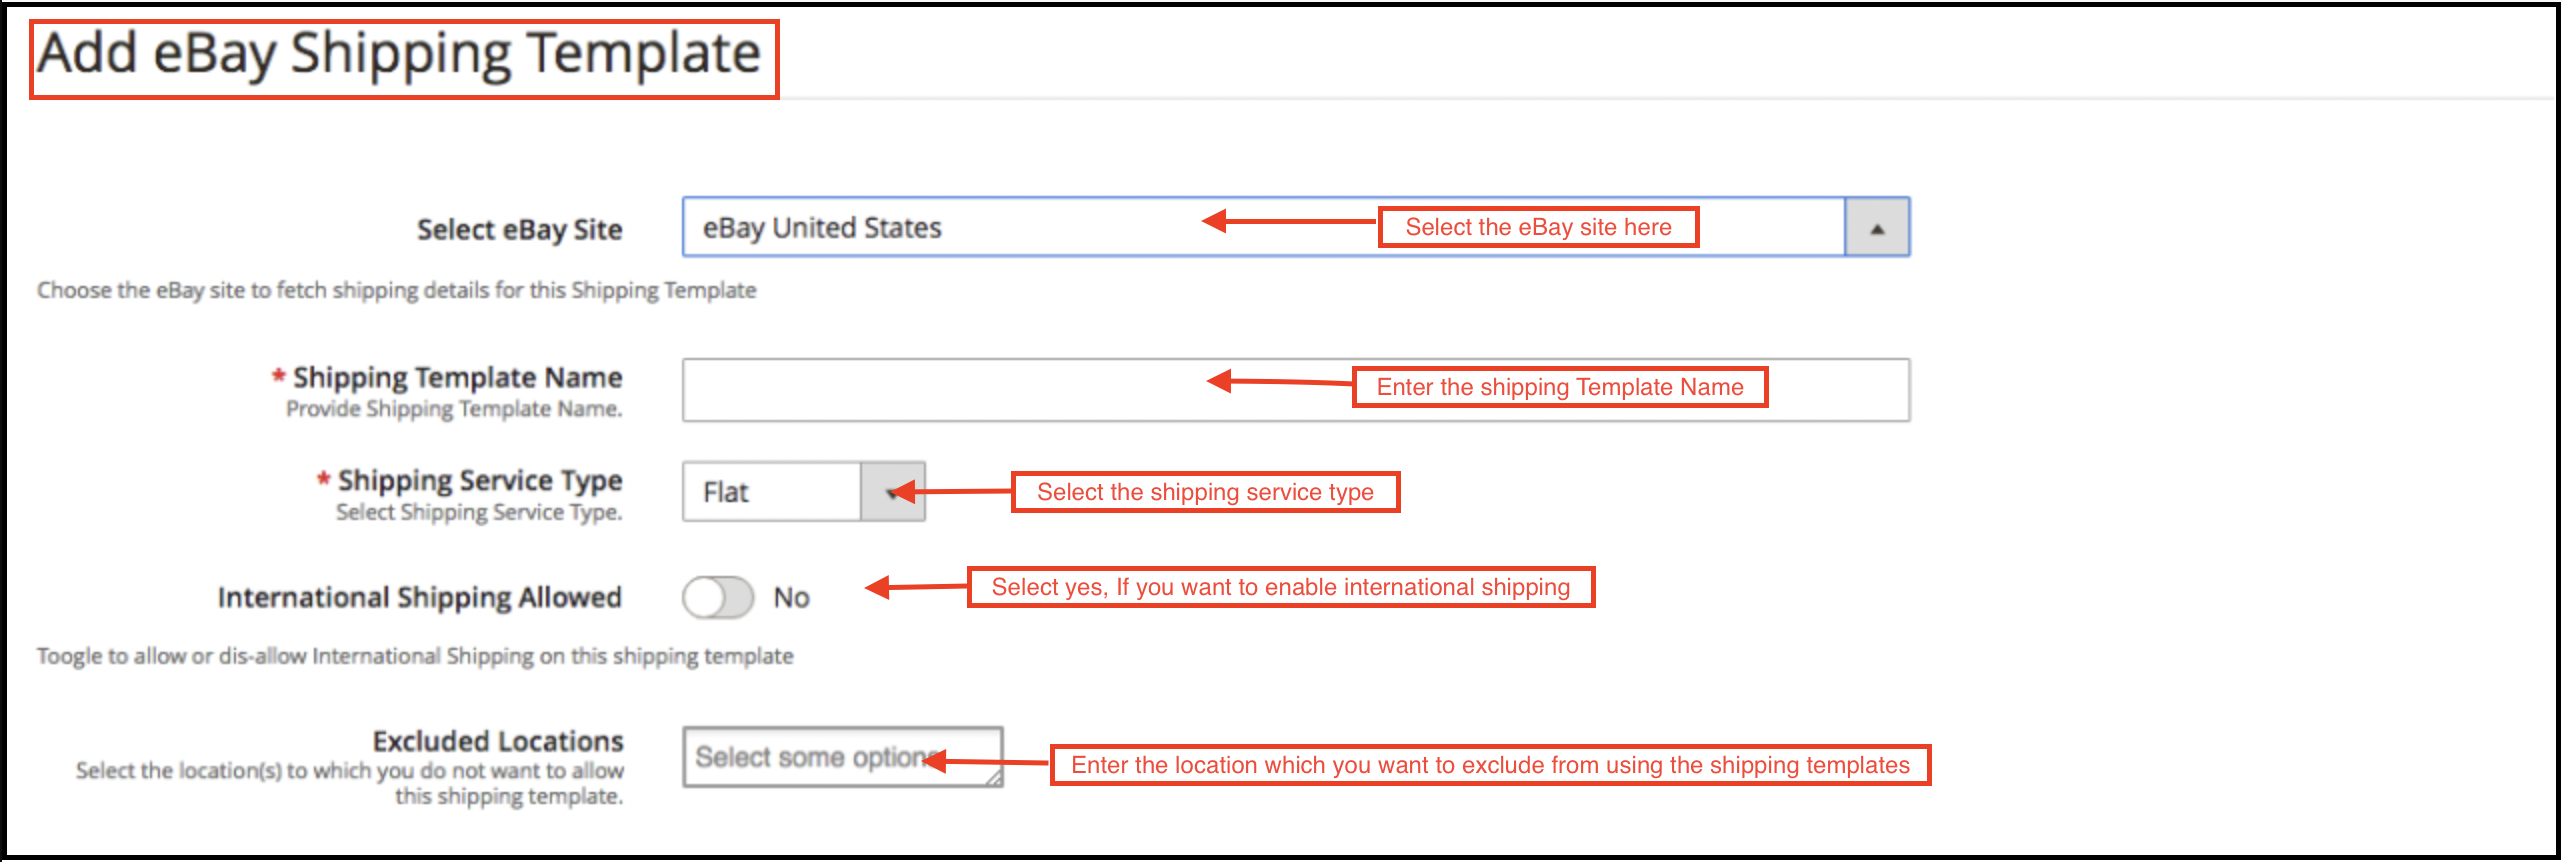
You’ll move to the shipping template creation page.
Select eBay Site: First, select the eBay site for which you are creating the shipping template.
Shipping Template Name: Enter a name for the shipping template.
Shipping Service Type: Select the shipping service type.
International Shipping Allowed: Switch on the button if you want to allow international shipping.
Excluded Location: Select the locations (if any) that you want to exclude from this shipping method.
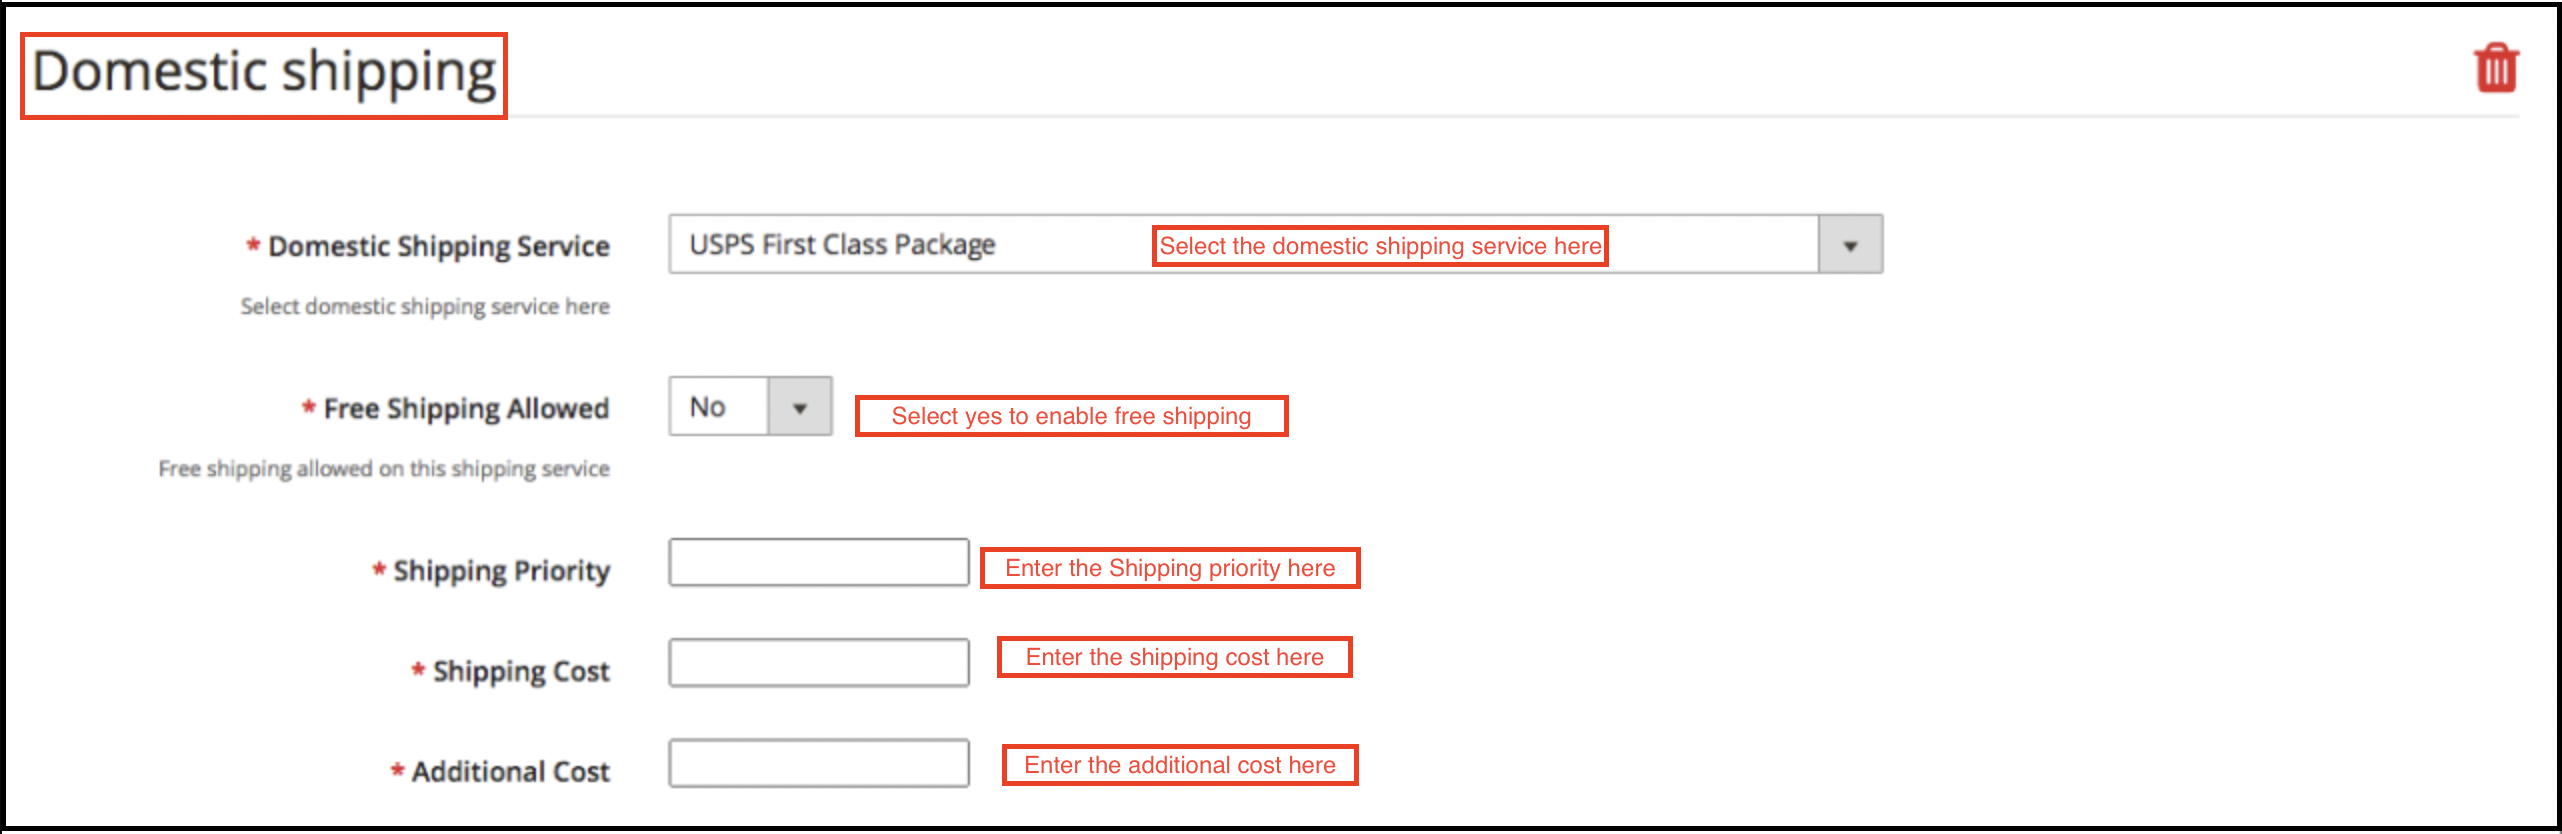
Fill the below-mentioned fields for domestic shipping:
Domestic Shipping Service: Select the domestic shipping service from here.
Free Shipping Allowed: Select ‘Yes’ if you want to allow free shipping services.
Shipping Priority: Set the priority for the shipping methods. The options will display in the front-end as per the priority set.
Shipping Cost: Enter the Shipping Cost that is chargeable.
Additional Cost: Specify the additional cost that is chargeable.
3.2.2 How to Edit/Delete Shipping Templates?
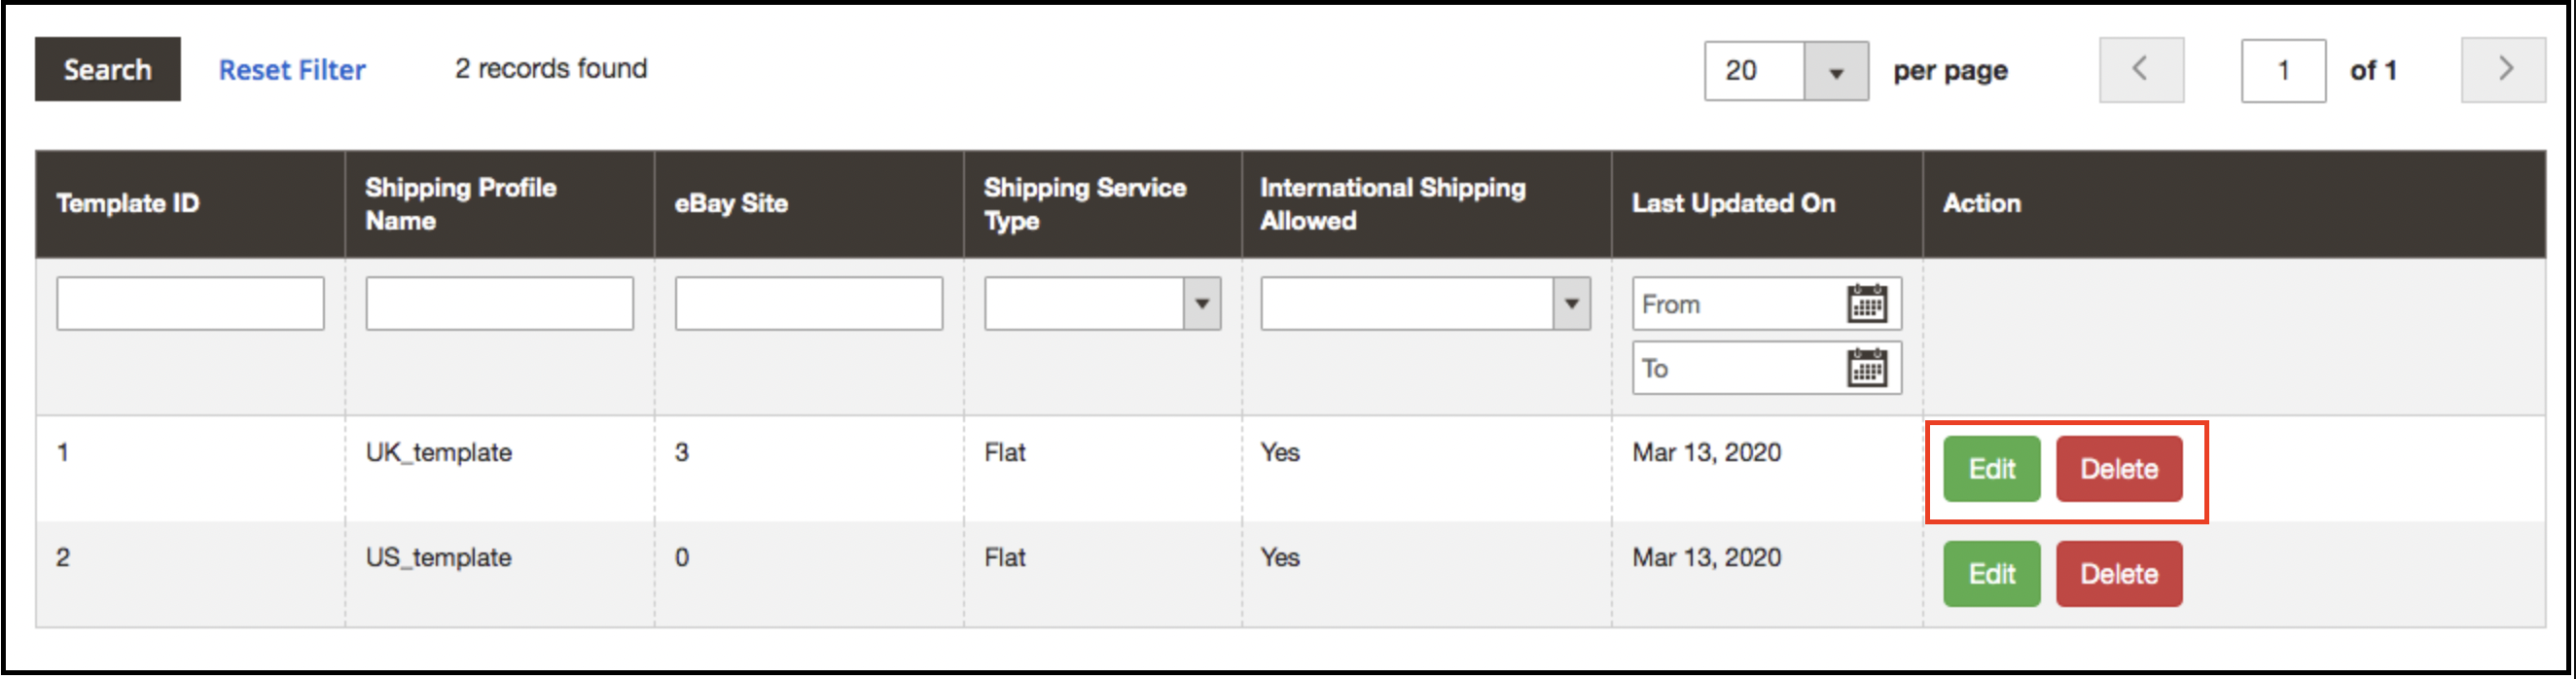
The admin can edit/delete the shipping template by entering the Edit or Delete button as highlighted in the image below:
3.3 Profiles Management
The eBay Marketplace Integrator plugin for Magento 2 offers an option of the profile-based product listing. The profiles created in the admin interface of the eBay connector plugin for Magento 2 can be viewed in this tab. The admin can create a new profile and edit or delete the already created profiles.
3.3.1 How to Add New Profiles?
Follow the steps, to create new profiles, Go to the Admin Panel>eBay Marketplace>Profile Management.
Click on the ‘Add New’ button as shown below:
The profile creation tab of the eBay Integration plugin for Magento 2 is categorized into three tabs. They are:
General Setting
Profile Return
Profile Specifics
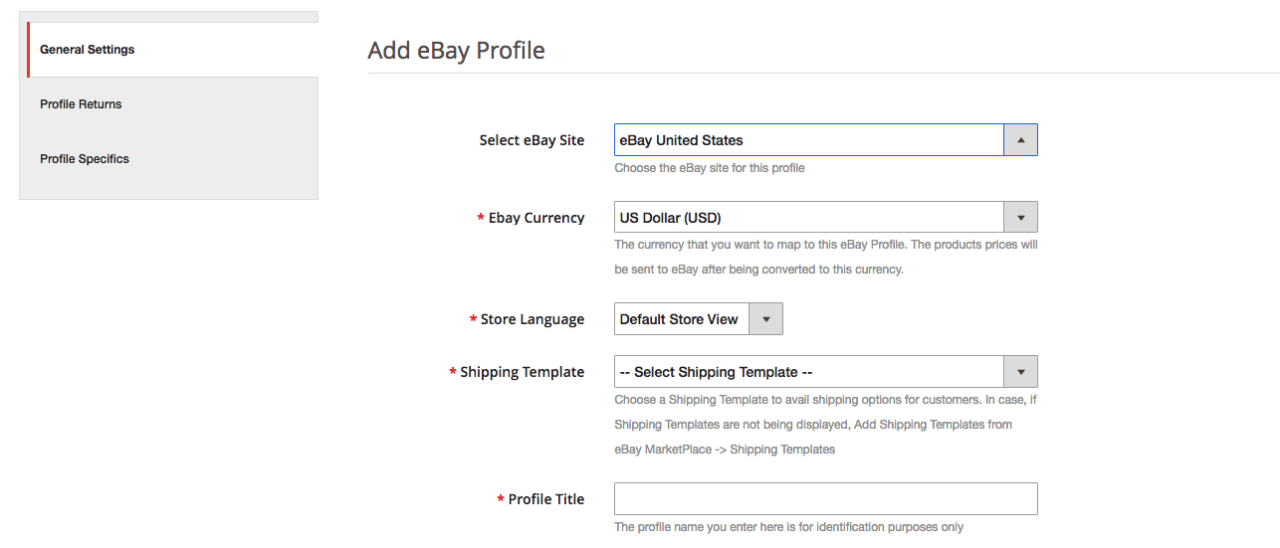
3.3.1.1 General Settings
Once the admin selects the eBay site, he has to enter the following information.
eBay Currency: The currency will be automatically selected as per the eBay site selected by the admin. The store admin can even change the currency if required.
Store Language: The store admin needs to select the language as per the selected eBay site.
Shipping Template: The shipping options created in the Shipping Template Tab will be listed here. Select the shipping option that you want to display to the marketplace customer.
eBay Category: Select the eBay category from the dropdown menu in which you want to map the categories of the store.
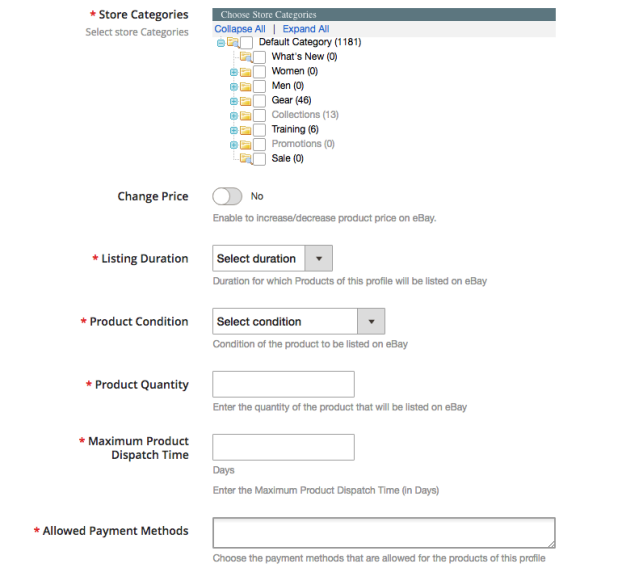
Store Categories: Check the categories that you want to map in the selected category of eBay. The eBay integrator for Magento 2 allows the admin to map multiple categories of the Magento 2 store with a single category of eBay. To list multiple eBay categories, you are supposed to create multiple profiles.
Listing Duration: Select the duration for which the products of the profile are to be listed in the marketplace.
Product Condition: The default conditions are listed in the drop-down menu. Select the condition of your product.
Product Quantity: Enter the quantity of the product here.
Maximum Product Dispatch Time: Enter the maximum expected product dispatch time.
Allowed Payment Methods: Select the payment methods that you want to allow for this particular profile.
3.3.1.2 Profile Returns
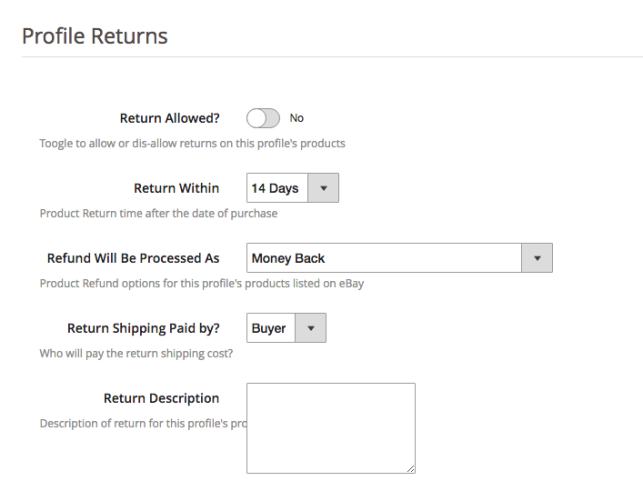
The store admin can manage the return requests of the marketplace from the back-end of the eBay API integrator for Magento 2. Here are some of the customization options offered in this tab.
Return Allowed: Enable the button if you want to allow the return option in this profile.
Return Within: Enter the maximum number of days within which the return request should be initiated.
Refund will Process: As selected how the refund will be offered to the customer.
Return Shipping Paid by?: Select who will pay for the shipping cost of the returned product.
Return Description: Enter a short description for the return option here.
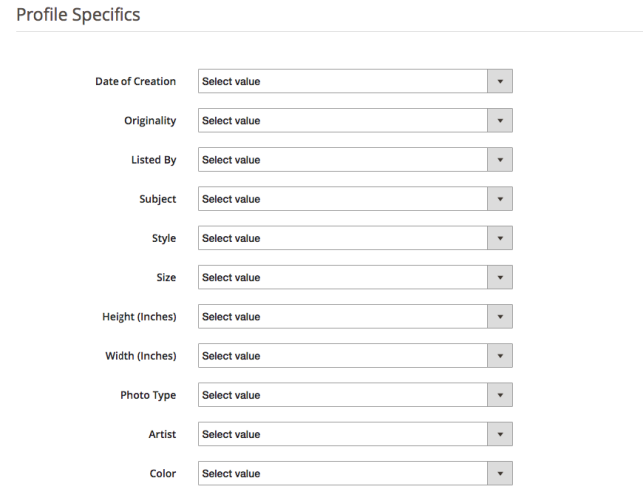
3.3.1.3 Profile Specifics
Profile specifics will appear as per the category of eBay selected in the General Setting tab of the Profile Management. This tab includes fields like Type, Brand, Model, Color, Features, and others. Fill up the fields as per the category selected and the product mapping will be done accordingly. The specifics marked by * are mandatory. Other specifics can be left blank.
3.3.2 How to Edit/Delete the existing Profile?
Click on the ‘Edit or Delete’ button to edit/delete the profile as shown in the image:
The admin can enable/disable the Profiles by selecting the option in the ‘Active’ tab.
3.4 Product Listing
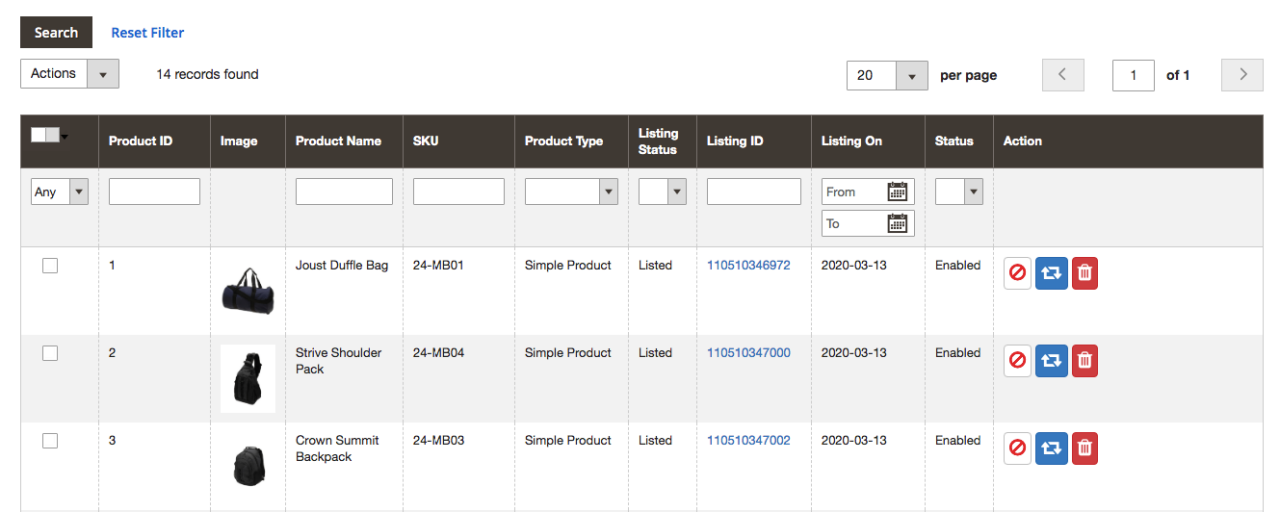
The store admin can view all the products listed in the marketplace from the Product Listing tab of the eBay Integration extension for Magento 2.
Here are some of the listing options offered in this tab of the eBay connector plugin for Magento 2.
Revise
The store admin can click on the ‘Revise’ button to update any change in the product detail. Whether you make a change in the product description, pricing, or quantity of the products, all the changes will be updated in the marketplace by this button.
Delete
This option allows the admin to delete the product from eBay Marketplace. Click on the “Delete” action corresponding to each product listing if you want to remove it from eBay.com.
Disable Products
The admin can disable the products that are listed For this, click on the ‘Disable Product’ action.
Adding products from the product listings tab
If you want to add a product to the product listing tab, the admin has to create a profile of the product in the Profile section of the module. There you will get a step-by-step procedure of creating a profile and adding the product in the products listing tab.
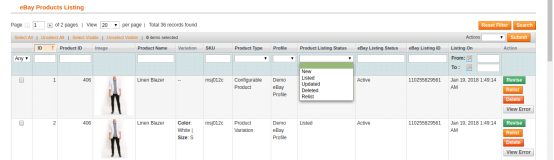
Different statues in the filter of the product listing
Here are some different statuses in the filter of the product listing.
New: After applying this filter, the admin can view the new products listed on the Marketplace.
Listed: After applying this filter, the admin can view the listed products listed on the Marketplace.
Updated: After applying this filter, the admin can view the updated products listed on the Marketplace.
Deleted: After applying this filter, the admin can view the list of disabled products.
Relist: After applying this filter, the admin can view the relist products listed on the Marketplace.
3.5 Orders Settings
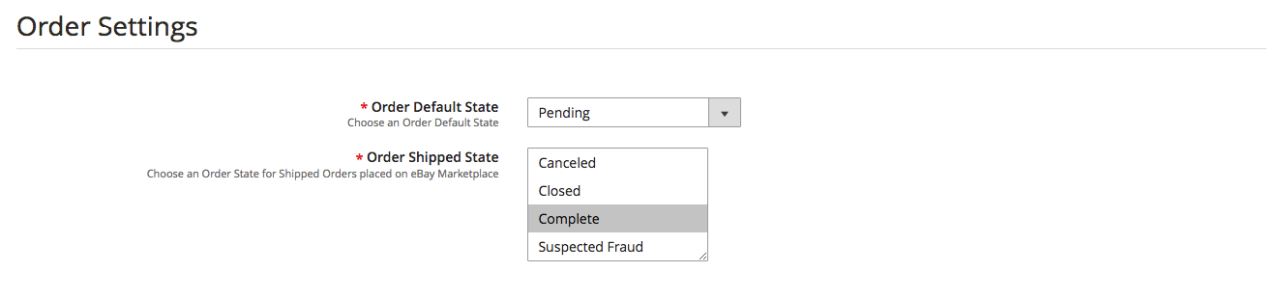
The eBay connector for Magento 2 offers two-way integration. The admin can mark which status will display when an order syncs.
It includes three options:
Order Default State: Select the default status of the orders that will display in the marketplace.
Order Shipped State: Select the status for shipped orders.
Note –
The default status is the first status of the order when it is placed in the store.
Shipped status means that ordered items have been shipped.
To update the change in the order status by executing cron in the Synchronization tab of the eBay Marketplace connector plugin for Magento 2.
3.6 Orders Listing
The orders available from the marketplace will sync to the Magento 2 store. Furthermore, when the cron executes in the Synchronization tab.
The orders are listed as shown in the image below. To view the details and process the same click on the ‘View’ button corresponding to each order.
The store admin can now see the following details of each order.
It offers basic information like order date, status, billing and shipping address, payment information, gift options, item ordered, comments history.
3.7 Synchronization
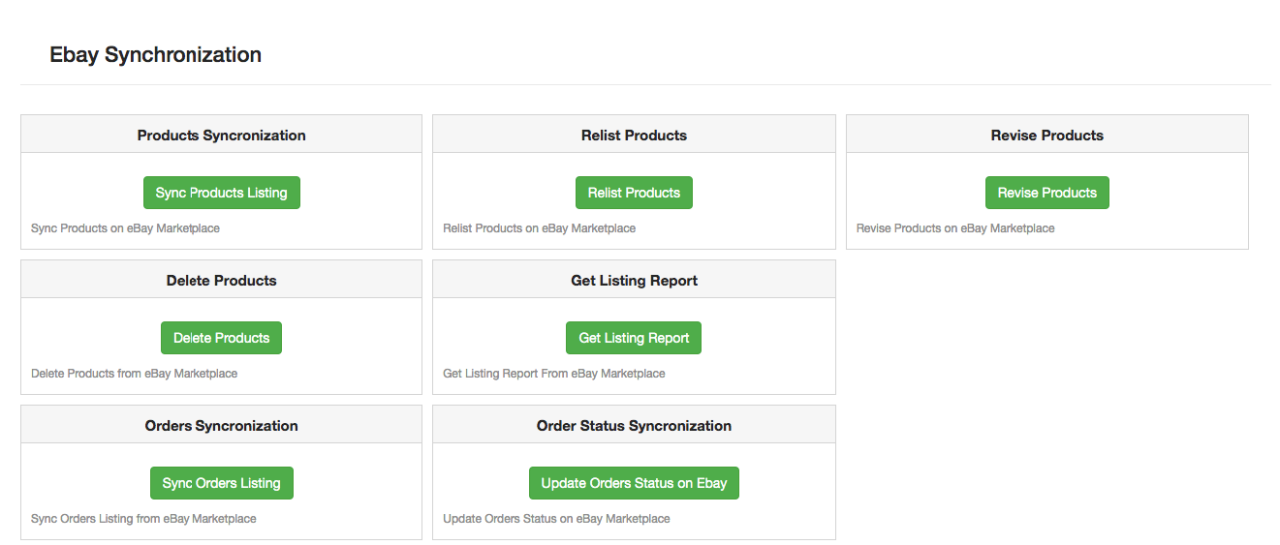
The eBay integration for Magento 2 allows easy synchronization between both stores. All the synchronization jobs can be performed from this tab.
The synchronization tab of the eBay connector module for Magento 2 offers two synchronization options. That is Product and Order synchronization.
3.7.1 How to sync the products on eBay Marketplace?
Click on the “Sync Product Listing” button as shown below.
It will add products in the marketplace with the respective product details.
3.7.2 How to Relist the product on the eBay Marketplace?
Click on the “Relist Products” button as shown below.
This will relist the expired products in the marketplace. It will update the listing of the products whose relisting was initiated in the Product Listing tab.
3.7.3 How to Revise the product on the eBay Marketplace?
Click on the ‘Revise Product’ as shown below to revise the products on the marketplace. Any change in the product details, image, pricing, etc can sync by executing this cron offered by eBay Integrator for Magento 2.
3.7.4 How to Remove a product on the eBay Marketplace?
Click on the ‘Delete Products’ as shown below to remove products from the marketplace. The admin has to click on the ‘Delete’ button in the products listing tab before executing this cron eBay Integrator for Magento 2.
3.7.5 How to Import the listing report from the eBay Marketplace?
By executing ‘Get Products Listing Report’, the admin can import the report of the product listing from the marketplace. The eBay status column will fill up when this action executes by eBay Integrator for Magento 2.
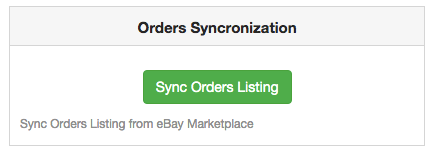
3.7.6 How to sync Orders from the eBay Marketplace?
Click on the “Sync Orders Listing” button as shown below.
It would perform the following actions:
The plugin will sync the Orders and related details from eBay Marketplace to the Magento 2 store.
It creates the orders in the Magento 2 store as per the details of the order received from the Marketplace.
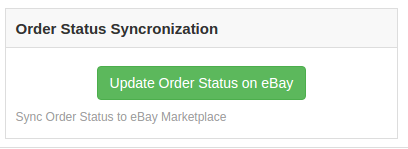
3.7.7 How to sync Order Status to the eBay Marketplace?
Click on the “Update Order Status on eBay” button as shown below.
It would perform the following actions
The cron checks if there is any status update recorded by the eBay integrator for any order.
The updates are then synchronized accordingly.
It updates the Status of Orders as per the configuration settings modification in the “Order Settings” tab of the admin interface of the eBay Integration module for Magento 2.
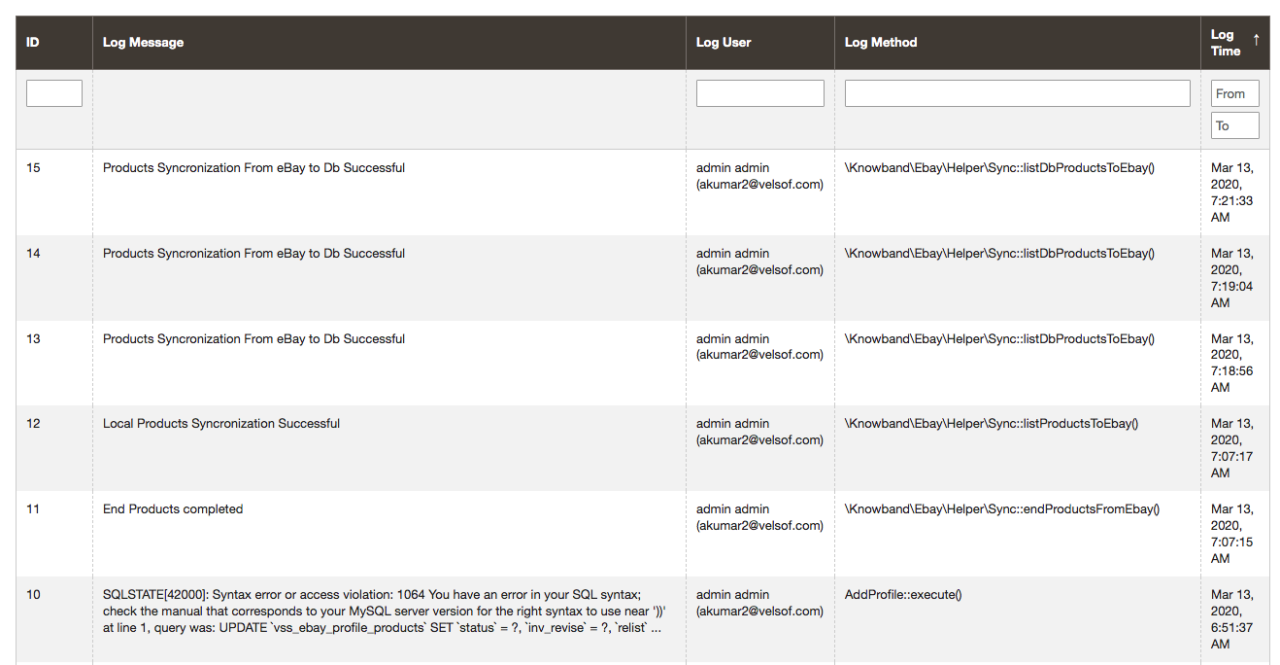
3.8 Audit Log
This tab offers an overview of all the tasks being performed in the back-end of the eBay Integrator extension for Magento 2.
Opencart eBay Marketplace Integrator by Knowband is one of the fastest means to connect your OpenCart store with eBay. The OpenCart plugin makes it easier for the store admin to connect their store with the marketplace. At the same time, the Opencart eBay Marketplace Integrator automates the entire process of product listing, inventory, and order management.
eBay is one of the most popular online marketplaces. Operating in over 30 countries worldwide, the marketplace has secured a significant place in online trading. ebay.com has gained the reputation of an online space where buyers and sellers come together and trade almost anything. The OpenCart store owners can streamline their selling and find a larger audience base in the popular marketplace.
OpenCart eBay Marketplace Integration Module by Knowband allows the OpenCart store admin to list their products on the eBay marketplace and manage their inventory and orders with a few button clicks. The Opencart eBay Marketplace Integrator makes it easier for the store admin to connect their store with the marketplace. At the same time, the OpenCart eBay API integrator automates the entire process of product listing, inventory, and order management.
1.1 Benefits offered by the Opencart eBay Marketplace Integrator:
The OpenCart eBay Integrator allows the store admin to skip the steps involved in lengthy store integration. The store admin can connect the store in a few simple steps.
The admin can create as many profiles as they wish from the back-end of the Opencart eBay Marketplace Integrator.
The profile-based product listing of the Opencart eBay Marketplace Integrator allows the store admin to skip manual listing.
The inventory can be easily managed with the help of these profiles created in the OpenCart eBay API Integration.
The eBay Connector makes it easier for the store admin to map the product attribute and categories with that attribute and categories of eBay.
The Opencart eBay Marketplace Integrator allows the merchants to add, remove, revise or relist the products on the marketplace.
Along with easy inventory management, the OpenCart eBay Connector offers easy order management as well. The admin can sync the orders received from ebay.com with their OpenCart store and process them from there. Thus, the merchants need not visit the marketplace.
The Opencart eBay Marketplace Integrator offers two-way synchronization that can be done by executing cron in the back-end.
The merchants can check the error that occurred while product listing from the back-end of the Opencart eBay Marketplace Integrator.
Discover the Latest Enhancements!
[New]Inventory Comparison
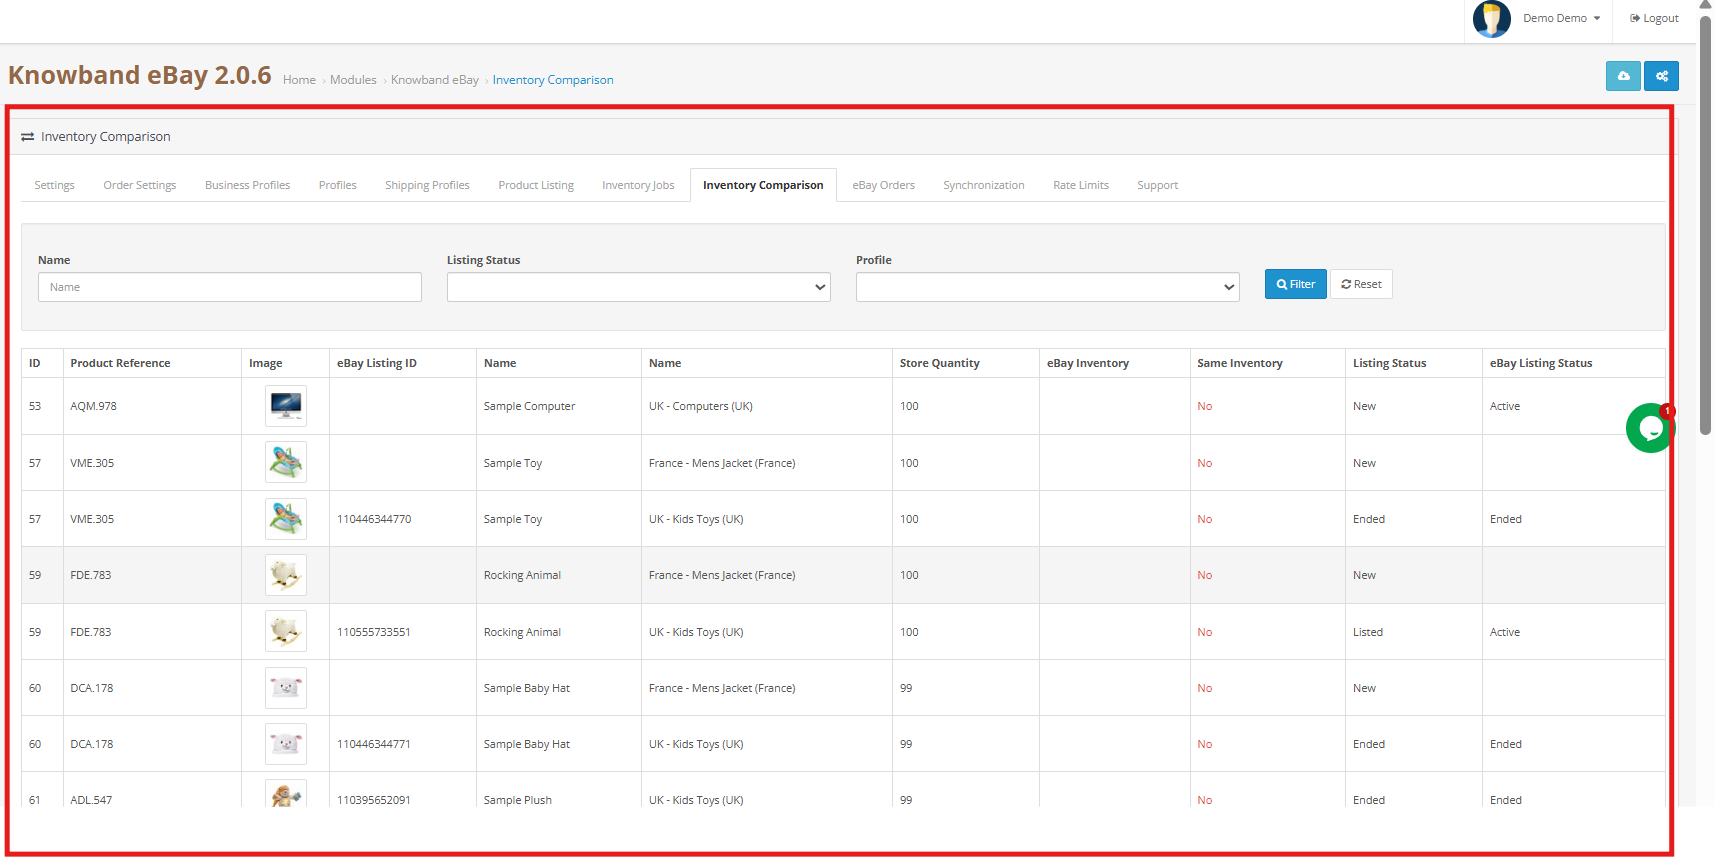
The Inventory Comparison feature ensures your OpenCart store and eBay stock stay consistent. Furthermore, it fetches the latest inventory from eBay, compares it with your store quantities, and marks any differences as Yes or No, helping to prevent overselling, stockouts, and manual errors while keeping your inventory accurate.
[New]Rate Limit Monitoring
The extension now includes a built-in feature to monitor eBay API usage and limits. Moreover, it tracks how frequently each API is called, displays the total allowed requests, and shows how many calls are still available.
Profile-Level Product Synchronisation:
Knowband’s Opencart eBay marketplace connector addon now includes profile-level product synchronization. This feature enables merchants to efficiently manage and synchronize their product listings by organizing them into profiles. Each profile can be customized with specific synchronization settings, streamlining inventory management and maintaining consistency across platforms.
Product Listings with Custom Titles and Descriptions:
The enhanced eBay Opencart connector addon allows merchants to create product listings with custom titles and descriptions on eBay. Merchants can now tailor these elements to better align with eBay’s search criteria and buyer preferences. This customization improves visibility, attracts more potential buyers, and ultimately increases sales.
eBay Business Policy Import:
The latest update to Knowband’s Opencart eBay marketplace connector includes the ability to import eBay business policies. This feature simplifies the process of bringing eBay’s business policies into Opencart, ensuring alignment in shipping, return, and payment policies. It enhances compliance, reduces manual errors, and saves time for merchants managing multiple platforms.
OpenCart eBay Marketplace Integration Module
Effortlessly sync your OpenCart store with eBay for seamless product listing and order management with Knowband’s OpenCart eBay Integration module.
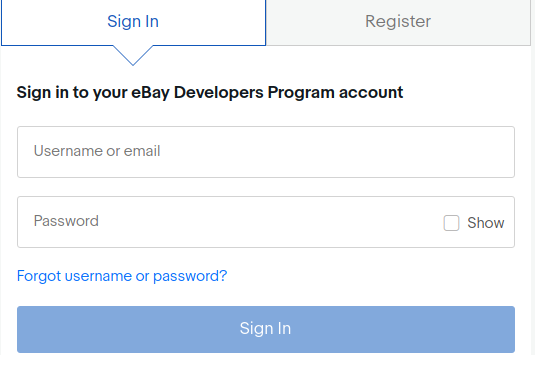
To start selling on eBay Marketplace you need to have a seller account on eBay. In this section, we are listing all the steps to create a seller account on eBay. Please find them below –
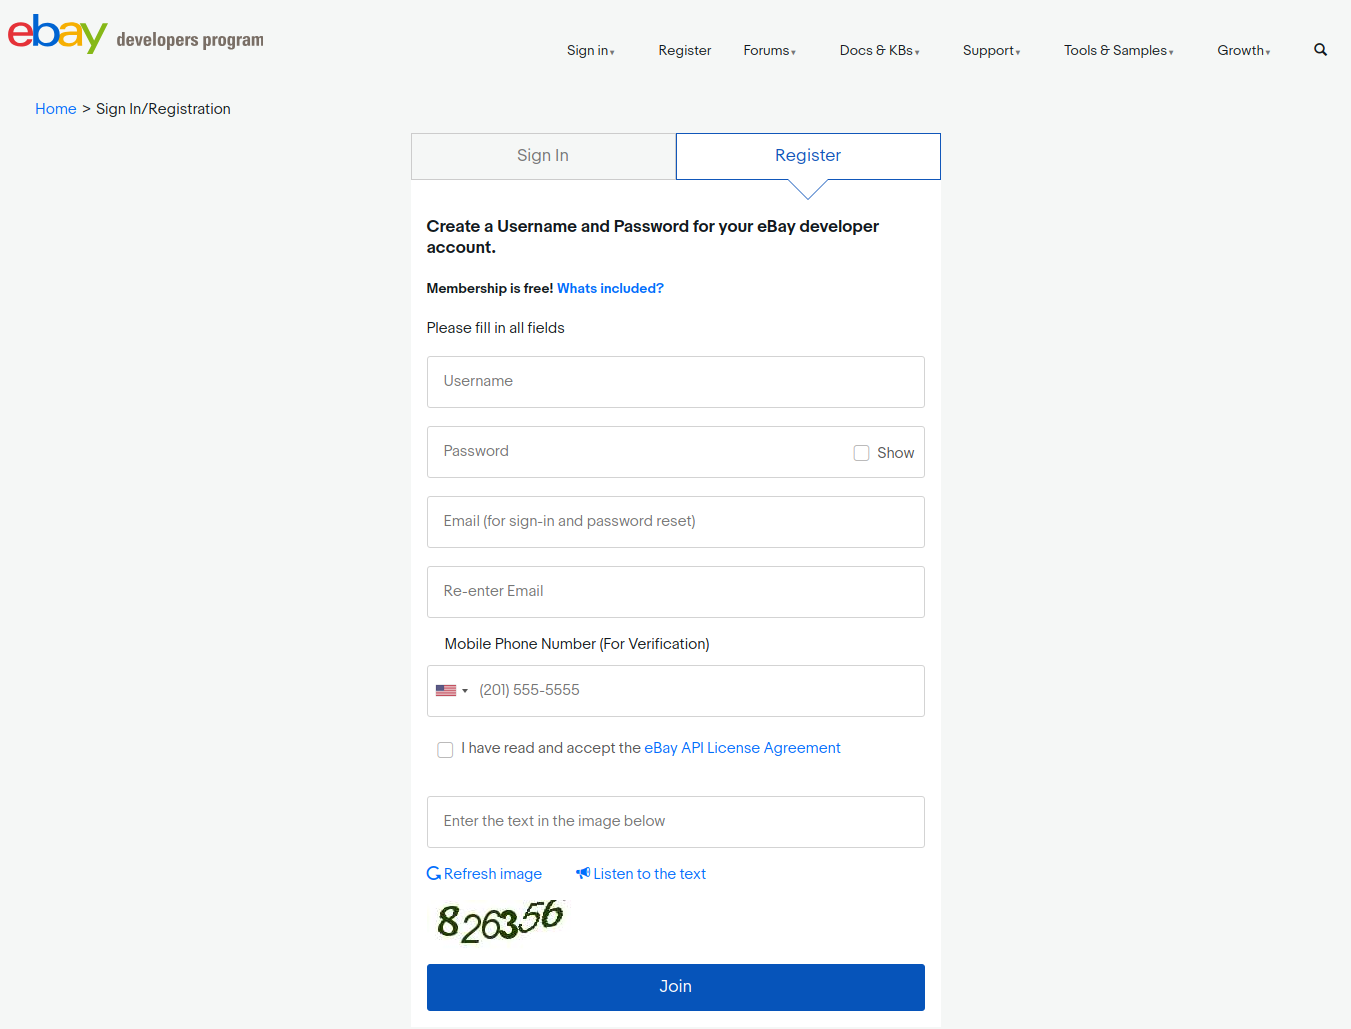
2. Click on the “Register” button for registration.
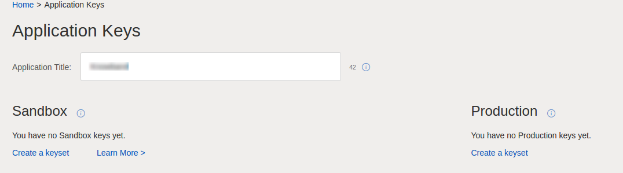
3. After filling-in valid data click on join and you will be redirected to the application creation page.
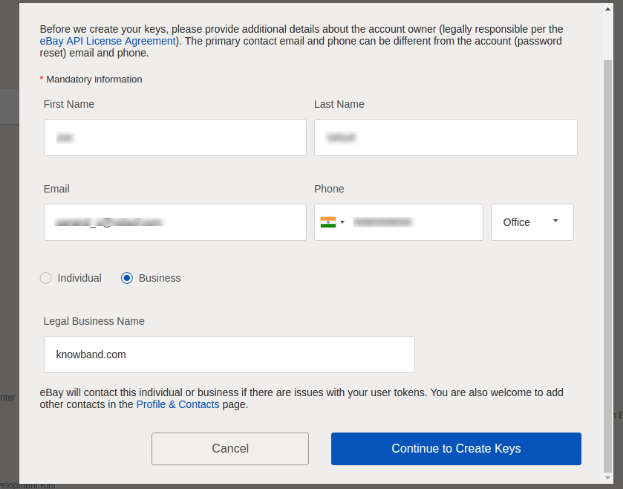
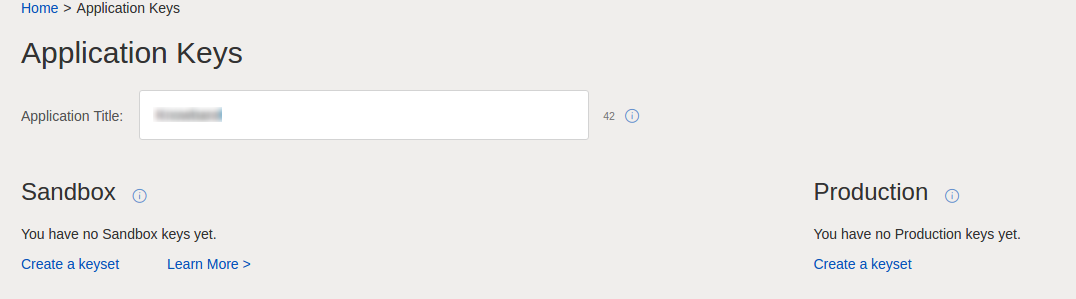
4. Enter the application name and click on ‘Create a keyset’ under the Production section, a new form will be opened.
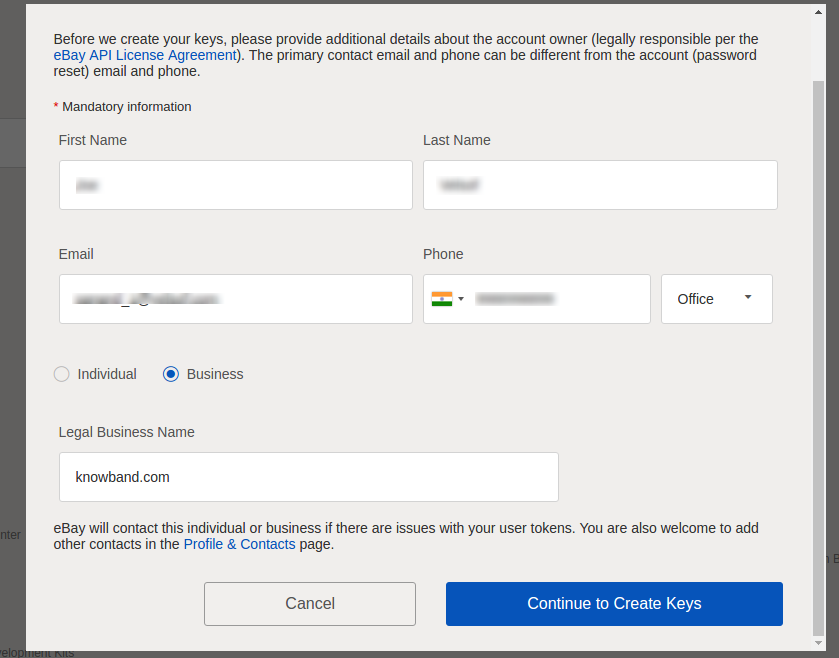
5. Enter the details and click on Continue to create Keys.
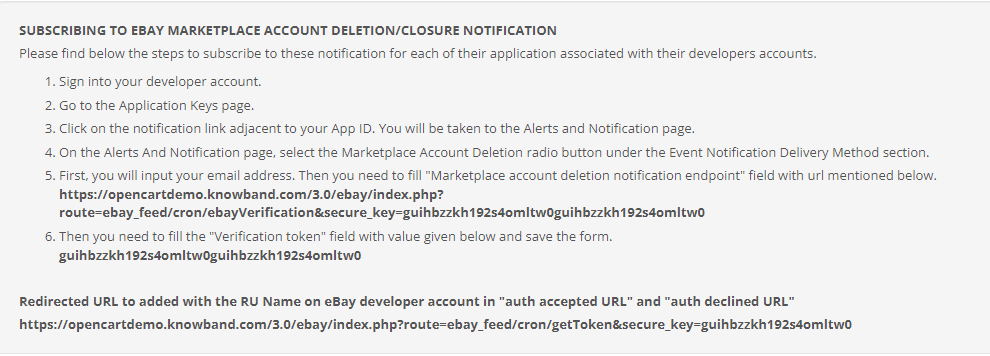
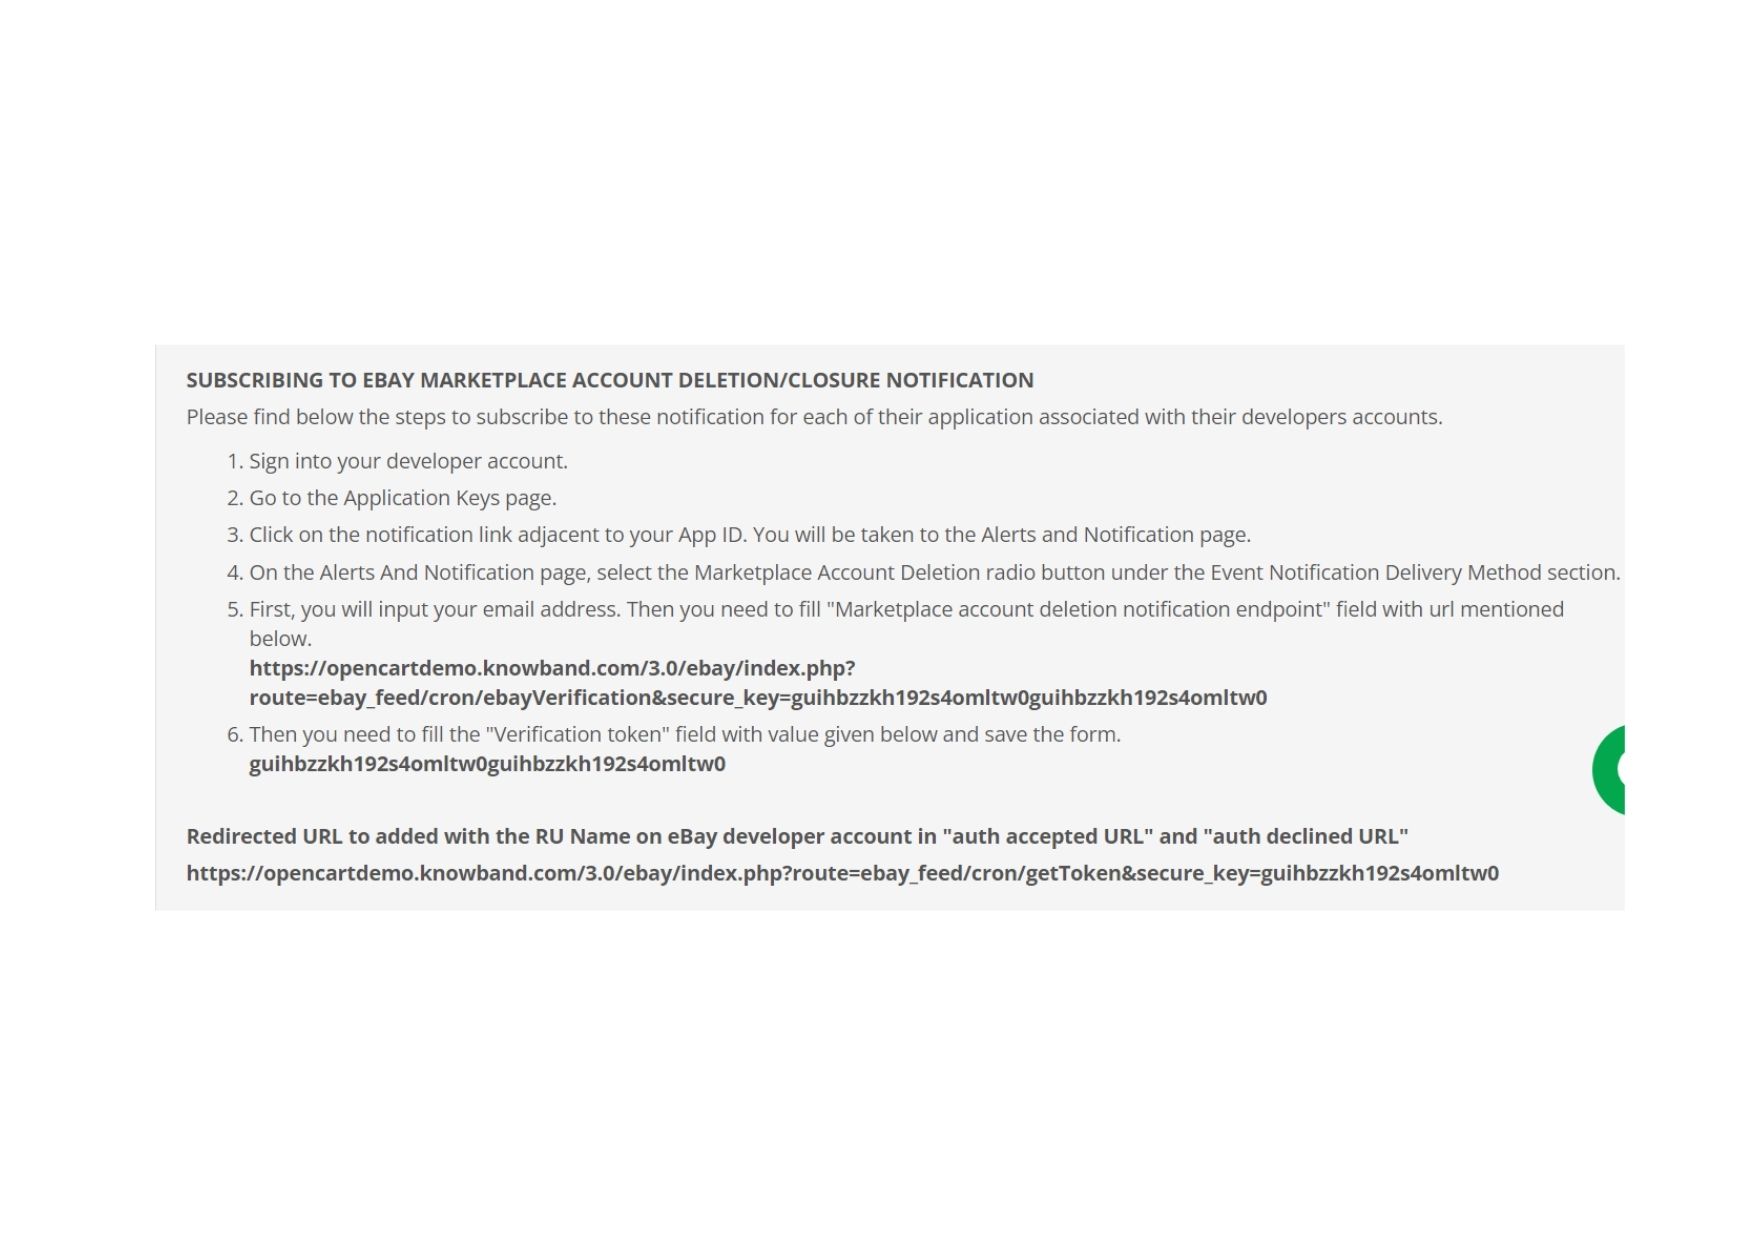
6. The application keys will be disabled until subscribed to eBay Marketplace Account Deletion/Closure Notifications.
7. To comply witheBay Marketplace Account Deletion/Closure Notifications follow steps mentioned in general setting steps of OpenCart eBay Marketplace Integrator module.
After you have successfully subscribed to eBay marketplace account deletion/closure notifications, you will be able to access API Keys from the developer’s account.
8. RU Name:
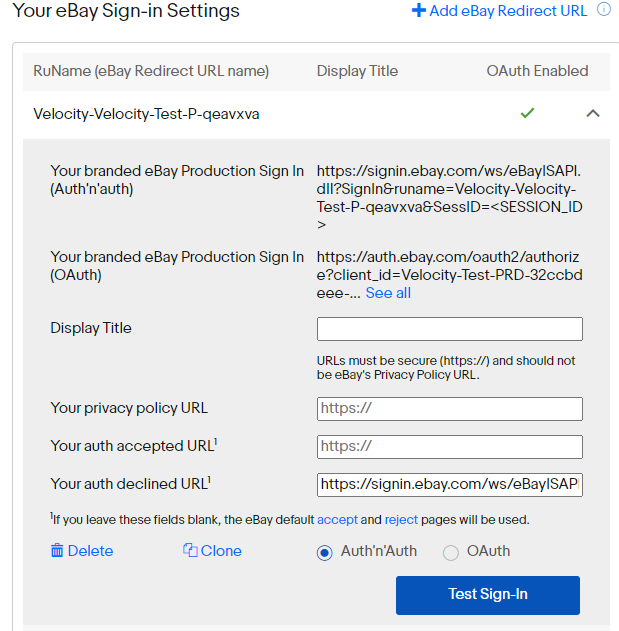
If your RU Name is not created click on “+Add eBay Redirect URL”.
Kindly copy the redirected URL from the module general setting and place it in the accept/decline field wall line.
Place
Click Save.
3.0 Admin Interface
The admin panel of the OpenCart eBay Integration plugin offers 5 configuration options. They are discussed in detail below:
3.1 General Settings
Once you have created a seller’s account, you need to synchronize the store with the marketplace. To validate the synchronization go to General Settings of the admin interface of the OpenCart eBay Integrator Module.
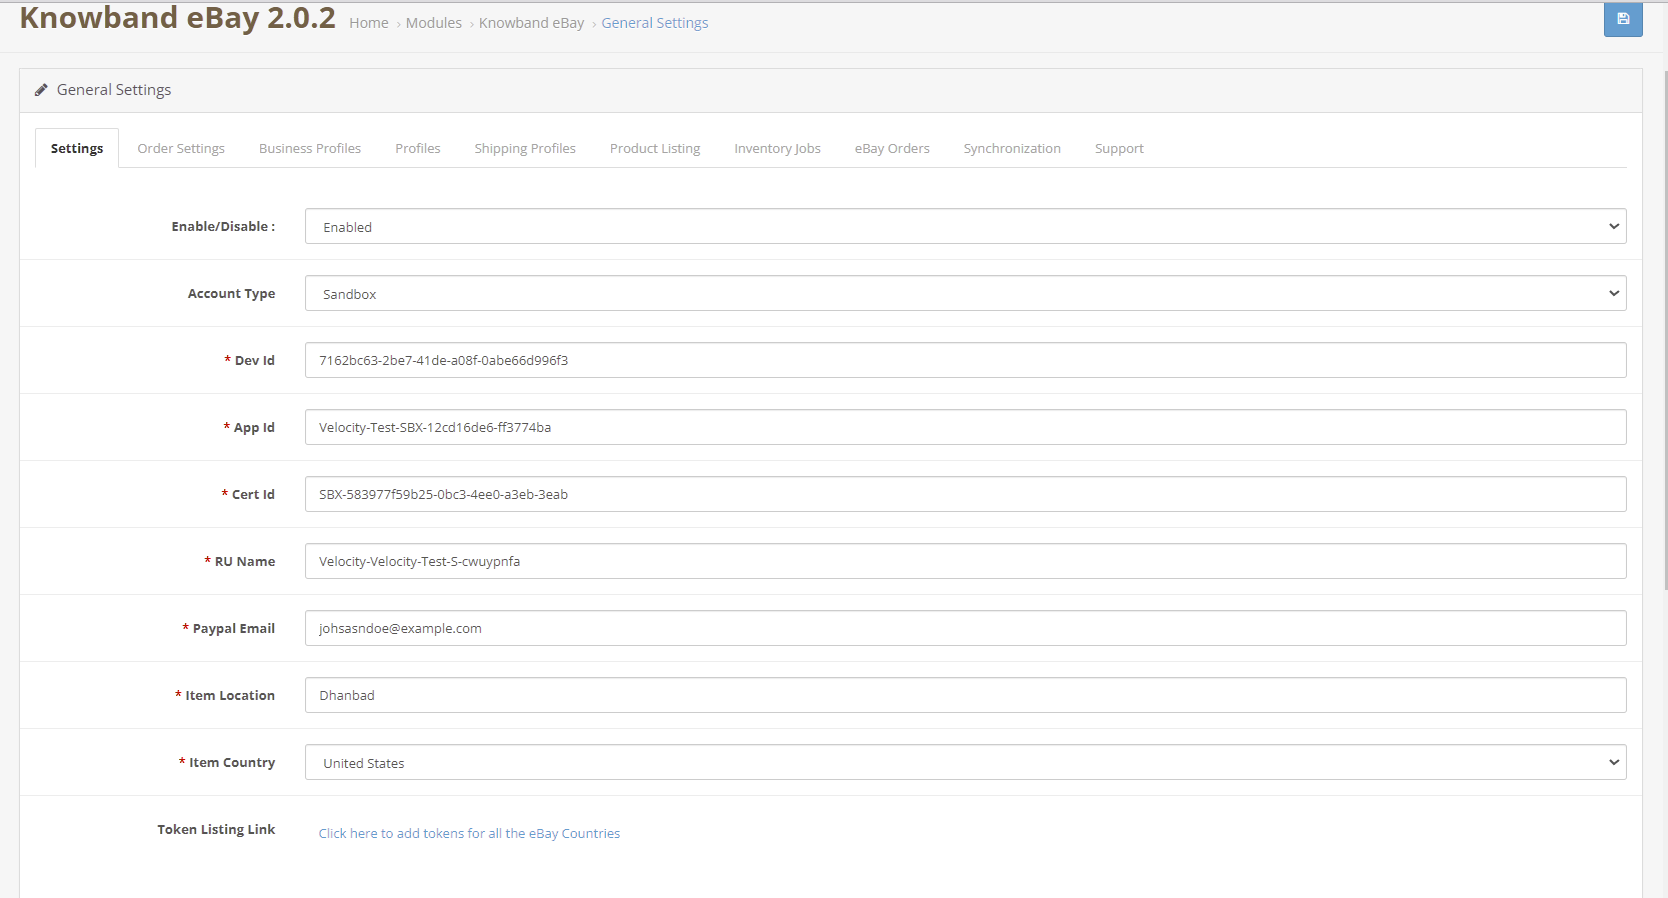
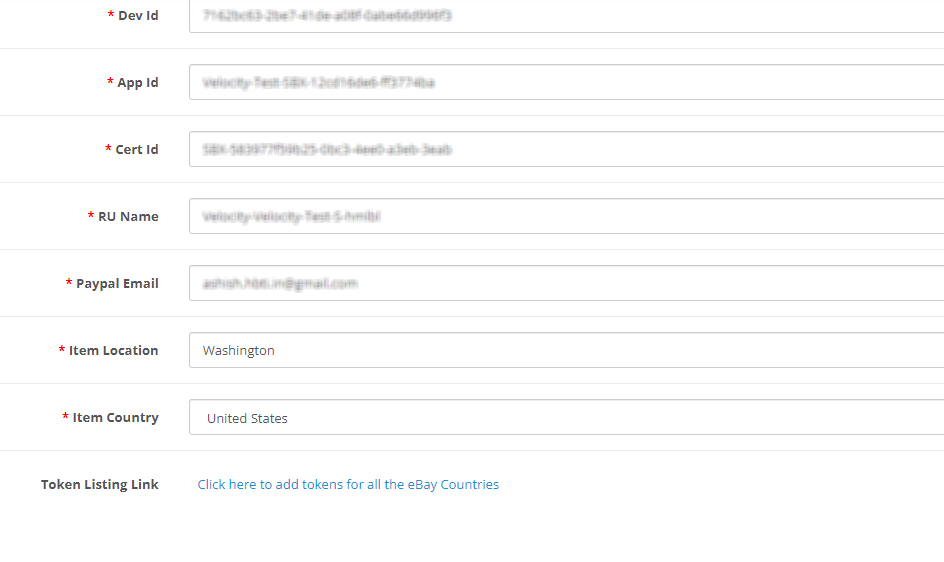
Fill out the form shown in the General settings section. Each field for the configuration panel of the OpenCart eBay Connector Plugin is explained below:-
1. Enable/Disable
The drop-down menu consists of Enable or Disable option. Select the options to enable/disable the eBay OpenCart API integrator.
2. Account Type
The admin can either choose the Sandbox account for testing purposes or the Live eBay account for the final store integration.
3. Dev Id
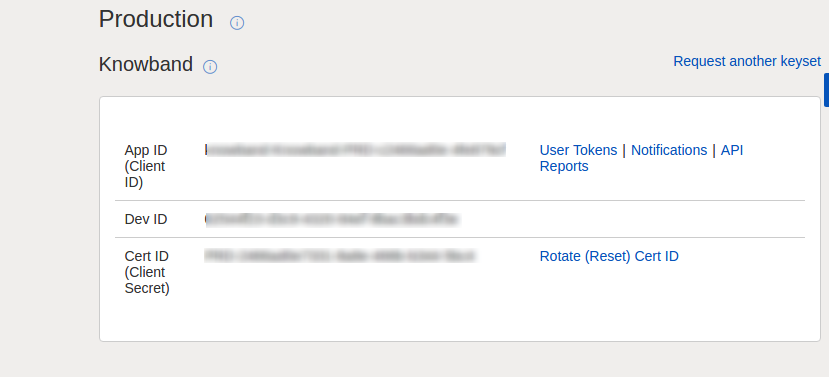
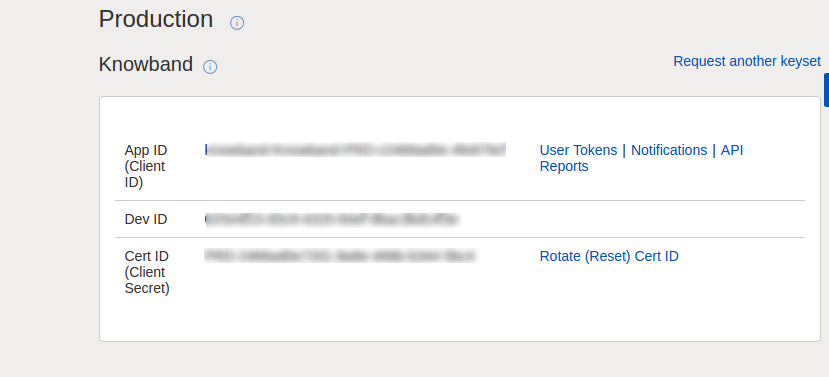
Enter the Dev ID of your eBay account here. To find your Dev ID, sign in to the eBay developer account. In the application key section, you’ll find App ID, Dev ID, and Cert ID as shown in the image below.
4. App Id
Copy the App ID from your eBay account as shown above and copy it in this field.
5. Cert Id
Enter the Cert Id of the eBay account in this section. You can find the Cert Id as shown in the above image.
6. RU Name
Enter the RU Name of the eBay account. To obtain your RU name, go to the ‘Get a Token from eBay via Your Application’ tab after adding a redirect URL.
7. Token
Click on the Token Listing Link from the general settings of the module.
2. Login with your eBay seller’s account.
3. A message will be received of success or failure.
4. Follow the instructions given in the window.
5. Once Token is connected, you can enable/disable countries.
8. Paypal Email
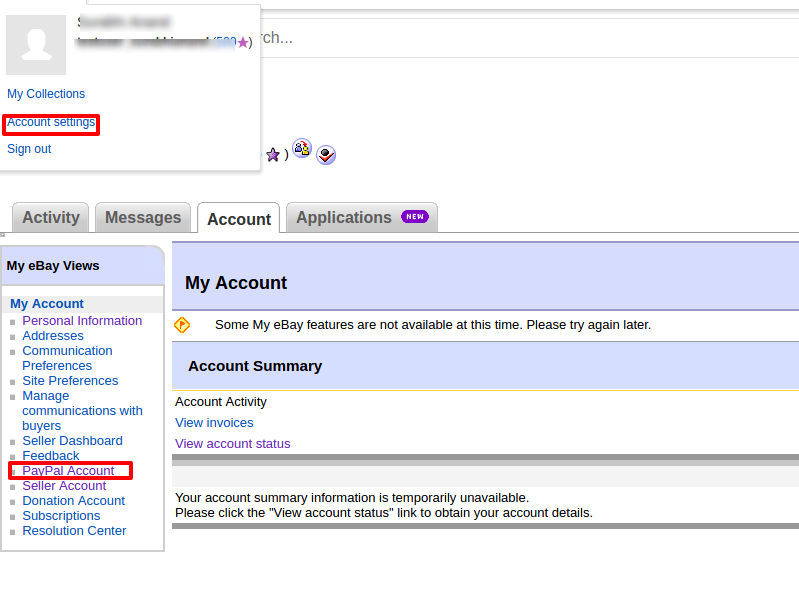
Enter a valid PayPal ID connected to your eBay account. Follow the steps mentioned below:
Log in to your eBay seller account.
Click on account settings from the top-left dropdown and click on Paypal account.
3. Now Sign up or link your already created PayPal account with the eBay seller account.
4. On clicking Sign Up, you will be redirected to the PayPal account creation page. Just create a profile by filling in the details and linking it to your seller’s account.
9. Item Country: Choose the product country from the list of country choices available.
10. Item Location: Enter the location (within that country) of the product while creating the admin profile in the admin panel.
3.2 Order Settings
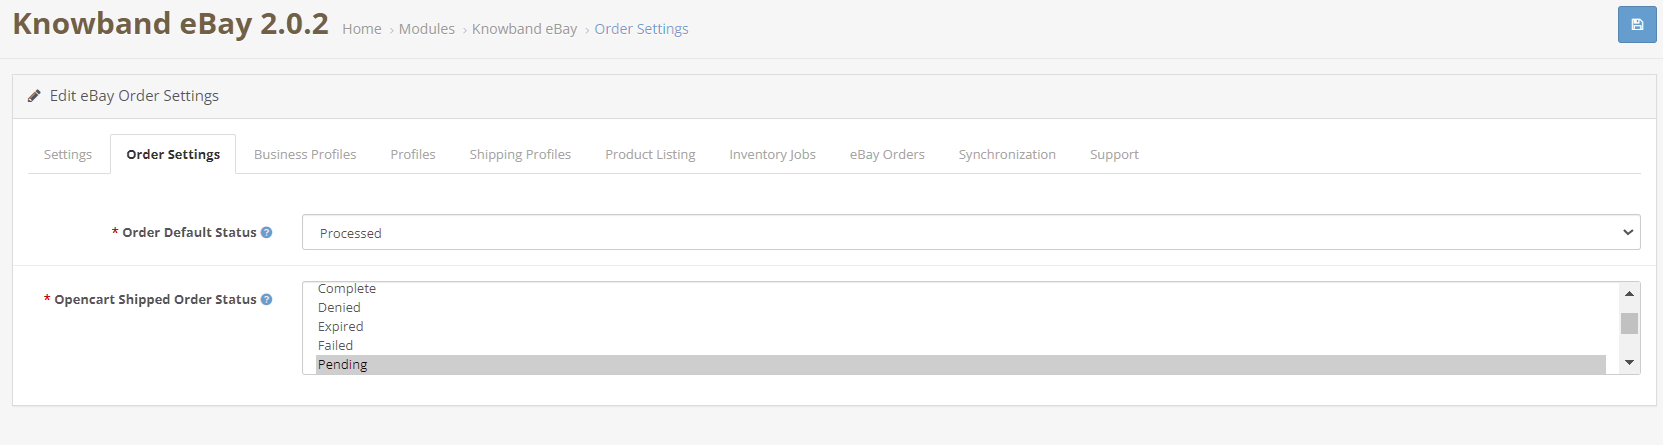
The OpenCart eBay Integrator allows the store admin to process the order to form the OpenCart admin panel. The admin can select the default order status from this tab. Further, sync with the marketplace by executing cron in the Synchronization tab.
Order Default Status: Default status is the first status of the order when it is placed in the store. Select the default status of the orders that will be displayed in the marketplace.
OpenCart Shipped Order Status: Shipped status means that ordered items have been shipped. Select the status for shipped orders.
3.3 Profiles
The OpenCart eBay Marketplace connector extension offers an option of a profile-based product listing to the store admin. The merchants can create profiles and manage them from the back-end of the OpenCart eBay Integration Addon.
3.3.1 How to Create a New Profile?
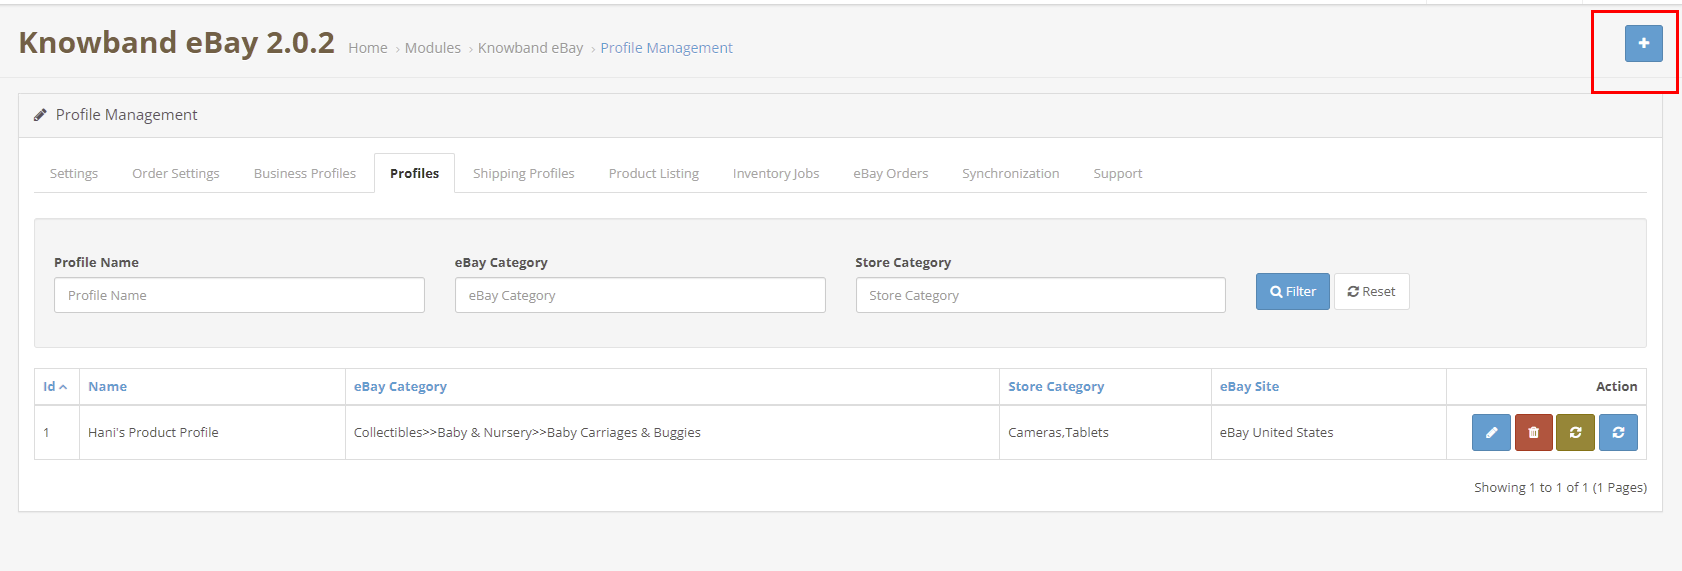
To create a new profile, click on the ‘+’ sign in the top right section.
The profile management tab of the OpenCart eBay connector plugin is further categorized into two tabs:
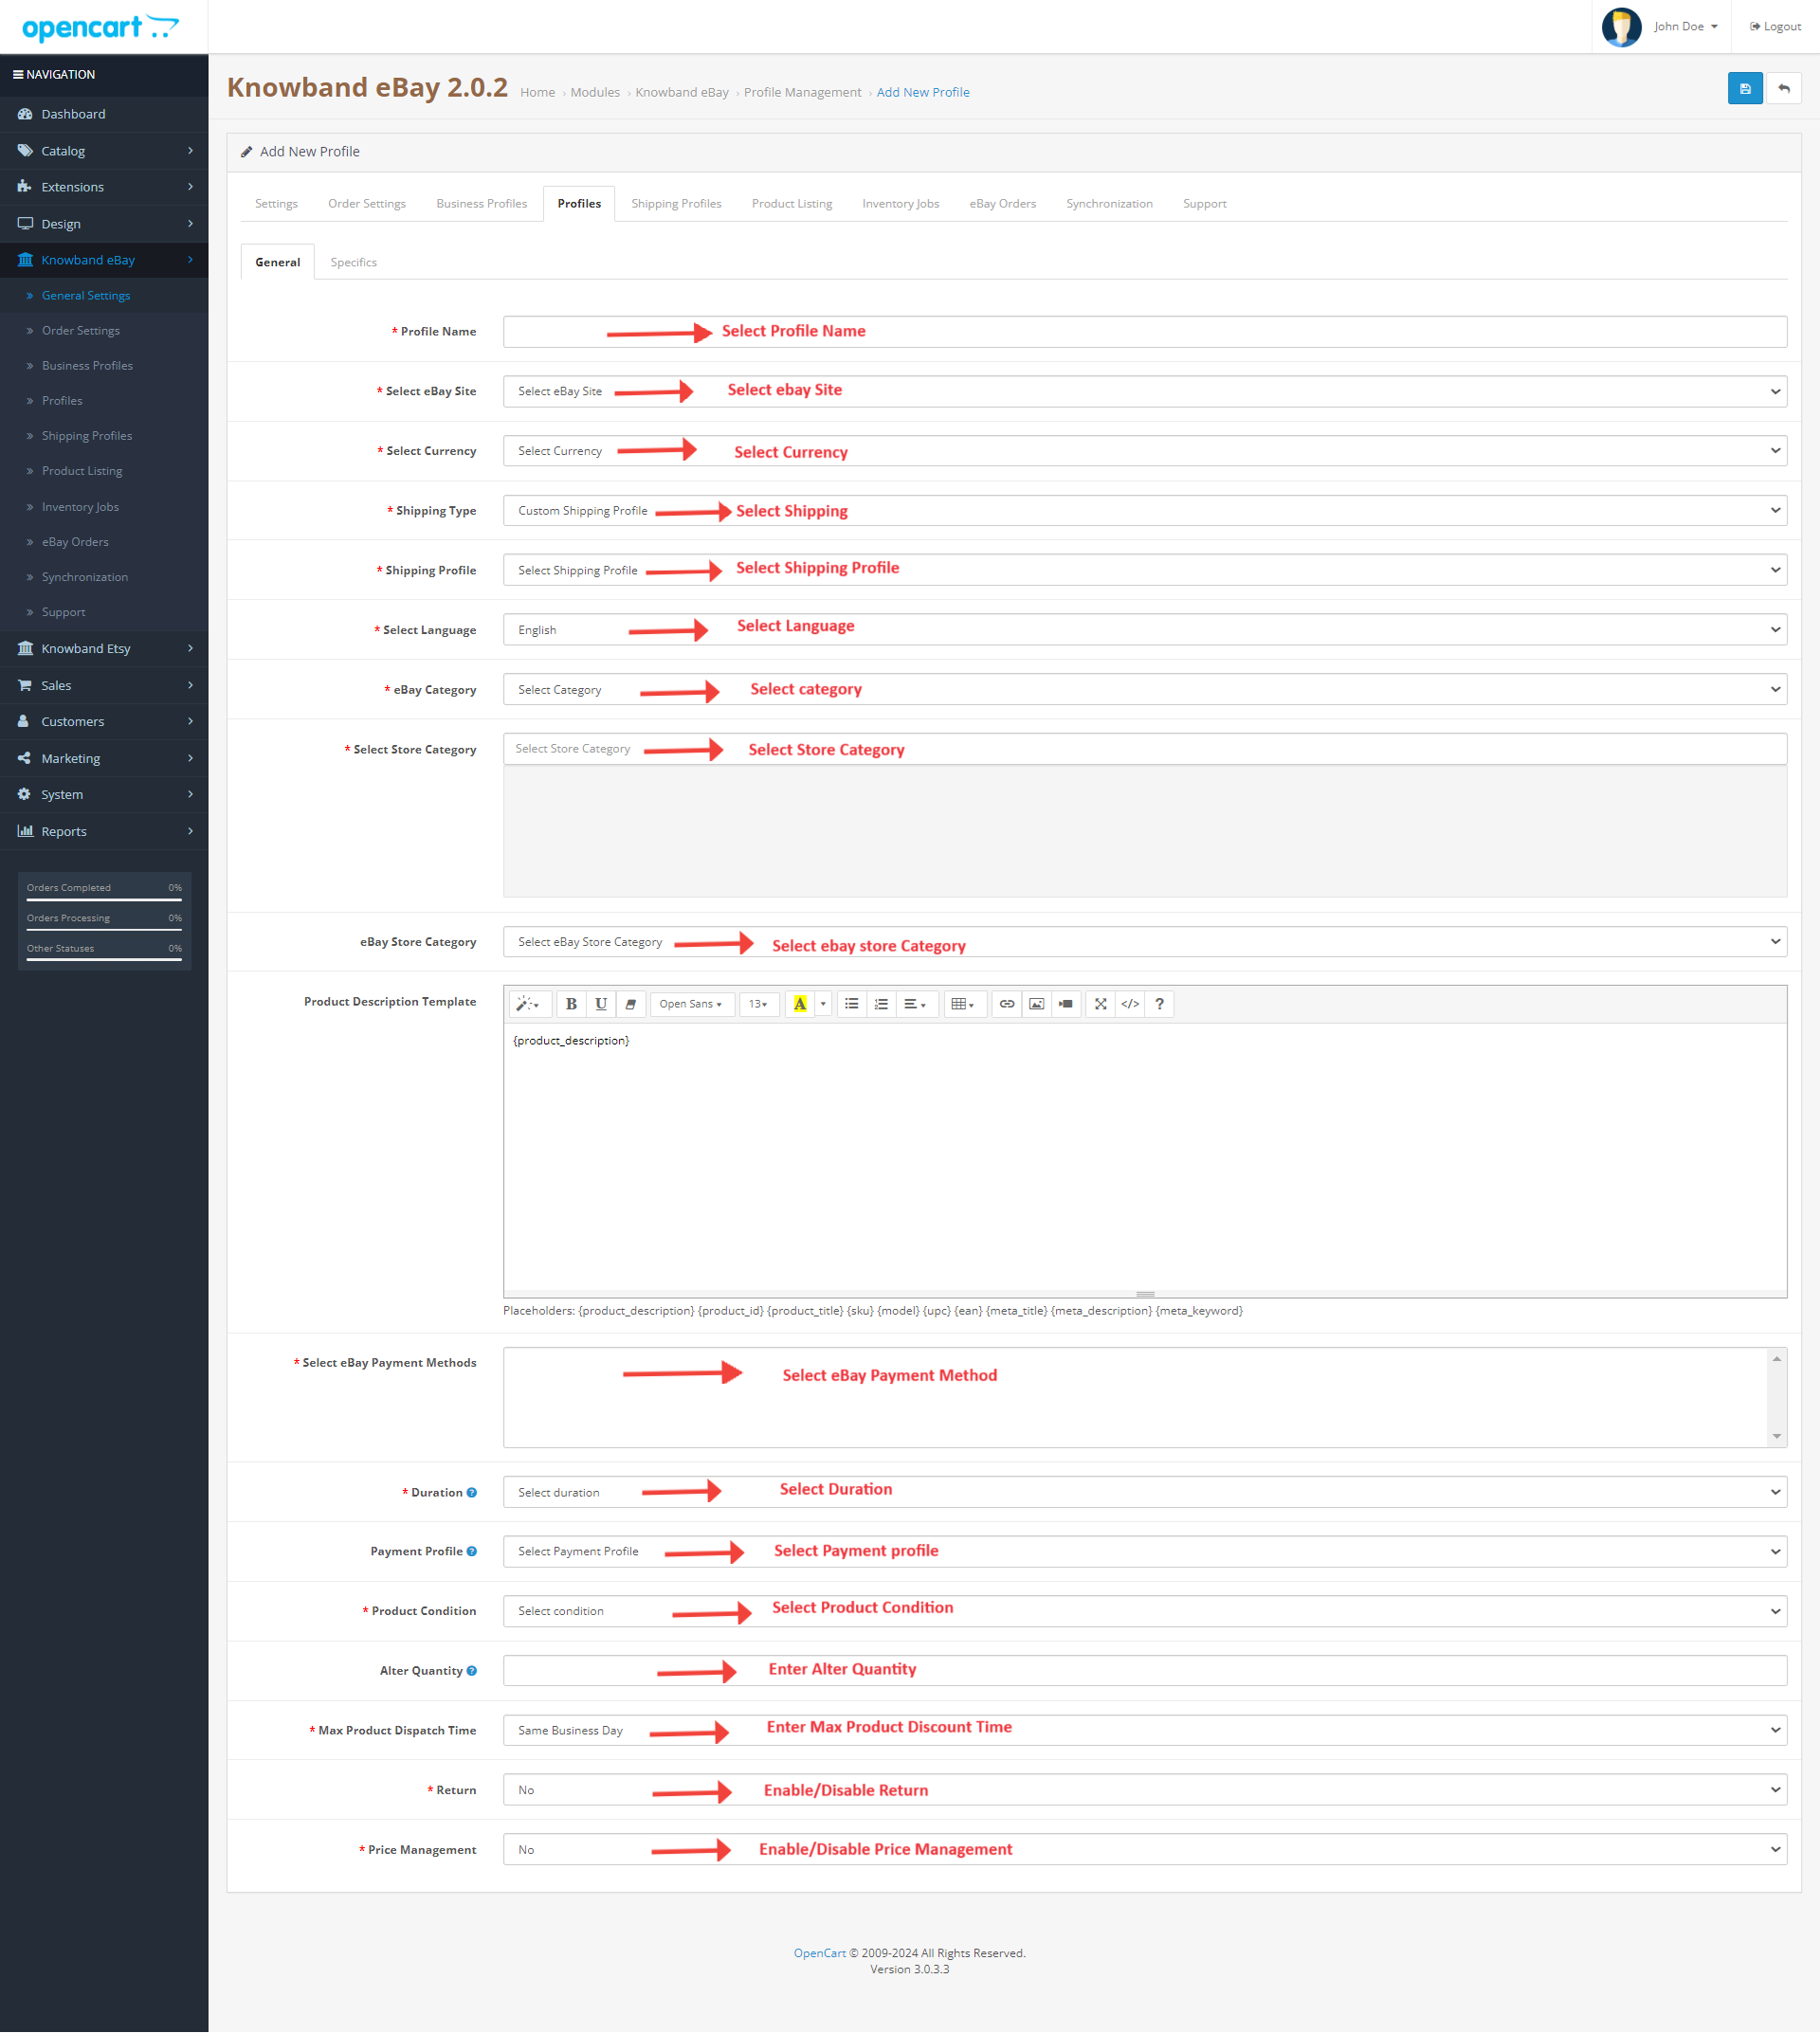
General
Specifics
3.3.1.1 General
Profile Name: Enter a unique name for the profile here.
Select eBay Site: The eBay OpenCart API integrator allows the store admin to integrate their site with multiple eBay sites operating worldwide. Further, select the site from the drop-down menu.
Select Currency: Select the Currency type.
Shipping Profile: Select a Shipping Profile.
Select Language: Select the language.
eBay Category: The admin can easily map the eBay categories with OpenCart categories. Select the eBay category from the drop-down menu in which you want to map the categories of the OpenCart store.
Select Store Category: Check the categories that you want to map in the respective category of eBay. The store admin can map multiple categories of the store with a single category of eBay.
Select eBay Payment Methods: Check the payment methods that you want to map on eBay.
Duration: Select the duration for which the products of the profile are to be listed in the eBay marketplace from the drop-down menu.
Product Condition: Select the condition of your product to be listed.
Alter Quantity: The quantity is the minimum quantity that will be sent to eBay for listing. That is if “20” is the quantity set as “Product Quantity” in the profile and the quantity of any particular product is greater than “20” (Opencart product quantity ) let’s assume “30”, then, “20” will be sent as the product quantity to eBay for that product and if the product quantity is less than “20” let’s assume “7”, then, “7” will be sent as the product quantity to eBay.
Maximum Product Dispatch Time: Enter the maximum expected product dispatch time.
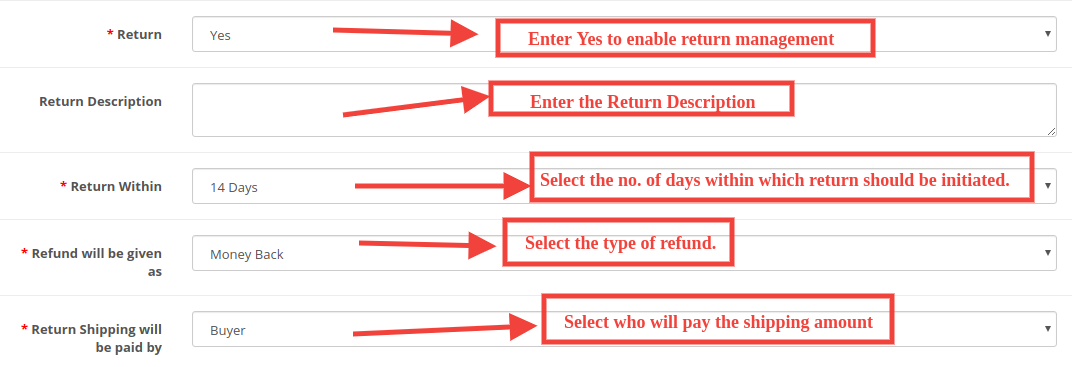
Return: Select whether you want to offer the return option for the listed products. If the admin selects Yes, then, the customers would be allowed to return the products.
Return Description: Enter the suitable return description.
Return Within: Select the no. of days within which return should be initiated.
Refund will be given as: The drop-down list shows several options in which the refund can be initiated. Select the one that suits your requirements.
Refund Shipping will be paid by Select who will pay for the shipping amount of the returned products.
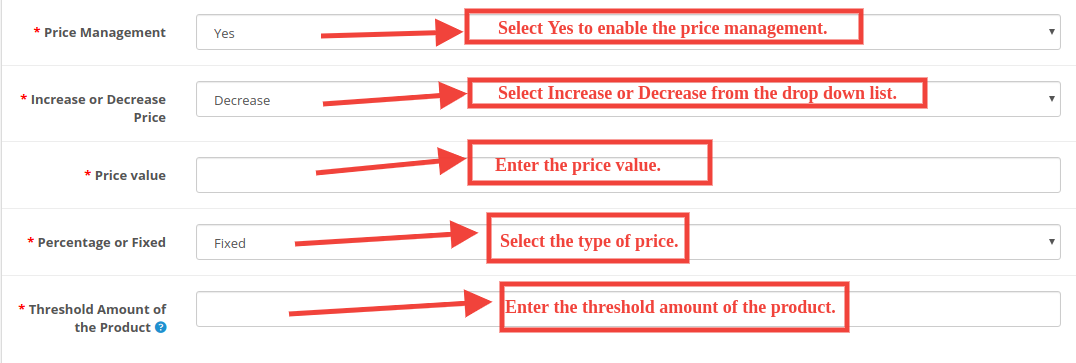
Price Management: Enable/Disable price management. If the admin selects Yes, then, the sellers would be allowed to manage the product price.
Increase or Decrease Price: Select an Increase or Decrease from the drop-down list.
Price value: Enter the price value.
Percentage or Fixed: Select the type of price.
Threshold Amount of the Product: Enter the threshold amount of the product.
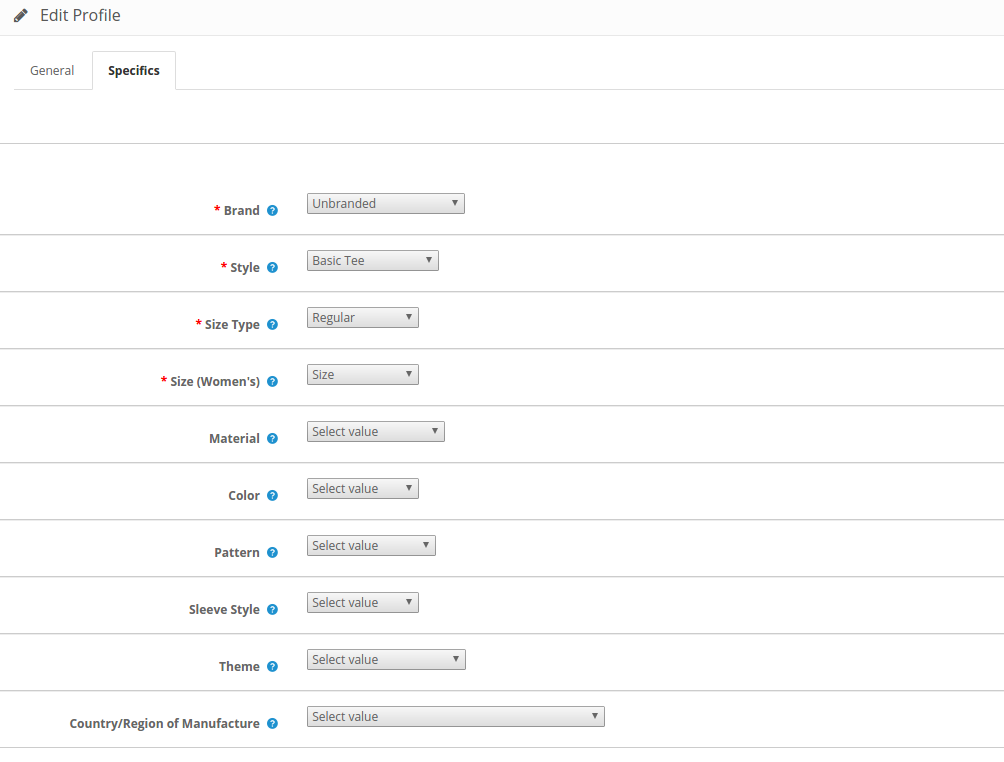
3.3.1.2 Specifics
The specifics in this section appear as per the eBay category selected in the General tab. The field marked with * is mandatory.
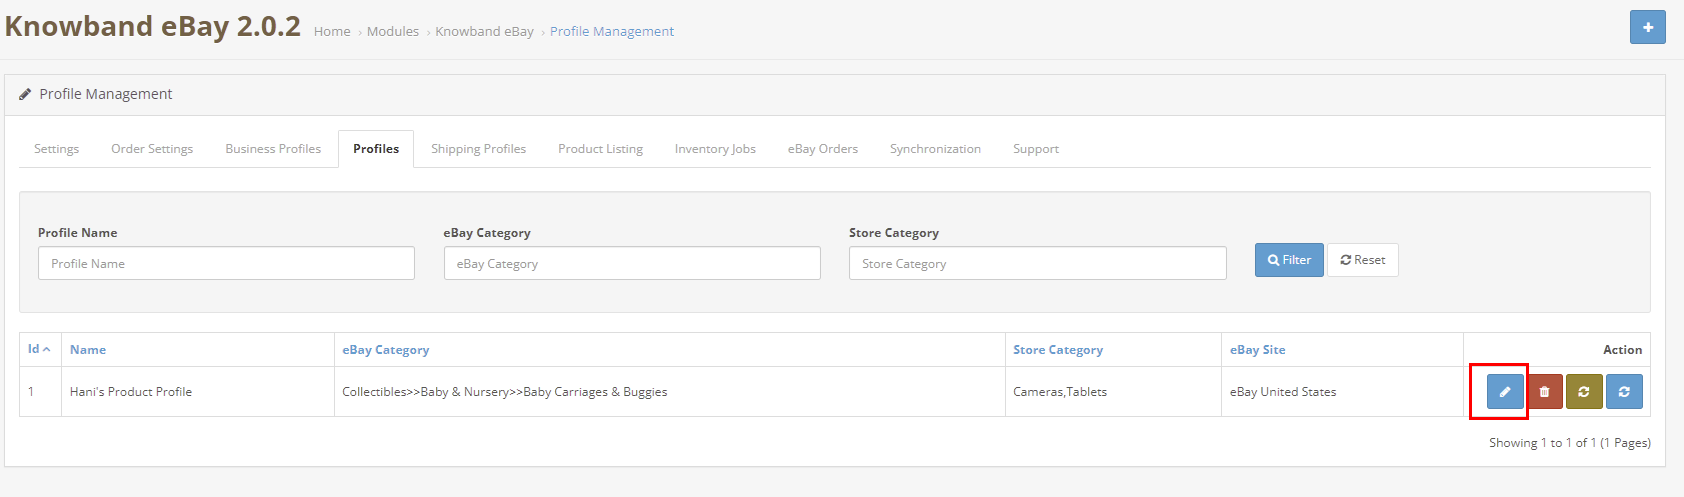
3.3.2 How to Edit the existing Profile?
The store admin gets an option to edit the existing profile as per the requirement from the back-end of the OpenCart eBay Integrator extension. Click on the Edit button corresponding to the profile to make the changes as shown in the image below.
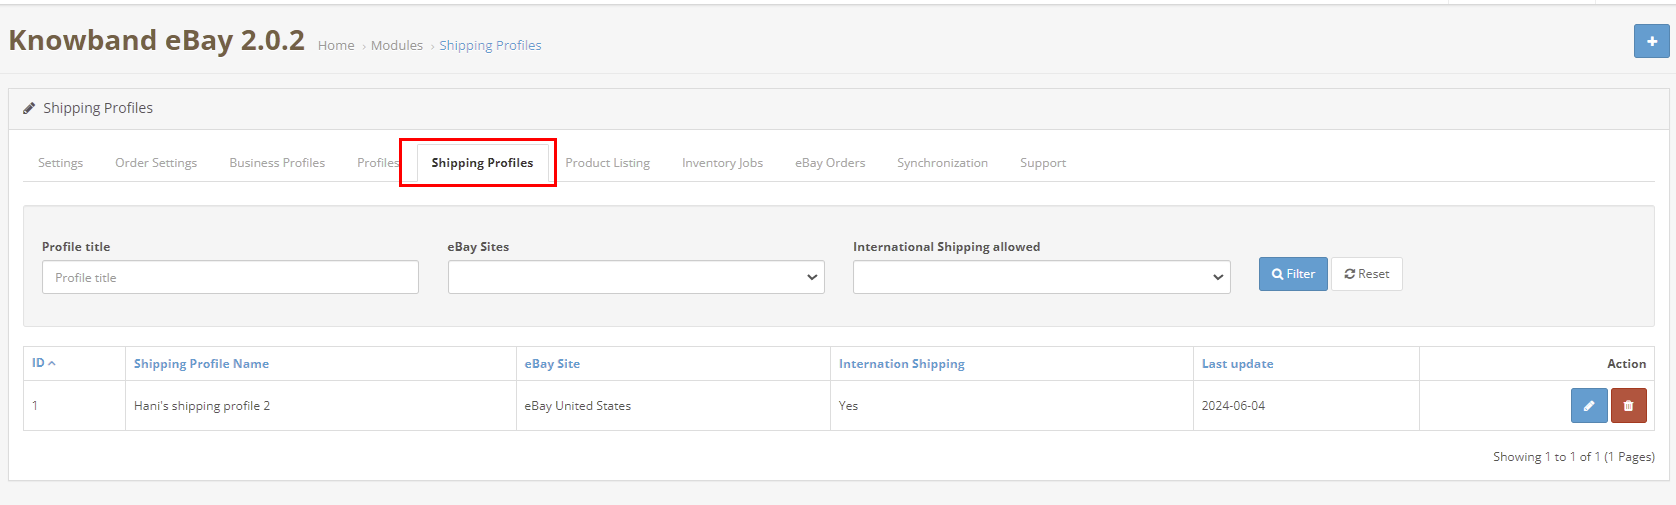
3.4 Shipping Profiles
This tab showcases the list of all the shipping profiles of the eBay Marketplace.
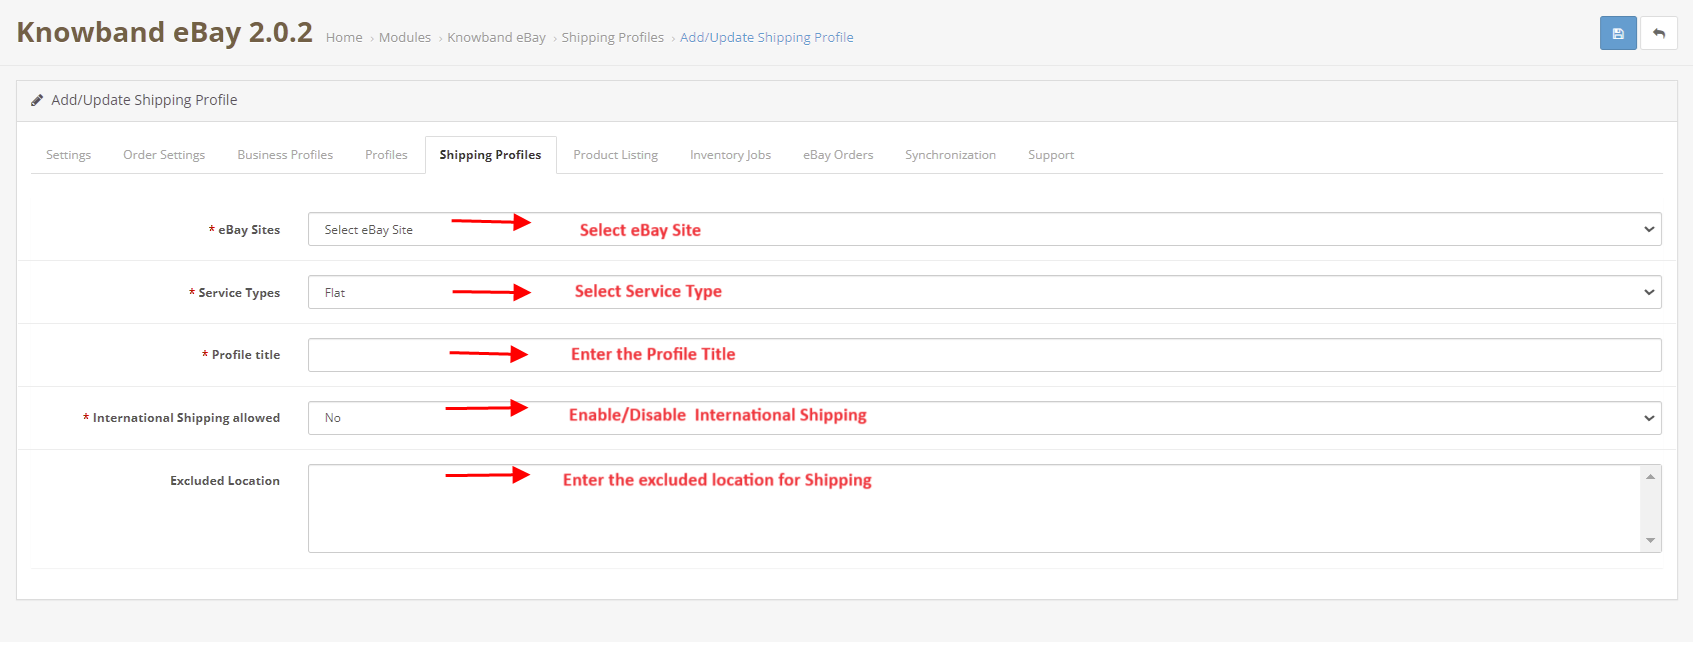
You can add multiple shipping profiles while you can also edit the existing shipping profiles too.
eBay Sites: Select the eBay site. Service Types: Select the service type. Profile Title: Enter the profile title. International Shipping allowed: Enable/Disable the international shipping. Excluded Location: Enter the excluded locations for shipping.
3.5 Product Listing
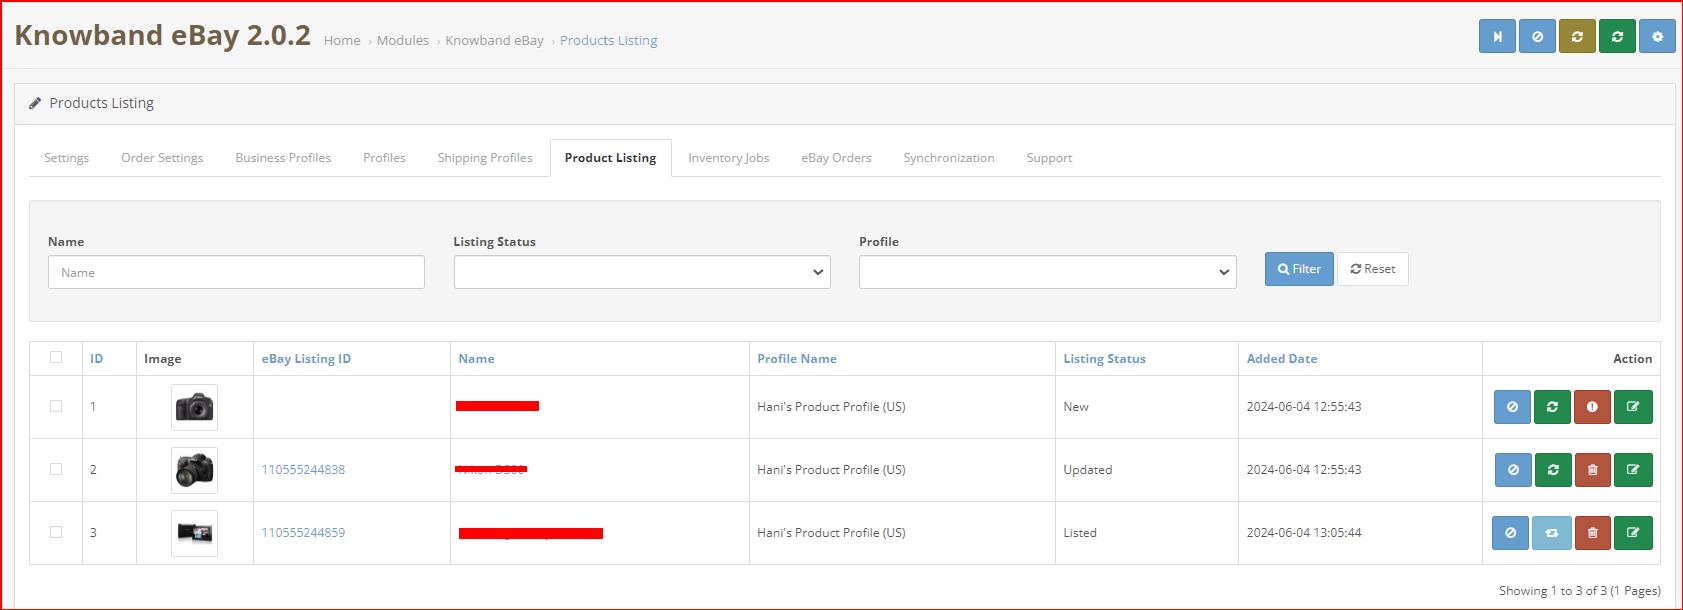
The OpenCart eBay Marketplace integrator makes it easier for the OpenCart store admin to view the product listing report. The products listed in the marketplace can be viewed from the back-end of the OpenCart eBay Integration plugin. The admin can remove the products by clicking on the ‘Delete’ button as shown in the image below.
There are the following options available corresponding to each product listing:
Disable the Product
This tab enables the admin to disable the product from the backend of the module. After disabling the product, it will not be shown on the front-end of the Marketplace. It can be only visible after enabling the product from the backend.
Product Listing Relisting
This option offered by eBay Prestashop integrator allows the admin to relist products in case the listing is expired on eBay Marketplace. To relist the product, the admin has to click on the “Relist” action given in bulk actions.
Product Listing Revision
If any update is done in product details then by default it will be marked as updated and if cron is set for this action then it will be sent for revision. If the admin manually wants to send products for revision then he can mark the product and click on “revise” from bulk actions.
Individual Product Synchronization
This feature enables the admin to sync the products one by one (Along with the bulk sync option at the top right corner). By this, the admin can filter out the products that need not be shown on the front end of the eBay Marketplace.
Delete the product
This feature enables the admin to delete the product. Admin can simply click on the Delete button and the product will be deleted from the front-end of the website.
Adding products from the product listings tab
If you want to add a product to the product listing tab, the admin has to create a profile of the product in the Profile section of the module. (read section 3.3.1) There you will get a step-by-step procedure of creating a profile and adding the product in the products listing tab.
Different statues in the filter of the product listing
Here are some different statuses in the filter of the product listing.
New: After applying this filter, the admin can view the new products listed on the Marketplace.
Listed: After applying this filter, the admin can view the listed products listed on the Marketplace.
Disabled: After applying this filter, the admin can view the list of disabled products.
Updated: After applying this filter, the admin can view the updated products listed on the Marketplace.
Ended: After applying this filter, the admin can view the list of ended products.
Relisting: After applying this filter, the admin can view the relist products listed on the Marketplace.
Listing a Product with Custom Product Details: The Opencart eBay marketplace connector provides custom product details features that enable listing the Opencart store’s products with a different name and different product description on the eBay marketplace.
Use Product Details: The store admin can enable/disable this feature from this button.
Custom Product Title: Enter the customized product title you want to synchronize on the eBay marketplace.
Custom Product Description: In this section, you can add the different product descriptions that you want to synchronize on the eBay marketplace for the mentioned product listing.
3.6 Inventory Cron:
This feature allows the store admin to sync the inventory of all the listed products from the OpenCart store to eBay.
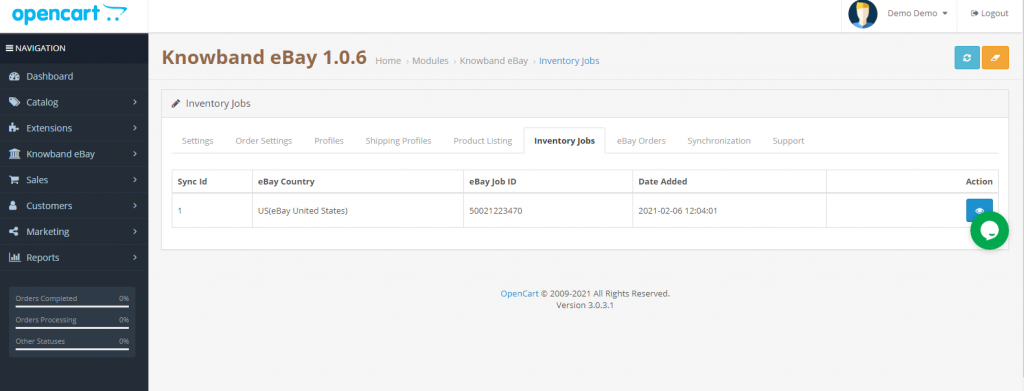
3.7 Inventory Jobs
This section has a button “Sync Inventory of Listed Product” on the top right side to sync the inventory of all the listed barcodes to eBay.
It also shows the list of Job IDs corresponding to the country with the date of the last inventory sync of all listed products.
On the click of view button, it will open the log of inventory sync for that Job Id where we can see the variants for inventory have been updated with eBay status.
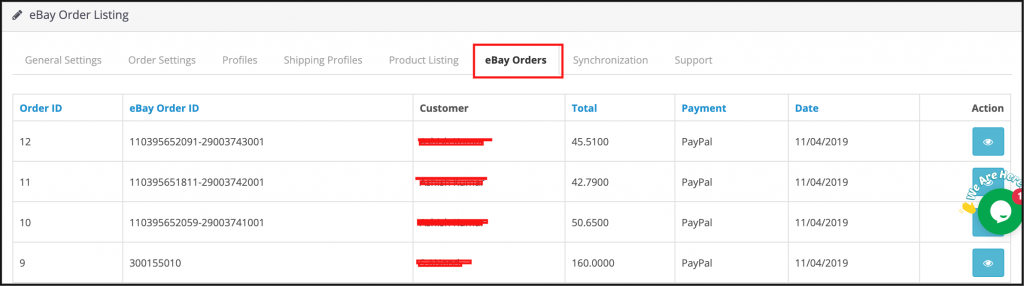
3.8 eBay Orders
The orders received from the marketplace sync with the OpenCart store by executing cron in the Synchronization tab of the OpenCart eBay Marketplace connector module admin panel.
The orders will be listed in this tab as shown in the image below:
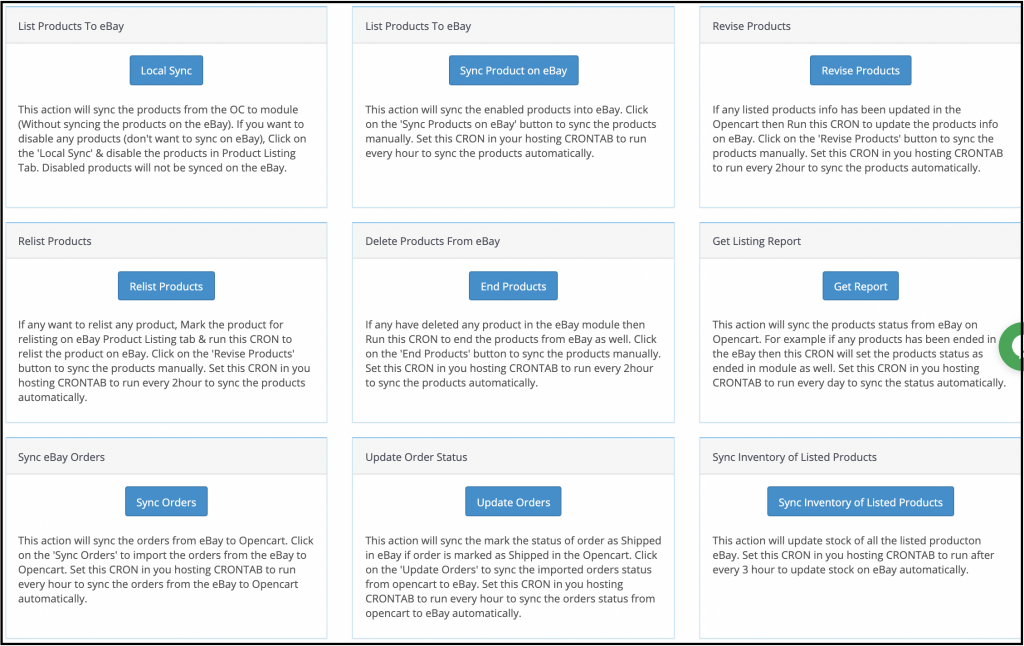
3.9 Synchronization
The eBay OpenCart Connector extension allows two-way integration to the OpenCart store owners. The merchants can list the products and the related details in the marketplace with the help of this OpenCart eBay API Integration. At the same time, the orders sync back from the eBay marketplace to the OpenCart store.
OpenCart eBay Connector Module offers three synchronization options offered including Category, Product, and Order synchronization.
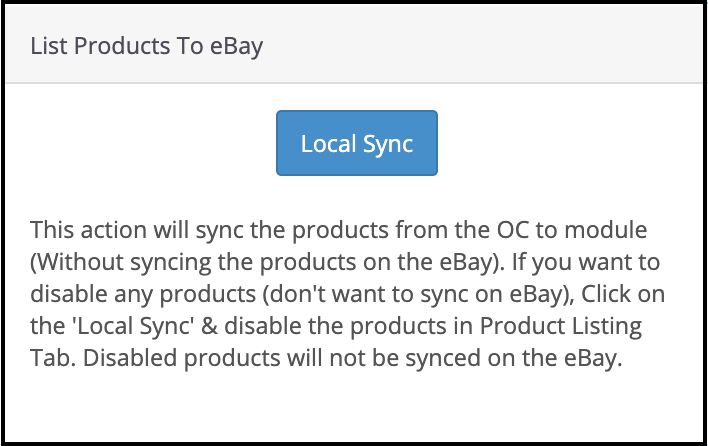
3.9.1 How to sync the Products from the store to Opencart eBay Knowband Module?
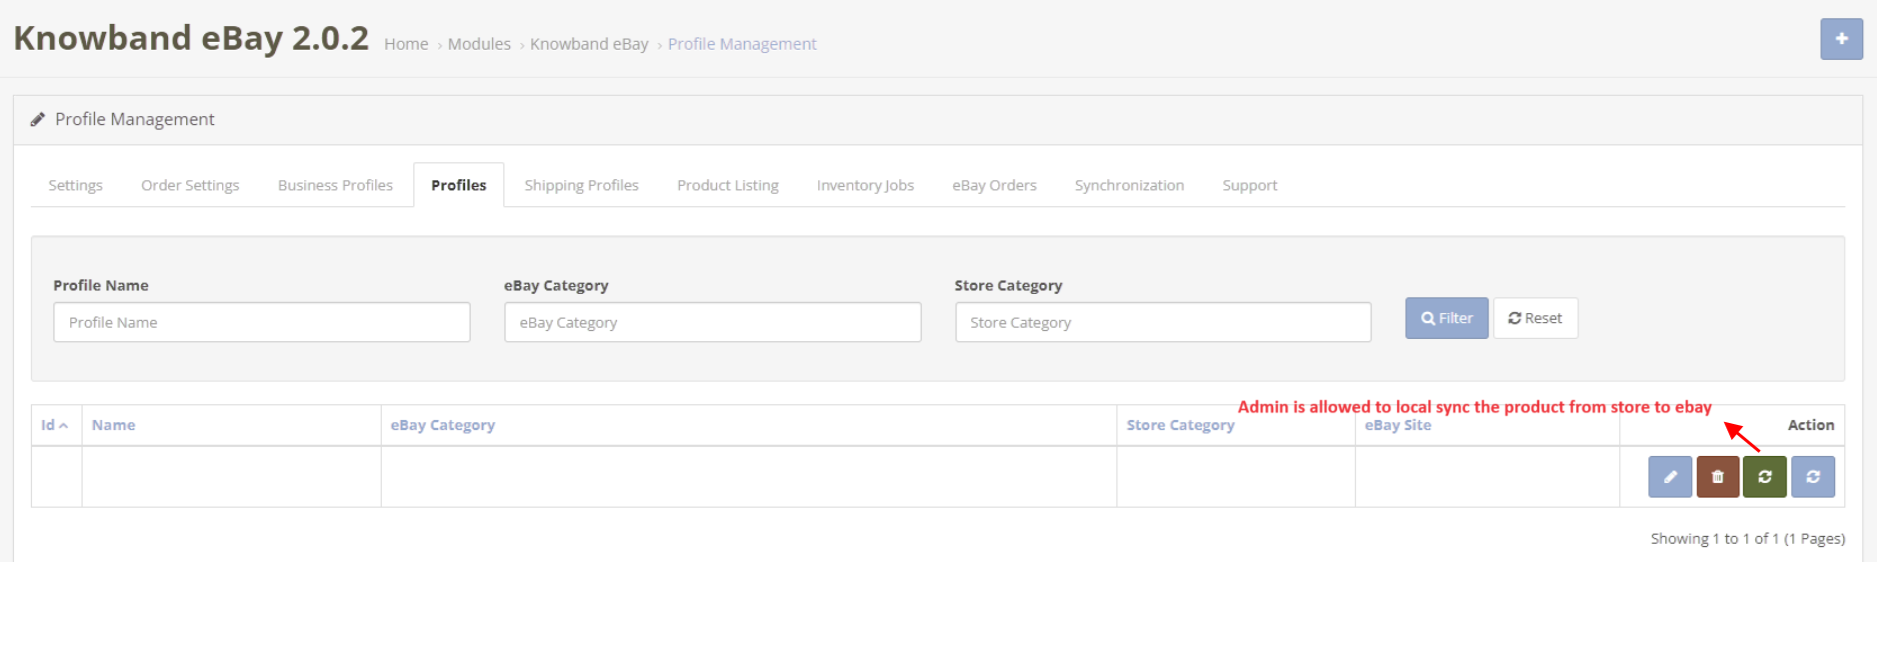
Add the shipping template and profile in this module. Now, click on the “Local Sync” button to sync products from the Opencart store to this module.
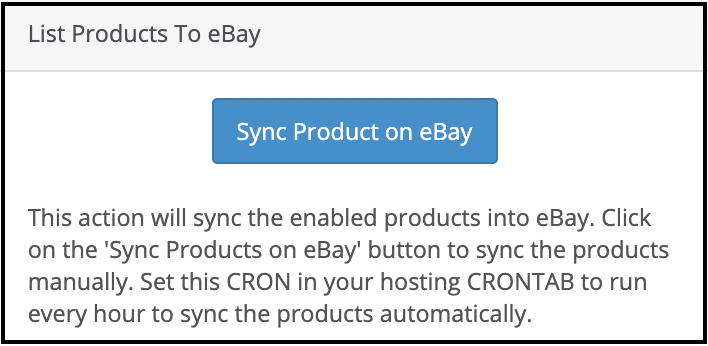
3.9.2 How to sync the Products with the eBay Marketplace?
Following are the steps to synchronize the profiles with eBay Marketplace –
Go to the Synchronization tab.
Select the profile whose products you want to list. Sync the profile with eBay.
Click on the “Sync Product on eBay” button as shown below.
It would perform the following actions –
Add the products in the marketplace with the respective product details.
It will list products to eBay from your OpenCart store.
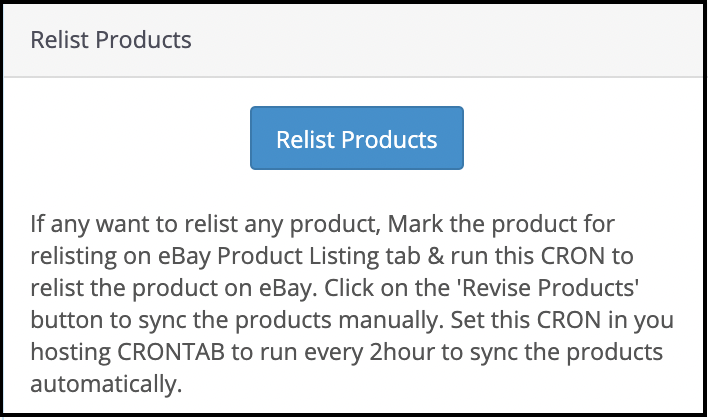
3.9.3 How to Relist the Products in the eBay Marketplace?
Click on the “Relist Products” button as shown below.
The cron job will relist the products that have expired from the marketplace.
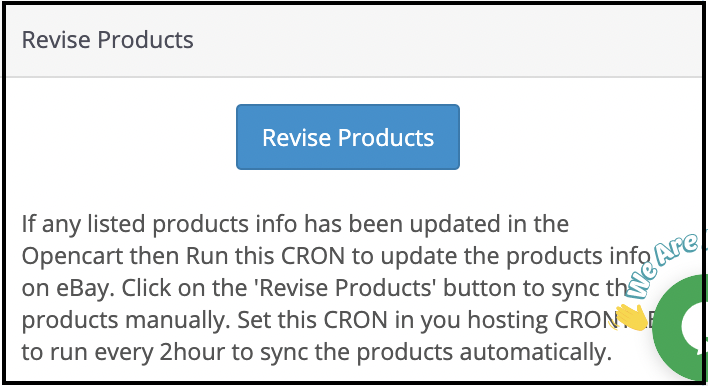
3.9.4 How to Revise the product on the eBay Marketplace?
Click on the ‘Revise Products’ as shown below to revise the products on the marketplace. Any change in the product details, image, pricing, etc sync by executing this cron.
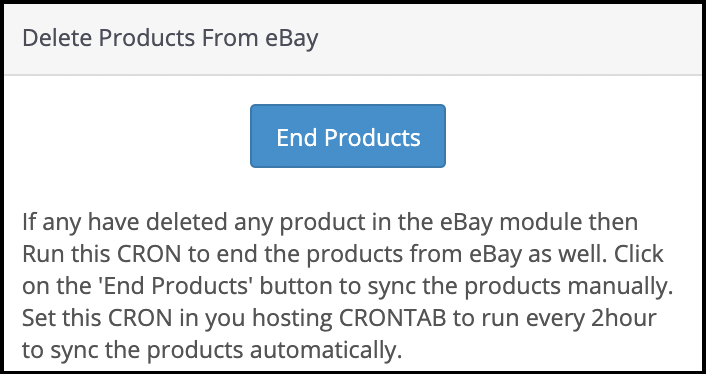
3.9.5 How to Remove a product on the eBay Marketplace?
Click on the ‘End Product’ as shown below to delete the products from the marketplace. The admin needs to click on the ‘Delete’ button in the products listing tab before executing this cron.
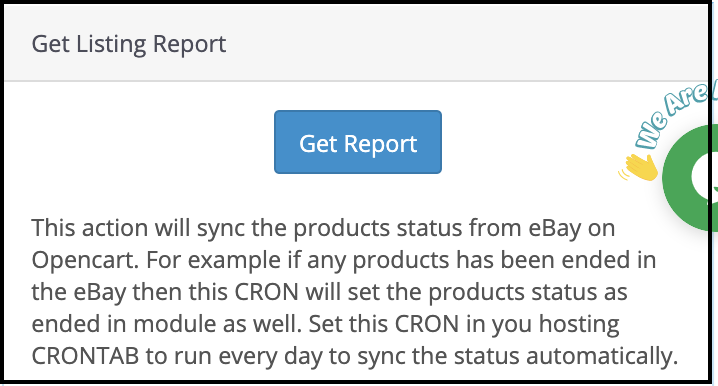
3.9.6 How to Import the listing report from the eBay Marketplace?
It fetches the product listing from the marketplace by executing the ‘Get Products Listing Report’ cron and updating the eBay status of the product on this module same as on the eBay marketplace.
3.9.7 How to sync Orders from the eBay Marketplace?
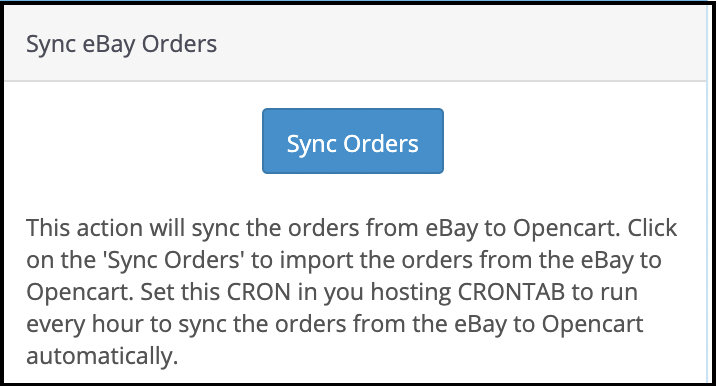
Click on the “Sync Orders” button to sync the orders received from the marketplace in the OpenCart store as shown below.
It would perform the following actions –
The plugin will sync all the Orders and related details from eBay Marketplace to the OpenCart store.
It creates the orders in the OpenCart store according to the details of the order received from the Marketplace. The admin can then process orders from a single interface, that is, from the back-end of the Opencart eBay Marketplace Integrator.
3.9.8 How to sync Order Status to the eBay Marketplace?
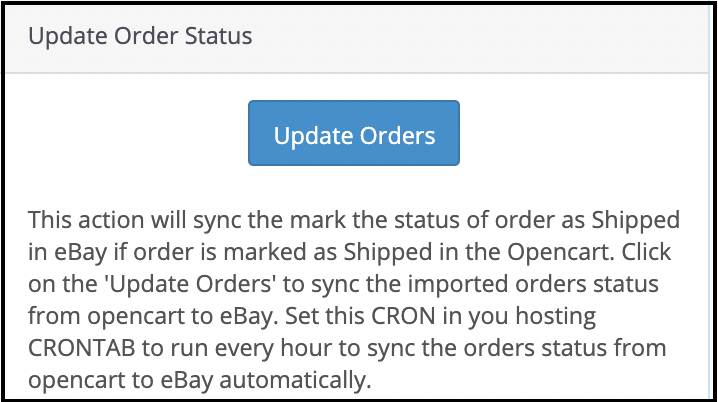
To sync the Click on the “Update Order Status on eBay” button as shown below.
It would perform the following actions –
The cron checks if there is any status update recorded by the OpenCart module for any order.
These updates are then synchronized with the eBay marketplace.
It updates the Status of Orders as per the configuration settings modification in the “Order Settings” tab of the admin interface of the Opencart eBay Marketplace Integrator.
3.9.9 How to sync inventory to eBay Marketplace for all Products?
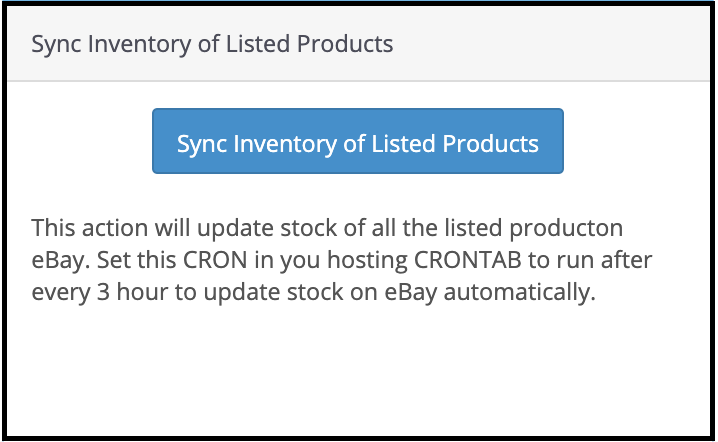
Click on “Sync Inventory of Listed Products” and it will update the inventory of all the listed products on the eBay marketplace.
3.10 How to Synchronize a Particular Profile on the eBay Marketplace?
All the crons available in the “Synchronization” tab of the Opencart eBay Connector plugin support all categories in bulk. However, if you wish to list or update a specific profile only, you can manage this task from the “Profile Management” tab.
In this section, we provide the “Local Sync,” “Sync Products,” and “Sync Product Status” crons to offer the Opencart admin flexibility in managing category-level synchronization between Opencart and eBay.
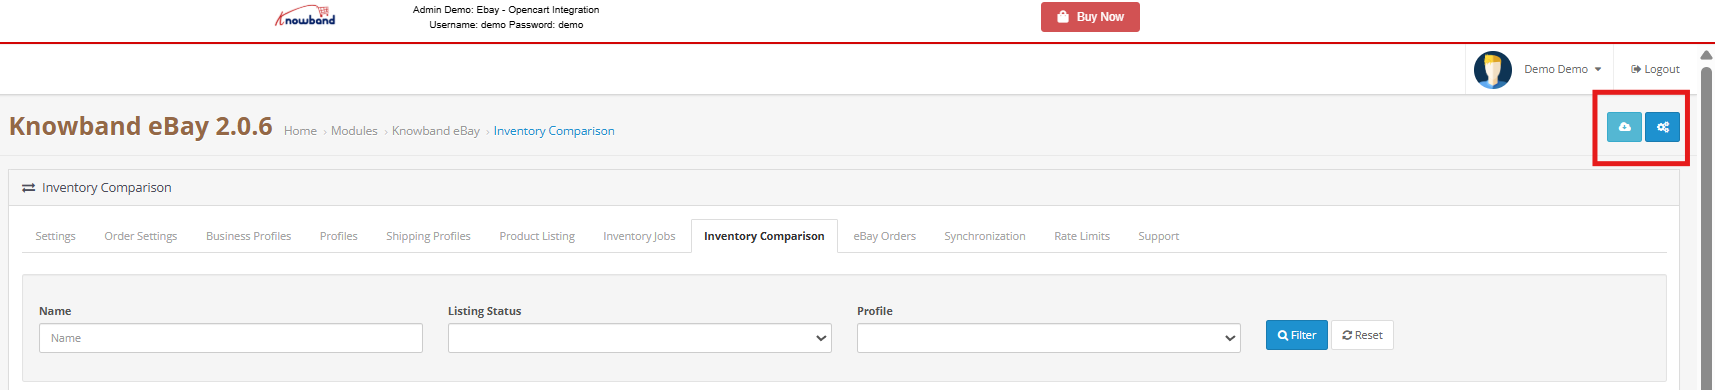
4.0 [New Enhancements] Inventory Comparison with eBay
The Inventory comparison tabs allows the Opencart store owners review and compare product stock available or quantity in their OpenCart store with the stock listed on eBay. This makes it easy to spot quantity differences and keep product availability consistent across both platforms.
By regularly checking this section, sellers can reduce the risk of overselling, avoid out-of-stock situations, and maintain smooth inventory management without manual checks.
The comparison process runs through two cron jobs that work together to collect and verify inventory data.
4.0.1 Fetch eBay Stock Data through Submit a Request to fetch eBay Inventory Cron
This scheduled cron fetches the latest product quantity details directly from your connected eBay account. When the cron runs, the fetched stock values are stored and displayed in the Inventory comparison section for reference.
Running this task ensures that the system always has updated eBay stock information ready for comparison.
4.0.2 Verify Inventory Data Using Process Last Inventory Request Cron
After the eBay inventory is fetched, this cron job compares the retrieved eBay quantities with the current inventory on your opencart. Furthermore, based on the comparison, this feature flags Yes or No depending on whether the stock values match or differ.
The results are clearly shown in the Inventory Comparison tab, helping store owners take quick action when needed.
4.1 API Usage & Rate Limit Monitoring
The Opencart eBay Marketplace Extension provides an API usage monitoring feature that helps track all eBay API interactions. Furthermore, it shows how many times each API has been called, along with the total limit and remaining available calls.
When an API request reaches or goes beyond the permitted limit, this feature automatically shows in the tab. This helps prevent interruptions and ensures the smooth operation of all syncing processes.
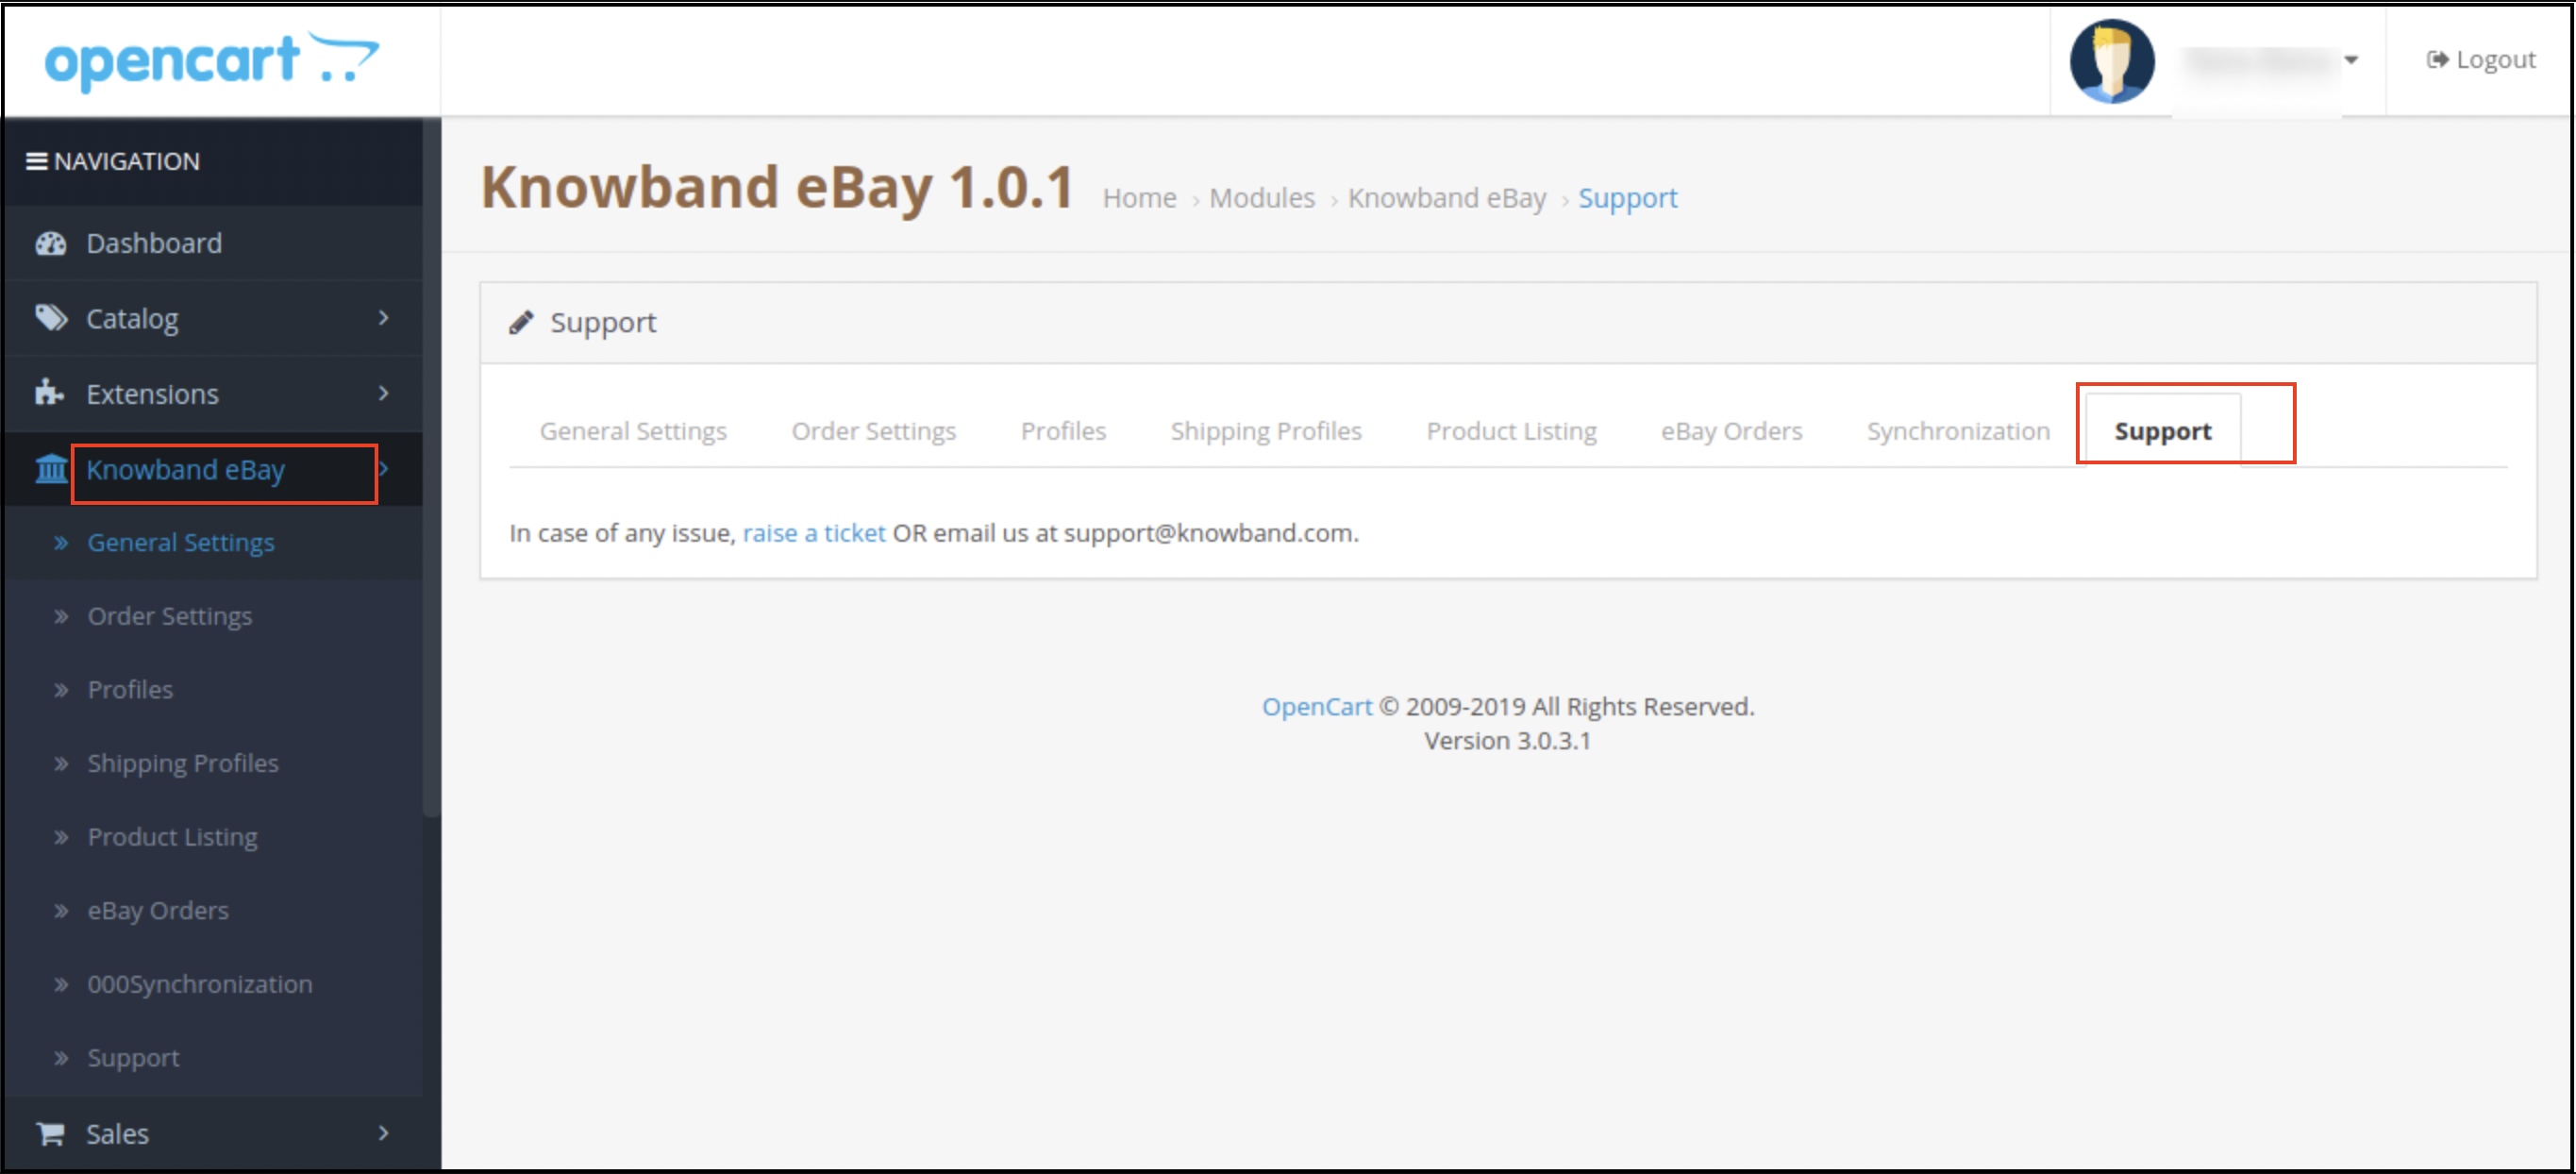
5.0 Support
This tab is for admin support. In case of any query, the admin can raise a ticket or mail it to the email ID given in the support tab.
You can try this Opencart eBay Marketplace Integrator for your OpenCart store at budget-friendly prices.
Full Tutorial of eBay Marketplace Integration Extension for OpenCart
This OpenCart eBay Marketplace Integration tutorial provides a complete step-by-step guide on installing and configuring the eBay integration module, connecting your OpenCart store with your eBay seller account, synchronizing products, categories, prices, and inventory in real time, managing orders seamlessly from the OpenCart admin panel, enabling automated product listing with advanced template controls, mapping store attributes with eBay specifications for accurate listings, and handling live/ended listings directly from your store.
Watch the tutorial here
Contact us at support@knowband.com for any query or custom change request as per your business requirement.