How to Increase Ecommerce Sales with Great Product Description

The product description is the most valuable element of the product page for an eCommerce website. It is important from a marketing point of view and it explains why the product is worth buying.

It is what convinces the visitor to take the final step- click on ‘add to cart’.

A product description aims to provide valuable information to consumers about the product’s characteristics and benefits so that they are forced to purchase.

Your product description should convert visitors into buyers, and then only it will be called successful product content. Visuals attract more than the text, hence optimize your product content according to your buyer persona.

To build scannable content, you can include short bullet points in your product descriptions for easy reading. Add concise content with limited sentences describing the commodity. Instead of exaggerating benefits, truthful material explains the product frankly.

The following article will be a complete guide for a product description that sells.

1.     A unique crystal clear product description

The product description should concentrate on their single value proposition, i.e. their primary benefit.

An average user just spends 15 seconds on your product page, as you already know, so it’s time to be impactful.

Sell advantages, not attributes, which means you have to highlight the outcome, not the object.

Clearly, consumers expect your product to achieve something and you have to persuade them that they can.

Add a size description or you can put a size chart if selling merchandise; this also reduces the product returns.

Prepare a buyer persona with keep things in mind, such as:

  • The location
  • The Age
  • Sex — Gender
  • The Interests
  • Level of Education
  • Revenue
  • Language Inside

This buyer persona will help you decide your target audience and you can put up a product description accordingly.

When writing the product description for an eCommerce, emphasize the product benefits that make it better than others.

2.     Keep the tone easy and understandable:

You will note that depending on the brand, the tone of the product description differs.

That’s a wonderful thing if the explanation of the product sounds like you.

Think of it as conversational or formal for your brand? Do you want to use the fun of tongue-in-cheek or do you keep it more straight-laced?

Maintain the tone and its consistency. Words like “exceptional,” “iconic” and one-of-a-kind” are prominently presented.

The argument is that you ought to be consistent with it, whatever your sound ends up being.

3.     Attractive and high-resolution product images

This is no secret: our brain just loves creative visuals.

The brain handles them more easily than text and allows us to guess the meaning.

In reality, visuals are so profoundly ingrained in our decision-making processes that every e-commerce website should be a priority, period. The product description with images is always attractive than simple text.

Add more than one image of your product because it increases the engagement rate and the customer may get convinced with your product images.

Since we are discussing the product images, you can add the zoom feature’ to the images.

For zooming purposes, you find an alternative where you can pinch-in and pinch-out. You can zoom in by double-tapping the product image on some websites.

4.     Evoke Curiosity

Price is one of the top three reasons why American customers shop from a specific e-commerce platform.

If you give better deals than your rivals, or if you have discounted products in your online shop, make sure that your guests are aware of them.

Contrasting it with the initial price is one way to highlight your price advantage.

FOMO (fear of missing out!) is what you can create because netizens feel anxious when they realize that the same thing won’t be available sometime later and others will have it and they don’t.

You can show the old price and the deal price together on the product description to add some FOMO!

5.     Product videos are compelling

Basically, a product video is the summary of the product in the form of a video in which brands attempt to inform clients about the product, its quality, features, benefits, etc.

A video of a product gives a realistic feeling. The uncertainty about the commodity is minimized. It also generates credibility concerning the company. People recognize that the organization is authoritative and not deceitful. For the majority of searches, Google attempts to screen images.

Read: 4 Benefits that Highlight the Importance of Product Videos in eCommerce

6.     Show the real image of your product

Not only does an optimized product page help you turn more visitors into clients but adding a real image can do wonders.

By raising the average order value of customers, it can also raise sales. By doing this, the company offers customers a compelling reason to select the more costly option.

The actual images build up trust and establish a brand’s unique identity.

7.     Add social proofs: review and rating

Social evidence comes in a variety of ways. They can be feedback, testimonials of customers, photographs, ratings, etc.

As long as it’s important to your audience, it doesn’t matter what sort of social evidence you use.

For most e-commerce websites, reviews and classic star ratings can do the job. Remember, always display genuine product ratings and reviews.

The fact is most internet customers are used to finding fake reviews, and some studies have also shown that your conversion rate could actually be affected by so many 5-star reviews.

In reality, every client is more likely to purchase from a website that shows reviews of clients. To get more reviews, you can incentivize customers with rewards or coupons for each review.

Note how the company under the purchase button adds “Free & Easy Returns” details.

Read: Why Product Reviews are Important in eCommerce?

Wrap up:

The product description should contain influential words that blow your customer’s mind. Also, optimize your product description copy for Google SEO.

The definition of a product should be concise and to the point.

Try to use keywords that are friendly for search engines. But instead, place them in the product title if you can’t match them in the definition.

If nothing else, concentrate on using terms of power in your explanations to make the object stand out.

Ultimately, you want to create a picture of the product that gives your shoppers the details they need.

Recommended Read:
Prestashop Advance Product Attribute/Field by Knowband – User Manual

1.0 Introduction

Prestashop Advance Product Attribute/Field Addon by Knowband is an effortless way to include additional information fields in the product page of the website. The store owner can now gather the required information for the product from the prospective customers with the help of this Prestashop Additional Product Field module. The Prestashop Advance Product Attribute module allows the e-merchants to add supplementary information field in the product pages of the website. This attribute of the Prestashop Advance Product Attribute/Field addon can be included in a particular product page or all the product pages of the website. In addition, the admin gets an option to choose the categories in which he wants to include the fields.

The Prestashop Advance Product Attribute module enables the e-merchants to add N number of different field type. The best thing is that all this can be done in a few simple steps. Even the required field validation in this Prestashop Advance Product Field module can be included in the fields at a button click. The created fields can be edited, deleted as required from the back end of the Prestashop Product Attribute/Field module.

1.1 Project Objectives

Here are some of the objectives of the Prestashop Product Page Field addon that can be achieved with the .
1. The Prestashop Additional field module on product page create new custom fields or attributes in the product page of the eCommerce website.
2. Edit/delete the exiting field from the admin interface of the Prestashop Additional Product Field module.
3. To include the attribute is a single product page.
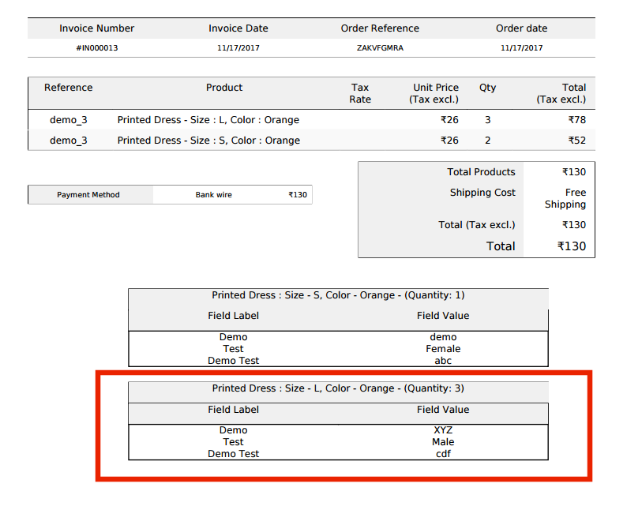
4. The Prestashop Advance Product Attribute/Field module shows the additional information in the invoice.

2.0 Installation

In order to install the Prestashop module follow the below-mentioned steps:

1. Purchase the Prestashop Advance Product Attribute module from the store. You’ll be provided with the following files:
a) Zipped file including the source code of the Prestashop module
b) User Manual
2. Unzip the zipped file. It would contain a number of files and folders as shown below –
3. Copy all the files and folders from the unzipped folder and paste them into your store “Modules” directory on the path – Root Directory/modules/.
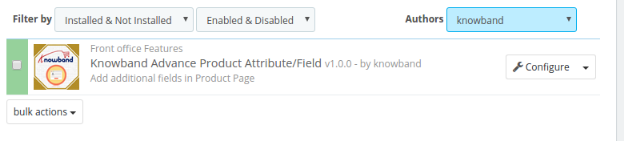
4. The Prestashop Advance Product Field module can be installed in the store and you can find that in Store Admin -> Modules and Services.

Searching the Prestashop module with following details –

Keyword – Advance Product Attribute
Category – Front Office
Filter By – Installed & Not Installed / Enabled & Disabled

5. Click on “Install” button to install the Prestashop module by Knowband. It would, then, ask for your conformation. Click on Proceed with the installation option.

6. This step will install the Prestashop Product Attribute/Field module and show notification – “Module(s) installed successfully”.

7. Once the installation is complete, the Prestashop Product Page Field addon can be configured as shown below:


3.0 Admin Interface

This Prestashop Additional field module on product page is easy-to-understand and use. All the customization and changes on the product pages can be done without any code changes. The Prestashop plugin by Knowband allows you to enter additional information fields in the product page of the website from the back-end of the admin interface.

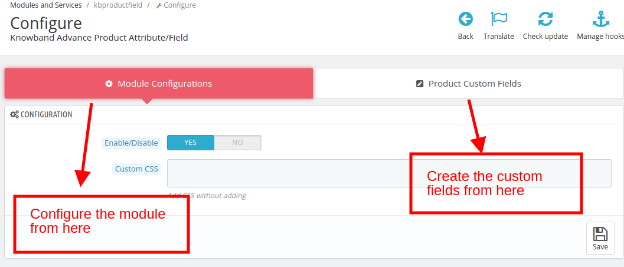
The admin panel includes Prestashop Additional Product Field module configuration as well as product custom field creation tabs.


Follow the below-mentioned steps in order to configure the Prestashop Advance Product Attribute/Field plugin.

3.1 How to configure the Prestashop module ?

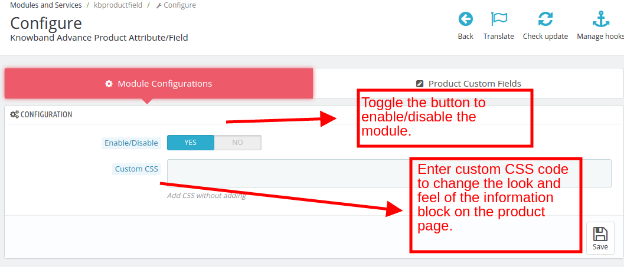
The admin can enable or disable the Prestashop Advance Product Attribute module as required. The “Module Configuration” tab offers easy configuration and optimization.

Toggle the button shown below to enable or disable the Prestashop Advance Product Field module.

The admin can customize the appearance of the Prestashop Product Attribute/Field module by entering the Custom CSS code.

3.2 How to create the custom product attribute or field?

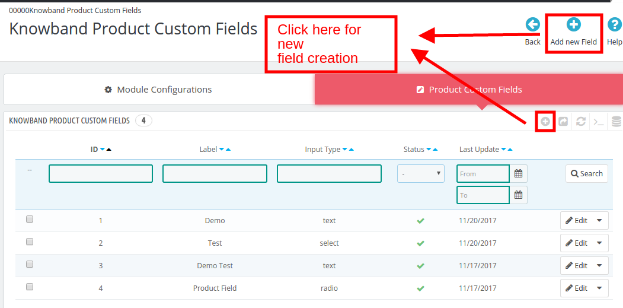
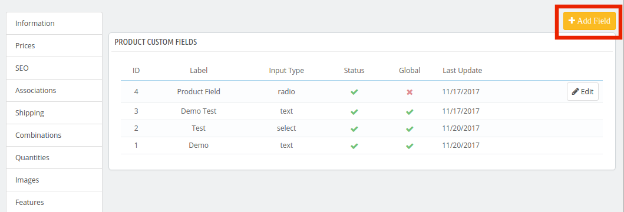
The admin can add a number of custom information fields in the product page of the website with this Prestashop Product Page Field addon. In order to create new fields, go to the “Product Custom Field” Tab and click on the “Add New Field” or “+” sign in the top right side as shown below.

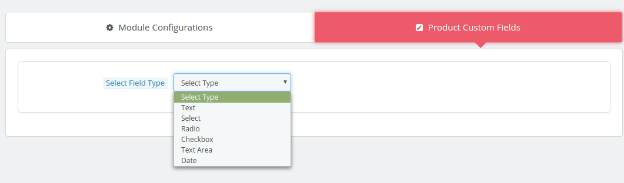
Once this is done, the admin will be redirected to field creation page. The Prestashop Additional field module on product page allows you to create various type of the field. The various type of fields are provided in the dropdown list. The admin can select any one as desired.

The various options offered in this section of the Prestashop Additional Product Field module is mentioned below.

  • Text
  • Select
  • Radio
  • Checkbox
  • Text Area
  • Date
  • File

Let us discuss the various field type one by one.

3.2.1 Text Field

With the text fields in the Prestashop Advance Product Attribute/Field module, the customers can enter their information in a textbox. This field is in general used for Name, Last Name, Address and other such information.

For the field creation, the admin is asked to fill up the form as shown in the image below.

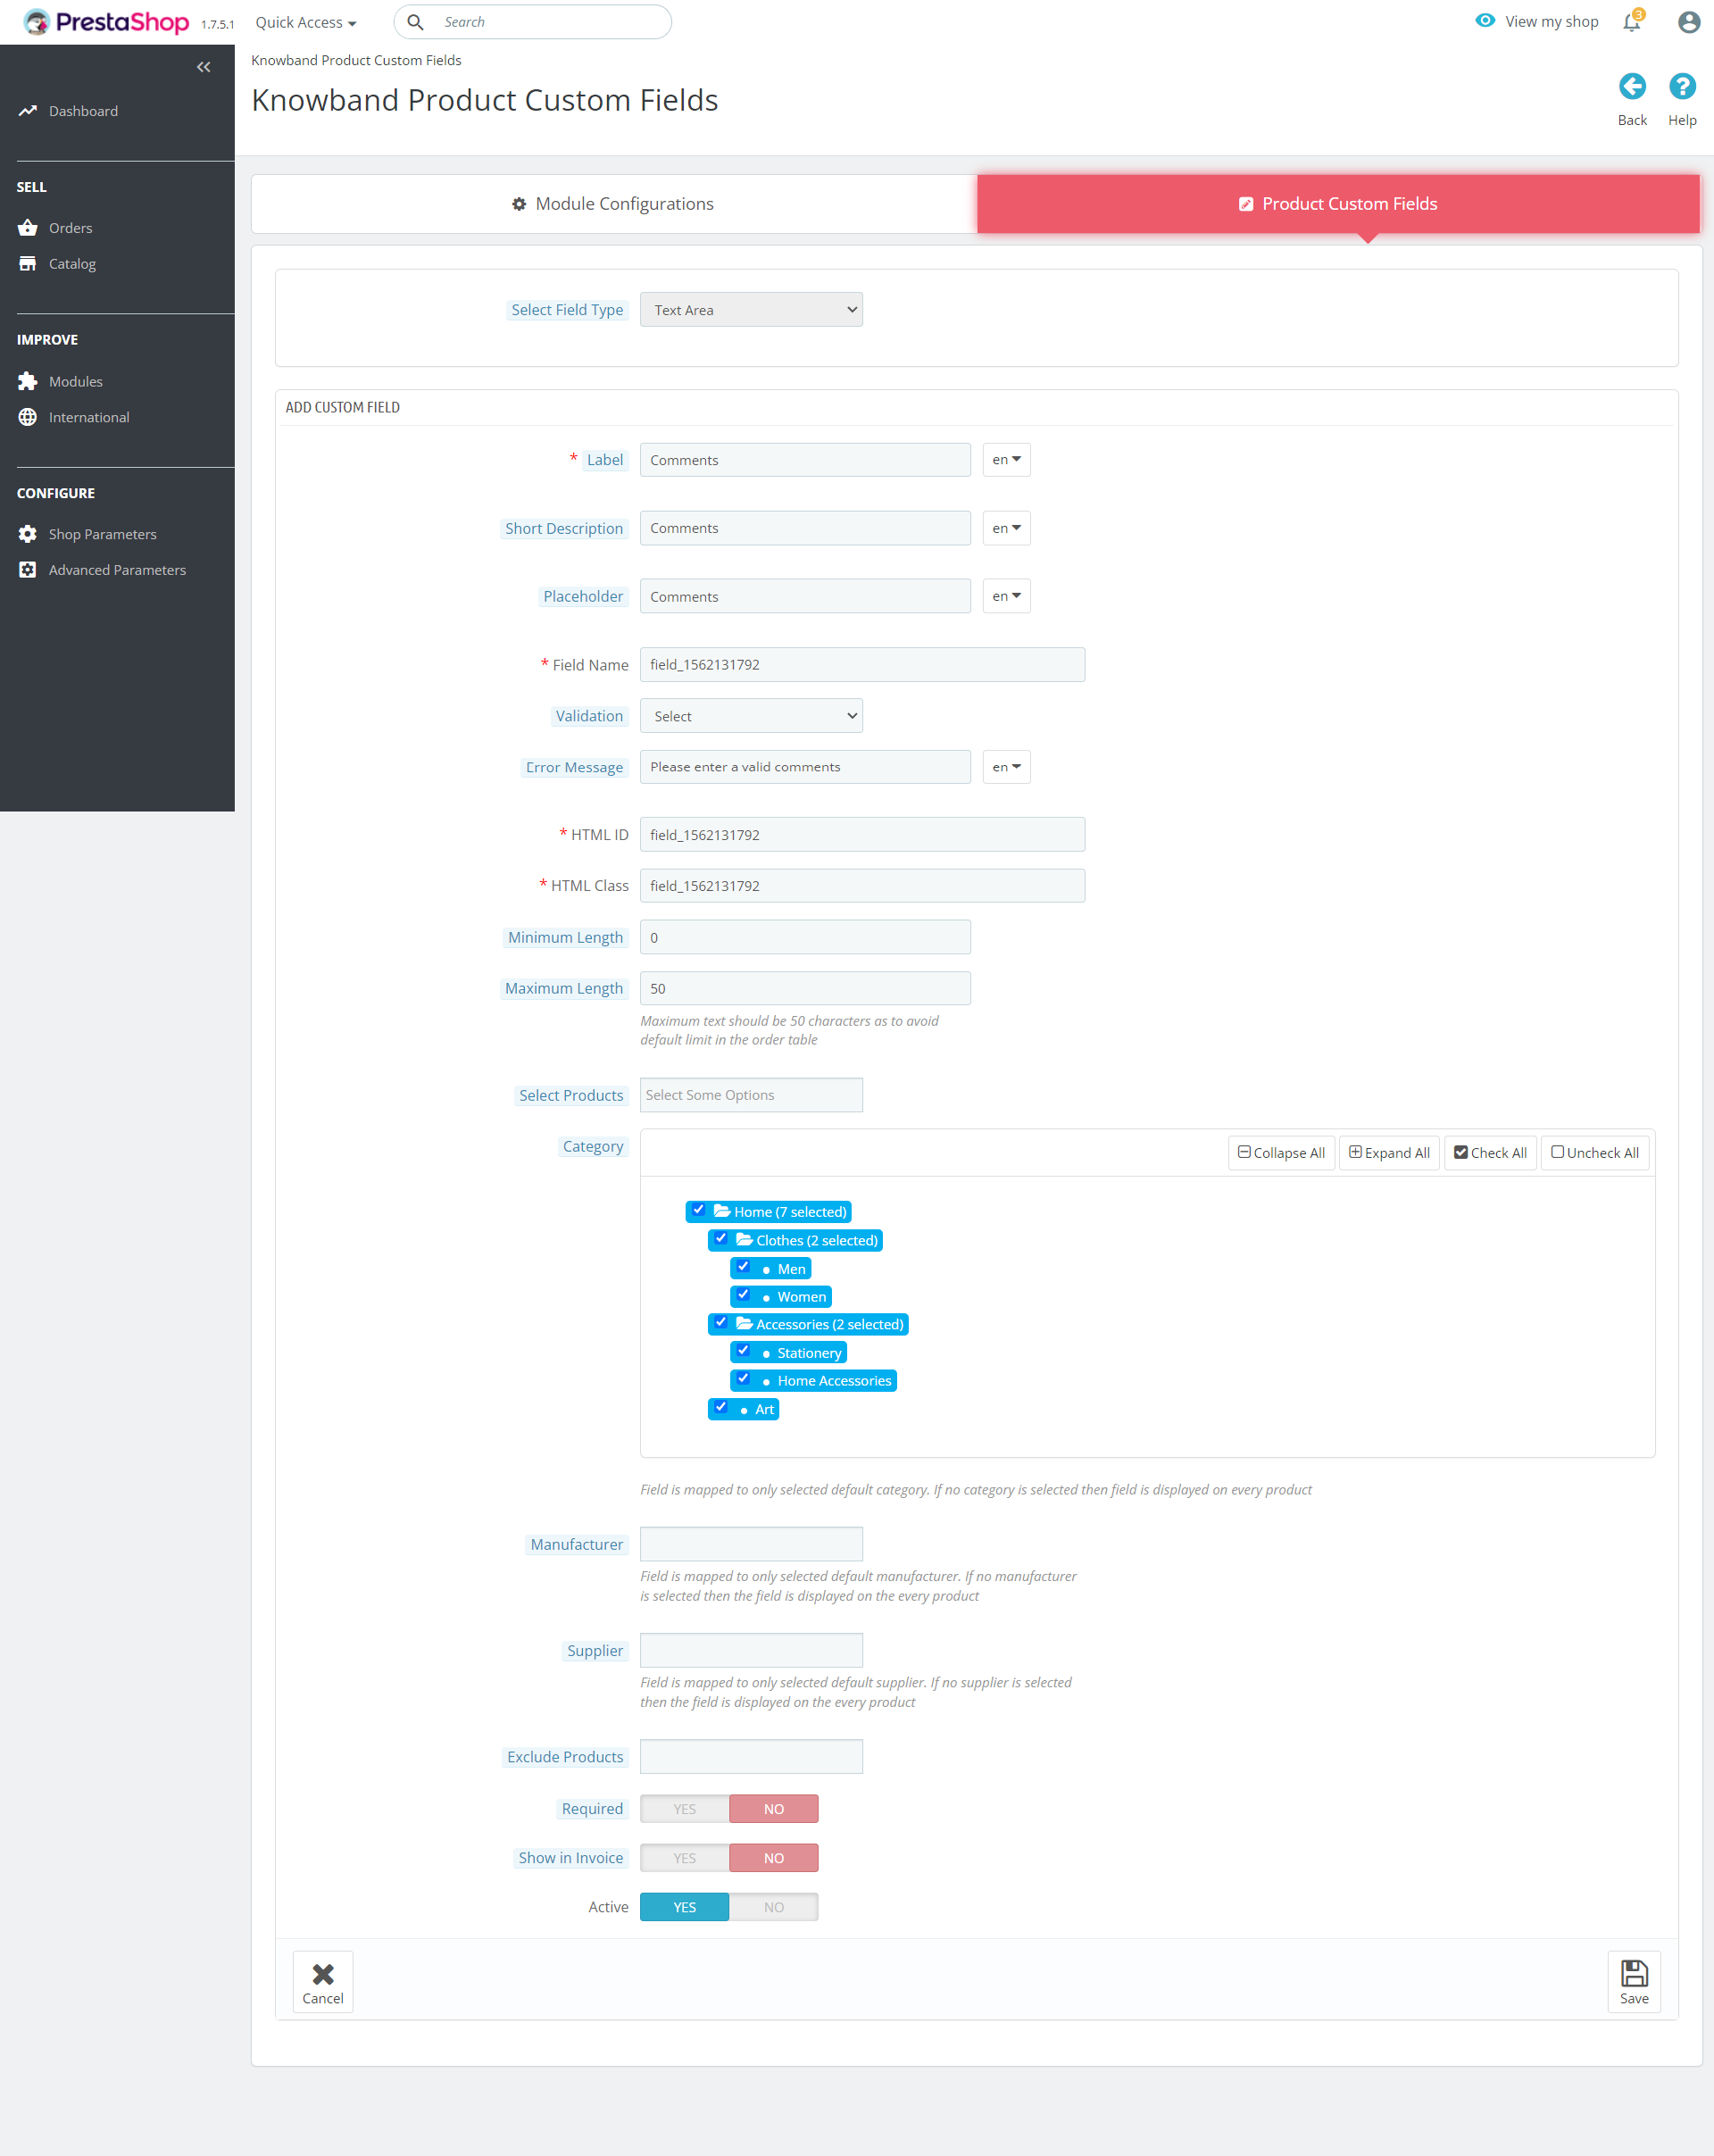
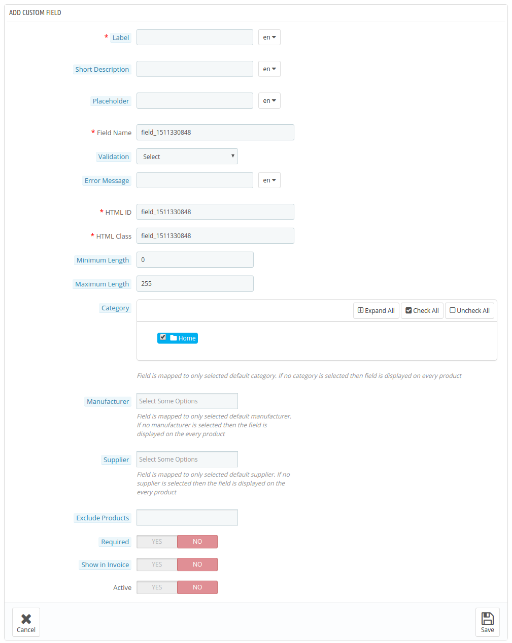
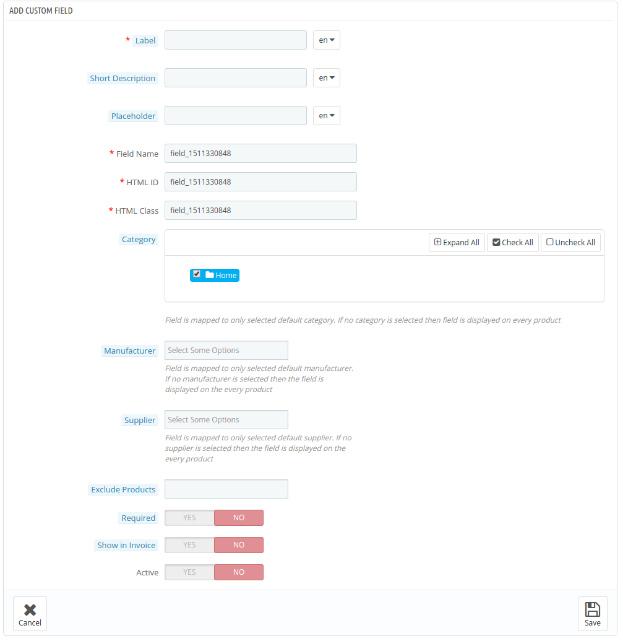
Label: Label specifies the name of the field that will be displayed on the front-end of the website.

Short Description: The short description in the Prestashop Advance Product Attribute module includes the specification of exactly what the field is intended for.

Placeholder: The admin can enter the Placeholder in this section of the Prestashop Advance Product Field module. All these inputs can be entered in multiple languages.

Field Name, HTML ID, HTML Class: This section of the Prestashop Product Attribute/Field addon will provide a unique identity to the fields. It will be same for all the three sections.

Error Message: The error message is shown if the customer enters a wrong information. This message can be entered in this section of the Prestashop Product Page Field addon as per the requirement. This can be done is multiple languages.

Maximum and Minimum Length: The word limit for the fields of the Prestashop Additional field module on product page can be fixed by entering the maximum and minimum length in the sections below. In case, no value is entered, then, the text box will be able to intake as many characters and words.

Select products: The additional attribute can be included in the specific products by entering the respective product’s names.

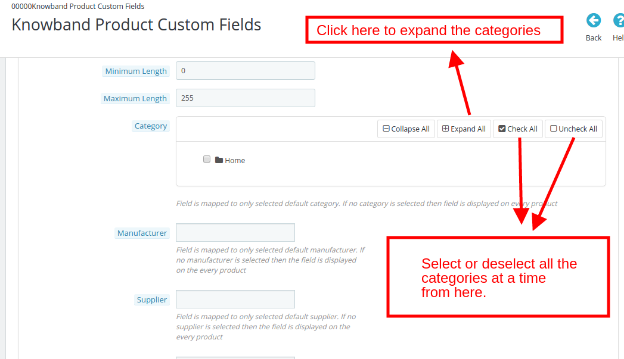
Category: The additional attribute can be included in the desired default category of the products. The admin can check or uncheck all the categories in one go for the same in this Prestashop Additional Product Field module.


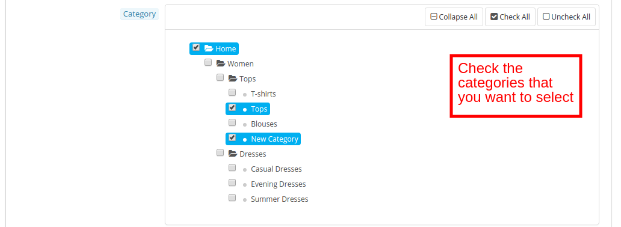
You can even select a particular category in this Prestashop Advance Product Attribute/Field addon by expanding the category as shown above. The categories to be selected can then checked accordingly.

Manufacturer and Supplier Name: The attribute or custom fields can be added for a particular manufacturer and supplier. The admin can select the same from the drop-down list in this section of the Prestashop Advance Product Attribute addon. The fields are mapped for the selected default manufacturer and default supplier of the product. In case no option is selected, then, the fields will be displayed on every product.

Exclude Product: The attribute can be excluded from a particular product if required. The admin can enter the name of the product in this section of the  Prestashop Advance Product Field addon and the additional field will not be mapped in that particular product page.

Required Field Validator: This field of the Prestashop Product Attribute/Field module can be enabled in the mandatory fields. In case the visitors leaves it empty, the Prestashop module by Knowband will throw an exception.

Show in Invoice: The information entered by the customers will be shown on the invoice if this field is enabled.

Active Button: Enable/disable the field by toggling this button of the Prestashop Product Page Field addon.
Note:- The Label, Short Description, Placeholder, Field Name, Error Message, HTML ID, Class, Category, Manufacturer, Supplier, Required Field Validator, Exclude Product and Show in Invoice sections will remain the same for all the field types.

3.2.2 Select Field

This field of the Prestashop Additional field module on product page allows the customers to select the option from the multiple choices available. This field of the Prestashop addon by Knowband is usually used for Gender field with the option of “Male” and “Female”.

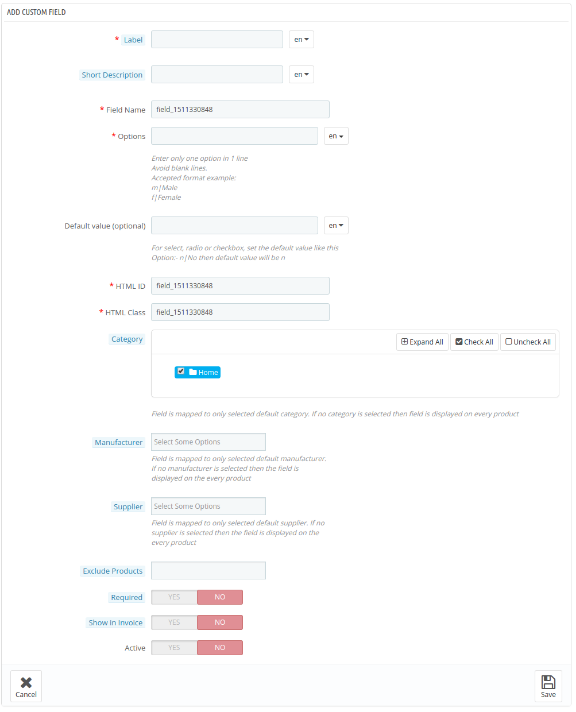
Multiple Select: The store visitors can be offered an option to select more than one choices by enabling this button of the Prestashop Additional Product Field module. In case the button is disabled, they will be able to select only one option at a time.

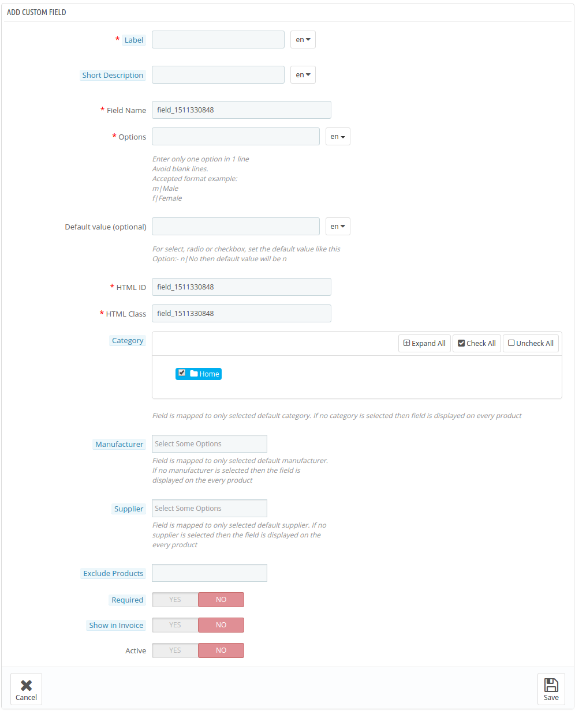
Options: The varied options can be entered here in this field of Prestashop Advance Product Attribute/Field module. The multi-lingual support allows you to enter the choices in multiple languages.

Default Value: This is an optional field of the Prestashop Advance Product Attribute module. The store admin can set the default value for the Radio, Select or Checkbox options.


3.2.3 Radio Field

The Select field of the Prestashop Advance Product Field addon allows the customers to even choose more than one option. However, the radio buttons will only allow the visitors to choose one option at a time.

The radio button type field creation is same as that of the “Select” field. Only the “Multiple Select” option is missing here.

3.2.4 Check Box Field

The check boxes is very similar as the radio buttons and select field of the Prestashop Product Attribute/Field module. The only difference is that the customers can select the desired options by checking the boxes.

3.2.5 Text Area Field

The text area and text field are very similar to each other. While the latter offers just a single line in order to enter their information, the former provides multiple line. The maximum and minimum length of the characters can be entered by the store admin from the back end of the Prestashop Product Page Field addon.

3.2.6 Date

This field of the Prestashop Additional field module on product page allows the customers to enter the date. In case the date is entered in the wrong format, an error message will be flashed on the front end.

3.2.7 File

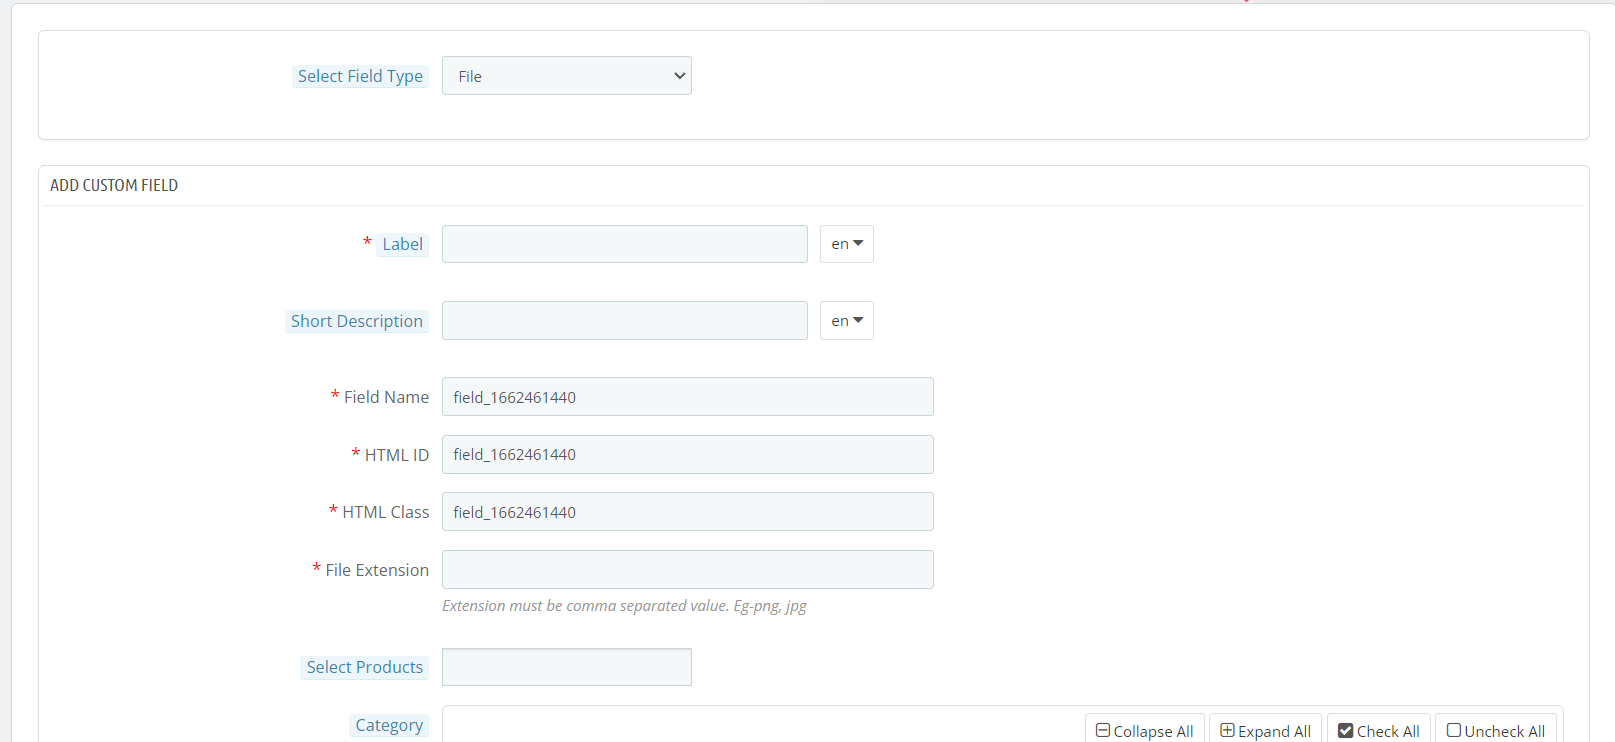
This field of the Prestashop Additional field module on the product page allows the customers to upload the file. In case the file extension is not the same as specified by the admin then, an error message will be flashed on the front end.


3.3 How to Edit or Delete the Custom Product Attribute or Field?

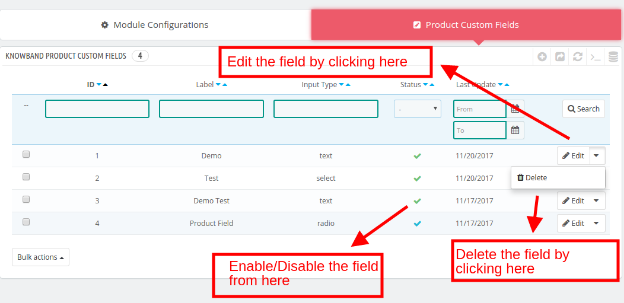
The list of the custom product fields created can be viewed in the admin panel of the Prestashop Additional Product Field module. The admin can edit, delete, enable/disable the field at a single button clicks from here.

3.3.1 Show in Invoice Option

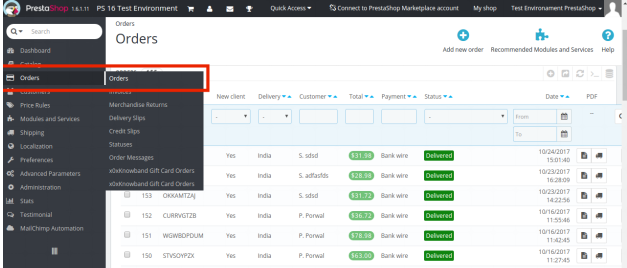
The fields of the Prestashop Advance Product Attribute/Field addon in which this option is enabled can be viewed in the order invoice copy. In order to check the same, go to the “Order” tab of the main menu of the admin interface.

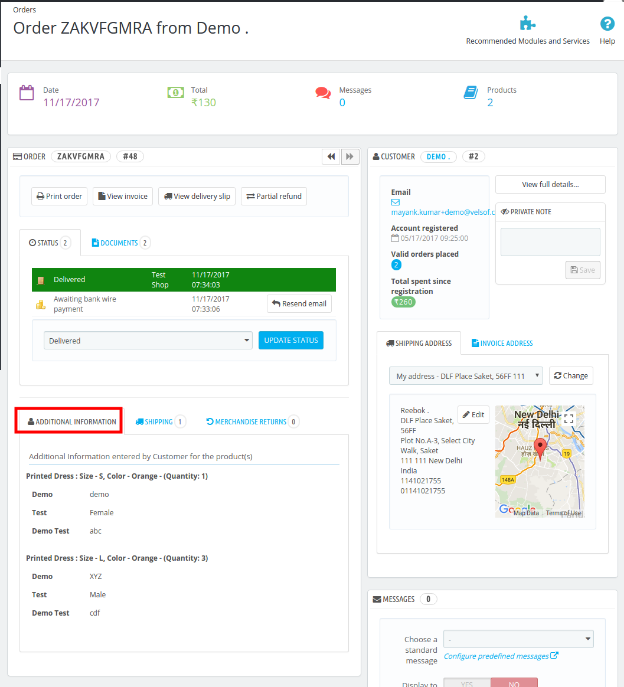
Select any one of the order profile. It includes a section of “Additional Information“. The custom attributes can be viewed here as shown below.

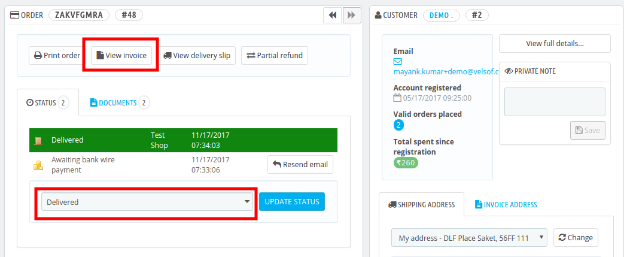
In case, the product status is Delivered, then, the same information will be shown in the invoice as well. Click on View Invoice.

The additional attributes can seen in the PDF of the invoice as well.

3.3.2 How to Add the Attribute in a single Product Page?

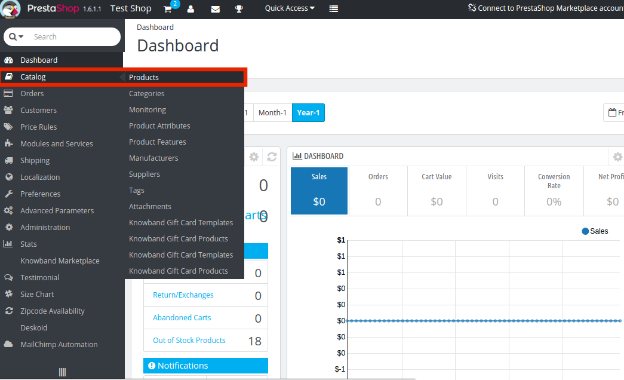
The custom fields can even be added in a particular product page instead of adding them on every product page with the help of this Prestashop Advance Product Attribute module. In order to do so, go to the Catalog -> Product option of the main menu.

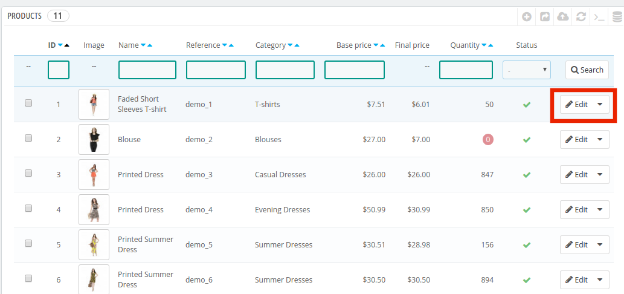
Select any one of the product in which you want to add the custom field and click on “Edit“.

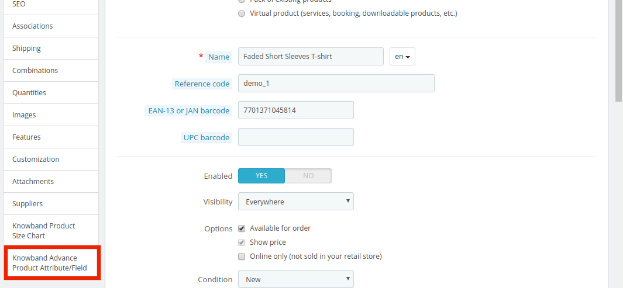
The product profile include the option of Advance Product Attribute/Field as shown below.

The attribute can be added by clicking on “Add Field“

The fields of the Prestashop Advance Product Field addon can then be created with the same process.

4.0 Product Page UI

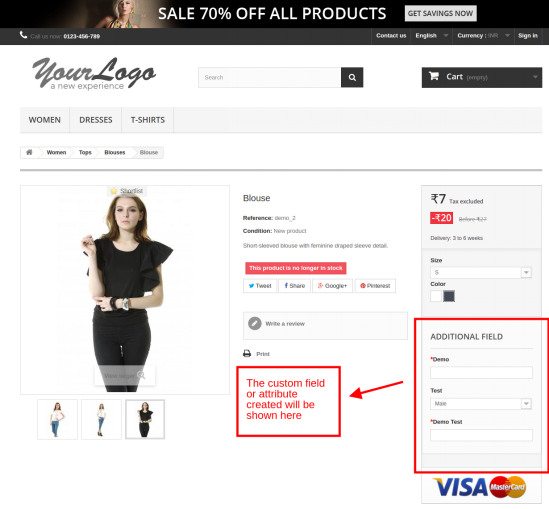
Once the various custom fields is created with the help of this Prestashop Product Attribute/Field module, the attributes will be shown on the product pages of the website. The additional field will be shown as image below:

Your customers play the best critics for your store products. They are key people that help you in taking your eCommerce store to next level. They criticise your product so that you can make it better for them.  So, focus on grabbing more information from the user side about your store products. You can simply buy this module from the addon store