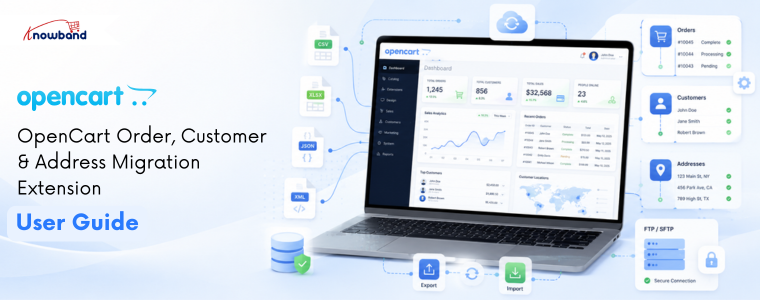
OpenCart Order, Customer & Address Import Export Extension User Manual

Every growing OpenCart store reaches a point where data management becomes its own full-time job. Order records pile up across multiple systems. Customer accounts live in one place while fulfilment teams need them somewhere else. A warehouse partner expects a structured file every morning, and right now someone on your team is logging in manually to make that happen.

The Knowband OpenCart Order, Customer & Address Import Export Extension ,  the most capable OpenCart import export extension for orders, customers, and addresses ,  is the opencart import export extension for order and customer data ,  is developed to remove that manual overhead entirely. It gives store administrators of this proven OpenCart import export extension a single, centralised control panel to move order records, registered customer profiles, and delivery address data in and out of OpenCart, in any direction, on any schedule, to any destination. No custom development. No third-party middleware. No spreadsheet gymnastics every time a partner changes their preferred file format.

What sets this OpenCart data migration module apart from generic data tools is its native understanding of OpenCart’s data structure. It does not simply read and write flat files. It resolves entity relationships across stores, validates every record before touching the database, and keeps a timestamped log of every operation so your team always knows exactly what moved, when, and whether it succeeded.

This user guide documents every feature of the Knowband OpenCart import/export extension in full detail. Admins can follow it from start to finish for initial setup, or jump to the relevant section whenever you need to configure a specific workflow.

1.0 Installation Steps

Log into your OpenCart administration panel. From the top navigation, go to Extensions and then select Extension Installer. On the installer page, click the Upload button and select the kborderimportexport.ocmod file. The installer processes the file without requiring any additional steps from you.

Log in through FTP, copy all the folders under the upload folder, and move them to the store root.

When the upload finishes, navigate to Extensions, select Extensions from the submenu, and choose Modules from the category dropdown. Find the Order, Customer & Address Import Export entry in the list and click Install. Once installation completes, click the Edit button to open the main configuration panel.

If the module does not appear in the list after installation, go to Extensions and click Modifications, then hit the Refresh button in the top right corner. Return to the modules list and search again.

2.0 Admin Panel Configuration
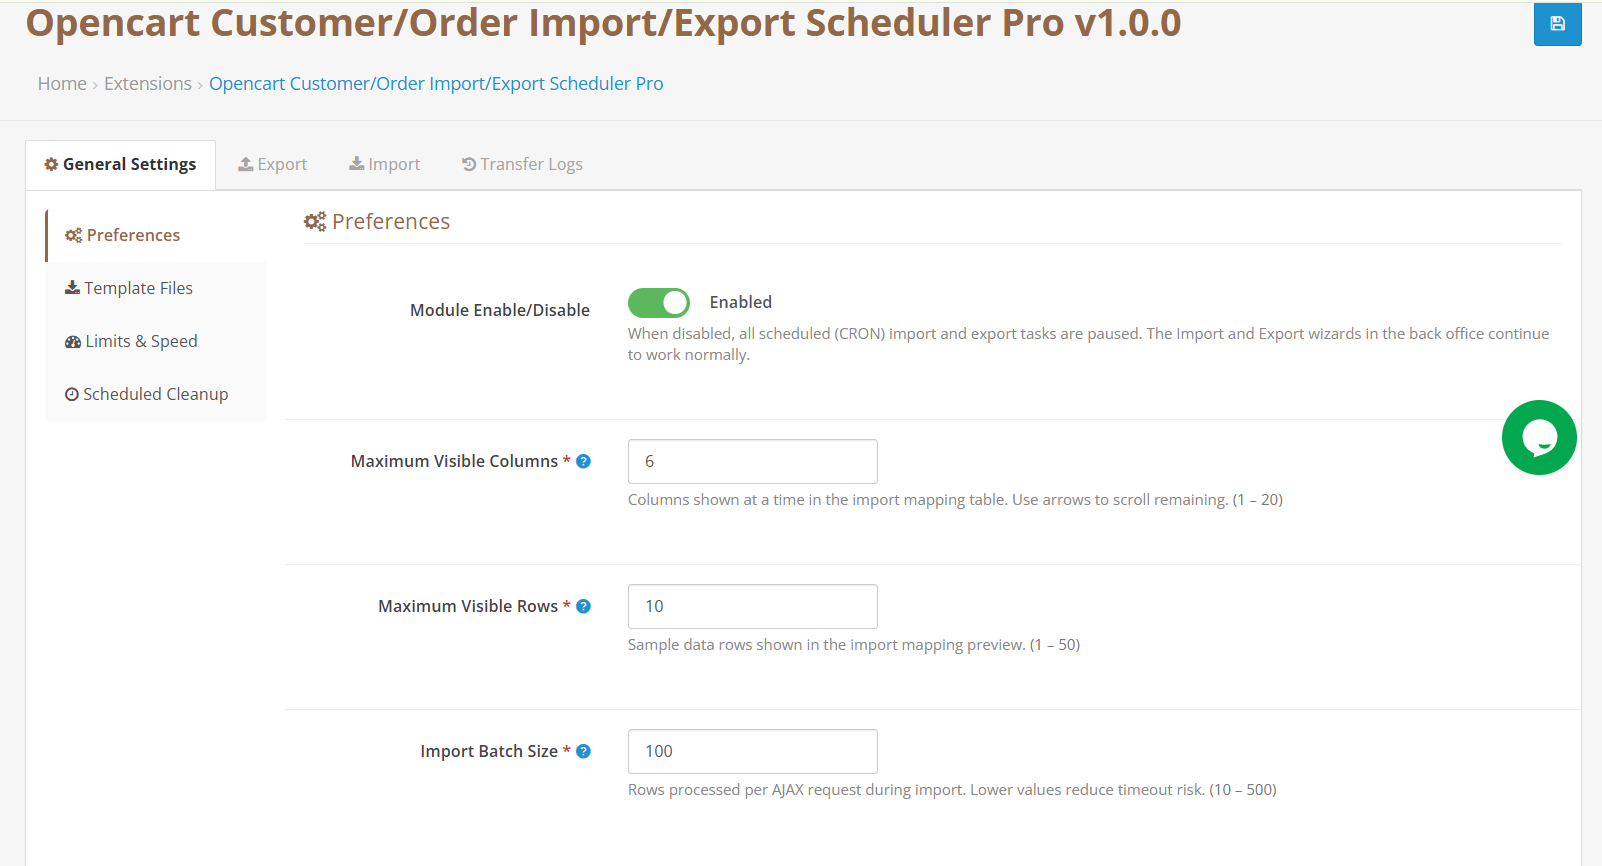
 

After installation, the OpenCart order import/export extension introduces four distinct areas to your OpenCart back office. Each handles a separate part of the data transfer workflow.

Settings Panel:  The global configuration hub. This is where you set performance preferences, download starter template files, manage size limits, and retrieve the scheduled automation URLs needed for task-scheduler setup.

Export Profile: Build, manage, and run export profiles. A guided setup process walks you through every configuration choice, from which fields to include to where the finished file should be delivered. This is the core of OpenCart’s bulk import/export capability.

Import Profile: Build, manage, and run import profiles. Handles one-time manual imports from local files and recurring automated imports from remote servers, making it a complete OpenCart CSV import customers, orders, and OpenCart customer migration solution.

Activity Log : A permanent record of every import and export operation the extension has performed. Includes run status, record counts, file references, and detailed error information for any operation that did not complete cleanly

3.1 General Settings

The Settings Panel is divided into four sub-sections. Work through each one during initial setup before creating your first import or export profile.

Enable/Disable Extension: Disabling the extension immediately pauses all scheduled automation. Any import or export profiles with scheduling enabled stop firing until the extension is re-enabled. Manual operations initiated directly from the Export Center or Import Center are unaffected by this switch.

Column Display Limit: Define how many mapping columns are shown simultaneously on the import mapping screen. The range is 1 to 20 columns. Files with more columns than this limit are still fully supported; the mapping interface provides navigation controls to move through all available columns in pages.

Preview Row Limit: Set how many data rows from your import file appear in the live preview section of the mapping screen. Increase this number when you want a broader sample of your data visible before committing to the import. The range is 1 to 50 rows.

Batch Processing Size: Determine how many records are processed in each cycle during an import run. The range spans 10 to 500 records per batch. If you are on a shared hosting environment where PHP execution times are tightly capped, set this to 50 or below to avoid timeout errors during large OpenCart bulk import export operations. Dedicated server environments can use higher values to complete imports faster.

Save your changes before moving to the next sub-section.

3.2 Template File Library
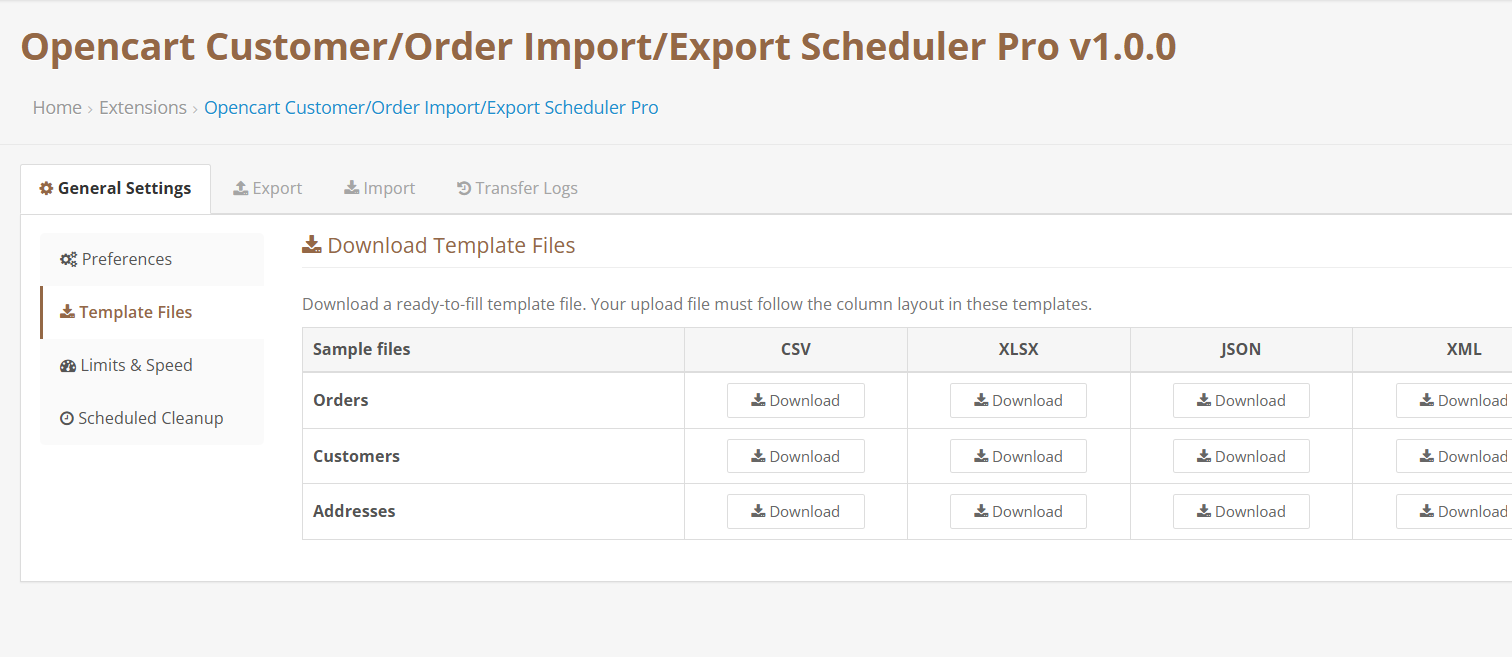
Before preparing your first import file, download the relevant sample template from this sub-section. Templates are available for all three data entities and all four supported formats ,  making this the most versatile OpenCart import/export CSV XLSX JSON XML toolkit available:

  • Order templates: CSV, XLSX, JSON, XML
  • Customer templates: CSV, XLSX, JSON, XML
  • Address templates: CSV, XLSX, JSON, XML

Use the XLSX template if you plan to export OpenCart orders to Excel format for review and editing before importing. Use CSV templates when integrating with third-party logistics platforms, ERPs, or automated data pipelines that expect OpenCart export orders in CSV format. The OpenCart export orders to CSV capability supports comma, semicolon, and pipe delimiters.

3.3 File Size and Volume Limits
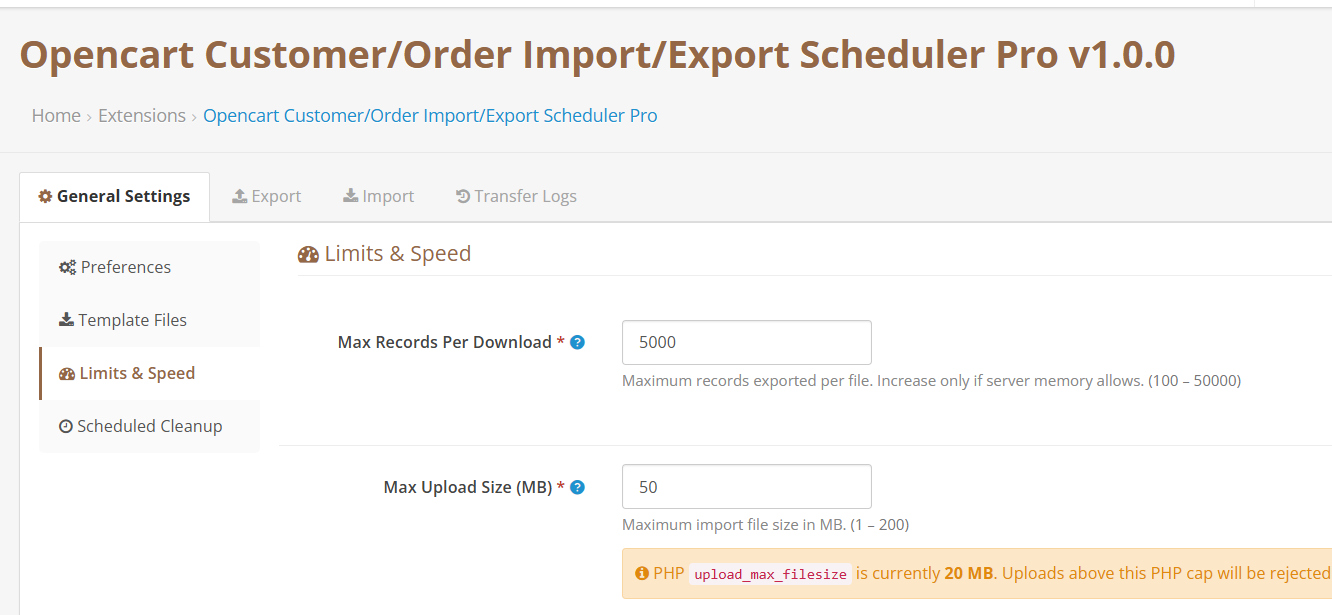
Records Per Export File controls how many records the OpenCart order export module includes in a single generated file. Adjust this based on your server’s available memory. The range is 100 to 50,000 records. For very large datasets, use the date range filter in your export configuration to split output across multiple files rather than raising this limit to its maximum.

Maximum Import File Size controls the largest file the import engine will accept. The range is 1 MB to 200 MB. Set this in line with what your server’s PHP configuration allows, or slightly below it.

Save your changes before continuing.

3.4 Automation and Scheduled Tasks in Opencart Customer Migration Extension
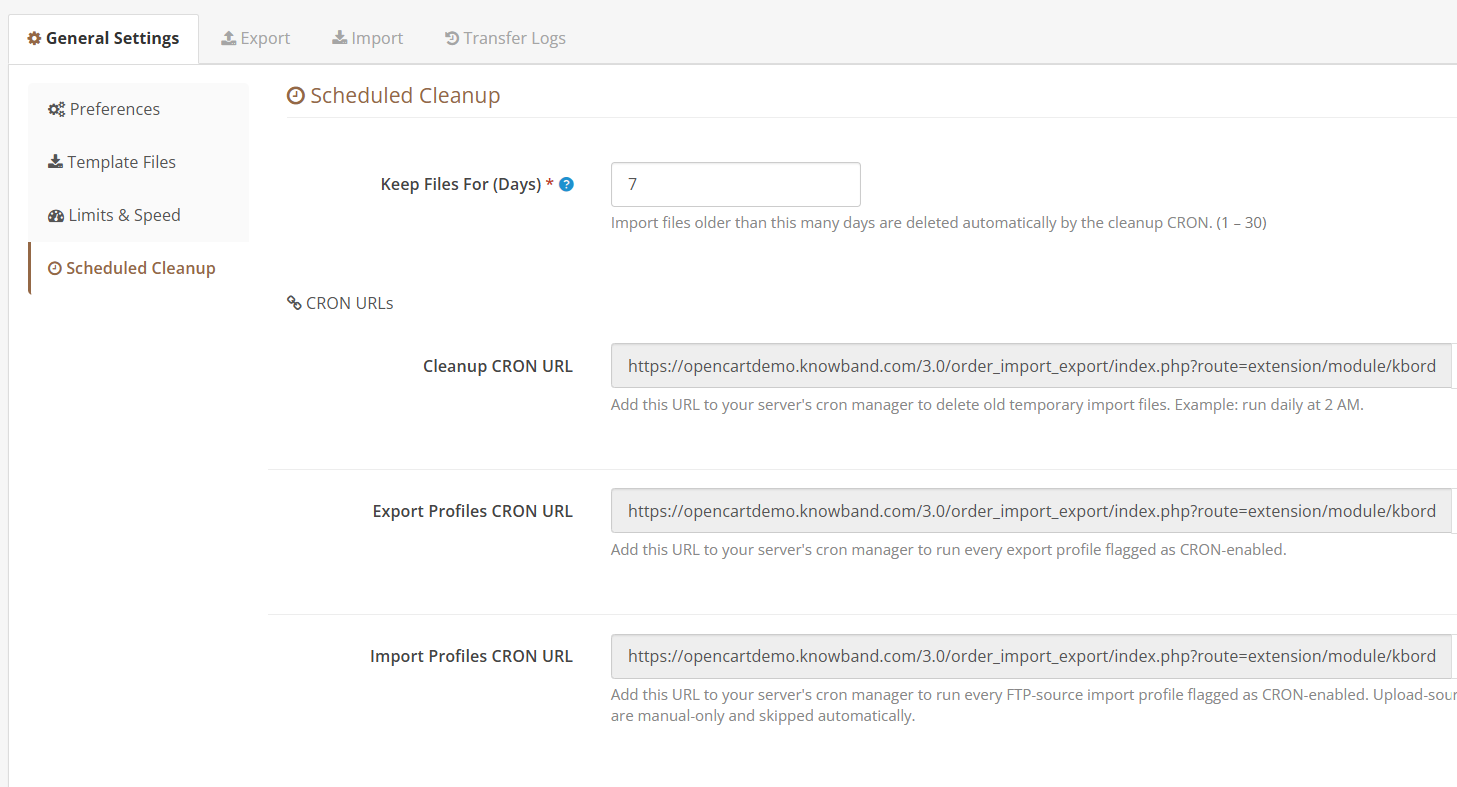
This sub-section is where you find the three scheduler-ready URLs that power the extension’s OpenCart automated data export and import capabilities. Each URL is unique to your installation and includes an authentication token. Copy them into your server’s task scheduler to activate automated operations.

Temporary File Cleanup URL: Runs a housekeeping routine that deletes old import files from the server. Use the adjacent setting to specify how many days to keep files before they are eligible for deletion (range: 1 to 30 days). A daily schedule at an off-peak hour like 2:00 AM is typical.

Export Automation URL: Triggers every export profile that has been configured with scheduling enabled. This is how you set up OpenCart scheduled export operations ,  call this URL as frequently as your business requires: every hour, every six hours, daily, or weekly. All enabled export profiles run in sequence each time the URL fires.

Import Automation URL: Triggers every import profile that uses a remote FTP or SFTP source and has scheduling enabled. Profiles configured to use a manually uploaded file are ignored when this URL runs. A daily early-morning schedule works well for most overnight data feed scenarios.

All three URLs reject any request that does not carry the correct authentication token, so they are safe to expose to a task scheduler without additional access controls.

4.0 Export Feature,  Full Setup Guide
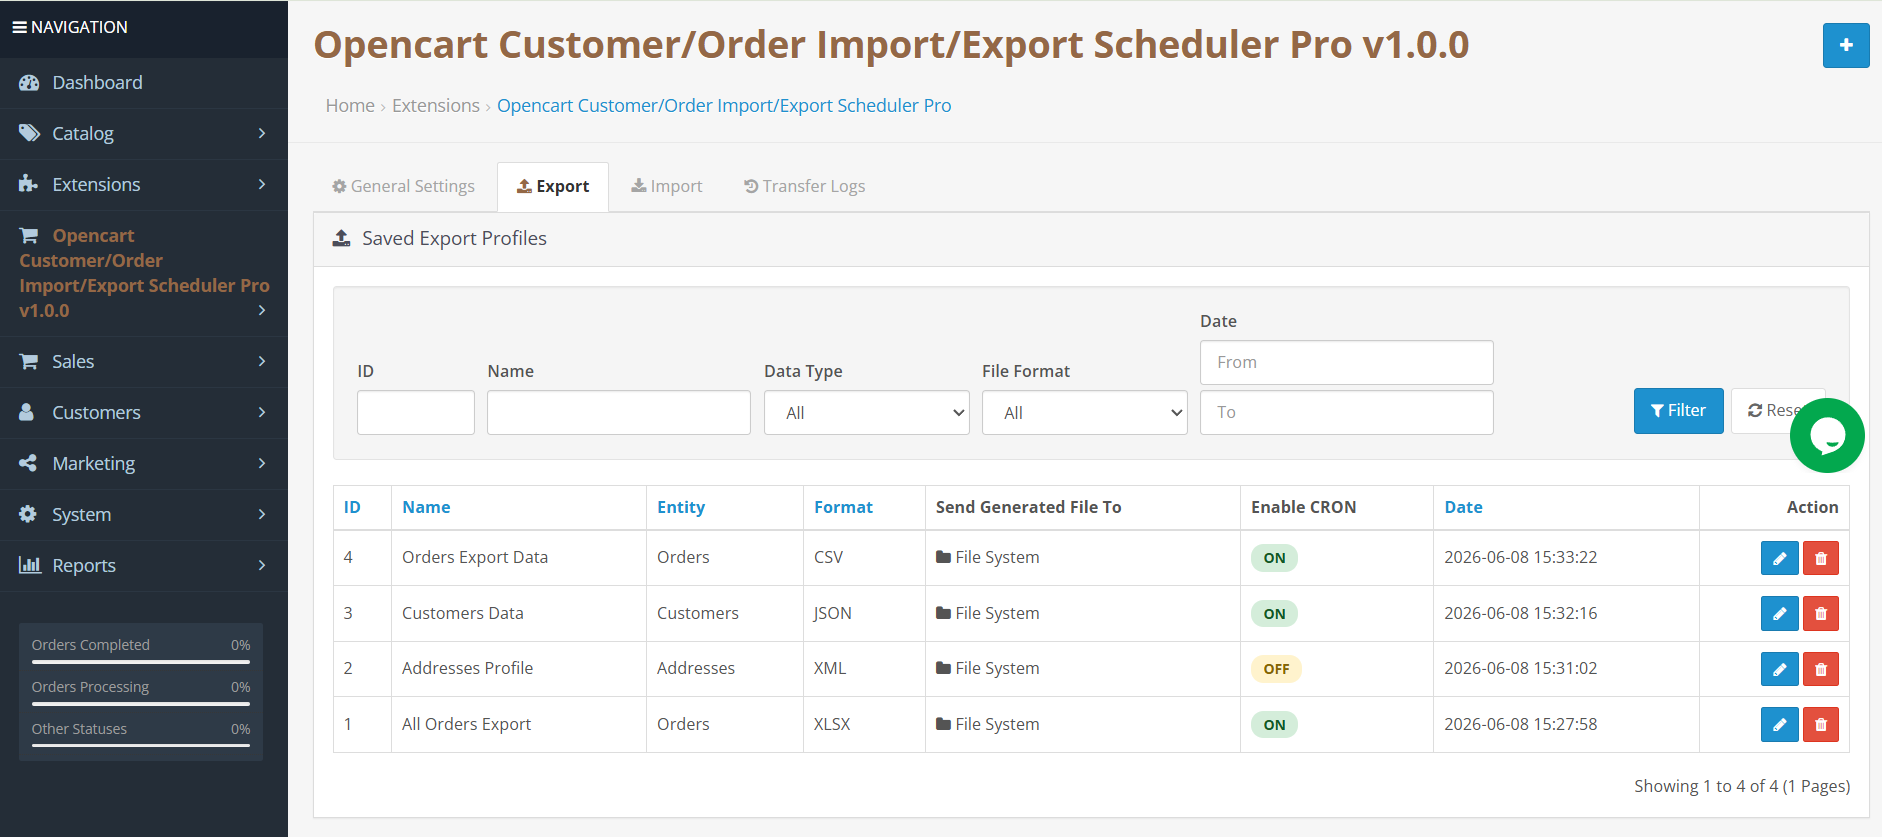
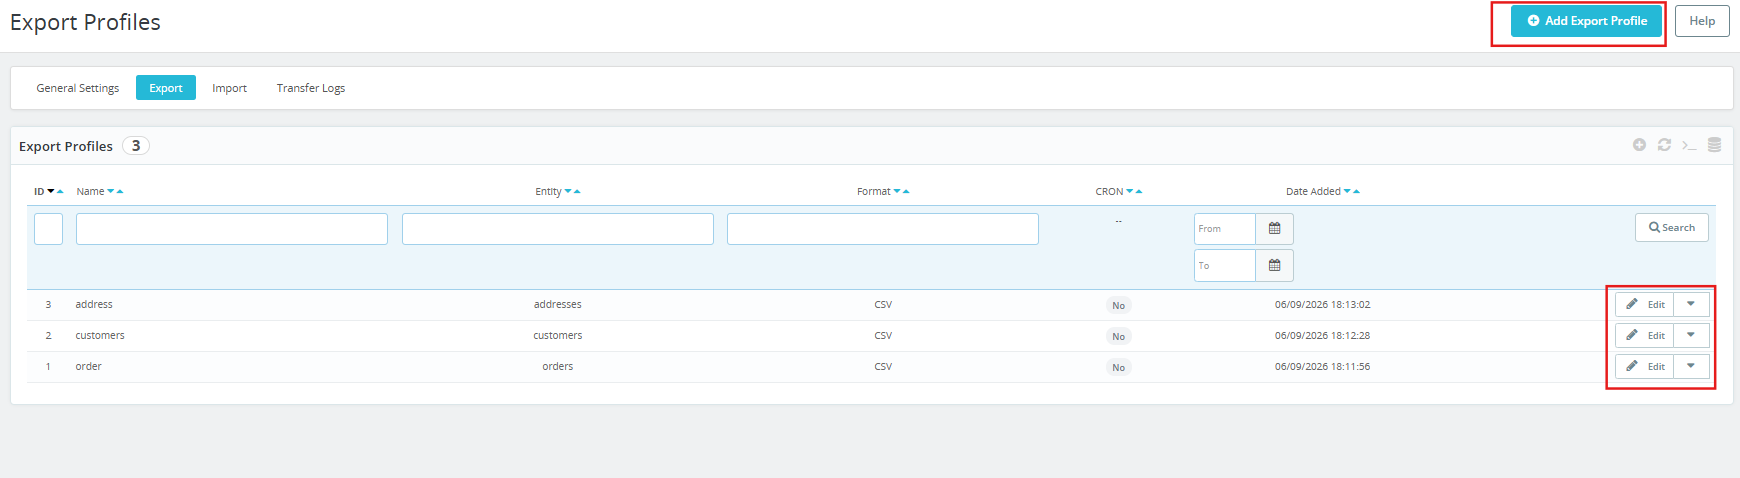
The Export Feature in Opencart Customer Migration Extension displays a table of all saved export profiles. Each row shows the profile name, the entity type, the file format, and the outcome of the most recent run. From this view, you can launch an immediate export on any profile, open an existing profile for editing, or create a new one using the setup wizard.

4.1 Step One: Basic Configuration and Delivery Options
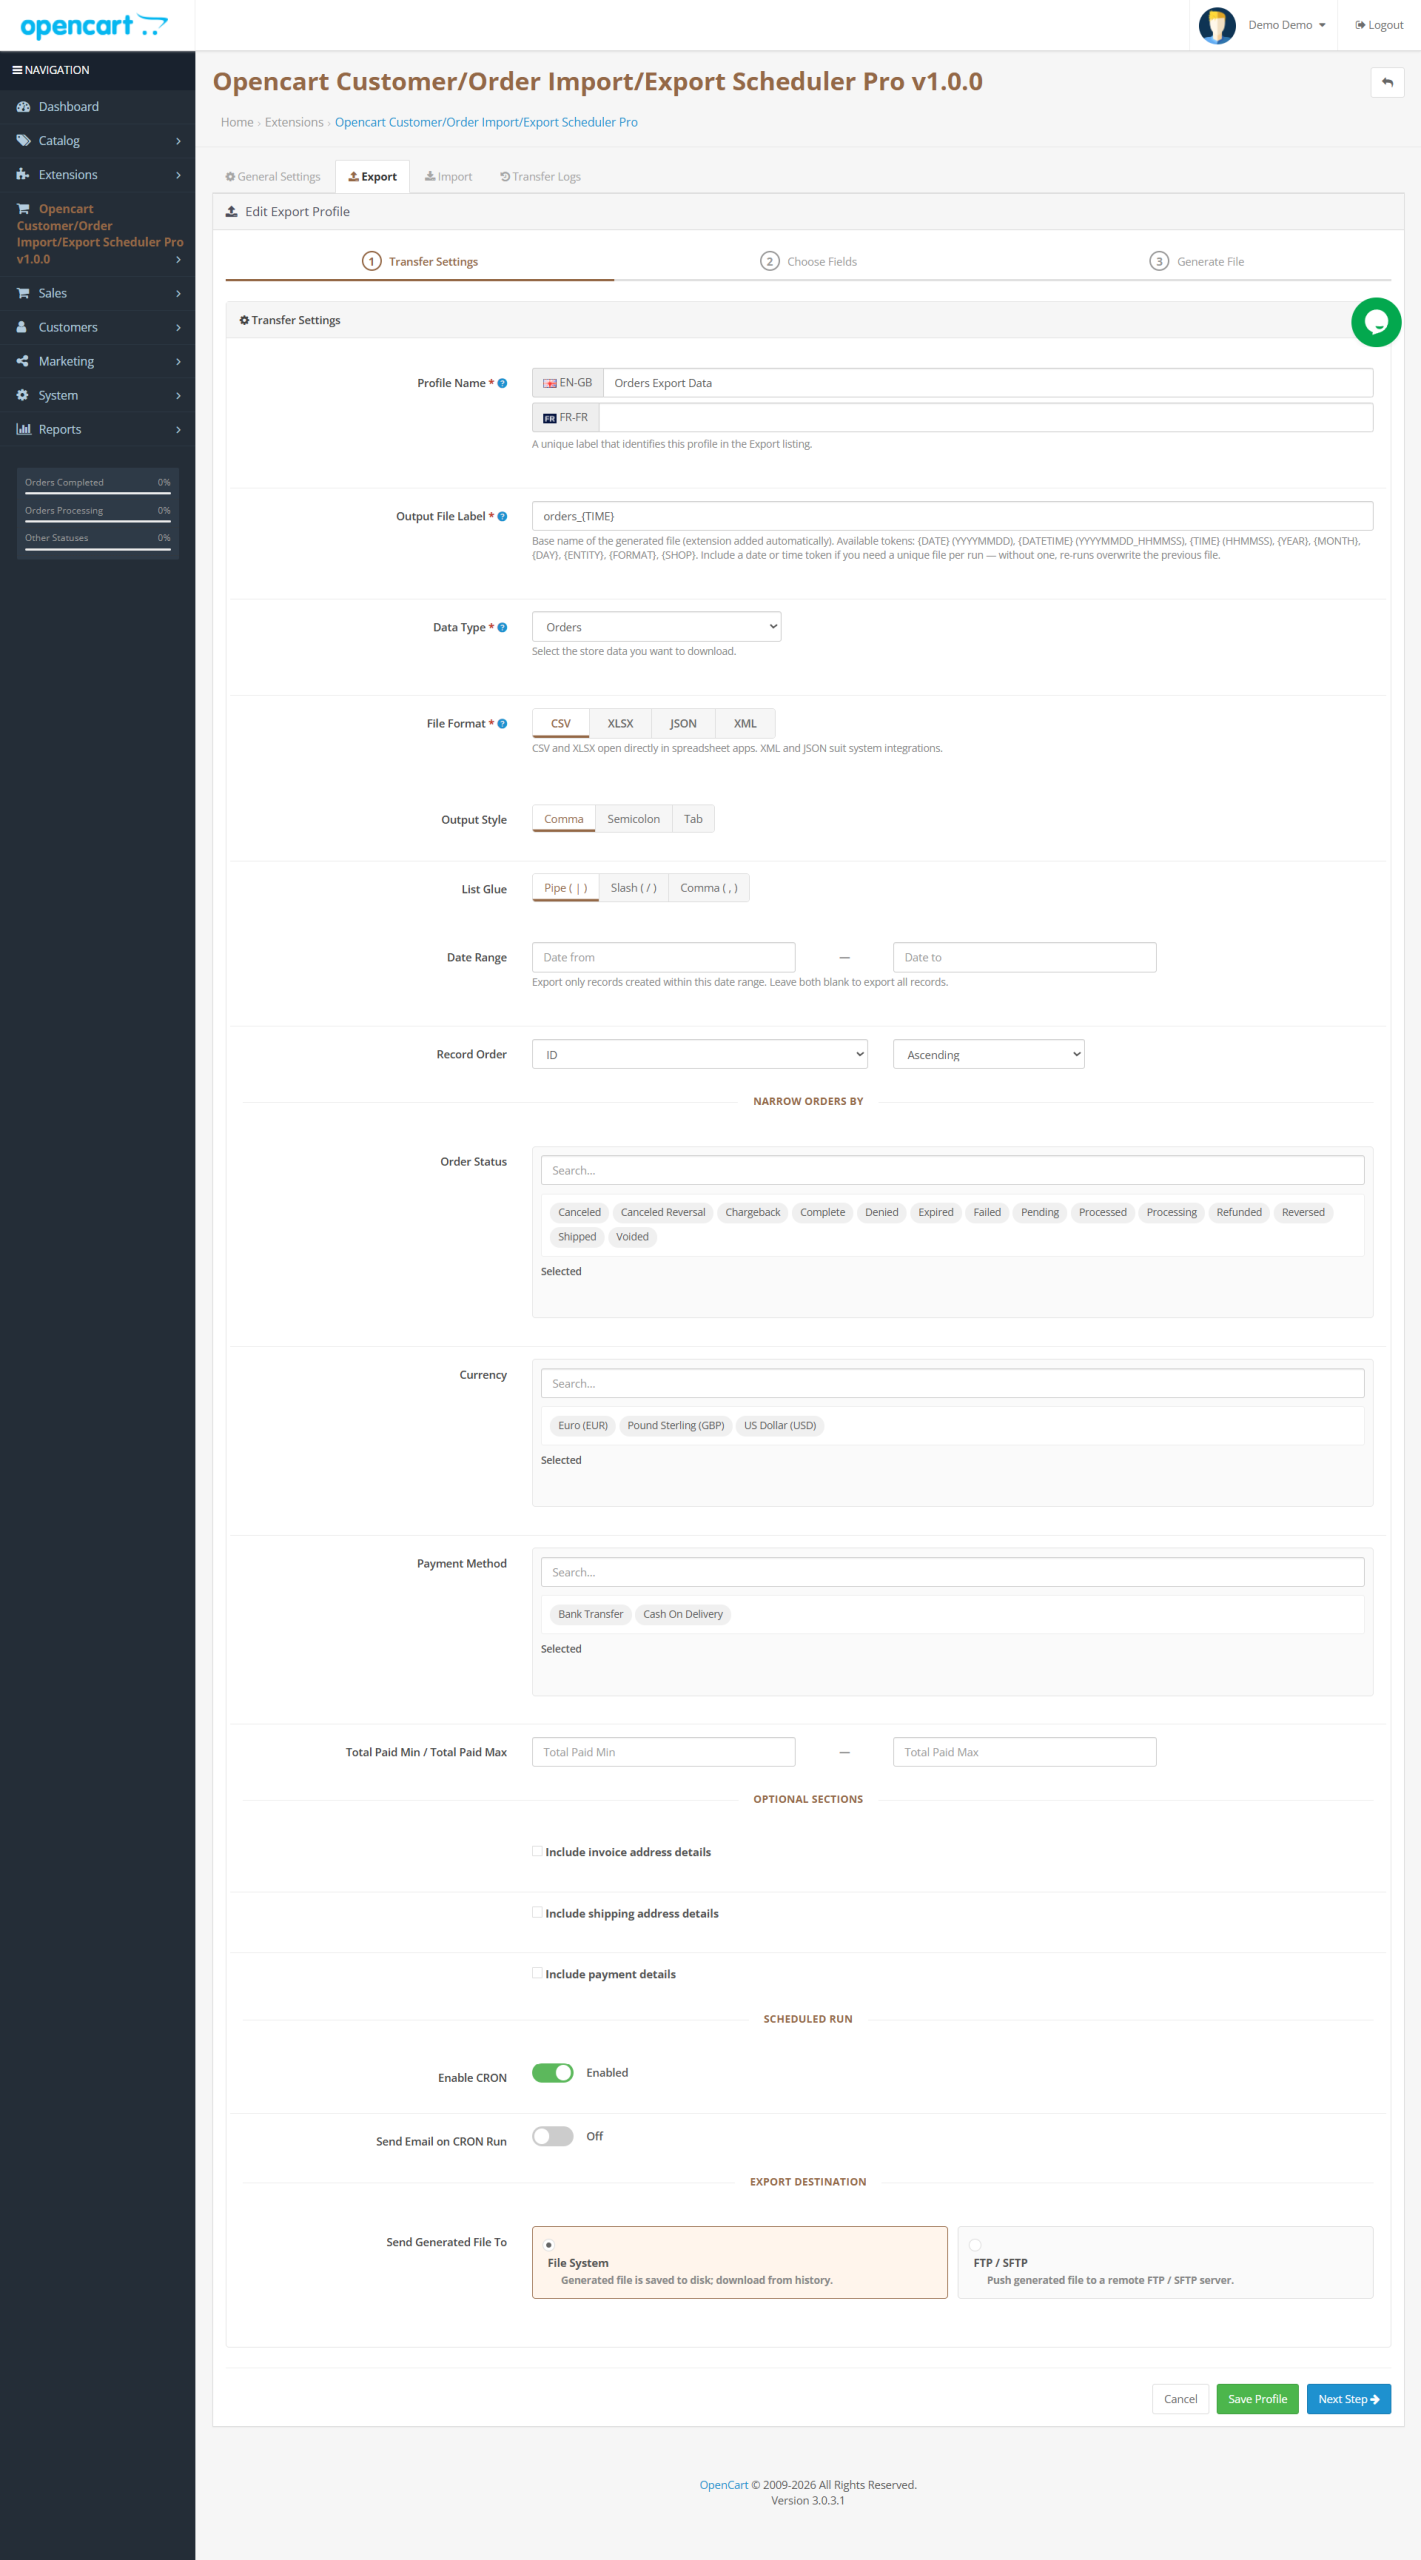
 

Profile Name: Give this profile a name that will make sense to you and your team six months from now. Something like “Daily Fulfilled Orders to WMS” or “Weekly Customer Backup XLSX” communicates the purpose at a glance.

Output Filename: The base name used for the generated file. File extension is added automatically. You can include dynamic tokens in this field to make filenames descriptive and date-stamped.

Entity Type: Choose which category of data this profile exports: Orders, Customers, or Addresses. The OpenCart address import export system handles all three entity types through this single unified interface.

File Format: Four options are available. CSV and XLSX work directly with Excel, Google Sheets, and most data tools with no conversion needed. JSON and XML are better suited to API integrations, ERPs, and software systems that consume structured data feeds.

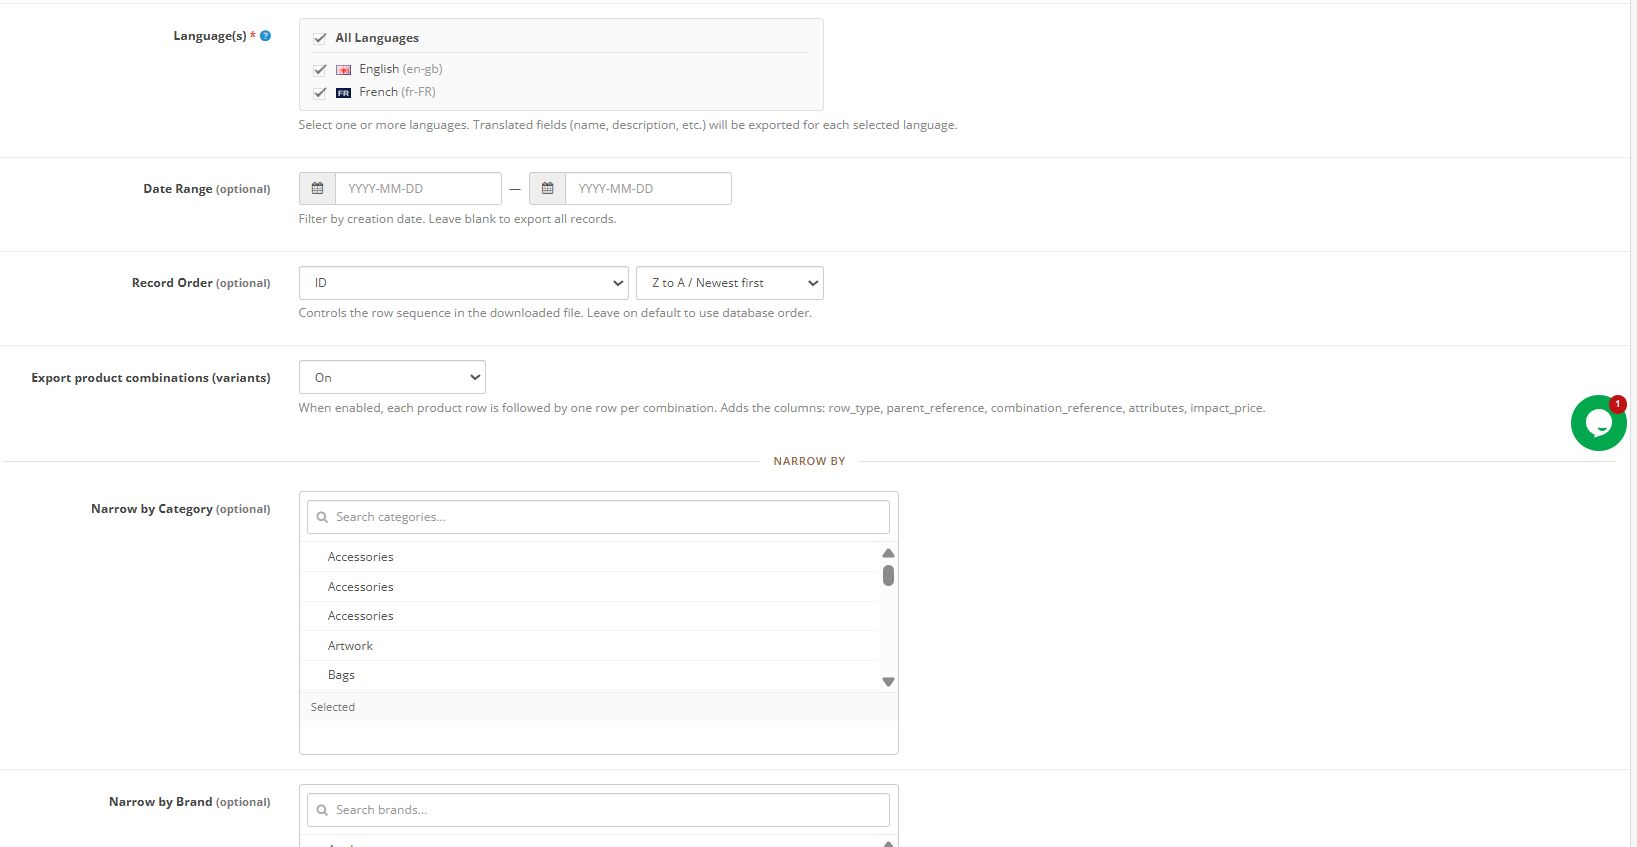
Store Scope: In multi-store OpenCart setups, use this field to restrict the export to a single storefront. Leave it on the all-stores default to pull records from every store in your installation.

Date Window: Optionally limit the export to records created within a specific date range. This is particularly useful for daily or weekly OpenCart scheduled export workflows where you only want records from the most recent period. Leave it blank when you need the full historical dataset.

Sort Preference: Controls the row order in your output file. Available sort keys include order ID, reference number, creation date, modification date, total order value, and order status. Choose an ascending or descending direction for each.

Column Block Controls: Three independent toggles let you expand or collapse entire sections of the output:

The invoice address toggle adds all billing address fields when enabled.

The delivery address toggle adds all shipping address fields when enabled.

The payment detail toggle adds payment amount, currency, method name, and transaction reference columns when enabled. When disabled, only the payment method name is exported.

Use these toggles to strip out data that the receiving system does not need, reducing file size and avoiding unnecessary transmission of financial data.

Scheduled Automation – Enable this toggle to include this profile in the automated OpenCart export orders run triggered by the Export Automation URL. When active, every time the URL fires, this profile generates its output file and either saves it locally or pushes it to the configured remote destination.

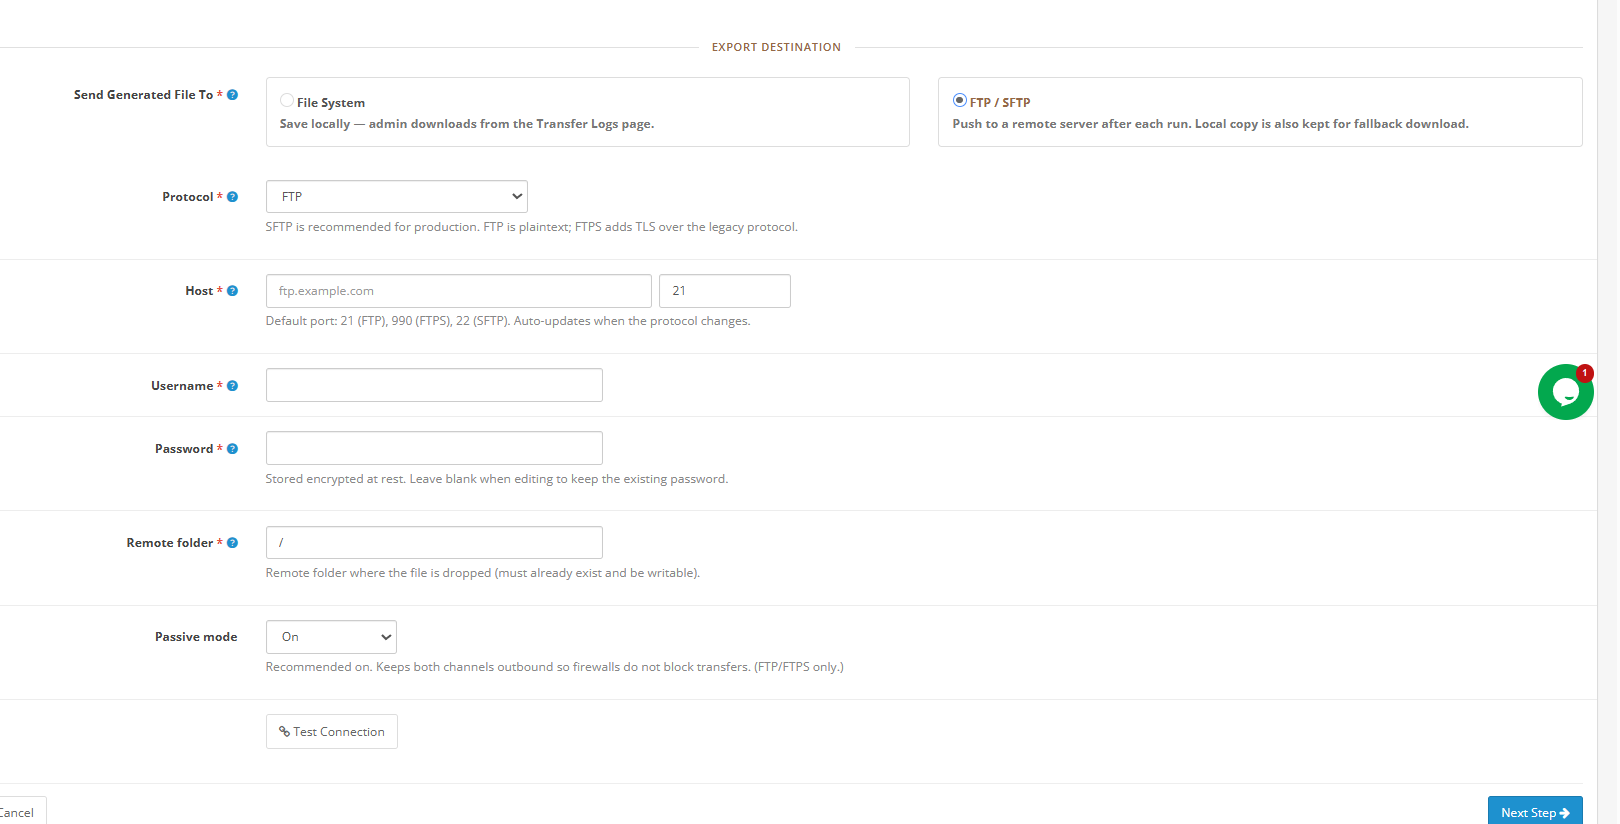
File Destination: Local storage saves the file to the server and makes it available for download from the Activity Log. Remote delivery via OpenCart FTP export orders or SFTP pushes the file to an external server after each run. When remote delivery is selected, a local backup copy is also retained.

Remote Server Configuration (visible when remote delivery is selected):

Select the transfer protocol based on your partner’s server requirements. OpenCart SFTP export using SSH key exchange is the most secure option and the recommended default for any production environment handling customer or payment data. FTPS provides encryption over the standard FTP protocol. Standard FTP should only be used in internal network scenarios where security is controlled at the network level.
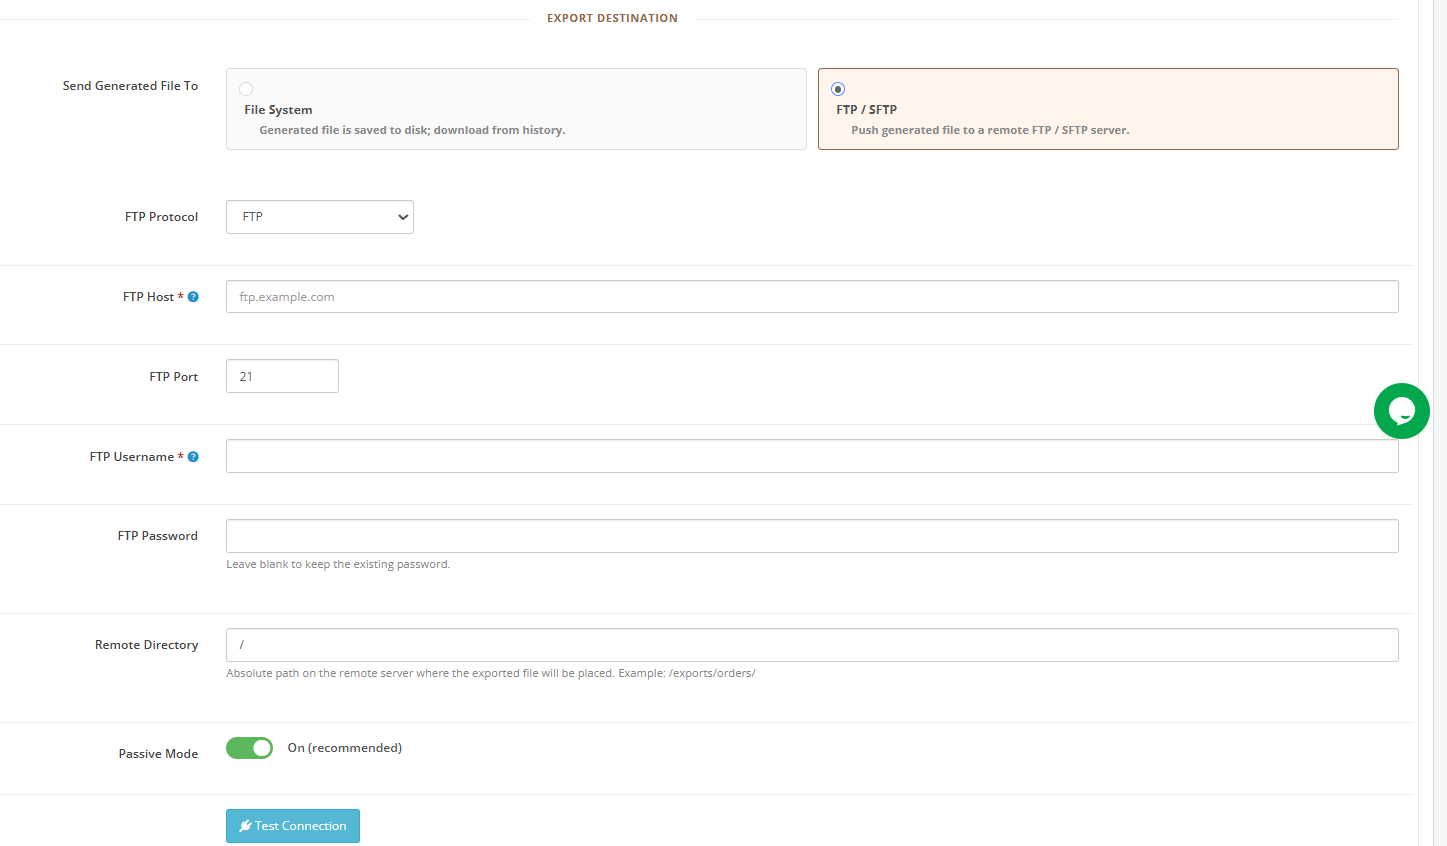
The port field updates automatically when you change the protocol selection: 21 for FTP, 990 for FTPS, and 22 for SFTP.

Enter the server hostname or IP address, username, and password. Credentials are stored in encrypted form. Provide the full absolute path to the destination directory on the remote server.

Passive mode is enabled by default. Use the Test Connection button before saving the profile to confirm the directory is accessible.

Field Delimiter: For CSV output, select the character that separates field values. Comma is the standard for most English-locale applications. Semicolon is the correct choice for European Excel locales.

Multi-Value Separator: Some order fields contain multiple values in a single cell, such as product options or applied discount codes. Pipe is the most unambiguous choice.

Order Filtering Options: The export wizard provides five narrowing filters:

  • Order Status: Narrows the export to orders currently in one or more selected status states, ideal for teams that need to export OpenCart orders to Excel for reporting only completed or pending records.
  • Shipping Method: Filters by carrier name, enabling logistics-specific exports for individual fulfilment partners.
  • Currency: Filters by transaction currency code, useful for finance teams working with region-specific revenue data.
  • Payment Method: Filters by the payment module used at checkout.
  • Order Value Range: Sets a minimum and maximum on the total paid amount, allowing you to isolate high-value orders.

Click Next to move to field selection.

4.2 Step Two: Choosing Which Fields to Export
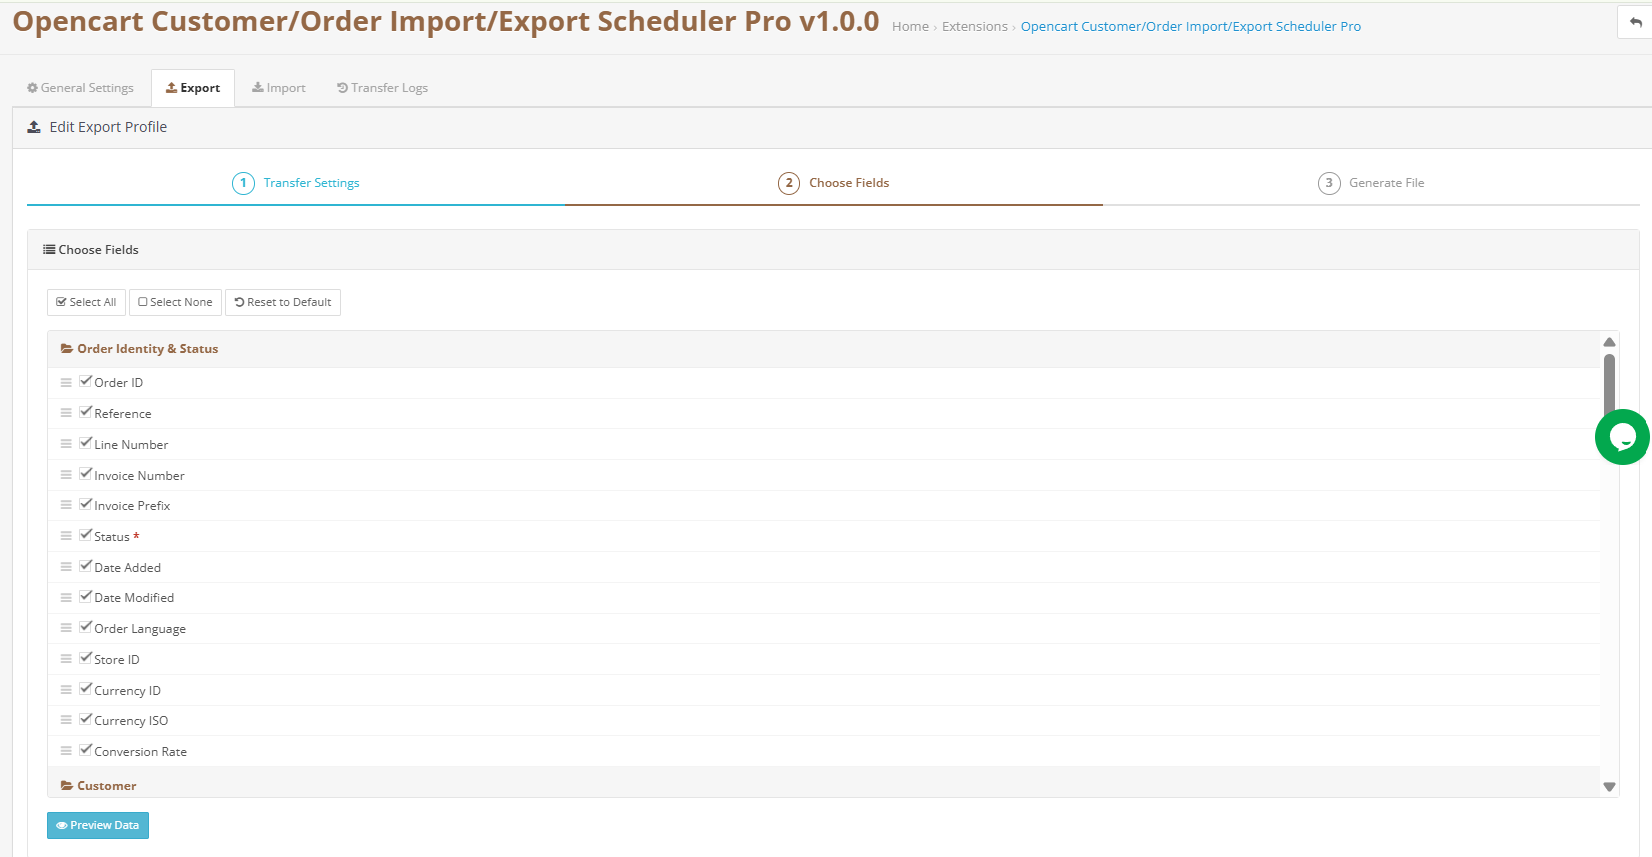
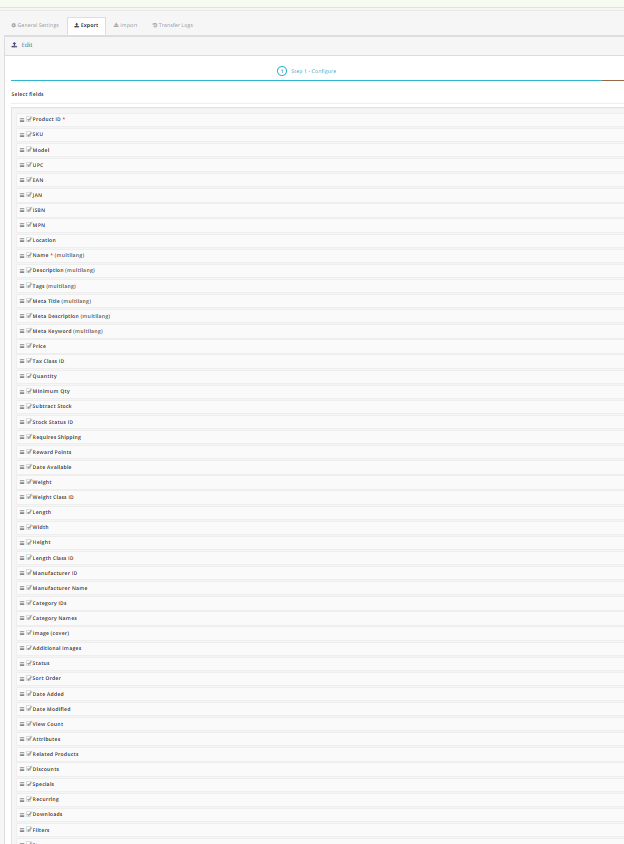
The field selection screen lists every available export column organised by data category. More than 155 individual fields are available, spanning order header information, full customer profile data, invoice and delivery address details, payment records, and product line item data ,  making this the most complete OpenCart bulk order management and export toolkit available.

Use the Select All control to include everything, Deselect All to start fresh, or Reset to Defaults to return to the standard recommended selection. A small number of identifier fields are mandatory and cannot be removed.

Drag any row to change the column sequence in the output file. An export file that contains only what the receiving system actually needs is faster to generate, smaller to transfer, and less likely to cause issues at the destination.

4.3 Step Three: Review and Generate
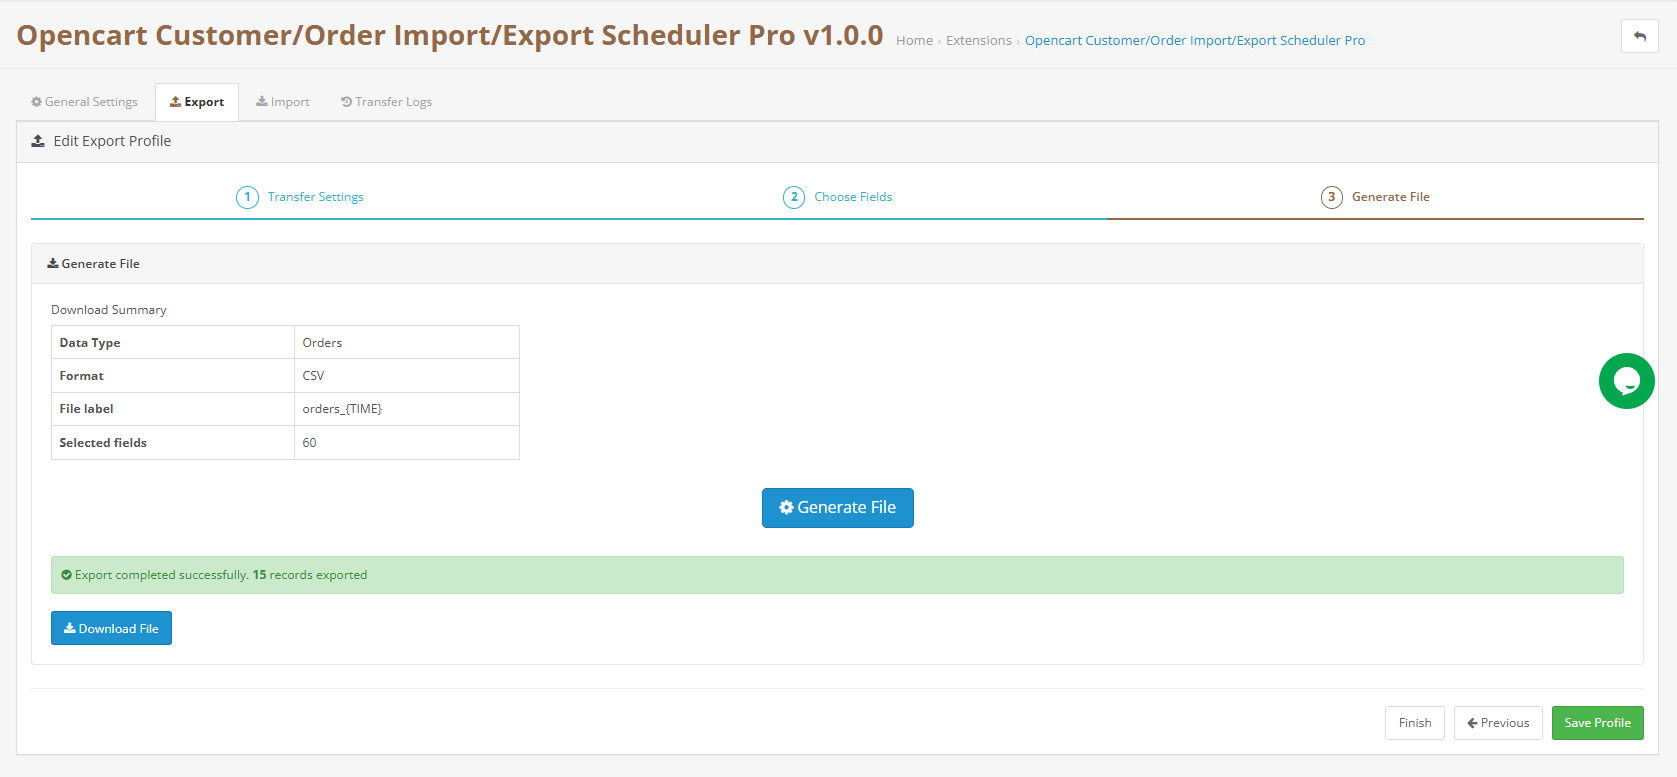
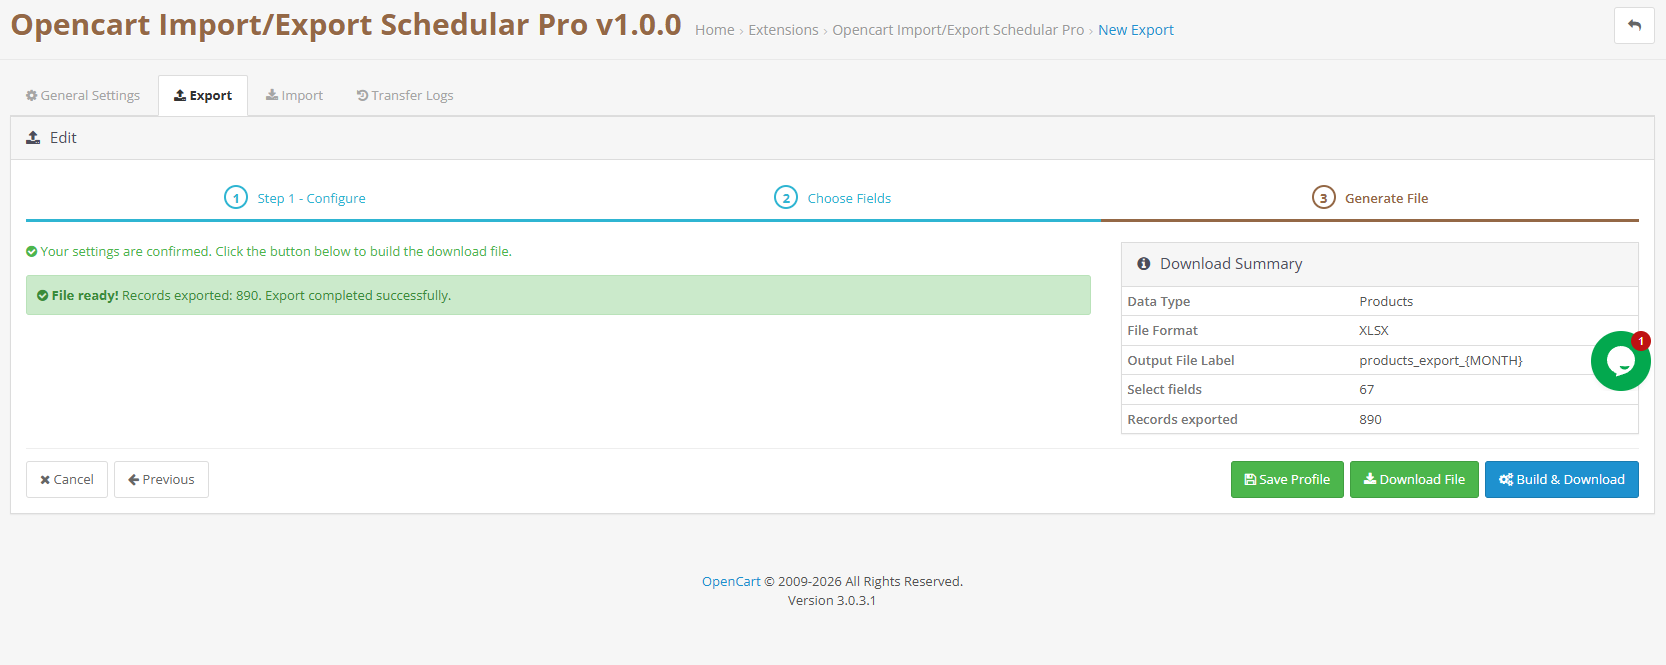
The final screen shows a complete summary of the profile configuration, including entity type, format, filename pattern, active filters, and the total number of fields selected for output.

Click Generate and Download to produce the file immediately. The OpenCart order export module creates the output and either initiates a browser download for local storage profiles or pushes the file to the configured remote server for FTP and SFTP profiles. The operation is recorded in the Activity Log.

Alternatively, save the profile without running it and let the next scheduled cycle trigger the first automated run.

5.0 Import Process,  Full Setup Guide

The Import Feature lists all saved import profiles with their configuration summary and last run status. The three-step wizard guides you through source configuration, field mapping, and execution. This is where OpenCart customer import, export and ecommerce order data transfer workflows are configured for both one-time and recurring use.

5.1 Step One: Source and Format Settings
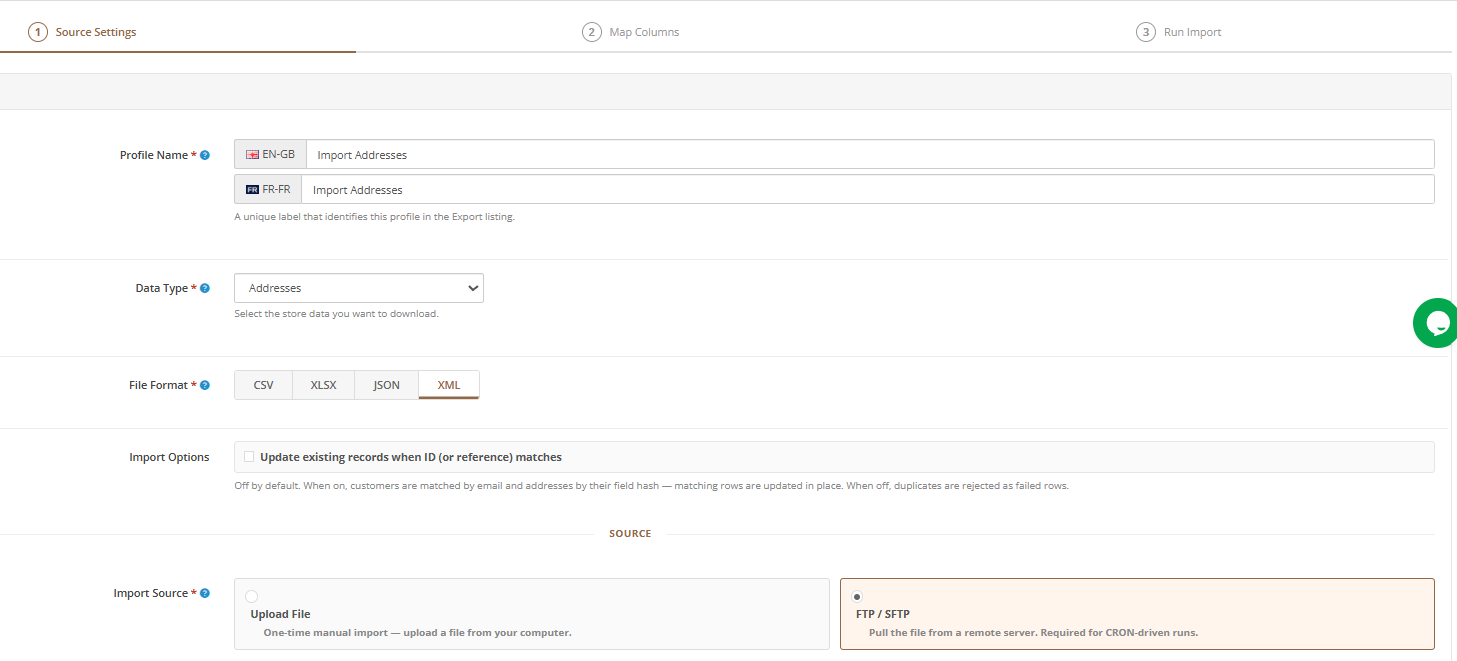
Profile Name:  A clear, descriptive label. Include the data entity and source system in the name for easy identification when multiple profiles accumulate over time.

Entity Type: Select Orders, Customers, or Addresses. The behaviour differs by entity type in an important way. Customer and address records are matched against existing data during import. A match updates the existing record, while no match creates a new one. Order records always result in new entries; the extension does not support updating existing order records through import, by design, to preserve the integrity of the historical order log.

File Format: Must match the format of the file you intend to import. The OpenCart CSV import customers details workflow requires CSV format selected here; XLSX for spreadsheet-based imports; JSON or XML for system-generated feeds.

Delimiter and Separator Settings: These must exactly match the settings used when the source file was created. A mismatch here is the most common cause of field boundary errors during OpenCart customer import and export operations.

Store Assignment: Imported records are created under the store selected here. Double-check this before saving in multi-store environments.

File Source: Manual upload accepts a file from your local machine and is suitable for one-time imports. Remote source connects to an FTP or SFTP server for the OpenCart FTP export orders and import automation workflows, required for any profile that runs on a schedule.
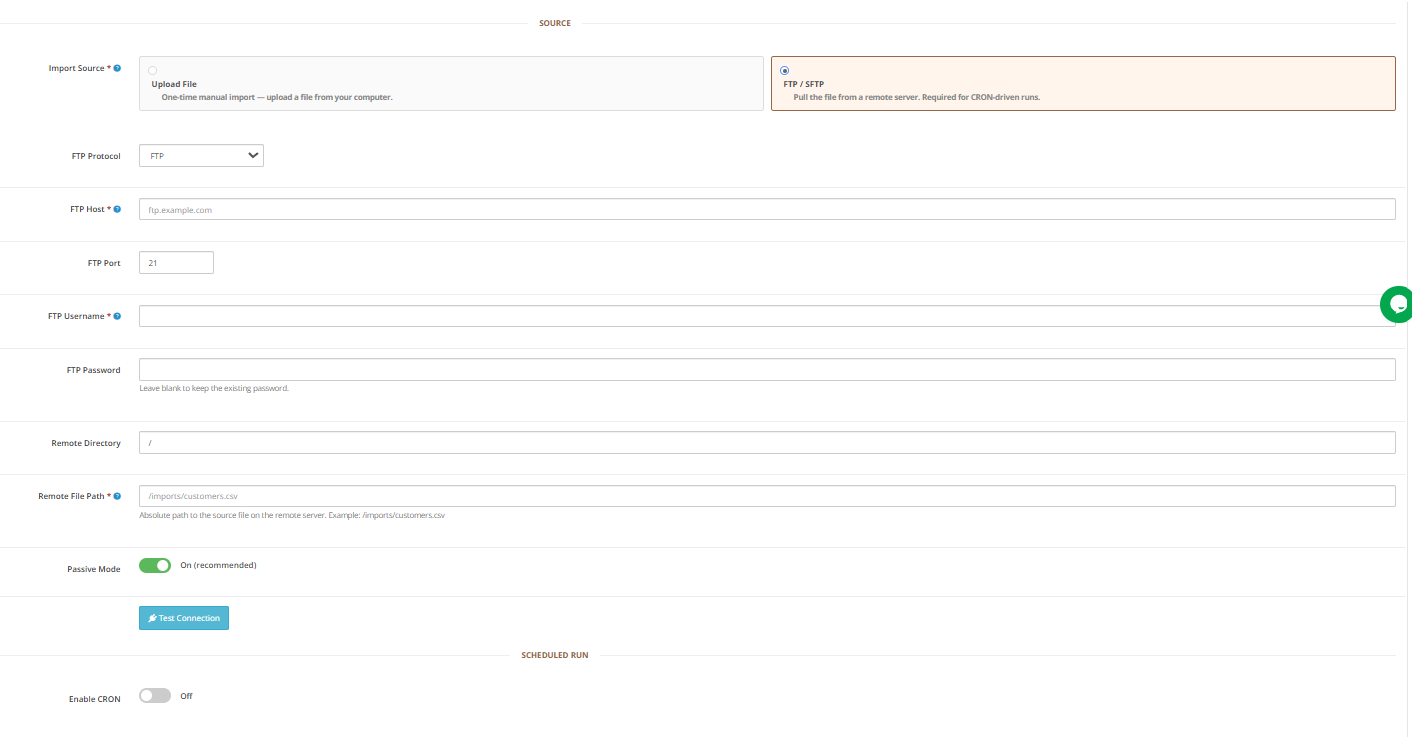
Remote Server Settings: Protocol, host, port, credentials, remote file path, passive mode, and test connection. Configure and test these before saving.

Schedule: When enabled, this profile runs each time the Import Automation URL fires. The extension connects to the remote server, retrieves the file from the specified path, and processes the OpenCart data migration without any manual action.

Click Save Profile to store the configuration, or proceed to the next step to continue directly to field mapping.

5.2 Step Two: Field Mapping
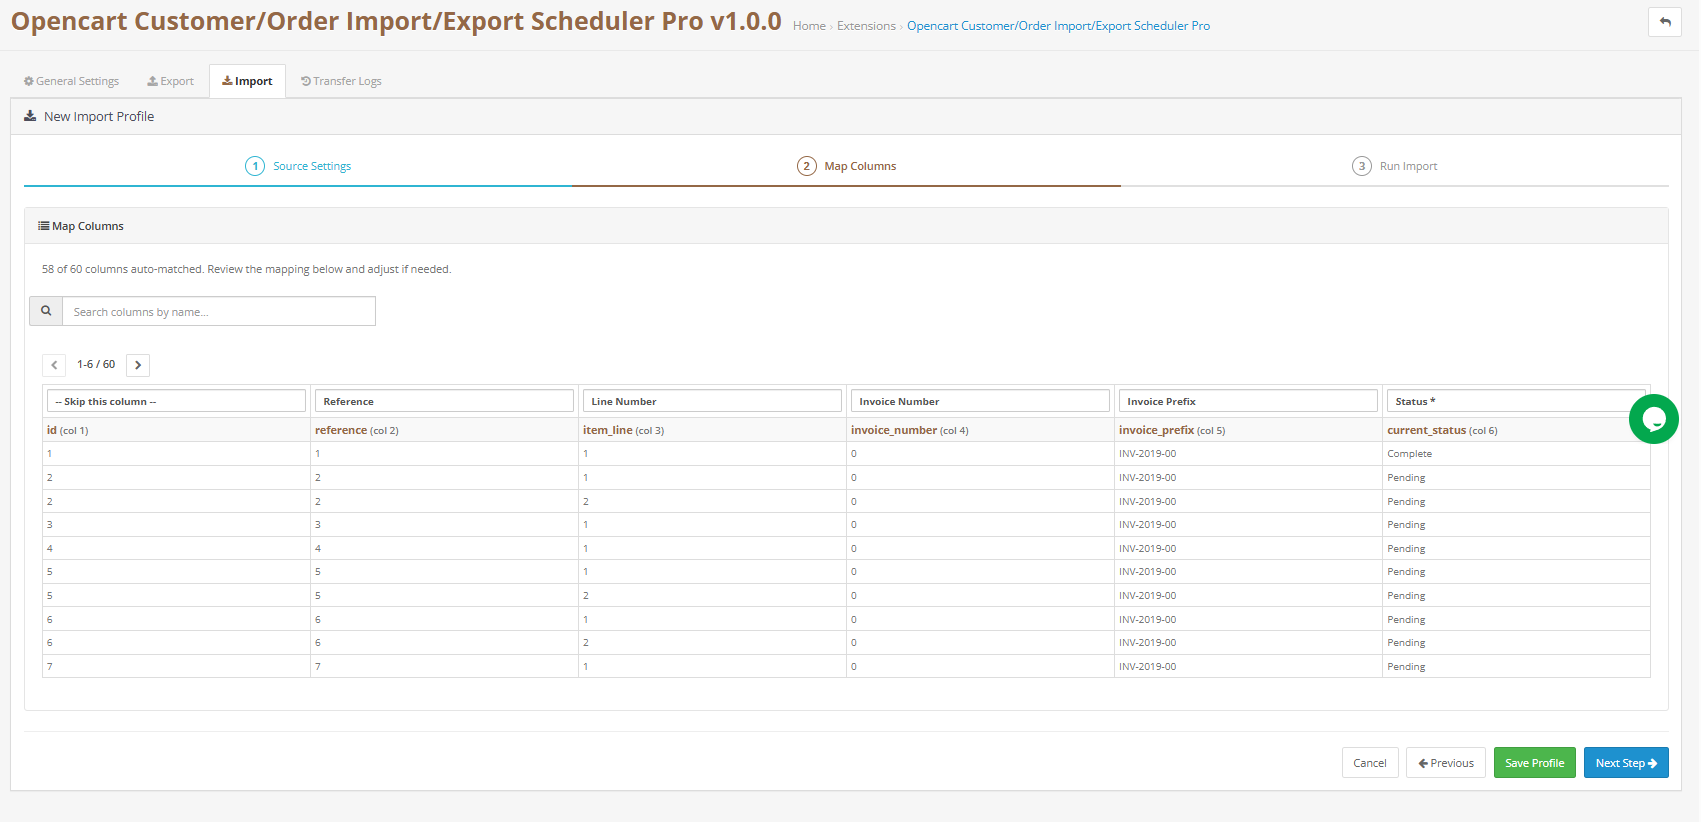
The mapping screen is where the extension reads your file and connects its columns to the corresponding OpenCart data fields. The process is largely automatic; the extension recognises standard column header names and common naming conventions used by popular eCommerce platforms and ERP systems.

A live data preview shows the first rows of your file alongside the field mapping assignments, so you can visually confirm that the data appearing under each field label is what you expect. Required fields are indicated clearly. If any required field has not been auto-matched, you must assign it manually before proceeding.

The search box above the mapping table makes it easy to find specific fields in files with a large number of columns. Review every auto-matched assignment carefully, particularly for date, currency, numeric, and address fields. These are the categories most likely to have naming variations that the auto-matcher may have interpreted differently.

The assignment you set manually is saved with the profile, so it only needs to be done once per file structure.

5.3 Step Three: Import the File

With mapping confirmed, click Start Import to begin processing. The extension works through the file in sequential batches, with each batch size determined by the Batch Processing Size value set in the Settings Panel.

A live progress display updates after each batch completes, showing how many records have been processed and how many are remaining. This is especially useful for large OpenCart bulk import/export operations on servers with limited memory.

Before clicking Start Import, click Save Profile if you want the field mapping preserved for future runs. Saving the profile means the next time you run an import with the same file structure, all field assignments are already in place.

6.0 Activity Log, Understanding Your Transfer History
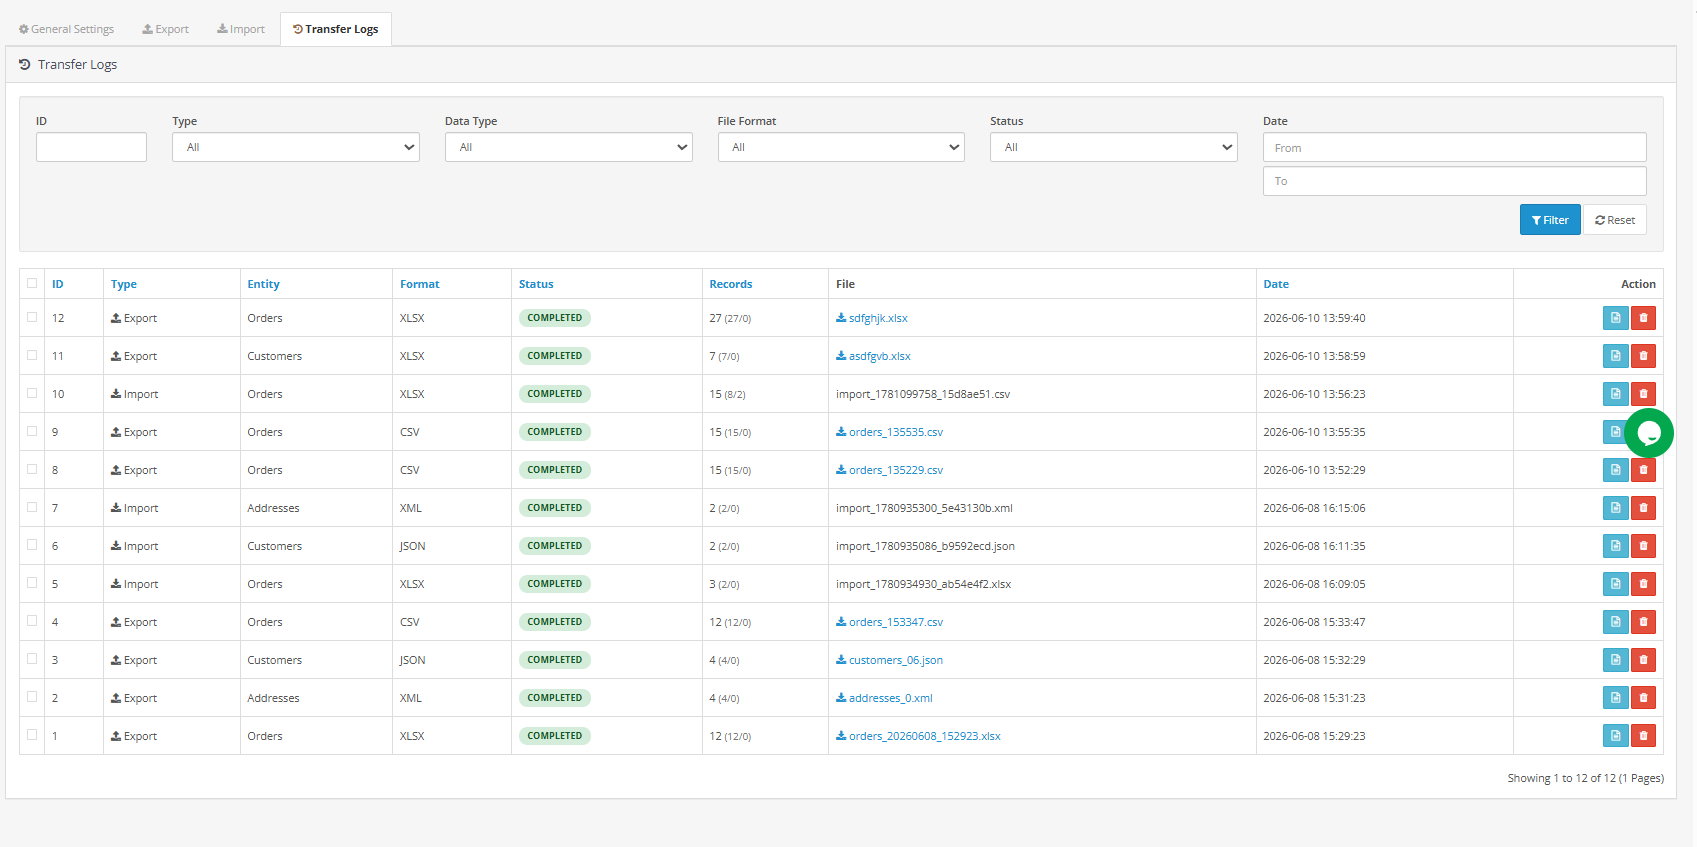
The Activity Log maintains a permanent record of every import and export the extension has performed. It is searchable and filterable, making it a practical audit tool for compliance reviews, dispute resolution, and operational troubleshooting.

Each log entry displays the following:

  • Run Number-  a sequential identifier assigned to each operation.
  • Operation Type- whether the run was an import or an export.
  • Entity-  which data type was involved (Orders- Customers- or Addresses).
  • Format –  the file type used (CSV- XLSX- JSON- or XML).
  • Status –  whether the run completed cleanly or encountered errors.
  • Record Count –  how many records the run processed.
  • Filename –  the output file name- with a download link for export runs.
  • Timestamp –  when the run started.Use the filter controls at the top of the log to narrow the view by any combination of these fields, including a custom date range. Export files remain downloadable from the log indefinitely. For runs that produced errors, expanding the log entry reveals the complete row-level error detail from that operation.

7.0 Full OpenCart Store Migration Workflow

This section covers end-to-end OpenCart store migration using Knowband as the sole migration tool.

Install the Knowband extension on both the source and destination OpenCart stores. On the source store, create three separate export profiles: one for Orders, one for Customers, and one for Addresses. For each, select all available fields, apply no filters, choose XLSX (easiest for pre-import review), and generate the files.

This approach makes the extension the most efficient OpenCart store migration plugin for preserving complete order history, ideal for OpenCart customer data migration scenarios, including customer accounts and delivery address data across environments, without requiring custom scripts or third-party migration services.

On the destination store, create a corresponding import profile for each entity type. Upload the exported file for each entity: orders, customers, and addresses. Confirm the field mapping and run the imports in this sequence: Customers first, then Addresses, then Orders. Running in this order means customer and address records exist before the order import attempts to link to them, which reduces the number of records the cross-store resolution engine needs to create from scratch.

This complete e-commerce order data transfer approach makes the Knowband extension the most efficient single-tool solution for OpenCart data migration.

8.0 Frequently Asked Questions

Q1: Can I export orders from multiple Opencart in the same operation?

Each export profile targets one store at a time using the Store Scope setting using Opencart Order Migrations Extension by Knowband. To combine data from multiple storefronts, run a separate export for each and merge the resulting files in your spreadsheet application before delivering them onward.

Q2: My import file has custom column names that do not match OpenCart’s field names. Will the mapping fail?

The auto-matcher recognises a wide range of common naming variants. For any column it cannot resolve automatically, the mapping screen lets you make the assignment manually by selecting the correct OpenCart field from a dropdown. The assignment is saved with the profile, so it only needs to be done once.

Q3: Does importing customer records create duplicate accounts?

No. Customer records are matched by email address. If the email already exists in your OpenCart database, the existing account is updated. New accounts are only created when the email does not match any existing record. This is the same de-duplication logic used by leading OpenCart customer import/export extensions.

Q4: Is it safe to re-run an export profile that already delivered a file to a remote server?

Yes. Each run generates a new file and each run is logged separately. Re-running a profile does not delete or replace files from previous runs when filenames include date or datetime tokens. If you are using a static filename without tokens, the file on the remote server will be overwritten on each run.

Q5: What should I do if a scheduled import or export did not run?

Check the Activity Log first to confirm whether the run was attempted. If no entry exists for the expected time, the issue is with the automation URL not being called by your task scheduler. Verify the URL is correctly saved in your task scheduler and that the scheduled automation toggle is enabled on the relevant profile.

This user guide covers the complete feature set of the Knowband OpenCart Order, Customer & Address Import Export Extension,  the leading OpenCart import export extension for orders, customers, and address data. For technical support, contact the support team directly via the extension’s support channel.

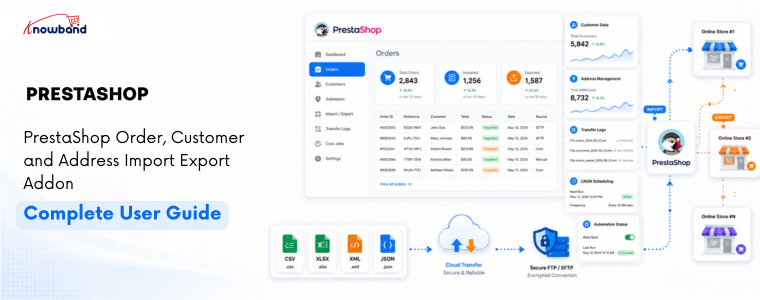
PrestaShop Order, Customer and Address Import Export Addon – Complete User Guide

1.0 Introduction

Managing order data across stores and partner systems is one of the most time-consuming tasks a PrestaShop admin faces. Migrating to a new store means recreating order history by hand. Sending daily order files to a warehouse or finance team means logging in, exporting, and sending on a schedule that someone has to maintain. Fixing corrupted records after a failed transfer means hours of cleanup with no clear record of what went wrong. The Knowband PrestaShop Order, Customer and Address Import Export Addon serves as a powerful PrestaShop Bulk Migration Module, handling all three challenges with ease. It transfers orders, customers, and addresses between PrestaShop stores and external systems in CSV, XLSX, JSON, and XML, with cross-store identity resolution, FTP/SFTP delivery, scheduled automation, and a full audit log. No developer is needed at any step.

This guide covers every tab, wizard step, and setting so you can configure the PrestaShop Order, Customer and Address Import Export Addon and start transferring order data on day one. Compatible with PrestaShop 1.7.x through 9.x.

1.1 Who Is The PrestaShop Bulk Migration Module For

The Knowband PrestaShop Order, Customer and Address Import Export Addon is built for:

  • Store owners migrating from an existing PrestaShop installation who need to bring the full order history across.
  • Operations teams that rely on a PrestaShop scheduled order export to send regular files to warehouses, fulfilment partners, or accounting systems.
  • Admins who need PrestaShop bulk order management for correcting records, exporting a set, editing in Excel, and re-importing the corrected file.
  • Any organisation that needs a verifiable record of every order data movement for audit or compliance purposes.

2.0 Installation Guide

System Requirements

  • PrestaShop 1.7.x, 8.x, or 9.x
  • PHP 7.2 or higher

Installing the Module

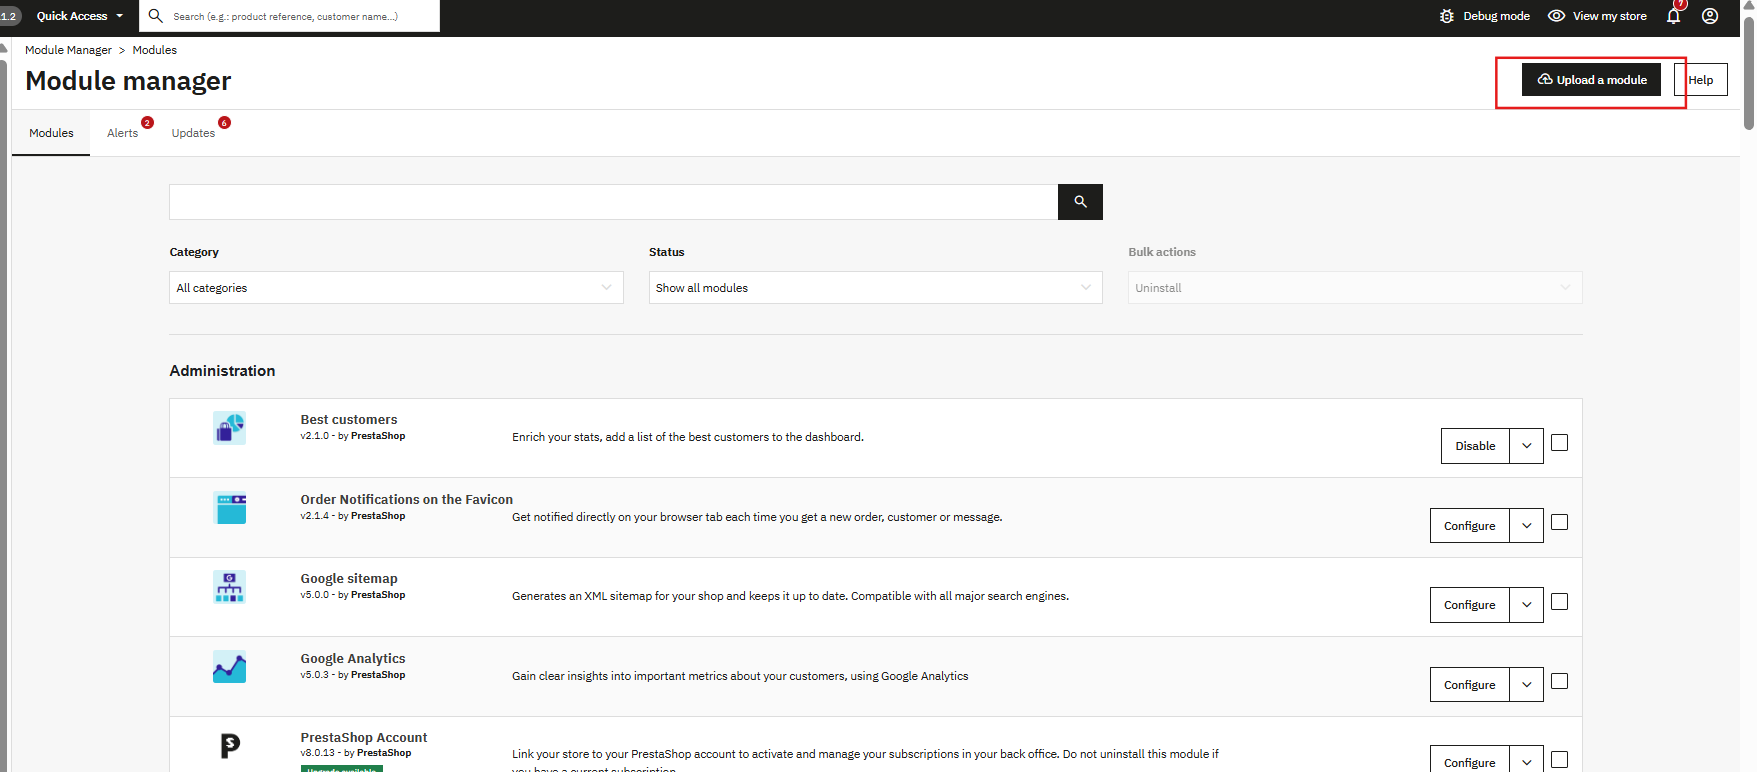
Head to your PrestaShop back office and go to Modules, then Module Manager. Find the upload option at the top right of the screen. Select the ZIP file from your account and confirm. PrestaShop processes the upload on its own.

Once the upload finishes, hit Install on the prompt that follows. The module configuration screen opens right after. If the module does not appear, type Order Import Export into the Module Manager search and click Configure.

Common Installation Issues

  • Upload fails: The server is rejecting the file size. Ask your host to raise upload_max_filesize and post_max_size to at least 32 MB.
  • Module not visible after install: Clear the PrestaShop cache under Advanced Parameters, then Performance and search again.
  • Configuration page looks broken: Clear your browser cache and the PrestaShop theme cache under Design, then Theme and Logo, then Advanced Settings.

3.0 Admin Panel Overview

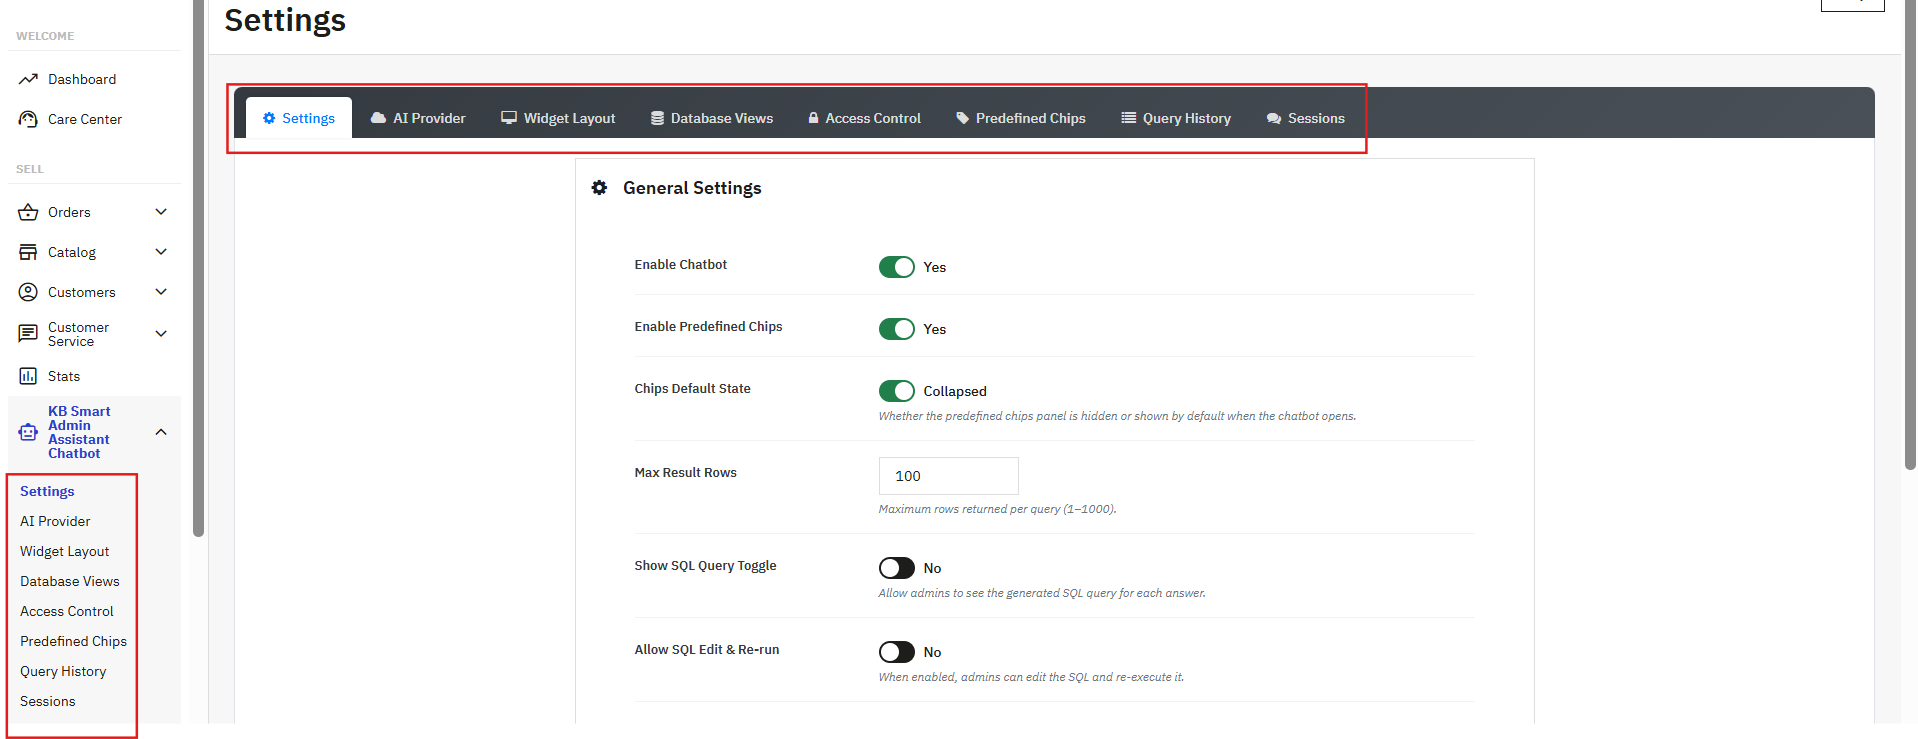
The Knowband PrestaShop Order, Customer and Address Import Export Addon adds four main tabs to the back office:

  • General Settings: Module preferences, sample template downloads, performance limits, and CRON configuration.
  • Export: Create and run export profiles using the three-step wizard.
  • Import: Create and run import profiles using the three-step wizard.
  • Transfer Logs: A full history of every import and export run with status, record counts, and row-level error detail.

4.0 General Settings Tab

The General Settings tab has four sub-tabs: Preferences, Template Files, Limits and Speed, and Scheduled Cleanup.

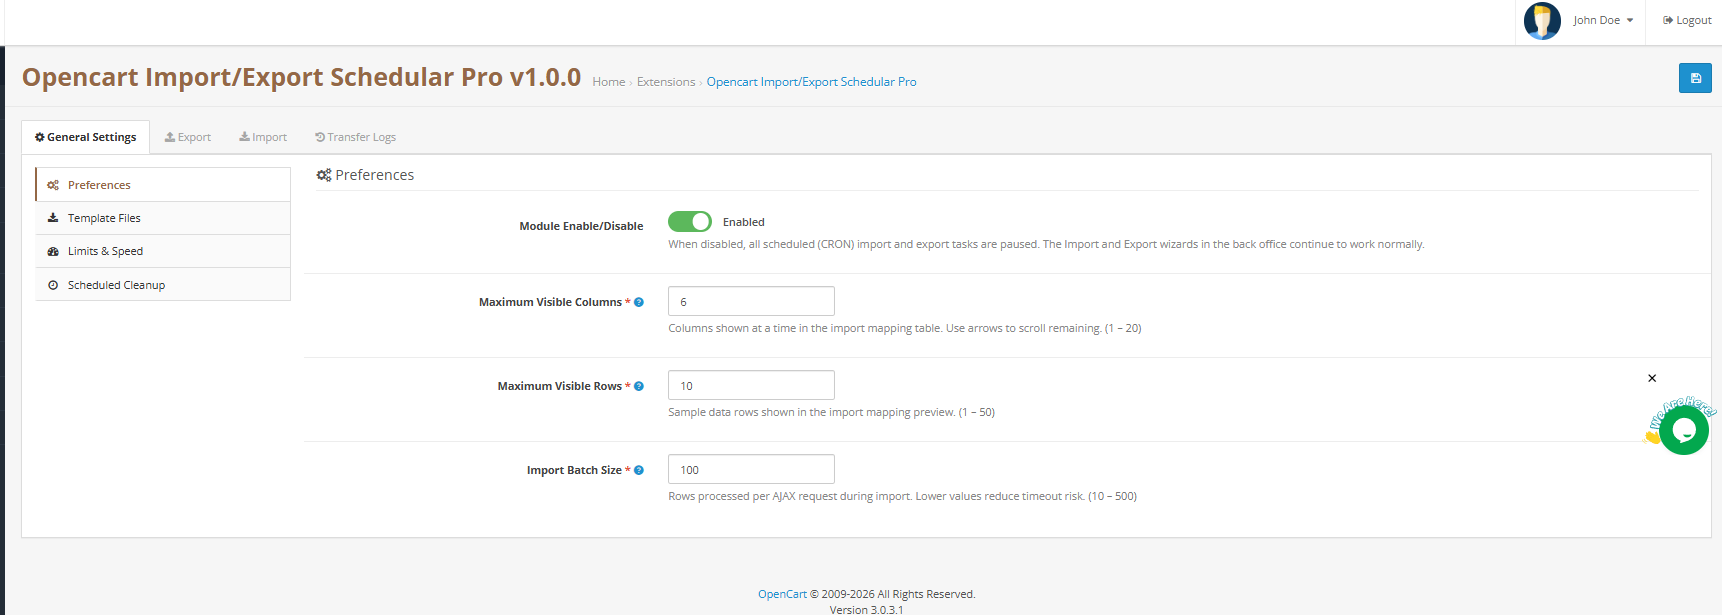
4.1 Preferences

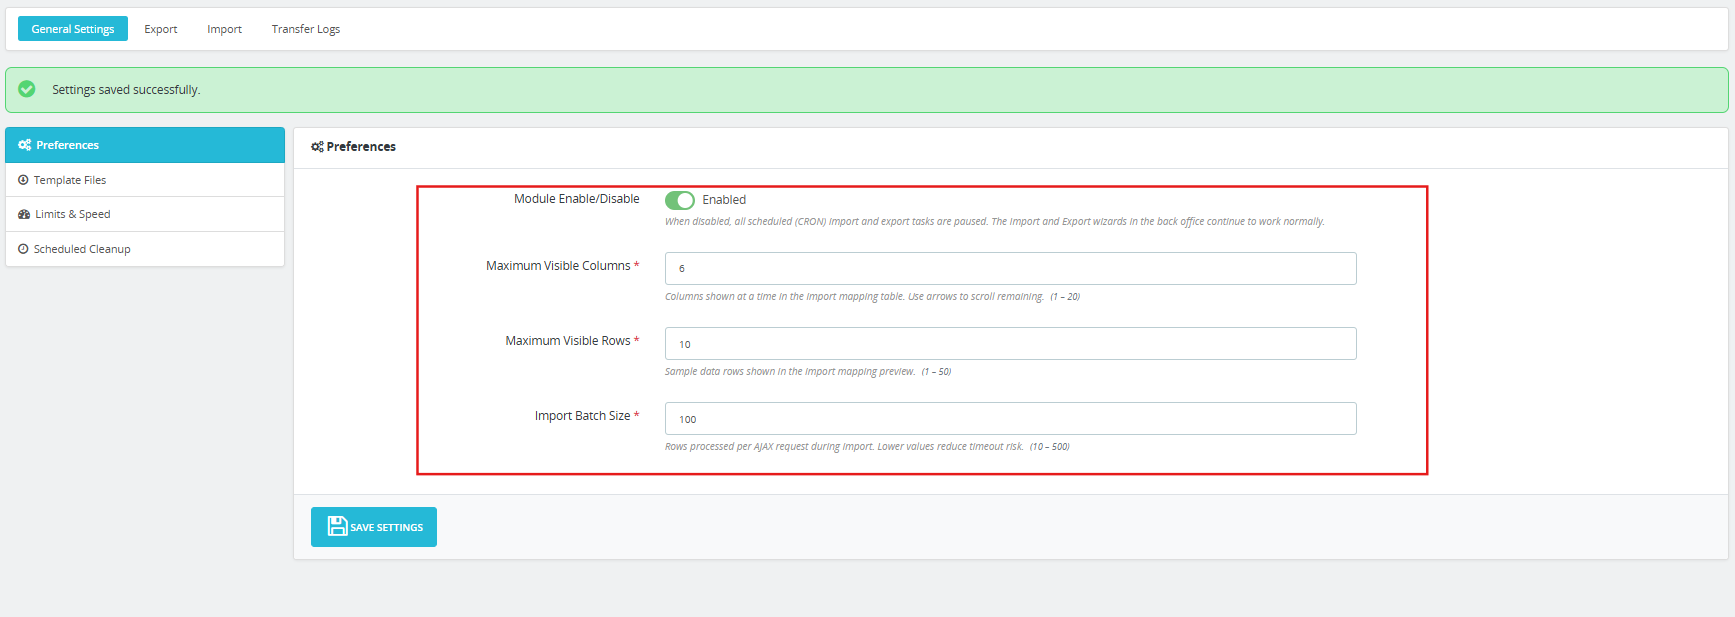
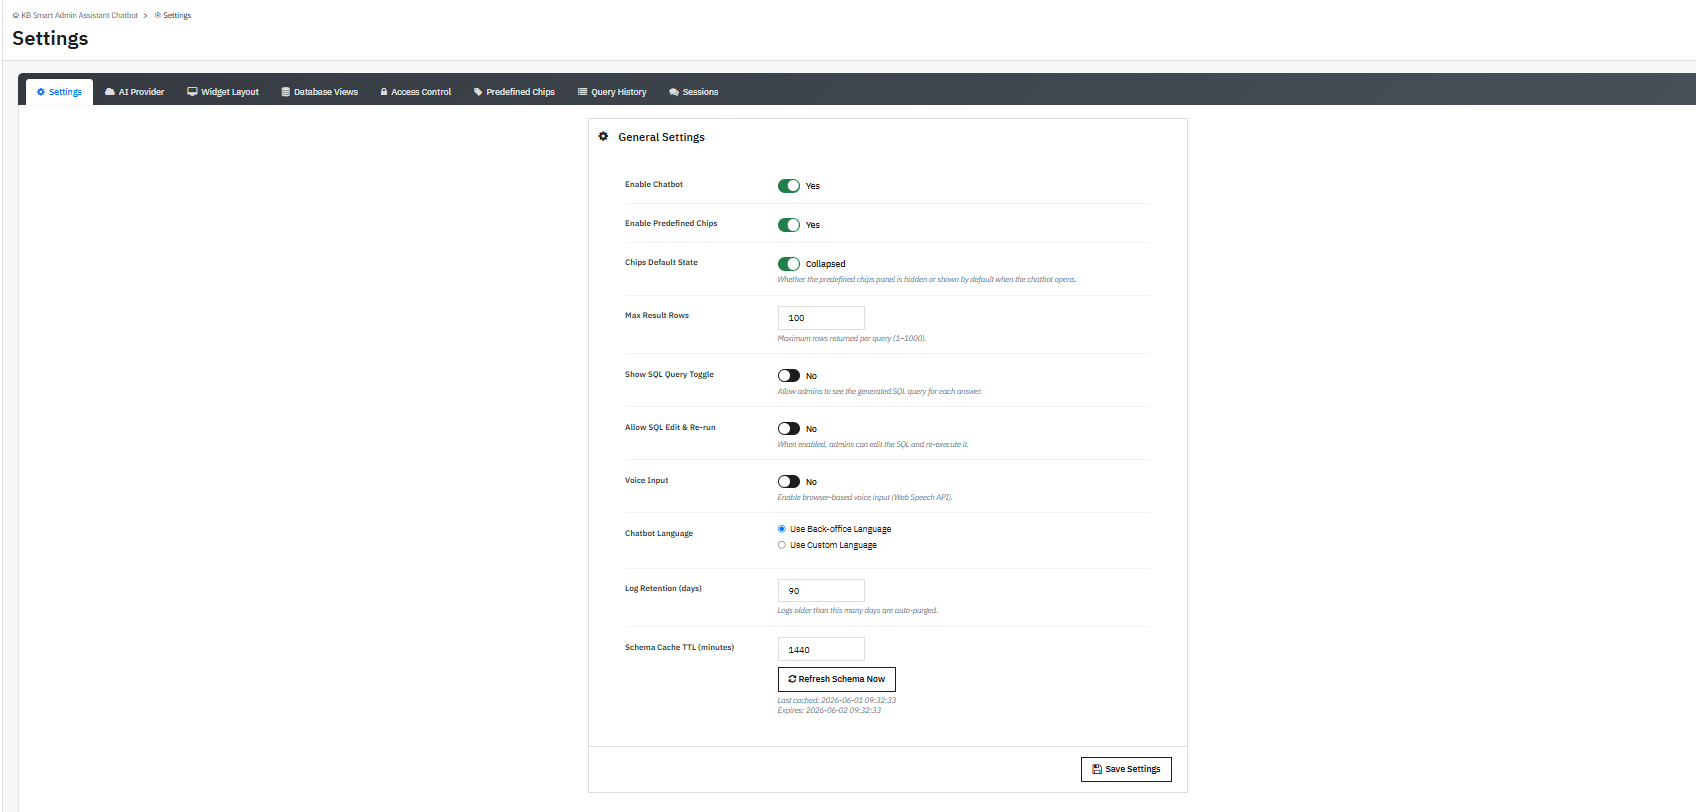
Module Enable/Disable: The main toggle for the entire PrestaShop Bulk Migration Module. When set to Disabled, all scheduled CRON import and export tasks pause automatically. The manual Export and Import wizards in the back office continue to work normally regardless of this setting.

Maximum Visible Columns: Sets how many columns appear at one time in the import mapping table. Range is 1 to 20. Use the arrow controls in the mapping interface to scroll through the remaining columns.

Maximum Visible Rows: Controls how many sample data rows appear in the import mapping preview. Range is 1 to 50.

Import Batch Size: The number of rows the module processes per AJAX request during an import run. Range is 10 to 500. Lower values reduce timeout risk on shared hosting environments where large imports hit PHP execution limits.

Click Save Settings to apply.

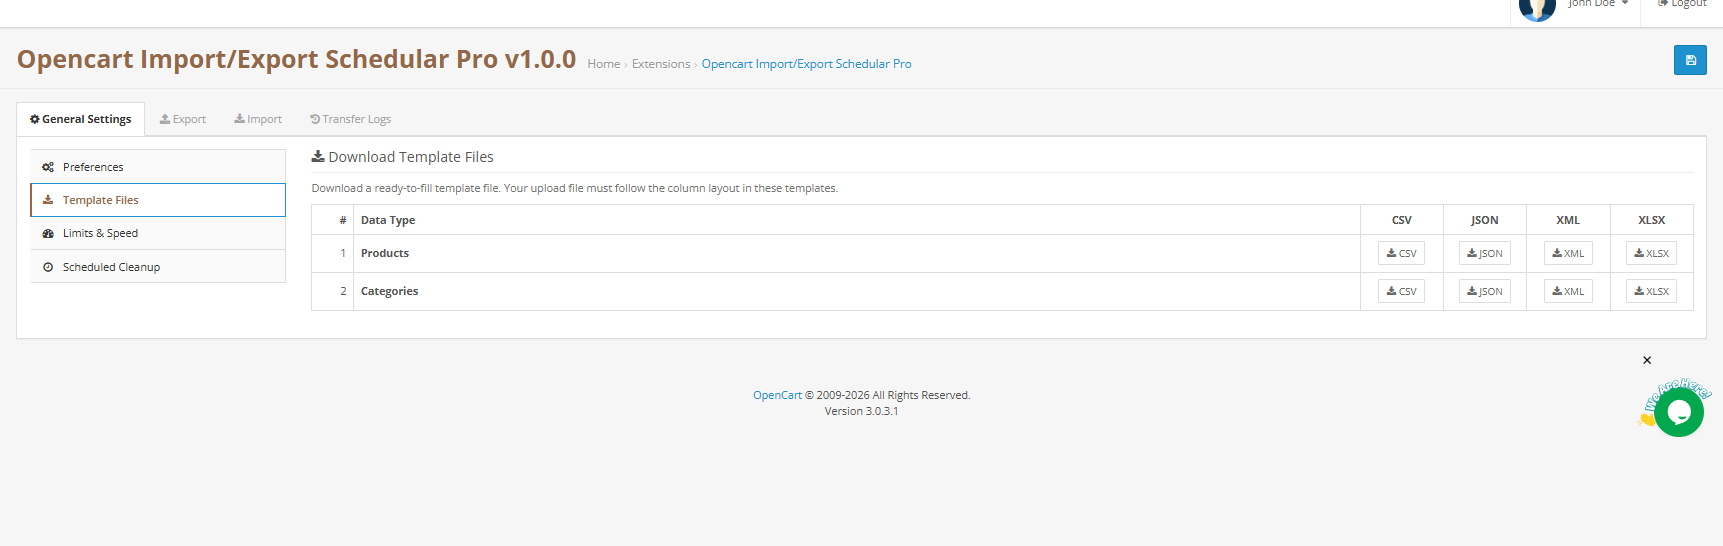
4.2 Template Files

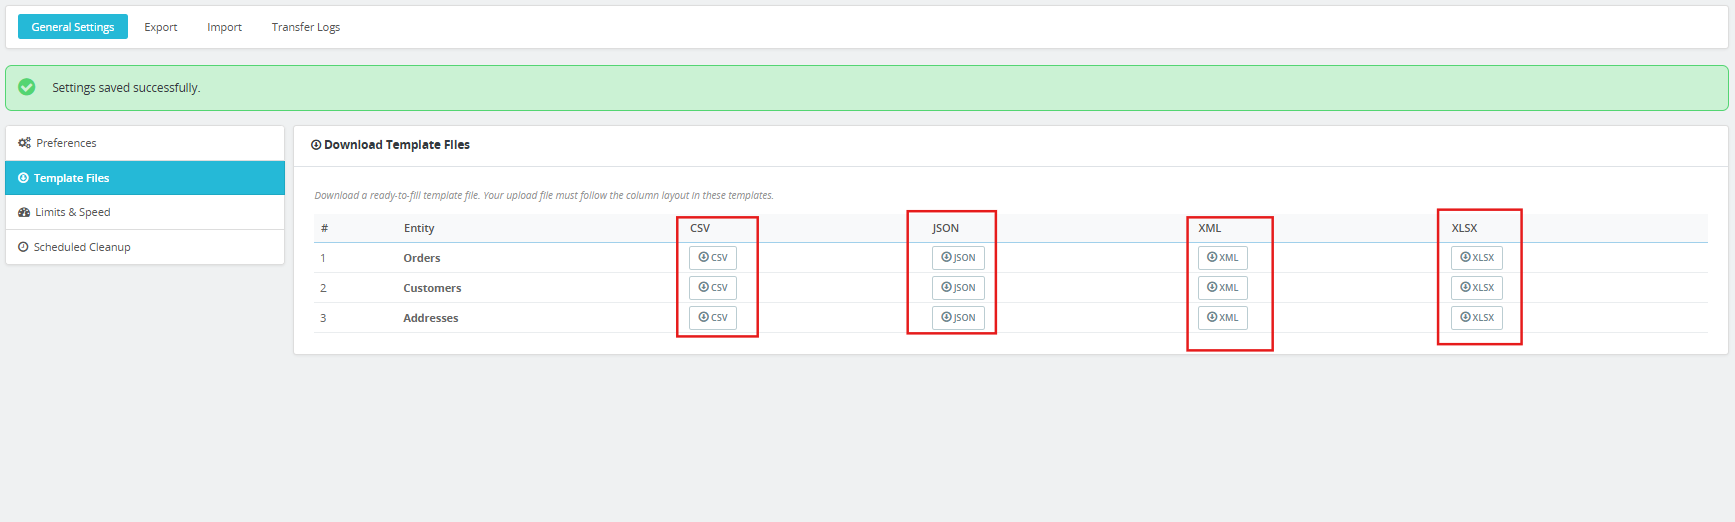
The Template Files sub-tab provides ready-to-fill sample files for each supported entity in all four formats. Download a template before building your first import file to confirm the column layout.

Three entities are available:

  • Orders: CSV, JSON, XML, XLSX
  • Customers: CSV, JSON, XML, XLSX
  • Addresses: CSV, JSON, XML, XLSX

Each sample contains realistic, fully populated data across every supported column. Templates are generated from the live column catalogue and stay updated with any schema updates.

4.3 Limits and Speed

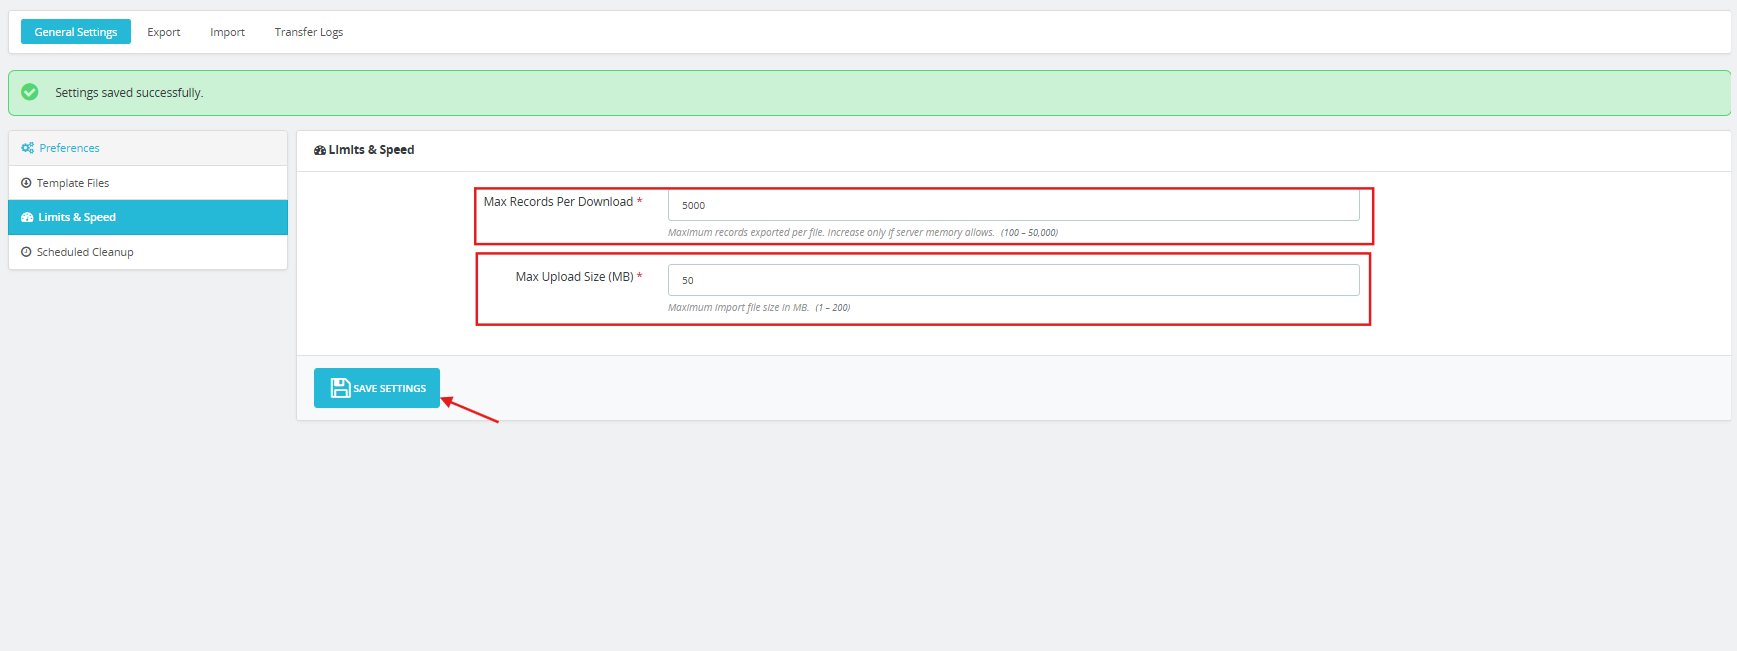
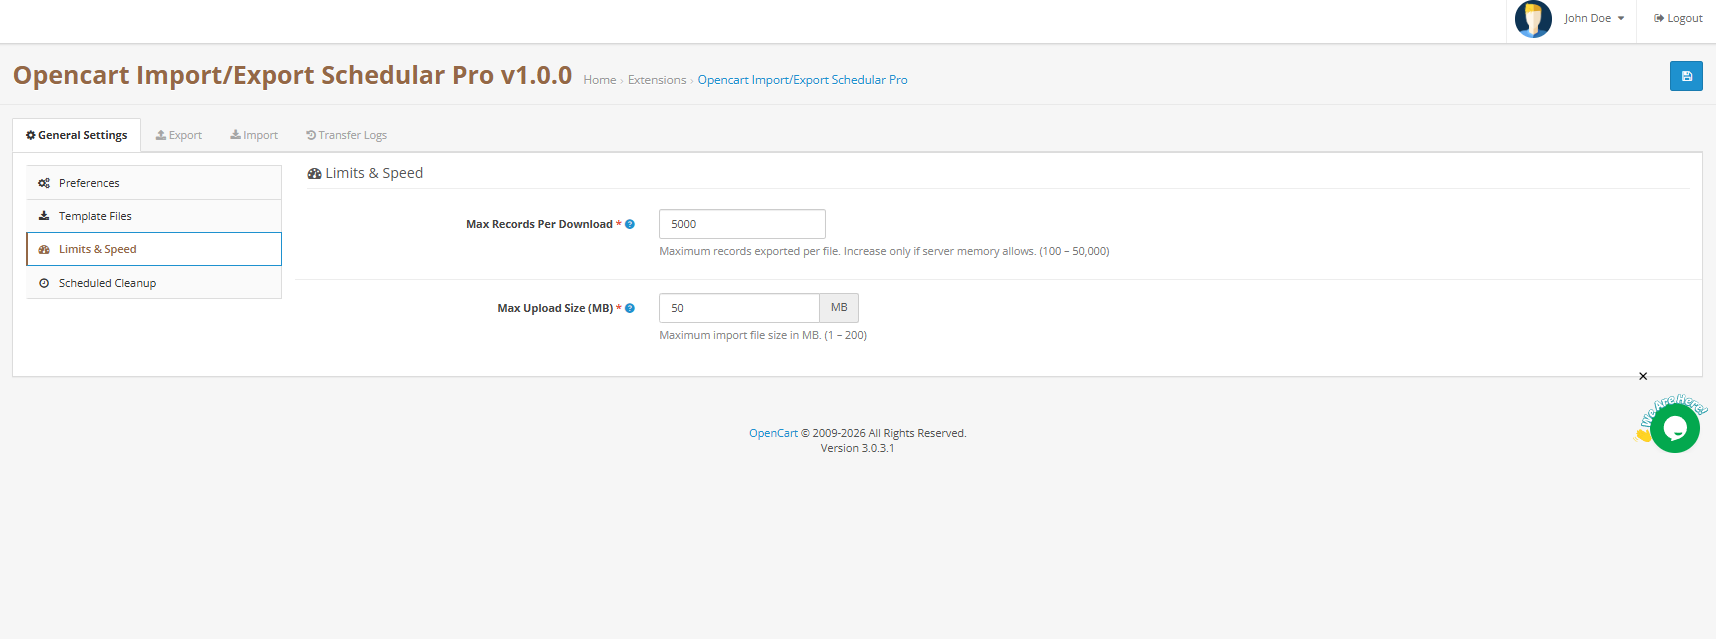
Max Records Per Download: The maximum number of records exported per file. Range is 100 to 50,000. Increase only when server memory allows.

Max Upload Size (MB): The maximum import file size the module accepts. Range is 1 to 200 MB.

Click Save Settings to apply.

4.4 Scheduled Cleanup

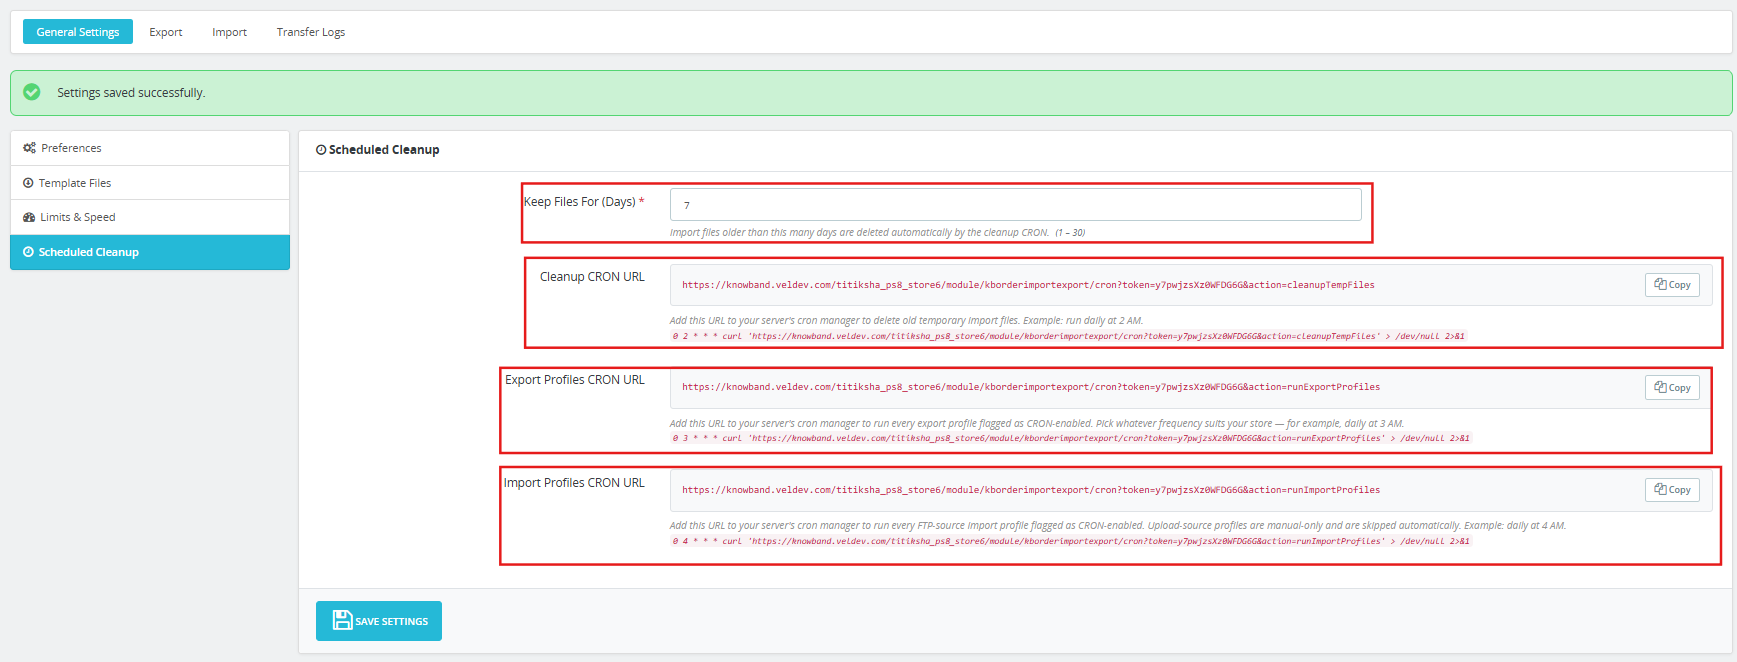
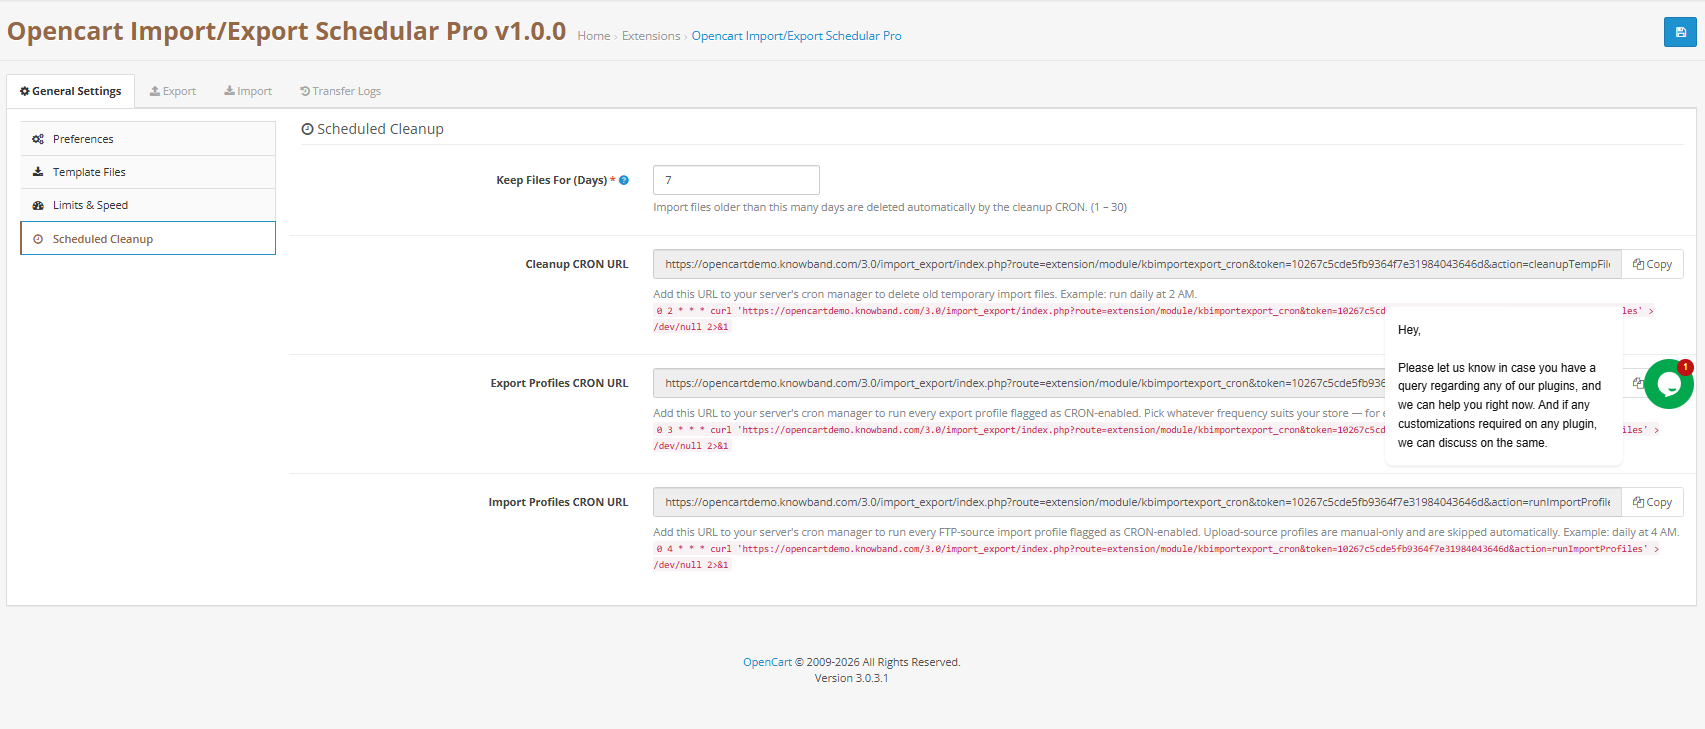
Keep Files For (Days): Import files older than this number of days are deleted automatically by the cleanup CRON. Range is 1 to 30 days.

Cleanup CRON URL: Paste this URL into your server’s cron manager to delete old temporary import files on a schedule. The example runs daily at 2 AM.

Export Profiles CRON URL: Paste this URL into your server’s cron manager to run every export profile flagged as CRON-enabled. Pick any frequency that suits your PrestaShop scheduled order export needs, for example, daily at 3 AM.

Import Profiles CRON URL: Paste this URL into your server’s cron manager to run every FTP-source import profile flagged as CRON-enabled. Upload-source profiles are manual-only and are skipped automatically when this URL runs. Example: daily at 4 AM.

All three URLs are token-secured. Only requests carrying the correct token trigger the operation.

5.0 Export Tab: Three-Step Wizard

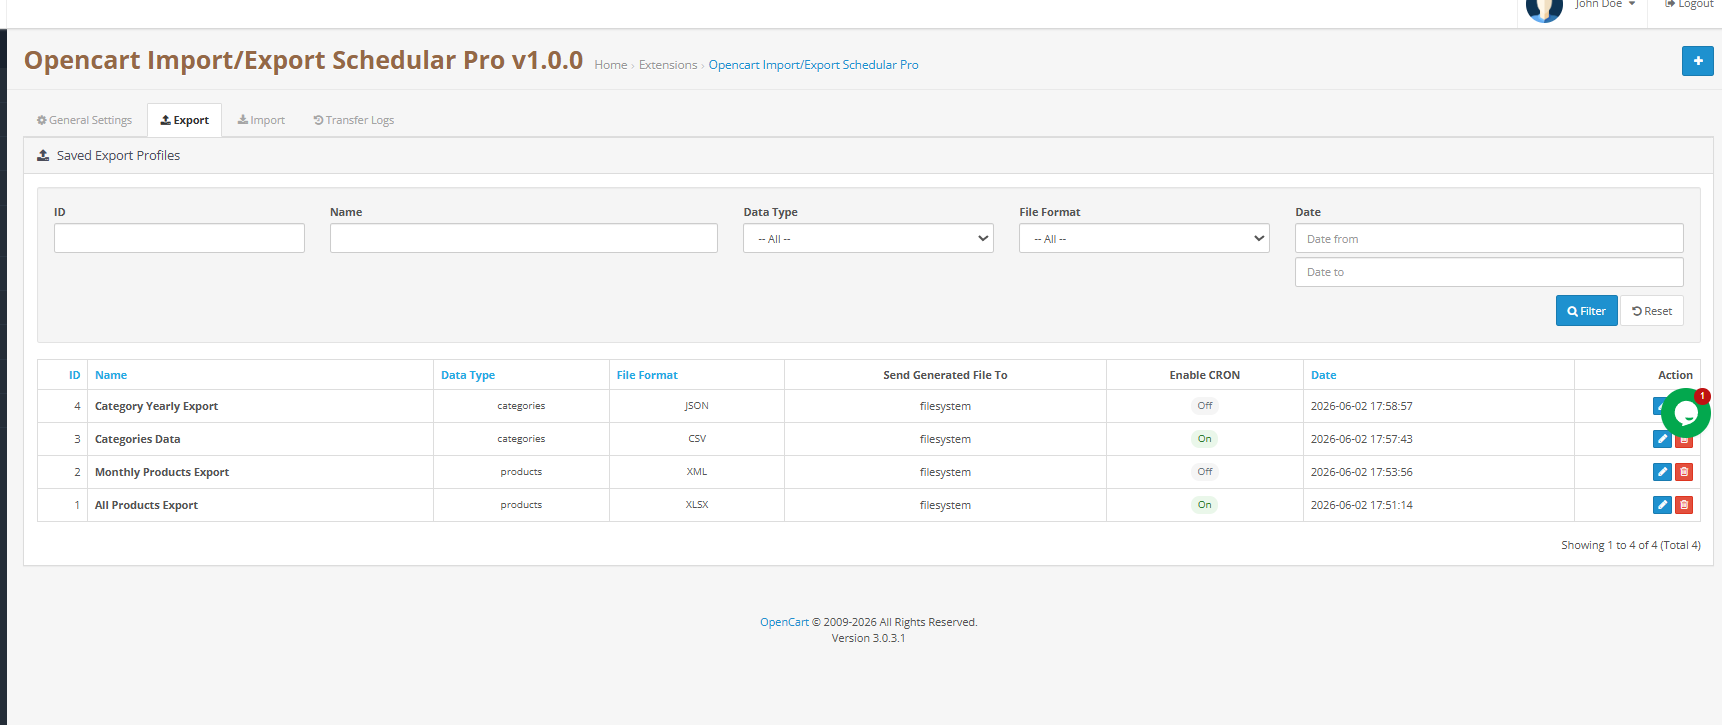
The Export tab lists all saved export profiles and provides the wizard for creating new ones. Each row in the list shows the profile name, data type, file format, and last run status. Click the run button to execute a profile immediately. Click Edit to change its settings.

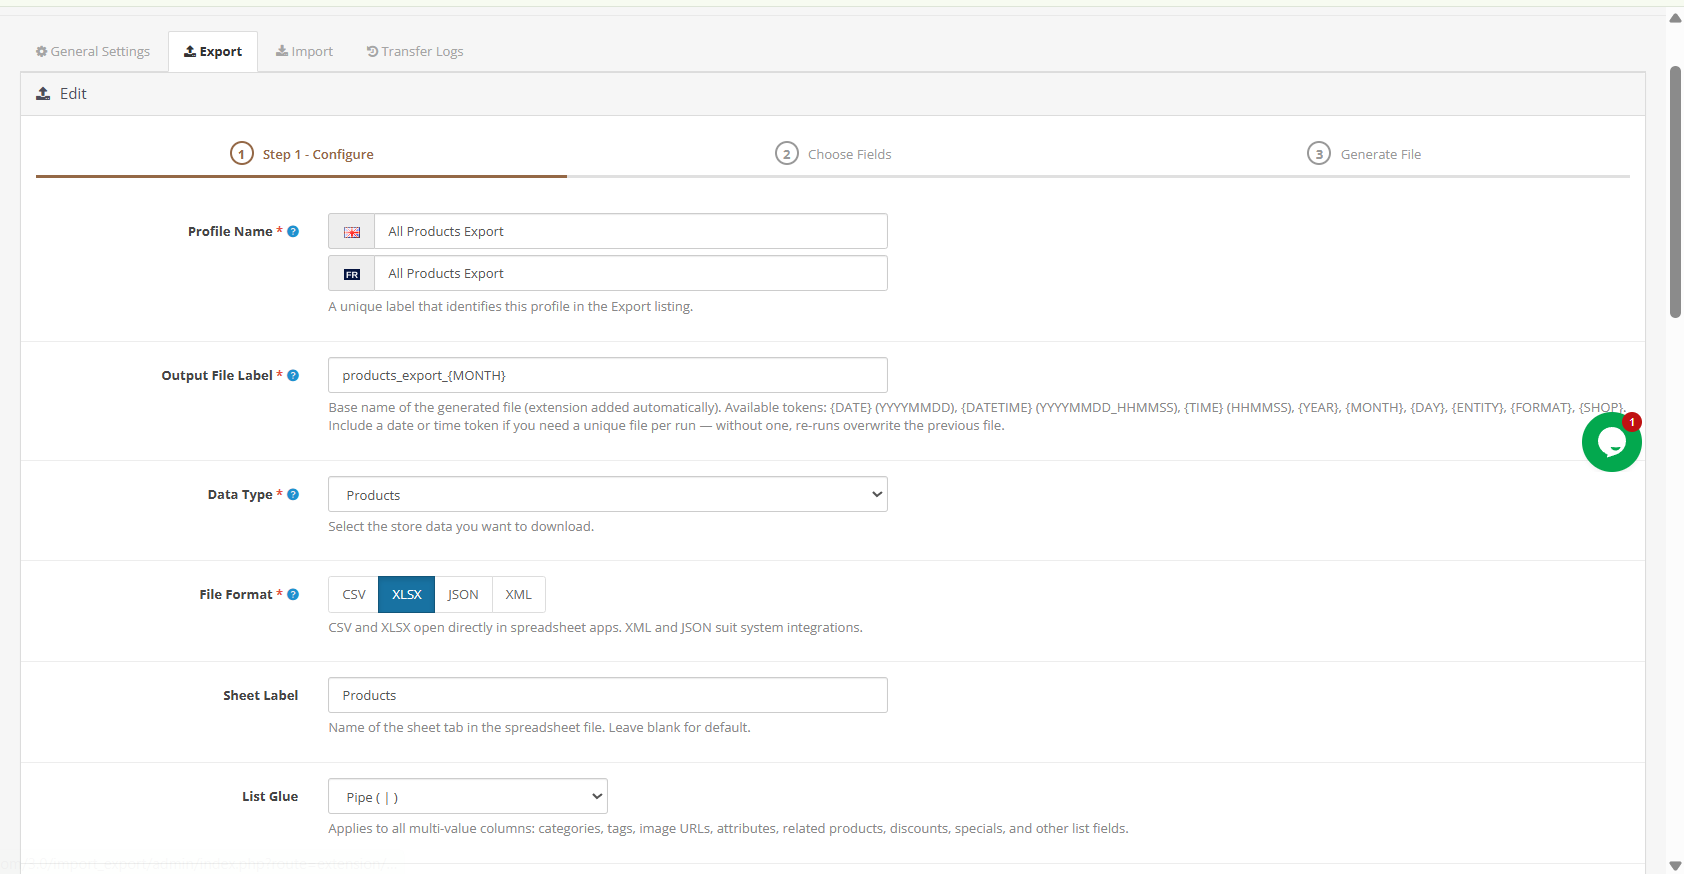
Step 1: Transfer Settings

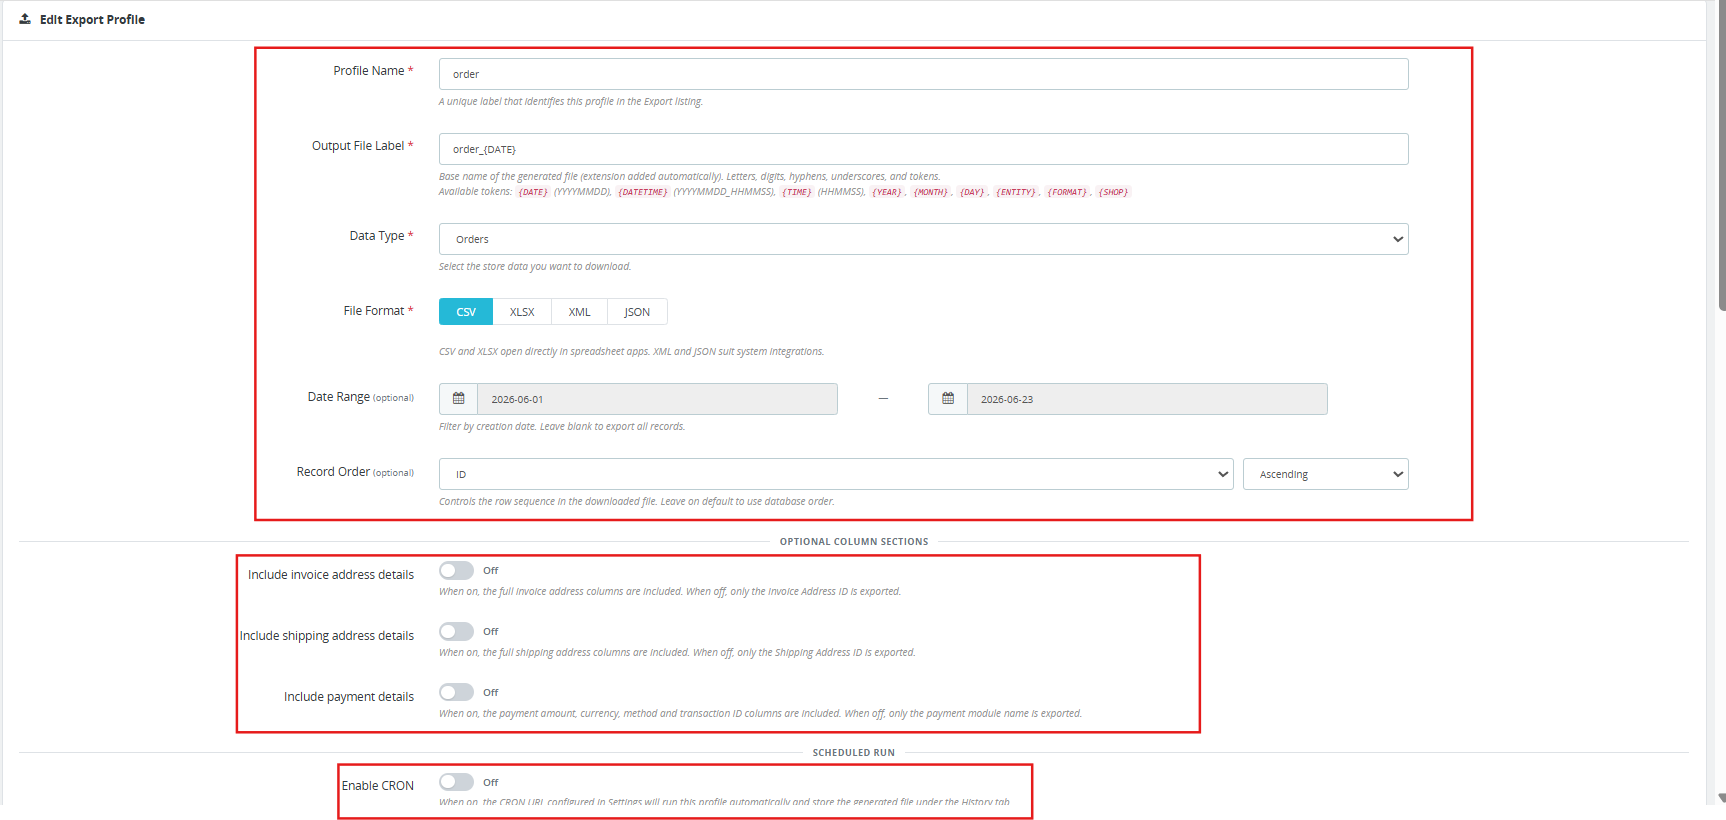
Profile Name: A unique label that identifies this profile in the Export listing.

Output File Label: The base name of the generated file. The extension is added automatically. Supports dynamic tokens (see Section 10).

Data Type: Choose what to export: Orders, Customers, or Addresses.

File Format: CSV, XLSX, XML, or JSON. CSV and XLSX open directly in any spreadsheet application. XML and JSON suit system integrations.

Shop: Limits the export to records belonging to the selected shop in a multi-shop setup.

Date Range (optional): Filter by order creation date. Leave blank to export all records.

Record Order (optional): Control the row sequence in the output file. Sort by ID, Reference, Date Created, Date Updated, Total Paid, or State, ascending or descending. Leave on default to use database order.

Optional Column Sections: Three independent toggles control whether full column blocks are included in the export.

  • Include invoice address details: When off, only the Invoice Address ID is exported. When on, all invoice address columns are included.
  • Include shipping address details: When off, only the Shipping Address ID is exported. When on, all shipping address columns are included.
  • Include payment details: When off, only the payment module name is exported. When on, the payment amount, currency, method, and transaction ID columns are included.

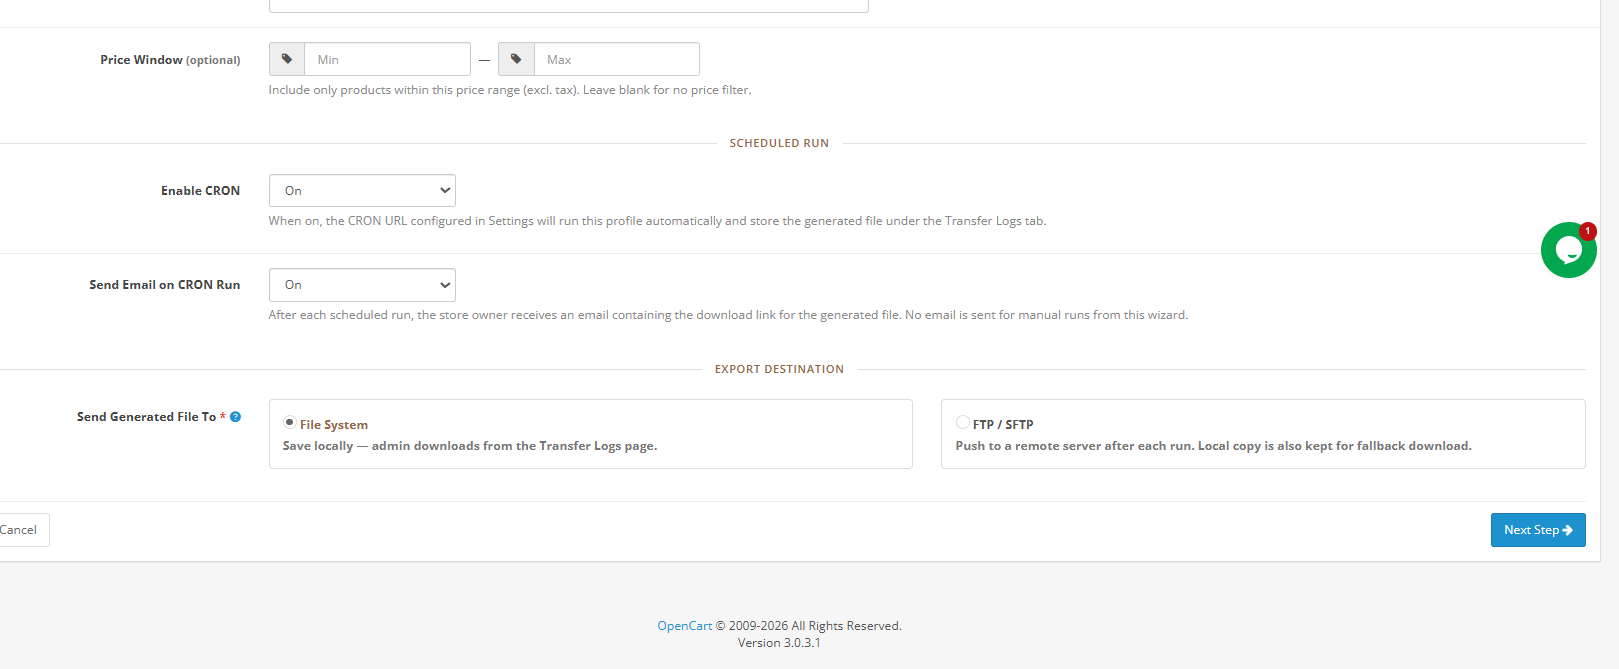
Scheduled Run (Enable CRON): When on, the Export Profiles CRON URL runs this profile automatically and stores the generated file under the Transfer Logs tab.

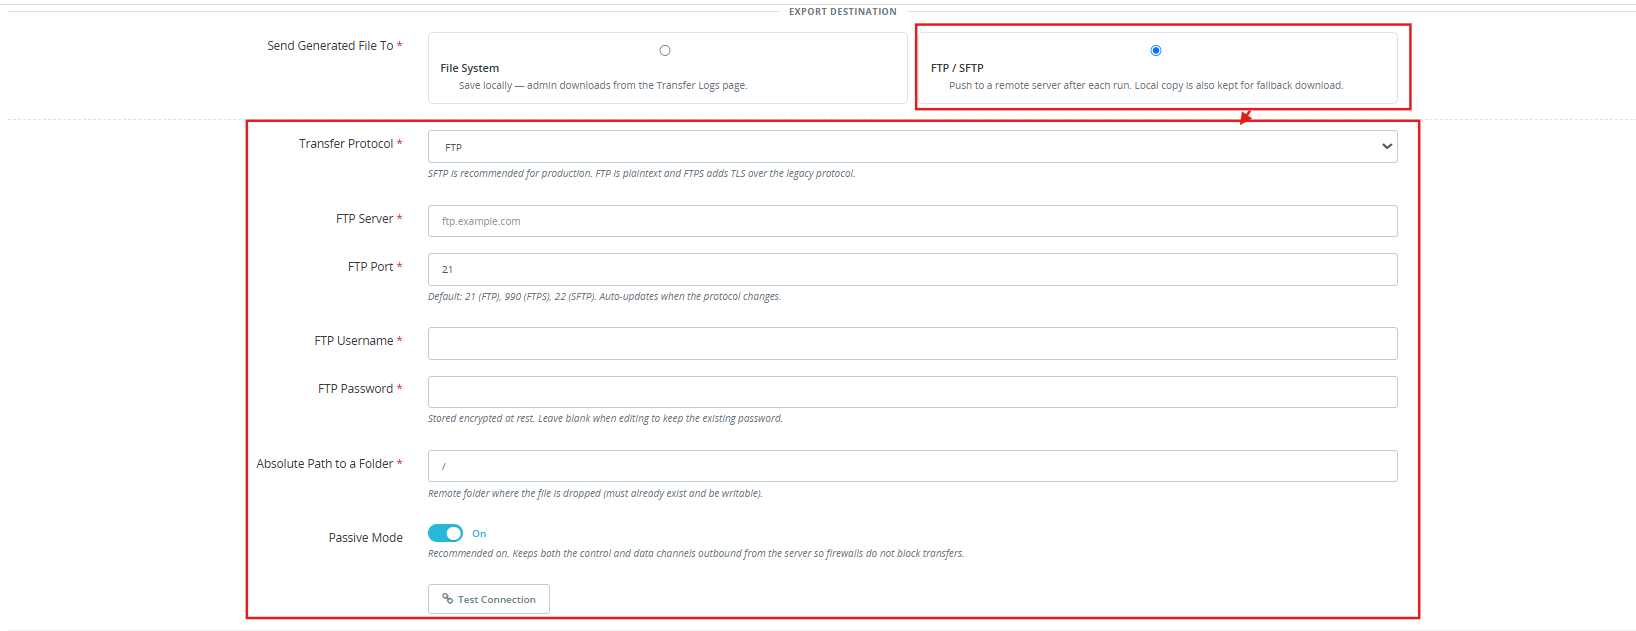
Export Destination: Choose File System to save the file locally for download from the Transfer Logs page. Choose FTP/SFTP to push the file to a remote server after each run. A local copy is also kept as a fallback download when FTP/SFTP is selected.

FTP/SFTP Settings (when FTP/SFTP destination is selected):

  • Transfer Protocol: FTP, FTPS (FTP over TLS), or SFTP (SSH). SFTP is recommended for production environments.
  • Server, Port (auto-updates when the protocol changes: 21 for FTP, 990 for FTPS, 22 for SFTP).
  • Username and Password (stored encrypted at rest).
  • Absolute Path to Folder on the remote server. The folder must exist and be writable.
  • Passive Mode: On by default. Recommended to keep on so firewalls do not block transfers.
  • Test Connection button: validates credentials against the live server before the profile is saved.

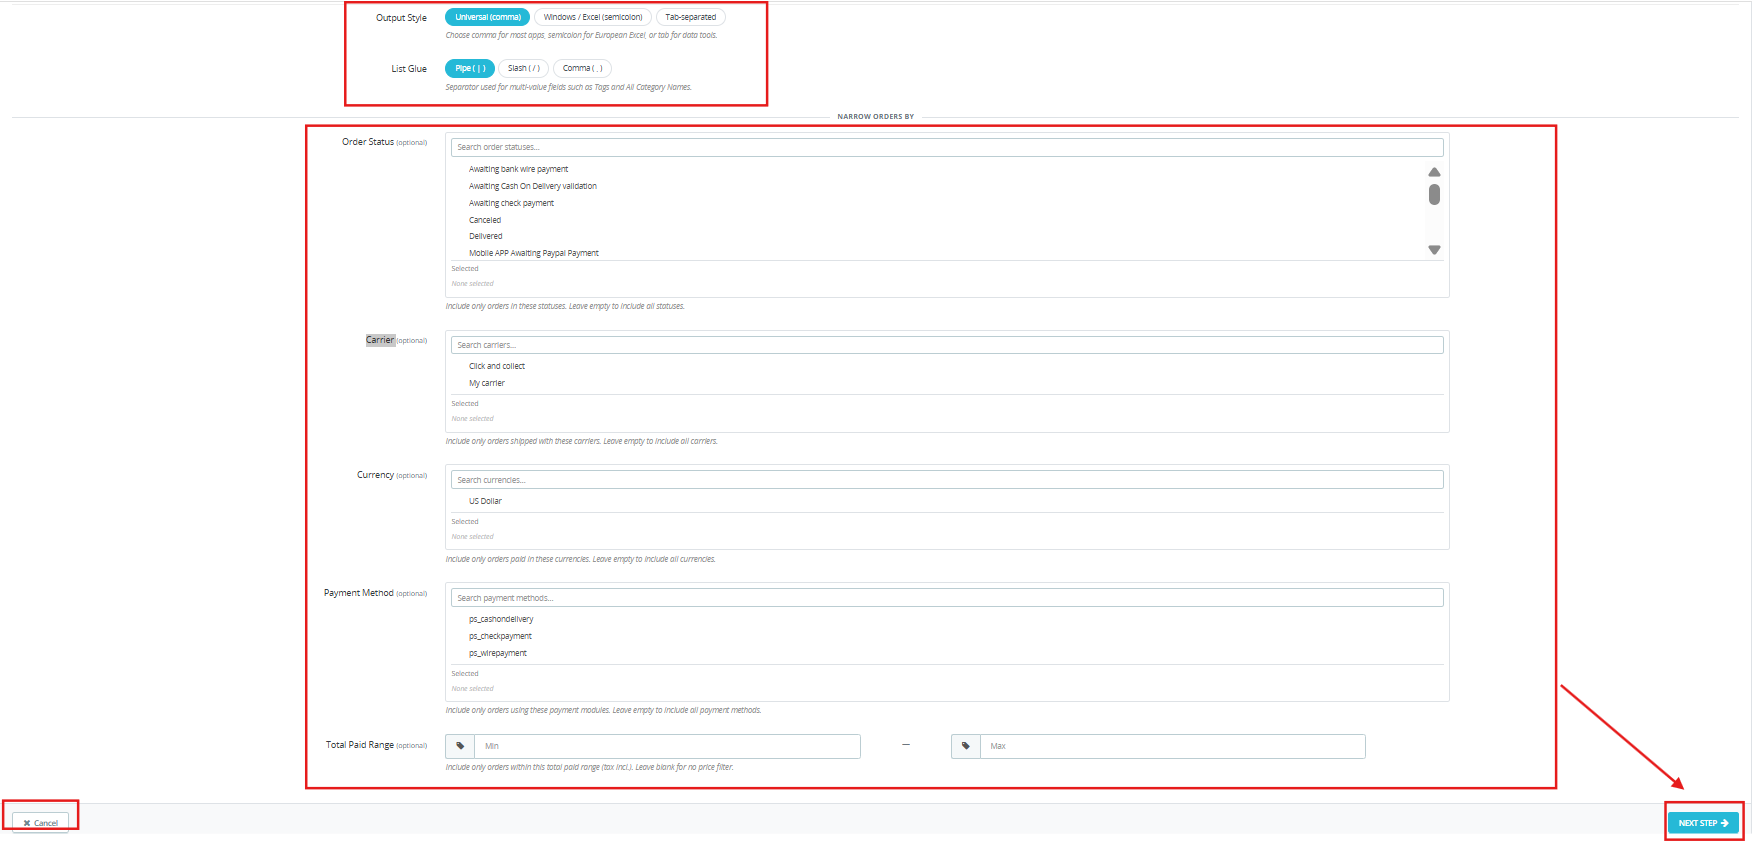
Output Style: Universal comma for most applications, semicolon for European Excel, or tab-separated for data tools.

List Glue: The separator used for multi-value fields. Pipe, Slash, or Comma.

Narrow Orders By (optional filters):

  • Order Status: filter by one or more statuses.
  • Carrier: filter by one or more carriers.
  • Currency: filter by one or more currencies.
  • Payment Method: filter by one or more payment modules.
  • Total Paid Range: include only orders within a minimum and maximum total paid value (tax included).

Leave any filter empty to include all records for that dimension.

Click Next Step to proceed.

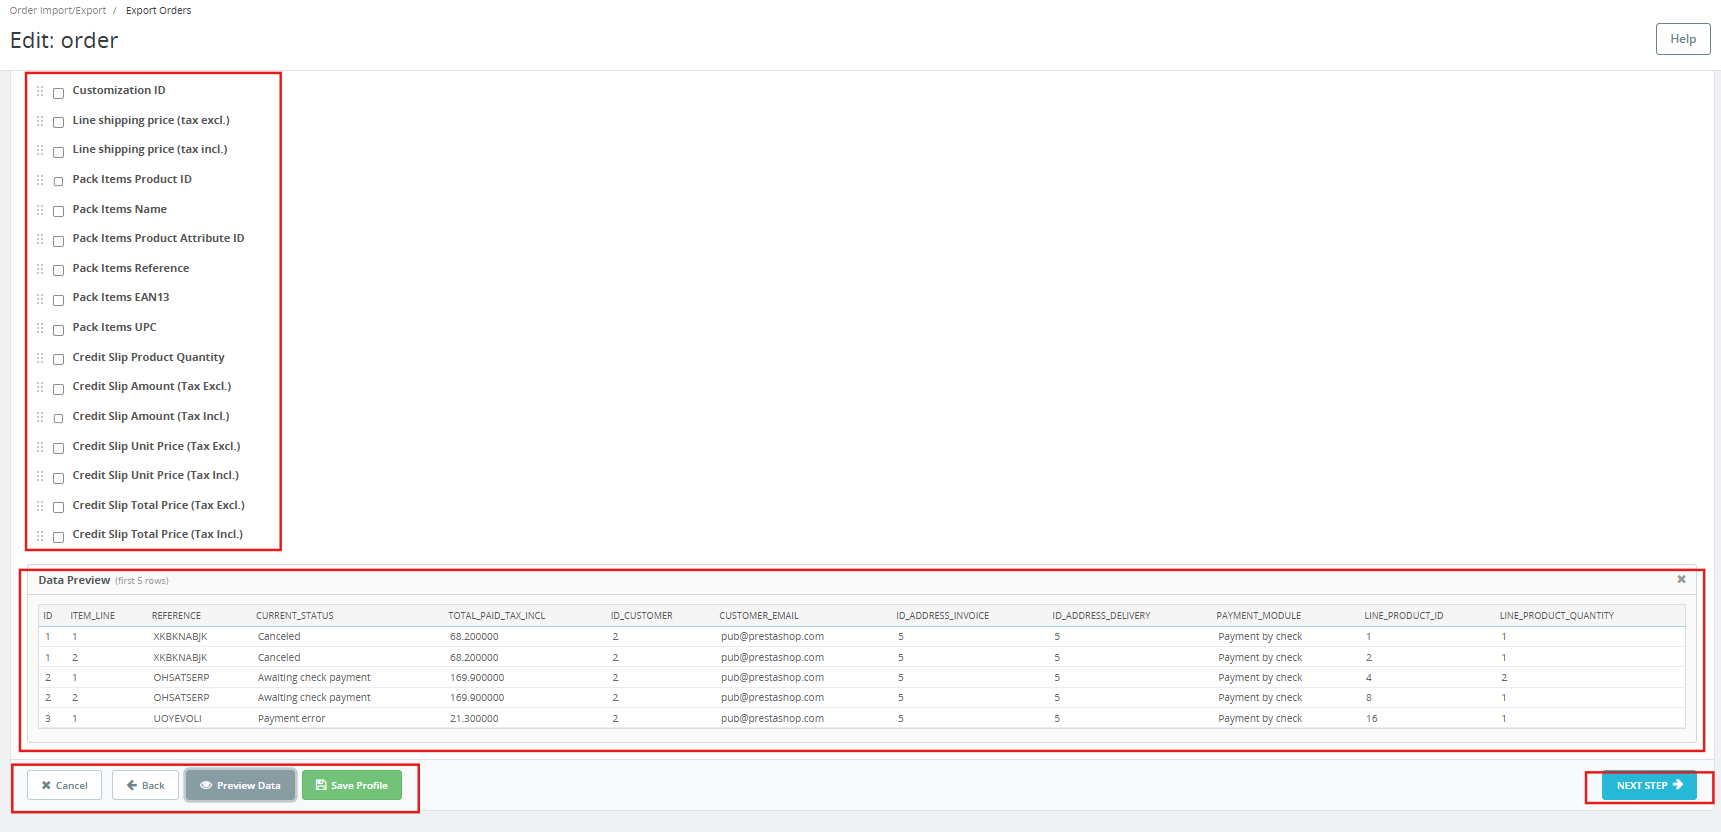
Step 2: Choose Fields

Select the fields to include in the export from 155 available columns. Use Select All, Deselect All, or Reset to Defaults as needed. Required fields cannot be deselected. Drag rows to reorder the columns in the output file.

The 155 available fields span six sections: order data, customer data, address data, payment data, and product line data.

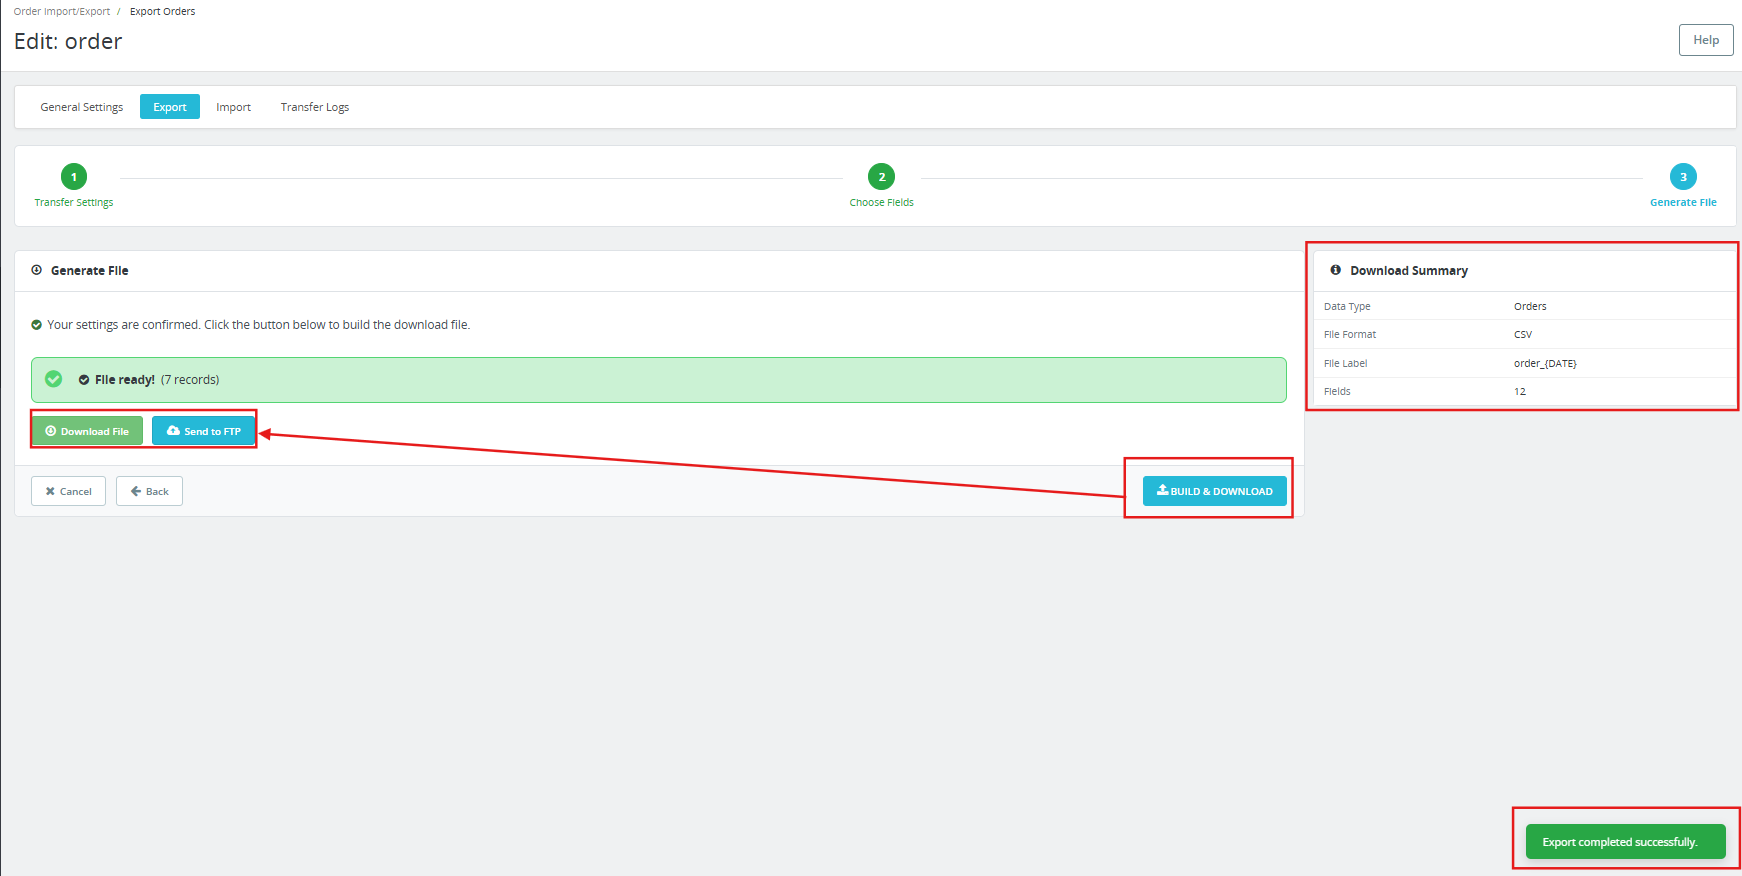
Step 3: Generate File

Review the export summary, data type, file format, file label, and field count. Click Build and Download to generate the file immediately, or save the profile and let the CRON run handle it on schedule.

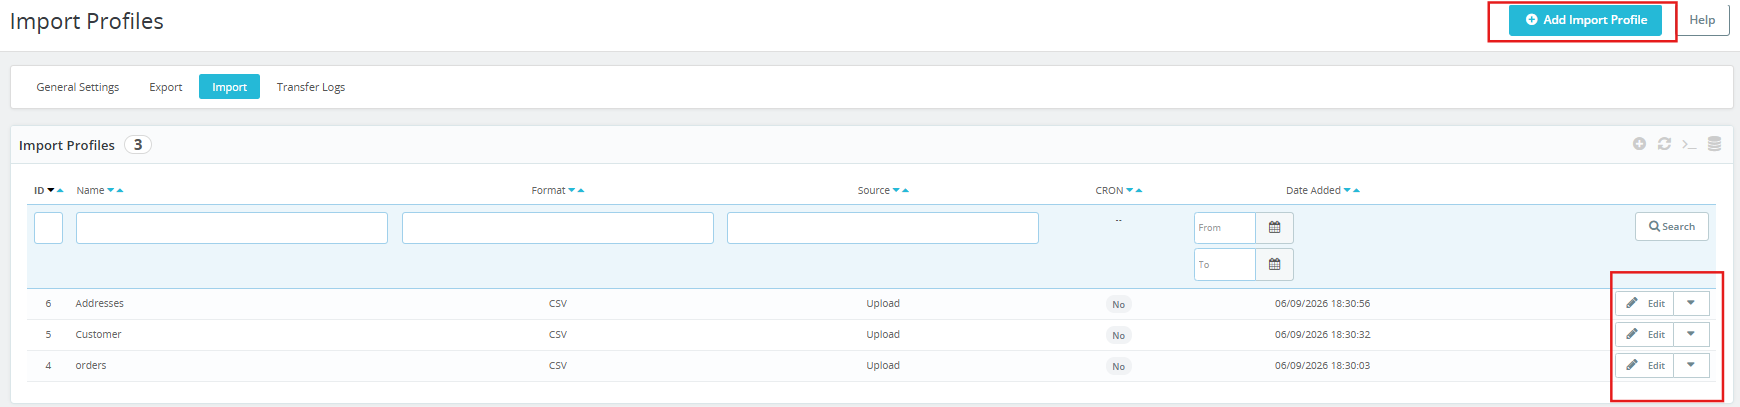
6.0 Import Tab: Three-Step Wizard

The Import tab lists all saved import profiles and provides the wizard for creating new ones.

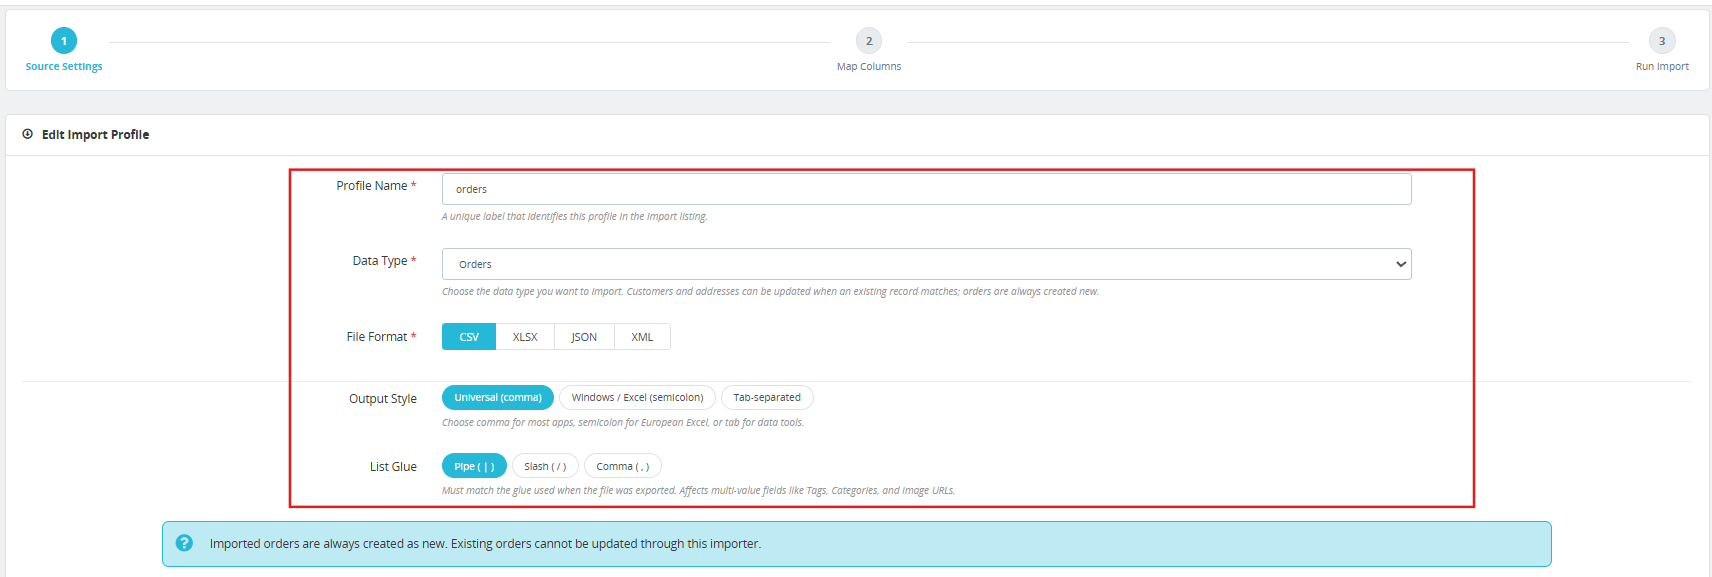
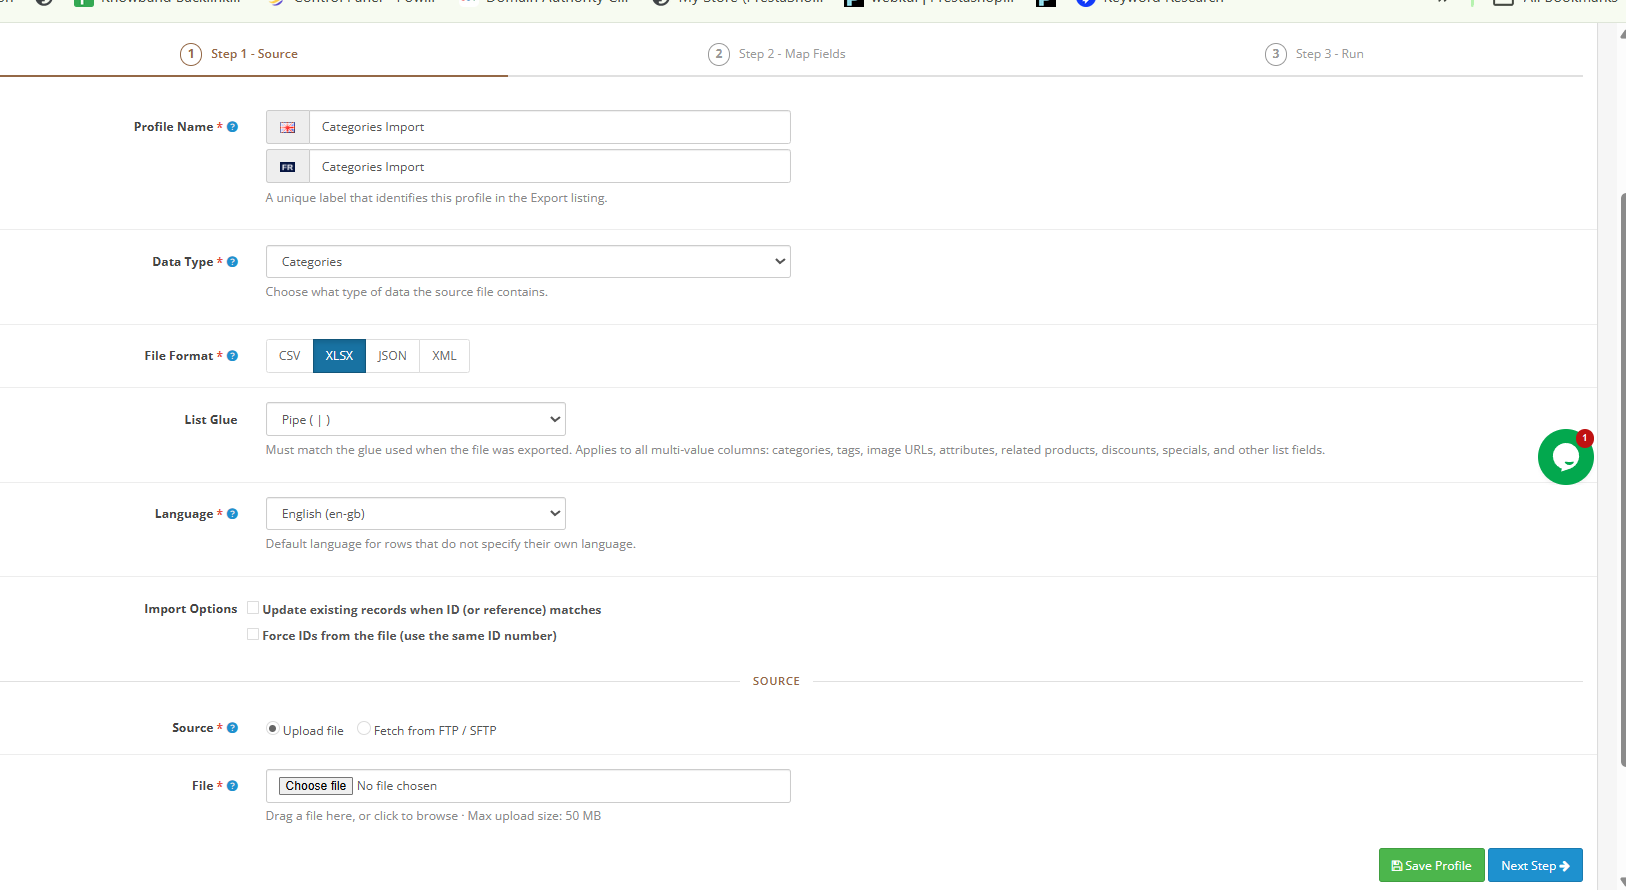
Step 1: Source Settings

Profile Name: A unique label for this profile in the Import listing.

Data Type: Orders, Customers, or Addresses. Customers and addresses update existing records on match. Orders are always created anew; existing orders cannot be updated through this module.

File Format: CSV, XLSX, JSON, or XML.

Output Style and List Glue: Must match the settings used when the file was exported.

Shop: Imported orders are always created under the selected shop.

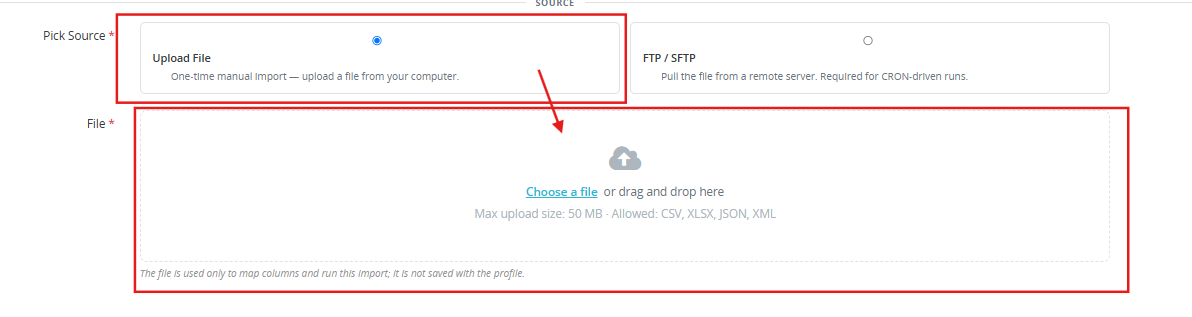
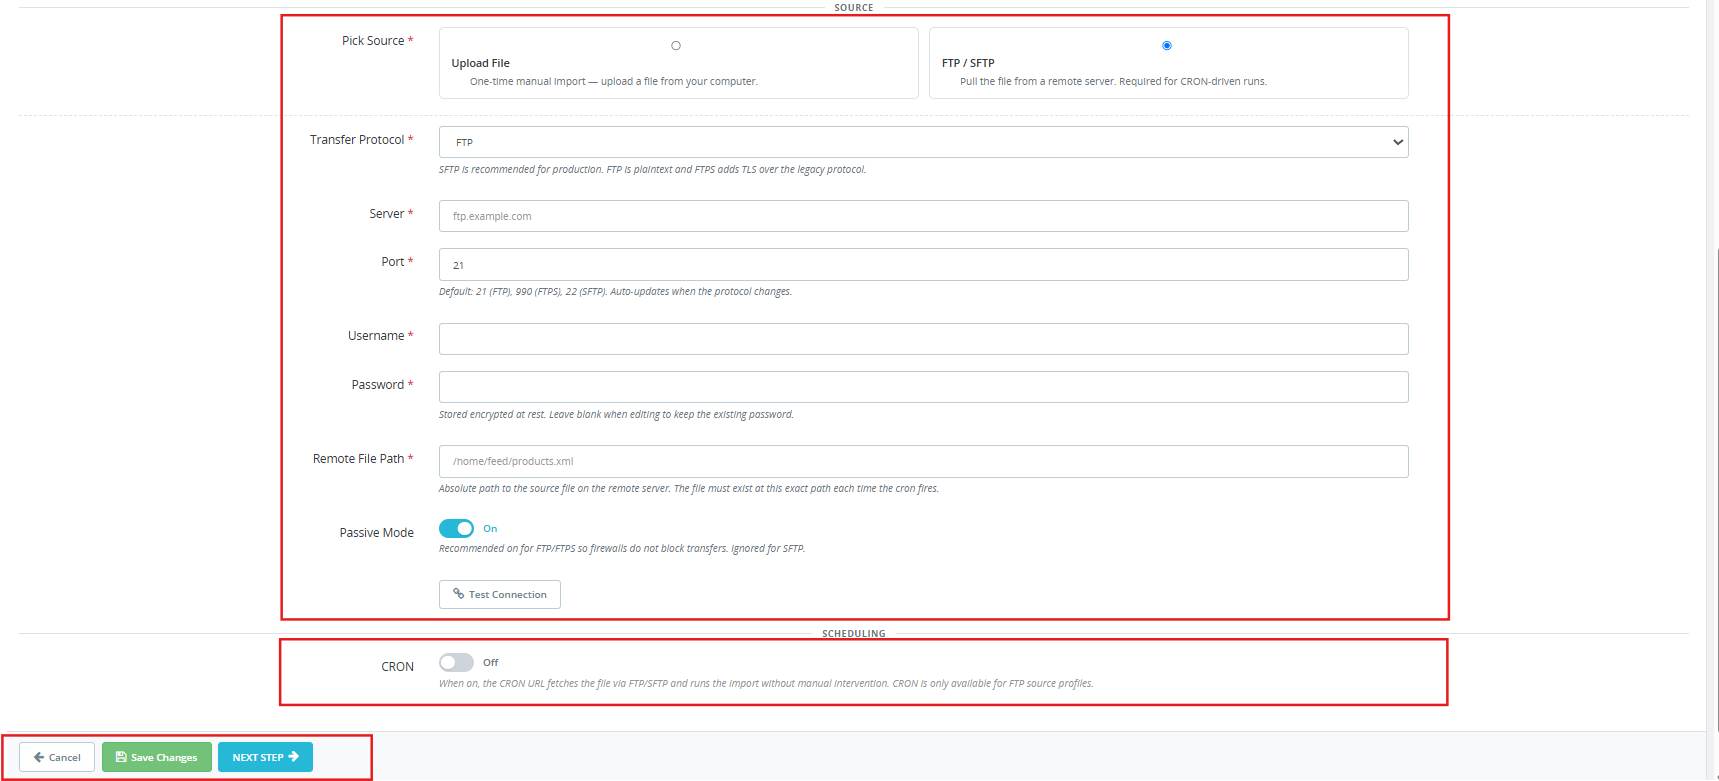
Source: Upload File for a one-time manual import from a local file. FTP/SFTP to pull the file from a remote server. FTP/SFTP source is required for CRON-driven import runs.

FTP/SFTP settings: Same fields as the export wizard, protocol, server, port, username, password, remote file path, passive mode, and test connection.

CRON: Only available for FTP source profiles. When on, the Import Profiles CRON URL fetches the file from the remote path and runs the import automatically without manual intervention.

Click Save Profile to save without running, or Next Step to proceed to mapping.

Step 2: Map Columns

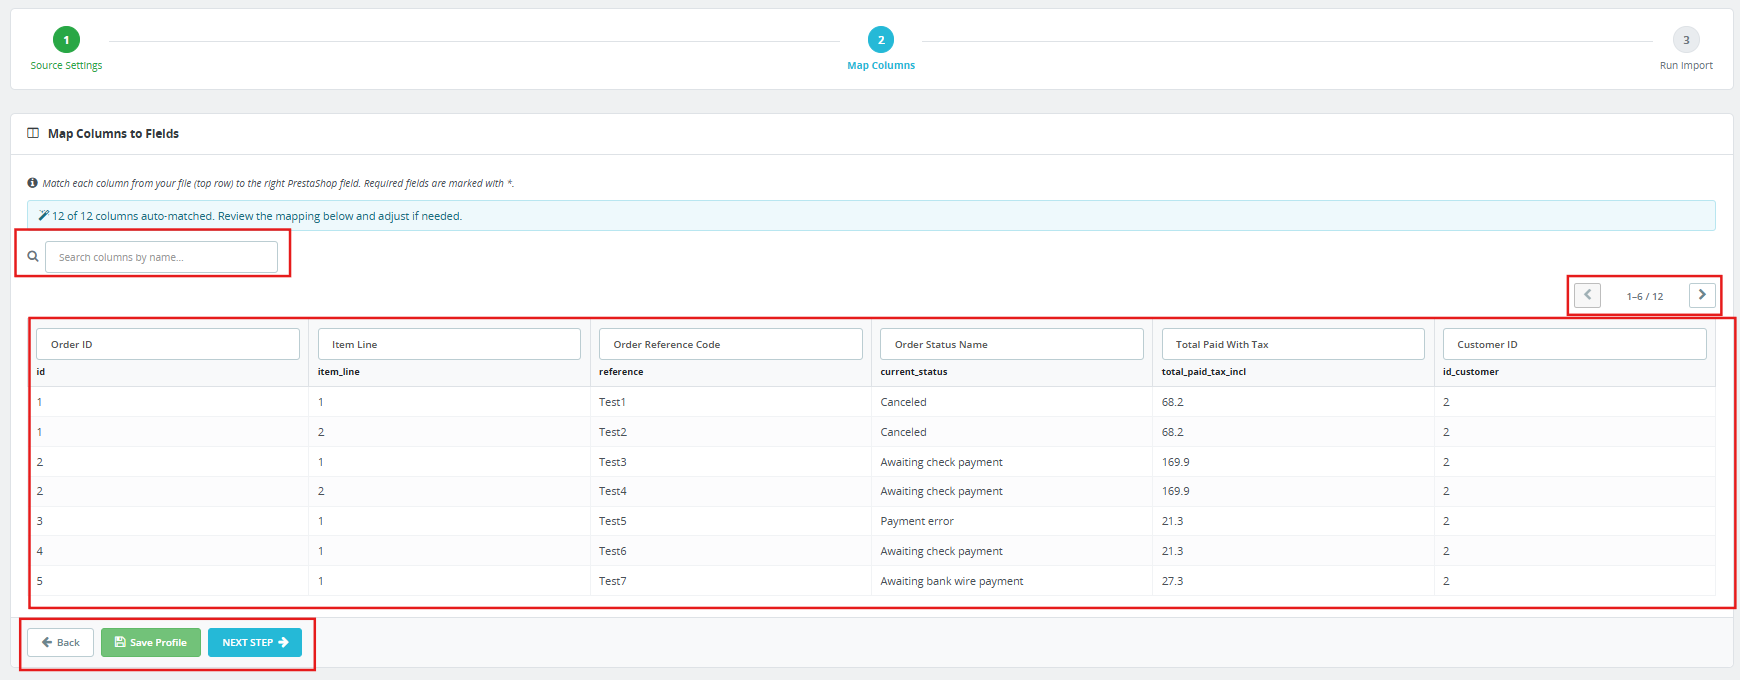
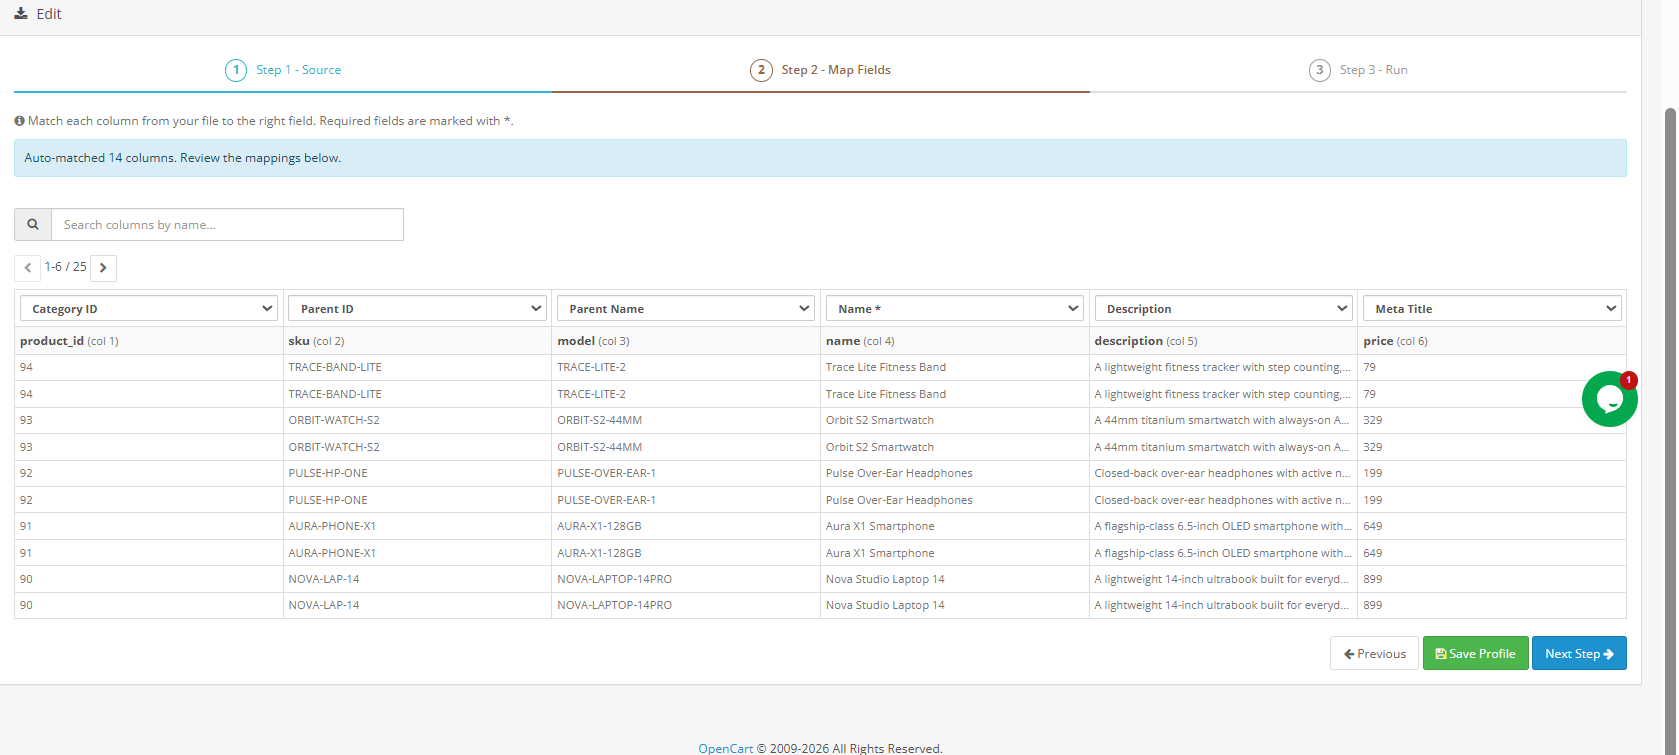
The PrestaShop Bulk Migration Module reads the uploaded file and auto-matches column headers to PrestaShop fields. From the live module, 154 of 155 columns are matched automatically from recognised header names.

The mapping screen shows the first rows of the file as a live preview so the admin can verify data before committing. Required fields are marked with an asterisk. Search columns by name using the search field above the table.

Review the auto-matched assignments and adjust any that need correcting. Common naming variants from external systems are recognised automatically in most cases.

Step 3: Run Import

Mapping confirmed. Click Start Import to begin. The module processes the file in batches based on the Import Batch Size setting in Preferences. A progress indicator shows the current status.

Click Save Profile before starting to preserve the column mapping for future runs of the same file structure.

7.0 Cross-Store Identity Resolution

Migrating orders between PrestaShop installations is the most complex use case for any PrestaShop store migration module. Raw database IDs for customers, addresses, and products differ between stores and cannot be used as transfer identifiers.

The PrestaShop order migration addon resolves all three entity types using identifiers that remain stable across installations:

Customers are matched by email address. No match creates a new account using the name, email, and a system-generated password. The customer resets credentials and accesses their account on the new store immediately.

Addresses are matched by a composite hash built from first name, last name, address line one, postcode, city, and phone. No match creates a new address record from the imported data.

Products and combinations are matched by product reference and combination reference. An unresolvable reference rejects the entire order, no partial writes, no line items pointing at missing products.

A full export from one store imports cleanly using this PrestaShop store migration module into a separate installation without any manual remapping of accounts, addresses, or product IDs.

8.0 Data Integrity and Validation

The importer enforces order-level atomicity. If any line item within an order fails validation, the entire order is excluded from the batch. No partial order record is written to the database.

Every rejection produces a precise log entry:

Row 23: column “currency_iso” contains “USDD”, expected a 3-letter ISO 4217 code (e.g. USD, EUR, GBP). Row 41: column “customer_email” contains “not-an-email”; a valid email address is required.

Fix only the affected rows in the source file and re-import them. The rest of the batch is unaffected.

9.0 Transfer Logs Tab

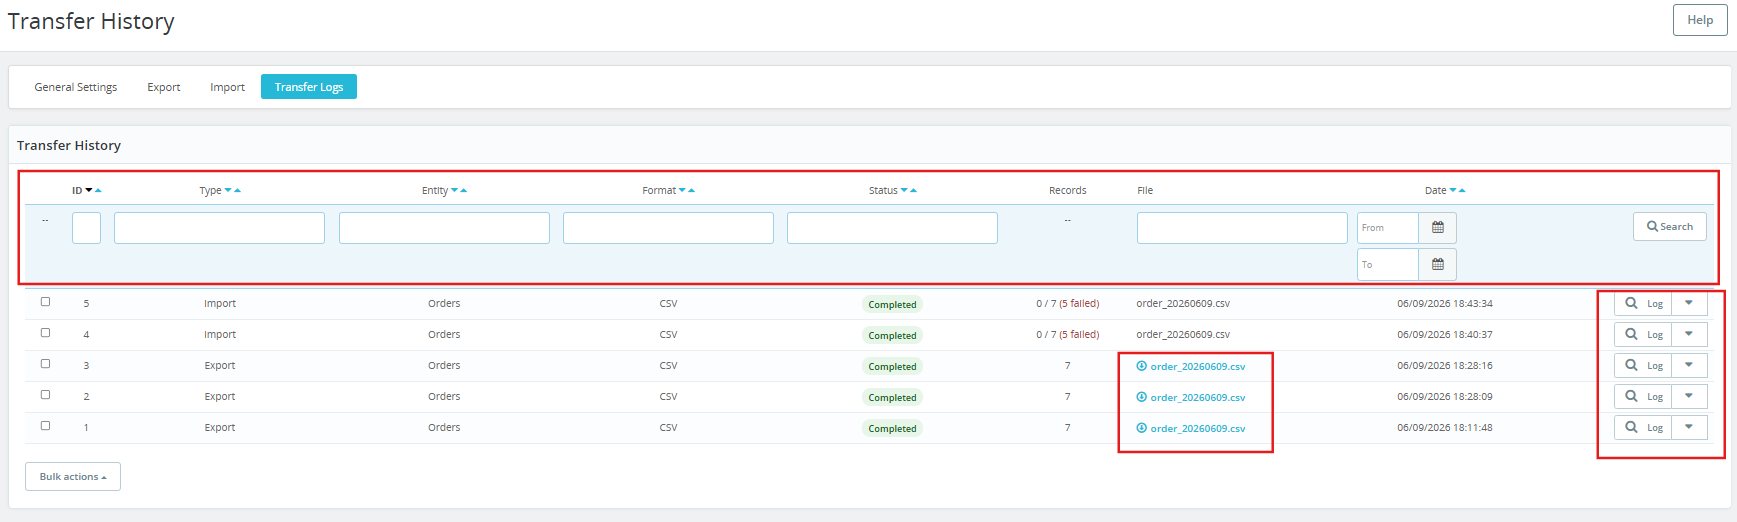
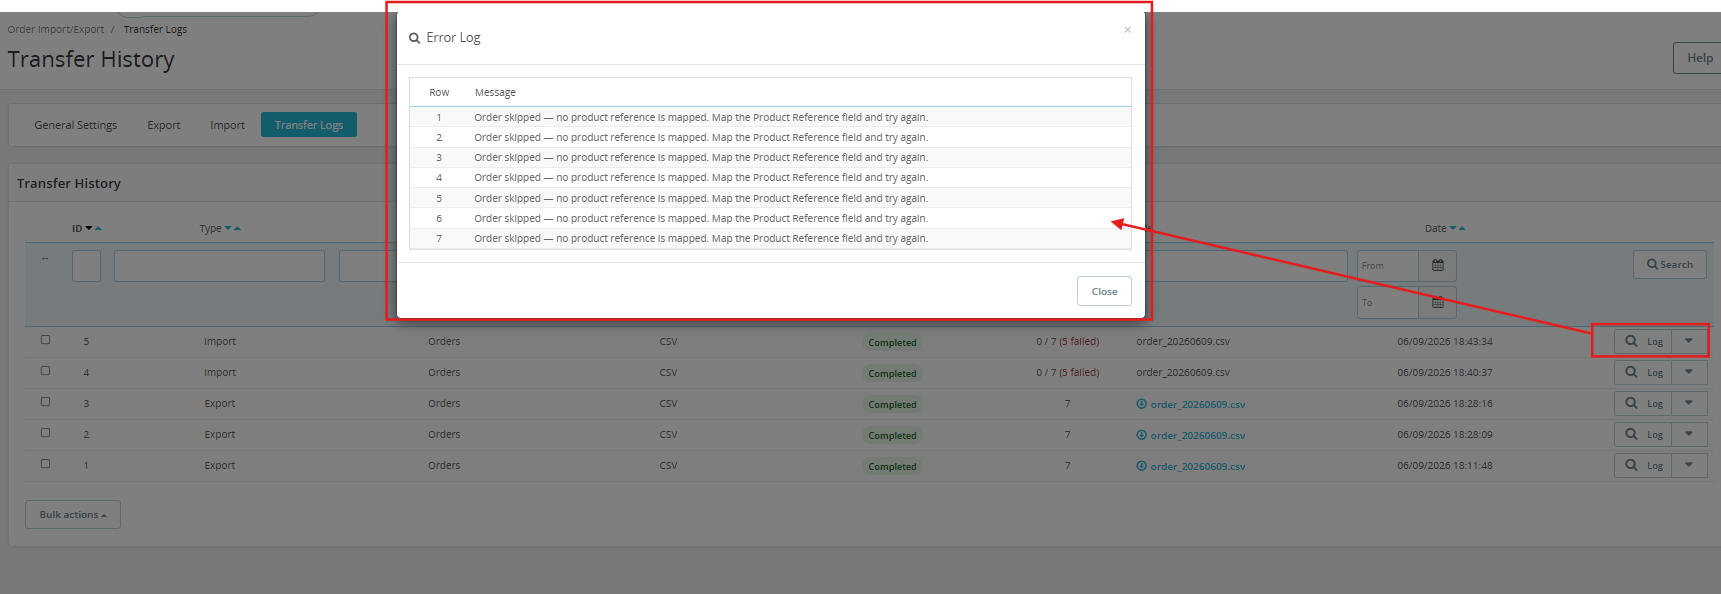
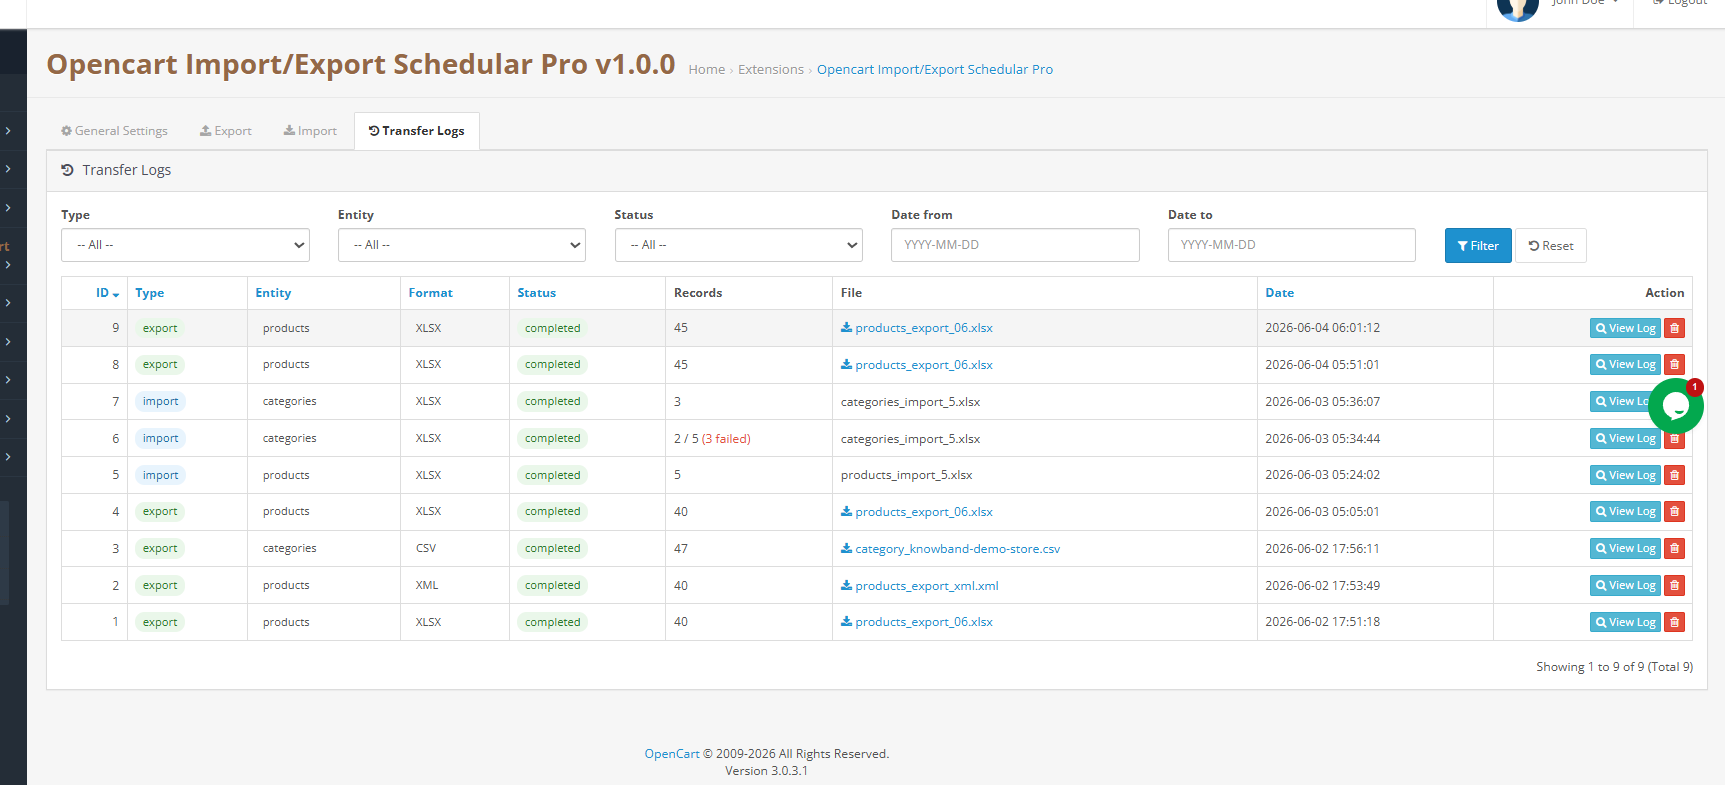
Every import and export operation writes a log entry to the Transfer Logs tab. Each row shows:

  • ID: Sequential run number.
  • Type: Export or Import.
  • Entity: Orders, Customers, or Addresses.
  • Format: CSV, XLSX, JSON, or XML.
  • Status: Completed or Failed.
  • Records: How many records the run processed.
  • File: The filename, with a download link for export files.
  • Date: When the run started.

Filter the log by ID, type, entity, format, status, or date range using the controls at the top of the table.

Past export files can be re-downloaded directly from the log without re-running the export. Row-level error detail is accessible for any run that produced failures.

10.0 Dynamic Filename Tokens

Output file labels support nine runtime tokens that expand at the point of generation:

  • orders_{DATE}.xlsx produces orders_20260608.xlsx
  • {SHOP}orders{DATETIME}.csv produces mystore_orders_20260608_143215.csv

Available tokens: {DATE}, {DATETIME}, {TIME}, {YEAR}, {MONTH}, {DAY}, {ENTITY}, {FORMAT}, {SHOP}.

11.0 Frequently Asked Questions

Q: What is the Knowband PrestaShop Order, Customer and Address Import Export Addon, and what does it do?

The Knowband PrestaShop Bulk Migration Module is a bulk order data transfer tool that imports and exports PrestaShop orders, customers, and addresses in CSV, XLSX, JSON, and XML. It handles cross-store identity resolution, reusable transfer profiles with saved column mapping, FTP and SFTP file delivery, CRON-based scheduled automation, 155 exportable fields, email notifications, and a full transfer log with row-level error detail. Compatible with PrestaShop 1.7.x through 9.x.

Q: How do I migrate orders from one PrestaShop store to another?

Create an export profile on the source store and download the orders file. On the destination store, create an import profile, upload the file, confirm the column mapping, and run the import. The PrestaShop order migration add-on resolves customers by email, addresses by composite hash, and products by reference. No manual remapping of accounts, addresses, or product IDs is needed between the two stores.

Q: What happens if a product reference in the import file does not exist in the destination store?

The entire order containing that line item is excluded from the import. No partial order record is written. The Transfer Logs tab records the row number, column name, and the specific value that could not be resolved. Fix only the affected rows and re-import them.

Q: What file formats does the PrestaShop Bulk Migration Module support?

CSV, XLSX, JSON, and XML, all four in both import and export directions. CSV and XLSX open in any spreadsheet application. JSON and XML suit system integrations and API-based partners.

Q: How does the scheduled PrestaShop order export work via CRON?

Enable CRON on any export profile, set the destination to FTP/SFTP, and copy the Export Profiles CRON URL from General Settings into your server’s cron manager with the required interval. Every CRON-enabled PrestaShop bulk order management profile runs automatically on that schedule, pushes the file to the configured server, and sends a completion notification. Upload-source import profiles are manual-only and are skipped automatically when the Import Profiles CRON URL fires.

Q: Can I filter which orders get exported?

Yes. The export wizard includes filters for order status, carrier, currency, payment method, and total paid range. A date range filter narrows exports to a specific creation window. Apply any combination of filters and leave the rest blank to include all records for those dimensions.

Q: How does FTP and SFTP file delivery work?

Export profiles push files to FTP (port 21), FTPS (FTP over TLS, port 990), or SFTP (SSH, port 22). Import profiles pull files from FTP or SFTP on a schedule. Credentials are stored encrypted. A test connection button validates the connection before the profile is saved. If a push fails, the file saves locally, and a notification email explains the failure.

Q: What is the PrestaShop order backup module feature?

Every import and export run writes a log entry to the Transfer Logs tab with date, filename, entity type, status, and record counts. Past export files re-download from the log without re-running the export. This gives organisations with audit or compliance requirements a complete, timestamped record of all order data movements.

Q: How many fields can be exported per order using the PrestaShop Bulk Migration Module?

155 fields are available across order data, customer data, product line data, address data, and payment data. Per-section toggles let admins include or exclude the full invoice address block, the shipping address block, and the payment detail block independently to keep files lean when full columns are not needed.

Q: Is the PrestaShop Order, Customer and Address Import Export Addon compatible with PrestaShop 9?

Yes. The PrestaShop Order, Customer and Address Import Export Addon works with PrestaShop 1.7.x through 9.x. Check the product page for the most current compatibility details.

12.0 Conclusion

This addon covers every order data transfer need from one back-office panel. Export any combination of orders, customers, and addresses to the format each receiving system needs. Import complete order history into a new store without manual account remapping. Schedule everything via CRON and push files automatically via FTP or SFTP.

Every run is logged with the PrestaShop order backup module, keeping every entry timestamped. Every failure gives a precise, fixable error message. Every export file stays available for re-download. For support, custom development requirements, or PrestaShop addon services, reach out to the Knowband support team or visit the Knowband product page directly.

Also available on Prestashop Addons – https://addons.prestashop.com/en/data-transfer-backup/98144-advanced-order-customer-address-data-migration.html


PrestaShop Form Studio – All-in-One Feedback, Contact & Survey Form Builder User Guide

1.0 Introduction

Running an online store without a reliable way to collect customer input is like selling in the dark. Whether you need a simple survey form, a detailed product feedback form, or a multi-layout customer satisfaction survey, the right tool makes all the difference. PrestaShop Form Studio, All-in-One Survey & Feedback Form Builder is built exactly for this.

This PrestaShop Form Builder Addon allows store owners to create unlimited forms without writing a single line of code. From basic contact forms to survey forms, it covers every data collection scenario that an eCommerce business faces. This works equally well for solo store owners and large enterprise teams managing multiple PrestaShop websites.

What sets this PrestaShop Form Builder Addon apart is the vast range of features that it handles in one place: form creation, spam protection via Cloudflare Turnstile, email notifications to admins and customers, marketing integrations with Mailchimp and Brevo, form submission management, and IP/email blacklisting. You do not need five different modules to manage your customer communication workflow. This one PrestaShop Form Builder Module handles it all.

2.0 Installation Guide of the PrestaShop Form Studio

System Requirements

Before installing the module, confirm that your environment meets the following requirements:

  • PrestaShop version 1.7.x or 8.x or 9.x.x
  • PHP 7.2 or higher
  • A working SMTP email configuration in your PrestaShop back office
  • Write permissions on the /modules directory of your PrestaShop installation

Uploading and Installing the Module

Step 1 – Upload the module: Log in to your PrestaShop back office. Go to Modules > Module Manager and click Upload a Module (top-right). Select the ZIP file downloaded from Knowband and click Open. PrestaShop will upload and extract the files automatically.

Step 2 – Install: Once uploaded, click Install when prompted. After installation, you’ll be redirected to the module configuration page.

Step 3 – Locate if needed: If the module doesn’t appear automatically, search “Form Studio” in the Module Manager search bar and click Configure.

3.0 Common Installation Issues

  1. Upload fails: Your server’s upload size limit is too low. Ask your hosting provider to increase upload_max_filesize and post_max_size in PHP settings to at least 32 MB.
  2. Emails not sending: Check your SMTP settings under Advanced Parameters > Email in the back office. The module uses the store’s default email configuration unless overridden on a per-form basis.
  3. Interface appears broken or unstyled: Clear your browser cache and the PrestaShop theme cache under Design > Theme & Logo > Advanced Settings.

4.0 General Settings Admin Panel

4.0. 1 Enable or Disable the Module

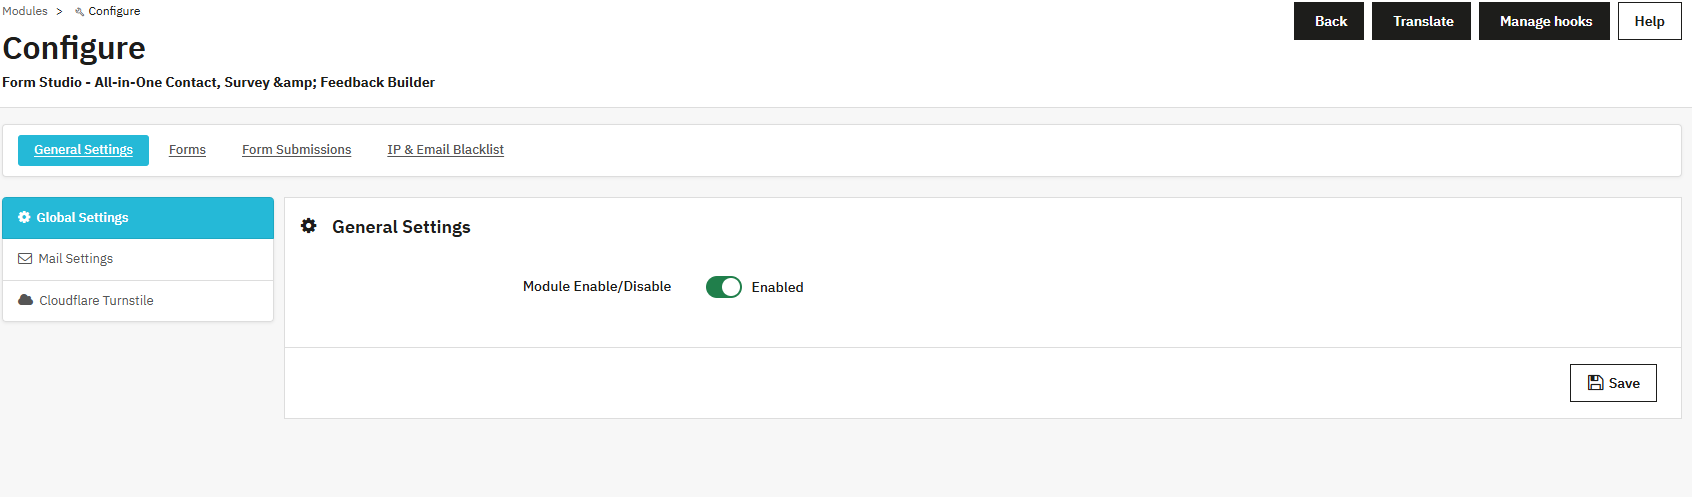
The first thing you see inside the module is the button to enable or disable the PrestaShop Survey Builder Module. When the module is enabled, all active forms are live on the front end. Disabling it hides all forms from visitors without deleting any configurations.

4.0.2 Mail Settings

The mail settings section controls how your store communicates with both admins and customers after a form is submitted.

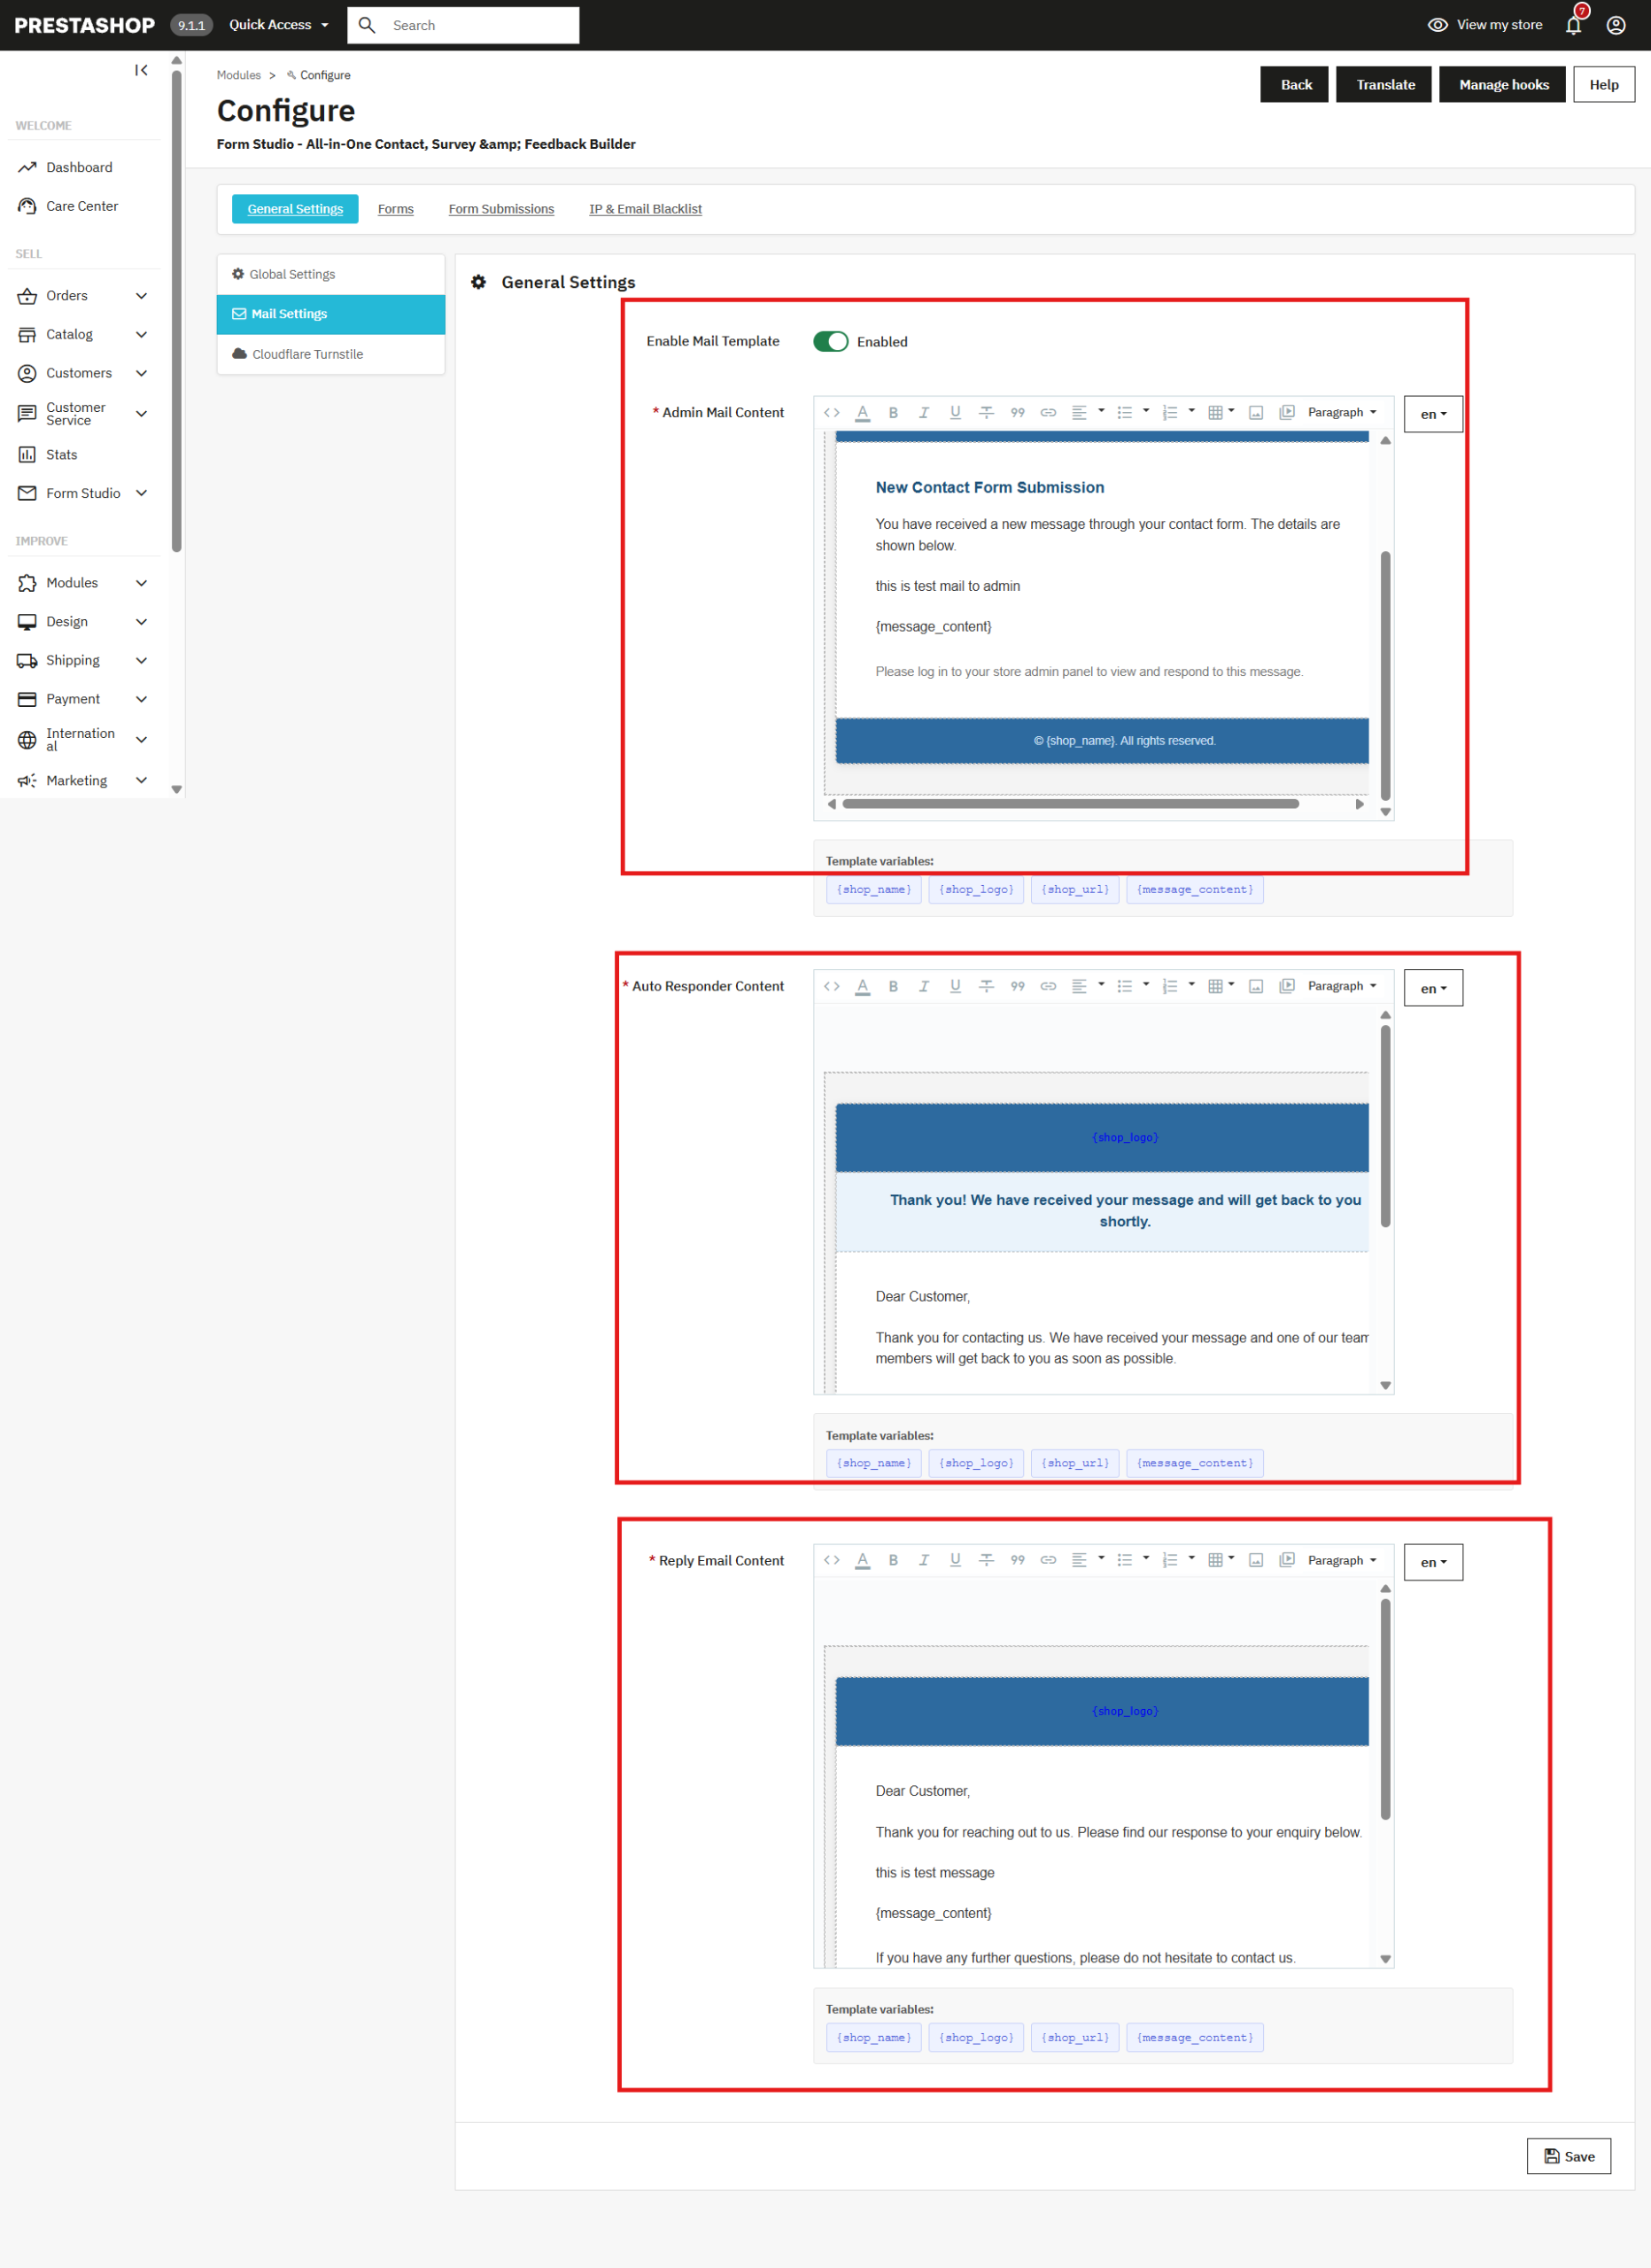
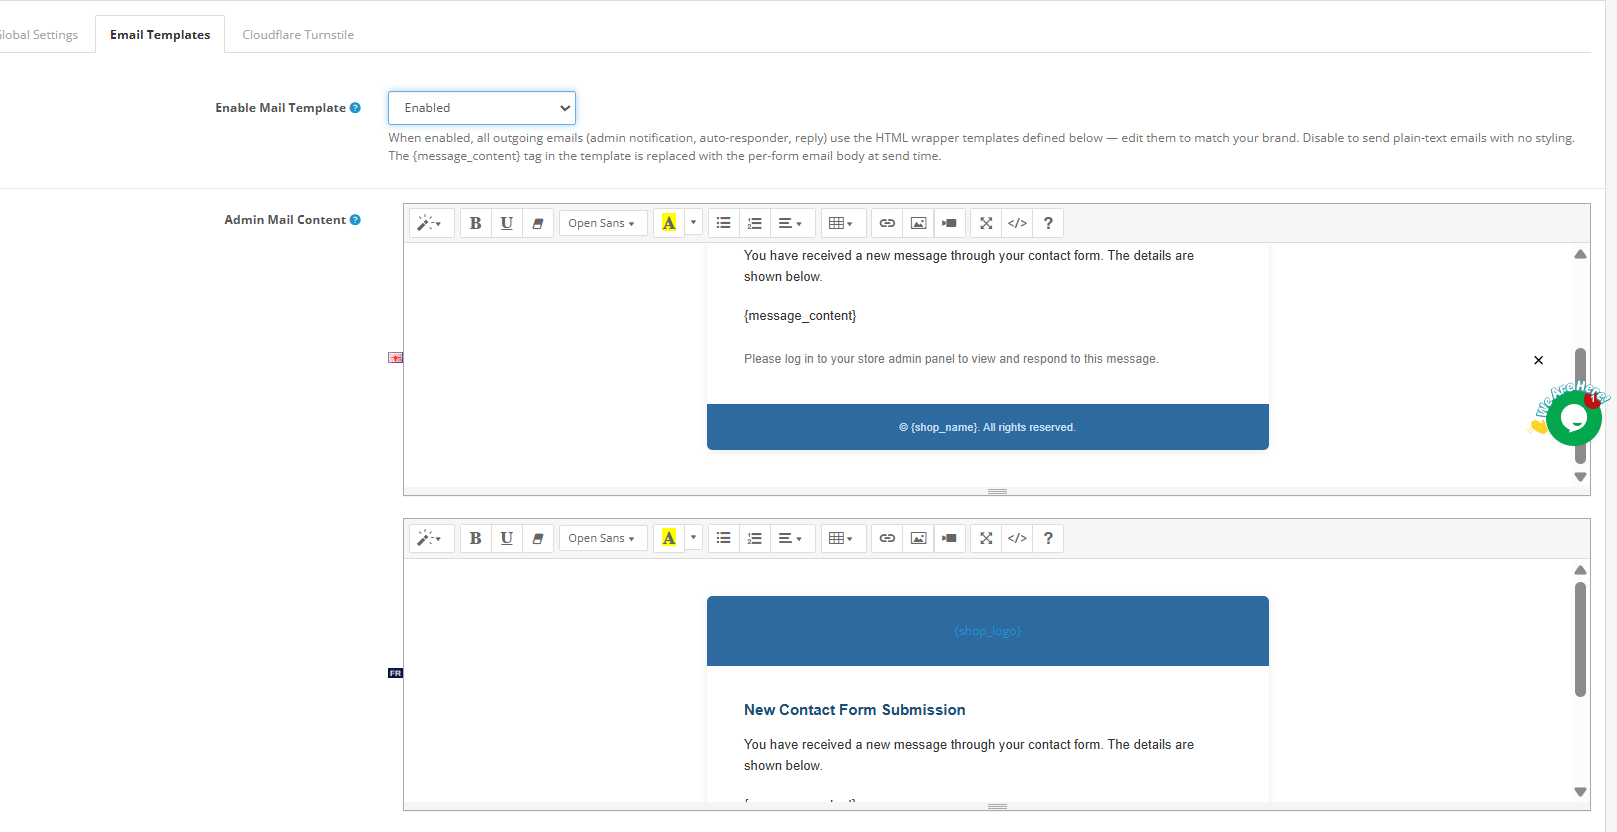
Enable Email templates: You can enable or disable the predefined email template in the PrestaShop Form Creator. If this module is on, then the mails will be delivered on the predefined email template with all variables.

Admin Mail Content: This is the email your store’s team receives whenever a form is submitted by a user. You can customise the subject, body, and format according to your store’s brand using the rich text editor. You can also add the template variables like the submitter’s name, email address, and form field values dynamically by clicking the corresponding tag in the Template Variables section.

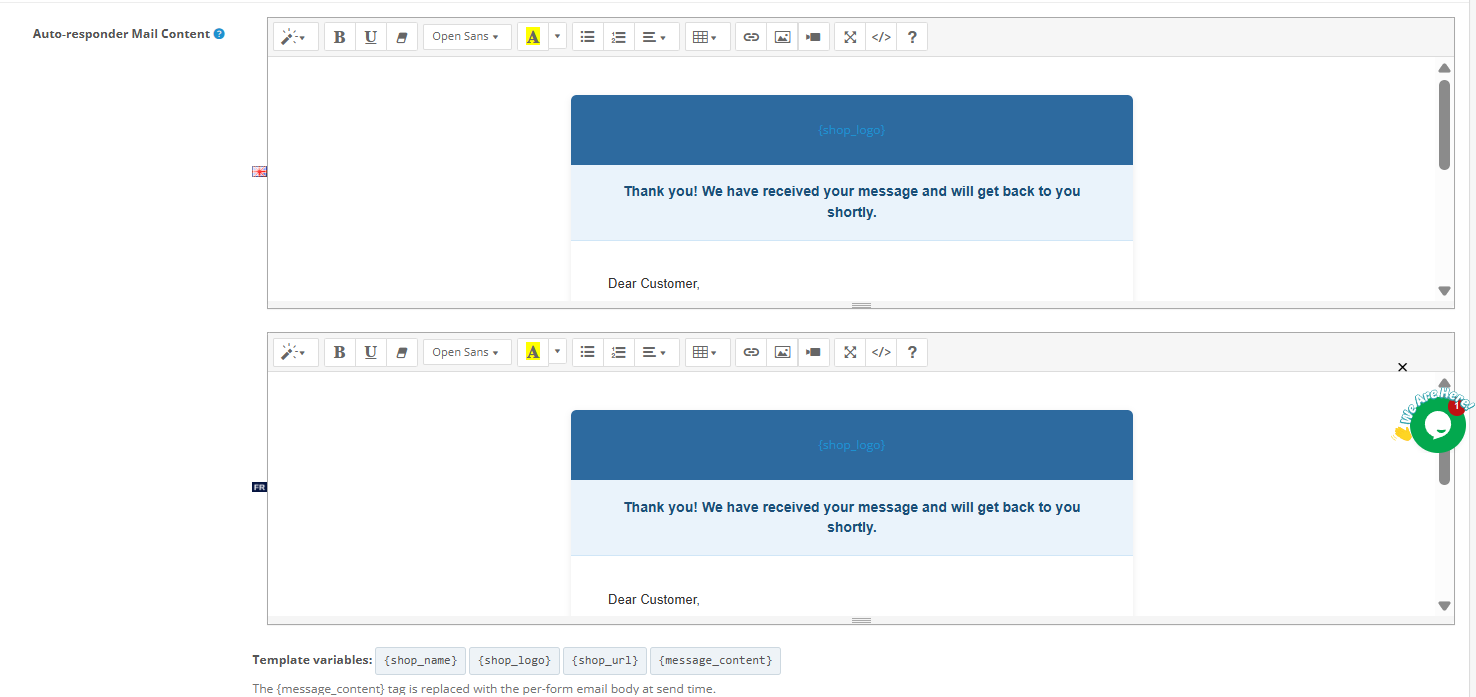
Auto Responder Content: Auto Responder Content is the confirmation email sent automatically to the customer after they submit a form. You can use it to set expectations, share next steps, or simply thank the customer for reaching out.

Reply Email: Reply Email Content controls the format of manual replies sent by admins directly from the form submissions panel inside the back office.

All three email templates in PrestaShop Survey Builder support rich text formatting, including bold, italic, links, lists, and HTML, so your emails can match your store without any custom development.

4.0.3 Cloudflare Turnstile Spam Protection

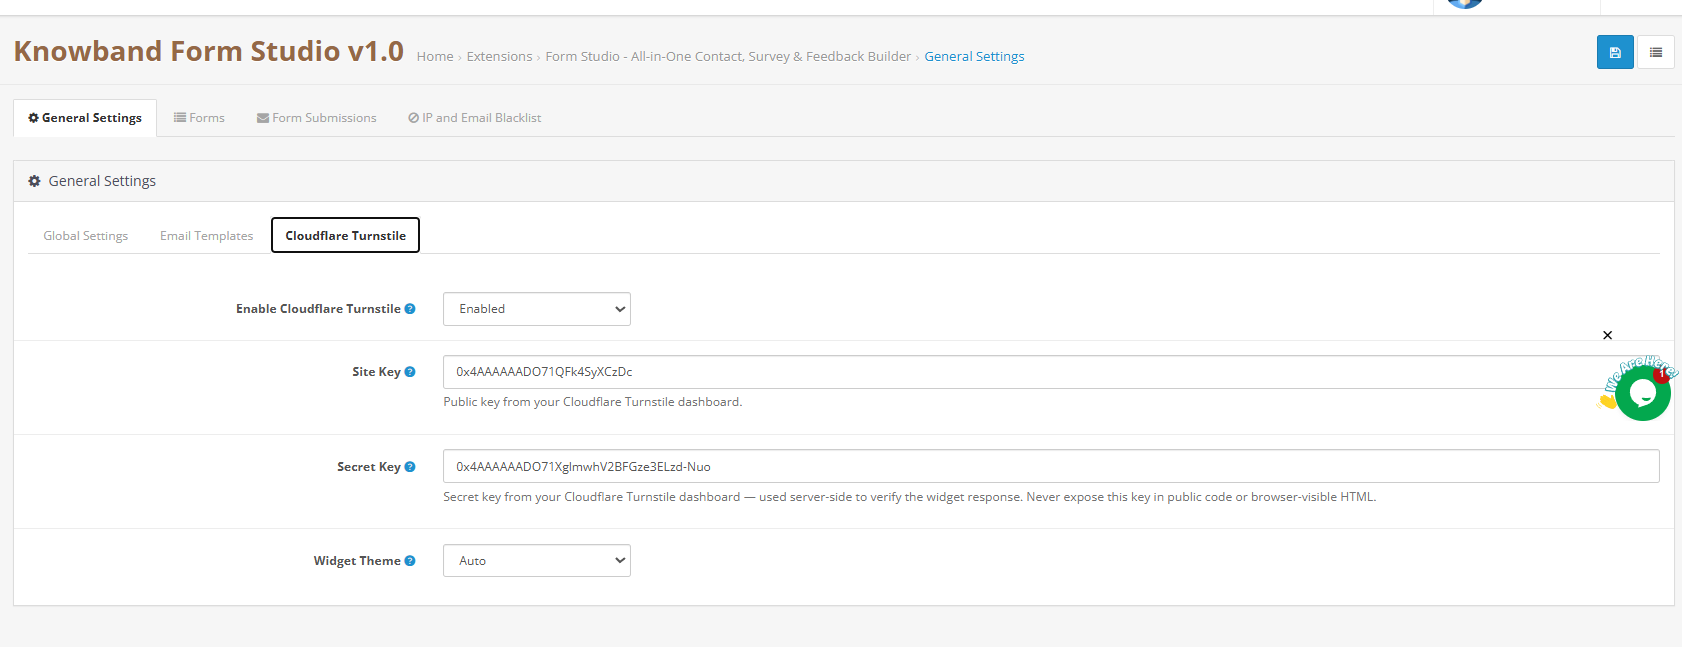
Spam is a real problem for any public-facing form. The module integrates spam protection from PrestaShop with Cloudflare Turnstile, one of the most effective and user-friendly spam protection systems available. Unlike traditional CAPTCHA, which frustrates real users, 

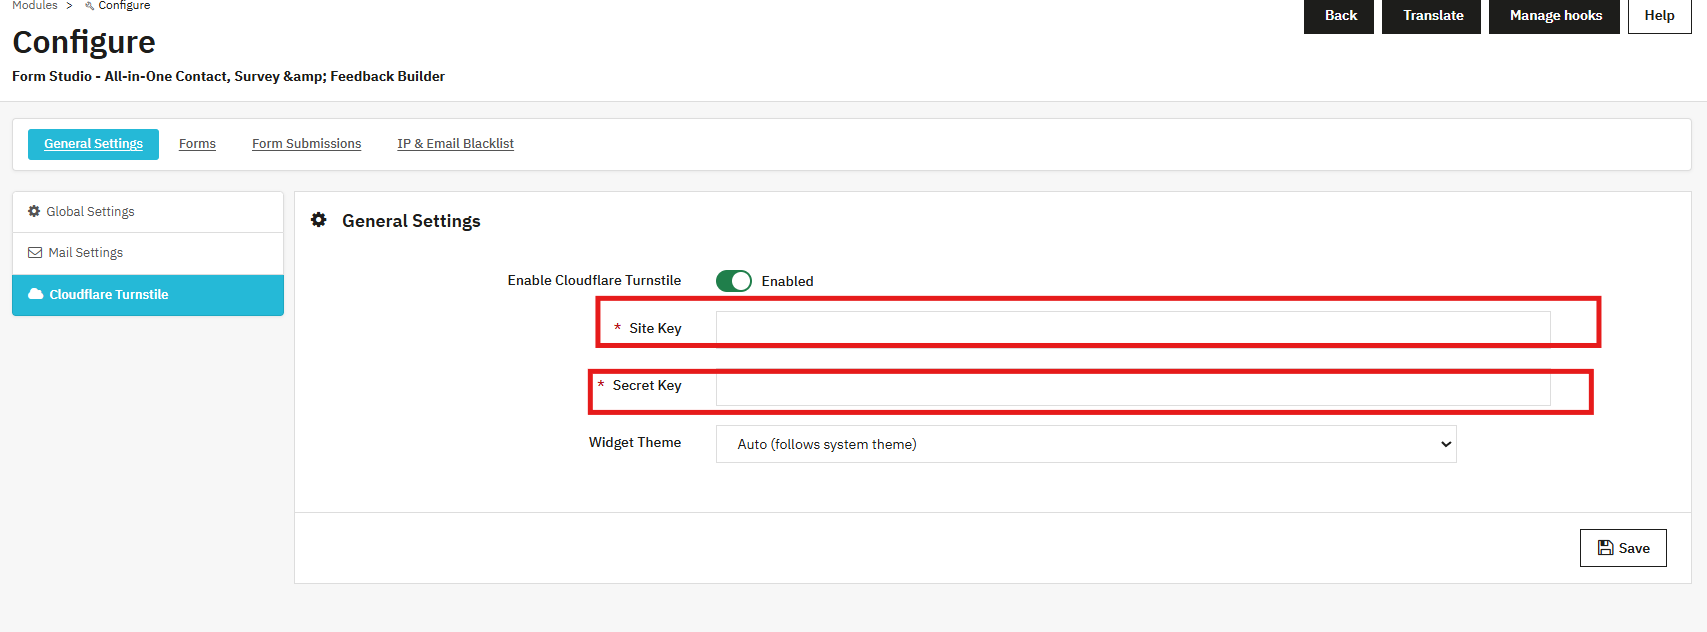
To enable spam detection, toggle Enable Cloudflare Turnstile on, then enter your Site Key and Secret Key from your Cloudflare dashboard. The Widget Theme can be set to Auto, Light, or Dark depending on your store’s design.

Once enabled, you can also add the Cloudflare Turnstile field directly inside individual forms using the form builder’s input field options.

Steps to Generate Secret Key and Site Key 

  1. Log in to your Cloudflare account and open the Turnstile dashboard from the left side in Protect & Connect->Application Security->Turnstile.
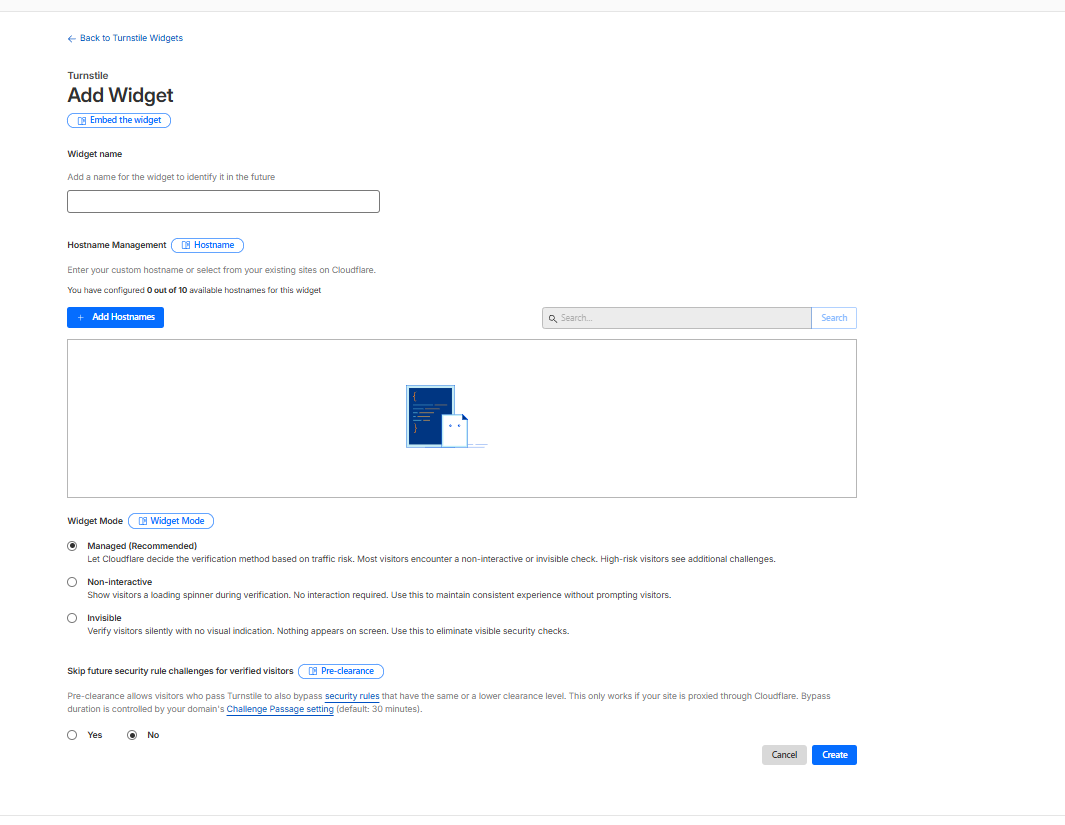
  2. Click Add Widget and enter your website domain details.
  3. Choose the preferred Turnstile widget mode and create the widget.
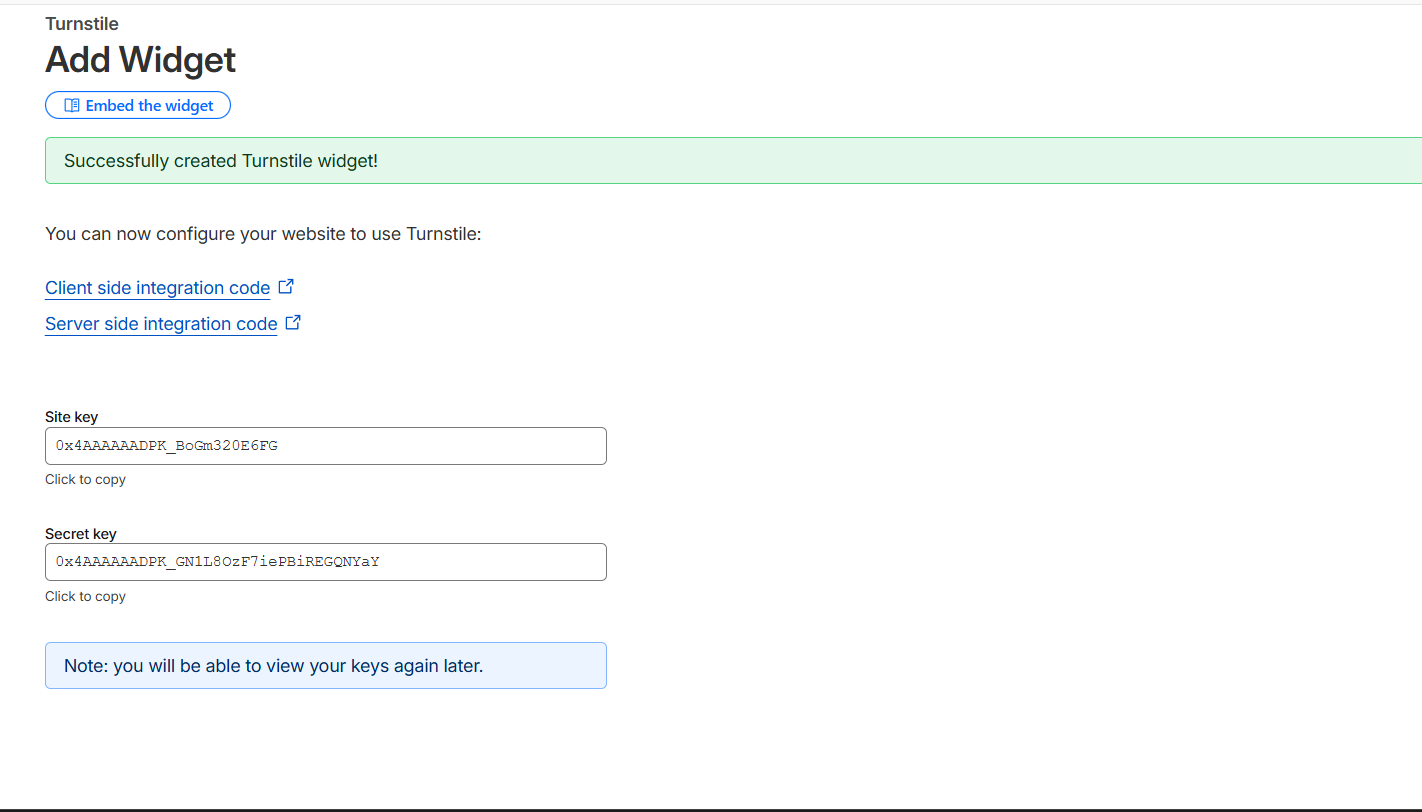
  4. Copy the generated Site Key and Secret Key from the dashboard.
  5. Paste the keys into your website or module settings and save the configuration.

4.1 Creating and Adding Forms Using PrestaShop Form Builder Module

4.1.1 Adding a New Form

Click Add New Form to begin. Each form has its own independent configuration, meaning you can run different forms with different settings across different pages of your store simultaneously.

The form creation panel includes the following fields:

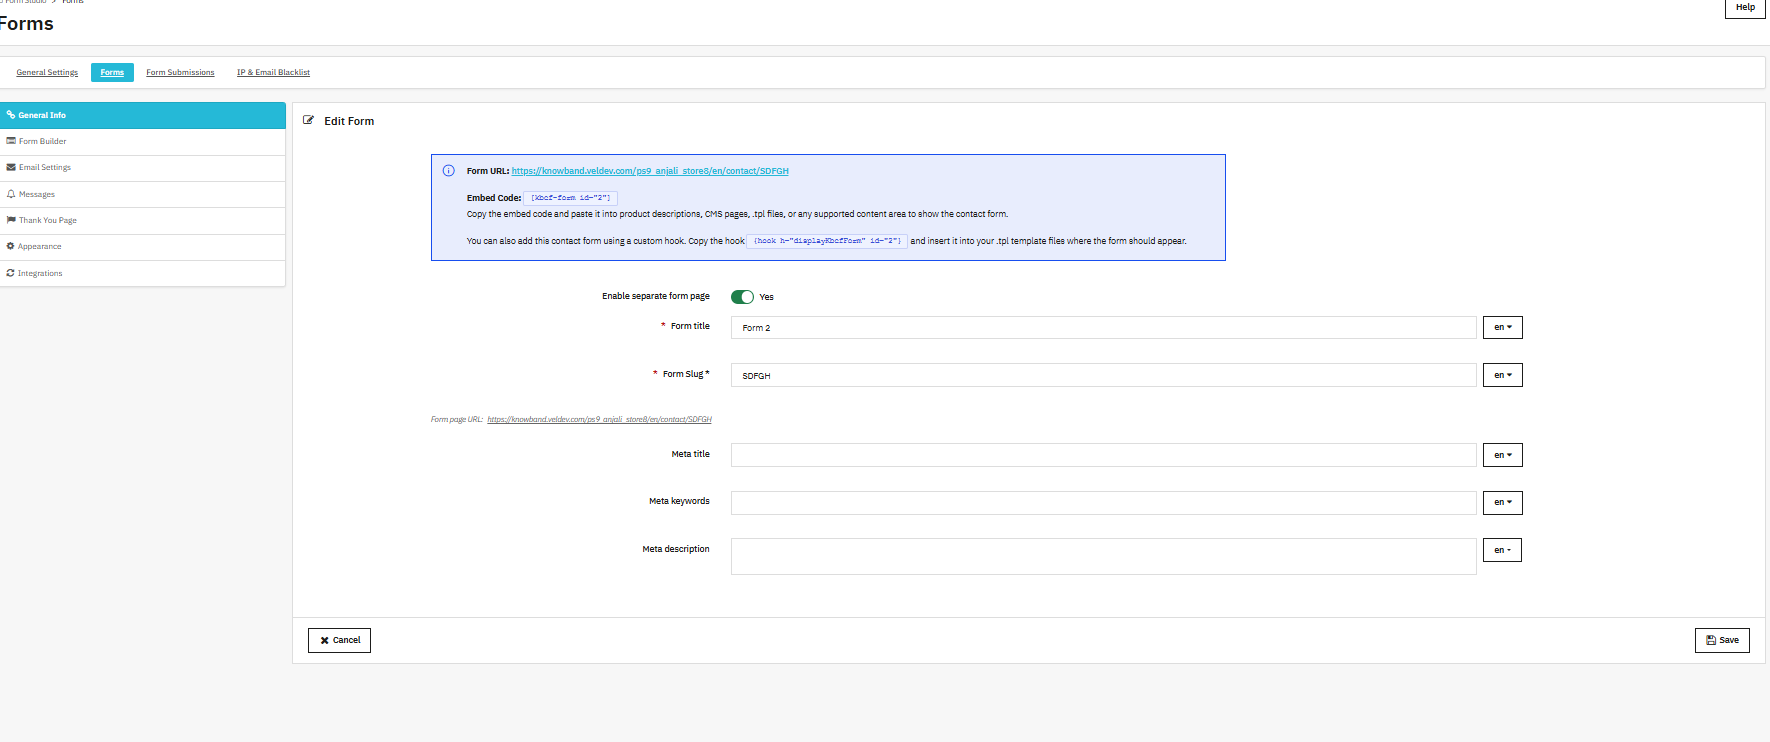
Enable Separate Form Page: This feature controls whether this form gets its own dedicated URL on your store. If this is enabled as yes, then the PrestaShop Form Studio module generates a page with the slug you provided.

Form Title: The name displayed to customers above the form. We suggest keeping it clear and descriptive so customers immediately understand what the form is for. For example: “Request a Quote,” “Share Your Feedback,” or “Get in Touch.”

Form Slug: The added slug will be added to the URL so that you can have the URL based on your requirement. For example, “thank-u” will result in yourstore.com/form/thank-u

Form Meta Title: This meta title helps in ranking the form page in the search results. For example: “Contact Our Support Team –  Fashionstore.” 

Form Keywords: This field’s meta keywords help in categorizing the form within the website.

Form Meta Description: This meta description of the form in PrestaShop form builder helps in search engines. For example, you can add in the form meta description as “Fill out our quick contact form and our team will get back to you within 24 hours.” This will help the customer to find the form when they search for your store’s support.

4.1.2 Designing the Form Layout

The form builder uses a column-based layout system. Before adding fields, choose how many columns each row should contain. 

Options range from a single full-width column to four equal columns, with additional variants offering larger left or right columns for asymmetric layouts.

This flexibility means you can create clean, single-column survey forms as easily as complex multi-column data collection forms where related fields sit side by side using the PrestaShop Online Form Builder Module

4.1.3 Adding Input Fields

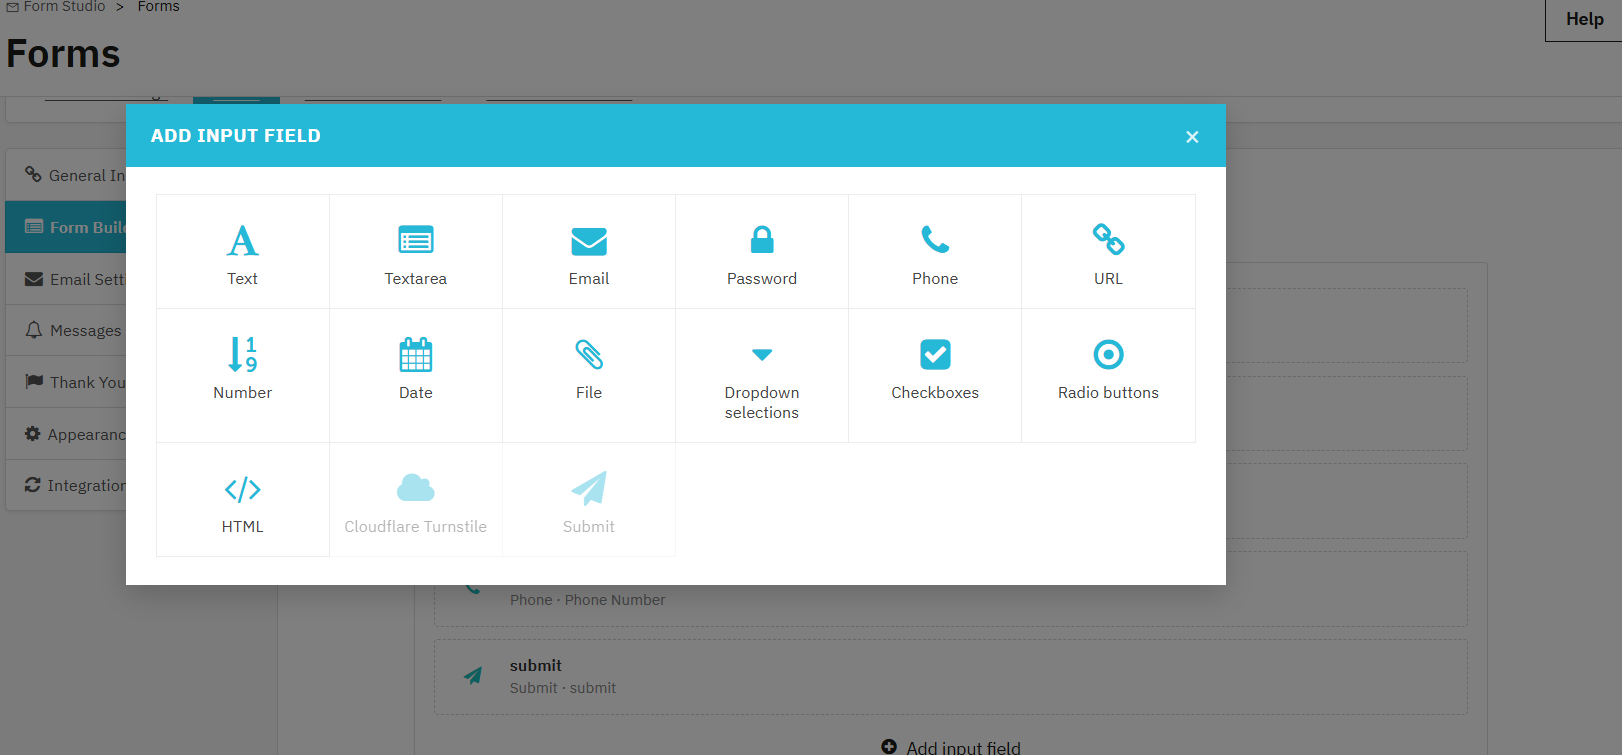
To add an input field, click Add Input Field inside any row to insert a form element. Available field types:

Text / Textarea: Collect short or long written responses from customers. 

Email: Captures email addresses with format validation.

Password, Phone, URL, Number: Specialized input fields with automatic validation based on the selected field type. 

Date: Allows users to select or enter dates with format validation. 

File: Let’s customers upload attachments in formats you specify.

Dropdown, Checkbox, Radio button: Multiple-choice fields; choose based on how many options you have and whether single or multiple selections are needed.

HTML: Embeds custom markup inside the form, such as instructions or section headers.

Cloudflare Turnstile: Places the spam protection widget at a specific position within the form.

Submit: Submits the form and triggers configured actions such as email notifications, auto-replies, integrations, and thank-you pages. 

4.1.4 Email Settings


Each form has its own email configuration, which can be managed from the contact form’s mail settings in the PrestaShop Online Form Builder Module. This is especially useful when you have multiple forms for different departments or purposes.

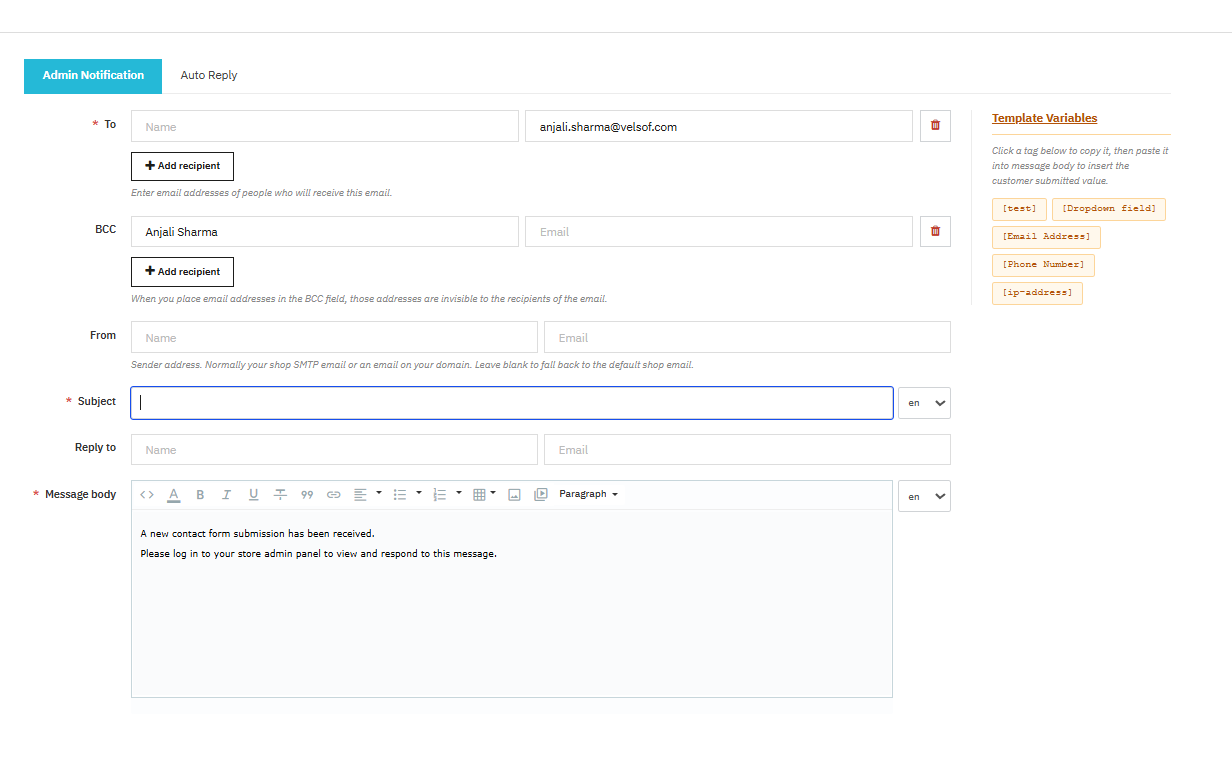
For the admin notification email:

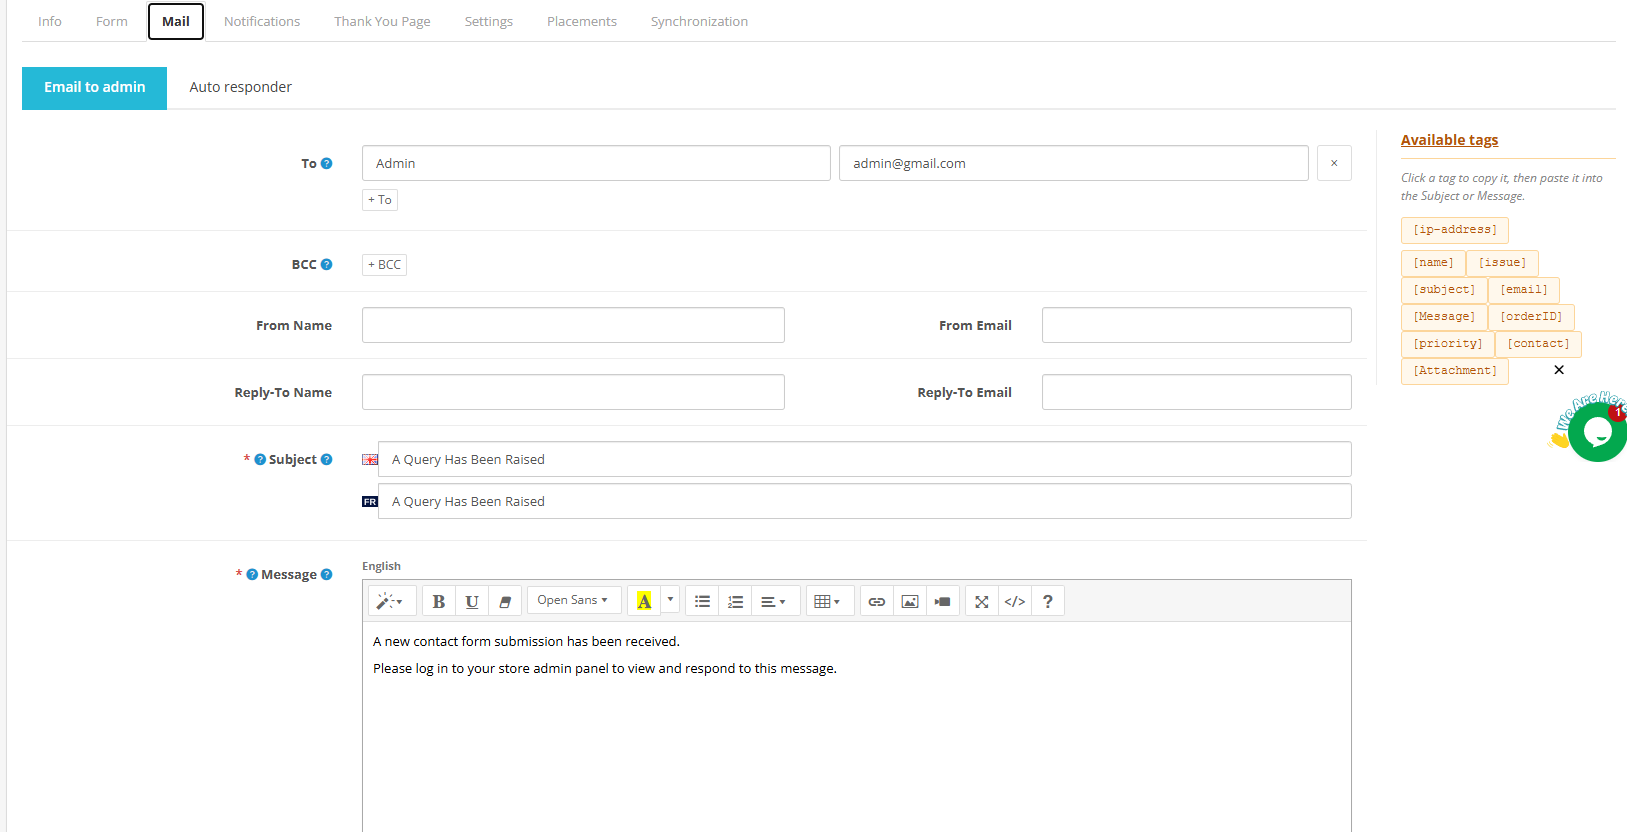
You can set: the recipient addresses in the To field; additional hidden recipients in the BCC field; a custom From address; and a Subject line that can vary by language in the PrestaShop lead generation form.

The Reply To field lets you route customer replies to a specific inbox, for example, your support team, rather than your general admin address.

The message body editor uses the same rich text interface as the general settings, and template variables let you pull in the actual values your customer submitted dynamically.

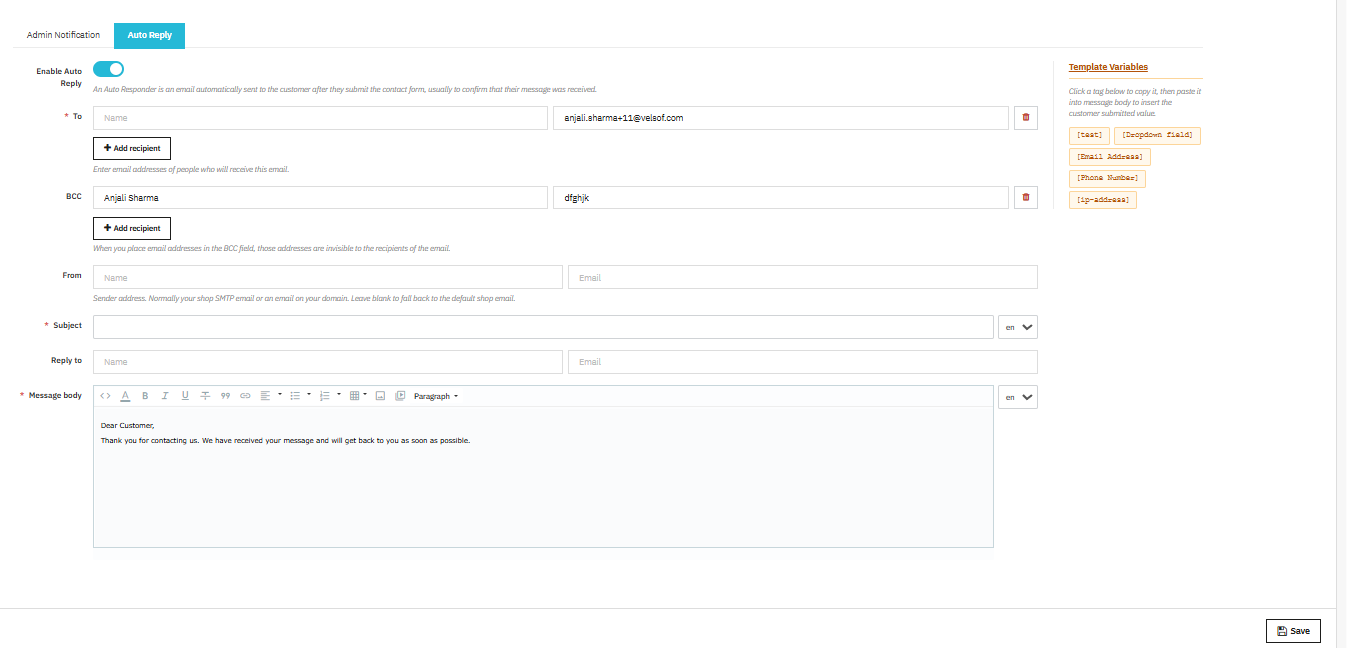
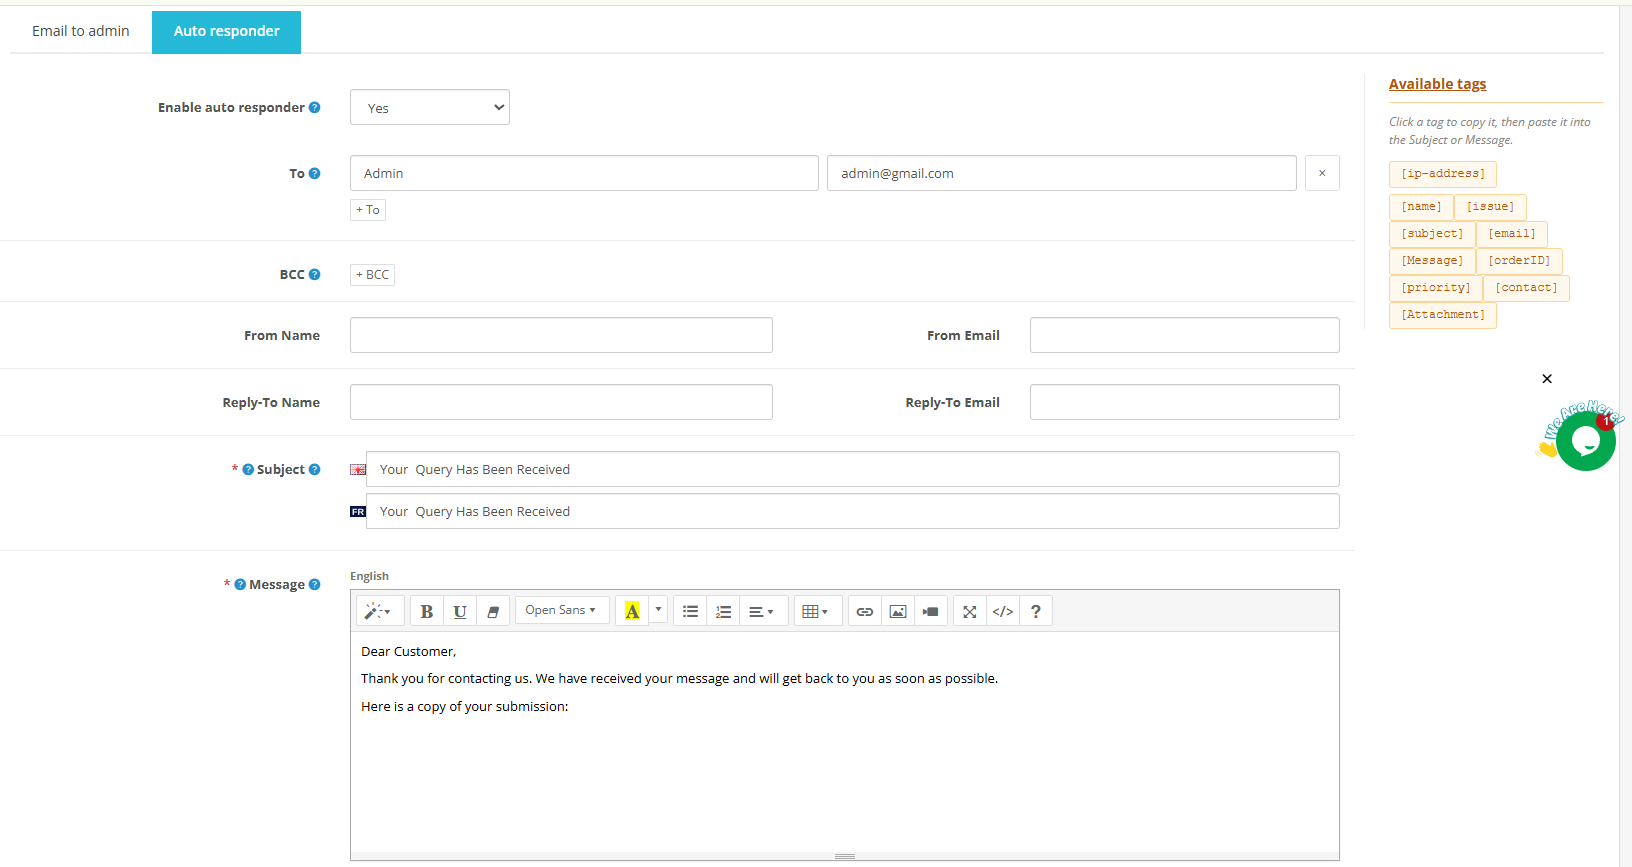
The Auto Reply section mirrors this configuration for the customer-facing confirmation email. Enable Auto Reply, then configure the To, BCC, From, Subject, Reply To, and Message Body fields. The auto-responder runs immediately after submission and does not require any manual action from your team.

4.1.5 Custom Validation Messages

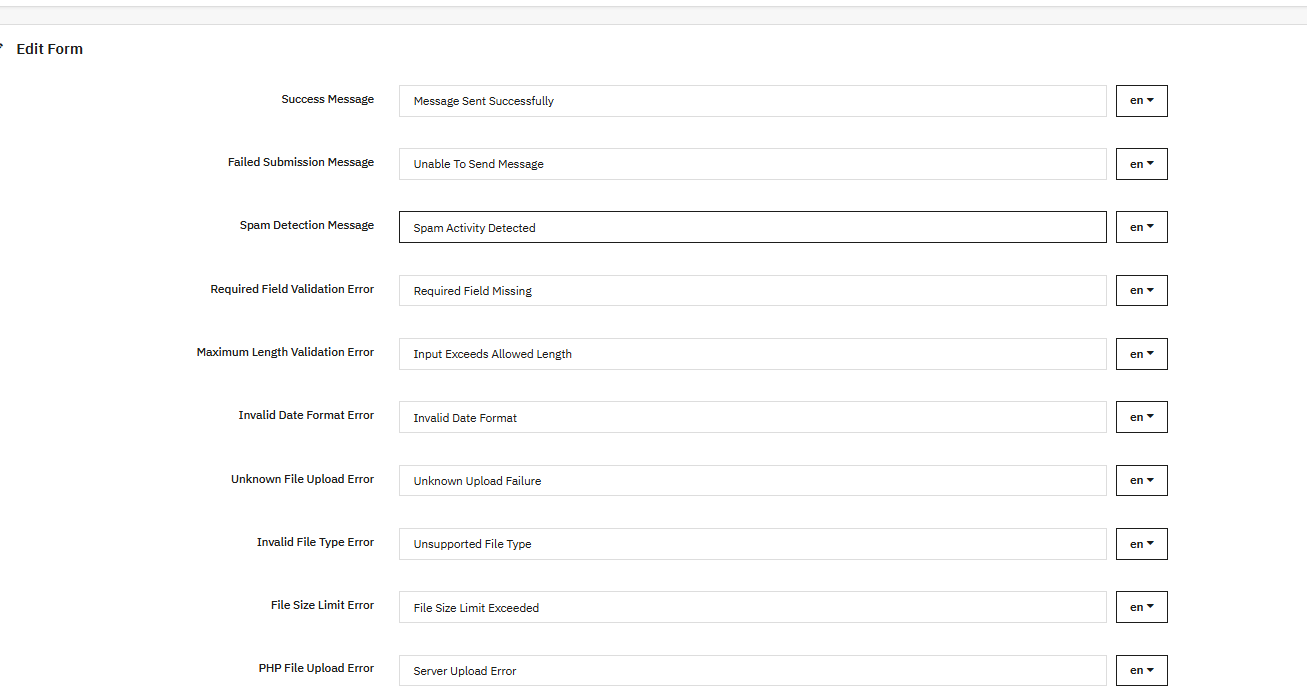
Each validation scenario has its own configurable message. You can set messages for: successful submission, failed submission, spam detection, empty required fields, inputs exceeding maximum length, invalid date formats, file upload failures, unsupported file types, oversized files, PHP upload errors, invalid number formats, values below or above the allowed range, invalid email addresses, invalid URLs, invalid phone numbers, and blocked IPs or emails.

4.1.6 Display “Thank you” page after form submission

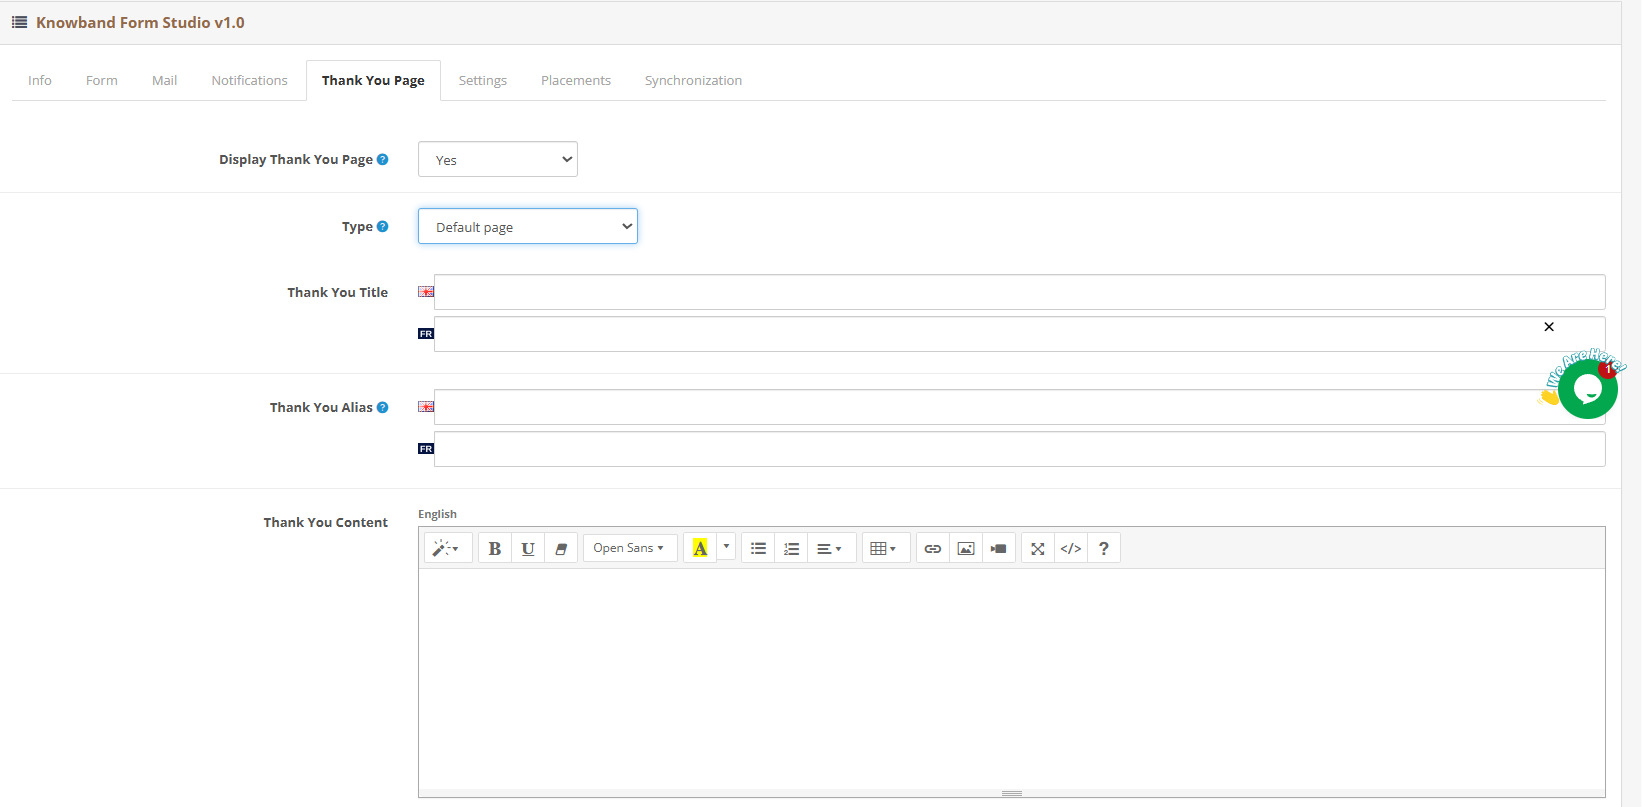
Set to “Yes” to activate a post-submission page. When disabled, the form resets after submission with no further action.

“Thank you” page type:

Once enabled, choose between:

  • Default page: A built-in thank-you page configured inside the module. No separate CMS page needed.
  • Custom URL: Redirects the customer to a URL you specify.

Title: The heading shown at the top of the default thank-you page.

Page alias: The URL slug for the page. Keep it short, lowercase, and hyphenated.

Content: Body text of the thank-you page, editable via the rich text editor. Supports bold, italic, underline, strikethrough, lists, tables, blockquotes, links, images, embedded videos, colored text, and raw HTML.

4.1.7 Appearance and Display Settings

From the Appearance setting, you can handle the display of the form on your website using the PrestaShop customer feedback form.  

Enable Form – Turns this form on or off on the front end. “Yes” makes it live, “No” hides it. Everything you’ve configured stays saved either way using PrestaShop Online Form Builder Addon.

Restrict to Customer Groups: Choose which visitors can see this form:

  • Visitor– Someone browsing without an account.
  • Guest – Someone going through checkout without registering.
  • Customer –  Someone logged into a registered account.

Leave it empty, and everyone sees it. Moreover, you can restrict to customers for post-purchase surveys, or you can restrict to visitors for new audience lead capture.

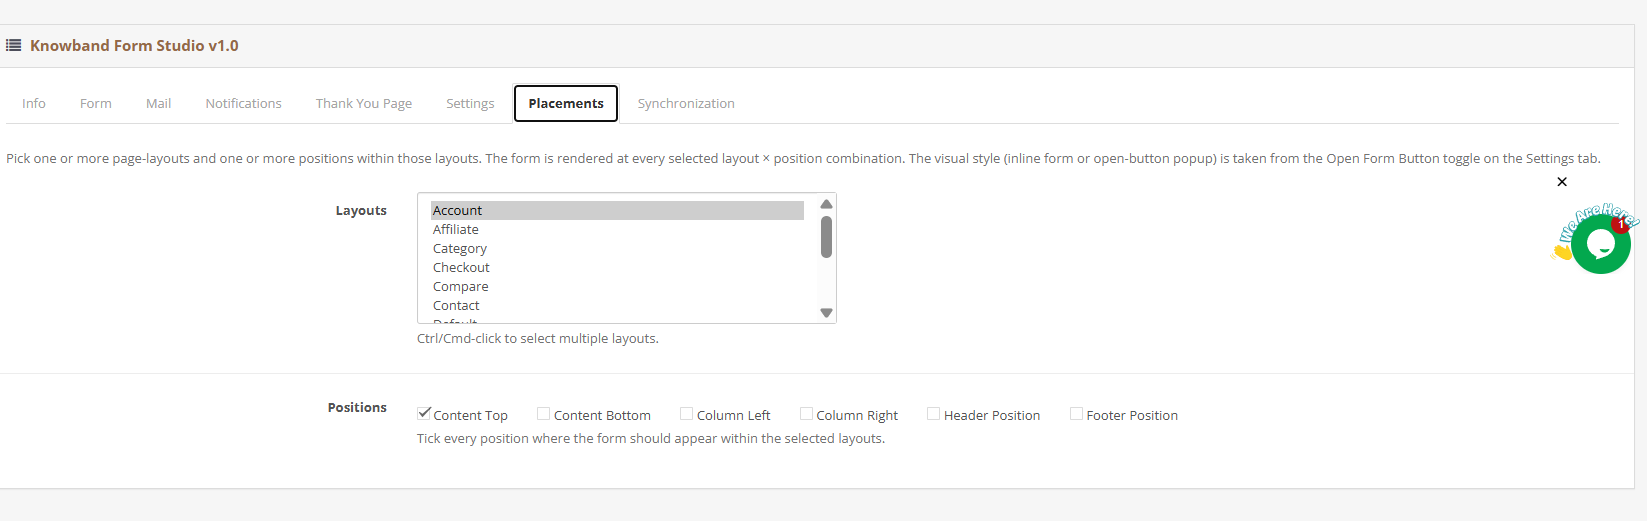
Display Positions: Pick where the form appears. These are PrestaShop’s built-in hook locations, no custom code needed:

  • Header Top Navigation: Above the nav bar, on every page.
  • Header – Main Header: Inside the header, on every page.
  • Top: Below the header, above the page content.
  • Home: Home page only. 
  • Left Column: Left sidebar, if your theme has one. 
  • Right Column: Right sidebar, if your theme has one. 
  • Footer: Bottom of every page. 
  • Product Page – Footer: Below the product description. 
  • Product Page – Below Product Images: Right under the product photos.
  •  Checkout Page: Handy for delivery notes or order preferences. 
  • Login Page: Good for surveys or lead capture at login. You can also place forms via embed shortcode, a custom hook, or the form’s standalone URL if none of the above fit.

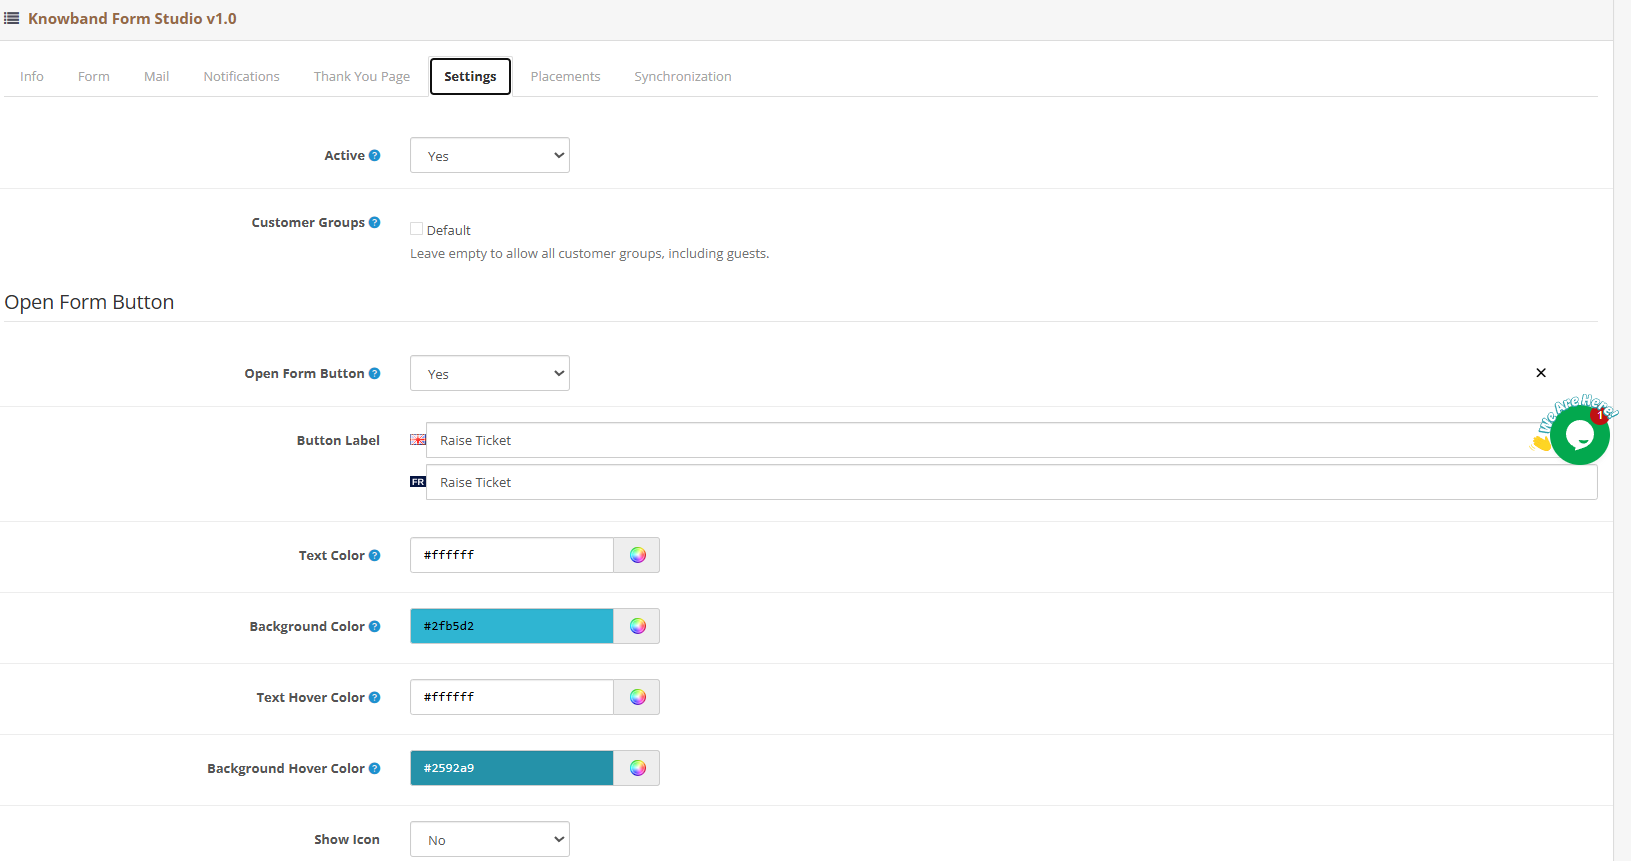
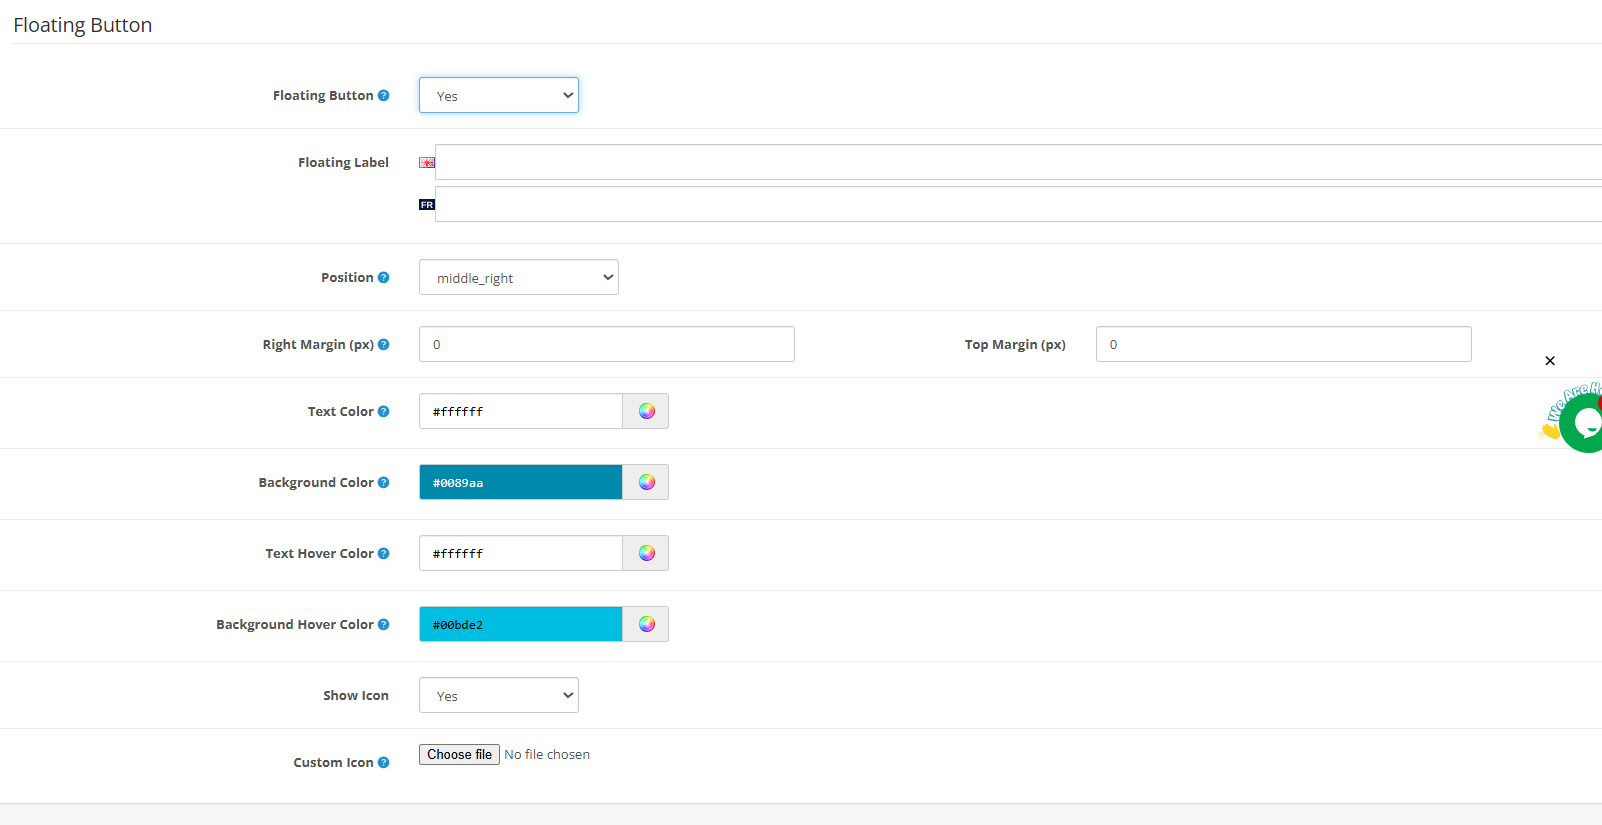
Enable Open Form Button: Adds a button that opens the form in a pop-up instead of embedding it on the page. The form only appears when the visitor clicks the button using the PrestaShop Form Builder Addon. 

Floating Button: The Open Form Button sticks to the corner of the screen as the visitor scrolls, so it stays reachable from anywhere on the page.

4.1.8 Email Marketing Integration

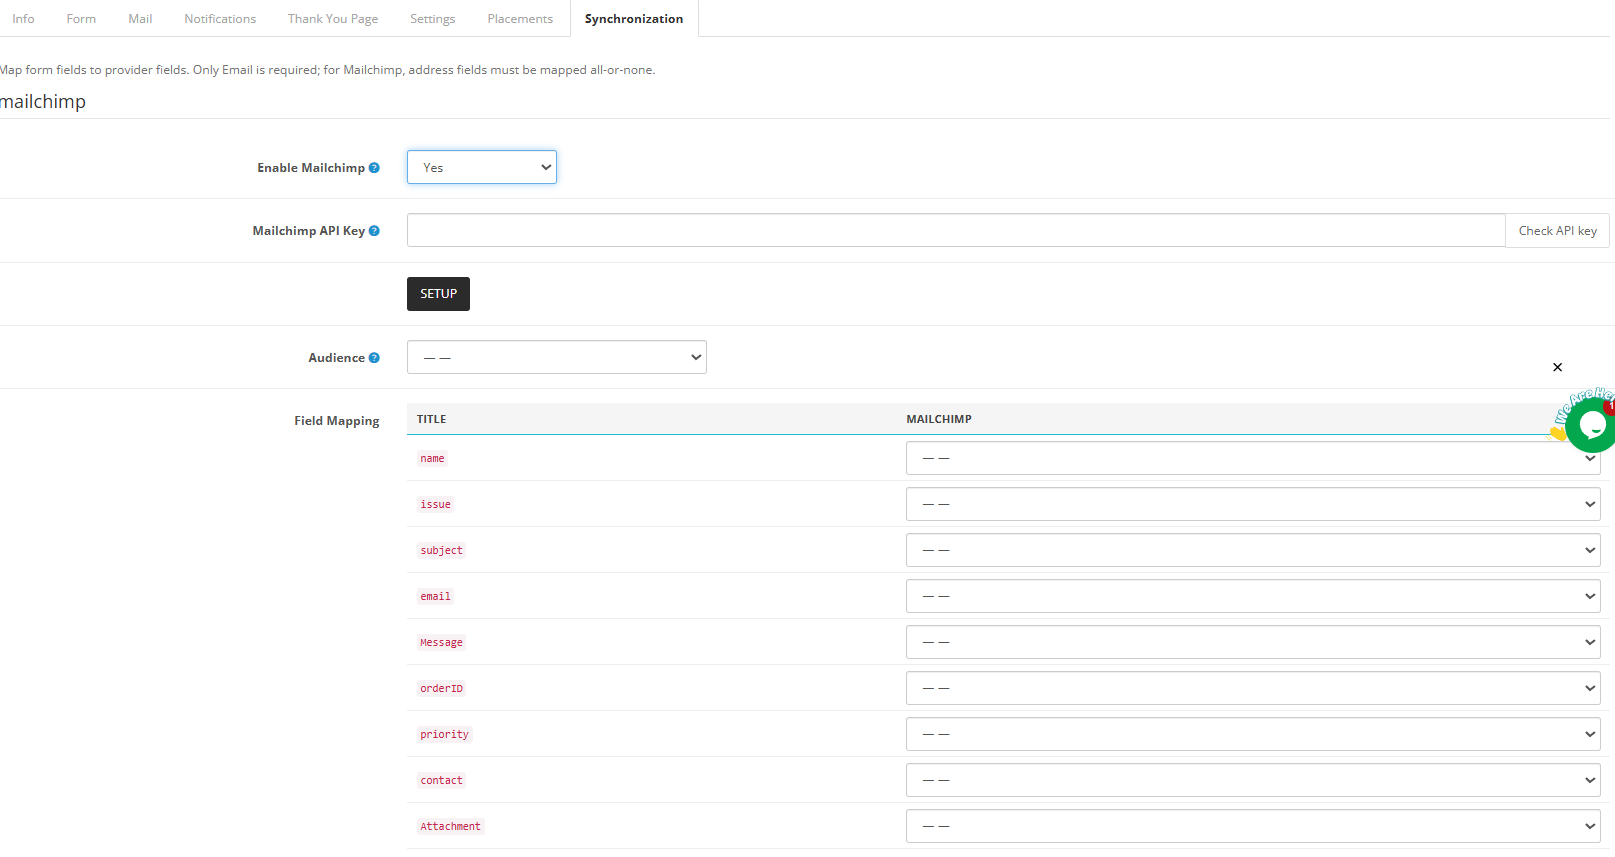
Enable Mailchimp Synchronisation: Anyone who submits the form gets added to your Mailchimp audience automatically. Connect your Mailchimp account using API Key once through the integration settings, and it handles the rest.

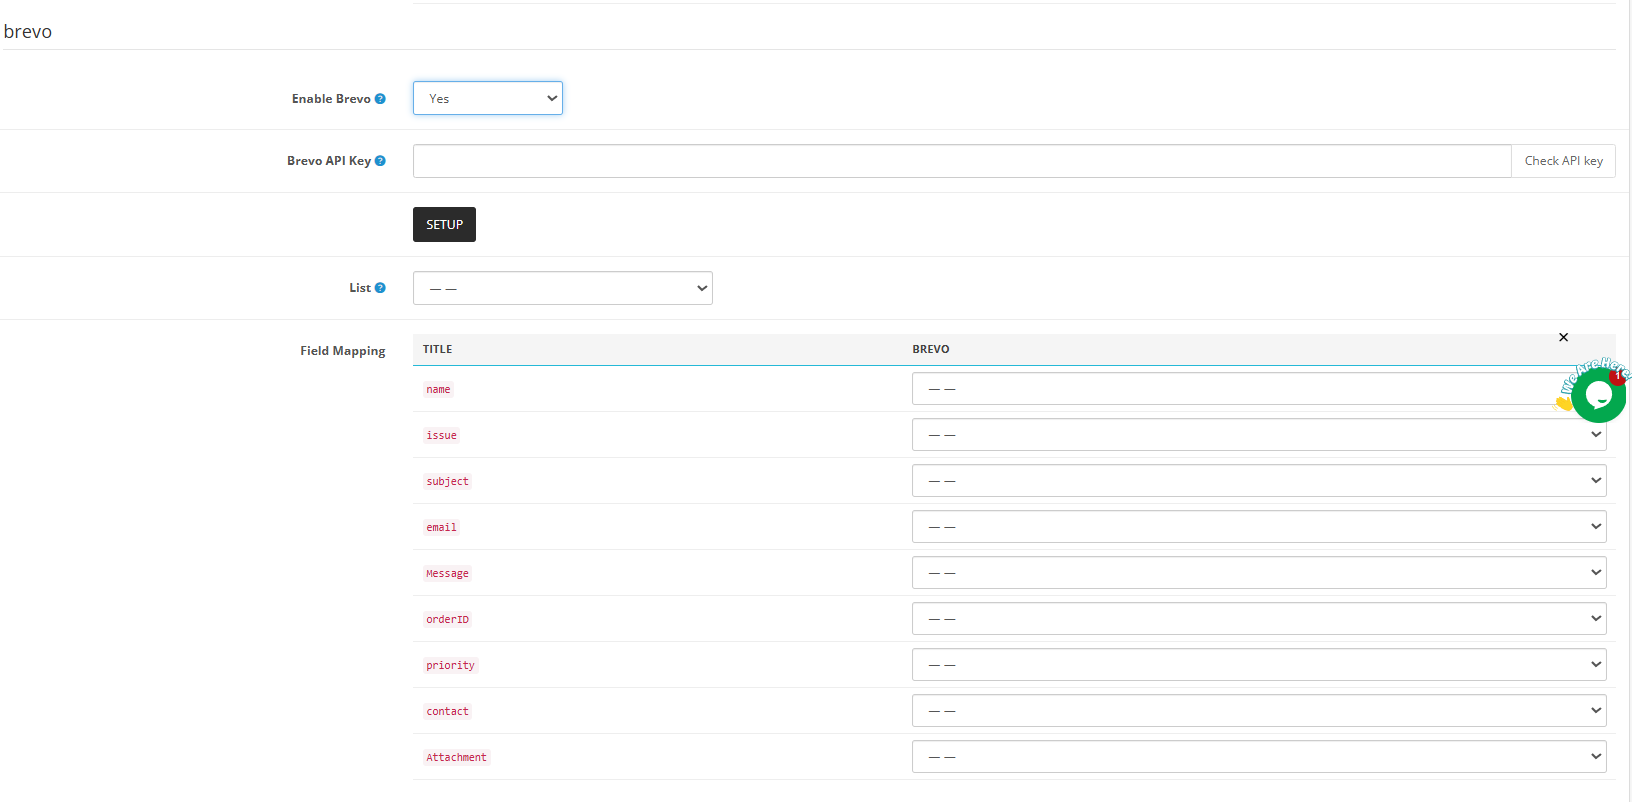
Enable Brevo Synchronisation: You can integrate Brevo using API keys, fetche the list, and synchronise the emails to Brevo lists.

4.2 Form Submissions Management

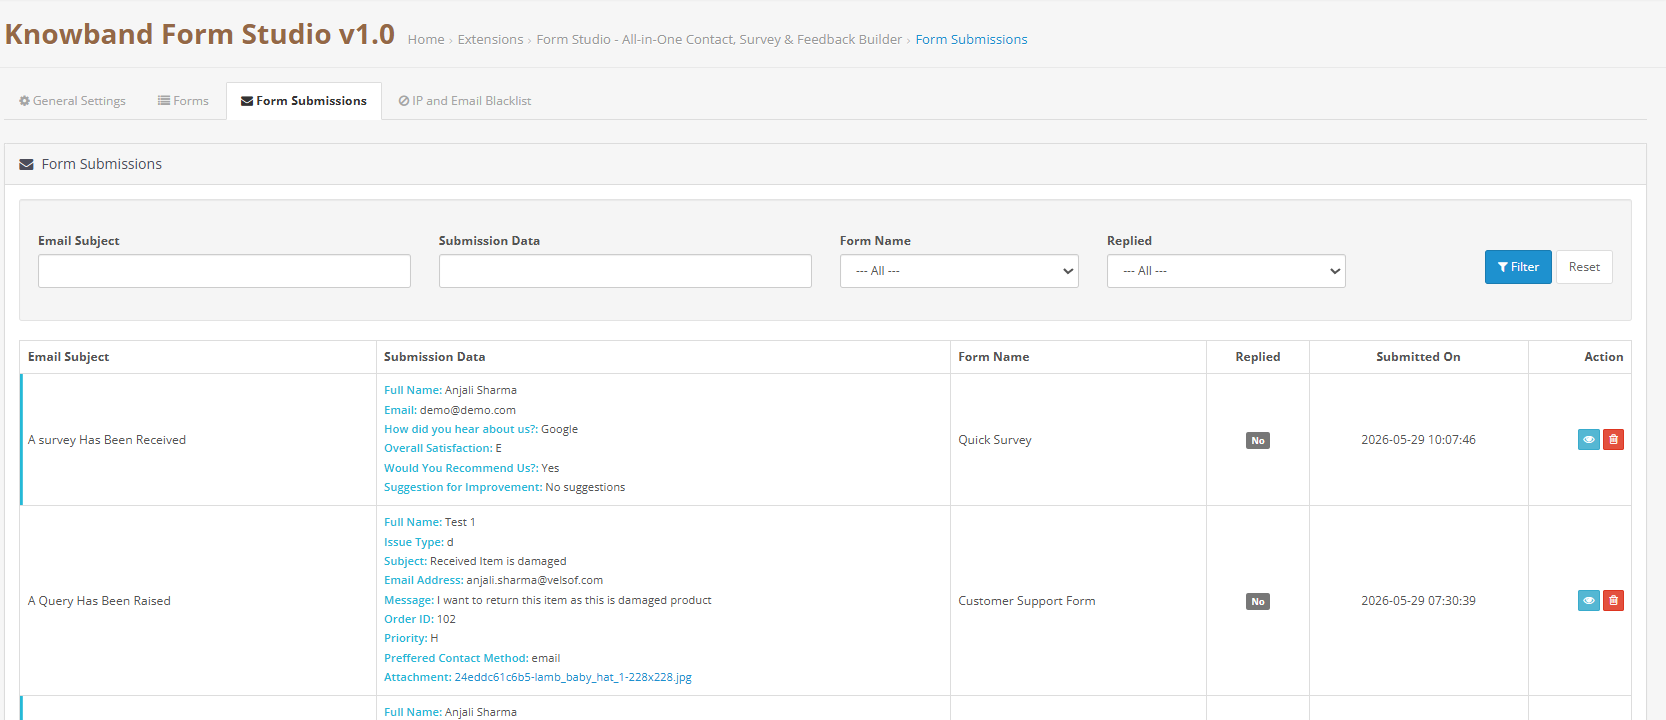
Every form submission on your store shows up here. You can see what was sent, which form the submission belongs to, and whether your team has replied.

Email Subject: The subject line from the admin notification email for that submission, shown in the list for quick reference.

Submission Data: A snapshot of what the customer filled in. Click the row to see the full submission with all fields and values.

Form Name: Which form the submission came from. Useful when you’re running several forms and need to filter by source.

Replied: Yes or No. Shows whether a reply has already been sent, so nothing gets missed or answered twice.

Submitted On: The date and time the submission came in, based on your store’s timezone.

Replying to a Submission

Click any row to open the full submission and reply from the same screen.

From: Your store’s name and email address as the sender.

To: The customer’s email address, pulled from their submission.

Reply-To: Pre-filled with your store’s reply address. Changes if the customer replies to your message.

Subject: Taken from the original submission so the thread stays connected. Edit it before sending if needed.

Message: Write your reply here for the customer and click on the send button to send the email.

Attachment: Attach a file if needed. Accepted formats: JPG, JPEG, PNG, GIF, ZIP, PDF. Max size 8 MB.

4.3 IP and Email Blacklist

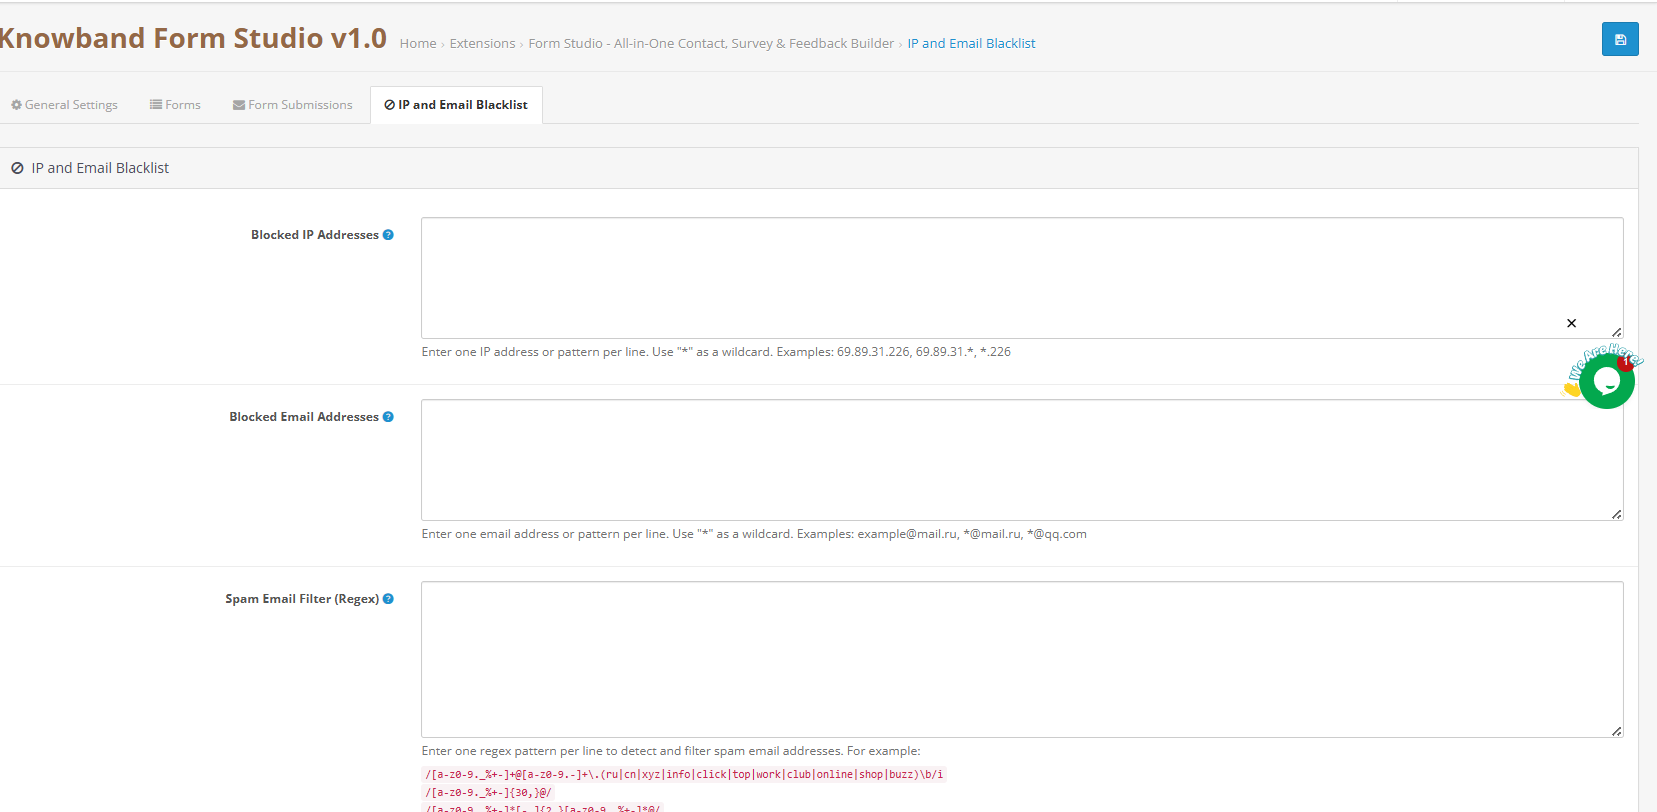
If you are dealing with repeated spam submissions or want to block certain users before they even reach your inbox, you can handle it using Knowband Prestashop Form Maker. Any entry added here is checked before the form submission is recorded or sent to anyone.

Blocked IP Addresses: Type in the IP addresses you want to block, one per line. You can enter a single exact address or use * as a wildcard to cover a whole range.

  • 69.89.31.226: blocks just that one address
  • 69.89.31.*: blocks every address in that range
  • *.226: locks any IP that ends with 226

If you keep seeing spam from the same source, adding their IP range here stops it at the door.

Blocked Email Addresses: Works the same way as IP blocking, but for email addresses. Enter one per line, exact or with wildcards.

This is the quickest way to shut out domains that keep sending junk without going through submissions one by one.

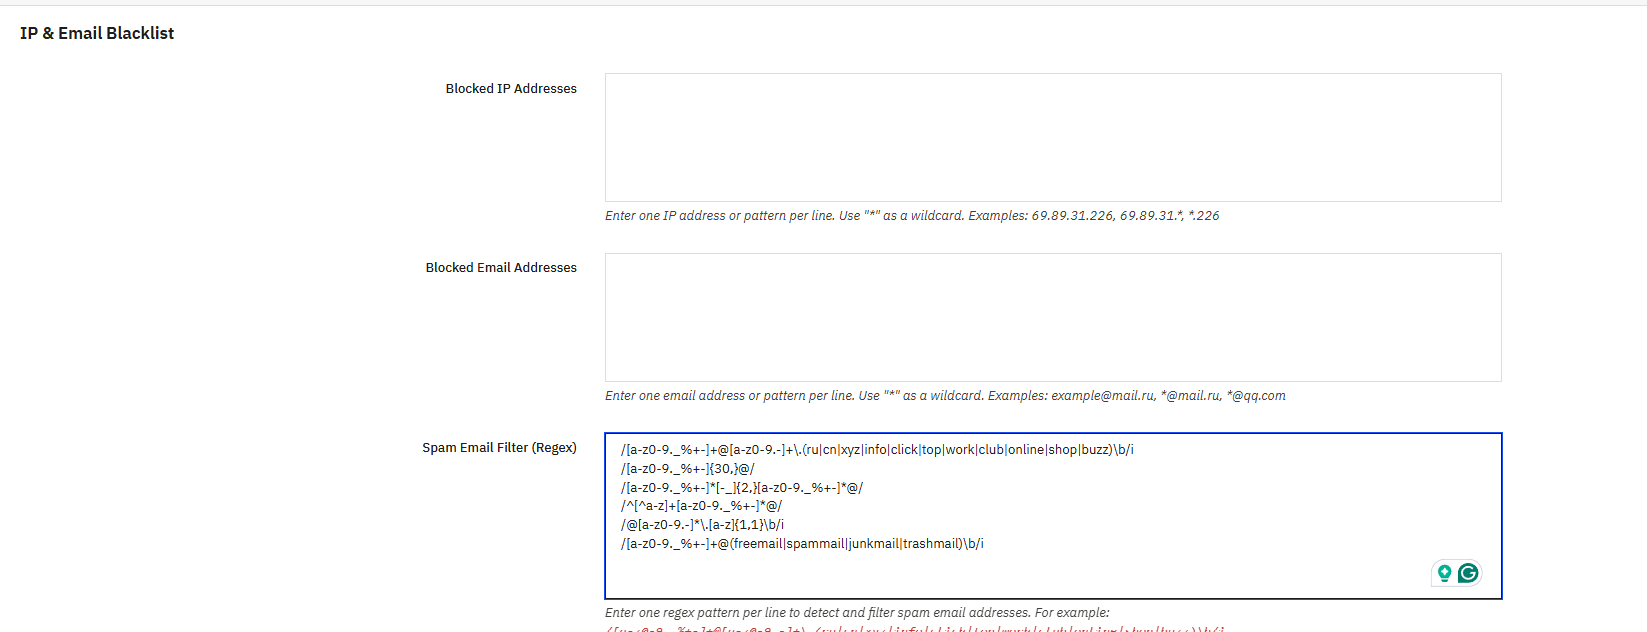
Spam Email Filter (Regex): For more control, this field lets you write regex patterns that check incoming email addresses against specific rules. If an address matches any pattern you’ve added, the submission gets blocked before anything else happens. Add each pattern on its own line.

The module comes with ready-to-use example patterns that cover the most common spam scenarios: domains like .ru, .cn, .xyz, .info, .click, .top, .work, .club, .online, .shop, and .buzz; unusually long usernames; addresses with repeated dashes or underscores; addresses starting with a number; single-character TLDs; and provider names commonly associated with throwaway accounts.

5.0. Frequently asked questions

Question: What is the best PrestaShop Form Builder module in 2026?

Answer: PrestaShop Form Studio by Knowband is one of the best PrestaShop Form Builders of 2026. Unlimited forms, spam protection, email marketing integrations, and form submission management with no coding needed.

Question: How do I create a customer satisfaction survey in PrestaShop?

Answer: Install Knowband PrestaShop Form Creator, click Add New Form, set a title and slug, drop in fields,  radio buttons, checkboxes, dropdowns, and text areas. The PrestaShop Advanced Form Builder Addon interface works on all screen sizes.

Question: How do I display forms on product pages?

Answer: You can modify the appearance settings in PrestaShop Form Builder, then “Product page – Footer” or “Product page  – below product images” under Display Positions. For specific pages, use the embed shortcode from the custom form builder PrestaShop panel.

Question: Does the module send email notifications automatically? 

Answer: Yes. The auto-responder feature is available on PrestaShop Form Maker when users make a submission. You can set the subject and message body once per form.

Question: Can I translate forms into multiple languages in PrestaShop?

Answer: Yes. Subject and Message Body fields in both the admin notification and auto-responder have tabs for each active language on your PrestaShop website.

6.0 Business use cases

Contact and support forms: Routes submissions to the right team, cuts follow-up messages. The PrestaShop checkout form builder collects extra details at the point of purchase.

Customer satisfaction survey PrestaShop: Sits on the order confirmation page. Collects feedback on shipping, product quality, and service.

Product feedback form PrestaShop: Goes on product pages or triggers post-purchase. Private forms pull more honest responses than public review systems.

PrestaShop lead generation form for wholesale and B2B: Collects business name, tax ID, purchase volume, and product categories. Leads go to Brevo or Mailchimp. Sales teams follow up without manual data entry.

Event registration: Takes name, email, company, dietary needs, and session choice. Confirmation fires via auto-responder on submission.

Style consultation (fashion): Customer submits size, budget, occasion, and preferences. Sales team replies with specific product picks.

Technical support intake (electronics): Takes model, purchase date, issue description, and photos. Cuts ticket back-and-forth. Spam protection from PrestaShop settings filters the inbox.

Post-return feedback: Asks why the item came back and what would have changed that. Feeds into product copy and buying decisions.

Subscription forms: Take interests, frequency, and format preferences. Syncs to Mailchimp or Brevo on signup. All entries are logged and exportable via the form submission management PrestaShop tools.

7.0 Conclusion

Form Studio is a complete PrestaShop Form Builder solution The module covers contact forms, surveys, feedback collection, lead generation, and submission management in one place.

Unlimited form creation, responsive design, Cloudflare Turnstile spam protection, email marketing integrations, per-form email setup, and a back-office submissions manager, all in a single module.

Building surveys in PrestaShop, collecting product feedback, handling support requests, or replacing a basic contact page, Knowband’s PrestaShop Form Studio handles all of it.

Install the PrestaShop Custom Form Creator now, set up your first form, and start collecting the data your store actually needs.


OpenCart AI Review Generator Extension – Complete User Guide

1.0 Introduction

Getting reviews on a new OpenCart store is one of the hardest parts of building credibility online. Customers rarely come back to leave feedback, and waiting for organic reviews can take months. In that time, your product pages sit without social proof, and potential buyers move on.

The Knowband OpenCart AI Review Generator Extension changes that. It connects your OpenCart store to an AI provider of your choice- OpenAI (ChatGPT), Anthropic (Claude), or Google (Gemini)- and generates product-specific reviews directly from your admin panel. You set the rules. The extension handles everything else.

Each generated review comes with a star rating, a title, a review body written in your chosen tone, and a guest reviewer profile with a randomised name. All reviews are published through OpenCart’s native review system and appear on product pages exactly the way a real customer review would.

This guide walks through every setting, tab, and option so you can get the OpenCart AI review generator configured and running from day one.


2.0 Installation Steps

Installing the Extension

Step 1: Download the extension ZIP file from your Knowband account.

Step 2: Log in to your OpenCart admin panel and go to Extensions, then Extension Installer.

Step 3: Upload the ocmod.zip file using the file upload option. OpenCart will handle unpacking automatically.

Step 4: Log in with FTP, copy all the folders from the Upload folders to your store, and select the Modules category. Locate the AI Review Generator in the list and click Install.

Step 5: After installation, click Edit to open the configuration panel.

Common Installation Problems

Upload fails: Your server’s file upload limit is likely too low. Ask your hosting provider to raise upload_max_filesize and post_max_size to at least 32 MB.

Extension not appearing in the list: Clear your OpenCart cache by going to Dashboard and clicking the blue cog icon, then Refresh. Run the search again.

3.0 Admin Panel Overview in OpenCart Product Review Generator Extension

After installing the extension, the Opencart AI Review Generator integrates three main sections to your opencart admin panel:

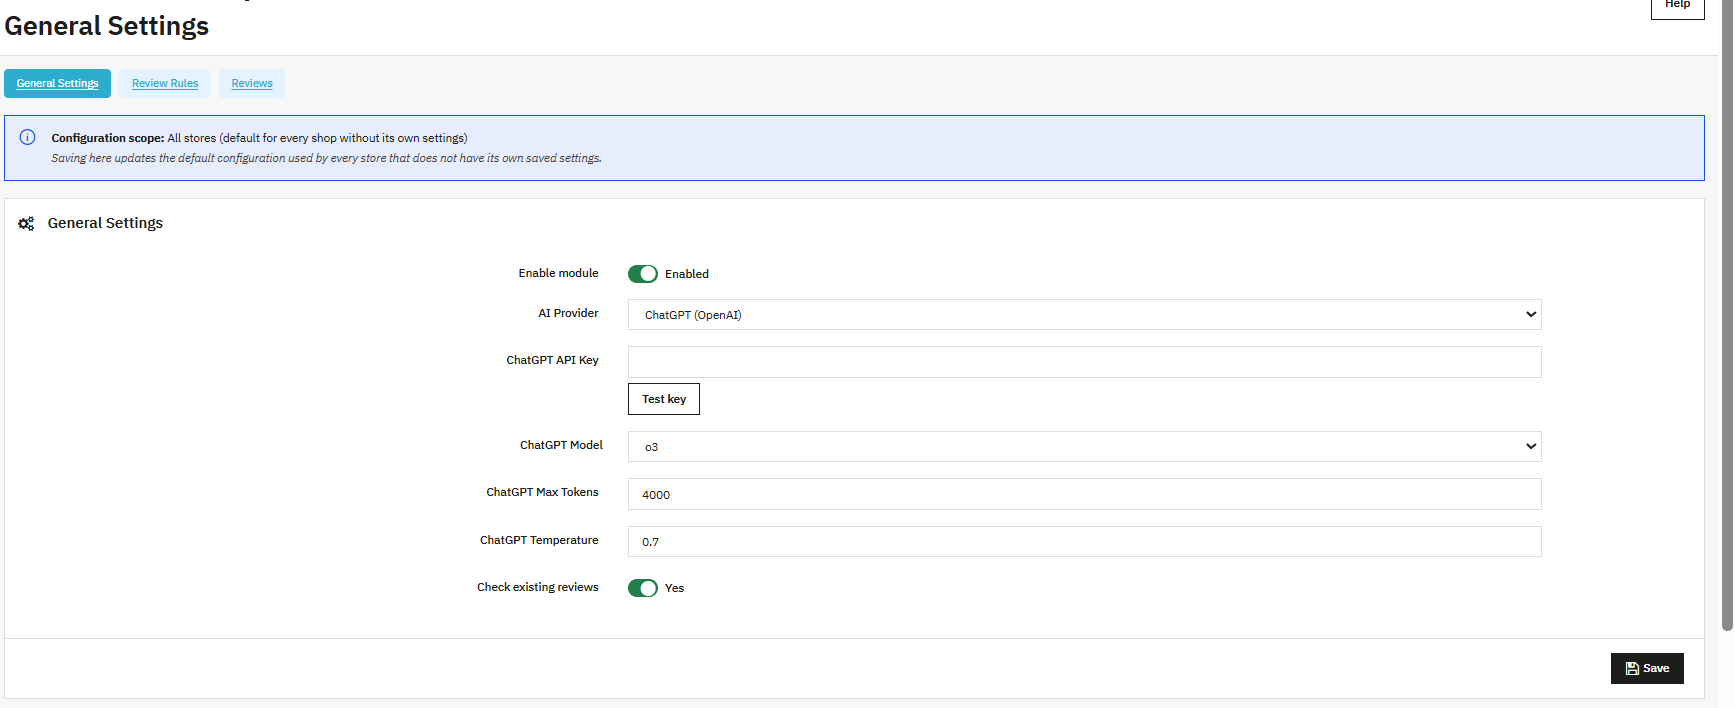
  • General Settings: Enable the extension, connect your AI provider, and copy the CRON URL for automated generation.
  • Review Rules: Create and manage rules that define how reviews are generated, which products they cover, and when they go live.
  • Reviews: View, approve, publish and manage every review generated by the extension.

4.0 General Settings

The General Settings tab holds your global configuration. Changes here affect how the entire extension operates.

4.1 Enable Extension

The main on/off switch. When enabled, the extension is active and ready to generate. When disabled, all generation stops, but every rule, review, and history entry stays saved exactly as it was.

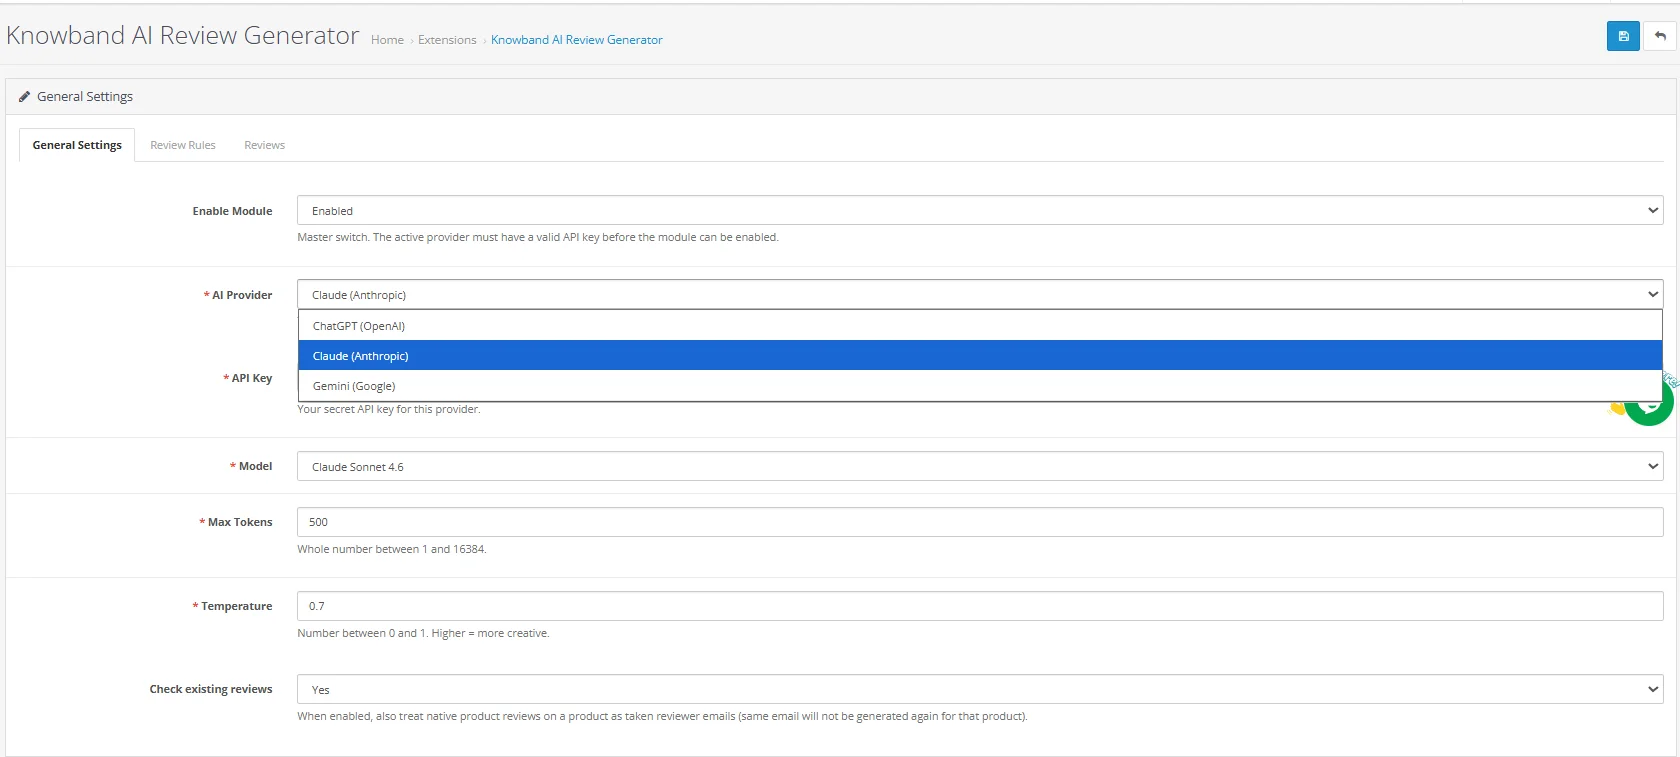
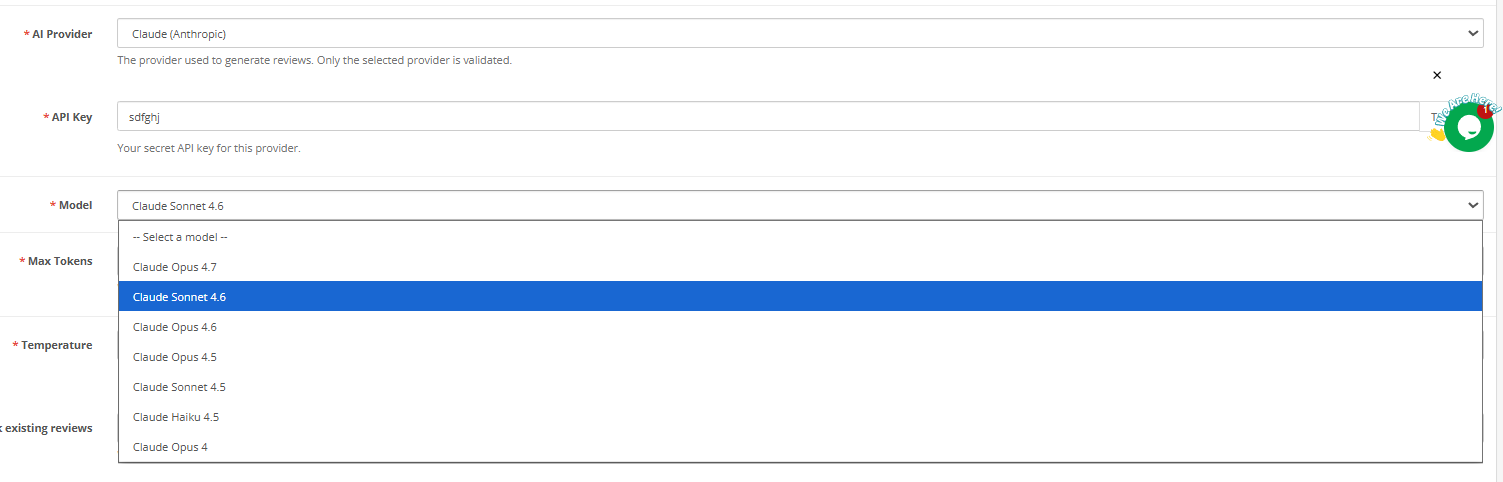
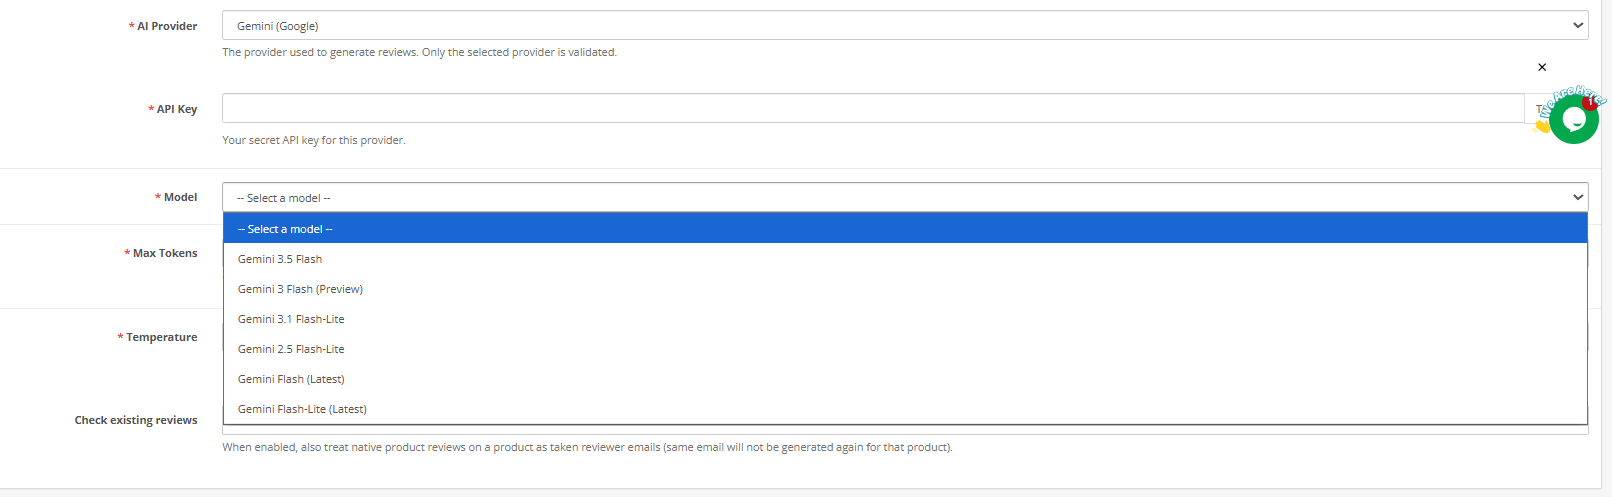
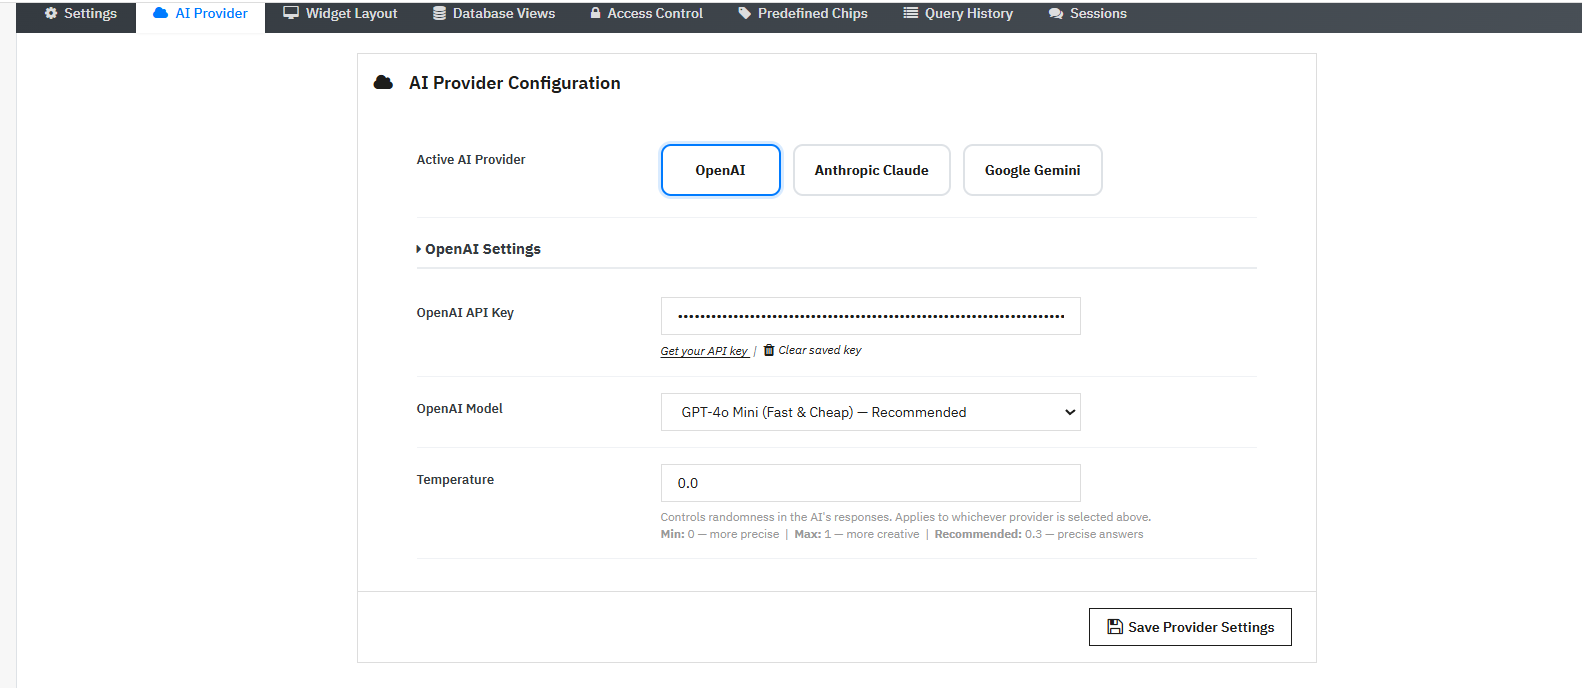
4.2 AI Provider

Choose which AI service you want to use for generating reviews:

  • ChatGPT (OpenAI)
  • Claude (Anthropic)
  • Gemini (Google)

Only one provider runs at a time. Switching providers does not affect any rules you have already created or reviews that have already been generated.

4.3 API Key

Paste your API key for the selected provider here. Without a valid key, the extension cannot connect to the AI service, and generation will not run.

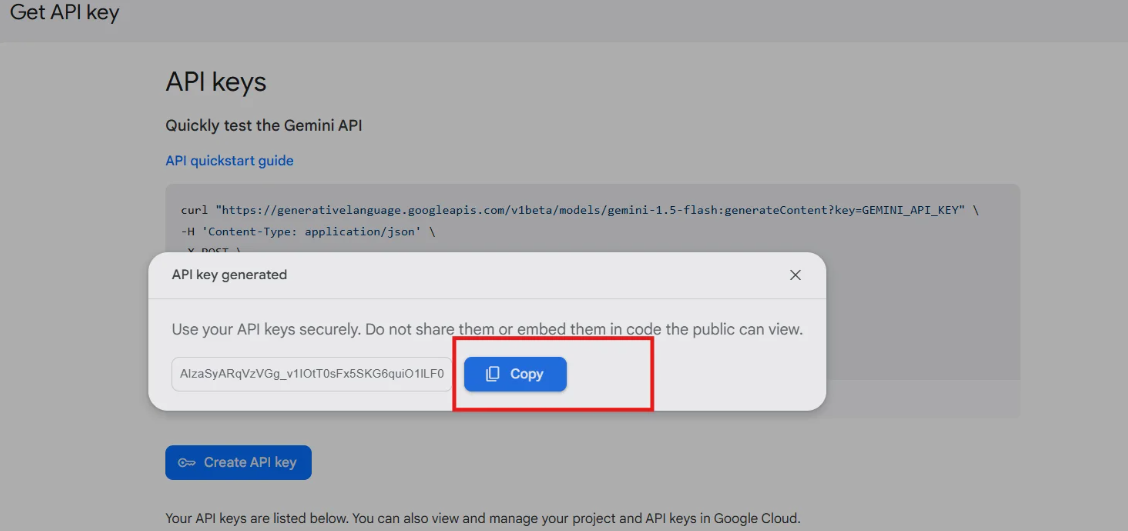
Getting your API key:

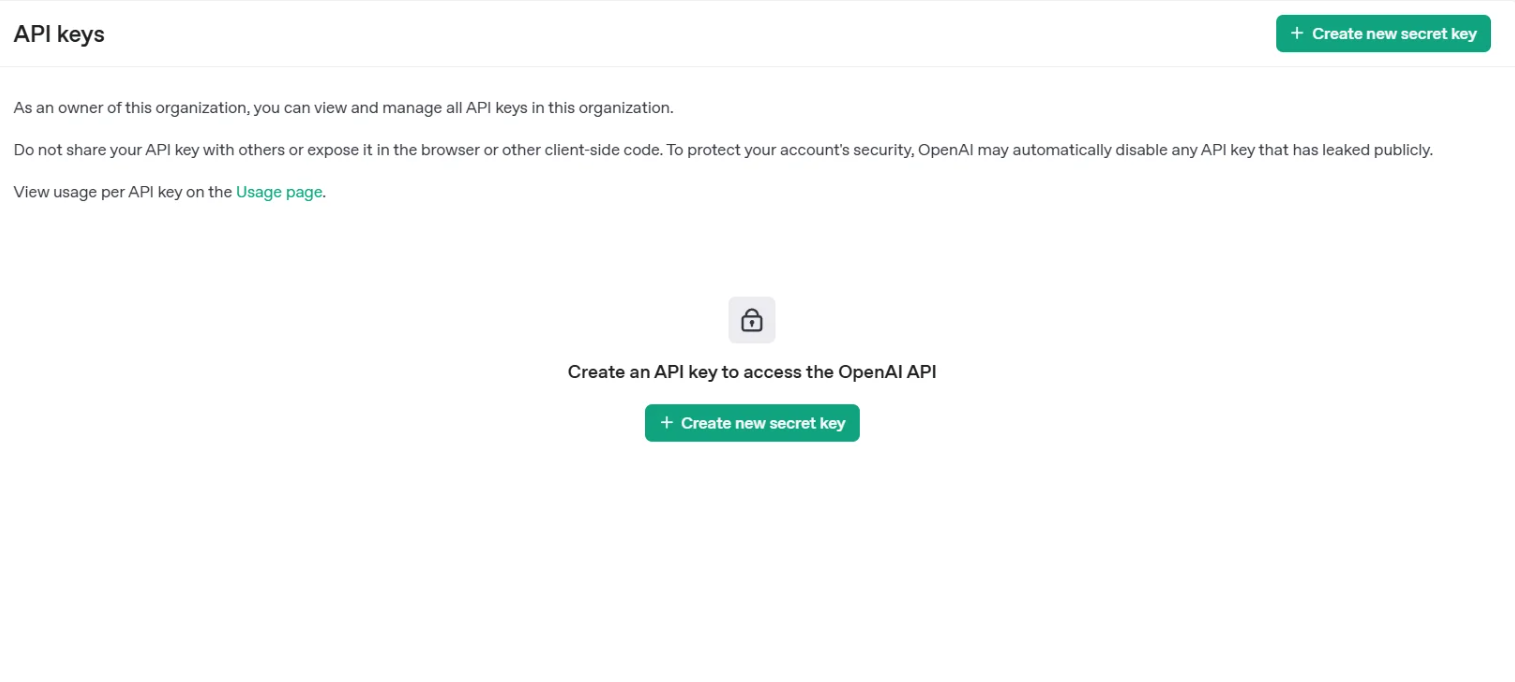
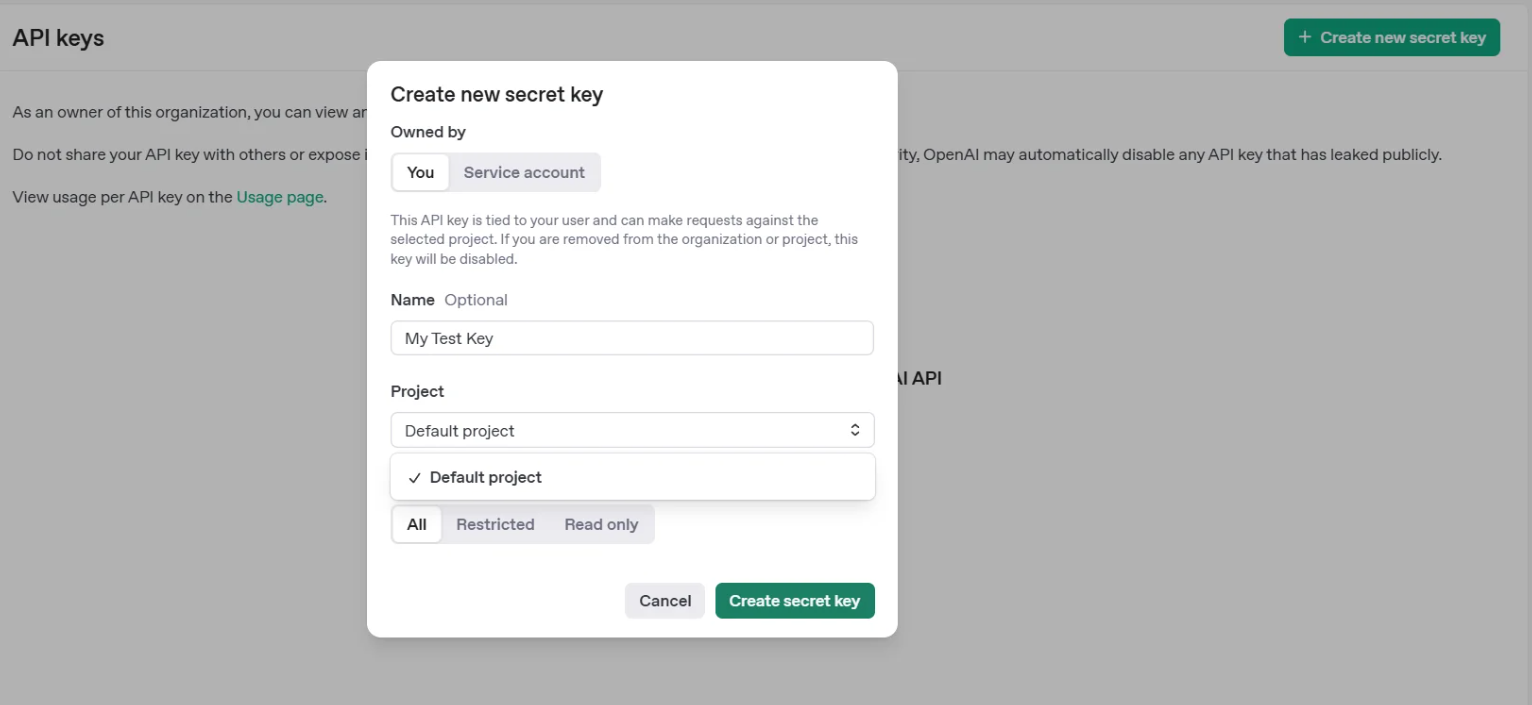
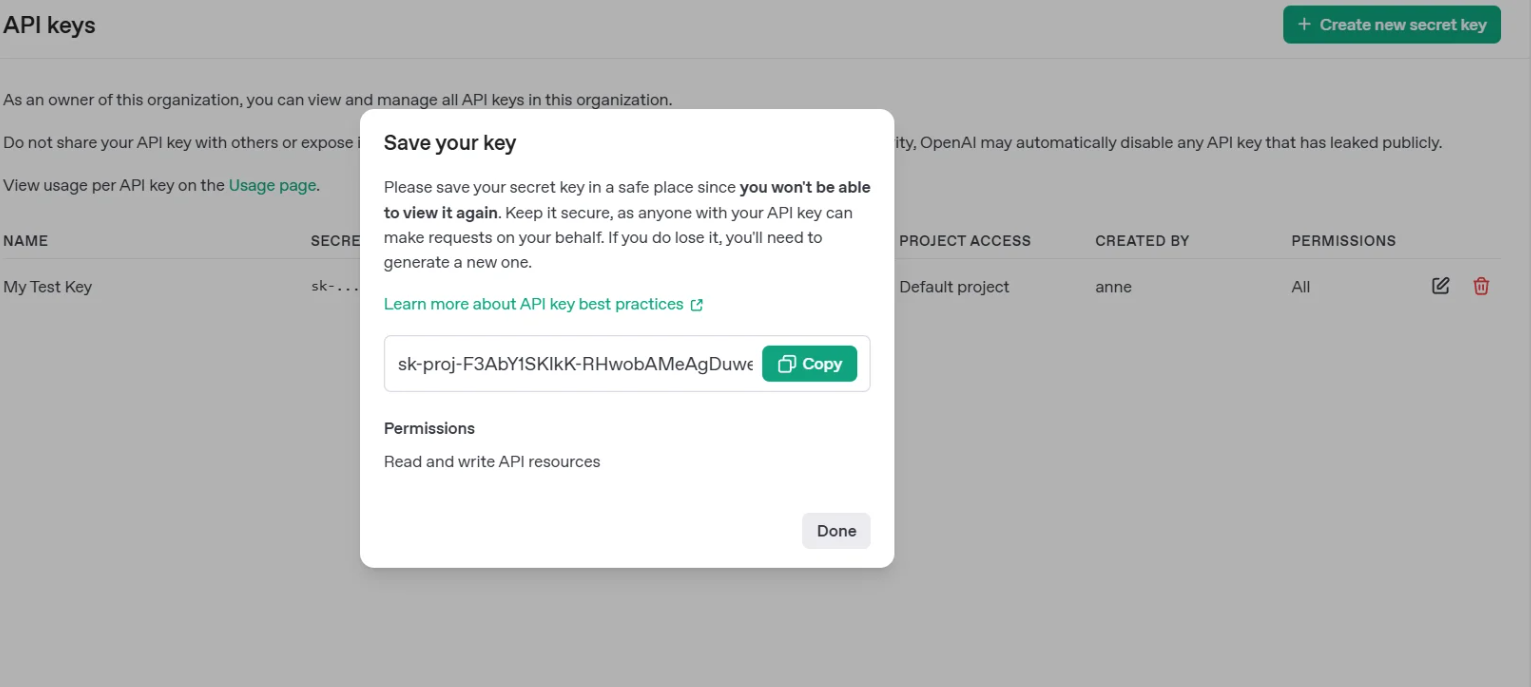
  • OpenAI: Visit platform.openai.com, go to API Keys under your account, and create a new key. Copy it immediately; it will not be shown again.
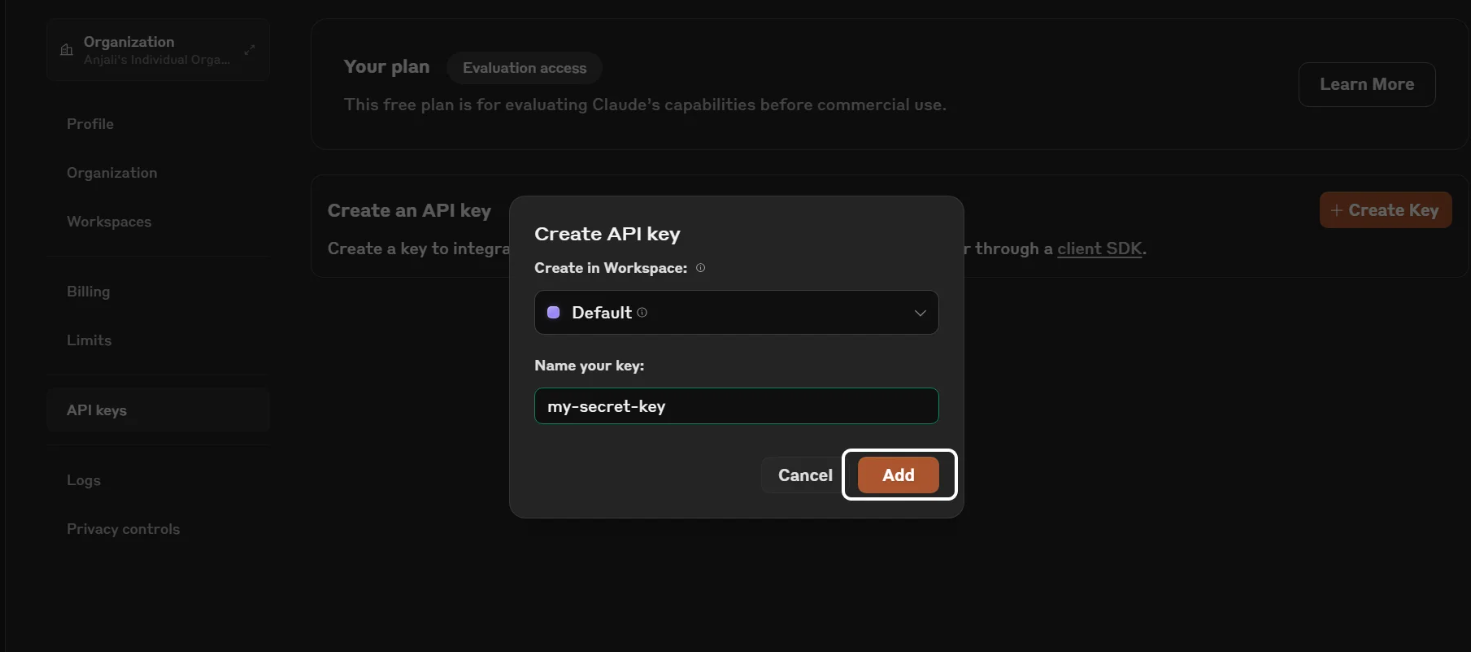
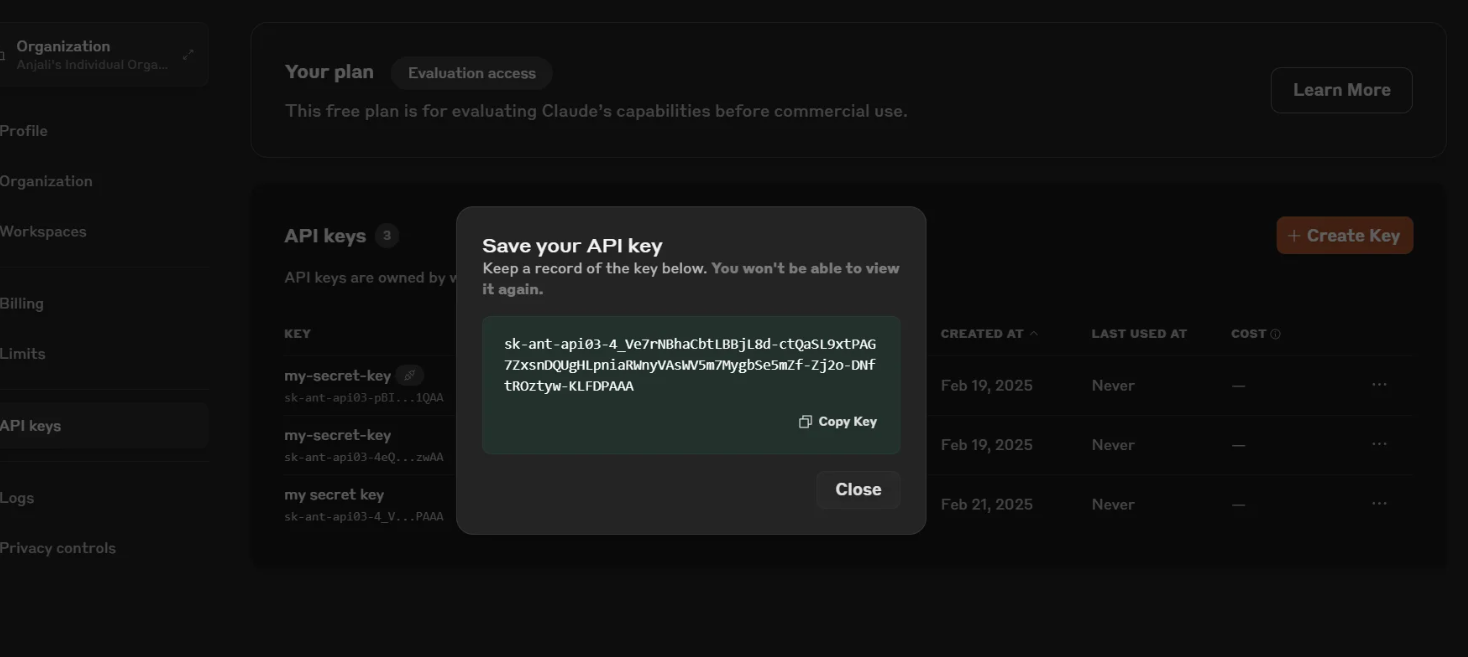
  • Anthropic: Visit console.anthropic.com, open API Keys, and generate a new one.
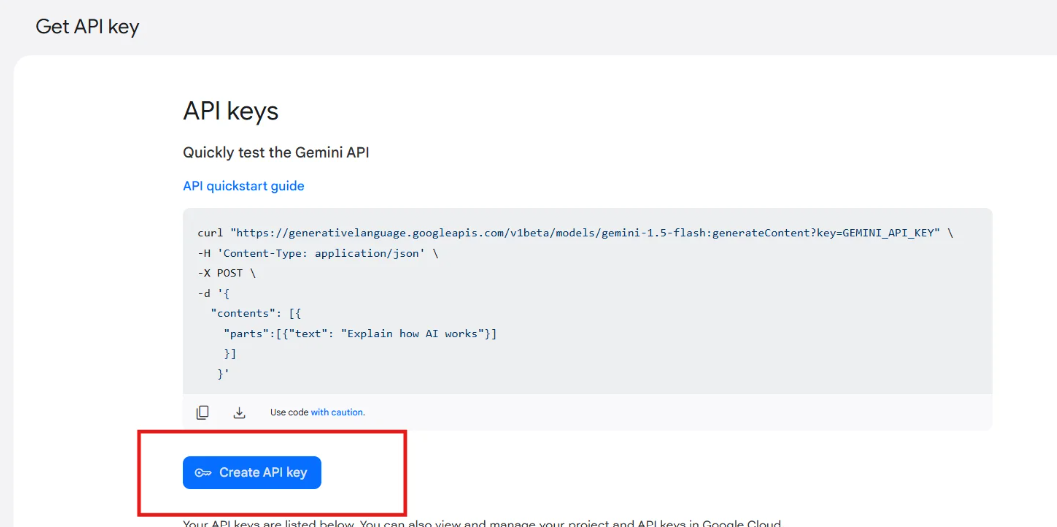
  • Google Gemini: Visit aistudio.google.com, click Get API Key, and create one under your project.

Use the Test Connection button to confirm the key is working before saving.

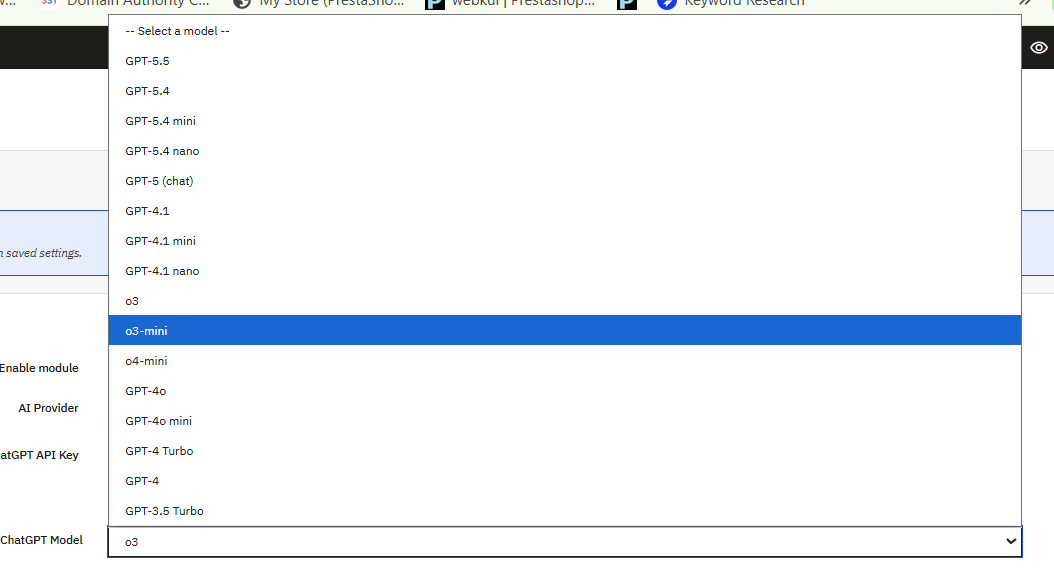
4.4 Model Selection

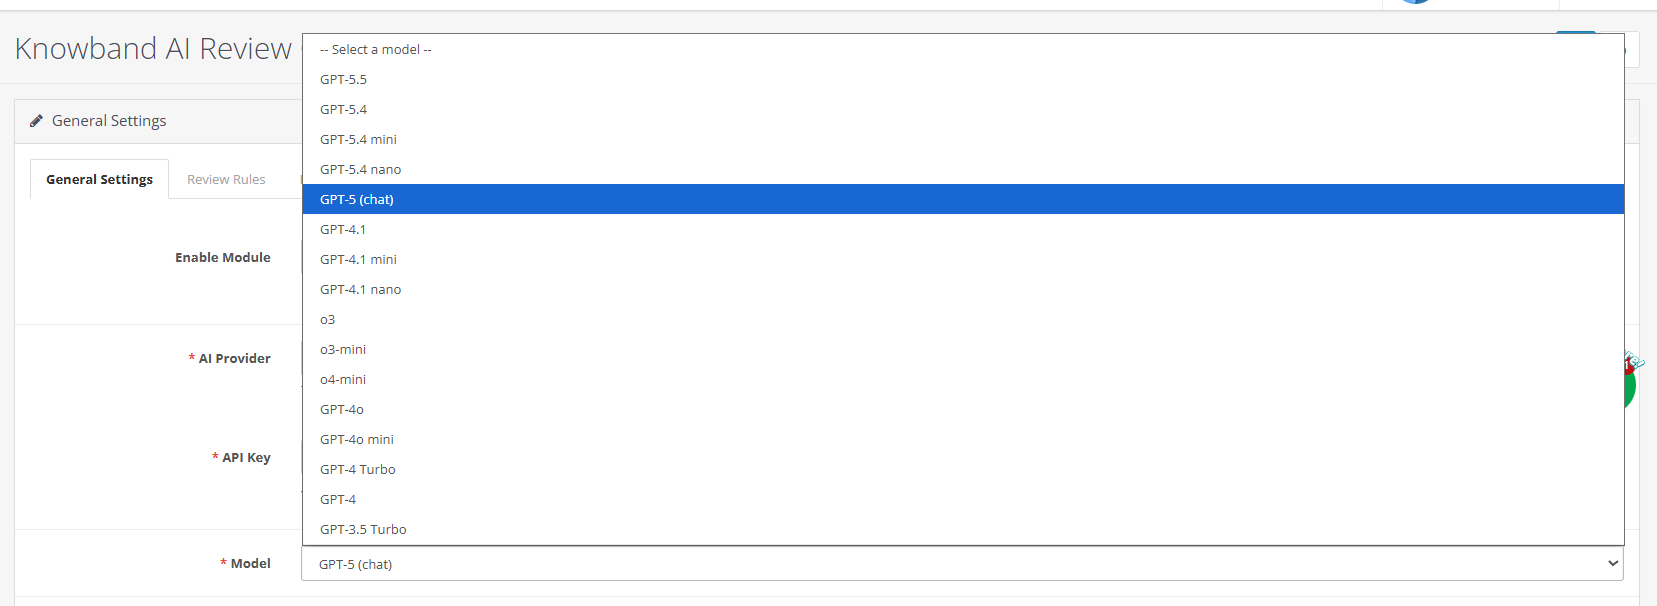
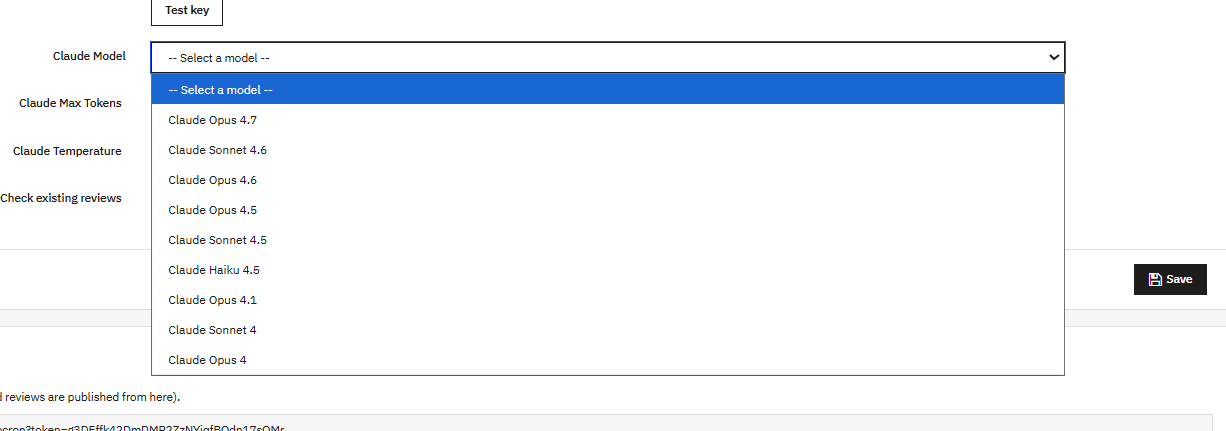
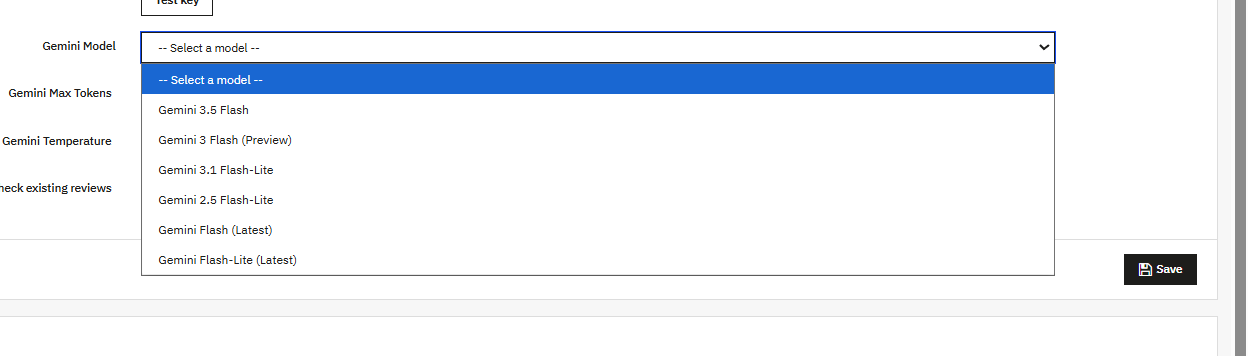
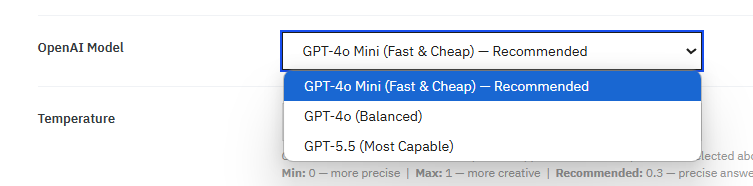
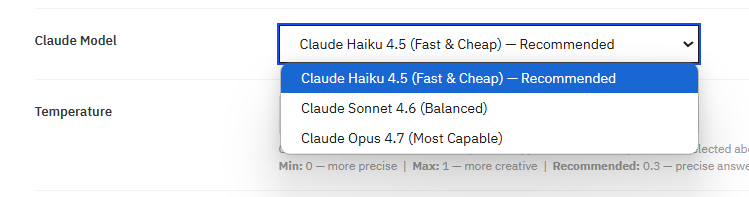
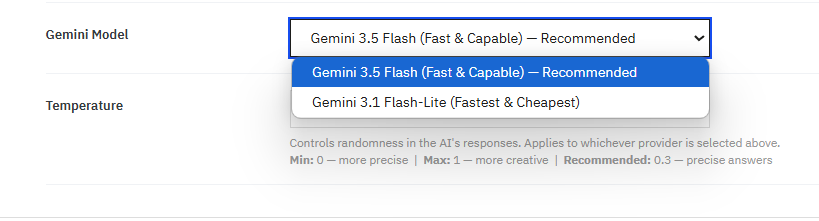
Select the specific AI model to use. Admins can see the available options depending on your requirements. These AI models include ChatGPT, Claude and Gemini models.

These AI Models in OpenCart product review generation through AI include these models:

OpenAI ChatGPT models: GPT-5.5, GPT-5.4, GPT-5.4 mini, GPT-5.4 nano, GPT-5, GPT-4.1, GPT-4.1 mini, GPT-4.1 nano, o3, o3-mini, o4-mini, GPT-4o, GPT-4o mini, GPT-4 Turbo, GPT-4, GPT-3.5 Turbo

Anthropic Claude models: Claude Opus 4.7, Claude Sonnet 4.6, Claude Opus 4.6, Claude Opus 4.5, Claude Sonnet 4.5, Claude Haiku 4.5, Claude Opus 4.1, Claude Sonnet 4, Claude Opus 4

Google Gemini models: Gemini 3.5 Flash, Gemini 3 Flash Preview, Gemini 3.1 Flash-Lite, Gemini 2.5 Flash-Lite, Gemini Flash Latest, Gemini Flash-Lite Latest

4.5 Max Tokens

Store admins can set the maximum amount of text the AI can write per review request in the OpenCart customer review generator. The range is 1 to 16,384, with a default of 4,000.

Higher values give the AI room to write longer, more detailed content but increase the API cost for each run. Additionally, it is recommended to keep lower values for reviews shorter and reduce cost. Admins can set this in line with the Max Words per Review value you configure in each rule.

4.6 Temperature

Merchants can also handle the creativity of the Opencart SEO Powered Reviews Generator by controlling the temperature values scale, which runs from 0.0 to 1.0. For ChatGPT‘s GPT 5.5, temperature is not supported in the module.

At 0.0, responses are predictable and stay close to a fixed pattern ,  good if you need every review to hold a consistent tone. Closer to 1.0, the output becomes more varied and less uniform. For reviews that read naturally, a value between 0.5 and 0.7 works well for most stores.

4.7 Check Existing Reviews

When set to Yes, the Knowband OpenCart AI-generated customer reviews check each product before running the generation. If a product already has reviews, it is skipped entirely. This prevents the same product from accumulating repeated batches and avoids wasting API tokens on products that do not need new content.

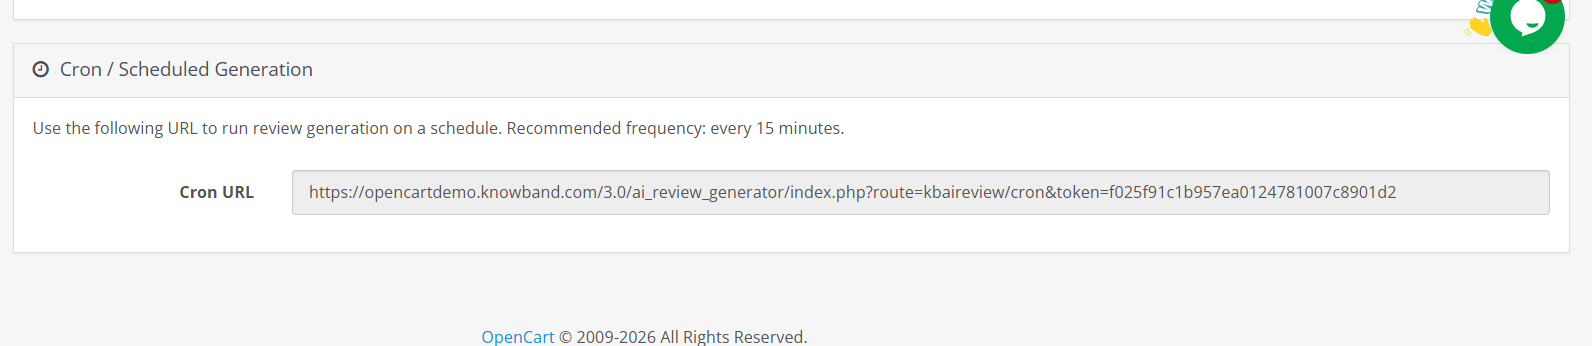
4.8 CRON URL in Opencart Product Reviews Generation

The General Settings tab provides a token-secured URL for automated review generation. Copy this URL and add it to your server as a cron job.

Running it every 15 minutes is the recommended frequency. Only requests carrying the correct token will trigger generation; the URL does nothing without it.

Click Save before leaving this tab.

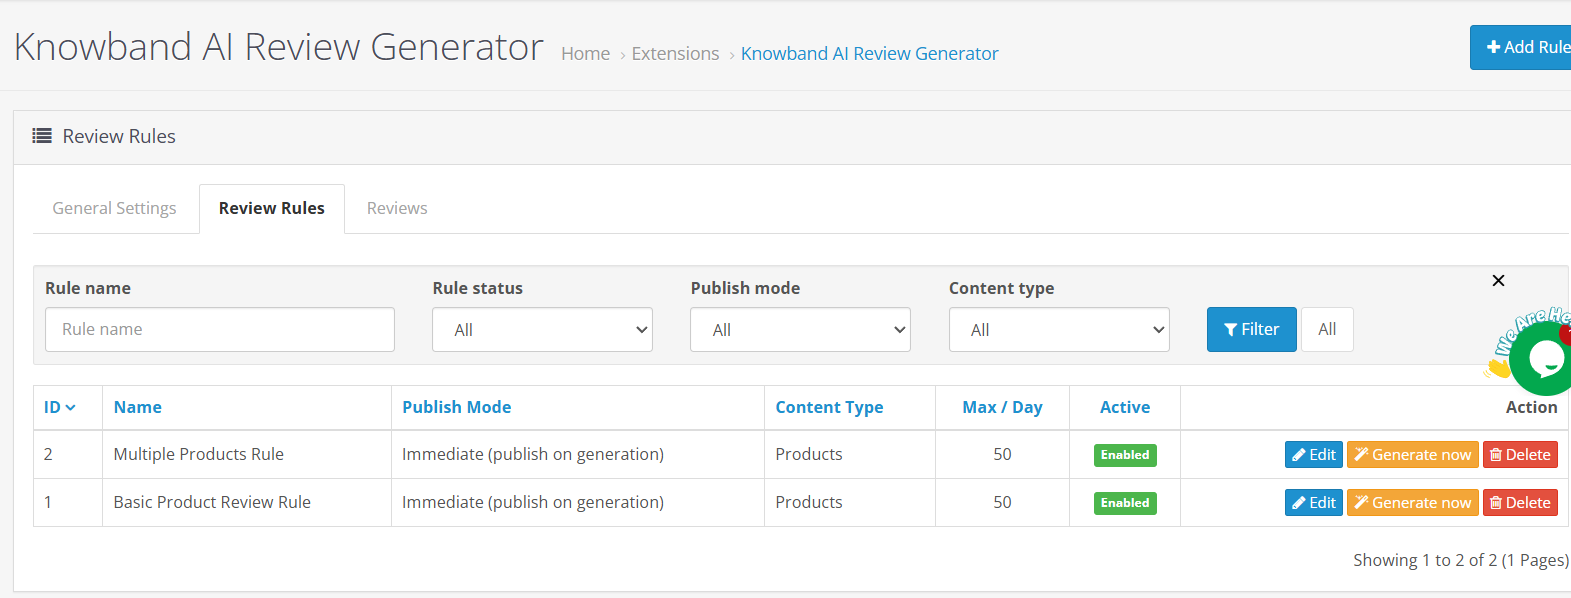
5.0 Review Rules

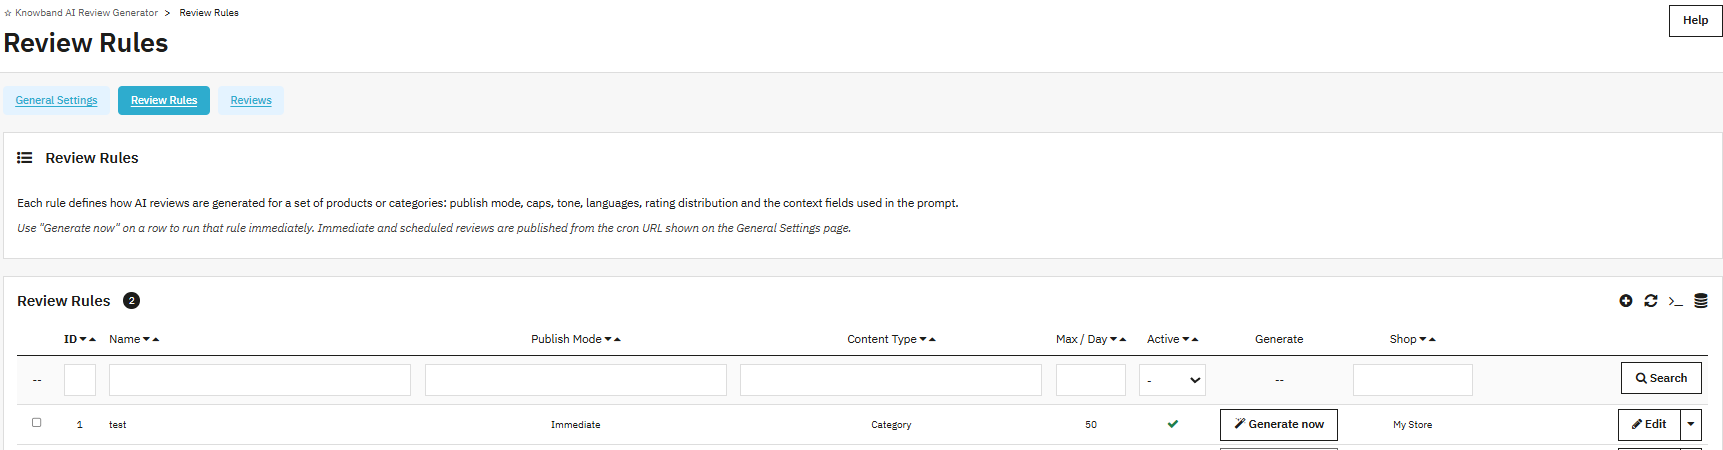
Review Rules are where you control exactly how the OpenCart automated review generation process runs. Each rule targets a specific group of products or categories and defines all the parameters, publishing timing, generation limits, tone, language, and rating breakdown.

The Review Rules list shows every rule with its ID, name, publish mode, content type, daily limit, active status, and assigned store. Hit Generate Now on any row to run that rule immediately. Click Edit to change its settings.

5.1 Adding a New Review Rule

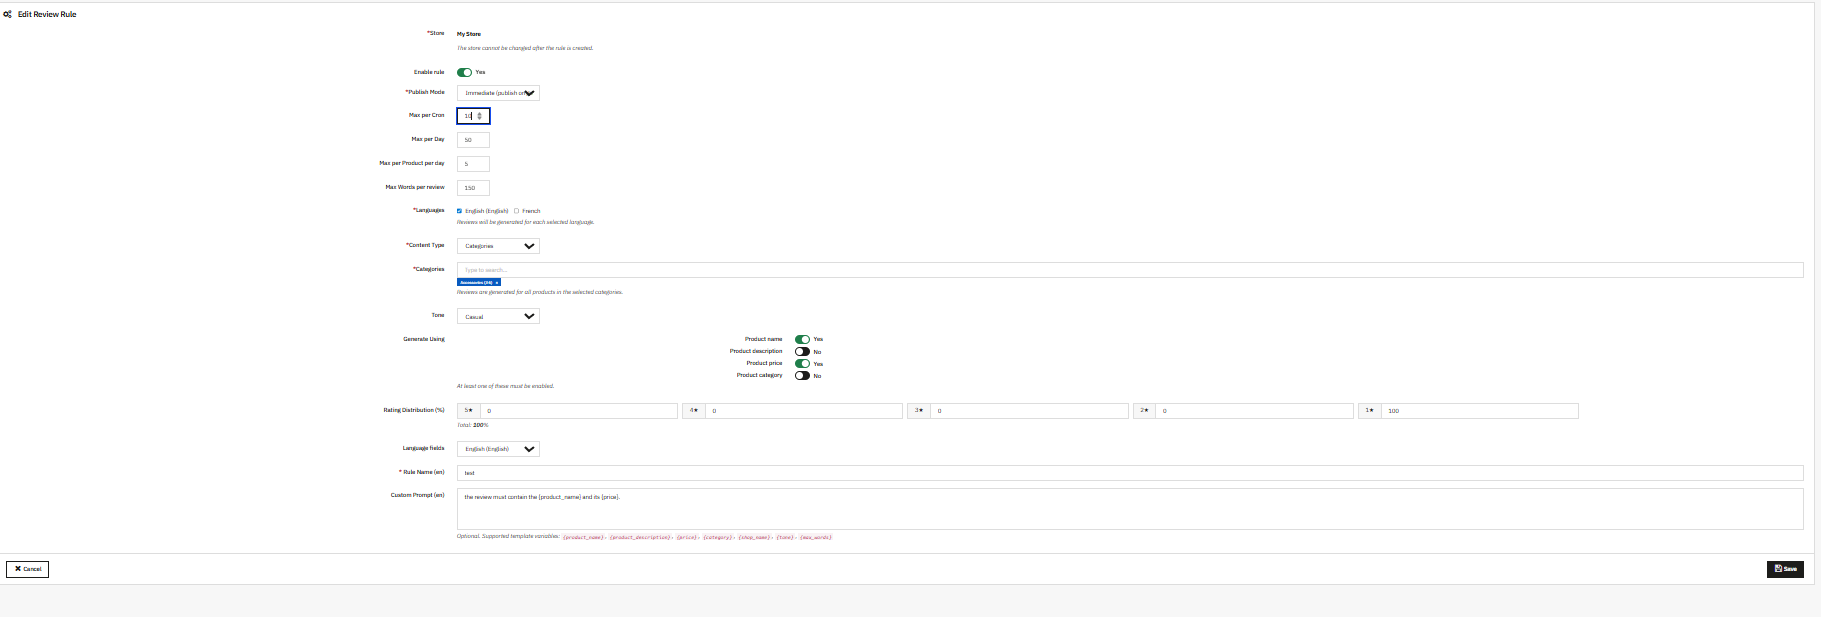
Store admins can add a rule to generate the reviews based on the configurations added in OpenCart automated product reviews.

Store: Select which store this rule applies to if you run a multi-store setup in Opencart

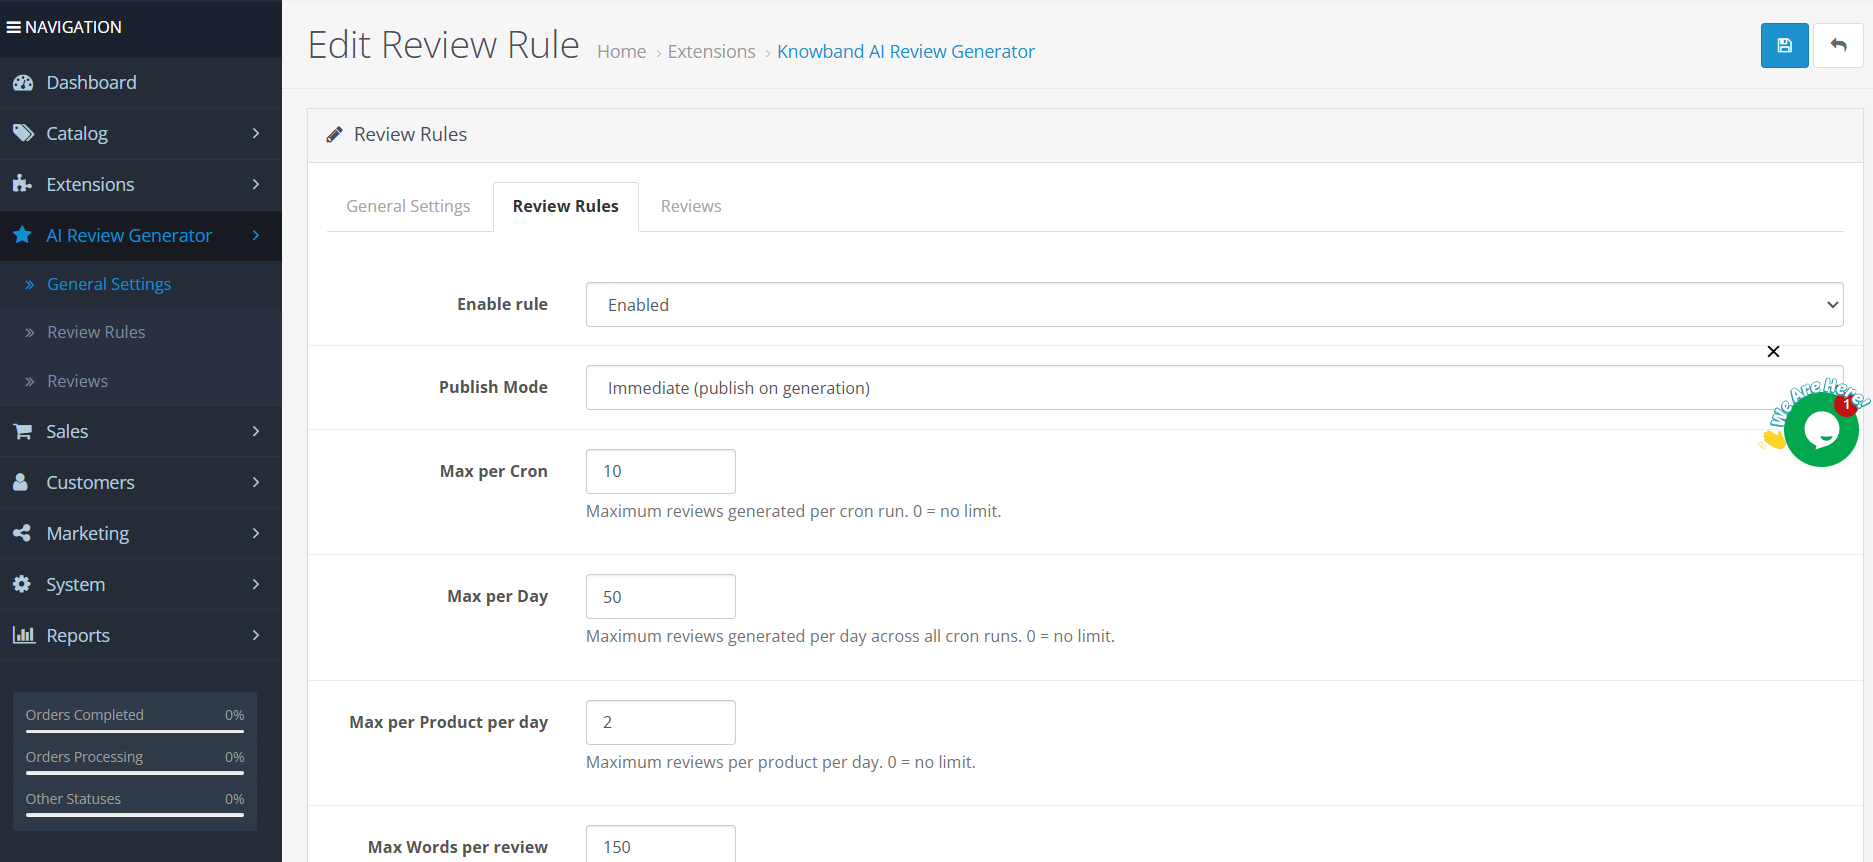
Enable Rule: Toggle on to make the rule active. Inactive rules are saved but will not run on CRON or when Generate Now is clicked.

Publish Mode:

  • Immediate– Reviews are published the moment they are generated. No delay, no approval step.
  • Scheduled– Reviews are generated and scheduled, then published at a random point within a day range you define. Store admins can add configuration in a range of 0 to 7 days, for example, releases each review at a random point across that window. This makes the accumulation pattern look natural rather than sudden.
  • Manual– Reviews are generated and held in the Reviews tab in the Opencart AI Review Generated Plugin. Nothing goes live until an admin opens each entry and approves it. Best when you want full control over what appears on the storefront.

Random Delay (days): Appears when Scheduled mode is selected. Set a minimum and maximum day range. Each generated review is published at a random point within that window.

Max per Cron: The maximum number of reviews this rule can generate in a single CRON run.

Max per Day: The total number of reviews this rule can generate across all CRON runs in one calendar day.

Max per Product per Day: Handles how many reviews a single product can receive from this rule in one day using Knowband eCommerce Review Generations. This keeps any one product from picking up an unnatural volume in a short period.

Max Words per Review: The word limit for each generated review body. Use 150 for standard reviews. Drop to 50 or below for short-form content. Raise it for long, detailed reviews.

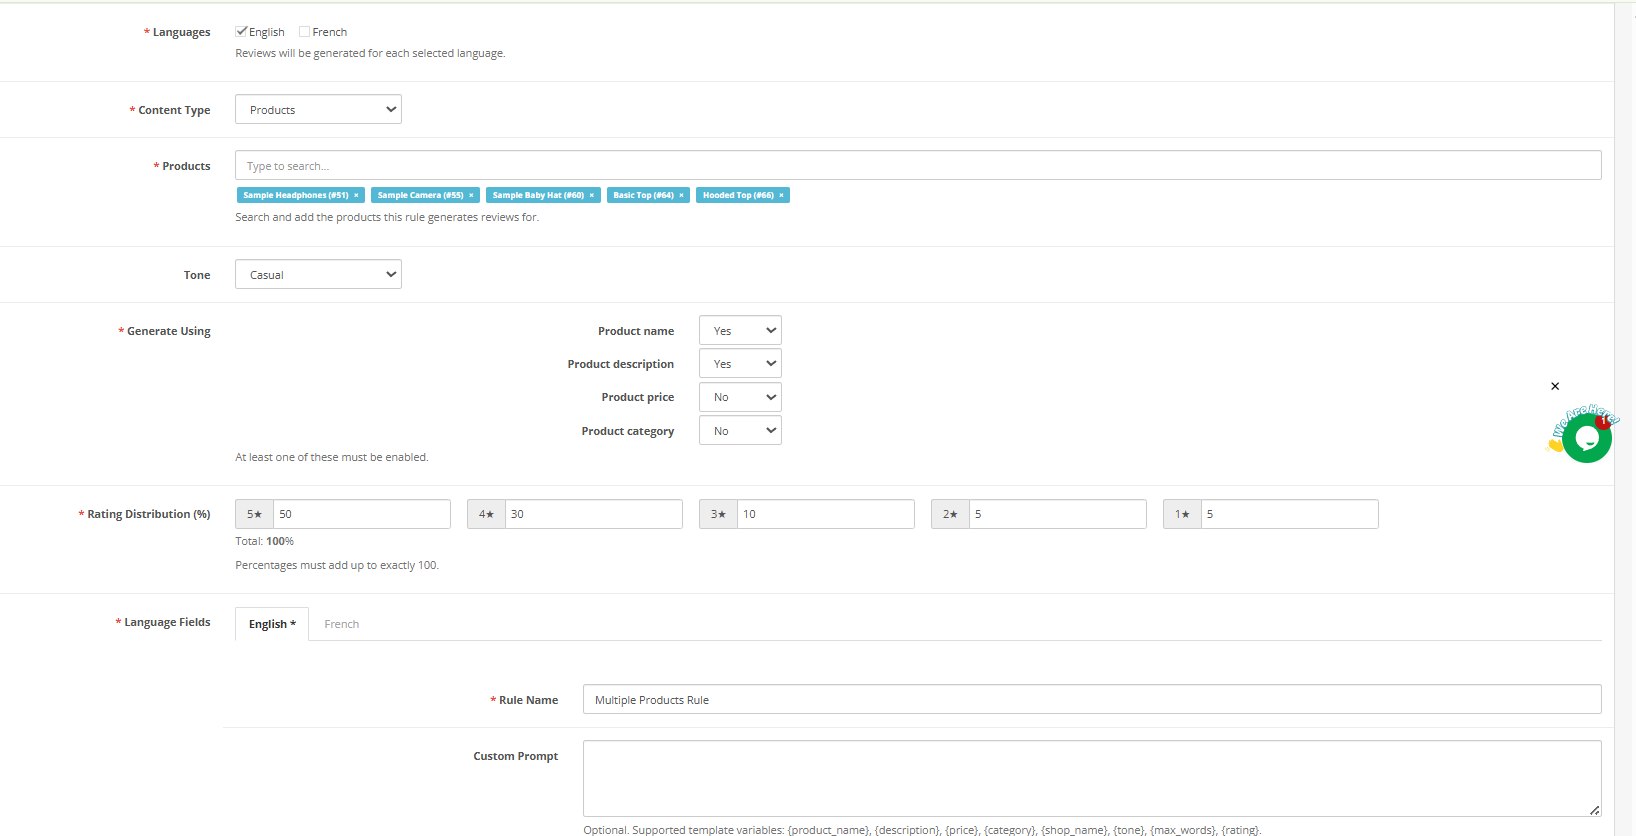
Languages: Tick each language you want reviews generated in. Selecting both English and French means every review is generated in both. Only languages installed in your OpenCart store appear in this list.

Content Type: Choose whether the rule targets specific Products or entire Categories. Selecting Products lets you search and add individual items. Selecting Categories applies the rule to every product within that category.

Tone: Set the voice for generated reviews.

  • Professional
  • Casual
  • Technical
  • Persuasive

Generate using: Toggle which product data points the AI uses when writing each review. At least one must be active.

  • Product name
  • Product description
  • Product price
  • Product category

Enabling the description gives the AI more context for specific, accurate content. Enabling price means reviews may reference value for money. Disabling a data point means the AI will not factor it in.

Rating Distribution (%): Store admins can set the percentage split across 1 to 5 star ratings. The total must equal exactly 100. For example: 5 stars at 50%, 4 stars at 30%, 3 stars at 10%, 2 stars at 5%, 1 star at 5%. The extension follows this distribution when assigning ratings to each generated review, so the overall profile on a product page looks realistic rather than uniformly perfect.

Rule Name: A required field. Give each rule a name that makes its purpose clear ,  for example, Winter Range English or Homepage Categories Casual.

Custom Prompt: An optional field in given in the rule review configurations that replaces the default generation instruction for this rule. Write a plain instruction and use the supported variables to pull product data into the prompt.

Supported variables are: {product_name}, {product_description}, {price}, {category}, {shop_name}, {tone}, {max_words}

Click Save to create the rule. It will appear in the Review Rules list straight away.

5.2 Editing and Deleting Rules

Click Edit on any rule row to reopen the form and change any setting. Use the dropdown arrow beside Edit and select Delete to remove a rule permanently. Deleting a rule does not remove reviews that were already generated under it in the reviews tab in the OpenCart review creation Plugin.

5.3 Bulk Actions

The Bulk Actions dropdown at the bottom of the rules list lets you apply actions to multiple selected rules at once.

6.0 Reviews Tab

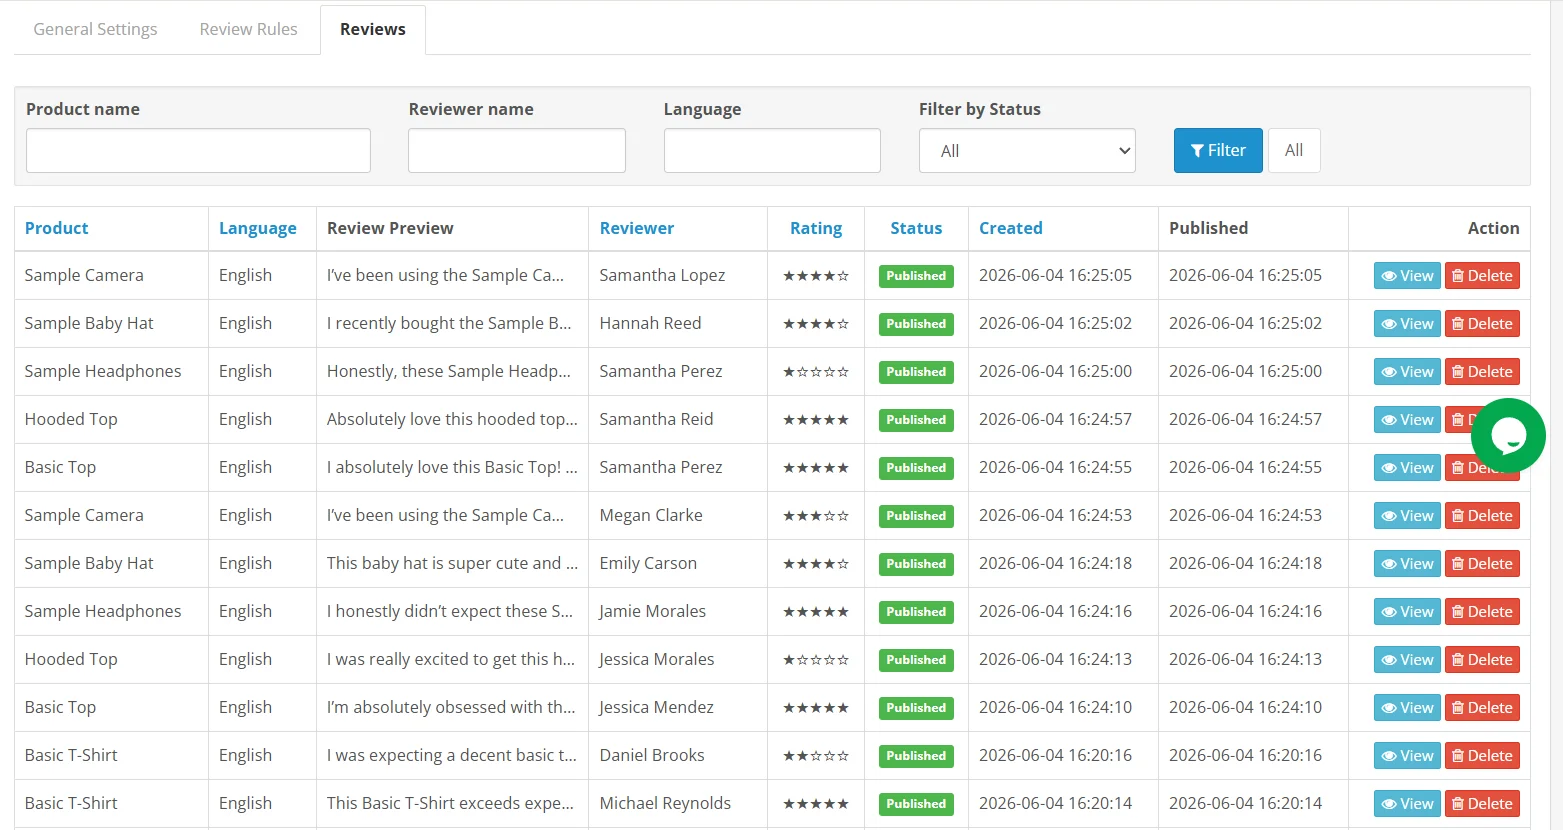
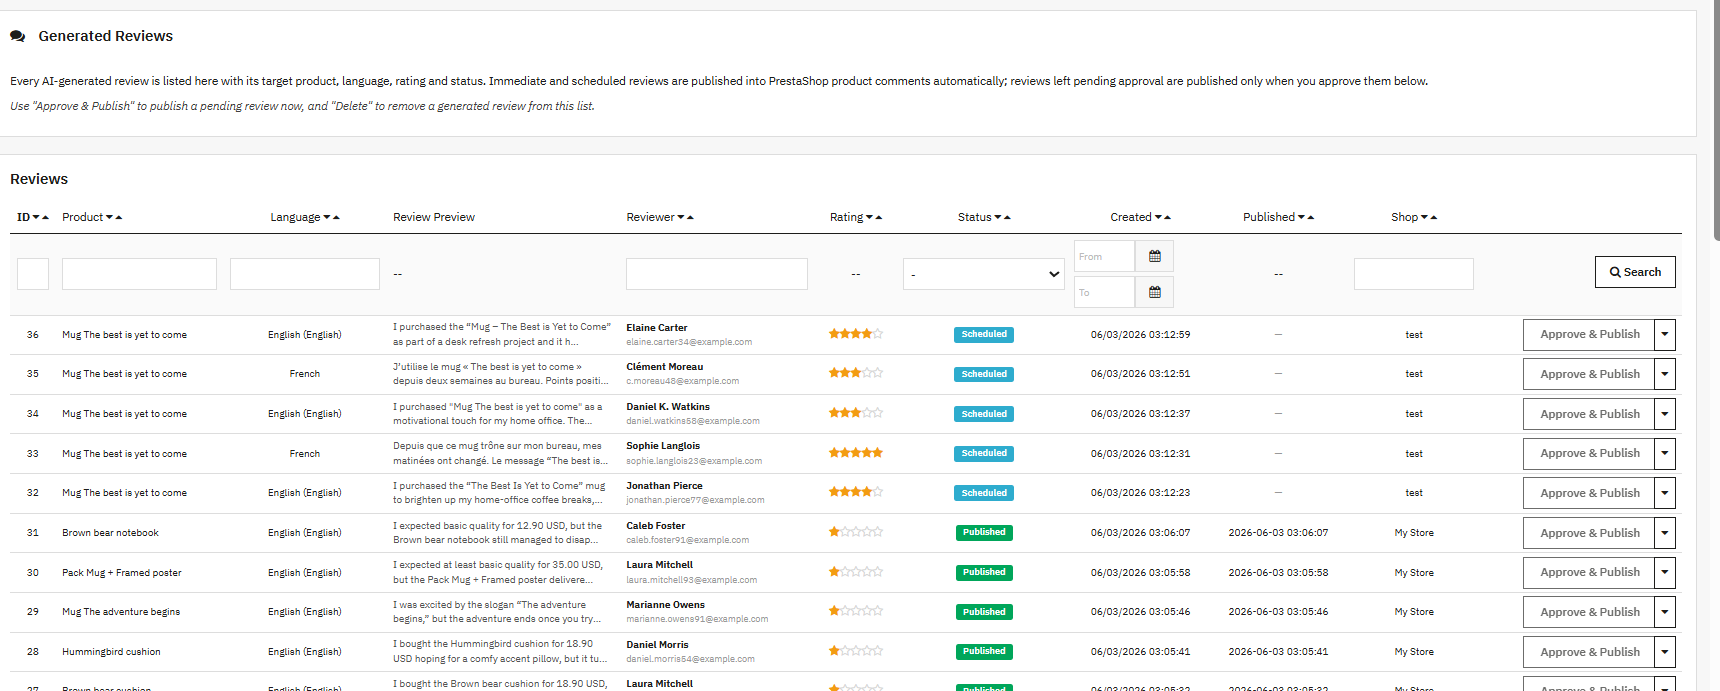
The Reviews tab shows every review the extension has generated. This is where you manage, approve, or remove reviews before or after they reach the product page.

6.1 Reviews List in  Knowband OpenCart AI Review Generator Plugin


Each entry in reviews tab shows:

  • ID: Sequential review number
  • Product: Which product was the review generated for
  • Language: Which language was it written in
  • Preview: A shortened version of the review body
  • Reviewer: The generated name and email address for the guest profile
  • Rating: The star rating assigned based on the rule’s distribution settings
  • Status: Scheduled, Published, or Pending Approval
  • Created: When the review was generated
  • Published: When it went live on the storefront
  • Store: Which store the review belongs to

Use the filter controls above the list to sort by product, language, reviewer, rating, status, date range, or store.

6.2 Approving and Publishing Reviews

For rules set to Manual publish mode, reviews arrive in this tab with a Pending Approval status. Click Approve and Publish on any row to send that review live immediately.

Click the drop-down arrow beside Approve and Publish to access the View option. This opens the full review text so you can read it before making a decision.

6.3 Deleting Reviews

Click the drop-down arrow beside Approve and Publish and select Delete to remove a review permanently. Deleted reviews cannot be recovered.

7.0 Steps to Generate the API Key for Prestashop AI Content Generator and Translator Module Configurations?

For Claude API: 

  1. Visit Anthropic’s website, and click “Start Building”.
  2. Create an account, access your Dashboard, generate an API key, and save it securely.

For Gemini API:

  1. To access the API,  visit the Google AI Studio website.
  2.  Click “Get API key,” accept the terms of service, create your key, and paste it into the module’s configuration settings.

For ChatGPT API: 

  1. Obtain an OpenAI API key and configure it within the module settings.
  2. Click on your profile (top-right) → “View API keys” → “Create a new secret key”.
  3. Copy the key immediately and store it safely. 

7.0 Frequently Asked Questions

What does the OpenCart AI Review Generator extension do?

The OpenCart AI Review Generator connects to ChatGPT, Claude, or Gemini and generates product-specific reviews based on rules you set in the admin panel. Each review is written for the specific product in the tone and language the rule specifies, then published through OpenCart’s native review system.

Which AI providers are supported?

The extension supports three providers: OpenAI (ChatGPT), Anthropic (Claude), and Google (Gemini). You connect using your own API key. Only one provider is active at a time. You can switch providers from General Settings without affecting existing rules or reviews.

What are the three publish modes in review generation?

Immediate publishes a review the moment it is generated. Scheduled holds it and releases it at a random point within a day range you configure, which creates a natural-looking pattern over time. Manual holds it in the Reviews tab until an admin approves it.

How does the rating distribution work in the OpenCart product review extension?

Inside any review rule, assign a percentage to each star level from 1 through 5. The numbers must total exactly 100. The extension follows this split when assigning ratings, so the profile across a product page does not look artificially uniform.

How does the CRON automation work in the OpenCart AI Review Generator Plugin?

Copy the token-secured CRON URL from General Settings and add it to your server cron job. Running it every 15 minutes is recommended. The URL only triggers generation when the correct token is present.

Does the OpenCart AI review extension support multiple languages?

Yes. Inside each rule, select the languages you want reviews generated in. Every review is produced in each selected language. Only languages installed in your OpenCart store appear in the list.

What is the custom prompt field for?

OpenCart AI-generated reviews replace the default generation instruction for that specific rule. Use it when you need reviews to follow a particular format or focus on a specific product attribute. Drop in the supported variables to pull in product data dynamically.

What does Max Tokens control?

It caps how much text the AI generates per review request. Higher values allow longer content but cost more per run. Lower values reduce both length and cost. Keep it consistent with the Max Words per Review setting in your rules.

Can I stop duplicate reviews in OpenCart automated product reviews from being generated?

Yes. Turn on Check Existing Reviews in General Settings. The extension will check each product before generating and skip any that already have reviews.

What versions of OpenCart do OpenCart AI-generated reviews support?

The OpenCart review automation runs on OpenCart 3.x. Make sure the native review system is active before running generation.

8.0 Conclusion

The Knowband OpenCart AI Review Generator puts automated review generation inside your admin panel. Set up a rule, connect an API key, and the extension takes care of generation, scheduling, and publishing from there.

Rating distribution keeps the review mix looking genuine. Multilingual generation covers every market your store serves. Manual approval gives you full editorial control when you need it. Once the rules are live, the CRON automation runs everything on schedule without daily input. The Opencart Automated AI Review Generator is also available on OpenCart Marketplace.

For support, custom development, or OpenCart extension requirements, contact the Knowband team directly.


OpenCart Form Studio: All-in-One Feedback, Contact, and Survey Form Builder User Guide

1.0 Introduction

Collecting customer data without a reliable solution results in missed feedback, unanswered enquiries, and lead-generation opportunities that go nowhere. Whether you need a basic contact form, a product feedback form, or a post-purchase customer satisfaction survey, the OpenCart Form Builder extension handles it all from one place.

This OpenCart Form Builder extension lets store owners create unlimited forms without writing a single line of code. Contact forms, survey forms, registration forms, lead generation forms, every data collection need an eCommerce store has is covered. This OpenCart contact form plugin works equally well for both small and huge businesses.

Form creation, spam protection via Cloudflare Turnstile, email notifications to admins and customers, Mailchimp and Brevo integration, form submission management, and IP and email blacklisting. The Knowband OpenCart Survey Extension covers the full workflow, use it as your OpenCart contact form plugin, survey tool, or lead capture form, all from one extension, without needing separate solutions for each job.

2.0 Installation Guide

System Requirements

Before installing the extension, confirm your environment meets the following:

  • OpenCart version 3.x
  • A working email configuration in your OpenCart admin panel

Installing the Extension

Step 1: Download the ZIP file and log in to your OpenCart admin panel.

Step 2: Go to Extensions, then Installer. Click the Upload button, select the ZIP file, and confirm. OpenCart processes the upload automatically.

Step 3: Once the upload completes, go to Extensions. Select the extension category from the dropdown. Find OpenCart Form Studio in the list and click Install.

Step 4: After installation, click Edit to open the extension configuration panel.

Step 5: If the extension does not appear in the list, clear your OpenCart cache under Dashboard, then click the blue cog icon and select Refresh.

Common Installation Issues

Upload fails: The server is rejecting the file size. Ask your host to raise upload_max_filesize and post_max_size to at least 32 MB.

Emails not going out: Head to System, then Settings, then the Mail tab. The extension pulls from the store’s default mail setup unless you have set a form-level override.

The page looks broken: Run a browser cache clear and reset the OpenCart theme cache from the Dashboard refresh panel.

3.0 Admin Panel Overview

After installation, the extension adds four sections to the admin:

  • General Settings: Turn the extension on or off, set global mail templates, configure Cloudflare Turnstile, and handle the IP and email blocklist.
  • Forms: Build, update, and organise all forms. Each one has its own tab structure.
  • Form Submissions: One view for every submission across every form.
  • IP and Email Blacklist: Block addresses from reaching your forms entirely.

4.0 General Settings

The General Settings section has three sub-tabs: Global Settings, Email Templates, and Cloudflare Turnstile.

4.1 Global Settings

Module Enable/Disable: The main toggle for the OpenCart Survey Plugin. Set to Enabled to make all active forms live on the front end. Switching to Disabled hides every form from visitors without touching any saved data or configuration.

4.2 Email Templates

Enable Mail Template: Turns the global HTML email template system on or off. When enabled, all outgoing emails, admin notifications, auto-responder, and manual replies use the HTML wrapper templates defined in this section. Disable this to send plain-text emails with no styling. The {message_content} tag in the template is replaced with the per-form email body at send time.

Admin Mail Content: The notification your team gets on each submission. Write the subject and body in the rich text editor and click variable tags from the Template Variables panel to pull in field values from the submission automatically.

Auto Responder Content: Goes straight to the customer after they submit. Use it to confirm receipt, give them a timeframe, or point them to the next step.

Reply Email: Defines the layout for manual replies your team sends from the Form Submissions panel.


All three email templates support rich text formatting, including bold, italic, links, lists, and HTML, so the emails can match your store branding without any custom development.

4.3 Cloudflare Turnstile Spam Protection

Any public-facing form attracts bot submissions. This Cloudflare Turnstile OpenCart integration blocks automated submissions without showing customers any visual puzzle or CAPTCHA challenge. Real visitors go through without any extra friction.

Switch the Enable Cloudflare Turnstile dropdown to Enabled, then paste the Site Key and Secret Key from your Cloudflare account into the fields provided. The Widget Theme can be set to Auto, Light, or Dark to match your store.

Steps to get your Cloudflare Site Key and Secret Key:

  1. Sign in to your Cloudflare account at dash.cloudflare.com.
  2. From the left menu, go to Protect and Connect, then Application Security, then Turnstile.
  3. Click Add Widget and fill in your domain details.
  4. Select a widget mode and finish creating the widget.
  5. Copy the Site Key and Secret Key that appear on the confirmation screen.
  6. Paste both into the Cloudflare Turnstile fields in the extension and save.

Once configured globally, the Cloudflare Turnstile field can also be added directly inside individual forms by dragging it into the form layout from the field selector.

5.0 Creating and Managing Forms

5.1 Forms List

The Forms section shows every form created using the OpenCart Form Builder. Each row in the list displays the form ID, title, short code, form URL, view count, message count, active status, and action buttons for viewing, editing, or deleting the form.

The short code column shows the embed code for each form in the format [kbcf-form id=1]. Paste this shortcode into any CMS page or content area in your OpenCart store to embed the form directly at that location without using the Placements tab.

Click Add New to create a form. Each form opens with eight configuration tabs: Info, Form, Mail, Notifications, Thank You Page, Settings, Placements, and Synchronization.

5.2 Info Tab: Form Identity and SEO Settings

Enable Separate Form Page: When set to Yes, the OpenCart Form Creator generates a standalone page for this form with its own URL based on the slug you enter.

Form Title: The name displayed to customers above the form on the front end. Supports English and French language inputs.

Form Slug: The URL path for the standalone form page. For example, entering contact-us produces the URL yourstore.com/contact-us. Supports multiple languages.

Meta Title: The SEO title for the standalone form page. Supports multiple languages.

Meta Keywords: Meta keywords for the form page to support internal content categorisation. Supports multiple languages.

Meta Description: The search engine description for the standalone form page. Keep it under 160 characters.

5.3 Form Tab: Building the Form Layout

The Form tab starts empty with a prompt to add a row. Click Add Row to open the layout selector.

You can select any layout out of the 9 options available.

After adding a row, click Add Input Field inside any column to open the field selector.

Available field types:

  • Text: short written responses
  • Textarea: long written responses
  • Email: with format validation
  • Password: masked input field
  • Phone: phone number input with validation
  • URL: web address input with format validation
  • Number: numeric input with validation
  • Date: date selection with format validation
  • File: customer attachment uploads in formats you specify
  • Dropdown selections: single-select multiple choice
  • Checkboxes: multiple-choice
  • Radio buttons: single-select with visible options
  • HTML: embed custom markup or section headers inside the form
  • Cloudflare Turnstile: Place the spam protection widget at a specific position
  • Submit: trigger configured actions on form completion

5.4 Mail Tab: Per-Form Email Configuration

The Mail tab has two sub-tabs: Email to admin and Auto responder.

Email to admin handles the notification your team receives on each new submission. Configure:

  • To: Recipient name and email address. Add multiple recipients using the + To button.
  • BCC: Hidden recipients. Add using the + BCC button.
  • From Name and From Email: The sender identity shown in the notification.
  • Reply-To Name and Reply-To Email: Where customer replies are routed.
  • Subject: The email subject line. Supports English and French.
  • Message: The email body is using the rich text editor. Supports English and French. Use the Available Tags panel on the right to insert dynamic values from the submission.

Auto responder mirrors the same fields for the customer-facing confirmation email. Enable Auto Reply and configure the subject, message, and sender details. The auto-responder fires immediately after submission with no manual action needed.

5.5 Notifications Tab: Custom Validation Messages

The Notifications tab sets per-form, per-language messages shown to the visitor when specific events occur during form submission. Leave any field empty to use the extension-level defaults.

Each message supports English and French language inputs. The configurable messages are:

  • Success Message: shown when the form submits successfully (default: Message Sent Successfully)
  • Failed Submission Message: shown when submission fails (default: Unable To Send Message)
  • Spam Detection Message: shown when spam is detected (default: Spam Activity Detected)
  • Required Field Validation Error: shown when a required field is left empty (default: Required Field Missing)
  • Maximum Length Validation Error: shown when input exceeds the allowed length (default: Input Exceeds Allowed Length)
  • Unknown File Upload Error: shown on unidentified upload failures (default: Unknown Upload Failure)
  • Invalid File Type Error: shown when an unsupported file format is uploaded (default: Unsupported File Type)
  • File Size Limit Error: shown when an uploaded file exceeds the size limit (default: File Size Limit Exceeded)
  • PHP File Upload Error: shown on server-side upload errors (default: Server Upload Error)
  • Invalid Number Format Error: shown when a number field receives an invalid value (default: Invalid Number Format)
  • Minimum Number Validation Error: shown when a number is below the allowed minimum (default: Number Below Minimum Limit)
  • Maximum Number Validation Error: shown when a number exceeds the allowed maximum (default: Number Exceeds Maximum Limit)
  • Invalid Email Address Error: shown when an invalid email is entered (default: Invalid Email Address)
  • Invalid URL Error: shown when an invalid URL format is entered (default: Invalid URL Format)
  • Invalid Phone Number Error: shown when an invalid phone number is entered (default: Invalid Phone Number)
  • Blacklisted IP Address Error: shown when a blocked IP attempts to submit (default: IP Address Blocked)
  • Blacklisted Email Address Error: shown when a blocked email attempts to submit (default: Email Address Blocked)

5.6 Thank You Page Tab

Display Thank You Page: Set to Yes to activate a post-submission page for this form.

Type:

  • Default page: A built-in confirmation page configured inside the extension. No separate CMS page needed.
  • Custom URL: Redirects the customer to any URL you specify after submission.

Thank You Title: The heading shown on the default thank you page. Supports English and French.

Thank You Alias: The URL slug for the thank you page. Supports multiple languages.

Thank You Content: Body text of the thank you page, editable with the rich text editor. Supports English and French. Accepts bold, italic, links, images, tables, and raw HTML.

5.7 Settings Tab: Display and Behaviour Controls

Active: Turns this specific form on or off on the front end. Set to Yes to make it live. Everything configured stays saved when set to No.

Customer Groups: Controls which customer groups can see this form. Tick the Default checkbox to limit visibility to the default customer group. Leave empty to allow all customer groups, including guests. This maps directly to the customer groups configured in your OpenCart store, not a Visitor/Guest/Customer segmentation.

Open Form Button: Toggle to Yes to replace the inline embedded form with a button that opens the form as a pop-up when clicked. When enabled, the following styling options appear:

  • Button Label (multilingual)
  • Text Color
  • Background Color
  • Text Hover Color
  • Background Hover Color
  • Show Icon (Yes/No)
  • Custom Icon (file upload)

Floating Button: Toggle to Yes to fix the Open Form Button to the screen so it stays visible as the visitor scrolls. When enabled, the following options appear:

  • Floating Label (multilingual)
  • Position (default: middle_right)
  • Right Margin (px)
  • Top Margin (px)
  • Text Color
  • Background Color
  • Text Hover Color
  • Background Hover Color
  • Show Icon (Yes/No)
  • Custom Icon (file upload)


5.8 Placements Tab: Where the Form Appears

The Placements tab controls where each form is displayed across your store. Pick one or more page layouts and one or more positions within those layouts. The form renders at every selected layout and position combination. The visual style, inline form or open-button pop-up, is taken from the Open Form Button toggle in the Settings tab.

Layouts available:

  • Account
  • Affiliate
  • Category
  • Checkout
  • Compare
  • Contact
  • Default
  • Home
  • Information
  • Manufacturer
  • Product
  • Search
  • Sitemap


Use Ctrl or Cmd and click to select multiple layouts at once.

Positions available:

  • Content Top
  • Content Bottom
  • Column Left
  • Column Right
  • Header Position
  • Footer Position

Tick every position where the form should appear within the selected layouts. No theme edits or custom code are needed.

For example, picking Product under Layouts and ticking Content Bottom under Positions puts the form below the product description on every product page. Picking Home with Content Top puts it above the page content on the homepage.

5.9 Synchronisation Tab: Email Marketing Integration

The Synchronization tab connects the form to Mailchimp or Brevo so submitted email addresses are added to your marketing lists automatically. Map form fields to provider fields before saving. Only the Email field is required. For Mailchimp, address fields must be mapped all-or-none.

Mailchimp:

  • Enable Mailchimp: Set to Yes to activate the integration for this form.
  • Mailchimp API Key: Paste your Mailchimp API key. Click Check API key to verify it.
  • SETUP: Click to load your Mailchimp account data.
  • Audience: Select the Mailchimp audience list to add subscribers to.
  • Field Mapping: Map your form fields to the corresponding Mailchimp fields using the Title and Mailchimp columns.

Brevo:

  • Enable Brevo: Set to Yes to activate the integration for this form.
  • Brevo API Key: Paste your Brevo API key. Click Check API key to verify it.
  • SETUP: Click to load your Brevo account data.
  • List: Select the Brevo contact list to add subscribers to.
  • Field Mapping: Map your form fields to the corresponding Brevo fields using the Title and Brevo columns.

6.0 Form Submissions Management

Every form submission across your store appears in the Form Submissions panel, making form submission management in OpenCart straightforward for any team size. Filter submissions by Email Subject, Submission Data, Form Name, or Replied status using the filter bar at the top.

The panel shows the email subject from the admin notification, the full submission data with field labels and values, the form name the submission came from, whether a reply has been sent, and the submission date and time.

Click the view icon on any row to open the full submission and reply directly from the same screen. The reply form includes From, To, Reply-To, and Subject fields pre-filled from the original submission. Attach files in JPG, JPEG, PNG, GIF, ZIP, or PDF format up to 8 MB if needed.

7.0 IP and Email Blacklist

The IP and Email Blacklist section handles repeat spam submissions at the source level. Any entry added here is checked before a form submission is recorded or sent to anyone.

Blocked IP Addresses: Enter one IP address or pattern per line. Use a single address for an exact block or a wildcard to cover a range. For example, 69.89.31.* stops every address in that range. Using *.226 blocks any IP ending in those digits.

Blocked Email Addresses: Follows the same logic as IP blocking. One address per line. Entering *@mail.ru shuts out every address from that domain. *@qq.com does the same for that provider.

Spam Email Filter (Regex): Write regex patterns here that run against incoming email addresses. Any address matching a pattern gets blocked before the submission goes any further. Add one pattern per line. The extension includes ready-to-use example patterns covering the most common high-spam domains and address structures. Paste them in, and they apply immediately.

8.0 Frequently Asked Questions

Q: What is the OpenCart Form Builder extension, and what does it do?

The Knowband OpenCart Survey Extension is a form builder tool that lets OpenCart store owners create unlimited contact forms, surveys, feedback forms, lead generation forms, and registration forms without writing any code. It includes drag and drop form creation, Cloudflare Turnstile spam protection, per-form email setup, auto-responder, Mailchimp and Brevo sync, form submission tracking, and placement control through the Placements tab. Works with OpenCart 3.x.

Q: How do I create a survey in OpenCart using the OpenCart Survey Builder?

Open the extension and click Add New Form. Give the form a title and a slug. Inside the Form tab, add a row, then drop in radio button fields for ratings, dropdowns for categories, and textarea fields for written feedback. Head to the Mail tab to set up the auto-responder, go to the Thank You Page tab to configure the post-submission message, pick the placement in the Placements tab, and turn the form on. No developer needed at any point.

Q: How do I collect customer feedback in OpenCart without a developer?

The OpenCart Survey Builder Plugin, also available on OpenCart Marketplace, manages the full feedback collection process from the admin panel. Build the form, go to the Settings tab, and set the Customer Groups to limit visibility, then pick the layout in the Placements tab. Once enabled, all submissions show up in the Form Submissions panel ready for your team to read and respond to.

Q: How do I display forms on product pages in OpenCart?

Go to the Placements tab inside the form. From the Layouts list, pick Product. In the Positions section, tick Content Bottom or Content Top. The form shows up at that position on every product page without any changes to the theme.

Q: Does this OpenCart survey plugin support email notifications?

Yes. Every form carries its own email setup in the Mail tab under the Email to admin sub-tab. The admin notification goes to whichever address you configure and fires as soon as a customer submits. The Auto responder sub-tab handles the customer-facing confirmation. Subject line, body text, and reply-to address are all set per form in the OpenCart Survey Builder using multilingual rich text editors.

Q: How do I build unlimited forms in OpenCart with this OpenCart Survey Extension?

This OpenCart Survey Extension has no cap on forms, fields, or submissions. Add as many as your store needs, contact forms, product feedback form OpenCart, customer satisfaction survey OpenCart, lead generation forms, registration forms, and post-purchase surveys. Each one runs on its own settings with separate placement rules, email routing, and a dedicated submission log.

Q: What is the easiest way to create a survey in OpenCart?

Open the OpenCart Form Creator, click Add New Form, name it, and set the slug. Use the drag and drop form builder OpenCart interface to pull fields into the layout rows. Set up the email and placement settings, switch the form on, and it goes live. A first-time user with no technical background can go from opening the extension to a live survey in under 15 minutes.

Q: What is the best OpenCart form builder plugin in 2026?

The best OpenCart form builder plugin in 2026 covers form creation, placement, spam filtering, email automation, and submission management from one installation with no developer needed for any of it. This extension covers all of these: drag and drop builder, Cloudflare Turnstile, per-form email and auto-responder, Mailchimp and Brevo integration with field mapping, layout-based placement control, and a full submission management panel with direct reply capability.

Q: How does spam protection work in the OpenCart Form Studio?

Switch Cloudflare Turnstile to Enabled in the General Settings Cloudflare Turnstile tab by entering the Site Key and Secret Key from your Cloudflare account. Once active globally, drag the Cloudflare Turnstile field into any individual form layout. This spam protection form OpenCart approach, blocks bots silently before the submission is recorded. Real customers see no challenge or CAPTCHA. The IP and Email Blacklist adds a second layer for blocking known bad actors by address or domain.

Q: Is the OpenCart Form Builder extension compatible with the latest OpenCart version?

Yes. This responsive form builder OpenCart extension is compatible with OpenCart 3.x. Check the Knowband OpenCart Form Builder product page for the most current compatibility information and version support details.

9.0 Conclusion

The OpenCart Form Studio covers every form-related need an OpenCart store has from one admin panel. Unlimited forms, drag and drop form builder, OpenCart functionality, spam protection, per-form email configuration, email marketing sync, placement control through the Layouts and Positions system, and a complete submission management panel, all without writing a single line of code.

For support, custom requirements, or OpenCart extension development, contact the Knowband team directly.

OpenCart Smart AI Admin Assistant Extention User Manual

1.0 Introduction

Every OpenCart store generates data every hour, orders arriving, stock moving, customers registering, carts being left behind, and revenue numbers shifting. All of it sits in the database. Getting to any specific figure means navigating to the right admin section, picking a date range, loading the report, and repeating the whole thing the next day.

The Knowband OpenCart Smart AI Admin Assistant removes that entirely. It places an AI chat interface inside your OpenCart admin panel. Type any store question in plain English and get a direct answer pulled from your live database in seconds. No SQL. No report pages. No developer in the loop.

This guide walks through every tab and setting so you can connect your AI provider, configure the assistant, and start querying your store data from day one. Compatible with OpenCart 3.x.

[Updated July 2, 2026] Analytics Dashboard Integration
Get a real-time view of your store’s performance right from the admin panel, revenue, orders, customers, and stock, all in one screen using the dashboard. Store owners can track trends, forecast revenue, spot slow-moving stock, and catch at-risk customers before they leave, with 34 customizable widgets you can arrange however works best for you.

1.1 Who Should Use This OpenCart AI Admin Chatbot

This admin assistant is built for:

  • Store owners who run the same data checks every morning need a faster way to get there.
  • Operations staff who want live answers on orders, stock levels, and revenue without loading report pages.
  • Multi-admin stores where different team members need different levels of access to store data.
  • Any merchant who wants OpenCart back office analytics powered by AI without relying on a developer.

2.0 Installation Guide

System Requirements

Before installing, confirm your setup meets the following:

  • OpenCart 3.x
  • PHP 7.2 or higher
  • An active API key from OpenAI (ChatGPT), Anthropic (Claude), or Google (Gemini)

Installing the Extension

Step 1: Download the extension ZIP file from your account. Log in to your OpenCart admin panel.

Step 2: Go to Extensions, then Installer. Click the Upload button, select the ZIP file from your system, and click Open. OpenCart processes the upload and extraction on its own.

Step 3: Once the upload confirms, navigate to Extensions, then Extensions. Choose Modules from the category dropdown. Locate the module in the list and click the green Install button next to it.

Step 4: After installation completes, click the Edit button to open the configuration panel for the first time.

Step 5: If the extension does not show up in the list after installation, go to the Dashboard, click the blue cog icon at the top right, and select Refresh to rebuild the cache.

Common Installation Issues

Upload fails: File size exceeds the server limit. Ask your host to raise upload_max_filesize and post_max_size in PHP settings to at least 32 MB, then try uploading again.

Extension not visible after install: Head to the Dashboard and use the cog icon to clear the OpenCart cache. Then return to Extensions, then Modules and search again.

Configuration screen looks broken: Clear your browser cache with a hard reload and reset the OpenCart theme cache from the Dashboard cog menu.

3.0 Admin Panel Overview

The Knowband OpenCart Smart AI Admin Assistant has eight tabs across the top of the configuration screen:

  • Settings: Core preferences, SQL visibility toggles, voice input, language, log retention, schema cache.
  • AI Provider: Connect OpenAI ChatGPT, Anthropic Claude, or Google Gemini using your own API key.
  • Widget Layout: Adjust how the chat widget looks inside the admin with a live preview on the right.
  • Database Views: Choose which store data domains the AI is allowed to query.
  • Access Control: Decide which employee profiles can open and use the assistant.
  • Predefined Chips: One-tap question shortcuts for daily store data checks.
  • Query History: A running log of every question asked with employee name, response time, and status.
  • Sessions: Full conversation threads per employee, viewable any time.

4.0 Settings Tab

4.1 General Settings for the OpenCart Smart AI Admin Assistant

Enable Chatbot: The main on/off control for this back office assistant. Turning it off removes the chat widget from the admin panel completely without deleting any saved configuration or query history.

Enable Predefined Chips: Shows or hides the one-tap question buttons inside the chat widget. The chips appear as an expandable panel that any admin can open or close.

Chips Default State: Sets whether the chips panel is open or closed when the widget first loads. Collapsed keeps it tucked away until the admin opens it. Expanded shows the chips panel straight away.

Max Result Rows: The upper limit on how many data rows the AI returns for a single query. Range is 1 to 1000, default is 100. Push it higher for queries that need full datasets and keep it at 100 or below for quick daily checks.

Show SQL Query Toggle: Set to Yes, and the SQL query used to produce each answer appears in the chat below the result. Any admin can read exactly how the data was fetched without asking a developer.

Allow SQL Edit and Re-run: Set to Yes, and the SQL shown under an answer becomes editable in the chat. Change a date range, swap a product category, or shift a threshold and run it again without typing a new question from scratch.

Voice Input: Turns on the microphone icon in the chat input. Speak a question and the browser converts it to text via the Web Speech API. Functions best in Chrome on desktop.

4.2 Language Settings

Use Back-office Language: The assistant replies in whatever language the OpenCart admin panel is currently running. Switch the back office to French, and responses come back in French automatically.

Use Custom Language: Lock the response language to a specific choice regardless of what the admin panel is set to. Useful where staff work in a different language from the back office default.

4.3 Log and Cache Settings

Log Retention (days): The number of days query history stays in the system before old entries are deleted automatically. Default is 90 days. No manual cleanup is needed; the purge runs on its own.

Schema Cache TTL (minutes): The period the extension holds the cached database schema before refreshing it. Default is 1440 minutes. The schema is a map of the store database structure that the AI relies on to build accurate queries. The Settings page displays the last cached timestamp and the next expiry, so the status is always clear.

Refresh Schema Now: Rebuilds the schema cache on demand without waiting for the TTL cycle. Use this after adding a new extension, upgrading OpenCart, or making any structural change to the database.

Click Save Settings to apply all changes on this tab.

5.0 AI Provider Tab

5.1 Choosing Your Provider

The AI Provider tab connects to an external AI model using your chosen provider. OpenAI (ChatGPT), Anthropic Claude, and Google Gemini are all supported. You bring your own API key, and it connects directly, no third-party relay, no separate subscription needed.

Click any provider button to load its settings below: the API key input, the model selector, and the temperature control. One provider is active at a time. Switching providers does not affect existing query history or configuration.

5.2 How to Get Your API Key

OpenAI

  1. Visit platform.openai.com and log in or register.
  2. Open the API Keys section from the account icon menu.
  3. Hit Create new secret key, give it a label, and save.
  4. Copy the key before leaving the page. OpenAI does not show it again. Paste it into the OpenAI API Key field.

Anthropic Claude

  1. Visit console.anthropic.com and log in or register.
  2. Go to API Keys in the left navigation.
  3. Click Create Key, name it, and copy it.
  4. Paste into the Claude API Key field. A direct link to the Anthropic console is also available in the module.

Google Gemini

  1. Visit aistudio.google.com and log in with a Google account.
  2. Click Get API key from the top left.
  3. Pick a project and generate the key.
  4. Copy and paste it into the Gemini API Key field.

5.3 Model Selection for the OpenCart Back Office Analytics Extension

OpenAI:

  • GPT-4o Mini, quick turnaround, lower API cost, suited to routine daily admin questions.
  • GPT-4o, stronger reasoning for queries that span multiple joined tables.
  • GPT-5.5, the most capable tier for complex or layered analytical questions.

Anthropic Claude:

  • Claude Haiku 4.5, fast and low-cost, works well for morning store checks.
  • Claude Sonnet 4.6 is a useful middle point between speed and analytical depth.
  • Claude Opus 4.7 is the best option when queries involve multiple data sources.

Google Gemini:

  • Gemini 3.5 Flash, fast and capable, the standard starting choice for most stores.
  • Gemini 3.1 Flash-Lite, the cheapest per query, ideal when keeping API spend low matters.

5.4 Temperature Setting

Governs how consistent or varied the AI responses are. At 0, the answers are most precise. At 1, there is more phrasing variation. For store data queries, 0.3 is the practical starting point. Use 0.0 when strict factual precision is the priority.

Click Save Provider Settings to apply.

6.0 Widget Layout Tab

The Widget Layout tab controls the appearance of the chat widget inside the OpenCart admin. Every adjustment shows in the real-time preview panel on the right before anything is saved.

Position: The screen corner where the chat bubble appears. Bottom Right is the default.

Chatbot Name: The name in the widget header. Smart Admin Assistant by default.

Greeting Message: The first message shown when the widget opens. Default: Hello! Ask me anything about your store.

Bubble Icon: Swap out the default bubble image. Square PNG, 64×64 px, 2 MB limit.

Chatbot Avatar: The image shown beside each bot reply. Square PNG, 48×48 px, 2 MB limit.

Widget Width and Height: The size of the open chat panel in pixels. Default is 400 wide by 560 tall.

Colour Settings: Six colour controls, Header, Chat Bubble, User Message, Bot Message, Background, and Text. No CSS knowledge needed. Changes reflect in the preview immediately.

Click Save Layout to apply.

7.0 Database Views Tab

7.1 How Database Views Work in This OpenCart Admin AI Chatbot

A set of pre-built MySQL views was built for the OpenCart AI reporting extension that organises and simplifies the relevant data for each domain. Queries run against these views only; the AI has no path to raw tables, and all views are read-only. Store data cannot be changed, deleted, or written through the chat under any circumstances.

Unticking a view removes that domain from the assistant’s allowed query list. The view stays in the database intact and can be re-enabled at any point.

7.2 Available Database Views

  • Orders Overview: Orders joined with customer details, currency, status, and totals.
  • Order Line Items: Individual product lines per order with quantities and prices.
  • Customers: Full customer records with group, gender, and last visit date.
  • Products: Catalog data with name, stock, price, category, and image info.
  • Specific Prices / Product Discounts: Per-product and per-combination price overrides. Off by default.
  • Categories: Category names and their hierarchy.
  • Shopping Carts: Active and abandoned carts with customer and currency details.
  • Cart Rules / Coupons: Discount rules with usage data and free shipping flag.
  • Stock Availability: Stock levels per product and combination with readable names.
  • Employees: Admin accounts and their profile data.
  • Customer Addresses: Address records with country, state, and customer data resolved.
  • Carriers / Shipping Methods: Active carriers with delivery delay text. Off by default.
  • Manufacturers / Brands: Brand records with descriptions and product counts.
  • Product Combinations / Variants: Variant data with stock, reference, and attribute names.
  • Product Attributes and Values: Attribute groups like Colour and Size with their values.

Click Save and Create Views to apply. The Knowband extension builds the MySQL views for any domain switched on.

8.0 Access Control Tab

The Access Control tab sets which OpenCart admin staff can open the assistant.

Tick: Restrict the chatbot to specific employee profiles to switch role-based access on. When this is off, every logged-in admin can use the assistant without restriction.

When role-based access is active, a profile list appears below. SuperAdmin access is permanent and does not appear in the list. Tick any other profiles, Logistician, Salesman, Translator, or custom roles, that should have access. Profiles left unticked see no assistant when they log in. Leaving all profiles unticked while role-based access is on limits the assistant to SuperAdmin only.

Click Save Access Settings to apply.

9.0 Predefined Chips Tab

Predefined chips are question shortcuts built into the chat widget. Each chip sends a stored question to the AI the moment it is tapped, no typing, no navigation.

9.1 Default Chips in the OpenCart Order Insights Plugin

Ten chips come ready out of the box:

  1. Orders Today: How many orders were placed today?
  2. Revenue (30d): What is the total revenue in the last 30 days?
  3. Cancelled Orders: How many orders were cancelled in the last 30 days?
  4. Abandoned Carts: How many carts were abandoned in the last 30 days?
  5. Active Customers: What is the current active customer count?
  6. Out of Stock: Which products are at zero stock right now?
  7. Low Stock (under 5): Which products have fewer than 5 units left?
  8. No SKU Products: How many products are missing a SKU reference?
  9. Free Shipping Coupons: Which active coupons offer free shipping today?
  10. New Customers (This Month): How many customers registered this month so far?

9.2 Adding a Custom Chip

Click Add Chip to open the chip form.

Label: Short button text. Keep it under three words. For example: Weekly Revenue.

Question: The question the AI gets when this chip is tapped. Write it the same way you would type it into the chat directly. For example: What is the total revenue for the past 7 days?

Position: The chip’s position in the panel list. Lower numbers appear first.

Active: Yes displays the chip in the widget. No keeps it saved but hidden.

Click Save Chip to finish. Edit and Delete buttons appear on each row for future changes.

10.0 Query History Tab

The Query History tab records every question sent through this tool. Each log entry shows:

  • Date: The time the query was sent.
  • Employee: Which admin account ran it.
  • Question: The full text of what was asked.
  • Rows: Number of data rows the query returned.
  • Time (ms): How long the query took to run.
  • Provider: The AI service that handled it, shown as a labelled badge.
  • Status: Green for success, red for errors.
  • SQL: The query that ran, visible inline.

Filter by status and date range at the top. Export visible results to CSV or Excel using the buttons above the table. Click Purge Old Logs to remove entries older than the Log Retention setting immediately.

11.0 Sessions Tab

The Sessions tab holds the full conversation history per employee. Each row shows the employee name, session start time, and message count. Click View to open the complete thread, questions and responses in chronological order in a pop-up window. Useful for reviewing what data was accessed, checking how the assistant is being used, or continuing the thread from a previous session.

12.0 Analytics Dashboard

The Analytics Dashboard gives you a real-time overview of your store’s performance, including sales, orders, customers, and inventory, all from a single screen in your OpenCart admin panel. The dashboard is organised into three widget groups:

Key Metrics: KPI cards summarising revenue, orders, and customer activity
Charts & Trends: visual breakdowns of sales over time and by category
Lists & Tables: detailed rankings such as best sellers and low stock alerts

Every admin user can choose which widgets appear on their own dashboard and reorder them freely. Store-wide behavior, such as which order statuses count as revenue, is controlled centrally by an administrator in Settings → Analytics Dashboard Settings.

12.1 Analytics Dashboard Settings

Store owners can find the dashboard setting in Settings -> Analytics Dashboard Settings
This is the central OpenCart admin dashboard settings screen for Knowband Smart AI Admin Assistant. Every field here applies globally, to all admin users. Individual users can still personalise which widgets they see and how they’re arranged from the dashboard’s Customize panel. Use this section to configure how your OpenCart analytics dashboard calculates revenue, which time period it opens with, how it looks, and whether it replaces your OpenCart admin home page.

12.2  Dashboard Settings in Smart AI Admin Assistant

Revenue Order Statuses

Revenue Order Statuses: This field controls which OpenCart order statuses count as revenue across every sales widget on the dashboard, including Revenue, Orders, Average Order Value, Best Sellers, Top Customers, and Coupon Usage.

Default Period

The default period is the period in which you want your dashboard to show the analytical data. Options are included as Last 7 days, Last 30 days, Last 3 months, Last 6 months, Last 1 year

Colour Theme

The colour theme is the theme of the dashboard which shows the analytics data. This module includes the Options like Indigo (default), Ocean, Emerald, Rose, Dark, and Custom.

List Rows

This feature controls how many rows are displayed in every list and table-style widget on the dashboard, including Best Sellers, Top Customers, Slow Movers, Reorder Suggestions, Churn Risk, Low Stock Alerts, Coupon Usage, and Brand Performance.

Churn Window

This defines the number of days of customer inactivity after which a customer is flagged in the Churn Risk widget, one of the key OpenCart customer retention tools on the dashboard.

Low Stock Threshold

This feature sets the product quantity at or below which a product is treated as “low stock” across the Low Stock, Low Stock Alerts, and Reorder Suggestions widgets, forming the basis of the dashboard’s OpenCart inventory management alerts.

Replace Default Dashboard

Store owners can enable the same to control whether the Analytics Dashboard should replace your opencart default dashbpard.
The admin home page automatically opens the Analytics Dashboard instead of OpenCart’s default dashboard the moment any admin user logs in. When set to Disabled, OpenCart’s standard dashboard remains the default landing page, and the Analytics Dashboard is accessed separately from the admin menu whenever needed.

5. Customising Your Dashboard

Each admin user can personalise their own dashboard layout independently by clicking on customisation on the dashboard.

Click Customise (widget library icon) on the dashboard.
Move or reorder any widget within its group (Key Metrics, Charts & Trends, Lists & Tables).
Close the panel, and now you will see the customised dashboard. You can click on Restore default to restore it to the original dashboard.

12.2 Key Metrics (17 widgets)

Revenue
Total order value for the selected period and order status chosen from the dashboard setting, with a daily trend graph and percentage change versus the previous period. This feature works as an OpenCart revenue report on the dashboard.

Orders
Total number of orders placed in the selected period, with a daily trend graph and percentage change, forming the base of the dashboard’s OpenCart order analytics.

Avg. Order Value
These values show the avgerage value per order, calculated on the basic total revenue divided by the total number of orders. Average order value provides store owners with a real-time check at a single glance. Instead of digging through spreadsheets, Excel, owners can instantly see if their pricing and marketing strategies are actually working.

Items Sold
This KPI metric shows the total units sold across all orders in the period that store admins have selected, which is useful for tracking sales volume independent of revenue.

Items per Order
This item per order metrics shows the items per order, so that store owners can have a idea of how he is selling items like individually or in bulk with OpenCart Analytics & Reporting Extension.

Discounts Given
The discount given option in the OpenCart AI Sales Analytics Plugin give the total value of coupon, voucher, and reward discounts applied during the selected period with per cent change from the previous analytics

Taxes Collected
The OpenCart AI Reporting Extension give the figure of total tax collected from orders in the period, useful for reconciliation and reporting.

Shipping Revenue
This feature gives the total shipping charges collected from customers on the orders during the selected periods, also show the percentage changes compared with the previous data.

Refunded Value
The total amount that is refunded will be marked as refunded in the selected periods, giving visibility into returns and lost revenue.

New Customers
Shows the total number of customers who registered during the selected period, calculated directly from new account sign-ups. This OpenCart Customer Analytics metric helps store owners gauge the real-time impact of acquisition campaigns, rather than waiting on a manual account export.

Repeat Customers
Counts customers who placed two or more orders within the selected period. This figure feeds directly into the dashboard’s OpenCart Customer Retention Dashboard, giving store owners a quick read on loyalty without cross-referencing order history manually.

Returning Buyer Rate
Shows the percentage/rate of buyers in the period who ordered more than once, which is calculated as repeat customers divided by total unique purchasers. This AI Assistant acts as an OpenCart Customer Analytics indicator; it shows store owners whether their retention strategy, from email marketing to loyalty programs, is actually converting first-time buyers into repeat business.

Total Customers
Total customers display every customer registered in the store to date, independent of the period selector. As a Real-Time Store Analytics snapshot, it always reflects the current customers the moment the dashboard loads, giving store owners an accurate data to check growth.

Active Products
Shows the number of products currently enabled and available for purchase in the storefront. This snapshot gives store owners an instant read on active catalogue size, useful when auditing inventory as part of the dashboard’s broader OpenCart Inventory Management toolkit.

Out of Stock
Flags-enabled products are currently sitting at zero quantity. As part of the OpenCart Inventory Management alert system, this widget lets store owners catch stockouts immediately, rather than discovering them after a lost sale.

Low Stock
Counts enabled products at or below the low-stock threshold configured in Analytics Dashboard Settings. This real-time alert gives store owners an early warning system for reordering, well before a product actually runs out.

Units in Stock
Totals the quantity across every enabled product in the store, giving a single figure for overall inventory volume. Store owners can use this widget alongside Low Stock and Out of Stock for a complete OpenCart Inventory Management picture in one glance.

12.4 Charts & Trends (9 widgets)

Revenue Trend
Plots revenue over time as a line chart, daily for periods up to six months and monthly for a full year. As a visual extension of the dashboard’s OpenCart Sales Report data, it helps store owners quickly spot spikes, dips, or seasonal patterns that raw numbers alone can hide.

Revenue Forecast
Analyses the last 90 days of trading and projects likely revenue for the next 30 days, using recent trend data rather than the selected period. This OpenCart Revenue Forecast widget helps store owners plan cash flow, stock orders, and marketing spend ahead of time, based on real sales momentum rather than guesswork.

Orders Trend
Charts order count over time using the same daily or monthly logic as Revenue Trend. It gives store owners a volume-based counterpart to the revenue chart, feeding into the dashboard’s wider OpenCart Order Analytics view of how order activity is moving.

Payment Methods
This chart shows how revenue splits across the payment options customers actually chose at checkout. If one method is quietly outperforming the rest, it’s worth understanding why, and if another barely gets used, that’s often a sign it needs more visibility or trust-building on the checkout page.

Sales by Country
A simple bar chart of revenue by shipping destination, but a genuinely useful one. It’s usually the fastest way to see where a store’s real strength lies geographically, which matters a lot if you’re weighing up new shipping zones or where to put the next ad budget.

Order Status
One bar list, every active status, revenue and order count side by side. It’s the quickest way to answer “where are things sitting right now,” whether that’s orders still processing, ones stuck pending, or ones already through to completion.

Sales by Carrier
Breaks revenue down by shipping method so you can see which carriers your customers end up using most. Worth checking every so often, especially when it’s time to renegotiate rates or decide if a new carrier option is actually needed.

Sales by Day of Week
Takes the whole selected period, not just last week, and groups total revenue by weekday. Patterns tend to show up here that aren’t obvious day to day, like a Thursday that consistently outsells everything else, which is handy to know when planning promotions or staffing.

Sales by Hour
Once you can see exactly when customers are most likely to buy, timing things like flash sales, email sends, or live support becomes a lot less guesswork and a lot more strategy.

12.4 Lists & Tables (8 widgets)

Best Sellers
Ranks products by units sold, with reference, quantity, and revenue shown side by side. As a key part of any OpenCart Sales Report review, this widget tells store owners exactly which products are carrying the business.

Slow Movers
Lists active products with the fewest sales in the selected period, helping store owners spot stock that needs a promotional push, a price adjustment, or removal from the catalog altogether.

Top Customers
Ranks customers by total revenue, alongside their order count, giving store owners a clear view of who to prioritize for loyalty perks, personal outreach, or account management as part of a broader OpenCart Customer Analytics strategy.

Churn Risk
Flags high-value customers who haven’t placed an order beyond the configured Churn Window, along with their lifetime value and last order date. This is the core of the dashboard’s OpenCart Customer Retention Dashboard, helping store owners win customers back before they’re gone for good.

Low Stock Alerts
Lists every product currently at or below the configured stock threshold, or already out of stock, with reference and quantity. This is a core OpenCart Inventory Management tool that gives store owners an early warning before a bestseller disappears from the shelf.

Reorder Suggestions
Calculates suggested reorder quantities for products sold in the last 30 days, based on current stock, units sold per day, and days of stock cover remaining. Store owners can use this feature to restock exactly the right amount, avoiding both overstocking and stockouts.

Coupon Usage
This shows every coupon redeemed during the selected period, along with number of uses and total discount value, so store owners can measure which promotions are actually driving orders versus which ones are just cutting into margin.

Brand Performance
Ranks manufacturers by revenue and units sold, rounding out the dashboard’s OpenCart Business Intelligence view of what’s actually driving the store, down to the brand level.
Rights Reserved.

12.0 Frequently Asked Questions

Q: What is the Knowband OpenCart Smart AI Admin Assistant, and how does it work?

This is an OpenCart Admin AI Chatbot that lets store admins ask plain-language questions and get answers from live store data instantly. It connects to the store database through pre-built read-only MySQL views, sends each question to the chosen AI provider, OpenAI, Anthropic Claude, or Google Gemini, which builds and runs a SQL query, then delivers the result in natural language. Compatible with OpenCart 3.x.

Q: Which AI providers work with the OpenCart back office analytics tool?

The Knowband OpenCart Smart AI Admin Assistant supports OpenAI (GPT-4o Mini, GPT-4o, GPT-5.5), Anthropic Claude (Haiku 4.5, Sonnet 4.6, Opus 4.7), and Google Gemini (Gemini 3.5 Flash, Gemini 3.1 Flash-Lite). Each provider connects via your own API key with no extra subscription. You pay only for what the AI actually processes.

Q: Can the OpenCart Smart AI Admin Assistant change or delete any store data?

No. The OpenCart AI sales analytics tool reads data only through pre-built MySQL views. No query sent through the chat can update, delete, or write anything back to the database. Every response is a read-only retrieval from your live store.

Q: What data can I query using the OpenCart admin AI chatbot?

Orders, customers, revenue, stock, abandoned carts, discount coupons, product combinations, employee accounts, shipping carriers, brands, and categories are all queryable. The Database Views tab governs which domains are active. Switch a domain on to allow it, switch it off to restrict it.

Q: How do predefined chips work in the OpenCart Smart Store Analytics tool?

Chips are one-tap question buttons in the widget. Tap one, and the saved question goes to the AI straight away. The default chip set covers orders, revenue, abandoned carts, low stock, out-of-stock items, active customers, new customers, cancelled orders, free shipping coupons, and products without a SKU. New chips can be added, edited, or removed from the Predefined Chips tab.

Q: What does the SQL visibility feature do in the OpenCart back office analytics tool?

Enable Show SQL Query Toggle, and the SQL behind each answer appears in the chat below the result. Turn on Allow SQL Edit and Re-run as well, and that SQL becomes editable directly in the chat. Change a date, a filter, or a threshold and run it again without asking a new question. This OpenCart AI sales analytics tool makes this accessible to any admin, not just those with SQL knowledge.

Q: How does role-based access control work in the OpenCart AI admin chatbot?

Open the Access Control tab and tick Restrict the chatbot to specific employee profiles. SuperAdmin access cannot be removed. For every other profile, Logistician, Salesman, Translator, or any custom role, tick the ones that should have access. Any profile left unticked will not see the assistant after logging in.

Q: What is the schema cache in the OpenCart back office analytics tool?

The schema cache holds the structural map of the store database so the AI can build queries accurately without reading the full database on every request. The first chat session builds it automatically. It refreshes based on the Schema Cache TTL setting. After installing a new extension, upgrading OpenCart, or making any database change, use Refresh Schema Now to rebuild it on the spot.

Q: How do I connect an AI provider to the OpenCart Smart AI Admin Assistant?

Go to the AI Provider tab. Click the provider you want: OpenAI, Anthropic Claude, or Google Gemini. For OpenAI, sign in at platform.openai.com, go to API Keys, and generate a new secret key. For Anthropic, sign in at console.anthropic.com, open API Keys, and create one. For Gemini, sign in at aistudio.google.com, click Get API key, and generate one for your project. Paste the key into the relevant field and save.

Q: Is the OpenCart Smart AI Admin Assistant compatible with OpenCart 3.x?

Yes. The Knowband OpenCart Smart AI Admin Assistant works on OpenCart 3.x. Visit the product page for current compatibility details and version notes.

13.0 Conclusion

The Knowband OpenCart Smart AI Admin Assistant delivers AI-powered OpenCart back office analytics to any OpenCart store without needing SQL knowledge, developer support, or third-party reporting platforms. Ask in plain English, get answers from live data, view the SQL behind each result, and refine it on the fly.

The Opencart AI Assistant for Admin is now available on OpenCart Marketplace. Try the demo now.

For support, custom requirements, or OpenCart development work, contact the Knowband team directly.

PrestaShop AI Review Generator Module – Complete User Guide

Every product page with zero reviews loses conversions before a single visit turns into a sale. Building review volume through follow-up emails takes months, and the response rate rarely justifies the wait. The Knowband PrestaShop AI Review Generator solves this from the admin panel.

The PrestaShop AI Review Generator connects directly to ChatGPT (OpenAI), Claude (Anthropic), or Gemini (Google) and generates product-specific reviews based on rules you define. Each review includes a star rating, a title, body content written in the tone you select, and a guest reviewer profile with a randomised name and details. Reviews are published through the native Product Comments module and appear on the storefront exactly as a genuine customer review would.

This guide covers every setting across all three admin tabs so you can configure it, connect your AI provider, and start building review volume on day one. Compatible with PrestaShop 1.7. x through 9.x.

1. 1 Who Is This Module For

This module is built for:

  • New stores that need review volume before organic feedback has had time to build.
  • Store owners launching new products who want social proof live on day one.
  • Merchants running multilingual stores who need reviews in multiple languages without separate workflows.
  • Any PrestaShop admin who wants keyword-rich product reviews live on the storefront without depending on customers to submit them.

2.0 Installation Guide for Prestashop AI Review Generator Addon

System Requirements

Check these before starting the install:

  • PrestaShop 1.7.x, 8.x, or 9.x
  • PHP 7.2 or higher 
  • Native PrestaShop Product Comments module is installed and active
  • A valid API key from OpenAI, Anthropic, or Google

Installing the Module

Step 1: Download the ZIP file from your account and open your PrestaShop back office.

Step 2: Head to Modules, then Module Manager. Find the upload option at the top right of the screen.

Step 3: Choose the ZIP file from your downloads. PrestaShop processes the upload and unpacks the files on its own.

Step 4: Hit Install on the prompt that follows. The module configuration screen loads straight after.

Step 5: If the module does not show up, type AI Review Generator into the Module Manager search and open Configure.

Common Installation Issues

Upload fails: The server is rejecting the file size. Ask your host to raise upload_max_filesize and post_max_size to at least 32 MB.

Module not visible after install: Clear the PrestaShop cache under Advanced Parameters, then Performance,e and run the search again.

Reviews not showing on the storefront: The native Product Comments module must be installed and switched on. Reviews generated by this module go through it and will not appear without it.

3.0 Admin Panel Overview of Prestashop AI Review Generator Addon

The PrestaShop AI Review Generator adds three tabs to the back office:

  • General Settings: Switch the module on, connect an AI provider, and get the CRON URL for automated generation.
  • Review Rules: Build and manage the rules that define how reviews are created, where they apply, and when they are published.
  • Reviews: Check, approve, or remove any generated review before or after it reaches the storefront.

4.0 General Settings Tab in Prestashop Product Review Generator Module

This tab holds the global configuration for the PrestaShop AI review generation module. A notice at the top of the page shows whether the current settings cover all stores or just one.

4.1 Enable Module

The main toggle. Set to Enabled, and the module is active across the store. Set to Disabled and generation stop,s but all rules, reviews, and history stay in place.

4.2 AI Provider

Choose from three providers:

  • ChatGPT (OpenAI)
  • Claude (Anthropic)
  • Gemini (Google)

One provider runs at a time. Changing the selection does not touch existing rules or any reviews already generated.

4.3 API Key

Enter the API key for the selected provider. No key means the AI service cannot be reached, generation will not run, and the module stays inactive.

How to get your API key:

For OpenAI: go to platform.openai.com, open the API Keys section under your account, and create a new key. Copy it straight away as it is only shown once.

For Anthropic: go to console.anthropic.com, open API Keys, and create a new one.

For Google Gemini: go to aistudio.google.com, click Get API key, and generate one under your chosen project.

Click the Test key to check the connection before saving.

4.4 Model Selection

Pick the model that suits your needs from the ones available under each provider.

OpenAI models: GPT-5.5, GPT-5.4, GPT-5.4 mini, GPT-5.4 nano, GPT-5 (chat), GPT-4.1, GPT-4.1 mini, GPT-4.1 nano, o3, o3-mini, o4-mini, GPT-4o, GPT-4o mini, GPT-4 Turbo, GPT-4, GPT-3.5 Turbo

Claude models: Claude Opus 4.7, Claude Sonnet 4.6, Claude Opus 4.6, Claude Opus 4.5, Claude Sonnet 4.5, Claude Haiku 4.5, Claude Opus 4.1, Claude Sonnet 4, Claude Opus 4

Gemini models: Gemini 3.5 Flash, Gemini 3 Flash (Preview), Gemini 3.1 Flash-Lite, Gemini 2.5 Flash-Lite, Gemini Flash (Latest), Gemini Flash-Lite (Latest)

4.5 Max Tokens

This number sets the upper limit on how much text the AI can write per review request. Range is 1 to 16384, and the default value is 4000. Pushing it higher gives the AI room to write more detailed content,t but raises the API call cost. Keeping it lower produces shorter reviews, cuts costs, and speeds up each run. Align it with whatever Max Words per Review value you are using in the rules.

4.6 Temperature

Temperature decides how consistent or varied the AI output is. The scale runs from 0.0 to 1.0. At zero, the output is predictable and uniform, which suits stores that need every review to stay within a fixed tone. Closer to 1, the output gets more varied. For reviews that are meant to read naturally, somewhere between 0.5 and 0.7 tends to give a good balance.

4.7 Check Existing Reviews

Set this to Yes, and the module runs a check on each product before generating. If reviews are already present, that product is skipped. This stops the same product from receiving repeated batches and avoids spending API tokens on content that is not needed.

4.8 CRON URL for Scheduled Generation

A token-secured URL for automated review generation on a schedule is available on the General Settings tab. Immediate and scheduled reviews are both published through this URL.

Copy it and add it to your server cron job. The recommended frequency is every 15 minutes. Only requests that carry the correct token trigger generation. The URL does nothing without it.

Click Save to apply all changes on this tab.

5.0 Review Rules Tab

Review Rules control exactly how the PrestaShop auto-generate reviews process runs. Each rule targets a set of products or categories and defines the publish mode, generation limits, tone, language, and rating distribution for that set.

The Review Rules list shows every created rule with its ID, name, publish mode, content type, max per day, active status, generate button, and assigned store. Click Generate now on any row to run that rule immediately. Click Edit to change the rule settings.

5.1 Adding a New Review Rule

Click the Add Rule button to open the rule creation form.

Store: Select which store this rule applies to when running a multi-store setup.

Enable rule: Toggle on to make the rule active. Rules set to off are saved, but do not run on CRON or Generate now.

Publish Mode: Three options control when generated reviews go live.

  • Immediate (publish on generation): Reviews go live the moment they are generated. No waiting, no approval step.
  • Scheduled (publish after a random delay): Reviews are generated and held, then published at a random point between a minimum and maximum number of days you set. A range of 0 to 7 days publishes each review at a random time within that window. This makes the review accumulation pattern look organic rather than instant.
  • Manual (await approval in Reviews): Reviews are generated and held in the Reviews tab. Nothing is published until an admin opens each entry and approves it. Best when editorial control over what goes live matters.

Random Delay (days): Appears when Scheduled mode is selected. Set a Min and Max day range. Generated reviews are published at a random point within that range.

Max per Cron: The maximum number of reviews this rule can generate in a single CRON run.

Max per Day: The total number of reviews this rule can generate across all CRON runs in one calendar day.

Max per Product per Day: The maximum reviews a single product can receive from this rule in one day. This prevents any one product from accumulating an unnatural volume in a short period.

Max Words per Review: The maximum word count for each generated review. Set to 150 for standard-length reviews. Reduce to 50 or below for short-form reviews. Increase for long-form, detailed content.

Languages: Tick the languages reviews should be generated in. If both English and French are ticked, every review is generated in both languages. Only languages installed in your PrestaShop store appear in this list.

Content Type: Choose whether the rule targets Products or Categories. Selecting Products lets you search and add specific products. Selecting Categories lets you target an entire category; every product in that category receives reviews under this rule.

Tone: Select the voice for the generated reviews.

  • Professional
  • Casual
  • Technical
  • Persuasive

Generate Using: Toggle which product data points the AI uses when writing the review. At least one must be enabled.

  • Product name
  • Product description
  • Product price
  • Product category

Disabling a data point means the AI does not factor it into the review. Enabling price means reviews may reference the product’s value. Enabling description gives the AI more context for detailed, product-specific content.

Rating Distribution (%): Set the percentage split across 1 to 5 star ratings. The total must equal exactly 100. For example: 5 stars 50%, 4 stars 30%, 3 stars 10%, 2 stars 5%, 1 star 5%. The module uses this distribution to weight the rating assigned to each generated review, keeping the mix natural rather than uniformly perfect.

Rule Name: A required field. Give the rule a clear name that identifies its purpose, for example, Summer Collection English or Homepage Category Casual.

Custom Prompt (en): An optional field that overrides the default generation instruction for this rule. Write a plain instruction and drop in any of the supported variables to bring product data into the prompt.

Supported variables: {product_name}, {product_description}, {price}, {category}, {shop_name}, {tone}, {max_words}

For example: Write a review for {product_name} priced at {price}. Keep it under {max_words} words and use a {tone} tone.

Click Save to create the rule. It appears in the Review Rules list immediately.

5.2 Editing and Deleting Rules

Click Edit on any rule row to reopen the configuration form and change any setting. Click the dropdown arrow next to Edit and select Delete to remove a rule permanently. Deleting a rule does not delete reviews already generated under it.

5.3 Bulk Actions

The Bulk actions dropdown at the bottom of the rules list lets you apply actions to multiple selected rules at once.

6.0 Reviews Tab

The Reviews tab shows every review generated by this module. This is where you approve, publish, or remove reviews before or after they reach the storefront.

6.1 Reviews List

Each entry in the list shows:

  • ID: Sequential review number.
  • Product: Which product was the review generated for?
  • Language: Which language was this review generated in?
  • Review Preview: A shortened version of the review body.
  • Reviewer: The generated reviewer name and email address.
  • Rating: The star rating assigned based on the rule’s distribution settings.
  • Status: Scheduled, Published, or Pending Approval.
  • Created: When the review was generated.
  • Published: When the review went live on the storefront.
  • Shop: Which store does the review belong to?


Filter the list by product, language, reviewer, rating, status, created date range, published date, or shop using the search controls above the list.

6.2 Approving and Publishing Reviews

For rules set to Manual publish mode, reviews land in this tab with Pending Approval status. Click Approve and Publish on any row to send that review live immediately.

Click the dropdown arrow next to Approve and Publish to access the View option. This opens the full review text so you can read it before publishing.

6.3 Deleting Reviews

Click the dropdown arrow next to Approve and Publish and select Delete to remove a generated review permanently. Deleted reviews cannot be recovered.

7.0 Frequently Asked Questions

Q: What is the Knowband PrestaShop AI Review Generator, and how does it work?

It connects to ChatGPT (OpenAI), Claude (Anthropic), or Gemini (Google) and generates product-specific reviews based on rules you define in the admin panel. Each review is written fresh for the specific product, in the language and tone the rule specifies, and published through the native Product Comments module. Compatible with PrestaShop 1.7. x through 9.x.

Q: Which AI providers does the PrestaShop AI Review Generator support?

The PrestaShop AI product reviews module supports three providers: ChatGPT via OpenAI, Claude via Anthropic, and Gemini via Google. You connect using your own API key. Only one provider is active at a time. Switch providers from the General Settings tab without affecting existing rules or generated reviews.

Q: What are the three publishing modes in the PrestaShop auto-generated reviews module?

Immediate publishes a review the moment it is generated. Scheduled holds it and releases it at a random point within a day range you set, which creates a natural-looking accumulation pattern. Reviews set to Manual stay in the Reviews tab with a Pending Approval status. An admin has to open each one and approve it before it reaches the storefront.

Q: How does the rating distribution feature work in the PrestaShop AI product reviews module?

Open any review rule and find the Rating Distribution (%) section. Assign a percentage to each star level from 1 through 5. The numbers must add up to exactly 100. As an example: 5 stars at 50%, 4 stars at 30%, 3 stars at 10%, 2 stars at 5%, 1 star at 5%. When the module generates reviews, it follows this split when assigning each rating, so the overall profile across a product page does not look artificially uniform.

Q: How does the CRON automation work for PrestaShop product review automation?

The General Settings tab provides a token-secured CRON URL. Add this URL to your server cron job set to run every 15 minutes. Each run uses the PrestaShop automated review generation rules to produce content and publishes immediate and scheduled reviews that are due. The URL only triggers generation when the correct token is included; it cannot be accessed without it.

Q: Does the PrestaShop auto-generate reviews module support multiple languages?

Yes. Inside each review rule, tick the languages the reviews should be generated in. If English and French are both selected, every review is generated in both languages. Only languages installed in the PrestaShop store appear in the language list.

Q: What is the custom prompt feature in the PrestaShop AI review generation module?

The Custom Prompt field sits inside each review rule and is optional. Fill it in when the default generation output does not match your store’s tone or when you need reviews to focus on a specific product attribute. Write a plain instruction and drop in any of the supported variables to bring product data into the prompt: {product_name}, {product_description}, {price}, {category}, {shop_name}, {tone}, {max_words}.

Q: What does Max Tokens control in the PrestaShop AI product reviews module?

Max Tokens caps how much text the AI generates per review in one request. The accepted range is 1 to 16384. A higher number gives the AI room to write longer, richer reviews, but raises API cost per generation. A lower number cuts both the length and the cost. Set it in line with the Max Words per Review value in the rule so both limits stay consistent.

Q: Can I prevent duplicate reviews from being generated?

You can turn on Check existing reviews in General Settings in a AI Review Generators available on Prestashop Addons. Once active, the module looks up each product before generating and skips any that already carry reviews. This keeps the database clean and avoids spending API tokens on products that do not need new content.

Q: Is the PrestaShop AI Review Generator compatible with PrestaShop 9?

Yes. The PrestaShop AI Review Generator runs on PrestaShop 1.7. xx through 9.x. Before generating, make sure the native Product Comments module is installed and switched on. No changes to the theme or custom templates are required.

8.0 Conclusion

This module puts AI-powered product review automation inside the PrestaShop admin panel. Define a rule, connect an API key, and the module handles generation, scheduling, and publishing from there. Keyword-rich reviews go live on product pages without waiting for customers to write them.

Rating distribution controls keep the review mix credible. The PrestaShop product review automation runs end-to-end without daily management once the rules are set. Multilingual generation covers every market the store serves. Manual approval mode gives full editorial control when it matters. The CRON automation handles the rest on schedule.

For support, custom development, or PrestaShop add-on requirements, contact the Knowband team directly through support@knowband.com

Opencart Catalogue Import Export Extension User Manual

If you manage a growing OpenCart store, you already know how time-consuming manual product updates can be. The Knowband OpenCart Import Export Scheduler Pro is, therefore, purpose-built to eliminate that friction entirely. It handles bulk product and category transfers in CSV, XLSX, JSON, and XML formats  all from within the OpenCart admin panel  with no coding, no developer involvement, and no wasted hours.

Furthermore, what truly sets this OpenCart bulk product import/export extension apart from generic tools is its reusable profile system. Every import or export task is consequently saved as a named profile with its own file format, column mapping, FTP or SFTP destination, and optional cron schedule. As a result, store owners can move from one-off data dumps to fully automated, scheduled catalogue syncs in a matter of minutes.

Moreover, whether you are running a daily supplier feed via FTP, migrating products between two OpenCart stores, or pushing bulk price updates to a remote SFTP server, Knowband‘s OpenCart Catalogue import export extension covers every scenario out of the box. No custom code is required. The OpenCart catalogue Migration via Import Export Extension is now available on the OpenCart Marketplace

1.1 Key Capabilities of Opencart Import Export Extension

  • Four file formats are supported for OpenCart bulk product import/export: CSV, XLSX, JSON, XML
  • Reusable named profiles with saved mappings, format settings, and FTP/SFTP configuration
  • FTP, FTPS, and SFTP transfer with live connection testing before saving
  • Fully automated, unattended OpenCart cron import/export on any schedule
  • Column auto-matching with required-field validation that blocks incomplete imports
  • Full import export support for OpenCart product combinations and variants
  • Multilingual field handling  export and import translated fields across all active languages
  • Transfer Logs with row-level error detail and re-download links for every run
  • Automatic file cleanup on a configurable retention schedule
  • Compatible with OpenCart 3. x.x | PHP 7.2+ | MySQL 5.6+

1.2 Who Is This Extension For?

This OpenCart CSV import export extension is specifically designed for:

  • Store owners managing catalogs of 100 to 50,000 SKUs who need repeatable bulk updates without manual effort
  • Agencies handling multiple OpenCart stores and requiring smooth catalogue migration between instances
  • International stores managing multilingual product data across several active languages
  • Businesses syncing supplier feeds on a daily or hourly schedule via FTP or SFTP
  • Administrators who want a reliable, log-backed history for every OpenCart bulk import/export run

2. Installation

Before proceeding, verify that your server meets the minimum requirements for Knowband‘s OpenCart scheduled import export extension: OpenCart 3.x.x, PHP 7.2 or higher, and MySQL 5.6 or higher.

Step 1: Upload via FTP

To begin with, extract the ZIP archive downloaded from the Knowband store. Connect to your server via an FTP client and copy all extracted files from the upload folder into the root directory of your OpenCart installation.

Step 2: Install in the Admin Panel

Next, log in to your OpenCart admin panel. Navigate to Extensions > Extensions, locate Knowband Import Export  Plugin in the list, and click Install. The  Plugin will thereafter be registered with your OpenCart instance.

Step 3:  Configure

Finally, click Edit on the same row to open the extension configuration page. You will land on the General Settings tab, where all global preferences  including cron URLs, file size limits, and cleanup schedules  are managed.

3. Admin Panel Overview

Once installation is complete, the Knowband OpenCart Import Export Scheduler Pro adds four clearly organised tabs inside its configuration page. Understanding each tab’s purpose is, consequently, the fastest way to get productive with OpenCart bulk catalog management.

4. General Settings

The General Settings tab is the control centre for all global behaviours of the OpenCart import export extension. It is divided into four sub-sections. Configuring these settings correctly upfront will, in turn, ensure that all subsequent import and export operations run smoothly.

4.1 Preferences

Extension Enable / Disable turns the entire extension on or off. When disabled, all scheduled cron import and export tasks are paused immediately.

Maximum Visible Columns sets how many columns display at once in the OpenCart import mapping table. Range: 1–20. Default: 6. Use the pagination arrows to navigate remaining columns.

Maximum Visible Rows sets how many sample data rows appear in the mapping preview. For visual verification only does not restrict the actual import row count. Range: 1–50. Default: 10.

Import Batch Size controls how many rows are processed per AJAX request during OpenCart bulk product import. Lower values reduce timeout risk on shared hosting. Range: 10–500. Default: 100. On VPS or dedicated servers, increase to 300 or higher for faster large imports.

Click Save Settings to apply.

4.2 Template Files

This section provides ready-to-fill sample files for every supported entity and format combination  an essential starting point for anyone setting up an OpenCart CSV import or XLSX-based bulk upload for the first time. Two entities are available: Products and Categories. Each has four format buttons: CSV, JSON, XML, and XLSX.

Simply click the relevant button to download the template. Each template includes every column the importer recognises, with safe placeholder data. Fill it with real product data and import it back.

Important: Your uploaded file must follow the column layout shown in the templates. Deviating from this layout will cause column auto-matching to fail and require manual remapping.

4.3 Limits and Speed

Max Records Per Download: Maximum number of records exported per file. Increase only if your server memory supports it. Range: 100–50,000. Default: 5,000.

Max Upload Size (MB)  Maximum import file size the plugin accepts. Works alongside PHP’s server-level upload limit; whichever is lower takes effect. Range: 1–200 MB. Default: 50 MB.

Click Save Settings to apply.

4.4 Scheduled Cleanup and Cron URLs

This is where you configure the three cron job URLs that power the automated side of Knowband‘s OpenCart scheduled import/export system. Each URL has a dedicated Copy button; paste it directly into your server crontab or OpenCart’s built-in scheduled tasks.

Keep Files For (Days)  Import and export files older than this number of days are deleted automatically by the cleanup cron. Range: 1–30 days. Default: 7 days.

Cleanup Cron URL  Recommended: daily at 2 AM. Deletes old temporary files automatically.

Export Profiles Cron URL: Recommended: daily at 3 AM. Runs every export profile flagged as cron-enabled and stores the generated file in Transfer Logs.

Import Profiles Cron URL  Recommended: daily at 4 AM. Fetches files via FTP/SFTP and runs every FTP-source import profile flagged as cron-enabled. Upload-source profiles are manual-only and are skipped automatically.

Click Save Settings to apply.

5. Export Profiles: Complete Walkthrough

The Export tab lists all saved export profiles. Knowband‘s profile-based approach means you set up the OpenCart bulk export once and reuse it indefinitely  either manually with one click or automatically on a cron schedule. Each profile displays its ID, name, entity type, format, cron status, and date added.

Click Add Export Profile to create a new one. The wizard runs through three steps: Transfer Settings, Choose Fields, and Generate File.

5.1 Step 1  Transfer Settings

Profile Name: A unique label for this profile in the Export listing. Example: Weekly Product Feed.

Output File Label: Base name for the generated file. The plugin is added automatically. Use letters, digits, hyphens, and underscores only. Example: products-daily.

Data Type: Select Products or Categories.

File Format: Select CSV, XLSX, XML, or JSON.

Language(s)  Select one or more store languages. Translated fields such as name and description are exported for each selected language. Select All Languages to include every active language, a key feature for multilingual OpenCart product import export workflows.

Date Range (optional)  Filter records by creation date. Leave blank to export all records.

Record Order (optional)  Controls row sequence in the output file. Leave on default for standard database order.

Export Product Combinations (Options/Variants). When enabled, each product row is followed by one row per combination. Adds the columns row_type, parent_reference, combination_reference, attributes, and impact_price. Enable this for a full OpenCart catalog export that includes all product variants.

Scheduled Run  Enable Cron  When on, the Export Profiles Cron URL runs this profile automatically and stores the generated file in Transfer Logs after each run.

Export Destination

The file system saves the file locally. Administrators download it directly from Transfer Logs.

FTP / SFTP pushes the file to a configured remote server after each run. A local copy is also retained in Transfer Logs as a fallback.

When FTP / SFTP is selected, the following additional fields appear, Username, Password, Hostname and Remote Folder which is basically a path name of the folder on which you will export.

Output Style (CSV Delimiter): Universal comma, Windows/Excel semicolon, or Tab-separated.

List Glue  Separator for multi-value fields such as Tags and Category Names. Options: Pipe, Slash, or Comma.

Narrow by Category / Manufacturer / Supplier. Optional filters to scope the export to a specific product subset.

Price Window: Include only products within a specified minimum–maximum price range. Leave blank for no filter.

Click Next Step to proceed.

5.2 Step 2  Choose Fields

Every available product or category column appears as a selectable checklist. Required fields, marked with an asterisk, cannot be deselected. Additionally, you can reorder columns by dragging rows to control the exact sequence in the output file.

Three quick-action buttons are available:

  • Select All includes every available column in the export.
  • Deselect All  Clears all optional selections, leaving only required fields active.
  • Reset to Defaults restores the recommended default column set.

Available product fields include: ID, Model (SKU), Name, Status, Product Type, Condition, Manufacturer, Supplier, Tags, Date Added, Short Description, Description, Weight, Dimensions, EAN, UPC, MPN, Meta Title, Meta Description, SEO URL, Cover Image URL, All Image URLs, Category IDs, Category Names, Price, Cost Price, Special Price, Minimum Quantity, Stock Quantity, Stock Status, and Out of Stock Behaviour  making it one of the most comprehensive OpenCart bulk product export tools available.

Click Preview Data to see the first five rows based on your current selection. Click Save Profile to save without generating, or Next Step to proceed.

5.3 Step 3: Generate File in Opencart Catalogue Import Export Plugin

The final step presents a Download Summary confirming Data Type, File Format, File Label, and Fields Selected. Click Build and Download to generate the file immediately. The file downloads to your browser or is pushed to the configured FTP/SFTP destination, and the run is recorded automatically in Transfer Logs.

Note: Export files remain available for re-download in Transfer Logs until the scheduled cleanup cron removes them after the configured retention period.

6. Import Profiles  Complete Walkthrough

The Import tab, similarly to the Export tab, lists all saved import profiles. Each profile shows its ID, name, entity type, format, source type (Upload or FTP), cron status, and date added. Click Add Import Profile to begin the three-step wizard: Source Settings, Map Columns, and Run Import.

6.1 Step 1  Source Settings

Profile Name: A unique label for this profile. Example: Daily Supplier Feed.

Data Type: Products or Categories.

File Format  CSV, XLSX, JSON, or XML  must match the actual file format.

Output Style: CSV delimiter matching the file being imported.

List Glue must match the glue used during the corresponding export. This setting directly affects multi-value fields like Tags, Categories, and Image URLs.

Language: Default language for rows that do not specify their own language within the file.

Import Options

Update existing records when ID or model matches. Standard setting for all regular OpenCart bulk product import runs. Updates an existing product when a matching ID or SKU is found instead of creating a duplicate.

Force IDs from the file. Use only when migrating between stores where preserving the exact original product ID is required. Not recommended for routine imports.

Source Selection

Upload File for one-time manual imports. Maximum file size: 50 MB. Accepted formats: CSV, XLSX, JSON, XML.

FTP / SFTP  For pulling files from a remote server. Required for cron-driven automated OpenCart imports via scheduled FTP product sync.

When FTP or SFTP is selected as the source for an import profile in the Knowband OpenCart Import Export Scheduler Pro, a set of additional configuration fields appears on the screen. Each field plays a specific role in establishing the remote connection and controlling how the automated OpenCart scheduled import behaves.

The Transfer Protocol field is where you choose the connection method between FTP, FTPS, or SFTP. FTPS is generally recommended for production environments because it adds a layer of encryption over the standard FTP connection. The Server field takes the address of your remote FTP server, for example ftp.example.com. Right alongside it, the Port field auto-populates based on whichever protocol you select, which is 21 for FTP and 22 for SFTP, though you can override this if your server uses a non-standard port.

The Username and Password fields hold the login credentials for the remote server. Both are stored encrypted at rest, meaning they are never saved in plain text anywhere in the system. Once you have filled in the credentials, the Remote File Path field requires the absolute path to the source file on the remote server. 

This path must be exact and the file must exist at that location every single time the OpenCart cron import export runs. A typical example would be something like /home/feed/products.xml.

Passive Mode is a toggle that is recommended for FTP and FTPS connections, as it helps avoid connection issues caused by firewalls blocking the data channel. When SFTP is selected as the protocol, this setting is simply ignored. 
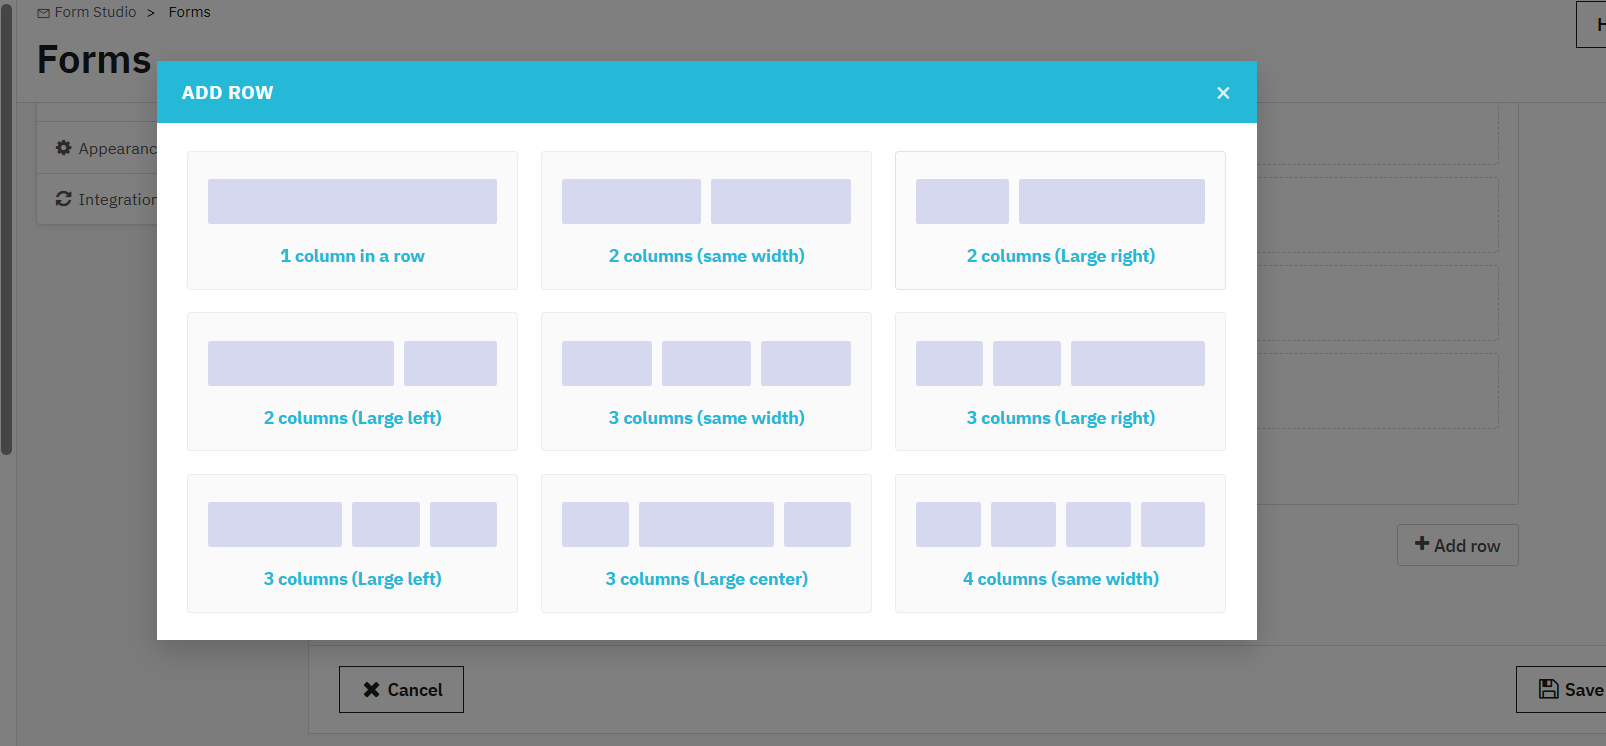
The Cron toggle, when enabled, instructs the Import Profiles Cron URL in General Settings to automatically fetch the file from the remote server and run the OpenCart bulk product import on the configured schedule, without any manual intervention. 

Click Save Profile, then Next Step.

6.2 Step 2: Map Columns

The column mapping screen loads actual rows from your uploaded or fetched file. Each column from your file is matched to the correct OpenCart field. Knowband‘s auto-matching engine detects column names and maps them without manual intervention wherever possible.

A confirmation at the top of the screen shows how many columns were successfully matched  for example: 47 of 47 columns auto-matched. Nevertheless, you should still review the mapping below to verify accuracy, particularly for custom or non-standard column names.

Each file column appears as a dropdown selector at the top of its respective data column. The rows below display real data values from the file, making it straightforward to verify that each column is mapped correctly. Use the search box to find a specific column, and navigate through remaining columns with the pagination arrows.

Important: If a required field is left unmapped, the extension blocks the import and displays a warning before allowing you to proceed. This OpenCart import mapping validation step ensures data integrity on every run.

Click Save Profile to save the mapping. Click Next Step to proceed.

6.3 Step 3: Run Import

Once the mapping is confirmed, two options are presented:

Save Profile saves the import profile for future use without running the import immediately.

Start Import runs the import in batches as configured in General Settings. When complete, Transfer Logs records the full result: total records processed, successful records, and any failures with row-level error detail.

For large catalogs, the batch processing approach used by Knowband‘s extension means the OpenCart bulk product import continues reliably even on shared hosting because each batch is a separate AJAX request; server timeouts cannot interrupt the overall process.

7. Transfer Logs

The Transfer Logs tab provides a comprehensive history of every import and export operation run through the extension. This is, consequently, the first place to check whenever an OpenCart bulk import export run produces unexpected results or an export does not appear in the expected destination.

Using Transfer Logs for Troubleshooting

Click the Log button on any row to open row-level error detail for failed records. This detail view shows precisely which rows failed and the specific error reason for each. As a result, you do not need to re-import the entire file; simply fix only the affected rows in your source file and re-import just those rows.

Export files remain available for re-download in the Logs tab until the scheduled cleanup cron removes them after the configured retention period (default: 7 days). This gives you ample time to verify, redistribute, or archive any generated OpenCart bulk export.


8. Frequently Asked Questions

Question1: What is the Knowband OpenCart Import Export Scheduler Pro?

Knowband‘s OpenCart Import Export Scheduler Pro is a professional-grade bulk data management extension for OpenCart 3.x.x. It handles product and category imports and exports in CSV, XLSX, JSON, and XML, and furthermore includes reusable profiles, column mapping with validation, FTP/SFTP file transfer, cron scheduling, email notifications, and full transfer logs  all from the OpenCart admin panel without any developer involvement.

Question2: How do I bulk upload products in OpenCart using a CSV file? Go to the Import tab and click Add Import Profile. Set the data type to Products, select CSV as the format, upload your file under Pick Source, and click Next Step. The extension auto-matches columns and displays the first rows of the actual file for verification. Confirm the mapping and click Start Import. Sample CSV templates are available from General Settings > Template Files to ensure your file follows the correct column layout.

Question3: Can I import and export OpenCart product combinations and variants? Yes. Enable Export Product Combinations (Options/Variants) in the export profile settings. Each product row is consequently followed by one row per combination, with attributes presented in a readable format. On re-import, any missing attribute groups and values are created automatically in the destination store.

Question4: How do I automate OpenCart product imports using cron jobs? Create an import profile with FTP or SFTP as the source and enable Cron in the scheduling section. Next, copy the Import Profiles Cron URL from General Settings > Scheduled Cleanup. Add it to your server crontab or OpenCart’s scheduled tasks with the required interval. From that point on, Knowband‘s extension handles the entire fetch-and-import cycle automatically a complete solution for scheduled OpenCart import automation.

Question5: How do I migrate products from one OpenCart store to another? Export the full catalog from the source store using any supported format. Import the resulting file into the destination store using a new import profile. Categories, product combinations, and attribute values that do not exist in the target store are created automatically on import, making cross-store OpenCart catalog migration clean and complete.

Question6: What happens if a bulk import fails or has errors? Every run is logged in Transfer Logs with a full record count. Partial failures show the count as X / Y with failures highlighted. Click the Log button on any row to review row-level error detail. Fix only the affected rows in your source file and re-import just those rows  there is no need to process the entire file again.

Question7: Which OpenCart versions does this extension support? Knowband‘s OpenCart Import Export Scheduler Pro is compatible with OpenCart 3.x.x, running on PHP 7.2 or higher and MySQL 5.6 or higher.

Question8: Can I schedule exports to be pushed automatically to an FTP server? Yes. In the export profile’s Transfer Settings, set the Export Destination to FTP / SFTP, configure the remote server credentials, and enable Cron. Thereafter, the Export Profiles Cron URL  when added to your server crontab  will automatically generate and push the export file to your FTP server on the schedule you define. Knowband‘s Opencart Import Export Extension additionally retains a local copy in Transfer Logs as a fallback for every automated run.

9. Tutorial

Admins can check the overall functionality through the tutorial video for the Opencart Import Export Extension

PrestaShop Smart Admin Assistant – Complete User Guide

1.0 Introduction

Managing a PrestaShop store means working with data every day. Orders, stock levels, customer registrations, abandoned carts, revenue, coupon activity, the numbers keep coming. Running the same data checks every day means going through the same steps each time: open a report, set the filters, wait for the page, and do it all over again the next morning. It adds up to a lot of time spent on something that should take seconds. The Knowband PrestaShop Smart AI Admin Assistant removes that friction. It places an AI-powered chat interface directly inside your PrestaShop back office. Type a question in plain English, get an answer from your live store data in seconds, no SQL knowledge, no report navigation, no developer required.

This user manual covers every tab and setting so you can configure the module, connect your AI provider, and start querying your store data on day one. Compatible with PrestaShop 1.7.x through 9.x.

1.1 Who Is This Module For

The PrestaShop Smart Admin Assistant is built for:

  • Store owners who check the same figures every morning and want a faster way to do it.
  • Operations managers who need instant answers on orders, stock, and revenue without digging through reports.
  • Stores with multiple admin staff where different roles need different levels of data access.
  • Any merchant who wants AI-powered PrestaShop back office analytics without a developer on call.

2.0 Installation Guide

System Requirements

  • PrestaShop 1.7.x, 8.x, or 9.x
  • PHP 7.2 or higher
  • A working API key from OpenAI, Anthropic, or Google

Uploading and Installing the Module

Step 1: Log in to your PrestaShop back office, go to Modules, and open Module Manager.

Step 2: Find the “Upload a Module” button at the top right, select the ZIP file you downloaded from Knowband, and confirm. PrestaShop takes it from there.

Step 3: Once the upload finishes, an Install button appears. Click it. The module configuration screen opens on its own once installation is done.

Step 4: If nothing appears after install, type Smart Admin Assistant into the Module Manager search bar and hit Configure.

Common Installation Issues

Upload fails: Server upload size limit is too low. Ask your host to increase upload_max_filesize and post_max_size in the PHP settings to at least 32 MB.

Module not visible after install: Clear the PrestaShop cache under Advanced Parameters, then Performance, then search for the addon again.

Configuration page appears broken: Clear your browser cache and the PrestaShop theme cache under Design, then Theme and Logo, then Advanced Settings.

3.0 PrestaShop Smart AI Admin Assistant: Admin Panel Overview

The PrestaShop Smart AI Admin Assistant has eight tabs across the top of the configuration page:

  • Settings: Core preferences, SQL toggles, voice input, language, log retention, schema cache.
  • AI Provider: Connect OpenAI (ChatGPT), Anthropic Claude, or Google Gemini using your API key.
  • Widget Layout: Customise the chat widget appearance with a live preview that updates as you make changes.
  • Database Views: Choose which data categories the AI is allowed to query.
  • Access Control: Manage which admin profiles are permitted to open the assistant.
  • Predefined Chips: One-click question buttons for quick daily checks.
  • Query History: A running log of every query, showing the employee, how long it took, and whether it succeeded.
  • Sessions: Complete chat threads per employee.

Together, these tabs cover everything from PrestaShop Smart Store Analytics and reporting to data access control and session history.

4.0 Settings Tab

4.1 General Settings of the PrestaShop AI Dashboard Module

Enable Chatbot: Toggle the PrestaShop Smart AI Admin Assistant on or off. All settings are preserved when disabled; re-enabling them brings everything back instantly.

Enable Predefined Chips: Toggle the quick-click question buttons on or off inside the chat widget.

Chips Default State: Collapsed means the chips panel will be hidden when the widget first opens. Expanded means all chips will be visible as soon as the assistant loads.

Max Result Rows: The maximum number of rows the AI may return for any one query.

The range runs from 1 to 1000, with 100 as the default. Push it higher for detailed data pulls, keep it lower when you just need a quick figure.

Show SQL Query Toggle: When set to Yes, the assistant displays the exact SQL it generated beneath each answer. This is the core PrestaShop back office analytics transparency feature; admins see precisely how every answer was produced.

Allow SQL Edit and Re-run: When set to Yes, admins can edit the generated SQL directly in the chat and re-run it. Useful for adjusting a date range, threshold, or filter without typing a new question from scratch.

Voice Input: Enables the microphone icon in the chat input. Admins can speak questions instead of typing, using the browser’s Web Speech API. This voice input admin feature for PrestaShop works best in Chrome on a desktop.

4.2 Language Settings

Use Back-office Language: The assistant matches the language your PrestaShop admin panel is currently running in.

Use Custom Language: Choose a fixed response language which will not change based on the language the back office is set to. Useful when individual staff members work in a language different from the one in which the back office is configured.

4.3 Log and Cache Settings

Log Retention (days): Decides how many days of query history the module holds before deleting old entries. Default is 90 days. The cleanup runs on its own schedule without any manual database work.

These settings help the PrestaShop Smart Insights Module maintain accurate and up-to-date query records at all times.

Schema Cache TTL (minutes): The schema is the structure map of your database that the AI reads to build accurate queries. This setting controls how long the map is cached before the addon fetches a fresh copy.

Refresh Schema Now: Triggers an immediate schema refresh on demand. Run this after adding a new module, upgrading PrestaShop, or any change that alters the database structure.

Click Save Settings to apply all changes on this tab.

5.0 AI Provider Tab

The AI Provider tab is where you link the module to your preferred AI service. OpenAI (ChatGPT), Anthropic Claude, and Google Gemini are all supported. This multi-AI provider support means you are not locked into a single vendor. You supply your own API key, and the addon connects directly to your chosen provider.

5.1 Choosing Your Provider

Click the provider button, OpenAI (ChatGPT), Anthropic Claude, or Google Gemini, to select it. The settings below update to show fields for that provider.

5.2 How to Get Your API Key

OpenAI

  1. Go to platform.openai.com and sign in or create an account.
  2. Select API Keys from your profile menu. Hit Create new secret key, name it, and confirm. Copy the key right away since OpenAI only shows it once.


  3. Paste it into the OpenAI API Key field in the module. This connects the PrestaShop OpenAI back office integration directly to your account.

Anthropic Claude

  1. Go to console.anthropic.com and sign in or create an account.
  2. Click API Keys in the left sidebar.

  3. Click Create Key, give it a name, and copy the key shown.

  4. Paste it into the Claude API Key field. The PrestaShop Claude AI back office connection is established as soon as the key is saved.

Google Gemini

  1. Go to aistudio.google.com and sign in with a Google account.
  2. Click Get API key in the top left.

  3. Click Create API key, select a project, and copy the generated key.

  4. Paste the key into the Gemini API Key field in the addon. The PrestaShop Gemini Admin Module integration activates immediately after saving.

5.3 Selecting a Model

OpenAI models:

  • GPT-4o Mini (Fast and Cheap): A solid choice for everyday admin queries.
  • GPT-4o (Balanced): Handles more complex questions that involve multiple tables.
  • GPT-5.5 (Most Capable): The strongest option for detailed analytical work.

Anthropic Claude models:

  • Claude Haiku 4.5 (Fast and Cheap): Works well for straightforward daily checks.
  • Claude Sonnet 4.6 (Balanced): Sits between speed and depth for most use cases.
  • Claude Opus 4.7 (Most Capable): Use this when queries involve several joined tables or layered conditions.

Google Gemini models:

  • Gemini 3.5 Flash (Fast and Capable): The recommended pick for general store queries.
  • Gemini 3.1 Flash-Lite (Fastest and Cheapest): Best suited for stores where keeping API costs low is the priority.

5.4 Temperature Setting

This controls how strictly the AI sticks to factual output. At 0, responses are as precise as possible. At 1, there is more variation in how answers are phrased. For store data queries, 0.3 works well as a starting point. Drop to 0.0 if you need the most literal, consistent results.

Click Save Provider Settings to apply.

6.0 Widget Layout Tab

The Widget Layout tab controls how the chat window looks inside the back office. A live preview panel on the right updates in real time as you adjust each setting.

Position: Where the chat bubble sits on screen. Default is Bottom Right.

Chatbot Name: The label shown in the widget header. Default is Smart Admin Assistant.

Greeting Message: The opening line the assistant shows when the widget is opened. Default reads “Hello! Ask me anything about your store.”

Bubble Icon: A custom image for the floating chat button. Square PNG, 64×64 px, maximum 2 MB.

Chatbot Avatar: The image that appears beside bot messages inside the chat window. Square PNG, 48×48 px, maximum 2 MB.

Widget Width and Height (px): Controls the size of the chat panel. Default is 400 wide by 560 tall.
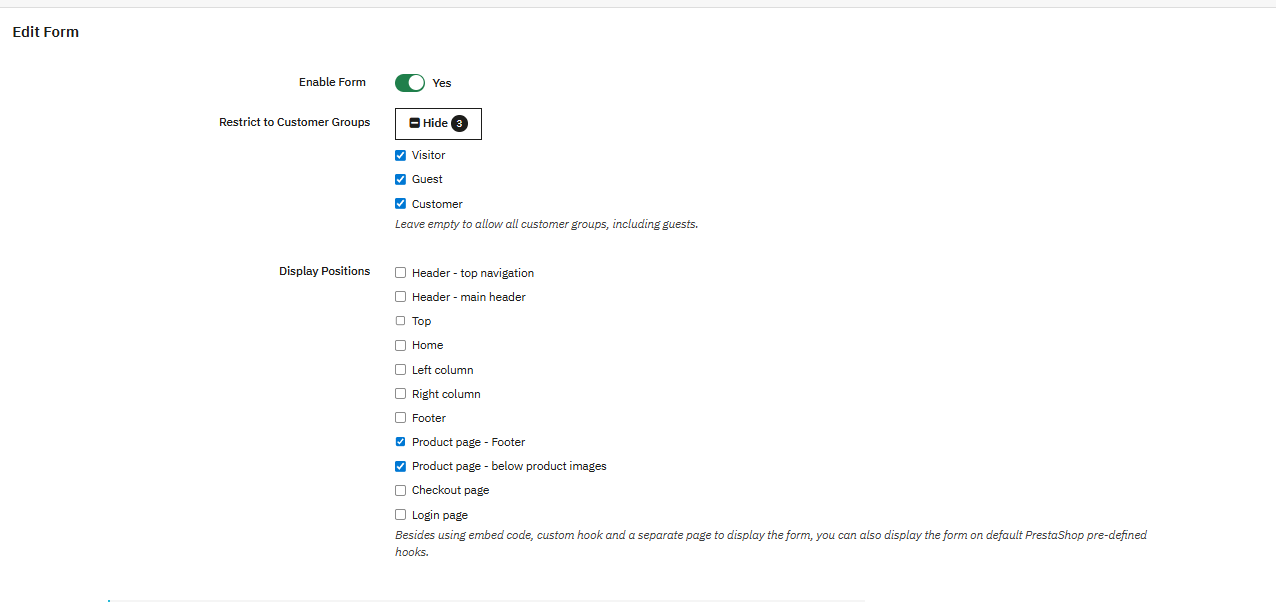
Colour Settings: Six individual controls for Header, Chat Bubble, User Message, Bot Message, Background, and Text colours. No CSS editing needed.

Click Save Layout to apply.

7.0 Database Views Tab

7.1 What Are Database Views

Database views in PrestaShop are pre-built MySQL structures that join and simplify relevant tables. The PrestaShop AI back office module works through these views rather than querying raw database tables directly, so the AI can give accurate answers without any risk of touching data it should not. Every view is read-only. The assistant can retrieve information but cannot change, remove, or add anything.

Turning off a view removes it from what the assistant can query. The MySQL view itself stays in the database unchanged, so switching it back on works immediately.

7.2 Available Database Views

  • Orders Overview: Order records including customer details, currency, status, and totals. Provides real-time order data for admins without any report generation.
  • Order Line Items: Individual product lines within each order, with quantities and prices.
  • Customers: Customer accounts with group membership, gender, and last visit date.
  • Products: Product data covering name, stock, price, category, and image information.
  • Specific Prices / Product Discounts: Price overrides set at the product level. Off by default.
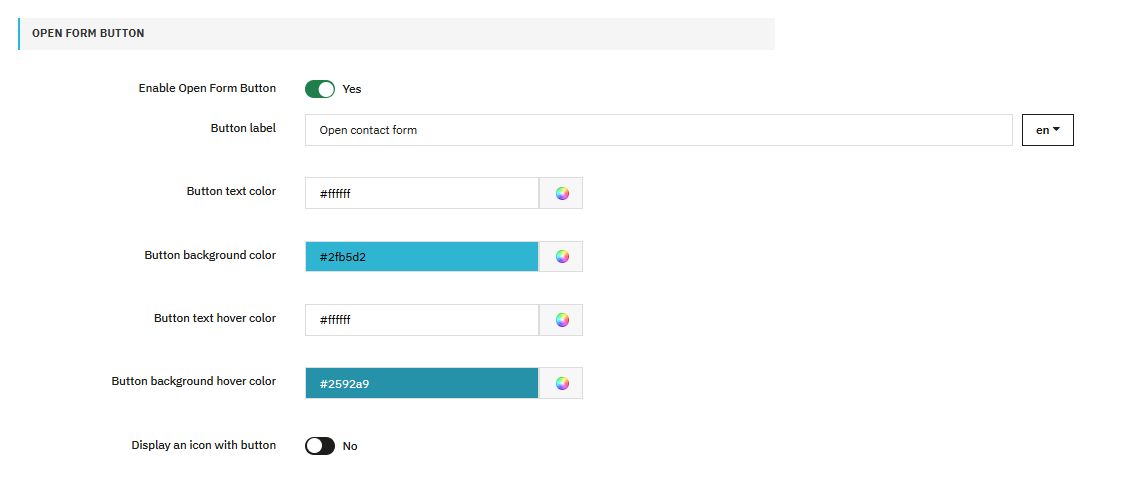
  • Categories: Category names and the hierarchy they sit in.
  • Shopping Carts: Both active and abandoned carts, with customer and currency details.
  • Cart Rules / Coupons: Discount rules with usage data, free shipping flag, and conditions.
  • Stock Availability: Stock levels per product and combination with readable combination names. Powers PrestaShop stock insights AI queries about low and out-of-stock items.
  • Employees: Back-office user accounts and profile information.
  • Customer Addresses: Full address records with country, state, and linked customer names.
  • Carriers / Shipping Methods: Active delivery carriers. Off by default.
  • Manufacturers / Brands: Brand records with descriptions and product counts.
  • Product Combinations / Variants: Variant-level data, including stock, reference, and attribute names.
  • Product Attributes and Values: Attribute groups such as Colour and Size, with all associated values.

Click Save and Create Views to apply. The module builds the MySQL views for each domain you have switched on.

8.0 Access Control Tab

The Access Control tab controls which back-office users can see and open the PrestaShop Smart Admin Assistant.

Toggle: Enable role-based access by limiting the chatbot to particular employee profiles.

When on, a profile list appears. SuperAdmin always has access and is not listed. Tick the additional profiles: Logistician, Translator, and Salesman. Profiles left unticked cannot see the assistant. Leaving all profiles unticked with role-based access restricts the assistant to SuperAdmin only.

This employee access control feature for PrestaShop makes the PrestaShop Store Management AI capability available only to the staff roles that need it.

Click Save Access Settings to apply.

9.0 Predefined Chips Tab

Predefined chips are quick-click question buttons inside the chat widget. Clicking a chip sends the saved question to the AI instantly, no typing needed.

They are one of the most practical features for PrestaShop Smart Store Analytics, covering the most common store performance questions admins ask every day.

9.1 Default Chips in the PrestaShop Smart AI Admin Assistant

The module ships with ten predefined quick query chips that are active and ready to use from the first login:

  1. Orders Today: How many orders were placed today?
  2. Revenue (30d): What is the total revenue in the last 30 days?
  3. Cancelled Orders: How many orders were cancelled in the last 30 days?
  4. Abandoned Carts: How many abandoned carts are there in the last 30 days?
  5. Active Customers: How many active customers do we have?
  6. Out of Stock: Which active products are currently out of stock?
  7. Low Stock (less than 5): Which products have fewer than 5 units in stock?
  8. No SKU Products: How many products do not have a SKU reference?
  9. Free Shipping Coupons: Are there any active coupons that offer free shipping?
  10. New Customers (This Month): How many customers registered this month?

9.2 Adding a Custom Chip

Click Add Chip to open the edit panel.
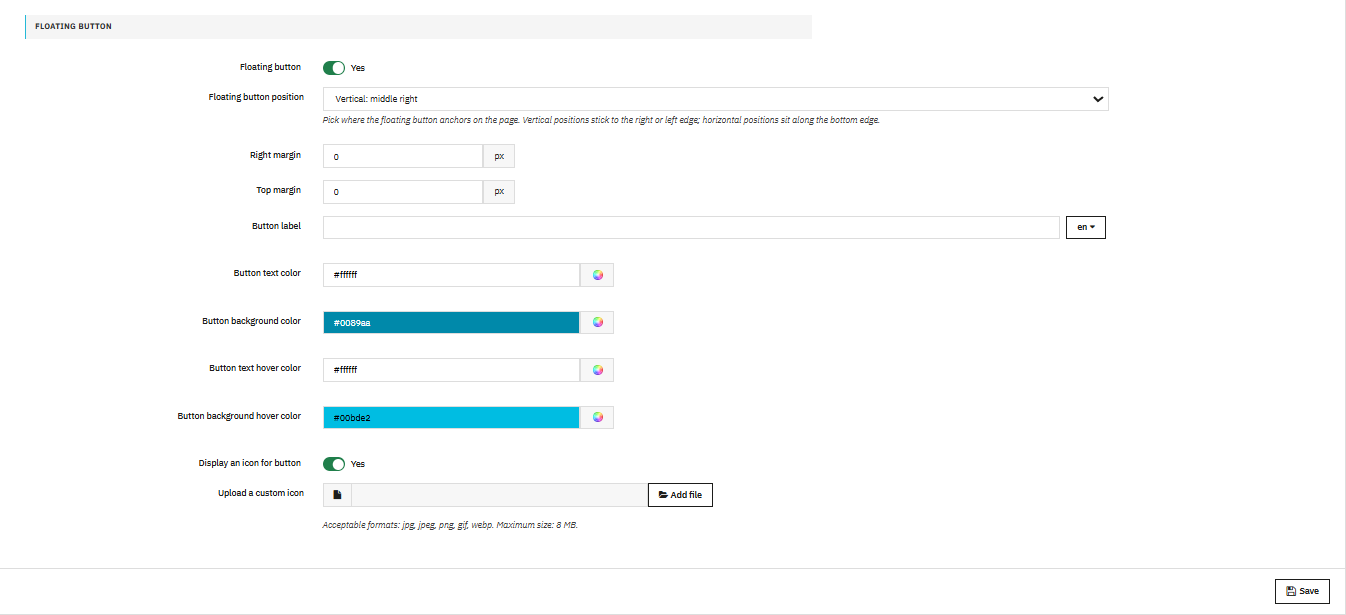
Label: The short text that shows on the chip button itself. For example: Weekly Revenue.
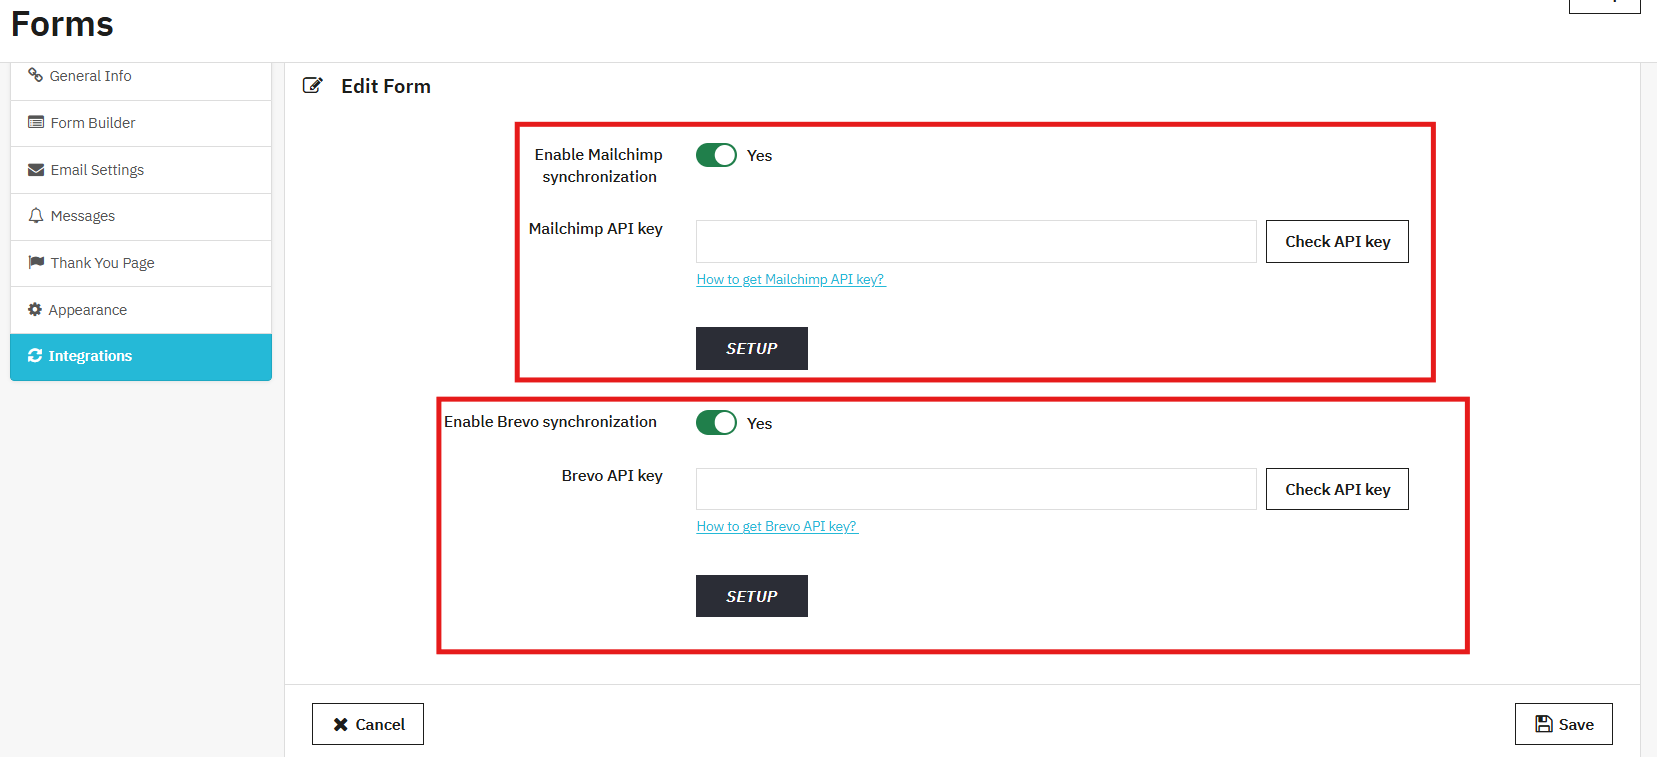
Question: The full question that gets sent to the AI when someone clicks the chip. For example: What is the total revenue for the last 7 days?

Position: Sets where this chip sits in the list. Lower numbers come first.

Active: Yes, puts the chip in the widget. No hides it without removing the configuration.

Click Save Chip to confirm. Each existing chip has Edit and Delete buttons on its row for making changes or removing it entirely.

10.0 Query History Tab

The Query History tab keeps a log of every question submitted through the PrestaShop admin AI chatbot, functioning as a complete admin session history log for back-office data requests. Each row shows:

  • Date: When the question was asked
  • Employee: The admin account that sent it
  • Question: The full text of the query
  • Rows: The number of data rows the answer contained
  • Time (ms): How long the query took to run, in milliseconds
  • Provider: Which AI provider processed the query, displayed as a labelled badge
  • Status: Shown as a green badge for success or a red badge for an error
  • SQL: The generated SQL is available to view directly in the row

Use the status and date filters at the top of the tab to narrow the list. Export to CSV or Excel with the buttons above the table. Click Purge Old Logs to immediately delete entries older than the Log Retention setting.

11.0 Sessions Tab

The Sessions tab stores complete conversation threads per employee. Each session shows the employee name, start time, and message count. Click View to open the full conversation, questions, and responses displayed chronologically in a pop-up. Useful for auditing how the assistant is being used or picking up context from a previous session.

12.0 Analytics Dashboard

The Analytics Dashboard is also the core feature of the PrestaShop AI Admin Assistant, which is added in the version 1.0.1, giving store owners a single, live screen for revenue, orders, customers, and stock the moment they open their back office. Being as a PrestaShop AI Dashboard Module, it removes the need to dig through order lists or export spreadsheets from the default prestashop just to understand how the store is performing. Here, widgets are grouped into three categories:

Key Metrics: KPI cards covering revenue, order volume, and customer activity
Charts & Trends: visual breakdowns of how sales move over time and across categories
Lists & Tables: ranked views such as top-selling products and low-stock warnings

Each employee can decide which widgets show up on their own dashboard and arrange them however suits their work using the module configuration. You can change the setting from the dashboard settings in the Prestashop Analytics & Reporting Module, like which order states count toward revenue are configured so that numbers stay consistent across the whole team. Together, this makes the module one of the more complete options for PrestaShop AI Backend Analysis, combining reporting, forecasting, and inventory intelligence in one place.

12.1 Analytics Dashboard Settings

You’ll find these controls under Settings → Dashboard Settings. This is the central configuration screen for Knowband Smart AI Admin for PrestaShop, and every option here applies store-wide, across all employee accounts. Individual staff can still adjust their own widget selection and layout from the dashboard’s Customize panel, but the calculations behind the numbers are governed here. Use this section to define how revenue is calculated, which time frame the dashboard opens with by default, its visual theme, and whether it becomes your new back office landing page.

12.2 Dashboard Settings in Smart AI Admin

Revenue Order States

This setting determines which PrestaShop order states are counted as revenue throughout the dashboard, feeding every sales-related widget including Revenue, Orders, Average Order Value, Best Sellers, Top Customers, and Coupon Usage.

Default Period

Sets the time range the dashboard loads with by default. Choose from Last 7 Days, Last 30 Days, Last 3 Months, Last 6 Months, or Last 1 Year.

Colour Theme

Controls the visual styling of the dashboard. Available themes include Indigo (default), Ocean, Emerald, Rose, Dark, and Custom.

List Rows

Sets how many rows appear in each list- or table-based widget across the dashboard, including Best Sellers, Top Customers, Slow Movers, Reorder Suggestions, Churn Risk, Low Stock Alerts, Coupon Usage, and Brand Performance.

Churn Window

Defines the number of days a customer must be inactive before they appear in the Churn Risk widget, one of the module’s dedicated customer retention tools.

Low Stock Threshold

Sets the quantity at or below which a product is classed as “low stock” across the Low Stock, Low Stock Alerts, and Reorder Suggestions widgets. This threshold underpins the dashboard’s Stock Insights AI, the module’s dedicated engine for surfacing inventory risks before they become lost sales.

Replace Default Dashboard

Enable this option to have the Analytics Dashboard take over as your PrestaShop back office home page, opening automatically for every employee immediately after login. When disabled, PrestaShop’s native dashboard remains the default landing screen, and the Analytics Dashboard can still be opened separately from the admin menu whenever it’s needed. This is what makes the module function as a true PrestaShop AI Module Back Office replacement rather than a bolt-on report you have to remember to check.

Customising Your Dashboard

Every employee can rearrange their own dashboard independently, without affecting anyone else’s view.

Click Customise (the widget library icon) on the dashboard. Drag widgets to reorder them within their group (Key Metrics, Charts & Trends, or Lists & Tables). Close the panel to see your updated layout in place. If you’d rather start over, click Restore Default to reset the dashboard to its original configuration.

12.2 Key Metrics (17 widgets)

As a PrestaShop Admin Analytics AI toolkit, the Key Metrics group is where store owners get their fastest daily read on the business, before digging into charts or lists.

Revenue shows total order value for the chosen period and the order states defined in your dashboard settings, paired with a daily trend line and a percentage change against the prior period. This is the module’s built-in PrestaShop AI Sales Report Module output, always visible from the moment you log in.

Orders: Displays the number of orders placed within the selected period, along with a trend line and percentage change, giving you the volume side of the store’s order analytics at a glance.

Avg. Order Value: Calculated as total revenue divided by total orders, this metric gives store owners an immediate pulse check without opening a spreadsheet. If pricing or promotions shift customer spending, it shows up here first.

Items Sold: Total units sold across all orders in the selected period. Useful for tracking sales volume on its own terms, separate from revenue, particularly when running discounts or bundle offers.

Items per Order: Shows the average number of items per order, helping you understand whether customers are typically buying single items or shopping in bulk.

Discounts Given Totals the value of vouchers, cart rules, and reward discounts applied in the selected period, with a percentage change against the previous period so you can track how promotional activity is trending.

Taxes Collected: Reports total tax collected on orders during the selected period, useful when reconciling figures for accounting or compliance.

Shipping Revenue Totals the shipping fees collected from customers over the selected period, with a percentage change shown against the prior period.

Refunded Value Tracks the total value of orders marked as refunded within the selected period, giving visibility into returns and revenue lost to them.

New Customers: Counts customers who created an account during the selected period, pulled directly from registration data. This metric lets store owners see the real-time effect of acquisition campaigns without waiting on a manual export.

Repeat Customers: Counts customers who placed two or more orders within the selected period. This figure feeds directly into the module’s customer retention view, offering a quick read on loyalty without manually cross-checking order histories.

Returning Buyer Rate: The percentage of buyers in the period who ordered more than once, calculated as repeat customers divided by total unique purchasers. It’s a fast way to see whether retention efforts, from email campaigns to loyalty schemes, are actually turning first-time buyers into repeat business.

Total Customers shows the full customer count registered in the store to date, independent of the selected period. As a live snapshot, it always reflects the current total the moment the dashboard loads.

Active Products shows how many products are currently enabled and available for sale on the storefront, giving a quick read on active catalogue size when auditing inventory.

Out of Stock Flags enable products currently sitting at zero quantity, so stockouts are caught immediately rather than discovered after a customer tries to order.

Low Stock Counts enabled products at or below the low-stock threshold set in Analytics Dashboard Settings, acting as an early warning for reordering before a product actually runs out. This is one of the widgets that makes Stock Insights AI genuinely useful day to day, rather than just a static report.

Units in Stock totals the quantity held across every enabled product in the store, giving a single figure for overall stock volume. Best read alongside Low Stock and Out of Stock for a full inventory picture.

12.4 Charts & Trends (Includes 9 widgets)

Revenue Trend plots revenue over time as a line chart, shown daily for periods up to six months and monthly for a full year. It’s a visual companion to the store’s sales figures, making spikes, dips, and seasonal patterns easier to spot than in raw numbers alone.

Revenue Forecast looks at the last 90 days of trading and projects likely revenue for the next 30 days, based on recent momentum rather than the period currently selected. Powered by the same engine behind the module’s PrestaShop AI Backend Analysis, this helps store owners plan stock orders, cash flow, and marketing spend ahead of time, grounded in actual sales data rather than guesswork.

Orders Trend Charts order volume over time using the same daily-or-monthly logic as Revenue Trend, giving a volume-based counterpart to the revenue chart.

Payment Methods: Breaks down revenue by the payment option customers actually chose at checkout. If one method is quietly outperforming the rest, it’s worth understanding why; if another is barely used, that’s often a sign it needs more visibility or trust-building at checkout.

Sales by Country: A straightforward bar chart of revenue by shipping destination, and a genuinely useful one for spotting where a store’s real geographic strength lies, especially when weighing up new shipping zones or ad spend.

Order Status: Lists every active order state with its revenue and order count side by side, making it easy to see at a glance where orders currently stand, whether still processing, stuck pending, or already delivered.

Sales by Carrier Breaks revenue down by shipping carrier, so you can see which ones your customers actually choose. Worth reviewing periodically, especially when renegotiating rates or deciding whether a new carrier is worth adding.

Sales by Day of Week Groups total revenue by weekday across the whole selected period, not just the past week. Patterns often surface here that aren’t obvious day to day, such as a Thursday that consistently outsells the rest, useful when planning promotions or staffing.

Sales by Hour Shows exactly when customers are most likely to buy, which takes the guesswork out of timing flash sales, email sends, or live chat support.

12.4 Lists & Tables (8 widgets)

Best Sellers ranks products by units sold, showing reference, quantity, and revenue side by side. A quick way to see exactly which products are carrying the business.

Slow Movers Lists active products with the fewest sales in the selected period, helping store owners identify stock that needs a promotional push, a price adjustment, or removal from the catalogue.

Top Customers ranks customers by total revenue alongside order count, giving a clear view of who to prioritise for loyalty perks, personal outreach, or dedicated account management.

Churn Risk Flags high-value customers who haven’t ordered within the configured Churn Window, along with their lifetime value and last order date. This is the core of the module’s retention toolkit, helping store owners re-engage customers before they’re gone for good.

Low Stock Alerts: Lists every product at or below the configured stock threshold, or already out of stock, with reference and quantity, giving an early warning before a bestseller disappears from the shelf.

Reorder Suggestions: Calculates suggested reorder quantities for products sold in the last 30 days, based on current stock, average daily units sold, and remaining days of stock cover. Store owners can use this to restock the right amount, avoiding both overstocking and stockouts.

Coupon Usage shows every voucher redeemed during the selected period, along with number of uses and total discount value, making it easy to see which promotions are actually driving orders versus which ones are just cutting into margin.

Brand Performance Ranks manufacturers by revenue and units sold, rounding out the dashboard’s view of what’s actually driving the store, down to the brand level.

13.0 Frequently Asked Questions

Q: What is the PrestaShop Smart AI Admin Assistant, and how does it work?

The PrestaShop Smart AI Admin Assistant by Knowband lets store admins ask plain-language questions about their store data and receive instant answers. It connects to the live database through pre-built read-only MySQL views, sends the question to the chosen AI provider: OpenAI, Anthropic Claude, or Google Gemini, which generates and runs a SQL query and returns the result in natural language. It brings real-time data access to any back office user without requiring technical knowledge.

Q: Which AI providers does the PrestaShop Smart Admin Assistant support?

The module supports OpenAI (GPT-4o Mini, GPT-4o, GPT-5.5), Anthropic Claude (Haiku 4.5, Sonnet 4.6, Opus 4.7), and Google Gemini (Gemini 3.5 Flash, Gemini 3.1 Flash-Lite). You supply your own API key, and the module connects directly. No subscription to the module’s own AI service is needed. You pay only for actual API usage. All models integrate with the PrestaShop AI Sales Analytics Addon to deliver accurate, fast answers from your live store data.

Q: Can the PrestaShop Smart Admin Assistant modify or delete store data?

No. The assistant accesses the database through pre-built MySQL views, read-only by design. It cannot update, delete or insert any data through the chat interface. Every answer is a read-only retrieval from your live PrestaShop store. It is therefore a safe tool for back office automation without any risk of storing data.

Q: What can I ask the PrestaShop Admin AI Module?

You can ask natural language queries about orders, customers, revenue, stock levels, abandoned carts, discount coupons, product combinations, employee accounts, shipping carriers, brands, and categories. The experience is similar to asking ChatGPT, but every answer comes directly from your live store data. This covers order management, inventory tracking, and no SQL store reporting, all from the back office.

Q: How do predefined chips work in the PrestaShop Smart Admin Assistant?

Predefined chips are quick-click buttons inside the chat widget of the PrestaShop admin AI chatbot. Each chip sends a pre-saved question to the AI when tapped. The default set covers orders today, revenue, abandoned carts, low stock, out-of-stock products, active customers, new customers, cancelled orders, free shipping coupons, and products missing a SKU. Custom chips can be added, edited, or removed from the Predefined Chips tab. This is one of the most useful features of the PrestaShop AI Reporting Module for running daily store checks.

Q: What does the SQL visibility feature of the PrestaShop admin AI chatbot do?

When Show SQL Query Toggle is enabled, the assistant displays the SQL it generated beneath each answer. With Allow SQL Edit and Re-run also on, the admin can modify that SQL in the chat, adjusting a date, threshold, or filter, and re-run it immediately. It effectively turns the PrestaShop AI Sales Analytics Addon into a SQL-free reporting tool that any team member can work with directly. This is especially useful for PrestaShop AI backend analysis without requiring a developer.

Q: How does role-based access control work?

Open the Access Control tab and switch on Restrict the chatbot to specific employee profiles. SuperAdmin always has full access and does not appear in the list. From there, tick any additional profiles you want to include, such as Logistician, Salesman, or Translator. Any profile left unticked will not see the assistant in their back office.

Q: What is the schema cache, and when should I refresh it?

The schema cache in the PrestaShop Smart Insight Module holds a structural map of your database so the AI knows which tables and columns to use when building queries. It generates automatically during the first chat session and updates on the interval set in Schema Cache TTL (24 hours by default). After installing a new module, upgrading PrestaShop, or making any change that affects the database structure, use Refresh Schema Now to pull a fresh copy straight away.

Q: How can I get an API key to work with the PrestaShop Admin AI Module?

OpenAI: go to platform.openai.com, open API Keys from your profile menu and create a new key. Anthropic Claude: go to console.anthropic.com, open API Keys from the sidebar and create one. Google Gemini: go to aistudio.google.com, press Get API key and create one from there. After you have the key, copy it into the appropriate field in the AI Provider tab and save.

Q: Is the PrestaShop Smart Admin Assistant compatible with PrestaShop 9?

Yes. The module runs on PrestaShop 1.7.x through 9.x. The product page has the latest compatibility information.

Q: How does the PrestaShop AI Reporting Module help with sales reporting in PrestaShop?

PrestaShop AI sales report module lets the admin get the revenue, orders and conversion data through a simple chat interface instead of running reports manually. For teams looking for the best PrestaShop admin AI tool to replace dashboards, this module has daily reporting, stock checks and customer data all in one place. 

13.0 Conclusion

The Knowband PrestaShop Smart AI Admin Assistant brings AI-powered PrestaShop back office analytics to any store without requiring SQL knowledge, developer access, or third-party solutions. Ask in plain English, get answers from live store data, see the SQL behind every result, and configure the PrestaShop Admin Analytics AI Addon in minutes.

Predefined chips turn the daily store check into a one-minute task. Role-based access keeps the right data in front of the right staff. Query History keeps a complete audit trail of everything asked.

For support, custom requirements, or add-on development, contact the Knowband team directly.

Get the Knowband PrestaShop Smart Admin Assistant and start querying your store data from day one.

How to Run a Post-Purchase OpenCart Survey Without a Single Line of Code

Most unhappy customers say nothing. They finish their order, have a bad experience, and never come back. You never find out what went wrong. For an OpenCart store, this is a real problem; the platform gives you no built-in way to ask customers how they feel.

OpenCart comes with a basic contact form and a product review option. Neither one collects post-purchase feedback properly, and neither lets you ask specific questions after an order. Many store owners use external tools like Google Forms instead, but these send customers away from your store. Others just never ask at all.

A dedicated survey solution for OpenCart keeps everything inside your store. You build the form in the admin panel. The right OpenCart Survey Plugin takes care of form creation, display, email alerts, and spam blocking, all from one place.
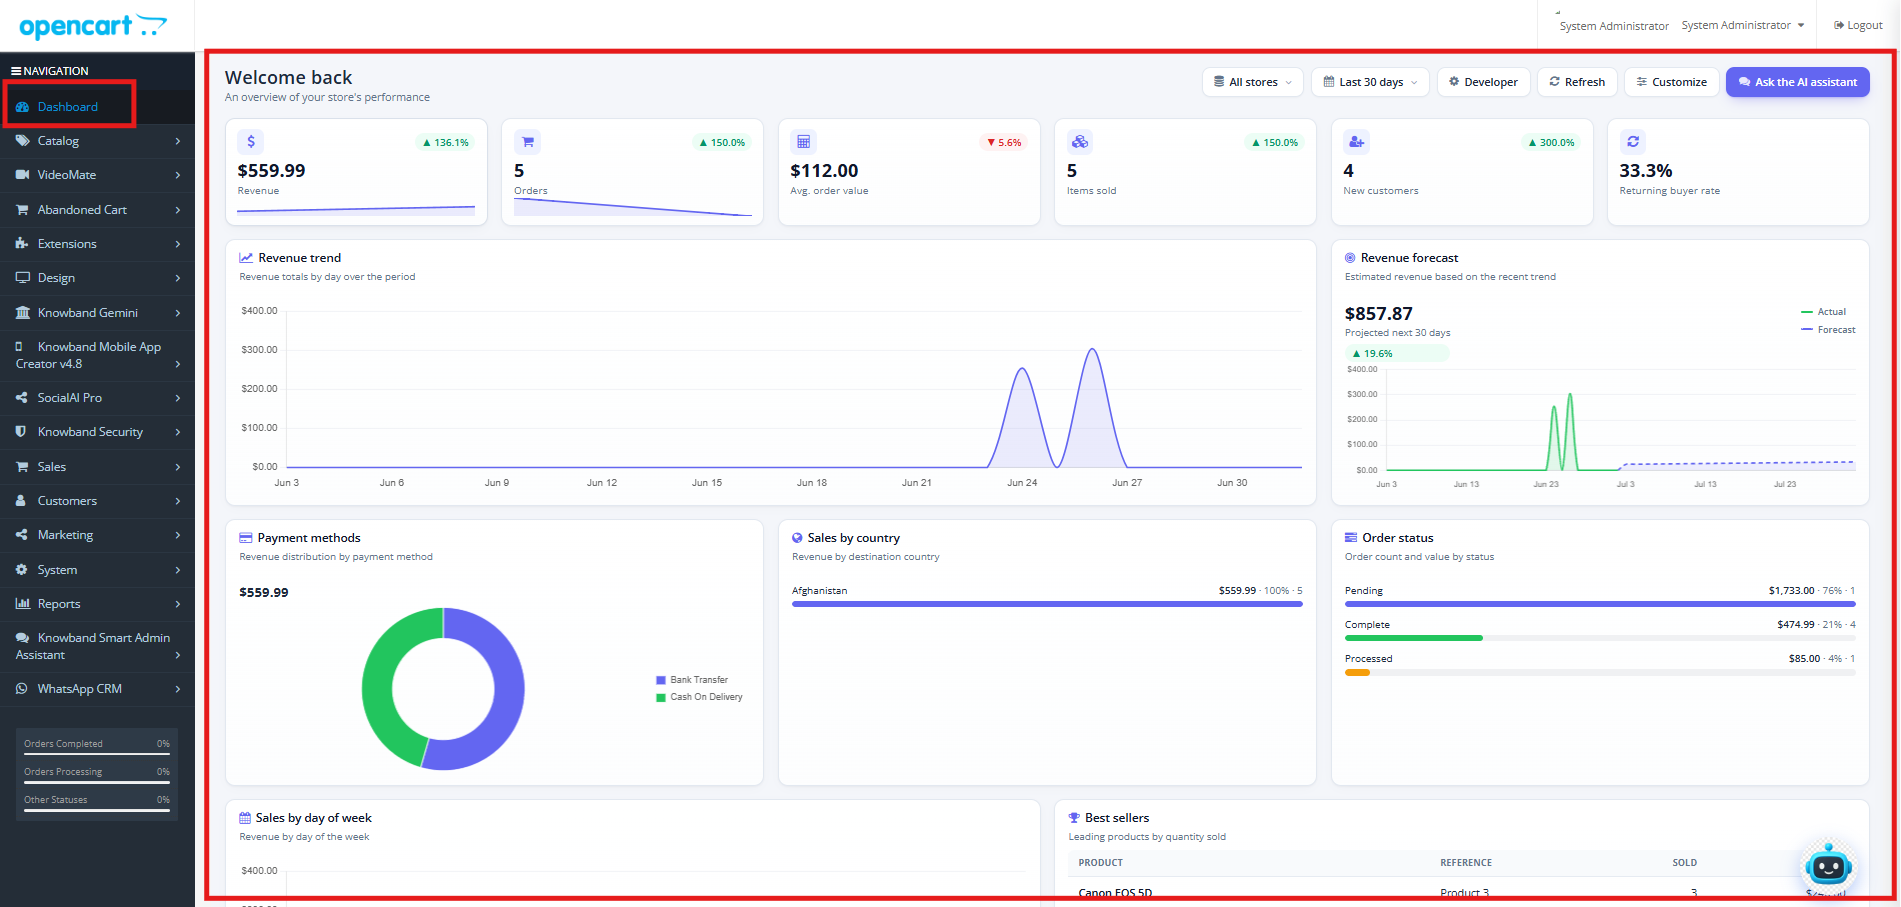
Why an OpenCart Survey Plugin Fills a Gap That Native Features Cannot

The built-in OpenCart features were made for support requests and product ratings, not for understanding the full customer experience. A product review only tells you what someone thought about a product. A contact form only collects complaints. Neither one tells you about the checkout process, the delivery, or whether a first-time buyer will return.

Surveys placed on the order confirmation page get far more responses than survey links sent by email days later. On-page surveys see completion rates of 15 to 20 percent on average. Email survey links often get under 5 percent. Where you place the form matters more than what you ask.

Knowband’s OpenCart Form Builder Extension solves this from inside the back office, with no separate platform, no extra subscription, and no technical skills required.

How to Set Up Your First Survey Using an OpenCart Survey Plugin

Building a satisfaction survey takes five steps inside the Forms section:

Step 1: Create the form. Click Add New Form and give it a name. You can set a URL slug for the form page and share that link in emails or support tickets, or add it to your site manually. On the front end, a button can open the form as a pop-up on the same page instead.

Step 2: Pick a layout. One column works best for satisfaction surveys. It keeps questions in a clear, top-to-bottom order, which reduces the chance of customers leaving before finishing. Two or more columns are available for longer forms, where related fields make sense next to each other.

Step 3: Add your questions. A good starting point: a radio button for the overall satisfaction rating, a dropdown for the product or order type, and a text box for written comments. Add a file upload option if you want customers to send photos of any product issues.

Step 4: Set up email alerts. Each form sends its own email notification. Choose which inbox receives the alert when a customer submits. Use BCC to copy additional team members. Turn on the auto-responder so customers get a short confirmation straight away, even one line works.

Step 5: Set up the thank-you page. After submission, show a short message or redirect to another page. Keep it simple, just let the customer know their feedback was received.

Where to Place Your OpenCart Survey for the Highest Completion Rate

The Placements tab inside each form controls where the form appears on your site. This is where the OpenCart customer feedback plugin displays logic. Pick the page type: Home, Product, Checkout, Information, or Search. Then choose the position on that page: top of content, bottom of content, left column, right column, header, or footer. The form shows up on every page and position you select.

For a post-purchase survey, put it on the Checkout page at the bottom of the content area. This places the form on the order confirmation page, right after a customer completes their purchase. The experience is fresh, the customer is still on your site, and there is nothing to influence their buying decision because the order is already done.

The Settings tab lets you choose between an inline form and a pop-up that opens when a customer clicks a button. The floating button option keeps that button visible in the corner of the screen as the page scrolls, and the form stays easy to reach without getting in the way.

Keeping Your OpenCart Survey Results Spam-Free

Any form on a live website receives bot submissions over time. If spam fills your survey data, the results become unreliable. Spam protection in the OpenCart Form Builder Extension works at three levels.

Cloudflare Turnstile runs quietly in the background and blocks bots. Real customers see no puzzles or extra steps. The IP blocklist lets you block specific addresses or whole ranges using a wildcard. The email blocklist works the same way; one entry like *@mail.ru blocks every address from that domain.

Knowband includes pre-written patterns for the Spam Email Filter field, covering the most common spam sources. Copy them in, and they work immediately, no technical knowledge needed.

Turning Survey Responses Into an Email Marketing Sequence

The Synchronization tab inside each form connects Mailchimp integration and Brevo. Add your API key, choose the list, and every person who fills in the form gets added automatically. Brevo connects the same way.

A customer who gives a high rating is a good candidate for a review request. A customer who reports a problem can receive a follow-up message before they post a negative review anywhere else. Both of these can happen automatically from a single form submission, no manual work needed.

Every response appears in the Form Submissions panel with the date, the form name, what was filled in, and whether your team has already replied. You can reply directly from your admin panel. Exporting submissions regularly lets you track the customer satisfaction score over time and spot patterns across many responses.
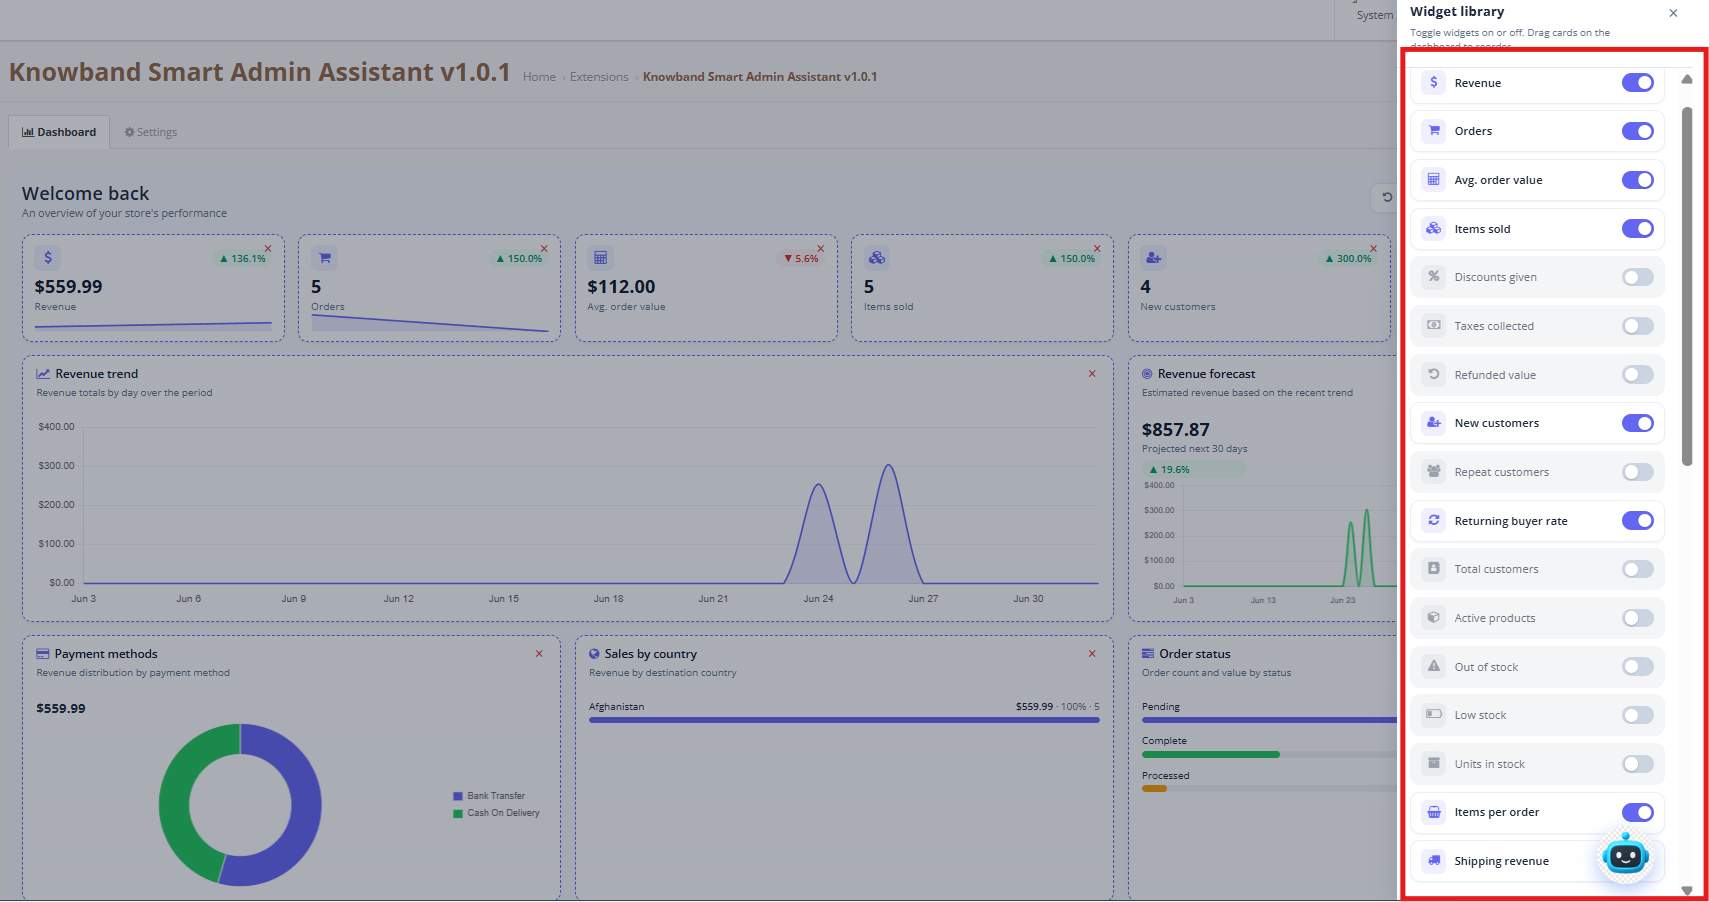
Why the Right OpenCart Survey Plugin Pays Off Before Your Next Order Ships

The full setup, building the form, choosing placement, configuring email alerts, and turning on spam filtering, takes under 30 minutes the first time. No developer needed, no outside solutions to manage, no ongoing costs beyond the OpenCart Survey Plugin.

The OpenCart customer feedback plugin handles satisfaction surveys, product feedback, lead generation forms, support requests, and event sign-ups, all from one extension. Every day your store runs without a way to collect structured feedback is another day of useful customer data that you cannot get back.